connectnext® infotainment system user's manual - tata motors
TRANSCRIPT

CONNECTNEXT® INFOTAINMENT SYSTEM USER’S MANUAL
Dear Customer,
Welcome to the CONNECTNEXT® Infotainment System User's Manual. The infotainment system in your vehicle provides you withstate of the art in-car entertainment to enhance your driving experience.
Before using the infotainment system for the first time, please ensure that all users read this manual carefully. The manual willfamiliarize you with the infotainment system of your car and its functionalities. It also contains instructions on how to use theinfotainment system in a safe and effective manner.
We insist that all service and maintenance of the infotainment system of your car must be done only at authorized TATA servicecenters. Incorrect installation or servicing can cause permanent damage to the system.If you have any further questions about theinfotainment system, please get in touch with the nearest Tata Dealership. We will be happy to answer your queries and value yourfeedback.
We wish you a safe and connected drive!
1
CONTENTS
CONTENTS
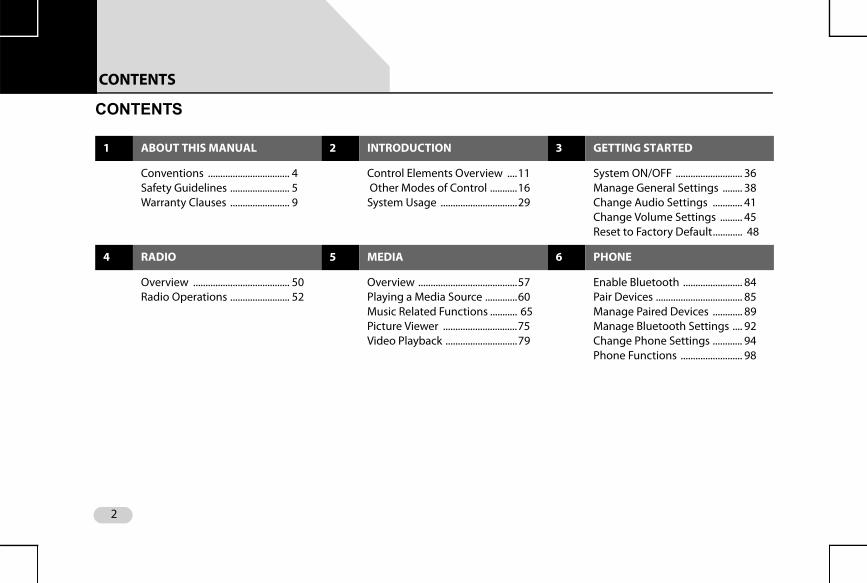
1 ABOUT THIS MANUAL 2 INTRODUCTION 3 GETTING STARTED
Conventions ................................. 4Safety Guidelines ........................ 5Warranty Clauses ........................ 9
Control Elements Overview ....11 Other Modes of Control ...........16System Usage ...............................29
System ON/OFF ........................... 36Manage General Settings ........ 38Change Audio Settings ............ 41Change Volume Settings ......... 45Reset to Factory Default............ 48
4 RADIO 5 MEDIA 6 PHONE
Overview ....................................... 50Radio Operations ........................ 52
Overview ........................................57Playing a Media Source .............60Music Related Functions ........... 65Picture Viewer ..............................75Video Playback .............................79
Enable Bluetooth ........................ 84Pair Devices ................................... 85Manage Paired Devices ............ 89Manage Bluetooth Settings .... 92Change Phone Settings ............ 94Phone Functions ......................... 98
2
CONTENTS
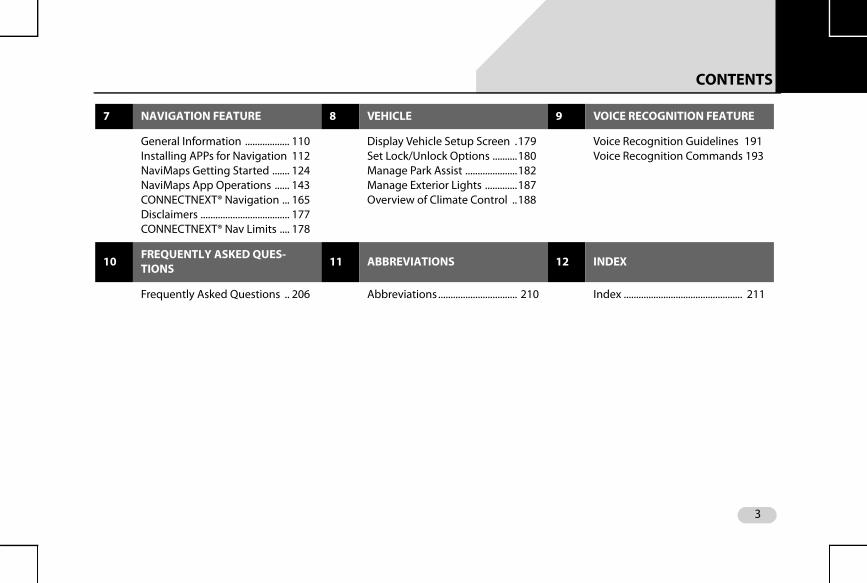
7 NAVIGATION FEATURE 8 VEHICLE 9 VOICE RECOGNITION FEATURE
General Information .................. 110Installing APPs for Navigation 112NaviMaps Getting Started ....... 124NaviMaps App Operations ...... 143CONNECTNEXT® Navigation ... 165Disclaimers .................................... 177CONNECTNEXT® Nav Limits .... 178
Display Vehicle Setup Screen .179Set Lock/Unlock Options ..........180Manage Park Assist .....................182Manage Exterior Lights .............187Overview of Climate Control ..188
Voice Recognition Guidelines 191Voice Recognition Commands 193
10 FREQUENTLY ASKED QUES-TIONS 11 ABBREVIATIONS 12 INDEX
Frequently Asked Questions .. 206 Abbreviations................................ 210 Index ................................................ 211
3
ABOUT THIS MANUAL CONVENTIONS01
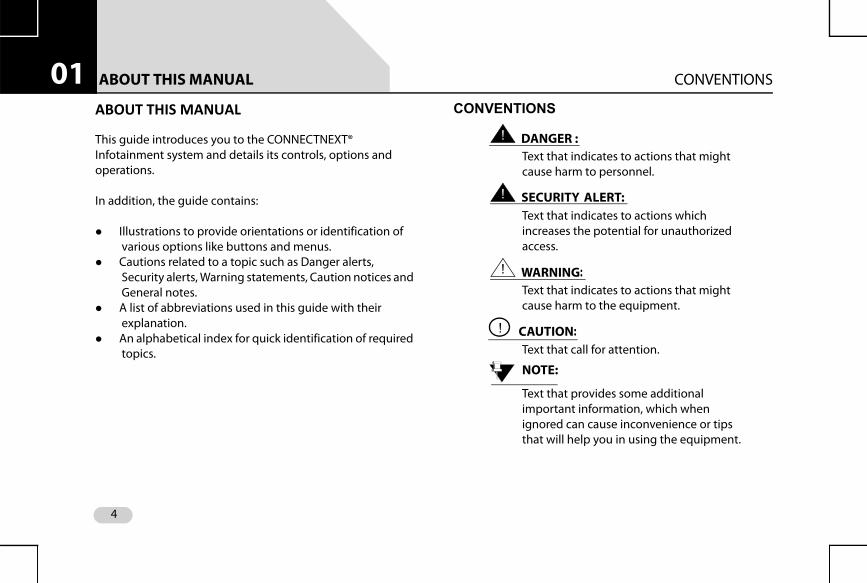
ABOUT THIS MANUALThis guide introduces you to the CONNECTNEXT® Infotainment system and details its controls, options and operations.
In addition, the guide contains:
Illustrations to provide orientations or identification of various options like buttons and menus.
Cautions related to a topic such as Danger alerts, Security alerts, Warning statements, Caution notices and General notes.
A list of abbreviations used in this guide with their explanation.
An alphabetical index for quick identification of required topics.
CONVENTIONS
! DANGER :Text that indicates to actions that might cause harm to personnel.
! SECURITY ALERT:Text that indicates to actions which increases the potential for unauthorized access.
! WARNING:Text that indicates to actions that might cause harm to the equipment.
! CAUTION:Text that call for attention.
NOTE:
Text that provides some additional important information, which when ignored can cause inconvenience or tips that will help you in using the equipment.
4
ABOUT THIS MANUAL SAFETY GUIDELINES 01
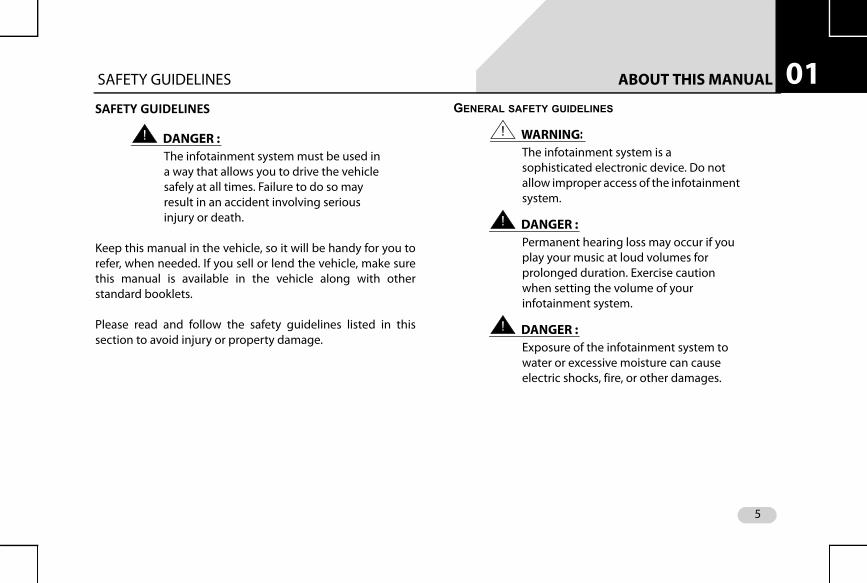
SAFETY GUIDELINES! DANGER :The infotainment system must be used in a way that allows you to drive the vehicle safely at all times. Failure to do so may result in an accident involving serious injury or death.
Keep this manual in the vehicle, so it will be handy for you torefer, when needed. If you sell or lend the vehicle, make surethis manual is available in the vehicle along with otherstandard booklets.
Please read and follow the safety guidelines listed in thissection to avoid injury or property damage.
GENERAL SAFETY GUIDELINES
! WARNING:The infotainment system is a sophisticated electronic device. Do not allow improper access of the infotainment system.
! DANGER :Permanent hearing loss may occur if you play your music at loud volumes for prolonged duration. Exercise caution when setting the volume of your infotainment system.
! DANGER :Exposure of the infotainment system to water or excessive moisture can cause electric shocks, fire, or other damages.
5
ABOUT THIS MANUAL SAFETY GUIDELINES01
SAFETY GUIDELINES WHILE DRIVING! DANGER :Glance at the screen of the infotainment system only when necessary and safe to do so. If prolonged viewing of the screen is necessary, park in a safe location and engage the hand brake.
! DANGER :Make certain that the volume level of the infotainment system is set to a level that allows you to hear outside traffic and other warnings.
SYSTEM CARE AND MAINTENANCE
Exert at most care while handling the infotainment system aspartial or complete loss of the infotainment system functionsdue to intentional misuse is not covered under warranty.Some guidance for using or maintaining the system are listedbelow:
! WARNING:Parking under direct sunlight for prolonged duration can result in high temperatures inside your car, which can damage your infotainment system, if used. So, before using the system let the car interior to cool down.
! WARNING:Do not open the infotainment system as incorrect handling can damage the system. Further, warranty is void, if seal is broken.
6
ABOUT THIS MANUAL SAFETY GUIDELINES 01
! WARNING:Do not replace the vehicle speakers or fit additional speakers with aftermarket speakers. It may lead to the malfunctioning or even damage of the infotainment system.
! WARNING:Do not apply sticky or strong alcohol based spray, lotion or liquid on the infotainment system while cleaning the vehicle dashboard. This may cause permanent damage to the system button functions, knob operations or the display screen. It may also lead to the deterioration of the system paint.
! WARNING:Usage of paint or color on the infotainment system can make the moving parts sticky and stop them from functioning correctly.
! WARNING:Avoid addition of any accessories such as external amplifiers, which will lead to the modification of the standard factory wiring connections. As such unauthorized interconnections, can result in the malfunctioning of the infotainment system. Always contact the Tata dealer for the changes to the vehicle or system.
! WARNING:Ensure that any liquid does not enter the infotainment system, as it will lead to the failure of radio. The warranty of the system will be void, if liquid ingress marks are observed inside the system.
! WARNING:Do not use excessive force while handling the infotainment system, USB slot, AUX-In slot and so on. It might cause damage to the system or component.
7
ABOUT THIS MANUAL SAFETY GUIDELINES01
! WARNING:Avoid insertion of any other object in the SD Card reader slot. Only SD Cards must be inserted in the slot.
! WARNING:Do not insert wet, moist or worn out SD Cards in the SD Card reader slot.
! WARNING:Do not insert Micro SD Cards into the SD Card reader slot.
! WARNING:Avoid usage of hard or sharp objects like pen, key, USB stick etc. to touch the screen, as it can cause scratches on the screen surface.
! WARNING:Use a soft, clean and dry cleaning cloth to clean the touch screen surface. If required, use a lint-free cloth damped with a cleaning solution such as isopropyl alcohol, or an isopropyl alcohol and water solution ratio of 50:50. Be sure to follow the solvent manufacturer's precautions and directions.
! WARNING:Avoid spraying or spilling of cleaning solutions, perfumes, car fresheners, beverages, caustic chemicals or any liquids on the touch screen surface, as it can damage the screen or the infotainment system.
8
ABOUT THIS MANUAL WARRANTY CLAUSES 01
WARRANTY CLAUSESThe warranty clauses applicable to the infotainment systemare listed below:
1. Warranty is applicable in India only.2. Warranty for the product is against defective materials
and manufacturing faults for 36 months / 36,000 km (whichever comes earlier) from the date of the first sale of vehicle.
3. Display and touch panel, if applicable to your system, are covered for 12 months / 36,000km (whichever comes earlier) from the date of the first sale of vehicle.
4. Warranty is expressly not applicable under the following conditions: 1. Where the product has been dismantled, repaired,
altered, modified or damaged due to user negligence and misuse
2. The serial number of the product been removed, defaced or altered.
3. Warranty void sticker is removed or tampered 4. Improper usage such as wrong electrical supply /
voltage setting causing damage to the equipment. 5. Tampered or serviced or repaired by any agency
not authorized by Tata Motors Limited.
9
INTRODUCTION 02
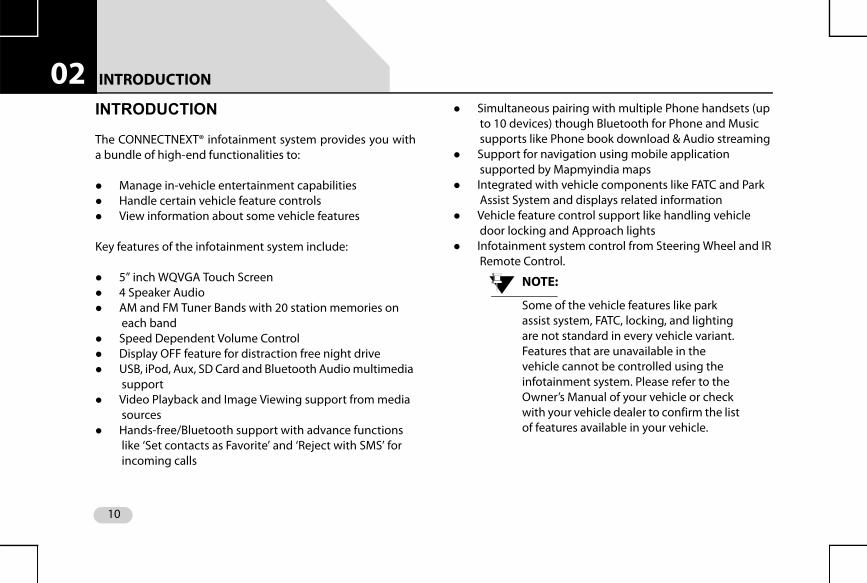
INTRODUCTIONThe CONNECTNEXT® infotainment system provides you witha bundle of high-end functionalities to:
Manage in-vehicle entertainment capabilities Handle certain vehicle feature controls View information about some vehicle features
Key features of the infotainment system include:
5” inch WQVGA Touch Screen 4 Speaker Audio AM and FM Tuner Bands with 20 station memories on
each band Speed Dependent Volume Control Display OFF feature for distraction free night drive USB, iPod, Aux, SD Card and Bluetooth Audio multimedia
support Video Playback and Image Viewing support from media
sources Hands-free/Bluetooth support with advance functions
like ‘Set contacts as Favorite’ and ‘Reject with SMS’ for incoming calls
Simultaneous pairing with multiple Phone handsets (up to 10 devices) though Bluetooth for Phone and Music supports like Phone book download & Audio streaming
Support for navigation using mobile application supported by Mapmyindia maps
Integrated with vehicle components like FATC and Park Assist System and displays related information
Vehicle feature control support like handling vehicle door locking and Approach lights
Infotainment system control from Steering Wheel and IR Remote Control.
NOTE:
Some of the vehicle features like park assist system, FATC, locking, and lighting are not standard in every vehicle variant. Features that are unavailable in the vehicle cannot be controlled using the infotainment system. Please refer to the Owner’s Manual of your vehicle or check with your vehicle dealer to confirm the list of features available in your vehicle.
10
INTRODUCTION CONTROL ELEMENTS OVERVIEW 02
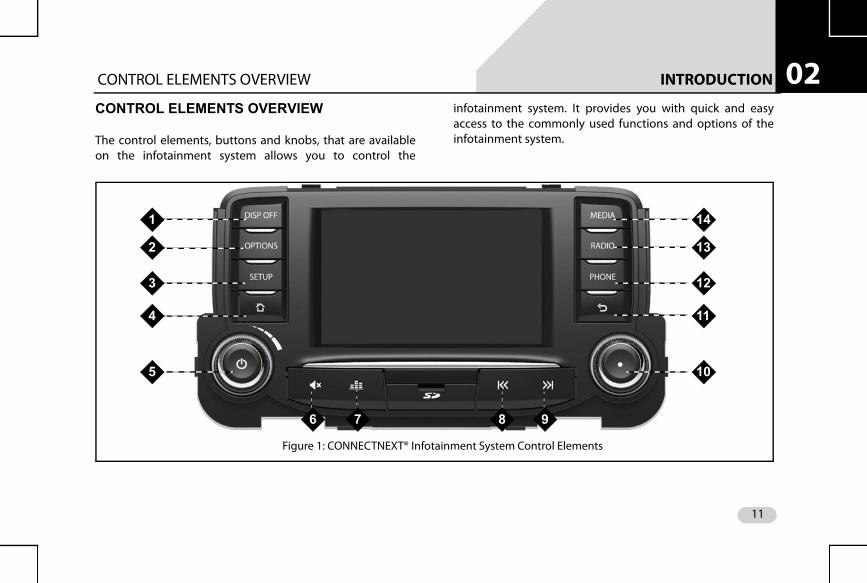
CONTROL ELEMENTS OVERVIEWThe control elements, buttons and knobs, that are availableon the infotainment system allows you to control the
infotainment system. It provides you with quick and easyaccess to the commonly used functions and options of theinfotainment system.
1
2
3
4
5
6 7 8 9
10
11
12
13
14
Figure 1: CONNECTNEXT® Infotainment System Control Elements
11
INTRODUCTION CONTROL ELEMENTS OVERVIEW02
Table 1: Infotainment System Control ElementsSl No
Control Elements Description
1
button
Single Press (SP) & Long Press (LP):Sets infotainment system display OFF, if display is ONSets infotainment system display ON, if display is OFF
NOTE:
In the rest of the manual, Single Press and Long Press will be only referred as SP and LP respectively.
2 button
SP & LP:Displays the options of the currently played audio source or the currently connected
phone. If a phone with navigation applications is connected to the system, displays options of the Navigation feature.
3 button
SP & LP:Displays setup menu.
4
Home button
SP & LP:Displays home screen with current media/audio source playing in the background.
12
INTRODUCTION CONTROL ELEMENTS OVERVIEW 02
5
Volume Rotary Knob
Clock Wise: Increases the volume.
Anti-Clock Wise: Decreases the volume.
SP & LP: System Audio ON/OFF.One Hour Mode System Switched ON Mode: Switches OFF the infotainment system.
6
Mute/Unmute button
SP & LP:Mute/Un Mute currently played audio/media source.
7
Audio button
SP & LP:Displays audio setup options.
8 Fast
Rewind button
SP:iPod, USB, Bluetooth Audio & SD: Plays the previous track.Radio: Enables auto seek down.
LP:iPod, USB, Bluetooth Audio & SD: Fast rewinds the current track.
Table 1: Infotainment System Control Elements
Sl No
Control Elements Description
13
INTRODUCTION CONTROL ELEMENTS OVERVIEW02
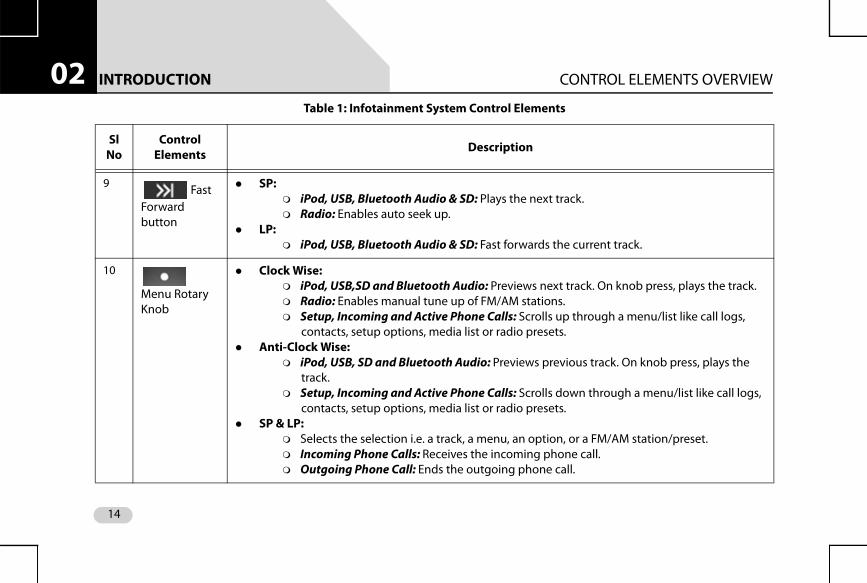
9 Fast Forward button
SP:iPod, USB, Bluetooth Audio & SD: Plays the next track.Radio: Enables auto seek up.
LP:iPod, USB, Bluetooth Audio & SD: Fast forwards the current track.
10 Menu Rotary Knob
Clock Wise: iPod, USB,SD and Bluetooth Audio: Previews next track. On knob press, plays the track.Radio: Enables manual tune up of FM/AM stations.Setup, Incoming and Active Phone Calls: Scrolls up through a menu/list like call logs,
contacts, setup options, media list or radio presets. Anti-Clock Wise:
iPod, USB, SD and Bluetooth Audio: Previews previous track. On knob press, plays the track.
Setup, Incoming and Active Phone Calls: Scrolls down through a menu/list like call logs, contacts, setup options, media list or radio presets.
SP & LP: Selects the selection i.e. a track, a menu, an option, or a FM/AM station/preset.Incoming Phone Calls: Receives the incoming phone call. Outgoing Phone Call: Ends the outgoing phone call.
Table 1: Infotainment System Control Elements
Sl No
Control Elements Description
14
INTRODUCTION CONTROL ELEMENTS OVERVIEW 02
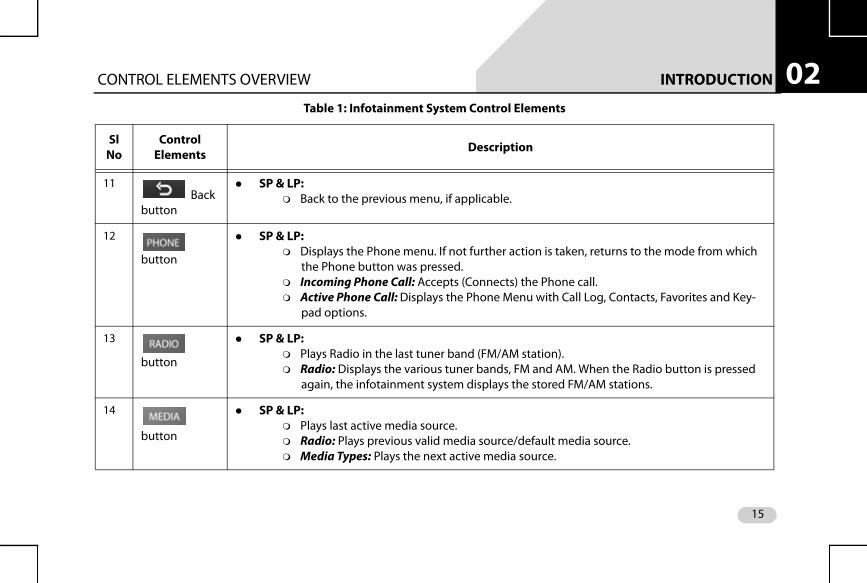
11 Back
button
SP & LP:Back to the previous menu, if applicable.
12
button
SP & LP:Displays the Phone menu. If not further action is taken, returns to the mode from which
the Phone button was pressed.Incoming Phone Call: Accepts (Connects) the Phone call.Active Phone Call: Displays the Phone Menu with Call Log, Contacts, Favorites and Key-
pad options.
13
button
SP & LP:Plays Radio in the last tuner band (FM/AM station).Radio: Displays the various tuner bands, FM and AM. When the Radio button is pressed
again, the infotainment system displays the stored FM/AM stations.
14
button
SP & LP:Plays last active media source.Radio: Plays previous valid media source/default media source.Media Types: Plays the next active media source.
Table 1: Infotainment System Control Elements
Sl No
Control Elements Description
15
INTRODUCTION OTHER MODES OF CONTROL02
OTHER MODES OF CONTROLIn addition to the control elements on the infotainmentsystem, the system can also be controlled from the:
Steering Wheel controls Infra-Red (IR) Remote controls
Steering wheel control elements provide you the flexibility ofcontrolling your infotainment system even while you aredriving without distracting your attention.
Using the IR Remote control elements, people in the backseat can also control the infotainment system without askingthe people in the front seat.
NOTE:
The battery inside the IR remote control is not covered under warranty.
16
INTRODUCTION OTHER MODES OF CONTROL 02
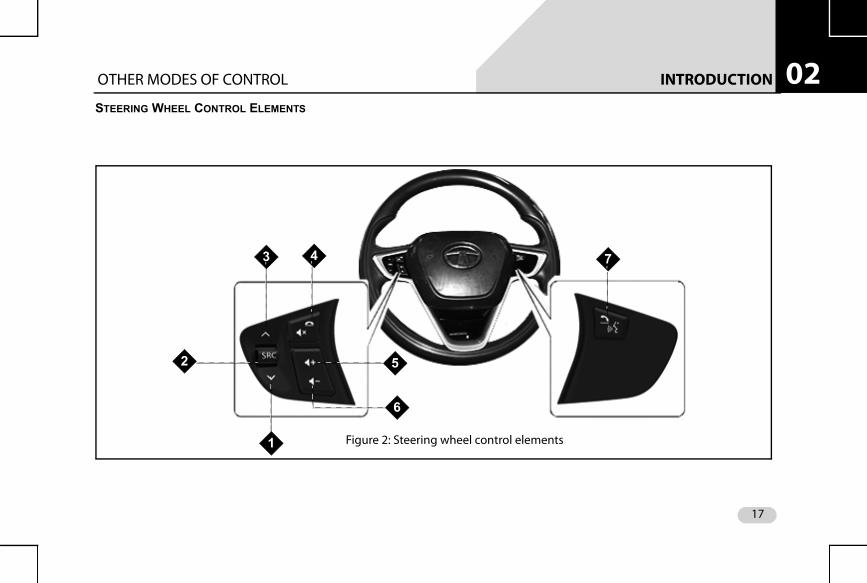
STEERING WHEEL CONTROL ELEMENTSFigure 2: Steering wheel control elements
3
2
1
4
5
6
7
17
INTRODUCTION OTHER MODES OF CONTROL02
Table 2: Steering Wheel Control ElementsSl No
Control Element Description
1 -Seek Down
SP:Media Types (except AUX-IN): Opens the previous track.Radio: Plays Previous Radio Preset.
LP:Media Types (except AUX-IN): Opens the previous folder.Radio: Initiates Auto Seek by decreasing radio frequency until the button is pressed.
2 -
Audio Source Change
Down/UP Scroll:Plays the media in the following sequence Previous FM station-> Previous AM station-
>USB/iPod->SD Card->Bluetooth audio streaming->AUX in.
3 - Seek Up
SP:Media Types (except AUX-IN): Opens the next track.Radio: Plays Next Preset.
LP:Media Types (except AUX-IN): Opens the next folder.Radio: Initiates Auto Seek by increasing radio frequency until the button is pressed.
18
INTRODUCTION OTHER MODES OF CONTROL 02
4a And 4b -
Mute / Reject Phone Call
SP & LP:Mutes/Unmutes the audio track.Incoming Phone Call: Reject call.Outgoing Phone Call: Cancel call.Active Phone Call: End call.
5 - Increase Volume
SP:Increases volume/ring tone volume by 1 unit.
LP:Increases volume or ring tone volume as long as the maximum volume is reached.
6 -
Decrease Volume
SP:Decreases volume/ring tone volume by 1 unit.
LP:Decreases volume/ring tone volume as long as volume value reaches 0.
Table 2: Steering Wheel Control Elements
Sl No
Control Element Description
19
INTRODUCTION OTHER MODES OF CONTROL02
7aAnd 7b -
Accept Phone Call / Phone Screen /Activate Voice Recognition
SP:Displays Phone screen.
Incoming Phone Call: Accept call.LP:Activates voice control system or cancels voice control, if active.
Table 2: Steering Wheel Control Elements
Sl No
Control Element Description
20
INTRODUCTION OTHER MODES OF CONTROL 02
IR REMOTE CONTROL ELEMENTS1
2
3
4
5
6
7
8
9
10
11
12
13
14
Figure 3: IR Remote Control Elements
21
INTRODUCTION OTHER MODES OF CONTROL02
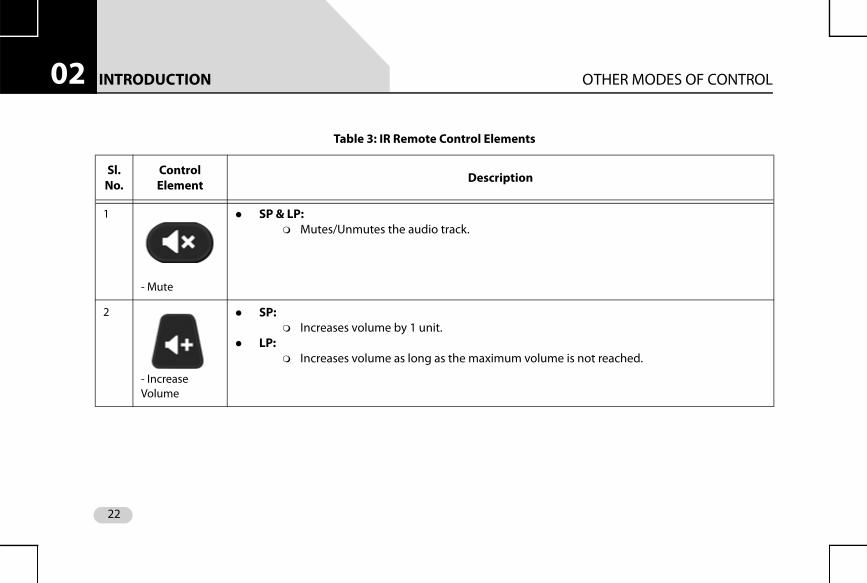
Table 3: IR Remote Control Elements
Sl. No.
Control Element Description
1
- Mute
SP & LP:Mutes/Unmutes the audio track.
2
- Increase Volume
SP:Increases volume by 1 unit.
LP:Increases volume as long as the maximum volume is not reached.
22
INTRODUCTION OTHER MODES OF CONTROL 02
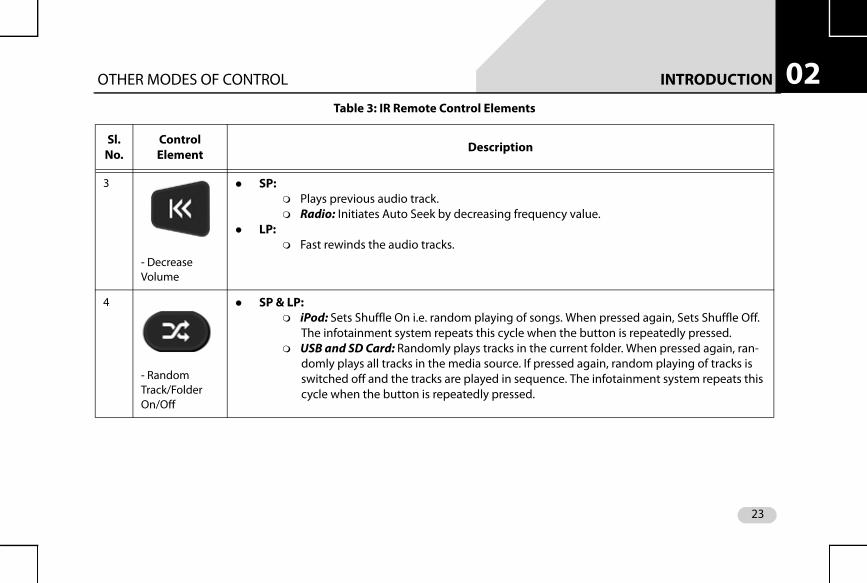
3
- Decrease Volume
SP:Plays previous audio track.Radio: Initiates Auto Seek by decreasing frequency value.
LP:Fast rewinds the audio tracks.
4
- Random Track/Folder On/Off
SP & LP:iPod: Sets Shuffle On i.e. random playing of songs. When pressed again, Sets Shuffle Off.
The infotainment system repeats this cycle when the button is repeatedly pressed. USB and SD Card: Randomly plays tracks in the current folder. When pressed again, ran-
domly plays all tracks in the media source. If pressed again, random playing of tracks is switched off and the tracks are played in sequence. The infotainment system repeats this cycle when the button is repeatedly pressed.
Table 3: IR Remote Control Elements
Sl. No.
Control Element Description
23
INTRODUCTION OTHER MODES OF CONTROL02
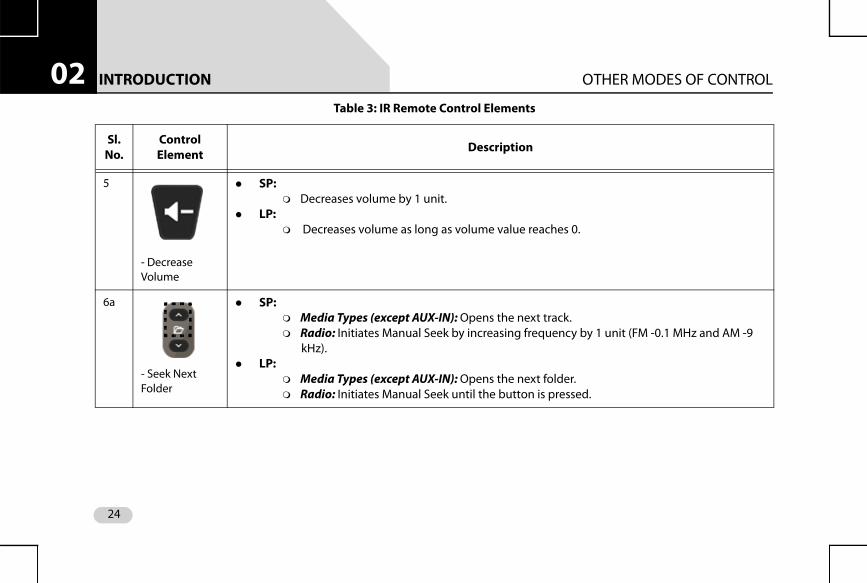
5
- Decrease Volume
SP:Decreases volume by 1 unit.
LP: Decreases volume as long as volume value reaches 0.
6a
- Seek Next Folder
SP:Media Types (except AUX-IN): Opens the next track.Radio: Initiates Manual Seek by increasing frequency by 1 unit (FM -0.1 MHz and AM -9
kHz). LP:
Media Types (except AUX-IN): Opens the next folder.Radio: Initiates Manual Seek until the button is pressed.
Table 3: IR Remote Control Elements
Sl. No.
Control Element Description
24
INTRODUCTION OTHER MODES OF CONTROL 02
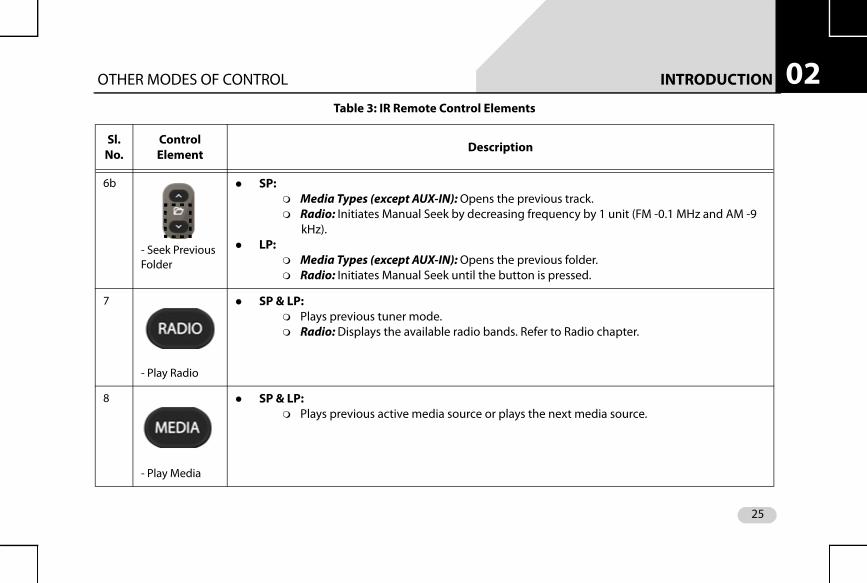
6b
- Seek Previous Folder
SP:Media Types (except AUX-IN): Opens the previous track.Radio: Initiates Manual Seek by decreasing frequency by 1 unit (FM -0.1 MHz and AM -9
kHz). LP:
Media Types (except AUX-IN): Opens the previous folder.Radio: Initiates Manual Seek until the button is pressed.
7
- Play Radio
SP & LP:Plays previous tuner mode. Radio: Displays the available radio bands. Refer to Radio chapter.
8
- Play Media
SP & LP:Plays previous active media source or plays the next media source.
Table 3: IR Remote Control Elements
Sl. No.
Control Element Description
25
INTRODUCTION OTHER MODES OF CONTROL02
9
- Scan Audio Source
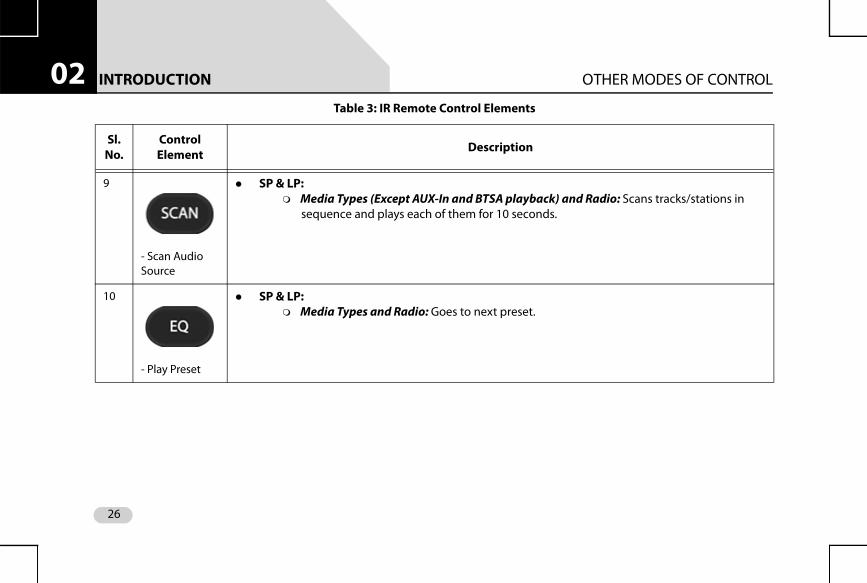
SP & LP:Media Types (Except AUX-In and BTSA playback) and Radio: Scans tracks/stations in
sequence and plays each of them for 10 seconds.
10
- Play Preset
SP & LP:Media Types and Radio: Goes to next preset.
Table 3: IR Remote Control Elements
Sl. No.
Control Element Description
26
INTRODUCTION OTHER MODES OF CONTROL 02
11
- Repeat Track/Folder
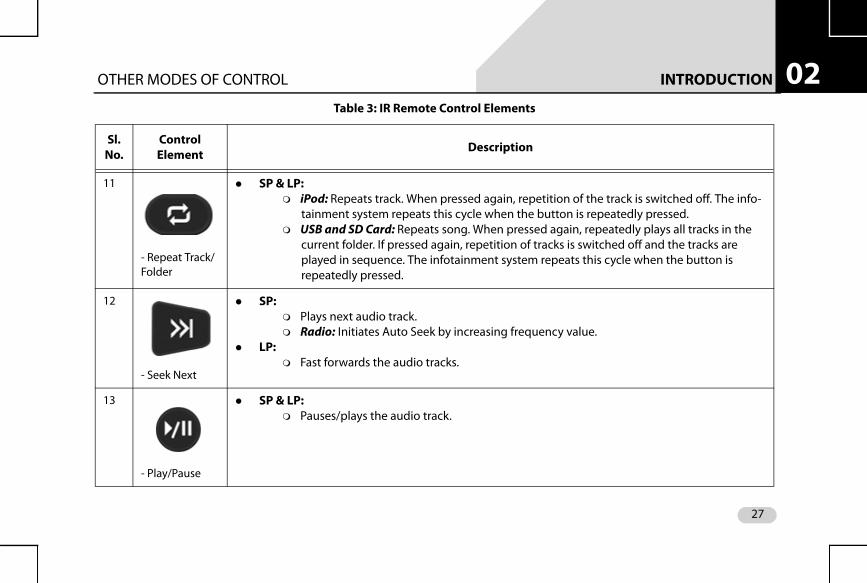
SP & LP:iPod: Repeats track. When pressed again, repetition of the track is switched off. The info-
tainment system repeats this cycle when the button is repeatedly pressed. USB and SD Card: Repeats song. When pressed again, repeatedly plays all tracks in the
current folder. If pressed again, repetition of tracks is switched off and the tracks are played in sequence. The infotainment system repeats this cycle when the button is repeatedly pressed.
12
- Seek Next
SP:Plays next audio track.Radio: Initiates Auto Seek by increasing frequency value.
LP:Fast forwards the audio tracks.
13
- Play/Pause
SP & LP:Pauses/plays the audio track.
Table 3: IR Remote Control Elements
Sl. No.
Control Element Description
27
INTRODUCTION OTHER MODES OF CONTROL02
14
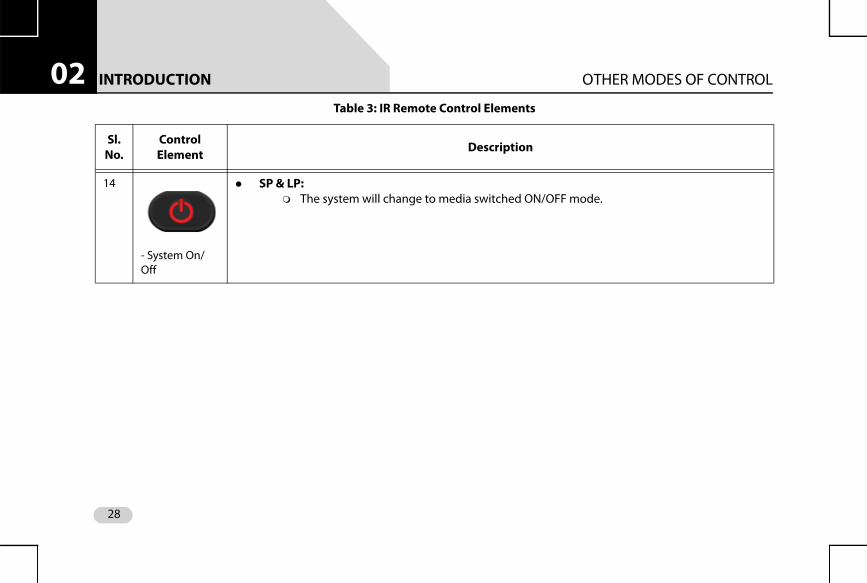
- System On/Off
SP & LP:The system will change to media switched ON/OFF mode.
Table 3: IR Remote Control Elements
Sl. No.
Control Element Description
28

INTRODUCTION SYSTEM USAGE 02
SYSTEM USAGEThe menus and submenus in the CONNECTNEXT®infotainment system helps you to easily browse and accessthe various features and functions of the system.
CONNECTNEXT® MENU STRUCTURE
Access to any function/feature begins from the Main Menu.The main menu of the CONNECTNEXT® infotainment systemhas 8 blank editable menu options and 1 non-editableNavigation menu option.
Blank editable menu option, which can be configured as a shortcut
Figure 4: Home Screen with Configured Media Menu
29
INTRODUCTION SYSTEM USAGE02
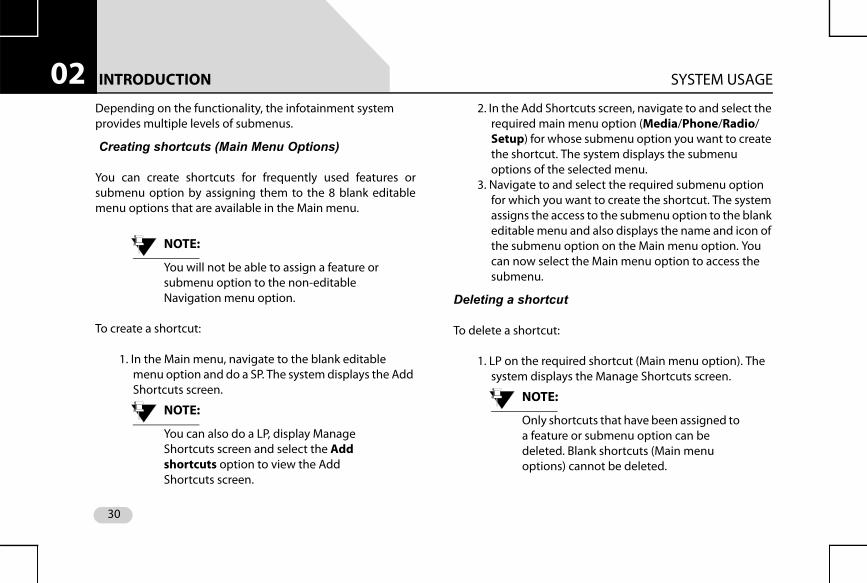
Depending on the functionality, the infotainment system provides multiple levels of submenus.Creating shortcuts (Main Menu Options)
You can create shortcuts for frequently used features orsubmenu option by assigning them to the 8 blank editablemenu options that are available in the Main menu.
NOTE:
You will not be able to assign a feature or submenu option to the non-editable Navigation menu option.
To create a shortcut:
1. In the Main menu, navigate to the blank editable menu option and do a SP. The system displays the Add Shortcuts screen.
NOTE:
You can also do a LP, display Manage Shortcuts screen and select the Add shortcuts option to view the Add Shortcuts screen.
2. In the Add Shortcuts screen, navigate to and select the required main menu option (Media/Phone/Radio/Setup) for whose submenu option you want to create the shortcut. The system displays the submenu options of the selected menu.
3. Navigate to and select the required submenu option for which you want to create the shortcut. The system assigns the access to the submenu option to the blank editable menu and also displays the name and icon of the submenu option on the Main menu option. You can now select the Main menu option to access the submenu.
Deleting a shortcut
To delete a shortcut:
1. LP on the required shortcut (Main menu option). The system displays the Manage Shortcuts screen.
NOTE:
Only shortcuts that have been assigned to a feature or submenu option can be deleted. Blank shortcuts (Main menu options) cannot be deleted.
30

INTRODUCTION SYSTEM USAGE 02
2. In the Manage Shortcuts screen, navigate to and selectthe Remove Shortcut option. The system deletes the shortcut and displays it as a blank editable Main menu option.
The system only deletes the shortcut. The feature orsubmenu option that was previously assigned to the Mainmenu option will be still available in the system. You will beable to access the feature or submenu option using analternate way. Refer to the section of the feature or submenuto identify the alternate way of access.
ACCESSING THE MAIN MENU
You can view the Main Menu and its options by pressing the button from any screen of the infotainment system.
NAVIGATING BETWEEN ON-SCREEN OBJECTS
The on-screen objects of the infotainment system like,menus, buttons and so on can be accessed using the
knob and the Touch Screen.
Selecting an On-Screen Object
You can select an on-screen object to:
display the corresponding submenu of the selected menu.
display a popup with information/message. activate the function corresponding to the selected
button. select or deselect a check box or a option button.
31
INTRODUCTION SYSTEM USAGE02
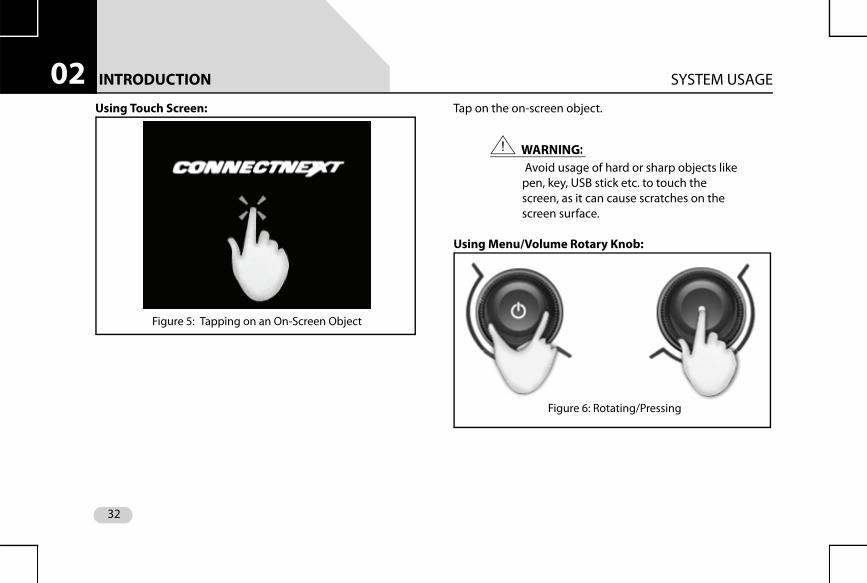
Using Touch Screen: Tap on the on-screen object.! WARNING: Avoid usage of hard or sharp objects like pen, key, USB stick etc. to touch the screen, as it can cause scratches on the screen surface.
Using Menu/Volume Rotary Knob:
Figure 5: Tapping on an On-Screen Object
Figure 6: Rotating/Pressing
32
INTRODUCTION SYSTEM USAGE 02
1. Rotate the knob clock-wise or anti-clock-wise to navigate to the required on-screen object like menu option or button.
The system highlights the object that is currently in focus.
2. Press the knob to select the required on-screen object.
NOTE:
The same functionalities are applicable for using the Knob.
Scrolling Through a Menu List
When there are many menu options, the system:
displays a scroll bar beside the options. displays arrows on the left & right/top & bottom of the
options.
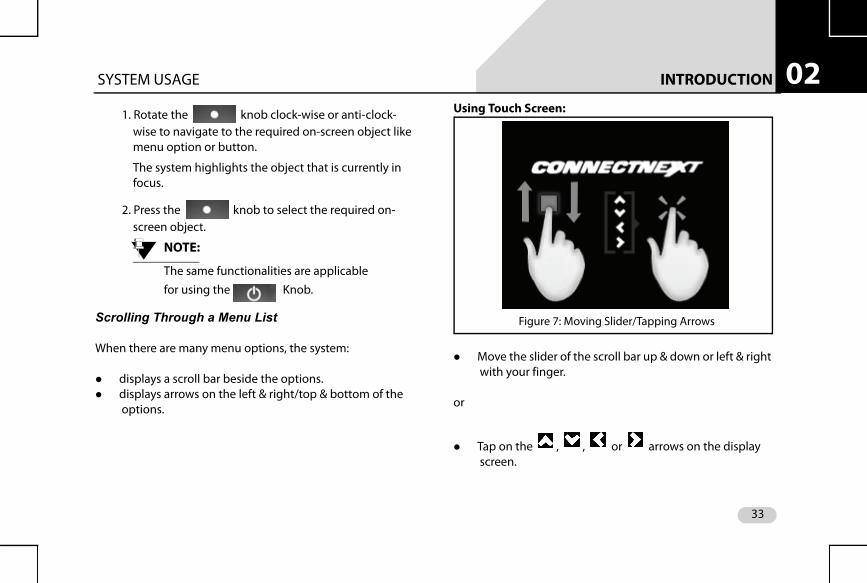
Using Touch Screen:
Move the slider of the scroll bar up & down or left & right with your finger.
or
Tap on the , , or arrows on the display screen.
Figure 7: Moving Slider/Tapping Arrows
33
INTRODUCTION SYSTEM USAGE02
Using Menu Rotary Knob:1. Rotate the knob clock-wise or anti-clock-wise to scroll through the menu list.
Modifying the Value in a Range
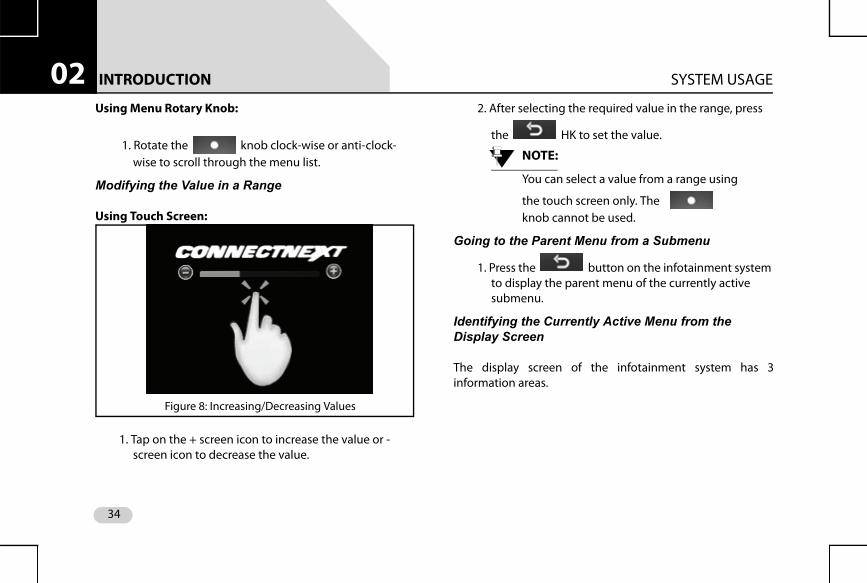
Using Touch Screen:
1. Tap on the + screen icon to increase the value or - screen icon to decrease the value.
2. After selecting the required value in the range, press
the HK to set the value.
NOTE:
You can select a value from a range using
the touch screen only. The knob cannot be used.
Going to the Parent Menu from a Submenu
1. Press the button on the infotainment system to display the parent menu of the currently active submenu.
Identifying the Currently Active Menu from the Display Screen
The display screen of the infotainment system has 3information areas.
Figure 8: Increasing/Decreasing Values
34
INTRODUCTION SYSTEM USAGE 02
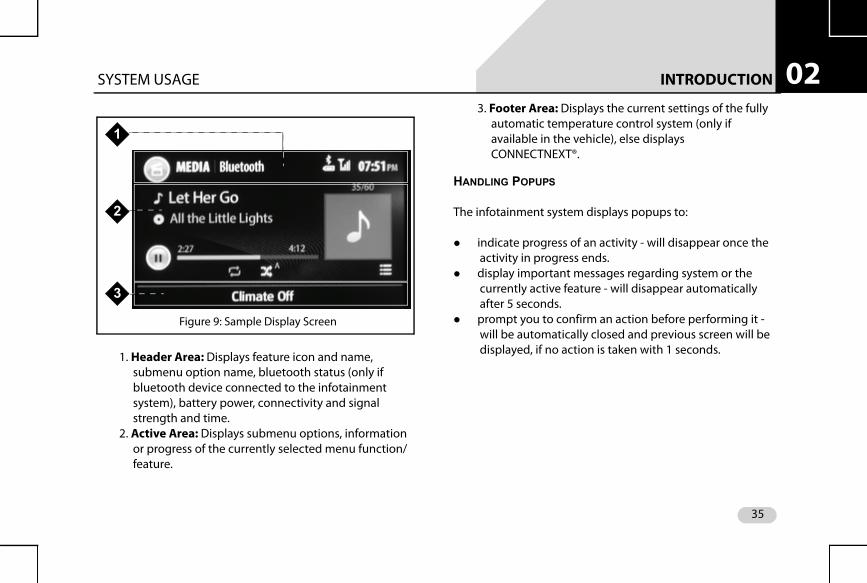
1. Header Area: Displays feature icon and name, submenu option name, bluetooth status (only if bluetooth device connected to the infotainment system), battery power, connectivity and signal strength and time.
2. Active Area: Displays submenu options, information or progress of the currently selected menu function/feature.
3. Footer Area: Displays the current settings of the fully automatic temperature control system (only if available in the vehicle), else displays CONNECTNEXT®.
HANDLING POPUPS
The infotainment system displays popups to:
indicate progress of an activity - will disappear once the activity in progress ends.
display important messages regarding system or the currently active feature - will disappear automatically after 5 seconds.
prompt you to confirm an action before performing it - will be automatically closed and previous screen will be displayed, if no action is taken with 1 seconds.
1
2
3
Figure 9: Sample Display Screen
35
GETTING STARTED SYSTEM ON/OFF03
GETTING STARTEDTo use the CONNECTNEXT® infotainment system, you mustfirst switch it ON.
When the vehicle ignition is switched ON and the infotainmentsystem is switched ON, the system will be in the SystemSwitched ON (Active) Mode.
SYSTEM ON/OFF1. To switch the infotainment system ON/OFF, press the
knob.
NOTE:
When the vehicle ignition is ON and if you press the knob to switch OFF the
system, media source or radio that is currently played will be stopped and the system displays the system clock.
When the vehicle ignition is switched ON, the system isautomatically switched ON and the audio source that wasactive before system switch OFF is reactivated. Even if the
system was switched OFF using the knob, thesystem will be automatically switched ON, after vehicleignition switch ON.
If the vehicle ignition is switched OFF and the key is removed,the system is switched OFF. The system will now be in theSystem Switched OFF Mode and no functions will beavailable.
36
GETTING STARTED SYSTEM ON/OFF 03
When the vehicle ignition and the infotainment system isswitched ON and you press the knob, the systemwill be in the Media Switched OFF Mode.
All entertainment functions (Media/ Radio) will beunavailable in this mode. Only Phone and display functionslike Setup, HVAC and so on will be active. By default, thesystem will display the time and date on the screen.
When the vehicle ignition is switched OFF, you can switch ON
the infotainment system by pressing the knob andthe system will be available for the next one hour. This iscalled the One Hour System Switched ON Mode.
After an hour, the system will be automatically switched OFF.Only Phone and entertainment functions (Media/Radio) willbe available in this mode.If an active phone call is in progress,the system will not be switched OFF after an hour. The systemwill be switched OFF, after the active call ends.
37
GETTING STARTED MANAGE GENERAL SETTINGS03
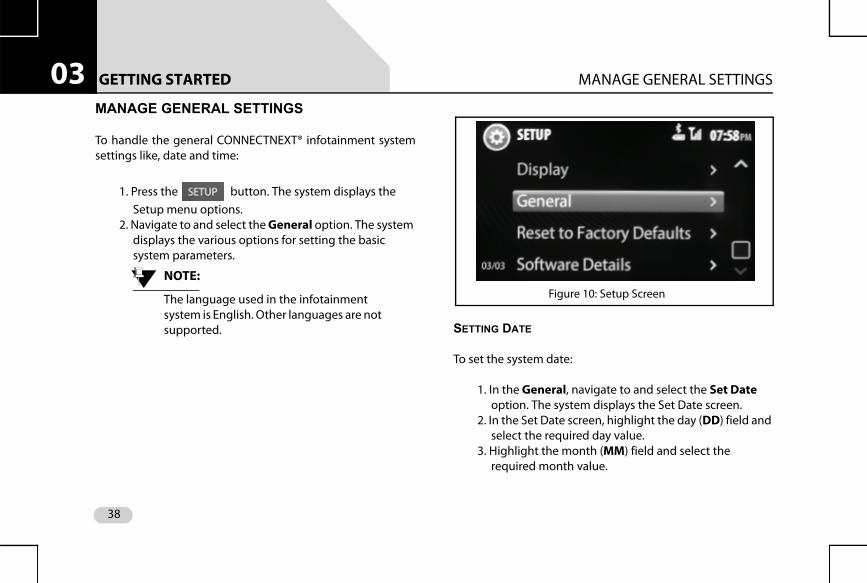
MANAGE GENERAL SETTINGSTo handle the general CONNECTNEXT® infotainment systemsettings like, date and time:
1. Press the button. The system displays the Setup menu options.
2. Navigate to and select the General option. The system displays the various options for setting the basic system parameters.
NOTE:
The language used in the infotainment system is English. Other languages are not supported. SETTING DATE
To set the system date:
1. In the General, navigate to and select the Set Date option. The system displays the Set Date screen.
2. In the Set Date screen, highlight the day (DD) field and select the required day value.
3. Highlight the month (MM) field and select the required month value.
Figure 10: Setup Screen
38
GETTING STARTED MANAGE GENERAL SETTINGS 03
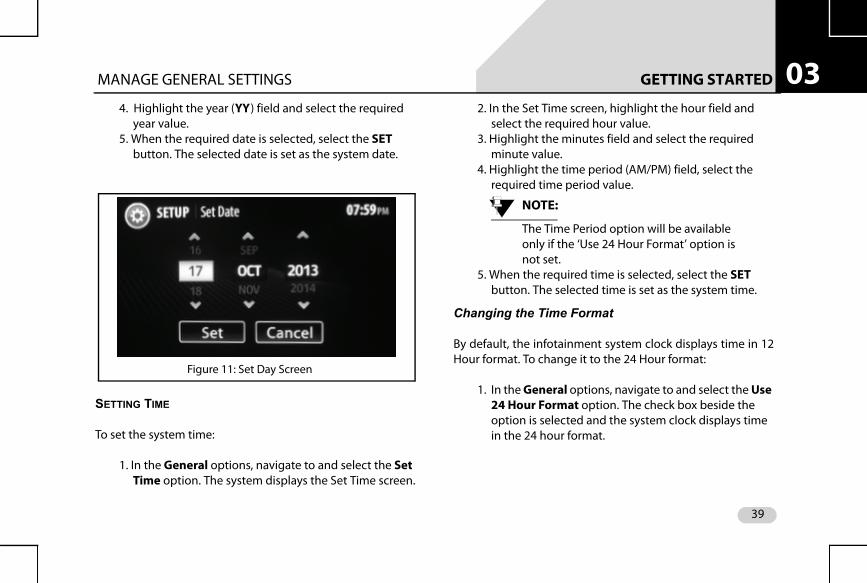
4. Highlight the year (YY) field and select the requiredyear value.5. When the required date is selected, select the SET
button. The selected date is set as the system date.
SETTING TIME
To set the system time:
1. In the General options, navigate to and select the Set Time option. The system displays the Set Time screen.
2. In the Set Time screen, highlight the hour field and select the required hour value.
3. Highlight the minutes field and select the required minute value.
4. Highlight the time period (AM/PM) field, select the required time period value.
NOTE:
The Time Period option will be available only if the ‘Use 24 Hour Format’ option is not set.
5. When the required time is selected, select the SET button. The selected time is set as the system time.
Changing the Time Format
By default, the infotainment system clock displays time in 12Hour format. To change it to the 24 Hour format:
1. In the General options, navigate to and select the Use 24 Hour Format option. The check box beside the option is selected and the system clock displays time in the 24 hour format.
Figure 11: Set Day Screen
39
GETTING STARTED MANAGE GENERAL SETTINGS03
NOTE:To change back to the 12 Hour format, clear the ‘Use 24 Hour Format’ check box.
CLEARING PERSONAL DATA
The system allows you to clear your following personal datathat are stored in the system:
Paired and connected devices. Favorites contacts.
To clear the personal data stored in the system:
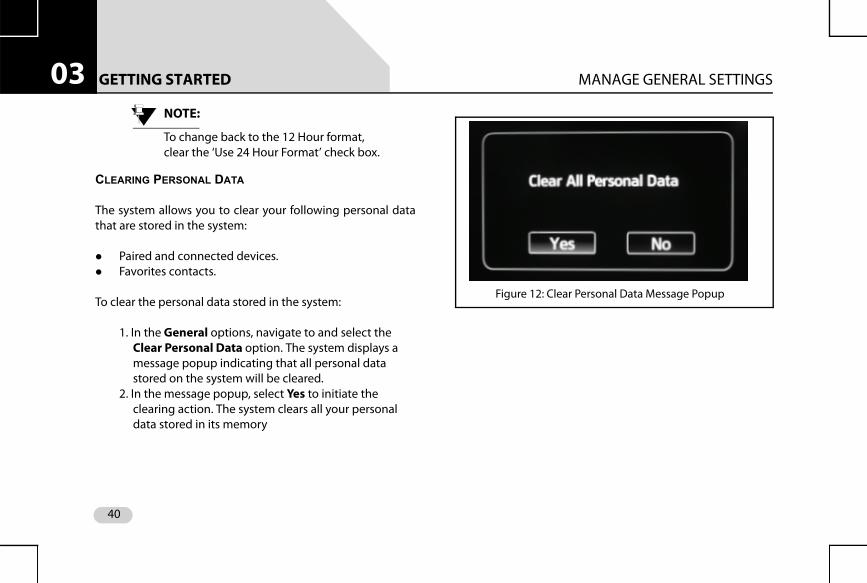
1. In the General options, navigate to and select the Clear Personal Data option. The system displays a message popup indicating that all personal data stored on the system will be cleared.
2. In the message popup, select Yes to initiate the clearing action. The system clears all your personal data stored in its memory
Figure 12: Clear Personal Data Message Popup
40
GETTING STARTED CHANGE AUDIO SETTINGS 03
CHANGE AUDIO SETTINGS1. Press the button. The system displays the Setup menu options.
2. Scroll to and select the Audio option. The system displays the various options for setting the audio parameters.
NOTE:
The audio settings are common to all media sources.
NOTE:
You can also view the Audio options by
pressing the button.
SETTING BASS, MIDDLE AND TREBLE VALUES
Bass: Increase or decrease the gain of low frequencies of theaudio sources.
Middle: Increase or decrease the mid frequency of the audiosources.
Treble: Increase or decrease the high frequencies of theaudio sources.
To set the bass, middle and/or treble values:
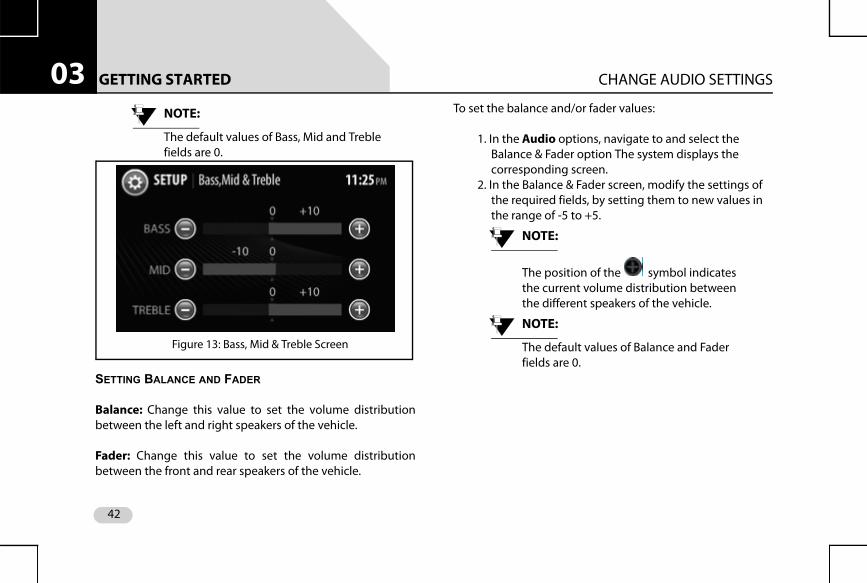
1. In the Audio options, navigate to and select the Bass, Mid & Treble option. The system displays the Bass/Mid/Treble screen.
2. In the Bass, Mid & Treble screen, modify the settings of the required fields, by setting them to new values in the range of -10 to +10.
41
GETTING STARTED CHANGE AUDIO SETTINGS03
NOTE:The default values of Bass, Mid and Treble fields are 0.
SETTING BALANCE AND FADER
Balance: Change this value to set the volume distributionbetween the left and right speakers of the vehicle.
Fader: Change this value to set the volume distributionbetween the front and rear speakers of the vehicle.
To set the balance and/or fader values:
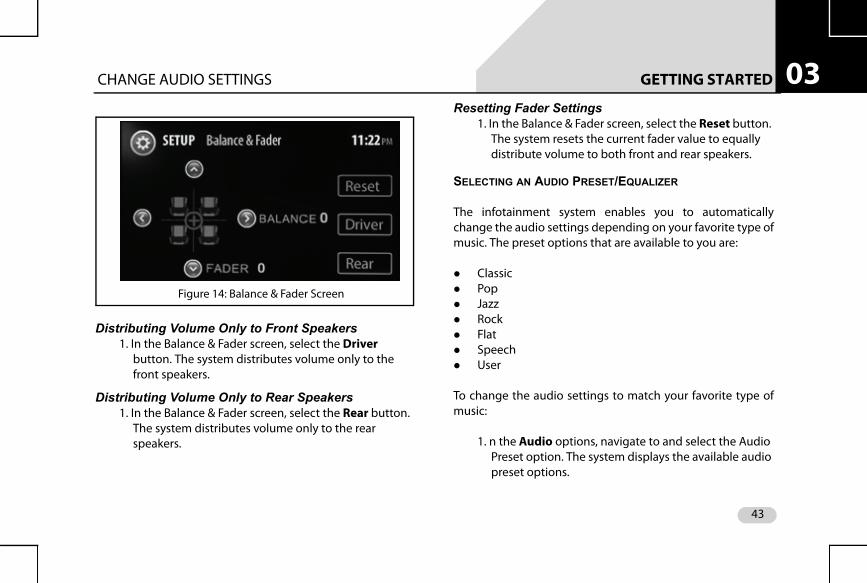
1. In the Audio options, navigate to and select the Balance & Fader option The system displays the corresponding screen.
2. In the Balance & Fader screen, modify the settings of the required fields, by setting them to new values in the range of -5 to +5.
NOTE:
The position of the symbol indicates the current volume distribution between the different speakers of the vehicle.
NOTE:
The default values of Balance and Fader fields are 0.
Figure 13: Bass, Mid & Treble Screen
42
GETTING STARTED CHANGE AUDIO SETTINGS 03
Distributing Volume Only to Front Speakers1. In the Balance & Fader screen, select the Driver
button. The system distributes volume only to the front speakers.
Distributing Volume Only to Rear Speakers1. In the Balance & Fader screen, select the Rear button.
The system distributes volume only to the rear speakers.
Resetting Fader Settings1. In the Balance & Fader screen, select the Reset button.
The system resets the current fader value to equally distribute volume to both front and rear speakers.
SELECTING AN AUDIO PRESET/EQUALIZER
The infotainment system enables you to automaticallychange the audio settings depending on your favorite type ofmusic. The preset options that are available to you are:
Classic Pop Jazz Rock Flat Speech User
To change the audio settings to match your favorite type ofmusic:
1. n the Audio options, navigate to and select the Audio Preset option. The system displays the available audio preset options.
Figure 14: Balance & Fader Screen
43
GETTING STARTED CHANGE AUDIO SETTINGS03
2. Scroll to and select your favorite option. The systemautomatically changes the audio settings depending on your selection.
NOTE:
The system displays the selected audio preset name beside the Audio Preset/Equalizer menu option and in the Bass, Mid & Treble screen.
44

GETTING STARTED CHANGE VOLUME SETTINGS 03
CHANGE VOLUME SETTINGSTo handle the volume settings of the vehicle and the variousfeatures of the infotainment system:
1. Press the button. The system displays the Setup menu options.
2. Navigate to and select the Volume option. The system displays the Volume Setup screen with various options for setting the volume of the vehicle or other system features.
SETTING SPEED DEPENDENT VOLUME
To set the speed dependent volume:
1. In the Volume screen, highlight the Speed Dependent Volume field, modify the settings of the field, by setting it to a new value in the range of 0 to 5.
NOTE:
The default value of Speed Dependent Volume is, ‘1’ and when set to ‘0’ it corresponds to switching OFF the volume.
DEFINITION:When the vehicle speed increases, the engine noise and surrounding noise like wind sound increases. The Speed Dependent Volume feature adjusts the audio volume of your system with the speed of the vehicle. This allows you to feel that the music is played at the same volume.
Figure 15: Volume Setup Screen
45
GETTING STARTED CHANGE VOLUME SETTINGS03
SETTING PHONE AUDIO VOLUMEThis option sets the in-call volume of the connected phone.
To set the phone audio volume:
1. In the Volume screen, highlight the Phone Audio Volume field, modify the settings of the field, by setting it to a new value in the range of 0 to 30.
NOTE:
The default value of Phone Audio Volume is, ‘10’.
SETTING STARTUP VOLUME
To set the startup volume of the system:
1. In the Volume screen, highlight the Startup Volume field, modify the settings of the field, by setting it to a new value in the range of 5 to 20.
NOTE:
At system startup, if the system volume is higher than the startup volume, the lower of them will be set as the volume.
NOTE:
The default value of Startup Volume is, ‘10’.
SETTING SMS READ OUT VOLUME
This option sets the volume in which your SMS will be readout to you.
1. In the Volume screen, highlight the SMS Read Out Volume field, modify the settings of the field, by setting it to a new value in the range of 0 to 30.
DEFINITION:Startup volume is the audio volume at which your music will be played, when the system is switched ON with the vehicle ignition switch ON. At system startup, the lower of the system volume or startup volume will be used as the system audio volume.
46

GETTING STARTED CHANGE VOLUME SETTINGS 03
NOTE:The default value of Startup Volume is, ‘10’.
SETTING VOICE COMMAND VOLUME
This option sets the volume that will be applicable to thevoice recognition feature.
1. In the Volume screen, highlight the Voice Command Volume field, modify the settings of the field, by setting it to a new value in the range of 0 to 10.
SETTING THE AUX-IN GAIN
The infotainment system acts as the amplifier for the audiooutput from the Auxiliary devices. You can set the audiooutput amplification level to Low, Mid (medium) or High.
To set the audio amplification level:
1. In the Volume screen, highlight the Aux-In Gain option. The system displays the available amplification level options.
2. Navigate to and select the required amplification level.
47
GETTING STARTED RESET TO FACTORY DEFAULT03
RESET TO FACTORY DEFAULTYou can reset the infotainment system to the factory settingsi.e default settings. This option is mainly useful when you aregiving your vehicle to someone for temporary usage or whenyou are selling your vehicle.
When you reset the system to factory settings, the followingchanges will be made:
All Setup settings like volume, audio and so on, which were changed by the user will be restored to default.
All Bluetooth devices will be disconnected and paired devices will be deleted
System Bluetooth name will be reset to Connectne><t. All media source details stored in the system will be
cleared. All the Radio presets will be cleared and the default
frequencies will be set i.e. FM -87.5 MHz and AM -531 kHz.
NOTE:
If Radio was the last played source or when you play Radio again, the default frequency will be played.
To reset the system to factory default settings:
1. Press the button. The system displays the Setup menu options.
2. Navigate to and select the Restore Factory Settings option. The system initiates the restoring to factory default settings action. The media source/radio that is currently played will be stopped. Phone will be disconnected.
Once the reset is completed, the system prompts the user to switch OFF ignition and remove the key. The reset action is completed, when you insert the key again (after 10 seconds at least) and switch ON ignition.
NOTE:
You will not be able to initiate reset to factory default when the vehicle is in the One Hour System Switched ON Mode. However, if you switch OFF ignition while the reset is in progress, the system completes the reset operations in the One Hour System Switched ON Mode.
48

GETTING STARTED RESET TO FACTORY DEFAULT 03
Figure 16: Reset to Factory Defaults Message Popup
49
RADIO OVERVIEW04
RADIOThe CONNECTNEXT® infotainment system supports FM andAM radio bands.
AM/FM RECEPTION LIMITATIONS
Some AM/FM signal reception limitations of the system arelisted below:
1. The AM/FM signal reception of the system does not cover long ranges. If your vehicle leaves the transmitter range, the sound quantity will become poor and there may be noise interferences.
2. The AM/FM signal cannot pass through hills and tall buildings. If vehicles enter such areas, the reception will be poor or there might be no reception at all.
3. The AM/FM signal reception quality might deteriorate with multi path effect, which results due to signal reflections from hills and tall buildings.
OVERVIEW
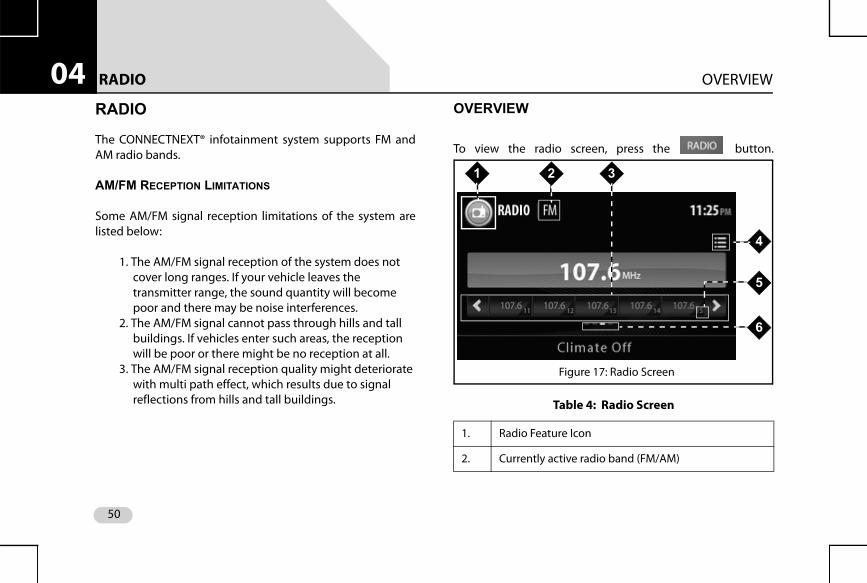
To view the radio screen, press the button.
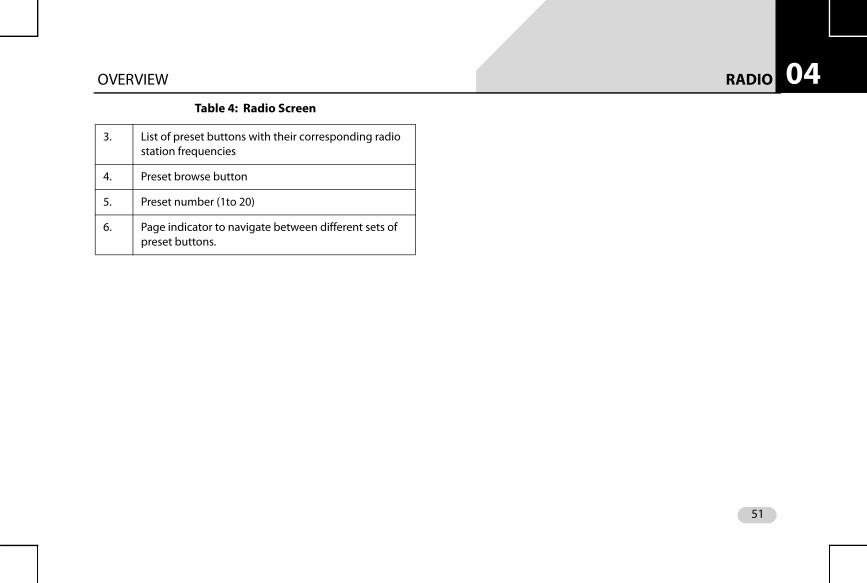
Table 4: Radio Screen
1. Radio Feature Icon
2. Currently active radio band (FM/AM)
2 3
4
5
6
1
Figure 17: Radio Screen
50
RADIO OVERVIEW 04
3. List of preset buttons with their corresponding radio station frequencies
4. Preset browse button
5. Preset number (1to 20)
6. Page indicator to navigate between different sets of preset buttons.
Table 4: Radio Screen
51
RADIO RADIO OPERATIONS04
RADIO OPERATIONSThe system allows you to perform the following radiooperations:
Changing the radio band Tuning radio stations Handling presets AutoStore Scan
CHANGING THE RADIO BAND
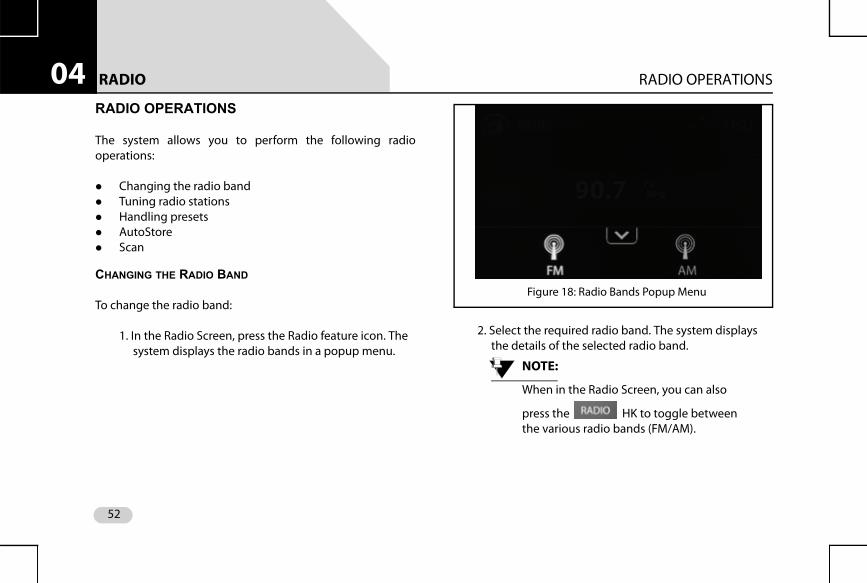
To change the radio band:
1. In the Radio Screen, press the Radio feature icon. The system displays the radio bands in a popup menu.
2. Select the required radio band. The system displays the details of the selected radio band.
NOTE:
When in the Radio Screen, you can also
press the HK to toggle between the various radio bands (FM/AM).
Figure 18: Radio Bands Popup Menu
52
RADIO RADIO OPERATIONS 04
Increasing/Decreasing Radio VolumeRotate the knob clockwise/anti-clockwise to
increase or decrease volume.
TUNING RADIO STATIONS
The infotainment system supports Manual tuning as well asAuto tuning radio stations.
Manually Tuning a Radio Station
To manually tune radio stations:
1. In the Radio screen, rotate the knob to tune to the next radio station by increasing or decreasing the frequency.
Auto Tuning a Radio Station
To auto tune radio stations:
1. In the Radio screen, press the button or the
button. The system will automatically tune
to the next available radio station by increasing or decreasing the frequency.
Stopping Auto Tuning
The system automatically stops the Auto Tuning action, whenit reaches the next/previous receivable frequency or whenthe search is unsuccessful.
To stop the auto tuning action manually:
1. Press any button or touch anywhere on the screen.
Scanning Radio Stations
To scan through the radio stations.
DEFINITION:You can scan through the available radio stations, when you are not sure of the station you want to hear. While scanning, the system plays each receivable station for 10 seconds. You must stop the scanning to continue hearing to a station.
53
RADIO RADIO OPERATIONS04
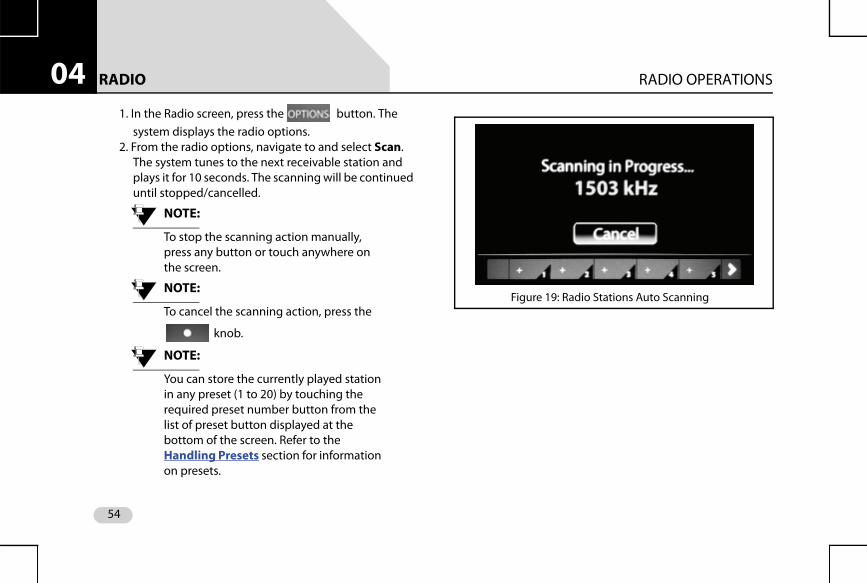
1. In the Radio screen, press the button. Thesystem displays the radio options.2. From the radio options, navigate to and select Scan.
The system tunes to the next receivable station and plays it for 10 seconds. The scanning will be continued until stopped/cancelled.
NOTE:
To stop the scanning action manually, press any button or touch anywhere on the screen.
NOTE:
To cancel the scanning action, press the
knob.
NOTE:
You can store the currently played station in any preset (1 to 20) by touching the required preset number button from the list of preset button displayed at the bottom of the screen. Refer to the Handling Presets section for information on presets.
Figure 19: Radio Stations Auto Scanning
54
RADIO RADIO OPERATIONS 04
HANDLING PRESETSThe infotainment system supports 20 presets per radio band.
Storing Presets
To store a tuned frequency (radio station) in a preset:
1. In the Radio screen, long press the required preset number (1 to 20) on the screen.
Auto Storing Presets
To enable auto search and storing of presets:
1. In the Radio screen, press the button. The system displays the radio options.
2. From the radio options, navigate to and select Autostore. The system search for the available radio stations and when found stores the stations as the presets for the current radio band (AM/FM). When radio stations have been stored in all presets or if there are no more available stations, the system stops the automatic storing of presets action.
DEFINITION:You can store a radio station in the system memory as a Preset, which will help in quick access of the station.
DEFINITION:The infotainment system allows you to automatically search and store available radio stations as presets. When initiated, the Auto Store feature priorities and stores the available stations, in the ascending order of their frequency, in the presets.
55
RADIO RADIO OPERATIONS04
Playing a PresetTo play a radio station that was stored as a preset:
1. Press the button. the system displays the Radio screen.
2. Change to the required radio band, if not already displayed.
3. Navigate to and select the corresponding preset button.
NOTE:
You can also play a preset by browsing through the available presets using the
and the Steering Wheel control elements or IR Remote control elements and pressing the
knob to play it.
BROWSING THROUGH THE PRESETS
To browse through the preset list:
1. In the Radio screen, select the preset browse button. The system displays the Preset screen with the list of presets. You can view the different presets by navigating through the sets of presets either using the
knob or the scroll bar beside the list.
NOTE:
You can also browse through the presets
by using the and the Steering Wheel control elements or IR Remote control elements.
56

MEDIA OVERVIEW 05
MEDIAThe CONNECTNEXT® infotainment system supports thefollowing media sources from which you can play music,videos and view pictures:
1. USB source2. Bluetooth Audio source3. iPod4. Audio AUX-In source5. SD Card source
The audio formats that are supported by the system are:.aac,.mp3, and .wma .
The supported video formats are .mp4, .avi and .divx.
NOTE:
Video playbacks and viewing of pictures are supported from USB source and SD card only.
OVERVIEW
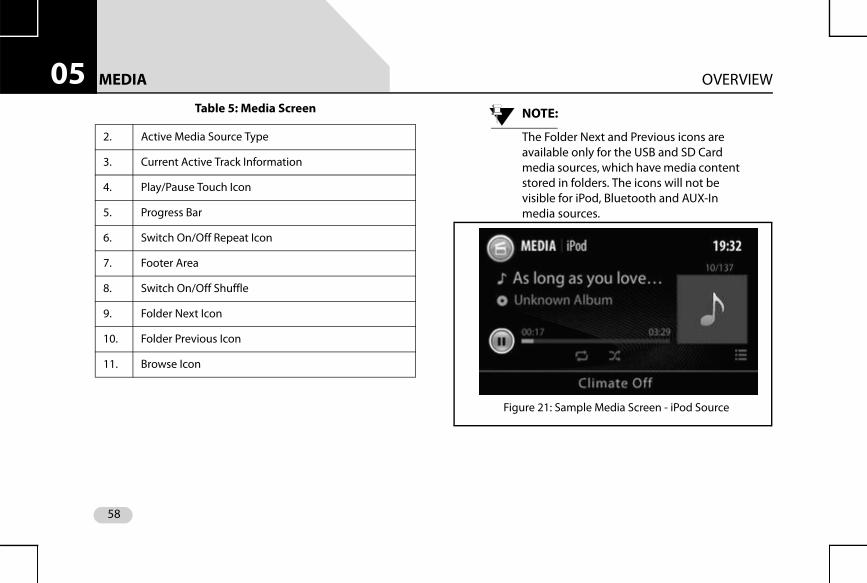
Table 5: Media Screen
1. Feature Icon
2 3
4 5 6
1
7 8 9 10 11
Figure 20: Sample Media Screen - USB Source
57
MEDIA OVERVIEW05
NOTE:The Folder Next and Previous icons are available only for the USB and SD Card media sources, which have media content stored in folders. The icons will not be visible for iPod, Bluetooth and AUX-In media sources.
2. Active Media Source Type
3. Current Active Track Information
4. Play/Pause Touch Icon
5. Progress Bar
6. Switch On/Off Repeat Icon
7. Footer Area
8. Switch On/Off Shuffle
9. Folder Next Icon
10. Folder Previous Icon
11. Browse Icon
Table 5: Media Screen
Figure 21: Sample Media Screen - iPod Source
58
MEDIA OVERVIEW 05
NOTE:For Bluetooth media source devices, the Media screen options will vary depending on the AVRCP version of the device. For devices with AVRCP 1.4, all screen options listed in the table, except the folder options (9 and 10) will be available in the Media screen. For devices with AVRCP 1.3 and above, the system displays the device name, the current active track name, a default track image and the play/pause icon. For devices with AVRCP below 1.3, the system only displays the device name and the play/pause icon. Please note that behavior on Bluetooth profiles can vary from device to device. Please check your phone user manual for more details.
59

MEDIA PLAYING A MEDIA SOURCE05
PLAYING A MEDIA SOURCEThe infotainment system allows you to play a media sourcetype by using anyone of the following ways:
By inserting/connecting a media source device to the vehicle
By selecting a media source type from the Media Sources menu options
By a shortcut configured for the media type By using the Voice Command
NOTE:
Depending on the content and device type, some media source devices might take more time to start.
CONNECTING TO A MEDIA SOURCE
The USB or Auxiliary media devices must be physicallyconnected to the vehicle for the system to recognize andaccess them. Refer to your vehicle Owner’s Manual forinformation on where and how to connect the USB andAuxiliary devices to your vehicle.
NOTE:
USB devices with up to 32 GB of memory are supported by the system.
Bluetooth devices do not require any physical connection tothe vehicle or system. Once you enable the Bluetooth featurein the media device and the system, both the devices can beconnected and paired with each other.
NOTE:
While playing music tracks from Bluetooth devices, the volume must be set to maximum in the device.
SD Cards can be connected to the system by inserting theminto the SD Card reader slot.
NOTE:
SD Cards with up to 16 GB of memory are supported by the system.
To insert a SD Card in the reader slot:
60
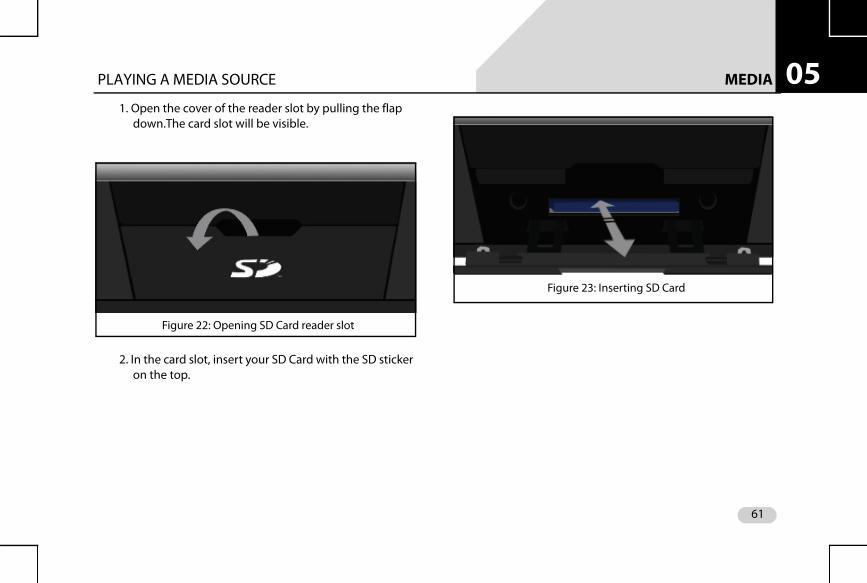
MEDIA PLAYING A MEDIA SOURCE 05
1. Open the cover of the reader slot by pulling the flapdown.The card slot will be visible.
2. In the card slot, insert your SD Card with the SD sticker on the top.
Figure 22: Opening SD Card reader slot
Figure 23: Inserting SD Card
61
MEDIA PLAYING A MEDIA SOURCE05
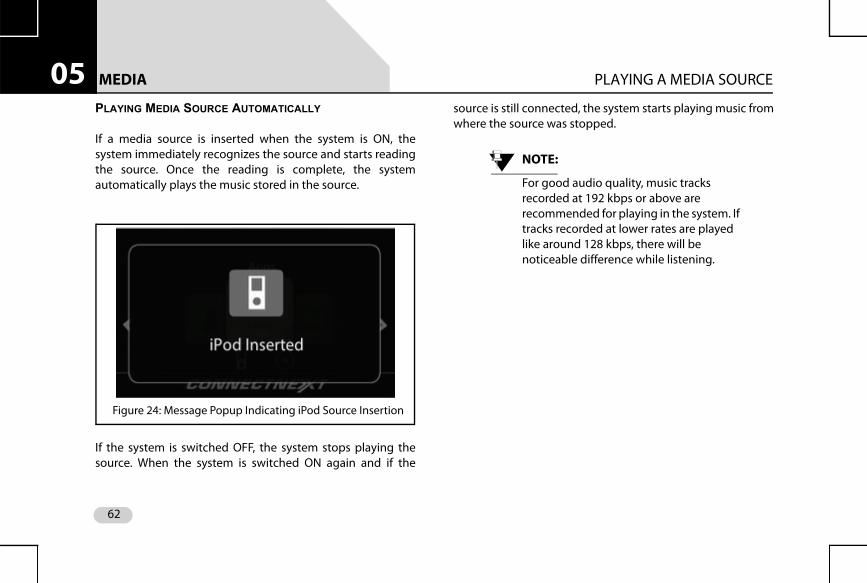
PLAYING MEDIA SOURCE AUTOMATICALLYIf a media source is inserted when the system is ON, thesystem immediately recognizes the source and starts readingthe source. Once the reading is complete, the systemautomatically plays the music stored in the source.
If the system is switched OFF, the system stops playing thesource. When the system is switched ON again and if the
source is still connected, the system starts playing music fromwhere the source was stopped.
NOTE:
For good audio quality, music tracks recorded at 192 kbps or above are recommended for playing in the system. If tracks recorded at lower rates are played like around 128 kbps, there will be noticeable difference while listening.
Figure 24: Message Popup Indicating iPod Source Insertion
62
MEDIA PLAYING A MEDIA SOURCE 05
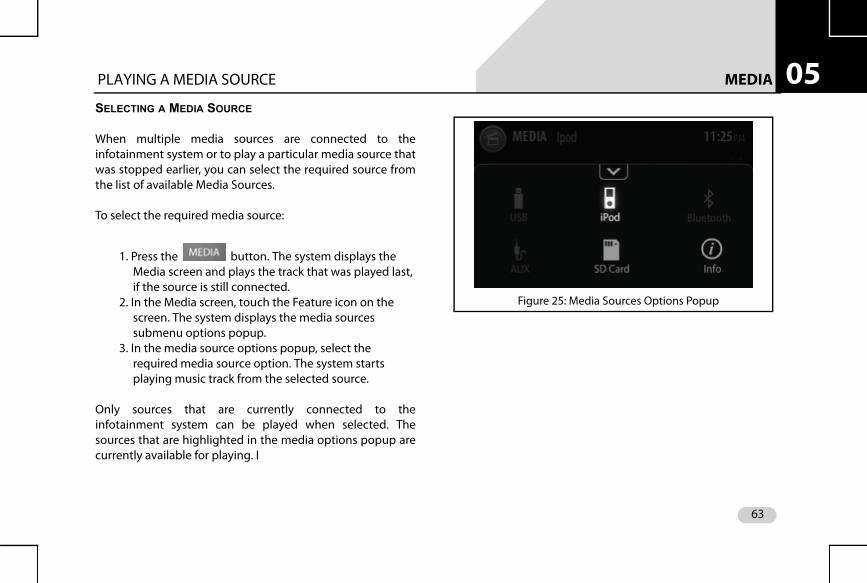
SELECTING A MEDIA SOURCEWhen multiple media sources are connected to theinfotainment system or to play a particular media source thatwas stopped earlier, you can select the required source fromthe list of available Media Sources.
To select the required media source:
1. Press the button. The system displays the Media screen and plays the track that was played last, if the source is still connected.
2. In the Media screen, touch the Feature icon on the screen. The system displays the media sources submenu options popup.
3. In the media source options popup, select the required media source option. The system starts playing music track from the selected source.
Only sources that are currently connected to theinfotainment system can be played when selected. Thesources that are highlighted in the media options popup arecurrently available for playing. I
Figure 25: Media Sources Options Popup
63
MEDIA PLAYING A MEDIA SOURCE05
PLAYING MEDIA SOURCE USING A SHORTCUTIf you have configured a shortcut in the Home scree for oneor more media sources, you can play the required mediasource by navigating and selecting the required mediaoption from the Main Menu. Refer to the Creating Shortcutssection, for the steps involved in creating shortcuts for thevarious media sources and the System Navigations sectionto understand how to select a Main Menu Option.
PLAYING MEDIA SOURCE USING A VOICE COMMAND
You can also access a media source type and play it using theVoice Recognition Command feature. Refer to the VoiceRecognition Command section for more information.
64
MEDIA MUSIC RELATED FUNCTIONS 05
MUSIC RELATED FUNCTIONSThe infotainment system allows you to perform the followingmusic related operations
Play/pause music Increase/decrease/mute volume Repeat music track/folder Randomly play music tracks in a folder/media source View next/previous music track names Play next/previous music tracks Perform Fast Forward/Fast Rewind Play next/previous folder View information of a music track Browse through the music content Scan through the music content
PAUSING/PLAYING MUSIC
Using the system, you can playback a maximum of 15000music files.
To pause playing of music:
1. In the Media screen, touch the Pause icon on the screen. The system pauses playing the music and the button changes to a Play icon.
Repeat the step to restart playing the music.
NOTE:
You can also use the on the IR Remote Control to pause/play music.
NOTE:
If the system comes across a corrupt music track in your media source, the system tries to play the track and after 2 seconds automatically moves to the next music track in the media source.
HANDLING MUSIC VOLUME
The infotainment system allows you to:
Increase/decrease the volume of the music Mute/Un-mute the volume
65
MEDIA MUSIC RELATED FUNCTIONS05
Increasing/decreasing volumeTo increase /decrease the volume of the music:
1. Rotate the knob clockwise/anti-clockwise to
increase or decrease volume.
NOTE:
You can also use the and the
control elements on the Steering Wheel or the IR Remote Control to increase/decrease the volume.
Muting/un-muting volume
To mute/un-mute volume:
1. Press the button. The system mutes the volume. When you press the button again, the system will un-mute the volume.
NOTE:
You can also process the control element on the Steering Wheel or the IR Remote Control to mute the volume.
REPEATING TRACK/FOLDER
You can either repeat a track or repeat music tracks in a folder.
To repeat a track or tracks in a folder:
1. In the Media screen, press the Switch On/Off Repeat Icon.The system repeats the current track and displays a ‘T’ above the Repeat icon to indicate the action. When you press the icon again, the system repeats the tracks in the current folder and displays a ‘F’ above the Repeat icon. If you press the icon for the third time, the repeat action is stopped.
66
MEDIA MUSIC RELATED FUNCTIONS 05
NOTE:You can also press the control element on the IR Remote Control to repeat track/folder.
NOTE:
For some Bluetooth audio devices, all repeat functions may not work. The availability of the functions is dependant on the Audio/Video Remote Control Profile (AVRCP) version of your device.
NOTE:
For iPod devices, you can repeat only the tracks in the device.
NOTE:
The repeat functionalities are not supported for the AUX-In music sources.
PLAYING TRACKS RANDOMLY
You can enable the system to randomly select and play musictracks available in a folder or all music tracks in the mediasource, instead of playing them in the sequence they arestored.
To randomly play music tracks:
1. In the Media screen, press the Switch On/Off Shuffle Icon.The system randomly plays all tracks in the current folder or all music tracks in the media source. If you press the icon again, the shuffle action is stopped.
NOTE:
You can also press the control
element on the IR Remote Control to randomly play all tracks in a folder.
NOTE:
For iPod devices (Apple devices), you can randomly play all tracks only in the music source device.
67

MEDIA MUSIC RELATED FUNCTIONS05
NOTE:For some Bluetooth audio devices, all random functions may not work. The availability of the functions is dependant on the Audio/Video Remote Control Profile (AVRCP) version of your device.
NOTE:
The shuffle functionalities are not supported for the AUX-In music sources.
VIEWING NEXT/PREVIOUS MUSIC TRACK NAMES
When in a music track, the system allows you to view thenext/previous music track names. This functionality issupported only for USB, SD Card and iPod devices.
To view the next/previous music track names:
1.From within the Media screen, rotate the knob clock-wise or anti-clock-wise to view the next/previous music track.
The system displays the next/previous music track name in the Next Song Preview area.
2. Press the knob to select the required music track.
PLAYING NEXT/PREVIOUS MUSIC TRACKS
When in a music track, the system allows you to play thenext/previous music tracks.
To play the next/previous music tracks:
Figure 26: Media Screen with Previous Music Track Name
68
MEDIA MUSIC RELATED FUNCTIONS 05
1.From within the Media screen, SP the or thebutton to play the next or previous track respectively. The system plays the next/previous track.
NOTE:
You can also do a SP of the or
the IR Remote control
elements or press the and the
Steering Wheel control elements to play the previous or next music track respectively.
NOTE:
The next/previous music track functionalities are not supported for the AUX-In music sources.
NOTE:
For some Bluetooth audio devices, the playing next/previous music tracks functions may not work. The availability of the function is dependant on the Audio/Video Remote Control Profile (AVRCP) version of your device.
PERFORM FAST FORWARD/FAST REWIND
You can fast forward or fast rewind the music tracks to quicklycomplete playing them and move ahead or backward in thefolder.
To fast forward or fast rewind:
1.From within the Media screen, LP the or the
button. The system fast forwards or fast rewinds the music tracks until the button is released and the action is stopped. The system plays the music track that is in focus when the action is stopped.
69
MEDIA MUSIC RELATED FUNCTIONS05
NOTE:You can also do a LP of the or
the IR Remote control elements to fast rewind or fast forward music tracks respectively.
NOTE:
The fast forward/ fast rewind of music tracks functionalities are not supported for the AUX-In music sources.
NOTE:
The fast forward/fast rewind operation response depends on the Bluetooth Device response.
PLAYING NEXT/PREVIOUS FOLDER
When in a music track, the system allows you to shift to thenext/previous folder and play the music tracks in them.
To shift to the next/previous folder:
1. When in the Media screen, press the Folder Up or the Folder Down icon to shift to the next or previous folder respectively. The system plays the first music track in the selected folder.
NOTE:
You can also long press the and
the Steering Wheel control elements or IR Remote control elements to play the previous or next folder respectively.
NOTE:
The next/previous folder functionalities are not supported for the iPod (Apple devices) devices, Bluetooth devices and AUX-In music sources.
VIEWING MUSIC TRACK INFORMATION
To view the details of a music track:
70
MEDIA MUSIC RELATED FUNCTIONS 05
1. When the music track is played, press the MediaFeature icon. The system displays the Media submenu options in a popup.
2. Touch the Info icon . The system displays the Song Info screen with details of the track, which contains details like, Song name, Artist, Album, Genre, Year, Album number, Track number and so on.
NOTE:
You can also display the Song Info screen by touching the album art (picture displayed beside the music track name) of the track. If there is no specific album art for the music track, the system displays a default picture. You can touch the default picture to view the details of the track.
NOTE:
The view music track information functionality is not support for the AUX-In music sources.
NOTE:
The information displayed by the functionality is dependent on the information stored in the music track and supported by the media source device. For example, album art information is not supported for Bluetooth devices.
.
Figure 27: Music Track Information Screen
71
MEDIA MUSIC RELATED FUNCTIONS05
BROWSING THROUGH THE MEDIA CONTENTYou can perform a category based browsing of mediacontent stored in a media device.
NOTE:
The types of categories supported will depend on the Media source/device.
NOTE:
The system supports limited browsing of Bluetooth media source devices with AVRCP 1.4. Devices with lower AVRCP versions cannot be browsed.
To browse through the media content:
1. In the Media screen, touch the Browse ( )icon. The system displays the Browse screen with applicable categories list.
NOTE:
You can also view the Browse screen, by
pressing the button or the
knob from within the Media screen and selecting the Browse menu option.
2. Select the required category from the list. The system displays the music tracks grouped under the selection.
3. From the available music tracks, chose from the required music track. The system plays the selected music track.
NOTE:
To play or browse through all music tracks within a category, you can touch the
Browse icon or Play icon displayed beside the applicable category names.
72
MEDIA MUSIC RELATED FUNCTIONS 05
SCANNING THROUGH THE MEDIA DEVICENOTE:
You can scan through a USB/SD Card/iPod media device for the required music track.
To scan through a media device:
1. When in the Media screen, press the button. The system displays the Options screen.
2. Navigate to and select the Scan option. The system displays the Scanning in progress screen and plays each track until the scanning is stopped for 10 seconds. the name of the currently played track is also displayed in the screen.
DEFINITION:When you are unsure of the music track you want to hear, you can scan through the tracks on your media source. While scanning, the system plays each track for 10 seconds. You must stop the scanning to continue hearing to a track.
Figure 28: Media Options Screen
73

MEDIA MUSIC RELATED FUNCTIONS05
NOTE:
You can also initiate scanning of the
Media device by pressing the IR Remote control element.
NOTE:
If you browse to a category and then initiate the scan, only the tracks in the selected category will be scanned.
NOTE:
You can cancel the scanning process to play a track completely.
Stopping Media Device Scanning
To stop scanning of the media device:
1. In the scan screen, select Cancel, using the knob. The system stops scanning the media device and starts playing music from the current music track.
Figure 29: Media Source Scanning in Progress
74
MEDIA PICTURE VIEWER 05
PICTURE VIEWERIf your USB/SD Card media device have picture files, you canview them in the infotainment system. The system supportsviewing of JPEG (.jpg), BMP, GIF and PNG picture file formats.
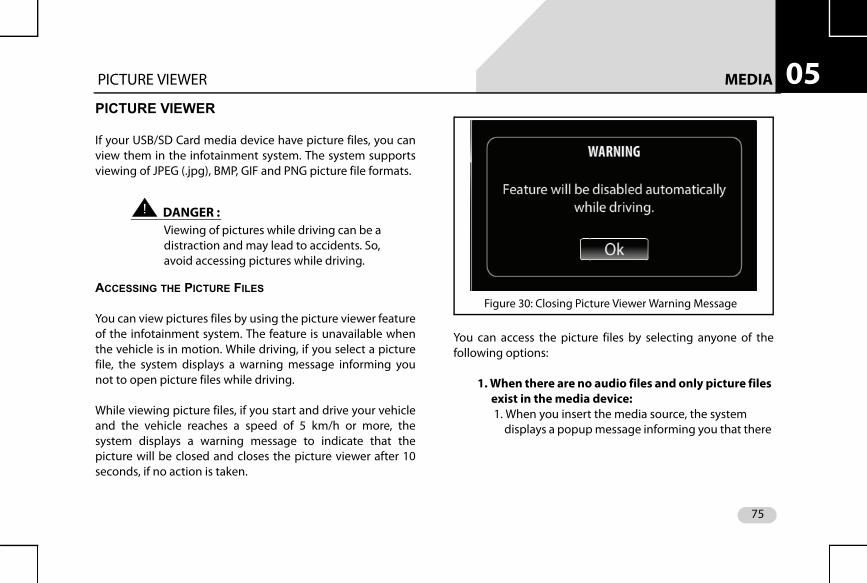
! DANGER :Viewing of pictures while driving can be a distraction and may lead to accidents. So, avoid accessing pictures while driving.
ACCESSING THE PICTURE FILES
You can view pictures files by using the picture viewer featureof the infotainment system. The feature is unavailable whenthe vehicle is in motion. While driving, if you select a picturefile, the system displays a warning message informing younot to open picture files while driving.
While viewing picture files, if you start and drive your vehicleand the vehicle reaches a speed of 5 km/h or more, thesystem displays a warning message to indicate that thepicture will be closed and closes the picture viewer after 10seconds, if no action is taken.
You can access the picture files by selecting anyone of thefollowing options:
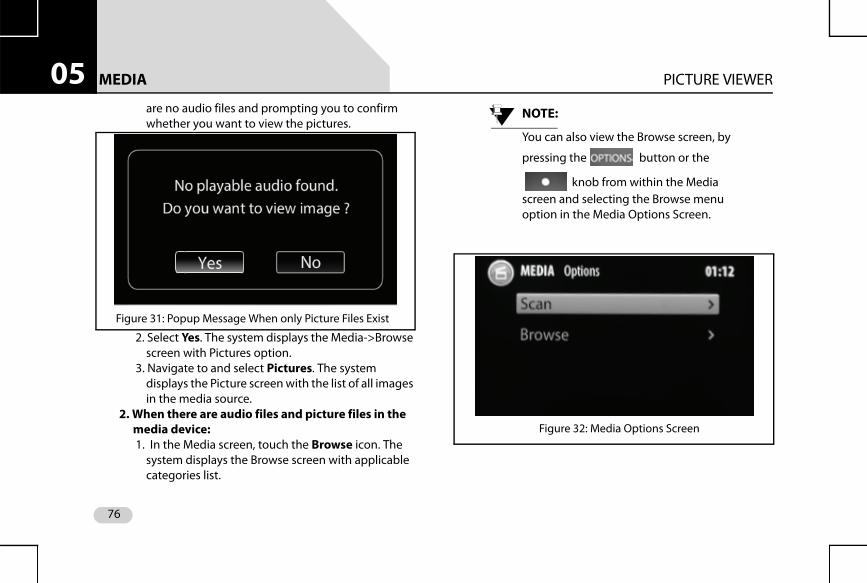
1. When there are no audio files and only picture files exist in the media device: 1. When you insert the media source, the system
displays a popup message informing you that there
Figure 30: Closing Picture Viewer Warning Message
75
MEDIA PICTURE VIEWER05
are no audio files and prompting you to confirm whether you want to view the pictures.2. Select Yes. The system displays the Media->Browse screen with Pictures option.
3. Navigate to and select Pictures. The system displays the Picture screen with the list of all images in the media source.
2. When there are audio files and picture files in the media device: 1. In the Media screen, touch the Browse icon. The
system displays the Browse screen with applicable categories list.
NOTE:
You can also view the Browse screen, by
pressing the button or the
knob from within the Media screen and selecting the Browse menu option in the Media Options Screen.
Figure 31: Popup Message When only Picture Files Exist
Figure 32: Media Options Screen
76
MEDIA PICTURE VIEWER 05
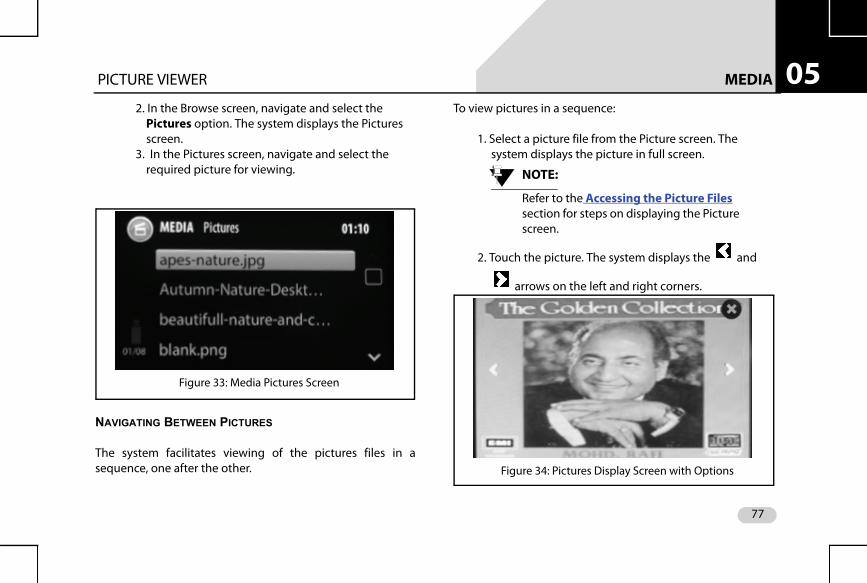
2. In the Browse screen, navigate and select thePictures option. The system displays the Pictures screen.
3. In the Pictures screen, navigate and select the required picture for viewing.
NAVIGATING BETWEEN PICTURES
The system facilitates viewing of the pictures files in asequence, one after the other.
To view pictures in a sequence:
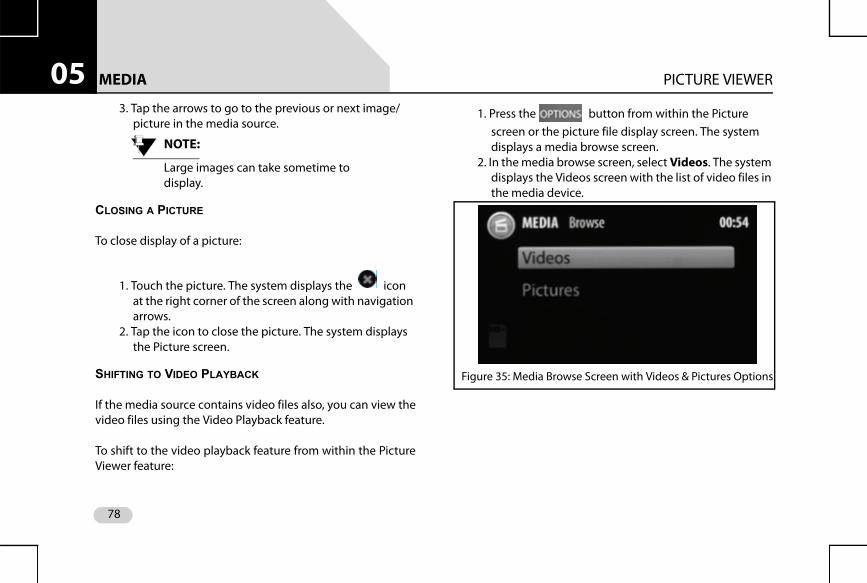
1. Select a picture file from the Picture screen. The system displays the picture in full screen.
NOTE:
Refer to the Accessing the Picture Files section for steps on displaying the Picture screen.
2. Touch the picture. The system displays the and
arrows on the left and right corners.
Figure 33: Media Pictures Screen
Figure 34: Pictures Display Screen with Options
77
MEDIA PICTURE VIEWER05
3. Tap the arrows to go to the previous or next image/picture in the media source.
NOTE:
Large images can take sometime to display.
CLOSING A PICTURE
To close display of a picture:
1. Touch the picture. The system displays the icon at the right corner of the screen along with navigation arrows.
2. Tap the icon to close the picture. The system displays the Picture screen.
SHIFTING TO VIDEO PLAYBACK
If the media source contains video files also, you can view thevideo files using the Video Playback feature.
To shift to the video playback feature from within the PictureViewer feature:
1. Press the button from within the Picture screen or the picture file display screen. The system displays a media browse screen.
2. In the media browse screen, select Videos. The system displays the Videos screen with the list of video files in the media device.
Figure 35: Media Browse Screen with Videos & Pictures Options
78

MEDIA VIDEO PLAYBACK 05
VIDEO PLAYBACKIf your USB/SD Card media device have video files, you canplay them in the infotainment system. The system supportsplayback of .mp4, .avi and .divx video file formats.
! DANGER :Viewing of videos while driving can be a distraction and may lead to accidents. So, avoid accessing video files while driving.
ACCESSING THE VIDEO FILES
You can view videos by using the video playback feature ofthe infotainment system. The feature is unavailable when thevehicle is in motion. While driving, if you select a video file,the system displays a warning message informing you not toopen video files while driving.
While playing video files, if you start and drive your vehicleand the vehicle reaches a speed of 5 km/h or more, thesystem displays a warning message to indicate that the videowill be closed and closes the video playback after 10 seconds,if no action is taken.
You can access the videos by selecting anyone of thefollowing options:
1. When there are no audio files and only video files exist in the media device: 1.When you insert the media source, the system
displays a popup message informing you that there
Figure 36: Closing Video Playback Warning Message
79
MEDIA VIDEO PLAYBACK05
are no audio files and prompting you to confirm whether you want to view the videos.2.Select Yes. The system displays the Media->Browse screen with Videos and Pictures option.
3.Navigate to and select Videos. The system displays the Videos screen with the list of all videos in the media source.
2. When there are audio files and video files in the media device: 1.When you insert the media source, the system
automatically starts playing the audio tracks in the device. To view videos, from within the Media
Screen, by displaying the Browse screen and selecting Videos option. Refer to the Browsing Through the Media Content section for the steps to display the Browse screen.
NOTE:
You can also browse videos by pressing
the button while playing audio files from a USB source/SD card.
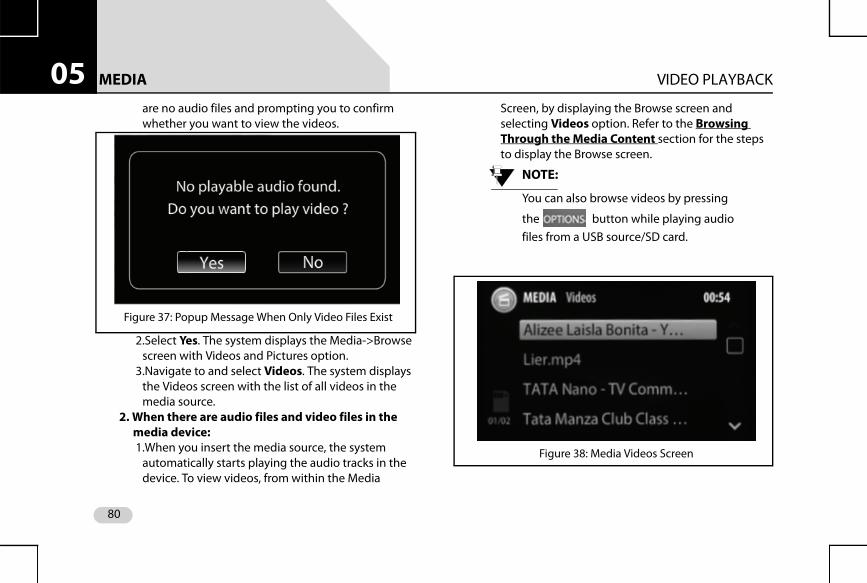
Figure 37: Popup Message When Only Video Files Exist
Figure 38: Media Videos Screen
80

MEDIA VIDEO PLAYBACK 05
VIDEO RELATED OPERATIONSThe system allow you to perform the following operations onthe video files:
Play/pause video
The steps for playing or pausing videos is similar to playing or pausing of music files. Refer to the Pausing/Playing Music section for the steps to pause or play a video.
Handle video volume
The steps for handling the volume of your video is similar to handling the volume of your audio. Refer to the Handling Music Volume section for the steps to handle the volume of your video.
Repeat a video
The steps for repeating a video is similar to repeating a music track. Refer to the Repeating Track/Folder section for the steps to repeat a video.
Randomly play videos
The steps for randomly playing videos is similar to randomly playing music tracks in a media source.
Refer to the Playing Tracks Randomly section for the steps to randomly play videos in a media source.
Play next/previous video
The steps for playing the next or previous video is similar to playing the next or previous music file. Refer to the Playing Next/Previous Music Tracks section for the steps to play next or previous video.
Perform Fast Forward/Fast Rewind of videos
The steps for performing fast forward or fast rewind of a video is similar to performing fast forward or fast rewind of music tracks. Refer to the Perform Fast Forward/Fast Rewind section for the steps to fast forward or fast rewind a video.
NOTE:
The fast forward/ fast rewind is supported up to 4x speed only.
Browse through videos
The steps for browsing through the video files in a media source is similar to browsing through other media content. Refer to the Browsing Through the Media Content section for the steps to browse through video files.
81
MEDIA VIDEO PLAYBACK05
GOING TO THE HOME SCREEN
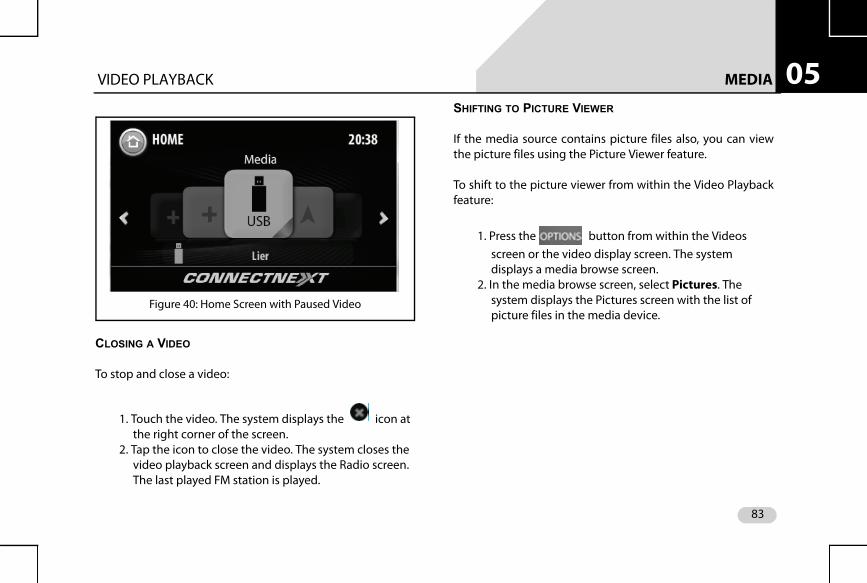
To open the Home Screen from within a video playback:
1. In the Video Playback screen, press the
button. The system pauses the video and displays the Home Screen.
NOTE:
To return back to the Video Playback screen, click the Media menu option or the paused video file name below it.
Table 6: Video Playback Screen Options
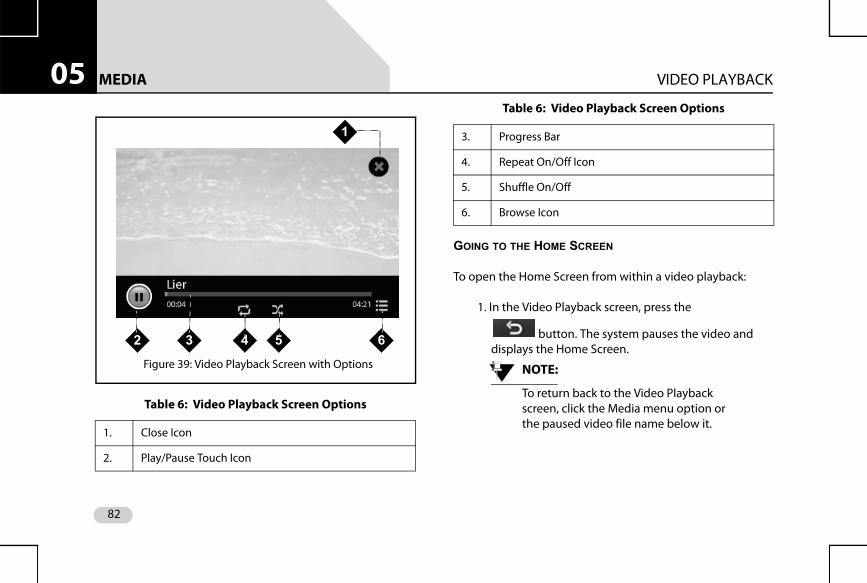
1. Close Icon
2. Play/Pause Touch Icon
Figure 39: Video Playback Screen with Options
2 3
1
4 65
3. Progress Bar
4. Repeat On/Off Icon
5. Shuffle On/Off
6. Browse Icon
Table 6: Video Playback Screen Options
82
MEDIA VIDEO PLAYBACK 05
CLOSING A VIDEO
To stop and close a video:
1. Touch the video. The system displays the icon at the right corner of the screen.
2. Tap the icon to close the video. The system closes the video playback screen and displays the Radio screen. The last played FM station is played.
SHIFTING TO PICTURE VIEWER
If the media source contains picture files also, you can viewthe picture files using the Picture Viewer feature.
To shift to the picture viewer from within the Video Playbackfeature:
1. Press the button from within the Videos screen or the video display screen. The system displays a media browse screen.
2. In the media browse screen, select Pictures. The system displays the Pictures screen with the list of picture files in the media device.
Figure 40: Home Screen with Paused Video
83
PHONE ENABLE BLUETOOTH06
PHONEUsing the Bluetooth capability, you can pair and connectyour phone to the CONNECTNEXT® infotainment system.Once both the devices are connected you can:
Access the phone contents like phone book contacts, call logs, music and so on through the system.
Make or attend phone calls even while driving through the infotainment system hands-free capability.
NOTE:
Few mobile phones may not support all the phone related features of the Infotainment system. It is recommended that you refer to the user manual of your mobile phone to understand its bluetooth and other capabilities.
ENABLE BLUETOOTH
To connect your cell phone to the infotainment system:
1. Turn ON the bluetooth capability and device visibility in your phone.
2. Activate the bluetooth capability of the infotainment system by:
1. Press the button. The system displays the Setup menu options.
2. Navigate to and select the Bluetooth option. The system lists various options to handle the bluetooth capabilities of the infotainment system.
3. Navigate to and select the Enable Bluetooth check box. The infotainment system will now be able to recognize the bluetooth enabled devices around it.
84
PHONE PAIR DEVICES 06
NOTE:If the visibility of the infotainment system is enabled, even the other devices with bluetooth capabilities can now search and view the infotainment system. For information on the steps to enable the system bluetooth visibility, refer to the Enabling/Disabling System Bluetooth Visibility section.
PAIR DEVICES
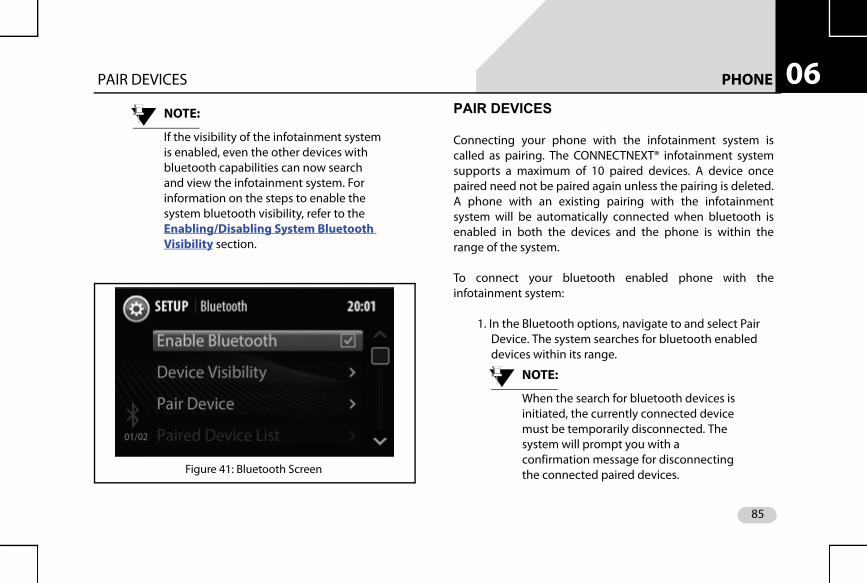
Connecting your phone with the infotainment system iscalled as pairing. The CONNECTNEXT® infotainment systemsupports a maximum of 10 paired devices. A device oncepaired need not be paired again unless the pairing is deleted.A phone with an existing pairing with the infotainmentsystem will be automatically connected when bluetooth isenabled in both the devices and the phone is within therange of the system.
To connect your bluetooth enabled phone with theinfotainment system:
1. In the Bluetooth options, navigate to and select Pair Device. The system searches for bluetooth enabled devices within its range.
NOTE:
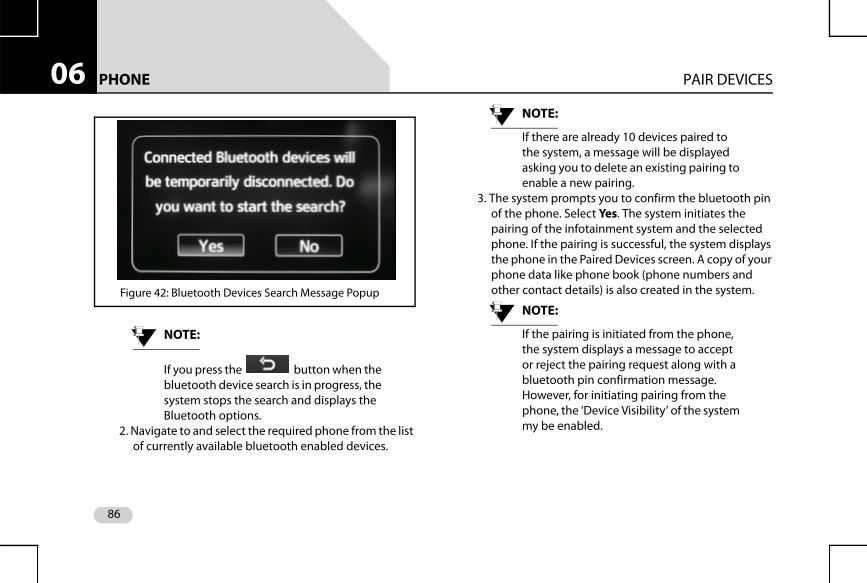
When the search for bluetooth devices is initiated, the currently connected device must be temporarily disconnected. The system will prompt you with a confirmation message for disconnecting the connected paired devices.Figure 41: Bluetooth Screen
85
PHONE PAIR DEVICES06
NOTE:
If you press the button when the bluetooth device search is in progress, the system stops the search and displays the Bluetooth options.
2. Navigate to and select the required phone from the list of currently available bluetooth enabled devices.
NOTE:
If there are already 10 devices paired to the system, a message will be displayed asking you to delete an existing pairing to enable a new pairing.
3. The system prompts you to confirm the bluetooth pin of the phone. Select Yes. The system initiates the pairing of the infotainment system and the selected phone. If the pairing is successful, the system displays the phone in the Paired Devices screen. A copy of your phone data like phone book (phone numbers and other contact details) is also created in the system.
NOTE:
If the pairing is initiated from the phone, the system displays a message to accept or reject the pairing request along with a bluetooth pin confirmation message. However, for initiating pairing from the phone, the ‘Device Visibility’ of the system my be enabled.
Figure 42: Bluetooth Devices Search Message Popup
86
PHONE PAIR DEVICES 06
GUIDELINES FOR PAIRING DEVICESSome of the guidelines for successfully pairing andconnecting your phone with the infotainment system are:
Ensure that Bluetooth feature is switched ON in your phone for successful pairing or auto-connection with your infotainment system.
Ensure that the phone and the infotainment system are set to be visible to one another (refer to the Bluetooth setup settings of your phone and infotainment system).
Ensure that your phone is not in Battery Saver or Airplane mode.
Ensure that the phone and infotainment system are close to each other (in range) and there are no obstructions blocking the phone and the infotainment system connectivity.
Ensure that your phone book contacts do not have special characters or blanks before their name. If there are such contacts, please rename them.
TROUBLESHOOTING STEPS FOR PAIRING DEVICES
If you are unable to pair your phone with the infotainmentsystem even after following the guidelines, try the followingtroubleshooting steps:
1. Refer to the user manual of your phone to verify whether all instructions for reset, connection and pairing have been followed.
2. Re-initiate Bluetooth pairing search or connection request either from the phone or the infotainment system. Pairing search enables faster pairing or connection between the devices.
3. If the above steps do not help, start the pairing process from the beginning.
4. If the pairing is still unsuccessful, try clearing the paired devices list from the Bluetooth settings of your phone and reset your phone, if required. Do the same on the infotainment system, if necessary.
If even after following the troubleshooting steps you areunable to pair the devices, any one of the followingconditions might be true for your phone:
87
PHONE PAIR DEVICES06
Compatibility with 3rd party phones depends on theBluetooth standards, Bluetooth versions, OS version and application software deployed on the phone by its manufacturer. So, the Bluetooth functions on your phone may not support pairing of devices or is not compatible with the infotainment system due to the differences in Bluetooth software versions.
It is recommended that you update the firmware of your phone when you receive a message from the phone manufacturer prompting you to upgrade, as these upgrades are meant to provide the latest and more defect free software to you.
Generally Bluetooth SIG certified phones are known to work reliably with the infotainment system. Please check if your phone complies with the Bluetooth standards.
88
PHONE MANAGE PAIRED DEVICES 06
MANAGE PAIRED DEVICESThe infotainment system allows you to:
View the list of devices paired to it Connect to a paired device Disconnect a paired device Delete paired devices
VIEW PAIRED DEVICES
To view the list of devices paired with the infotainmentsystem:
1. In the Bluetooth options, navigate to and select Paired Device List. The system displays the list of devices that are paired with the system.
NOTE:
You can also display the paired devices, by
pressing the HK from within the Contacts or Call Log screens and selecting
the BTSetup ( ) button from the displayed phone submenu options popup.
Figure 43: Paired Devices Screen
89
PHONE MANAGE PAIRED DEVICES06
CONNECT/DISCONNECT A PAIRED DEVICEYou can connect to a paired device to access the mediarelated data like music and/or phone related data likecontacts and call log stored in the device. Each device pairedwith the system are by default connected for both media andphone.
To connect or disconnect a paired device:
1. In the Paired Device screen, select the required device. The system displays the connection/disconnection options for the device.
2. You can select to connect/disconnect the device for:
Music only ( )
Phone only ( )
Both Music and Phone. (see Figure 37)
Select the required option. The system connects/disconnects the device as per the selected option.
NOTE:
You can also select/un select the Music () and/or Phone () icons beside the device in the Paired Device screen to connect/disconnect the device as required.
DELETE PAIRED DEVICES
You can either delete a paired device or all devices that arecurrently paired with the infotainment system.
Figure 44: Delete Devices Screen
90
PHONE MANAGE PAIRED DEVICES 06
Deleting All Paired DevicesTo delete all paired device:
1. In the Bluetooth options, navigate to and select Delete Devices. The system displays the delete options for the paired devices.
2. Select Delete All option. The system prompts you to confirm the deletion of all paired devices.
3. Select Yes. The system deletes all devices paired with the infotainment system.
Deleting a Paired Device
To delete a paired device:
1. In the Bluetooth options, navigate to and select Delete Devices. The system displays the delete options for the paired devices.
2. Select List All Devices option. The system displays the Paired Devices screen with the list of devices currently paired with the system.
3. Navigate to and select the required device for deletion. The system prompts you to confirm the deletion of the paired devices.
4. Select Yes. The system deletes the selected device that was paired with the infotainment system.
NOTE:
If the selected paired device is currently connected, the device will be disconnected before the device name is deleted from the pairing devices list.
91
PHONE MANAGE BLUETOOTH SETTINGS06
MANAGE BLUETOOTH SETTINGSIn addition to pairing devices and managing the paireddevices, the infotainment system allows you to:
enable/disable the visibility of your system as a Bluetooth device.
change the Bluetooth display name of your system. set the Bluetooth pin code of your system.
ENABLING/DISABLING SYSTEM BLUETOOTH VISIBILITY
To enable/disable the visibility of the system when otherdevices initiate a bluetooth devices search:
1. In the Bluetooth options, navigate to and select Device Visibility.When set, the system will be visible to other devices when they initiate a bluetooth devices search. If the visibility is not enabled, the system will not be listed when other devices search for Bluetooth devices around them.
NOTE:
When the visibility setting is changed, the bluetooth pairing with other devices, if any active, will be disconnected
CHANGING SYSTEM BLUETOOTH DISPLAY NAME
By default, the name that is used to recognize yourinfotainment system in other Bluetooth enabled devices isCONNECTNE><T.
To change the Bluetooth display name of your infotainmentsystem:
1. In the Bluetooth options, navigate to and select Device Name(<current device name>). The system displays the keypad with the current device name.
2. Type the required device name and select Enter. The system sets the new name as the Bluetooth display name of the system, which will be displayed when other devices initiate a bluetooth devices search. The system also displays the new name beside the Device Name option.
92
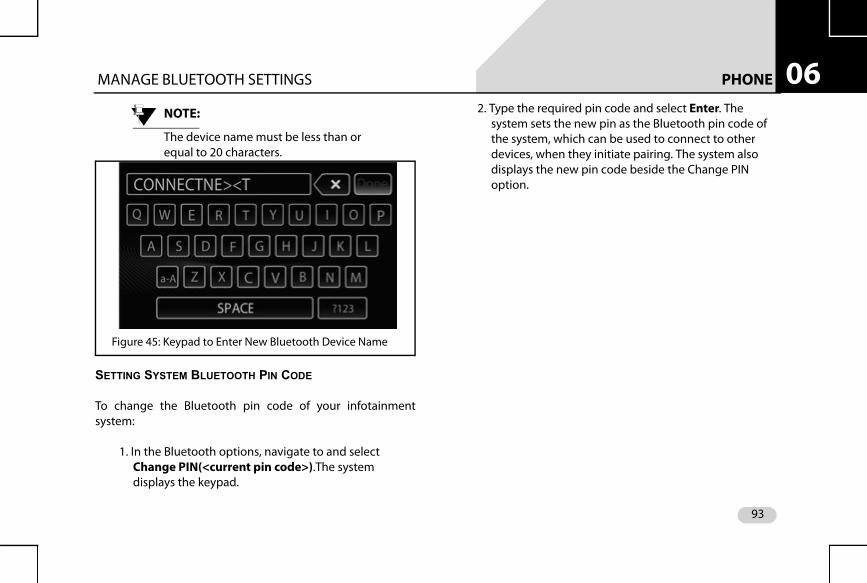
PHONE MANAGE BLUETOOTH SETTINGS 06
NOTE:The device name must be less than or equal to 20 characters.
SETTING SYSTEM BLUETOOTH PIN CODE
To change the Bluetooth pin code of your infotainmentsystem:
1. In the Bluetooth options, navigate to and select Change PIN(<current pin code>).The system displays the keypad.
2. Type the required pin code and select Enter. The system sets the new pin as the Bluetooth pin code of the system, which can be used to connect to other devices, when they initiate pairing. The system also displays the new pin code beside the Change PIN option.
Figure 45: Keypad to Enter New Bluetooth Device Name
93
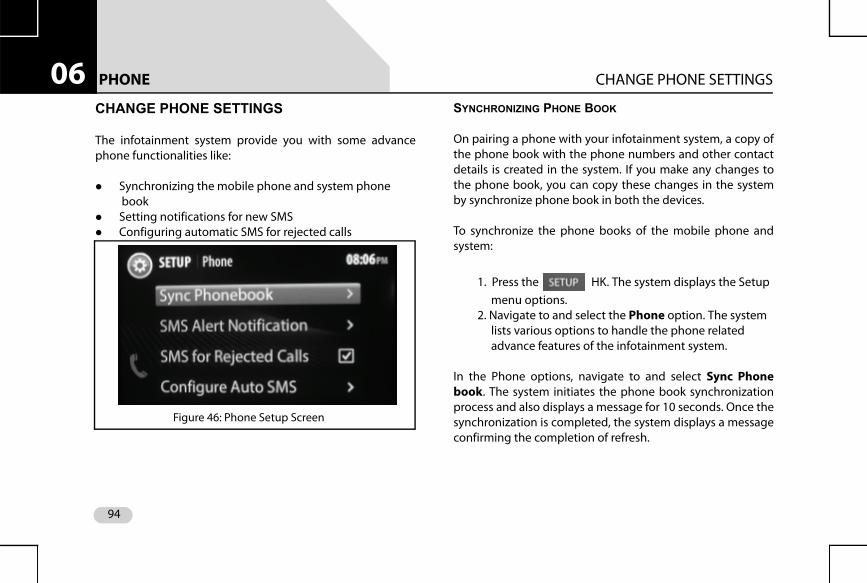
PHONE CHANGE PHONE SETTINGS06
CHANGE PHONE SETTINGSThe infotainment system provide you with some advancephone functionalities like:
Synchronizing the mobile phone and system phone book
Setting notifications for new SMS Configuring automatic SMS for rejected calls
SYNCHRONIZING PHONE BOOK
On pairing a phone with your infotainment system, a copy ofthe phone book with the phone numbers and other contactdetails is created in the system. If you make any changes tothe phone book, you can copy these changes in the systemby synchronize phone book in both the devices.
To synchronize the phone books of the mobile phone andsystem:
1. Press the HK. The system displays the Setup menu options.
2. Navigate to and select the Phone option. The system lists various options to handle the phone related advance features of the infotainment system.
In the Phone options, navigate to and select Sync Phonebook. The system initiates the phone book synchronizationprocess and also displays a message for 10 seconds. Once thesynchronization is completed, the system displays a messageconfirming the completion of refresh.
Figure 46: Phone Setup Screen
94

PHONE CHANGE PHONE SETTINGS 06
SETTING NOTIFICATIONS FOR NEW SMS
When you receive a new SMS on your mobile phone, thesystem can notify you of the SMS. The notification can be abeep and popup or only a beep.
To enable the SMS notification:
1. In the Phone options, navigate to and select SMS Alert Notification. The system displays the various SMS notification options.
2. Scroll to and select the required notification. The system sets the selected option for SMS notification and when you next receive a new SMS, you will be notified by the system accordingly.
NOTE:
If you select the Notify with Popup option, the system can also readout the new SMS to you. Refer to Enable SMS Readout section.
NOTE:
Support for this functionality is dependent on the capabilities supported by your phone. If your phone does not support notifications, this functionality may not work even after enabling.
Figure 47: Message Popup for Phone Book Synchronization
95
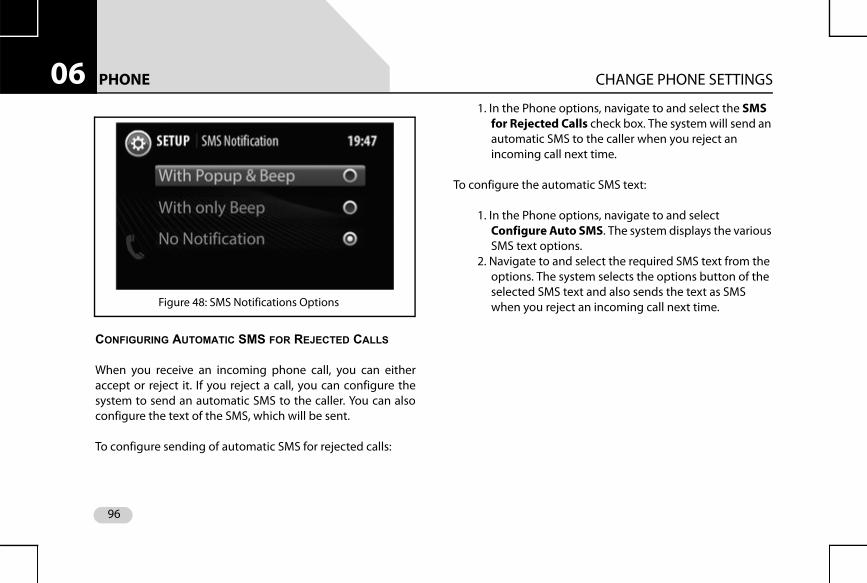
PHONE CHANGE PHONE SETTINGS06
CONFIGURING AUTOMATIC SMS FOR REJECTED CALLS
When you receive an incoming phone call, you can eitheraccept or reject it. If you reject a call, you can configure thesystem to send an automatic SMS to the caller. You can alsoconfigure the text of the SMS, which will be sent.
To configure sending of automatic SMS for rejected calls:
1. In the Phone options, navigate to and select the SMS for Rejected Calls check box. The system will send an automatic SMS to the caller when you reject an incoming call next time.
To configure the automatic SMS text:
1. In the Phone options, navigate to and select Configure Auto SMS. The system displays the various SMS text options.
2. Navigate to and select the required SMS text from the options. The system selects the options button of the selected SMS text and also sends the text as SMS when you reject an incoming call next time.Figure 48: SMS Notifications Options
96
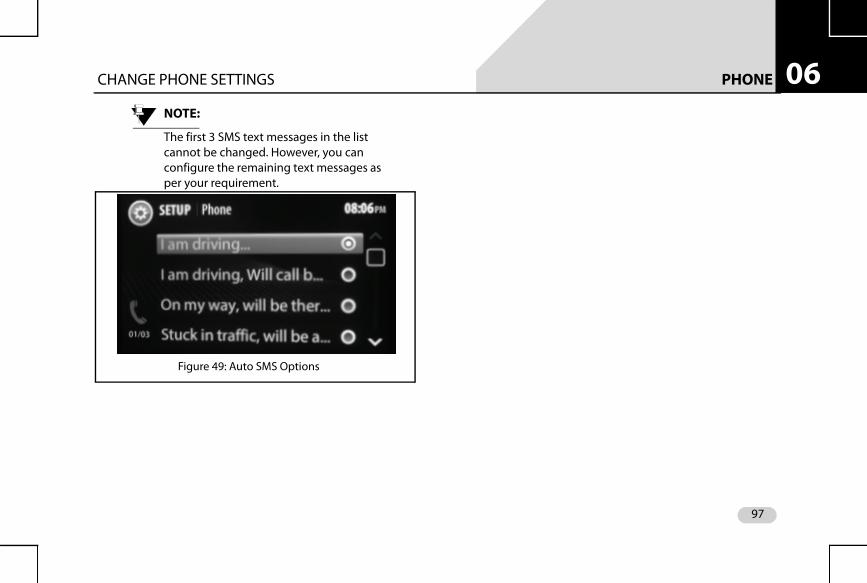
PHONE CHANGE PHONE SETTINGS 06
NOTE:The first 3 SMS text messages in the list cannot be changed. However, you can configure the remaining text messages as per your requirement.
Figure 49: Auto SMS Options
97
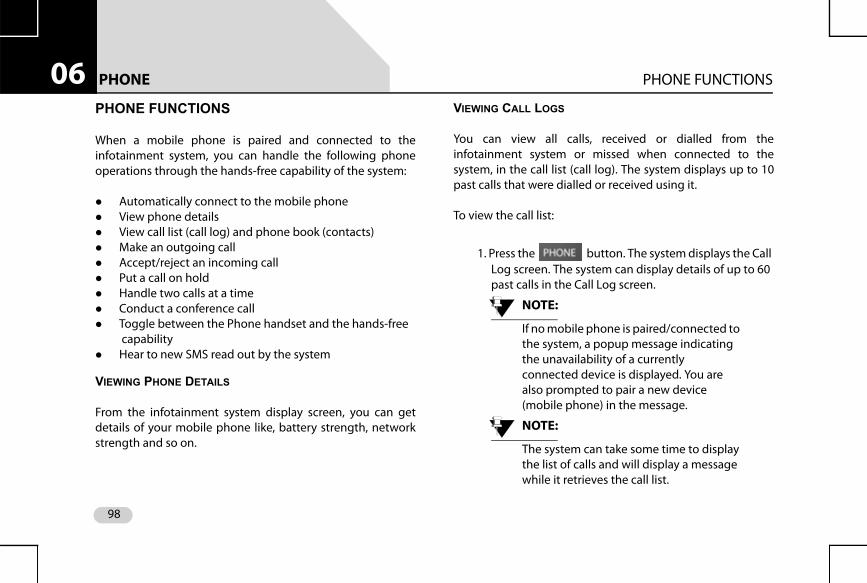
PHONE PHONE FUNCTIONS06
PHONE FUNCTIONSWhen a mobile phone is paired and connected to theinfotainment system, you can handle the following phoneoperations through the hands-free capability of the system:
Automatically connect to the mobile phone View phone details View call list (call log) and phone book (contacts) Make an outgoing call Accept/reject an incoming call Put a call on hold Handle two calls at a time Conduct a conference call Toggle between the Phone handset and the hands-free
capability Hear to new SMS read out by the system
VIEWING PHONE DETAILS
From the infotainment system display screen, you can getdetails of your mobile phone like, battery strength, networkstrength and so on.
VIEWING CALL LOGS
You can view all calls, received or dialled from theinfotainment system or missed when connected to thesystem, in the call list (call log). The system displays up to 10past calls that were dialled or received using it.
To view the call list:
1. Press the button. The system displays the Call Log screen. The system can display details of up to 60 past calls in the Call Log screen.
NOTE:
If no mobile phone is paired/connected to the system, a popup message indicating the unavailability of a currently connected device is displayed. You are also prompted to pair a new device (mobile phone) in the message.
NOTE:
The system can take some time to display the list of calls and will display a message while it retrieves the call list.
98
PHONE PHONE FUNCTIONS 06
VIEWING PHONE BOOKThe infotainment system allows you to view up to 1500contacts stored in your phone book.
To view the contacts:
1. Press the button. The system displays the Call Log screen.
2. In the Call Log screen, press the HK again. The system displays the Phone submenu options in a popup.
NOTE:
In the Call Log screen, you can also select the Phone feature icon to display the phone submenu options popup.
3. In the phone submenu options, navigate to and select the Contacts option. The system displays the Contacts screen with the list of contacts stored in your phone book.
NOTE:
The system can take some time to display the list of phone book contacts and will display a message while it retrieves the contact list.
Figure 50: Phone Submenu Options
99
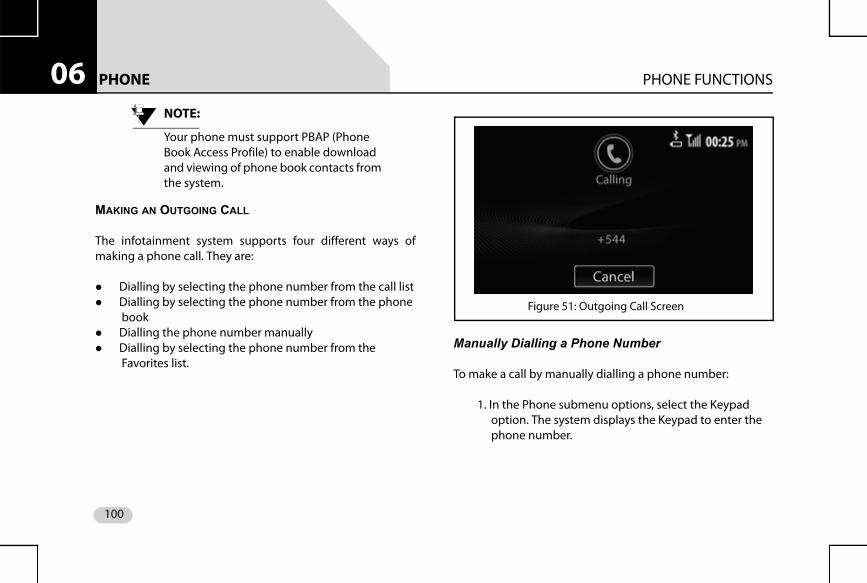
PHONE PHONE FUNCTIONS06
NOTE:Your phone must support PBAP (Phone Book Access Profile) to enable download and viewing of phone book contacts from the system.
MAKING AN OUTGOING CALL
The infotainment system supports four different ways ofmaking a phone call. They are:
Dialling by selecting the phone number from the call list Dialling by selecting the phone number from the phone
book Dialling the phone number manually Dialling by selecting the phone number from the
Favorites list.
Manually Dialling a Phone Number
To make a call by manually dialling a phone number:
1. In the Phone submenu options, select the Keypad option. The system displays the Keypad to enter the phone number.
Figure 51: Outgoing Call Screen
100
PHONE PHONE FUNCTIONS 06
NOTE:Refer to the Viewing Call List section for information on displaying the phone submenu options.
2. Enter the digits of the phone number in the keypad. 3. After entering the phone number, navigate to and
select the Call button. The system initiates the outgoing call.
NOTE:
To delete an incorrect entry, use the
button in the keypad to delete the entire number or digits in the number. On pressing the clear button, the system deletes one digit at a time starting with the last digit in the number.
NOTE:
The system retains the phone number that was last dialled in the Keypad. So, if you want to redial the phone number, you can just open the Keypad and select the Call button.
Dialling Using the Phone Book
To make a call by dialling a number in the phone book:
1. Open the Contacts screen. Refer to the Viewing Phone Book section for the steps to open the Contacts screen.
2. Navigate to through the contacts in the contact list and select the required number. The system dials the selected number and initiates the outgoing call.
NOTE:
To quickly select the required number, you can use any one of the following contact search steps:
Using the search optionUsing the filtering option
Using the Search Option
One of the quick way of selecting the required number fromthe phone book is by searching for the number using thecontact name.
101
PHONE PHONE FUNCTIONS06
To search for the number:1. In the Contacts screen, start browsing through the contact list. The system enables the search and filtering icons.
2. Select the search icon. The system displays an alphabetic keypad with the Search button greyed out.
3. Enter the complete/part of the contact name and select Search. The system searches the phone book and lists the contacts that match the entered name.
4. Select the number or browse through the matching entries and select the required number. The system dials the selected number and initiates the outgoing call.
Using the Filtering Option
The filtering option allows you to quickly search the phonebook and select the requirement number, even if you areunaware of the complete/part of the contact name and justremember the starting alphabet of the name.
To search for the number:
1. Start browsing through the contact list. The system enables the search and filtering icons.
2. Select the filtering icon. The system displays an alphabetic keypad.
3. Select the starting alphabet of the contact name. The system displays all the contacts in the phone book whose names start with the selected alphabet.
4. Select the number or browse through the matching entries and select the required number. The system dials the selected number and initiates the outgoing call.
Figure 52: Alphabetic Keypad Screen
102
PHONE PHONE FUNCTIONS 06
Dialling Using the Call LogTo dial a number from the list of previous calls (call log):
1. Display the call list. Refer to the Viewing Call List section for information on displaying the call list.
2. Select the required number from the list. The system dials the selected number and initiates the outgoing call
Dialling Using the Favorites List
The infotainment system supports marking some contacts asfavorites. The system also allows you to view and access thesefavorite contacts separately from the Favorites screen, inaddition to the Contacts screen.
Marking a Contact as Favorite
To mark a contact as favorite:
1. In the Contacts screen, press the grey star ( ) displayed beside the required contact. The system
highlights the star and the contact is marked as favorite.
NOTE:
If a contact has more than one number, the system displays an arrow beside the contact name/number instead of a star. You can view all the numbers of the contact by selecting the arrow and then pressing the star beside each number to add them to the Favorites list.
Figure 53: Contacts Screen with Favorites Star
103
PHONE PHONE FUNCTIONS06
Viewing the Favorites ListYou can identify the contacts marked as favorite with thehighlighted star in the Contacts screen. All favorite contactscan also be separately viewed in the Favorites screen.
To display the Favorites screen:
1. Open the Call Log screen. Refer to the Viewing Call List section for the steps to open the Call Log screen.
2. Press the HK. The system displays the phone submenu options popup.
3. In the phone submenu options popup, select the Favorites option. The system displays the Favorites screen with the list of favorite contacts.
Dialling a Favorite Number
To dial a favorite contact:
1.Open the Favorites screen. The system lists all contacts marked as favorite.
2.Navigate to and select the required favorite contact. The system dials the number of the selected favorite contact and initiates the outgoing call.
ACCEPTING/REJECTING AN INCOMING PHONE CALL
When you receive a phone call, you can either accept or rejectthe call using the infotainment system.
If your mobile phone is paired and currently connected to thesystem, the system notifies you with a popup message whenyou receive a phone call. The system allows you to Accept orReject or Reject with Message the incoming call.
In the Reject with Message option, the system rejects the calland also sends a SMS to the caller with the configured text.Refer to Configuring Automatic SMS for Rejected Callssection for the steps to configure automatic SMS.
To accept the incoming call:
1. Select the Accept button in the popup message. The system connects the call to enable you to talk to the caller.
NOTE:
You can also accept the call using the
Steering Wheel control.
104
PHONE PHONE FUNCTIONS 06
To reject the incoming call:1. Select the Reject button in the popup message. The system disconnects the call.
NOTE:
You can also reject the call using the
Steering Wheel control.
To reject the incoming call and send a SMS to the caller:
2. Select the Reject with Message button in the popup message. The system rejects the call and sends an SMS to the caller.
HANDLING IN-CALL FUNCTIONS
When you are in a call (outgoing or incoming), the systemsupports you to perform any of the following functions:
Respond to the Interactive Voice Response (IVR) with the required details
Put the call on hold Switch between phone (handset) and system (hands-
free) capability Accept another incoming call Switch between calls Conduct a conference call by adding another number or
by merging two existing calls Mute the microphone End the call
Responding to the IVR
When you have called a contact with Interactive VoiceResponse (IVR) like customer care number of bank and so on,you will have to enter some details through the phone. For
Figure 54: Incoming Call Screen
105
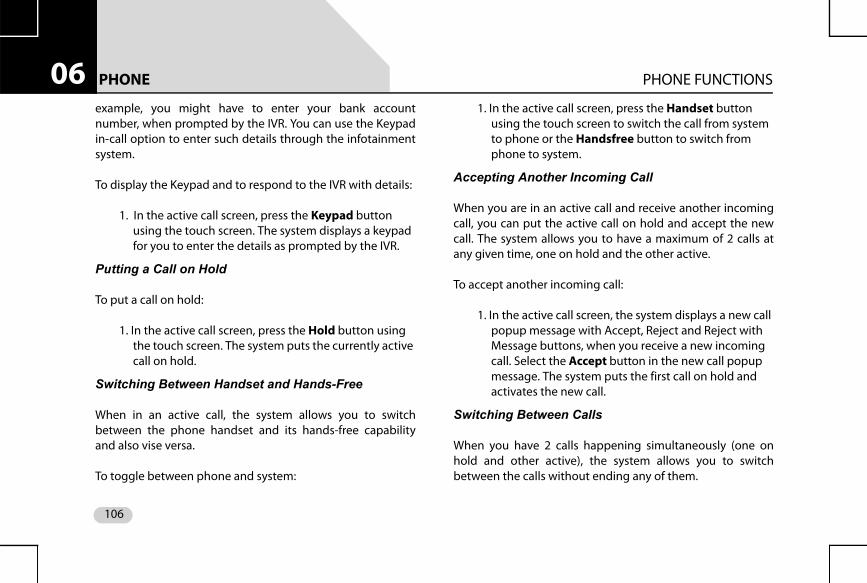
PHONE PHONE FUNCTIONS06
example, you might have to enter your bank accountnumber, when prompted by the IVR. You can use the Keypadin-call option to enter such details through the infotainmentsystem.To display the Keypad and to respond to the IVR with details:
1. In the active call screen, press the Keypad button using the touch screen. The system displays a keypad for you to enter the details as prompted by the IVR.
Putting a Call on Hold
To put a call on hold:
1. In the active call screen, press the Hold button using the touch screen. The system puts the currently active call on hold.
Switching Between Handset and Hands-Free
When in an active call, the system allows you to switchbetween the phone handset and its hands-free capabilityand also vise versa.
To toggle between phone and system:
1. In the active call screen, press the Handset button using the touch screen to switch the call from system to phone or the Handsfree button to switch from phone to system.
Accepting Another Incoming Call
When you are in an active call and receive another incomingcall, you can put the active call on hold and accept the newcall. The system allows you to have a maximum of 2 calls atany given time, one on hold and the other active.
To accept another incoming call:
1. In the active call screen, the system displays a new call popup message with Accept, Reject and Reject with Message buttons, when you receive a new incoming call. Select the Accept button in the new call popup message. The system puts the first call on hold and activates the new call.
Switching Between Calls
When you have 2 calls happening simultaneously (one onhold and other active), the system allows you to switchbetween the calls without ending any of them.
106
PHONE PHONE FUNCTIONS 06
To switch between calls:1. In the active call screen, select the Swap button. The system puts the active call on hold and activates the second call, which was on hold till then. To activate the previous call, follow the same step.
Conducting a Conference Call
When in an active call, you can connect an additional phonenumber to create a conference call between the contacts.You can create a conference call by either dialling to anadditional number or by accepting a new incoming call.
To create a conference call by dialling additional number:
1. In the active call screen, press the Add Call button. The system puts the active call on hold and displays the Contacts screen. You can dial the additional number from the contacts list or from the call log, the favorites list or keypad.
2. Follow the steps listed in the Making an Outgoing Call section for dialling a number using the various options. The system initiates an outgoing call for the selected number.
3. In the new call screen, press the Merge button using the touch screen. The system merges the 2 calls (one on hold and one new call) to create a conference call. The first call is activated before merger.
Figure 55: Phone In-Call Options
107
PHONE PHONE FUNCTIONS06
To create a conference call by accepting a new incoming call:1. Accept a new incoming call as detailed in the Accepting Another Incoming Call section.
2. In the new call screen, press the Merge button using the touch screen. The system merges the 2 calls (one on hold and one new call) to create a conference call. The first call is activated before merger.
Muting the Microphone
When in a call (both individual call and conference call), youcan mute the microphone to disable the other participant(s)in the call from hearing you.
To mute the microphone,
1. In the active call screen, select the mute microphone icon.
NOTE:
To un-mute the microphone, repeat the above step again.
Ending a Call
To end an active call:
1. In the active call screen, select the End button. The system disconnects the call.
NOTE:
You can also end the active call using the
Steering Wheel control.
Figure 56: Conference Call Created
108
PHONE PHONE FUNCTIONS 06
ENABLE SMS READOUTWhile driving the vehicle, you will be unable to read a newSMS that you receive. The infotainment system can solve thisproblem by reading out the SMS for you.
To enable the system to readout a new SMS:
1. Ensure that you have selected Notify with Popup option for SMS Alert Notification. Refer to Setting notifications for new SMS section. When you receive a new SMS, the system will display a popup message.
2. Select Read Out in the Popup message. The system reads out the new SMS for you.
109
NAVIGATION FEATURE GENERAL INFORMATION07
NAVIGATION FEATUREGENERAL INFORMATION
Navigation in general refers to the process of identifying ourcurrent position and accordingly planning and following aspecific route to reach our required destination. A Navigationapplication helps us to do this even when we have limited orno information about our current location and itssurroundings.
MOBILE NAVIGATION APP VS EMBEDDED NAVIGATION SYS-TEMS
Commonly, automobiles with navigation facility come withembedded navigation systems. However, these systems havethe following drawbacks:
1. They are generally high priced2. They come with a fixed set of map(s), which can be
upgraded with the help of the dealer or vendor, if required and if available.
The latest Mobile based Navigation Apps eradicate thesedrawbacks. They are comparatively cheaper and as they are
Internet based, they can be upgraded with new or latestmaps when ever required.
The path breaking Navigation feature of the CONNECTNEXT®Infotainment System allows you to take complete advantageof these benefits of a Mobile based Navigation app.
Using the Navigation feature, you can integrate your vehicleinfotainment system with the NaviMaps Mobile NavigationApp. For the integration, you just need to download andinstall the NaviMaps App and the ConnectNext Apps on yoursmartphone and connect your smartphone to theinfotainment system through USB.
NOTE:
All navigation functions of NaviMaps App that are available through your smartphone device may not be available through the infotainment system. Refer to the CONNECTNEXT® Nav. Limitations section for more information on the limitations.
110
NAVIGATION FEATURE GENERAL INFORMATION 07
TRAFFIC RULES AND ROAD SAFETYA navigation system/application can only guide with the bestpossible route to reach your destination after considering thecurrent traffic situations. It is your responsibility to follow thetraffic rules and road safety rules while driving.
SAFETY TIPS
You must be vigilant about the hazards or problems in theroad and also about any other traffic regulation that arerecently introduced like conversion of a road to one-way. If anavigation instruction provided by the app contradicts atraffic regulation, please follow only the traffic regulation.
111
NAVIGATION FEATURE INSTALLING APPS FOR NAVIGATION07
INSTALLING APPS FOR NAVIGATIONThe CONNECTNEXT® Navigation feature requires theinstallation of the following 3 Mobile Apps that can bedownloaded from your smartphone Google Android PlayStore:
NaviMaps App: This is the navigation application. ConnectNext App and ConnectNext Service App: These
applications are responsible for establishing the connection between your smartphone and your vehicle CONNECTNEXT® infotainment system.
INSTALL TO CONNECTNEXT APPS
The ConnectNext apps are required for connecting to theNaviMaps app on your smart phone and replicating its mapfunctionalities on your vehicle CONNECTNEXT® infotainmentsystem.
To install the ConnectNext apps:
1. Open the Play Store on your Android based smartphone.
2. Search for the ConnectNext App. Both the ConnectNext and ConnectNext Service apps will be listed.
3. Tap the ConnectNext app icon. The app page is displayed.
4. Tap the Get button. The Install button is displayed.5. Tap the Install button. The app is downloaded and
installed on your smartphone. The ConnectNext app icon is displayed on your smartphone.
Once the ConnectNext app is installed, you will beautomatically redirected to install the ConnectNext Serviceapp. The steps for installing the ConnectNext Service app issimilar to the ConnectNext app installation steps.
112
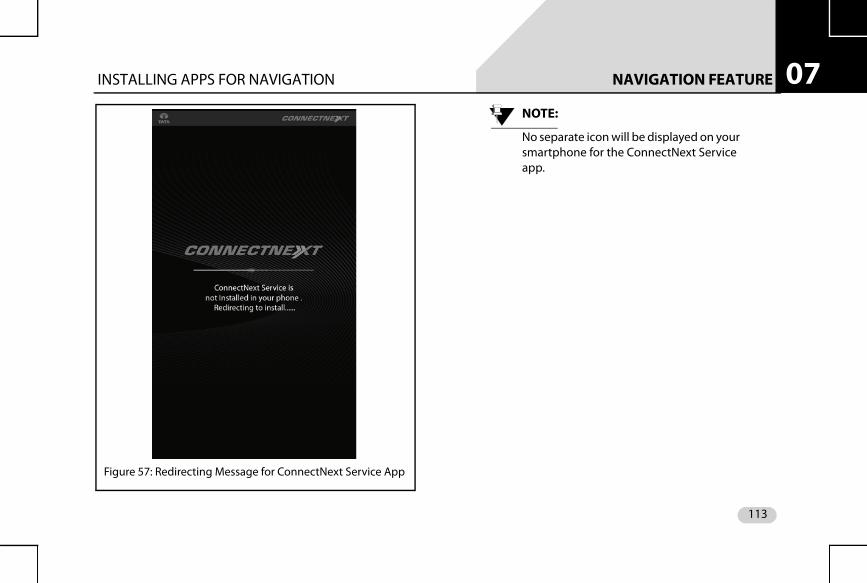
NAVIGATION FEATURE INSTALLING APPS FOR NAVIGATION 07
NOTE:No separate icon will be displayed on your smartphone for the ConnectNext Service app.
Figure 57: Redirecting Message for ConnectNext Service App
113
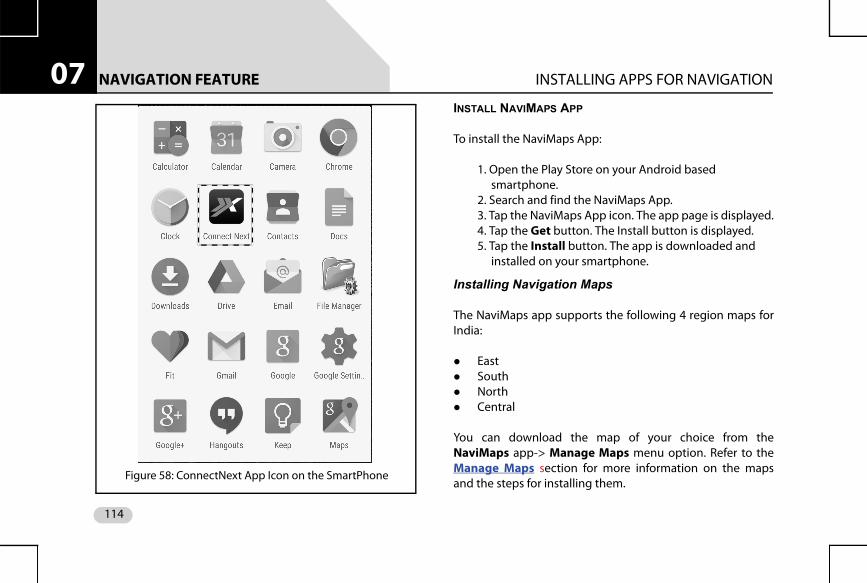
NAVIGATION FEATURE INSTALLING APPS FOR NAVIGATION07
INSTALL NAVIMAPS APPTo install the NaviMaps App:
1. Open the Play Store on your Android based smartphone.
2. Search and find the NaviMaps App.3. Tap the NaviMaps App icon. The app page is displayed.4. Tap the Get button. The Install button is displayed.5. Tap the Install button. The app is downloaded and
installed on your smartphone.
Installing Navigation Maps
The NaviMaps app supports the following 4 region maps forIndia:
East South North Central
You can download the map of your choice from theNaviMaps app-> Manage Maps menu option. Refer to theManage Maps section for more information on the mapsand the steps for installing them.
Figure 58: ConnectNext App Icon on the SmartPhone
114
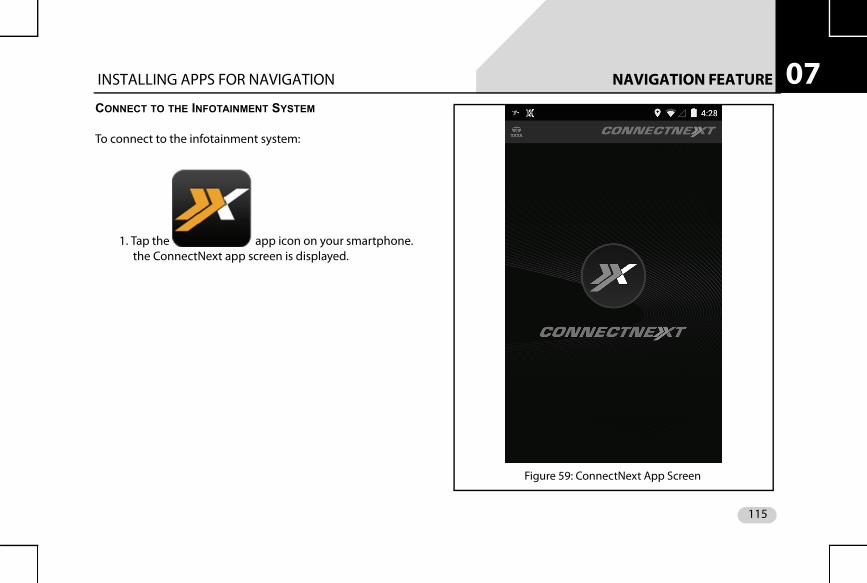
NAVIGATION FEATURE INSTALLING APPS FOR NAVIGATION 07
CONNECT TO THE INFOTAINMENT SYSTEMTo connect to the infotainment system:
1. Tap the app icon on your smartphone. the ConnectNext app screen is displayed.
Figure 59: ConnectNext App Screen
115
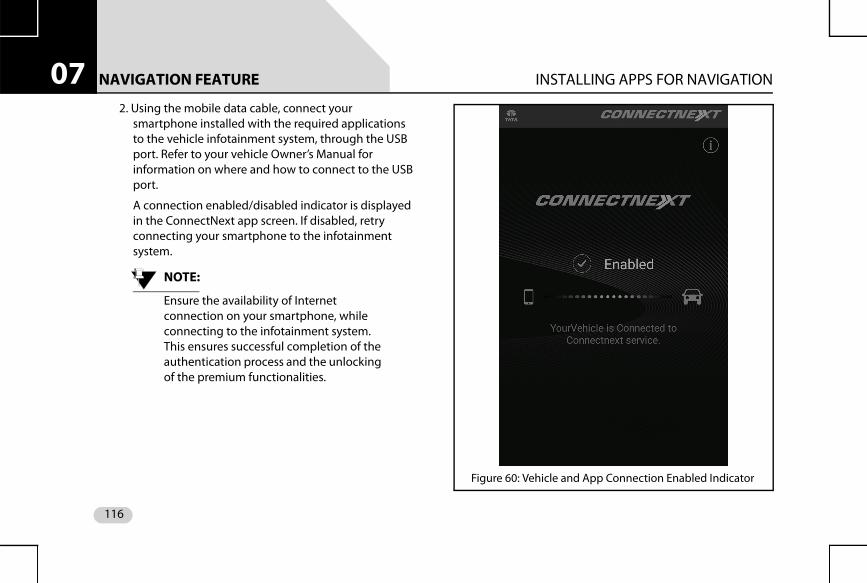
NAVIGATION FEATURE INSTALLING APPS FOR NAVIGATION07
2. Using the mobile data cable, connect yoursmartphone installed with the required applications to the vehicle infotainment system, through the USB port. Refer to your vehicle Owner’s Manual for information on where and how to connect to the USB port.
A connection enabled/disabled indicator is displayed in the ConnectNext app screen. If disabled, retry connecting your smartphone to the infotainment system.
NOTE:
Ensure the availability of Internet connection on your smartphone, while connecting to the infotainment system. This ensures successful completion of the authentication process and the unlocking of the premium functionalities.
Figure 60: Vehicle and App Connection Enabled Indicator
116
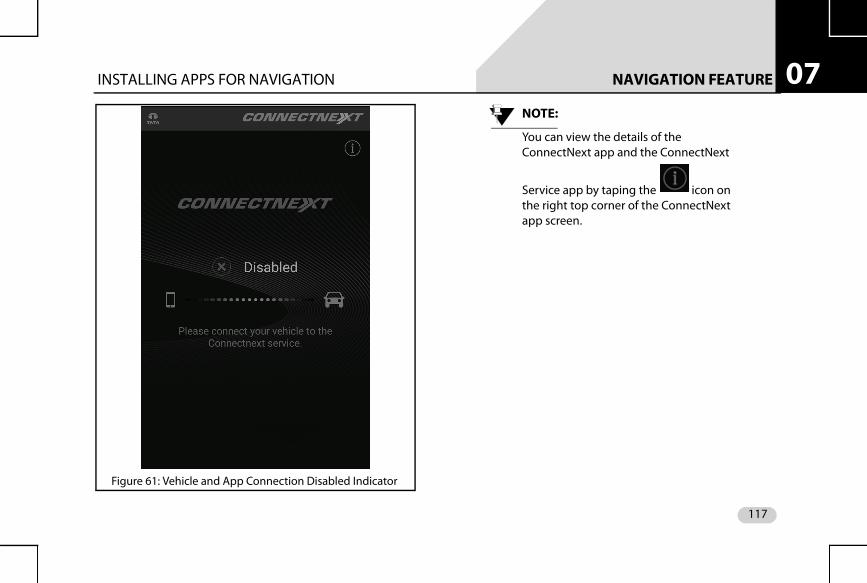
NAVIGATION FEATURE INSTALLING APPS FOR NAVIGATION 07
NOTE:You can view the details of the ConnectNext app and the ConnectNext
Service app by taping the icon on the right top corner of the ConnectNext app screen.
Figure 61: Vehicle and App Connection Disabled Indicator
117
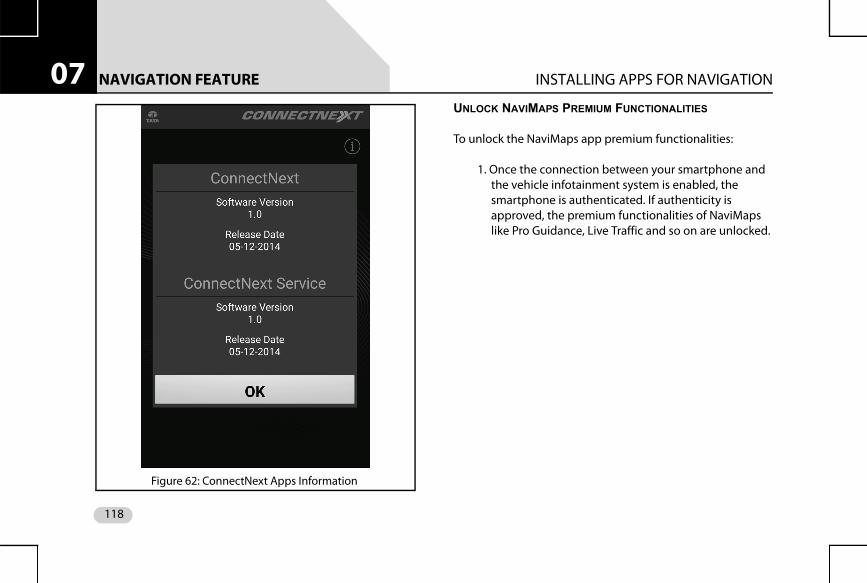
NAVIGATION FEATURE INSTALLING APPS FOR NAVIGATION07
UNLOCK NAVIMAPS PREMIUM FUNCTIONALITIESTo unlock the NaviMaps app premium functionalities:
1. Once the connection between your smartphone and the vehicle infotainment system is enabled, the smartphone is authenticated. If authenticity is approved, the premium functionalities of NaviMaps like Pro Guidance, Live Traffic and so on are unlocked.
Figure 62: ConnectNext Apps Information
118
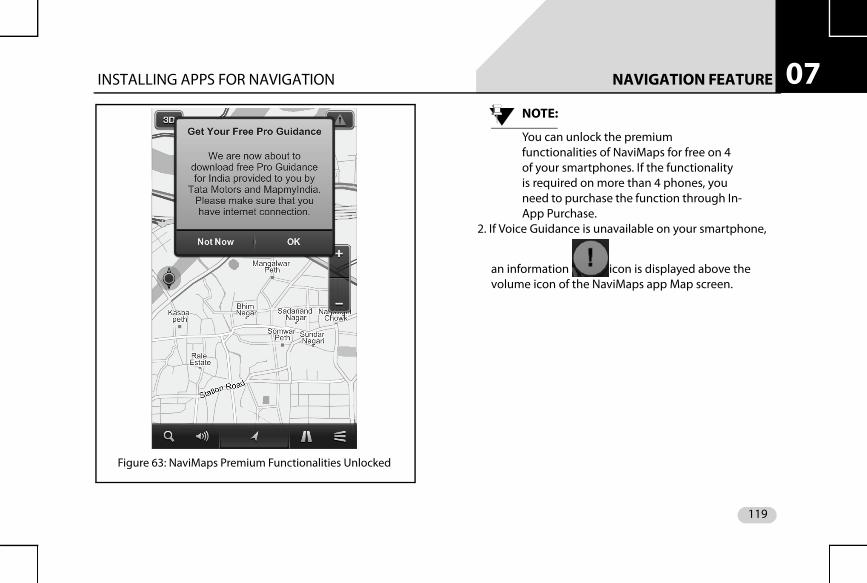
NAVIGATION FEATURE INSTALLING APPS FOR NAVIGATION 07
NOTE:You can unlock the premium functionalities of NaviMaps for free on 4 of your smartphones. If the functionality is required on more than 4 phones, you need to purchase the function through In-App Purchase.
2. If Voice Guidance is unavailable on your smartphone,
an information icon is displayed above the volume icon of the NaviMaps app Map screen.
Figure 63: NaviMaps Premium Functionalities Unlocked
119
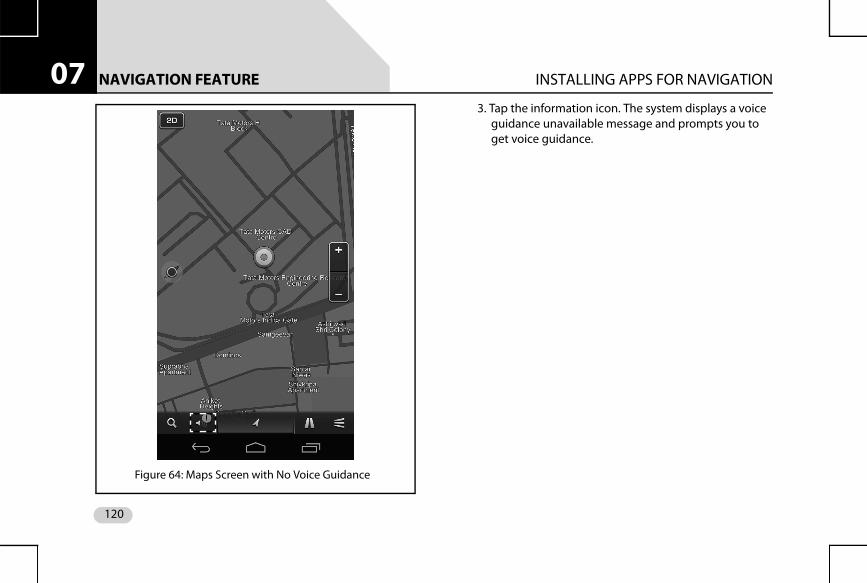
NAVIGATION FEATURE INSTALLING APPS FOR NAVIGATION07
3. Tap the information icon. The system displays a voiceguidance unavailable message and prompts you to get voice guidance.
Figure 64: Maps Screen with No Voice Guidance
120

NAVIGATION FEATURE INSTALLING APPS FOR NAVIGATION 07
4. Tap on the Get Voices button. The More Voices screenis displayed with a list of voice guidances that can be downloaded on your smartphone.
Figure 65: Voice Guidance Unavailable Message
121
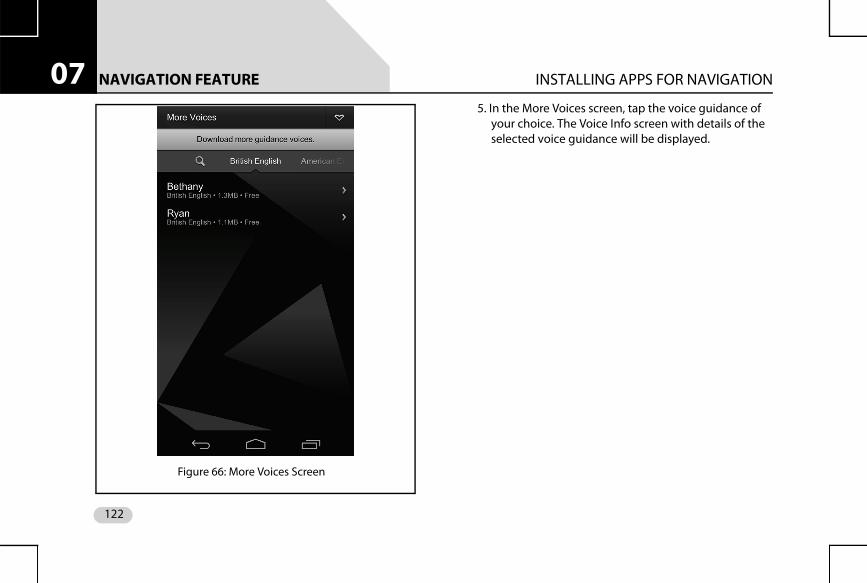
NAVIGATION FEATURE INSTALLING APPS FOR NAVIGATION07
5. In the More Voices screen, tap the voice guidance ofyour choice. The Voice Info screen with details of the selected voice guidance will be displayed.
Figure 66: More Voices Screen
122
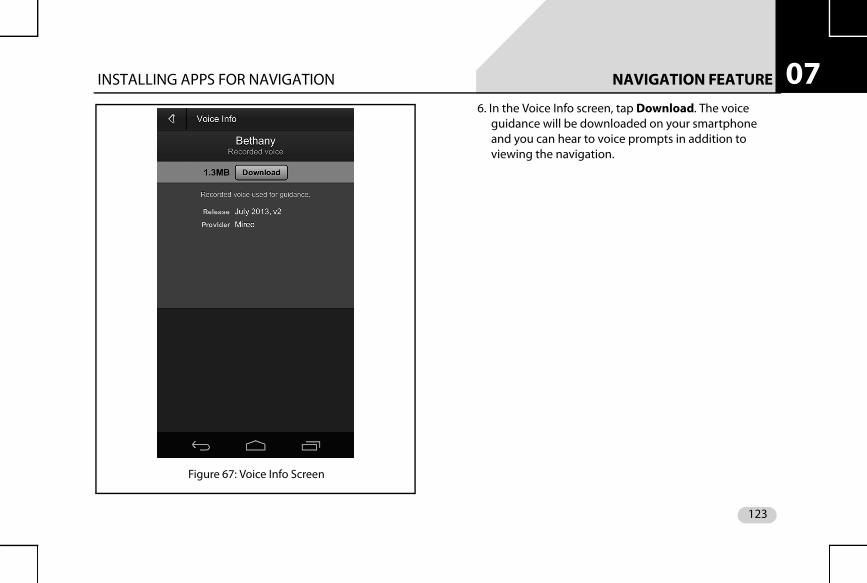
NAVIGATION FEATURE INSTALLING APPS FOR NAVIGATION 07
6. In the Voice Info screen, tap Download. The voiceguidance will be downloaded on your smartphone and you can hear to voice prompts in addition to viewing the navigation.
Figure 67: Voice Info Screen
123
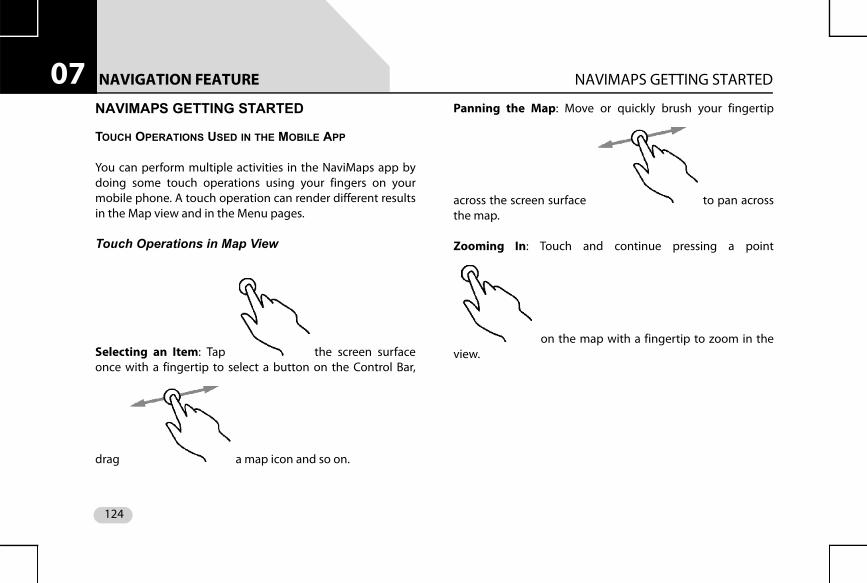
NAVIGATION FEATURE NAVIMAPS GETTING STARTED07
NAVIMAPS GETTING STARTEDTOUCH OPERATIONS USED IN THE MOBILE APP
You can perform multiple activities in the NaviMaps app bydoing some touch operations using your fingers on yourmobile phone. A touch operation can render different resultsin the Map view and in the Menu pages.
Touch Operations in Map View
Selecting an Item: Tap the screen surfaceonce with a fingertip to select a button on the Control Bar,
drag a map icon and so on.
Panning the Map: Move or quickly brush your fingertip
across the screen surface to pan acrossthe map.
Zooming In: Touch and continue pressing a point
on the map with a fingertip to zoom in theview.
124
NAVIGATION FEATURE NAVIMAPS GETTING STARTED 07
Touch Operations in Menu PagesSelecting, Deselecting and Toggling an Item: Tap the
screen surface once with a fingertip to selecta button, tab, list, deselect or toggle an applicable item
Scrolling a Page: Move or quickly brush your fingertip up
and down the screen surface to scroll upand down a page.
START NAVIMAPS APP
You can start the NaviMaps App by selecting the
app icon on your smartphone. The firstscreen you will see once the app starts is the Map View. This isthe app's default start screen. Your device GPS will tell theapp where you are currently and you will see your location.
NOTE:
To use the NaviMaps App, ensure you have the GPS feature of your smartphone switched on for the entire duration.
125

NAVIGATION FEATURE NAVIMAPS GETTING STARTED07
The Map View Controls NOTE:The CONNECTNEXT® infotainment system supports rendering of 2D maps. However, the 3D landmarks shown in the smartphone will not be displayed in the infotainment system Map screen.
1
2
3
4
5
6
7
8
9
Figure 68: Map View Controls
Table 7: The Map View Controls
1. 2D&3D Mode Button Tap the 2D button once to toggle between a two-dimensional (aerial) map view and a three dimensional (depth- perspective) map view. Tap the 3D button once to toggle between a three-dimensional (depth-perspective) map view and a two dimensional (aerial) map view.
126
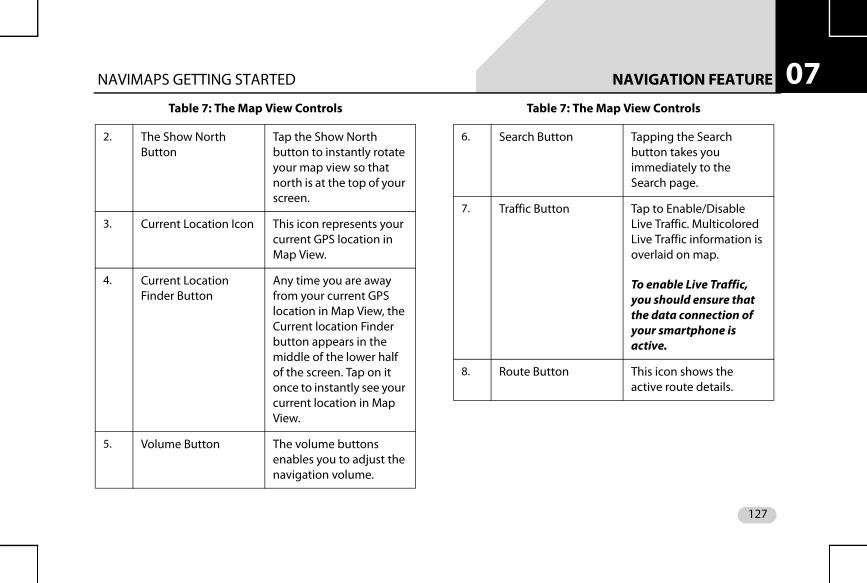
NAVIGATION FEATURE NAVIMAPS GETTING STARTED 07
2. The Show North Button
Tap the Show North button to instantly rotate your map view so that north is at the top of your screen.
3. Current Location Icon This icon represents your current GPS location in Map View.
4. Current Location Finder Button
Any time you are away from your current GPS location in Map View, the Current location Finder button appears in the middle of the lower half of the screen. Tap on it once to instantly see your current location in Map View.
5. Volume Button The volume buttons enables you to adjust the navigation volume.
Table 7: The Map View Controls
6. Search Button Tapping the Search button takes you immediately to the Search page.
7. Traffic Button Tap to Enable/Disable Live Traffic. Multicolored Live Traffic information is overlaid on map.
To enable Live Traffic, you should ensure that the data connection of your smartphone is active.
8. Route Button This icon shows the active route details.
Table 7: The Map View Controls
127
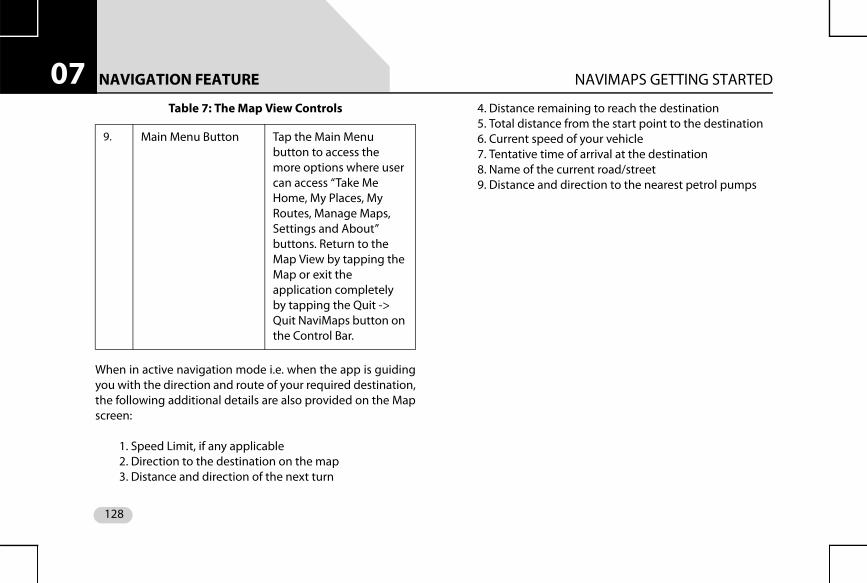
NAVIGATION FEATURE NAVIMAPS GETTING STARTED07
When in active navigation mode i.e. when the app is guidingyou with the direction and route of your required destination,the following additional details are also provided on the Mapscreen:
1. Speed Limit, if any applicable2. Direction to the destination on the map3. Distance and direction of the next turn
4. Distance remaining to reach the destination5. Total distance from the start point to the destination6. Current speed of your vehicle7. Tentative time of arrival at the destination8. Name of the current road/street9. Distance and direction to the nearest petrol pumps
9. Main Menu Button Tap the Main Menu button to access the more options where user can access “Take Me Home, My Places, My Routes, Manage Maps, Settings and About” buttons. Return to the Map View by tapping the Map or exit the application completely by tapping the Quit -> Quit NaviMaps button on the Control Bar.
Table 7: The Map View Controls
128

NAVIGATION FEATURE NAVIMAPS GETTING STARTED 07
DESTINATION ENTRY AND STARTTo start using the NaviMaps app, you must tap on the button, in the Map View to open the Search screen.
Figure 69: Map Screen in Active Navigation Mode
1
3 8
4 7
5 6
9
2
129

NAVIGATION FEATURE NAVIMAPS GETTING STARTED07
To select a state, tap on the icon on the Search screen.It will show you a list of the states from which the desiredstate can be chosen. There is also another way to select astate, by just sliding the state bar towards left or right andchoosing the desired state from the drop down state listusing the down arrow sign on the state bar.NOTE:
States that are listed is dependent on the map downloaded and installed on the smartphone.
Figure 70: Search Screen
130
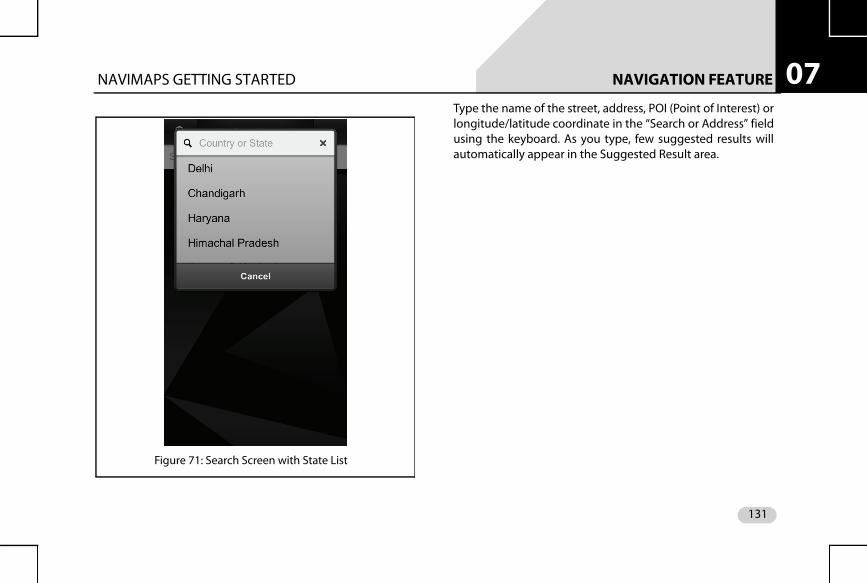
NAVIGATION FEATURE NAVIMAPS GETTING STARTED 07
Type the name of the street, address, POI (Point of Interest) orlongitude/latitude coordinate in the “Search or Address” fieldusing the keyboard. As you type, few suggested results willautomatically appear in the Suggested Result area.Figure 71: Search Screen with State List
131
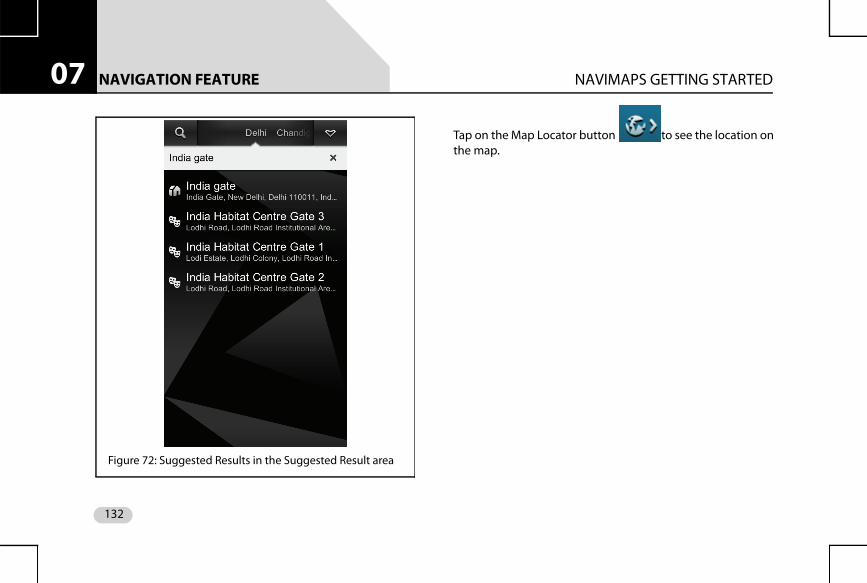
NAVIGATION FEATURE NAVIMAPS GETTING STARTED07
Tap on the Map Locator button to see the location onthe map.
Figure 72: Suggested Results in the Suggested Result area
132
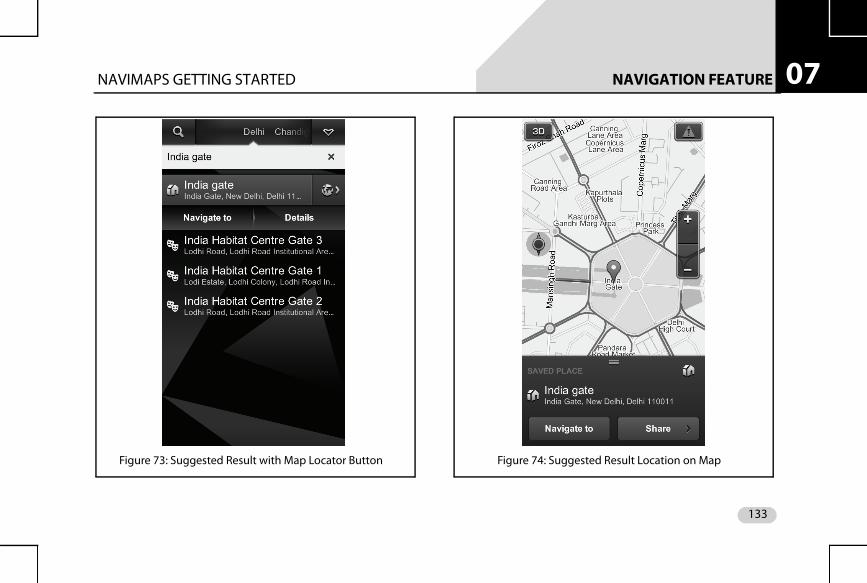
NAVIGATION FEATURE NAVIMAPS GETTING STARTED 07
Figure 73: Suggested Result with Map Locator Button Figure 74: Suggested Result Location on Map
133
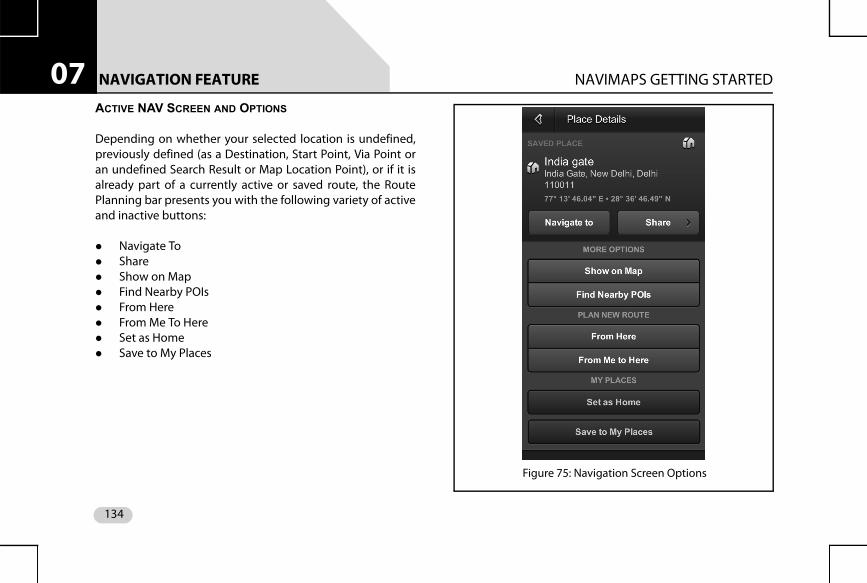
NAVIGATION FEATURE NAVIMAPS GETTING STARTED07
ACTIVE NAV SCREEN AND OPTIONSDepending on whether your selected location is undefined,previously defined (as a Destination, Start Point, Via Point oran undefined Search Result or Map Location Point), or if it isalready part of a currently active or saved route, the RoutePlanning bar presents you with the following variety of activeand inactive buttons:
Navigate To Share Show on Map Find Nearby POIs From Here From Me To Here Set as Home Save to My Places
Figure 75: Navigation Screen Options
134
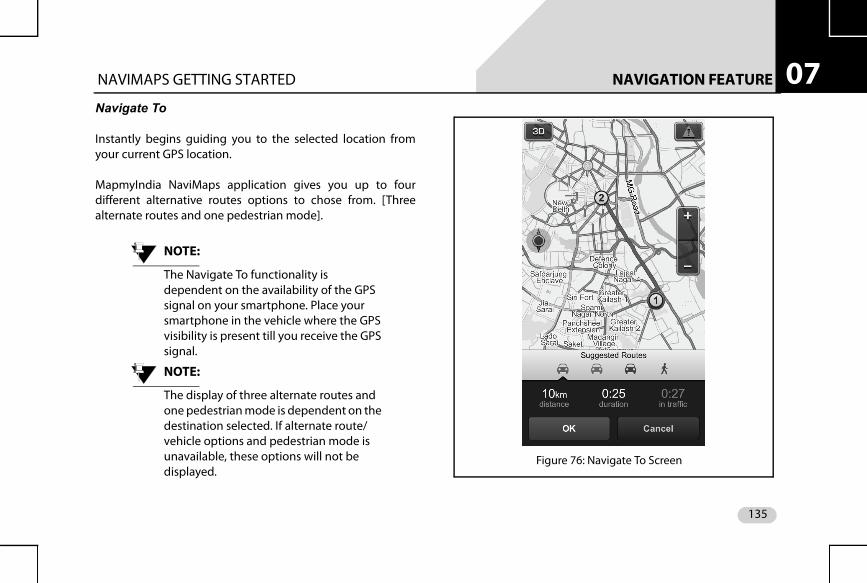
NAVIGATION FEATURE NAVIMAPS GETTING STARTED 07
Navigate ToInstantly begins guiding you to the selected location fromyour current GPS location.
MapmyIndia NaviMaps application gives you up to fourdifferent alternative routes options to chose from. [Threealternate routes and one pedestrian mode].
NOTE:
The Navigate To functionality is dependent on the availability of the GPS signal on your smartphone. Place your smartphone in the vehicle where the GPS visibility is present till you receive the GPS signal.
NOTE:
The display of three alternate routes and one pedestrian mode is dependent on the destination selected. If alternate route/vehicle options and pedestrian mode is unavailable, these options will not be displayed.
Figure 76: Navigate To Screen
135
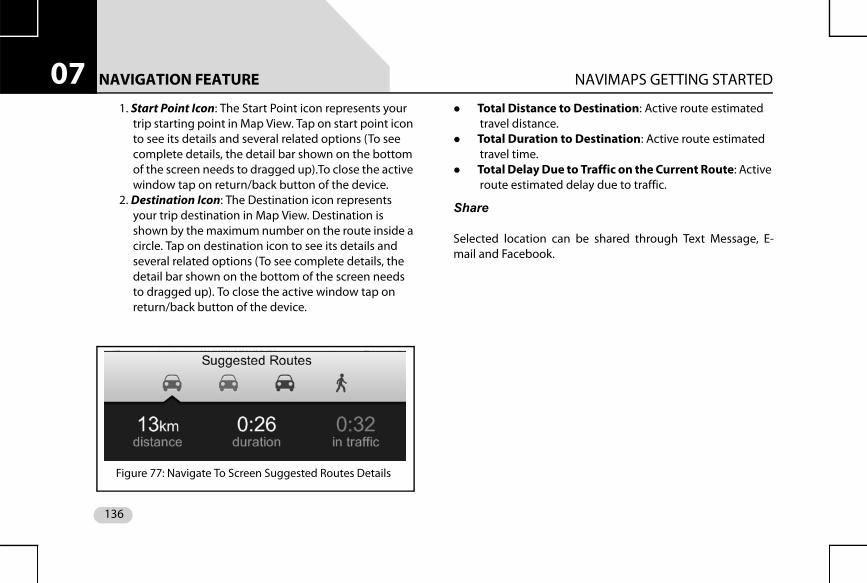
NAVIGATION FEATURE NAVIMAPS GETTING STARTED07
1. Start Point Icon: The Start Point icon represents yourtrip starting point in Map View. Tap on start point icon to see its details and several related options (To see complete details, the detail bar shown on the bottom of the screen needs to dragged up).To close the active window tap on return/back button of the device.
2. Destination Icon: The Destination icon represents your trip destination in Map View. Destination is shown by the maximum number on the route inside a circle. Tap on destination icon to see its details and several related options (To see complete details, the detail bar shown on the bottom of the screen needs to dragged up). To close the active window tap on return/back button of the device.
Total Distance to Destination: Active route estimated travel distance.
Total Duration to Destination: Active route estimated travel time.
Total Delay Due to Traffic on the Current Route: Active route estimated delay due to traffic.
Share
Selected location can be shared through Text Message, E-mail and Facebook.
Figure 77: Navigate To Screen Suggested Routes Details
136
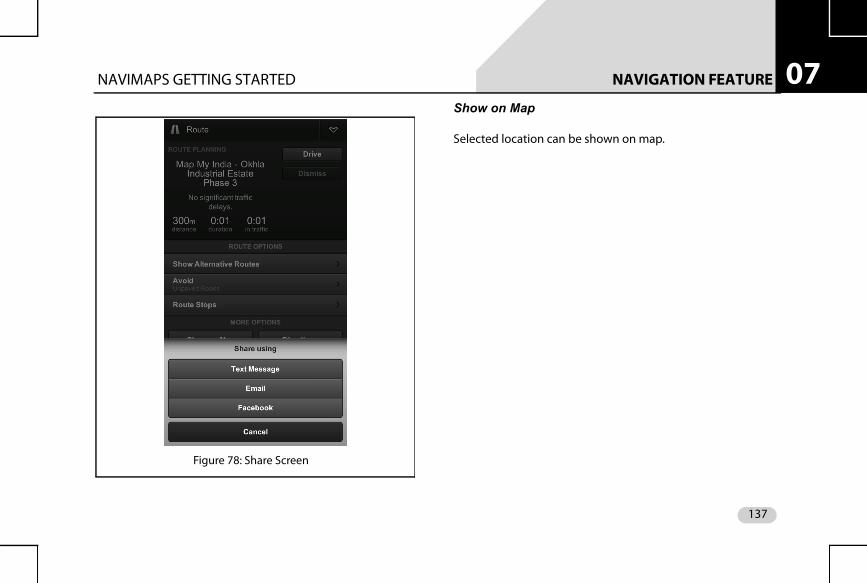
NAVIGATION FEATURE NAVIMAPS GETTING STARTED 07
Show on MapSelected location can be shown on map.
Figure 78: Share Screen
137
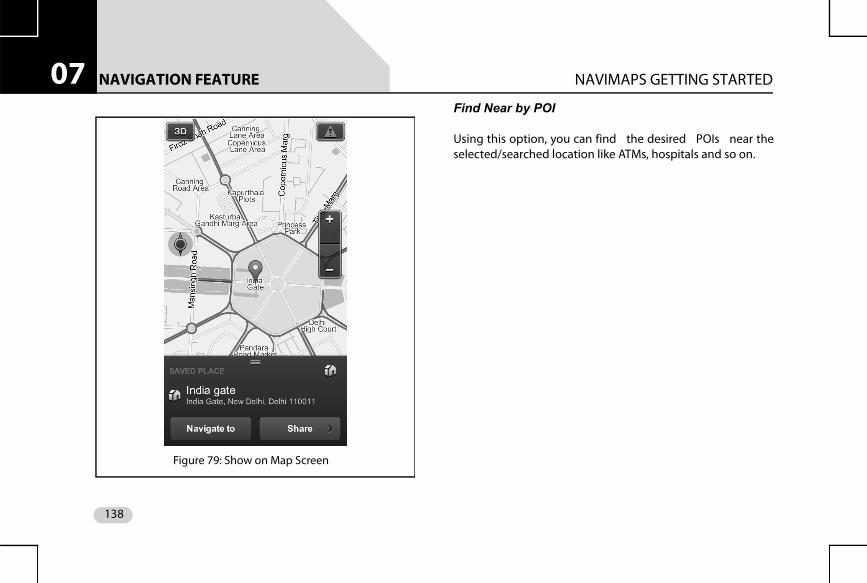
NAVIGATION FEATURE NAVIMAPS GETTING STARTED07
Find Near by POIUsing this option, you can find the desired POIs near theselected/searched location like ATMs, hospitals and so on.
Figure 79: Show on Map Screen
138
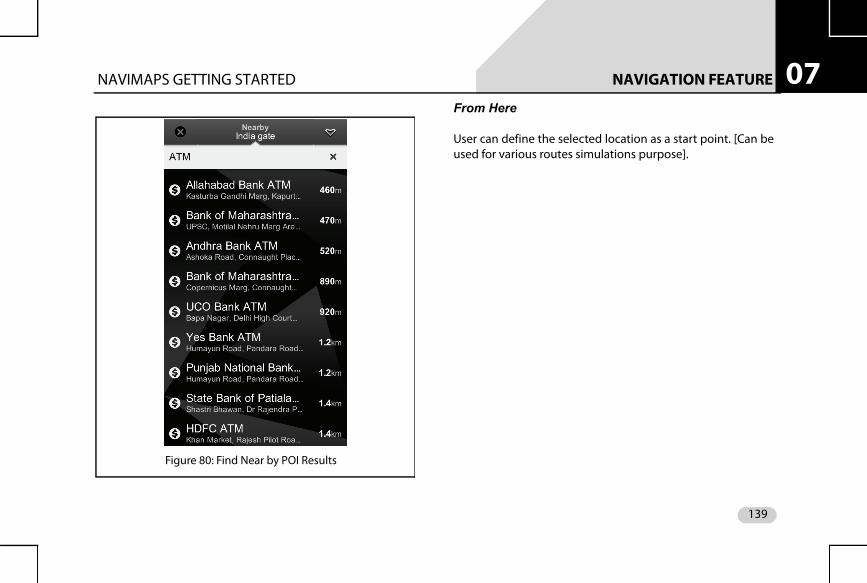
NAVIGATION FEATURE NAVIMAPS GETTING STARTED 07
From HereUser can define the selected location as a start point. [Can beused for various routes simulations purpose].
Figure 80: Find Near by POI Results
139
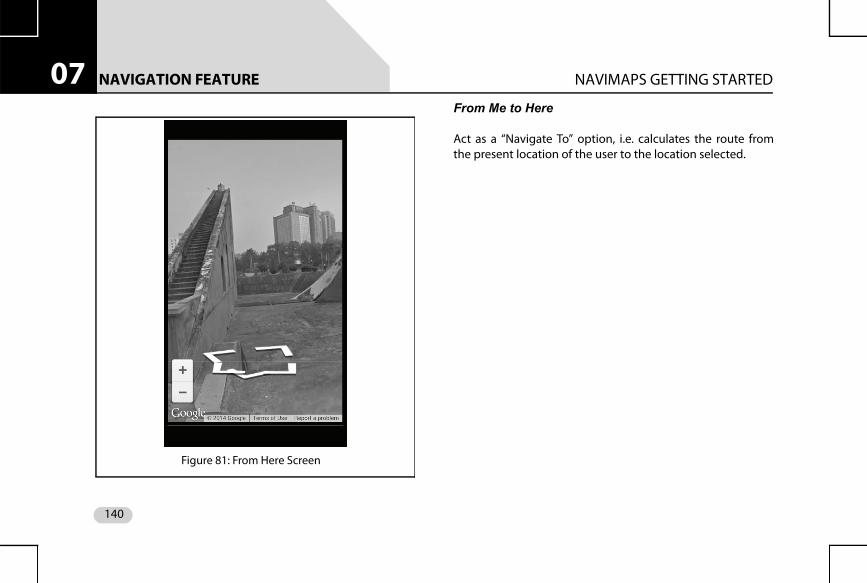
NAVIGATION FEATURE NAVIMAPS GETTING STARTED07
From Me to HereAct as a “Navigate To” option, i.e. calculates the route fromthe present location of the user to the location selected.
Figure 81: From Here Screen
140
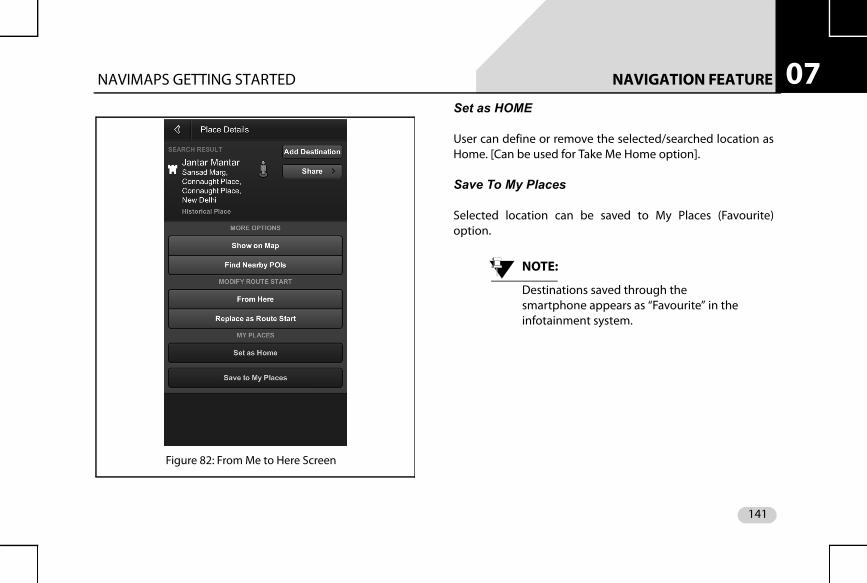
NAVIGATION FEATURE NAVIMAPS GETTING STARTED 07
Set as HOMEUser can define or remove the selected/searched location asHome. [Can be used for Take Me Home option].
Save To My Places
Selected location can be saved to My Places (Favourite)option.
NOTE:
Destinations saved through the smartphone appears as “Favourite” in the infotainment system.
Figure 82: From Me to Here Screen
141
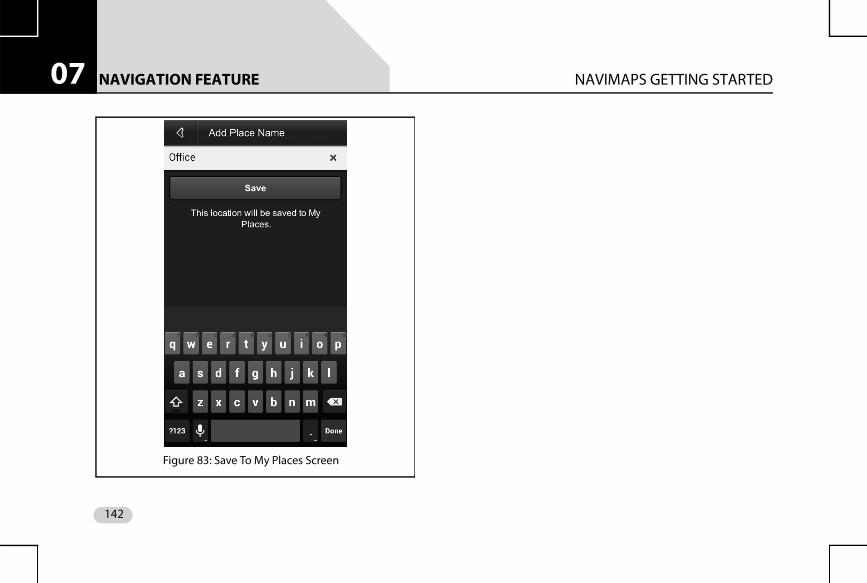
NAVIGATION FEATURE NAVIMAPS GETTING STARTED07
Figure 83: Save To My Places Screen
142
NAVIGATION FEATURE NAVIMAPS APP OPERATIONS 07
NAVIMAPS APP OPERATIONSOperations on the NaviMaps app are performed using thefollowing options:
Route Options Main Menu Options
ROUTE OPTIONS
Route options are of two types. Inactive route options andActive route options.
Inactive Route Options
If user has not set his/her route yet, he/she will see thefollowing options (see Figure 69):
Go to Search Browse My Places Live Traffic data Avoid
Figure 84: Inactive Route Options
143
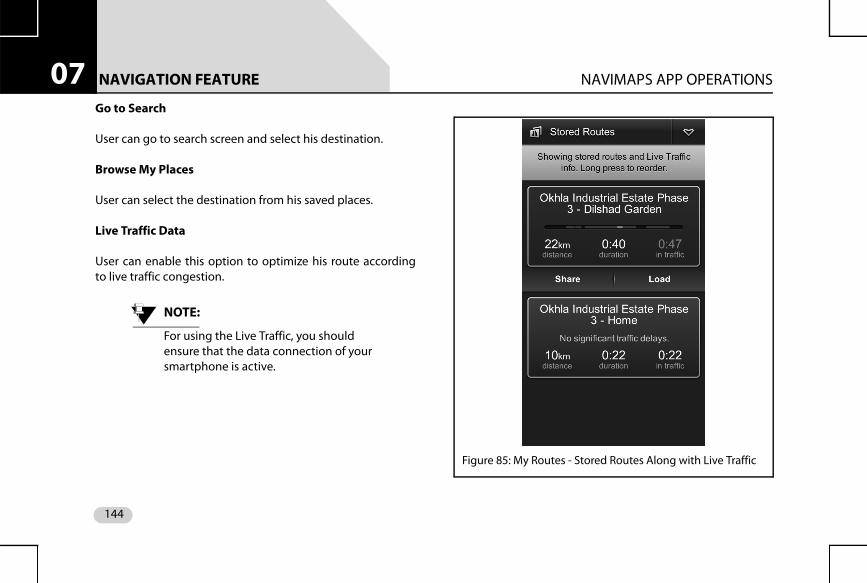
NAVIGATION FEATURE NAVIMAPS APP OPERATIONS07
Go to SearchUser can go to search screen and select his destination.
Browse My Places
User can select the destination from his saved places.
Live Traffic Data
User can enable this option to optimize his route accordingto live traffic congestion.
NOTE:
For using the Live Traffic, you should ensure that the data connection of your smartphone is active.
Figure 85: My Routes - Stored Routes Along with Live Traffic
144
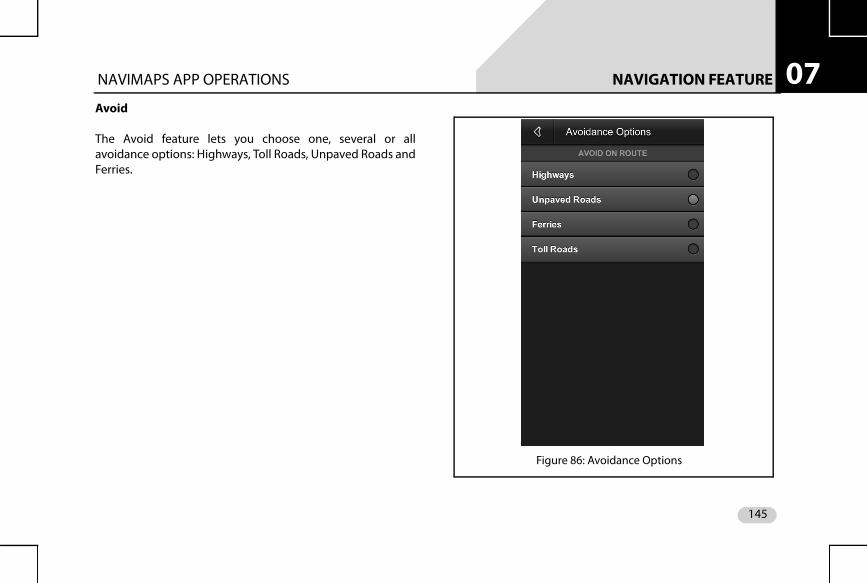
NAVIGATION FEATURE NAVIMAPS APP OPERATIONS 07
AvoidThe Avoid feature lets you choose one, several or allavoidance options: Highways, Toll Roads, Unpaved Roads andFerries.
Figure 86: Avoidance Options
145
NAVIGATION FEATURE NAVIMAPS APP OPERATIONS07
Active Route OptionsIf user has already defined his/her route, he/she will see routedetails and some additional options on the Route screen.
End Show alternative routes Route stops Show on map Directions Save Share
End
The End button ( ) is used to delete the currentroute.
Figure 87: Active Route Options
146
NAVIGATION FEATURE NAVIMAPS APP OPERATIONS 07
Show Alternative RoutesThis option calculates alternative routes.
Route Stops
Shows the order of Start Point, Via Points and Destination ofthe current route.
Figure 88: Show Alternate Route - Route Stops
147

NAVIGATION FEATURE NAVIMAPS APP OPERATIONS07
To add a Via point, perform the following steps:1. First search your via point.2. Select 'Navigate to' option. This action will prompt the
application to calculate a route from your current position to the selected via point.
3. Now search your destination and then select 'Add Destination' option. Application will now create a route afresh taking you to your destination through via point.
To add a Via point on the current route, perform the followingsteps:
1. Search for desired via point.2. Select 'Add Destination' option. Application will now
create a new route.3. Go to Route -> Route Stops. Here you can change the
order of the Via Points and Destination.
NOTE:
Via point can be added from the infotainment system Navigation “Options” screen.
Show on Map
The Show on Map option shows the complete active route onthe map.
148
NAVIGATION FEATURE NAVIMAPS APP OPERATIONS 07
DirectionsHere you can view your route directions as a list of turn-by-turn textual descriptions with corresponding descriptiveicons in sequence, their corresponding Map View by tappingMap Locator next to them or Individual DirectionalDescription -> Individual Directional Description Detailspage, which displays the descriptive icon, textual direction.
NOTE:
In the infotainment system the directions for selected destinations is displayed in the Navigation Options-> Routes.
Figure 89: Route -Show on Map Screen
149
NAVIGATION FEATURE NAVIMAPS APP OPERATIONS07
Figure 90: Directions Screen Figure 91: Directions Screen - Map View
150

NAVIGATION FEATURE NAVIMAPS APP OPERATIONS 07
SaveThe Save option saves the current route to My Routes forfuture use.
Figure 92: Save Screen
151
NAVIGATION FEATURE NAVIMAPS APP OPERATIONS07
ShareYou can share your current active route through TextMessage, E-mail and Facebook.
Figure 93: Share Screen
152
NAVIGATION FEATURE NAVIMAPS APP OPERATIONS 07
Post my progress on Facebook: Facebook tracking letsfriends know where users are, where they are going andwhen they'll get there.Users can compare and share route travel times withNaviMaps' estimated travel times.
MAIN MENU OPTIONS
Open the Main Menu screen by tapping the Main Menubutton [Icon]. From here, you can continue to the followingsix main menu options:
Take Me Home My Places My Routes Manage Maps Settings About
Closing the Main Menu Options Screen
To close the Main Menu options screen, tap on the Map.
Figure 94: Main Menu Options
153
NAVIGATION FEATURE NAVIMAPS APP OPERATIONS07
Take Me HomeTake Me Home at any time to be guided from your currentlocation to your previously designated Home location. If youare in an active navigation session, It Cancel Current Routeand start being guided to your Home location.
My Places
Shows the list of the places saved by user and recentdestinations.
Figure 95: My Places - Saved Places
154
NAVIGATION FEATURE NAVIMAPS APP OPERATIONS 07
My RoutesThis option contains the list of the saved/stored routes.
Figure 96: My Places - Recent Destinations
155
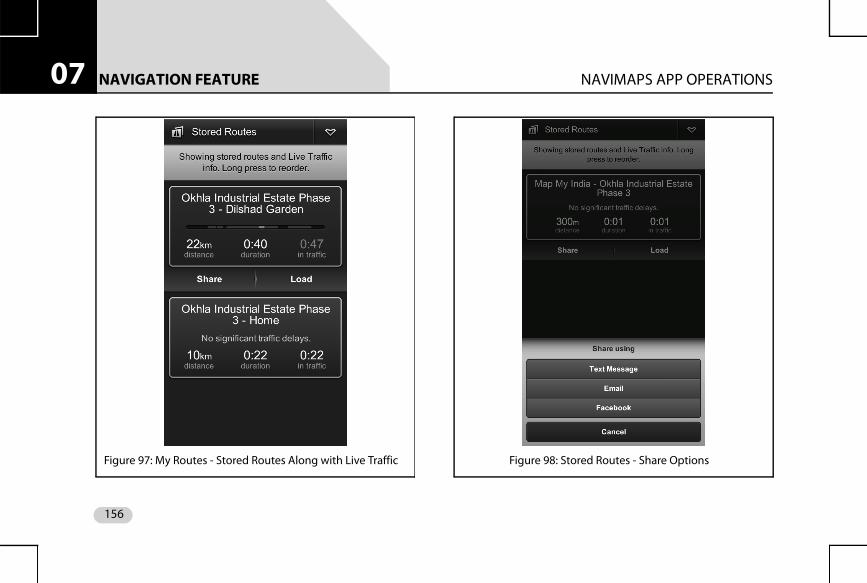
NAVIGATION FEATURE NAVIMAPS APP OPERATIONS07
Figure 97: My Routes - Stored Routes Along with Live Traffic Figure 98: Stored Routes - Share Options
156
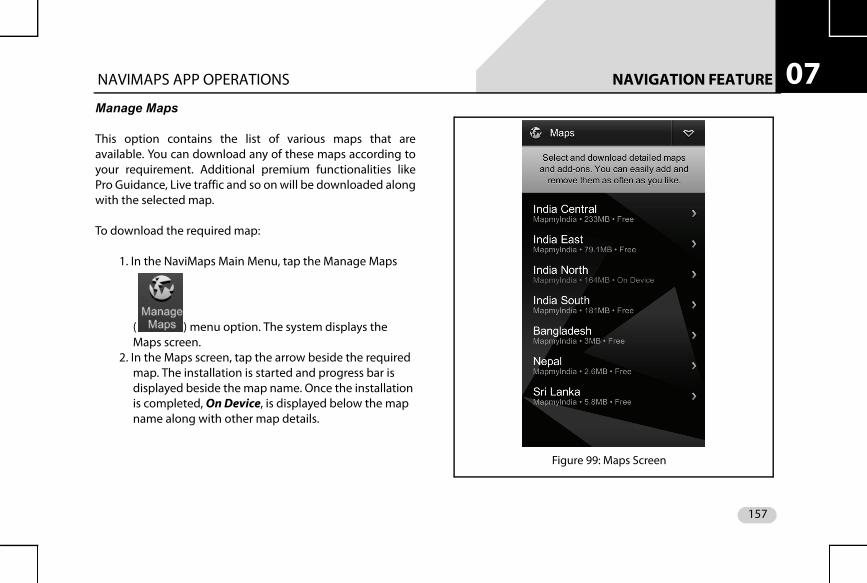
NAVIGATION FEATURE NAVIMAPS APP OPERATIONS 07
Manage MapsThis option contains the list of various maps that areavailable. You can download any of these maps according toyour requirement. Additional premium functionalities likePro Guidance, Live traffic and so on will be downloaded alongwith the selected map.
To download the required map:
1. In the NaviMaps Main Menu, tap the Manage Maps
( ) menu option. The system displays the Maps screen.
2. In the Maps screen, tap the arrow beside the required map. The installation is started and progress bar is displayed beside the map name. Once the installation is completed, On Device, is displayed below the map name along with other map details.
Figure 99: Maps Screen
157
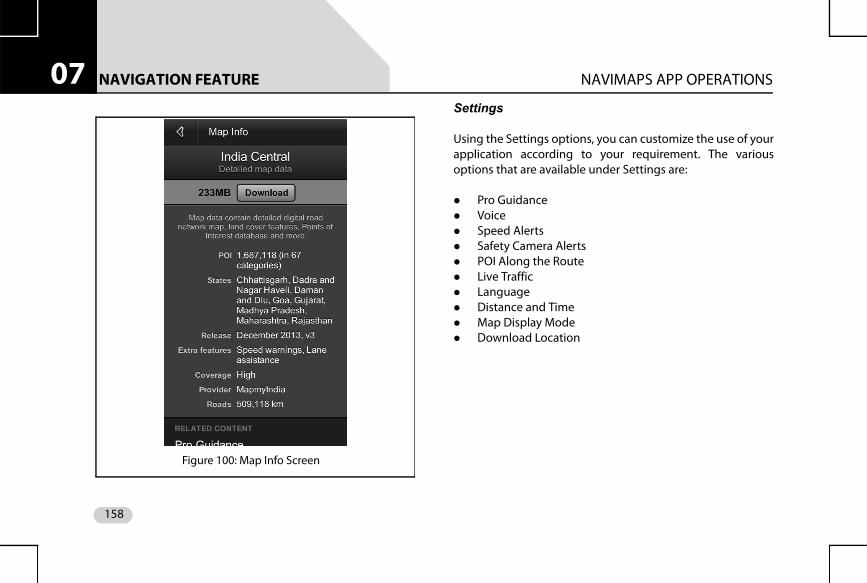
NAVIGATION FEATURE NAVIMAPS APP OPERATIONS07
SettingsUsing the Settings options, you can customize the use of yourapplication according to your requirement. The variousoptions that are available under Settings are:
Pro Guidance Voice Speed Alerts Safety Camera Alerts POI Along the Route Live Traffic Language Distance and Time Map Display Mode Download Location
Figure 100: Map Info Screen
158
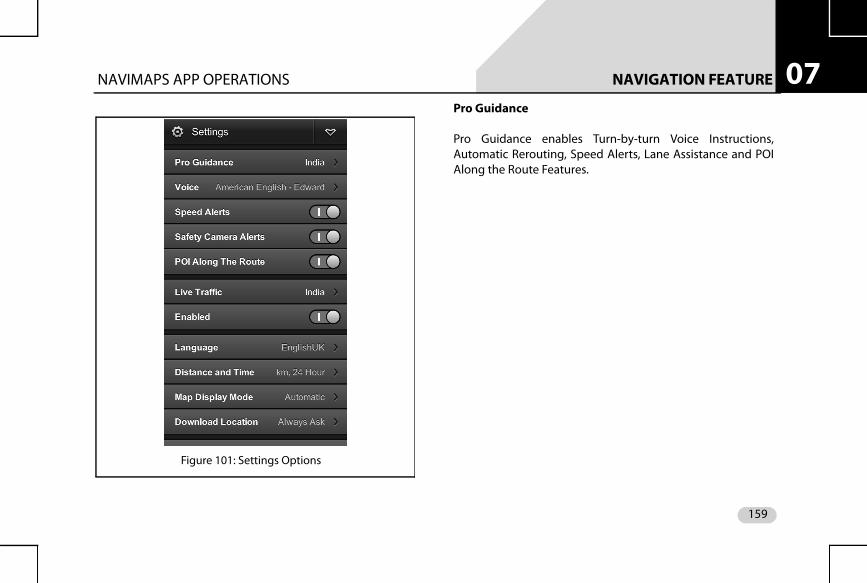
NAVIGATION FEATURE NAVIMAPS APP OPERATIONS 07
Pro GuidancePro Guidance enables Turn-by-turn Voice Instructions,Automatic Rerouting, Speed Alerts, Lane Assistance and POIAlong the Route Features.
Figure 101: Settings Options
159
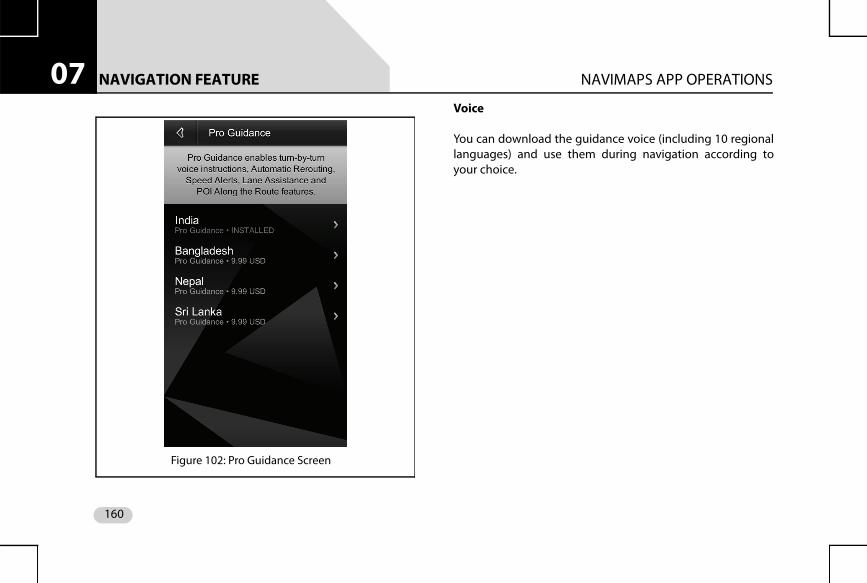
NAVIGATION FEATURE NAVIMAPS APP OPERATIONS07
VoiceYou can download the guidance voice (including 10 regionallanguages) and use them during navigation according toyour choice.
Figure 102: Pro Guidance Screen
160
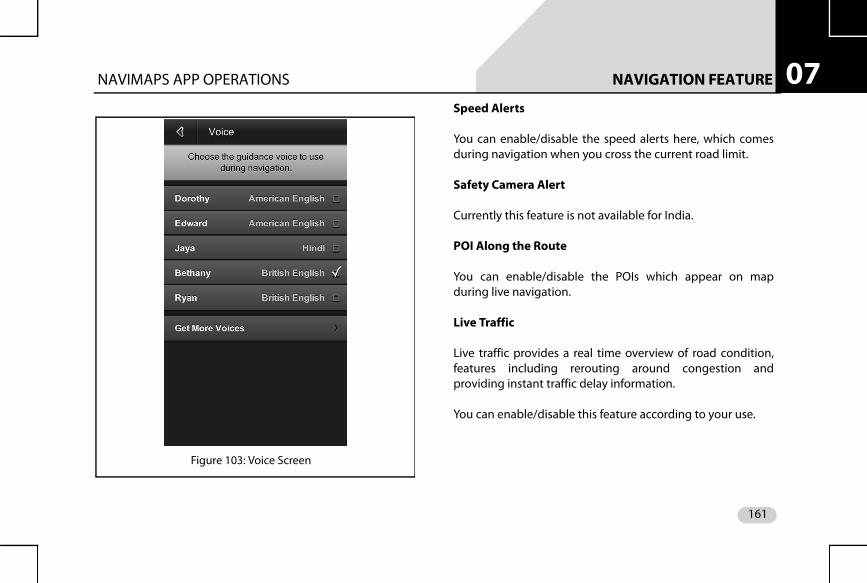
NAVIGATION FEATURE NAVIMAPS APP OPERATIONS 07
Speed AlertsYou can enable/disable the speed alerts here, which comesduring navigation when you cross the current road limit.
Safety Camera Alert
Currently this feature is not available for India.
POI Along the Route
You can enable/disable the POIs which appear on mapduring live navigation.
Live Traffic
Live traffic provides a real time overview of road condition,features including rerouting around congestion andproviding instant traffic delay information.
You can enable/disable this feature according to your use.
Figure 103: Voice Screen
161
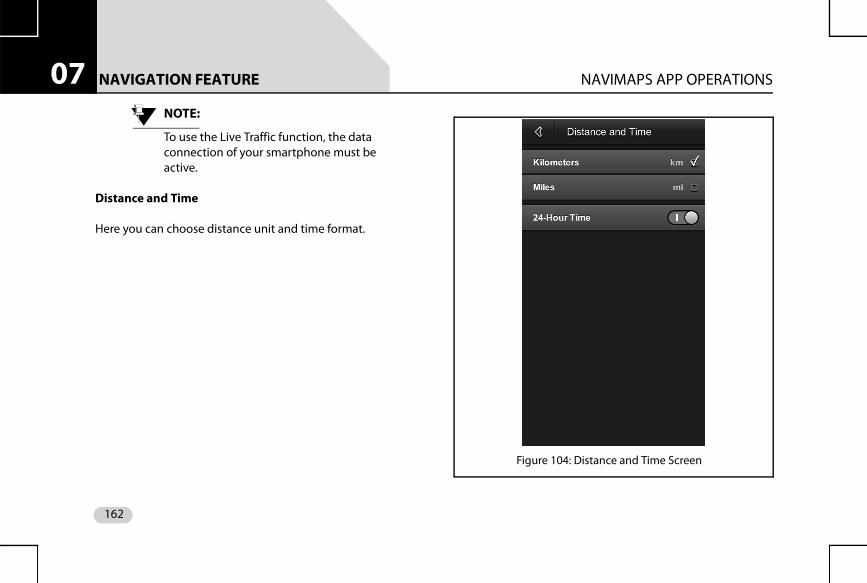
NAVIGATION FEATURE NAVIMAPS APP OPERATIONS07
NOTE:To use the Live Traffic function, the data connection of your smartphone must be active.
Distance and Time
Here you can choose distance unit and time format.
Figure 104: Distance and Time Screen
162
NAVIGATION FEATURE NAVIMAPS APP OPERATIONS 07
Map Display ModeHere you can adjust map display to Day or Night Modemanually. If you have chosen Automatic, map display willchange its mode automatically according to Day or Night.
Download Location
Here you can define the memory location where todownload the maps and its contents i.e. Device Memory orSD Card.
Restore My Purchases
This feature can be used to restore the map contents in caseyou lost or accidentally deleted the same.
Reset To Default
Reset the application to its default settings.
About
The About screen displays the following:
Application Version Serial Number Disclaimer Privacy Policy Copyright Information
163
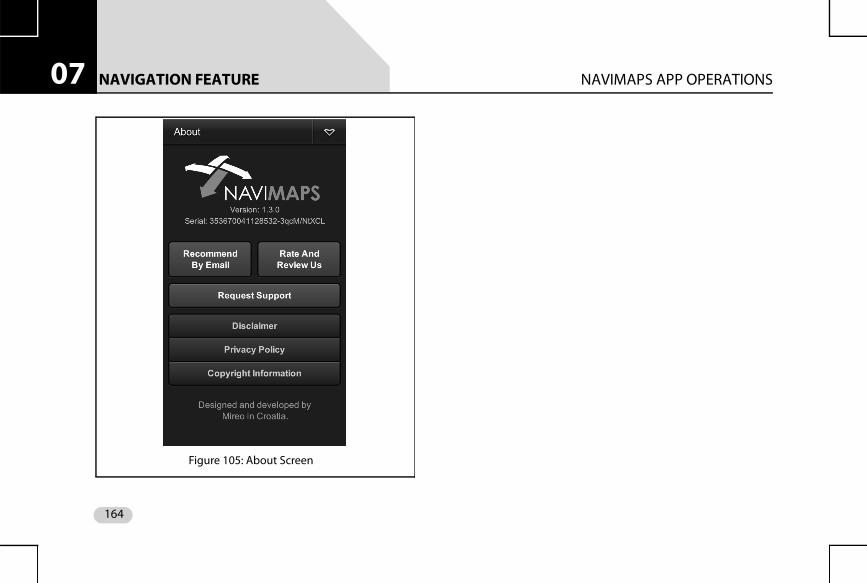
NAVIGATION FEATURE NAVIMAPS APP OPERATIONS07
Figure 105: About Screen
164
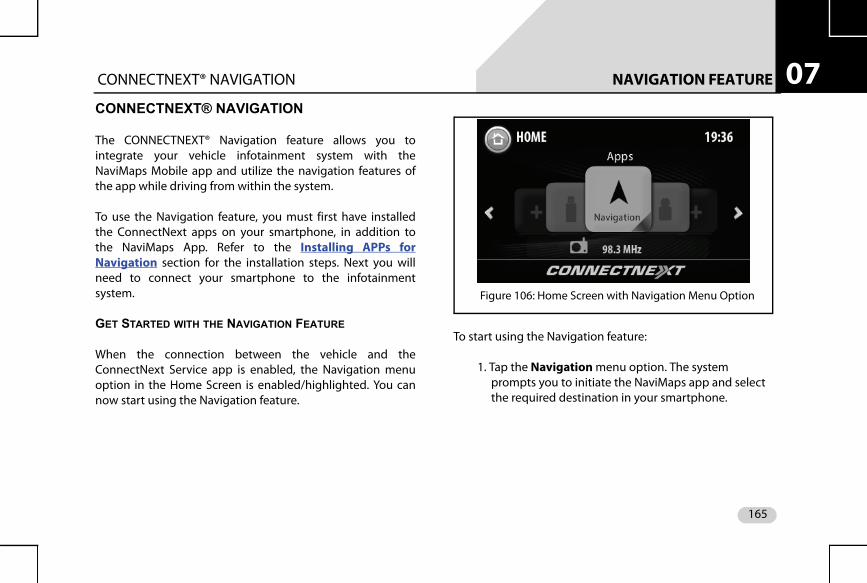
NAVIGATION FEATURE CONNECTNEXT® NAVIGATION 07
CONNECTNEXT® NAVIGATIONThe CONNECTNEXT® Navigation feature allows you tointegrate your vehicle infotainment system with theNaviMaps Mobile app and utilize the navigation features ofthe app while driving from within the system.
To use the Navigation feature, you must first have installedthe ConnectNext apps on your smartphone, in addition tothe NaviMaps App. Refer to the Installing APPs forNavigation section for the installation steps. Next you willneed to connect your smartphone to the infotainmentsystem.
GET STARTED WITH THE NAVIGATION FEATURE
When the connection between the vehicle and theConnectNext Service app is enabled, the Navigation menuoption in the Home Screen is enabled/highlighted. You cannow start using the Navigation feature.
To start using the Navigation feature:
1. Tap the Navigation menu option. The system prompts you to initiate the NaviMaps app and select the required destination in your smartphone.
Figure 106: Home Screen with Navigation Menu Option
165
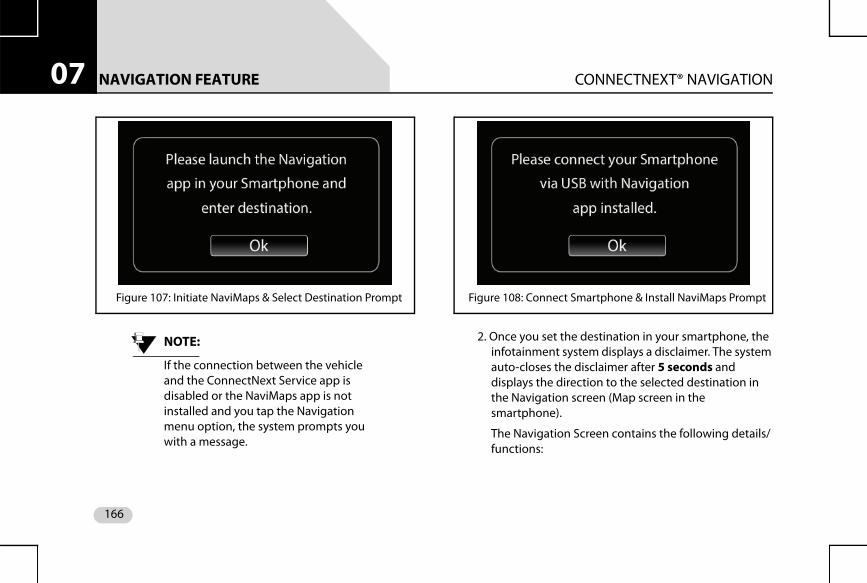
NAVIGATION FEATURE CONNECTNEXT® NAVIGATION07
NOTE:
If the connection between the vehicle and the ConnectNext Service app is disabled or the NaviMaps app is not installed and you tap the Navigation menu option, the system prompts you with a message.
2. Once you set the destination in your smartphone, the infotainment system displays a disclaimer. The system auto-closes the disclaimer after 5 seconds and displays the direction to the selected destination in the Navigation screen (Map screen in the smartphone).
The Navigation Screen contains the following details/functions:
Figure 107: Initiate NaviMaps & Select Destination Prompt Figure 108: Connect Smartphone & Install NaviMaps Prompt
166
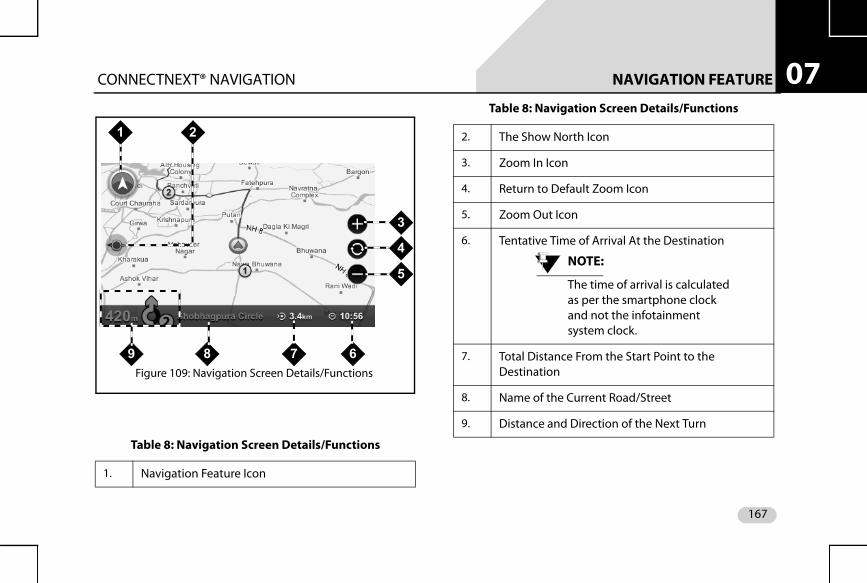
NAVIGATION FEATURE CONNECTNEXT® NAVIGATION 07
Table 8: Navigation Screen Details/Functions
1. Navigation Feature Icon
Figure 109: Navigation Screen Details/Functions
1 2
3
4
5
6789
2. The Show North Icon
3. Zoom In Icon
4. Return to Default Zoom Icon
5. Zoom Out Icon
6. Tentative Time of Arrival At the Destination
NOTE:
The time of arrival is calculated as per the smartphone clock and not the infotainment system clock.
7. Total Distance From the Start Point to the Destination
8. Name of the Current Road/Street
9. Distance and Direction of the Next Turn
Table 8: Navigation Screen Details/Functions
167
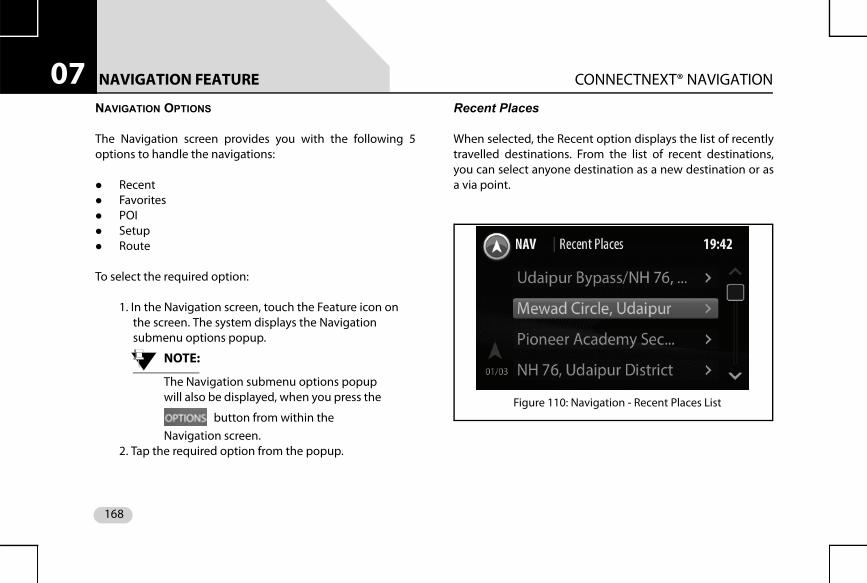
NAVIGATION FEATURE CONNECTNEXT® NAVIGATION07
NAVIGATION OPTIONSThe Navigation screen provides you with the following 5options to handle the navigations:
Recent Favorites POI Setup Route
To select the required option:
1. In the Navigation screen, touch the Feature icon on the screen. The system displays the Navigation submenu options popup.
NOTE:
The Navigation submenu options popup will also be displayed, when you press the
button from within the Navigation screen.
2. Tap the required option from the popup.
Recent Places
When selected, the Recent option displays the list of recentlytravelled destinations. From the list of recent destinations,you can select anyone destination as a new destination or asa via point.
Figure 110: Navigation - Recent Places List
168
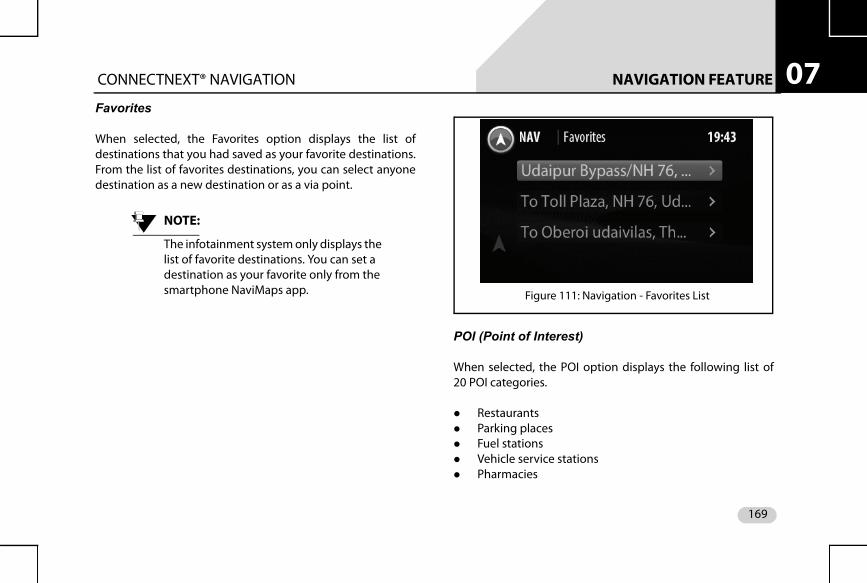
NAVIGATION FEATURE CONNECTNEXT® NAVIGATION 07
FavoritesWhen selected, the Favorites option displays the list ofdestinations that you had saved as your favorite destinations.From the list of favorites destinations, you can select anyonedestination as a new destination or as a via point.
NOTE:
The infotainment system only displays the list of favorite destinations. You can set a destination as your favorite only from the smartphone NaviMaps app.
POI (Point of Interest)
When selected, the POI option displays the following list of20 POI categories.
Restaurants Parking places Fuel stations Vehicle service stations Pharmacies
Figure 111: Navigation - Favorites List
169
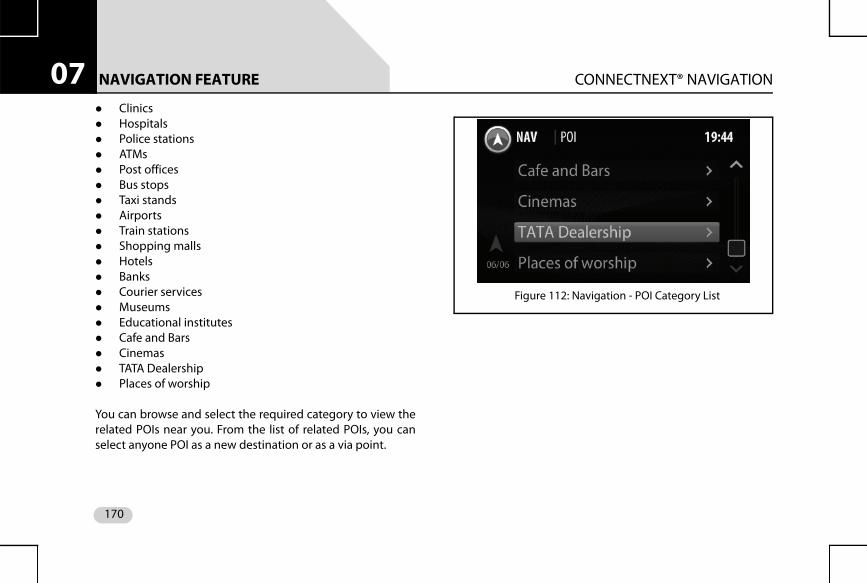
NAVIGATION FEATURE CONNECTNEXT® NAVIGATION07
Clinics Hospitals Police stations ATMs Post offices Bus stops Taxi stands Airports Train stations Shopping malls Hotels Banks Courier services Museums Educational institutes Cafe and Bars Cinemas TATA Dealership Places of worshipYou can browse and select the required category to view therelated POIs near you. From the list of related POIs, you canselect anyone POI as a new destination or as a via point.
Figure 112: Navigation - POI Category List
170
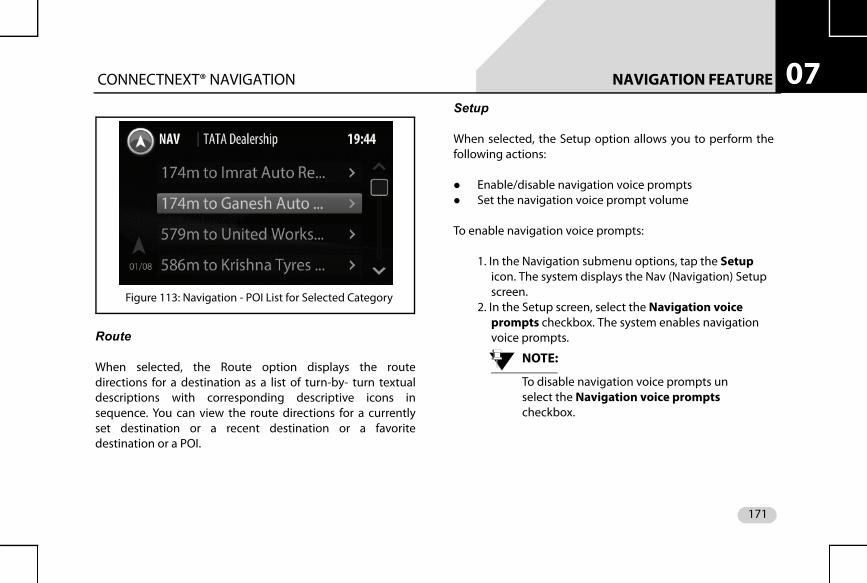
NAVIGATION FEATURE CONNECTNEXT® NAVIGATION 07
Route
When selected, the Route option displays the routedirections for a destination as a list of turn-by- turn textualdescriptions with corresponding descriptive icons insequence. You can view the route directions for a currentlyset destination or a recent destination or a favoritedestination or a POI.
Setup
When selected, the Setup option allows you to perform thefollowing actions:
Enable/disable navigation voice prompts Set the navigation voice prompt volume
To enable navigation voice prompts:
1. In the Navigation submenu options, tap the Setup icon. The system displays the Nav (Navigation) Setup screen.
2. In the Setup screen, select the Navigation voice prompts checkbox. The system enables navigation voice prompts.
NOTE:
To disable navigation voice prompts un select the Navigation voice prompts checkbox.
Figure 113: Navigation - POI List for Selected Category
171
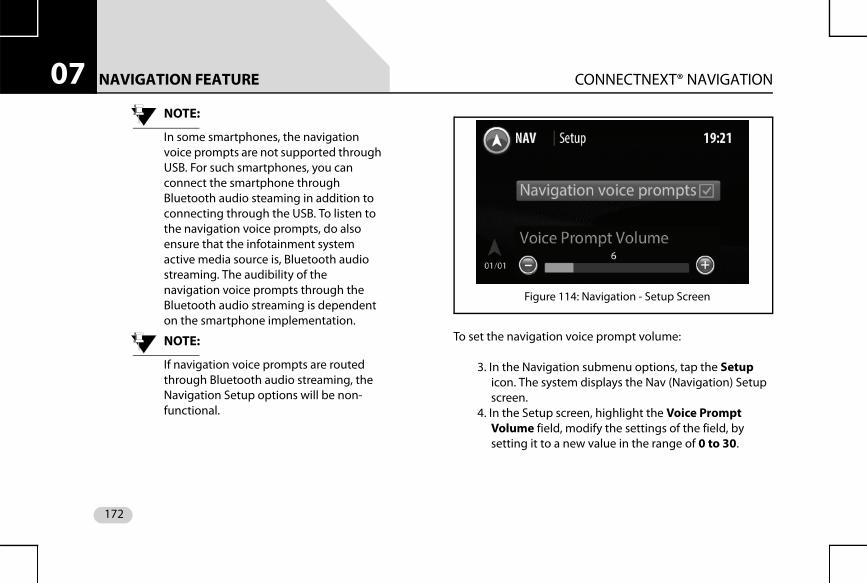
NAVIGATION FEATURE CONNECTNEXT® NAVIGATION07
NOTE:In some smartphones, the navigation voice prompts are not supported through USB. For such smartphones, you can connect the smartphone through Bluetooth audio steaming in addition to connecting through the USB. To listen to the navigation voice prompts, do also ensure that the infotainment system active media source is, Bluetooth audio streaming. The audibility of the navigation voice prompts through the Bluetooth audio streaming is dependent on the smartphone implementation.
NOTE:
If navigation voice prompts are routed through Bluetooth audio streaming, the Navigation Setup options will be non-functional.
To set the navigation voice prompt volume:
3. In the Navigation submenu options, tap the Setup icon. The system displays the Nav (Navigation) Setup screen.
4. In the Setup screen, highlight the Voice Prompt Volume field, modify the settings of the field, by setting it to a new value in the range of 0 to 30.
Figure 114: Navigation - Setup Screen
172
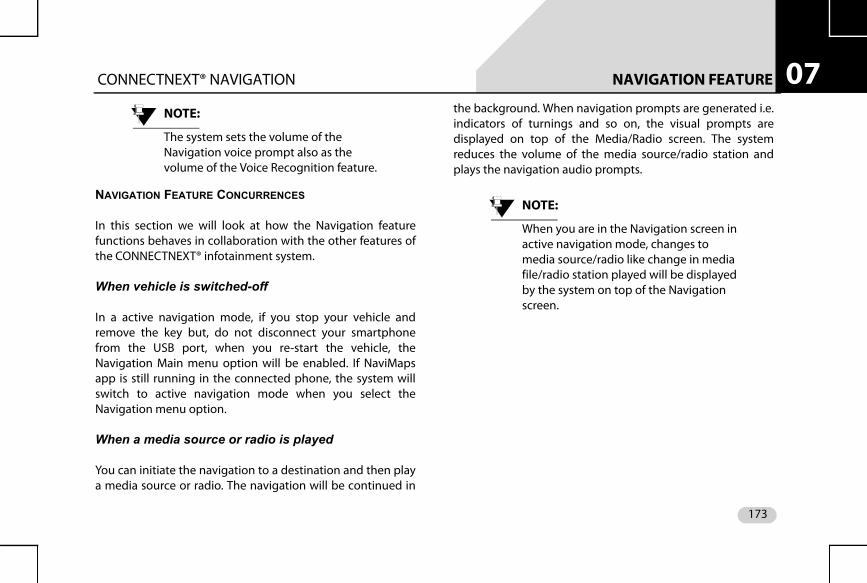
NAVIGATION FEATURE CONNECTNEXT® NAVIGATION 07
NOTE:The system sets the volume of the Navigation voice prompt also as the volume of the Voice Recognition feature.
NAVIGATION FEATURE CONCURRENCES
In this section we will look at how the Navigation featurefunctions behaves in collaboration with the other features ofthe CONNECTNEXT® infotainment system.
When vehicle is switched-off
In a active navigation mode, if you stop your vehicle andremove the key but, do not disconnect your smartphonefrom the USB port, when you re-start the vehicle, theNavigation Main menu option will be enabled. If NaviMapsapp is still running in the connected phone, the system willswitch to active navigation mode when you select theNavigation menu option.
When a media source or radio is played
You can initiate the navigation to a destination and then playa media source or radio. The navigation will be continued in
the background. When navigation prompts are generated i.e.indicators of turnings and so on, the visual prompts aredisplayed on top of the Media/Radio screen. The systemreduces the volume of the media source/radio station andplays the navigation audio prompts.
NOTE:
When you are in the Navigation screen in active navigation mode, changes to media source/radio like change in media file/radio station played will be displayed by the system on top of the Navigation screen.
173
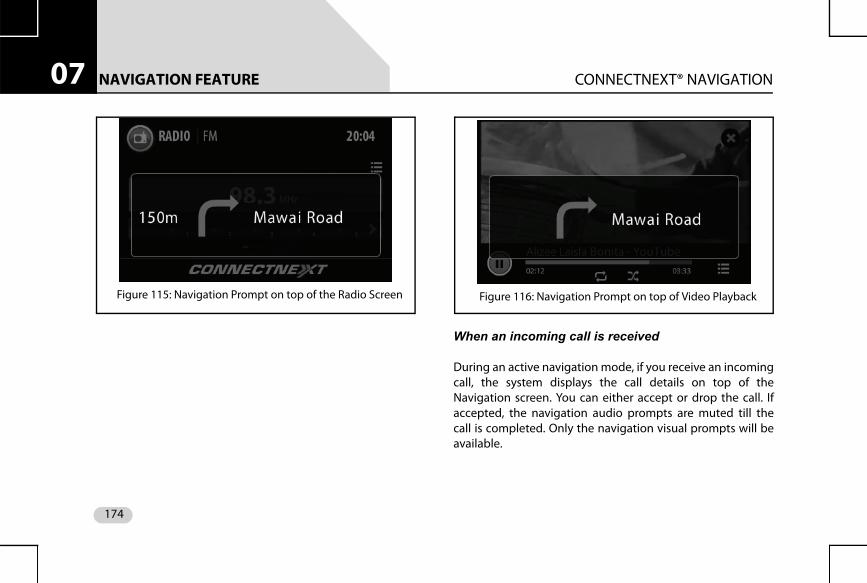
NAVIGATION FEATURE CONNECTNEXT® NAVIGATION07
When an incoming call is received
During an active navigation mode, if you receive an incomingcall, the system displays the call details on top of theNavigation screen. You can either accept or drop the call. Ifaccepted, the navigation audio prompts are muted till thecall is completed. Only the navigation visual prompts will beavailable.
Figure 115: Navigation Prompt on top of the Radio Screen Figure 116: Navigation Prompt on top of Video Playback
174
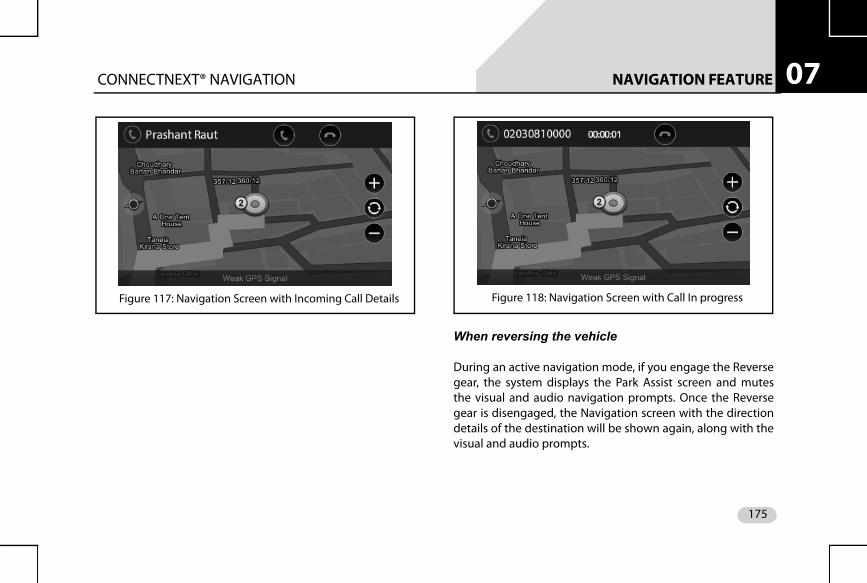
NAVIGATION FEATURE CONNECTNEXT® NAVIGATION 07
When reversing the vehicle
During an active navigation mode, if you engage the Reversegear, the system displays the Park Assist screen and mutesthe visual and audio navigation prompts. Once the Reversegear is disengaged, the Navigation screen with the directiondetails of the destination will be shown again, along with thevisual and audio prompts.
Figure 117: Navigation Screen with Incoming Call Details Figure 118: Navigation Screen with Call In progress
175
NAVIGATION FEATURE CONNECTNEXT® NAVIGATION07
When changing the Climate Control settingsDuring an active navigation mode, if you change the vehicleclimate control settings, the system displays the ClimateControl screen. If no action is performed for 10 seconds, theNavigation screen with the direction details of thedestination will be shown again, along with the visual andaudio prompts.
176
NAVIGATION FEATURE DISCLAIMERS 07
DISCLAIMERSMapmyIndia reserves all rights concerning the informationcontained herein. This document or any part thereof may notbe reproduced, distributed, or translated into otherlanguages in any way or form except with the writtenapproval of MapmyIndia. This document is provided to theuser on an 'as is' basis. Although maximum care was takenduring preparation of this manual to provide accurateinformation and to avoid errors, some technical inaccuraciesor editorial errors may occur, for which MapmyIndia acceptsno responsibility. In the interest of improving the content ofthe document, MapmyIndia reserves the right to modify,amend or delete any part of the document at any timewithout prior notice.
For better performance, certain features are optimized at theInfotainment System end and the functionality of Navigationmight not be exactly the same as it appears in thesmartphone.
e.g. 3D landmark view is not present in the infotainmentsystem and 2D building footprints are displayed as flatpolygons.
This is a generic version of the user manual. Some of thefeatures listed here may vary on your device. In case of anyquery, please contact us:
68 - Okhla Industrial Estate, Phase 3, New Delhi - 110020 Ph:+91-11 4600 9900, +91-9999333223/4
E-mail: [email protected]
Web: www.mapmyindia.com
177
NAVIGATION FEATURE CONNECTNEXT® NAV LIMITS07
CONNECTNEXT® NAV LIMITSThe following limitations are applicable to the integration orusage of the Mobile based navigation app, NaviMaps, fromthe CONNECTNEXT® infotainment system:
Typing of a destination location through the infotainment system is unavailable. You can set a destination location from the infotainment system, by selecting the location from a list of favorite destinations, recent destinations or POIs.
The 3D elements shown on the phone map will not be shown on the infotainment system screen.
The touch controls that appear along with the map on the phone screen will not be replicated on the infotainment system screen.
Destination setting with speech command is not supported.
NOTE:
Though the Navigation feature supports Voice Recognition, in an active navigation mode, when Voice Recognition is
activated, the icon is not displayed on the right top corner of the screen to indicate the activation of voice recognition.
In some smartphones, the navigation voice prompts are not supported through USB. For such smartphones, you can also connect the smartphone through Bluetooth audio steaming. The navigation voice prompts will be heard through the Bluetooth connection.
The Navigation feature of the infotainment system is supported only on some smartphones i.e. only on smartphones that have Android 4.0 ICS or above.
178
VEHICLE DISPLAY VEHICLE SETUP SCREEN 08
VEHICLEThe CONNECTNEXT® infotainment system supports handlingand viewing of some vehicle feature/components controls. Itallows you to:
Set vehicle door locking options Manage the Park Assist system settings, if available Handle exterior approach lights View vehicle climate control information
NOTE:
The above features are not standard in every vehicle variant. Features that are unavailable in the vehicle cannot be controlled using the infotainment system. Please refer to the Owner’s Manual of your vehicle or check with your vehicle dealer to confirm the list of features available in your vehicle.
Options to handle all these functions are available in theVehicle Setup screen of the infotainment system.
DISPLAY VEHICLE SETUP SCREEN
To display the Vehicle Setup screen:
1. Press the button. The system displays the Setup menu options.
2. Navigate to and select the Vehicle option. The system displays the Vehicle screen with various options for handling the vehicle door lock/unlock, park assist and exterior lights.
179

VEHICLE SET LOCK/UNLOCK OPTIONS08
SET LOCK/UNLOCK OPTIONSIn the Vehicle Setup screen, you can set the following optionsrelating to the remote door lock/unlock feature of yourvehicle:
Drive away locking Vehicle auto relock
NOTE:
For steps to display the Vehicle Setup screen, refer to the Display the Vehicle Setup Screen section.
SETTING DRIVE AWAY LOCKING
To set the Drive Away Locking feature:
1. In the Vehicle Setup screen, navigate to and select the Central Locking option. The system displays the Central Locking screen.
2. In the Central Locking screen, navigate to and select the Drive Away Locking option. The system selects the check box and enables the feature.
NOTE:
You can select the Drive Away Locking option again to clear the check box and disable the feature.
SETTING VEHICLE AUTO RELOCK
DEFINITION:The Drive Away Locking feature automatically locks all vehicle doors when you start driving the vehicle and reach a specific speed.
DEFINITION:With the Vehicle Auto Relock feature, when you unlock the vehicle through the remote key and none of the doors are opened for 60 seconds, the doors will be re-locked automatically, for safety purpose.
180
VEHICLE SET LOCK/UNLOCK OPTIONS 08
To set the Vehicle Auto Relock feature:1. In the Vehicle Setup screen, navigate to and select the Central Locking option. The system displays the Central Locking screen.
2. In the Central Locking screen, navigate to and select the Vehicle Auto Relock option. The system selects the check box and enables the feature.
NOTE:
You can select the Vehicle Auto Relock option again to clear the check box and disable the feature.
181

VEHICLE MANAGE PARK ASSIST (IF APPLICABLE)08
MANAGE PARK ASSIST (IF APPLICABLE)The Park Assist feature is vehicle dependant. If you have thepark assist system in your vehicle variant, you will be able tomanage it using the infotainment system. The system allowsyou to:
Activate park assist Enable Park Assist Delay Timer Set park assist volume
NOTE:
For steps to display the Vehicle Setup screen, refer to the Display the Vehicle Setup Screen section.
Manage park assist display
ACTIVATING PARK ASSIST
You can activate or deactivate the Park Assist system of yourcar without engaging/disengaging the Reverse gear.
To activate the Park Assist system from your infotainmentsystem:
1. In the Vehicle Setup screen, navigate to and select the Park Assist option. The system displays the park assist options.
2. In the Park Assist options, scroll to and select the Activate Park Assist option. The system displays the Park Assist screen.
NOTE:
Display of the Park Assist screen is automatically activated when you engage the Reverse gear.
182
VEHICLE MANAGE PARK ASSIST (IF APPLICABLE) 08
MANAGING PARK ASSIST DISPLAY
The system displays the Park Assist screen when the Reversegear is engaged. The display is stopped when the Reversegear is disengaged.
The Park Assist display screen has the following information:
Figure 119: Park Assist Screen
Table 9: Park Assist Screen
1. Information Header
Contains the any one of the following details: Screen name (Park Assist) and system time Park Assist component related message, for
example, can contain a message to indicate that the Park brake is engaged
Active phone call related information Radio/Media related information
NOTE:
The Phone call/Radio/Media related information will be displayed only if the Mix with Audio option is enabled. Refer to the Retaining Audio During Park Assist section for more information.
2. Park Assist sensor view
183
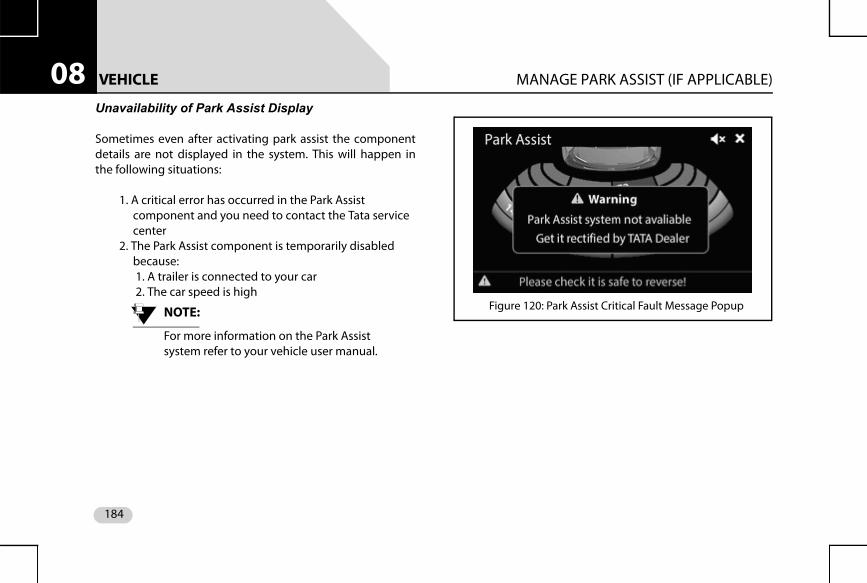
VEHICLE MANAGE PARK ASSIST (IF APPLICABLE)08
Unavailability of Park Assist DisplaySometimes even after activating park assist the componentdetails are not displayed in the system. This will happen inthe following situations:
1. A critical error has occurred in the Park Assist component and you need to contact the Tata service center
2. The Park Assist component is temporarily disabled because: 1. A trailer is connected to your car 2. The car speed is high
NOTE:
For more information on the Park Assist system refer to your vehicle user manual.
Figure 120: Park Assist Critical Fault Message Popup
184
VEHICLE MANAGE PARK ASSIST (IF APPLICABLE) 08
Delaying Park Assist Display StopThe system allows you to retain the Park Assist display screeneven after the Reverse gear is disengaged. This feature iscalled as Park Assist Delay Timer.
.
To enable the Park Assist Delay Timer:
1. In the Vehicle Setup screen, navigate to and select the Park Assist option. The system displays the Park Assist screen.
2. In the Park Assist screen, navigate to and select the Park Assist Delay Timer option. The system displays the options for the Park Assist delay timer.
3. Select the required timer option from 0 sec/5 sec/10 sec. When the Park Assist component is enabled next, the system retains the Park Assist display screen even after the Reverse gear is disengaged for the selected time period.
SETTING PARK ASSIST VOLUME
This option sets the volume related parameters of the vehiclePark Assist component.
To set the volume value for park assist:
1. In the Vehicle Setup screen, navigate to and select the Park Assist option. The system displays the Park Assist screen.
2. In the Park Assist screen, highlight Park Assist Volume field and modify the value of the field, by setting it to a new value in the range of 0 to 10.
DEFINITION:When in a closed parking lot, you have to disengage and engage the Reverse gear multiple times for parking your vehicle within the available space. The Park Assist Delay Timer feature, when enabled, will retain the park assist screen for a pre-configured time even when the Reverse gear is disengaged
185
VEHICLE MANAGE PARK ASSIST (IF APPLICABLE)08
Retaining Audio During Park AssistBy default, the infotainment system stops the currently activemedia source, when the park assist feature is used. To retainthe media source audio in the background even during parkassist:
1. In the Vehicle Setup screen, navigate to and select the Park Assist option. The system displays the Park Assist screen.
2. In the Park Assist screen, navigate to and select the Mix With Audio option. The check box beside the option is selected.
186
VEHICLE MANAGE EXTERIOR LIGHTS (IF 08
MANAGE EXTERIOR LIGHTS (IF APPLICABLE)The infotainment system provides you the flexibility ofhandling the exterior approach lights of your vehicle:
MANAGING APPROACH LIGHTS
NOTE:
Refer to the owner’s manual of your vehicle to understand how to switch on the Approach lights.
The system allows you to set the time period for which theApproach lights will be illuminated after you switch them ON.
To set the Approach lights illumination time period:
1. In the Vehicle Setup screen, navigate to and select the Exterior Lights option. The system displays the Exterior Lights screen.
2. In the Exterior Lights screen, navigate to and select the Approach Lamps option. The system displays the various illumination time period options.
3. Navigate to and select the required illumination time period option from 30 seconds/60 seconds/90 seconds.
DEFINITION:When you approach your car in the dark, you can switch on the Approach Lights (some exterior and interior lights of the vehicle) to identify your car as well as to find your way safely to it.
187
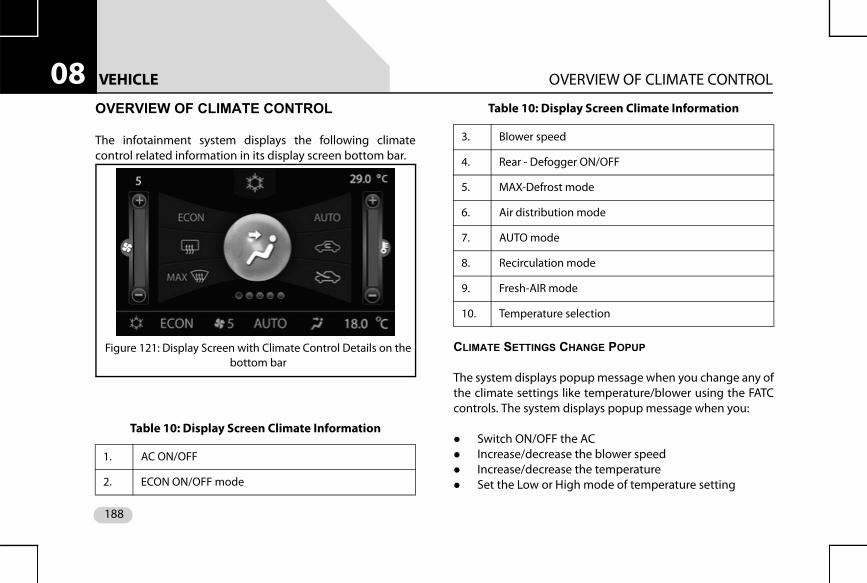
VEHICLE OVERVIEW OF CLIMATE CONTROL08
OVERVIEW OF CLIMATE CONTROLThe infotainment system displays the following climatecontrol related information in its display screen bottom bar.
CLIMATE SETTINGS CHANGE POPUP
The system displays popup message when you change any ofthe climate settings like temperature/blower using the FATCcontrols. The system displays popup message when you:
Switch ON/OFF the AC Increase/decrease the blower speed Increase/decrease the temperature Set the Low or High mode of temperature setting
Table 10: Display Screen Climate Information
1. AC ON/OFF
2. ECON ON/OFF mode
Figure 121: Display Screen with Climate Control Details on the bottom bar
3. Blower speed
4. Rear - Defogger ON/OFF
5. MAX-Defrost mode
6. Air distribution mode
7. AUTO mode
8. Recirculation mode
9. Fresh-AIR mode
10. Temperature selection
Table 10: Display Screen Climate Information
188
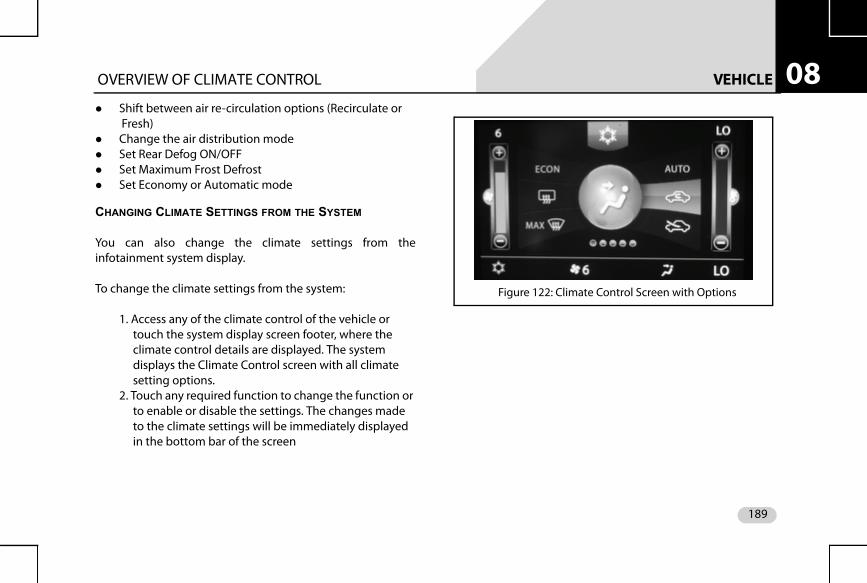
VEHICLE OVERVIEW OF CLIMATE CONTROL 08
Shift between air re-circulation options (Recirculate orFresh) Change the air distribution mode Set Rear Defog ON/OFF Set Maximum Frost Defrost Set Economy or Automatic mode
CHANGING CLIMATE SETTINGS FROM THE SYSTEM
You can also change the climate settings from theinfotainment system display.
To change the climate settings from the system:
1. Access any of the climate control of the vehicle or touch the system display screen footer, where the climate control details are displayed. The system displays the Climate Control screen with all climate setting options.
2. Touch any required function to change the function or to enable or disable the settings. The changes made to the climate settings will be immediately displayed in the bottom bar of the screen
Figure 122: Climate Control Screen with Options
189
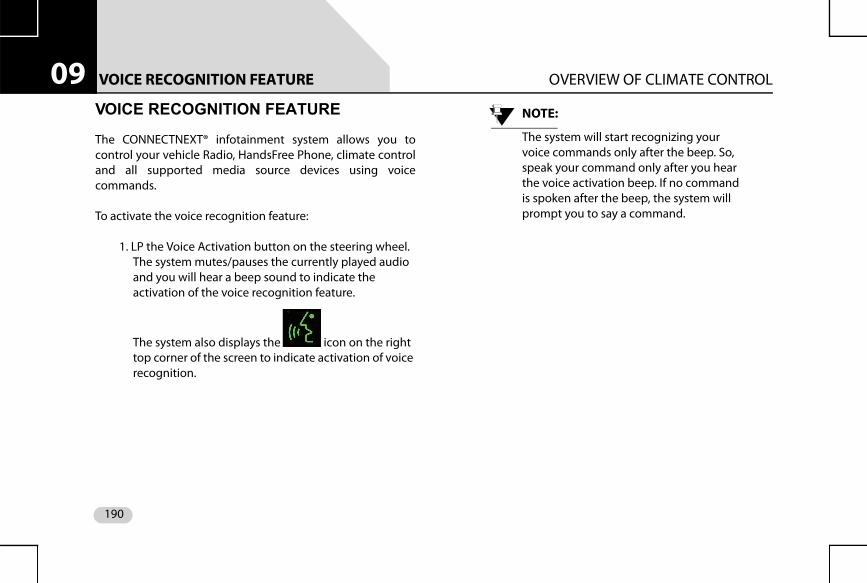
VOICE RECOGNITION FEATURE OVERVIEW OF CLIMATE CONTROL09
VOICE RECOGNITION FEATUREThe CONNECTNEXT® infotainment system allows you tocontrol your vehicle Radio, HandsFree Phone, climate controland all supported media source devices using voicecommands.
To activate the voice recognition feature:
1. LP the Voice Activation button on the steering wheel. The system mutes/pauses the currently played audio and you will hear a beep sound to indicate the activation of the voice recognition feature.
The system also displays the icon on the right top corner of the screen to indicate activation of voice recognition.
NOTE:
The system will start recognizing your voice commands only after the beep. So, speak your command only after you hear the voice activation beep. If no command is spoken after the beep, the system will prompt you to say a command.
190
VOICE RECOGNITION FEATURE VOICE RECOGNITION GUIDELINES 09
VOICE RECOGNITION GUIDELINESFor effective voice recognition, follow the below guidelines:
Do not speak the command when the icon is displayed. The icon indicates that the voice recognition component is prompting (the system is talking) you currently. and will not respond to your commands.
Do not give long pauses (greater than 1 second) while speaking the words in a command. Speak the words of the command at a constant rate.
Avoid varying your pitch and volume while speaking the commands. Speak clearly and loudly at a reasonable speed.
Speak only the commands that are listed in the Voice Recognition Commands section.
Ensure there is no noise disturbance when you speak the commands like, other passengers in the vehicle are talking or there is lot of wind noise. Disturbance from external sound sources may result in poor voice recognition.
Always face forward while speaking your commands as the voice recognition quality is best in this orientation.
There will be a temporary disturbance in the voice recognition accuracy, when the user speaking the voice command changes i.e. if you had initiated the voice recognition, and in the middle another user in the vehicle starts speaking out commands. This disturbance will be stopped when the system adopts to the voice of the new user after few voice command trails.
When similar sounding contact names/song names are spoken, the system will display a list of options matching the spoken name. You can choose the required option from the list by speaking the corresponding line number or touching the required option on the screen.
Please speak the commands and names in a neutral English accent for best results.
Scenarios for Ignoring Voice Recognition Activation
During the following situations, the system ignores activationof voice recognition even on the LP of the Voice Activationbutton:
When the reading of a media source device is in progress When you get an incoming call When you are dialing an outgoing call When a video playback is in progress
191
VOICE RECOGNITION FEATURE VOICE RECOGNITION GUIDELINES09
When the contacts and call logs in your phone andsystem are synchronized When a phone call is active
Scenarios for Ending A Voice Recognition Session
When voice recognition is active, you can end the session by:
Doing a LP on the Voice Activation button Pressing any HK, including the keys on the steering
wheel and IR remote control Touching the screen to perform an action, except for
selecting an option from the list displayed as response to a voice recognition command
Speaking the “Cancel” voice recognition command during the session.
Scenarios for Auto-Termination of A Voice Recognition Session
When in a voice recognition session, performing thefollowing actions will automatically terminate the session:
Receiving an incoming call Dialling an outgoing call Plugging-in a media source device
Pulling out the media source device, which you are currently handing through the voice recognition feature.
Getting Voice Recognition Command Help
The system provides help to complete a command, whenpart of the command is recognized. The system plays anaudio prompt to help you in completing the command.
192
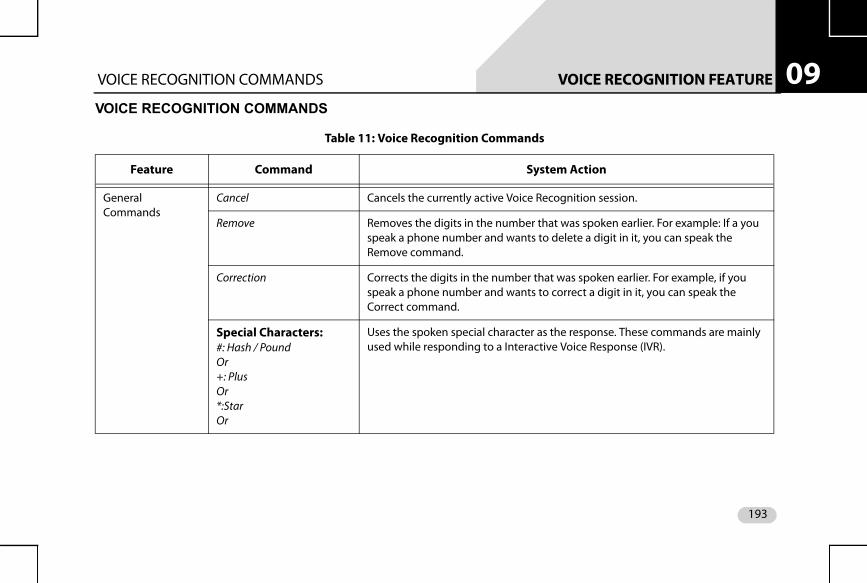
VOICE RECOGNITION FEATURE VOICE RECOGNITION COMMANDS 09
VOICE RECOGNITION COMMANDSTable 11: Voice Recognition Commands
Feature Command System Action
General Commands
Cancel Cancels the currently active Voice Recognition session.
Remove Removes the digits in the number that was spoken earlier. For example: If a you speak a phone number and wants to delete a digit in it, you can speak the Remove command.
Correction Corrects the digits in the number that was spoken earlier. For example, if you speak a phone number and wants to correct a digit in it, you can speak the Correct command.
Special Characters: #: Hash / PoundOr+: PlusOr*:StarOr
Uses the spoken special character as the response. These commands are mainly used while responding to a Interactive Voice Response (IVR).
193
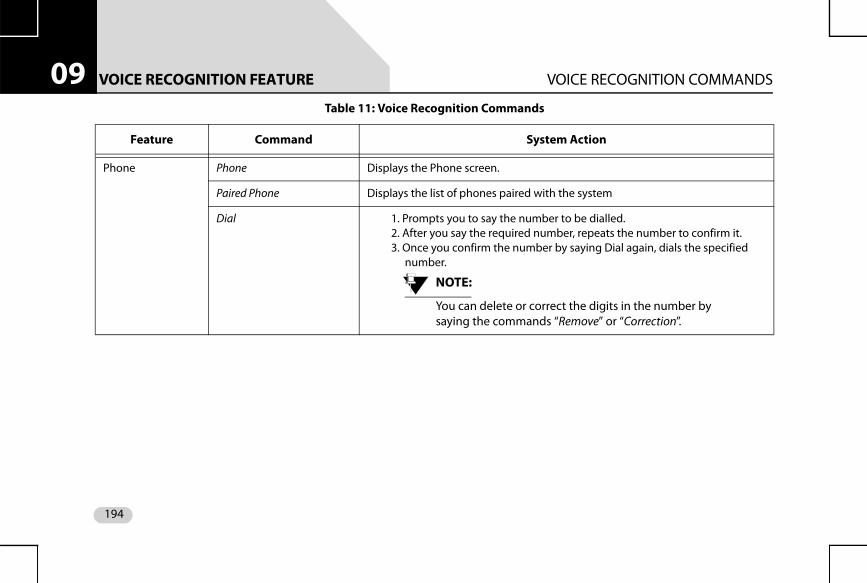
VOICE RECOGNITION FEATURE VOICE RECOGNITION COMMANDS09
Phone Phone Displays the Phone screen.
Paired Phone Displays the list of phones paired with the system
Dial 1. Prompts you to say the number to be dialled.2. After you say the required number, repeats the number to confirm it.3. Once you confirm the number by saying Dial again, dials the specified
number.
NOTE:
You can delete or correct the digits in the number by saying the commands “Remove” or “Correction”.
Table 11: Voice Recognition Commands
Feature Command System Action
194
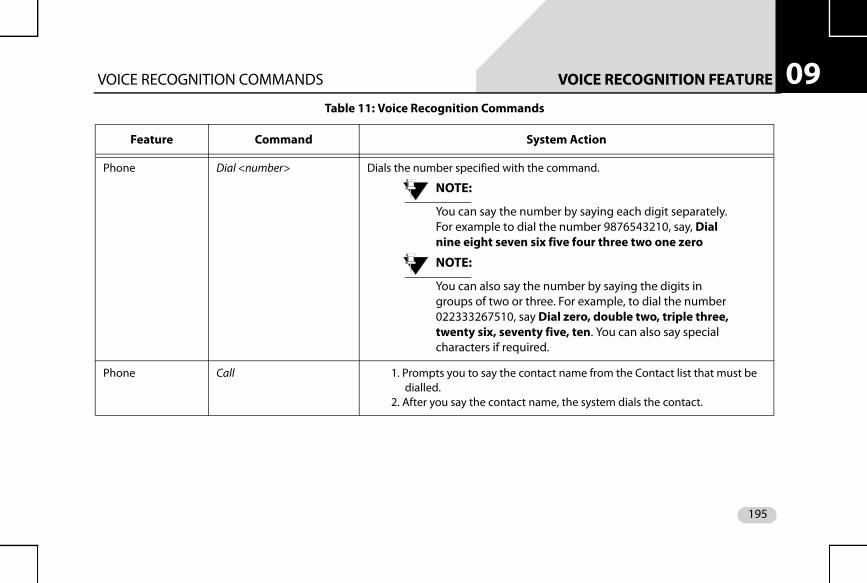
VOICE RECOGNITION FEATURE VOICE RECOGNITION COMMANDS 09
Phone Dial <number> Dials the number specified with the command.
NOTE:
You can say the number by saying each digit separately. For example to dial the number 9876543210, say, Dial nine eight seven six five four three two one zero
NOTE:
You can also say the number by saying the digits in groups of two or three. For example, to dial the number 022333267510, say Dial zero, double two, triple three, twenty six, seventy five, ten. You can also say special characters if required.
Phone Call 1. Prompts you to say the contact name from the Contact list that must be dialled.
2. After you say the contact name, the system dials the contact.
Table 11: Voice Recognition Commands
Feature Command System Action
195
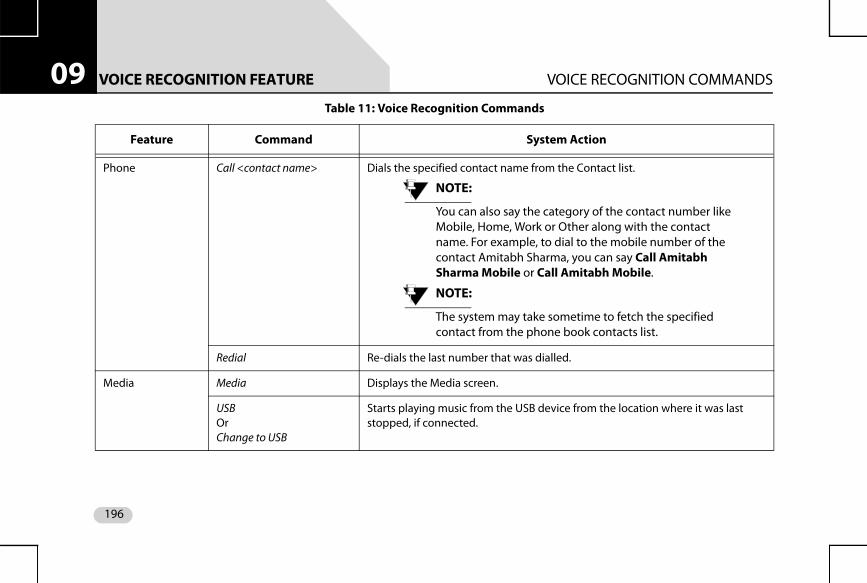
VOICE RECOGNITION FEATURE VOICE RECOGNITION COMMANDS09
Phone Call <contact name> Dials the specified contact name from the Contact list.
NOTE:
You can also say the category of the contact number like Mobile, Home, Work or Other along with the contact name. For example, to dial to the mobile number of the contact Amitabh Sharma, you can say Call Amitabh Sharma Mobile or Call Amitabh Mobile.
NOTE:
The system may take sometime to fetch the specified contact from the phone book contacts list.
Redial Re-dials the last number that was dialled.
Media Media Displays the Media screen.
USB OrChange to USB
Starts playing music from the USB device from the location where it was last stopped, if connected.
Table 11: Voice Recognition Commands
Feature Command System Action
196
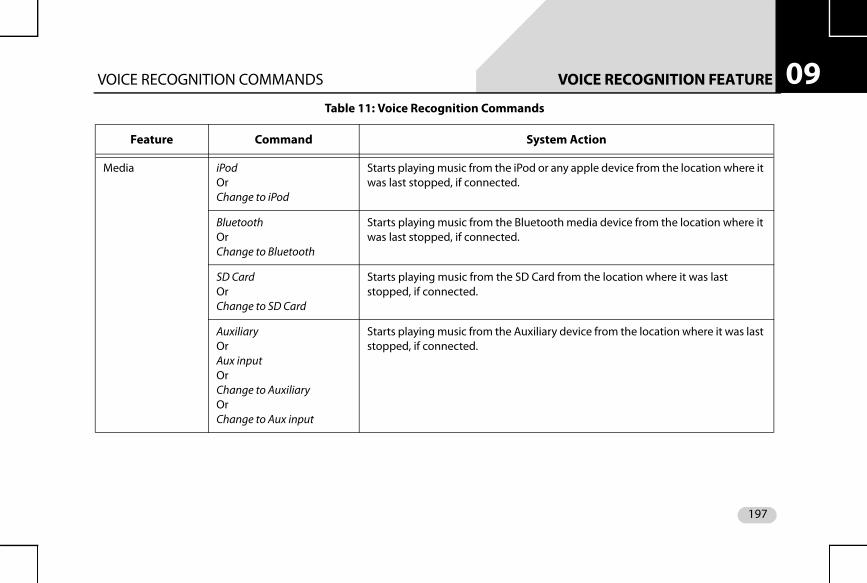
VOICE RECOGNITION FEATURE VOICE RECOGNITION COMMANDS 09
Media iPod OrChange to iPod
Starts playing music from the iPod or any apple device from the location where it was last stopped, if connected.
Bluetooth OrChange to Bluetooth
Starts playing music from the Bluetooth media device from the location where it was last stopped, if connected.
SD Card OrChange to SD Card
Starts playing music from the SD Card from the location where it was last stopped, if connected.
AuxiliaryOrAux inputOrChange to AuxiliaryOrChange to Aux input
Starts playing music from the Auxiliary device from the location where it was last stopped, if connected.
Table 11: Voice Recognition Commands
Feature Command System Action
197
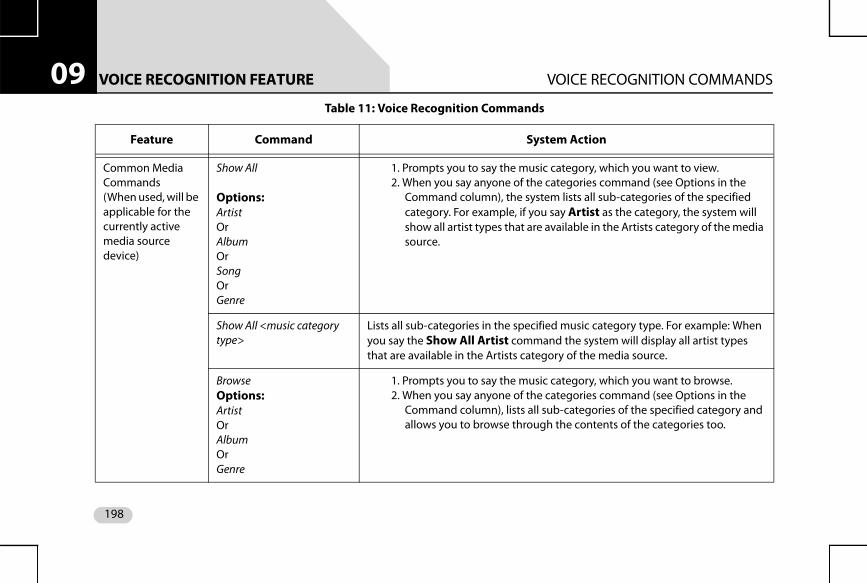
VOICE RECOGNITION FEATURE VOICE RECOGNITION COMMANDS09
Common Media Commands(When used, will be applicable for the currently active media source device)
Show All
Options:ArtistOrAlbumOrSongOrGenre
1. Prompts you to say the music category, which you want to view. 2. When you say anyone of the categories command (see Options in the
Command column), the system lists all sub-categories of the specified category. For example, if you say Artist as the category, the system will show all artist types that are available in the Artists category of the media source.
Show All <music category type>
Lists all sub-categories in the specified music category type. For example: When you say the Show All Artist command the system will display all artist types that are available in the Artists category of the media source.
BrowseOptions:ArtistOrAlbumOrGenre
1. Prompts you to say the music category, which you want to browse.2. When you say anyone of the categories command (see Options in the
Command column), lists all sub-categories of the specified category and allows you to browse through the contents of the categories too.
Table 11: Voice Recognition Commands
Feature Command System Action
198
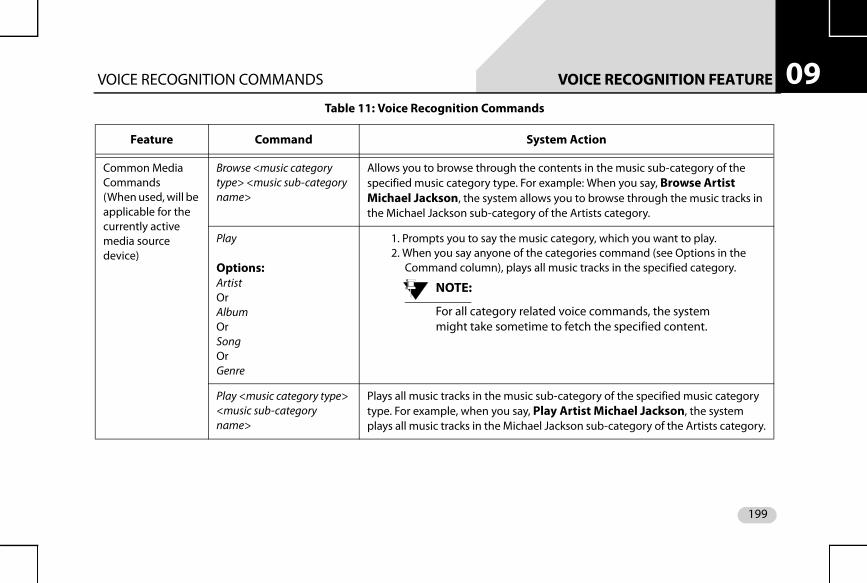
VOICE RECOGNITION FEATURE VOICE RECOGNITION COMMANDS 09
Common Media Commands(When used, will be applicable for the currently active media source device)
Browse <music category type> <music sub-category name>
Allows you to browse through the contents in the music sub-category of the specified music category type. For example: When you say, Browse Artist Michael Jackson, the system allows you to browse through the music tracks in the Michael Jackson sub-category of the Artists category.
Play
Options:ArtistOrAlbumOrSongOrGenre
1. Prompts you to say the music category, which you want to play.2. When you say anyone of the categories command (see Options in the
Command column), plays all music tracks in the specified category.
NOTE:
For all category related voice commands, the system might take sometime to fetch the specified content.
Play <music category type> <music sub-category name>
Plays all music tracks in the music sub-category of the specified music category type. For example, when you say, Play Artist Michael Jackson, the system plays all music tracks in the Michael Jackson sub-category of the Artists category.
Table 11: Voice Recognition Commands
Feature Command System Action
199
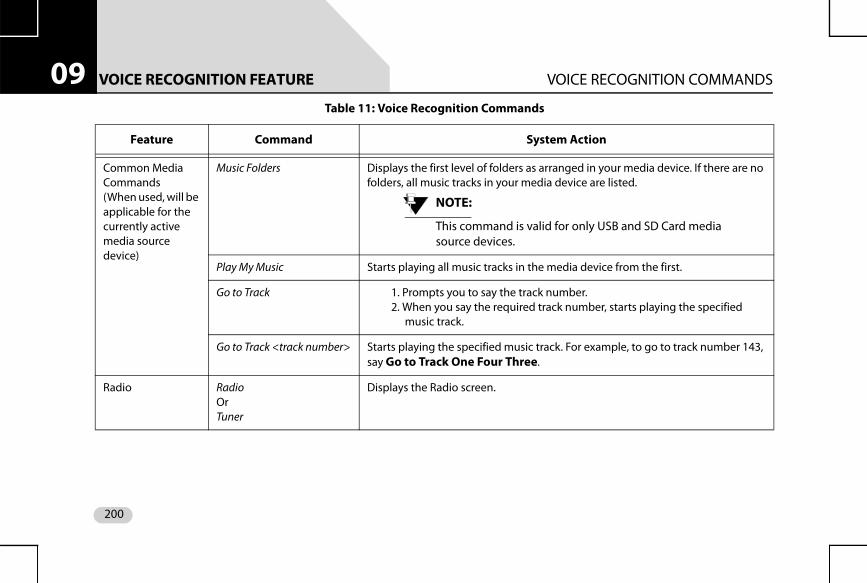
VOICE RECOGNITION FEATURE VOICE RECOGNITION COMMANDS09
Common Media Commands(When used, will be applicable for the currently active media source device)
Music Folders Displays the first level of folders as arranged in your media device. If there are no folders, all music tracks in your media device are listed.
NOTE:
This command is valid for only USB and SD Card media source devices.
Play My Music Starts playing all music tracks in the media device from the first.
Go to Track 1. Prompts you to say the track number.2. When you say the required track number, starts playing the specified
music track.
Go to Track <track number> Starts playing the specified music track. For example, to go to track number 143, say Go to Track One Four Three.
Radio RadioOrTuner
Displays the Radio screen.
Table 11: Voice Recognition Commands
Feature Command System Action
200
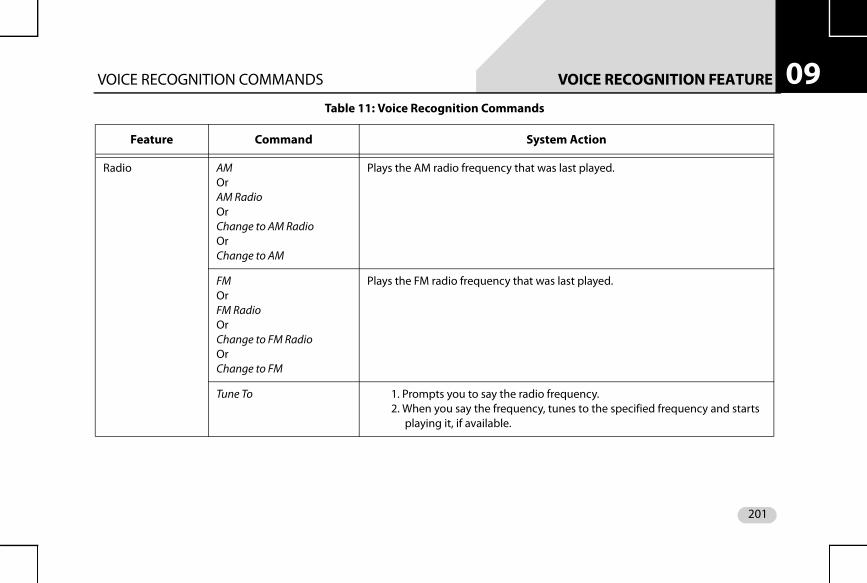
VOICE RECOGNITION FEATURE VOICE RECOGNITION COMMANDS 09
Radio AMOrAM RadioOrChange to AM RadioOrChange to AM
Plays the AM radio frequency that was last played.
FMOrFM RadioOrChange to FM RadioOrChange to FM
Plays the FM radio frequency that was last played.
Tune To 1. Prompts you to say the radio frequency.2. When you say the frequency, tunes to the specified frequency and starts
playing it, if available.
Table 11: Voice Recognition Commands
Feature Command System Action
201
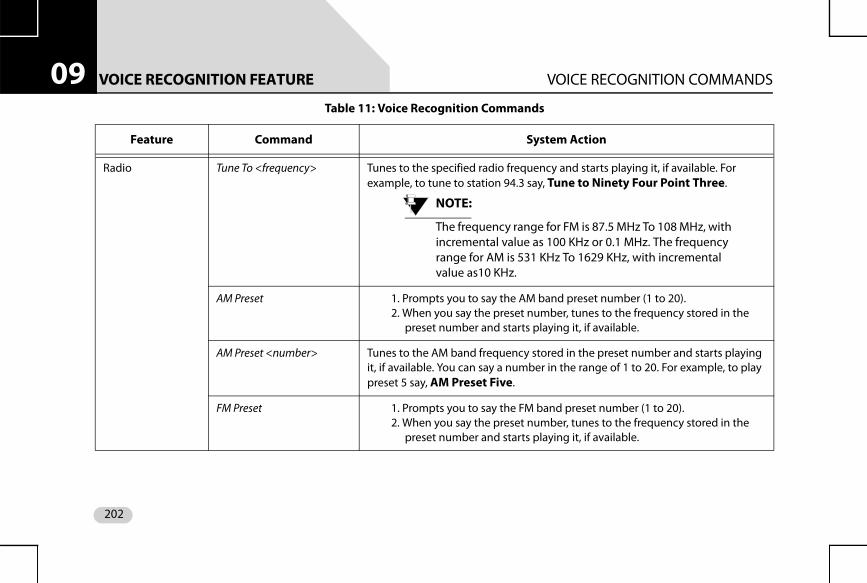
VOICE RECOGNITION FEATURE VOICE RECOGNITION COMMANDS09
Radio Tune To <frequency> Tunes to the specified radio frequency and starts playing it, if available. For example, to tune to station 94.3 say, Tune to Ninety Four Point Three.
NOTE:
The frequency range for FM is 87.5 MHz To 108 MHz, with incremental value as 100 KHz or 0.1 MHz. The frequency range for AM is 531 KHz To 1629 KHz, with incremental value as10 KHz.
AM Preset 1. Prompts you to say the AM band preset number (1 to 20).2. When you say the preset number, tunes to the frequency stored in the
preset number and starts playing it, if available.
AM Preset <number> Tunes to the AM band frequency stored in the preset number and starts playing it, if available. You can say a number in the range of 1 to 20. For example, to play preset 5 say, AM Preset Five.
FM Preset 1. Prompts you to say the FM band preset number (1 to 20).2. When you say the preset number, tunes to the frequency stored in the
preset number and starts playing it, if available.
Table 11: Voice Recognition Commands
Feature Command System Action
202

VOICE RECOGNITION FEATURE VOICE RECOGNITION COMMANDS 09
Radio FM Preset <number> Tunes to the FM band frequency stored in the preset number and starts playing it, if available. You can say a number in the range of 1 to 20. For example, to play preset 5 say, FM Preset Five.
Store to Preset 1. Prompts you to say the preset number (1to 20) to which the currently played radio frequency must be stored.
2. When you say the preset number, stores the frequency in the specified preset number.
Store to Preset <number> Stores the currently played radio frequency in the specified preset number. You can say a number in the range of 1 to 20. For example, to store to preset 20 say, Store to Preset Twenty.
Auto Store
Options:AMOrFM
1. Prompts you to say the radio band (FM/AM).2. When you say the radio band, the system searches for the available radio
stations and when found stores the frequencies as the presets for the specified radio band.
Climate Control Climate Control Displays the Climate screen.
Table 11: Voice Recognition Commands
Feature Command System Action
203

VOICE RECOGNITION FEATURE VOICE RECOGNITION COMMANDS09
Climate Control Set Temperature
Options:<temperature value>OrMinimumOrMaximum
1. Prompts you to say the temperature.2. When you say the temperature value/Minimum/Maximum, the system
sets the AC to the specified temperature.
Set Temperature to <temperature value>
Sets the AC to the specified temperature value. For example, to set the temperature as 23.5 degrees say, Set Temperature to twenty three point five.
NOTE:
The incremental value of temperature is 0.5 degrees.
Set temperature to Minimum
Sets the AC to the minimum temperature. Refer to the vehicle owner’s manual for the minimum temperature information.
Set temperature to Maximum
Sets the AC to the maximum temperature. Refer to the vehicle owner’s manual for the maximum temperature information.
Table 11: Voice Recognition Commands
Feature Command System Action
204
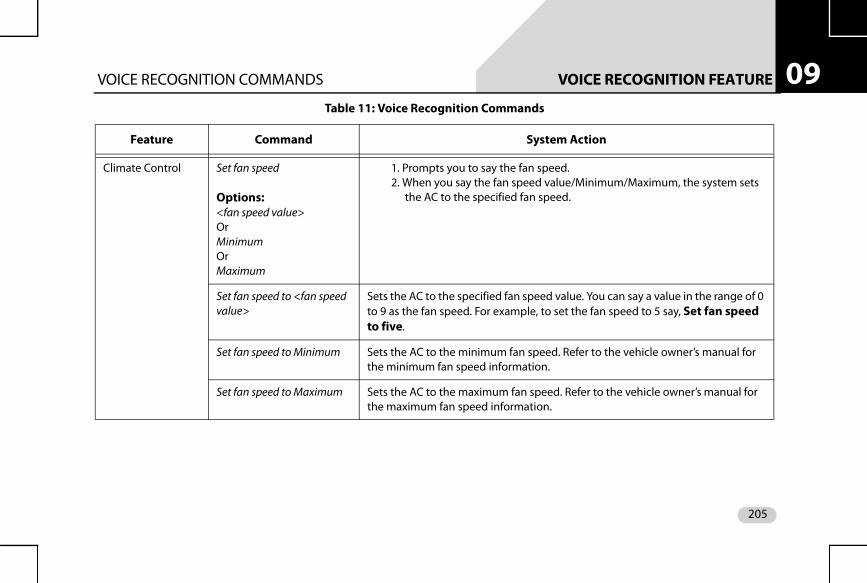
VOICE RECOGNITION FEATURE VOICE RECOGNITION COMMANDS 09
Climate Control Set fan speed
Options:<fan speed value>OrMinimumOrMaximum
1. Prompts you to say the fan speed.2. When you say the fan speed value/Minimum/Maximum, the system sets
the AC to the specified fan speed.
Set fan speed to <fan speed value>
Sets the AC to the specified fan speed value. You can say a value in the range of 0 to 9 as the fan speed. For example, to set the fan speed to 5 say, Set fan speed to five.
Set fan speed to Minimum Sets the AC to the minimum fan speed. Refer to the vehicle owner’s manual for the minimum fan speed information.
Set fan speed to Maximum Sets the AC to the maximum fan speed. Refer to the vehicle owner’s manual for the maximum fan speed information.
Table 11: Voice Recognition Commands
Feature Command System Action
205
FREQUENTLY ASKED QUESTIONS VOICE RECOGNITION COMMANDS10
FREQUENTLY ASKED QUESTIONSSome frequently asked questions related to the features andfunctions of the CONNECTNEXT® infotainment system arelisted below along with their answers.
1. I installed NaviMaps App in my smartphone but it doesn't work with my TATA vehicle?
Along with NaviMaps App, ConnectNext App shall also to be installed for Navigation feature to work with your TATA car. If ConnectNext App is not installed, Go to the Play Store and install it.
2. I installed ConnectNext App only in my smartphone will the navigation feature work in my TATA vehicle?
Along with ConnectNext App, NaviMaps shall also be installed for Navigation feature to work with your TATA car. If NaviMaps app is not installed, Go to the Play Store and install it.
3. I am already a using NaviMaps app before I bought my TATA vehicle. Will Navigation feature work in my new TATA vehicle?
May not be. It depends on the version of the App which you were using. It is preferable to update the
app for the Navigation feature to work with your new TATA vehicle.
4. Is internet connection required for using navigation
Internet connection is required only for downloading of App and Maps. After successful download and installation, you can use Navigation feature without your internet connection as maps are locally available in your smartphone. So, Internet charges might be applicable for download of app & Maps only but not for the usage of the NaviMaps, except while using the Live Traffic updates.
NOTE:
For using the Live Traffic function, you should ensure that the data connection of your smartphone is active.
5. Which Map shall I download? And how much memory is required in my smartphone
NaviMaps installed in smartphone will prompt for downloading the app. Based on your choice you can download EAST, North, South or Central map of India. This is just to avoid huge data download and memory consumption in your smartphone. if you download either of the maps, you might need approximately
206
FREQUENTLY ASKED QUESTIONS VOICE RECOGNITION COMMANDS 10
300MB (250MB for Map and 50MB for NaviMaps App). Total India map might be around 1.3GB. However this also depends on region of the map you have downloaded and version. It is to be noted that memory requirement changes as upgrades.6. I have connected my phone for handsfree functionality. Will the navigation work?
No. For Navigation feature to work you have to connect your smartphone through USB cable only. This also ensures that your phone battery remain charged via USB when navigation is running on your phone in the car. It is recommended to use the USB cable which you might have got along with your smartphone.
7. I have connected my phone through USB will my phone handsfree work
No. Handsfree Phone and Audio streaming works on Bluetooth connectivity only. Via USB it will not work.
8. Will navigation in my TATA vehicle work with any navigation App?
No. It will work only with NaviMaps App. Please check and install for the latest version available from the Play Store on your Android based smartphone.
9. Just like Maps can I see video from phone in infotainment display?
Video Playback from your smartphone is not mirrored in to infotainment system of your TATA vehicle. However to play video from your smartphone, when you connect your mobile over USB, Please ensure to select MSC mode on your device (Mass Storage Class mode, if it is supported by your smartphone). Then you should be able to browse and play compatible videos through infotainment system. Please note that behavior might vary from Phone to Phone based on phone specific implementation.
10. Do I have to pay for App and Map database upgrades?
At first time when NaviMaps app is installed, please Connect your smartphone with your TATA vehicle. After this you can install latest versions of the map for free. You are entitled for a maximum of 4 free upgrades in a span of 4 years from the date of purchase of your vehicle.
11. How frequently Map upgrades are released? And How it is informed to me?
After you connect your smartphone to your TATA vehicle for Navigation function, you are entitled for a
207

FREQUENTLY ASKED QUESTIONS VOICE RECOGNITION COMMANDS10
maximum of 4 upgrades in a span of 4 years from the date of purchase of your vehicle. The frequency of Map upgrade releases is every 6 months and these upgrades will be notified on the NaviMaps mobile app.12. Can my family members also can use this Navigation feature by downloading the same NaviMaps App? Do they have to pay?
Yes. However every other user shall also download and install the apps. Maximum of 4 distinct users per TATA vehicle are allowed. These 4 distinct users need not pay additionally. If users are more than 4 then user shall purchase pro-guidance version (in app purchase)
13. Should I enable GPS always in my smartphone?
Need not be. But you should enable GPS in your smartphone when it is connected for Navigation function with your infotainment system.
14. What should I do if GPS signal is not available?
This Navigation feature uses GPS from your smartphone. So your smartphone GPS reception is very important for reliable functionality of this feature. If you are getting weak or no GPS signal, ensure that you place your phone in a location of vehicle where it
is safe and visible to sky and check for the better GPS reception availability.
15. Which USB cable should I use to connect my smartphone for Navigation?
It is always recommended to use the cable which you might have received from your smartphone manufacturer.
16. Navigation audio prompts are not audible enough. What should I do to increase the volume level?
First try to increase the volume level from your smartphone. if it is still not sufficient then, when
Navigation function is working, Press the button and select “Settings” to see Voice Prompt volume. You can adjust the setting accordingly.
17. How to Play video in the infotainment system
Video Playback is available in “Browse” option of Media screen and select “Video” option. Through this you can browse through the Video files available in the current media source only (either USB or SD).
18. What all the video formats does it support?
.a vi, .mp4, and .divx as container formats will be supported. H264 (BP and MP up to AVC Level 3.1),
208
FREQUENTLY ASKED QUESTIONS VOICE RECOGNITION COMMANDS 10
MPEG4 (SP, ASP) up to D1 Resolution (specifically 720 x 480 resolution only) (std NTSC/PAL) will be supported.19. Can I play HD videos in the infotainment system?
No. Videos only till 720 x 480 resolution (Std NTSC /PAL) will be supported
20. How can I play video files from my phone?
Connect your phone via USB port. Just after connection put your phone in USB Mass Storage Class mode. After that you should be able to browse through the contents of Phone via Infotainment system and will be able to play compatible video files. It is to be note that this behavior might vary from phone to phone based your phone specific implementation.
21. From what all the Media sources I can play video?
You can play Video from USB and SD card. However you can see the contents of either USB only or SD card at a time only. To switch the source from USB to SD or vice versa, you have to change the current media source and browse for required video file accordingly.
22. Can I See / Play audio / Video / pictures from my smartphone when connected through USB port?
Yes. However you have to enable your phone in Mass Storage Class mode just after connection to Car USB port. This behavior might vary based on smartphone which you are using.
23. What are the supported video and audio codecs?
The supported video and audio codecs are as follows:
Video Codecs: H264 (Base and Main Profile till L 3.1), MPEG4 (Simple and Advanced Simple Pro-file - All Levels)
Audio Codecs - Profile Supported: MP3 Or MPEG-2 Audio Layer III, AAC (AAC-LC And HE-AAC), WMA, WAV
Container File: AVI, MP4, DIVX
209
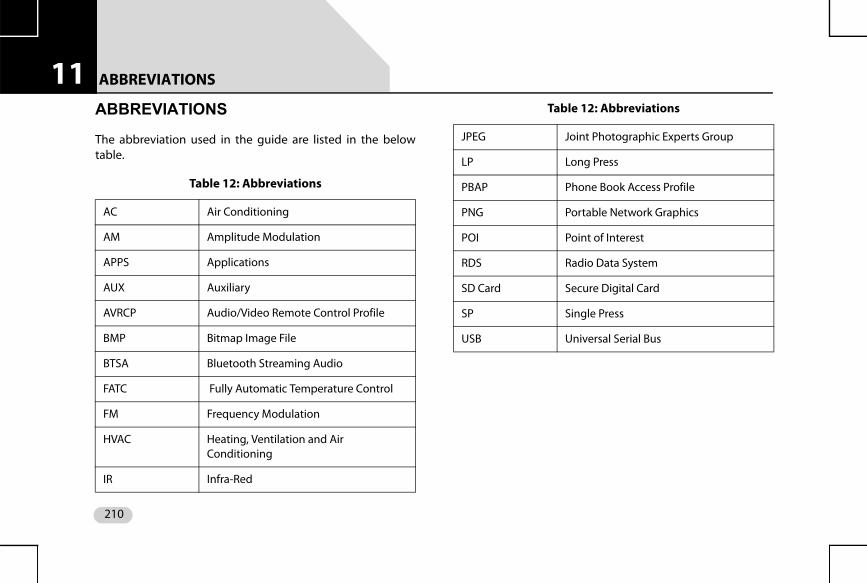
ABBREVIATIONS 11
ABBREVIATIONSThe abbreviation used in the guide are listed in the belowtable.
Table 12: Abbreviations
AC Air Conditioning
AM Amplitude Modulation
APPS Applications
AUX Auxiliary
AVRCP Audio/Video Remote Control Profile
BMP Bitmap Image File
BTSA Bluetooth Streaming Audio
FATC Fully Automatic Temperature Control
FM Frequency Modulation
HVAC Heating, Ventilation and Air Conditioning
IR Infra-Red
JPEG Joint Photographic Experts Group
LP Long Press
PBAP Phone Book Access Profile
PNG Portable Network Graphics
POI Point of Interest
RDS Radio Data System
SD Card Secure Digital Card
SP Single Press
USB Universal Serial Bus
Table 12: Abbreviations
210
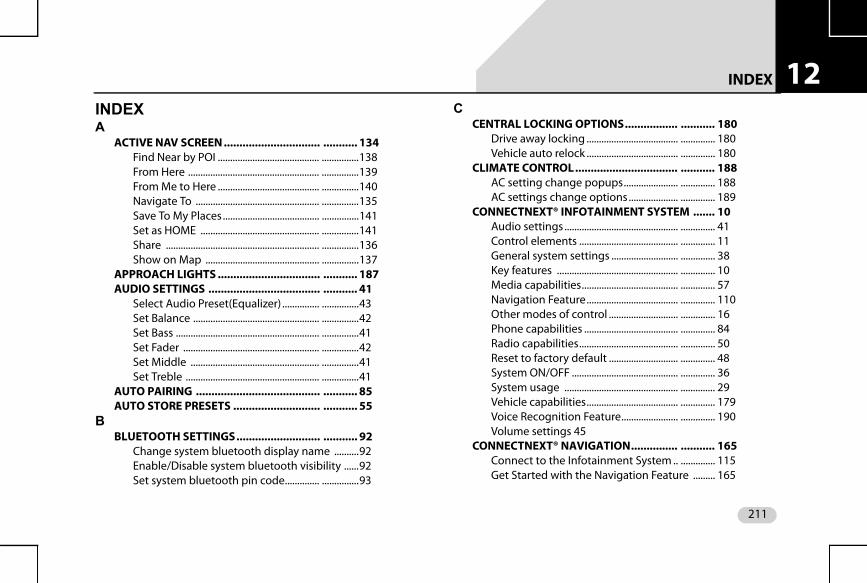
INDEX 12
INDEXAACTIVE NAV SCREEN ............................... ........... 134Find Near by POI ......................................... ...............138From Here ..................................................... ...............139From Me to Here ......................................... ...............140Navigate To .................................................. ...............135Save To My Places ....................................... ...............141Set as HOME ................................................ ...............141Share .............................................................. ...............136Show on Map .............................................. ...............137
APPROACH LIGHTS ................................. ........... 187AUDIO SETTINGS .................................... ........... 41
Select Audio Preset(Equalizer) ............... ...............43Set Balance ................................................... ...............42Set Bass .......................................................... ...............41Set Fader ....................................................... ...............42Set Middle .................................................... ...............41Set Treble ...................................................... ...............41
AUTO PAIRING ........................................ ........... 85AUTO STORE PRESETS ............................ ........... 55
BBLUETOOTH SETTINGS ........................... ........... 92
Change system bluetooth display name ..........92Enable/Disable system bluetooth visibility ......92Set system bluetooth pin code .............. ...............93
CCENTRAL LOCKING OPTIONS ................. ........... 180
Drive away locking ..................................... .............. 180Vehicle auto relock ..................................... .............. 180
CLIMATE CONTROL ................................. ........... 188AC setting change popups ...................... .............. 188AC settings change options .................... .............. 189
CONNECTNEXT® INFOTAINMENT SYSTEM ....... 10Audio settings .............................................. .............. 41Control elements ........................................ .............. 11General system settings ........................... .............. 38Key features ................................................. .............. 10Media capabilities ....................................... .............. 57Navigation Feature ..................................... .............. 110Other modes of control ............................ .............. 16Phone capabilities ...................................... .............. 84Radio capabilities ........................................ .............. 50Reset to factory default ............................ .............. 48System ON/OFF ........................................... .............. 36System usage .............................................. .............. 29Vehicle capabilities ..................................... .............. 179Voice Recognition Feature ....................... .............. 190Volume settings 45
CONNECTNEXT® NAVIGATION ............... ........... 165Connect to the Infotainment System .. .............. 115Get Started with the Navigation Feature ......... 165
211
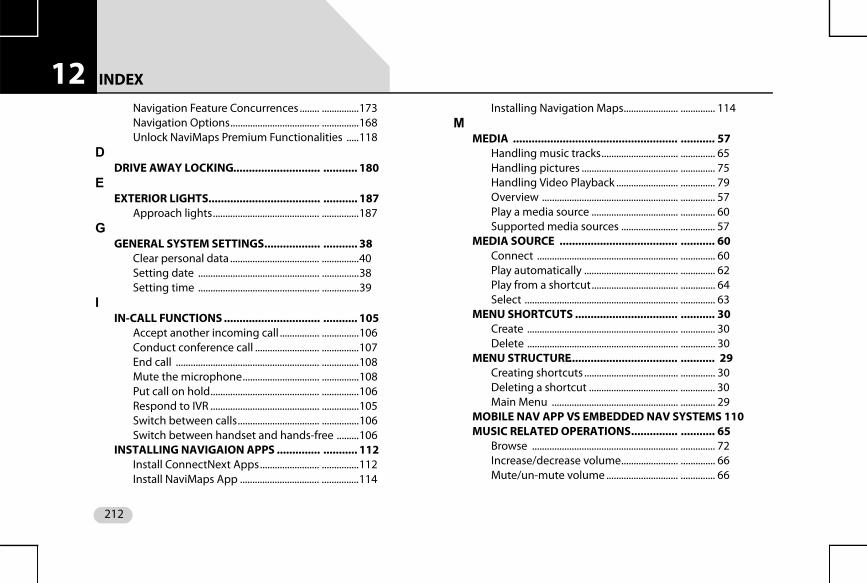
INDEX 12
Navigation Feature Concurrences ........ ...............173Navigation Options .................................... ...............168Unlock NaviMaps Premium Functionalities .....118DDRIVE AWAY LOCKING ............................ ........... 180
EEXTERIOR LIGHTS .................................... ........... 187
Approach lights ........................................... ...............187G
GENERAL SYSTEM SETTINGS .................. ........... 38Clear personal data .................................... ...............40Setting date ................................................. ...............38Setting time ................................................. ...............39
IIN-CALL FUNCTIONS ............................... ........... 105
Accept another incoming call ................ ...............106Conduct conference call .......................... ...............107End call .......................................................... ...............108Mute the microphone ............................... ...............108Put call on hold ............................................ ...............106Respond to IVR ............................................ ...............105Switch between calls ................................. ...............106Switch between handset and hands-free .........106
INSTALLING NAVIGAION APPS .............. ........... 112Install ConnectNext Apps ........................ ...............112Install NaviMaps App ................................ ...............114
Installing Navigation Maps ...................... .............. 114M
MEDIA ..................................................... ........... 57Handling music tracks ............................... .............. 65Handling pictures ....................................... .............. 75Handling Video Playback ......................... .............. 79Overview ....................................................... .............. 57Play a media source ................................... .............. 60Supported media sources ....................... .............. 57
MEDIA SOURCE ...................................... ........... 60Connect ......................................................... .............. 60Play automatically ...................................... .............. 62Play from a shortcut ................................... .............. 64Select .............................................................. .............. 63
MENU SHORTCUTS ................................. ........... 30Create ............................................................. .............. 30Delete ............................................................. .............. 30
MENU STRUCTURE................................... ........... 29Creating shortcuts ...................................... .............. 30Deleting a shortcut .................................... .............. 30Main Menu ................................................... .............. 29
MOBILE NAV APP VS EMBEDDED NAV SYSTEMS 110MUSIC RELATED OPERATIONS ............... ........... 65
Browse ........................................................... .............. 72Increase/decrease volume ....................... .............. 66Mute/un-mute volume ............................. .............. 66
212
INDEX 12
Pause/Play music ........................................ ...............65Perform fast forward/fast rewind ......... ...............69Play next/previous folder ......................... ...............70Play next/previous tracks ......................... ...............68Play tracks randomly ................................. ...............67Repeat track/folder .................................... ...............66Scan ................................................................ ...............73View next/previous track name ............. ...............68View track information ............................. ...............70NNAVIGATING BETWEEN ON-SCREEN OBJECTS 31
Going to the parent menu from a submenu 34Identifying the currently active menu ...............34Modifying the value in a range .............. ...............34Scrolling through a menu list ................. ...............33Selecting an on-screen object ............... ...............31
NAVIGATION FEATURE ........................... ........... 110ConnectNext Apps ..................................... ...............165Disclaimers ................................................... ...............177General Information .................................. ...............110Installing APPs for Navigation ................ ...............112Limitations ................................................... ...............178NaviMaps ...................................................... ...............124
NAVIGATION FEATURE OPTIONS ........... ........... 168Favorites ........................................................ ...............169POI ................................................................... ...............169
Recent ............................................................ .............. 168Route ............................................................... .............. 171Setup .............................................................. .............. 171
NAVIMAPSActive NAV Screen and Options ............ .............. 134App Operations ........................................... .............. 143Destination Entry ........................................ .............. 129Map View Controls ..................................... .............. 126Start App ....................................................... .............. 125Touch Operations ....................................... .............. 124
NAVIMAPS APP OPERATIONS ................ ........... 143Main Menu Options ................................... .............. 153Route Options .............................................. .............. 143
NAVIMAPS MAIN MENU OPTIONS ......... ........... 153About ............................................................. .............. 163Close the Main Menu Options Screen . .............. 153Manage Maps .............................................. .............. 157My Places ...................................................... .............. 154My Routes ..................................................... .............. 155Settings .......................................................... .............. 158Take Me Home ............................................. .............. 154
OOTHER MODES OF CONTROL ................. ........... 16
IR Remote ...................................................... .............. 21Steering Wheel ............................................ .............. 17
OUTGOING CALL .................................... ........... 100
213

INDEX 12
Dial using the call list ................................ ...............103Dial using the favorites list ...................... ...............103Dial using the phone book ...................... ...............101Manual dialling of phone number ....... ...............100PPAIR DEVICES .......................................... ........... 85
Guidelines .................................................... ...............87Troubleshooting Steps.............................. ............... 87
PAIRED DEVICES OPERATIONS ............... ........... 89Connect/disconnect paired devices .... ...............90Delete paired devices ................................ ...............90View paired devices.................................... ............... 89
PARK ASSIST............................................ ........... 182Activation ..................................................... ...............182Delay display stop ...................................... ...............185Display ........................................................... ...............183Display unavailability ................................ ...............183Retain audio ................................................ ...............186Volume .......................................................... ...............185
PARK ASSIST DELAY TIMER .................... ........... 185PHONE ..................................................... ........... 84
Bluetooth settings ...................................... ...............92Enable bluetooth ........................................ ...............84Functions ...................................................... ...............98Handle paired devices .............................. ...............89Pair Devices .................................................. ...............85
Phone Settings ............................................. .............. 94PHONE FAVORITES LIST .......................... ........... 103
Dial a favorite contact number .............. .............. 104Mark contact as favorite ........................... .............. 103View favorites list ........................................ .............. 104
PHONE FUNCTIONS ................................ ........... 98Accept/reject incoming calls .................. .............. 104Handle in-call functions ........................... .............. 105Make an Outgoing Call ............................. .............. 100View call list .................................................. .............. 98View phone book ........................................ .............. 99View phone details ..................................... .............. 98
PHONE SETTINGS .................................... ........... 94Configure automatic SMS for rejected calls .... 96Set notifications for new SMS ................. .............. 95Synchronize phone book.......................... .............. 94
PICTURE VIEWER .................................... ........... 75Access picture files ..................................... .............. 75Close a picture ............................................. .............. 78Navigate between pictures ..................... .............. 77Shift to Video Playback ............................. .............. 78
PRESET .................................................... ........... 55R
RADIO ...................................................... ........... 50AM/FM reception limitations .................. .............. 50Operations .................................................... .............. 52
214
INDEX 12
Overview of capabilities ........................... ...............50RADIO BAND ........................................... ........... 52Change radio band volume .................... ...............53
RADIO OPERATIONS ............................... ........... 52Change radio band .................................... ...............52Handle presets ............................................. ...............55Tune radio stations ..................................... ...............53
RADIO PRESETS ...................................... ........... 55Auto store presets ...................................... ...............55Browse through presets ........................... ...............56Play a preset ................................................ ...............56Store presets ................................................ ...............55
ROUTE OPTIONS ..................................... ........... 143Active Route Options................................. ............... 146Inactive Route Options ............................. ...............143
SSAFETY GUIDELINES ............................... ........... 5
General ........................................................... ............... 5System care and maintenance ............... ...............6While driving ............................................... ...............6
SPEED DEPENDENT VOLUME ................. ........... 45STARTUP VOLUME .................................. ........... 46SYSTEM USAGE ....................................... ........... 29
Accessing Main Menu ............................... ...............31Handling Popups ........................................ ...............35Menu structure ............................................ ...............29
Navigating between on-screen objects ............ 31V
VEHICLE .................................................. ........... 179Climate control notifications .................. .............. 188Display vehicle setup screen ................... .............. 179Exterior lights options ............................... .............. 187Locking/unlocking options ..................... .............. 180Park Assist ..................................................... .............. 182
VEHICLE AUTO RELOCK .......................... ........... 180VIDEO PLAYBACK.................................... ........... 79
Access video files......................................... .............. 79Browse through videos ............................. .............. 81Close a video ............................................... .............. 83Go to the Home Screen ............................ .............. 82Handle video volume................................. .............. 81Operations..................................................... .............. 81Perform Fast Forward/Fast Rewind of videos . 81Play next/previous video ......................... .............. 81Play/pause video ......................................... .............. 81Randomly play videos ............................... .............. 81Repeat a video.............................................. .............. 81Shift to Picture Viewer ............................... .............. 83
VOICE RECOGNITION COMMANDS ........ ........... 193Climate control ............................................ .............. 203Common media commands.................... .............. 198General Commands ................................... .............. 193
215
INDEX 12
Media ............................................................. ...............196Phone ............................................................. ...............194Radio .............................................................. ...............200VOICE RECOGNITION FEATURE .............. ........... 190Activation ..................................................... ...............190Commands ................................................... ...............193Guidelines .................................................... ...............191Help ................................................................ ...............192Scenarios for auto-termination ............. ...............192Scenarios for ending activation ............. ...............192Scenarios for ignoring activation........... ............... 191
VOLUME SETTINGS ................................. ........... 45Set Aux-In gain ............................................ ...............47Set phone audio volume.......................... ............... 46Set SMS read out volume......................... ............... 46Set speed dependent volume ............... ...............45Set startup volume...................................... ............... 46Set voice command volume ................... ...............47
WWARRANTY CLAUSES............................... ........... 9WAYS OF TUNING RADIO STATIONS ...... ........... 53
Auto tuning ................................................. ...............53Manual tuning ............................................. ...............53Scan radio stations...................................... ............... 53
216