common core user guide oracle banking electronic data
TRANSCRIPT

Common Core User Guide Oracle Banking Electronic Data Exchange for Corporates
Release 14.6.0.0.0
Part No. F57248-01
May 2022

Oracle Banking Common Core User Guide
May 2022
Oracle Financial Services Software Limited
Oracle Park
Off Western Express Highway
Goregaon (East)
Mumbai, Maharashtra 400 063
India
Worldwide Inquiries:
Phone: +91 22 6718 3000
Fax:+91 22 6718 3001
www.oracle.com/financialservices/
Copyright © 2018, 2022, Oracle and/or its affiliates. All rights reserved.
Oracle and Java are registered trademarks of Oracle and/or its affiliates. Other names may be trademarks of their respective owners.
U.S. GOVERNMENT END USERS: Oracle programs, including any operating system, integrated software, any programs installed on the hardware, and/or documentation, delivered to U.S. Government end users are “commercial computer software” pursuant to the applicable Federal Acquisition Regulation and agency-specific supplemental regulations. As such, use, duplication, disclosure, modification, and adaptation of the programs, including any operating system, integrated software, any programs installed on the hardware, and/or documentation, shall be subject to license terms and license restrictions applicable to the programs. No other rights are granted to the U.S. Government.
This software or hardware is developed for general use in a variety of information management applications. It is not developed or intended for use in any inherently dangerous applications, including applications that may create a risk of personal injury. If you use this software or hardware in dangerous applications, then you shall be responsible to take all appropriate failsafe, backup, redundancy, and other measures to ensure its safe use. Oracle Corporation and its affiliates disclaim any liability for any damages caused by use of this software or hardware in dangerous applications.
This software and related documentation are provided under a license agreement containing restrictions on use and disclosure and are protected by intellectual property laws. Except as expressly permitted in your license agreement or allowed by law, you may not use, copy, reproduce, translate, broadcast, modify, license, transmit, distribute, exhibit, perform, publish or display any part, in any form, or by any means. Reverse engineering, disassembly, or decompilation of this software, unless required by law for interoperability, is prohibited.
The information contained herein is subject to change without notice and is not warranted to be error-free. If you find any errors, please report them to us in writing.
This software or hardware and documentation may provide access to or information on content, products and services from third parties. Oracle Corporation and its affiliates are not responsible for and expressly disclaim all warranties of any kind with respect to third-party content, products, and services. Oracle Corporation and its affiliates will not be responsible for any loss, costs, or damages incurred due to your access to or use of third-party content, products, or services.

Table of Contents
1. Preface ......................................................................................................................................................... 1-1
1.1 Introduction ............................................................................................................................................ 1-1
1.2 Audience ................................................................................................................................................ 1-1
1.3 Document Accessibility .......................................................................................................................... 1-1
1.4 Acronyms and Abbreviations ................................................................................................................. 1-1
1.5 List of Topics .......................................................................................................................................... 1-1
1.6 Related Documents ............................................................................................................................... 1-2
1.7 Symbols and Icons ................................................................................................................................ 1-2
1.8 Basic Actions ......................................................................................................................................... 1-5
2. Core Maintenance ....................................................................................................................................... 2-7
2.1 Additional Field Maintenance................................................................................................................. 2-9
2.2 Advice .................................................................................................................................................. 2-11
2.3 Amount Text Language ........................................................................................................................ 2-15
2.4 BIC Directory ........................................................................................................................................ 2-18
2.5 Branch EOD ......................................................................................................................................... 2-22
2.6 Country Code ....................................................................................................................................... 2-26
2.7 Currency Definition ............................................................................................................................... 2-29
2.8 Currency Exchange Rate ..................................................................................................................... 2-34
2.9 Currency Holiday Master ...................................................................................................................... 2-37
2.10 Currency Pair Definition ....................................................................................................................... 2-40
2.11 Currency Rate Type ............................................................................................................................. 2-43
2.12 Customer Access Group ...................................................................................................................... 2-45
2.13 Customer Category .............................................................................................................................. 2-47
2.15 ECA System ......................................................................................................................................... 2-49
2.16 External Bank Parameters ................................................................................................................... 2-51
2.17 External Branch Parameters ................................................................................................................ 2-53
2.18 External Chart Account ........................................................................................................................ 2-56
2.19 External Customer ............................................................................................................................... 2-58
2.20 External Customer Account ................................................................................................................. 2-61
2.21 External Customer Account Structured Address ................................................................................. 2-65
2.22 External Virtual Account Structured Address ...................................................................................... 2-68
2.23 Forget Process ..................................................................................................................................... 2-69
2.24 Host Code ............................................................................................................................................ 2-71
2.25 Language Code.................................................................................................................................... 2-73
2.26 Local Holiday ....................................................................................................................................... 2-74

2.27 Media ................................................................................................................................................... 2-76
2.28 Multi-Currency Account Linkage .......................................................................................................... 2-80
2.29 Process Code ...................................................................................................................................... 2-82
2.30 System Dates ....................................................................................................................................... 2-85
2.31 Transaction Code ................................................................................................................................. 2-86
2.32 Upload Source ..................................................................................................................................... 2-88
2.33 Upload Source Preference ................................................................................................................... 2-90
2.34 Pricing Source System......................................................................................................................... 2-93
2.35 Integrating Bureau Integration Service with Oracle Banking Routing Hub .......................................... 2-95
2.36 Bureau Integration Service ................................................................................................................ 2-119
2.37 Credit Bureau Display ........................................................................................................................ 2-121
2.38 Lookup ............................................................................................................................................... 2-125
2.39 Criteria ............................................................................................................................................... 2-131
2.40 System Parameter ............................................................................................................................. 2-137
2.41 Integrating Decision Service with Oracle Banking Routing Hub ........................................................ 2-142
2.42 Decision Service ................................................................................................................................ 2-161
2.43 Product Processor ............................................................................................................................. 2-164
2.44 Lookup ............................................................................................................................................... 2-170
2.45 System Parameter ............................................................................................................................. 2-176
2.46 Strategy Configuration ....................................................................................................................... 2-181
2.47 Logical Model ..................................................................................................................................... 2-189
2.48 Borrowing Capacity ............................................................................................................................ 2-201
2.49 Questionnaire .................................................................................................................................... 2-212
2.50 Qualitative Scoring Model .................................................................................................................. 2-221
2.51 Scoring Feature ................................................................................................................................. 2-237
2.52 Quantitative Scoring Model................................................................................................................ 2-242
2.53 Decision Grade Matrix ....................................................................................................................... 2-261
2.54 Pricing ................................................................................................................................................ 2-277
2.55 View Execution Summary .................................................................................................................. 2-289
3. NLP Framework ....................................................................................................................................... 3-313
3.1 Toolkit ................................................................................................................................................ 3-313
3.2 Operation ........................................................................................................................................... 3-327
3.3 3P Service Integration ....................................................................................................................... 3-331
4. Machine Learning Framework ............................................................................................................... 4-346
4.1 Use Case On-Boarding ...................................................................................................................... 4-346
4.2 Frameworks Supported ..................................................................................................................... 4-347
4.3 Partitioned Model ............................................................................................................................... 4-350
4.4 On-Boarding Use Case ...................................................................................................................... 4-351
4.5 Online Single Record Prediction ........................................................................................................ 4-360
4.6 Use Case Modifications ..................................................................................................................... 4-360
4.7 Data Extensibility ............................................................................................................................... 4-361

4.8 Model Explainability ........................................................................................................................... 4-361
4.9 Time Series Forecast ......................................................................................................................... 4-362
5. File Upload ............................................................................................................................................... 5-363
5.1 Country Code File Upload ................................................................................................................. 5-363
5.2 Bank Core Parameters File Upload ................................................................................................... 5-365
5.3 Branch Core Parameters File Upload ................................................................................................ 5-366
5.4 Currency Definition File Upload ......................................................................................................... 5-368
5.5 BIC Directory File Upload .................................................................................................................. 5-372
5.6 Local Holiday File Upload .................................................................................................................. 5-374
5.7 Currency Holiday File Upload ............................................................................................................ 5-376
5.8 External Customer File Upload .......................................................................................................... 5-377
5.9 External Customer Account File Upload ............................................................................................ 5-380
5.10 Exchange Rate File Upload ............................................................................................................... 5-382
6. Error Codes and Messages.................................................................................................................... 6-385
7. Glossary ................................................................................................................................................... 7-409
8. List of Menus ........................................................................................................................................... 8-410
9. Feedback and Support ........................................................................................................................... 9-412
Preface
1-1
1. Preface
1.1 Introduction
This user guide is designed to help you quickly get acquainted with the many functions routinely executed every day.
1.2 Audience
This user guide is intended for the central administrator of the Bank who controls the system and application parameters and ensures smooth functionality and flexibility of the banking application.
1.3 Document Accessibility
For information about Oracle's commitment to accessibility, visit the Oracle Accessibility Program website at http://www.oracle.com/pls/topic/lookup?ctx=acc&id=docacc.
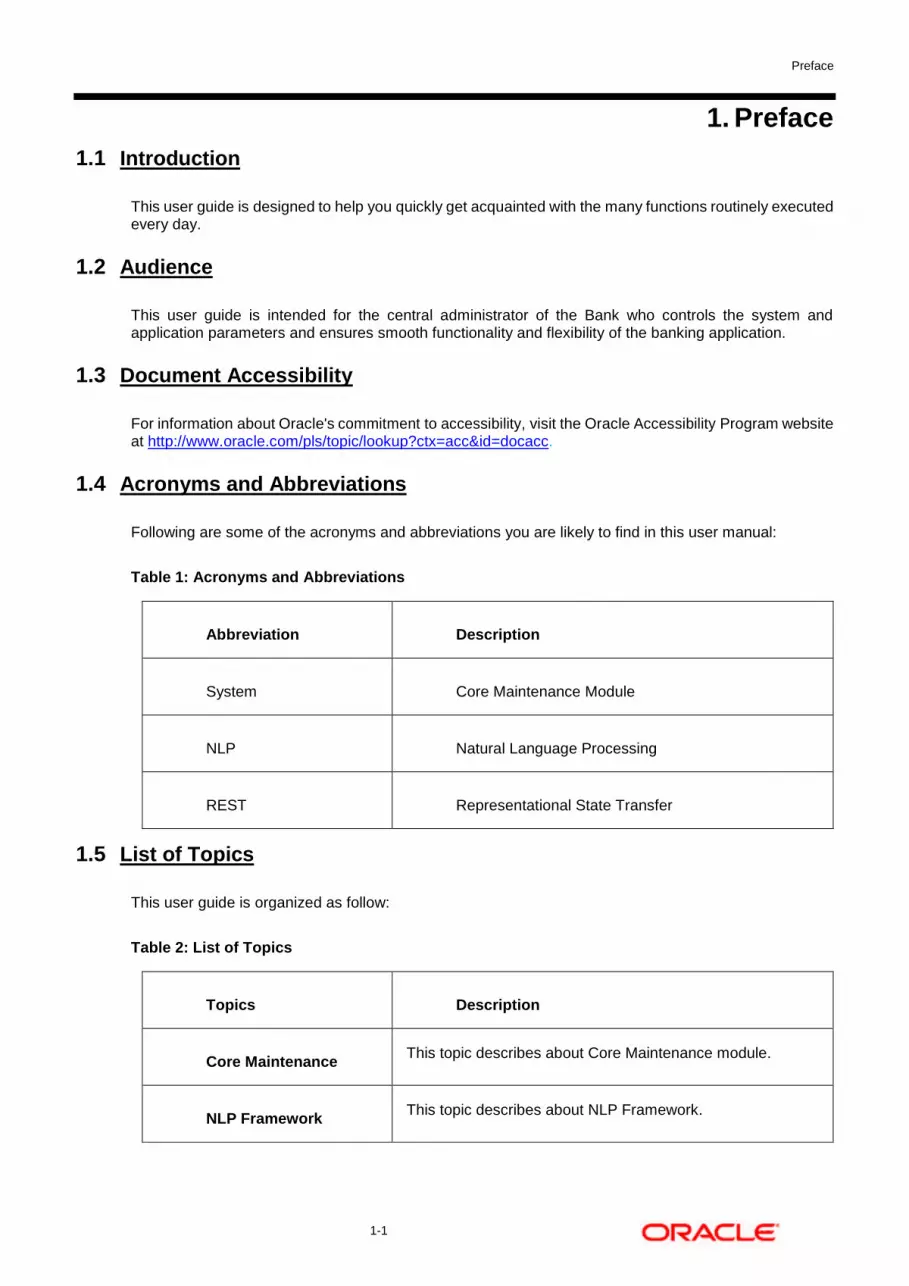
1.4 Acronyms and Abbreviations
Following are some of the acronyms and abbreviations you are likely to find in this user manual:
Table 1: Acronyms and Abbreviations
Abbreviation Description
System Core Maintenance Module
NLP Natural Language Processing
REST Representational State Transfer
1.5 List of Topics
This user guide is organized as follow:
Table 2: List of Topics
Topics Description
Core Maintenance This topic describes about Core Maintenance module.
NLP Framework This topic describes about NLP Framework.

Preface
1-2
Topics Description
Machine Learning Framework
This topic describes about Machine Learning Framework.
File Upload
This topic describes about the various file upload features
supported in common core maintenances.
Error Codes and Messages
This topic describes list of error codes and messages.
Glossary This topic provides list of glossary and their definitions.
List of Menus
This topic has alphabetical list of Core Maintenance
processes with page references for quick navigation.
Reference and Feedback
This topic provides the reference documents and information
about feedback and support.
1.6 Related Documents
For more information on any related features, you can refer to the following documents:
Oracle Banking Security Management System User Guide
Getting Started User Guide
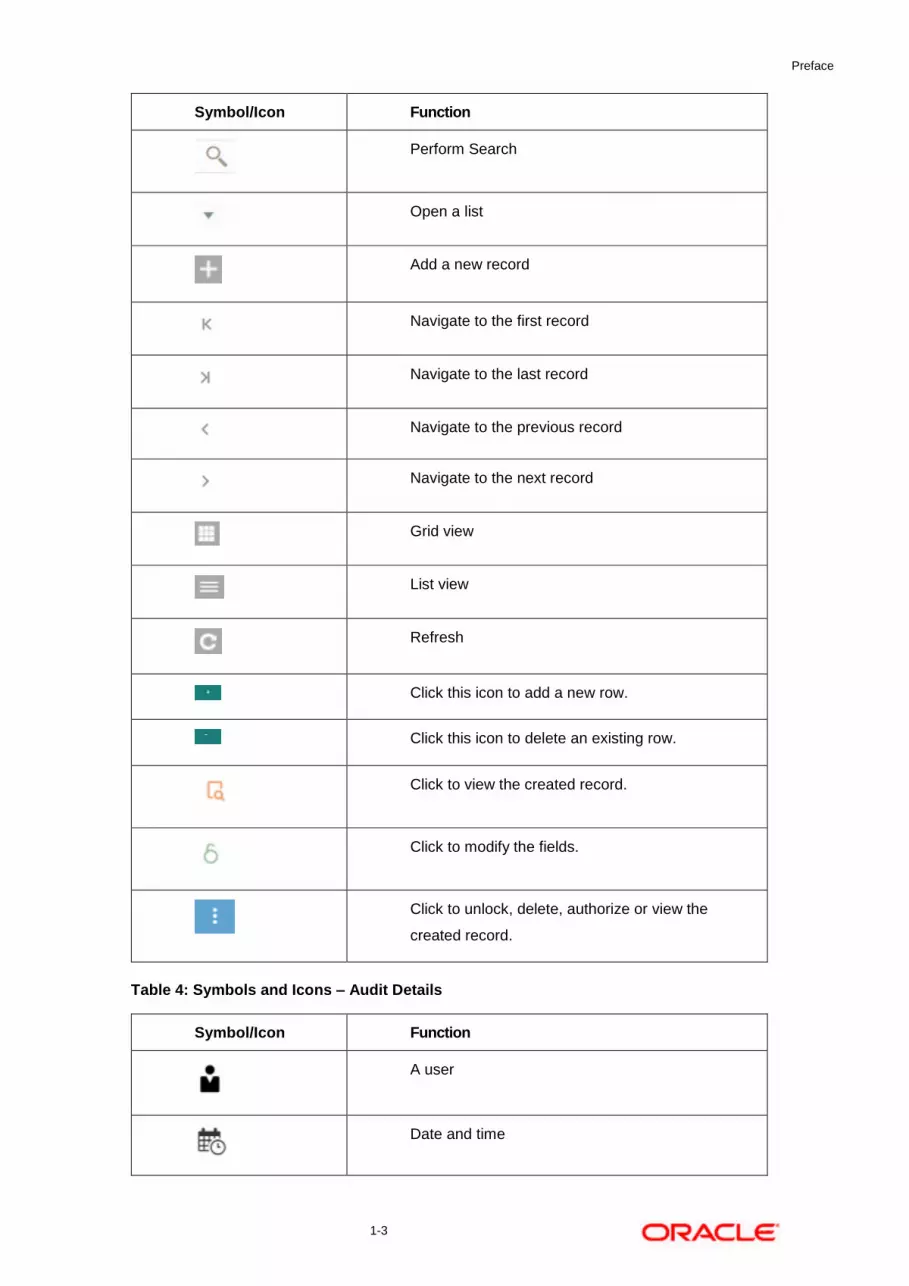
1.7 Symbols and Icons
The following are some of the Symbols you are likely to find in the guide:
Table 3: Symbols and Icons - Common
Symbol/Icon Function
Represents Results
Minimize
Maximize
Close
Preface
1-3
Symbol/Icon Function
Perform Search
Open a list
Add a new record
Navigate to the first record
Navigate to the last record
Navigate to the previous record
Navigate to the next record
Grid view
List view
Refresh
Click this icon to add a new row.
Click this icon to delete an existing row.
Click to view the created record.
Click to modify the fields.
Click to unlock, delete, authorize or view the
created record.
Table 4: Symbols and Icons – Audit Details
Symbol/Icon Function
A user
Date and time

Preface
1-4
Symbol/Icon Function
Unauthorized or Closed status
Authorized or Open status
Table 5: Symbols and Icons - Widget
Symbol/Icon Function
Open status
Unauthorized status
Closed status
Authorized status

Preface
1-5
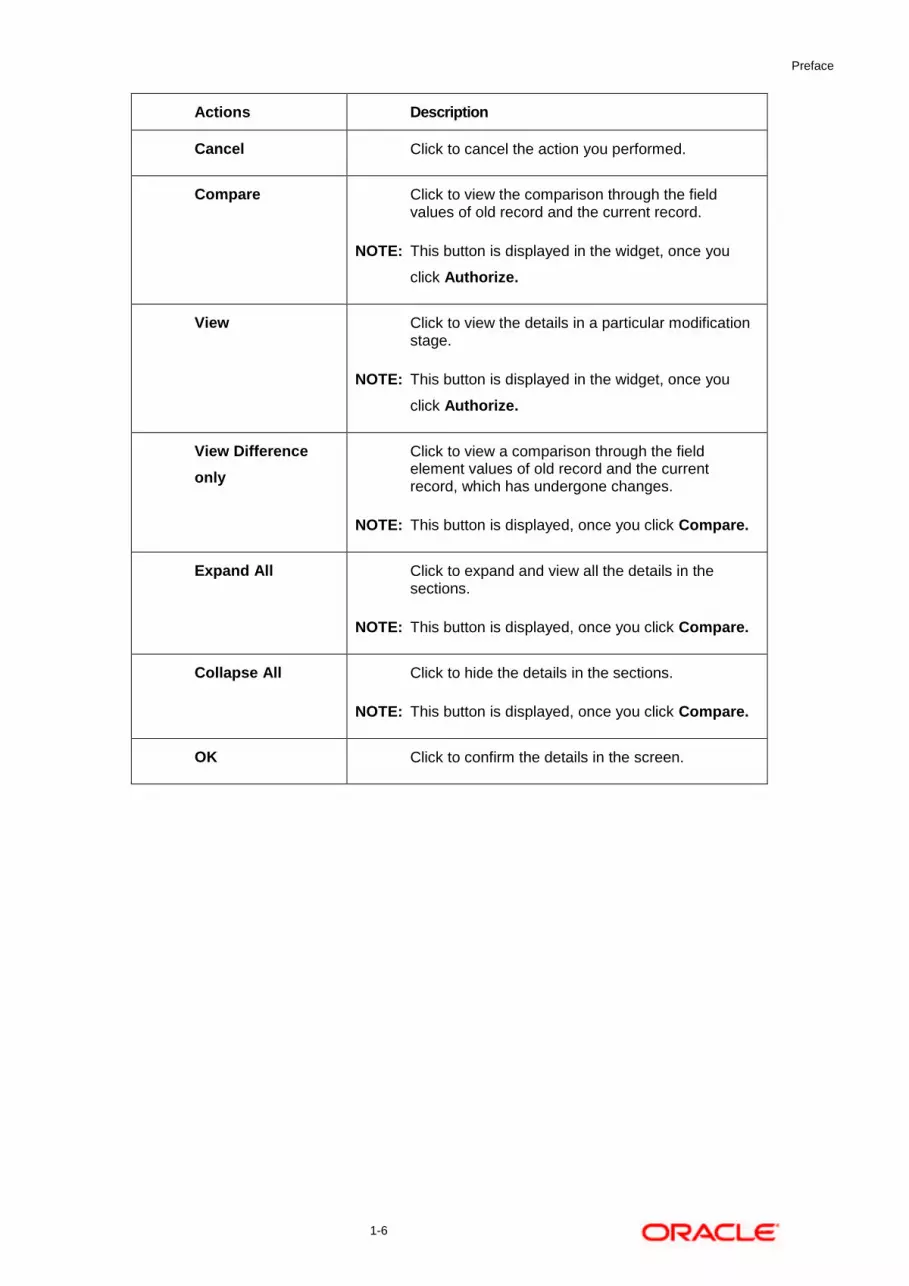
1.8 Basic Actions
Most of the screens contain buttons to perform all or few of the basic actions. The table below gives a snapshot of them:
Table 6: Basic Actions
Actions Description
New Click to add a new record. When you click New, system displays a new record enabling you to specify the required data. It is mandatory to specify details for the fields marked with ‘*’ symbol.
NOTE: This button is displayed only for the records that
are already created.
Save Click to save the details entered or selected in the
screen.
Unlock Click to update the details of an existing record. System displays an existing record in editable mode.
NOTE: This button is displayed only for the records that
are already created.
Authorize Click to authorize the record created. A maker of the screen is not allowed to authorize the same. Only a checker can authorize a record.
NOTE: This button is displayed only for the already
created records. For more information on the
process, see Authorization Process.
Approve Click to approve the initiated record.
NOTE: This button is displayed, once you click Authorize.
Audit Click to view the maker details, checker details of the particular record.
NOTE: This button is displayed only for the records that
are already created.
Close Click to close a record. This action is available only
when a record is created.
Confirm Click to confirm the action you performed.
Preface
1-6
Actions Description
Cancel Click to cancel the action you performed.
Compare Click to view the comparison through the field values of old record and the current record.
NOTE: This button is displayed in the widget, once you
click Authorize.
View Click to view the details in a particular modification stage.
NOTE: This button is displayed in the widget, once you
click Authorize.
View Difference
only
Click to view a comparison through the field element values of old record and the current record, which has undergone changes.
NOTE: This button is displayed, once you click Compare.
Expand All Click to expand and view all the details in the sections.
NOTE: This button is displayed, once you click Compare.
Collapse All Click to hide the details in the sections.
NOTE: This button is displayed, once you click Compare.
OK Click to confirm the details in the screen.
Core Maintenance
2-7
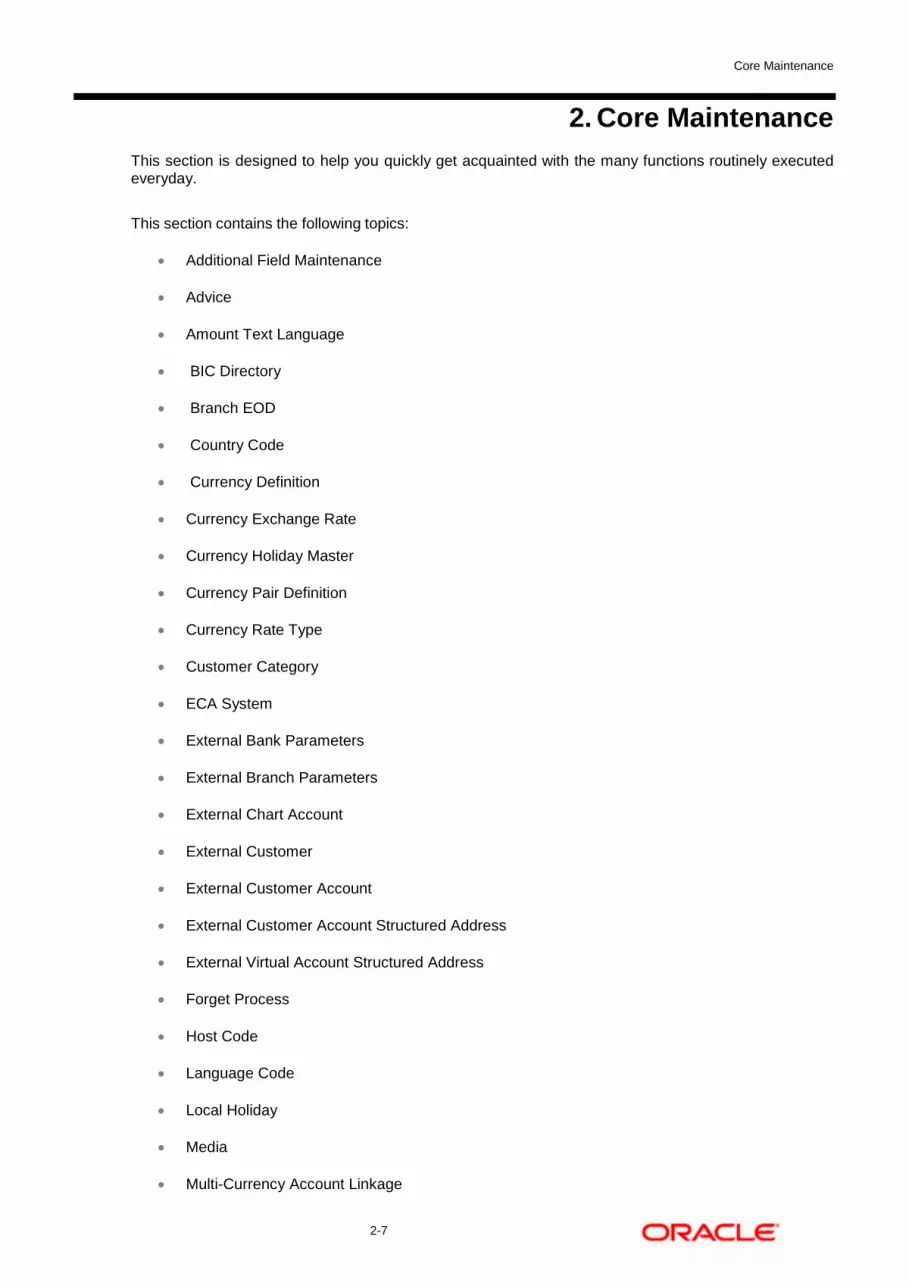
2. Core Maintenance
This section is designed to help you quickly get acquainted with the many functions routinely executed everyday.
This section contains the following topics:
Additional Field Maintenance
Advice
Amount Text Language
BIC Directory
Branch EOD
Country Code
Currency Definition
Currency Exchange Rate
Currency Holiday Master
Currency Pair Definition
Currency Rate Type
Customer Category
ECA System
External Bank Parameters
External Branch Parameters
External Chart Account
External Customer
External Customer Account
External Customer Account Structured Address
External Virtual Account Structured Address
Forget Process
Host Code
Language Code
Local Holiday
Media
Multi-Currency Account Linkage

Core Maintenance
2-8
Process Code
System Dates
Transaction Code
Upload Source
Upload Source Preference
Pricing Source System
Integrating Bureau Integration Service with Oracle Banking Routing Hub
Bureau Integration Service
Credit Bureau Display
Lookup
Criteria
System Parameter
Integrating Decision Service with Oracle Banking Routing Hub
Decision Service
Scoring Feature and Scoring Model
Decision Grade Matrix
Pricing
Execution Summary
Core Maintenance
2-9
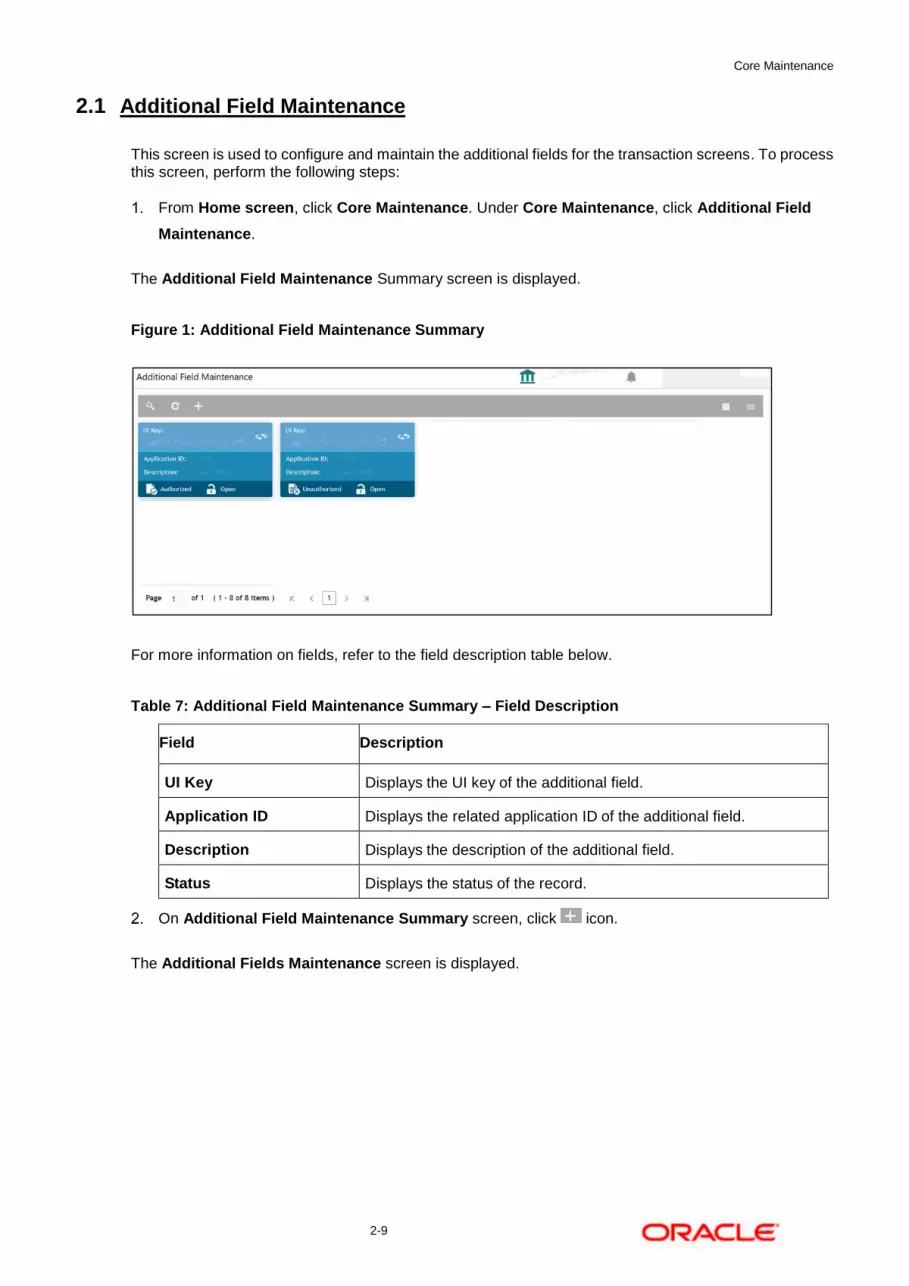
2.1 Additional Field Maintenance
This screen is used to configure and maintain the additional fields for the transaction screens. To process this screen, perform the following steps:
From Home screen, click Core Maintenance. Under Core Maintenance, click Additional Field
Maintenance.
The Additional Field Maintenance Summary screen is displayed.
Figure 1: Additional Field Maintenance Summary
For more information on fields, refer to the field description table below.
Table 7: Additional Field Maintenance Summary – Field Description
Field Description
UI Key Displays the UI key of the additional field.
Application ID Displays the related application ID of the additional field.
Description Displays the description of the additional field.
Status Displays the status of the record.
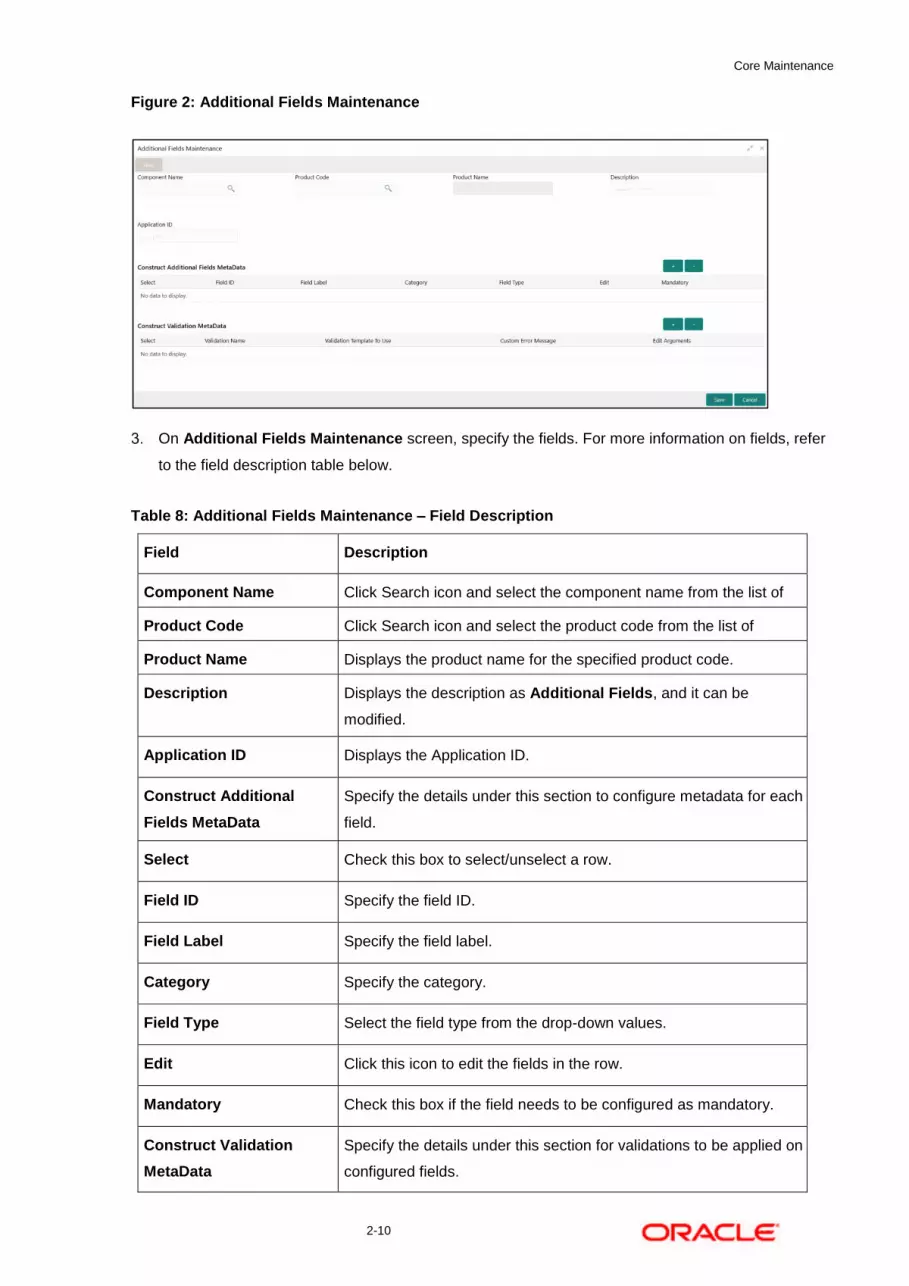
On Additional Field Maintenance Summary screen, click icon.
The Additional Fields Maintenance screen is displayed.
Core Maintenance
2-10
Figure 2: Additional Fields Maintenance
On Additional Fields Maintenance screen, specify the fields. For more information on fields, refer
to the field description table below.
Table 8: Additional Fields Maintenance – Field Description
Field Description
Component Name Click Search icon and select the component name from the list of
values. Product Code Click Search icon and select the product code from the list of
values. Product Name Displays the product name for the specified product code.
Description Displays the description as Additional Fields, and it can be
modified.
Application ID Displays the Application ID.
Construct Additional
Fields MetaData
Specify the details under this section to configure metadata for each
field.
Select Check this box to select/unselect a row.
Field ID Specify the field ID.
Field Label Specify the field label.
Category Specify the category.
Field Type Select the field type from the drop-down values.
Edit Click this icon to edit the fields in the row.
Mandatory Check this box if the field needs to be configured as mandatory.
Construct Validation
MetaData
Specify the details under this section for validations to be applied on
configured fields.
Core Maintenance
2-11
Field Description
Select Check this box to select/unselect a row.
Validation Name Specify the validation name.
Validation Template To
Use
Select the template to be used for the validation.
Custom Error Message Specify the error message that needs to be displayed for the
validation. Edit Arguments Click this icon to edit the fields in the row.
Click Save. You can view the confirmation advice details in the Additional Field Maintenance
Summary.
2.2 Advice
You can configure various BIP advices that are available for the process.
This section contains following subsections:
Advice Summary
Advice Maintenance
2.2.1 Advice Summary
The summary screen provides a list of configured advice. You can configure an advice for a process using the Advice Maintenance. To process this screen, perform the following steps:
1. From Home screen, click Core Maintenance. Under Core Maintenance, click Advice.
2. Under Advice, click View Advice.
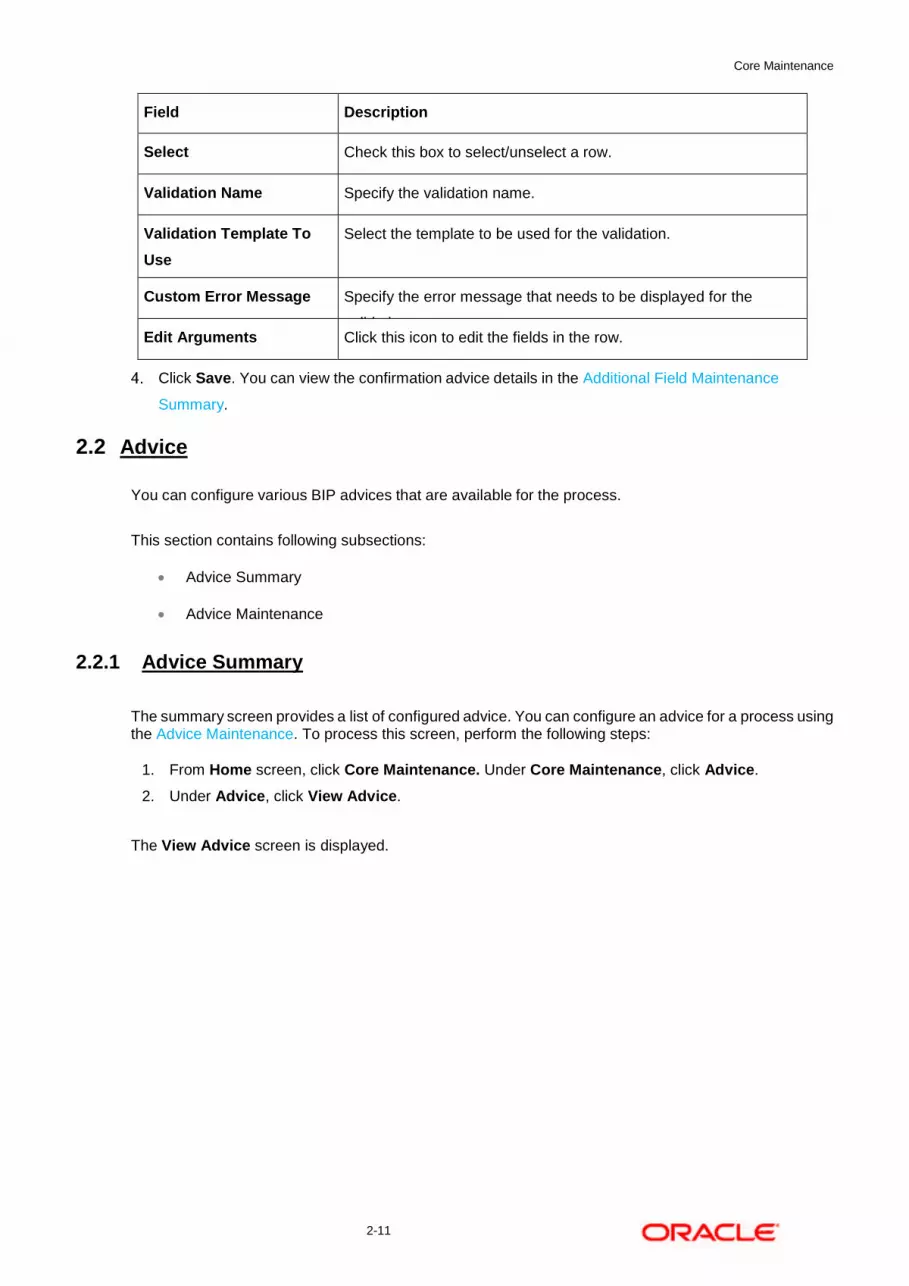
The View Advice screen is displayed.
Core Maintenance
2-12
Figure 3: View Advice
For more information on fields, refer to the field description table below.
Table 9: View Advice – Field Description
Field Description
Advice Name Displays the name of the advice.
Advice Description Displays information about the advice.
Micro Service Name Displays the name of the micro service.
Status Displays the status of the record.
2.2.2 Advice Maintenance
The maintenance screen allows you to configure advices. To process this screen, perform the following steps:
1. From Home screen, click Core Maintenance. Under Core Maintenance, click Advice.
2. Under Advice, click Create Advice.
The Create Advice screen is displayed.
Core Maintenance
2-13
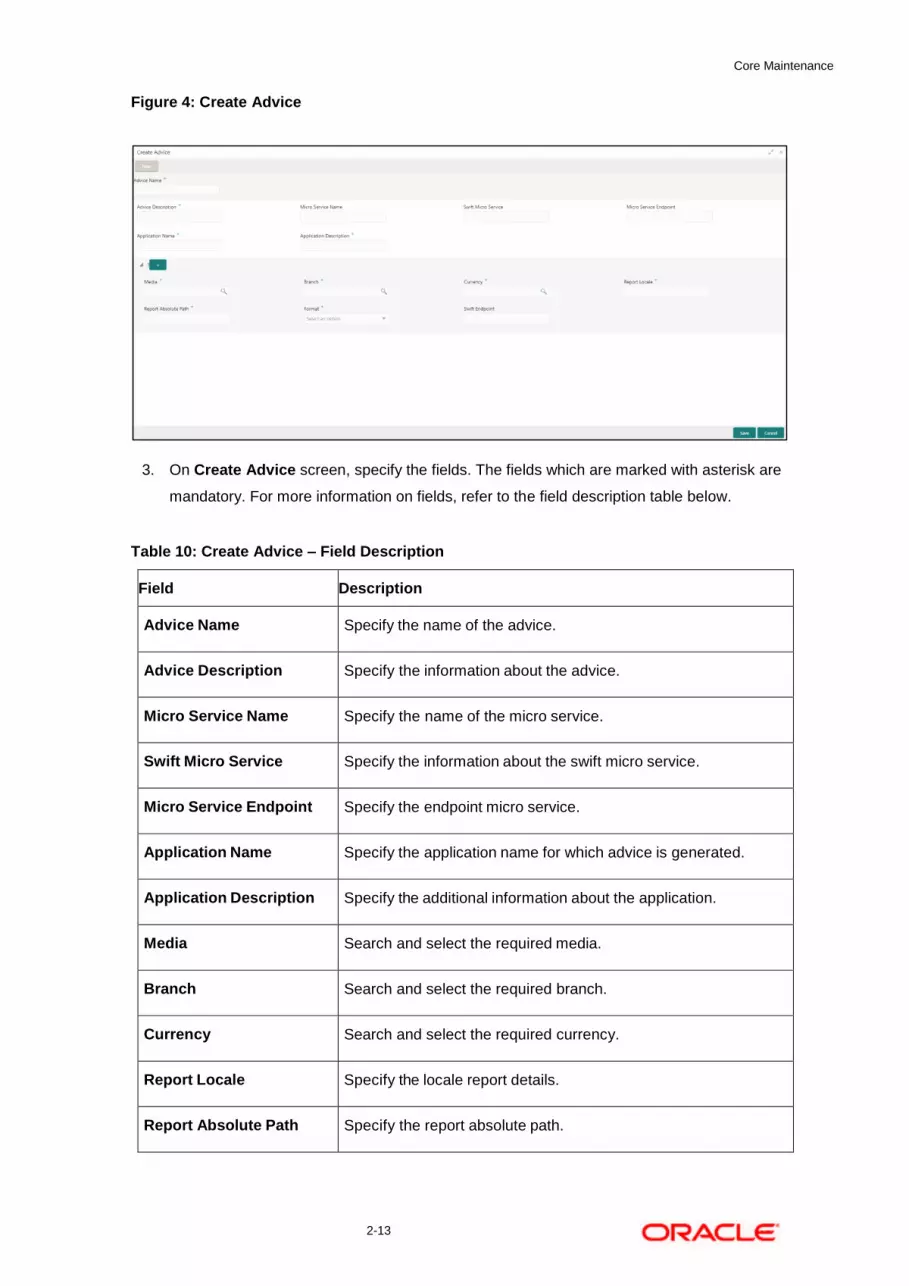
Figure 4: Create Advice
3. On Create Advice screen, specify the fields. The fields which are marked with asterisk are
mandatory. For more information on fields, refer to the field description table below.
Table 10: Create Advice – Field Description
Field Description
Advice Name Specify the name of the advice.
Advice Description Specify the information about the advice.
Micro Service Name Specify the name of the micro service.
Swift Micro Service Specify the information about the swift micro service.
Micro Service Endpoint Specify the endpoint micro service.
Application Name Specify the application name for which advice is generated.
Application Description Specify the additional information about the application.
Media Search and select the required media.
Branch Search and select the required branch.
Currency Search and select the required currency.
Report Locale Specify the locale report details.
Report Absolute Path Specify the report absolute path.

Core Maintenance
2-14
Field Description
Format Select a download file format for an advice from the dropdown list.
The formats available are, PDF, PPTX, HTML, XLS, and RTF.
Swift Endpoint Specify the swift endpoint.
4. Click Save. You can view the confirmation advice details in the Advice Summary.

Core Maintenance
2-15
2.3 Amount Text Language
You can configure an amount text language.
This section contains following subsections:
Amount Text Language Summary
Amount Text Language Maintenance
2.3.1 Amount Text Language Summary
The summary screen provides a list of configured amount text language. You can configure an amount text language using the Amount Text Language Maintenance. To process this screen, perform the following steps:
1. From Home screen, click Core Maintenance. Under Core Maintenance, click Amount Text
Language.
2. Under Amount Text Language, click View Amount Text Language.
The View Amount Text Language screen is displayed.
Figure 5: View Amount Text Language
For more information on fields, refer to the field description table below.
Table 11: View Amount Text Language – Field Description
Field Description
Language Code Displays the language code associated with the amount word.
Status Displays the status of the record.

Core Maintenance
2-16
2.3.2 Amount Text Language Maintenance
The maintenance screen allows you to configure amount text language. To process this screen, perform the following steps:
1. From Home screen, click Core Maintenance. Under Core Maintenance, click Amount Text
Language.
2. Under Amount Text Language, click Create Amount Text Language.
The Create Amount Text Language screen is displayed.
Figure 6: Create Amount Text Language
3. On Create Amount Text Language screen, specify the fields. The fields which are marked with
asterisk are mandatory. For more information on fields, refer to the field description table below. .
Table 12: Create Amount Text Language – Field Description
Field Description
Language Code Search and select the required language code.
Amount Word Currency
List
Specify the amount word currency details.

Core Maintenance
2-17
Field Description
CCY Symbol Specify the CCY symbols.
Decimals As Fraction Select a decimals as fraction value from the drop-down list.
Final Text Specify the final text for the amount word currency list.
CCY Search and select the CCY.
Post Decimal Specify the post decimal details.
Pre Decimal Specify the pre decimal details.
Text Before Select an option for the before text.
Text Between Specify the text that must appear between the amount word currency
list.
Amount Word Text List Specify the amount word text details.
Amount Select the amount details.
One Flag Select an option for the amount word text list.
Text Specify the text for the amount word.
4. Click Save. You can view the configured amount text language details in the Amount Text
Language Summary.

Core Maintenance
2-18
2.4 BIC Directory
As part of setting up basic information, you must maintain Bank Identifier Codes (BIC). You can configure the BIC directory for a customer.
This section contains following subsections:
BIC Directory Summary
BIC Directory Maintenance
2.4.1 BIC Directory Summary
The summary screen provides a list of configured BIC directory. You can configure the BIC directory using the BIC Directory Maintenance. To process this screen, perform the following steps:
1. From Home screen, click Core Maintenance. Under Core Maintenance, click BIC Directory.
2. Under BIC Directory, click View BIC Directory.
The View BIC Directory screen is displayed.
Figure 7: View BIC Directory
For more information on menus, refer to the field description table below. .
Table 13: View BIC Directory – Field Description
Field Description
Customer Number Displays the number of the customer.
Sub-type Code Displays the sub-type code associated with the customer number.
BIC Code Displays the defined BIC code for the associated customer
number. Bank Name Displays the name of the bank.
Status Displays the status of the record.

Core Maintenance
2-19
2.4.2 BIC Directory Maintenance
The maintenance screen allows you to configure a BIC directory for a customer. To process this screen, perform the following steps:
1. From Home screen, click Core Maintenance. Under Core Maintenance, click BIC Directory.
2. Under BIC Directory, click Create BIC Directory.
The Create BIC Directory screen is displayed.
Figure 8: Create BIC Directory
3. On Create BIC Directory screen, specify the fields. The fields which are marked with asterisk are
mandatory. For more information on fields, refer to the field description table below. .
Table 14: Create BIC Directory – Field Description
Field Description
BIC Code Specify the unique BIC Code by which the bank is identified by
SWIFT.
Bank Name Specify the name for the bank.
Customer Number Search and select the required customer number.
Customer Name Based on the Customer Number selected, the information is
auto-populated.
Bank Address 1-3 Based on the Customer Number selected, the information is
auto-populated.
SWIFT Key Specify the swift key details.

Core Maintenance
2-20
Field Description
Telex Key Specify the unique telex key for the BIC directory.
SWIFT Key Arrangement Select the SWIFT key arrangement from the drop-down list.
Relationship Select one of the following options:
No: If selected, indicates that the BIC Entity is not a customer of your bank
Mail: If selected, the BIC entity is not a recognized SWIFT entity but an address internal to your bank. In such cases, all correspondence directed to the particular BIC entity is sent as mail messages.
Keys: If selected, a SWIFT/Telex connectivity exists between your bank and the bank for which you are maintaining details. Subsequently, you must specify the SWIFT/Telex Key in the adjacent field.
Sub-type Code Search and select the required sub-type code.
BEI Indicator Based on the Sub-type Code selected, the information is auto-
populated.
ADB Member Select the ADB member from the drop-down list.
Payment Message Specify the payment message details.
MT103+ Preferred By default, this is disabled. If selected, indicates the counter party
whose BIC code details you are capturing capacitate to receive
payment messages in the MT 103 format.
Blacklisted By default, this is disabled. If selected, indicates the BIC entity is
blacklisted.
CUG Member By default, this is disabled. If selected, indicates the BIC entity is a
closed user group member. Remit Member: By default, this is
disabled. If selected, indicates the customer is registered with MT
103 extended remittance information multiple user group.
Update During Upload By default, this is disabled. If selected, updated the BIC directory
during an upload.
Multi-Customer Credit
Transfer
Specify the Multi-Customer Credit Transfer details.
Core Maintenance
2-21
Field Description
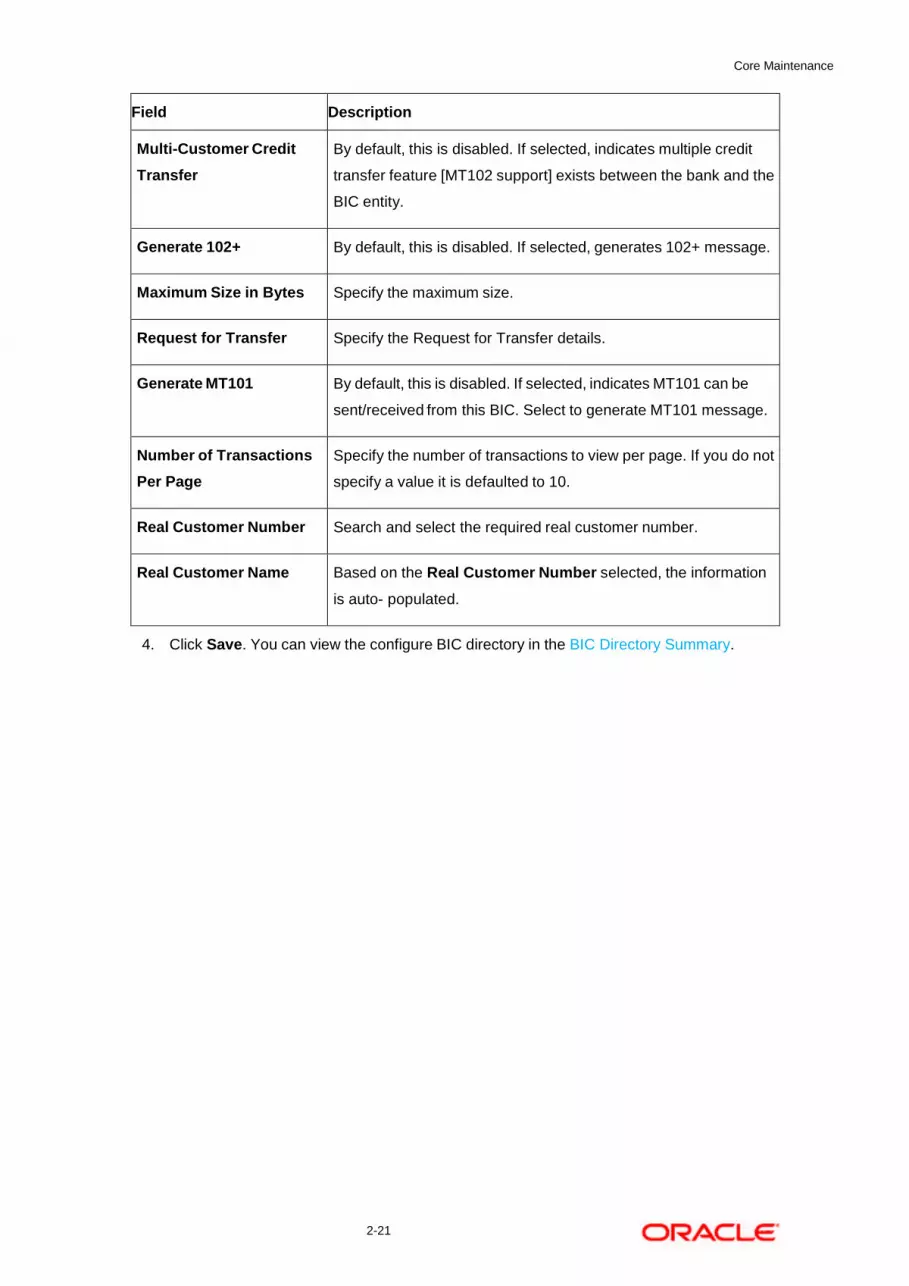
Multi-Customer Credit
Transfer
By default, this is disabled. If selected, indicates multiple credit
transfer feature [MT102 support] exists between the bank and the
BIC entity.
Generate 102+ By default, this is disabled. If selected, generates 102+ message.
Maximum Size in Bytes Specify the maximum size.
Request for Transfer Specify the Request for Transfer details.
Generate MT101 By default, this is disabled. If selected, indicates MT101 can be
sent/received from this BIC. Select to generate MT101 message.
Number of Transactions
Per Page
Specify the number of transactions to view per page. If you do not
specify a value it is defaulted to 10.
Real Customer Number Search and select the required real customer number.
Real Customer Name Based on the Real Customer Number selected, the information
is auto- populated.
4. Click Save. You can view the configure BIC directory in the BIC Directory Summary.
Core Maintenance
2-22
2.5 Branch EOD
You can invoke End of Day (EOD) to indicate that all the activities for the day are complete. Activities can be performed on the system only after the system date is changed to the next working day and authorized.
Most of the automated functions are part of the beginning of day operations. Thereafter, some of them must be executed when the system is in the EOTI (End of Transaction Input) stage.
This section contains following subsections:
Branch EOD Summary
Branch EOD Maintenance
Branch EOD Invoke
2.5.1 Branch EOD Summary
The summary screen provides list of branch workflow mappings. You can configure branch workflow mapping using the Branch EOD Maintenance. To process this screen, perform the following steps:
1. From Home screen, click Core Maintenance. Under Core Maintenance, click Branch EOD.
2. Under Branch EOD, click View EOD.
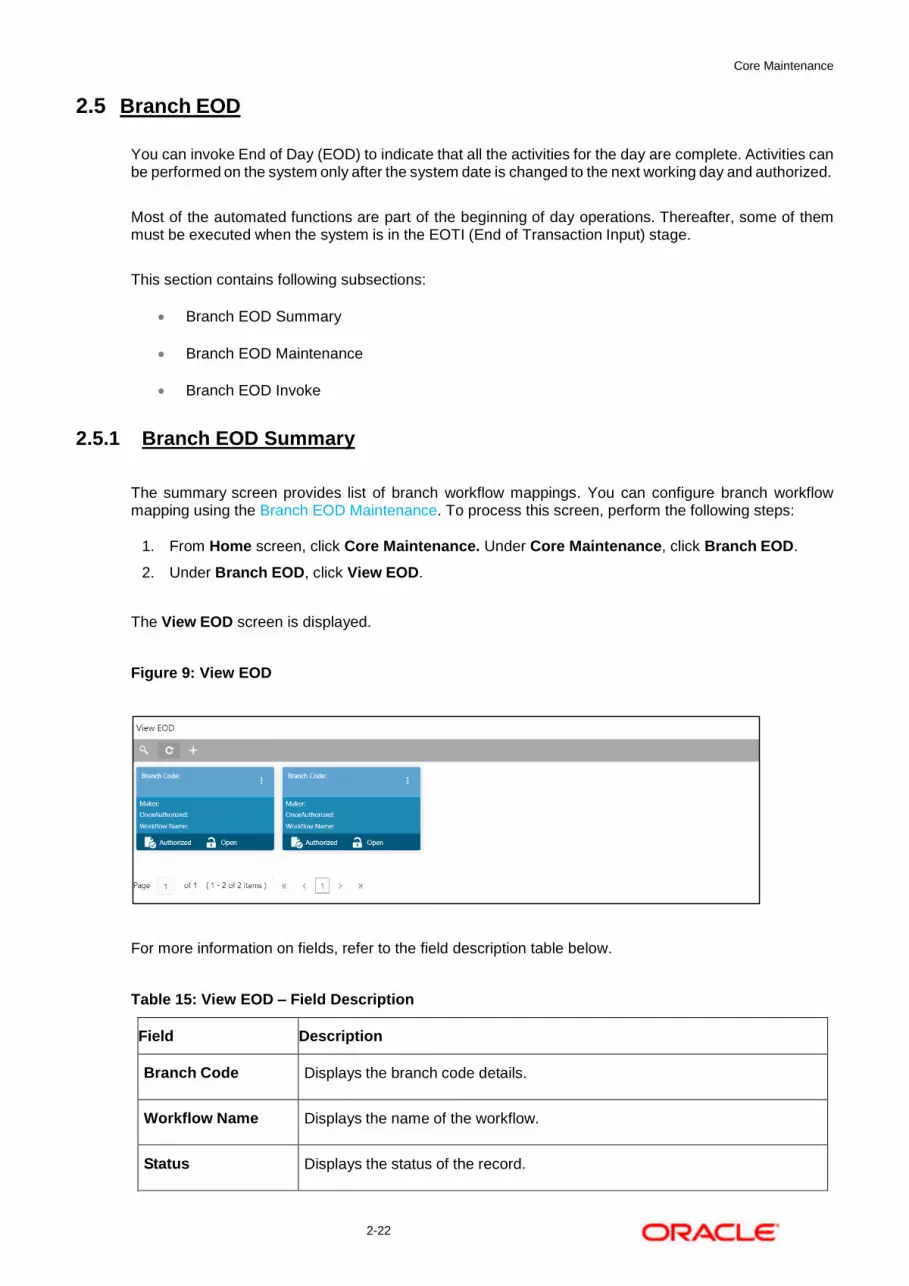
The View EOD screen is displayed.
Figure 9: View EOD
For more information on fields, refer to the field description table below.
Table 15: View EOD – Field Description
Field Description
Branch Code Displays the branch code details.
Workflow Name Displays the name of the workflow.
Status Displays the status of the record.
Core Maintenance
2-23
2.5.2 Branch EOD Maintenance
The maintenance screen allows you to create/configure the EOD workflow with a Branch. To process this screen, perform the following steps:
1. From Home screen, click Core Maintenance. Under Core Maintenance, click Branch EOD.
2. Under Branch EOD, click Configure EOD.
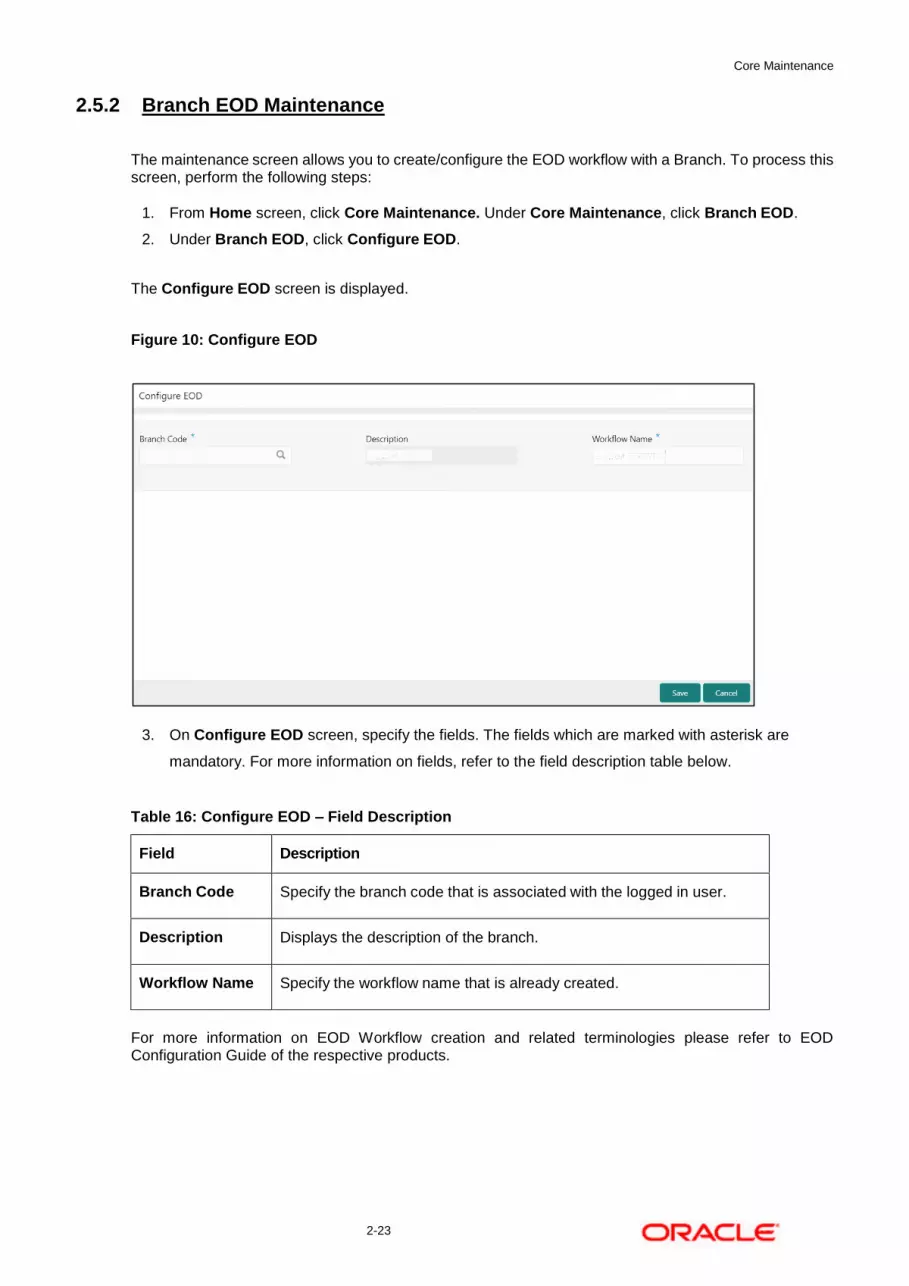
The Configure EOD screen is displayed.
Figure 10: Configure EOD
3. On Configure EOD screen, specify the fields. The fields which are marked with asterisk are
mandatory. For more information on fields, refer to the field description table below.
Table 16: Configure EOD – Field Description
Field Description
Branch Code Specify the branch code that is associated with the logged in user.
Description Displays the description of the branch.
Workflow Name Specify the workflow name that is already created.
For more information on EOD Workflow creation and related terminologies please refer to EOD Configuration Guide of the respective products.

Core Maintenance
2-24
2.5.3 Branch EOD Invoke
The action screen allows you to invoke the branch EOD process as per branch and workflow mapping configured using Branch EOD Maintenance. To process this screen, perform the following steps:
1. From Home screen, click Core Maintenance. Under Core Maintenance, click Branch EOD.
2. Under Branch EOD, click Invoke EOD.
The Invoke EOD screen is displayed.
Figure 15: Invoke EOD
3. On Invoke EOD screen, specify the fields. The fields which are marked with asterisk are
mandatory. For more information on fields, refer to the field description table below.
Table 17: Invoke EOD – Field Description
Field Description
Branch Code Specify the branch code that is associated with the logged in
user.
Description Displays the description of the branch.
Current Branch
Date
Displays the current branch date.
4. Click Start to invoke EOD for selected branch and Click Refresh to view the current status of
batch.
Core Maintenance
2-25
5. Click Retry to restart the EOD workflow from the failed task.
NOTE: Retry button will be enabled only if the failed task status is encountered.
6. Click Reset to clear the branch selected.
7. Click Refresh to view the current status of batch.
8. Mouse-hover on the task to view the relevant details such as Start time, End time and Error if any.
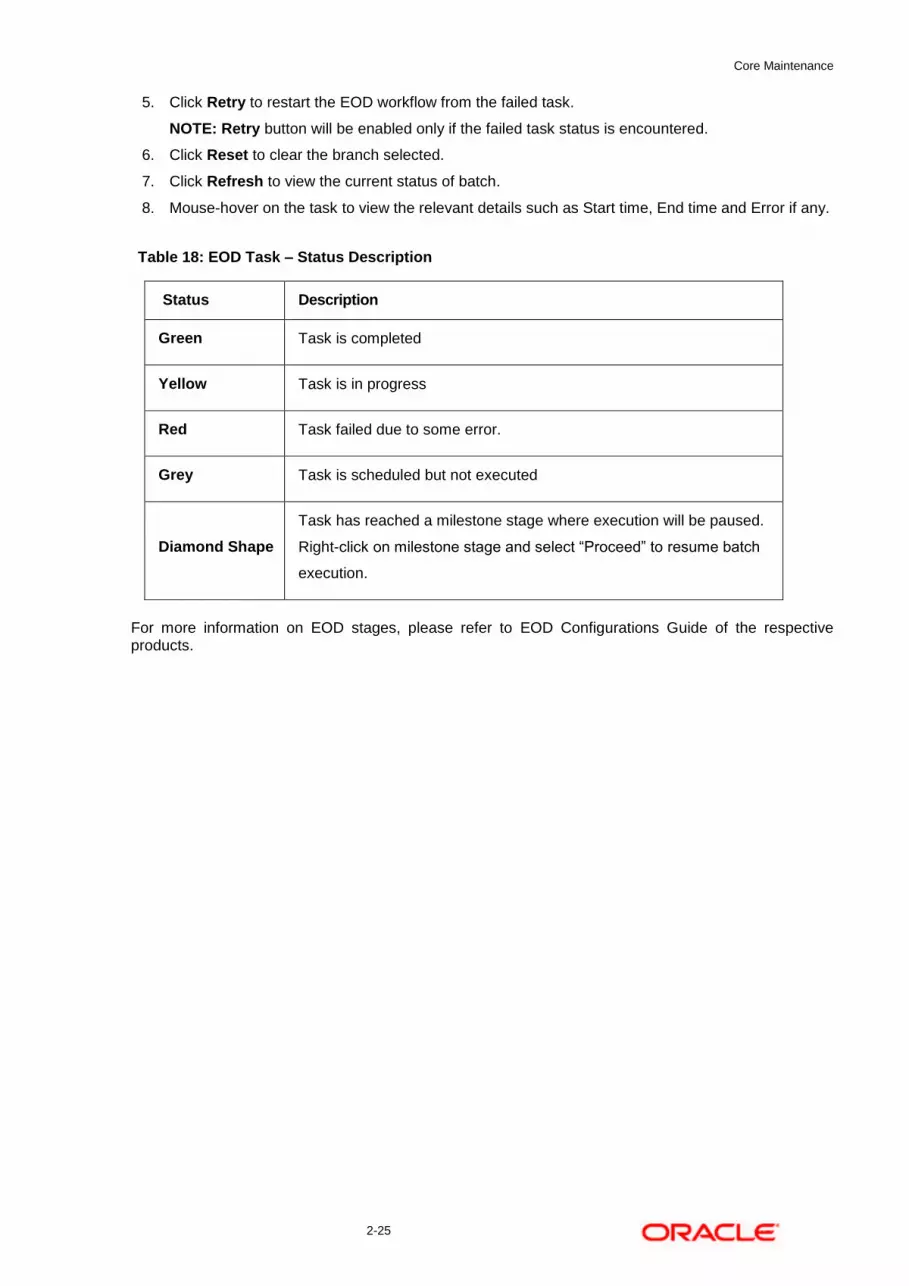
Table 18: EOD Task – Status Description
Status Description
Green Task is completed
Yellow Task is in progress
Red Task failed due to some error.
Grey Task is scheduled but not executed
Diamond Shape
Task has reached a milestone stage where execution will be paused.
Right-click on milestone stage and select “Proceed” to resume batch
execution.
For more information on EOD stages, please refer to EOD Configurations Guide of the respective products.

Core Maintenance
2-26
2.6 Country Code
You can configure a country code.
This section contains following subsections:
Country Code Summary
Country Code Maintenance
2.6.1 Country Code Summary
The summary screen provides a list of configured country code. You can configure a country code using the Country Code Maintenance. To process this screen, perform the following steps:
1. From Home screen, click Core Maintenance. Under Core Maintenance, click Country Code.
2. Under Country Code, click View Country Code.
The View Country Code screen is displayed.
Figure 12: View Country Code
For more information on fields, refer to the field description table below.
Table 19: View Country Code – Field Description
Field Description
Country Code Displays the country code details.
Country Name Displays the name of the country.
ISO Numeric Code Displays the ISO numeric code details of the country code.
Status Displays the status of the record.

Core Maintenance
2-27
2.6.2 Country Code Maintenance
The maintenance screen allows you to configure a country code. To process this screen, perform the following steps:
1. From Home screen, click Core Maintenance. Under Core Maintenance, click Country Code.
2. Under Country Code, click Create Country Code.
The Create Country Code screen is displayed.
Figure 13: Create Country Code
3. On Create Country Code screen, specify the fields. The fields which are marked with asterisk
are mandatory. For more information on fields, refer to the field description table below.
Table 20: Create Country Code – Field Description
Field Description
Country Code Specify the country code.
Country Name Specify the name of the country.
Alternate Country Code Specify the alternate country code.
Region Code Specify the region code.
ISO Country Code Specify the ISO country code.
ISO Code Specify the ISO code.
Limit Currency Specify the limit currency.
Overall Limit Specify the overall limit.
Core Maintenance
2-28
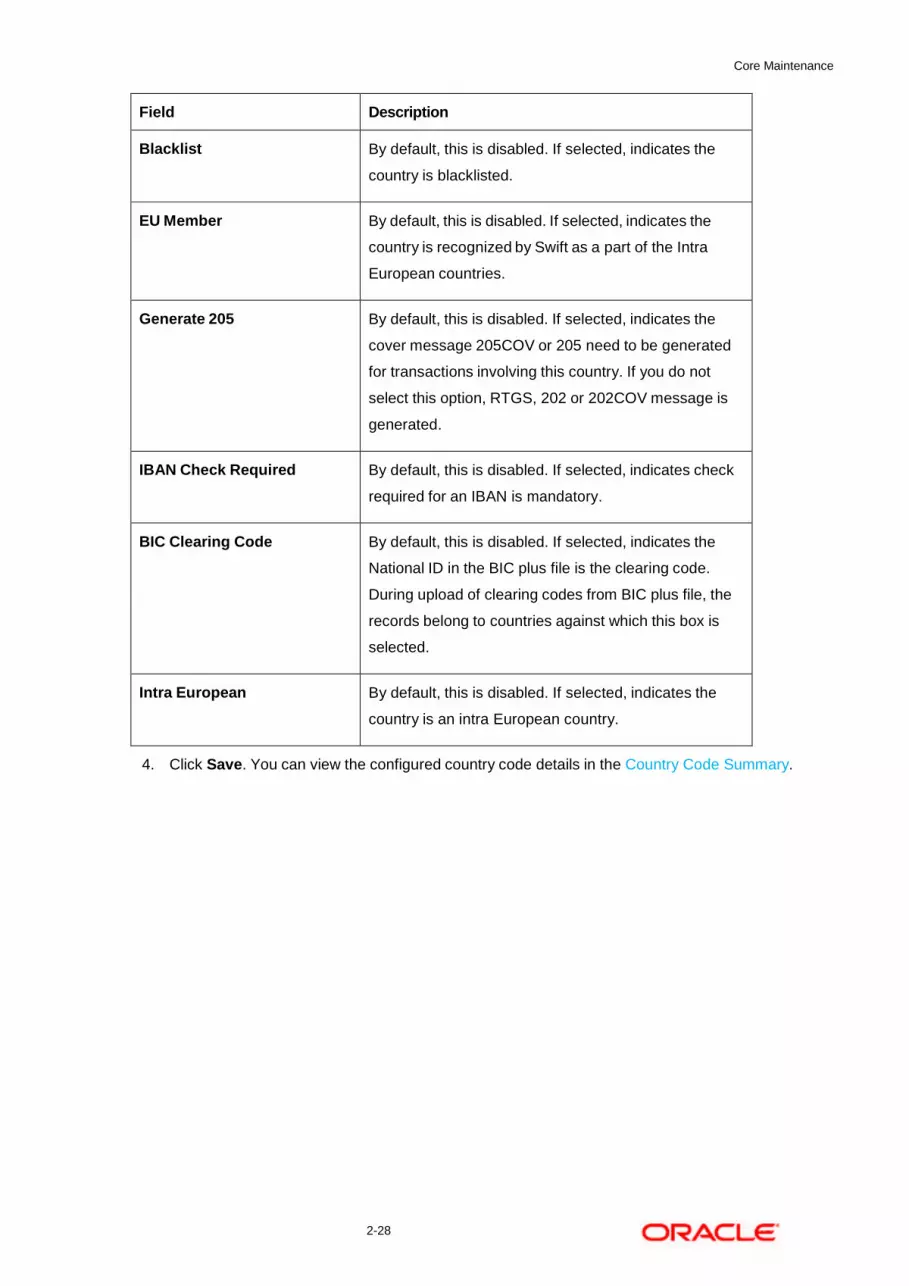
Field Description
Blacklist By default, this is disabled. If selected, indicates the
country is blacklisted.
EU Member By default, this is disabled. If selected, indicates the
country is recognized by Swift as a part of the Intra
European countries.
Generate 205 By default, this is disabled. If selected, indicates the
cover message 205COV or 205 need to be generated
for transactions involving this country. If you do not
select this option, RTGS, 202 or 202COV message is
generated.
IBAN Check Required By default, this is disabled. If selected, indicates check
required for an IBAN is mandatory.
BIC Clearing Code By default, this is disabled. If selected, indicates the
National ID in the BIC plus file is the clearing code.
During upload of clearing codes from BIC plus file, the
records belong to countries against which this box is
selected.
Intra European By default, this is disabled. If selected, indicates the
country is an intra European country.
4. Click Save. You can view the configured country code details in the Country Code Summary.

Core Maintenance
2-29
2.7 Currency Definition
You can define the attributes of the currencies in which the bank can deal. For each currency, you can define attributes such as, the SWIFT code for the currency, the country the currency belongs, the interest method, the spot days, the settlement days, and so on.
Currencies can be maintained only at the Head Office. The list of currencies are available to the branches based on the currencies defined for the country linked to the branch.
This section contains following subsections:
Currency Definition Summary
Currency Definition Maintenance
2.7.1 Currency Definition Summary
The summary screen provides a list of defined currency. You can define a currency using the Currency Definition Maintenance. To process this screen, perform the following steps:
1. From Home screen, click Core Maintenance. Under Core Maintenance, click Currency
Definition.
2. Under Currency Definition, click View Currency Definition.
The View Currency Definition screen is displayed.
Figure 14: View Currency Definition
For more information on fields, refer to the field description table below.
Table 21: View Currency Definition – Field Description
Field Description
Currency Code Displays the code of the currency.

Core Maintenance
2-30
Field Description
Currency Name Displays the name of the currency.
Alternate Currency Code Displays the code of the alternate currency.
Country Displays the country associated with the currency.
Maintenance Country Displays the maintenance country.
Status Displays the status of the record.
2.7.2 Currency Definition Maintenance
The maintenance screen allows you to define currency. To process this screen, perform the following steps:
1. From Home screen, click Core Maintenance. Under Core Maintenance, click Currency
Definition.
2. Under Currency Definition, click Create Currency Definition.
The Create Currency Definition screen is displayed.
Figure 15: Create Currency Definition

Core Maintenance
2-31
3. On Create Currency Definition screen, specify the fields. The fields which are marked with
asterisk are mandatory. For more information on fields, refer to the field description table below.
Table 22: Create Currency Definition – Field Description
Field Description
Currency Code Specify the currency code.
Maintenance Country Search and select the required maintenance country.
Currency Name Specify the name of the currency.
Alternate Currency Code Specify the code of the alternate currency.
Currency Type Specify the currency type.
ISO Numerical Currency
Code
Specify the International Standardization Organization
numerical currency code.
Currency Country Search and select the required currency country.
Currency Decimals Select the currency decimals.
Currency Interest Method Select the currency interest method from the drop-down
list.
Currency Spot Days Select the number of spot working days applicable for the
currency.
Foreign Exchange Netting
Days
Select the number of days for the foreign exchange
netting.
Settlement Message Days Select the settlement message days.
Position GL Search and select the required position GL.
Position Equivalent GL Search and select the required position equivalent GL.
Currency Tolerance Limit Specify the currency tolerance limit.
Index Base Currency Search and select the required index base currency.
Commodity Code By default, this is disabled. If selected, enables a
commodity code.
Cut Off Time Specify the cut off time details.

Core Maintenance
2-32
Field Description
Cut Off Days Select the cut off days for the payment transaction
involving the currency.
Cut Off Hour Select the hour of the day for the cut off.
Cut Off Min Select the minute of the hour for the cut off.
CLS Currency By default, this is disabled. If selected, allow customers of
your bank to settle their FX deals via the CLS (Continuous
Linked Settlements) Bank, you can identify the currency to
be a CLS Currency. FX deals in the CLS currency is only
eligible to be routed through the CLS bank.
Generate 103+ By default, this is disabled. If selected, generate outgoing
MT 103 messages in the MT 103 + format.
Index Flag By default, this is disabled. If selected, derives index rate
of the currency.
Euro Conversion Required By default, this is disabled. If selected, indicates the Euro
conversion is required.
New Cover Message Format
Required
By default, this is disabled. If selected, indicates a new
cover message format is required.
Validate Tag-50F By default, this is disabled. If selected, indicates
validations must be performed for the 50F details captured
for the ordering customer during contract input.
Rounding Specify the Rounding details of currency.
Currency Round Rule Select the currency round rule from the dropdown list.
Currency Round Unit Select the currency round unit.
Currency Format Mask Specify the currency format mask details.
Currency Format Mask Select one of the currency format.
Euro Type Specify the Euro Type details.
Currency Euro Type Select one of the currency Euro type.
Auto Exchange Rate Specify the Auto exchange rate details.

Core Maintenance
2-33
Field Description
Credit Auto Exchange Rate
Limit
Specify the credit automatic exchange rate limit.
Debit Auto Exchange Rate
Limit
Specify the debit automatic exchange rate limit.
Currency Country Mapping Specify the currency country mapping details.
Country Code Search and select the required country code.
Country Name Specify the name of the country.
Currency Code Search and select the required currency code.

Core Maintenance
2-34
Cut Off Time
Refers to the time by which all transactions involving a currency should be generated. For a
currency, you can indicate the cut-off hour and minute. This time should be expressed in the local
time of the bank.
The maintenance of a cut-off time for a currency has particular reference to outgoing funds
transfers involving it.
Example: The value date of a funds transfer transaction (incoming payment) involving USD, is 3rd
June 2018. The number of cut-off days specified for the currency is 2. This means that the
payment must be received on or before 1st June 2018. If the payment is received on 1st June, it
must be received before the cut-off time specified for USD.
If the USD cut-off time is 1200 hrs, if the payment is received on 1st June 2018, it must be
received before 1200 hrs.
4. Click Save. You can view the defined currency in the Currency Definition Summary.
2.8 Currency Exchange Rate
You can maintain exchange rates for a currency pair, the rates at which you buy and sell one currency for another. A bank determines its buy and sell rate for a currency pair by applying a spread (that is, its profit margin) to the mid-rate of the currency pair. Mid-rate is the basic rate at which a currency pair is exchanged.
The spread applied for a currency pair varies with the transaction type, while the mid-rate usually remains constant. Consequently, different rates are applicable to different transaction types. For instance dollars in currency are purchased at a certain rate, while USD traveler’s checks are bought at a different rate. You can define a rate type which you would like to associate with a transaction type example: CASH, TRAVCHKS, and so on.
You can define the mid-rate, buy and sell spread applicable to each rate type; the buy and sell exchange rates are computed by the system. Buy rates and sell rates can either be maintained by individual branches or can be input by the HO and propagated to all the branches.
If the branch for which the rate is being uploaded or maintained is the head office branch, then the rate would be copied to all those branches that have the same country code as the head office branch.
If the branch for which the rate is being uploaded or maintained is not the head office branch, but it has the same country code as the head office branch, then the rate being uploaded or maintained would be specific to the branch and would not be copied to any other branch.
If the branch for which the rate is being uploaded or maintained is not the head office branch and also does not have the same country code as the head office branch, then the rate being maintained would be copied to all the branches that has the same country code linked as the branch for which the rate is being maintained or uploaded.
This section contains following subsections:

Core Maintenance
2-35
Currency Exchange Rate Summary
Currency Exchange Rate Maintenance
2.8.1 Currency Exchange Rate Summary
The summary screen provides a list of configured currency exchange rates. You can configure a currency exchange rate using the Currency Exchange Rate Maintenance. To process this screen, perform the following steps:
1. From Home screen, click Core Maintenance. Under Core Maintenance, click Currency
Exchange Rate.
2. Under Currency Exchange Rate, click View Currency Exchange Rate.
The View Currency Exchange Rate screen is displayed.
Figure 16: View Currency Exchange Rate
For more information on fields, refer to the field description table below.
Table 23: View Currency Exchange Rate – Field Description
Field Description
Branch Code Displays the code of the branch.
Currency 1-2 Displays the currency associated with the branch code
Status Displays the status of the record.

Core Maintenance
2-36
2.8.2 Currency Exchange Rate Maintenance
The maintenance screen allows you to configure a currency exchange rate. To process this screen, perform the following steps:
1. From Home screen, click Core Maintenance. Under Core Maintenance, click Currency
Exchange Rate.
2. Under Currency Exchange Rate, click Create Currency Exchange Rate.
The Create Currency Exchange Rate screen is displayed.
Figure 17: Create Currency Exchange Rate
3. On Create Entity screen, specify the fields. The fields which are marked with asterisk are
mandatory. For more information on fields, refer to the field description table below.
Table 24: Create Currency Exchange Rate – Field Description
Field Description
Branch Code Search and select the required branch code.
Currency 1 Search and select the required currency.
Currency 2 Search and select the required currency.
Currency Rule Specify the currency rule details.
Rate Type Select a rate type from the drop-down list.
Buy Rate Specify the buy rate details.
Buy Spread Specify the buy spread details.

Core Maintenance
2-37
Field Description
Mid Rate Specify the mid-rate details.
Sale Spread Specify the sale spread details.
Sale Rate Specify the sale rate details.
Rate Date Select a rate date from the drop-down calendar.
4. Click Save. You can view the configured currency exchange rate details in the Currency Exchange
Rate Summary.
2.9 Currency Holiday Master
You can configure a yearly list of holidays, for the currencies, defined in the currency screen. The system uses the information maintained to check if any settlement involving a foreign currency (in the foreign Exchange, Money market, and Funds Transfer, Loans and Deposit modules) falls on that currency’s holiday. If yes, the system displays a message stating and ask the user for an override.
For any schedule or contract maturing at a future date, five years hence, you can input the future date, only if the calendar for that year is maintained. The currency holiday is maintained at the bank level by the Head Office.
This section contains following subsections:
Currency Holiday Master Summary
Currency Holiday Master Maintenance
2.9.1 Currency Holiday Master Summary
The summary screen provides a list of configured currency holiday. You can configure a currency holiday using the Currency Holiday Master Maintenance. To process this screen, perform the following steps:
1. From Home screen, click Core Maintenance. Under Core Maintenance, click Currency Holiday
Master.
2. Under Currency Holiday Master, click View Currency Holiday Master.
The View Currency Holiday Master screen is displayed.
Core Maintenance
2-38
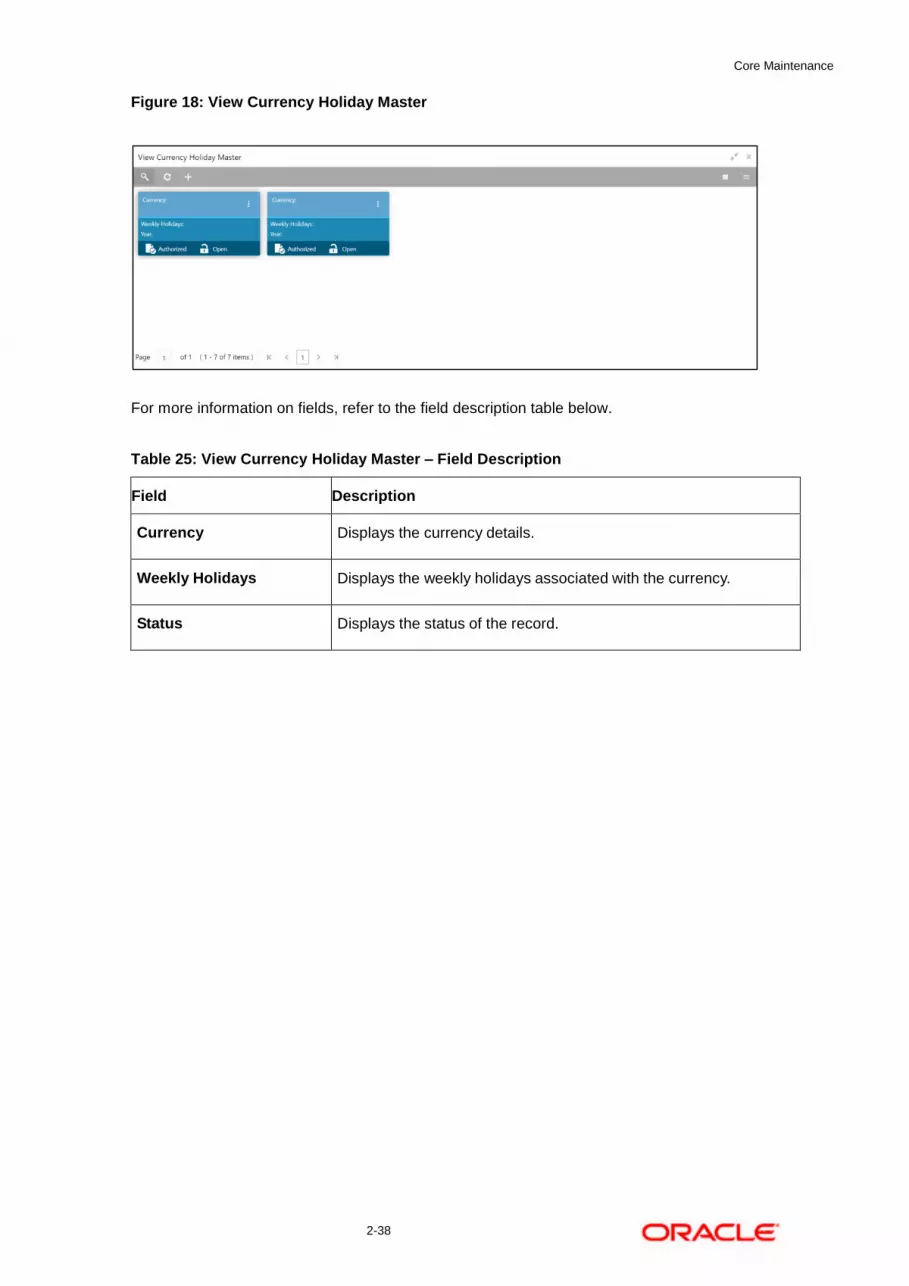
Figure 18: View Currency Holiday Master
For more information on fields, refer to the field description table below.
Table 25: View Currency Holiday Master – Field Description
Field Description
Currency Displays the currency details.
Weekly Holidays Displays the weekly holidays associated with the currency.
Status Displays the status of the record.

Core Maintenance
2-39
2.9.2 Currency Holiday Master Maintenance
The maintenance screen allows you to configure a currency holiday. To process this screen, perform the following steps:
1. From Home screen, click Core Maintenance. Under Core Maintenance, click Currency Holiday
Master.
2. Under Currency Holiday Master, click Create Currency Holiday Master.
The Create Currency Holiday Master screen is displayed.
Figure 19: Create Currency Holiday Master
3. On Create Currency Holiday Master screen, specify the fields. The fields which are marked with
asterisk are mandatory. For more information on fields, refer to the field description table below.
Table 26: Create Currency Holiday Master – Field Description
Field Description
Currency Search and select the required currency.
Year Specify the year details.
Weekly Holidays By default, this is disabled. If selected, indicates the weekly
holidays.
4. Select the dates using the calendar. The selected dates appear in blue highlighted circle.
5. Click Save. You can view the configured currency holidays in the Currency Holiday Master
Summary.

Core Maintenance
2-40
2.10 Currency Pair Definition
In the foreign exchange markets, the exchange rates for some currency pairs such as the USD-GBP or USD-JPY are easily obtainable, since these are frequently traded. The exchange rates of other currencies such as the ZAR-INR (South African Rand - Indian Rupee), which is not traded very often, is determined through a third currency. The third currency is usually the US dollar, since the US dollar is quoted in all trading centers.
You can define the static attributes of currency pairs for which a regular market quote is readily available. For other pairs, which do not have a regular market quote, you need to specify the third currency through which the system should compute the exchange rate. The currency pair is maintained at the bank level by the Head Office branch.
This section contains following subsections:
3.10.1 Currency Pair Definition Summary
3.10.2 Currency Pair Definition Maintenance
2.10.1 Currency Pair Definition Summary
The summary screen provides a list of define a currency pair. You can define a currency pair using the Currency Pair Definition Maintenance. To process this screen, perform the following steps:
1. From Home screen, click Core Maintenance. Under Core Maintenance, click Currency Pair
Definition.
2. Under Currency Pair Definition, click View Currency Pair Definition.
The View Currency Pair Definition screen is displayed.
Figure 20: View Currency Pair Definition
For more information on fields, refer to the field description table below.
Table 27: View Currency Pair Definition – Field Description
Core Maintenance
2-41
Field Description
Maintenance Country Displays the maintenance country details.
Number of Units Displays the number of units.
Currency 1-2 Displays the currency associated with the country.
Status Displays the status of the record.
2.10.2 Currency Pair Definition Maintenance
The maintenance screen allows you to define currency pair. To process this screen, perform the following steps:
1. From Home screen, click Core Maintenance. Under Core Maintenance, click Currency Pair
Definition.
2. Under Currency Pair Definition, click Create Currency Pair Definition.
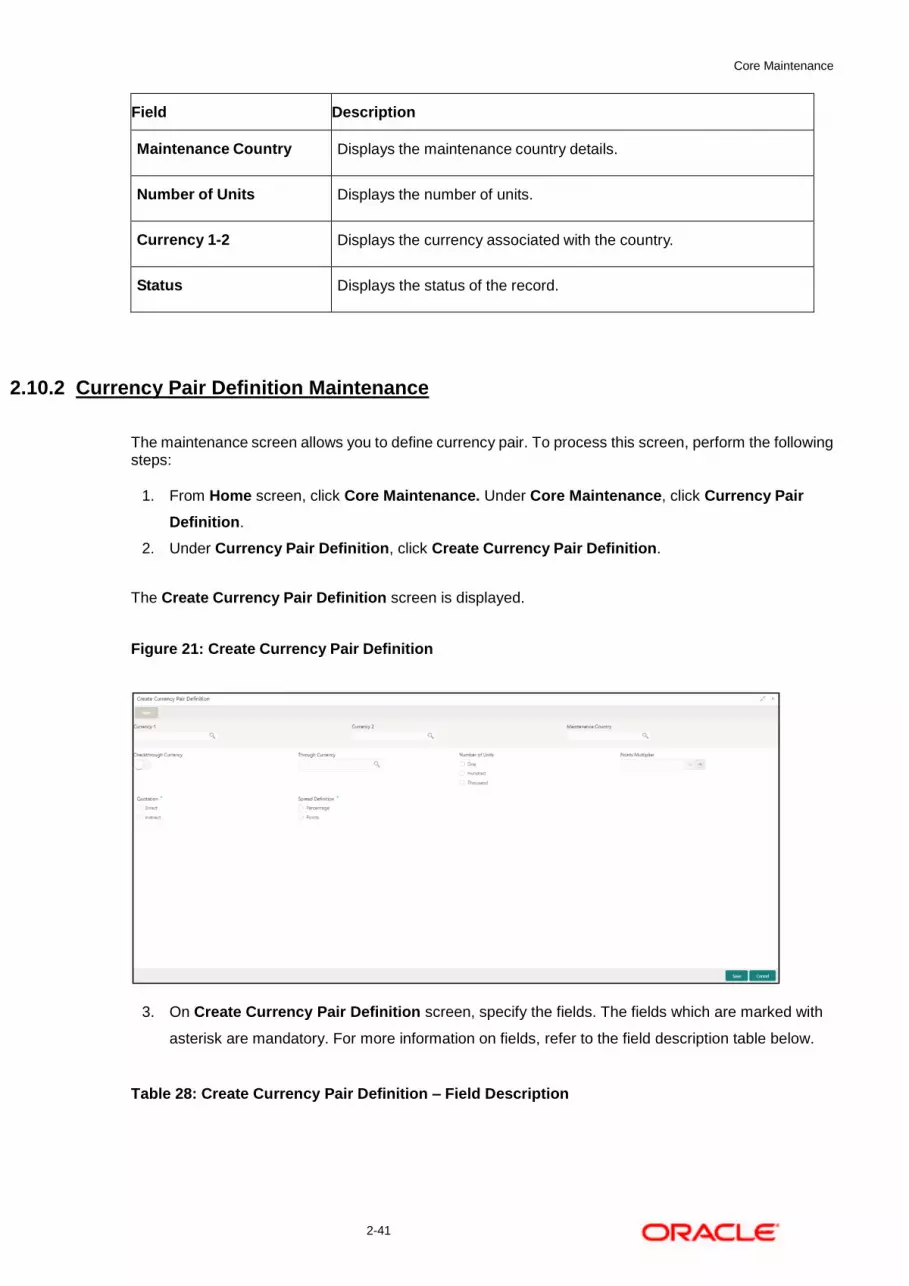
The Create Currency Pair Definition screen is displayed.
Figure 21: Create Currency Pair Definition
3. On Create Currency Pair Definition screen, specify the fields. The fields which are marked with
asterisk are mandatory. For more information on fields, refer to the field description table below.
Table 28: Create Currency Pair Definition – Field Description
Core Maintenance
2-42
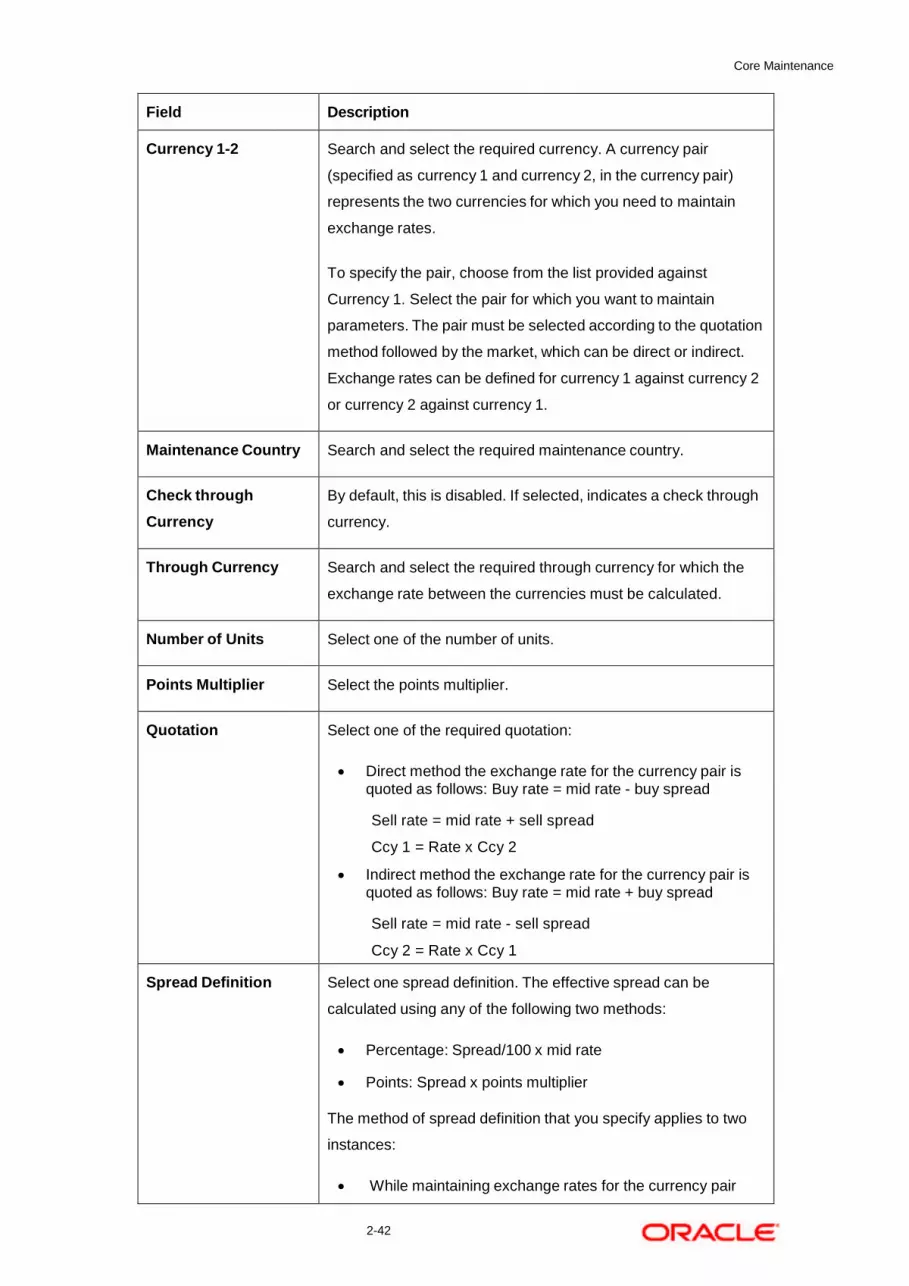
Field Description
Currency 1-2 Search and select the required currency. A currency pair
(specified as currency 1 and currency 2, in the currency pair)
represents the two currencies for which you need to maintain
exchange rates.
To specify the pair, choose from the list provided against
Currency 1. Select the pair for which you want to maintain
parameters. The pair must be selected according to the quotation
method followed by the market, which can be direct or indirect.
Exchange rates can be defined for currency 1 against currency 2
or currency 2 against currency 1.
Maintenance Country Search and select the required maintenance country.
Check through
Currency
By default, this is disabled. If selected, indicates a check through
currency.
Through Currency Search and select the required through currency for which the
exchange rate between the currencies must be calculated.
Number of Units Select one of the number of units.
Points Multiplier Select the points multiplier.
Quotation Select one of the required quotation:
Direct method the exchange rate for the currency pair is quoted as follows: Buy rate = mid rate - buy spread
Sell rate = mid rate + sell spread
Ccy 1 = Rate x Ccy 2
Indirect method the exchange rate for the currency pair is quoted as follows: Buy rate = mid rate + buy spread
Sell rate = mid rate - sell spread
Ccy 2 = Rate x Ccy 1
Spread Definition Select one spread definition. The effective spread can be
calculated using any of the following two methods:
Percentage: Spread/100 x mid rate
Points: Spread x points multiplier
The method of spread definition that you specify applies to two
instances:
While maintaining exchange rates for the currency pair

Core Maintenance
2-43
Field Description
While maintaining customer spread for the currency pair
4. Click Save. You can view the defined currency pair details in the Currency Pair Definition
Summary.
2.11 Currency Rate Type
You can configure a currency rate type.
This section contains following subsections:
Currency Rate Type Summary
Currency Rate Type Maintenance
2.11.1 Currency Rate Type Summary
The summary screen provides a list of configured currency rate type. You can configure a currency rate type using the Currency Rate Type Maintenance. To process this screen, perform the following steps:
1. From Home screen, click Core Maintenance. Under Core Maintenance, click Currency Rate
Type.
2. Under Currency Rate Type, click View Currency Rate Type.
The View Currency Rate Type screen is displayed.
Figure 22: View Currency Rate Type
For more information on fields, refer to the field description table below.
Table 29: View Currency Rate Type – Field Description
Field Description
Currency Rate Type Displays the currency rate type.
Description Displays additional information about the currency rate type.
Status Displays the status of the record.

Core Maintenance
2-44
2.11.2 Currency Rate Type Maintenance
The maintenance screen allows you to configure currency rate type. To process this screen, perform the following steps:
1. From Home screen, click Core Maintenance. Under Core Maintenance, click Currency Rate
Type.
2. Under Currency Rate Type, click Create Currency Rate Type.
The Create Currency Rate Type screen is displayed.
Figure 23: Create Currency Rate Type
3. On Create Currency Rate Type screen, specify the fields. The fields which are marked with
asterisk are mandatory. For more information on fields, refer to the field description table below.
Table 30: Create Currency Rate Type – Field Description
Field Description
Currency Rate Type Specify the currency rate type.
Currency Rate Type Description Specify additional information about the currency rate
type.
4. Click Save. You can view the configured currency rate type details in the Currency Rate Type
Summary.

Core Maintenance
2-45
2.12 Customer Access Group
You can configure a customer access group.
This section contains following subsections:
Customer Access Group Summary
Customer Access Group Maintenance
2.12.1 Customer Access Group Summary
The summary screen provides a list of configured customer access group. You can configure a customer access group using the Customer Access Group Maintenance. To process this screen, perform the following steps:
1. From Home screen, click Core Maintenance. Under Core Maintenance, click Customer Access
Group.
2. Under Customer Access Group, click View Customer Access Group.
The View Customer Access Group screen is displayed.
Figure 24: View Customer Access Group
For more information on fields, refer to the field description table below.
Table 31: View Customer Access Group – Field Description
Field Description
Access Group Displays the access group.
Access Group Description Displays additional information about the customer access
group.
Status Displays the status of the record.

Core Maintenance
2-46
2.12.2 Customer Access Group Maintenance
The maintenance screen allows you to configure a customer access group. To process this screen, perform the following steps:
1. From Home screen, click Core Maintenance. Under Core Maintenance, click Customer Access
Group.
2. Under Customer Access Group, click Create Customer Access Group.
The Create Customer Access Group screen is displayed.
Figure 25: Create Customer Access Group
3. On Create Customer Access Group screen, specify the fields. The fields which are marked with
asterisk are mandatory. For more information on fields, refer to the field description table below.
Table 32: Create Customer Access Group – Field Description
Field Description
Access Group Specify the access group.
Access Group Description Specify the additional information about the access
group.
4. Click Save. You can view the configured customer access group details in the Customer Access
Group Summary.
Note: Customer Access Group can be linked at the user level to restrict unauthorized access to Customer details. Refer Oracle Banking Security Management System User Guide for more details.

Core Maintenance
2-47
2.13 Customer Category
You can configure a customer category.
This section contains following subsections:
3.12.1 Customer Category Summary
3.12.2 Customer Category Maintenance
2.13.1 Customer Category Summary
The summary screen provides a list of configured customer category. You can configure a customer category using the Customer Category Maintenance. To process this screen, perform the following steps:
1. From Home screen, click Core Maintenance. Under Core Maintenance, click Customer
Category.
2. Under Customer Category, click View Customer Category.
The View Customer Category screen is displayed.
Figure 26: View Customer Category
For more information on fields, refer to the field description table below.
Table 33: View Customer Category – Field Description
Field Description
Customer Category Displays the customer category.
Description Displays additional information about the customer category.
Status Displays the status of the record.

Core Maintenance
2-48
2.14.1 Customer Category Maintenance
The maintenance screen allows you to configure a customer category. To process this screen, perform the following steps:
1. From Home screen, click Core Maintenance. Under Core Maintenance, click Customer
Category.
2. Under Customer Category, click Create Customer Category.
The Create Customer Category screen is displayed.
Figure 27: Create Customer Category
3. On Create Customer Category screen, specify the fields. The fields which are marked with
asterisk are mandatory. For more information on fields, refer to the field description table below.
Table 34: Create Customer Category – Field Description
Field Description
Customer Category Specify the customer category.
Customer Category
Description
Specify the additional information about the customer category.
Populate Changes By default, this is disabled. If selected, displays the changes.
4. Click Save. You can view the configured customer category details in the Customer Category
Summary.

Core Maintenance
2-49
2.15 ECA System
You can configure the External Credit Approval (ECA) system.
This section contains following subsections:
ECA System Summary
ECA System Maintenance
2.15.1 ECA System Summary
The summary screen provides a list of configured ECA system. You can configure the ECA system details using the ECA System Maintenance. To process this screen, perform the following steps:
1. From Home screen, click Core Maintenance. Under Core Maintenance, click ECA System.
2. Under ECA System, click View ECA System.
The View ECA System screen is displayed.
Figure 28: View ECA System
For more information on fields, refer to the field description table below.
Table 35: View ECA System – Field Description
Field Description
Description Displays any additional information of the ECA system.
ECA System Displays the name of the ECA system.
Status Displays the status of the record.

Core Maintenance
2-50
2.15.2 ECA System Maintenance
The maintenance screen allows you to configure ECA system details. To process this screen, perform the following steps:
1. From Home screen, click Core Maintenance. Under Core Maintenance, click ECA System.
2. Under ECA System, click Create ECA System.
The Create ECA System screen is displayed.
Figure 29: Create ECA System
3. On Create ECA System screen, specify the fields. The fields which are marked with asterisk are
mandatory. For more information on fields, refer to the field description table below.
Table 36: Create ECA System – Field Description
Field Description
Source System Specify the source system.
Description Specify the additional information about the ECA system.
4. Click Save. You can view the configure ECA system details in the ECA System Summary.

Core Maintenance
2-51
2.16 External Bank Parameters
You can configure bank level parameters.
This section contains following subsections:
External Bank Parameters Summary
External Bank Parameters Maintenance
2.16.1 External Bank Parameters Summary
The summary screen provides a list of configured external bank parameters. You can configure the external bank parameters using the External Bank Parameters Maintenance. To process this screen, perform the following steps:
1. From Home screen, click Core Maintenance. Under Core Maintenance, click External Bank
Parameters.
2. Under External Bank Parameters, click View External Bank Parameters.
The View External Bank Parameters screen is displayed.
Figure 30: View External Bank Parameters
For more information on fields, refer to the field description table below.
Table 37: View External Bank Parameters – Field Description
Field Description
Head Office Branch Displays the head office branch details.
Maker Displays the name of the user who has configured the bank details.
Once Authorized Indicates if the record is authorized once or not.
Bank Code Displays the code of the bank.
Bank Name Displays the name of the bank.
Status Displays the status of the record.

Core Maintenance
2-52
2.16.2 External Bank Parameters Maintenance
The maintenance screen allows you to configure external bank parameters. The Bank Code will be auto-created for an entity when the entity is created. Please refer the View External Bank Parameters screen for the bank code created. To process this screen, perform the following steps:
1. From Home screen, click Core Maintenance. Under Core Maintenance, click External Bank
Parameters.
2. Under External Bank Parameters, click Create External Bank Parameters.
The Create External Bank Parameters screen is displayed.
Figure 31: Create External Bank Parameters
3. On Create External Bank Parameters screen, specify the fields. The fields which are marked
with asterisk are mandatory. For more information on fields, refer to the field description table
below.
Table 38: Create External Bank Parameters – Field Description
Field Description
Bank Code Specify the code for the bank.
Bank Name Specify the name of the bank.
Head Office Branch Search and select the required head office branch.
Branch Description Based on the Head Office Branch selected, the information is
auto-populated.

Core Maintenance
2-53
Field Description
Number of Days to Forget
Customer
Specify the number of days to inactive/forget the customer.
4. Click Save. You can view the configure core bank parameter details in the External Bank
Parameters Summary.
2.17 External Branch Parameters
You can configure branch level parameters.
This section contains following subsections:
External Branch Parameters Summary
External Branch Parameters Maintenance
2.17.1 External Branch Parameters Summary
The summary screen provides a list of configured external branch parameters. You can configure the external branch parameters using the External Branch Parameters Maintenance. To process this screen, perform the following steps:
1. From Home screen, click Core Maintenance. Under Core Maintenance, click External Branch
Parameters.
2. Under External Branch Parameters, click View External Branch Parameters.
The View External Branch Parameters screen is displayed.
Figure 32: View External Branch Parameters

Core Maintenance
2-54
For more information on fields, refer to the field description table below.
Table 39: View External Branch Parameters – Field Description
Field Description
Branch Code Displays the code of the branch associated with the bank.
Branch Name Displays the name of the branch associated with the bank.
Local Currency Displays the local currency details.
Source Branch Code Displays the code of the source branch.
Status Displays the status of the record.
Note: The Branch Parameters for the Head Office (HO) Branch of the entity will get auto-created when the entity is defined in the Multi-Entity Maintenance. Further changes/configuration of the HO Branch can be performed by modifying the record for the HO Branch’s Parameterrs
2.17.2 External Branch Parameters Maintenance
The maintenance screen allows you to configure the branch parameters. To process this screen, perform the following steps:
1. From Home screen, click Core Maintenance. Under Core Maintenance, click External Branch
Parameters.
2. Under External Branch Parameters, click Create External Branch Parameters.
The Create External Branch Parameters screen is displayed.
Figure 33: Create External Branch Parameters

Core Maintenance
2-55
3. On Create External Branch Parameters screen, specify the fields. The fields which are marked
with asterisk are mandatory. For more information on fields, refer to the field description table
below.
Table 40: Create External Branch Parameters – Field Description
Field Description
Branch Details Specify the branch details.
Branch Code Specify a branch code.
Branch Name Specify a name for the branch.
Local Currency Search and select the required local currency.
Source System Search and select the required source system.
Source Branch Code Specify a source branch code.
Branch Address Specify the branch address details.
Address Line 1-3 Specify the address details.
Other Details Specify the other details.
Host Code Search and select the required host code.
Country Code Based on the Host Code selected, the information is auto-populated.
Host Name Specify the name for the host.
Walk-in Customer Search and select the required walk-in customer.
Weekly Holiday 1-2 Select a weekly holiday from the dropdown list.
Note
There are two days of weekly holiday depending on the geographical
zone.
Auto Authorization: By default, it is disabled. If selected, the record is automatically authorized.
Report DSN: Specify the details of the report DSN.
Swift Address Specify the swift address details.
SWIFT Address Search and select the required SWIFT address.
Default BIC If selected, indicates the selected SWIFT address as the default BIC.
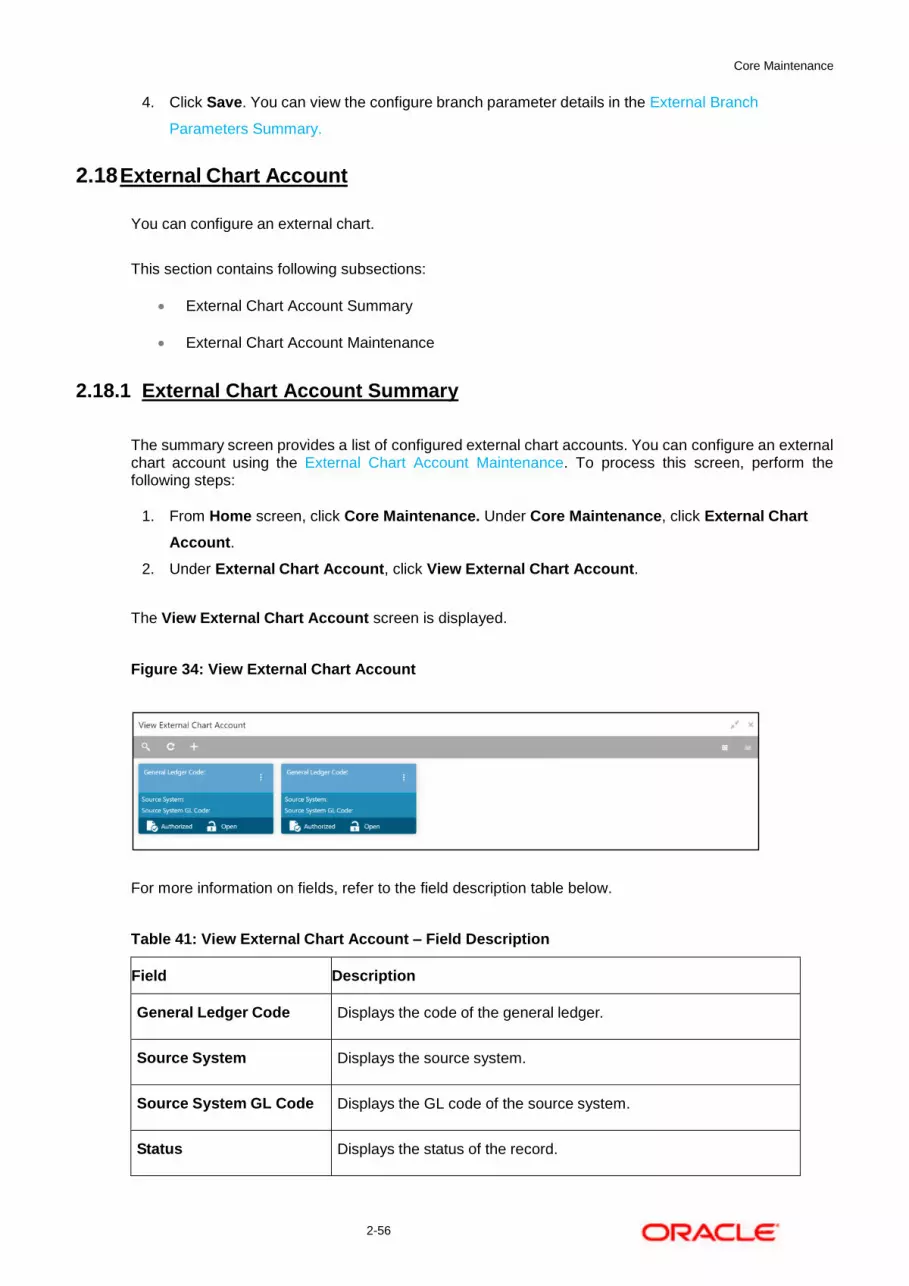
Core Maintenance
2-56
4. Click Save. You can view the configure branch parameter details in the External Branch
Parameters Summary.
2.18 External Chart Account
You can configure an external chart.
This section contains following subsections:
External Chart Account Summary
External Chart Account Maintenance
2.18.1 External Chart Account Summary
The summary screen provides a list of configured external chart accounts. You can configure an external chart account using the External Chart Account Maintenance. To process this screen, perform the following steps:
1. From Home screen, click Core Maintenance. Under Core Maintenance, click External Chart
Account.
2. Under External Chart Account, click View External Chart Account.
The View External Chart Account screen is displayed.
Figure 34: View External Chart Account
For more information on fields, refer to the field description table below.
Table 41: View External Chart Account – Field Description
Field Description
General Ledger Code Displays the code of the general ledger.
Source System Displays the source system.
Source System GL Code Displays the GL code of the source system.
Status Displays the status of the record.

Core Maintenance
2-57
2.18.2 External Chart Account Maintenance
The maintenance screen allows you to configure external chart accounts. To process this screen, perform the following steps:
1. From Home screen, click Core Maintenance. Under Core Maintenance, click External Chart
Account.
2. Under External Chart Account, click Create External Chart Account.
The Create External Chart Account screen is displayed.
Figure 35: Create External Chart Account
3. On Create External Chart Account screen, specify the fields. For more information on fields,
refer to the field description table below.
Table 42: Create External Chart Account – Field Description
Field Description
General Ledger Code Specify the general ledger code.
General Ledger
Description
Specify the additional information about the general ledger.
Source System Search and select the required source system.
Source System GL Code Specify the source system GL code.
Category Select the category from the drop-down list.
Blocked By default, this is disabled. If selected, indicates the external
chart account is blocked.

Core Maintenance
2-58
4. Click Save. You can view the configured external chart details in the External Chart Account
Summary.
2.19 External Customer
You can configure the external customer details.
This section contains following subsections:
External Customer Summary
External Customer Maintenance
2.19.1 External Customer Summary
The summary screen provides a list of configured external customer details. You can configure the external customers using the External Customer Maintenance. To process this screen, perform the following steps:
1. From Home screen, click Core Maintenance. Under Core Maintenance, click External
Customer.
2. Under External Customer, click View External Customer.
The View External Customer screen is displayed.
Figure 36: View External Customer
For more information on fields, refer to the field description table below.
Table 43: View External Customer – Field Description
Field Description
Customer Name Displays the name of the customer.
Source System Displays the source system details.

Core Maintenance
2-59
Field Description
Customer Type Displays the type of the customer.
Customer Number Displays the customer number associated with the customer name.
Source Customer ID Displays the source of the customer ID associated with the customer name.
Status Displays the status of the record.
2.19.2 External Customer Maintenance
The maintenance screen allows you to configure the external customer details. To process this screen, perform the following steps:
1. From Home screen, click Core Maintenance. Under Core Maintenance, click External
Customer.
2. Under External Customer, click Create External Customer.
The Create External Customer screen is displayed.
Figure 37: Create External Customer
3. On Create External Customer screen, specify the fields. The fields which are marked with
asterisk are mandatory. For more information on fields, refer to the field description table below.
Table 44: Create External Customer – Field Description
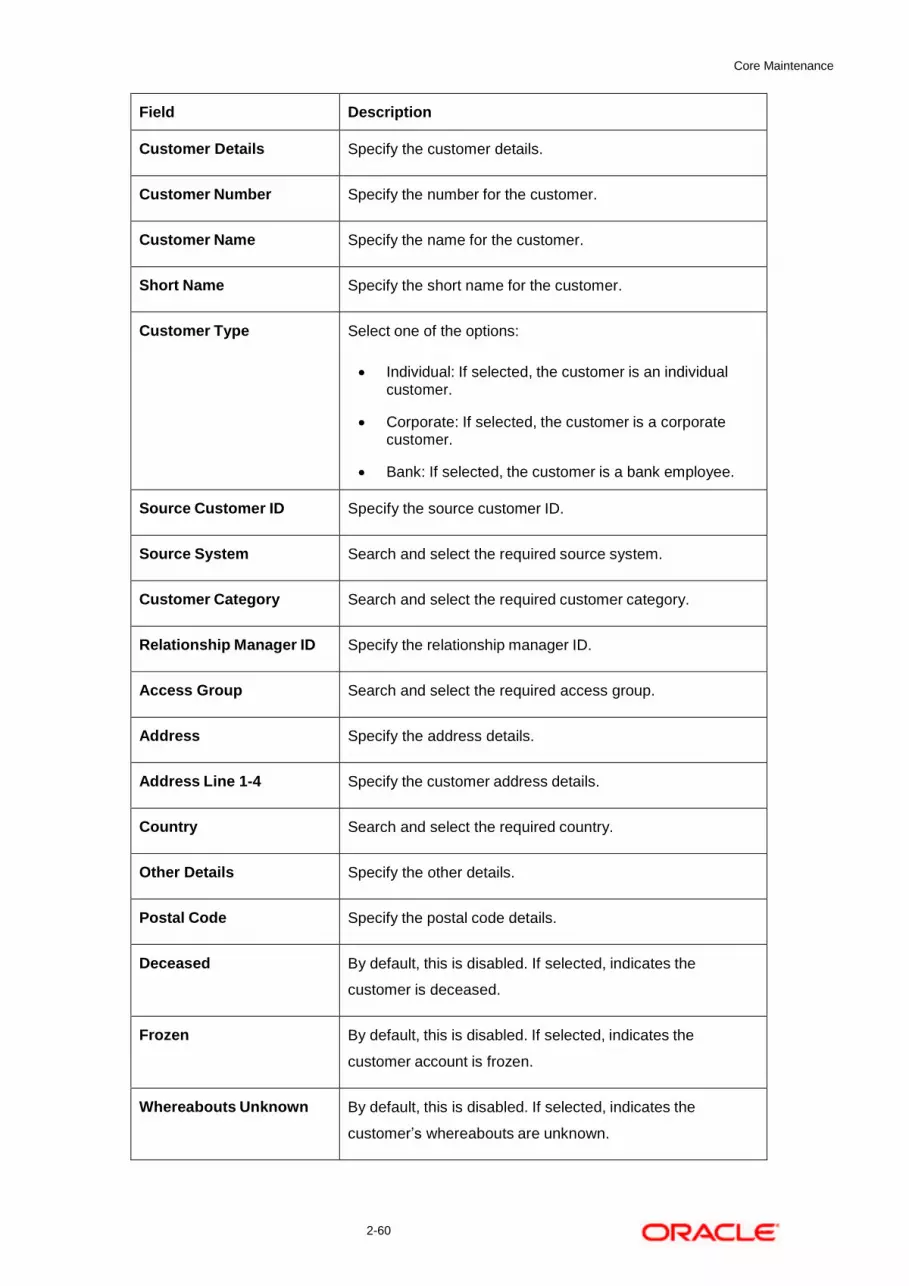
Core Maintenance
2-60
Field Description
Customer Details Specify the customer details.
Customer Number Specify the number for the customer.
Customer Name Specify the name for the customer.
Short Name Specify the short name for the customer.
Customer Type Select one of the options:
Individual: If selected, the customer is an individual customer.
Corporate: If selected, the customer is a corporate customer.
Bank: If selected, the customer is a bank employee.
Source Customer ID Specify the source customer ID.
Source System Search and select the required source system.
Customer Category Search and select the required customer category.
Relationship Manager ID Specify the relationship manager ID.
Access Group Search and select the required access group.
Address Specify the address details.
Address Line 1-4 Specify the customer address details.
Country Search and select the required country.
Other Details Specify the other details.
Postal Code Specify the postal code details.
Deceased By default, this is disabled. If selected, indicates the
customer is deceased.
Frozen By default, this is disabled. If selected, indicates the
customer account is frozen.
Whereabouts Unknown By default, this is disabled. If selected, indicates the
customer’s whereabouts are unknown.

Core Maintenance
2-61
Field Description
Sanction Check Required By default, this is disabled. If selected, indicates the sanction
check is required.
Walk-in Customer By default, this is disabled. If selected, indicates a walk-in
customer.
Staff By default, this is disabled. If selected, indicates a staff
customer.
Language Search and select the required language.
Nationality Search and select the required nationality.
4. Click Save. You can view the configured external customer details in the External Customer
Summary. In addition, the external customers can be directly replicated from the host system
using service API.
2.20 External Customer Account
You can configure the external customer account details.
This section contains following subsections:
External Customer Account Summary
External Customer Account Maintenance
2.20.1 External Customer Account Summary
The summary screen provides a list of configured external customer accounts. You can configure the external customer accounts using the External Customer Account Maintenance. To process this screen, perform the following steps:
1. From Home screen, click Core Maintenance. Under Core Maintenance, click External
Customer Account.
2. Under External Customer Account, click View External Customer Account.
The View External Customer Account screen is displayed.
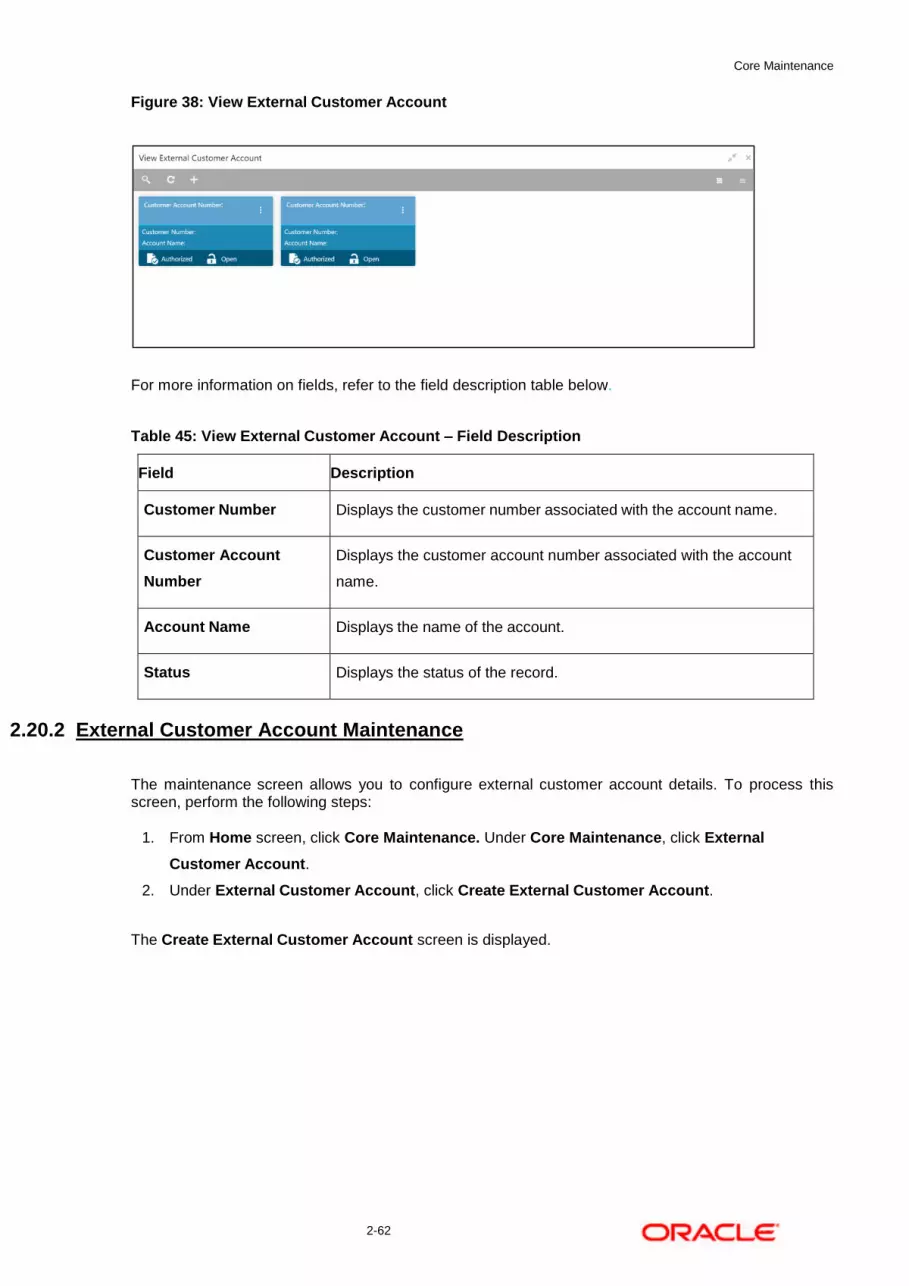
Core Maintenance
2-62
Figure 38: View External Customer Account
For more information on fields, refer to the field description table below.
Table 45: View External Customer Account – Field Description
Field Description
Customer Number Displays the customer number associated with the account name.
Customer Account
Number
Displays the customer account number associated with the account
name.
Account Name Displays the name of the account.
Status Displays the status of the record.
2.20.2 External Customer Account Maintenance
The maintenance screen allows you to configure external customer account details. To process this screen, perform the following steps:
1. From Home screen, click Core Maintenance. Under Core Maintenance, click External
Customer Account.
2. Under External Customer Account, click Create External Customer Account.
The Create External Customer Account screen is displayed.
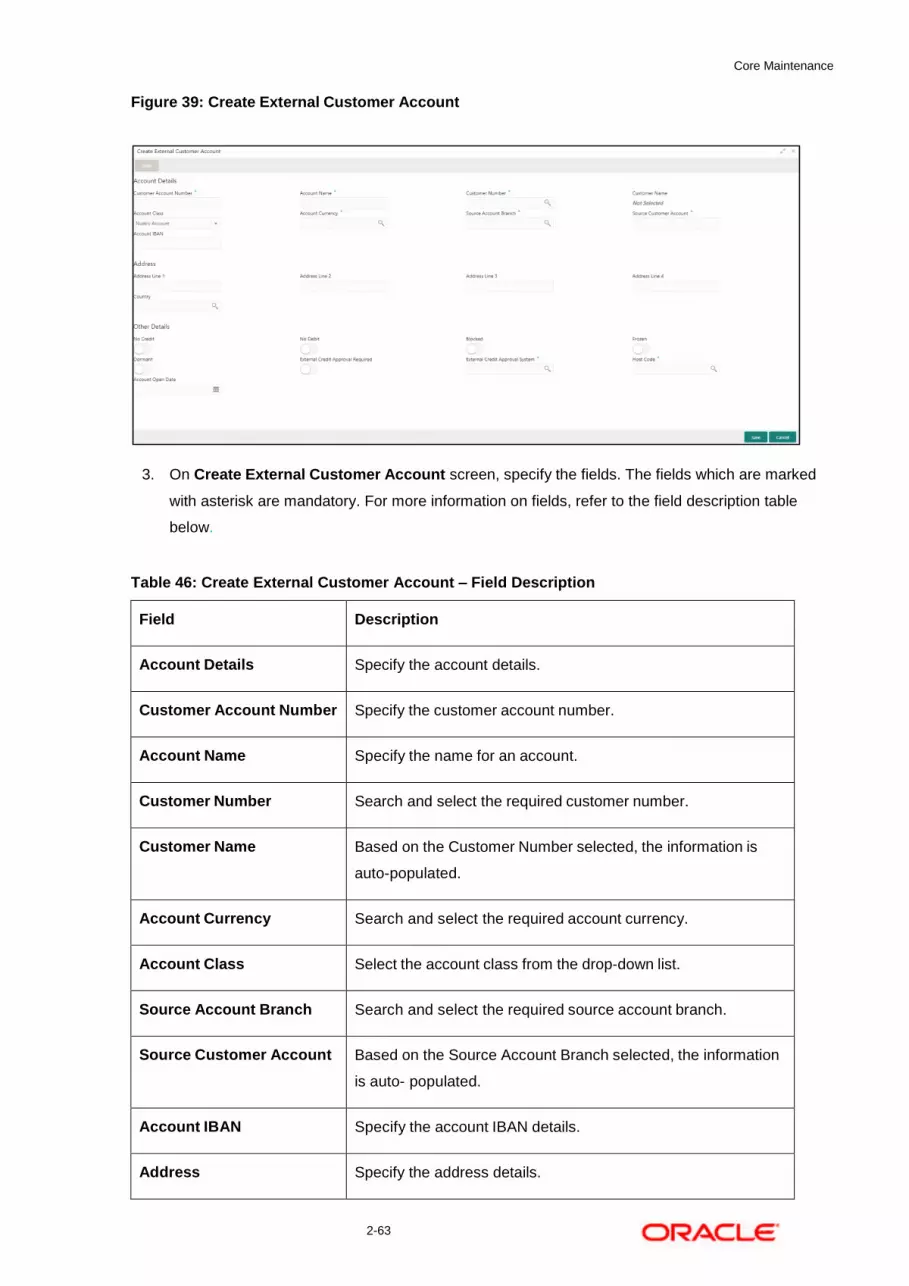
Core Maintenance
2-63
Figure 39: Create External Customer Account
3. On Create External Customer Account screen, specify the fields. The fields which are marked
with asterisk are mandatory. For more information on fields, refer to the field description table
below.
Table 46: Create External Customer Account – Field Description
Field Description
Account Details Specify the account details.
Customer Account Number Specify the customer account number.
Account Name Specify the name for an account.
Customer Number Search and select the required customer number.
Customer Name Based on the Customer Number selected, the information is
auto-populated.
Account Currency Search and select the required account currency.
Account Class Select the account class from the drop-down list.
Source Account Branch Search and select the required source account branch.
Source Customer Account Based on the Source Account Branch selected, the information
is auto- populated.
Account IBAN Specify the account IBAN details.
Address Specify the address details.
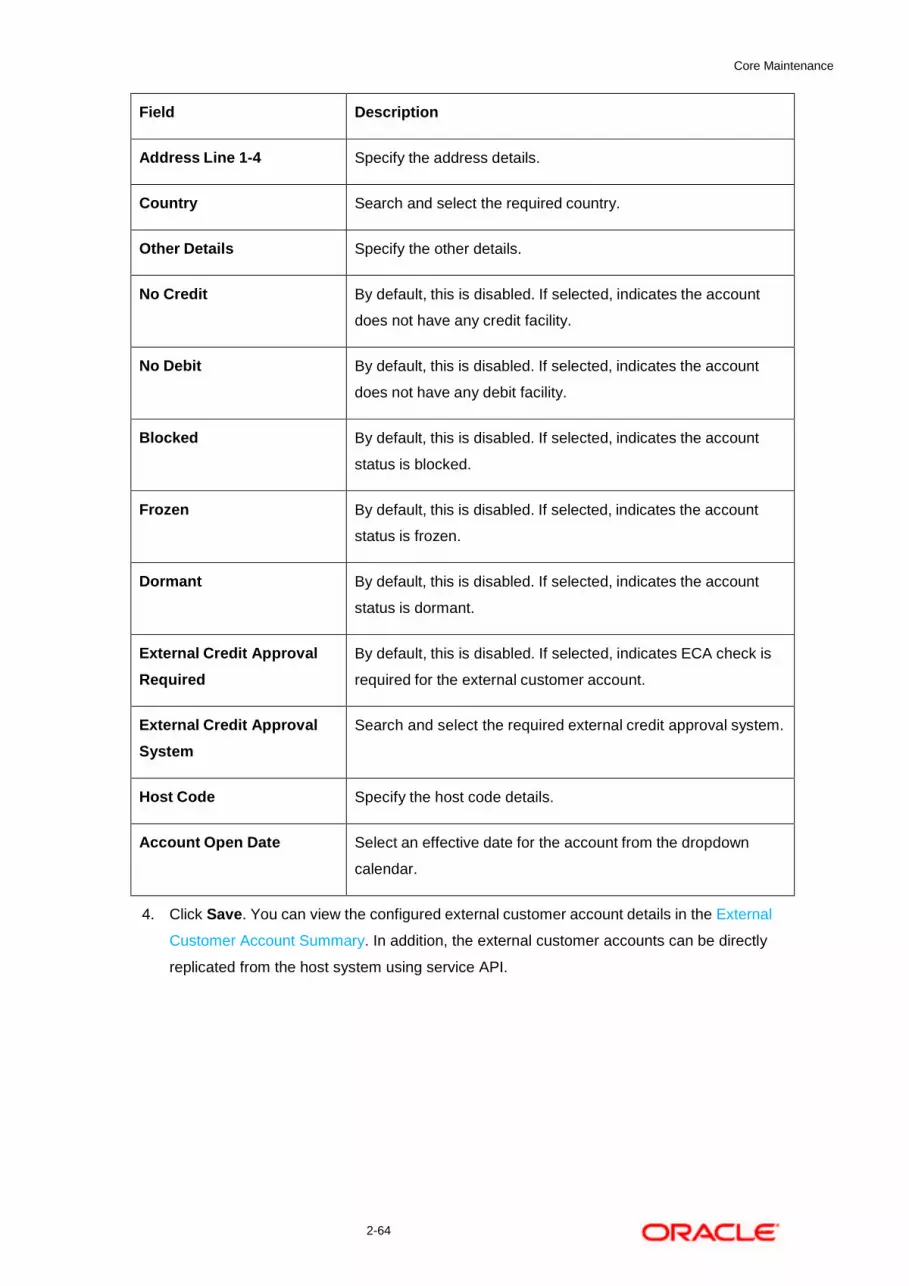
Core Maintenance
2-64
Field Description
Address Line 1-4 Specify the address details.
Country Search and select the required country.
Other Details Specify the other details.
No Credit By default, this is disabled. If selected, indicates the account
does not have any credit facility.
No Debit By default, this is disabled. If selected, indicates the account
does not have any debit facility.
Blocked By default, this is disabled. If selected, indicates the account
status is blocked.
Frozen By default, this is disabled. If selected, indicates the account
status is frozen.
Dormant By default, this is disabled. If selected, indicates the account
status is dormant.
External Credit Approval
Required
By default, this is disabled. If selected, indicates ECA check is
required for the external customer account.
External Credit Approval
System
Search and select the required external credit approval system.
Host Code Specify the host code details.
Account Open Date Select an effective date for the account from the dropdown
calendar.
4. Click Save. You can view the configured external customer account details in the External
Customer Account Summary. In addition, the external customer accounts can be directly
replicated from the host system using service API.
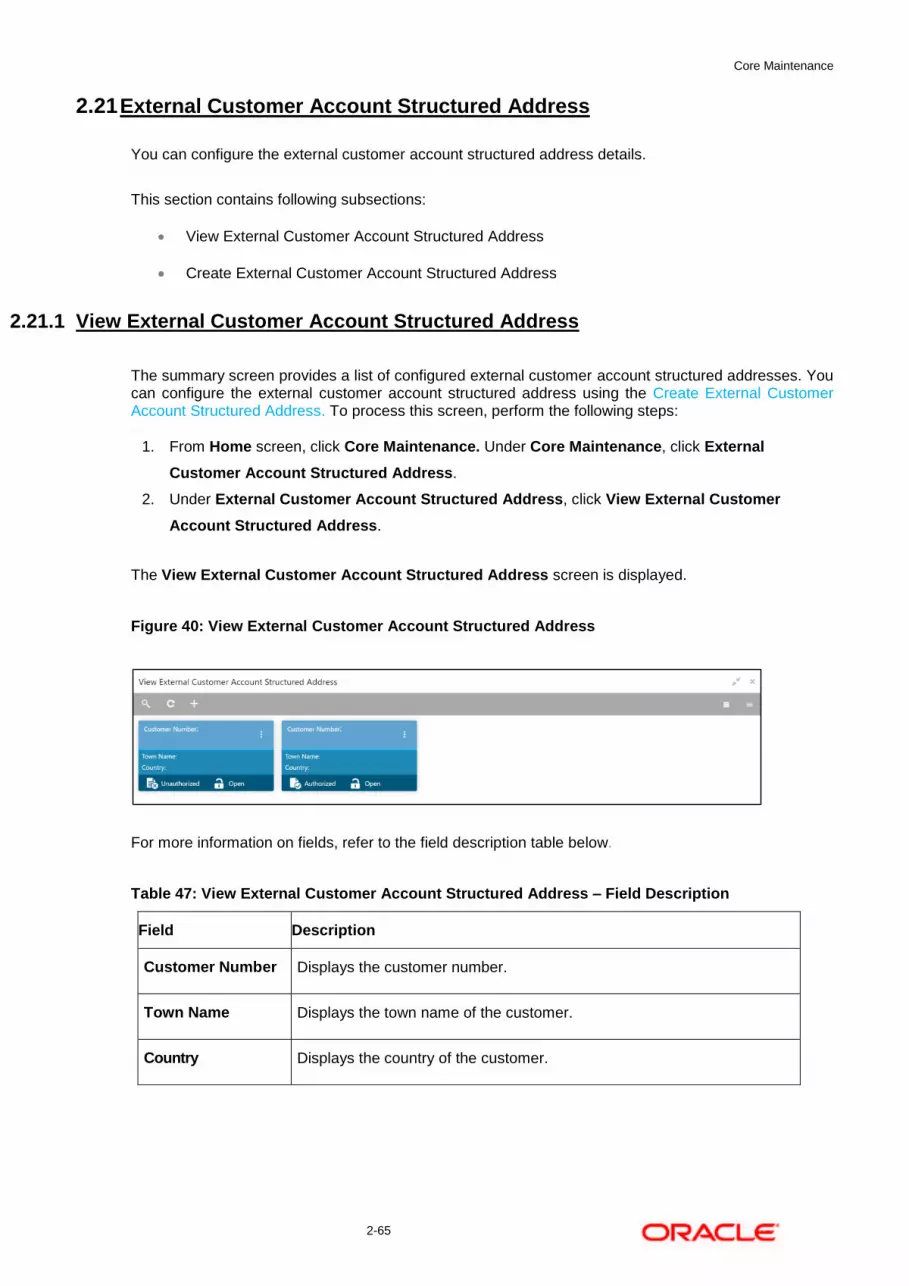
Core Maintenance
2-65
2.21 External Customer Account Structured Address
You can configure the external customer account structured address details.
This section contains following subsections:
View External Customer Account Structured Address
Create External Customer Account Structured Address
2.21.1 View External Customer Account Structured Address
The summary screen provides a list of configured external customer account structured addresses. You can configure the external customer account structured address using the Create External Customer Account Structured Address. To process this screen, perform the following steps:
1. From Home screen, click Core Maintenance. Under Core Maintenance, click External
Customer Account Structured Address.
2. Under External Customer Account Structured Address, click View External Customer
Account Structured Address.
The View External Customer Account Structured Address screen is displayed.
Figure 40: View External Customer Account Structured Address
For more information on fields, refer to the field description table below.
Table 47: View External Customer Account Structured Address – Field Description
Field Description
Customer Number Displays the customer number.
Town Name Displays the town name of the customer.
Country Displays the country of the customer.
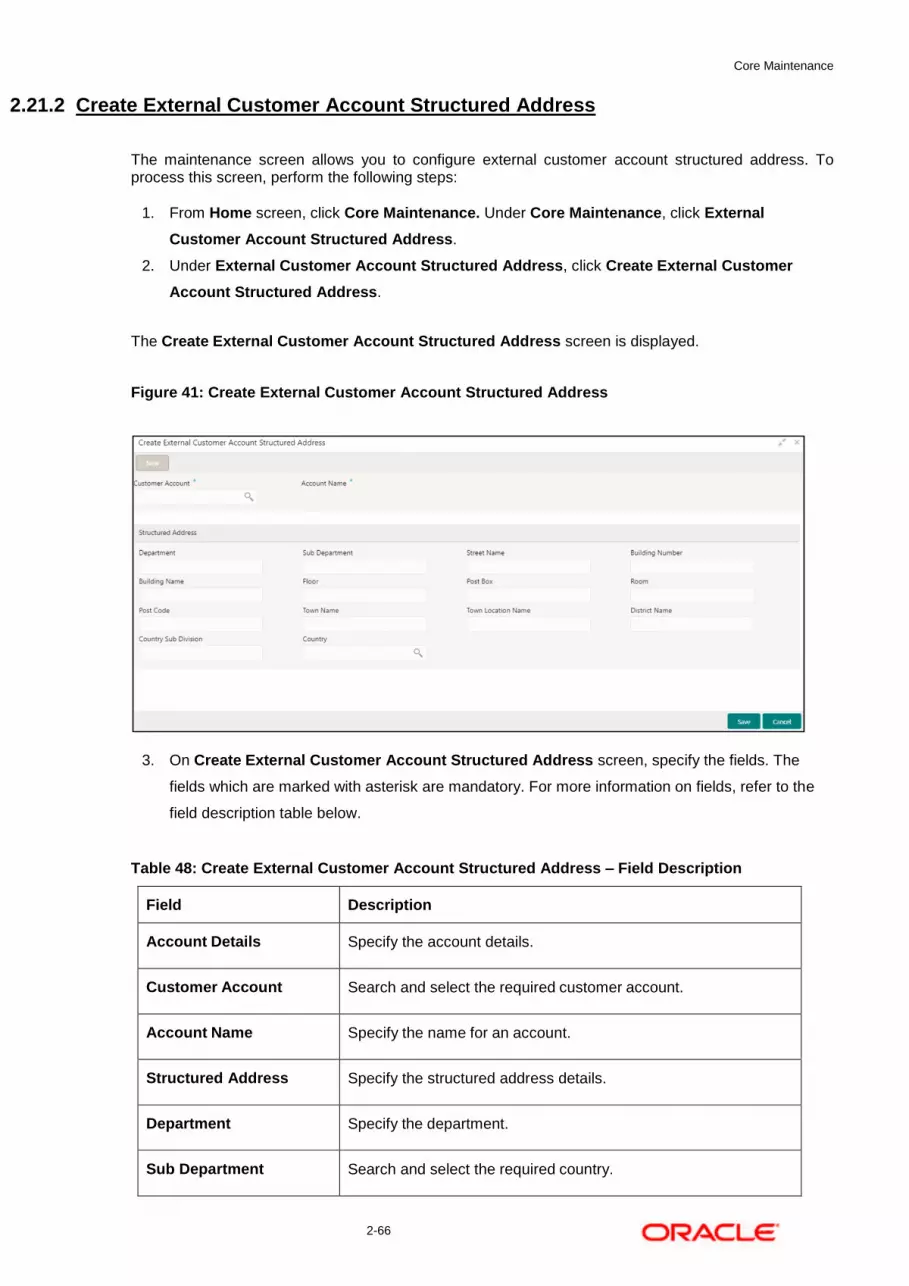
Core Maintenance
2-66
2.21.2 Create External Customer Account Structured Address
The maintenance screen allows you to configure external customer account structured address. To process this screen, perform the following steps:
1. From Home screen, click Core Maintenance. Under Core Maintenance, click External
Customer Account Structured Address.
2. Under External Customer Account Structured Address, click Create External Customer
Account Structured Address.
The Create External Customer Account Structured Address screen is displayed.
Figure 41: Create External Customer Account Structured Address
3. On Create External Customer Account Structured Address screen, specify the fields. The
fields which are marked with asterisk are mandatory. For more information on fields, refer to the
field description table below.
Table 48: Create External Customer Account Structured Address – Field Description
Field Description
Account Details Specify the account details.
Customer Account Search and select the required customer account.
Account Name Specify the name for an account.
Structured Address Specify the structured address details.
Department Specify the department.
Sub Department Search and select the required country.

Core Maintenance
2-67
Field Description
Street Name Specify the street name.
Building Number Specify the building number.
Building Name Specify the building name.
Floor Specify the floor.
Post Box Specify the post box details.
Room Specify the room number.
Post Code Specify the post code.
Town Name Specify the town name.
Town Location Name Specify the town location name.
District Name Specify the district name.
Country Sub Division Specify the country sub division.
Country Specify the country name.
4. Click Save. You can view the configured external customer structured address details in View
External Customer Account Structured Address.
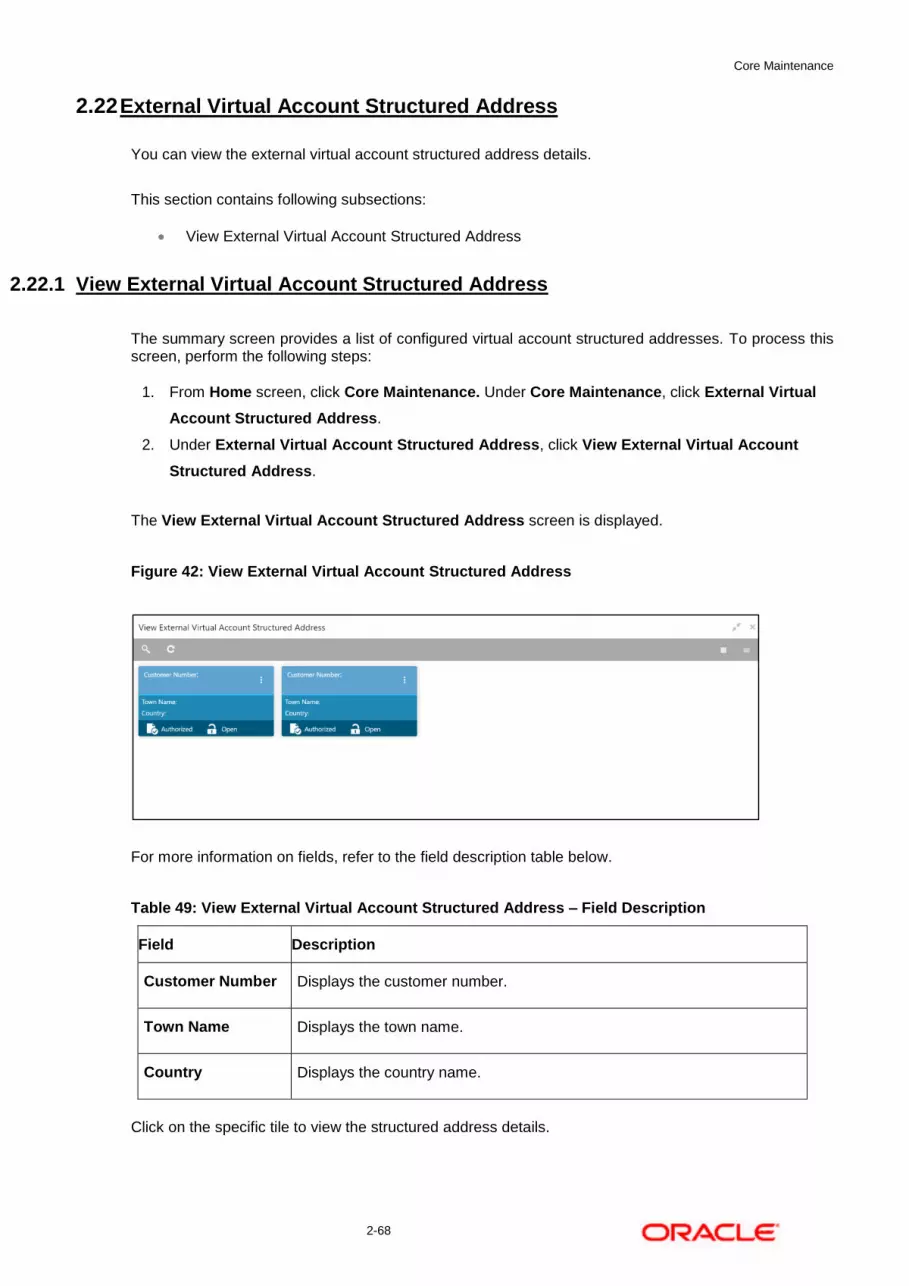
Core Maintenance
2-68
2.22 External Virtual Account Structured Address
You can view the external virtual account structured address details.
This section contains following subsections:
View External Virtual Account Structured Address
2.22.1 View External Virtual Account Structured Address
The summary screen provides a list of configured virtual account structured addresses. To process this screen, perform the following steps:
1. From Home screen, click Core Maintenance. Under Core Maintenance, click External Virtual
Account Structured Address.
2. Under External Virtual Account Structured Address, click View External Virtual Account
Structured Address.
The View External Virtual Account Structured Address screen is displayed.
Figure 42: View External Virtual Account Structured Address
For more information on fields, refer to the field description table below.
Table 49: View External Virtual Account Structured Address – Field Description
Field Description
Customer Number Displays the customer number.
Town Name Displays the town name.
Country Displays the country name.
Click on the specific tile to view the structured address details.

Core Maintenance
2-69
2.23 Forget Process
The Personally identifiable information (PII) is any data that could potentially identify a specific individual. PII data access can be controlled based on the user role and you can configure details of a customer who wants to be forgotten if the customer withdraws/does not avail the virtual account facility.
This section contains following subsections:
Forgotten Customers Summary
Forget Customer Maintenance
2.23.1 Forgotten Customers Summary
The summary screen provides a list of configured customer to be forgotten. You can configure a customer detail who wants to be forgotten using the Forget Customer Maintenance. To process this screen, perform the following steps:
1. From Home screen, click Core Maintenance. Under Core Maintenance, click Forget Process.
2. Under Forget Process, click View Forgotten Customer.
The View Forgotten Customer screen is displayed.
Figure 43: View Forgotten Customers
For more information on fields, refer to the field description table below.
Table 50: View Forgotten Customers – Field Description
Field Description
Process Type Indicates if the process is initiated by the customer/bank
Process ID Displays the forgotten customer’s process ID.
Maker Displays the name of the user who has configured the forgotten customer
details.

Core Maintenance
2-70
Status Displays the status of the record.
2.23.2 Forget Customer Maintenance
The maintenance screen allows you to configure a customer to be forgotten. To process this screen, perform the following steps:
1. From Home screen, click Core Maintenance. Under Core Maintenance, click Forget Process.
2. Under Forget Process, click Forget Customer.
The Forget Customer screen is displayed.
Figure 44: Forget Customer
3. On Forget Customer screen, specify the fields. The fields which are marked with asterisk are
mandatory. For more information on fields, refer to the field description table below.
Table 51: Forget Customer – Field Description
Field Description
Forget Customer Process ID Specify a forget customer process ID.
Forget Customer Process Type Select one of the options
Customer Initiated: If selected, indicates the customer has initiated the process.
Bank Initiated: If selected, indicates the bank has initiated the process.
4. Click + to add a row and provide the customer/bank details.
5. Click Save. You can view the configured forgotten customers in the Forgotten Customers
Summary.

Core Maintenance
2-71
2.24 Host Code
You can group branches in the same zone or region under a host for specific processing. You can have multiple hosts depending on processing requirements.
This section contains following subsections:
Host Code Summary
Host Code Maintenance
2.24.1 Host Code Summary
The summary screen provides a list of configured host codes. You can configure the host code using the Host Code Maintenance. To process this screen, perform the following steps:
1. From Home screen, click Core Maintenance. Under Core Maintenance, click Host Code.
2. Under Host Code, click View Host Code.
The View Host Code screen is displayed.
Figure 45: View Host Code
For more information on fields, refer to the field description table below.
Table 52: View Host Code – Field Description
Field Description
Default Branch Code Displays the default branch code associated with the host code.
Processing Time Zone Displays the processing time zone.
Host Code Displays the host code details.
Country Code Displays the country code details.

Core Maintenance
2-72
Field Description
Status Displays the status of the records.
2.24.2 Host Code Maintenance
The maintenance screen allows you to configure host code. To process this screen, perform the following steps:
1. From Home screen, click Core Maintenance. Under Core Maintenance, click Host Code.
2. Under Host Code, click Create Host Code.
The Create Host Code screen is displayed.
Figure 46: Create Host Code
3. On Create Host Code screen, specify the fields. The fields which are marked with asterisk are
mandatory. For more information on fields, refer to the field description table below.
Table 53: Create Host Code – Field Description
Field Description
Host Code Specify the host code details.
Description Specify the additional information about the host code.
Country Code Search and select the required country code.
Processing Time Zone Specify the processing time zone details.
Default Branch Code Search and select the required default branch code.
4. Click Save. You can view the configured host code details in the Host Code Summary.

Core Maintenance
2-73
2.25 Language Code
You can configure a language code.
This section contains following subsections:
Language Code Summary
Language Code Maintenance
2.25.1 Language Code Summary
The summary screen provides a list of configured language code. You can configure a language code using the Language Code Maintenance. To process this screen, perform the following steps:
1. From Home screen, Core Maintenance. Under Core Maintenance, click Language Code.
2. Under Language Code, click View Language Code.
The View Language Code screen is displayed.
Figure 47: View Language Code
For more information on fields, refer to the field description table below.
Table 54: View Language Code – Field Description
Field Description
Language ISO Code Displays the default branch code associated with the host code.
Language Code Displays the processing time zone.
Language Name Displays the host code details.
Status Displays the status of the records.
2.25.2 Language Code Maintenance
The maintenance screen allows you to configure a language code. To process this screen, perform the following steps:
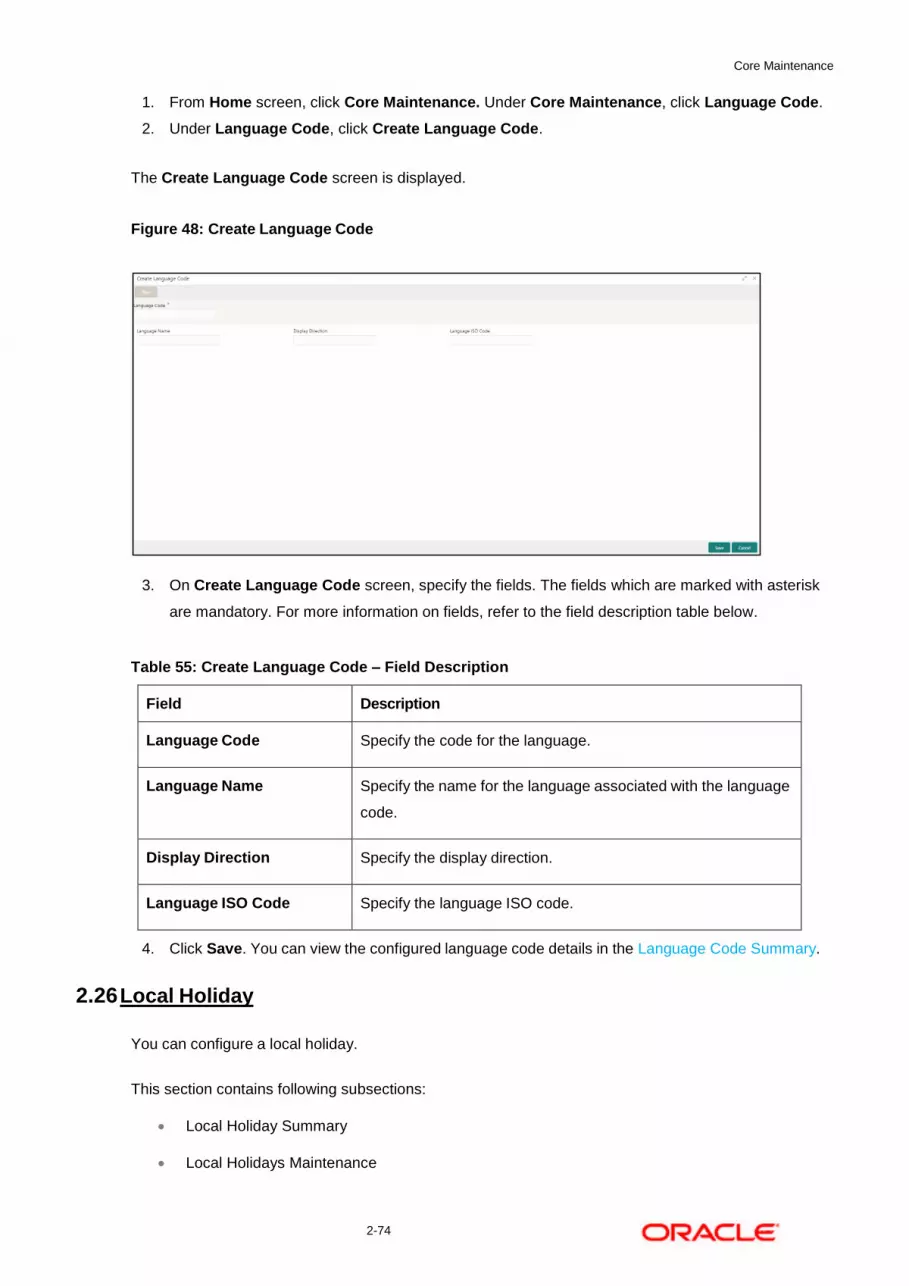
Core Maintenance
2-74
1. From Home screen, click Core Maintenance. Under Core Maintenance, click Language Code.
2. Under Language Code, click Create Language Code.
The Create Language Code screen is displayed.
Figure 48: Create Language Code
3. On Create Language Code screen, specify the fields. The fields which are marked with asterisk
are mandatory. For more information on fields, refer to the field description table below.
Table 55: Create Language Code – Field Description
Field Description
Language Code Specify the code for the language.
Language Name Specify the name for the language associated with the language
code.
Display Direction Specify the display direction.
Language ISO Code Specify the language ISO code.
4. Click Save. You can view the configured language code details in the Language Code Summary.
2.26 Local Holiday
You can configure a local holiday.
This section contains following subsections:
Local Holiday Summary
Local Holidays Maintenance

Core Maintenance
2-75
2.26.1 Local Holiday Summary
The summary screen provides a list of configured local holidays. You can configure a local holiday using the Local Holidays Maintenance. To process this screen, perform the following steps:
1. From Home screen, click Core Maintenance. Under Core Maintenance, click Local Holiday.
2. Under Local Holiday, click View Local Holiday.
The View Local Holiday screen is displayed.
Figure 49: View Local Holiday
For more information on fields, refer to the field description table below.
Table 56: View Local Holiday – Field Description
Field Description
Branch Code Displays the code of the branch.
Unexpected Holiday Indicates if the record is an unexpected holiday.
Year Displays the year of the holiday.
Status Displays the status of the record.
2.26.2 Local Holidays Maintenance
The maintenance screen allows you to configure local holidays. To process this screen, perform the following steps:
1. From Home screen, click Core Maintenance. Under Core Maintenance, click Local Holiday.
2. Under Local Holiday, click Create Local Holiday.
The Create Local Holiday screen is displayed.
Figure 50: Create Local Holiday

Core Maintenance
2-76
3. On Create Local Holiday screen, specify the fields. The fields which are marked with asterisk are
mandatory. For more information on fields, refer to the field description table below.
Table 57: Create Local Holiday – Field Description
Field Description
Branch Code Search and select the required branch code.
Year Specify the year details.
Weekly Holidays By default, this is disabled. If selected, you can define weekly
holidays.
Unexpected Holidays By default, this is disabled. If selected, you can define
unexpected holidays.
4. Select the dates using the calendar. The selected dates appear in pink highlighted circle.
5. Click Save. You can view the configured local holiday details in the Local Holiday Summary.
2.27 Media
You can configure media information.
This section contains following subsections:
Media Summary
Media Maintenance

Core Maintenance
2-77
2.27.1 Media Summary
The summary screen provides a list of configured media. You can configure a media using the Media Maintenance. To process this screen, perform the following steps:
1. From Home screen, click Core Maintenance. Under Core Maintenance, click Media.
2. Under Media, click View Media.
The View Media screen is displayed.
Figure 51: View Media
For more information on fields, refer to the field description table below.
Table 58: View Media – Field Description
Field Description
Media Displays the name of the media.
Media Number Displays the number of the media.
Status Displays the status of the record.
2.27.2 Media Maintenance
The maintenance screen allows you to configure media. To process this screen, perform the following steps:
1. From Home screen, click Core Maintenance. Under Core Maintenance, click Media.
2. Under Media, click Create Media.
The Create Media screen is displayed.
Figure 52: Create Media
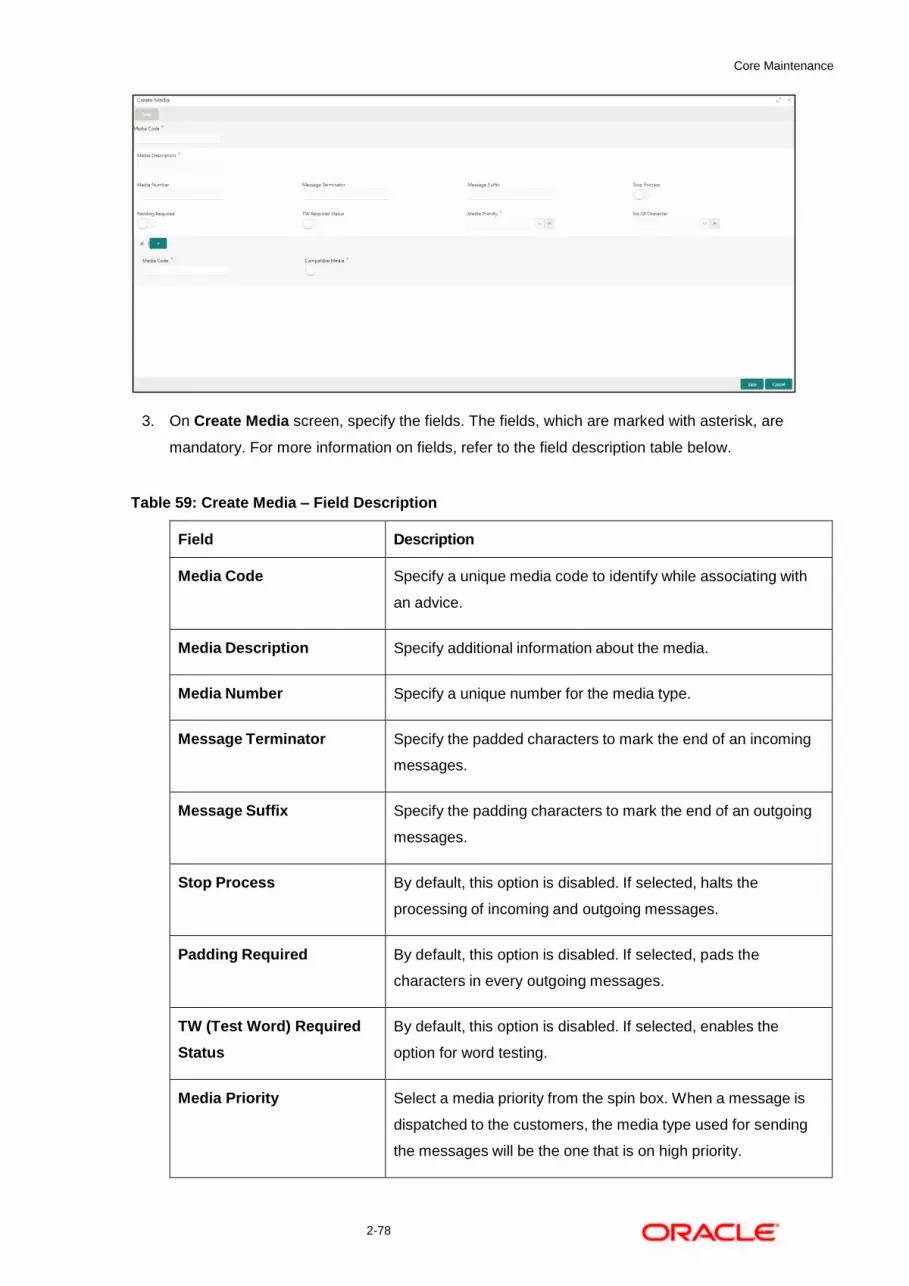
Core Maintenance
2-78
3. On Create Media screen, specify the fields. The fields, which are marked with asterisk, are
mandatory. For more information on fields, refer to the field description table below.
Table 59: Create Media – Field Description
Field Description
Media Code Specify a unique media code to identify while associating with
an advice.
Media Description Specify additional information about the media.
Media Number Specify a unique number for the media type.
Message Terminator Specify the padded characters to mark the end of an incoming
messages.
Message Suffix Specify the padding characters to mark the end of an outgoing
messages.
Stop Process By default, this option is disabled. If selected, halts the
processing of incoming and outgoing messages.
Padding Required By default, this option is disabled. If selected, pads the
characters in every outgoing messages.
TW (Test Word) Required
Status
By default, this option is disabled. If selected, enables the
option for word testing.
Media Priority Select a media priority from the spin box. When a message is
dispatched to the customers, the media type used for sending
the messages will be the one that is on high priority.

Core Maintenance
2-79
Field Description
Number of Character Select a number the padding characters should be repeated for
the advice from the spin box.
Media Details Specify the media details.
Media Code Specify the unique media code to identify while associating with
an advice.
Compatible Media By default, this option is disabled. If selected, indicates the
media is compatible.
4. Click Save. You can view the configured media details in the Media Summary.
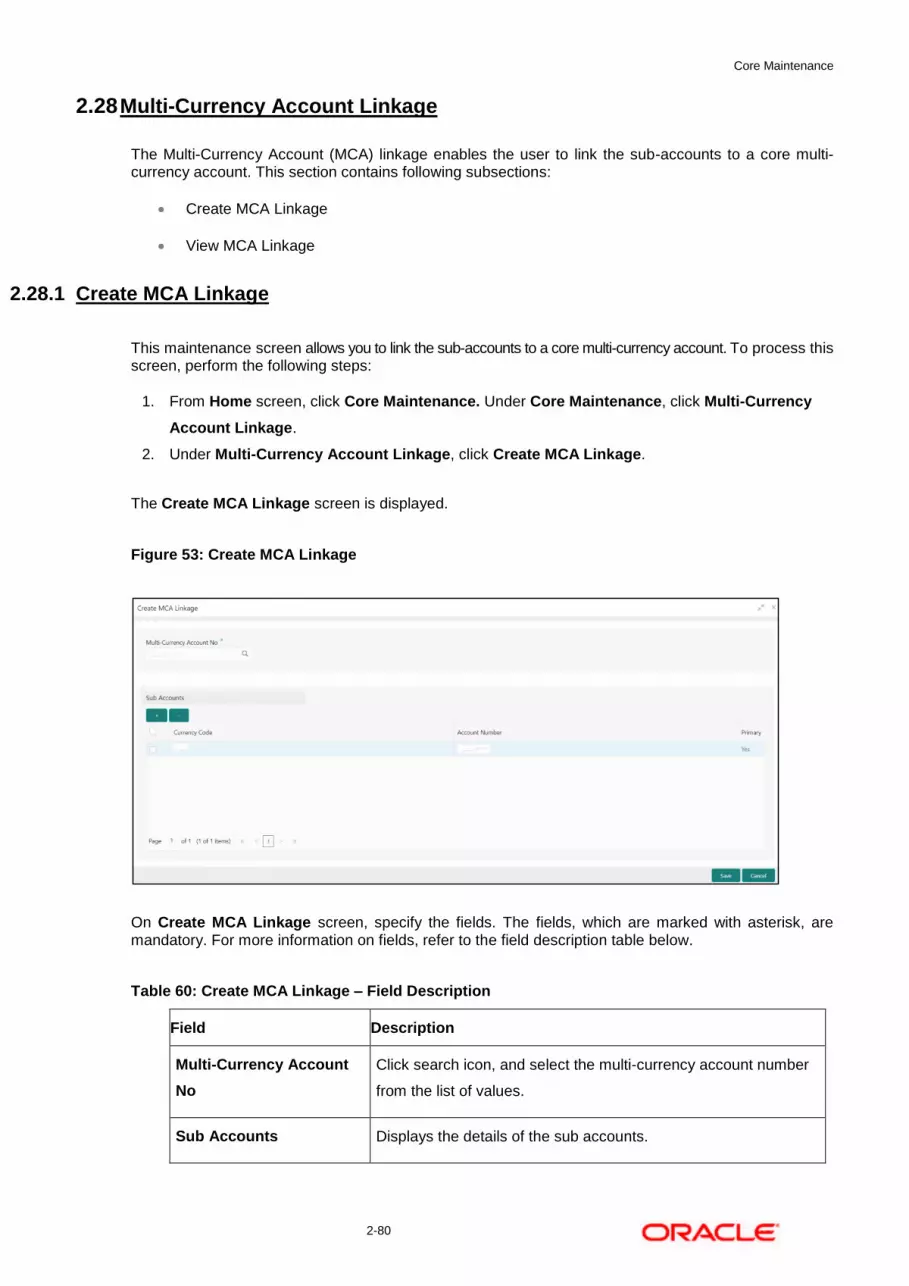
Core Maintenance
2-80
2.28 Multi-Currency Account Linkage
The Multi-Currency Account (MCA) linkage enables the user to link the sub-accounts to a core multi-currency account. This section contains following subsections:
Create MCA Linkage
View MCA Linkage
2.28.1 Create MCA Linkage
This maintenance screen allows you to link the sub-accounts to a core multi-currency account. To process this screen, perform the following steps:
1. From Home screen, click Core Maintenance. Under Core Maintenance, click Multi-Currency
Account Linkage.
2. Under Multi-Currency Account Linkage, click Create MCA Linkage.
The Create MCA Linkage screen is displayed.
Figure 53: Create MCA Linkage
On Create MCA Linkage screen, specify the fields. The fields, which are marked with asterisk, are mandatory. For more information on fields, refer to the field description table below.
Table 60: Create MCA Linkage – Field Description
Field Description
Multi-Currency Account
No
Click search icon, and select the multi-currency account number
from the list of values.
Sub Accounts Displays the details of the sub accounts.

Core Maintenance
2-81
Field Description
Currency Code Specify the currency code of the sub account.
Account Number Specify the account number of the sub account.
Primary Select Yes, if the sub account is Primary. If it is not Primary,
select No.
3. Click Save. You can view the configured sub-account details in the View MCA Linkage.
2.28.2 View MCA Linkage
This summary screen provides a list of configured sub-accounts to a core multi-currency account. To process this screen, perform the following steps:
1. From Home screen, click Core Maintenance. Under Core Maintenance, click Multi-Currency
Account Linkage.
2. Under Multi-Currency Account Linkage, click View MCA Linkage.
The View MCA Linkage screen is displayed.
Figure 54: View MCA Linkage
For more information on fields, refer to the field description table below.
Table 61: View MCA Linkage – Field Description
Field Description
Multi-Currency Account
Number
Displays the multi-currency account number.
Customer Number Displays the customer number.
Status Displays the status of the record.
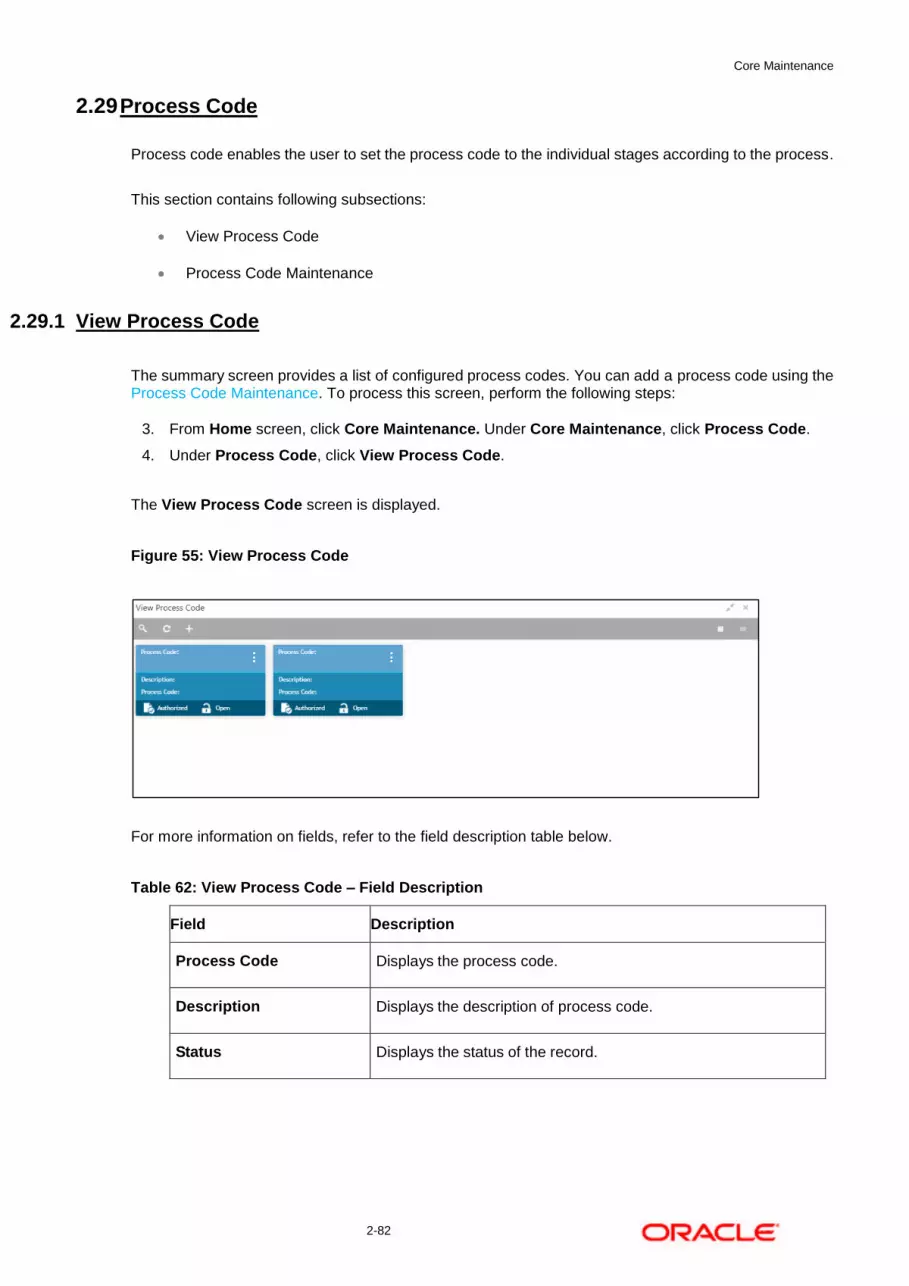
Core Maintenance
2-82
2.29 Process Code
Process code enables the user to set the process code to the individual stages according to the process.
This section contains following subsections:
View Process Code
Process Code Maintenance
2.29.1 View Process Code
The summary screen provides a list of configured process codes. You can add a process code using the Process Code Maintenance. To process this screen, perform the following steps:
3. From Home screen, click Core Maintenance. Under Core Maintenance, click Process Code.
4. Under Process Code, click View Process Code.
The View Process Code screen is displayed.
Figure 55: View Process Code
For more information on fields, refer to the field description table below.
Table 62: View Process Code – Field Description
Field Description
Process Code Displays the process code.
Description Displays the description of process code.
Status Displays the status of the record.

Core Maintenance
2-83
2.29.2 Process Code Maintenance
Process Code Maintenance screen allows you to define the stages for a particular process. The process code information that is defined in this screen will be used in further business processing to construct the stages. To process this screen, perform the following steps:
1. From Home screen, click Core Maintenance. Under Core Maintenance, click Process Code.
The Process Code screen is displayed.
Figure 56: Process Code
2. On Process Code screen, specify the fields. The fields which are marked with asterisk are
mandatory. For more information on fields, refer to the field description table below.
Table 63: Process Code – Field Description
Field Description
Process Code Specify the code.
Process Name Specify the process name.
Process Version Specify the process version.
Domain Specify the process domain.
Stage ID Specify the unique stage ID.
Stage Description Specify the stage description.
Seq Order Displays the sequential order of the stage in the entire process.

Core Maintenance
2-84
Field Description
Source Stage Select it to indicate if the specific stage is the source stage of the
process.
Add Row Click Add Row to add a row and to capture the stage details that needs
to be mapped to the process code.
Delete Row Click Delete Row to delete an existing row with stage details.
Phase Code Specify the phase code.
Phase Description Specify the phase description.
Seq Order Displays the sequential order of the phase.
Stage ID Select the stage ID from the drop down list. Available options in the
drop-down will be based on Stage ID mentioned at Process Code level.
Add Row Click Add Row to add a row and to capture the phase details that
needs to be mapped to the process code.
Delete Row Click Delete Row to delete an existing row with phase details.
3. Click Save. You can view the configured process codes in the View Process Code.

Core Maintenance
2-85
2.30 System Dates
You can view the system date details.
This section contains following subsections:
System Dates Summary
2.30.1 System Dates Summary
The summary screen provides a list of configured system date. To process this screen, perform the following steps:
1. From Home screen, click Core Maintenance. Under Core Maintenance, click System Dates.
2. Under System Dates, click View System Dates.
The View System Dates screen is displayed.
Figure 57: View System Dates
For more information on fields, refer to the field description table below.
Table 64: View System Dates – Field Description
Field Description
Branch Code Displays the code of the branch.
Today’s Date Displays system’s current date.
Today’s Date in
Text
Displays the system’s current date in words.
Status Displays the status of the record.
Note: When the entity is created from the Multi-Entity Maintenances, the System Dates for the Head Office (HO) Branch would be automatically created

Core Maintenance
2-86
2.31 Transaction Code
You can configure the transaction code.
This section contains following subsections:
Transaction Code Summary
Transaction Code Maintenance
2.31.1 Transaction Code Summary
The summary screen provides a list of configured transaction code. You can configure a transaction code using the Transaction Code Maintenance. To process this screen, perform the following steps:
1. From Home screen, click Core Maintenance. Under Core Maintenance, click Transaction
Code.
2. Under Transaction Code, click View Transaction Code.
The View Transaction Code screen is displayed.
Figure 58: View Transaction Code
For more information on fields, refer to the field description table below.
Table 65: View Transaction Code – Field Description
Field Description
Source System Displays the source system details.
Transaction Code Displays the transaction code details.
Source Transaction
Code
Displays the source transaction code associated with the transaction code.
Status Displays the status of the record,

Core Maintenance
2-87
2.31.2 Transaction Code Maintenance
The maintenance screen allows you to configure transaction code details. To process this screen, perform the following steps:
1. From Home screen, click Core Maintenance. Under Core Maintenance, click Transaction
Code.
2. Under Transaction Code, click Create Transaction Code.
The Create Transaction Code screen is displayed.
Figure 59: Create Transaction Code
3. On Create Transaction Code screen, specify the fields. The fields which are marked with
asterisk are mandatory. For more information on fields, refer to the field description table below.
Table 66: Create Transaction Code – Field Description
Field Description
Transaction Code Specify the transaction code details.
Description Specify additional information about the transaction code.
Source System Search and select the required source system.
Source Transaction
Code
Specify the source transaction code details.
4. Click Save. You can view the configured transaction code details in the Transaction Code
Summary.

Core Maintenance
2-88
2.32 Upload Source
You can upload a source code.
This section contains following subsections:
Upload Source Summary
Upload Source Maintenance
2.32.1 Upload Source Summary
The summary screen provides a list of configured source code. You can upload a source code using the Upload Source Maintenance. To process this screen, perform the following steps:
1. From Home screen, click Core Maintenance. Under Core Maintenance, click Upload Source.
2. Under Upload Source, click View Upload Source.
The View Upload Source screen is displayed.
Figure 60: View Upload Source
For more information on fields, refer to the field description table below.
Table 67: View Upload Source – Field Description
Field Description
Upload Source Displays the upload source details.
Source Description Displays information about the source code.
Status Displays the status of the record.

Core Maintenance
2-89
2.32.2 Upload Source Maintenance
The maintenance screen allows you to upload source. To process this screen, perform the following steps:
1. From Home screen, click Core Maintenance. Under Core Maintenance, click Upload Source.
2. Under Upload Source, click Create Upload Source.
The Create Upload Source screen is displayed.
Figure 61: Create Upload Source
3. On Create Upload Source screen, specify the fields. The fields which are marked with asterisk
are mandatory. For more information on fields, refer to the field description table below.
Table 68: Create Upload Source – Field Description
Field Description
Source Code Specify the source code details.
Source Description Specify additional information of the source code.
Base Data from Flexcube By default, this is disabled. If selected, indicates the base
data is from FLEXCUBE.
System Authorization Required By default, this is disabled. If selected, indicates the system
requires authorization.
4. Click Save. You can view the configured upload source details in the Upload Source Summary.
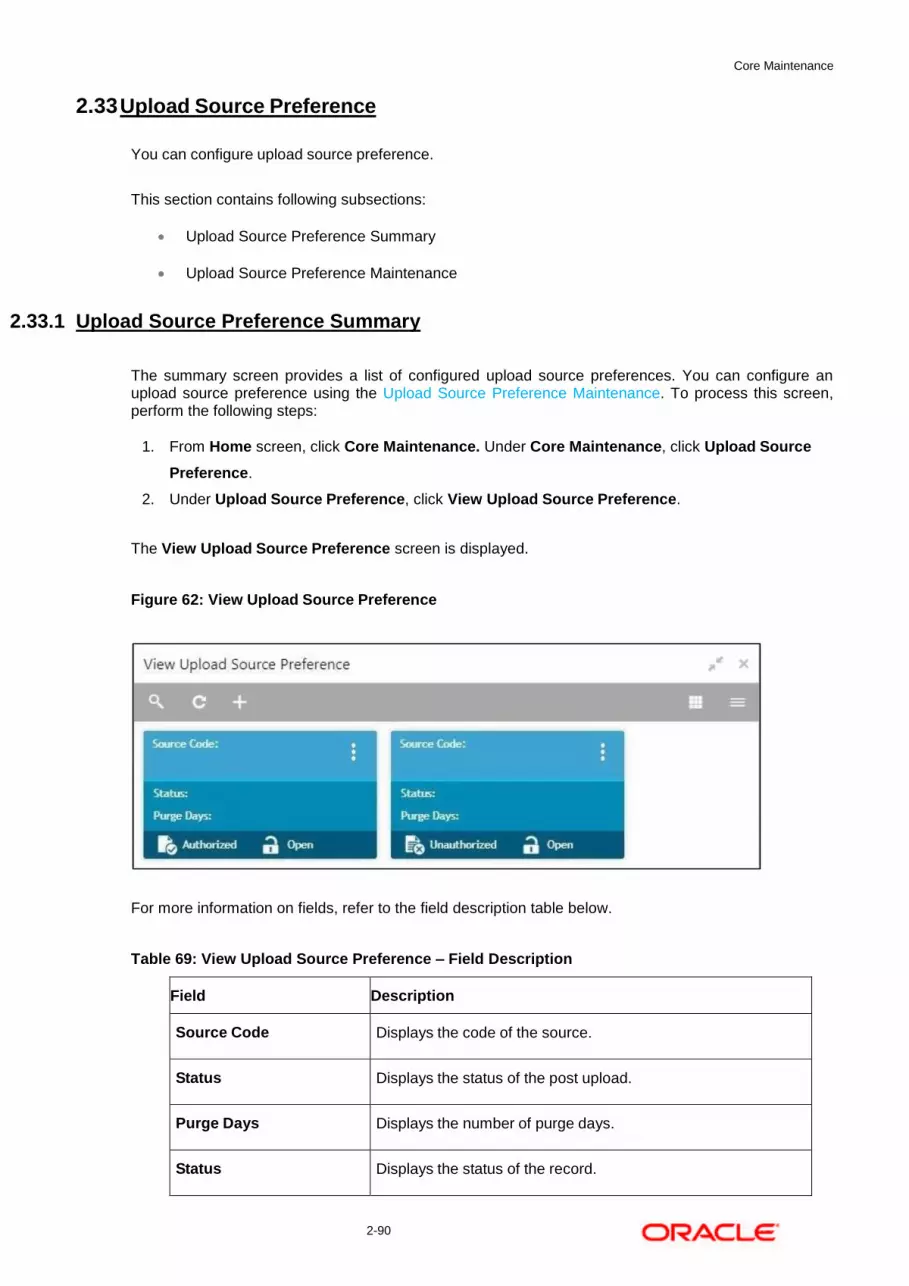
Core Maintenance
2-90
2.33 Upload Source Preference
You can configure upload source preference.
This section contains following subsections:
Upload Source Preference Summary
Upload Source Preference Maintenance
2.33.1 Upload Source Preference Summary
The summary screen provides a list of configured upload source preferences. You can configure an upload source preference using the Upload Source Preference Maintenance. To process this screen, perform the following steps:
1. From Home screen, click Core Maintenance. Under Core Maintenance, click Upload Source
Preference.
2. Under Upload Source Preference, click View Upload Source Preference.
The View Upload Source Preference screen is displayed.
Figure 62: View Upload Source Preference
For more information on fields, refer to the field description table below.
Table 69: View Upload Source Preference – Field Description
Field Description
Source Code Displays the code of the source.
Status Displays the status of the post upload.
Purge Days Displays the number of purge days.
Status Displays the status of the record.

Core Maintenance
2-91
2.33.2 Upload Source Preference Maintenance
The maintenance screen allows you to configure upload source preference. To process this screen, perform the following steps:
1. From Home screen, click Core Maintenance. Under Core Maintenance, click Upload Source
Preference.
2. Under Upload Source Preference, click Create Upload Source Preference.
The Create Upload Source Preference screen is displayed.
Figure 63: Create Upload Source Preference
3. On Create Upload Source Preference screen, specify the fields. For more information on fields,
refer to the field description table below.
Table 70: Create Upload Source Preference – Field Description
Field Description
Source Code Search and select the required source code.
Error Handling Specify the error handling details.
On Error Select an error from the drop-down list.
On Override Select an override from the drop-down list.
On Repairable
Exception
Select the repairable exception from the drop-down list.
On Queue Exception Select the queue exception from the drop-down list.
Post Upload Specify the post upload details.

Core Maintenance
2-92
Field Description
Status Select a status from the dropdown list.
Purge Days Specify the purging days if you want to maintain any days to be
purged while processing interface.
Allow Deferred
Processing
By default, this is disabled. If selected, defers process the upload
source preference.
Allow EOD with
Deferred
By default, this is disabled. If selected, processes the EOD with
deferred.
Deletion Allowed By default, this is disabled. If selected, deletes the upload source
preferences.
Reverse Allowed By default, this is disabled. If selected, reverses the upload source
preferences.
Amend Allowed By default, this is disabled. If selected, amends the upload source
preferences.
Proceed with EOD By default, this is disabled. If selected, proceeds with the EOD.
4. Click Save. You can view the configured upload source preference details in the Upload Source
Preference Summary.

Core Maintenance
2-93
2.34 Pricing Source System
You can configure the pricing source system.
This section contains following subsections:
Pricing Source System Summary
Pricing Source System Maintenance
2.34.1 Pricing Source System Summary
The summary screen provides a list of configured Pricing Source system. You can configure the pricing source system details using the Pricing Source System Maintenance. To process this screen, perform the following steps:
1. From Home screen, click Core Maintenance. Under Core Maintenance, click Pricing Source
System.
2. Under Pricing Source System, click View Pricing Source System.
The View Pricing Source System screen is displayed.
Figure 64: View Pricing Source System
For more information on fields, refer to the field description table below.
Table 71: View Pricing Source System – Field Description
Field Description
Pricing Source System Displays the name of the Pricing Source system.
Pricing Source System
Description
Displays any additional information of the Pricing Source system.
Status Displays the status of the record.
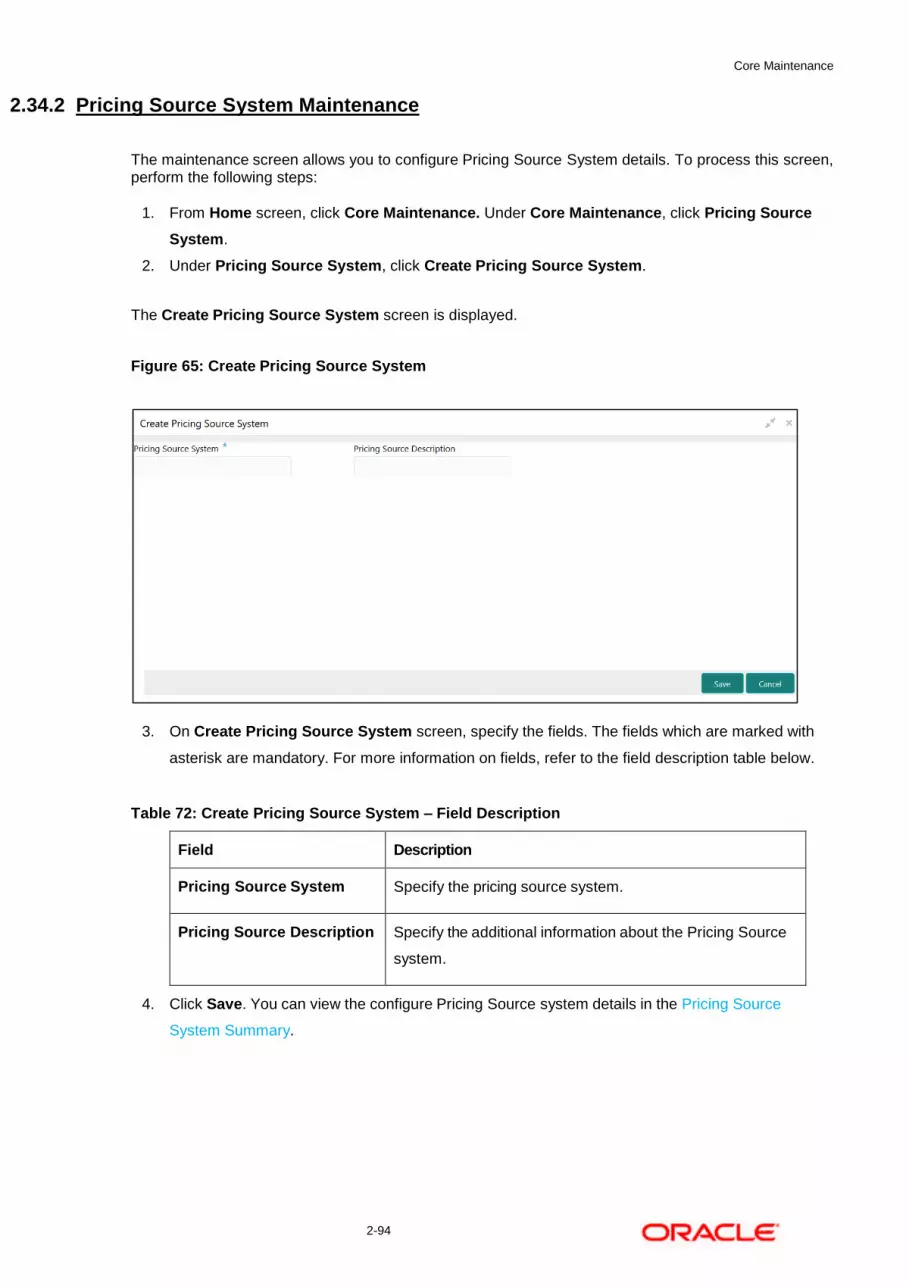
Core Maintenance
2-94
2.34.2 Pricing Source System Maintenance
The maintenance screen allows you to configure Pricing Source System details. To process this screen, perform the following steps:
1. From Home screen, click Core Maintenance. Under Core Maintenance, click Pricing Source
System.
2. Under Pricing Source System, click Create Pricing Source System.
The Create Pricing Source System screen is displayed.
Figure 65: Create Pricing Source System
3. On Create Pricing Source System screen, specify the fields. The fields which are marked with
asterisk are mandatory. For more information on fields, refer to the field description table below.
Table 72: Create Pricing Source System – Field Description
Field Description
Pricing Source System Specify the pricing source system.
Pricing Source Description Specify the additional information about the Pricing Source
system.
4. Click Save. You can view the configure Pricing Source system details in the Pricing Source
System Summary.

Core Maintenance
2-95
2.35 Integrating Bureau Integration Service with Oracle Banking Routing Hub
2.35.1 Oracle Banking Routing Hub Configuration
Need to import existing service consumer and providers in the system. Service Consumer is Oracle product, which invokes oracle banking routing hub API, oracle banking routing hub analyses evaluates destination product processor and transform data into format of the same. Service consumer comprises of the source and destination integration details.
1. From Home screen, click Core Maintenance. Under Core Maintenance, click Routing Hub.
2. Under Routing Hub, click Service Consumers.
The Service Consumers screen is displayed.
Figure 66: Service Consumers
Figure 67: Oracle Banking Routing Hub Configuration

Core Maintenance
2-96
Table 73: Oracle Banking Routing Hub Configuration
Component Name Component Type Condition Comments
Add Button Pops up add dialog
Import Button Pops up import dialog
Search Combo Box One Provides search functionality with case insensitive (Service Consumer Name)
View menu option Non-editable Pops up view dialog
Edit menu option Pops up edit dialog
Delete menu option
Export Sub menu item
JSON menu option Exports in JSON
SQL menu option Exports in SQL
Configuration menu option Pops up configuration dialog
Request Audit menu option Pops up request audit log
This section contains the following subsections:
Add
Environment Variables
Import
View
Edit
Delete
JSON Export
SQL Export
2.35.1.1 Add
You can create service consumer manually.
On Service Consumers screen, click Add to create service consumer.
Figure 68: Add

Core Maintenance
2-97
Table 74: Add
Component Name
Component Type
Is Mandatory
Data type Validation Comments
Name Text Box Yes Alphanumeric with special characters
Name cannot be blank
Specify 0 or more characters, up to a maximum of 255
No numeric value at beginning and no space allowed
Unique Service Consumer name
Environme
nt Variables
Table Content
Save Button Saves the Service Consumer
2.35.1.2 Environment Variables
You can define the group of variables, which can be accessed through the specific consumer’s configuration. Below is the syntax for accessing environment variables: $env.Environment_Group_Name.Environment_Variable_Name such as: $env.COMMON.BRANCH_CODE

Core Maintenance
2-98
Figure 69: Environment Variables
Figure 70: Environment Variables
Figure 71: Environment Variables
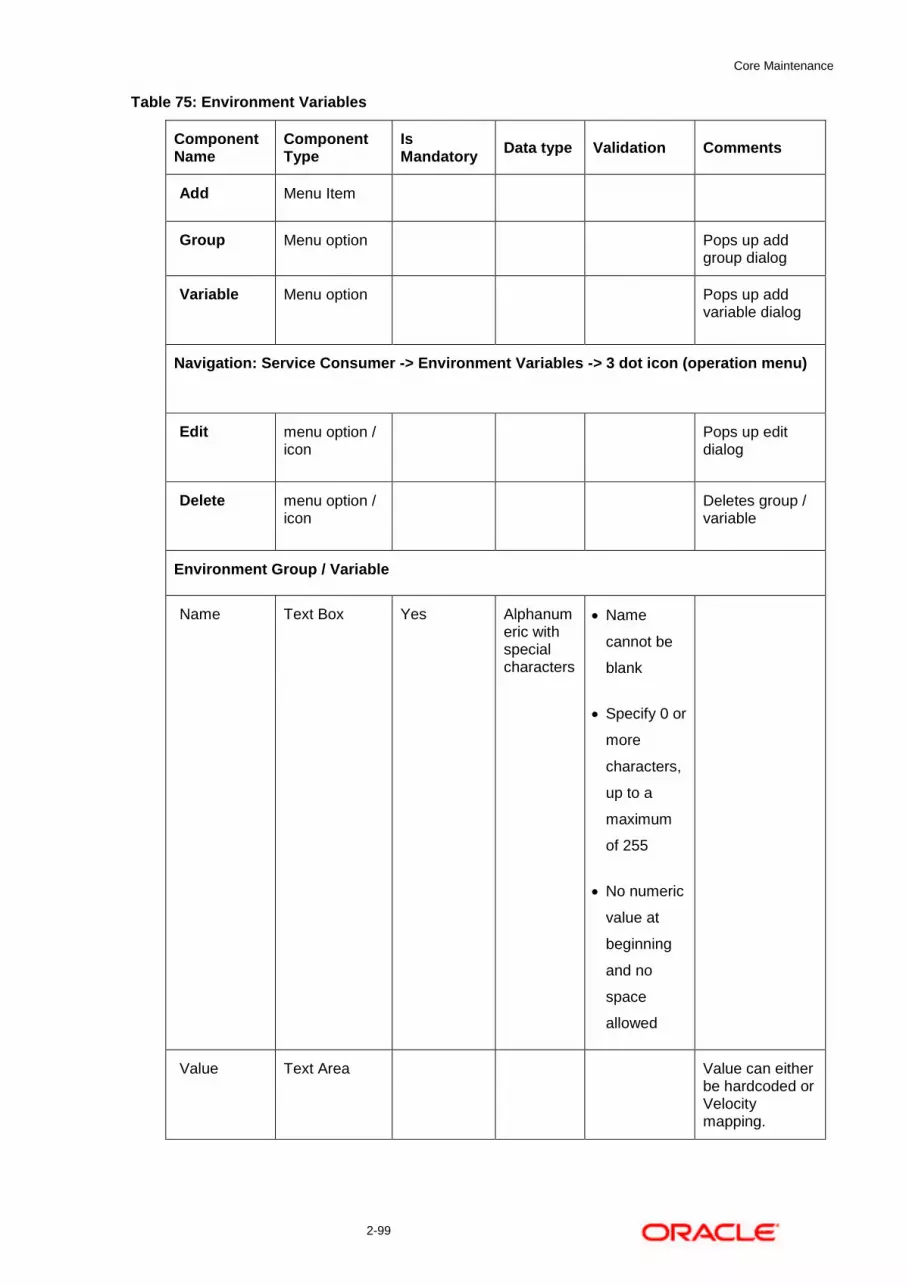
Core Maintenance
2-99
Table 75: Environment Variables
Component Name
Component Type
Is Mandatory
Data type Validation Comments
Add Menu Item
Group Menu option Pops up add group dialog
Variable Menu option Pops up add variable dialog
Navigation: Service Consumer -> Environment Variables -> 3 dot icon (operation menu)
Edit menu option / icon
Pops up edit dialog
Delete menu option / icon
Deletes group / variable
Environment Group / Variable
Name Text Box Yes Alphanumeric with special characters
Name
cannot be
blank
Specify 0 or
more
characters,
up to a
maximum
of 255
No numeric
value at
beginning
and no
space
allowed
Value Text Area Value can either be hardcoded or Velocity mapping.

Core Maintenance
2-100
OK Button Saves the group / variable and displays it in the list
2.35.1.3 Import
You can create a service consumer by importing the JSON file and manually selecting the service providers or select all providers that needs to be imported.
On Service Consumers screen, click Import.
Figure 72: Import
Table 76: Import
Component Name
Component Type
Is Mandatory
Data type Validation Condition
Comments
File File picker Yes Allows only to select one file
Accepts only JSON file
Pops up file selection dialog box
Extract Button Yes Extracts Consumer Name and Service Provider list from JSON file and displays it in the respective elements.

Core Maintenance
2-101
Component Name
Component Type
Is Mandatory
Data type Validation Condition
Comments
Name Text Box Yes Alphanumeric with special characters
Name cannot be blank
Specify 0 or more characters, up to a maximum of 255
No numeric value at beginning and no space allowed
Editable Unique
Service Provider
Collapsible Header & Content
Displays the list of service providers that are present in JSON file
Import Button Imports Service Consumer
Note: Below data needs to be changed after importing consumer configuration file: • Implementation Host and Port • Implementation Authentication Password
2.35.1.4 View
You can view consumer details and can also switch to edit form by clicking on edit icon. On Service Consumers screen, click Operation Menu (3 dot icon), and select View.
Figure 73: View

Core Maintenance
2-102
2.35.1.5 Edit
You can modify the consumer details. On Service Consumers screen, click Operation Menu (3 dot icon), and select Edit.
Figure 74: Edit

Core Maintenance
2-103
2.35.1.6 Delete
You can delete the consumer. On Service Consumers screen, click Operation Menu (3 dot icon), and select Delete.
Figure 75: Delete
2.35.1.7 JSON Export
You can export the consumer configuration as JSON file. On Service Consumers screen, click Operation Menu (3 dot icon), and select Export
Then, Click JSON.
Figure 76: JSON Export
Note: You have an option to select service providers from the list that needs to be exported or can click on Select All option for all service providers. JSON Export feature will export below data:
Selected service consumer
All consumer services
Selected service providers with services
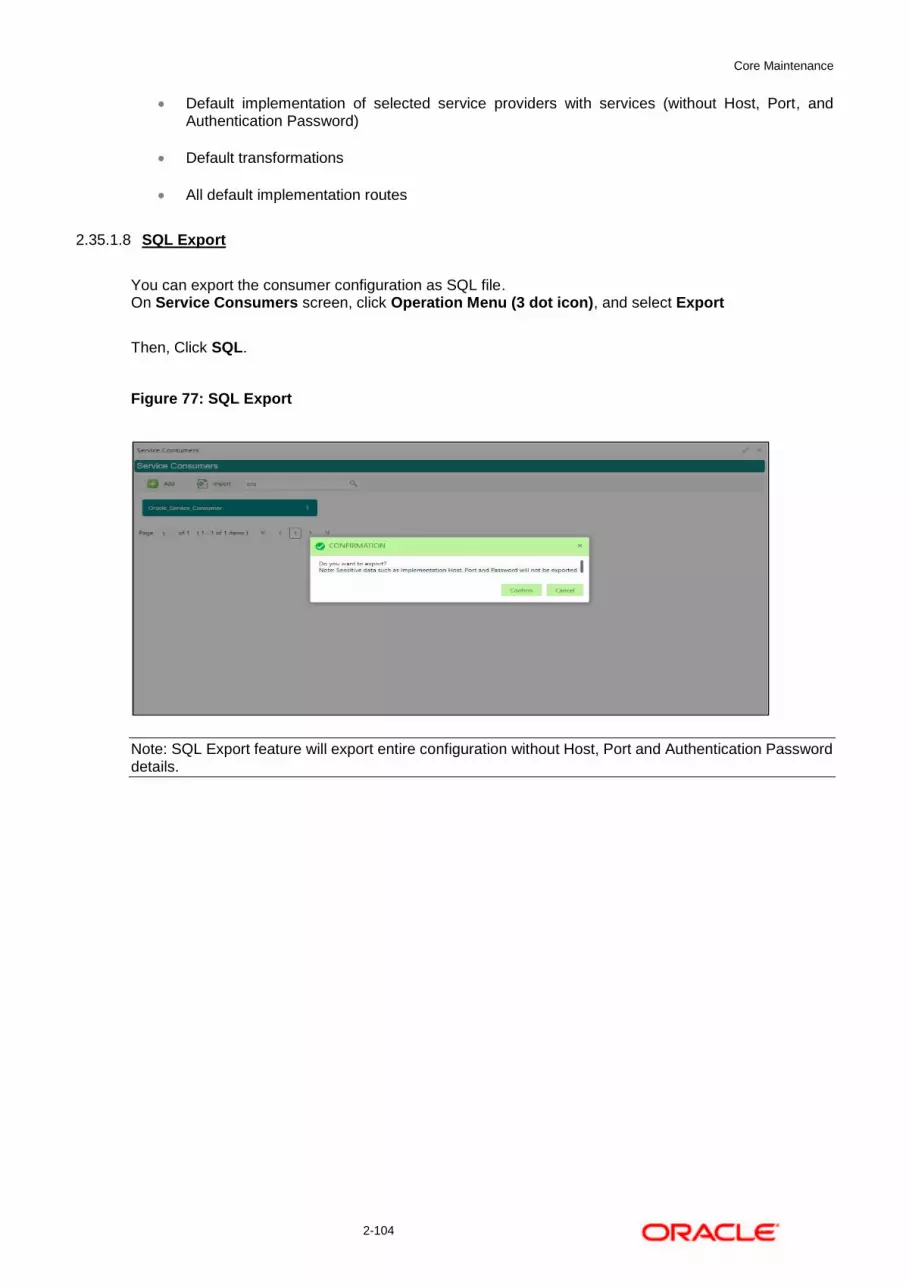
Core Maintenance
2-104
Default implementation of selected service providers with services (without Host, Port, and Authentication Password)
Default transformations
All default implementation routes
2.35.1.8 SQL Export
You can export the consumer configuration as SQL file. On Service Consumers screen, click Operation Menu (3 dot icon), and select Export
Then, Click SQL.
Figure 77: SQL Export
Note: SQL Export feature will export entire configuration without Host, Port and Authentication Password details.

Core Maintenance
2-105
2.35.2 Service Providers
Service Providers are the product processors configure to process request send by oracle banking routing hub on behalf of service consumers.
The Service Provider comprises of destination integration details.
1. From Home screen, click Core Maintenance. Under Core Maintenance, click Routing Hub.
2. Under Routing Hub, click Service Consumers. Under Service Consumers, click <Specific
Service Consumer>.
The Service Providers screen is displayed.
Figure 78: Service Providers
Figure 79: Service Providers
Table 77: Service Providers
Component Name
Component Type
Is Mandatory
Data type
Validation Condition Comments

Core Maintenance
2-106
<Service Consumer>
Button Navigates back to Service Consumers
Add Button Pops up add dialog
Import Button Pops up import dialog
Search Combo Box One
Provides search functionality with case insensitive (Service Provider Name)
Navigation: Service Providers -> 3 dot icon (operation menu)
View menu option Non-editable
Pops up view dialog
Edit menu option Pops up edit dialog
Delete menu option
Export menu option Exports in JSON
Request Audit
menu option Pops up request audit log
This section contains the following subsections:
Add
Headers

Core Maintenance
2-107
Service
WSDL
SWAGGER
Import
View
Edit
Delete
Export
2.35.2.1 Add
You can create service provider manually. On Service Providers screen, click Add to create service providers.
Figure 80: Add
Table 78: Add

Core Maintenance
2-108
Component
Name
Component
Type
Is
Mandatory Data type Validation Comments
Product Name
Text Box Yes Alphanumeric with special characters
Name cannot be blank
Specify 0 or more characters, up to a maximum of 255.
No numeric value at beginning and no space allowed.
Unique provider name
Type Combo Box One
Yes
Predefined Values: INTERNAL / EXTERNAL
Version Text Box Yes Number Version cannot be blank
Specify 0 or more characters, up to a maximum of 255.
Specify only numeric or decimal values.
Unique provider version
Active Switch
Predefined Values: ACTIVE / INACTIVE If provider is marked as inactive, then all related routes will be stopped.
Headers Collapsible Header & Content
Provider specific headers

Core Maintenance
2-109
Component
Name
Component
Type
Is
Mandatory Data type Validation Comments
Service Collapsible Header & Content
Provider specific service details
Save Button
Saves the Service Provider
2.35.2.2 Headers
External product processor might require some standard headers to be passed along with the request. You can specify the headers which are required by service endpoints for its all implementations but not present in swagger file. These headers can be configured in oracle banking routing hub using the steps given below.

Core Maintenance
2-110
Figure 81: Headers
Figure 82: Headers
Table 79: Headers
Component Name
Component Type
Is Mandatory
Data type Validation Condition
Comments
Add Button Pops up add dialog
Navigation: Service Providers -> Headers -> 3 dot icon (operation menu)
Edit menu option
Pops up edit dialog
Delete menu option
Deletes header
Navigation: Service Providers -> Headers -> Add

Core Maintenance
2-111
Component Name
Component Type
Is Mandatory
Data type Validation Condition
Comments
Name Text Box Yes Alphanumeric with special
characters
Name cannot be
blank
Specify 0 or more
characters, up to a maximum
of 255.
No numeric value at
beginning and no space
allowed.
Value Text Area Yes Alphanumeric with special characters
Value cannot be blank
Specify 0 or more characters, up to a maximum of 255.
No space allowed.
Value can either be hardcoded or can be Velocity mapping.
OK Button Saves the header details and displays it in the list

Core Maintenance
2-112
2.35.2.3 Service
Figure 83: Service
Table 80: Service
Component Name
Component Type
Is Mandatory
Comments
Type Combo Box One
Yes Predefined Values: WSDL / SWAGGER
URL Text Box Yes Service URL of the file location
Gateway Prefix
Text Box Gateway Prefix is context path of below formatted URL http://host:port/gateway-prefix/endpoint
Import Button Extracts the service information from URL and displays it in the Service list
2.35.2.4 WSDL
The Web Services Description Language (WSDL) is an XML-based interface description language that is used for describing the functionality offered by a web service. Currently, non-SSL WSDL URL is only supported.
Note: In case there is a change in wsdl file, then same wsdl file need to be imported again in order to update the provided service information in routing hub.
2.35.2.5 SWAGGER
Swagger is an Interface Description Language for describing RESTful APIs expressed using JSON. Currently, Swagger 2.0 & OpenAPI 3.0 both are supported.

Core Maintenance
2-113
Note: In case there is a change in swagger file, then same swagger file need to be imported again in order to update the provided service information in routing hub.
2.35.2.6 Import
You can create a service provider by importing the JSON file. On Service Providers screen, click Import.
Figure 84: Import
Table 81: Import
Component Name
Component Type
Is Mandatory
Validation Condition Comments
File File picker Yes Allows only to select one file
Accepts only JSON file
Pops up file selection dialog box
Import Button Imports Service Provider
Note: Below data needs to be changed after importing provider configuration file: • Implementation Host and Port • Implementation Authentication Password
2.35.2.7 View
You can view provider details and can also switch to edit form by clicking on edit icon. On Service Providers screen, click Operation Menu (3 dot icon), and click View.

Core Maintenance
2-114
Figure 85: View Service Provider
2.35.2.8 Edit
You can modify the provider details. On Service Providers screen, click Operation Menu (3 dot icon), and click Edit.
Figure 86: Edit

Core Maintenance
2-115
2.35.2.9 Delete
You can delete the provider. On Service Providers screen, click Operation Menu (3 dot icon), and click Delete.
Figure 87: Delete
2.35.2.10 Export
You can export the provider configuration as JSON file. On Service Providers screen, click Operation Menu (3 dot icon), and click Export.
Figure 88: Export
Note: Below data is not be exported: • Implementation Host • Implementation Port • Implementation Authentication Password The above data needs to be configured manually after importing the configuration file. Same has been mentioned in Import section

Core Maintenance
2-116
2.35.3 Experian Configuration
2.35.3.1 Experian Fetch Credit Report
Figure 89: Experian Fetch Credit Report
Figure 90: Experian Fetch Credit Report
2.35.3.2 Experian Sandbox
Service Consumer is used to export details of fetch credit report from sandbox environment

Core Maintenance
2-117
Figure 91: Experian Sandbox
2.35.4 Equifax Configuration
Equifax is configured in lookup as a bureau and rule services to configure in oracle banking routing hub as consumer service to fetch details from Equifax sand.
2.35.4.1 Equifax Fetch Credit Report
Figure 92: Equifax Fetch Credit Report

Core Maintenance
2-118
2.35.4.2 Equifax Sandbox
Service consumer exports details of fetch credit report from sandbox environment.
Figure 93: Equifax Sandbox
2.35.5 Document Configuration
Bureaus usually send applicants credit reports in PDF or encrypted format. The product processors prefers the PDF reports for easy readability and usability. In addition, product processors want to display PDF reports in their system and share these reports with the applicants. In such cases, the PDF credit reports are stored in the document server, which can be accessed by the bureau integration service and the product processor.
2.35.5.1 Content Management Server
The Oracle content management server is used to store and manage documents. It can accept encoded strings of data and stores them in the provided extension format like (pdf, jpeg, png). The content management server allows to view the document online.
The latest available version is 12.2.1.4.
The cmc-document-service is a gateway to access the oracle content management server. Using this service, other applications can store, manage and process the document with ease.
2.35.5.2 Environment Configuration
To install cmc-document-services, additional configuration is added. This includes the moc domain.
Dflyway.domain.locations=db/migration/domain/plato,db/migration/domain/sms,db/migration/domain/moc,db/migration/domain/cmc
-Dflyway.domain.placeHolders.moc.cmc-comments-services.server.port=<MOC_PORT>
-Dflyway.domain.placeHolders.moc.cmc-document-services.server.port=<MOC_PORT>

Core Maintenance
2-119
-Dflyway.domain.placeHolders.dmsServiceUrl=<CONTENT_SERVER_URL>
-Dflyway.domain.placeHolders.dmsServiceUsrname=<CONTENT_SERVER_USERNAME>
-Dflyway.domain.placeHolders.dmsServicePwd=<CONTENT_SERVER_PASSWORD>
-Dflyway.domain.placeHolders.cmc-document-services.schema=<SCHEMA_NAME>
-Dflyway.domain.placeHolders.cmc-document-services.server.port=<SCHEMA_PORT>
-Dflyway.domain.placeHolders.cmc-document-services.username=<SCHEMA_USERNAME>
-Dflyway.domain.placeHolders.cmc-document-services.password=<SCHEMA_PASSWORD>
-Dflyway.domain.placeHolders.cmc-document-services.domain.jndi=jdbc/CMNCORE
-Dflyway.domain.placeHolders.cmc-document-services.jndi=jdbc/CMNCORE
-Dflyway.domain.placeHolders.cmc-document-services.db.jndi=jdbc/CMNCORE
-Dflyway.domain.placeHolders.cmc-document-services.jdbcUrl=jdbc:oracle:thin:@//<SCHEMA_IP>:<SCHEMA_PORT>/<SERVICE_NAME>
-Dflyway.domain.placeHolders.cmc-document-services.db.jdbcUrl=jdbc:oracle:thin:@//<SCHEMA_IP>:<SCHEMA_PORT>/<SERVICE_NAME>
2.35.6 Troubleshooting
2.35.6.1 Oracle FLEXCUBE Onboarding issues faced during cmc-obcbs-service and cmc-obrh-services integration
Experian password expired The password for the Experian account had expired The solution is to login to the Experian website and reset the password. The new password is generated via mail and you can configure in oracle banking routing hub for token generation.
2.35.6.2 Unable to connect to external server
The oracle banking routing hub server is unable to connect to the experian server. The proxy is not configured The VM arguments were added for oracle banking routing hub's managed server. -Dhttps.proxyHost=www-proxy-idc.in.oracle.com -Dhttps.proxyPort=80 https://confluence.oraclecorp.com/confluence/pages/viewpage.action?pageId=2863487960
2.35.6.3 Oracle Banking Routing Hub environment variable value not found
The environment variable for the Bureau Integration Service product processor is improper. ($.headers["bureauType"][0]) The correct path was provided($.headers["bureauType"][0]

Core Maintenance
2-120
2.36 Bureau Integration Service
2.36.1 Overview
Bureau integration service facilitates financial institutions to send requests to the credit bureau agencies for credit scores and reports. It also facilitates viewing reports received from the bureaus.
The credit report presents the credit information of an individual or a company, which is fetched by credit bureaus from various financial institutions. It is a detailed report, which contains the history of borrowings, repayment routine, defaults, and delays. This report contains vital information about a customer’s credit score, personal information, employment details, contact information, and details of accounts in various banks of a given geographical region. The objective of this report is to present the financial history of an individual or a company, which further helps a bank to take a decision on granting a loan based on the credit score of a company or an individual.
For requesting and receiving the credit reports, bureau integration service is integrated with the financial institution or the product processor.
The oracle banking routing hub facilitates routing and transforming the information between the product processor, the underlying integration service and the bureau. The flow is as follows:
1. The product processor requests bureau integration service for credit reports. It provides the required customer information for whom the report is requested.
2. The routing hub transforms the data and forwards the request to the bureau integration service.
3. Once the integration service receives the request, the data is processed based on various criteria. The criteria contain the rules and facts of the product processor that are maintained in the rules engine.
4. Bureaus to be called are identified based on evaluation of the rules.
5. The integration service then sends the request to the routing hub, which transforms the data and sends the request to the respective credit bureaus.
6. The bureau processes the request and sends the credit report back.
7. The routing hub receives the report and transforms the report as per the defined template and sends it back to bureau integration service.
8. Bureau integration service then saves the data, displays the credit report, and sends the same to the product processor through the routing hub.
One or more bureaus can be called based on evaluation of the rules. The bureaus can be either called simultaneously or based on the response from the previous bureau call.
Bureau integration service maintains aging for credit report of an applicant. History service allows to store and pull existing credit report of an individual customer. The integration service retrieves report from history for those applicants if subsequent call to same bureau is made within defined period, beyond which a new credit report is called from the bureau. Existing credit reports from history are sent back to the product processor.
In case of multiple applicants being received by bureau integration service as a part of a lending application, based on the evaluation of criteria, the integration service consolidates all the multiple bureau responses into one and sends it to the product processor.

Core Maintenance
2-121
A new bureau can be added with only a configuration and without any change in the code. Two lookup types are required to be created in the bureau integration service. One for bureau and another for bureau product type. The additional maintenance required is configuration of the new bureau in the routing hub.
Bureau integration service supports override of criteria rules if the product processor wants to call a specific bureau or bureau product, for an applicant. In such cases, bureau service will not check criteria for rules evaluation. Instead, bureau service will call the bureau as intimated by the product processor in the request. Here, product processor can list one or more bureau’s to be called.
Bureau Integration service supports decoding of encoded pdf string from a bureau response to a pdf report using web content document server. The document server generates a unique document ID for each record stored. Bureau service can access the pdf reports using this document ID.
The below flow diagram depicts how bureau integration service works with the integrated product processor and interfaces with the routing hub for fetching and displaying the credit bureau reports:
Figure 94: Bureau Integration Service
Authorization process
To authorize and approve record, you need to perform the following actions:
1. Navigate to the required screen.
2. Click Authorize. The record pending for authorization are displayed.
3. Select the required record and click Approve.
4. The records are displayed in a widget. If you have modified the lookup, criteria twice, system displays two widgets with respective modification number along with the modified details.
5. Specify remarks for approving the record in the Remarks field.
6. Click Confirm and authorize the record. The record is authorized successfully.

Core Maintenance
2-122
2.37 Credit Bureau Display
The credit bureau display screen facilitates to view the reports received from the various bureaus. The report includes credit history details of the customer and the credit score of the customer based on these details.
This section contains the following subsection:
View Credit Bureau Report
2.37.1 View Credit Bureau Report
The Credit Bureau Display screen allows the user to view the credit bureau report based on the various filter options provided.
To view a credit bureau report:
1. From Home screen, click Credit Bureau. Under Credit Bureau, click Operations.
2. Under Operations, click Credit Bureau Display.
The Credit Bureau Display screen is displayed.
Figure 95 : Credit Bureau Display
3. Specify the fields on Credit Bureau Display screen. The fields, which are marked with asterisk, are mandatory. For more information on fields, refer to the field description table below.
Table 82: Credit Bureau Display- Field Description
Field Description
Filter Select the required option based on which you can search for the credit bureau reports from the drop-down list.
The options are:
External Reference Number

Core Maintenance
2-123
Field Description
Inquiry ID
Inquiry Date
Bureau Name
Product Processor
Application Number
Bureau Report ID
Value Specify the required details or select the appropriate option for the selected filter option.
This field appears once you select an option from the Filter list.
From Date Select the start of the period during which the report was generated.
This field appears once the user select the filter option as Inquiry Date and value as Date Range.
To Date Select the end date of the period during which the report was generated.
This field appears if you have selected the filter option as Inquiry Date and value as Date Range.
4. In the Search Criteria section, specify the details and click Search.
The Credit Bureau Display – Report History screen displays showing a list of records based on the specified search criteria.
Figure 96 : Credit Bureau Display – Report History
For more information on fields, refer to the field description table below.
Table 83: Credit Bureau Display – Field Description
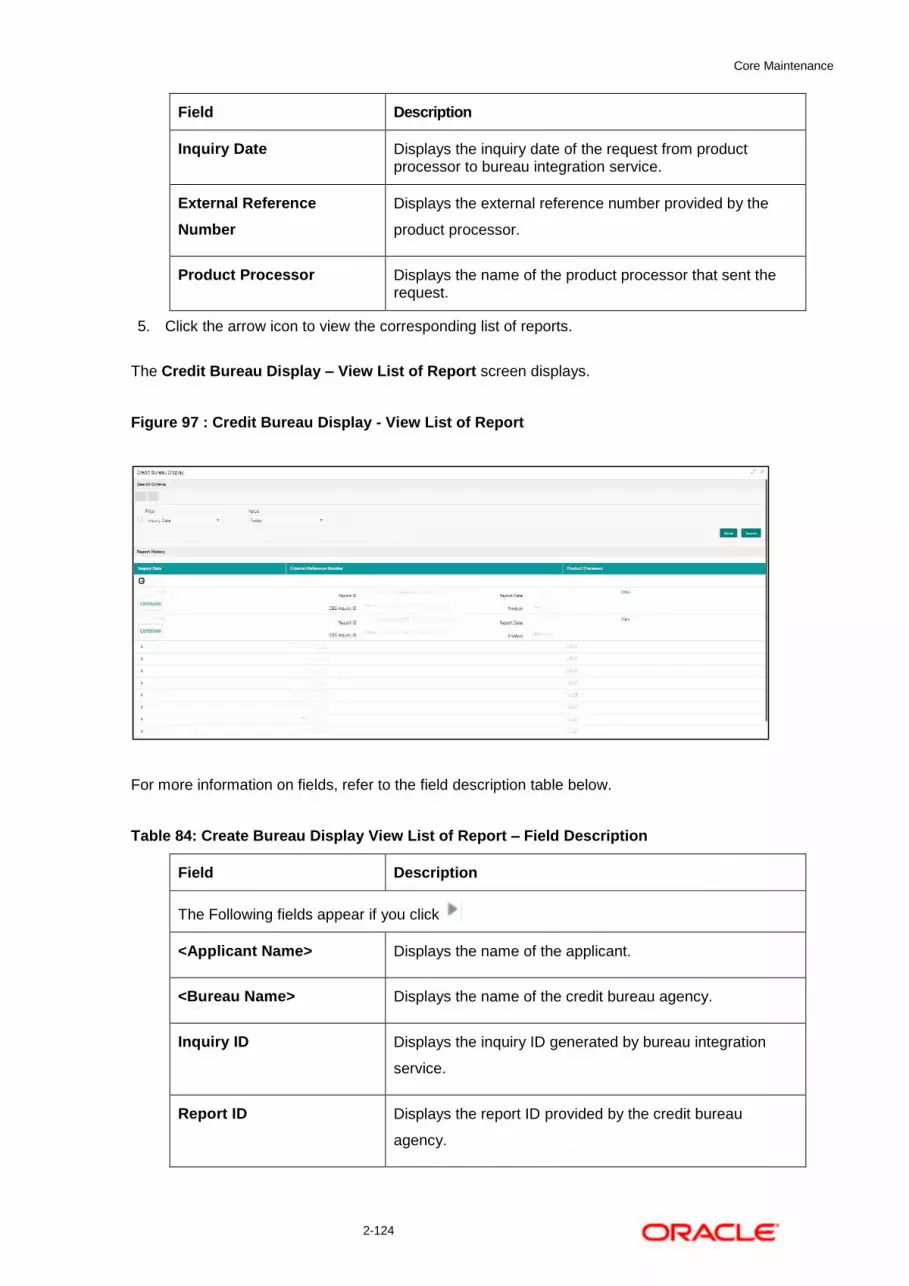
Core Maintenance
2-124
Field Description
Inquiry Date Displays the inquiry date of the request from product processor to bureau integration service.
External Reference
Number
Displays the external reference number provided by the
product processor.
Product Processor Displays the name of the product processor that sent the request.
5. Click the arrow icon to view the corresponding list of reports.
The Credit Bureau Display – View List of Report screen displays.
Figure 97 : Credit Bureau Display - View List of Report
For more information on fields, refer to the field description table below.
Table 84: Create Bureau Display View List of Report – Field Description
Field Description
The Following fields appear if you click
<Applicant Name> Displays the name of the applicant.
<Bureau Name> Displays the name of the credit bureau agency.
Inquiry ID Displays the inquiry ID generated by bureau integration
service.
Report ID Displays the report ID provided by the credit bureau
agency.
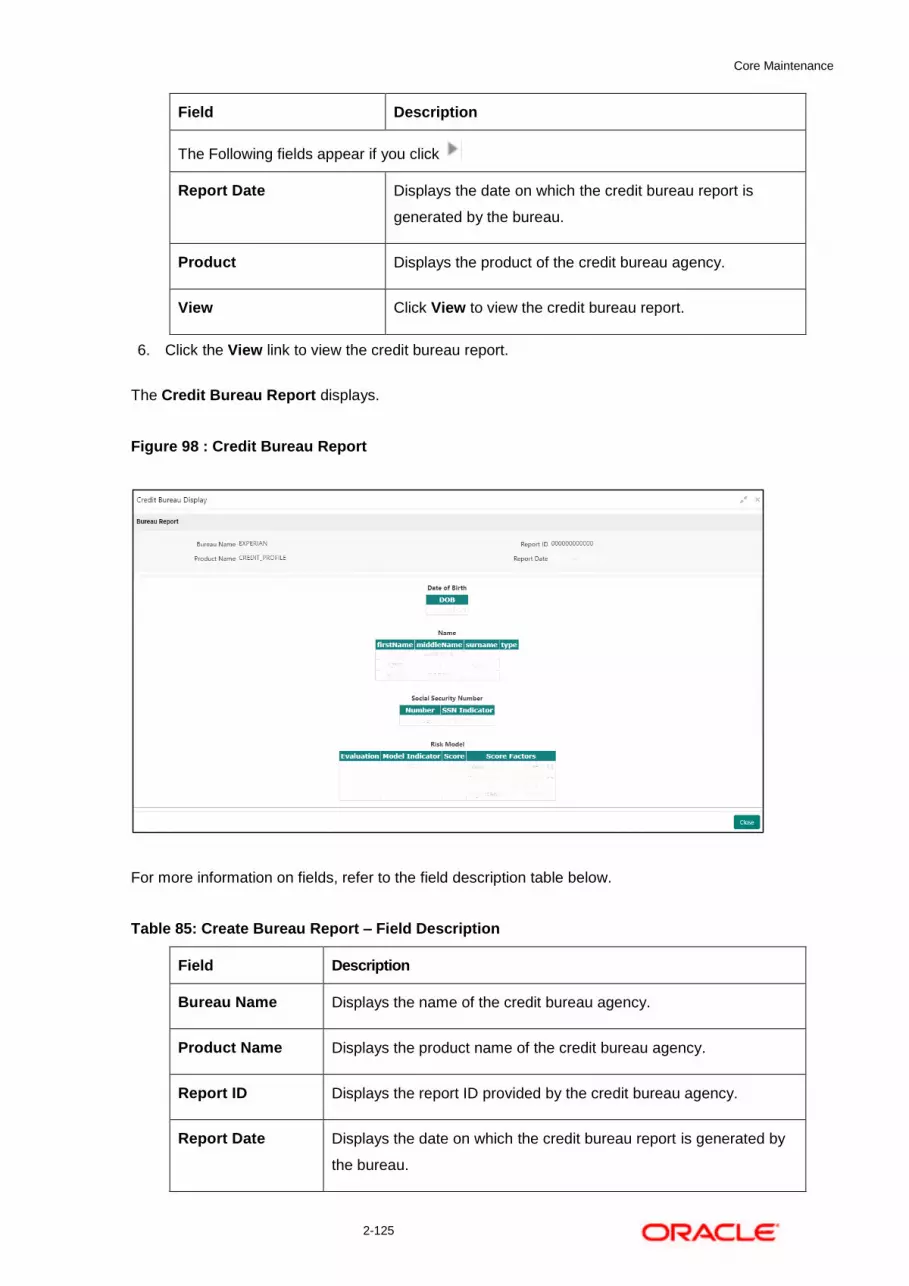
Core Maintenance
2-125
Field Description
The Following fields appear if you click
Report Date Displays the date on which the credit bureau report is
generated by the bureau.
Product Displays the product of the credit bureau agency.
View Click View to view the credit bureau report.
6. Click the View link to view the credit bureau report.
The Credit Bureau Report displays.
Figure 98 : Credit Bureau Report
For more information on fields, refer to the field description table below.
Table 85: Create Bureau Report – Field Description
Field Description
Bureau Name Displays the name of the credit bureau agency.
Product Name Displays the product name of the credit bureau agency.
Report ID Displays the report ID provided by the credit bureau agency.
Report Date Displays the date on which the credit bureau report is generated by
the bureau.

Core Maintenance
2-126
2.38 Lookup
Lookup is the service for mapping of keys and values that is used to enrich the description of the data displayed to the user. The lookup screen facilitates to define the contents for drop-down or list of value fields. Lookup fields are used throughout the system. The identified fields will only accept entries stored in this screen. Below are some examples of the lookup fields.
Static/Enumeration values
Credit Bureau: For example, credit bureau1, credit bureau 2, and credit bureau 3.
Comparison Operator: Equals, Greater than.
Dependent lookups based on another selection
Based on Country, State should have different values in the lookup.
Based on Country, Currency should have different values in the lookup.
This section contains the following subsections:
Create Lookup
View Lookup
2.38.1 Create Lookup
The Create Lookup screen allows the user to create lookup definitions by updating various details.
To create lookup:
1. From Home screen, click Core maintenance. Under Core Maintenance, click Credit Bureau.
2. Under Credit Bureau, click Maintenance. Under Maintenance, click Lookup.
3. Under Lookup, click Create Lookup.
The Create Lookup screen is displayed.
Figure 99 : Create Lookup

Core Maintenance
2-127
4. Specify the fields on Create Lookup screen.
The fields which are marked with asterisk, are mandatory. For more information on fields, refer the field description table.
Table 86: Create Lookup – Field Description
Field Description
Lookup Type Specify the unique lookup type name.
Description Specify the short description for lookup.
+ button Click to add a new row.
- button Click to delete an existing row.
Lookup Code Specify the unique lookup code.
Description Specify the short description for lookup.
Sort Order Specify the sort Order.
Dependent Identifier Specify the dependent Identifier.
Enable Click the toggle status to enable the parameter.
5. Click Save to save the details.
The lookup is successfully created and can be viewed using the View Lookup screen.

Core Maintenance
2-128
2.38.2 View Lookup
The View Lookup screen allows user to view the lookup created using the Create Lookup screen. The status of the created lookup is displayed as Unauthorized and Open. Once the checker authorizes the lookup, the status is updated to Authorized and Open.
To view created lookup:
1. From the Home screen, click Core Maintenance. Under Core Maintenance, click Credit Bureau.
2. Under Credit Bureau, click Maintenance. Under Maintenance, click Lookup.
3. Under Lookup, click View Lookup.
The View Lookup screen is displayed.
Figure 100 : View Lookup
For more information on field, refer the field description table.
Table 87 View Lookup – Field Description
Field Description
Lookup Type Displays the lookup type.
Description Displays the description of the lookup.
Status Displays the status of the record.
4. Click Search.
5. Specify the search criteria to fetch the required lookup.
The View Lookup Search screen displays.

Core Maintenance
2-129
Figure 101 : View Lookup - Search
For more information on fields, refer to the field description table below.
Table 88: View Lookup – Search Option – Field Description
Field Description
Lookup Type Displays the lookup type.
Authorization Status Select the authorization status of the lookup.
The options are:
Authorized
Unauthorized
Record Status Select the record status of the lookup.
The options are:
Open
Close
6. Click Search.
7. Click three-dots icon to unlock, delete, authorize or view the created criteria code
8. Click Unlock icon to modify the following fields. The fields are displayed in the Lookup Maintenance screen.
Lookup Code
Description
Sort Order
Dependent Identifier
Enable

Core Maintenance
2-130
Figure 102 : Lookup Maintenance – Modify
For more information on fields, refer to the field description table below.
Table 89: Lookup Maintenance – Modify- Field Description.
Field Description
Basic Details
Lookup Type Displays the lookup type.
Description Displays the description of the lookup.
Lookup Codes
+ button Click to add a new row.
- button Click to delete an existing row.
Lookup Code Displays the lookup code for the created lookup.
You can modify the same.
Description Displays the description for the created lookup.
Sort Order Displays the sort order for the created lookup.
Dependent Identifier Displays the dependent Identifier for the created lookup.
You can modify the same.
Enable Indicates if the lookup is enabled or not.
You can modify the same.
9. Click Save to update the modified fields.
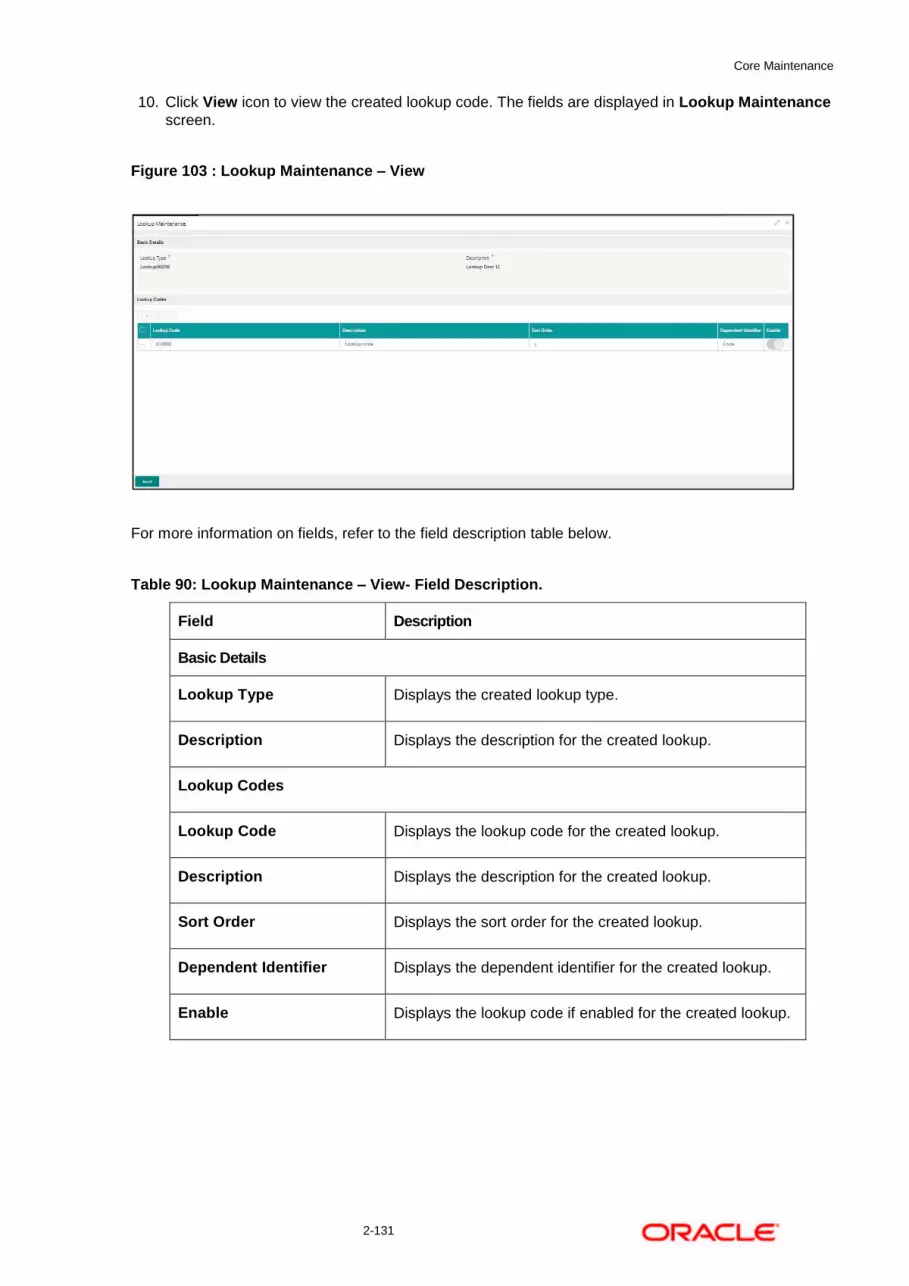
Core Maintenance
2-131
10. Click View icon to view the created lookup code. The fields are displayed in Lookup Maintenance
screen.
Figure 103 : Lookup Maintenance – View
For more information on fields, refer to the field description table below.
Table 90: Lookup Maintenance – View- Field Description.
Field Description
Basic Details
Lookup Type Displays the created lookup type.
Description Displays the description for the created lookup.
Lookup Codes
Lookup Code Displays the lookup code for the created lookup.
Description Displays the description for the created lookup.
Sort Order Displays the sort order for the created lookup.
Dependent Identifier Displays the dependent identifier for the created lookup.
Enable Displays the lookup code if enabled for the created lookup.
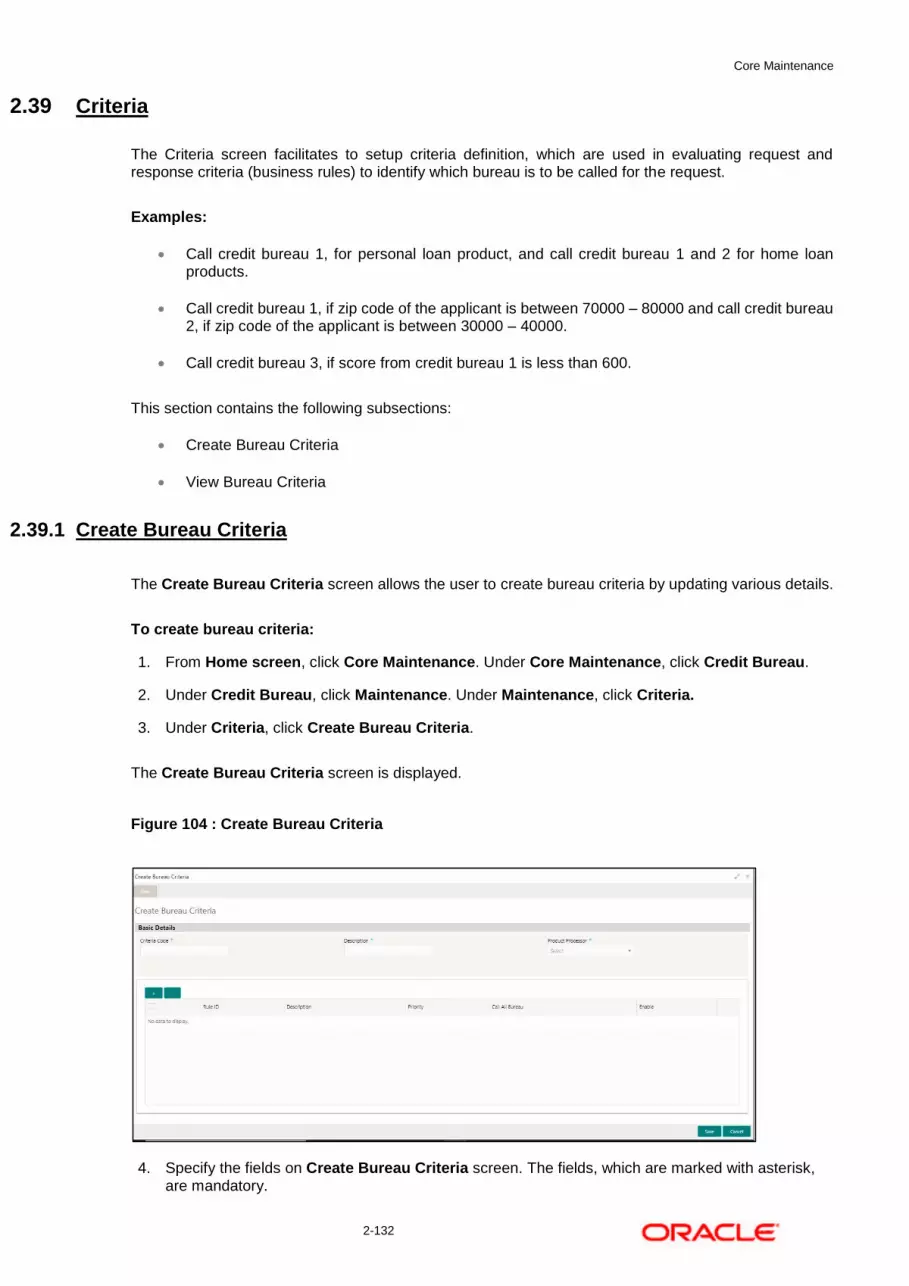
Core Maintenance
2-132
2.39 Criteria
The Criteria screen facilitates to setup criteria definition, which are used in evaluating request and response criteria (business rules) to identify which bureau is to be called for the request.
Examples:
Call credit bureau 1, for personal loan product, and call credit bureau 1 and 2 for home loan products.
Call credit bureau 1, if zip code of the applicant is between 70000 – 80000 and call credit bureau 2, if zip code of the applicant is between 30000 – 40000.
Call credit bureau 3, if score from credit bureau 1 is less than 600.
This section contains the following subsections:
Create Bureau Criteria
View Bureau Criteria
2.39.1 Create Bureau Criteria
The Create Bureau Criteria screen allows the user to create bureau criteria by updating various details.
To create bureau criteria:
1. From Home screen, click Core Maintenance. Under Core Maintenance, click Credit Bureau.
2. Under Credit Bureau, click Maintenance. Under Maintenance, click Criteria.
3. Under Criteria, click Create Bureau Criteria.
The Create Bureau Criteria screen is displayed.
Figure 104 : Create Bureau Criteria
4. Specify the fields on Create Bureau Criteria screen. The fields, which are marked with asterisk, are mandatory.
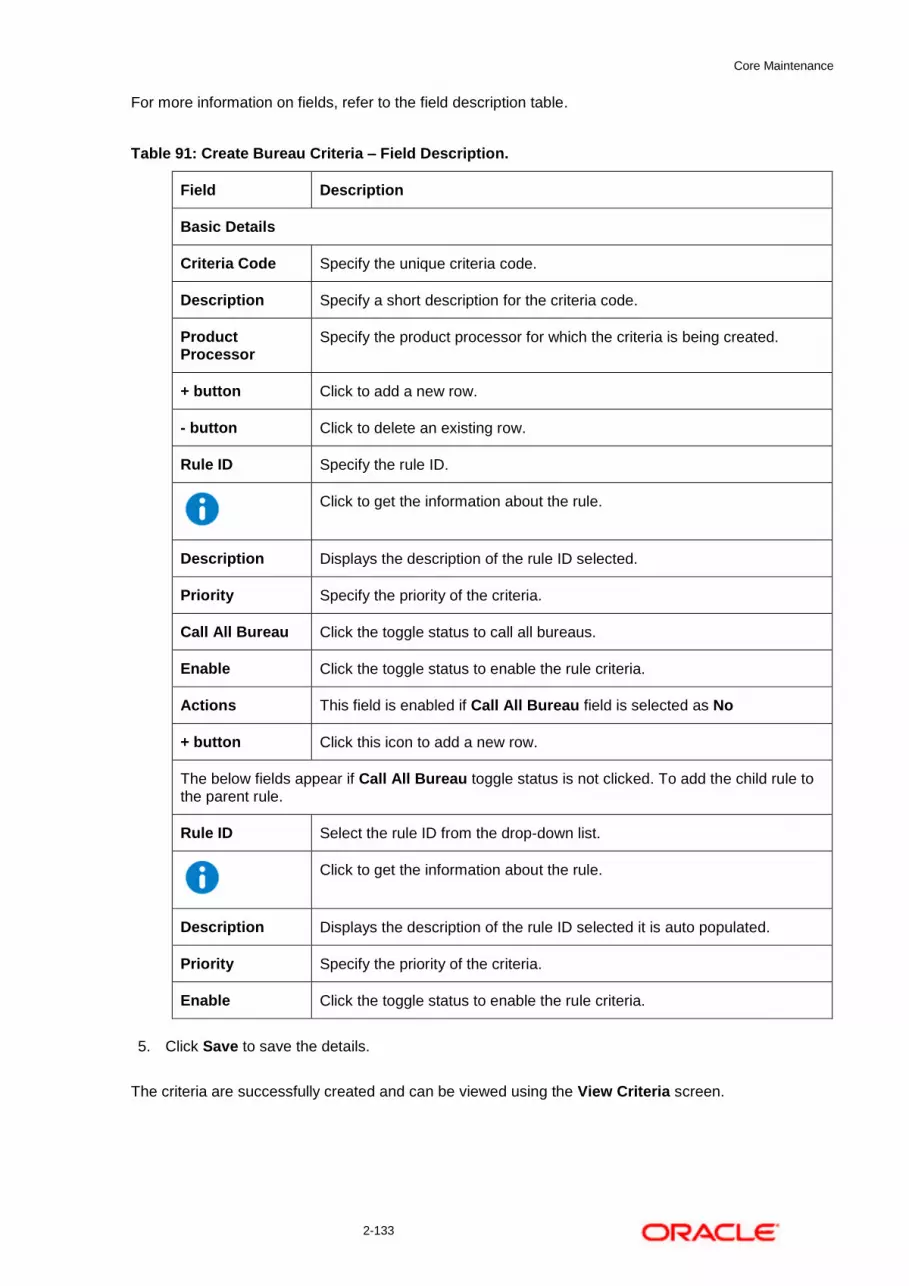
Core Maintenance
2-133
For more information on fields, refer to the field description table.
Table 91: Create Bureau Criteria – Field Description.
Field Description
Basic Details
Criteria Code Specify the unique criteria code.
Description Specify a short description for the criteria code.
Product Processor
Specify the product processor for which the criteria is being created.
+ button Click to add a new row.
- button Click to delete an existing row.
Rule ID Specify the rule ID.
Click to get the information about the rule.
Description Displays the description of the rule ID selected.
Priority Specify the priority of the criteria.
Call All Bureau Click the toggle status to call all bureaus.
Enable Click the toggle status to enable the rule criteria.
Actions This field is enabled if Call All Bureau field is selected as No
+ button Click this icon to add a new row.
The below fields appear if Call All Bureau toggle status is not clicked. To add the child rule to the parent rule.
Rule ID Select the rule ID from the drop-down list.
Click to get the information about the rule.
Description Displays the description of the rule ID selected it is auto populated.
Priority Specify the priority of the criteria.
Enable Click the toggle status to enable the rule criteria.
5. Click Save to save the details.
The criteria are successfully created and can be viewed using the View Criteria screen.

Core Maintenance
2-134
2.39.2 View Bureau Criteria
The View Bureau Criteria screen allows the user to view the criteria created using the Create Bureau Criteria screen. The status of the created criteria is displayed as Unauthorized and Open. Once the checker authorizes the criteria, the status is updated to Authorized and Open.
To view created criteria:
1. From Home screen, click Core Maintenance. Under Core Maintenance, click Credit Bureau.
2. Under Credit Bureau, click Maintenance. Under Maintenance, click Criteria.
3. Under Criteria, click View Bureau Criteria.
The View Bureau Criteria screen is displayed.
Figure 105 : View Bureau Criteria
For more information on fields refer to the field description table.
Table 92: View Bureau Criteria – Field Description.
Field Description
Criteria Code Displays the criteria code.
Description Displays the description of the criteria code.
Product Processor Displays the product processor of the criteria.
4. Click Search icon.
5. Specify the search criteria to fetch the required criteria.
6. Click Search.
The View Criteria - Search screen displays.
Figure 106 : View Criteria –Search Option

Core Maintenance
2-135
For more information on fields, refer to the field description table below.
Table 93: View Criteria – Field Description.
Field Description
Criteria Code Specify the criteria code.
Description Specify the criteria description.
Product Processor Select the product processor from the drop-down list.
Authorization Status
Select the authorization status of the criteria.
The available options are:
Authorized
Unauthorized
Record Status Select the record status from the drop-down list.
The available options are:
Open
Close
7. Click three-dots icon to unlock, delete, authorize or view the created criteria code.
8. Click Unlock icon to modify the following fields. The fields are displayed in the Bureau Criteria Maintenance screen.
Rule ID
Description
Priority
Call All Bureau Status
Enable

Core Maintenance
2-136
Figure 107 : Bureau Criteria Maintenance- Modify
For more information on fields, refer to the field description table below.
Table 94: Bureau Criteria Maintenance – Modify - Field Description.
Field Description
Basic Details
Criteria Code Displays the created criteria code.
Description Displays the description for the created criteria code.
Product Processor
Displays the product processor for which the criteria being created.
Criteria Definition
Rule ID Displays the rule ID for the created criteria.
Description Displays the description for the created criteria.
Priority Displays the priority for the created criteria.
Call All Bureau Displays if call all bureau has been enabled for the created criteria.
Enable Displays the criteria code if enabled for the created criteria.
Actions Displays the actions of the created criteria.
10. Click Save to update the modified fields.
11. Click View icon to view the created criteria code. The fields are displayed in Bureau Criteria Maintenance screen.
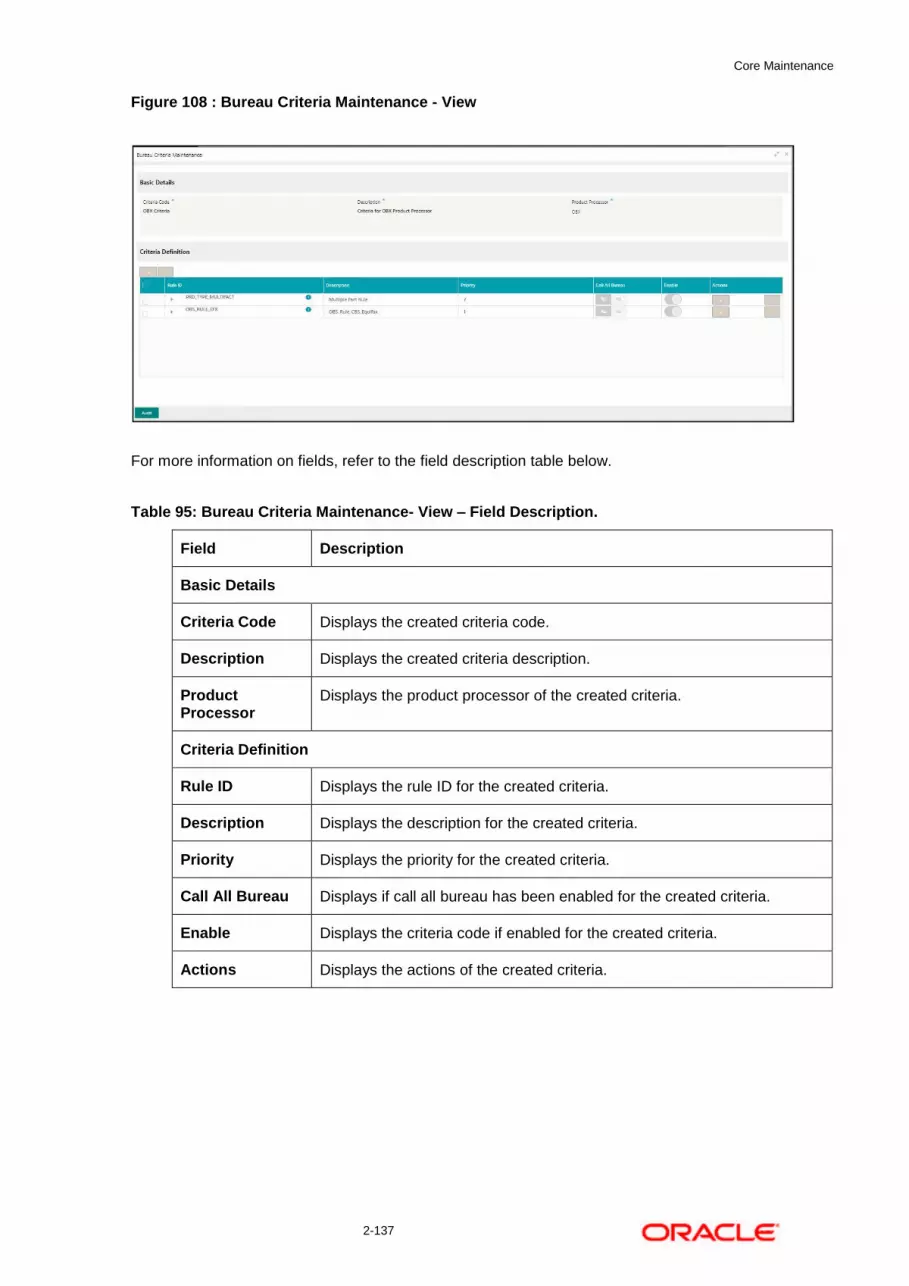
Core Maintenance
2-137
Figure 108 : Bureau Criteria Maintenance - View
For more information on fields, refer to the field description table below.
Table 95: Bureau Criteria Maintenance- View – Field Description.
Field Description
Basic Details
Criteria Code Displays the created criteria code.
Description Displays the created criteria description.
Product Processor
Displays the product processor of the created criteria.
Criteria Definition
Rule ID Displays the rule ID for the created criteria.
Description Displays the description for the created criteria.
Priority Displays the priority for the created criteria.
Call All Bureau Displays if call all bureau has been enabled for the created criteria.
Enable Displays the criteria code if enabled for the created criteria.
Actions Displays the actions of the created criteria.
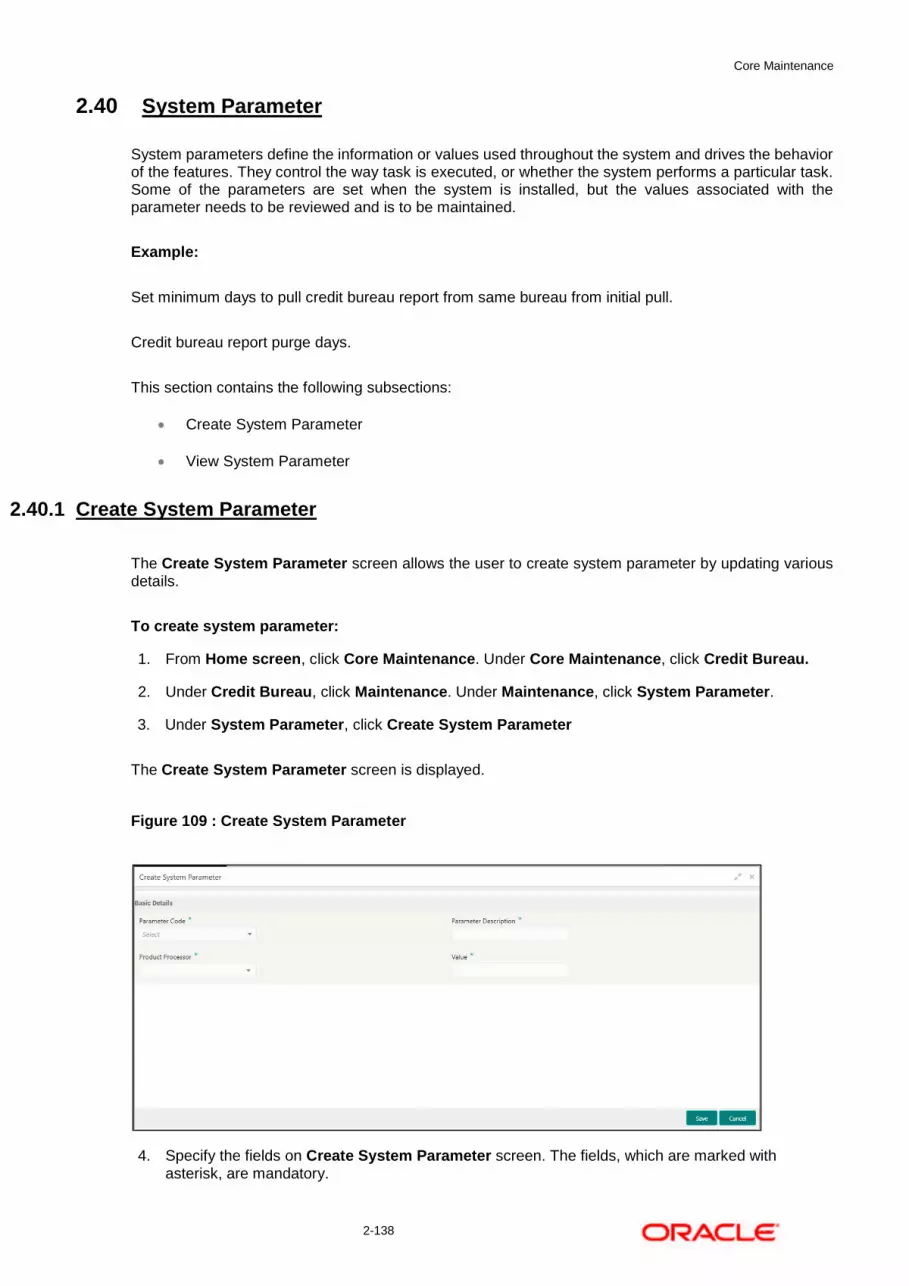
Core Maintenance
2-138
2.40 System Parameter
System parameters define the information or values used throughout the system and drives the behavior of the features. They control the way task is executed, or whether the system performs a particular task. Some of the parameters are set when the system is installed, but the values associated with the parameter needs to be reviewed and is to be maintained.
Example:
Set minimum days to pull credit bureau report from same bureau from initial pull.
Credit bureau report purge days.
This section contains the following subsections:
Create System Parameter
View System Parameter
2.40.1 Create System Parameter
The Create System Parameter screen allows the user to create system parameter by updating various details.
To create system parameter:
1. From Home screen, click Core Maintenance. Under Core Maintenance, click Credit Bureau.
2. Under Credit Bureau, click Maintenance. Under Maintenance, click System Parameter.
3. Under System Parameter, click Create System Parameter
The Create System Parameter screen is displayed.
Figure 109 : Create System Parameter
4. Specify the fields on Create System Parameter screen. The fields, which are marked with asterisk, are mandatory.

Core Maintenance
2-139
For more information on fields, refer to the field description table below.
Table 96: System Parameter – Field Description.
Field Description
Basic Details
Parameter Code Select the parameter code from the drop-down list.
Parameter Description
Specify a short description for the parameter code.
Product Processor
Select the product processor from the drop-down list for which the parameter is being created.
Value Specify the value for the parameter code.
6. Click Save to save the details.
The parameter is successfully created and can be viewed using the View System Parameter screen.
2.40.2 View System Parameter
The View System Parameter screen allows the user to view the system parameter created using the Create System Parameter screen. The status of the created system parameter is displayed as Unauthorized and Open. Once the checker authorizes the parameter, the status is updated to Authorized and Open.
To view created parameter:
1. From Home screen, click Core Maintenance. Under Core Maintenance, click Credit Bureau.
2. Under Credit Bureau, click Maintenance. Under Maintenance, click System Parameter.
3. Under System Parameter, click View System Parameter.
The View System Parameter screen is displayed.
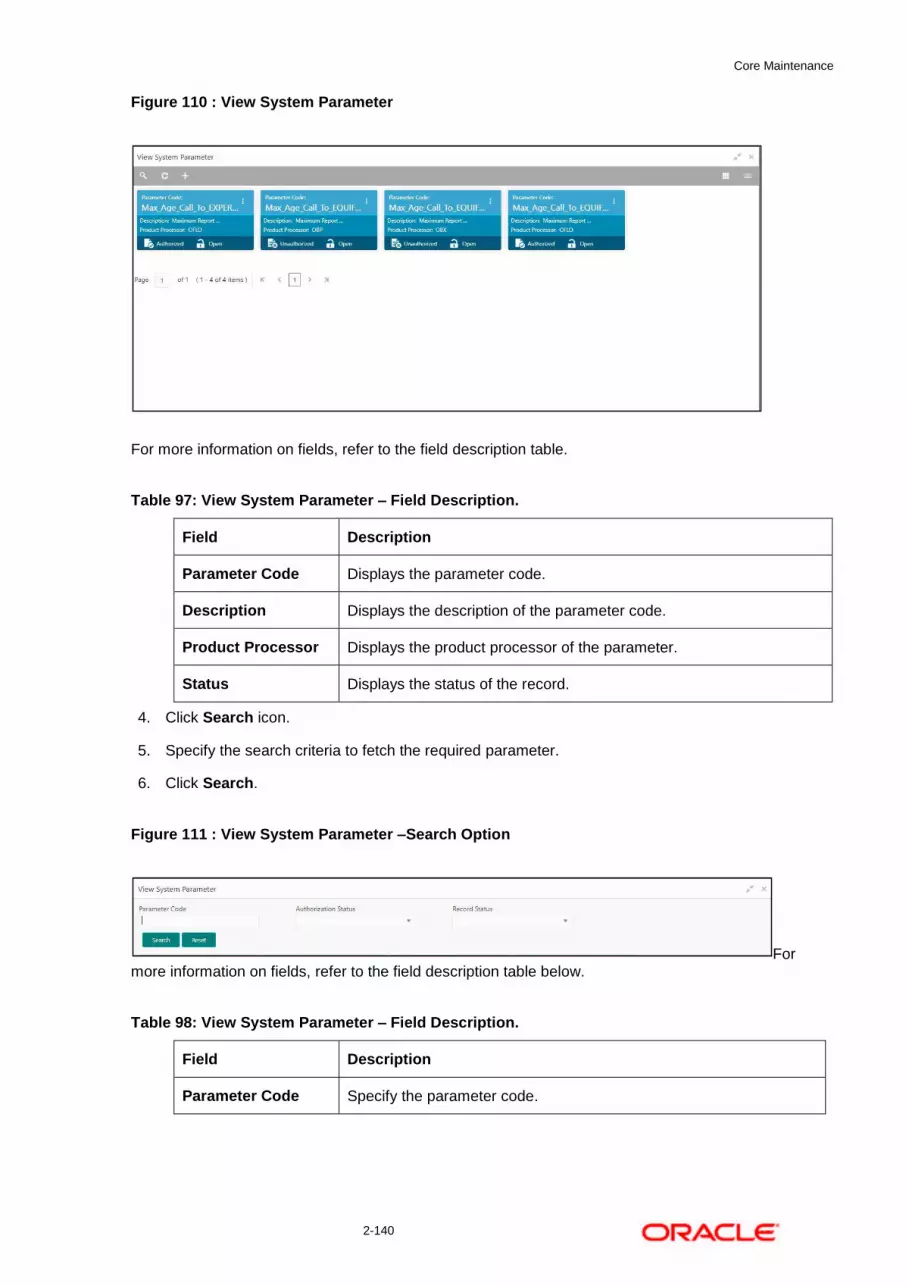
Core Maintenance
2-140
Figure 110 : View System Parameter
For more information on fields, refer to the field description table.
Table 97: View System Parameter – Field Description.
Field Description
Parameter Code Displays the parameter code.
Description Displays the description of the parameter code.
Product Processor Displays the product processor of the parameter.
Status Displays the status of the record.
4. Click Search icon.
5. Specify the search criteria to fetch the required parameter.
6. Click Search.
Figure 111 : View System Parameter –Search Option
For more information on fields, refer to the field description table below.
Table 98: View System Parameter – Field Description.
Field Description
Parameter Code Specify the parameter code.

Core Maintenance
2-141
Field Description
Authorization Status
Select the authorization status of the criteria.
The options are:
Authorized
Unauthorized
Record Status Select the record status of the criteria.
The options are:
Open
Close
7. Click three-dots icon to unlock, delete, authorize or view the created parameter code.
8. Click Unlock icon to modify the following fields. The fields are displayed in the System Parameter Maintenance screen.
Product Processor
Value
Figure 112 : System Parameter Maintenance - Modify
For more information on fields, refer to the field description table below.
Table 99: System Parameter Maintenance – Modify – Field Description.
Field Description
Basic Details
Parameter Code Displays the created parameter code.
Parameter Description
Displays the description for the created parameter.
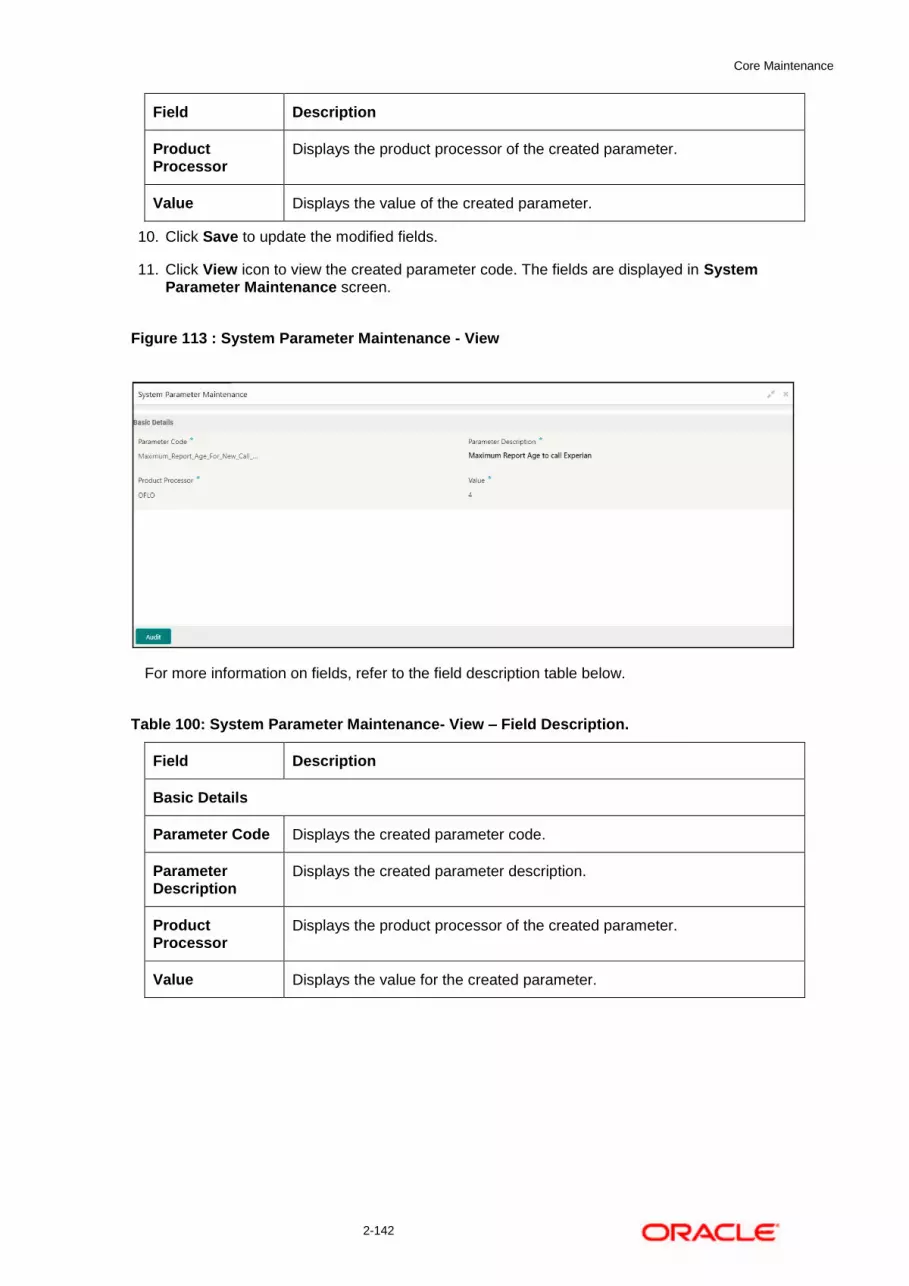
Core Maintenance
2-142
Field Description
Product Processor
Displays the product processor of the created parameter.
Value Displays the value of the created parameter.
10. Click Save to update the modified fields.
11. Click View icon to view the created parameter code. The fields are displayed in System Parameter Maintenance screen.
Figure 113 : System Parameter Maintenance - View
For more information on fields, refer to the field description table below.
Table 100: System Parameter Maintenance- View – Field Description.
Field Description
Basic Details
Parameter Code Displays the created parameter code.
Parameter Description
Displays the created parameter description.
Product Processor
Displays the product processor of the created parameter.
Value Displays the value for the created parameter.
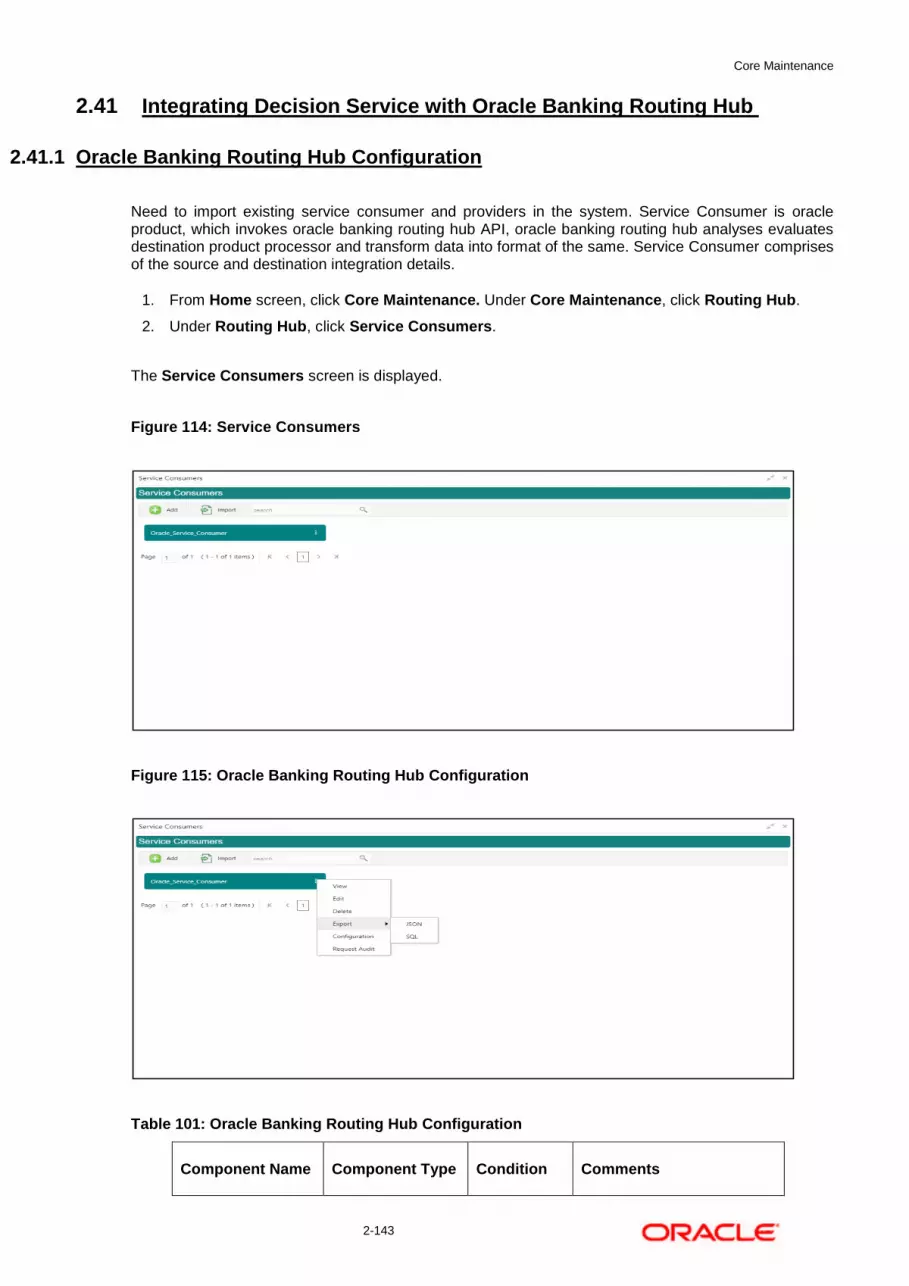
Core Maintenance
2-143
2.41 Integrating Decision Service with Oracle Banking Routing Hub
2.41.1 Oracle Banking Routing Hub Configuration
Need to import existing service consumer and providers in the system. Service Consumer is oracle product, which invokes oracle banking routing hub API, oracle banking routing hub analyses evaluates destination product processor and transform data into format of the same. Service Consumer comprises of the source and destination integration details.
1. From Home screen, click Core Maintenance. Under Core Maintenance, click Routing Hub.
2. Under Routing Hub, click Service Consumers.
The Service Consumers screen is displayed.
Figure 114: Service Consumers
Figure 115: Oracle Banking Routing Hub Configuration
Table 101: Oracle Banking Routing Hub Configuration
Component Name Component Type Condition Comments

Core Maintenance
2-144
Add Button Pops up add dialog
Import Button Pops up import dialog
Search Combo Box One Provides search functionality with case insensitive (Service Consumer Name)
View menu option Non-editable Pops up view dialog
Edit menu option Pops up edit dialog
Delete menu option
Export Sub menu item
JSON menu option Exports in JSON
SQL menu option Exports in SQL
Configuration menu option Pops up configuration dialog
Request Audit menu option Pops up request audit log
2.41.1.1 Add
You can create Service Consumer manually.
On Service Providers screen, click Add to create service providers.
Figure 116: Add
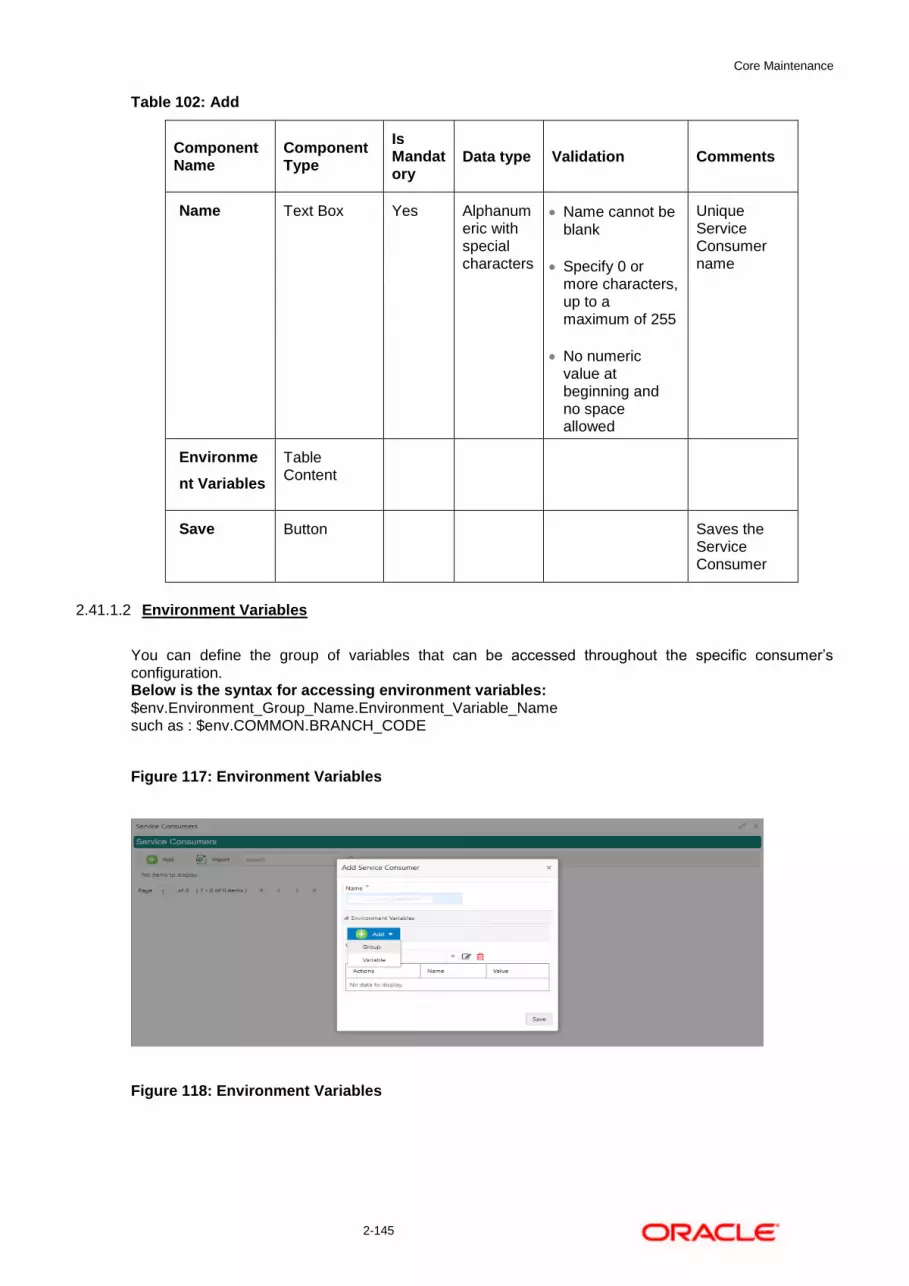
Core Maintenance
2-145
Table 102: Add
Component Name
Component Type
Is Mandatory
Data type Validation Comments
Name Text Box Yes Alphanumeric with special characters
Name cannot be blank
Specify 0 or more characters, up to a maximum of 255
No numeric value at beginning and no space allowed
Unique Service Consumer name
Environme
nt Variables
Table Content
Save Button Saves the Service Consumer
2.41.1.2 Environment Variables
You can define the group of variables that can be accessed throughout the specific consumer’s configuration. Below is the syntax for accessing environment variables: $env.Environment_Group_Name.Environment_Variable_Name such as : $env.COMMON.BRANCH_CODE
Figure 117: Environment Variables
Figure 118: Environment Variables

Core Maintenance
2-146
Figure 119: Environment Variables
Table 103: Environment Variables
Component Name
Component Type
Is Mandatory
Data type Validation Comments
Add Menu Item
Group Menu option Pops up add group dialog
Variable Menu option Pops up add variable dialog
Navigation: Service Consumer -> Environment Variables -> 3 dot icon (operation menu)
Edit menu option / icon
Pops up edit dialog

Core Maintenance
2-147
Delete menu option / icon
Deletes group / variable
Environment Group / Variable
Name Text Box Yes Alphanumeric with special characters
Name
cannot be
blank
Specify 0 or
more
characters,
up to a
maximum
of 255
No numeric
value at
beginning
and no
space
allowed
Value Text Area Value can either be hardcoded or Velocity mapping.
OK Button Saves the group / variable and displays it in the list
2.41.1.3 Import
You can create a service consumer by importing the JSON file and manually selecting the service Providers or select all providers that needs to be imported. On Service Providers screen, click Import.
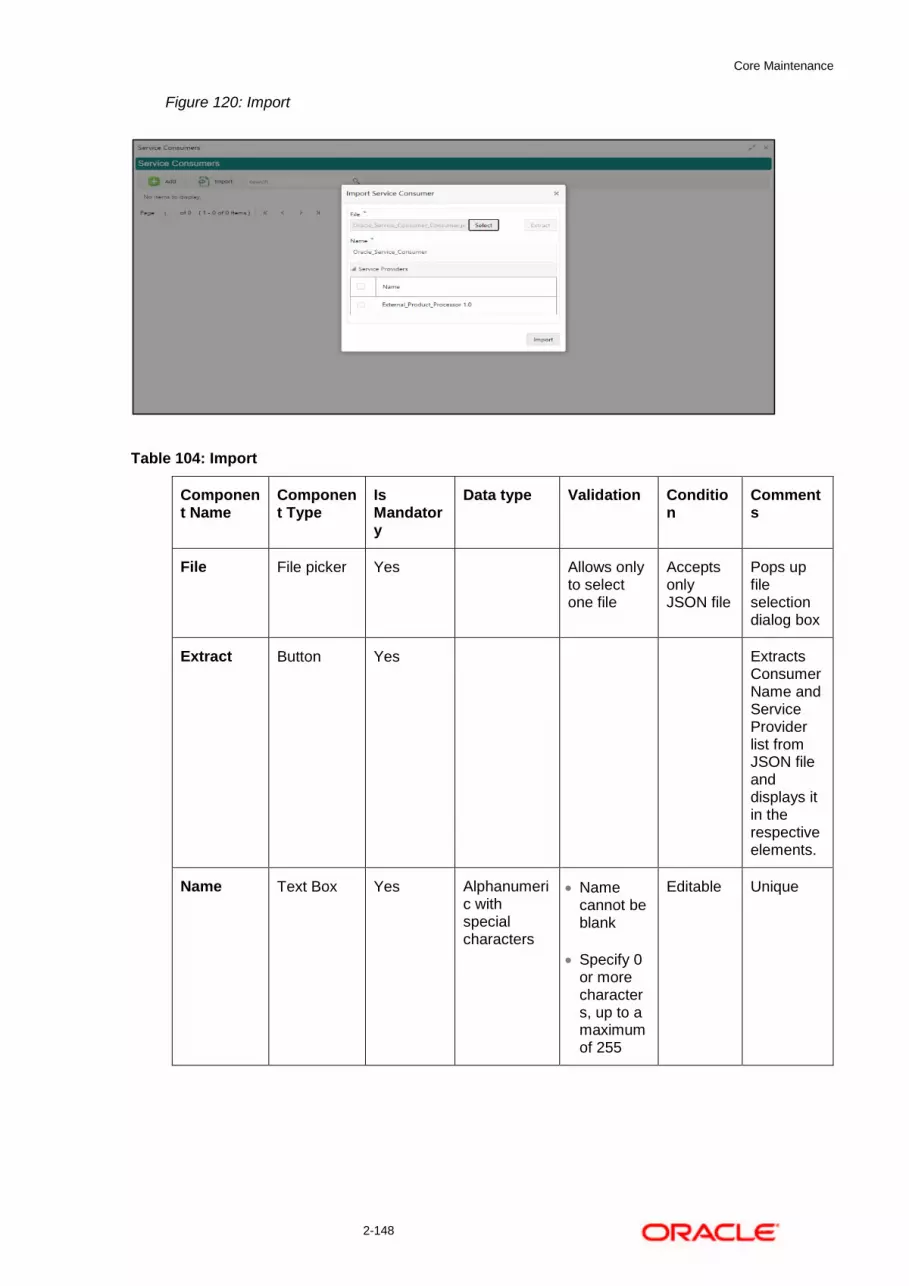
Core Maintenance
2-148
Figure 120: Import
Table 104: Import
Component Name
Component Type
Is Mandatory
Data type Validation Condition
Comments
File File picker Yes Allows only to select one file
Accepts only JSON file
Pops up file selection dialog box
Extract Button Yes Extracts Consumer Name and Service Provider list from JSON file and displays it in the respective elements.
Name Text Box Yes Alphanumeric with special characters
Name cannot be blank
Specify 0 or more characters, up to a maximum of 255
Editable Unique

Core Maintenance
2-149
Component Name
Component Type
Is Mandatory
Data type Validation Condition
Comments
No numeric value at beginning and no space allowed
Service Provider
Collapsible Header & Content
Displays the list of service providers that are present in JSON file
Import Button Imports Service Consumer
Note: Below data needs to be changed after importing consumer configuration file: • Implementation Host and Port • Implementation Authentication Password
2.41.1.4 View
You can view consumer details and can switch to edit form by clicking on edit icon. On Service Providers screen, click Operation Menu (3-dot icon), and click View.
Figure 121: View
2.41.1.5 Edit
You can modify the consumer details. On Service Providers screen, click Operation Menu (3-dot icon), and click Edit.
Figure 122: Edit

Core Maintenance
2-150
2.41.1.6 Delete
You can delete the consumer. On Service Providers screen, click Operation Menu (3-dot icon), and click Delete.
Figure 123: Delete
2.41.1.7 JSON Export
You can export the consumer configuration as JSON file. On Service Providers screen, click Operation Menu (3-dot icon), and click Export.
and then, Click JSON.
Figure 124: JSON Export
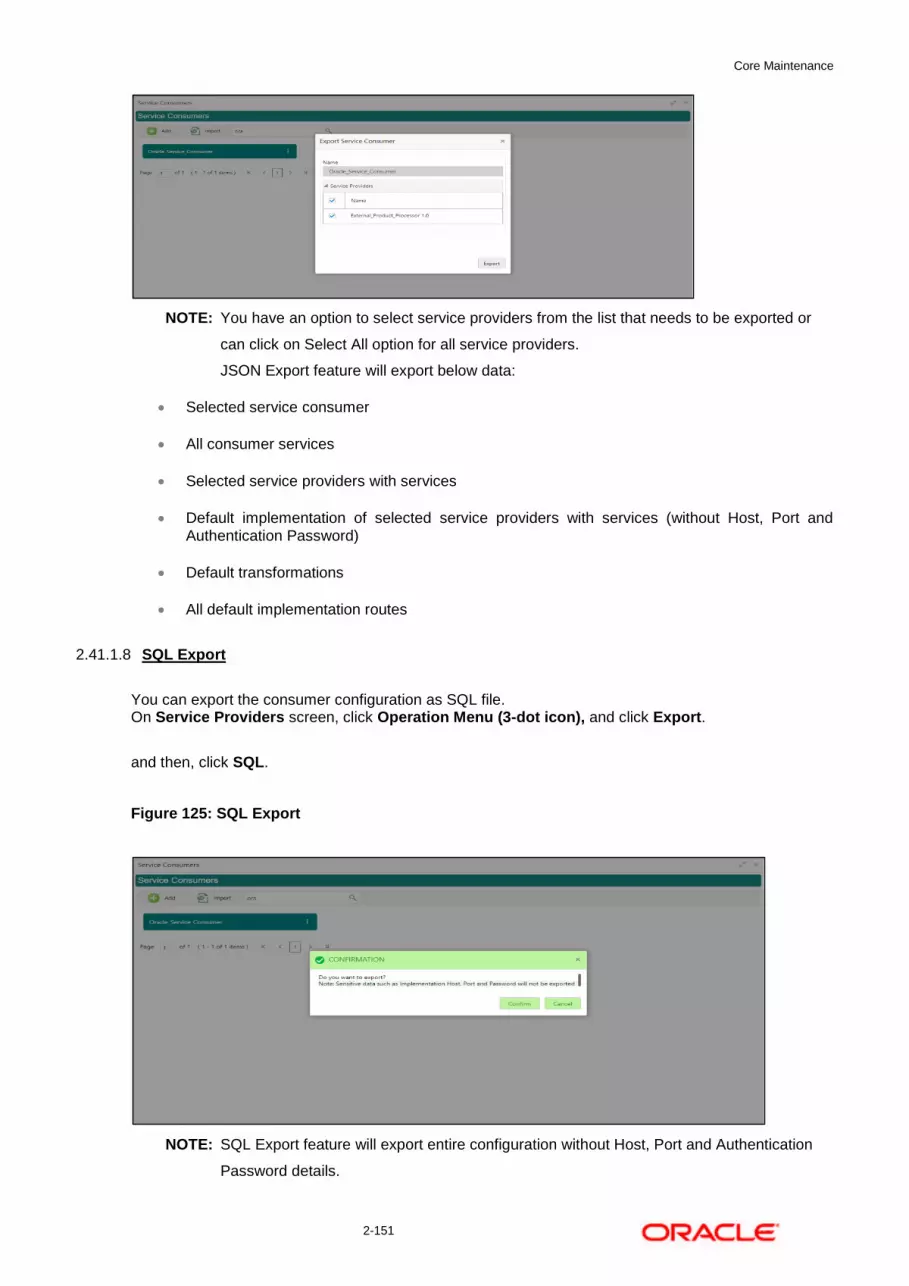
Core Maintenance
2-151
NOTE: You have an option to select service providers from the list that needs to be exported or
can click on Select All option for all service providers.
JSON Export feature will export below data:
Selected service consumer
All consumer services
Selected service providers with services
Default implementation of selected service providers with services (without Host, Port and Authentication Password)
Default transformations
All default implementation routes
2.41.1.8 SQL Export
You can export the consumer configuration as SQL file. On Service Providers screen, click Operation Menu (3-dot icon), and click Export.
and then, click SQL.
Figure 125: SQL Export
NOTE: SQL Export feature will export entire configuration without Host, Port and Authentication
Password details.
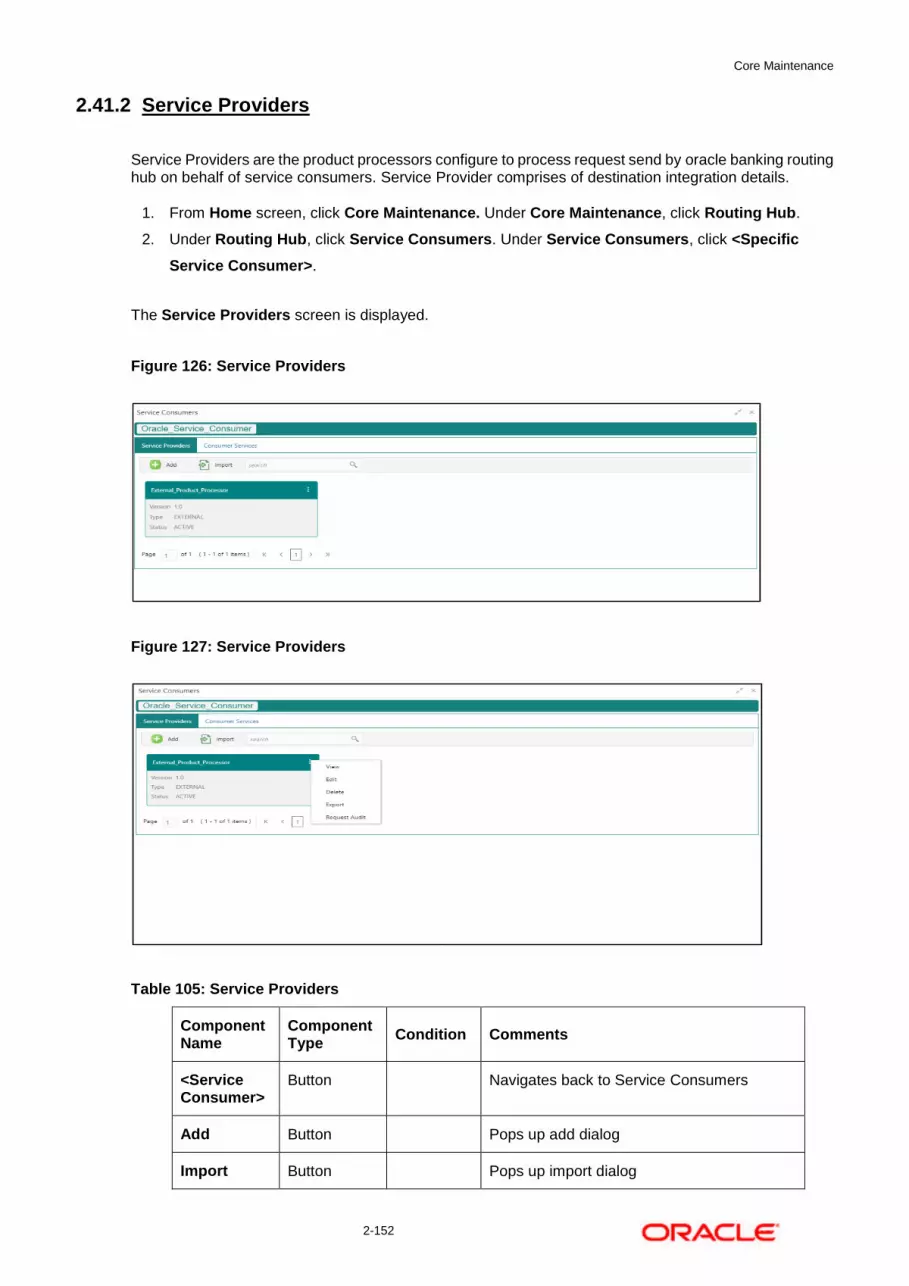
Core Maintenance
2-152
2.41.2 Service Providers
Service Providers are the product processors configure to process request send by oracle banking routing hub on behalf of service consumers. Service Provider comprises of destination integration details.
1. From Home screen, click Core Maintenance. Under Core Maintenance, click Routing Hub.
2. Under Routing Hub, click Service Consumers. Under Service Consumers, click <Specific
Service Consumer>.
The Service Providers screen is displayed.
Figure 126: Service Providers
Figure 127: Service Providers
Table 105: Service Providers
Component Name
Component Type
Condition Comments
<Service Consumer>
Button Navigates back to Service Consumers
Add Button Pops up add dialog
Import Button Pops up import dialog

Core Maintenance
2-153
Search Combo Box One
Provides search functionality with case insensitive (Service Provider Name)
Navigation: Service Providers -> 3 dot icon (operation menu)
View menu option Non-editable
Pops up view dialog
Edit menu option Pops up edit dialog
Delete menu option
Export menu option Exports in JSON
Request Audit
menu option Pops up request audit log
2.41.2.1 Add
You can create service provider manually. On Service Providers screen, click Add to create service providers.
Figure 128: Add

Core Maintenance
2-154
Table 106: Add
Component
Name
Component
Type
Is
Mandatory Data type Validation Comments
Product Name
Text Box Yes Alphanumeric with special characters
Name cannot be blank
Specify 0 or more characters, up to a maximum of 255.
No numeric value at beginning and no space allowed.
Unique provider name
Type Combo Box One
Yes
Predefined Values: INTERNAL / EXTERNAL
Version Text Box Yes Number Version cannot be blank
Specify 0 or more characters, up to a maximum of 255.
Specify only numeric or decimal values.
Unique provider version
Active Switch
Predefined Values: ACTIVE / INACTIVE If provider is marked as inactive, then all related routes will be stopped.
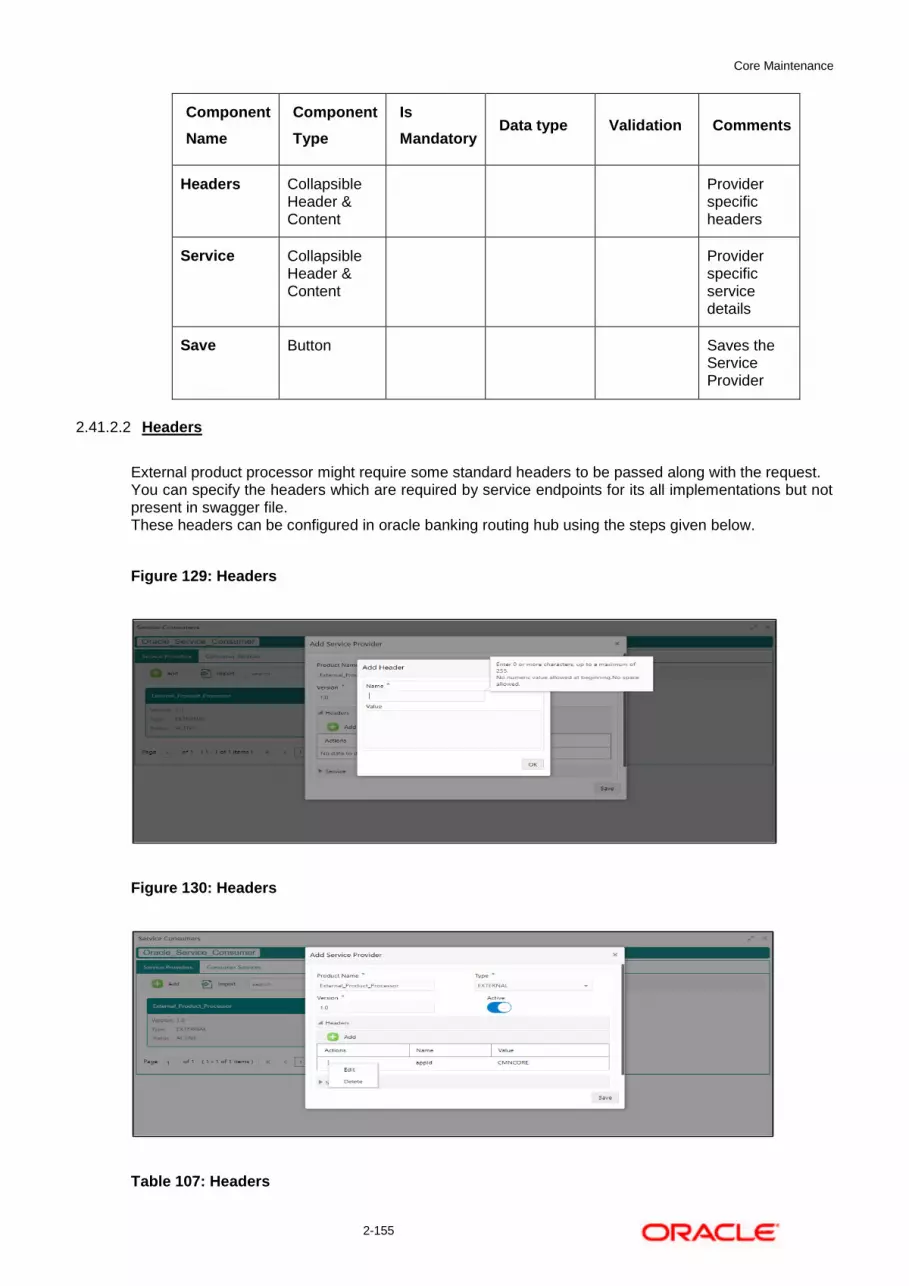
Core Maintenance
2-155
Component
Name
Component
Type
Is
Mandatory Data type Validation Comments
Headers Collapsible Header & Content
Provider specific headers
Service Collapsible Header & Content
Provider specific service details
Save Button
Saves the Service Provider
2.41.2.2 Headers
External product processor might require some standard headers to be passed along with the request. You can specify the headers which are required by service endpoints for its all implementations but not present in swagger file. These headers can be configured in oracle banking routing hub using the steps given below.
Figure 129: Headers
Figure 130: Headers
Table 107: Headers
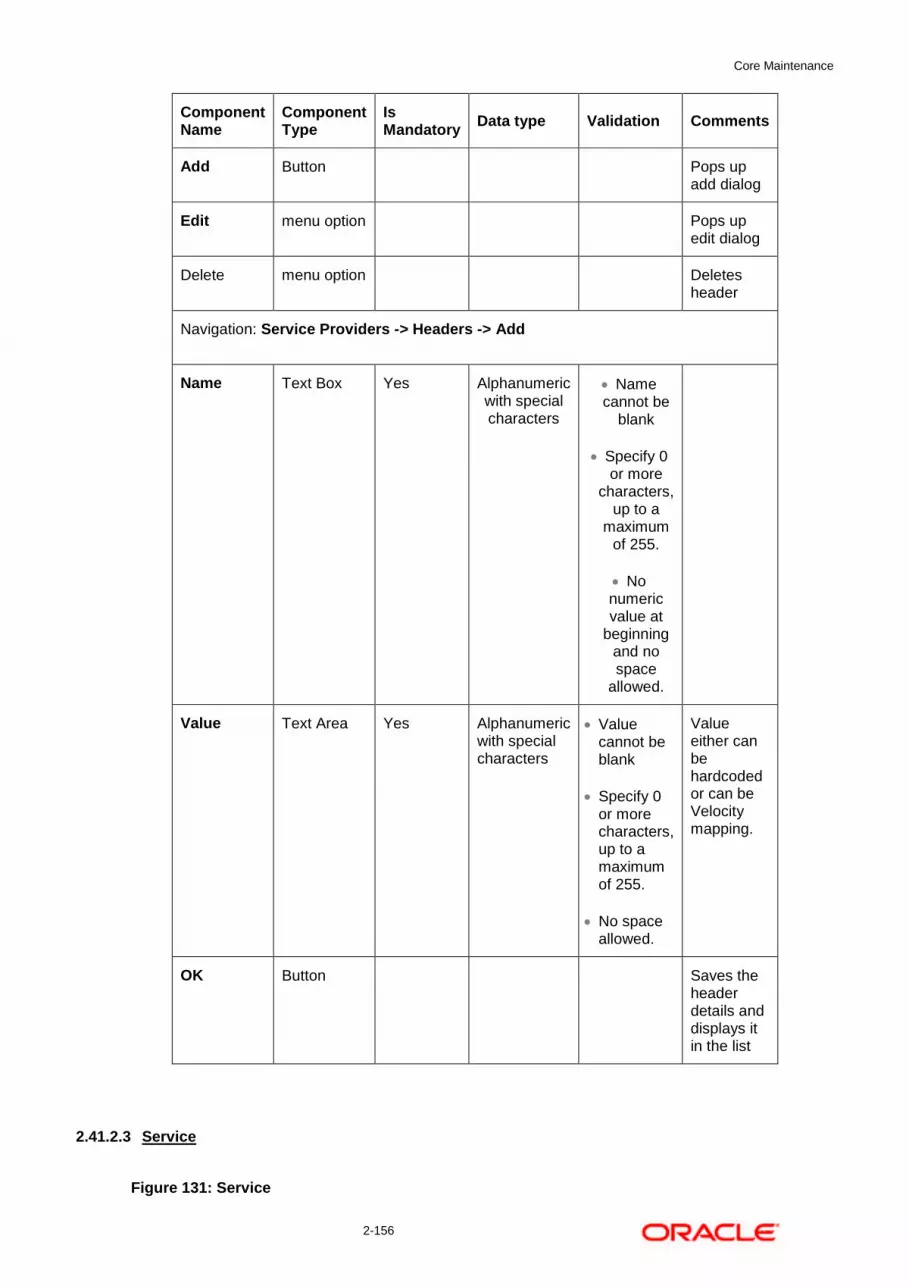
Core Maintenance
2-156
Component Name
Component Type
Is Mandatory
Data type Validation Comments
Add Button Pops up add dialog
Edit menu option Pops up edit dialog
Delete menu option Deletes header
Navigation: Service Providers -> Headers -> Add
Name Text Box Yes Alphanumeric with special characters
Name cannot be
blank
Specify 0 or more
characters, up to a
maximum of 255.
No numeric value at
beginning and no space
allowed.
Value Text Area Yes Alphanumeric with special characters
Value cannot be blank
Specify 0 or more characters, up to a maximum of 255.
No space allowed.
Value either can be hardcoded or can be Velocity mapping.
OK Button Saves the header details and displays it in the list
2.41.2.3 Service
Figure 131: Service
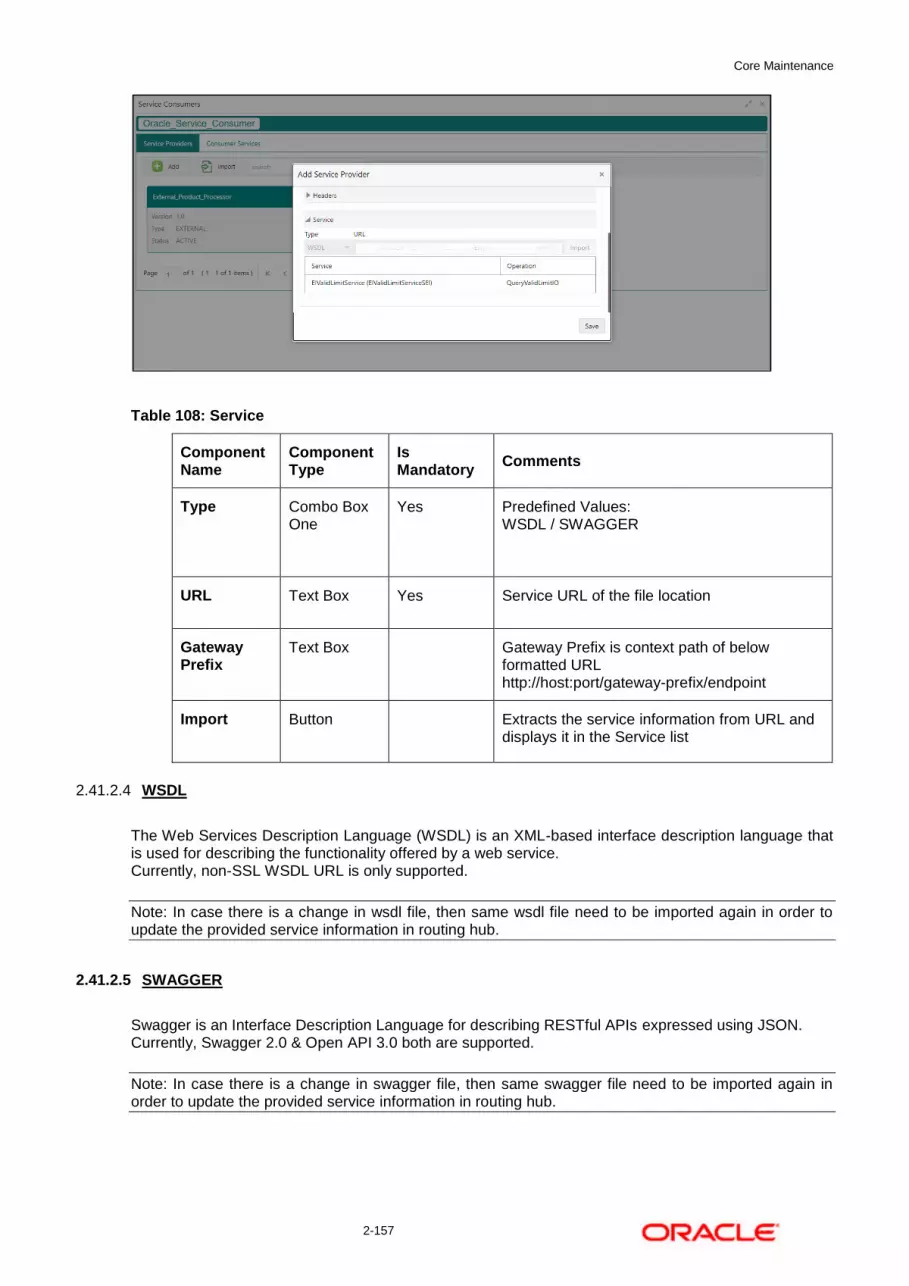
Core Maintenance
2-157
Table 108: Service
Component Name
Component Type
Is Mandatory
Comments
Type Combo Box One
Yes Predefined Values: WSDL / SWAGGER
URL Text Box Yes Service URL of the file location
Gateway Prefix
Text Box Gateway Prefix is context path of below formatted URL http://host:port/gateway-prefix/endpoint
Import Button Extracts the service information from URL and displays it in the Service list
2.41.2.4 WSDL
The Web Services Description Language (WSDL) is an XML-based interface description language that is used for describing the functionality offered by a web service. Currently, non-SSL WSDL URL is only supported.
Note: In case there is a change in wsdl file, then same wsdl file need to be imported again in order to update the provided service information in routing hub.
2.41.2.5 SWAGGER
Swagger is an Interface Description Language for describing RESTful APIs expressed using JSON. Currently, Swagger 2.0 & Open API 3.0 both are supported.
Note: In case there is a change in swagger file, then same swagger file need to be imported again in order to update the provided service information in routing hub.

Core Maintenance
2-158
2.41.2.6 Import
You can create a service provider by importing the JSON file. On Service Providers screen, click Import.
Figure 132: Import
Table 109: Import
Component Name
Component Type
Is Mandatory
Validation Condition Comments
File File picker Yes Allows only to select one file
Accepts only JSON file
Pops up file selection dialog box
Import Button Imports Service Provider
Note: Below data needs to be changed after importing provider configuration file: • Implementation Host and Port • Implementation Authentication Password
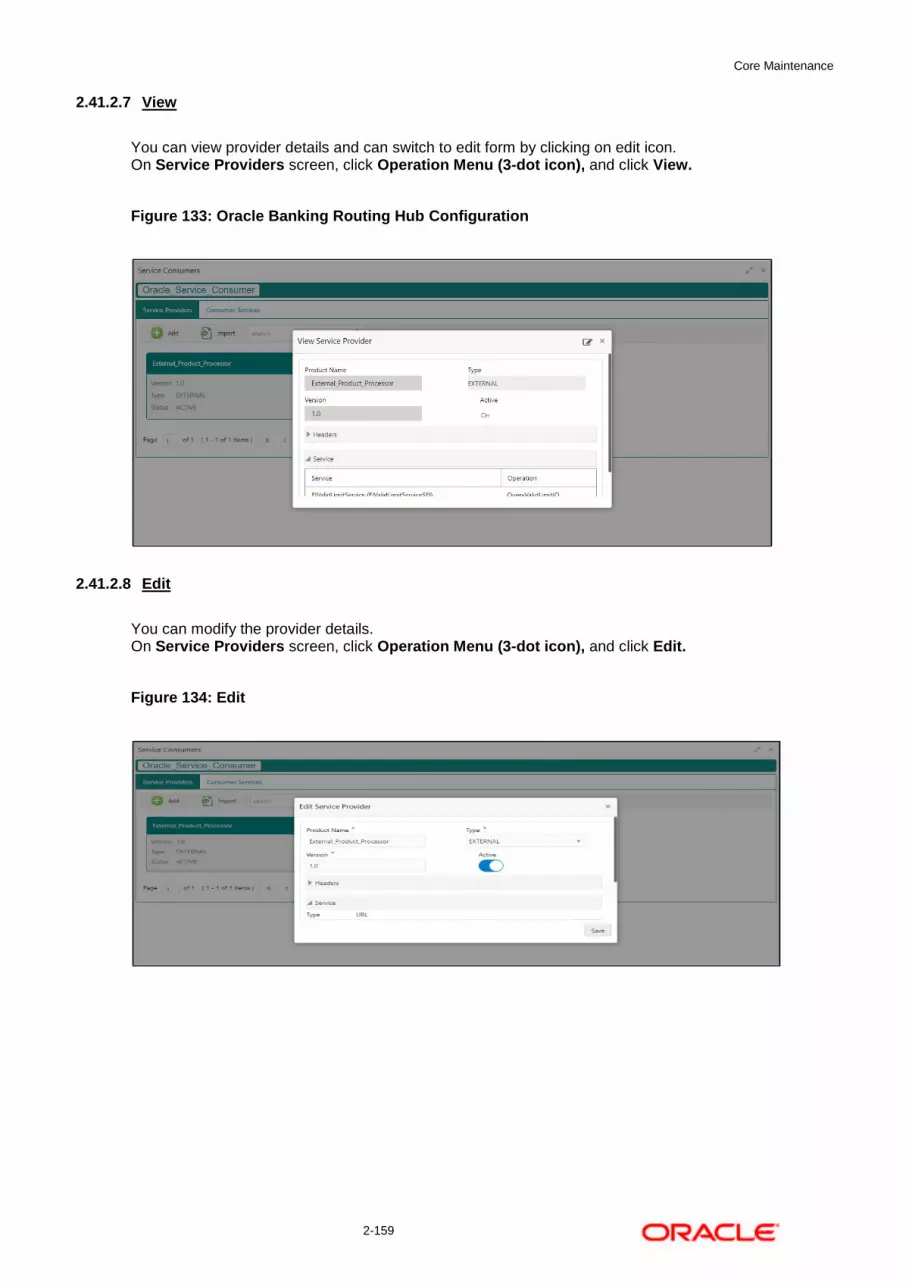
Core Maintenance
2-159
2.41.2.7 View
You can view provider details and can switch to edit form by clicking on edit icon. On Service Providers screen, click Operation Menu (3-dot icon), and click View.
Figure 133: Oracle Banking Routing Hub Configuration
2.41.2.8 Edit
You can modify the provider details. On Service Providers screen, click Operation Menu (3-dot icon), and click Edit.
Figure 134: Edit

Core Maintenance
2-160
2.41.2.9 Delete
You can delete the provider. On Service Providers screen, click Operation Menu (3-dot icon), and click Delete.
Figure 135: Delete
2.41.2.10 Export
You can export the provider configuration as JSON file. On Service Providers screen, click Operation Menu (3-dot icon), and click Export.
Figure 136: Export
Note: Below data is not be exported: • Implementation Host • Implementation Port • Implementation Authentication Password The above data needs to be configured manually after importing the configuration file. Same has been mentioned in Import section
2.41.3 Oracle FLEXCUBE Onboarding to Decision Service Configuration
1.1.1.1 Fetch Credit Decision
Figure 137: Fetch credit decision – Header

Core Maintenance
2-161
Figure 138: Fetch credit decision - Transformation:
Figure 139: Consumer Services

Core Maintenance
2-162
2.42 Decision Service
2.42.1 Overview
The decision service provides automatic decision making capabilities that can allow lenders to develop simple business processes and strengthen the decision-making process.
It gives flexibility to adjust the credit scoring model according to the lending policy.
When an organization calls the decision service to make a decision based on data attributes shared, system solves the best fit scoring model and provide scores and decisions.
Decision Service is a robust and scalable system that can be easily integrated with any product processor providing auto decision capability and risk based pricing.
Figure 140 : Decision Service Overview
Decision service can be called from various product processor such as Collections, Deposits, Loans, Insurance, Trade Finance or Payment etc. This product processor calls the decision service and the decision service intern uses the rule engine to configure various complex rules.
The decision service can calculate behavioral scores and suggest the best recommended collection strategy accordingly. For lending products, it can offer a credit score, a decision based on the score, the recommended rate of interest and the ability to calculate which is the maximum amount that can be borrowed by the applicant.
2.42.2 Process Flow
The below diagram depicts the entire process flow of how decision service works.
Figure 141 : Decision Service Process Flow

Core Maintenance
2-163
2.42.2.1 Questionnaire
The first step is to get the questionnaire. The product processor sends the data of all the applicants in the application. A qualitative scoring model is resolved for each applicant and this information along with the details of the questionnaire is sent back to the product processor. The product processor captures the response to the questions and sends back as part of the second step which is the execution of the credit decision.
2.42.2.2 Logical Model
First step in execution of the credit decision is logical screening. In this application pre screening is done to check the basic eligibility of the application as per the bank’s policy. For example, if the bank’s policy is not to fund to property in flood prone area, then as a part of this step, if the property is in flood prone area then the application will be rejected and the application will not be processed further. Or the applicants minimum age should be more then 18 and the applicant applying is of less than 18, in that case the application is rejected and it will not be processed further.
2.42.2.3 Borrowing Capacity
Once eligibility is checked, the next step is borrowing capacity. This is the maximum loan amount the applicant is eligible for. The stage at which it is to be calculated depends on the configuration made. It can be calculated before the scoring after the decision. The loan amount considered for decision is minimum of requested loan amount or the amount calculated for scoring, decision and pricing.
2.42.2.4 Qualitative Score
After borrowing capacity, the next step is qualitative scoring done using the feedback from the applicants for questionnaire.
2.42.2.5 Quantitative Score
After qualitative scoring next step is quantitative scoring where scoring is done using application and bureau attributes such as salary, number of credit lines, bureau score etc.
Core Maintenance
2-164
2.42.2.6 Decision and Grade
The decision on the application is done based on the quantitative and qualitative scores. The decision can be approve, manual or decline.
The borrowing capacity can also be calculated after the decision, in this case, the amount calculated will be used only for pricing.
2.42.2.7 Pricing
The last step is to determine the recommended interest rate. This is a risk-based price that refers to offering different interest rates to different customers depending on their risk exposure.
2.42.3 Strategy Configuration
Decision service is used for multiple purposes such as borrowing capacity, borrowing capacity plus pricing, only pricing, only decision, logical plus decision etc. System should have an ability to configure the strategy like when the decision service is being called for borrowing capacity, should the request pass through the logical check. In addition, the product processor can configure different strategies for different product types or customer types. Strategy configuration allows the product processor to configure the strategy as per its requirements for all the modes for which decision service can be called. Separate strategy can be defined for origination, servicing or collection. In addition, multiple strategy can be defined for the same module like for origination i.e. multiple strategy can be defined. This maintenance allows the product processor to configure the strategy according to its need for all the modes for which the decision service can be called for.
The various request types using which the product processor can call the decision service are mentioned below:
Score, Decsion and Pricing
Score and Decision
Scores
Pricing and Borrowing Capacity
Pricing
Borrowing Capacity
Decision
Qualitative Score
Quantitative Score

Core Maintenance
2-165
2.43 Product Processor
The source system calling the decision system for decisioning the credit application is defined as product processor. There are multiple data segments like account information, customer details, collateral details, credit bureau information or any additional notes if any is received from the product processor for credit decisioning and pricing in decision service.
This section contains the following subsections:
Create Product Processor
View Product Processor
2.43.1 Create Product Processor
The Create Product Processor screen allows the user to create product processor by updating various details.
To Create Product Processor:
1. From Home screen, click Core Maintenance, Under Core Maintenance, click Credit Decision.
2. Under Credit Decision, click Maintenance. Under Maintenance, click Product Processor.
3. Under Product Processor, click Create Product Processor.
The Create Product Processor screen is displayed.
Figure 142 : Create Product Processor
4. Specify the fields on Create Product Processor screen.
The fields, which are marked with asterisk, are mandatory.
For more information on fields, refer to the field description table below.
Table 110 : Create Product Processor - Field Description

Core Maintenance
2-166
Field Description
Basic Details
Product Processor Code
Specify the unique product processor code.
Product Processor Description
Specify the short description for the product processor.
Effective Date Specify the effective date.
Expiry Date Specify the expiry date.
5. Click Save to save the details.
The product processor is created successfully and can be viewed using the View Product Processor screen.
2.43.2 View Product Processor
The View Product Processor screen allows the user to view the product processor created using the Create Product Processor screen. The status of the created product processor is displayed as Unauthorized and Open. Once the checker authorizes the product processor, the status is updated to Authorized and Open.
To view created product processor:
1. From Home screen, click Core Maintenance. Under Core Maintenance, click Credit Decision.
2. Under Credit Decision, click Maintenance. Under Maintenance, click Product Processor.
3. Under Product Processor, click View Product Processor.
The View Product Processor screen is displayed.

Core Maintenance
2-167
Figure 143 : View Product Processor
Table 111 : View Product Processor - Field Description
Field Description
Product Processor Code
Displays the product processor code.
Product Processor Description
Displays the product processor description.
Status Displays the status of the record.
4. Click Search icon.
5. Specify the search criteria to fetch the required product processor.
Figure 144 : View Product Processor - Search Option
For more information on fields, refer to the field description table below.
Table 112 : View Product Processor- Search Option - Field Description
Field Description
Product Processor Code
Specify the product processor code.
Product Processor Description
Specify the product processor description.
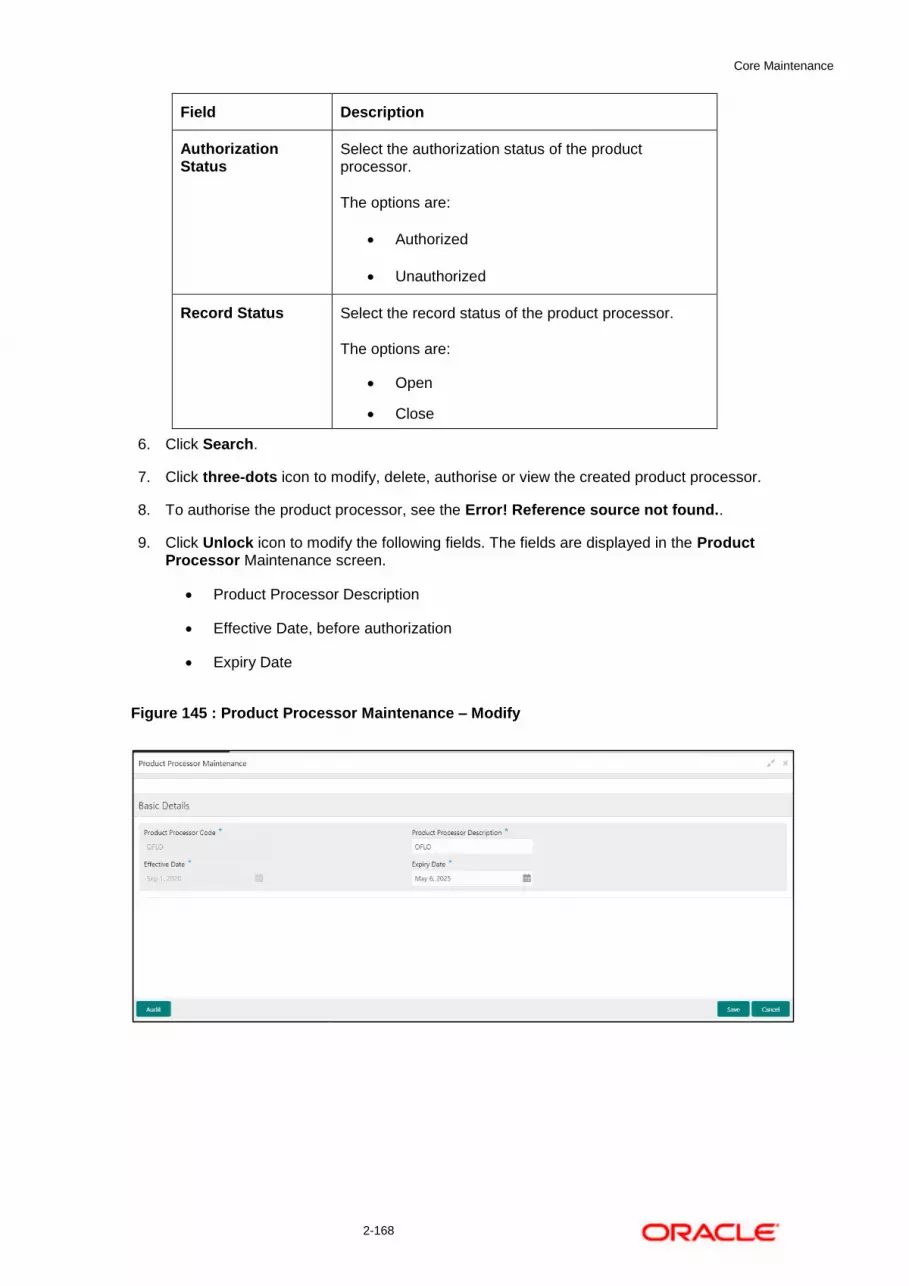
Core Maintenance
2-168
Field Description
Authorization Status
Select the authorization status of the product processor.
The options are:
Authorized
Unauthorized
Record Status Select the record status of the product processor.
The options are:
Open
Close
6. Click Search.
7. Click three-dots icon to modify, delete, authorise or view the created product processor.
8. To authorise the product processor, see the Error! Reference source not found..
9. Click Unlock icon to modify the following fields. The fields are displayed in the Product Processor Maintenance screen.
Product Processor Description
Effective Date, before authorization
Expiry Date
Figure 145 : Product Processor Maintenance – Modify

Core Maintenance
2-169
For more information on fields, refer to the field description table below.
Table 113 : Product Processor Maintenance - Modify - Field Description
Field Description
Basic Details
Product Processor Code
Displays the product processor code.
Product Processor Description
Displays the product processor description.
User can modify the same.
Effective Date Displays the effective date of created product processor.
User can modify the same before authorization if it is future dated.
Expiry Date Displays the expiry date of created product processor.
User can modify the same.
6. Click Save to update the modified fields.
7. Click View icon to view the created product processor.
The fields are displayed in Product Processor Maintenance screen.
Figure 146 : Product Processor Maintenance – View

Core Maintenance
2-170
For more information on fields, refer to the field description table below.
Table 114 : Product Processor Maintenance - View - Field Description
Field Description
Basic Details
Product Processor Code
Displays the product processor code.
Product Processor Description
Displays the product processor description.
Effective Date Displays the effective date of the created product processor.
Expiry Date Displays the expiry date of the created product processor.
Core Maintenance
2-171
2.44 Lookup
Lookup are the service for mapping of keys and values that is used to enrich the description of the data displayed to the user. The lookup screen facilitates to define the contents for drop-down or list of value fields. Lookup fields are used throughout the system. The identified fields will only accept entries stored in this screen. Below are some examples of the lookup fields.
Static/Enumeration values
Credit Bureau: Like Credit Bureau 1, Credit Bureau 2 and Credit Bureau 3.
Comparison Operator: Equals, Greater than.
Dependent lookups based on another selection
Based on Country, State should have different values in the lookup.
Based on Country, Currency should have different values in the lookup.
This section contains the following subsections:
Create Lookup
View Lookup
2.44.1 Create Lookup
The Create Lookup screen allows the user to create lookup definitions by updating various details.
To create lookups:
1. From Home screen, click Core Maintenance. Under Core Maintenance click, Credit Decision.
2. Under Credit Decision click, Maintenance. Under Maintenance, click Lookup.
3. Under Lookup, click Create Lookup.
The Create Lookup screen is displayed.

Core Maintenance
2-172
Figure 147 : Create Lookup Screen
4. Specify the fields on Create Lookups screen.
The fields, which are marked with asterisk, are mandatory.
For more information on fields, refer to the field description table below.
Table 115 : Create Lookups - Field Description
Field Description
Basic Details
Lookup Type Specify the unique lookup type name.
Description Specify the short description for lookup.
+ button Click to add a new row.
- button Click to delete an existing row.
Lookup Code Specify the unique lookup code.
Description Specify the short description for lookup.
Sort Order Specify the sort order.
Dependent Identifier
Specify the dependent Identifier.
Enable By default, this option is enabled. Indicates if the lookup is enabled or not.
6. Click Save to save the details.
The lookup is successfully created and can be viewed using the View Lookup screen.

Core Maintenance
2-173
2.44.2 View Lookup
The View Lookup screen allows the user to view the lookup created using the Create Lookup screen. The status of the created lookup is displayed as Unauthorized and Open. Once the checker authorizes the lookup, the status is updated to Authorized and Open.
To view created lookups:
1. From Home screen, click Core Maintenance. Under Core Maintenance click, Credit Decision.
2. Under Credit Decision click, Maintenance. Under Maintenance, click Lookup.
3. Under Lookup, click View Lookup.
The View Lookup screen is displayed.
Figure 148 : View Lookup
For more information on the fields, refer to the field description table below.
Table 116 : View Product Processor - Field Description
Field Description
Lookup Type Displays the lookup type.
Description Displays the description of the lookup.
Status Displays the status of the record.
4. Click Search icon.
5. Specify the search criteria to fetch the required lookups.

Core Maintenance
2-174
Figure 149 : View Lookups- Search Option
6. Click Search.
For more information on fields, refer the field description table below.
Table 117 : View Lookups - Search Option - Field Description
Field Description
Lookup Type Displays the lookup type.
Authorization Status
Select the authorization status of the lookups.
The options are:
Authorized
Unauthorized
Record Status Select the record status of the lookups.
The options are:
Open
Close
7. Click three-dot icon to unlock, delete, authorize or view the created lookups.
8. Click Unlock icon to modify the following fields.
The fields are displayed in the Lookup Maintenance screen.
Description
Lookup Code
Sort Order
Dependent Identifier
Enable

Core Maintenance
2-175
Figure 150 : Lookup Maintenance - Modify
For more information on fields, refer to the field description table below.
Table 118 : Lookup Maintenance - Modify - Field Description
Field Description
Basic Details
Lookup Type Displays the created lookup type.
Description Displays the description of the created lookup.
User can modify the same.
Lookup Codes
+ button Click to add a new row.
- button Click to delete an existing row.
Lookup Code Displays the lookup code for the created lookups.
User can modify the same.
Description Displays the description for the created lookups.
User can modify the same.
Sort Order Displays the sort order for the created lookups.
User can modify the same.
Dependent Identifier
Displays the dependent identifier for the created lookups.
User can modify the same.
Enable Displays the lookup code if enabled for the created lookup.
User can modify the same.

Core Maintenance
2-176
9. Click Save to update the modified fields.
10. Click View icon to view the created lookup code.
The fields are displayed in Lookup Maintenance screen.
Figure 151 : Lookup Maintenance – View
For more information on fields, refer to the field description table below.
Table 119 : Lookup Maintenance - View - Field Description
Field Description
Basic Details
Lookup Type Displays the created lookup type.
Description Displays the created lookup type description.
Lookup Codes
Lookup Code Displays the lookup code for the created lookup.
Description Displays the description for the created lookup.
Sort Order Displays the sort order for the created lookup.
Dependent Identifier
Displays the dependent identifier for the created lookup.
Enable Displays the lookup code if enabled for the created lookup.

Core Maintenance
2-177
2.45 System Parameter
System Parameter define the information or values used throughout the system and drives the behavior of the features. They control the way task is executed, or whether the system performs a particular task. Some of the parameters are set when the system is installed, but the values associated with the parameter needs to be reviewed and is to be maintained.
Example:
Set minimum days to pull credit bureau report from same bureau from initial pull.
Credit bureau report purge days.
This section contains the following subsections:
Create System Parameter
View System Parameter
2.45.1 Create System Parameter
The Create System Parameter screen allows the user to create parameters by updating various details.
To Create System Parameter:
1. From Home screen, click Core Maintenance. Under Core Maintenance click, Credit Decision.
2. Under Credit Decision click, Maintenance. Under Maintenance, click System Parameters.
3. Under System Parameter, click Create System Parameter.
The Create System Parameter screen is displayed.
Figure 152 : Create System Parameter
4. Specify the fields on Create System Parameter screen.

Core Maintenance
2-178
The fields, which are marked with asterisk, are mandatory.
For more information on fields, refer to the field description table below.
Table 120 : Create System Parameter - Field Description
Field Description
Basic Details
Parameter Code Select the parameter code from the drop-down list.
Parameter Description
Specify a short description for the parameter code.
Parameter Description
Specify a short description for the parameter code.
Value Specify the value for the parameter code.
5. Click Save to save the details.
The system parameters is successfully created and can be viewed using the View System Parameter screen.
2.45.2 View System Parameter
The View System Parameter screen allows user to view the parameters created using the Create System Parameter screen. The status of the created system parameter is displayed as Unauthorized and Open. Once the checker authorizes the parameter, the status is updated to Authorized and Open.
To view created system parameter:
1. From Home screen, click Core Maintenance. Under Core Maintenance click, Credit Decision.
2. Under Credit Decision click, Maintenance. Under Maintenance, click System Parameter.
3. Under System Parameter, click View System Parameter.
The View System Parameter screen is displayed.

Core Maintenance
2-179
Figure 153 : View System Parameter
For more information on the fields, refer to the field description table below.
Table 121 : View System Parameter - Field Description
Field Description
Parameter Code Displays the parameter code.
Description Displays the description of the parameter code.
Product Processor Displays the product processor of the parameter.
Status Displays the status of the record.
4. Click Search icon.
5. Specify the search criteria to fetch the required system parameter.
6. Click Search.
Figure 154 : View System Parameters- Search Option
Table 122 : View System Parameters - Field Description
Field Description
Parameter Code Specify the parameter code.

Core Maintenance
2-180
Field Description
Authorization Status
Select the authorisation status of the parameters.
The options are:
Authorised
Unauthorised
Record Status Select the record status of the parameters.
The options are:
Open
Close
7. Click three-dots icon to unlock, delete, authorize or view the created system parameter.
8. Click Unlock icon to modify the following fields.
The fields are displayed in the System Parameter Maintenance screen.
Product Processor
Value
Figure 155 : System Parameter Maintenance – Modify
For more information on fields, refer to the field description table below.
Table 123 : System Parameter Maintenance - Modify - Field Description
Field Description
Basic Details
Parameter Code Displays the created system parameter code.

Core Maintenance
2-181
Field Description
Parameter Description
Displays the description for the created system parameter code.
Product Processor Displays the product processor of the created system parameter code.
User can modify the same.
Value Displays the value of the system parameter.
User can modify the same.
9. Click Save to update the modified fields.
10. Click View icon to view the created system parameter code.
The fields are displayed in System Parameter Maintenance screen.
Figure 156 : System Parameter Maintenance – View
For more information on fields, refer to the field description table below.
Table 124 : System Parameter Maintenance - View - Field Description
Field Description
Basic Details
Parameter Code Displays the created system parameter code.
Parameter Description
Displays the created system parameter description.
Product Processor Displays the product processor of the created system parameter.
Value Displays the value for the created system parameter.
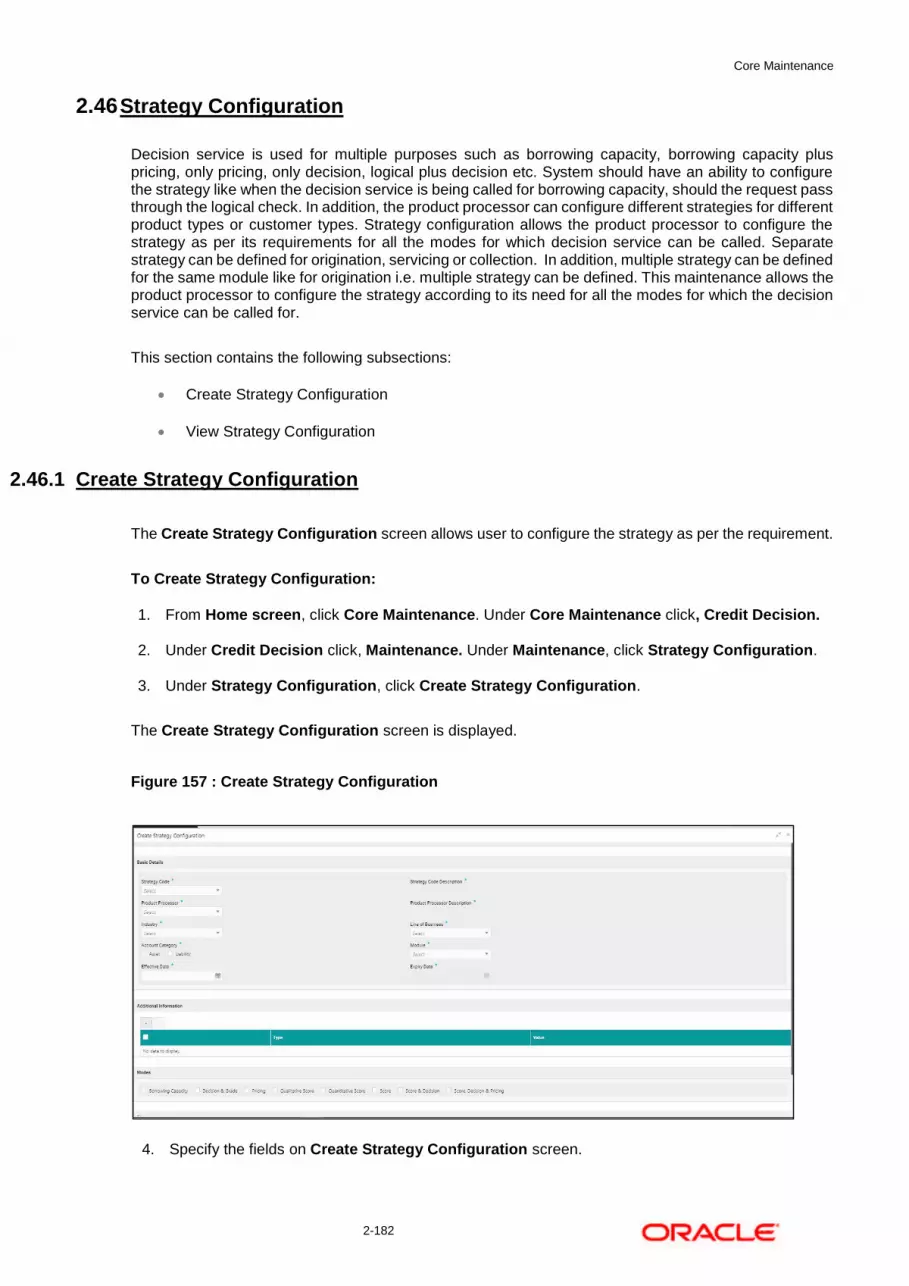
Core Maintenance
2-182
2.46 Strategy Configuration
Decision service is used for multiple purposes such as borrowing capacity, borrowing capacity plus pricing, only pricing, only decision, logical plus decision etc. System should have an ability to configure the strategy like when the decision service is being called for borrowing capacity, should the request pass through the logical check. In addition, the product processor can configure different strategies for different product types or customer types. Strategy configuration allows the product processor to configure the strategy as per its requirements for all the modes for which decision service can be called. Separate strategy can be defined for origination, servicing or collection. In addition, multiple strategy can be defined for the same module like for origination i.e. multiple strategy can be defined. This maintenance allows the product processor to configure the strategy according to its need for all the modes for which the decision service can be called for.
This section contains the following subsections:
Create Strategy Configuration
View Strategy Configuration
2.46.1 Create Strategy Configuration
The Create Strategy Configuration screen allows user to configure the strategy as per the requirement.
To Create Strategy Configuration:
1. From Home screen, click Core Maintenance. Under Core Maintenance click, Credit Decision.
2. Under Credit Decision click, Maintenance. Under Maintenance, click Strategy Configuration.
3. Under Strategy Configuration, click Create Strategy Configuration.
The Create Strategy Configuration screen is displayed.
Figure 157 : Create Strategy Configuration
4. Specify the fields on Create Strategy Configuration screen.

Core Maintenance
2-183
The fields, which are marked with asterisk, are mandatory.
For more information on fields, refer to the field description table below.
Table 125 : Create Strategy Configuration - Field Description
Field Description
Basic Details
Strategy Code Specify the unique strategy code.
Strategy Code Description
Specify a short description for the strategy code.
Product Processor Specify the product processor for which the strategy is being configured.
Product Processor Description
Displays the product processor description.
Industry Select the industry type from the drop down list.
The values are configurable based on the lookup values maintained.
The options are:
Banking Industry
Insurance
Trade Finance
Line of Business Select the line of business type from the drop down list. The values are configurable based on the lookup values maintained.
The options are:
Corporate
Retail
SMEnt
Account Category Select the category from the drop-down list.
The options are:
Asset
Liability

Core Maintenance
2-184
Field Description
Module Select the module from the drop down list. The values are configurable based on the lookup values maintained.
The options are:
Collection
Origination
Servicing
Effective Date Specify the effective date.
Expiry Date Specify the expiry date.
Additional Information
+ button Click to add a new facts.
- button Click to delete an existing row.
Type Select the fact type from the drop down list.
Value Select the value configured for the fact type from the drop down list. The values are configurable based on the lookup values maintained.
Modes Select the modes from the list.
The options are:
Borrowing Capacity
Decision & Grade
Pricing
Qualitative Score
Quantitative Score
Score
Score & Decision
Score, Decision & Pricing
If the Module is selected as Collection, then below options are available.
The options are:
Decision and Grade
Qualitative Score
Quantitative Score
Score
Score and Decision

Core Maintenance
2-185
Field Description
Steps Steps are defined based on the modes selected.
For example:
If Borrowing Capacity mode is selected, the check box for borrowing capacity is by default selected and disabled, you can select the other steps.
5. Click Save to save the details.
The strategy configuration is successfully created and can be viewed using the View strategy Configuration screen.

Core Maintenance
2-186
2.46.2 View Strategy Configuration
The View Strategy Configuration screen allows the user to view the strategy configuration created using the Create Strategy Configuration screen. The status of the created strategy configuration is displayed as Unauthorized and Open. Once the checker authorizes the parameter, the status is updated to Authorized and Open.
To view Created Strategy Configuration:
1. From Home screen, click Core Maintenance. Under Core Maintenance click, Credit Decision.
2. Under Credit Decision click, Maintenance. Under Maintenance, click Strategy Configuration.
3. Under Strategy Configuration, click View Strategy Configuration.
The View Strategy Configuration screen is displayed.
Figure 158 : View Strategy Configuration
For more information on the fields, refer to the field description table below.
Table 126 : View Strategy Configuration - Field Description
Field Description
Strategy Code Displays the strategy code.
Strategy Description
Displays the strategy description.
Product Processor Displays the product processor.
Status Displays the status of the record.
4. Click Search icon.
5. Specify the search criteria to fetch the required strategy configuration.
Figure 159 : View Strategy Configuration- Search Option
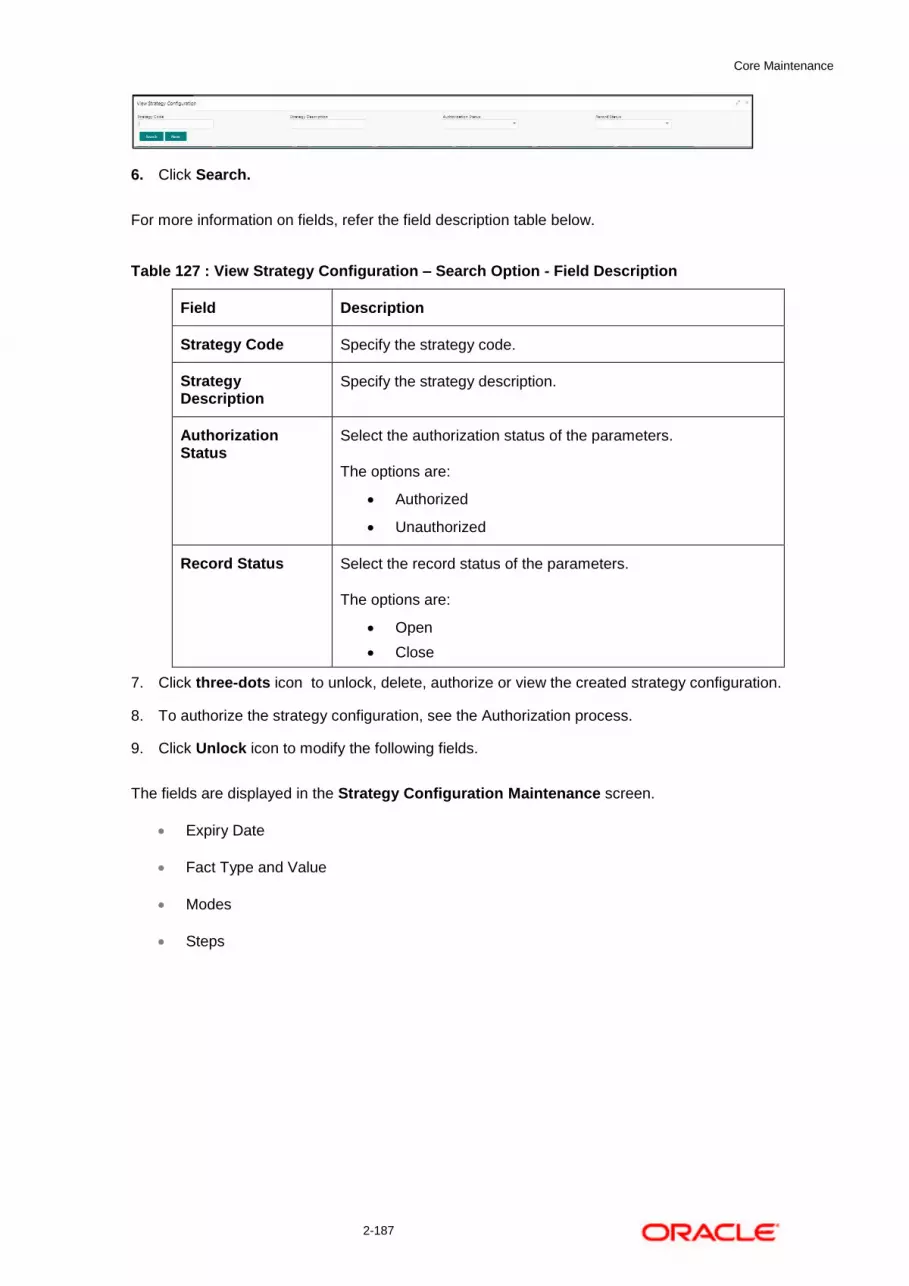
Core Maintenance
2-187
6. Click Search.
For more information on fields, refer the field description table below.
Table 127 : View Strategy Configuration – Search Option - Field Description
Field Description
Strategy Code Specify the strategy code.
Strategy Description
Specify the strategy description.
Authorization Status
Select the authorization status of the parameters.
The options are:
Authorized
Unauthorized
Record Status Select the record status of the parameters.
The options are:
Open
Close
7. Click three-dots icon to unlock, delete, authorize or view the created strategy configuration.
8. To authorize the strategy configuration, see the Authorization process.
9. Click Unlock icon to modify the following fields.
The fields are displayed in the Strategy Configuration Maintenance screen.
Expiry Date
Fact Type and Value
Modes
Steps

Core Maintenance
2-188
Figure 160 : Strategy Configuration Maintenance – Modify
For more information on fields, refer to the field description table below.
Table 128 : Strategy Configuration Maintenance - Modify - Field Description
Field Description
Basic Details
Strategy Code Displays the strategy code.
Strategy Code Description
Displays the strategy code description.
Product Processor Displays the product processor for the created strategy configuration.
Product Processor Description
Displays the product processor description for the created strategy configuration.
Industry Displays the industry for the created strategy configuration.
Line of Business Displays the line of business for the created strategy configuration.
Account Category Displays the account category for the created strategy configuration.
Module Displays the module for the created strategy configuration.
Effective Date Displays the effective date for the created strategy configuration.
Expiry Date Displays the expiry date for the created strategy configuration.
User can modify the same.
Additional Information
Type Displays the fact type for the created strategy configuration.
User can modify the same.

Core Maintenance
2-189
Field Description
Value Displays the fact value for the created strategy configuration.
User can modify the same.
Modes Displays the modes defined for the created strategy configuration.
User can modify the same.
Steps Displays the steps defined for the created strategy configuration.
User can modify the same.
10. Click Save to update the modified fields.
11. Click View icon to view the created strategy configuration.
The fields are displayed in Strategy Configuration Maintenance screen.
Figure 161 : Strategy Configuration Maintenance – View
For more information on fields, refer to the field description table below.
Table 129 : Strategy Configuration Maintenance - View - Field Description
Field Description
Basic Details
Strategy Code Displays the strategy code.
Strategy Code Description
Displays the strategy code description.
Product Processor Displays the product processor for the created strategy configuration.

Core Maintenance
2-190
Field Description
Product Processor Description
Displays the product processor description for the created strategy configuration.
Industry Displays the industry for the created strategy configuration.
Line of Business Displays the line of business for the created strategy configuration.
Account Category Displays the account category for the created strategy configuration.
Module Displays the module for the created strategy configuration.
Effective Date Displays the effective date for the created strategy configuration.
Expiry Date Displays the expiry date for the created strategy configuration.
Additional Information
Type Displays the fact type for the created strategy configuration.
Value Displays the fact value for the created strategy configuration.
Steps Displays the steps defined for the created strategy configuration.
2.47 Logical Model
During credit decision, system evaluates a credit score that represents the creditworthiness of an individual. Banks also do an initial evaluation by using some rules to decide whether to proceed with credit decisioning process or not. A bank can perform this evaluation by maintaining a logical model. Multiple levels of rule can be setup in logical model. The system will process the next step of credit decisioning only if all the rules are satisfied. If any rule fails, then system will stop the processing and decline the request.
This section contains the following subsections:
Create Logical Model
View Logical Model
2.47.1 Create Logical Model
The Create Logical Model screen allows user to create logical model based on the various input.
User can configure the strategy as per the requirement.
To create Logical Model:
1. From Home screen, click Core Maintenance. Under Core Maintenance click, Credit Decision.
2. Under Credit Decision click, Maintenance. Under Maintenance, click Logical Model.
3. Under Logical Model, click Create Logical Model.
The Create Logical Model screen is displayed.

Core Maintenance
2-191
Figure 162 : Create Logical Model
4. Specify the fields on Create Logical Model screen.
The fields, which are marked with asterisk, are mandatory.
For more information on fields, refer to the field description table below.
Table 130 : Create Logical Scoring Model - Field Description
Field Description
Basic Details
Logical Model Code
Specify the unique logical model code.
Logical Model Description
Specify a short description for the logical model.
Effective Date Specify the effective date.
Expiry Date Specify the expiry date.
Product Processor Specify the product processor for which the logical model is being defined.
Priority Specify the priority for the logical model.
Stop on Failure By default, this option is disabled. Indicates whether system should stop execution of rules if any rules fails or continue ahead with the remaining rules as per the sequence.
5. Click the Selection Criteria tab to define selection criteria rules for logical model.
Figure 163 : Create Logical Scoring Model - Selection Criteria

Core Maintenance
2-192
For more information on fields, refer to the field description table below.
Table 131 : Create Logical Scoring Model – Selection Criteria - Field Description
Field Description
The following fields appear if you click the Selection Criteria Tab
Use Existing Rule By default, this option is enabled. Indicates if the existing rule is linked.
Rules
Rule Code Select the rule code from the drop down list.
Click to get the information about the rule.
Rule Name View the rule name.
Create New Rule Select this option to create new rule.
Rules
Code Specify the rule code.
Description Specify the rule description.
Select Existing Rule
Select the existing rule from the drop-down list.
Click to view the existing rule.
Below field appears once you click the icon.
Rule ID Displays the rule ID.
Rule Name Displays the rule name.
Description Displays the rule description.

Core Maintenance
2-193
Field Description
Rule Version Displays the rule version.
Click to view the list of rule versions.
Note: This is used when existing rule is to be used for some modification like copy of existing rule.
Below field appears once you click the icon.
List of Versions
Version Displays the rule version.
Description Displays the rule description.
Creation Date Displays the rule creation date.
Note: This is used when existing rule is to be used for some modification like copy of existing rule.
Expression Builder
+ button Click to add new expression.
Fact / Rules Select the fact or rule from the drop-down list.
Once you select the fact/rules one more field opens adjacent to it, update the same based on the selected option.

Core Maintenance
2-194
Field Description
Operator Select the comparison operator from the drop-down list.
The options are:
<
>
+
=
%
!=
-
>=
<=
*
/
Contains
In
Like
Matches
Notmatches
Notcontains
Notin
Data Type Select the data type for the fact or rule. Once you select the data type one more field opens adjacent to the output, update the same based on the selected output option.
The options are:
Text
Number
Boolean
Date
Fact
Rules
The below option appears if the Data Type is selected as Boolean.
True
False

Core Maintenance
2-195
Field Description
Output Select the output from the drop-down list. Once you select the output one more field opens adjacent to the output, update the same based on the selected output option.
The options are:
Text
Number
Boolean
Date
Fact
The below option appears if the Data Type is selected as Boolean.
True
False
Expression View the expression updated in the expression builder.
6. Click the Logical Model tab to define various logical modeling rules
Figure 164 : Create Logical Model – Logical Model Tab
For more information on fields, refer to the field description table below.
Table 132 : Create Logical Model – Logical Model Tab - Field Description
Field Description
The following fields appear if you click the Logical Model Tab
+ button Click to add a new row.
- button Click to delete an existing row.

Core Maintenance
2-196
Field Description
Rule ID Select the rule ID from the drop down list.
All rules configured in the rule engine for the selected product processor are obtained.
Click to get the information about the rule.
Sequence Specify the sequence of execution of rules.
Reason Select the reason from the drop down list.
Comments Specify the comments.
7. Click Save to save the details.
The logical model is successfully created and can be viewed using the View Logical Model screen.

Core Maintenance
2-197
2.47.2 View Logical Model
The View Logical Model screen allows the user to view the logical model created using the Create Logical Model screen. The status of the created logical model is displayed as Unauthorized and Open. Once the checker authorizes the model, the status is updated to Authorized and Open.
To View Logical Model:
1. From Home screen, click Core Maintenance, Under Core Maintenance, click Credit Decision.
2. Under Credit Decision, click Maintenance. Under Maintenance, click Logical Model.
3. Under Logical Model, click View Logical Model.
The View Logical Model screen is displayed.
Figure 165 : View Logical Model
For more information on fields, refer to the field description table below.
Table 133: View Logical Model – Field Description.
Field Description
Logical Model Code Displays the logical model code.
Logical Model Description Displays the logical model description.
Product Processor Code Displays the product processor code.
Status Displays the status of the record.
4. Click Search icon.
5. Specify the search criteria to fetch the required logical model.

Core Maintenance
2-198
Figure 166 : Logical Model- Search Option
6. Click Search.
For more information on fields, refer to the field description table below.
Table 134 : View Logical Model -Search Option- Field Description
Field Description
Logical Model Code
Specify the logical model code.
Logical Model Description
Specify the description of the logical model.
Authorization Status
Select the authorization status of the logical model.
The options are:
Authorized
Unauthorized
Record Status Select the record status of the logical model.
The options are:
Open
Close
6. Click three-dots icon to unlock, delete, authorize or view the created logical model.
7. Click Unlock icon to modify the following fields.
The fields are displayed in the Logical Model Maintenance screen. The following fields are editable during unlock.
Logical Model Description
Effective date before authorization
Expiry date
Add new fact or rule to the selection criteria
Modify the rule in logical model tab
Modify the sequence, reason or comments in logical model tab
Figure 167 : Logical Model Maintenance - Modify

Core Maintenance
2-199
For more information on fields, refer to the field description table below.
Table 135: Logical Model Maintenance – Modify – Field Description.
Field Description
Basic Details
Logical Model Code
Displays the created logical model code.
Logical Model Description
Displays the description for the created logical model.
User can modify the same.
Effective Date Displays the effective date for the created borrowing capacity.
User can modify the same, if the date is future dated.
Expiry Date Displays the expiry date for the created logical model.
User can modify the same.
Product Processor
Displays the product processor of the created logical scoring model.
Priority Displays the priority of the logical model.
User can modify the same.
Stop On Failure Indicates whether system should stop execution of rules if any rules fails or continue ahead with the remaining rules as per the sequence.
Selection Criteria
Use Existing Rule
By default, this option is enabled. Indicates if the existing rule is linked.
Rules
Rule Code Displays the rule code.

Core Maintenance
2-200
Field Description
Click to get the information about the rule.
Rule Name Displays the rule name.
Create New Rule Indicates if the new rule is created.
Rules
Code Displays the rule code.
Description Displays the rule description
Select Existing Rule
Displays the existing rule.
Rule Version Displays the rule version.
Expression Builder
Fact / Rules Displays the fact/rules of the created logical model.
Operator Displays the comparison operator of the created logical model.
Data Type Displays the data type for the fact or rule of the created logical model.
Output Displays the output of the created logical model.
Expression Displays the expression updated in the expression builder of the crated logical model.
Logical Model
Rule ID Displays the rule ID of the created logical model.
You can modify the same.
Click to get the information about the rule.
Sequence Displays the sequence of the created logical model.
User can modify the same.
Reason Displays the reason of the created logical model.
User can modify the same.
Comments Displays the comments of the created logical model.
User can modify the same.
8. Click Save to update the modified fields.
9. Click View icon to view the created logical model.

Core Maintenance
2-201
The fields are displayed in Logical Model Maintenance screen.
Figure 168 : Logical Model Maintenance - View
For more information on fields, refer to the field description table below.
Table 136 : Logical Model Maintenance- View – Field Description.
Field Description
Basic Details
Logical Model Code
Displays the created logical model code.
Logical Model Description
Displays the created logical model description.
Effective Date Displays the effective date.
Expiry Date Displays the expiry date.
Product Processor Displays the product processor of the created logical model.
Priority Displays the priority of the logical model.
Selection Criteria
Rules
Use Existing Rule Displays if the existing rule is linked to logical model.
Rule Code Displays the rule code of the created logical model.
Rule Name Displays the rule name of the created logical model.
Create New Rule Displays if new rule is linked to the logical model.
Rules
Code Displays the rule code of the created logical model.

Core Maintenance
2-202
Field Description
Description Displays the rule description of the created logical model.
Select Existing Rule
Displays the existing rule.
Rule Version Displays the rule version.
Expression Builder
Fact / Rules Displays the fact/rules of the created logical model.
Operator Displays the comparison operator of the created logical model.
Data Type Displays the data type for the fact or rule of the created logical model.
Output Displays the output of the created logical model.
Expression Displays the expression updated in the expression builder of the crated logical model.
Logical Model
Rule ID Displays the rule ID of the created logical model.
Sequence Displays the sequence of the created logical model.
Reason Displays the reason of the created logical model.
Comments Displays the comments of the created logical model.
2.48 Borrowing Capacity
Borrowing capacity describes the total amount the applicant is eligible to borrow. Maximum loan amount are used for loans, credit cards, and line of credit accounts. The maximum credit amount depends on a number of factors including the borrower’s credit worthiness i.e. financial profile and debt to income, loan term, loan purpose, whether the loan is supported by a collateral etc.
Using this screen, we can link a rule for calculating borrowing capacity. We can calculate the maximum lendable amount based on the various criteria of the lender such as debt to income ratio, credit score, credit history etc.
A sample rule to calculate borrowing capacity is given below:
Scenario: Based on Income and FICO score
Rule 1:
IF MIN(FICO_SCORE) >= 500 AND MIN(EMPLOYMENT_PERIOD )< 1 YEAR THEN MULTIPLIER = 5 ELSEIF MIN(FICO_SCORE) < 500 AND MIN(EMPLOYMENT_PERIOD) > 1 YEAR THEN MULTIPLIER = 4
Rule2: Max Lendable Amount

Core Maintenance
2-203
MIN(Income) * Rule1
This section contains the following subsections:
Create Borrowing Capacity
View Borrowing Capacity
2.48.1 Create Borrowing Capacity
The Create Borrowing Capacity screen allows the user to define the borrowing capacity based on the various input.
To Create a Borrowing Capacity:
1. From Home screen, click Core Maintenance, Under Core Maintenance, click Credit Decision.
2. Under Credit Decision, click Maintenance. Under Maintenance, click Borrowing Capacity.
3. Under Borrowing Capacity, click Create Borrowing Capacity.
The Create Borrowing Capacity screen is displayed.
Figure 169 : Create Borrowing Capacity
4. Specify the fields on Create Borrowing Capacity screen.
The fields, which are marked with asterisk, are mandatory.
For more information on fields, refer to the field description table below.
Table 137 : Create Borrowing Capacity - Field Description
Field Description
Basic Details
Eligibility Code Specify the unique eligibility code.

Core Maintenance
2-204
Field Description
Eligibility Description
Specify a short description for the eligibility.
Effective Date Specify the effective date.
Expiry Date Specify the expiry date.
Product Processor Specify the product processor for which the borrowing capacity is being defined.
Execution Stage Select the required option for execution stage.
The options are:
Before Decision: If this option is selected, amount is calculated before scoring model resolution. Loan amount is replaced with the minimum of requested loan amount and maximum lendable amount for scoring and pricing.
After Decision: If this option is selected, Amount is calculated after decision and before pricing. Loan amount is replaced with the minimum of requested loan amount and maximum lendable amount for pricing.
5. Click the Selection Criteria tab to define selection criteria rules.
Figure 170 : Create Borrowing Capacity - Selection Criteria
For more information on fields, refer to the field description table below.
Table 138 : Create Borrowing Capacity – Selection Criteria - Field Description
Field Description
The following fields appear if you click the Selection Criteria Tab
Use Existing Rule By default, this option is enabled. Indicates if the existing rule is linked.

Core Maintenance
2-205
Field Description
Rules
Rule Code Select the rule code from the drop down list.
Click this icon to get the information about the rule.
Rule Name View the rule name.
Create New Rule Select this option to create new rule.
Rules
Code Specify the rule code.
Description Specify the rule description.
Select Existing Rule
Select existing rule from the drop-down list.
Click to view the existing rule.
Note: This is used when existing rule is to be used for some modification like copy of existing rule.
Below fields appears once you click icon.
Rule ID Displays the rule ID.
Rule Name Displays the rule name.
Description Displays the rule description.
Rule Version Displays the rule version.
Click to view the rule version.
Note: This is used when existing rule is to be used for some modification like copy of existing rule.
Below fields appears once you click icon.
Version Displays the rule version.
Description Displays the rule description.
Creation Date Displays the rule creation date.
Expression Builder
+ button Click to add new expression.

Core Maintenance
2-206
Field Description
Fact / Rules Select the fact or rule from the drop-down list.
Once you select the fact/rules one more field opens adjacent to the output, update the same based on the selected output option.
Operator Select the comparison operator from the drop-down list.
The options are:
<
>
+
=
%
!=
-
>=
<=
*
/
Contains
In
Like
Matches
Notmatches
Notcontains
Notin
Data Type Select the data type for the fact or rule. Once you select the data type one more field opens adjacent to it, update the same based on the selected option.
The options are:
Text
Number
Boolean
Fact
The below option appears if the Data Type is selected as Boolean.
True
False

Core Maintenance
2-207
Field Description
Output Select the output from the drop-down list. Once you select the output one more field opens adjacent to it, update the same based on the selected option.
The options are:
Text
Number
Boolean
Date
Fact
The below option appears if the Data Type is selected as Boolean.
True
False
Expression View the expression updated in the expression builder.
6. Click the Eligibility tab to define eligibility.
Figure 171 : Create Borrowing Capacity – Eligibility Tab
For more information on fields, refer to the field description table below.
Table 139 : Create Borrowing Capacity – Eligibility Tab - Field Description
Field Description
The following fields appear if you click the Eligibility Tab
+ button Click to add a new row.
- button Click to delete an existing row.
Actions Select this checkbox corresponding to the row to be deleted.
Fact ID Select the fact ID from the drop down list.

Core Maintenance
2-208
Field Description
Rule ID Select the rule ID from the drop down list.
Click to get the information about the rule.
7. Click Save to save the details.
The Borrowing Capacity is successfully created and can be viewed using the View Borrowing Capacity screen.
2.48.2 View Borrowing Capacity
The View Borrowing Capacity screen allows user to view the borrowing capacity created using the Create Borrowing Capacity screen. The status of the created capacity is displayed as Unauthorized and Open. Once the checker authorizes the capacity, the status is updated to Authorized and Open.
To view the created Borrowing Capacity:
1. From Home screen, click Core Maintenance, Under Core Maintenance, click Credit Decision.
2. Under Credit Decision, click Maintenance. Under Maintenance, click Borrowing Capacity.
3. Under Borrowing Capacity, click View Borrowing Capacity.
The View Borrowing Capacity screen is displayed.
Figure 172 : View Borrowing Capacity
For more information on fields, refer to the field description table below.
Table 140: View Borrowing Capacity – Field Description.

Core Maintenance
2-209
Field Description
Borrowing Capacity Code Displays the borrowing capacity code.
Borrowing Capacity Model Description
Displays the borrowing capacity description.
Product Processor Displays the product processor.
Status Displays the status of the record.
4. Click Search icon.
5. Specify the search criteria to fetch the required borrowing capacity.
Figure 173 : View Borrowing Capacity- Search Option
6. Click Search.
For more information on fields, refer to the field description table below.
Table 141 : View Borrowing Capacity -Search Option- Field Description
Field Description
Borrowing Capacity Code
Specify the borrowing capacity code.
Borrowing Capacity Description
Specify the description of the borrowing capacity.
Authorization Status Select the authorization status of the logical model.
The options are:
Authorized
Unauthorized
Record Status Select the record status of the logical model.
The options are:
Open
Close
7. Click three-dots icon to unlock, delete, authorize or view the created borrowing capacity.

Core Maintenance
2-210
8. Click Unlock icon to modify the following fields.
The fields are displayed in the Borrowing Capacity Maintenance screen. The following fields are editable during unlock.
Eligibility Description
Effective date before authorization
Expiry date
Add new fact or rule to the selection criteria
Fact or Rule in eligibility tab
Figure 174 : Borrowing Capacity Maintenance - Modify
For more information on fields, refer to the field description table below.
Table 142: Borrowing Capacity Maintenance – Modify – Field Description.
Field Description
Basic Details
Eligibility Code Displays the eligibility code for the created borrowing capacity.
Eligibility Description
Displays the description for the created borrowing capacity.
User can modify the same.
Effective Date Displays the effective date for the created borrowing capacity.
User can modify the same, if the date is future dated.
Expiry Date Displays the expiry date for the created borrowing capacity.
User can modify the same.
Product Processor
Displays the product processor of the created borrowing capacity.

Core Maintenance
2-211
Field Description
Execution Stage Displays the execution stage for the created borrowing capacity.
Selection Criteria
Use Existing Rule
By default, this option is enabled. Indicates if the existing rule is linked.
Rules
Rule Code Displays the rule code.
Click to get the information about the rule.
Rule Name Displays the rule name.
Create New Rule Indicates if the new rule is created.
Rules
Code Displays the rule code.
Description Displays the rule description
Select Existing Rule
Displays the existing rule.
User can modify the same.
Version Displays the rule version.
Expression Builder
Fact / Rules Displays the fact/rules of the created borrowing capacity.
Operator Displays the comparison operator of the created borrowing capacity.
Data Type Displays the data type for the fact or rule of the created borrowing capacity.
Output Displays the output of the created borrowing capacity.
Expression Displays the expression updated in the expression builder of the created borrowing capacity.
Eligibility
Fact ID Displays the fact ID of the created borrowing capacity.
User can modify the same.
Rule ID Displays the rule ID of the created borrowing capacity.
User can modify the same.
Click to get the information about the rule.
9. Click Save to update the modified fields.

Core Maintenance
2-212
10. Click View icon to view the created borrowing capacity.
The fields are displayed in Borrowing Capacity Maintenance screen.
Figure 175 : Borrowing Capacity Maintenance - View
For more information on fields, refer to the field description table below.
Table 143 : Borrowing Capacity Maintenance- View – Field Description.
Field Description
Basic Details
Eligibility Code Displays the eligibility code for the created borrowing capacity.
Eligibility Description
Displays the description for the created borrowing capacity.
Effective Date Displays the effective date for the created borrowing capacity.
Expiry Date Displays the expiry date for the created borrowing capacity.
Product Processor Displays the product processor for the created borrowing capacity.
Execution Stage Displays the execution stage for the created borrowing capacity.
Selection Criteria
Rules
Use Existing Rule Displays if the existing rule is linked to borrowing capacity.
Rule Code Displays the rule code of the created borrowing capacity.

Core Maintenance
2-213
Field Description
Rule Name Displays the rule name of the created borrowing capacity.
Create New Rule Displays if new rule is linked to the created borrowing capacity.
Rules
Rule Code Displays the rule code of the created borrowing capacity.
Description Displays the rule description of the created borrowing capacity.
Select Existing Rule
Displays the existing rule.
Rule Version Displays the rule version.
Expression Builder
Fact / Rules Displays the fact/rules of the created borrowing capacity.
Operator Displays the comparison operator of the created borrowing capacity.
Data Type Displays the data type for the fact or rule of the created borrowing capacity.
Output Displays the output of the created borrowing capacity.
Expression Displays the expression updated in the expression builder of the crated borrowing capacity.
Eligibility
Fact ID Displays the fact ID of the created borrowing capacity.
Rule ID Displays the rule ID of the created borrowing capacity.
Click to get the information about the rule.
2.49 Questionnaire
Credit analysis includes analysis of more information and data. Considering that, some of them have quantitative character and others qualitative, credit analysis are viewed from two aspects such as:
Quantitative analysis involves, an assessment of the financial position based on the customer’s income and monthly expenses. It may also include a cash flow analysis of the customer’s accounts and credit history.
While qualitative assessment, among others takes into account marital status, education or employment form.

Core Maintenance
2-214
Banks usually grant loan based on a credit scoring model that combines quantitative and qualitative analysis.
This section contains the following subsections:
Create Questionnaire
View Questionnaire
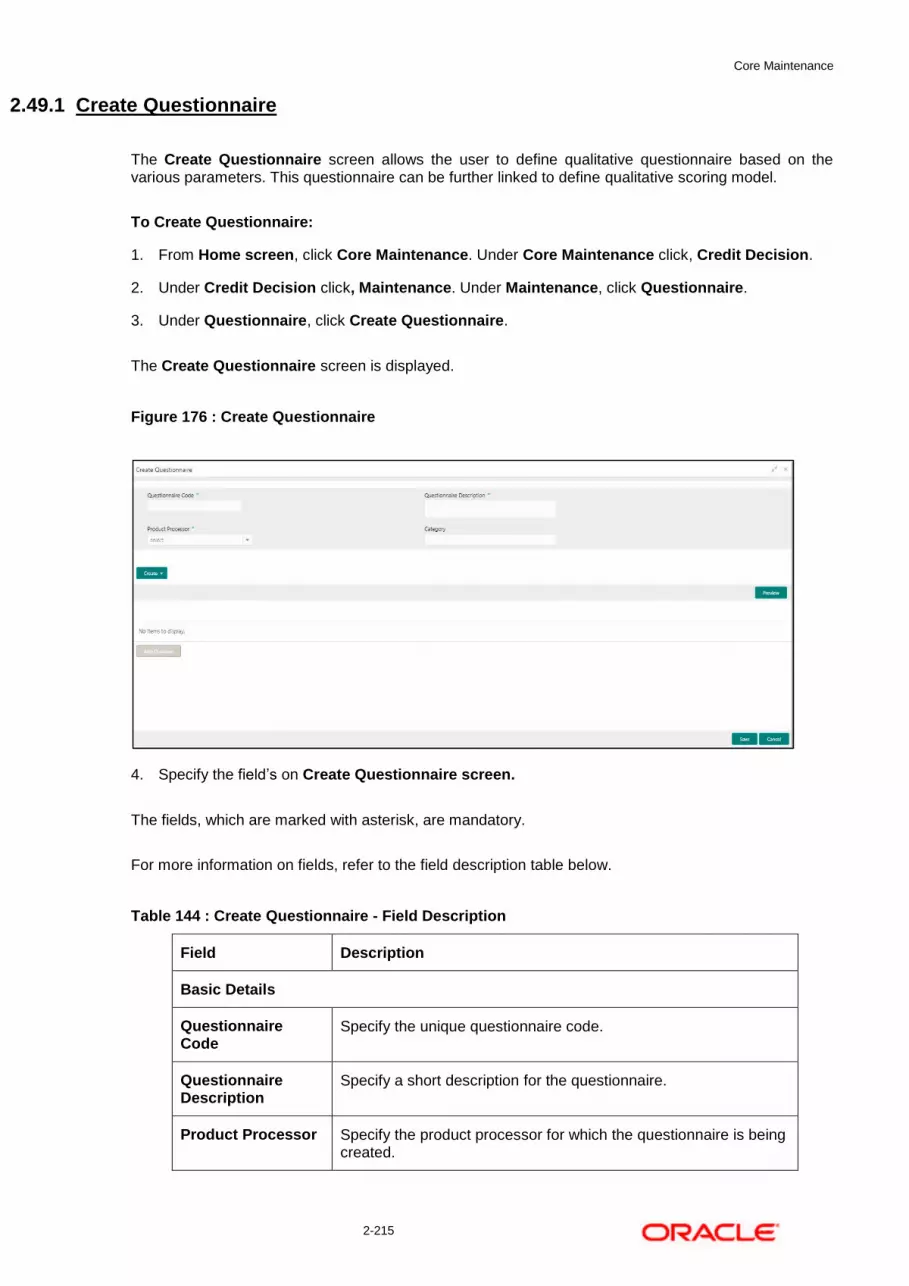
Core Maintenance
2-215
2.49.1 Create Questionnaire
The Create Questionnaire screen allows the user to define qualitative questionnaire based on the various parameters. This questionnaire can be further linked to define qualitative scoring model.
To Create Questionnaire:
1. From Home screen, click Core Maintenance. Under Core Maintenance click, Credit Decision.
2. Under Credit Decision click, Maintenance. Under Maintenance, click Questionnaire.
3. Under Questionnaire, click Create Questionnaire.
The Create Questionnaire screen is displayed.
Figure 176 : Create Questionnaire
4. Specify the field’s on Create Questionnaire screen.
The fields, which are marked with asterisk, are mandatory.
For more information on fields, refer to the field description table below.
Table 144 : Create Questionnaire - Field Description
Field Description
Basic Details
Questionnaire Code
Specify the unique questionnaire code.
Questionnaire Description
Specify a short description for the questionnaire.
Product Processor Specify the product processor for which the questionnaire is being created.

Core Maintenance
2-216
Field Description
Category Specify the category for the questionnaire.
Create Click Create to configure the questions.
Question Code Specify the unique question code.
Question Description
Specify the description for the question.
Select-Type Select the type of response option from the drop-down list.
The option are:
Select-Single-Choice
Short Name Specify the short name of the question. This will be displayed in the execution summary.
Answer Code Displays the answer code.
Answer Option Specify all the expected response for the question configured.
Add Click to add the expected response to the question.
Update Click Update to edit the response.
Remove Click to remove the response.
Required By default, this option is enabled. Indicates whether the question is mandatory or optional.
Done Click to save the data.
Preview Click Preview to view the questions configured for the questionnaire along with the response choice.
Click to view the responses configured for the questionnaire.
Click to move the position of the questions.
Click to expand, copy or remove question.
Click to copy the question.
Click to remove the question.
Add Question Click to add another question.
5. Click Save to save the details.
The Questionnaire is successfully created and can be viewed using View Questionnaire screen.

Core Maintenance
2-217
2.49.2 View Questionnaire
The View Questionnaire screen allows user to view the questionnaire created using the Create Questionnaire screen. The status of the created questionnaire is displayed as Unauthorized and Open. Once the checker authorizes the questionnaire, the status is updated to Authorized and Open.
To view created questionnaire:
1. From Home screen, click Core Maintenance. Under Core Maintenance, click Credit Decision.
2. Under Credit Decision, click Maintenance. Under Maintenance, click Questionnaire.
3. Under Questionnaire, click View Questionnaire.
The View Questionnaire screen is displayed.
Figure 177 : View Questionnaire
For more information on fields, refer to the field description table below.
Table 145: View Borrowing Capacity – Field Description.
Field Description
Questionnaire Code Displays the questionnaire code.
Questionnaire Description Displays the questionnaire description.
Product Processor Code Displays the product processor code for which the questionnaire is created.
4. Click Search icon.
5. Specify the search criteria to fetch the required questionnaire.

Core Maintenance
2-218
Figure 178 : View Questionnaire - Search Option
6. Click Search.
For more information on fields, refer to the field description table below.
Table 146 : View Questionnaire -Search Option- Field Description
Field Description
Questionnaire Code
Specify the questionnaire code.
Questionnaire Description
Specify the questionnaire description.
Authorization Status
Select the authorization status of the logical model.
The options are:
Authorized
Unauthorized
Record Status Select the record status of the logical model.
The options are:
Open
Close
7. Click three-dots icon to unlock, delete, authorize or view the created questionnaire.
8. To authorise the questionnaire, see the Authorization Process.

Core Maintenance
2-219
9. Click Unlock icon to modify the following fields.
The fields are displayed in the Questionnaire Maintenance screen. The following fields are editable during unlock.
Questionnaire Description
Category
Add Question
Remove Question
Required (Enable/Disable)
User can add new, update existing, or remove existing response
Copy the existing question
Figure 179 : Questionnaire Maintenance - Modify
For more information on fields, refer to the field description table below.
Table 147: Questionnaire Maintenance – Modify – Field Description.
Field Description
Basic Details
Questionnaire Code
Displays the questionnaire code.
Questionnaire Description
Displays the questionnaire description.
User can modify the description.
Product Processor
Displays the product processor for the created questionnaire.
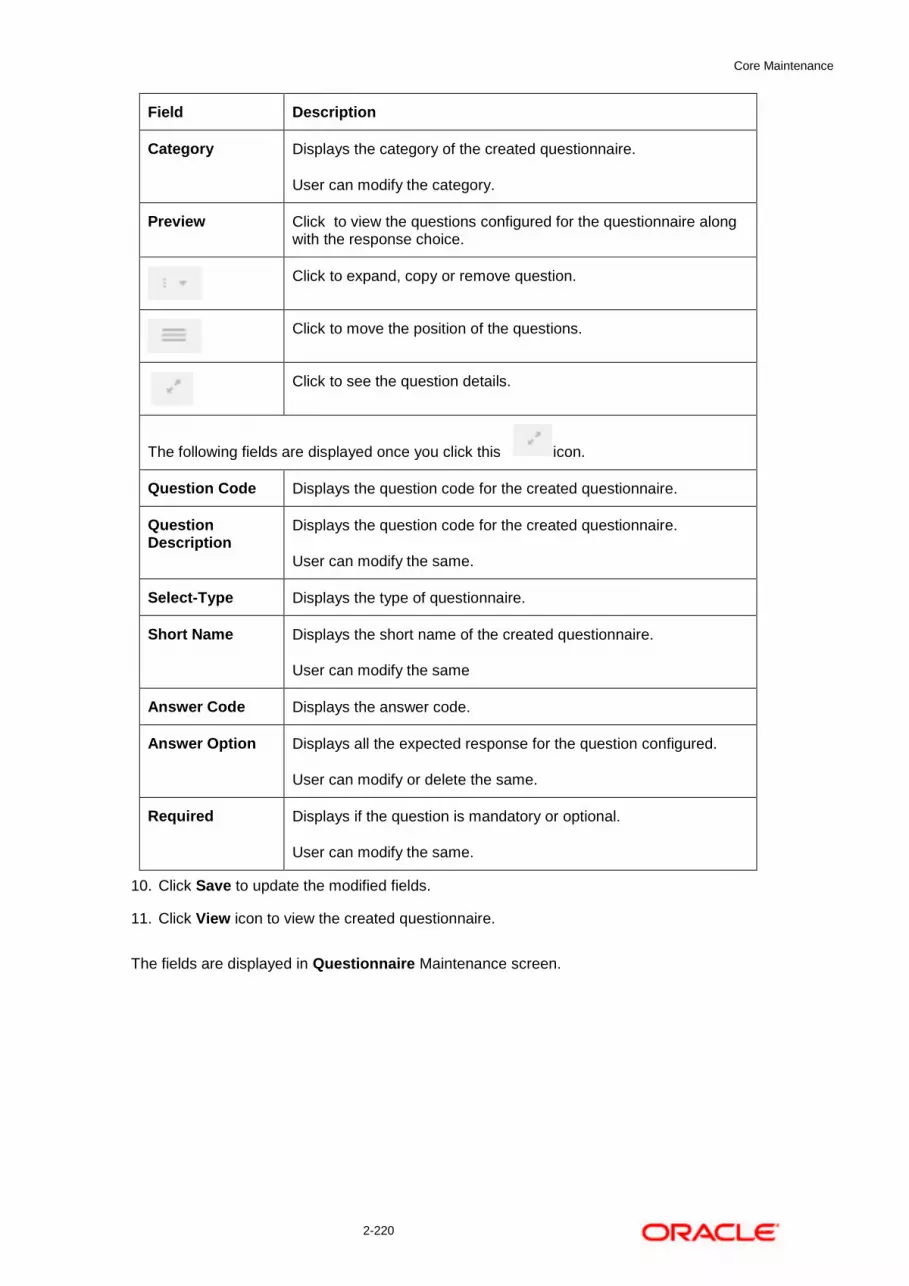
Core Maintenance
2-220
Field Description
Category Displays the category of the created questionnaire.
User can modify the category.
Preview Click to view the questions configured for the questionnaire along with the response choice.
Click to expand, copy or remove question.
Click to move the position of the questions.
Click to see the question details.
The following fields are displayed once you click this icon.
Question Code Displays the question code for the created questionnaire.
Question Description
Displays the question code for the created questionnaire.
User can modify the same.
Select-Type Displays the type of questionnaire.
Short Name Displays the short name of the created questionnaire.
User can modify the same
Answer Code Displays the answer code.
Answer Option Displays all the expected response for the question configured.
User can modify or delete the same.
Required Displays if the question is mandatory or optional.
User can modify the same.
10. Click Save to update the modified fields.
11. Click View icon to view the created questionnaire.
The fields are displayed in Questionnaire Maintenance screen.

Core Maintenance
2-221
Figure 180 : Questionnaire Maintenance - View
For more information on fields, refer to the field description table below.
Table 148 : Questionnaire Maintenance- View – Field Description.
Field Description
Basic Details
Eligibility Code Displays the eligibility code for the created questionnaire.
Eligibility Description
Displays the description for the created questionnaire.
Effective Date Displays the effective date for the created questionnaire.
Expiry Date Displays expiry date for the created questionnaire.
Product Processor Displays product processor for the created questionnaire.
Execution Stage Displays the execution stage for the created questionnaire.
Selection Criteria
Rules
Use Existing Rule Displays if the existing rule is linked to questionnaire.
Rule Code Displays the rule code of the created questionnaire.
Rule Name Displays the rule name of the created questionnaire.
Create New Rule Displays if new rule is linked to the questionnaire.
Rules
Rule Code Displays the rule code of the created questionnaire.
Description Displays rule description of the created questionnaire.
Expression Builder
Core Maintenance
2-222
Field Description
Fact / Rules Displays the fact/rules of the created questionnaire.
Operator Displays the comparison operator of the created Questionnaire.
Data Type Displays the data type for the fact or rule of the created Questionnaire.
Output Displays the output of the created questionnaire.
Expression Displays the expression updated in the expression builder of the crated questionnaire.
Eligibility
Fact ID Displays the fact ID of the created questionnaire.
Rule ID Displays the rule ID of the created questionnaire.
Click this to get the information about the rule.
2.50 Qualitative Scoring Model
Financial institution use different models for different product or use case. The qualitative scoring model used for home loan would be different then the personal loan. Banks usually grant loan based on a credit scoring model that combines quantitative and qualitative analysis.
This section contains the following subsections:
Create Qualitative Scoring Model
View Qualitative Scoring Model
2.50.1 Create Qualitative Scoring Model
The Create Qualitative Scoring Model screen allows user to define qualitative scoring model based on the various scoring parameters.
To create a qualitative scoring Model:
1. From Home screen, click Core Maintenance. Under Core Maintenance click, Credit Decision.
2. Under Credit Decision click, Maintenance. Under Maintenance, click Qualitative Scoring
Model.
3. Under Qualitative Scoring model, click Create Qualitative Scoring Model
The Create Qualitative Scoring Model screen is displayed.
Figure 181 : Create Qualitative Scoring Model

Core Maintenance
2-223
4. Specify fields on Create Qualitative Scoring Model screen.
The fields, which are marked with asterisk, are mandatory.
For more information on fields, refer to the field description table below.
Table 149 : Create Qualitative Scoring Model - Field Description
Field Description
Basic Details
Scoring Model Select the scoring model from the drop-sown list.
The options are:
Application Scoring Model
Applicant Scoring Model
Scoring Model code
Specify the unique scoring model code.
Scoring Model Description
Specify a short description for the scoring model.
Effective Date Specify the effective date.
Expiry Date Specify the expiry date.
Product Processor
Specify the product processor for which the model is being created.
Priority Specify the priority of the model.
5. Click the Selection Criteria tab to define qualitative scoring model.
Figure 182 : Create Qualitative Scoring Model – Selection Criteria Tab

Core Maintenance
2-224
For more information on fields refer field description table.
Table 150 : Create Qualitative Scoring Model – Selection Criteria Tab Field Description
Field Description
Use Existing Rule By default, this option is enabled. Indicates if the existing rule is linked.
Rules
Rule Code Select the rule code from the drop down list.
Click to get the information about the rule.
Rule Name Displays the rule name of the rule code.
Create New Rule Select this option to create new rule.
Rules
Code Specify the rule code.
Description Specify the rule description.
Select Existing Rule
Select the existing rule from the drop-down list.
Click to view the existing rule.
Note: This is used when existing rule is to be used for some modification like copy of existing rule.
Below fields appears once you click icon.
Rule ID Displays the rule ID.
Rule Name Displays the rule name.
Description Displays the rule description.

Core Maintenance
2-225
Field Description
Rule Version Displays the rule version.
Click to view the existing rule version.
Note: This is used when existing rule is to be used for some modification like copy of existing rule.
Below fields appears once you click icon.
Version Displays the rule version.
Description Displays the rule description.
Creation Date Displays the rule creation date.
Expression Builder
+ button Click to add new expression.
Fact / Rules Select the fact or rule from the drop-down list.
Once you select the fact/rules one more field opens adjacent to tit, update the same based on the selected option.
Operator Select the comparison operator from the drop-down list.
The options are:
<
>
+
=
%
!=
-
>=
<=
*
/
Contains
In
Like
Matches
Notmatches
Notcontains
Notin

Core Maintenance
2-226
Field Description
Data Type Select the data type for the fact or rule. Once you select the data type one more field opens adjacent to it, update the same based on the selected option.
The options are:
Text
Number
Boolean
Fact
The below option appears if the Data Type is selected as Boolean.
True
False
Output Select the output from the drop-down list. Once you select the output one more field opens adjacent to it, update the same based on the selected option.
The options are:
Text
Number
Boolean
Date
Fact
The below option appears if the Data Type is selected as Boolean.
True
False
Expression Displays the expression updated in the expression builder.
7. Click the Scoring Rule tab to define the rules. This tab is enabled if Application Scoring Model
is selected.
Figure 183 : Create Qualitative Scoring Model- Scoring Rule Tab

Core Maintenance
2-227
For more information on fields, refer to the field description table below.
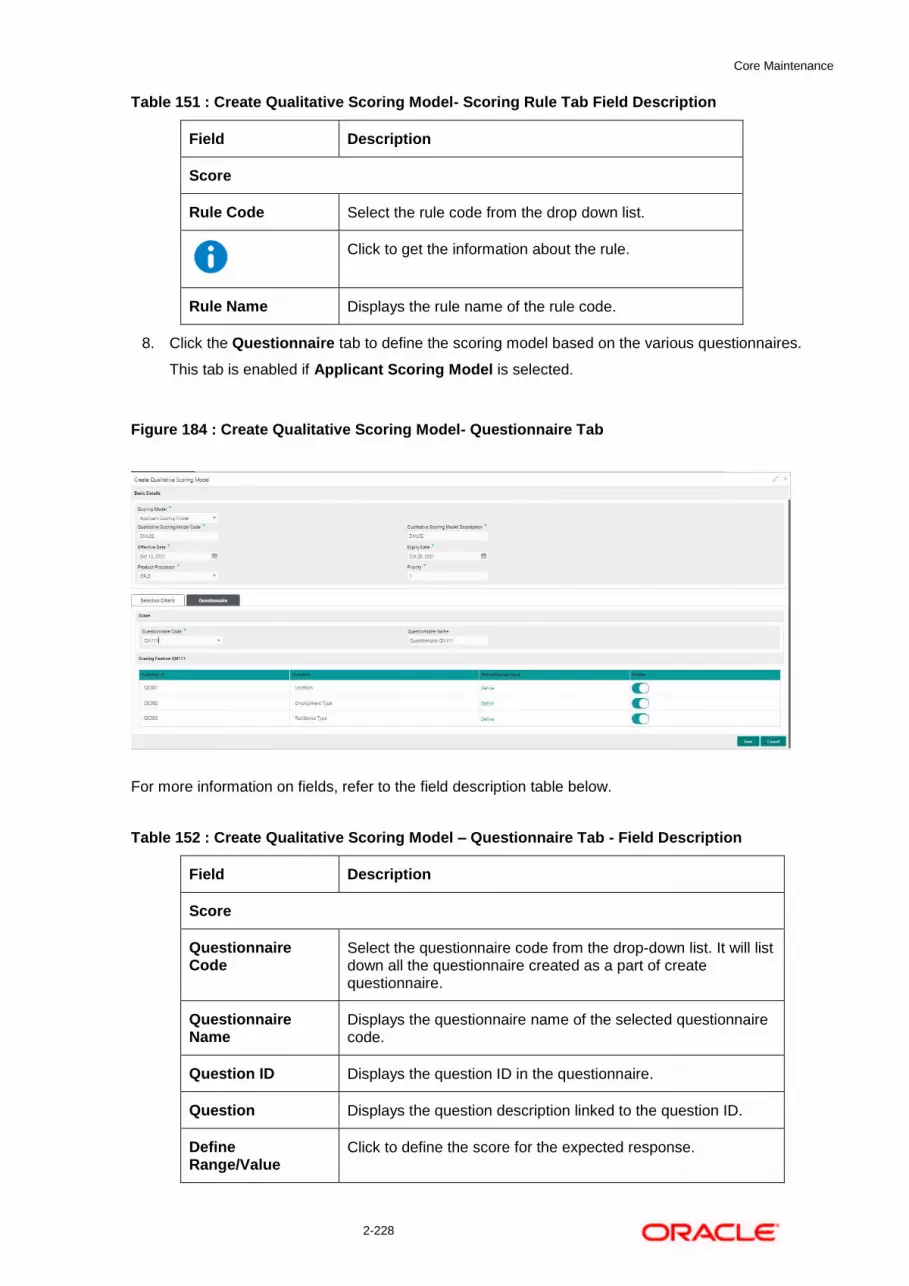
Core Maintenance
2-228
Table 151 : Create Qualitative Scoring Model- Scoring Rule Tab Field Description
Field Description
Score
Rule Code Select the rule code from the drop down list.
Click to get the information about the rule.
Rule Name Displays the rule name of the rule code.
8. Click the Questionnaire tab to define the scoring model based on the various questionnaires.
This tab is enabled if Applicant Scoring Model is selected.
Figure 184 : Create Qualitative Scoring Model- Questionnaire Tab
For more information on fields, refer to the field description table below.
Table 152 : Create Qualitative Scoring Model – Questionnaire Tab - Field Description
Field Description
Score
Questionnaire Code
Select the questionnaire code from the drop-down list. It will list down all the questionnaire created as a part of create questionnaire.
Questionnaire Name
Displays the questionnaire name of the selected questionnaire code.
Question ID Displays the question ID in the questionnaire.
Question Displays the question description linked to the question ID.
Define Range/Value
Click to define the score for the expected response.
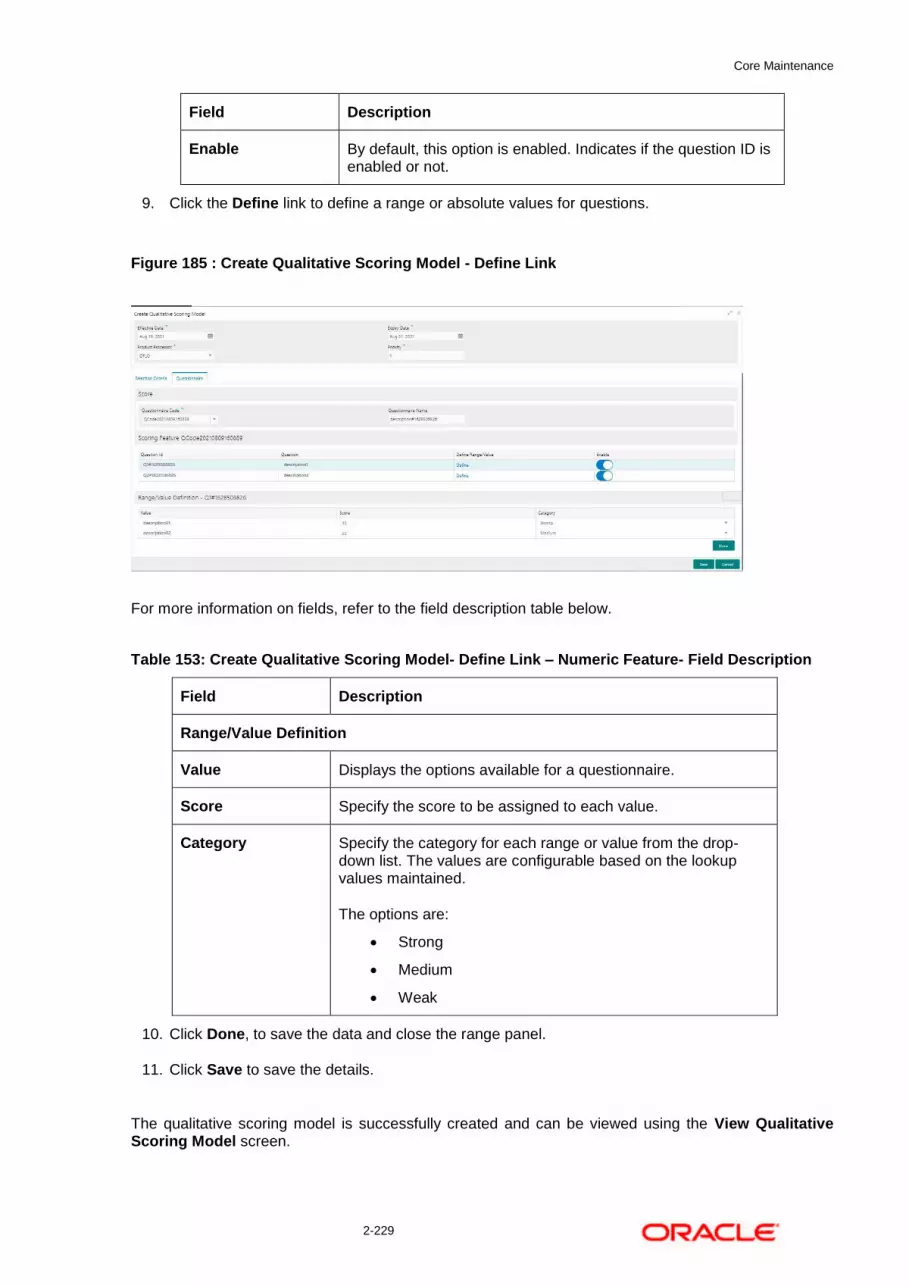
Core Maintenance
2-229
Field Description
Enable By default, this option is enabled. Indicates if the question ID is enabled or not.
9. Click the Define link to define a range or absolute values for questions.
Figure 185 : Create Qualitative Scoring Model - Define Link
For more information on fields, refer to the field description table below.
Table 153: Create Qualitative Scoring Model- Define Link – Numeric Feature- Field Description
Field Description
Range/Value Definition
Value Displays the options available for a questionnaire.
Score Specify the score to be assigned to each value.
Category Specify the category for each range or value from the drop-down list. The values are configurable based on the lookup values maintained.
The options are:
Strong
Medium
Weak
10. Click Done, to save the data and close the range panel.
11. Click Save to save the details.
The qualitative scoring model is successfully created and can be viewed using the View Qualitative Scoring Model screen.
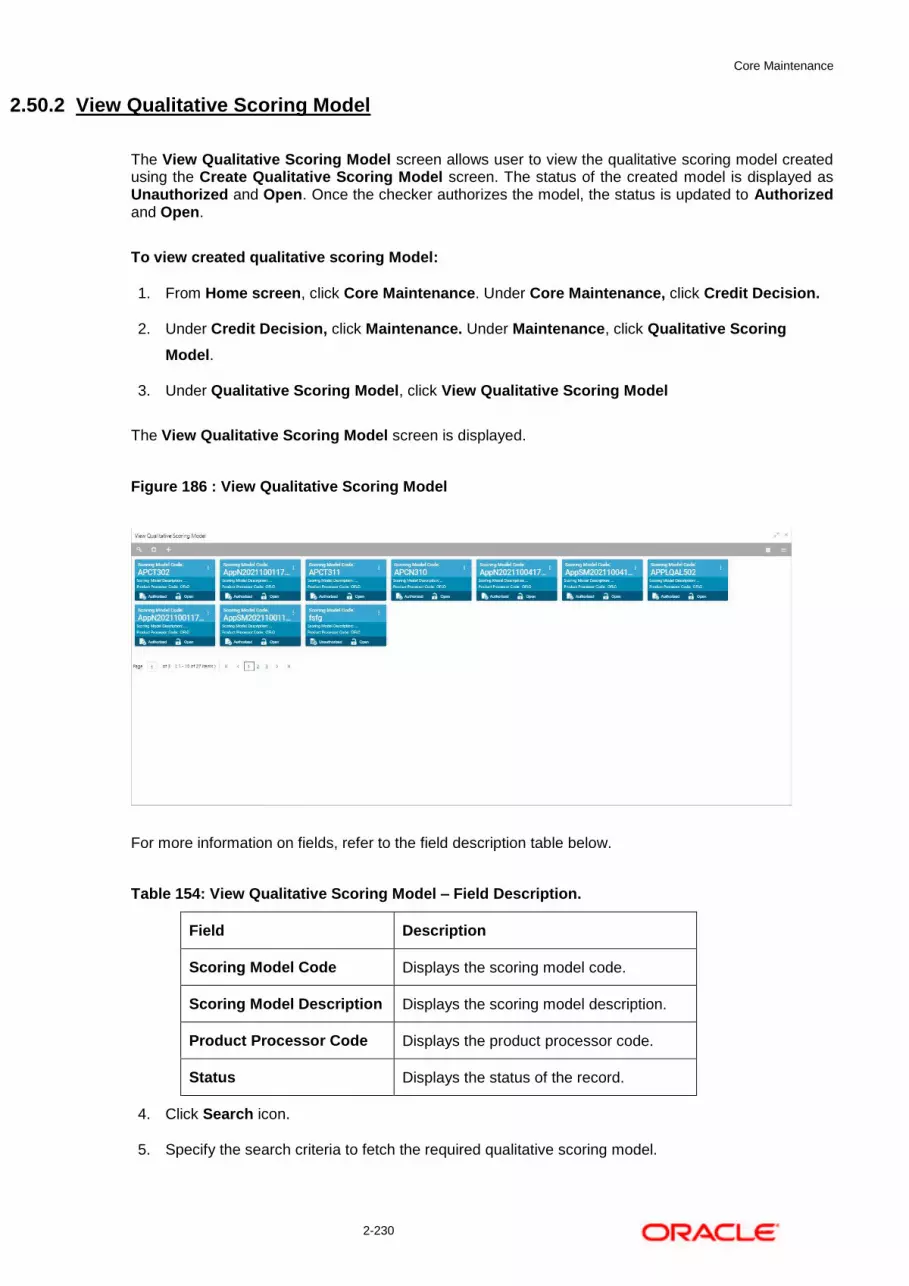
Core Maintenance
2-230
2.50.2 View Qualitative Scoring Model
The View Qualitative Scoring Model screen allows user to view the qualitative scoring model created using the Create Qualitative Scoring Model screen. The status of the created model is displayed as Unauthorized and Open. Once the checker authorizes the model, the status is updated to Authorized and Open.
To view created qualitative scoring Model:
1. From Home screen, click Core Maintenance. Under Core Maintenance, click Credit Decision.
2. Under Credit Decision, click Maintenance. Under Maintenance, click Qualitative Scoring
Model.
3. Under Qualitative Scoring Model, click View Qualitative Scoring Model
The View Qualitative Scoring Model screen is displayed.
Figure 186 : View Qualitative Scoring Model
For more information on fields, refer to the field description table below.
Table 154: View Qualitative Scoring Model – Field Description.
Field Description
Scoring Model Code Displays the scoring model code.
Scoring Model Description Displays the scoring model description.
Product Processor Code Displays the product processor code.
Status Displays the status of the record.
4. Click Search icon.
5. Specify the search criteria to fetch the required qualitative scoring model.

Core Maintenance
2-231
Figure 187 : View Qualitative Scoring Model - Search Option
6. Click Search.
For more information on fields, refer to the field description table below.
Table 155 : View Qualitative Scoring Model -Search Option- Field Description
Field Description
Scoring Model Code
Specify the scoring model code.
Scoring Model Description
Specify the scoring model description.
Authorization Status
Select the authorization status of the logical model.
The options are:
Authorized
Unauthorized
Record Status Select the record status of the logical model.
The options are:
Open
Close
7. Click three-dots icon to unlock, delete, authorize or view the created qualitative scoring model.
8. To authorize the qualitative scoring model, see the Authorization process.
9. Click Unlock icon to modify the following fields.
The fields are displayed in the Qualitative Scoring Model Maintenance screen. The following fields are editable during unlock.
Qualitative Scoring Model Description
Effective Date before Authorization
Expiry Date
Priority
Add new fact or rule to the selection criteria
Enable, if you want to disable any question ID from the model
Modify the score for existing response

Core Maintenance
2-232
Define score or update score a range when new questions are added or modified in a questionnaire
Scoring model before authorization
Figure 188 : Qualitative Scoring Model Maintenance - Modify
For more information on fields, refer to the field description table below.
Table 156: Qualitative Scoring Model Maintenance – Modify – Field Description.
Field Description
Basic Details
Scoring Model Displays the scoring model for the created qualitative scoring model.
Qualitative Scoring Model Code
Displays the qualitative scoring model code for the created qualitative scoring model.
Qualitative Scoring Model Description
Displays the qualitative scoring model description for the created qualitative scoring model.
User can modify the same.
Effective Date Displays the effective date of the created qualitative scoring model.
User can modify the same before authorization.
Expiry Date Displays the expiry date of the created qualitative scoring model.
User can modify the same.
Product Processor
Displays the product processor for the created qualitative scoring model.
Priority Displays the priority of the created qualitative scoring model.
User can modify the same.
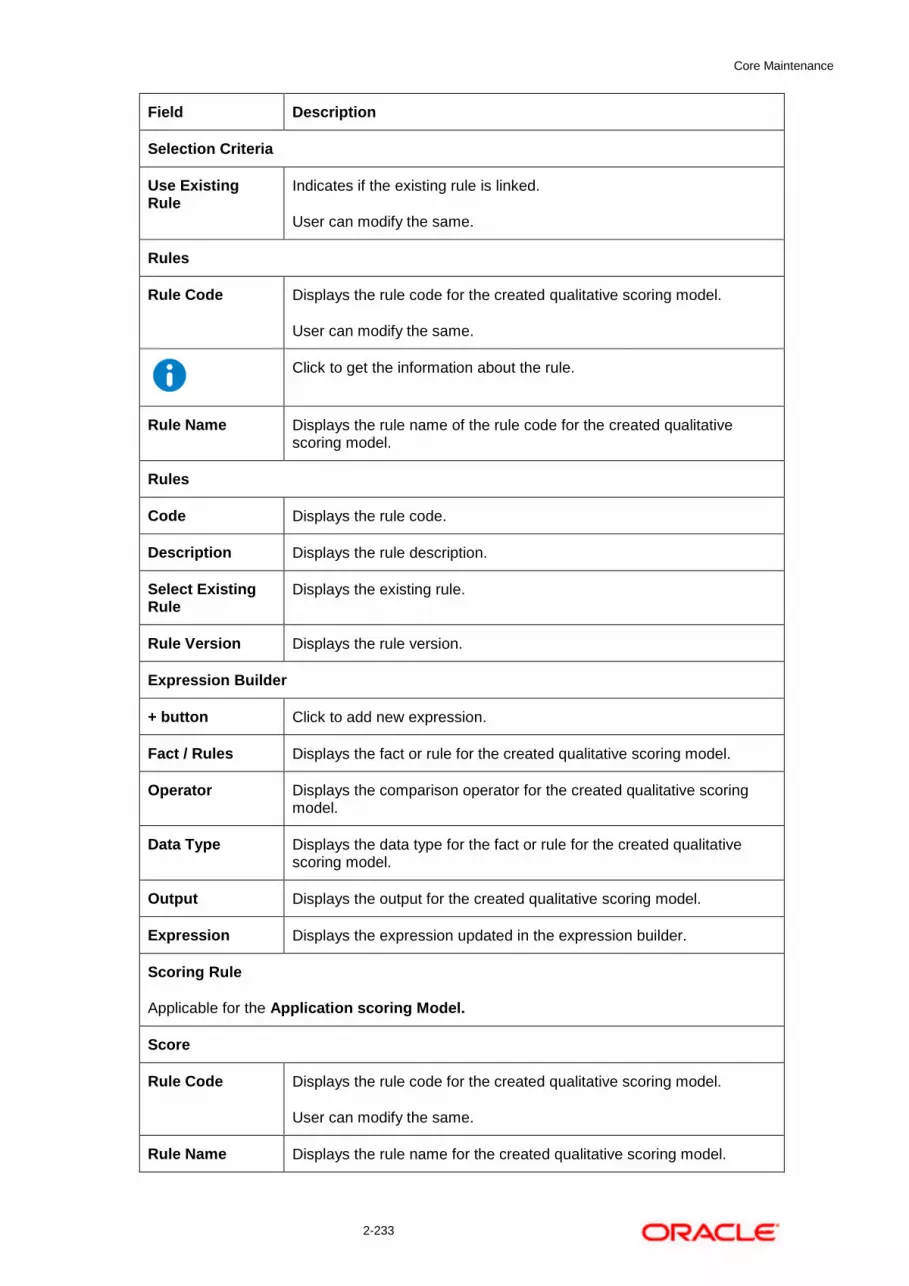
Core Maintenance
2-233
Field Description
Selection Criteria
Use Existing Rule
Indicates if the existing rule is linked.
User can modify the same.
Rules
Rule Code Displays the rule code for the created qualitative scoring model.
User can modify the same.
Click to get the information about the rule.
Rule Name Displays the rule name of the rule code for the created qualitative scoring model.
Rules
Code Displays the rule code.
Description Displays the rule description.
Select Existing Rule
Displays the existing rule.
Rule Version Displays the rule version.
Expression Builder
+ button Click to add new expression.
Fact / Rules Displays the fact or rule for the created qualitative scoring model.
Operator Displays the comparison operator for the created qualitative scoring model.
Data Type Displays the data type for the fact or rule for the created qualitative scoring model.
Output Displays the output for the created qualitative scoring model.
Expression Displays the expression updated in the expression builder.
Scoring Rule
Applicable for the Application scoring Model.
Score
Rule Code Displays the rule code for the created qualitative scoring model.
User can modify the same.
Rule Name Displays the rule name for the created qualitative scoring model.

Core Maintenance
2-234
Field Description
Questionnaire
Applicable for Applicant Scoring Model.
Score
Questionnaire Code
Displays the questionnaire code for the created qualitative scoring model.
User can modify the same.
Questionnaire Name
Displays the questionnaire name for the created qualitative scoring model.
Question ID Displays the question ID for the created qualitative scoring model.
Question Displays the question for the created qualitative scoring model.
Define Range/Value
Displays the defined range or value.
User can modify the same.
Value Displays the defined value for the created qualitative scoring model.
Score Displays the score for the created qualitative scoring model.
User can modify the same.
Category Displays the category for the created qualitative scoring model.
User can modify the same.
Enable Displays if the question ID is enabled or not.
1. Click Save to update the modified fields.
2. Click View icon to view the created qualitative scoring model.
The fields are displayed in Qualitative Scoring Model Maintenance screen.

Core Maintenance
2-235
Figure 189 : Qualitative Scoring Model Maintenance - View
For more information on fields, refer to the field description table below.
Table 157 : Qualitative Scoring Model Maintenance- View – Field Description.
Field Description
Basic Details
Scoring Model Displays the scoring model for the created qualitative scoring model.
Qualitative Scoring Model Code
Displays the qualitative scoring model code for the created qualitative scoring model.
Qualitative Scoring Model Description
Displays the qualitative scoring model description for the created qualitative scoring model.
Effective Date Displays the effective date of the created qualitative scoring model.
Expiry Date Displays the expiry date of the created qualitative scoring model.
Product Processor Displays the product processor for the created qualitative scoring model.
Priority Displays the priority of the created qualitative scoring model.
Selection Criteria
Rules
Use Existing Rule Indicates if the existing rule is linked.
Rules
Rule Code Displays the rule code for the created qualitative scoring model.
Click to get the information about the rule.
Rule Name Displays the rule name of the rule code for the created qualitative scoring model.

Core Maintenance
2-236
Field Description
Create New Rule Indicates if the new rule is created.
Rules
Rule Code Displays the rule code of the created qualitative scoring model.
Description Displays the rule description of the created qualitative scoring model.
Select Existing Rule
Displays the existing rule.
Rule Version Displays the rule version.
Expression Builder
+ button Click this icon to add new expression.
Fact / Rules Displays the fact/rules of the created qualitative scoring model.
Operator Displays the comparison operator of the created qualitative scoring model.
Data Type Displays the data type for the fact or rule of the created qualitative scoring model.
Output Displays the output of the created qualitative scoring model.
Expression Displays the expression updated in the expression builder of the crated qualitative scoring model.
Scoring Rule
Applicable for the Application scoring Model.
Score
Rule Code Displays the rule code for the created qualitative scoring model.
Rule Name Displays the rule name for the created qualitative scoring model.
Questionnaire
Applicable for Applicant Scoring Model.
Score
Questionnaire Code
Displays the questionnaire code for the created qualitative scoring model.
Questionnaire Name
Displays the questionnaire name for the created qualitative scoring model.
Question ID Displays the question ID for the created qualitative scoring model.
Question Displays the question for the created qualitative scoring model.

Core Maintenance
2-237
Field Description
Define Range/Value Displays the defined range or value.
Value Displays the defined value for the created qualitative scoring model.
Score Displays the score for the created qualitative scoring model.
Category Displays the category for the created qualitative scoring model.
Enable Displays if the question ID is enabled or not.

Core Maintenance
2-238
2.51 Scoring Feature
Lending institution have complex credit scoring models. The model uses the information contained in an application such as salary, credit commitments, and past loan performances to determine a credit score of an application or an existing customer. The model generates a score and based on that score, system takes the decision like approve, referred or to reject the application. To achieve these, in the decision service, you need to define maintenances of scoring feature. A feature can be either fact based or rule based. The features created in this maintenance can be linked in quantitative score model and decision grade matrix screen.
This section contains the following subsections:
Create Scoring Feature
View Scoring Feature
2.51.1 Create Scoring Feature
The Create Scoring Feature screen allows user to define scoring feature for determining the credit score. This score applies to applications during origination and based on the information received from the product processor.
To create a Scoring Feature:
1. From Home screen, click Core Maintenance, Under Core Maintenance, click SCredit Decision.
2. Under Credit Decision click, Maintenance. Under Maintenance click, Scoring Feature.
3. Under Scoring Feature, click Create Scoring Feature.
The Create Scoring Feature screen is displayed.
Figure 190 : Create Scoring Feature
4. Specify the fields on Create Scoring Feature screen.
The fields, which are marked with asterisk, are mandatory.
For more information on fields, refer to the field description table below.

Core Maintenance
2-239
Table 158 : Create Scoring Feature - Field Description
Field Description
Basic Details
Feature Code Specify the unique feature code.
Feature Description
Specify a short description for the feature.
Product Processor Specify the product processor for which the feature is being created.
Rule Select the rule, if it is required to define the feature.
This option is used to decide whether the feature is rule based or fact based.
The options are:
Yes
No
Fact Code Select the fact code to be mapped to the feature from the drop-down list.
This field is enabled if the Rule is selected as No.
Fact Name Displays the fact name for the selected fact.
This field is enabled if the Rule is selected as No.
Rule Code Select the rule code to be mapped to the feature from the drop-down list.
This field is enabled, if the Rule is selected as Yes.
Click this icon to get the information about the rule.
Rule Name Displays the rule name for the selected rule.
This field is enabled if the Rule is selected as Yes.
5. Click Save to save the details.
6. The scoring feature is successfully created and can be viewed using the View Scoring Feature
screen.
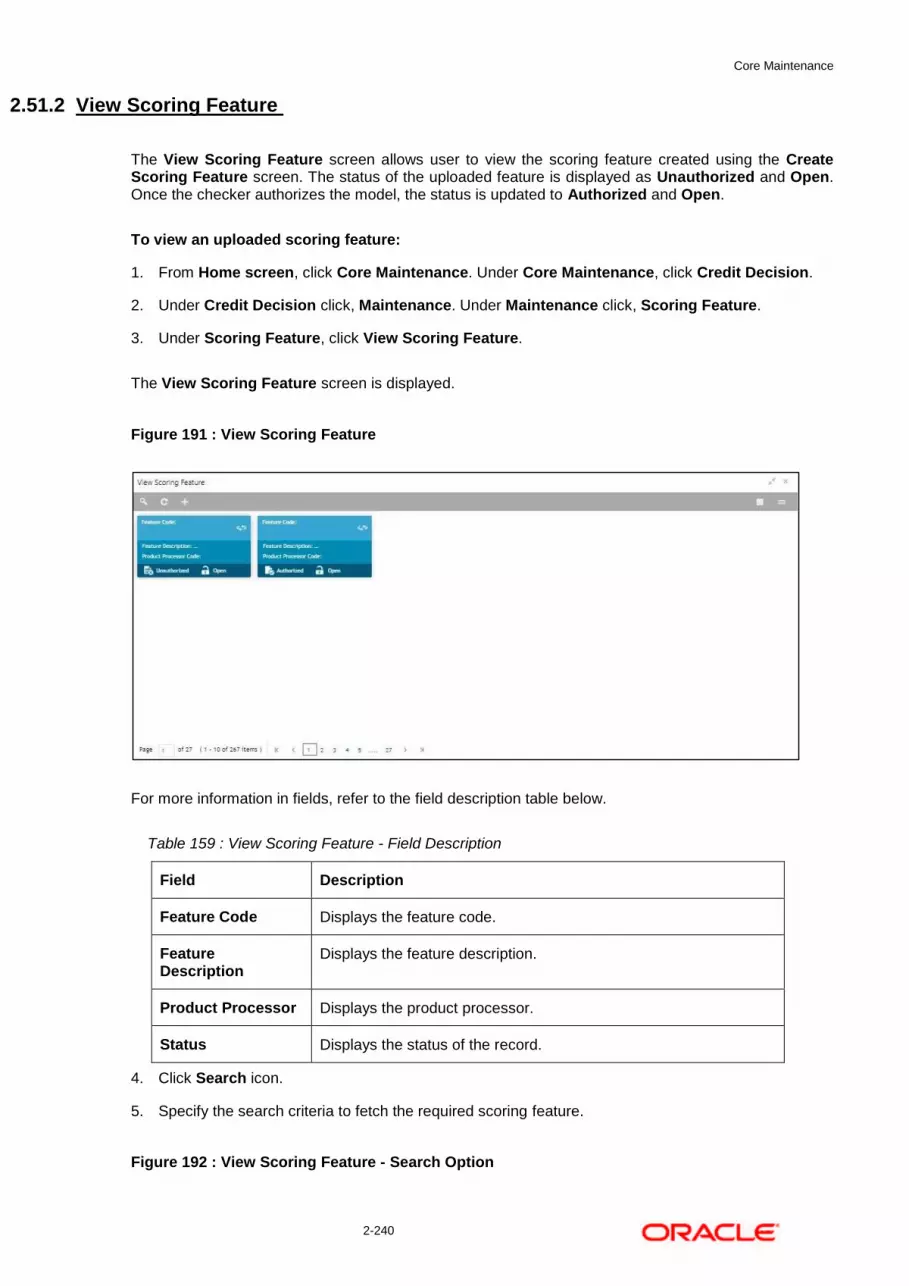
Core Maintenance
2-240
2.51.2 View Scoring Feature
The View Scoring Feature screen allows user to view the scoring feature created using the Create Scoring Feature screen. The status of the uploaded feature is displayed as Unauthorized and Open. Once the checker authorizes the model, the status is updated to Authorized and Open.
To view an uploaded scoring feature:
1. From Home screen, click Core Maintenance. Under Core Maintenance, click Credit Decision.
2. Under Credit Decision click, Maintenance. Under Maintenance click, Scoring Feature.
3. Under Scoring Feature, click View Scoring Feature.
The View Scoring Feature screen is displayed.
Figure 191 : View Scoring Feature
For more information in fields, refer to the field description table below.
Table 159 : View Scoring Feature - Field Description
Field Description
Feature Code Displays the feature code.
Feature Description
Displays the feature description.
Product Processor Displays the product processor.
Status Displays the status of the record.
4. Click Search icon.
5. Specify the search criteria to fetch the required scoring feature.
Figure 192 : View Scoring Feature - Search Option

Core Maintenance
2-241
6. Click Search.
For more information on fields, refer to the field description table below.
Table 160 : View Scoring Feature- Search Option- Field Description
Field Description
Feature Code Displays the feature code.
Feature Description
Displays the feature description.
Authorization Status
Select the authorization status of the feature.
The options are:
Authorized
Unauthorized
Record Status Select the record status of the feature.
The options are:
Open
Close
7. Click three-dots icon to unlock, delete, authorize or view the created scoring feature.
8. To authorise the feature, see the Error! Reference source not found..
9. Click Unlock icon to modify the following fields.
The fields are displayed in the Scoring Feature Maintenance screen. The following fields are editable.
Feature Description
Modification of rule linkage
Modification of fact mapped to the feature in case no rule is linked to the feature.

Core Maintenance
2-242
Figure 193 : Scoring Feature Maintenance - Modify
For more information on fields, refer to the field description table below.
Table 161 : Scoring Feature Maintenance – Modify - Field Description
Field Description
Basic Details
Feature Code Displays the feature code.
Feature Description
Displays the feature description.
User can modify the same.
Product Processor Displays the product processor for the created scoring feature.
Rule Displays the rule defined to the feature.
User can modify the same.
Rule Code Displays the rule code of the feature.
User can modify the same.
This field is displayed, if the Rule is selected as Yes.
Click to get the information about the rule.
Rule Name Displays the rule name of the feature.
This field is displayed, if the Rule is selected as Yes.
Fact Code Displays the fact code of the feature.
User can modify the same.
This field is displayed, if the Rule is selected as No.

Core Maintenance
2-243
Field Description
Fact Name Displays the fact name of the feature.
This field is displayed if the Rule is selected as No.
2.52 Quantitative Scoring Model
Quantitative analysis involves, an assessment of the financial position based on the customer’s income and monthly expenses. It may also include a cash flow analysis of the customer’s accounts and credit history.
Banks usually grant loan based on a credit scoring model that combines quantitative and qualitative analysis.
This section contains the following subsections:
Create Quantitative Scoring Model
View Quantitative Scoring Model
2.52.1 Create Quantitative Scoring Model
The Create Quantitative Scoring Model screen allows user to define quantitative scoring model based on the various scoring parameters. The parameters driving the scoring models are configurable. You can create quantitative scoring model by updating various details.
To create a Quantitative Scoring Model:
1. From Home screen, click Core Maintenance. Under Core Maintenance, click Credit Decision.
2. Under Credit Decision, click Maintenance. Under Maintenance, click Quantitative Scoring Model.
3. Under Quantitative Scoring Model, click Create Quantitative Scoring Model.
The Create Quantitative Scoring Model screen is displayed.

Core Maintenance
2-244
Figure 194 : Create Quantitative Scoring Model
4. Specify the fields on Create Quantitative Scoring Model screen.
The fields, which are marked with asterisk, are mandatory.
For more information on fields, refer to the field description table below.
Table 162 : Create Quantitative Scoring Model - Field Description
Field Description
Basic Details
Scoring Model Select the scoring model from the drop-down list.
The options are:
Application Scoring Model
Applicant Scoring Model
Multi-Applicant Scoring Model
Scoring Model code
Specify the unique scoring model code.
Scoring Model Description
Specify a short description for the scoring model.
Effective Date Specify the effective date.
Expiry Date Specify the expiry date.
Product Processor Specify the product processor for which the model is being created.
Priority Specify the priority of the model.
5. Click the Selection Criteria tab to define scoring model.

Core Maintenance
2-245
Figure 195 : Create Quantitative Scoring Model – Selection Criteria Tab
For more information on fields, refer to the field description table below.Table 163 : Create Quantitative Scoring Model – Selection Criteria Tab - Field Description
Field Description
Use Existing Rule By default, this option is enabled. Indicates if the existing rule is linked.
Rules
Rule Code Select the rule code from the drop down list.
Click to get the information about the rule.
Rule Name Displays the rule name of the rule code.
Create New Rule Select this option to create new rule.
Rules
Code Specify the new rule code.
Description Specify the rule description.
Select Existing Rule Select the existing rule from the drop down list.
Click to view the existing rule.
Note: This is used when existing rule is to be used for some modification like copy of existing rule.
Below field appears once you click icon.
Rule ID Displays the rule ID.
Rule Name Displays the rule name.

Core Maintenance
2-246
Field Description
Description Displays the rule description.
Rule Version Displays the rule version
Click to view the existing rule version.
Note: This is used when existing rule is to be used for some modification like copy of existing rule.
Below fields appears once you click icon.
Version Displays the rule version.
Description Displays the rule description.
Creation Date Displays the rule creation date.
Expression Builder
+ button Click to add new expression.
Fact / Rules Select the fact or rule from the drop-down list.
Once you select the fact/rules one more field opens adjacent to it, update the same based on the selected option.
Operator Select the comparison operator from the drop-down list.
The options are:
<
>
+
=
%
!=
-
>=
<=
*
/
Contains
In
Like
Matches
Notmatches
Notcontains
Notin

Core Maintenance
2-247
Field Description
Data Type Select the data type for the fact or rule. Once you select the data type one more field opens adjacent to it, update the same based on the selected option.
The options are:
Text
Number
Boolean
Fact
The below option appears if the Data Type is selected as Boolean.
True
False
Output Select the output from the drop-down list. Once you select the output one more field opens adjacent to it, update the same based on the selected option.
The options are:
Text
Number
Boolean
Date
Fact
The below option appears if the Data Type is selected as Boolean.
True
False
Expression Displays the expression updated in the expression builder.
6. Click the Scoring Rule tab to define the rule. This tab is enabled if Application Scoring Model is selected.
Figure 196 : Create Quantitative Scoring Model – Scoring Rule Tab
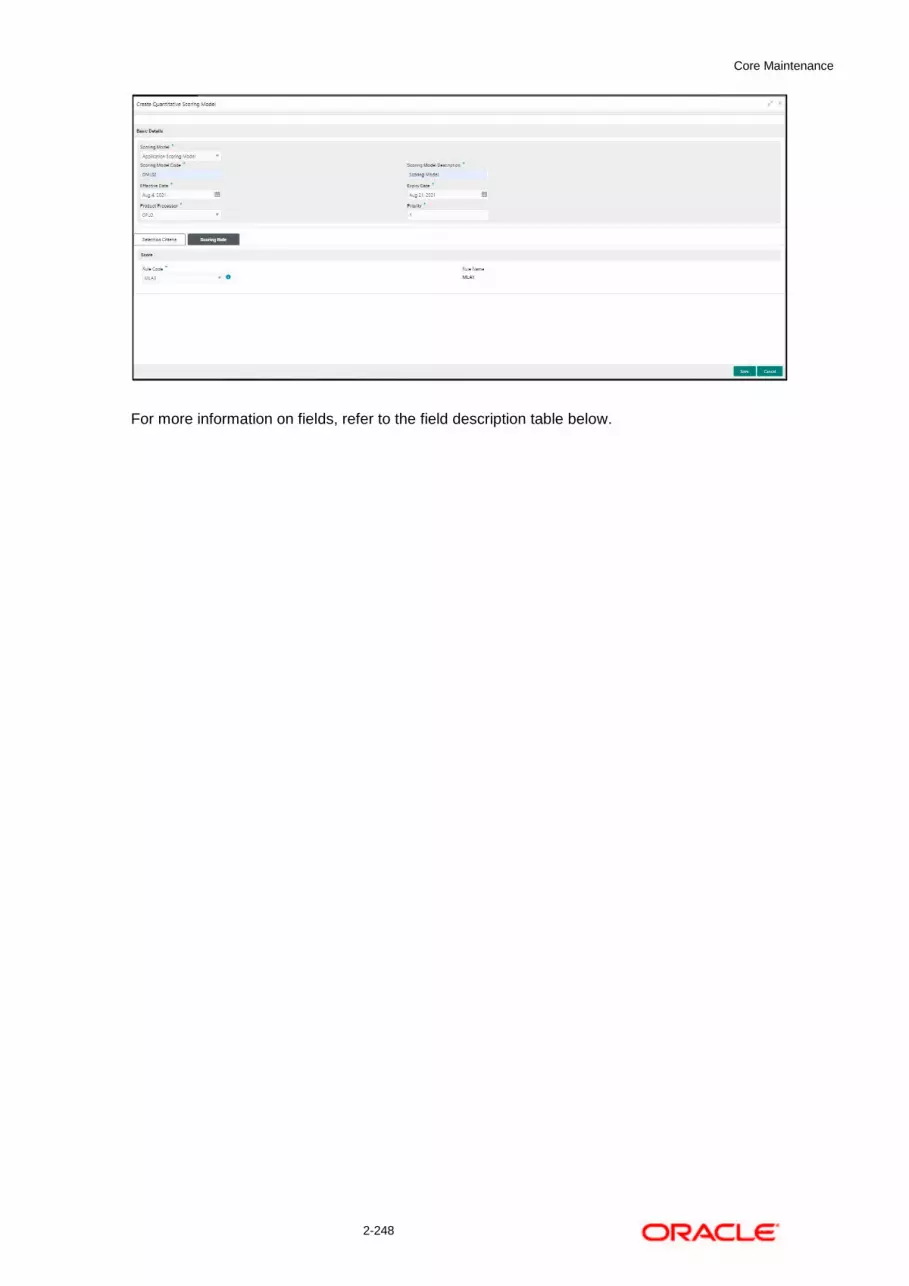
Core Maintenance
2-248
For more information on fields, refer to the field description table below.

Core Maintenance
2-249
Table 164 : Create Quantitative Scoring Model – Scoring Rule Tab - Field Description
Field Description
Score
Rule Code Select the rule code from the drop down list.
Click to get the information about the rule.
Rule Name Displays the rule name of the rule code.
7. Click the Feature tab to define the feature. This tab is enabled if Applicant Scoring Model and Multiple Applicant Scoring Model is selected.
Figure 197 : Create Quantitative Scoring Model – Feature Tab
For more information on fields, refer to the field description table below.
Table 165 : Create Quantitative Scoring Model – Feature Tab - Field Description
Field Description
Scoring Feature
+ button Click to add a new row.
- button Click to delete an existing row.
Feature Select the feature from the drop-down list.
Weightage (%) Specify the weightage to be assigned to each feature code.

Core Maintenance
2-250
Field Description
Range Type Select the range type from the drop down list.
The options are:
Max Value
Param Percent%
Value
For Applicant Scoring Model this field is editable.
Define Range/Value Click to define the feature.
Enable By default, this option is enabled. Indicates if the scoring parameter is enabled or not.
8. Click the Define link to define a range or absolute values for each scoring feature to be considered for scoring model and score for that range or value. In case the data type of feature is numeric such as Bureau score the below screen appears.
Figure 198 : Create Quantitative Scoring Model – Define Link – Numeric Feature
For more information on fields, refer to the field description table below.
Table 166: Create Quantitative Scoring Model – Define Link – Numeric Feature- Field Description
Field Description
Range/Value Definition
Range Type Displays the range type selected.
Max Value Specify the maximum value on which scoring has to be done, if range type ID is Max Value % or Param %.
+ button Click to add a new row.
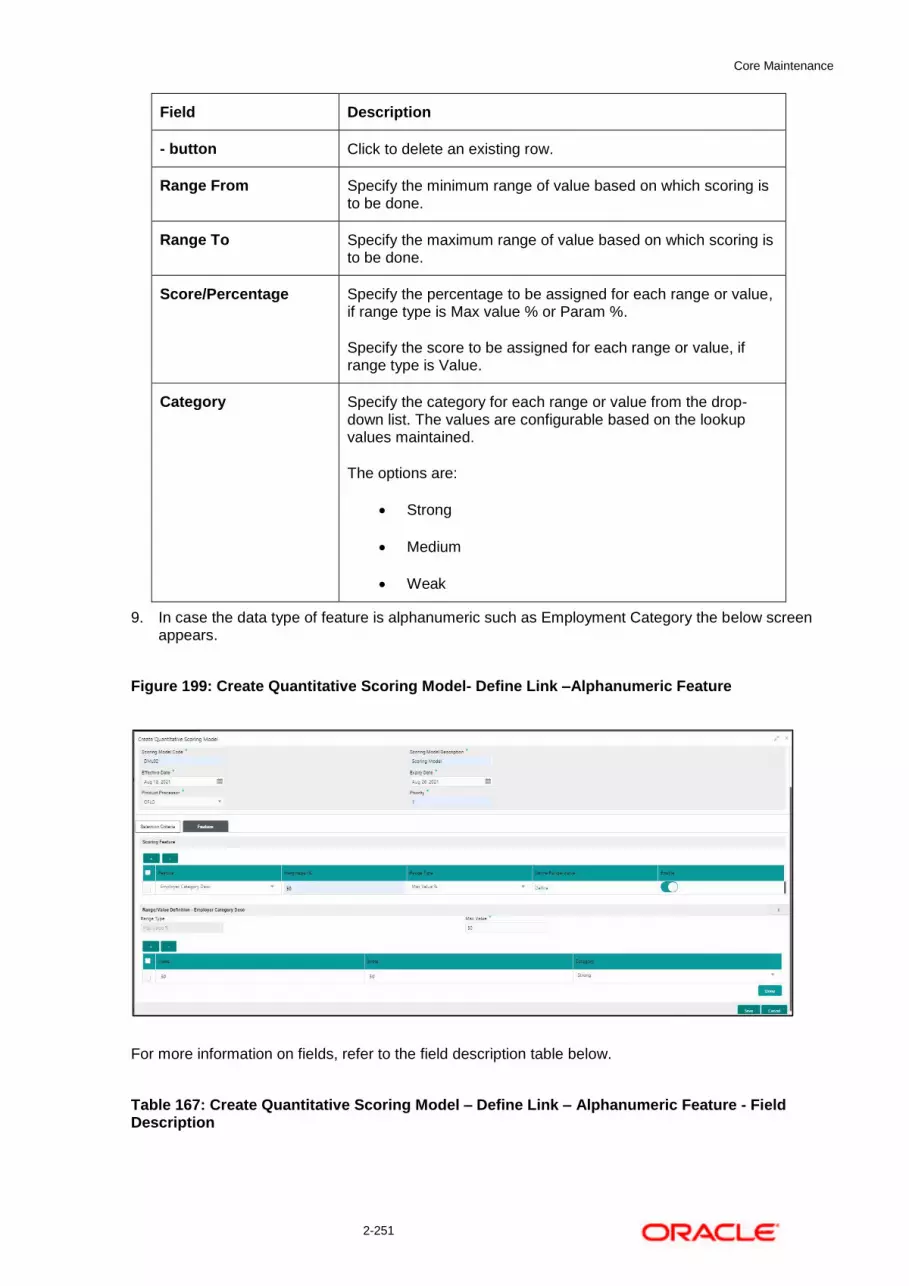
Core Maintenance
2-251
Field Description
- button Click to delete an existing row.
Range From Specify the minimum range of value based on which scoring is to be done.
Range To Specify the maximum range of value based on which scoring is to be done.
Score/Percentage Specify the percentage to be assigned for each range or value, if range type is Max value % or Param %.
Specify the score to be assigned for each range or value, if range type is Value.
Category Specify the category for each range or value from the drop-down list. The values are configurable based on the lookup values maintained.
The options are:
Strong
Medium
Weak
9. In case the data type of feature is alphanumeric such as Employment Category the below screen appears.
Figure 199: Create Quantitative Scoring Model- Define Link –Alphanumeric Feature
For more information on fields, refer to the field description table below.
Table 167: Create Quantitative Scoring Model – Define Link – Alphanumeric Feature - Field Description
Core Maintenance
2-252
Field Description
Range/Value Definition
Range Type Displays the range type selected. The default value for the same is Value.
Max Value Specify the maximum value for the range type.
+ button Click to add a new row.
- button Click to delete an existing row.
Value Specify the value of the feature.
Score Specify the score assigned for each range value.
Category Specify the category for each range or value from the drop-down list.
The options are:
Strong
Medium
Weak
10. Click Done, to save the data and close the range panel.
11. Click Save to save the details.
The quantitative scoring model is successfully created and can be viewed using the View Quantitative Scoring Model screen.

Core Maintenance
2-253
2.52.2 View Quantitative Scoring Model
The View Quantitative Scoring Model screen allows the user to view the quantitative scoring Model created using the Create Quantitative Scoring Model screen. The status of the uploaded model is displayed as Unauthorized and Open. Once the checker authorizes the model, the status is updated to Authorized and Open.
To view created quantitative scoring model:
1. From Home screen, click Core Maintenance. Under Core Maintenance, click Credit Decision.
2. Under Credit Decision click, Maintenance. Under Maintenance click, Quantitative Scoring Model.
3. Under Quantitative Scoring Model, click View Quantitative Scoring Model.
The View Quantitative Scoring Model screen is displayed.
Figure 200 : View Quantitative Scoring Model
For more information on fields, refer to the field description table below.
Table 168 : View Quantitative Scoring Model- Field Description
Field Description
Scoring Model Code
Displays the scoring model code.
Scoring Model Description
Displays the scoring model description.
Product Processor Code
Displays the product processor code.
Status Displays the status of the record.
4. Click Search icon.
5. Specify the search criteria to fetch the required quantitative scoring model.

Core Maintenance
2-254
Figure 201 : View Quantitative Scoring Model- Search Option
6. Click Search.
For more information on fields, refer to the field description table below.
Table 169 : View Quantitative Scoring Model- Search Option- Field Description
Field Description
Scoring Model Code
Specify the scoring model code.
Scoring Model Description
Specify the scoring model description.
Authorization Status
Select the authorization status of the model.
The options are:
Authorized
Unauthorized
Record Status Select the record status of the model.
The options are:
Open
Close
7. Click three-dots icon to unlock, delete, authorize or view the created quantitative scoring model.
8. To authorize the quantitative scoring model, see the Error! Reference source not found..
9. Click Unlock icon to modify the following fields. The fields are displayed in the Quantitative Scoring Model Maintenance screen. The following fields are editable.
Scoring Model Description
Effective date, before authorization
Expiry Date
Priority
Add/Delete new scoring feature to the quantitative scoring model
Change the weightage of the scoring feature code
Range Type
Facts and Rules in Selection Criteria
Range/Value
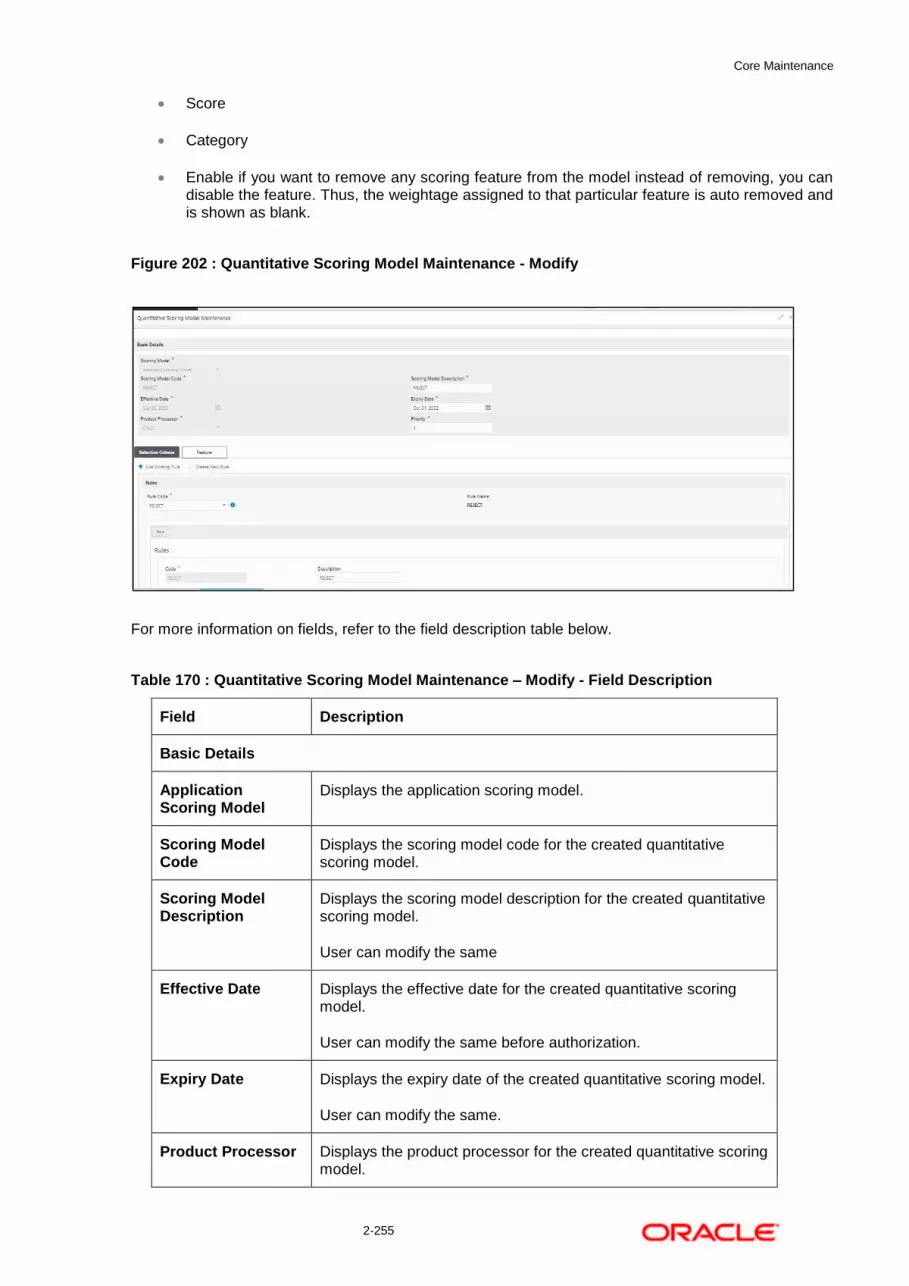
Core Maintenance
2-255
Score
Category
Enable if you want to remove any scoring feature from the model instead of removing, you can disable the feature. Thus, the weightage assigned to that particular feature is auto removed and is shown as blank.
Figure 202 : Quantitative Scoring Model Maintenance - Modify
For more information on fields, refer to the field description table below.
Table 170 : Quantitative Scoring Model Maintenance – Modify - Field Description
Field Description
Basic Details
Application Scoring Model
Displays the application scoring model.
Scoring Model Code
Displays the scoring model code for the created quantitative scoring model.
Scoring Model Description
Displays the scoring model description for the created quantitative scoring model.
User can modify the same
Effective Date Displays the effective date for the created quantitative scoring model.
User can modify the same before authorization.
Expiry Date Displays the expiry date of the created quantitative scoring model.
User can modify the same.
Product Processor Displays the product processor for the created quantitative scoring model.
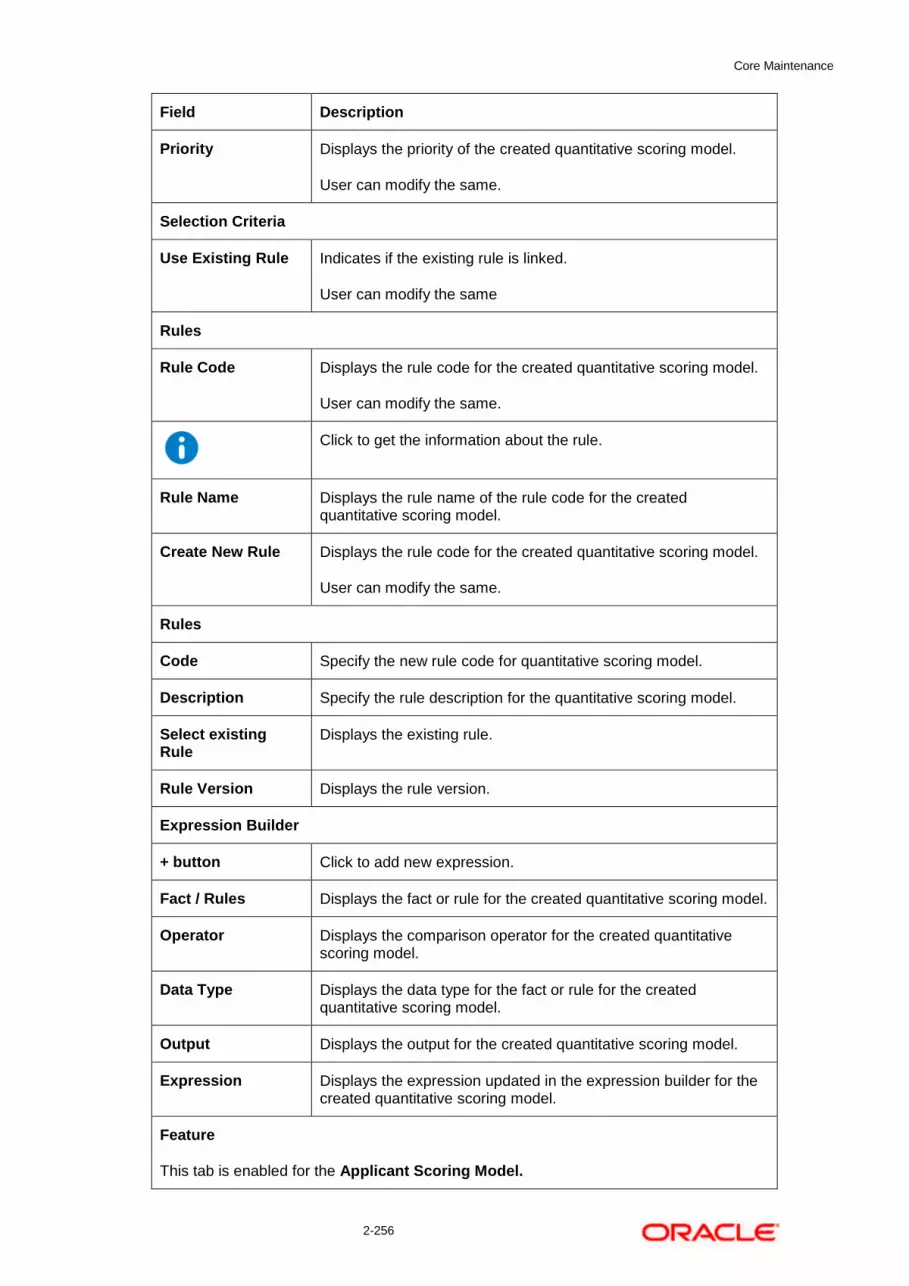
Core Maintenance
2-256
Field Description
Priority Displays the priority of the created quantitative scoring model.
User can modify the same.
Selection Criteria
Use Existing Rule Indicates if the existing rule is linked.
User can modify the same
Rules
Rule Code Displays the rule code for the created quantitative scoring model.
User can modify the same.
Click to get the information about the rule.
Rule Name Displays the rule name of the rule code for the created quantitative scoring model.
Create New Rule Displays the rule code for the created quantitative scoring model.
User can modify the same.
Rules
Code Specify the new rule code for quantitative scoring model.
Description Specify the rule description for the quantitative scoring model.
Select existing Rule
Displays the existing rule.
Rule Version Displays the rule version.
Expression Builder
+ button Click to add new expression.
Fact / Rules Displays the fact or rule for the created quantitative scoring model.
Operator Displays the comparison operator for the created quantitative scoring model.
Data Type Displays the data type for the fact or rule for the created quantitative scoring model.
Output Displays the output for the created quantitative scoring model.
Expression Displays the expression updated in the expression builder for the created quantitative scoring model.
Feature
This tab is enabled for the Applicant Scoring Model.
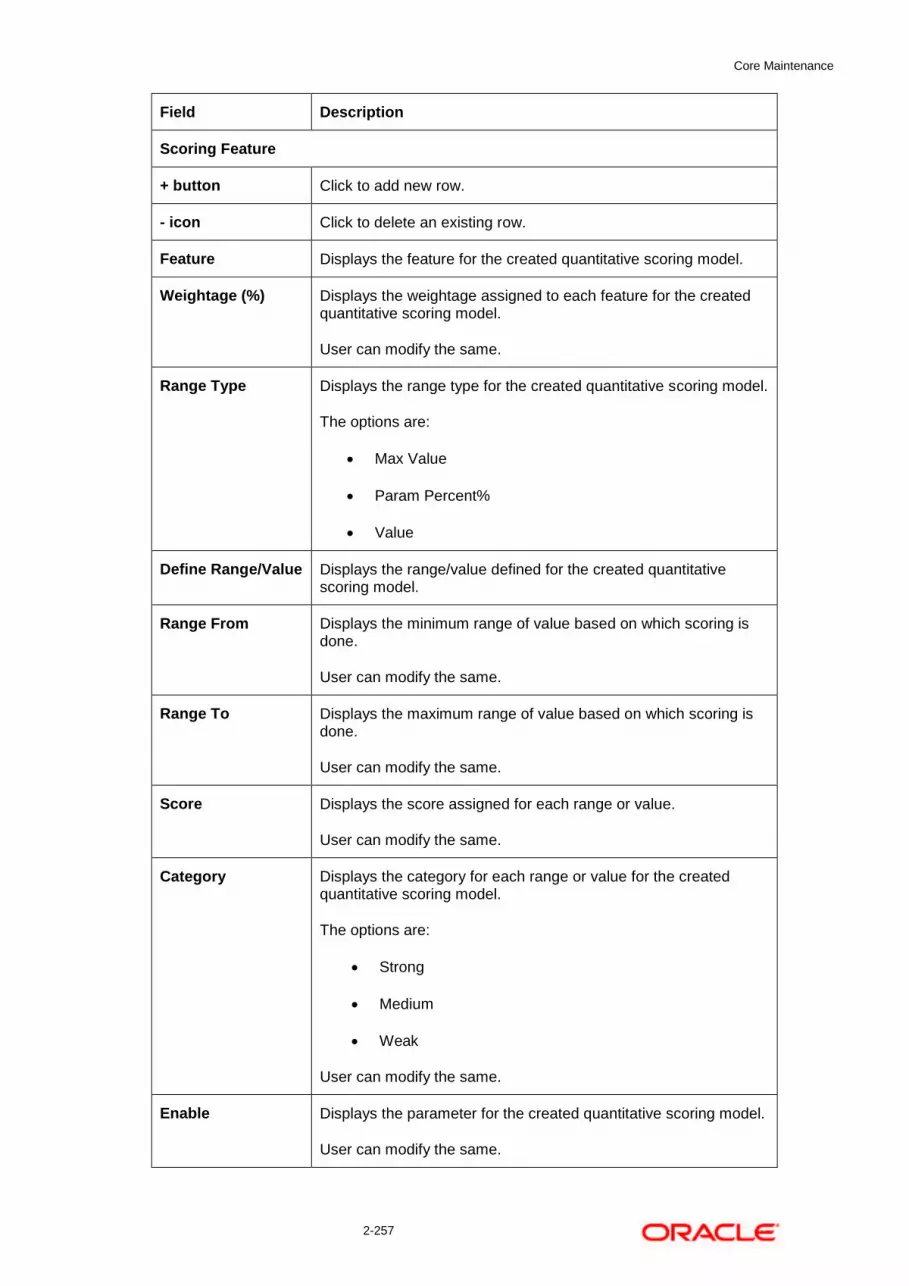
Core Maintenance
2-257
Field Description
Scoring Feature
+ button Click to add new row.
- icon Click to delete an existing row.
Feature Displays the feature for the created quantitative scoring model.
Weightage (%) Displays the weightage assigned to each feature for the created quantitative scoring model.
User can modify the same.
Range Type Displays the range type for the created quantitative scoring model.
The options are:
Max Value
Param Percent%
Value
Define Range/Value Displays the range/value defined for the created quantitative scoring model.
Range From Displays the minimum range of value based on which scoring is done.
User can modify the same.
Range To Displays the maximum range of value based on which scoring is done.
User can modify the same.
Score Displays the score assigned for each range or value.
User can modify the same.
Category Displays the category for each range or value for the created quantitative scoring model.
The options are:
Strong
Medium
Weak
User can modify the same.
Enable Displays the parameter for the created quantitative scoring model.
User can modify the same.
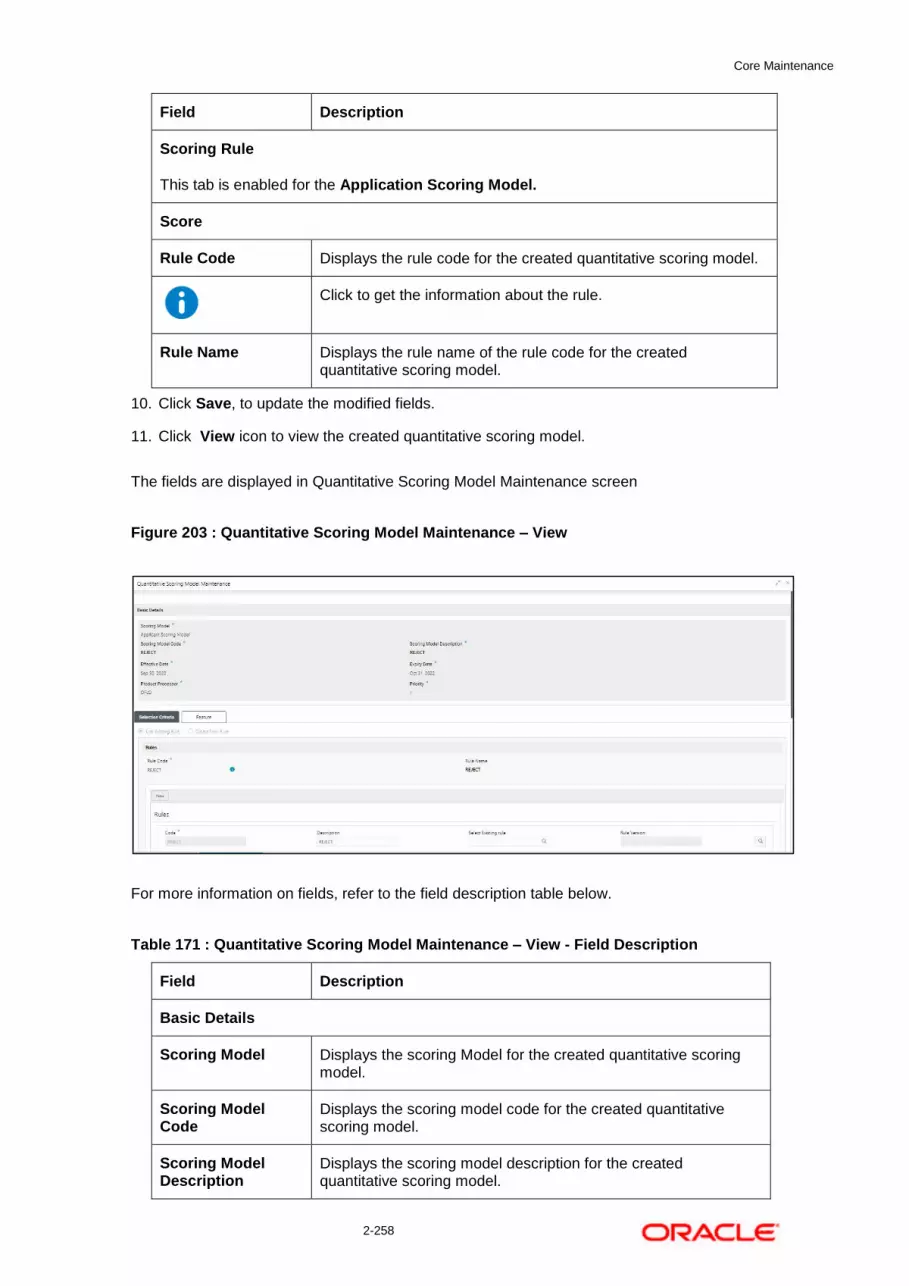
Core Maintenance
2-258
Field Description
Scoring Rule
This tab is enabled for the Application Scoring Model.
Score
Rule Code Displays the rule code for the created quantitative scoring model.
Click to get the information about the rule.
Rule Name Displays the rule name of the rule code for the created quantitative scoring model.
10. Click Save, to update the modified fields.
11. Click View icon to view the created quantitative scoring model.
The fields are displayed in Quantitative Scoring Model Maintenance screen
Figure 203 : Quantitative Scoring Model Maintenance – View
For more information on fields, refer to the field description table below.
Table 171 : Quantitative Scoring Model Maintenance – View - Field Description
Field Description
Basic Details
Scoring Model Displays the scoring Model for the created quantitative scoring model.
Scoring Model Code
Displays the scoring model code for the created quantitative scoring model.
Scoring Model Description
Displays the scoring model description for the created quantitative scoring model.

Core Maintenance
2-259
Field Description
Effective Date Displays the effective date for the created quantitative scoring model.
Expiry Date Displays the expiry date of the created quantitative scoring model.
Product Processor Displays the product processor for the created quantitative scoring model.
Priority Displays the priority of the created quantitative scoring model.
Selection Criteria
Use Existing Rule Indicates if the existing rule is linked.
Rules
Rule Code Displays the rule code for the created quantitative scoring model.
Click to get the information about the rule.
Rule Name Displays the rule name of the rule code for the created quantitative scoring model.
Create New Rule Displays the rule code for the created quantitative scoring model.
Rules
Code Specify the new rule code for quantitative scoring model.
Description Specify the rule description for the quantitative scoring model.
Select Existing Rule
Displays the existing rule.
Rule Version Displays the rule version.
Expression Builder
+ button Click to add new expression.
Fact / Rules Displays the fact or rule for the created quantitative scoring model.
Operator Displays the comparison operator for the created quantitative scoring model.
Data Type Displays the data type for the fact or rule for the created quantitative scoring model.
Output Displays the output for the created quantitative scoring model.
Expression Displays the expression updated in the expression builder for the created quantitative scoring model.

Core Maintenance
2-260
Field Description
Feature
This tab is enabled for the Applicant Scoring Model.
Scoring Feature
+ button Click to add new row.
- button Click to delete an existing row.
Feature Displays the feature for the created quantitative scoring model.
Weightage (%) Displays the weightage assigned to each feature for the created quantitative scoring model.
Range Type Displays the range type for the created quantitative scoring model.
The options are:
Max Value
Param Percent%
Value
Define Range/Value Displays the range/value defined for the created quantitative scoring model.
Range From Displays the minimum range of value based on which scoring is done.
Range To Displays the maximum range of value based on which scoring is done.
Score Displays the score assigned for each range or value.
Category Displays the category for each range or value for the created quantitative scoring model.
The options are:
Strong
Medium
Weak
Enable Displays the parameter for the created quantitative scoring model.
Scoring Rule
This tab is enabled for the Application Scoring Model.
Score

Core Maintenance
2-261
Field Description
Rule Code Displays the rule code for the created quantitative scoring model.
Click to get the information about the rule.
Rule Name Displays the rule name of the rule code for the created quantitative scoring model.

Core Maintenance
2-262
2.53 Decision Grade Matrix
The Decision Grade Matrix screen allows the user to define the decision and grade based on the score calculated by the scoring model.
This section contains following subsections:
Create Decision Grade Matrix
View Decision Grade Matrix
2.53.1 Create Decision Grade Matrix
The Create Decision Grade Matrix screen allows user to create decision and grade matrix by updating various details.
To create decision and grade matrix:
1. From Home screen, click Core Maintenance. Under Core Maintenance click, Credit Decision.
2. Under Credit Decision click, Maintenance. Under Maintenance, click Decision Grade Matrix.
3. Under Decision Grade Matrix, click Create Decision Grade Matrix.
The Create Decision Grade Matrix screen is displayed.
Figure 204 : Create Decision Grade Matrix
4. Specify the fields on Create Decision Grade Matrix screen.
The fields, which are marked with asterisk, are mandatory.
For more information on fields, refer to the field description table below.

Core Maintenance
2-263
Table 172: Create Decision and Grade Matrix - Field Description
Field Description
Basic Details
Model code Specify the unique model code.
Model Description Specify a short description for the model.
Effective Date Select the effective date.
Expiry Date Select the expiry date.
Product Processor Specify the product processor for which the decision and grade matrix is being created.
Priority Specify the priority of the model.
5. Click the Selection Criteria tab to configure the parameters based on which decision model is to be resolved.
Figure 205 : Create Decision Grade Matrix – Selection Criteria Tab
For more information on fields, refer to the field description table below.
Table 173 : Decision and Grade Matrix - Selection Criteria Field Description
Field Description
Use Existing Rule By default, this option is enabled. Indicates if the existing rule is linked.
Rules
Rule Code Select the rule code from the drop-down list.
Click to get the information about the rule.
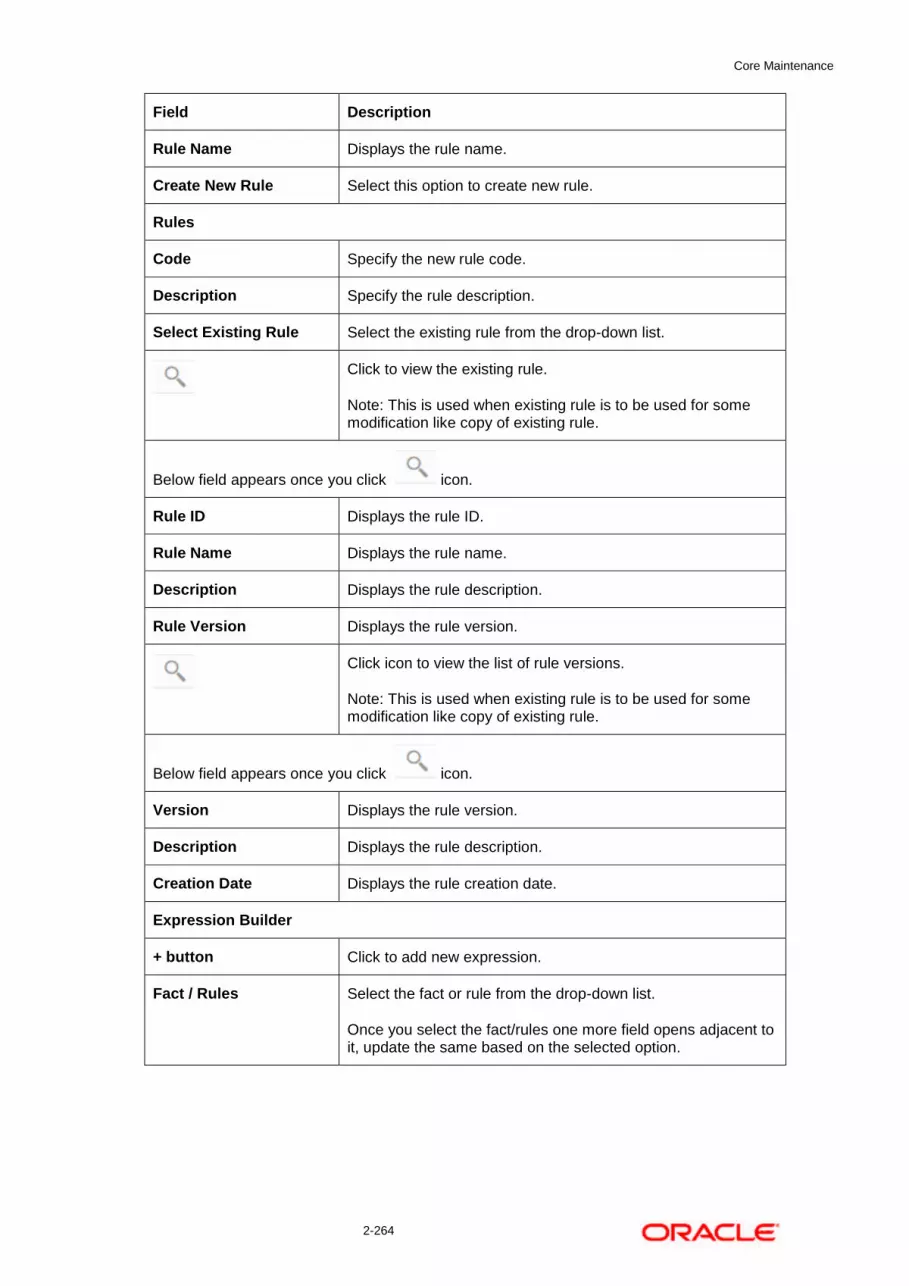
Core Maintenance
2-264
Field Description
Rule Name Displays the rule name.
Create New Rule Select this option to create new rule.
Rules
Code Specify the new rule code.
Description Specify the rule description.
Select Existing Rule Select the existing rule from the drop-down list.
Click to view the existing rule.
Note: This is used when existing rule is to be used for some modification like copy of existing rule.
Below field appears once you click icon.
Rule ID Displays the rule ID.
Rule Name Displays the rule name.
Description Displays the rule description.
Rule Version Displays the rule version.
Click icon to view the list of rule versions.
Note: This is used when existing rule is to be used for some modification like copy of existing rule.
Below field appears once you click icon.
Version Displays the rule version.
Description Displays the rule description.
Creation Date Displays the rule creation date.
Expression Builder
+ button Click to add new expression.
Fact / Rules Select the fact or rule from the drop-down list.
Once you select the fact/rules one more field opens adjacent to it, update the same based on the selected option.

Core Maintenance
2-265
Field Description
Operator Select the comparison operator from the drop-down list.
The options are:
<
>
+
=
%
!=
-
>=
<=
*
/
Contains
In
Like
Matches
Notmatches
Notcontains
Notin
Data Type Select the data type for the fact or rule. Once you select the data type one more field opens adjacent to it, update the same based on the selected option.
The options are:
Text
Number
Boolean
Date
Fact
The below option appears if the Data Type is selected as Boolean.
True
False

Core Maintenance
2-266
Field Description
Output Select the output from the drop-down list. Once you select the output one more field opens adjacent to it, update the same based on the selected option.
The options are:
Text
Number
Boolean
Date
Fact
The below option appears if the Data Type is selected as Boolean.
True
False
Expression Displays the expression updated in the expression builder.
6. Click the Decision Matrix tab to define decision on the application. You can select the feature for which the decision needs to be maintained like Quantitative/Qualitative.
Figure 206 : Create Decision Grade Matrix- Decision Matrix Tab
For more information on fields, refer to the field description table below.
Table 174 : Create Decision Grade Matrix – Decision Matrix Tab - Field Description
Field Description
The following fields appear if you click Decision Matrix Tab.

Core Maintenance
2-267
Field Description
Add Column Click for addition of features for which decision has to be maintained.
On click of Add Column, all the features are shown in the drop down list. Select the feature to be added. Click save to add the feature.
If the feature is numeric type, two columns gets added in the table From and To. If the feature is character/alphanumeric type one column Value gets added.
System should not save, if no feature have been added. User can click Cancel to close the window.
Link a Rule? User can link a rule to the features.
The options are:
Yes: If this option is selected, system displays the list of rules and based on rule mapped the decision is provided.
No: If this option is selected, system displays the list of
decision lookup values.
Click to delete a column.
+ button Click to add a new row.
- button Click to delete an existing row.
Score From Specify the minimum range of score for the decision.
Score To Specify the maximum range of score for the decision.
Decision Specify the decision of an application from the drop-down list. The values are configurable based on the look up values maintained
The options are:
Approved
Manual
Rejected
Rule Displays the rules based on which decision is to be made.
This field is enabled if Link a Rule? Option is update as Yes.
7. Click the Grade Matrix tab to assign the grade to the application that is used during the pricing of the application. You can select the feature for which the grade needs to be maintained like Quantitative/Qualitative.
Figure 207 : Create Decision Grade Matrix – Grade Matrix Tab

Core Maintenance
2-268
For more information on fields, refer to the field description table below.
Table 175 : Create Decision Grade Matrix – Grade Matrix Tab - Field Description
Field Description
The following fields appear if you click Grade Matrix tab.
Add Column Click for addition of features for which decision has to be maintained.
On click of Add Column, all the features are shown in the drop down list. Select the feature to be added. Click save to add the feature.
If the feature is numeric type, two columns gets added in the table From and To. If the feature is character/alphanumeric type one column Value gets added.
System should not save, if no feature have been added. User can click Cancel to close the window.
Link a Rule? User can link a rule to the features.
The options are:
Yes: If this option is selected, system displays the list of rules and based on rule mapped the decision is provided.
No: If this option is selected, system displays the list of
decision lookup values.
Click to delete a column.
+ button Click to add a new row.
- button Click to delete an existing row.
Score From Specify the minimum range of the score for the grade.
Score To Specify the maximum range of the score for the grade.

Core Maintenance
2-269
Field Description
Grade Specify the grade of the application based on the score scored. The values are configurable based on the look up values maintained.
The options are:
A
B
C
Value In case the data type of feature is numeric such as Age, FICO score the below field appears. , specify the value for which the grade has to be maintained.
Rule Displays the rules based on which decision is to be made.
This field is enabled if Link a Rule? Option is updated as Yes.
8. Click Save to save the details.
The decision grade matrix is successfully created and can be viewed using the View Decision and Grade Matrix screen.
2.53.2 View Decision Grade Matrix
The View Decision Grade Matrix screen allows the user to view the decision grade matrix created using the Create Decision Grade Matrix screen. The status of the uploaded model is displayed as Unauthorized and Open. Once the checker authorizes the matrix, the status is updated to Authorized and Open.
To view an uploaded decision grade matrix:
1. From Home screen, click Core Maintenance. Under Core Maintenance click, Credit Decision.
2. Under Credit Decision, click Maintenance. Under Maintenance, click Decision Grade Matrix.
3. Under Decision Grade Matrix, click View Decision Grade Matrix.
The View Decision Grade Matrix screen is displayed.
Figure 208 : View Decision Grade Matrix

Core Maintenance
2-270
For more information on fields, refer to the field description table below.
Table 176 : View Decision Grade Matrix - Field Description
Field Description
Model Code Displays the model code.
Model Description Displays the description of the model.
Product Processor Displays the product processor for which the model is created.
Status Displays the status of the record.
4. Click Search icon.
5. Specify the search criteria to fetch the required decision grade matrix.
Figure 209 : View Decision Grade Matrix- Search Option
6. Click Search.
For more information on fields, refer to the field description table below.
Table 177 : View Decision Grade Matrix Field Description
Field Description
Model Code Displays the model code.
Model Description Displays the model description.

Core Maintenance
2-271
Field Description
Authorization Status Select the authorization status of the model.
The options are:
Authorized
Unauthorized
Record Status Select the record status of the model.
The options are:
Open
Close
7. Click three-dots icon to unlock, delete, authorize or view the created decision grade matrix.
8. Click Unlock icon to modify the following fields.
The fields are displayed in the Decision Grade Maintenance screen. The following fields are editable.
Model Description
Effective Date, before authorization
Expiry Date
Priority
Rule Code
Add New fact or rule to the selection criteria
Score from
Score to
Decision
Grade
Figure 210 : Decision Grade Maintenance - Modify
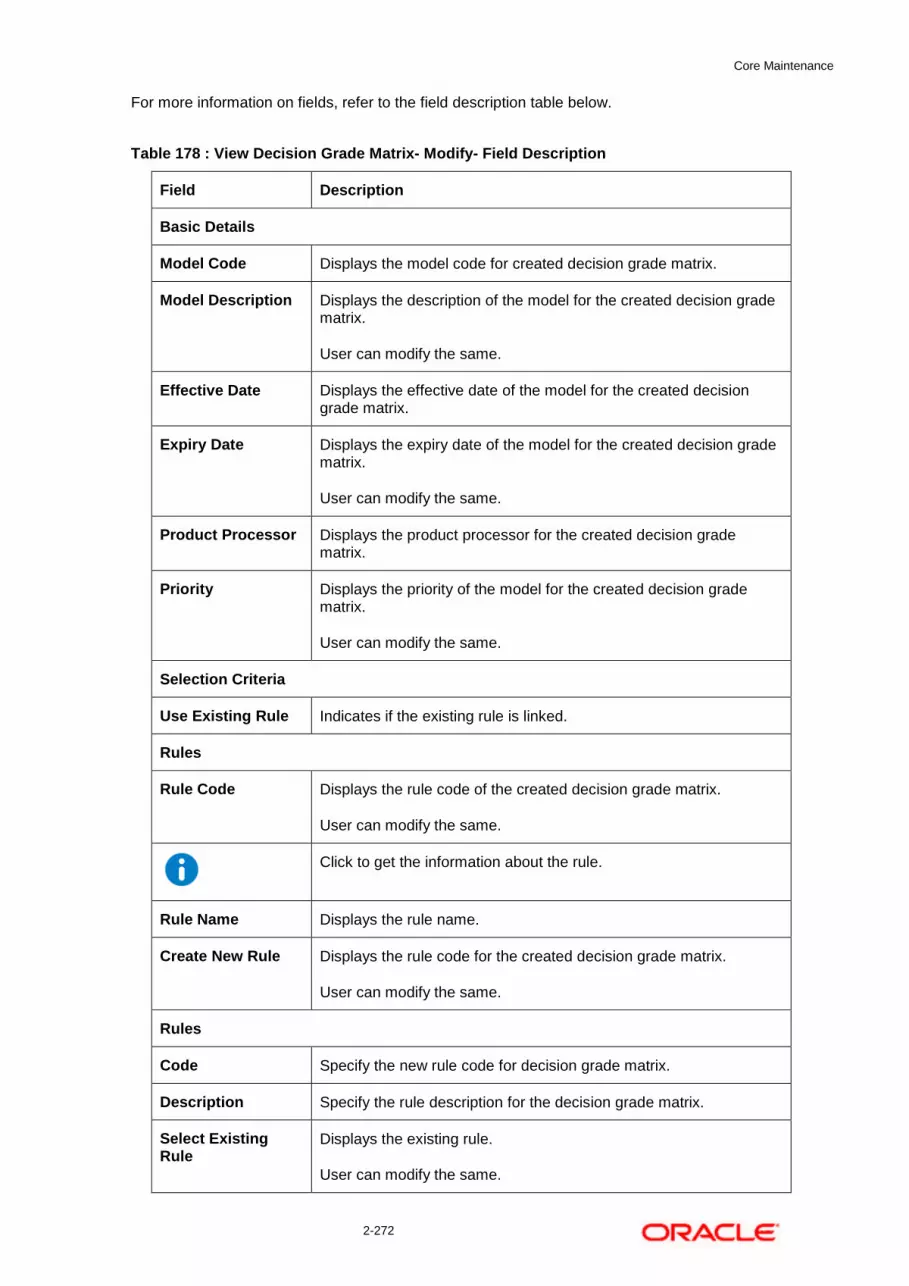
Core Maintenance
2-272
For more information on fields, refer to the field description table below.
Table 178 : View Decision Grade Matrix- Modify- Field Description
Field Description
Basic Details
Model Code Displays the model code for created decision grade matrix.
Model Description Displays the description of the model for the created decision grade matrix.
User can modify the same.
Effective Date Displays the effective date of the model for the created decision grade matrix.
Expiry Date Displays the expiry date of the model for the created decision grade matrix.
User can modify the same.
Product Processor Displays the product processor for the created decision grade matrix.
Priority Displays the priority of the model for the created decision grade matrix.
User can modify the same.
Selection Criteria
Use Existing Rule Indicates if the existing rule is linked.
Rules
Rule Code Displays the rule code of the created decision grade matrix.
User can modify the same.
Click to get the information about the rule.
Rule Name Displays the rule name.
Create New Rule Displays the rule code for the created decision grade matrix.
User can modify the same.
Rules
Code Specify the new rule code for decision grade matrix.
Description Specify the rule description for the decision grade matrix.
Select Existing Rule
Displays the existing rule.
User can modify the same.

Core Maintenance
2-273
Field Description
Rule Version Displays the rule version.
Expression Builder
+ button Click to add new expression.
Fact / Rules Displays the fact or rule for the created decision grade matrix.
Operator Displays the comparison operator for the created decision grade matrix.
Data Type Displays the data type for the fact or rule for the created decision grade matrix.
Output Displays the output for the created decision grade matrix.
Expression Displays the expression updated in the expression builder for the created quantitative scoring model.
Decision Matrix
Add Column Click to add addition of features for which decision has to be maintained.
Link a Rule? User can link a rule to the features.
The options are:
Yes: This option displays the list of rules and based on rule mapped the decision is provided.
No: This option displays the list of decision lookup values.
Click to delete a column.
+ button Click to add new row.
- button Click to delete row.
Score From Displays the minimum range of score for the decision.
User can modify the same.
Score To Displays the maximum range of score for the decision.
User can modify the same.

Core Maintenance
2-274
Field Description
Decision Displays the decision of an application. The values are configurable based on the look up values maintained
The options are:
Approved
Manual
Rejected
User can modify the same.
Rule Displays the rule based on which decision is to be made.
This field is enabled if Link a Rule? Option is updated as Yes.
Grade Matrix
Add Column Click to add addition of features for which decision has to be maintained.
Link a Rule? User can link a rule to the features.
The option are:
Yes: This option displays the list of rules and based on the rules mapped decision is provided.
No: this option displays the list of decision lookup values.
Click to delete a column.
+ button Click to add new row.
- button Click to delete row.
Score From Displays the minimum range of score for the grade.
User can modify the same.
Score To Displays the maximum range of score for the grade.
User can modify the same.
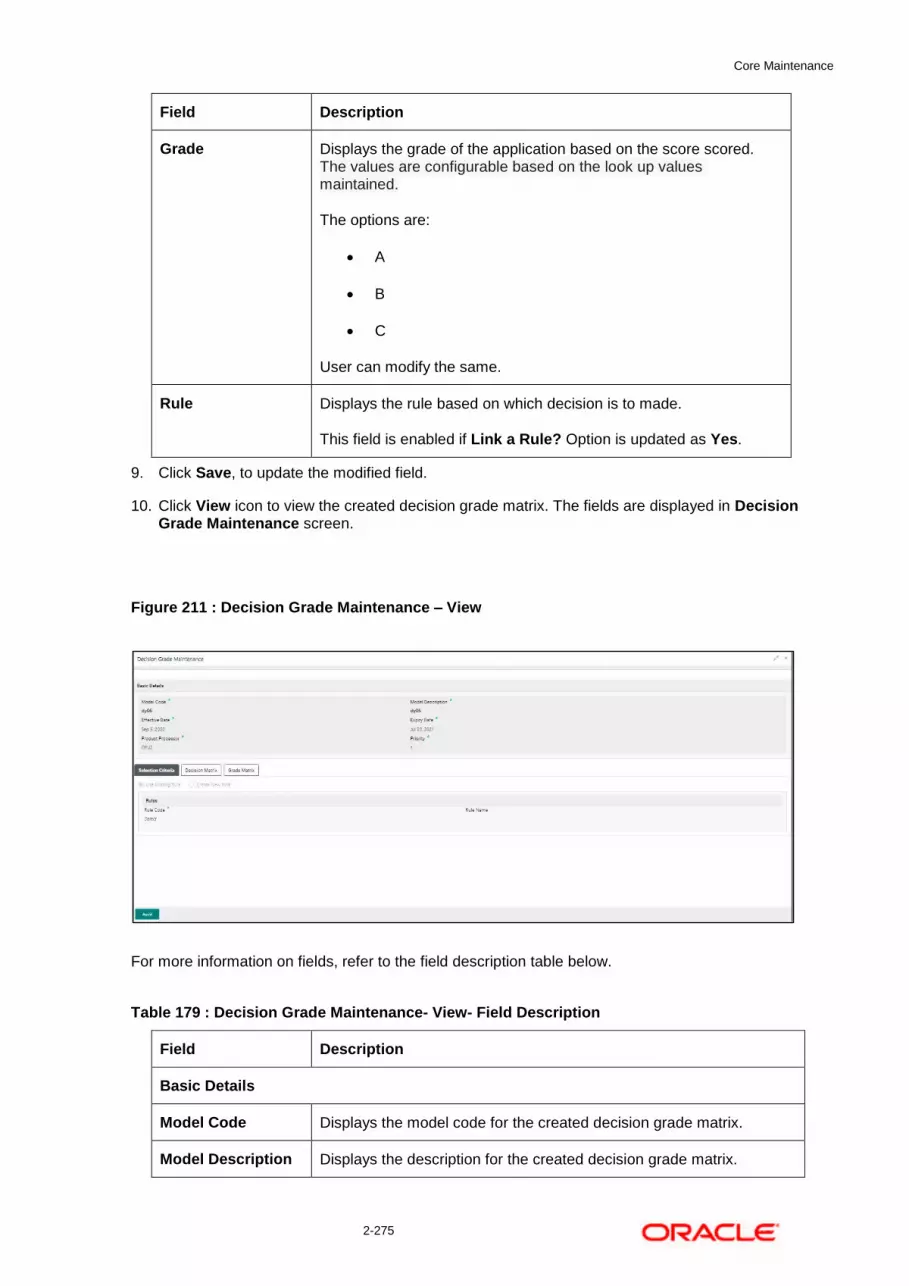
Core Maintenance
2-275
Field Description
Grade Displays the grade of the application based on the score scored. The values are configurable based on the look up values maintained.
The options are:
A
B
C
User can modify the same.
Rule Displays the rule based on which decision is to made.
This field is enabled if Link a Rule? Option is updated as Yes.
9. Click Save, to update the modified field.
10. Click View icon to view the created decision grade matrix. The fields are displayed in Decision Grade Maintenance screen.
Figure 211 : Decision Grade Maintenance – View
For more information on fields, refer to the field description table below.
Table 179 : Decision Grade Maintenance- View- Field Description
Field Description
Basic Details
Model Code Displays the model code for the created decision grade matrix.
Model Description Displays the description for the created decision grade matrix.

Core Maintenance
2-276
Field Description
Effective Date Displays the effective date for the created decision grade matrix.
Expiry Date Displays the expiry date for the created decision grade matrix.
Product Processor Displays the product processor for the created decision grade matrix.
Priority Displays the priority for the created decision grade matrix.
Selection Criteria
Use Existing Rule Indicates if the existing rule is linked.
Rules
Rule Code Displays the rule code of the created decision grade matrix.
Click to get the information about the rule.
Rule Name Displays the rule name.
Create New Rule Displays if new rule is linked to the created decision grade matrix.
Rules
Code Specify the new rule code for decision grade matrix.
Description Specify the rule description for the decision grade matrix.
Select Existing Rule
Displays the existing rule.
Rule Version Displays the rule version.
Expression Builder
+ button Click to add new expression.
Fact / Rules Displays the fact or rule for the created decision grade matrix.
Operator Displays the comparison operator for the created decision grade matrix.
Data Type Displays the data type for the fact or rule for the created decision grade matrix.
Output Displays the output for the created decision grade matrix.
Expression Displays the expression updated in the expression builder for the created quantitative scoring model.
Decision Matrix
Add Column Click to add addition of features for which decision has to be maintained.
Link a Rule? Displays if the rule is linked to the feature or not.

Core Maintenance
2-277
Field Description
Click to delete a column.
+ button Click to add a new row.
- button Click to delete a row.
Score From Displays the minimum range of score for the decision.
Score To Displays the maximum range of score for the decision.
Decision Displays the decision of an application. The values are configurable based on the look up values maintained
The options are:
Approved
Manual
Rejected
Rule Displays the rule based on which decision is made.
This field is enabled if Link a Rule? Option is updated as Yes.
Grade Matrix
Add Column Click to add addition of features for which decision has to be maintained.
Click to delete a column.
+ button Click to add a new row.
- button Click to delete a row.
Score From Displays the minimum range of score for the grade.
Score To Displays the maximum range of score for the grade.
Grade Displays the grade of the application based on the score scored. The values are configurable based on the look up values maintained.
The options are:
A
B
C
Rule Displays the rule based on which decision is made.
This field is enabled if Link a Rule? Option is updated as Yes.

Core Maintenance
2-278
2.54 Pricing
Risk-based pricing refers to the offering of different interest rates to different customers depending on their credit worthiness. Thus, not all borrowers for the same product receives the same interest rate and credit terms. This means that high-risk borrowers who are less likely to repay their loans in full and on time will be charged higher rate of interest. While the low risk borrowers, having greater capacity to make payments will be charged lower rate of interest.
This section contains the following subsections:
Create Pricing Model
View Pricing Model
2.54.1 Create Pricing Model
The Create Pricing Model screen allows user to create pricing model based on various pricing parameter by updating various details.
To create a pricing set up:
1. From Home screen, click Core Maintenance. Under Core Maintenance click, Credit Decision.
2. Under Credit Decision click Maintenance. Under Maintenance, click Pricing.
3. Under Pricing, click Create Pricing Model.
The Create Pricing Model screen is displayed.
Figure 212 : Create Pricing Model
4. Specify the fields on Create Pricing Model screen.
The fields, which are marked with asterisk, are mandatory.
For more information on fields, refer to the field description table below.

Core Maintenance
2-279
Table 180 : Create Pricing Model – Field Description
Field Description
Basic Details
Pricing Code Specify the unique pricing code.
Pricing Description Specify a short description for the pricing.
Effective Date Select the effective date.
Expiry Date Select the expiry date.
Product Processor Specify the product processor for which the pricing is being defined.
Priority Specify the priority of the pricing.
5. Click the Selection Criteria tab to define pricing.
Figure 213 : Create Pricing Model - Selection Criteria Tab
For more information on fields, refer to the field description table below.
Table 181 : Create Pricing Model – Selection Criteria - Field Description
Field Description
Use Existing Rule By default, this option is enabled. Indicates if the existing rule is linked.
Rules
Rule Code Select the rule code from the drop down list.
Click to get the information about the rule.
Rule Name Displays the rule name.

Core Maintenance
2-280
Field Description
Create New Rule Select this option to create new rule.
Rules
Code Displays the rule code.
Description Displays the rule description.
Select existing Rule Select the existing rule from the drop-down list.
Rule Version Displays the rule version.
Click to view the existing rule.
Note: This is used when existing rule is to be used for some modification like copy of existing rule.
Below field appears once you click icon.
Rule ID Displays the rule ID.
Rule Name Displays the rule name.
Description Displays the rule description.
Rule version Displays the rule version.
Click to view the existing rule version.
Note: This is used when existing rule is to be used for some modification like copy of existing rule.
Below field appears once you click icon.
Version Displays the rule version.
Description Displays the rule description.
Creation Date Displays the rule creation date.
Expression Builder
+ button Click icon to add new expression.
Fact / Rules Select the fact or rule from the drop-down list.
Once you select the fact/rules one more field opens adjacent to it, update the same based on the selected option.

Core Maintenance
2-281
Field Description
Operator Select the comparison operator from the drop-down list.
The options are:
<
>
+
=
%
!=
-
>=
<=
*
/
Contains
In
Like
Matches
Notmatches
Notcontains
Notin
Data Type Select the data type for the fact or rule. Once you select the data type one more field opens adjacent to it, update the same based on the selected option.
The options are:
Text
Number
Boolean
Fact
The below option appears if the Data Type is selected as Boolean.
True
False

Core Maintenance
2-282
Field Description
Output Select the output from the drop-down list. Once you select the output one more field opens adjacent it, update the same based on the selected option.
The options are:
Text
Number
Boolean
Date
Fact
The below option appears if the Data Type is selected as Boolean.
True
False
Expression Displays the expression updated in the expression builder.
6. Click the Price Definition tab to define pricing.
Figure 214 : Create Pricing Model – Price Definition Tab
For more information on fields, refer to the field description table below.
Table 182 : Create Pricing Model – Price Definition – Field Description
Field Description
Minimum Rate Specify the minimum rate applicable for the defined pricing code.
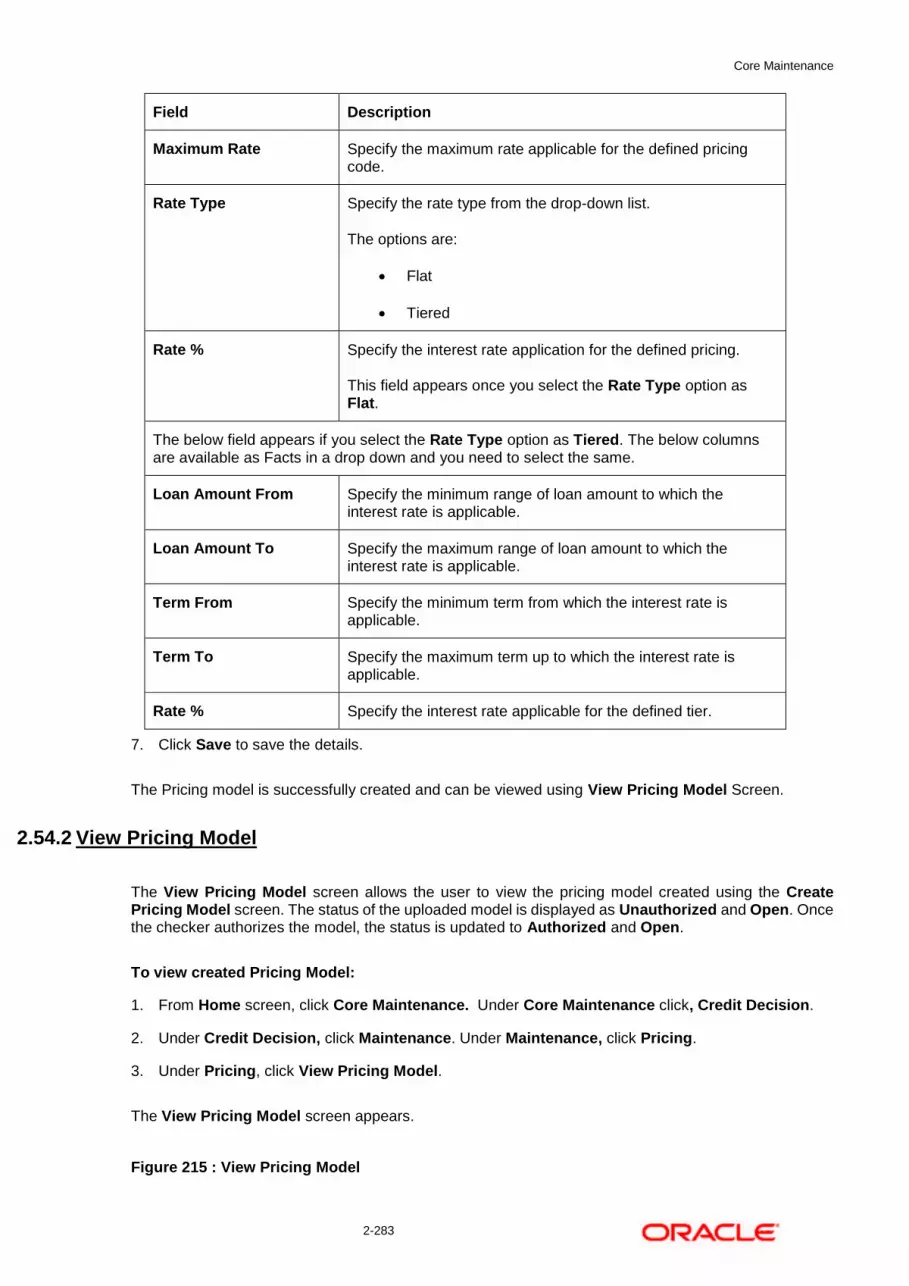
Core Maintenance
2-283
Field Description
Maximum Rate Specify the maximum rate applicable for the defined pricing code.
Rate Type Specify the rate type from the drop-down list.
The options are:
Flat
Tiered
Rate % Specify the interest rate application for the defined pricing.
This field appears once you select the Rate Type option as Flat.
The below field appears if you select the Rate Type option as Tiered. The below columns are available as Facts in a drop down and you need to select the same.
Loan Amount From Specify the minimum range of loan amount to which the interest rate is applicable.
Loan Amount To Specify the maximum range of loan amount to which the interest rate is applicable.
Term From Specify the minimum term from which the interest rate is applicable.
Term To Specify the maximum term up to which the interest rate is applicable.
Rate % Specify the interest rate applicable for the defined tier.
7. Click Save to save the details.
The Pricing model is successfully created and can be viewed using View Pricing Model Screen.
2.54.2 View Pricing Model
The View Pricing Model screen allows the user to view the pricing model created using the Create Pricing Model screen. The status of the uploaded model is displayed as Unauthorized and Open. Once the checker authorizes the model, the status is updated to Authorized and Open.
To view created Pricing Model:
1. From Home screen, click Core Maintenance. Under Core Maintenance click, Credit Decision.
2. Under Credit Decision, click Maintenance. Under Maintenance, click Pricing.
3. Under Pricing, click View Pricing Model.
The View Pricing Model screen appears.
Figure 215 : View Pricing Model
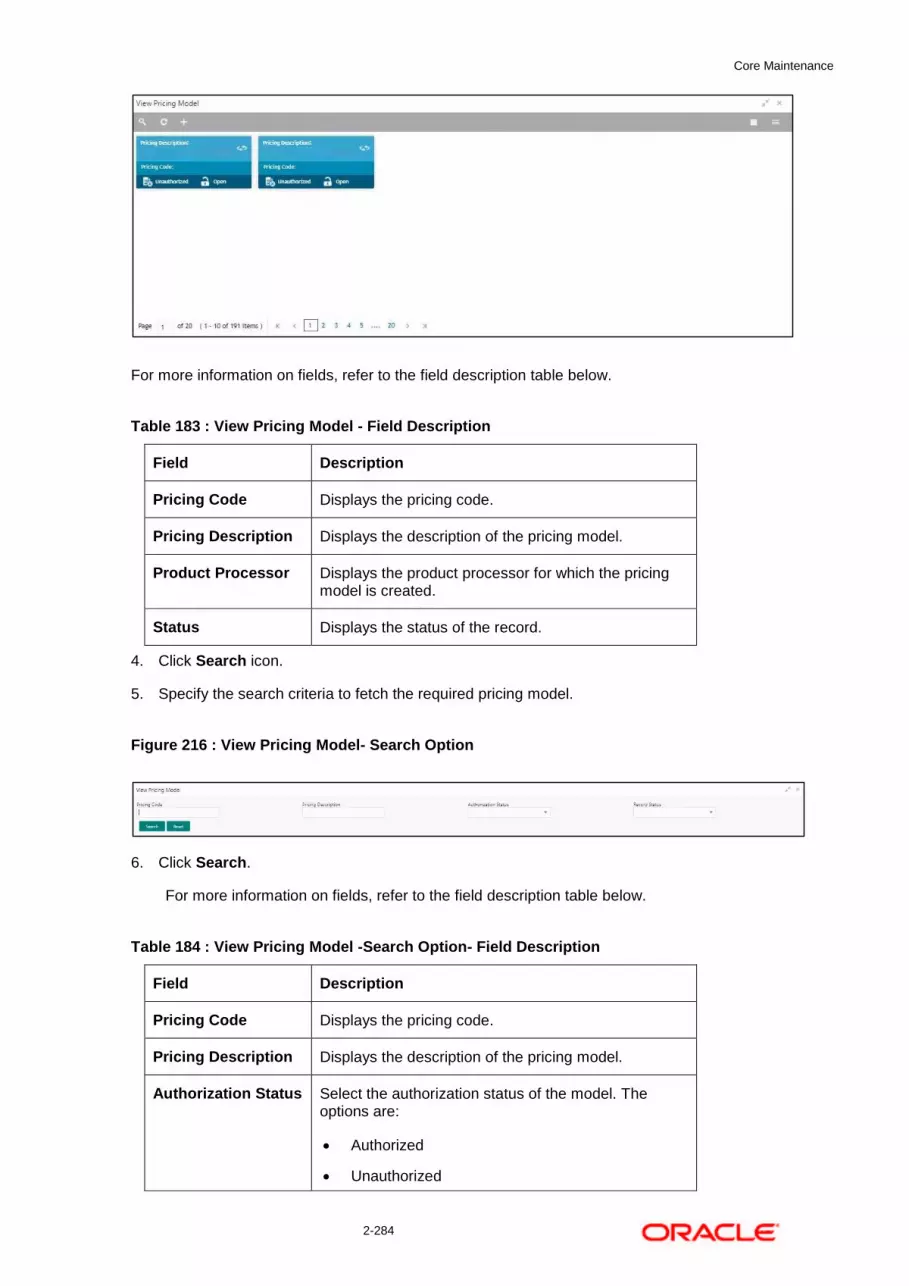
Core Maintenance
2-284
For more information on fields, refer to the field description table below.
Table 183 : View Pricing Model - Field Description
Field Description
Pricing Code Displays the pricing code.
Pricing Description Displays the description of the pricing model.
Product Processor Displays the product processor for which the pricing model is created.
Status Displays the status of the record.
4. Click Search icon.
5. Specify the search criteria to fetch the required pricing model.
Figure 216 : View Pricing Model- Search Option
6. Click Search.
For more information on fields, refer to the field description table below.
Table 184 : View Pricing Model -Search Option- Field Description
Field Description
Pricing Code Displays the pricing code.
Pricing Description Displays the description of the pricing model.
Authorization Status Select the authorization status of the model. The options are:
Authorized
Unauthorized

Core Maintenance
2-285
Field Description
Record Status Select the record status of the model. The options are:
Open
Close
7. Click three-dots icon to unlock, delete, authorize or view the created pricing model.
8. Click Unlock to modify the following fields.
The fields are displayed in the Pricing Model Maintenance screen. The following fields are editable.
Pricing Description
Effective Date, before authorization
Expiry Date
Priority
Rule Code
Add new fact o rule to the selection criteria
Loan Amount From
Loan Amount To
Term From
Term To
Rate Type
Rate %
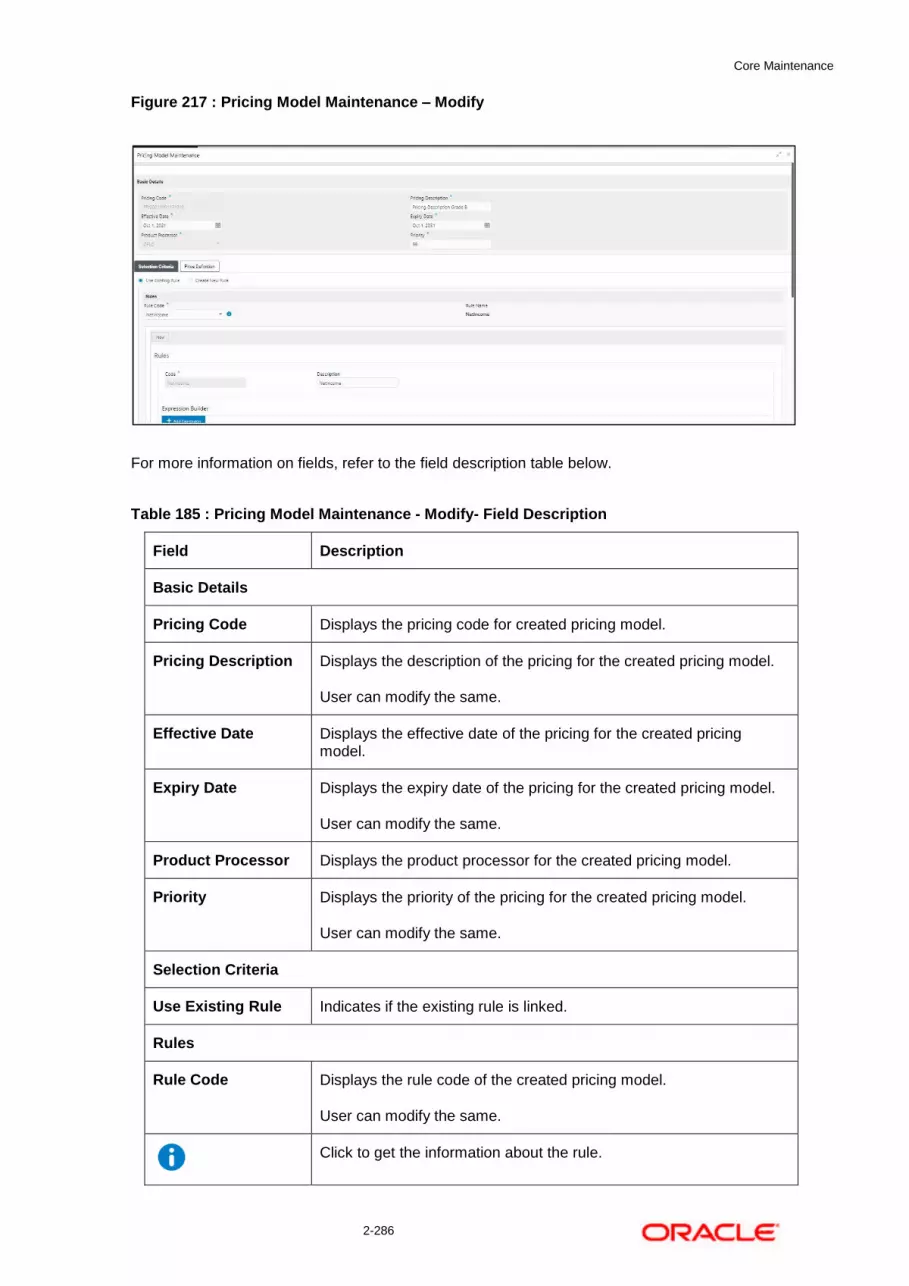
Core Maintenance
2-286
Figure 217 : Pricing Model Maintenance – Modify
For more information on fields, refer to the field description table below.
Table 185 : Pricing Model Maintenance - Modify- Field Description
Field Description
Basic Details
Pricing Code Displays the pricing code for created pricing model.
Pricing Description Displays the description of the pricing for the created pricing model.
User can modify the same.
Effective Date Displays the effective date of the pricing for the created pricing model.
Expiry Date Displays the expiry date of the pricing for the created pricing model.
User can modify the same.
Product Processor Displays the product processor for the created pricing model.
Priority Displays the priority of the pricing for the created pricing model.
User can modify the same.
Selection Criteria
Use Existing Rule Indicates if the existing rule is linked.
Rules
Rule Code Displays the rule code of the created pricing model.
User can modify the same.
Click to get the information about the rule.
Core Maintenance
2-287
Field Description
Rule Name Displays the rule name.
Create New Rule Displays if new rule is linked to the pricing model.
User can modify the same.
Rules
Code Specify the new rule code for the created pricing model.
Description Specify the rule description for the created pricing model.
Select Existing Rule Displays the existing rule.
User can modify the same.
Rule Version Displays the rule version.
Expression Builder
+ button Click to add new expression.
Fact / Rules Displays the fact/rules of the created pricing model.
Operator Displays the comparison operator of the created pricing model.
Data Type Displays the data type for the fact or rule of the created pricing model.
Output Displays the output of the created pricing model.
Expression Displays the expression updated in the expression builder of the created pricing model.
Pricing Definition
Minimum Rate Displays the minimum rate applicable for the defined pricing model.
User can modify the same.
Maximum Rate Displays the maximum rate applicable for the defined pricing model.
User can modify the same.
Rate Type Displays the rate type from the drop-down list.
The options are:
Flat
Tiered
User can modify the same.

Core Maintenance
2-288
Field Description
Rate % Displays the interest rate application for the defined pricing.
This field appears once you select the Rate Type option as Flat.
User can modify the same.
Below field appears if the rate type is updated as Tiered. The below columns are available as “Facts” in a drop down.
User can modify the same.
Loan Amount From Displays the minimum range of loan amount to which the interest rate is applicable.
User can modify the same.
Loan Amount To Displays the maximum range of loan amount to which the interest rate is applicable.
User can modify the same.
Term From Displays the minimum term from which the interest rate is applicable.
User can modify the same.
Term To Displays the maximum term up to which the interest rate is applicable.
User can modify the same.
Rate % Displays the interest rate applicable for the defined tier.
9. Click Save, to update the modified fields.
10. Click View icon to view the created pricing model.
The fields are displayed in Pricing Model Maintenance screen.
Figure 218 : Pricing Model Maintenance – View
For more information on fields, refer to the field description table below.
Core Maintenance
2-289
Table 186 : Pricing Model Maintenance - View- Field Description
Field Description
Basic Details
Pricing Code Displays the pricing code for created pricing model.
Pricing Description Displays the description of the pricing for the created pricing model.
Effective Date Displays the effective date of the pricing for the created pricing model.
Expiry Date Displays the expiry date of the pricing for the created pricing model.
Product Processor Displays the product processor for the created pricing model.
Priority Displays the priority of the pricing for the created pricing model.
Selection Criteria
Use Existing Rule Indicates if the existing rule is linked.
Rules
Rule Code Displays the rule code of the created pricing model.
Click to get the information about the rule.
Rule Name Displays the rule name for the created pricing model.
Create New Rule Displays if new rule is linked to the pricing model.
Rules
Code Displays the new rule code for created pricing model.
Description Displays the rule description for the created pricing model.
Select Existing Rule Displays the existing rule.
Rule Version Displays the rule version.
Expression Builder
+ button Click to add a new expression.
Fact / Rules Displays the fact/rules of the created pricing model.
Operator Displays the comparison operator of the created pricing model.
Data Type Displays the data type for the fact or rule of the created pricing model.
Output Displays the output of the created pricing model.
Expression Displays the expression updated in the expression builder of the created pricing model.

Core Maintenance
2-290
Field Description
Pricing Definition
Minimum Rate Displays the minimum rate applicable for the defined pricing model.
Maximum Rate Displays the maximum rate applicable for the defined pricing model.
Rate Type Displays the rate type from the drop-down list.
The options are:
Flat
Tiered
Rate % Displays the interest rate application for the defined pricing.
This field appears once you select the Rate Type option as Flat.
The below field appears if the rate type is updated as Tiered. The below columns are available as “Facts” in a drop down.
Loan Amount From Displays the minimum range of loan amount to which the interest rate is applicable.
Loan Amount To Displays the maximum range of loan amount to which the interest rate is applicable.
Term From Displays the minimum term from which the interest rate is applicable.
Term To Displays the maximum term up to which the interest rate is applicable.
Rate % Displays the interest rate applicable for the defined tier.
2.55 View Execution Summary
Execution Summary screen enables the user to view the details of the processed application. Based on the request mode it displays details related to logical model, borrowing capacity, quantitative score, qualitative score, decision and grade details and pricing details. It also provides different type of filters to perform search for a specific record.
This section contains following subsection:
View Execution Summary
2.55.1 View Execution Summary
The View Execution Summary screen allows user to view the execution summary based on the various filter options provided.
To view execution summary:
1. From Home screen, click Core Maintenance. Under Core Maintenance click, Credit Decision.

Core Maintenance
2-291
2. Under Credit Decision click, Operations. Under Operations, click Execution Summary.
The Execution Summary screen appears.
Figure 219 : View Execution Summary
For more information on fields, refer to the field description table below.
Table 187 : Execution Summary Field Description
Field Description
Search Criteria
+ button Click to add a new row.
- button Click to delete an existing row.

Core Maintenance
2-292
Field Description
Filter Select the required option based on which you can search for the execution summary.
The options are:
Request Reference Number
Internal Reference Number
Decision
Batch/Online
Product Processor
Status
Request Type
Execution Date
Contract ID
Value Specify the required details or select an appropriate option for the selected filter option.
This field appears once you select an option from the Filter list.
From Date Select the start date of the period during which the execution summary is generated.
This field appears if you select the filter option as Execution Date and value as Date Range.
To Date Select the end date of the period during which the execution summary is generated.
This field appears if you select the filter option as Execution Date and value as Date Range.

Core Maintenance
2-293
3. In the Search Criteria section, specify the details and click Search. The search results appear showing a list of records based on the specified search criteria.
4. Click Reset, to reset the search criteria.
Figure 220 : Execution Summary Search Option
For more information on fields, refer to the field description table below.
Table 188 : Execution Summary- Search option- Field Description
Field Description
Scoring Decision Summary
Product Processor Displays the name of the product processor that sent the request.
Request Type Displays the request type sent by product processor.
Contract ID Displays the contract ID sent by the product processor.
Request Reference Number
Displays the request reference number sent by product processor.
Internal Reference Number
Displays the internal reference number of the application.
Execution Date Displays the execution date of the processing application.
Mode Displays the mode of execution of the application.
Status Displays the status of the processed application.
5. Click the icon corresponding to the required record to view the decision related details on each widget. Only one record is viewed at a time. If you need to view another record, you have to click on
to close the already open record and then the next record can be viewed. The widgets are arranged in the flow in which the execution is done and is indicated by showing the sequence 1, 2, 3 numbers in the top right corner. The widgets are clickable on hover the color of the widget changes to indicate the widget is clickable.

Core Maintenance
2-294
6. When the status of processed application is Failure, on click of the failure message is displayed in the step that is failed. For example, in case of Qualitative Score Model is not resolved, then the error message is displayed in the Qualitative Score Model widget and the previous widget will show the data which was processed. Where in if the logical processing fails, then the status Fail is shown in the Logical Model widget and reason for failure is displayed on click of the widget.
Figure 221 View Execution Summary
For more information on fields, refer to the field description table below.
Table 189 : View Execution Summary Field Description
Field Description
Logical Model Widget Displays the status of the logical model processed.
The following fields appear in Logical Model widget.
Logical Model Code
Displays the logical model code, resolved for credit decision.
Description Displays the logical model description, resolved for the credit decision.
Status Displays the status of the logical model processed.
For status Pass, the color is shown as Green.
For status, Fail the color is shown as Red.
Borrowing Capacity Widget
Displays the maximum lendable amount that can be given for an application.
The following fields appear in Borrowing Capacity widget.

Core Maintenance
2-295
Field Description
Eligibility Code Displays the eligibility model code, resolved for calculating the borrowing capacity.
Description Displays the eligibility model description, resolved for calculating the borrowing capacity.
Requested Amount Displays the requested amount for the lending application.
Borrowing Capacity Displays the maximum lendable amount that can be given for the application.
Qualitative Score Widget
Displays the qualitative credit score, post credit decision of the application.
The following fields appear in Qualitative Score widget.
Scoring Model Code Displays the scoring model code, resolved for credit decision.
When Is Application Decision Required is Yes, the application level decision scoring code is displayed.
When Is Application Decision Required is No, the
applicant level decision scoring code is displayed.
When Is Application Decision Required is No, and Is Primary Applicant is No, the application level decision scoring code is displayed.
Description
Displays the scoring model description, resolved for credit decision.
Score Displays the qualitative credit score post credit decision of the application.
When Is Application Decision Required is Yes, the system performs the aggregation, which can be minimum, maximum or average of all applicant’s score. The aggregation performed is defined as rules and linked at the application level scoring model and this aggregated score is displayed.
When Is Application Decision Required is No, the score is displayed by resolving the applicant level scoring model.
When Is Application Decision Required is No, and Is Primary Applicant is No, the system performs the aggregation, which can be minimum, maximum or average of all applicant’s score. The aggregation performed is defined as rule and linked at the application level scoring model and this aggregated score is displayed.

Core Maintenance
2-296
Field Description
Quantitative Score Widget
Displays the quantitative credit score post credit decision of the application.
The following fields appear in Quantitative Score widget.
Scoring Model Code Displays scoring model code, resolved for credit decision.
When Is Application Decision Required is Yes, the
application level decision scoring code is displayed.
When Is Application Decision Required is No, the applicant level decision scoring code is displayed.
When Is Application Decision Required is No, and Is Primary Applicant is No, the multi applicant level scoring code is displayed.
Description Displays the scoring model description, resolved for credit decision.
Score Displays the quantitative credit score, post credit decision of the application.
When Is Application Decision Required is Yes, the system performs the aggregation, which can be minimum, maximum or average of all applicant’s score. The aggregation performed is defined as rules and linked at the application level scoring model and this aggregated score is displayed.
When Is Application Decision Required is No, the
score is displayed by resolving the applicant level scoring model.
When Is Application Decision Required is No, and Is Primary Applicant is No, score is displayed by resolving the multi applicant level scoring model.
Decision and Grade Widget
Displays the credit decision and scoring grade, taken for the application.
The following fields appear in Quantitative Score widget.
Model Code Displays the model code, resolved for credit decision and grade.
Description Displays the model description, resolved for credit decision and grade.
Decision Displays the credit decision, taken for the application.

Core Maintenance
2-297
Field Description
Grade Displays the scoring grade, post credit decision of the application.
Pricing Widget
Displays the rate applicable post credit decision.
The following fields appear in Quantitative Score widget.
Pricing Model Code Displays the pricing model code, resolved for credit decision.
Description Displays the pricing model description, resolved for credit decision.
Rate Type Displays the rate type applicable post credit decision.
Rate % Displays the rate applicable post credit decision.
The following fields are displayed once you click the Logical Model widget. The details for the request which was clicked on the landing page is displayed.
Figure 222 : Logical Model Widget
For more information on fields, refer to the field description table below.
Table 190 : Logical Model Widget - Field Description

Core Maintenance
2-298
Field Description
Internal Reference Number
Specify the internal reference number.
Product Processor Displays the name of the product processor that sent the request.
This field will be shown on click of each widget.
Request Type Displays the request type sent by the product processor.
This field will be shown on click of each widget.
Contract ID Displays the contract ID sent by the product processor.
This field will be shown on click of each widget.
Request Reference Number
Displays the request reference number sent by product processor.
This field will be shown on click of each widget.
Internal Reference Number
Displays the internal reference number of the application.
This field will be shown on click of each widget.
Execution Date Displays the execution date of the processing application.
This field will be shown on click of each widget.
Mode Displays the mode of execution of the application.
This field will be shown on click of each widget.
Status Displays the status of the application.
This field is shown on click of each widget.
The following fields appear once you click the Logical Model widget.
<Logical Model Code> Displays the logical model code that is resolved for credit decision.
Click the hyper link to view the rule executed to resolve the model.
Show Rule Log Click to see the rule log.
Click to expand the rule.
Expression Displays the expression of the rule.
Input Displays the input of the rule.
Value Displays the value of the rule.
Description Displays the description of the logical model.
Core Maintenance
2-299
Field Description
Internal Reference Number
Specify the internal reference number.
Status Displays the status of logical model.
Rule ID Displays the rule ID executed for logical model processing.
Click the hyperlink to view the rule executed.
Show Rule Log Click to see the rule log.
Click to expand the rule.
Expression Displays the expression of the rule.
Input Displays the input of the rule.
Value Displays the value of the rule.
Sequence Displays the sequence in which the rules are executed for logical model processing.
Status Displays the status of the rule execution. In case the status is failed, the reason for failure is displayed as Reason <>.
The options are:
Pass
Not Executed: This status is displayed against a rule if the Stop on Failure is set as ON and previous rule the sequence has failed.
The following fields are displayed once you click the Borrowing Capacity widget.
Figure 223 : Borrowing Capacity Widget

Core Maintenance
2-300
For more information on fields, refer to the field description table below.
Table 191 : Borrowing Capacity Widget - Field Description
Field Description
The following fields appears in Borrowing Capacity widget.
<Eligibility Code> Displays the eligibility code resolved for calculating the borrowing capacity.
Click the hyperlink to view the rule executed to resolve the borrowing capacity.
Show Rule Log Click to see the rule log.
Click to expand the rule.
Expression Displays the expression of the rule.
Input Displays the input of the rule.
Value Displays the value of the rule.
Eligibility Description Displays the eligibility description resolved for calculating the borrowing capacity.
Requested Amount Displays the requested amount for the lending application.
Borrowing Capacity Displays the maximum lendable amount that can be given for an application.
Fact Displays the fact using which the maximum lendable amount was calculated.

Core Maintenance
2-301
Field Description
Rule ID Displays the rule ID executed for calculating the maximum lendable amount.
Click the hyper link to view the rule executed.
Show Rule Log Click to see the rule log.
Click to expand the rule.
Expression Displays the expression of the rule.
Input Displays the input of the rule.
Value Displays the value of the rule.

Core Maintenance
2-302
The following fields are displayed once you click the Qualitative Score widget.
Figure 224 : Qualitative Score Widget – Bar Graph View
Figure 225 : Qualitative Score Widget – Pie Graph View
Figure 226 : Qualitative Score Widget – Data View

Core Maintenance
2-303
For more information on fields, refer to the field description table below.
Table 192 : Qualitative Score Widget - Field Description
Field Description
The following fields appears in Qualitative Score widget.
<Scoring Model Code> Displays the scoring model code resolved for credit decision.
When Is Application Decision Required is Yes, the application level decision scoring code is displayed.
When Is Application Decision Required is No, the applicant level decision scoring code is displayed.
When Is Application Decision Required is No, and Is Primary Applicant is No, the application level scoring code is displayed.
Description Displays the scoring model description resolved for credit decision.
Weightage Score/Application Score
Displays the qualitative credit score post credit decision of the application.
When Is Application Decision Required is Yes, the field name is displayed as Application Score. The system performs the aggregation, which can be minimum, maximum or average of all applicant’s score. The aggregation performed is defined as rules and linked at the application level scoring model and this aggregated score is displayed.
When Is Application Decision Required is No, the field name is displayed as Weightage Score. The score is displayed by resolving the applicant level scoring model.
When Is Application Decision Required is No, and Is Primary Applicant is No, the field name is displayed as Application Score. The system performs the aggregation, which can be minimum, maximum or average of all applicant’s score. The aggregation performed is defined as rules and linked at the application level scoring model and this aggregated score is displayed
Click to get the information about the formula for calculation of score.
Applicant details are shown at the left panel.
<Applicant Name> Displays the applicant names present in the application.

Core Maintenance
2-304
Field Description
<Score> Displays the weighted credit score post credit decision of the application.
The score is calculated for each applicant by resolving the applicant level scoring model.
Below details are shown at the right panel.
<Applicant Name> Displays the applicant names present in the application.
Scoring Model Code Displays the applicant level scoring model code resolved for credit decision.
Description Displays the applicant scoring model description.
Weightage Score Displays the weighted credit score post credit decision of the application.
Click to get the information about the formula for calculation of score.
Graph View Two graphical views are available.
Bar Graphs
The details are shown as a graphical representation as bar charts.
o List of question ID on the X-axis
o Score on the Y-axis.
Based on the evaluation of the category, the questions are shown in a particular color based on the maintenance done in the lookups screen.
Pie Charts
The details are shown as a graphical representation as pie charts.
The calculation logic for the question is (Score of the question/ Weightage score of the applicant)*100. The pis is shown from a pool of colors available/defined in the code.
Data View The scoring details are shown as mentioned below in data view.
Scoring Details

Core Maintenance
2-305
Field Description
Question Code Displays the question code resolved for the applicant in the scoring model.
Question Displays the question description resolved for the applicant in the scoring model.
Value Displays the response received for the question in the payload.
Score Displays the score calculated for the question based on the range and the response.
In case any question was optional for which the response was not received, NA will be displayed.
The following fields are displayed once you click the Quantitative Score widget.
Figure 227 : Quantitative Score Widget – Bar Graph View
Figure 228 : Quantitative Score Widget – Pie Graph View

Core Maintenance
2-306
Figure 229 : Quantitative Score Widget – Data View
For more information on fields, refer to the field description table below.
Table 193 : Quantitative Score Widget - Field Description
Field Description
The following fields appears in Quantitative Score widget.
<Scoring Model Code> Displays the scoring model code resolved for credit decision.
When Is Application Decision Required is Yes, the application level decision scoring code is displayed.
When Is Application Decision Required is No, the applicant level decision scoring code is displayed.
When Is Application Decision Required is No, and Is Primary Applicant is No, the multi applicant level scoring code is displayed.
Click the hyperlink to view the rule executed to resolve the quantitative score.
Show Rule Log Click to see the rule log.
Click to expand the rule.
Expression Displays the expression of the rule.
Input Displays the input of the rule.
Value Displays the value of the rule.
Description Displays the scoring model description resolved for credit decision.

Core Maintenance
2-307
Field Description
Weightage Score Displays the weightage score post credit decision of the application.
When Is Application Decision Required is Yes, the
system performs the aggregation, which can be minimum, maximum or average of all applicant’s score. The aggregation performed is defined as rules and linked at the application level scoring model and this aggregated score is displayed.
When Is Application Decision Required is No, the score is displayed by resolving the applicant level scoring model.
When Is Application Decision Required is No, and Is Primary Applicant is No, the score is displayed by resolving multi applicant level scoring model.
In case of Is Application Decision Required is Yes, system displays the hyperlink on the weightage score value. It shows the aggregate rule details.
Applicant details are shown at the left panel.
<Applicant Name> Displays the applicant names present in the application.
<Score> Displays the weighted credit score post credit decision of the application.
The score is calculated for each applicant by resolving the applicant level scoring model.
In case of multi applicant scenario, weightage score per applicant is not shown.
Below details are shown at the right panel.
<Applicant Name> Displays the applicant names present in the application.

Core Maintenance
2-308
Field Description
Scoring Model Code Displays the applicant level scoring model code resolved for credit decision.
Applicant level scoring model is applicable for below case.
If Is Application Decision required is Yes
If Is Application Decision Required is No, and Is Primary Applicant is Yes
Multi applicant level scoring model is applicable in the below case.
If Is Application Decision Required is No, and Is Primary Applicant is No
Click the hyperlink to view the rule executed to resolve the quantitative score.
Show Rule Log Click to see the rule log.
Click to expand the rule.
Expression Displays the expression of the rule.
Input Displays the input of the rule.
Value Displays the value of the rule.
Description Displays the applicant scoring model description.
Weightage Score Displays the weighted credit score post credit decision of the application.
The weightage score is calculated for each applicant by resolving the applicant scoring model.
In case of multi applicant scoring model, for both the applicant the same score is shown since the score is not calculated per applicant.
Click to get the information about the formula for calculation of score.
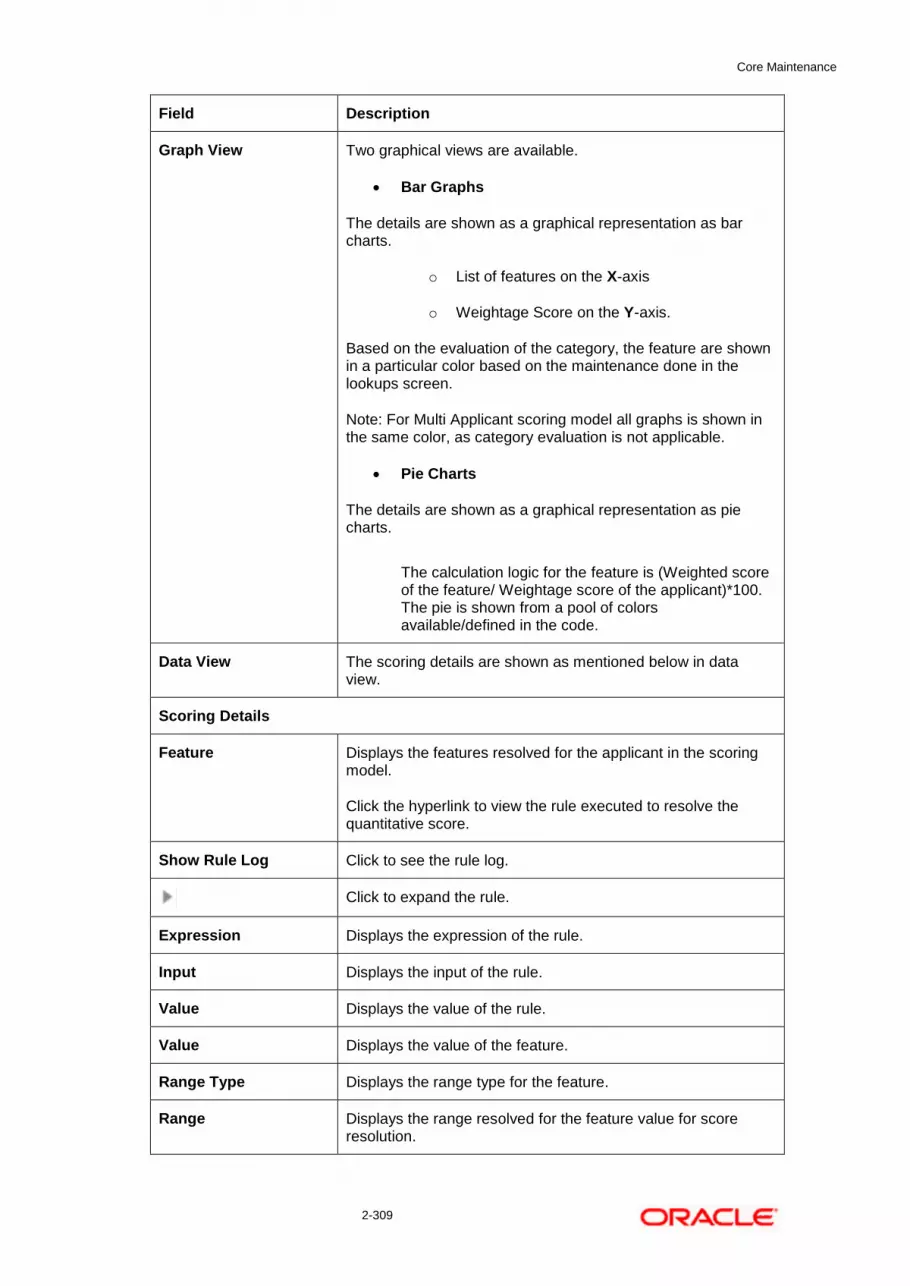
Core Maintenance
2-309
Field Description
Graph View Two graphical views are available.
Bar Graphs
The details are shown as a graphical representation as bar charts.
o List of features on the X-axis
o Weightage Score on the Y-axis.
Based on the evaluation of the category, the feature are shown in a particular color based on the maintenance done in the lookups screen.
Note: For Multi Applicant scoring model all graphs is shown in the same color, as category evaluation is not applicable.
Pie Charts
The details are shown as a graphical representation as pie charts.
The calculation logic for the feature is (Weighted score of the feature/ Weightage score of the applicant)*100. The pie is shown from a pool of colors available/defined in the code.
Data View The scoring details are shown as mentioned below in data view.
Scoring Details
Feature Displays the features resolved for the applicant in the scoring model.
Click the hyperlink to view the rule executed to resolve the quantitative score.
Show Rule Log Click to see the rule log.
Click to expand the rule.
Expression Displays the expression of the rule.
Input Displays the input of the rule.
Value Displays the value of the rule.
Value Displays the value of the feature.
Range Type Displays the range type for the feature.
Range Displays the range resolved for the feature value for score resolution.

Core Maintenance
2-310
Field Description
Weightage % Displays the weightage defined for the feature in the scoring model.
Score Displays the score calculated for the feature based on the range and feature value.
Weightage Score Displays the weighed credit score post credit decision of the application.
The following fields are displayed once you click the Decision and Grade widget.
Figure 230 : Decision and Grade Widget
For more information on fields, refer to the field description table below.
Table 194 : Decision and Grade Widget - Field Description
Field Description
The following fields appears in Decision and Grade widget.
<Model Code> Displays the model code resolved for credit decision and grade.
Click the hyper link to view the rule executed to resolve the decision and grade.
Show Rule Log Click to see the rule log.
Click to expand the rule.
Expression Displays the expression of the rule.
Input Displays the input of the rule.
Value Displays the value of the rule.

Core Maintenance
2-311
Field Description
Model Description Displays the model description resolved for credit decision and grade.
Decision Displays the credit decision taken for the application.
Grade Displays the scoring grade post credit decision of the application.
Decision
<Feature Name> Score Displays the score calculated for the application based on the feature selected.
If the feature is rule based, system displays the hyper link.
Show Rule Log Click to see the rule log.
Click to expand the rule.
Expression Displays the expression of the rule.
Input Displays the input of the rule.
Value Displays the value of the rule.
<Feature Name> Range Displays the score resolved for the application based on the feature selected.
Color Feature Displays the color feature.
Color Feature Range Displays the color feature range.
Decision Displays the decision taken for the application.
Rule ID Displays the rule ID of the feature.
Click the hyperlink to view the rule executed.
Show Rule Log Click to see the rule log.
Click to expand the rule.
Expression Displays the expression of the rule.
Input Displays the input of the rule.

Core Maintenance
2-312
Field Description
Value Displays the value of the rule.
Grade
<Feature Name> Score Displays the score calculated for the application based on the feature selected.
If the feature is rule based, system displays the hyperlink.
Show Rule Log Click to see the rule log.
Click to expand the rule.
Expression Displays the expression of the rule.
Input Displays the input of the rule.
Value Displays the value of the rule.
<Feature Name> Range Displays the score resolved for the application based on the feature selected.
Grade Displays the scoring grade taken for the application.
The following fields are displayed once you click the Pricing widget.
Figure 231 : Pricing Widget
For more information on fields, refer to the field description table below.
Table 195 : Pricing Widget - Field Description
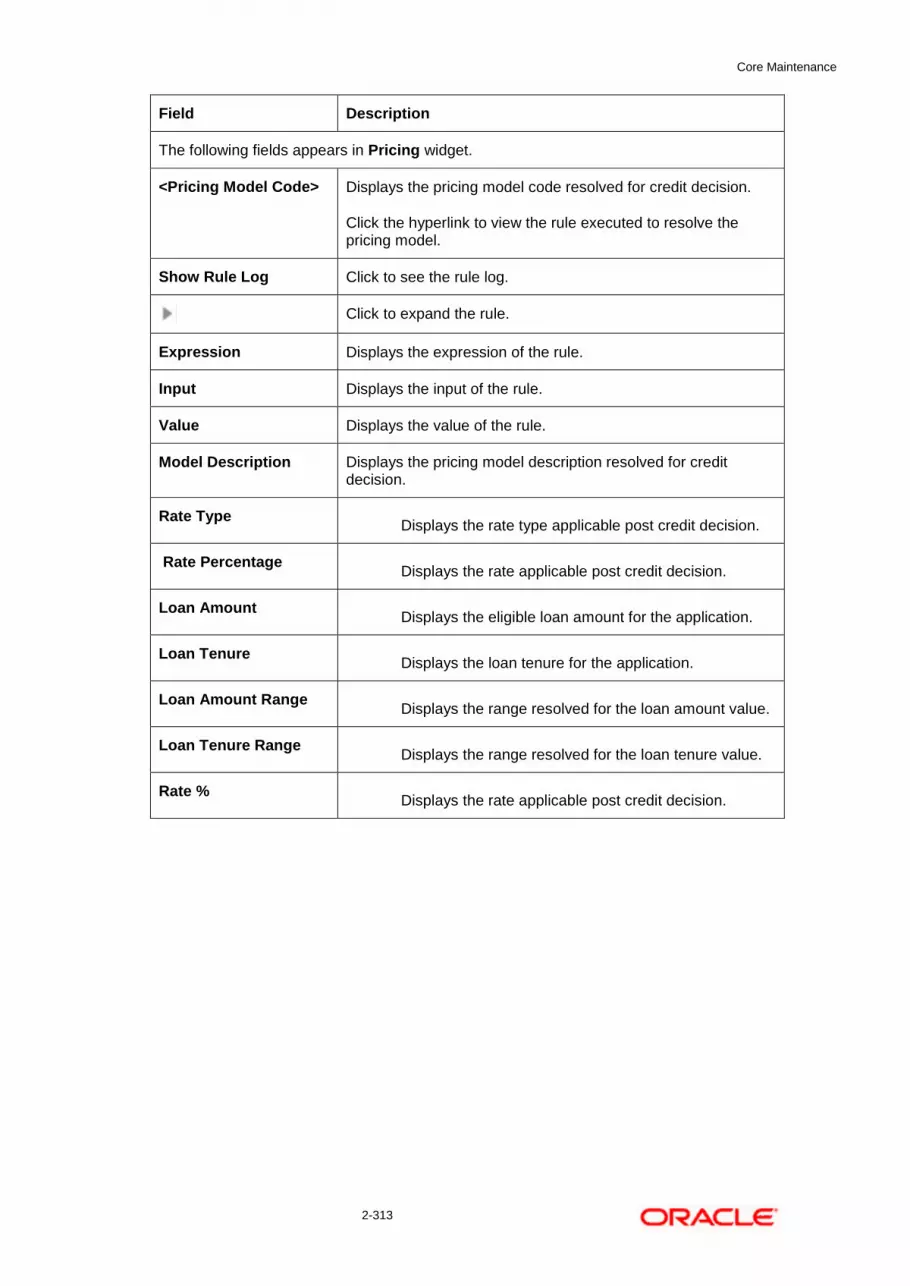
Core Maintenance
2-313
Field Description
The following fields appears in Pricing widget.
<Pricing Model Code> Displays the pricing model code resolved for credit decision.
Click the hyperlink to view the rule executed to resolve the pricing model.
Show Rule Log Click to see the rule log.
Click to expand the rule.
Expression Displays the expression of the rule.
Input Displays the input of the rule.
Value Displays the value of the rule.
Model Description Displays the pricing model description resolved for credit decision.
Rate Type Displays the rate type applicable post credit decision.
Rate Percentage Displays the rate applicable post credit decision.
Loan Amount Displays the eligible loan amount for the application.
Loan Tenure Displays the loan tenure for the application.
Loan Amount Range Displays the range resolved for the loan amount value.
Loan Tenure Range Displays the range resolved for the loan tenure value.
Rate % Displays the rate applicable post credit decision.

NLP Framework
3-314
3. NLP Framework
This section of the user guide is designed to help you quickly get acquainted with the Machine Learning, Natural Language Processing (NLP) framework.
Pre-requisites
Specify User Id and Password, and login to Home screen.
This section contains the following topics:
Toolkit
Operation
3P Service Integration
3.1 Toolkit
The Toolkit is used to design and train NLP/Named Entity Recognition (NER) Model(s).
This section contains following subsections:
Use Case Definition
Use Case Definition Summary
Use Case Definition Maintenance
Annotator
Model Training
Model Management
Model Management Summary
Model Management Maintenance
3.1.1 Use Case Definition
Use cases are defined by the business domain. The information that is required to be extracted from documents are driven by business consideration against the context of the use case being defined.
Tags/entities are required for annotating or tagging of information in the source document in order to create training files for a use case model training. These tags or entities will always be driven by business considerations for a particular use case.
The use case definition maintenance screen allows the user to define use case(s) and maintain specific list of tags for the use case.

NLP Framework
3-315
3.1.1.1 Use Case Definition Summary
The summary screen displays the list of defined use cases. To process this screen, perform the following steps:
1. From Home screen, click Machine Learning. Under Machine Learning, click NLP Toolkit.
2. Under NLP Toolkit, click Use Case Definition.
The Use Case Definition screen is displayed.
Figure 232: Use Case Definition
For more information on fields, refer to the field description table below.
Table 196: Use Case Definition – Field Description
Field Description
Usecase Name Displays the name of the use case
Mod No Displays the modification number
Authorized Status Displays the Authorized or Unauthorized status
Record Status Displays the status of the record.

NLP Framework
3-316
3.1.1.2 Use Case Definition Maintenance
The maintenance screen allows you to define use cases and maintain entities/tags for the use case.
Figure 233: Use Case Definition Maintenance
On Tag Maintenance screen, specify the fields. The fields which are marked with asterisk are mandatory. For more information on fields, refer to the field description table below.
Table 197: Tag Maintenance – Field Description
Field Description
Use Case Name Unique use case name. It gets populated on Save, from the last folder
name from the "Training Corpus Path (DOC)"
Description Use Case Description
Mod No Automatic Modification Number
Straight Through
Processing yes = Unattended / No = Attended
Use Case Tags/Entities Specifies the use case tags entities.
Tag Display Sequence The sequence in which the tags get displayed.
Tag Screen Display Business Name of the Tag
Tag Name Technical Name of the Tag
Annotation Tag To identify tags to be used in Training

NLP Framework
3-317
Field Description
Default Value Default value for tags not used for training
3.1.2 Annotator
Annotation is the process of identifying information within a document content and tagging them as a specific type of information. Of course, each use case defined, will have their own relevant maintained list of tags/entities, which will be used to annotate source documents for a use case.
Figure 234: Annotator
Annotator helps you to perform the annotations on a source document for a use case. To process this screen, perform the following steps:
1. From Home screen, click Machine Learning. Under Machine Learning, click NLP Toolkit.
2. Under NLP Toolkit, click Annotator.
The Annotator screen is displayed.
Figure 235: Annotator

NLP Framework
3-318
3. On Annotator screen, specify the fields. The fields which are marked with asterisk are mandatory.
For more information on fields, refer to the field description table below.
Table 198: Annotator – Field Description
Field Description
Action Type Select the action type. Available options are as following:
Create New Annotated File
Edit Created Annotated File
Source File Definition Select the source document from local windows explorer based on
the Action Type.
Document Type Displays the list of all the use cases defined under use case
definition.
Get Labels For the selected Document Type the maintained Tags/entities are
displayed in the below Annotations section.
Create Annotated File Once annotations of all the Tags are completed, this will perform
two outcomes,
Create annotated text file in the defined NER train path as maintained under use case definition
Create text file in the defined DOC train path as maintained under use case definition
Follow the below mentioned steps to annotate the source files:
4. Select action type as “Create New Annotated File”.
Figure 236: Action Type

NLP Framework
3-319
5. Click Select File. It will open the windows explorer. Navigate and select the source document to
be annotated.
Figure 237: File Upload
6. The source document will be displayed in the “Original File” section and the text version of the
document will be displayed in the “Text Form” section below:
Figure 238: Text Form
7. Chose the “Document Type”.
Figure 239: Document Type

NLP Framework
3-320

NLP Framework
3-321
8. Click Get Labels. It will load all the maintained Tags for the Document Type.
Figure 240: Tags
9. Identify and select information within the “Text Form” section of the document and RIGHT-CLICK
to display the list of tags and select the relevant tag.
Figure 241: List of Tags
Figure 242: Select Annotation Label

NLP Framework
3-322

NLP Framework
3-323
10. The selected Tag and the information will get displayed in section “Annotations” under Tag Name
and Tag Value.
Figure 243: Annotations
11. Repeat steps (6) and (7) for all the displayed tags as per availability of information in the source
document.
12. Select a Tag Name from the “Annotations” section and RIGHT- CLICK to delete the Tag Value.
Figure 244: Tag Value
13. After all the tags are assigned relevant information click Create Annotated File to create the
annotated file and end the process.

NLP Framework
3-324
3.1.3 Model Training
Model training is done on the annotated training corpus. The annotated training corpus is a collection of annotated training files created using the annotator.
Model training is iterative and is carried out over increasing corpus size depending on the model parameters.
Each defined use case will have its own training corpus available in the path set up in the use case definition. To process this screen, perform the following steps:
1. From Home screen, click Machine Learning. Under Machine Learning, click NLP Toolkit.
2. Under NLP Toolkit, click Model Training.
The Model Training screen is displayed.
Figure 245: Model Training
Training NER Models:
3. Select the Model Type as NLP(NER).
4. Choose the use case name.
5. Click Train Model.
Each model for a use case is identified by a unique run reference.
Training Document Classifier Model:
6. Select the Model Type as Document Classification.
7. Click Train Model.
If you find the model parameters acceptable, you may want to save the model by clicking Model Save.
The alternative is to add more annotated training files for the use case and repeat model training, till satisfactory parameters are achieved.

NLP Framework
3-325
3.1.4 Model Management
All the run reference of models saved from model training for a use case can be seen here. For each model run reference, you can view the parameters for the model as well as individual tag/entities
You may choose the active model run reference to be used as part of business processing.
This section contains following subsections:
3.1.4.1 Model Management Summary
3.1.4.2 Model Management Maintenance
3.1.4.1 Model Management Summary
The summary screen displays the list of use case models. To process this screen, perform the following steps:
1. From Home screen, click Machine Learning. Under Machine Learning, click NLP Toolkit.
2. Under NLP Toolkit, click Model Management.
The Model Management screen is displayed.
Figure 246: Model Management Summary
For more information on fields, refer to the field description table below.
Table 199: Model Management Summary – Field Description
Field Description
Use Case Name Displays the name of the Use Case.
Mod No Displays the number of modifications.
Authorized Status Displays the status as Authorized or Unauthorized.
Record Status Displays the record status as Open or Closed.

NLP Framework
3-326
3.1.4.2 Model Management Maintenance
This is where you may unlock and choose the active model run reference to be used as part of business processing. To process this screen, perform the following steps:
1. From Home screen, click Machine Learning. Under Machine Learning, click NLP Toolkit.
2. Under NLP Toolkit, click Model Management.
The Model Management screen is displayed.
Figure 247: Model Management Maintenance
3. On Model Management screen, specify the fields. The fields which are marked with asterisk are
mandatory. For more information on fields, refer to the field description table below.
Table 200: Model Management Maintenance – Field Description
Field Description
Use Case Name Displays the name of the Use Case.
Model Type Displays the NER or Classification type of Model.
Run Reference Unique Model Version Identifier.
Precision Value between 0 to 1. Closer to 1 is better.
Recall Value between 0 to 1. Closer to 1 is better.
F1 Score Value between 0 to 1. Closer to 1 is better.
Active The model run reference that is currently active.
For each model run reference you could view the individual tag parameters.
Figure 248: Tag Parameters

NLP Framework
3-327
At this stage you have defined a new use case with the tags/entities to be recognized by the model and trained and exported the use case model to be used by business.

NLP Framework
3-328
3.2 Operation
This is where the trained models are consumed for business processing.
This section contains following subsections:
4.2.1 Document Upload
4.2.2 Transaction Log
3.2.1 Document Upload
This is the screen where you upload the source document which is consumed by the NLP model and defined tags/entities are recognized.
The information that is extracted by the model is seamlessly used in further business processing. To process this screen, perform the following steps:
1. From Home screen, click Machine Learning. Under Machine Learning, click Operation.
2. Under Operation, click Document Upload.
The Document Upload screen is displayed.
Figure 249: Document Upload
3. Click Select File to select the source document.
4. Chose the Document Type from the pick list.
5. Click Upload to initiate business process.
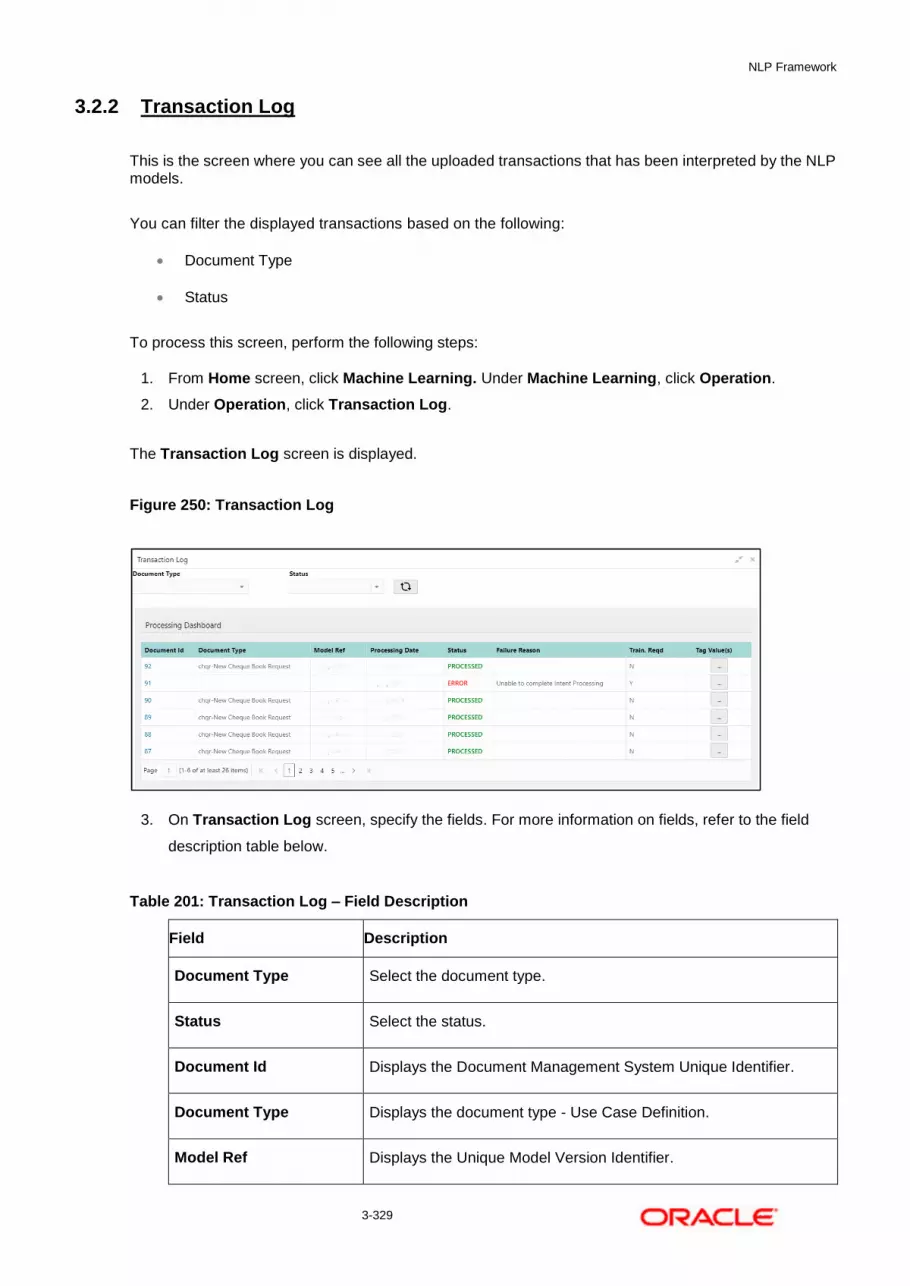
NLP Framework
3-329
3.2.2 Transaction Log
This is the screen where you can see all the uploaded transactions that has been interpreted by the NLP models.
You can filter the displayed transactions based on the following:
Document Type
Status
To process this screen, perform the following steps:
1. From Home screen, click Machine Learning. Under Machine Learning, click Operation.
2. Under Operation, click Transaction Log.
The Transaction Log screen is displayed.
Figure 250: Transaction Log
3. On Transaction Log screen, specify the fields. For more information on fields, refer to the field
description table below.
Table 201: Transaction Log – Field Description
Field Description
Document Type Select the document type.
Status Select the status.
Document Id Displays the Document Management System Unique Identifier.
Document Type Displays the document type - Use Case Definition.
Model Ref Displays the Unique Model Version Identifier.

NLP Framework
3-330
Field Description
Processing Date Displays the document processed date.
Status Displays the status of the transaction.
Failure Reason Displays the reason for failed status.
Train. Reqd Displays train required status.
Tag Values Displays the tag values for the processed transactions and allow the
correction for transactions with errors.
Execution Flow
Click on document reference ID to view details and execution flow.
Figure 251: Execution Flow
Processed Status
For any Document Type, you can filter on the ‘Processed’ status and view the model tag values used to process the transactions. The displayed information reflects both the original retrieved values by the model from the document and also the values which have been corrected by human intervention.
Figure 252: Processed Status
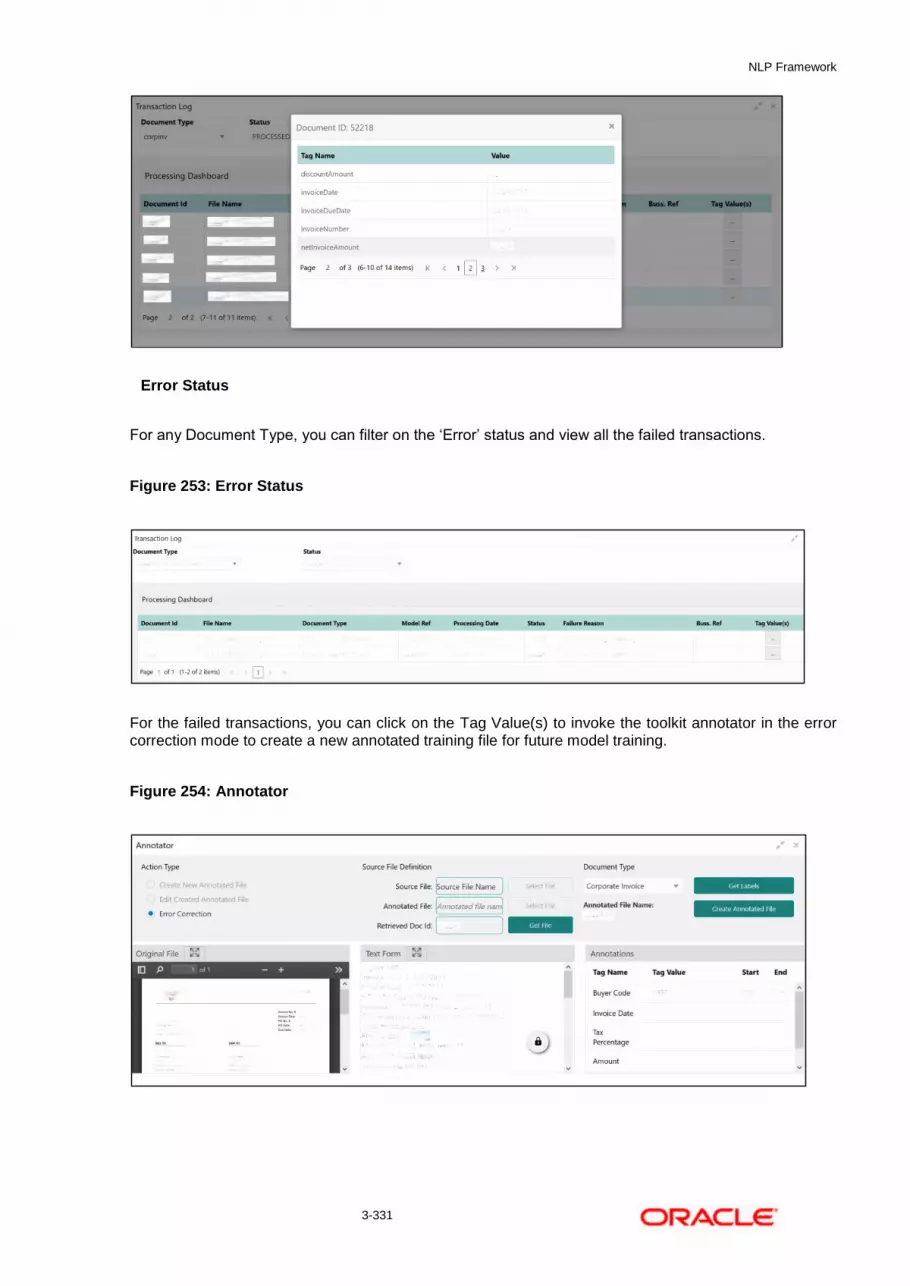
NLP Framework
3-331
Error Status
For any Document Type, you can filter on the ‘Error’ status and view all the failed transactions.
Figure 253: Error Status
For the failed transactions, you can click on the Tag Value(s) to invoke the toolkit annotator in the error correction mode to create a new annotated training file for future model training.
Figure 254: Annotator

NLP Framework
3-332
3.3 3P Service Integration
Any model execution or training service(s) built using any 3P NLP library can be integrated in the NLP framework.
The only requirement being the REST services must confirm to the payload definition detailed in the following section.
Building model training and execution services using other 3P NLP libraries would involve consulting effort.
This section contains following subsections:
4.3.1 Classification Training Service
4.3.2 NER Training Service
4.3.3 Classification Processing Service
4.3.4 NER Processing Service
4.3.5 Service Mapping
4.3.6 Business Service Mapping
3.3.1 Classification Training Service
This section elaborates the payload details for document classification model training service.
Input Payload
Table 202: Input Payload
name in type required Remarks
trainCorpusPath formData string true Training Corpus path
modelType formData File true Type of model being trained
runRef formData string true Unique running reference number
- name: " trainCorpusPath"
in: "formData"
type: string
required: true
- name: " modelType"
in: "formData"
type: string
value for document classification training: "docClassification"
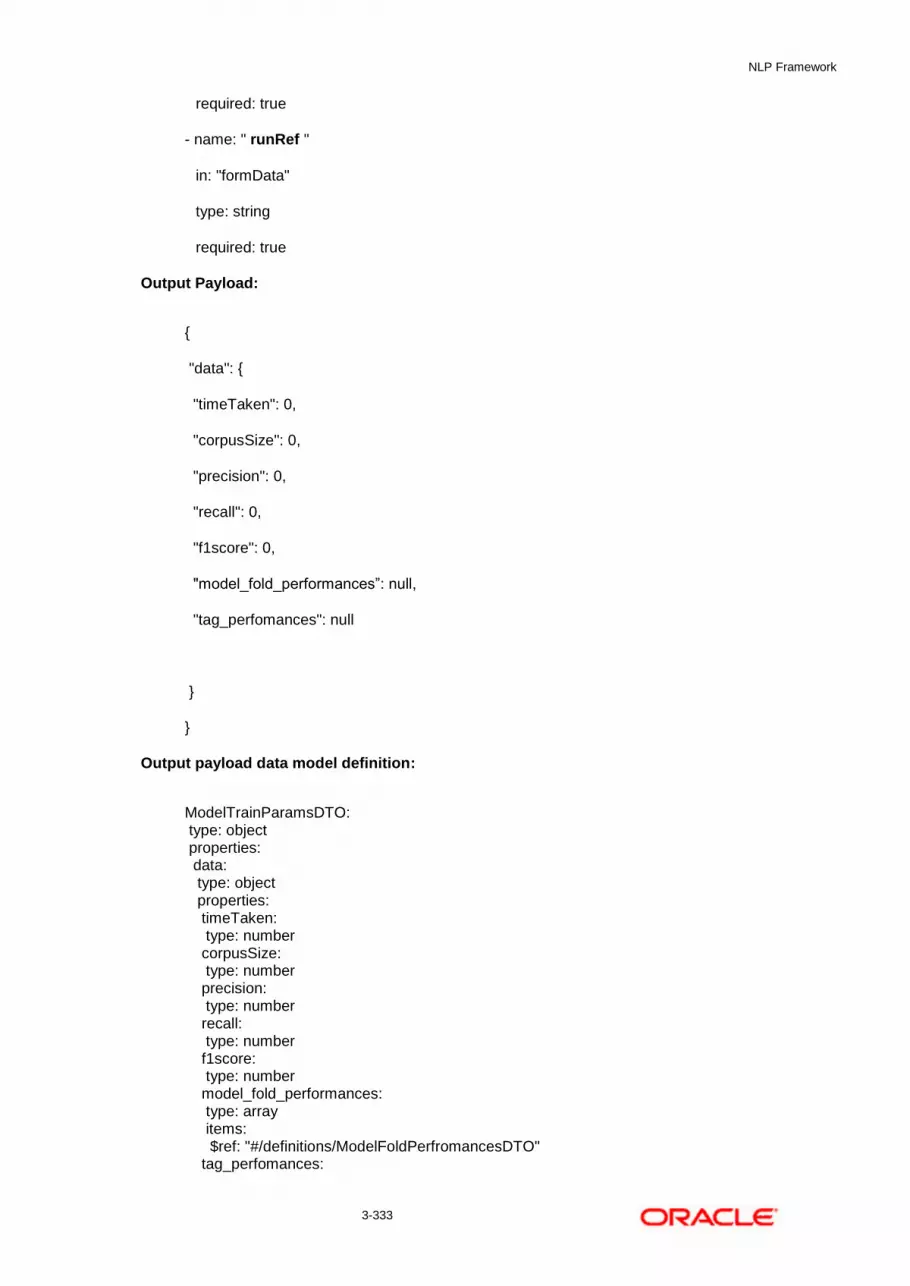
NLP Framework
3-333
required: true
- name: " runRef "
in: "formData"
type: string
required: true
Output Payload:
{
"data": {
"timeTaken": 0,
"corpusSize": 0,
"precision": 0,
"recall": 0,
"f1score": 0,
"model_fold_performances”: null,
"tag_perfomances": null
}
}
Output payload data model definition:
ModelTrainParamsDTO: type: object properties: data: type: object properties: timeTaken: type: number corpusSize: type: number precision: type: number recall: type: number f1score: type: number model_fold_performances: type: array items: $ref: "#/definitions/ModelFoldPerfromancesDTO" tag_perfomances:

NLP Framework
3-334
type: array items: $ref: "#/definitions/MltbTagPerfomancesDTO"

NLP Framework
3-335
3.3.2 NER Training Service
This section elaborates the payload details for NER model training service.
Input Payload
Table 203: Input Payload
name in type required Remarks
trainCorpusPath formData string true Training Corpus path
modelType formData File true Type of model being trained
runRef formData string true Unique running reference number
- name: " trainCorpusPath"
in: "formData"
type: string
required: true
- name: " modelType"
in: "formData"
type: string
value for NER model training: "nlpNer "
required: true
- name: " runRef "
in: "formData"
type: string
required: true
Output Payload
{
"data": {
"timeTaken": 0,
"corpusSize": 0,
"precision": 0,

NLP Framework
3-336
"recall": 0,
"f1score": 0,
"model_fold_performances": [
{
"fold_no": 0,
"eval_metric": "string",
"value": 0
}
],
"tag_perfomances": [
{
"name": "string",
"precision": 0,
"recall": 0,
"f1score": 0
}
]
}
}
Output Payload data model definition
ModelTrainParamsDTO:
type: object
properties:
data:
type: object
properties:
timeTaken:
type: number
corpusSize:
type: number

NLP Framework
3-337
precision:
type: number
recall:
type: number
f1score:
type: number
model_fold_performances:
type: array
items:
$ref: "#/definitions/ModelFoldPerfromancesDTO"
tag_perfomances:
type: array
items:
$ref: "#/definitions/MltbTagPerfomancesDTO"
ModelFoldPerfromancesDTO:
type: object
properties:
fold_no:
type: number
eval_metric:
type: string
value:
type: number
MltbTagPerfomancesDTO:
type: object
properties:
name:
type: string

NLP Framework
3-338
precision:
type: number
recall:
type: number
f1score:
type: number
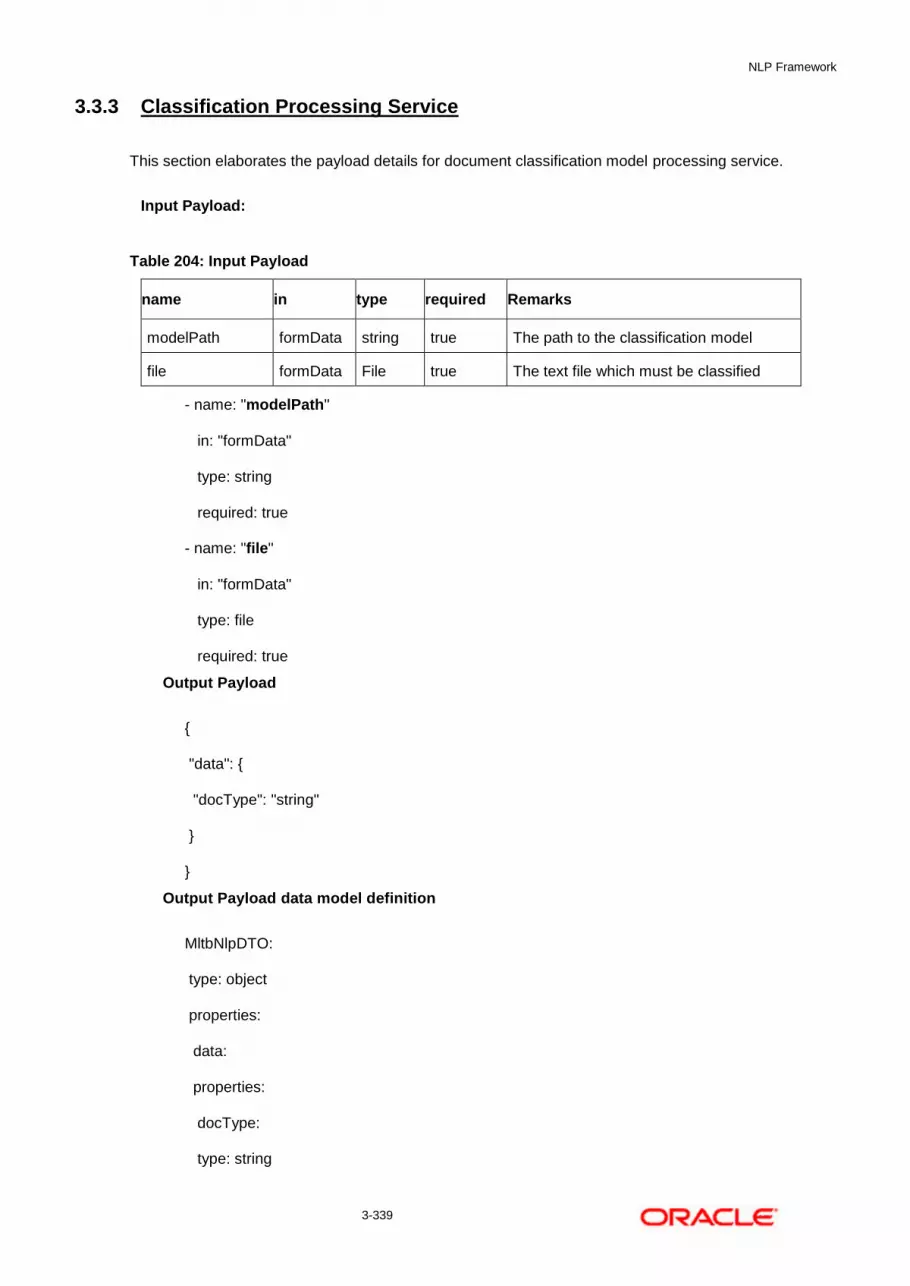
NLP Framework
3-339
3.3.3 Classification Processing Service
This section elaborates the payload details for document classification model processing service.
Input Payload:
Table 204: Input Payload
name in type required Remarks
modelPath formData string true The path to the classification model
file formData File true The text file which must be classified
- name: "modelPath"
in: "formData"
type: string
required: true
- name: "file"
in: "formData"
type: file
required: true
Output Payload
{
"data": {
"docType": "string"
}
}
Output Payload data model definition
MltbNlpDTO:
type: object
properties:
data:
properties:
docType:
type: string
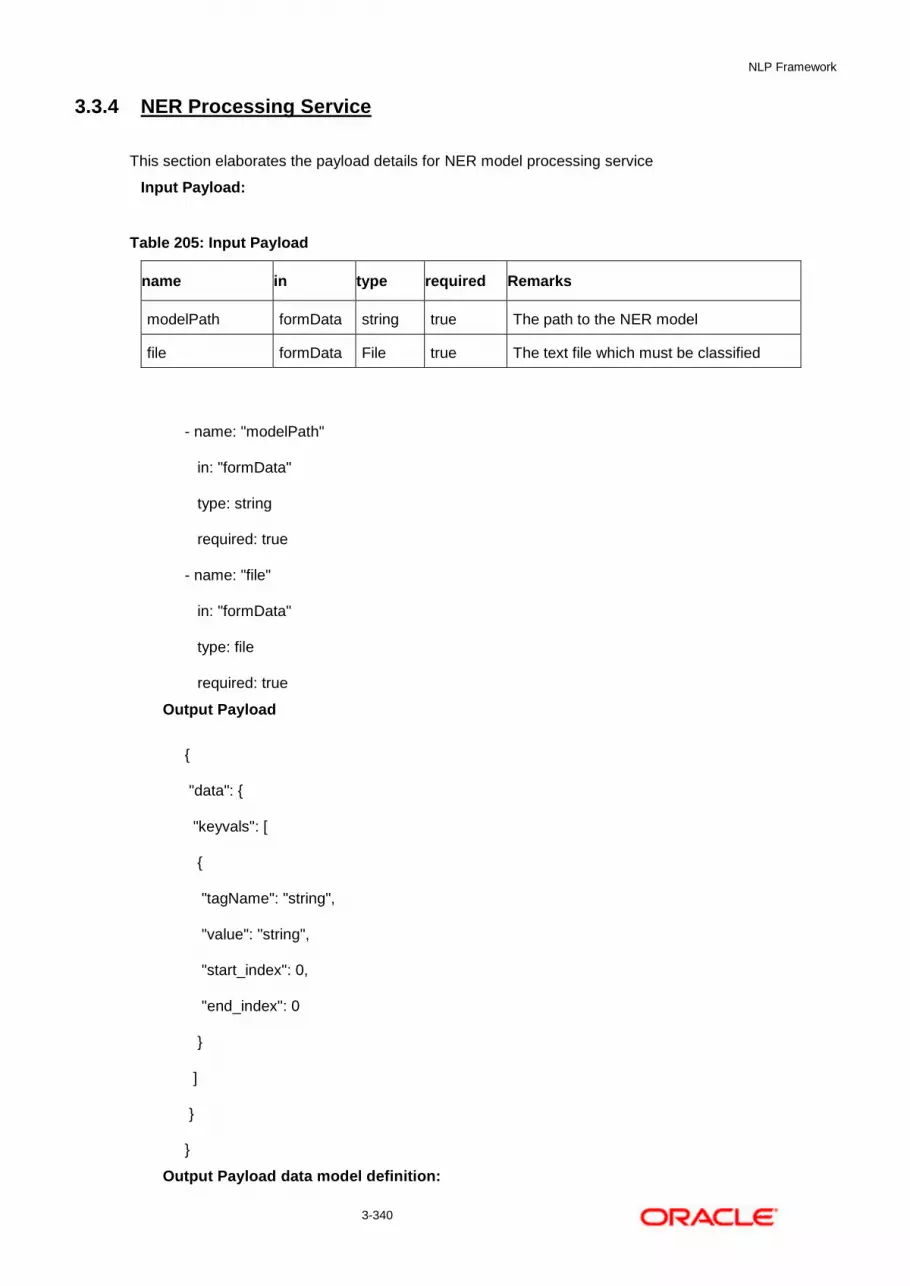
NLP Framework
3-340
3.3.4 NER Processing Service
This section elaborates the payload details for NER model processing service
Input Payload:
Table 205: Input Payload
name in type required Remarks
modelPath formData string true The path to the NER model
file formData File true The text file which must be classified
- name: "modelPath"
in: "formData"
type: string
required: true
- name: "file"
in: "formData"
type: file
required: true
Output Payload
{
"data": {
"keyvals": [
{
"tagName": "string",
"value": "string",
"start_index": 0,
"end_index": 0
}
]
}
}
Output Payload data model definition:

NLP Framework
3-341
MltbNerKeyValsDTO:
type: object
properties:
data:
properties:
keyvals:
type: array
items:
$ref: '#/definitions/MltbNerKeyValExtractedObjDTO'
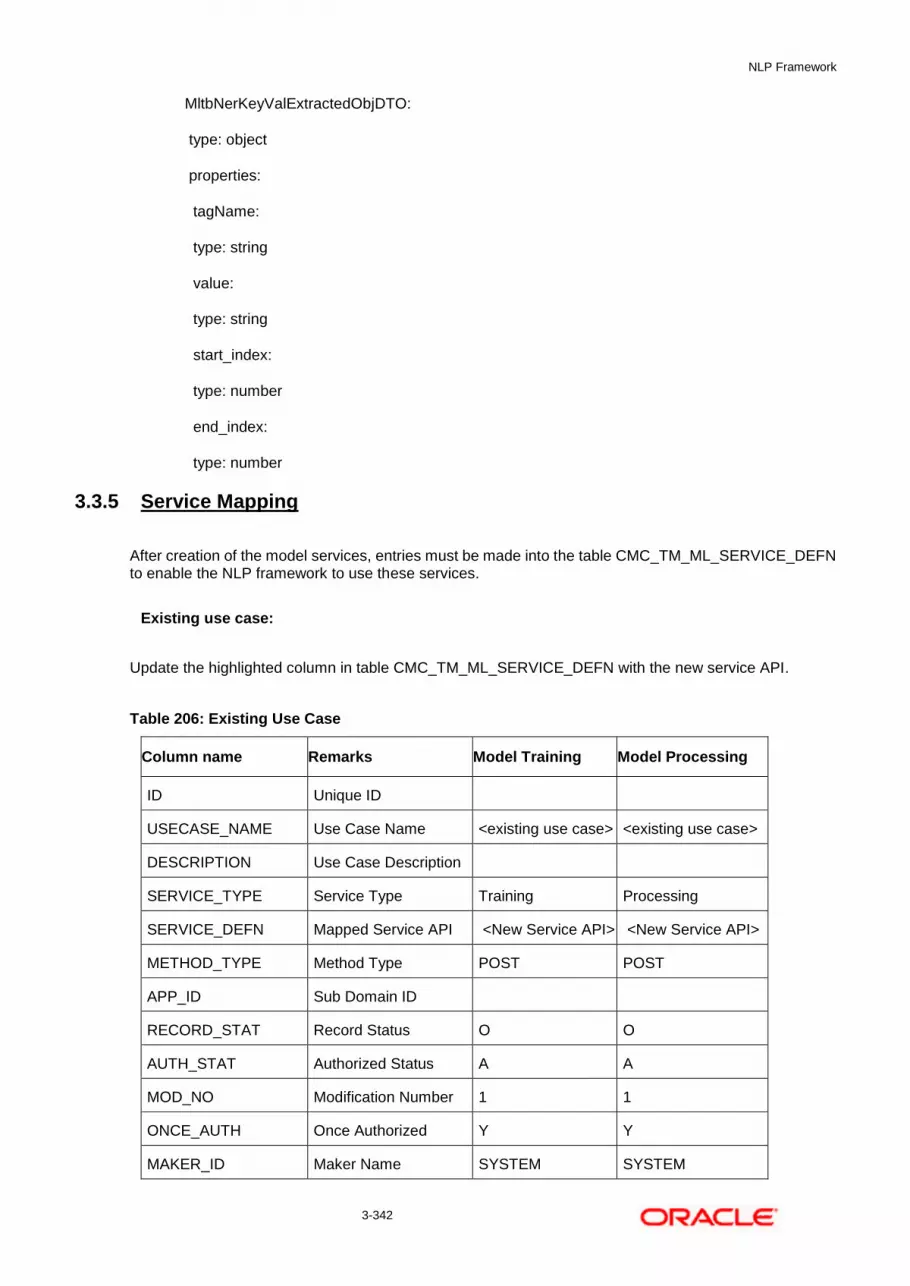
NLP Framework
3-342
MltbNerKeyValExtractedObjDTO:
type: object
properties:
tagName:
type: string
value:
type: string
start_index:
type: number
end_index:
type: number
3.3.5 Service Mapping
After creation of the model services, entries must be made into the table CMC_TM_ML_SERVICE_DEFN to enable the NLP framework to use these services.
Existing use case:
Update the highlighted column in table CMC_TM_ML_SERVICE_DEFN with the new service API.
Table 206: Existing Use Case
Column name Remarks Model Training Model Processing
ID Unique ID
USECASE_NAME Use Case Name <existing use case> <existing use case>
DESCRIPTION Use Case Description
SERVICE_TYPE Service Type Training Processing
SERVICE_DEFN Mapped Service API <New Service API> <New Service API>
METHOD_TYPE Method Type POST POST
APP_ID Sub Domain ID
RECORD_STAT Record Status O O
AUTH_STAT Authorized Status A A
MOD_NO Modification Number 1 1
ONCE_AUTH Once Authorized Y Y
MAKER_ID Maker Name SYSTEM SYSTEM
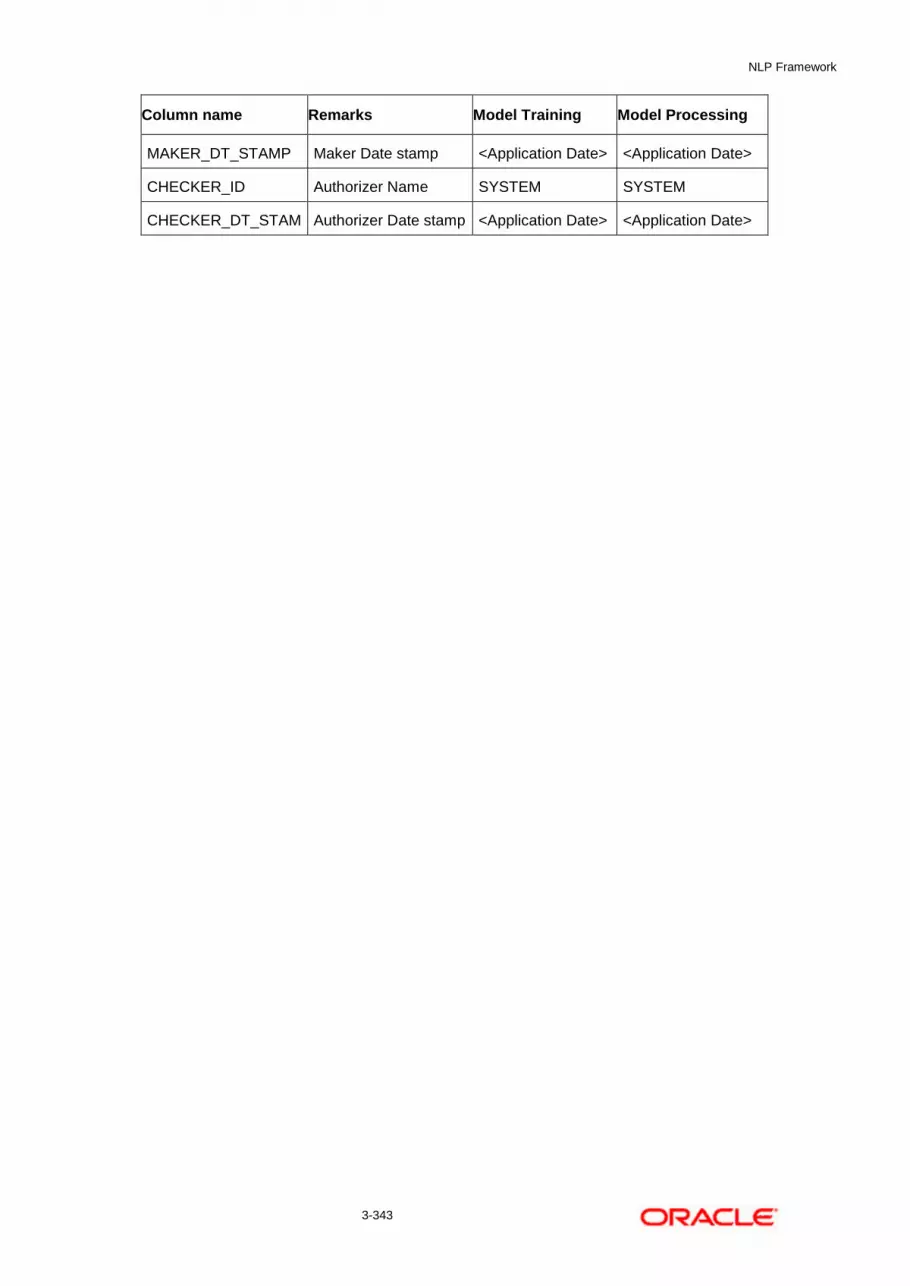
NLP Framework
3-343
Column name Remarks Model Training Model Processing
MAKER_DT_STAMP Maker Date stamp <Application Date> <Application Date>
CHECKER_ID Authorizer Name SYSTEM SYSTEM
CHECKER_DT_STAM
P
Authorizer Date stamp <Application Date> <Application Date>

NLP Framework
3-344
New use case
Insert a new record into the table CMC_TM_ML_SERVICE_DEFN.
Table 207: New Use Case
Column name Description Remarks for Data
ID Unique ID Ensure a Unique ID
USECASE_NAME Use Case Name Must be one of the usecase_name from the table
CMC_TM_ML_NER_TAG_MAS
DESCRIPTION Use Case Description
SERVICE_TYPE Service Type
‘Training’ Use this value for model
Training Service
‘Processing’ Use this value for model
execution Service
‘Business’ Use this value for business
Service
SERVICE_DEFN Mapped Service API <The newly created 3P NLP service API>
METHOD_TYPE Method Type POST
APP_ID Sub Domain ID NULL
RECORD_STAT Record Status O
AUTH_STAT Authorized Status A
MOD_NO Modification Number 1
ONCE_AUTH Once Authorized Y
MAKER_ID Maker Name SYSTEM
MAKER_DT_STAMP Maker Date stamp <Application Date>
CHECKER_ID Authorizer Name SYSTEM
CHECKER_DT_STAMP Authorizer Date
stamp <Application Date>

NLP Framework
3-345
3.3.6 Business Service Mapping
If straight through processing is enabled in use case definition, then entries must be made into the table CMC_TM_ML_BUS_SERVICE_DEFN to enable the NLP framework to call the Business Service.
Insert a new record into the table CMC_TM_ML_BUS_SERVICE_DEFN for each use-case with straight through processing enabled.
Table 208: For Each Use Case
Column name Description Remarks for Data
ID Unique ID Ensure a Unique ID
USECASE_NAME Use Case Name Must be one of the usecase_name from the table
CMC_TM_ML_NER_TAG_MAS
DESCRIPTION Use Case Description
SERVICE_TYPE Service Type ‘Business’ Use this value for business
Service
ADAPTER_CLASS Fully qualified name
of the adapter class
Use
oracle.fsgbu.cmc.nlp.pipeline.services.adaptor.Gene
ricAdaptor for all the business service calls
Use
oracle.fsgbu.cmc.nlp.pipeline.services.adaptor.OBR
HAdaptor if you want to call business service via
Oracle Banking Routing Hub
SERVICE_DEFN Mapped Service API API, which will be called for Business service
execution
HEADERS
Comma separated
headers key value
separated by colon (:)
Eg : docId:123 , branchCode : 000
METHOD_TYPE Method Type POST
APP_ID Sub Domain ID NULL

NLP Framework
3-346
Column name Description Remarks for Data
RECORD_STAT Record Status O
AUTH_STAT Authorized Status A
MOD_NO Modification Number 1
ONCE_AUTH Once Authorized Y
MAKER_ID Maker Name SYSTEM
MAKER_DT_STAMP Maker Date stamp <Application Date>
CHECKER_ID Authorizer Name SYSTEM
CHECKER_DT_STAMP Authorizer Date
stamp <Application Date>
If you are Integrating Business Service via Oracle Banking Routing Hub then in service definition column, you need to provide URL of Oracle Banking Routing Hub dispatch API and the additional headers in headers column.
Since there are some common headers, which are required for calling Oracle Banking Routing Hub as well (like appId, branchCode, uderId) and to avoid the conflict for these headers, the ML_ prefix is appended in header keys by Oracle Banking Routing Hub adaptor. You need to configure transformation logic of these headers in Oracle Banking Routing Hub.

Machine Learning Framework
4-347
4. Machine Learning Framework
This section is designed to help you quickly get acquainted with how to on-board business cases on the Machine Learning framework in Oracle Banking.
The assets used to build the Machine Learning framework is available by default with Oracle database.
Oracle Database 19c and above.
Prerequisites
Specify User Id and Password, and login to Home screen.
Make sure that Machine Learning framework is already deployed and available as part of the application menu. Refer to Common Core Services Installation Guide for more details.
4.1 Use Case On-Boarding
On-boarding a new business case onto the Machine Learning framework involves two broad stages as highlighted below.
Model Definition
One-time setup of use case definition captures the data source, target columns and type of use case.
Model Training
Model training is use case specific and has the intelligence to evaluate multiple algorithms and discover the best fit algorithm to the data pattern.
The onset of these two stages assumes that you have already decided on the business use case that you would want to on-board.

Machine Learning Framework
4-348
4.2 Frameworks Supported
4.2.1 Timeseries
Timeseries are the use cases involving the date sequence data to forecast for future dates.
Example:
CASE ID CCY BALANCE
17-Aug USD 6723.00
18-Aug USD 250.00
19-Aug USD 2654.00
20-Aug USD 20.00
21-Aug USD ?
NOTE: CASE ID can either be a DATE or a Sequence
4.2.2 Timeseries Algorithms Supported
By default, the framework uses Exponential Smoothing to forecast from timeseries data. It evaluates 14 different algorithmic combinations to best fit the patterns of
Error type (additive or multiplicative),
Trend (additive, multiplicative, or none), including damped trends
and Seasonality (additive, multiplicative, or none)
Note: User is not required to select any algorithmic combinations. The framework evaluates and selects the best fit combination for you.

Machine Learning Framework
4-349
4.2.3 Regression
Regression is a statistical technique to discover relationships using independent variables to estimate/predict a target variable of NUMBER or INTEGER type.
Example: User needs to predict the value of LUXURY SPEND for a new CASE ID, given the data of branch, marital status, income and savings
CASE ID BRANCH MARITAL STATUS
INCOME SAVING LUXURY SPEND
12345 BRT Y 15000 6723 1000
12346 BRT N 17500 250 750
12347 CSR D 25000 2654 1900
12348 CSR N 16567 20 2500
Note: CASE ID MUST uniquely identify a row
4.2.4 Regression Algorithms Supported
The following algorithm are available as part of the framework.
S No ALGORITHM REMARKS
1 GENRALIZED LINEAR
REGRESSION
Also handles RIDGE regression depending on
the underlying pattern of data
2 SUPPORT VECTOR
MACHINES
Supports both linear and gaussian kernels
3 NEURAL NETWORK Uses default 1 layer with number of nodes <= 50
Note: Users have the flexibility to select a specific algorithm or keep it as NULL for the framework to evaluate and best fit the algorithm to the underlying data.
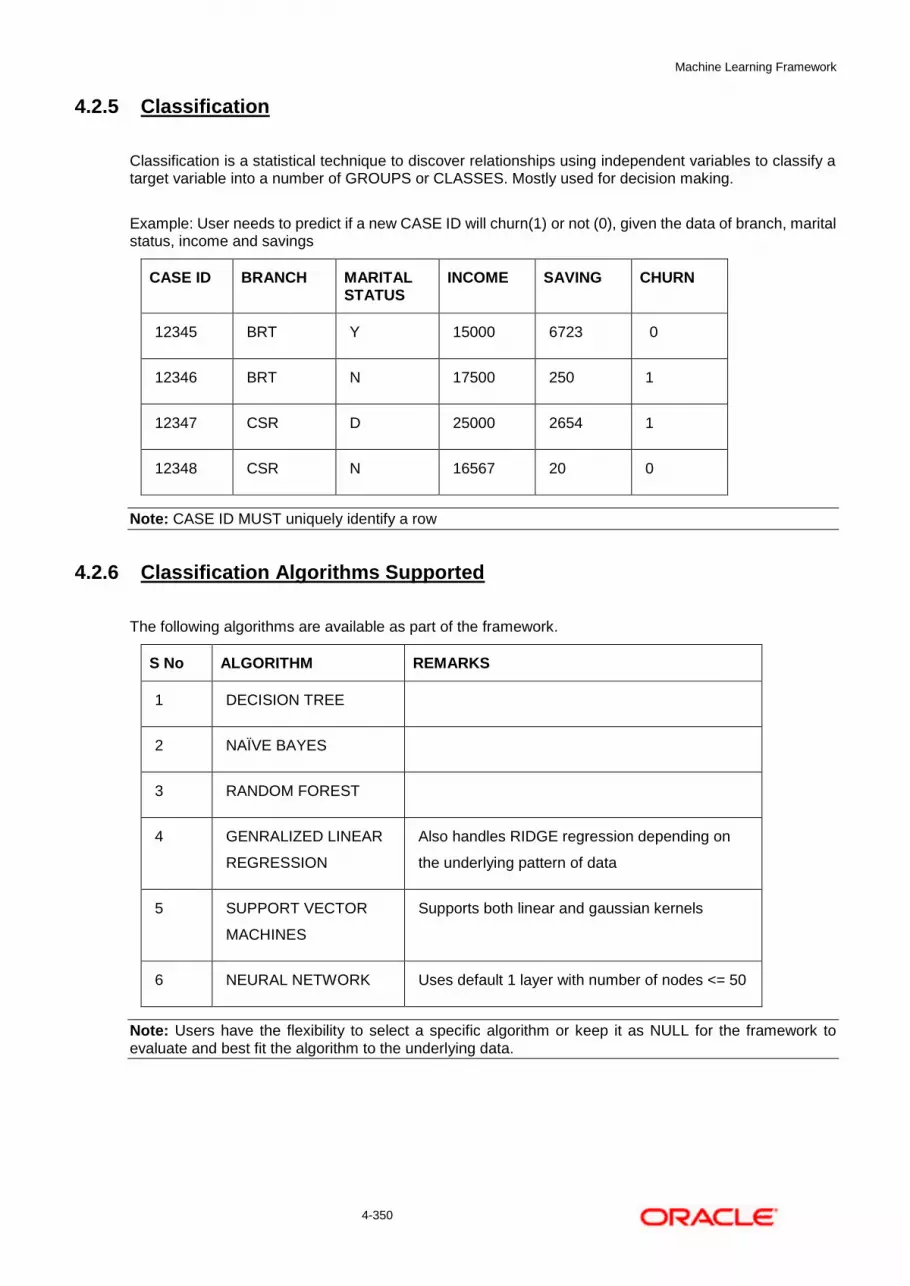
Machine Learning Framework
4-350
4.2.5 Classification
Classification is a statistical technique to discover relationships using independent variables to classify a target variable into a number of GROUPS or CLASSES. Mostly used for decision making.
Example: User needs to predict if a new CASE ID will churn(1) or not (0), given the data of branch, marital status, income and savings
CASE ID BRANCH MARITAL STATUS
INCOME SAVING CHURN
12345 BRT Y 15000 6723 0
12346 BRT N 17500 250 1
12347 CSR D 25000 2654 1
12348 CSR N 16567 20 0
Note: CASE ID MUST uniquely identify a row
4.2.6 Classification Algorithms Supported
The following algorithms are available as part of the framework.
S No ALGORITHM REMARKS
1 DECISION TREE
2 NAÏVE BAYES
3 RANDOM FOREST
4 GENRALIZED LINEAR
REGRESSION
Also handles RIDGE regression depending on
the underlying pattern of data
5 SUPPORT VECTOR
MACHINES
Supports both linear and gaussian kernels
6 NEURAL NETWORK Uses default 1 layer with number of nodes <= 50
Note: Users have the flexibility to select a specific algorithm or keep it as NULL for the framework to evaluate and best fit the algorithm to the underlying data.

Machine Learning Framework
4-351
4.3 Partitioned Model
Oracle in-Database machine learning allows the user to design partitioned models.
Partitioned model organizes and represents multiple models as partitions in a single model entity, enabling you to easily build and manage models tailored to independent slices of data.
Example:
CUSTOMER ID
BRANCH MARITAL STATUS
INCOME SAVING LUXURY SPEND
12345 BRT Y 15000 6723 1000
12346 BRT N 17500 250 750
12347 CSR D 25000 2654 1900
12348 GRF N 16567 20 2500
In this above example of data, user could build a single partitioned model on independent slices of data based on branch code.
The user has the advantage of having a single partitioned model instead of having multiple models for each individual branch.

Machine Learning Framework
4-352
4.4 On-Boarding Use Case
4.4.1 Model Definition
Use cases are defined by the business domain of the product processor to which it is mapped. They are unique and machine learning models are named after the use case.
The model definition screen allows you to define the use case and configure the data source to be used for model training.
4.4.1.1 Model Definition Summary
The summary screen displays the list of defined use cases. To access the screen, perform the following steps:
1. From Home screen, click Machine Learning. Under Machine Learning, click Model Definition.
The Model Definition Summary screen is displayed.
Figure 255: Model Definition Summary
For more information on fields, refer to the field description table below.
Table 209: Model Definition Summary – Field Description
Field Description
Usecase Name Displays the name of the use case
Mod No Displays the modification number
Correlation Displays the default orange colour for New records. On
correlation validation in Model definition screen, it will
change to green colour.
Authorized Status Displays the Authorized or Unauthorized status
Record Status Displays the status of the record.

Machine Learning Framework
4-353
4.4.1.2 Model Definition Maintenance
Model Definition Maintenance screen enables the user to maintain the use case details and define the use case type and data source details.
1. From Model Definition Summary screen, click button on the Use case tile to Unlock or click
to create the new model definition.
The Model Definition Maintenance screen is displayed.
Figure 256: Model Definition Maintenance
2. On Model Definition Maintenance screen, specify the fields. The fields which are marked with
asterisk are mandatory. For more information on fields, refer to the field description table below.
Table 210: Model Definition Maintenance – Field Description
Field Description
Use Case Name Specify the name of the Use Case.
Description Specify the description of the Use Case.
Use Case Type Select the type of Use Case – Regression or
classification from the drop down.
Product Processor Select the product to which the use case belongs.
Training Data Source Specify the Table or View name used as data source to
train the model.
Unique Case Identifier
Select the column name to uniquely identify a record.
NOTE: Column name is a function of table/view design
and has to have unique constraint defined

Machine Learning Framework
4-354
Field Description
Target Column
Select the value of the column which is to be predicted
by training the model. It has to have unique constraint
defined
NOTE: Column name is a function of table/view design
Positive Target Value
If Use Case Type selected is CLASSIFICATION, then
this field is enabled else disabled for REGRESSION. It
will display distinct values from the target column
Tablespace Specify the valid tablespace and all model related data
will be persisted in this table space
Partition Column Names Specify the column names to slice data. Refer
Partitioned Model for details
Selected Algorithm
Select the algorithm from the list and build the model.
This field should be null to allow the framework to select
the best fit algorithm to build the model.
Model Error Statistics
Select the model error statistics.
By Default, the value is selected as ‘RMSE’ for
REGRESSION.
The user can also select ‘MAE’.
It will be disabled for CLASSIFICATION
Cost Matrix:
This button is enabled ONLY for CLASSIFICATION type of use cases.
Any classification model can make two kinds of error
Actual Value Predicted Value Error Type
1 0 False Negative
0 1 False Positive
This screen is used to bias the model into minimizing one of the error types, by adding a penalty cost. All penalty cost has to be positive.
Actual Value Predicted Value Penalty Cost
1 0 6
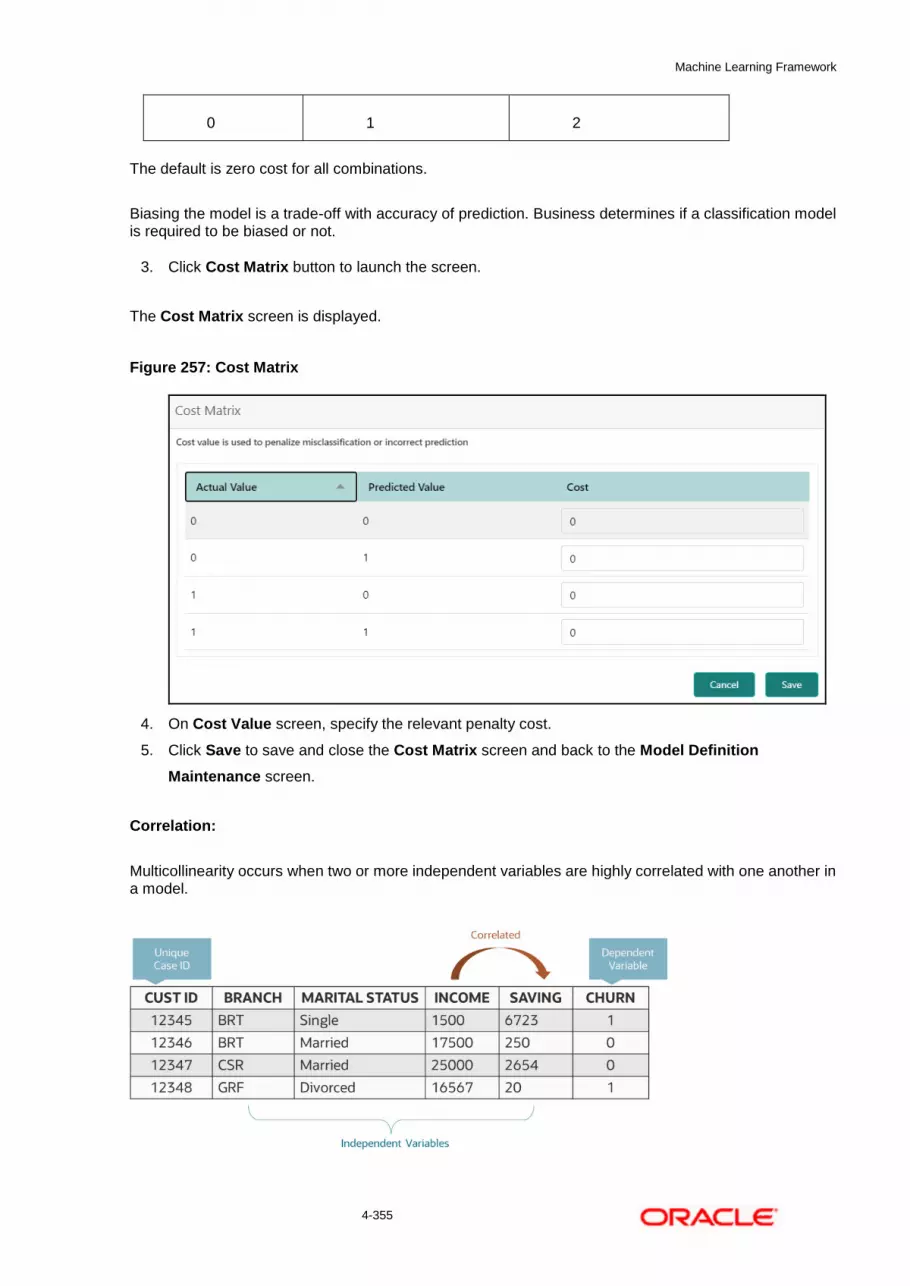
Machine Learning Framework
4-355
0 1 2
The default is zero cost for all combinations.
Biasing the model is a trade-off with accuracy of prediction. Business determines if a classification model is required to be biased or not.
3. Click Cost Matrix button to launch the screen.
The Cost Matrix screen is displayed.
Figure 257: Cost Matrix
4. On Cost Value screen, specify the relevant penalty cost.
5. Click Save to save and close the Cost Matrix screen and back to the Model Definition
Maintenance screen.
Correlation:
Multicollinearity occurs when two or more independent variables are highly correlated with one another in a model.

Machine Learning Framework
4-356
Multicollinearity may not affect the accuracy of the model as much, but we might lose reliability in model interpretation
Irrespective of CLASSIFICATION or REGRESSION, all use cases must be evaluated for Correlation.
This button will display Orange mark if evaluation is pending.
6. Click Correlation button to launch the screen.
The Correlation Analysis screen is displayed.
Figure 258: Correlation Analysis
7. On Correlation Analysis screen, select the required fields. For more information on fields, refer to
the field description table below.
Table 211: Correlation Analysis – Field Description
Field Description
Threshold Value Select the threshold value.
By default, the value is set as 0.5.
The Value can be set between 0.1 to 0.9.
Type of Correlation Select the type of correlation.
By default, the option is selected as Pearson. The formula
used for calculation is different for each type
Pairwise Correlation Displays the output of the Correlation Validation.
Analyzed Features Displays the distinct analysed Features from Pairwise
Correlation.
Ignore Features User defined list created from Analysed Features.

Machine Learning Framework
4-357
8. Click to initiate the evaluation process.
The Correlation Analysis - Pairwise Correlation screen is populated.
Figure 259: Correlation Analysis - Pairwise Correlation
9. Move ONE of the Analyzed Features to Ignore Features List
10. Click and re-evaluate Correlation as mentioned in Step 8.
11. Rinse & repeat Step 9 & 10 for each feature addition to the Ignore feature list, until Pairwise
Correlation displays zero correlated pair.
12. Attempting to exit the screen midway without achieving zero Pairwise Correlation, will display the
following error message.
Figure 260: Error Message
13. After successful Correlation Evaluation, the orange highlight on the Correlation button is
removed.
14. After Correlation Evaluation and Cost Matrix definition (for CLASSIFICATION), click Save to
create the new Model Definition. The user can view the configured details in the Model Definition
Summary.

Machine Learning Framework
4-358
Model Metrices
Once the user has successfully trained Machine Learning model, the user can score/predict the model outcomes as required by the use case. The user can view the Model Metrices tab only after training the model successfully. Refer to Model Training and Scoring section for training the model.
15. Click Model Metrices tab to view the Model Metrices details.
The Model Metrices screen is displayed.
Figure 261: Model Metrices
16. For more information on fields, refer to the field description table below.
Table 212: Model Metrices – Field Description
Field Description
Model Partitions Select the model partitions from the dropdown.
If the model has been designed to have partitions, it will display
the partitioned values based on underlying data of the defined
partition column else display FULL MODEL.
Metrices Displays the various model attributes, as per the best model
identified and trained. The number of model attributes is a
function of algorithm and underlying pattern of data
Some attributes are common for all models,
Model Name
Algorithm
INF_TIME (Inference Time)
<Model metric>(Train)
<Model metric>(Test)

Machine Learning Framework
4-359
Value Displays the value of the attribute.

Machine Learning Framework
4-360
4.4.2 Model Training and Scoring
Model Training and Scoring screen enables the user to train the model for the selected use case and use the trained model to predict and score multiple records at a time. The predicted values persist in the database and are available in the prediction column maintained for the user case.
1. From Home screen, click Machine Learning. Under Machine Learning, click Model Training
and Scoring.
The Model Training and Scoring screen is displayed.
Figure 262: Model Training and Scoring
For more information on fields, refer to the field description table below.
Table 213: Model Training and Scoring – Field Description
Field Description
Use Case Name Select the Use Case name from the dropdown.
Description Displays the description of the use case.
Use Case Type Displays the type of use case.
Model Training
Training Data Source Displays the training data source.
Unique Case Identifier Displays the unique case identifier.
Target Column Displays the target column of the model.
Partition Column(s) Displays the partition column of the model.
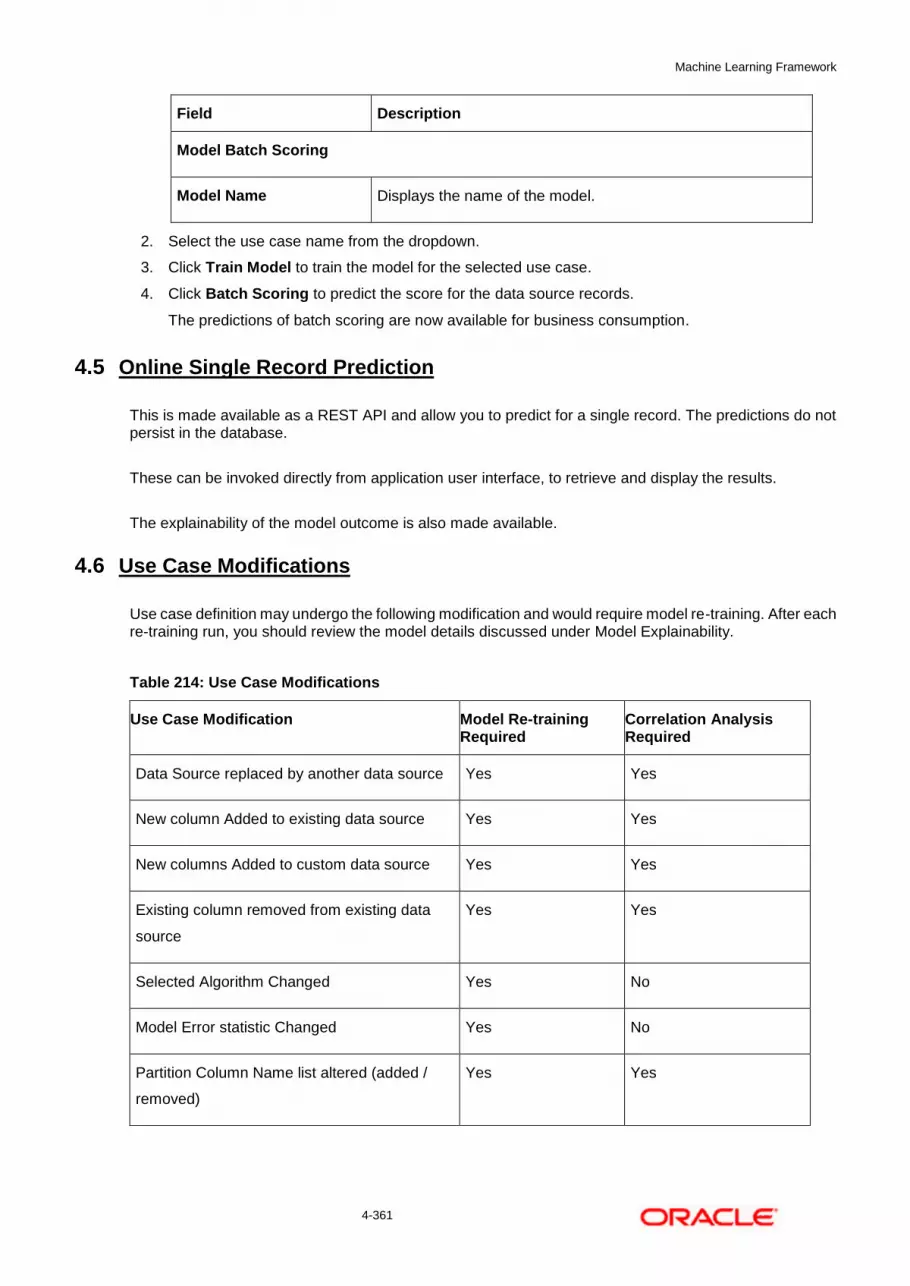
Machine Learning Framework
4-361
Field Description
Model Batch Scoring
Model Name Displays the name of the model.
2. Select the use case name from the dropdown.
3. Click Train Model to train the model for the selected use case.
4. Click Batch Scoring to predict the score for the data source records.
The predictions of batch scoring are now available for business consumption.
4.5 Online Single Record Prediction
This is made available as a REST API and allow you to predict for a single record. The predictions do not persist in the database.
These can be invoked directly from application user interface, to retrieve and display the results.
The explainability of the model outcome is also made available.
4.6 Use Case Modifications
Use case definition may undergo the following modification and would require model re-training. After each re-training run, you should review the model details discussed under Model Explainability.
Table 214: Use Case Modifications
Use Case Modification Model Re-training Required
Correlation Analysis Required
Data Source replaced by another data source Yes Yes
New column Added to existing data source Yes Yes
New columns Added to custom data source Yes Yes
Existing column removed from existing data
source
Yes Yes
Selected Algorithm Changed Yes No
Model Error statistic Changed Yes No
Partition Column Name list altered (added /
removed)
Yes Yes
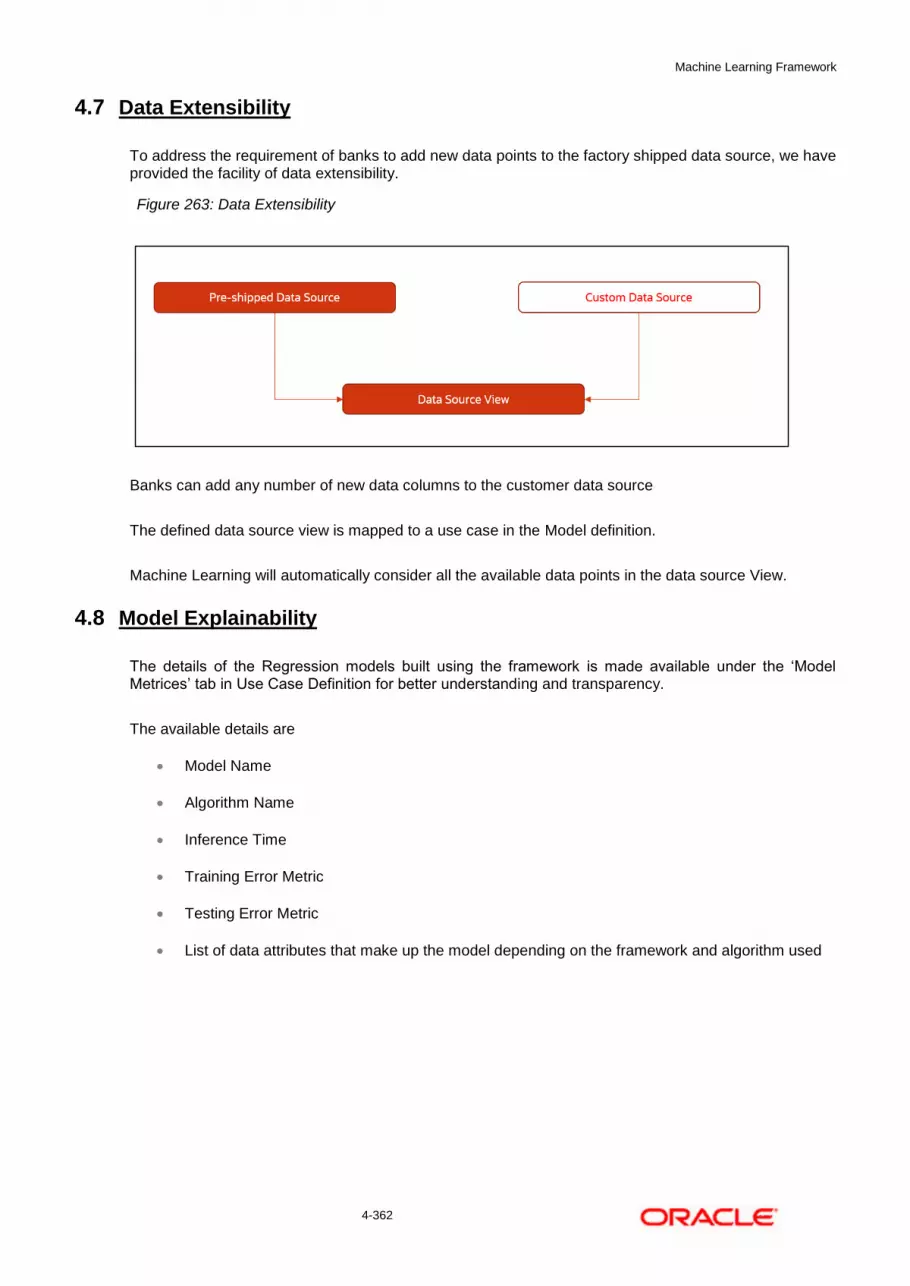
Machine Learning Framework
4-362
4.7 Data Extensibility
To address the requirement of banks to add new data points to the factory shipped data source, we have provided the facility of data extensibility.
Figure 263: Data Extensibility
Banks can add any number of new data columns to the customer data source
The defined data source view is mapped to a use case in the Model definition.
Machine Learning will automatically consider all the available data points in the data source View.
4.8 Model Explainability
The details of the Regression models built using the framework is made available under the ‘Model Metrices’ tab in Use Case Definition for better understanding and transparency.
The available details are
Model Name
Algorithm Name
Inference Time
Training Error Metric
Testing Error Metric
List of data attributes that make up the model depending on the framework and algorithm used
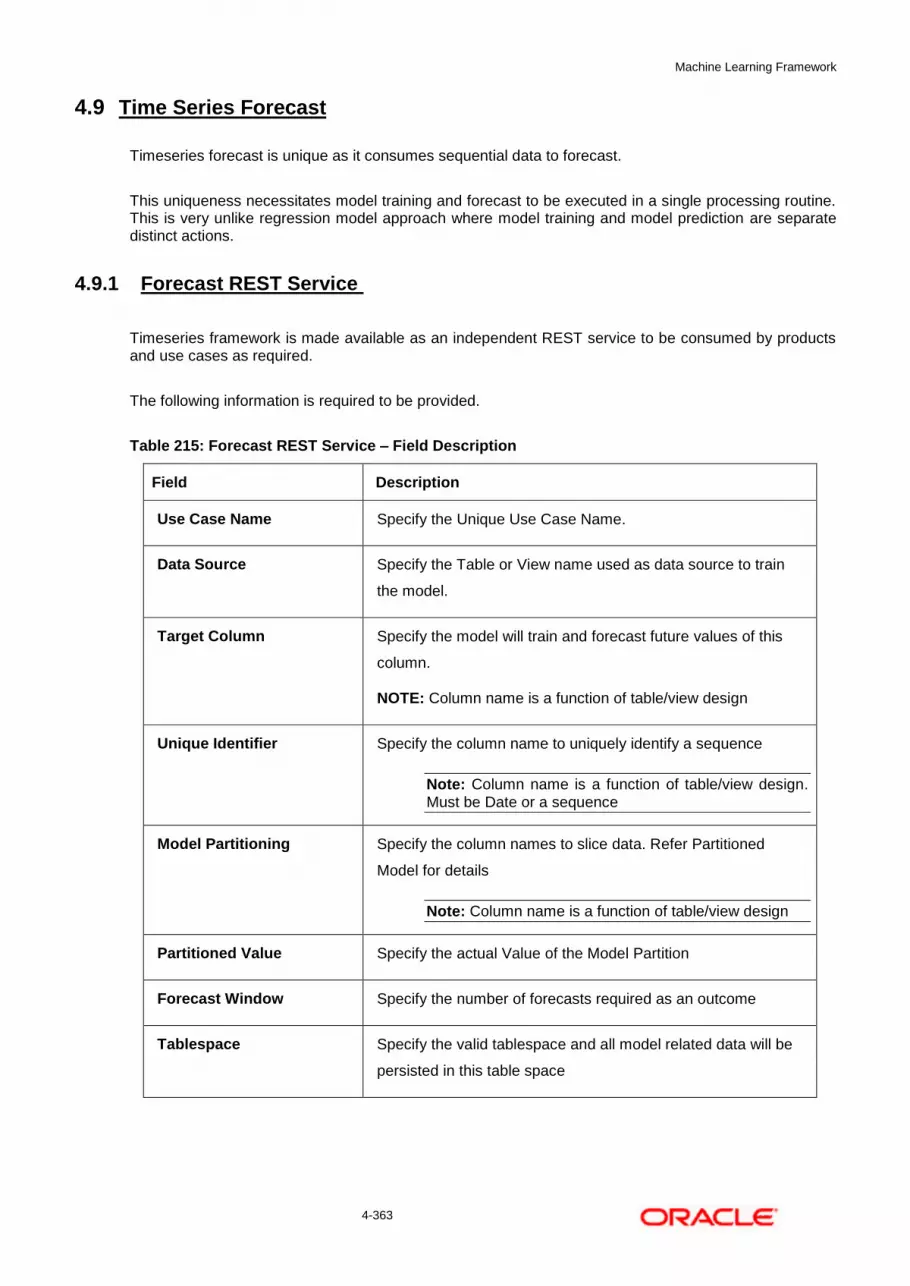
Machine Learning Framework
4-363
4.9 Time Series Forecast
Timeseries forecast is unique as it consumes sequential data to forecast.
This uniqueness necessitates model training and forecast to be executed in a single processing routine. This is very unlike regression model approach where model training and model prediction are separate distinct actions.
4.9.1 Forecast REST Service
Timeseries framework is made available as an independent REST service to be consumed by products and use cases as required.
The following information is required to be provided.
Table 215: Forecast REST Service – Field Description
Field Description
Use Case Name Specify the Unique Use Case Name.
Data Source Specify the Table or View name used as data source to train
the model.
Target Column Specify the model will train and forecast future values of this
column.
NOTE: Column name is a function of table/view design
Unique Identifier Specify the column name to uniquely identify a sequence
Note: Column name is a function of table/view design. Must be Date or a sequence
Model Partitioning Specify the column names to slice data. Refer Partitioned
Model for details
Note: Column name is a function of table/view design
Partitioned Value Specify the actual Value of the Model Partition
Forecast Window Specify the number of forecasts required as an outcome
Tablespace Specify the valid tablespace and all model related data will be
persisted in this table space
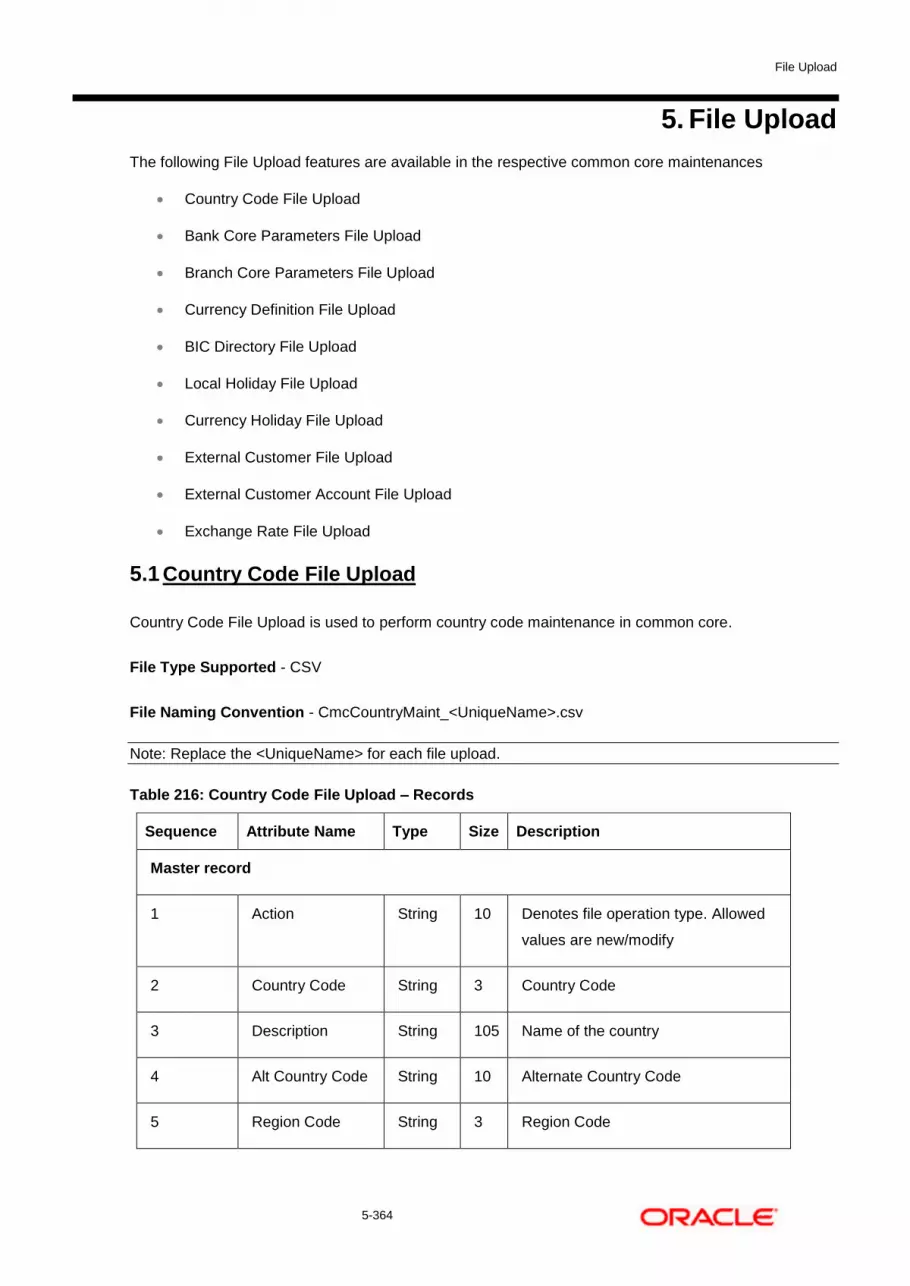
File Upload
5-364
5. File Upload
The following File Upload features are available in the respective common core maintenances
Country Code File Upload
Bank Core Parameters File Upload
Branch Core Parameters File Upload
Currency Definition File Upload
BIC Directory File Upload
Local Holiday File Upload
Currency Holiday File Upload
External Customer File Upload
External Customer Account File Upload
Exchange Rate File Upload
5.1 Country Code File Upload
Country Code File Upload is used to perform country code maintenance in common core.
File Type Supported - CSV
File Naming Convention - CmcCountryMaint_<UniqueName>.csv
Note: Replace the <UniqueName> for each file upload.
Table 216: Country Code File Upload – Records
Sequence Attribute Name Type Size Description
Master record
1 Action String 10 Denotes file operation type. Allowed
values are new/modify
2 Country Code String 3 Country Code
3 Description String 105 Name of the country
4 Alt Country Code String 10 Alternate Country Code
5 Region Code String 3 Region Code

File Upload
5-365
Sequence Attribute Name Type Size Description
6 Blacklisted String 1 Indicates the country is blacklisted
7 IBAN Check Reqd String 1 Indicates check required for an IBAN
is mandatory
8 Intra European String 1 Denotes the country is an intra
European country.
9 Clr Code Bic String 1 BIC Clearing Code Indicates the
National ID in the BIC plus file is the
clearing code.
10 Clearing Network String 6 Indicates the Clearing Network
11 ISO Num Country
Code
String 3 Denotes the ISO Country Code
12 Gen Mt205 String 1 Indicates the cover message 205COV
or 205
13 ISD Code Number 10 Denotes the ISD Code
14 EU Country String 1 Indicates the country is recognized by
Swift as a part of the Intra European
countries
Mandatory Fields are
Action
Country Code
Description
Alt Country Code
Region Code
Blacklisted
IBAN Check Reqd
Intra European
Clr Code Bic
ISO Num Country Code
Gen Mt205
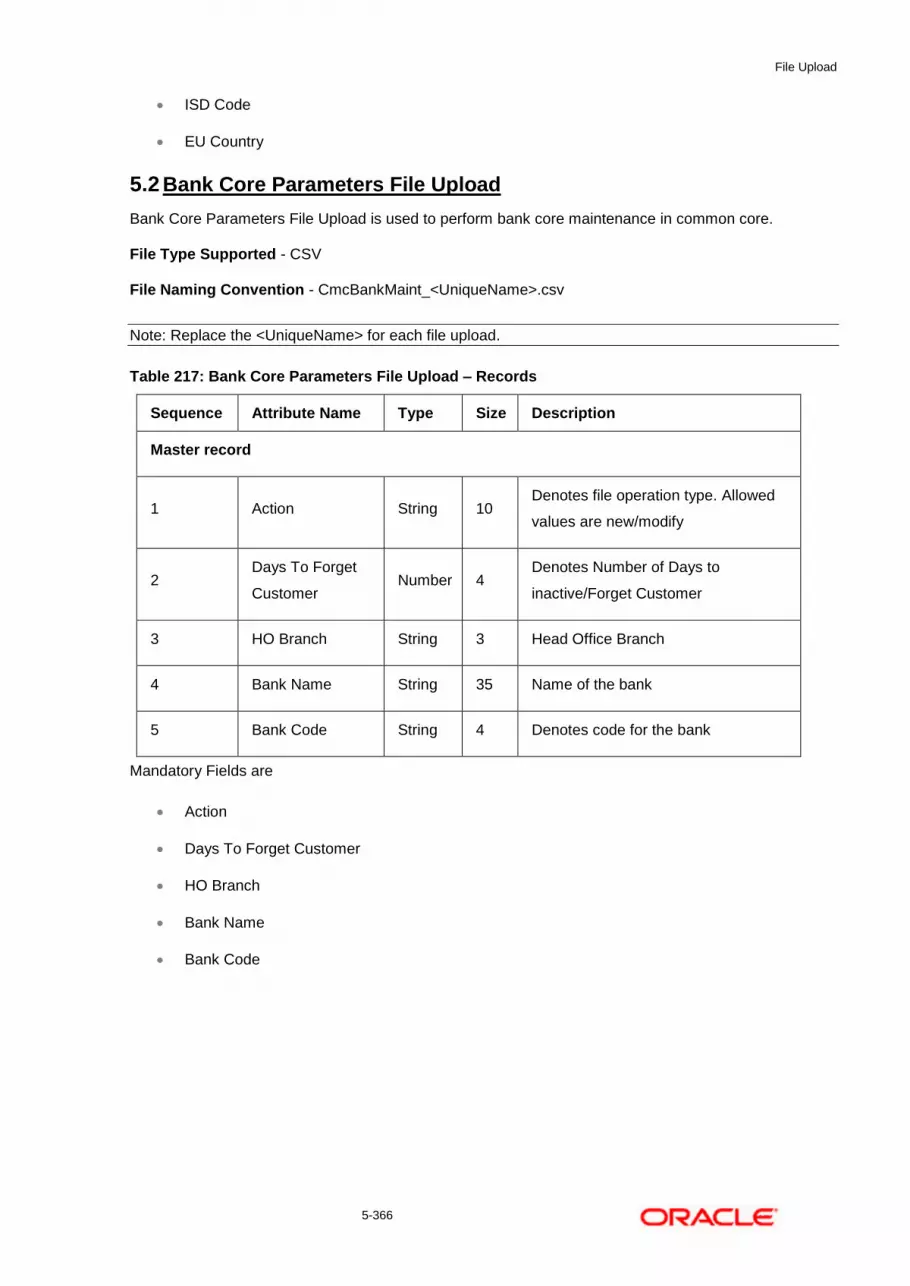
File Upload
5-366
ISD Code
EU Country
5.2 Bank Core Parameters File Upload
Bank Core Parameters File Upload is used to perform bank core maintenance in common core.
File Type Supported - CSV
File Naming Convention - CmcBankMaint_<UniqueName>.csv
Note: Replace the <UniqueName> for each file upload.
Table 217: Bank Core Parameters File Upload – Records
Sequence Attribute Name Type Size Description
Master record
1 Action String 10 Denotes file operation type. Allowed
values are new/modify
2 Days To Forget
Customer Number 4
Denotes Number of Days to
inactive/Forget Customer
3 HO Branch String 3 Head Office Branch
4 Bank Name String 35 Name of the bank
5 Bank Code String 4 Denotes code for the bank
Mandatory Fields are
Action
Days To Forget Customer
HO Branch
Bank Name
Bank Code

File Upload
5-367
5.3 Branch Core Parameters File Upload
Branch Code Parameters File Upload is used to perform branch code maintenance in common core.
File Type Supported - CSV
File Naming Convention - CmcBranchMaint_<UniqueName>.csv
Note: Replace the <UniqueName> for each file upload.
Table 218: Branch Core Parameters File Upload – Records
Sequence Attribute Name Type Size Description
Master record
1 Discriminator String 1 Denotes master record type. Default
value is always “P”
2 Action String 10 Denotes file operation type. Allowed
values are new/modify
3 Source Branch
Code String 20 Code of the Source Branch
4 Source System String 35 Source System
5 Week Hol2 String 1 Denotes the weekly holiday 2
6 Week Hol1 String 1 Denotes the weekly holiday 1
7 Auto Auth String 1 Auto Authorization
8 Walkin Customer String 20 Denotes Walk-in customer
9 Branch Lcy String 3 Branch Local Currency
10 Branch Addr3 String 105 Denotes the branch address details -
Address Line 1
11 Branch Addr2 String 105 Denotes the branch address details -
Address Line 2
12 Branch Addr1 String 105 Denotes the branch address details -
Address Line 3
13 Branch Name String 105 Name of the branch

File Upload
5-368
Sequence Attribute Name Type Size Description
14 Country Code String 3 Country Code
15 Host Code String 8 Host Code
16 Branch Code String 3 Denotes the Code of Branch
Child record 1
1 Discriminator String 10 Denotes the first child record type.
Default value is always “BranchPref”
2 Report DSN String 35 Denotes the details of the report DSN
3 DSN Name String 35 Name of the DSN
4 Host Name String 35 Host Name
5 Branch Code String 3 Denotes the Branch Code
Child record 2
1 Discriminator String 12 Denotes the second child record type.
Default value is always “SwiftAddress”
2 Default BIC String 1 Denotes the Default BIC
3 Swift Address String 12 Denotes the swift address details
4 Branch Code String 3 Branch Code
Mandatory Fields are
Discriminator
Action
Source Branch Code
Source System
Auto Auth
Branch Lcy
Branch Addr3
Branch Addr2
Branch Addr1

File Upload
5-369
Branch Name
Country Code
Host Code
Branch Code
Discriminator (Child record 1)
Branch Code (Child record 1)
Discriminator (Child record 2)
Default BIC (Child record 2)
Swift Address (Child record 2)
Branch Code (Child record 2)
5.4 Currency Definition File Upload
Currency Definition Upload is used to perform currency definition maintenance in common core.
File Type Supported - CSV
File Naming Convention - CmcCurrencyMaint_<UniqueName>.csv
Note: Replace the <UniqueName> for each file upload.
Table 219: Currency Definition File Upload – Records
Sequence Attribute Name Type Size Description
Master record
1 Discriminator String 1 Denotes master record type. Default
value is always “P”
2 Action String 10 Denotes file operation type. Allowed
values are new/modify
3 Currency Code String 3 Denotes Currency Code
4 Currency Name String 105 Name of the currency
5 Country String 3 Currency Country
6 Currency
Decimals Number 1 Currency Decimals

File Upload
5-370
Sequence Attribute Name Type Size Description
7 Currency Round
Rule String 1 Denotes Currency Round Rule
8 Currency Round
Unit Number 7 Denotes Currency Round Unit
9 Currency Format
Mask String 1 Denotes Currency Format Mask
10 Currency Spot
Days Number 3
Number of spot working days
applicable for the currency
11 Currency Int
Method Number 1 Currency Interest Method
12 Position Gl String 9 Position GL
13 Position Eqvgl String 9 Position Equivalent GL
14 Currency Eur
Type String 1 Currency Euro Type
15 Currency Tol Limit Number 7 Currency Tolerance Limit
16 Settlement Msg
Days Number 3 Settlement Message Days
17 Index Flag String 1 Derives index rate of the currency
18 Index Base
Currency String 3 Index Base Currency
19 Cut Off Hr Number 2 Hour of the day for the cut off
20 Cut Off Min Number 2 Minute of the hour for the cut of
21 Alt Currency
Code String 10 Code of the alternate currency
22 Eur Conversion
Reqd String 1 Euro Conversion Required

File Upload
5-371
Sequence Attribute Name Type Size Description
23 Cut Off Days Number 2 Cut Off Days for the payment
transaction involving the currency
24 Cr Auto Ex Rate
Lmt Number 22 Credit Auto Exchange Rate Limit
25 Dr Auto Ex Rate
Lmt Number 22 Debit Auto Exchange Rate Limit
26 Currency Type String 3 Denotes Currency Type
27 Gen 103p String 1 Generate outgoing MT 103 messages
in the MT 103 + format
28 Cls Currency String 1 CLS Currency
29 Fx Netting Days Number 3 Foreign Exchange Netting Days
30 Iso Num Currency
Code String 3
International Standardization
Organization numerical currency code
31 Gen Cust Cov String 1 New Cover Message Format Required
32 Validate 50f String 1 Validate Tag-50F
33 Maintenance
Country String 3 Maintenance Country
34 Commodity Code String 1 Denotes Commodity Code
Child record
1 Discriminator String 1 Denotes child record type. Default
value is always “C”
2 Maintenance
Country String 3 Maintenance Country
3 Country Code String 3 Denotes Country Code
4 Country Desc String 105 Name of the Country
5 Currency Code String 3 Denotes Currency Code
Mandatory Fields are

File Upload
5-372
Discriminator
Action
Currency Code
Currency Name
Country
Currency Decimals
Currency Round Rule
Currency Round Unit
Currency Spot Days
Currency Int Method
Currency Eur Type
Settlement Msg Days
Index Flag
Cut Off Hr
Cut Off Min
Alt Currency Code
Eur Conversion Reqd
Cut Off Days
Gen 103p
Cls Currency
Fx Netting Days
Gen Cust Cov
Validate 50f
Maintenance Country
Commodity Code
Discriminator (Child Record)
Maintenance Country (Child Record)
Country Code (Child Record)
Country Desc (Child Record)
Currency Code (Child Record)

File Upload
5-373
5.5 BIC Directory File Upload
BIC Directory File Upload is used to perform BIC directory maintenance in common core.
File Type Supported - CSV
File Naming Convention - CmcBICDirectory_<UniqueName>.csv
Note: Replace the <UniqueName> for each file upload.
Table 220: BIC Directory File Upload – Records
Sequence Attribute Name Type Size Description
Master record
1 Action String 10
Denotes file operation type. Allowed
values are new/modify
2 BIC Code String 11
Indicates the unique BIC Code by
which the bank is identified by SWIFT.
3 Bank Name String 35 Name of the bank
4 Customer No String 20 Customer Number
5 Sk Arrangement String 1 Denotes the SWIFT key arrangement
6 Bank Address1 String 35
Indicates the bank address details of
the customer - Address Line 1
7 Bank Address2 String 35
Indicates the bank address details of
the customer - Address Line 2
8 Bank Address3 String 90
Indicates the bank address details of
the customer - Address Line 3
9 Relationship String 1 Relationship
10 Swift Key String 50 Denotes the swift key details
11 Telex Key String 50
Indicates the unique telex key for the
BIC directory
12 Upload Flag String 1 Upload Flag for the BIC directory

File Upload
5-374
Sequence Attribute Name Type Size Description
13 Upload Update String 1
Updated the BIC directory during an
upload
14 Gen Mt103 String 1
Indicates the counter party whose BIC
code details you are capturing
capacitate to receive payment
messages in the MT 103 format
15 Blacklisted String 1 Indicates the BIC entity is blacklisted
16 CUG Member String 1
Indicates the BIC entity is a closed
user group member
17 Gen Mt103p String 1
Indicates the counter party whose BIC
code details you are capturing
capacitate to receive payment
messages in the MT 103 format
18
Multi Cust
Transfer String 1
Denotes the Multi-Customer Credit
Transfer details
19 Max Size Number 38 Indicates the maximum size
20 Remit Member String 1
Indicates the customer is registered
with MT 103 extended remittance
information multiple user group
21 Sub Type Code String 4 Denotes the Sub-Type Code
22 Gen Mt102p String 1 Generates 102+ message
23 Gen Mt101 String 1
Indicates MT101 can be sent/received
from this BIC
24
Transaction Per
Msg Number 40 Number of Transactions Per Page
25 ADB Member String 1 Denotes the ADB member
26 BE Indicator String 1 Denotes the BEI Indicator
Mandatory Fields are
Action

File Upload
5-375
BIC Code
Bank Name
Sk Arrangement
Bank Address1
Bank Address2
Bank Address3
Relationship
Swift Key
Telex Key
Upload Flag
Upload Update
Gen Mt103
Blacklisted
CUG Member
Gen Mt103p
Multi Cust Transfer
Max Size
Remit Member
Gen Mt102p
Gen Mt101
Transaction Per Msg
ADB Member
BE Indicator
5.6 Local Holiday File Upload
Local Holiday File Upload is used to perform local holiday maintenance in common core.
File Type Supported - CSV
File Naming Convention - CmcBranchLocalHoliday_<UniqueName>.csv
Note: Replace the <UniqueName> for each file upload.

File Upload
5-376
Table 221: Local Holiday File Upload – Records
Sequence Attribute Name Type Size Description
Master record
1 Discriminator String 1 Denotes master record type. Default
value is always “P”
2 Action String 10 Denotes file operation type. Allowed
values are new/modify
3 Branch Code String 3 Branch Code
4 Year Number 4 Indicates the year details
5 Weekly Holidays String 7 Defines weekly holidays
6 Unexp Hol String 1 Define unexpected holidays
Child record
1 Discriminator String 1 Denotes child record type. Default
value is always “C”
2 Branch Code String 3 Branch Code
3 Year Number 4 Indicates the year details
4 Month Number 2 Indicates the month details
5 Holiday List String 31 Denotes the Holiday List
Mandatory Fields are
Discriminator
Action
Branch Code
Year
Weekly Holidays
Unexp Hol
Discriminator (Child record)
Branch Code (Child record)

File Upload
5-377
Year (Child record)
Month (Child record)
Holiday List (Child record)
5.7 Currency Holiday File Upload
Country Code File Upload is used to perform country code maintenance in common core.
File Type Supported - CSV
File Naming Convention - CmcCurrencyHoliday_<UniqueName>.csv
Note: Replace the <UniqueName> for each file upload.
Table 222: Country Code File Upload – Records
Sequence Attribute Name Type Size Description
Master record
1 Discriminator String 1
Denotes master record type. Default
value is always “P”
2 Action String 10
Denotes file operation type. Allowed
values are new/modify
3 Currency String 3 Currency
4 Year Number 4 Indicates the year details
5 Weekly Holidays String 7 Defines weekly holidays
Child record
1 Discriminator String 1
Denotes child record type. Default
value is always “C”
2 Currency String 3 Currency
3 Year String 4 Indicates the year details
4 Month Number 2 Indicates the month details
5 Holiday List String 31 Denotes the Holiday List
Mandatory Fields are

File Upload
5-378
Discriminator
Action
Currency
Year
Weekly Holidays
Discriminator (Child record)
Currency (Child record)
Year (Child record)
Month (Child record)
Holiday List (Child record)
5.8 External Customer File Upload
External Customer File Upload is used to perform external customer maintenance in common core.
File Type Supported - CSV
File Naming Convention - CmcCustomerMaint_<UniqueName>.csv
Note: Replace the <UniqueName> for each file upload.
Table 223: External Customer File Upload – Records
Sequence Attribute Name Type Size Description
Master record
1 Action String 10 Denotes file operation type. Allowed
values are new/modify
2 Country String 3 Country of the customer
3 Language String 3 Denotes the Language of the
customer
4 Nationality String 3 Denotes the Nationality of the
customer
5 Locale String 10 Indicates the Locale of the customer
6 Deceased String 1 Indicates the customer is deceased

File Upload
5-379
Sequence Attribute Name Type Size Description
7 Frozen String 1 Denotes the customer account is
frozen
8 Whereabouts
Unknown String 1
Indicates the customer’s whereabouts
are unknown
9 RmId String 12 Relationship Manager ID
10 Sanctions Checks
Required String 1
Indicates the sanction check is
required
11 Staff String 1 Indicates a staff customer
12 Walkin Customer String 1 Indicates a walk-in customer
13 Source System String 35 Source System
14 Source System
Cust No String 35
Denotes the Source System Customer
Number
15 Customer No String 20 Number for the customer
16 Host Code String 8 Denotes the Host Code
17 Customer Type String 1 Type of Customer
18 Customer
Category String 10 Denotes the Customer Category
19 Customer Name1 String 105 Name of the customer
20 Short Name String 20 Short name of the customer
21 Address Line1 String 105 Indicates the customer address details
- Address Line 1
22 Address Line2 String 105 Indicates the customer address details
- Address Line 2
23 Address Line3 String 105 Indicates the customer address details
- Address Line 3
24 Address Line4 String 105 Indicates the customer address details
- Address Line 4
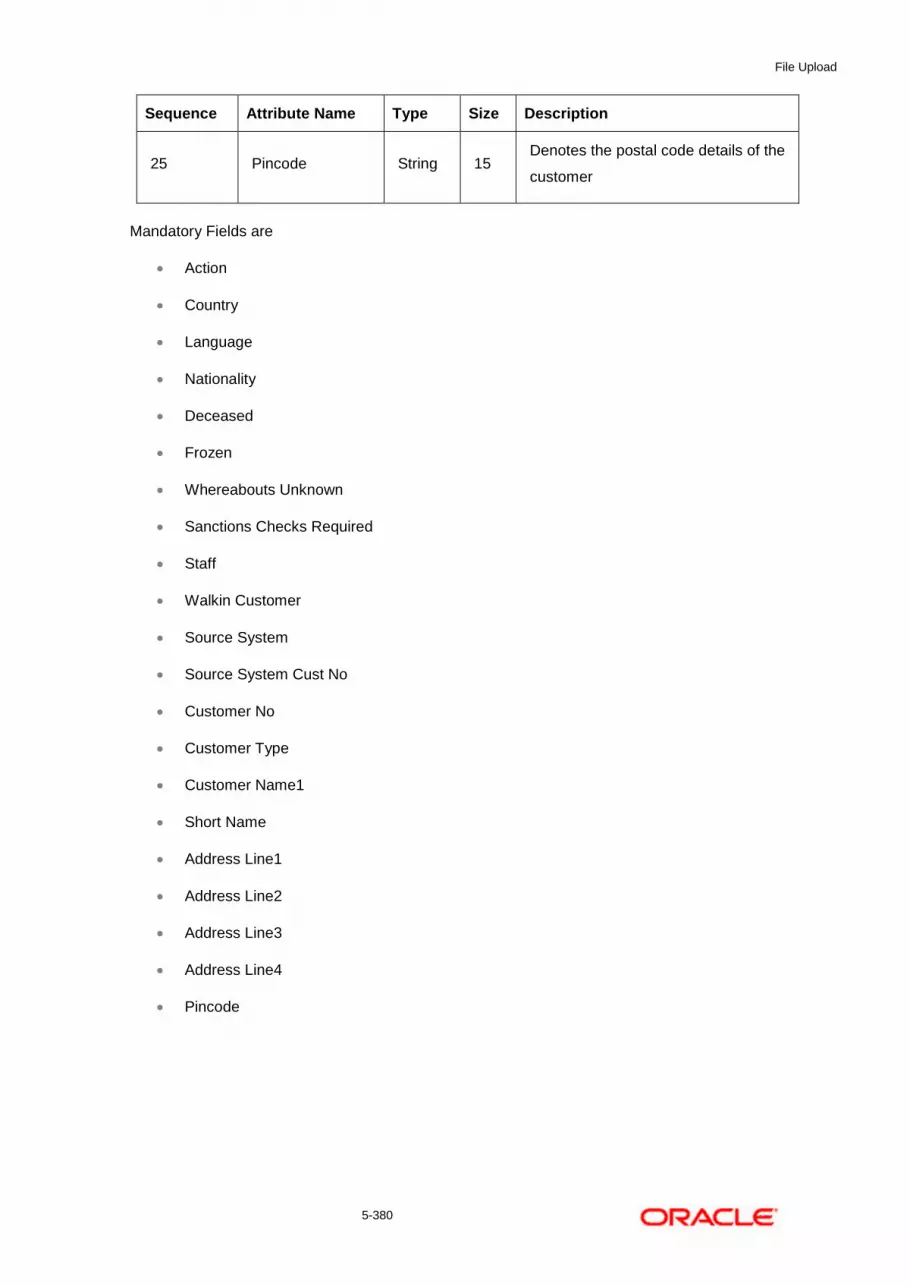
File Upload
5-380
Sequence Attribute Name Type Size Description
25 Pincode String 15 Denotes the postal code details of the
customer
Mandatory Fields are
Action
Country
Language
Nationality
Deceased
Frozen
Whereabouts Unknown
Sanctions Checks Required
Staff
Walkin Customer
Source System
Source System Cust No
Customer No
Customer Type
Customer Name1
Short Name
Address Line1
Address Line2
Address Line3
Address Line4
Pincode

File Upload
5-381
5.9 External Customer Account File Upload
External Customer Account File Upload is used to perform external customer account maintenance in common core.
File Type Supported - CSV
File Naming Convention - CmcAccountMaint_<UniqueName>.csv
Note: Replace the <UniqueName> for each file upload.
Table 224: External Customer Account File Upload – Records
Sequence Attribute Name Type Size Description
Master record
1 Action String 10 Denotes file operation type. Allowed
values are new/modify
2 Country Code String 10 Country Code
3 Address4 String 105 Denotes the address details - Address
Line 4
4 Address3 String 105 Denotes the address details - Address
Line 3
5 Address2 String 105 Denotes the address details - Address
Line 2
6 Address1 String 105 Denotes the address details - Address
Line 1
7 Eca Check Req String 1
Indicates External Credit Approval
Required check is required for the
external customer account
8 Account Class String 6 Denotes the Account Class
9 Ac Stat Dormant String 1 Indicates the account status is
dormant
10 Ac Stat Frozen String 1 Indicates the account status is frozen
11 Gl Stat Blocked String 1 Indicates the account status is
blocked

File Upload
5-382
Sequence Attribute Name Type Size Description
12 Ac Stat No Dr String 1 Indicates the account does not have
any debit facility
13 Ac Stat No Cr String 1 Indicates the account does not have
any credit facility
14 Ac Open Date String 35
Denotes the Account Open Date
(Date format should be yyyy-MM-dd,
i.e. 2018-03-30)
15 Cust Ac Name String 105 Account Name of the customer
16 Cust Ac Ccy String 3 Account Currency of the customer
17 Customer No String 20 Indicates the Customer Number
18 Source System
Acc Brn String 20 Denotes the Source Account Branch
19 Source System
Acc No String 35
Denotes the Source Customer
Account Number
20 Source System String 35 Source System
21 Cust Ac IBAN String 35 Indicates the account IBAN details
22 Host Code String 8 Denotes the host code details
23 Cust Account No String 20 Indicates the Customer Account
Number
Mandatory Fields are
Action
Country Code
Address4
Address3
Address2
Address1
Eca Check Req

File Upload
5-383
Account Class
Ac Stat Dormant
Ac Stat Frozen
Gl Stat Blocked
Ac Stat No Dr
Ac Stat No Cr
Ac Open Date
Cust Ac Name
Cust Ac Ccy
Customer No
Source System Acc Brn
Source System Acc No
Source System
Host Code
Cust Account No
5.10 Exchange Rate File Upload
Exchange Rate File Upload is used to perform exchange rate maintenance in common core.
File Type Supported - CSV
File Naming Convention - CmcCurrencyExchangeRate_<UniqueName>.csv
Note: Replace the <UniqueName> for each file upload.
Table 225: Exchange Rate File Upload – Records
Sequence Attribute Name Type Size Description
Master record
1 Discriminator String 1 Denotes master record type. Default
value is always “P”
2 Action String 10 Denotes file operation type. Allowed
values are new/modify

File Upload
5-384
Sequence Attribute Name Type Size Description
3 Branch Code String 3 Branch for which exchange rate is
applicable
4 Currency1 String 3 From currency pair
5 Currency2 String 3 To currency pair
Child record
1 Discriminator String 1 Denotes child record type. Default
value is always “C”
2 Branch Code String 3 Branch for which exchange rate is
applicable
3 Currency1 String 3 From currency pair
4 Currency2 String 3 To currency pair
5 Rate Type Number 8 Denotes rate type defined in the
system
6 Mid Rate Number 25 Mid rate applicable for the current pair
7 Buy Spread Number 40 Buy spread applicable for the currency
8 Sale Spread Number 40 Sell spread applicable for the currency
9 Buy Rate Number 25 Buy rate applicable for the currency
10 Sale Rate Number 25 Sell rate applicable for the currency
11 Rate Date String 35 Effective date applicable for the rate
Mandatory Fields are
Discriminator
Action
Branch Code
Currency1
Currency2
Discriminator

File Upload
5-385
Branch Code
Currency1
Currency2
Rate Type
Mid Rate
Buy Spread
Sale Spread
Buy Rate
Sale Rate
Rate Date

Error Codes and Messages
6-386
6. Error Codes and Messages
This topic contains the error codes and messages:
Table 226: Error Codes and Messages
Error Codes Messages
CC-01015 Default BIC Is Checked For More Than One BIC
CC-01016 Swift Address is Mandatory
CC-01017 Default BIC Is Not Checked For any BIC
CC-01018 Same Swift Address is present more than once
CC-01019 Mismatch in bank code
CC-ACC-002 Currency should be null for Multi-Currency Account
CC-ACC-102 Record already exist for Source Branch and Source Account No
combination
CC-ACC-169 Reopen not allowed for a closed Customer No
CC-BIC-010 Bic code is being used in branch maintenance. Close not allowed.
CC-BIC02 The BIC code does not conform to SWIFT standards
CC-BIC05 Record already maintained for the customer no
CC-BNK-001 Branch code is in Open status. Close not allowed.
CC-BNK-002 Reopen not allowed for a closed Branch Code
CC-BNK-003 Only one Bank Code is allowed.
CC-BRN-101 Active account / accounts exist for the branch code. Close not
allowed.
CC-BRN-102 This is HO branch. Close not allowed.
CC-BRN-103 Record for Source Branch Code already exists
CC-C00100 Relationship cannot be No for a Customer Linked BIC Code
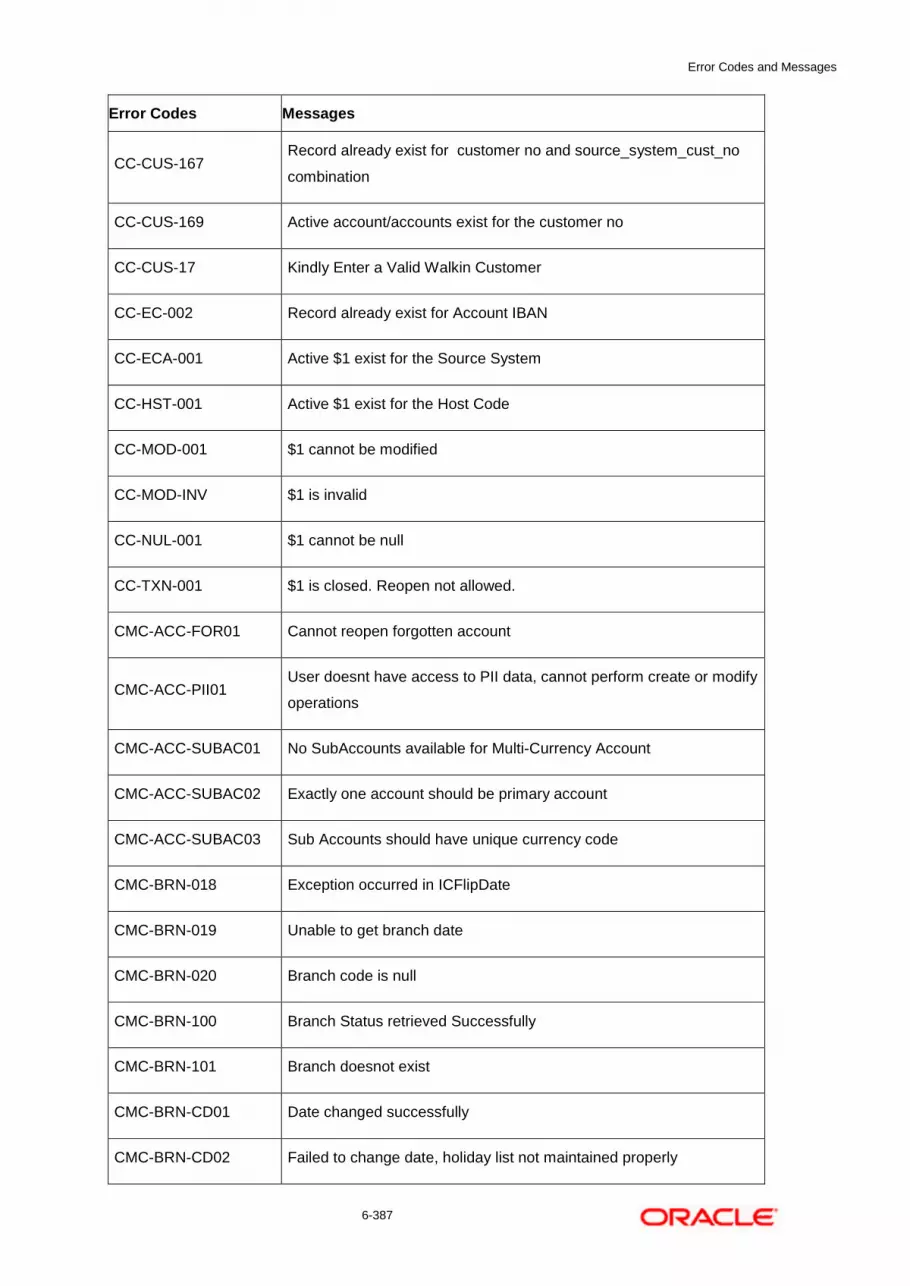
Error Codes and Messages
6-387
Error Codes Messages
CC-CUS-167 Record already exist for customer no and source_system_cust_no
combination
CC-CUS-169 Active account/accounts exist for the customer no
CC-CUS-17 Kindly Enter a Valid Walkin Customer
CC-EC-002 Record already exist for Account IBAN
CC-ECA-001 Active $1 exist for the Source System
CC-HST-001 Active $1 exist for the Host Code
CC-MOD-001 $1 cannot be modified
CC-MOD-INV $1 is invalid
CC-NUL-001 $1 cannot be null
CC-TXN-001 $1 is closed. Reopen not allowed.
CMC-ACC-FOR01 Cannot reopen forgotten account
CMC-ACC-PII01 User doesnt have access to PII data, cannot perform create or modify
operations
CMC-ACC-SUBAC01 No SubAccounts available for Multi-Currency Account
CMC-ACC-SUBAC02 Exactly one account should be primary account
CMC-ACC-SUBAC03 Sub Accounts should have unique currency code
CMC-BRN-018 Exception occurred in ICFlipDate
CMC-BRN-019 Unable to get branch date
CMC-BRN-020 Branch code is null
CMC-BRN-100 Branch Status retrieved Successfully
CMC-BRN-101 Branch doesnot exist
CMC-BRN-CD01 Date changed successfully
CMC-BRN-CD02 Failed to change date, holiday list not maintained properly

Error Codes and Messages
6-388
Error Codes Messages
CMC-BRN-EOD01 Branch Status not in TI, cannot initiate EOD
CMC-BRN-EOD02 EOD invoked for the branch
CMC-BRN-EOD03 Invalid Branch Code
CMC-BRN-EOD04 Eod Requested on Date is not Branch's Today
CMC-BRN-EOD05 EOD cannot be invoked on a holiday
CMC-BRN-EOD06 Date changed successfully
CMC-BRN-EOD07 EOD not invoked, cannot initiate change date
CMC-BRN-EOD08 EOFI job not completed, cannot initiate change date
CMC-BRN-EOD09 EOD not invoked, cannot initiate mark TI
CMC-BRN-EOD10 Date Change job not completed, cannot initiate TI for next day
CMC-BRN-EOD11 Mark TI successful
CMC-BRN-EOD12 Branch status not in TI, cannot initiate Mark EOFI
CMC-BRN-EOD13 Branch status not in EOFI, cannot change Date
CMC-BRN-EOD14 Branch status for next working date update to BOD
CMC-BRN-EOD15 Branch status not in BOD, cannot mark TI
CMC-BRN-EOD16 Branch status for next working date update to TI
CMC-BRN-EOD17 Branch Status Changed to EOFI
CMC-BRN-EOD18 Invoke Mark TI failed
CMC-BRN-EOD19 Date change completed cannot retrigger
CMC-BRN-EOD20 Mark TI completed cannot retrigger
CMC-BRN-EOD21 Date changed failed
CMC-BRN-EOD30 Invalid requested date, failed to parse
CMC-BRN-EOD31 Mark Eoti retry intiated

Error Codes and Messages
6-389
Error Codes Messages
CMC-BRN-EOD32 Cannot retry Mark EOFI which has not failed
CMC-BRN-EOD33 Date Changed successfully. $1
CMC-BRN-EOD34 BOD Batches completed successfully.
CMC-BRN-EOD35 BOD Batches retriggered successfully. $1
CMC-BRN-EOD36 $1. Hence EOFI Failed.
CMC-BRN-EOD37 Failed in getting current date
CMC-CCY-001 Duplicate records exists in Amount word currency Mapping
CMC-CCY-002 Duplicate records exists in Amount Text Mapping
CMC-CCY-003 Cannot change Currency Decimal for once authorized currencies
CMC-CCY-004 Cannot Change round unit if the round rule is Truncate (T)
CMC-CCY-005 Mandatory field Interest Method is not entered
CMC-CCY-006 Mandatory field Spot Days is not entered
CMC-CCY-007 Mandatory field Settlement Days is not entered
CMC-CCY-008 Mandatory field Country is not entered
CMC-CCY-009 Mandatory field Rule is not entered
CMC-CCY-010 Value should be in range of 0 and 999 for Settlement Days
CMC-CCY-011 Mandatory field Unit is not entered
CMC-CCY-012 Decimals/ Rounding Unit Mismatch
CMC-CCY-013 Numerator of Interest Method is not Actual
CMC-CCY-014 Duplicate Alternate Currency Code
CMC-CCY-015 Duplicate ISO Numeric Currency Code
CMC-CCY-016 Duplicate Euro currency
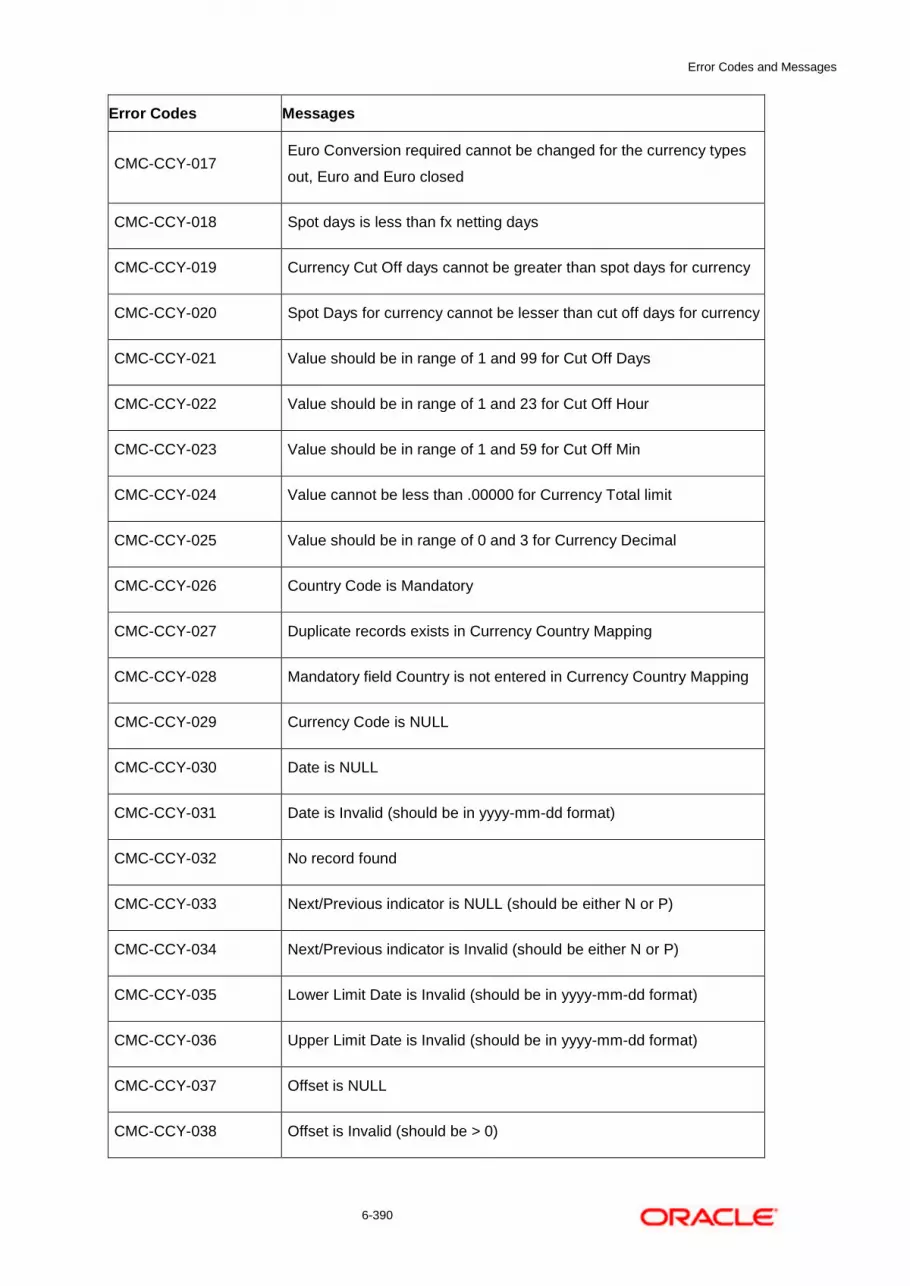
Error Codes and Messages
6-390
Error Codes Messages
CMC-CCY-017 Euro Conversion required cannot be changed for the currency types
out, Euro and Euro closed
CMC-CCY-018 Spot days is less than fx netting days
CMC-CCY-019 Currency Cut Off days cannot be greater than spot days for currency
CMC-CCY-020 Spot Days for currency cannot be lesser than cut off days for currency
CMC-CCY-021 Value should be in range of 1 and 99 for Cut Off Days
CMC-CCY-022 Value should be in range of 1 and 23 for Cut Off Hour
CMC-CCY-023 Value should be in range of 1 and 59 for Cut Off Min
CMC-CCY-024 Value cannot be less than .00000 for Currency Total limit
CMC-CCY-025 Value should be in range of 0 and 3 for Currency Decimal
CMC-CCY-026 Country Code is Mandatory
CMC-CCY-027 Duplicate records exists in Currency Country Mapping
CMC-CCY-028 Mandatory field Country is not entered in Currency Country Mapping
CMC-CCY-029 Currency Code is NULL
CMC-CCY-030 Date is NULL
CMC-CCY-031 Date is Invalid (should be in yyyy-mm-dd format)
CMC-CCY-032 No record found
CMC-CCY-033 Next/Previous indicator is NULL (should be either N or P)
CMC-CCY-034 Next/Previous indicator is Invalid (should be either N or P)
CMC-CCY-035 Lower Limit Date is Invalid (should be in yyyy-mm-dd format)
CMC-CCY-036 Upper Limit Date is Invalid (should be in yyyy-mm-dd format)
CMC-CCY-037 Offset is NULL
CMC-CCY-038 Offset is Invalid (should be > 0)
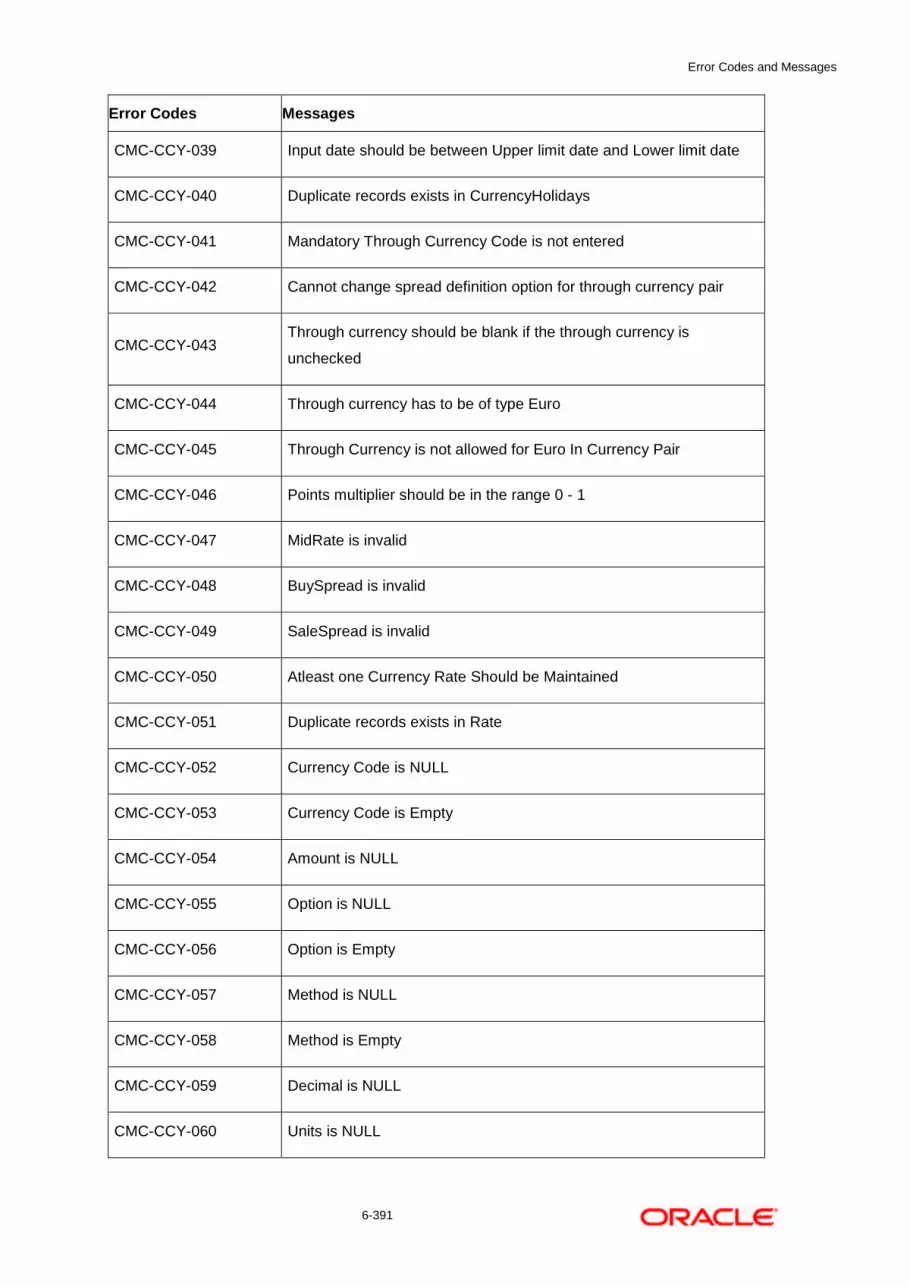
Error Codes and Messages
6-391
Error Codes Messages
CMC-CCY-039 Input date should be between Upper limit date and Lower limit date
CMC-CCY-040 Duplicate records exists in CurrencyHolidays
CMC-CCY-041 Mandatory Through Currency Code is not entered
CMC-CCY-042 Cannot change spread definition option for through currency pair
CMC-CCY-043 Through currency should be blank if the through currency is
unchecked
CMC-CCY-044 Through currency has to be of type Euro
CMC-CCY-045 Through Currency is not allowed for Euro In Currency Pair
CMC-CCY-046 Points multiplier should be in the range 0 - 1
CMC-CCY-047 MidRate is invalid
CMC-CCY-048 BuySpread is invalid
CMC-CCY-049 SaleSpread is invalid
CMC-CCY-050 Atleast one Currency Rate Should be Maintained
CMC-CCY-051 Duplicate records exists in Rate
CMC-CCY-052 Currency Code is NULL
CMC-CCY-053 Currency Code is Empty
CMC-CCY-054 Amount is NULL
CMC-CCY-055 Option is NULL
CMC-CCY-056 Option is Empty
CMC-CCY-057 Method is NULL
CMC-CCY-058 Method is Empty
CMC-CCY-059 Decimal is NULL
CMC-CCY-060 Units is NULL

Error Codes and Messages
6-392
Error Codes Messages
CMC-CCY-061 Maintenance Country is NULL
CMC-CCY-062 Maintenance Country is Empty
CMC-CCY-063 Currency1/Currency2/branch Code is NULL
CMC-CCY-065 Error in conversion
CMC-CCY-066 Rate is not handled for currency1 and currency2
CMC-CCY-067 Rate is not handled for currency2 and currency1
CMC-CCY-068 Error in Amount rounding
CMC-CCY-069 Currency definition is not maintaned for given currency and
maintenance country
CMC-CCY-070 Error in getting branch currency and country
CMC-CCY-071 Error in getting currency pair for currency1 and currency2
CMC-CCY-072 Error in getting Premium points for currency1 and currency2
CMC-CCY-073 Error in getting rate with through currency
CMC-CCY-074 Error in getting Rate
CMC-CCY-075 Rate History is not handled for currency1 and currency2
CMC-CCY-076 Rate History is not handled for currency2 and currency1
CMC-CCY-077 Currency Pair is not maintained
CMC-CCY-078 Error in purging
CMC-CCY-079 Data inadequate in currency Pair Definition
CMC-CCY-080 Currency Pair already exists for the given Maintenance Country
CMC-CCY-081 MidRate is mandatory
CMC-CCY-082 Either buySpread/buyRate are mandatory
CMC-CCY-083 Either saleSpread/saleRate are mandatory

Error Codes and Messages
6-393
Error Codes Messages
CMC-CUS-FOR01 Record successfully deleted
CMC-CUS-PII01 User doesnt have access to PII data, cannot perform create or modify
operations
CMC-EOD-001 Invoked EOD successfully
CMC-EOD-002 Failed while resolving current date
CMC-EOD-003 EOD flow is not maintained for $1 branch
CMC-EOD-004 EOD already invoked for today
CMC-EOD-005 Unable to invoke EOD
CMC-EOD-006 Retried EOD successfully
CMC-EOD-007 Failed to retry EOD
CMC-EOD-008 Pending maintenances exist. Failed to start EOD
CMC-EOD-009 Failed during pending maintenance check
CMC-EOD-010 Pending transactions exist. Failed to start EOD
CMC-EOD-011 Failed during pending transaction check
CMC-EOD-012 Marked cutoff for the branch successfully
CMC-EOD-013 Branch not in Transaction Input. Cannot mark cutoff
CMC-EOD-014 Branch not in BOD stage. Cannot release cutoff
CMC-EOD-015 Released cutoff for the branch successfully
CMC-EOD-016 Branch cutoff not released. Cannot mark Transaction Input
CMC-EOD-017 Branch cutoff not marked. Cannot mark End of Transaction Input
CMC-FORC-001 Request is null, not valid.
CMC-FORC-002 Forget customers request created successfully.
CMC-FORC-003 Failed to create forget entities request.

Error Codes and Messages
6-394
Error Codes Messages
CMC-FORC-004 Invalid id sent, id null
CMC-FORC-005 Already authorized
CMC-FORC-006 Authorized successfully
CMC-FORC-007 Record not found, invalid id.
CMC-FORC-008 Cannot delete authorized record
CMC-FORC-009 Record successfully deleted
CMC-FORC-010 Invalid Customer $1 added, customer should be valid and in closed
and authorized state without pending maintenance
CMC-FORC-011 Invalid request. Duplicate requests for customer number $1
CMC-INDBML-001 Usecase already exists with a same name
CMC-INDBML-002 Target Column cannot be null
CMC-INDBML-003 Unique Case Identifier Column cannot be null
CMC-INDBML-004 Invalid Partition column value
CMC-INDBML-005 Duplicate Column Values
CMC-INDBML-006 Partition Columns cannot be same as either of target, usecase
identifier or prediction column.
CMC-LOV-001 Invalid Source Code
CMC-LOV-002 Invalid Currency
CMC-LOV-003 Cannot Close the record for which rates are maintained
CMC-LOV-004 Invalid Language Code
CMC-LOV-005 Invalid Country
CMC-LOV-006 Invalid GLCode
CMC-LOV-007 Invalid Limit Currency
CMC-LOV-008 Invalid Year
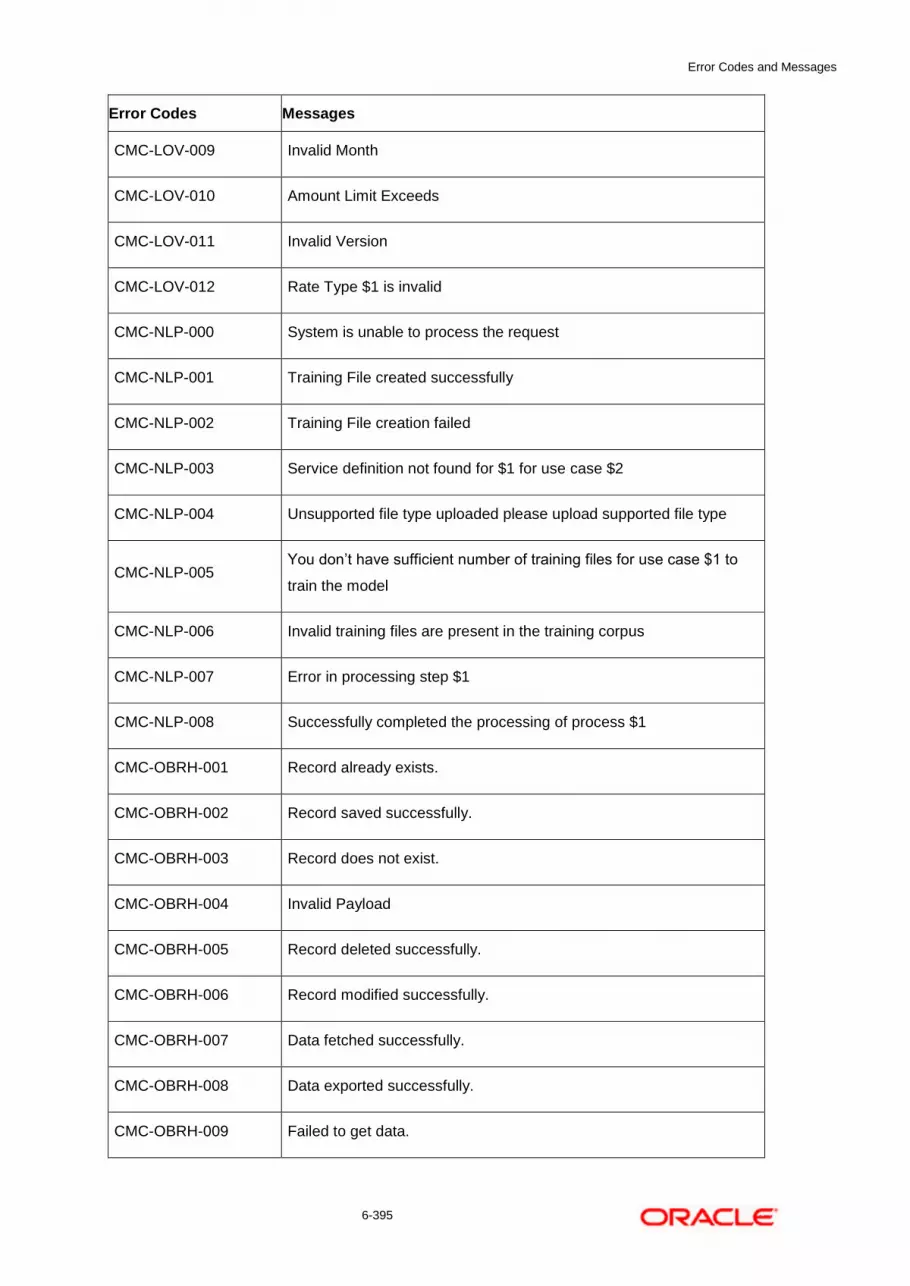
Error Codes and Messages
6-395
Error Codes Messages
CMC-LOV-009 Invalid Month
CMC-LOV-010 Amount Limit Exceeds
CMC-LOV-011 Invalid Version
CMC-LOV-012 Rate Type $1 is invalid
CMC-NLP-000 System is unable to process the request
CMC-NLP-001 Training File created successfully
CMC-NLP-002 Training File creation failed
CMC-NLP-003 Service definition not found for $1 for use case $2
CMC-NLP-004 Unsupported file type uploaded please upload supported file type
CMC-NLP-005 You don’t have sufficient number of training files for use case $1 to
train the model
CMC-NLP-006 Invalid training files are present in the training corpus
CMC-NLP-007 Error in processing step $1
CMC-NLP-008 Successfully completed the processing of process $1
CMC-OBRH-001 Record already exists.
CMC-OBRH-002 Record saved successfully.
CMC-OBRH-003 Record does not exist.
CMC-OBRH-004 Invalid Payload
CMC-OBRH-005 Record deleted successfully.
CMC-OBRH-006 Record modified successfully.
CMC-OBRH-007 Data fetched successfully.
CMC-OBRH-008 Data exported successfully.
CMC-OBRH-009 Failed to get data.

Error Codes and Messages
6-396
Error Codes Messages
CMC-OBRH-010 Cannot start disabled route.
CMC-OBRH-011 Data imported successfully.
CMC-OBRH-012 Failed to import.
CMC-OBRH-013 Failed to parse [$1]
CMC-OBRH-014 Data extracted successfully.
CMC-OBRH-015 Route state cannot be changed to Start as Consumer Service /
Provider is inactive.
CMC-OBRH-016 Modified/Deleted attribute is already in use by route.
CMC-OBRH-017 Something went wrong!
CMC-OBRH-018 Imported WSDL successfully
CMC-OBRH-019 Imported Swagger successfully
CMC-OBRH-020 Failed to import [$1]
CMC-OBRH-021 Failed to export [$1]
CMC-OBRH-022 Request failed [$1]
CMC-OBRH-023 Request is being processed
CMC-ORCH-001 Failed to initiate.
CMC-ORCH-002 Transaction is successfully initiated.
CMC-ORCH-003 Invalid action, failed to initiate.
CMC-ORCH-004 $1 is not submitted, transaction remains the same.
CMC-ORCH-005 Cannot proceed with submit as the action is not initiated.
CMC-ORCH-006 Cannot proceed with submit as the information is incomplete.
CMC-ORCH-007 Failed to submit.
CMC-ORCH-008 Record successfully submitted.

Error Codes and Messages
6-397
Error Codes Messages
CMC-ORCH-009 $1 is in-progress, failed to initiate.
CMC-ORCH-010 Aw, snap! An unexpected exception occurred, try again.
CMC-ORCH-011 Invalid request.
CMC-ORCH-012 Cannot proceed with submit as the action is not initiated.
CMC-ORCH-013 Cannot find the provided information.
CMC-ORCH-014 Record is not yet submitted by $1, cannot initiate the action.
CMC-ORCH-015 Record already unlocked by $1.
CMC-ORCH-016 One record can be authorized at a time. Please close the screen and
try again
CMC-ORCH-017 Current operation terminated
CMC-ORCH-018 Current operation could not be terminated
CMC-OV-001 Override Codes must not be empty
CMC-OV-002 Business Overrides Saved Successfully
CMC-OV-003 Business Overrides Updated Successfully
CMC-OV-004 Business Overrides Authorized Successfully
CMC-OV-005 Business Overrides Approval Pending
CMC-OV-006 Maker Cannot Authorize
CMC-OV-007 Multiple Authorizations not allowed for checker
CMC-OV-008 No Records found for approval
CMC-OV-009 Maker should approve the records
CMC-OV-010 Reference number is not valid
CMC-OV-011 Exception Occurred while converting string to number
CMC-OV-012 Server Error Occurred during API call

Error Codes and Messages
6-398
Error Codes Messages
CMC-OV-013 Client Error Occurred during API call
CMC-OV-014 Illegal State Exception Occurred
CMC-OV-015 JTA Transaction unexpectedly rolled back
CMC-OV-016 Exception Occurred while creating Bean
CMC-OV-017 Unexpected Exception Occurred
CMC-OV-018 Exception Occurred while Executing Query
CMC-STR-001 mandatory fields are missing...
CMC-STR-002 invalid real account number
CMC-STR-003 Real Account No cannot be modified
CMC-STR-004 Structured Address is already created for this Real Account
CMC-STR-005 Structured Address is already created for this External Virtual Account
CMC-STR-006 invalid virtual account number
CMC-STR-007 Virtual Account No cannot be modified
CMC-VAM-001 Rolled Back Due to Exception
ERR_DEF_CODE System is unable to process the request
GCS-AUTH-01 Record Successfully Authorized
GCS-AUTH-02 Valid modifications for approval were not sent. Failed to match
GCS-AUTH-03 Maker cannot authorize
GCS-AUTH-04 No Valid unauthroized modifications found for approval.
GCS-CLOS-002 Record Successfully Closed
GCS-CLOS-01 Record Already Closed
GCS-CLOS-02 Record Successfully Closed

Error Codes and Messages
6-399
Error Codes Messages
GCS-CLOS-03 Unauthorized record cannot be closed, it can be deleted before first
authorization
GCS-COM-001 Record does not exist
GCS-COM-002 Invalid version sent, operation can be performed only on latest version
GCS-COM-003 Please Send Proper ModNo
GCS-COM-004 Please send makerId in the request
GCS-COM-005 Request is Null. Please Resend with Proper SELECT
GCS-COM-006 Unable to parse JSON
GCS-COM-007 Request Successfully Processed
GCS-COM-008 Modifications should be consecutive.
GCS-COM-009 Resource ID cannot be blank or "null".
GCS-COM-010 Successfully cancelled $1.
GCS-COM-011 $1 failed to update.
GCS-DEL-001 Record deleted successfully
GCS-DEL-002 Record(s) deleted successfully
GCS-DEL-003 Modifications didnt match valid unauthorized modifications that can be
deleted for this record
GCS-DEL-004 Send all unauthorized modifications to be deleted for record that is not
authorized even once.
GCS-DEL-005 Only Maker of first version of record can delete modifications of record
that is not once authorized.
GCS-DEL-006 No valid unauthroized modifications found for deleting
GCS-DEL-007 Failed to delete. Only maker of the modification(s) can delete.
GCS-MOD-001 Closed Record cannot be modified
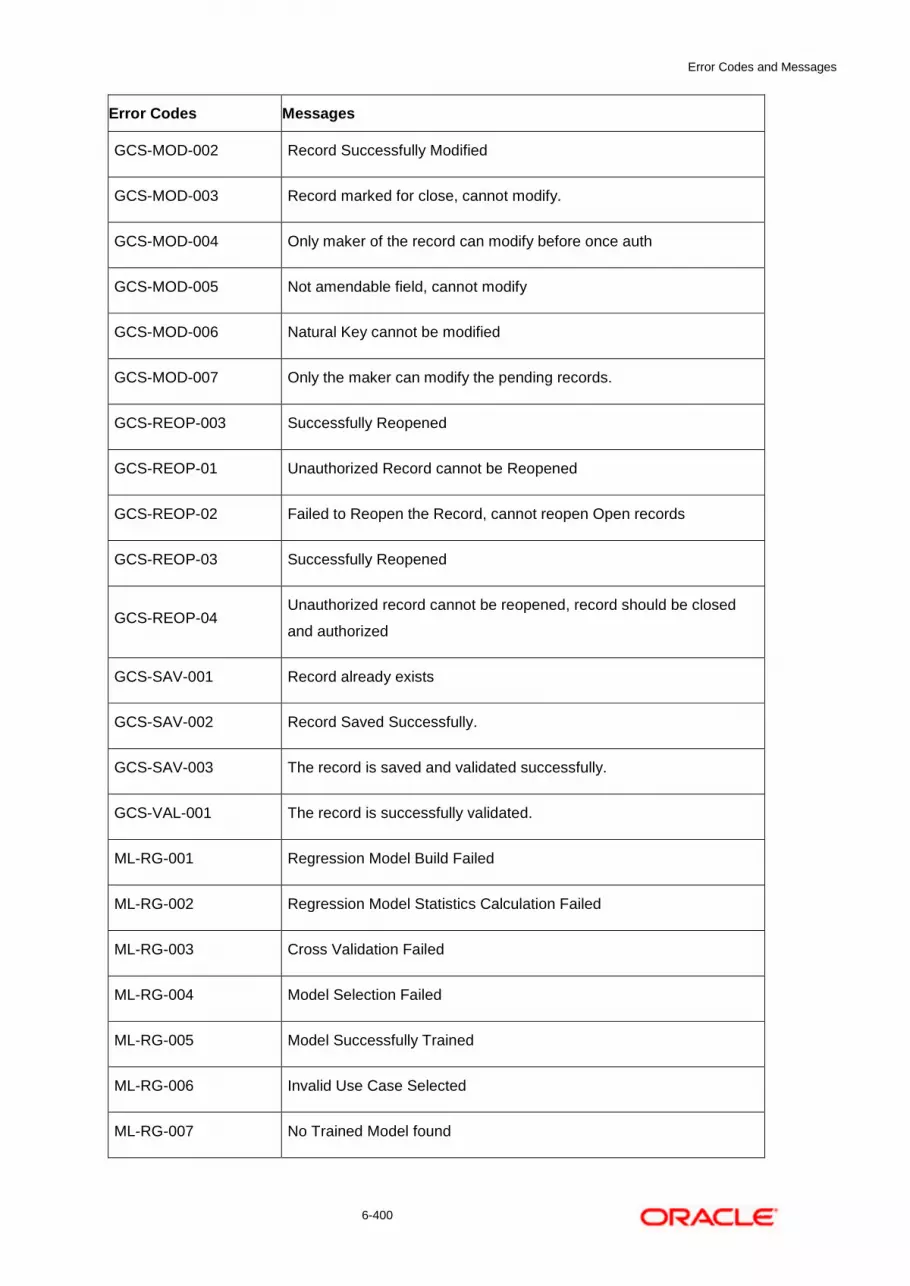
Error Codes and Messages
6-400
Error Codes Messages
GCS-MOD-002 Record Successfully Modified
GCS-MOD-003 Record marked for close, cannot modify.
GCS-MOD-004 Only maker of the record can modify before once auth
GCS-MOD-005 Not amendable field, cannot modify
GCS-MOD-006 Natural Key cannot be modified
GCS-MOD-007 Only the maker can modify the pending records.
GCS-REOP-003 Successfully Reopened
GCS-REOP-01 Unauthorized Record cannot be Reopened
GCS-REOP-02 Failed to Reopen the Record, cannot reopen Open records
GCS-REOP-03 Successfully Reopened
GCS-REOP-04 Unauthorized record cannot be reopened, record should be closed
and authorized
GCS-SAV-001 Record already exists
GCS-SAV-002 Record Saved Successfully.
GCS-SAV-003 The record is saved and validated successfully.
GCS-VAL-001 The record is successfully validated.
ML-RG-001 Regression Model Build Failed
ML-RG-002 Regression Model Statistics Calculation Failed
ML-RG-003 Cross Validation Failed
ML-RG-004 Model Selection Failed
ML-RG-005 Model Successfully Trained
ML-RG-006 Invalid Use Case Selected
ML-RG-007 No Trained Model found

Error Codes and Messages
6-401
Error Codes Messages
ML-RG-008 Batch Scoring Failed
ML-RG-009 Successfully completed Batch scoring
ML-UTIL-003 Failed in Random Sampling
ML-UTIL-004 Too less data for model building
ML-UTIL-005 Failed in Splitting Data
ML-UTIL-006 Failed in Selecting Feature
ML-UTIL-007 Failed to Drop Model(s)
ST-CUS-167 Record already exist for customer no and source_system_cust_no
combination
ST-SAVE-027 Request Successfully Processed
CBS-CRITERIA-001 Criteria Code cannot be blank
CBS-CRITERIA-002 Criteria Description cannot be blank
CBS-CRITERIA-003 Select valid Product Processor
CBS-CRITERIA-004 Atleast one Rule should be selected in Criteria Definition
CBS-CRITERIA-005 Rule Description cannot be blank
CBS-CRITERIA-006 Select a Rule ID from the list
CBS-CRITERIA-007 Enter a valid number for Priority
CBS-CRITERIA-008 Enter a valid number for Priority
CBS-CRITERIA-009 Duplicate entries found for Rule ID
CBS-CRITERIA-010 Duplicate entries found for Priority
CBS-CRITERIA-011 Enter valid Parent Rule ID for
CBS-CRITERIA-012 Duplicate entries found for Rule ID
CBS-CRITERIA-013 Cannot add child Rule when Call All Bureau is enabled

Error Codes and Messages
6-402
Error Codes Messages
CBS-CRITERIA-014 Duplicate entries found for Priority
CBS_ERR_004 Parameter description cannot be modified
CBS_LKUP_01 Duplicate entries found for Lookup Code
CBS_500
Error occurred at Bureau Call
Response structure from Bureau is different
CBS_SYSPAR_001 System parameter not maintained for the bureau for history call
CBS_400
Facts not found for Bureau identification Rule
Empty response from criteria for given PPcode
Empty response from Oracle Banking Routing Hub from bureau call
Bureau identification Rule not found for given facts
CBS-CRTR-015 Criteria Code has exceeded the max length specified
CBS-CRTR-016 Description has exceeded the max length specified
CBS-CRTR-017 Rule Id has exceeded the max length specified
CBS-CRTR-018 Rule Description has exceeded the max length specified
CBS_BR_DTLS_NOT_
FOUND Bureau Details are not provided
CBS_BR_DTLS_NOT_
MNT
Bureau Details are not maintained for +{reqBureauProductType}
(variable, value will be replaced at runtime from payload)
CDS-DML-006 Invalid range definition. Either range or value is allowed
CDS-DML-007 Duplicate $1 values are not allowed
CDS-DML-010 From value should not be greater than To value
CDS-RUL-001 Error occurred while evaluating the rule
CDS-DML-003 Effective date should be less than Expiry Date
CDS-PRC-006 Effective date should be less than the Expiry Date

Error Codes and Messages
6-403
Error Codes Messages
CDS-DML-002 Maintain at least one record in $1
CDS-DML-014 Effective date cannot be less than the Product Processor Effective
date.
CDS-PRC-014 Effective date cannot be less than the Product Processor Effective
Date.
CDS-DML-017 if dmlAppEnabledInd is selected as N then dmlFeature can not be null
CDS-DML-018 if dmlAppEnabledInd is selected as y then dmlScoreRuleId can not be
null
CDS-DML-022 Input parameter is missing or incorrect. Unable to resolve any scoring
model
CDS-DML-023 Input parameter is missing or incorrect. Unable to calculate the score
CDS-DML-013 Invalid product processor
CDS-PRC-011 Incorrect Range Definition. Range definition should be continuous in
$1
CDS-PRC-012 Duplicate $1 values are not allowed
CDS-DML-015 Product Processor is not authorized
CDS-DML-011 Incorrect Range Definition. Range definition should be continuous
CDS-DML-012 Input parameter is missing or incorrect. Unable to resolve any pricing
setup
CDS-QFT-001 if qftRuleApplicableInd is selected as y then qftRuleName and
qftRuleId cannot be null
CDS-QFT-002 if qftRuleApplicableInd is selected as N then qftFactName and
qftFactId cannot be null
CDS-QFT-005 qftCode cannot be other than alphanumeric
CDS-QFT-004 Fact or rule not found
CDS-DML-008 Invalid rule name

Error Codes and Messages
6-404
Error Codes Messages
CDS-PRC-0010 Fact or rule not found
CDS-PRC-007 Pricing Rate definition should be greater than or equal to minimum
rate and less than or equal to maximum rate
CDS-PRC-009 rate percentage of range cannot be equal to zero or less than the
previous one
CDS-PRC-005 $1 should be equal to or greater than the System date
CDS-PRC-010 Invalid product processor
CDS-PRC-004 Maintain at least one record $1
CDS-PRC-001 Min Rate cannot be less than zero or not be more than max rate
CDS-PRC-003 Overlapping price range definition not allowed $1
CDS-PRC-002 Rate Type cannot any other keyword
CDS-PRC-008 $1 cannot be less than or equal to zero
CDS-DML-009 Unable to resolve any scoring model
CDS-PPR-001 $1 should be equal to or greater than the System date
CDS-DML-005 Overlapping range definition not allowed in $1
CDS-QFT-003 Invalid product processor
CDS-DML-001 $1 should be equal to or greater than the Posting date
CDS-DML-019 Unable to resolve the best fit scoring model. Multiple scoring model
resolved
CDS-DML-016 Unable to resolve the best fit pricing model. Multiple pricing model
resolved
CDS-DML-004 The sum of weightage assigned to the feature code should be 100
CDS-PPR-002 Effective date should be less than Expiry Date
CDS-PRC-013 Rate definition should be greater than or equal to minimum rate and
less than or equal to maximum rate

Error Codes and Messages
6-405
Error Codes Messages
CDS-DML-020 Unable to resolve the best fit application scoring model Multiple
application scoring model resolved
CDS-DML-021 Unable to resolve the best fit decision and grade matrix. Multiple
decision and grade matrix resolved
CDS-BWC-001 $1 should be equal to or greater than the System date
CDS-BWC-002 Maintain at least one record in $1
CDS-BWC-003 Effective date should be less than the Expiry Date
CDS-BWC-014 Effective date cannot be less than the Product Processor Effective
date
CDS-STG-006 Effective Date cannot be null or blank
CDS-STG-007 Expiry Date cannot be null or blank
CDS-STG-008 Industry cannot be null or blank
CDS-STG-009 Module cannot be null or blank
CDS-STG-010 Line of Business cannot be null or blank
CDS-STG-011 Effective date should be less than the Expiry Date
CDS-STG-012 Expiry Date should be equal to or greater then the System date
CDS-STG-013 Invalid Strategy Code
CDS-STG-014 Invalid Industry
CDS-STG-015 Invalid Module
CDS-STG-016 Invalid Line of Business
CDS-STG-017 Invalid product processor
CDS-STG-018 Invalid Account Category
CDS-STG-019 Invalid modes for the selected module
CDS-STG-020 Invalid combination of steps for selected modes

Error Codes and Messages
6-406
Error Codes Messages
CDS-STG-021 Record already exists
CDS-STG-022 Effective date cannot be less than the Product Processor Effective
Date
CDS-RUL-002 Fact already exists
CDS-STG-023 Invalid combination of modes and steps
CDS-DML-043 Invalid $1 sent
CDS-DML-040 FeatureDTO missing. Kindly enter the details
CDS-LML-029 Logical Model Reason Code is Invalid
CDS-DML-024 Negative values not allowed
CDS-DML-025 Category not allowed in case of multi applicant scoring model
CDS-DML-026 Percenatge cannot be greater than 100
CDS-DML-027 For multi-applicant max value not allowed
CDS-DML-028 Max value not required for range type Value
CDS-DML-029 Range type cannot be null
CDS-DML-030 Max value cannot be null
CDS-DML-031 Please enter a valid scoring model type
CDS-DML-032 Please enter a valid range type
CDS-DML-033 Feature list not required for application model
CDS-DML-034 Scoring rule id not required for the scoring model type
CDS-DML-035 Please enter a valid feature type
CDS-DML-036 Only range Type Value is allowed, for fact type feature
CDS-DML-037 Only range Type ParamPercent is allowed, for rule based feature
CDS-DML-038 Only range Type Value is allowed, for Text type fact

Error Codes and Messages
6-407
Error Codes Messages
CDS-DML-039 Category code missing
CDS-LML-015 Logical Model Code size must be between 1 and 30
CDS-LML-016 Logical Model Description size must be between 1 and 240
CDS-LML-017 Logical Model Effective Date cannot be null
CDS-LML-018 Logical Model Expiry Date cannot be null
CDS-LML-019 Logical Model Rule Id size must be between 1 and 80
CDS-LML-020 Logical Model Details Rule Id cannot be null
CDS-LML-021 Reason Code cannot be null
CDS-LML-022 Logical Model comments size must be between 1 and 80
CDS-LML-023 Logical Model Sequence must be in the range of 1 to 999
CDS-LML-024 Logical Model Sequence is Incorrect
CDS-LML-025 Logical Model Priority must be in the range of 1 to 100
CDS-LML-026 Logical Model Details cannot be null or empty
CDS-LML-027 Rule Id cannot be duplicate
CDS-LML-028 Invalid Rule Id
CDS-QUR-001 Invalid Input for QuestionnaireId, can not be null or blank
CDS-QUR-002 Invalid Input for QuestionnaireId, null or blank required
CDS-QUR-003 Invalid Input for QuestionId, null or blank required
CDS-QUR-004 Invalid Input for QuestionId, can not be null or blank
CDS-QUR-005 Questionnaire Code cannot be null or empty
CDS-QUR-006 Questionnaire Description cannot be null or empty
CDS-QUR-007 Product Processor cannot be null or empty
CDS-QUR-008 Question Code cannot be null or empty

Error Codes and Messages
6-408
Error Codes Messages
CDS-QUR-009 Question Short Name cannot be null or empty
CDS-QUR-010 Question Description cannot be null or empty
CDS-QUR-011 Question Type cannot be null or empty
CDS-QUR-012 Answer Description cannot be null or empty
CDS-QUR-013 Questionnaire Code size must be between 1 and 30
CDS-QUR-014
CDS-QUR-015
Questionnaire Description size must be between 1 and 240
Question Code cannot be duplicate for a product processor
CDS-QUR-016 Question Sequence Number cannot be null, empty or zero, negetive
CDS-QUR-017 Answer Option Sequence Number cannot be null, empty or zero,
negetive
CDS-QUR-018 Question Sequence Number cannot be duplicate for a questionnaire
CDS-QUR-019 Answer Option Sequence Number cannot be duplicate for a Question
CDS-QUR-020 Answer OptionId cannot be null or empty
CDS-QUR-021 Answer OptionId cannot be duplicate for a question
CDS-BWC-004 Incorrect execution stage
CDS-BWC-005 $1 fact or rule not found
CDS-QUR-022 Input for whether Question Mandatory cannot be null or empty
CDS-QUR-023 System will not allow to add questions where response choice has not
been captured,At least 2 record should be available
CDS-QUR-024
System will not allow to save the questionnaire without any question
configured, Atleast 1 question should be configured in the
questionnaire
CDS-QUR-025
CDS-STG-024
Question Code cannot be duplicate for a questionnaire.
Invalid type and value for additional info

Error Codes and Messages
6-409
Error Codes Messages
CDS-STG-025 Selection of atleast 1 mode is mandatory
CDS-STG-026 Effective date cannot be updated after authorisation
CDS-STG-027 Multiple values of same type are not allowed under Additional
Information
CDS-LOOKUP-001 Lookup Type must be alphanumeric
CDS-LOOKUP-002 Lookup Type must be between 1 and 30
CDS-LOOKUP-003 Lookup Description must be between 1 and 240
CDS-LOOKUP-004 Duplicate lookup codes not allowed
CDS-STG-001 Strategy Code cannot be null or blank
CDS-STG-002 Strategy Code Description cannot be null or blank
CDS-STG-003 Product Processor cannot be null or blank.
CDS-STG-004 Product Processor Description cannot be null or blank.
CDS-STG-005 Account Category cannot be null or blank.
CDS-DML-041 Multiple Range definitions not allowed in case of MultiApplicant
Scoring Model
CDS-DML-042 Incorrect Range Definition. $1

Glossary
7-410
7. Glossary
This section provides a glossary of all terms and abbreviations used in the user manual.
Accounts
Continuing financial relationship between a bank and a customer, in which deposits and debts are held and processed within a framework of established rules and procedures.
Reports
A page containing information organized in a narrative, graphic, or tabular format, prepared on ad-hoc, periodic, recurring, regular, or as required basis. Reports may refer to specific periods, events, occurrences, or subjects.
Pareto Chart
It is a type of chart that consists of both bars and a line graph, where individual values are represented in descending order by bars, and the cumulative total is represented by the line.
Sunburst Chart
It is a type of chart that is ideal for displaying hierarchical data. Each level of the hierarchy is represented by one ring or circle with the innermost circle as the top of the hierarchy. A sunburst chart without any hierarchical data (one level of categories), looks similar to a doughnut chart.
Virtual Account
Virtual accounts are provided to a corporate by its banking partner. Each account is a subsidiary or sub- account of the client’s own physical account with the bank; they cannot exist outside of the immediate relationship; hence they are virtual.
Virtual Identifier
Virtual identifier serves to segregate any funds from any other funds in the same main account and yet is inextricably linked to the virtual account.

List of Menus
8-411
8. List of Menus 1. 3P Service Integration - 4.3 3P Service Integration (pg. 328)
2. Additional Field Maintenance - 3.1 Additional Field Maintenance (pg. 15)
3. Advice - 3.2 Advice (pg.17)
4. Amount Text Language - 3.3 Amount Text Language (pg. 20)
5. BIC Directory - 3.4 BIC Directory (pg. 23)
6. Borrowing Capacity - 3.46 Borrowing Capacity (pg.212)
7. Branch EDD - 3.5 Branch EOD (pg. 27)
8. Bureau Integration Service - 3.34 Bureau Integration Service (pg. 127)
9. Country Code - 3.6 Country Code (pg. 31)
10. Create Questionnaire - 3.47 Questionnaire (pg. 223)
11. Credit Bureau Display - 3.35 Credit Bureau Display (pg.130)
12. Criteria - 3.37 Criteria (pg.140)
13. Currency Definition - 3.7 Currency Definition (pg. 34)
14. Currency Exchange Rate - 3.8 Currency Exchange Rate (pg. 40)
15. Currency Holiday Master - 3.9 Currency Holiday Master (pg. 43)
16. Currency Pair Definition - 3.10 Currency Pair Definition (pg. 46)
17. Currency Rate Type - 3.11 Currency Rate Type (pg. 49)
18. Customer Category - 3.12 Customer Category (pg. 51)
19. Decision Grade Matrix - 3.51 Decision Grade Matrix (pg.267)
20. Decision Service - 3.40 Decision Service (pg. 172)
21. ECA System - 3.13 ECA System (pg. 53)
22. Entities - 2.2 Entities (pg. 7)
23. Execution Summary - 3.53 View Execution Summary (pg.294)
24. External Bank Parameters - 3.14 External Bank Parameters (pg. 55)
25. External Branch Parameters - 3.15 External Branch Parameters (pg. 57)
26. External Chart Account - 3.16 External Chart Account (pg. 61)
27. External Customer - 3.17 External Customer (pg. 63)
28. External Customer Account - 3.18 External Customer Account (pg. 66)
29. External Customer Account Structured Address - 3.19 External Customer Account Structured
Address (pg. 70)
30. External Virtual Account Structured Address - 3.20 External Virtual Account Structured Address (p
73)
31. Forget Process - 3.21 Forget Process (pg. 74)
32. Host Code - 3.22 Host Code (pg. 76)
33. Integrating Bureau Integration Service with Oracle Banking Routing Hub - 3.33 Integrating Bureau
Integration Service with Oracle Banking Routing Hub (pg.101)
34. Integrating Decision Service with Oracle Banking Routing Hub - 3.39 Integrating Decision Service
with Oracle Banking Routing Hub (pg. 152)
35. Language Code - 3.23 Language Code (pg. 78)
36. Local Holiday - 3.24 Local Holiday (pg. 80)

List of Menus
8-412
37. Logical Model - 3.45 Logical Model (pg.200)
38. Lookup - 3.36 Lookup (pg.134)
39. Media - 3.25 Media (pg. 82)
40. Multi-Currency Account Linkage - 3.26 Multi-Currency Account Linkage (pg. 85)
41. Operation - 4.2 Operation (pg. 324)
42. Process Code - 3.27 Process Code (pg. 87)
43. Pricing - 3.52 Pricing (pg.282)
44. Pricing Source System - 3.32 Pricing Source System (pg. 98)
45. Product Processor - 3.41 Product Processor (pg.175)
46. Qualitative Scoring Model - 3.48 Qualitative Scoring Model (pg. 231)
47. Quantitative Scoring Model - 3.50 Quantitative Scoring Model (pg. 249)
48. Scoring Feature - 3.49 Scoring Feature (pg. 245)
49. Strategy Configuration - 3.44 Strategy Configuration (pg.192)
50. System Dates - 3.28 System Dates (pg. 90)
51. System Parameter - 3.38 System Parameter (pg.147)
52. Transaction Code - 3.29 Transaction Code (pg. 91)
53. Toolkit - 4.1 Toolkit (pg.312)
54. Upload Source - 3.30 Upload Source (pg. 93)
55. Upload Source Preferences - 3.31 Upload Source Preference (pg. 95)
56. Users - 2.3 Users (pg. 10)
57. Customer Access Group - 2.12 Customer Access Group (pg. 2-45)

Feedback and Support
9-413
9. Feedback and Support
Oracle welcomes customers' comments and suggestions on the quality and usefulness of the document. Your feedback is important to us. If you have a query that is not covered in this user guide or if you still need assistance, please contact documentation team.