clone and os customization - cisco
TRANSCRIPT
Clone and OS Customization
• Clone and OS Customization Process, page 2
• Automated Cloning and OS Customization, page 3
• Manual Cloning and OS Customization, page 16
Installing and Configuring Cisco HCS for Contact Center 10.0(1) 1
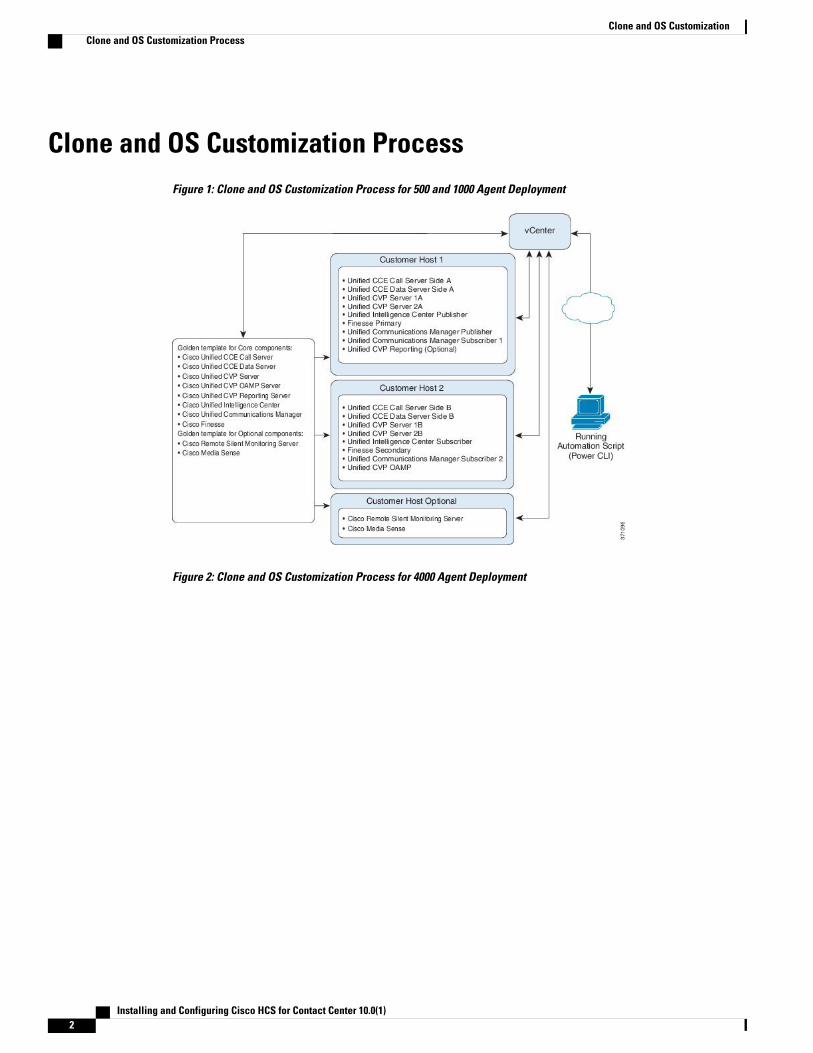
Clone and OS Customization ProcessFigure 1: Clone and OS Customization Process for 500 and 1000 Agent Deployment
Figure 2: Clone and OS Customization Process for 4000 Agent Deployment
Installing and Configuring Cisco HCS for Contact Center 10.0(1)2
Clone and OS CustomizationClone and OS Customization Process
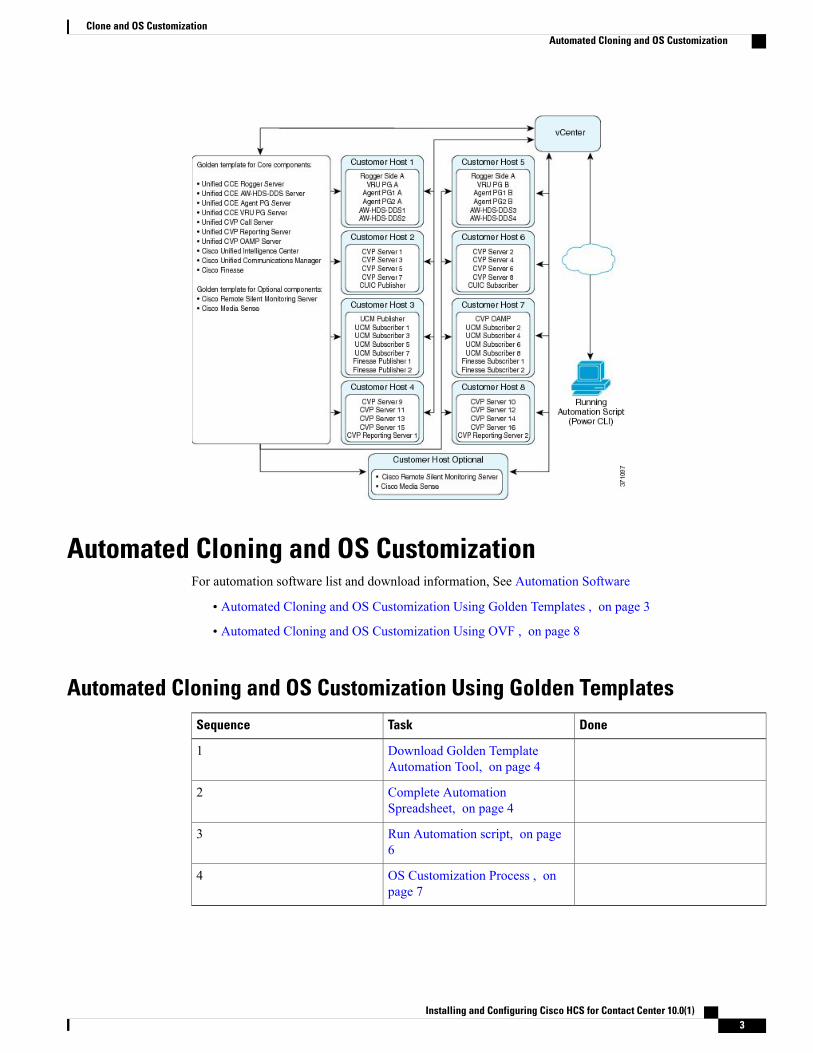
Automated Cloning and OS CustomizationFor automation software list and download information, See Automation Software
• Automated Cloning and OS Customization Using Golden Templates , on page 3
• Automated Cloning and OS Customization Using OVF , on page 8
Automated Cloning and OS Customization Using Golden TemplatesDoneTaskSequence
Download Golden TemplateAutomation Tool, on page 4
1
Complete AutomationSpreadsheet, on page 4
2
Run Automation script, on page6
3
OS Customization Process , onpage 7
4
Installing and Configuring Cisco HCS for Contact Center 10.0(1) 3
Clone and OS CustomizationAutomated Cloning and OS Customization
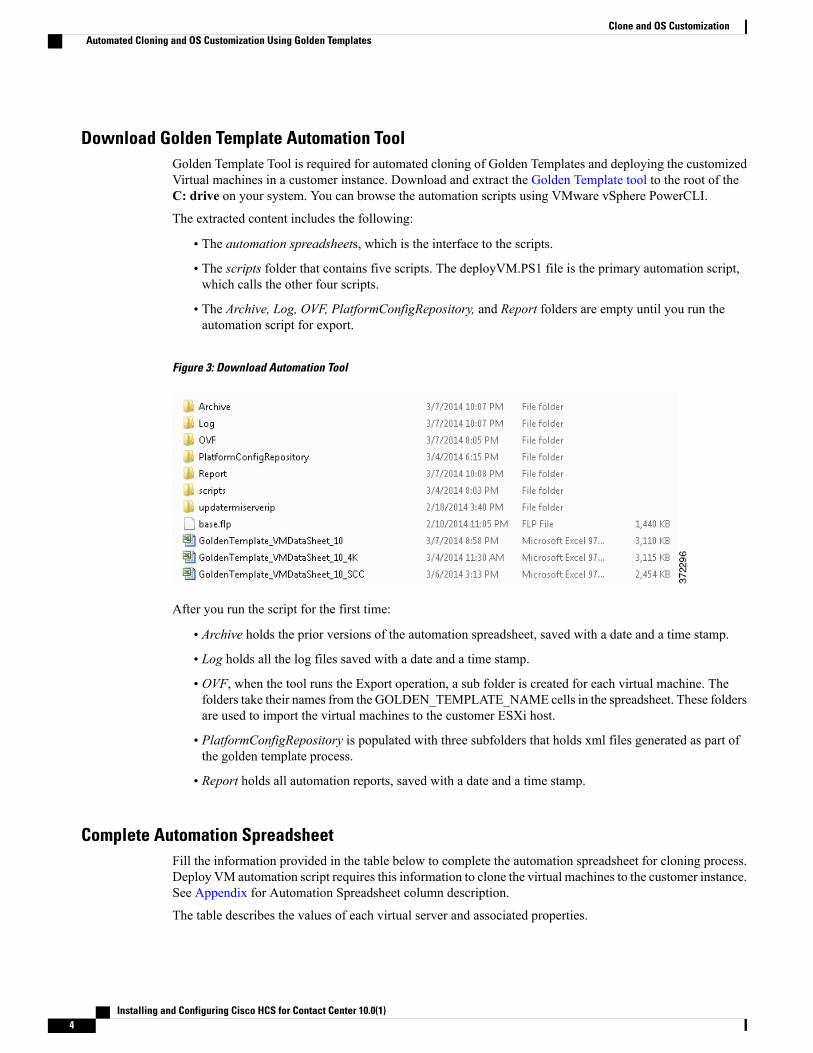
Download Golden Template Automation ToolGolden Template Tool is required for automated cloning of Golden Templates and deploying the customizedVirtual machines in a customer instance. Download and extract the Golden Template tool to the root of theC: drive on your system. You can browse the automation scripts using VMware vSphere PowerCLI.
The extracted content includes the following:
• The automation spreadsheets, which is the interface to the scripts.
• The scripts folder that contains five scripts. The deployVM.PS1 file is the primary automation script,which calls the other four scripts.
• The Archive, Log, OVF, PlatformConfigRepository, and Report folders are empty until you run theautomation script for export.
Figure 3: Download Automation Tool
After you run the script for the first time:
• Archive holds the prior versions of the automation spreadsheet, saved with a date and a time stamp.
• Log holds all the log files saved with a date and a time stamp.
• OVF, when the tool runs the Export operation, a sub folder is created for each virtual machine. Thefolders take their names from the GOLDEN_TEMPLATE_NAME cells in the spreadsheet. These foldersare used to import the virtual machines to the customer ESXi host.
• PlatformConfigRepository is populated with three subfolders that holds xml files generated as part ofthe golden template process.
• Report holds all automation reports, saved with a date and a time stamp.
Complete Automation SpreadsheetFill the information provided in the table below to complete the automation spreadsheet for cloning process.Deploy VM automation script requires this information to clone the virtual machines to the customer instance.See Appendix for Automation Spreadsheet column description.
The table describes the values of each virtual server and associated properties.
Installing and Configuring Cisco HCS for Contact Center 10.0(1)4
Clone and OS CustomizationAutomated Cloning and OS Customization Using Golden Templates
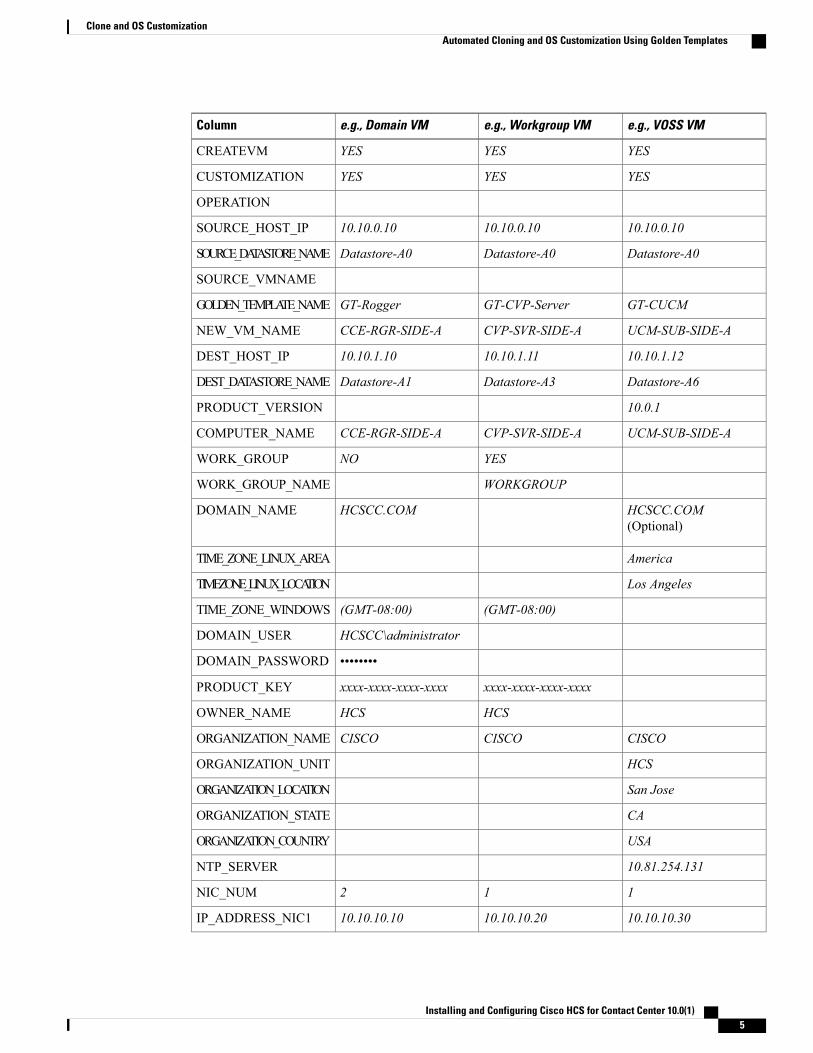
e.g., VOSS VMe.g., Workgroup VMe.g., Domain VMColumn
YESYESYESCREATEVM
YESYESYESCUSTOMIZATION
OPERATION
10.10.0.1010.10.0.1010.10.0.10SOURCE_HOST_IP
Datastore-A0Datastore-A0Datastore-A0SOURCE_DATASTORE_NAME
SOURCE_VMNAME
GT-CUCMGT-CVP-ServerGT-RoggerGOLDEN_TEMPLATE_NAME
UCM-SUB-SIDE-ACVP-SVR-SIDE-ACCE-RGR-SIDE-ANEW_VM_NAME
10.10.1.1210.10.1.1110.10.1.10DEST_HOST_IP
Datastore-A6Datastore-A3Datastore-A1DEST_DATASTORE_NAME
10.0.1PRODUCT_VERSION
UCM-SUB-SIDE-ACVP-SVR-SIDE-ACCE-RGR-SIDE-ACOMPUTER_NAME
YESNOWORK_GROUP
WORKGROUPWORK_GROUP_NAME
HCSCC.COM(Optional)
HCSCC.COMDOMAIN_NAME
AmericaTIME_ZONE_LINUX_AREA
Los AngelesTIMEZONE_LINUX_LOCATION
(GMT-08:00)(GMT-08:00)TIME_ZONE_WINDOWS
HCSCC\administratorDOMAIN_USER
••••••••DOMAIN_PASSWORD
xxxx-xxxx-xxxx-xxxxxxxx-xxxx-xxxx-xxxxPRODUCT_KEY
HCSHCSOWNER_NAME
CISCOCISCOCISCOORGANIZATION_NAME
HCSORGANIZATION_UNIT
San JoseORGANIZATION_LOCATION
CAORGANIZATION_STATE
USAORGANIZATION_COUNTRY
10.81.254.131NTP_SERVER
112NIC_NUM
10.10.10.3010.10.10.2010.10.10.10IP_ADDRESS_NIC1
Installing and Configuring Cisco HCS for Contact Center 10.0(1) 5
Clone and OS CustomizationAutomated Cloning and OS Customization Using Golden Templates
e.g., VOSS VMe.g., Workgroup VMe.g., Domain VMColumn
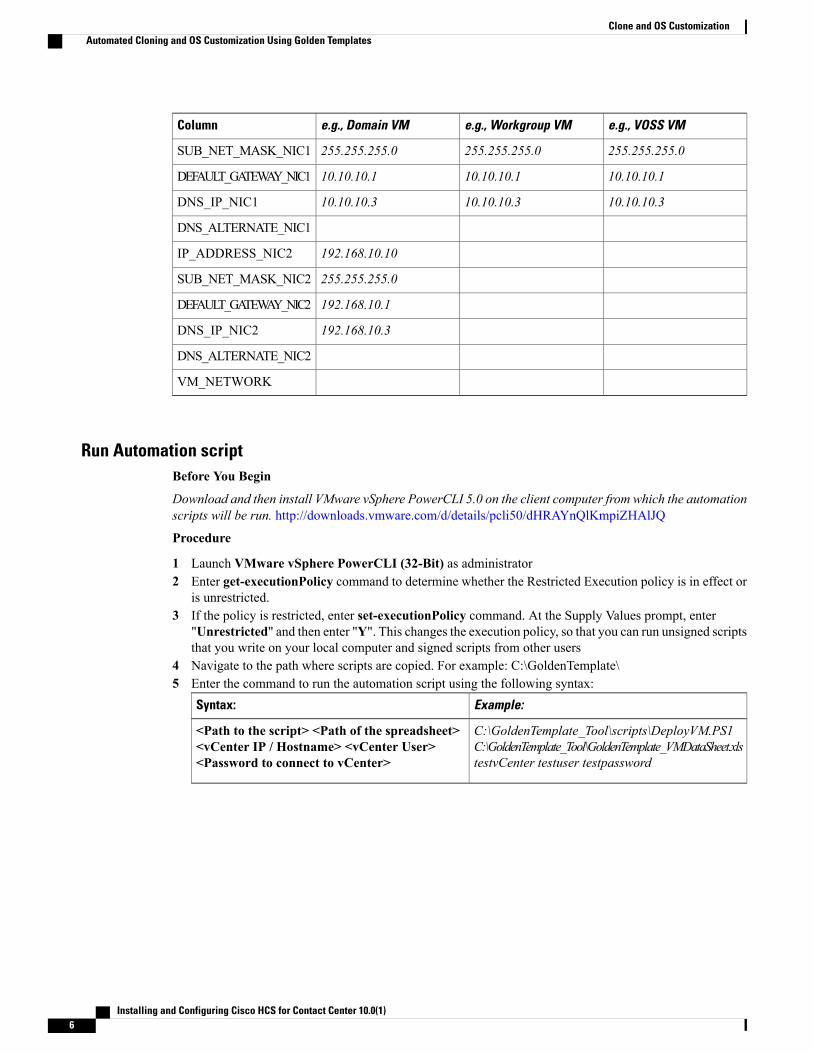
255.255.255.0255.255.255.0255.255.255.0SUB_NET_MASK_NIC1
10.10.10.110.10.10.110.10.10.1DEFAULT_GATEWAY_NIC1
10.10.10.310.10.10.310.10.10.3DNS_IP_NIC1
DNS_ALTERNATE_NIC1
192.168.10.10IP_ADDRESS_NIC2
255.255.255.0SUB_NET_MASK_NIC2
192.168.10.1DEFAULT_GATEWAY_NIC2
192.168.10.3DNS_IP_NIC2
DNS_ALTERNATE_NIC2
VM_NETWORK
Run Automation scriptBefore You Begin
Download and then install VMware vSphere PowerCLI 5.0 on the client computer from which the automationscripts will be run. http://downloads.vmware.com/d/details/pcli50/dHRAYnQlKmpiZHAlJQ
Procedure
1 Launch VMware vSphere PowerCLI (32-Bit) as administrator2 Enter get-executionPolicy command to determine whether the Restricted Execution policy is in effect or
is unrestricted.3 If the policy is restricted, enter set-executionPolicy command. At the Supply Values prompt, enter
"Unrestricted" and then enter "Y". This changes the execution policy, so that you can run unsigned scriptsthat you write on your local computer and signed scripts from other users
4 Navigate to the path where scripts are copied. For example: C:\GoldenTemplate\5 Enter the command to run the automation script using the following syntax:
Example:Syntax:
C:\GoldenTemplate_Tool\scripts\DeployVM.PS1C:\GoldenTemplate_Tool\GoldenTemplate_VMDataSheet.xlstestvCenter testuser testpassword
<Path to the script> <Path of the spreadsheet><vCenter IP / Hostname> <vCenter User><Password to connect to vCenter>
Installing and Configuring Cisco HCS for Contact Center 10.0(1)6
Clone and OS CustomizationAutomated Cloning and OS Customization Using Golden Templates
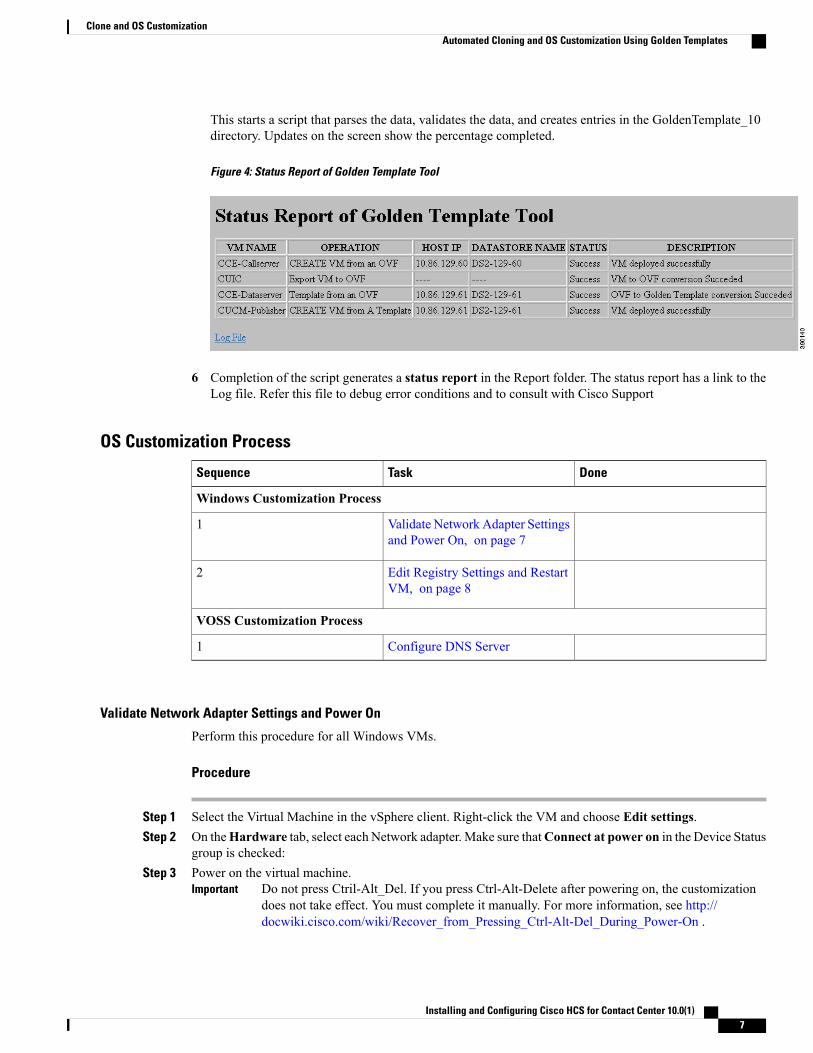
This starts a script that parses the data, validates the data, and creates entries in the GoldenTemplate_10directory. Updates on the screen show the percentage completed.
Figure 4: Status Report of Golden Template Tool
6 Completion of the script generates a status report in the Report folder. The status report has a link to theLog file. Refer this file to debug error conditions and to consult with Cisco Support
OS Customization Process
DoneTaskSequence
Windows Customization Process
Validate Network Adapter Settingsand Power On, on page 7
1
Edit Registry Settings and RestartVM, on page 8
2
VOSS Customization Process
Configure DNS Server1
Validate Network Adapter Settings and Power On
Perform this procedure for all Windows VMs.
Procedure
Step 1 Select the Virtual Machine in the vSphere client. Right-click the VM and choose Edit settings.Step 2 On theHardware tab, select each Network adapter. Make sure thatConnect at power on in the Device Status
group is checked:Step 3 Power on the virtual machine.
Do not press Ctril-Alt_Del. If you press Ctrl-Alt-Delete after powering on, the customizationdoes not take effect. You must complete it manually. For more information, see http://docwiki.cisco.com/wiki/Recover_from_Pressing_Ctrl-Alt-Del_During_Power-On .
Important
Installing and Configuring Cisco HCS for Contact Center 10.0(1) 7
Clone and OS CustomizationAutomated Cloning and OS Customization Using Golden Templates
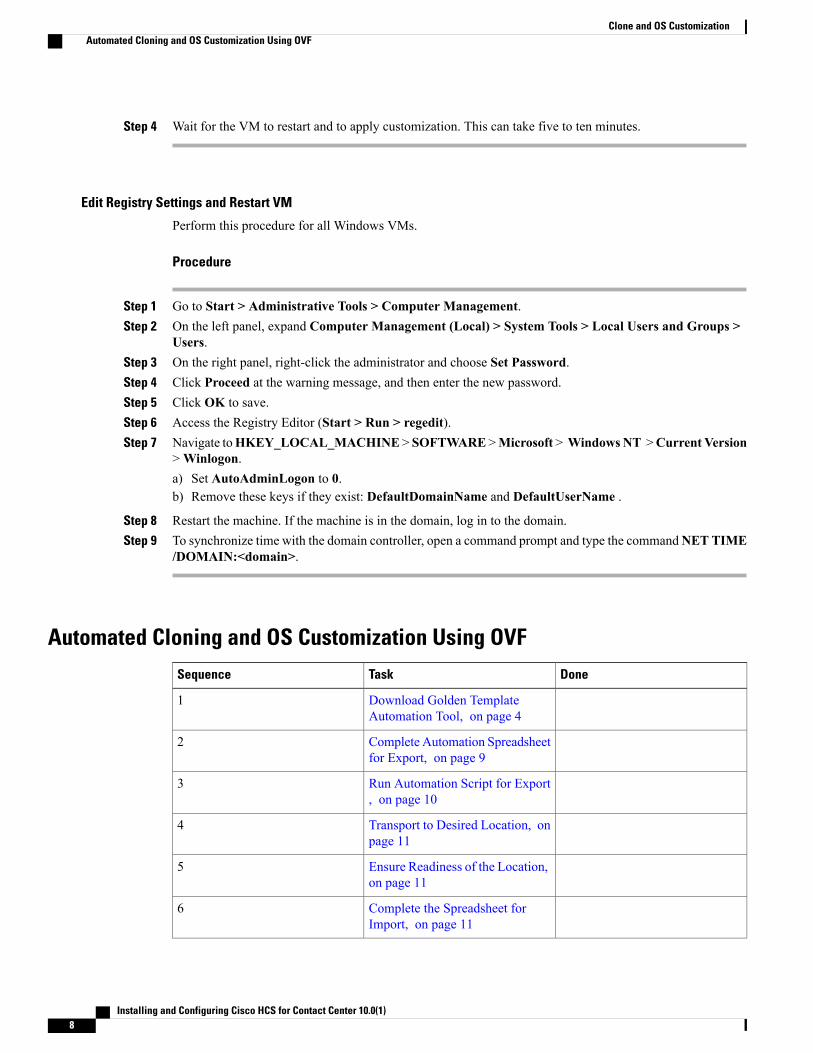
Step 4 Wait for the VM to restart and to apply customization. This can take five to ten minutes.
Edit Registry Settings and Restart VM
Perform this procedure for all Windows VMs.
Procedure
Step 1 Go to Start > Administrative Tools > Computer Management.Step 2 On the left panel, expand Computer Management (Local) > System Tools > Local Users and Groups >
Users.Step 3 On the right panel, right-click the administrator and choose Set Password.Step 4 Click Proceed at the warning message, and then enter the new password.Step 5 Click OK to save.Step 6 Access the Registry Editor (Start > Run > regedit).Step 7 Navigate toHKEY_LOCAL_MACHINE > SOFTWARE >Microsoft > WindowsNT >Current Version
>Winlogon.a) Set AutoAdminLogon to 0.b) Remove these keys if they exist: DefaultDomainName and DefaultUserName .
Step 8 Restart the machine. If the machine is in the domain, log in to the domain.Step 9 To synchronize time with the domain controller, open a command prompt and type the commandNETTIME
/DOMAIN:<domain>.
Automated Cloning and OS Customization Using OVFDoneTaskSequence
Download Golden TemplateAutomation Tool, on page 4
1
Complete Automation Spreadsheetfor Export, on page 9
2
Run Automation Script for Export, on page 10
3
Transport to Desired Location, onpage 11
4
Ensure Readiness of the Location,on page 11
5
Complete the Spreadsheet forImport, on page 11
6
Installing and Configuring Cisco HCS for Contact Center 10.0(1)8
Clone and OS CustomizationAutomated Cloning and OS Customization Using OVF
DoneTaskSequence
RunAutomation Script for Import,on page 15
7
OS Customization Process , onpage 7
8
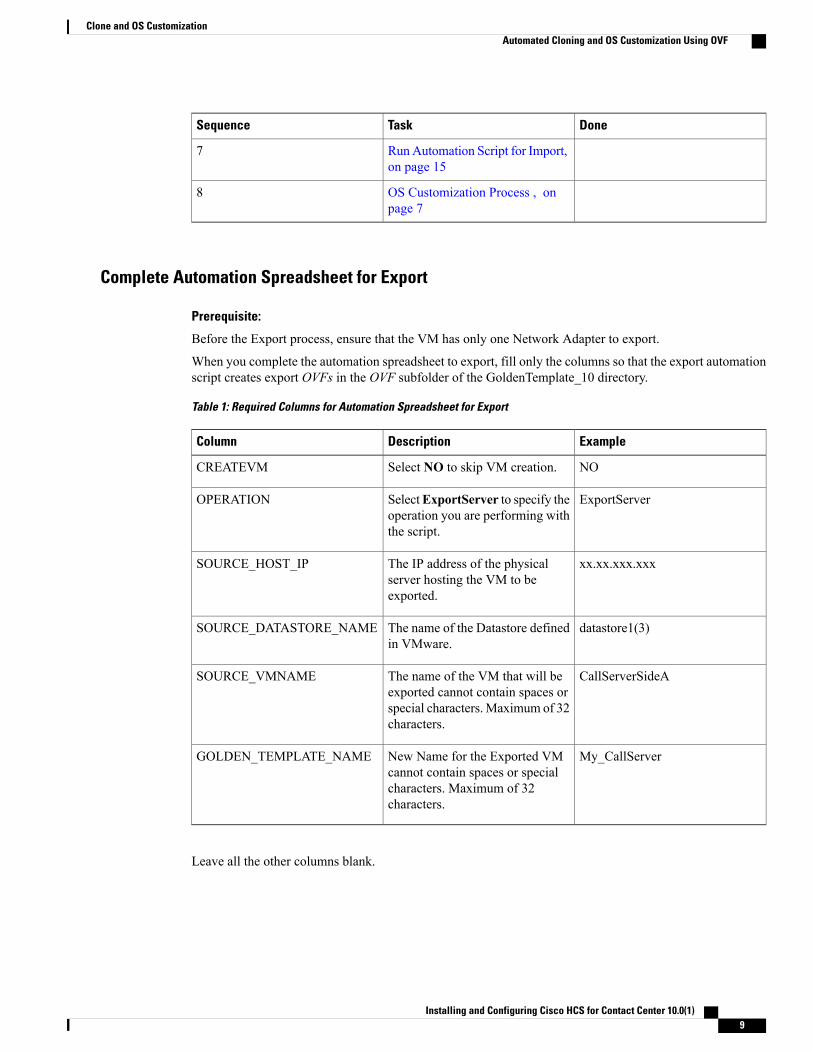
Complete Automation Spreadsheet for Export
Prerequisite:
Before the Export process, ensure that the VM has only one Network Adapter to export.
When you complete the automation spreadsheet to export, fill only the columns so that the export automationscript creates export OVFs in the OVF subfolder of the GoldenTemplate_10 directory.
Table 1: Required Columns for Automation Spreadsheet for Export
ExampleDescriptionColumn
NOSelect NO to skip VM creation.CREATEVM
ExportServerSelectExportServer to specify theoperation you are performing withthe script.
OPERATION
xx.xx.xxx.xxxThe IP address of the physicalserver hosting the VM to beexported.
SOURCE_HOST_IP
datastore1(3)The name of the Datastore definedin VMware.
SOURCE_DATASTORE_NAME
CallServerSideAThe name of the VM that will beexported cannot contain spaces orspecial characters.Maximum of 32characters.
SOURCE_VMNAME
My_CallServerNew Name for the Exported VMcannot contain spaces or specialcharacters. Maximum of 32characters.
GOLDEN_TEMPLATE_NAME
Leave all the other columns blank.
Installing and Configuring Cisco HCS for Contact Center 10.0(1) 9
Clone and OS CustomizationAutomated Cloning and OS Customization Using OVF
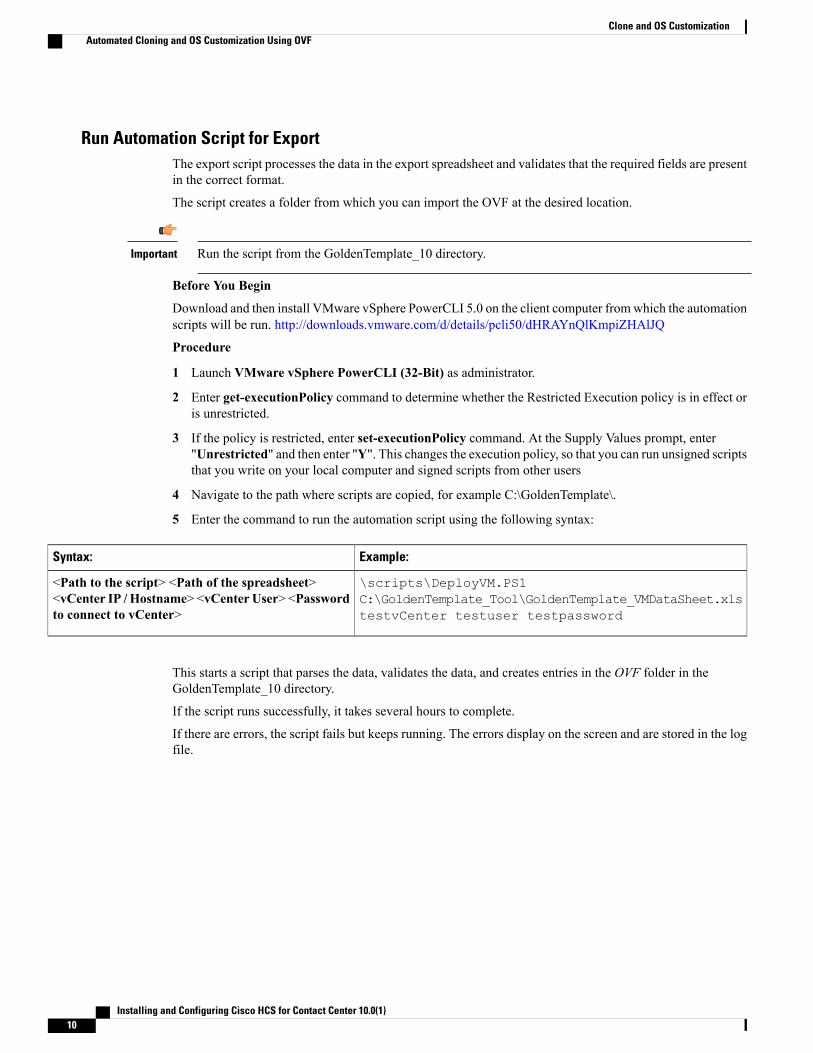
Run Automation Script for ExportThe export script processes the data in the export spreadsheet and validates that the required fields are presentin the correct format.
The script creates a folder from which you can import the OVF at the desired location.
Run the script from the GoldenTemplate_10 directory.Important
Before You Begin
Download and then install VMware vSphere PowerCLI 5.0 on the client computer fromwhich the automationscripts will be run. http://downloads.vmware.com/d/details/pcli50/dHRAYnQlKmpiZHAlJQ
Procedure
1 Launch VMware vSphere PowerCLI (32-Bit) as administrator.
2 Enter get-executionPolicy command to determine whether the Restricted Execution policy is in effect oris unrestricted.
3 If the policy is restricted, enter set-executionPolicy command. At the Supply Values prompt, enter"Unrestricted" and then enter "Y". This changes the execution policy, so that you can run unsigned scriptsthat you write on your local computer and signed scripts from other users
4 Navigate to the path where scripts are copied, for example C:\GoldenTemplate\.
5 Enter the command to run the automation script using the following syntax:
Example:Syntax:
\scripts\DeployVM.PS1C:\GoldenTemplate_Tool\GoldenTemplate_VMDataSheet.xlstestvCenter testuser testpassword
<Path to the script> <Path of the spreadsheet><vCenter IP / Hostname> <vCenter User> <Passwordto connect to vCenter>
This starts a script that parses the data, validates the data, and creates entries in the OVF folder in theGoldenTemplate_10 directory.
If the script runs successfully, it takes several hours to complete.
If there are errors, the script fails but keeps running. The errors display on the screen and are stored in the logfile.
Installing and Configuring Cisco HCS for Contact Center 10.0(1)10
Clone and OS CustomizationAutomated Cloning and OS Customization Using OVF
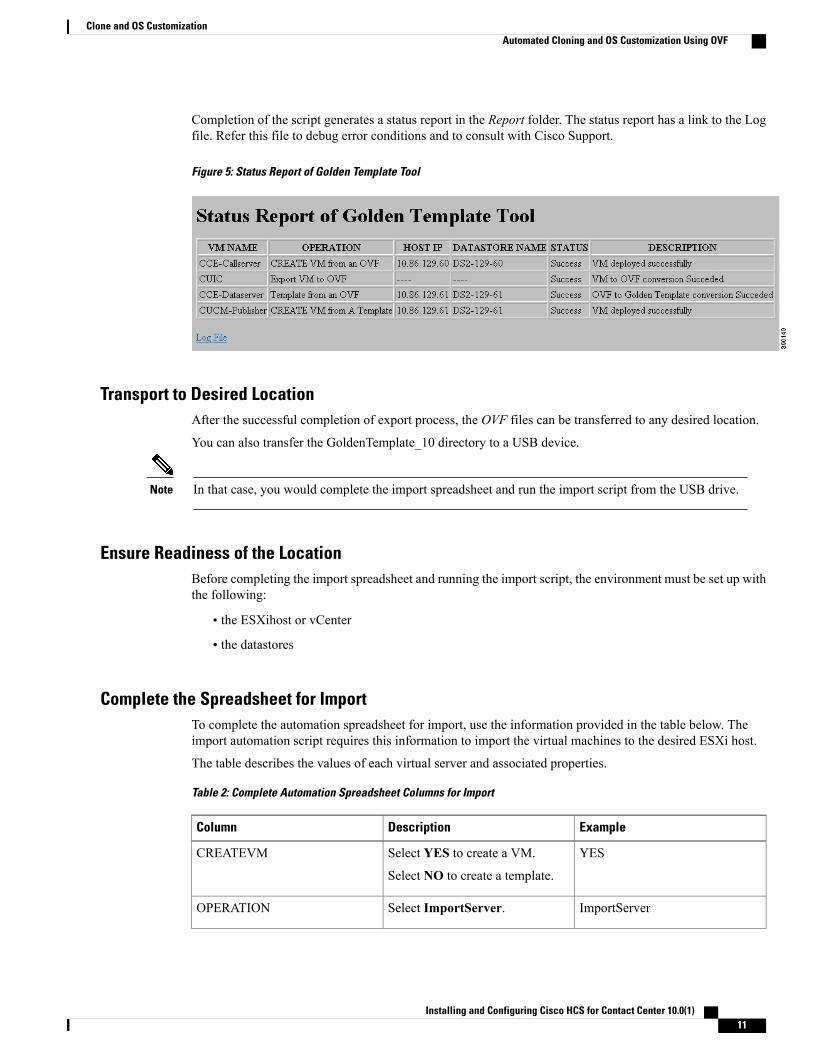
Completion of the script generates a status report in the Report folder. The status report has a link to the Logfile. Refer this file to debug error conditions and to consult with Cisco Support.
Figure 5: Status Report of Golden Template Tool
Transport to Desired LocationAfter the successful completion of export process, the OVF files can be transferred to any desired location.
You can also transfer the GoldenTemplate_10 directory to a USB device.
In that case, you would complete the import spreadsheet and run the import script from the USB drive.Note
Ensure Readiness of the LocationBefore completing the import spreadsheet and running the import script, the environment must be set up withthe following:
• the ESXihost or vCenter
• the datastores
Complete the Spreadsheet for ImportTo complete the automation spreadsheet for import, use the information provided in the table below. Theimport automation script requires this information to import the virtual machines to the desired ESXi host.
The table describes the values of each virtual server and associated properties.
Table 2: Complete Automation Spreadsheet Columns for Import
ExampleDescriptionColumn
YESSelect YES to create a VM.
Select NO to create a template.
CREATEVM
ImportServerSelect ImportServer.OPERATION
Installing and Configuring Cisco HCS for Contact Center 10.0(1) 11
Clone and OS CustomizationAutomated Cloning and OS Customization Using OVF
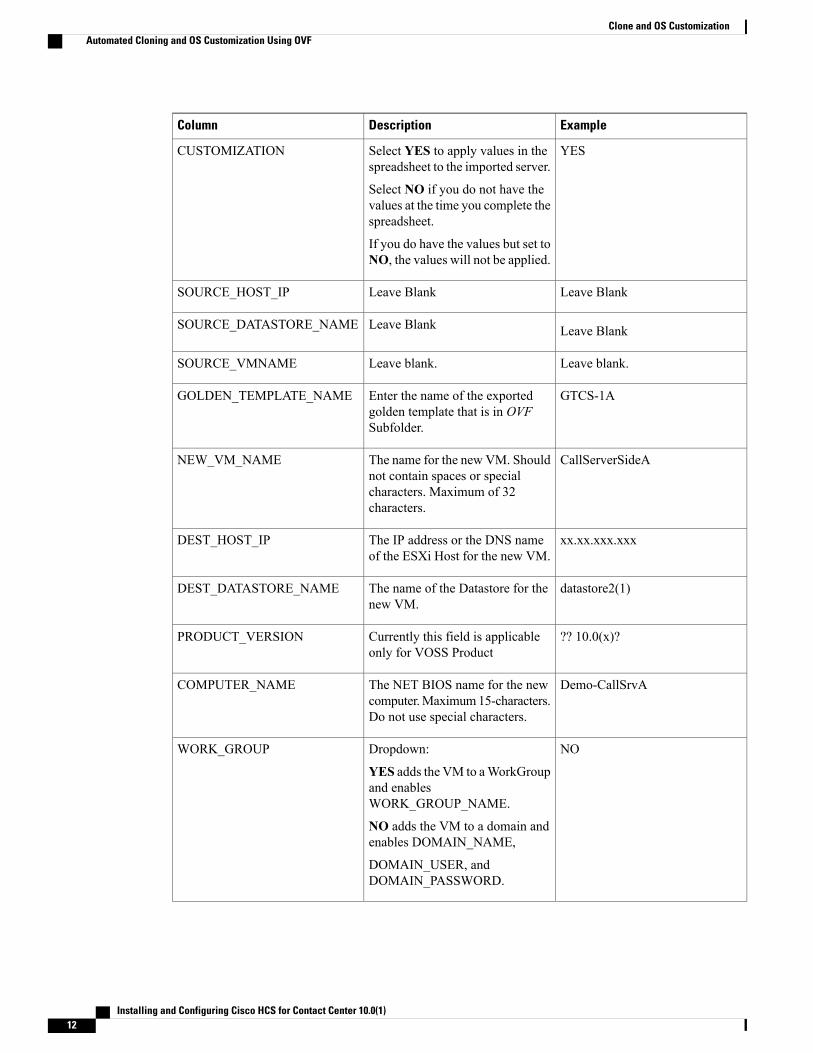
ExampleDescriptionColumn
YESSelect YES to apply values in thespreadsheet to the imported server.
Select NO if you do not have thevalues at the time you complete thespreadsheet.
If you do have the values but set toNO, the values will not be applied.
CUSTOMIZATION
Leave BlankLeave BlankSOURCE_HOST_IP
Leave BlankLeave BlankSOURCE_DATASTORE_NAME
Leave blank.Leave blank.SOURCE_VMNAME
GTCS-1AEnter the name of the exportedgolden template that is in OVFSubfolder.
GOLDEN_TEMPLATE_NAME
CallServerSideAThe name for the new VM. Shouldnot contain spaces or specialcharacters. Maximum of 32characters.
NEW_VM_NAME
xx.xx.xxx.xxxThe IP address or the DNS nameof the ESXi Host for the new VM.
DEST_HOST_IP
datastore2(1)The name of the Datastore for thenew VM.
DEST_DATASTORE_NAME
?? 10.0(x)?Currently this field is applicableonly for VOSS Product
PRODUCT_VERSION
Demo-CallSrvAThe NET BIOS name for the newcomputer.Maximum15-characters.Do not use special characters.
COMPUTER_NAME
NODropdown:
YES adds the VM to aWorkGroupand enablesWORK_GROUP_NAME.
NO adds the VM to a domain andenables DOMAIN_NAME,
DOMAIN_USER, andDOMAIN_PASSWORD.
WORK_GROUP
Installing and Configuring Cisco HCS for Contact Center 10.0(1)12
Clone and OS CustomizationAutomated Cloning and OS Customization Using OVF
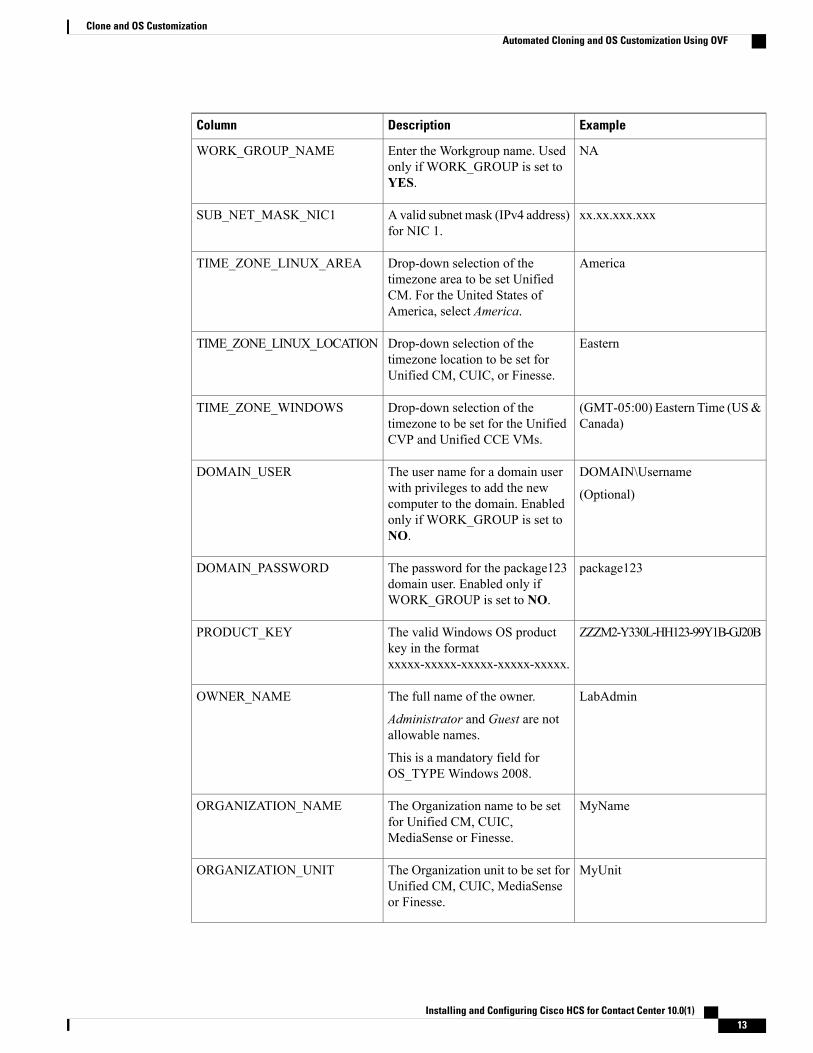
ExampleDescriptionColumn
NAEnter the Workgroup name. Usedonly if WORK_GROUP is set toYES.
WORK_GROUP_NAME
xx.xx.xxx.xxxA valid subnet mask (IPv4 address)for NIC 1.
SUB_NET_MASK_NIC1
AmericaDrop-down selection of thetimezone area to be set UnifiedCM. For the United States ofAmerica, select America.
TIME_ZONE_LINUX_AREA
EasternDrop-down selection of thetimezone location to be set forUnified CM, CUIC, or Finesse.
TIME_ZONE_LINUX_LOCATION
(GMT-05:00) Eastern Time (US&Canada)
Drop-down selection of thetimezone to be set for the UnifiedCVP and Unified CCE VMs.
TIME_ZONE_WINDOWS
DOMAIN\Username
(Optional)
The user name for a domain userwith privileges to add the newcomputer to the domain. Enabledonly if WORK_GROUP is set toNO.
DOMAIN_USER
package123The password for the package123domain user. Enabled only ifWORK_GROUP is set to NO.
DOMAIN_PASSWORD
ZZZM2-Y330L-HH123-99Y1B-GJ20BThe valid Windows OS productkey in the formatxxxxx-xxxxx-xxxxx-xxxxx-xxxxx.
PRODUCT_KEY
LabAdminThe full name of the owner.
Administrator and Guest are notallowable names.
This is a mandatory field forOS_TYPE Windows 2008.
OWNER_NAME
MyNameThe Organization name to be setfor Unified CM, CUIC,MediaSense or Finesse.
ORGANIZATION_NAME
MyUnitThe Organization unit to be set forUnified CM, CUIC, MediaSenseor Finesse.
ORGANIZATION_UNIT
Installing and Configuring Cisco HCS for Contact Center 10.0(1) 13
Clone and OS CustomizationAutomated Cloning and OS Customization Using OVF
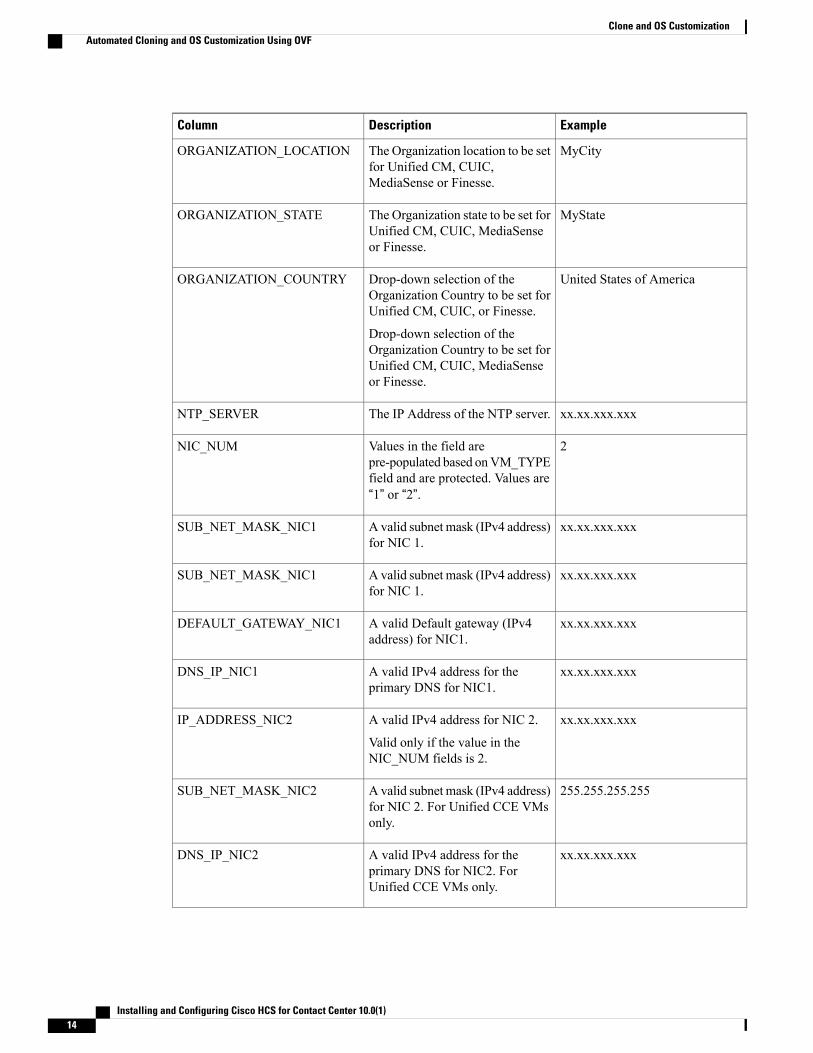
ExampleDescriptionColumn
MyCityThe Organization location to be setfor Unified CM, CUIC,MediaSense or Finesse.
ORGANIZATION_LOCATION
MyStateThe Organization state to be set forUnified CM, CUIC, MediaSenseor Finesse.
ORGANIZATION_STATE
United States of AmericaDrop-down selection of theOrganization Country to be set forUnified CM, CUIC, or Finesse.
Drop-down selection of theOrganization Country to be set forUnified CM, CUIC, MediaSenseor Finesse.
ORGANIZATION_COUNTRY
xx.xx.xxx.xxxThe IP Address of the NTP server.NTP_SERVER
2Values in the field arepre-populated based onVM_TYPEfield and are protected. Values are“1” or “2”.
NIC_NUM
xx.xx.xxx.xxxA valid subnet mask (IPv4 address)for NIC 1.
SUB_NET_MASK_NIC1
xx.xx.xxx.xxxA valid subnet mask (IPv4 address)for NIC 1.
SUB_NET_MASK_NIC1
xx.xx.xxx.xxxA valid Default gateway (IPv4address) for NIC1.
DEFAULT_GATEWAY_NIC1
xx.xx.xxx.xxxA valid IPv4 address for theprimary DNS for NIC1.
DNS_IP_NIC1
xx.xx.xxx.xxxA valid IPv4 address for NIC 2.
Valid only if the value in theNIC_NUM fields is 2.
IP_ADDRESS_NIC2
255.255.255.255A valid subnet mask (IPv4 address)for NIC 2. For Unified CCE VMsonly.
SUB_NET_MASK_NIC2
xx.xx.xxx.xxxA valid IPv4 address for theprimary DNS for NIC2. ForUnified CCE VMs only.
DNS_IP_NIC2
Installing and Configuring Cisco HCS for Contact Center 10.0(1)14
Clone and OS CustomizationAutomated Cloning and OS Customization Using OVF

ExampleDescriptionColumn
xx.xx.xxx.xxxA valid IPv4 address for thealternate DNS for NIC2. ForUnified CCE VMs only. Mustdiffer from the address of theprimaryDNS for NIC2. (Optional)
DNS_ALTERNATE_NIC2
VLAN2A valid Network adapter settingsVM_NETWORK
Run Automation Script for ImportThe script imports the OVF files and converts them to templates, so that the spreadsheet values can be appliedto the virtual machines.
Run the script from the GoldenTemplate_10 directory.Important
Before You Begin
As you did at the partner lab, enter the get-executionpolicy command to determine whether the RestrictedExecution policy is in effect or is restricted.
If the policy is restricted, enter set-executionpolicy command. At the Supply Values prompt, enter"Unrestricted" and then enter "Y". This changes the execution policy so that you can run unsigned scripts thatyou write on your local computer and signed scripts from other users.
Procedure
1 Launch VMware vSphere PowerCLI (32-Bit) to run the automation script.
2 Navigate to the path where the scripts are copied, for example : C:\GoldenTemplate\
3 Enter a command using the following syntax:
Example:Syntax:
\scripts\DeployVM.PS1C:\GoldenTemplate_Tool\GoldenTemplate_VMDataSheet.xlstestvCenter testuser testpassword
<Path to the script> <Path of the spreadsheet><vCenter IP /Hostname> <vCenterUser> <Passwordto connect to vCenter>
This starts a script that parses the data, validates data, and creates entries in the OVF folder in theGoldenTemplate_10 directory. Updates on the screen show the percentage completed.
If the script runs successfully, it typically completes in several hours.
If there are errors, the script fails but, keeps running. The errors display on the screen and are stored in thelog file.
Installing and Configuring Cisco HCS for Contact Center 10.0(1) 15
Clone and OS CustomizationAutomated Cloning and OS Customization Using OVF
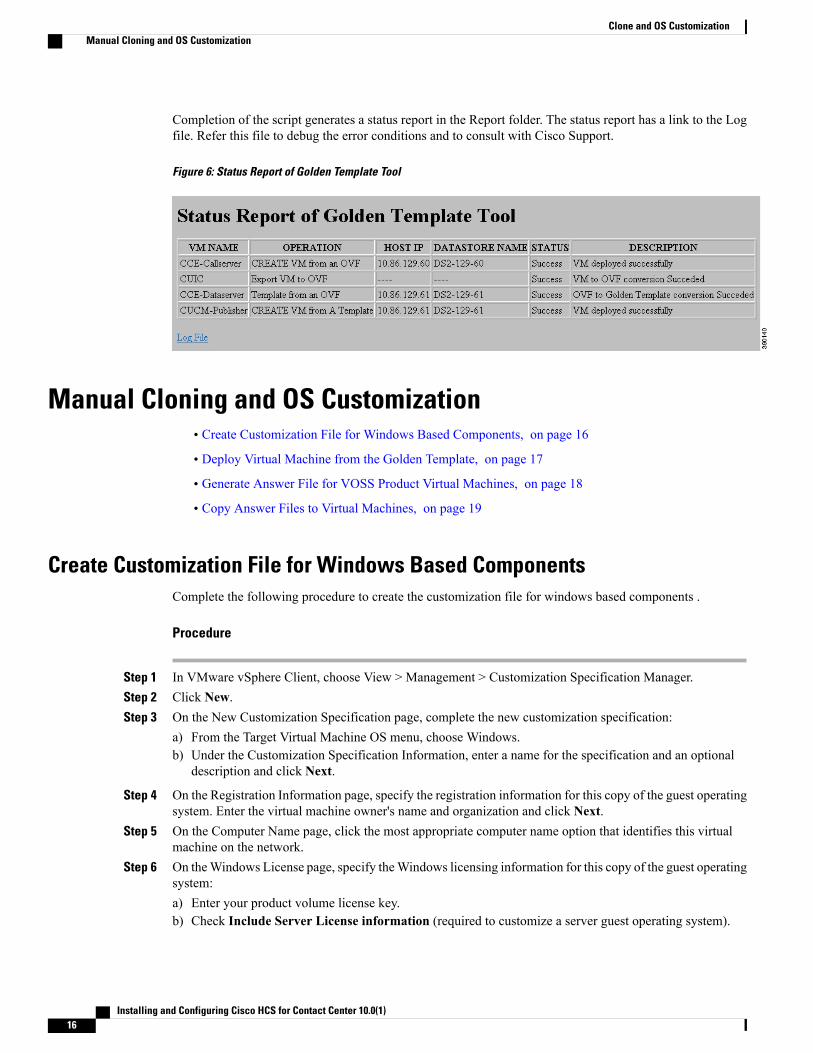
Completion of the script generates a status report in the Report folder. The status report has a link to the Logfile. Refer this file to debug the error conditions and to consult with Cisco Support.
Figure 6: Status Report of Golden Template Tool
Manual Cloning and OS Customization• Create Customization File for Windows Based Components, on page 16
• Deploy Virtual Machine from the Golden Template, on page 17
• Generate Answer File for VOSS Product Virtual Machines, on page 18
• Copy Answer Files to Virtual Machines, on page 19
Create Customization File for Windows Based ComponentsComplete the following procedure to create the customization file for windows based components .
Procedure
Step 1 In VMware vSphere Client, choose View > Management > Customization Specification Manager.Step 2 Click New.Step 3 On the New Customization Specification page, complete the new customization specification:
a) From the Target Virtual Machine OS menu, choose Windows.b) Under the Customization Specification Information, enter a name for the specification and an optional
description and click Next.
Step 4 On the Registration Information page, specify the registration information for this copy of the guest operatingsystem. Enter the virtual machine owner's name and organization and click Next.
Step 5 On the Computer Name page, click the most appropriate computer name option that identifies this virtualmachine on the network.
Step 6 On theWindows License page, specify theWindows licensing information for this copy of the guest operatingsystem:a) Enter your product volume license key.b) Check Include Server License information (required to customize a server guest operating system).
Installing and Configuring Cisco HCS for Contact Center 10.0(1)16
Clone and OS CustomizationManual Cloning and OS Customization
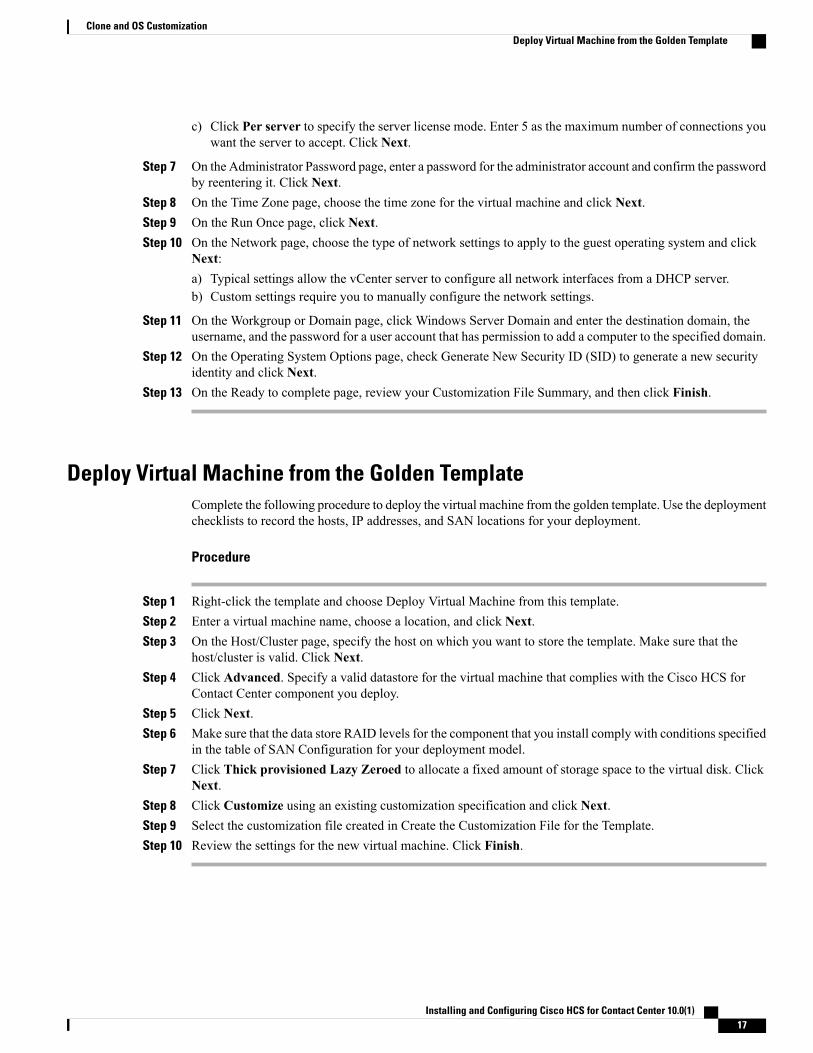
c) Click Per server to specify the server license mode. Enter 5 as the maximum number of connections youwant the server to accept. Click Next.
Step 7 On the Administrator Password page, enter a password for the administrator account and confirm the passwordby reentering it. Click Next.
Step 8 On the Time Zone page, choose the time zone for the virtual machine and click Next.Step 9 On the Run Once page, click Next.Step 10 On the Network page, choose the type of network settings to apply to the guest operating system and click
Next:a) Typical settings allow the vCenter server to configure all network interfaces from a DHCP server.b) Custom settings require you to manually configure the network settings.
Step 11 On the Workgroup or Domain page, click Windows Server Domain and enter the destination domain, theusername, and the password for a user account that has permission to add a computer to the specified domain.
Step 12 On the Operating System Options page, check Generate New Security ID (SID) to generate a new securityidentity and click Next.
Step 13 On the Ready to complete page, review your Customization File Summary, and then click Finish.
Deploy Virtual Machine from the Golden TemplateComplete the following procedure to deploy the virtual machine from the golden template. Use the deploymentchecklists to record the hosts, IP addresses, and SAN locations for your deployment.
Procedure
Step 1 Right-click the template and choose Deploy Virtual Machine from this template.Step 2 Enter a virtual machine name, choose a location, and click Next.Step 3 On the Host/Cluster page, specify the host on which you want to store the template. Make sure that the
host/cluster is valid. Click Next.Step 4 Click Advanced. Specify a valid datastore for the virtual machine that complies with the Cisco HCS for
Contact Center component you deploy.Step 5 Click Next.Step 6 Make sure that the data store RAID levels for the component that you install comply with conditions specified
in the table of SAN Configuration for your deployment model.Step 7 Click Thick provisioned Lazy Zeroed to allocate a fixed amount of storage space to the virtual disk. Click
Next.Step 8 Click Customize using an existing customization specification and click Next.Step 9 Select the customization file created in Create the Customization File for the Template.Step 10 Review the settings for the new virtual machine. Click Finish.
Installing and Configuring Cisco HCS for Contact Center 10.0(1) 17
Clone and OS CustomizationDeploy Virtual Machine from the Golden Template
Generate Answer File for VOSS Product Virtual MachinesComplete the following procedure to generate an answer file for VOSS product Virtual machines.
Procedure
Step 1 Open the link http://www.cisco.com/web/cuc_afg/index.html.Step 2 Configure the following cluster-wide parameters:
a) Under Hardware, select Virtual Machine for Primary Node Installed On.b) Under Product, select the product name and the product version.c) Under Administrator credentials, enter the administrator username and password, and confirm the password.d) Under Security Password, enter a password and confirm password.e) Under the Application user credentials, enter the application username, password, and confirm the password.
Cisco suggests that you use the same System Application or Administrator credentials for all nodes.
f) Under Certificate information, enter the organization name, unit, location, state, and country for the UnifiedCM and Unified Intelligence Center.
g) Under SMTP, check the box Configure SMTP host and enter the SMTP location.
Step 3 Configure the following primary node parameters:a) Under NIC Interface Settings, check the check box Use Auto Negotiation.
Do not change the MTUsettings.
Note
b) Under Network Information, enter the IP address, hostname ,IP mask, and gateway information.Do not select the option Use DHCP for IP Address Resolution.
c) Under DNS, select the option Configure Client DNS, and enter Primary DNS IP and DNS name.d) Under Timezone, select the option Use Primary Time Zone Settings.e) Under Network Time Protocol, check Use Network Time Protocol and enter the IP address, NTP server
name, or NTP Server Pool name for at least one external NTP server.
Step 4 Configure the following secondary node parameters:a) Under NIC Interface Settings, check the check box Use Auto Negotiation.
Do not change the MTUsettings.
Note
b) Under Network Information, enter the IP address, hostname, IP mask, and gateway information.Do not select the option Use DHCP for IP Address Resolution.
c) Under DNS, select the option Configure Client DNS, and enter primary DNS IP and DNS name.d) Under Timezone, check Use Primary Time Zone Settings.e) Under List of Secondary Nodes, click Add Secondary Node.
Step 5 ClickGenerate Answer files & LicenseMAC to download the answer file for publisher and first subscriber.For Unified CM, where an answer file for a second subscriber is required, close and open the answerfile generator web page and enter the details for the publisher and second subscriber. Download theanswer file for the second subscriber only, because you already downloaded the publisher file alongwith the first subscriber.
Note
Step 6 Perform steps given in section for mounting the answer files to VM. See Copy Answer Files to VirtualMachines, on page 19
Installing and Configuring Cisco HCS for Contact Center 10.0(1)18
Clone and OS CustomizationGenerate Answer File for VOSS Product Virtual Machines
Copy Answer Files to Virtual MachinesGolden Template automation tool generates answer files for unattended installations. Individual answer filesget copied to the C:\GoldenTemplateTool_lO\PlatformConfigRepository directory. These answer files arethen converted to a floppy diskette file format and are used in addition to your VOSS product DVD duringthe installation process.
Before You Begin
Download and then install WinImage 8.5 on the client computer from which the automation scripts will berun. http://winimage.com/download.htm
Procedure
Step 1 Copy the generated Answer file to the folder and rename it to platformConfig.xml
Example:Copy CUCM_PUB_SideA_platformConfig.xml to other location and rename it to platformConfig.xml
Step 2 Launch WinImage and select File > New > 1.44 MB and click OKStep 3 Drag and drop platformConfig.xml into WinImageStep 4 When prompted to inject the file, click Yes.Step 5 Select File > Save AsStep 6 From the Save as type list, choose Virtual floppy image. Provide the file name as platformConfig.flp and
click SaveStep 7 Open vSphere infrastructure client and connect to the vCenter. Go to the customer ESXi host where the VMs
are deployedStep 8 Navigate to the Configuration tab. In the storage section, right click on the Datastore and choose Browse
Datastore, create a folder named <Product_Node>
Example:CUCM_PUB .
Step 9 Upload the platformConfig.flp file to the folder <Product_Node>.
Example:CUCM_PUB .
Step 10 Navigate to the <Product_Node> Virtual Machine(Ex; CUCM_PUB_SideA). Right-click and choose EditSettings
Step 11 On the Hardware tab, click Floppy drive 1, choose the radio button Use The Existing Floppy Image inDatastore.
Step 12 Mount the platformConfig.flp from the <Product_Node> folder (Ex: CUCM_PUB) on the data store andclick OK
Step 13 Ensure that the Device status shows Connect at Power On checked for the Network adapter and for theFloppy drive and click OK.
Installing and Configuring Cisco HCS for Contact Center 10.0(1) 19
Clone and OS CustomizationCopy Answer Files to Virtual Machines

Installing and Configuring Cisco HCS for Contact Center 10.0(1)20
Clone and OS CustomizationCopy Answer Files to Virtual Machines