cleaning procedures - camden and islington nhs
TRANSCRIPT
CLEANING PROCEDURES
March 2019
THIS PROCEDURES SUPERSEDES ALL PREVIOUS PROCEDURAL DOCUMENTS CLEANING
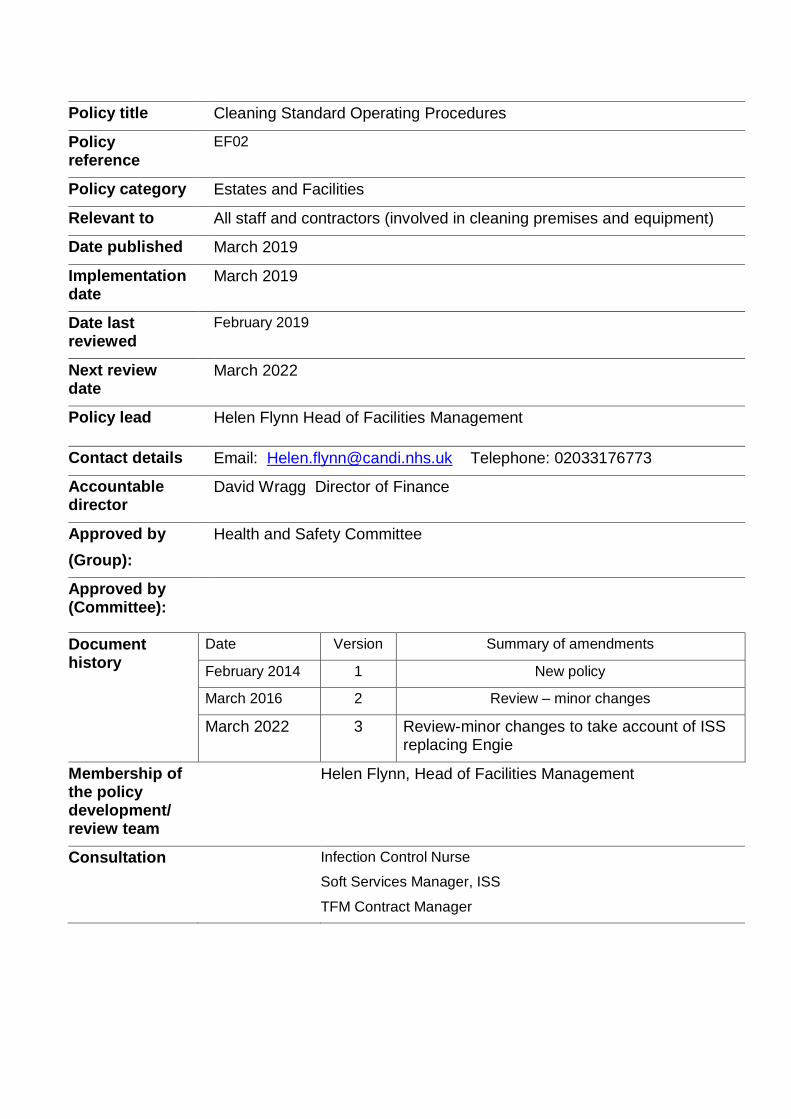
Policy title Cleaning Standard Operating Procedures
Policy reference
EF02
Policy category Estates and Facilities
Relevant to All staff and contractors (involved in cleaning premises and equipment)
Date published March 2019
Implementation date
March 2019
Date last reviewed
February 2019
Next review date
March 2022
Policy lead Helen Flynn Head of Facilities Management
Contact details Email: [email protected] Telephone: 02033176773
Accountable director
David Wragg Director of Finance
Approved by
(Group):
Health and Safety Committee
Approved by (Committee):
Document history
Date Version Summary of amendments
February 2014 1 New policy
March 2016 2 Review – minor changes
March 2022 3 Review-minor changes to take account of ISS replacing Engie
Membership of the policy development/ review team
Helen Flynn, Head of Facilities Management
Consultation Infection Control Nurse
Soft Services Manager, ISS
TFM Contract Manager
Contents Page
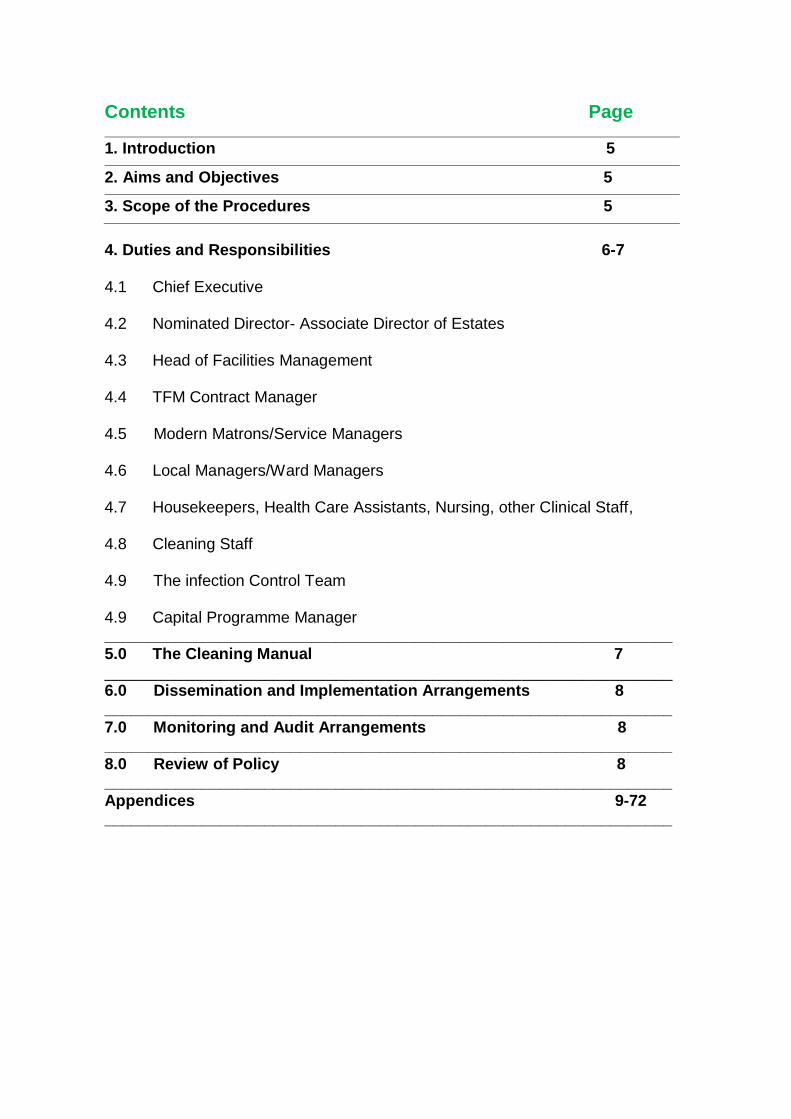
1. Introduction 5
2. Aims and Objectives 5
3. Scope of the Procedures 5
4. Duties and Responsibilities 6-7 4.1 Chief Executive 4.2 Nominated Director- Associate Director of Estates 4.3 Head of Facilities Management 4.4 TFM Contract Manager 4.5 Modern Matrons/Service Managers 4.6 Local Managers/Ward Managers 4.7 Housekeepers, Health Care Assistants, Nursing, other Clinical Staff, 4.8 Cleaning Staff 4.9 The infection Control Team 4.9 Capital Programme Manager ________________________________________________________________ 5.0 The Cleaning Manual 7 ________________________________________________________________ 6.0 Dissemination and Implementation Arrangements 8 ________________________________________________________________ 7.0 Monitoring and Audit Arrangements 8 ________________________________________________________________ 8.0 Review of Policy 8 ________________________________________________________________ Appendices 9-72 ________________________________________________________________
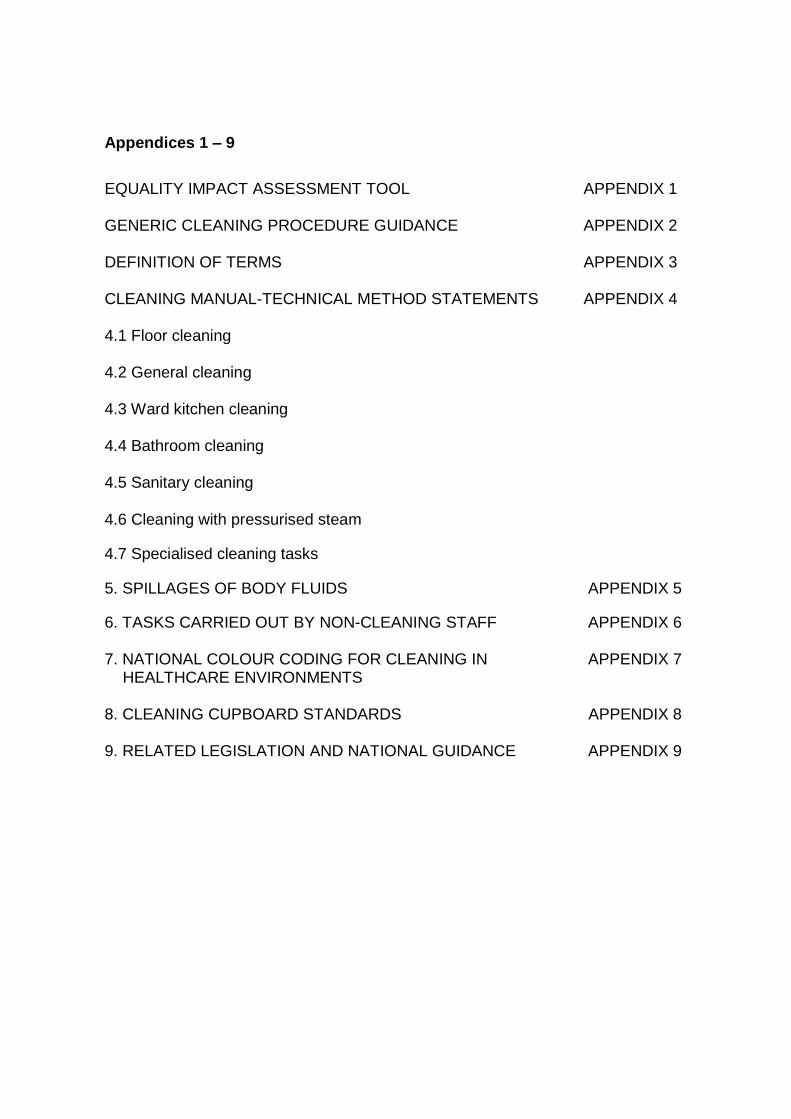
Appendices 1 – 9
EQUALITY IMPACT ASSESSMENT TOOL APPENDIX 1 GENERIC CLEANING PROCEDURE GUIDANCE APPENDIX 2 DEFINITION OF TERMS APPENDIX 3 CLEANING MANUAL-TECHNICAL METHOD STATEMENTS APPENDIX 4 4.1 Floor cleaning 4.2 General cleaning 4.3 Ward kitchen cleaning 4.4 Bathroom cleaning 4.5 Sanitary cleaning 4.6 Cleaning with pressurised steam
4.7 Specialised cleaning tasks
5. SPILLAGES OF BODY FLUIDS APPENDIX 5
6. TASKS CARRIED OUT BY NON-CLEANING STAFF APPENDIX 6 7. NATIONAL COLOUR CODING FOR CLEANING IN APPENDIX 7 HEALTHCARE ENVIRONMENTS 8. CLEANING CUPBOARD STANDARDS APPENDIX 8 9. RELATED LEGISLATION AND NATIONAL GUIDANCE APPENDIX 9
5
1. Introduction
Camden and Islington Foundation Trust is aware of its moral, social and legal obligation to provide a consistently high quality standard of cleanliness. Cleanliness makes a significant contribution towards the prevention and/or reduction of Healthcare Associated Infections (HCAIs) and is an integral part of providing safe, effective and efficient healthcare. A clean, well maintained environment enhances aesthetic appeal, providing confidence and reassurance to all service users and the general public. This document aims to provide assurance of the Trust’s compliance to the Code of Practice for the Prevention and Control of Health Care Associated infections and as a result the continued maintenance of a visibly clean environment. This document specifies how Camden and Islington Foundation Trust aims to achieve and maintain a clean environment across all sites, both in hospital and community settings, irrespective of the cleaning service provider arrangements. The document lays out the responsibilities, procedures, and protocols for cleaning within the organisation to achieve compliance with National Standards for Cleanliness (2007).
2. Aims and Objectives:
To ensure that Camden and Islington Foundation Trust complies with national standards.
To demonstrate continuous improvement in cleanliness to minimise the risks of healthcare associated infections by adopting proven cleaning methods.
To develop a culture within The Foundation Trust that cleanliness is everyone’s responsibility.
To continuously strive to improve environmental standards by regularly listening and engaging with service users and staff to obtain their views.
To define and allocate the necessary resources to achieve consistently high
quality standards of cleanliness across the estate.
To ensure the use of correct cleaning specifications to comply with the requirements of service users, infection control and national directives.
To specify clear, well defined roles and responsibilities across the whole spectrum of staff groups within clinical and community settings.
To provide the necessary training requirements to all relevant staff in relation to cleaning competencies.
To closely monitor cleaning performance, according to national guidance and with a view to further improve service provision.
To ensure that any persistent failings with regards to cleanliness are addressed promptly.
3. Scope of the Policy
These procedures provide specific guidance for all staff directly involved in the cleaning of premises and equipment, but also provides all Trust staff with information about the standards of cleanliness that can be expected in their work area and what to do if standards fall below agreed levels.
6
Roles and Responsibilities
4.1 The Chief Executive The Chief Executive is ultimately responsible for cleaning standards across Foundation Trust Estate, ensuring that cleanliness is kept high on the corporate agenda. The Chief Executive will ensure that adequate resource is available to enable the provision of high quality cleaning service and that the organisational structure depicts the hierarchy of responsibility with regards to cleaning throughout The Trust. 4.2 The Associate Director of Estates and Facilities The Associate Director for Estates and Facilities has been delegated responsibility for ensuring that robust systems and processes are in place across the Trust and that sufficient resources are allocated to maintain adequate levels of cleanliness of all throughout buildings. They also have the responsibility for overseeing the Service user Led-Assessment of the Clinical Environment (PLACE) annual audits, which include cleanliness.
4.3 Head of Facilities Management The Head of Facilities Management is responsible for drawing up a detailed audit internal plan for monitoring cleaning standards at an agreed interval across all properties and for collecting the results and where standards are unsatisfactory, for agreeing action plans and rectification times and scheduling follow-up audits. The Head of Facilities Management is also responsible for organising the PLACE inspection visits and inputting the resulting scores and comments and developing a list of actions as a result of the PLACE audits. 4.4 TFM Contract Manager The role of the TFM Contract Manager is to monitor the standard of the cleaning service provided by the Total Facilities Manager (TFM) contractor and to ensure where failings have been identified that they are rectified quickly, and if necessary report where financial deductions need to be applied. In addition, sites where services are provided by non-TFM staff will be audited as part of the annual E &F audit programme. 4.5 Divisional Managers Matrons/Senior and Service Managers Divisional Managers will receive monitor cleaning audit scores and address deficiencies highlighted e.g. decorating the fabric of the building and soft furnishings. Matrons, Senior and Service Managers have responsibility for ensuring that all buildings/wards that come under their jurisdiction are subject to regular cleaning audits in line with national directives as detailed in their job description.
They must ensure that their managers understand and carry out their responsibilities with regards to cleanliness in their areas, whether cleaning is provided by directly-employed individuals, through a contracted cleaning service or is undertaken by service users themselves. In addition, they are required to ensure that staff undertake environmental audits at agreed frequencies. Where the cleaning is provided under the TFM contract, a number of those audits must be conducted jointly with a supervisor/manager from the TFM contract company.
They must monitor their departmental cleaning audit scores to ensure they are acceptable and that any deficiencies are timely addressed.
4.6 Local Managers/Ward Managers
7
Local office managers and managers of non-clinical departments /Ward Managers are responsible for the cleanliness and tidiness of their areas. They are required to undertake local environmental audits (jointly with a TFM contract supervisor/manager – where the service is provided). Cleaning activity should be considered as a fundamental part of the ward routine within service user units, with those responsible for cleaning treated as an integral part of that ward team. Clean office and departments help to enhance the reputation of the organisation and provide reassurance to visitors and members of the public.
4.7 Housekeepers, Health Care Assistants, Nursing, other Clinical Staff
Housekeepers, HCA’s, nursing and other clinical staff, managed directly at ward and department level may also carry out cleaning duties primarily associated with medical equipment, and are responsible for dealing with the cleaning of all body fluid spillages in ward’s.
4.8 Cleaning Staff Cleaning staff are responsible for undertaking cleaning tasks as detailed in their job descriptions and to agreed standards. 4.9 The Infection Control Team The Infection Control Team is responsible for offering support, advice and guidance on specific / specialist cleaning requirements and may offer training to staff in relation to cleaning bodily fluid spills. Where there are concerns about the effectiveness of cleaning, use of cleaning products or equipment they may instigate microbiological tests or specific audits. 4.10 Capital Programme Manager The Capital Programme manager is responsible for ensuring that when refurbishments are planned or new developments approved consideration is given to the materials to be used in terms of flooring and wall surfaces, to ensure ease of cleaning. In addition that the correct amenities are provided to cleaning staff i.e. a dedicated cleaners cupboard, sufficiently large to store the required equipment e.g. floor cleaning machines, buckets etc., with shelving for supplies and a low level sink with hot and cold water supplies.
4. The Cleaning Manual and Procedures
The Trust Cleaning Manual follows the National Cleaning Manual guidance. Each ward within St Pancras Hospital, Highgate Mental Health Centre and all other Camden and Islington premises would have access to a cleaning manual accessible from the intranet, hard copies would also be available. The content includes:
Cleaning methods.
Cleaning methods risk assessments.
Chemical Range.
Chemical COSHH, (copies must also be placed into the Health and Safety File).
Chemical usage risk assessment.
The National Colour Coding Scheme. Specific information related to the standard of cleaning and the procedures are contained in the
appendices below. The instructions in the appendices should be followed.
8
5. Dissemination and Implementation Arrangements
These procedures are available to staff on the intranet. In areas where there may be agency staff
used who do not have access to the intranet paper copies will be made available to those units.
6. Monitoring and Audit Arrangements
Compliance will be monitored on the scheduled audit visits conducted by Estates and Facilities
Managers and the Infection Control Team. Where there are failures found assistance will be
provided to ensure compliance is adhered to and best practice is implemented.
7. Review of Policy
These procedures will be reviewed should a new piece of legislation or guidance be published or every three years.
9
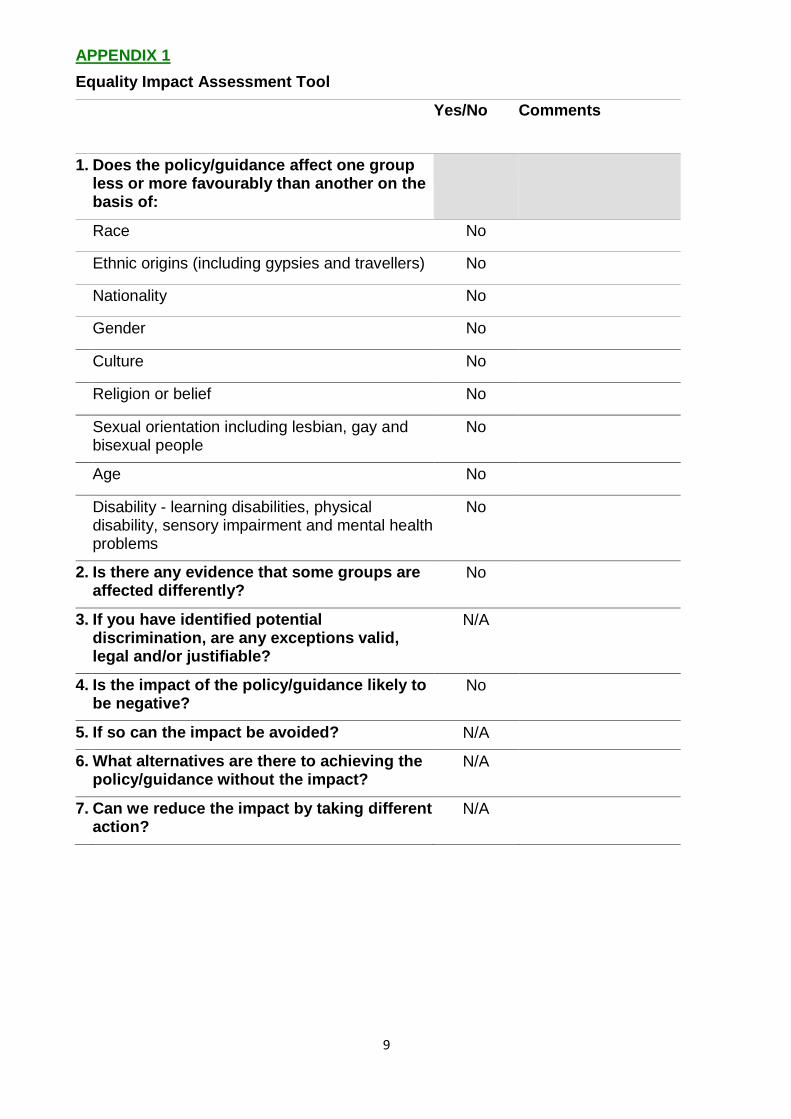
APPENDIX 1
Equality Impact Assessment Tool
Yes/No Comments
1. Does the policy/guidance affect one group less or more favourably than another on the basis of:
Race No
Ethnic origins (including gypsies and travellers) No
Nationality No
Gender No
Culture No
Religion or belief No
Sexual orientation including lesbian, gay and bisexual people
No
Age No
Disability - learning disabilities, physical disability, sensory impairment and mental health problems
No
2. Is there any evidence that some groups are affected differently?
No
3. If you have identified potential discrimination, are any exceptions valid, legal and/or justifiable?
N/A
4. Is the impact of the policy/guidance likely to be negative?
No
5. If so can the impact be avoided? N/A
6. What alternatives are there to achieving the policy/guidance without the impact?
N/A
7. Can we reduce the impact by taking different action?
N/A
10
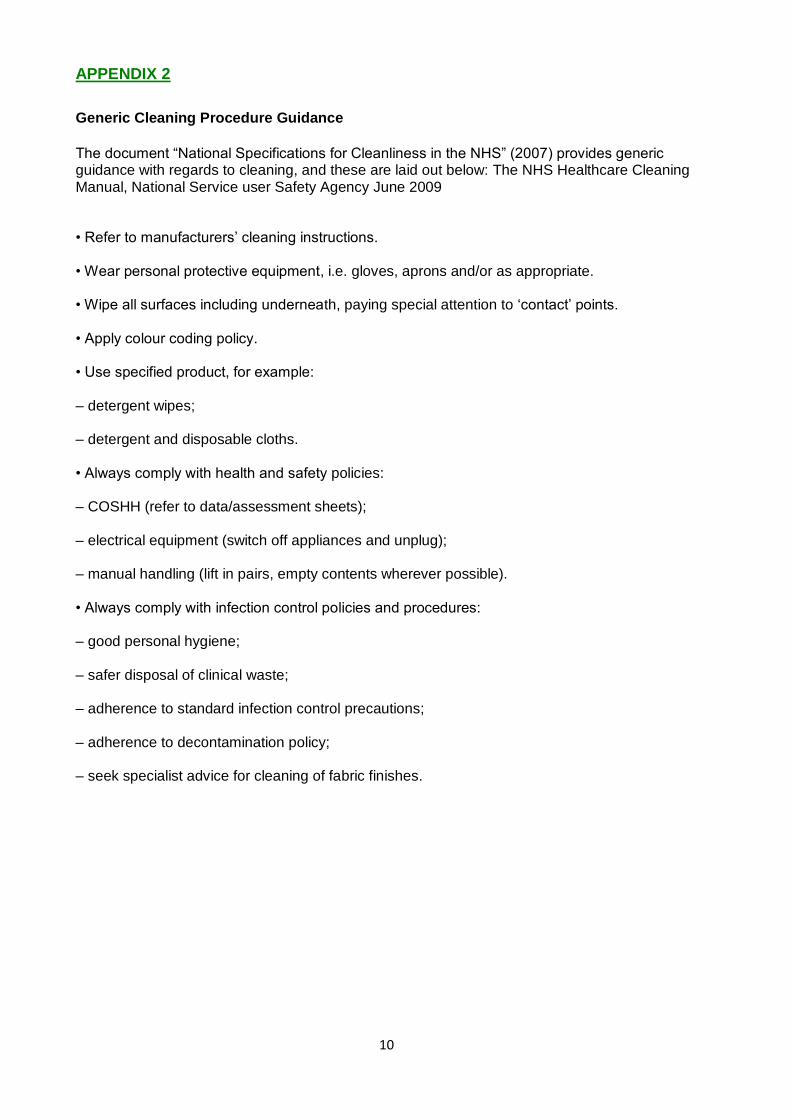
APPENDIX 2
Generic Cleaning Procedure Guidance
The document “National Specifications for Cleanliness in the NHS” (2007) provides generic guidance with regards to cleaning, and these are laid out below: The NHS Healthcare Cleaning Manual, National Service user Safety Agency June 2009 • Refer to manufacturers’ cleaning instructions. • Wear personal protective equipment, i.e. gloves, aprons and/or as appropriate. • Wipe all surfaces including underneath, paying special attention to ‘contact’ points. • Apply colour coding policy. • Use specified product, for example: – detergent wipes; – detergent and disposable cloths. • Always comply with health and safety policies: – COSHH (refer to data/assessment sheets); – electrical equipment (switch off appliances and unplug); – manual handling (lift in pairs, empty contents wherever possible). • Always comply with infection control policies and procedures: – good personal hygiene; – safer disposal of clinical waste; – adherence to standard infection control precautions;
– adherence to decontamination policy; – seek specialist advice for cleaning of fabric finishes.
11
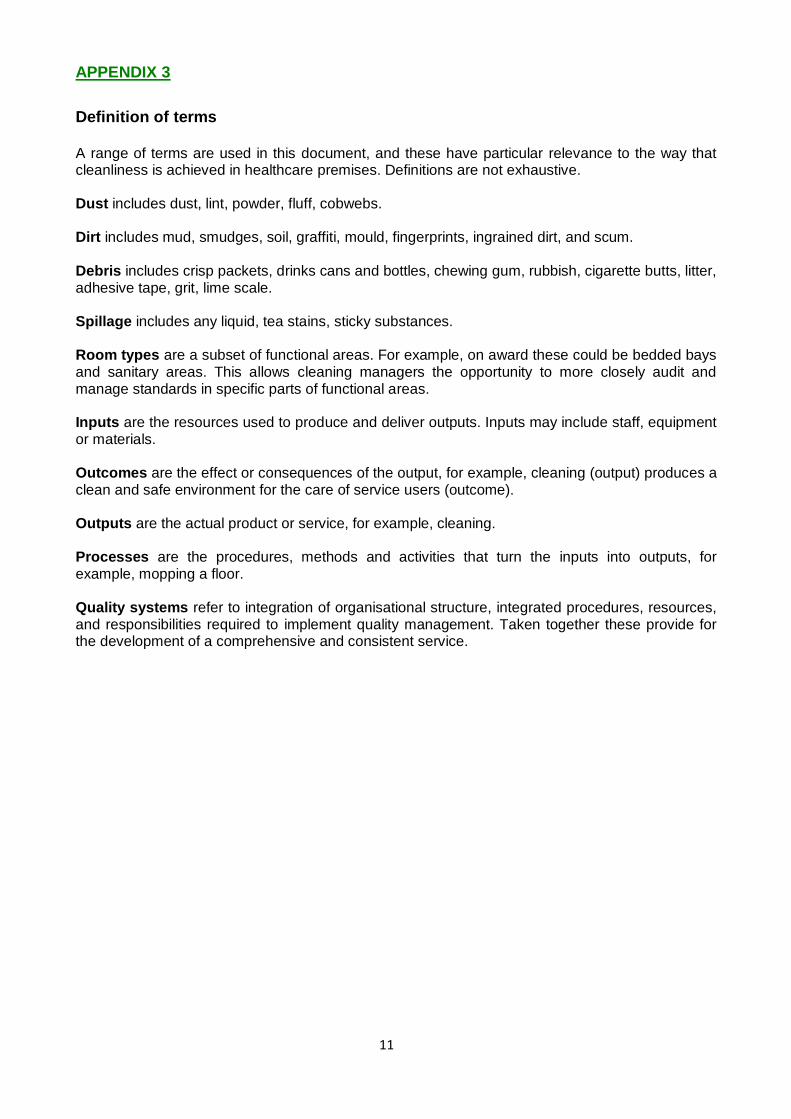
APPENDIX 3
Definition of terms A range of terms are used in this document, and these have particular relevance to the way that cleanliness is achieved in healthcare premises. Definitions are not exhaustive. Dust includes dust, lint, powder, fluff, cobwebs. Dirt includes mud, smudges, soil, graffiti, mould, fingerprints, ingrained dirt, and scum.
Debris includes crisp packets, drinks cans and bottles, chewing gum, rubbish, cigarette butts, litter, adhesive tape, grit, lime scale.
Spillage includes any liquid, tea stains, sticky substances. Room types are a subset of functional areas. For example, on award these could be bedded bays and sanitary areas. This allows cleaning managers the opportunity to more closely audit and manage standards in specific parts of functional areas. Inputs are the resources used to produce and deliver outputs. Inputs may include staff, equipment or materials. Outcomes are the effect or consequences of the output, for example, cleaning (output) produces a clean and safe environment for the care of service users (outcome). Outputs are the actual product or service, for example, cleaning. Processes are the procedures, methods and activities that turn the inputs into outputs, for example, mopping a floor. Quality systems refer to integration of organisational structure, integrated procedures, resources, and responsibilities required to implement quality management. Taken together these provide for the development of a comprehensive and consistent service.
12
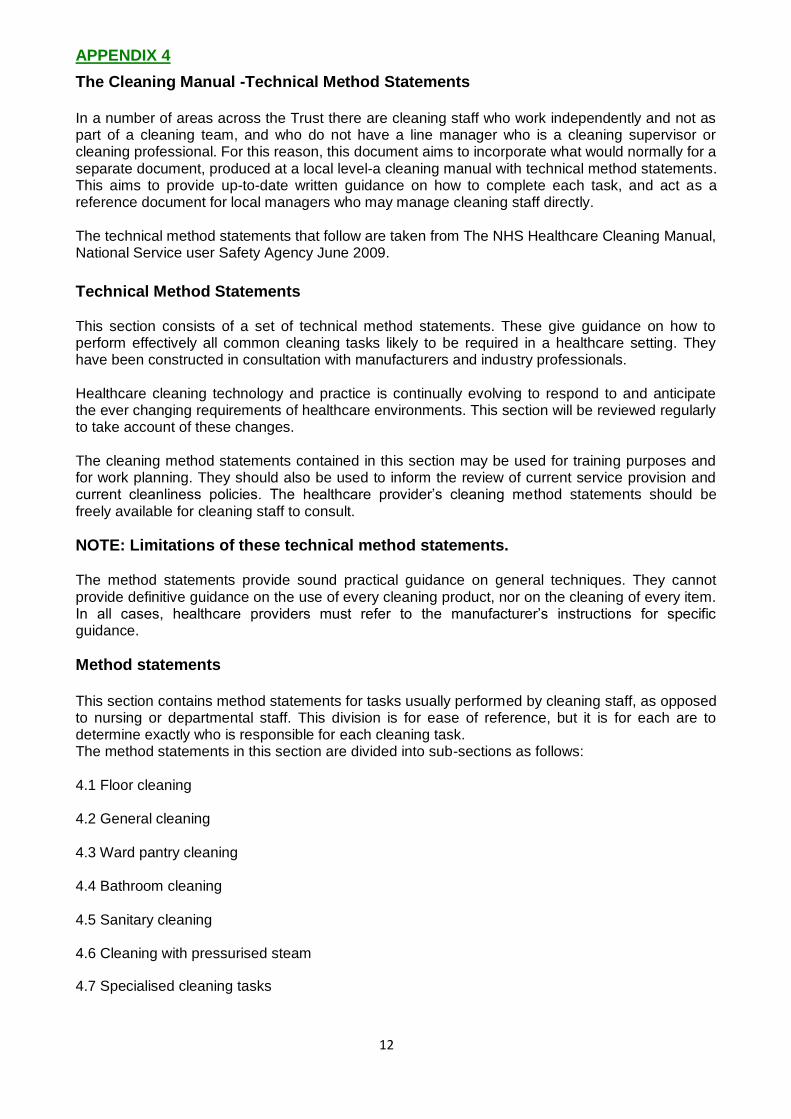
APPENDIX 4
The Cleaning Manual -Technical Method Statements In a number of areas across the Trust there are cleaning staff who work independently and not as part of a cleaning team, and who do not have a line manager who is a cleaning supervisor or cleaning professional. For this reason, this document aims to incorporate what would normally for a separate document, produced at a local level-a cleaning manual with technical method statements. This aims to provide up-to-date written guidance on how to complete each task, and act as a reference document for local managers who may manage cleaning staff directly.
The technical method statements that follow are taken from The NHS Healthcare Cleaning Manual, National Service user Safety Agency June 2009.
Technical Method Statements This section consists of a set of technical method statements. These give guidance on how to perform effectively all common cleaning tasks likely to be required in a healthcare setting. They have been constructed in consultation with manufacturers and industry professionals. Healthcare cleaning technology and practice is continually evolving to respond to and anticipate the ever changing requirements of healthcare environments. This section will be reviewed regularly to take account of these changes. The cleaning method statements contained in this section may be used for training purposes and for work planning. They should also be used to inform the review of current service provision and current cleanliness policies. The healthcare provider’s cleaning method statements should be freely available for cleaning staff to consult.
NOTE: Limitations of these technical method statements. The method statements provide sound practical guidance on general techniques. They cannot provide definitive guidance on the use of every cleaning product, nor on the cleaning of every item. In all cases, healthcare providers must refer to the manufacturer’s instructions for specific guidance.
Method statements This section contains method statements for tasks usually performed by cleaning staff, as opposed to nursing or departmental staff. This division is for ease of reference, but it is for each are to determine exactly who is responsible for each cleaning task. The method statements in this section are divided into sub-sections as follows: 4.1 Floor cleaning 4.2 General cleaning 4.3 Ward pantry cleaning 4.4 Bathroom cleaning 4.5 Sanitary cleaning 4.6 Cleaning with pressurised steam
4.7 Specialised cleaning tasks
13
4.1 Floor cleaning a. Dust-controlling
b. Damp-mopping (single bucket, single solution) – using conventional cleaning product
c. Damp-mopping (single bucket, single solution) – using chlorine-based disinfectant cleaning
product
d. Damp-mopping (double bucket, double solution) – using conventional cleaning product
e. Damp-mopping (double bucket, double solution) – using chlorine-based disinfectant cleaning product
f. Spot-mopping – using conventional cleaning product
g. Spot-mopping – using chlorine-based disinfectant cleaning product
h. Flat-mopping – using conventional cleaning product
i. Flat-mopping - using chlorine-based disinfectant cleaning product
j. Spray cleaning – using high-speed rotary machine
k. High-speed buffing and burnishing
l. Floor scrubbing using standard speed rotary machine
m. Floor scrubbing using an automatic scrubber-dryer
n. Floor stripping
o. Applying floor polishes and sealants
p. Stain removal
q. Chewing gum removal
r. Suction cleaning
s. Water extraction
t. Carpet shampooing
A. DUST-CONTROLLING
Equipment and materials required:
colour-coded long-handled dustpan and brush colour-coded long handled dust-control
system tool
disposable colour coded dust-control systems mop head or static cloth.
colour-coded domestic gloves;
14
colour-coded hand held scraper;
cleaning trolley;
black bag;
Warning signs.
Method: 1. Wash hands and put on gloves. 2. Display the warning signs.
3. Attach the static cloth or the mop head to the dust-control system tool.
4. Using a litter picker up tool Pick up all large items of litter, for example tissues and sweet wrappers.
5. Use the scraper to remove any chewing gum or other large deposits attached to the floor. Very gently run the scraper blade along the surface towards the deposit and then work it gently in a semi-circular motion until the deposit is removed. Take care not to damage the surface.
6. When dust-controlling in a room, aim to finish by the door and start at the furthest point away from it. When dust-controlling a long corridor, aim to perform the task in small sections of between ten and fifteen paces.
7. Clean the edges of the floor first, with the leading edge of the dust-control tool, then work backwards, dusting the area using an overlapping figure-of-eight pattern. The dust-control tool should remain in contact with the floor at all times.
8. When the cloth or mop head has become full of dust, remove it, dispose of it and replace it with a new one. Disposable cloths should be placed in a domestic waste bag and.
9. Use the long handled dustpan and brush to collect remaining particles.
10. On completion of the task, clean and dry all equipment and store safely and tidily in a secure storage area, segregated according to colour-coding where appropriate.
11. Remove gloves, dispose then wash and dry hands.
B. DAMP-MOPPING (SINGLE BUCKET, SINGLE SOLUTION) USING CONVENTIONAL CLEANING PRODUCT
Equipment and materials required:
colour-coded mop bucket and wringer set;
colour-coded mop handle;
colour-coded disposable mop head;
colour-coded domestic gloves;
cleaning trolley;
Black bag;
Warning signs;
15
General purpose detergent or other conventional floor cleaning product.
Method:
1. Wash hands and put on gloves. 2. Display the warning signs.
3. Dust-control the floor (refer to the dust-control method statement) or suction clean the floor (refer to suction cleaning method statement).
4. Prepare the cleaning solution in the mop bucket, in strict accordance with the manufacturer’s instructions and with your training. Do not mix chemicals and only use a cleaning product provided by the Trust (or TFM contractor).
5. Attach the mop head to the mop handle.
6. Submerge the mop into the cleaning solution and remove excess using the wringer so that the mop is fairly dry.
7. Mop the floor in 1-2 metre square sections.
8. Mop edges with straight strokes and then continue working from side to side in a backwards direction, using a figure-of-eight pattern on the remainder of the section, turning the mop frequently. The floor should be fairly dry on completion.
9. Move to the next section and repeat the process.
10. Replace the mop head and solution as required throughout the cleaning process, placing the mop head in the black bag.
11. On completion, remove the final disposable mop head and place in the black bag, clean and dry all equipment and store safely and tidily in a secure storage area, segregated according to colour-coding where appropriate.
12. Remove gloves, dispose then wash and dry hands.
C. DAMP-MOPPING (SINGLE BUCKET, SINGLE SOLUTION) – USING CHLORINE-BASED DISINFECTANT CLEANING PRODUCT
YELLOW CODED Equipment and materials required:
colour-coded mop bucket and wringer set;
colour-coded mop handle;
colour-coded mop head;
colour-coded domestic gloves suitable for chemical resistance and complying with the
PPE Directive (89/686/EEC);
cleaning trolley;
Orange bag;
Warning signs;
16
chlorine-based disinfectant cleaning product;
Product diluting container.
Method:
1. Wash hands and put on gloves.
2. Display the warning signs.
3. Dust-control the floor (refer to the dust-control method statement) or suction clean the floor (refer to suction cleaning method statement).
4. Prepare the cleaning solution. The ventilation of the area in which you are working must be thorough; if there is no window, the door should be left open. Make up the solution in the product diluting container, never directly in the bucket. Use cold water only. When prepared, decant carefully into the bucket. Staff should check with Supervisor that strength of chlorine is correct
5. Attach the mop head to the mop handle.
6. Submerge the mop into the cleaning solution and remove excess using the wringer so that the mop is fairly dry.
7. Mop the floor in 1-2 metre square sections.
8. Mop edges with straight strokes, and then continue working from side to side in a backwards direction, using a figure-of-eight pattern on the remainder of the section, turning the mop frequently. The floor should be fairly dry on completion.
9. Move to the next section and repeat the process.
10. Replace the mop head and solution as required throughout the cleaning process, placing the old mop head in the Orange bag. On completion, remove the final mop head and place in the Orange bag, clean with new 1,000 parts per million available chlorine solution and dry all equipment and store safely and tidily in a secure storage area, segregated according to colour-coding where appropriate. Remove gloves and wash hands.
D. DAMP MOPPING (DOUBLE BUCKET, DOUBLE SOLUTION) CONVENTIONAL CLEANING PRODUCT
Equipment and materials required:
colour-coded double mop bucket and wringer set;
colour-coded mop handle;
colour-coded mop head;
colour-coded domestic gloves;
cleaning trolley;
Black bag;
Warning signs;
General purpose detergent or other conventional floor cleaning product.
17
Method:
1. Wash hands and put on gloves. 2. Display the warning signs.
3. Dust-control the floor (refer to the dust-control method statement) or suction clean the floor (refer to suction cleaning method statement).
4. Prepare the cleaning solution in one of the mop buckets, in strict accordance with the
manufacturer’s instructions and with your training. Do not mix chemicals and only use a cleaning product provided by The Trust/TFM Contractor.
5. Half fill the second bucket with water. 6. Attach the mop head to the mop handle.
7. Submerge the mop into the cleaning solution and remove excess using the wringer so that the mop is fairly dry.
8. Mop the floor in 1-2 metre square sections. 9. Mop edges with straight strokes and then continue working from side to side in a backwards
direction, using a figure-of-eight pattern on the remainder of the section, turning the mop frequently. The floor should be fairly dry on completion.
10. During the cleaning process, as the mop becomes dirty, submerge it into the second bucket and wring out.
11. Move to the next section and repeat the process.
12. Replace the mop head and solution and water as required throughout the cleaning process, placing the mop head in the black waste bag.
13. On completion, remove the final mop head and place in the black bag, clean and dry all
equipment and store safely and tidily in a secure storage area, segregated according to colour-coding where appropriate.
Remove gloves and wash hands
E. DAMP-MOPPING (DOUBLE BUCKET, DOUBLE SOLUTION) USING CHLORINE- BASED DISINFECTANT CLEANING PRODUCT
Equipment and materials required:
colour-coded mop bucket and wringer set;
colour-coded mop handle;
colour-coded mop head;
colour-coded domestic gloves suitable for chemical resistance and complying with the PPE
Directive (89/686/EEC);
cleaning trolley;
black bag;
warning signs;
18
chlorine-based disinfectant cleaning product;
product diluting container.
Method:
1. Wash hands and put on gloves.
2. Display the warning signs.
3. Dust-control the floor (refer to the dust-control method statement) or suction clean the floor refer to suction cleaning method statement).
4. Prepare the cleaning solution. The ventilation of the area in which you are working must be thorough; if there is no window, the door should be left open. Make up the solution in the product diluting container, never directly in the bucket. Use cold water only. When prepared, decant carefully into one of the buckets.
5. Half fill the other bucket with water
6. Attach the mop head to the mop handle.
7. Submerge the mop into the cleaning solution and remove excess using the wringer so that the mop is fairly dry
8. Mop the floor in 1-2 metre square sections.
9. Mop edges with straight strokes, and then continue working from side to side in a backwards direction, using a figure-of-eight pattern on the remainder of the section, turning the mop frequently. The floor should be fairly dry on completion.
10. During the cleaning process, as the mop becomes dirty, submerge it into the second bucket, containing water, and wring out.
11. Move to the next section and repeat the process.
12. Replace the mop head and solution and water as required throughout the cleaning process placing the mop head in the black bag.
13. On completion, remove the final mop head and place in the black bag, clean and dry all equipment and store safely and tidily in a secure storage area, segregated according to colour-coding where appropriate.
14. Remove gloves and wash hands.
F. SPOT-MOPPING USING CONVENTIONAL CLEANING PRODUCT
Equipment and materials required:
colour-coded mop bucket and wringer set;
colour-coded domestic gloves;
colour-coded mop handle;
colour-coded mop head;
cleaning trolley;
black bag;
19
warning signs;
floor cleaner or general purpose detergent.
Method:
1. Wash hands and put on gloves.
2. Display the warning signs.
3. Dust-control the floor (refer to the dust-control method statement) or suction clean the floor (refer to suction cleaning method statement).
4. Prepare the cleaning solution in the mop bucket, in strict accordance with the
manufacturer’s instructions and with your training. Do not mix chemicals and only use a cleaning product provided by the Trust/TFM Contractor.
5. Attach the mop head to the mop handle.
6. Submerge the mop into the cleaning solution and remove excess solution from the mop in the wringer so that the mop is fairly dry.
7. Spot-mop the floor to remove stains or spillages, leaving the floor as dry as possible.
8. Replace the mop head and solution as required throughout the cleaning process, placing the mop head in the black bag.
9. On completion, remove the final mop head and place in the black bag, clean and dry all
equipment and store safely and tidily in a secure storage area, segregated according to colour-coding where appropriate.
10. Remove gloves and wash hands.
G. SPOT-MOPPING USING CHLORINE-BASED DISINFECTANT CLEANING PRODUCT
Equipment and materials required:
colour-coded mop-bucket and wringer set;
colour-coded domestic gloves suitable for chemical resistance and complying with the PPE
Directive (89/686/EEC);
colour-coded mop handle;
colour-coded mop head;
cleaning trolley;
black bag;
warning signs;
chlorine-based disinfectant cleaning product;
product diluting container.
Method:
1. Wash hands and put on gloves.
20
2. Display the warning signs.
3. Dust-control the floor (refer to the dust-control method statement) or suction clean the floor (refer to suction cleaning method statement).
4. Prepare the cleaning solution. The ventilation of the area in which you are working must be thorough; if there is no window, the door should be left open.
5. Make up the solution in the product diluting container, never directly in the bucket. Use cold water only.
6. When prepared, decant carefully into the bucket.
7. Attach the mop head to the mop handle.
8. Submerge the mop into the cleaning solution and remove excess solution from the mop in the winger so that the mop is fairly dry.
9. Spot-mop the floor to remove stains or spillages, leaving the floor as dry as possible.
10. Replace the mop head and solution as required throughout the cleaning process, placing
the mop head in the black bag.
11. On completion, remove the final mop head and place in the black bag, clean and dry all equipment and store safely and tidily in a secure storage area, segregated according to colour-coding where appropriate.
12. Remove gloves and wash hands.
H. FLAT-MOPPING USING CONVENTIONAL CLEANING PRODUCT
Equipment and materials required:
colour-coded mop-bucket and wringer set;
colour-coded domestic gloves;
colour-coded flat mop handle;
colour-coded flat mop head;
cleaning trolley;
black bag;
warning signs;
floor cleaner or general purpose detergent.
Method:
1. Wash hands and put on gloves.
2. Display the warning signs.
3. Dust-control the floor (refer to the dust-control method statement) or suction clean the floor (refer to suction cleaning method statement).
21
4. Prepare the cleaning solution in the mop bucket, in strict accordance with the manufacturer’s instructions and with your training. Do not mix chemicals and only use a cleaning product provided by the Trust/TFM Contractor.
5. Attach the mop head to the mop handle.
6. Submerge the mop into the cleaning solution and remove excess solution from the mop in the wringer so that the mop head is fairly dry.
7. Mop the floor in 1-2 metre square sections.
8. Mop edges of the floor with a straight stroke, then continue working from side to side in a backwards direction, using a figure-of-eight pattern, turning the mop frequently leaving the
floor as dry as possible. 9. Avoid splashing other surfaces and remove any splashes that do occur.
10. Replace the mop head and solution as required throughout the cleaning process, placing
the mop head in the black bag.
11. On completion, remove the final mop head and place in the black bag, clean and dry all equipment and store safely and tidily in a secure storage area, segregated according to colour-coding where appropriate.
12. Remove gloves and wash hands.
I. FLAT-MOPPING USING CHLORINE-BASED DISINFECTANT CLEANING
PRODUCT
Equipment and materials required:
colour-coded mop bucket and wringer set;
colour-coded domestic gloves suitable for chemical resistance and complying with the PPE
Directive (89/686/EEC);
colour-coded flat mop handle;
colour-coded flat mop head-single use only;
cleaning trolley;
black bag;
warning signs;
chlorine-based disinfectant cleaning product;
product dilution container.
Method:
1. Wash hands and put on gloves. 2. Display the warning signs. 3. Dust-control the floor (refer to the dust-control method statement) or suction clean the floor (refer to suction cleaning method statement). 4. Prepare the cleaning solution. The ventilation of the area in which you are working must be
22
thorough; if there is no window, the door should be left open. Make up the solution in the product diluting container, never directly in the bucket. Use cold water only. When prepared, decant carefully into the bucket.
5. Attach the mop head to the mop handle6. Submerge the mop into the cleaning solution and
remove excess solution from the mop in the wringer, so that the mop head is fairly dry. 6. Mop the floor in 1-2 metre square sections. 7. Mop edges of the floor with a straight stroke and then continue working from side to side in a
backwards direction, using a figure-of-eight pattern, turning the mop frequently leaving the floor as dry as possible.
8. Avoid splashing other surfaces and remove any splashes that do occur.
Replace the mop head and solution as required throughout the cleaning process, placing the mop head in the black bag.
9. On completion, remove the final mop head and place in the black bag, clean and dry all
equipment and store safely and tidily in a secure storage area, segregated according to colour-coding where appropriate.
10. Remove gloves and wash hands.
J. SPRAY CLEANING USING HIGH-SPEED ROTARY MACHINE
Equipment and materials required:
colour-coded domestic gloves;
colour-coded labelled spray bottle;
floor pad and drive disc;
high-speed rotary machine;
black bag;
warning signs;
general purpose detergent or other conventional floor cleaning product.
Method:
1. Plan work route and when necessary, temporarily move items that may obstruct you to a
new, safe location.
2. Wash hands and put on gloves.
3. Display warning signs.
4. Dust-control or suction clean the floor (refer to the dust-controlling method statement or
suction cleaning method statement).
5. Damp-mop if necessary (refer to damp-mopping method statement) ensuring the floor is dry before spray cleaning.
6. Attach the floor pad to the high-speed machine in strict accordance with the manufacturer’s instructions and with your training.
23
7. Prepare the cleaning solution in strict accordance with the manufacturer’s instructions and with your training. Do not mix chemicals and only use a cleaning product provided by the Trust or the TFM contractor.
8. Unwind cable and plug into a mains socket.
9. Adjust handle to a comfortable height for you to use.
10. Ensure that you are holding the high-speed machine firmly and that the cable is behind the machine. 11. Switch the machine on. Beware of the initial “kick”.
12. Spray a fine mist of the cleaning solution over the floor to be cleaned, holding the spray
gun no more than one metre from the floor surface. Five sprays are sufficient for 2-3 square metres. Do not over spray as this will result in a slippery floor.
13. Spray clean the floor area by moving the high-speed machine in continuous passes
working forward, then working backwards to give the best result.
14. When the floor pad becomes full of dirt, unplug the machine and replace it, placing the used floor pad in the black bag.
15. On completion, remove the final floor pad and place in the black bag, clean and dry all Equipment and store safely and tidily in a secure storage area, segregated according to colour-coding where appropriate.
16. With dry hands, remove the plug from the mains socket and rewind the electricity cable.
17. When the area is completely dry, return any items to their original positions.
18. Remove gloves, dispose then wash and dry hands.
K. HIGH-SPEED BUFFING AND BURNISHING
Equipment and materials required:
colour-coded domestic gloves;
floor pad and drive disc;
high-speed rotary machine (with or without suction unit);
black bag;
warning signs.
Method:
1. Plan work route and when necessary, temporarily move items that may obstruct you to a new, safe location.
2. Wash hands and put on gloves.
3. Display warning signs.
4. If the high-speed machine does not have an integral suction unit, dust-control or suction clean the floor (refer to the dust-controlling method statement or suction cleaning method statement).
24
5. If the high-speed machine has an integral suction unit, check the filter and bag and
replace if necessary.
6. Damp-mop if necessary (refer to damp-mopping method statement) ensuring the floor is dry before buffing.
7. Attach the floor pad to the high-speed machine in strict accordance with the
manufacturer’s instructions and with your training.
8. Unwind cable and plug into a mains socket.
9. Adjust handle to a comfortable height for you to use.
10. Ensure that you are holding the high-speed machine firmly and that the cable is behind the machine.
11. Switch the machine on. Beware of the initial “kick”.
12. Buff the floor by moving the machine in a straight line in a continuous series of overlapping
passes, beginning with the edges. Do not allow the machine to remain over one area constantly: this will damage the floor surface.
13. If the floor pad becomes full of dirt, unplug the machine and replace it, placing the used
floor pad in the black bag. 14. With dry hands, remove the plug from the mains socket and rewind the electricity cable.
15. On completion, remove the final floor pad and place in the black bag, clean and dry all
equipment and store safely and tidily in a secure storage area, segregated according to colour-coding where appropriate.
16. When the area is completely dry, return the furniture to original position. 17. Remove gloves, dispose then wash and dry hands.
J. FLOOR SCRUBBING USING A STANDARD SPEED ROTARY MACHINE
Equipment and materials required:
colour-coded domestic gloves;
colour-coded bucket;
colour-coded mop handle;
colour-coded mop head;
edge cleaning tool and pad;
scouring pad;
floor pad and drive disc, or polypropylene brush head
standard speed rotary machine fitted with tank;
black bag;
warning signs;
low foam general purpose detergent or other conventional floor cleaning product.
25
Method: a. Plan work route and when necessary, temporarily move items that may obstruct you to a
new, safe location.
b. Check battery level before use.
c. Wash hands and put on gloves.
d. Display warning signs.
e. Dust-control or suction clean the floor (refer to the dust-controlling method statement or suction cleaning method statement).
f. Clean and prepare the floor edges, using the edge cleaning tool and pad, if necessary. attach pad to tool and run the pad along the edge in a short repeated motion, covering approximately one metre at a time.
g. Attach the floor pad or polypropylene brush head to the standard speed machine in strict accordance with the manufacturer’s instructions and with your training.
h. Prepare the cleaning solution in strict accordance with the manufacturer’s instructions and
with your training. Carefully pour the cleaning solution into the standard speed machine’s tank attachment.
i. Unwind cable and plug into a mains socket.
j. Adjust handle to a comfortable height for you to use.
k. Ensure that you are holding the standard speed machine firmly and that the cable is behind the machine.
l. Switch the machine on. Beware of the initial “kick”.
m. Starting at the point furthest away from where you have planned to end, start scrubbing the first five metre square section, using the handle and release a small amount of the cleaning solution onto the floor.
n. Scrub the floor area by moving the high-speed machine in continuous, small, overlapping, side to side movements.
o. Regularly replace the floor pad. Unplug the machine and replace it, placing the used floor pad in the black bag.
p. For stubborn stains, manually use a small scouring pad.
q. With dry hands, remove the plug from the mains socket and rewind the electricity cable.
r. On completion, remove the final floor pad and place in the black bag, empty the water
tank, clean and dry all equipment and store safely and tidily in a secure storage area, segregated according to colour coding where appropriate.
s. If necessary, damp-mop the floor with clean water (refer to damp-mopping method
statement).
t. When the area is completely dry, return any items moved to their original positions.
u. Remove gloves and wash hands.
26
K. FLOOR SCRUBBING USING AN AUTOMATIC SCRUBBER-DRYER Equipment and materials required:
automatic scrubber-dryer;
colour-coded domestic gloves;
colour-coded bucket;
colour-coded mop handle;
colour-coded mop head;
edge cleaning tool and pad;
scouring pad;
floor pad and drive disc, or polypropylene brush head;
black bag;
warning signs;
low foam general purpose detergent or other conventional floor cleaning product.
Method:
1. Plan work route and when necessary, temporarily move items that may obstruct you to a new, safe location.
2. Check battery level before use.
3. Ensure that the automatic scrubber-dryer’s floor pads or brush heads and its squeegee blade are clean prior to use. Ensure that the float valve is in place and working.
4. Wash hands and put on gloves.
5. Display warning signs.
6. Dust-control or suction clean the floor, (refer to the dust-controlling method statement or suction cleaning method statement).
7. Clean and prepare the floor edges, using the edge cleaning tool and pad, if necessary. Attach pad to tool and run the pad along the edge in a short repeated motion, covering approximately one metre at a time.
8. Attach the floor pad or polypropylene brush head to the automatic scrubber-dryer in strict
accordance with the manufacturer’s instructions and with your training.
9. Prepare the cleaning solution in strict accordance with the manufacturer’s instructions and with your training. Carefully pour the cleaning solution into the automatic scrubber-dryer tank.
10. Check that the dirty water tank is empty and clean.
11. Turn the solution and vacuum on. Lower the squeegee. Starting at the point furthest away from where you have planned to end, release a small amount of the cleaning solution onto the floor, ensure the extraction system is set correctly and is working.
12. Scrub the floor area by moving the machine slowly forward over the area. Regularly check the dirty and clean water tanks, emptying and refilling as necessary.
27
13. Regularly replace the floor pad. Unplug the machine and replace it, placing the used floor
pad in the black bag.
14. For stubborn stains, manually use a small scouring pad.
15. Remove any excess water and splashes using a mop or cloth.
16. With dry hands, remove the plug from the mains socket and rewind the electricity cable.
17. On completion, remove the final floor pad and place in the black bag, empty the water tanks, clean and dry all equipment and store safely and tidily in a secure storage area, segregated according to colour coding where appropriate.
18. When the area is completely dry, return any items moved to their original positions.
19. Remove gloves and wash hands.
L. FLOOR STRIPPING (PREPARATORY TO APPLYING FLOOR POLISH OR SEALANT)
Equipment and materials required:
colour-coded domestic gloves suitable for chemical resistance and complying with the PPE
Directive (89/686/EEC);
colour-coded bucket;
colour-coded mop handle;
colour-coded mop head;
colour-coded scraper;
edge cleaning tool and pad;
floor pad and drive disc;
standard speed rotary floor machine;
wet pick-up machine;
eye goggles;
knee pads;
black bag;
warning signs;
floor stripping chemical product;
universal indicator paper.
Method:
1. Plan work route and when necessary, temporarily move items that may obstruct you to a
new, safe location.
2. Wash hands and put on gloves.
3. Display warning signs.
28
4. Ensure standard speed machine and floor pads are clean prior to use.
5. Dust-control or suction clean the floor, (refer to the dust-controlling method statement or suction cleaning method statement).
6. Remove chewing gum and other deposits using a scraper and weaken polish build-up to edges using an edge cleaning tool. Attach pad to tool and run the pad along the edge in a short repeated motion, covering approximately one metre at a time.
7. Attach the floor pad to the standard speed machine in strict accordance with the manufacturer’s instructions and with your training. Always use green pads to strip linoleum floors, as black pads may cause damage.
8. Prepare the floor stripper solution in strict accordance with the manufacturer’s instructions and with your training. Use eye goggles when preparing the solution and remove afterwards.
9. Carefully place the solution in a mop bucket. Using the mop, apply the solution to the first five metre section of flooring.
10. Unwind cable and plug into a mains socket.
11. Adjust handle to a comfortable height for you to use.
12. Ensure that you are holding the high-speed machine firmly and that the cable is behind the machine.
13. Switch the machine on. Beware of the initial “kick”.
14. Allow a five minute contact time and then start stripping the floor by moving the standard speed rotary machine in continuous, small, overlapping, side to side movements.
15. Do not allow the floor to dry while stripping the floor. If necessary, repeat the application of
solution as above.
16. When the floor pad becomes full of dirt, unplug the machine and replace it, placing the used floor pad in the black bag.
17. Use a wet pick-up machine to remove remaining slurry from the floor (refer to water extraction method statement).
18. If polish residue remains, repeat the process, using increased solution strength and allow additional contact time.
19. On completion, remove the final floor pad and place in the black bag, clean and dry all
equipment and store safely and tidily in a secure storage area, segregated according to colour-coding where appropriate.
20. With dry hands, remove the plug from the mains socket and rewind the electricity cable. When the area is completely dry, return the furniture to its original position.
21. Damp-mop the floor with clean water (refer to damp-mopping method statement).
22. Check the PH of the floor using the universal indicator paper. The floor should be visibly clean, dry and have a neutral PH.
23. Dust-control the floor if necessary (refer to dust-control method statement). When the area is completely dry, apply a seal and/or a finish to protect the floor.
29
24. Clean and dry all equipment and store tidily in a secure storage area, segregated
according to colour coding where appropriate.
25. Remove gloves and wash hands.
M. APPLYING FLOOR POLISHES OR SEALANTS
Equipment and materials required:
colour-coded bucket;
colour-coded mop handle;
colour-coded flat mop head for applying polish;
colour-coded domestic gloves;
cleaning trolley;
black bag;
warning signs;
floor polish or sealant.
Method:
1. Wash hands and put on gloves.
2. Display the warning signs.
3. Prepare the floor for polishing (refer to floor stripping method statement).
4. Pour the appropriate amount of floor polish or sealant into the bucket.
5. Attach the mop head to the mop handle.
6. Place the mop head onto the surface of the polish so that the floor polish is slowly
absorbed into the mop; do not submerge the mop – when the mop is taken out of the bucket it should not be dripping.
7. Carefully apply the polish, starting at the point furthest from where you intend to finish. Begin with a single stroke along the edge.
8. Keeping the mop in contact with the floor, draw the polish or sealant across the floor so that a uniform amount is evenly spread. Replenish mop with polish from the bucket as required. As you go, ensure that the floor has no bare patches, streaks or bubbles; the polish can be reworked with the mop for only 30 seconds after it is applied (refer to manufacturer’s instructions for advice).
9. When the area is completed, allow it to dry. Be careful not to walk on the surface until it is completely dry.
10. The second coat should then be applied. Repeat points 4, 5, 6, 7, 8 and 9 above, except
that the polish or sealant should be laid at right angles to the first coat. Use a new mop head and bucket for each coat, disposing of the used mop head in the black bag.
11. A third coat may be applied if required, laying the polish at right angles to the second coat.
12. On completion, remove the final mop head and place in the black bag, clean and dry all
30
equipment and store safely and tidily in a secure storage area, segregated according to colour-coding where appropriate.
13. Return any items moved to their original positions.
14. Remove gloves and wash hands.
N. STAIN REMOVAL
Equipment and materials required:
colour-coded bucket;
colour-coded cloth;
soft or medium scrubbing brush
disposable paper towels;
colour-coded domestic gloves;
knee pads; goggles (if using a spray or where a splash is a possibility)
warning signs;
carpet stain remover or general surface cleaner.
Method:
1. Where possible, all liquid spillages should be cleared before they can dry, using paper
towels. This will normally prevent staining which is resistant to routine cleaning. Where such staining does occur, it should be treated in the first instance by the friction method:
2. Wash hands and put on gloves.
3. Display the warning signs.
4. Put warm water into the bucket.
5. Wet and wring out the cloth, and rub gently at the stain, starting on the outer edge and working towards the middle.
6. Change to use of the brush if 4) is unsuccessful.
7. On completion, clean and dry all equipment and store safely and tidily in a secure storage area, segregated according to colour-coding where appropriate. Leave warning signs in place until the area has thoroughly dried.
8. Remove gloves and wash hands.
If the friction method is unsuccessful, the chemical method should be used:
9. Wash hands and put on gloves suitable for chemical resistance and complying with the PPE Directive (89/686/EEC).
10. Display the warning signs.
11. Prepare the cleaning solution in the bucket, in strict accordance with the manufacturer’s instructions and with your training. Do not mix chemicals, and only use a cleaning product provided by The Trust/TFM Contractor.
31
12. Wet and wring out the cloth, and rub gently at the stain, starting on the outer edge and working towards the middle.
13. Change to use of the brush if 11) is unsuccessful.
14. On completion, clean and dry all equipment and store safely and tidily in a secure storage
area, segregated according to colour-coding where appropriate. Leave warning signs in place until the area has thoroughly dried.
15. Remove gloves and wash hands.
16. If this is unsuccessful, the use of stain specific agents may be necessary, using the same general method.
17. These may cause damage to flooring. In all cases, consult your supplier, and ensure that small test patches are made.
o. CHEWING GUM REMOVAL
Equipment and materials required:
colour-coded scraper;
colour-coded dustpan and brush;
colour-coded domestic gloves;
eye goggles;
knee pads;
warning signs;
aerosol freezing spray for gum removal.
Method:
1. Wash hands and put on gloves and kneepads if working on large areas. (Note, kneepads should be available for use by staff that require physical support regardless of the area to be covered).
2. Display the warning signs.
3. Insert directional tube into the aerosol spray head valve and spray freezing agent directly
onto the surface of the chewing gum for 4-5 seconds.
4. Immediately, use scraper to gently remove the frozen gum.
5. Use the dustpan and brush to collect the frozen pieces
6. Repeat points 3 to 5 until deposit is removed.
7. Remove gloves and wash hands.
P. WATER EXTRACTION
Equipment and materials required:
wet pick-up machine;
32
hose wand attachment;
colour-coded domestic gloves;
colour-coded mop handle;
colour-coded mop head;
black bag;
warning signs.
Method:
1. Plan work route and when necessary, temporarily move items that may obstruct you to a new, safe location. Identify where you are going to dispose of dirty collected water, referring to risk assessments and your supervisor.
2. Wash hands and put on gloves.
3. Display warning signs.
4. Check that the wet pick-up machine is clean prior to use.
5. Unwind cable and plug into a mains socket. Switch on the machine, ensuring that the cable is behind the machine.
6. Move the wet pick-up machine slowly across the floor in a steady forward motion to pick up liquid.
7. Use the hose wand attachment, or other suitable attachments, to collect residual water from restricted areas
8. Each time the dirty water tank is full, turn off the machine and empty the tank in the identified area.
9. On completion, turn off the machine and empty the dirty water tank in the identified area.
10. With dry hands, remove the plug from the mains socket and rewind the electricity cable.
11. Mop any small remaining wet patches (refer to spot-mopping method statement).
12. For stubborn stains, manually use a small scouring pad.
13. Remove any excess water and splashes using a mop or cloth.
14. On completion, clean and dry all equipment and store safely and tidily in a secure storage area, segregated according to colour-coding where appropriate.
15. When the area is completely dry, return any items moved to their original positions.
16. Remove gloves and wash hands.
Q. CARPET EXTRACTION Equipment and materials required:
carpet shampooing machine with attachments;
colour-coded cloth;
33
colour-coded domestic gloves;
colour-coded mop handle;
colour-coded mop head;
black bag;
warning signs;
carpet shampoo.
Method:
1. Plan work route and when necessary, temporarily move items that may obstruct you to a new, safe location. Identify where you are going to dispose of dirty collected water, referring to risk assessments and your supervisor.
2. Wash hands and put on gloves. 3. Display warning signs.
4. Check that the machine is clean prior to use.
5. Suction clean the floor (refer to suction cleaning method statement).
6. Prepare the cleaning solution in strict accordance with the manufacturer’s instructions and with your training.
7. Carefully pour the cleaning solution into the carpet shampoo machine’s tank. Unwind cable
and plug into a mains socket.
8. Turn on the carpet shampooing machine, ensuring that both the solution release and extraction functions are working.
9. Starting at the furthest point from where you have planned to finish, begin carpet shampooing by moving the machine slowly backwards and forwards in straight overlapping lines, covering a 2-3 metre square section.
10. Turn off the solution release function and go over the section twice more using the suction function only. Use attachment to reach areas inaccessible to the machine.
11. When the dirty water tank is filled, turn off the machine and dispose of the dirty water in the planned location.
12. On completion, empty the dirty water tank, clean and dry all equipment and store safely and tidily in a secure storage area, segregated according to colour-coding where appropriate.
13. With dry hands, remove the plug from the mains socket and rewind the electricity cable.
14. Suction clean the floor (refer to suction cleaning method statement).
15. When the area is completely dry, return any items moved to their original positions. return any items moved to their original positions.
16. Remove gloves and wash hands.
34
4.2 General cleaning
a. Damp-dusting – horizontal and vertical surfaces.
b. Damp-dusting – bedside and overhead lamps.
c. Damp-dusting – chair and settee.
d. Damp-dusting – radiator.
e. Damp-dusting – beds.
f. Glass – internal glass and mirrors.
g. Glass – external glass.
h. Dusting – high-dusting.
i. Furniture polishing.
j. Walls – spot cleaning.
a. DAMP-DUSTING – HORIZONTAL AND VERTICAL SURFACES
Equipment and materials required:
colour-coded bucket;
colour-coded cloth;
colour-coded domestic gloves;
cleaning trolley;
general purpose detergent or general surface cleaner;
warning signs.
Method:
1. Wash hands and put on gloves.
2. Display warning signs.
3. Prepare the cleaning solution in the bucket, in strict accordance with the manufacturer’s instructions and with your training. Do not mix chemicals, and only use a cleaning product provided by The Trust/TFM contractor/TFM Contractor.
4. Place the bucket on a cleaning trolley.
5. Dampen or rinse a cloth in the cleaning solution.
6. Remove items from the surface to be cleaned.
7. Begin damp-dusting. For small flat surfaces, wipe in straight lines beginning with the edges. For larger surfaces, begin with the edges and damp-dust using an overlapping figure-of-eight pattern. Turn the cloth on each second pass, and rinse regularly in the solution. Take care to damp-dust the edges and undersides of surfaces after the tops. Where extendable items, such as bedside tables are to be damp-dusted, extend them before beginning to work.
35
8. Change the cleaning solution when it becomes soiled.
9. Greasy or stubborn deposits may require repeated passes.
10. Replace any items moved on to the clean surface when it is dry.
11. On completion, dispose of the cloth, clean and dry all equipment and store safely and tidily
in a secure storage area, segregated according to colour-coding where appropriate.
12. Remove gloves and wash hands.
b. DAMP-DUSTING - BEDSIDE AND OVERHEAD LAMPS
Equipment and materials required:
colour-coded bucket;
colour-coded cloth;
colour-coded domestic gloves;
cleaning trolley;
general purpose detergent or general surface cleaner;
warning signs;
Method:
1. Wash hands and put on gloves.
2. Display warning signs.
3. Prepare the cleaning solution in the bucket, in strict accordance with the manufacturer’s instructions and with your training. Do not mix chemicals, and only use a cleaning product provided by The Trust/TFM contractor/TFM Contractor.
4. Place the bucket on a cleaning trolley.
5. Dampen or rinse a cloth in the cleaning solution.
6. Extend the lamp to its full length.
7. Starting at the base, damp-dust all surfaces carefully avoiding the bulb and bulb fitting. Turn the cloth regularly and rinse in the solution as soon as it becomes soiled.
8. Change the cleaning solution when it becomes soiled.
9. Greasy or stubborn deposits may require repeated passes.
10. Leave the lamp to dry.
11. On completion, dispose of the cloth, clean and dry all equipment and store safely and tidily in a secure storage area, segregated according to colour-coding where appropriate.
12. Remove gloves and wash hands.
36
c. DAMP-DUSTING - CHAIR AND SETTEE
Equipment and materials required:
colour-coded bucket;
colour-coded cloth;
colour-coded domestic gloves;
cleaning trolley;
suction cleaner with crevice tool;
general purpose detergent or general surface cleaner;
warning signs.
Method:
1. Wash hands and put on gloves.
2. Display warning signs.
3. Prepare the cleaning solution in the bucket, in strict accordance with the manufacturer’s instructions and with your training. Do not mix chemicals, and only use a cleaning product provided by your The Trust/TFM Contractor.
4. Place the bucket on a cleaning trolley.
5. Use the suction cleaner and crevice tool to remove debris from between and underneath
cushions and from corners and edges (refer to suction cleaning method statement).
6. Dampen or rinse a cloth in the cleaning solution.
7. Begin damp-dusting. For small flat surfaces, wipe in straight lines beginning with the edges.
8. For larger surfaces, begin with the edges and damp-dust using an overlapping figure-of-
eight patterns. Turn the cloth on each second pass and rinse regularly in the solution.
9. Take care to damp-dust the edges and undersides of surfaces after the tops. Where extendable items, such plate rests and foot rests, are to be damp-dusted, extend them before beginning to work.
10. Change the cleaning solution when it becomes soiled.
11. Greasy or stubborn deposits may require repeated passes.
12. On completion, dispose of the cloth, clean and dry all equipment and store safely and
tidily in a secure storage area, segregated according to colour-coding where appropriate.
13. Remove gloves and wash hands.
d. DAMP-DUSTING – RADIATOR
Equipment and materials required:
colour-coded bucket;
colour-coded cloth;
37
colour-coded domestic gloves;
flexible radiator cleaning tool;
cleaning trolley;
general purpose detergent or general surface cleaner;
warning signs.
Additional Notes: Radiator covers should be removed prior to cleaning. Where these are fixed and require unscrewing and re screwing by the estates department, it is very important that the task is performed in a planned manner to ensure that covers are not left off the radiators for any longer than is necessary for the cleaning process.
Carefully check the temperature of the exposed radiator by placing your hand near it. If you think it is too hot for you to clean safely, inform your supervisor, who will consult with the Estates department/TFM Contract Cleaning Supervisor.
Method:
1. Wash hands and put on gloves.
2. Display warning signs.
3. Prepare the cleaning solution in the bucket, in strict accordance with the manufacturer’s instructions and with your training. Do not mix chemicals and only use a cleaning product provided by The Trust/TFM contractor/TFM Contractor.
4. Place the bucket on a cleaning trolley.
5. Dampen or rinse a cloth in the cleaning solution.
6. Remove radiator cover according to procedure.
7. Begin damp-dusting. For small flat surfaces, wipe in straight lines beginning with the edges. For larger surfaces, begin with the edges and damp-dust using an overlapping figure-of-eight pattern. Turn the cloth on each second pass and rinse regularly in the solution.
8. Use the flexible radiator tool to reach less accessible areas.
9. Take care to damp-dust the edges and undersides of surfaces after the tops.
10. Change the cleaning solution when it becomes soiled.
11. Greasy or stubborn deposits may require repeated passes.
12. On completion, dispose of the cloth, clean and dry all equipment and store safely and tidily in a secure storage area, segregated according to colour-coding where appropriate.
13. Remove gloves and wash hands.
e. DAMP-DUSTING – BEDS
Equipment and materials required:
38
colour-coded bucket;
colour-coded cloth;
colour-coded domestic gloves;
knee pads;
cleaning trolley;
general purpose detergent or general surface cleaner;
warning signs.
Additional Notes: This task will normally be performed while the service user is out of the bed. If it is necessary for the cleaning to be done while the service user is present, seek permission from the person in charge to clean the bed. Explain to the service user what you are doing.
Method:
1. Wash hands and put on gloves and knee pads.
2. Display warning signs.
3. Prepare the cleaning solution in the bucket, in strict accordance with the manufacturer’s instructions and with your training. Do not mix chemicals and only use a cleaning product provided by The Trust/TFM contractor/TFM Contractor.
4. Place the bucket on a cleaning trolley. Raise or lower the bed to a convenient height for cleaning, if it is an electrically operated bed. If unsure,
5. Dampen or rinse a cloth in the cleaning solution.
6. Temporarily remove items from the bed frame to a new, safe location.
7. Begin damp-dusting. Start from the top and work downwards to the base and the wheels. Turn the cloth regularly, and rinse regularly in the solution.
8. Take care to damp-dust the edges and undersides of surfaces after the tops.
9. Change the cleaning solution when it becomes soiled.
10. Greasy or stubborn deposits may require repeated passes.
11. Replace any items moved, back on to the bed frame when it is dry.
12. Lower or raise the bed to its original position.
13. On completion, dispose of the cloth, clean and dry all equipment and store safely and tidily in a secure storage area, segregated according to colour-coding where appropriate.
14. Remove gloves and wash hands.
39
f. GLASS – INTERNAL GLASS AND MIRRORS
Equipment and materials required:
colour-coded cloths x 2;
colour-coded domestic gloves;
colour-coded, labelled spray-bottle;
general purpose detergent or general surface cleaner or glass cleaner;
warning signs.
Additional Notes: Glass automatic doors must be switched off before cleaning. Where this requires the involvement of the TFM contractor or in-house estates or security personnel, this work must be planned to ensure that doors do not remain inactive for longer than necessary for cleaning.
Method:
1. Wash hands and put on gloves.
2. Display warning signs.
3. Prepare the cleaning solution in the labelled spray bottle, in strict accordance with the manufacturer’s instructions and with your training. Do not mix chemicals and only use a cleaning product provided by The Trust/TFM contractor/TFM Contractor.
4. Spray some of the cleaning solution onto the first cloth so that it is slightly damp.
5. Clean the glass surface or mirror, starting along the top edge and then working down in an
overlapping figure-of-eight pattern covering all of the surface.
6. Using the second dry cloth, buff, using small overlapping circular motions until all smears are removed and the surface is shiny.
7. Change the first cloth when it becomes soiled.
8. Change the second cloth when it becomes too damp to buff effectively.
9. Greasy or stubborn deposits may require repeated passes.
10. On completion, dispose of the cloths, clean and dry the spray bottle and store safely and tidily in a secure storage area, segregated according to colour-coding where appropriate.
11. Remove gloves and wash hands.
g. GLASS – EXTERNAL GLASS
The routine cleaning of external glass, i.e. windows, is usually carried out by a specialist contractor. This method statement is designed for use in carrying out additional cleans to low level external glass and the outside surfaces of glass automatic doors in high traffic areas. It is not recommended that any climbing equipment is used in this cleaning procedure. Areas where this is applicable include the windows into Rosewood Garden and the doors into the internal gardens in Highgate Mental Health Centre and the main entrance door there, as well
40
as Camden Mews etc. Glass automatic doors must be switched off before cleaning. Where this requires the involvement of the TFM Contractor or in-house estates or security personnel, this work must be planned to ensure that doors do not remain inactive for longer than necessary for cleaning.
Equipment and materials required:
colour-coded bucket;
colour-coded cloth x 2;
colour-coded domestic gloves;
colour-coded non-abrasive pad;
squeegee blade with extension attachment;
cleaning trolley;
general purpose detergent or general surface cleaner or glass cleaner;
warning signs.
Method:
1. Wash hands and put on gloves.
2. Display warning signs.
3. Check that the squeegee blade is undamaged and that the extension pole will attach correctly.
4. Prepare the cleaning solution in the bucket, in strict accordance with the manufacturer’s instructions and with your training. Do not mix chemicals and only use a cleaning product provided by The Trust/TFM contractor/TFM Contractor.
5. Place the bucket on a cleaning trolley.
6. Submerge the first cloth in the cleaning solution and apply liberally to glass surface,
starting along the top edge, then working downwards in an overlapping figure-of-eight pattern, rubbing away noticeable deposits as you go.
7. For greasy or stubborn deposits, it may be necessary to use the non-abrasive pad. If this is unsuccessful the scraper may be used. Very gently run the scraper blade along the surface towards the deposit and then work it gently in a semi-circular motion until it is removed. Take care not to press down onto the surface.
8. Using the squeegee blade, with extension attachment if necessary, dry the window. Start with a single stroke along the top edge, then move downwards in an overlapping figure-of-eight pattern.
9. Using the second cloth, clear the window frames of any remaining cleaning solution. Replace the cloth when it becomes soiled.
10. On completion, dispose of the cloths, clean and dry all equipment and store safely and tidily in a secure storage area, segregated according to colour-coding where appropriate.
11. Remove gloves and wash hands.
41
h. DUSTING – HIGH-DUSTING
Equipment and materials required:
colour-coded high-dusting tool;
telescopic handle attachment (if required);
dusting tool duster head or dusting cloth;
colour-coded domestic gloves;
cleaning trolley;
black bag;
warning signs.
Method:
1. Wash hands and put on gloves.
2. Display warning signs.
3. Check that pictures, clocks and other hangings are secure before dusting.
4. Place the duster head or duster cloth onto the high-dusting tool. If dusting a high ceilinged room, it may be necessary to use the telescopic attachment.
5. Firmly holding the handle of the tool or telescopic attachment, begin to high-dust. Work
systematically around the room you are dusting, covering a 1-2 metre section at a time. Begin at the highest point and work methodically to the lowest point.
6. Start by dusting the join of the ceiling with the wall.
7. Pass the dusting tool head along the tops of all high surfaces, such as picture frames, bed rails, pipes, high dado rails, clocks, cupboard tops, and high ledges.
8. Pass the flat surface of the tool head over the wall surface, starting at the top and working systematically downwards in overlapping side to side passes.
9. Repeat the process for the next 1-2 metre section.
10. Replace duster heads or duster cloths when they become soiled. Place reusable heads in the black bag.
11. Change the cleaning solution when it becomes soiled.
12. On completion, dispose of the final cloth, clean and dry all equipment and store safely and tidily in a secure storage area, segregated according to colour-coding where appropriate.
13. Remove gloves and wash hands.
i. FURNITURE POLISHING
Equipment and materials required:
colour-coded cloths x 2;
colour-coded domestic gloves;
42
furniture polish;
warning signs.
Additional Notes: Do not move PC equipment and other equipment from desks without consulting the user. Be aware of your manual handling training and request assistance if necessary. Method:
1. Wash hands and put on gloves.
2. Display warning signs.
3. Plan your work route and temporarily remove magazines, leaflets, and other items from surfaces to be polished to a new, safe location.
4. Damp-dust all surfaces (refer to damp-dusting – horizontal and vertical surfaces method statement).
5. Apply a small amount of furniture polish to the first cloth.
6. Polish the furniture, using overlapping straight lines.
7. Using the second, dry cloth, buff with small overlapping circular motions until all smears are removed and the surface is shiny.
8. Replace cloths when they become worn.
9. On completion, dispose of the final cloths, clean and dry all equipment and store safely and tidily in a secure storage area, segregated according to colour-coding where appropriate.
10. Remove gloves and wash hands.
j. WALLS – SPOT-CLEANING
Equipment and materials required:
colour-coded bucket;
colour-coded cloth x 2;
colour-coded domestic gloves;
non-abrasive pad;
cleaning trolley;
general purpose detergent or general surface cleaner;
warning signs;
Method:
1. Wash hands and put on gloves.
2. Display warning signs.
43
3. Prepare the cleaning solution in the bucket, in strict accordance with the manufacturer’s instructions and with your training. Do not mix chemicals and only use a cleaning product provided by The Trust/TFM contractor/TFM Contractor.
4. Place the bucket on a cleaning trolley.
5. Dampen or rinse a cloth in the cleaning solution so that it is fairly dry.
6. Gently wipe the mark, scuff or soiling from the wall using a gentle circular motion, starting at the outside of the soiling and moving towards the centre.
7. Dry the area and remove any drips and runs using the second, dry, cloth. 8. For greasy or stubborn deposits, repeat the process using the non-abrasive pad in place of
the first cloth. Stop immediately if any damage to the painted surface begins to occur and inform your supervisor.
9. On completion, dispose of the final cloths, clean and dry all equipment and store safely and tidily in a secure storage area, segregated according to colour-coding where appropriate.
10. Remove gloves and wash hands.
4.3 Ward Kitchen Cleaning
1. Washing up
2. Mechanical waste disposal unit
3. Microwave
4. Oven cleaning
5. Refrigerator
6. Kitchen sink
7. Regeneration Trolley – routine daily clean
Ward Kitchen Cleaning
4.3.1 WASHING UP
Note: Because very high temperature water should be used for the cleaning of shared use service user crockery and cutlery, it is strongly advised that a mechanical dishwasher is used for this process. Where this is impossible, the task should be risk-assessed and a local policy developed. Equipment and materials required:
colour-coded single use cloth;
colour-coded domestic gloves;
colour-coded polypropylene scrubbing brush;
abrasive pad;
general purpose detergent;
44
warning signs.
Method:
1. Wash hands and put on gloves.
2. Display warning signs.
3. Remove all residual waste from crockery and place in the mechanical waste disposal unit, or in a dedicated waste food bag ready for disposal.
4. Sort the most heavily soiled items from the rest and pre-wash them under a running tap.
5. Fill the sink to two-thirds full with hot water, then add general purpose detergent, in accordance with the manufacturer’s instructions and with your training.
6. Immerse soiled items in the hot cleaning solution and clean off visible soiling. Greasy or stubborn deposits may require removal with the abrasive pad.
7. Place crockery and cutlery in the dishwasher tray, put tray into dishwasher and start dishwashing cycle.
8. Dispose of the cloth, clean and dry all equipment and store safely and tidily in a secure storage area, segregated according to colour-coding where appropriate.
9. Remove gloves and wash hands.
10. When cycle is finished, wash hands and put on clean gloves and neatly store crockery.
4.3.2 MECHANICAL WASTE DISPOSAL UNIT Equipment and materials required:
colour-coded bucket;
colour-coded cloths;
colour-coded domestic gloves;
non-abrasive pad;
warning signs;
general purpose detergent or degreaser.
Method:
1. Wash hands and put on gloves.
2. Display the warning signs.
3. Turn on the waste disposal unit for twenty seconds to dispose of any residual waste.
4. Turn off the electricity supply at the mains socket.
5. Following the manufacturer’s instructions, carefully remove all detachable parts.
6. Prepare the cleaning solution in the mop bucket, in strict accordance with the instructions
and with your training. Do not mix chemicals and only use a cleaning product provided by The Trust/TFM contractor/TFM Contractor.
45
7. Dampen or rinse the cloth in the cleaning solution and wring so that it is fairly dry.
8. Carefully clean the detachable parts and all the surfaces of the machine. For greasy
deposits the non-abrasive pad may be required.
9. Clean the surrounding areas.
10. Rinse cloth regularly and change the cleaning solution when it becomes soiled.
11. Empty and clean the bucket and refill with warm water.
12. Using a new cloth, rinse the detachable parts and all surfaces.
13. Allow to dry and carefully replace the detachable parts, following the manufacturer’s instructions.
14. On completion, clean and dry all equipment and store safely and tidily in a secure storage area, segregated according to colour-coding where appropriate.
15. Remove gloves and wash hands.
16. With dry hands, plug the machine into the mains socket.
4.3.3 MICROWAVE
Equipment and materials required:
colour-coded bucket;
colour-coded cloths;
colour-coded domestic gloves;
non-abrasive pad;
warning signs;
general purpose detergent.
Method:
1. Wash hands and put on gloves.
2. Display the warning signs.
3. Prepare the cleaning solution in the bucket, in strict accordance with the manufacturer’s instructions and with your training. Do not mix chemicals and only use a cleaning product provided by The Trust/TFM Contractor.
4. Disconnect the microwave from the mains socket.
5. Dampen or rinse the cloth in the cleaning solution and wring so that it is fairly dry.
6. Clean the microwave, working from outside to inside, paying particular attention to the “ceiling” of the inside and the inside of the door. For greasy or hardened deposits, the non-abrasive pad may be required.
7. Rinse cloth regularly and change the cleaning solution when it becomes soiled.
46
8. Empty and clean the bucket and refill with warm water.
9. Using a new cloth, rinse all surfaces with a fairly dry cloth.
10. Allow to dry with the door open.
11. On completion, clean and dry all equipment and store safely and tidily in a secure storage
area, segregated according to colour-coding where appropriate.
12. Remove gloves and wash hands. 13. With dry hands, plug the machine into the mains socket and test for correct operation. If it
does not operate correctly, report this to your supervisor.
4.3.4 OVEN CLEANING
Equipment and materials required:
colour-coded bucket;
colour-coded cloths;
colour-coded domestic gloves suitable for chemical resistance and complying with the PPE
Directive (89/686/EEC);
colour-coded dustpan and brush;
gauntlet gloves;
colour-coded scraper;
colour-coded labelled spray bottle;
eye goggles;
non-abrasive pad;
paper towel roll;
warning signs;
general purpose detergent and caustic cleaner if heavy soiling present;
spray on oven cleaner chemical product.
Method:
1. Wash hands and put on gloves.
2. Display the warning signs.
3. Paper towels should be placed along the join between the floor and oven to absorb leaking cleaning fluid.
4. Take care to check the temperature of the oven carefully before attempting to clean it.
5. Prepare the general purpose detergent cleaning solution in the bucket, in strict accordance with the manufacturer’s instructions and with your training. Do not mix chemicals and only use a cleaning product provided by The Trust/TFM Contractor.
6. Disconnect the oven from the mains socket and ensure that the oven controls are set to “off”.
47
7. Carefully test the temperature of the oven by placing your hand into the oven. Delay starting the task if the oven is too hot to clean safely.
8. Remove the shelves to a safe cleaning area.
9. Carefully remove any loose, flaky soiling with the scraper. Hold the scraper parallel to the oven surface and gently push soiling loose. Collect from the floor of the oven with the dustpan and brush.
10. Dampen or rinse the cloth in the cleaning solution and wring so that it is fairly dry.
11. Clean the oven, working from outside to inside, paying particular attention to the “ceiling” of the inside, the inside of the door and the joint between the door and the oven. For greasy or hardened deposits the non-abrasive pad may be required.
12. Rinse cloth regularly and change the cleaning solution when it becomes soiled.
13. Empty and clean the bucket and refill with warm water.
14. Using a new cloth, rinse all surfaces with a fairly dry cloth.
15. Allow to dry.
16. Move to the shelves and repeat points 7 to 13.
17. Where there is heavy soiling which resists cleaning with general purpose detergent, a caustic oven cleaning chemical should now be used. Remove gloves and wash hands.
18. Put on gauntlet gloves and eye goggles and carefully spray small amounts of the product onto the soiled areas. Leave in contact in strict accordance with manufacturer’s instructions. Use the non-abrasive pad to clean off the soiling.
19. Repeat points 11) to 14), taking care to ensure that the chemical residue is removed. Change water and cloth when they become dirty.
20. Replace the shelves in the oven.
21. On completion, clean and dry all equipment and store safely and tidily in a secure storage area, segregated according to colour-coding where appropriate.
22. Remove gloves and wash hands.
23. With dry hands, turn the oven on and test for correct operation. If it does not operate correctly, report this to your supervisor.
4.3.5 REFRIGERATOR Equipment and materials required:
colour-coded bucket;
colour-coded cloths;
colour-coded domestic gloves;
non-abrasive pad;
warning signs;
general purpose detergent.
48
Method:
1. Wash hands and put on gloves.
2. Display the warning signs.
3. Decant food to another refrigerator, discarding any out of date or unlabelled food.
4. Manually remove any large pieces of debris, such as pieces of food wrapper.
5. Prepare the cleaning solution in the bucket, in strict accordance with the manufacturer’s instructions and with training. Do not mix chemicals and only use a cleaning product provided by The Trust/TFM Contractor.
6. Disconnect the refrigerator from the mains socket.
7. Following the manufacturer’s instructions, carefully remove all detachable parts.
8. Dampen or rinse the cloth in the cleaning solution and wring so that it is fairly dry.
9. Clean the detachable parts and all the surfaces of the refrigerator, paying particular attention to the door seal, the shelf rails, and the join between the door and the refrigerator.
10. Rinse cloth regularly and change the cleaning solution when it becomes soiled.
11. Empty and clean the bucket and refill with warm water.
12. Using a new cloth, rinse the detachable parts and all surfaces.
13. Allow to dry and carefully reassemble, following the manufacturer’s instructions.
14. On completion, clean and dry all equipment and store safely and tidily in a secure storage area, segregated according to colour-coding where appropriate.
15. Remove gloves and wash hands.
16. With dry hands, plug the refrigerator into the mains socket and test for correct operation. If it does not operate correctly, report this to your supervisor.
17. When the refrigerator has reached the correct temperature, replace decanted food.
4.3.6 KITCHEN SINK Equipment and materials required:
colour-coded cloths;
colour-coded bucket;
colour-coded domestic gloves;
paper towels;
non-abrasive pad;
warning signs;
general purpose detergent.
49
Additional Notes:
Do not use a bottle brush to clean overflows or drains. Method:
1. Wash hands and put on gloves.
2. Display the warning signs.
3. Empty the sink and clear the surrounding area.
4. Prepare the cleaning solution in the bucket, in strict accordance with the manufacturer’s instructions and with your training. Do not mix chemicals and only use a cleaning product provided by The Trust/TFM Contractor.
5. Dampen or rinse the cloth in the cleaning solution and wring so that it is fairly dry.
6. Clean the outer frame of the sink, pipe work, splash back and surrounds.
7. Clean the taps, sink and drain.
8. Rinse cloth regularly and change the cleaning solution when it becomes soiled.
9. Using the tap and a new cloth, rinse the cleaned area and thoroughly dry it, using a well wrung cloth or paper towels. Insufficient drying will give a dull and unpleasing appearance to the surface.
10. On completion, clean and dry all equipment and store safely and tidily in a secure storage area, segregated according to colour-coding where appropriate.
11. Remove gloves and wash hands.
4.3.7 REGENERATION TROLLEY Note: This method statement is for the routine daily clean only. Regeneration trollies also require a periodic deeper clean. Periodic deep clean techniques differ widely between types of regeneration unit. Refer to manufacturer’s instructions. Stainless steel polish will cause floors to become extremely slippery. Clean up any misdirected sprays immediately.
Equipment and materials required:
colour-coded buckets;
colour-coded cloths;
colour-coded domestic gloves;
colour-coded labelled spray bottle;;
non-abrasive pad;
warning signs;
general purpose detergent;
kitchen sanitiser product;
food-safe stainless steel polish.
50
Method:
1. Wash hands and put on gloves.
2. Display the warning signs.
3. Prepare the general purpose detergent cleaning solution in the bucket, in strict accordance with the manufacturer’s instructions and with your training. Do not mix chemicals and only use a cleaning product provided by The Trust/TFM Contractor.
4. Prepare the kitchen sanitiser cleaning solution in the labelled spray bottle, in strict accordance with the manufacturer’s instructions and with your training. Do not mix chemicals and only use a cleaning product provided by The Trust/TFM Contractor.
5. Disconnect the regeneration trolley from the mains socket.
6. Carefully manually check the temperature of the regeneration unit to ensure that it is not too hot for safe cleaning.
7. Remove the racks from the oven and ambient/fridge compartments.
8. Dampen or rinse the cloth in the general purpose detergent cleaning solution. Do not use a wet cloth, as wet marks foster bacteria and spoil the finish.
9. Clean the regeneration trolley. Begin with the compartments, paying particular attention to the “ceiling” of the inside and the inside of the door. Move on to the heated top plate, the exterior panels, the food probe, the silicon gaskets, the racks and the sneeze guard, paying particular attention to joints and edges. For greasy or hardened deposits, the non-abrasive pad and a longer contact time with the detergent may be required. Care should be taken not to damage the surface of the sneeze screen, and not to over-wet the control panel, which should be wiped with a slightly damp cloth only.
10. Rinse cloth regularly and change the cleaning solution when it becomes soiled. Empty
used solution into the sluice.
11. Empty and clean the bucket and refill with warm water.
12. Using a new cloth, rinse all surfaces thoroughly with clean warm water. Care must be taken to thoroughly remove any detergent residue from the compartments, which could taint food. Care must be taken not to over-wet the control panel.
13. Allow to dry with the doors open.
14. Spray kitchen sanitiser solution onto the ambient/fridge compartment, the silicon gaskets, the exterior panels, the food probe and the heated top plate. Wipe dry using a new cloth.
15. Apply food-safe stainless steel polish to exterior stainless steel surfaces, following
manufacturer’s instructions.
16. Refit the racks.
17. On completion, clean and dry all equipment and store safely and tidily in a secure storage area, segregated according to colour-coding where appropriate.
18. Remove gloves and wash hands. 19. With dry hands, plug the machine into the mains socket and test for correct operation.
51
20. If it does not operate correctly, report this to your supervisor/the catering supervisor.
NOTE: Freezers -any cleaning of freezers has to be planned in advance with the Soft Services Manager or local manager and the methodology and timing agreed – especially in units where Cook Frozen products are stored (e.g. Day Hospitals). Water Dispenser Machines-these are serviced and de-scaled by specialists every six months, but on a daily basis they should be wiped down with a disposable cloth (green) and the water overspill tray emptied.
4.4 Bathroom Cleaning
All clothes and equipment used should be colour coded-RED
1. Bath
2. Hand wash basin
3. Shower cubicle
4. Lime scale removal – detachable shower heads and metal hoses
5. Lime scale removal – taps, fittings and tiles
6. Lime scale removal – floors
7. Dispensers -soap, alcohol gel, toilet paper, hand towels
4.4.1 BATH
Do not use a bottle brush to clean overflows or drains. Report any faults, including scale build-up which resists normal cleaning, to your supervisor. Equipment and materials required:
colour-coded cloth (RED);
colour-coded bucket;
colour-coded labelled spray bottle;
colour-coded domestic gloves;
paper towels;
non-abrasive pad;
warning signs;
general purpose detergent or general surface cleaner or bathroom cleaner.
Method:
1. Wash hands and put on gloves.
2. Display the warning signs.
52
3. Empty the bath, if necessary, and clear the surrounding area.
4. Prepare the cleaning solution in the bucket, in strict accordance with the manufacturer’s instructions and with your training. Do not mix chemicals and only use a cleaning product provided by The Trust/TFM contractor/TFM contractor.
5. Use paper towels to remove hair from the plug, drain, plug chain (where used) and
overflow.
6. Place paper towel over the above making sure hair is pulled into the paper towel and dispose of in waste bag.
7. Dampen or rinse the cloth in the cleaning solution and wring so that it is fairly dry.
8. Working from the outside to the inside, begin cleaning wall tiles, ledges, pipe work,
dispensers and underside or edges of bath.
9. Clean the taps, overflow, inside surface of the bath, plug, plug chain and drain. Greasy soiling and lime scale deposits will require use of the non-abrasive pad.
10. Rinse cloth regularly and change the cleaning solution when it becomes soiled.
11. Using the tap and a new cloth, rinse the cleaned area and thoroughly dry it, using a well wrung cloth or paper towels. Insufficient drying will give a dull and unpleasing appearance to the stainless steel or chrome surface.
12. On completion, clean and dry all equipment and store safely and tidily in a secure storage area, segregated according to colour-coding where appropriate.
13. Remove gloves and wash hands.
4.4.2 HAND WASH BASIN Do not use a bottle brush to clean overflows or drains. Report any faults, including scale build-up which resists normal cleaning, to your supervisor. Equipment and materials required:
colour-coded cloth;
colour-coded bucket;
colour-coded labelled spray bottle;
colour-coded domestic gloves;
paper towels;
non-abrasive pad;
warning signs;
general purpose detergent or general surface cleaner or bathroom cleaner.
Method:
1. Wash hands and put on gloves.
2. Display the warning signs.
3. Empty the sink, if necessary, and clear the surrounding area.
53
4. Prepare the cleaning solution in the bucket, in strict accordance with the manufacturer’s instructions and with your training. Do not mix chemicals and only use a cleaning product provided by The Trust/TFM contractor/TFM contractor.
5. Use paper towels to remove hair from the plug, drain, plug chain (where used) and
overflow.
6. Place paper towel over the above making sure hair is pulled into the paper towel and dispose of in waste bag.
7. Dampen or rinse the cloth in the cleaning solution and wring so that it is fairly dry.
8. Working from the outside to the inside, begin cleaning wall tiles, ledges, pipe work,
dispensers and underside and edges of the sink.
9. Clean the taps, overflow, inside surface of the sink, plug, plug chain and drain. Greasy soiling and lime scale deposits will require use of the non-abrasive pad.
10. Rinse cloth regularly and change the cleaning solution when it becomes soiled.
11. Using the tap and a new cloth, rinse the cleaned area and thoroughly dry it, using a well wrung cloth or paper towels. Insufficient drying will give a dull and unpleasing appearance to the stainless steel or chrome surface.
12. On completion, clean and dry all equipment and store safely and tidily in a secure storage area, segregated according to colour-coding where appropriate.
13. Remove gloves and wash hands.
4.4.3 SHOWER CUBICLE
Equipment and materials required:
colour-coded cloth;
colour-coded bucket;
colour-coded labelled spray bottle;
colour-coded domestic gloves;
paper towels;
non-abrasive pad;
warning signs;
general purpose detergent or general surface cleaner or bathroom cleaner.
Method:
1. Wash hands and put on gloves.
2. Display the warning signs.
3. Prepare the cleaning solution in the bucket, in strict accordance with the manufacturer’s instructions and with your training. Do not mix chemicals and only use a cleaning product provided by The Trust/TFM contractor/TFM contractor.
4. Clear all objects from the cubicle.
54
5. Use paper towels to remove hair from the plug, drain, plug chain (where used) and overflow.
6. Place paper towel over the above making sure hair is pulled into the paper towel and
dispose of in waste bag.
7. Dampen or rinse the cloth in the cleaning solution and wring so that it is fairly dry. Dampen the non-abrasive pad.
8. Working from the outside to the inside, begin cleaning. Clean the curtain rail first, then, starting at the highest point, clean the wall tiles.
9. Clean the shower curtain.
10. Clean the shower head, hose, taps and soap tray.
11. Clean the drain and overflow.
12. Rinse cloth regularly and change the cleaning solution when it becomes soiled.
13. Using the tap and a new cloth, rinse the cleaned area and thoroughly dry it, using a well wrung cloth or paper towels. Insufficient drying will give a dull and unpleasing appearance to the stainless steel or chrome surface.
14. On completion, clean and dry all equipment and store safely and tidily in a secure storage area, segregated according to colour-coding where appropriate.
15. Remove gloves and wash hands.
4.4.5 LIME SCALE REMOVAL – SHOWER HEADS AND METAL HOSES
This task should be planned carefully; it should be carried out in a secure, well-ventilated area, with a running water supply, away from service users. Prior to commencing, staff should identify a safe drain in which the discarded cleaning solution can be disposed of, in liaison with the estates department. Equipment and materials required:
colour-coded bucket;
colour-coded domestic gloves suitable for chemical resistance and complying with the PPE
Directive (89/686/EEC);
non-abrasive pad;
eye goggles;
warning signs;
lime scale remover (care must be taken when choosing product to ensure that it does not
contain hydrochloric acid, which will discolour chromed items).
Method:
1. Wash hands and put on gloves.
2. Plan the task with colleagues to work around requirement for showers to be available.
3. Remove detachable shower heads and metal hoses and take to identified secure, well-ventilated area.
55
4. Prepare the cleaning solution in the bucket, in strict accordance with the manufacturer’s instructions and with your training. Do not mix chemicals and only use a cleaning product provided by the Trust/TFM contractor .
5. Place the shower heads and hoses in the cleaning solution. If you cannot remove the
shower head from the wall, place the tablet and water in a polythene bag and tie securely round the shower head.
6. Soak for 15 minutes, or until all bubbling stops.
7. Remove the items and rinse in flowing water.
8. Carefully discard the cleaning solution in the identified drain.
9. If lime scale remains, repeat points 5 to 8.
10. On completion, clean and dry all equipment and store safely and tidily in a secure storage area, segregated according to colour-coding where appropriate.
11. Return detachable shower heads and hoses to original area and refit.
12. Remove gloves and wash hands.
4.4.6 LIME SCALE REMOVAL – TAPS, FITTINGS AND TILES
Equipment and materials required:
colour-coded bucket;
colour-coded cloth;
colour-coded domestic gloves suitable for chemical resistance and complying with the PPE
Directive (89/686/EEC);
non-abrasive pad; eye goggles
warning signs;
lime scale remover (care must be taken when choosing product to ensure that it does not
contain hydrochloric acid, which will discolour chromed items). The use of a pre-mixed bottled proprietary product is recommended for this task.
Method:
1. Wash hands and put on gloves.
2. Plan the task with colleagues to work around requirement for showers to be available.
3. Apply pre-mixed lime scale remover to cloth and apply to tiles, taps and other surfaces, paying particular attention to water outlets.
4. Leave in contact for five minutes.
5. Use non-abrasive pad and pre-mixed lime scale remover to loosen heavier areas of scaling during contact time.
6. Discard cloths and pads.
7. Fill bucket with clean water and rinse all treated areas thoroughly.
56
8. If lime scale remains, repeat points 3 to 7.
9. On completion, clean and dry all equipment and store safely and tidily in a secure storage area, segregated according to colour-coding where appropriate.
10. Remove gloves and wash hands.
4.4.7 LIME SCALE REMOVAL – FLOORS
Note: for planned periodic use in showers and bathrooms. This procedure should not be carried out when the areas are in use. Care should be taken to ensure that the floors are free from excess water Cables should not be allowed to come into contact with water.
Equipment and materials required:
colour-coded domestic gloves suitable for chemical resistance and complying with the PPE
Directive (89/686/EEC);
colour-coded mop bucket x 2;
colour-coded mop handle x 2;
colour-coded mop head x 2;
edge cleaning tool and pad;
scouring pad; eye goggles
floor pad and drive disc, or polypropylene brush head;
standard speed rotary machine ;
black bag;
warning signs;
lime scale remover.
Method:
1. Plan work route and when necessary, temporarily move items that may obstruct you to a
new, safe location.
2. Wash hands and put on gloves.
3. Display warning signs.
4. Dust-control or suction clean the floor, (refer to the dust-controlling method statement or suction cleaning method statement).
5. Prepare the lime scale remover solution in strict accordance with the manufacturer’s instructions and with your training. Carefully pour the lime scale remover solution into the mop bucket. Apply the solution to the floor, aiming to cover a 3-4 metre section.
6. Use the edge cleaning tool to agitate the solution along wall edges and other awkward areas.
7. Attach head to tool and run the pad along the edges in a short repeated motion.
8. Attach the floor pad or polypropylene brush head to the standard speed machine in strict
57
accordance with the manufacturer’s instructions and with your training. Unwind cable and plug into a mains socket.
9. Adjust handle to a comfortable height for you to use.
10. Ensure that you are holding the standard speed machine firmly and that the cable is behind the machine. Switch the machine on. Beware of the initial “kick”.
11. Starting at the point furthest away from where you have planned to end, start scrubbing the first 3-4 metre square section.
12. Scrub the floor area by moving the high-speed machine in continuous, small, overlapping, side to side movements.
13. Replace or turn the floor pad as required, unplug the machine and replace or turn the pad, placing the used floor pad in the black bag if replacing.
14. For stubborn scaling, manually use a small scouring pad.
15. Rinse the floor thoroughly with clean water and allow to air dry.
16. Repeat points 5 to 15 for the next 3-4 square metre section.
17. On completion, remove the final floor pad and place in the black bag. Clean and dry all equipment and store safely and tidily in a secure storage area, segregated according to colour-coding where appropriate.
18. With dry hands, remove the plug from the mains socket and rewind the electricity cable.
19. When the area is completely dry, return any items moved to their original positions.
20. Remove gloves and wash hands.
4.4.8 DISPENSERS: SOAP, ALCOHOL GEL, TOILET PAPER, HAND TOWEL
Note: Alcohol hand-rub will damage flooring if it is allowed to drip. Best practice guidance is to use dispensers which have lipped drip trays fitted, or to use a non-drip foam product. Equipment and materials required:
colour-coded cloth;
colour-coded bucket;
colour-coded domestic gloves;
dispenser key (if required);
alcohol hand-rub, soap, refill cartridges;
non-abrasive pad;
general purpose detergent or general surface cleaner.
Hand Towel Dispensers must not be over-filled
Method:
1. Wash hands and put on gloves.
58
2. Prepare the cleaning solution in the bucket, in strict accordance with the manufacturer’s instructions and with your training. Do not mix chemicals and only use a cleaning product provided by The Trust/TFM contractor.
3. Open the dispenser, using the key if necessary, and check whether the soap needs to be
replenished.
4. If necessary, remove the empty alcohol gel/ soap cartridge and place in a waste bag. 5. Damp-dust all external and internal areas of the dispenser. Pay particular attention to the
lipped tray and the exit point on liquid dispensers as build-ups of alcohol/soap may form in these areas. Use the non-abrasive pad if necessary.
6. Check the floor below the dispenser to see whether it has been leaking. If it has, clean the
deposit from the floor (refer to stain removal method statement) and inform your supervisor.
7. When the dispenser is dry, fit the new cartridge and close dispenser, following the manufacturer’s instructions.
8. Move on to next dispenser, and repeat points 3 to 7. 9. Rinse cloth regularly and change the cleaning solution when it becomes soiled.
10. On completion, clean and dry all equipment and store safely and tidily in a secure storage area, segregated according to colour-coding where appropriate.
11. Remove gloves and wash hands.
4.5 SANITARY CLEANING
4.5.1 TOILET
Equipment and materials required:
colour-coded cloths;
colour-coded buckets;
colour-coded labelled spray bottle;
colour-coded domestic gloves suitable for chemical resistance and complying with the PPE
Directive (89/686/EEC);
paper towels;
non-abrasive pad;
warning signs;
general purpose detergent or general surface cleaner or bathroom cleaner;
toilet bowl cleaner.
Method:
1. Wash hands and put on gloves.
2. Display the warning signs.
3. Clear and tidy the surrounding area, moving any items placed on top of the cistern or on ledges.
59
4. Place the toilet brush head beneath the water level and flush the toilet.
5. Lower the water level by pumping down three or four times with the toilet brush and
replace the brush in its holder.
6. Prepare the solution of general purpose detergent or general surface cleaner in the bucket, in strict accordance with the manufacturer’s instructions and with your training. Do not mix chemicals and only use a cleaning product provided by the Trust/TFM contractor.
7. Use an approved toilet bowl cleaner, do not decant any chemicals and use in strict
accordance with the manufacturer’s instructions and with your training. Do not mix chemicals and only use a cleaning product provided by the Trust/TFM contractor..
8. Spray the toilet cleaner into the inside of the toilet bowl, taking care to spray under the rim and around the normal waterline and leave in contact while performing the next tasks. Do not allow to dry.
9. Dampen or rinse the cloth in the cleaning solution and wring so that it is fairly dry.
10. Working from the outside to the inside, begin cleaning the flush handle, wall tiles, ledges, pipe work, toilet roll holder, sanitary bins, cistern, toilet seat lid. Lift the toilet seat and clean the underside and hinges of the seat, then the rim and underside of the bowl, finishing with the junction with the floor. Greasy soiling and lime scale deposits will require use of the nonabrasive pad.
11. Rinse cloth regularly and change the cleaning solution when it becomes soiled.
12. Take the toilet brush and use it to scrub the inside of the toilet bowl, paying particular
attention to under the rim and the normal waterline.
13. Thoroughly dry the flush handle using paper towels. Insufficient drying will give a dull and unpleasing appearance to the stainless steel or chrome surfaces.
14. Clean the toilet brush and holder using the general purpose cleaning solution and a cloth. If the brush or holder is damaged, scuffed or otherwise difficult to clean, it should be safely disposed of and replaced with a new one. Inform your supervisor.
15. On completion, clean and dry all equipment and store safely and tidily in a secure storage area, segregated according to colour-coding where appropriate.
16. Remove gloves and wash hands.
4.6 Cleaning with Pressurised Steam The use of steam cleaning machines, as part of the overall cleaning regime in healthcare environments is increasing. There is evidence for the effectiveness of this technology See “An Integrated Approach to Hospital Cleaning: Microfibre Cloth and Steam Cleaning Technology” (Department of Health, June 2007) Steam cleaning uses superheated dry steam delivered under pressure. It has a dual cleaning and disinfectant function: the high temperature of the steam is very efficient at killing micro-organisms, while the pressurised steam loosens dirt and greasy deposits, which are then pulled into the machine using vacuum suction.
60
It is suggested that correct use of the machines is at least as effective as conventional cleaning at removing soiling from surfaces, and will be better than conventional cleaning at cleaning crevices and other difficult to reach surfaces. Correct training in the use of steam cleaners is particularly important. As soon as steam is released into the atmosphere for cleaning it will rapidly, in less than one second, condense into minute water droplets. Through evaporation, the water droplets will cool very quickly. Moist heat above 80°C will kill all pathogens except bactericidal spores. If the steam nozzle is too far away from the surface being treated, or passes over it too quickly, this temperature will not be reached. The achievement of an effective level of performance, therefore, depends entirely on the skill and training of the user, in ensuring that the steam nozzle remains the optimum distance from the treated surface and that each part of the surface receives optimum length of exposure. Introduction of steam cleaning, therefore, must be accompanied by a rigorous programme of training, working closely with the manufacturer. Commercially available steam cleaning machines vary considerably in quality and effectiveness. Careful consideration should be given to the relative merits of products on the market.
NO STEAM CLEANING EQUIPMENT SHOULD BE PURCHASED FOR INTERNAL USE WITHOUT THE EXPRESS APPROVAL OF THE SENIOR NURSE FOR INFECTION CONTROL.
Where pressurised jet cleaners are used for paving stones on external gardens et.c the same principals are to be applied in its use and the need for appropriate PPE and training.
4.6.1 CLEANING WITH PRESSURISED STEAM – ROUTINE CLEANING Equipment and materials required:
colour-coded, heat resistant gauntlet gloves suitable for chemical resistance and
complying with the PPE Directive (89/686/EEC);
eye goggles;
colour-coded cloths;
pressurised steam cleaner;
steam cleaner accessories;
warning signs.
Method:
1. Plan work route and when necessary, temporarily move items that may obstruct you to a
new, safe location. Identify a suitable drain for disposal of the dirty water.
2. Wash hands and put on heat resistant gauntlet gloves and eye goggles.
3. Display warning signs.
4. Fill the steam cleaner with clean water, following the manufacturer’s instructions and your training.
5. Attach the general purpose nozzle head.
6. Unwind the cable, plug into a mains socket and turn on the machine.
61
7. Wait for the water to reach the required temperature, following the manufacturer’s instructions and your training. This will normally take between 4 and 8 minutes depending on the machine used.
8. When the machine is ready to use, begin cleaning. Starting with the highest areas and moving to the lowest, clean ledges and surfaces in a 1-2 metre section, taking care not to overstretch. Use the suction cleaning function following the manufacturer’s instructions and your training.
9. Repeat the process, moving systematically around the room section by section.
10. When completed, turn off the machine, fit the crevice cleaning attachment, or the smallest directional nozzle and turn the machine back on. Clean the joint between the wall and the floor and other awkward areas, which have resisted the general steam cleaning, moving systematically around the room as before.
11. When completed, turn off the machine, fit the floor cleaning attachment and turn the
machine back on.
12. Clean the main surface of the floor, beginning at the point furthest from the door and progressing towards it.
13. With dry hands, remove the plug from the mains socket and rewind the electricity cable.
14. Empty the dirty water tank in identified drain.
15. Collect all accessories. 16. Clean the steam cleaner and accessories.
17. Store the cleaned equipment safely and tidily in the secure storage area, segregated
according to colour-coding where appropriate.
18. Return any items moved to their original positions.
19. Remove gloves and wash hands.
4.7 Specialised cleaning tasks
1. Barrier-nursed rooms – using a chlorine-based disinfectant cleaning product.
2. Terminal cleans of vacated rooms – using a chlorine-based disinfectant cleaning product.
3. Spillages of bodily fluids using a chlorine-based disinfectant cleaning product.
4.7.1 BARRIER-NURSED ROOMS – USING A SLOW RELEASE CHLORINE-BASED DISINFECTANT CLEANING PRODUCT
Note: The use of combined hypochlorite disinfectant cleaning products, which provide a solution
of 1.000 (one thousand) parts per million available chlorine combined with a detergent property, has replaced the previous use of general purpose detergent solution followed by an application of a disinfectant product. The method statement reflects this.
62
Barrier-nursed rooms will have a clear sign, prominently displayed, stating which items of protective disposable wear are required by all those entering the room. Cleaning staff should report daily to the nurse in charge to receive any new instructions. YELLOW CODED Equipment and materials required:
colour-coded bucket;
colour-coded disposable cloths;
colour-coded domestic gloves suitable for chemical resistance and complying with the PPE
Directive (89/686/EEC);
single-use gloves;
disposable apron;
colour-coded mop handle;
colour-coded mop bucket;
colour-coded disposable mop head;
colour-coded high duster
disposable dust-control tool
dust-control head;
cleaning trolley;
warning signs;
disinfectant cleaning product giving sodium hypochlorite solution of strength 1,000 parts
per million available chlorine;
product dilution container.
Method:
1. Wash hands and put on gloves.
2. Prepare the cleaning solution. The ventilation of the area in which you are working must be thorough; if there is no window, the door should be left open. Make up the solution in the product diluting container, never directly in the bucket. Use cold water only. When prepared, decant carefully into the buckets.
3. Wash hands, put on single-use gloves and other protective wear required (see nurse in charge for further advice) and enter room.
4. Display the warning signs.
5. High-dust the room (refer to high-dusting method statement).
6. Dust-control the floor (refer to the dust-control method statement).
7. Using a disposable cloth dampened in the disinfectant cleaning solution, begin cleaning surfaces, changing cloths and solution as they become soiled. Work in the following order: curtain tracks and high ledges; furniture and fittings alcohol gel, soap and paper towel dispensers (refer to replenishment method statements); bed frame; Use a new cloth to clean the wash hand basin, shower and toilet (refer to wash room cleaning and sanitary cleaning
method statement) .
8. Attach the disposable mop head to the mop handle. Submerge the mop into the cleaning solution and remove excess using the wringer so that the mop is fairly dry.
63
9. Mop the floor in 1-2 metre square sections.
10. Mop edges with straight strokes and use a figure-of-eight pattern on the remainder of the
section, turning the mop frequently. The floor should be fairly dry on completion.
11. Move to the next section and repeat the process.
12. Replace the mop head and solution as required throughout the cleaning process and store safely and tidily in a secure storage area, away from other equipment; segregated according to colour-coding where appropriate.
15. Remove and dispose of single-use gloves, apron and other protective wear. Wash and dry
hands.
4.7.2 TERMINAL CLEANS OF VACATED ROOMS – USING A SLOW RELEASE CHLORINE-BASED DISINFECTANT CLEANING PRODUCT
Note: The use of dual purpose disinfectant cleaning products, which provide a solution of 1000 (one thousand) parts per million available chlorine combined with a detergent property, has replaced the previous use of general purpose detergent solution followed by an application of a disinfectant product. This method statement reflects this. Ventilation in the room should be increased during and after cleaning. Pressurised steam cleaning can also be used successfully for this task if equipment is available. For use of steam cleaning machines, refer to the cleaning with steam method statement. YELLOW CODED Equipment and materials are required:
colour-coded bucket;
colour-coded disposable cloths;
colour-coded domestic gloves suitable for chemical resistance and complying with the PPE
Directive (89/686/EEC);
single-use gloves;
disposable apron;
colour-coded mop handle;
colour-coded disposable mop bucket;
colour-coded mop head;
colour-coded high-duster;
dust-control tool;
dust-control head;
cleaning trolley;
red water soluble laundry bag
warning signs;
disinfectant cleaning product giving sodium hypochlorite solution of strength 1000 parts per
Million available chlorine;
product dilution container.
64
Method: 1. Wash hands and put on gloves.
2. Prepare the cleaning solution. The ventilation of the area in which you are working must be
thorough; if there is no window, the door should be left open. Make up the solution in the product diluting container, never directly in the bucket. Use cold water only. When prepared, decant carefully into the buckets. CHECK with Supervisor that strength of chlorine is correct.
3. Wash hands, put on single-use gloves and other protective wear required (see nurse in charge for any additional instructions) and enter room.
4. Display the warning signs.
5. Take down curtains place in separate clearly marked red water soluble (infected) linen laundry bag.
6. Strip bed and place linen in separate clearly marked red water soluble (infected) linen laundry bag.
7. High-dust the room (refer to high-dusting method statement).
8. Dust-control the floor (refer to the dust-control method statement).
9. Using a disposable cloth dampened in the disinfectant cleaning solution, begin cleaning surfaces, changing cloths and solution as they become soiled. Work in the following order: curtain tracks and high ledges; furniture and fittings; patient equipment, such as drip stands; alcohol gel. soap and paper towel dispensers (refer to replenishment method statements); bed frame; wash hand basin, shower and toilet (refer to bathroom cleaning and sanitary cleaning method statements).
10. Place all waste in the clinical waste bag. Remove and dispose of clinical waste bag, damp
dust waste sack holder using the disinfectant cleaning solution, and fit a new bag.
11. Damp-dust walls.
12. Attach the mop head to the mop handle.
13. Submerge the mop into the cleaning solution and remove excess using the wringer so that the mop is fairly dry.
14. Mop the floor in 1-2 metre square sections.
15. Mop edges with straight strokes and use a figure-of-eight pattern on the remainder of the section, turning the mop frequently. The floor should be fairly dry on completion.
16. Move to the next section and repeat the process.
17. Replace the mop head and solution as required throughout the cleaning process.
18. On completion, clean and dry all equipment and store safely and tidily in a secure storage area, away from other equipment, segregated according to colour-coding where appropriate.
19. Remove and dispose of single-use gloves, apron and other protective wear. Wash hands and put on clean colour-coded domestic gloves.
20. Hang clean curtains.
65
APPENDIX 5
SAFE MANAGEMENT OF BODY FLUID SPILLAGES
A spillage is contamination of the environment by blood, body fluid or excreta. Dealing with spillages of blood or body fluids carries a risk of exposure to blood-borne viruses or other pathogens. Studies have demonstrated that some pathogenic organisms such as Clostridium Difficile, Meticillian Resistant Staphylococcus Aureus, Norovirus, HIV and Hepatitis C can survive for long periods in the environment. The Trust/TFM Contractors have a duty to protect workers from hazards encountered during their work: this includes microbiological hazards (COSHH 2002).
Risks will be minimised by following the precautions recommended, including the correct use of protective clothing and disinfectant products. For spillages, whether caused by service users, staff or visitors, the responsibility is as follows:
Area Responsibility: In service user wards / units Clinical staff to reduce to a cleanable level, then contact the cleaning provider, if during service hours, outside this time the clinical staff would be expected to clean the completely if not doing so were to cause a health and safety risk e.g. of slipping on a wet surface. Residential Units/Community buildings etc. including day hospitals, counselling units clinical staff to reduce to a cleanable level, then contact cleaning services provider.
Principles of Safe Practice:
This is also detailed in the Infection Control Policy, which can be found on the intranet.
Depending on the type of spillage it may be necessary to complete a risk assessment and report any incident or near miss through the Trust incident reporting software- Datix.
Spillages of blood or body fluids should be dealt with promptly, but ONLY by staff who
have received appropriate training and who are fully protected against Hepatitis B.
Spillages should be dealt with as soon as possible. If there is any delay in dealing with a spillage, e.g. staff with appropriate training are not readily available, the spillage must be safely cordoned off and/or the room locked, where this is feasible. If in a public area, it must not be left unattended by staff. The area should be ventilated.
Anyone not involved with cleaning the spillage should be kept away from the area.
A simple risk assessment should be carried out and the recommended / approved protective apparel worn.
Care should be taken to avoid skin, eye, and mucous membrane contamination during the cleaning and disinfection of spillages.
Staff must always follow routine infection control standard precautions when dealing with blood and body fluids (refer to the Infection Control Policy for further guidance).

66
Staff must always cover cuts and lesions with a waterproof dressing whilst on duty and not clean spillages if they have any broken skin.
Accidental exposure to blood/body fluids must be reported according to Trust Exposure to Blood/Body fluid reporting and procedures, advice should be sought by contacting Occupational Health Department telephone 020 3317 3350 out of office hour’s contact nearest A&E Department. Complete a DATIX form Detailed step by step advice is in the Infection Control Manual on the trust intranet.
NO CHEMICAL AGENTS TO BE LEFT UNATTENDED UNDER ANY CIRCUMSTANCES
In preparing to deal with spillage members of staff need to gather all equipment required to deal with a spillage including personal protective equipment (apron, gloves etc.) and spillage kits and clinical waste bags.
Chlorine-releasing agents Chlorine-releasing agents are chemical disinfectants which are effective against blood-borne viruses and are rapid in action. They are the disinfectant of choice in the event of a spillage of blood or body fluid. However, the effectiveness of all chemical disinfectants is strongly dependent on their conditions of use. In order to be effective, they must be used in accordance with the manufacturer’s instructions, at the appropriate strength for the contact time specified. Solutions made from tablets should be freshly prepared. Chlorine-releasing agents fall into two groups: 1.Sodium dichloroisocyanurate (NaDCC), e.g. Actichlor, Presept, Haz Tabs
2.Sodium hypochlorites, e.g. Milton
The use of Sodium dichloroisocyanurate NaDCC is recommended for spillages. It is less resistant than hypochlorites are to organic matter, less corrosive, and has a longer shelf life, as it is manufactured as tablets or granules. Chlorine-releasing agents - Safe practice COSHH regulations apply to chemicals and to the micro-organisms that may be present in the spillage. COSHH assessments should be available in every ward and department. Staff should be aware of the implications of these for storage and use of the product, and first aid in the event of exposure, e.g. a splash to the eye.
Chlorine-releasing agents are corrosive to many materials, e.g. metals, and will bleach carpets, fabrics and soft furnishings.
Chlorine-releasing agents can damage the skin and mucous membranes, therefore gloves and aprons should be worn for any contact. If there is a risk of splashing, eye protection should be worn.
Caution must be taken when using chlorine based disinfectants as they can cause irritation to the eyes, skin or mucous membranes if used in poorly ventilated areas.
Chlorine granules should not be used for a spillage covering a large area as too much chlorine gas may be generated, which may necessitate evacuation of the area (You should not use more than a quarter of the pot of granules).
67
Chlorine based disinfectants must not be applied directly to acidic bodily fluids such as
urine or vomit as chlorine vapour will be released.
They should not be mixed with hot water or any other cleaning agents. Use cold water
only to dilute the solution.
Whilst the granules and tablets are stable when stored dry, they are unstable when I solutions. Solutions of chlorine must be made up as needed and any remaining solution discarded.
Any unused solution must be discarded immediately by pouring gently down the sluice (or an external drain in community premises) followed by copious amounts of water.
Chlorine based disinfectants are inactivated by organic matter and it is necessary for any soiling to be removed by cleaning prior to the application of the disinfectant. The exception is where a blood spillage can be treated with hypochlorite granules which will penetrate organic matter due to its strength of 10,000 ppm and can be applied directly to the spill.
Disposable wipes should be used, e.g. soft paper towels, which must be immediately discarded.
First Aid Eyes: Keeping eye open, immediately irrigate thoroughly with water or eyewash for at least 15 minutes obtain medical attention. Skin: Wash thoroughly with plenty water. Ingestion: Do not induce vomiting. Provided the person is conscious, wash out mouth with water and give water to drink. Obtain medical attention immediately if several tablets may have been swallowed. Inhalation: Remove to fresh air if affected. Seek medical attention.
Spillage kits
A spillage kit should be kept in each clinical area, community building and vehicle. It must also be stored in accordance with COSHH requirements. The staff member dealing with the spillage is responsible for ensuring that the equipment is replenished after the kit is used.
SPILLAGES OF BODILY FLUIDS
Equipment and materials required:
colour-coded bucket (RED)
colour-coded cloth; (RED)
single-use gloves suitable for chemical resistance and complying with the PPE Directive(89/686/EEC);
plastic apron;
paper towels;
chlorine-based absorbent granules;
disinfectant product giving sodium hypochlorite solution of strength 10,000 parts per million available chlorine
Clinical, orange, waste bags;
warning signs.

68
Method 1. Wash hands and put on gloves.
2. Display warning signs.
3. Clear spillages of urine or faeces with paper towels and place directly into the clinical waste bag. The bag should be next to the spillage in readiness for this. Tie the bag following waste disposal policy and dispose of at the central point as soon as possible.
4. Large spillages of blood should be absorbed using chlorine-based absorbent granules. Allow to remain in contact for 2 minutes then place debris in a clinical waste bag as at point 3.
5. Prepare the disinfectant solution in the bucket in strict accordance with the manufacturer’s instructions and with your training. Do not mix chemicals and only use a cleaning product provided by the Trust.
6. Dampen or rinse a cloth in the cleaning solution.
7. Disinfect thoroughly, changing the cloth as necessary. On completion, dispose of cloths, gloves and other protective wear used as clinical waste, as at point 3.
8. Allow the area to dry.
9. Damp-mop the affected area (refer to damp-mopping method statement).
69
APPENDIX 6
Method statement – task usually carried out by nursing or staff other than Domestic
This section contains a method statement for a task usually performed by nursing staff, as opposed to cleaning staff. Detailed guidance on cleaning and disinfecting medical equipment, commodes, walking frames etc can be found in the Trust’s Infection Control Policy.
Baby changing mat/ Baby Nappy Changer Units.
6.1 BABY CHANGING MAT/Baby Nappy Changer Units
This is only likely to be relevant to staff working at 32 Drayton Park and the Bloomsbury Building GP toilets.
Equipment and materials required:
colour-coded bucket;
colour-coded cloth;
non-abrasive pad;
colour-coded domestic gloves;
cleaning trolley;
general purpose detergent or general surface cleaner;
Clinell universal sanitising wipes
warning signs.
Method:
1. Wash hands and put on gloves.
2. Identify a suitable location for cleaning.
3. Prepare the cleaning solution in the bucket in strict accordance with the manufacturer’s instructions and with your training. Do not mix chemicals and only use a cleaning product provided by the Trust.
4. Place the bucket on a cleaning trolley.
5. Dampen or rinse a cloth in the cleaning solution or use Clinell universal sanitising wipes
6. Wipe the baby changing mats clean, starting at the point furthest from you and working
methodically towards you. Turn the mat and clean the underside then wipe clean the edges. For greasy or stubborn soiling, use the non-abrasive pad.
7. Change the cleaning solution and cloth when it becomes soiled.
8. Allow the baby changing mat to dry.
9. Wipe with alcohol disinfectant wipe if using detergent and water.
10. On completion, dispose of the cloth, clean and dry all equipment and store safely and tidily in a secure storage area, segregated according to colour-coding where appropriate.
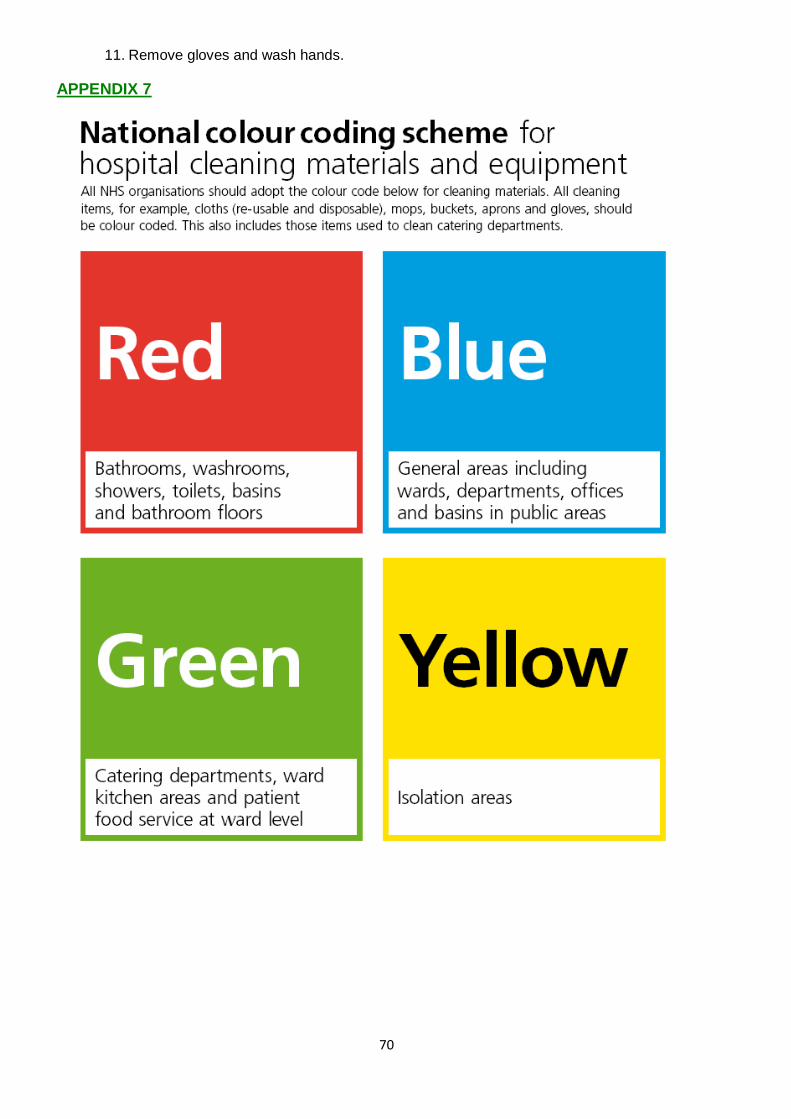
70
11. Remove gloves and wash hands.
APPENDIX 7
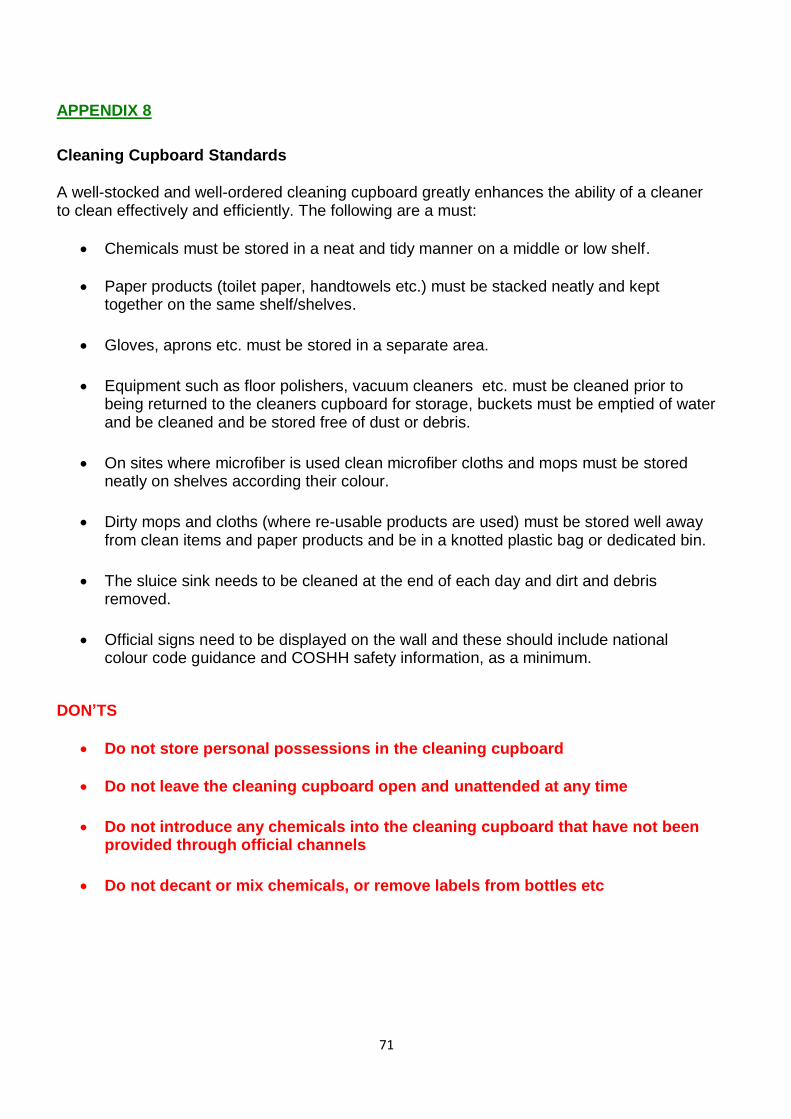
71
APPENDIX 8
Cleaning Cupboard Standards A well-stocked and well-ordered cleaning cupboard greatly enhances the ability of a cleaner to clean effectively and efficiently. The following are a must:
Chemicals must be stored in a neat and tidy manner on a middle or low shelf.
Paper products (toilet paper, handtowels etc.) must be stacked neatly and kept together on the same shelf/shelves.
Gloves, aprons etc. must be stored in a separate area.
Equipment such as floor polishers, vacuum cleaners etc. must be cleaned prior to being returned to the cleaners cupboard for storage, buckets must be emptied of water and be cleaned and be stored free of dust or debris.
On sites where microfiber is used clean microfiber cloths and mops must be stored neatly on shelves according their colour.
Dirty mops and cloths (where re-usable products are used) must be stored well away from clean items and paper products and be in a knotted plastic bag or dedicated bin.
The sluice sink needs to be cleaned at the end of each day and dirt and debris removed.
Official signs need to be displayed on the wall and these should include national colour code guidance and COSHH safety information, as a minimum.
DON’TS
Do not store personal possessions in the cleaning cupboard
Do not leave the cleaning cupboard open and unattended at any time
Do not introduce any chemicals into the cleaning cupboard that have not been provided through official channels
Do not decant or mix chemicals, or remove labels from bottles etc
72
APPENDIX 9
Related legislation and national guidance The NHS Healthcare Cleaning Manual, National Service user Safety Agency June 2009 PLACE (patient-led assessment of the Care Environment) 2012 Winning Ways – Working together to reduce Healthcare Associated Infection in England. Department of Health 2003 Towards Cleaner Hospitals and Lower Rates of Infection DOH 2004 A Matrons Charter: an Action Plan for Cleaner Hospitals DOH 2004 The National Specifications for Cleanliness in the NHS: a framework for setting and measuring performance Outcomes (NPSA 2007) Saving Lives; a delivery programme to reduce Healthcare associated infection including MRSA challenge 6 & 7 (2007) Going further faster 11: applying the learning to reduce HCAI and improve cleanliness DOH 2008 Revised Guidance on Contracting for Cleaning (Department of Health, December 2004) (NHS CLEANING MANUAL REPLACES SECTION 5) The Impact of Microfibre Technology on the Cleaning of Healthcare Facilities (Association of healthcare cleaning professionals, 2006) Colour Coding Hospital Cleaning Materials and Equipment: Safer Practice Notice 15 (National Service user Safety Agency, January 2007) An Integrated Approach to Hospital Cleaning: Microfibre Cloth and Steam Cleaning Technology (Department of Health, May 2007) Health and Social Care Act 2008: the Code of Practice for the Prevention and Control of Healthcare Associated Infections (the ‘Code of Practice’) (Department of Health, updated January 2009) Uniforms and Workwear: an Evidence Base for Developing Local Policy (Department of Health, January 2007) Clean Hands Save Lives: Service user Safety Alert (National Service user Safety Agency, September 2008) From Deep Clean to Keep Clean: Learning from the Deep Clean Programme (Department of Health, October 2008)