cameron university website editing guide
TRANSCRIPT
CAMERON UNIVERSITY 2021-2022
Website Editing Guide

1
Table of Contents Getting Logged In………………………………………………………..2
Finding or Creating a Page……………………………………………….4
Setting Up Your Page for Edits…………………………………………..7
Page Layout Options…………………………………………………..…8
Layout Components……………………………………………………...9
Editing a Content Area………………………………………………….10
Making a List……………………………………………………………12
Adding or Editing a Contact Box………………………………………..13
Linking Email Addresses………………………………………………..14
File Manager…………………………………………………………….14
Forms…………………………………………………………………...15
2
Welcome to Cameron University Web Editing It is great to have you as part of our web editing team. A little bit of background on our website - it
was launched in March 2020. It replaced the previous website that was built on the WebGui Content
Management System (CMS). That site was born in 2012. By 2020, it had roughly 5600 pages. When
we transitioned to our new site, we converted those 5600 pages into 1200. Our website was developed
by a third-party company named Liquidfish. It was created on a content management system named
Laravel. Luckily for our web editors, this CMS requires very little coding on your part. Feel free to
reach out to me if you run into anything that you want help with. Your time is valuable, so lets get
started.
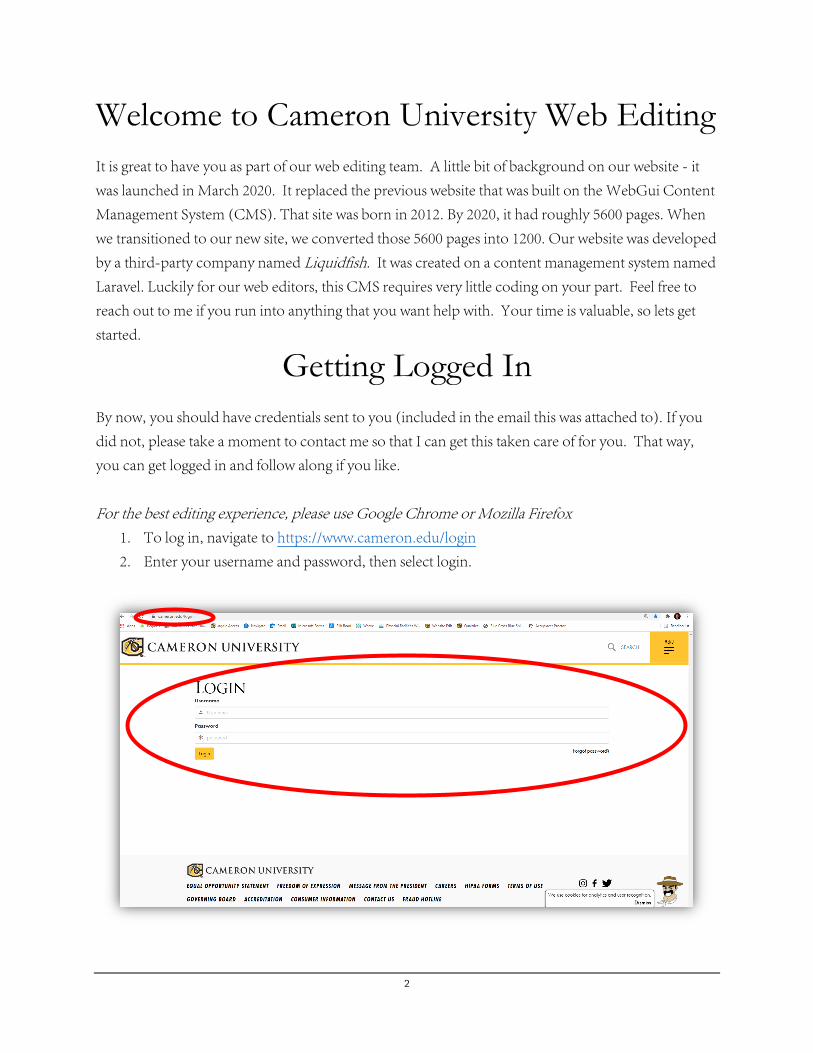
Getting Logged In By now, you should have credentials sent to you (included in the email this was attached to). If you
did not, please take a moment to contact me so that I can get this taken care of for you. That way,
you can get logged in and follow along if you like.
For the best editing experience, please use Google Chrome or Mozilla Firefox 1. To log in, navigate to https://www.cameron.edu/login
2. Enter your username and password, then select login.
3
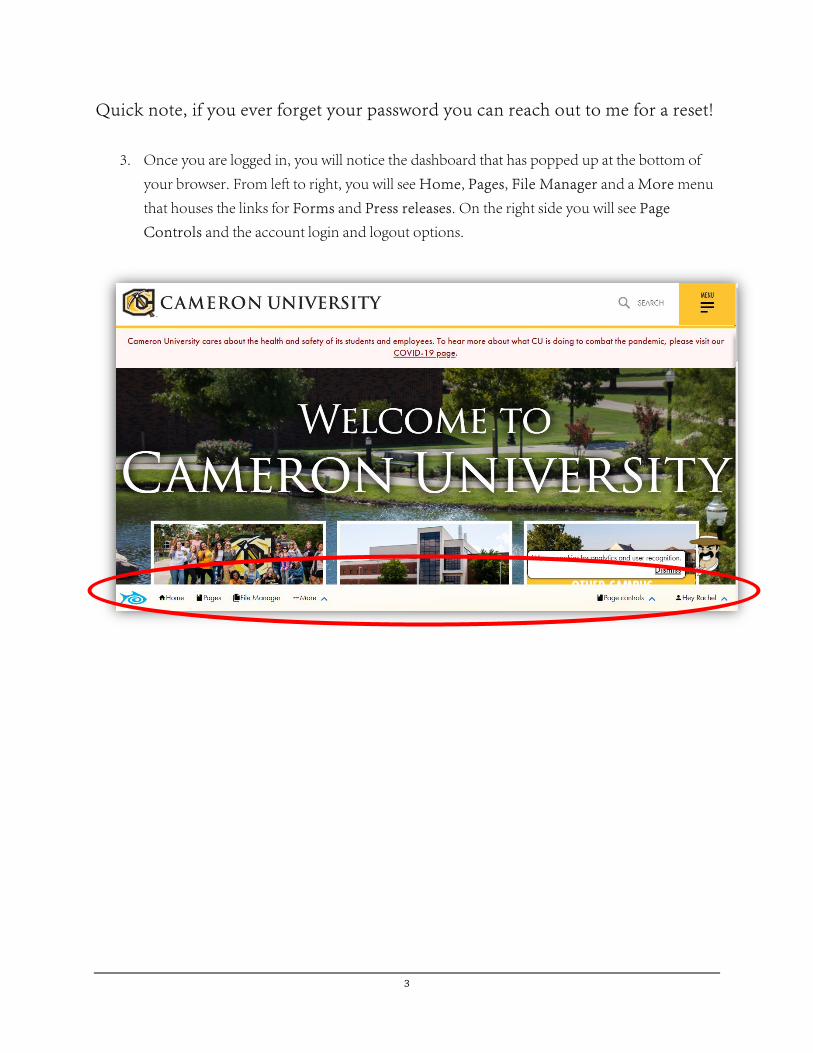
Quick note, if you ever forget your password you can reach out to me for a reset!
3. Once you are logged in, you will notice the dashboard that has popped up at the bottom of
your browser. From left to right, you will see Home, Pages, File Manager and a More menu
that houses the links for Forms and Press releases. On the right side you will see Page
Controls and the account login and logout options.
4
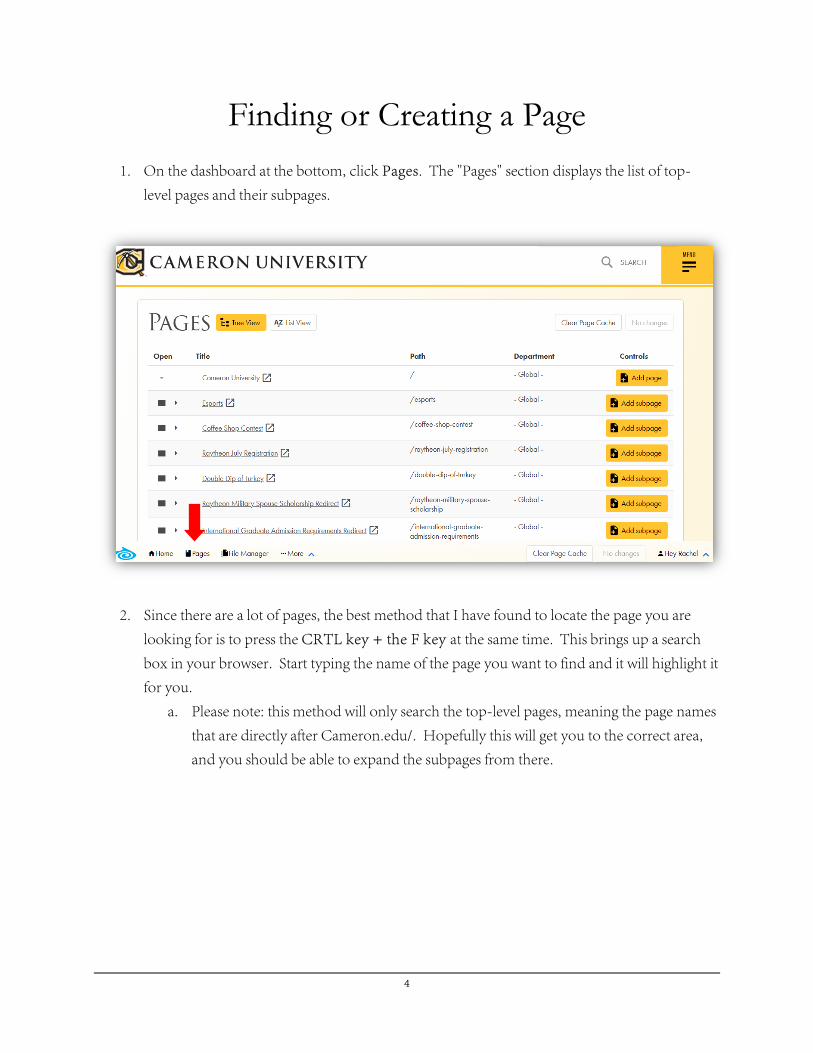
Finding or Creating a Page
1. On the dashboard at the bottom, click Pages. The "Pages" section displays the list of top-
level pages and their subpages.
2. Since there are a lot of pages, the best method that I have found to locate the page you are
looking for is to press the CRTL key + the F key at the same time. This brings up a search
box in your browser. Start typing the name of the page you want to find and it will highlight it
for you.
a. Please note: this method will only search the top-level pages, meaning the page names
that are directly after Cameron.edu/. Hopefully this will get you to the correct area,
and you should be able to expand the subpages from there.
5
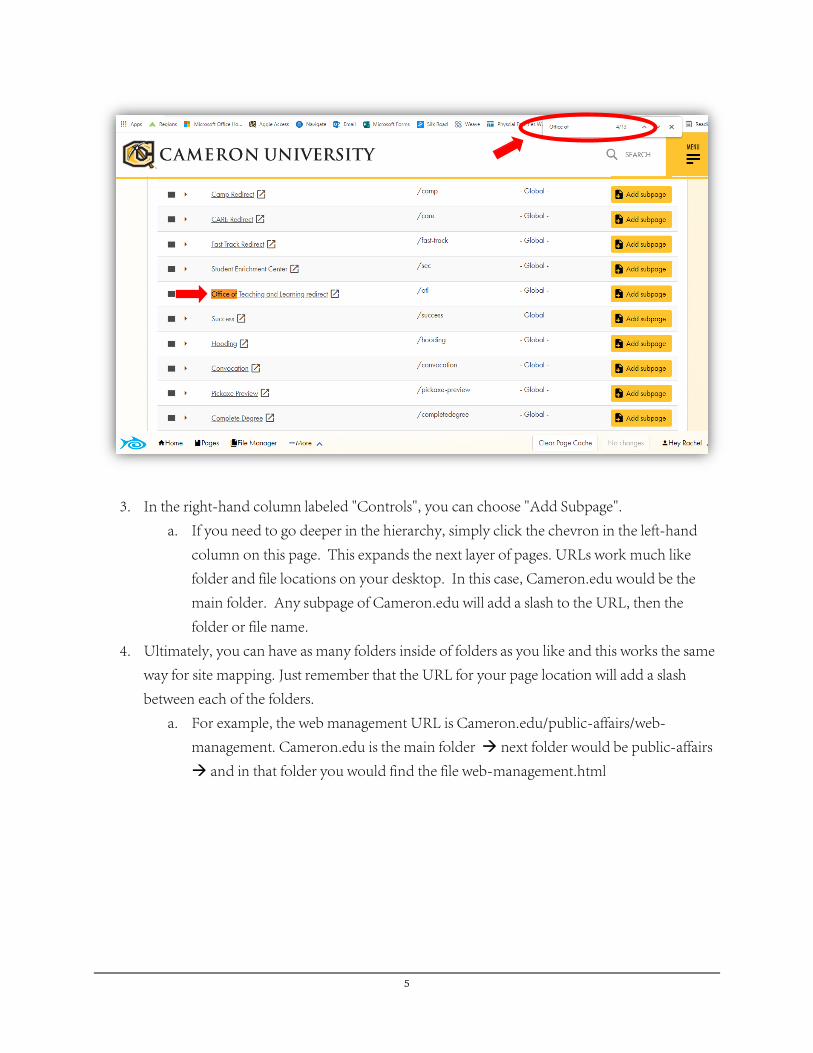
3. In the right-hand column labeled "Controls", you can choose "Add Subpage".
a. If you need to go deeper in the hierarchy, simply click the chevron in the left-hand
column on this page. This expands the next layer of pages. URLs work much like
folder and file locations on your desktop. In this case, Cameron.edu would be the
main folder. Any subpage of Cameron.edu will add a slash to the URL, then the
folder or file name.
4. Ultimately, you can have as many folders inside of folders as you like and this works the same
way for site mapping. Just remember that the URL for your page location will add a slash
between each of the folders.
a. For example, the web management URL is Cameron.edu/public-affairs/web-
management. Cameron.edu is the main folder next folder would be public-affairs
and in that folder you would find the file web-management.html
6
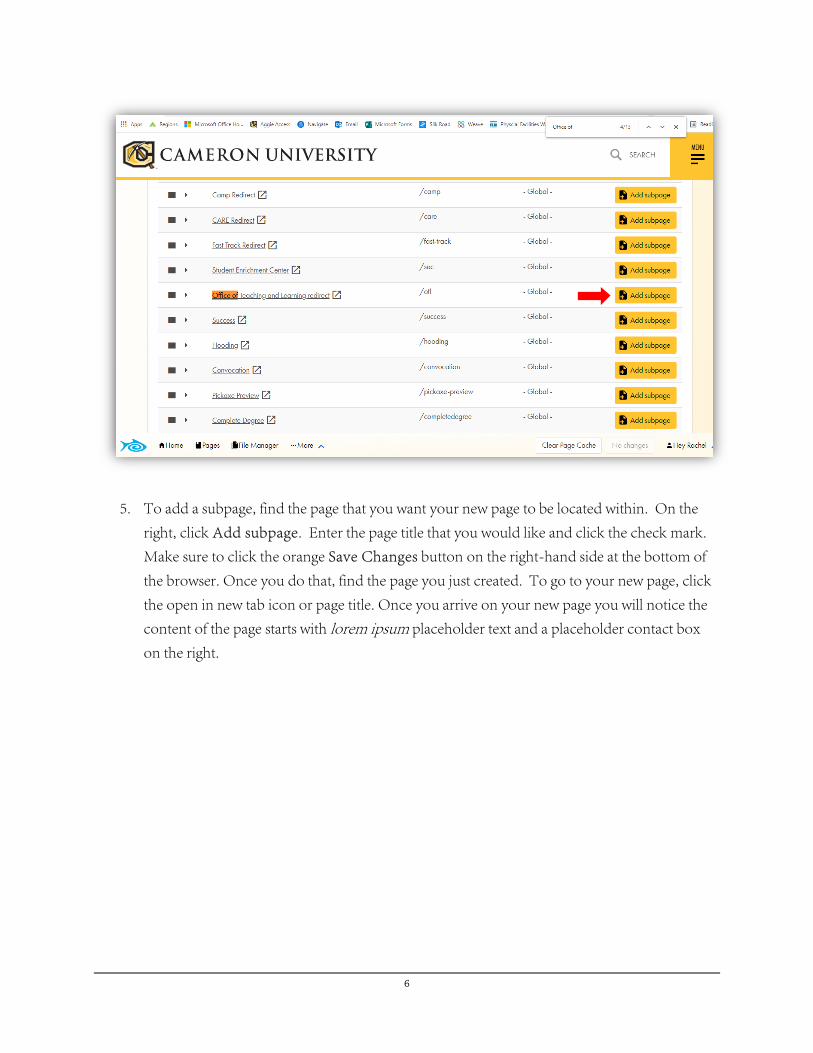
5. To add a subpage, find the page that you want your new page to be located within. On the
right, click Add subpage. Enter the page title that you would like and click the check mark.
Make sure to click the orange Save Changes button on the right-hand side at the bottom of
the browser. Once you do that, find the page you just created. To go to your new page, click
the open in new tab icon or page title. Once you arrive on your new page you will notice the
content of the page starts with lorem ipsum placeholder text and a placeholder contact box
on the right.
7
Setting Up Your Page for Edits
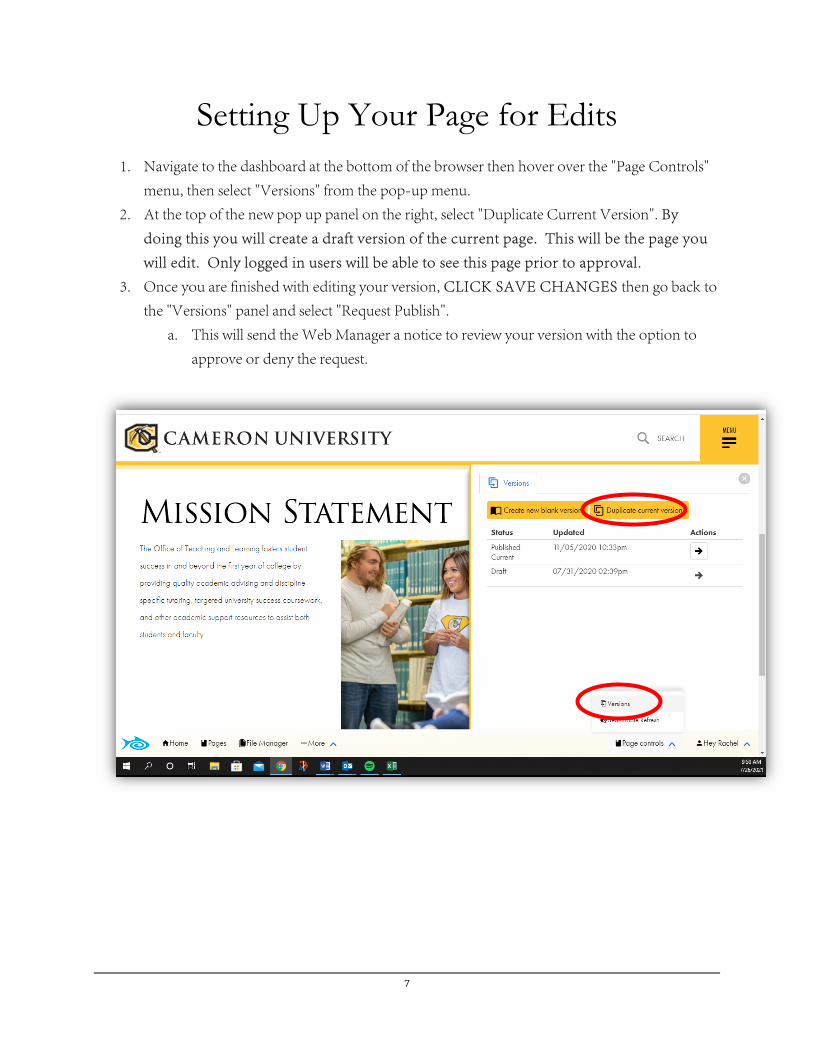
1. Navigate to the dashboard at the bottom of the browser then hover over the "Page Controls"
menu, then select "Versions" from the pop-up menu.
2. At the top of the new pop up panel on the right, select "Duplicate Current Version". By
doing this you will create a draft version of the current page. This will be the page you
will edit. Only logged in users will be able to see this page prior to approval.
3. Once you are finished with editing your version, CLICK SAVE CHANGES then go back to
the "Versions" panel and select "Request Publish".
a. This will send the Web Manager a notice to review your version with the option to
approve or deny the request.
8
Page Layout Options
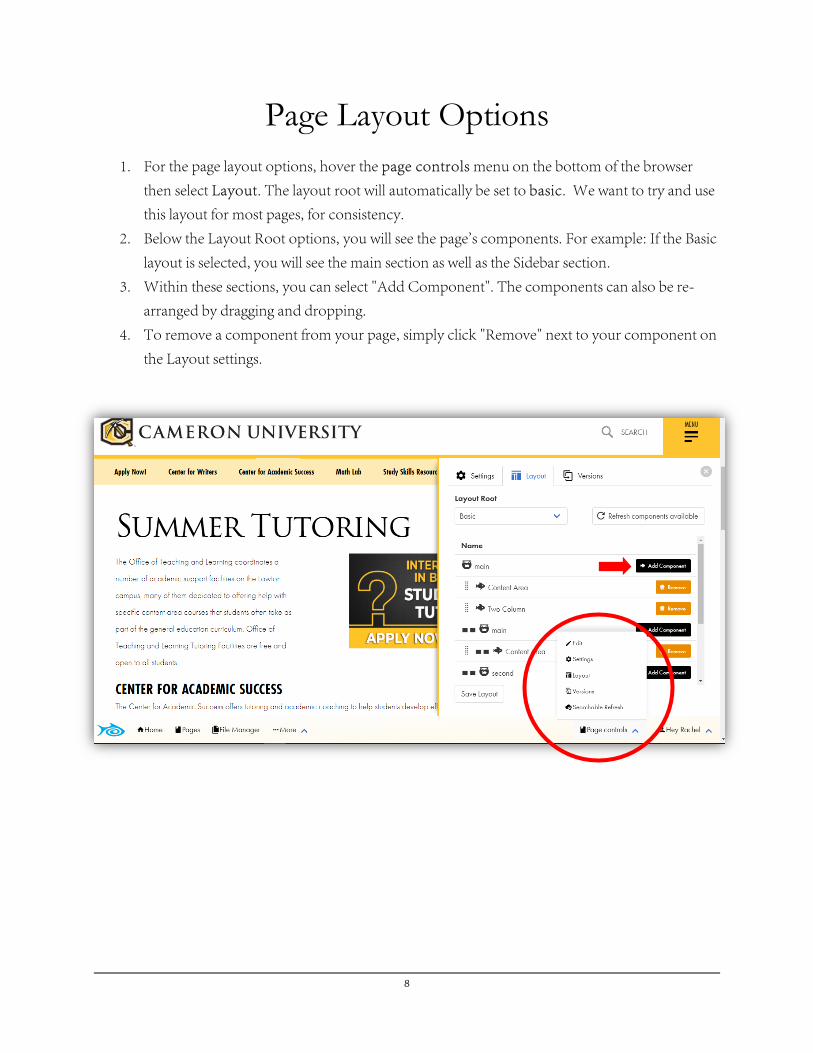
1. For the page layout options, hover the page controls menu on the bottom of the browser
then select Layout. The layout root will automatically be set to basic. We want to try and use
this layout for most pages, for consistency.
2. Below the Layout Root options, you will see the page's components. For example: If the Basic
layout is selected, you will see the main section as well as the Sidebar section.
3. Within these sections, you can select "Add Component". The components can also be re-
arranged by dragging and dropping.
4. To remove a component from your page, simply click "Remove" next to your component on
the Layout settings.
9
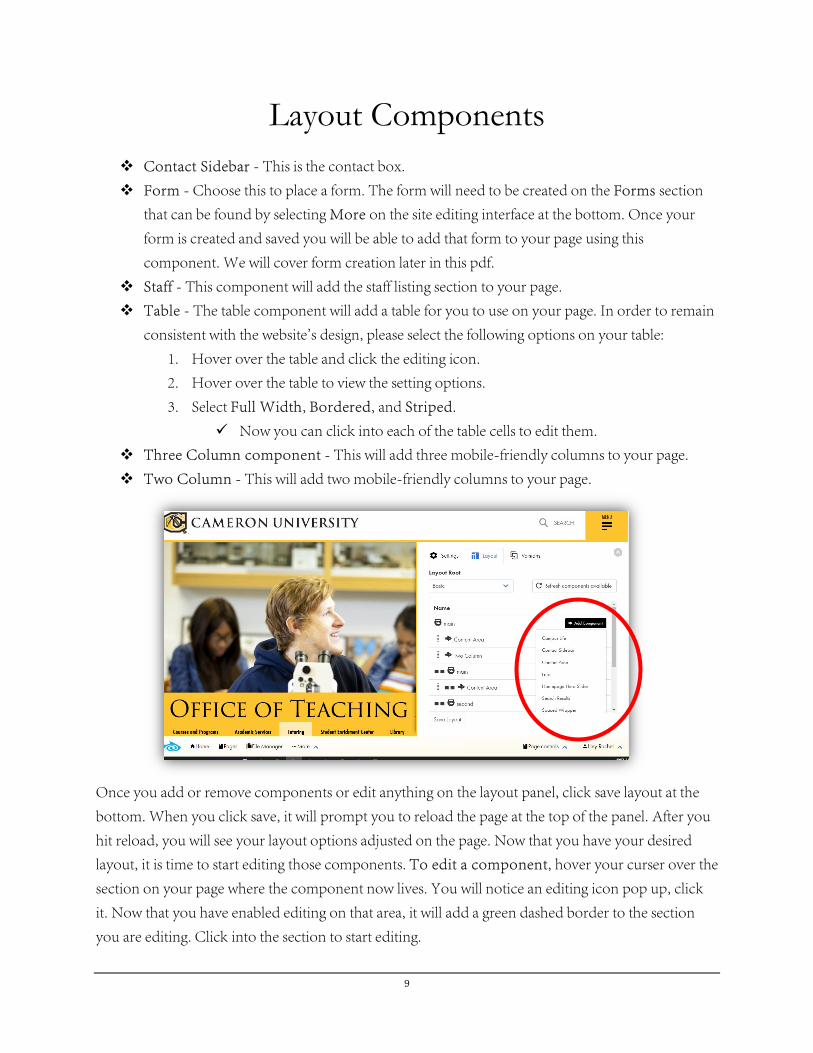
Layout Components
Contact Sidebar - This is the contact box.
Form - Choose this to place a form. The form will need to be created on the Forms section
that can be found by selecting More on the site editing interface at the bottom. Once your
form is created and saved you will be able to add that form to your page using this
component. We will cover form creation later in this pdf.
Staff - This component will add the staff listing section to your page.
Table - The table component will add a table for you to use on your page. In order to remain
consistent with the website's design, please select the following options on your table:
1. Hover over the table and click the editing icon.
2. Hover over the table to view the setting options.
3. Select Full Width, Bordered, and Striped.
Now you can click into each of the table cells to edit them.
Three Column component - This will add three mobile-friendly columns to your page.
Two Column - This will add two mobile-friendly columns to your page.
Once you add or remove components or edit anything on the layout panel, click save layout at the
bottom. When you click save, it will prompt you to reload the page at the top of the panel. After you
hit reload, you will see your layout options adjusted on the page. Now that you have your desired
layout, it is time to start editing those components. To edit a component, hover your curser over the
section on your page where the component now lives. You will notice an editing icon pop up, click
it. Now that you have enabled editing on that area, it will add a green dashed border to the section
you are editing. Click into the section to start editing.
10
Editing a Content Area Now you can start typing the text you want in the content area that you have enabled editing on.
You can highlight your text to get a text formatting pop up. This functions similar to text editing
software like Word with options like Bold, Italicize, Underline, and making ordered and
unordered lists.
Links In the center of the pop up mentioned above, you will see an anchor icon. Select this to make the
highlighted text a link. Add the URL of the page destination you would like the text to be linked to.
The general rule is to check the Open in new window option if the link takes the user off of our
website to another site.
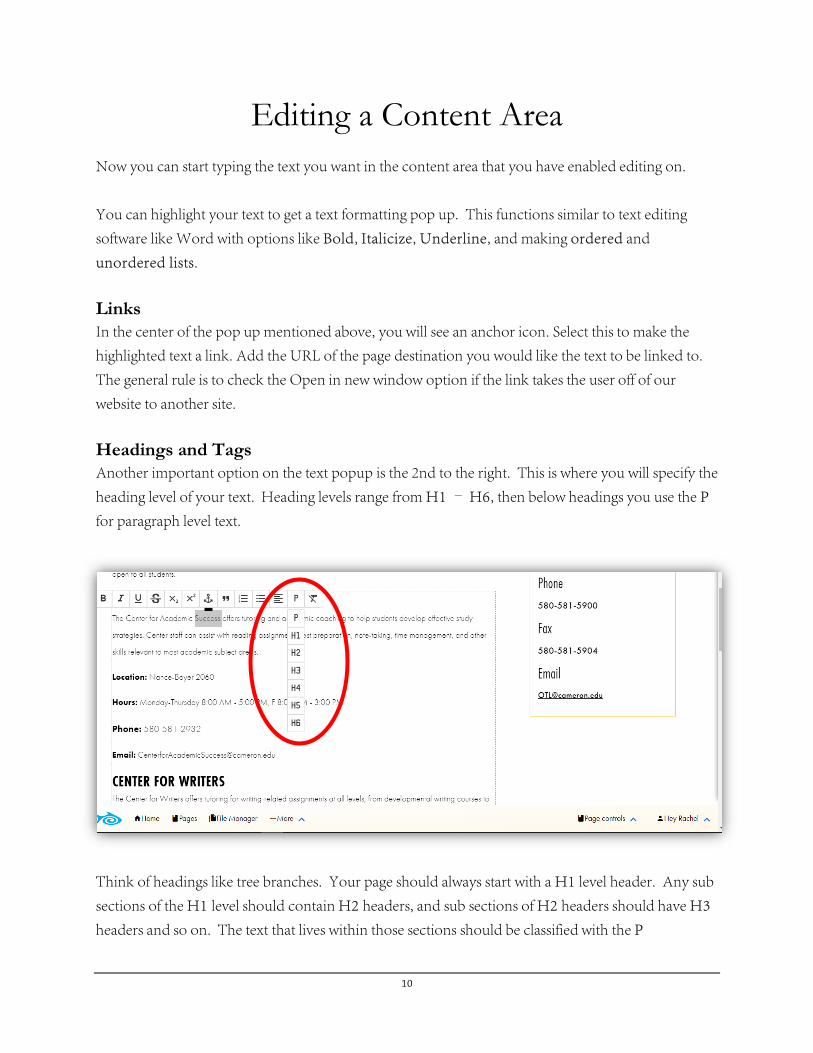
Headings and Tags Another important option on the text popup is the 2nd to the right. This is where you will specify the
heading level of your text. Heading levels range from H1 – H6, then below headings you use the P
for paragraph level text.
Think of headings like tree branches. Your page should always start with a H1 level header. Any sub
sections of the H1 level should contain H2 headers, and sub sections of H2 headers should have H3
headers and so on. The text that lives within those sections should be classified with the P
11
(paragraph) option. This is not primarily used for the appearance of your page, but more so for
people that use screen readers. They are able to tab through headers and navigate your page with
keyboard shortcuts, so it is essential for accessibility sakes to have your headers correct. Typically if I
receive a publish request with incorrect header usage, I will fix it before publishing it.
Images To add an image to your content area, place your cursor where you would like the image to display.
Click the add image icon. This will prompt the "File Selection" pop-up.
Navigate within the File Manager and locate the appropriate folder for your files. We will cover the
file manager later in this guide.
1. Click "Upload file" and choose the desired image.
2. Select "Start Upload"
3. Once the upload is complete, select the checkbox on the left of the image you just
uploaded.
4. Click Select. Once you have the image on your page, a few editing options become
available.
5. Double Click the image and the image editing pop up will display.
6. To make your image a link, click the anchor icon in the pop-up. Paste or type your link
in the entry field. Click the checkmark to complete.
7. The other important option is the icon that displays like a picture frame.
8. Click the picture frame icon. For this option, you will be able to edit the image size,
position, as well as enter the "Alt Text". Alt Text is mandatory for every image due to
accessibility rules outlined in WCAG 2.0. Also called "alt tags" and "alt descriptions,"
alt text is the written copy that appears in place of an image on a webpage if the image fails
to load on a user's screen. This text helps screen-reading tools describe images to visually
impaired readers and allows search engines to search your website better, as well as
increasing our SEO ranking.
12
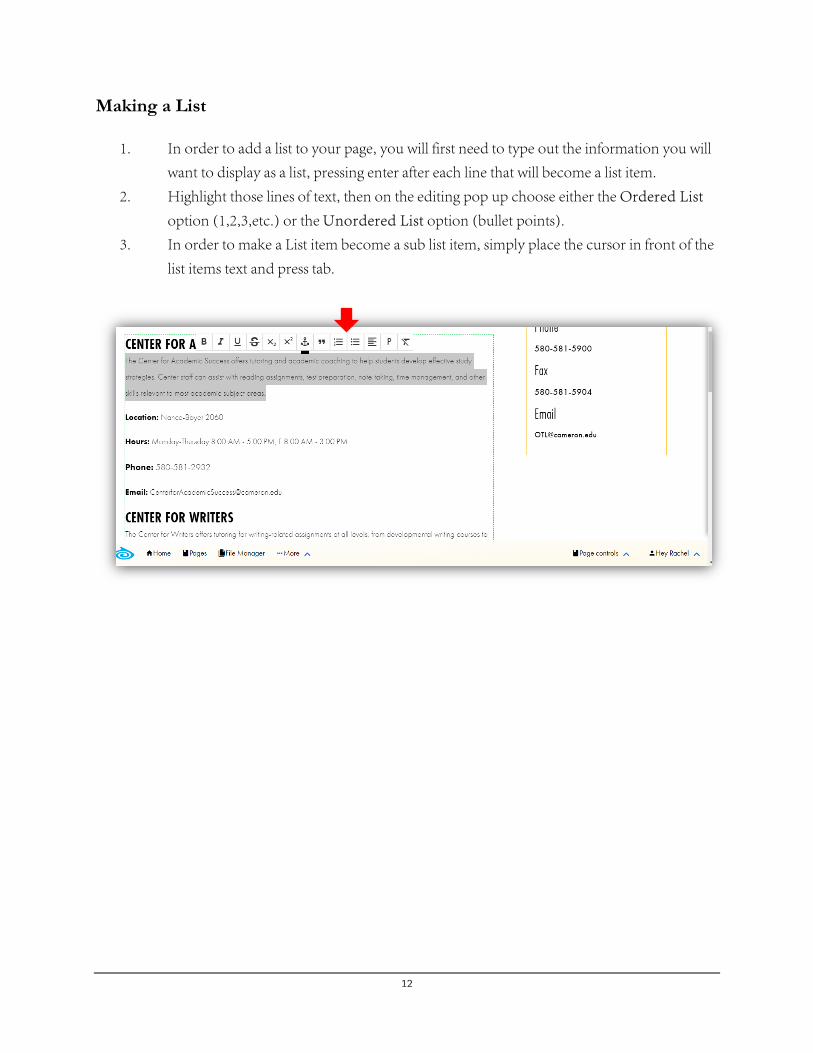
Making a List
1. In order to add a list to your page, you will first need to type out the information you will
want to display as a list, pressing enter after each line that will become a list item.
2. Highlight those lines of text, then on the editing pop up choose either the Ordered List
option (1,2,3,etc.) or the Unordered List option (bullet points).
3. In order to make a List item become a sub list item, simply place the cursor in front of the
list items text and press tab.
13
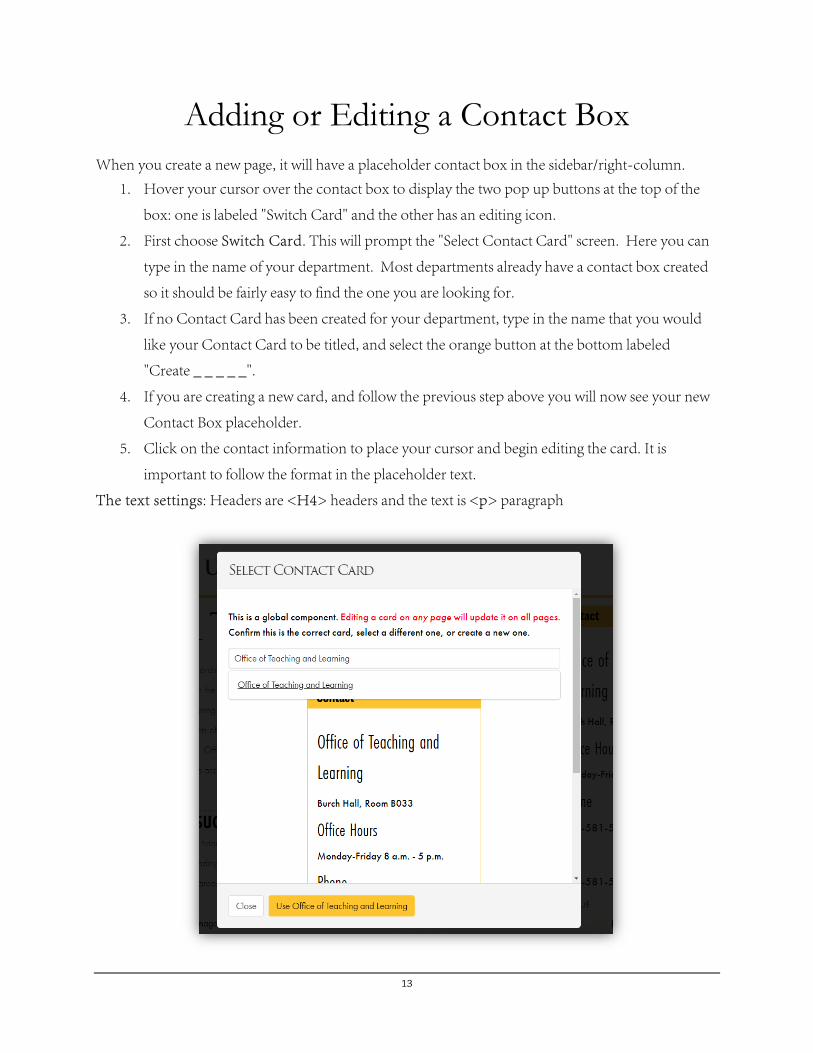
Adding or Editing a Contact Box When you create a new page, it will have a placeholder contact box in the sidebar/right-column.
1. Hover your cursor over the contact box to display the two pop up buttons at the top of the
box: one is labeled "Switch Card" and the other has an editing icon.
2. First choose Switch Card. This will prompt the "Select Contact Card" screen. Here you can
type in the name of your department. Most departments already have a contact box created
so it should be fairly easy to find the one you are looking for.
3. If no Contact Card has been created for your department, type in the name that you would
like your Contact Card to be titled, and select the orange button at the bottom labeled
"Create _ _ _ _ _".
4. If you are creating a new card, and follow the previous step above you will now see your new
Contact Box placeholder.
5. Click on the contact information to place your cursor and begin editing the card. It is
important to follow the format in the placeholder text.
The text settings: Headers are <H4> headers and the text is <p> paragraph
14
Linking Email Addresses To link an email address, highlight the address text, click the anchor link on the pop up, and type
“mailto:”then the email address (one word).
Example: mailto:[email protected]
Once you have completed this, click the save button at the bottom of the site editing interface.
Important Note: Editing a Contact Card will push the changes to all other pages site-wide that
use the same contact card.
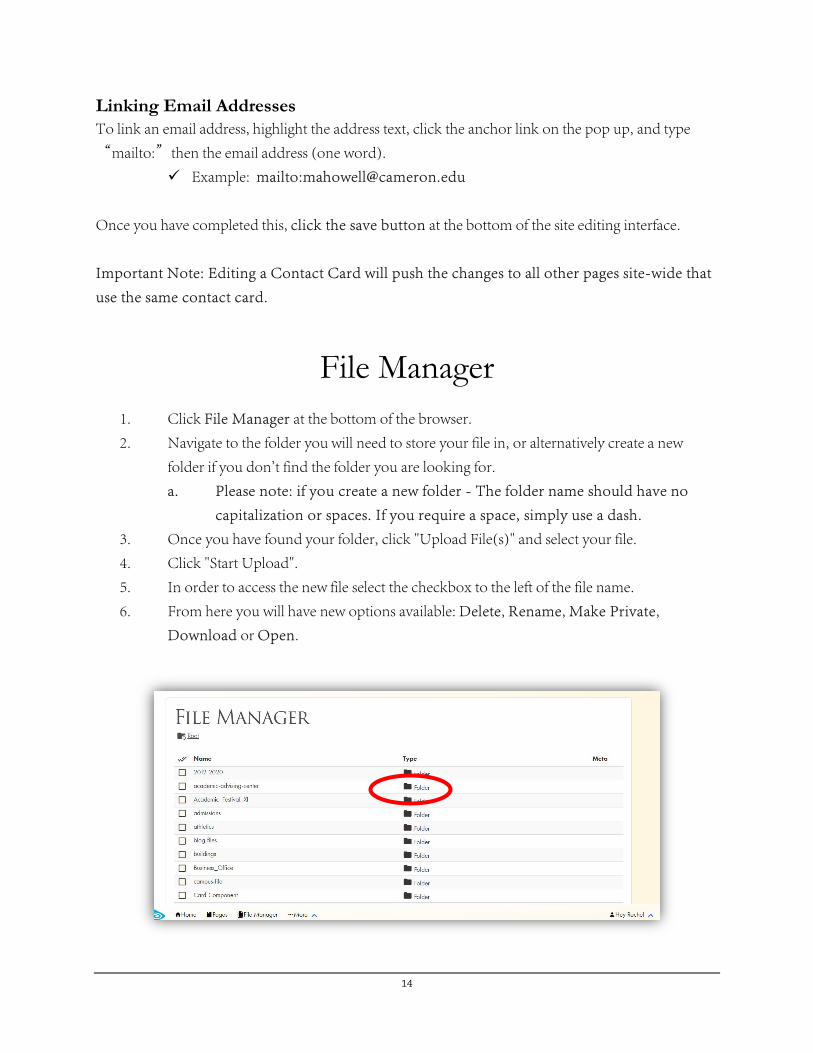
File Manager
1. Click File Manager at the bottom of the browser.
2. Navigate to the folder you will need to store your file in, or alternatively create a new
folder if you don't find the folder you are looking for.
a. Please note: if you create a new folder - The folder name should have no
capitalization or spaces. If you require a space, simply use a dash.
3. Once you have found your folder, click "Upload File(s)" and select your file.
4. Click "Start Upload".
5. In order to access the new file select the checkbox to the left of the file name.
6. From here you will have new options available: Delete, Rename, Make Private,
Download or Open.

15
Linking files If you would like to link your newly uploaded document to a web page, follow these steps:
1. Type the link text on your page then highlight it, select the anchor icon.
2. Now back on your file manager tab check the checkbox for the file you would like to link.
3. Right click on the Open button and select Copy Link Address.
4. Go back to the tab you were working on and paste the link address in the URL field.
5. Now the link will open your file!
Forms The first step in creating your new form is to click "Forms" from the "More" tab at the bottom of your
browser. On this page, you will find all of the site forms.
Create a new form To create a new form:
1. Click the "Create Form" button at the top right of the Forms page.
2. Next, you will be prompted to add a "Title". Once you've entered your title click "Create
Form".
3. The form creation interface has 3 tabbed panels (Form, Settings, Notifications) Form panel The first panel is broken down into the following sections:
Form Title - This is the title of your form
Description (Optional) - Explanation of the form, what it’s for, etc.
Sections - Here is where your form fields will go. Most forms will only have one section.
Within the Section is where you will add your form fields. Types of Fields
Text - This will be the basic text field. You can ask for information that will generally use less
than 50 characters in a user's response.
Checkboxes - Checkboxes will allow the user to select multiple options. Please not that there
is an issue on our site that will force a user to check all boxes if you mark this a required field,
so currently the best practice here is to not make your checkbox field required.
16
Radios - Radios will allow the user to select one option.
Text Area - You will use this option for answers/information that requires more than 50
characters.
Dropdown - The dropdown field option will allow the user to click a dropdown menu and
select one option.
Photo - You will use this field if you are requesting the user to upload a photo.
File - You will use this field if you are requesting the user to upload file types other than a
photo (pdf, word doc, etc.)
Date and Time - Currently the date and time field options do not work correctly on certain
browsers. For now please use the text field for getting date and time information.
SSN - The social security option will allow the user to submit their SSN confidentially.
Closing Comments (Optional) - This is a place for you to add any closing comments associated
with the form.
*Make sure to click "Save" at the bottom of the page in order to save your form.
Settings Panel Within the Settings panel you will find:
Availability - This section will give you the option to Publish or Schedule the start date for
the form.
General - This section will give you the option to "Require Recaptcha", "Require Receipt"
and Edit the Submit Button label.
Require Recaptcha - This confirms that the user is not a spam bot.
Requires Receipt - This will send the user a receipt of the form. Important to note: In order
to use this there must be at least one text field with email validation selected.
Submit Button Title - Edit the text on the submit button to display your personalized call-
to-action.
Form Completion - Here you can edit the message that will be displayed once the user
successfully completes the form. If you would rather send the user to a specific page once they
have submitted the form, you can add the URL for that page in the Redirect URL field.
*Make sure to click "Save" at the bottom of the page in order to save your form.
17
Notifications Panel This is the section that you will use to edit who receives the notifications/submissions for your form.
1. Select "Add Recipient" then enter their Name and Email Address. (You may enter more
than one recipient in this location.)
*Make sure to click "Save" at the bottom of the page in order to save your form.
Once again, I am really happy to have you as part of our web editing team.
Please reach out to me anytime that you have any questions. My extension is 6711 and
my email is [email protected].