ca arcserve central protection manager user guide
TRANSCRIPT
User Guide r16.5
CA ARCserve® Central Protection Manager

This Documentation, which includes embedded help systems and electronically distributed materials, (hereinafter referred to as the “Documentation”) is for your informational purposes only and is subject to change or withdrawal by CA at any time.
This Documentation may not be copied, transferred, reproduced, disclosed, modified or duplicated, in whole or in part, without the prior written consent of CA. This Documentation is confidential and proprietary information of CA and may not be disclosed by you or used for any purpose other than as may be permitted in (i) a separate agreement between you and CA governing your use of the CA software to which the Documentation relates; or (ii) a separate confidentiality agreement between you and CA.
Notwithstanding the foregoing, if you are a licensed user of the software product(s) addressed in the Documentation, you may print or otherwise make available a reasonable number of copies of the Documentation for internal use by you and your employees in connection with that software, provided that all CA copyright notices and legends are affixed to each reproduced copy.
The right to print or otherwise make available copies of the Documentation is limited to the period during which the applicable license for such software remains in full force and effect. Should the license terminate for any reason, it is your responsibility to certify in writing to CA that all copies and partial copies of the Documentation have been returned to CA or destroyed.
TO THE EXTENT PERMITTED BY APPLICABLE LAW, CA PROVIDES THIS DOCUMENTATION “AS IS” WITHOUT WARRANTY OF ANY KIND, INCLUDING WITHOUT LIMITATION, ANY IMPLIED WARRANTIES OF MERCHANTABILITY, FITNESS FOR A PARTICULAR PURPOSE, OR NONINFRINGEMENT. IN NO EVENT WILL CA BE LIABLE TO YOU OR ANY THIRD PARTY FOR ANY LOSS OR DAMAGE, DIRECT OR INDIRECT, FROM THE USE OF THIS DOCUMENTATION, INCLUDING WITHOUT LIMITATION, LOST PROFITS, LOST INVESTMENT, BUSINESS INTERRUPTION, GOODWILL, OR LOST DATA, EVEN IF CA IS EXPRESSLY ADVISED IN ADVANCE OF THE POSSIBILITY OF SUCH LOSS OR DAMAGE.
The use of any software product referenced in the Documentation is governed by the applicable license agreement and such license agreement is not modified in any way by the terms of this notice.
The manufacturer of this Documentation is CA.
Provided with “Restricted Rights.” Use, duplication or disclosure by the United States Government is subject to the restrictions set forth in FAR Sections 12.212, 52.227-14, and 52.227-19(c)(1) - (2) and DFARS Section 252.227-7014(b)(3), as applicable, or their successors.
Copyright © 2013 CA. All rights reserved. All trademarks, trade names, service marks, and logos referenced herein belong to their respective companies.
CA Technologies Product References
This document references the following CA Technologies products:
■ CA ARCserve® Backup
■ CA ARCserve® D2D
■ CA ARCserve® Replication and High Availability
■ CA ARCserve® Central Host-Based VM Backup
■ CA ARCserve® Central Protection Manager
■ CA ARCserve® Central Reporting
■ CA ARCserve® Central Virtual Standby
Contact CA
Contact CA Support
For your convenience, CA Technologies provides one site where you can access the information that you need for your Home Office, Small Business, and Enterprise CA Technologies products. At http://ca.com/support, you can access the following resources:
■ Online and telephone contact information for technical assistance and customer services
■ Information about user communities and forums
■ Product and documentation downloads
■ CA Support policies and guidelines
■ Other helpful resources appropriate for your product
Providing Feedback About Product Documentation
If you have comments or questions about CA Technologies product documentation, you can send a message to [email protected].
To provide feedback about CA Technologies product documentation, complete our short customer survey which is available on the CA Support website at http://ca.com/docs.
Support Links for CA ARCserve Central Applications:
CA Support Online offers a rich set of resources for resolving your technical issues and provides easy access to important product information. With CA Support, you have easy access to trusted advice that is always available. The following links let you access the various CA Support sites that are available:
■ Understanding your Support--The following link provides information about maintenance programs and support offerings, including terms and conditions, claims, service-level objectives (SLO), and service hours.
https://support.ca.com/prodinfo/centappssupportofferings
■ Registering for Support--The following link takes you to the CA Support Online registration form which is used to activate your product support.
https://support.ca.com/prodinfo/supportregistration
■ Accessing Technical Support--The following link takes you to the One-Stop Product Support page for CA ARCserve Central Applications.
https://support.ca.com/prodinfo/arccentapps
Documentation Changes
The following documentation updates have been made since the last release of CA ARCserve Central Protection Manager:
■ Updated to include user feedback, enhancements, corrections, and other minor changes to help improve the usability and understanding of the product or the documentation itself.
■ Updated Specify Advanced Backup Settings (see page 94). This topic now includes the option that you use to generate file system catalog for faster search after each backup.
■ Updated View CA ARCserve Central Protection Manager Logs (see page 152). This topic now includes two new Module options: Update Multiple Nodes and CA ARCserve D2D Merge Job. Removed Preflight Check and Submit VM Backup Jobs.
■ Updated Access Denied Errors Occur When Adding a Node by IP/Name (see page 180). This topic now includes two solutions for disabling User Account Control (UAC).

Contents 7
Contents
Chapter 1: Introducing CA ARCserve Central Protection Manager 11
Introduction ............................................................................................................................................................... 11
How the Application Works ....................................................................................................................................... 12
CA ARCserve Central Applications Bookshelf ............................................................................................................. 13
Chapter 2: Installing CA ARCserve Central Protection Manager 15
Prerequisite Installation Tasks ................................................................................................................................... 15
Installation Considerations ......................................................................................................................................... 17
Install CA ARCserve Central Protection Manager ....................................................................................................... 17
Install CA ARCserve Central Protection Manager Silently .......................................................................................... 21
How to Uninstall CA ARCserve Central Protection Manager ..................................................................................... 22
Uninstall CA ARCserve Central Protection Manager ........................................................................................... 24
Uninstall CA ARCserve Central Protection Manager Silently .............................................................................. 25
Release Policy Control to the CA ARCserve D2D Nodes ...................................................................................... 26
How the Installation Process Affects Operating Systems .......................................................................................... 27
Binary Files Containing Incorrect File Version Information................................................................................. 29
Binary Files that Do Not Contain an Embedded Manifest .................................................................................. 29
Binary Files that have a Privilege Level of Require Administrator in Manifest ................................................... 30
Chapter 3: Getting Started With CA ARCserve Central Protection Manager 33
Verify That the CA ARCserve Central Protection Manager Server Can Communicate With the Nodes .................... 33
Configure CA ARCserve Backup Data Synchronization Schedules.............................................................................. 34
Configure SRM Schedules........................................................................................................................................... 35
Configure Discovery Schedules .................................................................................................................................. 36
Configure Email and Alert Settings ............................................................................................................................. 36
Configure IT Management Server Settings ................................................................................................................ 38
Configure CA ARCserve Central Applications Update Schedules ............................................................................... 38
Configure Proxy Settings ..................................................................................................................................... 39
Configure Social Networking Preferences .................................................................................................................. 41
Modify the Administrator Account ............................................................................................................................ 42
Configure D2D Deployment Settings.......................................................................................................................... 42
Configure the Database .............................................................................................................................................. 43
Re-create the CA ARCserve Central Protection Manager Database .......................................................................... 44
8 User Guide
Chapter 4: Using CA ARCserve Central Protection Manager 47
Using CA ARCserve Central Protection Manager to Back up CA ARCserve D2D Nodes ............................................. 48
Add Nodes ........................................................................................................................................................... 49
Create a Basic Policy............................................................................................................................................ 49
Assign Nodes to the Policy .................................................................................................................................. 53
How to Manage Nodes in CA ARCserve Central Protection Manager ....................................................................... 54
Understanding the Node Management Screen .................................................................................................. 54
What You Can Do With Nodes ............................................................................................................................ 56
What You Can Do With Node Groups ................................................................................................................. 71
Search for Nodes Using Discover ........................................................................................................................ 76
CA ARCserve D2D Deployment Tasks .................................................................................................................. 77
Filter Node Groups .............................................................................................................................................. 80
How to Manage CA ARCserve D2D Policies ................................................................................................................ 81
Create Policies ..................................................................................................................................................... 81
Edit or Copy Policies .......................................................................................................................................... 128
Delete Policies ................................................................................................................................................... 128
Deploy Policies .................................................................................................................................................. 129
Run a Back Up Now .................................................................................................................................................. 131
View Job Status Information .................................................................................................................................... 133
How to Restore Nodes in CA ARCserve Central Protection Manager ...................................................................... 134
Restore Data from Recovery Points .................................................................................................................. 134
Restore Data from File Copies ........................................................................................................................... 137
Restore Data from Files and Folders ................................................................................................................. 140
Restore Data from Virtual Machines ................................................................................................................. 144
Restore Microsoft Exchange Email Data ........................................................................................................... 148
View CA ARCserve Central Protection Manager Logs .............................................................................................. 152
Add Links to the Navigation Bar ............................................................................................................................... 154
Applying Best Practices ............................................................................................................................................ 155
Change Server Communication Protocol ................................................................................................................. 156
Chapter 5: Integrating CA ARCserve Central Protection Manager with IT Management Server Tools 157
How CA ARCserve Central Protection Manager Integrates with Nimsoft and Kaseya ............................................. 157
How to Integrate CA ARCserve Central Protection Manager with Nimsoft ............................................................. 159
Install the Robot ................................................................................................................................................ 160
Configure CA ARCserve Central Protection Manager Servers to Communicate with Nimsoft Servers ............ 161
Configure the Nimsoft Server to Detect and Send Email Messages ................................................................. 162
View Information About Alerts in the Nimsoft Alarm SubConsole ................................................................... 162
How to Integrate CA ARCserve Central Protection Manager with Kaseya ............................................................... 164
Install the Kaseya Agent .................................................................................................................................... 165
Contents 9
Configure the CA ARCserve Central Protection Manager Server to Communicate with the Kaseya Server ................................................................................................................................................................ 165
Configure the Log Parser for the Kaseya Server ................................................................................................ 166
Assign the Parser Sets on the Kaseya Server .................................................................................................... 168
Configure Kaseya Servers to Detect and Send Email Messages ........................................................................ 170
View Information About Alerts in the Kaseya Agent Log Monitor .................................................................... 171
Chapter 6: Troubleshooting CA ARCserve Central Protection Manager 173
Cannot Connect to Specified Server Messages Appear when Attempting to Add Nodes ....................................... 174
Blank Webpages Appear or Javascript Errors Occur ................................................................................................ 176
Web Pages Do Not Load Properly When Logging in to CA ARCserve D2D Nodes .................................................... 177
Invalid Credentials Message Appears When Adding Nodes .................................................................................... 179
Invalid Credentials Messages on Windows XP ......................................................................................................... 180
Access Denied Errors Occur when Adding a Node by IP/Name ............................................................................... 180
Certificate Error Appears When You Log In to the Application ................................................................................ 182
The CA ARCserve Backup Synchronization Process Fails .......................................................................................... 183
CA ARCserve D2D Redeployment Operations Fail ................................................................................................... 184
How to Troubleshoot Page Loading Problems ......................................................................................................... 185
Garbage Characters Appear in Browser Windows When Accessing CA ARCserve Central Applications ................. 186
Nodes Do Not Appear on the Nodes Screen After Changing the Name of the Node .............................................. 186
CA ARCserve Central Protection Manager Cannot Communicate with the CA ARCserve D2D Web Service on Remote Nodes ..................................................................................................................................................... 187
Nodes Are Not Managed After D2D Deployment .................................................................................................... 188
How to Set Schedules for Node Data Deletion ........................................................................................................ 188
CA ARCserve Central Applications Database Services Do Not Start ......................................................................... 189
Multiple Connections Error Occurs When Saving or Assigning a Policy to a CA ARCserve D2D Server ................... 190
Data Synchronization and Policy Deployment Operations Fail ................................................................................ 190
Troubleshooting Error Numbers .............................................................................................................................. 191
Add New Tab Link Not Launching Properly for Internet Explorer 8, 9, and Chrome ............................................... 192
Add New Tab Link, RSS Feeds, and Social Networking Feedback Not Launching Properly on Internet Explorer 8 and 9 ....................................................................................................................................................... 194
Characters from Localized Servers Appear as Garbled Text in the Nimsoft UMP Alarm Console ........................... 195
Index 197

Chapter 1: Introducing CA ARCserve Central Protection Manager 11
Chapter 1: Introducing CA ARCserve Central Protection Manager
This section contains the following topics:
Introduction (see page 11) How the Application Works (see page 12) CA ARCserve Central Applications Bookshelf (see page 13)
Introduction
CA ARCserve Central Applications combine core data protection and management technologies with an ecosystem of targeted applications that work in unison to facilitate on- and off-premises protection, copy, movement, and transformation of data across global environments.
CA ARCserve Central Applications are easy to use, manage, and install. It provides organizations with automated control of their information to make educated decisions about the access, availability, and security of their data, based on the overall business value.
Among the applications offered by CA ARCserve Central Applications is CA ARCserve Central Protection Manager. CA ARCserve Central Protection Manager lets you manage CA ARCserve D2D and CA ARCserve Backup environments from a central location. Individual applications provide a limited degree of node management while the CA ARCserve Central Protection Manager lets you do the following:
■ Add one or multiple nodes
■ Discover nodes from the Active Directory server
■ Discover and add virtual machines managed by a hypervisor
■ Discover the application on added servers
■ Create and assign CA ARCserve D2D policies
■ Submit restore job for managed CA ARCserve D2D
■ Synchronize data from managed CA ARCserve Backup and CA ARCserve D2D servers
■ Deploy CA ARCserve D2D
How the Application Works
12 User Guide
How the Application Works
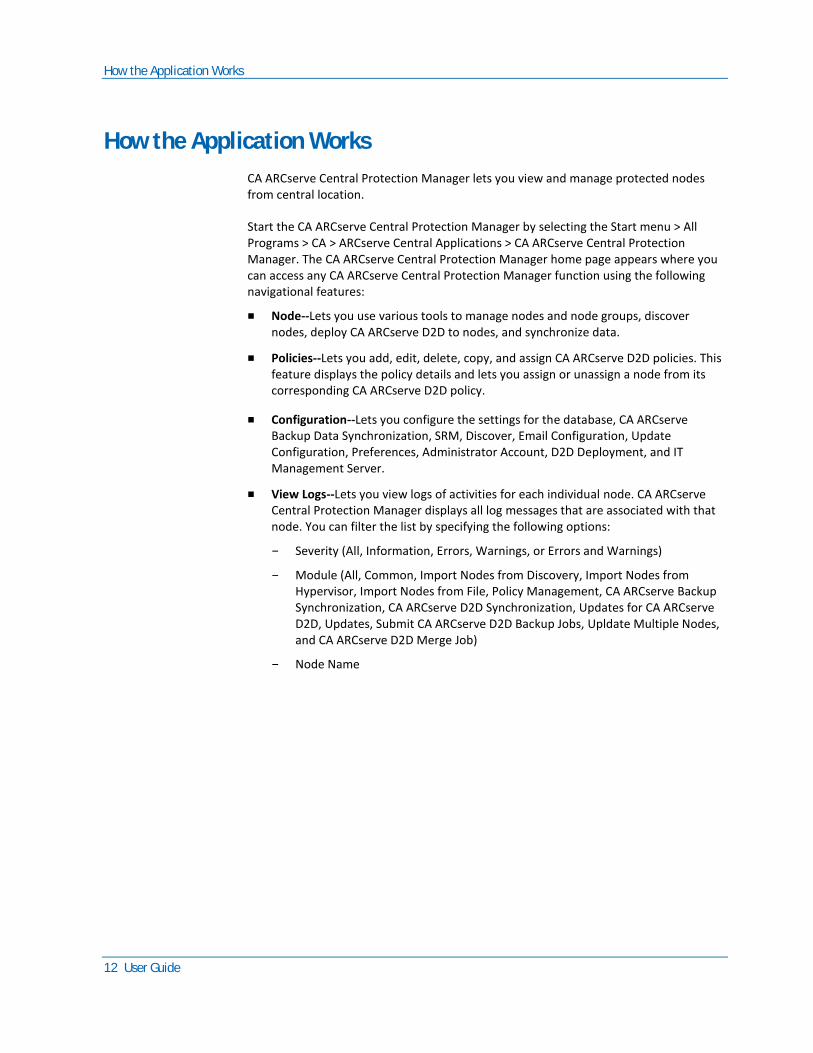
CA ARCserve Central Protection Manager lets you view and manage protected nodes from central location.
Start the CA ARCserve Central Protection Manager by selecting the Start menu > All Programs > CA > ARCserve Central Applications > CA ARCserve Central Protection Manager. The CA ARCserve Central Protection Manager home page appears where you can access any CA ARCserve Central Protection Manager function using the following navigational features:
■ Node--Lets you use various tools to manage nodes and node groups, discover nodes, deploy CA ARCserve D2D to nodes, and synchronize data.
■ Policies--Lets you add, edit, delete, copy, and assign CA ARCserve D2D policies. This feature displays the policy details and lets you assign or unassign a node from its corresponding CA ARCserve D2D policy.
■ Configuration--Lets you configure the settings for the database, CA ARCserve Backup Data Synchronization, SRM, Discover, Email Configuration, Update Configuration, Preferences, Administrator Account, D2D Deployment, and IT Management Server.
■ View Logs--Lets you view logs of activities for each individual node. CA ARCserve Central Protection Manager displays all log messages that are associated with that node. You can filter the list by specifying the following options:
– Severity (All, Information, Errors, Warnings, or Errors and Warnings)
– Module (All, Common, Import Nodes from Discovery, Import Nodes from Hypervisor, Import Nodes from File, Policy Management, CA ARCserve Backup Synchronization, CA ARCserve D2D Synchronization, Updates for CA ARCserve D2D, Updates, Submit CA ARCserve D2D Backup Jobs, Upldate Multiple Nodes, and CA ARCserve D2D Merge Job)
– Node Name
CA ARCserve Central Applications Bookshelf
Chapter 1: Introducing CA ARCserve Central Protection Manager 13
CA ARCserve Central Applications Bookshelf
The topics contained in the CA ARCserve Central Applications Help system are also available as a User Guide in PDF format. The latest PDF version of this guide and Help System can be accessed from the CA ARCserve Central Applications Bookshelf.
The CA ARCserve Central Applications Release Notes files contain information relating to system requirements, operating system support, application recovery support, and other information you may need to know before installing this product. In addition, the Release Notes files contain a list of known issues that you should be aware of before you use CA ARCserve Central Applications. The latest version of the Release Notes can be accessed from the CA ARCserve Central Applications Bookshelf.

Chapter 2: Installing CA ARCserve Central Protection Manager 15
Chapter 2: Installing CA ARCserve Central Protection Manager
This section contains the following topics:
Prerequisite Installation Tasks (see page 15) Installation Considerations (see page 17) Install CA ARCserve Central Protection Manager (see page 17) Install CA ARCserve Central Protection Manager Silently (see page 21) How to Uninstall CA ARCserve Central Protection Manager (see page 22) How the Installation Process Affects Operating Systems (see page 27)
Prerequisite Installation Tasks
Before you install the application, complete the following prerequisite tasks:
■ Review the Release Notes. The Release Notes contain a description of system requirements, supported operating systems, and a list of issues that are known to exist with this release of the CA ARCserve Central Protection Manager.
■ Verify that your system meets the software and hardware requirements that are needed to install the application.
■ Verify that your Windows account has administrator privileges or any other equal privileges to install software on the computers where you plan to install CA ARCserve Central Protection Manager.
■ Verify that you have the user names and passwords of the computers where you are installing the application in your possession.
Prerequisite Installation Tasks
16 User Guide
■ Verify that the server where you install CA ARCserve Central Protection Manager and the nodes where you want to deploy policies can communicate with each other using their host names. To verify that the CA ARCserve Central Protection Manager servers and nodes can communicate with each other, do the following:
– From the CA ARCserve Central Protection Manager server, ping the nodes using the host names of the nodes.
– From the nodes that you want to protect, ping the CA ARCserve Central Protection Manager server using the host name of the server.
■ CA ARCserve Central Applications lets you install CA ARCserve D2D and upgrade the previous version to the latest version on remote nodes using the Deploy utility. To back up data on the remote nodes using the latest version of CA ARCserve D2D, you must obtain the latest version of CA ARCserve D2D licenses and apply the licenses on the nodes. If you do not apply the licenses within 31 days of the date that you installed or upgraded on the nodes, CA ARCserve D2D stops working.
■ The CA ARCserve Central Protection Manager installation media contains Microsoft SQL Server 2008 R2 Express Edition, which is the minimum database application that is required to support the CA ARCserve Central Protection Manager database. If you want to use Microsoft SQL Server to support the CA ARCserve Central Protection Manager database, install Microsoft SQL Server on the CA ARCserve Central Protection Manager server or a remote server before you install CA ARCserve Central Protection Manager. If the installation routine detects a version of Microsoft SQL Server that is not supported, the installation routine fails. For more information about the supported versions of Microsoft SQL Server, see the Release Notes.
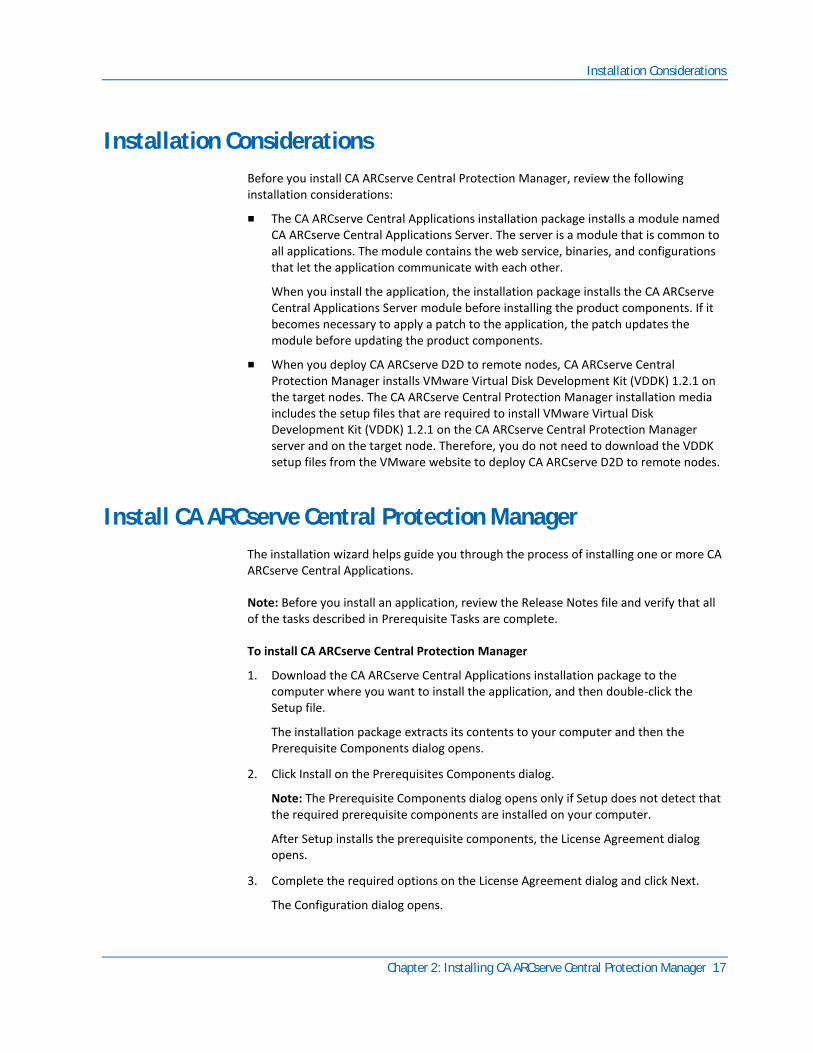
Installation Considerations
Chapter 2: Installing CA ARCserve Central Protection Manager 17
Installation Considerations
Before you install CA ARCserve Central Protection Manager, review the following installation considerations:
■ The CA ARCserve Central Applications installation package installs a module named CA ARCserve Central Applications Server. The server is a module that is common to all applications. The module contains the web service, binaries, and configurations that let the application communicate with each other.
When you install the application, the installation package installs the CA ARCserve Central Applications Server module before installing the product components. If it becomes necessary to apply a patch to the application, the patch updates the module before updating the product components.
■ When you deploy CA ARCserve D2D to remote nodes, CA ARCserve Central Protection Manager installs VMware Virtual Disk Development Kit (VDDK) 1.2.1 on the target nodes. The CA ARCserve Central Protection Manager installation media includes the setup files that are required to install VMware Virtual Disk Development Kit (VDDK) 1.2.1 on the CA ARCserve Central Protection Manager server and on the target node. Therefore, you do not need to download the VDDK setup files from the VMware website to deploy CA ARCserve D2D to remote nodes.
Install CA ARCserve Central Protection Manager
The installation wizard helps guide you through the process of installing one or more CA ARCserve Central Applications.
Note: Before you install an application, review the Release Notes file and verify that all of the tasks described in Prerequisite Tasks are complete.
To install CA ARCserve Central Protection Manager
1. Download the CA ARCserve Central Applications installation package to the computer where you want to install the application, and then double-click the Setup file.
The installation package extracts its contents to your computer and then the Prerequisite Components dialog opens.
2. Click Install on the Prerequisites Components dialog.
Note: The Prerequisite Components dialog opens only if Setup does not detect that the required prerequisite components are installed on your computer.
After Setup installs the prerequisite components, the License Agreement dialog opens.
3. Complete the required options on the License Agreement dialog and click Next.
The Configuration dialog opens.
Install CA ARCserve Central Protection Manager
18 User Guide
4. On the Configuration dialog, complete the following:
■ Components--Specify the applications that you want to install.
Note: If you are installing this application using the suite installation package, you can install multiple applications.
■ Location--Accept the default installation location or click Browse to specify an alternative installation location. The default location is as follows:
C:\Program Files\CA\ARCserve Central Applications
■ Disk Information-- Verify that your hard drive has sufficient free disk space to install the applications.
■ Windows Administrator Name--Specify the user name of the Windows Administrator account using the following syntax:
Domain\User Name
■ Password--Specify the password for the user account.
■ Specify Port Number--Specify the port number that you want to use to communicate with the web-based user interface. As a best practice, you should accept the default port number. The default port number is as follows:
8015
Note: If you want to specify an alternative port number, the available port numbers are from 1024 through 65535. Before you specify an alternative port number, verify that the specified port number is free and available for use. Setup prevents you from installing the application using a port that is not available for use.
■ Use HTTPS for web communication--Specify to use HTTPS communication for data transmission. By default, this is not selected.
Note: HTTPS (secure) communication provides a higher level of security than HTTP communication. HTTPS is recommended communication protocol if you transmit confidential information in your network.
Install CA ARCserve Central Protection Manager
Chapter 2: Installing CA ARCserve Central Protection Manager 19
■ Allow Setup to register CA ARCserve Central Applications services and programs to the Windows Firewall as exceptions--Verify that the check box next to this option is selected. Firewall exceptions are required if you want to configure and manage CA ARCserve Central Applications from remote computers.
Note: For local users, you do not need to register firewall exceptions.
Click Next.
The Database Settings dialog opens.
5. On the Database Settings dialog, click the drop-down list next to Choose a database type and specify one of the following.
■ ARCserve Central Applications Default Database
■ Microsoft SQL Server
After you specify a type of database, the required options for the specified database appear on the Database Settings dialog.
6. Do one of the following:
■ ARCserve Central Applications Default Database--Complete the following fields on the Database Settings dialog:
– Specify the Installation Path--Specify the location where you want to install the CA ARCserve Central Applications default database. You can accept the default path or specify an alternative path.
– Specify the Data File Path--Specify the location where you want to install the data file for the CA ARCserve Central Applications default database. You can accept the default path or specify an alternative path.
Note: The CA ARCserve Central Applications default database does not support remote communication. Therefore, install the default database and the data file on the computer where you are installing the application.
Install CA ARCserve Central Protection Manager
20 User Guide
■ Microsoft SQL Server Databases--Complete the following fields on the Database Settings dialog:
– SQL Server Type--Specify the type of communication that the application is to use to communicate with the SQL Server database.
Local: Specify Local when the application and SQL Server are installed on the same computer.
Remote: Specify Remote when the application and SQL Server are installed on different computers.
– SQL Server Name--If the SQL Server Type specified is Remote, specify the remote SQL Server name. If the SQL Server is used locally, select the server from the drop-down list.
– Security--Specify the type of credentials that you want to use to authenticate with SQL Server.
Use Windows Security--Specify Use Windows Security to authenticate using your Windows credentials.
Use SQL Server Security--Specify Use SQL Server Security to authenticate using SQL Server credentials. Then specify the Login ID and Password for the SQL Server account.
– Overwrite existing database--Specify Overwrite database if you want to allow Setup to detect and overwrite existing CA ARCserve Central Applications database.
Click Install.
After the installation process is complete, the Installation Report dialog opens.
7. The Installation Report dialog summarizes the installation. If you want to check for updates to the application now, click Check for updates and then click Finish.
The application is installed.
Install CA ARCserve Central Protection Manager Silently
Chapter 2: Installing CA ARCserve Central Protection Manager 21
Install CA ARCserve Central Protection Manager Silently
CA ARCserve Central Applications lets you install CA ARCserve Central Protection Manager silently. A silent installation eliminates the need for user interaction. The following steps describe how to install the application silently using Windows Command Line.
To install CA ARCserve Central Protection Manager silently
1. Open the Windows Command Line on the computer where you want to start the silent installation process.
2. Download the CA ARCserve Central Applications self-extracting installation package to your computer.
Start the silent installation process using the following Command Line syntax:
"CA ARCserve Central Applications Setup.exe" /s /v"/q -Path:<INSTALLDIR>
-Port:<PORT> -U:<UserName> -P:<Password> -Products:<ProductList>"
Usage:
s
Lets you run the executable file package in silent mode.
v
Lets you specify additional command line options.
q
Lets you install the application in silent mode.
-Path:<INSTALLDIR>
(Optional) Lets you specify the target installation path.
Example:
-Path:\"C:\Program Files\CA\ARCserve Central Applications\"
Note: If the value for INSTALLDIR contains a space, enclose the path with backslashes and quotation marks. Additionally, the path cannot end with a backslash character.
-Port:<PORT>
(Optional) Lets you specify the port number for communication.
Example:
-Port:8015
How to Uninstall CA ARCserve Central Protection Manager
22 User Guide
-U:<UserName>
Lets you specify the user name to use to install and run the application.
Note: The user name must be an administrative account or an account with administrative privileges.
-P:<Password>
Lets you specify the password for UserName.
-Products:<ProductList>
(Optional) Lets you specify CA ARCserve Central Applications to install silently. If you do not specify a value for this argument, the silent installation process installs all components of CA ARCserve Central Applications.
CA ARCserve Central Host-Based VM Backup
VSPHEREX64
CA ARCserve Central Protection Manager
CMX64
CA ARCserve Central Reporting
REPORTINGX64
CA ARCserve Central Virtual Standby
VCMX64
All CA ARCserve Central Applications
ALL
Note: The following examples describe the syntax that is required to install one, two, three, or all CA ARCserve Central Applications silently:
-Products:CMX64
-Products:CMX64,VCMX64
-Products:CMX64,VCMX64,REPORTINGX64
-Products:ALL
The application is installed silently.
How to Uninstall CA ARCserve Central Protection Manager
You can uninstall CA ARCserve Central Protection Manager using the following methods:
■ Standard uninstallation--This method uses Windows Control Panel to uninstall the application.
■ Silent uninstallation--This method lets you perform an unattended uninstallation using Windows Command Line.
How to Uninstall CA ARCserve Central Protection Manager
Chapter 2: Installing CA ARCserve Central Protection Manager 23
Unassigning Policies
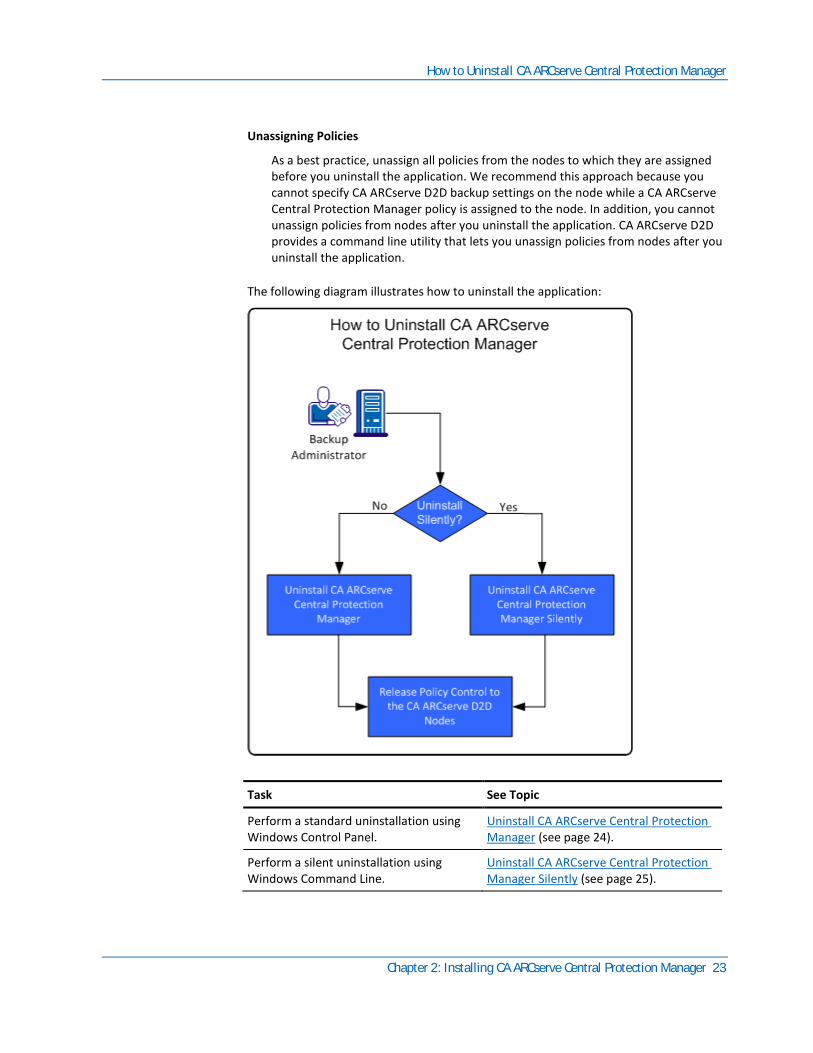
As a best practice, unassign all policies from the nodes to which they are assigned before you uninstall the application. We recommend this approach because you cannot specify CA ARCserve D2D backup settings on the node while a CA ARCserve Central Protection Manager policy is assigned to the node. In addition, you cannot unassign policies from nodes after you uninstall the application. CA ARCserve D2D provides a command line utility that lets you unassign policies from nodes after you uninstall the application.
The following diagram illustrates how to uninstall the application:
Task See Topic
Perform a standard uninstallation using Windows Control Panel.
Uninstall CA ARCserve Central Protection Manager (see page 24).
Perform a silent uninstallation using Windows Command Line.
Uninstall CA ARCserve Central Protection Manager Silently (see page 25).
How to Uninstall CA ARCserve Central Protection Manager
24 User Guide
Task See Topic
Unassign policies from nodes after uninstalling CA ARCserve Central Protection Manager.
Release Policy Control to the CA ARCserve D2D Nodes (see page 26).
Uninstall CA ARCserve Central Protection Manager
You can uninstall CA ARCserve Central Protection Manager using Programs and Features located in Windows Control Panel.
Follow these steps:
1. Log in to the computer where you want to uninstall the application.
Note: Log in using an administrative account or an account with administrative privileges.
2. From the Windows Start menu, click Start and click Control Panel to open Windows Control Panel.
3. Click Programs and Features to open the Uninstall or change a program window.
4. Locate and click CA ARCserve Central Protection Manager.
Right-click the application and click Uninstall on the pop-up menu.
Follow the on-screen instructions to uninstall the application.
The application is uninstalled.
How to Uninstall CA ARCserve Central Protection Manager
Chapter 2: Installing CA ARCserve Central Protection Manager 25
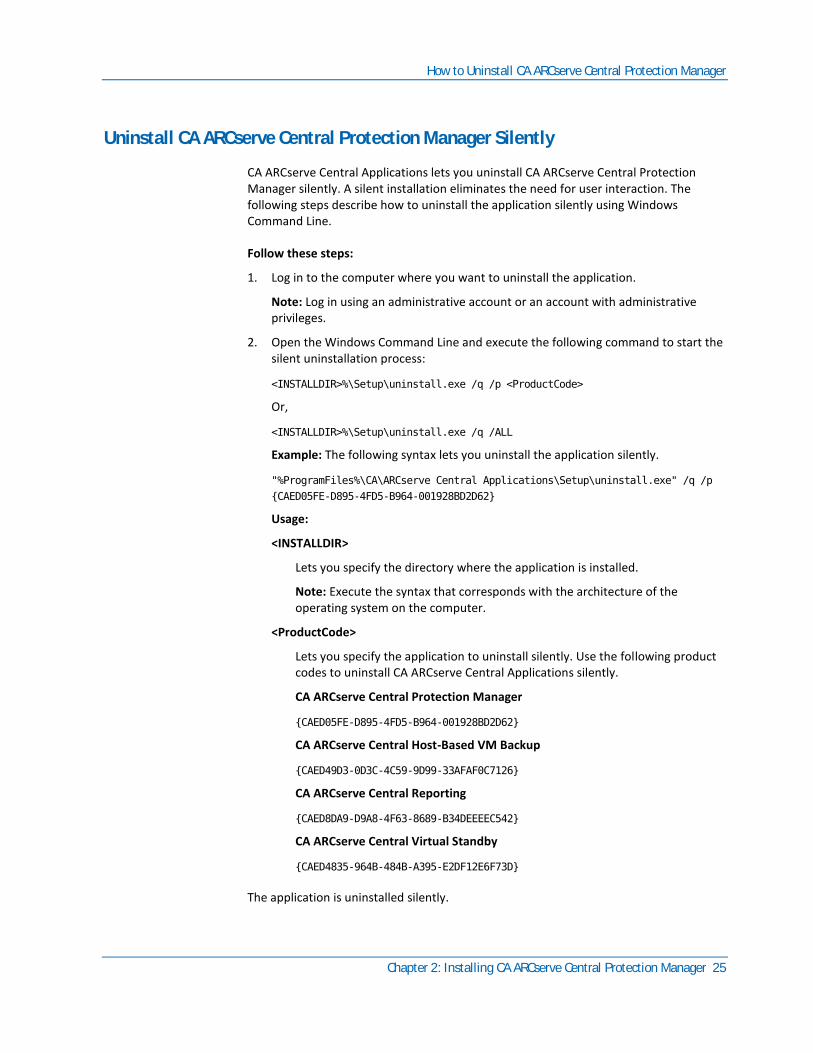
Uninstall CA ARCserve Central Protection Manager Silently
CA ARCserve Central Applications lets you uninstall CA ARCserve Central Protection Manager silently. A silent installation eliminates the need for user interaction. The following steps describe how to uninstall the application silently using Windows Command Line.
Follow these steps:
1. Log in to the computer where you want to uninstall the application.
Note: Log in using an administrative account or an account with administrative privileges.
2. Open the Windows Command Line and execute the following command to start the silent uninstallation process:
<INSTALLDIR>%\Setup\uninstall.exe /q /p <ProductCode>
Or,
<INSTALLDIR>%\Setup\uninstall.exe /q /ALL
Example: The following syntax lets you uninstall the application silently.
"%ProgramFiles%\CA\ARCserve Central Applications\Setup\uninstall.exe" /q /p
{CAED05FE-D895-4FD5-B964-001928BD2D62}
Usage:
<INSTALLDIR>
Lets you specify the directory where the application is installed.
Note: Execute the syntax that corresponds with the architecture of the operating system on the computer.
<ProductCode>
Lets you specify the application to uninstall silently. Use the following product codes to uninstall CA ARCserve Central Applications silently.
CA ARCserve Central Protection Manager
{CAED05FE-D895-4FD5-B964-001928BD2D62}
CA ARCserve Central Host-Based VM Backup
{CAED49D3-0D3C-4C59-9D99-33AFAF0C7126}
CA ARCserve Central Reporting
{CAED8DA9-D9A8-4F63-8689-B34DEEEEC542}
CA ARCserve Central Virtual Standby
{CAED4835-964B-484B-A395-E2DF12E6F73D}
The application is uninstalled silently.
How to Uninstall CA ARCserve Central Protection Manager
26 User Guide
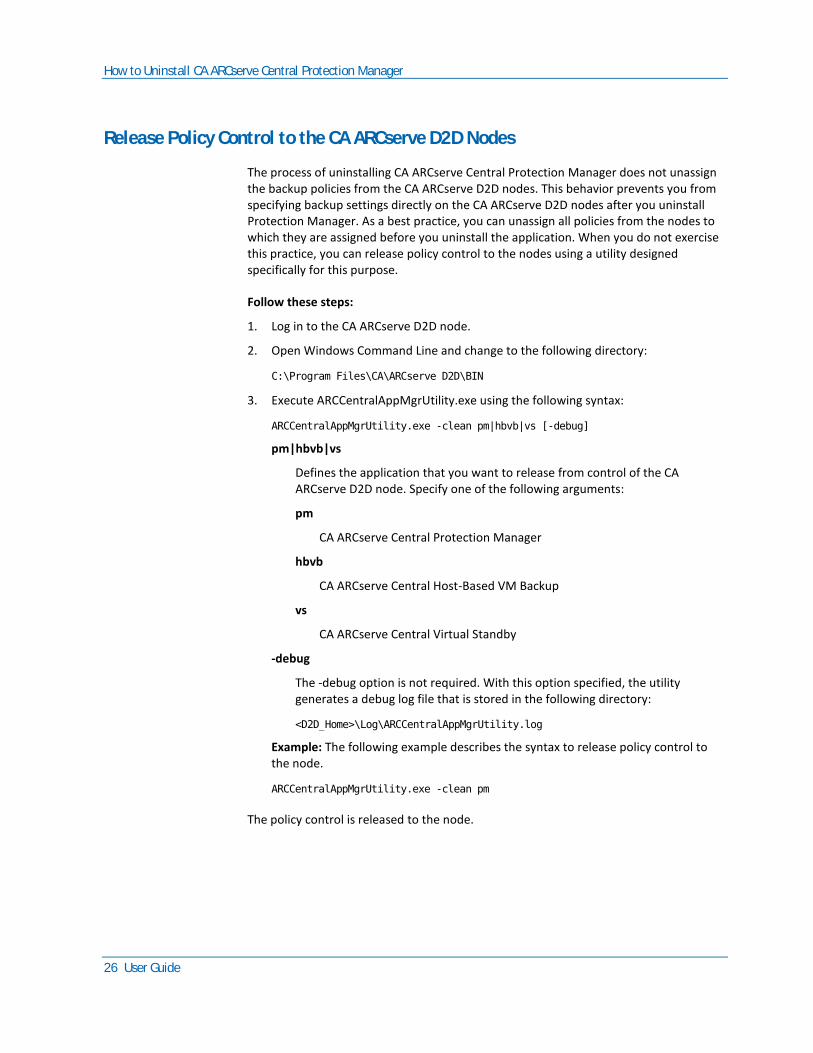
Release Policy Control to the CA ARCserve D2D Nodes
The process of uninstalling CA ARCserve Central Protection Manager does not unassign the backup policies from the CA ARCserve D2D nodes. This behavior prevents you from specifying backup settings directly on the CA ARCserve D2D nodes after you uninstall Protection Manager. As a best practice, you can unassign all policies from the nodes to which they are assigned before you uninstall the application. When you do not exercise this practice, you can release policy control to the nodes using a utility designed specifically for this purpose.
Follow these steps:
1. Log in to the CA ARCserve D2D node.
2. Open Windows Command Line and change to the following directory:
C:\Program Files\CA\ARCserve D2D\BIN
3. Execute ARCCentralAppMgrUtility.exe using the following syntax:
ARCCentralAppMgrUtility.exe -clean pm|hbvb|vs [-debug]
pm|hbvb|vs
Defines the application that you want to release from control of the CA ARCserve D2D node. Specify one of the following arguments:
pm
CA ARCserve Central Protection Manager
hbvb
CA ARCserve Central Host-Based VM Backup
vs
CA ARCserve Central Virtual Standby
-debug
The -debug option is not required. With this option specified, the utility generates a debug log file that is stored in the following directory:
<D2D_Home>\Log\ARCCentralAppMgrUtility.log
Example: The following example describes the syntax to release policy control to the node.
ARCCentralAppMgrUtility.exe -clean pm
The policy control is released to the node.
How the Installation Process Affects Operating Systems
Chapter 2: Installing CA ARCserve Central Protection Manager 27
How the Installation Process Affects Operating Systems
The CA ARCserve Central Applications installation process updates various Windows operating system components using an installation engine named the Microsoft Installer Package (MSI). The components included in MSI let CA ARCserve Central Applications perform custom actions that let you install, upgrade, or uninstall CA ARCserve Central Applications.
The following table describes the custom actions and the affected components.
Note: All CA ARCserve Central Applications MSI packages call the components listed in this table when you install and uninstall CA ARCserve Central Applications.
Component Description
CallAllowInstall Lets the installation process check for conditions relating to the current application installation.
CallPreInstall Lets the installation process read and write MSI properties. For example, read the application installation path from the MSI.
CallPostInstall Lets the installation process perform various tasks relating to installation. For example, registering application into the Windows Registry.
CallAllowUninstall Lets the uninstallation process check for conditions relating the current application installation.
CallPreUninstall Lets the uninstallation process perform various tasks relating to uninstallation. For example, un-registering application from the Windows Registry.
CallPostUninstall Lets the uninstallation process perform various tasks after the installed files are uninstalled. For example, removing the remaining files.
ShowMsiLog Displays the Windows Installer log file in Notepad if the end user selects the Show the Windows Installer log check box in the SetupCompleteSuccess, SetupCompleteError, or SetupInterrupted dialogs and then clicks Finish. (This works only with Windows Installer 4.0.)
How the Installation Process Affects Operating Systems
28 User Guide
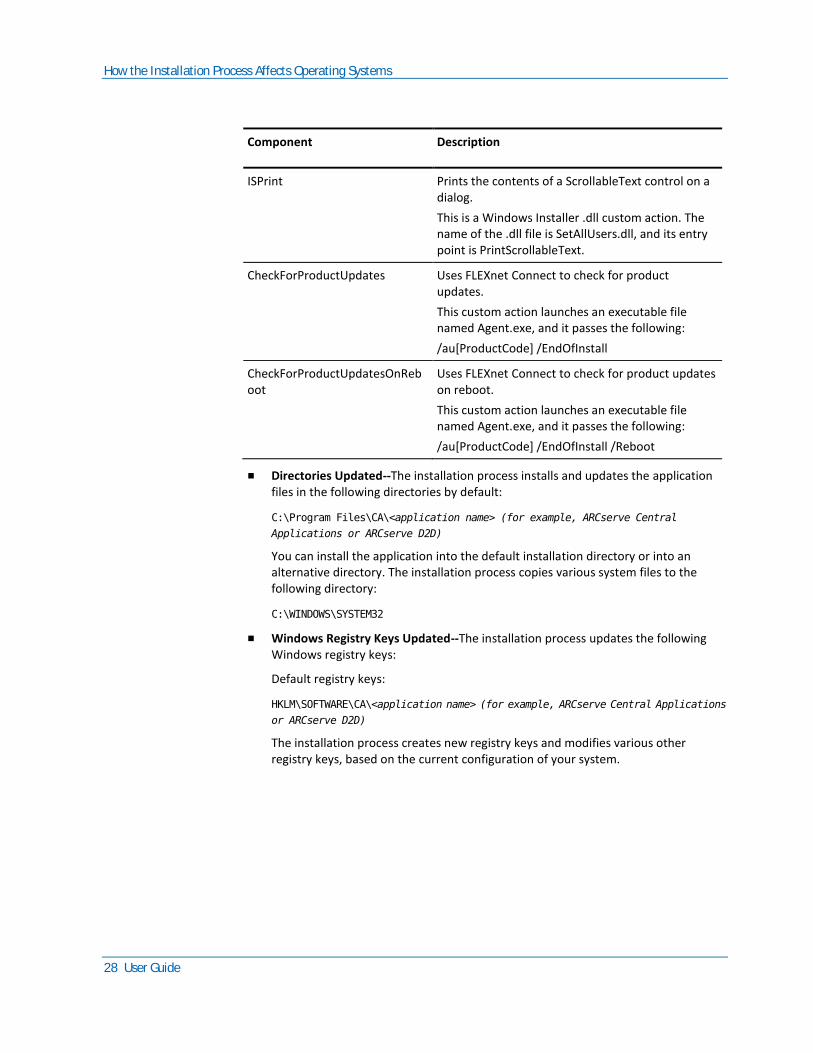
Component Description
ISPrint Prints the contents of a ScrollableText control on a dialog.
This is a Windows Installer .dll custom action. The name of the .dll file is SetAllUsers.dll, and its entry point is PrintScrollableText.
CheckForProductUpdates Uses FLEXnet Connect to check for product updates.
This custom action launches an executable file named Agent.exe, and it passes the following:
/au[ProductCode] /EndOfInstall
CheckForProductUpdatesOnReboot
Uses FLEXnet Connect to check for product updates on reboot.
This custom action launches an executable file named Agent.exe, and it passes the following:
/au[ProductCode] /EndOfInstall /Reboot
■ Directories Updated--The installation process installs and updates the application files in the following directories by default:
C:\Program Files\CA\<application name> (for example, ARCserve Central
Applications or ARCserve D2D)
You can install the application into the default installation directory or into an alternative directory. The installation process copies various system files to the following directory:
C:\WINDOWS\SYSTEM32
■ Windows Registry Keys Updated--The installation process updates the following Windows registry keys:
Default registry keys:
HKLM\SOFTWARE\CA\<application name> (for example, ARCserve Central Applications
or ARCserve D2D)
The installation process creates new registry keys and modifies various other registry keys, based on the current configuration of your system.
How the Installation Process Affects Operating Systems
Chapter 2: Installing CA ARCserve Central Protection Manager 29
■ Applications Installed--The installation process installs the following applications into your computer:
– CA Licensing
– Microsoft Visual C++ 2010 SP1 Redistributable
– Java Runtime Environment (JRE) 1.7.0_06
– Tomcat 7.0.29
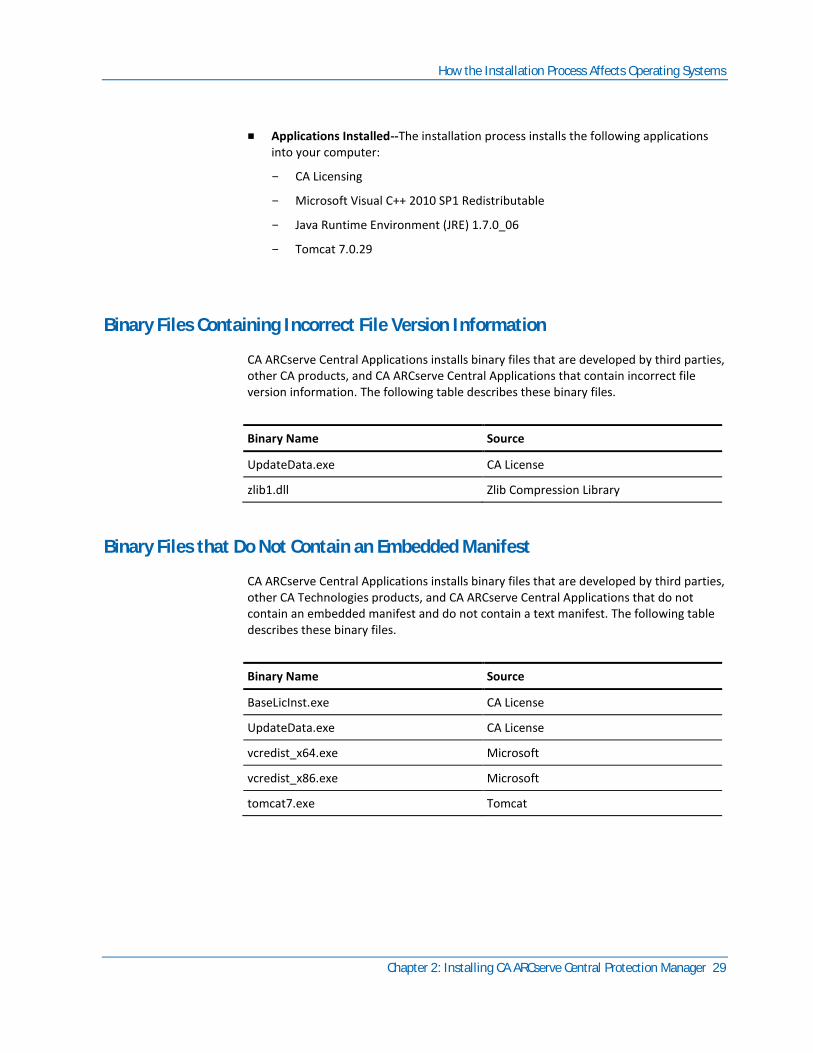
Binary Files Containing Incorrect File Version Information
CA ARCserve Central Applications installs binary files that are developed by third parties, other CA products, and CA ARCserve Central Applications that contain incorrect file version information. The following table describes these binary files.
Binary Name Source
UpdateData.exe CA License
zlib1.dll Zlib Compression Library
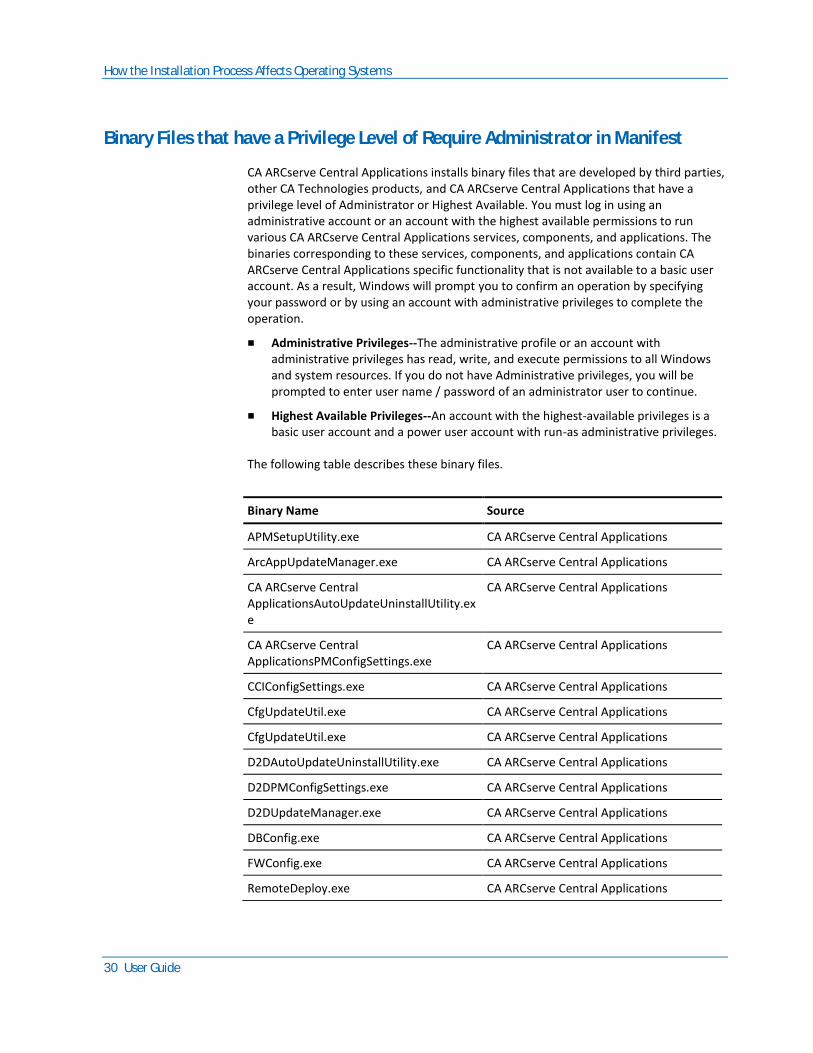
Binary Files that Do Not Contain an Embedded Manifest
CA ARCserve Central Applications installs binary files that are developed by third parties, other CA Technologies products, and CA ARCserve Central Applications that do not contain an embedded manifest and do not contain a text manifest. The following table describes these binary files.
Binary Name Source
BaseLicInst.exe CA License
UpdateData.exe CA License
vcredist_x64.exe Microsoft
vcredist_x86.exe Microsoft
tomcat7.exe Tomcat
How the Installation Process Affects Operating Systems
30 User Guide
Binary Files that have a Privilege Level of Require Administrator in Manifest
CA ARCserve Central Applications installs binary files that are developed by third parties, other CA Technologies products, and CA ARCserve Central Applications that have a privilege level of Administrator or Highest Available. You must log in using an administrative account or an account with the highest available permissions to run various CA ARCserve Central Applications services, components, and applications. The binaries corresponding to these services, components, and applications contain CA ARCserve Central Applications specific functionality that is not available to a basic user account. As a result, Windows will prompt you to confirm an operation by specifying your password or by using an account with administrative privileges to complete the operation.
■ Administrative Privileges--The administrative profile or an account with administrative privileges has read, write, and execute permissions to all Windows and system resources. If you do not have Administrative privileges, you will be prompted to enter user name / password of an administrator user to continue.
■ Highest Available Privileges--An account with the highest-available privileges is a basic user account and a power user account with run-as administrative privileges.
The following table describes these binary files.
Binary Name Source
APMSetupUtility.exe CA ARCserve Central Applications
ArcAppUpdateManager.exe CA ARCserve Central Applications
CA ARCserve Central ApplicationsAutoUpdateUninstallUtility.exe
CA ARCserve Central Applications
CA ARCserve Central ApplicationsPMConfigSettings.exe
CA ARCserve Central Applications
CCIConfigSettings.exe CA ARCserve Central Applications
CfgUpdateUtil.exe CA ARCserve Central Applications
CfgUpdateUtil.exe CA ARCserve Central Applications
D2DAutoUpdateUninstallUtility.exe CA ARCserve Central Applications
D2DPMConfigSettings.exe CA ARCserve Central Applications
D2DUpdateManager.exe CA ARCserve Central Applications
DBConfig.exe CA ARCserve Central Applications
FWConfig.exe CA ARCserve Central Applications
RemoteDeploy.exe CA ARCserve Central Applications
How the Installation Process Affects Operating Systems
Chapter 2: Installing CA ARCserve Central Protection Manager 31
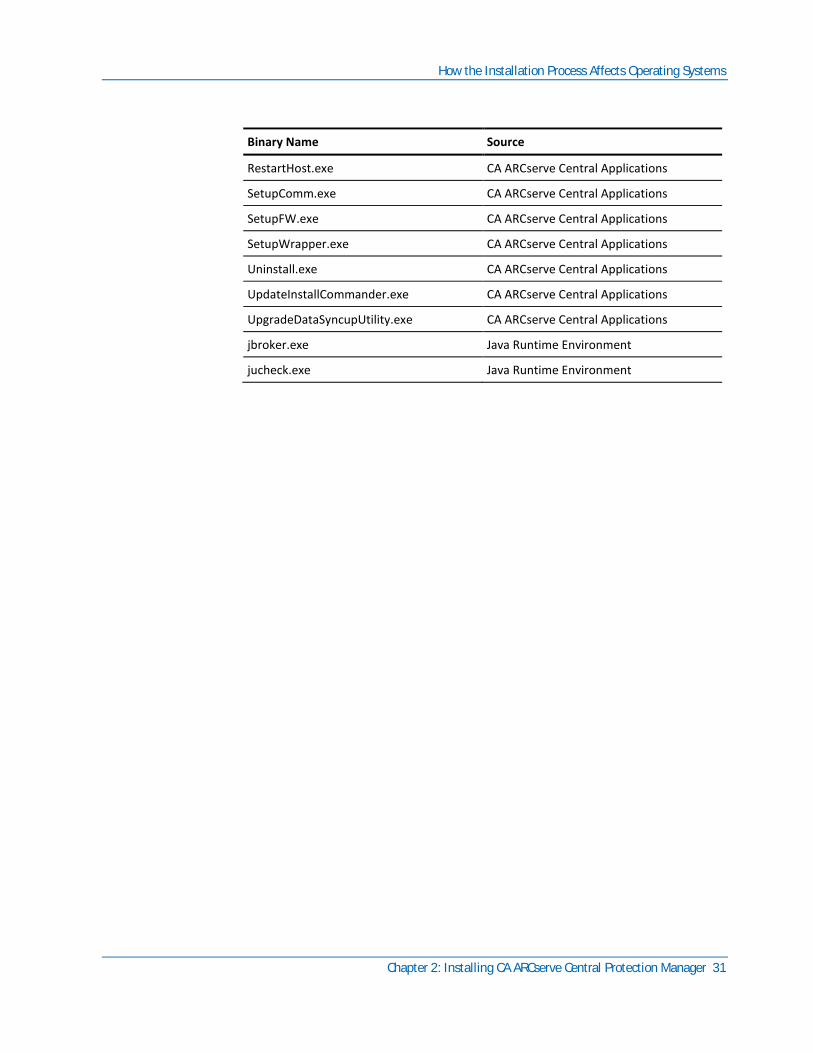
Binary Name Source
RestartHost.exe CA ARCserve Central Applications
SetupComm.exe CA ARCserve Central Applications
SetupFW.exe CA ARCserve Central Applications
SetupWrapper.exe CA ARCserve Central Applications
Uninstall.exe CA ARCserve Central Applications
UpdateInstallCommander.exe CA ARCserve Central Applications
UpgradeDataSyncupUtility.exe CA ARCserve Central Applications
jbroker.exe Java Runtime Environment
jucheck.exe Java Runtime Environment

Chapter 3: Getting Started With CA ARCserve Central Protection Manager 33
Chapter 3: Getting Started With CA ARCserve Central Protection Manager
The following sections describe how to configure CA ARCserve Central Protection Manager to protect CA ARCserve D2D nodes.
This section contains the following topics:
Verify That the CA ARCserve Central Protection Manager Server Can Communicate With the Nodes (see page 33) Configure CA ARCserve Backup Data Synchronization Schedules (see page 34) Configure SRM Schedules (see page 35) Configure Discovery Schedules (see page 36) Configure Email and Alert Settings (see page 36) Configure IT Management Server Settings (see page 38) Configure CA ARCserve Central Applications Update Schedules (see page 38) Configure Social Networking Preferences (see page 41) Modify the Administrator Account (see page 42) Configure D2D Deployment Settings (see page 42) Configure the Database (see page 43) Re-create the CA ARCserve Central Protection Manager Database (see page 44)
Verify That the CA ARCserve Central Protection Manager Server Can Communicate With the Nodes
Note: This is an optional step to configuring CA ARCserve Central Protection Manager to protect nodes.
To help ensure that CA ARCserve Central Protection Manager can deploy policies to nodes and protect nodes, you must verify that the Protection Manager server and the nodes that you want to protect can communicate with each other using their host names.
To verify that the CA ARCserve Central Protection Manager server can communicate with the nodes
1. From the CA ARCserve Central Protection Manager server, ping the nodes that you want to protect using the host names of the nodes.
2. From the nodes that you want to protect, ping the CA ARCserve Central Protection Manager server using the host name of the server.

Configure CA ARCserve Backup Data Synchronization Schedules
34 User Guide
Configure CA ARCserve Backup Data Synchronization Schedules
The CA ARCserve Backup Data Synchronization enables you to configure the system to set a scheduled time and repeat method of how many days, which day of the week, or which day of the month the user can sync the CA ARCserve Backup database with the CA ARCserve Central Protection Manager database.
Follow these steps:
1. Log in to the application.
2. Click Configuration on the Navigation bar to open the Configuration screen.
3. From the Configuration panel, click CA ARCserve Backup Data Synchronization Schedule to display the CA ARCserve Backup Data Synchronization options.
4. Click Enable to enable CA ARCserve Backup Data Synchronization.
Note: By default, CA ARCserve Backup Data Synchronization Configuration is enabled.
5. Specify the following parameters to schedule CA ARCserve Backup Data Synchronization:
■ Repeat Method
■ Scheduled Time
6. Click Save to apply the CA ARCserve Backup Data Synchronization schedule.
7. (Optional) Click the Run Now to start the CA ARCserve Backup Data Synchronization process now.
Configure SRM Schedules
Chapter 3: Getting Started With CA ARCserve Central Protection Manager 35
Configure SRM Schedules
CA ARCserve Central Protection Manager lets Backup Administrators configure a schedule for CA ARCserve D2D nodes that defines when and how often to collect SRM data. SRM (Storage Resource Management) is functionality that collects information about the following:
■ Hardware, software, and application data for Microsoft SQL Server and Microsoft Exchange Server implementations.
■ Performance Key Indicators (PKI) data from CA ARCserve D2D servers that are managed by a CA ARCserve Central Applications server.
Note: For CA ARCserve Backup nodes, CA ARCserve Backup collects PKI data and then synchronizes the data with CA ARCserve Central Protection Manager during the CA ARCserve Backup data synchronization process.
Follow these steps:
1. Log in to the application.
2. Open the Configuration screen by clicking Configuration on the Navigation bar.
3. From the Configuration panel, click SRM Configuration to display the SRM configuration options.
4. Click Enable to enable SRM.
Note: By default, SRM Configuration is enabled.
5. Specify the following parameters to schedule SRM:
■ Repeat Method
■ Scheduled Time
6. Click Save to apply the SRM schedule.
7. (Optional) Click the Run Now to start the SRM data collection process now.
Configure Discovery Schedules
36 User Guide
Configure Discovery Schedules
You can configure the Discovery schedule for nodes on a repeating basis and on a scheduled time. By default, Discovery Configuration is disabled. To enable the configuration, click the Enable option to specify the type of repeating method that you want and a scheduled time for the node discovery to begin. You can specify the following parameters to configure your Discovery schedule:
■ Every number of days--Lets you repeat this method on the number of days that are specified. (Default)
■ Every selected day of the week--Lets you repeat this method on the days that are specified. Monday, Tuesday, Wednesday, Thursday, and Friday are the default days of the week.
■ Every selected day of the month--Lets you repeat this method on the specified day of the month. 1 is the default option for the day of the month.
An Active Directory list is displayed for you to view when setting up a schedule to discover nodes.
Configure Email and Alert Settings
You can configure email and alert settings for use with your application to send alerts automatically under conditions you specify.
Follow these steps:
1. Log in to the application.
From the Navigation bar on the home page, click Configuration to open the Configuration screen.
2. From the Configuration panel, click Email and Alert Configuration to open the Email and Alert Configuration options.
Configure Email and Alert Settings
Chapter 3: Getting Started With CA ARCserve Central Protection Manager 37
3. Complete the following fields:
■ Service--Specify the type of email service from the drop-down. (Google Mail, Yahoo Mail, Live Mail or Other).
■ Mail Server--Specify the host name of the SMTP server that you want CA ARCserve Central Applications to use to send email.
■ Requires Authentication--Select this option when the mail server that you specified requires authentication. The Account Name and Password are required.
■ Subject--Specify a default email subject.
■ From--Specify the email address the email is being sent from.
■ Recipients--Specify one or more email addresses, separated by a semicolon(;), the email is being sent to.
■ Use SSL--Select this option if the mail server you specified requires secure connection (SSL).
■ Send STARTTLS--Select this option if the mail server you specified requires STARTTLS command.
■ Use HTML format--Lets you send the email messages in HTML format. (selected by default)
■ Enable Proxy Settings--Select this option if there is a proxy server and then specify the proxy server settings.
4. Click Test Email to verify that the mail configuration settings are correct.
5. (Optional) From the Send Email Alerts section, click Discovered nodes to let the application send email alert messages when new nodes are discovered.
6. Click Save.
Note: You can click Reset to revert to the previously saved values or click Delete to delete your saved settings. Deleting your email and alert settings prevents you from receiving email alert messages.
The email configuration is applied.
Configure IT Management Server Settings
38 User Guide
Configure IT Management Server Settings
CA ARCserve Central Protection Manager lets you sent alert messages to IT Management servers. To send the alert information, configure the application server to communicate with the IT Management server.
To configure IT Management server settings
1. Log in to CA ARCserve Central Protection Manager and click Configuration on the Navigation
2. From the Configuration screen, click IT Management Server Configuration in the Configuration list.
3. Complete the following IT Management Server configuration options:
■ Click Enable.
■ Click Nimsoft or Kasaya.
■ Specify a Repeat Method. The Repeat Method defines the days of the week to resend alert notifications to the IT Management server when the original send process failed. The process of sending alerts can fail when the IT Management server is not available or offline.
■ Specify a Schedule. The Schedule defines the time of the day to resend the alert notifications to the Nimsoft server.
4. Click Save.
The CA ARCserve Central Protection Manager server is configured to communicate with the IT Management server.
Note: Click Reset to revert to the previously saved values.
Configure CA ARCserve Central Applications Update Schedules
The application lets you set up a schedule that automatically downloads product updates from a CA Server or a local software staging server.
To configure CA ARCserve Central Applications update schedules
1. Log in to the application.
2. Click Configuration on the Navigation bar to open the Configuration screen.
3. From the Configuration panel, click Update Configuration.
The update configuration options appear.
Configure CA ARCserve Central Applications Update Schedules
Chapter 3: Getting Started With CA ARCserve Central Protection Manager 39
4. Select a Download Server.
■ CA Server--Click Proxy Settings for the following options:
– Use browser proxy settings--Lets you use the credentials that provided for the browser proxy settings.
Note: The Use browser proxy settings option affects Internet Explorer and Chrome.
– Configure proxy settings--Specify the IP Address or Host Name of the proxy server and the port number. If the server you specified requires authentication, click Proxy server requires authentication and provide the credentials.
Click OK to return to Update configuration.
■ Staging Server--If you select this option, click Add Server to add a staging server to the list. Enter its host name and Port number and click OK.
If you specify multiple staging servers, the application tries to use the first server listed. If connection succeeds, the remaining servers listed are not used for staging.
5. (Optional) Click Test Connection to verify the server connection and wait until the test completes.
6. (Optional) Click Automatically check for updates, and then specify the day and time. You can specify a daily or weekly schedule.
Click Save to apply the Update configuration.
Configure Proxy Settings
CA ARCserve Central Applications let you specify a proxy server to communicate with CA Support to check for and download available updates. To enable this capability, you specify the proxy server that you want to communicate in behalf of the CA ARCserve Central Applications server.
Follow these steps:
1. Log in to the application and click Configuration on the Navigation bar.
The Configuration options appear.
2. Click Update Configuration.
The update configuration options display.
3. Click Proxy Settings.
The Proxy Settings dialog opens.

Configure CA ARCserve Central Applications Update Schedules
40 User Guide
4. Click one of the following options:
■ Use browser proxy settings--Lets the application detect and use the same proxy settings that are applied to the browser to connect to the CA Technologies server for update information.
Note: This behavior applies to only Internet Explorer and Chrome browsers.
■ Configure proxy settings--Lets you define an alternative server that the application will use to communicate with CA Support to check for updates. The alternative server (proxy) can help ensure security, increased performance, and administrative control.
Complete the following fields:
– Proxy Server--Specify the host name or IP address of the proxy server.
– Port--Specify the port number that the proxy server will use to communicate with the CA Support website.
– (Optional) Proxy server requires authentication--If the login credentials for the proxy server are not the same as the credentials for the CA ARCserve Central Applications server, click the check box next to Proxy server requires authentication and specify the User Name and Password that is required to log in to the proxy server.
Note: Use the following format to specify the user name: <domain name>/<user name>.
Click OK.
The proxy settings are configured
Configure Social Networking Preferences
Chapter 3: Getting Started With CA ARCserve Central Protection Manager 41
Configure Social Networking Preferences
CA ARCserve Central Applications let you manage the social networking tools that can help you manage each application. You can generate news feeds, specify links to popular social networking websites, and select video source websites.
To configure social networking preferences
1. Log in to the application.
From the Navigation bar on the home page, click Configuration.
The Configuration screen displays
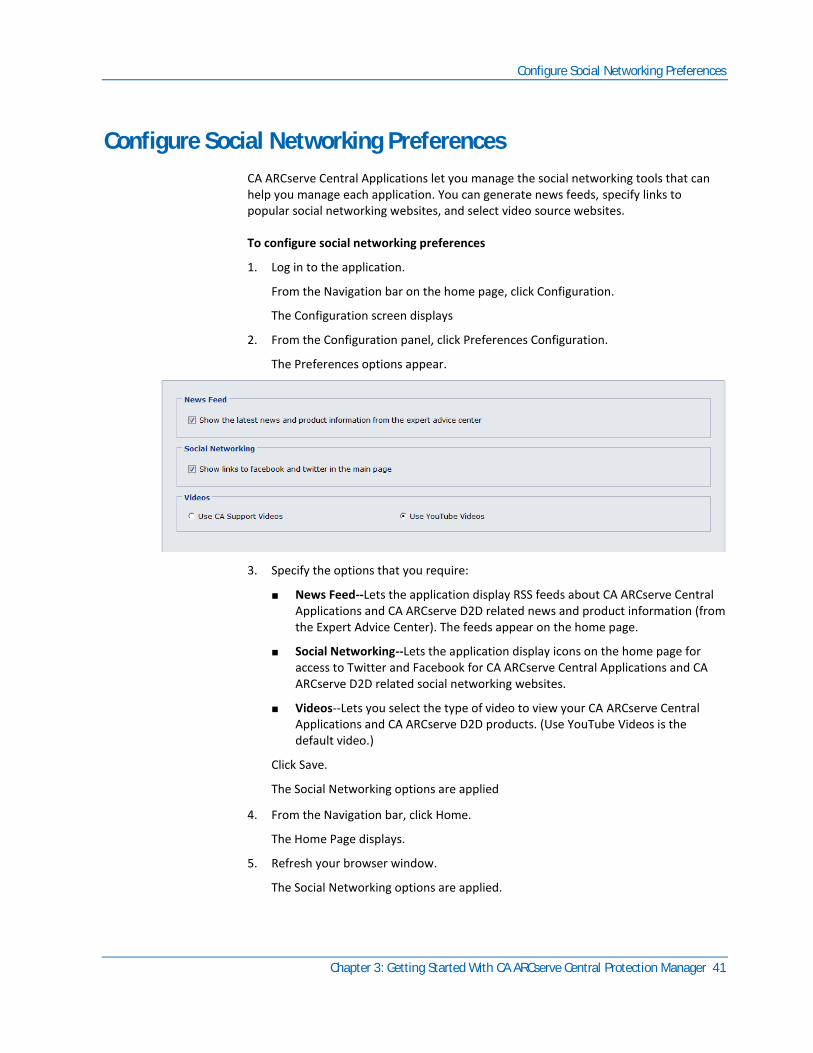
2. From the Configuration panel, click Preferences Configuration.
The Preferences options appear.
3. Specify the options that you require:
■ News Feed--Lets the application display RSS feeds about CA ARCserve Central Applications and CA ARCserve D2D related news and product information (from the Expert Advice Center). The feeds appear on the home page.
■ Social Networking--Lets the application display icons on the home page for access to Twitter and Facebook for CA ARCserve Central Applications and CA ARCserve D2D related social networking websites.
■ Videos--Lets you select the type of video to view your CA ARCserve Central Applications and CA ARCserve D2D products. (Use YouTube Videos is the default video.)
Click Save.
The Social Networking options are applied
4. From the Navigation bar, click Home.
The Home Page displays.
5. Refresh your browser window.
The Social Networking options are applied.
Modify the Administrator Account
42 User Guide
Modify the Administrator Account
CA ARCserve Central Applications let you modify the user name, password, or both for the administrator account after you install the application. This administrator account is used only for the default display user name on the login screen.
Note: The user name specified must be a Windows administrative account or an account that has Windows administrative privileges.
Follow these steps:
1. Log in to the application and click Configuration in the Navigation bar.
The configuration options appear.
2. Click Administrator Account
3. The Administrator account settings appear.
4. Update the following fields, as required:
■ User Name
■ Password
Click Save
The administrator account is modified.
Configure D2D Deployment Settings
CA ARCserve Central Protection Manager lets you configure the D2D Deployment settings for the location of where you want to deploy CA ARCserve D2D to.
Note: To deploy CA ARCserve D2D to computers running Windows XP, disable the Use Simple File Sharing option on the remote Windows XP computer.
To configure D2D Deployment settings
1. Log in to the application.
From the Navigation bar on the home page, click Configuration.
The Configuration screen displays.
2. From the Configuration panel, click D2D Deployment Configuration.
The D2D Deployment Configuration options appear.
Configure the Database
Chapter 3: Getting Started With CA ARCserve Central Protection Manager 43
3. Complete the following fields on the configuration screen:
■ Port--This port number is used to connect to the web-based UI. By default, the port number is 8014.
■ Install Path--This is the installation path on the remote server for CA ARCserve D2D. By default, this location is %Program Files%.
■ Allow setup to install driver (selected by default)--Specify if you want the setup to install the driver automatically.
■ Reboot (defaults to Yes)--Specify if you want the required reboot to be performed automatically upon completion of the deployment process or if you want to reboot manually at a later time.
■ Use HTTPS (defaults to No)--HTTPS (secure) provides a higher level of security than HTTP communication. HTTPS is recommended communication protocol when you transmit confidential information in your network.
4. Click Save.
The Deploy D2D Configuration is applied.
Configure the Database
After you install CA ARCserve Central Protection Manager, you can do the following:
■ Update the settings for the CA ARCserve Central Protection Manager database. For example, you can update the name of the instance, the port values, and so on.
■ Change the CA ARCserve Central Protection Manager database application to Microsoft SQL Server.
■ Change the CA ARCserve Central Protection Manager database application to Microsoft SQL Server Express Edition.
Re-create the CA ARCserve Central Protection Manager Database
44 User Guide
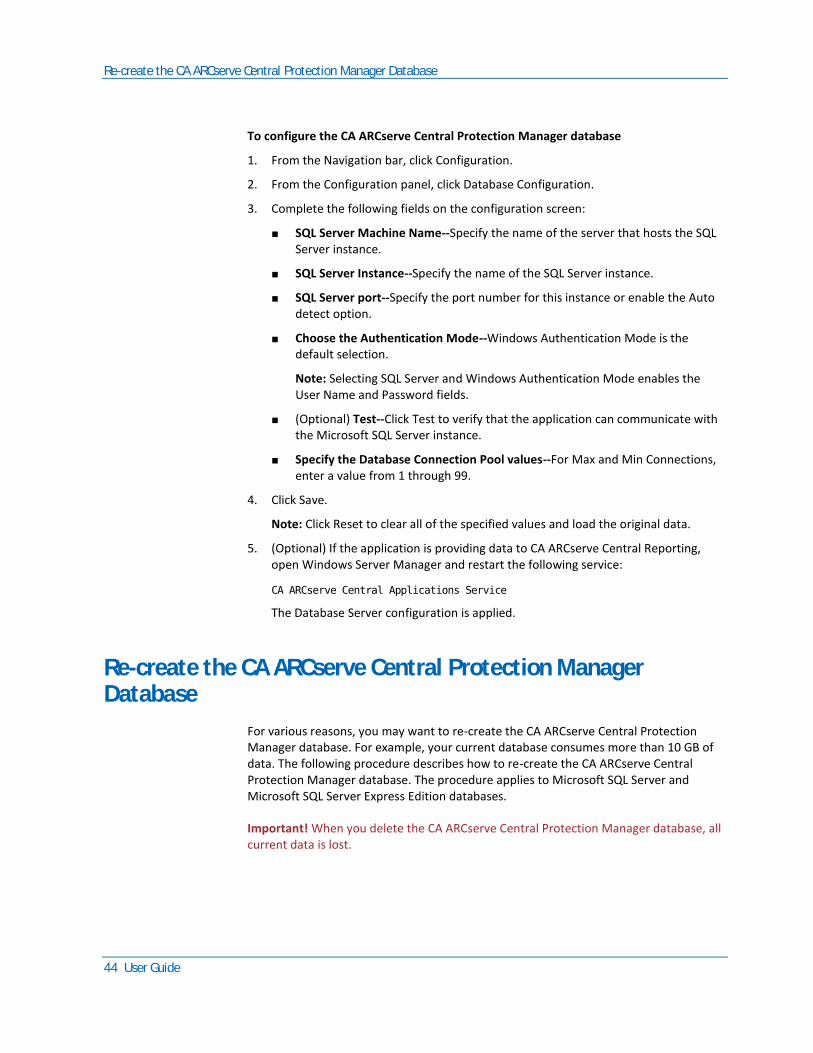
To configure the CA ARCserve Central Protection Manager database
1. From the Navigation bar, click Configuration.
2. From the Configuration panel, click Database Configuration.
3. Complete the following fields on the configuration screen:
■ SQL Server Machine Name--Specify the name of the server that hosts the SQL Server instance.
■ SQL Server Instance--Specify the name of the SQL Server instance.
■ SQL Server port--Specify the port number for this instance or enable the Auto detect option.
■ Choose the Authentication Mode--Windows Authentication Mode is the default selection.
Note: Selecting SQL Server and Windows Authentication Mode enables the User Name and Password fields.
■ (Optional) Test--Click Test to verify that the application can communicate with the Microsoft SQL Server instance.
■ Specify the Database Connection Pool values--For Max and Min Connections, enter a value from 1 through 99.
4. Click Save.
Note: Click Reset to clear all of the specified values and load the original data.
5. (Optional) If the application is providing data to CA ARCserve Central Reporting, open Windows Server Manager and restart the following service:
CA ARCserve Central Applications Service
The Database Server configuration is applied.
Re-create the CA ARCserve Central Protection Manager Database
For various reasons, you may want to re-create the CA ARCserve Central Protection Manager database. For example, your current database consumes more than 10 GB of data. The following procedure describes how to re-create the CA ARCserve Central Protection Manager database. The procedure applies to Microsoft SQL Server and Microsoft SQL Server Express Edition databases.
Important! When you delete the CA ARCserve Central Protection Manager database, all current data is lost.
Re-create the CA ARCserve Central Protection Manager Database
Chapter 3: Getting Started With CA ARCserve Central Protection Manager 45
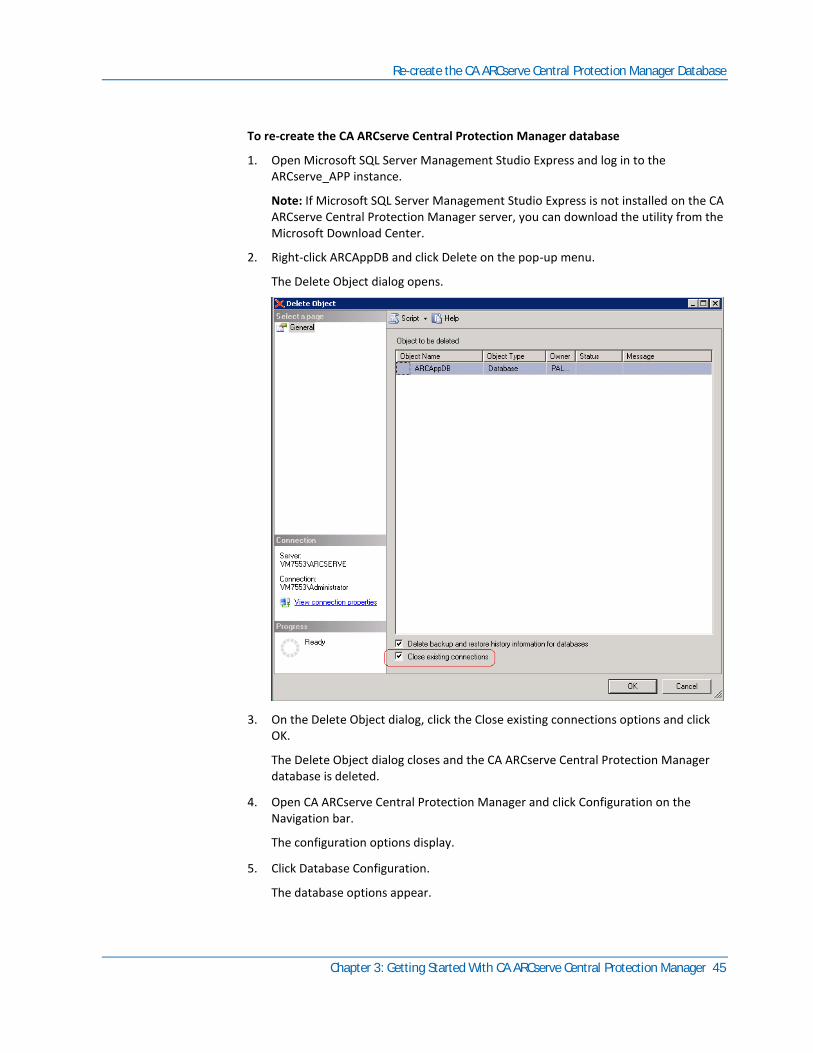
To re-create the CA ARCserve Central Protection Manager database
1. Open Microsoft SQL Server Management Studio Express and log in to the ARCserve_APP instance.
Note: If Microsoft SQL Server Management Studio Express is not installed on the CA ARCserve Central Protection Manager server, you can download the utility from the Microsoft Download Center.
2. Right-click ARCAppDB and click Delete on the pop-up menu.
The Delete Object dialog opens.
3. On the Delete Object dialog, click the Close existing connections options and click OK.
The Delete Object dialog closes and the CA ARCserve Central Protection Manager database is deleted.
4. Open CA ARCserve Central Protection Manager and click Configuration on the Navigation bar.
The configuration options display.
5. Click Database Configuration.
The database options appear.
Re-create the CA ARCserve Central Protection Manager Database
46 User Guide
6. Verify that that the values specified in the following fields are correct:
■ SQL Server Machine Name--Specify the name of the server that hosts the SQL Server instance.
■ SQL Server Instance--Specify the name of the SQL Server instance.
7. (Optional) Complete the following fields:
■ SQL Server port--Specify the port number for this instance or enable the Auto detect option.
■ Choose the Authentication Mode--Windows Authentication Mode is the default selection.
Note: Selecting SQL Server and Windows Authentication Mode enables the User Name and Password fields.
■ Specify the Database Connection Pool values--For Max and Min Connections, enter a value from 1 through 99.
8. Click Test to establish a connection to the database.
9. Click Save.
CA ARCserve Central Protection Manager re-creates the database. The name of the database instance is ARCAppDB.
Chapter 4: Using CA ARCserve Central Protection Manager 47
Chapter 4: Using CA ARCserve Central Protection Manager
This section contains the following topics:
Using CA ARCserve Central Protection Manager to Back up CA ARCserve D2D Nodes (see page 48) How to Manage Nodes in CA ARCserve Central Protection Manager (see page 54) How to Manage CA ARCserve D2D Policies (see page 81) Run a Back Up Now (see page 131) View Job Status Information (see page 133) How to Restore Nodes in CA ARCserve Central Protection Manager (see page 134) View CA ARCserve Central Protection Manager Logs (see page 152) Add Links to the Navigation Bar (see page 154) Applying Best Practices (see page 155) Change Server Communication Protocol (see page 156)
Using CA ARCserve Central Protection Manager to Back up CA ARCserve D2D Nodes
48 User Guide
Using CA ARCserve Central Protection Manager to Back up CA ARCserve D2D Nodes
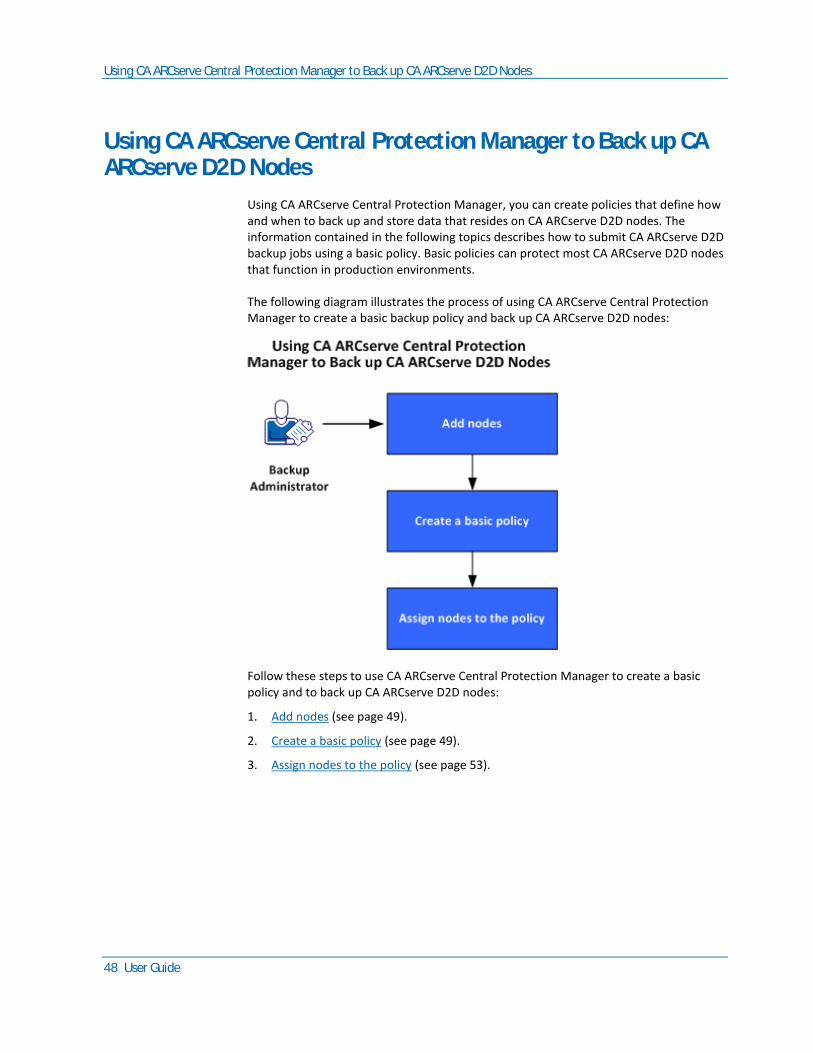
Using CA ARCserve Central Protection Manager, you can create policies that define how and when to back up and store data that resides on CA ARCserve D2D nodes. The information contained in the following topics describes how to submit CA ARCserve D2D backup jobs using a basic policy. Basic policies can protect most CA ARCserve D2D nodes that function in production environments.
The following diagram illustrates the process of using CA ARCserve Central Protection Manager to create a basic backup policy and back up CA ARCserve D2D nodes:
Follow these steps to use CA ARCserve Central Protection Manager to create a basic policy and to back up CA ARCserve D2D nodes:
1. Add nodes (see page 49).
2. Create a basic policy (see page 49).
3. Assign nodes to the policy (see page 53).
Using CA ARCserve Central Protection Manager to Back up CA ARCserve D2D Nodes
Chapter 4: Using CA ARCserve Central Protection Manager 49
Add Nodes
To back up CA ARCserve D2D nodes using a policy, you first define the nodes that you want to back up.
Note: You can use Discover to automate this task. However, Discover detects only the nodes that appear in the Active Directory on Active Directory servers.
Follow these steps:
1. Log in to CA ARCserve Central Protection Manager and click Node on the Navigation bar.
2. From the Node toolbar, click Add, and then click Add Node by IP/Name on the pop-up menu.
3. Complete all of the fields Add Node by IP/Name dialog and click OK.
4. (Optional) If the newly added node does not appear in the nodes list, click Refresh on the Node toolbar.
Note: To add more nodes, repeat Steps 2, 3, and 4.
After the node is added, it appears in the default groups.
Create a Basic Policy
Policies define how and when to back up and store data that resides on CA ARCserve D2D nodes. CA ARCserve Central Protection Manager does not contain default policies. Creating a policy is a prerequisite task to backing up the data that resides on nodes.
To create a basic policy, you specify the protection settings and create a schedule. Protection settings define the data that you want to back up, where to store the data, and how to store the data. The schedule defines when and how often to back up the nodes.
Follow these steps:
1. From the CA ARCserve Central Protection Manager home page, click Policies on the Navigation bar to open the Policies screen.
2. Click New to create a new policy.
3. In the Policy Name field on the New Policy dialog, specify a name for the policy.
4. Click the Backup Settings tab and then click Protection Settings to display the Protection Settings options.
Using CA ARCserve Central Protection Manager to Back up CA ARCserve D2D Nodes
50 User Guide
5. Specify the Backup Destination.
You can specify a local path (volume or folder), or remote shared folder (or mapped drive) for the backup location.
■ If you specify to back up to your local path (volume or folder), the specified backup destination cannot be the same location as the source. If you inadvertently include the source in your destination, the job ignores this portion of the source and does not include it in the backup.
Important! Verify that your specified destination volume does not contain system information. CA ARCserve D2D does not back up destination volumes that contain system information. When you try to recover the computer using Bare Metal Recovery (BMR), the recovery can fail.
Note: Dynamic disks cannot be restored at the disk level. If your data is backed up to a volume on a dynamic disk, you cannot restore this dynamic disk during BMR.
■ When you back up data to a remote shared location, specify a location path and the credentials that are required to access the remote computer.
6. Specify the Backup Source.
You can specify to back up the entire node or an individual volume on the node.
Be aware of the following:
■ If the full machine backup option is selected, CA ARCserve D2D automatically discovers all disks/volumes attached to the current machine, and include them in the backup.
■ If system/boot volume is not selected for backup, a warning message displays. The message indicates that the backup cannot be used for BMR.
7. Specify the Recovery Points.
Specifies the quantity of backup images retained. The default is 31 and maximum is 1344. When modifying this quantity, consider the amount of free space available on the destination.
When the specified quantity of Recovery Points is exceeded, CA ARCserve D2D merges the oldest incremental child backup into the parent backup and recreates the baseline image. The new baseline image consists of the "parent plus oldest child" blocks. The cycle of merging the oldest child backup into the parent backup repeats for each subsequent backup. This process lets you perform infinite incremental backups, while maintaining the same retention count.
Using CA ARCserve Central Protection Manager to Back up CA ARCserve D2D Nodes
Chapter 4: Using CA ARCserve Central Protection Manager 51
8. Specify the type of Compression that you want to use for backups.
Compression decreases your disk space usage, but also has an inverse impact on your backup speed due to the increased CPU usage.
The available compression options are as follows:
No Compression
No compression is performed. This option has the lowest CPU usage (fastest speed), but also has the highest disk space usage for your backup image.
Standard Compression
Some compression is performed. This option provides a good balance between CPU usage and disk space usage. Standard compression is the default setting.
Maximum Compression
Maximum compression is performed. This option provides the highest CPU usage (lowest speed), but also has the lowest disk space usage for your backup image.
Be aware of the following:
■ If your backup image contains data that cannot be compressed, such as JPG images, ZIP files, and so on, allocate storage space to handle such data.
■ If your destination does not have sufficient free space, consider increasing the Compression setting of the backup.
9. Specify the Encryption settings that you want to use for added security.
a. Specify the type of encryption algorithm that you want to use for backups.
Data encryption is the translation of data into a form that is unintelligible without a deciphering mechanism. CA ARCserve D2D data protection uses secure, AES (Advanced Encryption Standard) encryption algorithms to achieve maximum security and privacy of your specified data.
The available format options are No Encryption, AES-128, AES-192, and AES-256. (To disable encryption, select No Encryption).
■ A full backup and all its related incremental and verify backups must use the same encryption algorithm.
■ When you change the encryption algorithm for an incremental or a verify backup, perform a full backup. This means after changing encryption algorithm, the first backup will be full, despite the original backup type.
For example, if you change the algorithm format and submit a customized incremental or verify backup manually, it automatically converts to a full backup.
Using CA ARCserve Central Protection Manager to Back up CA ARCserve D2D Nodes
52 User Guide
b. After you specify an encryption algorithm, provide (and confirm) an encryption password.
■ The encryption password is limited to a maximum of 23 characters.
■ A full backup and all its related incremental and verify backups must use the same password to encrypt data.
■ If you change the encryption password for an incremental or a verify backup, perform a full backup. This means after changing encryption password, the first backup will be full, despite the original backup type.
For example, if you change the encryption password and submit a customized incremental or verify backup manually, it automatically converts to a full backup.
When encryption is enabled, the activity log is updated to describe the encryption used for every backup.
10. Specify the Throttle Backup.
You can specify the maximum speed (MB/min) at which backups are written. You can throttle the backup speed to reduce CPU or network utilization. However, limiting the backup speed adversely affect the backup window.
11. Click the Schedule tab to display the Schedule options.
12. Specify the backup schedule:
Set start date and time
Specifies the start date and start time for your scheduled backups.
Incremental Backup
Specifies the backup schedule for Incremental backups.
The available options are Repeat and Never. If you select the Repeat option, specify the elapsed time period (in minutes, hours, or days) between backup attempts. The minimum setting for Incremental backups is every 15 minutes.
By default the schedule for Incremental backups is to repeat every one day.
Full Backup
Specifies the backup schedule for Full backups.
As scheduled, CA ARCserve D2D performs a Full backup of all used blocks from the source machine. The available options are Repeat and Never. If you select the Repeat option, specify the elapsed time period (in minutes, hours, or days) between backup attempts. The minimum setting for Full backups is every 15 minutes.
By default the schedule for Full backups is Never (no scheduled repeat).
Using CA ARCserve Central Protection Manager to Back up CA ARCserve D2D Nodes
Chapter 4: Using CA ARCserve Central Protection Manager 53
Verify Backup
Specifies the backup schedule for Verify backups.
The available options are Repeat and Never. If you select the Repeat option, specify the elapsed time period (in minutes, hours, or days) between backup attempts. The minimum setting for Verify backups is every 15 minutes.
By default the schedule for Verify backups is Never (no scheduled repeat).
13. Click Save.
The basic backup policy is created. The policy appears in the list of policies using the name that you specified in Step 3 on the Policies screen.
Note: If there is more than one type of backup scheduled to be performed simultaneously, the type of backup performed is based upon the following priorities:
■ Priority 1 - Full backup
■ Priority 2 - Verify backup
■ Priority 3 - Incremental backup
Example: When all three types of backup scheduled to run concurrently, CA ARCserve D2D performs the Full backup. CA ARCserve D2D performs Verify backups when Verify backups and Incremental backups are scheduled to run concurrently, and there are no full backups scheduled. A scheduled incremental backup is performed only if there is no conflict with any other type of backup.
Assign Nodes to the Policy
After you create the basic policy, you assign the CA ARCserve D2D nodes that you want to back up using to the policy.
Follow these steps:
1. From the CA ARCserve Central Protection Manager home page, click Policies on the Navigation bar to open the Policies screen.
2. From the list of policies on the Policy screen, click the policy that you created.
3. Click the Policy Assignment tab to display the policy assignment (list).
4. Click Assign and Unassign to open the Assign/Unassign Policy dialog.
5. Click the check box next to the node or nodes that you want to add and click the right arrow.
A License Agreement dialog opens.
How to Manage Nodes in CA ARCserve Central Protection Manager
54 User Guide
6. Read and accept the terms of the Licensing Agreement and click Complete.
The nodes are assigned to the policy that you created and deployed immediately. Backups start based on the schedule that you defined on the Schedule tab.
7. When you are finished assigning nodes to policies, click OK to save the policy assignments and close the Assign and Unassign dialog.
After the nodes are assigned, CA ARCserve Central Protection Manager deploys the policy to the nodes immediately. The backup operations start based upon the protection settings that you selected and following the schedule that you defined in your policy.
How to Manage Nodes in CA ARCserve Central Protection Manager
CA ARCserve Central Protection Manager provides you with various tools and options that you can use to manage nodes and node groups. This section includes information about how you can add, delete, modify, and sync data for nodes and node groups. You can also discover and deploy CA ARCserve D2D to nodes.
This section contains the following topics:
Understanding the Node Management Screen (see page 54) What You Can Do With Nodes (see page 56) What You Can Do With Node Groups (see page 71) Search for Nodes Using Discover (see page 76) CA ARCserve D2D Deployment Tasks (see page 77) Filter Node Groups (see page 80)
Understanding the Node Management Screen
Node Management is an entry component of CA ARCserve Central Applications. You can access it from the Navigation bar on the left panel of the CA ARCserve Central Protection Manager application.
Node Management contains four categories to work from on the screen:
■ Node--Lets you manage specific nodes. For more information about managing nodes, see What You Can Do With Nodes (see page 56).
■ Node Group--Lets you manage specific node groups. For more information, see What You Can Do With Node Groups (see page 71).
■ Actions--Lets you Back up data (see page 131), Restore data (see page 134), and Deploy data (see page 78).
■ Filter--Lets you use filters to display nodes in a group with a particular application installed. For more information, see Filter Node Groups (see page 80).
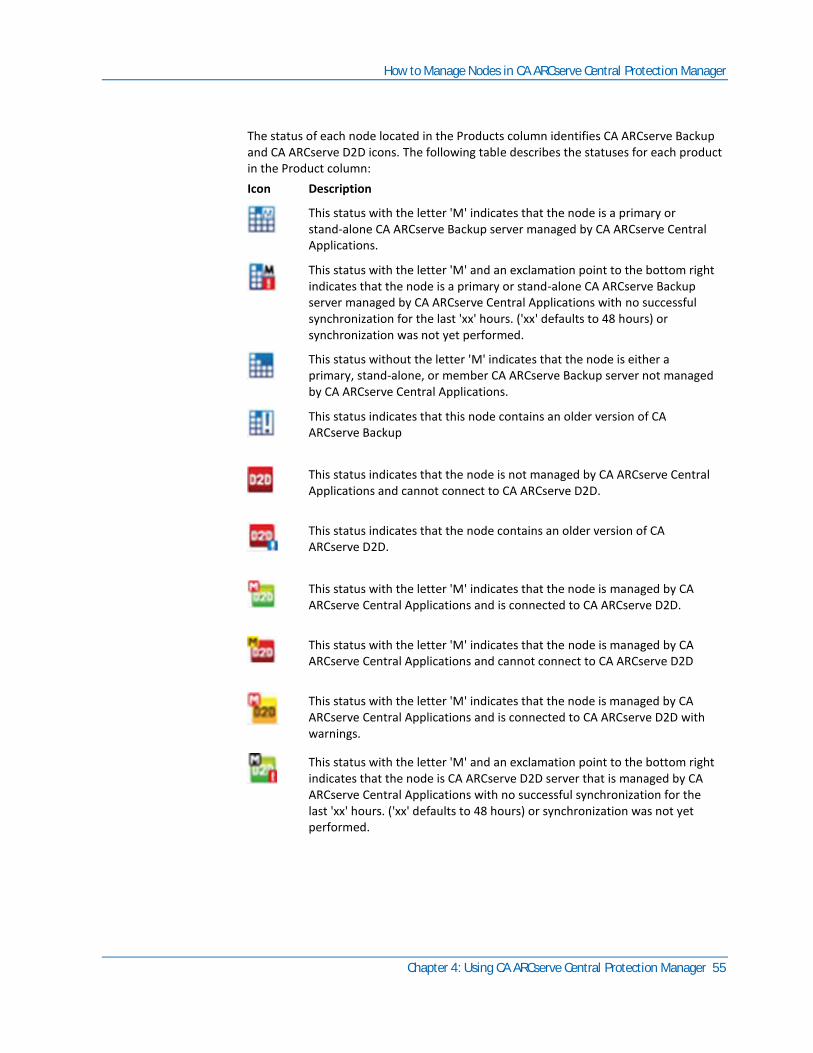
How to Manage Nodes in CA ARCserve Central Protection Manager
Chapter 4: Using CA ARCserve Central Protection Manager 55
The status of each node located in the Products column identifies CA ARCserve Backup and CA ARCserve D2D icons. The following table describes the statuses for each product in the Product column:
Icon Description
This status with the letter 'M' indicates that the node is a primary or stand-alone CA ARCserve Backup server managed by CA ARCserve Central Applications.
This status with the letter 'M' and an exclamation point to the bottom right indicates that the node is a primary or stand-alone CA ARCserve Backup server managed by CA ARCserve Central Applications with no successful synchronization for the last 'xx' hours. ('xx' defaults to 48 hours) or synchronization was not yet performed.
This status without the letter 'M' indicates that the node is either a primary, stand-alone, or member CA ARCserve Backup server not managed by CA ARCserve Central Applications.
This status indicates that this node contains an older version of CA ARCserve Backup
This status indicates that the node is not managed by CA ARCserve Central Applications and cannot connect to CA ARCserve D2D.
This status indicates that the node contains an older version of CA ARCserve D2D.
This status with the letter 'M' indicates that the node is managed by CA ARCserve Central Applications and is connected to CA ARCserve D2D.
This status with the letter 'M' indicates that the node is managed by CA ARCserve Central Applications and cannot connect to CA ARCserve D2D
This status with the letter 'M' indicates that the node is managed by CA ARCserve Central Applications and is connected to CA ARCserve D2D with warnings.
This status with the letter 'M' and an exclamation point to the bottom right indicates that the node is CA ARCserve D2D server that is managed by CA ARCserve Central Applications with no successful synchronization for the last 'xx' hours. ('xx' defaults to 48 hours) or synchronization was not yet performed.
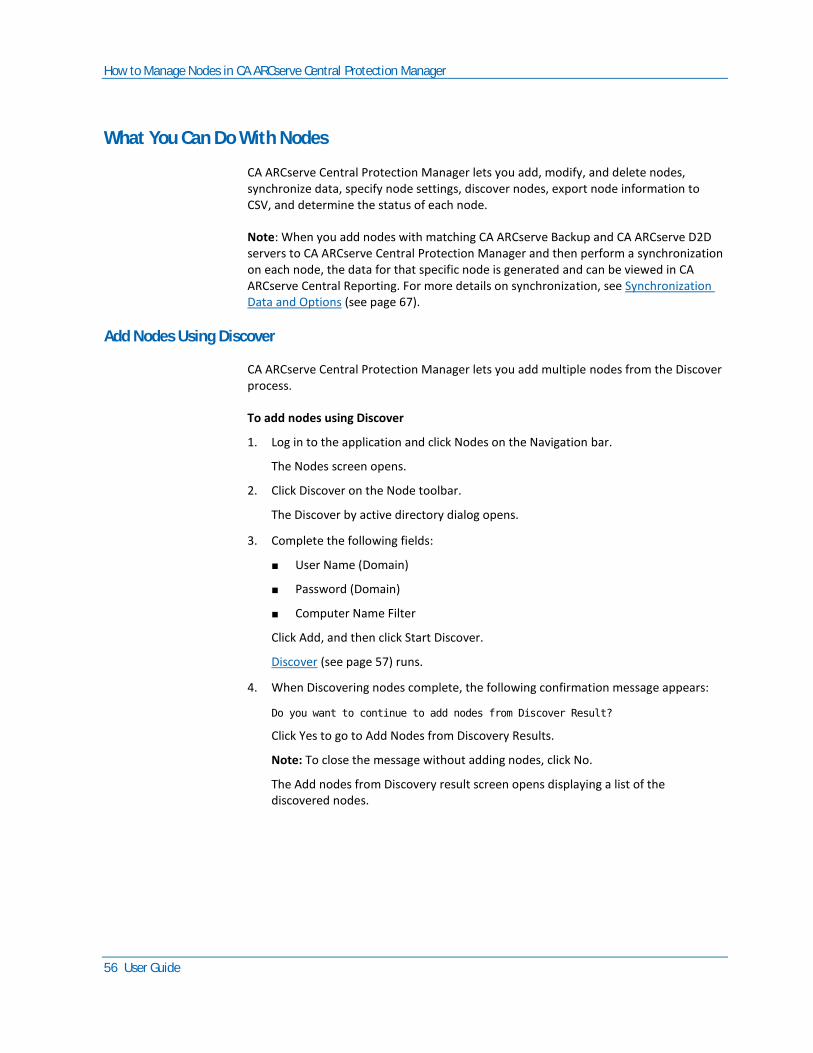
How to Manage Nodes in CA ARCserve Central Protection Manager
56 User Guide
What You Can Do With Nodes
CA ARCserve Central Protection Manager lets you add, modify, and delete nodes, synchronize data, specify node settings, discover nodes, export node information to CSV, and determine the status of each node.
Note: When you add nodes with matching CA ARCserve Backup and CA ARCserve D2D servers to CA ARCserve Central Protection Manager and then perform a synchronization on each node, the data for that specific node is generated and can be viewed in CA ARCserve Central Reporting. For more details on synchronization, see Synchronization Data and Options (see page 67).
Add Nodes Using Discover
CA ARCserve Central Protection Manager lets you add multiple nodes from the Discover process.
To add nodes using Discover
1. Log in to the application and click Nodes on the Navigation bar.
The Nodes screen opens.
2. Click Discover on the Node toolbar.
The Discover by active directory dialog opens.
3. Complete the following fields:
■ User Name (Domain)
■ Password (Domain)
■ Computer Name Filter
Click Add, and then click Start Discover.
Discover (see page 57) runs.
4. When Discovering nodes complete, the following confirmation message appears:
Do you want to continue to add nodes from Discover Result?
Click Yes to go to Add Nodes from Discovery Results.
Note: To close the message without adding nodes, click No.
The Add nodes from Discovery result screen opens displaying a list of the discovered nodes.
How to Manage Nodes in CA ARCserve Central Protection Manager
Chapter 4: Using CA ARCserve Central Protection Manager 57
5. From the Nodes Discovered list, select the nodes that you want to add and click the arrow to add them to the Nodes to Protect list. Click Next when you are finished.
Note: You can filter the list by Node Name or Domain to minimize the list.
6. (Optional) Select one or more nodes and click Hide Selected Nodes to hide nodes you do not want to back up.
7. (Optional) Check the Show hidden nodes option to display any hidden nodes back on to the Nodes Discovered list. To hide the nodes again, uncheck the option.
8. On the Node Credentials screen, provide a User Name and Password for the node you want to add. You can specify global credentials or apply credentials to the selected nodes.
9. Click Finish.
The nodes are added.
Discovery Monitor Dialog
The Discovery Monitor dialog displays the overall status of the nodes discovered within your environment.
The Discovery Monitor dialog provides the following information:
Phase
Displays the three phases on discovering nodes: Discovering Node, Updating data, and Discovery Completed.
Status
Displays an Active status during the discovery process and then displays Finished when discovery is completed.
Elapsed Time
Displays the amount of time discovering nodes.
Processed Node Num
Displays the processed node count that is logged and updated in the database.
How to Manage Nodes in CA ARCserve Central Protection Manager
58 User Guide
Add Nodes by IP Address or Node Name
CA ARCserve Central Protection Manager lets you add CA ARCserve D2D and CA ARCserve Backup nodes to node groups by referencing the IP address or the host name of the node.
To add nodes by IP address or node name
1. From the home page, select Node on the Navigation bar.
The Node screen displays.
2. From the Node toolbar, click Add, and then click Add Node by IP/Name on the pop-up menu.
The Add Node by IP/Name dialog opens.
3. Complete the following fields on the Add Node by IP/Name dialog:
■ IP/Node Name--Lets you specify the IP address or the name of the node.
■ Description--Lets you specify a description for the node.
■ Username--Lets you specify the user name that is required to log in to the node.
■ Password--Lets you specify the password that is required to log in to the node.
Click OK.
4. (Optional) If the newly added node does not appear in the nodes list, click Refresh on the Node toolbar.
The Add Node by IP/Name dialog closes and the node is added.
5. (Optional) If CA ARCserve Backup is installed on the node and the CA ARCserve Central Protection Manager credentials do not have CA ARCserve Backup administrator privileges, the following message appears:
ARCserve Backup administrator privilege is required.
To continue, specify the login credentials for the CA ARCserve Backup administrator account and click OK.
Note: CA ARCserve Central Protection Manager can perform data synchronization on only CA ARCserve Backup primary and stand-alone servers. When the primary server is a branch server, CA ARCserve Central Protection Manager can synchronize the CA ARCserve Backup data only with the global dashboard server.
The node is added.
How to Manage Nodes in CA ARCserve Central Protection Manager
Chapter 4: Using CA ARCserve Central Protection Manager 59
Add Nodes from Discovery Result
This option lets you select the nodes that are automatically detected based on the settings you specified in the Discovery Configuration panel.
Follow these steps:
1. Log in to the application.
Click Nodes on the Navigation bar to open the Nodes screen.
2. From the Node category, click Add and then click Add nodes from Discovery result on the pop-up menu.
The Add nodes from Discovery result screen opens displaying a list of the discovered nodes.
3. From the Nodes Discovered list, select the nodes that you want to add and click the arrow to add them to the Nodes to Protect list. Click Next when you are finished.
Note: You can filter the list by Node Name or Domain to minimize the list.
4. (Optional) Select one or more nodes and click Hide Selected Nodes to hide nodes you do not want to back up.
5. (Optional) Check the Show hidden nodes option to display any hidden nodes back on to the Nodes Discovered list. To hide the nodes again, uncheck the option.
6. On the Node Credentials screen, provide a User Name and Password for the node you want to add. You can specify global credentials or can apply credentials to the selected nodes.
7. Click Finish.
The nodes are added.
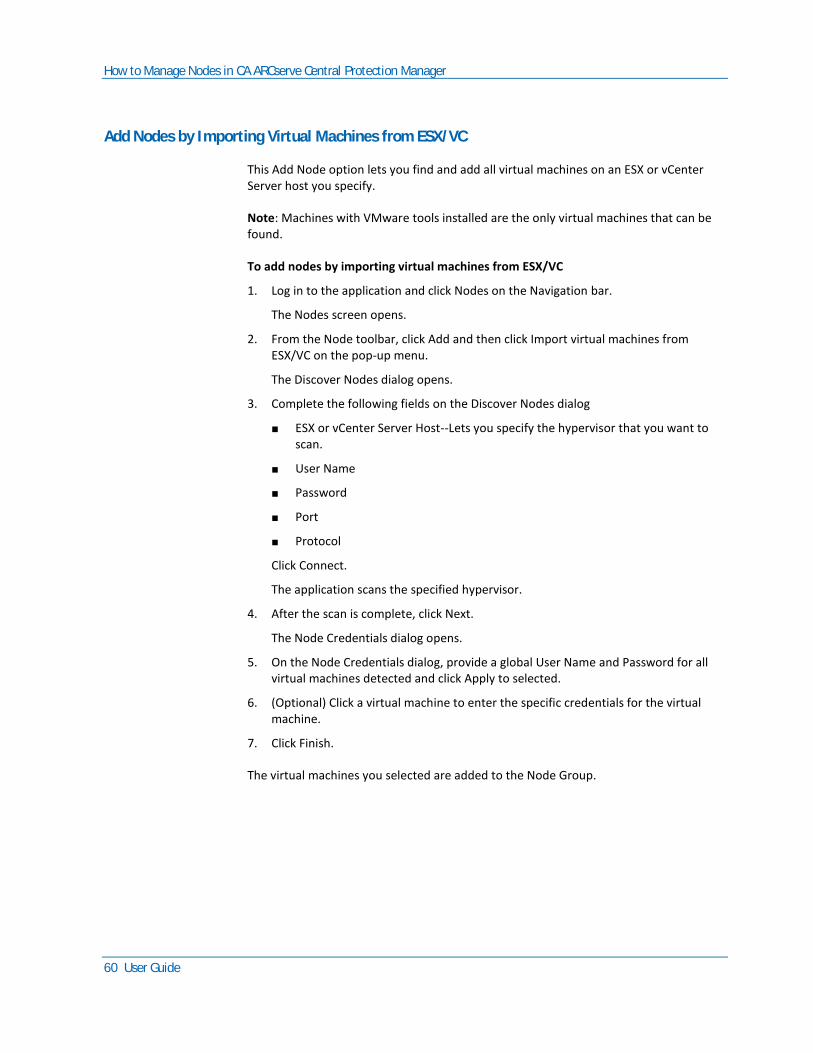
How to Manage Nodes in CA ARCserve Central Protection Manager
60 User Guide
Add Nodes by Importing Virtual Machines from ESX/VC
This Add Node option lets you find and add all virtual machines on an ESX or vCenter Server host you specify.
Note: Machines with VMware tools installed are the only virtual machines that can be found.
To add nodes by importing virtual machines from ESX/VC
1. Log in to the application and click Nodes on the Navigation bar.
The Nodes screen opens.
2. From the Node toolbar, click Add and then click Import virtual machines from ESX/VC on the pop-up menu.
The Discover Nodes dialog opens.
3. Complete the following fields on the Discover Nodes dialog
■ ESX or vCenter Server Host--Lets you specify the hypervisor that you want to scan.
■ User Name
■ Password
■ Port
■ Protocol
Click Connect.
The application scans the specified hypervisor.
4. After the scan is complete, click Next.
The Node Credentials dialog opens.
5. On the Node Credentials dialog, provide a global User Name and Password for all virtual machines detected and click Apply to selected.
6. (Optional) Click a virtual machine to enter the specific credentials for the virtual machine.
7. Click Finish.
The virtual machines you selected are added to the Node Group.
How to Manage Nodes in CA ARCserve Central Protection Manager
Chapter 4: Using CA ARCserve Central Protection Manager 61
Import Nodes from a File
CA ARCserve Central Protection Manager lets you import multiple nodes from a file. You can import nodes from a comma-separated values text file (.txt) or a spread sheet (.CSV).
To import nodes from a file
1. Log in to the application.
From the Navigation Bar on the home page, select Node.
The Node screen displays.
2. From the Node toolbar, click Add, and then click Import Nodes from file on the pop-up menu.
The Select Nodes dialog opens.
3. Click Browse to specify the file that contains the nodes that you want to import.
Note: You can specify a comma separate values (CSV) file or a text file that contains comma-separated values.
Click Upload.
The Node Names and the corresponding User Names appear on the dialog.
4. Click Next.
The Node Credentials dialog opens.
If the User Names and Passwords provided are correct, a green checkmark appears in the Verified field. If the User Names and Passwords provided are not correct, a red exclamation point appears in the Verified field.
5. Do one of the following:
■ To add the nodes, verify that all user names and passwords are correct. To change the credentials for a specific node, click the Node Name field.
The Validate Credential dialog opens.
Complete the required fields on the Validate Credential dialog and click OK.
■ To apply a global user name and password to all nodes, complete User Name and Password fields and click Apply to Selected.
The global user name and password is applied to all nodes.
Click Finish.
The nodes are added.
How to Manage Nodes in CA ARCserve Central Protection Manager
62 User Guide
Update Nodes
CA ARCserve Central Protection Manager lets you update information about nodes that were added previously. You update nodes when the following conditions arise:
■ All nodes:
– A new product was installed on the node after the node was registered with CA ARCserve Central Protection Manager.
– The user name or password for the node was updated after the node was registered with CA ARCserve Central Protection Manager.
■ CA ARCserve Backup nodes:
– A CA ARCserve Backup branch server was updated to a CA ARCserve Backup primary server.
– A CA ARCserve Backup central primary server was updated to a CA ARCserve Backup primary server after the central primary server was registered with CA ARCserve Central Protection Manager.
Note: When you add or update nodes that function as CA ARCserve Backup branch servers associated with a central primary server, the host name of the central primary server appears in two locations on the Node screen. The first location on the Node screen is the All Nodes group. The full name of the server displays in the All Nodes group, regardless of the quantity of characters contained in the host name of the server. The second location on the Node screen is Global Dashboard Groups. When the host name of the server contains more than 15 characters, the host name of the server is truncated to 15 characters in Global Dashboard Groups.
Follow these steps:
1. Log in to the application.
From the Navigation Bar on the home page, select Node.
The Node screen displays.
2. From the Groups bar, click the All Nodes group or click the group name containing the nodes that you want to update.
The nodes that are associated with the group appear in the nodes list.
3. Click the nodes that you want to update and then right-click and click Update Node from the pop-up menu.
The Update Node dialog opens.
Note: To update all nodes in the node group, right-click the Node Group name and then click Update Node from the pop-up menu.
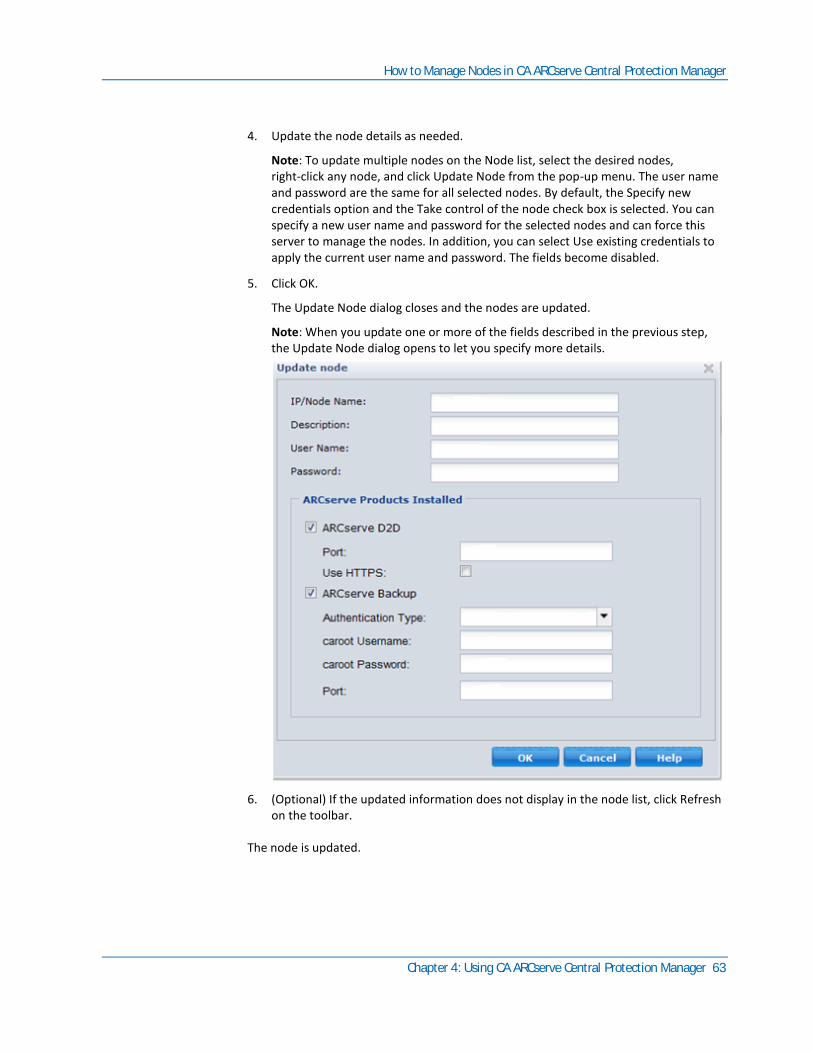
How to Manage Nodes in CA ARCserve Central Protection Manager
Chapter 4: Using CA ARCserve Central Protection Manager 63
4. Update the node details as needed.
Note: To update multiple nodes on the Node list, select the desired nodes, right-click any node, and click Update Node from the pop-up menu. The user name and password are the same for all selected nodes. By default, the Specify new credentials option and the Take control of the node check box is selected. You can specify a new user name and password for the selected nodes and can force this server to manage the nodes. In addition, you can select Use existing credentials to apply the current user name and password. The fields become disabled.
5. Click OK.
The Update Node dialog closes and the nodes are updated.
Note: When you update one or more of the fields described in the previous step, the Update Node dialog opens to let you specify more details.
6. (Optional) If the updated information does not display in the node list, click Refresh on the toolbar.
The node is updated.
How to Manage Nodes in CA ARCserve Central Protection Manager
64 User Guide
Delete Nodes
CA ARCserve Central Protection Manager lets you delete nodes from your environment.
Follow these steps:
1. Log in to the application.
Click Node on the Navigation bar to open the Node screen.
2. From the Groups bar, click the All Nodes group or click the group name containing the node that you want to delete.
The nodes that are associated with the group appear in the nodes list.
3. Check one or more nodes that you want to delete and then click Delete on the toolbar.
A confirmation message opens.
4. Do one of the following:
■ Click Yes to delete the node.
■ Click No if you do not want to delete the node.
Export Nodes to a File
CA ARCserve Central Protection Manager lets you export the nodes from the selected Node Group with credential information into a CSV file.
To export nodes to a file
1. Log in to the application.
From the Navigation Bar on the home page, select Node.
The Node screen displays
2. Select a Node Group to export.
The nodes for the selected Node Group are displayed.
3. Click Export from the Node toolbar.
A message appears notifying you that the CSV file will contain passwords that will be displayed in plain text.
Click Yes to open or save the CSV file or click No to cancel.
The nodes are exported to a CSV file.
How to Manage Nodes in CA ARCserve Central Protection Manager
Chapter 4: Using CA ARCserve Central Protection Manager 65
Log In to CA ARCserve D2D Nodes
From the CA ARCserve Central Protection Manager home page, you can log in to CA ARCserve D2D nodes.
To log in to CA ARCserve D2D nodes
1. Open the application and click Nodes in the Navigation Bar.
The Node screen displays.
2. From the Groups list, click All Nodes, or click the group that contains the CA ARCserve D2D node that you want to log in to.
The nodes list displays all nodes associated with the specified group.
3. Browse to and click the node that you want to log in to and then click Login D2D from the pop-up menu.
Note: If a new browser window does not open, verify that the pop-up options for your browser allow all pop-ups or pop-ups only for this website.
You are logged in to the CA ARCserve D2D node.
Note: The first time that you log in to the CA ARCserve D2D node, an HTML page may open and display a warning message. This behavior can occur when using Internet Explorer. To correct this behavior, close Internet Explorer and repeat Step 3. You should then be able to log in to the CA ARCserve D2D node successfully.
Update Nodes and Policies After Changing the Host Name of the CA ARCserve Central Applications Server
After you change the host name of the CA ARCserve Central Protection Manager server, you update the nodes and the policies applied to the nodes. You perform these tasks to maintain the relationship between the CA ARCserve Central Protection Manager server and the nodes that the CA ARCserve Central Protection Manager server is protecting. The following table describes the possible scenarios and the corrective action for each scenario.
Scenario Corrective Action
The node was added after the host name of the CA ARCserve Central Protection Manager server was changed.
No action required.
The node was added before the host name of the CA ARCserve Central Protection Manager server was changed and a policy was not applied to the node.
Update the node. For more information, see Update Nodes (see page 62).
How to Manage Nodes in CA ARCserve Central Protection Manager
66 User Guide
Scenario Corrective Action
The node was added before the host name of the CA ARCserve Central Protection Manager server was changed and a policy was applied to the node.
Reapply the policy. For more information, see Deploy Policies (see page 129).
Merge Job Options
CA ARCserve Central Protection Manager lets you pause and resume merge jobs for each node at any time. The process of pausing and resuming merge jobs does not affect in-progress jobs.
Pause a Merge Job on a Node
CA ARCserve Central Protection Manager lets you pause a merge job on a specific node.
For example, merge jobs can consume system resources and cause backup jobs to run slowly. Use the pause option to stop an in-progress merge job so that in-progress backup jobs can complete at their highest level of efficiency. After the backups complete, you can then resume the merge job.
Follow these steps:
1. From the CA ARCserve Central Protection Manager home page, click Node on the Navigation bar to open the Node screen.
2. Select the node group that contains the nodes with merge jobs you want paused.
A list of nodes for the selected Node Group displays.
3. Click the nodes with merge jobs you want paused. Then right-click the selected nodes and click Pause Merge Job from the pop-up menu.
Note: By default, the Pause Merge Job option is disabled. When the node is running a merge job, as indicated in the Job column, the Pause Merge Job option becomes enabled.
The merge job of the selected node is paused and can be verified on CA ARCserve D2D home page.
How to Manage Nodes in CA ARCserve Central Protection Manager
Chapter 4: Using CA ARCserve Central Protection Manager 67
Resume a Merge Job on a Node
CA ARCserve Central Protection Manager lets you resume merge jobs that were paused for specific nodes.
Follow these steps:
1. From the CA ARCserve Central Protection Manager home page, click Node on the Navigation bar to open the Node screen.
2. Select the node group that contains the nodes with merge jobs you want resumed.
A list of nodes for the selected Node Group displays.
3. Click the nodes with merge jobs that are paused that you now want resumed. Then right-click the selected nodes and click Resume Merge Job from the pop-up menu.
Note: The Resume Merge Job option is enabled when a backup job is not running and the merge jobs are paused.
The merge job of the selected node is resumed and can be verified on CA ARCserve D2D home page.
Synchronization Data and Options
CA ARCserve Central Protection Manager provides the ability to synchronize data for each node by transmitting information from CA ARCserve Backup primary server (asdb), CA ARCserve D2D, or Global Dashboard Central primary database (central_asdb) to the CA ARCserve Central Protection Manager database (ARCAppDB).
Synchronizing data keeps the data that are in different databases consistent and up-to-date so that the central site database contains the same information as each of the registered branch site databases.
This section contains the following topics
Perform a Full Synchronization of CA ARCserve Backup Data for a Specific Node or Node Group (see page 68) Perform an Incremental Synchronization of CA ARCserve Backup Data for a Specific Node or Node Group (see page 68) Perform a Full Synchronization of CA ARCserve D2D Data for a Specific Node or Node Group (see page 69)
How to Manage Nodes in CA ARCserve Central Protection Manager
68 User Guide
Perform a Full Synchronization of CA ARCserve Backup Data for a Specific Node or Node Group
CA ARCserve Central Protection Manager lets you perform full synchronization of CA ARCserve Backup data on a specific node or group of nodes.
During a Full Synchronize CA ARCserve Backup process, the CA ARCserve Backup Database Engine stops for a few minutes. This behavior can prevent the logging of any CA ARCserve Backup job information until the database synchronization process is complete.
To perform a full synchronization of CA ARCserve Backup data for a specific node or node group
1. From the CA ARCserve Central Protection Manager home page, click Node on the Navigation bar.
The Node screen displays.
2. Select the node group that contains the nodes you want to synchronize.
A list of nodes for the selected Node Group displays.
3. Do one of the following:
■ For a specific node, select the CA ARCserve Backup node from the right side of the Groups and click Full Synchronize CA ARCserve Backup from the pop-up menu or the Sync Data button from the Node toolbar.
■ For a group of nodes, right-click the node group and click Full Synchronize CA ARCserve Backup on the pop-up menu.
CA ARCserve Central Protection Manager submits a full synchronization of CA ARCserve Backup data for the node or node group selected.
Perform an Incremental Synchronization of CA ARCserve Backup Data for a Specific Node or Node Group
CA ARCserve Central Protection Manager lets you perform an incremental synchronization of CA ARCserve Backup data on a specific node.
Incremental Synchronize CA ARCserve Backup synchronizes data that was modified, deleted, or added after the last synchronization was performed. The synchronized data is compressed to minimize size prior to transmittal.
How to Manage Nodes in CA ARCserve Central Protection Manager
Chapter 4: Using CA ARCserve Central Protection Manager 69
To perform an incremental synchronization of CA ARCserve Backup data for a specific node or node group
1. From the CA ARCserve Central Protection Manager home page, click Node on the Navigation bar.
The Node screen displays.
2. Select the node group that contains the nodes you want to synchronize.
A list of nodes for the selected Node Group displays.
3. Do one of the following:
■ For a specific node, select the CA ARCserve Backup node from the right side of the Groups and click Incremental Synchronize CA ARCserve Backup from the pop-up menu or the Sync Data button from the Node toolbar.
■ For a group of nodes, right-click the node group and click Incremental Synchronize CA ARCserve Backup on the pop-up menu.
CA ARCserve Central Protection Manager submits an incremental synchronization of CA ARCserve Backup data for the node or node group selected.
Perform a Full Synchronization of CA ARCserve D2D Data for a Specific Node or Node Group
CA ARCserve Central Protection Manager lets you perform full synchronization of CA ARCserve D2D data on a specific node or group of nodes.
To perform full synchronization of CA ARCserve D2D data for a specific node or node group
1. From the CA ARCserve Central Protection Manager home page, click Node on the Navigation bar.
The Node screen displays.
2. Select the node group that contains the nodes you want synchronize.
A list of nodes for the selected Node Group displays.
3. Do one of the following:
■ For a specific node, select the CA ARCserve D2D node from the right side of the Groups and click Full Synchronize CA ARCserve D2D from the pop-up menu or the Sync Data button from the Node toolbar.
■ For a group of nodes, right-click the node group and click Full Synchronize CA ARCserve D2D on the pop-up menu.
CA ARCserve Central Protection Manager submits a full synchronization of CA ARCserve D2D data for the node or node group selected.
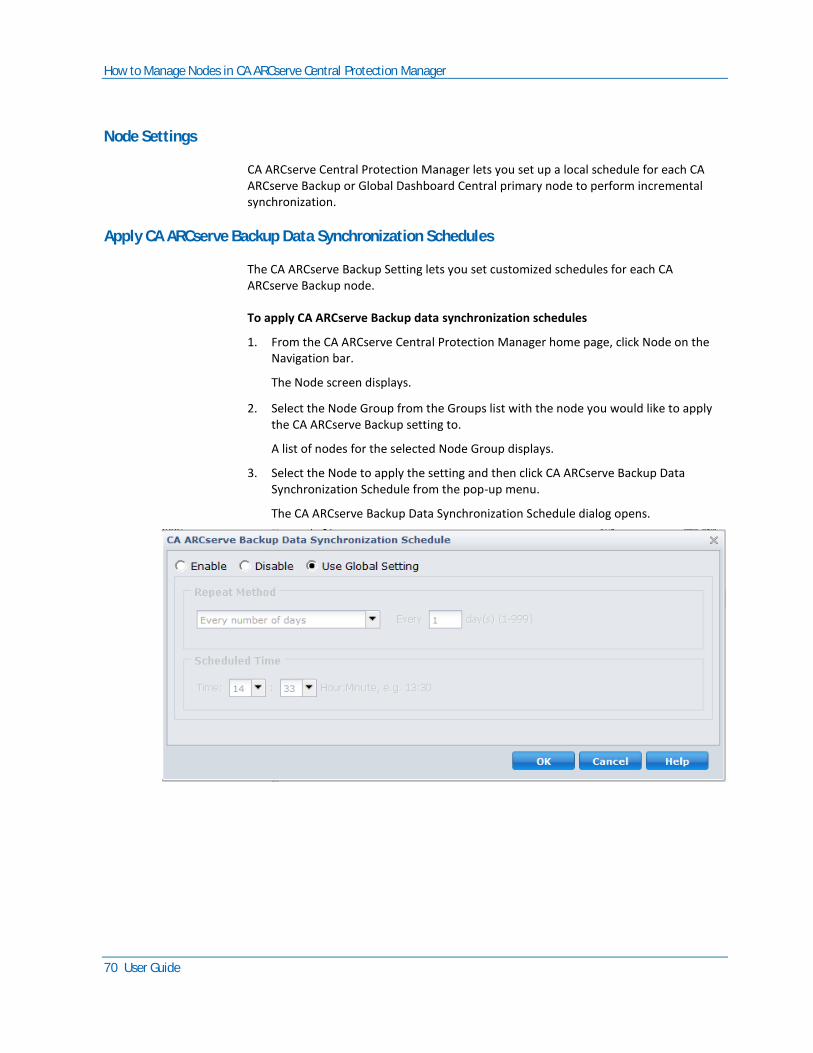
How to Manage Nodes in CA ARCserve Central Protection Manager
70 User Guide
Node Settings
CA ARCserve Central Protection Manager lets you set up a local schedule for each CA ARCserve Backup or Global Dashboard Central primary node to perform incremental synchronization.
Apply CA ARCserve Backup Data Synchronization Schedules
The CA ARCserve Backup Setting lets you set customized schedules for each CA ARCserve Backup node.
To apply CA ARCserve Backup data synchronization schedules
1. From the CA ARCserve Central Protection Manager home page, click Node on the Navigation bar.
The Node screen displays.
2. Select the Node Group from the Groups list with the node you would like to apply the CA ARCserve Backup setting to.
A list of nodes for the selected Node Group displays.
3. Select the Node to apply the setting and then click CA ARCserve Backup Data Synchronization Schedule from the pop-up menu.
The CA ARCserve Backup Data Synchronization Schedule dialog opens.
How to Manage Nodes in CA ARCserve Central Protection Manager
Chapter 4: Using CA ARCserve Central Protection Manager 71
4. Select one of the following options:
■ Enable--Lets you specify schedule options by entering a Repeat Method and a Scheduled Time:
– Every number of days
– Every selected day of the week
– Every selected day of the month
■ Disable--With this option, no settings will be applied.
■ Use Global--Lets you apply the global settings configured in the CA ARCserve Backup configuration module. For more details, see CA ARCserve Backup Data Synchronization Schedules.
5. Click OK.
The CA ARCserve Backup settings are applied.
What You Can Do With Node Groups
CA ARCserve Central Protection Manager lets you create node groups with the ability to assign individual nodes to each group, modify and delete node groups.
Note: You can only modify and delete the node groups you created.
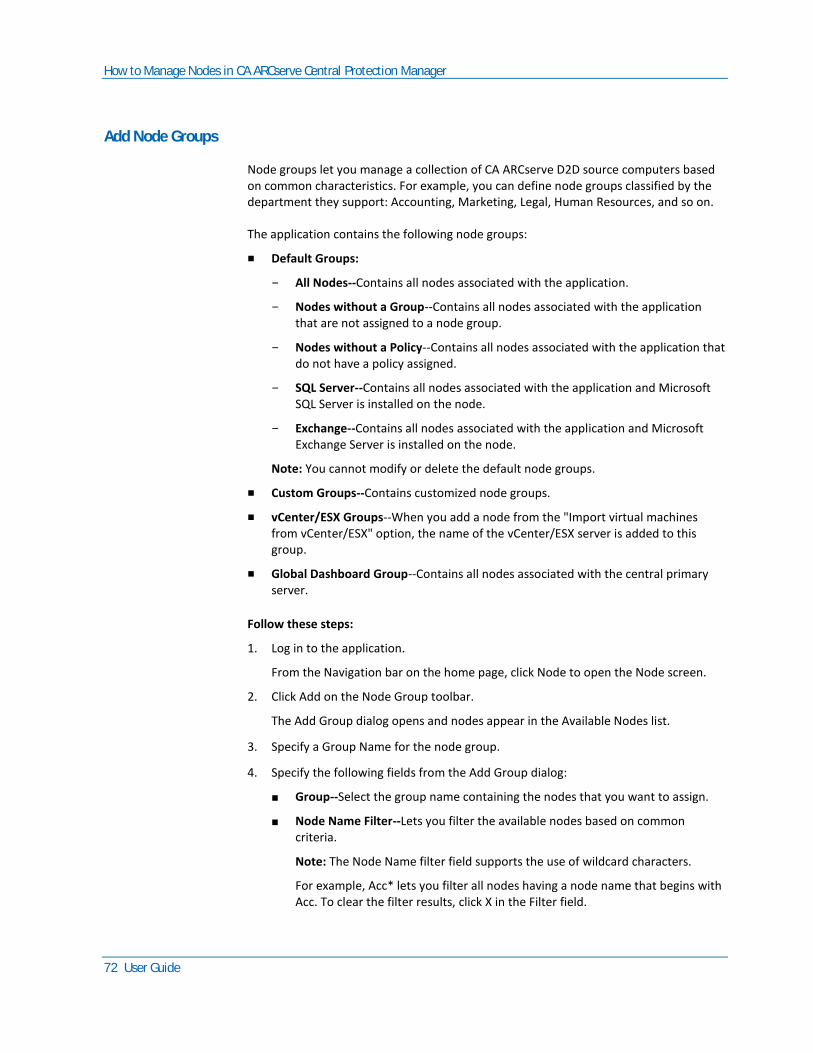
How to Manage Nodes in CA ARCserve Central Protection Manager
72 User Guide
Add Node Groups
Node groups let you manage a collection of CA ARCserve D2D source computers based on common characteristics. For example, you can define node groups classified by the department they support: Accounting, Marketing, Legal, Human Resources, and so on.
The application contains the following node groups:
■ Default Groups:
– All Nodes--Contains all nodes associated with the application.
– Nodes without a Group--Contains all nodes associated with the application that are not assigned to a node group.
– Nodes without a Policy--Contains all nodes associated with the application that do not have a policy assigned.
– SQL Server--Contains all nodes associated with the application and Microsoft SQL Server is installed on the node.
– Exchange--Contains all nodes associated with the application and Microsoft Exchange Server is installed on the node.
Note: You cannot modify or delete the default node groups.
■ Custom Groups--Contains customized node groups.
■ vCenter/ESX Groups--When you add a node from the "Import virtual machines from vCenter/ESX" option, the name of the vCenter/ESX server is added to this group.
■ Global Dashboard Group--Contains all nodes associated with the central primary server.
Follow these steps:
1. Log in to the application.
From the Navigation bar on the home page, click Node to open the Node screen.
2. Click Add on the Node Group toolbar.
The Add Group dialog opens and nodes appear in the Available Nodes list.
3. Specify a Group Name for the node group.
4. Specify the following fields from the Add Group dialog:
■ Group--Select the group name containing the nodes that you want to assign.
■ Node Name Filter--Lets you filter the available nodes based on common criteria.
Note: The Node Name filter field supports the use of wildcard characters.
For example, Acc* lets you filter all nodes having a node name that begins with Acc. To clear the filter results, click X in the Filter field.
How to Manage Nodes in CA ARCserve Central Protection Manager
Chapter 4: Using CA ARCserve Central Protection Manager 73
5. To add nodes to the node group, select the node or nodes that you want to add and click the single right arrow.
The nodes move from the Available Node list to the Selected Nodes list, and are assigned to the node group.
Note: To select and move all the nodes from the current group, click the double right arrow.
6. (Optional) To move nodes from the Selected Nodes list to the Available Nodes list, click the single left arrow.
Note: To select and move all nodes in the current group, click the double left arrow.
7. Click OK.
The Node Group is added.
Modify Node Groups
The application lets you modify the node groups that you created. You can add and remove nodes from node groups and change the name of node groups.
Note: You cannot modify the following node groups:
■ All Nodes--Contains all nodes associated with the application.
■ Nodes without a Group--Contains all nodes associated with the application that are not assigned to a node group.
■ Nodes without a Policy--Contains all nodes associated with the application that do not have a policy assigned.
■ SQL Server--Contains all nodes associated with the application and Microsoft SQL Server is installed.
■ Exchange--Contains all nodes associated with the application and Microsoft Exchange Server is installed.
Follow these steps:
1. Log in to the application.
From the Navigation Bar on the home page, click Node.
The Node screen displays.
2. Click the node group that you want to modify and then click Modify in the Node Group toolbar.
The Modify Group dialog opens.
3. To modify the Group Name, specify a new name in the Group Name field.
How to Manage Nodes in CA ARCserve Central Protection Manager
74 User Guide
4. To add nodes to the node group, select the node or nodes that you want to add to the node group and click the right arrow.
The nodes move from the Available Node list to the Selected Nodes list, and are assigned to the node group.
Note: To move all nodes from the Available Node list to the Selected Nodes list, click the double right arrow.
5. To remove nodes from the node group, click the left arrow or the double left arrow to remove one or all nodes respectively.
6. (Optional) To filter the available nodes based on common criteria, specify a filtering value in the Node Name Filter field.
Note: The Filter field supports the use of wildcard characters.
For example, Acc* lets you filter all nodes having a node name that begins with Acc. To clear the filter results, click the X in the Filter field.
7. Click OK.
The node group is modified.
Note: When you assign a CA ARCserve Backup Global Dashboard node to a node group, all CA ARCserve Backup branches render to the CA ARCserve Backup Global Dashboard node even though all branches do not belong to the node group. Therefore, when you select the node group that contains the CA ARCserve Backup Global Dashboard node in the CA ARCserve Central Reporting application, the reports will not display data for all branches from the Global Dashboard node.
How to Manage Nodes in CA ARCserve Central Protection Manager
Chapter 4: Using CA ARCserve Central Protection Manager 75
Delete Node Groups
You may delete a node group as needed. When you delete a group that was manually added, the virtual machines are not removed from the application. However, if you delete a group that was automatically created from an ESX or vCenter Server discovery, the group and all virtual machines are deleted from the application.
The application lets you delete the Node Groups that you created.
You cannot delete the following node groups:
■ All Nodes--Contains all nodes associated with the application.
■ Nodes without a Group--Contains all nodes associated with the application that are not assigned to a node group.
■ Nodes without a Policy--Contains all nodes associated with the application that do not have a policy assigned.
■ SQL Server--Contains all nodes associated with the application and Microsoft SQL Server is installed on the nodes.
■ Exchange--Contains all nodes associated with the application and Microsoft Exchange Server is installed on the nodes.
Note: The process of deleting node groups does not delete individual nodes from the application.
Follow these steps:
1. Log in to the application.
From the Navigation Bar on the home page, click Node to open the Node screen.
2. Click the node group that you want to delete and then click Delete in the Node Group toolbar.
The Confirm message box dialog opens.
3. If you are sure that you want to delete the node group, click Yes.
Note: Click No if you do not want to delete the node group.
The node group is deleted.
How to Manage Nodes in CA ARCserve Central Protection Manager
76 User Guide
Search for Nodes Using Discover
CA ARCserve Central Protection Manager lets you search for nodes using Discover. Protection Manager searches for nodes based on information that is retained in a server's Active Directory. The Active Directory provides the following information:
■ machine name
■ operating system info (name, version, patch)
■ if Microsoft Exchange Server exists on the machine
■ if Microsoft SQL Server exists on the machine
To search for nodes using Discover
1. Log in to the application.
From the Navigation bar on the home page, click Node.
The Node screen displays.
2. From the Node category, click Discover to open the Discover nodes by active directory dialog.
3. Complete the following fields on the Discover nodes by active directory dialog and then click Add:
■ (Domain) User Name
■ (Domain) Password
■ Computer Name Filter
Click Discover.
The discovery process (see page 57) starts.
4. When Discover is finished, the following confirmation message appears:
Do you want to continue to add nodes from Discover Result?
Do one of the following:
■ Click Yes to go to Add Nodes from Discover Results.
■ Click No to close the message.
Note: If you select Yes then go to Add Nodes Using Discover (see page 56) for details.
How to Manage Nodes in CA ARCserve Central Protection Manager
Chapter 4: Using CA ARCserve Central Protection Manager 77
CA ARCserve D2D Deployment Tasks
CA ARCserve Central Protection Manager lets you remotely or locally deploy one or more nodes simultaneously to target systems. In addition, you can add or edit nodes for deployment or delete nodes from deployment.
This section contains the following topics:
Deploy CA ARCserve D2D to Nodes (see page 78) Add Nodes for Deployment (see page 78) Edit Nodes for Deployment (see page 79) Delete Nodes from Deployment (see page 80)
How to Manage Nodes in CA ARCserve Central Protection Manager
78 User Guide
Deploy CA ARCserve D2D to Nodes
CA ARCserve Central Protection Manager lets you discover and deploy the latest version of CA ARCserve D2D to one or more new or existing nodes.
Note: To deploy CA ARCserve D2D to computers running Windows XP, disable the Use Simple File Sharing option on the remote Windows XP computer.
Follow these steps:
1. Log in to the application and click Node on the Navigation bar.
2. From the Node screen, click Deploy on the toolbar.
The License Agreement dialog opens.
3. Read and accept the terms of the Licensing Agreement and click Next to open the D2D Deployment dialog.
4. From the D2D Deployment dialog, specify the Group and Node Name filter for the available nodes that are based on the common criterion.
The Name, Version, and Status for each node is displayed.
Note: The Version column displays the current D2D version the node is running.
5. Click the check boxes next to the nodes or click Select All for all the nodes that are listed to deploy D2D to.
Note: When you click Select All, the option changes to Unselect All for your convenience. In addition, if you select a node from the Node list, you can edit the node fields from the Node Information tab.
6. Click Deploy Now to deploy the latest D2D version, which is displayed on the title bar, to the nodes.
Note: For information and deployment status on a specific node, highlight the node and select the appropriate tab in the right pane.
Note: CA ARCserve Central Protection Manager lets you install, upgrade, and deploy the latest version of CA ARCserve D2D to lower versions or nodes without CA ARCserve D2D installed using the D2D Deployment utility.
Add Nodes for Deployment
CA ARCserve Central Protection Manager lets you add multiple nodes for deployment.
To add nodes for deployment
1. Log in to the application and click Node on the Navigation bar.
2. From the Node screen, click Deploy on the toolbar.
The License Agreement dialog opens.
How to Manage Nodes in CA ARCserve Central Protection Manager
Chapter 4: Using CA ARCserve Central Protection Manager 79
3. Read and accept the terms of the Licensing Agreement and click Next.
The D2D Deployment dialog opens.
4. Click Add and complete the following fields on the D2D Deployment dialog:
■ Server Name
■ User Name
■ Password
■ Port
■ Install Path
■ Allow setup to install driver (selected by default)
■ Reboot (defaults to Yes)
If the node deploys with a successful reboot (Yes), then the node is added to the node list managed by CA ARCserve Central Applications.
If the node deploys without the reboot option (No), then the node is added to the node group not managed by CA ARCserve Central Applications.
■ Use HTTPS (defaults to No)
HTTPS (secure) provides a higher level of security than HTTP communication. HTTPS is recommended communication protocol when you transmit confidential information in your network.
Note: You can view the nodes you added under the All Nodes and Ungrouped Group filter.
5. Click OK to add the nodes.
Edit Nodes for Deployment
CA ARCserve Central Protection Manager lets you edit nodes for deployment.
To edit nodes for deployment
1. Log in to the application and click Node on the Navigation bar.
2. From the Node screen, click Deploy on the toolbar.
The License Agreement dialog opens.
3. Read and accept the terms of the Licensing Agreement and click Next.
The D2D Deployment screen displays.
4. Select the node that you want to edit for deployment and click Edit to open the Edit dialog.
5. From the Edit dialog, edit the data that you want to change and click OK.
How to Manage Nodes in CA ARCserve Central Protection Manager
80 User Guide
Delete Nodes from Deployment
CA ARCserve Central Protection Manager lets you delete one or more nodes from deploying.
To delete nodes from deployment
1. Log in to the application and click Node on the Navigation bar.
2. From the Node screen, click Deploy on the toolbar.
The License Agreement dialog opens.
3. Read and accept the terms of the Licensing Agreement and click Next.
The D2D Deployment screen displays.
4. Select one or more nodes to delete from deployment.
5. Click Delete to delete the nodes from the D2D deployment.
Filter Node Groups
CA ARCserve Central Protection Manager lets you use filters to display nodes in a group with a particular application installed. CA ARCserve Central Protection Manager lets you filter the following applications:
■ CA ARCserve Backup
■ CA ARCserve D2D
■ Microsoft SQL Server
■ Microsoft Exchange Server
To filter node groups
1. Log in to CA ARCserve Central Protection Manager.
From the Navigation bar on the home page, click Node.
The Node screen displays.
2. From the Groups list, click the group that you want to filter.
Note: You can filter all of the default groups (All Nodes, Unassigned, SQL Server, Exchange) and all custom-named groups.
From the Filter toolbar, click the check box next to the application that you want to filter.
The node group is filtered.
How to Manage CA ARCserve D2D Policies
Chapter 4: Using CA ARCserve Central Protection Manager 81
How to Manage CA ARCserve D2D Policies
CA ARCserve Central Protection Manager provides you with various tools and options that you can use to manage CA ARCserve D2D policies. This section includes information about how you can add, delete, modify, deploy D2D, and copy policies to remote servers. You can create centralized backup policies that can be distributed to multiple managed nodes simultaneously.
Some common examples for centralized backup policies are as follows:
■ Schedules
■ Jobs
■ Destinations
■ Events
■ Settings
This section contains the following topics:
Create Policies (see page 81) Edit or Copy Policies (see page 128) Delete Policies (see page 128) Deploy Policies (see page 129)
Create Policies
CA ARCserve Central Protection Manager lets you create one or more policies to assign to D2D nodes.
Follow these steps:
1. From the CA ARCserve Central Protection Manager home page, click Policies on the Navigation bar to open the Policies screen.
2. Click New to open the New Policy dialog.
3. Enter the Policy Name and complete the required fields in the Backup Settings (see page 82), File Copy Settings (see page 98), Copy Recovery Points (see page 113), and Preferences (see page 116) tabs.
4. Click Save.
The new policy is saved and prompts a message when you want to assign the policy to nodes now. When you click No, the new policy displays on the Policies screen. When you click Yes, the Assign/Unassign Policy (see page 130) screen opens.
How to Manage CA ARCserve D2D Policies
82 User Guide
Manage Backup Settings
The backup settings let you define behaviors such as the source and destination of your backup, the schedule for each type of backup, and the settings and advanced settings for your backup jobs. These settings can be modified at any time from the Policies screen.
To manage the backup settings, click Policies from the Navigation bar on the home page and click New.
This section contains the following topics:
Specify Protection Settings (see page 82) Specify Backup Schedules (see page 91) Specify Advanced Backup Settings (see page 94) Specify Pre/Post Backup Settings (see page 97)
Specify Protection Settings
CA ARCserve Central Protection Manager lets you specify the protection settings for the data that you want to back up.
To specify protection settings
1. From the CA ARCserve Central Protection Manager home page, click Policies on the Navigation bar.
The Policies screen opens.
2. Click New to create a new policy.
The New Policy dialog opens, displaying the Protection Settings option of the Backup Settings tab.
3. Specify the Backup Destination.
You can specify a local path (volume or folder), or remote shared folder (or mapped drive) for the backup location.
a. If you specify to back up to your local path (volume or folder), the specified backup destination cannot be the same location as your backup source. If you inadvertently include the source in your destination, the backup job ignores this portion of the source and not include it in the backup.
How to Manage CA ARCserve D2D Policies
Chapter 4: Using CA ARCserve Central Protection Manager 83
For example, if you are attempting to back up your entire local computer which consists of Volumes C, D, and E; and also specify Volume E as your destination, CA ARCserve D2D backs up only Volumes C and D to Volume E. Data from Volume E is not included in the backup. If you want to back up all local volumes, specify a remote location for your destination.
Important! Verify that your specified destination volume does not contain system information or else it will not be protected (backed up) and your system will fail to recover after Bare Metal Recovery (BMR), if necessary.
Note: Dynamic disks cannot be restored at disk level. If your data is backed up to a volume on a dynamic disk, you cannot restore this dynamic disk during BMR.
b. If you choose to back up to a remote shared location, it is imperative that you specify a location path or browse to the location and provide user credentials (User name and Password) to access the remote computer.
c. If the specified backup destination has changed since the last backup was performed, it is required that you select the backup type. These options are enabled when you change your backup destination. The available options are Full Backup and Incremental Backup.
■ Full Backup--Specifies that the next backup performed is a full backup. The new backup destination does not have any dependency on the old backup destination. If you continue with a full backup, the previous location is no longer needed for backups to continue. You can choose to keep the old backup for any restores or delete it if you do not want to perform any restores from there. It will not affect future backups.
■ Incremental Backup--Specifies that the next backup performed is an incremental backup. The next incremental backup to the new destination is performed without copying all the backups from the previous destination. However, the new location is dependent on the previous location because the changes include only the incremental data (not the full backup data). Do not delete the data from the previous location. If you change the backup destination to another folder, and attempt to perform an incremental backup and the former backup destination does not exist, the backup will fail.
How to Manage CA ARCserve D2D Policies
84 User Guide
4. Specify the Backup Source.
You can specify to back up the entire computer or an individual volume on your computer.
■ Back up the entire machine--Specifies to back up the entire machine. All volumes on the machine are backed up.
Note: If the full machine backup option is selected, CA ARCserve D2D automatically discovers all disks/volumes attached to current machine, and include them in the backup.
For example, if a new disk is attached to the machine after the backup setting is configured, you will not need to change the backup settings and the data on the new disk will be protected automatically.
■ Select individual volumes to back up--This volume filtering capability lets you specify to back up only the selected volumes. However, if you specify a volume that does not exist in the remote CA ARCserve D2D server, the volume automatically skips during backup. For example, specify to back up volumes C, D, and E; and assign it to the CA ARCserve D2D server which only contains volumes C and D. The policy is assigned to volumes C and D to the CA ARCserve D2D server and volume E is skipped with a warning message saved in the Activity Log.
You also have the option to Select/Unselect all listed volumes.
Note: If some volumes are selected explicitly for backup, only the selected volumes are backed up.
A notification message is displayed for the following condition:
– BMR related--If system/boot volume is not selected for backup, a warning message is displayed to notify you that the backup cannot be used for BMR.
5. Specify the Retention Setting.
You can set the retention policy that is based on the number of recovery points to retain (merges sessions) or based on the number of recovery sets to retain (deletes recovery sets and disables infinite incrementals).
■ Recovery Point – This is the recommended option. With this option selected, you can fully leverage the infinite incremental backup capabilities and save storage space.
■ Recovery Set – This option is generally used for large storage environments. With this option selected, you can create and manage backup sets that help you manage your backup window time more efficiently when you are protecting a large amount of data. You can use this option when backup time is a priority over space constraints.
Default: Retain Recovery Points
How to Manage CA ARCserve D2D Policies
Chapter 4: Using CA ARCserve Central Protection Manager 85
Retain Recovery Points
Select this option to specify the number of recovery points (full, incremental, and verify backup images) to retain.
– Specify the number of recovery points to retain
When the specified limit is exceeded; CA ARCserve D2D merges the earliest (oldest) incremental child backup into the parent backup to create a baseline image that includes the "parent plus oldest child" blocks. This cycle of merging the oldest child backup into the parent backup repeats for each subsequent backup, allowing you to perform infinite incremental backups, while maintaining the same retention count.
Note: If your destination does not have sufficient free space, consider reducing the number of saved recovery points.
Default: 31
Minimum: 1
Maximum: 1344
– Run the merge job--Select one of the following options when to run the merge job:
■ As soon as possible--Select this option to run the merge job at any time.
■ Each day during the following time range-- Select this option to run the merge job in a specified time range. Setting a time range helps avoid the merge job from introducing too many I/O operations to the production server when the merge job runs for a long time.
Note: When setting the time range to run the merge job, ensure that you specify a time range that will allow the related backup jobs to complete prior to the start of the merge.
How to Manage CA ARCserve D2D Policies
86 User Guide
Retain Recovery Sets
Select this option to specify the number of recovery sets to retain. With this setting, you can disable infinite incremental backups forever, without merging any sessions. Using recovery sets helps resolve the time that it takes to complete merge jobs.
– Specify the number of recovery sets to retain
Select this option to specify the number of recovery sets retained. A recovery set is a series of backups, starting with a full backup, and then a number of incremental, verify, or full backups.
Example Set 1:
■ Full
■ Incremental
■ Incremental
■ Verify
■ Incremental
Example Set 2:
■ Full
■ Incremental
■ Full
■ Incremental
A full backup is required to start a new recovery set. The backup that starts the set is automatically converted to a full backup, even if no full backup is configured or scheduled to be performed at that time.
Note: An incomplete recovery set is not counted when calculating an existing recovery set. A recovery set is considered complete only when the starting backup of the next recovery set is created.
Default: 2
Minimum: 1
Maximum: 100

How to Manage CA ARCserve D2D Policies
Chapter 4: Using CA ARCserve Central Protection Manager 87
Note: When you want to delete a recovery set to save backup storage space, reduce the number of retained sets and CA ARCserve D2D automatically deletes the oldest recovery set. Do not attempt to delete the recovery set manually.
Example 1 - Recovery Set:
■ The backup start time is 6:00 AM, August 20, 2012.
■ An incremental backup runs every 12 hours.
■ A new recovery set starts at the last backup on Friday.
■ You want to retain three recovery sets.
In this example, an incremental backup runs at 6:00 AM and 6:00 PM every day. The first recovery set is created when the first backup (must be a full backup) is taken. Then the first full backup is marked as the starting backup of the recovery set. When the backup scheduled at 6:00 PM on Friday is run, it converts to a full backup and the backup is marked as the starting backup of the recovery set.
Example 2 - Recovery Set:
■ Specify the number of recovery sets to retain as 1.
Note: CA ARCserve D2D always keeps two sets so that one complete set is kept before starting the next recovery set.
Example 3 - Recovery Set:
■ Specify the number of recovery sets to retain as 2.
Note: CA ARCserve D2D deletes the first recovery set when the fourth recovery set is about to start. Performing this action ensures that when the first backup is deleted and the fourth is starting, you still have two recovery sets (recovery set 2 and recovery set 3) available on the disk.
Even if you retain only one recovery set, you will need space for at least two full backups.
How to Manage CA ARCserve D2D Policies
88 User Guide
– Start a new recovery set on every:
■ Selected day of the week--Specifies the day of the week that is selected to start a new recovery set.
■ Selected day of the month--Specifies the day of the month that is selected to start a new recovery set. Specify 1 through 30 or if a month has 28, 29, 30, or 31 days, you can specify the last day of the month as the day to create the recovery set.
– Start of a new recovery set with:
■ First backup on the selected day--Specifies the day of the week that is selected to start a new recovery set.
■ Last backup on the selected day--Indicates that you want to start a new recovery set with the last scheduled backup on the specified day. If the last backup is selected to start the set and for any reason the last backup did not run, then the next scheduled backup will start the set by converting it to a full backup. If the next backup is run ad-hoc (for example an emergency situation requires a quick incremental backup), you can decide if you want to run a full backup to start the recovery set or run an incremental backup so that the next backup starts the recovery set.
Note: The last backup may not be the last backup of the day when you run an ad-hoc backup.
6. Specify the type of Compression.
Select this option to specify the type of compression that you want to use for backups.
Compression decreases your disk space usage, but also has an inverse impact on your backup speed due to the increased CPU usage.
How to Manage CA ARCserve D2D Policies
Chapter 4: Using CA ARCserve Central Protection Manager 89
The available compression options are as follows:
■ No Compression
No compression is performed. This option has the lowest CPU usage (fastest speed), but also has the highest disk space usage for your backup image.
■ Standard Compression
Some compression is performed. This option provides a good balance between CPU usage and disk space usage. This is the default setting.
■ Maximum Compression
Maximum compression is performed. This option provides the highest CPU usage (lowest speed), but also has the lowest disk space usage for your backup image.
Be aware of the following scenarios:
■ If your backup image contains data that cannot be compressed, such as JPG images, ZIP files, and so on, additional storage space needs to be allocated to handle such data. If you specify compression options and the backup source contains data that cannot be compressed, you will notice an overall increase in disk space usage.
■ If you change the compression level from no compression to standard or maximum compression; or, if you change the compression level from standard or maximum compression to no compression, the first backup performed after the compression level change will be full backup. After the full backup completes, all future backups (Full, Incremental, or Verify) will be performed as scheduled.
■ If your destination does not have sufficient free space, consider increasing the Compression setting of the backup.
7. Specify the Encryption settings.
a. Select the type of encryption algorithm that you want to use for backups.
Data encryption is the translation of data into a form that is unintelligible without a deciphering mechanism. CA ARCserve D2D data protection uses secure, AES (Advanced Encryption Standard) encryption algorithms to achieve maximum security and privacy of your specified data.
How to Manage CA ARCserve D2D Policies
90 User Guide
The available format options are No Encryption, AES-128, AES-192, and AES-256. (To disable encryption, select No Encryption).
■ A full backup and all its related incremental and verify backups must use same encryption algorithm.
■ If the encryption algorithm for an incremental or verify backup is changed, a full backup must be performed. This means after changing encryption algorithm, the first backup will be full, despite the original backup type.
For example, if you change the algorithm format and submit a customized incremental or verify backup manually, it automatically converts to a full backup.
b. When an encryption algorithm is selected, provide (and confirm) an encryption password.
■ The encryption password is limited to a maximum of 23 characters.
■ A full backup and all its related incremental and verify backups must use same password to encrypt data.
■ If the encryption password for an incremental or verify backup is changed, a full backup must be performed. This means after changing encryption password, the first backup will be full, despite the original backup type.
For example, if you change the encryption password and submit a customized incremental or verify backup manually, it automatically converts to a full backup.
c. CA ARCserve D2D provides encryption password management so that you do not need to remember encryption passwords.
■ Password will also be encrypted.
■ Password will be remembered and not required if you restore to the same machine.
■ Password is required if you restore to a different machine.
■ Password is not required if you are attempting to export a recovery point that contains encrypted data and the recovery point belongs to backups performed on the current machine.
■ Password is always required if you are attempting to recover encrypted data from an exported recovery point.
■ Password is not required to browse to an encrypted recovery point.
■ Password is required to perform a BMR.
How to Manage CA ARCserve D2D Policies
Chapter 4: Using CA ARCserve Central Protection Manager 91
d. When encryption is enabled the activity log will be updated.
■ A message will be recorded in the activity log to describe the selected encryption algorithm for every backup.
■ A message will be recorded in the activity log to indicate why an incremental or verify backup was converted to a full backup (password change or algorithm change).
Note: Encryption settings do not have to remain the same for your backups. You can change these settings at any time, including after several backups of the same data.
8. Specify the Throttle Backup.
You can specify the maximum speed (MB/min) at which backups will be written. You can throttle the backup speed to reduce CPU or network utilization. However, by limiting the backup speed, it will have an adverse affect on the backup window. As you lower the maximum backup speed it will increase the amount of time of perform the backup.
Note: By default, the Throttle Backup option is not enabled and backup speed is not being controlled.
9. Click Save.
The protection settings are saved.
Specify Backup Schedules
CA ARCserve Central Protection Manager lets you specify schedules for your backups.
To specify backup schedules
1. From the CA ARCserve Central Protection Manager home page, click Policies on the Navigation bar.
The Policies screen opens.
2. Click New to create a new policy.
The New Policy dialog opens.
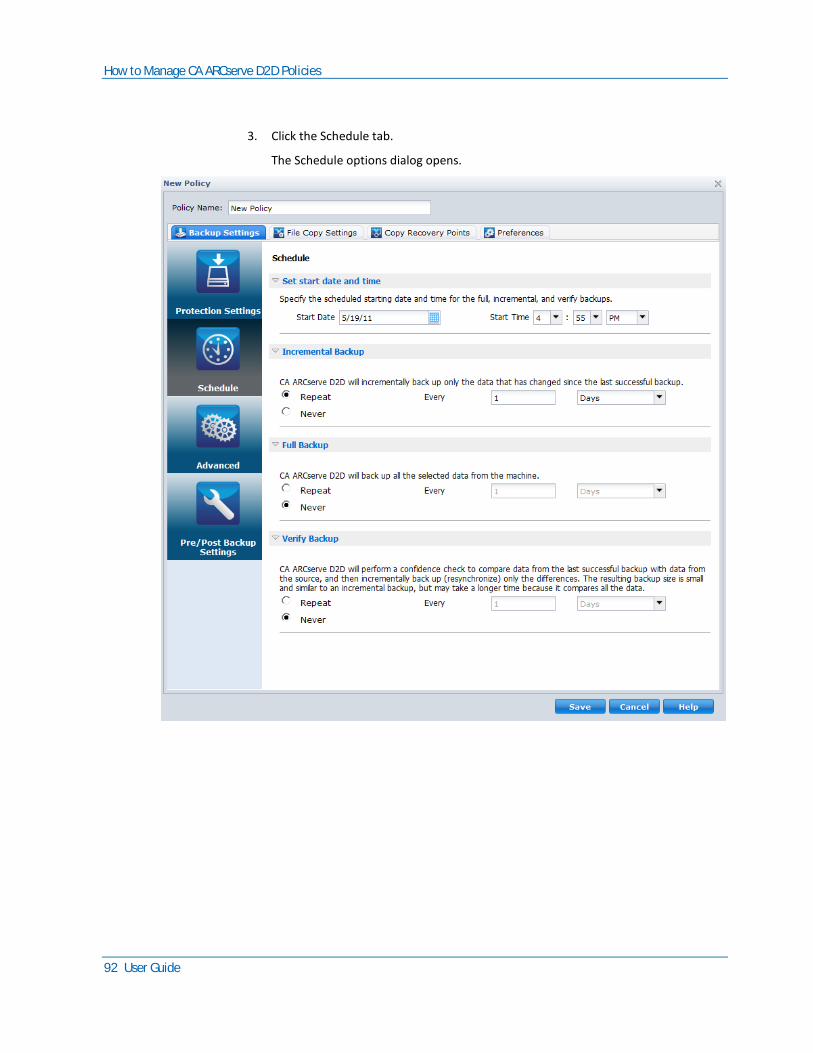
How to Manage CA ARCserve D2D Policies
92 User Guide
3. Click the Schedule tab.
The Schedule options dialog opens.
How to Manage CA ARCserve D2D Policies
Chapter 4: Using CA ARCserve Central Protection Manager 93
4. Specify your backup schedule options:
■ Set start date and time--Specifies the start date and start time for your scheduled backups.
Note: When setting the interval between repeat backup jobs, ensure that you leave enough time to allow the previous job and any related merge jobs to complete before the next backup job starts. This amount of time can be estimated based on your own specific backup environment and history.
■ Incremental Backup--Specifies the backup schedule for Incremental backups.
As scheduled, CA ARCserve D2D incrementally backs up of only those blocks that have changed since the last successful backup. The advantages of Incremental backups are that it is a very fast backup and it produces a very small backup image. This is the most optimal way to perform backups and you should use this option by default.
The available options are Repeat and Never. If you select the Repeat option, you must then also specify the elapsed time period (in minutes, hours, or days) between backup attempts. The minimum setting for Incremental backups is every 15 minutes.
By default the schedule for Incremental backups is to repeat every one day.
■ Full Backup--Specifies the backup schedule for Full backups.
As scheduled, CA ARCserve D2D performs a Full backup of all used blocks from the source machine. The available options are Repeat and Never. If you select the Repeat option, you must then also specify the elapsed time period (in minutes, hours, or days) between backup attempts. The minimum setting for Full backups is every 15 minutes.
By default the schedule for Full backups is Never (no scheduled repeat).
■ Verify Backup--Specifies the backup schedule for Verify backups.
As scheduled, CA ARCserve D2D verifies that the protected data is valid and complete by performing a confidence check of the stored backup image to the original backup source and will resynchronize that image if necessary. A Verify type backup will look at the most recent backup of each individual block and compare the content and information to the source. This comparison verifies that the latest backed up blocks represent the corresponding information at the source. If the backup image for any block does not match the source (possibly because of changes in the system since the last backup), CA ARCserve D2D will refresh (resynchronize) the backup of the block that does not match. A Verify backup can also be used (very infrequently) to get the guarantee of full backup without taking the space of full backup.
The advantage of a Verify backup is that it produces a very small backup image when compared to full backup because only the changed blocks (blocks that do not match the last backup) are backed up. The disadvantage of a Verify backup is that the backup time is long because CA ARCserve D2D has to compare all of source disk blocks with the blocks of the last backup.
How to Manage CA ARCserve D2D Policies
94 User Guide
The available options are Repeat and Never. If you select the Repeat option, you must then also specify the elapsed time period (in minutes, hours, or days) between backup attempts. The minimum setting for Verify backups is every 15 minutes.
By default the schedule for Verify backups is Never (no scheduled repeat).
5. Click Save.
The backup schedule settings are saved.
Note: If at a given time there are more than one type of backup scheduled to be performed simultaneously, the type of backup that will be performed is based upon the following priorities:
■ Priority 1 - Full backup
■ Priority 2 - Verify backup
■ Priority 3 - Incremental backup
For example, if you have all three types of backup scheduled to be performed at the same time, CA ARCserve D2D performs the Full backup. If there is no Full backup scheduled, but a Verify and Incremental backup is scheduled to be performed at the same time, CA ARCserve D2D performs the Verify backup. A scheduled incremental backup will be performed only if there is no conflict with any other type of backup.
Specify Advanced Backup Settings
CA ARCserve Central Protection Manager lets you specify advanced settings for your backups.
To specify advanced backup settings
1. From the CA ARCserve Central Protection Manager home page, click Policies on the Navigation bar.
The Policies screen opens.
2. Click New to create a new policy.
The New Policy dialog opens.
How to Manage CA ARCserve D2D Policies
Chapter 4: Using CA ARCserve Central Protection Manager 95
3. Click the Advanced tab.
The Advanced Settings options dialog opens.
4. Specify the advanced actions setting options.
■ Truncate Log--Specifies to truncate the accumulated transaction log files for the selected applications after the next successful backup.
CA ARCserve D2D backups consist of a snapshot image and the transaction log files that were created for it. At some point in time, the older (committed) transaction log files are no longer needed and can be purged to make space for new log files. The process of purging these log files is called truncating the log. This option enables truncating of committed transaction log files, which conserves disk space.
The available options are SQL Server and Exchange Server. You can select either, both, or none of these applications. If you select any of these applications, you can also specify a scheduled time period (Daily, Weekly, or Monthly) for automatic log truncation:
Note: The transaction log files cannot be truncated without performing a successful backup.
– Daily--Each day after the backup completes successfully, the committed transaction logs will be purged immediately.
– Weekly--After seven days, the committed transaction logs will be purged immediately after the backup completes successfully.
– Monthly--After 30 days, the committed transaction logs will be purged immediately after the backup completes successfully.
If a backup job is already running at the same time the purging is scheduled to be performed, the purging operation is moved to the next scheduled job.
For Example:
If you scheduled an Incremental Backup to run automatically every day at 5:00 pm, and start a Full Backup manually at 4:55 pm, then assume that the backup successfully finishes at 5:10 pm.
In this case, the Incremental Backup that was scheduled for 5:00 pm will not run because the ad-hoc Full Backup is still in progress. Now the committed transaction log files will be purged after the next successful backup job. In this case it will be performed on the next day after the scheduled Incremental Backup completes successfully at 5:00 pm.
How to Manage CA ARCserve D2D Policies
96 User Guide
■ Reserve Space on Destination
This value indicates a percentage of the calculated space that is necessary to perform a backup. This amount of continuous space is then immediately reserved on the destination before the backup starts writing data and helps improve backup speed.
Default: 10%.
Example: Set the value to 10% and the current backup has 50 GB of data to back up. Before the backup starts writing data, it first reserves 5 GB of disk space. After the 5 GB of disk space is used up, it then reserves the next 5 GB of disk space. If the data remaining for the backup is less than 5 GB (suppose 2 GB are remaining to back up), then the remaining GB (in this example 2 GB) are reserved.
■ Catalogs
Exchange Granular Restore Catalog
When this option is selected, enables automatic generation of the Exchange Granular Restore catalogs after each backup. By default, this option is enabled.
An Exchange Granular Restore backup captures information about the mail message, the mail folder, and the mailbox levels of Exchange in a single pass backup through the Exchange database. With this option enabled, you can then perform granular recoveries of the Exchange database by selecting from a list of objects inside Exchange and specifying exactly what you want to recover without first having to recover or dump the Exchange database to an alternate location.
Advantages: With an Exchange Granular Restore catalog, there is no need to wait a long time to perform a restore browse.
Disadvantages: When you generate an Exchange Granular Restore catalog during each backup, it results in an increased backup window (additional time to complete the backup job) and an increased workload. CA ARCserve D2D must go to each mailbox, authenticate, and build the granular information, which considering the number of mailboxes and size of data, could be a time consuming task.
Note: If you disable this option, CA ARCserve D2D only saves the general information for Exchange. Before restore you have an opportunity to generate an Exchange Granular Restore catalog at that time.
How to Manage CA ARCserve D2D Policies
Chapter 4: Using CA ARCserve Central Protection Manager 97
File System Catalog
When this option is selected, enables generation of the file system catalog. If your browse time is too slow (especially if the CA ARCserve D2D destination is over a WAN) or if your restore by search time is too slow, this option helps reduce your wait time. This catalog job will run for each scheduled backup job after this option is selected.
If this option is not selected, the restores can be performed immediately after backup without having to wait for the catalog job to finish. By default, this option is not enabled.
Note: When you generate a File System catalog for each backup job, it results in an increased amount of disk storage needed to store the metadata files and catalog files and an increase in CPU usage. In addition, if the backup source contains a large amount of files, the process of generating a catalog could be a time consuming task.
■ Administrator Account--Specifies the User Name and Password with access rights to perform the backup. CA ARCserve D2D verifies that the name and password are valid and that the user belongs to an administrator group.
Be aware of the following:
– To specify a domain account, the format for user name is a fully qualified domain user name in the form of "<domain name>\<user name>".
– If the Administrator Account information for the CA ARCserve D2D server is changed (User Name/Password), then reconfiguring the Administrator Account information from this dialog is recommended.
– If you do not specify the Administrator Account credentials, then CA ARCserve D2D automatically enters the account information where the policy is deployed to.
5. Click Save.
The advanced backup settings are saved.
Specify Pre/Post Backup Settings
CA ARCserve Central Protection Manager lets you specify the settings for your backups.
To specify pre/post backup settings
1. From the CA ARCserve Central Protection Manager home page, click Policies on the Navigation bar.
The Policies screen opens.
2. Click New to create a new policy.
The New Policy dialog opens.
How to Manage CA ARCserve D2D Policies
98 User Guide
3. Click the Pre/Post Backup Settings tab.
The Pre/Post Backup Settings options dialog opens.
4. Specify your backup settings options.
■ Actions--Specifies to run script commands for actions taken before the start of the backup, after the snapshot image is captured, and/or upon the completion of the backup. You can also trigger the script command based upon specific exit codes and select the action taken (run job or fail job) when that exit code is returned.
■ A "run job" action directs CA ARCserve D2D to continue to run the job if the specified exit code is returned.
■ A "fail job" action directs CA ARCserve D2D to cancel the job if the specified exit code is returned.
5. Click Save.
The pre/post backup settings are saved.
Manage File Copy Settings
Prior to performing your first File Copy job, you must specify the File Copy settings and policies. These configurations allow you to specify behaviors such as the source of your file copy data, destination for your copied files, the schedule for each file copy job, and the settings and filters applied to your file copy jobs. These settings can be modified at any time from the Policies screen.
Specify File Copy Sources
CA ARCserve Central Protection Manager lets you specify source files to be file copied to a specific destination.
To specify file copy sources
1. From the CA ARCserve Central Protection Manager home page, click Policies on the Navigation bar.
The Policies screen opens.
2. Click New to create a new policy.
The New Policy dialog opens.
3. Select the File Copy Settings tab.
The File Copy Settings Source dialog opens.
4. Select the Enable File Copy option to validate and save any changes to the File Copy Settings. This option is disabled by default.
How to Manage CA ARCserve D2D Policies
Chapter 4: Using CA ARCserve Central Protection Manager 99
5. Specify your file copy source settings.
File Copy Sources
Lets you manually specify file copy sources along with the corresponding policy (filters) and type of file copy (copy and retain or copy and move) to perform after each successful CA ARCserve D2D backup. These File Copy Sources can be added, removed, or modified.
Note: CA ARCserve D2D will not copy application files, files with system attributes, and files with temporary attributes.
■ Add Source
When clicked, the Policy type dialog opens to let you select the type of file copy job to be performed (copy and retain or copy and move). After you select the policy type, the corresponding File Copy Policy dialog opens to let you add a source to be copied and specify the corresponding policies for that source. For more information, see Specify File Copy Policies (see page 100).
Note: Only a current backed up source is eligible for file copying. You cannot add a source from a volume which has not been previously backed up by CA ARCserve D2D.
■ Remove
When clicked will remove the selected source from this displayed list.
■ Modify
When clicked, the File Copy Policies dialog opens to let you change the policy settings for the selected source. For more information, see Specify File Copy Policies (see page 100).
6. Click Save Settings.
The File Copy settings are saved.
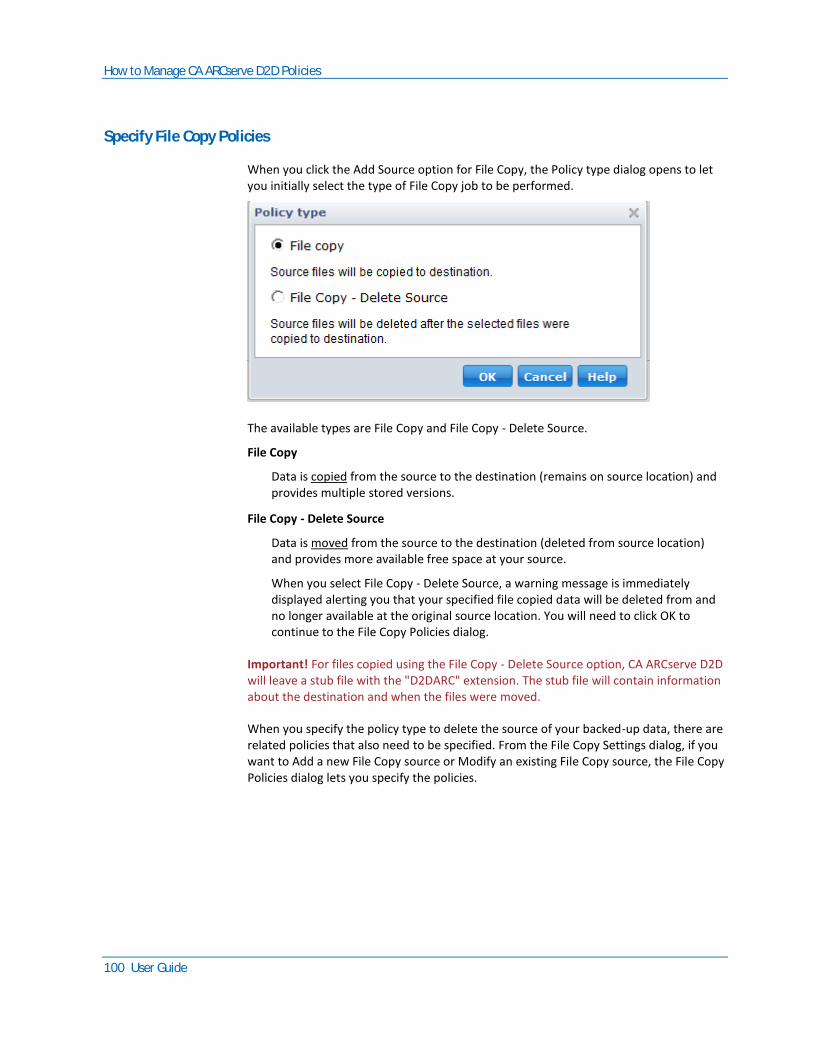
How to Manage CA ARCserve D2D Policies
100 User Guide
Specify File Copy Policies
When you click the Add Source option for File Copy, the Policy type dialog opens to let you initially select the type of File Copy job to be performed.
The available types are File Copy and File Copy - Delete Source.
File Copy
Data is copied from the source to the destination (remains on source location) and provides multiple stored versions.
File Copy - Delete Source
Data is moved from the source to the destination (deleted from source location) and provides more available free space at your source.
When you select File Copy - Delete Source, a warning message is immediately displayed alerting you that your specified file copied data will be deleted from and no longer available at the original source location. You will need to click OK to continue to the File Copy Policies dialog.
Important! For files copied using the File Copy - Delete Source option, CA ARCserve D2D will leave a stub file with the "D2DARC" extension. The stub file will contain information about the destination and when the files were moved.
When you specify the policy type to delete the source of your backed-up data, there are related policies that also need to be specified. From the File Copy Settings dialog, if you want to Add a new File Copy source or Modify an existing File Copy source, the File Copy Policies dialog lets you specify the policies.
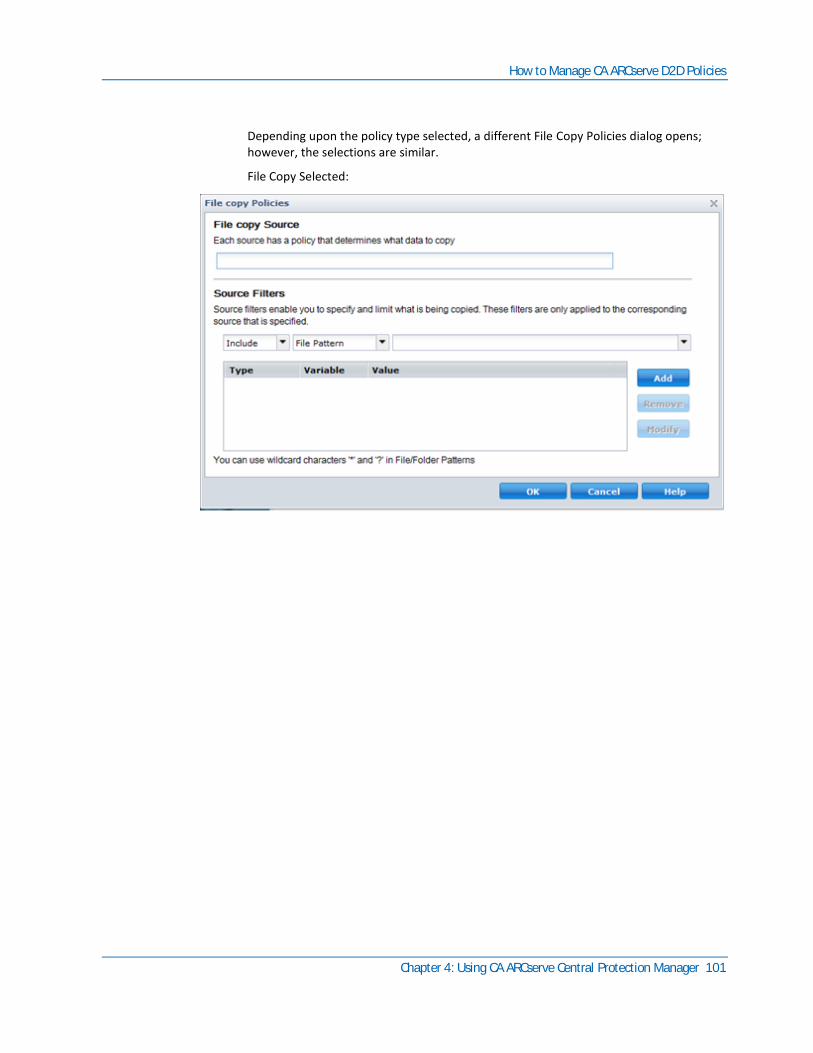
How to Manage CA ARCserve D2D Policies
Chapter 4: Using CA ARCserve Central Protection Manager 101
Depending upon the policy type selected, a different File Copy Policies dialog opens; however, the selections are similar.
File Copy Selected:
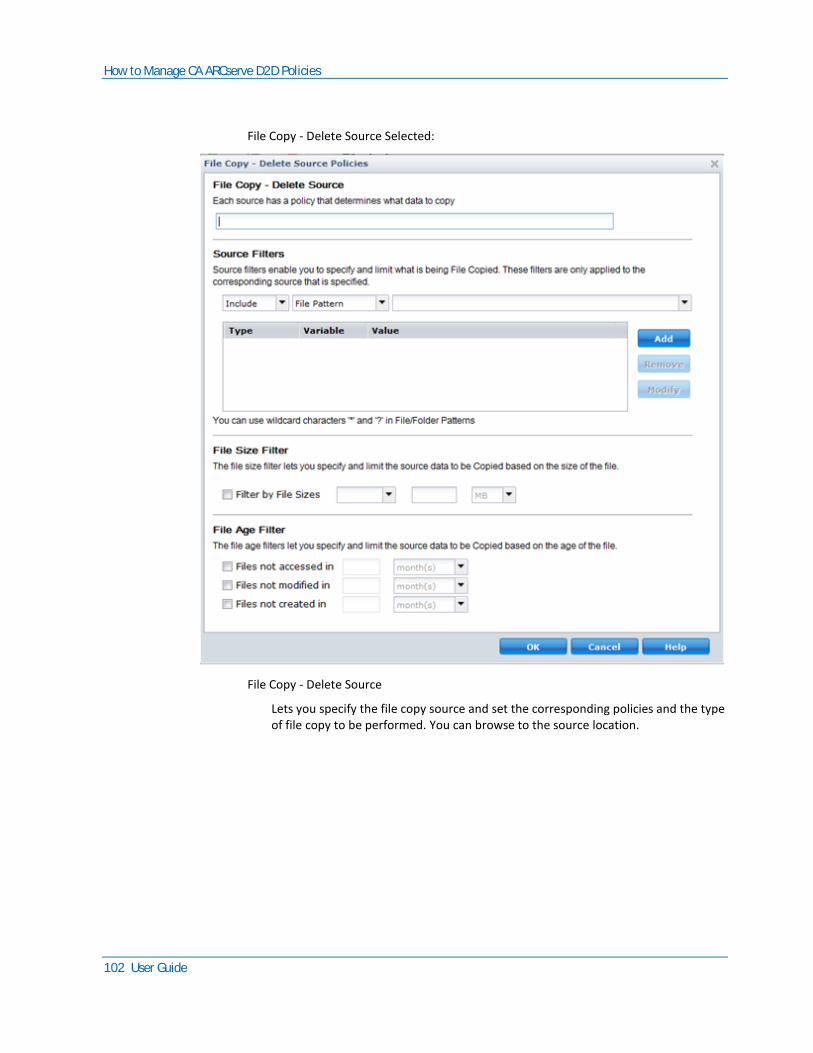
How to Manage CA ARCserve D2D Policies
102 User Guide
File Copy - Delete Source Selected:
File Copy - Delete Source
Lets you specify the file copy source and set the corresponding policies and the type of file copy to be performed. You can browse to the source location.
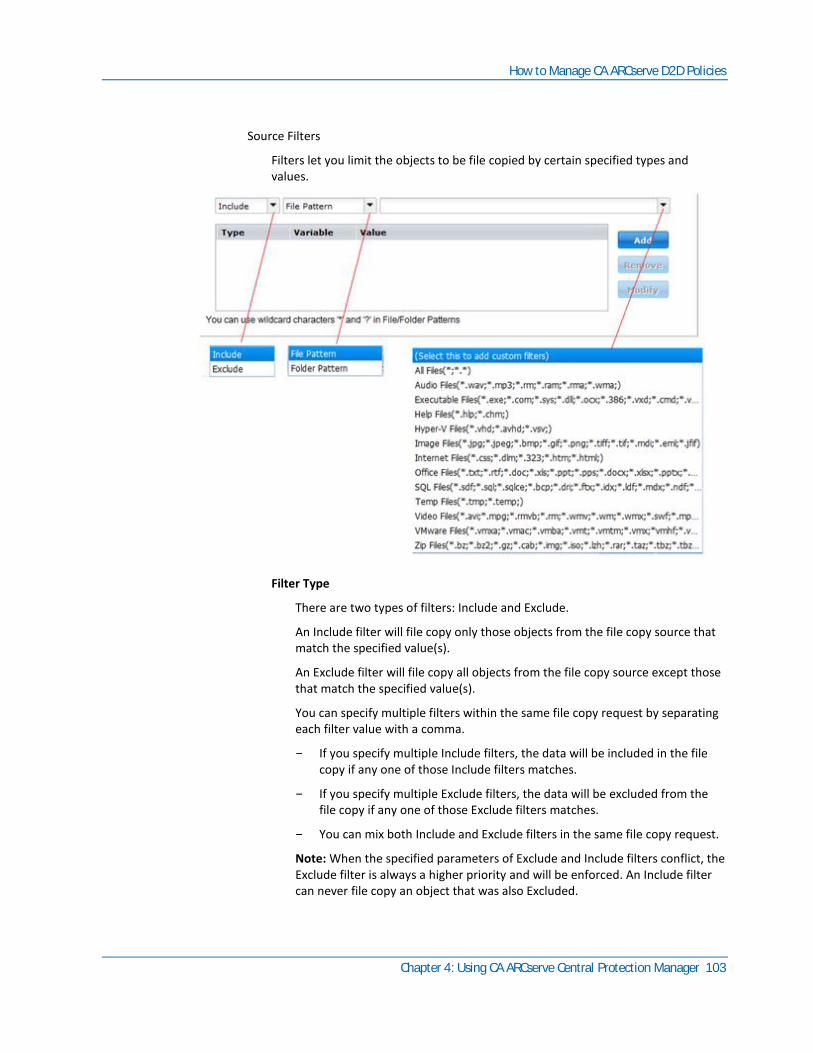
How to Manage CA ARCserve D2D Policies
Chapter 4: Using CA ARCserve Central Protection Manager 103
Source Filters
Filters let you limit the objects to be file copied by certain specified types and values.
Filter Type
There are two types of filters: Include and Exclude.
An Include filter will file copy only those objects from the file copy source that match the specified value(s).
An Exclude filter will file copy all objects from the file copy source except those that match the specified value(s).
You can specify multiple filters within the same file copy request by separating each filter value with a comma.
– If you specify multiple Include filters, the data will be included in the file copy if any one of those Include filters matches.
– If you specify multiple Exclude filters, the data will be excluded from the file copy if any one of those Exclude filters matches.
– You can mix both Include and Exclude filters in the same file copy request.
Note: When the specified parameters of Exclude and Include filters conflict, the Exclude filter is always a higher priority and will be enforced. An Include filter can never file copy an object that was also Excluded.
How to Manage CA ARCserve D2D Policies
104 User Guide
Filter Variable (Pattern)
There are two types of variable pattern filters: File Pattern and Folder Pattern
You can use a File Pattern filter or Folder Pattern filter to include or exclude certain objects from the file copy.
Filter Value
The filter value lets you limit the information that is file copied by selecting only the parameter information that you specify, such as .txt files.
CA ARCserve D2D supports the use of wildcard characters to help select multiple objects to file copy with a single request. A wildcard character is a special character that can be used as a substitute to represent either a single character or a string of text.
The wildcard characters asterisk and question mark are supported in the Value field. If you do not know the complete file/folder pattern value, you can simplify the results of the filter by specifying a wildcard character.
– "*" - Use the asterisk to substitute zero or more characters in the value.
– "?" - Use the question mark to substitute a single character in the value.
For example, you can enter *.txt to exclude all files with a .txt extension if you do not know the specific file name. You can provide as much of the file name as you know, then use wildcards to fill in the blanks.
Note: When you select File Pattern as the filter type, a drop-down list of predefined filters for many commonly used files is available (MS-Office files, Image files, Executable files, Temp files, etc.).
File Size Filter (File Copy - Delete Source Jobs Only)
This filter only applies to File Copy - Delete Source jobs (not File Copy jobs).
File size filters let you limit the source objects to be file copied based upon the size of the file. When you enable the file size filter, the parameters that you specify will become the filter for which objects will and will not be included in the file copy. You can select the range (Equal to or Greater Than, Equal to or Less Than, or Between) and then enter a value for the size.
For example if you specify Equal to or Greater Than 10MB, then CA ARCserve D2D will only file copy objects that meet this criteria. All other objects that do not meet this file size criteria will not be file copied.
How to Manage CA ARCserve D2D Policies
Chapter 4: Using CA ARCserve Central Protection Manager 105
File Age Filter (File Copy - Delete Source Jobs Only)
This filter only applies to File Copy - Delete Source jobs (not File Copy jobs).
File age filters let you automatically include source objects to be file copied based upon certain dates for the file. You can select a parameter (Files not accessed in, Files not modified in, and/or Files not created in) and then enter a value for the number of days, months, or years for the file age filter. You can select multiple file age filters for automatic file copying.
For example if you specify Files not modified in 180 days, then CA ARCserve D2D will automatically file copy all files that meet this criteria (have not been modified during the last 180 days).
Important! If you specify both File Size and File Age filters (or multiple File Age filters), then only the files which meet all of the specified filter parameters will be file copied. Files which do not meet any one of these specified parameters will not be file copied.
Specify File Copy Destinations
CA ARCserve Central Protection Manager lets you specify the destination settings for your information to be file copied.
To specify file copy destinations
1. From the CA ARCserve Central Protection Manager home page, click Policies on the Navigation bar.
The Policies screen opens.
2. Click New to create a new policy.
The New Policy dialog opens.
3. Select the File Copy Settings tab and then select Destination to open the File Copy Settings Destination dialog.
How to Manage CA ARCserve D2D Policies
106 User Guide
4. Specify your destination settings.
■ Destination--Specifies the destination location for the file copy job. You can only select one destination.
CA ARCserve D2D lets you specify the settings for file copying your backed up files to a disk or to the cloud. For file copying, you can specify to perform a copy and retain or a copy and move of your backed up data. The two processes are similar, with the exception that when you perform a copy and move, the data is moved from the source to the destination (deleted from source location) and provides more available free space at your source. When you perform a copy and retain, the data is copied from the source to the destination (remains on source destination) and provides multiple stored versions.
– File Copy to a local or network drive--When selected, lets you specify the full path of the location where you want to move or copy the source files/folders. You can browse to this destination location. Clicking the green arrow icon lets you validate the connection to the specified destination.
– File Copy to Cloud--When selected, lets you specify the cloud location where you want to move or copy the source files/folders. CA ARCserve D2D currently supports file copying to multiple cloud vendors, such as Amazon S3 (Simple Storage Service), Windows Azure, Fujitsu Cloud (Windows Azure), and Eucalyptus-Walrus. These cloud vendors are publicly available web services that let you safely and securely store and retrieve any amount of data, at any time, from anywhere on the web.
You can click the Configure button to display the Cloud Configuration dialog. For more information, see Specify Cloud Configuration Details for File Copy (see page 108).
Note: To eliminate any potential clock skew error when attempting to connect to the cloud, verify that your machine has the correct time zone set and the clock is in sync with the global time. You should always check the time of your machine against the GMT time. If the time of your machine is not synchronized with the correct global clock time (within 5 to 10 minutes), Amazon S3 will not work. If necessary, reset the correct time for your machine and rerun your archive job.
For either destination option, if the connection to the specified destination is lost or broken, CA ARCserve D2D makes several attempts to continue the file copy job. If these reattempts are not successful, a makeup job is performed from the point where the failure occurred. In addition, the activity log is updated with a corresponding error message and an email notification is sent (if configured).
How to Manage CA ARCserve D2D Policies
Chapter 4: Using CA ARCserve Central Protection Manager 107
■ Compression--Specifies the type of compression to be used for File Copy jobs.
Compression is usually performed to decrease your storage space but also has an inverse impact on your file copy speed due to the increased CPU usage.
The available options are:
– No Compression--No compression will be performed. This option has the lowest CPU usage (fastest speed), but also has the largest storage space requirement for your file copy.
– Standard Compression--Some compression will be performed. This option provides a good balance between CPU usage and storage space requirement. This is the default setting.
– Maximum Compression--Maximum compression will be performed. This option provides the highest CPU usage (lowest speed), but also has the lowest storage space requirement for your file copy.
■ Encryption--Lets you enable your encryption password for file copying.
■ Retention Time--This setting only applies to file copied data that is moved (not file copy data that is retained).
Specifies the amount of time (years, months, weeks, days) that the stored data is retained at the destination location. At the end of the specified retention time period, the stored data is purged from the destination.
The retention time calculations are based upon a month being 30 days and a year being 365 days. For example: If you specify a retention time of 2 years, 2 months, and 5 days, then the total retention time for your file copied data will be 795 days (365 + 365 + 30 + 30 + 5).
Important! Because this retention time setting only applies to data that has been copied and moved from the source to the destination (and not copied and retained), it is important to understand that at the end of the specified retention time when the data is purged from the destination, all of this moved data will no longer be stored or saved.
How to Manage CA ARCserve D2D Policies
108 User Guide
■ File Versions--This setting applies only to copied data that is retained (not copied data that is moved).
Specifies the number of copies retained and stored at the destination location (cloud or disk). After this number is exceeded, the earliest (oldest) version will be discarded. This cycle of discarding the oldest stored version will repeat as newer versions are added to the destination, allowing you to always maintain the specified number of stored versions.
For example, if your specified File Versions retention count is set to 5 and you perform five file copies at a time: t1, t2, t3, t4, and t5, these file copies become the five file copy versions retained and available to recover. After the 6th file copy is performed (new version is saved), CA ARCserve D2D will remove the t1 copy and the five available versions to recover are now t2, t3, t4, t5, and t6.
By default, the number of copies retained at the destination location before discarding is 15.
5. Click Save Settings.
The file copy destination settings are saved.
Specify Cloud Configuration Details for File Copy
From this dialog you can use the drop-down menu to select which cloud vendor type you want to use for storage of your file copies. The available options are Amazon S3, Windows Azure, Fujitsu Cloud (Windows Azure), and Eucalyptus-Walrus. (Amazon S3 is the default vendor). For more information about Fujitsu Cloud (Windows Azure), see the Overview and Registration.
Note: If you are using Eucalyptus-Walrus as your file copy cloud vendor, you will not be able to copy files whose entire path length is greater than 170 characters.
The configuration options for each cloud vendor are similar (with some different terminology), and any differences are described.
1. Specify the Connection Settings:
Vendor URL
Identifies the URL address of the cloud provider.
(For Amazon S3, Windows Azure, and Fujitsu Cloud (Windows Azure), the Vendor URL is automatically pre-populated. For Eucalyptus-Walrus, the Vendor URL must be manually entered using the specified format).
Access Key ID/Account Name/Query ID
Identifies the user who is requesting access this location.
(For this field, Amazon S3 uses Access Key ID, Windows Azure and Fujitsu Cloud (Windows Azure) use Account Name, and Eucalyptus-Walrus uses Query ID).
How to Manage CA ARCserve D2D Policies
Chapter 4: Using CA ARCserve Central Protection Manager 109
Secret Access Key/Secret Key
Because your Access Key is not encrypted, this Secret Access Key is a password that is used to verify the authenticity of the request to access this location.
Important! This Secret Access Key is crucial for maintaining the security of your accounts. You should keep your keys and your account credentials in a secure location. Do not embed your Secret Access Key in a web page or other publicly accessible source code and do not transmit it over insecure channels.
(For this field, Amazon S3 uses Secret Access Key. Windows Azure, Fujitsu Cloud (Windows Azure), and Eucalyptus-Walrus use Secret Key).
How to Manage CA ARCserve D2D Policies
110 User Guide
Enable Proxy
If you select this option, you must also include the IP address (or machine name) of the proxy server and the corresponding port number that is used by the proxy server for internet connections. You can also select this option if your proxy server requires authentication. You then must provide the corresponding authentication information (Username and Password) that is required to use the proxy server.
(Proxy capability is not available for Eucalyptus-Walrus).
2. Specify the Advanced Settings:
Bucket Name/Container
All files and folders that are moved or copied to the cloud vendor are stored and organized in your buckets (or containers). Buckets are like a container for your files and are used to group and organize objects together. Every object that is stored at the cloud vendor is placed in a bucket.
(For this field, Amazon S3 and Eucalyptus-Walrus use Bucket Name. Windows Azure and Fujitsu Cloud (Windows Azure) use Container).
Note: For the remainder of this step, all references to Buckets can also be applied to Containers unless specified.
To specify a new bucket name:
a. Specify your new Bucket Name.
Note: CA ARCserve Central Protection Manager does not create the bucket name, however it is generated for each CA ARCserve D2D node when a CA ARCserve Central Protection Manager policy is successfully assigned to it. The Bucket Name for each CA ARCserve D2D node is automatically prefixed with "d2dfilecopy-<hostname>-<user given name>".
A bucket name is unique, easily identifiable, and compliant with internet domain naming rules. No two buckets can have the same name. It is important to understand valid syntax for bucket names.
For Amazon S3 and Eucalyptus-Walrus, refer to the Amazon S3 documentation for more information about bucket naming requirements.
For Windows Azure and Fujitsu Cloud (Windows Azure), refer to the Microsoft documentation for more information about container naming requirements.
How to Manage CA ARCserve D2D Policies
Chapter 4: Using CA ARCserve Central Protection Manager 111
b. For Amazon S3 only, select an available region from the drop-down menu. By default, all available regions are included in the drop-down menu and you can select the region where you want the new bucket created.
Regions allow you to select the geographical region where Amazon S3 stores the buckets that you create. Select a Region that provides you with fast access to your data and allows you to optimize latency, minimize costs, or address regulatory requirements.
(For Windows Azure, Fujitsu Cloud (Windows Azure), and Eucalyptus-Walrus, the region is not selectable).
c. After you have specified your values, click OK. The Bucket name is validated and created at the cloud.
d. After you successfully created the bucket, the main Cloud Configuration dialog is displayed again, with the new bucket information (name and region) included in the Advanced Settings fields.
Enable Reduced Redundancy Storage
For Amazon S3 only, this option lets you select to enable Reduced Redundancy Storage (RRS). RRS is a storage option within Amazon S3 that helps you reduce cost by storing non-critical, reproducible data at lower levels of redundancy than Amazon S3’s standard storage. Both the standard and reduced redundancy storage options store data in multiple facilities and on multiple devices, but with RRS the data is replicated fewer times, so the cost is less. You should expect the same latency and throughput using either the Amazon S3 standard storage or RRS. By default this option is not selected (Amazon S3 uses the standard storage option).
3. Click Test Connection to verify the connection to the specified cloud location.
4. Click OK to exit the Cloud Configuration dialog.
Specify File Copy Schedules
CA ARCserve Central Protection Manager lets you specify the schedule settings for your information to be file copied.
To specify file copy schedules
1. From the CA ARCserve Central Protection Manager home page, click Policies on the Navigation bar.
The Policies screen opens.
2. Click New to create a new policy.
The New Policy dialog opens.
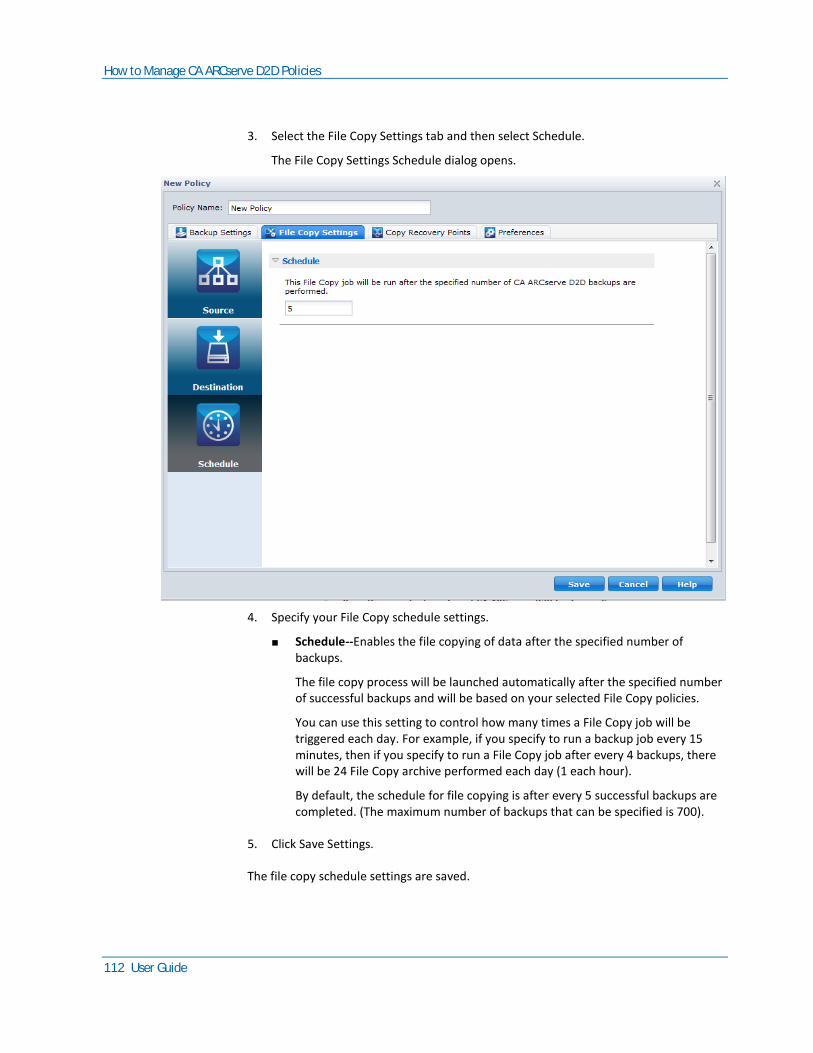
How to Manage CA ARCserve D2D Policies
112 User Guide
3. Select the File Copy Settings tab and then select Schedule.
The File Copy Settings Schedule dialog opens.
4. Specify your File Copy schedule settings.
■ Schedule--Enables the file copying of data after the specified number of backups.
The file copy process will be launched automatically after the specified number of successful backups and will be based on your selected File Copy policies.
You can use this setting to control how many times a File Copy job will be triggered each day. For example, if you specify to run a backup job every 15 minutes, then if you specify to run a File Copy job after every 4 backups, there will be 24 File Copy archive performed each day (1 each hour).
By default, the schedule for file copying is after every 5 successful backups are completed. (The maximum number of backups that can be specified is 700).
5. Click Save Settings.
The file copy schedule settings are saved.
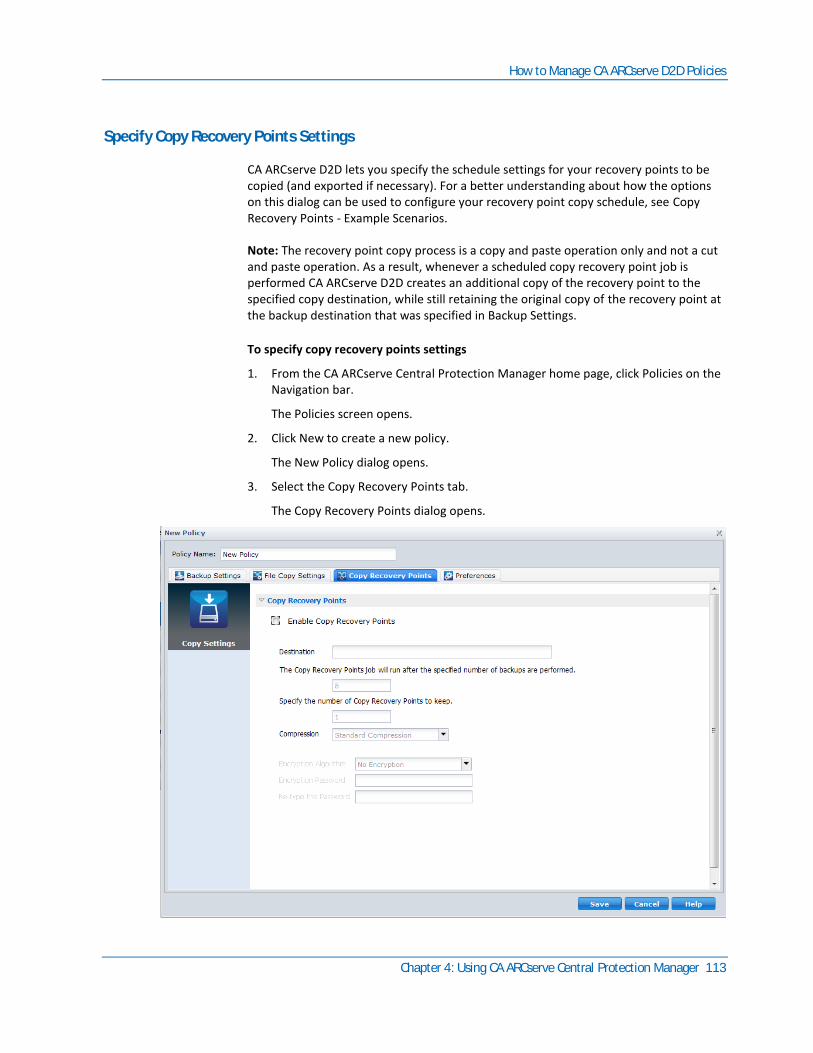
How to Manage CA ARCserve D2D Policies
Chapter 4: Using CA ARCserve Central Protection Manager 113
Specify Copy Recovery Points Settings
CA ARCserve D2D lets you specify the schedule settings for your recovery points to be copied (and exported if necessary). For a better understanding about how the options on this dialog can be used to configure your recovery point copy schedule, see Copy Recovery Points - Example Scenarios.
Note: The recovery point copy process is a copy and paste operation only and not a cut and paste operation. As a result, whenever a scheduled copy recovery point job is performed CA ARCserve D2D creates an additional copy of the recovery point to the specified copy destination, while still retaining the original copy of the recovery point at the backup destination that was specified in Backup Settings.
To specify copy recovery points settings
1. From the CA ARCserve Central Protection Manager home page, click Policies on the Navigation bar.
The Policies screen opens.
2. Click New to create a new policy.
The New Policy dialog opens.
3. Select the Copy Recovery Points tab.
The Copy Recovery Points dialog opens.
How to Manage CA ARCserve D2D Policies
114 User Guide
4. Specify your recovery point copy schedule settings.
Enable Copy Recovery Points
Enables the scheduled copying of recovery points after the specified number of backups. If this option is not checked, no scheduled copying of recovery points will be performed.
Destination
Specifies the location (destination) for the copy of the recovery points or you can browse to a copy location. You can click on the green arrow icon button to verify the connection to the specified location.
The Copy Recovery Points job will run after the specified number of backups are performed.
Specifies when the scheduled recovery point copy process will be automatically launched.
The recovery point copy process will be launched automatically after the specified number of successful backups and will be based on your selected copy policies.
You can use this setting to control how many times a recovery point copy process will be triggered each day. For example, if you specify to run a backup job every 15 minutes, then if you specify to copy the recovery points run an after every 4 backups, there will be 24 recovery point copy jobs performed each day (1 each hour).
By default, the schedule for recovery point copy is after every 8 successful backups are completed.
Important! If you schedule backup and copy jobs to run at regular intervals and if the copy job is currently running (in active state) when the scheduled time for the backup job time arrives, the backup job will fail. (The next backup job will run as scheduled and should be successful if it does not conflict with another copy job). Because the copy operation will take almost same amount of time as performing a full backup, the best practice is not to set a frequent schedule for your recovery point copy jobs.
Specify the number of Copy Recovery Points to keep.
Specifies the number of recovery points retained and stored at the specified copy destination. After this number is exceeded, the earliest (oldest) recovery point will be discarded. This cycle of discarding the oldest recovery points will repeat as newer recovery points are added to the destination, allowing you to always maintain the specified number of stored recovery points.
Note: If you destination does not have sufficient free space, you may consider reducing the number of saved recovery points.
By default the retention count is set to 31 recovery points.
Note: The maximum number of recovery points is 1344.
How to Manage CA ARCserve D2D Policies
Chapter 4: Using CA ARCserve Central Protection Manager 115
Compression
Specifies the type of compression to be used for recovery point copies.
Compression is typically performed to decrease your disk space usage, but also has an inverse impact on your backup speed due to the increased CPU usage.
The available options are:
■ No Compression - Compression is not performed. Files are pure VHD. This option has the lowest CPU usage (fastest speed), but also has the highest disk space usage for your backup image.
■ No Compression - VHD - Compression is not performed. Files are converted to .vhd format directly, without the need for manual operations. This option has the lowest CPU usage (fastest speed), but also has the highest disk space usage for your backup image.
■ Standard Compression - Some compression is performed. This option provides a good balance between CPU usage and disk space usage. This setting is the default setting.
■ Maximum Compression - Maximum compression is performed. This option provides the highest CPU usage (lowest speed), but also has the lowest disk space usage for your backup image.
Note: If your backup image contains uncompressible data (such as JPG images or ZIP files), additional storage space can be allocated to handle such data. As a result, if you select any compression option and you have uncompressible data in your backup, it can actually result in an increase in your disk space usage.
i
Encryption Algorithm
Specify the type of encryption algorithm to be used for the recovery point copies.
Data encryption is the translation of data into a form that is unintelligible without a deciphering mechanism. CA ARCserve D2D data protection uses secure, AES (Advanced Encryption Standard) encryption algorithms to achieve maximum security and privacy of your specified data.
The available format options are No Encryption, AES-128, AES-192, and AES-256. (To disable encryption, select No Encryption).
Encryption Password
If the recovery point to be copied was previously encrypted, you will need to provide (and confirm) the password.
■ If the recovery point is being copied to a location on the same machine, the encryption password will be remembered and this field will be automatically populated.
■ If the recovery point is being copied to a different machine, you will need to enter the encryption password.
How to Manage CA ARCserve D2D Policies
116 User Guide
5. Click Save Settings.
The Copy Recovery Point settings are saved.
Manage Preferences
CA ARCserve Central Protection Manager lets you manage the general needs of a policy. You can generate news feeds or create email alert notifications or update your server or connections.
This section contains the following topics
Specify General Preferences (see page 116) Specify Email Alerts (see page 118) Specify Update Preferences (see page 123)
Specify General Preferences
CA ARCserve Central Protection Manager lets you specify the general preferences of a policy.
To specify general preferences
1. From the CA ARCserve Central Protection Manager home page, click Policies on the Navigation bar.
The Policies screen opens.
2. Click New to create a new policy.
The New Policy dialog opens.
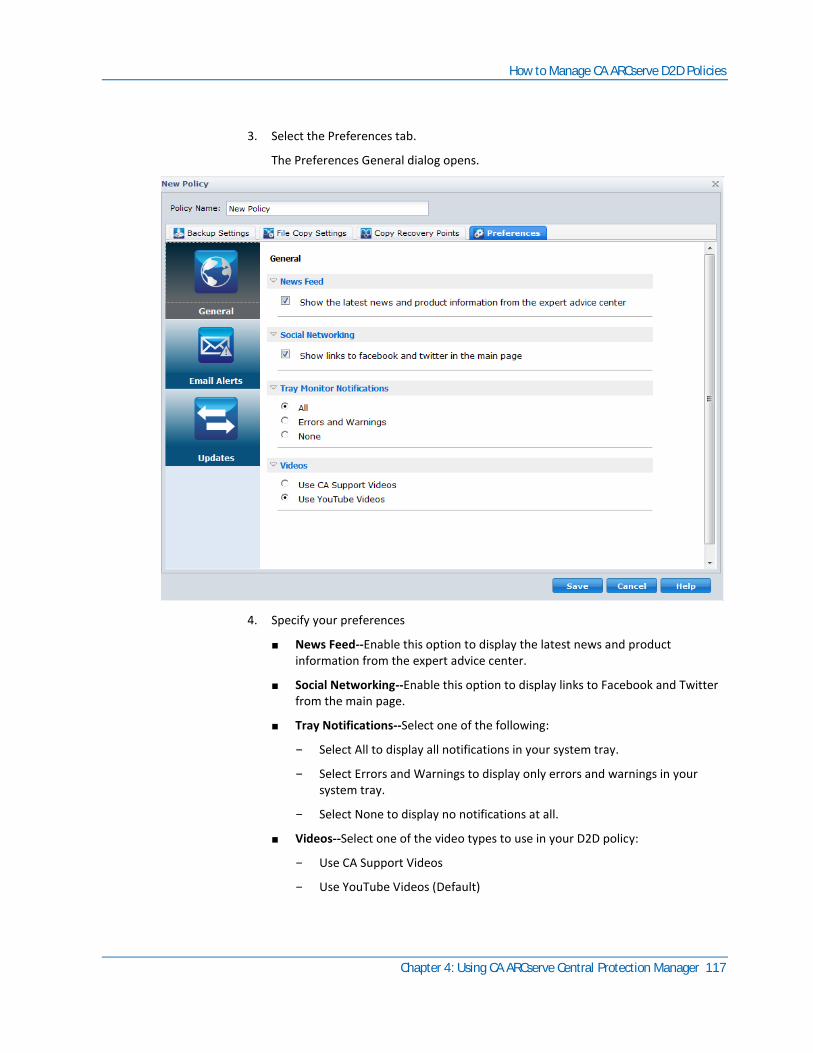
How to Manage CA ARCserve D2D Policies
Chapter 4: Using CA ARCserve Central Protection Manager 117
3. Select the Preferences tab.
The Preferences General dialog opens.
4. Specify your preferences
■ News Feed--Enable this option to display the latest news and product information from the expert advice center.
■ Social Networking--Enable this option to display links to Facebook and Twitter from the main page.
■ Tray Notifications--Select one of the following:
– Select All to display all notifications in your system tray.
– Select Errors and Warnings to display only errors and warnings in your system tray.
– Select None to display no notifications at all.
■ Videos--Select one of the video types to use in your D2D policy:
– Use CA Support Videos
– Use YouTube Videos (Default)
How to Manage CA ARCserve D2D Policies
118 User Guide
5. Click Save.
The general preferences are saved.
Specify Email Alerts
CA ARCserve Central Protection Manager lets you specify Email Alert preferences.
To specify email alerts
1. From the CA ARCserve Central Protection Manager home page, click Policies on the Navigation bar.
The Policies screen opens.
2. Click New to create a new policy.
The New Policy dialog opens.
How to Manage CA ARCserve D2D Policies
Chapter 4: Using CA ARCserve Central Protection Manager 119
3. Select the Preferences tab and then select Email Alerts.
The Preferences Email Alerts dialog opens.
4. Specify your email alerts.
■ Enable Email Alerts--Select this option to enable the preferences on this screen.
■ Email Settings--Click this button to open the Email Settings dialog (see page 121).
■ Notifications--Specifies to send automatic email alert notifications upon the completion of selected events. You can select any or all of the available options.
The available options are to send an alert notification for the following events:
Backup Job Alerts
– Missed jobs--Sends an email alert notification for all missed jobs. A missed job is any scheduled job that did not run at the scheduled time. This could happen when some other job is running or previous job that started earlier did not finish yet. For example, if an export or recovery job is running at the scheduled time for a backup job, then that backup job will be missed.
– Backup, Catalog, File Copy, Restore, or Copy Recovery Point job failure/crash--Sends an email alert notification for all unsuccessful backup, catalog, file copy, restore or copy recovery point job attempts. This category includes all failed, incomplete, canceled, missed jobs, and crashed attempts.
– Backup, Catalog, File Copy, Restore, or Copy Recovery Point job success--Sends an email alert notification for all successful backup, catalog, file copy, restore, or copy recovery point job attempts.
– Merge Job stopped, skipped, failed, or crashed--Sends an alert notification for all stopped, skipped, failed, or crashed merge jobs. If you enable this alert, you are informed once a merge job fails. A merge failure can occur for the following reasons: the session is mounted, the session is locked by a catalog job, or the session is locked due to other reasons.
– Merge Job success--Sends an alert for all successful merge jobs.
Disk Space Alerts
– Backup Destination free space is less than--Sends an email alert notification when the amount of unused space at the backup destination is less than a specified value. For this option, you can further select either a percentage of the total capacity or a specific value (in MB) for the threshold level of when the alert notification will be sent.
Update Alerts
– New Updates Available--Sends an email notification when a new update for CA ARCserve D2D is available. Email notifications will also be sent if a failure occurs during the check for updates or during the download.
How to Manage CA ARCserve D2D Policies
120 User Guide
Resource Alerts
– Enable Resource Alerts--Sends an email notification when any specified performance key indicator (PKI) threshold level is reached. To ensure your server is efficient and reliable, you need to continually be aware of the performance to identify possible problems and quickly address bottleneck situations.
Defining threshold levels for these performance indicators is strictly up to you and your knowledge of your server. There are no right or wrong settings and these alert notifications should be based upon "normal" and acceptable performance. For example, if your system normally runs at an 80% CPU load, then setting a CPU Usage threshold at 75% would not be very useful or efficient.
Each of these PKI parameters can be separately configured to send an alert notification when the corresponding threshold level is reached. The maximum number that each PKI alert email will be sent is 5 per day.
– CPU Usage--The specified CPU Usage alert threshold indicates the percentage of CPU usage for your CA ARCserve D2D protected server. You can use this alert notification to make sure that your server does not become overloaded too often.
If your CPU usage is too high, your server response time may become very slow or unresponsive and you should consider spreading out (balancing) your load.
– Disk Throughput--The specified Disk Throughput alert threshold indicates the disk throughput (MB/second) for your CA ARCserve D2D protected server. You can use this alert notification to make sure that you are maximizing the capability of your disk.
If your disk throughput is close to the maximum value that your disk can handle, you should consider upgrading to a disk that better matches your needs. Generally a faster disk leads to better performance.
– Memory Usage--The specified Memory Usage alert threshold indicates the percentage of memory in use on your CA ARCserve D2D protected server. Utilization is how much of your memory capacity you are using. The higher the percentage the worse your server performance will be.
If your memory utilization continually becomes too high, you need to determine which process is causing this high usage. You can use this indicator setting to alert you of when an application or server upgrade may be necessary.
– Network I/O--The specified Network I/O alert threshold indicates the percentage of NIC bandwidth you are currently using on your CA ARCserve D2D protected server. Utilization is how much of your network interface card (or NIC) capacity you are using. The higher the percentage the worse your network performance will be.
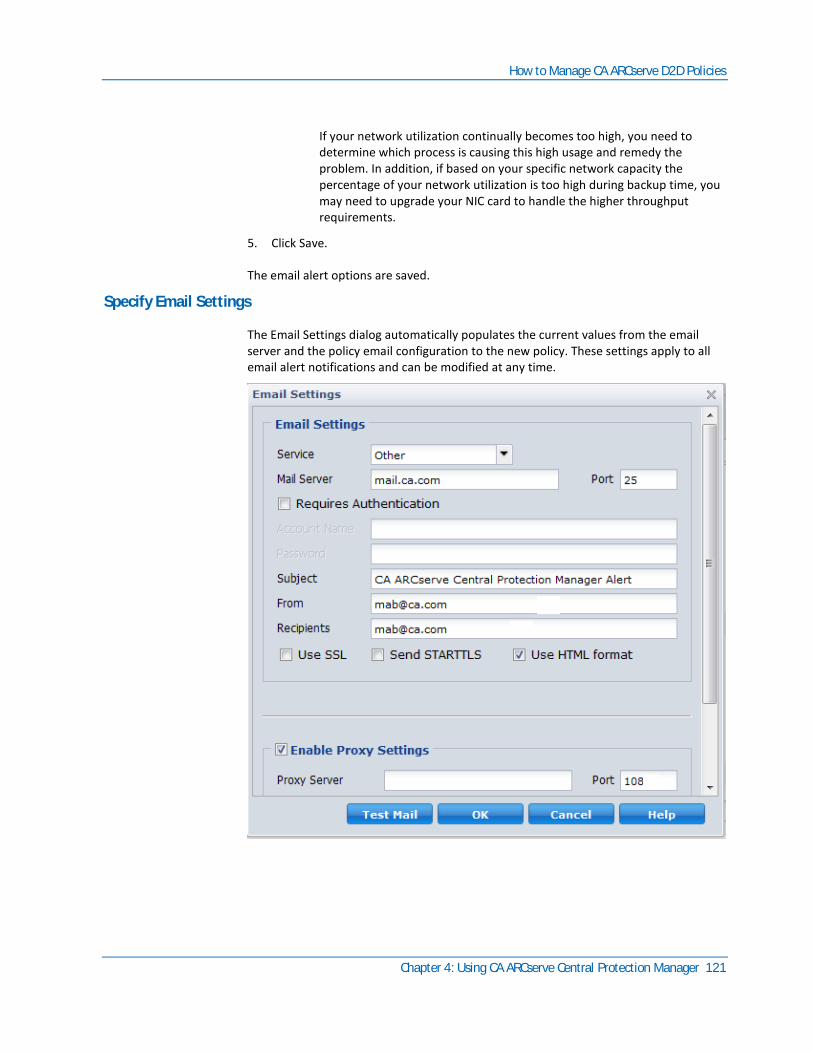
How to Manage CA ARCserve D2D Policies
Chapter 4: Using CA ARCserve Central Protection Manager 121
If your network utilization continually becomes too high, you need to determine which process is causing this high usage and remedy the problem. In addition, if based on your specific network capacity the percentage of your network utilization is too high during backup time, you may need to upgrade your NIC card to handle the higher throughput requirements.
5. Click Save.
The email alert options are saved.
Specify Email Settings
The Email Settings dialog automatically populates the current values from the email server and the policy email configuration to the new policy. These settings apply to all email alert notifications and can be modified at any time.
How to Manage CA ARCserve D2D Policies
122 User Guide
Service
The email provider service to use for sending the alert notifications. The available options are Google Mail, Yahoo Mail, Live Mail, and Other.
■ If you select Other, you must identify the mail server and corresponding port number used as the default setting.
■ If you select Google Mail, Yahoo Mail, or Live Mail the mail server and port number fields are automatically populated.
Mail Server
The host name of the SMTP mail server that CA ARCserve D2D can use to send the email alerts.
Port
The output port number for the mail server.
Requires Authentication
Specifies if this mail server requires authentication when attempting to send an email via the Internet. When this option is selected, the corresponding user Account Name and Password must be provided.
Subject
Subject description for the email alert notifications that CA ARCserve D2D sends. By default, this is "CA ARCserve D2D Alert".
From
The email address that CA ARCserve D2D uses to send the email alert notifications.
Recipients
Email address for the recipients receiving the email alert notifications.
Note: To enter multiple email addresses, each address must be separated by a semi-colon character.
Use SSL
Email server requires an SSL (Secure Sockets Layer) connection to transmit data securely via the Internet.
Send STARTTLS
Email server requires a STARTTLS (Start TLS extension) command issued to initiate a secure SMTP connection between servers.
How to Manage CA ARCserve D2D Policies
Chapter 4: Using CA ARCserve Central Protection Manager 123
Use HTML format
Email alert notifications sent as HTML. If this option is not selected, the alerts are sent as plain text. By default, this option is selected.
Enable Proxy Settings
Specifies if you want to connect to a proxy server for sending your email alert notifications. When this option is selected, the corresponding name of the proxy server and port number must be provided.
Test Mail
Verifies that the mail configuration settings are correct.
Specify Update Preferences
CA ARCserve Central Protection Manager lets you specify your Update preferences.
To specify update preferences
1. From the CA ARCserve Central Protection Manager home page, click Policies on the Navigation bar.
The Policies screen opens.
2. Click New to create a new policy.
The New Policy dialog opens.
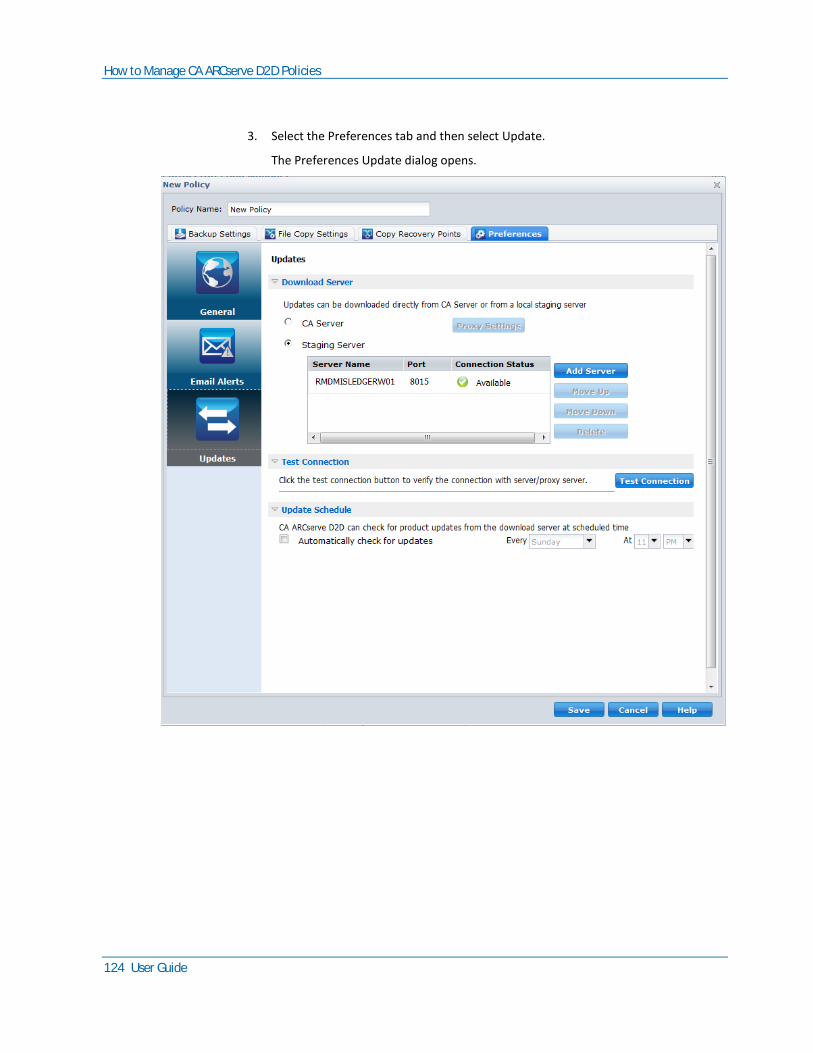
How to Manage CA ARCserve D2D Policies
124 User Guide
3. Select the Preferences tab and then select Update.
The Preferences Update dialog opens.
How to Manage CA ARCserve D2D Policies
Chapter 4: Using CA ARCserve Central Protection Manager 125
4. Specify your Update preferences.
■ Download Server--Specifies the source server from where your CA ARCserve D2D server connects to and download available updates.
– CA Technologies Server--Use this option to specify that CA ARCserve D2D updates download from the CA Technologies server directly to your local server.
– Staging Server--Use this option to specify the server that you want to use as a staging server.
If you specify more than one staging server, the first listed server is designated as the primary staging server. CA ARCserve D2D initially attempts to connect to the primary staging server. If for any reason the first listed server is not available, then the next listed server becomes the primary staging server. The same sequence continues until the last listed server becomes the primary staging server. (The Staging Server list is limited to the maximum of five servers).
– You can use the Move Up and Move Down buttons to change the staging server sequence.
– You can use the Delete button to remove a server from this listing.
– You can use the Add Server button to add a new server to this listing. When you click the Add Server button, the Staging Server dialog opens, allowing you to specify the name of the added staging server and the Port number which defaults to your current port number.
This is the default setting.
Note: For D2D Policies, the default staging server is the local CA ARCserve Central Applications computer.
CA ARCserve D2D updates download from the CA Technologies server directly to the specified staging server location. After the updates are downloaded to this staging server, you can then further download the updates from the staging server to a client server. If you select the Staging Server location, specify the host name or IP address for the staging server, with the corresponding port number.
How to Manage CA ARCserve D2D Policies
126 User Guide
■ Proxy Settings--This is only available when you select CA Server as the download server.
Click Proxy Settings to specify if you want the CA ARCserve D2D updates to download via a proxy server. This will be the connection to the CA server from which your download server obtains the updates.
When you click this button, the Proxy Settings dialog opens.
– Use browser proxy settings (for IE and Chrome only)--Lets you use the credentials that provided for the CA ARCserve D2D proxy.
– Configure proxy settings--A proxy server acts as an intermediary between your download server (staging or client) and the CA server to ensure security, increased performance, and administrative control. By default, this option is disabled.
Select this option to use a proxy server to connect to the CA server for CA ARCserve D2D update information. The proxy server connects directly to the CA server to obtain update information. With this option enabled, include the IP address (or host name) of the proxy server and the corresponding port number that the proxy server uses for internet connections.
If you do not select this option, then the download server connects directly to the CA server without going through a proxy server).
In addition, you can also specify if your proxy server requires authentication. When selected, specifies that authentication information (User ID and Password) are required to use the proxy server.
How to Manage CA ARCserve D2D Policies
Chapter 4: Using CA ARCserve Central Protection Manager 127
■ Test Connection--Lets you test the following connections and display a status message when completed:
– If you selected "CA Technologies Server" as the download server, it tests the connection between the computer and the CA Technologies server through the specified proxy server.
– If you selected "Staging Server" as the download server, it tests the connection between the computer and the specified staging server.
The test connection button is used to test the availability of each listed staging server, and a corresponding status is displayed in the Connection Status field.
Note: The test connection is automatically performed when you launch the Preferences Auto Updates dialog when you create a new policy.
■ Update Schedule--Specifies when to check for (and download) new CA ARCserve D2D updates.
With this option selected, it automatically checks for new and available CA ARCserve D2D updates. When you select this option, you then have drop-down menu capabilities to specify when to perform this function (every day or weekly on a specified day) and the time of the day that it will be performed.
If you select this option and do not specify a day and time, the default schedule is to perform the automatic check every Sunday at 4:00AM.
By default, if this check determines that a new update is available, CA ARCserve D2D automatically downloads the update. If you do not want download the updates automatically, you can disable this function from the D2DPMSettings.INI file. For more information, see CA ARCserve D2D User Guide.
If you do not select this option, it disables all automatic check and download functions (and its status is displayed under status Summary section of the home page).
These update functions can only be triggered manually.
Note: If configured you will get an email notification if the scheduled check for updates discovers that a new update is available. In addition, email notifications will also be sent if a failure occurs during the check for updates or during the download.
5. Click Save.
The update preferences are saved.
How to Manage CA ARCserve D2D Policies
128 User Guide
Edit or Copy Policies
CA ARCserve Central Protection Manager lets you edit or copy policies after they are created.
To edit policies
1. Log in to the application.
Click Policies on the Navigation bar to open the Policies screen.
2. From the Policies screen, click the check box next to a policy and do one of the following:
■ Click Edit on the toolbar and edit the selected policy.
■ Click Copy on the toolbar to copy and create a new policy from the selected policy.
Note: When you copy a policy, the Copy Policy dialog opens. Specify a name for the new policy and click OK.
The Edit Policy dialog opens.
3. If you want to change the name of the policy name, specify a name in the Policy Name field.
4. Specify the values that you require and click Save.
The policy is edited or copied.
Delete Policies
CA ARCserve Central Protection Manager lets you delete policies that were created previously.
Note: CA ARCserve Central Protection Manager does not let you delete policies that are assigned to nodes. To delete policies with assigned nodes, you must unassign the nodes from the policy and then delete the policy. For information about how to unassign nodes from a policy, see Assign and Unassign Nodes from Policies (see page 130).
To delete policies
1. From the CA ARCserve Central Protection Manager home page, click Policies on the Navigation bar.
The Policies screen opens.
2. From the Policies list, click the policy that you want to delete.
How to Manage CA ARCserve D2D Policies
Chapter 4: Using CA ARCserve Central Protection Manager 129
3. Click Delete on the Policies toolbar.
A delete confirmation message appears.
4. Click Yes to delete the policy.
Note: If you delete a policy in error, you must recreate the policy. If you do not want to delete the policy, click No.
The policy is deleted.
Deploy Policies
CA ARCserve Central Protection Manager lets you deploy Policies whether it was deployed multiple times or failed to deploy to remote servers.
To deploy policies
1. From the CA ARCserve Central Protection Manager home page, click Policies on the Navigation bar
The Policies screen opens.
2. Select a Policy from the Policies list and click Deploy Now.
The policy is deployed immediately.
Note: When the policy deploys successfully to a CA ARCserve D2D node, all settings on the CA ARCserve D2D node cannot be changed. With the exception of the Update Connection button enabled, CA ARCserve D2D can resynchronize the connection information to the backup destination if the access credentials have changed on the remote server. In addition, you can view the policy deployment status on the Node list screen under the Policy column.
How to Manage CA ARCserve D2D Policies
130 User Guide
Assign and Unassign Nodes from Policies
CA ARCserve Central Protection Manager lets you assign or unassign nodes from existing D2D Policies.
Follow these steps:
1. From the CA ARCserve Central Protection Manager home page, click Policies on the Navigation bar to open the Policies screen.
2. Select a Policy from the Policies list and click the Policy Assignment tab.
A list of nodes that are assigned to the selected Policy displays one of the following deployment actions and statuses (Format: [action] deployment status):
■ [Assign] Pending
■ [Unassign] Deploying
■ [Resync] Done
■ [Update] Failed
■ [Re-deploy] Deploy D2D successful
■ [Re-deploy] Deploy D2D failed
■ [Re-deploy] Deploy D2D rebooting
3. Click the Assign and Unassign button.
The Assign/Unassign Policy dialog opens.
4. Specify the following fields from the Assign/Unassign Policy dialog:
■ Group--Lets you select the group name containing the nodes that you want to assign.
■ Node Name Filter--Lets you filter the available nodes based on common criteria.
Note: The Node Name field lets you filter nodes using wildcard characters.
For example, Acc* lets you filter all nodes having a node name that begins with Acc. To clear the filter results, click X in the Filter field.
Run a Back Up Now
Chapter 4: Using CA ARCserve Central Protection Manager 131
5. Do one of the following actions:
■ Assign nodes to policies--Select the nodes that you want to add and click the single right arrow.
The nodes move from the Available Nodes list to the Selected Nodes list.
Note: To select and move all nodes, click the double right arrow.
■ Unassign nodes from policies--Select the nodes that you want to unassign and click the single left arrow.
The nodes move from the Selected Nodes list to the Available Nodes list.
Note: To select and move all nodes, click the double left arrow.
Click OK.
Note: The following message appears when you unassign policies:
You are unassigning the policies from the selected node. You can keep the current
settings to allow the node to continue the backup process. Do you want to keep
the settings?" Click Yes to keep the current CA ARCserve D2D settings, click No
to remove the current CA ARCserve D2D settings, or click Cancel to go back to the
Assign/Unassign Policy screen.
When you click No, the remote CA ARCserve D2D settings will be lost and the CA ARCserve D2D server will not be protected.
The nodes are applied to the specified policies.
Run a Back Up Now
Typically, backups are performed automatically and controlled by the schedule settings. However, there may be times when you need to perform an ad-hoc backup (Full, Incremental, or Verify) immediately.
An ad-hoc backup is need-based, rather than being scheduled in advance as part of a backup plan. For example, if you have a repeat schedule for Full, Incremental, and Verify backups and you want to make major changes to your machine, you should perform an immediate ad-hoc backup without waiting for the next scheduled backup to occur.
An ad-hoc backup also allows you to add a customized (unscheduled) recovery point so that you can roll back to this previous point in time if necessary. For example, if you install a patch or service pack and then discover that it adversely affects the performance of your machine, you may want to roll back to the ad-hoc backup session that does not include the patch or service pack.
Follow these steps:
1. Log in to the application.
2. From the Navigation bar on the home page, click Node to open the Node screen.
Run a Back Up Now
132 User Guide
3. Do one of the following actions to specify the nodes that you want to back up:
■ Node level: Click the group containing the nodes that you want to back up and then click the check box next to the nodes that you want to back up.
■ Group level: Click the group containing the nodes that you want to back up.
4. Then do one of the following actions to back up the node:
■ Click Backup on the toolbar.
■ Right-click the selected group or right-click the nodes and click Backup Now on the context menu.
5. On the Run a backup now dialog, specify a backup type by clicking one of the following types:
■ Full Backup--Initiates a Full Backup of your entire machine or the selected volumes.
■ Incremental Backup--Initiates an Incremental Backup of your machine. An Incremental Backup backs up only those blocks that have changed since the previous backup.
Note: The advantages of Incremental Backups are that it is a fast backup and it produces a small backup image. This is the most optimal way to perform backups.
■ Verify Backup--Initiates a Verify Backup of your machine by examining the most recent backup of each individual block and comparing the content and information to the original source. This comparison verifies that the latest backed up blocks represent the corresponding information at the source. If the backup image for any block does not match the source, CA ARCserve D2D refreshes (resynchronizes) the backup of the block that does not match. Be aware of the following advantages and disadvantages to performing Verify backups:
– Advantages--A very small backup image is produced when compared to a Full Backup because only the changed blocks (blocks that do not match the last backup) are backed up.
– Disadvantages--The backup time is slow because all of source disk blocks are compared with the blocks of the last backup.
Note: If you add a new volume to the backup source, the newly added volume is fully backed up regardless of the overall backup method selected.
6. (Optional) Specify the Backup Name and click OK. If you do not specify a name, by default, it is named Customized/Full/Incremental/Verify Backup.
A confirmation screen appears, and the selected type of backup is launched immediately.
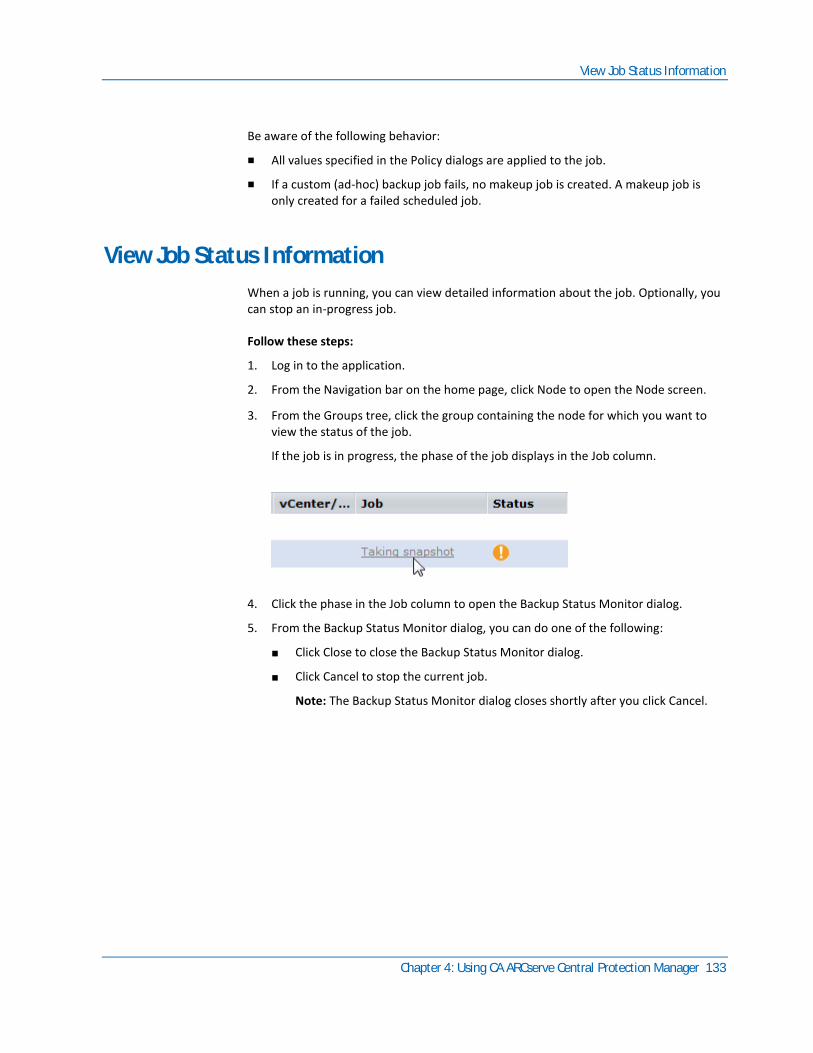
View Job Status Information
Chapter 4: Using CA ARCserve Central Protection Manager 133
Be aware of the following behavior:
■ All values specified in the Policy dialogs are applied to the job.
■ If a custom (ad-hoc) backup job fails, no makeup job is created. A makeup job is only created for a failed scheduled job.
View Job Status Information
When a job is running, you can view detailed information about the job. Optionally, you can stop an in-progress job.
Follow these steps:
1. Log in to the application.
2. From the Navigation bar on the home page, click Node to open the Node screen.
3. From the Groups tree, click the group containing the node for which you want to view the status of the job.
If the job is in progress, the phase of the job displays in the Job column.
4. Click the phase in the Job column to open the Backup Status Monitor dialog.
5. From the Backup Status Monitor dialog, you can do one of the following:
■ Click Close to close the Backup Status Monitor dialog.
■ Click Cancel to stop the current job.
Note: The Backup Status Monitor dialog closes shortly after you click Cancel.
How to Restore Nodes in CA ARCserve Central Protection Manager
134 User Guide
How to Restore Nodes in CA ARCserve Central Protection Manager
CA ARCserve Central Protection Manager provides you with various tools and options that you can use to restore nodes. This section includes information about how you can safely and efficiently restore data.
The section contains the following topics:
Restore Data from Recovery Points (see page 134) Restore Data from File Copies (see page 137) Restore Data from Files and Folders (see page 140) Restore Data from Virtual Machines (see page 144) Restore Microsoft Exchange Email Data (see page 148)
Restore Data from Recovery Points
The Browse Recovery Points lets you restore any applications by browsing for the available recovery points (successful backups) from a calendar view.
To restore data from recovery points
1. Log in to the application and click Node on the Navigation bar.
2. From the Node screen, expand the group containing the node that you want to restore.
Click the check box next to the node that you want to restore and then click Restore on the toolbar.
3. From the Restore dialog, click Browse Recovery Points.
The Browse Recovery Points dialog opens.
4. Specify the Backup Location or browse to the location where your backup images are stored.
Note: You can click the green arrow by the Browse button to validate the connection to the specified backup destination. You may have to enter the user name and password credentials to connect to a remote network share.
The calendar view highlights all dates in green, during the displayed time period that contain recovery points for that backup source.
How to Restore Nodes in CA ARCserve Central Protection Manager
Chapter 4: Using CA ARCserve Central Protection Manager 135
5. Specify the information to restore.
a. Select the calendar date for the backup image you want to restore.
The corresponding recovery points for that date are displayed, along with the time of the backup, the type of backup that was performed, the name of the backup, and the catalog status.
b. Select a recovery point that you want to restore.
The corresponding backup content (including any applications) for that recovery point is displayed.
c. Select the content to be restored.
■ For a volume-level restore, you can specify to restore the entire volume or selected files or folders within the volume.
■ For an application-level restore, you can specify to restore the entire application or selected components, databases, instances, and so on within the application.
Click Next.
The Restore Options dialog is displayed.
6. Select the destination for the restore.
The available options are to restore to the original location of the backup or restore to a different location.
Restore to Original Location
Restores to the original location from where the backup image was captured.
Note: When restoring the CA ARCserve D2D logs folder to the original location, the files that are in the logs folder are skipped. For CA ARCserve Central Host-Based VM Backup, this option is disabled by default. To use it, install CA ARCserve D2D inside the Guest OS and then restore.
Restore to:
You can either specify a location or browse to the location where your backup images are to be restored. You can click on the green arrow icon button to verify the connection to the specified location.
If necessary, you will need to enter the User Name and Password credentials to gain access to that location.
How to Restore Nodes in CA ARCserve Central Protection Manager
136 User Guide
7. Select the option on how CA ARCserve D2D can resolve conflicts that are encountered during the restore process.
The available options are:
Overwrite existing files
Overwrites (replaces) any existing files that are located at the restore destination. All objects will be restored from the backup files regardless of their current presence on your machine.
Replace active files
Replaces any active files upon reboot. If during the restore attempt CA ARCserve D2D discovers that the existing file is currently in use or being accessed and it will not immediately replace that file, but instead to avoid any problems, it will delay the replacement of the active files until the next time the machine is rebooted. (The restore will occur immediately, but the replacement of any active files is done during the next reboot).
Note: If this option is not selected, then any active file is skipped from the restore.
Rename files
Creates a new file if the file name already exists. Selecting this option will copy the source file to the destination with the same filename but a different extension. Data is then restored to the new file.
Skip existing files
Skips over and not overwrite (replace) any existing files that are located at the restore destination. Only objects that do not currently existing on your computer will be restored from the backup files.
By default, this option is selected.
8. (Optional) Select Create root directory from the Directory Structure.
This allows CA ARCserve D2D to recreate the same root directory structure on the restore destination path.
Note: If this option is not selected, the file or folder to be restored is restored directly to the destination folder.
9. Enter the backup encryption password to restore the encrypted data and then click Next.
The Restore Summary dialog is displayed.
10. Review the displayed information to verify that all the restore options and settings are correct.
– If the summary information is not correct, click Previous and go back to the applicable dialog to change the incorrect setting.
If the summary information is correct, click Finish to launch the restore process.
How to Restore Nodes in CA ARCserve Central Protection Manager
Chapter 4: Using CA ARCserve Central Protection Manager 137
Restore Data from File Copies
The Browse File Copies option lets you recover data from CA ARCserve D2D file copies. Files copies are copies of CA ARCserve D2D recovery points that you copy to offline storage, such as a disk or the cloud. From the file copies, you can specify the data that you want to recover.
To restore data from file copies
1. Log in to the application and click Node on the Navigation bar.
2. From the Node screen, expand the group containing the node that you want to restore.
Click the check box next to the node that you want to restore and then click Restore on the toolbar.
3. From the Restore dialog, click Browse File Copies.
The Browse File Copies dialog opens.
4. From the Name pane, specify the file copy data that you want to recover. You can specify any combination of files and folders, or the volume.
When you select an individual file to be restored, all file copied versions of that file will be displayed in the right pane. If multiple versions are available, select the version of file copy that you want to recover.
■ Change--Lets you browse to an alternative location where your file copy images are stored.
A dialog opens displaying the available alternative destination options:
■ Local or network drive--The Select a Backup Location dialog opens, allowing you to browse to and select an alternate local or network drive location.
■ Cloud--The Cloud Configuration dialog opens, allowing you to access and select an alternate cloud location.
5. Click Next.
The Restore Options dialog opens.
6. Complete the following options on the Restore Options dialog:
■ Destination--Select the destination for the restore.
– Restore to Original Location--Lets you restore data to the original location from where the backup image was captured.
– Restore to--Lets you specify or browse to the location where your backup images will be restored. Click the arrow next to the Restore to field to verify the connection to the specified location.
If necessary, you will need to enter the User Name and Password credentials to gain access to that location.
How to Restore Nodes in CA ARCserve Central Protection Manager
138 User Guide
■ Resolving Conflicts--Lets you specify how you want CA ARCserve D2D to resolve conflicts that are encountered during the restore process.
– Overwrite existing files--Lets you overwrite (replace) existing files that are located at the restore destination. All objects will be restored from the backup files regardless of their current presence on your machine.
– Replace active files--Lets you replace active files upon reboot. If the restore attempt CA ARCserve D2D detects that the existing file is currently in use, it will not immediately replace that file, but instead to avoid any problems will delay the replacement of the active files until the next time the machine is rebooted. (The restore will occur immediately, but the replacement of any active files is done during the next reboot).
Note: If this option is not selected any active file will be skipped from the restore.
– Rename files--Lets you create new files if the file name already exists. Selecting this option will copy the source file to the destination with the same filename but a different extension. Data will then be restored to the new file.
– Skip existing files--Lets you skip over and not overwrite (replace) any existing files that are located at the restore destination. Only objects that do not currently exist on your computer will be restored from the backup files.
By default, this option is selected.
How to Restore Nodes in CA ARCserve Central Protection Manager
Chapter 4: Using CA ARCserve Central Protection Manager 139
■ Directory Structure--Lets you specify what CA ARCserve D2D will or will not do with the directory structure during the restore process.
– Create root directory--Lets you specify that if a root directory structure exists in the captured backup image, CA ARCserve D2D will recreate that same root directory structure on the restore destination path.
When the Create Root Directory option is not selected (unchecked), the file/folder to be restored will be restored directly to the destination folder.
Example:
If during the backup you captured the files "C:\Folder1\SubFolder2\A.txt" and "C:\Folder1\SubFolder2\B.txt" and during the restore you specified to the restore destination as "D:\Restore".
If you select to restore the "A.txt" and "B.txt" files individually, the destination for the restored files will be "D:\Restore\A.txt" and "D:\Restore\B.txt" (the root directory above the specified file level will not be recreated).
If you select to restore from the "SubFolder2" level, the destination for the restored files will be "D:\Restore\SubFolder2\A.txt" and "D:\Restore\SubFolder2\B.txt" (the root directory above the specified folder level will not be recreated).
When the Create Root Directory option is selected (checked), the entire root directory path for the files/folders (including the volume name) will be recreated to the destination folder. If the files/folders to be restored are from the same volume name, then the destination root directory path will not include that volume name. However, if the files/folders to be restored are from different volume names, then the destination root directory path will include the volume name.
Example:
If during the backup you captured the files "C:\Folder1\SubFolder2\A.txt", "C:\Folder1\SubFolder2\B.txt", and also E:\Folder3\SubFolder4\C.txt" and during the restore you specified to the restore destination as "D:\Restore".
If you select to restore just the "A.txt" file, the destination for the restored file will be "D:\Restore\ Folder1\SubFolder2\A.txt" (the entire root directory without the volume name will be recreated).
If you select to restore both the "A.txt" and "C.txt" files, the destination for the restored files will be "D:\Restore\C\Folder1\SubFolder2\A.txt" and "D:\Restore\E\Folder3\SubFolder4\C.txt" (the entire root directory with the volume name will be recreated).
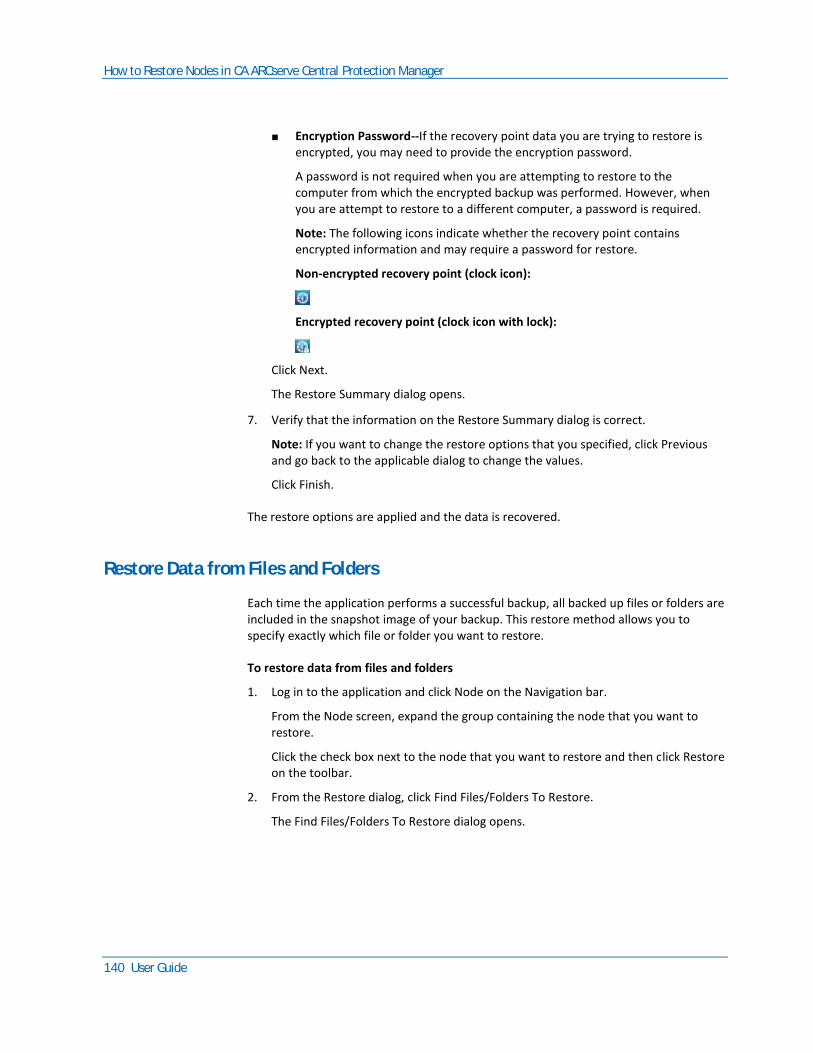
How to Restore Nodes in CA ARCserve Central Protection Manager
140 User Guide
■ Encryption Password--If the recovery point data you are trying to restore is encrypted, you may need to provide the encryption password.
A password is not required when you are attempting to restore to the computer from which the encrypted backup was performed. However, when you are attempt to restore to a different computer, a password is required.
Note: The following icons indicate whether the recovery point contains encrypted information and may require a password for restore.
Non-encrypted recovery point (clock icon):
Encrypted recovery point (clock icon with lock):
Click Next.
The Restore Summary dialog opens.
7. Verify that the information on the Restore Summary dialog is correct.
Note: If you want to change the restore options that you specified, click Previous and go back to the applicable dialog to change the values.
Click Finish.
The restore options are applied and the data is recovered.
Restore Data from Files and Folders
Each time the application performs a successful backup, all backed up files or folders are included in the snapshot image of your backup. This restore method allows you to specify exactly which file or folder you want to restore.
To restore data from files and folders
1. Log in to the application and click Node on the Navigation bar.
From the Node screen, expand the group containing the node that you want to restore.
Click the check box next to the node that you want to restore and then click Restore on the toolbar.
2. From the Restore dialog, click Find Files/Folders To Restore.
The Find Files/Folders To Restore dialog opens.
How to Restore Nodes in CA ARCserve Central Protection Manager
Chapter 4: Using CA ARCserve Central Protection Manager 141
3. Specify the Backup Location and File Copy Location or browse to the location where the backup images are stored.
Be aware of the following:
■ For Backup Location, you can click the green arrow by the Browse button to validate the connection to the specified backup destination. You may have to enter the user name and password credentials to connect to a remote network share.
■ For File Copy Location, you can click Change to switch to a local or network drive or to cloud. For more details on File Copy Location, see Restore Data from File Copies (see page 137).
4. Specify the file or folder name to restore.
Note: The File Name field supports full name searching and wildcard searching. If you do not know the complete file name, you can simplify the results of the search by specifying the wildcard characters "*" and "?" in the File Name field.
The wildcard characters supported for the file or folder name are as follows:
■ "*"--Use the asterisk to substitute zero or more characters in a file or folder name.
■ "?"--Use the question mark to substitute a single character in a file or folder name.
For example, if you specify *.txt, all files with a .txt file extension appear in the search results.
5. (Optional) Specify a path name to further filter your search and select whether to include or not include subdirectories or files and folders.
6. Click Find to launch the search.
The results of the search are displayed. If the search discovers multiple occurrences (recovery points) of the same searched file, it lists all occurrences sorted by date (with the most recent listed first).
How to Restore Nodes in CA ARCserve Central Protection Manager
142 User Guide
7. Select the version that you want to restore from the list and click Next.
The Restore Options dialog is displayed.
8. Select the destination for the restore.
The available options are to restore to the original location of the backup or restore to a different location.
Restore to Original Location
Restores to the original location from where the backup image was captured.
Note: When restoring the CA ARCserve D2D logs folder to the original location, the files that are in the logs folder is skipped.
Restore to:
You can either specify a location or browse to the location where your backup images are to be restored. You can click the green arrow icon button to verify the connection to the specified location.
If necessary, you will need to enter the User Name and Password credentials to gain access to that location.
How to Restore Nodes in CA ARCserve Central Protection Manager
Chapter 4: Using CA ARCserve Central Protection Manager 143
9. Select the option on how CA ARCserve D2D can resolve conflicts that are encountered during the restore process.
The available options are:
Overwrite existing files
Overwrites (replaces) any existing files that are located at the restore destination. All objects will be restored from the backup files regardless of their current presence on your machine.
Replace active files
Replaces any active files upon reboot. If during the restore attempt CA ARCserve D2D discovers that the existing file is currently in use or being accessed and it will not immediately replace that file, but instead to avoid any problems, it will delay the replacement of the active files until the next time that you reboot the machine. (The restore occurs immediately, but the replacement of any active files is done during the next reboot).
Note: If this option is not selected, then any active file is skipped from the restore.
Rename files
Creates a new file if the file name already exists. Selecting this option copies the source file to the destination with the same filename but a different extension. Data is then restored to the new file.
Skip existing files
Skips over and not overwrite (replace) any existing files that are located at the restore destination. Only objects that are not currently existing on your machine is restored from the backup files.
By default, this option is selected.
10. (Optional) Select Create root directory from the Directory Structure.
This allows CA ARCserve D2D to recreate the same root directory structure on the restore destination path.
Note: If this option is not selected, the file or folder to be restored is restored directly to the destination folder.
11. Enter the backup encryption password to restore the encrypted data and then click Next.
The Restore Summary dialog is displayed.
12. Review the displayed information to verify that all the restore options and settings are correct.
■ If the summary information is not correct, click Previous and go back to the applicable dialog to change the incorrect setting.
If the summary information is correct, click Finish to launch the restore process.
How to Restore Nodes in CA ARCserve Central Protection Manager
144 User Guide
Restore Data from Virtual Machines
Use the Restore VM (Virtual Machine) option to restore a virtual machine that you previously backed up.
To restore data from virtual machines
1. Log in to the application and click Node on the Navigation bar.
From the Node screen, expand the group containing the node that you want to restore.
Click the check box next to the node that you want to restore and then click Restore on the toolbar. The application logs you into CA ARCserve D2D.
2. From the Restore dialog, click Recover VM.
The Restore dialog opens.
3. Specify the backup location (source). You can either specify a location or browse to the location where your backup images are stored. If necessary, enter the User Name and Password credentials to gain access to that location. You can click green arrow validate icon to verify proper access to the source location.
The calendar view highlights (in green) all dates during the displayed time period that contain recovery points for that backup source.
4. Specify the Virtual Machine to restore.
The drop-down menu includes all Virtual Machines at the specified backup location.
5. Select the calendar date for the Virtual Machine image you want to restore.
The corresponding recovery points for that date are displayed, with the time of the backup, the type of backup that was performed, and the name of the backup.
6. Select a recovery point that you want to restore.
The corresponding backup content (including any applications) for that recovery point is displayed for reference purposes only. When restoring a Virtual Machine, the entire machine will be restored. As a result, you can view, but not select individual volumes, folders, or files from within the selected Virtual Machine.
Note: A clock icon with a lock symbol indicates the recovery point contains encrypted information and may require a password for restore.
How to Restore Nodes in CA ARCserve Central Protection Manager
Chapter 4: Using CA ARCserve Central Protection Manager 145
7. When the backup information to be restored is specified, click Next.
The Restore Options dialog is displayed.
8. Select the restore destination.
Restore to Original Location
Restores to the Virtual Machine to the original location from where the backup image was captured. By default, this option is selected.
For more information, see Restore VM to Original Location (see page 145).
Restore to an Alternative Location
Restores to the Virtual Machine to a different location from where the backup image was captured.
For more information, see Restore VM to an Alternative Location (see page 146).
9. Specify what CA ARCserve D2D will do to resolve any conflicts that are encountered during the restore process.
The available option is whether to overwrite the existing Virtual Machine. By default, this overwrite option is not selected.
– If you select this option, the restore process overwrites (replace) any existing images of this Virtual Machine that are located at the specified restore destination. The Virtual Machine image is restored from the backup files regardless of its current presence on your restore destination.
– If you do not select this option, the restore process creates a separate image of this Virtual Machine that does not overwrite any existing images located at the specified restore destination.
10. Specify the Post Recovery option.
Select whether power will be applied to the Virtual Machine at the end of the restore process. By default, this power on option is not selected.
Restore Virtual Machines to Original Locations
During the Restore VM (Virtual Machine) configuration process, you are required to select the option of where you want to restore the virtual machine to. The available selections are Restore to the Original Location and Restore to an Alternative Location.
If you select to restore your VM to the original location, perform the following steps:
How to Restore Nodes in CA ARCserve Central Protection Manager
146 User Guide
Follow these steps:
1. From the Restore Options dialog, after specifying the Resolve Conflicts and Post Recovery options, select Restore to Original Location and click Next.
Note: For more information about Resolve Conflicts and Post Recovery options, see Restore Data from Virtual Machines (see page 144).
The Set Credential for Source vCenter/ESX Server dialog is displayed.
2. Specify the credentials for accessing the Virtual Machine.
■ vCenter/ESX Server--Specify the host name or IP address for the destination vCenter or ESX server system.
■ VM Name--Specify the host name of the virtual machine that you are restoring.
■ Protocol--Specify the protocol that you want to use for communication with the destination server. The available selections are HTTP and HTTPS.
■ Port Number--Specify the port that you want to use for data transfer between the source server and the destination. By default this port number is 443.
■ User Name--Specify the user name that has access permission to log in to the virtual machine you are restoring.
■ Password--Specify the corresponding password for the User Name that is required to log in to the virtual machine you are restoring.
3. When the credentials are specified, click OK.
The Restore Summary dialog opens.
4. Review the displayed information to verify that all the restore options and settings are correct.
■ If the summary information is not correct, click Previous and go back to the applicable dialog to change the incorrect setting.
■ If the summary information is correct, click Finish to launch the restore process.
Restore Virtual Machines to Alternative Locations
During the Restore VM (virtual machine) configuration process, you are required to select the option of where you want to restore the virtual machine to. The available selections are Restore to the Original Location and Restore to an Alternative Location.
If you want to restore the virtual machine to an alternative location, perform the following steps:
How to Restore Nodes in CA ARCserve Central Protection Manager
Chapter 4: Using CA ARCserve Central Protection Manager 147
Follow these steps:
1. From the Restore Options dialog, after specifying the Resolve Conflicts and Post Recovery options, select Restore to an Alternative Location.
Note: For more information about the Resolve Conflicts and Post Recovery options, see Recover Data to Virtual Machines (see page 144).
The Restore Options dialog expands to display additional restore to alternative options.
2. Specify the vCenter/ESX Server Information.
■ vCenter/ESX Server--Specify the host name or IP address for the destination vCenter or ESX server system.
■ Username--Specify the user name that has access privilege to log in to the virtual machine you are restoring.
■ Password--Specify the corresponding password for the User Name that is required to log in to the virtual machine you are restoring.
■ Protocol--Specify the protocol that you want to use for communication with the destination server. The available selections are HTTP and HTTPS.
■ Port Number--Specify the port that you want to use for data transfer between the source server and the destination. By default this port number is 44.
3. When the vCenter/ESX Server Information is specified, click the Connect to this vCenter/ESX Server button.
If the alternative server access credential information is correct, the Other Information fields become enabled.
4. Specify the Other Information.
■ VM Name--Specify the host name of the virtual machine that you are restoring.
■ ESX Server--Specify the destination ESX server. The drop-down menu will contain a listing of all ESX servers that are associated with the specified virtual machine.
■ VM DataStore--Specify the destination VM DataStore.
5. When the Other Information are specified, click Next.
The Restore Summary dialog opens.
6. Review the displayed information to verify that all the restore options and settings are correct.
■ If the summary information is not correct, click Previous and go back to the applicable dialog to change the incorrect setting.
■ If the summary information is correct, click Finish to launch the restore process.
How to Restore Nodes in CA ARCserve Central Protection Manager
148 User Guide
Restore Microsoft Exchange Email Data
Each time CA ARCserve D2D performs a successful backup, a point-in-time snapshot image of your backup is also created. This collection of recovery points allows you to locate and specify exactly which backup image you want to restore. For Microsoft Exchange Server, you can then browse these recovery points to locate the individual objects (mailboxes, mailbox folders, or mail) that you want to recover. To perform an Exchange Granular Restore, the account must have the required permissions. For more information, see Exchange Account Required Permissions.
Note: For Microsoft Exchange Server 2007 and later, Messaging API (MAPI) is a prerequisite for Exchange Granular Restore. If MAPI is not installed on your Exchange Server, mailbox or mail level granular restores may fail. For more information about installing MAPI on your Exchange Server, see the Microsoft Download Center.
To restore Microsoft Exchange email data
1. Log in to the application and click Node on the Navigation bar.
From the Node screen, expand the group containing the node that you want to restore.
Click the check box next to the node that you want to restore and then click Restore on the toolbar.
2. From the Restore dialog, click Restore Exchange Mails.
The Restore Exchange Mails dialog opens.
3. Specify the backup location. You can either specify a location or browse to the location where your backup images are stored. If necessary, enter the User name and Password credentials to gain access to that location. You can click the green arrow validate icon to verify proper access to the source location.
The calendar view highlights (in green) all dates during the displayed time period that contain recovery points for that backup source.
4. Select the calendar date for the backup image you want to restore.
The corresponding Exchange mailbox databases for that date are displayed, along with the time of the backup, the type of backup that was performed, and the name of the backup.
How to Restore Nodes in CA ARCserve Central Protection Manager
Chapter 4: Using CA ARCserve Central Protection Manager 149
5. Select an Exchange mailbox database that you want to restore and click Next.
Note: A notification message is displayed asking you if you want to generate an Exchange Granular Restore catalog at this time. If you select No for generating a catalog now, you will not be able to browse to or select a granular recovery point. As a result you will only be able to perform full database restore from the Browse Recovery Points Restore dialog.
The Restore Options dialog is displayed and the corresponding list of mailbox content for the selected database is listed.
Note: Only email restore is supported. Restoring Calendar, Contacts, Notes and Tasks items is not supported.
6. Select the level of Exchange object(s) to restore (mailbox, folder, or individual mail).
Note: You can select the entire content, partial content, or multiple Exchange objects to restore.
a. If you select a mailbox database, all of the mailboxes in that database are restored.
b. If you select a mailbox level, all corresponding content (folders and individual mail) within that mailbox are restored.
c. If you select the mailbox folder level, all corresponding mail content within that folder are restored.
d. If you select the individual mail level, only the selected mail object(s) are restored.
Note: For Exchange 2003 only, if the individual mail was restored and sent by any email client other than Outlook with some type of flag status marker attached to it when it was backed up, then the mail itself becomes restored, but the attached marker will not be included with the restored mail.
How to Restore Nodes in CA ARCserve Central Protection Manager
150 User Guide
7. Click Next.
8. Select the destination for the restore.
The available options are to restore to the original location of the backup or restore to a different location.
Notes:
■ When restoring a mailbox or mail (to original or alternate location), ensure that the destination is available, or else the restore attempt fails. CA ARCserve D2D only validates the destination when the restore job is submitted.
■ If you attempt to restore mails to a machine where the email addresses in these mails are not valid (does not exist in the domain) or if the user has not logged into the mailbox, some fields may not appear the same when backed up.
■ For Exchange 2010, archived mailbox items cannot be restored to the original location. Archived mailbox items can only be restored to an alternate location or to a local disk. In addition, regular mailbox items cannot be restored to archive mailboxes.
Restore to Original Location
Restores the mails to the original location from where the backup image was captured. Mails will retain the same hierarchy and be restored to its original mailbox and original folder.
■ If the current machine is not the active Exchange server, CA ARCserve D2D will detect the location of the active server and then restore the mails to that active server.
■ If the mailbox has been moved to another Exchange server, but still in the same organization, CA ARCserve D2D will detect the new Exchange server where the original mailbox resides, and then restore to that new server.
■ If the display name of the mailbox was changed, any attempt to restore the mailbox (from an earlier backup session) to its original location fails because CA ARCserve D2D is not able to find the changed name. To resolve this, you can specify to restore this mailbox to an alternate location.
How to Restore Nodes in CA ARCserve Central Protection Manager
Chapter 4: Using CA ARCserve Central Protection Manager 151
Dump File Only
Restores the mails to a disk. This disk location must be a local path. The restored mails will maintain the same hierarchy as they had in the corresponding Exchange Mailbox. The file name is the subject of mail.
Note: If the mail subject, folder name, or mailbox name includes any of the following characters, the character will be replaced by hyphen (-) in file name: \ / : * ? " < > |
There are two options to resolve a conflict situation in a File System. Two files in File System cannot exist under the same folder, while Exchange mails can.
■ Rename--If there is a file on the disk with the same name as the mail subject, CA ARCserve D2D names the mail subject and appends a number at the end of the mail subject.
■ Overwrite--If there is a file on the disk with the same name as the mail subject, CA ARCserve D2D overwrites that file.
Restore to Alternate Location
Restores the mails to a specified location or lets you browse to the location where your backup images are restored. The destination must be a mailbox in the same Exchange organization, and a new folder name is required. (If you are attempting to restore mails to an alternate location, the destination cannot be a public folder).
After specifying the User Name and Password, click the Browse button to navigate through a list of all Exchange Servers, Storage Groups, Exchange Databases, and Mailboxes in the current organization.
Select any mailbox as the destination.
9. Click Next.
The Restore Summary dialog is displayed.
10. Review the displayed information to verify that all the restore options and settings are correct.
■ If the summary information is not correct, click Previous and go back to the applicable dialog to change the incorrect setting.
■ If the summary information is correct, click Finish to launch the restore process.
Note: When the Catalog and Restore Job for Exchange Granular Restore is in progress, the backup session is in a mounted state. Do not perform any operation (format, change drive letter, delete partition, etc.) on this mounted volume.
View CA ARCserve Central Protection Manager Logs
152 User Guide
View CA ARCserve Central Protection Manager Logs
The View Log contains comprehensive information about all the operations performed by your application. The log provides an audit trail of every job that is run (with the most recent activities listed first) and can be helpful in troubleshooting any problems that may occur.
Follow these steps:
1. From the home page, click View Logs in the navigation bar.
The View Logs screen appears.
2. From the drop-down lists, specify the log information that you want to view.
■ Severity--This option lets you specify the severity of the log that you want to view. You can specify the following severity options:
– All--This option lets you view all logs, regardless of the severity.
– Information--This option lets you view only logs that describe general information.
– Errors--This option lets you view only logs that describe severe errors that occurred.
– Warnings--This option lets you view only logs that describe warming errors that occurred.
– Errors and Warnings--This option lets you view only severe errors and warning errors that occurred.
View CA ARCserve Central Protection Manager Logs
Chapter 4: Using CA ARCserve Central Protection Manager 153
■ Module--This option lets you specify the module for which you want to view logs. You can specify the following module options:
– All--This option lets you view logs about all application components.
– Common--This option lets you view logs about common processes.
– Import Nodes from Discovery--This option lets you view logs about nodes that were imported only from Discover.
– Import Nodes from Hypervisor--This option lets you view logs about nodes that were imported only from Hypervisor.
– Import Nodes From File--This option lets you view logs only about importing nodes in to the application from a file.
– Policy Management--This option lets you view logs only about managing policies.
– CA ARCserve Backup Synchronization--This option lets you view logs only about CA ARCserve Backup data synchronization.
– CA ARCserve D2D Synchronization--This option lets you view logs only about CA ARCserve D2D data synchronization.
– Updates for CA ARCserve D2D--This option lets you view logs only about changes made in CA ARCserve D2D.
– Updates--This option lets you view logs only about updating the application.
– Submit CA ARCserve D2D Backup Jobs--This option lets you view logs only about submitted CA ARCserve D2D backup jobs.
– Update Multiple Nodes--This option lets you view only logs about updating multiple nodes simultaneously.
– CA ARCserve D2D Merge Job--This option lets you view only logs of CA ARCserve D2D merge jobs.
■ Node Name--This option lets you view logs only for a specific node.
Note: This field supports the wildcard '*' and '?'. For example, enter 'lod*' to return all activity logs for the computer name that begins with 'lod'.
Note: The Severity, Module, and Node Name options can be applied collectively. For example, you can view Errors (severity) that relate to Updates (Module) for Node X (Node Name).
Click Refresh.
The logs display based on the view options specified.
Note: The displayed Time in the log is based on the time zone where the CA ARCserve Central Protection Manager server resides.
Add Links to the Navigation Bar
154 User Guide
Add Links to the Navigation Bar
Each of the CA ARCserve Central Applications has an Add New Tab link in the Navigation bar. Use this feature to add entries in the Navigation bar for additional web-based applications you would like to manage. However, for every application that is installed, a new link is automatically added to the Navigation bar. For example, if you installed CA ARCserve Central Reporting and CA ARCserve Central Virtual Standby on "Computer A" and then launch CA ARCserve Central Reporting, CA ARCserve Central Virtual Standby is automatically added to the Navigation bar.
Note: Every application that is installed is detected only if other CA ARCserve Central Applications are on the same computer.
Follow these steps:
1. From the Navigation bar of the application, click the Add New Tab link.
2. Specify the Name and URL of the application or website you want to add. For example, www.google.com.
Optionally, specify the location of an icon.
3. Click OK.
The new tab is added to the bottom of the Navigation bar.
Be aware of the following considerations:
■ The CA Support link is added by default for your convenience.
You can remove the new tab by highlighting the tab and click the Remove link.
Applying Best Practices
Chapter 4: Using CA ARCserve Central Protection Manager 155
Applying Best Practices
Consider the following best practices for the CA ARCserve Central Protection Manager application:
■ CA ARCserve Central Applications can retrieve data for a specific node from a remote computer by communications between the CA ARCserve Central Applications local computer and the remote computer.
To help ensure that remote access operates successfully, the following restrictions are required:
– Network restriction--The remote administrator share named 'admin$' on the remote computer must be enabled. To enable 'admin$' on the remote computer, click the following link for instructions:
http://support.microsoft.com/kb/947232
– User Account restriction--To log in to CA ARCserve Central Applications, you use the bulletin administrator account from the CA ARCserve Central Applications local computer or add the administrative privileges to the CA ARCserve Central Applications local computer and remote computer.
Note: To add a node, it is required that you have the administrative privileges from the remote computer.
■ To add nodes using the node name or IP address on Windows Server 2008 R2 computers, use the account based on one of the following requirements:
– If you use the Administrator Group account from the CA ARCserve Central Applications computer and the remote computer to log in to CA ARCserve Central Applications, then you can use that same account to add a node.
– If you use the Bulletin Administrator account from the CA ARCserve Central Applications computer to log in to CA ARCserve Central Applications, then use the Administrator Group account from the remote computer to add a node.
■ To discover nodes from the Active Directory, do one of the following options:
– If you install CA ARCserve Central Applications on a node that is connected to a Windows domain, then CA ARCserve Central Applications can have access to the Active Directory information that resides on the domain controller.
– If you install CA ARCserve Central Applications on a node that is connected to a workgroup, then it is required that you run the following command line in a command window to confirm that CA ARCserve Central Applications has access to the associated domain controller:
nltest /dsgetdc:%domain_name%
Note: If this option fails with a status of ERROR_NO_SUCH_DOMAIN (1355) then you will have to adjust your network settings.
Change Server Communication Protocol
156 User Guide
Change Server Communication Protocol
By default, CA ARCserve Central Applications use the Hypertext Transfer Protocol (HTTP) for communication among all of its components. If you are concerned about the security of passwords that are communicated between these components, you can change the protocol being used to Hypertext Transfer Protocol Secure (HTTPS). When you do not need this extra level of security, you can change the protocol being used to HTTP.
Follow these steps:
1. Log in to the computer where the application is installed using an administrative account or an account with administrative privileges.
Note: If you do not log in using an administrative account or an account with administrative privileges, configure the Command Line to run using the Run as Administrator privilege.
2. Open Windows Command Line.
3. Do one of the following:
■ To change the protocol from HTTP to HTTPS:
Launch the "changeToHttps.bat" utility tool from the following default location (the location of the BIN folder can vary depending upon where you installed the application):
C:\Program Files\CA\ARCserve Central Applications\BIN
When the protocol has been successfully changed, the following message displays:
The communication protocol was changed to HTTPS.
■ To change the protocol from HTTPS to HTTP:
Launch the "changeToHttp.bat" utility tool from the following default location (the location of the BIN folder can vary depending upon where you installed the application):
C:\Program Files\CA\ARCserve Central Applications\BIN
When the protocol has been successfully changed, the following message displays:
The communication protocol was changed to HTTP.
4. Restart the browser and reconnect to CA ARCserve Central Applications.
Note: When you change the protocol to HTTPS, a warning displays in the web browser. This behavior occurs because of a self-signed security certificate that prompts you to ignore the warning and proceed or add that certificate to the browser to prevent the warning from coming back in future.
Chapter 5: Integrating CA ARCserve Central Protection Manager with IT Management Server Tools 157
Chapter 5: Integrating CA ARCserve Central Protection Manager with IT Management Server Tools
This section contains the following topics:
How CA ARCserve Central Protection Manager Integrates with Nimsoft and Kaseya (see page 157) How to Integrate CA ARCserve Central Protection Manager with Nimsoft (see page 159) How to Integrate CA ARCserve Central Protection Manager with Kaseya (see page 164)
How CA ARCserve Central Protection Manager Integrates with Nimsoft and Kaseya
You can configure CA ARCserve Central Protection Manager to publish information about alert messages in real time to IT Management Server Infrastructure management tools. This capability lets IT Server Management Administrators respond to CA ARCserve Central Protection Manager alerts in an appropriate manner.
CA ARCserve Central Protection Manager integrates with the following IT Management Server Infrastructure management tools:
■ Nimsoft
– Server: 5.11
– Robot: 5.32
– Unified Monitoring Portal: 2.1.2
■ Kaseya
– Server: 6.1.0.0
– Agent: 6.1.0.6
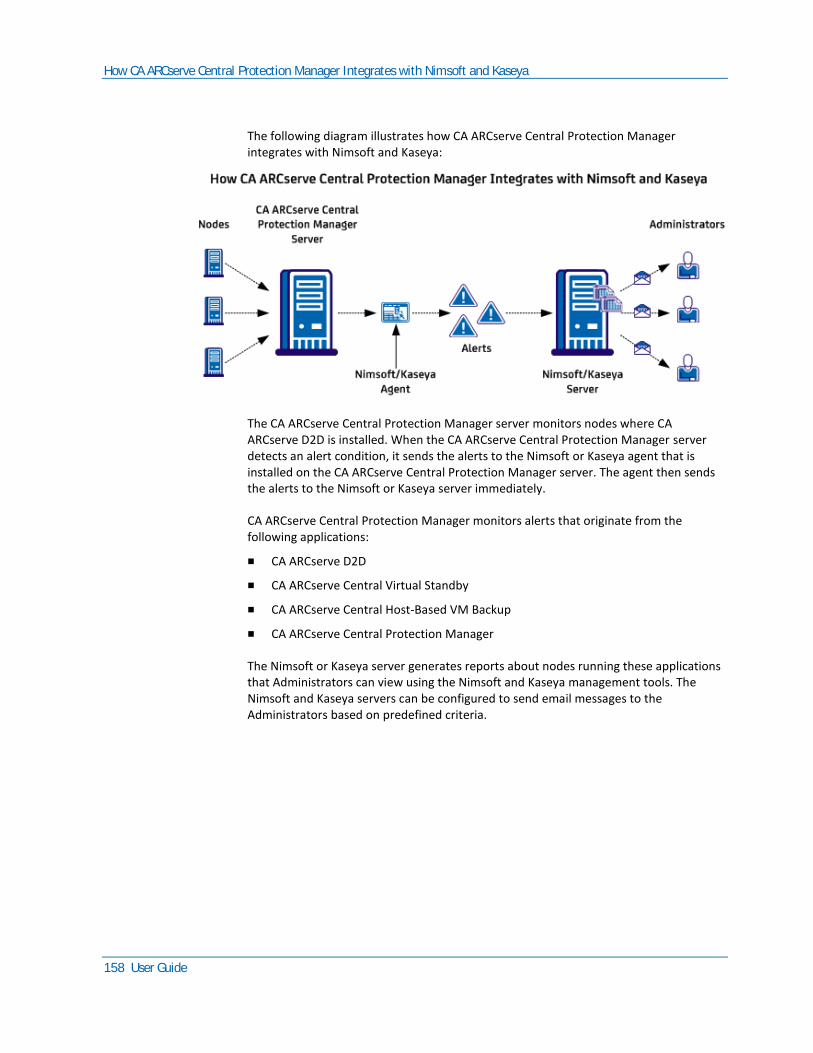
How CA ARCserve Central Protection Manager Integrates with Nimsoft and Kaseya
158 User Guide
The following diagram illustrates how CA ARCserve Central Protection Manager integrates with Nimsoft and Kaseya:
The CA ARCserve Central Protection Manager server monitors nodes where CA ARCserve D2D is installed. When the CA ARCserve Central Protection Manager server detects an alert condition, it sends the alerts to the Nimsoft or Kaseya agent that is installed on the CA ARCserve Central Protection Manager server. The agent then sends the alerts to the Nimsoft or Kaseya server immediately.
CA ARCserve Central Protection Manager monitors alerts that originate from the following applications:
■ CA ARCserve D2D
■ CA ARCserve Central Virtual Standby
■ CA ARCserve Central Host-Based VM Backup
■ CA ARCserve Central Protection Manager
The Nimsoft or Kaseya server generates reports about nodes running these applications that Administrators can view using the Nimsoft and Kaseya management tools. The Nimsoft and Kaseya servers can be configured to send email messages to the Administrators based on predefined criteria.
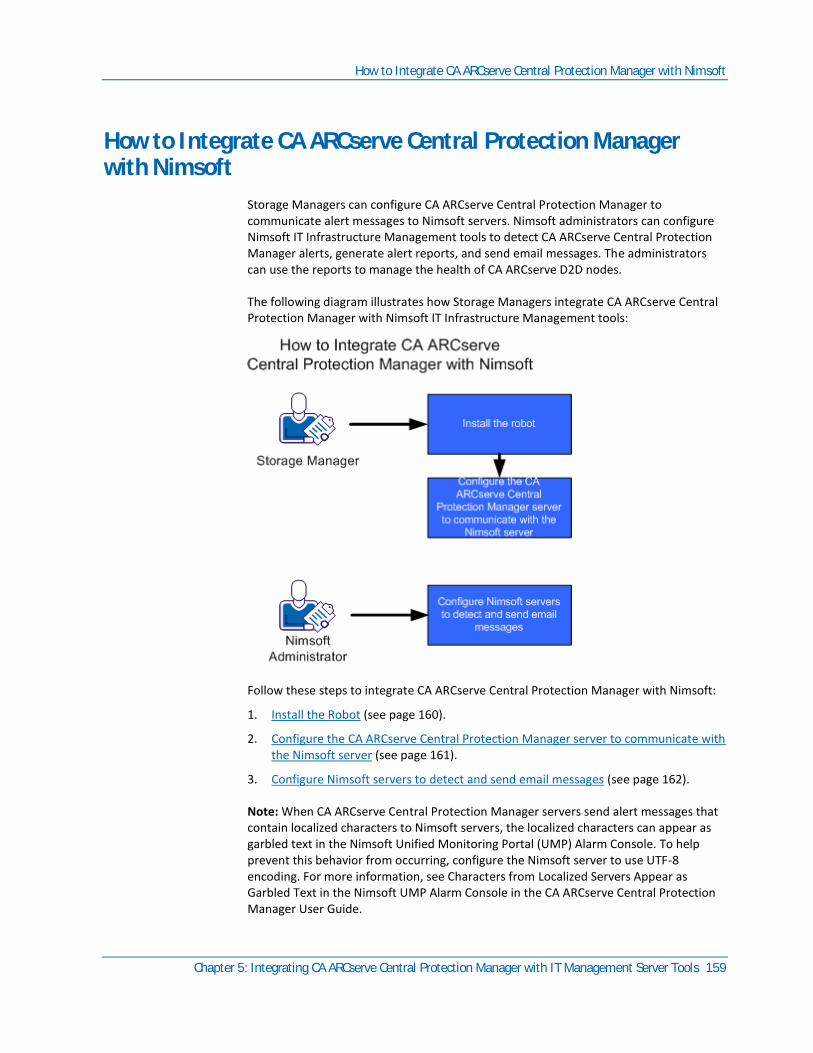
How to Integrate CA ARCserve Central Protection Manager with Nimsoft
Chapter 5: Integrating CA ARCserve Central Protection Manager with IT Management Server Tools 159
How to Integrate CA ARCserve Central Protection Manager with Nimsoft
Storage Managers can configure CA ARCserve Central Protection Manager to communicate alert messages to Nimsoft servers. Nimsoft administrators can configure Nimsoft IT Infrastructure Management tools to detect CA ARCserve Central Protection Manager alerts, generate alert reports, and send email messages. The administrators can use the reports to manage the health of CA ARCserve D2D nodes.
The following diagram illustrates how Storage Managers integrate CA ARCserve Central Protection Manager with Nimsoft IT Infrastructure Management tools:
Follow these steps to integrate CA ARCserve Central Protection Manager with Nimsoft:
1. Install the Robot (see page 160).
2. Configure the CA ARCserve Central Protection Manager server to communicate with the Nimsoft server (see page 161).
3. Configure Nimsoft servers to detect and send email messages (see page 162).
Note: When CA ARCserve Central Protection Manager servers send alert messages that contain localized characters to Nimsoft servers, the localized characters can appear as garbled text in the Nimsoft Unified Monitoring Portal (UMP) Alarm Console. To help prevent this behavior from occurring, configure the Nimsoft server to use UTF-8 encoding. For more information, see Characters from Localized Servers Appear as Garbled Text in the Nimsoft UMP Alarm Console in the CA ARCserve Central Protection Manager User Guide.
How to Integrate CA ARCserve Central Protection Manager with Nimsoft
160 User Guide
Install the Robot
You install the robot on the CA ARCserve Central Protection Manager server. The robot lets the CA ARCserve Central Protection Manager server communicate with and send alert messages real time to Nimsoft servers.
Note: Before you run the setup program, verify that you have a valid license in your possession.
Follow these steps:
1. Download or copy the Robot setup file to your computer.
Double-click "NimBUS Robot.exe" to start the installation.
The License Agreement dialog opens.
2. Click Yes on the License dialog to start the installation.
The Choose Destination Location dialog opens.
3. Specify the location where you want to install the robot or click next to accept the default directory.
The Choose Setup Type dialog opens.
4. Click Normal Installation and click Next.
The Nimsoft Domain dialog opens to display a list of detected domains.
5. Click the check box next to the Choose to connect to the network interface through IP address option and click Next.
The Specify Nimsoft Hub IP Address dialog opens.
6. In the Hub IP field, specify the IP address of the Nimsoft hub where you want the CA ARCserve Central Protection Manager server to send alert messages.
Click Next.
The Options dialog opens.
How to Integrate CA ARCserve Central Protection Manager with Nimsoft
Chapter 5: Integrating CA ARCserve Central Protection Manager with IT Management Server Tools 161
7. Complete the following fields on the Options dialog:
(Optional) First probe port
Lets you specify the first port number to use when starting probes.
Note: Do not specify a port to allow the operating system to generate random ports.
Passive mode
Specify this mode only when the robot cannot communicate with the Nimsoft hub. If the Nimsoft hub can communicate with the CA ARCserve Central Protection Manager server, click the check box next to Passive mode.
Note: With this option specified, add the passive robot to the hub configuration manually.
Click Next.
The Start Copying Files dialog opens.
8. Click Next.
Setup installs the robot.
9. When the installation is complete, click Finish.
The robot is installed.
Configure CA ARCserve Central Protection Manager Servers to Communicate with Nimsoft Servers
CA ARCserve Central Protection Manager lets you sent alert messages to Nimsoft IT Management servers. To send the alert information, configure the CA ARCserve Central Protection Manager server to communicate with the Nimsoft server.
Follow these steps:
1. Log in to CA ARCserve Central Protection Manager and click Configuration on the Navigation bar.
The Configuration options appear.
2. Click IT Management Server Configuration in the Configuration list.
The IT Management Server Configuration options appear.
How to Integrate CA ARCserve Central Protection Manager with Nimsoft
162 User Guide
3. Complete the following options:
a. Click Enable.
b. Click Nimsoft.
c. Specify a Repeat Method. The Repeat Method defines the days of the week to resend alert notifications to the Nimsoft server when the original send process failed. The process of sending alerts can fail when the Nimsoft server is not available or offline.
d. Specify a Schedule. The Schedule defines the time of the day to resend the alert notifications to the Nimsoft server.
Click Save.
The CA ARCserve Central Protection Manager server is configured to communicate with the Nimsoft server.
Configure the Nimsoft Server to Detect and Send Email Messages
Nimsoft Administrators can configure the Alarm SubConsole to send email messages to designated recipients upon detection of alert messages from CA ARCserve Central Protection Manager servers. For more information, see the Nimsoft documentation.
View Information About Alerts in the Nimsoft Alarm SubConsole
The Nimsoft Alarm SubConsole lets Nimsoft Administrators view information about CA ARCserve Central Protection Manager alerts. The Nimsoft Alarm SubConsole provides the following information about CA ARCserve Central Protection Manager alerts:
Host Name
Specifies the host name of the CA ARCserve Central Protection Manager server that sent the alert to the Nimsoft server.
Source
Specifies the IP address of the CA ARCserve Central Protection Manager server that sent the alert to the Nimsoft server.
Severity
Specifies the severity of the alert that was sent to the Nimsoft server.
How to Integrate CA ARCserve Central Protection Manager with Nimsoft
Chapter 5: Integrating CA ARCserve Central Protection Manager with IT Management Server Tools 163
Subsystem
Specifies the host name of the server that encountered the alert condition.
Example: The alert condition occurred on a CA ARCserve D2D server. The system field specifies the host name of the CA ARCserve D2D server.
Subsystem ID
Specifies the IP address of the server that encountered the alert condition.
The Alarm SubConsole lets Nimsoft Administrators perform various tasks, such as the following:
■ Configure the Alarm SubConsole to send email messages to designated recipients upon detection of alerts
■ View the history of alerts
■ Acknowledge alerts
■ Assign alerts to technicians
Note: For more information about how to use the Nimsoft Alarm SubConsole, see the Nimsoft documentation.
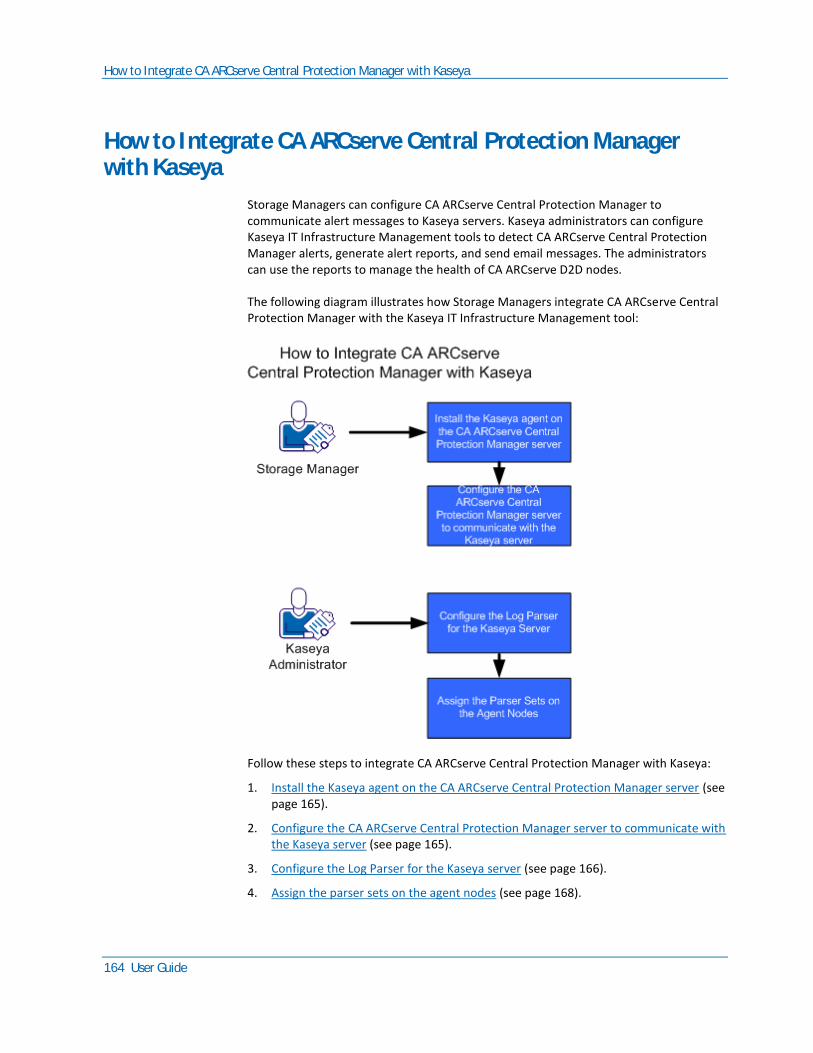
How to Integrate CA ARCserve Central Protection Manager with Kaseya
164 User Guide
How to Integrate CA ARCserve Central Protection Manager with Kaseya
Storage Managers can configure CA ARCserve Central Protection Manager to communicate alert messages to Kaseya servers. Kaseya administrators can configure Kaseya IT Infrastructure Management tools to detect CA ARCserve Central Protection Manager alerts, generate alert reports, and send email messages. The administrators can use the reports to manage the health of CA ARCserve D2D nodes.
The following diagram illustrates how Storage Managers integrate CA ARCserve Central Protection Manager with the Kaseya IT Infrastructure Management tool:
Follow these steps to integrate CA ARCserve Central Protection Manager with Kaseya:
1. Install the Kaseya agent on the CA ARCserve Central Protection Manager server (see page 165).
2. Configure the CA ARCserve Central Protection Manager server to communicate with the Kaseya server (see page 165).
3. Configure the Log Parser for the Kaseya server (see page 166).
4. Assign the parser sets on the agent nodes (see page 168).
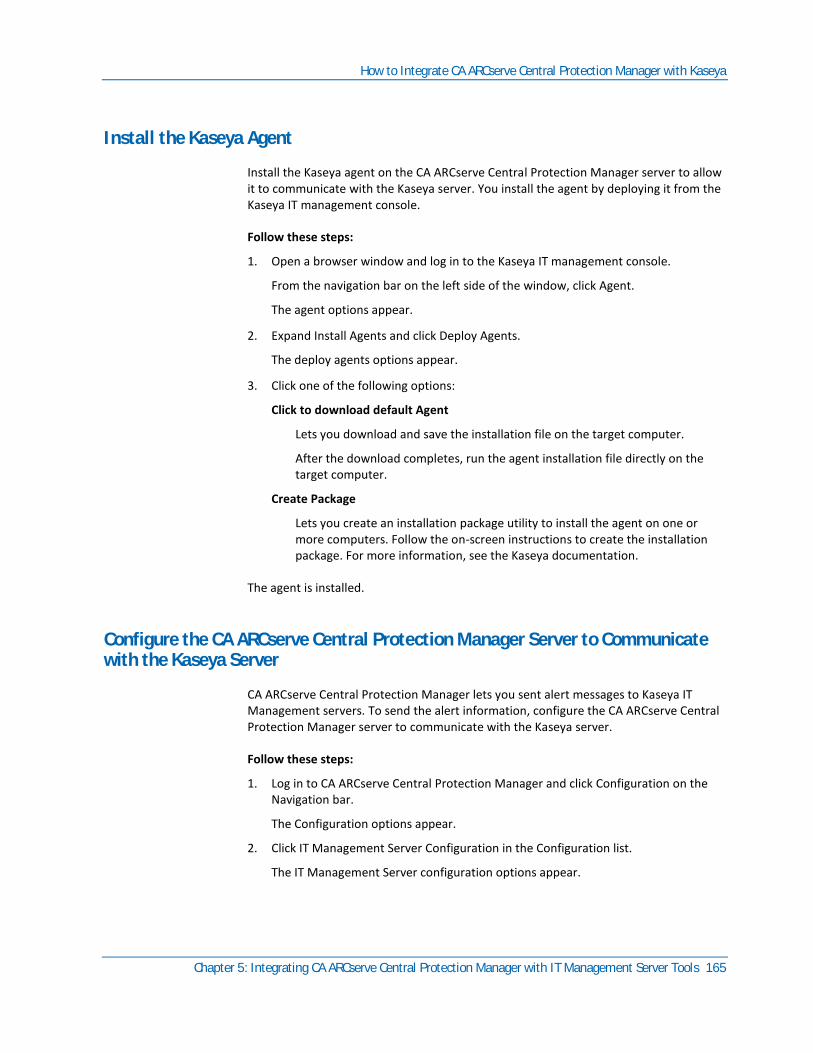
How to Integrate CA ARCserve Central Protection Manager with Kaseya
Chapter 5: Integrating CA ARCserve Central Protection Manager with IT Management Server Tools 165
Install the Kaseya Agent
Install the Kaseya agent on the CA ARCserve Central Protection Manager server to allow it to communicate with the Kaseya server. You install the agent by deploying it from the Kaseya IT management console.
Follow these steps:
1. Open a browser window and log in to the Kaseya IT management console.
From the navigation bar on the left side of the window, click Agent.
The agent options appear.
2. Expand Install Agents and click Deploy Agents.
The deploy agents options appear.
3. Click one of the following options:
Click to download default Agent
Lets you download and save the installation file on the target computer.
After the download completes, run the agent installation file directly on the target computer.
Create Package
Lets you create an installation package utility to install the agent on one or more computers. Follow the on-screen instructions to create the installation package. For more information, see the Kaseya documentation.
The agent is installed.
Configure the CA ARCserve Central Protection Manager Server to Communicate with the Kaseya Server
CA ARCserve Central Protection Manager lets you sent alert messages to Kaseya IT Management servers. To send the alert information, configure the CA ARCserve Central Protection Manager server to communicate with the Kaseya server.
Follow these steps:
1. Log in to CA ARCserve Central Protection Manager and click Configuration on the Navigation bar.
The Configuration options appear.
2. Click IT Management Server Configuration in the Configuration list.
The IT Management Server configuration options appear.
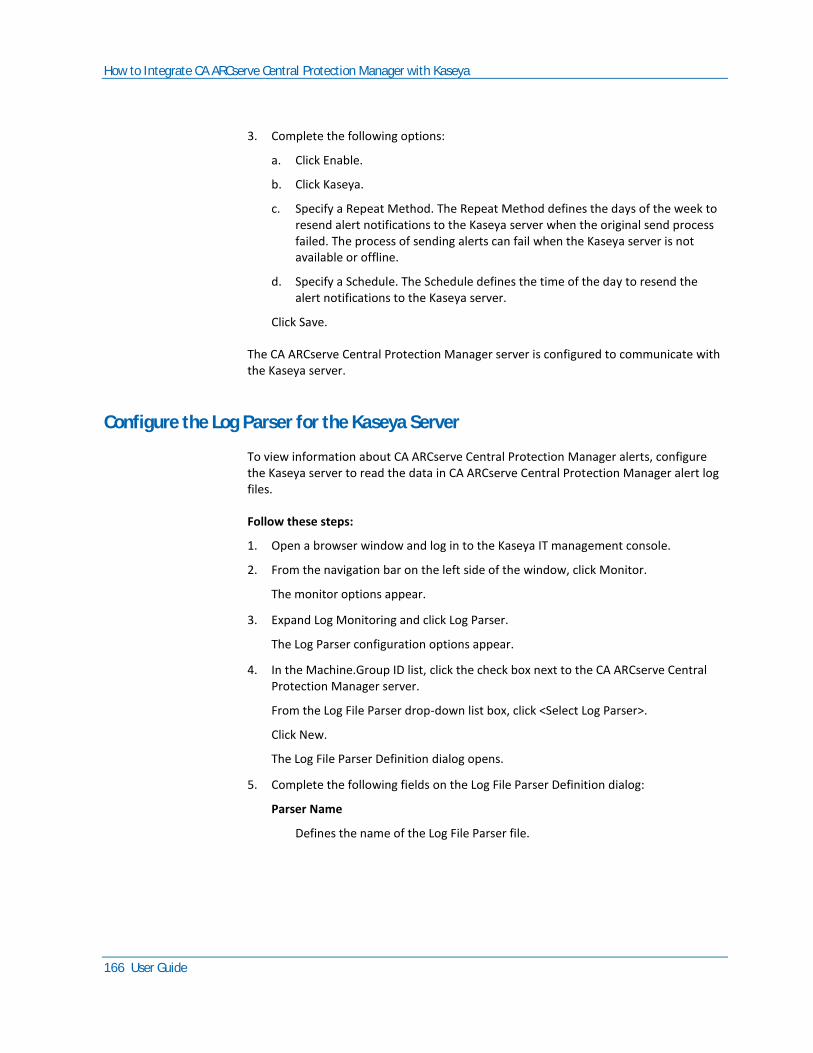
How to Integrate CA ARCserve Central Protection Manager with Kaseya
166 User Guide
3. Complete the following options:
a. Click Enable.
b. Click Kaseya.
c. Specify a Repeat Method. The Repeat Method defines the days of the week to resend alert notifications to the Kaseya server when the original send process failed. The process of sending alerts can fail when the Kaseya server is not available or offline.
d. Specify a Schedule. The Schedule defines the time of the day to resend the alert notifications to the Kaseya server.
Click Save.
The CA ARCserve Central Protection Manager server is configured to communicate with the Kaseya server.
Configure the Log Parser for the Kaseya Server
To view information about CA ARCserve Central Protection Manager alerts, configure the Kaseya server to read the data in CA ARCserve Central Protection Manager alert log files.
Follow these steps:
1. Open a browser window and log in to the Kaseya IT management console.
2. From the navigation bar on the left side of the window, click Monitor.
The monitor options appear.
3. Expand Log Monitoring and click Log Parser.
The Log Parser configuration options appear.
4. In the Machine.Group ID list, click the check box next to the CA ARCserve Central Protection Manager server.
From the Log File Parser drop-down list box, click <Select Log Parser>.
Click New.
The Log File Parser Definition dialog opens.
5. Complete the following fields on the Log File Parser Definition dialog:
Parser Name
Defines the name of the Log File Parser file.
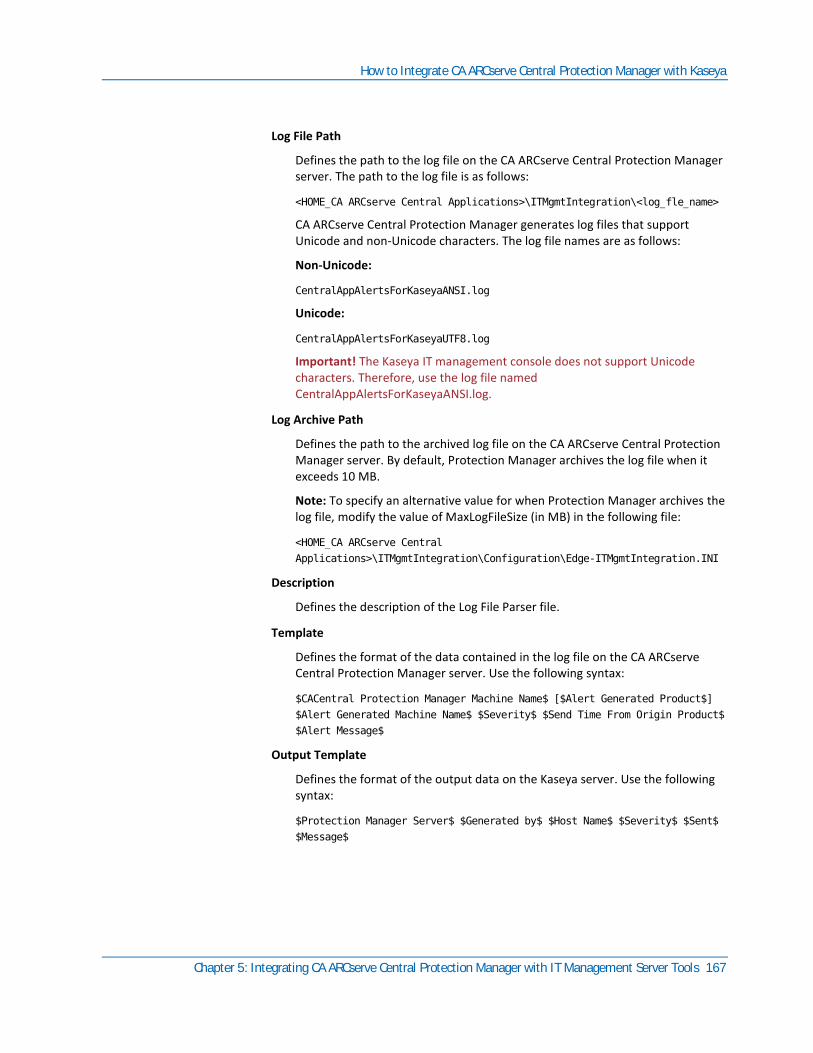
How to Integrate CA ARCserve Central Protection Manager with Kaseya
Chapter 5: Integrating CA ARCserve Central Protection Manager with IT Management Server Tools 167
Log File Path
Defines the path to the log file on the CA ARCserve Central Protection Manager server. The path to the log file is as follows:
<HOME_CA ARCserve Central Applications>\ITMgmtIntegration\<log_fle_name>
CA ARCserve Central Protection Manager generates log files that support Unicode and non-Unicode characters. The log file names are as follows:
Non-Unicode:
CentralAppAlertsForKaseyaANSI.log
Unicode:
CentralAppAlertsForKaseyaUTF8.log
Important! The Kaseya IT management console does not support Unicode characters. Therefore, use the log file named CentralAppAlertsForKaseyaANSI.log.
Log Archive Path
Defines the path to the archived log file on the CA ARCserve Central Protection Manager server. By default, Protection Manager archives the log file when it exceeds 10 MB.
Note: To specify an alternative value for when Protection Manager archives the log file, modify the value of MaxLogFileSize (in MB) in the following file:
<HOME_CA ARCserve Central
Applications>\ITMgmtIntegration\Configuration\Edge-ITMgmtIntegration.INI
Description
Defines the description of the Log File Parser file.
Template
Defines the format of the data contained in the log file on the CA ARCserve Central Protection Manager server. Use the following syntax:
$CACentral Protection Manager Machine Name$ [$Alert Generated Product$]
$Alert Generated Machine Name$ $Severity$ $Send Time From Origin Product$
$Alert Message$
Output Template
Defines the format of the output data on the Kaseya server. Use the following syntax:
$Protection Manager Server$ $Generated by$ $Host Name$ $Severity$ $Sent$
$Message$
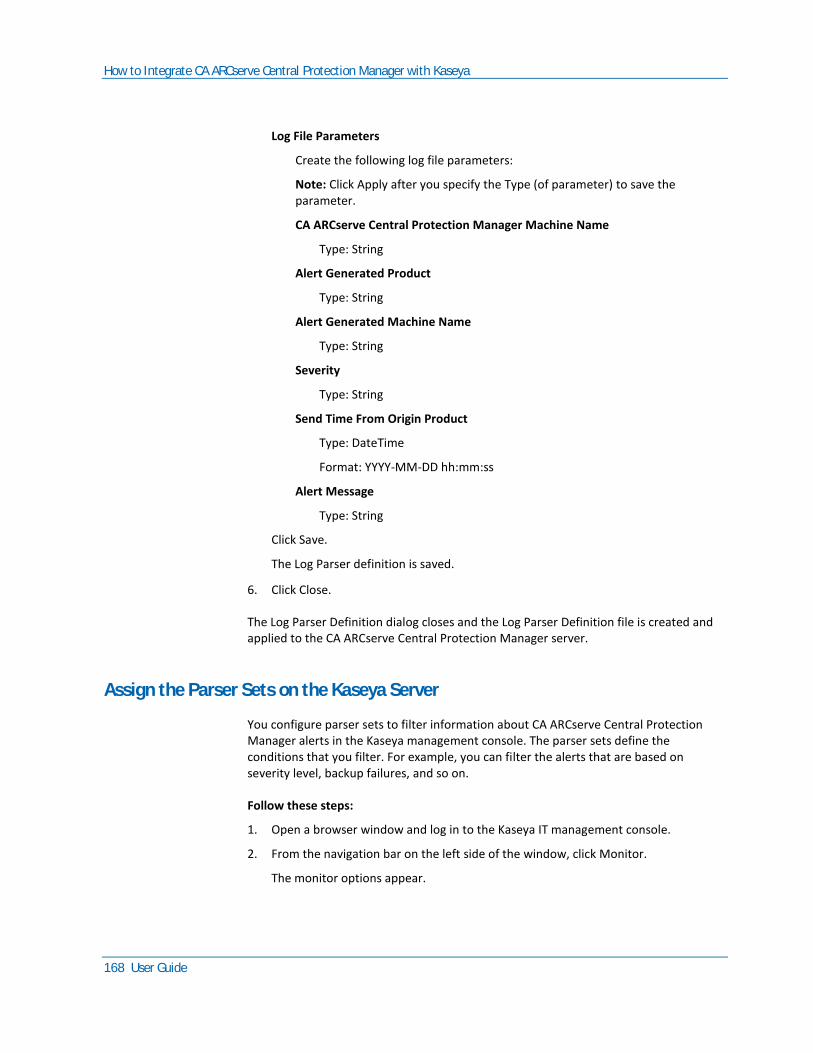
How to Integrate CA ARCserve Central Protection Manager with Kaseya
168 User Guide
Log File Parameters
Create the following log file parameters:
Note: Click Apply after you specify the Type (of parameter) to save the parameter.
CA ARCserve Central Protection Manager Machine Name
Type: String
Alert Generated Product
Type: String
Alert Generated Machine Name
Type: String
Severity
Type: String
Send Time From Origin Product
Type: DateTime
Format: YYYY-MM-DD hh:mm:ss
Alert Message
Type: String
Click Save.
The Log Parser definition is saved.
6. Click Close.
The Log Parser Definition dialog closes and the Log Parser Definition file is created and applied to the CA ARCserve Central Protection Manager server.
Assign the Parser Sets on the Kaseya Server
You configure parser sets to filter information about CA ARCserve Central Protection Manager alerts in the Kaseya management console. The parser sets define the conditions that you filter. For example, you can filter the alerts that are based on severity level, backup failures, and so on.
Follow these steps:
1. Open a browser window and log in to the Kaseya IT management console.
2. From the navigation bar on the left side of the window, click Monitor.
The monitor options appear.
How to Integrate CA ARCserve Central Protection Manager with Kaseya
Chapter 5: Integrating CA ARCserve Central Protection Manager with IT Management Server Tools 169
3. Expand Log Monitoring and click Assign Log Parser.
The assign log parser sets options appear.
4. In the section Assign log parser sets to selected machines, specify the alert options that you require.
5. From the Select log parser drop-down list, click the Log Parser that you want to assign the parser sets.
From the Define parser sets drop-down list, click <New Parser Set>.
The Edit Parser Set dialog opens.
6. In the Parser Set Name field, specify a name for the Parser Set and click New.
The parsing options appear.
7. Specify the following values:
Parser Column
Defines the parameter that you want to filter.
Operator
Defines how you want to filter the data contained in the parameter.
Parameter File
Defines the value of the parameter that you want to filter.
Click Add and click Close.
The filter is applied to the Parser Set and the Edit Parser Set dialog closes.
Note: For examples of how to specify Parser Set filters, see Examples of Parser Set Filters.
8. From the Select log parser drop-down list, click the Log Parser that you want to apply.
From the Define parser sets drop-down list, click the Parser Set that you created.
From the Machine IDs column, click the check box next to the servers that you want to apply the Parser Set.
Click Apply.
The Log Parser and the Parser Set are assigned.
How to Integrate CA ARCserve Central Protection Manager with Kaseya
170 User Guide
Examples of Parser Set Filters
To create Parser Sets that filter only alerts that contain errors, specify the following values:
Parser Column
Severity
Operator
Equal
Parameter Filter
error
To create Parser Sets that display all alerts, regardless of severity level, specify the following values:
Parser Column
Severity
Operator
Contains
Parameter Filter
error, warning, information
To create Parser Sets that display only alerts about failed backups, specify the following values:
Parser Column
Alert Message
Operator
Contains
Parameter Filter
backup, failed
Configure Kaseya Servers to Detect and Send Email Messages
Kaseya Administrators can configure the management console to send email messages to designated recipients upon detection of alert messages from CA ARCserve Central Protection Manager servers. For more information, see the Kaseya documentation.
How to Integrate CA ARCserve Central Protection Manager with Kaseya
Chapter 5: Integrating CA ARCserve Central Protection Manager with IT Management Server Tools 171
View Information About Alerts in the Kaseya Agent Log Monitor
The Kaseya Agent Log Monitor lets you view alert logs based on the criteria that you defined in the Log Parser and the Parser Set. The logs let you identify and perform remedial actions to correct the alert condition.
To view information about alerts in the Kaseya Agent Log Monitor
1. Open a browser window and log in to the Kaseya IT management console.
From the navigation bar on the left side of the window, click Agent.
The Agent options appear.
2. Expand Machine Status and click Agent Logs.
The Agent Logs appear in the right side of the window.
3. From the list of servers, click the server for which you want to view information.
Click Refresh.
The information about the alert messages appears for the specified server.

Chapter 6: Troubleshooting CA ARCserve Central Protection Manager 173
Chapter 6: Troubleshooting CA ARCserve Central Protection Manager
This section provides troubleshooting information to help you identify and resolve problems that you can encounter when using CA ARCserve Central Protection Manager.
This section contains the following topics:
Cannot Connect to Specified Server Messages Appear when Attempting to Add Nodes (see page 174) Blank Webpages Appear or Javascript Errors Occur (see page 176) Web Pages Do Not Load Properly When Logging in to CA ARCserve D2D Nodes (see page 177) Invalid Credentials Message Appears When Adding Nodes (see page 179) Invalid Credentials Messages on Windows XP (see page 180) Access Denied Errors Occur when Adding a Node by IP/Name (see page 180) Certificate Error Appears When You Log In to the Application (see page 182) The CA ARCserve Backup Synchronization Process Fails (see page 183) CA ARCserve D2D Redeployment Operations Fail (see page 184) How to Troubleshoot Page Loading Problems (see page 185) Garbage Characters Appear in Browser Windows When Accessing CA ARCserve Central Applications (see page 186) Nodes Do Not Appear on the Nodes Screen After Changing the Name of the Node (see page 186) CA ARCserve Central Protection Manager Cannot Communicate with the CA ARCserve D2D Web Service on Remote Nodes (see page 187) Nodes Are Not Managed After D2D Deployment (see page 188) How to Set Schedules for Node Data Deletion (see page 188) CA ARCserve Central Applications Database Services Do Not Start (see page 189) Multiple Connections Error Occurs When Saving or Assigning a Policy to a CA ARCserve D2D Server (see page 190) Data Synchronization and Policy Deployment Operations Fail (see page 190) Troubleshooting Error Numbers (see page 191) Add New Tab Link Not Launching Properly for Internet Explorer 8, 9, and Chrome (see page 192) Add New Tab Link, RSS Feeds, and Social Networking Feedback Not Launching Properly on Internet Explorer 8 and 9 (see page 194) Characters from Localized Servers Appear as Garbled Text in the Nimsoft UMP Alarm Console (see page 195)
Cannot Connect to Specified Server Messages Appear when Attempting to Add Nodes
174 User Guide
Cannot Connect to Specified Server Messages Appear when Attempting to Add Nodes
Valid on Windows platforms.
Symptom:
The following message appears when you to try to add or connect to nodes from the Node screen.
Cannot connect to specified server.
Solution:
If the above message appears when you try to add nodes from the Node screen, the following corrective actions can help you solve the problem:
■ Verify that the Windows Server service is running on the CA ARCserve Central Protection Manager server and the source virtual machine (node).
■ Verify that a Windows Firewall exception is applied to the Windows File and Printer Sharing service on the CA ARCserve Central Protection Manager server and the source virtual machine (node).
■ Verify that a Windows Firewall exception is applied to the Windows Netlogon service only if the node is not a member of a domain. Perform this task on the CA ARCserve Central Protection Manager server and the source virtual machine (node).
■ Verify that the value applied to the Sharing and Security model for local account is Classic. To apply the Classic value, do the following:
Note: Perform the following steps on the CA ARCserve Central Protection Manager server and the source virtual machine (node).
1. Log in to the CA ARCserve Central Protection Manager server and open Control Panel.
2. From the Control Panel, open Administrative Tools.
3. Double-click Local Security Policy.
The Local Security Policy window opens.
Cannot Connect to Specified Server Messages Appear when Attempting to Add Nodes
Chapter 6: Troubleshooting CA ARCserve Central Protection Manager 175
4. From the Local Security Policy window, expand Local Policies and expand Security Options.
The Security Policies appear.
5. Right-click Network access: Sharing and security model for local accounts and click Properties on the pop-up menu.
The Network access: Sharing and security model for local accounts properties dialog opens.
6. Click Local Security Setting.
From the drop-down list, select Classic - local users authenticate as themselves.
Click OK.
■ Verify that the value applied to the Local Policies for the LAN manager authentication level is set to send LM & NTLMv2 – use NTLMv2 session security if negotiated. To apply the value, do the following:
1. Log in to the CA ARCserve Central Protection Manager server and open the command prompt.
Execute the following command
secpol.msc
The Local Security Settings dialog opens.
2. Select local policies and click security options.
Search for Network security: LAN manager authentication level.
Double-click the option.
The Properties dialog opens
3. Select the following option and click OK.
send LM & NTLMv2 – use NTLMv2 session security if negotiated
4. From the command prompt, execute the following command:
gpupdate
The value is applied.
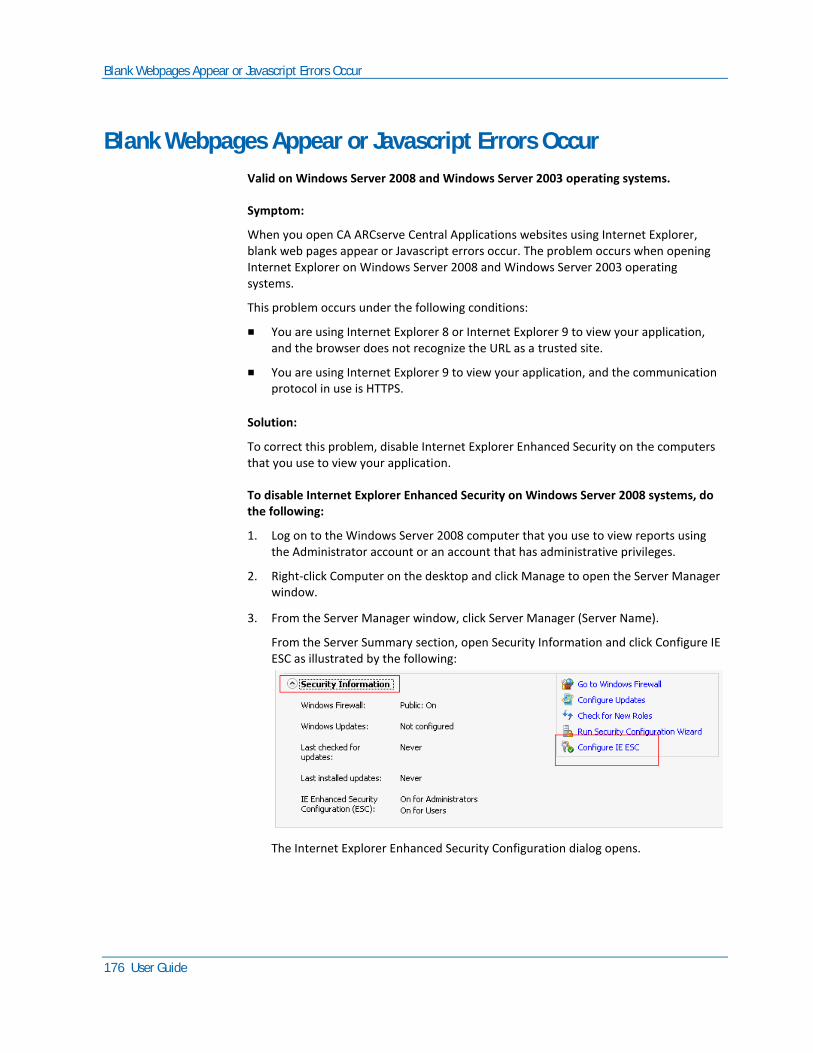
Blank Webpages Appear or Javascript Errors Occur
176 User Guide
Blank Webpages Appear or Javascript Errors Occur
Valid on Windows Server 2008 and Windows Server 2003 operating systems.
Symptom:
When you open CA ARCserve Central Applications websites using Internet Explorer, blank web pages appear or Javascript errors occur. The problem occurs when opening Internet Explorer on Windows Server 2008 and Windows Server 2003 operating systems.
This problem occurs under the following conditions:
■ You are using Internet Explorer 8 or Internet Explorer 9 to view your application, and the browser does not recognize the URL as a trusted site.
■ You are using Internet Explorer 9 to view your application, and the communication protocol in use is HTTPS.
Solution:
To correct this problem, disable Internet Explorer Enhanced Security on the computers that you use to view your application.
To disable Internet Explorer Enhanced Security on Windows Server 2008 systems, do the following:
1. Log on to the Windows Server 2008 computer that you use to view reports using the Administrator account or an account that has administrative privileges.
2. Right-click Computer on the desktop and click Manage to open the Server Manager window.
3. From the Server Manager window, click Server Manager (Server Name).
From the Server Summary section, open Security Information and click Configure IE ESC as illustrated by the following:
The Internet Explorer Enhanced Security Configuration dialog opens.
Web Pages Do Not Load Properly When Logging in to CA ARCserve D2D Nodes
Chapter 6: Troubleshooting CA ARCserve Central Protection Manager 177
4. On the Internet Explorer Enhanced Security Configuration dialog, do the following:
■ Administrators--Click Off
■ Users--Click Off.
Click OK.
The Internet Explorer Enhanced Security Configuration dialog closes and Internet Explorer Enhanced Security is disabled.
To disable Internet Explorer Enhanced Security on Windows Server 2003 systems, do the following:
1. Log on to the Windows Server 2003 computer that you use to view reports using the Administrator account or an account that has administrative privileges.
2. Open Windows Control Panel and then open Add or Remove Programs.
3. From the Add or Remove Programs dialog, click the Add/Remove Windows Components option to access the Windows Components Wizard screen.
Clear the checkmark next to Internet Explorer Enhanced Security Configuration.
Click Next.
Follow the on-screen instructions to complete the configuration and then click Finish.
Internet Explorer Enhanced Security is disabled.
Web Pages Do Not Load Properly When Logging in to CA ARCserve D2D Nodes
Valid on Windows platforms.
Symptom:
Web pages in browser windows do not load properly, display error messages, or both when logging in to CA ARCserve D2D nodes from the Nodes screen.
Solution:
This behavior affects mainly Internet Explorer browsers. Web pages may not load properly when Active scripting, ActiveX controls, or Java programs are disabled on your computer or blocked on your network.
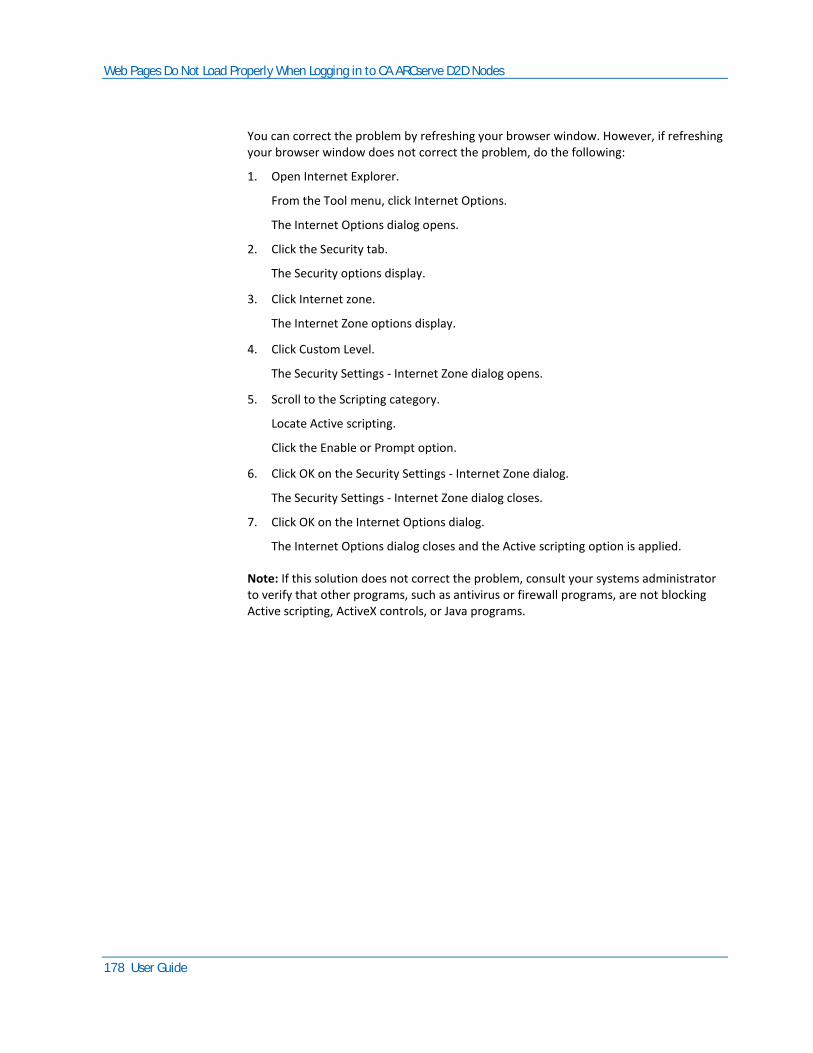
Web Pages Do Not Load Properly When Logging in to CA ARCserve D2D Nodes
178 User Guide
You can correct the problem by refreshing your browser window. However, if refreshing your browser window does not correct the problem, do the following:
1. Open Internet Explorer.
From the Tool menu, click Internet Options.
The Internet Options dialog opens.
2. Click the Security tab.
The Security options display.
3. Click Internet zone.
The Internet Zone options display.
4. Click Custom Level.
The Security Settings - Internet Zone dialog opens.
5. Scroll to the Scripting category.
Locate Active scripting.
Click the Enable or Prompt option.
6. Click OK on the Security Settings - Internet Zone dialog.
The Security Settings - Internet Zone dialog closes.
7. Click OK on the Internet Options dialog.
The Internet Options dialog closes and the Active scripting option is applied.
Note: If this solution does not correct the problem, consult your systems administrator to verify that other programs, such as antivirus or firewall programs, are not blocking Active scripting, ActiveX controls, or Java programs.
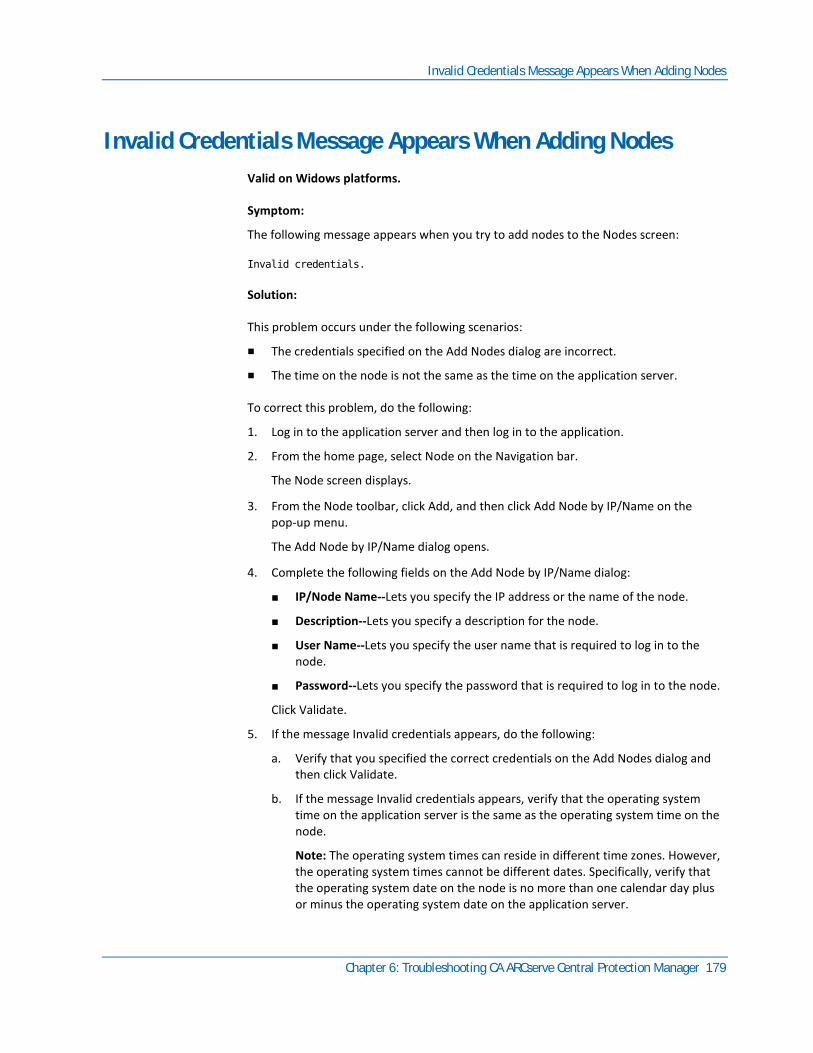
Invalid Credentials Message Appears When Adding Nodes
Chapter 6: Troubleshooting CA ARCserve Central Protection Manager 179
Invalid Credentials Message Appears When Adding Nodes
Valid on Widows platforms.
Symptom:
The following message appears when you try to add nodes to the Nodes screen:
Invalid credentials.
Solution:
This problem occurs under the following scenarios:
■ The credentials specified on the Add Nodes dialog are incorrect.
■ The time on the node is not the same as the time on the application server.
To correct this problem, do the following:
1. Log in to the application server and then log in to the application.
2. From the home page, select Node on the Navigation bar.
The Node screen displays.
3. From the Node toolbar, click Add, and then click Add Node by IP/Name on the pop-up menu.
The Add Node by IP/Name dialog opens.
4. Complete the following fields on the Add Node by IP/Name dialog:
■ IP/Node Name--Lets you specify the IP address or the name of the node.
■ Description--Lets you specify a description for the node.
■ User Name--Lets you specify the user name that is required to log in to the node.
■ Password--Lets you specify the password that is required to log in to the node.
Click Validate.
5. If the message Invalid credentials appears, do the following:
a. Verify that you specified the correct credentials on the Add Nodes dialog and then click Validate.
b. If the message Invalid credentials appears, verify that the operating system time on the application server is the same as the operating system time on the node.
Note: The operating system times can reside in different time zones. However, the operating system times cannot be different dates. Specifically, verify that the operating system date on the node is no more than one calendar day plus or minus the operating system date on the application server.
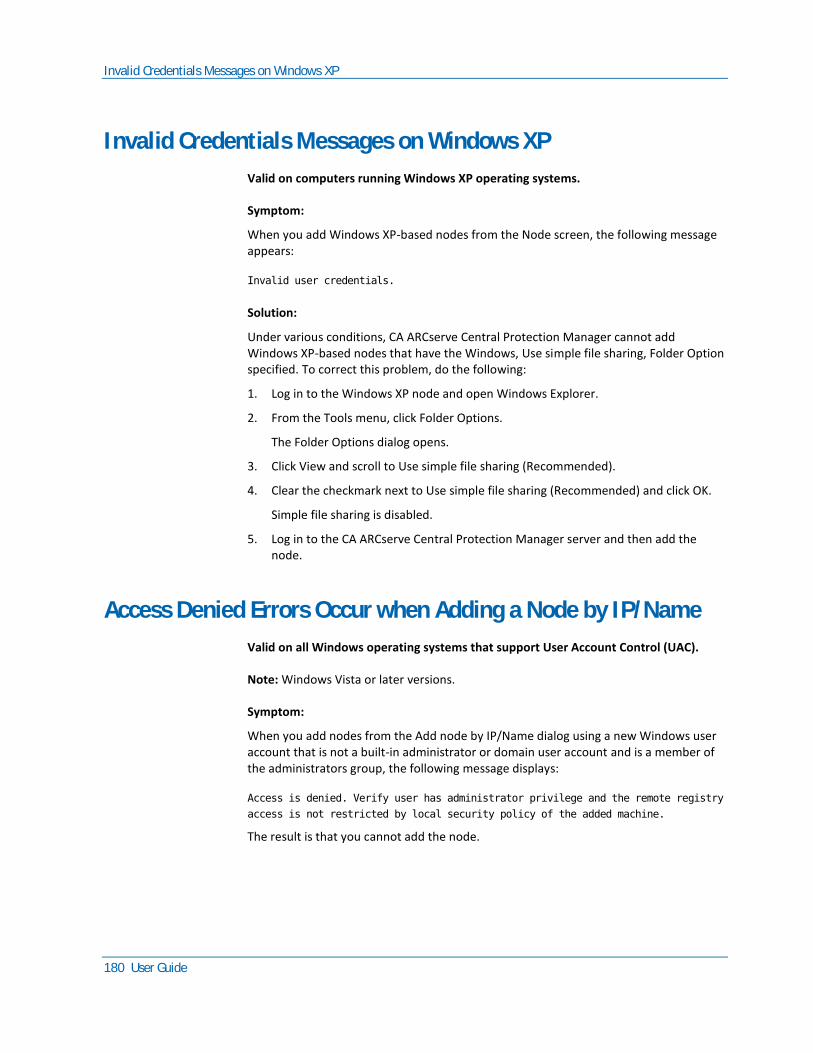
Invalid Credentials Messages on Windows XP
180 User Guide
Invalid Credentials Messages on Windows XP
Valid on computers running Windows XP operating systems.
Symptom:
When you add Windows XP-based nodes from the Node screen, the following message appears:
Invalid user credentials.
Solution:
Under various conditions, CA ARCserve Central Protection Manager cannot add Windows XP-based nodes that have the Windows, Use simple file sharing, Folder Option specified. To correct this problem, do the following:
1. Log in to the Windows XP node and open Windows Explorer.
2. From the Tools menu, click Folder Options.
The Folder Options dialog opens.
3. Click View and scroll to Use simple file sharing (Recommended).
4. Clear the checkmark next to Use simple file sharing (Recommended) and click OK.
Simple file sharing is disabled.
5. Log in to the CA ARCserve Central Protection Manager server and then add the node.
Access Denied Errors Occur when Adding a Node by IP/Name
Valid on all Windows operating systems that support User Account Control (UAC).
Note: Windows Vista or later versions.
Symptom:
When you add nodes from the Add node by IP/Name dialog using a new Windows user account that is not a built-in administrator or domain user account and is a member of the administrators group, the following message displays:
Access is denied. Verify user has administrator privilege and the remote registry
access is not restricted by local security policy of the added machine.
The result is that you cannot add the node.
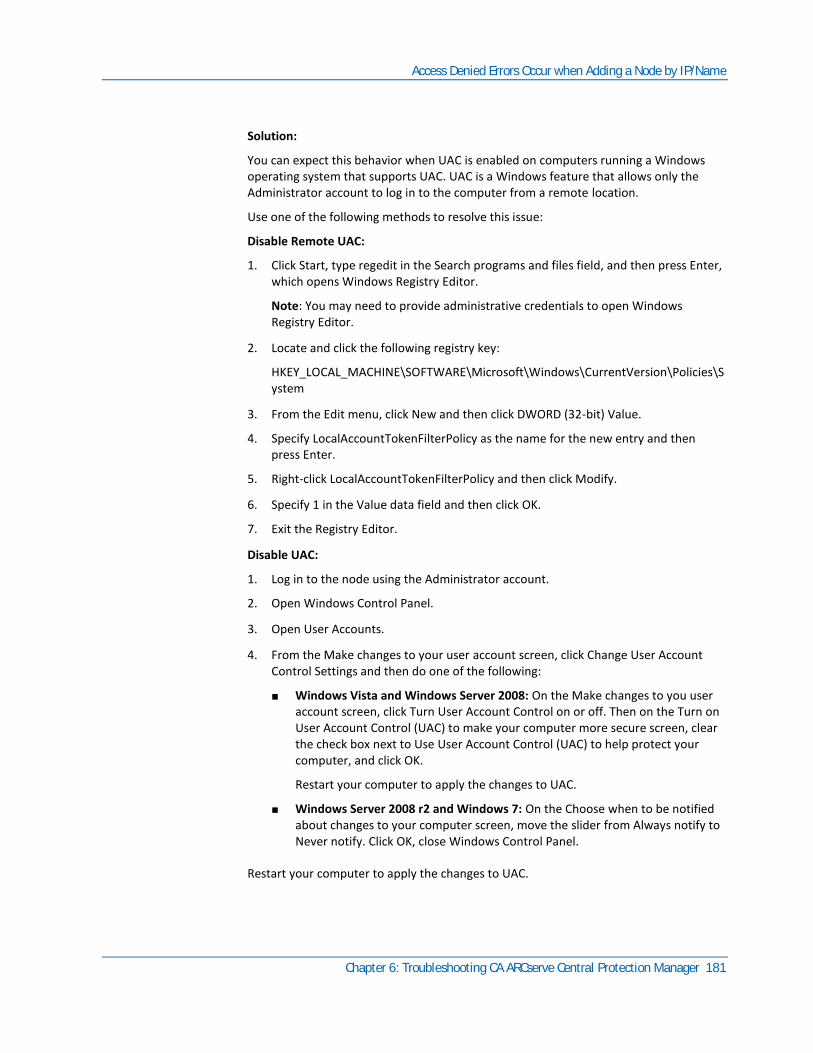
Access Denied Errors Occur when Adding a Node by IP/Name
Chapter 6: Troubleshooting CA ARCserve Central Protection Manager 181
Solution:
You can expect this behavior when UAC is enabled on computers running a Windows operating system that supports UAC. UAC is a Windows feature that allows only the Administrator account to log in to the computer from a remote location.
Use one of the following methods to resolve this issue:
Disable Remote UAC:
1. Click Start, type regedit in the Search programs and files field, and then press Enter, which opens Windows Registry Editor.
Note: You may need to provide administrative credentials to open Windows Registry Editor.
2. Locate and click the following registry key:
HKEY_LOCAL_MACHINE\SOFTWARE\Microsoft\Windows\CurrentVersion\Policies\System
3. From the Edit menu, click New and then click DWORD (32-bit) Value.
4. Specify LocalAccountTokenFilterPolicy as the name for the new entry and then press Enter.
5. Right-click LocalAccountTokenFilterPolicy and then click Modify.
6. Specify 1 in the Value data field and then click OK.
7. Exit the Registry Editor.
Disable UAC:
1. Log in to the node using the Administrator account.
2. Open Windows Control Panel.
3. Open User Accounts.
4. From the Make changes to your user account screen, click Change User Account Control Settings and then do one of the following:
■ Windows Vista and Windows Server 2008: On the Make changes to you user account screen, click Turn User Account Control on or off. Then on the Turn on User Account Control (UAC) to make your computer more secure screen, clear the check box next to Use User Account Control (UAC) to help protect your computer, and click OK.
Restart your computer to apply the changes to UAC.
■ Windows Server 2008 r2 and Windows 7: On the Choose when to be notified about changes to your computer screen, move the slider from Always notify to Never notify. Click OK, close Windows Control Panel.
Restart your computer to apply the changes to UAC.
Certificate Error Appears When You Log In to the Application
182 User Guide
Certificate Error Appears When You Log In to the Application
Valid on Windows platforms.
Symptom:
The following message appears in your browser window when you log in to the application:
■ Internet Explorer:
There is a problem with this website's security certificate.
■ Firefox:
This connection is untrusted.
■ Chrome:
This site's security certificate is not trusted!
If you specify an option that lets you continue to the website, you can log in to the application successfully. However, you encounter this behavior every time you log in to the application.
Solution:
This behavior occurs when you specify to use HTTPS as the communication protocol. To correct this problem temporarily, click the link in your browser window that lets you continue to the website. However, the next time that you log in to the application, you will encounter the message again.
HTTPS communication protocol provides a higher level of security than HTTP communication protocol. If you want to continue to communicate using HTTPS communication protocol, you can purchase a security certificate from VeriSign and then install the certificate on the application server. Optionally, you can change the communication protocol used by the application to HTTP. To change the communication protocol to HTTP, do the following:
1. Log in to the server where you installed the application.
2. Browse to the following directory:
C:\Program Files\CA\ARCserve Central Applications\BIN
3. Execute the following batch file:
ChangeToHttp.bat
4. After the batch file executes, open Windows Server Manager.
Restart the following service:
CA ARCserve Central Applications Service
The CA ARCserve Backup Synchronization Process Fails
Chapter 6: Troubleshooting CA ARCserve Central Protection Manager 183
The CA ARCserve Backup Synchronization Process Fails
Valid on Windows platforms.
Symptom:
The CA ARCserve Backup synchronization process fails and can be viewed in the View Log.
Solution:
The CA ARCserve Backup synchronization process can fail when there is not enough disk space to store temporary synchronization data (dump files). By default, the application stores the dump files to the ARCserve_Central_Applications_Home\ASBUSync directory.
If there is a limit to the amount of free disk space in C:\Program Files, and the files contained in ASBUSync consume more than the amount of free disk space, the application cannot retrieve the CA ARCserve Backup database dump data that is required to complete the synchronization process. As a result, the CA ARCserve Backup synchronization process fails.
Optionally, the application lets you specify an alternative location to store CA ARCserve Backup synchronization data. To correct this problem or to prevent this problem from occurring, do the following:
1. Log in to the CA ARCserve Central Protection Manager server.
2. Open Windows Registry Editor and browse to the following:
HKEY_LOCAL_MACHINE\SOFTWARE\CA\CA ARCserve Central Application\CM
3. Right-click CM, select New and click String Value on the pop-up menu.
Name the key as follows:
ARCserveSyncPath
4. Right-click ARCserveSyncPath and click Modify on the pop-up menu.
The Edit String dialog opens.
5. In the Value Data field, specify the alternative location where you want to store the CA ARCserve Backup synchronization data.
Click OK.
The alternative location is specified.
CA ARCserve D2D Redeployment Operations Fail
184 User Guide
CA ARCserve D2D Redeployment Operations Fail
Valid on Windows platforms.
Symptom:
When you redeploy CA ARCserve D2D to nodes, the deployment process does not complete successfully. This symptom becomes evident when one of the following events occurs:
■ One of the following messages appears in Deployment Status on the D2D Deployment dialog:
The user did not log in successfully.
The same version, a newer version, or a version of this product that is not
supported is installed on the target computer. Before you can install the current
version of this product, you must uninstall the previous version from the target
computer.
Setup cannot copy files to the remote computer.
■ The node does not appear on the Node screen.
■ The node appears on the Node screen with an incorrect status. For example, the
icon displays on the Node screen, or the icon does not display on the Node screen.
Solution:
These events occur under the following conditions:
■ The CA ARCserve Central Applications web service stops or restarts during the deployment process and the destination server was not restarted after CA ARCserve D2D was installed.
■ The CA ARCserve Central Applications server restarts during the deployment process and the destination server was not restarted after CA ARCserve D2D was installed.
The solution is to perform the following actions:
1. Log in to the D2D server and restart the server.
2. Log in to Central Protection Manager and complete one of the following tasks:
■ If the node appears in the node list on the Node screen and the status is not correct, update the node.
To update the node, click the node and then click Update on the pop-up menu.
■ If the node does not appear in the node list on the Node screen, add the node manually.
To add the node manually, click Add on the toolbar and then click Add node by IP/Name on the pop-up menu.
How to Troubleshoot Page Loading Problems
Chapter 6: Troubleshooting CA ARCserve Central Protection Manager 185
How to Troubleshoot Page Loading Problems
Valid on Windows platforms.
Symptom:
The following error messages appear in browser windows when you log in to CA ARCserve Central Applications, CA ARCserve D2D nodes, and monitoring servers.
Message 1:
Errors on this webpage might cause it to work incorrectly.
Message 2:
!
Solution:
Web pages do not load properly for many reasons. The following table describes common reasons and the corresponding corrective actions:
Reason Corrective Action
There are problems with the underlying HTML source code.
Refresh the webpage and try again.
Your network blocks Active scripting, ActiveX, or Java programs.
Allow your browser to use Active scripting, ActiveX, or Java programs.
Your antivirus application is configured to scan temporary Internet files and downloaded programs.
Filter your antivirus application to allow Internet-related files associated with CA ARCserve Central Applications webpages.
The scripting engine installed on your computer is corrupt or outdated.
Update the scripting engine.
The video card drivers installed on your computer are corrupt or outdated.
Update the video card drivers.
The DirectX component installed on your computer is corrupt or outdated.
Update the DirectX component.
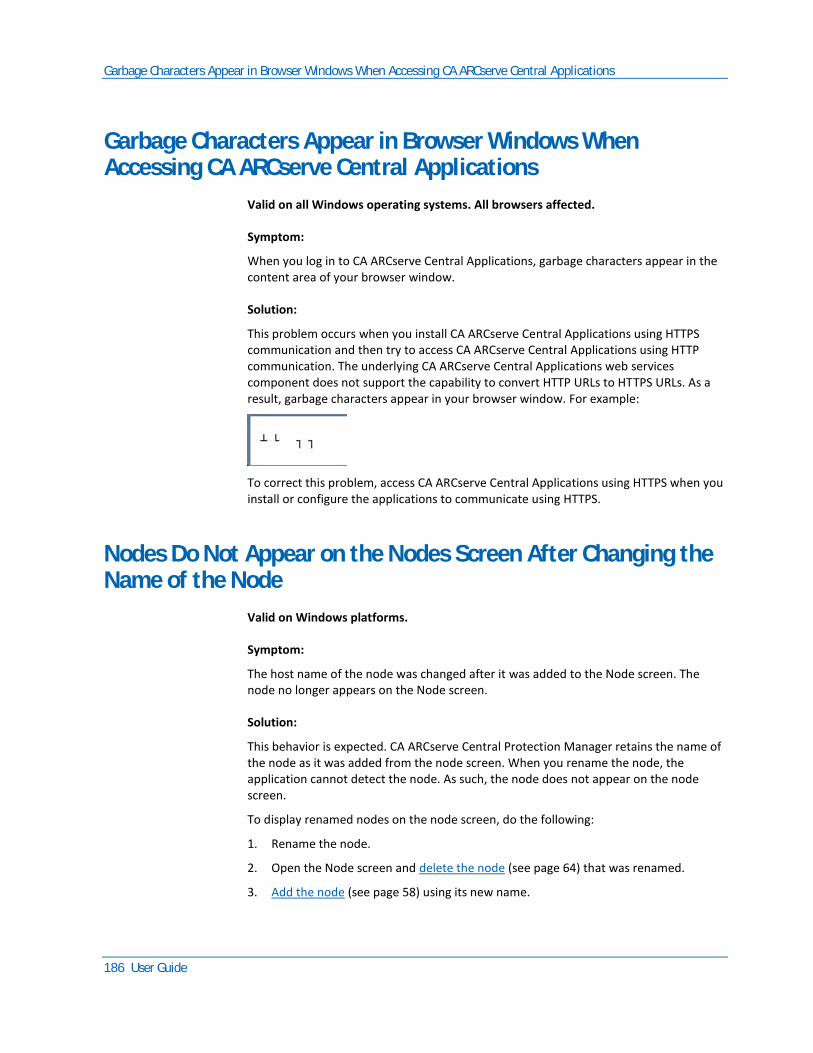
Garbage Characters Appear in Browser Windows When Accessing CA ARCserve Central Applications
186 User Guide
Garbage Characters Appear in Browser Windows When Accessing CA ARCserve Central Applications
Valid on all Windows operating systems. All browsers affected.
Symptom:
When you log in to CA ARCserve Central Applications, garbage characters appear in the content area of your browser window.
Solution:
This problem occurs when you install CA ARCserve Central Applications using HTTPS communication and then try to access CA ARCserve Central Applications using HTTP communication. The underlying CA ARCserve Central Applications web services component does not support the capability to convert HTTP URLs to HTTPS URLs. As a result, garbage characters appear in your browser window. For example:
To correct this problem, access CA ARCserve Central Applications using HTTPS when you install or configure the applications to communicate using HTTPS.
Nodes Do Not Appear on the Nodes Screen After Changing the Name of the Node
Valid on Windows platforms.
Symptom:
The host name of the node was changed after it was added to the Node screen. The node no longer appears on the Node screen.
Solution:
This behavior is expected. CA ARCserve Central Protection Manager retains the name of the node as it was added from the node screen. When you rename the node, the application cannot detect the node. As such, the node does not appear on the node screen.
To display renamed nodes on the node screen, do the following:
1. Rename the node.
2. Open the Node screen and delete the node (see page 64) that was renamed.
3. Add the node (see page 58) using its new name.
CA ARCserve Central Protection Manager Cannot Communicate with the CA ARCserve D2D Web Service on Remote Nodes
Chapter 6: Troubleshooting CA ARCserve Central Protection Manager 187
CA ARCserve Central Protection Manager Cannot Communicate with the CA ARCserve D2D Web Service on Remote Nodes
Valid on Windows operating systems.
Symptom:
CA ARCserve Central Protection Manager cannot communicate with the CA ARCserve D2D web service on remote nodes.
Solution:
The following table describes reasons why CA ARCserve Central Protection Manager cannot communicate with the CA ARCserve D2D web service on remote nodes and the corresponding corrective action:
Cause Corrective Action
The network was not available or not stable when applying policies.
Verify that the network is available and stable and then try again.
The CA ARCserve D2D computer could not handle the load when the application tried to communicate with the node.
Verify that the CPU on the remote CA ARCserve D2D node is in a normal state and then try again.
The CA ARCserve D2D service on the remote node was not running when applying policies.
Verify that the CA ARCserve D2D on the remote node is running and then try again.
The CA ARCserve D2D service was not communicating properly.
Restart the CA ARCserve D2D service on the remote node and then try again.
Nodes Are Not Managed After D2D Deployment
188 User Guide
Nodes Are Not Managed After D2D Deployment
Valid on Windows platforms.
Symptom:
When I deploy CA ARCserve D2D to a node on a local or remote server, the node is added to the node group but the status is NOT managed.
This problem occurs under one of the following condidtions:
■ CA ARCserve D2D was deployed to a remote node without rebooting.
■ CA ARCserve D2D was deployed local CA ARCserve Central Applications server with or without rebooting.
Solution:
To correct this problem, restart the CA ARCserve D2D server and update the CA ARCserve D2D node information in CA ARCserve Central Protection Manager. The status becomes managed.
How to Set Schedules for Node Data Deletion
Valid on Windows platforms.
Symptom:
By default, the node data deletion schedule is set to clear data for deleted nodes every day at 2:00 AM. I would like to customize the schedule for multi-data deletion.
Solution:
To create a customized schedule for node data deletion, set the value of the registry key, CA ARCserve Central Applications\CM\ShowDeleteNodeConfigurationUI to 1. Setting the registry key to 1 adds the Node Data Deletion Configuration tab to the Configuration panel in the CA ARCserve Central Protection Manager application for you to change the schedule.
Note: To access the registry, log in directly to the CA ARCserve Central Protection Manager server and go to Start > Run > Regedit.
CA ARCserve Central Applications Database Services Do Not Start
Chapter 6: Troubleshooting CA ARCserve Central Protection Manager 189
CA ARCserve Central Applications Database Services Do Not Start
Valid on Windows platforms and Microsoft SQL Server and Microsoft SQL Server Express Edition databases.
Symptom:
When you start or restart the CA ARCserve Central Protection Manager server or the server where the CA ARCserve Central Applications database is installed, the CA ARCserve Central Applications database services do not start.
Solution:
When you start a computer, services report their startup status to the operating system. When services do not report a status to the operating system within a predetermined period time (or the timeout period), Windows stops the services. By default, when the CA ARCserve Central Applications services do not report a status to Windows within 30 seconds of the start time, Windows stops the CA ARCserve Central Applications database service. You are more likely to encounter problems of this type when the database is installed on a server that lacks sufficient resources. However, you can prevent this problem occurring by increasing the timeout period for startup. To increase the timeout period, do the following:
1. Open Windows Registry Editor and locate the following key:
HKEY_LOCAL_MACHINE\SYSTEM\CurrentControlSet\Control
2. Right-click Control, point to New, and click Key on the pop-up menu.
A key named New Key #1 is created.
3. Rename New Key #1 to ServicesPipeTimeout.
4. Right-click ServicesPipeTimeout and click Modify on the pop-up menu.
The Edit DWORD Value dialog opens.
5. In the Value data field, specify the value that you want to set for the timeout period. Express the value in milliseconds. For example, to set the timeout period to 60 seconds, specify 60000 in the Value data field.
Note: One second equals 1000 milliseconds.
Click OK.
The timeout period is applied.
6. To apply the changes to Windows, restart the computer.
Multiple Connections Error Occurs When Saving or Assigning a Policy to a CA ARCserve D2D Server
190 User Guide
Multiple Connections Error Occurs When Saving or Assigning a Policy to a CA ARCserve D2D Server
Valid on all Windows platforms.
Symptom:
When you try to save or assign a policy to a CA ARCserve D2D server, the following error message appears:
Validate backup destination failed. Multiple connections to a server or shared
resource by the same user, using more than one user name, are not allowed. Disconnect
all previous connections to the server or shared resource and try again.
Solution:
If the preceding message appears when you try to save or assign a policy to a CA ARCserve D2D server, the following corrective actions can help you solve the problem:
■ Specify the User Name field with "machine (or domain) name\username".
■ Go to the remote server where the shared folder is hosted and delete all sessions from the CA ARCserve Central Applications Server or CA ARCserve D2D Server. Do one of the following to delete the sessions:
– Run the following command line:
net session \\machinename /delete
– Go to the following directory to disconnect the session:
Compmgmt.msc > System Tools > Shared Folders > Sessions > Disconnect session
■ Confirm that you are using the same user name to access the remote shared folder.
■ Save and deploy the policy again.
Data Synchronization and Policy Deployment Operations Fail
Valid on Windows platforms.
Symptom:
The following message appears in the Activity Log after the CA ARCserve D2D data synchronization operation starts:
The application cannot log in to the CA ARCserve D2D service.
The following message box appears when you deploy a policy to the node:
Deploy policy failed (failed to connect to the node).
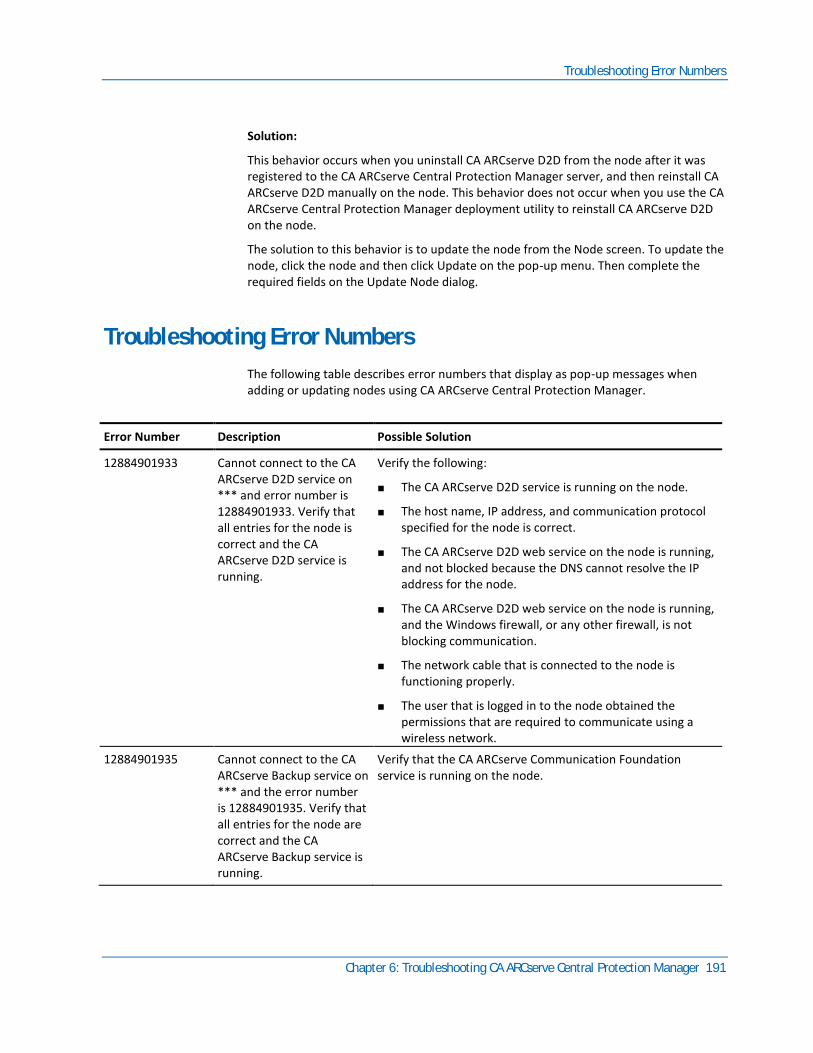
Troubleshooting Error Numbers
Chapter 6: Troubleshooting CA ARCserve Central Protection Manager 191
Solution:
This behavior occurs when you uninstall CA ARCserve D2D from the node after it was registered to the CA ARCserve Central Protection Manager server, and then reinstall CA ARCserve D2D manually on the node. This behavior does not occur when you use the CA ARCserve Central Protection Manager deployment utility to reinstall CA ARCserve D2D on the node.
The solution to this behavior is to update the node from the Node screen. To update the node, click the node and then click Update on the pop-up menu. Then complete the required fields on the Update Node dialog.
Troubleshooting Error Numbers
The following table describes error numbers that display as pop-up messages when adding or updating nodes using CA ARCserve Central Protection Manager.
Error Number Description Possible Solution
12884901933 Cannot connect to the CA ARCserve D2D service on *** and error number is 12884901933. Verify that all entries for the node is correct and the CA ARCserve D2D service is running.
Verify the following:
■ The CA ARCserve D2D service is running on the node.
■ The host name, IP address, and communication protocol specified for the node is correct.
■ The CA ARCserve D2D web service on the node is running, and not blocked because the DNS cannot resolve the IP address for the node.
■ The CA ARCserve D2D web service on the node is running, and the Windows firewall, or any other firewall, is not blocking communication.
■ The network cable that is connected to the node is functioning properly.
■ The user that is logged in to the node obtained the permissions that are required to communicate using a wireless network.
12884901935 Cannot connect to the CA ARCserve Backup service on *** and the error number is 12884901935. Verify that all entries for the node are correct and the CA ARCserve Backup service is running.
Verify that the CA ARCserve Communication Foundation service is running on the node.
Add New Tab Link Not Launching Properly for Internet Explorer 8, 9, and Chrome
192 User Guide
Error Number Description Possible Solution
12884901936 Cannot connect to the CA ARCserve Backup service on *** and the error number is 12884901936. Verify that CA ARCserve Central Applications supports the version of the CA ARCserve Backup service that is installed on the node.
Verify the following:
■ CA ARCserve Central Applications supports the version of the CA ARCserve Backup service that is installed on the node.
■ The CA ARCserve Communication service is running on the node
Add New Tab Link Not Launching Properly for Internet Explorer 8, 9, and Chrome
Valid on Windows
Symptom:
When I add a new tab link to the Navigation bar specifying an HTTPS URL, the following error messages appear when I click the new tab:
■ Internet Explorer 8 and 9:
Content was blocked because it was not signed by a valid security certificate.
■ Chrome:
The webpage is not available.
Solution:
To correct this problem for Internet Explorer, do the following:
■ Internet Explorer 8:
Click on the message bar and select "Display Blocked Content".
■ Internet Explorer 9:
Click the "Show content" button from the message bar at the bottom of the page. The page refreshes and the added tab link opens successfully.
Add New Tab Link Not Launching Properly for Internet Explorer 8, 9, and Chrome
Chapter 6: Troubleshooting CA ARCserve Central Protection Manager 193
To correct this problem for Chrome, perform the following steps:
Step 1 - Export Certificate:
1. Open a new tab in Chrome and enter the HTTPS URL.
A warning message appears, "The site's security certificate is not trusted!"
2. From the address bar, click the lock with the 'X'.
A pop-up window opens with a Certification Information link.
3. Click the Certificate Information link.
The Certificate dialog opens.
4. Click the Details tab and then click Copy to File, to save the certificate to your local computer.
The Certificate Export Wizard dialog opens.
5. Click Next to select the format you want to use to export the file.
Note: DER encoded binary X.509 (.CER) is selected by default.
6. Click Next to browse to a location where you want to save the certificate.
7. Click Next to complete the Certificate Export Wizard and then click Finish.
The certificate exports successfully.
Step 2 - Import Certificate:
1. Open the Tools Options from Chrome.
The Options screen opens.
2. Select the Under the Hood option and click Manage Certificates from HTTPS/SSL.
The Certificates dialog opens.
3. Click Import.
The Certificate Import Wizard dialog opens.
4. Click Next to browse for the certificate you saved on your local computer.
Add New Tab Link, RSS Feeds, and Social Networking Feedback Not Launching Properly on Internet Explorer 8 and 9
194 User Guide
5. Click Next to open the Certificate Store.
The Certificate Store dialog opens.
6. Click Browse to open the Select Certificate Store dialog.
The Select Certificate Store dialog opens.
7. Select Trusted Root Certification Authorities from the file list and click OK.
The Certificate Store dialog appears.
8. Click Next to complete the Certificate Import Wizard and then click Finish.
A Security Warning dialog opens stating that you are about to install a certificate.
Click Yes to agree on the terms.
The certificate imports successfully.
Add New Tab Link, RSS Feeds, and Social Networking Feedback Not Launching Properly on Internet Explorer 8 and 9
Valid on Windows
Symptom:
For an HTTPS CA ARCserve Central Applications URL:
When I add a new tab link to the Navigation bar specifying an HTTP URL, the following error message appears when I click the new tab and the Feedback link:
Navigation to the webpage was canceled.
In addition, the RSS Feeds are not displayed.
Note: The Feedback link also displays the error message even if you do not select the new added tab link.
Solution:
To correct this problem, do the following:
■ Internet Explorer 8:
After you log in, click No on the pop-up security warning message, "Do you want to view only the webpage content that was delivered securely?" By clicking No allows the delivery of unsecured content to your webpage.
■ Internet Explorer 9:
Click the "Show all content" button on the message bar displayed at the bottom of the page. The page refreshes and the added tab link opens successfully.
Characters from Localized Servers Appear as Garbled Text in the Nimsoft UMP Alarm Console
Chapter 6: Troubleshooting CA ARCserve Central Protection Manager 195
Characters from Localized Servers Appear as Garbled Text in the Nimsoft UMP Alarm Console
Valid on Windows.
Symptom:
Characters from alert messages received from localized servers appear as garbled text in the Nimsoft Unified Monitoring Portal (UMP) Alarm Console.
Solution:
This behavior occurs when the character set running on the server that is sending alerts is different from the character set that is running on the Nimsoft server. The solution to this behavior is to configure the Nimsoft server to use UTF-8 encoding. To configure the Nimsoft server to use UTF-8 encoding, do the following:
1. Verify that the dashboard engine is configured to use –Dfile.encoding=utf-8 as a startup parameter.
2. Verify that the wasp Extra Java VM arguments option is defined as –Dfile.encoding=utf-8.
Note: For more information, see the Nimsoft documentation.

Index 197
Index
A
Access Denied Errors Occur when Adding a Node by IP/Name • 180
Add Links to the Navigation Bar • 154 Add New Tab Link Not Launching Properly for
Internet Explorer 8, 9, and Chrome • 192 Add New Tab Link, RSS Feeds, and Social Networking
Feedback Not Launching Properly on Internet Explorer 8 and 9 • 194
Add Node Groups • 72 Add Nodes • 49 Add Nodes by Importing Virtual Machines from
ESX/VC • 60 Add Nodes by IP Address or Node Name • 58 Add Nodes for Deployment • 78 Add Nodes from Discovery Result • 59 Add Nodes Using Discover • 56 Apply CA ARCserve Backup Data Synchronization
Schedules • 70 Applying Best Practices • 155 Assign and Unassign Nodes from Policies • 130 Assign Nodes to the Policy • 53 Assign the Parser Sets on the Kaseya Server • 168
B
Binary Files Containing Incorrect File Version Information • 29
Binary Files that Do Not Contain an Embedded Manifest • 29
Binary Files that have a Privilege Level of Require Administrator in Manifest • 30
Blank Webpages Appear or Javascript Errors Occur • 176
C
CA ARCserve Central Applications Bookshelf • 13 CA ARCserve Central Applications Database Services
Do Not Start • 189 CA ARCserve Central Protection Manager Cannot
Communicate with the CA ARCserve D2D Web Service on Remote Nodes • 187
CA ARCserve D2D Deployment Tasks • 77 CA ARCserve D2D Redeployment Operations Fail •
184
CA Technologies Product References • 3 Cannot Connect to Specified Server Messages
Appear when Attempting to Add Nodes • 174 Certificate Error Appears When You Log In to the
Application • 182 Change Server Communication Protocol • 156 Characters from Localized Servers Appear as Garbled
Text in the Nimsoft UMP Alarm Console • 195 Configure CA ARCserve Backup Data Synchronization
Schedules • 34 Configure CA ARCserve Central Applications Update
Schedules • 38 Configure CA ARCserve Central Protection Manager
Servers to Communicate with Nimsoft Servers • 161
Configure D2D Deployment Settings • 42 Configure Discovery Schedules • 36 Configure Email and Alert Settings • 36 Configure IT Management Server Settings • 38 Configure Kaseya Servers to Detect and Send Email
Messages • 170 Configure Proxy Settings • 39 Configure Social Networking Preferences • 41 Configure SRM Schedules • 35 Configure the CA ARCserve Central Protection
Manager Server to Communicate with the Kaseya Server • 165
Configure the Database • 43 Configure the Log Parser for the Kaseya Server • 166 Configure the Nimsoft Server to Detect and Send
Email Messages • 162 Contact CA • 3 Create a Basic Policy • 49 Create Policies • 81
D
Data Synchronization and Policy Deployment Operations Fail • 190
Delete Node Groups • 75 Delete Nodes • 64 Delete Nodes from Deployment • 80 Delete Policies • 128 Deploy CA ARCserve D2D to Nodes • 78 Deploy Policies • 129 Discovery Monitor Dialog • 57
198 User Guide
Documentation Changes • 5
E
Edit Nodes for Deployment • 79 Edit or Copy Policies • 128 Examples of Parser Set Filters • 170 Export Nodes to a File • 64
F
Filter Node Groups • 80
G
Garbage Characters Appear in Browser Windows When Accessing CA ARCserve Central Applications • 186
Getting Started With CA ARCserve Central Protection Manager • 33
H
How CA ARCserve Central Protection Manager Integrates with Nimsoft and Kaseya • 157
How the Application Works • 12 How the Installation Process Affects Operating
Systems • 27 How to Integrate CA ARCserve Central Protection
Manager with Kaseya • 164 How to Integrate CA ARCserve Central Protection
Manager with Nimsoft • 159 How to Manage CA ARCserve D2D Policies • 81 How to Manage Nodes in CA ARCserve Central
Protection Manager • 54 How to Restore Nodes in CA ARCserve Central
Protection Manager • 134 How to Set Schedules for Node Data Deletion • 188 How to Troubleshoot Page Loading Problems • 185 How to Uninstall CA ARCserve Central Protection
Manager • 22
I
Import Nodes from a File • 61 Install CA ARCserve Central Protection Manager • 17 Install CA ARCserve Central Protection Manager
Silently • 21 Install the Kaseya Agent • 165 Install the Robot • 160 Installation Considerations • 17
Installing CA ARCserve Central Protection Manager • 15
Integrating CA ARCserve Central Protection Manager with IT Management Server Tools • 157
Introducing CA ARCserve Central Protection Manager • 11
Introduction • 11 Invalid Credentials Message Appears When Adding
Nodes • 179 Invalid Credentials Messages on Windows XP • 180
L
Log In to CA ARCserve D2D Nodes • 65
M
Manage Backup Settings • 82 Manage File Copy Settings • 98 Manage Preferences • 116 Merge Job Options • 66 Modify Node Groups • 73 Modify the Administrator Account • 42 Multiple Connections Error Occurs When Saving or
Assigning a Policy to a CA ARCserve D2D Server • 190
N
Node Settings • 70 Nodes Are Not Managed After D2D Deployment •
188 Nodes Do Not Appear on the Nodes Screen After
Changing the Name of the Node • 186
P
Pause a Merge Job on a Node • 66 Perform a Full Synchronization of CA ARCserve
Backup Data for a Specific Node or Node Group • 68
Perform a Full Synchronization of CA ARCserve D2D Data for a Specific Node or Node Group • 69
Perform an Incremental Synchronization of CA ARCserve Backup Data for a Specific Node or Node Group • 68
Prerequisite Installation Tasks • 15
R
Re-create the CA ARCserve Central Protection Manager Database • 44
Index 199
Release Policy Control to the CA ARCserve D2D Nodes • 26
Restore Data from File Copies • 137 Restore Data from Files and Folders • 140 Restore Data from Recovery Points • 134 Restore Data from Virtual Machines • 144 Restore Microsoft Exchange Email Data • 148 Restore Virtual Machines to Alternative Locations •
146 Restore Virtual Machines to Original Locations • 145 Resume a Merge Job on a Node • 67 Run a Back Up Now • 131
S
Search for Nodes Using Discover • 76 Specify Advanced Backup Settings • 94 Specify Backup Schedules • 91 Specify Cloud Configuration Details for File Copy •
108 Specify Copy Recovery Points Settings • 113 Specify Email Alerts • 118 Specify Email Settings • 121 Specify File Copy Destinations • 105 Specify File Copy Policies • 100 Specify File Copy Schedules • 111 Specify File Copy Sources • 98 Specify General Preferences • 116 Specify Pre/Post Backup Settings • 97 Specify Protection Settings • 82 Specify Update Preferences • 123 Synchronization Data and Options • 67
T
The CA ARCserve Backup Synchronization Process Fails • 183
Troubleshooting CA ARCserve Central Protection Manager • 173
Troubleshooting Error Numbers • 191
U
Understanding the Node Management Screen • 54 Uninstall CA ARCserve Central Protection Manager •
24 Uninstall CA ARCserve Central Protection Manager
Silently • 25 Update Nodes • 62
Update Nodes and Policies After Changing the Host Name of the CA ARCserve Central Applications Server • 65
Using CA ARCserve Central Protection Manager • 47 Using CA ARCserve Central Protection Manager to
Back up CA ARCserve D2D Nodes • 48
V
Verify That the CA ARCserve Central Protection Manager Server Can Communicate With the Nodes • 33
View CA ARCserve Central Protection Manager Logs • 152
View Information About Alerts in the Kaseya Agent Log Monitor • 171
View Information About Alerts in the Nimsoft Alarm SubConsole • 162
View Job Status Information • 133
W
Web Pages Do Not Load Properly When Logging in to CA ARCserve D2D Nodes • 177
What You Can Do With Node Groups • 71 What You Can Do With Nodes • 56