aws elemental server - user guide
TRANSCRIPT
AWS Elemental ServerUser Guide
Version 2.16

AWS Elemental Server User Guide
AWS Elemental Server: User GuideCopyright © Amazon Web Services, Inc. and/or its affiliates. All rights reserved.
Amazon's trademarks and trade dress may not be used in connection with any product or service that is notAmazon's, in any manner that is likely to cause confusion among customers, or in any manner that disparages ordiscredits Amazon. All other trademarks not owned by Amazon are the property of their respective owners, who mayor may not be affiliated with, connected to, or sponsored by Amazon.

AWS Elemental Server User Guide
Table of Contents. . . . . . . . . . . . . . . . . . . . . . . . . . . . . . . . . . . . . . . . . . . . . . . . . . . . . . . . . . . . . . . . . . . . . . . . . . . . . . . . . . . . . . . . . . . . . . . . . . . . . . . . . . . . . . . . . . . . . . . . . . . . . . . . . . . . . . . . . . . . . . . . . . . . . . vii
What Is AWS Elemental Server? ... . . . . . . . . . . . . . . . . . . . . . . . . . . . . . . . . . . . . . . . . . . . . . . . . . . . . . . . . . . . . . . . . . . . . . . . . . . . . . . . . . . . . . . . . . . . . . . . . . . . . . . . . 1Finding Information About Server ... . . . . . . . . . . . . . . . . . . . . . . . . . . . . . . . . . . . . . . . . . . . . . . . . . . . . . . . . . . . . . . . . . . . . . . . . . . . . . . . . . . . . . . . . . . . . . 1
Including Inserted Images (Graphic Overlays) ... . . . . . . . . . . . . . . . . . . . . . . . . . . . . . . . . . . . . . . . . . . . . . . . . . . . . . . . . . . . . . . . . . . . . . . . . . . . . . . . . . . . . . . 2Still Image Inserter ... . . . . . . . . . . . . . . . . . . . . . . . . . . . . . . . . . . . . . . . . . . . . . . . . . . . . . . . . . . . . . . . . . . . . . . . . . . . . . . . . . . . . . . . . . . . . . . . . . . . . . . . . . . . . . . . . . . 2
Choosing Between Input, Stream, and Global Overlay .... . . . . . . . . . . . . . . . . . . . . . . . . . . . . . . . . . . . . . . . . . . . . . . . . . . . . . . . . . 3Requirements for the Overlay File ... . . . . . . . . . . . . . . . . . . . . . . . . . . . . . . . . . . . . . . . . . . . . . . . . . . . . . . . . . . . . . . . . . . . . . . . . . . . . . . . . . . . . . 4Sizing Your Overlay to Account for Scaling .... . . . . . . . . . . . . . . . . . . . . . . . . . . . . . . . . . . . . . . . . . . . . . . . . . . . . . . . . . . . . . . . . . . . . . . . . 4Setting Up When Your Overlay Plays .... . . . . . . . . . . . . . . . . . . . . . . . . . . . . . . . . . . . . . . . . . . . . . . . . . . . . . . . . . . . . . . . . . . . . . . . . . . . . . . . . 5Setting Up Overlapping Overlays .... . . . . . . . . . . . . . . . . . . . . . . . . . . . . . . . . . . . . . . . . . . . . . . . . . . . . . . . . . . . . . . . . . . . . . . . . . . . . . . . . . . . . . 5
Motion Image Inserter ... . . . . . . . . . . . . . . . . . . . . . . . . . . . . . . . . . . . . . . . . . . . . . . . . . . . . . . . . . . . . . . . . . . . . . . . . . . . . . . . . . . . . . . . . . . . . . . . . . . . . . . . . . . . . . 6Requirements for Motion Overlay Files ... . . . . . . . . . . . . . . . . . . . . . . . . . . . . . . . . . . . . . . . . . . . . . . . . . . . . . . . . . . . . . . . . . . . . . . . . . . . . . . 8Specifying the Motion Overlay File Location .... . . . . . . . . . . . . . . . . . . . . . . . . . . . . . . . . . . . . . . . . . . . . . . . . . . . . . . . . . . . . . . . . . . . . . . 9Setting Up When Your Motion Graphic Plays .... . . . . . . . . . . . . . . . . . . . . . . . . . . . . . . . . . . . . . . . . . . . . . . . . . . . . . . . . . . . . . . . . . . . . . 9
Using SWF Files for Motion Graphic Overlay .... . . . . . . . . . . . . . . . . . . . . . . . . . . . . . . . . . . . . . . . . . . . . . . . . . . . . . . . . . . . . . . . . . . . . . . . . . . . . . . . . . . . . 11Minimize Your Flash Stage Size .... . . . . . . . . . . . . . . . . . . . . . . . . . . . . . . . . . . . . . . . . . . . . . . . . . . . . . . . . . . . . . . . . . . . . . . . . . . . . . . . . . . . . . . . . . . . . . . 11Optimize Flash Stage for Input .... . . . . . . . . . . . . . . . . . . . . . . . . . . . . . . . . . . . . . . . . . . . . . . . . . . . . . . . . . . . . . . . . . . . . . . . . . . . . . . . . . . . . . . . . . . . . . . 11Optimize Your Assets ... . . . . . . . . . . . . . . . . . . . . . . . . . . . . . . . . . . . . . . . . . . . . . . . . . . . . . . . . . . . . . . . . . . . . . . . . . . . . . . . . . . . . . . . . . . . . . . . . . . . . . . . . . . . . . 12Sandbox the SWF File ... . . . . . . . . . . . . . . . . . . . . . . . . . . . . . . . . . . . . . . . . . . . . . . . . . . . . . . . . . . . . . . . . . . . . . . . . . . . . . . . . . . . . . . . . . . . . . . . . . . . . . . . . . . . . 12Do Not Embed Video .... . . . . . . . . . . . . . . . . . . . . . . . . . . . . . . . . . . . . . . . . . . . . . . . . . . . . . . . . . . . . . . . . . . . . . . . . . . . . . . . . . . . . . . . . . . . . . . . . . . . . . . . . . . . . 12Be Wary of Simulating Video in Flash .... . . . . . . . . . . . . . . . . . . . . . . . . . . . . . . . . . . . . . . . . . . . . . . . . . . . . . . . . . . . . . . . . . . . . . . . . . . . . . . . . . . . . . 12Set Publish Target and Script ... . . . . . . . . . . . . . . . . . . . . . . . . . . . . . . . . . . . . . . . . . . . . . . . . . . . . . . . . . . . . . . . . . . . . . . . . . . . . . . . . . . . . . . . . . . . . . . . . . . 12
Including SCTE-35 Markers ... . . . . . . . . . . . . . . . . . . . . . . . . . . . . . . . . . . . . . . . . . . . . . . . . . . . . . . . . . . . . . . . . . . . . . . . . . . . . . . . . . . . . . . . . . . . . . . . . . . . . . . . . . . . . . 13Processing Options .... . . . . . . . . . . . . . . . . . . . . . . . . . . . . . . . . . . . . . . . . . . . . . . . . . . . . . . . . . . . . . . . . . . . . . . . . . . . . . . . . . . . . . . . . . . . . . . . . . . . . . . . . . . . . . . . 13
Default Behavior ... . . . . . . . . . . . . . . . . . . . . . . . . . . . . . . . . . . . . . . . . . . . . . . . . . . . . . . . . . . . . . . . . . . . . . . . . . . . . . . . . . . . . . . . . . . . . . . . . . . . . . . . . . . . 14About Timecode Configuration and Timers .... . . . . . . . . . . . . . . . . . . . . . . . . . . . . . . . . . . . . . . . . . . . . . . . . . . . . . . . . . . . . . . . . . . . . . . 14
Scope of Processing Depending on Outputs .... . . . . . . . . . . . . . . . . . . . . . . . . . . . . . . . . . . . . . . . . . . . . . . . . . . . . . . . . . . . . . . . . . . . . . . . . . . . . . 15Archive Output with MPEG-2 Container ... . . . . . . . . . . . . . . . . . . . . . . . . . . . . . . . . . . . . . . . . . . . . . . . . . . . . . . . . . . . . . . . . . . . . . . . . . . . . 15Archive Output with Other Containers ... . . . . . . . . . . . . . . . . . . . . . . . . . . . . . . . . . . . . . . . . . . . . . . . . . . . . . . . . . . . . . . . . . . . . . . . . . . . . . 16Apple HLS Output .... . . . . . . . . . . . . . . . . . . . . . . . . . . . . . . . . . . . . . . . . . . . . . . . . . . . . . . . . . . . . . . . . . . . . . . . . . . . . . . . . . . . . . . . . . . . . . . . . . . . . . . . . 17DASH Output .... . . . . . . . . . . . . . . . . . . . . . . . . . . . . . . . . . . . . . . . . . . . . . . . . . . . . . . . . . . . . . . . . . . . . . . . . . . . . . . . . . . . . . . . . . . . . . . . . . . . . . . . . . . . . . . . 18Adobe HDS Output .... . . . . . . . . . . . . . . . . . . . . . . . . . . . . . . . . . . . . . . . . . . . . . . . . . . . . . . . . . . . . . . . . . . . . . . . . . . . . . . . . . . . . . . . . . . . . . . . . . . . . . . . 18MS Smooth Output .... . . . . . . . . . . . . . . . . . . . . . . . . . . . . . . . . . . . . . . . . . . . . . . . . . . . . . . . . . . . . . . . . . . . . . . . . . . . . . . . . . . . . . . . . . . . . . . . . . . . . . . 19UDP/TS Output .... . . . . . . . . . . . . . . . . . . . . . . . . . . . . . . . . . . . . . . . . . . . . . . . . . . . . . . . . . . . . . . . . . . . . . . . . . . . . . . . . . . . . . . . . . . . . . . . . . . . . . . . . . . . . 20RTSP Output .... . . . . . . . . . . . . . . . . . . . . . . . . . . . . . . . . . . . . . . . . . . . . . . . . . . . . . . . . . . . . . . . . . . . . . . . . . . . . . . . . . . . . . . . . . . . . . . . . . . . . . . . . . . . . . . . 21
Blanking and Passthrough and Manifest Decoration .... . . . . . . . . . . . . . . . . . . . . . . . . . . . . . . . . . . . . . . . . . . . . . . . . . . . . . . . . . . . . . . . . . . 22Getting Ready: Setting the Ad Avail Mode .... . . . . . . . . . . . . . . . . . . . . . . . . . . . . . . . . . . . . . . . . . . . . . . . . . . . . . . . . . . . . . . . . . . . . . . . . . . . . . . . 22Manifest Decoration .... . . . . . . . . . . . . . . . . . . . . . . . . . . . . . . . . . . . . . . . . . . . . . . . . . . . . . . . . . . . . . . . . . . . . . . . . . . . . . . . . . . . . . . . . . . . . . . . . . . . . . . . . . . . . . . 24
How SCTE-35 Events Are Handled in Manifests ... . . . . . . . . . . . . . . . . . . . . . . . . . . . . . . . . . . . . . . . . . . . . . . . . . . . . . . . . . . . . . . . . . 24Procedure to Enable Decoration .... . . . . . . . . . . . . . . . . . . . . . . . . . . . . . . . . . . . . . . . . . . . . . . . . . . . . . . . . . . . . . . . . . . . . . . . . . . . . . . . . . . . . . 25
Ad Avail Blanking and Blackout .... . . . . . . . . . . . . . . . . . . . . . . . . . . . . . . . . . . . . . . . . . . . . . . . . . . . . . . . . . . . . . . . . . . . . . . . . . . . . . . . . . . . . . . . . . . . . . . 27Blanking is Global ... . . . . . . . . . . . . . . . . . . . . . . . . . . . . . . . . . . . . . . . . . . . . . . . . . . . . . . . . . . . . . . . . . . . . . . . . . . . . . . . . . . . . . . . . . . . . . . . . . . . . . . . . . 27Scope of Blackout .... . . . . . . . . . . . . . . . . . . . . . . . . . . . . . . . . . . . . . . . . . . . . . . . . . . . . . . . . . . . . . . . . . . . . . . . . . . . . . . . . . . . . . . . . . . . . . . . . . . . . . . . . 28Scope of Ad Avail Blanking .... . . . . . . . . . . . . . . . . . . . . . . . . . . . . . . . . . . . . . . . . . . . . . . . . . . . . . . . . . . . . . . . . . . . . . . . . . . . . . . . . . . . . . . . . . . . . 28Procedure to Enable Ad Avail Blanking .... . . . . . . . . . . . . . . . . . . . . . . . . . . . . . . . . . . . . . . . . . . . . . . . . . . . . . . . . . . . . . . . . . . . . . . . . . . . . 31Procedure to Enable Blackout .... . . . . . . . . . . . . . . . . . . . . . . . . . . . . . . . . . . . . . . . . . . . . . . . . . . . . . . . . . . . . . . . . . . . . . . . . . . . . . . . . . . . . . . . . 32
Passthrough or Removal ... . . . . . . . . . . . . . . . . . . . . . . . . . . . . . . . . . . . . . . . . . . . . . . . . . . . . . . . . . . . . . . . . . . . . . . . . . . . . . . . . . . . . . . . . . . . . . . . . . . . . . . . . 32Archive .... . . . . . . . . . . . . . . . . . . . . . . . . . . . . . . . . . . . . . . . . . . . . . . . . . . . . . . . . . . . . . . . . . . . . . . . . . . . . . . . . . . . . . . . . . . . . . . . . . . . . . . . . . . . . . . . . . . . . . . . . 33Apple HLS .... . . . . . . . . . . . . . . . . . . . . . . . . . . . . . . . . . . . . . . . . . . . . . . . . . . . . . . . . . . . . . . . . . . . . . . . . . . . . . . . . . . . . . . . . . . . . . . . . . . . . . . . . . . . . . . . . . . . 33UDP/TS .... . . . . . . . . . . . . . . . . . . . . . . . . . . . . . . . . . . . . . . . . . . . . . . . . . . . . . . . . . . . . . . . . . . . . . . . . . . . . . . . . . . . . . . . . . . . . . . . . . . . . . . . . . . . . . . . . . . . . . . . 34
POIS Conditioning .... . . . . . . . . . . . . . . . . . . . . . . . . . . . . . . . . . . . . . . . . . . . . . . . . . . . . . . . . . . . . . . . . . . . . . . . . . . . . . . . . . . . . . . . . . . . . . . . . . . . . . . . . . . . . . . . . 34Effect of POIS Conditioning .... . . . . . . . . . . . . . . . . . . . . . . . . . . . . . . . . . . . . . . . . . . . . . . . . . . . . . . . . . . . . . . . . . . . . . . . . . . . . . . . . . . . . . . . . . . . 35Procedure to Enable POIS Conditioning .... . . . . . . . . . . . . . . . . . . . . . . . . . . . . . . . . . . . . . . . . . . . . . . . . . . . . . . . . . . . . . . . . . . . . . . . . . . . 36
Setting up POIS Conditioning via the REST API ... . . . . . . . . . . . . . . . . . . . . . . . . . . . . . . . . . . . . . . . . . . . . . . . . . . . . . . . . . . . . . . . . . . . . . . . . . 37
Version 2.16iii
AWS Elemental Server User Guide
Example Manifests for Apple HLS .... . . . . . . . . . . . . . . . . . . . . . . . . . . . . . . . . . . . . . . . . . . . . . . . . . . . . . . . . . . . . . . . . . . . . . . . . . . . . . . . . . . . . . . . . . . . 40Adobe Ad Marker ... . . . . . . . . . . . . . . . . . . . . . . . . . . . . . . . . . . . . . . . . . . . . . . . . . . . . . . . . . . . . . . . . . . . . . . . . . . . . . . . . . . . . . . . . . . . . . . . . . . . . . . . . . . 40AWS Elemental Ad Marker ... . . . . . . . . . . . . . . . . . . . . . . . . . . . . . . . . . . . . . . . . . . . . . . . . . . . . . . . . . . . . . . . . . . . . . . . . . . . . . . . . . . . . . . . . . . . . . . 41SCTE-35 Enhanced Ad Marker ... . . . . . . . . . . . . . . . . . . . . . . . . . . . . . . . . . . . . . . . . . . . . . . . . . . . . . . . . . . . . . . . . . . . . . . . . . . . . . . . . . . . . . . . . . 41
Tuning Your Video Quality ... . . . . . . . . . . . . . . . . . . . . . . . . . . . . . . . . . . . . . . . . . . . . . . . . . . . . . . . . . . . . . . . . . . . . . . . . . . . . . . . . . . . . . . . . . . . . . . . . . . . . . . . . . . . . . . 43Image Processing Controls ... . . . . . . . . . . . . . . . . . . . . . . . . . . . . . . . . . . . . . . . . . . . . . . . . . . . . . . . . . . . . . . . . . . . . . . . . . . . . . . . . . . . . . . . . . . . . . . . . . . . . . . 43
Image Processing – Scaling Content .... . . . . . . . . . . . . . . . . . . . . . . . . . . . . . . . . . . . . . . . . . . . . . . . . . . . . . . . . . . . . . . . . . . . . . . . . . . . . . . . . 43Image Processing – Color Correction .... . . . . . . . . . . . . . . . . . . . . . . . . . . . . . . . . . . . . . . . . . . . . . . . . . . . . . . . . . . . . . . . . . . . . . . . . . . . . . . . 44Image Processing – Scan Type – Key Controls ... . . . . . . . . . . . . . . . . . . . . . . . . . . . . . . . . . . . . . . . . . . . . . . . . . . . . . . . . . . . . . . . . . . . 45Image Processing – Scan Type – Secondary Fields .... . . . . . . . . . . . . . . . . . . . . . . . . . . . . . . . . . . . . . . . . . . . . . . . . . . . . . . . . . . . . . 48Image Processing – Noise Reduction .... . . . . . . . . . . . . . . . . . . . . . . . . . . . . . . . . . . . . . . . . . . . . . . . . . . . . . . . . . . . . . . . . . . . . . . . . . . . . . . . 49Image Processing – framerate Conversion .... . . . . . . . . . . . . . . . . . . . . . . . . . . . . . . . . . . . . . . . . . . . . . . . . . . . . . . . . . . . . . . . . . . . . . . . . 49
Encoding Controls ... . . . . . . . . . . . . . . . . . . . . . . . . . . . . . . . . . . . . . . . . . . . . . . . . . . . . . . . . . . . . . . . . . . . . . . . . . . . . . . . . . . . . . . . . . . . . . . . . . . . . . . . . . . . . . . . . . 51Encoding – Group of Pictures (GOP) .... . . . . . . . . . . . . . . . . . . . . . . . . . . . . . . . . . . . . . . . . . . . . . . . . . . . . . . . . . . . . . . . . . . . . . . . . . . . . . . . 51Encoding – Rate Control ... . . . . . . . . . . . . . . . . . . . . . . . . . . . . . . . . . . . . . . . . . . . . . . . . . . . . . . . . . . . . . . . . . . . . . . . . . . . . . . . . . . . . . . . . . . . . . . . . . 53Encoding – Rate Control Modes .... . . . . . . . . . . . . . . . . . . . . . . . . . . . . . . . . . . . . . . . . . . . . . . . . . . . . . . . . . . . . . . . . . . . . . . . . . . . . . . . . . . . . . 55Encoding – Rate Control Tuning .... . . . . . . . . . . . . . . . . . . . . . . . . . . . . . . . . . . . . . . . . . . . . . . . . . . . . . . . . . . . . . . . . . . . . . . . . . . . . . . . . . . . . . 56Encoding – Statmux Rate Control ... . . . . . . . . . . . . . . . . . . . . . . . . . . . . . . . . . . . . . . . . . . . . . . . . . . . . . . . . . . . . . . . . . . . . . . . . . . . . . . . . . . . . 57Encoding – Quantization Controls ... . . . . . . . . . . . . . . . . . . . . . . . . . . . . . . . . . . . . . . . . . . . . . . . . . . . . . . . . . . . . . . . . . . . . . . . . . . . . . . . . . . . 59Encoding – Scan Type .... . . . . . . . . . . . . . . . . . . . . . . . . . . . . . . . . . . . . . . . . . . . . . . . . . . . . . . . . . . . . . . . . . . . . . . . . . . . . . . . . . . . . . . . . . . . . . . . . . . . 61Encoding – MPEG-4 AVC (H.264) Controls ... . . . . . . . . . . . . . . . . . . . . . . . . . . . . . . . . . . . . . . . . . . . . . . . . . . . . . . . . . . . . . . . . . . . . . . . . . 61Encoding – HEVC (H.265) Controls ... . . . . . . . . . . . . . . . . . . . . . . . . . . . . . . . . . . . . . . . . . . . . . . . . . . . . . . . . . . . . . . . . . . . . . . . . . . . . . . . . . . . 62
Setting Up Audio Channel Mapping .... . . . . . . . . . . . . . . . . . . . . . . . . . . . . . . . . . . . . . . . . . . . . . . . . . . . . . . . . . . . . . . . . . . . . . . . . . . . . . . . . . . . . . . . . . . . . . . . . 64About Audio Mapping .... . . . . . . . . . . . . . . . . . . . . . . . . . . . . . . . . . . . . . . . . . . . . . . . . . . . . . . . . . . . . . . . . . . . . . . . . . . . . . . . . . . . . . . . . . . . . . . . . . . . . . . . . . . . 64
Relevant Terminology .... . . . . . . . . . . . . . . . . . . . . . . . . . . . . . . . . . . . . . . . . . . . . . . . . . . . . . . . . . . . . . . . . . . . . . . . . . . . . . . . . . . . . . . . . . . . . . . . . . . . 64Foundational Audio Concepts .... . . . . . . . . . . . . . . . . . . . . . . . . . . . . . . . . . . . . . . . . . . . . . . . . . . . . . . . . . . . . . . . . . . . . . . . . . . . . . . . . . . . . . . . . . 64Using Multiple Input Files ... . . . . . . . . . . . . . . . . . . . . . . . . . . . . . . . . . . . . . . . . . . . . . . . . . . . . . . . . . . . . . . . . . . . . . . . . . . . . . . . . . . . . . . . . . . . . . . . 65Prerequisite Information .... . . . . . . . . . . . . . . . . . . . . . . . . . . . . . . . . . . . . . . . . . . . . . . . . . . . . . . . . . . . . . . . . . . . . . . . . . . . . . . . . . . . . . . . . . . . . . . . . 66
Audio Mapping Workflow Examples .... . . . . . . . . . . . . . . . . . . . . . . . . . . . . . . . . . . . . . . . . . . . . . . . . . . . . . . . . . . . . . . . . . . . . . . . . . . . . . . . . . . . . . . . . 67Workflow Example - Identical Input Audio Channels, One Output .... . . . . . . . . . . . . . . . . . . . . . . . . . . . . . . . . . . . . . . . 67Workflow Example - Identical Input Audio Channels, Two Outputs .... . . . . . . . . . . . . . . . . . . . . . . . . . . . . . . . . . . . . . . 68Workflow Example - Inputs Have Audio Channels in Different Order .... . . . . . . . . . . . . . . . . . . . . . . . . . . . . . . . . . . . . 69Workflow Example 4: Inputs Have a Different Number of Channels ... . . . . . . . . . . . . . . . . . . . . . . . . . . . . . . . . . . . . . . 71When to Use Mapping Matrices .... . . . . . . . . . . . . . . . . . . . . . . . . . . . . . . . . . . . . . . . . . . . . . . . . . . . . . . . . . . . . . . . . . . . . . . . . . . . . . . . . . . . . . . 72
Audio Mapping Procedures .... . . . . . . . . . . . . . . . . . . . . . . . . . . . . . . . . . . . . . . . . . . . . . . . . . . . . . . . . . . . . . . . . . . . . . . . . . . . . . . . . . . . . . . . . . . . . . . . . . . . . 72Map Input Tracks to Output Tracks .... . . . . . . . . . . . . . . . . . . . . . . . . . . . . . . . . . . . . . . . . . . . . . . . . . . . . . . . . . . . . . . . . . . . . . . . . . . . . . . . . . 72Create Input Matrices .... . . . . . . . . . . . . . . . . . . . . . . . . . . . . . . . . . . . . . . . . . . . . . . . . . . . . . . . . . . . . . . . . . . . . . . . . . . . . . . . . . . . . . . . . . . . . . . . . . . . . 73Create Output Matrices .... . . . . . . . . . . . . . . . . . . . . . . . . . . . . . . . . . . . . . . . . . . . . . . . . . . . . . . . . . . . . . . . . . . . . . . . . . . . . . . . . . . . . . . . . . . . . . . . . . 75
Audio Mapping Using the REST API ... . . . . . . . . . . . . . . . . . . . . . . . . . . . . . . . . . . . . . . . . . . . . . . . . . . . . . . . . . . . . . . . . . . . . . . . . . . . . . . . . . . . . . . . . . 76Audio Mapping XML Reference Tables .... . . . . . . . . . . . . . . . . . . . . . . . . . . . . . . . . . . . . . . . . . . . . . . . . . . . . . . . . . . . . . . . . . . . . . . . . . . . . . 76Example XML .... . . . . . . . . . . . . . . . . . . . . . . . . . . . . . . . . . . . . . . . . . . . . . . . . . . . . . . . . . . . . . . . . . . . . . . . . . . . . . . . . . . . . . . . . . . . . . . . . . . . . . . . . . . . . . . . 83
Dolby Metadata .... . . . . . . . . . . . . . . . . . . . . . . . . . . . . . . . . . . . . . . . . . . . . . . . . . . . . . . . . . . . . . . . . . . . . . . . . . . . . . . . . . . . . . . . . . . . . . . . . . . . . . . . . . . . . . . . . . . . . . . . . . . . 91Categories of Metadata: Delivered and Encoder Control ... . . . . . . . . . . . . . . . . . . . . . . . . . . . . . . . . . . . . . . . . . . . . . . . . . . . . . . . . . . . . . 91Source of AWS Elemental Server Metadata .... . . . . . . . . . . . . . . . . . . . . . . . . . . . . . . . . . . . . . . . . . . . . . . . . . . . . . . . . . . . . . . . . . . . . . . . . . . . . . . 92Impact of the Metadata on the Output Audio .... . . . . . . . . . . . . . . . . . . . . . . . . . . . . . . . . . . . . . . . . . . . . . . . . . . . . . . . . . . . . . . . . . . . . . . . . . . 92Combinations of Input and Output Codec .... . . . . . . . . . . . . . . . . . . . . . . . . . . . . . . . . . . . . . . . . . . . . . . . . . . . . . . . . . . . . . . . . . . . . . . . . . . . . . . . 92Setting Up the Profile or Event Using the Web Interface .... . . . . . . . . . . . . . . . . . . . . . . . . . . . . . . . . . . . . . . . . . . . . . . . . . . . . . . . . . . . 93
Use the Metadata in the Audio Source – Case 1 .... . . . . . . . . . . . . . . . . . . . . . . . . . . . . . . . . . . . . . . . . . . . . . . . . . . . . . . . . . . . . . . . 94Use the Metadata in the Audio Source – Case 2 .... . . . . . . . . . . . . . . . . . . . . . . . . . . . . . . . . . . . . . . . . . . . . . . . . . . . . . . . . . . . . . . . 94Use the Metadata in the Audio Source – Case 3 .... . . . . . . . . . . . . . . . . . . . . . . . . . . . . . . . . . . . . . . . . . . . . . . . . . . . . . . . . . . . . . . . 94Use the Metadata in the Audio Source – Case 4 .... . . . . . . . . . . . . . . . . . . . . . . . . . . . . . . . . . . . . . . . . . . . . . . . . . . . . . . . . . . . . . . . 95Override the Metadata with New Values – Case 5 .... . . . . . . . . . . . . . . . . . . . . . . . . . . . . . . . . . . . . . . . . . . . . . . . . . . . . . . . . . . . . . 95
Output with the Dolby Digital Codec .... . . . . . . . . . . . . . . . . . . . . . . . . . . . . . . . . . . . . . . . . . . . . . . . . . . . . . . . . . . . . . . . . . . . . . . . . . . . . . . . . . . . . . . 96Output with Dolby Digital Plus (EC2, EAC3) Codec .... . . . . . . . . . . . . . . . . . . . . . . . . . . . . . . . . . . . . . . . . . . . . . . . . . . . . . . . . . . . . . . . . . . . . 99
Setting up HLS Rendition Groups .... . . . . . . . . . . . . . . . . . . . . . . . . . . . . . . . . . . . . . . . . . . . . . . . . . . . . . . . . . . . . . . . . . . . . . . . . . . . . . . . . . . . . . . . . . . . . . . . . . 103How Video Is Associated with Audio Rendition Groups .... . . . . . . . . . . . . . . . . . . . . . . . . . . . . . . . . . . . . . . . . . . . . . . . . . . . . . . . . . . . . 103Rules for Rendition Groups .... . . . . . . . . . . . . . . . . . . . . . . . . . . . . . . . . . . . . . . . . . . . . . . . . . . . . . . . . . . . . . . . . . . . . . . . . . . . . . . . . . . . . . . . . . . . . . . . . . . 104
Version 2.16iv
AWS Elemental Server User Guide
Examples .... . . . . . . . . . . . . . . . . . . . . . . . . . . . . . . . . . . . . . . . . . . . . . . . . . . . . . . . . . . . . . . . . . . . . . . . . . . . . . . . . . . . . . . . . . . . . . . . . . . . . . . . . . . . . . . . . . . . . . . . . . . . 104Example 1 .... . . . . . . . . . . . . . . . . . . . . . . . . . . . . . . . . . . . . . . . . . . . . . . . . . . . . . . . . . . . . . . . . . . . . . . . . . . . . . . . . . . . . . . . . . . . . . . . . . . . . . . . . . . . . . . . . . 104Example 2 .... . . . . . . . . . . . . . . . . . . . . . . . . . . . . . . . . . . . . . . . . . . . . . . . . . . . . . . . . . . . . . . . . . . . . . . . . . . . . . . . . . . . . . . . . . . . . . . . . . . . . . . . . . . . . . . . . . 105Example 3 .... . . . . . . . . . . . . . . . . . . . . . . . . . . . . . . . . . . . . . . . . . . . . . . . . . . . . . . . . . . . . . . . . . . . . . . . . . . . . . . . . . . . . . . . . . . . . . . . . . . . . . . . . . . . . . . . . . 105Example 4 .... . . . . . . . . . . . . . . . . . . . . . . . . . . . . . . . . . . . . . . . . . . . . . . . . . . . . . . . . . . . . . . . . . . . . . . . . . . . . . . . . . . . . . . . . . . . . . . . . . . . . . . . . . . . . . . . . . 106Example 5 .... . . . . . . . . . . . . . . . . . . . . . . . . . . . . . . . . . . . . . . . . . . . . . . . . . . . . . . . . . . . . . . . . . . . . . . . . . . . . . . . . . . . . . . . . . . . . . . . . . . . . . . . . . . . . . . . . . 106
Creating HLS Rendition Groups .... . . . . . . . . . . . . . . . . . . . . . . . . . . . . . . . . . . . . . . . . . . . . . . . . . . . . . . . . . . . . . . . . . . . . . . . . . . . . . . . . . . . . . . . . . . . . 107Getting Ready to Create HLS Rendition Groups .... . . . . . . . . . . . . . . . . . . . . . . . . . . . . . . . . . . . . . . . . . . . . . . . . . . . . . . . . . . . . . . 107Creating HLS Rendition Groups (Web Interface) ... . . . . . . . . . . . . . . . . . . . . . . . . . . . . . . . . . . . . . . . . . . . . . . . . . . . . . . . . . . . . . . . 110Creating HLS Rendition Groups (REST API) ... . . . . . . . . . . . . . . . . . . . . . . . . . . . . . . . . . . . . . . . . . . . . . . . . . . . . . . . . . . . . . . . . . . . . . . 114
Sample HLS Output Group with Audio Rendition Group Event Manifest ... . . . . . . . . . . . . . . . . . . . . . . . . . . . . . . . . . . . . . . 120Video Information for an HLS Output Group with Audio Rendition Group Event .... . . . . . . . . . . . . . . . . . . 120Audio Information for an HLS Output Group with Audio Rendition Group Event .... . . . . . . . . . . . . . . . . . . 120Captions Information for an HLS Output Group with Audio Rendition Group Event .... . . . . . . . . . . . . . . 121
Setting Up Captions .... . . . . . . . . . . . . . . . . . . . . . . . . . . . . . . . . . . . . . . . . . . . . . . . . . . . . . . . . . . . . . . . . . . . . . . . . . . . . . . . . . . . . . . . . . . . . . . . . . . . . . . . . . . . . . . . . . . . . 122Setting the Timecode Source Settings .... . . . . . . . . . . . . . . . . . . . . . . . . . . . . . . . . . . . . . . . . . . . . . . . . . . . . . . . . . . . . . . . . . . . . . . . . . . . . . . . . . . . 122Gathering Required Captions Information .... . . . . . . . . . . . . . . . . . . . . . . . . . . . . . . . . . . . . . . . . . . . . . . . . . . . . . . . . . . . . . . . . . . . . . . . . . . . . . . 122Choose a Supported Output Captions Format .... . . . . . . . . . . . . . . . . . . . . . . . . . . . . . . . . . . . . . . . . . . . . . . . . . . . . . . . . . . . . . . . . . . . . . . . . 123Creating Input Captions Selectors ... . . . . . . . . . . . . . . . . . . . . . . . . . . . . . . . . . . . . . . . . . . . . . . . . . . . . . . . . . . . . . . . . . . . . . . . . . . . . . . . . . . . . . . . . . . 124
Ancillary (QuickTime Captions Track or Captions in MXF VANC Data) ... . . . . . . . . . . . . . . . . . . . . . . . . . . . . . . . . . . 124ARIB .... . . . . . . . . . . . . . . . . . . . . . . . . . . . . . . . . . . . . . . . . . . . . . . . . . . . . . . . . . . . . . . . . . . . . . . . . . . . . . . . . . . . . . . . . . . . . . . . . . . . . . . . . . . . . . . . . . . . . . . . . . . 125Embedded (CEA/EIA-608, CEA/EIA-708), SCTE-20, and Embedded+SCTE-20, andSCTE-20+Embedded .... . . . . . . . . . . . . . . . . . . . . . . . . . . . . . . . . . . . . . . . . . . . . . . . . . . . . . . . . . . . . . . . . . . . . . . . . . . . . . . . . . . . . . . . . . . . . . . . . . . . . 125DVB-Sub or SCTE-27 Formats .... . . . . . . . . . . . . . . . . . . . . . . . . . . . . . . . . . . . . . . . . . . . . . . . . . . . . . . . . . . . . . . . . . . . . . . . . . . . . . . . . . . . . . . 127Teletext ... . . . . . . . . . . . . . . . . . . . . . . . . . . . . . . . . . . . . . . . . . . . . . . . . . . . . . . . . . . . . . . . . . . . . . . . . . . . . . . . . . . . . . . . . . . . . . . . . . . . . . . . . . . . . . . . . . . . . . . 127SCC, SMI, SRT, STL, TTML (Sidecar) ... . . . . . . . . . . . . . . . . . . . . . . . . . . . . . . . . . . . . . . . . . . . . . . . . . . . . . . . . . . . . . . . . . . . . . . . . . . . . . . . . 128Setting up for 608 XDS Data .... . . . . . . . . . . . . . . . . . . . . . . . . . . . . . . . . . . . . . . . . . . . . . . . . . . . . . . . . . . . . . . . . . . . . . . . . . . . . . . . . . . . . . . . 129Embedded Captions in Captions in VBI Data .... . . . . . . . . . . . . . . . . . . . . . . . . . . . . . . . . . . . . . . . . . . . . . . . . . . . . . . . . . . . . . . . . . . 130
Including Captions in the Streams and Outputs .... . . . . . . . . . . . . . . . . . . . . . . . . . . . . . . . . . . . . . . . . . . . . . . . . . . . . . . . . . . . . . . . . . . . . . . 131Setting Up Output Captions in a Sidecar Format (SCC, SMI, SRT, TTML, WebVTT) .... . . . . . . . . . . . . . . . . . 132Setting Up Output Captions for All Formats Except Sidecar ... . . . . . . . . . . . . . . . . . . . . . . . . . . . . . . . . . . . . . . . . . . . . . . . 134About Captions Handling in Outputs .... . . . . . . . . . . . . . . . . . . . . . . . . . . . . . . . . . . . . . . . . . . . . . . . . . . . . . . . . . . . . . . . . . . . . . . . . . . . . . 141
Examples for Setting Up Captions .... . . . . . . . . . . . . . . . . . . . . . . . . . . . . . . . . . . . . . . . . . . . . . . . . . . . . . . . . . . . . . . . . . . . . . . . . . . . . . . . . . . . . . . . . 143One Input Format to a Different Output Format, One Output .... . . . . . . . . . . . . . . . . . . . . . . . . . . . . . . . . . . . . . . . . . . . 143One Input Format to the Same Output Format, One Output .... . . . . . . . . . . . . . . . . . . . . . . . . . . . . . . . . . . . . . . . . . . . . 146One Input Format to Several Outputs .... . . . . . . . . . . . . . . . . . . . . . . . . . . . . . . . . . . . . . . . . . . . . . . . . . . . . . . . . . . . . . . . . . . . . . . . . . . . 149One Input Format to Multiple Different Formats, One for Each Output .... . . . . . . . . . . . . . . . . . . . . . . . . . . . . . . 153One Captions Output Shared by Multiple Video Streams .... . . . . . . . . . . . . . . . . . . . . . . . . . . . . . . . . . . . . . . . . . . . . . . . . . 159
Reference .... . . . . . . . . . . . . . . . . . . . . . . . . . . . . . . . . . . . . . . . . . . . . . . . . . . . . . . . . . . . . . . . . . . . . . . . . . . . . . . . . . . . . . . . . . . . . . . . . . . . . . . . . . . . . . . . . . . . . . . . . . . 166Supported Containers - Input .... . . . . . . . . . . . . . . . . . . . . . . . . . . . . . . . . . . . . . . . . . . . . . . . . . . . . . . . . . . . . . . . . . . . . . . . . . . . . . . . . . . . . . . . 166Reference: Supported Captions Formats .... . . . . . . . . . . . . . . . . . . . . . . . . . . . . . . . . . . . . . . . . . . . . . . . . . . . . . . . . . . . . . . . . . . . . . . . . 167
Using QVBR Rate Control Mode .... . . . . . . . . . . . . . . . . . . . . . . . . . . . . . . . . . . . . . . . . . . . . . . . . . . . . . . . . . . . . . . . . . . . . . . . . . . . . . . . . . . . . . . . . . . . . . . . . . . . 171Using IMF Inputs .... . . . . . . . . . . . . . . . . . . . . . . . . . . . . . . . . . . . . . . . . . . . . . . . . . . . . . . . . . . . . . . . . . . . . . . . . . . . . . . . . . . . . . . . . . . . . . . . . . . . . . . . . . . . . . . . . . . . . . . . . 174Creating HDR Outputs .... . . . . . . . . . . . . . . . . . . . . . . . . . . . . . . . . . . . . . . . . . . . . . . . . . . . . . . . . . . . . . . . . . . . . . . . . . . . . . . . . . . . . . . . . . . . . . . . . . . . . . . . . . . . . . . . . . 176
Supported HDR Formats .... . . . . . . . . . . . . . . . . . . . . . . . . . . . . . . . . . . . . . . . . . . . . . . . . . . . . . . . . . . . . . . . . . . . . . . . . . . . . . . . . . . . . . . . . . . . . . . . . . . . . . . 176Setting Up HDR Jobs Using the Web Interface .... . . . . . . . . . . . . . . . . . . . . . . . . . . . . . . . . . . . . . . . . . . . . . . . . . . . . . . . . . . . . . . . . . . . . . . . 176
Input > Advanced: Managing Overwrite of Source Metadata .... . . . . . . . . . . . . . . . . . . . . . . . . . . . . . . . . . . . . . . . . . . . . . 179Stream > Video > Advanced: Include/Exclude Metadata per Output .... . . . . . . . . . . . . . . . . . . . . . . . . . . . . . . . . . . . 180Stream > Video > Advanced > Preprocessors > Color Corrector ... . . . . . . . . . . . . . . . . . . . . . . . . . . . . . . . . . . . . . . . . . . 180
Setting Up HDR Jobs Using the REST API ... . . . . . . . . . . . . . . . . . . . . . . . . . . . . . . . . . . . . . . . . . . . . . . . . . . . . . . . . . . . . . . . . . . . . . . . . . . . . . . . 182XML Reference Tables for HDR .... . . . . . . . . . . . . . . . . . . . . . . . . . . . . . . . . . . . . . . . . . . . . . . . . . . . . . . . . . . . . . . . . . . . . . . . . . . . . . . . . . . . . . 182
Creating Dolby Atmos Outputs .... . . . . . . . . . . . . . . . . . . . . . . . . . . . . . . . . . . . . . . . . . . . . . . . . . . . . . . . . . . . . . . . . . . . . . . . . . . . . . . . . . . . . . . . . . . . . . . . . . . . . . 189Using Dolby Atmos Passthrough .... . . . . . . . . . . . . . . . . . . . . . . . . . . . . . . . . . . . . . . . . . . . . . . . . . . . . . . . . . . . . . . . . . . . . . . . . . . . . . . . . . . . . . . . . . . . 189
Feature Restrictions for Dolby Atmos Passthrough .... . . . . . . . . . . . . . . . . . . . . . . . . . . . . . . . . . . . . . . . . . . . . . . . . . . . . . . . . . . 189Using Dolby Atmos Encoding .... . . . . . . . . . . . . . . . . . . . . . . . . . . . . . . . . . . . . . . . . . . . . . . . . . . . . . . . . . . . . . . . . . . . . . . . . . . . . . . . . . . . . . . . . . . . . . . . 190
Input File Requirements for Dolby Atmos Encoding .... . . . . . . . . . . . . . . . . . . . . . . . . . . . . . . . . . . . . . . . . . . . . . . . . . . . . . . . . . 190Feature Restrictions for Dolby Atmos Encoding .... . . . . . . . . . . . . . . . . . . . . . . . . . . . . . . . . . . . . . . . . . . . . . . . . . . . . . . . . . . . . . . 190
Version 2.16v

AWS Elemental Server User Guide
Setting Up a Job for Dolby Atmos Encoding .... . . . . . . . . . . . . . . . . . . . . . . . . . . . . . . . . . . . . . . . . . . . . . . . . . . . . . . . . . . . . . . . . . . 190Supported DRM Solutions with AWS Elemental Server ... . . . . . . . . . . . . . . . . . . . . . . . . . . . . . . . . . . . . . . . . . . . . . . . . . . . . . . . . . . . . . . . . . . . . . 194Document History .... . . . . . . . . . . . . . . . . . . . . . . . . . . . . . . . . . . . . . . . . . . . . . . . . . . . . . . . . . . . . . . . . . . . . . . . . . . . . . . . . . . . . . . . . . . . . . . . . . . . . . . . . . . . . . . . . . . . . . . 197
Version 2.16vi

AWS Elemental Server User Guide
This is version 2.16 of the AWS Elemental Server documentation. This is the latest version. For priorversions, see the Previous Versions section of AWS Elemental Conductor File and AWS Elemental ServerDocumentation.
Version 2.16vii
AWS Elemental Server User GuideFinding Information About Server
What Is AWS Elemental Server?AWS Elemental Server provides fast and reliable video processing for file-based workflows. It performssimultaneous, faster-than-real-time conversion of multiple video files to create mezzanine deliverables,traditional on-demand assets, and adaptive bitrate outputs for delivery to TVs, PCs, and mobile devices.
Ideal for large-scale broadcast and multi-screen video applications, AWS Elemental Server operatesseamlessly with on-premises storage systems and Amazon Simple Storage Service (Amazon S3).
Finding Information About AWS Elemental ServerInformation about AWS Elemental Server is available in the following guides and resources.
AWS Elemental Server Features Guide (this guide)
This guide offers conceptual and procedural information for specific features of the software. For a list ofthe features covered in this guide, see the topic list previous to this section.
AWS Elemental Server API and User Guide
This document is intended for system integrators and AWS Elemental Server operators. It contains thefollowing information:
• An outline of the interfaces for machine and human control, configuration, and monitoring. Each API isdefined in enough detail to explain how to use the system and how to integrate it into larger workflowautomation systems.
• An overview of how to work with transcoding jobs, job profiles, and presets.• A list and explanation of job and system parameters.
This document is available on the Support tab of the web interface of your AWS Elemental Serverappliance and as a PDF on the AWS Elemental User Community.
AWS Elemental Server Installation Guide
This document describes how to perform initial installation of AWS Elemental Server. For the mostrecent version, see AWS Elemental Server Installation Guide.
AWS Elemental Server Configuration Guide
This document describes how to complete the initial settings configurations for AWS Elemental Server.For the most recent version, see AWS Elemental Server Configuration Guide.
AWS Elemental Server Upgrade and Downgrade Guide
This document describes how to perform upgrades and downgrades on AWS Elemental Server software.For the most recent version, see AWS Elemental Server Upgrade Guide.
Version 2.161

AWS Elemental Server User GuideStill Image Inserter
Including Inserted Images (GraphicOverlays) with AWS ElementalServer
The image inserter (graphic overlay) feature lets you insert a still image or motion graphic at a specifiedtime and display it as an overlay on the underlying video for a specified duration. With still overlays, youcan specify fade-in and fade-out times and adjust the opacity.
You can set up an output with both a motion graphic overlay and still overlays. For example, you mightinclude a motion graphic logo in the corner of the video frame throughout the duration of the video anda still image HDR indicator for only the portions of the file that are HDR. Each overlay is independent ofthe others, with its own settings for opacity, fade-in and fade-out times, position on the frame, and thelength of time that it is on the video. You can set up overlays so that they all appear on the underlyingvideo at the same time and physically overlap each other.
You can use up to one motion overlay and 100 still overlays per job.
Topics• Still Image Inserter (Graphic Overlay) in AWS Elemental Server (p. 2)• Motion Image Inserter (Graphic Overlay) in AWS Elemental Server (p. 6)
Still Image Inserter (Graphic Overlay) in AWSElemental Server
The following procedure walks you through setting up a still graphic overlay. To begin, decide where inyour job to specify the overlay. This choice affects how the overlay appears in outputs.
NoteOne job can have any combination of input, stream, and global overlays. To set up multipleoverlays, repeat this procedure.
To set up a still image overlay
1. Decide where in your job to specify the overlay.For information about how this choice affectshow the overlay appears in the outputs, see Choosing Between Input, Stream, and GlobalOverlay (p. 3).
2. Prepare your overlay file.For more information, see Overlay File Requirements (p. 4) and SizingYour Overlay to Account for Scaling (p. 4).
3. In the appropriate section of the job, choose the Image Inserter slider and then choose Add Image.Find the appropriate sections as follows:
• Find the dark gray Input section at the top of the job.• Find the medium gray Global Processors section just below the Input section.• Add Stream sections in the Output sections that are on the appropriate group tab in the very light
gray Output Groups section at the bottom of the job.4. Specify values for the image inserter settings. For more information about these specific settings,
see the following topics:
Version 2.162
AWS Elemental Server User GuideChoosing Between Input, Stream, and Global Overlay
• For information about Start Time, Duration, Fade In, and Fade Out, see Setting Up When YourOverlay Plays (p. 5).
• For information about Layer, see Setting Up Overlapping Overlays (p. 5).
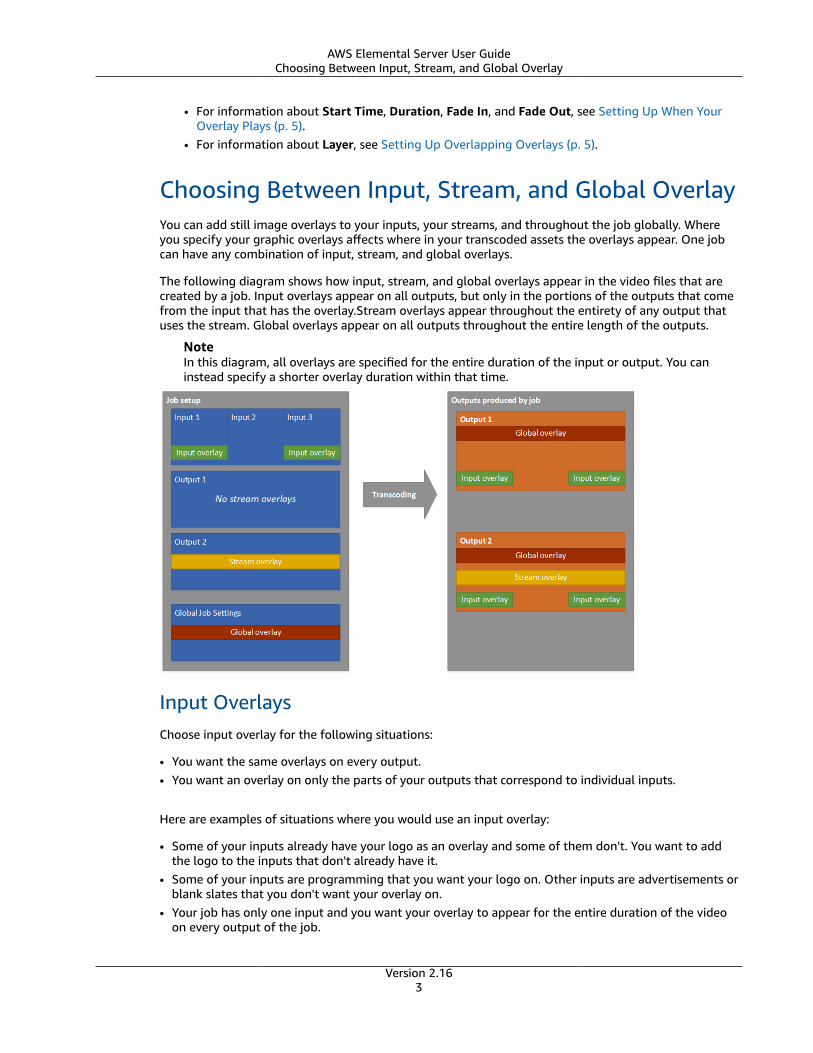
Choosing Between Input, Stream, and Global OverlayYou can add still image overlays to your inputs, your streams, and throughout the job globally. Whereyou specify your graphic overlays affects where in your transcoded assets the overlays appear. One jobcan have any combination of input, stream, and global overlays.
The following diagram shows how input, stream, and global overlays appear in the video files that arecreated by a job. Input overlays appear on all outputs, but only in the portions of the outputs that comefrom the input that has the overlay.Stream overlays appear throughout the entirety of any output thatuses the stream. Global overlays appear on all outputs throughout the entire length of the outputs.
NoteIn this diagram, all overlays are specified for the entire duration of the input or output. You caninstead specify a shorter overlay duration within that time.
Input OverlaysChoose input overlay for the following situations:
• You want the same overlays on every output.• You want an overlay on only the parts of your outputs that correspond to individual inputs.
Here are examples of situations where you would use an input overlay:
• Some of your inputs already have your logo as an overlay and some of them don't. You want to addthe logo to the inputs that don't already have it.
• Some of your inputs are programming that you want your logo on. Other inputs are advertisements orblank slates that you don't want your overlay on.
• Your job has only one input and you want your overlay to appear for the entire duration of the videoon every output of the job.
Version 2.163

AWS Elemental Server User GuideRequirements for the Overlay File
Global OverlaysChoose Global Overlay for these situations:
• You want overlays that appear the same way on every output.• You have multiple inputs, but you want the same overlay across all of them.
Stream OverlaysChoose Stream Overlay for the following situations:
• You want overlays on some outputs but not others.• You want different overlays on different outputs.• You want different overlays on different renditions within one ABR stack.• You have multiple inputs, but you want the same overlay across all of them.
These examples are situations where you would use stream overlay:
• You set up a standalone file output with high definition and another standalone file output withstandard definition. You want to include an HD indicator in the corner of the frame on the highdefinition output only.
• You set up one of the renditions in your ABR stack with high definition. You want to include an HDindicator in the corner of the frame on this rendition only.
• You are stitching together several films as separate inputs to create a single-asset film marathon. Youwant to put a graphic on all of them indicating that they are part of the larger marathon.
Overlay File RequirementsSet up the image files that you want to insert over your video as follows:
• File type: Use files with the extension .png or .tga.• Aspect ratio: Use any aspect ratio; the aspect ratio of the overlay file doesn't need to match the aspect
ratio of the underlying video.• Size in pixels: Use any size. If the overlaid graphic is larger than the output video frame, the service
crops the graphic at the edge of the frame.
NoteIn jobs that scale the video resolution, whether your overlay scales with your video dependson where you specify the graphic overlay. For more information, see Sizing Your Overlay toAccount for Scaling (p. 4).
Sizing Your Overlay to Account for ScalingIn jobs that scale the video resolution, whether your overlay scales with your video depends on whereyou specify the graphic overlay. Global and input overlays scale with the video; stream overlays do not.
For example, suppose that the input video for your job is 1080 x 1920 and you specify three outputsat 720 x 1280, 480 x 640, and 360 x 480. You want your square logo to be 10% of the width of yourframes. You would provide overlay images at the following resolutions:
• For a motion graphic overlay or an input graphic overlay, provide a 108 x 108 image. AWS ElementalServer appropriately sizes each overlay on each output.
Version 2.164
AWS Elemental Server User GuideSetting Up When Your Overlay Plays
• For a stream graphic overlay on your 720 x 1280 output, provide a 72 x 72 image.
• For a stream graphic overlay on your 480 x 640 output, provide a 48 x 48 image.
• For a stream graphic overlay on your 360 x 480 output, provide a 36 x 36 image.
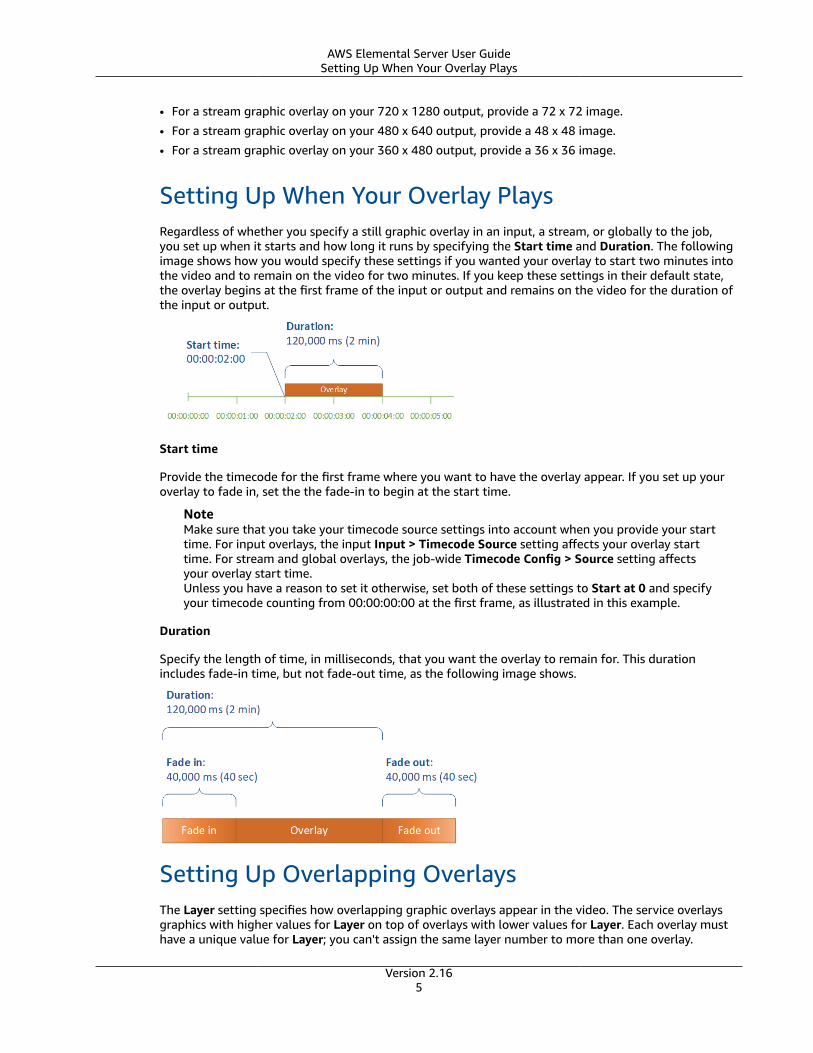
Setting Up When Your Overlay PlaysRegardless of whether you specify a still graphic overlay in an input, a stream, or globally to the job,you set up when it starts and how long it runs by specifying the Start time and Duration. The followingimage shows how you would specify these settings if you wanted your overlay to start two minutes intothe video and to remain on the video for two minutes. If you keep these settings in their default state,the overlay begins at the first frame of the input or output and remains on the video for the duration ofthe input or output.
Start time
Provide the timecode for the first frame where you want to have the overlay appear. If you set up youroverlay to fade in, set the the fade-in to begin at the start time.
NoteMake sure that you take your timecode source settings into account when you provide your starttime. For input overlays, the input Input > Timecode Source setting affects your overlay starttime. For stream and global overlays, the job-wide Timecode Config > Source setting affectsyour overlay start time.Unless you have a reason to set it otherwise, set both of these settings to Start at 0 and specifyyour timecode counting from 00:00:00:00 at the first frame, as illustrated in this example.
Duration
Specify the length of time, in milliseconds, that you want the overlay to remain for. This durationincludes fade-in time, but not fade-out time, as the following image shows.
Setting Up Overlapping OverlaysThe Layer setting specifies how overlapping graphic overlays appear in the video. The service overlaysgraphics with higher values for Layer on top of overlays with lower values for Layer. Each overlay musthave a unique value for Layer; you can't assign the same layer number to more than one overlay.
Version 2.165

AWS Elemental Server User GuideMotion Image Inserter
NoteEven if your overlays never overlap, you need to specify unique Layer values for each overlay inthe job.
The following illustration shows how the value for Layer affects how a graphic overlay appears inrelation to other overlays. The triangle has the highest value for Layer and appears on top, obscuring thevideo frame and all graphic overlays with lower values of Layer.
To specify a value for the Layer setting
1. Set up your graphic overlay as described in Still Image Inserter (p. 2).2. For Layer, enter a whole number from 0 to 99.
NoteYou can use each number only once. Each graphic overlay must have its own layer.
Motion Image Inserter (Graphic Overlay) in AWSElemental Server
The following procedure walks you through how to set up motion graphic overlays. Motion graphicoverlays are global, so they appear in all outputs.
To set up a motion graphic overlay
1. Prepare your overlay asset. For more information, see Requirements for Motion OverlayFiles (p. 8).
NoteMotion graphic overlays are in the global processors. They appear on every output of thejob and they scale with the video. Therefore, make your overlay size proportional to the sizeof your input video.
2. In the medium gray Global Processors section of the job, choose the Motion Image Inserter slider.The Global Processors section is just below the dark gray Input section.
3. Specify values for the motion image inserter settings. See the following table for information abouteach field. For information about Action Time and Loop Input, see Setting Up When Your MotionGraphic Plays (p. 9).
Field Description
Insertion Mode Choose SWF, MOV, or PNG.
Input The location and file name of the motiongraphic.
For more information, see Specifying theMotion Overlay File Location (p. 9).
Version 2.166
AWS Elemental Server User GuideMotion Image Inserter
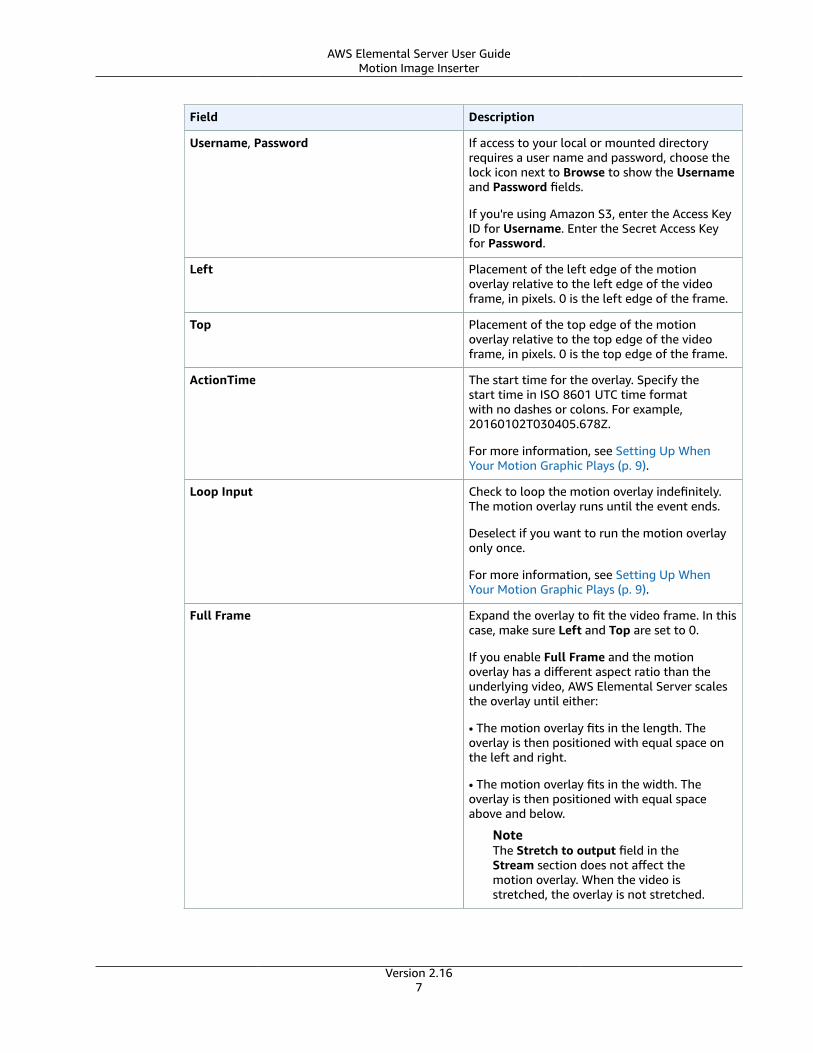
Field Description
Username, Password If access to your local or mounted directoryrequires a user name and password, choose thelock icon next to Browse to show the Usernameand Password fields.
If you're using Amazon S3, enter the Access KeyID for Username. Enter the Secret Access Keyfor Password.
Left Placement of the left edge of the motionoverlay relative to the left edge of the videoframe, in pixels. 0 is the left edge of the frame.
Top Placement of the top edge of the motionoverlay relative to the top edge of the videoframe, in pixels. 0 is the top edge of the frame.
ActionTime The start time for the overlay. Specify thestart time in ISO 8601 UTC time formatwith no dashes or colons. For example,20160102T030405.678Z.
For more information, see Setting Up WhenYour Motion Graphic Plays (p. 9).
Loop Input Check to loop the motion overlay indefinitely.The motion overlay runs until the event ends.
Deselect if you want to run the motion overlayonly once.
For more information, see Setting Up WhenYour Motion Graphic Plays (p. 9).
Full Frame Expand the overlay to fit the video frame. In thiscase, make sure Left and Top are set to 0.
If you enable Full Frame and the motionoverlay has a different aspect ratio than theunderlying video, AWS Elemental Server scalesthe overlay until either:
• The motion overlay fits in the length. Theoverlay is then positioned with equal space onthe left and right.
• The motion overlay fits in the width. Theoverlay is then positioned with equal spaceabove and below.
NoteThe Stretch to output field in theStream section does not affect themotion overlay. When the video isstretched, the overlay is not stretched.
Version 2.167
AWS Elemental Server User GuideRequirements for Motion Overlay Files
Field Description
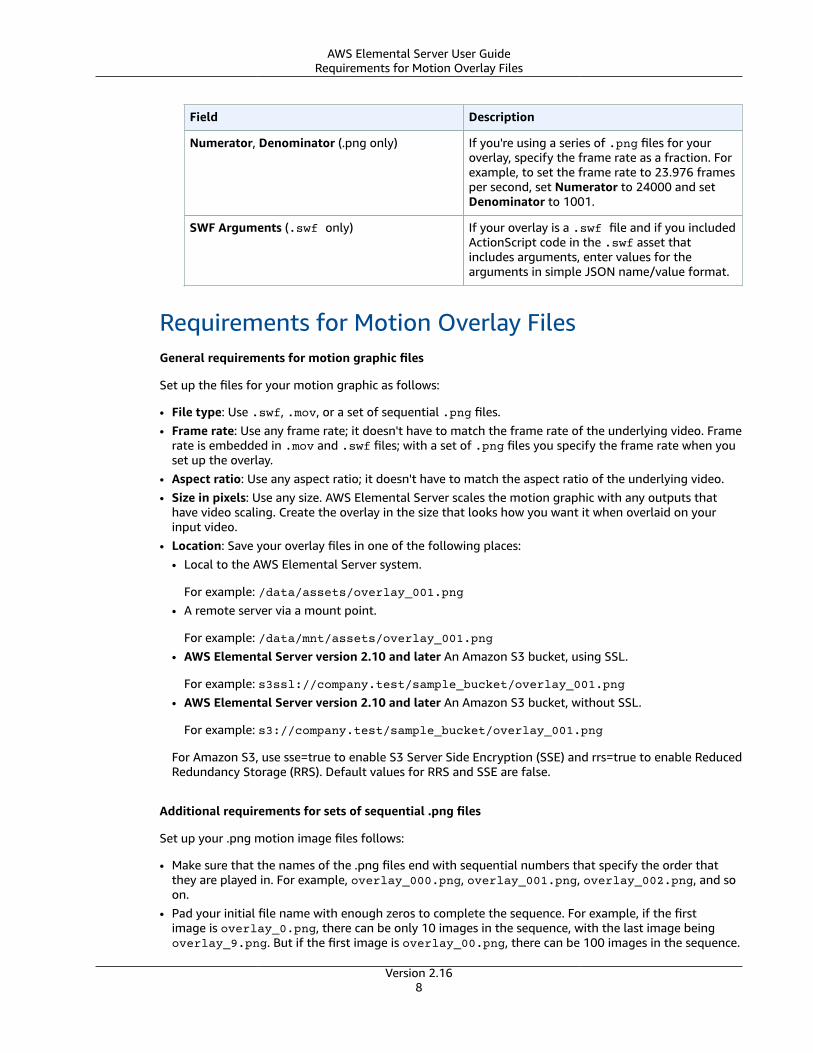
Numerator, Denominator (.png only) If you're using a series of .png files for youroverlay, specify the frame rate as a fraction. Forexample, to set the frame rate to 23.976 framesper second, set Numerator to 24000 and setDenominator to 1001.
SWF Arguments (.swf only) If your overlay is a .swf file and if you includedActionScript code in the .swf asset thatincludes arguments, enter values for thearguments in simple JSON name/value format.
Requirements for Motion Overlay FilesGeneral requirements for motion graphic files
Set up the files for your motion graphic as follows:
• File type: Use .swf, .mov, or a set of sequential .png files.• Frame rate: Use any frame rate; it doesn't have to match the frame rate of the underlying video. Frame
rate is embedded in .mov and .swf files; with a set of .png files you specify the frame rate when youset up the overlay.
• Aspect ratio: Use any aspect ratio; it doesn't have to match the aspect ratio of the underlying video.• Size in pixels: Use any size. AWS Elemental Server scales the motion graphic with any outputs that
have video scaling. Create the overlay in the size that looks how you want it when overlaid on yourinput video.
• Location: Save your overlay files in one of the following places:• Local to the AWS Elemental Server system.
For example: /data/assets/overlay_001.png• A remote server via a mount point.
For example: /data/mnt/assets/overlay_001.png• AWS Elemental Server version 2.10 and later An Amazon S3 bucket, using SSL.
For example: s3ssl://company.test/sample_bucket/overlay_001.png• AWS Elemental Server version 2.10 and later An Amazon S3 bucket, without SSL.
For example: s3://company.test/sample_bucket/overlay_001.png
For Amazon S3, use sse=true to enable S3 Server Side Encryption (SSE) and rrs=true to enable ReducedRedundancy Storage (RRS). Default values for RRS and SSE are false.
Additional requirements for sets of sequential .png files
Set up your .png motion image files follows:
• Make sure that the names of the .png files end with sequential numbers that specify the order thatthey are played in. For example, overlay_000.png, overlay_001.png, overlay_002.png, and soon.
• Pad your initial file name with enough zeros to complete the sequence. For example, if the firstimage is overlay_0.png, there can be only 10 images in the sequence, with the last image beingoverlay_9.png. But if the first image is overlay_00.png, there can be 100 images in the sequence.
Version 2.168
AWS Elemental Server User GuideSpecifying the Motion Overlay File Location
• Make sure that the number of images in your series matches the frame rate and your intended overlayduration. For example, if you want a 30-second overlay at 30 fps, you should have 900 .png images.
Specifying the Motion Overlay File LocationSpecify one of the following valid locations for your overlay file:
• Local to the AWS Elemental Server system.
For example: /data/assets/overlay_001.png
• A remote server via a mount point.
For example: /data/mnt/assets/overlay_001.png
• AWS Elemental Server version 2.10 and later An Amazon S3 bucket, using SSL.
For example: s3ssl://company.test/sample_bucket/overlay_001.png
• AWS Elemental Server version 2.10 and later An Amazon S3 bucket, without SSL.
For example: s3://company.test/sample_bucket/overlay_001.png
For Amazon S3, use sse=true to enable S3 Server Side Encryption (SSE) and rrs=true to enable ReducedRedundancy Storage (RRS). Default values for RRS and SSE are false.
NoteIf your motion overlay is a series of .png images, the way you specify it depends on the versionof AWS Elemental Server you're running. In version 2.10 and later, include the full filename ofthe first image, as in the examples in the previous list. In version 2.9 and earlier, include the partof the filename that is common to all the images. For example, /data/assets/overlay_.
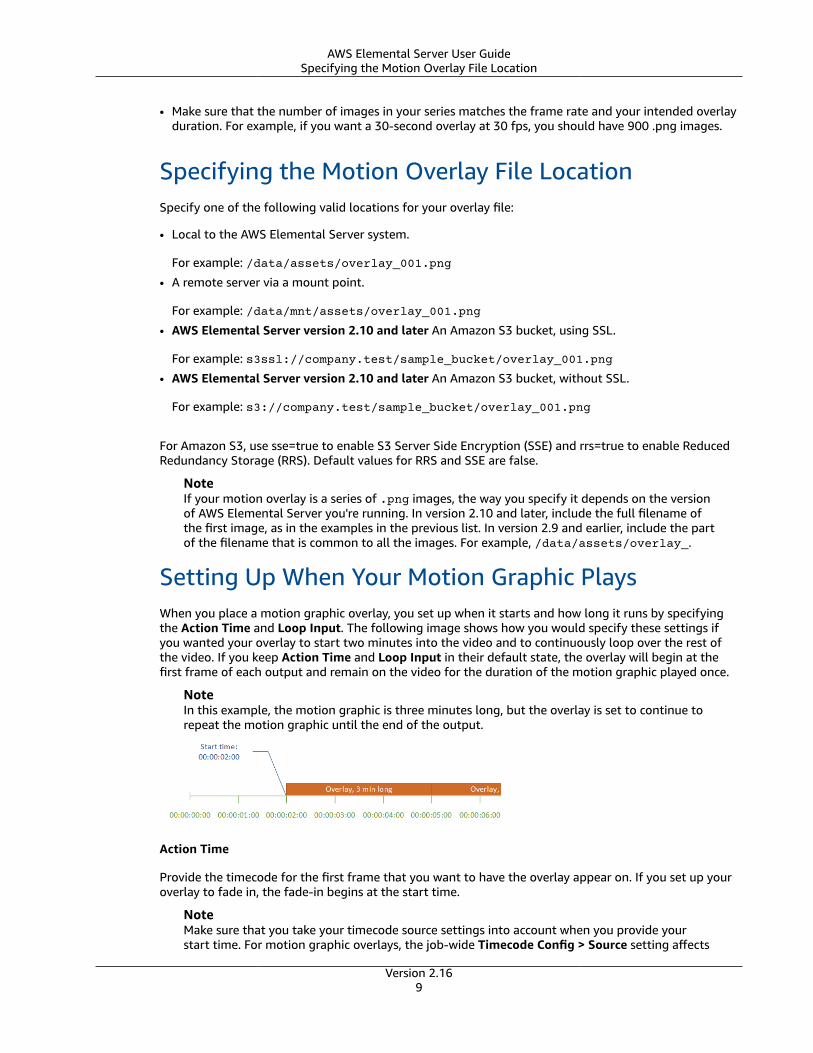
Setting Up When Your Motion Graphic PlaysWhen you place a motion graphic overlay, you set up when it starts and how long it runs by specifyingthe Action Time and Loop Input. The following image shows how you would specify these settings ifyou wanted your overlay to start two minutes into the video and to continuously loop over the rest ofthe video. If you keep Action Time and Loop Input in their default state, the overlay will begin at thefirst frame of each output and remain on the video for the duration of the motion graphic played once.
NoteIn this example, the motion graphic is three minutes long, but the overlay is set to continue torepeat the motion graphic until the end of the output.
Action Time
Provide the timecode for the first frame that you want to have the overlay appear on. If you set up youroverlay to fade in, the fade-in begins at the start time.
NoteMake sure that you take your timecode source settings into account when you provide yourstart time. For motion graphic overlays, the job-wide Timecode Config > Source setting affects
Version 2.169
AWS Elemental Server User GuideSetting Up When Your Motion Graphic Plays
your overlay start time. The input Input > Timecode Source setting affects doesn't affect youroverlay start time.Unless you have a reason to set it otherwise, set both of these settings to Start at 0 and specifyyour timecode counting from 00:00:00:00 at the first frame, as illustrated in the example.
Loop Input
You can set your overlay to last the duration of the motion graphic played through once or you canset it to loop motion graphic continuously from the start time to the end of the output. The durationof a .mov motion graphic is built into the .mov file, which has a set number of frames and a definedframe rate. If your motion graphic is a set of .png images, you determine the duration of the overlay byhow many images you provide and the framerate you specify. The duration in seconds is the number offrames times the framerate in frames per second.
Version 2.1610
AWS Elemental Server User GuideMinimize Your Flash Stage Size
Using SWF Files for Motion GraphicOverlay with AWS Elemental Server
With Shockwave Flash (SWF) files, the AWS Elemental encoder renders each frame of animation duringtranscoding. SWF rendering is resource-intensive, so poorly optimized SWF assets may significantly slowdown transcoding time.
If your motion graphic overlay doesn't rely on any of the ActionScript abilities of Flash, for example,performing squeezeback, then a SWF file may not be the best choice, especially at high resolutions and/or high framerates. For more information about using the other supported formats for motion graphicoverlay, see Including Inserted Images (Graphic Overlays) (p. 2).
For motion graphics that rely on ActionScript, follow the best practices outlined in this document tocreate SWF files that are optimized to render with the least impact on encoder system resources.
Topics
• Minimize Your Flash Stage Size (p. 11)
• Optimize Flash Stage for Input (p. 11)
• Optimize Your Assets (p. 12)
• Sandbox the SWF File (p. 12)
• Do Not Embed Video (p. 12)
• Be Wary of Simulating Video in Flash (p. 12)
• Set Publish Target and Script (p. 12)
Minimize Your Flash Stage SizeIf your overlay only takes up a small portion of the screen (such as a lower-third or animated bug), sizeyour Flash stage as small as possible to still contain the asset's size/motion/movement. Position it withinthe underlying video in AWS Elemental Server when setting up the event or job. For example, instead ofputting a 40x40 animation on a 1280x720 Flash canvas, size your canvas down to 40x40 (or just slightlylarger to capture any dropshadow, embossing, and such).
To specify the position of the animation, go to the Motion Image Inserter portion of the GlobalProcessors section of the AWS Elemental event or job. Use the “Left” and “Top” fields to specify theoffset, in pixels, from the top left corner of the screen.
Optimize Flash Stage for InputFor best quality, the resolution and framerate of the animation should match those of the underlyingvideo. We particularly recommend against scaling down.
If the animation resolution and framerate cannot be changed, the AWS Elemental encoder automaticallyadjusts the animation, but the quality of the animation may suffer.
Version 2.1611
AWS Elemental Server User GuideOptimize Your Assets
Optimize Your AssetsBe sure the assets in your Flash animation are optimized for the canvas.Don’t embed a series of largeimages and scale them down to fit.Instead use images that are properly sized before bringing them intoFlash.
Sandbox the SWF FileTest the SWF file in the sandbox environment before using it. In the sandbox testing environment, theSWF file must not reference other resources on the filesystem or network, which would slow down therendering of the frames.
Do Not Embed VideoThe AWS Elemental motion graphic overlay feature does not have the ability to decode video.
Therefore, you cannot embed video into your Flash animation.
Be Wary of Simulating Video in FlashOne way of simulating video in Flash is to include a sequence of images in the SWF file.This mechanism issupported but not recommended. We strongly encourage use of the native Flash animation componentsas Flash is optimized for those. Fall back to using sequences of images only as a last resort and only forsmall subsections of the screen as Flash is more reliable in those situations.
If you do use a sequence of images, it is especially important to optimize your images—make sure theyare small and simple, crop them down to the smallest possible area, and keep them scaled 1:1 with theimage canvas.
Set Publish Target and ScriptSet your Publish Settings so that Target is Flash Player 11.1 and Script is set to ActionScript 3.0. This isthe only version that is supported.
Version 2.1612
AWS Elemental Server User GuideProcessing Options
Including SCTE-35 Markers with AWSElemental Server
You can use AWS Elemental Server to manipulate the SCTE-35 messages in MPEG-2 transport stream(TS) inputs. These messages may or may not include segmentation descriptors. You can also use AWSElemental Server to remove or include the cueing information conveyed by SCTE messages in theoutput streams (video, audio, closed captioning, data) and in any associated manifests. The processinginstructions are all set up in the AWS Elemental Server job.
Note that AWS Elemental encoders do not support processing of manifests that are present in the input.The information in these manifests is not ingested by the AWS Elemental encoder and is not included inthe output or the output manifest.
About this topic
SCTE messages may convey DPI cueing information for ad avails and for other non-ad-avail messagessuch as programs and chapters.
This topic covers both ESAM and non-ESAM processing of SCTE messages.
Assumptions
This topic assumes you are familiar with the following:
• SCTE-35 standards and how the input you are encoding implements these standards• Profiles and with managing AWS Elemental Server jobs.
SCTE Processing OptionsAWS Elemental Server supports the following processing possibilities.
Blanking and Blackout
The “cue out” and “cue in” instructions in SCTE-35 messages line up with specific content in the video,audio, and closed captions streams. You can set up so that this content is blanked out in the output.
• The content for ad avails is blanked out using the Ad avail blanking feature.• The content for other messages is blanked out using the Blackout feature.
You must set up the desired behavior in the job or profile.
SCTE-35 Message Passthrough
SCTE-35 messages can be included in the output data stream in any TS output. You must set up thedesired behavior in the job or profile.
Manifest Decoration
Manifest decoration has the following options:
• HLS and HDS outputs can be set up so that their manifests include instructions that correspond to theoriginal SCTE-35 message content.
Version 2.1613
AWS Elemental Server User GuideDefault Behavior
• MS Smooth outputs can be set up to include these instructions in the sparse track.
You must set up the desired behavior in the job or profile.
Conditioning by a POIS
Optionally, SCTE-35 messages can be diverted to a POIS for ESAM conditioning. This conditioning is inaddition to all the other processing (manifest decoration, blanking and blackout, and passthrough).
POIS and ESAM conditioning are covered in this manual in POIS Conditioning (p. 34).
Default BehaviorThe default handling of SCTE-35 messages by AWS Elemental Server includes the following:
• No manifest decoration: Does not convert any SCTE-35 messages to job information in any outputmanifests or data streams.
• No passthrough: Does not pass through SCTE-35 messages in any data stream outputs.• No blanking: Does not blank out video content for any jobs: leave the content as is.
If you want this default behavior in all of your outputs, you can submit your job without adjusting anySCTE-35 settings.
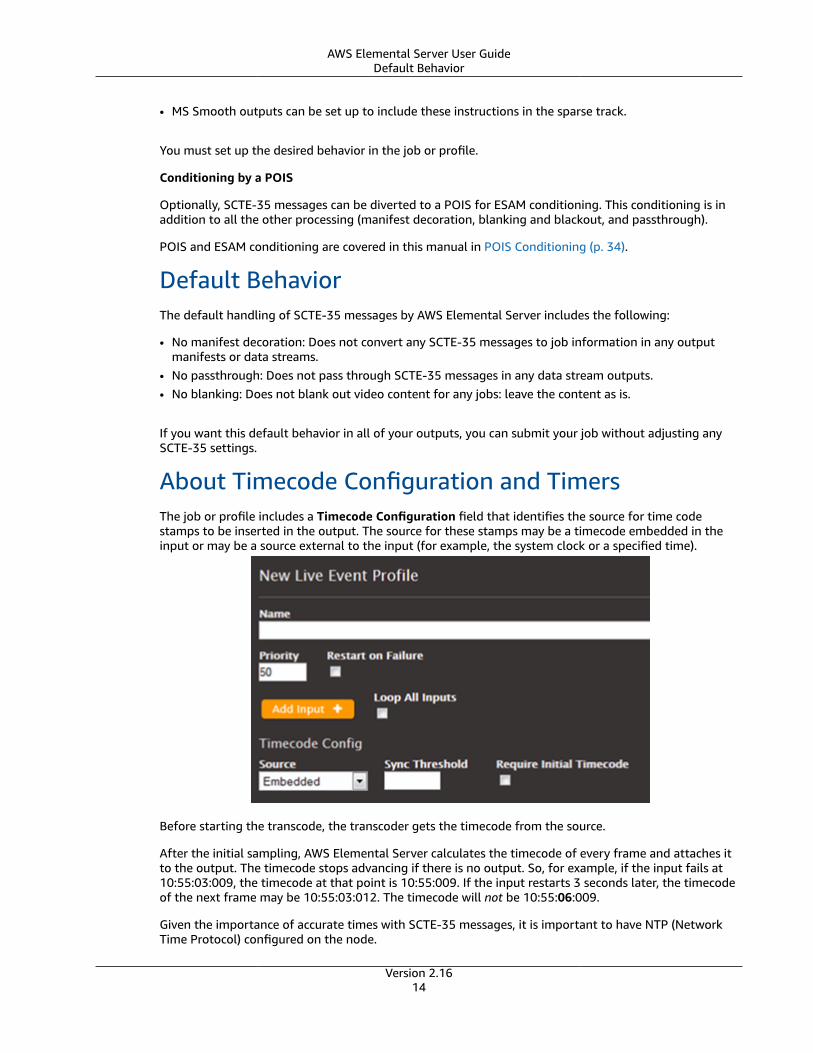
About Timecode Configuration and TimersThe job or profile includes a Timecode Configuration field that identifies the source for time codestamps to be inserted in the output. The source for these stamps may be a timecode embedded in theinput or may be a source external to the input (for example, the system clock or a specified time).
Before starting the transcode, the transcoder gets the timecode from the source.
After the initial sampling, AWS Elemental Server calculates the timecode of every frame and attaches itto the output. The timecode stops advancing if there is no output. So, for example, if the input fails at10:55:03:009, the timecode at that point is 10:55:009. If the input restarts 3 seconds later, the timecodeof the next frame may be 10:55:03:012. The timecode will not be 10:55:06:009.
Given the importance of accurate times with SCTE-35 messages, it is important to have NTP (NetworkTime Protocol) configured on the node.
Version 2.1614
AWS Elemental Server User GuideScope of Processing Depending on Outputs
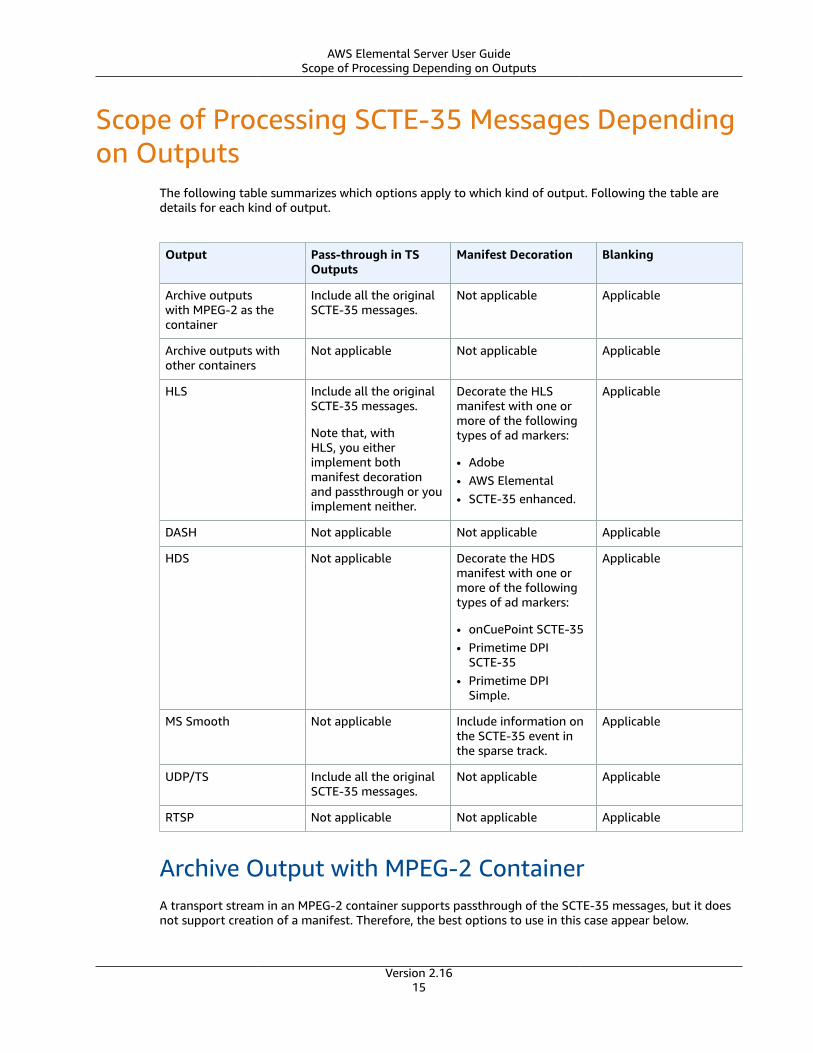
Scope of Processing SCTE-35 Messages Dependingon Outputs
The following table summarizes which options apply to which kind of output. Following the table aredetails for each kind of output.
Output Pass-through in TSOutputs
Manifest Decoration Blanking
Archive outputswith MPEG-2 as thecontainer
Include all the originalSCTE-35 messages.
Not applicable Applicable
Archive outputs withother containers
Not applicable Not applicable Applicable
HLS Include all the originalSCTE-35 messages.
Note that, withHLS, you eitherimplement bothmanifest decorationand passthrough or youimplement neither.
Decorate the HLSmanifest with one ormore of the followingtypes of ad markers:
• Adobe• AWS Elemental• SCTE-35 enhanced.
Applicable
DASH Not applicable Not applicable Applicable
HDS Not applicable Decorate the HDSmanifest with one ormore of the followingtypes of ad markers:
• onCuePoint SCTE-35• Primetime DPI
SCTE-35• Primetime DPI
Simple.
Applicable
MS Smooth Not applicable Include information onthe SCTE-35 event inthe sparse track.
Applicable
UDP/TS Include all the originalSCTE-35 messages.
Not applicable Applicable
RTSP Not applicable Not applicable Applicable
Archive Output with MPEG-2 ContainerA transport stream in an MPEG-2 container supports passthrough of the SCTE-35 messages, but it doesnot support creation of a manifest. Therefore, the best options to use in this case appear below.
Version 2.1615
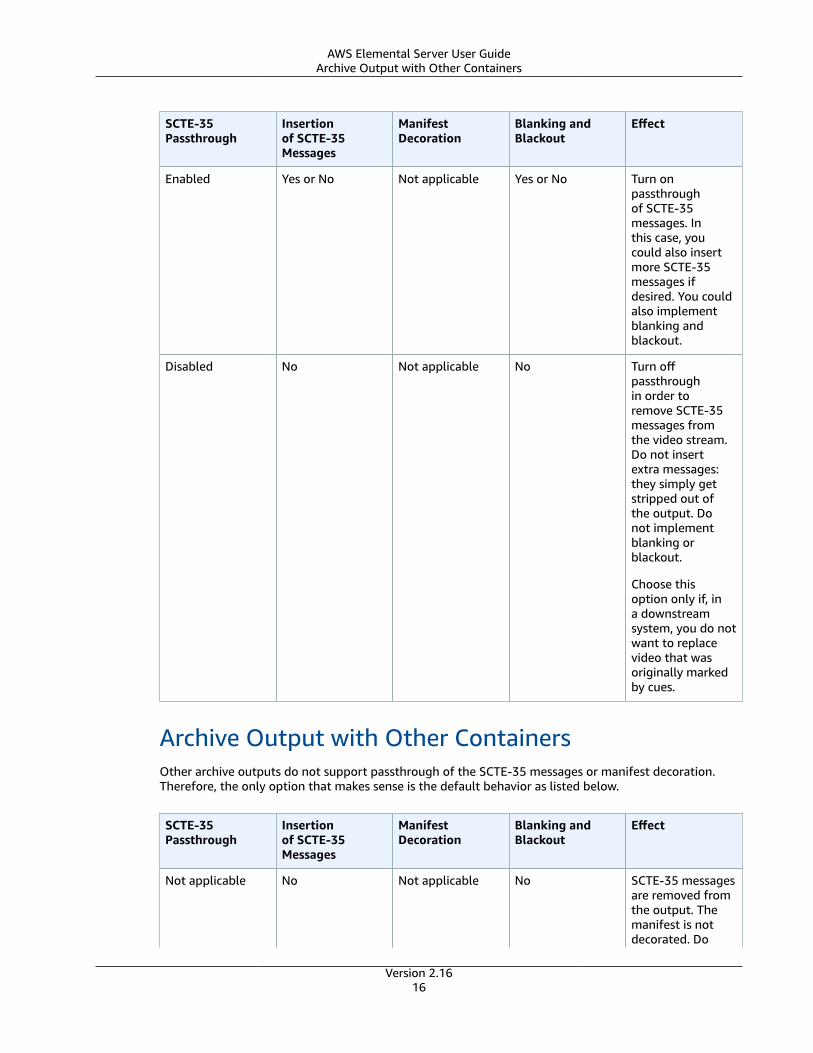
AWS Elemental Server User GuideArchive Output with Other Containers
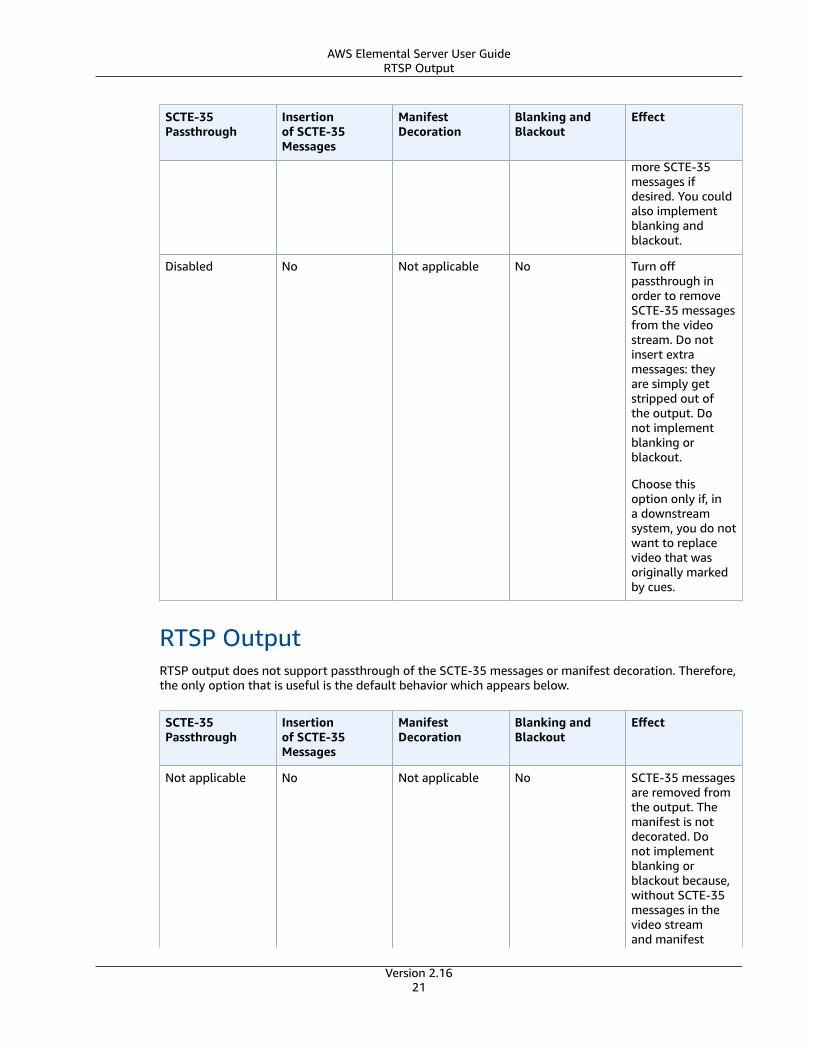
SCTE-35Passthrough
Insertionof SCTE-35Messages
ManifestDecoration
Blanking andBlackout
Effect
Enabled Yes or No Not applicable Yes or No Turn onpassthroughof SCTE-35messages. Inthis case, youcould also insertmore SCTE-35messages ifdesired. You couldalso implementblanking andblackout.
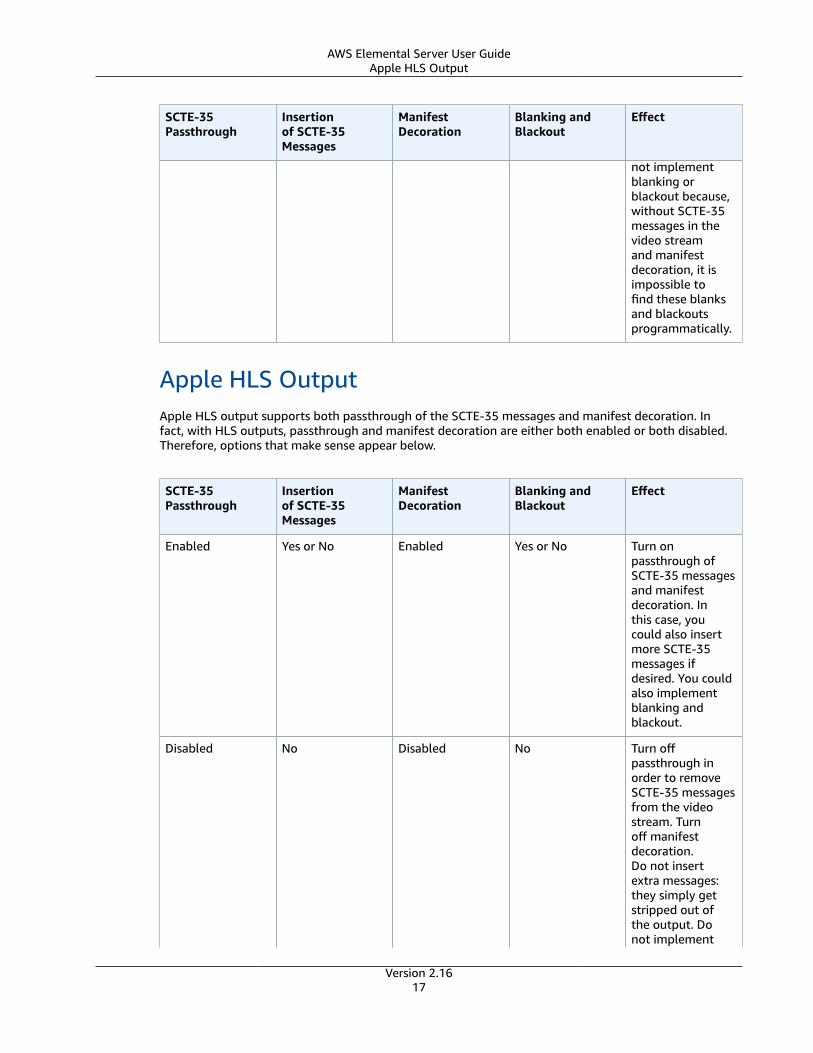
Disabled No Not applicable No Turn offpassthroughin order toremove SCTE-35messages fromthe video stream.Do not insertextra messages:they simply getstripped out ofthe output. Donot implementblanking orblackout.
Choose thisoption only if, ina downstreamsystem, you do notwant to replacevideo that wasoriginally markedby cues.
Archive Output with Other ContainersOther archive outputs do not support passthrough of the SCTE-35 messages or manifest decoration.Therefore, the only option that makes sense is the default behavior as listed below.
SCTE-35Passthrough
Insertionof SCTE-35Messages
ManifestDecoration
Blanking andBlackout
Effect
Not applicable No Not applicable No SCTE-35 messagesare removed fromthe output. Themanifest is notdecorated. Do
Version 2.1616
AWS Elemental Server User GuideApple HLS Output
SCTE-35Passthrough
Insertionof SCTE-35Messages
ManifestDecoration
Blanking andBlackout
Effect
not implementblanking orblackout because,without SCTE-35messages in thevideo streamand manifestdecoration, it isimpossible tofind these blanksand blackoutsprogrammatically.
Apple HLS OutputApple HLS output supports both passthrough of the SCTE-35 messages and manifest decoration. Infact, with HLS outputs, passthrough and manifest decoration are either both enabled or both disabled.Therefore, options that make sense appear below.
SCTE-35Passthrough
Insertionof SCTE-35Messages
ManifestDecoration
Blanking andBlackout
Effect
Enabled Yes or No Enabled Yes or No Turn onpassthrough ofSCTE-35 messagesand manifestdecoration. Inthis case, youcould also insertmore SCTE-35messages ifdesired. You couldalso implementblanking andblackout.
Disabled No Disabled No Turn offpassthrough inorder to removeSCTE-35 messagesfrom the videostream. Turnoff manifestdecoration.Do not insertextra messages:they simply getstripped out ofthe output. Donot implement
Version 2.1617
AWS Elemental Server User GuideDASH Output
SCTE-35Passthrough
Insertionof SCTE-35Messages
ManifestDecoration
Blanking andBlackout
Effect
blanking orblackout.
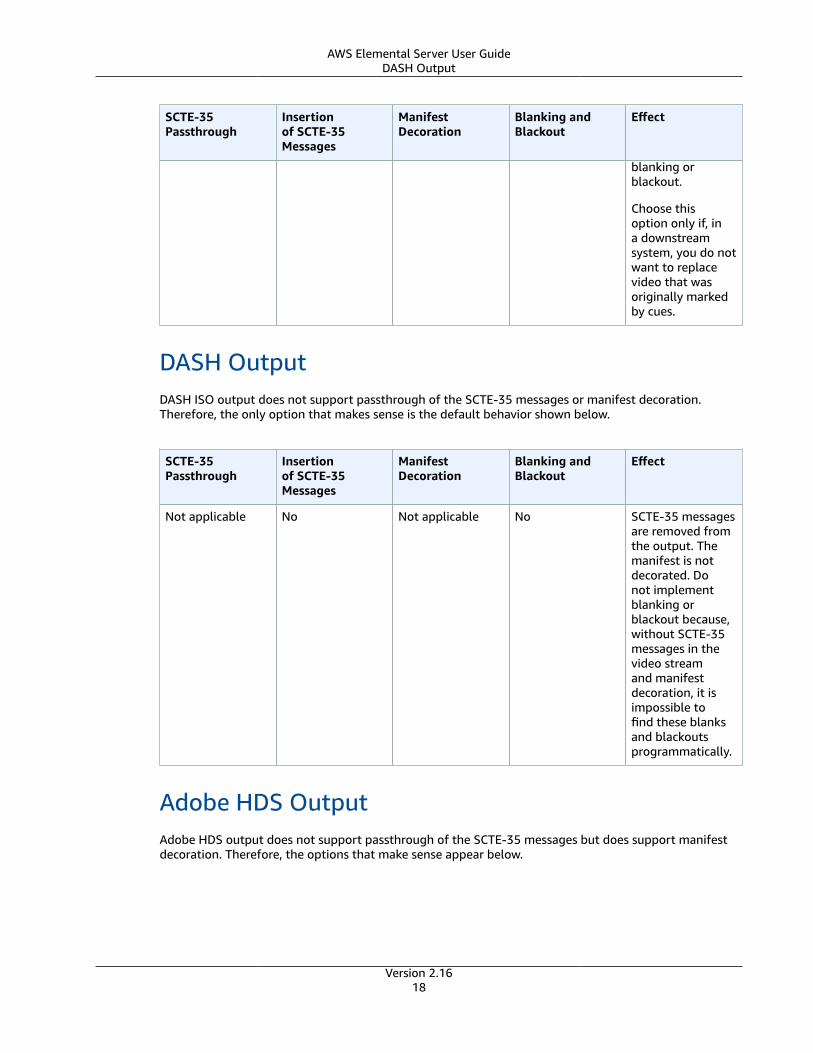
Choose thisoption only if, ina downstreamsystem, you do notwant to replacevideo that wasoriginally markedby cues.
DASH OutputDASH ISO output does not support passthrough of the SCTE-35 messages or manifest decoration.Therefore, the only option that makes sense is the default behavior shown below.
SCTE-35Passthrough
Insertionof SCTE-35Messages
ManifestDecoration
Blanking andBlackout
Effect
Not applicable No Not applicable No SCTE-35 messagesare removed fromthe output. Themanifest is notdecorated. Donot implementblanking orblackout because,without SCTE-35messages in thevideo streamand manifestdecoration, it isimpossible tofind these blanksand blackoutsprogrammatically.
Adobe HDS OutputAdobe HDS output does not support passthrough of the SCTE-35 messages but does support manifestdecoration. Therefore, the options that make sense appear below.
Version 2.1618
AWS Elemental Server User GuideMS Smooth Output
SCTE-35Passthrough
Insertionof SCTE-35Messages
ManifestDecoration
Blanking andBlackout
Effect
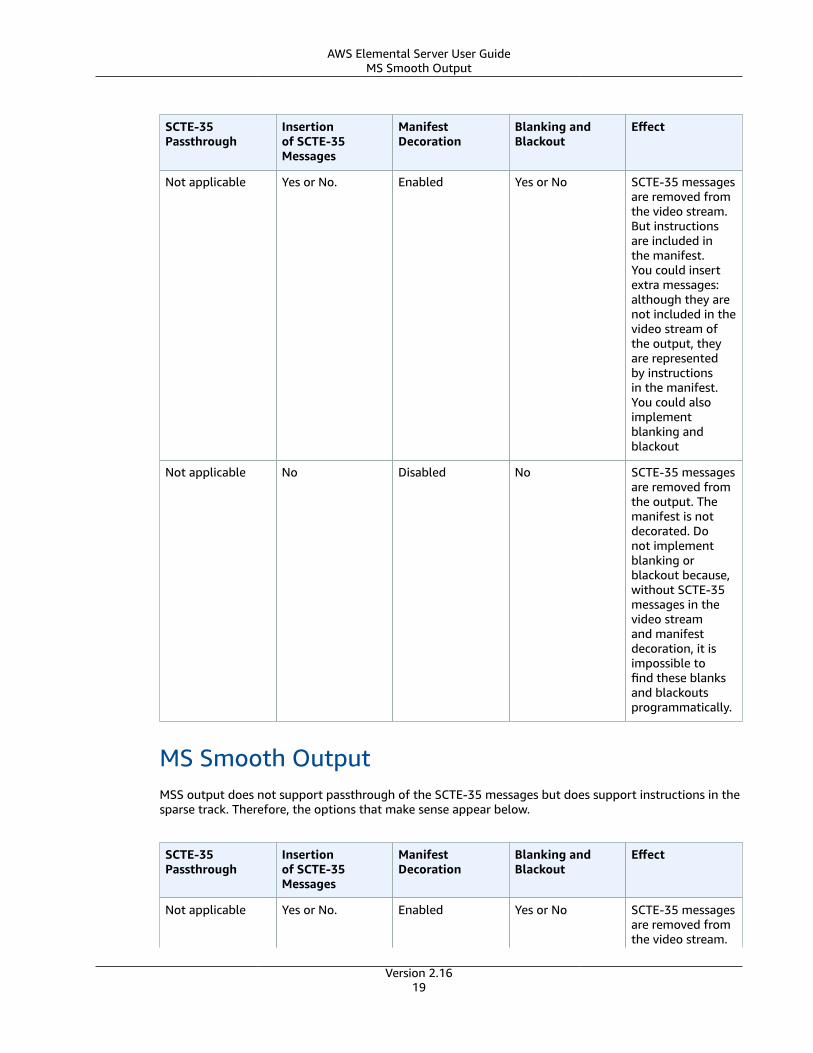
Not applicable Yes or No. Enabled Yes or No SCTE-35 messagesare removed fromthe video stream.But instructionsare included inthe manifest.You could insertextra messages:although they arenot included in thevideo stream ofthe output, theyare representedby instructionsin the manifest.You could alsoimplementblanking andblackout
Not applicable No Disabled No SCTE-35 messagesare removed fromthe output. Themanifest is notdecorated. Donot implementblanking orblackout because,without SCTE-35messages in thevideo streamand manifestdecoration, it isimpossible tofind these blanksand blackoutsprogrammatically.
MS Smooth OutputMSS output does not support passthrough of the SCTE-35 messages but does support instructions in thesparse track. Therefore, the options that make sense appear below.
SCTE-35Passthrough
Insertionof SCTE-35Messages
ManifestDecoration
Blanking andBlackout
Effect
Not applicable Yes or No. Enabled Yes or No SCTE-35 messagesare removed fromthe video stream.
Version 2.1619
AWS Elemental Server User GuideUDP/TS Output
SCTE-35Passthrough
Insertionof SCTE-35Messages
ManifestDecoration
Blanking andBlackout
Effect
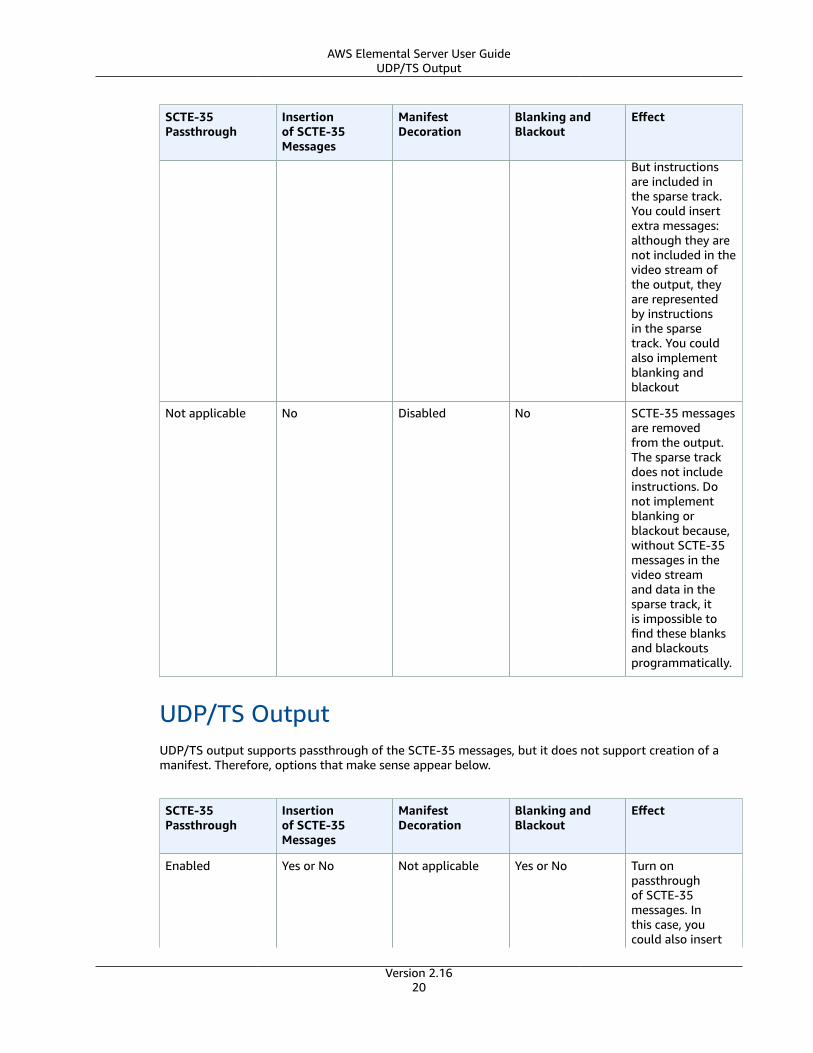
But instructionsare included inthe sparse track.You could insertextra messages:although they arenot included in thevideo stream ofthe output, theyare representedby instructionsin the sparsetrack. You couldalso implementblanking andblackout
Not applicable No Disabled No SCTE-35 messagesare removedfrom the output.The sparse trackdoes not includeinstructions. Donot implementblanking orblackout because,without SCTE-35messages in thevideo streamand data in thesparse track, itis impossible tofind these blanksand blackoutsprogrammatically.
UDP/TS OutputUDP/TS output supports passthrough of the SCTE-35 messages, but it does not support creation of amanifest. Therefore, options that make sense appear below.
SCTE-35Passthrough
Insertionof SCTE-35Messages
ManifestDecoration
Blanking andBlackout
Effect
Enabled Yes or No Not applicable Yes or No Turn onpassthroughof SCTE-35messages. Inthis case, youcould also insert
Version 2.1620
AWS Elemental Server User GuideRTSP Output
SCTE-35Passthrough
Insertionof SCTE-35Messages
ManifestDecoration
Blanking andBlackout
Effect
more SCTE-35messages ifdesired. You couldalso implementblanking andblackout.
Disabled No Not applicable No Turn offpassthrough inorder to removeSCTE-35 messagesfrom the videostream. Do notinsert extramessages: theyare simply getstripped out ofthe output. Donot implementblanking orblackout.
Choose thisoption only if, ina downstreamsystem, you do notwant to replacevideo that wasoriginally markedby cues.
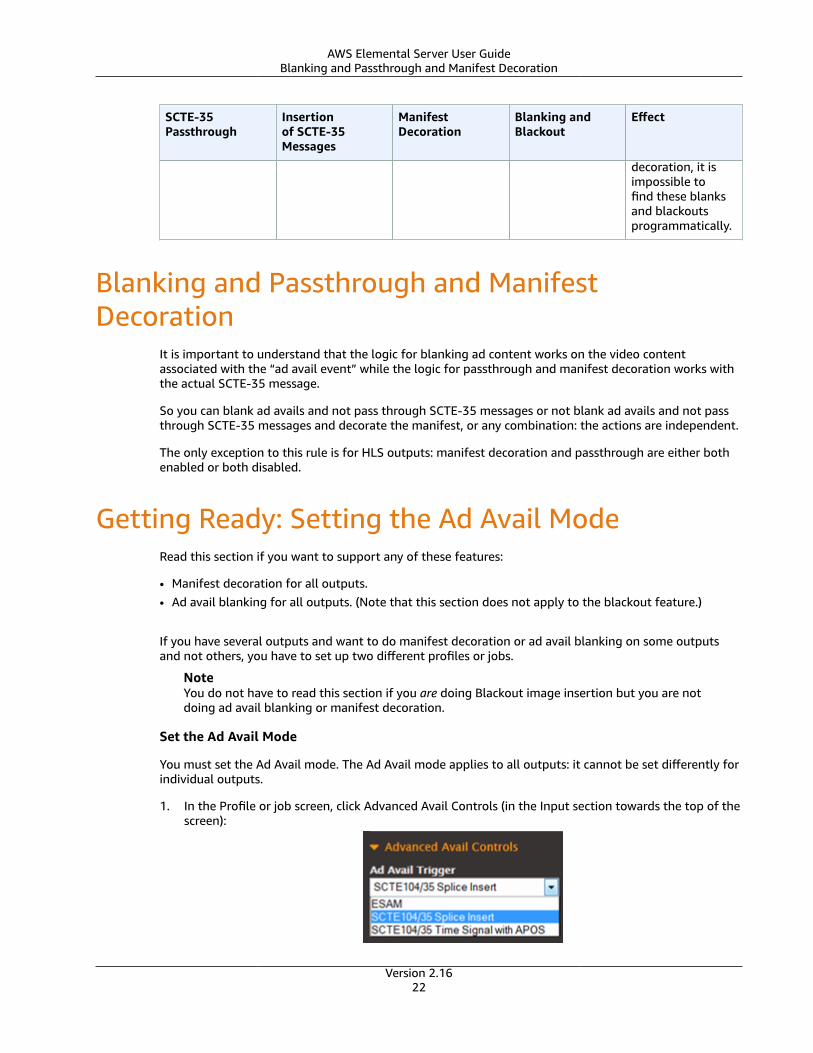
RTSP OutputRTSP output does not support passthrough of the SCTE-35 messages or manifest decoration. Therefore,the only option that is useful is the default behavior which appears below.
SCTE-35Passthrough
Insertionof SCTE-35Messages
ManifestDecoration
Blanking andBlackout
Effect
Not applicable No Not applicable No SCTE-35 messagesare removed fromthe output. Themanifest is notdecorated. Donot implementblanking orblackout because,without SCTE-35messages in thevideo streamand manifest
Version 2.1621
AWS Elemental Server User GuideBlanking and Passthrough and Manifest Decoration
SCTE-35Passthrough
Insertionof SCTE-35Messages
ManifestDecoration
Blanking andBlackout
Effect
decoration, it isimpossible tofind these blanksand blackoutsprogrammatically.
Blanking and Passthrough and ManifestDecoration
It is important to understand that the logic for blanking ad content works on the video contentassociated with the “ad avail event” while the logic for passthrough and manifest decoration works withthe actual SCTE-35 message.
So you can blank ad avails and not pass through SCTE-35 messages or not blank ad avails and not passthrough SCTE-35 messages and decorate the manifest, or any combination: the actions are independent.
The only exception to this rule is for HLS outputs: manifest decoration and passthrough are either bothenabled or both disabled.
Getting Ready: Setting the Ad Avail ModeRead this section if you want to support any of these features:
• Manifest decoration for all outputs.• Ad avail blanking for all outputs. (Note that this section does not apply to the blackout feature.)
If you have several outputs and want to do manifest decoration or ad avail blanking on some outputsand not others, you have to set up two different profiles or jobs.
NoteYou do not have to read this section if you are doing Blackout image insertion but you are notdoing ad avail blanking or manifest decoration.
Set the Ad Avail Mode
You must set the Ad Avail mode. The Ad Avail mode applies to all outputs: it cannot be set differently forindividual outputs.
1. In the Profile or job screen, click Advanced Avail Controls (in the Input section towards the top of thescreen):
Version 2.1622
AWS Elemental Server User GuideGetting Ready: Setting the Ad Avail Mode
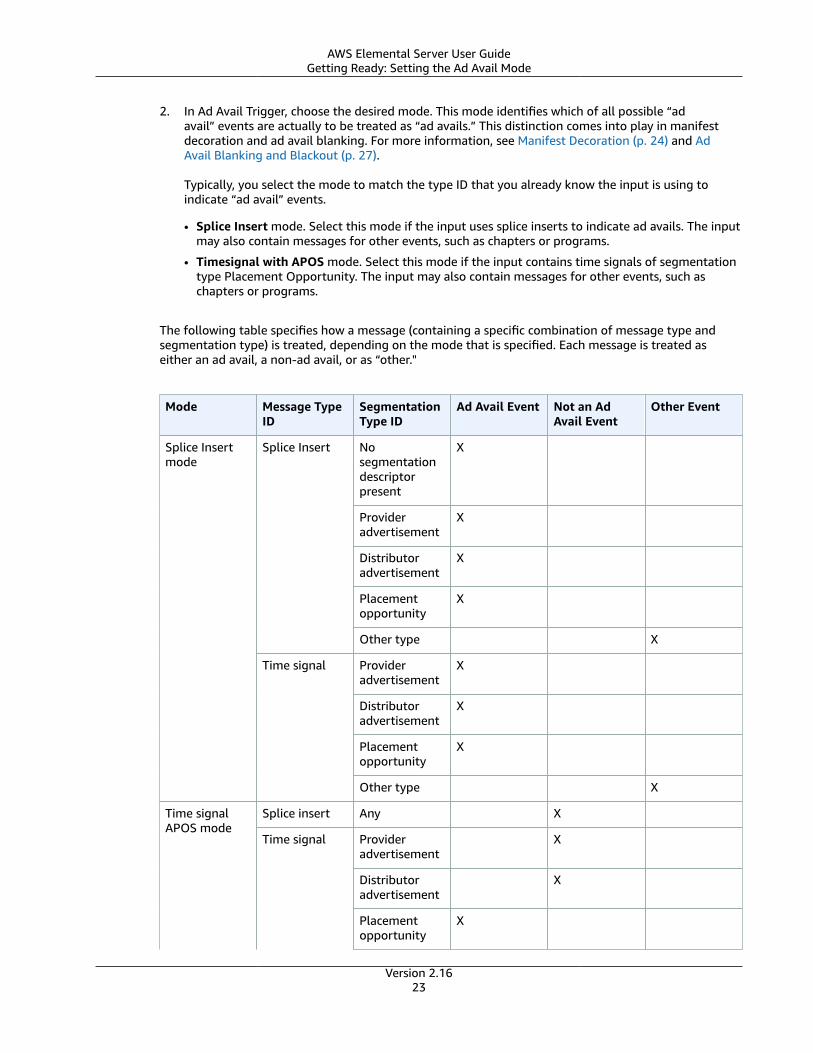
2. In Ad Avail Trigger, choose the desired mode. This mode identifies which of all possible “adavail” events are actually to be treated as “ad avails.” This distinction comes into play in manifestdecoration and ad avail blanking. For more information, see Manifest Decoration (p. 24) and AdAvail Blanking and Blackout (p. 27).
Typically, you select the mode to match the type ID that you already know the input is using toindicate “ad avail” events.
• Splice Insert mode. Select this mode if the input uses splice inserts to indicate ad avails. The inputmay also contain messages for other events, such as chapters or programs.
• Timesignal with APOS mode. Select this mode if the input contains time signals of segmentationtype Placement Opportunity. The input may also contain messages for other events, such aschapters or programs.
The following table specifies how a message (containing a specific combination of message type andsegmentation type) is treated, depending on the mode that is specified. Each message is treated aseither an ad avail, a non-ad avail, or as “other."
Mode Message TypeID
SegmentationType ID
Ad Avail Event Not an AdAvail Event
Other Event
Nosegmentationdescriptorpresent
X
Provideradvertisement
X
Distributoradvertisement
X
Placementopportunity
X
Splice Insert
Other type X
Provideradvertisement
X
Distributoradvertisement
X
Placementopportunity
X
Splice Insertmode
Time signal
Other type X
Splice insert Any X
Provideradvertisement
X
Distributoradvertisement
X
Time signalAPOS mode
Time signal
Placementopportunity
X
Version 2.1623

AWS Elemental Server User GuideManifest Decoration
Mode Message TypeID
SegmentationType ID
Ad Avail Event Not an AdAvail Event
Other Event
Other type X
Manifest DecorationYou can choose to interpret SCTE-35 messages from the original input and insert correspondinginstructions into the output manifest for the following outputs:
• HLS• HDS• MS Smooth (the instructions are inserted in the sparse track).
How SCTE-35 Events Are Handled in ManifestsThe following information may be inserted into the manifest:
Type of Instruction When Inserted
Base-64 Information about all SCTE-35 messages in theoutput is incorporated into the manifest; theentire SCTE-35 message is added in base-64format.
Cue-out, Cue-in SCTE-35 messages that are ad avails (see GettingReady: Setting the Ad Avail Mode (p. 22)) resultin the insertion of “cue-out, cue-in” instructions.
Blackout Only applies to the SCTE-35 Enhanced ad markerstyle (for HLS output; see below).
SCTE-35 messages that are not ad avails result inthe insertion of “blackout start/end” instructions,assuming that blackout is enabled (Ad AvailBlanking and Blackout (p. 27)). If blackout isnot enabled, these instructions are not inserted.
Splice Insert Mode
This table describes which of the three types of instructions are inserted for each message type/segmentation type.
Message Type ID SegmentationType ID
Base 64 Cue-out, Cue-in Blackout
No segmentationdescriptor present
X XSplice insert
Provideradvertisement
X X
Version 2.1624
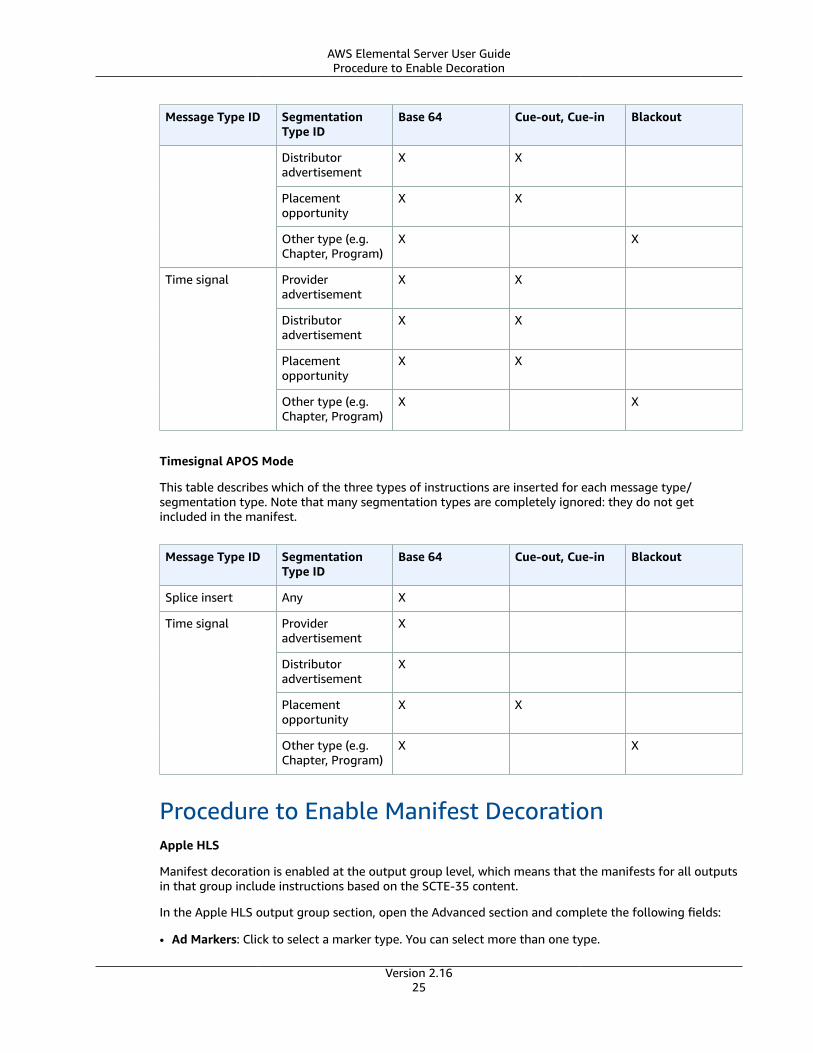
AWS Elemental Server User GuideProcedure to Enable Decoration
Message Type ID SegmentationType ID
Base 64 Cue-out, Cue-in Blackout
Distributoradvertisement
X X
Placementopportunity
X X
Other type (e.g.Chapter, Program)
X X
Provideradvertisement
X X
Distributoradvertisement
X X
Placementopportunity
X X
Time signal
Other type (e.g.Chapter, Program)
X X
Timesignal APOS Mode
This table describes which of the three types of instructions are inserted for each message type/segmentation type. Note that many segmentation types are completely ignored: they do not getincluded in the manifest.
Message Type ID SegmentationType ID
Base 64 Cue-out, Cue-in Blackout
Splice insert Any X
Provideradvertisement
X
Distributoradvertisement
X
Placementopportunity
X X
Time signal
Other type (e.g.Chapter, Program)
X X
Procedure to Enable Manifest DecorationApple HLS
Manifest decoration is enabled at the output group level, which means that the manifests for all outputsin that group include instructions based on the SCTE-35 content.
In the Apple HLS output group section, open the Advanced section and complete the following fields:
• Ad Markers: Click to select a marker type. You can select more than one type.
Version 2.1625
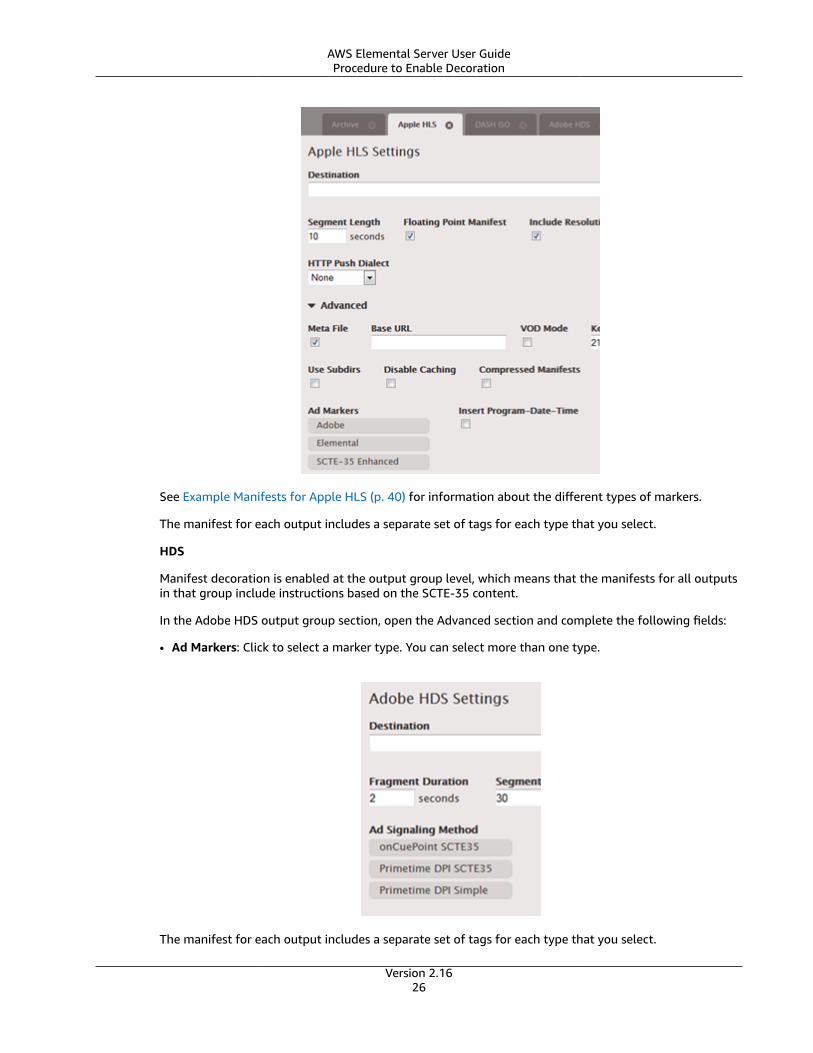
AWS Elemental Server User GuideProcedure to Enable Decoration
See Example Manifests for Apple HLS (p. 40) for information about the different types of markers.
The manifest for each output includes a separate set of tags for each type that you select.
HDS
Manifest decoration is enabled at the output group level, which means that the manifests for all outputsin that group include instructions based on the SCTE-35 content.
In the Adobe HDS output group section, open the Advanced section and complete the following fields:
• Ad Markers: Click to select a marker type. You can select more than one type.
The manifest for each output includes a separate set of tags for each type that you select.
Version 2.1626

AWS Elemental Server User GuideAd Avail Blanking and Blackout
MS Smooth
With MS Smooth, if you enable manifest decoration, instructions are actually inserted in the sparse track.
Manifest decoration is enabled at the output group level, which means that the sparse tracks for alloutputs in that group include instructions based on the SCTE-35 content.
In the MS Smooth output group section, complete the following fields:
• Enable Sparse Track: Click to select a marker type. You can select more than one type.• Acquisition Point ID: Enter the address of the certificate if encryption is enabled on the output.
Ad Avail Blanking and BlackoutYou can turn on one or both of the following features to blank out the content associated with aSCTE-35 event:
• “Blackout”: Blank out the content for other types of SCTE-35 messages such as chapters andprograms.
• “Ad avail blanking”: Blank out the content for a SCTE-35 message that is considered an “adavail” (according to the mode, Getting Ready: Setting the Ad Avail Mode (p. 22)).
In both features, the handling is:
• Replace the video content associated with the event with an image you specify or with a black image.• Remove the audio associated with the event.• Remove the closed captions associated with the event.
Blanking is GlobalBoth ad avail blanking and blackout apply to all outputs. You cannot choose to blank out for someoutputs and not blank out for others: it is an all-or-nothing decision.
Comparison to Manifest Decoration and Passthrough
Version 2.1627
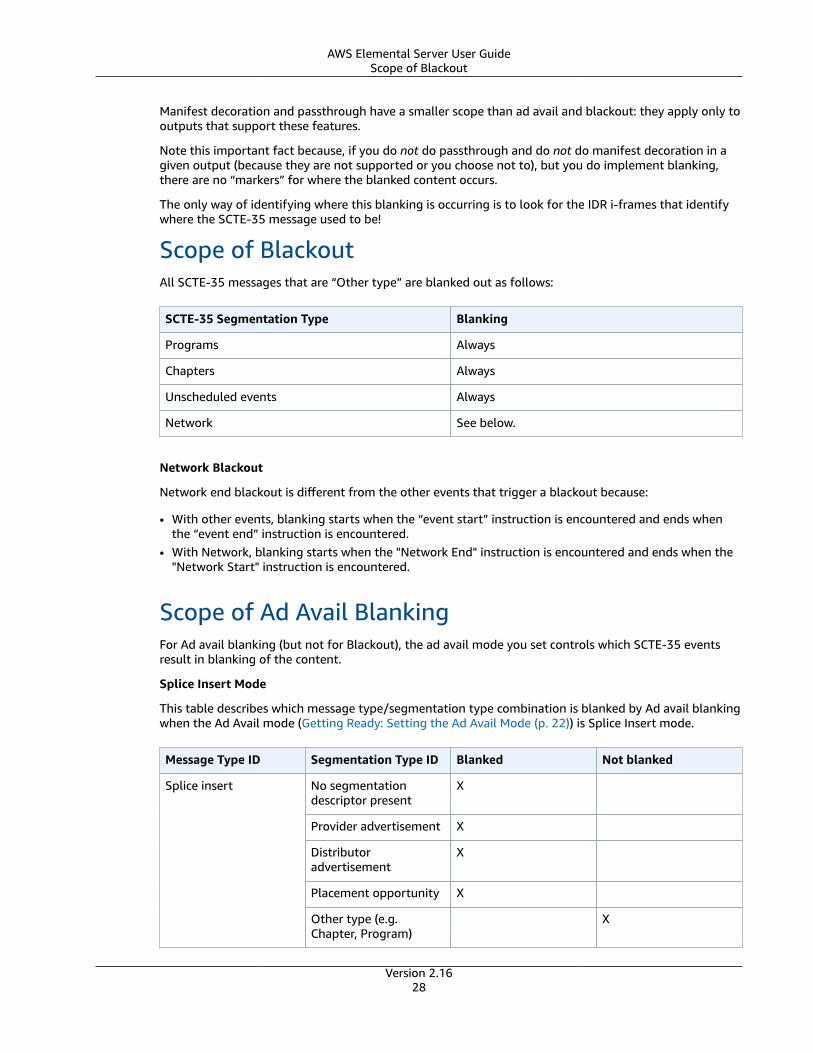
AWS Elemental Server User GuideScope of Blackout
Manifest decoration and passthrough have a smaller scope than ad avail and blackout: they apply only tooutputs that support these features.
Note this important fact because, if you do not do passthrough and do not do manifest decoration in agiven output (because they are not supported or you choose not to), but you do implement blanking,there are no “markers” for where the blanked content occurs.
The only way of identifying where this blanking is occurring is to look for the IDR i-frames that identifywhere the SCTE-35 message used to be!
Scope of BlackoutAll SCTE-35 messages that are “Other type” are blanked out as follows:
SCTE-35 Segmentation Type Blanking
Programs Always
Chapters Always
Unscheduled events Always
Network See below.
Network Blackout
Network end blackout is different from the other events that trigger a blackout because:
• With other events, blanking starts when the “event start” instruction is encountered and ends whenthe “event end” instruction is encountered.
• With Network, blanking starts when the "Network End" instruction is encountered and ends when the"Network Start" instruction is encountered.
Scope of Ad Avail BlankingFor Ad avail blanking (but not for Blackout), the ad avail mode you set controls which SCTE-35 eventsresult in blanking of the content.
Splice Insert Mode
This table describes which message type/segmentation type combination is blanked by Ad avail blankingwhen the Ad Avail mode (Getting Ready: Setting the Ad Avail Mode (p. 22)) is Splice Insert mode.
Message Type ID Segmentation Type ID Blanked Not blanked
No segmentationdescriptor present
X
Provider advertisement X
Distributoradvertisement
X
Placement opportunity X
Splice insert
Other type (e.g.Chapter, Program)
X
Version 2.1628
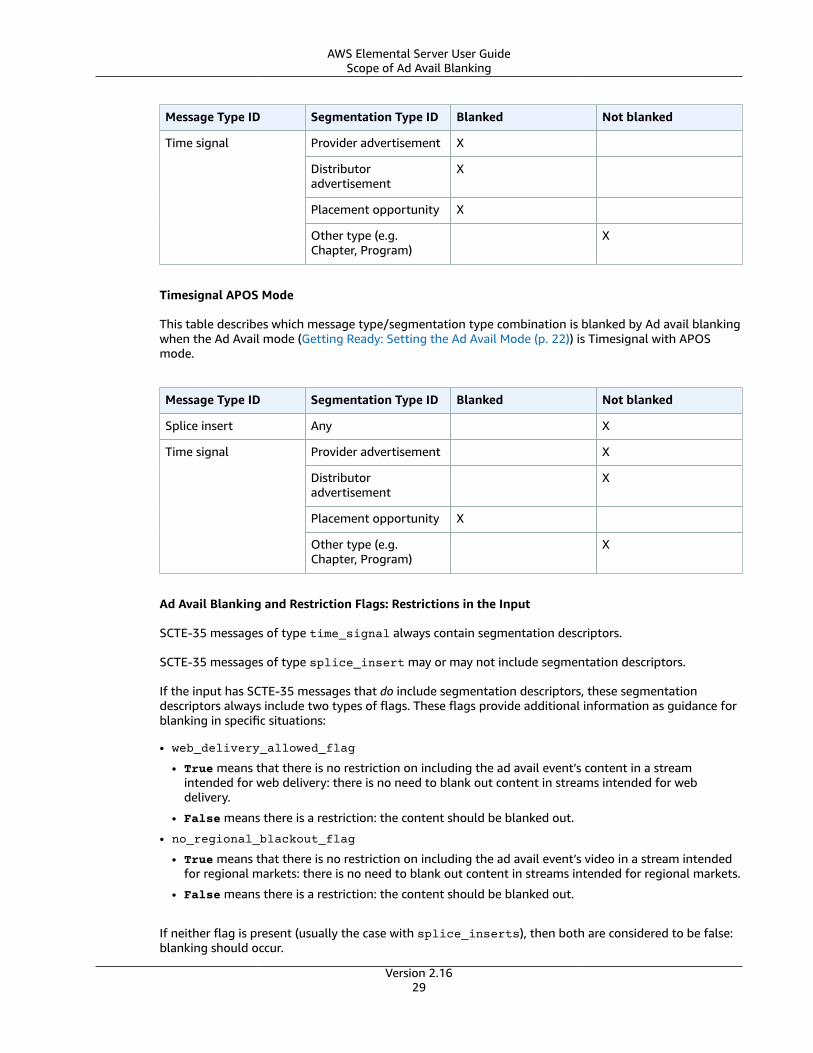
AWS Elemental Server User GuideScope of Ad Avail Blanking
Message Type ID Segmentation Type ID Blanked Not blanked
Provider advertisement X
Distributoradvertisement
X
Placement opportunity X
Time signal
Other type (e.g.Chapter, Program)
X
Timesignal APOS Mode
This table describes which message type/segmentation type combination is blanked by Ad avail blankingwhen the Ad Avail mode (Getting Ready: Setting the Ad Avail Mode (p. 22)) is Timesignal with APOSmode.
Message Type ID Segmentation Type ID Blanked Not blanked
Splice insert Any X
Provider advertisement X
Distributoradvertisement
X
Placement opportunity X
Time signal
Other type (e.g.Chapter, Program)
X
Ad Avail Blanking and Restriction Flags: Restrictions in the Input
SCTE-35 messages of type time_signal always contain segmentation descriptors.
SCTE-35 messages of type splice_insert may or may not include segmentation descriptors.
If the input has SCTE-35 messages that do include segmentation descriptors, these segmentationdescriptors always include two types of flags. These flags provide additional information as guidance forblanking in specific situations:
• web_delivery_allowed_flag
• True means that there is no restriction on including the ad avail event’s content in a streamintended for web delivery: there is no need to blank out content in streams intended for webdelivery.
• False means there is a restriction: the content should be blanked out.
• no_regional_blackout_flag
• True means that there is no restriction on including the ad avail event’s video in a stream intendedfor regional markets: there is no need to blank out content in streams intended for regional markets.
• False means there is a restriction: the content should be blanked out.
If neither flag is present (usually the case with splice_inserts), then both are considered to be false:blanking should occur.
Version 2.1629
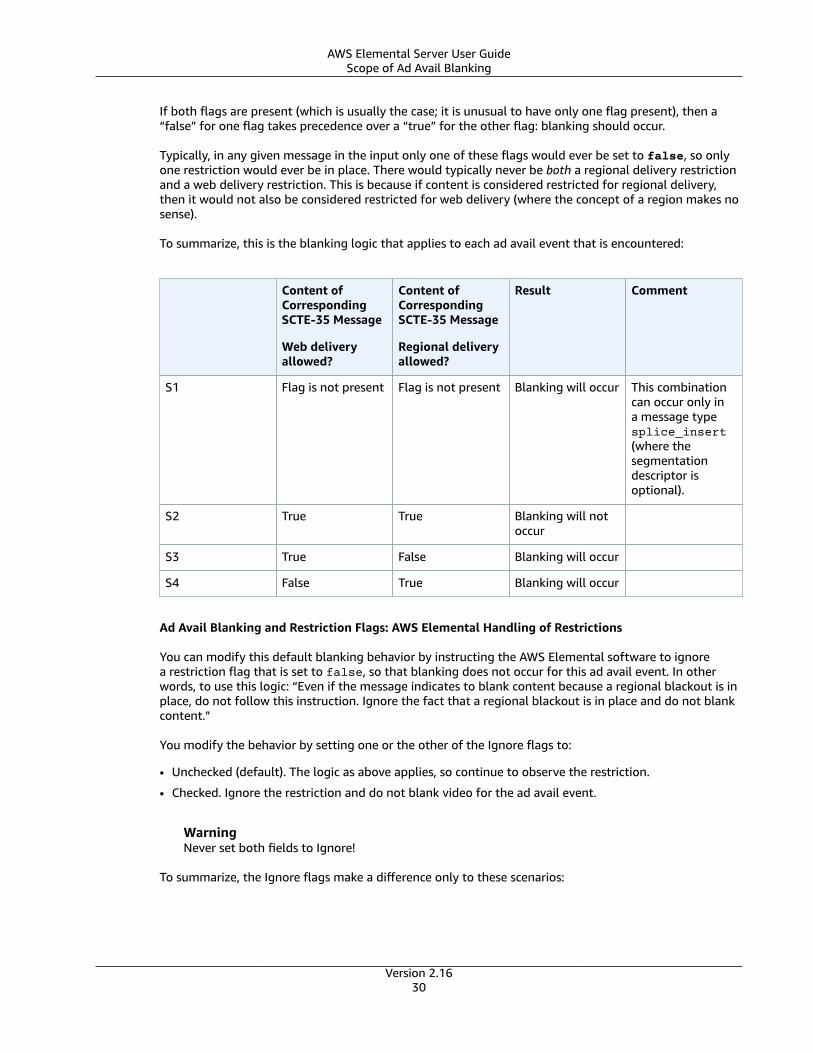
AWS Elemental Server User GuideScope of Ad Avail Blanking
If both flags are present (which is usually the case; it is unusual to have only one flag present), then a“false” for one flag takes precedence over a “true” for the other flag: blanking should occur.
Typically, in any given message in the input only one of these flags would ever be set to false, so onlyone restriction would ever be in place. There would typically never be both a regional delivery restrictionand a web delivery restriction. This is because if content is considered restricted for regional delivery,then it would not also be considered restricted for web delivery (where the concept of a region makes nosense).
To summarize, this is the blanking logic that applies to each ad avail event that is encountered:
Content ofCorrespondingSCTE-35 Message
Web deliveryallowed?
Content ofCorrespondingSCTE-35 Message
Regional deliveryallowed?
Result Comment
S1 Flag is not present Flag is not present Blanking will occur This combinationcan occur only ina message typesplice_insert(where thesegmentationdescriptor isoptional).
S2 True True Blanking will notoccur
S3 True False Blanking will occur
S4 False True Blanking will occur
Ad Avail Blanking and Restriction Flags: AWS Elemental Handling of Restrictions
You can modify this default blanking behavior by instructing the AWS Elemental software to ignorea restriction flag that is set to false, so that blanking does not occur for this ad avail event. In otherwords, to use this logic: “Even if the message indicates to blank content because a regional blackout is inplace, do not follow this instruction. Ignore the fact that a regional blackout is in place and do not blankcontent.”
You modify the behavior by setting one or the other of the Ignore flags to:
• Unchecked (default). The logic as above applies, so continue to observe the restriction.
• Checked. Ignore the restriction and do not blank video for the ad avail event.
WarningNever set both fields to Ignore!
To summarize, the Ignore flags make a difference only to these scenarios:
Version 2.1630
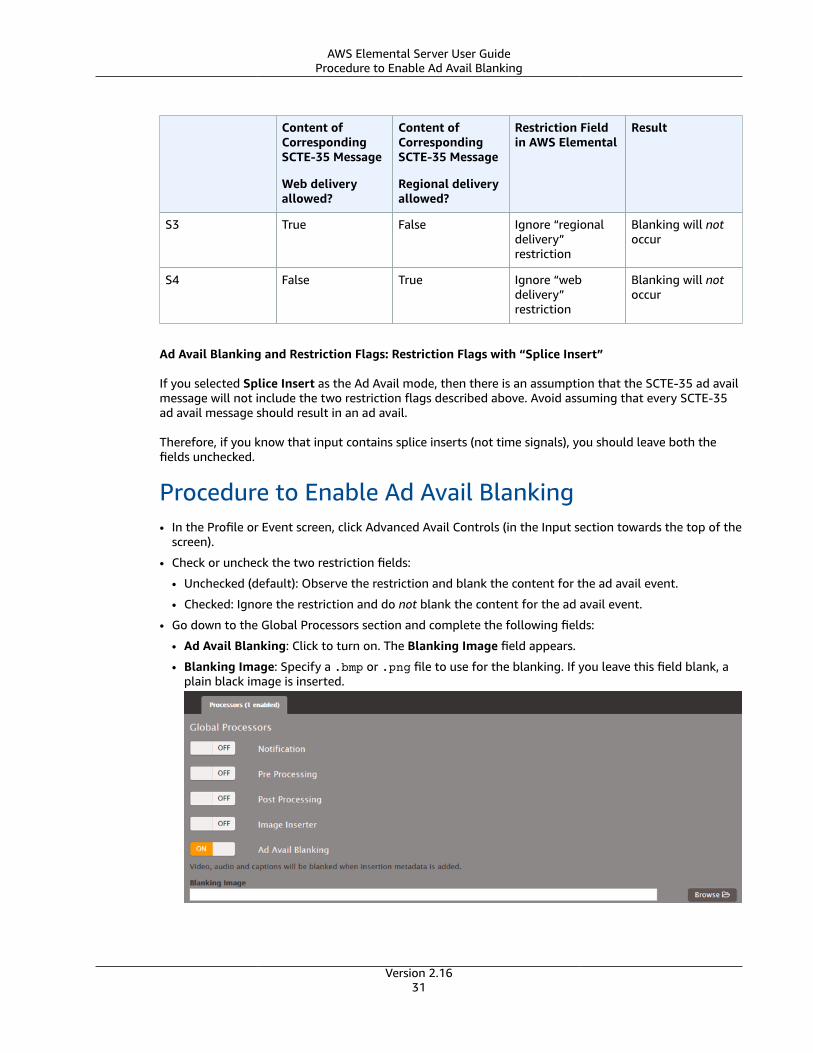
AWS Elemental Server User GuideProcedure to Enable Ad Avail Blanking
Content ofCorrespondingSCTE-35 Message
Web deliveryallowed?
Content ofCorrespondingSCTE-35 Message
Regional deliveryallowed?
Restriction Fieldin AWS Elemental
Result
S3 True False Ignore “regionaldelivery”restriction
Blanking will notoccur
S4 False True Ignore “webdelivery”restriction
Blanking will notoccur
Ad Avail Blanking and Restriction Flags: Restriction Flags with “Splice Insert”
If you selected Splice Insert as the Ad Avail mode, then there is an assumption that the SCTE-35 ad availmessage will not include the two restriction flags described above. Avoid assuming that every SCTE-35ad avail message should result in an ad avail.
Therefore, if you know that input contains splice inserts (not time signals), you should leave both thefields unchecked.
Procedure to Enable Ad Avail Blanking• In the Profile or Event screen, click Advanced Avail Controls (in the Input section towards the top of the
screen).
• Check or uncheck the two restriction fields:
• Unchecked (default): Observe the restriction and blank the content for the ad avail event.
• Checked: Ignore the restriction and do not blank the content for the ad avail event.
• Go down to the Global Processors section and complete the following fields:
• Ad Avail Blanking: Click to turn on. The Blanking Image field appears.
• Blanking Image: Specify a .bmp or .png file to use for the blanking. If you leave this field blank, aplain black image is inserted.
Version 2.1631
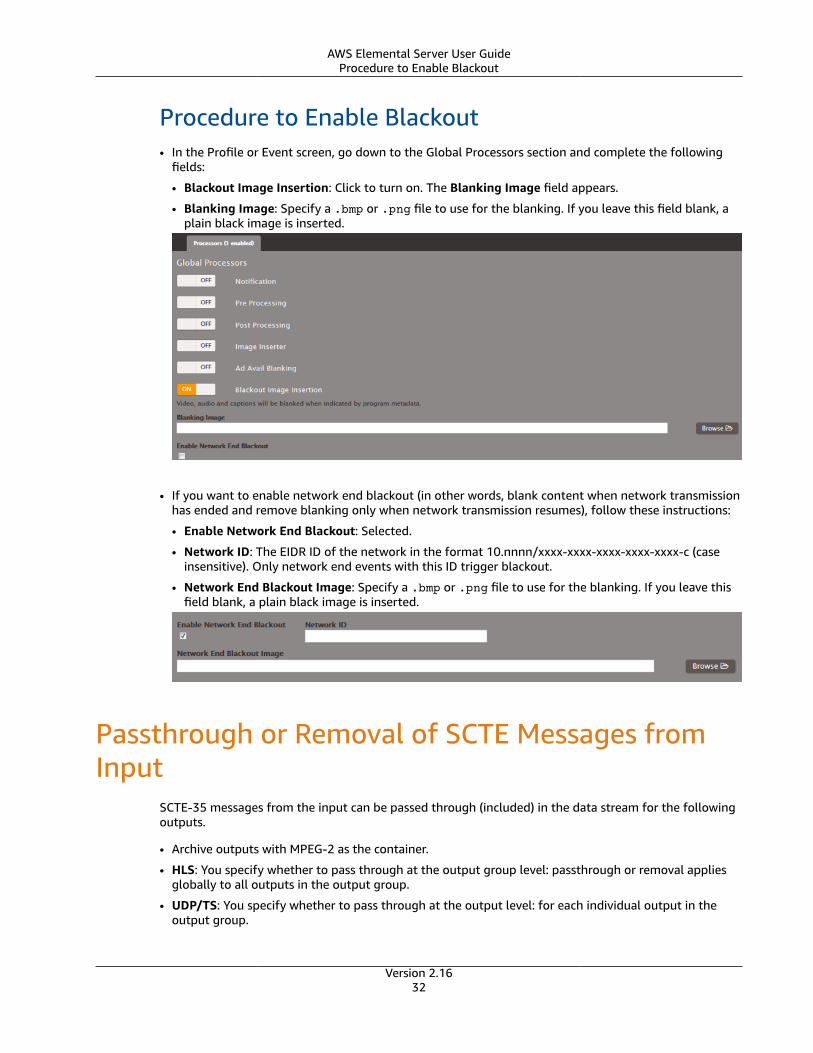
AWS Elemental Server User GuideProcedure to Enable Blackout
Procedure to Enable Blackout• In the Profile or Event screen, go down to the Global Processors section and complete the following
fields:
• Blackout Image Insertion: Click to turn on. The Blanking Image field appears.
• Blanking Image: Specify a .bmp or .png file to use for the blanking. If you leave this field blank, aplain black image is inserted.
• If you want to enable network end blackout (in other words, blank content when network transmissionhas ended and remove blanking only when network transmission resumes), follow these instructions:
• Enable Network End Blackout: Selected.
• Network ID: The EIDR ID of the network in the format 10.nnnn/xxxx-xxxx-xxxx-xxxx-xxxx-c (caseinsensitive). Only network end events with this ID trigger blackout.
• Network End Blackout Image: Specify a .bmp or .png file to use for the blanking. If you leave thisfield blank, a plain black image is inserted.
Passthrough or Removal of SCTE Messages fromInput
SCTE-35 messages from the input can be passed through (included) in the data stream for the followingoutputs.
• Archive outputs with MPEG-2 as the container.
• HLS: You specify whether to pass through at the output group level: passthrough or removal appliesglobally to all outputs in the output group.
• UDP/TS: You specify whether to pass through at the output level: for each individual output in theoutput group.
Version 2.1632
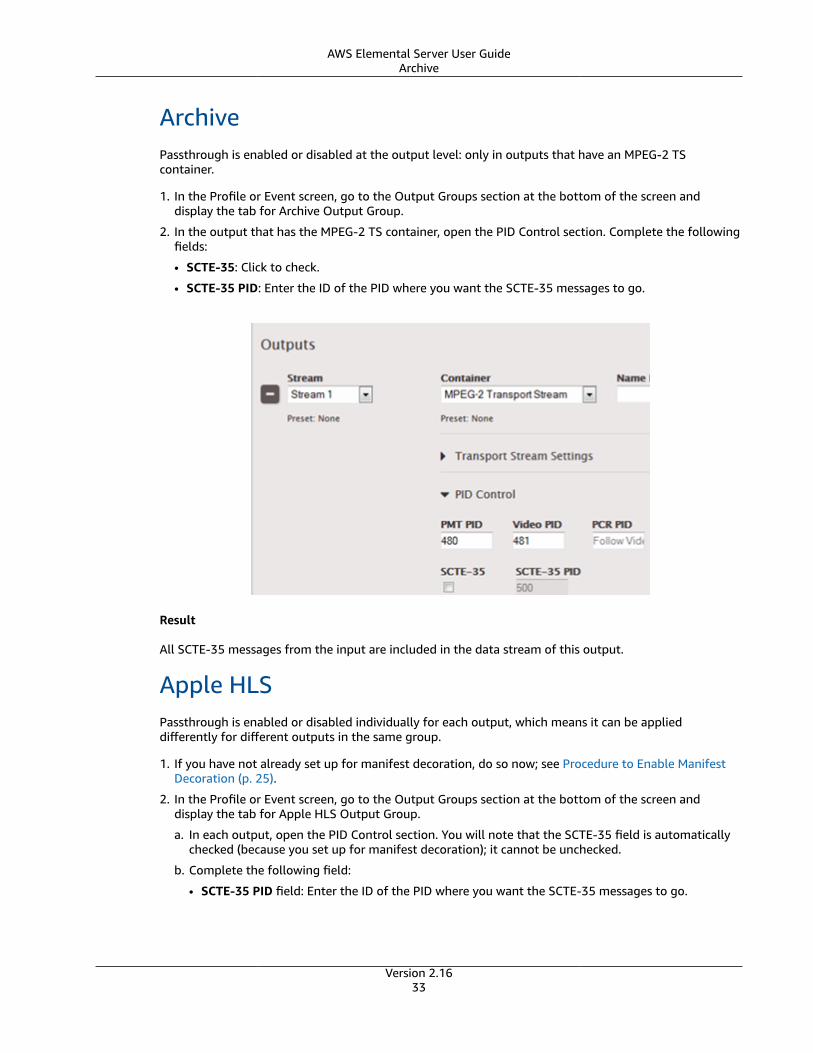
AWS Elemental Server User GuideArchive
ArchivePassthrough is enabled or disabled at the output level: only in outputs that have an MPEG-2 TScontainer.
1. In the Profile or Event screen, go to the Output Groups section at the bottom of the screen anddisplay the tab for Archive Output Group.
2. In the output that has the MPEG-2 TS container, open the PID Control section. Complete the followingfields:
• SCTE-35: Click to check.
• SCTE-35 PID: Enter the ID of the PID where you want the SCTE-35 messages to go.
Result
All SCTE-35 messages from the input are included in the data stream of this output.
Apple HLSPassthrough is enabled or disabled individually for each output, which means it can be applieddifferently for different outputs in the same group.
1. If you have not already set up for manifest decoration, do so now; see Procedure to Enable ManifestDecoration (p. 25).
2. In the Profile or Event screen, go to the Output Groups section at the bottom of the screen anddisplay the tab for Apple HLS Output Group.
a. In each output, open the PID Control section. You will note that the SCTE-35 field is automaticallychecked (because you set up for manifest decoration); it cannot be unchecked.
b. Complete the following field:
• SCTE-35 PID field: Enter the ID of the PID where you want the SCTE-35 messages to go.
Version 2.1633
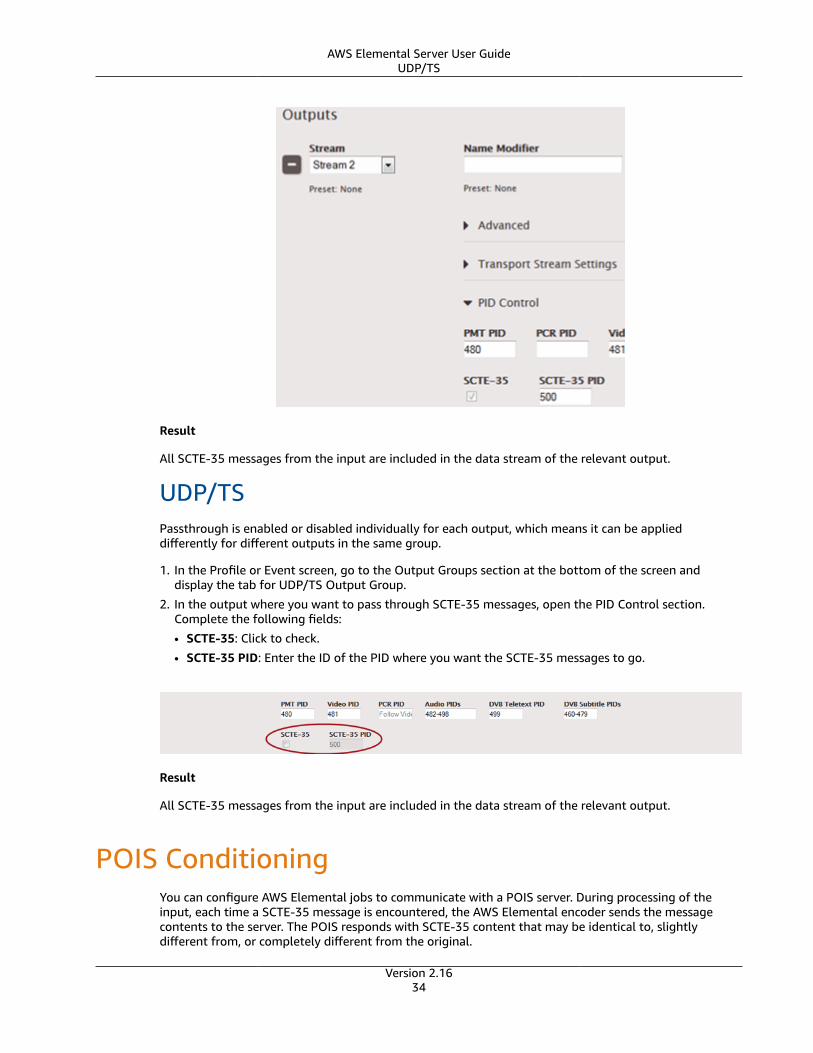
AWS Elemental Server User GuideUDP/TS
Result
All SCTE-35 messages from the input are included in the data stream of the relevant output.
UDP/TSPassthrough is enabled or disabled individually for each output, which means it can be applieddifferently for different outputs in the same group.
1. In the Profile or Event screen, go to the Output Groups section at the bottom of the screen anddisplay the tab for UDP/TS Output Group.
2. In the output where you want to pass through SCTE-35 messages, open the PID Control section.Complete the following fields:
• SCTE-35: Click to check.
• SCTE-35 PID: Enter the ID of the PID where you want the SCTE-35 messages to go.
Result
All SCTE-35 messages from the input are included in the data stream of the relevant output.
POIS ConditioningYou can configure AWS Elemental jobs to communicate with a POIS server. During processing of theinput, each time a SCTE-35 message is encountered, the AWS Elemental encoder sends the messagecontents to the server. The POIS responds with SCTE-35 content that may be identical to, slightlydifferent from, or completely different from the original.
Version 2.1634

AWS Elemental Server User GuideEffect of POIS Conditioning
The AWS Elemental encoder also supports handling of “out-of-band” SCTE-35 messages from the POIS –messages that are not in response to a message originally sent by the AWS Elemental encoder. If such amessage is received, the AWS Elemental encoder accepts and processes it.
Effect of POIS ConditioningWhen you enable POIS conditioning, an extra step is inserted into the regular processing of the SCTE-35messages. The job’s ad avail mode, of manifest decoration, of ad avail blanking, of blackout and ofSCTE-35 passthrough still apply to some degree.
You should read the other SCTE-35 topics and the following to determine how POIS conditioningchanges the standard behavior.
Ad Avail Mode
When POIS conditioning is enabled, the ad avail mode is always set to “splice insert.” For informationabout the implications for manifest decoration and ad avail blanking that are performed by the AWSElemental encoder, see Getting Ready: Setting the Ad Avail Mode (p. 22).
SCTE-35 Messages Inserted by REST API
All these messages are sent to the POIS along with messages that were already in the input.
New or Conditioned SCTE-35 Messages
The POIS can send an instruction to insert a new SCTE-35 message, modify an existing one, or delete anexisting one. A message received from the POIS may include any message type and segmentation type.
Manifest Decoration
The effect of POIS conditioning on manifest decoration is as follows:
• HLS Outputs – A message received from the POIS may include instructions to decorate an HLSmanifest (not other types of manifests). This information is used to decorate the HLS manifest.
How the AWS Elemental encoder processes the decoration information depends on how the job hasbeen configured:• If the job does not have manifest decoration enabled for HLS outputs, then the information is
ignored.• If the job does have it enabled, then the decoration information is inserted in the manifest.• The information is inserted into the manifest “as is.” The style of the information may not match the
styles (ad marker styles) specified in the job. The AWS Elemental encoder does not check for formatinconsistencies between these instructions and the ad marker style.
• Other Outputs – Decoration of other manifest types occurs according to the information in theSCTE-35 message, how the AWS Elemental encoder job is set up for manifest decoration, and which adavail mode is enabled. The POIS conditioning has no effect on these manifest types.
Blanking and Blackout
The effect of POIS conditioning on blanking and blackout is as follows:
• Extra Blackout Instructions – A message received from the POIS may include explicit “blank thecontent corresponding to this SCTE-35 message” instructions for any SCTE-35 message.
Even if blanking or blackout (whichever applies to the message type and segmentation descriptortype) is disabled in the encoder, the AWS Elemental encoder observes the instruction for this specificmessage.
Version 2.1635
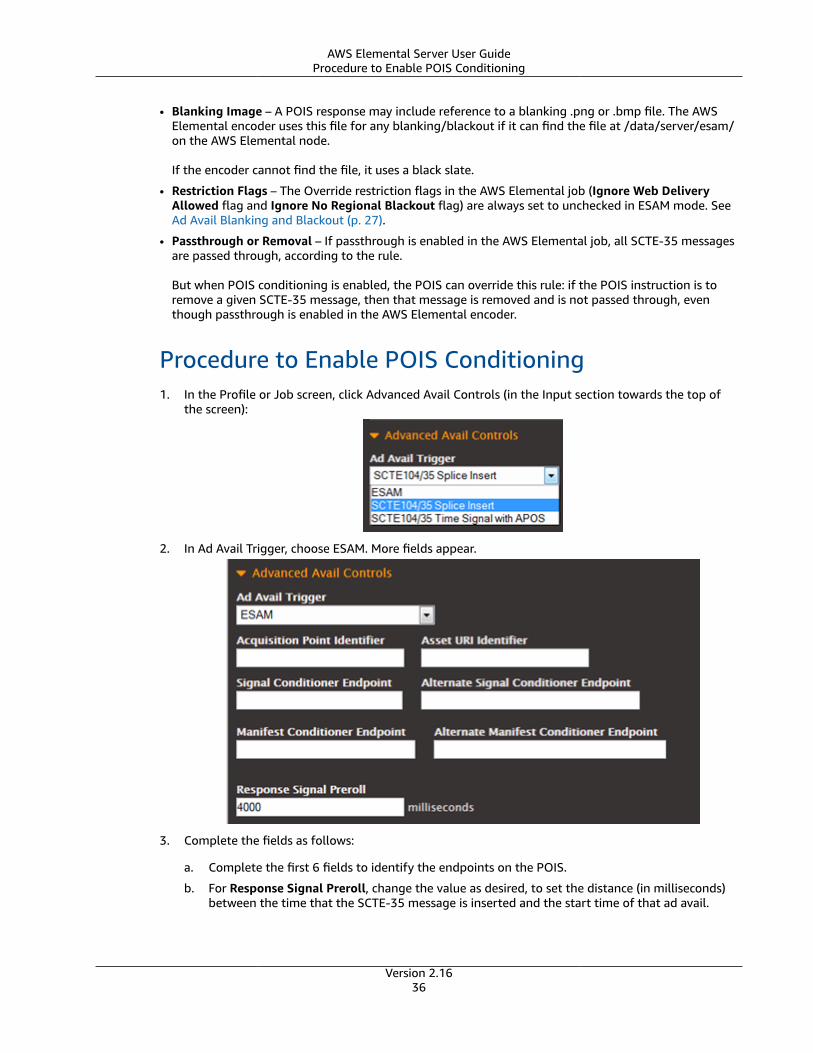
AWS Elemental Server User GuideProcedure to Enable POIS Conditioning
• Blanking Image – A POIS response may include reference to a blanking .png or .bmp file. The AWSElemental encoder uses this file for any blanking/blackout if it can find the file at /data/server/esam/on the AWS Elemental node.
If the encoder cannot find the file, it uses a black slate.
• Restriction Flags – The Override restriction flags in the AWS Elemental job (Ignore Web DeliveryAllowed flag and Ignore No Regional Blackout flag) are always set to unchecked in ESAM mode. SeeAd Avail Blanking and Blackout (p. 27).
• Passthrough or Removal – If passthrough is enabled in the AWS Elemental job, all SCTE-35 messagesare passed through, according to the rule.
But when POIS conditioning is enabled, the POIS can override this rule: if the POIS instruction is toremove a given SCTE-35 message, then that message is removed and is not passed through, eventhough passthrough is enabled in the AWS Elemental encoder.
Procedure to Enable POIS Conditioning1. In the Profile or Job screen, click Advanced Avail Controls (in the Input section towards the top of
the screen):
2. In Ad Avail Trigger, choose ESAM. More fields appear.
3. Complete the fields as follows:
a. Complete the first 6 fields to identify the endpoints on the POIS.
b. For Response Signal Preroll, change the value as desired, to set the distance (in milliseconds)between the time that the SCTE-35 message is inserted and the start time of that ad avail.
Version 2.1636
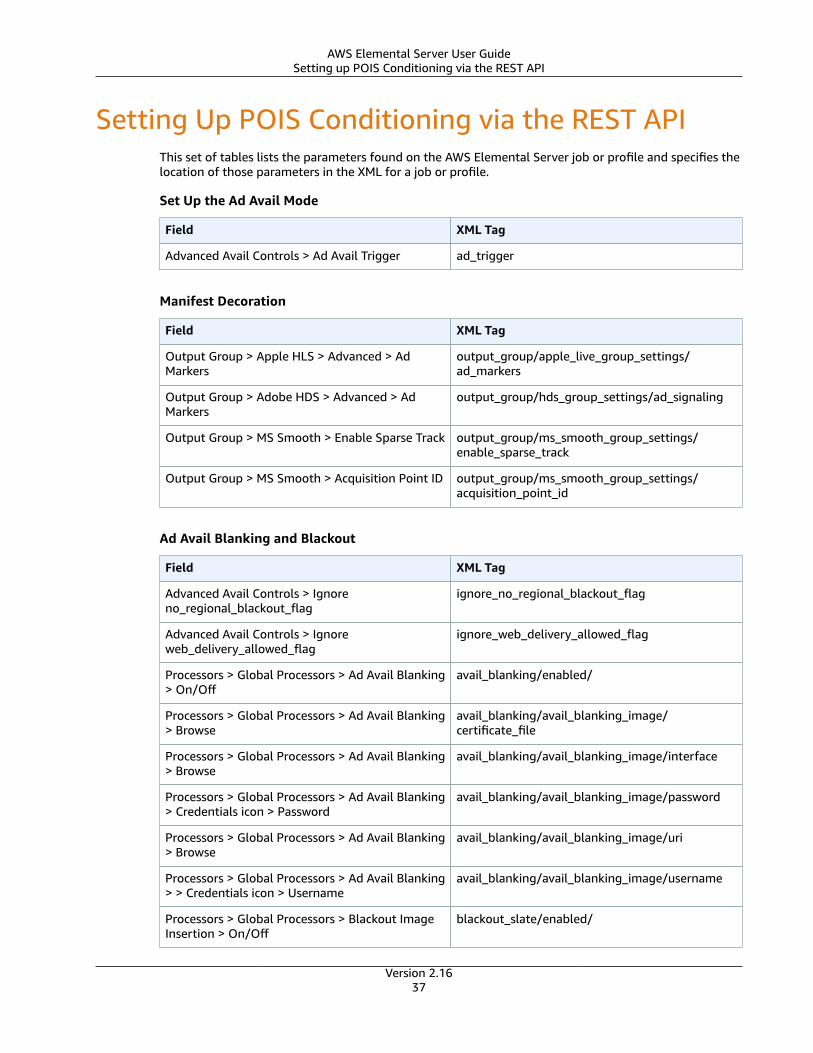
AWS Elemental Server User GuideSetting up POIS Conditioning via the REST API
Setting Up POIS Conditioning via the REST APIThis set of tables lists the parameters found on the AWS Elemental Server job or profile and specifies thelocation of those parameters in the XML for a job or profile.
Set Up the Ad Avail Mode
Field XML Tag
Advanced Avail Controls > Ad Avail Trigger ad_trigger
Manifest Decoration
Field XML Tag
Output Group > Apple HLS > Advanced > AdMarkers
output_group/apple_live_group_settings/ad_markers
Output Group > Adobe HDS > Advanced > AdMarkers
output_group/hds_group_settings/ad_signaling
Output Group > MS Smooth > Enable Sparse Track output_group/ms_smooth_group_settings/enable_sparse_track
Output Group > MS Smooth > Acquisition Point ID output_group/ms_smooth_group_settings/acquisition_point_id
Ad Avail Blanking and Blackout
Field XML Tag
Advanced Avail Controls > Ignoreno_regional_blackout_flag
ignore_no_regional_blackout_flag
Advanced Avail Controls > Ignoreweb_delivery_allowed_flag
ignore_web_delivery_allowed_flag
Processors > Global Processors > Ad Avail Blanking> On/Off
avail_blanking/enabled/
Processors > Global Processors > Ad Avail Blanking> Browse
avail_blanking/avail_blanking_image/certificate_file
Processors > Global Processors > Ad Avail Blanking> Browse
avail_blanking/avail_blanking_image/interface
Processors > Global Processors > Ad Avail Blanking> Credentials icon > Password
avail_blanking/avail_blanking_image/password
Processors > Global Processors > Ad Avail Blanking> Browse
avail_blanking/avail_blanking_image/uri
Processors > Global Processors > Ad Avail Blanking> > Credentials icon > Username
avail_blanking/avail_blanking_image/username
Processors > Global Processors > Blackout ImageInsertion > On/Off
blackout_slate/enabled/
Version 2.1637
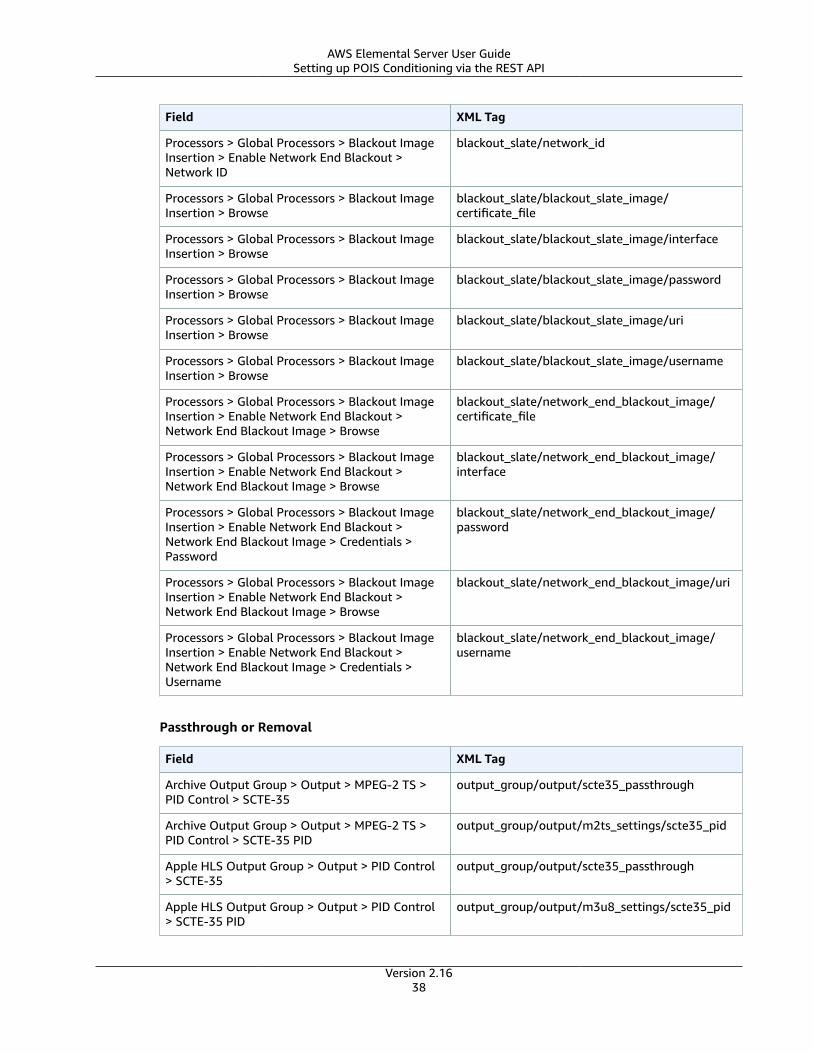
AWS Elemental Server User GuideSetting up POIS Conditioning via the REST API
Field XML Tag
Processors > Global Processors > Blackout ImageInsertion > Enable Network End Blackout >Network ID
blackout_slate/network_id
Processors > Global Processors > Blackout ImageInsertion > Browse
blackout_slate/blackout_slate_image/certificate_file
Processors > Global Processors > Blackout ImageInsertion > Browse
blackout_slate/blackout_slate_image/interface
Processors > Global Processors > Blackout ImageInsertion > Browse
blackout_slate/blackout_slate_image/password
Processors > Global Processors > Blackout ImageInsertion > Browse
blackout_slate/blackout_slate_image/uri
Processors > Global Processors > Blackout ImageInsertion > Browse
blackout_slate/blackout_slate_image/username
Processors > Global Processors > Blackout ImageInsertion > Enable Network End Blackout >Network End Blackout Image > Browse
blackout_slate/network_end_blackout_image/certificate_file
Processors > Global Processors > Blackout ImageInsertion > Enable Network End Blackout >Network End Blackout Image > Browse
blackout_slate/network_end_blackout_image/interface
Processors > Global Processors > Blackout ImageInsertion > Enable Network End Blackout >Network End Blackout Image > Credentials >Password
blackout_slate/network_end_blackout_image/password
Processors > Global Processors > Blackout ImageInsertion > Enable Network End Blackout >Network End Blackout Image > Browse
blackout_slate/network_end_blackout_image/uri
Processors > Global Processors > Blackout ImageInsertion > Enable Network End Blackout >Network End Blackout Image > Credentials >Username
blackout_slate/network_end_blackout_image/username
Passthrough or Removal
Field XML Tag
Archive Output Group > Output > MPEG-2 TS >PID Control > SCTE-35
output_group/output/scte35_passthrough
Archive Output Group > Output > MPEG-2 TS >PID Control > SCTE-35 PID
output_group/output/m2ts_settings/scte35_pid
Apple HLS Output Group > Output > PID Control> SCTE-35
output_group/output/scte35_passthrough
Apple HLS Output Group > Output > PID Control> SCTE-35 PID
output_group/output/m3u8_settings/scte35_pid
Version 2.1638
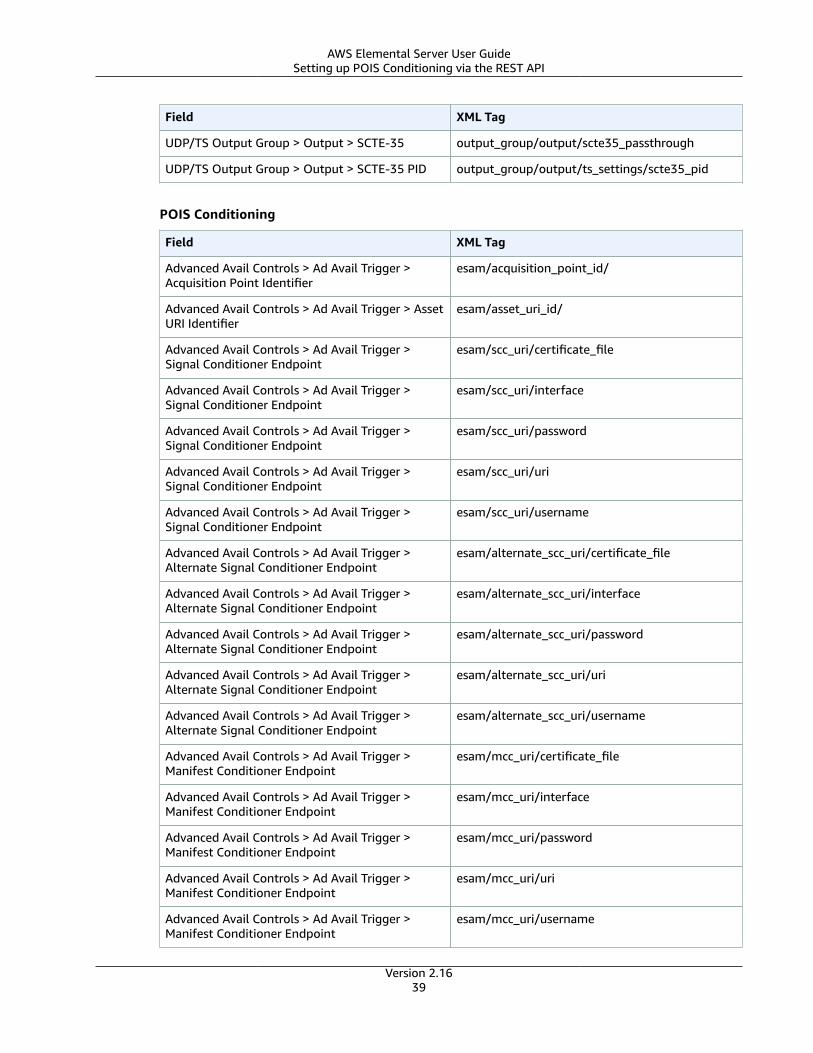
AWS Elemental Server User GuideSetting up POIS Conditioning via the REST API
Field XML Tag
UDP/TS Output Group > Output > SCTE-35 output_group/output/scte35_passthrough
UDP/TS Output Group > Output > SCTE-35 PID output_group/output/ts_settings/scte35_pid
POIS Conditioning
Field XML Tag
Advanced Avail Controls > Ad Avail Trigger >Acquisition Point Identifier
esam/acquisition_point_id/
Advanced Avail Controls > Ad Avail Trigger > AssetURI Identifier
esam/asset_uri_id/
Advanced Avail Controls > Ad Avail Trigger >Signal Conditioner Endpoint
esam/scc_uri/certificate_file
Advanced Avail Controls > Ad Avail Trigger >Signal Conditioner Endpoint
esam/scc_uri/interface
Advanced Avail Controls > Ad Avail Trigger >Signal Conditioner Endpoint
esam/scc_uri/password
Advanced Avail Controls > Ad Avail Trigger >Signal Conditioner Endpoint
esam/scc_uri/uri
Advanced Avail Controls > Ad Avail Trigger >Signal Conditioner Endpoint
esam/scc_uri/username
Advanced Avail Controls > Ad Avail Trigger >Alternate Signal Conditioner Endpoint
esam/alternate_scc_uri/certificate_file
Advanced Avail Controls > Ad Avail Trigger >Alternate Signal Conditioner Endpoint
esam/alternate_scc_uri/interface
Advanced Avail Controls > Ad Avail Trigger >Alternate Signal Conditioner Endpoint
esam/alternate_scc_uri/password
Advanced Avail Controls > Ad Avail Trigger >Alternate Signal Conditioner Endpoint
esam/alternate_scc_uri/uri
Advanced Avail Controls > Ad Avail Trigger >Alternate Signal Conditioner Endpoint
esam/alternate_scc_uri/username
Advanced Avail Controls > Ad Avail Trigger >Manifest Conditioner Endpoint
esam/mcc_uri/certificate_file
Advanced Avail Controls > Ad Avail Trigger >Manifest Conditioner Endpoint
esam/mcc_uri/interface
Advanced Avail Controls > Ad Avail Trigger >Manifest Conditioner Endpoint
esam/mcc_uri/password
Advanced Avail Controls > Ad Avail Trigger >Manifest Conditioner Endpoint
esam/mcc_uri/uri
Advanced Avail Controls > Ad Avail Trigger >Manifest Conditioner Endpoint
esam/mcc_uri/username
Version 2.1639
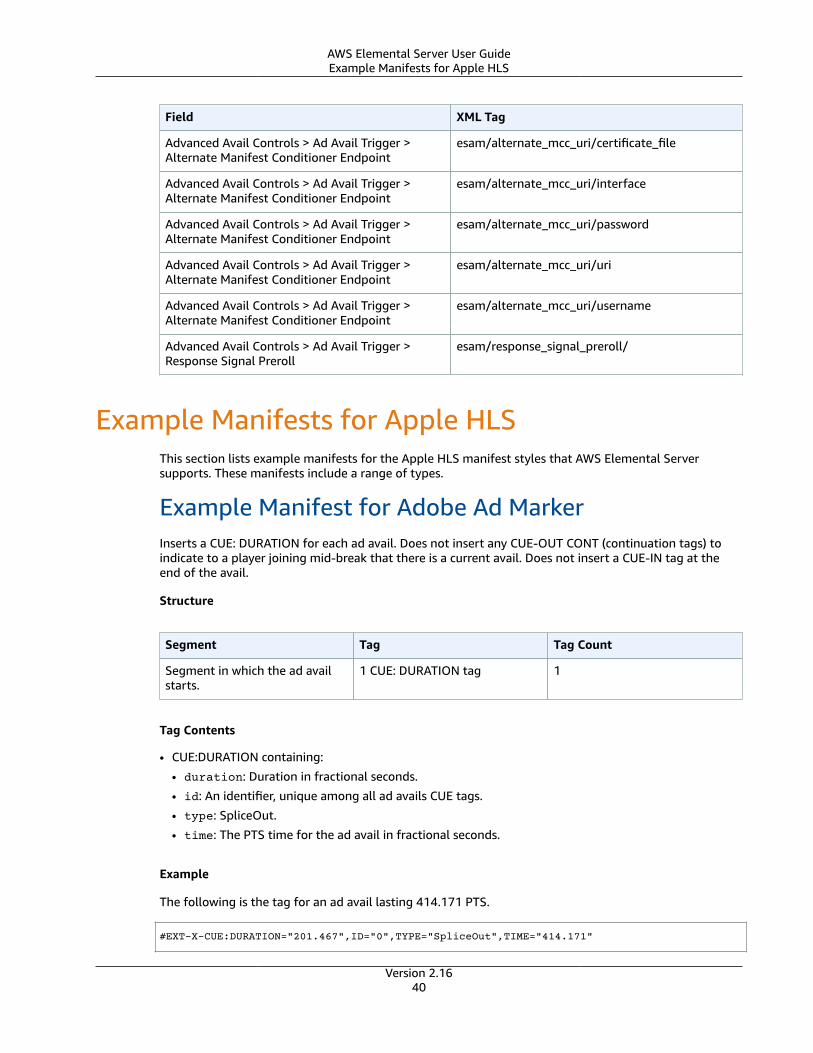
AWS Elemental Server User GuideExample Manifests for Apple HLS
Field XML Tag
Advanced Avail Controls > Ad Avail Trigger >Alternate Manifest Conditioner Endpoint
esam/alternate_mcc_uri/certificate_file
Advanced Avail Controls > Ad Avail Trigger >Alternate Manifest Conditioner Endpoint
esam/alternate_mcc_uri/interface
Advanced Avail Controls > Ad Avail Trigger >Alternate Manifest Conditioner Endpoint
esam/alternate_mcc_uri/password
Advanced Avail Controls > Ad Avail Trigger >Alternate Manifest Conditioner Endpoint
esam/alternate_mcc_uri/uri
Advanced Avail Controls > Ad Avail Trigger >Alternate Manifest Conditioner Endpoint
esam/alternate_mcc_uri/username
Advanced Avail Controls > Ad Avail Trigger >Response Signal Preroll
esam/response_signal_preroll/
Example Manifests for Apple HLSThis section lists example manifests for the Apple HLS manifest styles that AWS Elemental Serversupports. These manifests include a range of types.
Example Manifest for Adobe Ad MarkerInserts a CUE: DURATION for each ad avail. Does not insert any CUE-OUT CONT (continuation tags) toindicate to a player joining mid-break that there is a current avail. Does not insert a CUE-IN tag at theend of the avail.
Structure
Segment Tag Tag Count
Segment in which the ad availstarts.
1 CUE: DURATION tag 1
Tag Contents
• CUE:DURATION containing:
• duration: Duration in fractional seconds.
• id: An identifier, unique among all ad avails CUE tags.
• type: SpliceOut.
• time: The PTS time for the ad avail in fractional seconds.
Example
The following is the tag for an ad avail lasting 414.171 PTS.
#EXT-X-CUE:DURATION="201.467",ID="0",TYPE="SpliceOut",TIME="414.171"
Version 2.1640
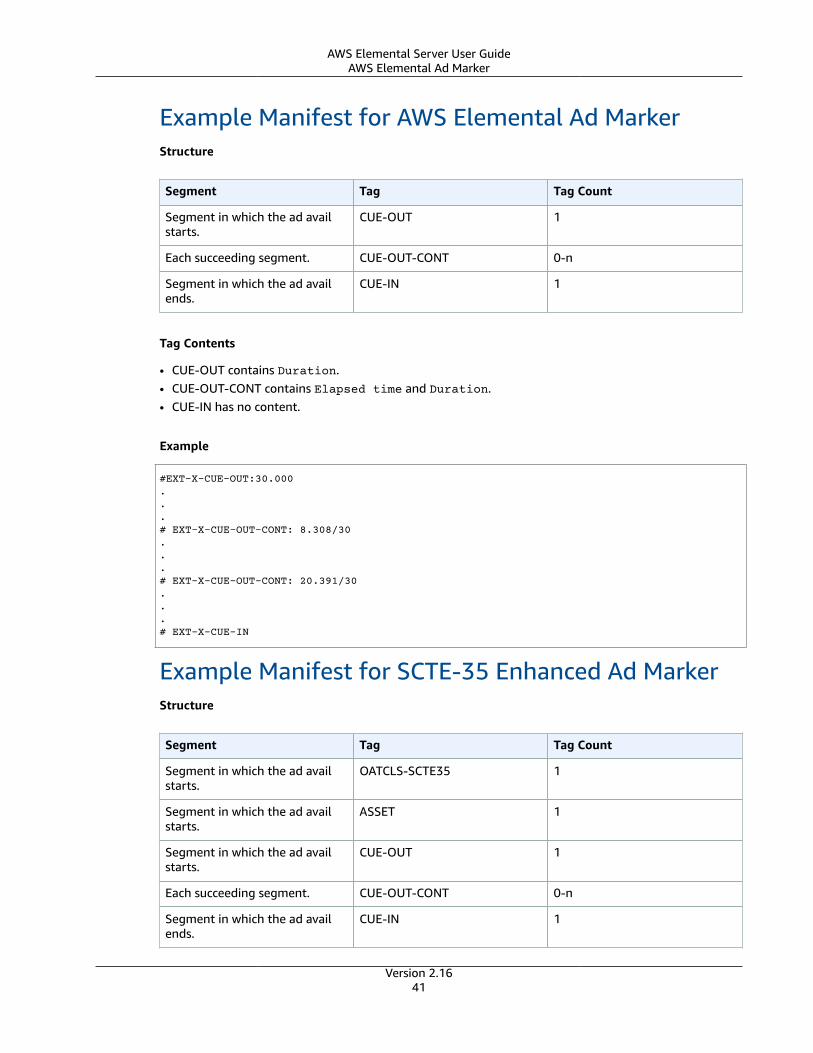
AWS Elemental Server User GuideAWS Elemental Ad Marker
Example Manifest for AWS Elemental Ad MarkerStructure
Segment Tag Tag Count
Segment in which the ad availstarts.
CUE-OUT 1
Each succeeding segment. CUE-OUT-CONT 0-n
Segment in which the ad availends.
CUE-IN 1
Tag Contents
• CUE-OUT contains Duration.• CUE-OUT-CONT contains Elapsed time and Duration.• CUE-IN has no content.
Example
#EXT-X-CUE-OUT:30.000 ...# EXT-X-CUE-OUT-CONT: 8.308/30 ...# EXT-X-CUE-OUT-CONT: 20.391/30...# EXT-X-CUE-IN
Example Manifest for SCTE-35 Enhanced Ad MarkerStructure
Segment Tag Tag Count
Segment in which the ad availstarts.
OATCLS-SCTE35 1
Segment in which the ad availstarts.
ASSET 1
Segment in which the ad availstarts.
CUE-OUT 1
Each succeeding segment. CUE-OUT-CONT 0-n
Segment in which the ad availends.
CUE-IN 1
Version 2.1641
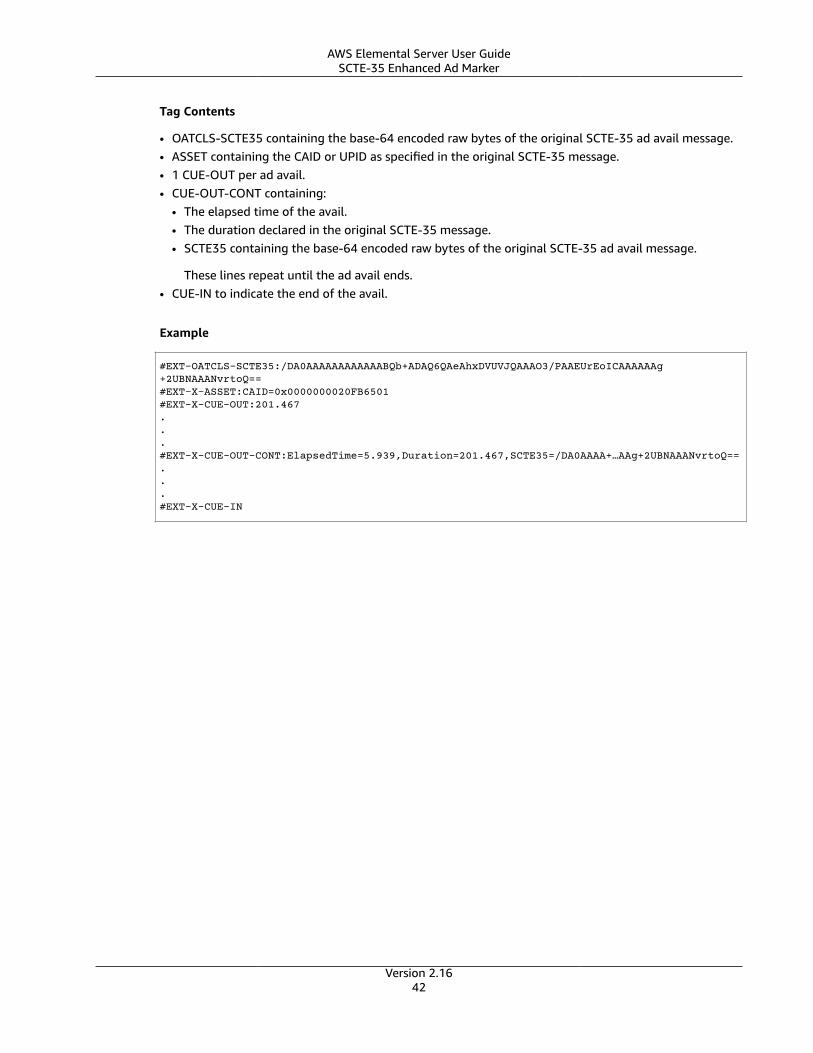
AWS Elemental Server User GuideSCTE-35 Enhanced Ad Marker
Tag Contents
• OATCLS-SCTE35 containing the base-64 encoded raw bytes of the original SCTE-35 ad avail message.• ASSET containing the CAID or UPID as specified in the original SCTE-35 message.• 1 CUE-OUT per ad avail.• CUE-OUT-CONT containing:
• The elapsed time of the avail.• The duration declared in the original SCTE-35 message.• SCTE35 containing the base-64 encoded raw bytes of the original SCTE-35 ad avail message.
These lines repeat until the ad avail ends.• CUE-IN to indicate the end of the avail.
Example
#EXT-OATCLS-SCTE35:/DA0AAAAAAAAAAAABQb+ADAQ6QAeAhxDVUVJQAAAO3/PAAEUrEoICAAAAAAg+2UBNAAANvrtoQ== #EXT-X-ASSET:CAID=0x0000000020FB6501 #EXT-X-CUE-OUT:201.467...#EXT-X-CUE-OUT-CONT:ElapsedTime=5.939,Duration=201.467,SCTE35=/DA0AAAA+…AAg+2UBNAAANvrtoQ==...#EXT-X-CUE-IN
Version 2.1642
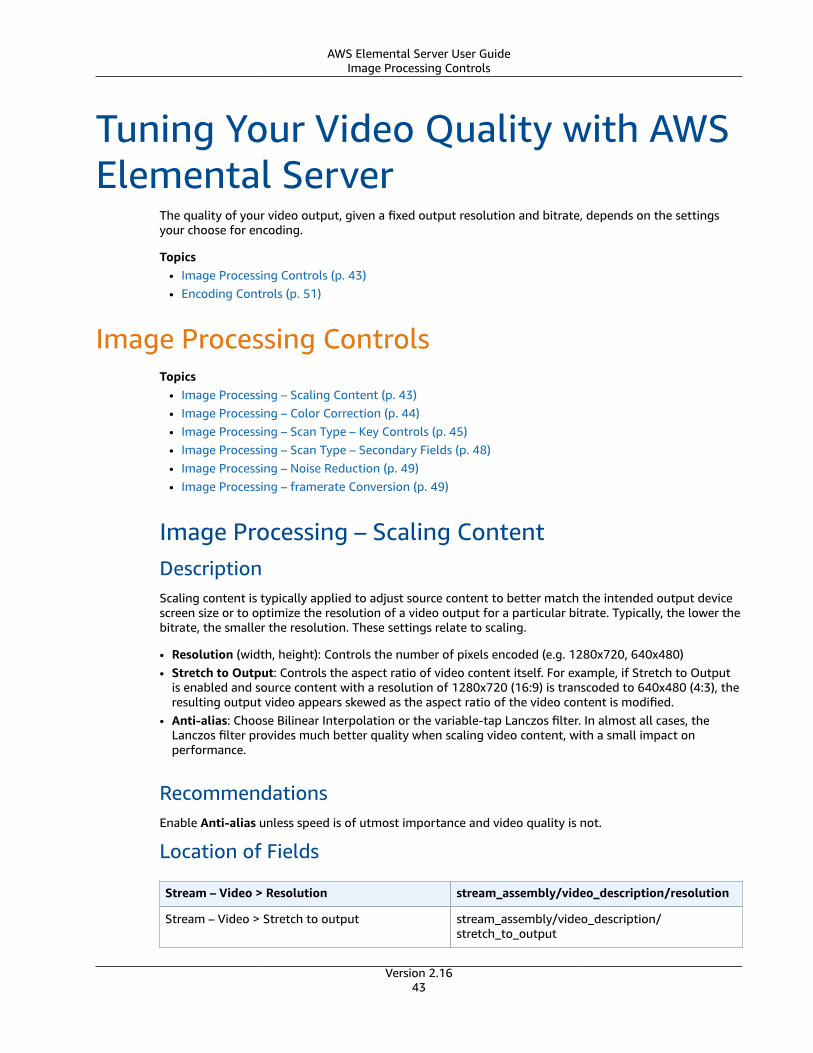
AWS Elemental Server User GuideImage Processing Controls
Tuning Your Video Quality with AWSElemental Server
The quality of your video output, given a fixed output resolution and bitrate, depends on the settingsyour choose for encoding.
Topics• Image Processing Controls (p. 43)• Encoding Controls (p. 51)
Image Processing ControlsTopics
• Image Processing – Scaling Content (p. 43)• Image Processing – Color Correction (p. 44)• Image Processing – Scan Type – Key Controls (p. 45)• Image Processing – Scan Type – Secondary Fields (p. 48)• Image Processing – Noise Reduction (p. 49)• Image Processing – framerate Conversion (p. 49)
Image Processing – Scaling ContentDescriptionScaling content is typically applied to adjust source content to better match the intended output devicescreen size or to optimize the resolution of a video output for a particular bitrate. Typically, the lower thebitrate, the smaller the resolution. These settings relate to scaling.
• Resolution (width, height): Controls the number of pixels encoded (e.g. 1280x720, 640x480)• Stretch to Output: Controls the aspect ratio of video content itself. For example, if Stretch to Output
is enabled and source content with a resolution of 1280x720 (16:9) is transcoded to 640x480 (4:3), theresulting output video appears skewed as the aspect ratio of the video content is modified.
• Anti-alias: Choose Bilinear Interpolation or the variable-tap Lanczos filter. In almost all cases, theLanczos filter provides much better quality when scaling video content, with a small impact onperformance.
RecommendationsEnable Anti-alias unless speed is of utmost importance and video quality is not.
Location of Fields
Stream – Video > Resolution stream_assembly/video_description/resolution
Stream – Video > Stretch to output stream_assembly/video_description/stretch_to_output
Version 2.1643
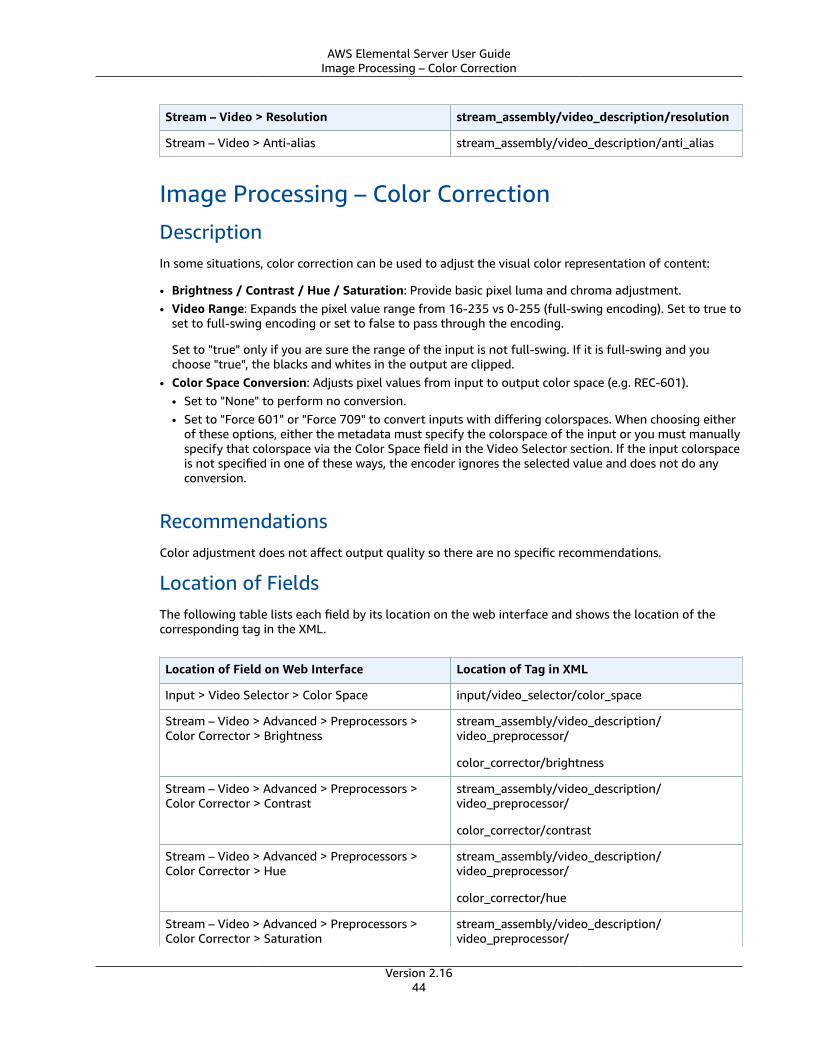
AWS Elemental Server User GuideImage Processing – Color Correction
Stream – Video > Resolution stream_assembly/video_description/resolution
Stream – Video > Anti-alias stream_assembly/video_description/anti_alias
Image Processing – Color CorrectionDescriptionIn some situations, color correction can be used to adjust the visual color representation of content:
• Brightness / Contrast / Hue / Saturation: Provide basic pixel luma and chroma adjustment.• Video Range: Expands the pixel value range from 16-235 vs 0-255 (full-swing encoding). Set to true to
set to full-swing encoding or set to false to pass through the encoding.
Set to "true" only if you are sure the range of the input is not full-swing. If it is full-swing and youchoose "true", the blacks and whites in the output are clipped.
• Color Space Conversion: Adjusts pixel values from input to output color space (e.g. REC-601).• Set to "None" to perform no conversion.• Set to "Force 601" or "Force 709" to convert inputs with differing colorspaces. When choosing either
of these options, either the metadata must specify the colorspace of the input or you must manuallyspecify that colorspace via the Color Space field in the Video Selector section. If the input colorspaceis not specified in one of these ways, the encoder ignores the selected value and does not do anyconversion.
RecommendationsColor adjustment does not affect output quality so there are no specific recommendations.
Location of FieldsThe following table lists each field by its location on the web interface and shows the location of thecorresponding tag in the XML.
Location of Field on Web Interface Location of Tag in XML
Input > Video Selector > Color Space input/video_selector/color_space
Stream – Video > Advanced > Preprocessors >Color Corrector > Brightness
stream_assembly/video_description/video_preprocessor/
color_corrector/brightness
Stream – Video > Advanced > Preprocessors >Color Corrector > Contrast
stream_assembly/video_description/video_preprocessor/
color_corrector/contrast
Stream – Video > Advanced > Preprocessors >Color Corrector > Hue
stream_assembly/video_description/video_preprocessor/
color_corrector/hue
Stream – Video > Advanced > Preprocessors >Color Corrector > Saturation
stream_assembly/video_description/video_preprocessor/
Version 2.1644
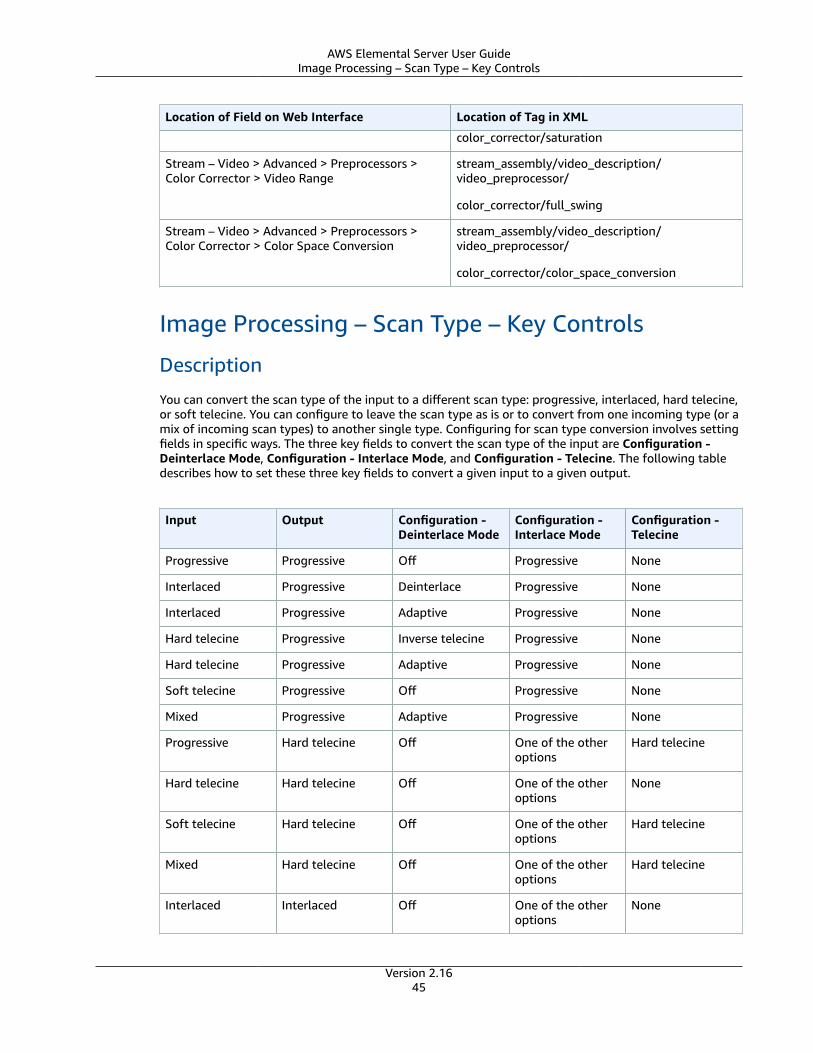
AWS Elemental Server User GuideImage Processing – Scan Type – Key Controls
Location of Field on Web Interface Location of Tag in XML
color_corrector/saturation
Stream – Video > Advanced > Preprocessors >Color Corrector > Video Range
stream_assembly/video_description/video_preprocessor/
color_corrector/full_swing
Stream – Video > Advanced > Preprocessors >Color Corrector > Color Space Conversion
stream_assembly/video_description/video_preprocessor/
color_corrector/color_space_conversion
Image Processing – Scan Type – Key Controls
Description
You can convert the scan type of the input to a different scan type: progressive, interlaced, hard telecine,or soft telecine. You can configure to leave the scan type as is or to convert from one incoming type (or amix of incoming scan types) to another single type. Configuring for scan type conversion involves settingfields in specific ways. The three key fields to convert the scan type of the input are Configuration -Deinterlace Mode, Configuration - Interlace Mode, and Configuration - Telecine. The following tabledescribes how to set these three key fields to convert a given input to a given output.
Input Output Configuration -Deinterlace Mode
Configuration -Interlace Mode
Configuration -Telecine
Progressive Progressive Off Progressive None
Interlaced Progressive Deinterlace Progressive None
Interlaced Progressive Adaptive Progressive None
Hard telecine Progressive Inverse telecine Progressive None
Hard telecine Progressive Adaptive Progressive None
Soft telecine Progressive Off Progressive None
Mixed Progressive Adaptive Progressive None
Progressive Hard telecine Off One of the otheroptions
Hard telecine
Hard telecine Hard telecine Off One of the otheroptions
None
Soft telecine Hard telecine Off One of the otheroptions
Hard telecine
Mixed Hard telecine Off One of the otheroptions
Hard telecine
Interlaced Interlaced Off One of the otheroptions
None
Version 2.1645
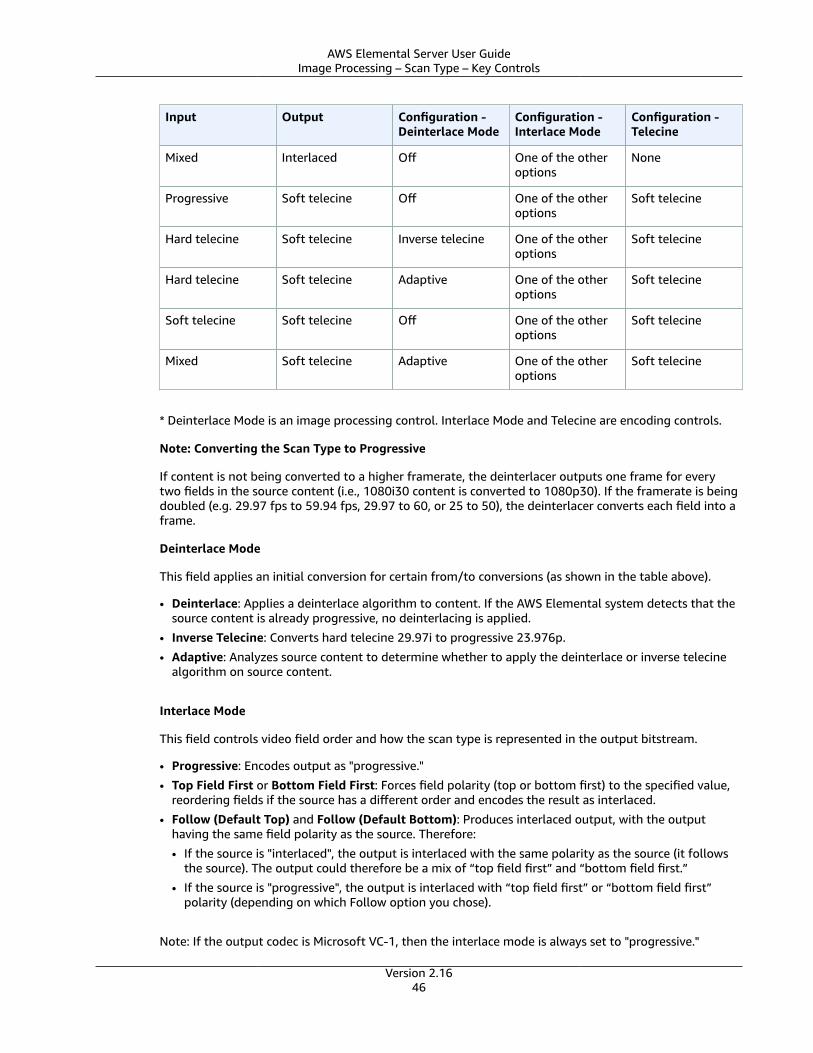
AWS Elemental Server User GuideImage Processing – Scan Type – Key Controls
Input Output Configuration -Deinterlace Mode
Configuration -Interlace Mode
Configuration -Telecine
Mixed Interlaced Off One of the otheroptions
None
Progressive Soft telecine Off One of the otheroptions
Soft telecine
Hard telecine Soft telecine Inverse telecine One of the otheroptions
Soft telecine
Hard telecine Soft telecine Adaptive One of the otheroptions
Soft telecine
Soft telecine Soft telecine Off One of the otheroptions
Soft telecine
Mixed Soft telecine Adaptive One of the otheroptions
Soft telecine
* Deinterlace Mode is an image processing control. Interlace Mode and Telecine are encoding controls.
Note: Converting the Scan Type to Progressive
If content is not being converted to a higher framerate, the deinterlacer outputs one frame for everytwo fields in the source content (i.e., 1080i30 content is converted to 1080p30). If the framerate is beingdoubled (e.g. 29.97 fps to 59.94 fps, 29.97 to 60, or 25 to 50), the deinterlacer converts each field into aframe.
Deinterlace Mode
This field applies an initial conversion for certain from/to conversions (as shown in the table above).
• Deinterlace: Applies a deinterlace algorithm to content. If the AWS Elemental system detects that thesource content is already progressive, no deinterlacing is applied.
• Inverse Telecine: Converts hard telecine 29.97i to progressive 23.976p.
• Adaptive: Analyzes source content to determine whether to apply the deinterlace or inverse telecinealgorithm on source content.
Interlace Mode
This field controls video field order and how the scan type is represented in the output bitstream.
• Progressive: Encodes output as "progressive."
• Top Field First or Bottom Field First: Forces field polarity (top or bottom first) to the specified value,reordering fields if the source has a different order and encodes the result as interlaced.
• Follow (Default Top) and Follow (Default Bottom): Produces interlaced output, with the outputhaving the same field polarity as the source. Therefore:
• If the source is "interlaced", the output is interlaced with the same polarity as the source (it followsthe source). The output could therefore be a mix of “top field first” and “bottom field first.”
• If the source is "progressive", the output is interlaced with “top field first” or “bottom field first”polarity (depending on which Follow option you chose).
Note: If the output codec is Microsoft VC-1, then the interlace mode is always set to "progressive."
Version 2.1646
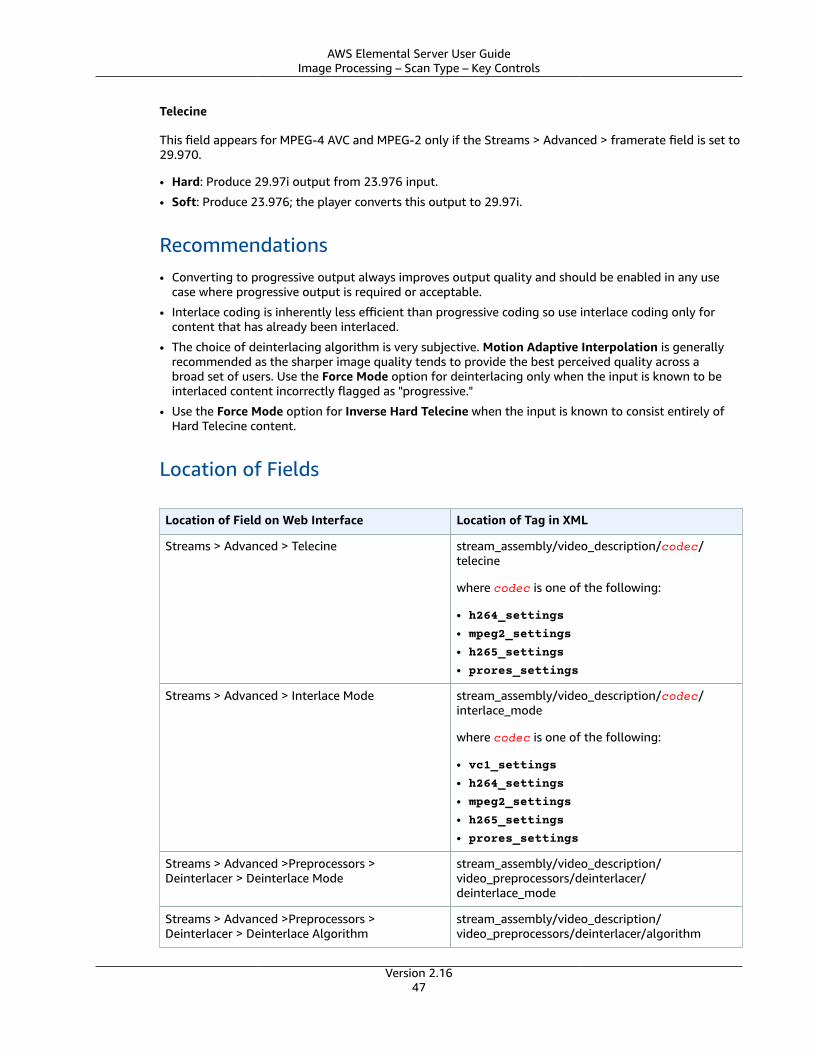
AWS Elemental Server User GuideImage Processing – Scan Type – Key Controls
Telecine
This field appears for MPEG-4 AVC and MPEG-2 only if the Streams > Advanced > framerate field is set to29.970.
• Hard: Produce 29.97i output from 23.976 input.
• Soft: Produce 23.976; the player converts this output to 29.97i.
Recommendations• Converting to progressive output always improves output quality and should be enabled in any use
case where progressive output is required or acceptable.
• Interlace coding is inherently less efficient than progressive coding so use interlace coding only forcontent that has already been interlaced.
• The choice of deinterlacing algorithm is very subjective. Motion Adaptive Interpolation is generallyrecommended as the sharper image quality tends to provide the best perceived quality across abroad set of users. Use the Force Mode option for deinterlacing only when the input is known to beinterlaced content incorrectly flagged as "progressive."
• Use the Force Mode option for Inverse Hard Telecine when the input is known to consist entirely ofHard Telecine content.
Location of Fields
Location of Field on Web Interface Location of Tag in XML
Streams > Advanced > Telecine stream_assembly/video_description/codec/telecine
where codec is one of the following:
• h264_settings
• mpeg2_settings
• h265_settings
• prores_settings
Streams > Advanced > Interlace Mode stream_assembly/video_description/codec/interlace_mode
where codec is one of the following:
• vc1_settings
• h264_settings
• mpeg2_settings
• h265_settings
• prores_settings
Streams > Advanced >Preprocessors >Deinterlacer > Deinterlace Mode
stream_assembly/video_description/video_preprocessors/deinterlacer/deinterlace_mode
Streams > Advanced >Preprocessors >Deinterlacer > Deinterlace Algorithm
stream_assembly/video_description/video_preprocessors/deinterlacer/algorithm
Version 2.1647
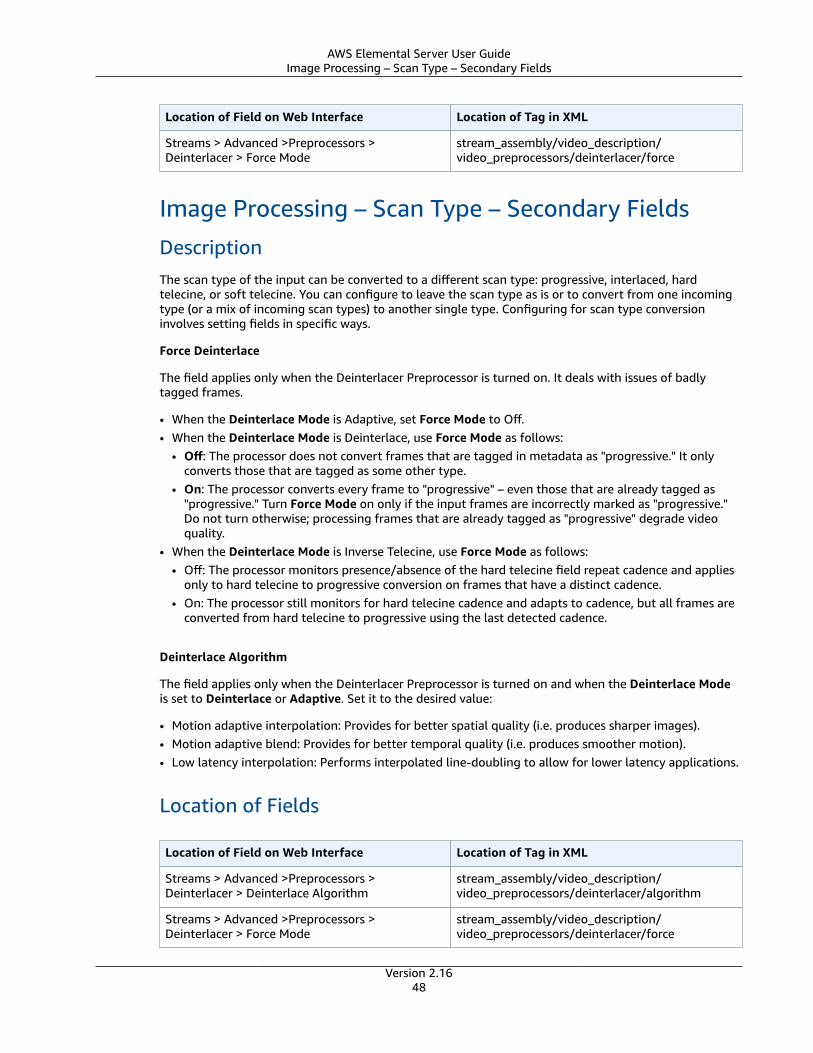
AWS Elemental Server User GuideImage Processing – Scan Type – Secondary Fields
Location of Field on Web Interface Location of Tag in XML
Streams > Advanced >Preprocessors >Deinterlacer > Force Mode
stream_assembly/video_description/video_preprocessors/deinterlacer/force
Image Processing – Scan Type – Secondary Fields
DescriptionThe scan type of the input can be converted to a different scan type: progressive, interlaced, hardtelecine, or soft telecine. You can configure to leave the scan type as is or to convert from one incomingtype (or a mix of incoming scan types) to another single type. Configuring for scan type conversioninvolves setting fields in specific ways.
Force Deinterlace
The field applies only when the Deinterlacer Preprocessor is turned on. It deals with issues of badlytagged frames.
• When the Deinterlace Mode is Adaptive, set Force Mode to Off.• When the Deinterlace Mode is Deinterlace, use Force Mode as follows:
• Off: The processor does not convert frames that are tagged in metadata as "progressive." It onlyconverts those that are tagged as some other type.
• On: The processor converts every frame to "progressive" – even those that are already tagged as"progressive." Turn Force Mode on only if the input frames are incorrectly marked as "progressive."Do not turn otherwise; processing frames that are already tagged as "progressive" degrade videoquality.
• When the Deinterlace Mode is Inverse Telecine, use Force Mode as follows:• Off: The processor monitors presence/absence of the hard telecine field repeat cadence and applies
only to hard telecine to progressive conversion on frames that have a distinct cadence.• On: The processor still monitors for hard telecine cadence and adapts to cadence, but all frames are
converted from hard telecine to progressive using the last detected cadence.
Deinterlace Algorithm
The field applies only when the Deinterlacer Preprocessor is turned on and when the Deinterlace Modeis set to Deinterlace or Adaptive. Set it to the desired value:
• Motion adaptive interpolation: Provides for better spatial quality (i.e. produces sharper images).• Motion adaptive blend: Provides for better temporal quality (i.e. produces smoother motion).• Low latency interpolation: Performs interpolated line-doubling to allow for lower latency applications.
Location of Fields
Location of Field on Web Interface Location of Tag in XML
Streams > Advanced >Preprocessors >Deinterlacer > Deinterlace Algorithm
stream_assembly/video_description/video_preprocessors/deinterlacer/algorithm
Streams > Advanced >Preprocessors >Deinterlacer > Force Mode
stream_assembly/video_description/video_preprocessors/deinterlacer/force
Version 2.1648
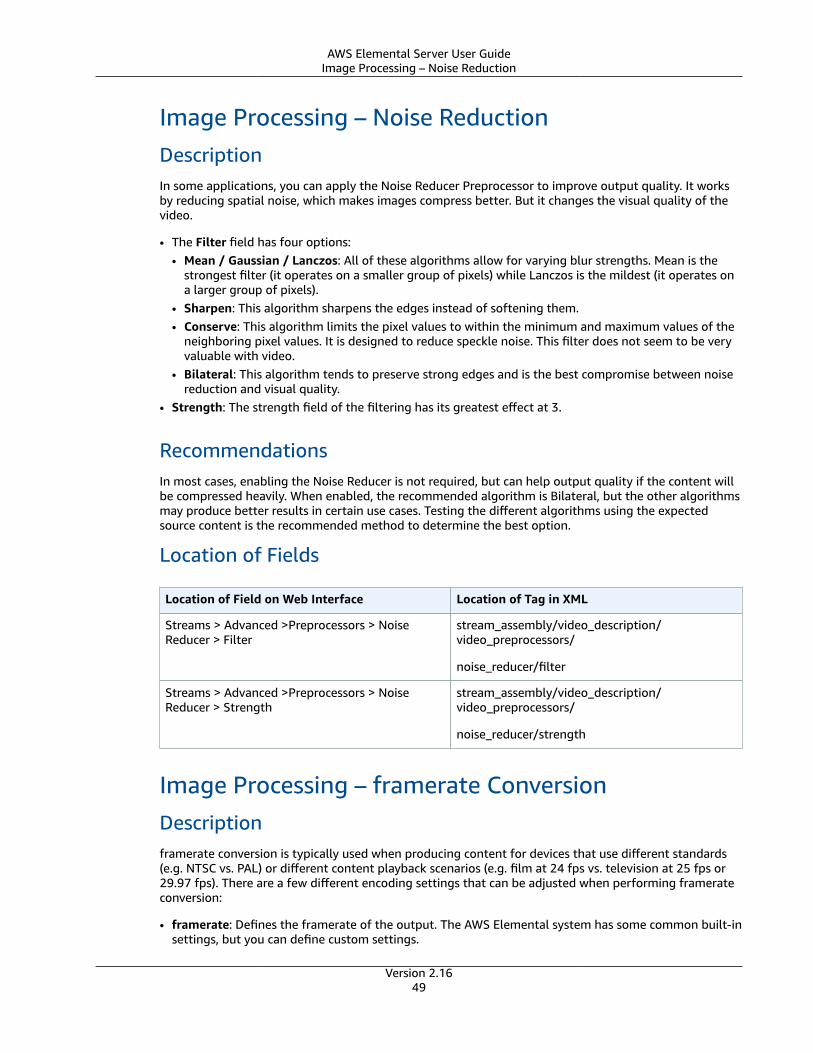
AWS Elemental Server User GuideImage Processing – Noise Reduction
Image Processing – Noise ReductionDescriptionIn some applications, you can apply the Noise Reducer Preprocessor to improve output quality. It worksby reducing spatial noise, which makes images compress better. But it changes the visual quality of thevideo.
• The Filter field has four options:• Mean / Gaussian / Lanczos: All of these algorithms allow for varying blur strengths. Mean is the
strongest filter (it operates on a smaller group of pixels) while Lanczos is the mildest (it operates ona larger group of pixels).
• Sharpen: This algorithm sharpens the edges instead of softening them.• Conserve: This algorithm limits the pixel values to within the minimum and maximum values of the
neighboring pixel values. It is designed to reduce speckle noise. This filter does not seem to be veryvaluable with video.
• Bilateral: This algorithm tends to preserve strong edges and is the best compromise between noisereduction and visual quality.
• Strength: The strength field of the filtering has its greatest effect at 3.
RecommendationsIn most cases, enabling the Noise Reducer is not required, but can help output quality if the content willbe compressed heavily. When enabled, the recommended algorithm is Bilateral, but the other algorithmsmay produce better results in certain use cases. Testing the different algorithms using the expectedsource content is the recommended method to determine the best option.
Location of Fields
Location of Field on Web Interface Location of Tag in XML
Streams > Advanced >Preprocessors > NoiseReducer > Filter
stream_assembly/video_description/video_preprocessors/
noise_reducer/filter
Streams > Advanced >Preprocessors > NoiseReducer > Strength
stream_assembly/video_description/video_preprocessors/
noise_reducer/strength
Image Processing – framerate ConversionDescriptionframerate conversion is typically used when producing content for devices that use different standards(e.g. NTSC vs. PAL) or different content playback scenarios (e.g. film at 24 fps vs. television at 25 fps or29.97 fps). There are a few different encoding settings that can be adjusted when performing framerateconversion:
• framerate: Defines the framerate of the output. The AWS Elemental system has some common built-insettings, but you can define custom settings.
Version 2.1649
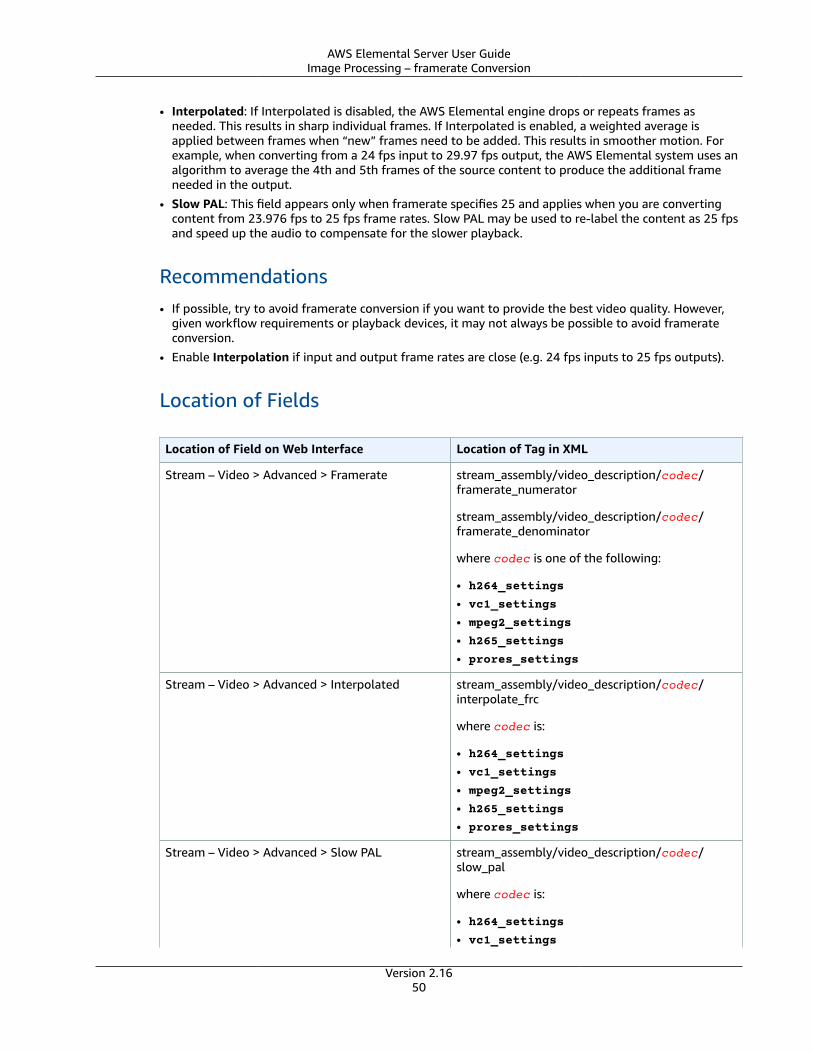
AWS Elemental Server User GuideImage Processing – framerate Conversion
• Interpolated: If Interpolated is disabled, the AWS Elemental engine drops or repeats frames asneeded. This results in sharp individual frames. If Interpolated is enabled, a weighted average isapplied between frames when “new” frames need to be added. This results in smoother motion. Forexample, when converting from a 24 fps input to 29.97 fps output, the AWS Elemental system uses analgorithm to average the 4th and 5th frames of the source content to produce the additional frameneeded in the output.
• Slow PAL: This field appears only when framerate specifies 25 and applies when you are convertingcontent from 23.976 fps to 25 fps frame rates. Slow PAL may be used to re-label the content as 25 fpsand speed up the audio to compensate for the slower playback.
Recommendations• If possible, try to avoid framerate conversion if you want to provide the best video quality. However,
given workflow requirements or playback devices, it may not always be possible to avoid framerateconversion.
• Enable Interpolation if input and output frame rates are close (e.g. 24 fps inputs to 25 fps outputs).
Location of Fields
Location of Field on Web Interface Location of Tag in XML
Stream – Video > Advanced > Framerate stream_assembly/video_description/codec/framerate_numerator
stream_assembly/video_description/codec/framerate_denominator
where codec is one of the following:
• h264_settings
• vc1_settings
• mpeg2_settings
• h265_settings
• prores_settings
Stream – Video > Advanced > Interpolated stream_assembly/video_description/codec/interpolate_frc
where codec is:
• h264_settings
• vc1_settings
• mpeg2_settings
• h265_settings
• prores_settings
Stream – Video > Advanced > Slow PAL stream_assembly/video_description/codec/slow_pal
where codec is:
• h264_settings
• vc1_settings
Version 2.1650
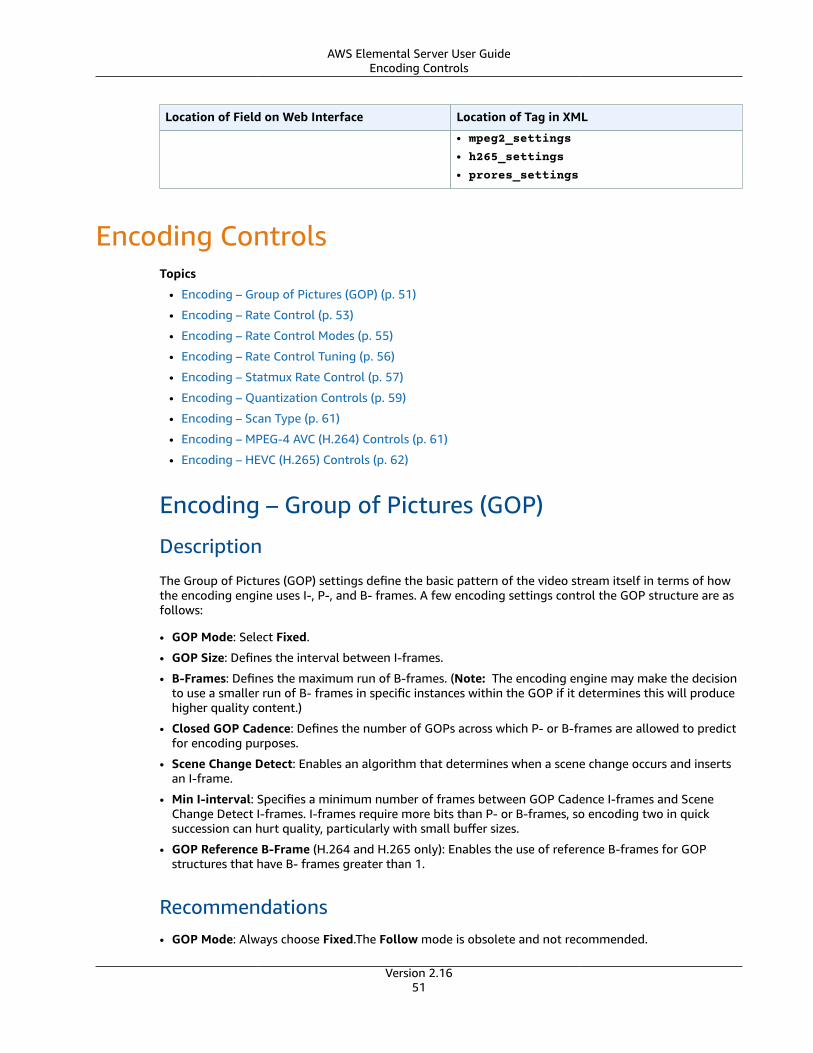
AWS Elemental Server User GuideEncoding Controls
Location of Field on Web Interface Location of Tag in XML
• mpeg2_settings
• h265_settings
• prores_settings
Encoding ControlsTopics
• Encoding – Group of Pictures (GOP) (p. 51)
• Encoding – Rate Control (p. 53)
• Encoding – Rate Control Modes (p. 55)
• Encoding – Rate Control Tuning (p. 56)
• Encoding – Statmux Rate Control (p. 57)
• Encoding – Quantization Controls (p. 59)
• Encoding – Scan Type (p. 61)
• Encoding – MPEG-4 AVC (H.264) Controls (p. 61)
• Encoding – HEVC (H.265) Controls (p. 62)
Encoding – Group of Pictures (GOP)
Description
The Group of Pictures (GOP) settings define the basic pattern of the video stream itself in terms of howthe encoding engine uses I-, P-, and B- frames. A few encoding settings control the GOP structure are asfollows:
• GOP Mode: Select Fixed.
• GOP Size: Defines the interval between I-frames.
• B-Frames: Defines the maximum run of B-frames. (Note: The encoding engine may make the decisionto use a smaller run of B- frames in specific instances within the GOP if it determines this will producehigher quality content.)
• Closed GOP Cadence: Defines the number of GOPs across which P- or B-frames are allowed to predictfor encoding purposes.
• Scene Change Detect: Enables an algorithm that determines when a scene change occurs and insertsan I-frame.
• Min I-interval: Specifies a minimum number of frames between GOP Cadence I-frames and SceneChange Detect I-frames. I-frames require more bits than P- or B-frames, so encoding two in quicksuccession can hurt quality, particularly with small buffer sizes.
• GOP Reference B-Frame (H.264 and H.265 only): Enables the use of reference B-frames for GOPstructures that have B- frames greater than 1.
Recommendations• GOP Mode: Always choose Fixed.The Follow mode is obsolete and not recommended.
Version 2.1651
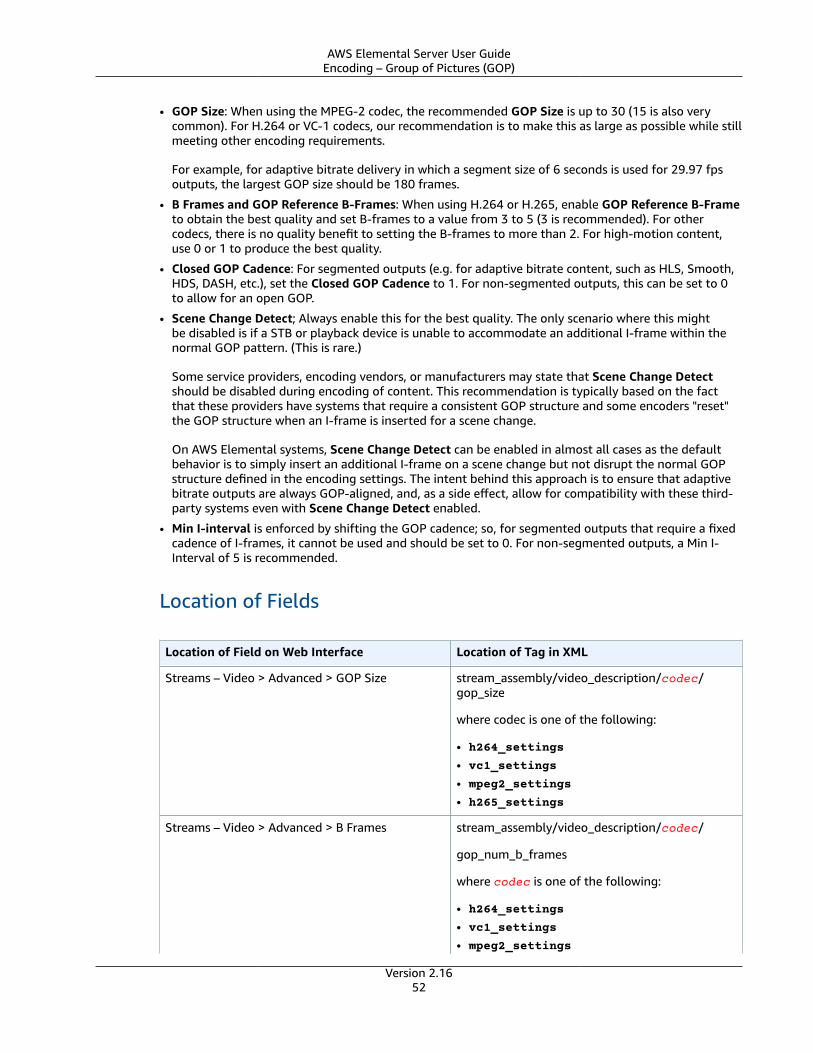
AWS Elemental Server User GuideEncoding – Group of Pictures (GOP)
• GOP Size: When using the MPEG-2 codec, the recommended GOP Size is up to 30 (15 is also verycommon). For H.264 or VC-1 codecs, our recommendation is to make this as large as possible while stillmeeting other encoding requirements.
For example, for adaptive bitrate delivery in which a segment size of 6 seconds is used for 29.97 fpsoutputs, the largest GOP size should be 180 frames.
• B Frames and GOP Reference B-Frames: When using H.264 or H.265, enable GOP Reference B-Frameto obtain the best quality and set B-frames to a value from 3 to 5 (3 is recommended). For othercodecs, there is no quality benefit to setting the B-frames to more than 2. For high-motion content,use 0 or 1 to produce the best quality.
• Closed GOP Cadence: For segmented outputs (e.g. for adaptive bitrate content, such as HLS, Smooth,HDS, DASH, etc.), set the Closed GOP Cadence to 1. For non-segmented outputs, this can be set to 0to allow for an open GOP.
• Scene Change Detect; Always enable this for the best quality. The only scenario where this mightbe disabled is if a STB or playback device is unable to accommodate an additional I-frame within thenormal GOP pattern. (This is rare.)
Some service providers, encoding vendors, or manufacturers may state that Scene Change Detectshould be disabled during encoding of content. This recommendation is typically based on the factthat these providers have systems that require a consistent GOP structure and some encoders "reset"the GOP structure when an I-frame is inserted for a scene change.
On AWS Elemental systems, Scene Change Detect can be enabled in almost all cases as the defaultbehavior is to simply insert an additional I-frame on a scene change but not disrupt the normal GOPstructure defined in the encoding settings. The intent behind this approach is to ensure that adaptivebitrate outputs are always GOP-aligned, and, as a side effect, allow for compatibility with these third-party systems even with Scene Change Detect enabled.
• Min I-interval is enforced by shifting the GOP cadence; so, for segmented outputs that require a fixedcadence of I-frames, it cannot be used and should be set to 0. For non-segmented outputs, a Min I-Interval of 5 is recommended.
Location of Fields
Location of Field on Web Interface Location of Tag in XML
Streams – Video > Advanced > GOP Size stream_assembly/video_description/codec/gop_size
where codec is one of the following:
• h264_settings
• vc1_settings
• mpeg2_settings
• h265_settings
Streams – Video > Advanced > B Frames stream_assembly/video_description/codec/
gop_num_b_frames
where codec is one of the following:
• h264_settings
• vc1_settings
• mpeg2_settings
Version 2.1652
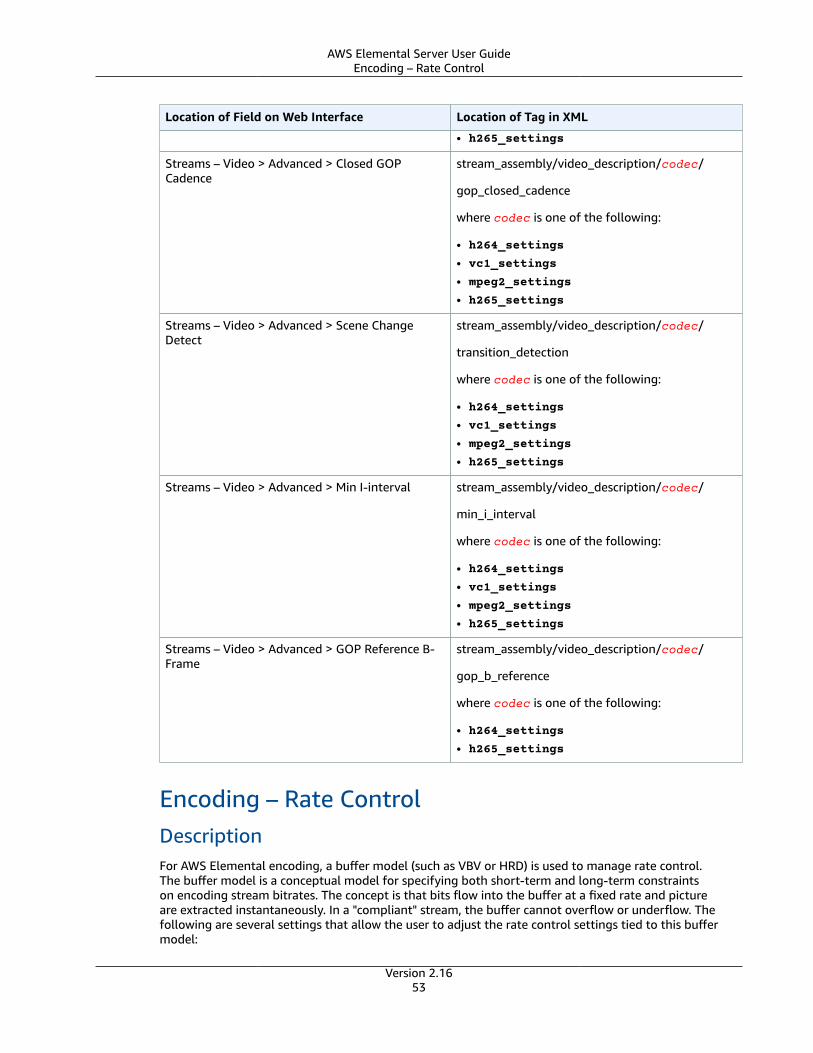
AWS Elemental Server User GuideEncoding – Rate Control
Location of Field on Web Interface Location of Tag in XML
• h265_settings
Streams – Video > Advanced > Closed GOPCadence
stream_assembly/video_description/codec/
gop_closed_cadence
where codec is one of the following:
• h264_settings
• vc1_settings
• mpeg2_settings
• h265_settings
Streams – Video > Advanced > Scene ChangeDetect
stream_assembly/video_description/codec/
transition_detection
where codec is one of the following:
• h264_settings
• vc1_settings
• mpeg2_settings
• h265_settings
Streams – Video > Advanced > Min I-interval stream_assembly/video_description/codec/
min_i_interval
where codec is one of the following:
• h264_settings
• vc1_settings
• mpeg2_settings
• h265_settings
Streams – Video > Advanced > GOP Reference B-Frame
stream_assembly/video_description/codec/
gop_b_reference
where codec is one of the following:
• h264_settings
• h265_settings
Encoding – Rate ControlDescriptionFor AWS Elemental encoding, a buffer model (such as VBV or HRD) is used to manage rate control.The buffer model is a conceptual model for specifying both short-term and long-term constraintson encoding stream bitrates. The concept is that bits flow into the buffer at a fixed rate and pictureare extracted instantaneously. In a "compliant" stream, the buffer cannot overflow or underflow. Thefollowing are several settings that allow the user to adjust the rate control settings tied to this buffermodel:
Version 2.1653

AWS Elemental Server User GuideEncoding – Rate Control
• Bitrate: Defines the long-term average bitrate, in bits/second. This field does not appear when RateControl Mode is set to CQ.
• Buffer Size: Defines the total buffer size in bits.• Max Bitrate: Defines the buffer fill rate, in bits/second. This field appears only when Rate Control
Mode is set to VBR or Statmux.• Initial Buffer Fill: Defines the percentage of the buffer filled with bits before the decode begins.
These fields work with the Rate Control Mode field, which is discussed in the section called “Encoding –Rate Control Modes” (p. 55).
Recommendations• For Bitrate, more is better. The value used will depend more on other workflow constraints and will
likely be different for each application.• In general, Buffer Size is commonly set to 1x to 2x the bitrate (again, more is typically better).• Max Bitrate is commonly set to 1x to 2x the bitrate. Although more is typically better, this value must
also fit within the other encoding requirements of your specific application.• For Initial Buffer Fill, the default value (90%) typically provides the best video quality, so leave it
blank to use the default.
Location of Fields
Location of Field on Web Interface Location of Tag in XML
Streams – Video > Advanced > Bitrate stream_assembly/video_description/codec/bitrate
where codec is one of the following:
• h264_settings
• vc1_settings
• mpeg2_settings
• h265_settings
Streams – Video > Advanced > Buffer Sizestream_assembly/video_description/codec/buf_size
where codec is one of the following:
• h264_settings
• vc1_settings
• mpeg2_settings
• h265_settings
Streams – Video > Advanced > Max Bitrate stream_assembly/video_description/codec/max_bitrate
where codec is one of the following:
• h264_settings
• vc1_settings
• mpeg2_settings
Version 2.1654
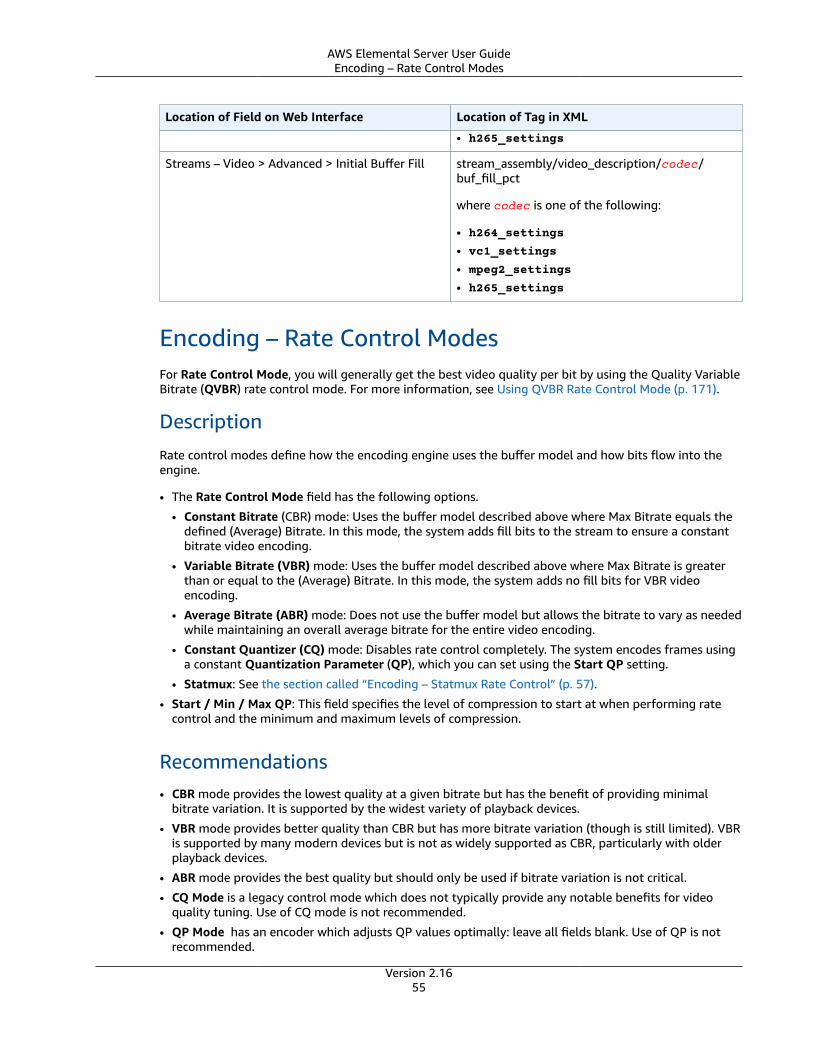
AWS Elemental Server User GuideEncoding – Rate Control Modes
Location of Field on Web Interface Location of Tag in XML
• h265_settings
Streams – Video > Advanced > Initial Buffer Fill stream_assembly/video_description/codec/buf_fill_pct
where codec is one of the following:
• h264_settings
• vc1_settings
• mpeg2_settings
• h265_settings
Encoding – Rate Control ModesFor Rate Control Mode, you will generally get the best video quality per bit by using the Quality VariableBitrate (QVBR) rate control mode. For more information, see Using QVBR Rate Control Mode (p. 171).
DescriptionRate control modes define how the encoding engine uses the buffer model and how bits flow into theengine.
• The Rate Control Mode field has the following options.
• Constant Bitrate (CBR) mode: Uses the buffer model described above where Max Bitrate equals thedefined (Average) Bitrate. In this mode, the system adds fill bits to the stream to ensure a constantbitrate video encoding.
• Variable Bitrate (VBR) mode: Uses the buffer model described above where Max Bitrate is greaterthan or equal to the (Average) Bitrate. In this mode, the system adds no fill bits for VBR videoencoding.
• Average Bitrate (ABR) mode: Does not use the buffer model but allows the bitrate to vary as neededwhile maintaining an overall average bitrate for the entire video encoding.
• Constant Quantizer (CQ) mode: Disables rate control completely. The system encodes frames usinga constant Quantization Parameter (QP), which you can set using the Start QP setting.
• Statmux: See the section called “Encoding – Statmux Rate Control” (p. 57).
• Start / Min / Max QP: This field specifies the level of compression to start at when performing ratecontrol and the minimum and maximum levels of compression.
Recommendations• CBR mode provides the lowest quality at a given bitrate but has the benefit of providing minimal
bitrate variation. It is supported by the widest variety of playback devices.
• VBR mode provides better quality than CBR but has more bitrate variation (though is still limited). VBRis supported by many modern devices but is not as widely supported as CBR, particularly with olderplayback devices.
• ABR mode provides the best quality but should only be used if bitrate variation is not critical.
• CQ Mode is a legacy control mode which does not typically provide any notable benefits for videoquality tuning. Use of CQ mode is not recommended.
• QP Mode has an encoder which adjusts QP values optimally: leave all fields blank. Use of QP is notrecommended.
Version 2.1655

AWS Elemental Server User GuideEncoding – Rate Control Tuning
Location of Fields
Location of Field on Web Interface Location of Tag in XML
Streams – Video > Advanced > Rate Control Mode stream_assembly/video_description/codec/rate_control_mode
where codec is one of the following:
• h264_settings
• vc1_settings
• mpeg2_settings
• h265_settings
Streams – Video > Advanced > Start QP stream_assembly/video_description/codec/qp
where codec is one of the following:
• h264_settings
• vc1_settings
• mpeg2_settings
Streams – Video > Advanced > Min QP stream_assembly/video_description/codec/min_qp
where codec is one of the following:
• h264_settings
• vc1_settings
• mpeg2_settings
Streams – Video > Advanced > Max QP stream_assembly/video_description/codec/max_qp
where codec is one of the following:
• h265_settings
• vc1_settings
• mpeg2_settings
Encoding – Rate Control Tuning
DescriptionFollowing are encoding settings that can be used to provide additional tuning of video quality.
• Passes: When this field is set to 2-pass and Rate Control Mode is set to CBR, VBR, or ABR, the systemanalyzes the entire source video stream before encoding in order to better distribute bits to more- orless-complex portions of the video. The tradeoff is that encoding time is increased as the system needsto decode/analyze the source stream prior to starting the encode process.
• Lookahead: This setting indicates the system should analyze a few frames in the future of thecurrently encoded frame (higher values mean more frames) and allow the encoder to take futureframe data into account during rate control logic.
Version 2.1656
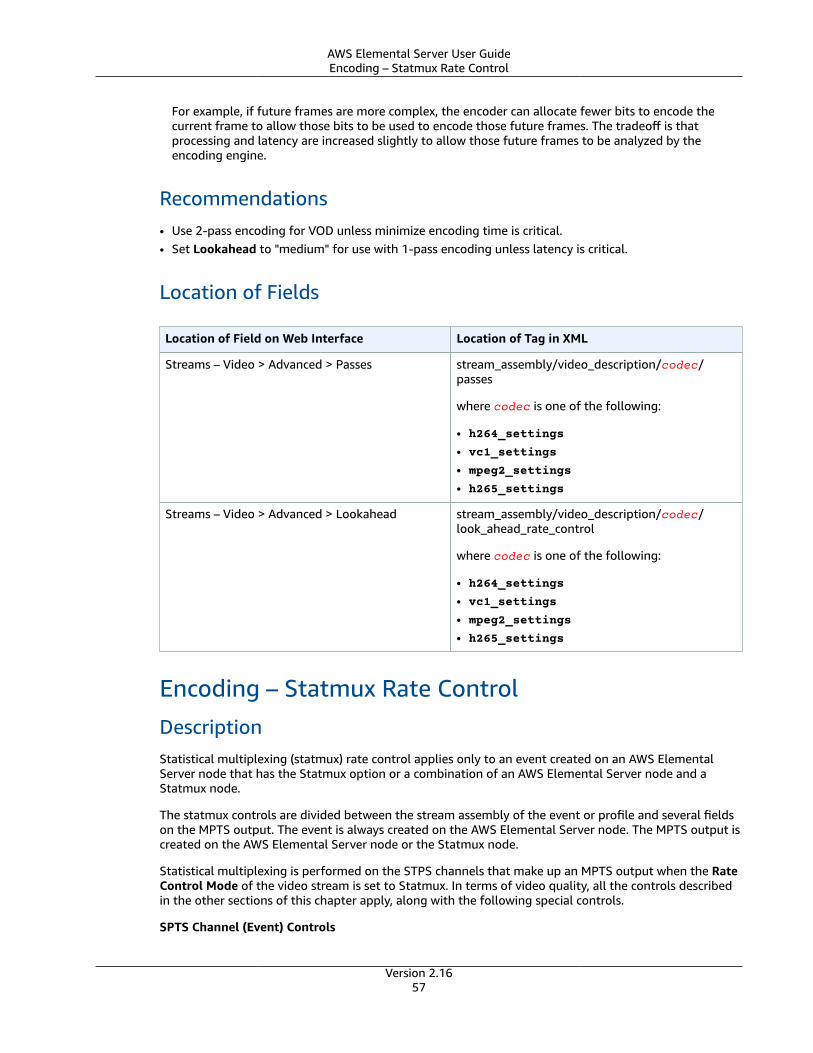
AWS Elemental Server User GuideEncoding – Statmux Rate Control
For example, if future frames are more complex, the encoder can allocate fewer bits to encode thecurrent frame to allow those bits to be used to encode those future frames. The tradeoff is thatprocessing and latency are increased slightly to allow those future frames to be analyzed by theencoding engine.
Recommendations• Use 2-pass encoding for VOD unless minimize encoding time is critical.• Set Lookahead to "medium" for use with 1-pass encoding unless latency is critical.
Location of Fields
Location of Field on Web Interface Location of Tag in XML
Streams – Video > Advanced > Passes stream_assembly/video_description/codec/passes
where codec is one of the following:
• h264_settings
• vc1_settings
• mpeg2_settings
• h265_settings
Streams – Video > Advanced > Lookahead stream_assembly/video_description/codec/look_ahead_rate_control
where codec is one of the following:
• h264_settings
• vc1_settings
• mpeg2_settings
• h265_settings
Encoding – Statmux Rate ControlDescriptionStatistical multiplexing (statmux) rate control applies only to an event created on an AWS ElementalServer node that has the Statmux option or a combination of an AWS Elemental Server node and aStatmux node.
The statmux controls are divided between the stream assembly of the event or profile and several fieldson the MPTS output. The event is always created on the AWS Elemental Server node. The MPTS output iscreated on the AWS Elemental Server node or the Statmux node.
Statistical multiplexing is performed on the STPS channels that make up an MPTS output when the RateControl Mode of the video stream is set to Statmux. In terms of video quality, all the controls describedin the other sections of this chapter apply, along with the following special controls.
SPTS Channel (Event) Controls
Version 2.1657
AWS Elemental Server User GuideEncoding – Statmux Rate Control
In the event (which is called an SPTS channel in an MPTS output) the following controls apply:
• Bitrate (Nominal Bitrate).• Minimum Bitrate. The bitrate allocated to a given SPTS channel, which will never go below this
number.
• Maximum Bitrate. The bitrate allocated to a given SPTS channel, which will never exceed this number.
These settings guide the distribution of bitrate among the channels in the multiplex as described below.
MPTS Output Controls
The MPTS output has the following controls:
• Transport Stream Bitrate: The total size of the MPTS output.
• Video Allocation: The portion of the Transport Stream Bitrate that is allocated to the video of all theSPTS channels.
These settings determine the overall bitrate "pool" that is distributed among the channels in themultiplex as described below.
Statmux Bitrate Allocation
At runtime, each SPTS channel sends per-frame complexity information to the multiplexer and receivescorresponding bitrate allocations. The allocations for each frame in channel are computed as follows.
• The Nominal Bitrates for all channels are scaled proportionately; such sum of the scaled nominalbitrates matches the Video Allocation for the multiplex. This is bitrate distribution if all the channelshave the same complexity.
• The complexity of each channel is examined (relative to the other channels) and the Nominal Bitrateof each channel is adjusted. In this adjustment, the spread between the Min and Max of a givenchannel affects how much that channel's Nominal Bitrate is adjusted: the bigger the range, the biggerthe adjustment.
• The Nominal Bitrate of each channel is adjusted again, if necessary, to stay within the Min and Maxrange.
• This last adjustment may result in “leftovers.” These leftovers are distributed among channels that didnot get adjusted.
• The final bitrate allocation is sent to each SPTS channel.
Recommendations• Transport Stream Bitrate: The total size of the MPTS output; this number is set based on the
bandwidth characteristics of the intended network.
• Video Allocation: This number is typically calculated as follows:
VA = Useable bitrate - (the maximum anticipated audio of all SPTS channels) - (the maximumanticipated data of all SPTS channels).
where the useable bitrate is typically 95-97% of the Transportation Stream Bitrate.
• Nominal bitrate is set for each SPTS channel relative to other channels depending on resolution,framerate, and codec used to encode the video. Typically the nominal bit rate is set to a value thatprovides the desired video quality in an non-statmuxed application.
• Minimum bitrate sets a minimum allocation for a channel regardless of how low its relativecomplexity. A typical value for each SPTS channel is:
Version 2.1658
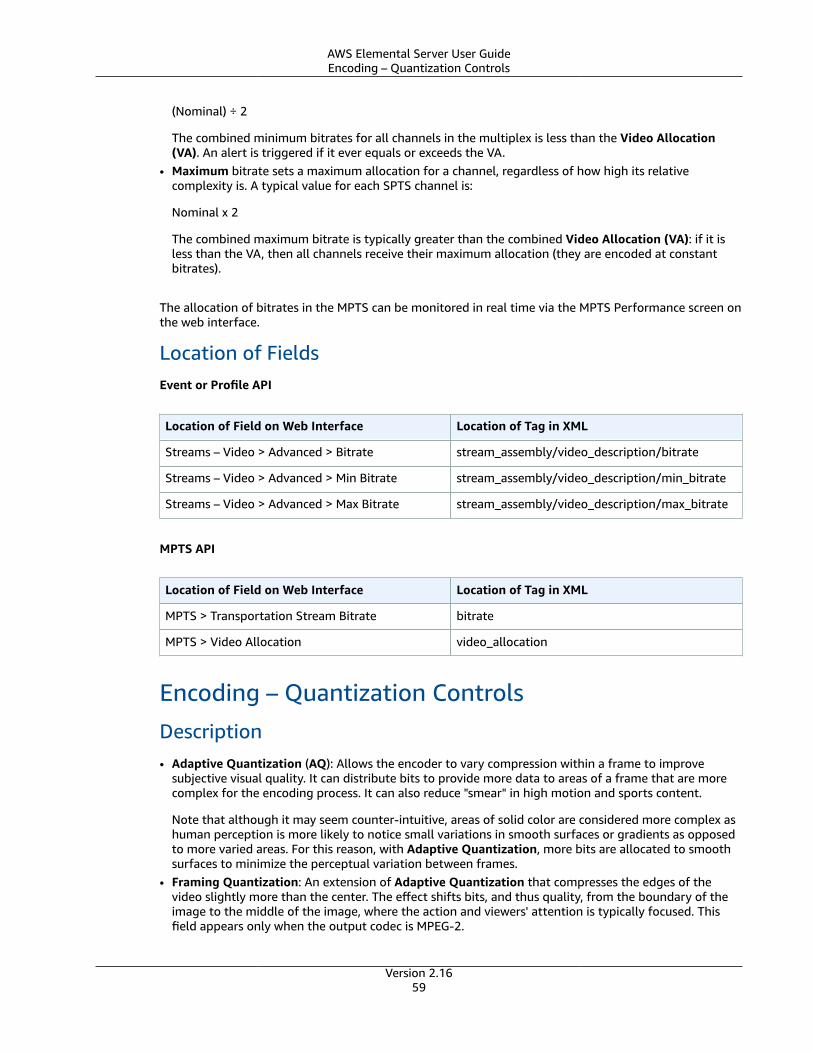
AWS Elemental Server User GuideEncoding – Quantization Controls
(Nominal) ÷ 2
The combined minimum bitrates for all channels in the multiplex is less than the Video Allocation(VA). An alert is triggered if it ever equals or exceeds the VA.
• Maximum bitrate sets a maximum allocation for a channel, regardless of how high its relativecomplexity is. A typical value for each SPTS channel is:
Nominal x 2
The combined maximum bitrate is typically greater than the combined Video Allocation (VA): if it isless than the VA, then all channels receive their maximum allocation (they are encoded at constantbitrates).
The allocation of bitrates in the MPTS can be monitored in real time via the MPTS Performance screen onthe web interface.
Location of FieldsEvent or Profile API
Location of Field on Web Interface Location of Tag in XML
Streams – Video > Advanced > Bitrate stream_assembly/video_description/bitrate
Streams – Video > Advanced > Min Bitrate stream_assembly/video_description/min_bitrate
Streams – Video > Advanced > Max Bitrate stream_assembly/video_description/max_bitrate
MPTS API
Location of Field on Web Interface Location of Tag in XML
MPTS > Transportation Stream Bitrate bitrate
MPTS > Video Allocation video_allocation
Encoding – Quantization ControlsDescription• Adaptive Quantization (AQ): Allows the encoder to vary compression within a frame to improve
subjective visual quality. It can distribute bits to provide more data to areas of a frame that are morecomplex for the encoding process. It can also reduce "smear" in high motion and sports content.
Note that although it may seem counter-intuitive, areas of solid color are considered more complex ashuman perception is more likely to notice small variations in smooth surfaces or gradients as opposedto more varied areas. For this reason, with Adaptive Quantization, more bits are allocated to smoothsurfaces to minimize the perceptual variation between frames.
• Framing Quantization: An extension of Adaptive Quantization that compresses the edges of thevideo slightly more than the center. The effect shifts bits, and thus quality, from the boundary of theimage to the middle of the image, where the action and viewers' attention is typically focused. Thisfield appears only when the output codec is MPEG-2.
Version 2.1659
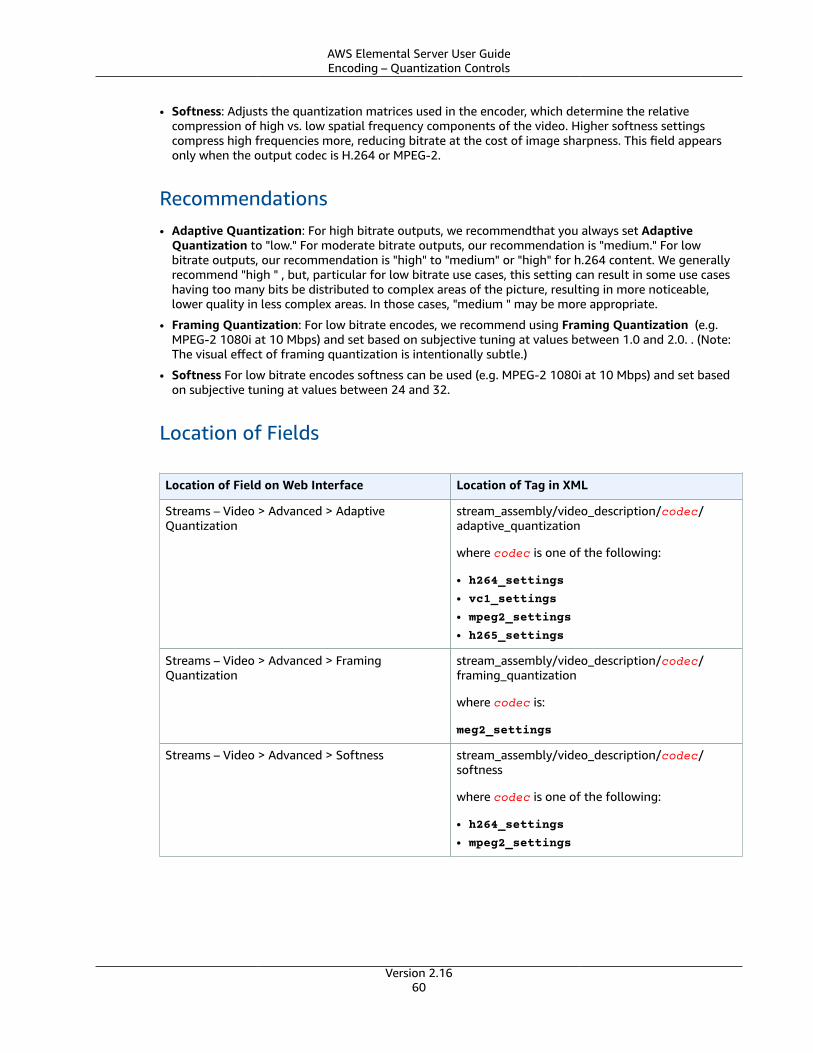
AWS Elemental Server User GuideEncoding – Quantization Controls
• Softness: Adjusts the quantization matrices used in the encoder, which determine the relativecompression of high vs. low spatial frequency components of the video. Higher softness settingscompress high frequencies more, reducing bitrate at the cost of image sharpness. This field appearsonly when the output codec is H.264 or MPEG-2.
Recommendations• Adaptive Quantization: For high bitrate outputs, we recommendthat you always set Adaptive
Quantization to "low." For moderate bitrate outputs, our recommendation is "medium." For lowbitrate outputs, our recommendation is "high" to "medium" or "high" for h.264 content. We generallyrecommend "high " , but, particular for low bitrate use cases, this setting can result in some use caseshaving too many bits be distributed to complex areas of the picture, resulting in more noticeable,lower quality in less complex areas. In those cases, "medium " may be more appropriate.
• Framing Quantization: For low bitrate encodes, we recommend using Framing Quantization (e.g.MPEG-2 1080i at 10 Mbps) and set based on subjective tuning at values between 1.0 and 2.0. . (Note:The visual effect of framing quantization is intentionally subtle.)
• Softness For low bitrate encodes softness can be used (e.g. MPEG-2 1080i at 10 Mbps) and set basedon subjective tuning at values between 24 and 32.
Location of Fields
Location of Field on Web Interface Location of Tag in XML
Streams – Video > Advanced > AdaptiveQuantization
stream_assembly/video_description/codec/adaptive_quantization
where codec is one of the following:
• h264_settings
• vc1_settings
• mpeg2_settings
• h265_settings
Streams – Video > Advanced > FramingQuantization
stream_assembly/video_description/codec/framing_quantization
where codec is:
meg2_settings
Streams – Video > Advanced > Softness stream_assembly/video_description/codec/softness
where codec is one of the following:
• h264_settings
• mpeg2_settings
Version 2.1660
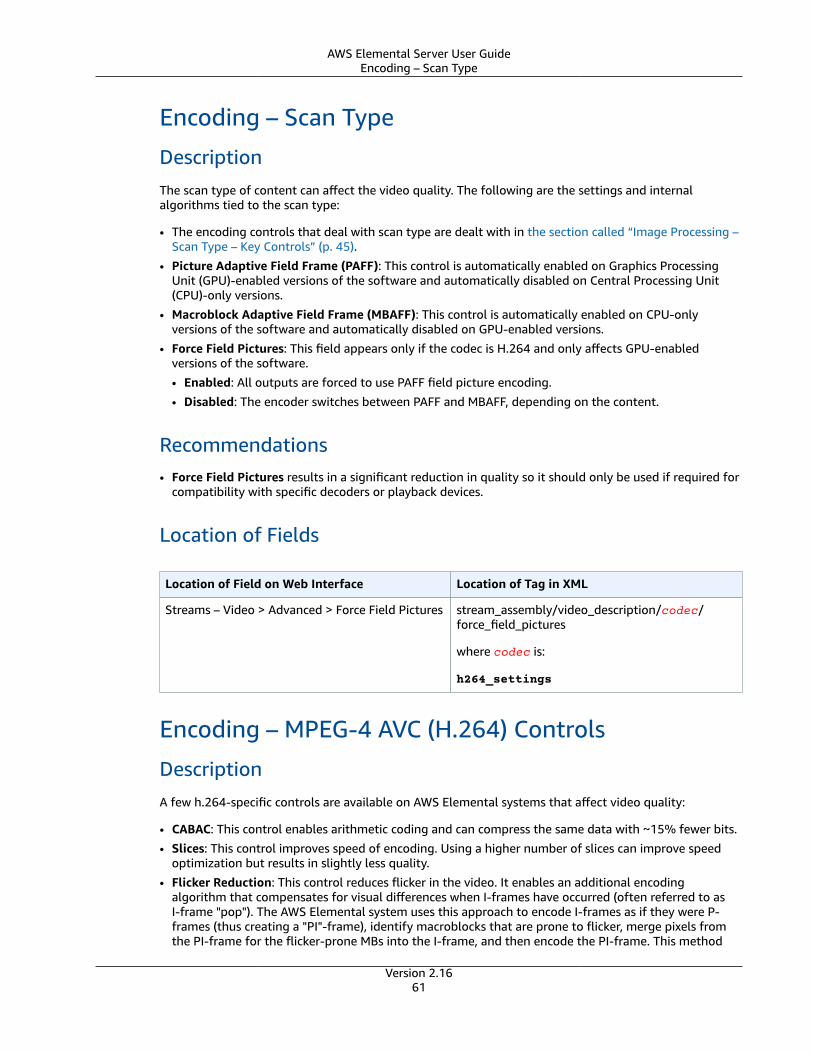
AWS Elemental Server User GuideEncoding – Scan Type
Encoding – Scan Type
DescriptionThe scan type of content can affect the video quality. The following are the settings and internalalgorithms tied to the scan type:
• The encoding controls that deal with scan type are dealt with in the section called “Image Processing –Scan Type – Key Controls” (p. 45).
• Picture Adaptive Field Frame (PAFF): This control is automatically enabled on Graphics ProcessingUnit (GPU)-enabled versions of the software and automatically disabled on Central Processing Unit(CPU)-only versions.
• Macroblock Adaptive Field Frame (MBAFF): This control is automatically enabled on CPU-onlyversions of the software and automatically disabled on GPU-enabled versions.
• Force Field Pictures: This field appears only if the codec is H.264 and only affects GPU-enabledversions of the software.
• Enabled: All outputs are forced to use PAFF field picture encoding.
• Disabled: The encoder switches between PAFF and MBAFF, depending on the content.
Recommendations• Force Field Pictures results in a significant reduction in quality so it should only be used if required for
compatibility with specific decoders or playback devices.
Location of Fields
Location of Field on Web Interface Location of Tag in XML
Streams – Video > Advanced > Force Field Pictures stream_assembly/video_description/codec/force_field_pictures
where codec is:
h264_settings
Encoding – MPEG-4 AVC (H.264) Controls
DescriptionA few h.264-specific controls are available on AWS Elemental systems that affect video quality:
• CABAC: This control enables arithmetic coding and can compress the same data with ~15% fewer bits.
• Slices: This control improves speed of encoding. Using a higher number of slices can improve speedoptimization but results in slightly less quality.
• Flicker Reduction: This control reduces flicker in the video. It enables an additional encodingalgorithm that compensates for visual differences when I-frames have occurred (often referred to asI-frame "pop"). The AWS Elemental system uses this approach to encode I-frames as if they were P-frames (thus creating a "PI"-frame), identify macroblocks that are prone to flicker, merge pixels fromthe PI-frame for the flicker-prone MBs into the I-frame, and then encode the PI-frame. This method
Version 2.1661

AWS Elemental Server User GuideEncoding – HEVC (H.265) Controls
carries some of the visual quality from the end of one GOP to the start of the next GOP, preventing theabrupt change in detail that gives the effect of a flicker in the video.
• Reference Frames: This control defines the number of frames that can be used to define B- and P-frames.
Recommendations• Use High Profile with H.264 to improve quality over Baseline Profile and Main Profile.• Always enable CABAC unless the intended decoder or playback device doesn't support it.• Set Slices to 2 (or higher) for all HD resolution outputs or high bitrate outputs. (AWS Elemental presets
typically use 2 slices for 720p content and 4 slices for 1080p content.) For resolutions below 720p, setSlices to 1.
• Set Flicker Reduction to "high" for low-motion content. Disable it for high-motion content.• Set Reference Frames to 2 or more for flash compensation.
Location of Fields
Location of Field on Web Interface Location of Tag in XML
Streams – Video > Advanced > Profile stream_assembly/video_description/h264_settings>/cabac
Streams – Video > Advanced > Level stream_assembly/video_description/h264_settings>/level
Streams – Video > Advanced > CABAC stream_assembly/video_description/h264_settings>/cabac
Streams – Video > Advanced > Slices stream_assembly/video_description/h264_settings/slices
Streams – Video > Advanced > Flicker Reduction stream_assembly/video_description/h264_settings/flicker_reduction
Encoding – HEVC (H.265) ControlsDescriptionThe following HEVC-specific control can affect video quality:
• Slices: This control improves speed of encoding. Using a higher number of slices can improve speedoptimization but results in slightly less quality.
RecommendationsThe AWS Elemental HEVC encoder performance is less sensitive to changes in slices than the MPEG-4AVC encoder (the section called “Encoding – MPEG-4 AVC (H.264) Controls” (p. 61)), so the benefitof using more slices is reduced and having more slices reduces video quality. For these reasons, therecommendation is to use half as many slices with HEVC as with MPEG-4 AVC for the same resolution.In other words, set Slices to 2 (or higher) for all 1080p (or above) resolution outputs or high bitrateoutputs. Set Slices to 1 for Resolutions below 1080p .
Version 2.1662
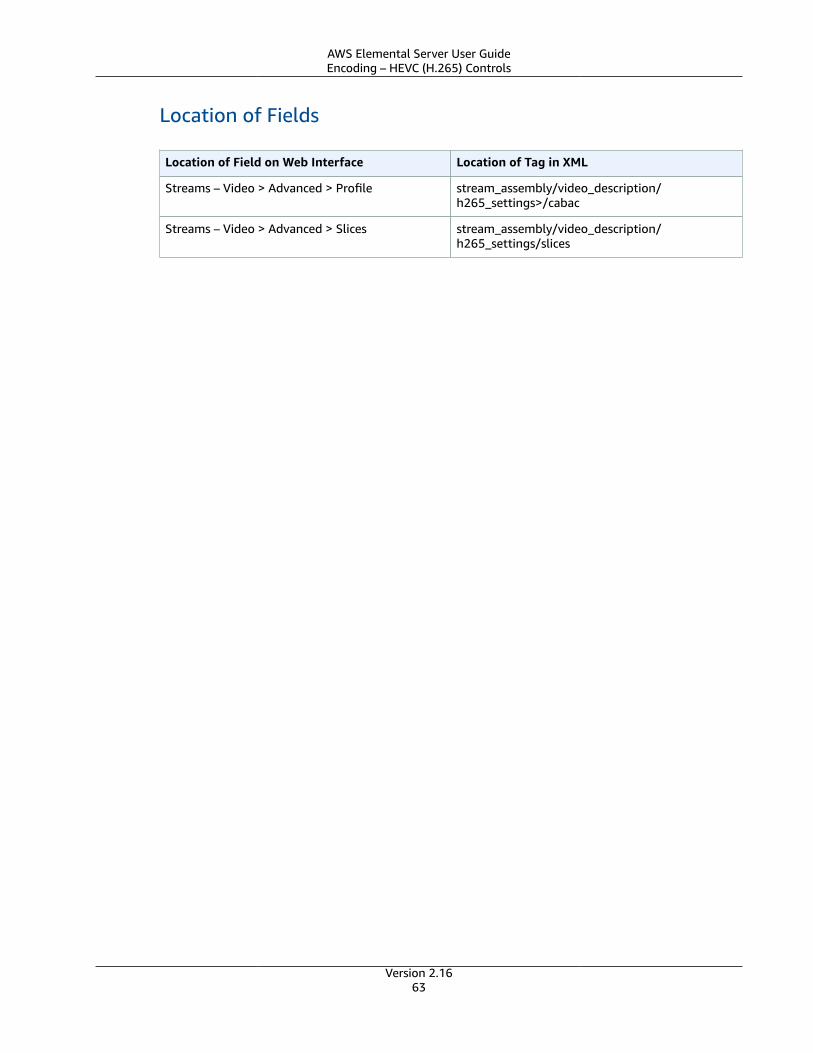
AWS Elemental Server User GuideEncoding – HEVC (H.265) Controls
Location of Fields
Location of Field on Web Interface Location of Tag in XML
Streams – Video > Advanced > Profile stream_assembly/video_description/h265_settings>/cabac
Streams – Video > Advanced > Slices stream_assembly/video_description/h265_settings/slices
Version 2.1663
AWS Elemental Server User GuideAbout Audio Mapping
Setting Up Audio Channel Mappingwith AWS Elemental Server
About this manual
This guide is intended for users who set up transcoding jobs that require moving input audio channels toa different track or channel on the output.
Assumptions
To use this guide, you should be familiar with or understand:
• How to use AWS Elemental Server web interface to set up and run jobs.• How to include audio in your AWS Elemental Server outputs.• How to use the REST interface to set up and run AWS Elemental Server jobs when you already know
how the REST interface to use the audio mapping feature.
About Audio MappingWith AWS Elemental Server, you can map audio tracks and channels from your input file to differentaudio tracks and channels on your output files. You can map any input channel on any input track to anyoutput channel on any output track.
Relevant TerminologyThroughout this document and on the AWS Elemental Server web interface, we use terminology asdefined below.
Coding mode (or audio type): The phrases “coding mode” or “audio type” refer to how the audio wasrecorded and is intended to be played. Supported types of audio are mono, dual mono, stereo, and 5.1Dolby Digital.
Channels: The smallest unit of audio. For example, a stereo pair consists of left and right channels.
Tracks: A set of channels grouped together is a track.
Audio Stream: All the audio tracks together make up the audio stream.
Stream Assembly: All the streams together (including any of the following: video stream, audio stream,captions, and metadata) make up the stream assembly.
In the AWS Elemental Server web interface, the Stream section contains the encoding instructions thatdefine the outgoing stream assembly. So the Stream section is more correctly the “Stream Assembly”section.
AWS Elemental Server Foundational Audio ConceptsAudio SelectorsAWS Elemental Server manages audio at the track level with Audio Selectors. When you set up yourinput, you create Audio Selectors to select tracks from the input that are used in a given output.
Version 2.1664
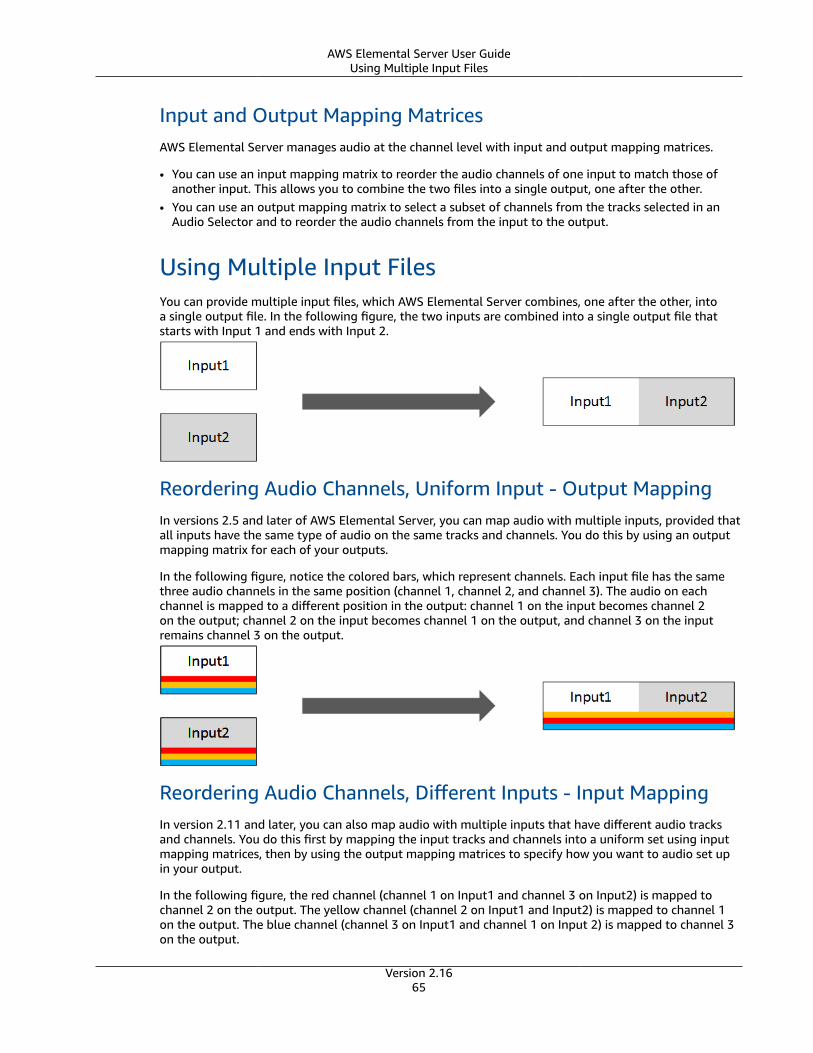
AWS Elemental Server User GuideUsing Multiple Input Files
Input and Output Mapping MatricesAWS Elemental Server manages audio at the channel level with input and output mapping matrices.
• You can use an input mapping matrix to reorder the audio channels of one input to match those ofanother input. This allows you to combine the two files into a single output, one after the other.
• You can use an output mapping matrix to select a subset of channels from the tracks selected in anAudio Selector and to reorder the audio channels from the input to the output.
Using Multiple Input FilesYou can provide multiple input files, which AWS Elemental Server combines, one after the other, intoa single output file. In the following figure, the two inputs are combined into a single output file thatstarts with Input 1 and ends with Input 2.
Reordering Audio Channels, Uniform Input - Output MappingIn versions 2.5 and later of AWS Elemental Server, you can map audio with multiple inputs, provided thatall inputs have the same type of audio on the same tracks and channels. You do this by using an outputmapping matrix for each of your outputs.
In the following figure, notice the colored bars, which represent channels. Each input file has the samethree audio channels in the same position (channel 1, channel 2, and channel 3). The audio on eachchannel is mapped to a different position in the output: channel 1 on the input becomes channel 2on the output; channel 2 on the input becomes channel 1 on the output, and channel 3 on the inputremains channel 3 on the output.
Reordering Audio Channels, Different Inputs - Input MappingIn version 2.11 and later, you can also map audio with multiple inputs that have different audio tracksand channels. You do this first by mapping the input tracks and channels into a uniform set using inputmapping matrices, then by using the output mapping matrices to specify how you want to audio set upin your output.
In the following figure, the red channel (channel 1 on Input1 and channel 3 on Input2) is mapped tochannel 2 on the output. The yellow channel (channel 2 on Input1 and Input2) is mapped to channel 1on the output. The blue channel (channel 3 on Input1 and channel 1 on Input 2) is mapped to channel 3on the output.
Version 2.1665
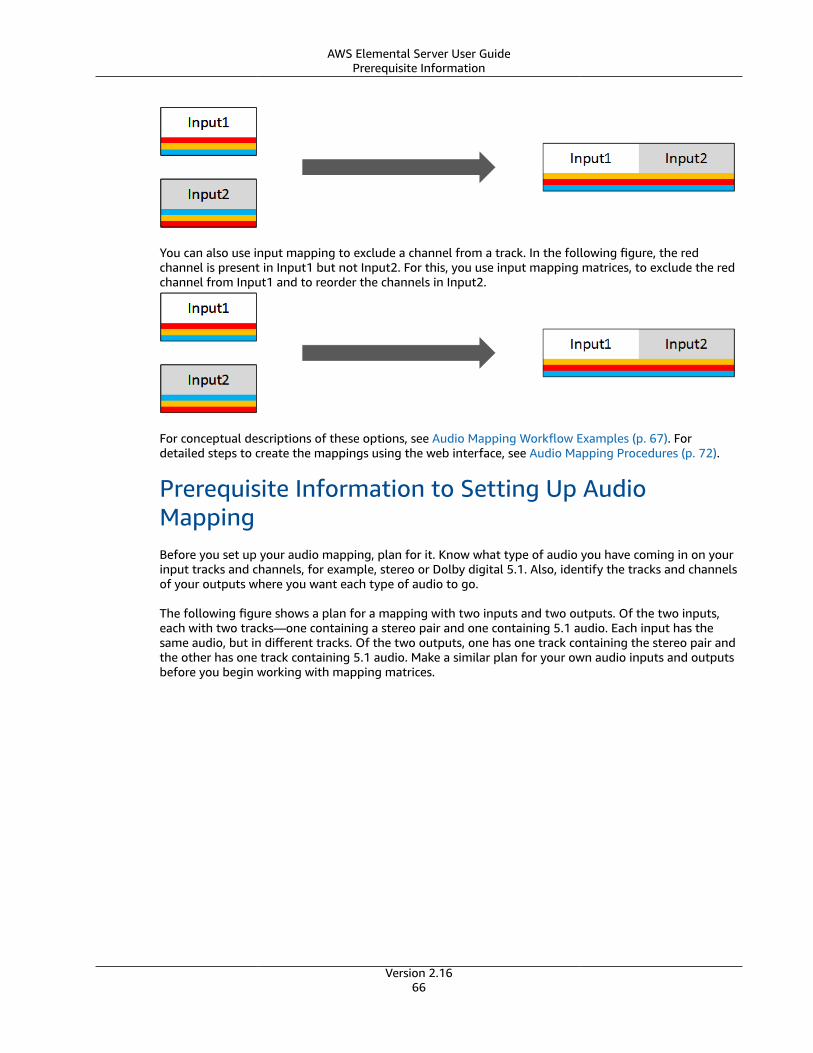
AWS Elemental Server User GuidePrerequisite Information
You can also use input mapping to exclude a channel from a track. In the following figure, the redchannel is present in Input1 but not Input2. For this, you use input mapping matrices, to exclude the redchannel from Input1 and to reorder the channels in Input2.
For conceptual descriptions of these options, see Audio Mapping Workflow Examples (p. 67). Fordetailed steps to create the mappings using the web interface, see Audio Mapping Procedures (p. 72).
Prerequisite Information to Setting Up AudioMappingBefore you set up your audio mapping, plan for it. Know what type of audio you have coming in on yourinput tracks and channels, for example, stereo or Dolby digital 5.1. Also, identify the tracks and channelsof your outputs where you want each type of audio to go.
The following figure shows a plan for a mapping with two inputs and two outputs. Of the two inputs,each with two tracks—one containing a stereo pair and one containing 5.1 audio. Each input has thesame audio, but in different tracks. Of the two outputs, one has one track containing the stereo pair andthe other has one track containing 5.1 audio. Make a similar plan for your own audio inputs and outputsbefore you begin working with mapping matrices.
Version 2.1666
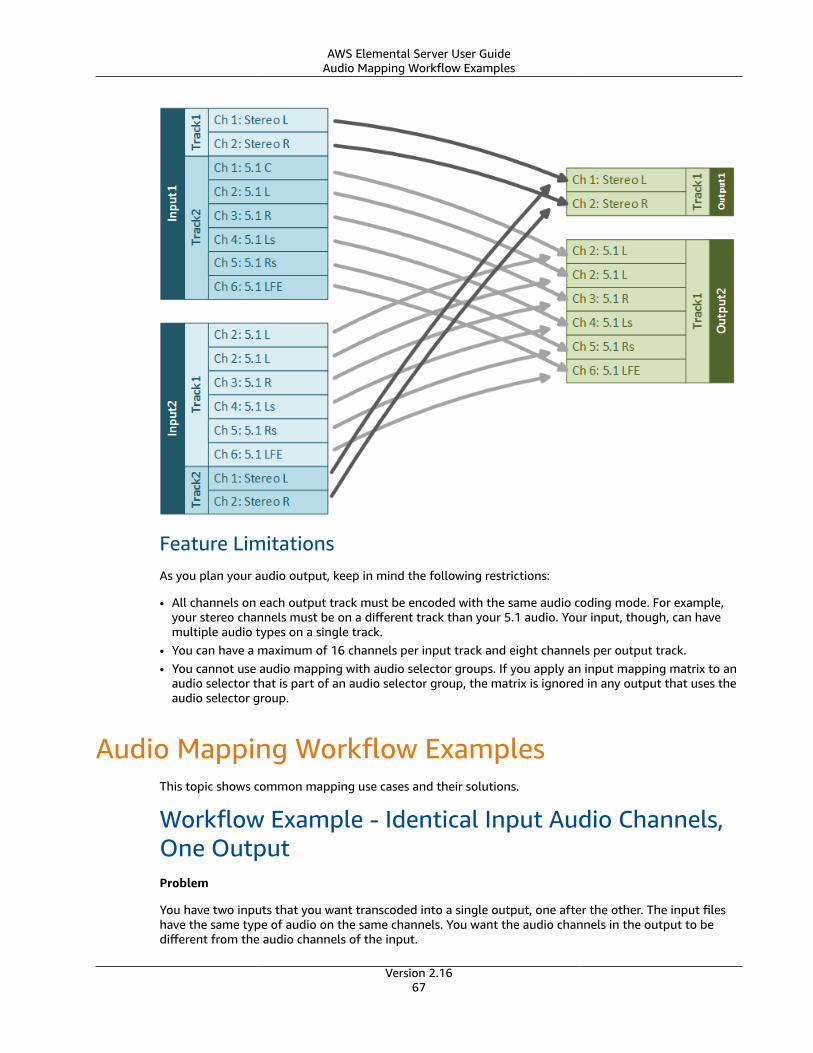
AWS Elemental Server User GuideAudio Mapping Workflow Examples
Feature LimitationsAs you plan your audio output, keep in mind the following restrictions:
• All channels on each output track must be encoded with the same audio coding mode. For example,your stereo channels must be on a different track than your 5.1 audio. Your input, though, can havemultiple audio types on a single track.
• You can have a maximum of 16 channels per input track and eight channels per output track.• You cannot use audio mapping with audio selector groups. If you apply an input mapping matrix to an
audio selector that is part of an audio selector group, the matrix is ignored in any output that uses theaudio selector group.
Audio Mapping Workflow ExamplesThis topic shows common mapping use cases and their solutions.
Workflow Example - Identical Input Audio Channels,One OutputProblem
You have two inputs that you want transcoded into a single output, one after the other. The input fileshave the same type of audio on the same channels. You want the audio channels in the output to bedifferent from the audio channels of the input.
Version 2.1667
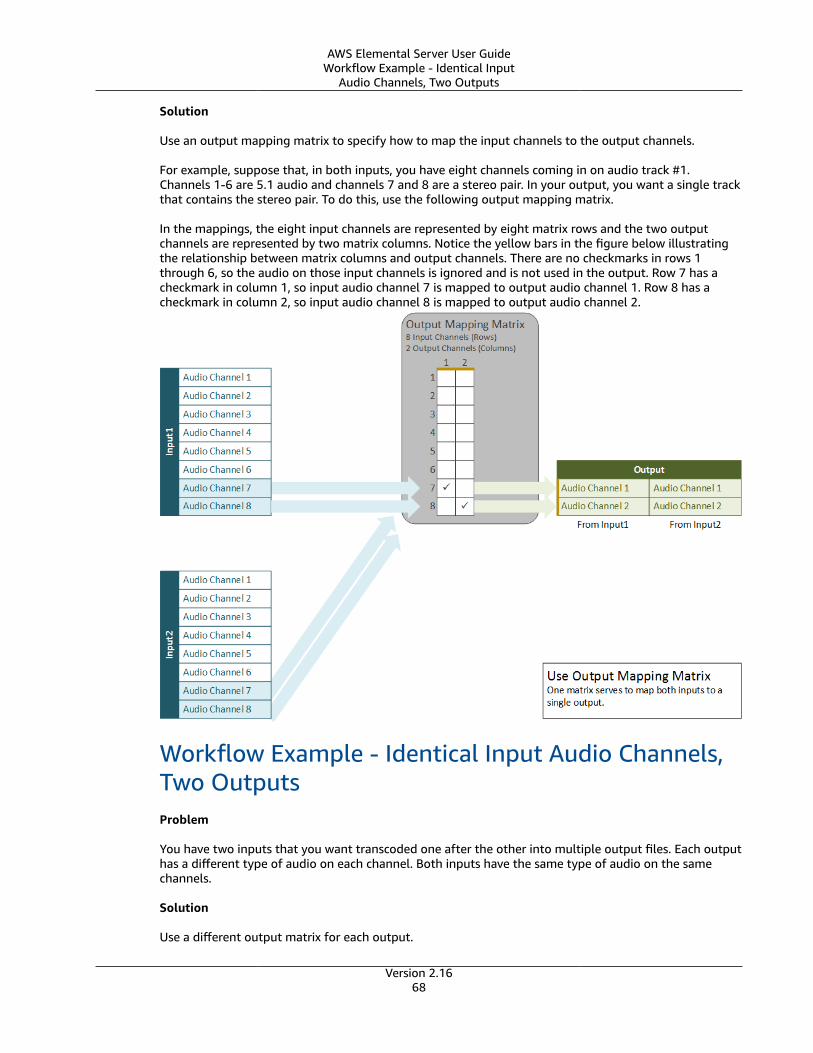
AWS Elemental Server User GuideWorkflow Example - Identical Input
Audio Channels, Two Outputs
Solution
Use an output mapping matrix to specify how to map the input channels to the output channels.
For example, suppose that, in both inputs, you have eight channels coming in on audio track #1.Channels 1-6 are 5.1 audio and channels 7 and 8 are a stereo pair. In your output, you want a single trackthat contains the stereo pair. To do this, use the following output mapping matrix.
In the mappings, the eight input channels are represented by eight matrix rows and the two outputchannels are represented by two matrix columns. Notice the yellow bars in the figure below illustratingthe relationship between matrix columns and output channels. There are no checkmarks in rows 1through 6, so the audio on those input channels is ignored and is not used in the output. Row 7 has acheckmark in column 1, so input audio channel 7 is mapped to output audio channel 1. Row 8 has acheckmark in column 2, so input audio channel 8 is mapped to output audio channel 2.
Workflow Example - Identical Input Audio Channels,Two OutputsProblem
You have two inputs that you want transcoded one after the other into multiple output files. Each outputhas a different type of audio on each channel. Both inputs have the same type of audio on the samechannels.
Solution
Use a different output matrix for each output.
Version 2.1668
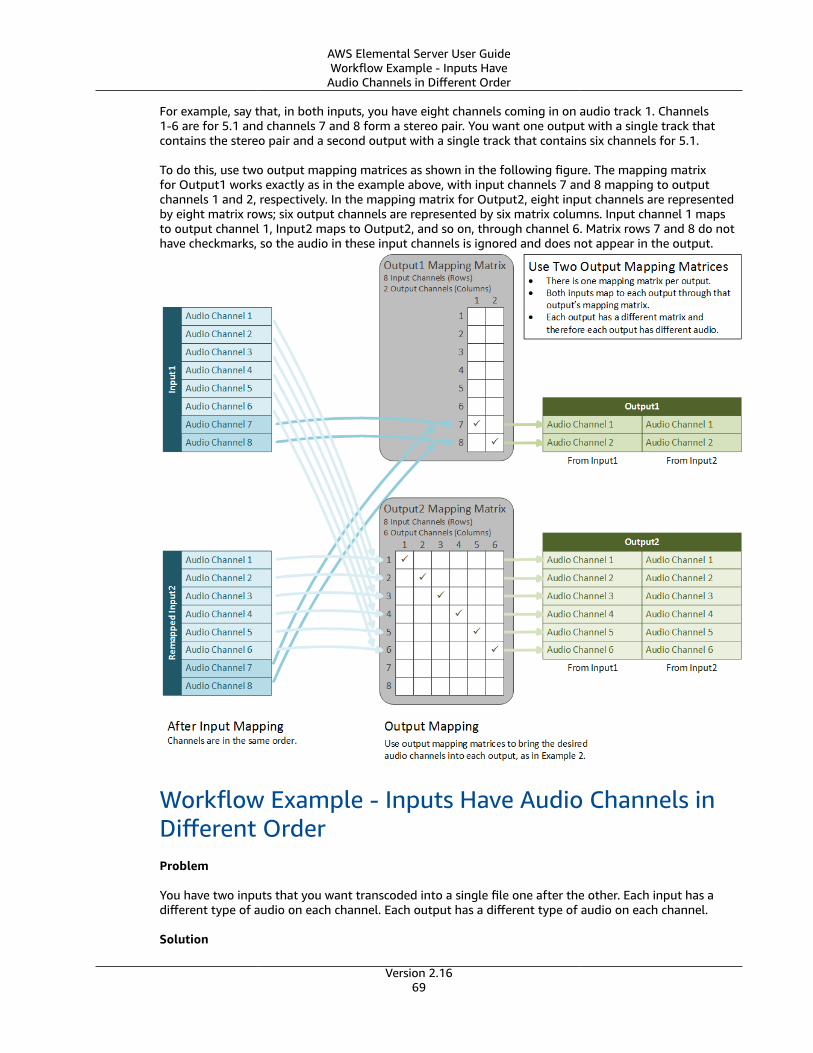
AWS Elemental Server User GuideWorkflow Example - Inputs Have
Audio Channels in Different Order
For example, say that, in both inputs, you have eight channels coming in on audio track 1. Channels1-6 are for 5.1 and channels 7 and 8 form a stereo pair. You want one output with a single track thatcontains the stereo pair and a second output with a single track that contains six channels for 5.1.
To do this, use two output mapping matrices as shown in the following figure. The mapping matrixfor Output1 works exactly as in the example above, with input channels 7 and 8 mapping to outputchannels 1 and 2, respectively. In the mapping matrix for Output2, eight input channels are representedby eight matrix rows; six output channels are represented by six matrix columns. Input channel 1 mapsto output channel 1, Input2 maps to Output2, and so on, through channel 6. Matrix rows 7 and 8 do nothave checkmarks, so the audio in these input channels is ignored and does not appear in the output.
Workflow Example - Inputs Have Audio Channels inDifferent OrderProblem
You have two inputs that you want transcoded into a single file one after the other. Each input has adifferent type of audio on each channel. Each output has a different type of audio on each channel.
Solution
Version 2.1669
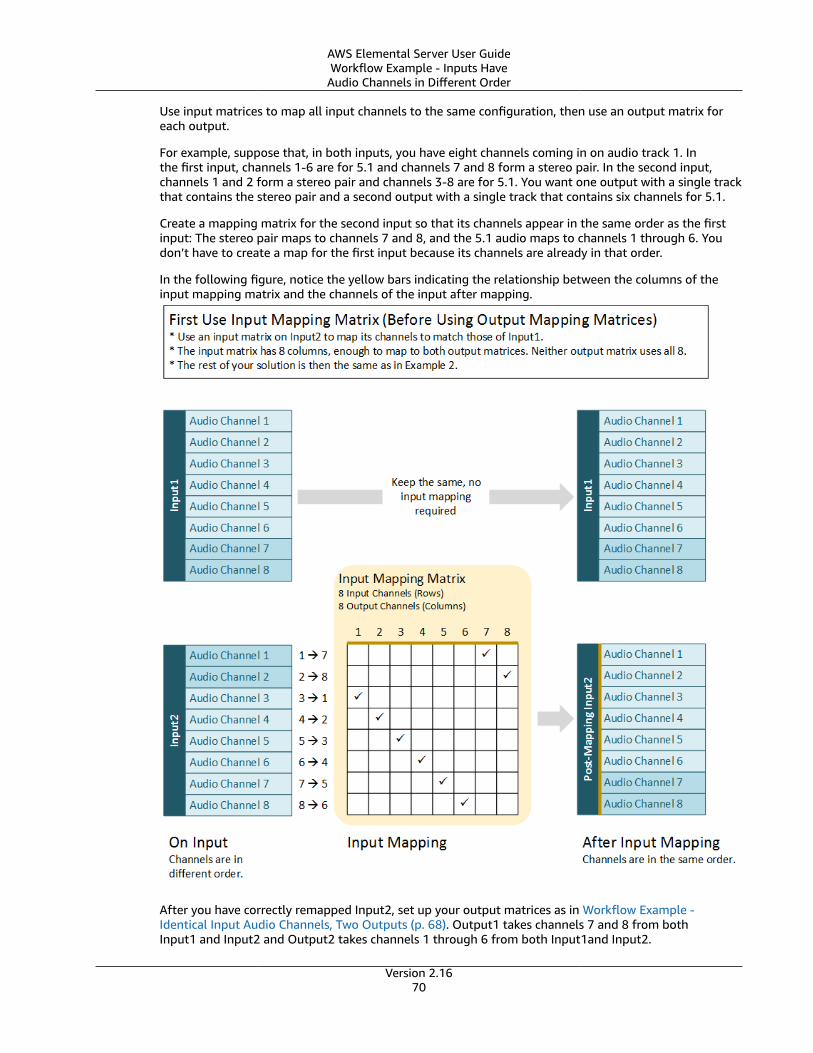
AWS Elemental Server User GuideWorkflow Example - Inputs Have
Audio Channels in Different Order
Use input matrices to map all input channels to the same configuration, then use an output matrix foreach output.
For example, suppose that, in both inputs, you have eight channels coming in on audio track 1. Inthe first input, channels 1-6 are for 5.1 and channels 7 and 8 form a stereo pair. In the second input,channels 1 and 2 form a stereo pair and channels 3-8 are for 5.1. You want one output with a single trackthat contains the stereo pair and a second output with a single track that contains six channels for 5.1.
Create a mapping matrix for the second input so that its channels appear in the same order as the firstinput: The stereo pair maps to channels 7 and 8, and the 5.1 audio maps to channels 1 through 6. Youdon’t have to create a map for the first input because its channels are already in that order.
In the following figure, notice the yellow bars indicating the relationship between the columns of theinput mapping matrix and the channels of the input after mapping.
After you have correctly remapped Input2, set up your output matrices as in Workflow Example -Identical Input Audio Channels, Two Outputs (p. 68). Output1 takes channels 7 and 8 from bothInput1 and Input2 and Output2 takes channels 1 through 6 from both Input1and Input2.
Version 2.1670
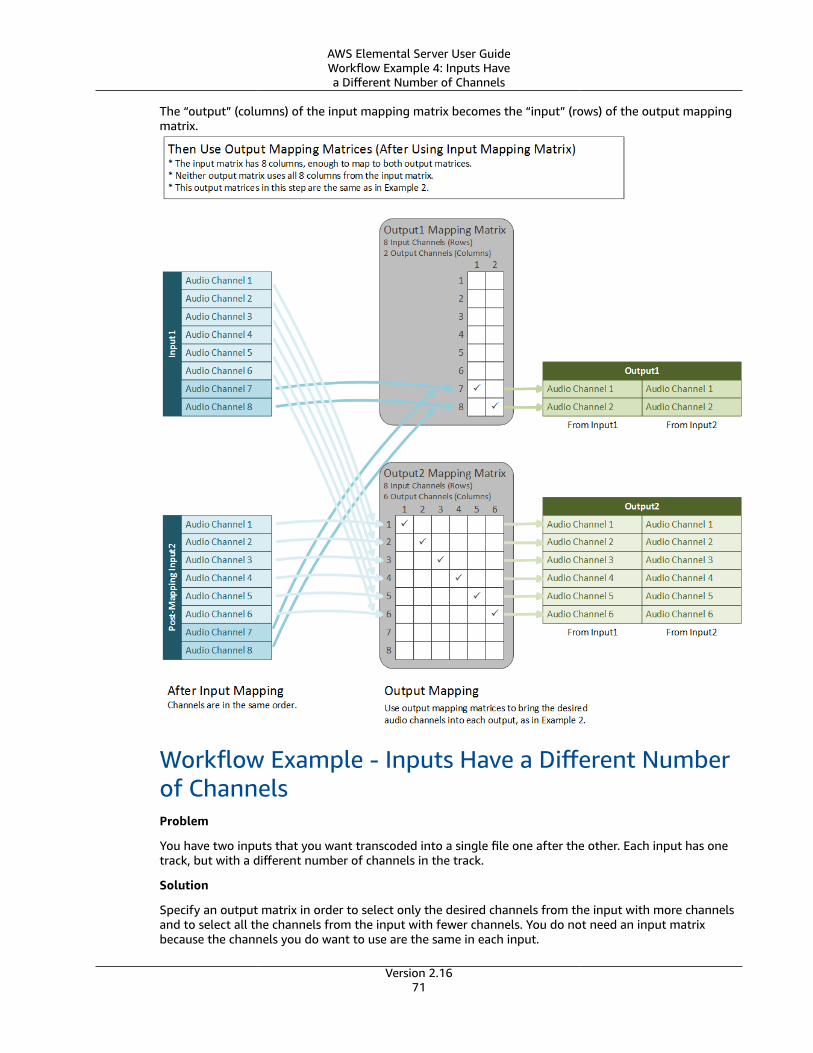
AWS Elemental Server User GuideWorkflow Example 4: Inputs Havea Different Number of Channels
The “output” (columns) of the input mapping matrix becomes the “input” (rows) of the output mappingmatrix.
Workflow Example - Inputs Have a Different Numberof ChannelsProblem
You have two inputs that you want transcoded into a single file one after the other. Each input has onetrack, but with a different number of channels in the track.
Solution
Specify an output matrix in order to select only the desired channels from the input with more channelsand to select all the channels from the input with fewer channels. You do not need an input matrixbecause the channels you do want to use are the same in each input.
Version 2.1671
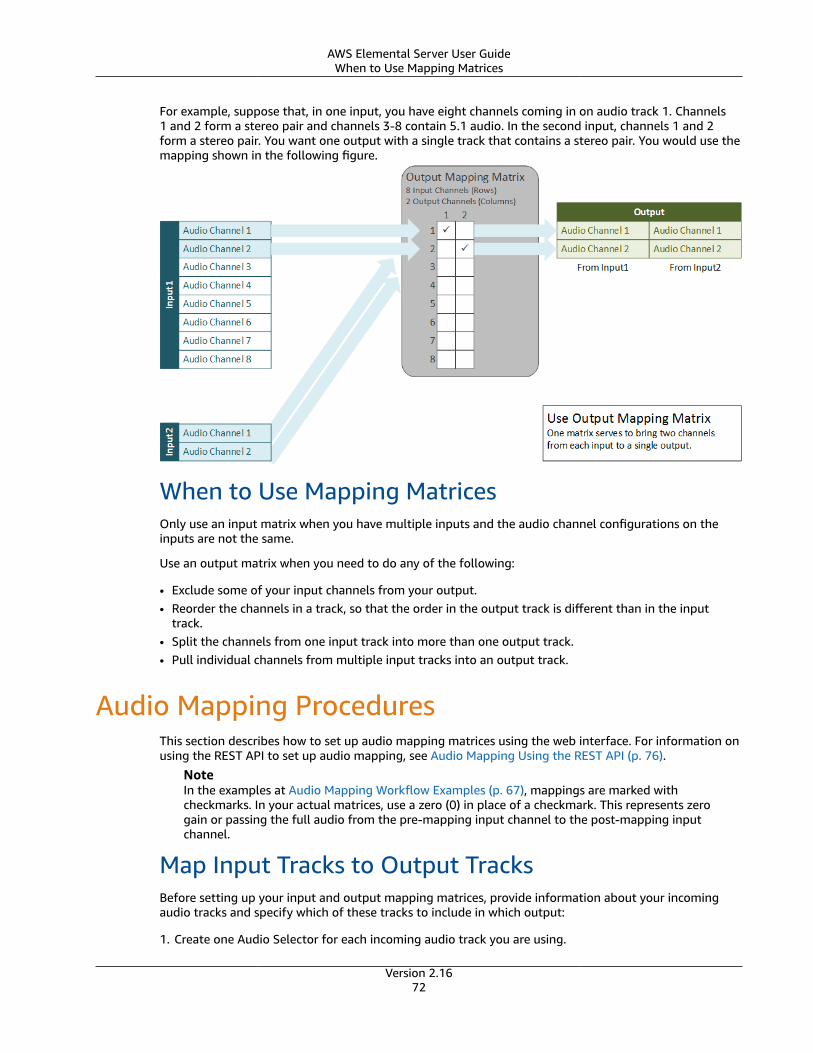
AWS Elemental Server User GuideWhen to Use Mapping Matrices
For example, suppose that, in one input, you have eight channels coming in on audio track 1. Channels1 and 2 form a stereo pair and channels 3-8 contain 5.1 audio. In the second input, channels 1 and 2form a stereo pair. You want one output with a single track that contains a stereo pair. You would use themapping shown in the following figure.
When to Use Mapping MatricesOnly use an input matrix when you have multiple inputs and the audio channel configurations on theinputs are not the same.
Use an output matrix when you need to do any of the following:
• Exclude some of your input channels from your output.• Reorder the channels in a track, so that the order in the output track is different than in the input
track.• Split the channels from one input track into more than one output track.• Pull individual channels from multiple input tracks into an output track.
Audio Mapping ProceduresThis section describes how to set up audio mapping matrices using the web interface. For information onusing the REST API to set up audio mapping, see Audio Mapping Using the REST API (p. 76).
NoteIn the examples at Audio Mapping Workflow Examples (p. 67), mappings are marked withcheckmarks. In your actual matrices, use a zero (0) in place of a checkmark. This represents zerogain or passing the full audio from the pre-mapping input channel to the post-mapping inputchannel.
Map Input Tracks to Output TracksBefore setting up your input and output mapping matrices, provide information about your incomingaudio tracks and specify which of these tracks to include in which output:
1. Create one Audio Selector for each incoming audio track you are using.
Version 2.1672
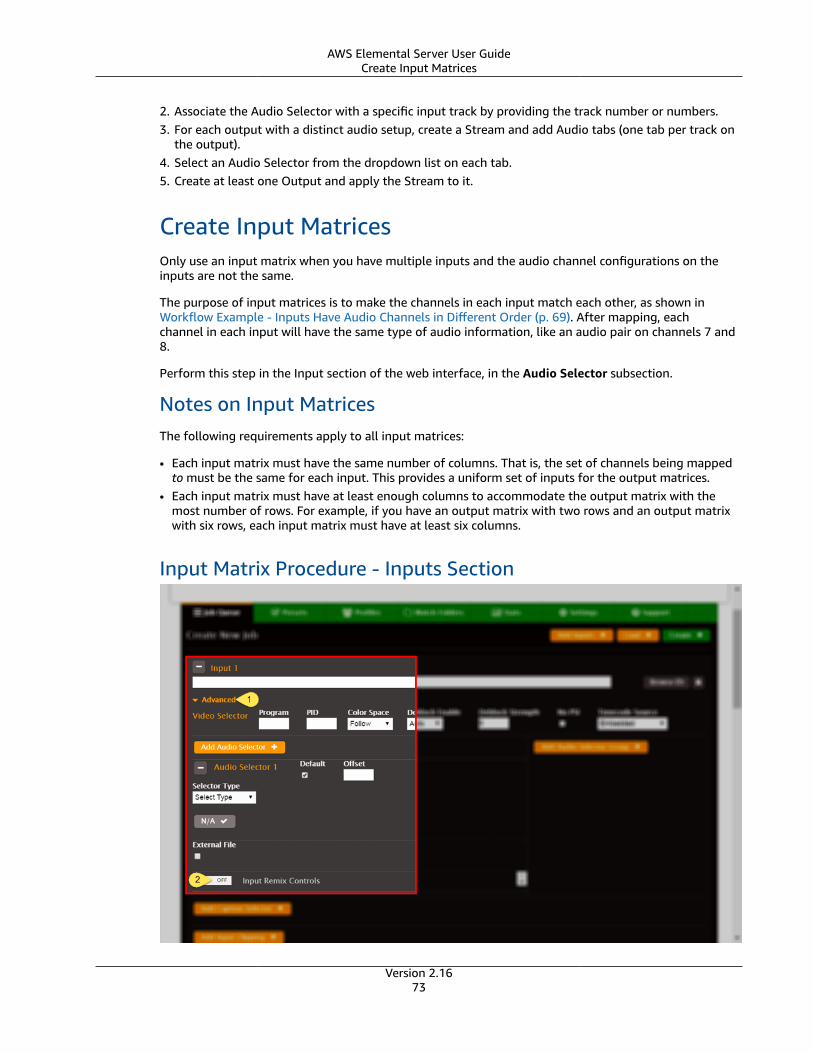
AWS Elemental Server User GuideCreate Input Matrices
2. Associate the Audio Selector with a specific input track by providing the track number or numbers.3. For each output with a distinct audio setup, create a Stream and add Audio tabs (one tab per track on
the output).4. Select an Audio Selector from the dropdown list on each tab.5. Create at least one Output and apply the Stream to it.
Create Input MatricesOnly use an input matrix when you have multiple inputs and the audio channel configurations on theinputs are not the same.
The purpose of input matrices is to make the channels in each input match each other, as shown inWorkflow Example - Inputs Have Audio Channels in Different Order (p. 69). After mapping, eachchannel in each input will have the same type of audio information, like an audio pair on channels 7 and8.
Perform this step in the Input section of the web interface, in the Audio Selector subsection.
Notes on Input MatricesThe following requirements apply to all input matrices:
• Each input matrix must have the same number of columns. That is, the set of channels being mappedto must be the same for each input. This provides a uniform set of inputs for the output matrices.
• Each input matrix must have at least enough columns to accommodate the output matrix with themost number of rows. For example, if you have an output matrix with two rows and an output matrixwith six rows, each input matrix must have at least six columns.
Input Matrix Procedure - Inputs Section
Version 2.1673
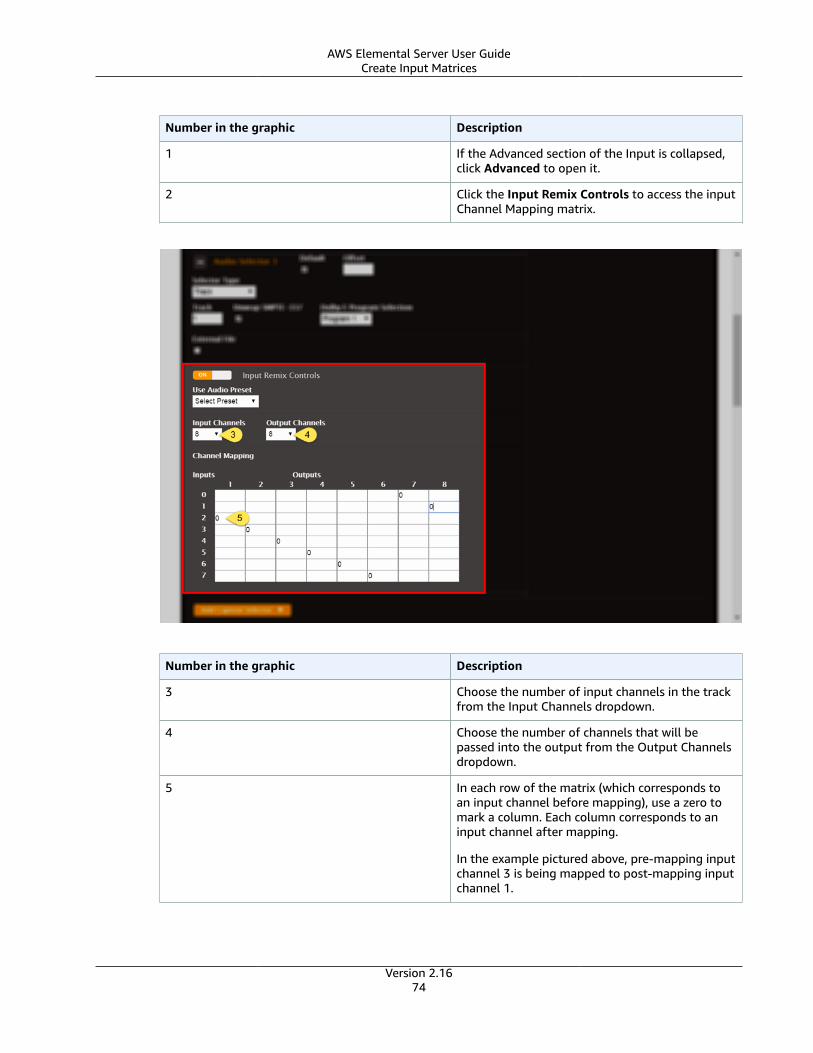
AWS Elemental Server User GuideCreate Input Matrices
Number in the graphic Description
1 If the Advanced section of the Input is collapsed,click Advanced to open it.
2 Click the Input Remix Controls to access the inputChannel Mapping matrix.
Number in the graphic Description
3 Choose the number of input channels in the trackfrom the Input Channels dropdown.
4 Choose the number of channels that will bepassed into the output from the Output Channelsdropdown.
5 In each row of the matrix (which corresponds toan input channel before mapping), use a zero tomark a column. Each column corresponds to aninput channel after mapping.
In the example pictured above, pre-mapping inputchannel 3 is being mapped to post-mapping inputchannel 1.
Version 2.1674
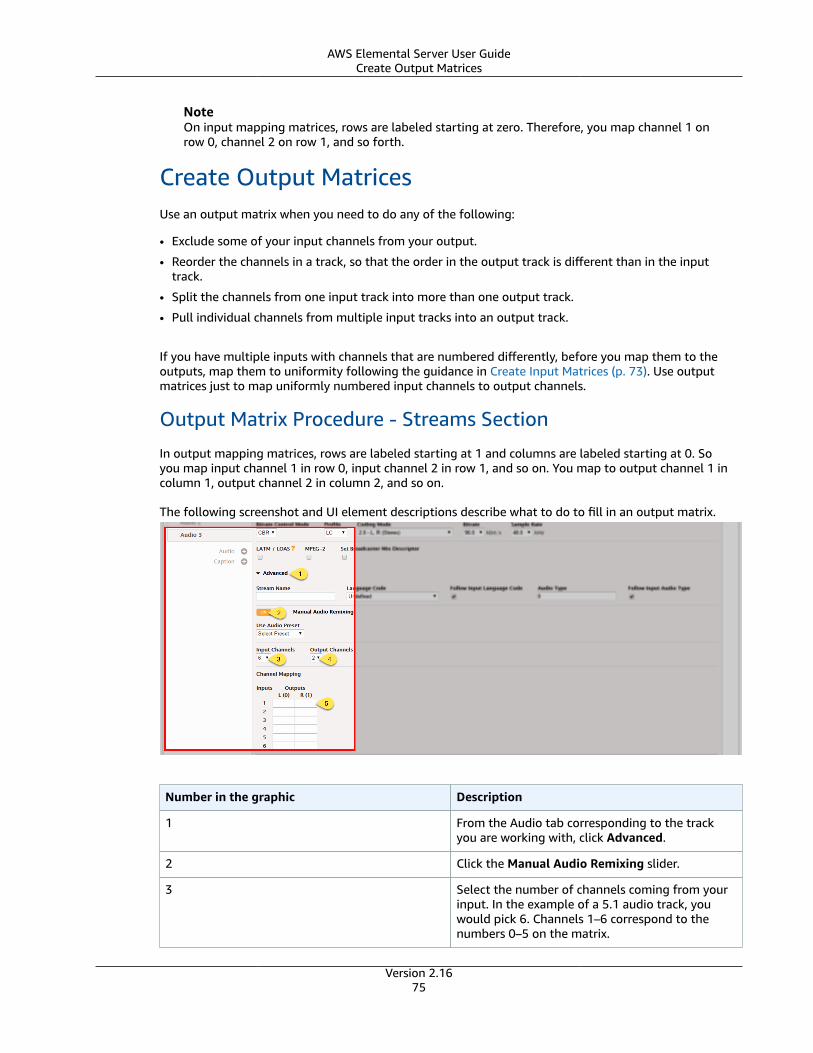
AWS Elemental Server User GuideCreate Output Matrices
NoteOn input mapping matrices, rows are labeled starting at zero. Therefore, you map channel 1 onrow 0, channel 2 on row 1, and so forth.
Create Output MatricesUse an output matrix when you need to do any of the following:
• Exclude some of your input channels from your output.
• Reorder the channels in a track, so that the order in the output track is different than in the inputtrack.
• Split the channels from one input track into more than one output track.
• Pull individual channels from multiple input tracks into an output track.
If you have multiple inputs with channels that are numbered differently, before you map them to theoutputs, map them to uniformity following the guidance in Create Input Matrices (p. 73). Use outputmatrices just to map uniformly numbered input channels to output channels.
Output Matrix Procedure - Streams Section
In output mapping matrices, rows are labeled starting at 1 and columns are labeled starting at 0. Soyou map input channel 1 in row 0, input channel 2 in row 1, and so on. You map to output channel 1 incolumn 1, output channel 2 in column 2, and so on.
The following screenshot and UI element descriptions describe what to do to fill in an output matrix.
Number in the graphic Description
1 From the Audio tab corresponding to the trackyou are working with, click Advanced.
2 Click the Manual Audio Remixing slider.
3 Select the number of channels coming from yourinput. In the example of a 5.1 audio track, youwould pick 6. Channels 1–6 correspond to thenumbers 0–5 on the matrix.
Version 2.1675
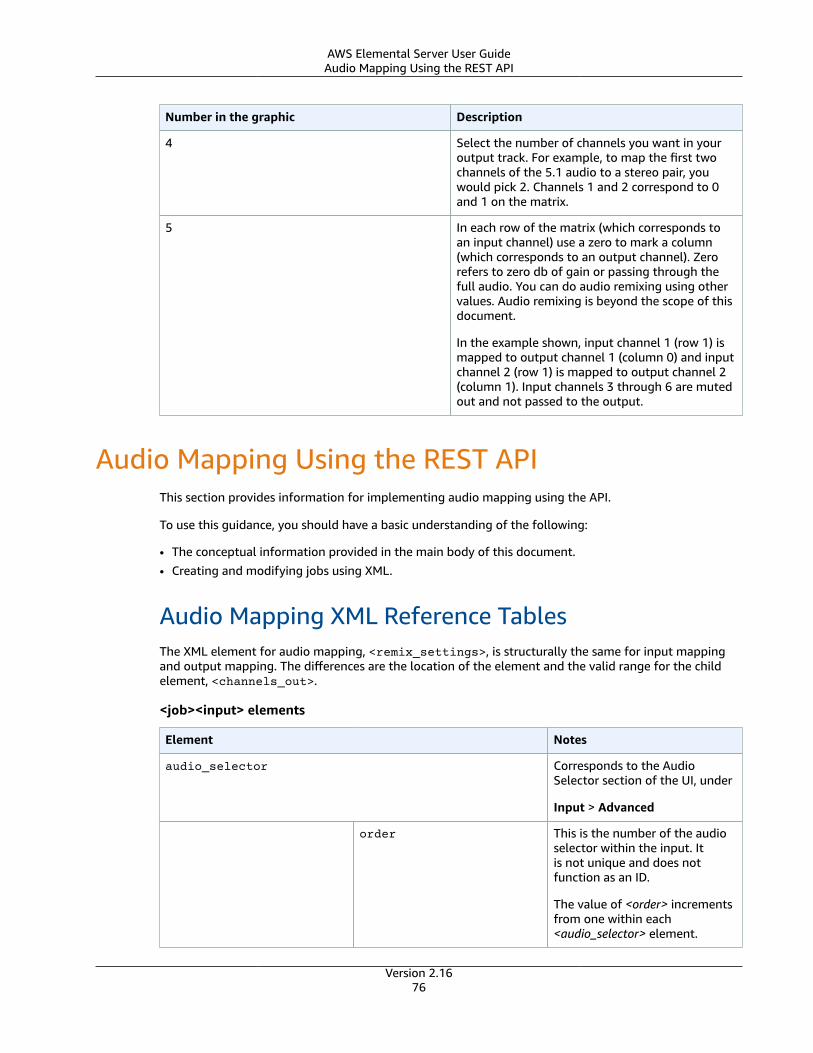
AWS Elemental Server User GuideAudio Mapping Using the REST API
Number in the graphic Description
4 Select the number of channels you want in youroutput track. For example, to map the first twochannels of the 5.1 audio to a stereo pair, youwould pick 2. Channels 1 and 2 correspond to 0and 1 on the matrix.
5 In each row of the matrix (which corresponds toan input channel) use a zero to mark a column(which corresponds to an output channel). Zerorefers to zero db of gain or passing through thefull audio. You can do audio remixing using othervalues. Audio remixing is beyond the scope of thisdocument.
In the example shown, input channel 1 (row 1) ismapped to output channel 1 (column 0) and inputchannel 2 (row 1) is mapped to output channel 2(column 1). Input channels 3 through 6 are mutedout and not passed to the output.
Audio Mapping Using the REST APIThis section provides information for implementing audio mapping using the API.
To use this guidance, you should have a basic understanding of the following:
• The conceptual information provided in the main body of this document.• Creating and modifying jobs using XML.
Audio Mapping XML Reference TablesThe XML element for audio mapping, <remix_settings>, is structurally the same for input mappingand output mapping. The differences are the location of the element and the valid range for the childelement, <channels_out>.
<job><input> elements
Element Notes
audio_selector Corresponds to the AudioSelector section of the UI, under
Input > Advanced
order This is the number of the audioselector within the input. Itis not unique and does notfunction as an ID.
The value of <order> incrementsfrom one within each<audio_selector> element.
Version 2.1676
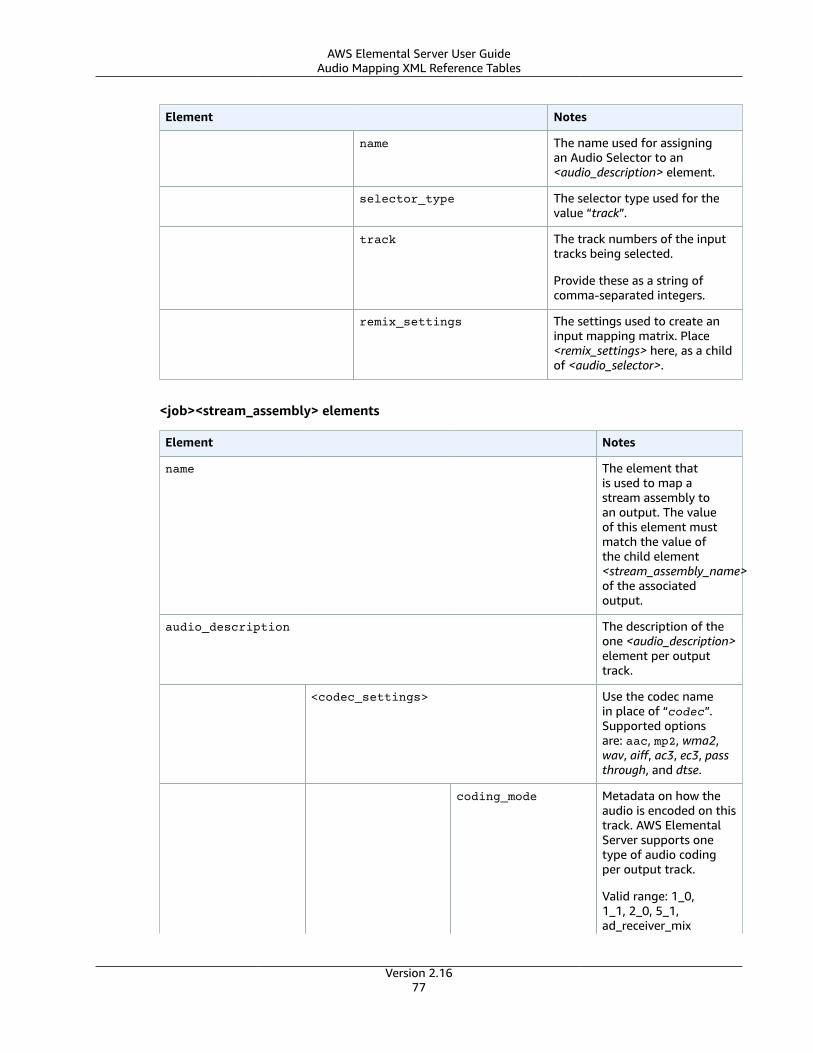
AWS Elemental Server User GuideAudio Mapping XML Reference Tables
Element Notes
name The name used for assigningan Audio Selector to an<audio_description> element.
selector_type The selector type used for thevalue “track”.
track The track numbers of the inputtracks being selected.
Provide these as a string ofcomma-separated integers.
remix_settings The settings used to create aninput mapping matrix. Place<remix_settings> here, as a childof <audio_selector>.
<job><stream_assembly> elements
Element Notes
name The element thatis used to map astream assembly toan output. The valueof this element mustmatch the value ofthe child element<stream_assembly_name>of the associatedoutput.
audio_description The description of theone <audio_description>element per outputtrack.
<codec_settings> Use the codec namein place of “codec”.Supported optionsare: aac, mp2, wma2,wav, aiff, ac3, ec3, passthrough, and dtse.
coding_mode Metadata on how theaudio is encoded on thistrack. AWS ElementalServer supports onetype of audio codingper output track.
Valid range: 1_0,1_1, 2_0, 5_1,ad_receiver_mix
Version 2.1677
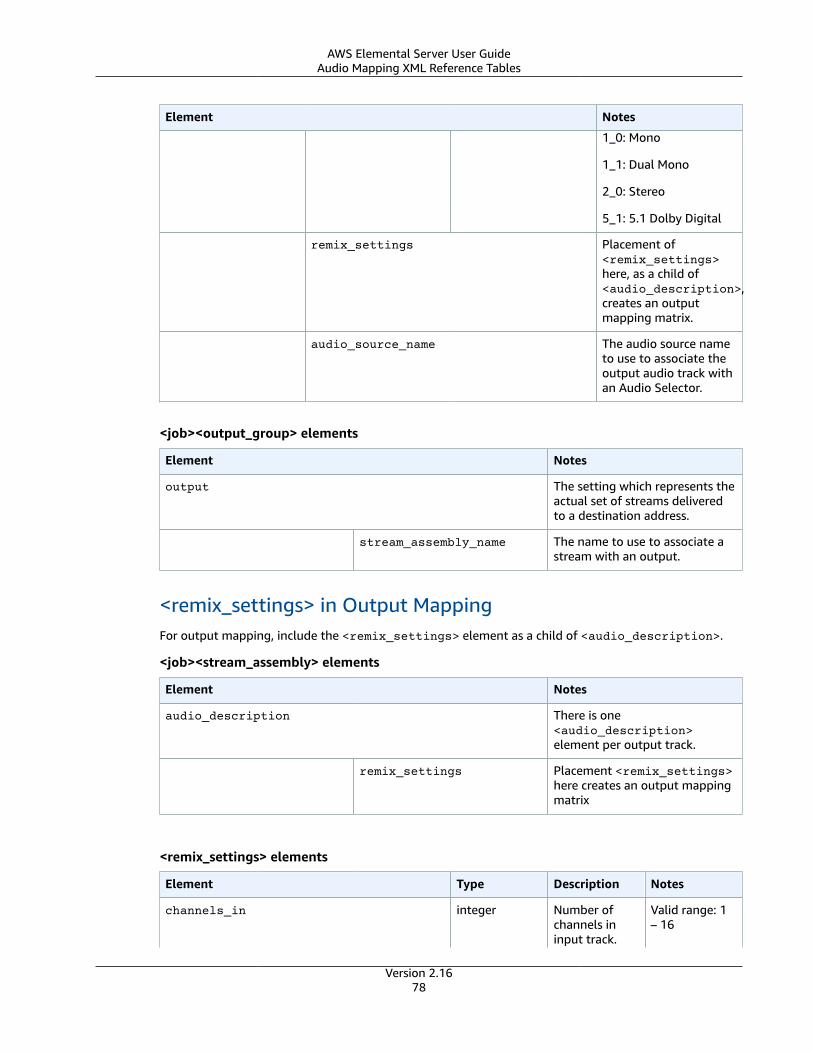
AWS Elemental Server User GuideAudio Mapping XML Reference Tables
Element Notes
1_0: Mono
1_1: Dual Mono
2_0: Stereo
5_1: 5.1 Dolby Digital
remix_settings Placement of<remix_settings>here, as a child of<audio_description>,creates an outputmapping matrix.
audio_source_name The audio source nameto use to associate theoutput audio track withan Audio Selector.
<job><output_group> elements
Element Notes
output The setting which represents theactual set of streams deliveredto a destination address.
stream_assembly_name The name to use to associate astream with an output.
<remix_settings> in Output MappingFor output mapping, include the <remix_settings> element as a child of <audio_description>.
<job><stream_assembly> elements
Element Notes
audio_description There is one<audio_description>element per output track.
remix_settings Placement <remix_settings>here creates an output mappingmatrix
<remix_settings> elements
Element Type Description Notes
channels_in integer Number ofchannels ininput track.
Valid range: 1– 16
Version 2.1678
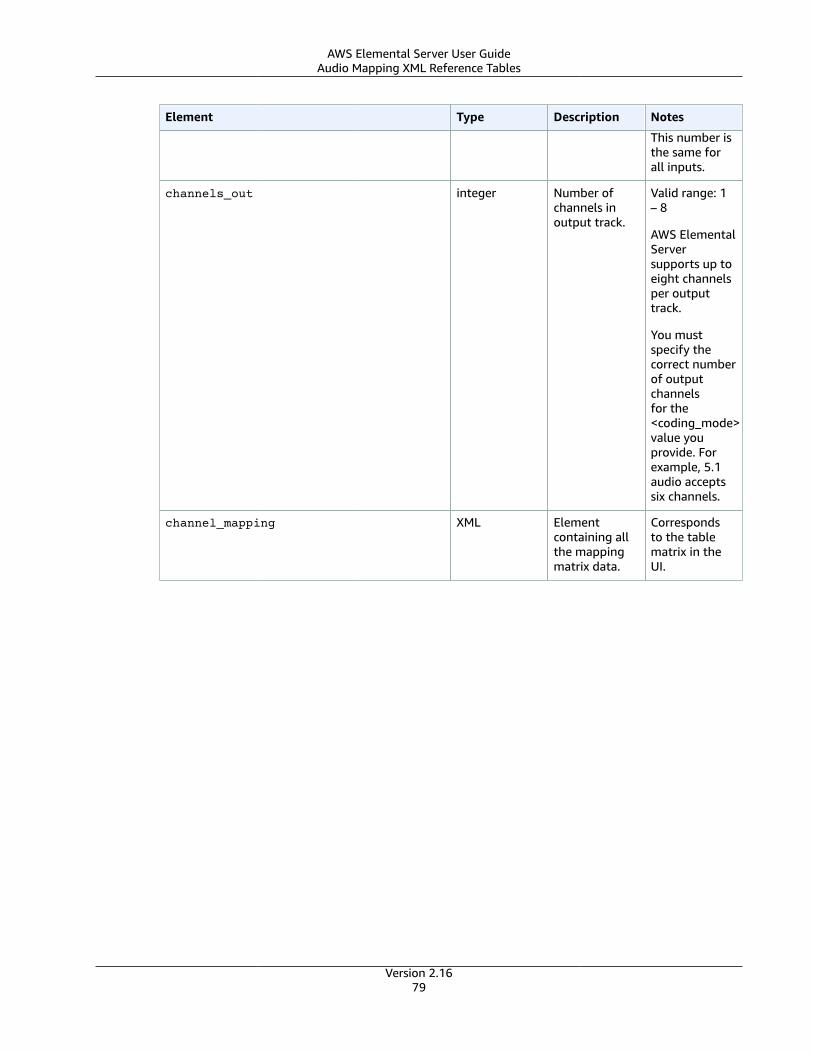
AWS Elemental Server User GuideAudio Mapping XML Reference Tables
Element Type Description Notes
This number isthe same forall inputs.
channels_out integer Number ofchannels inoutput track.
Valid range: 1– 8
AWS ElementalServersupports up toeight channelsper outputtrack.
You mustspecify thecorrect numberof outputchannelsfor the<coding_mode>value youprovide. Forexample, 5.1audio acceptssix channels.
channel_mapping XML Elementcontaining allthe mappingmatrix data.
Correspondsto the tablematrix in theUI.
Version 2.1679
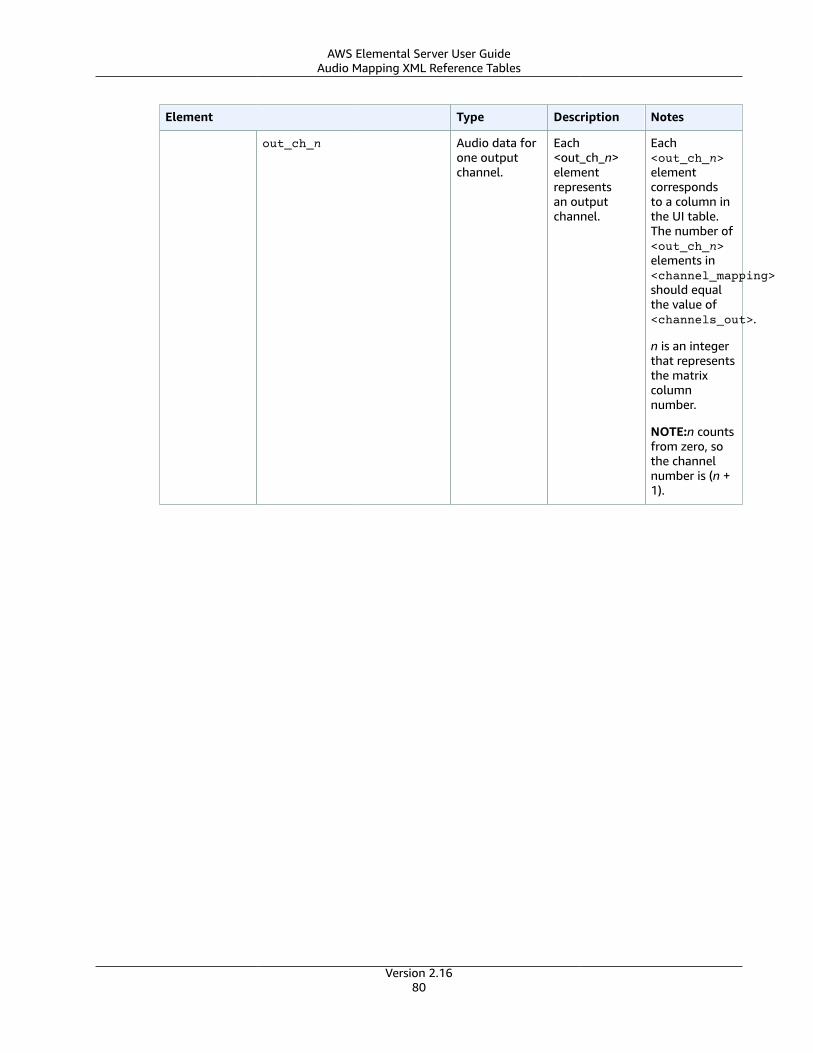
AWS Elemental Server User GuideAudio Mapping XML Reference Tables
Element Type Description Notes
out_ch_n Audio data forone outputchannel.
Each<out_ch_n>elementrepresentsan outputchannel.
Each<out_ch_n>elementcorrespondsto a column inthe UI table.The number of<out_ch_n>elements in<channel_mapping>should equalthe value of<channels_out>.
n is an integerthat representsthe matrixcolumnnumber.
NOTE:n countsfrom zero, sothe channelnumber is (n +1).
Version 2.1680

AWS Elemental Server User GuideAudio Mapping XML Reference Tables
Element Type Description Notes
in_ch_m integer The amount ofaudio from theinput channelthat is passedinto the outputchannel in dBgain.
Valid range:-60 to 60
0: Pass throughaudio at samelevel as input
-60: Mutechannel
Each<in_ch_m>elementcorrespondsto the cell inthe nth columnand mth row ofthe UI table.
m is an integerthat representsthe matrix rownumber.
The numberof <in_ch_m>elements in<out_ch_n>should equalthe value of<channels_in>.
NOTE:mcounts fromzero, so thechannelnumber is (m +1).
<remix_settings> Input Mapping
For input mapping, include the <remix_settings> element as a child of <audio_selector>. The<audio_selector> corresponds to the Audio Selector section of the web UI. Both represent an inputaudio track.
<job><input> elements
Element Notes
audio_selector The setting which represents the audioinformation for a single track from the input.
Placement of the <remix_settings> elementhere creates an input mapping matrix.
Version 2.1681
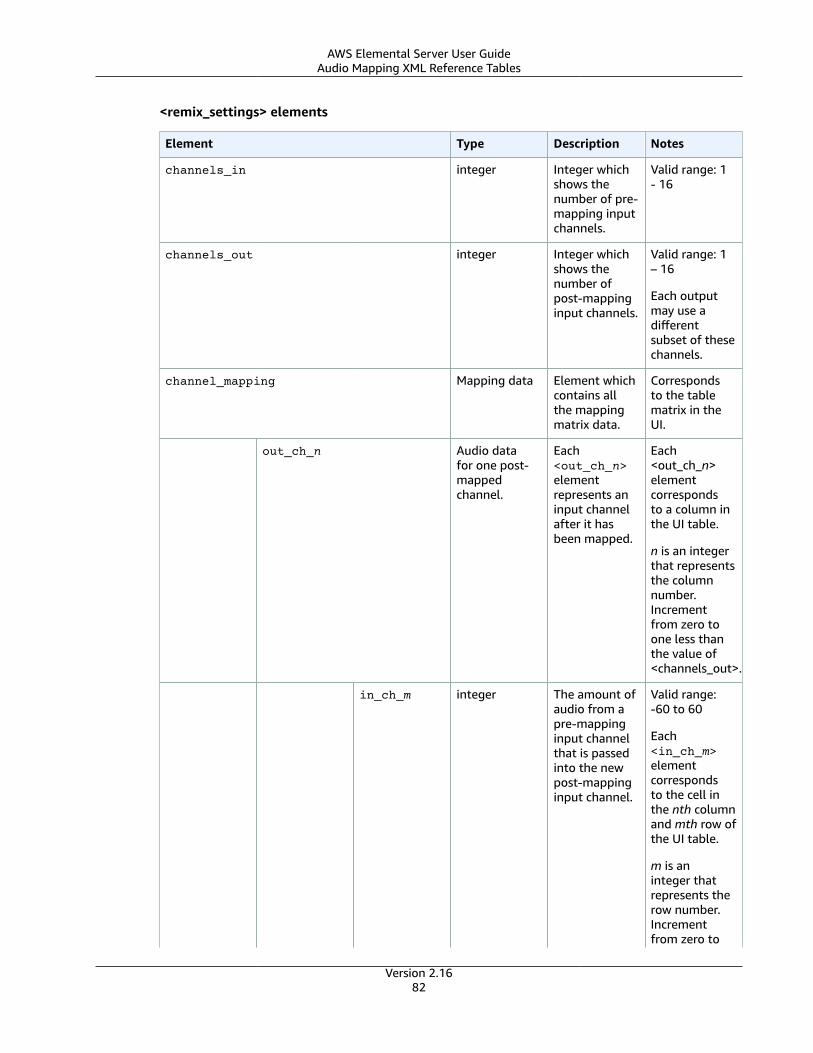
AWS Elemental Server User GuideAudio Mapping XML Reference Tables
<remix_settings> elements
Element Type Description Notes
channels_in integer Integer whichshows thenumber of pre-mapping inputchannels.
Valid range: 1- 16
channels_out integer Integer whichshows thenumber ofpost-mappinginput channels.
Valid range: 1– 16
Each outputmay use adifferentsubset of thesechannels.
channel_mapping Mapping data Element whichcontains allthe mappingmatrix data.
Correspondsto the tablematrix in theUI.
out_ch_n Audio datafor one post-mappedchannel.
Each<out_ch_n>elementrepresents aninput channelafter it hasbeen mapped.
Each<out_ch_n>elementcorrespondsto a column inthe UI table.
n is an integerthat representsthe columnnumber.Incrementfrom zero toone less thanthe value of<channels_out>.
in_ch_m integer The amount ofaudio from apre-mappinginput channelthat is passedinto the newpost-mappinginput channel.
Valid range:-60 to 60
Each<in_ch_m>elementcorrespondsto the cell inthe nth columnand mth row ofthe UI table.
m is aninteger thatrepresents therow number.Incrementfrom zero to
Version 2.1682
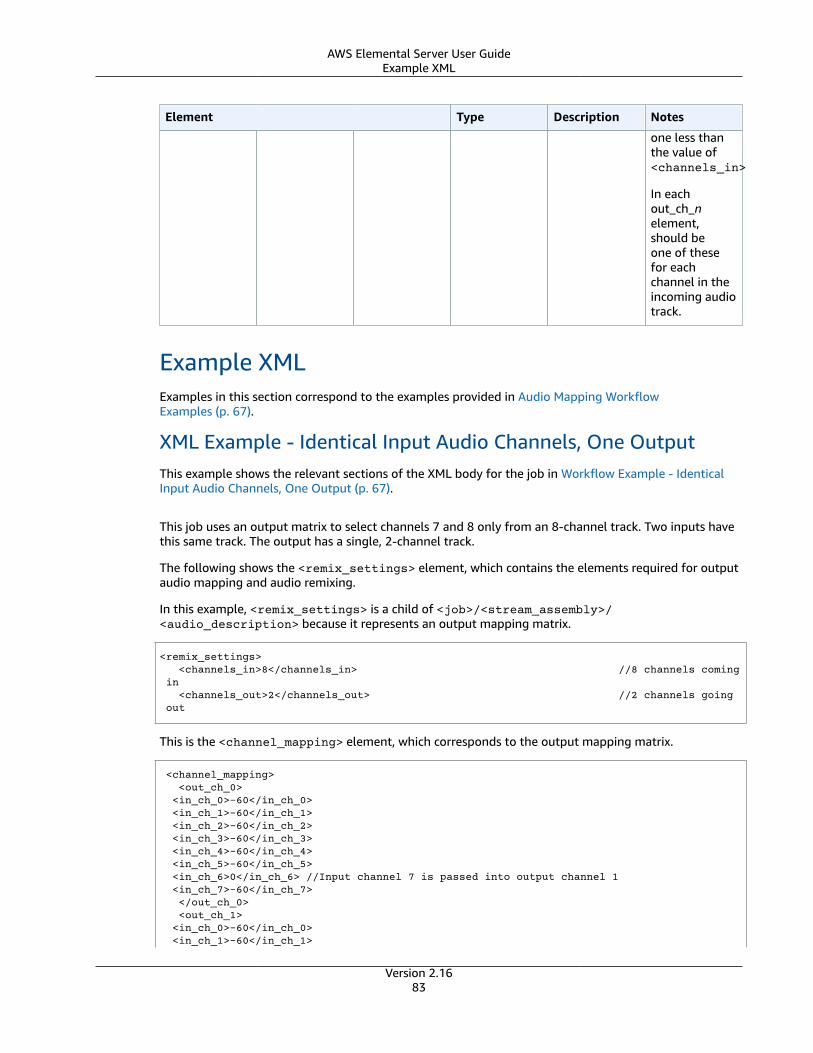
AWS Elemental Server User GuideExample XML
Element Type Description Notes
one less thanthe value of<channels_in>
In eachout_ch_nelement,should beone of thesefor eachchannel in theincoming audiotrack.
Example XMLExamples in this section correspond to the examples provided in Audio Mapping WorkflowExamples (p. 67).
XML Example - Identical Input Audio Channels, One OutputThis example shows the relevant sections of the XML body for the job in Workflow Example - IdenticalInput Audio Channels, One Output (p. 67).
This job uses an output matrix to select channels 7 and 8 only from an 8-channel track. Two inputs havethis same track. The output has a single, 2-channel track.
The following shows the <remix_settings> element, which contains the elements required for outputaudio mapping and audio remixing.
In this example, <remix_settings> is a child of <job>/<stream_assembly>/<audio_description> because it represents an output mapping matrix.
<remix_settings> <channels_in>8</channels_in> //8 channels coming in <channels_out>2</channels_out> //2 channels going out
This is the <channel_mapping> element, which corresponds to the output mapping matrix.
<channel_mapping> <out_ch_0> <in_ch_0>-60</in_ch_0> <in_ch_1>-60</in_ch_1> <in_ch_2>-60</in_ch_2> <in_ch_3>-60</in_ch_3> <in_ch_4>-60</in_ch_4> <in_ch_5>-60</in_ch_5> <in_ch_6>0</in_ch_6> //Input channel 7 is passed into output channel 1 <in_ch_7>-60</in_ch_7> </out_ch_0> <out_ch_1> <in_ch_0>-60</in_ch_0> <in_ch_1>-60</in_ch_1>
Version 2.1683
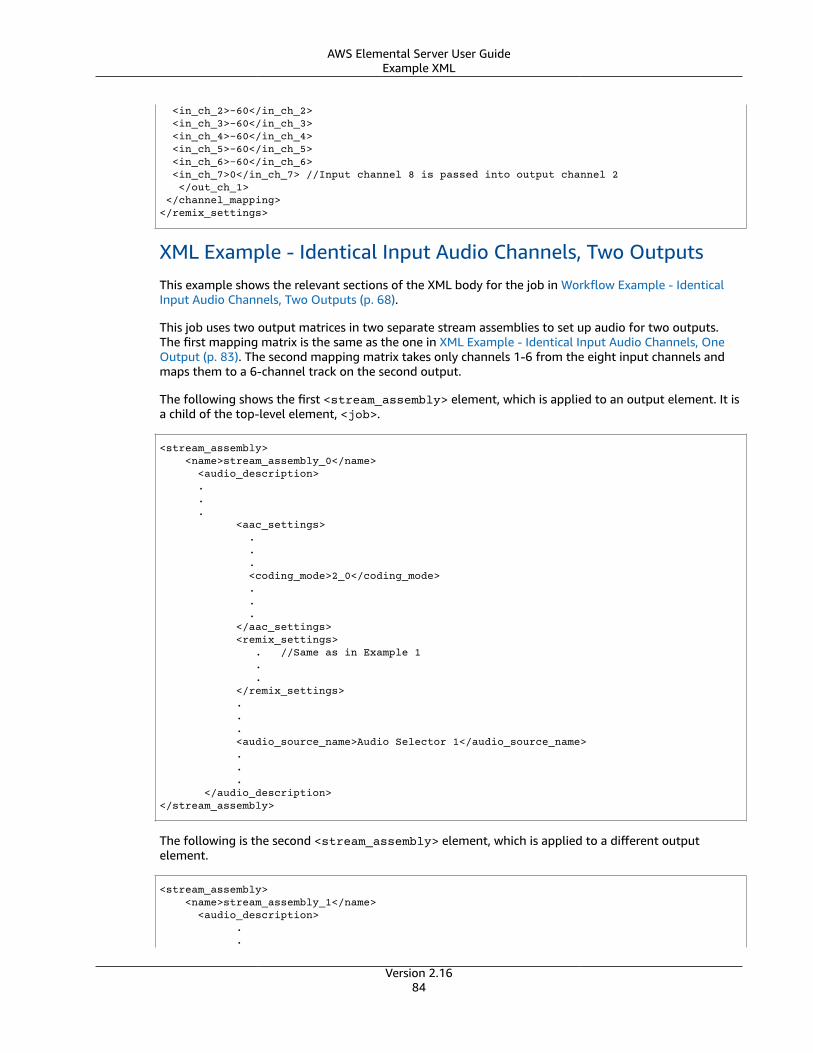
AWS Elemental Server User GuideExample XML
<in_ch_2>-60</in_ch_2> <in_ch_3>-60</in_ch_3> <in_ch_4>-60</in_ch_4> <in_ch_5>-60</in_ch_5> <in_ch_6>-60</in_ch_6> <in_ch_7>0</in_ch_7> //Input channel 8 is passed into output channel 2 </out_ch_1> </channel_mapping></remix_settings>
XML Example - Identical Input Audio Channels, Two OutputsThis example shows the relevant sections of the XML body for the job in Workflow Example - IdenticalInput Audio Channels, Two Outputs (p. 68).
This job uses two output matrices in two separate stream assemblies to set up audio for two outputs.The first mapping matrix is the same as the one in XML Example - Identical Input Audio Channels, OneOutput (p. 83). The second mapping matrix takes only channels 1-6 from the eight input channels andmaps them to a 6-channel track on the second output.
The following shows the first <stream_assembly> element, which is applied to an output element. It isa child of the top-level element, <job>.
<stream_assembly> <name>stream_assembly_0</name> <audio_description> . . . <aac_settings> . . . <coding_mode>2_0</coding_mode> . . . </aac_settings> <remix_settings> . //Same as in Example 1 . . </remix_settings> . . . <audio_source_name>Audio Selector 1</audio_source_name> . . . </audio_description></stream_assembly>
The following is the second <stream_assembly> element, which is applied to a different outputelement.
<stream_assembly> <name>stream_assembly_1</name> <audio_description> . .
Version 2.1684
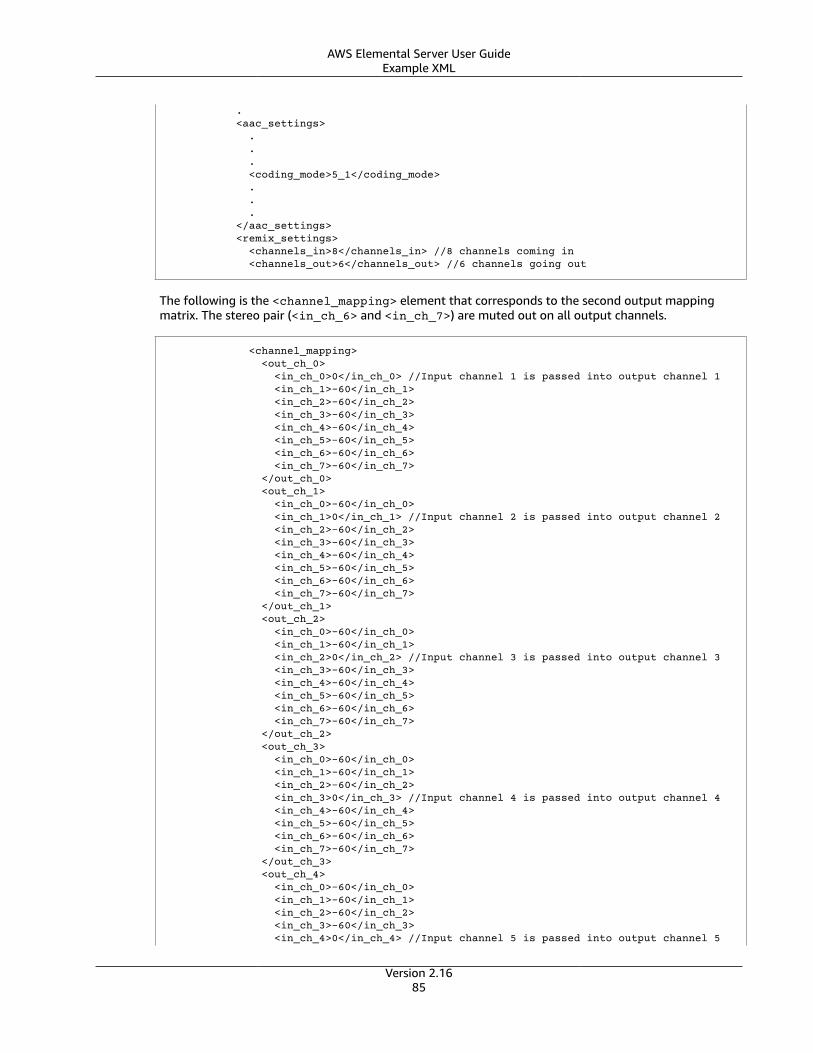
AWS Elemental Server User GuideExample XML
. <aac_settings> . . . <coding_mode>5_1</coding_mode> . . . </aac_settings> <remix_settings> <channels_in>8</channels_in> //8 channels coming in <channels_out>6</channels_out> //6 channels going out
The following is the <channel_mapping> element that corresponds to the second output mappingmatrix. The stereo pair (<in_ch_6> and <in_ch_7>) are muted out on all output channels.
<channel_mapping> <out_ch_0> <in_ch_0>0</in_ch_0> //Input channel 1 is passed into output channel 1 <in_ch_1>-60</in_ch_1> <in_ch_2>-60</in_ch_2> <in_ch_3>-60</in_ch_3> <in_ch_4>-60</in_ch_4> <in_ch_5>-60</in_ch_5> <in_ch_6>-60</in_ch_6> <in_ch_7>-60</in_ch_7> </out_ch_0> <out_ch_1> <in_ch_0>-60</in_ch_0> <in_ch_1>0</in_ch_1> //Input channel 2 is passed into output channel 2 <in_ch_2>-60</in_ch_2> <in_ch_3>-60</in_ch_3> <in_ch_4>-60</in_ch_4> <in_ch_5>-60</in_ch_5> <in_ch_6>-60</in_ch_6> <in_ch_7>-60</in_ch_7> </out_ch_1> <out_ch_2> <in_ch_0>-60</in_ch_0> <in_ch_1>-60</in_ch_1> <in_ch_2>0</in_ch_2> //Input channel 3 is passed into output channel 3 <in_ch_3>-60</in_ch_3> <in_ch_4>-60</in_ch_4> <in_ch_5>-60</in_ch_5> <in_ch_6>-60</in_ch_6> <in_ch_7>-60</in_ch_7> </out_ch_2> <out_ch_3> <in_ch_0>-60</in_ch_0> <in_ch_1>-60</in_ch_1> <in_ch_2>-60</in_ch_2> <in_ch_3>0</in_ch_3> //Input channel 4 is passed into output channel 4 <in_ch_4>-60</in_ch_4> <in_ch_5>-60</in_ch_5> <in_ch_6>-60</in_ch_6> <in_ch_7>-60</in_ch_7> </out_ch_3> <out_ch_4> <in_ch_0>-60</in_ch_0> <in_ch_1>-60</in_ch_1> <in_ch_2>-60</in_ch_2> <in_ch_3>-60</in_ch_3> <in_ch_4>0</in_ch_4> //Input channel 5 is passed into output channel 5
Version 2.1685

AWS Elemental Server User GuideExample XML
<in_ch_5>-60</in_ch_5> <in_ch_6>-60</in_ch_6> <in_ch_7>-60</in_ch_7> </out_ch_4> <out_ch_5> <in_ch_0>-60</in_ch_0> <in_ch_1>-60</in_ch_1> <in_ch_2>-60</in_ch_2> <in_ch_3>-60</in_ch_3> <in_ch_4>-60</in_ch_4> <in_ch_5>0</in_ch_5> //Input channel 6 is passed into output channel 6 <in_ch_6>-60</in_ch_6> <in_ch_7>-60</in_ch_7> </out_ch_5> </channel_mapping> </remix_settings> . . . . </audio_description></stream_assembly>
The following is the first <output> element, which we associate with the first stream assembly,so the stereo pair ends up on this output. In this example, both outputs are children of the same<output_group> element. <output_group> is a child of <job>.
<output_group> . . . <output> . . . <stream_assembly_name>stream_assembly_0</stream_assembly_name> . . . </output>
The following is the second <output> element, which we associate with the second stream assembly, sothe 5.1 audio ends up on this output.
<output> . . . <stream_assembly_name>stream_assembly_1</stream_assembly_name> . . . </output></output_group>
XML Example - Inputs Have Audio Channels in Different OrderThis example shows the relevant sections of the XML body for the job in Workflow Example - Inputs HaveAudio Channels in Different Order (p. 69).
This job takes two inputs, both with stereo and 5.1 audio. Each input has the audio on different channels.To bring the inputs together, this job uses an input mapping matrix on the second input that reorders
Version 2.1686
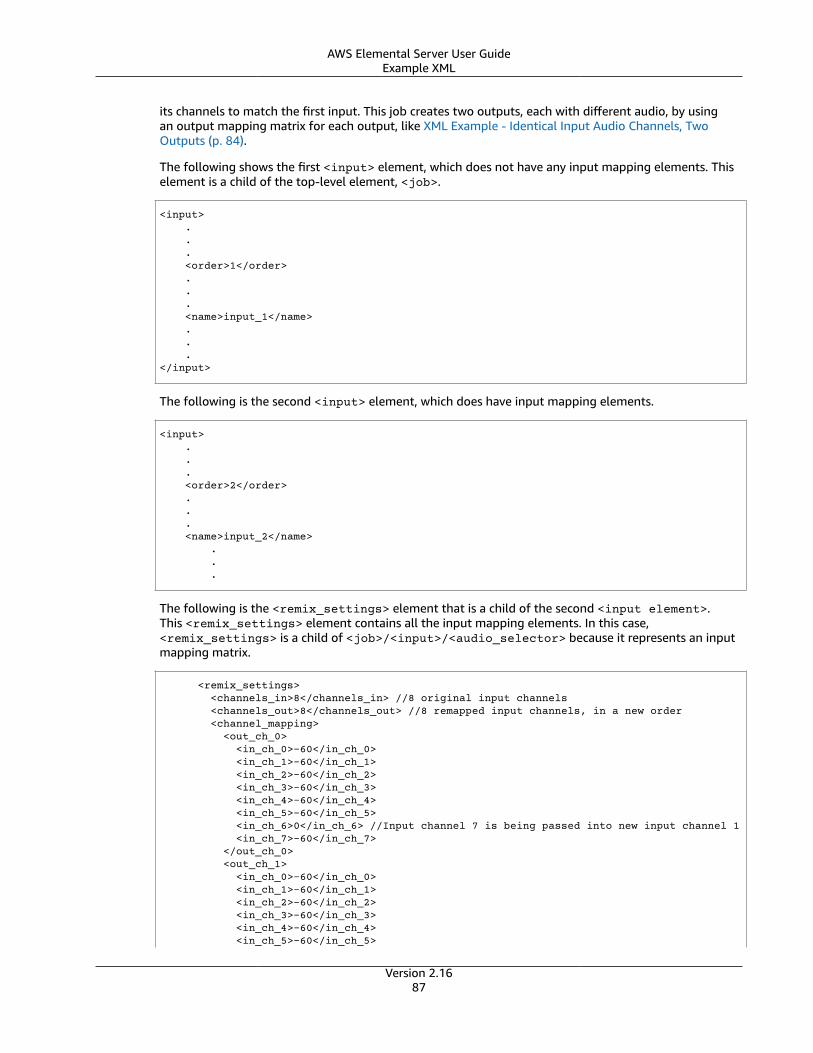
AWS Elemental Server User GuideExample XML
its channels to match the first input. This job creates two outputs, each with different audio, by usingan output mapping matrix for each output, like XML Example - Identical Input Audio Channels, TwoOutputs (p. 84).
The following shows the first <input> element, which does not have any input mapping elements. Thiselement is a child of the top-level element, <job>.
<input> . . . <order>1</order> . . . <name>input_1</name> . . .</input>
The following is the second <input> element, which does have input mapping elements.
<input> . . . <order>2</order> . . . <name>input_2</name> . . .
The following is the <remix_settings> element that is a child of the second <input element>.This <remix_settings> element contains all the input mapping elements. In this case,<remix_settings> is a child of <job>/<input>/<audio_selector> because it represents an inputmapping matrix.
<remix_settings> <channels_in>8</channels_in> //8 original input channels <channels_out>8</channels_out> //8 remapped input channels, in a new order <channel_mapping> <out_ch_0> <in_ch_0>-60</in_ch_0> <in_ch_1>-60</in_ch_1> <in_ch_2>-60</in_ch_2> <in_ch_3>-60</in_ch_3> <in_ch_4>-60</in_ch_4> <in_ch_5>-60</in_ch_5> <in_ch_6>0</in_ch_6> //Input channel 7 is being passed into new input channel 1 <in_ch_7>-60</in_ch_7> </out_ch_0> <out_ch_1> <in_ch_0>-60</in_ch_0> <in_ch_1>-60</in_ch_1> <in_ch_2>-60</in_ch_2> <in_ch_3>-60</in_ch_3> <in_ch_4>-60</in_ch_4> <in_ch_5>-60</in_ch_5>
Version 2.1687
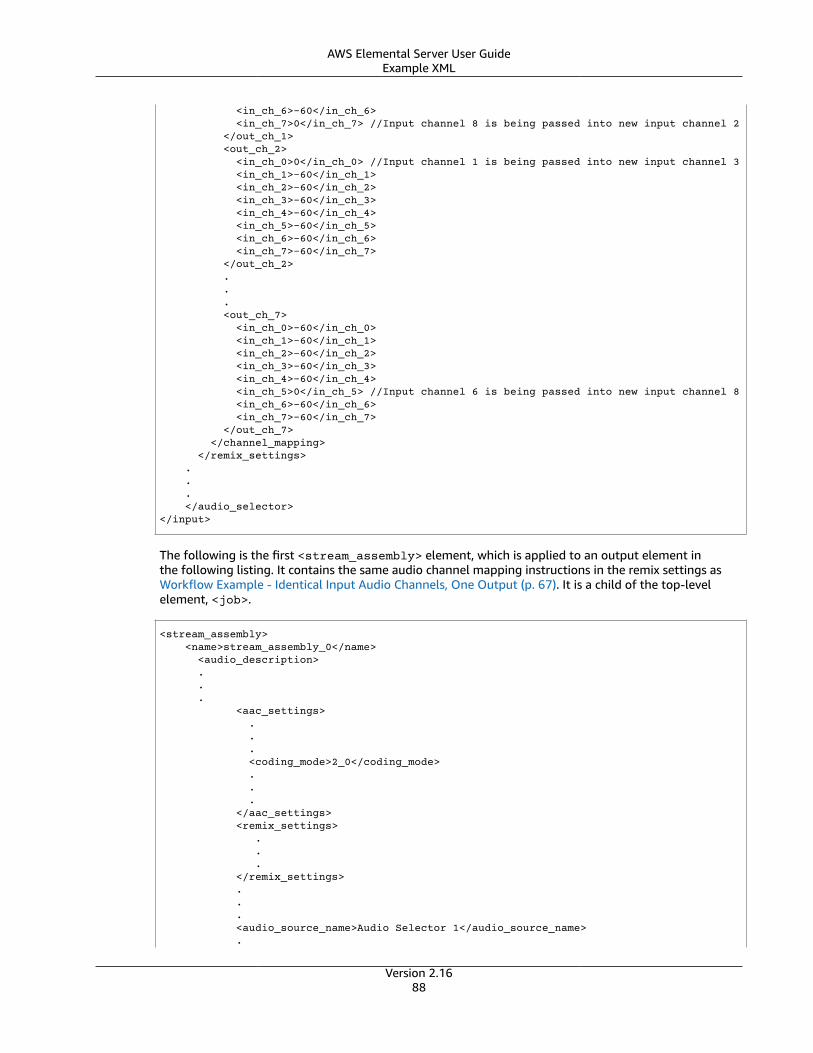
AWS Elemental Server User GuideExample XML
<in_ch_6>-60</in_ch_6> <in_ch_7>0</in_ch_7> //Input channel 8 is being passed into new input channel 2 </out_ch_1> <out_ch_2> <in_ch_0>0</in_ch_0> //Input channel 1 is being passed into new input channel 3 <in_ch_1>-60</in_ch_1> <in_ch_2>-60</in_ch_2> <in_ch_3>-60</in_ch_3> <in_ch_4>-60</in_ch_4> <in_ch_5>-60</in_ch_5> <in_ch_6>-60</in_ch_6> <in_ch_7>-60</in_ch_7> </out_ch_2> . . . <out_ch_7> <in_ch_0>-60</in_ch_0> <in_ch_1>-60</in_ch_1> <in_ch_2>-60</in_ch_2> <in_ch_3>-60</in_ch_3> <in_ch_4>-60</in_ch_4> <in_ch_5>0</in_ch_5> //Input channel 6 is being passed into new input channel 8 <in_ch_6>-60</in_ch_6> <in_ch_7>-60</in_ch_7> </out_ch_7> </channel_mapping> </remix_settings> . . . </audio_selector></input>
The following is the first <stream_assembly> element, which is applied to an output element inthe following listing. It contains the same audio channel mapping instructions in the remix settings asWorkflow Example - Identical Input Audio Channels, One Output (p. 67). It is a child of the top-levelelement, <job>.
<stream_assembly> <name>stream_assembly_0</name> <audio_description> . . . <aac_settings> . . . <coding_mode>2_0</coding_mode> . . . </aac_settings> <remix_settings> . . . </remix_settings> . . . <audio_source_name>Audio Selector 1</audio_source_name> .
Version 2.1688
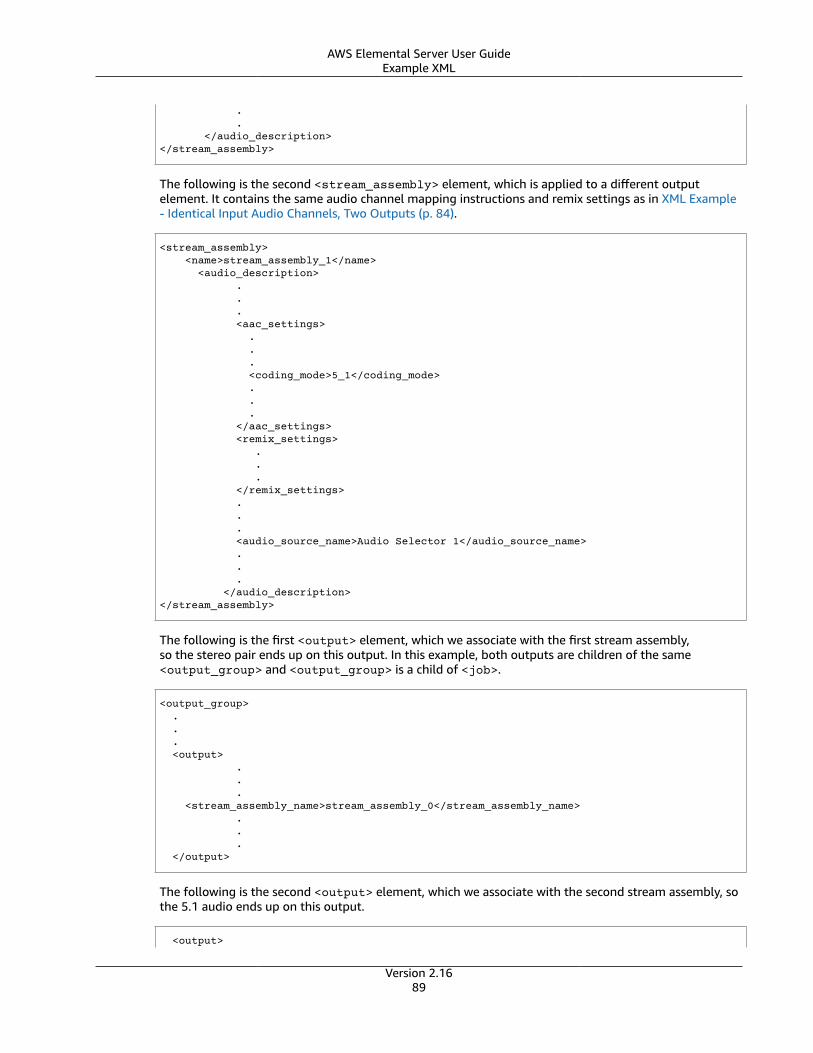
AWS Elemental Server User GuideExample XML
. . </audio_description></stream_assembly>
The following is the second <stream_assembly> element, which is applied to a different outputelement. It contains the same audio channel mapping instructions and remix settings as in XML Example- Identical Input Audio Channels, Two Outputs (p. 84).
<stream_assembly> <name>stream_assembly_1</name> <audio_description> . . . <aac_settings> . . . <coding_mode>5_1</coding_mode> . . . </aac_settings> <remix_settings> . . . </remix_settings> . . . <audio_source_name>Audio Selector 1</audio_source_name> . . . </audio_description></stream_assembly>
The following is the first <output> element, which we associate with the first stream assembly,so the stereo pair ends up on this output. In this example, both outputs are children of the same<output_group> and <output_group> is a child of <job>.
<output_group> . . . <output> . . . <stream_assembly_name>stream_assembly_0</stream_assembly_name> . . . </output>
The following is the second <output> element, which we associate with the second stream assembly, sothe 5.1 audio ends up on this output.
<output>
Version 2.1689

AWS Elemental Server User GuideExample XML
. . . <stream_assembly_name>stream_assembly_1</stream_assembly_name> . . . </output></output_group>
Version 2.1690
AWS Elemental Server User GuideCategories of Metadata: Delivered and Encoder Control
Working with Dolby Metadata
Audio encoded with a Dolby codec always includes Dolby metadata, as per the ATSC A/52 2012standard. This Dolby metadata is used by AWS Elemental Server in two ways when the stream is encodedwith Dolby codec:
• It is used to manipulate the audio just before encoding the output.
• It is included in the metadata for the output stream.
This document describes how to set up an AWS Elemental Server profile or job to use Dolby metadata inthese ways.
Dolby metadata is supported in the output only when the audio codec for the output is Dolby Digital(also known as AC3) or Dolby Digital Plus (also known as Enhanced AC3).
Topics
• Categories of Metadata: Delivered and Encoder Control (p. 91)
• Source of AWS Elemental Server Metadata (p. 92)
• Impact of the Metadata on the Output Audio (p. 92)
• Combinations of Input and Output Codec (p. 92)
• Setting Up the Profile or Event Using the Web Interface (p. 93)
• Output with the Dolby Digital Codec (p. 96)
• Output with Dolby Digital Plus (EC2, EAC3) Codec (p. 99)
Categories of Metadata: Delivered and EncoderControl
There are two categories of parameters in the Dolby metadata, characterized by how AWS ElementalServer uses it:
• Delivered: AWS Elemental Server does not read these parameters, so they have no effect on the audioproduced by AWS Elemental Server. Instead, they are included as metadata in the output in order todeliver them to the downstream decoder.
“Delivered” metadata is also called Consumer metadata because it is intended to be used by the endconsumer’s home decoder.
• Encoder Control: AWS Elemental Server uses these parameters to manipulate the audio just beforeencoding the stream and producing the output. They provide a mechanism for AWS Elemental Serverto control the transcoding performed by AWS Elemental Server. These parameters are never includedin the output metadata.
“Encoder Control” metadata is also called Professional metadata because it is intended to be used bya professional device – in our case AWS Elemental Server. It is never intended for the end consumer'shome decoder.
Version 2.1691

AWS Elemental Server User GuideSource of AWS Elemental Server Metadata
Source of AWS Elemental Server MetadataThe metadata that AWS Elemental Server emits can come from one of two sources:
• Metadata that is already in the source. Only audio sources that use a Dolby codec can include thismetadata. Different Dolby codecs include different categories of metadata as shown in this table.
Codec Categories Present
Dolby Digital or Dolby Digital Plus Delivered only
Dolby E Delivered and Encoder Control
• Metadata that is specified by completing metadata fields in the profile or event. You can specify thismetadata in any audio whose output codec is a Dolby codec. In other words, you can add it when theaudio source is not a Dolby codec as long as the output audio uses a Dolby codec.
Both categories of metadata can be specified when specifying this source.
You specify the source when setting up the profile or event.
Impact of the Metadata on the Output AudioRegardless of the source of the metadata, it affects the audio (either by manipulating encoder control orby being included in the output metadata) but only if the output codec is Dolby Digital or Dolby DigitalPlus.
Combinations of Input and Output CodecThe possible input and output codec combinations (in which at least one codec is a Dolby codec) are asfollows. All these combinations support including metadata in the output.
Input Codec Output Codec
Dolby Digital or Dolby Digital Plus Dolby Digital or Dolby Digital Plus
Dolby Digital Dolby Digital Passthrough (so Dolby Digital audiois passed through; it is not transcoded)
Dolby Digital Plus Dolby Digital Passthrough (so Dolby Digital Plusaudio is passed through; it is not transcoded)
Mix of Dolby Digital Plus and another codec Dolby Digital Plus (with the AutomaticPassthrough field checked)
Dolby E Dolby Digital
Dolby E Dolby Digital Plus
Dolby E Dolby E (passthrough )
A non-Dolby codec Dolby Digital or Dolby Digital Plus
Version 2.1692
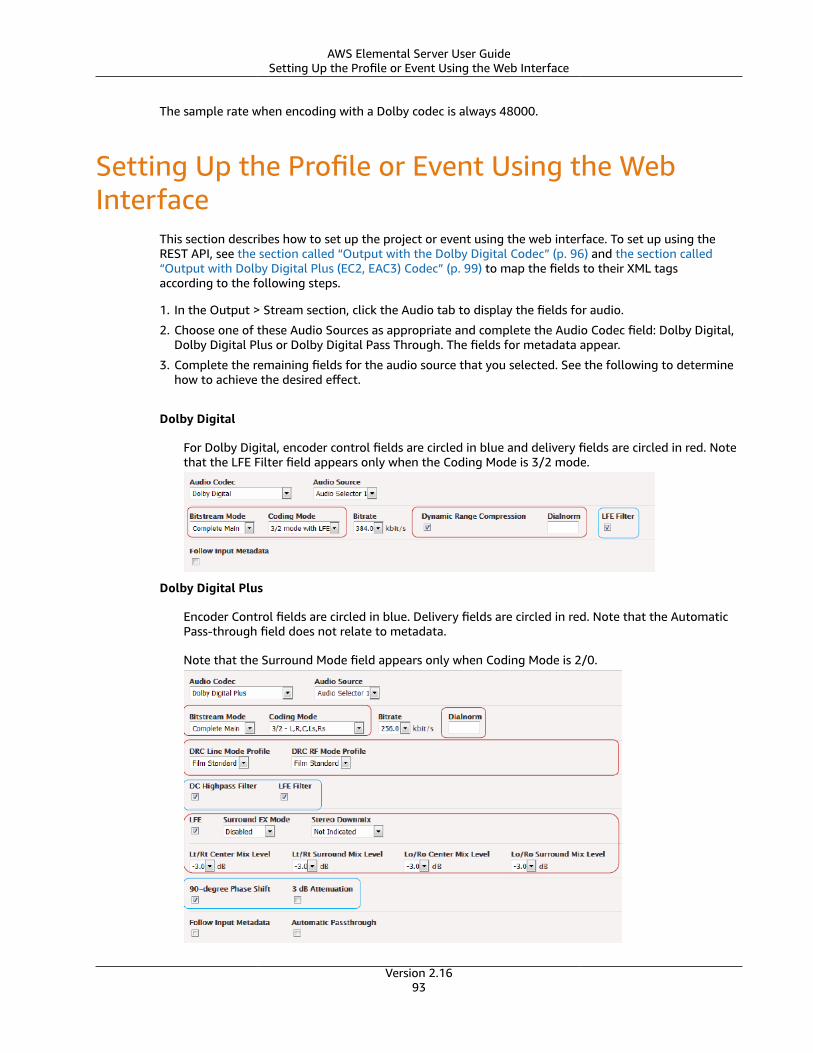
AWS Elemental Server User GuideSetting Up the Profile or Event Using the Web Interface
The sample rate when encoding with a Dolby codec is always 48000.
Setting Up the Profile or Event Using the WebInterface
This section describes how to set up the project or event using the web interface. To set up using theREST API, see the section called “Output with the Dolby Digital Codec” (p. 96) and the section called“Output with Dolby Digital Plus (EC2, EAC3) Codec” (p. 99) to map the fields to their XML tagsaccording to the following steps.
1. In the Output > Stream section, click the Audio tab to display the fields for audio.
2. Choose one of these Audio Sources as appropriate and complete the Audio Codec field: Dolby Digital,Dolby Digital Plus or Dolby Digital Pass Through. The fields for metadata appear.
3. Complete the remaining fields for the audio source that you selected. See the following to determinehow to achieve the desired effect.
Dolby Digital
For Dolby Digital, encoder control fields are circled in blue and delivery fields are circled in red. Notethat the LFE Filter field appears only when the Coding Mode is 3/2 mode.
Dolby Digital Plus
Encoder Control fields are circled in blue. Delivery fields are circled in red. Note that the AutomaticPass-through field does not relate to metadata.
Note that the Surround Mode field appears only when Coding Mode is 2/0.
Version 2.1693
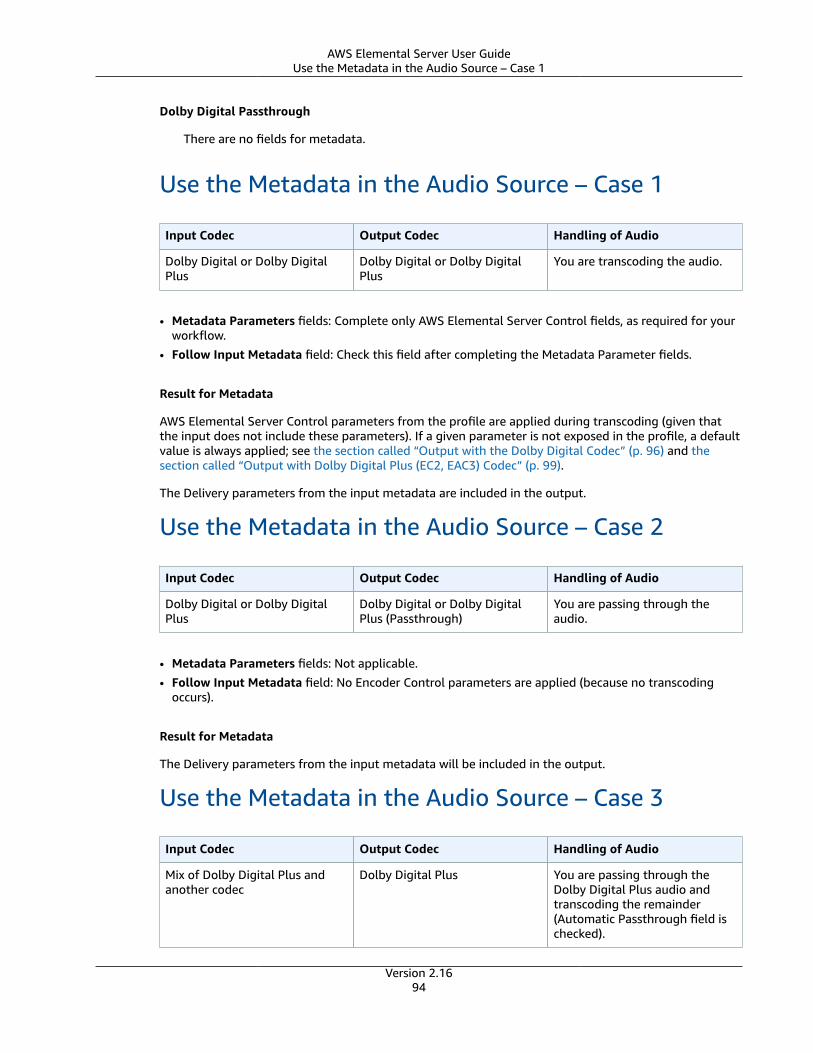
AWS Elemental Server User GuideUse the Metadata in the Audio Source – Case 1
Dolby Digital Passthrough
There are no fields for metadata.
Use the Metadata in the Audio Source – Case 1
Input Codec Output Codec Handling of Audio
Dolby Digital or Dolby DigitalPlus
Dolby Digital or Dolby DigitalPlus
You are transcoding the audio.
• Metadata Parameters fields: Complete only AWS Elemental Server Control fields, as required for yourworkflow.
• Follow Input Metadata field: Check this field after completing the Metadata Parameter fields.
Result for Metadata
AWS Elemental Server Control parameters from the profile are applied during transcoding (given thatthe input does not include these parameters). If a given parameter is not exposed in the profile, a defaultvalue is always applied; see the section called “Output with the Dolby Digital Codec” (p. 96) and thesection called “Output with Dolby Digital Plus (EC2, EAC3) Codec” (p. 99).
The Delivery parameters from the input metadata are included in the output.
Use the Metadata in the Audio Source – Case 2
Input Codec Output Codec Handling of Audio
Dolby Digital or Dolby DigitalPlus
Dolby Digital or Dolby DigitalPlus (Passthrough)
You are passing through theaudio.
• Metadata Parameters fields: Not applicable.• Follow Input Metadata field: No Encoder Control parameters are applied (because no transcoding
occurs).
Result for Metadata
The Delivery parameters from the input metadata will be included in the output.
Use the Metadata in the Audio Source – Case 3
Input Codec Output Codec Handling of Audio
Mix of Dolby Digital Plus andanother codec
Dolby Digital Plus You are passing through theDolby Digital Plus audio andtranscoding the remainder(Automatic Passthrough field ischecked).
Version 2.1694
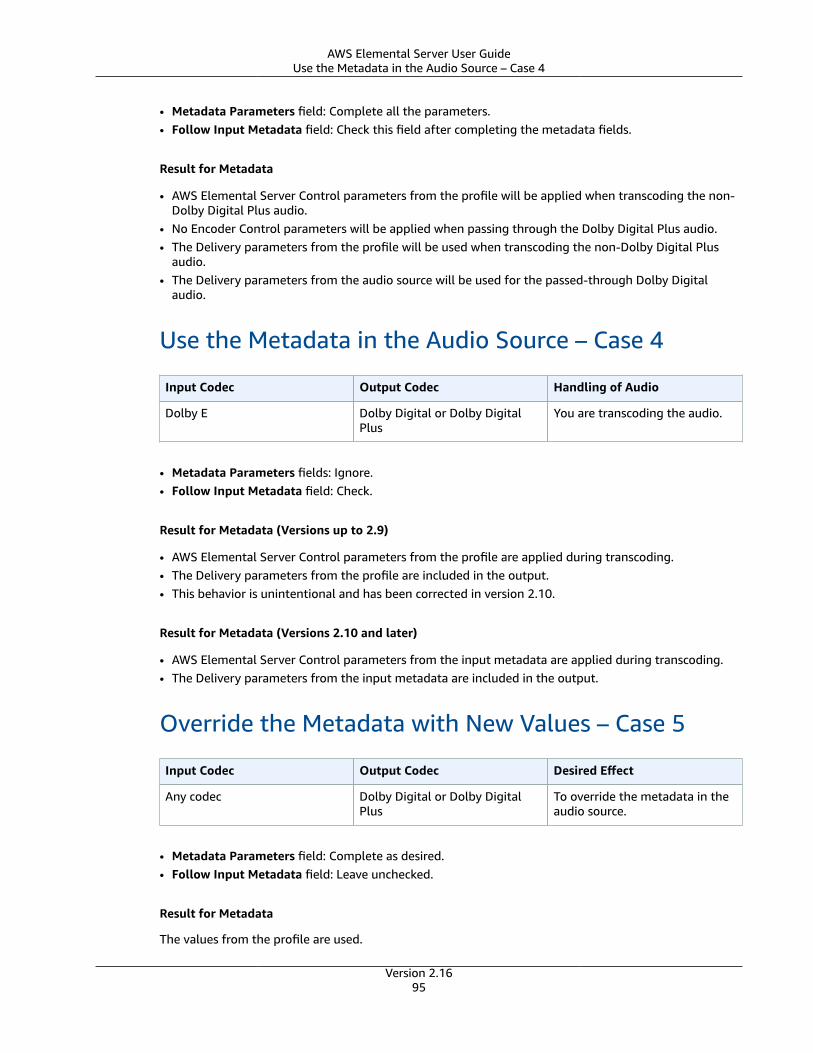
AWS Elemental Server User GuideUse the Metadata in the Audio Source – Case 4
• Metadata Parameters field: Complete all the parameters.• Follow Input Metadata field: Check this field after completing the metadata fields.
Result for Metadata
• AWS Elemental Server Control parameters from the profile will be applied when transcoding the non-Dolby Digital Plus audio.
• No Encoder Control parameters will be applied when passing through the Dolby Digital Plus audio.• The Delivery parameters from the profile will be used when transcoding the non-Dolby Digital Plus
audio.• The Delivery parameters from the audio source will be used for the passed-through Dolby Digital
audio.
Use the Metadata in the Audio Source – Case 4
Input Codec Output Codec Handling of Audio
Dolby E Dolby Digital or Dolby DigitalPlus
You are transcoding the audio.
• Metadata Parameters fields: Ignore.• Follow Input Metadata field: Check.
Result for Metadata (Versions up to 2.9)
• AWS Elemental Server Control parameters from the profile are applied during transcoding.• The Delivery parameters from the profile are included in the output.• This behavior is unintentional and has been corrected in version 2.10.
Result for Metadata (Versions 2.10 and later)
• AWS Elemental Server Control parameters from the input metadata are applied during transcoding.• The Delivery parameters from the input metadata are included in the output.
Override the Metadata with New Values – Case 5
Input Codec Output Codec Desired Effect
Any codec Dolby Digital or Dolby DigitalPlus
To override the metadata in theaudio source.
• Metadata Parameters field: Complete as desired.• Follow Input Metadata field: Leave unchecked.
Result for Metadata
The values from the profile are used.
Version 2.1695
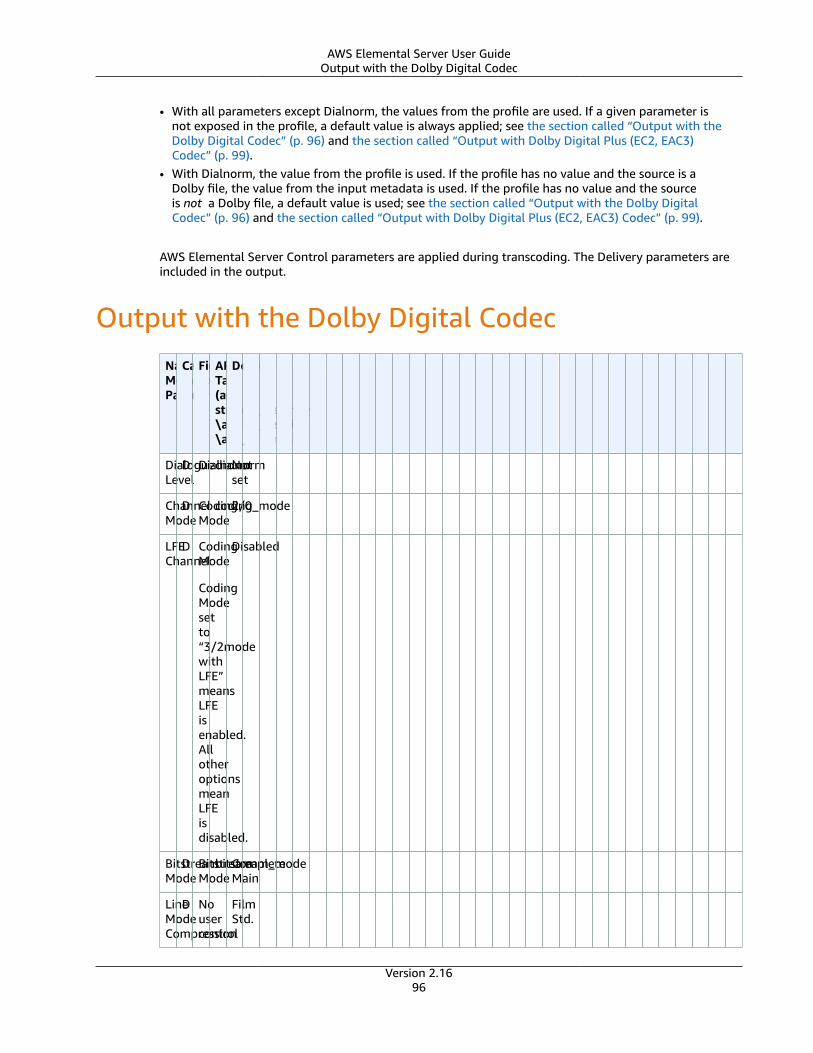
AWS Elemental Server User GuideOutput with the Dolby Digital Codec
• With all parameters except Dialnorm, the values from the profile are used. If a given parameter isnot exposed in the profile, a default value is always applied; see the section called “Output with theDolby Digital Codec” (p. 96) and the section called “Output with Dolby Digital Plus (EC2, EAC3)Codec” (p. 99).
• With Dialnorm, the value from the profile is used. If the profile has no value and the source is aDolby file, the value from the input metadata is used. If the profile has no value and the sourceis not a Dolby file, a default value is used; see the section called “Output with the Dolby DigitalCodec” (p. 96) and the section called “Output with Dolby Digital Plus (EC2, EAC3) Codec” (p. 99).
AWS Elemental Server Control parameters are applied during transcoding. The Delivery parameters areincluded in the output.
Output with the Dolby Digital CodecNamedMetadataParameters
CategoryFieldAPITag(atstream_assembly\audio_description\ac3_settings)
Default
DialogueLevel
D DialnormdialnormNotset
ChannelMode
D CodingMode
coding_mode2/0
LFEChannel
D CodingMode
CodingModesetto“3/2modewithLFE”meansLFEisenabled.AllotheroptionsmeanLFEisdisabled.
Disabled
BitstreamMode
D BitstreamMode
bitstream_modeCompleteMain
LineModeCompression
D Nousercontrol
FilmStd.
Version 2.1696
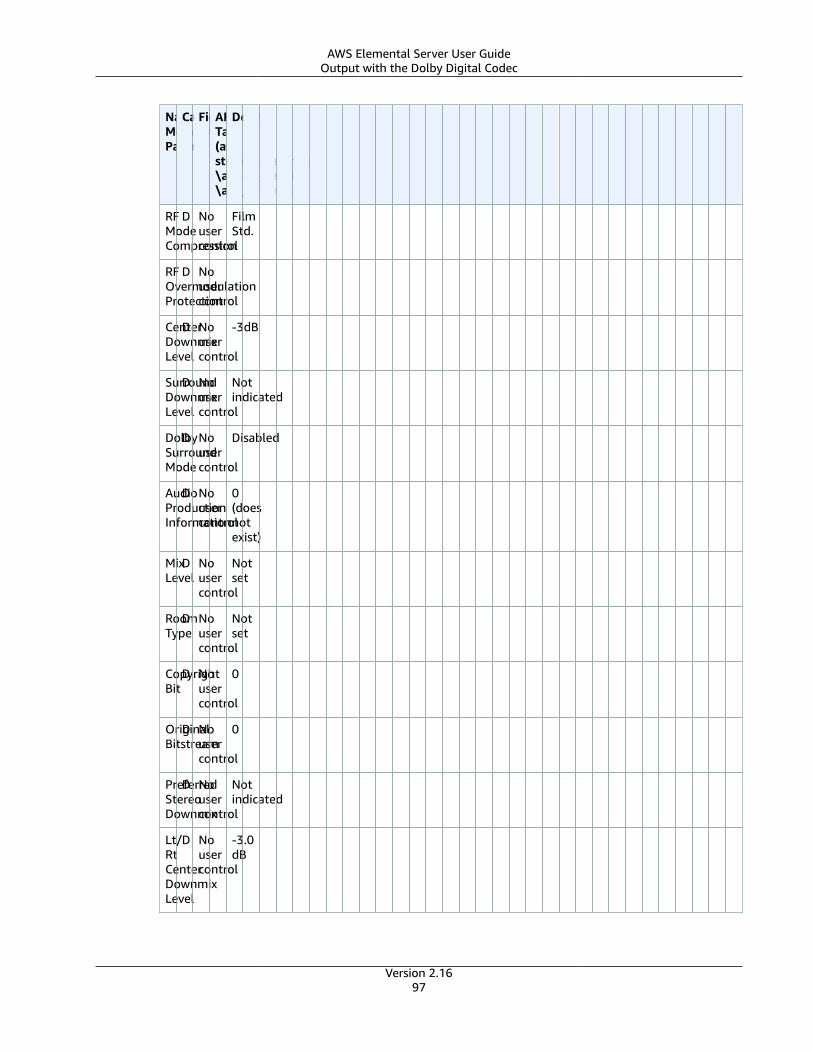
AWS Elemental Server User GuideOutput with the Dolby Digital Codec
NamedMetadataParameters
CategoryFieldAPITag(atstream_assembly\audio_description\ac3_settings)
Default
RFModeCompression
D Nousercontrol
FilmStd.
RFOvermodulationProtection
D Nousercontrol
CenterDownmixLevel
D Nousercontrol
-3dB
SurroundDownmixLevel
D Nousercontrol
Notindicated
DolbySurroundMode
D Nousercontrol
Disabled
AudioProductionInformation
D Nousercontrol
0(doesnotexist)
MixLevel
D Nousercontrol
Notset
RoomType
D Nousercontrol
Notset
CopyrightBit
D Nousercontrol
0
OriginalBitstream
D Nousercontrol
0
PreferredStereoDownmix
D Nousercontrol
Notindicated
Lt/RtCenterDownmixLevel
D Nousercontrol
-3.0dB
Version 2.1697
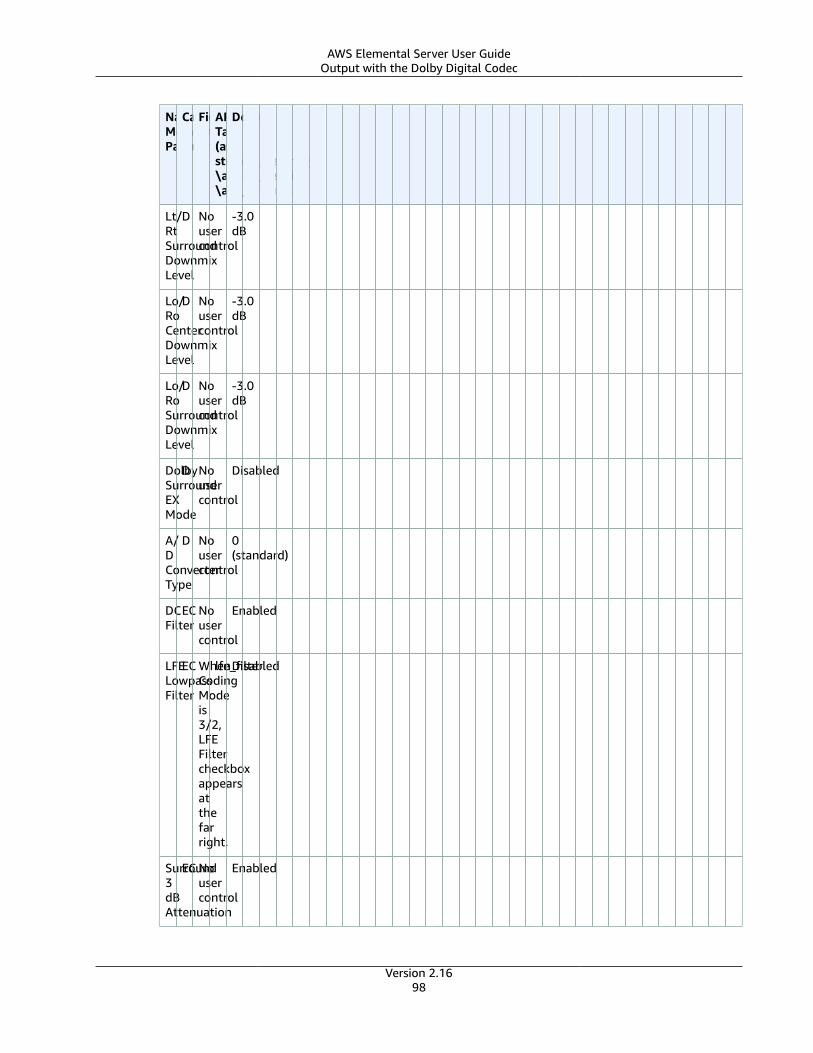
AWS Elemental Server User GuideOutput with the Dolby Digital Codec
NamedMetadataParameters
CategoryFieldAPITag(atstream_assembly\audio_description\ac3_settings)
Default
Lt/RtSurroundDownmixLevel
D Nousercontrol
-3.0dB
Lo/RoCenterDownmixLevel
D Nousercontrol
-3.0dB
Lo/RoSurroundDownmixLevel
D Nousercontrol
-3.0dB
DolbySurroundEXMode
D Nousercontrol
Disabled
A/DConverterType
D Nousercontrol
0(standard)
DCFilter
EC Nousercontrol
Enabled
LFELowpassFilter
EC WhenCodingModeis3/2,LFEFiltercheckboxappearsatthefarright.
lfe_filterDisabled
Surround3dBAttenuation
EC Nousercontrol
Enabled
Version 2.1698
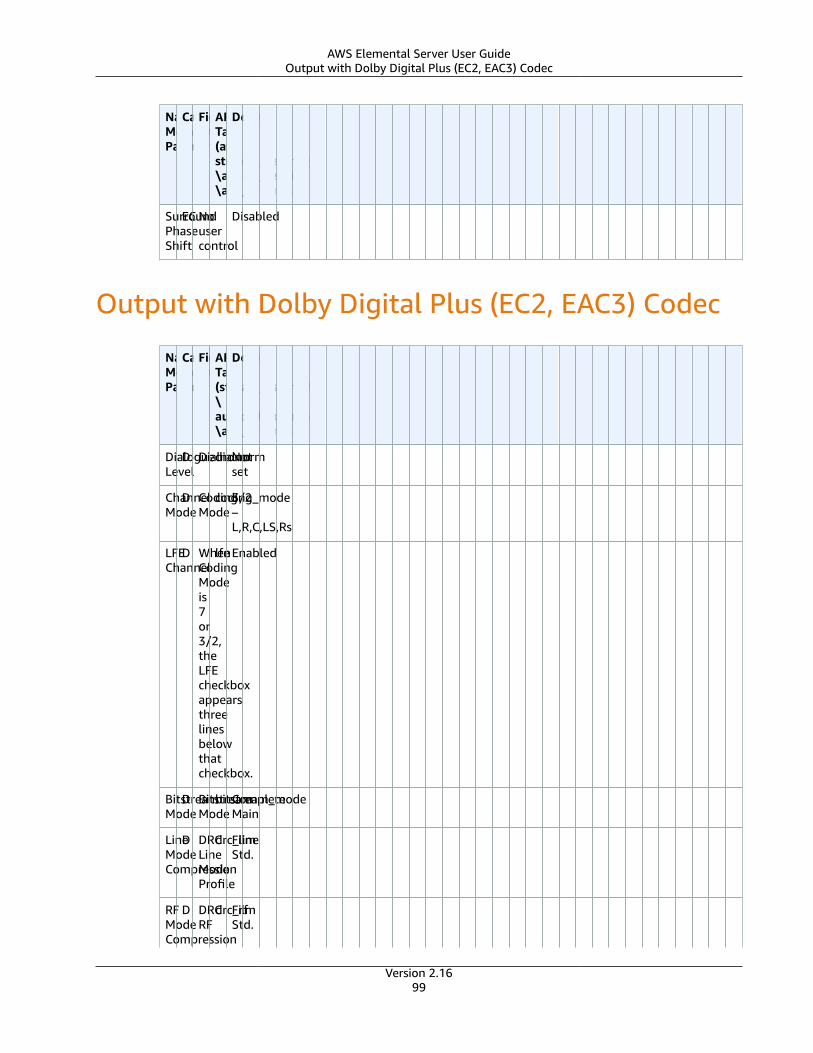
AWS Elemental Server User GuideOutput with Dolby Digital Plus (EC2, EAC3) Codec
NamedMetadataParameters
CategoryFieldAPITag(atstream_assembly\audio_description\ac3_settings)
Default
SurroundPhaseShift
EC Nousercontrol
Disabled
Output with Dolby Digital Plus (EC2, EAC3) Codec
NamedMetadataParameters
CategoryFieldAPITag(stream_assembly\audio_description\ac3_settings)
Default
DialogueLevel
D DialnormdialnormNotset
ChannelMode
D CodingMode
coding_mode3/2–L,R,C,LS,Rs
LFEChannel
D WhenCodingModeis7or3/2,theLFEcheckboxappearsthreelinesbelowthatcheckbox.
lfe Enabled
BitstreamMode
D BitstreamMode
bitstream_modeCompleteMain
LineModeCompression
D DRCLineModeProfile
drc_lineFilmStd.
RFModeCompression
D DRCRF
drc_rfFilmStd.
Version 2.1699
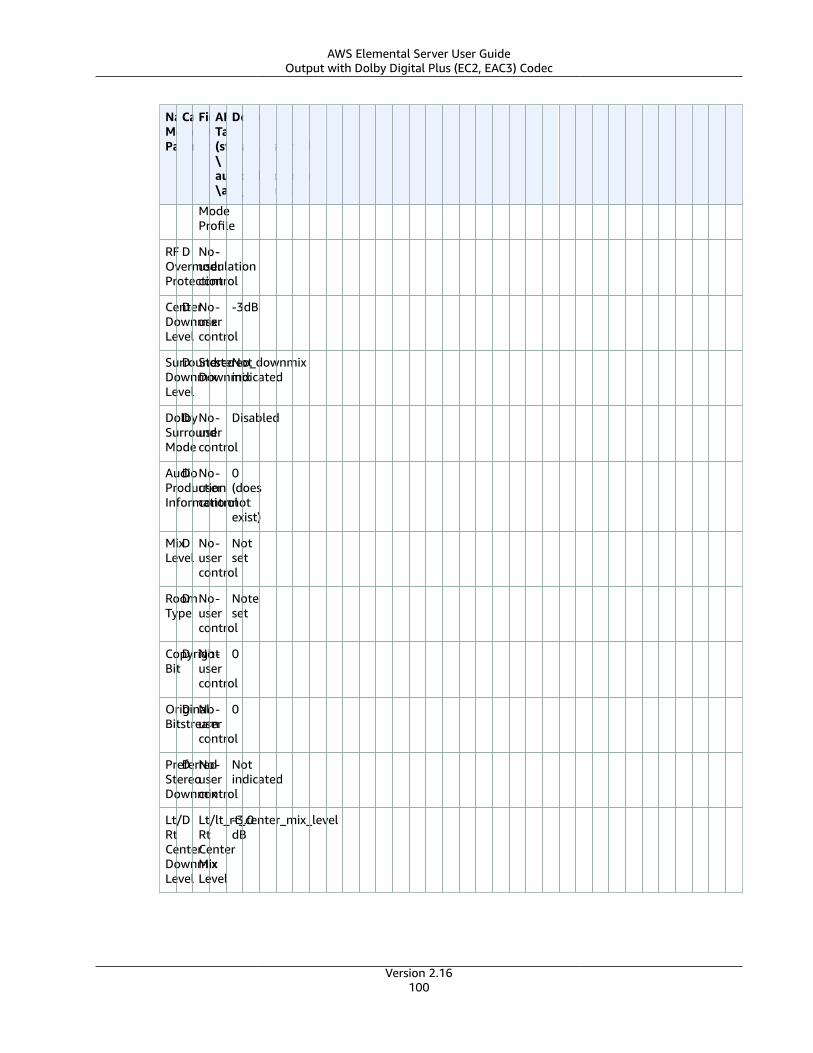
AWS Elemental Server User GuideOutput with Dolby Digital Plus (EC2, EAC3) Codec
NamedMetadataParameters
CategoryFieldAPITag(stream_assembly\audio_description\ac3_settings)
Default
ModeProfile
RFOvermodulationProtection
D Nousercontrol
-
CenterDownmixLevel
D Nousercontrol
- -3dB
SurroundDownmixLevel
D StereoDownmix
stereo_downmixNotindicated
DolbySurroundMode
D Nousercontrol
- Disabled
AudioProductionInformation
D Nousercontrol
- 0(doesnotexist)
MixLevel
D Nousercontrol
- Notset
RoomType
D Nousercontrol
- Noteset
CopyrightBit
D Nousercontrol
- 0
OriginalBitstream
D Nousercontrol
- 0
PreferredStereoDownmix
D Nousercontrol
- Notindicated
Lt/RtCenterDownmixLevel
D Lt/RtCenterMixLevel
lt_rt_center_mix_level-3.0dB
Version 2.16100
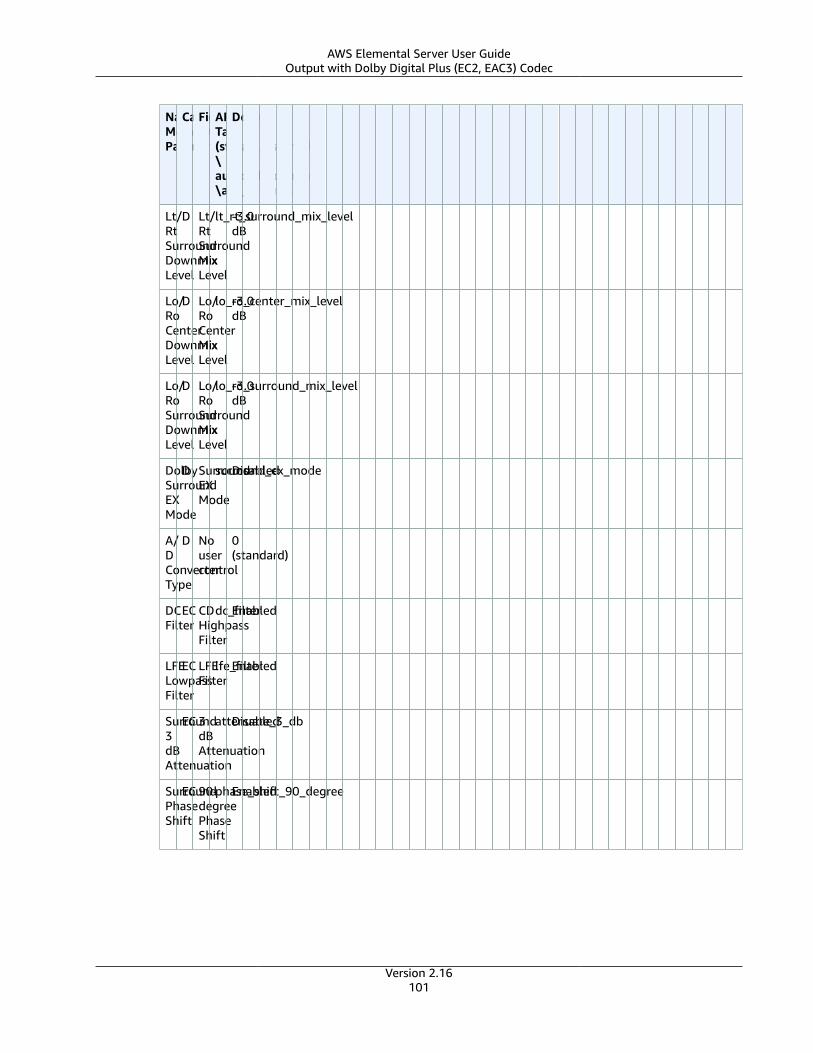
AWS Elemental Server User GuideOutput with Dolby Digital Plus (EC2, EAC3) Codec
NamedMetadataParameters
CategoryFieldAPITag(stream_assembly\audio_description\ac3_settings)
Default
Lt/RtSurroundDownmixLevel
D Lt/RtSurroundMixLevel
lt_rt_surround_mix_level-3.0dB
Lo/RoCenterDownmixLevel
D Lo/RoCenterMixLevel
lo_ro_center_mix_level-3.0dB
Lo/RoSurroundDownmixLevel
D Lo/RoSurroundMixLevel
lo_ro_surround_mix_level-3.0dB
DolbySurroundEXMode
D SurroundEXMode
surround_ex_modeDisabled
A/DConverterType
D Nousercontrol
0(standard)
DCFilter
EC CDHighpassFilter
dc_filterEnabled
LFELowpassFilter
EC LFEFilter
lfe_filterEnabled
Surround3dBAttenuation
EC 3dBAttenuation
attenuate_3_dbDisabled
SurroundPhaseShift
EC 90-degreePhaseShift
phase_shift_90_degreeEnabled
Version 2.16101
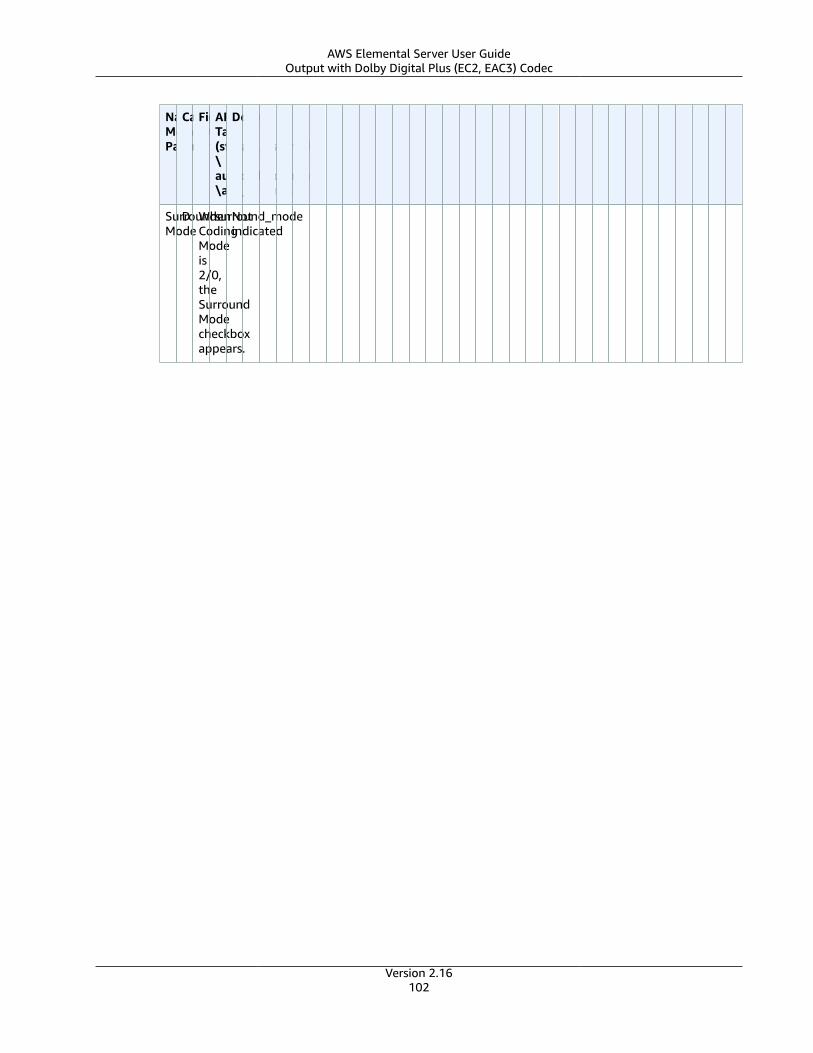
AWS Elemental Server User GuideOutput with Dolby Digital Plus (EC2, EAC3) Codec
NamedMetadataParameters
CategoryFieldAPITag(stream_assembly\audio_description\ac3_settings)
Default
SurroundMode
D WhenCodingModeis2/0,theSurroundModecheckboxappears.
surround_modeNotindicated
Version 2.16102
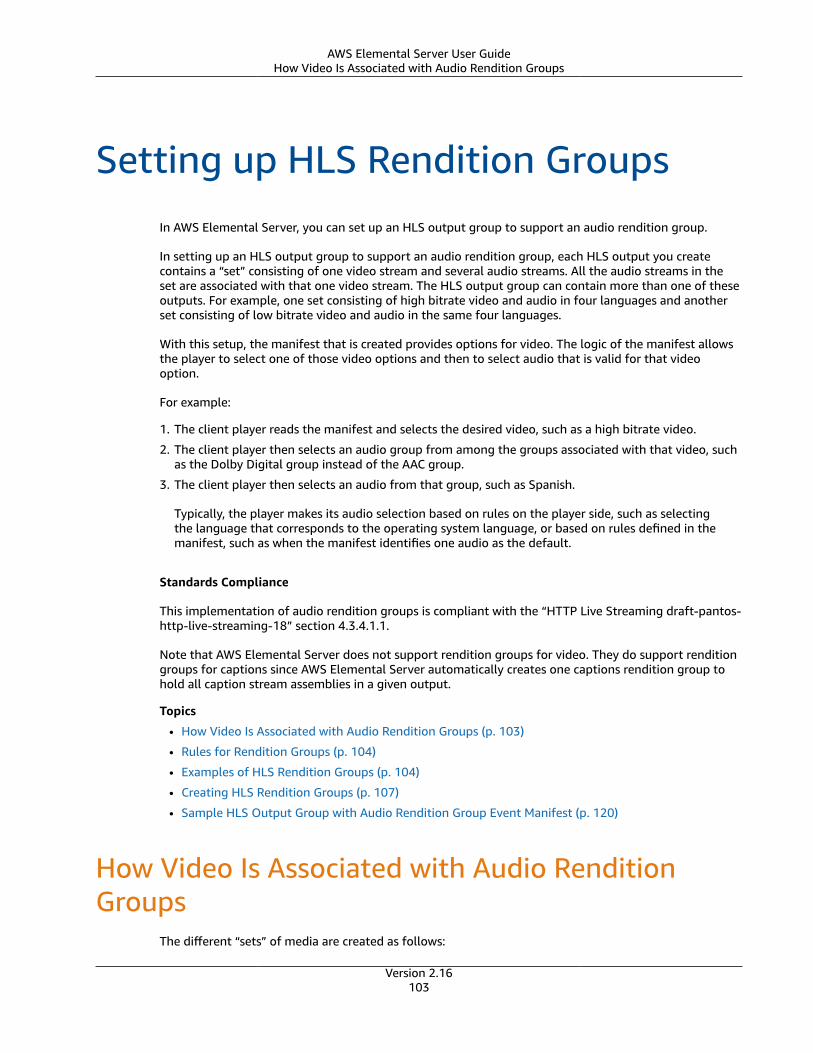
AWS Elemental Server User GuideHow Video Is Associated with Audio Rendition Groups
Setting up HLS Rendition GroupsIn AWS Elemental Server, you can set up an HLS output group to support an audio rendition group.
In setting up an HLS output group to support an audio rendition group, each HLS output you createcontains a “set” consisting of one video stream and several audio streams. All the audio streams in theset are associated with that one video stream. The HLS output group can contain more than one of theseoutputs. For example, one set consisting of high bitrate video and audio in four languages and anotherset consisting of low bitrate video and audio in the same four languages.
With this setup, the manifest that is created provides options for video. The logic of the manifest allowsthe player to select one of those video options and then to select audio that is valid for that videooption.
For example:
1. The client player reads the manifest and selects the desired video, such as a high bitrate video.
2. The client player then selects an audio group from among the groups associated with that video, suchas the Dolby Digital group instead of the AAC group.
3. The client player then selects an audio from that group, such as Spanish.
Typically, the player makes its audio selection based on rules on the player side, such as selectingthe language that corresponds to the operating system language, or based on rules defined in themanifest, such as when the manifest identifies one audio as the default.
Standards Compliance
This implementation of audio rendition groups is compliant with the “HTTP Live Streaming draft-pantos-http-live-streaming-18” section 4.3.4.1.1.
Note that AWS Elemental Server does not support rendition groups for video. They do support renditiongroups for captions since AWS Elemental Server automatically creates one captions rendition group tohold all caption stream assemblies in a given output.
Topics
• How Video Is Associated with Audio Rendition Groups (p. 103)
• Rules for Rendition Groups (p. 104)
• Examples of HLS Rendition Groups (p. 104)
• Creating HLS Rendition Groups (p. 107)
• Sample HLS Output Group with Audio Rendition Group Event Manifest (p. 120)
How Video Is Associated with Audio RenditionGroups
The different “sets” of media are created as follows:
Version 2.16103
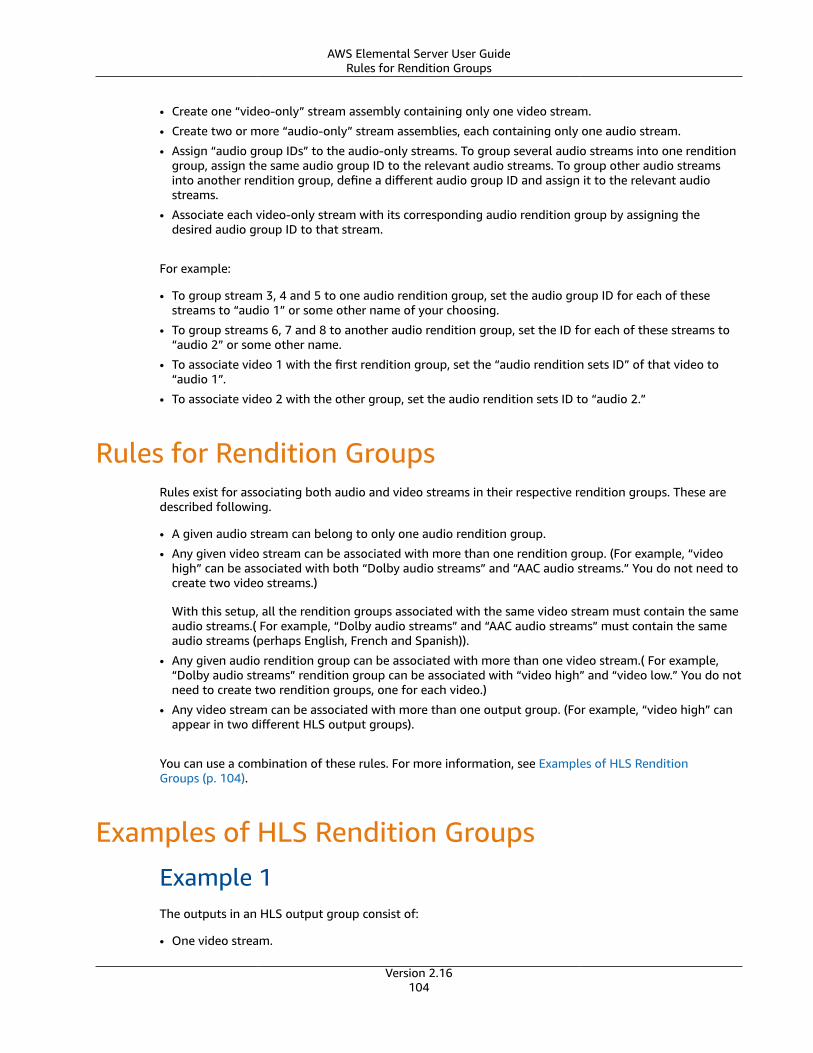
AWS Elemental Server User GuideRules for Rendition Groups
• Create one “video-only” stream assembly containing only one video stream.
• Create two or more “audio-only” stream assemblies, each containing only one audio stream.
• Assign “audio group IDs” to the audio-only streams. To group several audio streams into one renditiongroup, assign the same audio group ID to the relevant audio streams. To group other audio streamsinto another rendition group, define a different audio group ID and assign it to the relevant audiostreams.
• Associate each video-only stream with its corresponding audio rendition group by assigning thedesired audio group ID to that stream.
For example:
• To group stream 3, 4 and 5 to one audio rendition group, set the audio group ID for each of thesestreams to “audio 1” or some other name of your choosing.
• To group streams 6, 7 and 8 to another audio rendition group, set the ID for each of these streams to“audio 2” or some other name.
• To associate video 1 with the first rendition group, set the “audio rendition sets ID” of that video to“audio 1”.
• To associate video 2 with the other group, set the audio rendition sets ID to “audio 2.”
Rules for Rendition GroupsRules exist for associating both audio and video streams in their respective rendition groups. These aredescribed following.
• A given audio stream can belong to only one audio rendition group.
• Any given video stream can be associated with more than one rendition group. (For example, “videohigh” can be associated with both “Dolby audio streams” and “AAC audio streams.” You do not need tocreate two video streams.)
With this setup, all the rendition groups associated with the same video stream must contain the sameaudio streams.( For example, “Dolby audio streams” and “AAC audio streams” must contain the sameaudio streams (perhaps English, French and Spanish)).
• Any given audio rendition group can be associated with more than one video stream.( For example,“Dolby audio streams” rendition group can be associated with “video high” and “video low.” You do notneed to create two rendition groups, one for each video.)
• Any video stream can be associated with more than one output group. (For example, “video high” canappear in two different HLS output groups).
You can use a combination of these rules. For more information, see Examples of HLS RenditionGroups (p. 104).
Examples of HLS Rendition GroupsExample 1The outputs in an HLS output group consist of:
• One video stream.
Version 2.16104
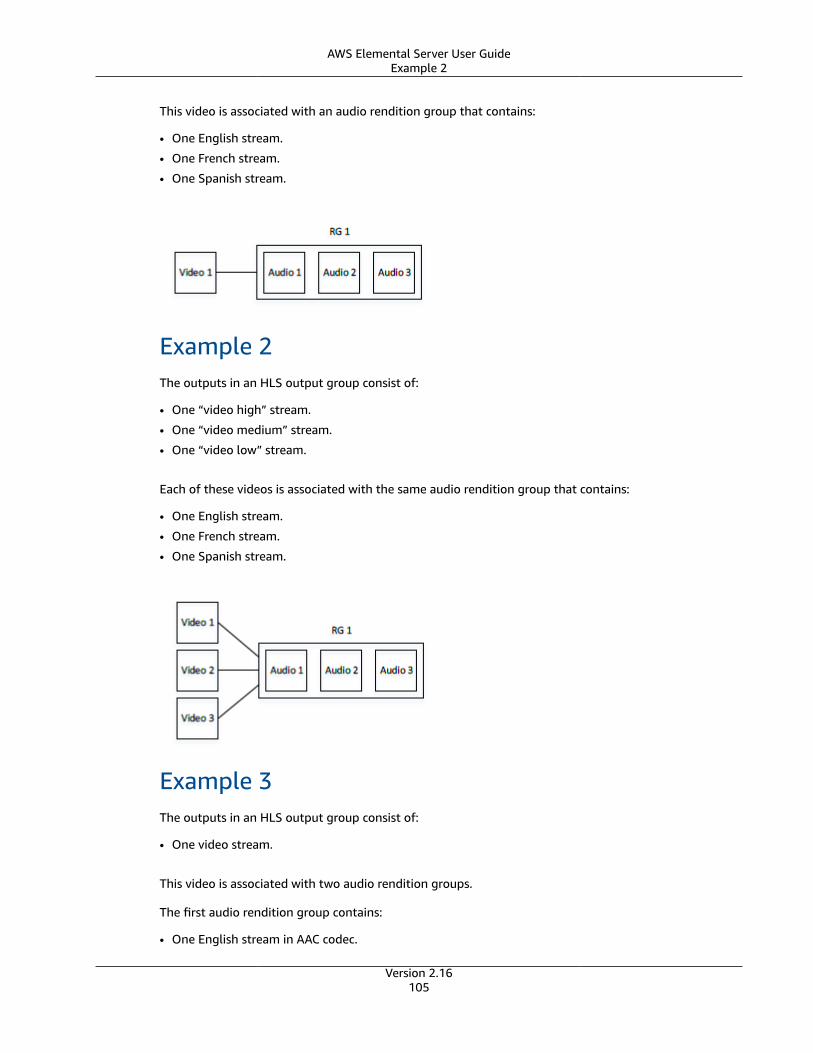
AWS Elemental Server User GuideExample 2
This video is associated with an audio rendition group that contains:
• One English stream.
• One French stream.
• One Spanish stream.
Example 2The outputs in an HLS output group consist of:
• One “video high” stream.
• One “video medium” stream.
• One “video low” stream.
Each of these videos is associated with the same audio rendition group that contains:
• One English stream.
• One French stream.
• One Spanish stream.
Example 3The outputs in an HLS output group consist of:
• One video stream.
This video is associated with two audio rendition groups.
The first audio rendition group contains:
• One English stream in AAC codec.
Version 2.16105
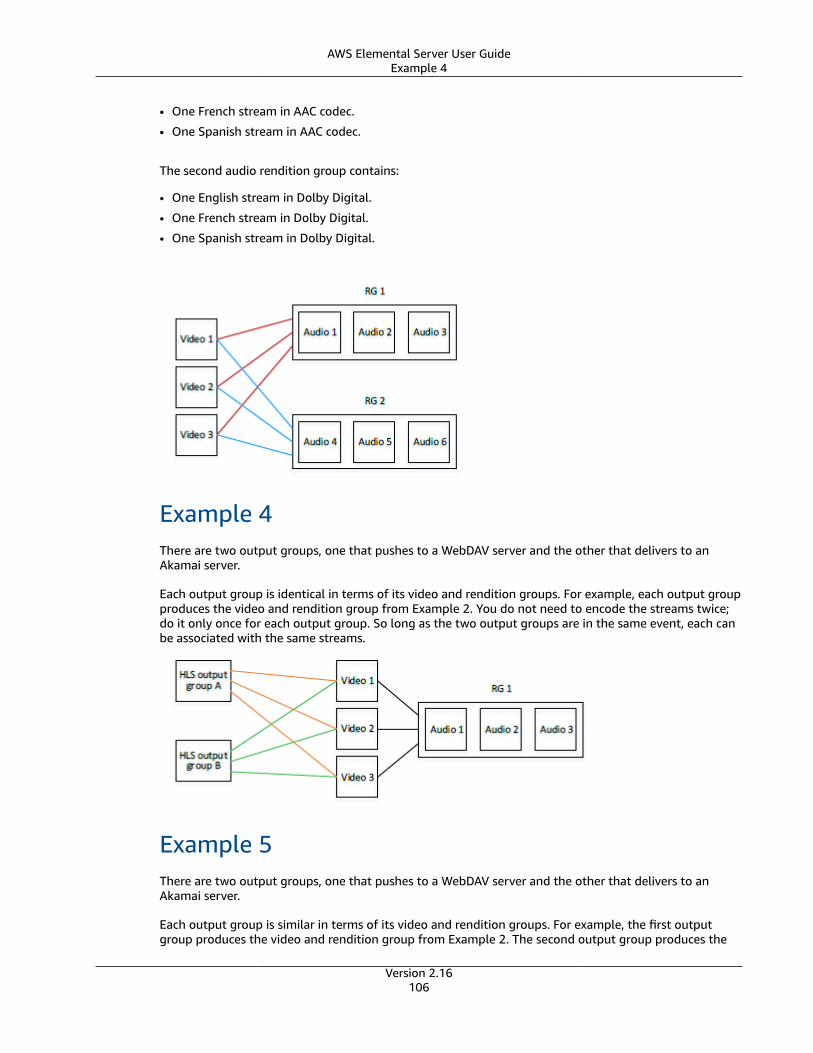
AWS Elemental Server User GuideExample 4
• One French stream in AAC codec.
• One Spanish stream in AAC codec.
The second audio rendition group contains:
• One English stream in Dolby Digital.
• One French stream in Dolby Digital.
• One Spanish stream in Dolby Digital.
Example 4There are two output groups, one that pushes to a WebDAV server and the other that delivers to anAkamai server.
Each output group is identical in terms of its video and rendition groups. For example, each output groupproduces the video and rendition group from Example 2. You do not need to encode the streams twice;do it only once for each output group. So long as the two output groups are in the same event, each canbe associated with the same streams.
Example 5There are two output groups, one that pushes to a WebDAV server and the other that delivers to anAkamai server.
Each output group is similar in terms of its video and rendition groups. For example, the first outputgroup produces the video and rendition group from Example 2. The second output group produces the
Version 2.16106
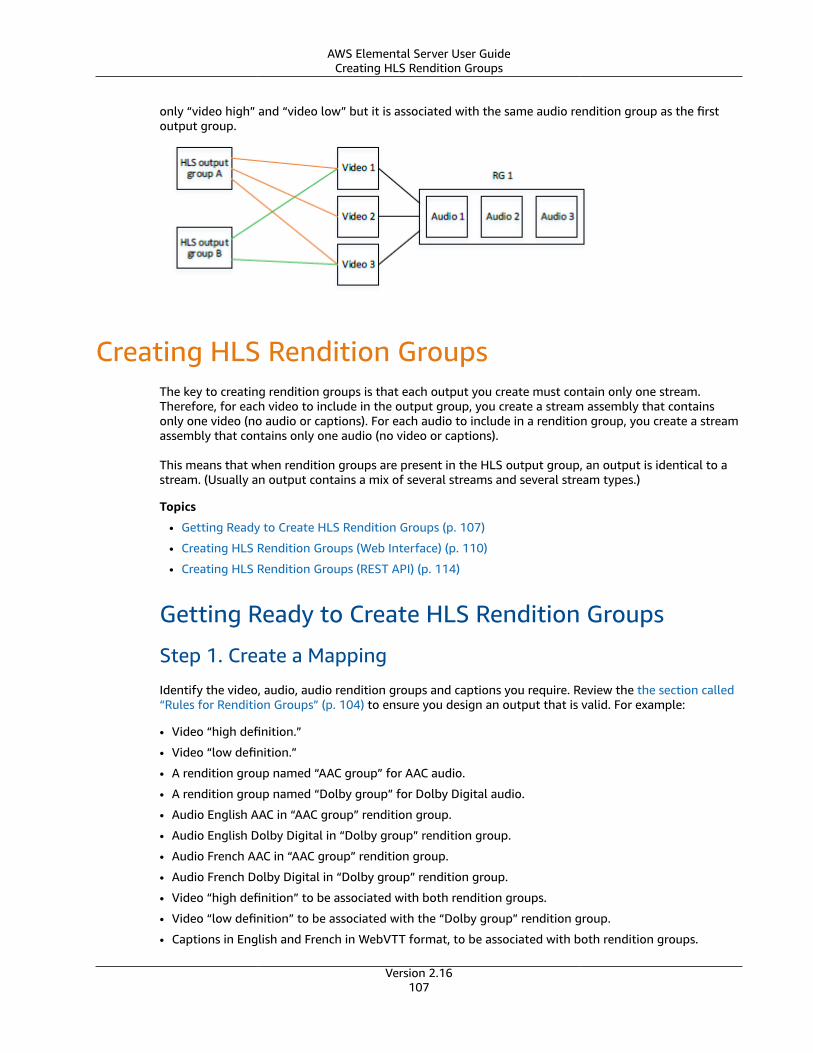
AWS Elemental Server User GuideCreating HLS Rendition Groups
only “video high” and “video low” but it is associated with the same audio rendition group as the firstoutput group.
Creating HLS Rendition GroupsThe key to creating rendition groups is that each output you create must contain only one stream.Therefore, for each video to include in the output group, you create a stream assembly that containsonly one video (no audio or captions). For each audio to include in a rendition group, you create a streamassembly that contains only one audio (no video or captions).
This means that when rendition groups are present in the HLS output group, an output is identical to astream. (Usually an output contains a mix of several streams and several stream types.)
Topics
• Getting Ready to Create HLS Rendition Groups (p. 107)
• Creating HLS Rendition Groups (Web Interface) (p. 110)
• Creating HLS Rendition Groups (REST API) (p. 114)
Getting Ready to Create HLS Rendition Groups
Step 1. Create a Mapping
Identify the video, audio, audio rendition groups and captions you require. Review the the section called“Rules for Rendition Groups” (p. 104) to ensure you design an output that is valid. For example:
• Video “high definition.”
• Video “low definition.”
• A rendition group named “AAC group” for AAC audio.
• A rendition group named “Dolby group” for Dolby Digital audio.
• Audio English AAC in “AAC group” rendition group.
• Audio English Dolby Digital in “Dolby group” rendition group.
• Audio French AAC in “AAC group” rendition group.
• Audio French Dolby Digital in “Dolby group” rendition group.
• Video “high definition” to be associated with both rendition groups.
• Video “low definition” to be associated with the “Dolby group” rendition group.
• Captions in English and French in WebVTT format, to be associated with both rendition groups.
Version 2.16107
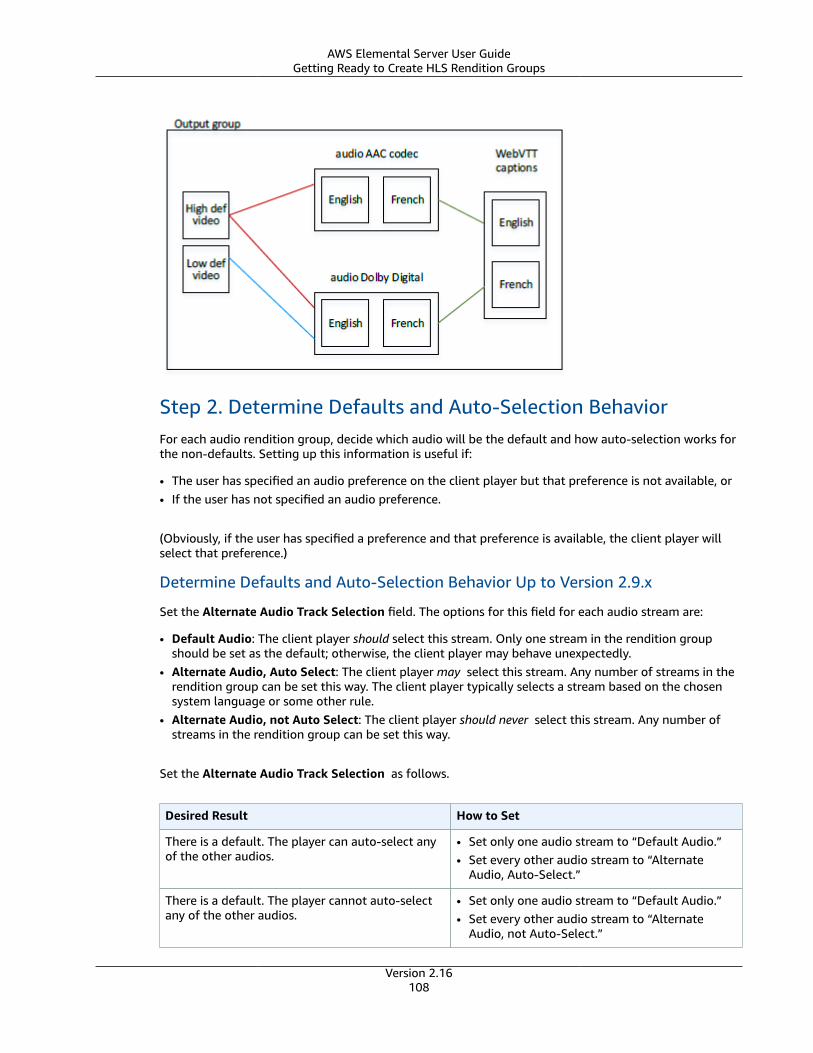
AWS Elemental Server User GuideGetting Ready to Create HLS Rendition Groups
Step 2. Determine Defaults and Auto-Selection BehaviorFor each audio rendition group, decide which audio will be the default and how auto-selection works forthe non-defaults. Setting up this information is useful if:
• The user has specified an audio preference on the client player but that preference is not available, or• If the user has not specified an audio preference.
(Obviously, if the user has specified a preference and that preference is available, the client player willselect that preference.)
Determine Defaults and Auto-Selection Behavior Up to Version 2.9.x
Set the Alternate Audio Track Selection field. The options for this field for each audio stream are:
• Default Audio: The client player should select this stream. Only one stream in the rendition groupshould be set as the default; otherwise, the client player may behave unexpectedly.
• Alternate Audio, Auto Select: The client player may select this stream. Any number of streams in therendition group can be set this way. The client player typically selects a stream based on the chosensystem language or some other rule.
• Alternate Audio, not Auto Select: The client player should never select this stream. Any number ofstreams in the rendition group can be set this way.
Set the Alternate Audio Track Selection as follows.
Desired Result How to Set
There is a default. The player can auto-select anyof the other audios.
• Set only one audio stream to “Default Audio.”• Set every other audio stream to “Alternate
Audio, Auto-Select.”
There is a default. The player cannot auto-selectany of the other audios.
• Set only one audio stream to “Default Audio.”• Set every other audio stream to “Alternate
Audio, not Auto-Select.”
Version 2.16108
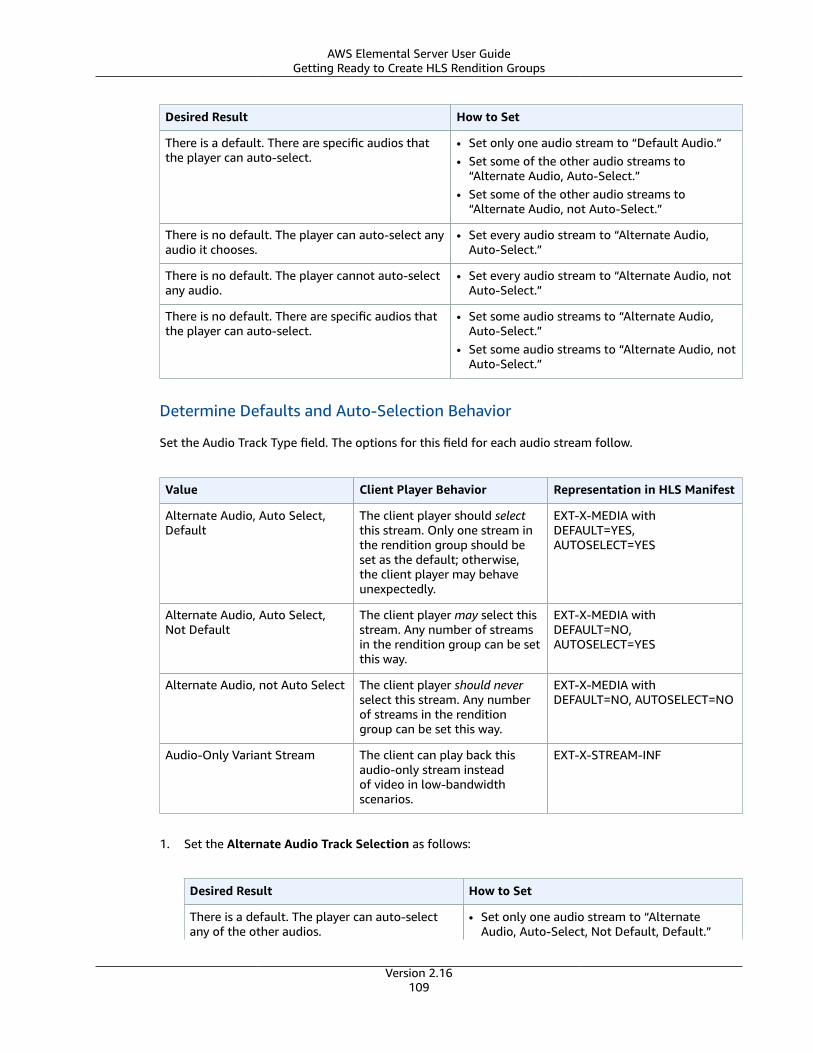
AWS Elemental Server User GuideGetting Ready to Create HLS Rendition Groups
Desired Result How to Set
There is a default. There are specific audios thatthe player can auto-select.
• Set only one audio stream to “Default Audio.”• Set some of the other audio streams to
“Alternate Audio, Auto-Select.”• Set some of the other audio streams to
“Alternate Audio, not Auto-Select.”
There is no default. The player can auto-select anyaudio it chooses.
• Set every audio stream to “Alternate Audio,Auto-Select.”
There is no default. The player cannot auto-selectany audio.
• Set every audio stream to “Alternate Audio, notAuto-Select.”
There is no default. There are specific audios thatthe player can auto-select.
• Set some audio streams to “Alternate Audio,Auto-Select.”
• Set some audio streams to “Alternate Audio, notAuto-Select.”
Determine Defaults and Auto-Selection Behavior
Set the Audio Track Type field. The options for this field for each audio stream follow.
Value Client Player Behavior Representation in HLS Manifest
Alternate Audio, Auto Select,Default
The client player should selectthis stream. Only one stream inthe rendition group should beset as the default; otherwise,the client player may behaveunexpectedly.
EXT-X-MEDIA withDEFAULT=YES,AUTOSELECT=YES
Alternate Audio, Auto Select,Not Default
The client player may select thisstream. Any number of streamsin the rendition group can be setthis way.
EXT-X-MEDIA withDEFAULT=NO,AUTOSELECT=YES
Alternate Audio, not Auto Select The client player should neverselect this stream. Any numberof streams in the renditiongroup can be set this way.
EXT-X-MEDIA withDEFAULT=NO, AUTOSELECT=NO
Audio-Only Variant Stream The client can play back thisaudio-only stream insteadof video in low-bandwidthscenarios.
EXT-X-STREAM-INF
1. Set the Alternate Audio Track Selection as follows:
Desired Result How to Set
There is a default. The player can auto-selectany of the other audios.
• Set only one audio stream to “AlternateAudio, Auto-Select, Not Default, Default.”
Version 2.16109
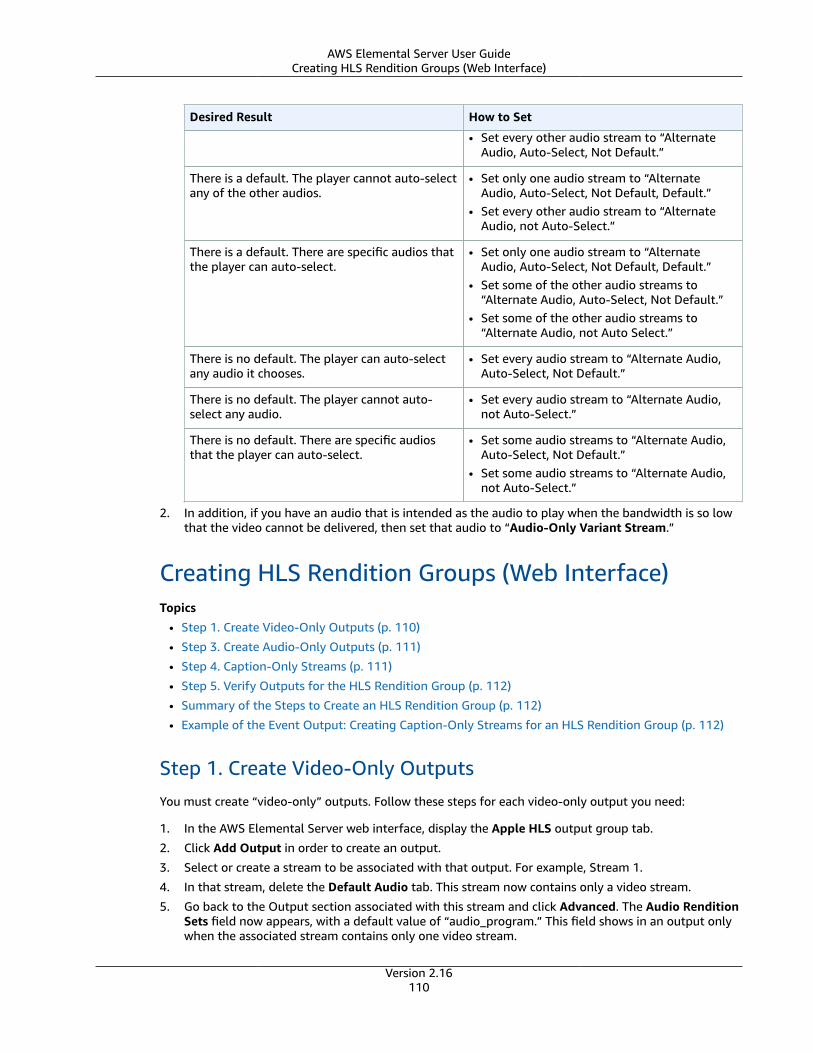
AWS Elemental Server User GuideCreating HLS Rendition Groups (Web Interface)
Desired Result How to Set
• Set every other audio stream to “AlternateAudio, Auto-Select, Not Default.”
There is a default. The player cannot auto-selectany of the other audios.
• Set only one audio stream to “AlternateAudio, Auto-Select, Not Default, Default.”
• Set every other audio stream to “AlternateAudio, not Auto-Select.”
There is a default. There are specific audios thatthe player can auto-select.
• Set only one audio stream to “AlternateAudio, Auto-Select, Not Default, Default.”
• Set some of the other audio streams to“Alternate Audio, Auto-Select, Not Default.”
• Set some of the other audio streams to“Alternate Audio, not Auto Select.”
There is no default. The player can auto-selectany audio it chooses.
• Set every audio stream to “Alternate Audio,Auto-Select, Not Default.”
There is no default. The player cannot auto-select any audio.
• Set every audio stream to “Alternate Audio,not Auto-Select.”
There is no default. There are specific audiosthat the player can auto-select.
• Set some audio streams to “Alternate Audio,Auto-Select, Not Default.”
• Set some audio streams to “Alternate Audio,not Auto-Select.”
2. In addition, if you have an audio that is intended as the audio to play when the bandwidth is so lowthat the video cannot be delivered, then set that audio to “Audio-Only Variant Stream.”
Creating HLS Rendition Groups (Web Interface)Topics
• Step 1. Create Video-Only Outputs (p. 110)
• Step 3. Create Audio-Only Outputs (p. 111)
• Step 4. Caption-Only Streams (p. 111)
• Step 5. Verify Outputs for the HLS Rendition Group (p. 112)
• Summary of the Steps to Create an HLS Rendition Group (p. 112)
• Example of the Event Output: Creating Caption-Only Streams for an HLS Rendition Group (p. 112)
Step 1. Create Video-Only OutputsYou must create “video-only” outputs. Follow these steps for each video-only output you need:
1. In the AWS Elemental Server web interface, display the Apple HLS output group tab.
2. Click Add Output in order to create an output.
3. Select or create a stream to be associated with that output. For example, Stream 1.
4. In that stream, delete the Default Audio tab. This stream now contains only a video stream.
5. Go back to the Output section associated with this stream and click Advanced. The Audio RenditionSets field now appears, with a default value of “audio_program.” This field shows in an output onlywhen the associated stream contains only one video stream.
Version 2.16110
AWS Elemental Server User GuideCreating HLS Rendition Groups (Web Interface)
6. Change the Audio Rendition Sets field to specify the rendition group or groups to associate withthis video:
• To associate the video with one rendition group, enter the name of the rendition group.
• To associate the video with several rendition groups, enter a comma-separated list of the renditiongroup names. Do not put a space after each comma.
Step 3. Create Audio-Only Outputs
Follow these steps for each audio-only output you need:
1. Click Add Output in order to create an output.
2. Select or create a stream to be associated with that output. For example, Stream 3.
3. In that stream, delete the default Video and Captions tabs.This stream is now an audio stream.
4. Complete the following fields in the Advanced section:
• Stream Name: The wording for the NAME parameter in the manifest, as described in AudioInformation for an HLS Output Group with Audio Rendition Group Event (p. 120). This is theaudio description that the client player user interface displays. If the description is a language, itshould be in that language. For example, “Deutsch ”, not “German”.
• Language Code: Optional; complete only if the audio is a language. The wording that is to appearin the LANGUAGE parameter in the manifest should be the language code as per RFC 5646, asdescribed in Audio Information for an HLS Output Group with Audio Rendition Group Event (p. 120). This is the language code that the client player reads.
You can also leave this field blank and check Follow Input Language Code; the language of theaudio (specified in Audio Source, a bit higher up on the screen) is detected.
5. Go back to the Output section associated with the first audio stream and click Advanced.
The Audio Group ID field and Alternate Audio Track Type field (named Audio Track Selection inearlier versions) now show. These fields show in an output only when the associated stream containsonly one audio stream. The Audio Group ID field shows the default value “audio_program.”
(Note that the Audio Only Image field also appears in an audio-only stream. This field has nothingto do with audio rendition groups; it is used to assign an image in a “regular stream that has novideo.”)
• Set the Audio Group ID field to specify the audio rendition group that this audio will belong to.For example, “AAC group” or “Dolby group.”
• Set up the Alternate Audio Track Selection field (Audio Track Type field), as described in Step 2.Determine Defaults and Auto-Selection Behavior (p. 108).
Step 4. Caption-Only Streams
If your output includes captions, you must create “captions-only” outputs. Follow these steps for eachcaptions-only output you need:
1. Click Add Output in order to create an output.
2. Select or create a stream to be associated with that output.For example, Stream 4.
3. In that stream, delete the default Video tab and the default Audio tab. This stream now containsonly a captions stream.
Version 2.16111
AWS Elemental Server User GuideCreating HLS Rendition Groups (Web Interface)
For more information on setting up captions, see Setting Up Captions with AWS ElementalServer (p. 122).
Step 5. Verify Outputs for the HLS Rendition Group• Finally, check all your outputs for the HLS output groups and make sure you do not have an output
that contains both audio and video. Including such an output may produce a manifest that the clientplayer cannot interpret.
Summary of the Steps to Create an HLS Rendition Group
After these steps, you have:
• One or more video-only outputs. Each output is associated through its Audio Rendition Sets field toone or more audio rendition groups.
• Two or more audio-only outputs. Each output belongs to an audio rendition group based on the valuein the Audio Group ID field.
• Optionally, one or more captions-only outputs.
Example of the Event Output: Creating Caption-Only Streamsfor an HLS Rendition Group
Here is the Output section.
Version 2.16112
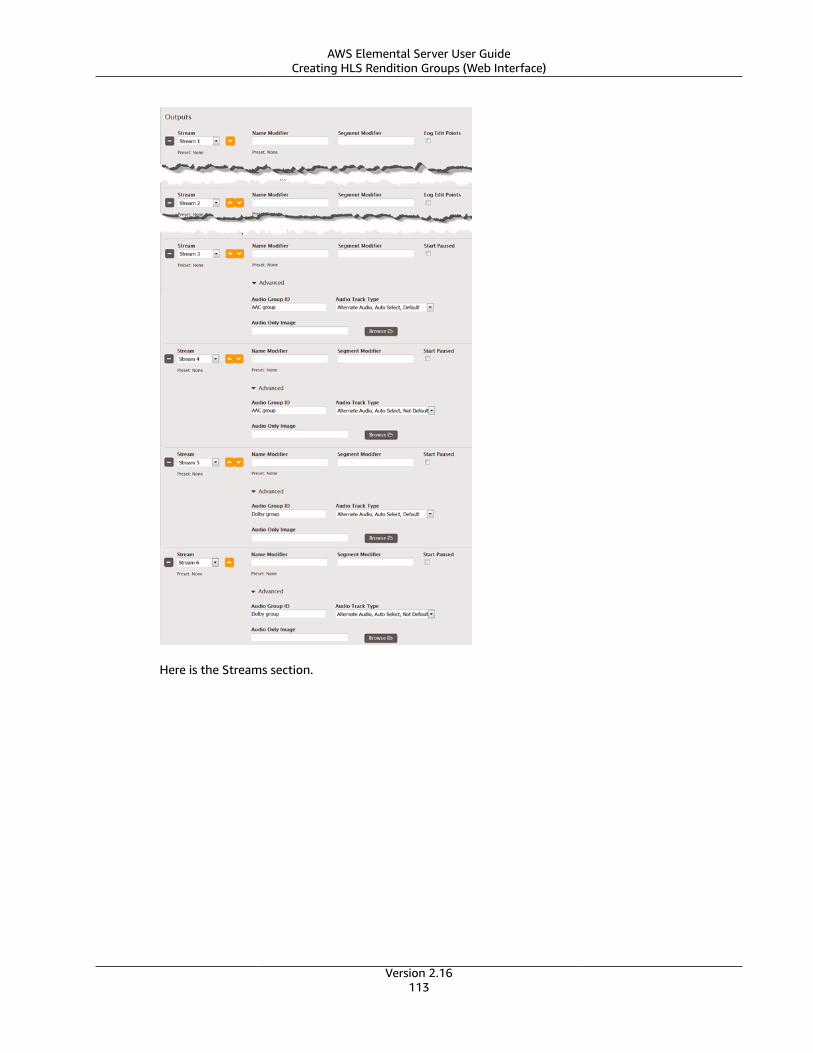
AWS Elemental Server User GuideCreating HLS Rendition Groups (Web Interface)
Here is the Streams section.
Version 2.16113

AWS Elemental Server User GuideCreating HLS Rendition Groups (REST API)
Creating HLS Rendition Groups (REST API)The following information assumes that you have read the section called “Creating HLS Rendition Groups(Web Interface)” (p. 110) and are therefore familiar with the construction and association of an outputcontaining video and rendition groups.
Via the REST API, create or modify the event to include the elements and tags in the XML body asdescribed in the following sections.
Topics• Creating Streams for HLS Rendition Groups in the REST API (p. 114)• Creating Output Groups for HLS Rendition Groups in the REST API (p. 115)• Creating Outputs for HLS Output Groups in the REST API (p. 115)• Sample XML Body For an HLS Output Group with Audio Rendition Group Event (p. 116)
Creating Streams for HLS Rendition Groups in the REST API• Create as many stream_assembly elements as you require, one for each unique video stream, one for
each unique audio stream, and one for each caption stream.
Version 2.16114
AWS Elemental Server User GuideCreating HLS Rendition Groups (REST API)
• Each stream_assembly element must contain only of these:
• One video_description element (plus an optional preset_id tag and name tag), or
• One audio_description element (plus an optional preset_id tag and name tag), or
• One caption_descriptoin element (plus an optional preset_id tag and name tag).
Creating Output Groups for HLS Rendition Groups in the RESTAPI• Create as many HLS output groups as desired by creating one output group that has the value
“apple_live_group_settings” in its type tag and that contains one apple_live_group_settings element.Set other tags as desired.
Creating Outputs for HLS Output Groups in the REST API• Within each HLS output group, create as many output elements as required, one for each video stream
(plus captions), one for each audio stream, and one for each captions stream.
• Each video output element must contain:
• container: m3u8
• extension: m3u8
• stream_assembly_name: The name of the one stream_assembly to associate with this output.Thisvalue matches the value of the name tag in the corresponding stream_assembly_name element.
• apple_live_settings element that contains:
• audio_rendition_sets tag: A comma-separated list of the names of the audio rendition groupsto associate with this video output to create a set. This value matches the value of theaudio_group_id tag in each of the associated audio outputs. For example, “audio_1” in theaudio_rendition_sets of this video output matches the “audio_1” in the audio_group_id tag of theassociated audio output.
• Other tags as you require.
• Each audio output element must contain:
• container: m3u8
• extension: m3u8
• stream_assembly_name: The name of the one stream_assembly to associate with this output.Thisvalue matches the value of the name tag in the corresponding stream_assembly_name element.
• apple_live_settings element that contains:
• audio_group_id: The name of the audio rendition group this audio output belongs to. Specifying avalue here creates the rendition group and puts this audio output into that rendition group.
• Up to version 2.9.x: alternate_audio_track_selection: Either “default_audio” or“alternate_audio_auto_select” or “alternate_audio_not_auto_select”. See the section called “Step2. Determine Defaults and Auto-Selection Behavior” (p. 108) for information.
• Version 2.10.0 and later: audio_track_type: Either “alternate_audio_auto_select_default”or “alternate_audio_auto_select” or “alternate_audio_not_auto_select” or“audio_only_variant_stream”. See the section called “Step 2. Determine Defaults and Auto-Selection Behavior” (p. 108)for information.
• Other tags as you require.
• Each captions output element must contain:
• container: m3u8
• extension: m3u8Version 2.16
115
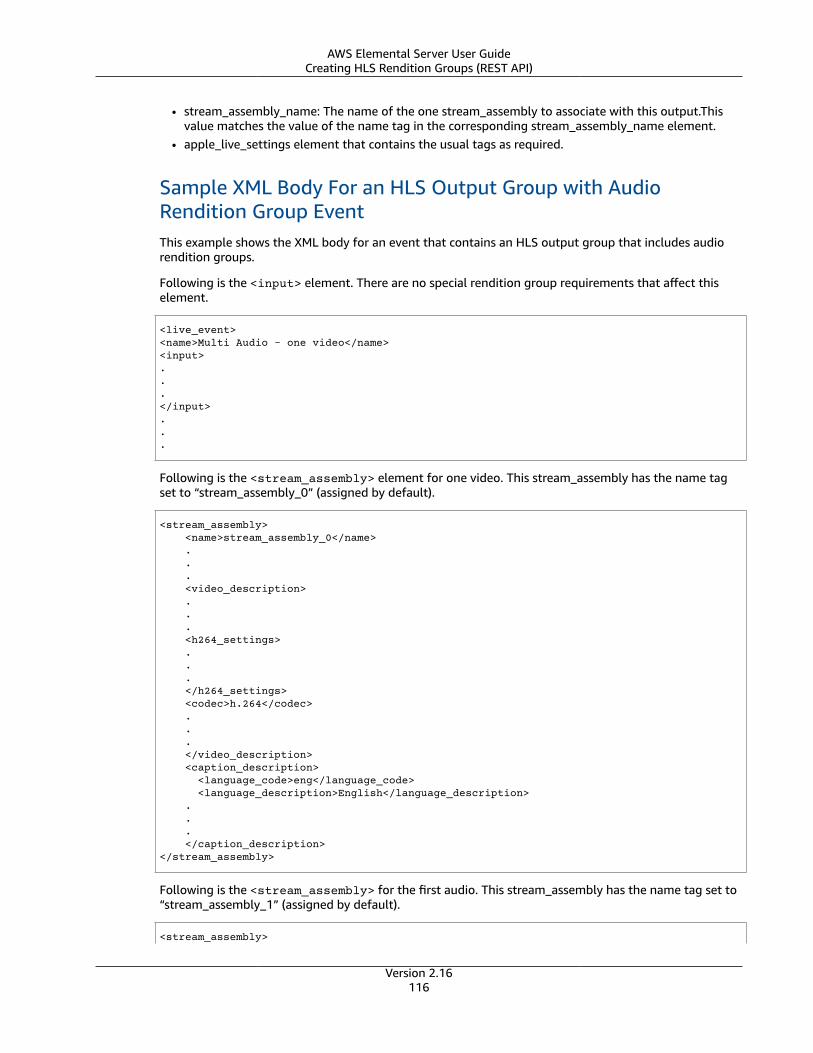
AWS Elemental Server User GuideCreating HLS Rendition Groups (REST API)
• stream_assembly_name: The name of the one stream_assembly to associate with this output.Thisvalue matches the value of the name tag in the corresponding stream_assembly_name element.
• apple_live_settings element that contains the usual tags as required.
Sample XML Body For an HLS Output Group with AudioRendition Group EventThis example shows the XML body for an event that contains an HLS output group that includes audiorendition groups.
Following is the <input> element. There are no special rendition group requirements that affect thiselement.
<live_event><name>Multi Audio - one video</name><input>...</input>...
Following is the <stream_assembly> element for one video. This stream_assembly has the name tagset to “stream_assembly_0” (assigned by default).
<stream_assembly> <name>stream_assembly_0</name> . . . <video_description> . . . <h264_settings> . . . </h264_settings> <codec>h.264</codec> . . . </video_description> <caption_description> <language_code>eng</language_code> <language_description>English</language_description> . . . </caption_description></stream_assembly>
Following is the <stream_assembly> for the first audio. This stream_assembly has the name tag set to“stream_assembly_1” (assigned by default).
<stream_assembly>
Version 2.16116
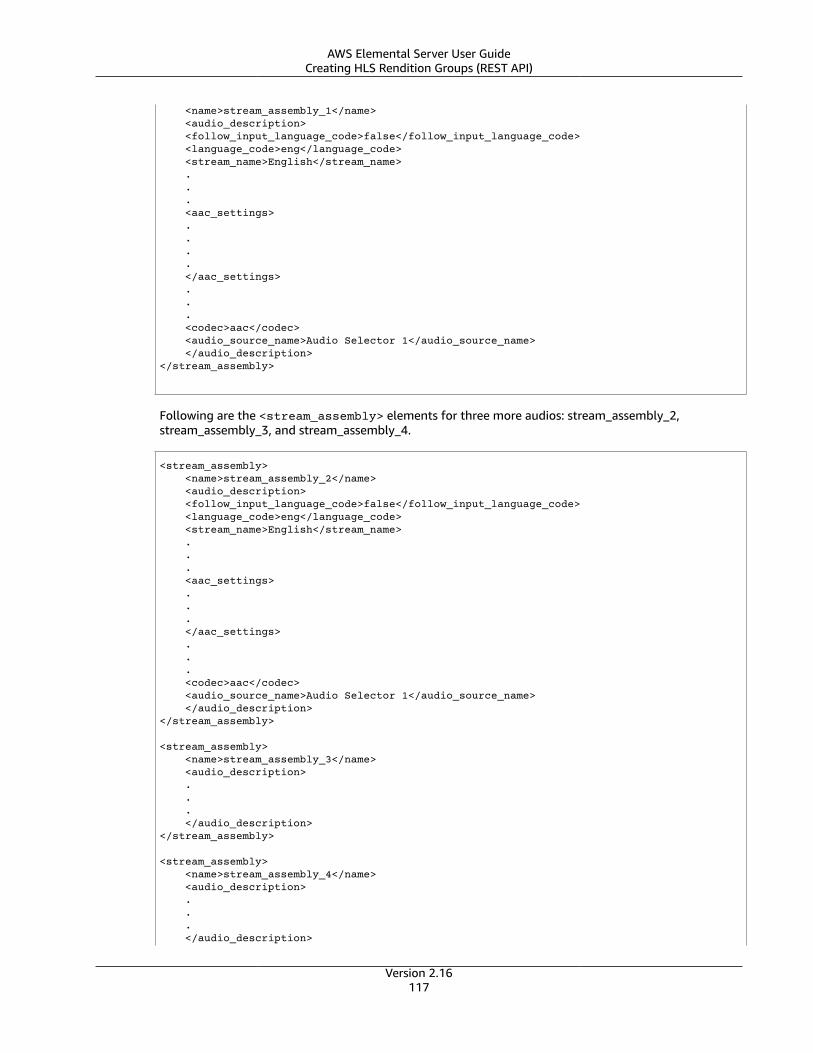
AWS Elemental Server User GuideCreating HLS Rendition Groups (REST API)
<name>stream_assembly_1</name> <audio_description> <follow_input_language_code>false</follow_input_language_code> <language_code>eng</language_code> <stream_name>English</stream_name> . . . <aac_settings> . . . . </aac_settings> . . . <codec>aac</codec> <audio_source_name>Audio Selector 1</audio_source_name> </audio_description></stream_assembly>
Following are the <stream_assembly> elements for three more audios: stream_assembly_2,stream_assembly_3, and stream_assembly_4.
<stream_assembly> <name>stream_assembly_2</name> <audio_description> <follow_input_language_code>false</follow_input_language_code> <language_code>eng</language_code> <stream_name>English</stream_name> . . . <aac_settings> . . . </aac_settings> . . . <codec>aac</codec> <audio_source_name>Audio Selector 1</audio_source_name> </audio_description></stream_assembly> <stream_assembly> <name>stream_assembly_3</name> <audio_description> . . . </audio_description></stream_assembly> <stream_assembly> <name>stream_assembly_4</name> <audio_description> . . . </audio_description>
Version 2.16117
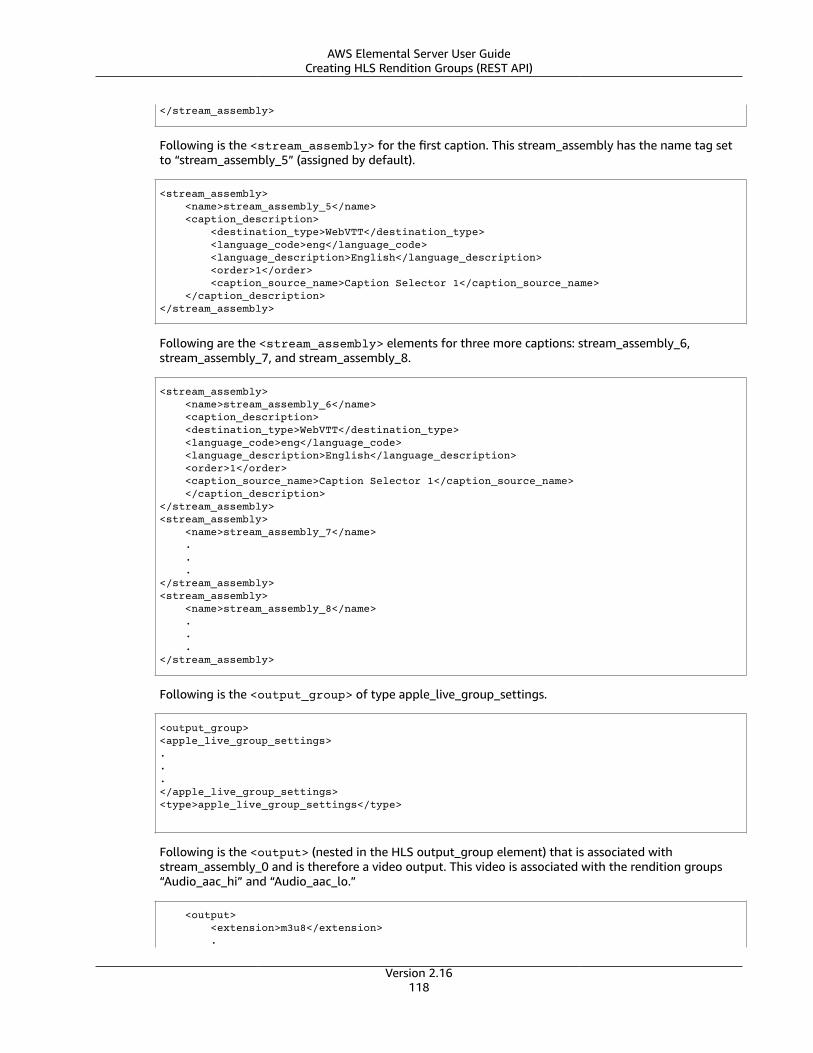
AWS Elemental Server User GuideCreating HLS Rendition Groups (REST API)
</stream_assembly>
Following is the <stream_assembly> for the first caption. This stream_assembly has the name tag setto “stream_assembly_5” (assigned by default).
<stream_assembly> <name>stream_assembly_5</name> <caption_description> <destination_type>WebVTT</destination_type> <language_code>eng</language_code> <language_description>English</language_description> <order>1</order> <caption_source_name>Caption Selector 1</caption_source_name> </caption_description></stream_assembly>
Following are the <stream_assembly> elements for three more captions: stream_assembly_6,stream_assembly_7, and stream_assembly_8.
<stream_assembly> <name>stream_assembly_6</name> <caption_description> <destination_type>WebVTT</destination_type> <language_code>eng</language_code> <language_description>English</language_description> <order>1</order> <caption_source_name>Caption Selector 1</caption_source_name> </caption_description></stream_assembly><stream_assembly> <name>stream_assembly_7</name> . . .</stream_assembly><stream_assembly> <name>stream_assembly_8</name> . . .</stream_assembly>
Following is the <output_group> of type apple_live_group_settings.
<output_group><apple_live_group_settings>...</apple_live_group_settings><type>apple_live_group_settings</type>
Following is the <output> (nested in the HLS output_group element) that is associated withstream_assembly_0 and is therefore a video output. This video is associated with the rendition groups“Audio_aac_hi” and “Audio_aac_lo.”
<output> <extension>m3u8</extension> .
Version 2.16118
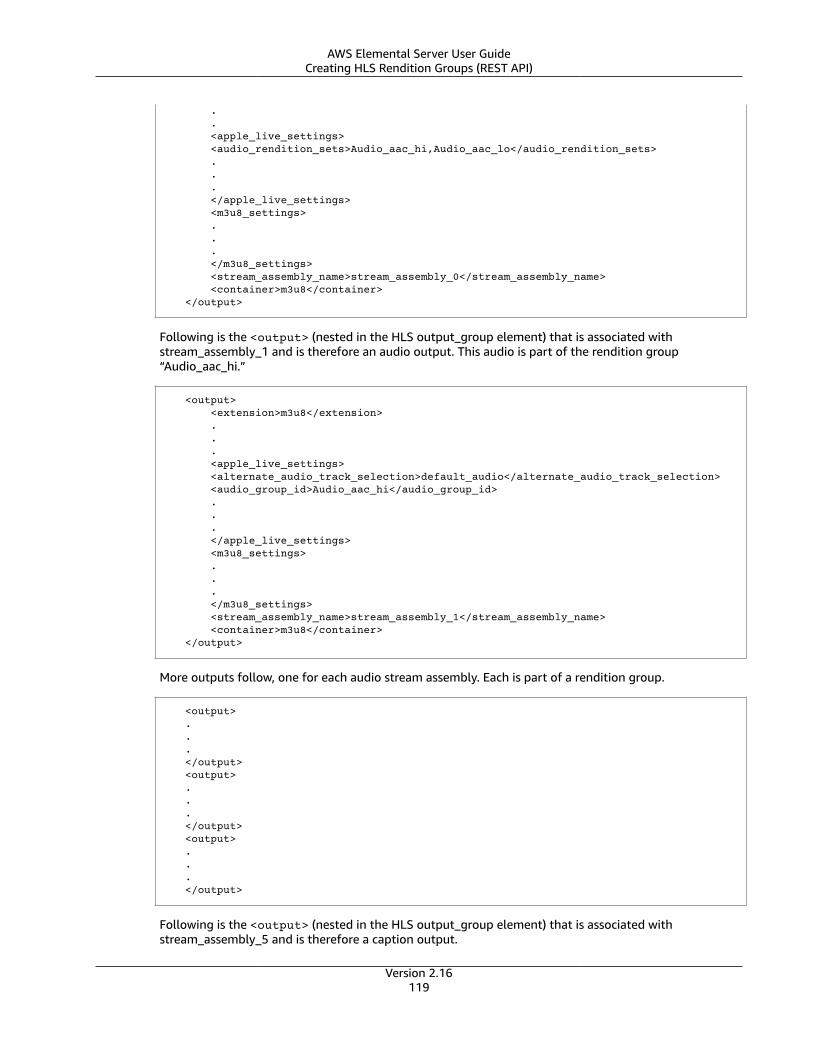
AWS Elemental Server User GuideCreating HLS Rendition Groups (REST API)
. . <apple_live_settings> <audio_rendition_sets>Audio_aac_hi,Audio_aac_lo</audio_rendition_sets> . . . </apple_live_settings> <m3u8_settings> . . . </m3u8_settings> <stream_assembly_name>stream_assembly_0</stream_assembly_name> <container>m3u8</container> </output>
Following is the <output> (nested in the HLS output_group element) that is associated withstream_assembly_1 and is therefore an audio output. This audio is part of the rendition group“Audio_aac_hi.”
<output> <extension>m3u8</extension> . . . <apple_live_settings> <alternate_audio_track_selection>default_audio</alternate_audio_track_selection> <audio_group_id>Audio_aac_hi</audio_group_id> . . . </apple_live_settings> <m3u8_settings> . . . </m3u8_settings> <stream_assembly_name>stream_assembly_1</stream_assembly_name> <container>m3u8</container> </output>
More outputs follow, one for each audio stream assembly. Each is part of a rendition group.
<output> . . . </output> <output> . . . </output> <output> . . . </output>
Following is the <output> (nested in the HLS output_group element) that is associated withstream_assembly_5 and is therefore a caption output.
Version 2.16119
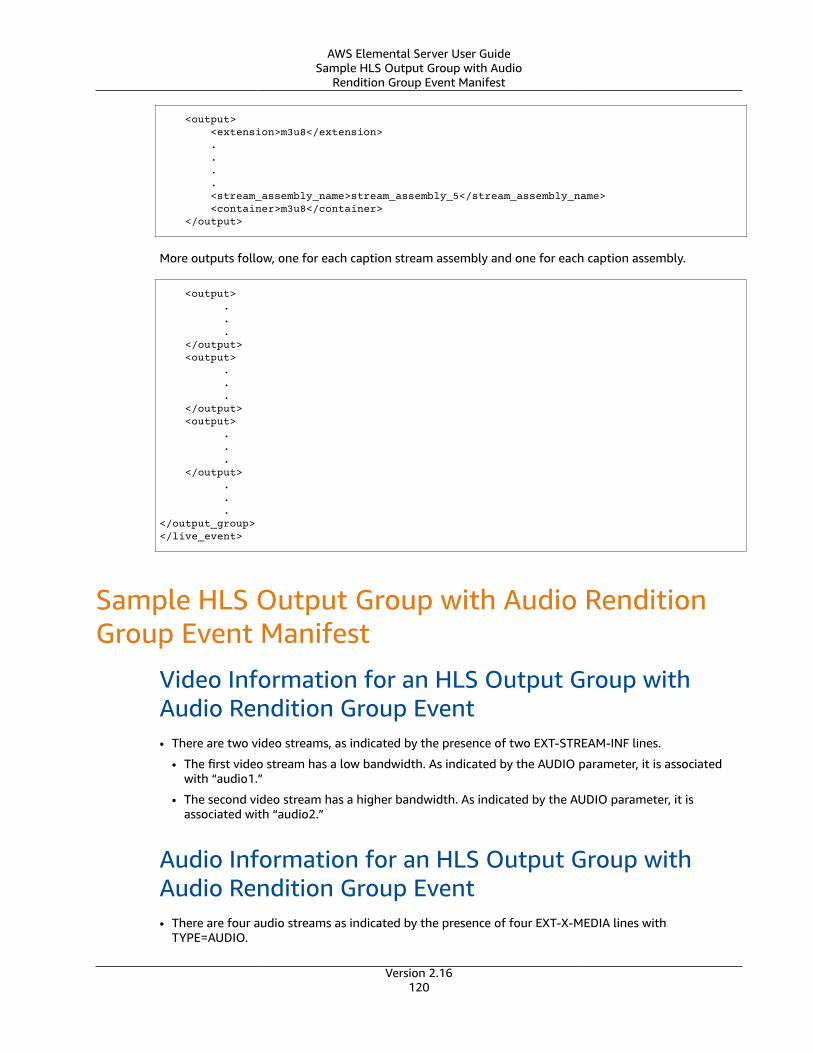
AWS Elemental Server User GuideSample HLS Output Group with Audio
Rendition Group Event Manifest
<output> <extension>m3u8</extension> . . . . <stream_assembly_name>stream_assembly_5</stream_assembly_name> <container>m3u8</container> </output>
More outputs follow, one for each caption stream assembly and one for each caption assembly.
<output> . . . </output> <output> . . . </output> <output> . . . </output> . . .</output_group></live_event>
Sample HLS Output Group with Audio RenditionGroup Event Manifest
Video Information for an HLS Output Group withAudio Rendition Group Event• There are two video streams, as indicated by the presence of two EXT-STREAM-INF lines.
• The first video stream has a low bandwidth. As indicated by the AUDIO parameter, it is associatedwith “audio1.”
• The second video stream has a higher bandwidth. As indicated by the AUDIO parameter, it isassociated with “audio2.”
Audio Information for an HLS Output Group withAudio Rendition Group Event• There are four audio streams as indicated by the presence of four EXT-X-MEDIA lines with
TYPE=AUDIO.
Version 2.16120
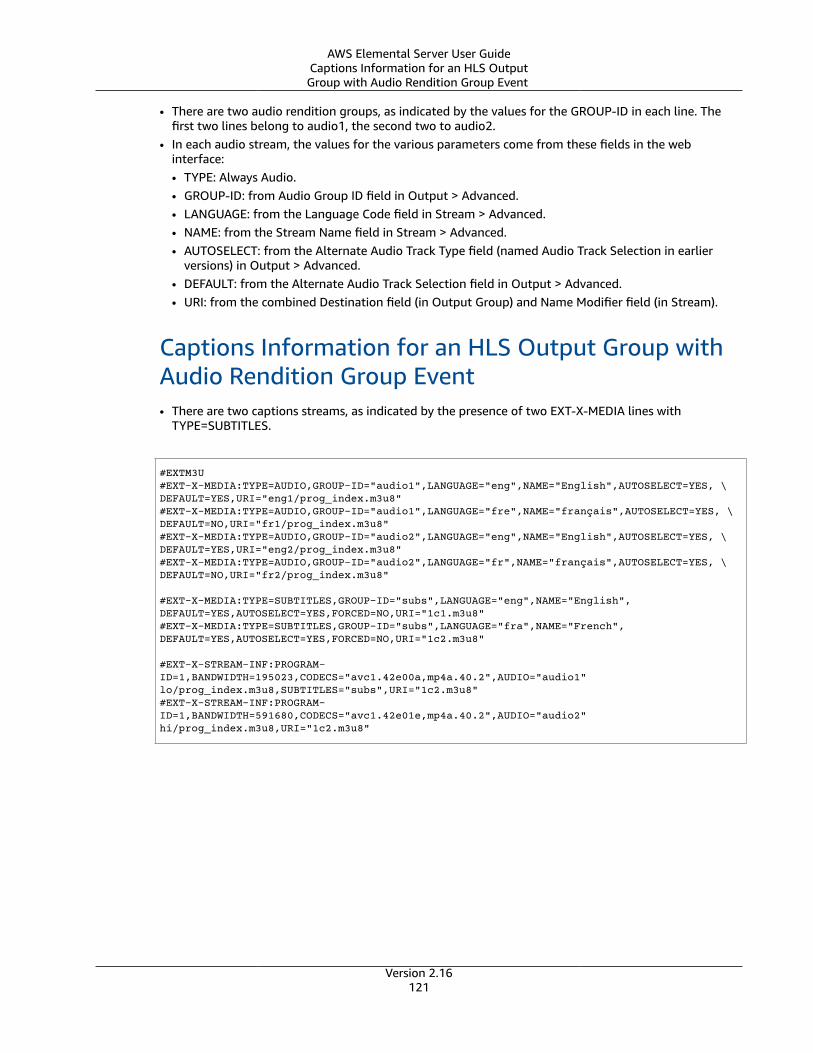
AWS Elemental Server User GuideCaptions Information for an HLS OutputGroup with Audio Rendition Group Event
• There are two audio rendition groups, as indicated by the values for the GROUP-ID in each line. Thefirst two lines belong to audio1, the second two to audio2.
• In each audio stream, the values for the various parameters come from these fields in the webinterface:• TYPE: Always Audio.• GROUP-ID: from Audio Group ID field in Output > Advanced.• LANGUAGE: from the Language Code field in Stream > Advanced.• NAME: from the Stream Name field in Stream > Advanced.• AUTOSELECT: from the Alternate Audio Track Type field (named Audio Track Selection in earlier
versions) in Output > Advanced.• DEFAULT: from the Alternate Audio Track Selection field in Output > Advanced.• URI: from the combined Destination field (in Output Group) and Name Modifier field (in Stream).
Captions Information for an HLS Output Group withAudio Rendition Group Event• There are two captions streams, as indicated by the presence of two EXT-X-MEDIA lines with
TYPE=SUBTITLES.
#EXTM3U#EXT-X-MEDIA:TYPE=AUDIO,GROUP-ID="audio1",LANGUAGE="eng",NAME="English",AUTOSELECT=YES, \DEFAULT=YES,URI="eng1/prog_index.m3u8"#EXT-X-MEDIA:TYPE=AUDIO,GROUP-ID="audio1",LANGUAGE="fre",NAME="français",AUTOSELECT=YES, \DEFAULT=NO,URI="fr1/prog_index.m3u8"#EXT-X-MEDIA:TYPE=AUDIO,GROUP-ID="audio2",LANGUAGE="eng",NAME="English",AUTOSELECT=YES, \DEFAULT=YES,URI="eng2/prog_index.m3u8"#EXT-X-MEDIA:TYPE=AUDIO,GROUP-ID="audio2",LANGUAGE="fr",NAME="français",AUTOSELECT=YES, \DEFAULT=NO,URI="fr2/prog_index.m3u8"
#EXT-X-MEDIA:TYPE=SUBTITLES,GROUP-ID="subs",LANGUAGE="eng",NAME="English",DEFAULT=YES,AUTOSELECT=YES,FORCED=NO,URI="1c1.m3u8"#EXT-X-MEDIA:TYPE=SUBTITLES,GROUP-ID="subs",LANGUAGE="fra",NAME="French",DEFAULT=YES,AUTOSELECT=YES,FORCED=NO,URI="1c2.m3u8"
#EXT-X-STREAM-INF:PROGRAM-ID=1,BANDWIDTH=195023,CODECS="avc1.42e00a,mp4a.40.2",AUDIO="audio1"lo/prog_index.m3u8,SUBTITLES="subs",URI="1c2.m3u8" #EXT-X-STREAM-INF:PROGRAM-ID=1,BANDWIDTH=591680,CODECS="avc1.42e01e,mp4a.40.2",AUDIO="audio2"hi/prog_index.m3u8,URI="1c2.m3u8"
Version 2.16121
AWS Elemental Server User GuideSetting the Timecode Source Settings
Setting Up Captions with AWSElemental Server
To include captions in your job, follow these steps in the order listed:
1. Set the timecode source settings. (p. 122)2. Gather required captions information. (p. 122)3. Choose a supported output captions format. (p. 123)4. Create input captions selectors. (p. 124)5. Set up captions in outputs. (p. 131)
For information about the files AWS Elemental Server generates from jobs that have captions in theoutputs, see the section called “About Captions Handling in Outputs” (p. 141).
Setting the Timecode Source SettingsBefore you start setting up the captions themselves, you need to make sure that the timecode settingsyou make result in correctly synchronized captions. The simplest way to make sure that your captionssynchronize correctly with your video is to set both the input and job-wide timecode source to Start at 0or to set them both to Embedded.
NoteIf you set both to Embedded, the timecodes in your captions files must begin at the same timeas the timecodes that are embedded in your input video.
To set your input timecode source setting
1. On the Create New Job page, in the Input section, under Input 1, choose Advanced to display moresettings.
2. For Timecode Source, choose Start at 0 or Embedded.
To set your job-wide timecode source setting
1. On the Create New Job page, at the bottom of the Input section, find the Timecode Config section.2. For Source choose, choose the same value that you set for the input timecode source setting.
Gathering Required Captions InformationTo choose an appropriate output captions format and to set up your captions in your job, you need thefollowing information:
• The input video container. You must have this information ahead of time; AWS Elemental Server doesnot read this from your input files. For a list of supported input containers and information aboutwhether captions can be extracted from them, see Reference: Supported Input Containers (p. 166).
Version 2.16122
AWS Elemental Server User GuideChoose a Supported Output Captions Format
• The input captions format. You must have this information ahead of time; AWS Elemental Server doesnot read this from your input files. For a list of supported input captions, see Reference: SupportedCaptions Formats (p. 167).
• The tracks from the input captions that you intend to use in any of your outputs. Captions tracks oftencorrespond to language, as in "a French captions track". You must have this information ahead of time;AWS Elemental Server does not read this from your input files.
• The output packages and standalone files that you intend to create with the job.
Captions are supported in every output container type. For a list of supported output containers,see the Reference tab of the documentation on the web interface of your appliance. To go to thedocumentation, choose the Support tab at the top of the interface.
• The output captions tracks that you intend to include for each output.
In most cases, the tracks that you include in an output might be a subset of the tracks that areavailable in the input. If you pass through Teletext-to-Teletext, all tracks in the input are available inthe output. In this situation, you can't choose only a subset of the input tracks.
Choosing a Supported Output Captions FormatBefore you set up captions in your job, make sure that the transcode you want to set up is supported.Support for a particular output caption format depends on the following factors:
• Output container. A given output caption can appear only in specific output containers.
• Input container. From a given input container, AWS Elemental Server can read certain caption formats.
• Input captions format. For a given caption format in the source, the AWS Elemental Server can createoutput captions in one or more formats.
To find the supported output captions formats, given your output container, input containerand input captions format
1. Find the Supported Caption Formats table on the web interface of your AWS ElementalServer appliance. The URL for this table is <your-AWS Elemental Server-node>/help/reference#supported_captions.
a. Choose the Support tab on the web interface. These top-level tabs are at the top of the webinterface, just below the AWS Elemental logo.
NoteChoose the word Support. Don't choose from the dropdown menu.
b. Choose the Reference tab from the set of tabs just below the label Table of Contents.
c. Choose Supported Caption Formats from the left navigation menu on the Reference page.
2. Find the table with the heading that corresponds to your output container.
3. In the Original Input Container column, find your input container.
4. Of the rows that show your input container, find the row that shows your input captions format inthe Original Caption Format column.
NoteIf your input captions format isn't shown in any row that also shows your input container,your input captions format isn't supported.
5. Find your choices for output captions formats in the third column of that row under SupportedOutput Caption Formats.
Version 2.16123
AWS Elemental Server User GuideCreating Input Captions Selectors
Creating Input Captions SelectorsWhen you set up captions, you begin by creating input captions selectors. Captions selectors identify aparticular captions asset on the input and associate a label with it. The captions asset is either a singletrack or the set of all tracks contained in the input file, depending on your input captions format. Forexample, you might add Captions selector 1 and associate the French captions with it. When you set upan output to include captions (p. 131), you do so by specifying these input captions selectors in thestreams in your outputs.
To create input captions selectors
1. On the Create New Job page, In the Input section, under Input 1, choose Advanced to display moresettings.
2. Choose the Add Caption Selector, below the Video Selector and Audio Selector sections.3. Under Source, choose the input captions format.4. For most formats, more fields appear. Specify the values for these fields as described in the topic
that relates to your input captions format. For more information about these fields, choose theappropriate topic from the list following this procedure.
5. Create more captions selectors as necessary. The number of captions selectors you need depends onyour input captions format. For information on the number of captions selectors you should set up,see the topic from the list following this procedure that corresponds to your input captions format.
Detailed information by input captions format• Ancillary (QuickTime Captions Track or Captions in MXF VANC Data) (p. 124)• ARIB (p. 125)• Embedded (CEA/EIA-608, CEA/EIA-708), SCTE-20, and Embedded+SCTE-20, and
SCTE-20+Embedded (p. 125)• DVB-Sub or SCTE-27 Formats (p. 127)• Teletext (p. 127)• SCC, SMI, SRT, STL, TTML (Sidecar) (p. 128)• Setting Up Input Captions With 608 XDS Data (p. 129)• Extracting VBI Data Included in Embedded Input Captions (p. 130)
Ancillary (QuickTime Captions Track or Captions inMXF VANC Data)If your input captions are in either of the following formats, the service handles them as "ancillary" data:
• QuickTime captions track (format QTCC)• MXF VANC data
AWS Elemental Server does not create output captions in these formats, but you can convert them to asupported output format (p. 123)..
NoteIf your content includes 608 XDS data, see Setting Up Input Captions With 608 XDSData (p. 129)
For ancillary captions
• Create one captions selector per track to use in your outputs.
Version 2.16124
AWS Elemental Server User GuideARIB
• In each captions selector, for Source, choose Ancillary.• In each captions selector, for CC channel, choose the channel number for the track that is associated
with the selector.
For example, the input captions have English in CC channel 1 and Spanish in CC channel 2. To usethese captions, create Captions selector 1, and then choose 1 in the CC channel dropdown list. Next,create Captions selector 2, and then choose 2 in the CC channel dropdown list.
ARIBFor ARIB captions, create one input captions selector. For Source, choose ARIB.
Embedded (CEA/EIA-608, CEA/EIA-708), SCTE-20,and Embedded+SCTE-20, and SCTE-20+EmbeddedIf your input captions are in any of the following formats, AWS Elemental Server handles them as"embedded."
• CEA-608• EIA-608• CEA-708• EIA-708
If your input captions have both embedded captions and SCTE-20 captions and you want both typesin your outputs, set up separate input captions selectors for the SCTE-20 and the embedded captionstracks. Set up the SCTE-20 captions selectors the same way you set up the embedded selectors.
NoteIf you are extracting embedded captions from the input and using embedded captions in theoutput, and if the input includes VBI data and you want to include all that data in the output,then do not follow this procedure. Instead, see Extracting VBI Data Included in Embedded InputCaptions (p. 130).
Number of Captions Selectors for Embedded and SCTE-20Captions• If all of your output captions are also an embedded format, create only one captions selector,
even if you want to include multiple tracks in the output. With this setup, AWS Elemental Serverautomatically extracts all tracks and includes them in the output.
• If all of your outputs are in a format that is not embedded, create one captions selector for each trackthat you want to include in the output.
• If some of your outputs have captions in an embedded format and some of your outputs have captionsin a different format, create one captions selector for the outputs with embedded captions. Also createindividual selectors for the outputs with other captions that aren't embedded, one for each track thatyou want in your outputs.
Captions Selector Fields for Embedded, SCTE-20, Embedded+SCTE-20, and SCTE-20+Embedded Captions• Source: Specify a value for the source format as follows:
Version 2.16125
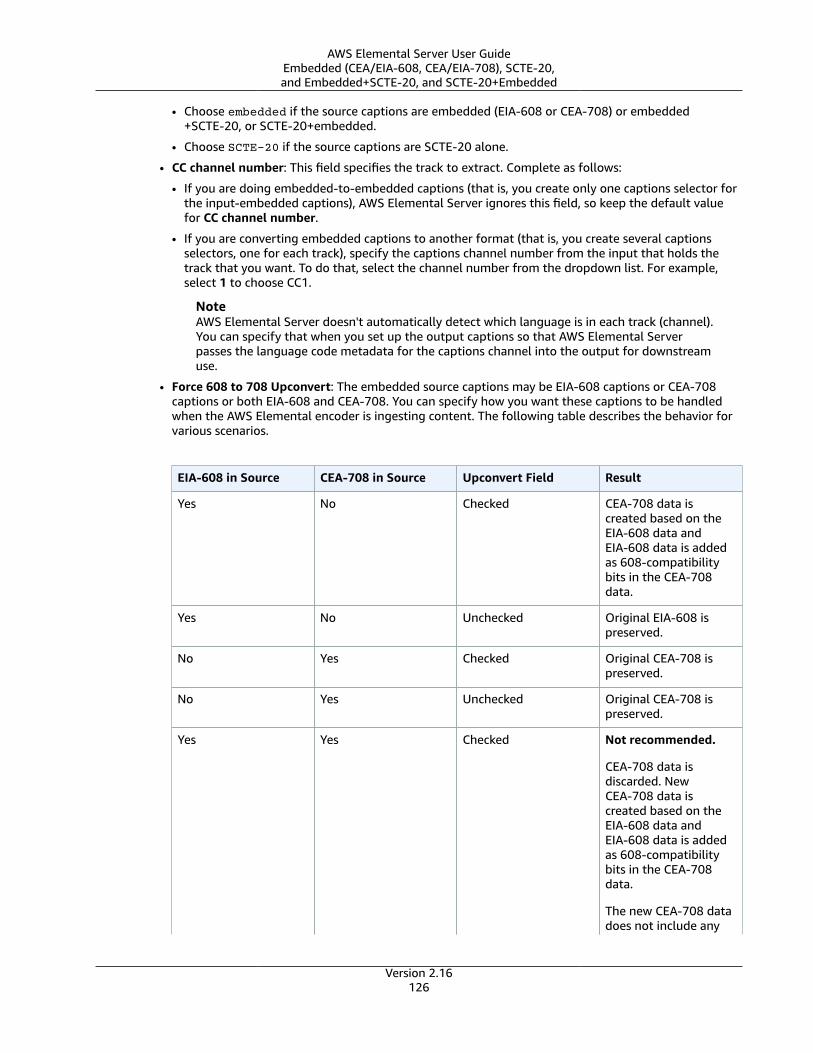
AWS Elemental Server User GuideEmbedded (CEA/EIA-608, CEA/EIA-708), SCTE-20,and Embedded+SCTE-20, and SCTE-20+Embedded
• Choose embedded if the source captions are embedded (EIA-608 or CEA-708) or embedded+SCTE-20, or SCTE-20+embedded.
• Choose SCTE-20 if the source captions are SCTE-20 alone.
• CC channel number: This field specifies the track to extract. Complete as follows:
• If you are doing embedded-to-embedded captions (that is, you create only one captions selector forthe input-embedded captions), AWS Elemental Server ignores this field, so keep the default valuefor CC channel number.
• If you are converting embedded captions to another format (that is, you create several captionsselectors, one for each track), specify the captions channel number from the input that holds thetrack that you want. To do that, select the channel number from the dropdown list. For example,select 1 to choose CC1.
NoteAWS Elemental Server doesn't automatically detect which language is in each track (channel).You can specify that when you set up the output captions so that AWS Elemental Serverpasses the language code metadata for the captions channel into the output for downstreamuse.
• Force 608 to 708 Upconvert: The embedded source captions may be EIA-608 captions or CEA-708captions or both EIA-608 and CEA-708. You can specify how you want these captions to be handledwhen the AWS Elemental encoder is ingesting content. The following table describes the behavior forvarious scenarios.
EIA-608 in Source CEA-708 in Source Upconvert Field Result
Yes No Checked CEA-708 data iscreated based on theEIA-608 data andEIA-608 data is addedas 608-compatibilitybits in the CEA-708data.
Yes No Unchecked Original EIA-608 ispreserved.
No Yes Checked Original CEA-708 ispreserved.
No Yes Unchecked Original CEA-708 ispreserved.
Yes Yes Checked Not recommended.
CEA-708 data isdiscarded. NewCEA-708 data iscreated based on theEIA-608 data andEIA-608 data is addedas 608-compatibilitybits in the CEA-708data.
The new CEA-708 datadoes not include any
Version 2.16126
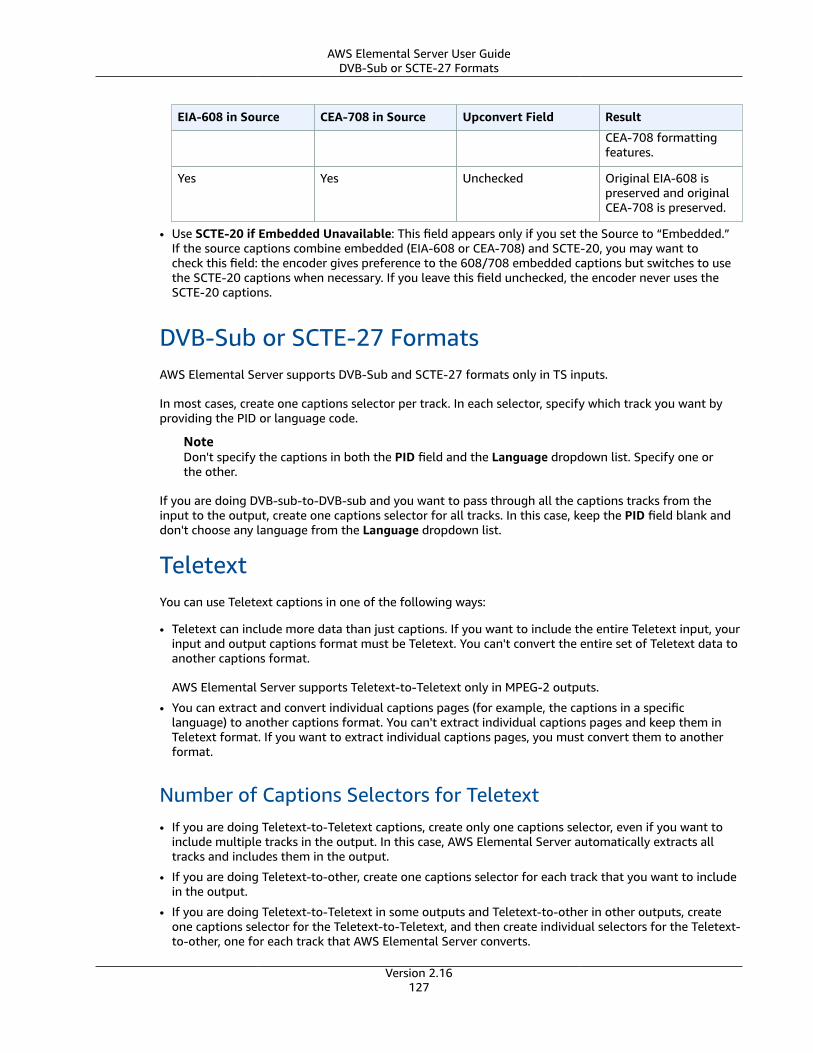
AWS Elemental Server User GuideDVB-Sub or SCTE-27 Formats
EIA-608 in Source CEA-708 in Source Upconvert Field Result
CEA-708 formattingfeatures.
Yes Yes Unchecked Original EIA-608 ispreserved and originalCEA-708 is preserved.
• Use SCTE-20 if Embedded Unavailable: This field appears only if you set the Source to “Embedded.”If the source captions combine embedded (EIA-608 or CEA-708) and SCTE-20, you may want tocheck this field: the encoder gives preference to the 608/708 embedded captions but switches to usethe SCTE-20 captions when necessary. If you leave this field unchecked, the encoder never uses theSCTE-20 captions.
DVB-Sub or SCTE-27 FormatsAWS Elemental Server supports DVB-Sub and SCTE-27 formats only in TS inputs.
In most cases, create one captions selector per track. In each selector, specify which track you want byproviding the PID or language code.
NoteDon't specify the captions in both the PID field and the Language dropdown list. Specify one orthe other.
If you are doing DVB-sub-to-DVB-sub and you want to pass through all the captions tracks from theinput to the output, create one captions selector for all tracks. In this case, keep the PID field blank anddon't choose any language from the Language dropdown list.
TeletextYou can use Teletext captions in one of the following ways:
• Teletext can include more data than just captions. If you want to include the entire Teletext input, yourinput and output captions format must be Teletext. You can't convert the entire set of Teletext data toanother captions format.
AWS Elemental Server supports Teletext-to-Teletext only in MPEG-2 outputs.
• You can extract and convert individual captions pages (for example, the captions in a specificlanguage) to another captions format. You can't extract individual captions pages and keep them inTeletext format. If you want to extract individual captions pages, you must convert them to anotherformat.
Number of Captions Selectors for Teletext• If you are doing Teletext-to-Teletext captions, create only one captions selector, even if you want to
include multiple tracks in the output. In this case, AWS Elemental Server automatically extracts alltracks and includes them in the output.
• If you are doing Teletext-to-other, create one captions selector for each track that you want to includein the output.
• If you are doing Teletext-to-Teletext in some outputs and Teletext-to-other in other outputs, createone captions selector for the Teletext-to-Teletext, and then create individual selectors for the Teletext-to-other, one for each track that AWS Elemental Server converts.
Version 2.16127
AWS Elemental Server User GuideSCC, SMI, SRT, STL, TTML (Sidecar)
Captions Selector Fields for Teletext Captions• Source: Choose Teletext.
• Page: This field specifies the captions page you want. A captions page usually corresponds to alanguage. Complete as follows:
• If you are doing Teletext-to-Teletext captions (that is, you create only one captions selector for theinput embedded captions), keep this field blank. AWS Elemental Server ignores any value that youprovide.
• If you are converting Teletext to another format (that is, you create several captions selectors, onefor each language), then specify the page for the language that you want. If you keep this fieldblank, you will get a validation error when you submit the job.
SCC, SMI, SRT, STL, TTML (Sidecar)SCC, SMI, SRT, STL, and TTML are sidecar captions formats. With these formats, you provide inputcaptions as a separate file. AWS Elemental Server handles all sidecar formats the same way. The servicecan pass them through to the output in the same format or convert them into another sidecar format. Inall cases, you must create one captions selector for the entire set of captions tracks.
Provide the following values for the captions selector fields:
• External captions file: The URI to the captions file. AWS Elemental Server accepts captions files fromAmazon S3.
• Time delta: (Optional) Use this setting if you need to adjust the sync between the captions and thevideo:
• Type a positive number to add to the times in the captions file. For example, type 15 to add 15seconds to all the times in the captions file.
• Type a negative number to subtract from the times in the captions file. For example, type -5 tosubtract 5 seconds from the times in the captions file.
The format of the times in the captions file doesn't have to match the value in the Timecode configfield (in the input portion of your job). The number that you type in this field simply delays thecaptions or makes the captions play earlier, regardless of the timecode formats.
NoteTo make sure that your captions are properly synchronized with your video, check that thevalue for Timecode source in the Video selector section matches the timecodes in yourcaptions file. For example, if the timecodes in your captions file start at zero but your video hasembedded timecodes starting at 01:00:00:00, change the default value for Timecode sourcefrom Embedded to Start at 0.If you use the API or an SDK, you can find this setting in your job XML file, calledTimecodeSource, located in Settings, Inputs. When you use SCC, you must provide a valuefor TimecodeSource. Otherwise, AWS Elemental Server does not insert the captions.
Use Cases for Time DeltaSCC: The start time for the captions is not 00:00:00:00. For captions handling, AWS Elemental Serveralways treats the video and audio start time as 00:00:00, even if your input video file has embeddedtimecodes that start at a time other than 00:00:00:00. If your captions file assumes a start time otherthan 00:00:00, you might need to adjust the captions start time.
For example, your video file may have embedded timecodes that start at 00:05:00:00 and the firstinstance of dialogue that requires captions might be one minute into the video, at timecode 00:06:00:00.
Version 2.16128
AWS Elemental Server User GuideSetting up for 608 XDS Data
If your captions file is set to begin captions at 00:06:00:00, you must subtract five minutes from thecaptions. In this case, you would enter -300 in the Time delta field.
SMI, SRT, STL, TTML: The start time in the captions file is slightly off. With these types of captionsfiles, the start time for both the video file (containing video and audio), and the captions file is always00:00:00.
For example, the first instance of dialogue that requires captions might be at 00:06:15. But in thecaptions file, this time is marked as 00:06:18, and every other instance of captions is also off by 3seconds. The solution is to subtract 3 seconds from the captions file. In this case, you would enter "-3" inthe Time delta field.
Setting Up Input Captions With 608 XDS DataThe Extended Data Services (XDS or EDS) standard is part of EIA-608 and allows for the delivery ofancillary data.
If your content includes 608 XDS data, you can set up to include it or strip it from the output.
NoteThe data is global – it is either included in every output and stream (even those streams that donot include captions) or it is excluded in every output and stream.
Extracting Data from Input
1. In the Input section of the job, click Advanced.
2. Click the Add Caption Selector button.
3. Set the source to Null.
You only need to create one Caption Selector for 608 XDS data, regardless of the number of outputsyou are creating.
4. If you also want to extract regular captions, create more Caption Selectors according to the regularprocedure as described in Creating Input Captions Selectors (p. 124).
Including Data in Output
• In the Global Processors section, turn on 608 Extended Data Services and complete the fields asdesired.
Version 2.16129
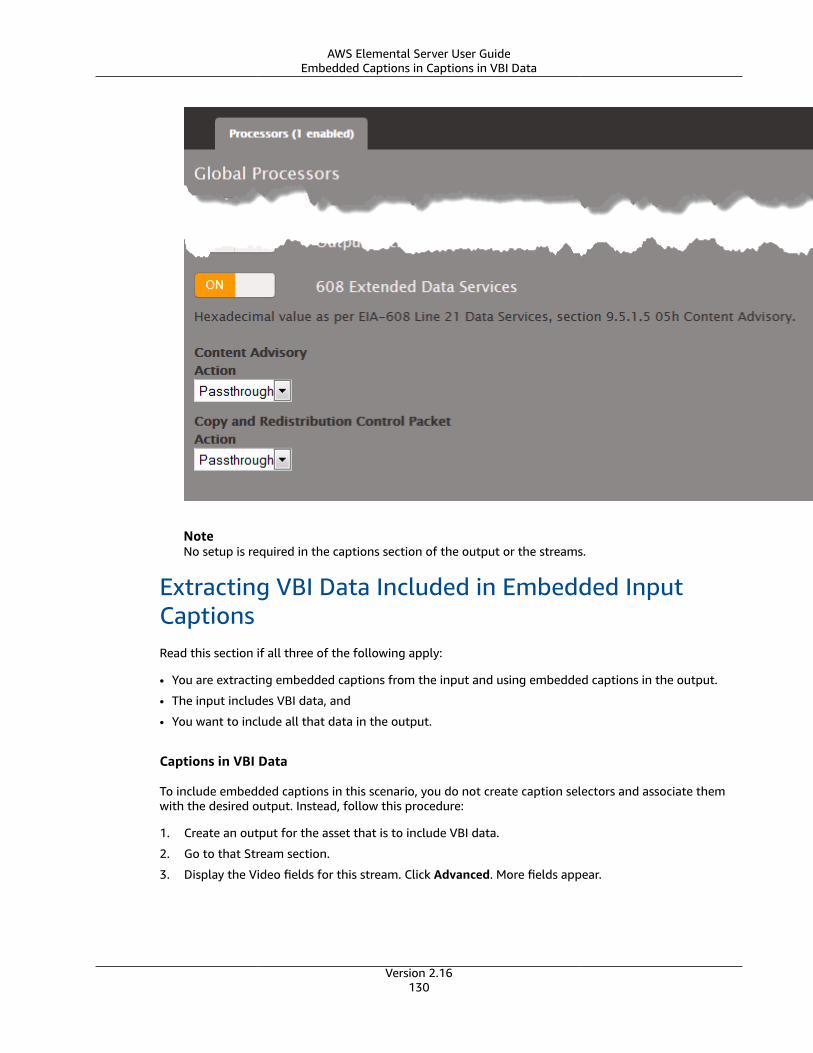
AWS Elemental Server User GuideEmbedded Captions in Captions in VBI Data
NoteNo setup is required in the captions section of the output or the streams.
Extracting VBI Data Included in Embedded InputCaptionsRead this section if all three of the following apply:
• You are extracting embedded captions from the input and using embedded captions in the output.
• The input includes VBI data, and
• You want to include all that data in the output.
Captions in VBI Data
To include embedded captions in this scenario, you do not create caption selectors and associate themwith the desired output. Instead, follow this procedure:
1. Create an output for the asset that is to include VBI data.
2. Go to that Stream section.
3. Display the Video fields for this stream. Click Advanced. More fields appear.
Version 2.16130
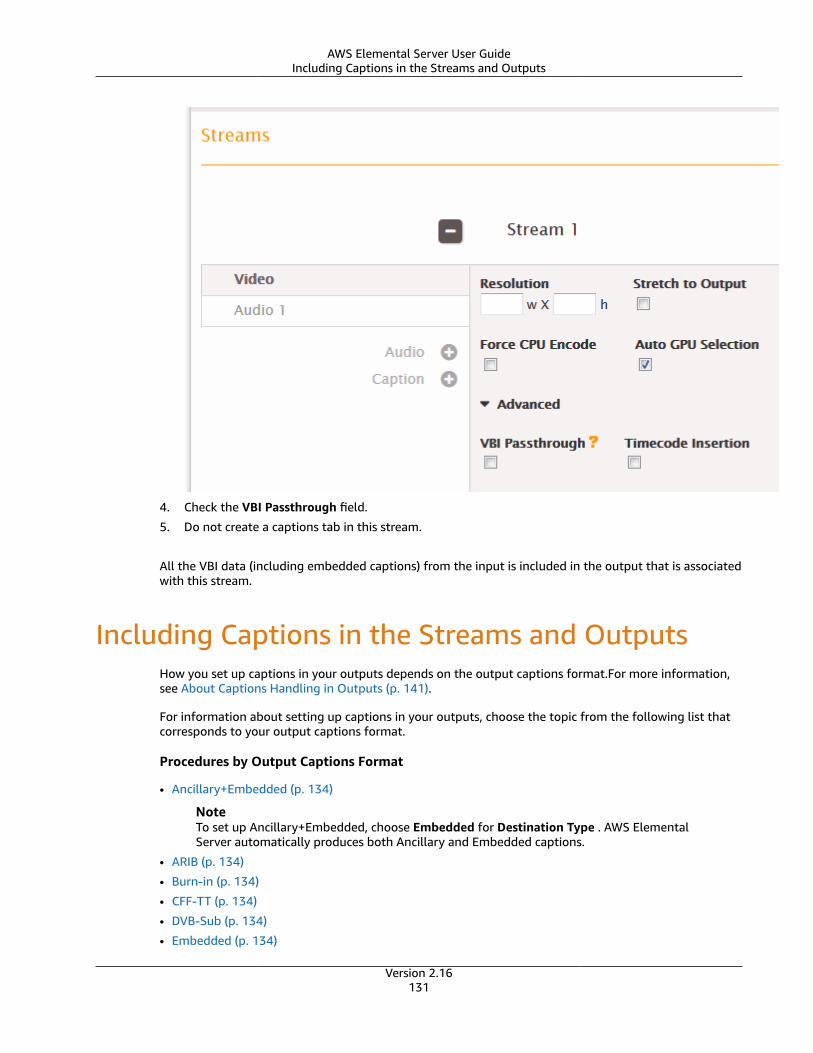
AWS Elemental Server User GuideIncluding Captions in the Streams and Outputs
4. Check the VBI Passthrough field.
5. Do not create a captions tab in this stream.
All the VBI data (including embedded captions) from the input is included in the output that is associatedwith this stream.
Including Captions in the Streams and OutputsHow you set up captions in your outputs depends on the output captions format.For more information,see About Captions Handling in Outputs (p. 141).
For information about setting up captions in your outputs, choose the topic from the following list thatcorresponds to your output captions format.
Procedures by Output Captions Format
• Ancillary+Embedded (p. 134)
NoteTo set up Ancillary+Embedded, choose Embedded for Destination Type . AWS ElementalServer automatically produces both Ancillary and Embedded captions.
• ARIB (p. 134)
• Burn-in (p. 134)
• CFF-TT (p. 134)
• DVB-Sub (p. 134)
• Embedded (p. 134)
Version 2.16131
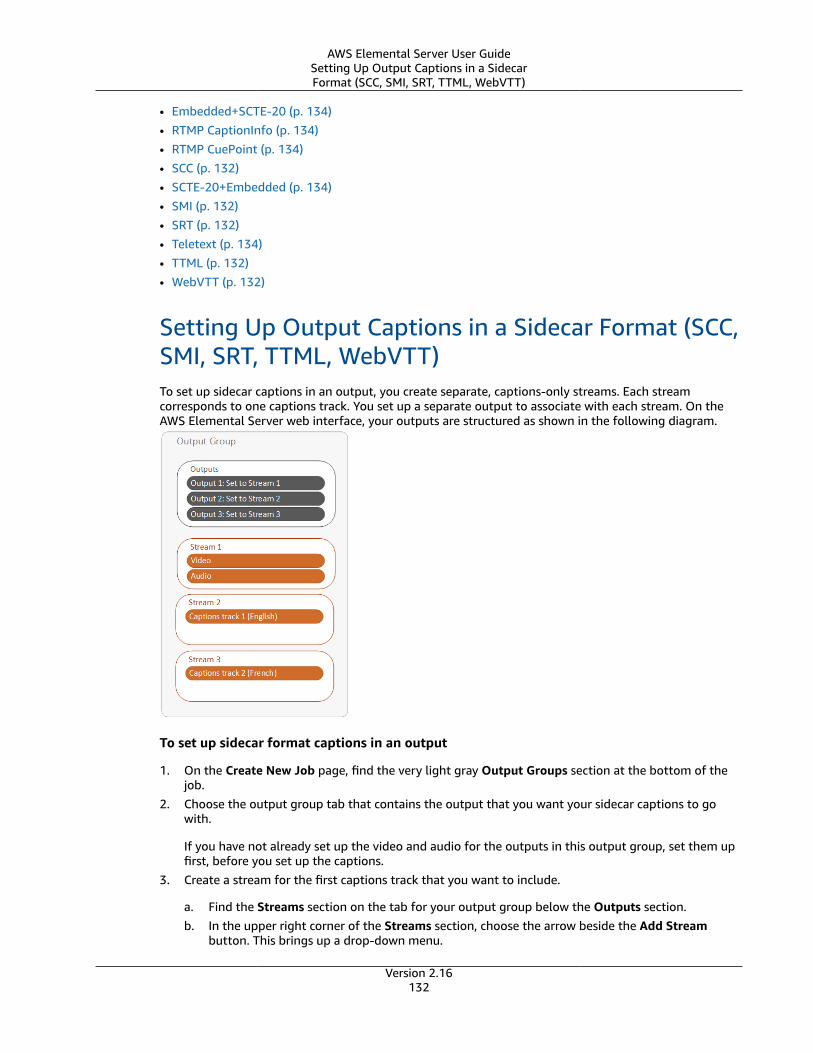
AWS Elemental Server User GuideSetting Up Output Captions in a SidecarFormat (SCC, SMI, SRT, TTML, WebVTT)
• Embedded+SCTE-20 (p. 134)• RTMP CaptionInfo (p. 134)• RTMP CuePoint (p. 134)• SCC (p. 132)• SCTE-20+Embedded (p. 134)• SMI (p. 132)• SRT (p. 132)• Teletext (p. 134)• TTML (p. 132)• WebVTT (p. 132)
Setting Up Output Captions in a Sidecar Format (SCC,SMI, SRT, TTML, WebVTT)To set up sidecar captions in an output, you create separate, captions-only streams. Each streamcorresponds to one captions track. You set up a separate output to associate with each stream. On theAWS Elemental Server web interface, your outputs are structured as shown in the following diagram.
To set up sidecar format captions in an output
1. On the Create New Job page, find the very light gray Output Groups section at the bottom of thejob.
2. Choose the output group tab that contains the output that you want your sidecar captions to gowith.
If you have not already set up the video and audio for the outputs in this output group, set them upfirst, before you set up the captions.
3. Create a stream for the first captions track that you want to include.
a. Find the Streams section on the tab for your output group below the Outputs section.b. In the upper right corner of the Streams section, choose the arrow beside the Add Stream
button. This brings up a drop-down menu.
Version 2.16132
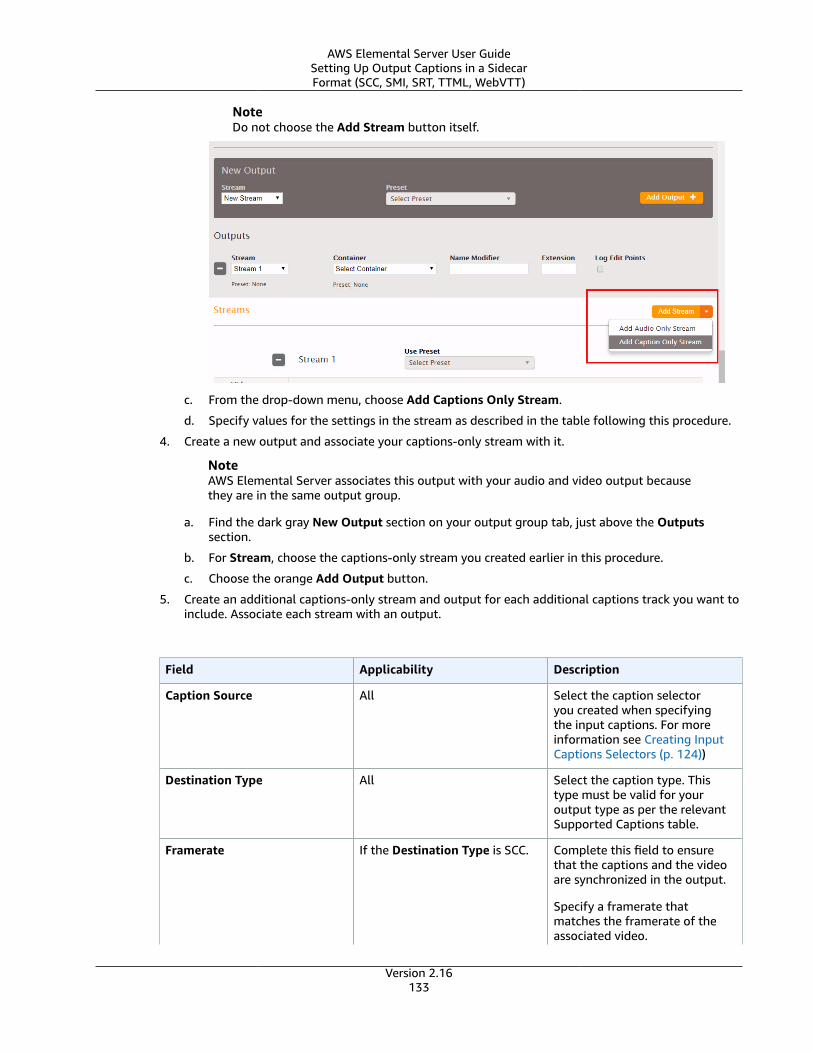
AWS Elemental Server User GuideSetting Up Output Captions in a SidecarFormat (SCC, SMI, SRT, TTML, WebVTT)
NoteDo not choose the Add Stream button itself.
c. From the drop-down menu, choose Add Captions Only Stream.
d. Specify values for the settings in the stream as described in the table following this procedure.
4. Create a new output and associate your captions-only stream with it.
NoteAWS Elemental Server associates this output with your audio and video output becausethey are in the same output group.
a. Find the dark gray New Output section on your output group tab, just above the Outputssection.
b. For Stream, choose the captions-only stream you created earlier in this procedure.
c. Choose the orange Add Output button.
5. Create an additional captions-only stream and output for each additional captions track you want toinclude. Associate each stream with an output.
Field Applicability Description
Caption Source All Select the caption selectoryou created when specifyingthe input captions. For moreinformation see Creating InputCaptions Selectors (p. 124))
Destination Type All Select the caption type. Thistype must be valid for youroutput type as per the relevantSupported Captions table.
Framerate If the Destination Type is SCC. Complete this field to ensurethat the captions and the videoare synchronized in the output.
Specify a framerate thatmatches the framerate of theassociated video.
Version 2.16133
AWS Elemental Server User GuideSetting Up Output Captions for All Formats Except Sidecar
Field Applicability Description
• If the video framerate is23.97 or 24, choose thecorresponding option
• If the video framerateis 29.97, choose 29.97dropframe only if the videohas the Video Insertion andDrop Frame Timecode bothchecked; otherwise, choose29.97 non-dropframe.
Pass-style If Destination Type is TTML.
And if:
• The source caption type isTTML, SMPTE-TT, or CCF-TT.
• And the output is an Archiveoutput.
Complete as follows:
• Check this box if you want thestyle (font, position, and soon) of the input captions to becopied.
• Leave unchecked if you want asimplified caption style. Someclient players work best with asimplified caption style.
(For other combinations ofsource caption types and outputcaption type, the output isalways simplified.)
Font style fields If the Destination Type is Burn-in.
See Font Styles for Burn-in (p. 137).
Language All Complete if desired. Thisinformation may be useful toor required by a downstreamsystem.
Description All Complete if desired. Thisinformation may be useful toor required by a downstreamsystem.
Setting Up Output Captions for All Formats ExceptSidecarTo set up output captions in any format other than sidecar, you add captions tabs to the stream thatalso contains the video and audio. You associate the one stream with one output. On the AWS ElementalServer web interface, your outputs are structured as shown in the following diagram. Depending on theoutput captions format, AWS Elemental Server creates the captions differently in the outputs. For moreinformation about the job output results for different captions formats, see About Captions Handling inOutputs (p. 141).
Version 2.16134
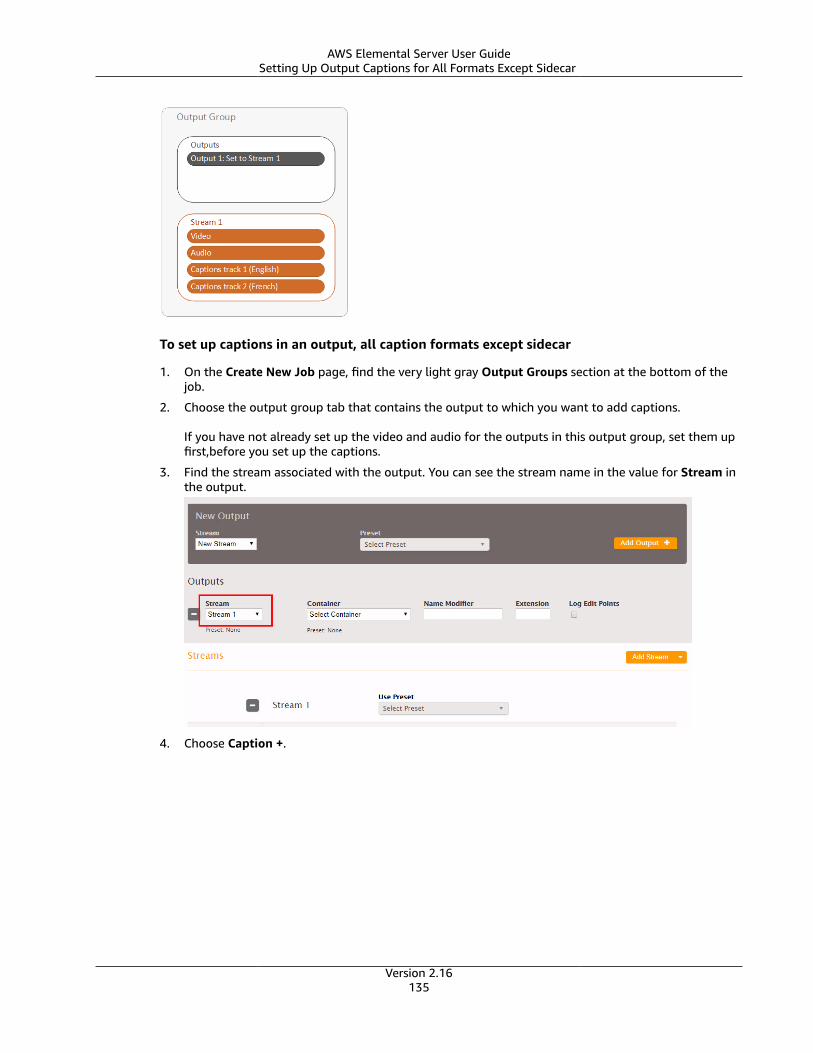
AWS Elemental Server User GuideSetting Up Output Captions for All Formats Except Sidecar
To set up captions in an output, all caption formats except sidecar
1. On the Create New Job page, find the very light gray Output Groups section at the bottom of thejob.
2. Choose the output group tab that contains the output to which you want to add captions.
If you have not already set up the video and audio for the outputs in this output group, set them upfirst,before you set up the captions.
3. Find the stream associated with the output. You can see the stream name in the value for Stream inthe output.
4. Choose Caption +.
Version 2.16135
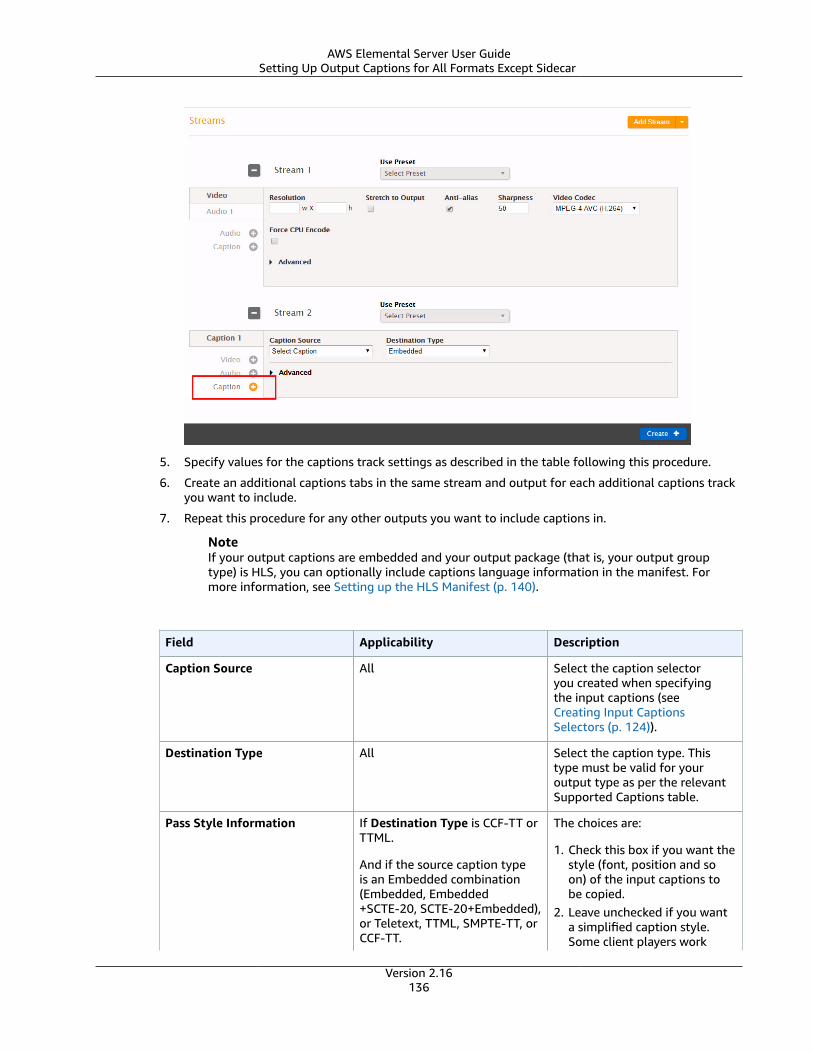
AWS Elemental Server User GuideSetting Up Output Captions for All Formats Except Sidecar
5. Specify values for the captions track settings as described in the table following this procedure.
6. Create an additional captions tabs in the same stream and output for each additional captions trackyou want to include.
7. Repeat this procedure for any other outputs you want to include captions in.
NoteIf your output captions are embedded and your output package (that is, your output grouptype) is HLS, you can optionally include captions language information in the manifest. Formore information, see Setting up the HLS Manifest (p. 140).
Field Applicability Description
Caption Source All Select the caption selectoryou created when specifyingthe input captions (seeCreating Input CaptionsSelectors (p. 124)).
Destination Type All Select the caption type. Thistype must be valid for youroutput type as per the relevantSupported Captions table.
Pass Style Information If Destination Type is CCF-TT orTTML.
And if the source caption typeis an Embedded combination(Embedded, Embedded+SCTE-20, SCTE-20+Embedded),or Teletext, TTML, SMPTE-TT, orCCF-TT.
The choices are:
1. Check this box if you want thestyle (font, position and soon) of the input captions tobe copied.
2. Leave unchecked if you wanta simplified caption style.Some client players work
Version 2.16136
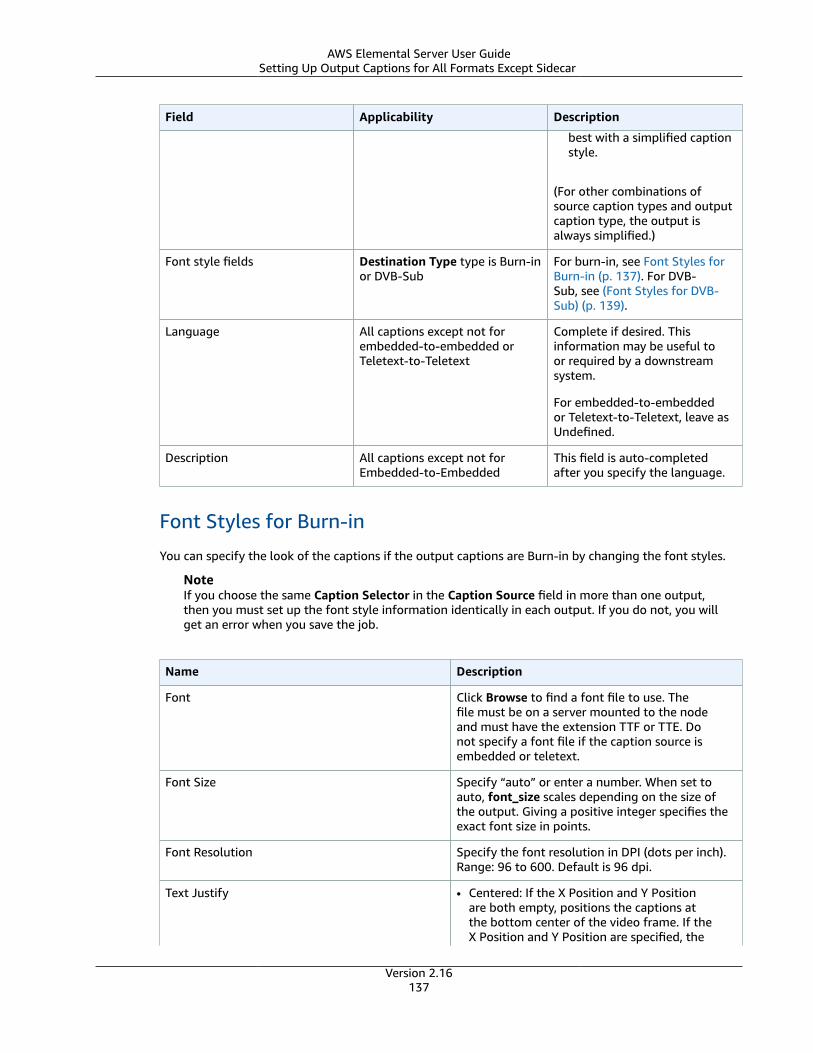
AWS Elemental Server User GuideSetting Up Output Captions for All Formats Except Sidecar
Field Applicability Description
best with a simplified captionstyle.
(For other combinations ofsource caption types and outputcaption type, the output isalways simplified.)
Font style fields Destination Type type is Burn-inor DVB-Sub
For burn-in, see Font Styles forBurn-in (p. 137). For DVB-Sub, see (Font Styles for DVB-Sub) (p. 139).
Language All captions except not forembedded-to-embedded orTeletext-to-Teletext
Complete if desired. Thisinformation may be useful toor required by a downstreamsystem.
For embedded-to-embeddedor Teletext-to-Teletext, leave asUndefined.
Description All captions except not forEmbedded-to-Embedded
This field is auto-completedafter you specify the language.
Font Styles for Burn-in
You can specify the look of the captions if the output captions are Burn-in by changing the font styles.
NoteIf you choose the same Caption Selector in the Caption Source field in more than one output,then you must set up the font style information identically in each output. If you do not, you willget an error when you save the job.
Name Description
Font Click Browse to find a font file to use. Thefile must be on a server mounted to the nodeand must have the extension TTF or TTE. Donot specify a font file if the caption source isembedded or teletext.
Font Size Specify “auto” or enter a number. When set toauto, font_size scales depending on the size ofthe output. Giving a positive integer specifies theexact font size in points.
Font Resolution Specify the font resolution in DPI (dots per inch).Range: 96 to 600. Default is 96 dpi.
Text Justify • Centered: If the X Position and Y Positionare both empty, positions the captions atthe bottom center of the video frame. If theX Position and Y Position are specified, the
Version 2.16137
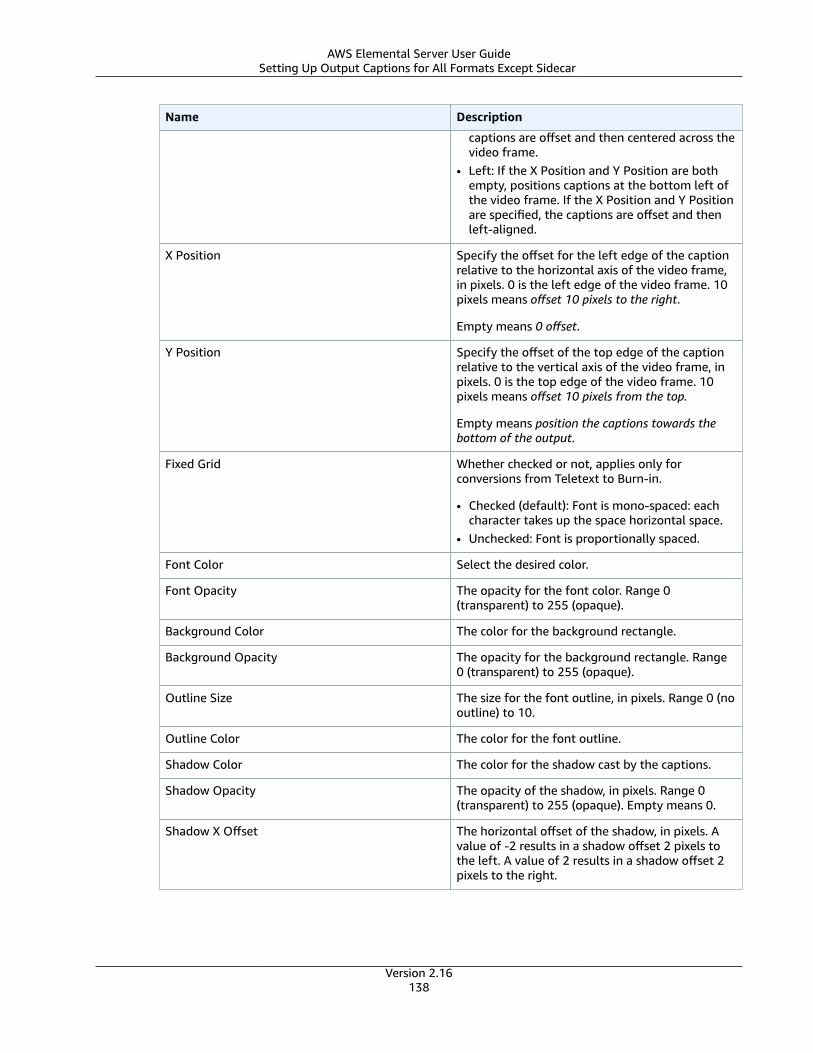
AWS Elemental Server User GuideSetting Up Output Captions for All Formats Except Sidecar
Name Description
captions are offset and then centered across thevideo frame.
• Left: If the X Position and Y Position are bothempty, positions captions at the bottom left ofthe video frame. If the X Position and Y Positionare specified, the captions are offset and thenleft-aligned.
X Position Specify the offset for the left edge of the captionrelative to the horizontal axis of the video frame,in pixels. 0 is the left edge of the video frame. 10pixels means offset 10 pixels to the right.
Empty means 0 offset.
Y Position Specify the offset of the top edge of the captionrelative to the vertical axis of the video frame, inpixels. 0 is the top edge of the video frame. 10pixels means offset 10 pixels from the top.
Empty means position the captions towards thebottom of the output.
Fixed Grid Whether checked or not, applies only forconversions from Teletext to Burn-in.
• Checked (default): Font is mono-spaced: eachcharacter takes up the space horizontal space.
• Unchecked: Font is proportionally spaced.
Font Color Select the desired color.
Font Opacity The opacity for the font color. Range 0(transparent) to 255 (opaque).
Background Color The color for the background rectangle.
Background Opacity The opacity for the background rectangle. Range0 (transparent) to 255 (opaque).
Outline Size The size for the font outline, in pixels. Range 0 (nooutline) to 10.
Outline Color The color for the font outline.
Shadow Color The color for the shadow cast by the captions.
Shadow Opacity The opacity of the shadow, in pixels. Range 0(transparent) to 255 (opaque). Empty means 0.
Shadow X Offset The horizontal offset of the shadow, in pixels. Avalue of -2 results in a shadow offset 2 pixels tothe left. A value of 2 results in a shadow offset 2pixels to the right.
Version 2.16138
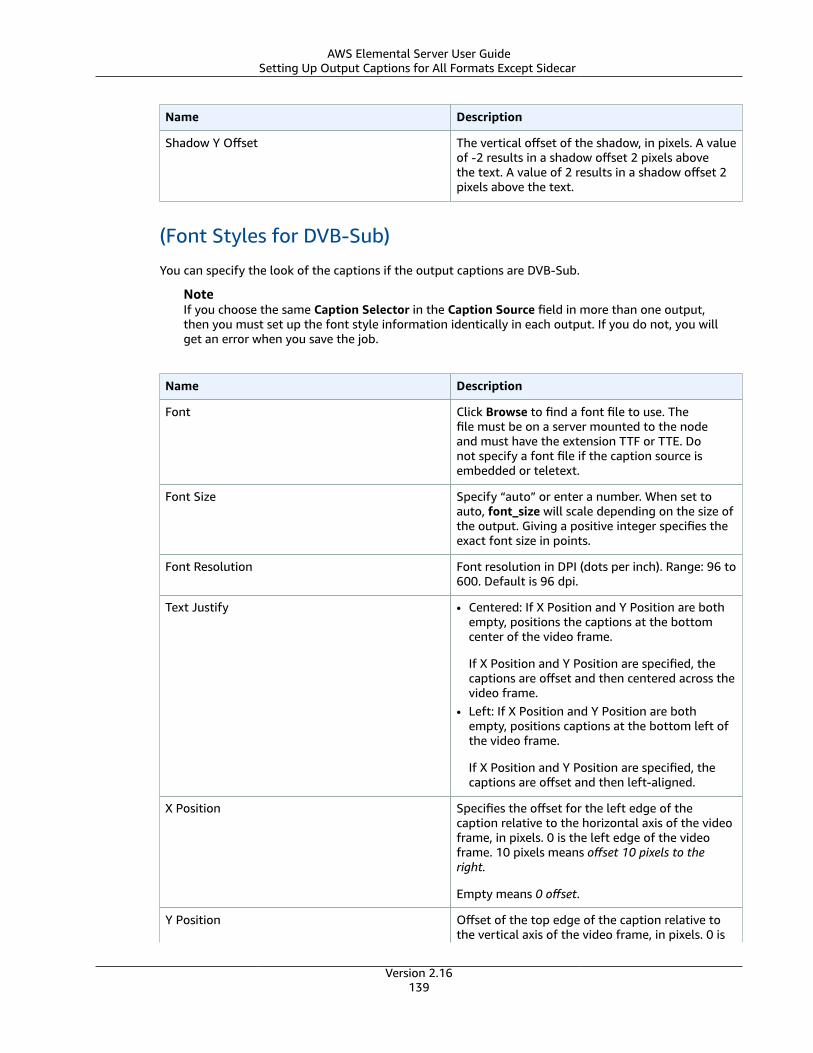
AWS Elemental Server User GuideSetting Up Output Captions for All Formats Except Sidecar
Name Description
Shadow Y Offset The vertical offset of the shadow, in pixels. A valueof -2 results in a shadow offset 2 pixels abovethe text. A value of 2 results in a shadow offset 2pixels above the text.
(Font Styles for DVB-Sub)
You can specify the look of the captions if the output captions are DVB-Sub.
NoteIf you choose the same Caption Selector in the Caption Source field in more than one output,then you must set up the font style information identically in each output. If you do not, you willget an error when you save the job.
Name Description
Font Click Browse to find a font file to use. Thefile must be on a server mounted to the nodeand must have the extension TTF or TTE. Donot specify a font file if the caption source isembedded or teletext.
Font Size Specify “auto” or enter a number. When set toauto, font_size will scale depending on the size ofthe output. Giving a positive integer specifies theexact font size in points.
Font Resolution Font resolution in DPI (dots per inch). Range: 96 to600. Default is 96 dpi.
Text Justify • Centered: If X Position and Y Position are bothempty, positions the captions at the bottomcenter of the video frame.
If X Position and Y Position are specified, thecaptions are offset and then centered across thevideo frame.
• Left: If X Position and Y Position are bothempty, positions captions at the bottom left ofthe video frame.
If X Position and Y Position are specified, thecaptions are offset and then left-aligned.
X Position Specifies the offset for the left edge of thecaption relative to the horizontal axis of the videoframe, in pixels. 0 is the left edge of the videoframe. 10 pixels means offset 10 pixels to theright.
Empty means 0 offset.
Y Position Offset of the top edge of the caption relative tothe vertical axis of the video frame, in pixels. 0 is
Version 2.16139
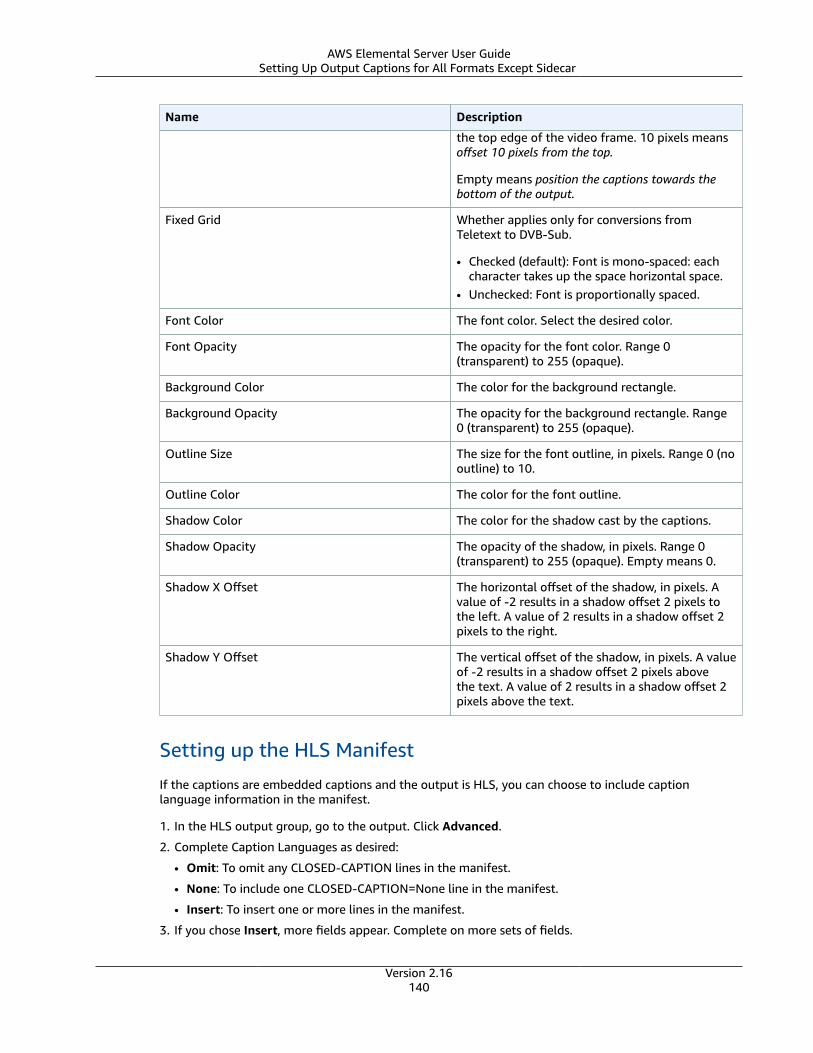
AWS Elemental Server User GuideSetting Up Output Captions for All Formats Except Sidecar
Name Description
the top edge of the video frame. 10 pixels meansoffset 10 pixels from the top.
Empty means position the captions towards thebottom of the output.
Fixed Grid Whether applies only for conversions fromTeletext to DVB-Sub.
• Checked (default): Font is mono-spaced: eachcharacter takes up the space horizontal space.
• Unchecked: Font is proportionally spaced.
Font Color The font color. Select the desired color.
Font Opacity The opacity for the font color. Range 0(transparent) to 255 (opaque).
Background Color The color for the background rectangle.
Background Opacity The opacity for the background rectangle. Range0 (transparent) to 255 (opaque).
Outline Size The size for the font outline, in pixels. Range 0 (nooutline) to 10.
Outline Color The color for the font outline.
Shadow Color The color for the shadow cast by the captions.
Shadow Opacity The opacity of the shadow, in pixels. Range 0(transparent) to 255 (opaque). Empty means 0.
Shadow X Offset The horizontal offset of the shadow, in pixels. Avalue of -2 results in a shadow offset 2 pixels tothe left. A value of 2 results in a shadow offset 2pixels to the right.
Shadow Y Offset The vertical offset of the shadow, in pixels. A valueof -2 results in a shadow offset 2 pixels abovethe text. A value of 2 results in a shadow offset 2pixels above the text.
Setting up the HLS Manifest
If the captions are embedded captions and the output is HLS, you can choose to include captionlanguage information in the manifest.
1. In the HLS output group, go to the output. Click Advanced.
2. Complete Caption Languages as desired:
• Omit: To omit any CLOSED-CAPTION lines in the manifest.
• None: To include one CLOSED-CAPTION=None line in the manifest.
• Insert: To insert one or more lines in the manifest.
3. If you chose Insert, more fields appear. Complete on more sets of fields.
Version 2.16140
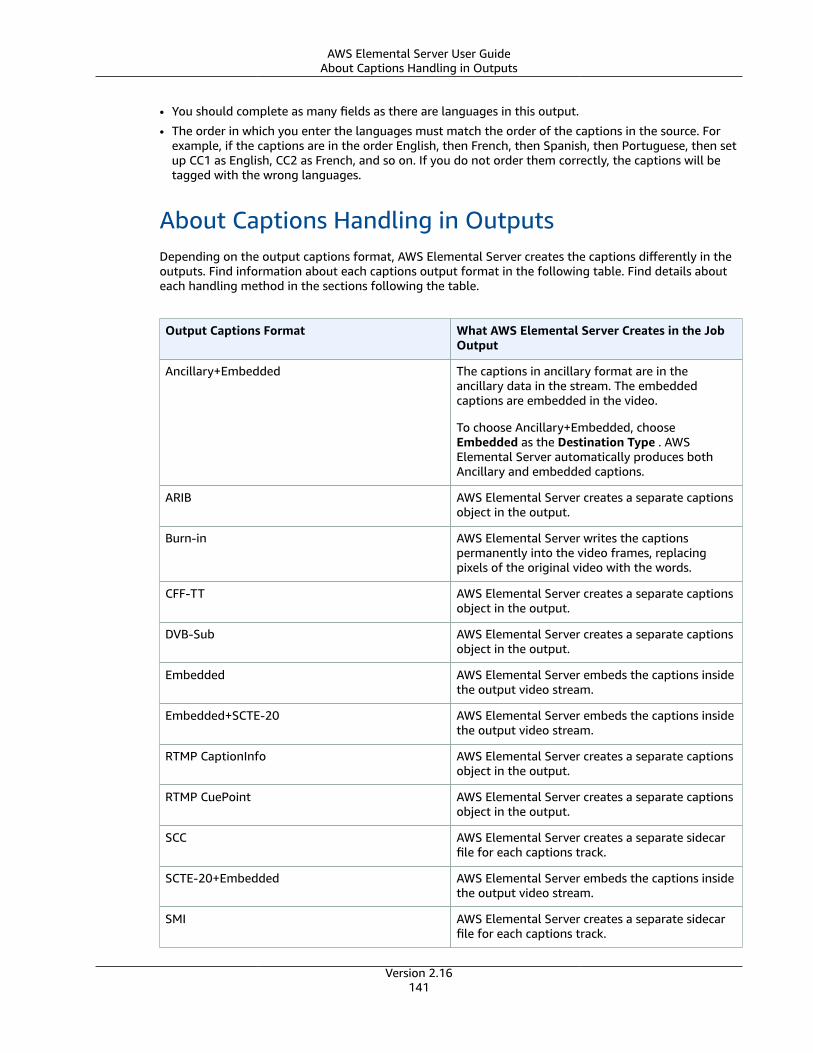
AWS Elemental Server User GuideAbout Captions Handling in Outputs
• You should complete as many fields as there are languages in this output.
• The order in which you enter the languages must match the order of the captions in the source. Forexample, if the captions are in the order English, then French, then Spanish, then Portuguese, then setup CC1 as English, CC2 as French, and so on. If you do not order them correctly, the captions will betagged with the wrong languages.
About Captions Handling in OutputsDepending on the output captions format, AWS Elemental Server creates the captions differently in theoutputs. Find information about each captions output format in the following table. Find details abouteach handling method in the sections following the table.
Output Captions Format What AWS Elemental Server Creates in the JobOutput
Ancillary+Embedded The captions in ancillary format are in theancillary data in the stream. The embeddedcaptions are embedded in the video.
To choose Ancillary+Embedded, chooseEmbedded as the Destination Type . AWSElemental Server automatically produces bothAncillary and embedded captions.
ARIB AWS Elemental Server creates a separate captionsobject in the output.
Burn-in AWS Elemental Server writes the captionspermanently into the video frames, replacingpixels of the original video with the words.
CFF-TT AWS Elemental Server creates a separate captionsobject in the output.
DVB-Sub AWS Elemental Server creates a separate captionsobject in the output.
Embedded AWS Elemental Server embeds the captions insidethe output video stream.
Embedded+SCTE-20 AWS Elemental Server embeds the captions insidethe output video stream.
RTMP CaptionInfo AWS Elemental Server creates a separate captionsobject in the output.
RTMP CuePoint AWS Elemental Server creates a separate captionsobject in the output.
SCC AWS Elemental Server creates a separate sidecarfile for each captions track.
SCTE-20+Embedded AWS Elemental Server embeds the captions insidethe output video stream.
SMI AWS Elemental Server creates a separate sidecarfile for each captions track.
Version 2.16141
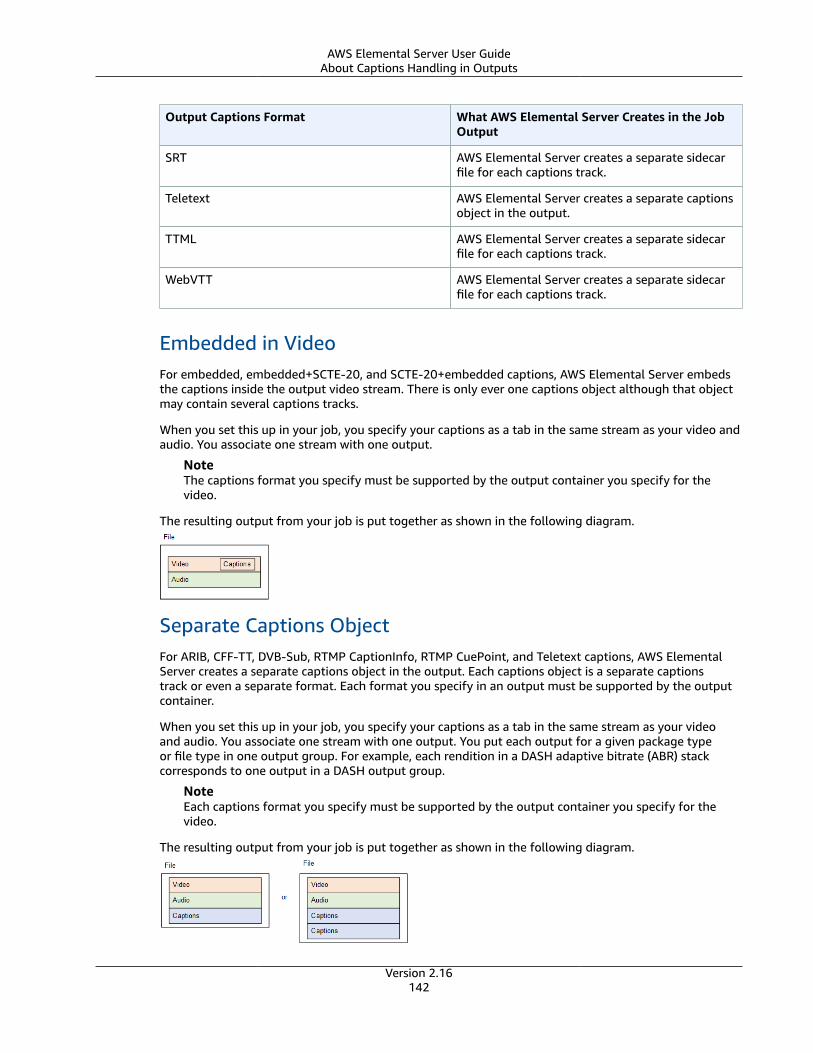
AWS Elemental Server User GuideAbout Captions Handling in Outputs
Output Captions Format What AWS Elemental Server Creates in the JobOutput
SRT AWS Elemental Server creates a separate sidecarfile for each captions track.
Teletext AWS Elemental Server creates a separate captionsobject in the output.
TTML AWS Elemental Server creates a separate sidecarfile for each captions track.
WebVTT AWS Elemental Server creates a separate sidecarfile for each captions track.
Embedded in VideoFor embedded, embedded+SCTE-20, and SCTE-20+embedded captions, AWS Elemental Server embedsthe captions inside the output video stream. There is only ever one captions object although that objectmay contain several captions tracks.
When you set this up in your job, you specify your captions as a tab in the same stream as your video andaudio. You associate one stream with one output.
NoteThe captions format you specify must be supported by the output container you specify for thevideo.
The resulting output from your job is put together as shown in the following diagram.
Separate Captions ObjectFor ARIB, CFF-TT, DVB-Sub, RTMP CaptionInfo, RTMP CuePoint, and Teletext captions, AWS ElementalServer creates a separate captions object in the output. Each captions object is a separate captionstrack or even a separate format. Each format you specify in an output must be supported by the outputcontainer.
When you set this up in your job, you specify your captions as a tab in the same stream as your videoand audio. You associate one stream with one output. You put each output for a given package typeor file type in one output group. For example, each rendition in a DASH adaptive bitrate (ABR) stackcorresponds to one output in a DASH output group.
NoteEach captions format you specify must be supported by the output container you specify for thevideo.
The resulting output from your job is put together as shown in the following diagram.
Version 2.16142
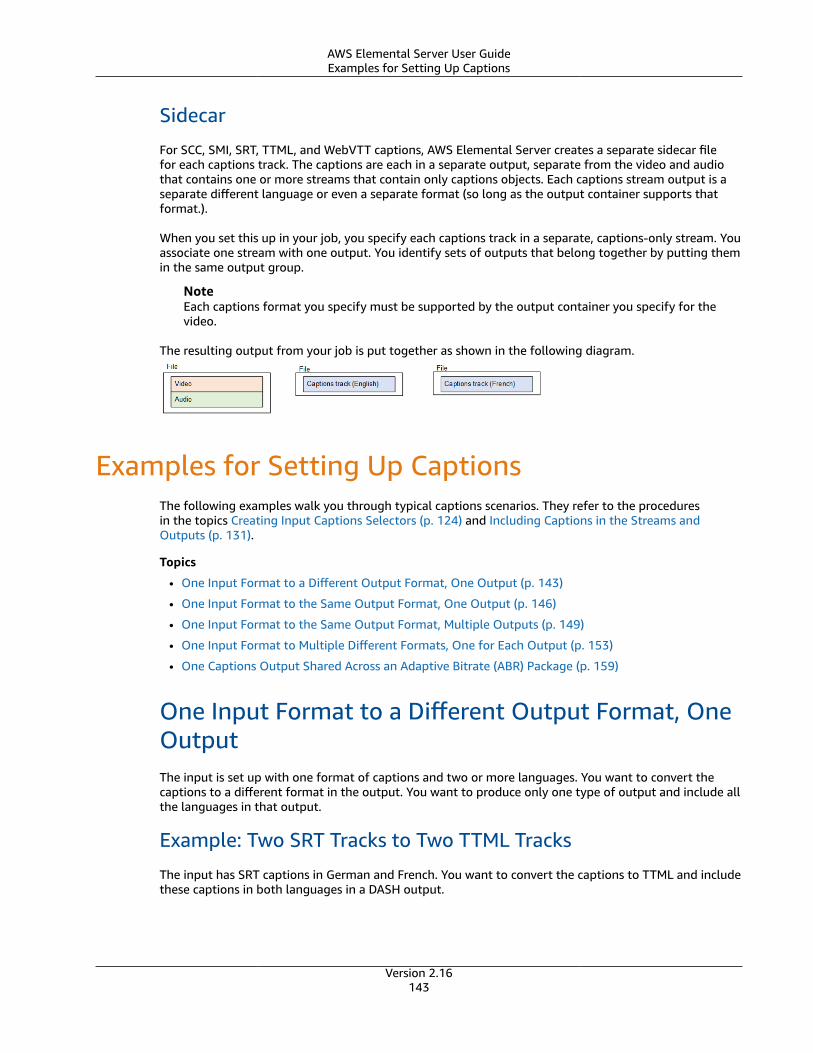
AWS Elemental Server User GuideExamples for Setting Up Captions
Sidecar
For SCC, SMI, SRT, TTML, and WebVTT captions, AWS Elemental Server creates a separate sidecar filefor each captions track. The captions are each in a separate output, separate from the video and audiothat contains one or more streams that contain only captions objects. Each captions stream output is aseparate different language or even a separate format (so long as the output container supports thatformat.).
When you set this up in your job, you specify each captions track in a separate, captions-only stream. Youassociate one stream with one output. You identify sets of outputs that belong together by putting themin the same output group.
NoteEach captions format you specify must be supported by the output container you specify for thevideo.
The resulting output from your job is put together as shown in the following diagram.
Examples for Setting Up CaptionsThe following examples walk you through typical captions scenarios. They refer to the proceduresin the topics Creating Input Captions Selectors (p. 124) and Including Captions in the Streams andOutputs (p. 131).
Topics
• One Input Format to a Different Output Format, One Output (p. 143)
• One Input Format to the Same Output Format, One Output (p. 146)
• One Input Format to the Same Output Format, Multiple Outputs (p. 149)
• One Input Format to Multiple Different Formats, One for Each Output (p. 153)
• One Captions Output Shared Across an Adaptive Bitrate (ABR) Package (p. 159)
One Input Format to a Different Output Format, OneOutputThe input is set up with one format of captions and two or more languages. You want to convert thecaptions to a different format in the output. You want to produce only one type of output and include allthe languages in that output.
Example: Two SRT Tracks to Two TTML Tracks
The input has SRT captions in German and French. You want to convert the captions to TTML and includethese captions in both languages in a DASH output.
Version 2.16143
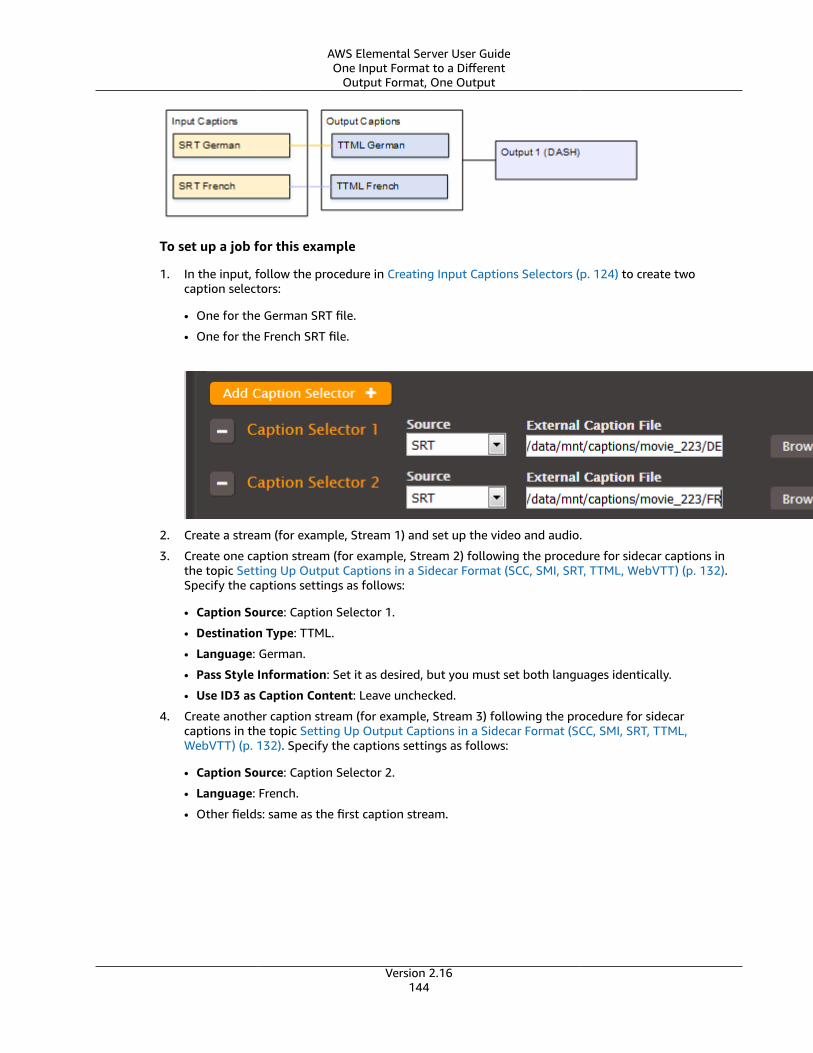
AWS Elemental Server User GuideOne Input Format to a Different
Output Format, One Output
To set up a job for this example
1. In the input, follow the procedure in Creating Input Captions Selectors (p. 124) to create twocaption selectors:
• One for the German SRT file.
• One for the French SRT file.
2. Create a stream (for example, Stream 1) and set up the video and audio.
3. Create one caption stream (for example, Stream 2) following the procedure for sidecar captions inthe topic Setting Up Output Captions in a Sidecar Format (SCC, SMI, SRT, TTML, WebVTT) (p. 132).Specify the captions settings as follows:
• Caption Source: Caption Selector 1.
• Destination Type: TTML.
• Language: German.
• Pass Style Information: Set it as desired, but you must set both languages identically.
• Use ID3 as Caption Content: Leave unchecked.
4. Create another caption stream (for example, Stream 3) following the procedure for sidecarcaptions in the topic Setting Up Output Captions in a Sidecar Format (SCC, SMI, SRT, TTML,WebVTT) (p. 132). Specify the captions settings as follows:
• Caption Source: Caption Selector 2.
• Language: French.
• Other fields: same as the first caption stream.
Version 2.16144
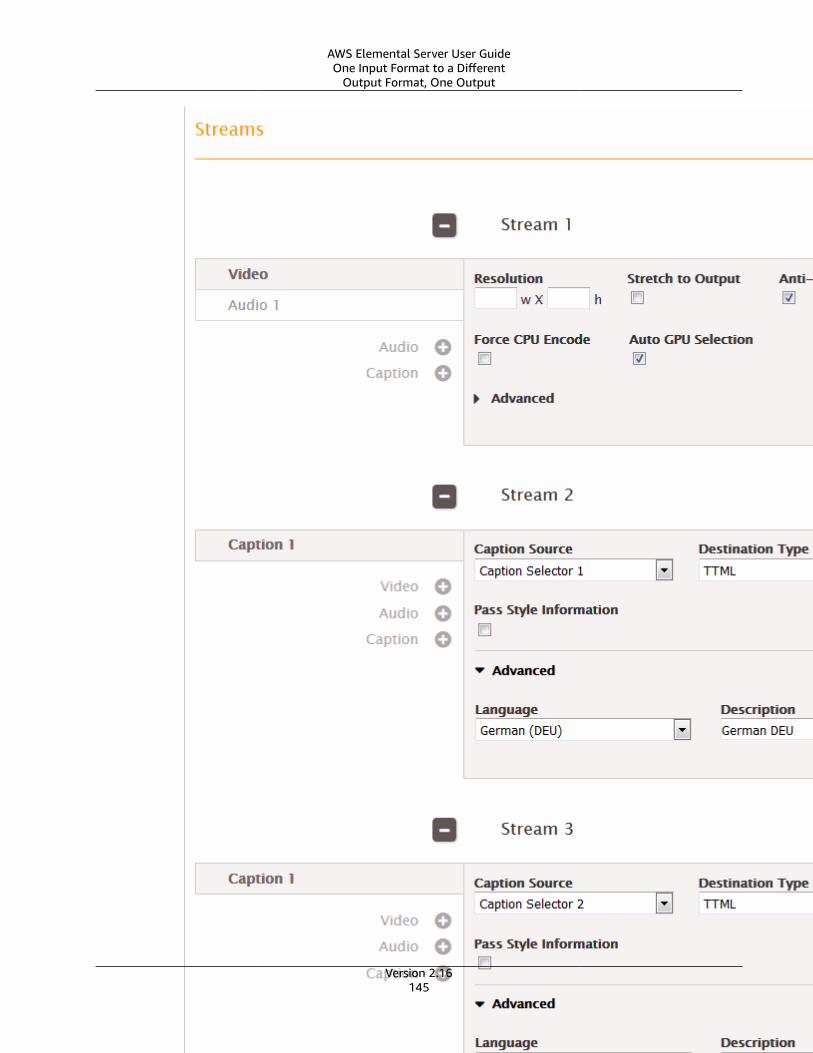
AWS Elemental Server User GuideOne Input Format to a Different
Output Format, One Output
Version 2.16145

AWS Elemental Server User GuideOne Input Format to the Same Output Format, One Output
5. In the DASH output group, create three outputs:
• In the first output, set the Stream field in that output to Stream 1.
• In the second output, set the Stream field in that output to Stream 2.
• In the third output, set the Stream field in that output to Stream 3.
Although there are three outputs, they are all in the same output group, so the video/audio and twocaptions are kept together.
One Input Format to the Same Output Format, OneOutputThe input is set up with one format of captions and two or more languages. You want to maintain theformat in the output. You want to produce only one type of output and include all the languages in thatoutput.
Example: Pass Through Embedded Captions to an HLS Output
The input has embedded captions in English and Spanish. You want to produce HLS output that includesembedded captions in both English and Spanish.
Version 2.16146
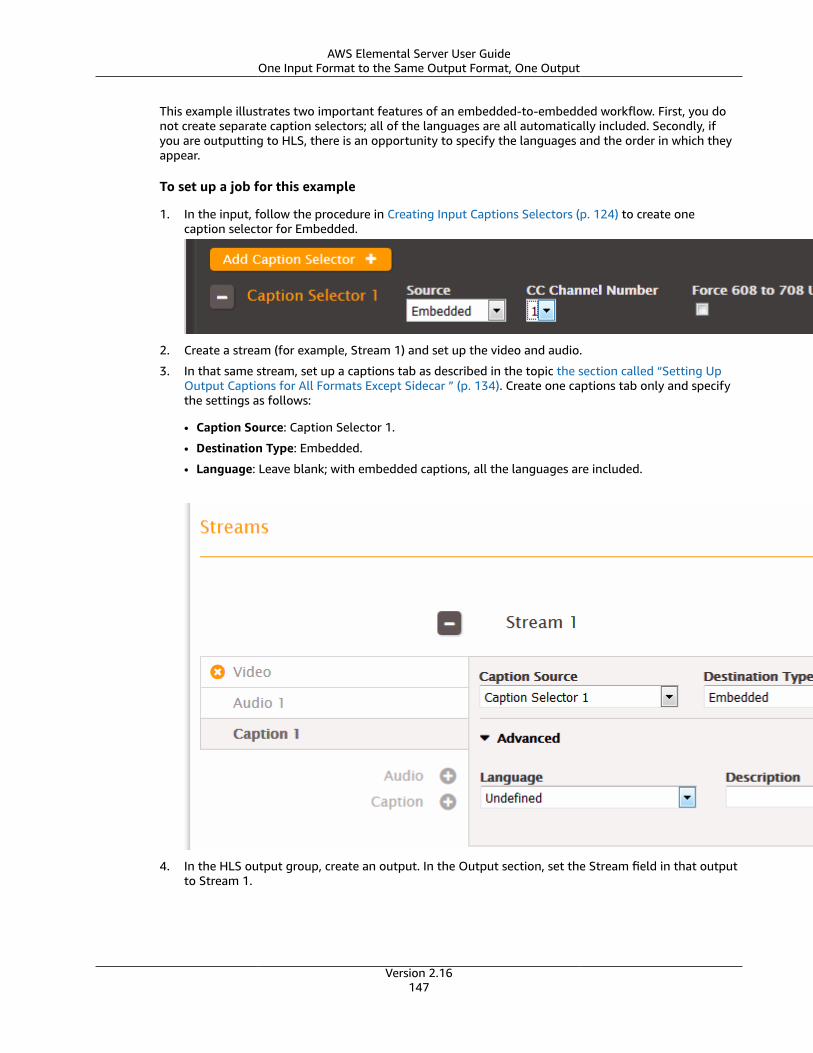
AWS Elemental Server User GuideOne Input Format to the Same Output Format, One Output
This example illustrates two important features of an embedded-to-embedded workflow. First, you donot create separate caption selectors; all of the languages are all automatically included. Secondly, ifyou are outputting to HLS, there is an opportunity to specify the languages and the order in which theyappear.
To set up a job for this example
1. In the input, follow the procedure in Creating Input Captions Selectors (p. 124) to create onecaption selector for Embedded.
2. Create a stream (for example, Stream 1) and set up the video and audio.
3. In that same stream, set up a captions tab as described in the topic the section called “Setting UpOutput Captions for All Formats Except Sidecar ” (p. 134). Create one captions tab only and specifythe settings as follows:
• Caption Source: Caption Selector 1.
• Destination Type: Embedded.
• Language: Leave blank; with embedded captions, all the languages are included.
4. In the HLS output group, create an output. In the Output section, set the Stream field in that outputto Stream 1.
Version 2.16147

AWS Elemental Server User GuideOne Input Format to the Same Output Format, One Output
5. Still in the Output Group section (not in the Output section), click Advanced. In Caption Languages,choose Insert. The CC Language fields appear:
• Set up CC1 as English.
• Set up CC2 as French.
6. Save the job.
Version 2.16148
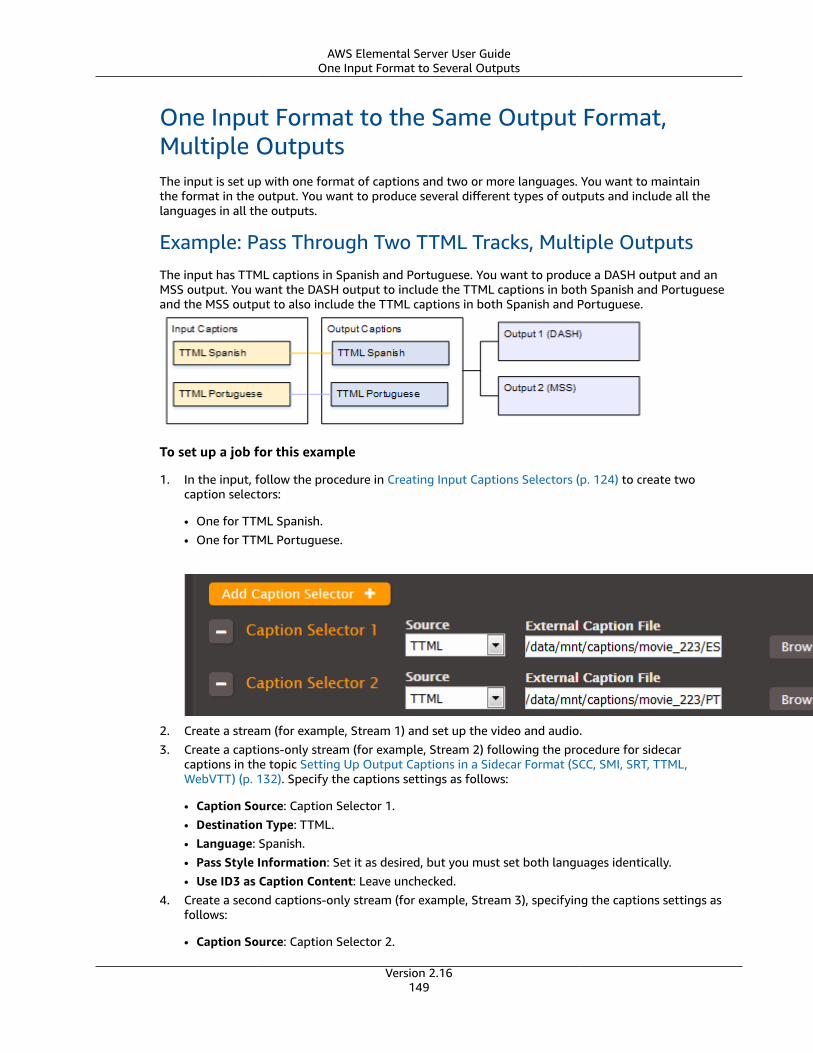
AWS Elemental Server User GuideOne Input Format to Several Outputs
One Input Format to the Same Output Format,Multiple OutputsThe input is set up with one format of captions and two or more languages. You want to maintainthe format in the output. You want to produce several different types of outputs and include all thelanguages in all the outputs.
Example: Pass Through Two TTML Tracks, Multiple OutputsThe input has TTML captions in Spanish and Portuguese. You want to produce a DASH output and anMSS output. You want the DASH output to include the TTML captions in both Spanish and Portugueseand the MSS output to also include the TTML captions in both Spanish and Portuguese.
To set up a job for this example
1. In the input, follow the procedure in Creating Input Captions Selectors (p. 124) to create twocaption selectors:
• One for TTML Spanish.• One for TTML Portuguese.
2. Create a stream (for example, Stream 1) and set up the video and audio.3. Create a captions-only stream (for example, Stream 2) following the procedure for sidecar
captions in the topic Setting Up Output Captions in a Sidecar Format (SCC, SMI, SRT, TTML,WebVTT) (p. 132). Specify the captions settings as follows:
• Caption Source: Caption Selector 1.• Destination Type: TTML.• Language: Spanish.• Pass Style Information: Set it as desired, but you must set both languages identically.• Use ID3 as Caption Content: Leave unchecked.
4. Create a second captions-only stream (for example, Stream 3), specifying the captions settings asfollows:
• Caption Source: Caption Selector 2.
Version 2.16149

AWS Elemental Server User GuideOne Input Format to Several Outputs
• Language: Portuguese.
• Other fields: Same as the first caption stream.
Version 2.16150
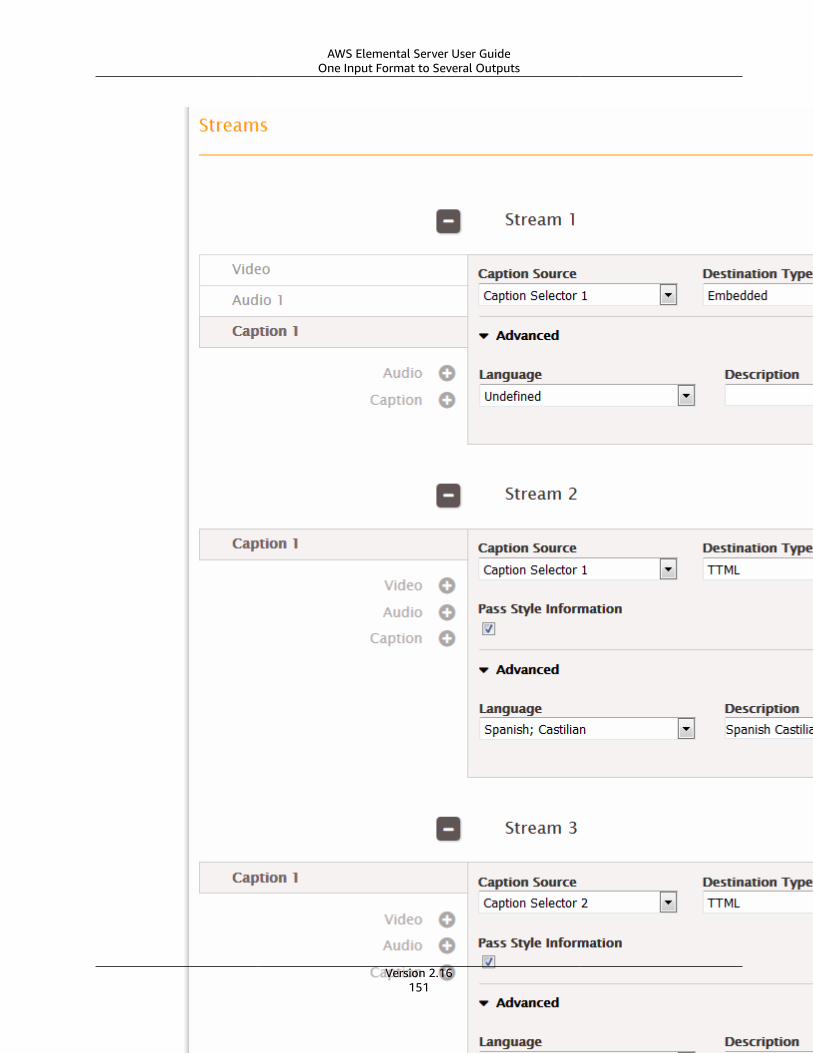
AWS Elemental Server User GuideOne Input Format to Several Outputs
Version 2.16151
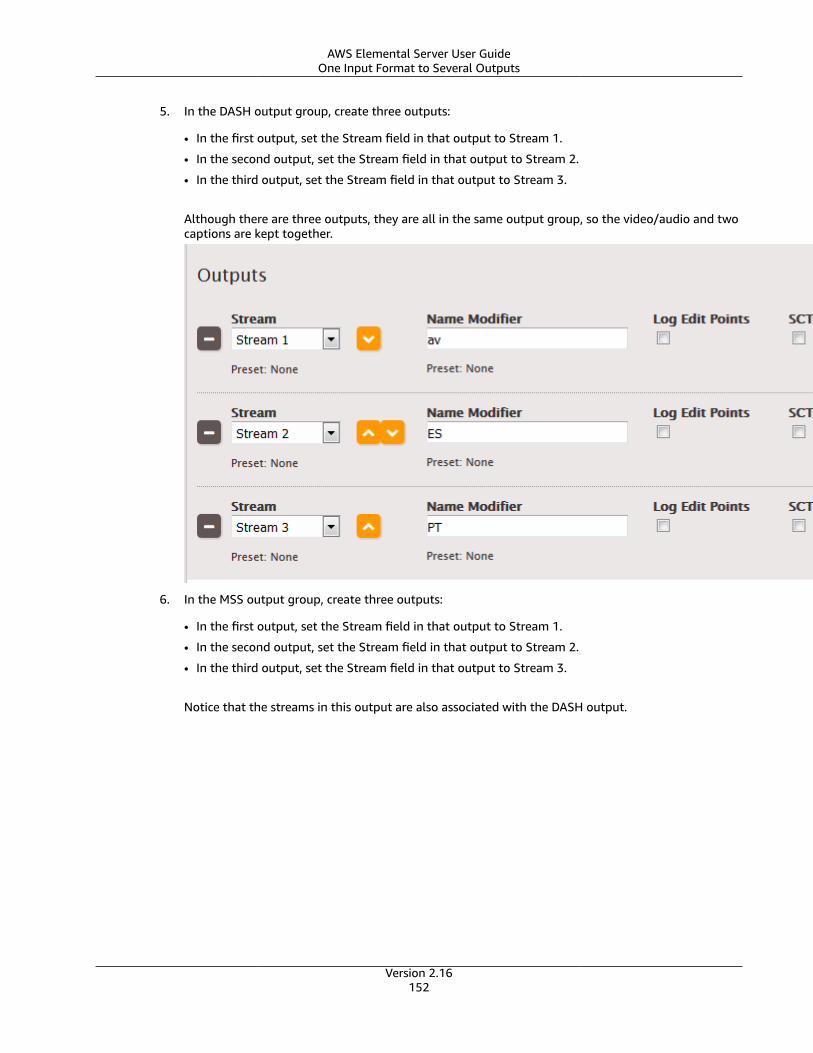
AWS Elemental Server User GuideOne Input Format to Several Outputs
5. In the DASH output group, create three outputs:
• In the first output, set the Stream field in that output to Stream 1.
• In the second output, set the Stream field in that output to Stream 2.
• In the third output, set the Stream field in that output to Stream 3.
Although there are three outputs, they are all in the same output group, so the video/audio and twocaptions are kept together.
6. In the MSS output group, create three outputs:
• In the first output, set the Stream field in that output to Stream 1.
• In the second output, set the Stream field in that output to Stream 2.
• In the third output, set the Stream field in that output to Stream 3.
Notice that the streams in this output are also associated with the DASH output.
Version 2.16152
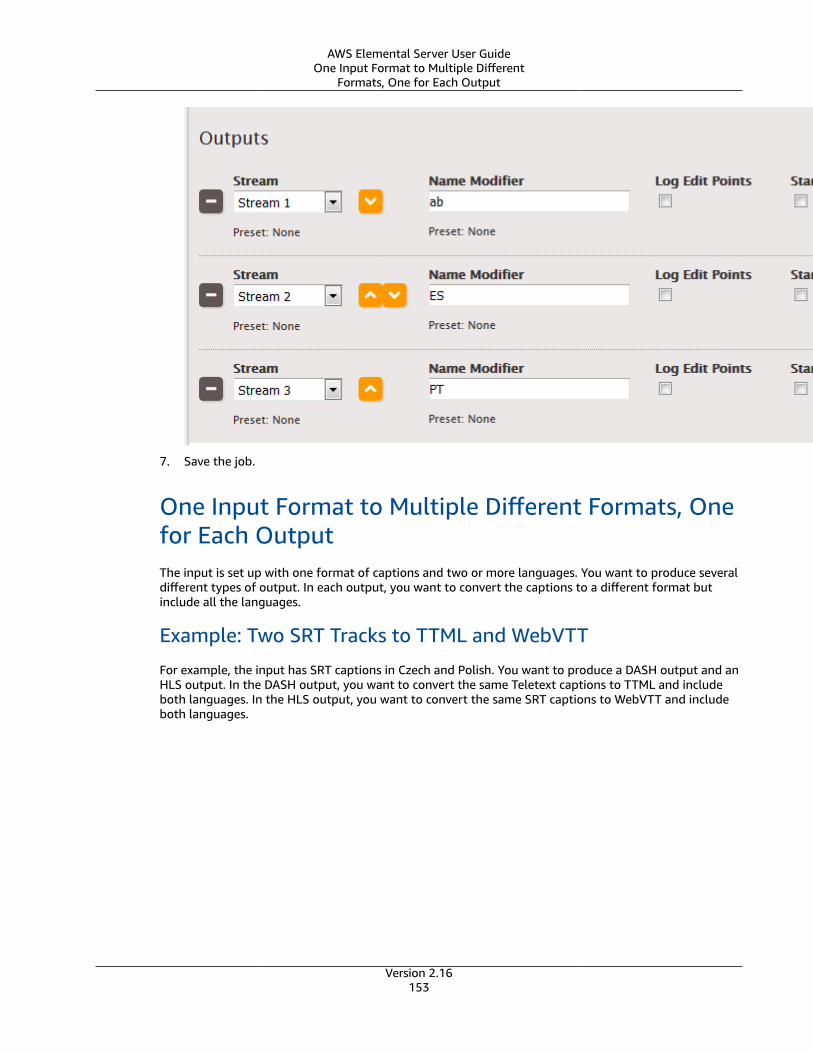
AWS Elemental Server User GuideOne Input Format to Multiple Different
Formats, One for Each Output
7. Save the job.
One Input Format to Multiple Different Formats, Onefor Each OutputThe input is set up with one format of captions and two or more languages. You want to produce severaldifferent types of output. In each output, you want to convert the captions to a different format butinclude all the languages.
Example: Two SRT Tracks to TTML and WebVTT
For example, the input has SRT captions in Czech and Polish. You want to produce a DASH output and anHLS output. In the DASH output, you want to convert the same Teletext captions to TTML and includeboth languages. In the HLS output, you want to convert the same SRT captions to WebVTT and includeboth languages.
Version 2.16153
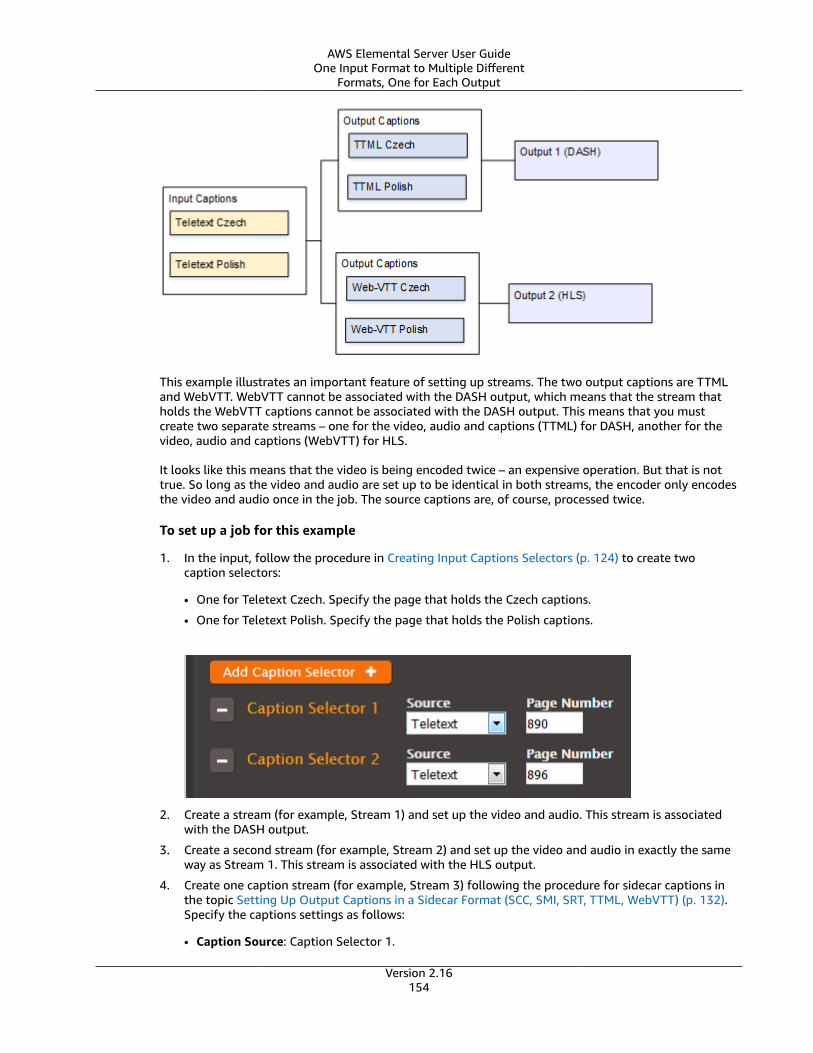
AWS Elemental Server User GuideOne Input Format to Multiple Different
Formats, One for Each Output
This example illustrates an important feature of setting up streams. The two output captions are TTMLand WebVTT. WebVTT cannot be associated with the DASH output, which means that the stream thatholds the WebVTT captions cannot be associated with the DASH output. This means that you mustcreate two separate streams – one for the video, audio and captions (TTML) for DASH, another for thevideo, audio and captions (WebVTT) for HLS.
It looks like this means that the video is being encoded twice – an expensive operation. But that is nottrue. So long as the video and audio are set up to be identical in both streams, the encoder only encodesthe video and audio once in the job. The source captions are, of course, processed twice.
To set up a job for this example
1. In the input, follow the procedure in Creating Input Captions Selectors (p. 124) to create twocaption selectors:
• One for Teletext Czech. Specify the page that holds the Czech captions.
• One for Teletext Polish. Specify the page that holds the Polish captions.
2. Create a stream (for example, Stream 1) and set up the video and audio. This stream is associatedwith the DASH output.
3. Create a second stream (for example, Stream 2) and set up the video and audio in exactly the sameway as Stream 1. This stream is associated with the HLS output.
4. Create one caption stream (for example, Stream 3) following the procedure for sidecar captions inthe topic Setting Up Output Captions in a Sidecar Format (SCC, SMI, SRT, TTML, WebVTT) (p. 132).Specify the captions settings as follows:
• Caption Source: Caption Selector 1.
Version 2.16154
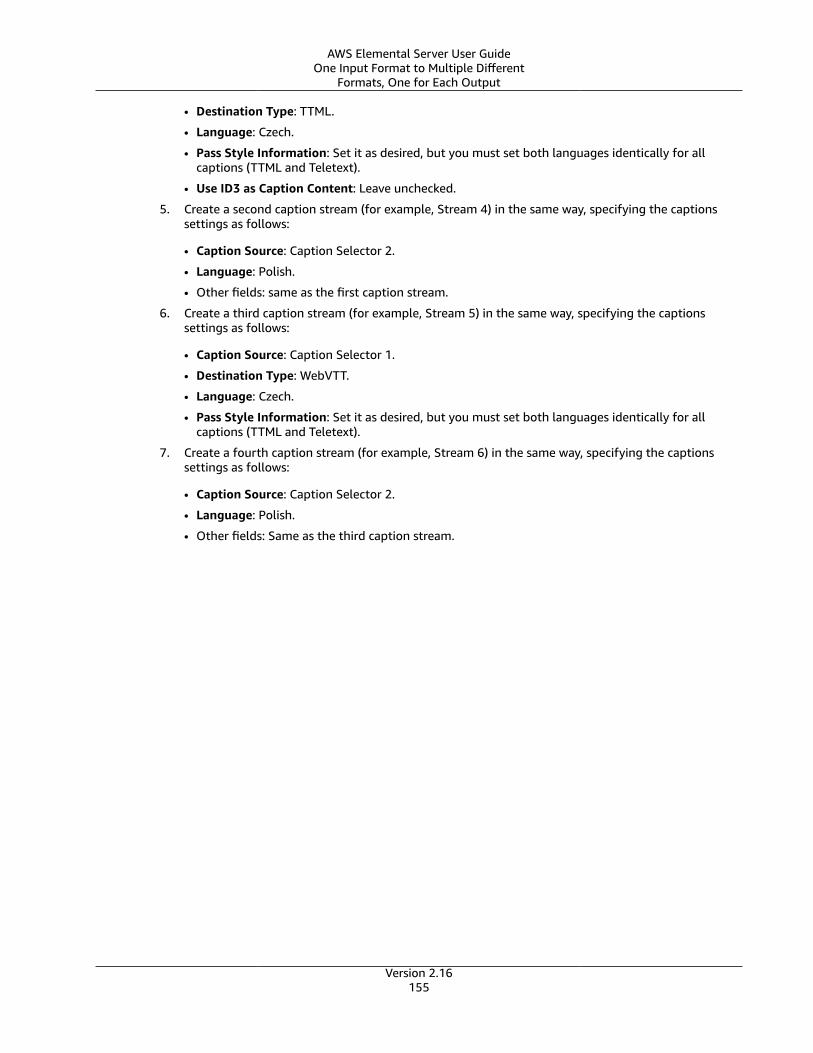
AWS Elemental Server User GuideOne Input Format to Multiple Different
Formats, One for Each Output
• Destination Type: TTML.
• Language: Czech.
• Pass Style Information: Set it as desired, but you must set both languages identically for allcaptions (TTML and Teletext).
• Use ID3 as Caption Content: Leave unchecked.
5. Create a second caption stream (for example, Stream 4) in the same way, specifying the captionssettings as follows:
• Caption Source: Caption Selector 2.
• Language: Polish.
• Other fields: same as the first caption stream.
6. Create a third caption stream (for example, Stream 5) in the same way, specifying the captionssettings as follows:
• Caption Source: Caption Selector 1.
• Destination Type: WebVTT.
• Language: Czech.
• Pass Style Information: Set it as desired, but you must set both languages identically for allcaptions (TTML and Teletext).
7. Create a fourth caption stream (for example, Stream 6) in the same way, specifying the captionssettings as follows:
• Caption Source: Caption Selector 2.
• Language: Polish.
• Other fields: Same as the third caption stream.
Version 2.16155
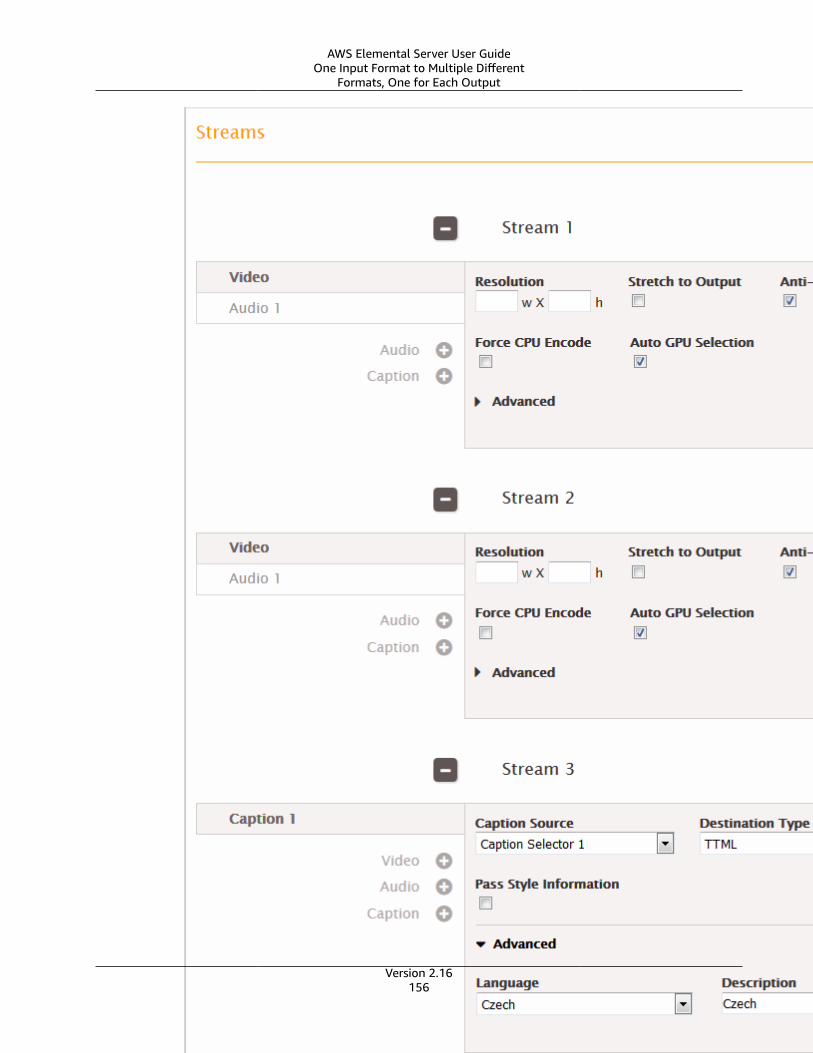
AWS Elemental Server User GuideOne Input Format to Multiple Different
Formats, One for Each Output
Version 2.16156

AWS Elemental Server User GuideOne Input Format to Multiple Different
Formats, One for Each Output
8. In the DASH output group, create three outputs:
• In the first output, set the Stream field in that output to Stream 1 (the first video/audio stream).
• In the second output, set the Stream field in that output to Stream 3.
• In the third output, set the Stream field in that output to Stream 4.
Although there are three outputs, they are all in the same output group, so the video/audio and twocaptions are kept together.
9. In the HLS output group, create three outputs:
• In the first output, set the Stream field in that output to Stream 2 (the second video/audiostream).
• In the second output, set the Stream field in that output to Stream 5.
• In the third output, set the Stream field in that output to Stream 6.
Again, although there are three outputs, they are all in the same output group, so the video/audioand two captions are kept together.
Version 2.16157
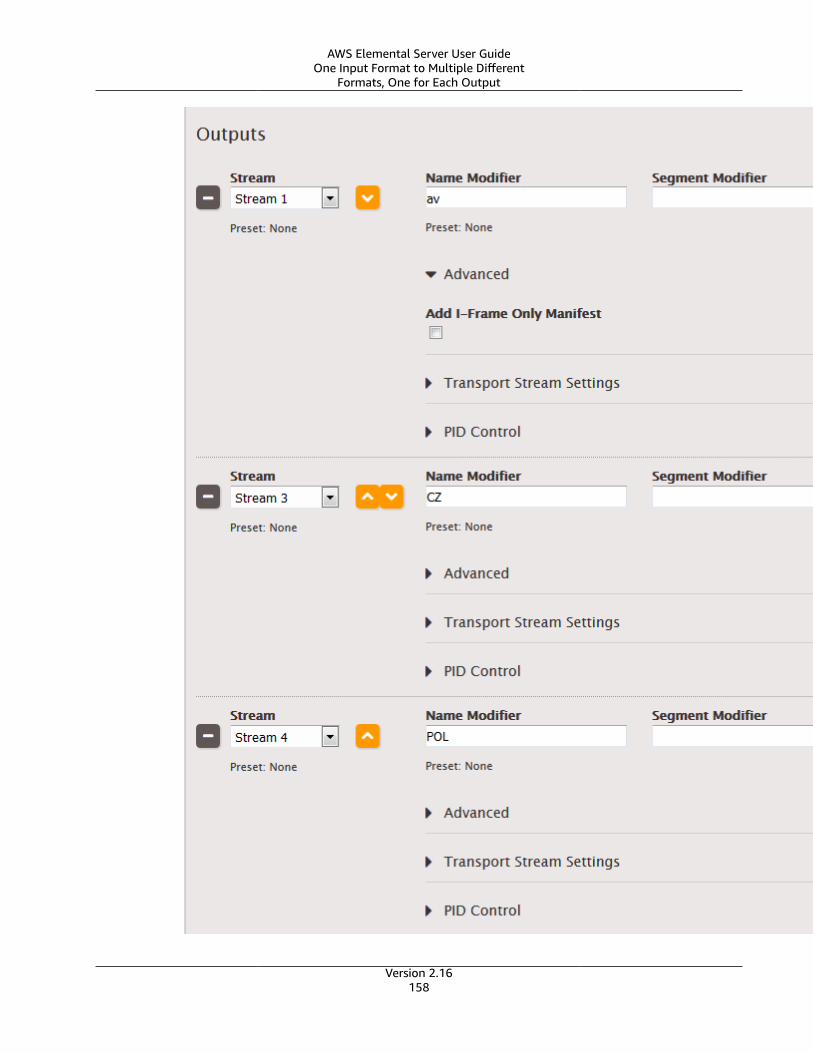
AWS Elemental Server User GuideOne Input Format to Multiple Different
Formats, One for Each Output
Version 2.16158
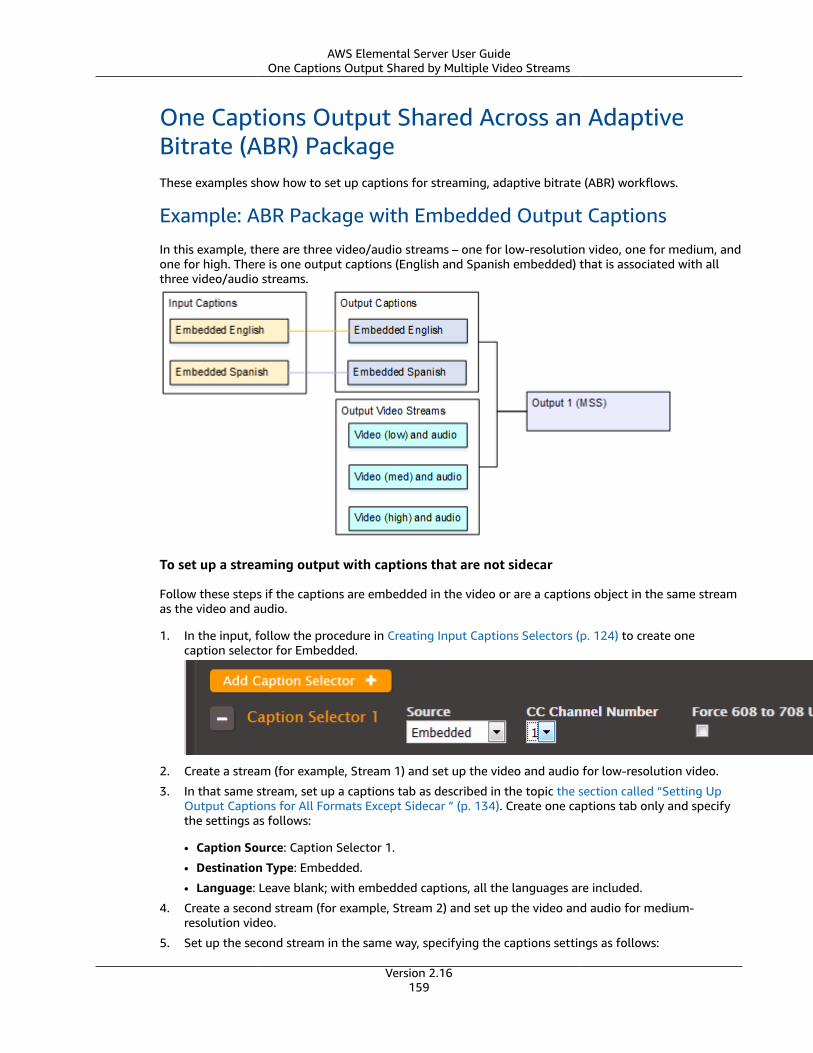
AWS Elemental Server User GuideOne Captions Output Shared by Multiple Video Streams
One Captions Output Shared Across an AdaptiveBitrate (ABR) PackageThese examples show how to set up captions for streaming, adaptive bitrate (ABR) workflows.
Example: ABR Package with Embedded Output Captions
In this example, there are three video/audio streams – one for low-resolution video, one for medium, andone for high. There is one output captions (English and Spanish embedded) that is associated with allthree video/audio streams.
To set up a streaming output with captions that are not sidecar
Follow these steps if the captions are embedded in the video or are a captions object in the same streamas the video and audio.
1. In the input, follow the procedure in Creating Input Captions Selectors (p. 124) to create onecaption selector for Embedded.
2. Create a stream (for example, Stream 1) and set up the video and audio for low-resolution video.
3. In that same stream, set up a captions tab as described in the topic the section called “Setting UpOutput Captions for All Formats Except Sidecar ” (p. 134). Create one captions tab only and specifythe settings as follows:
• Caption Source: Caption Selector 1.
• Destination Type: Embedded.
• Language: Leave blank; with embedded captions, all the languages are included.
4. Create a second stream (for example, Stream 2) and set up the video and audio for medium-resolution video.
5. Set up the second stream in the same way, specifying the captions settings as follows:
Version 2.16159

AWS Elemental Server User GuideOne Captions Output Shared by Multiple Video Streams
• Caption Source: Caption Selector 1.
• Destination Type: Embedded.
• Language: Leave blank; with embedded captions, all the languages are included.
6. Create a third stream (for example, Stream 3) and set up the video and audio for high-resolutionvideo.
7. Set up the third stream in the same way, specifying the captions settings as follows:
• Caption Source: Caption Selector 1.
• Destination Type: Embedded.
• Language: Leave blank; with embedded captions, all the languages are included.
Version 2.16160
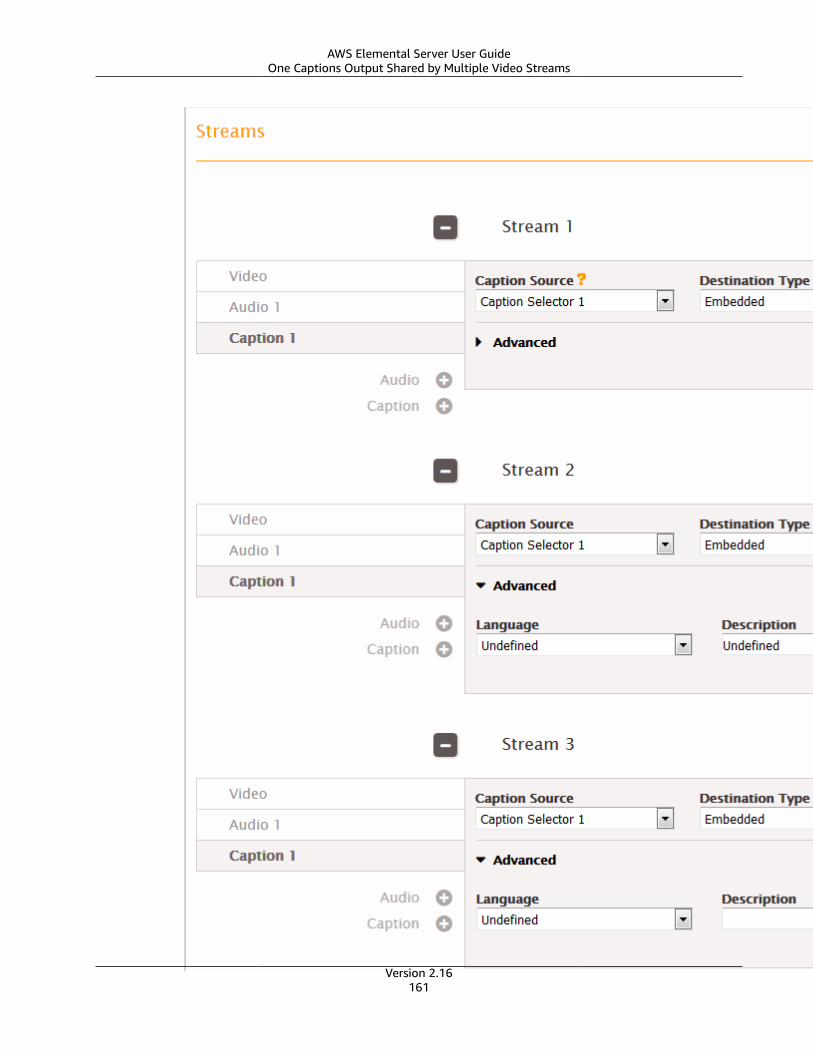
AWS Elemental Server User GuideOne Captions Output Shared by Multiple Video Streams
Version 2.16161
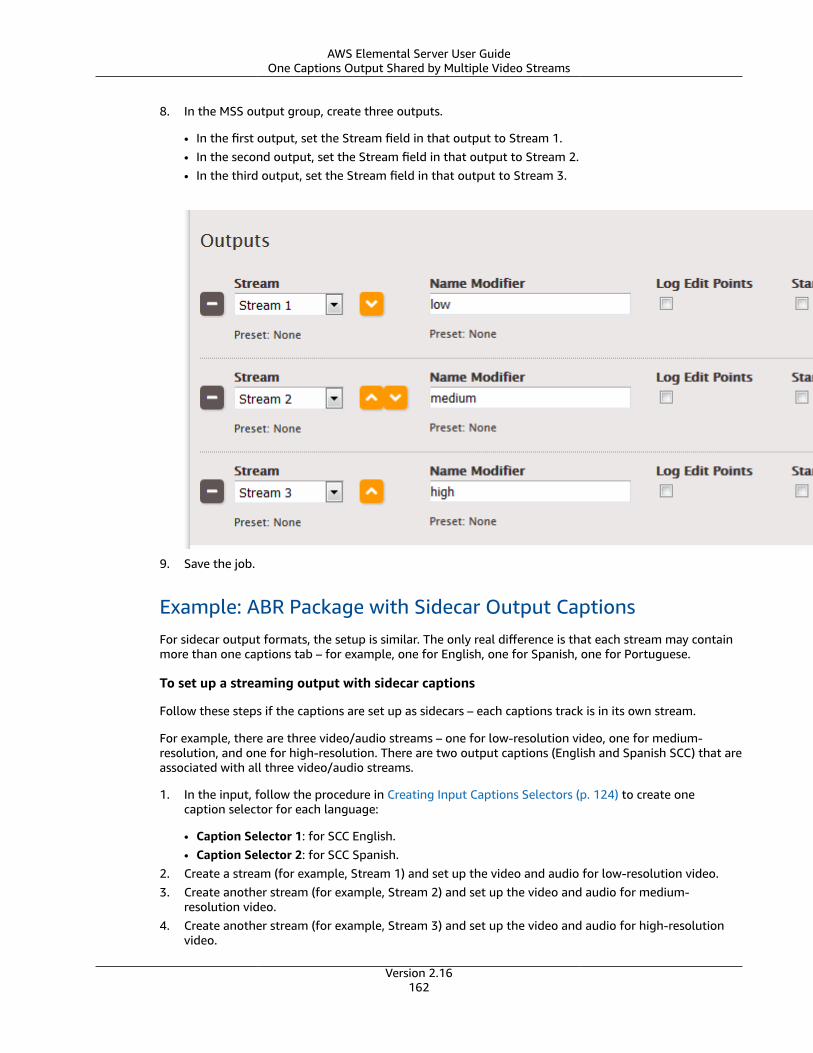
AWS Elemental Server User GuideOne Captions Output Shared by Multiple Video Streams
8. In the MSS output group, create three outputs.
• In the first output, set the Stream field in that output to Stream 1.• In the second output, set the Stream field in that output to Stream 2.• In the third output, set the Stream field in that output to Stream 3.
9. Save the job.
Example: ABR Package with Sidecar Output CaptionsFor sidecar output formats, the setup is similar. The only real difference is that each stream may containmore than one captions tab – for example, one for English, one for Spanish, one for Portuguese.
To set up a streaming output with sidecar captions
Follow these steps if the captions are set up as sidecars – each captions track is in its own stream.
For example, there are three video/audio streams – one for low-resolution video, one for medium-resolution, and one for high-resolution. There are two output captions (English and Spanish SCC) that areassociated with all three video/audio streams.
1. In the input, follow the procedure in Creating Input Captions Selectors (p. 124) to create onecaption selector for each language:
• Caption Selector 1: for SCC English.• Caption Selector 2: for SCC Spanish.
2. Create a stream (for example, Stream 1) and set up the video and audio for low-resolution video.3. Create another stream (for example, Stream 2) and set up the video and audio for medium-
resolution video.4. Create another stream (for example, Stream 3) and set up the video and audio for high-resolution
video.
Version 2.16162
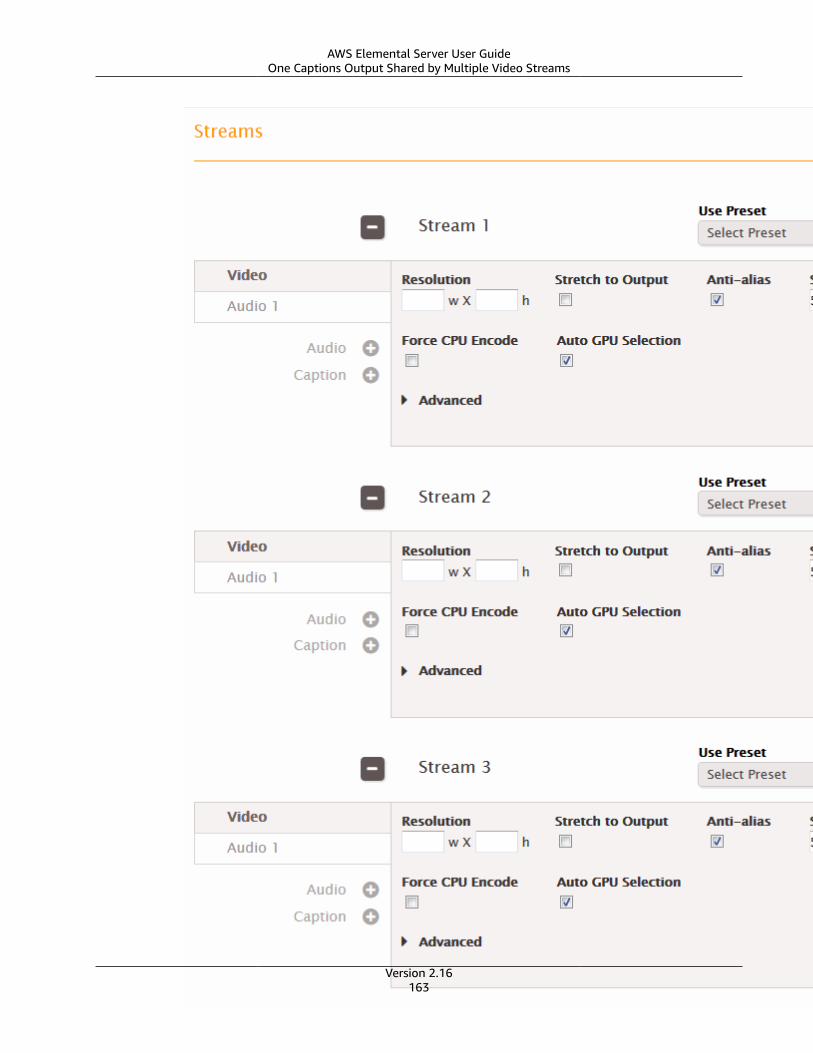
AWS Elemental Server User GuideOne Captions Output Shared by Multiple Video Streams
Version 2.16163
AWS Elemental Server User GuideOne Captions Output Shared by Multiple Video Streams
5. Set up a captions-only stream (for example, Stream 4) for your first captions track following theprocedure for sidecar captions in the topic Setting Up Output Captions in a Sidecar Format (SCC,SMI, SRT, TTML, WebVTT) (p. 132). Specify the captions settings as follows:
• Caption Source: Caption Selector 1.
• Destination Type: SCC.
• Language: English
• Frameraterate: As appropriate.
6. Set up another captions-only stream (for example, Stream 5) in the same way, specifying thecaptions settings as follows:
• Caption Source: Caption Selector 2.
• Destination Type: SCC.
• Language: Spanish
• Framerate: As appropriate.
Version 2.16164
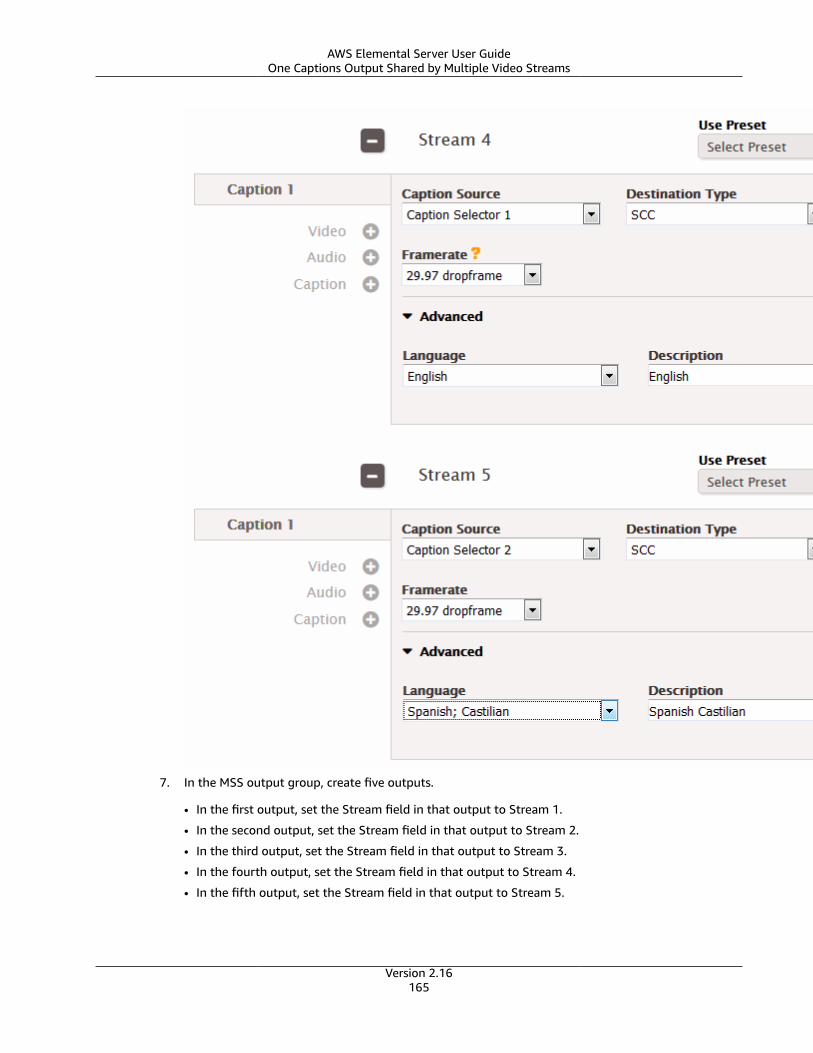
AWS Elemental Server User GuideOne Captions Output Shared by Multiple Video Streams
7. In the MSS output group, create five outputs.
• In the first output, set the Stream field in that output to Stream 1.
• In the second output, set the Stream field in that output to Stream 2.
• In the third output, set the Stream field in that output to Stream 3.
• In the fourth output, set the Stream field in that output to Stream 4.
• In the fifth output, set the Stream field in that output to Stream 5.
Version 2.16165
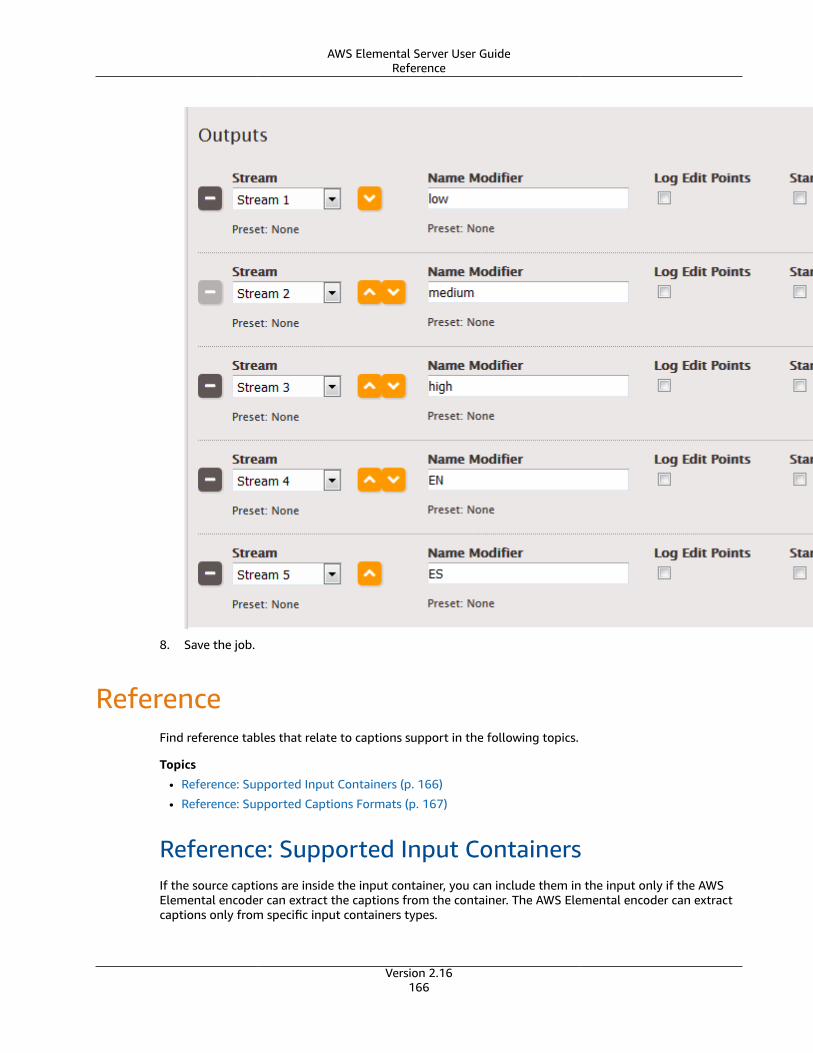
AWS Elemental Server User GuideReference
8. Save the job.
ReferenceFind reference tables that relate to captions support in the following topics.
Topics
• Reference: Supported Input Containers (p. 166)
• Reference: Supported Captions Formats (p. 167)
Reference: Supported Input ContainersIf the source captions are inside the input container, you can include them in the input only if the AWSElemental encoder can extract the captions from the container. The AWS Elemental encoder can extractcaptions only from specific input containers types.
Version 2.16166
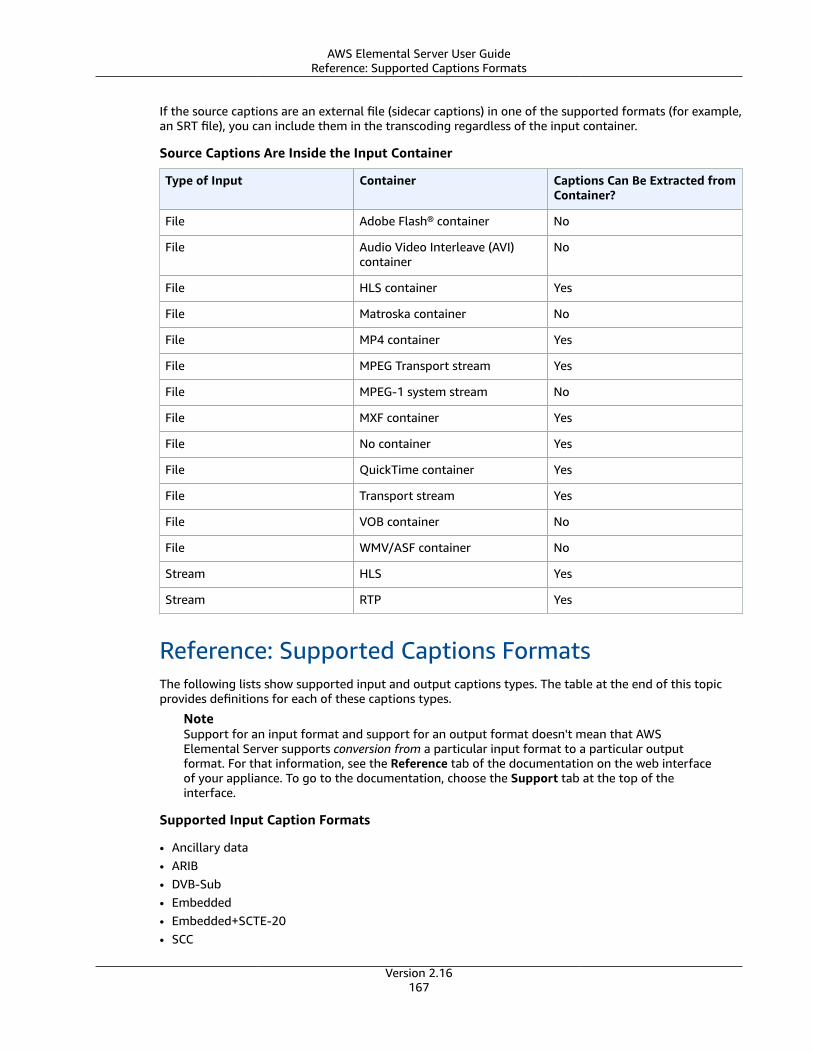
AWS Elemental Server User GuideReference: Supported Captions Formats
If the source captions are an external file (sidecar captions) in one of the supported formats (for example,an SRT file), you can include them in the transcoding regardless of the input container.
Source Captions Are Inside the Input Container
Type of Input Container Captions Can Be Extracted fromContainer?
File Adobe Flash® container No
File Audio Video Interleave (AVI)container
No
File HLS container Yes
File Matroska container No
File MP4 container Yes
File MPEG Transport stream Yes
File MPEG-1 system stream No
File MXF container Yes
File No container Yes
File QuickTime container Yes
File Transport stream Yes
File VOB container No
File WMV/ASF container No
Stream HLS Yes
Stream RTP Yes
Reference: Supported Captions FormatsThe following lists show supported input and output captions types. The table at the end of this topicprovides definitions for each of these captions types.
NoteSupport for an input format and support for an output format doesn't mean that AWSElemental Server supports conversion from a particular input format to a particular outputformat. For that information, see the Reference tab of the documentation on the web interfaceof your appliance. To go to the documentation, choose the Support tab at the top of theinterface.
Supported Input Caption Formats
• Ancillary data• ARIB• DVB-Sub• Embedded• Embedded+SCTE-20• SCC
Version 2.16167

AWS Elemental Server User GuideReference: Supported Captions Formats
• SCTE-20• SCTE-27• SMI• SRT• STL
Supported Output Caption Formats
• Ancillary+Embedded• ARIB• Burn-in• CFF-TT• DVB-Sub• Embedded• Embedded+SCTE-20• RTMP CaptionInfo• RTMP CuePoint• SCC• SCTE-20+Embedded• SMI• SRT• Teletext• TTML• WebVTT
Caption Format Descriptions
Caption Description
Ancillary data From MXF input, data that is compliant with“SMPTE 291M: Ancillary Data Package and SpaceFormatting” and is contained in ancillary data.
From QuickTime® input or for QuickTime output,data that is compliant with EIA-608 (also knownas CEA-608) or CEA-708 (also known as EIA-708)and is contained in ancillary data.
Ancillary+Embedded For QuickTime output only, the output combinescaptions in ancillary data and embedded captions.The ancillary captions are compliant with EIA-608(also known as CEA-608) or CEA-708 (also knownas EIA-708). The embedded captions are describedbelow.
ARIB Captions that are compliant with the ARIB STD-B37 Version 2.4
Burn-in It is technically impossible for the encoder toread burn-in captions. Therefore, from an inputviewpoint, they cannot be considered to becaptions.
Version 2.16168
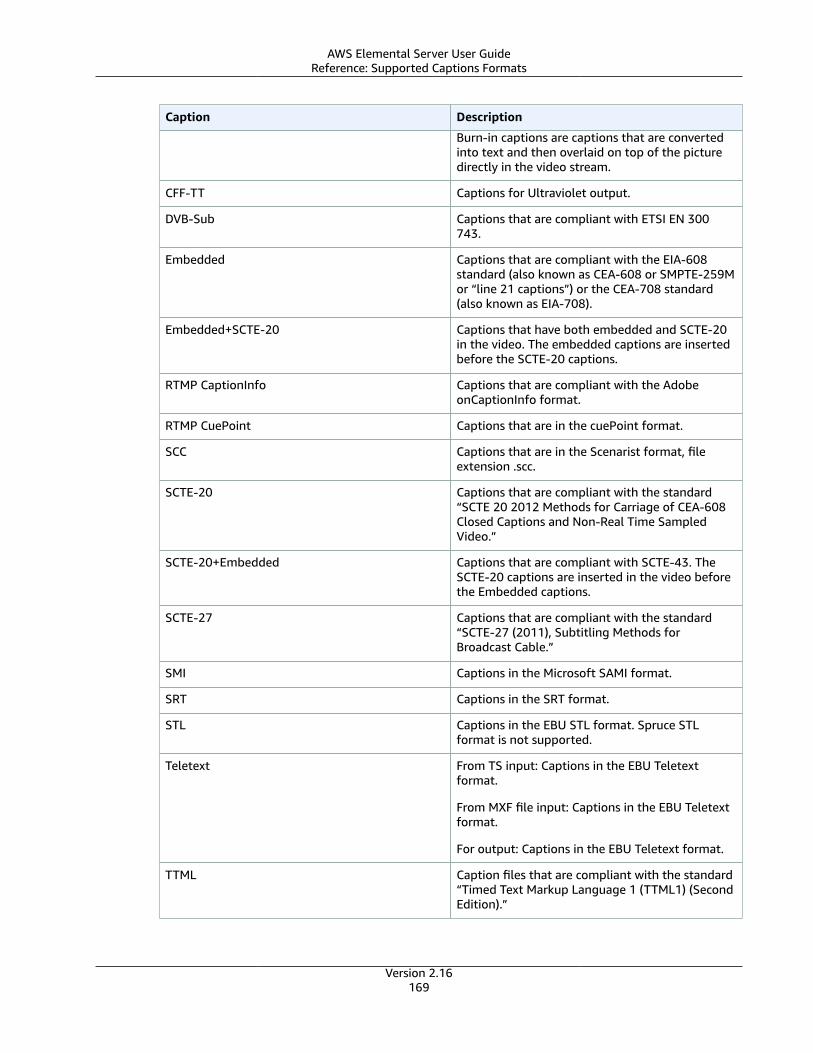
AWS Elemental Server User GuideReference: Supported Captions Formats
Caption Description
Burn-in captions are captions that are convertedinto text and then overlaid on top of the picturedirectly in the video stream.
CFF-TT Captions for Ultraviolet output.
DVB-Sub Captions that are compliant with ETSI EN 300743.
Embedded Captions that are compliant with the EIA-608standard (also known as CEA-608 or SMPTE-259Mor “line 21 captions”) or the CEA-708 standard(also known as EIA-708).
Embedded+SCTE-20 Captions that have both embedded and SCTE-20in the video. The embedded captions are insertedbefore the SCTE-20 captions.
RTMP CaptionInfo Captions that are compliant with the AdobeonCaptionInfo format.
RTMP CuePoint Captions that are in the cuePoint format.
SCC Captions that are in the Scenarist format, fileextension .scc.
SCTE-20 Captions that are compliant with the standard“SCTE 20 2012 Methods for Carriage of CEA-608Closed Captions and Non-Real Time SampledVideo.”
SCTE-20+Embedded Captions that are compliant with SCTE-43. TheSCTE-20 captions are inserted in the video beforethe Embedded captions.
SCTE-27 Captions that are compliant with the standard“SCTE-27 (2011), Subtitling Methods forBroadcast Cable.”
SMI Captions in the Microsoft SAMI format.
SRT Captions in the SRT format.
STL Captions in the EBU STL format. Spruce STLformat is not supported.
Teletext From TS input: Captions in the EBU Teletextformat.
From MXF file input: Captions in the EBU Teletextformat.
For output: Captions in the EBU Teletext format.
TTML Caption files that are compliant with the standard“Timed Text Markup Language 1 (TTML1) (SecondEdition).”
Version 2.16169

AWS Elemental Server User GuideReference: Supported Captions Formats
Caption Description
WebVTT Captions that are compliant with “webvtt: TheWeb Video Text Tracks Format” as defined by theW3C organization.
Version 2.16170
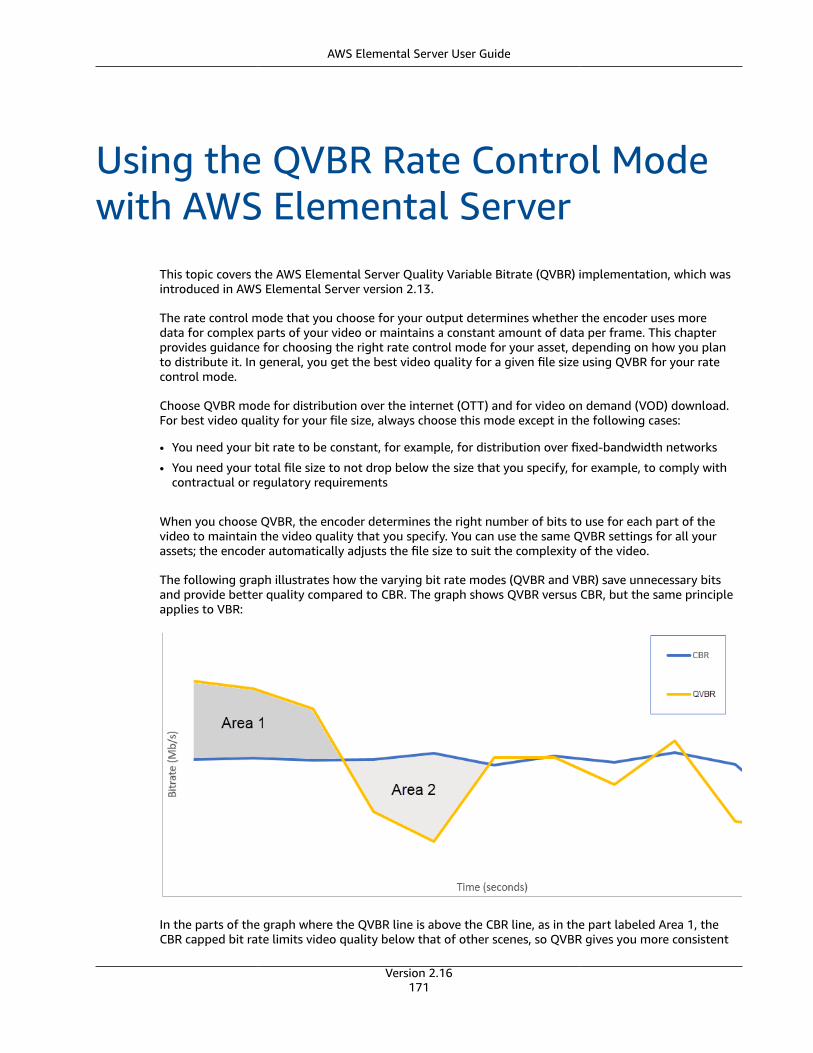
AWS Elemental Server User Guide
Using the QVBR Rate Control Modewith AWS Elemental Server
This topic covers the AWS Elemental Server Quality Variable Bitrate (QVBR) implementation, which wasintroduced in AWS Elemental Server version 2.13.
The rate control mode that you choose for your output determines whether the encoder uses moredata for complex parts of your video or maintains a constant amount of data per frame. This chapterprovides guidance for choosing the right rate control mode for your asset, depending on how you planto distribute it. In general, you get the best video quality for a given file size using QVBR for your ratecontrol mode.
Choose QVBR mode for distribution over the internet (OTT) and for video on demand (VOD) download.For best video quality for your file size, always choose this mode except in the following cases:
• You need your bit rate to be constant, for example, for distribution over fixed-bandwidth networks
• You need your total file size to not drop below the size that you specify, for example, to comply withcontractual or regulatory requirements
When you choose QVBR, the encoder determines the right number of bits to use for each part of thevideo to maintain the video quality that you specify. You can use the same QVBR settings for all yourassets; the encoder automatically adjusts the file size to suit the complexity of the video.
The following graph illustrates how the varying bit rate modes (QVBR and VBR) save unnecessary bitsand provide better quality compared to CBR. The graph shows QVBR versus CBR, but the same principleapplies to VBR:
In the parts of the graph where the QVBR line is above the CBR line, as in the part labeled Area 1, theCBR capped bit rate limits video quality below that of other scenes, so QVBR gives you more consistent
Version 2.16171
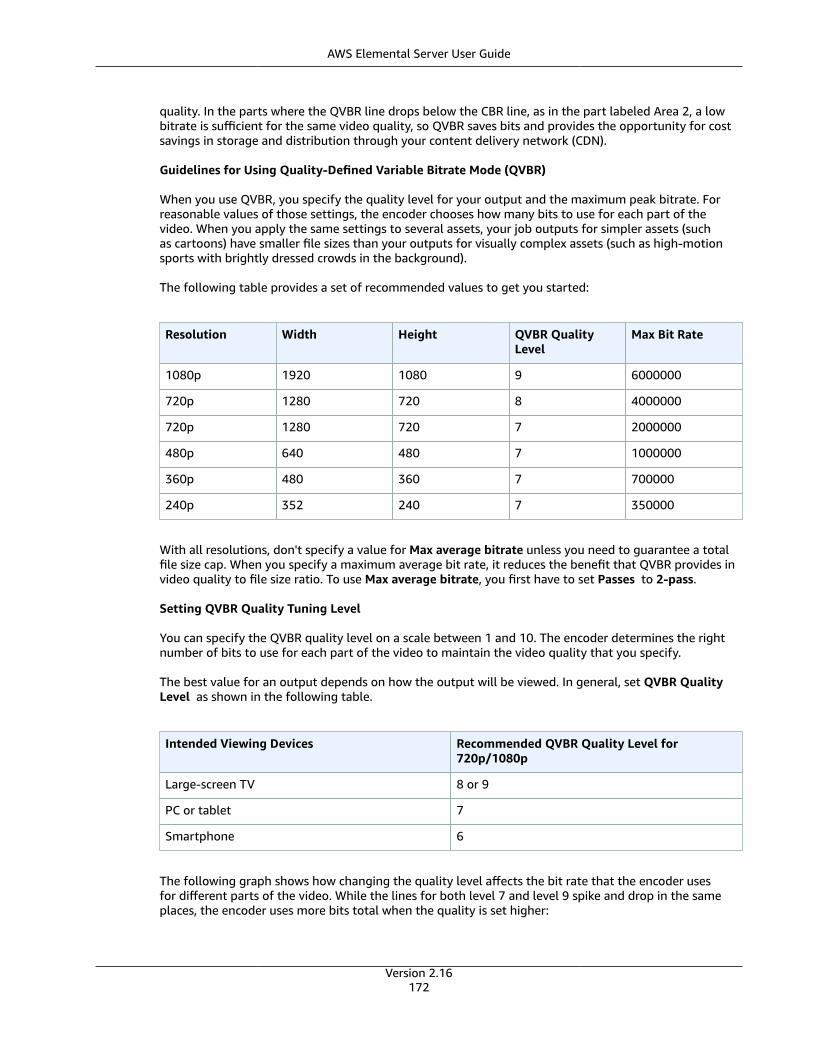
AWS Elemental Server User Guide
quality. In the parts where the QVBR line drops below the CBR line, as in the part labeled Area 2, a lowbitrate is sufficient for the same video quality, so QVBR saves bits and provides the opportunity for costsavings in storage and distribution through your content delivery network (CDN).
Guidelines for Using Quality-Defined Variable Bitrate Mode (QVBR)
When you use QVBR, you specify the quality level for your output and the maximum peak bitrate. Forreasonable values of those settings, the encoder chooses how many bits to use for each part of thevideo. When you apply the same settings to several assets, your job outputs for simpler assets (suchas cartoons) have smaller file sizes than your outputs for visually complex assets (such as high-motionsports with brightly dressed crowds in the background).
The following table provides a set of recommended values to get you started:
Resolution Width Height QVBR QualityLevel
Max Bit Rate
1080p 1920 1080 9 6000000
720p 1280 720 8 4000000
720p 1280 720 7 2000000
480p 640 480 7 1000000
360p 480 360 7 700000
240p 352 240 7 350000
With all resolutions, don't specify a value for Max average bitrate unless you need to guarantee a totalfile size cap. When you specify a maximum average bit rate, it reduces the benefit that QVBR provides invideo quality to file size ratio. To use Max average bitrate, you first have to set Passes to 2-pass.
Setting QVBR Quality Tuning Level
You can specify the QVBR quality level on a scale between 1 and 10. The encoder determines the rightnumber of bits to use for each part of the video to maintain the video quality that you specify.
The best value for an output depends on how the output will be viewed. In general, set QVBR QualityLevel as shown in the following table.
Intended Viewing Devices Recommended QVBR Quality Level for720p/1080p
Large-screen TV 8 or 9
PC or tablet 7
Smartphone 6
The following graph shows how changing the quality level affects the bit rate that the encoder usesfor different parts of the video. While the lines for both level 7 and level 9 spike and drop in the sameplaces, the encoder uses more bits total when the quality is set higher:
Version 2.16172
AWS Elemental Server User Guide
Version 2.16173
AWS Elemental Server User Guide
Using IMF Inputs with AWSElemental Server
This topic covers the AWS Elemental Server Interoperable Master Format (IMF) App #2 and App #2Eingest implementation, which was introduced in AWS Elemental Server version 2.13. IMF is a collectionof SMPTE specifications, starting with the prefix ST 2067.
Anatomy of an Interoperable Master Package (IMP)
An IMP is just a directory. It must contain an ASSETMAP.xml at the root of the IMP. This file associatesfile paths with asset UUIDs. All assets must be within the IMP directory - no relative paths ../, etc. areallowed.
IMPs can have the following status:
• Complete - All of the assets that exist in this IMP.• Incomplete - CPL refers to assets in another folder.
A composition playlist (CPL) describes how a version of an asset is presented (within a timeline). Thistimeline is specified similarly to a non-linear edit timeline. It consists of a description of what samplesplay from what files and when. Files are located by the source file ID via the ASSETMAP.xmls.
Feature Limitations
AWS Elemental Server cannot do the following with IMF:
• Ingest IMF applications other than #2 and #2E.• Write IMF assets.• Ingest IMSC1 image profile captions.• Ingest new IMSC1.1 features like skew, top-bottom captions, ruby, etc.• Burn in IMSC1 captions with styling.• Parse timecode start time from CPL.
Specifying Inputs
To ingest an IMF source, enter the Composition Playlist (CPL) file in the input field. The extension mustbe .xml.
Incomplete IMPs (OV + VF workflows)
If the IMP that contained the specified CPL file is not complete (i.e. it relies on resources in another IMP),provide paths to the ASSETMAP.xml files for every required supplemental IMP.
For example, you may specify a CPL from a localized version file (VF) of an asset. This VF IMP replacescaptions, audio, and certain video scenes. The CPL still uses to the original version (OV) video file formost of the timeline.
The user would select the VF CPL as the file input, then add the ASSETMAP.xml of the OV IMP as asupplemental IMP after choosing Add IMF Asset.
Version 2.16174
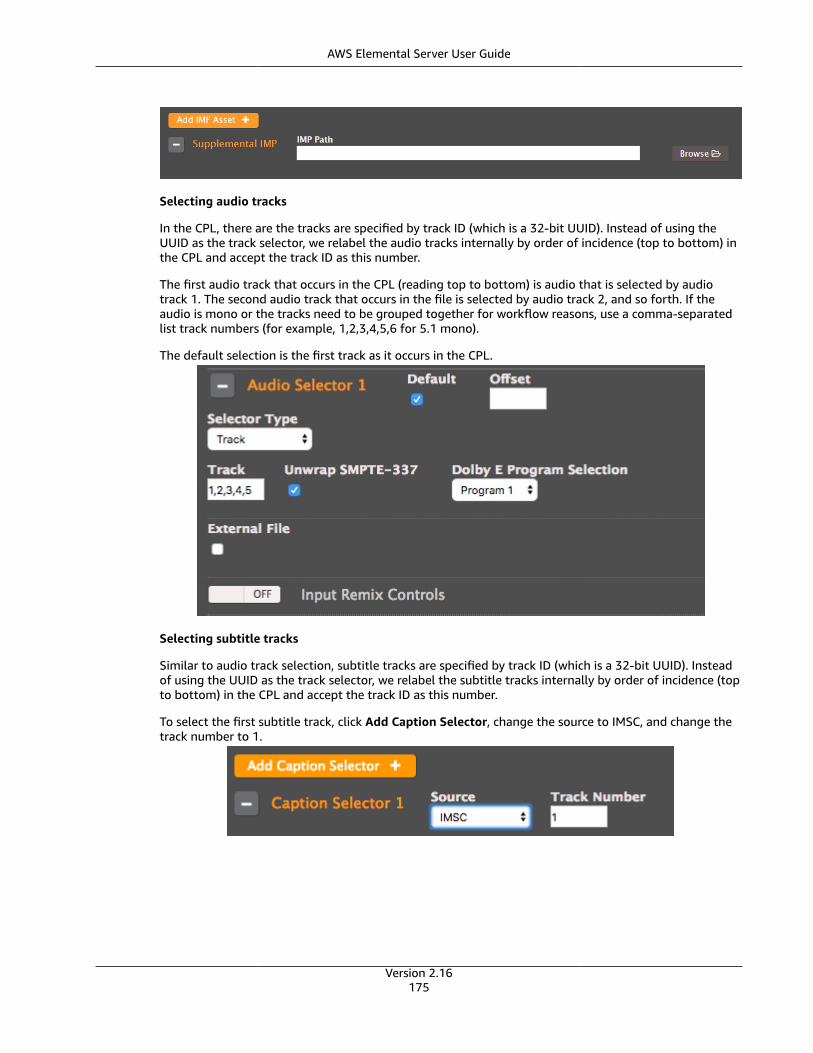
AWS Elemental Server User Guide
Selecting audio tracks
In the CPL, there are the tracks are specified by track ID (which is a 32-bit UUID). Instead of using theUUID as the track selector, we relabel the audio tracks internally by order of incidence (top to bottom) inthe CPL and accept the track ID as this number.
The first audio track that occurs in the CPL (reading top to bottom) is audio that is selected by audiotrack 1. The second audio track that occurs in the file is selected by audio track 2, and so forth. If theaudio is mono or the tracks need to be grouped together for workflow reasons, use a comma-separatedlist track numbers (for example, 1,2,3,4,5,6 for 5.1 mono).
The default selection is the first track as it occurs in the CPL.
Selecting subtitle tracks
Similar to audio track selection, subtitle tracks are specified by track ID (which is a 32-bit UUID). Insteadof using the UUID as the track selector, we relabel the subtitle tracks internally by order of incidence (topto bottom) in the CPL and accept the track ID as this number.
To select the first subtitle track, click Add Caption Selector, change the source to IMSC, and change thetrack number to 1.
Version 2.16175
AWS Elemental Server User GuideSupported HDR Formats
Creating HDR Outputs with AWSElemental Server
Supported HDR FormatsAWS Elemental Server can ingest and output video in the following formats and color spaces:
• HDR10
• HLG, rec. 2020
• SDR, rec. 709
• SDR, rec. 609
Setting Up HDR Jobs Using the Web InterfaceUse the following flowchart to determine which fields in the job or profile you need to adjust to get theHDR functionality that you need. Then find detailed instructions and screenshots in the sections thatfollow.
Version 2.16176
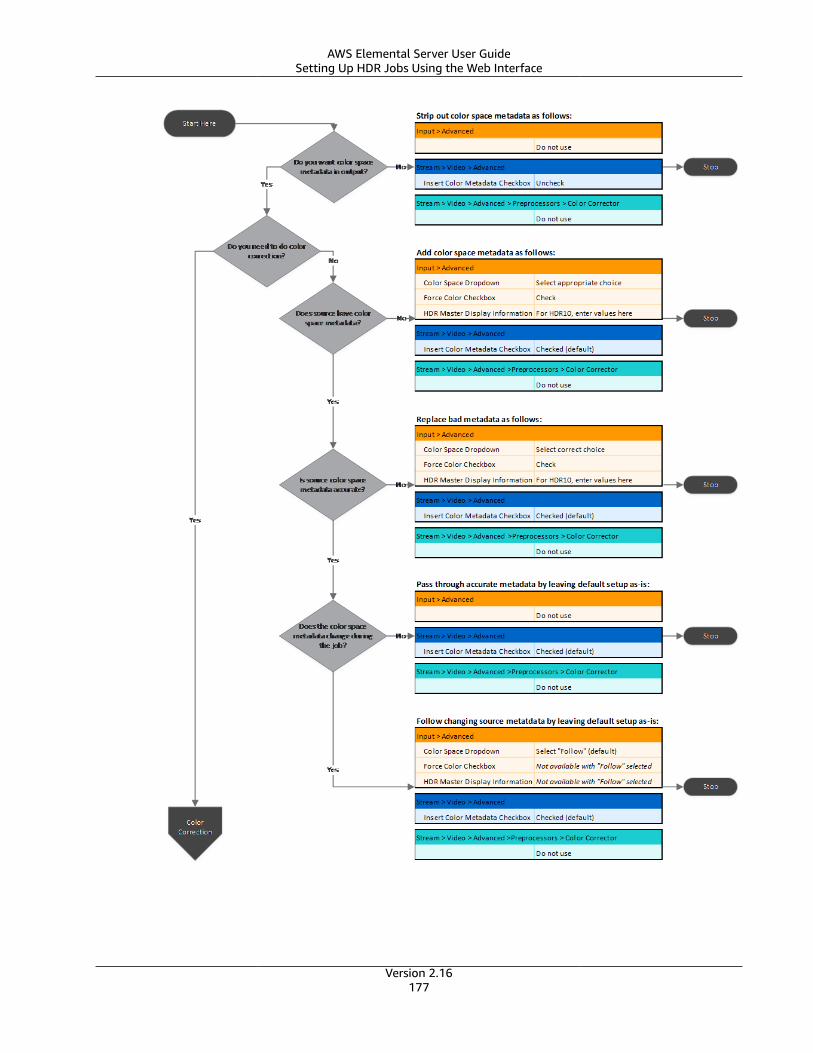
AWS Elemental Server User GuideSetting Up HDR Jobs Using the Web Interface
Version 2.16177
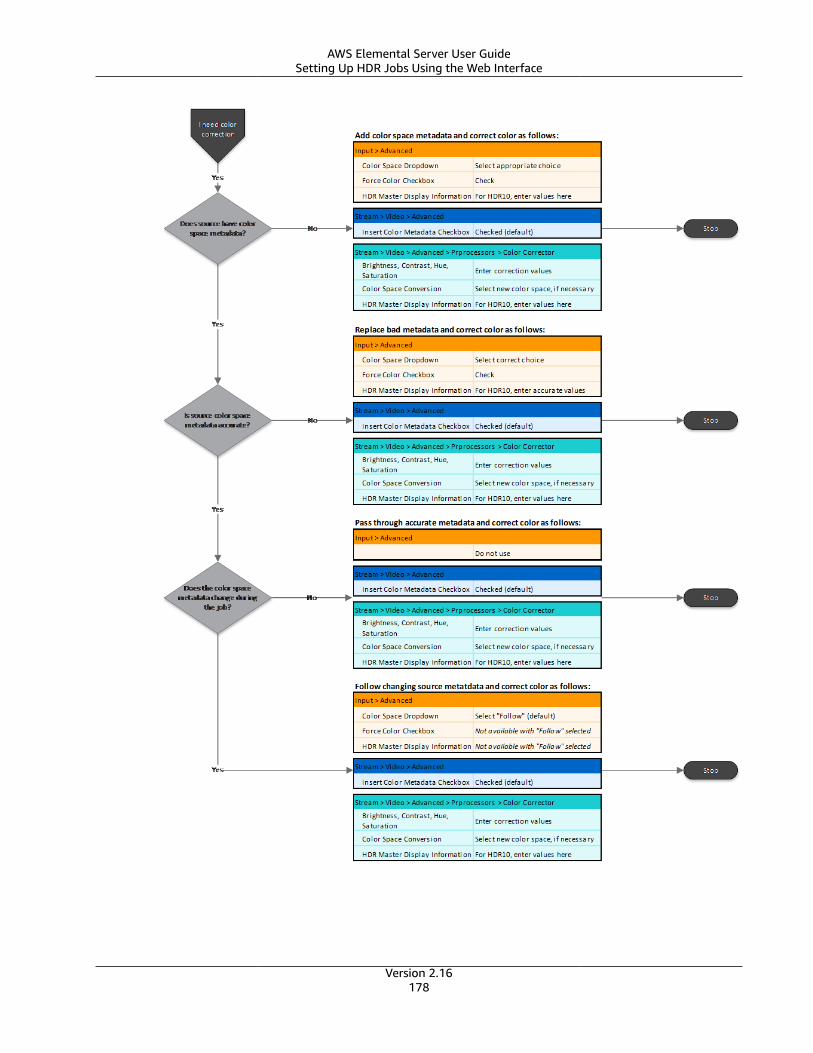
AWS Elemental Server User GuideSetting Up HDR Jobs Using the Web Interface
Version 2.16178
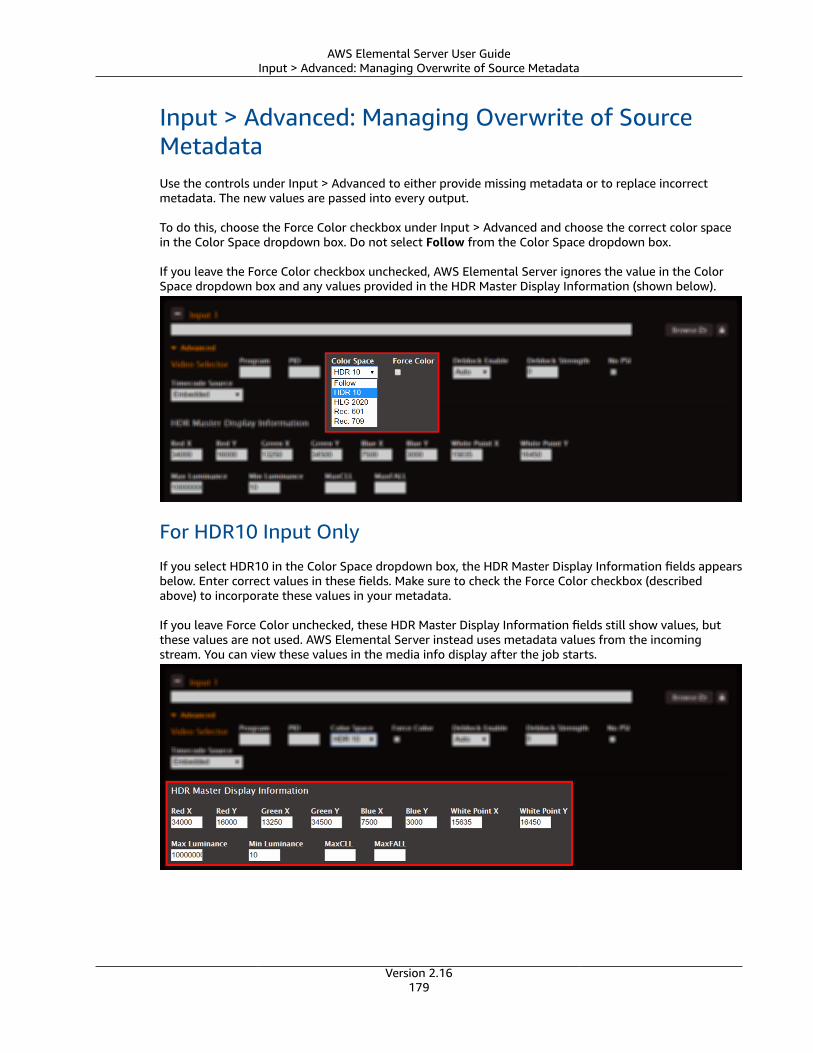
AWS Elemental Server User GuideInput > Advanced: Managing Overwrite of Source Metadata
Input > Advanced: Managing Overwrite of SourceMetadataUse the controls under Input > Advanced to either provide missing metadata or to replace incorrectmetadata. The new values are passed into every output.
To do this, choose the Force Color checkbox under Input > Advanced and choose the correct color spacein the Color Space dropdown box. Do not select Follow from the Color Space dropdown box.
If you leave the Force Color checkbox unchecked, AWS Elemental Server ignores the value in the ColorSpace dropdown box and any values provided in the HDR Master Display Information (shown below).
For HDR10 Input Only
If you select HDR10 in the Color Space dropdown box, the HDR Master Display Information fields appearsbelow. Enter correct values in these fields. Make sure to check the Force Color checkbox (describedabove) to incorporate these values in your metadata.
If you leave Force Color unchecked, these HDR Master Display Information fields still show values, butthese values are not used. AWS Elemental Server instead uses metadata values from the incomingstream. You can view these values in the media info display after the job starts.
Version 2.16179
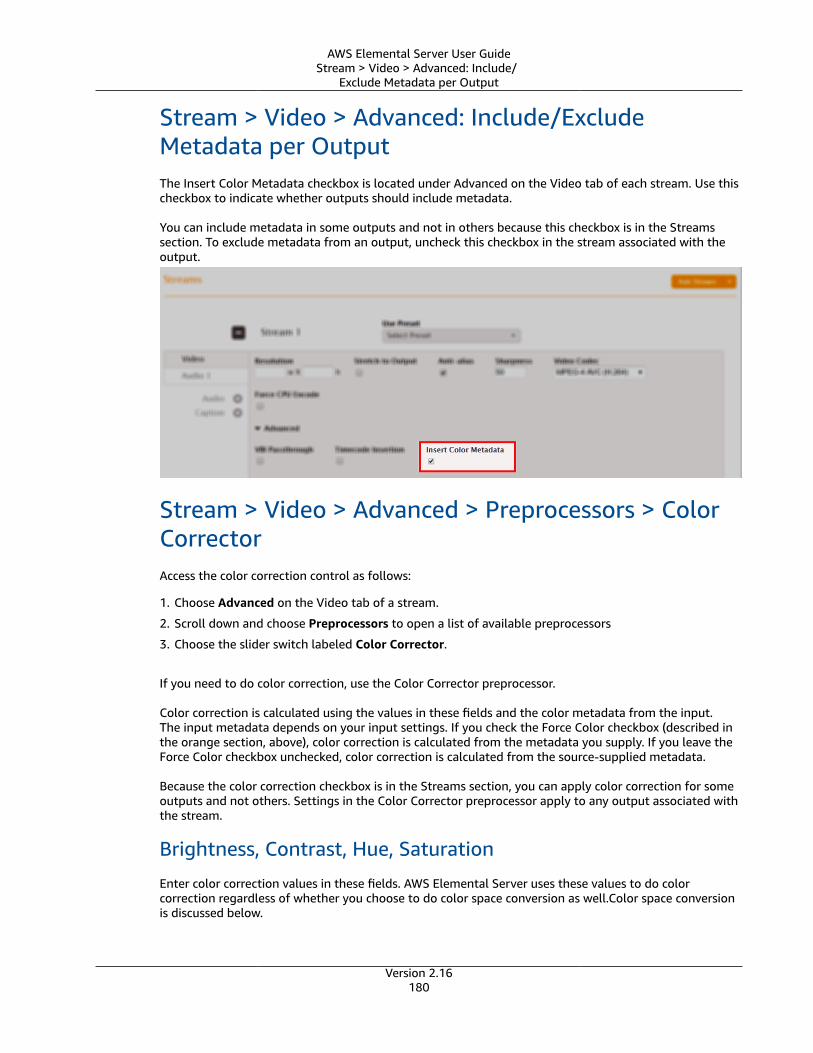
AWS Elemental Server User GuideStream > Video > Advanced: Include/
Exclude Metadata per Output
Stream > Video > Advanced: Include/ExcludeMetadata per OutputThe Insert Color Metadata checkbox is located under Advanced on the Video tab of each stream. Use thischeckbox to indicate whether outputs should include metadata.
You can include metadata in some outputs and not in others because this checkbox is in the Streamssection. To exclude metadata from an output, uncheck this checkbox in the stream associated with theoutput.
Stream > Video > Advanced > Preprocessors > ColorCorrectorAccess the color correction control as follows:
1. Choose Advanced on the Video tab of a stream.
2. Scroll down and choose Preprocessors to open a list of available preprocessors
3. Choose the slider switch labeled Color Corrector.
If you need to do color correction, use the Color Corrector preprocessor.
Color correction is calculated using the values in these fields and the color metadata from the input.The input metadata depends on your input settings. If you check the Force Color checkbox (described inthe orange section, above), color correction is calculated from the metadata you supply. If you leave theForce Color checkbox unchecked, color correction is calculated from the source-supplied metadata.
Because the color correction checkbox is in the Streams section, you can apply color correction for someoutputs and not others. Settings in the Color Corrector preprocessor apply to any output associated withthe stream.
Brightness, Contrast, Hue, Saturation
Enter color correction values in these fields. AWS Elemental Server uses these values to do colorcorrection regardless of whether you choose to do color space conversion as well.Color space conversionis discussed below.
Version 2.16180

AWS Elemental Server User GuideStream > Video > Advanced >
Preprocessors > Color Corrector
Color Space Conversion
The Color Space Conversion dropdown box is located on the right side of the Color Corrector section. Usethis dropdown to create output streams encoded with a different standard than the input stream. Selectthe option for the format you are converting to. (The format you are converting from is determined bythe input.)
AWS Elemental Server supports the following conversions:
• Between the two HDR formats (HDR10 and HLG)
• Between the two SDR color spaces (rec. 601 and rec. 709)
• From either SDR color space to either HDR format
HDR Master Display Information
The HDR Master Display Information fields appear when you select “Force HDR 10” from the Color SpaceConversion dropdown list. If you are converting to HDR10, use these fields to supply master displayinformation metadata to be included in the output.
Version 2.16181
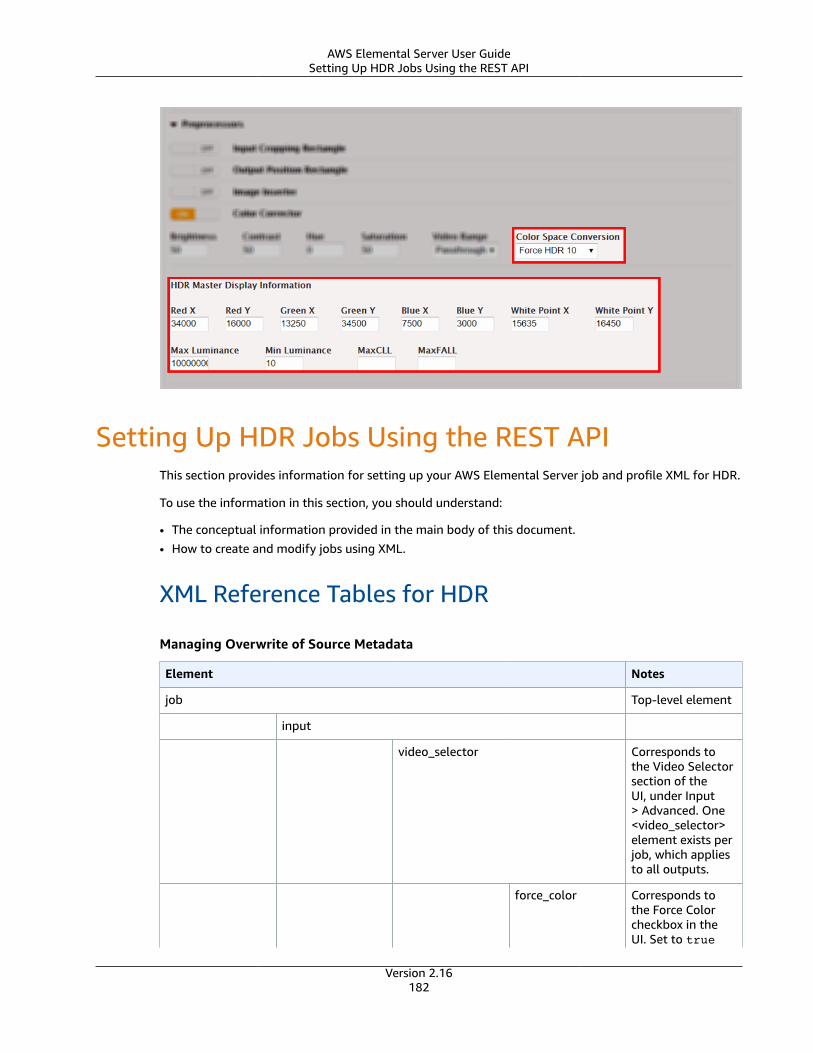
AWS Elemental Server User GuideSetting Up HDR Jobs Using the REST API
Setting Up HDR Jobs Using the REST APIThis section provides information for setting up your AWS Elemental Server job and profile XML for HDR.
To use the information in this section, you should understand:
• The conceptual information provided in the main body of this document.• How to create and modify jobs using XML.
XML Reference Tables for HDR
Managing Overwrite of Source Metadata
Element Notes
job Top-level element
input
video_selector Corresponds tothe Video Selectorsection of theUI, under Input> Advanced. One<video_selector>element exists perjob, which appliesto all outputs.
force_color Corresponds tothe Force Colorcheckbox in theUI. Set to true
Version 2.16182
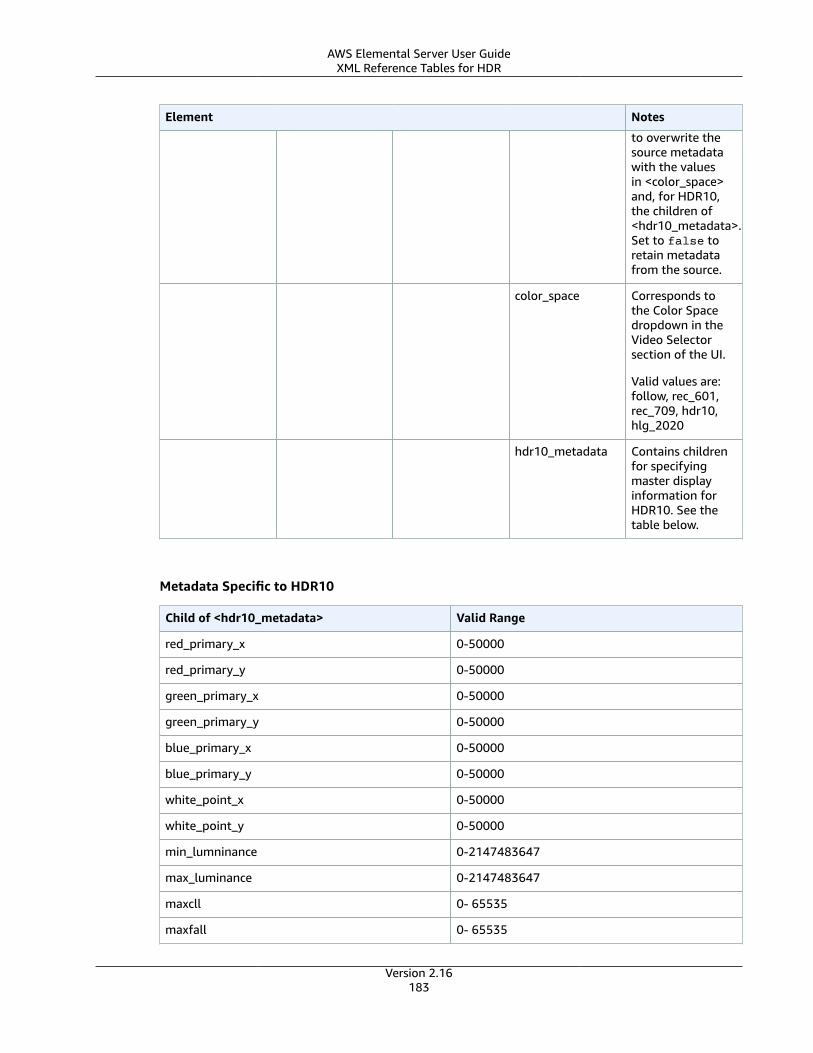
AWS Elemental Server User GuideXML Reference Tables for HDR
Element Notes
to overwrite thesource metadatawith the valuesin <color_space>and, for HDR10,the children of<hdr10_metadata>.Set to false toretain metadatafrom the source.
color_space Corresponds tothe Color Spacedropdown in theVideo Selectorsection of the UI.
Valid values are:follow, rec_601,rec_709, hdr10,hlg_2020
hdr10_metadata Contains childrenfor specifyingmaster displayinformation forHDR10. See thetable below.
Metadata Specific to HDR10
Child of <hdr10_metadata> Valid Range
red_primary_x 0-50000
red_primary_y 0-50000
green_primary_x 0-50000
green_primary_y 0-50000
blue_primary_x 0-50000
blue_primary_y 0-50000
white_point_x 0-50000
white_point_y 0-50000
min_lumninance 0-2147483647
max_luminance 0-2147483647
maxcll 0- 65535
maxfall 0- 65535
Version 2.16183
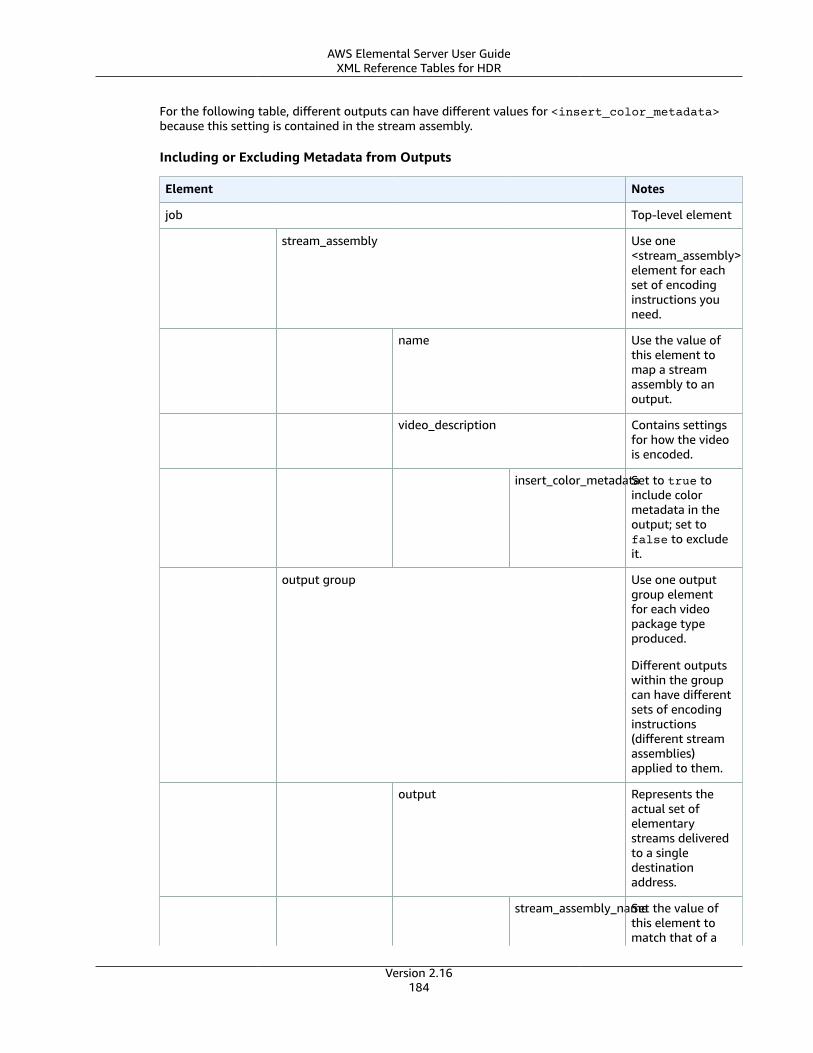
AWS Elemental Server User GuideXML Reference Tables for HDR
For the following table, different outputs can have different values for <insert_color_metadata>because this setting is contained in the stream assembly.
Including or Excluding Metadata from Outputs
Element Notes
job Top-level element
stream_assembly Use one<stream_assembly>element for eachset of encodinginstructions youneed.
name Use the value ofthis element tomap a streamassembly to anoutput.
video_description Contains settingsfor how the videois encoded.
insert_color_metadataSet to true toinclude colormetadata in theoutput; set tofalse to excludeit.
output group Use one outputgroup elementfor each videopackage typeproduced.
Different outputswithin the groupcan have differentsets of encodinginstructions(different streamassemblies)applied to them.
output Represents theactual set ofelementarystreams deliveredto a singledestinationaddress.
stream_assembly_nameSet the value ofthis element tomatch that of a
Version 2.16184
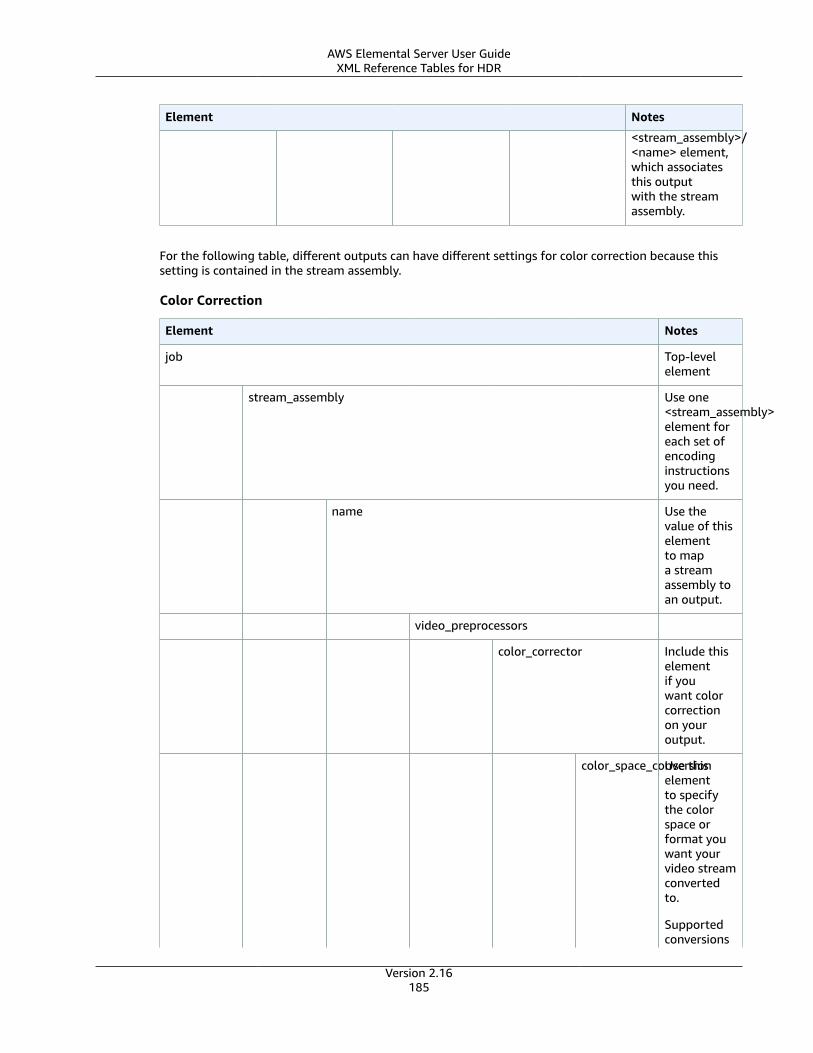
AWS Elemental Server User GuideXML Reference Tables for HDR
Element Notes
<stream_assembly>/<name> element,which associatesthis outputwith the streamassembly.
For the following table, different outputs can have different settings for color correction because thissetting is contained in the stream assembly.
Color Correction
Element Notes
job Top-levelelement
stream_assembly Use one<stream_assembly>element foreach set ofencodinginstructionsyou need.
name Use thevalue of thiselementto mapa streamassembly toan output.
video_preprocessors
color_corrector Include thiselementif youwant colorcorrectionon youroutput.
color_space_conversionUse thiselementto specifythe colorspace orformat youwant yourvideo streamconvertedto.
Supportedconversions
Version 2.16185
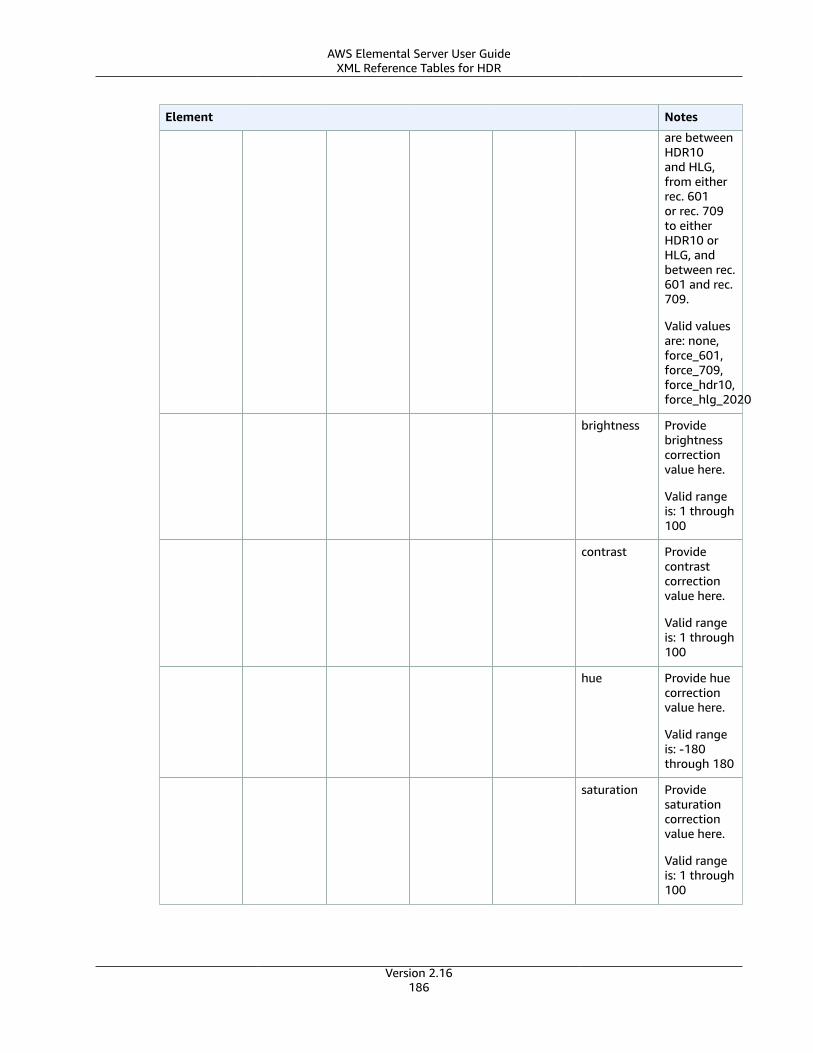
AWS Elemental Server User GuideXML Reference Tables for HDR
Element Notes
are betweenHDR10and HLG,from eitherrec. 601or rec. 709to eitherHDR10 orHLG, andbetween rec.601 and rec.709.
Valid valuesare: none,force_601,force_709,force_hdr10,force_hlg_2020
brightness Providebrightnesscorrectionvalue here.
Valid rangeis: 1 through100
contrast Providecontrastcorrectionvalue here.
Valid rangeis: 1 through100
hue Provide huecorrectionvalue here.
Valid rangeis: -180through 180
saturation Providesaturationcorrectionvalue here.
Valid rangeis: 1 through100
Version 2.16186
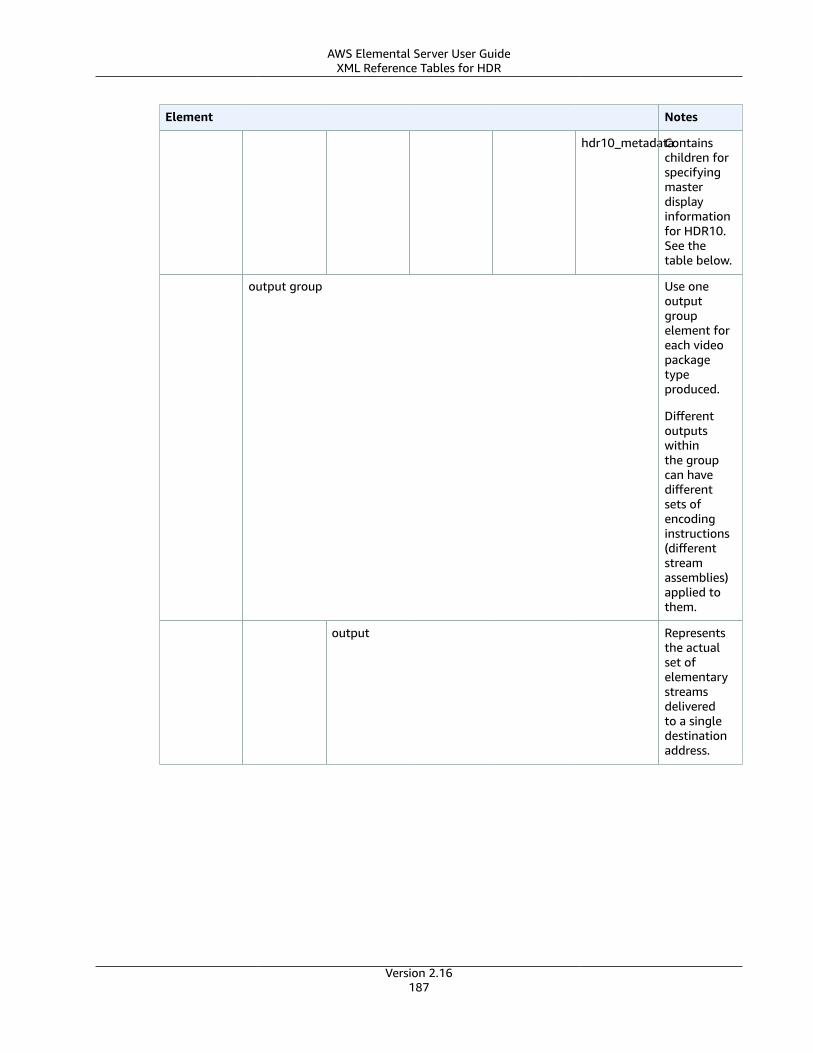
AWS Elemental Server User GuideXML Reference Tables for HDR
Element Notes
hdr10_metadataContainschildren forspecifyingmasterdisplayinformationfor HDR10.See thetable below.
output group Use oneoutputgroupelement foreach videopackagetypeproduced.
Differentoutputswithinthe groupcan havedifferentsets ofencodinginstructions(differentstreamassemblies)applied tothem.
output Representsthe actualset ofelementarystreamsdeliveredto a singledestinationaddress.
Version 2.16187
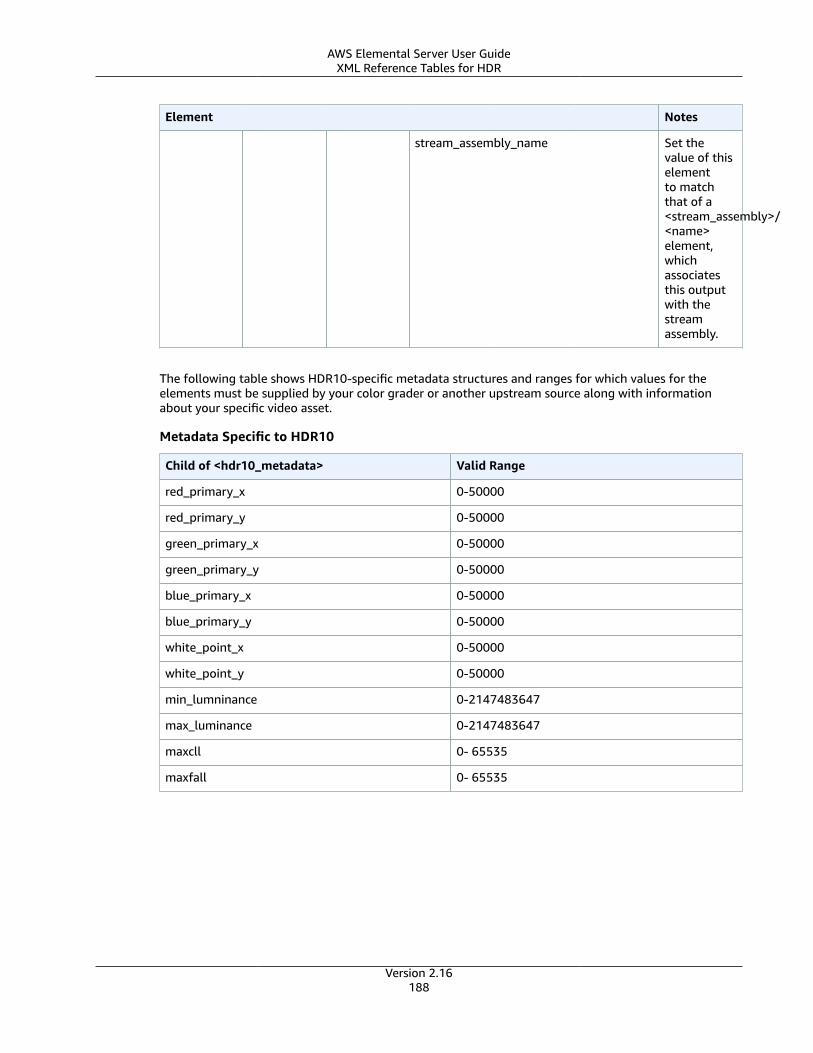
AWS Elemental Server User GuideXML Reference Tables for HDR
Element Notes
stream_assembly_name Set thevalue of thiselementto matchthat of a<stream_assembly>/<name>element,whichassociatesthis outputwith thestreamassembly.
The following table shows HDR10-specific metadata structures and ranges for which values for theelements must be supplied by your color grader or another upstream source along with informationabout your specific video asset.
Metadata Specific to HDR10
Child of <hdr10_metadata> Valid Range
red_primary_x 0-50000
red_primary_y 0-50000
green_primary_x 0-50000
green_primary_y 0-50000
blue_primary_x 0-50000
blue_primary_y 0-50000
white_point_x 0-50000
white_point_y 0-50000
min_lumninance 0-2147483647
max_luminance 0-2147483647
maxcll 0- 65535
maxfall 0- 65535
Version 2.16188
AWS Elemental Server User GuideUsing Dolby Atmos Passthrough
Creating Dolby Atmos Outputs withAWS Elemental Server
Dolby Atmos provides an immersive audio experience in cinemas and home theaters. With the rightaudio input files, you can use AWS Elemental Server to create Dolby Atmos outputs. You can createstreaming outputs that end viewers can experience in their home theaters or file outputs that you canuse in your professional workflows.
AWS Elemental Server can create Dolby Digital Plus with Atmos outputs by either encoding channel-based immersive audio content that you provide as 9.1.6, 7.1.1, or 5.1.4 PCM mono channels, or bypassing through already encoded Dolby Digital Plus with Atmos content.
Topics
• Using Dolby Atmos Passthrough with AWS Elemental Server (p. 189)
• Using Dolby Atmos Encoding with AWS Elemental Server (p. 190)
Using Dolby Atmos Passthrough with AWSElemental Server
AWS Elemental Server can create Dolby Digital Plus with Atmos outputs by either encoding audio in9.1.6, 7.1.5, or 5.1.4 PCM mono channels, or by passing through already encoded Dolby Digital Plus withAtmos content.
You set up your job to pass through Dolby Digital Plus with Atmos content in the same way that you passthrough Dolby Digital and Dolby Digital Plus content.
To set up a Dolby Atmos job, passing through finished audio content
1. Set up your input audio and video as usual.
2. Create outputs and streams. To set up the audio in your streams, for Audio Codec, choose DolbyDigital Pass Through.
Feature Restrictions for Dolby Atmos PassthroughNote the following restrictions in the AWS Elemental Server implementation of Dolby Atmospassthrough:
• Output codec: You can create Dolby Atmos audio outputs encoded with only the Dolby Digital Plus(EAC3) codec.
• Output containers: For file outputs, you can create Dolby Atmos audio in only one of the videocontainers that supports Dolby Digital Plus: MPEG-4, MPEG-2 Transport Stream, or QuickTime.
Version 2.16189
AWS Elemental Server User GuideUsing Dolby Atmos Encoding
Using Dolby Atmos Encoding with AWS ElementalServer
AWS Elemental Server can encode Dolby Digital Plus with Atmos channel-based, immersive audio, AudioDescriptive Model Broadcast WAV files, or Dolby Atmos Master File.
NoteUnderstanding Dolby Atmos is required prerequisite knowledge for using this feature. Yourinput audio channels must already be set up according the Dolby Atmos standard you are usingas input. For more information about Dolby Atmos, see the Dolby online documentation.
Input File Requirements for Dolby Atmos Encoding
Feature Restrictions for Dolby Atmos EncodingNote the following restrictions in the AWS Elemental Server implementation of Dolby Atmos encoding:
• Channel-based immersive: AWS Elemental Server supports channel-based immersive (CBI) content.
• Dolby Atmos Master File (DAMF): AWS Elemental Server supports Dolby Atmos master file (DAMF).This is a collection of 3 files with the extensions, .atmos, .atmos.metadata, and .atmos.audio
• Audio Descriptive Model Broadcast WAV Format (ADM BWF): AWS Elemental Server supports ADMBWF. It is a single broadcast WAV file contains header data with the .atmos and .atmos.metadatainformation.
• Output codec: You can create Dolby Atmos audio outputs encoded with only the Dolby Digital Plus(EAC3) codec.
• Output containers: For file outputs, you can create Dolby Atmos audio in only in one of the videocontainers that supports Dolby Digital Plus: MPEG-4, MPEG-2 Transport Stream, or QuickTime.
• Output packages: For adaptive bitrate (ABR) outputs, you can create Dolby Atmos audio in any ofthe AWS Elemental Server output group types: CMAF, Apple HLS, DASH ISO, or Microsoft SmoothStreaming.
Setting Up a Job for Dolby Atmos EncodingTo encode 9.1.6 audio Dolby Atmos objects, provide 16 input channels of PCM audio, either inindividual .wav files or as tracks in a single container.
If you provide input audio as individual .wav files, you specify them in order in your input. You specifythem as Audio selector 1, Audio selector 2, and so on, up to Audio selector 16. If you provide youraudio as a single file containing 16 tracks, you specify the file in your input as Audio selector 1, and thenyou specify the tracks individually within that audio selector.
ImportantRegardless of whether they are in separate files or a single file, you must set up the channels inthe following order: L, R, C, LFE, Ls, Rs, Lrs, Rrs, Lw, Rw, Ltf, Rtf, Ltm, Rtm, Ltr, Rtr.
Summary Instructions for Individual .wav File Input
If your audio input is individual .wav files, do the following:
1. Create 16 separate input audio selectors, in this order: L, R, C, LFE, Ls, Rs, Lrs, Rrs, Lw, Rw, Ltf, Rtf,Ltm, Rtm, Ltr, Rtr.
Version 2.16190
AWS Elemental Server User GuideSetting Up a Job for Dolby Atmos Encoding
2. Create a single audio selector group; include each of the 16 audio selectors.
3. Create one output stream with a single audio tab.
a. For Audio Codec, choose Dolby Digital Plus JOC (Atmos).
b. For Audio Source, choose the audio selector group that you created.
Summary Instructions for Single, Multi-Track File Input
1. Create an input audio selector.
2. For Selector Type, choose Track.
3. For Track, specify your 16 channels with a comma-separated list of channel numbers. Specify themin this order: L, R, C, LFE, Ls, Rs, Lrs, Rrs, Lw, Rw, Ltf, Rtf, Ltm, Rtm, Ltr, Rtr.
4. Create one output stream with a single audio tab.
a. For Audio Codec, choose Dolby Digital Plus JOC (Atmos).
b. For Audio Source, keep the default Audio Selector 1.
For more detailed instructions, see one of the following procedures:
Procedure with separate audio input files
Procedure with a single audio input file
To set up a Dolby Atmos job, with audio inputs as 16 individual .wav files
1. Set up your input audio selectors as follows:
a. On the Create New Job page, in the Input section, under Advanced, find Audio Selector 1.
b. Choose the External file check box.
c. For External File, provide the path and file name to the .wav file for your first channel. ForAudio Selector 1, this channel must be L.
ImportantYou must set up the channels in the following order: L, R, C, LFE, Ls, Rs, Lrs, Rrs, Lw, Rw,Ltf, Rtf, Ltm, Rtm, Ltr, Rtr.That is, if your input audio is in separate .wav files, Audio Selector 1 must point to theL channel, Audio Selector 2 must point to the R channel, and so on.
d. At the top of the Audio Selector sections, choose Add Audio Selector to create Audio Selector2.
e. Under Audio Selector 2, choose External file.
f. Specify the path and file name to the .wav file for your second channel. For Audio Selector 2,this channel must be R.
g. Repeat the steps to create an audio selector for the rest of your 16 channels. Choose thefollowing channels for each selector:
• Audio Selector 3: C
• Audio Selector 4: LFE
• Audio Selector 5: Ls
• Audio Selector 6: Rs
• Audio Selector 7: Lrs
• Audio Selector 8: Rrs
• Audio Selector 9: LwVersion 2.16
191
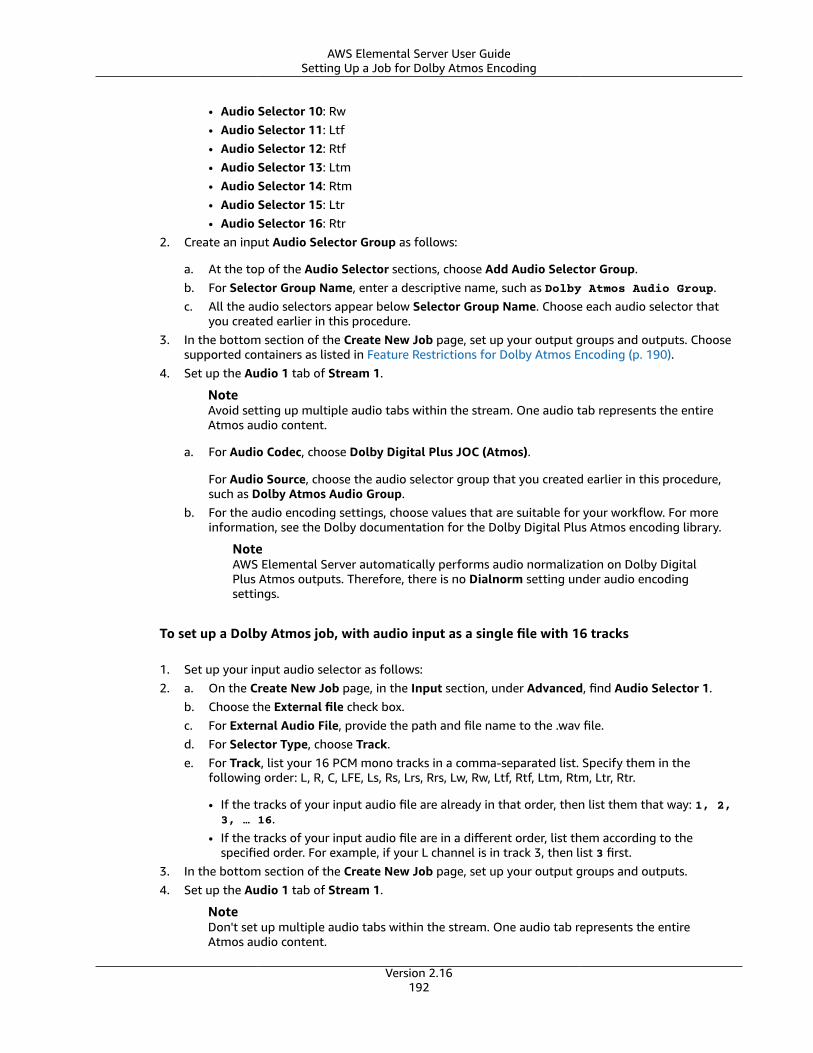
AWS Elemental Server User GuideSetting Up a Job for Dolby Atmos Encoding
• Audio Selector 10: Rw• Audio Selector 11: Ltf• Audio Selector 12: Rtf• Audio Selector 13: Ltm• Audio Selector 14: Rtm• Audio Selector 15: Ltr• Audio Selector 16: Rtr
2. Create an input Audio Selector Group as follows:
a. At the top of the Audio Selector sections, choose Add Audio Selector Group.b. For Selector Group Name, enter a descriptive name, such as Dolby Atmos Audio Group.c. All the audio selectors appear below Selector Group Name. Choose each audio selector that
you created earlier in this procedure.3. In the bottom section of the Create New Job page, set up your output groups and outputs. Choose
supported containers as listed in Feature Restrictions for Dolby Atmos Encoding (p. 190).4. Set up the Audio 1 tab of Stream 1.
NoteAvoid setting up multiple audio tabs within the stream. One audio tab represents the entireAtmos audio content.
a. For Audio Codec, choose Dolby Digital Plus JOC (Atmos).
For Audio Source, choose the audio selector group that you created earlier in this procedure,such as Dolby Atmos Audio Group.
b. For the audio encoding settings, choose values that are suitable for your workflow. For moreinformation, see the Dolby documentation for the Dolby Digital Plus Atmos encoding library.
NoteAWS Elemental Server automatically performs audio normalization on Dolby DigitalPlus Atmos outputs. Therefore, there is no Dialnorm setting under audio encodingsettings.
To set up a Dolby Atmos job, with audio input as a single file with 16 tracks
1. Set up your input audio selector as follows:2. a. On the Create New Job page, in the Input section, under Advanced, find Audio Selector 1.
b. Choose the External file check box.c. For External Audio File, provide the path and file name to the .wav file.d. For Selector Type, choose Track.e. For Track, list your 16 PCM mono tracks in a comma-separated list. Specify them in the
following order: L, R, C, LFE, Ls, Rs, Lrs, Rrs, Lw, Rw, Ltf, Rtf, Ltm, Rtm, Ltr, Rtr.
• If the tracks of your input audio file are already in that order, then list them that way: 1, 2,3, … 16.
• If the tracks of your input audio file are in a different order, list them according to thespecified order. For example, if your L channel is in track 3, then list 3 first.
3. In the bottom section of the Create New Job page, set up your output groups and outputs.4. Set up the Audio 1 tab of Stream 1.
NoteDon't set up multiple audio tabs within the stream. One audio tab represents the entireAtmos audio content.
Version 2.16192

AWS Elemental Server User GuideSetting Up a Job for Dolby Atmos Encoding
a. For Audio Codec, choose Dolby Digital Plus JOC (Atmos).
For Audio Source, keep the default Audio selector 1.b. For the audio encoding settings, choose values that are suitable for your workflow. For more
information, see the Dolby documentation for the Dolby Digital Plus Atmos encoding library.
NoteAWS Elemental Server automatically performs audio normalization on Dolby DigitalPlus Atmos outputs. Therefore, there is no Dialnorm setting under audio encodingsettings.
Version 2.16193
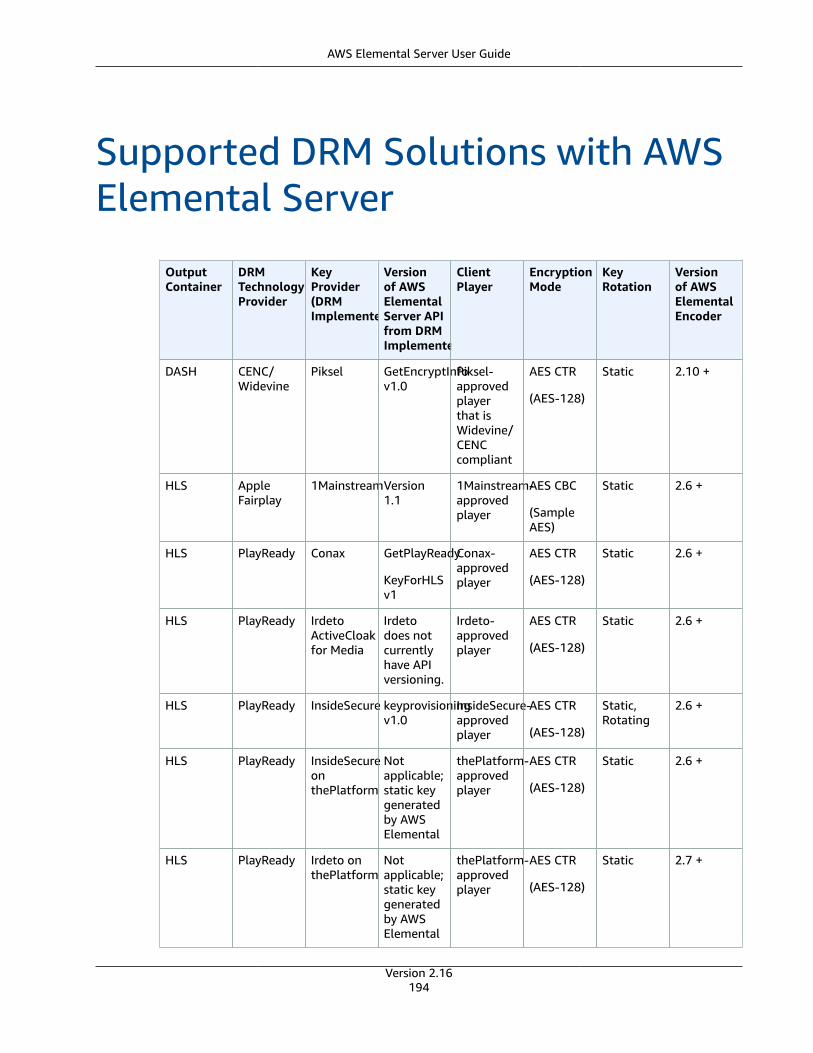
AWS Elemental Server User Guide
Supported DRM Solutions with AWSElemental Server
OutputContainer
DRMTechnologyProvider
KeyProvider(DRMImplementer)
Versionof AWSElementalServer APIfrom DRMImplementer
ClientPlayer
EncryptionMode
KeyRotation
Versionof AWSElementalEncoder
DASH CENC/Widevine
Piksel GetEncryptInfov1.0
Piksel-approvedplayerthat isWidevine/CENCcompliant
AES CTR
(AES-128)
Static 2.10 +
HLS AppleFairplay
1MainstreamVersion1.1
1Mainstream-approvedplayer
AES CBC
(SampleAES)
Static 2.6 +
HLS PlayReady Conax GetPlayReady
KeyForHLSv1
Conax-approvedplayer
AES CTR
(AES-128)
Static 2.6 +
HLS PlayReady IrdetoActiveCloakfor Media
Irdetodoes notcurrentlyhave APIversioning.
Irdeto-approvedplayer
AES CTR
(AES-128)
Static 2.6 +
HLS PlayReady InsideSecure keyprovisioningv1.0
InsideSecure-approvedplayer
AES CTR
(AES-128)
Static,Rotating
2.6 +
HLS PlayReady InsideSecureonthePlatform
Notapplicable;static keygeneratedby AWSElemental
thePlatform-approvedplayer
AES CTR
(AES-128)
Static 2.6 +
HLS PlayReady Irdeto onthePlatform
Notapplicable;static keygeneratedby AWSElemental
thePlatform-approvedplayer
AES CTR
(AES-128)
Static 2.7 +
Version 2.16194
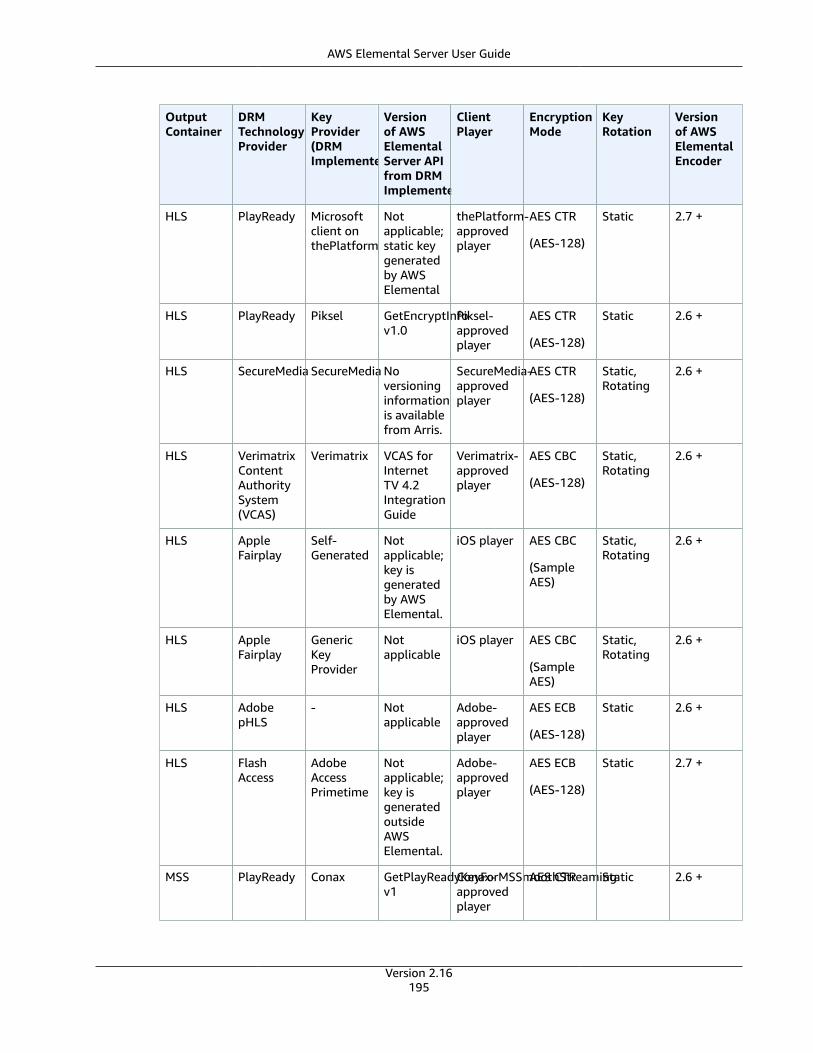
AWS Elemental Server User Guide
OutputContainer
DRMTechnologyProvider
KeyProvider(DRMImplementer)
Versionof AWSElementalServer APIfrom DRMImplementer
ClientPlayer
EncryptionMode
KeyRotation
Versionof AWSElementalEncoder
HLS PlayReady Microsoftclient onthePlatform
Notapplicable;static keygeneratedby AWSElemental
thePlatform-approvedplayer
AES CTR
(AES-128)
Static 2.7 +
HLS PlayReady Piksel GetEncryptInfov1.0
Piksel-approvedplayer
AES CTR
(AES-128)
Static 2.6 +
HLS SecureMedia SecureMedia Noversioninginformationis availablefrom Arris.
SecureMedia-approvedplayer
AES CTR
(AES-128)
Static,Rotating
2.6 +
HLS VerimatrixContentAuthoritySystem(VCAS)
Verimatrix VCAS forInternetTV 4.2IntegrationGuide
Verimatrix-approvedplayer
AES CBC
(AES-128)
Static,Rotating
2.6 +
HLS AppleFairplay
Self-Generated
Notapplicable;key isgeneratedby AWSElemental.
iOS player AES CBC
(SampleAES)
Static,Rotating
2.6 +
HLS AppleFairplay
GenericKeyProvider
Notapplicable
iOS player AES CBC
(SampleAES)
Static,Rotating
2.6 +
HLS AdobepHLS
- Notapplicable
Adobe-approvedplayer
AES ECB
(AES-128)
Static 2.6 +
HLS FlashAccess
AdobeAccessPrimetime
Notapplicable;key isgeneratedoutsideAWSElemental.
Adobe-approvedplayer
AES ECB
(AES-128)
Static 2.7 +
MSS PlayReady Conax GetPlayReadyKeyForMSSmoothStreamingv1
Conax-approvedplayer
AES CTR Static 2.6 +
Version 2.16195
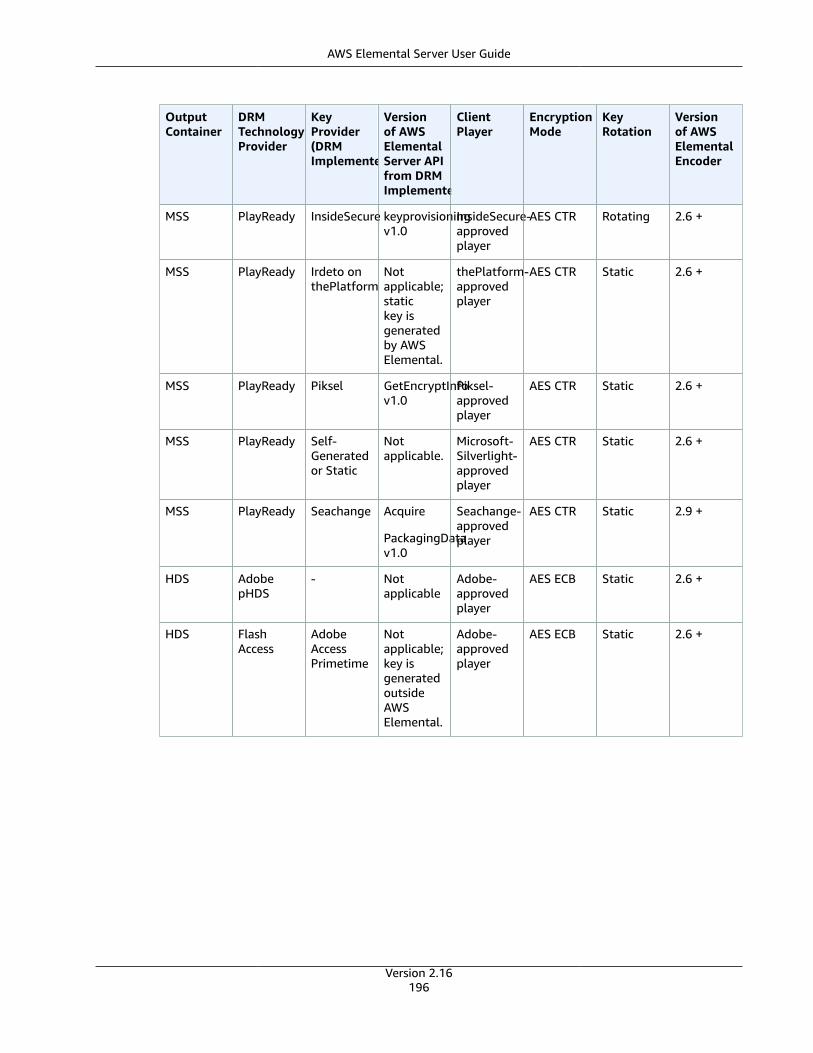
AWS Elemental Server User Guide
OutputContainer
DRMTechnologyProvider
KeyProvider(DRMImplementer)
Versionof AWSElementalServer APIfrom DRMImplementer
ClientPlayer
EncryptionMode
KeyRotation
Versionof AWSElementalEncoder
MSS PlayReady InsideSecure keyprovisioningv1.0
InsideSecure-approvedplayer
AES CTR Rotating 2.6 +
MSS PlayReady Irdeto onthePlatform
Notapplicable;statickey isgeneratedby AWSElemental.
thePlatform-approvedplayer
AES CTR Static 2.6 +
MSS PlayReady Piksel GetEncryptInfov1.0
Piksel-approvedplayer
AES CTR Static 2.6 +
MSS PlayReady Self-Generatedor Static
Notapplicable.
Microsoft-Silverlight-approvedplayer
AES CTR Static 2.6 +
MSS PlayReady Seachange Acquire
PackagingDatav1.0
Seachange-approvedplayer
AES CTR Static 2.9 +
HDS AdobepHDS
- Notapplicable
Adobe-approvedplayer
AES ECB Static 2.6 +
HDS FlashAccess
AdobeAccessPrimetime
Notapplicable;key isgeneratedoutsideAWSElemental.
Adobe-approvedplayer
AES ECB Static 2.6 +
Version 2.16196
AWS Elemental Server User Guide
Document History for User GuideThe following table describes the documentation for this release of AWS Elemental Server.
• API version: 2.16• Release notes: AWS Elemental Server Release Notes
The following table describes the documentation for this release of AWS Elemental Server. Fornotification about updates to this documentation, you can subscribe to an RSS feed.
update-history-change update-history-description update-history-date
Version 2.16 release (p. 1) Changes to support the 2.16software release.
June 16, 2020
Version 2.16197