avid newscutter products
TRANSCRIPT

a
IMPORTANT: Avid periodically makes software updates and Customer Patch Releases (CPR) available for download on Avid.com at the following location:
www.avid.com/support/downloadcenter/index.asp
Please check the above site regularly for information on available downloads for your product.
Important Information
Avid® recommends that you read all the information in this ReadMe file thoroughly before installing or using any new software release.
This document describes compatibility issues with previous releases, hardware and software requirements, software installation instructions, and summary information on system and memory requirements. This document also lists hardware and software limitations.
Latest ReadMe
Information might be added even after this ReadMe is complete. For the most up-to-date ReadMe, check the Knowledge Base at http://www.avid.com/readme.
Latest Drive Striping Tables
To find the latest striping tables:
1. Access the Knowledge Base at www.avid.com/onlinesupport/.
2. Type “striping tables” in the Search Knowledge Base text box.
3. Click Search.
4. Select the table appropriate for your product.
Avid NewsCutter® ProductsVersion 6.8.3 ReadMe

2
Contents
Changed in v6.8.3 . . . . . . . . . . . . . . . . . . . . . . . . . . . . . . . . . . . . . . . . . . . . . . . . . . . . . . . . 4
Fixed in v6.8.3 . . . . . . . . . . . . . . . . . . . . . . . . . . . . . . . . . . . . . . . . . . . . . . . . . . . . . . . . . . . 4
Fixed in v6.8.1 . . . . . . . . . . . . . . . . . . . . . . . . . . . . . . . . . . . . . . . . . . . . . . . . . . . . . . . . . . . 5
Changed in v6.8 . . . . . . . . . . . . . . . . . . . . . . . . . . . . . . . . . . . . . . . . . . . . . . . . . . . . . . . . . . 6
Fixed in v6.8 . . . . . . . . . . . . . . . . . . . . . . . . . . . . . . . . . . . . . . . . . . . . . . . . . . . . . . . . . . . . 10
Fixed in v6.7.7 . . . . . . . . . . . . . . . . . . . . . . . . . . . . . . . . . . . . . . . . . . . . . . . . . . . . . . . . . . 11
Changed in v6.7.6 . . . . . . . . . . . . . . . . . . . . . . . . . . . . . . . . . . . . . . . . . . . . . . . . . . . . . . . 11
Fixed in v6.7.6 . . . . . . . . . . . . . . . . . . . . . . . . . . . . . . . . . . . . . . . . . . . . . . . . . . . . . . . . . . 11
Fixed in v6.7.5 . . . . . . . . . . . . . . . . . . . . . . . . . . . . . . . . . . . . . . . . . . . . . . . . . . . . . . . . . . 11
Changed in v6.7.4 . . . . . . . . . . . . . . . . . . . . . . . . . . . . . . . . . . . . . . . . . . . . . . . . . . . . . . . 11
Fixed in v6.7.4 . . . . . . . . . . . . . . . . . . . . . . . . . . . . . . . . . . . . . . . . . . . . . . . . . . . . . . . . . . 12
Documentation Changes in v6.7.4 . . . . . . . . . . . . . . . . . . . . . . . . . . . . . . . . . . . . . . . . . . . 19
Changes in v6.7.2. . . . . . . . . . . . . . . . . . . . . . . . . . . . . . . . . . . . . . . . . . . . . . . . . . . . . . . . 20
Fixed in v6.7.2 . . . . . . . . . . . . . . . . . . . . . . . . . . . . . . . . . . . . . . . . . . . . . . . . . . . . . . . . . . 20
New Features in NewsCutter Adrenaline v6.7 and NewsCutter XP v6.7 . . . . . . . . . . . . . . 25
Adding Text to Multiple Clips . . . . . . . . . . . . . . . . . . . . . . . . . . . . . . . . . . . . . . . . . . . . 27
Requirements . . . . . . . . . . . . . . . . . . . . . . . . . . . . . . . . . . . . . . . . . . . . . . . . . . . . . . . . . . . 28
NewsCutter Adrenaline . . . . . . . . . . . . . . . . . . . . . . . . . . . . . . . . . . . . . . . . . . . . . . . . 28
NewsCutter XP . . . . . . . . . . . . . . . . . . . . . . . . . . . . . . . . . . . . . . . . . . . . . . . . . . . . . . 28
QuickTime Support. . . . . . . . . . . . . . . . . . . . . . . . . . . . . . . . . . . . . . . . . . . . . . . . . . . . . . . 29
Third Party Support . . . . . . . . . . . . . . . . . . . . . . . . . . . . . . . . . . . . . . . . . . . . . . . . . . . . . . 29
Avid Interplay Support . . . . . . . . . . . . . . . . . . . . . . . . . . . . . . . . . . . . . . . . . . . . . . . . . . . . 29
Shared Storage Support. . . . . . . . . . . . . . . . . . . . . . . . . . . . . . . . . . . . . . . . . . . . . . . . . . . 30
Avid Unity Workgroup Support . . . . . . . . . . . . . . . . . . . . . . . . . . . . . . . . . . . . . . . . . . . . . . 30
Studio Toolkit Support . . . . . . . . . . . . . . . . . . . . . . . . . . . . . . . . . . . . . . . . . . . . . . . . . . . . 30
Pro Tools LE Support . . . . . . . . . . . . . . . . . . . . . . . . . . . . . . . . . . . . . . . . . . . . . . . . . . . . . 30
Supported NVIDIA Driver (Windows) . . . . . . . . . . . . . . . . . . . . . . . . . . . . . . . . . . . . . . . . . 30
Qualified Graphics Card Setup (Windows). . . . . . . . . . . . . . . . . . . . . . . . . . . . . . . . . . . . . 31
Legacy Graphics Cards (Windows Only). . . . . . . . . . . . . . . . . . . . . . . . . . . . . . . . . . . 31
NVIDIA Card Not Installed . . . . . . . . . . . . . . . . . . . . . . . . . . . . . . . . . . . . . . . . . . . . . 32

3
Setting up the NVIDIA Card . . . . . . . . . . . . . . . . . . . . . . . . . . . . . . . . . . . . . . . . . . . . . 32
Installation Notes. . . . . . . . . . . . . . . . . . . . . . . . . . . . . . . . . . . . . . . . . . . . . . . . . . . . . . . . . 35
Administrator Privileges . . . . . . . . . . . . . . . . . . . . . . . . . . . . . . . . . . . . . . . . . . . . . . . . 35
Starting the Application. . . . . . . . . . . . . . . . . . . . . . . . . . . . . . . . . . . . . . . . . . . . . . . . . 36
Dongle Compatibility . . . . . . . . . . . . . . . . . . . . . . . . . . . . . . . . . . . . . . . . . . . . . . . . . . . . . . 37
Windows Media Version Support . . . . . . . . . . . . . . . . . . . . . . . . . . . . . . . . . . . . . . . . . . . . 38
Avid Unity Client Configuration Notes . . . . . . . . . . . . . . . . . . . . . . . . . . . . . . . . . . . . . . . . . 38
Configuring PCI Bus with the Avid DNA Device . . . . . . . . . . . . . . . . . . . . . . . . . . . . . . . . . 38
FireWire Cable Requirements . . . . . . . . . . . . . . . . . . . . . . . . . . . . . . . . . . . . . . . . . . . . . . . 39
XDCAM Support . . . . . . . . . . . . . . . . . . . . . . . . . . . . . . . . . . . . . . . . . . . . . . . . . . . . . . . . . 39
Panasonic P2 Support. . . . . . . . . . . . . . . . . . . . . . . . . . . . . . . . . . . . . . . . . . . . . . . . . . . . . 39
Disabling Automatic Software Updates . . . . . . . . . . . . . . . . . . . . . . . . . . . . . . . . . . . . . . . . 40
Installing the SCSI Driver (Windows) . . . . . . . . . . . . . . . . . . . . . . . . . . . . . . . . . . . . . . . . . 40
Installing the Fibre Channel Driver (Windows) . . . . . . . . . . . . . . . . . . . . . . . . . . . . . . . . . . 41
Formatting and Striping Media Drives . . . . . . . . . . . . . . . . . . . . . . . . . . . . . . . . . . . . . . . . 43
Installing Command|8 Drivers on a Windows System. . . . . . . . . . . . . . . . . . . . . . . . . . . . . 44
Limitations . . . . . . . . . . . . . . . . . . . . . . . . . . . . . . . . . . . . . . . . . . . . . . . . . . . . . . . . . . . . . . 44
Documentation Additions . . . . . . . . . . . . . . . . . . . . . . . . . . . . . . . . . . . . . . . . . . . . . . . . . . 65
Disconnecting an Avid Editing Application from the Interplay Environment . . . . . . . . . 66
Voluntarily Disconnecting from the Interplay Environment . . . . . . . . . . . . . . . . . . . . . . 66
Limitations of Disconnected Client Mode . . . . . . . . . . . . . . . . . . . . . . . . . . . . . . . . . . . 67
Using Disconnected Client Mode with Network Problems . . . . . . . . . . . . . . . . . . . . . . 67
Forcing Disconnected Client Mode. . . . . . . . . . . . . . . . . . . . . . . . . . . . . . . . . . . . . . . . 68
Adding Locators On-the-Fly while Playing . . . . . . . . . . . . . . . . . . . . . . . . . . . . . . . . . . 70
Reference to JL Cooper Controller. . . . . . . . . . . . . . . . . . . . . . . . . . . . . . . . . . . . . . . . 71
Suggestions for Optimum Performance . . . . . . . . . . . . . . . . . . . . . . . . . . . . . . . . . . . . . . . 71
Turn Off Simple File Sharing (Windows) . . . . . . . . . . . . . . . . . . . . . . . . . . . . . . . . . . . 71
Optimum Performance (Windows) . . . . . . . . . . . . . . . . . . . . . . . . . . . . . . . . . . . . . . . . 71
Extending Your Usable Address Space and Adding RAM for Improved Performance (Windows) . . . . . . . . . . . . . . . . . . . . . . . . . . . . . . . . . . . . . . . . . . . . . . . . . . . . . . . . . 73
Special Notes . . . . . . . . . . . . . . . . . . . . . . . . . . . . . . . . . . . . . . . . . . . . . . . . . . . . . . . . 76

4
Changed in v6.8.3
Avid Interplay Support
This release of the Windows version of the editing application has been qualified in an Avid Interplay™ 1.2.3 environment. Macintosh editing applications are not supported in an Avid Interplay environment.
Fixed in v6.8.3
The following have been fixed in this release:
➤ Sound TC was counting at 24fps as opposed to 30fps in 1080p23 projects, causing the Sound TC information to drop out before the end of the clip. This has been fixed.
➤ Previously importing or capturing new clips in local bin into Avid Interplay did not update auto-reservation time.
➤ Previously, you might have received a “FatalAbortAssertion failed” error when loading master clips with Pan/Volume changes with Dynamic Relink enabled. This has been fixed.
➤ Effects that were nested inside a submaster effect might have appeared as black instead of letting the lower video layers show through. This has been fixed.
➤ Previously after opening, closing, or saving a bin, the system might hang. “Not responding” would appear in the title bar. This has been fixed.
➤ Previously, locators placed on a title track did not reappear after the original title media was deleted and then title media was recreated.
➤ Previously, if you used the Audio Mixer tool to change gain and or pan, and then checked the clip into Avid Interplay, when you checked the clip out on another editor, the changes to gain or pan were lost. This has been fixed.
➤ When checking in XDCAM proxy media into Avid Interplay, you might have received a C++ Runtime Error. This has been fixed.
➤ Previously, sequences with imported TIFF files might not have checked in and out of Interplay properly. You might have seen an “Unsupported pixel format” error. This has been fixed.
Fixed in v6.8.1
5
➤ Previously, you might have received the error message: "Sequence refers to non-existent tracks in clip" when you try to play a sequence that has been updated in Interplay by Pro Tools. This occurred when the original sequence’s timecode did not match the Pro Tools sequence timecode. This has been fixed.
➤ If you have problems with batch capture accuracy for footage captured over 1394 due to undetected small timecode breaks, enable the “Enable detection of small timecode break” option located in the Capture Settings DV& HDV tab.
➤ Previously, you might have been unable to transcode 720p 50 to 1080p 25. This has been fixed.
➤ Previously, you might have received a “Video Overrun” error when capturing 720p or 1080p with more than 2 AES/EBU audio tracks. This has been fixed.
➤ Previously, it might have taken a long time for the editing application to log on to Interplay if a full text search on the Interplay database was running at the same time. This has been fixed.
➤ Previously, if you transferred a sequence with a long name to AirSpace, the sequence would fail to transfer with a “requested function is not implemented” message. A more accurate message of “Sequence name exceeds 63 characters” now appears.
Fixed in v6.8.1
The following have been fixed in this release:
• A permission problem that might have occurred depending on how you set up your Avid Interplay user database has been fixed. For more information, see the Avid Interplay Readme. This change only affects editors in an Avid Interplay environment.
• The x.8.1 release did not include a Macintosh version of the editing application. The only fix included with this release applied to the Windows version of the application.
Avid Interplay Support
The Windows version of the editing application has been qualified in an Avid Interplay™ 1.2.1 environment. Macintosh editing applications are not supported in an Avid Interplay environment.
6
Changed in v6.8
Avid Interplay Support
The Windows version of the editing application has been qualified in an Avid Interplay™ 1.2 environment. Macintosh editing applications are not supported in an Avid Interplay environment.
VC-1 Resolution
This release of the editing application includes support for editing and playback of MXF media encoded using the VC-1 resolution and codec. VC-1 was initially developed by Microsoft® and has been standardized as SMPTE 421-M. Avid Interplay v1.2 does not support VC-1 media.
(Windows) To use the VC-1 resolutions, you must have Windows Media Player 11 installed on your system.
The VC-1 options appear in the Media Creation settings for Render and Mixdown & Transcode. These options also appear in the AAF Export settings when setting the “Transcode Video To” option.
With this release of the editing application, depending on the Project type and edit rate, you can fast copy import, playback, transcode, and render VC-1 resolutions. You must first export your sequence as a Windows Media File in order to perform a fast copy import into the editing application.
The following limitations apply to this release of VC-1:
• Macintosh: The VC-1 codec is only available on Intel-based systems and is limited to playback only.
• The VC-1 codec is only available for Windows media. If exporting to QuickTime you must export to a QuickTime-supported codec or transcode your sequence prior to exporting.
• AAF or OMF embedded exports of VC-1 are not allowed. Linked media is supported.
The following table shows the VC-1 capabilities with this release.

Changed in v6.8
7
Editor VC-1 Capabilities
Project Edit Rate
Resolution Name
Max Bit Rate
Stored Raster Size (WxHxFields) Playback Transcode
Fast Copy Import Render
NTSC 29.97 VC1-APL0 768KBit 352x240x1 Y Y N Y
VC1-APL1 10MBit 720x240x2 Y Y Y Y
VC1-APL2 20Mbit 720x240x2 Y Y Y Y
24 VC1-APL0 768KBit 352x240x1 Y Y Y Y
VC1-APL1 10MBit 720x480x1 Y Y Y Y
23.976 VC1-APL0 768KBit 352x240x1 Y Y Y Y
VC1-APL1 10MBit 720x480x1 Y Y Y Y
PAL 25i VC1-APL0 768KBit 352x288x1 Y Y N Y
VC1-APL1 10MBit 720x288x2 Y Y Y Y
VC1-APL2 20Mbit 720x288x2 Y Y Y Y
25p VC1-APL0 768KBit 352x288x1 Y Y Y Y
VC1-APL1 10Mbit 720x576x1 Y Y Y Y
1080i 59.94 VC1-APL3 45MBbit 1920x540x2 Y Y Y Y
VC1-APL3 6MBbit 1920x540x2 N N N N
50 VC1-APL3 45MBbit 1920x540x2 Y Y Y Y
VC1-APL3 6MBbit 1920x540x2 N N N N
1080p 23.976 VC1-APL3 45MBbit 1920x1080x1 Y Y Y Y
VC1-APL3 6MBbit 1920x1080x1 N N N N
29.97 N N N N
24 VC1-APL3 45MBbit 1920x1080x1 Y Y Y Y
VC1-APL3 6MBbit 1920x1080x1 N N N N
25 VC1-APL3 45MBbit 1920x1080x1 Y Y Y Y
VC1-APL3 6MBbit 1920x1080x1 N N N N
720p 23.976 VC1-APL2 20MBbit 1280x720x1 Y Y Y Y
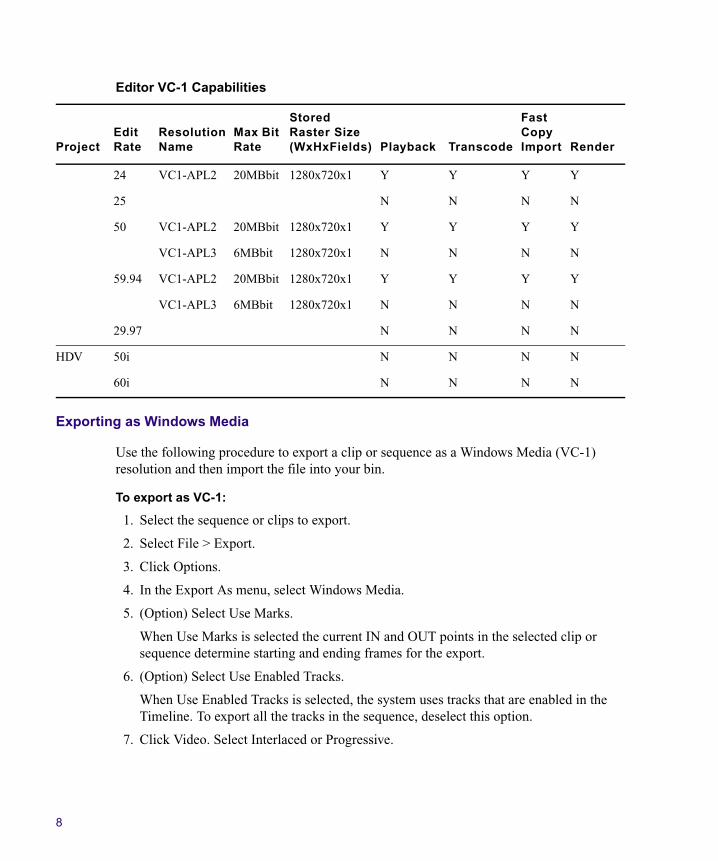
8
Exporting as Windows Media
Use the following procedure to export a clip or sequence as a Windows Media (VC-1) resolution and then import the file into your bin.
To export as VC-1:
1. Select the sequence or clips to export.
2. Select File > Export.
3. Click Options.
4. In the Export As menu, select Windows Media.
5. (Option) Select Use Marks.
When Use Marks is selected the current IN and OUT points in the selected clip or sequence determine starting and ending frames for the export.
6. (Option) Select Use Enabled Tracks.
When Use Enabled Tracks is selected, the system uses tracks that are enabled in the Timeline. To export all the tracks in the sequence, deselect this option.
7. Click Video. Select Interlaced or Progressive.
24 VC1-APL2 20MBbit 1280x720x1 Y Y Y Y
25 N N N N
50 VC1-APL2 20MBbit 1280x720x1 Y Y Y Y
VC1-APL3 6MBbit 1280x720x1 N N N N
59.94 VC1-APL2 20MBbit 1280x720x1 Y Y Y Y
VC1-APL3 6MBbit 1280x720x1 N N N N
29.97 N N N N
HDV 50i N N N N
60i N N N N
Editor VC-1 Capabilities
Project Edit Rate
Resolution Name
Max Bit Rate
Stored Raster Size (WxHxFields) Playback Transcode
Fast Copy Import Render

Changed in v6.8
9
n If you are exporting an HD interlaced sequence or clip, you must delete the audio profile in the Windows Media Export dialog box and export the video only. Then repeat the process, deleting the video and exporting the audio only.
8. Set Pixel Aspect to Square 1:1.
9. Choose Windows Media Video 9 Advanced Profile.
10. Make sure the Keyframe value is set to less than 1.00 seconds.
11. See “Windows Media Options Video Settings” in the Help for a description of the other video setting options.
12. Click Save.
13. In the Export As dialog box, select the destination folder for the file.
14. Click Save.
15. Make sure the bin where you want to import the file is active.
16. Select Import and select the .wmv file(s) you exported.
17. Select Open and the file will appear in your active bin. The file is imported as VC-1.
Transcoding to VC1
1. Double-click Media Creation in the Settings list.
2. Click the Mixdown & Transcode tab.
3. Select the desired VC1 video resolution.
4. Select the sequence or clip you want to transcode.
5. Select Clip > Consolidate/Transcode.
6. Select Transcode.
7. Select the appropriate options as describe in “Transcode Options” in the Help.
8. The sequence will be transcoded to the VC1 video resolution.
Rendering to VC1
1. Double-click Media Creation in the Settings list.
2. Click the Render tab.
3. Select the desired VC1 video resolution.
4. When you perform a render, the selected VC1 resolution will be used.
10
Fixed in v6.8
The following have been fixed in this release:
➤ Previously, voice-over recordings with the Audio Punch-In tool might have resulted in missing voice-over. This has been fixed.
➤ Previously, in Interplay Access, not all clips in a sequence were displayed in the sequence relatives. This has been fixed.
➤ When importing XDCAM, the FTPClipList ignored the Audio Track settings and always imported ALL available tracks. This has now been fixed.
➤ Previously, you might have received an “omfiHPDomain_INIT-FAILED” error when transcoding XDCAM PAL MPEG 30 to MPEG 2. This has been fixed.
➤ Previously, when performing a transcode, if the media files written to a folder exceeded 10,000, a new folder was not created. This has been fixed. Now when the media file count exceeds 10,000 a new folder is created.
➤ Previously, when you swapped a P2 card that did not contain spanned clips with another P2 card that did not have spanned clips, you received an exception error. This has been fixed.
➤ Previously, you could change the Export to ProEncode settings during an export to ProEncode. This has been fixed. You cannot change the export settings during the export process.
➤ Previously, if you entered an invalid iNEWS server hostname when logging into Instinct, the application would hang. This has been fixed.
➤ You might have received an “internal client” error message when trying to configure storage in the Interplay Administrator Tool. This has been fixed.
➤ The Center Duration value was not displaying correct film footage values for various film types. This has been fixed.
➤ Previously, the MM Access API garbled some international characters when setting attributes on clips or sequences. This has been fixed.
➤ Previously, Script Based editing was not supported with Shared Avid Projects. This has been fixed.
➤ You might not have been able to create multiple Media Creation Settings in the same project. This has been fixed.
Fixed in v6.7.7
11
➤ Attempting to use previous user settings might have resulted in “User Setting Not Found” errors. This has been fixed.
➤ Imported P2 clips might have appeared offline in an Interplay environment. This has been fixed.
Fixed in v6.7.7
An issue with using JKL scrub while in Trim mode has been fixed.
Changed in v6.7.6
The Windows editing application has been qualified in an Avid Interplay™ 1.1.6 environment.
Fixed in v6.7.6
The following have been fixed in this release:
➤ Previously, you might have received a Runtime error when loading a clip from the Interplay window when the Audio Mixer tool was open. This has been fixed.
➤ Previously, restored OMF or WAV files might have been quarantined. This has been fixed.
➤ Previously, you might have received an Assertion error while using a Popup monitor while the Interplay window was open. This has been fixed.
Fixed in v6.7.5
A compatibility issue was fixed in this release. No user functionality was affected. The Windows editing application has been qualified in an Avid Interplay™ 1.1.5 environment. Macintosh editing applications are not supported in an Avid Interplay environment.
Changed in v6.7.4
The following additions or changes have been incorporated into this release of the editing application.

12
Avid Interplay Support
Avid has qualified the Windows version of the editing applications in an Avid Interplay™ 1.1.4 environment. Macintosh editing applications are not supported in an Avid Interplay environment.
QuickTime Support
Avid has qualified QuickTime® 7.2 with the editing applications.
Fixed in v6.7.4
The following have been fixed:
Audio
➤ Consolidating audio-only sequences might not have generated any new media, and consolidating any sequence might have skipped all audio. This has been fixed.
➤ If you had two MXF audio clips adjacent in the Timeline and you exported the sequence as a QuickTime reference file, the first MXF audio file might have been silent when you played the sequence in QuickTime. This has been fixed.
➤ Previously, audio may have been out of phase on playback and digital cut. This has been fixed.
➤ HD ancillary timecode was causing HD embedded audio to disappear during playback. This has been fixed.
➤ If you were using desktop play delay with monitored audio or audio-only clips or sequences, the blue position bar might have jumped forward at the start of play. This has been fixed by having the system ignore the play delay for monitored audio or audio-only clips or sequences.
Bins
➤ You might have seen an error message when you tried to open the Bin Fast menu. This has been fixed.
➤ You might have seen errors when you attempted to open bins containing master clips or sequences with alpha clips. This has been fixed.

Fixed in v6.7.4
13
Capture
➤ Advanced pulldown JFIF compressed resolution media captured through Firewire in SD progressive projects might have been shifted down. This has been fixed.
➤ You might have experienced a system error when you tried to enter key numbers for 1080p24 clips in a 24p NTSC project. This has been fixed.
➤ You might have received a BuildComposition error when trying to perform a Varicam capture. This has been fixed.
➤ A standalone TransferManager might not have ingested media to the correct LANshare folder. This has been fixed.
Compatibility
➤ You might have experienced your application key (dongle) expiring prematurely. This has been fixed.
EDL Manager
➤ If you scrolled through an off line sequence created from an EDL you might have experienced system errors. This has been fixed.
➤ You can now open EDL Manager from within an Avid editor and select Get Current Sequence from EDL Manager without getting a DISK_FILE_NOT_FOUND error.
Effects
➤ Sequences that contain certain AVX 2.0 effects (Sapphire, Boris BCC) which were created and saved on one type of platform (Power Mac) can now be opened on other types of platforms (Mac Intel or Windows PC) without causing errors.
➤ You might have seen system errors relating to memory usage after using the application for several hours while rendering many effects and opening and closing many bins. This has been fixed.
➤ The memory leaks that were occurring during rendering have been fixed.
➤ Importing moving Alpha Mattes that were non-native size to the project, displayed as black. This has been fixed.
Import
➤ Your system might have hung when you tried to batch import a sequence. This has been fixed.
14
➤ (Windows only) You might have experienced a system error if you tried to set the file location in a batch import for clips that weren’t found, particularly for clips that were created on a Macintosh system. This has been fixed.
Interplay
➤ Previously, if a transcode failed with an STD Exception, audio files from the clip that was transcoding were deleted by the Transcode provider. This has been fixed.
➤ Previously, you might have received a “Cannot Import composition” error while transcoding an MPEG sequence. This has been fixed.
➤ Previously, the headframe of a clip might not have appeared in the Interplay window. This has been fixed.
➤ After performing an audio punch-in on a channel other than channel 1, the voice-over clip might have appeared offline in the bin or Timeline. This has been fixed.
➤ OMF media drives might have taken a very long time to be scanned by your Media Indexer. This has been fixed.
➤ Previously, the editing application might crash if you tried to search in the Interplay Window without being logged in to Interplay. This has been fixed.
➤ A sequence with filler and a video mixdown that played back successfully in the editing application might have received a “Play frame error” when the sequence was loaded in Assist. This has been fixed.
➤ If you created two sequences with identical tape ID names that differed only by upper and lower case letters (for example, footballAug07 and FOOTBALLAug07) and then sent one after another to the Media Stream Server, the server might have replaced the first clip with the second one. Clip names on the Media Stream server are not case sensitive and the server does not notify the transfer manager that the tape ID is already in use for another clip. When sending to the Media Stream Server, the transfer manager now forces all tape IDs to lower case. If the tape ID already exists on the server, the transfer fails and you see an error message that the tape ID already exists.
➤ Clips that you checked into Interplay might have had missing associations and it might not have been possible to delete them. This has been fixed.
➤ Improvements were made to the validation process of the Media Indexer, this should improve some slowdown issues that might have occurred working on your editor workstation and Avid Interplay.

Fixed in v6.7.4
15
➤ We have fixed the issue where the Interplay database intermittently locks when logged into an editing application.
➤ You might have seen inconsistent online-offline status of EDL-based clips in Interplay Access. This has been fixed.
➤ Previously, master clips with audio gain were checking into Interplay with no sequence relatives. This has been fixed.
➤ In the Interplay Login dialog box, you could enter or change the Interplay user name and you should not have been able to. This has been fixed.
➤ Exported P2 DV 25 PAL clips might have appeared with media offline when you tried to import them into an Avid editing application with Dynamic Relink set to Specific Resolution. This has been fixed.
➤ You might not have been able to delete certain assets from your Interplay database. This has been fixed.
➤ You might not have been able to restore rendered effects or titles from within the Avid editing application or from the online database (AvidWG) in Interplay Access. This has been fixed.
➤ Interplay Names of folders that were opened in the Interplay window and then renamed in another Interplay application were not reflected in the Interplay window even if you refreshed the window; they sometimes caused system failures. This has been fixed. After you refresh the window, references to the directory in the tree browser as well as opened bins in the Research panel should change to the new name.
➤ In Interplay Access, rendered effects might have added incorrect names in the Tape Name text box. This has been fixed.
➤ If you tried to check an audio-only sequence from a 23.976/1080p or a 23.976/720p 23 project into Interplay, the checkin might not have been successful. This has been fixed.
➤ If you tried to use Media Services to transcode a master clip that contained offline media, the error message might not have clearly indicated the problem. This has been fixed.
➤ Sending a long sequence or several short sequences to a MediaStream server might have caused Interplay Transfer to fail. This has been fixed.
➤ Previously, you might have received an “Error loading workspaces” error when selecting folders. This has been fixed.

16
➤ In Interplay Assist, if you changed a shotlist and clicked the red X to close the shotlist, the changes might not have been saved. This has been fixed.
➤ In Interplay Assist, the Audio/Video Monitoring Window might have displayed tracks as disabled when in fact they were not. This has been fixed.
➤ Previously, the Interplay Transfer Engine was ignoring the catalog specified by an ingest device in the configuration. It would not create the catalog or check clips into it, if manually created. Clips were ingested and checked in, but could not be easily located via the specified catalog. This has been fixed.
➤ (Interplay Transcode Service) You might have received intermittent DecompStream Errors after transcoding for several hours. Transcoding reliability has been improved.
➤ Previously, you might not have been able to delete a QT with Alpha file from a bin once it had been checked in. This has been fixed.
➤ Previously, when a sequence that contained clips that shared the same video but not the same audio were archived, one of the archived clips would display in the Archive Engine as online and the other would display as partially online. This has been fixed. Both clips will now display as online.
➤ You might have received an Access violation when trying to manipulate keyframes using an effects template that was Checked In and then Checked out of Interplay. This has been fixed.
➤ Previously, if you modified a clip in a bin and later dragged the same clip from the Interplay Window to the bin, you did not receive a warning dialog that the clip had been modified. This has been fixed.
➤ If you tried to access a clip or sequence in an Interplay folder for which you did not have permissions, you might have seen the error message, "Required property 'Flags (direct)' isn't set." The message has been changed to "User rights do not allow this operation."
➤ In an Asian Interplay environment, you might have created a subfolder in a folder with a name created in Asian characters. If you then tried to drag a clip from a bin to that folder in the editing application Interplay window, the clip might have appeared instead in a new, misnamed folder. This has been fixed.
➤ You might have experienced a system error when you tried to check a 720p sequence from the NRCS Tool into Interplay. This has been fixed.
Managing Media
➤ Media files from the current project might not have been appearing in the Media tool. This has been fixed.

Fixed in v6.7.4
17
➤ Transcoding clips of over 30 minutes to JFIF might have failed. This has been fixed.
Output
➤ HD video with embedded closed captioning might have produced white lines or noise on output. This has been fixed.
Panasonic P2
➤ If you imported clips that spanned P2 cards, the duration might have disappeared in the bin. This has been fixed. The media might also have gone blank.
Workaround: To see the media, close and reopen the bin or restart the editing application.
➤ You might have received an “HTABLE_LOOPSTATE_CORRUPT” error when importing spanned P2 clips. This has been fixed.
➤ Imported P2 clips might not have relinked properly. This has been fixed.
➤ Previously, you could not group P2 imported subclips by Start TC. This has been fixed.
➤ If you exported P2 clips to a device, they might have appeared in a Quarantine folder. This has been fixed.
Play
➤ HD Ancillary timecode was not working properly. White lines may have appeared in the video during playback. This has been fixed.
➤ After loading a sequence that contained Nitris Alpha RLE for 1080i you might have seen an error message; the system allowed you to continue after you clicked OK. You should no longer see the error message.
Projects
➤ If you created and closed new bins in a 24p NTSC project, you might have had to turn off your system to get rid of an error message. This has been fixed.
➤ When you opened a large project and began opening folders and subfolders, system performance might have slowed noticeably. This has been improved.
Settings
➤ Previously, if you changed a resolution in any of the Media Creation Settings tabs and then changed a filter setting in the Drive Filtering tab, all resolution tabs would change to that same resolution. This has been fixed.
18
➤ If you changed user profiles from within the Avid editing application Settings window, the profile named might have changed but the setting did not. This has been fixed. Now when you change user profiles, the existing profile saves and the new profile loads correctly.
Timeline
➤ Previously, if you deleted tracks when the Timecode Window was open, you might receive a “Track not found” error. This has been fixed.
➤ Previously, special keyboard keys might have invoked editing application commands. For example, the volume increase button initiated an insert edit, the volume decrease button initiated a copy command, and the Mute button cleared IN marks. This has been fixed.
➤ If you selected the Snap-to-Edit option, during drag operations in the Timeline restrict motion to vertical and single-frame motion might not have been available. This has been fixed.
Titles
➤ On MacIntel systems, if you imported an image containing alpha, you might have seen blue corruption in and around the image. This has been fixed for new images. For existing images, you need to batch import them, and for existing titles, you need to recreate the title media.
➤ 16-bit processing of 10-bit resolution titles (static and animated only, not rolling or crawling) produced artifacts around soft shadow edges. This has been fixed.
Trim
➤ If you tried to trim or extend the end of a FrameChase subclip in a sequence, you might have seen a PMM_insufficient_media error message. This has been fixed.
XDCAM
➤ If you selected multiple clips or sequences in a bin, and then selected Special > Export to Device > device (that is, P2, XDCAM, or HDV), only the first item was exported. This has been fixed.
➤ Previously, if you performed a video mixdown of DV25 XDCAM material you might have seen WRONG FORMAT in the monitor. This has been fixed.
Documentation Changes in v6.7.4
19
Documentation Changes in v6.7.4Full Screen Playback Settings
The following two options were not included in the documentation description of the Full Screen Playback Settings:
Flip on Vertical Sync
If your graphics board is able to render the frame of video before the vertical retrace, enabling this option removes the tearing seen on the Full Screen Play monitor. (Vertical retrace is the action within the monitor that turns the monitor beam off when moving it from the lower right corner of the monitor to the upper left.) If the board is unable to render the frame, you might see a stutter. The size of the video frame, the throughput of the board, and the speed of the bus that the graphics board runs affect the ability of the board to complete the render in time. This option is disabled by default.
Expand Luminance For Computer Displays
Enabling this option gives a more accurate representation of the video image when using Full Screen Play on a standard computer monitor. If you are driving a studio quality monitor through either component, DVI or HDMI inputs you may want to run with this option disabled. The option is disabled by default.
Voiceover Audio
If you tried to use the Capture tool to record Voiceover audio on more than one track, you might not have been able to. This is as designed; the current documentation is incorrect.
Avid Log Exchange Stores ASC Color Decision List (CDL) Parameters
Avid Log Exchange can now store ASC_SOP (American Society of Cinematographers Slope, Offset and Power) and ASC_SAT (American Society of Cinematographers Saturation) parameters.
To view the ASC_SOP and ASC_SAT parameters in the Avid editing application:
1. In the editing application, with a bin in Text view, select Bin > Headings.
2. Click to select ASC_SOP and ASC_SAT.
3. Import the ALE file.
The ASC_SOP and ASC_SAT information appears in the appropriate bin column.
To view the ASC_SOP and ASC_SAT parameters in the EDL application:
1. With the sequence loaded in the Avid editing system, select Tools EDL.
2. In EDL Manager, select Window > Options.
20
3. Select the Comments tab.
4. Enable the Color Decision List option.
5. Select File > Get Current Sequence.
The ASC_SOP and ASC_SAT information appears as part of the edit event.
Changes in v6.7.2
The following additions have been made to this release:
• Disconnected Client Mode. See “Disconnecting an Avid Editing Application from the Interplay Environment” on page 66.
• Added the following procedure to the Documentation. See “Adding Locators On-the-Fly while Playing” on page 70.
• Added the following note to the documentation in the “Selecting Output and Timecode Formats for 23.976p, 24p, and 25p Projects.”
Depending on the type of project you are working with, NTSC or PAL, the system will only display output options for one format. You cannot switch from NTSC to PAL or PAL to NTSC. You can only switch from one PAL format to another PAL format or from one NTSC format to another NTSC format.
• The following note has been added to the documentation:
If you mount your P2 cards as virtual drives on your Avid editing application, import clips from them, and then exit the editing application, you won't see the P2 drives the next time you open the editing application. You need to reimport the clips. For more information about mounting P2 drives, see “Mounting P2 Cards as Drives” in the Help for your editing application.
• NVIDIA® Driver Update to v91.85. See “Checking the NVIDIA Display Driver Version” on page 32.
• Avid Unity™ MediaNetwork v5.0 compatibility. See “Shared Storage Support” on page 30.
Fixed in v6.7.2
➤ The issue causing a “Filesystem busy, retrying (deleting old bin)” and then a “binSave: error deleting old bin file” message when attempting to save a project, no longer exists. The Bin_name.avb file displayed in the Bin tab of the Project window was red and the bin file could not be deleted.

Fixed in v6.7.2
21
➤ Previously, MPEG2 transcoded resolutions may not have played back successfully. This has been fixed.
➤ If you made your Media Creation settings a site setting, opened a new project, and then closed it, you might have experienced Access Violation errors followed by a “DOMAIN_COPYIN_FAILED” message. This has been fixed.
➤ If you attempted a digital cut of HD material that originated in SD or the reverse, you might have been prompted to transcode even though it was not necessary. This has been fixed.
➤ You might not have been able to use the DV 25 QuickTime® codec to export a 720x480-sized composition from Adobe® After Effects®. This has been fixed.
➤ At the end of a transcoded clip, you might have seen a corrupt frame. This has been fixed.
➤ You might have been forced to quit the editing application if you tried to unmount a workspace while on the timeline. This has been fixed.
➤ A “MainThreadBus” error might have occurred when lifting a clip from a complex sequence after adjusting Automation Gain. This has been fixed.
➤ An Assertion error might have occurred when exporting a master clip with audio as OMF_1. This has been fixed.
➤ If you saved a bin while a Locator comment field was active, a “MainThread Bus” or “Runtime” error might have occurred. This has been fixed.
➤ Stepping into HD progressive titles or Matte Keys might have caused Assertion failures. This has been fixed.
➤ Group clips did not ScriptSync™ if a clip had black at the head. This has been fixed.
➤ An ”Exception: MSM: No OFFLINE Media found” error might have occurred when attempting to link to XDCAM™ media. This has been fixed.
➤ (Mac Pro) Saved Marquee® .mqp titles would lose edge properties on objects or text when reopened in Marquee. This has been fixed.
➤ Previously, if a P2 drive was connected after launching the editor, the P2 drives did not appear when selecting Import P2 > Clip to Bin > Browse For Folder. This has been fixed.
➤ LTC output was not adjusting properly for Audio Punchin preroll. This has been fixed.
➤ (FilmScribe) TabbedLists or WebLists were not initially generated if you chose an audio channel. This has been fixed.

22
➤ Previously, playback of multi-layered, high definition, progressive sequences sometimes resulted in an “Exception” error, which has been fixed.
➤ Output as RGB did not appear properly in Adobe After Effects. This has been fixed.
➤ Previously, if you deleted some of the media for a clip (either video or audio) and then later tried to come back to delete the remaining media, you only had the choice to delete the master clip. This has been fixed.
➤ If you tried to send media from a local drive (such as your C drive) to playback, you might have seen a fatal error message. This has been fixed.
➤ You might have seen a white video line with Plasma Wipe effects in HD interlaced projects because the effects were being created in SD and then resized. This has been fixed.
➤ Effects templates saved in bins might not have seemed to have a logical sort method when they displayed in the Effects Palette. Effect templates in bins now display as alphabetically sorted in the Effect Palette and in the Quick Transitions menu.
➤ If you played (in Full Quality mode) progressive HD media after an SD clip in an SD project, you might have seen a green bar and strobing in the image. This has been fixed.
➤ Previously, you might have received Exception errors when arming the video track in the Capture tool while attempting to capture in a 16mm PAL 24p Film Rate project. This has been fixed.
➤ The editing application might not have rendered AudioSuite™ effects to a workspace. This has been fixed.
➤ You might have seen a “Runtime” error when lifting a clip containing an Advanced Keyframe effect while the Effect Editor was open. This has been fixed.
➤ You might have seen an “Assertion” error when performing an XDCAM SD high-resolution batch import. This has been fixed.
➤ Previously, you might not have been able to capture audio in a 16mm PAL 24P video project. This has been fixed.
➤ (Macintosh PowerPC®) XDCAM HD long clips did not import into HD projects. This has been fixed.
➤ Importing XDCAM is available on the Windows® and Macintosh platforms. Please disregard any mention in our documentation that states importing XDCAM media is available on (Windows only). The documentation text will be updated in a future release.
Fixed in v6.7.2
23
➤ If you tried to do an audio mixdown of a single audio track, you might have seen an Access Violation error and the system might have frozen. This has been fixed.
➤ With some of the previous NVIDIA drivers, if you created a Marquee title and tried to save it, you might have seen a “Serious Error” message. This has been fixed with the latest NVIDIA drivers, which you must install manually. See “Checking the NVIDIA Display Driver Version” on page 32.
➤ If you used uncompressed SD material in an HD project, you might have seen corruption on line 21. This has been fixed.
➤ With an Avid Mojo® attached, connecting a blackburst after you have opened a PAL project could cause jittery playback.
Workaround: Connect the PAL blackburst before you open the project, reopen the project with the blackburst attached, or change the resolution (Draft to Full quality or the reverse).
➤ The Video Input tool and Video Output tool are now available from the Tools Menu.
➤ You can now mount a new tape in an Ikegami® NLTEK drive and have the Media Indexer recognize it, and the Manual Storage Scan command in the Avid editing application now points to the correct folder on the drive.
➤ Occasionally, access violations occurred when trying to Post to Web. This has been fixed.
➤ (Interplay) Choosing Undo (Ctrl + Z) after performing an “Update Bin from Interplay” operation caused the application to crash. This has been fixed.
➤ (Interplay™) Previously, transcoded media did not show up online unless you restarted the editing application. This has been fixed.
➤ (Interplay) Previously, imported M2T files did not check into the Unchecked In Avid Assets folder. This has been fixed.
➤ (Interplay) If you selected Bin > Update Bin from Interplay and then closed the dialog box by clicking the close button (the red X) without selecting any options, the bin might have updated anyway and any changes you made were lost. This has been fixed.
➤ (Interplay) In the Service Configuration window of the Avid Interplay Administrator, you can now log in without a password if a password was not set.
➤ (Interplay) Previously, you might not have been able to delete media in a bin when working with 720p 23.976 35mm media. This has been fixed.

24
➤ (Interplay) When you captured a master clip at 24 NTSC or 23.976 NTSC and checked in the clip and then checked the clip out onto another system, the clip would be 30 fps and would not load into the source monitor. This has been fixed.
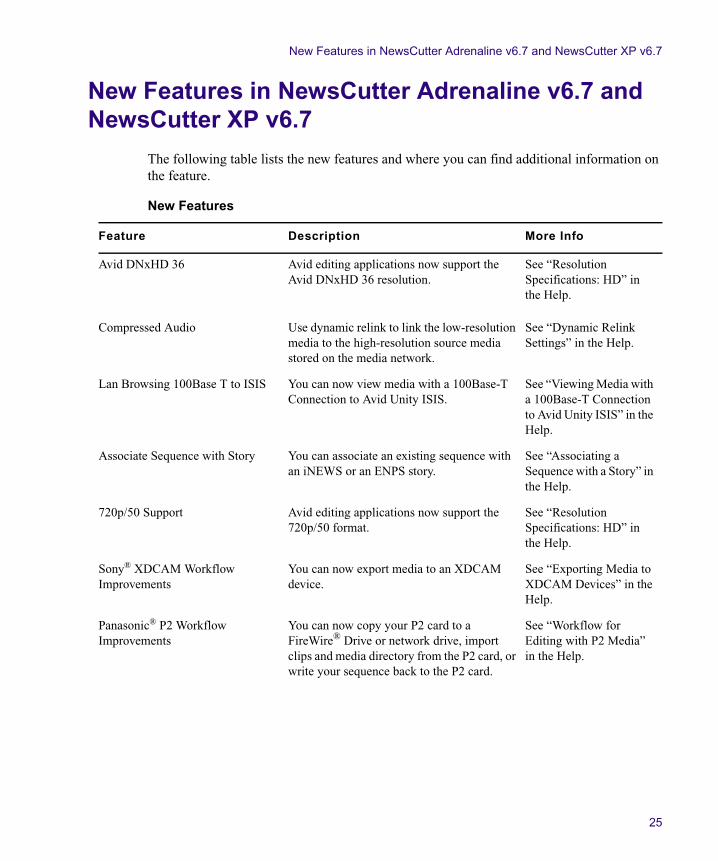
New Features in NewsCutter Adrenaline v6.7 and NewsCutter XP v6.7
25
New Features in NewsCutter Adrenaline v6.7 and NewsCutter XP v6.7
The following table lists the new features and where you can find additional information on the feature.
New Features
Feature Description More Info
Avid DNxHD 36 Avid editing applications now support the Avid DNxHD 36 resolution.
See “Resolution Specifications: HD” in the Help.
Compressed Audio Use dynamic relink to link the low-resolution media to the high-resolution source media stored on the media network.
See “Dynamic Relink Settings” in the Help.
Lan Browsing 100Base T to ISIS You can now view media with a 100Base-T Connection to Avid Unity ISIS.
See “Viewing Media with a 100Base-T Connection to Avid Unity ISIS” in the Help.
Associate Sequence with Story You can associate an existing sequence with an iNEWS or an ENPS story.
See “Associating a Sequence with a Story” in the Help.
720p/50 Support Avid editing applications now support the 720p/50 format.
See “Resolution Specifications: HD” in the Help.
Sony® XDCAM Workflow Improvements
You can now export media to an XDCAM device.
See “Exporting Media to XDCAM Devices” in the Help.
Panasonic® P2 Workflow Improvements
You can now copy your P2 card to a FireWire® Drive or network drive, import clips and media directory from the P2 card, or write your sequence back to the P2 card.
See “Workflow for Editing with P2 Media” in the Help.

26
Script-Based Editing Updates Script-Based editing is a new feature for the NewsCutter.
The following feature updates are new for all editing applications:
• The ability to select all text and takes.
• The ability to double-click any line in a take to select the take and load it into a monitor.
• The ability to specify the text encoding of the script.
See “Script-Based Editing” in the Help.
ScriptSync™ ScriptSync™ uses phonetic-indexing technology from Nexidia™ to analyze the audio portion of a clip and match it to lines of the script text.
See “Marking with ScriptSync” in the Help.
AudioSuite plug-ins The editing applications now include the Time Shift Audio Plug-In.
See “Time Shift AudioSuite Plug-In” in the Help.
Scrolling Timeline You can have the Timeline scroll over the position indicator while you play a sequence.
See “Setting the Scroll Option for the Timeline” in the Help.
Advanced Keyframe Improvements Allows you to adjust your view of advanced keyframe graphs.
See “Adjusting Advanced Keyframe Graphs” in the Help.
Frame Chase Capture The media becomes available for viewing and editing from any applications in the workgroup while the capture is still in progress.
See “Frame Chase Capture” in the Help.
MXF vs. OMF default media. In previous releases, the default media type in the Media Creation settings was set to OMF. The default media type is now set to MXF.
See “Media Creation Settings: Media Type Tab” in the Help.
Adding Text to Multiple Clips Allows you to enter the same comment to several clips at once.
See “Adding Text to Multiple Clips” on page 27.
New Features (Continued)
Feature Description More Info

New Features in NewsCutter Adrenaline v6.7 and NewsCutter XP v6.7
27
Adding Text to Multiple Clips
If you want to enter the same comment for several clips at once, you can use the “Set column name for selected clips” feature. For example, if you have twenty clips that all need to have their scene modified, you can select all twenty clips and type the new scene number, and the system updates across all twenty clips. If you have twenty clips that need the same information added to the Comment field, you can use this feature to add comments to multiple clips. You can use this feature whether you are modifying column text or adding new column text.
The columns affected by this feature include: Audio SR, Audio Format, Camera, Camroll, Drive, DiskLabel, Format, IDataLink, Journalist, Labroll, LUT, Name, Offline, Production, Project, Pullin, Pullout, Reel #, Scene, Shoot Date, Soundroll, Take, Tape, TapeID, Tracks, UNC Path, VFX Reel, Video, Video File Format, and custom-created columns.
To apply one comment to multiple clips:
1. In a bin, Shift+click or lasso multiple clips.
2. Position the cursor over the column where you want to add the comment.
The cursor changes to a double-arrow.
3. Right-click the column and select “Set column name column for selected clips.” For example, “Set Production column for selected clips.”
n Depending on the column you have selected, the column name appears in the menu.
The Set column name dialog box appears, for example, the Set Production dialog box opens.
n If you already have entered a value in one cell of a column and want to use it in several cells, position the cursor on that cell as you right-click the column; the text appears in the dialog box as an initial value.
4. Type the text you want to appear for all clips.
5. Click OK.
The system asks if you are sure you want to apply the comment.
6. Click OK.
The comment appears for all selected clips.

28
Requirements
For the list of qualified and supported platforms:
1. Go to www.avid.com/products/
2. Choose your product.
3. Click System Requirements.
NewsCutter Adrenaline• Windows® XP Professional with Service Pack 2
• System memory
- 2 GB minimum
- 3 GB recommended for HD or high stream count SD projects, or for workgroup-connected systems
• Dual 3.06 GHz Xeon® processor or higher
• Qualified graphics card (NVIDIA® Quadro FX 1100, FX 1300, FX 1400, FX 3400, FX 3450, 3500)
n Some existing customers upgrading to this release might need to update their graphics card to a qualified card.
• IEEE-1394 FireWire® port (integrated or add-in card)
• 40 GB internal IDE drive
• DVD-ROM or DVD+RW drive
NewsCutter XP• Windows XP Professional with Service Pack 2
• System memory (same requirements for Software-only, with Avid Mojo)
- 1 GB system minimum
- 2 GB recommended for HD or high-stream count SD projects, or for workgroup-connected NCXP systems
• 2.4 GHz Xeon OR 1.8 GHz Pentium® 4 OR 1.8 GHz Pentium M
• Qualified graphics card (NVIDIA Quadro FX 500, FX 1100, FX 1300, FX 1400, FX 3400, FX 3450, 3500) (per model, as supported by system vendors)
• Qualified IEEE-1394 FireWire port (integrated or add-in card; Avid Mojo is not supported on notebook systems with PCMCIA cards of any kind)
• 40 GB internal IDE drive
• DVD-ROM or DVD+RW drive

QuickTime Support
29
QuickTime Support
Avid has tested and approved the use of Apple® QuickTime® version 7.3. Avid recommends that you upgrade to this version for maximum compatibility with this release. You must install QuickTime from the Apple web site. This is not supplied by Avid. Avid does not recommend you update to a later version at this time.
Third Party Support
Avid has qualified the following with this release of the editing application:
Avid Interplay Support
This release of the Avid Windows editing application is supported in an Avid Interplay v1.2.3 environment. Macintosh editing applications are not supported in an Avid Interplay environment. For more information, see your Avid Interplay ReadMe.
Application VersionShipped with the following editing applications:
Boris™ Continuum Complete v4.2.2 and v4.2.3 Avid Media ComposerAvid NewsCutter AdrenalineAvid Symphony Nitris
Sonic® DVDit® v6.2 Avid Media ComposerAvid NewsCutter AdrenalineAvid Symphony NitrisAvid NewsCutter XPAvid Xpress Pro
Sorenson Squeeze® v4.5.5 Avid Media ComposerAvid NewsCutter AdrenalineAvid Symphony NitrisAvid NewsCutter XPAvid Xpress Pro
SmartSound® V4.2 Avid Media ComposerAvid NewsCutter AdrenalineAvid Symphony NitrisAvid NewsCutter XPAvid Xpress Pro

30
Shared Storage Support
The editing application has been tested in a Shared Storage environment with the following:
• Avid Unity MediaNetwork v4.1.5 and v4.2.3 (Windows, Macintosh PowerPC, and Mac Pro systems)
• Avid Unity MediaNetwork v5.0 (Windows, Macintosh PowerPC, and Mac Pro systems)
• Avid Unity ISIS v1.3a (Windows, Macintosh PowerPC, and Mac Pro systems)
• Avid Unity ISIS v1.4 (Windows, Macintosh PowerPC, and Mac Pro systems)
Avid Unity Workgroup Support
The editing applications are NOT supported in the Avid Unity Workgroup environment that includes an Avid Unity MediaManager or Avid Unity TransferManager. Avid Unity MediaManager and Avid Unity TransferManager support Media Composer v2.2.x, NewsCutter v6.2.x, Symphony v1.0.x, and earlier releases.
Studio Toolkit Support
The editing applications (Windows only) have been qualified with Studio Toolkit v 5.7.
Pro Tools LE Support
ProTools LE v7.4 has been qualified for interoperability with the editing application but cannot coexist on the same system as the editing application.
For information on supported versions of Pro Tools in an Interplay environment, see the Avid Interplay ReadMe.
Supported NVIDIA Driver (Windows)
The supported NVIDIA graphics driver is version 91.85.

Qualified Graphics Card Setup (Windows)
31
Qualified Graphics Card Setup (Windows)
Although other graphics cards might work, for full performance the editing application supports the graphics cards listed in “Requirements” on page 28 for full 3D OpenGL® compatibility.
Driver versions change frequently. Please go to the online support page at www.avid.com for the current driver version information.
n See the following sections for adjustments you might need to make for the NVIDIA to work properly with your Avid system setup.
Legacy Graphics Cards (Windows Only)
With some older generation (or legacy) graphics cards, you might find that desktop video runs very slowly or that a “Serious Error has Occurred” error might appear on startup. Some systems with legacy cards might run better if you use the old legacy (DirectDraw overlay) code instead of the current OpenGL® shaders. If you receive the “Serious Error has Occurred” error upon start, hold down the “L” and “O” keys when launching until the first dialog box appears. This turns the Legacy Overlay feature on until you restart the system again.
To turn the Legacy Overlay feature on:
1. Select Tools > Console.
2. In the Console command line, type:
legacyoverlay on
3. Press Enter.
You can turn off the feature by typing “LegacyOverlay off” and restarting the application.
n On some legacy display cards, especially when they are set to higher resolutions, you might need to disable the OpenGL effects to get the overlays to function. This can be done by holding down the "O" and "G" keys, or using the diable3d console command.
n The following features are affected when you set the Legacy Overlay feature on:
• No Full Screen Playback.
• Full resolution HD does not work due to Direct DrawOverlays size limitations.
• On some cards, driver versions, and resolutions, overlays don't work, so you won’t see video playing.
32
NVIDIA Card Not Installed
If you do not have an NVIDIA card installed on your system and NVIDIA drivers are installed, a dialog box opens informing you that NVIDIA DLL could not be loaded. You can either click through the dialog boxes and ignore the message, or uninstall the NVIDIA drivers.
To uninstall the NVIDIA driver:
1. Select Start > Settings > Control Panel > Add or Remove Programs.
2. Click NVIDIA Drivers.
3. Click Change/Remove and continue through the dialog boxes.
4. If the problem persists, or the NVIDIA driver was not listed in the Add or Remove Programs window, delete the following file from your system: C:\\WINNT\SYSTEM32\nvoglnt.dll
Setting up the NVIDIA Card
To set up the NVIDIA card, you must make sure you have the correct display driver version, install the display driver if necessary, and select the correct display settings.
Checking the NVIDIA Display Driver Version
Prior to setting up the NVIDIA card, check to make sure you have the correct display driver version.
c Avid has tested the specific drivers for each NVIDIA board and supplies them in the Program Files\Avid \ Utilities \NVIDIA folder on the system. Avid recommends that you do not go to the NVIDIA Web site and download the latest drivers.
To check the NVIDIA display driver version:
1. Right-click the Desktop and select Properties.
The Display Properties dialog box opens.
2. Click the Settings tab.
3. Click the Advanced button.
4. Click the Adapter tab.
5. Click Properties.
6. Click Driver Tab.
The version number is listed under the Driver Version Information. It should be 91.85.

Qualified Graphics Card Setup (Windows)
33
Installing the NVIDIA Display Driver
If you do not have the proper NVIDIA driver, do the following.
To install the NVIDIA display driver:
1. Double-click Program Files\Avid \ Utilities \NVIDIA\WinXP_2k(91[1].85).exe.
2. Unzip the NVIDIA file to C:\NVIDIA.
3. Double-click C:\NVIDIA\WinXP_2k(91[1].85).exe file.
4. Follow the on-screen instructions and then restart your system.
Configuring the NVIDIA Display Settings for Multiple Display Systems
To set the Dualview mode and set acceleration on a primary monitor, do the following.
To set Dualview mode:
1. Right-click the Desktop, and select Properties.
The Display Properties dialog box opens.
2. Click the Settings tab.
3. Click the Advanced button.
4. Click the Quadro tab.
5. In the pop-up settings window to the left of the Window, click nView Display Settings.
6. Select nView Display Modes > Dualview.
7. Click Apply, and then click OK.
To set acceleration on a primary monitor:
1. Right-click the Desktop, and select Properties.
The Display Properties dialog box opens.
2. Click the Settings tab.
3. Click the Advanced button.
4. Click the applicable Quadro tab.
n Depending on the display driver version you have, the names of the settings might be different.
5. In the settings window to the left of the Window, click Performance and Quality Settings.
6. From the Active Profile select Global Driver Settings (scroll up to select Global Driver).

34
7. From the Global Driver Settings, select Advanced Settings from the View menu.
8. Scroll down and select Hardware Acceleration in the settings box.
9. Click the Hardware Accelerator slider at the bottom of the dialog and move the slider to the middle, choosing Multi-display compatibility mode.
10. Click Apply and then click OK.
Configuring the NVIDIA Anti-Alias Settings to Application-controlled
When the Anti-alias setting is not set to Application-controlled, the mouse may become sluggish.
To set Anti-Alias to Application controlled:
1. Right-click the Desktop, and select Properties.
The Display Properties dialog box opens.
2. Click the Settings tab.
3. Click the Advanced button.
4. Click the applicable Quadro tab.
n Depending on the display driver version you have, the names of the settings might be different.
5. In the settings window to the left of the Window, click Performance and Quality Settings.
6. Make sure the Anti-alias setting is set to Application-controlled.
7. Click OK.
Checking the OpenGL Settings
After you update your driver, when you start the editing application, make sure the OpenGL setting is set to your NVIDIA Display Card.
1. In the Avid editing application, open a new or existing project.
2. In the Project Window click the Settings tab.
3. Double-click Video Display.
4. In the OpenGL Hardware area, choose your NVIDIA Display Card.

Installation Notes
35
Disabling the NVIDIA Driver Helper Service
The NVIDIA driver Helper Service is a background program that runs with the NVIDIA Driver installed. This service informs you when an update to the NVIDIA Driver is available. There have been instances where this service causes slow restarts and shutdown with the Avid DNA hardware attached. The service also can prevent the Adobe® Photoshop® Gamma loader from operating, which causes color correction settings not to work properly. If this occurs, you should disable the NVIDIA Driver Helper Service.
To disable the NVIDIA Driver Helper Service:
1. Right-click My Computer.
2. Click Manage.
3. Double-click Services and Applications.
4. Double-click Services.
5. Right-click NVIDIA Display Driver or NVIDIA Driver Helper Service.
6. Click Properties.
7. Select Startup Type > Disable.
8. Click OK.
n Every time you update or reload the driver, this service is enabled again.
Installation Notes
See the following topics for special installation notes:
• Administrator Privileges
• Starting the Application
Administrator Privileges
For all Avid editing applications, you must first log in as an Administrator, install the application, and initially launch the application as an Administrator. You may then subsequently run the Avid editing application as a regular User.
n Beginning with Avid Interplay 1.1.4, an editor in an Avid Interplay environment can be a regular User.
36
Starting the Application
When you first start the application, if a dialog box opens requiring you to update the Avid DNA firmware, choose to Update. When you restart the Avid DNA hardware and start the application again, you might receive the dialog to update again, if applicable. Select Update and follow the prompts. The firmware is then updated, and you should be able to restart and launch the application.
Dongle Compatibility
37
Dongle Compatibility
Dongle (application key) part numbers from Avid have identifiers on the end that indicate which version of the software they are compatible with. Avid dongles do not have the Avid part number label attached to the product, so you need to use the Model Number listed on the dongle to identify it. If you use an incorrect combination of software and dongle, you will receive a “No valid Dongle was found” error.
Dongle Part Number Model Number Can be used with:
0060-03016-10 SRB11249 • Avid Xpress Pro v4.0 and higher
• Avid NewsCutter® XP v5.0 and higher
• Avid NewsCutter Adrenaline v5.0 and higher
• Avid Media Composer v1.0 and higher
7060-03016-12 SCT11871 • Avid Xpress Pro v5.x and higher (v5.1, v5.2.x, v5.5.x, v5.6, v5.6.1, v5.6.2, and v5.6.3)
• Avid NewsCutter XP v6.x and higher (v6.1, v6.2.x, v6.5.x, v6.6, v6.6.1, v6.6.2, and v6.6.3)
• Avid NewsCutter Adrenaline v6.x and higher (v6.1, v6.2.x, v6.5.x, v6.6, v6.6.1, v6.6.2, and v6.6.3)
• Avid Media Composer v2.x and higher (v2.1, v2.2.x, v2.5.x, v2.6, v2.6.1, v2.6.2, and v2.6.3)
• Avid Symphony Nitris v1.0 and higher (v1.0, v1.1, v1.2.x, v1.5.x, v1.6, v1.6.1, v1.6.2, and v1.6.3)
7060-03016-14 SCT12096 • Avid Xpress Pro v5.6.4 and higher
• Avid NewsCutter XP v6.6.4 and higher
• Avid NewsCutter Adrenaline v6.6.4 and higher
• Avid Media Composer v2.6.4 and higher
• Avid Symphony™ Nitris® v1.6.4 and higher.

38
Windows Media Version Support
(Windows Only) The Avid editing application requires you to have Windows Media Player 11. If you do not have Windows Media Player 11, access the download at www.microsoft.com.
n Windows Media export compatibility is subject to Microsoft® Windows Media updates.
Avid Unity Client Configuration Notes
If you install SP2 on an Avid Unity client system, do the following:
1. Launch the Security Center application from Start > Programs > Accessories > System Tools > Security Center.
2. Click Windows Firewall.
3. In the General tab, make sure Firewall is turned ON.
4. In the Exceptions tab, make sure the Avid Unity Connection Manager is listed in the exceptions list and has a check mark next to it.
5. In the Advanced tab, navigate to the ICMP area and click the Settings button.
6. Make sure “Allow incoming echo requests” has a check mark next to it.
7. In the main Security Center window, click Windows Update. Make sure the “Turn off Automatic Windows Updates” is selected.
Configuring PCI Bus with the Avid DNA Device
The FireWire interface for the Avid DNA device cannot be on the same PCI bus as any storage devices. Depending on your system, your PCI bus configuration can be different. For examples of different configurations, go to www.avid.com/products/dna/ and select your DNA device and then click specifications.
When you are using an Avid Adrenaline or an Avid Mojo and you want to use 1394 (FireWire) drives, you need a second 1394 OHCI board on a different bus segment in your Avid editing system. See your computer manufacturer’s documentation to identify a PCI bus slot that is on a different bus segment than the 1394 port used for the Avid Adrenaline or Avid Mojo.

FireWire Cable Requirements
39
FireWire Cable Requirements
The IEEE 1394 cabling standard requires that 1394 devices be within 14.76 ft. (4.5 m) of the next bus connector. When you connect a 1394 device (drive, camera, or deck), your FireWire cable must not exceed this length. Avid products do not support the use of 1394 repeaters to boost or extend the signal to the device.
In addition, Avid does not support any type of cable extender or FireWire hub between the Avid editing system connection and the Avid Adrenaline. If the Avid editing system does not sense a direct connection to the Avid Adrenaline, the Avid editing system enters a non-operating mode.
XDCAM Support
Make sure you are using the correct Sony firmware and driver version that has been tested with the Avid editing application. The Free file naming mode is not supported at this time. The latest Sony XDCAM driver version that is officially supported for this release is the following:
• Firmware and Driver version for XDCAM SD and HD: v1.5
Panasonic P2 Support
In your Avid editing application, you can edit directly from a P2 card inserted into a PCMCIA PC card slot in a laptop computer (you cannot use a standard PCMCIA slot, which is an older technology). You can also copy media files from the card to a local media drive or consolidate them to an Avid workgroup. You need to install the correct Panasonic® P2 card driver. The version supported for this release is the following:
(Windows) Driver version for P2 devices: v2.02
(Macintosh PowerPC and MacIntel) Driver version for P2 devices: v1.2
With this driver loaded on the Macintosh, it is no longer necessary to switch the P2 cards to write-protect mode when using them. We currently do not support P2 write back/export on the Mac Pro (Intel-based) platform.
The following table lists the Panasonic P2 devices supporting write-back.
Panasonic P2 Device Configurations Supporting Write-Back
Device Platform Connection
AG-HVX200P PC USB

40
The Interplay Media Indexer does not support P2 files created by a Panasonic SPC700 camera that uses a firmware version earlier than December 2005. To prevent this limitation, update the camera firmware.
Disabling Automatic Software Updates
Avid cannot guarantee the compatibility of the Avid editing application with automatic updates to system software components. You should disable automatic updates.
Installing the SCSI Driver (Windows)
The Avid application does not automatically load the SCSI driver. If you install an ATTO™ Celerity host adapter or ATTO ExpressPCI host adapter, install the appropriate SCSI driver.
To install the ATTO Celerity SCSI driver:
1. After installing the ATTO Celerity host adapter, access the Program Files/Avid/Utilitities folder.
n If the Found New Hardware dialog box opens, do not use the Wizard to install the driver.
2. Open the ATTOSCSI folder.
3. Double-click the Setup.exe file.
4. Follow the on-screen prompts.
To install the ExpressPCI SCSI driver:
1. Install the board into the proper slot.
2. Do not connect any drives to the ExpressPCI board.
3. Replace the side panel.
4. Plug the power cord into the system.
5. Turn on the system and log in with administrator privileges.
AJ-PCD20 PC USB
PC Firewire (1394)
Mac PPC Firewire (1394)
AJ-PCD10 PC USB
Panasonic P2 Device Configurations Supporting Write-Back
Installing the Fibre Channel Driver (Windows)
41
A Found New Hardware Wizard appears.
6. Select “Install the software automatically (Recommended)” and click Next.
Windows installs the driver.
7. Click Finish.
8. Click Next.
The Install Complete window opens.
9. Click Done.
10. Restart the system.
Installing the Fibre Channel Driver (Windows)
The Avid application doesn’t automatically load the Fibre Channel driver or firmware. The ATTO™ 4-GB Fibre Channel adapter boards, both optical and copper, use the same driver. An ATTO configuration utility is used to perform firmware updates. The configuration utility, firmware, and driver are placed on the hard drive. If you install a Fibre Channel board, install the Fibre Channel driver.
To install the Celerity Fibre Channel driver:
1. After you have installed the Celerity host adapter board, access the Program Files/Avid/Utilities folder.
2. Open the folder containing the Fibre Channel driver.
3. Double-click the Setup.exe file.
4. Follow the on-screen prompts.
To install the ATTO Fibre Channel adapter board and driver:
1. Install the board into the proper slot.
2. Do not connect any drives to the ATTO Fibre Channel board.
3. Replace the side panel.
4. Plug the power cord into the system.
5. Turn on the system and log in with administrator privileges.
A Found New Hardware Wizard appears.
6. Select “Install the software automatically (Recommended)” and click Next.
Windows installs the driver.
7. Click Finish.
42
8. Click Next.
The Install Complete window opens.
9. Click Done.
10. Restart the system.
To install the ATTO Configuration Utility:
1. Navigate to the following location:
Program Files\Avid\Utilities\ATTOFC\Utilities
2. Double-click epiconf230.exe.
The ExpressPCI Configuration tool opens.
3. Click Next.
The License Agreement window opens.
4. Select “I accept the terms of the License Agreement,” and then click Next.
5. Read the information in the window, and then click Next.
The Choose Install Folder window opens.
6. Accept the default, and then click Next.
The Pre-Installation Summary window opens.
7. Click Install.
The configuration utility and driver are installed. This takes approximately 1 minute.
8. Click Done.
9. Restart the system.
To update the Fibre Channel adapter board firmware:
1. Shut down the system.
2. Disconnect the Fibre Channel cable from the Fibre Channel board.
3. Start the system.
4. Navigate to Start > All Programs > ExpressPCI Configuration Tool.
5. Select ExpressPCI Configuration Tool.
The ATTO ExpressPCI Configuration Tool window opens.
6. In the left pane, expand hosts to localhost. You see ExpressPCI FC 3300 or FC 3305.
7. Click ExpressPCI FC 3300 or FC 3305.
8. In the right pane, click the Flash tab

Formatting and Striping Media Drives
43
The Flash options appear.
9. Click the Browse button, navigate to Program Files\Avid\Utilities\ATTOFC\FirmwareFlashBundle_xx, and then click Open.
10. Click Update.
A message box opens, instructing you to unmount all devices.
11. Click OK.
The firmware updates. The update is finished when a message appears at the bottom of the ExpressPCI Configuration Tool window.
12. Close all open windows.
13. Shut down the system.
14. Connect the Fibre Channel cable to your PC.
15. Start the system.
Formatting and Striping Media Drives
To use all the resolutions that the editing application offers, you need to format your media drives using a four-way stripe.
n (Windows) Disk drives must be configured as Dynamic if you are striping drives.
See your operating system documentation for information on creating partitions.
Avid provides recommended drive striping information for your product.
To find the latest striping tables:
1. Access the Knowledge Base at www.avid.com/onlinesupport/.
2. Type “striping tables” in the Search Knowledge Base text box.
3. Click Search.
4. Select the table appropriate for your product.
44
Installing Command|8 Drivers on a Windows System
You can use the Command|8® as a control surface for your Avid editing application as well as for Pro Tools®. Access the Pro Tools 6.9 or higher installer CD, and launch the Command|8 installer located at \Drivers\Command8\Command8 setup.exe. For more information on using the Command|8 with your Avid editing application, see “Using an External Fader Controller or Mixer” in the Help.
Limitations
Audio
➤ If your system is an HP XW8400, you must customize the sound configuration in order for the editing application to correctly control the levels of the microphone or other connected audio device:
To customize the sound card configuration:
1. In the Project window, click the Settings tab.
2. Double-click Sound Card Configuration.
3. Ensure that the Record/Input descriptions match the Playback/Output settings. For example, if you have a microphone plugged into the rear pink connector, then the Playback/Output option should be set to Rear Pink In. If you have a Line input audio device connected to the front black connector, the Playback/Output option should be set to Front Black In.
➤ Clip Pan: When you add an audio dissolve between two clips with Clip Pan onto a single audio track, the audio dissolve uses the Clip Pan setting on the outgoing source for the duration of the dissolve.
Pan Automation (overrides Clip Pan when applied): When you add an audio dissolve between two clips with Automation Pan onto a single audio track, the audio dissolve interpolates the pan values between the pan keyframe value at the beginning of the dissolve and the pan keyframe value at the end of the dissolve. Any pan keyframe that exists in the middle of the dissolve is ignored.
Workaround: Place the two clips on separate tracks using Clip Pan, fade one to silence, and fade the other up from silence.

Limitations
45
➤ (NewsCutter) AutoVO is not working properly. Incorrect tracks or segments get extracted, or all tracks are extracted, or no tracks are extracted.
➤ If you open a 720p59 HD project, open the Capture tool window, select HD-SDI video and Audio input. Capture an HD Clip from Satellite source using HD-SDI Embedded feature, saved it to Bin. Create an HD sequence using above saved HD Clip. Configure the Panasonic HD 150, set the deck to accept HD-SDI audio Embedded. Open Video output dialog: Turn on HD-SDI Audio Embedded ON. Attempt to output an HD sequence (Preview) to a HD deck using HD-SDI audio Embedded feature completely fail. There is no audio output signal seen on Deck.
➤ The Panasonic HD150 deck will not decode the HD embedded audio stream from Adrenaline or Avid Nitris®.
Workaround: Connect AES audio from the Avid DNA hardware to the deck and disable the embedded audio.
Audio Punch-In Tool
➤ You could monitor input during preroll in previous versions. If you have a software-only system, you can still monitor input during preroll. If you have an Avid Mojo, input monitoring begins at the IN point, not during preroll.
Avid Unity
Avid Unity MediaNetwork and Power User login: If you log into your Windows system as a Power User and use the same login in the Connection Manager to log onto Avid Unity MediaNetwork, you won’t be able to play media.
Workaround: In order to use an Avid editing application in Interplay you must log in as a Power User. However, do not use the same login when you use the Connection Manager to log onto Avid Unity MediaNetwork. Use a different login for the Connection Manager. This problem does not exist on Avid Unity ISIS.
➤ Workspace names in Asian characters might appear truncated at the end in any drive-selection list.
Workaround: Use no more than 5 characters for workspace names.
➤ Changing Users on MediaNetwork Fibre attached clients: When you change users on a fibre attached client, do not use the Switch User function in the Windows Log Off dialog box. When you log back in as the original user you may get the following errors when you play media:

46
Exception: FILE_OTHER, filename:… Exception: SYS_ERROR, status:1317, msg:The specified user does not exist.
Workaround: To fix the problem once it occurs, reboot the system. To avoid the problem, before you switch users, log off completely and reboot the system.
Capture
➤ If you capture clips with an Avid editing system on two or more days and use the same project and the same tape name (for example, if you capture on two separate days from a cable feed named “Live”), relinking the clips might cause the old clips to relink to the new clips. Because the clips in this instance are captured on different days but use the same 24-hour timecode and have the same tape name, the Avid system treats the captured material as coming from the same source. When you relink the clips, they relink incorrectly.
Workaround: Avid recommends that you avoid using generic or nondescriptive tape names — for example, do not use the tape name “Live” for a live feed. Instead, use distinctive tape names for each capture. Also, you can use separate projects when capturing with your editing system. When you change projects, even if you use the same tape name for your captures the Avid system generates new source IDs. This prevents the relink problem.
➤ The Sony HVR-M10U deck failed to find preroll. If you are working with DV tapes in the Sony HVR-M10U you might experience “failed to find preroll errors”.
Workaround: Change the machine template to the “Generic_DVDevice-NTSC” or “Generic_DVDevice-PAL” template. This will force the software to use a different method for cueing to the preroll timecode.
➤ The editing application does not warn you if you try to send a Frame Chase editing clip to Media Services Transcode. Do not send ingesting clips to Media Services Transcode. Wait until the clip is completely ingested.
➤ You may see the following error message when loading a clip captured by Frame Chase capture in the editor: “Error encountered during relink process: New track length does not equal original track length.”
Workaround: In the editing application, right click the clip and sequence and select Update from Interplay. In Assist, refresh the clip from the Interplay database by selecting the clip and pressing F5.

Limitations
47
➤ When you are capturing and using the passthrough monitor, desktop passthrough might cover error messages that are in the same space as the passthrough monitor, preventing you from being able to read them.
Workaround: Move the affected window or message box away from the Record monitor, put another application in front of the Avid application, and then go back to Avid to force the UI to refresh.
➤ When you capture from an HDV device through 1394 into an HDV interlaced project, you might see the video break up into squares. The captured media is intact and complete, however.
➤ When you capture media that includes invalid frames, you might see an error message that the capture has been aborted and the invalid frames discarded; it asks you if you want to keep the clip. This message is incorrect; the invalid frames have not been discarded.
Workaround: Click No to discard the clip, and then recapture using new marks that exclude the bad sections on the tape. Do not keep the clip.
➤ When you deselect Enable Confidence View in the Video Display Settings dialog box and then open the Capture tool, the Client monitor does not display passthrough.
Workaround: Do one of the following:
t Select Enable Confidence View.
t Click the Capture button in the Capture tool.
➤ In an HDV project, you can only capture audio at the 48k sample rate. Because the incoming audio is digital over FireWire, the software is unable to up-sample 32k and 44.1k audio reliably during capture. If you try to capture audio at another sample rate, you do not receive the error message warning that the audio on the tape does not match the setting in the Audio Project Settings dialog. Currently, only the 48k sample rate is supported in the HDV project format.
➤ If you lose connection to your 1394 port or receive “OHCI Port Busy” errors, check the Firewire cable length. See “FireWire Cable Requirements” on page 39.
➤ When you capture HDV, the system might not find the preroll point if the Preroll setting is set to 3 or below. The default is set to 6. Do not set this option to 3 or below.
➤ (HDV) Passthrough does not work if Delay Audio is set to 7 frames or greater. (The Delay Audio option appears in the Capture tool.)
Workaround: Set Delay Audio to 6 or less.
48
➤ Drop frame/Non-drop frame mismatch errors occurred often when capturing. A new Deck Preference setting has been added. Access the Deck Preferences Settings dialog box. A new “When the deck contains no tape Log as” option appears. Select the timecode format (Drop Frame or Non-drop Frame) for logging clips when no tape is in the deck. When a tape is in the deck, the system automatically uses the existing timecode format on the tape.
➤ (HDV) When switching from one project format to another while connected to an HDV device, you must turn the HDV device off and then turn it back on again.
➤ (Windows) If after initially setting up a DV deck for the first time, or after a system recovery you cannot see the deck, manually register the DV buffers file by doing the following:
1. Go to Program Files\Common Files\Avid.
2. Right click Dvbuffers.ax.
3. Select Open.
4. Choose to select the program from a list and click OK.
5. Browse to windows/system32.
6. Select regsvr32.exe.
➤ The following error message, “Exception: ADM_DIO_ERROR_OCCURRED, DIOerr:Expected DV50 NTSC but received DV25NTSC” appears if you attempt to capture DV 25 from a DV 50 source or DV 50 from a DV 25 source.
➤ When you batch capture long clips with a lot of metadata, the following error appears and no media is captured: “Exception: MXFDomain::SaveMetaDataToFile - Failed to save meta data to file.” This does not occur when you batch capture OMF.
➤ When you capture from a Panasonic AJ-SD93P or Panasonic AJ-SD93E, note the following: the Panasonic default for DIF SPEED is set to S400. The Adrenaline and Avid Mojo expect a DIF SPEED of S100. Capture fails, producing scrambled or blocky images.
Workaround: From the Panasonic DVCPRO® deck's menu, set the menu DIF SPEED to S100.
➤ When you capture DVCPRO HD from a Panasonic HD 1200A deck, keep the menu DIF SPEED set to S400.
➤ (NewsCutter XP Software Only) Capturing media using the Sony® DVMC-DA1 transcoder might produce clips where a/v is out of sync.

Limitations
49
Compatibility
➤ A non Administrator cannot send or receive EDLs. You must be an administrator to use EDL Manager.
➤ (Filmscribe) The Tape Name does not appear in a cut list when you select the TapeID column heading.
Workaround: If you select both the Reel# and TapeID column heading, the Tape Name appears.
➤ If you are using an Mbox 2 and an HP8400 computer, you should connect the Mbox 2 to a rear USB port. The USB ports on the front of the HP8400 can cause problems with the Digidesign Driver Installer. Once the installation is complete, you can connect the Mbox 2 to the front or rear USB ports.
➤ If you are using the Safari browser to access the Avid Learning Excellerator site (select Help > Learning Resources, and then click the Avid Learning Excellerator link), you must have Javascript® and cookies enabled (Safari > Preferences > Security).
➤ If you are a non-administrator and you want to launch AudioSuite Plug-Ins, perform the following:
1. Install the Avid Editing application. During the installation, an AvidUsers group is automatically created.
2. Have your administrator make you a member of the AvidUsers group. Then you can access the AudioSuite Plug-Ins when logging in as a non administrator.
➤ You currently cannot select HDV projects in the MediaLog™ application.
➤ (Media Composer with Adrenaline or NewsCutter with Adrenaline) If you uninstall a v2.5 Media Composer or a v6.5 NewsCutter, reinstall 2.2.1 or 6.2.1, and then update the firmware, you might see a message that your HD board firmware program failed.
Workaround: Turn off your system, turn it on again, restart your Avid editing application, and run the updater again.
➤ (NewsCutter XP Software Only) When working with the HP/Compaq nw8000 laptop, if you press the volume button (which is located on the front of the laptop, not on the keyboard), this causes an overwrite in the source/record edit to the Timeline.
50
➤ Sending to Digidesign® Pro Tools: When you export an OMF 2.0 file that links to MXF media, you should first transcode the MXF Media to OMF media. If you have a long sequence containing MXF media, you are not prompted prior to the export process that the export will not be successful. To save time, transcode MXF media to OMF media prior to exporting as OMF 2.0.
Digital Cut
➤ The first 35 frames of a sequence might be missing when you perform a digital cut after selecting Crash Record and Ignore Time in the Digital Cut tool.
Workaround: Add filler to the beginning of the sequence.
➤ When performing an HDV Digital Cut, the last few seconds are not cut to tape.
Workaround: Generate a clip of black and add it to the end of the sequence.
➤ A digital cut of an HD project might drop the last frames of audio.
Workaround: Add 10 frames of audio to the end of the sequence.
➤ When you perform a digital cut using the Pioneer® PRV-LX1 DVD recorder, select Ignore Time in the Digital Cut Tool window.
➤ A video underrun might occur at the start of a digital cut if the Digital Cut tool does not have focus when you click the Play Digital cut button. The Digital Cut window must be active before you click either the Start or Preview button. If an underrun occurs at the very start of the digital cut, you should be able to perform the digital cut without a problem.
➤ When you perform a digital cut to a Panasonic DVCPRO HD deck using HD-SDI with 720p/59.94 material, several frames of black might be written to tape before the start of the outputted sequence. This might result in the end of the sequence being truncated on tape.
Workaround: Place several seconds of black or color bars at the end of a sequence.
➤ The Digital Cut tool does not allow certain durations of black to be added to the tail of a sequence. Certain values (including 20 minutes, 30 minutes, 60 minutes, and so on) reset the clock to zero when applied. If the value you entered resets to zero when applied, adjust the value upward or downward until a satisfactory length is determined (at which point the clock does not reset itself and the desired duration is correctly applied).
Limitations
51
Dynamic Relink
➤ When working with HDV projects, HDV resolutions are not available for Dynamic Relink.
Workaround: Choose “Use Closest Media” instead of “Relink to Offline” when in HDV projects and “Specific Resolution” is selected as the Relink Method. If you do not choose “Use Closet Media”, captured clips appear as offline when Dynamic Relink is enabled.
➤ If you want to re-create title media at a target format other than the working format, you must change the project format to that designated for the target, otherwise only the working format resolutions are available.
Effects
➤ If you include progressive clips, for example, 1080p 25, in an interlaced project, for example, 30i or 25i, or the reverse (interlaced clips in a progressive project) and then add effects, you might experience an Assertion Failed error.
Workaround: Do not mix progressive and interlaced material.
➤ Safe Color limits might be exceeded in SD downconverted output from an HD project. In an HD project, if you use the Safe Color Limiter effect to ensure safe colors in a sequence and then output that sequence using SD downconvert, some transient pixel values might exceed your safe color ranges. This is a consequence of the resizing process performed in the Avid Nitris or Adrenaline hardware during an SD downconvert.
Workaround: Change the project type to an SD type before you output or render the sequence.
➤ In 30i or 1080i60 projects, Timewarp effects that use the Film With 2:3 Pulldown Input format might not render correctly. Some frames might remain unrendered or it might not be possible to complete the render. This problem is known to occur in the specific circumstances described below, but might also occur in other circumstances.
Partial Render. The problem might occur if you perform a partial render of a Timewarp effect using the Film With 2:3 Pulldown Input format, then render the remaining part of the segment. Some frames might remain unrendered or the second part of the segment might not render.
Division of rendered segment. The problem might occur if you render an entire Timewarp effect using the Film With 2:3 Pulldown Input format, and then divide the segment (for example, by performing an overwrite edit of new material into the middle of the segment). Some frames in the second part of the divided segment might become unrendered.

52
Trimming head frame of rendered segment. The problem might occur if you render an entire Timewarp effect using the Film With 2:3 Pulldown Input format, and then trim the head frame of the segment. Some frames in the segment might become unrendered.
➤ You might not be able to render a FluidBlur, FluidColorMap, or FluidMorph effect in an HD project if there is not enough memory available.
Workaround: Try one of the following:
- In the Bins tab of the Project window, click the Clear button, and render the Fluid effect (see “Managing Bins and Memory” in the Help).
- Close all unused bins, relaunch, and render the Fluid effect.
- In the Format tab of the Project window, switch the project format to an SD format, render the Fluid effect, then switch back to HD.
➤ In previous releases, when you moved a multi-stream effect such as PIP slowly across the screen, the edges could be blurred and aliased. With this release, the edges of the multi-stream effect have improved with the use of a new high quality filter algorithm. With this improved quality, you might experience reduced stream count.
➤ Very high speed Motion Effects with rates greater than 500% no longer play in real time; they now appear in the Timeline as a blue dot effect, and must be rendered. Since any motion effect with a rate greater than 100% plays back inefficiently, and the higher the rate the less efficiently it plays back, real time playback efficiency will improve by rendering such motion effects.
➤ (HDV) If a clip contains Timewarp effects, you should render the effects.
➤ You might experience effects render issues with stacked effects.
Workaround: Render each individual track starting with the bottom track.
➤ When you are working with AVX effects, performing an Expert Render or a Render IN to OUT on a sequence that contains multiple third-party AVX effects might lead to excessive memory consumption that could cause the application to hang or to display errors.
Workaround: Render the effects in smaller groups.
➤ AVX 1.0 effects might have invalid color levels.
➤ You might see problems with superblacks in 16-bit mode.

Limitations
53
➤ Performing an Add Edit on a promoted Advanced Keyframe Picture-in-Picture effect might cause a “DataPointOneError”.
Workaround: Instead of first promoting to 3D, then Advanced Keyframe, promote in the reverse order.
➤ Most effects support 16-bit processing. The following lists the effects that do not support 16-bit processing at this time.
• Avid Pan & Zoom
• Blur effect
• Mosaic effect
• Paint effect
• Region Stabilize
• Scratch Removal
• Animatte™
• RGB Keyer
• Pan and Scan
• Illusion FX
• PlasmaWipes
• AVX 1.x effects
Whether a particular AVX 2.0 effect supports 16-bit processing is up to the plug-in vendor.
n Rendering times are slower when you use 16-bit processing because 16-bit effects have two times the data of classic 8-bit effects.
➤ You might see a “FluidMotion Vector Edit Requires Full Resolution” error if you work in FluidMotion™ Vector Edit mode in anything other than full resolution (green mode in the Timeline). Render FluidMotion effects before you combine them with any other effects, especially any other time-based effects.
➤ (Progressive projects only) If a clip contains any of the following effects, you must render the effects before you apply Scratch Removal:
• Timewarp effects
• Any effect that has been promoted to the Advanced Keyframe model
➤ Removing or undoing some timewarp effects might cause audio and video to lose sync.
54
➤ In the Transition Corner Display mode, two of the six frames display incorrect frames during trim operations initiated from the Timeline.
Workaround: Trim using the Trim buttons.
➤ The Fluid film 2:3 timewarp effect might render incorrectly when you are rendering fluid motion type. The effect might flash a crop of left and right edges.
Workaround: Set the left and right mask in the FluidMotion Editor to zero.
➤ (HD only) Any animated alpha matte over 35 seconds long might fail.
➤ When an Avid effect is applied in an SD 24p progressive project, it can create unwanted aliasing on the resulting clip.
Effects (Pan & Zoom)
You might encounter the following limitations when you use the Pan & Zoom effect:
➤ (Macintosh) After the link to a Pan & Zoom effect is broken and you want to reestablish it, the application doesn’t prompt you for the source image name in the Open dialog box.
Workaround: Import still images into a bin and use them in the edit. With the imported image in the Timeline, apply the Pan & Zoom effect and load the respective file from the Open dialog box. This way you can use “Clip Text” and confirm that the correct images are being loaded.
➤ To improve memory issues, the options in the Pan & Zoom Cache Fast menu are ignored and Video Resolution is used, although when you render the effect, the highest-quality resolution is always used. After you partially render a Pan & Zoom effect, however, you might see a slight pixel shift when you move between the rendered and unrendered portions.
➤ When you zoom in with Hi Qual and Ultra Qual filtering, you might experience a system error (Windows) or see green lines when you preview (Macintosh).
➤ Pan & Zoom keyframe settings can revert to defaults if you select all keyframes when you link to a new picture.
Export
➤ An error might occur when you export to HDV when the first frame of the sequence is a video mixdown clip.
Workaround: Place filler or a frame of non-video mixdown media at the head of the sequence.
Limitations
55
➤ Currently, our export settings allow a 720x486 size when exporting Avid DV, which creates a field alignment issue. Make sure that you set the export settings correctly for 720 x 480 for DV exports. Currently, QuickTime must do a resize from 486 lines down to 480 and you receive an odd interpolation. (Even if you specify 720x486, the Quicktime file displays 720x480).
➤ In NTSC, QuickTime Same as Source and QuickTime Reference clips containing DV material can sometimes show visual distortions when burned to DVD from Avid DVD. This is because the DV portions are resized from the DV raster size 720x480 up to the standard NTSC raster size 720x486.
Workaround: When exporting the QuickTime Same as Source or Quicktime Reference clips, choose “Use Avid DV” .
➤ (Macintosh) The editing application might crash after exporting to an Avid Unity ISIS Read-only workspace. Make sure you export to a Read/Write workspace. You can determine whether a workspace is Read/Write through the Client Manager application. Navigate to the Workspaces tab in Client Manager. The Read/Write workspaces are listed with an R/W under the name of the workspace.
➤ If you have a mixed-resolution DV 25 sequence and try to export it as QuickTime for DVD using the Apple DV Codec, the .mov might contain artifacts.
Workaround: You must use the Avid DV Codec for this kind of sequence.
➤ You might receive exception errors when exporting HDV 1080i/59.94 or 1080i 50 as Windows Media.
➤ When exporting to an HDV device, at least 4 to 5 seconds of media might be missing from the beginning of the sequence.
Workaround: Add 10 seconds of color bar or black filler at the beginning and at the end of the sequence.
➤ When you export a QuickTime Reference movie, do not mix DV and non-DV media. If you mix DV and non-DV media, the resulting movie might contain line shifts.
➤ When you export pan automation on an audio clip as AAF, it does not translate in Pro Tools. Pro Tools does not accept varying value pan controls during import.
➤ In the Export Settings dialog box, the default size is not the image size of the opened project.
56
➤ When you play an exported clip in the Windows Media Player, the sequence stalls in the desktop monitor. The audio plays, the blue bar progresses in the Timeline, and the video and audio output to the client monitor is OK. If the clip that is loaded in Windows Media Player is removed, then the Play operation plays properly in both the desktop and client monitors.
➤ Exporting Locators exports only a .txt file with frame count information, not timecode or Feet and Frames. Import also supports only frame count.
➤ A “Not enough memory is available to complete this operation or WM_BeginWriting_FAILED” error results from the application running out of available memory (RAM) while you perform the encode. Encoding to a Windows Media Video codec requires a lot of memory. The amount of memory required is directly related to the number of audio and video profile streams, width, height, bit rate, number of passes, VBR/CBR, and quality of the encoded video, as well as the resolution of the source media. If you encode HD media, you might need to reduce the bit rate, turn on 2-pass encoding, turn on VBR, lower the quality, or reduce the frame dimension.
➤ A “WM_FindInputFormat_FAILED” error might appear if the Windows Media exporter cannot find a suitable input format for a video or audio stream contained in the current Windows Media Export setting's stream profile. For example, using non-standard frame dimensions might result in this error. See the Microsoft Windows Media web site for more detail.
ICS (International Character Support)
➤ Workspace names that contain non-ASCII characters can cause poor performance when working in a bin.
Workaround: Use only ASCII characters in workspace names.
➤ If you capture a clip from a workspace with a French name through CaptureManager™, in the Avid editing application the bin heading Drive might be empty where it should list the French name of the workspace.
➤ If you change the font or font size of your input, and see characters rotated 90 degrees, make sure you select the correct font. Do not use any font that begins with the “@” symbol.
➤ Do not create a project using the Euro currency character (ALT 0128). The project fails to be created and a “Can't Open Project” error message is displayed.
➤ Certain Asian characters might not appear in the correct order in some text boxes in your Avid editing application.

Limitations
57
Import
➤ Occasionally, if you cancel an import of a clip, you might receive a “DISK_SHARING_VIOLATION” error.
➤ When you import an uncompressed QuickTime file, a PICT image, or a TIFF image, the first 4 or 5 vertical columns of pixels might truncate when you display the file in the Source, Record, or client monitors.
➤ When you batch import a sequence with a graphic animation that was created in a 30i project and then modified in a 720p project, it might not import.
Workaround: Import the graphic and manually edit it back into your sequence.
➤ Avid editing systems cannot import AVI files created on Avid DS Nitris systems. The import fails with an error message stating that the file format is not supported for import.
Interplay Workgroup
➤ You might receive an access violation error while dragging multiple clips from the Interplay window into a bin. This occurs if you select an individual clip, drag it to the bin and then repeat the process quickly.
Workaround: Select multiple clips and drag them to the bin.
➤ Selecting Check In All Open Bins from the Fast menu (hamburger menu) in the bin might not check in the open bins.
Workaround: To check in all open bins, select Check In All Open Bins from the File menu.
➤ After you perform a search for media in the Interplay Window, you cannot refresh the search results displayed in the Research panel by pressing F5. If you want to refresh the results, repeat the search.
➤ Batch Import of files containing Alpha. This problem occurs if you want to batch import files in SD and HD formats and then use Dynamic Relink to switch between the different formats. The problem occurs with QuickTime movies, graphics, and sequences that contain alpha. You can batch import the files and relink to the different formats, but if you exit and then restart the Avid editing application you can no longer relink to the HD format. The system displays an “Exception: NO Compressed Data Format found” error message.
Workaround: You cannot use Dynamic Relink with HD and SD clips that contain alpha. Import the HD files with alpha as individual clips. When you want to switch to HD format, edit the HD versions into your sequence.
58
➤ If you import a graphic from your local drive into a project in an Avid editing application, change the original name of the clip to a name of your choice, and check that clip into a folder in the Interplay Window, the new name does not appear in the Interplay Window even when you refresh the window. You see only the original name.
➤ When you import a clip onto local storage into a local bin and then delete the clip’s media, you continue to see the clip in the Avid editing application Source monitor instead of the message “Media Offline.” If you try to play the clip, an error message box opens.
Workaround: Open another clip in the Source monitor, and then reopen the clip with the deleted media to correctly see the “Media Offline” message.
➤ When you incorporate clips and subclips that include locators added in Interplay Assist into a story in Instinct, the locators do not appear in the story. If you open the same story (sequence) in an Avid editing application, the locators do not appear there, either.
➤ In the Avid editing application, the Record Track monitor buttons might be deselected if the following happens:
1. On System 1, you create a sequence and check it into a folder in the Interplay Window.
2. On System2, you check out the sequence and load it into the Timeline.
3. On system1, you edit the sequence and check it into the Interplay folder again.
4. On system2, you refresh the Interplay window then check out the same sequence again.
Workaround: Select the Record Track buttons again.
➤ In an Avid editing application, if you have a sequence that you have not checked into the Interplay Window and you try to use the Transfer > Send to Workgroup command, you might experience an error.
Workaround: Check the sequence into the Interplay Window before you attempt to transfer it.
➤ In workgroup environments prior to Avid Interplay, you could automatically consolidate from NewsCutter during Send to DMS. With the Avid Interplay release, the automated consolidate is not available. Choose to consolidate prior to sending to DMS.
➤ When working with MultiRez, high-quality audio cannot be distinguished from up-sampled proxy audio created with previous versions of the editor. For instance, an 8 kHz proxy audio up-sampled to 48 kHz on import in Interplay version 1.0 is considered as good as a real 48 kHz high quality audio. In that case, if MultiRez is set to use 48 kHz audio, it picks up the most recent file of the two.
Limitations
59
Locators
➤ If you add a locator to a shotlist, and then open the sequence in an editing application, the locator appears, but if you perform a match frame on the locator, it might not appear in the master clip.
Workaround: In the editing application, check the master clip in question out of Interplay and then update the bin or the clip. The locator appears.
➤ A new item has been added to the Fast menu in the Locators window. “Disable Locator Popup” disables the locator pop-up window. It is disabled only for the work session. When you restart the Avid application, the locator pop-up menu is enabled.
Panasonic P2
➤ Export to P2 limitations:
• Use Marks and Use Enabled tracks are ignored on export.
• All Audio must be PCM 16b/48K.
• All audio tracks will be exported, although P2 devices either support 2 or 4 audio tracks. Therefore sequences should be built for delivery to the specified P2 playback device. Sequences with 6 audio tracks will have 6 audio tracks and the P2 device will only playback the first 2 or 4 tracks.
➤ SD/HD Mixed sequences are not supported.
➤ 1:1 MXF media cannot be exported in both SD and HD projects. Transcode 1:1 MXF before exporting.
➤ The editing application does not currently support Export to P2 spanning 16GB Panasonic P2 cards.
➤ Occasionally the File > Import P2 > Media command does not consolidate media to the drives.
Workaround: Close and re-open the bin and then execute the command again.
➤ When you view a P2 clip that spans across multiple P2 cards in the timeline, you might be surprised as to what you see and don't see due to the history of mounting P2 cards on your current system and the P2 cards that are currently mounted. Be aware that even though media is offline, or you are not able to view the P2 media in the Timeline, the media is not lost. The media appears when the card containing it is mounted.
➤ If you have P2 clips on a P2 card and you display the clips in the Media tool, you might be able to delete the audio and video .mxf files from the Media tool.
60
➤ If you remove a card from a slot in the P2 reader and do not put another card in the reader, you must delete the P2 folder before inserting that same card in another slot.
➤ A DVD Drive cannot be a media drive. If a CONTENTS folder is located on the root level of the DVD, you might see a “No clips were found” message when performing an Import P2 Clips to Bin.
Workaround: Create a folder that contains the CONTENTS folder on the DVD. This instructs the editor to mount a virtual drive.
➤ When the P2 CONTENTS folder is located at the root level on a drive where the Avid editing application looks for media files, you might encounter errors when importing P2 clips. For example, if you are working on a laptop, the Avid editing application and local storage folders are on the same drive and are usually located at the root level. If you create virtual P2 volumes on the Desktop, you might encounter a “No clips were found” message when trying to import the P2 clips and media.
Workaround: If you locate the virtual P2 volume in a different location such as a subfolder on the Desktop, you should be able use virtual P2 volumes.
➤ If you experience unusually long scan times, check to make sure both the local time and Greenwich Mean Time (GMT) are set correctly on your camera. If the GMT is not set correctly, you may need updated firmware for your camera.
➤ Play performance for a multi-stream sequence suffers when you directly access media from the P2 media cards in the AJ-SPX800P camera.
➤ If you turn off the P2 card reader while a bin accessing P2 media is open, attempting to load any P2 clip results in a DISK_FILE_NOT_FOUND message in the Source monitor window. The message should read Media Offline.
➤ Dupe detection is not available for P2 source material.
Play
➤ When you play media and then you press stop, the source monitor stops, but the external client monitor steps back approximately 2 frames.

Limitations
61
➤ (Macintosh) QuickTime reference movies are useful as long as you are working with Avid media files available on your local system or in an Avid Unity environment. However, if you expect to move the exported QuickTime file to a system that doesn't have access to the media, then you should use the standard QuickTime export so the media files and QuickTime wrapper can be moved as one file.
➤ With Full Screen Playback enabled on a single monitor, the video might stutter and you might notice tearing toward the top of the image during playback. Tearing might also appear if you use variable-speed play.
➤ When the Avid editing application stops streaming play, a number of additional frames are sent to the DNA device in order to keep the client monitor synchronous with the desktop display. The DNA device must play out that number of frames after the desktop has stopped playing. To make sure you view the actual last frame, the application then snaps the client monitor back to the frame on the desktop. This might be more apparent when playing HD media.
➤ If you do not see video output to your device, make sure that the appropriate device is selected in the Special > Device menu. If FireWire is selected in the Device menu, make sure Output to Device is selected in the Video Display Settings.
➤ If you experience a flashing monitor when attempting to play using the Japanese version of Windows XP, and your monitor does not appear to be covered by anything, adjust the state of your Language bar by maximizing and minimizing it. This restores the ability to play.
➤ (Adrenaline) LTC output is now off by default. To turn it on, open General Settings and enable “Generate LTC On Playback”.
Projects
➤ (Windows Only) Avid Attic folders can only be created by Administrators. An Administrator has to first launch the application, open a project, close the project and quit the application. Then when a non-Administrator user uses the application, their work is saved to the Avid Attic.
Settings
➤ Do not carry User Profiles from a previous version to this version. Create new user settings. If you do use previous settings, the size of tools and windows might not be as expected, especially tools and windows that have been updated for this version.

62
Titles
➤ If you re-create a rolling or crawling title in your sequence, the Scroll Position parameter values for the first and last keyframes are not preserved. They are set to the default values (start and end).
Workaround: Promote the title to advanced keyframe model before you re-create.
➤ Avid suggests that you do not attempt to edit the nested tracks of a re-created rolling or crawling title. If you attempt to select or edit one of these types of nested tracks, an error occurs. This is also the case with a re-created static title on its alpha channel subtrack.
➤ A sys_error occurs when you modify a title to an available drive with Render settings that are set to an unavailable drive (a drive that you do not have write access to). A .bak file of the title also appears in the bin.
Workaround: Close the Title tool and change the Render settings to a drive that you do have write access to.
➤ Character spacing might be inaccurate in Title Tool titles using large font sizes. Some character pairs might appear too close together, or overlapping. In HD projects, the problem is only visible in the rendered title clip in the bin. In SD projects, the problem is visible immediately in the Title Tool. Also, once the problem has occurred in text using a large font size, it might persist when you create other text objects in the title at any font size.
Workaround: The best general workaround is to promote the title to Marquee. Text in Marquee titles does not have the same problem at large font sizes. Also, if you do not need your final text to use a large font size, avoid converting it to a large font size at any point in your workflow, or retype it as a new text object at a smaller size if increasing the font size causes the problem.
➤ Marquee title format does not need to change in normal workflows. In most normal workflows, the title format in Marquee automatically matches the project format in your Avid editing application and you do not need to change it. If you change the title format in Marquee so that it does not match the project format in your editing application, you might see artifacts around the edges of some title objects. One situation in which you might need to change the Marquee title format occurs when you are creating a title by opening an existing .mqp file. If the .mqp file’s format does not match the project format in your Avid editing application, you should change the title’s format to match the project format in your editing application. For more information on changing the title format, see “Changing Title Formats” in the Marquee Help.

Limitations
63
➤ When you render a rolling or crawling NTSC SD title with Same as Source selected in the Media Creation dialog box in an HD project, you might see problems with the title.
Workaround: For highest quality titles, re-create your title media in the format of the project in which you are working; in this case, re-create your SD title media in an HD format.
➤ Unrendered back-to-back titles in a 1080i HDV sequence might not play in real time. The second title does not display.
Workaround: Render the titles.
➤ Rolling and crawling titles in 24p and 25p projects might display a “Layout Mismatch” error when in Full Quality mode.
Workaround: Select another quality mode. The error also goes away if you toggle to the HD project equivalent and load the title.
➤ When you reedit a Marquee title in the Timeline, you might see artifacts in the video background. This is cosmetic only and does not appear in the resulting title.
Workaround: If you reedit the title in the bin rather than the Timeline, the artifacts do not appear.
➤ For projects whose formats are changed to HD, if there are Marquee crawls in sequences, these need to be modified to keep them as Avid DSK titles. Reedit these titles by using the effect editor to bring up Marquee. If when saving to a bin in Marquee you receive a message that the title is animated or that it cannot be saved directly to the Timeline, then perform the following workaround.
Workaround: Select the Crawl text box. Press the “C” toolbar button within Marquee to cause the crawling text box to extend for the new larger width of the title. Now you should be able to save to the bin or the Timeline as before and the title will not be animated.
➤ Page breaks appear on rolling and crawling titles when an HD title is over SD media, or an SD title is over HD media.
Workaround: Recreate the title at the same resolution as the underlying video.

64
➤ HD titles appear aliased when you are not in Effect mode. Some titles you create in HD projects might look aliased (blocky) when you view them at Full Quality in Source/Record mode. To improve the visible quality, render the title or view it in Effect mode.
➤ The application might appear frozen after you edit a Marquee title in the Timeline. If you edit a Marquee title that is already part of a sequence in the Timeline and then exit Marquee, you might not be able to perform any other operations.
Workaround: Press the Escape key. Use a different user setting to avoid the problem.
➤ Rolling titles created in SD and rendered in HD display 1 line at the top of the matte when they are rendered.
Workaround: Recreate the title and matte before you render.
➤ If you change the size of text, it might yield different kerning results. If you highlight text and change the text properties, the kerning result might be different than if you had changed the text properties in the Parent text box. For consistent results, change the text properties in the Parent text box.
➤ When you edit large or unrendered SD crawling or rolling titles in an HD project, switch to SD, promote the title to Marquee, save the title in SD, then open the title in HD.
This workaround is not possible for a 720p project, but you can open the 720p bin in a 30i project and modify the title there, as long as there is an SD version of the sequence.
➤ Titles created in 4x3 SD and then re-created in 16x9 (SD or HD) appear to shift to the left. You must manually reedit the title in 16x9 for correct positioning.
Workaround: In 16x9 mode, load the original 4x3 title in the Title tool. Click the Selection tool, select Edit > Select All, and then click Object-Group. Click Alignment > Center in Frame Horiz. Save the title to the bin.
➤ You might receive an “Out of Range” error when you try to modify and then re-create rolling and crawling titles in the timeline in a 720p project.
Workaround: Manually reedit the titles into the sequence.

Documentation Additions
65
XDCAM
Importing XDCAM Files
➤ When you import XDCAM files, be aware that Avid does not support the batch import workflow when you are working in the following Sony XDCAM camera modes: Picture Cache Record Mode, Interval Record Mode, or VFR (Variable Frame Rate) Mode (UCC/OCC - Undercrank/Overcrank). An error message appears which informs you that the video is not supported. However, the High-Rez versions of these clips can be imported. Their timecode values, however, will be inaccurate. The Avid editor appends its own generic timecode to clips recorded in any of the previously mentioned modes.
➤ When you export XDCAM media to disk, it will not include embedded timecode in this release.
➤ XDCAM proxy media might not export to a QuickTime reference movie successfully.
If you export as a regular QuickTime movie, MPEG 4, or as Windows Media 9, the export is successful. Or, you can transcode the proxy sequence to DV 25 or MPEG-IMX and then export as QuickTime reference.
Workaround: Import the whole XDCAM HD clip and then transcode it.
➤ The Avid editing applications refer to XDCAM HD 25 Mbits media files as HDV 1080i 50/60. These Dynamic Relink settings are only available in project types 1080i/59.94 HDV or 1080i/50 HDV.
➤ When performing an XDCAM Proxy to High Resolution Batch Import workflow using different Avid editing systems, make sure the Avid editing applications are installed on the same type of platforms. For example, both on Macintosh platforms or both on Microsoft platforms. The XDCAM Proxy to High Resolution Batch Import workflow does not support cross platform compatible.
Documentation Additions
The following information was added after the production of the printed documentation and help system.

66
Disconnecting an Avid Editing Application from the Interplay Environment
This section describes the new Disconnected Client mode that allows you to work while disconnected from the Avid Interplay™ environment.
There are two basic cases when you might want to voluntarily disconnect an Avid editing application from the Interplay environment:
• If you have a laptop that you want to disconnect from the network and then use it to work with media on your local drives. See “Voluntarily Disconnecting from the Interplay Environment” on page 66
• If the Interplay Framework is not available and you want to continue working on your local drives. See “Using Disconnected Client Mode with Network Problems” on page 67.
Your system administrator might also perform a forced disconnect on your system in case of software installation or system update. See “Forcing Disconnected Client Mode” on page 68.
Voluntarily Disconnecting from the Interplay Environment
In this example, assume that you are working on a laptop; you want to disconnect the laptop from the Interplay environment and work using the media on your local drives.
To disconnect from the network and run an Avid editing application using local drives:
1. If the Avid editing application is running, exit the application.
2. Disconnect the network cable from the Avid editing system.
3. Disconnect the Fibre Channel cable, if you have one, from the editing system.
4. Start the Avid editing application. The system displays the following message:
You don't have access to MediaIndexer. Do you want to continue in Disconnected Client Mode? If you do, you won't have access to shared media drives.
5. Click Continue.
The application starts without using the Media Indexer. The application uses .pmr and .mdb files to track media on your local drive.
The .pmr and .mdb files are database files that standalone Avid editing applications use to keep track of media files. A standalone system is defined as an Avid editing system that is not connected to an Avid Interplay environment and does not have Avid Interplay Access or
Documentation Additions
67
the Interplay Framework software installed. The Avid editing application reads .pmr files to determine the location of media files to load into a monitor or into the Timeline. It uses the .mdb files to provide information for the relink function and to populate the Media tool.
To reconnect an Avid editing application to the Interplay environment:
1. If the Avid editing application is running, exit the application.
2. Reconnect the network cable and the Fibre Channel cable to the Avid editing system.
3. Start the Avid editing application.
The system automatically starts using the Media Indexer to index media, and you are reconnected to the Interplay environment.
To ensure that the Media Indexer scans your local drives, do one of the following:
t Configure your local Media Indexer to scan your local drives.
t In the Media Creation tool, select “Automatically index local drives as they come online.”
n For information about ensuring that the Media Indexer scans your local drives, see the Avid Interplay Framework User’s Guide.
Limitations of Disconnected Client Mode
The following limitations apply to Disconnected Client mode:
• The mode cannot be used with Interplay Assist or iNews® Instinct™. Those applications require shared storage.
• No shared drives are available in Disconnected Client mode. This includes the following:
- Shared drives do not appear in media drive menus for tools such as the Capture tool, the Import tool, or the Media Creation tool.
- Shared drives do not display in the File > Mount menu or the File > Unmount menu.
- If Auto Login is turned on for the Interplay window, the login is disabled.
- If you attempt to manually connect to the Interplay window, the option is disabled.
Using Disconnected Client Mode with Network Problems
When the Avid editing application starts up in an Interplay environment, it uses the Interplay Framework Lookup Service to locate the local Media Indexer. The Lookup Service is usually running on a network server. If the Avid editing application cannot locate the Lookup Service, it cannot find the Media Indexer.
68
To continue to work in Disconnected Client mode:
1. Start the editing application.
If the application is disconnected because it has lost access to the Media Indexer, it displays the following message:
You don't have access to MediaIndexer. Do you want to continue in Disconnected Client Mode? If you do, you won't have access to shared media drives.
2. Disconnect your network cables as described in “Voluntarily Disconnecting from the Interplay Environment” on page 66.
3. Click Continue to work using the media on your local drives.
The Avid editing application uses .pmr files to keep track of the media on your local drives.
4. If the network problem is fixed while you are working in the Avid editing application, exit the application, restart the application, and reconnect your cables.
The system now uses Media Indexer to scan and keep track of your media. Besides having access to shared storage again, your local Media Indexer scans your local drives to recognize the work you did while you were disconnected.
5. For information about ensuring that the Media Indexer scans your local drives, see the Avid Interplay Framework User’s Guide.
Forcing Disconnected Client Mode
Your system administrator might need to temporarily remove your editing system from access to the network. This might occur if new software needs to be installed or if components need to be updated, for example. To force a disconnect, your administrator runs a script that forces disconnection from the network without physically removing your system. Your administrator can also reconnect your system at the appropriate time using another script.
In this release, it is possible to import from shared drives and export to them in Forced Disconnected Client mode. Avid recommends, however, that you do not import from or export to shared drives when your administrator has force-disconnected your editing system. Avid does not support any workflow that includes importing from or exporting to shared drives when the system is in Forced Disconnected Client mode.
In general, if you are in Forced Disconnected Client mode and if you import or export using shared drives, after the import or export those drives might appear to be available for other purposes such as importing, capturing, playing, or deleting media, but they are not available.

Documentation Additions
69
Similarly, options for shared storage might appear to be available in various settings dialog boxes and shared drives and media might appear in various menus, tools, and applications; Avid does not support use of these settings, drives, or media.
Workaround: To remove the shared drives from your drive lists, do one of the following:
t Disconnect your network cables as described in “Voluntarily Disconnecting from the Interplay Environment” on page 66.
t Exit your editing application and restart it.
The following limitations describe specific instances of drives and options appearing in Forced Disconnected Client mode:
• In the Select Project dialog box, shared workspaces and projects are available and should not be.
• Shared drives and media are available in the Media tool and in the MetaSync® application and should not be.
• In the Interplay Server Settings dialog box, you can change the Interplay server name and you should not be able to.
• In the Capture tool, you can select the Interplay Folders option as your capture destination and you should not be able to.
• In the MXF Media Files tab of the Capture Settings dialog box, you can select the “During capture, clip is updated in Interplay” option and you should not be able to.
• In the Temporary File Directory option of the General Settings dialog box, you can type the name and location of a shared drive and you should not be able to.
• Shared drives and media are visible in the Hardware tool and should not be.
• Shared drives are visible in the Import dialog box and should not be.
• Options in the Media Services Settings dialog box are available and and should not be.
• Options in the Transfer Settings dialog box are available and should not be.
• Selecting LANshare, PortServer settings, or ProEncode™ appears to be available but should not be. Do not select these options.
• Dynamic Relink can be enabled but that should not have been allowed. Do not enable it.
• With several of the options in the File menu, you are allowed to select a shared workspace as a destination but you should not be able to. Do not select a shared workspace in this context.
• If you select Automatic Login at Project Selection in the Interplay User Settings dialog box, enter Disconnected Client mode, exit the mode and the editing application, reconnect, and then restart the editing application, you need to log into Interplay again and you shouldn’t have to.

70
• In Forced Disconnect mode, if you make a change to your User settings, the change might appear for all other users, as well.
Adding Locators On-the-Fly while Playing1. Load a sequence or clip. See “Loading Footage” in the Help.
2. (Option) Select a specific track, using the Track Selector panel. See “Using the Track Selector Panel” in the Help.
3. Map the Add Locator button to a key by doing the following:
a. Open the Command Palette, click the More tab, and select Button-to-Button Reassigment.
b. In the Settings list of the Project window, double-click Keyboard.
c. Drag an Add Locator button to a key on the Keyboard palette.
n For more information about mapping buttons to keys, see “Mapping User-Selectable Buttons” in the Help.
4. Click the Play button, and every time you want to add a locator, press the key to which you mapped the Add Locator button.
n You can map different Add Locator buttons to different keys to be able to add more than one color of locator.
To add comments to the locators:
1. Stop playing.
2. Do one of the following:
t Double-click the locator in the position bar under the monitor.
t Click the large oval on the frame in the monitor.
A Locator edit pane opens. The locator name, color, frame, and track information appear.
n By default, the locator name is the user name logged onto your system. You can change this by typing a new name in the Name text box.
3. Type your comments in the comment area of the Locator edit pane.
4. (Option) Change the color from the Color menu or change the locator name.
5. To save your information, click OK, or press the Enter key.
The information is stored with the marked frame.
Suggestions for Optimum Performance
71
The locator oval appears in the Timeline, in the position bar, and at the bottom of the frame in the monitor.
n You can also click the Locator icon in the Locators window to edit locator information.
To keep the Locator edit pane from opening:
1. Select Tools > Locators.
The Locators window opens.
2. Select Disable Locators Popup from the Fast menu.
The Locator edit pane now does not open even if you double-click a locator.
Reference to JL Cooper Controller
The documentation and help reference support for the JL Cooper controller. This controller is not supported.
Suggestions for Optimum Performance
Background tasks can interrupt time-critical operations, such as capturing, playing, or rendering. Make sure that background tasks are not running while you are working on the Avid editing system.
Turn Off Simple File Sharing (Windows)
c Turning off Simple File Sharing is required. If you do not do this, you might get Access Denied errors after moving files.
To turn off Simple File Sharing:
a. Double-click My Computer.
b. Select Tools > Folder Options > View.
c. Scroll down to the bottom of the window and deselect “Use simple file sharing (Recommended)”.
Optimum Performance (Windows)
The following list contains suggestions for ensuring optimum performance when working with the Avid editing system:
n The steps below might vary depending on if you have Windows Classic mode or Windows XP mode selected.

72
• Disable CPU throttling:
a. Select Start > Control Panel.
b. Double-click Power Options.
c. Select Power schemes > Always On.
• Do not enable the Windows Display setting “Show window contents while dragging.” This setting hinders redraw performance on the Avid editing system. Do the following:
a. Select Start > Control Panel.
b. Double-click Display.
c. Click the Appearance tab.
d. Click the Effects button.
e. Deselect “Show window contents while dragging.”
• Do not leave the Console window open when you are editing. The Avid editing system performance slows considerably when the Console window is open.
• Do not leave a Windows Explorer window open. Windows Explorer tries to update file information.
• Do not leave an e-mail application open if it is set to do periodic checks for mail.
• Do not run any application that periodically “wakes up” and performs an action (for example, virus scanners and disk fragment utilities).
• Disable screen savers.
• Do not keep media on the same partition where the application is installed. Avid recommends external media drives.
• Always disable system sounds:
a. Select Start > Settings > Control Panel.
b. Double-click Sounds and Audio Devices.
c. Click the Sounds tab, and select Sound scheme > No Sounds.
d. Click OK.
• Always use small fonts with the display driver to avoid missing characters in the application dialog boxes.
• After moving a drive from one system to another, you must restart your system. Windows does not recognize the drive until you restart the system.
• To ensure you do not accidentally delete locked items from your desktop:
a. Right-click the Recycle Bin icon on your desktop.
b. Select Properties.
Suggestions for Optimum Performance
73
c. Click the Global tab.
d. Select “Display delete confirmation dialog.”
e. Click OK.
• When you are advancing by single frames through the Timeline, deselect Clip > Render On-the-Fly to enable faster response time.
• Do not name files with special characters (/ \ : ? ” < > | *), because Windows does not recognize special characters in file names. Bin names are limited to 27 characters (not including the four characters reserved for the file name extension).
• Do not schedule automatic backups at times when your Avid editing system might be in use.
• Do not run any application that includes prescheduled or automatically scheduled activities, such as a calendar program.
• Do not leave other applications running. Some applications, such as Microsoft Office, run background processes.
• Do not allow the Find Fast background process (find.exe) to run. The process tries to update its cache of file and folder locations. Check your Startup folder, and delete the file if it is there. To locate the find.exe, select Start > Search > find.exe.
• Turn off AutoPlay for Multimedia devices. Windows XP uses an AutoPlay feature to automatically run programs and open files that it encounters on CD-ROMs and DVDs. If you plan to use the Online Library and Online Tutorial CD-ROMs, you should turn off AutoPlay for CD-ROMs that contain mixed content.
a. Double-click the My Computer icon on your desktop.
b. Right-click the CD-ROM or DVD drive you want and select Properties.
c. Click the AutoPlay tab, and select Mixed content from the pop-up menu.
d. Select “Select an action to perform,” and then select Take no action.
e. Click OK.
Extending Your Usable Address Space and Adding RAM for Improved Performance (Windows)
The Microsoft Windows XP operating system limits every program to 2 gigabytes (GB) of address space. It reserves the remaining 2 gigabytes of address space for its own use. The operating system includes a boot-time mechanism that allows applications access to a larger virtual address space than was previously available. Avid provides a utility for setting the boot-time mechanism to extend the process address space. See “Using Install3GB.bat to Extend Your Usable Address Space” on page 74 for information on using the utility.

74
Setting your Avid editing system to access a larger virtual address space might improve working with HD projects without running out of memory.
n Even though you might gain more memory space, this can be quickly consumed with bins and complex HD effects.
n For best performance, if you choose to extend your address space beyond 2 gigabytes, you should install an additional 1 or 2 GB of RAM.
Using Install3GB.bat to Extend Your Usable Address Space
Use the following procedure to extend your usable address space.
To extend address space:
1. Double-click Program Files\Avid\Utilities\3GB\Install3G.bat.
The following window opens.
2. Choose one of the following:
t If you want to always use the extended memory every time you boot the system, type D.
t If you want the option to choose between the extended memory and the original default setting whenever you reboot, type M.
3. Restart your system.
If you typed D in step 2, the 3G extended memory is automatically used. If you typed M in step 2, you are presented with a list like the following:
1. Microsoft Windows XP Professional
2. Microsoft Windows XP Professional /3GB /userva=2700

Suggestions for Optimum Performance
75
4. To boot with extended address space, choose 2.
Restoring the Boot.ini Backup file
If you run the Install3GB.bat a subsequent time, it will determine that you have already modified the Boot.ini file and gives you the option to restore the boot.ini file to its original state prior to running the utility.
To restore the Boot.ini backup file:
1. Double-click Program Files\Avid\Utilities\3GB\Install3G.bat.
The following window opens.
n The only time you should select Y at this prompt is if you had run the utility previously, had chosen the “D” option in step 2 on page 74, and had installed another copy of Windows operating system on a different partition.
2. Type N.

76
The following window opens.
3. Type Y to restore the Boot.ini file.
If you type N, you exit the utility without making any changes.
Special Notes
This section contains important information about system-level changes that affect the way your Avid software and hardware operate.
Antivirus Applications
Antivirus programs containing autoscanning features can interfere with the operation of the Avid editing application. For example, some antivirus programs can be configured to run in the background and scan all files for viruses whenever they are opened, copied, or moved. Since virus scanning is a processor-and disk-intensive activity, it can interfere with capturing and playing real-time effects in the Avid editing application.
Avid recommends you do not scan all files or schedule any background tasks such as virus scanning when you are using your Avid editing application.
File deletion protection utilities also consume system resources and could interfere with the proper operation of the Avid editing application. These utilities automatically back up any files that are deleted, even temporary files created and deleted by the Avid editing application. This consumes a large amount of disk space.
Suggestions for Optimum Performance
77
Turn off Automatic Reboots (Windows)
The Automatic Reboot option is turned on by default on some Windows XP systems. You should turn off this option.
To turn off automatic reboot:
1. Select Start > Settings > Control Panel.
2. Double-click System.
3. Click the Advanced tab.
4. Click the Settings button in the Startup and Recovery area.
5. Deselect Automatically restart in the System failure area.
6. Click OK and then click OK again.
Goodies Folder
Avid supplies a Goodies folder located on the editing application DVD. Access the Goodies folder by browsing the DVD. This folder contains programs and files you might find useful when trying to perform functions beyond the scope of the editing application software.
w The information in the Goodies folder is provided solely for your reference and as suggestions for you to decide if any of these products fit into your process. Avid is not responsible for the manufacture, support, or sales of these products. Avid is also not responsible for any loss of data or time, or any other adverse results related to the use of these products. All risks of using such products or accessing such Web sites are entirely your own. The Web sites listed in the Goodies folder are not under the control of Avid, and Avid is not responsible for their content, any changes or updates to them, or the collection of any personal data or information by the operators of such Web sites. All information and product availability is subject to change without notice.
Panasonic AG-DVX100 Camera
Avid recommends that you use certain device settings when using the AG-DVX100 camera with an Avid editor.
Device Setup
Make sure the device is in VTR mode by toggling the button on the front of the camera. Adjust the following Device Menu Settings on the camera:

78
Recording Setup
• REC SPEED - SP
• 1394 TC REGEN - OFF
• TC MODE - DF/NDF (Must match the tape in the device)
• TCG - REC RUN
• FIRST REC TC - REGEN
AV In/Out Setup
DV OUT - OFF
Using the Panasonic AG-DVX100 Camera with a 24p Project
To capture an NTSC 24p project in DV, your footage needs to have been shot with advanced pulldown. This is currently available using the Advanced option of the Panasonic AG-DVX100 camera.
If you want to use 1394 deck control to capture from the Panasonic AG-DVX100 camera, set the menu in the device as follows:
Menu > RECORDING SETUP > 1394 TC REGEN > OFF
Panasonic AG-DVX100 Camera Communication Error
You might lose communication with the Avid DNA hardware if you switch between the Capture tool and the Digital Cut tool when performing a digital cut with DV device control.
Workaround: Close each tool after you are through using it.
If you lose communication, quit the application, power cycle the Avid DNA hardware, then restart the application.
Disconnecting Devices
Do not disconnect devices while running the Avid application. Before starting the Avid application, make sure all your devices are connected first.
Suggestions for Optimum Performance
79
Copyright and DisclaimerProduct specifications are subject to change without notice and do not represent a commitment on the part of Avid Technology, Inc.
The software described in this document is furnished under a license agreement. You can obtain a copy of that license by visiting Avid's Web site at www.avid.com. The terms of that license are also available in the product in the same directory as the software. The software may not be reverse assembled and may be used or copied only in accordance with the terms of the license agreement. It is against the law to copy the software on any medium except as specifically allowed in the license agreement.
This document is protected under copyright law. An authorized licensee may reproduce this publication for the licensee’s own use in learning how to use the software. This document may not be reproduced or distributed, in whole or in part, for commercial purposes, such as selling copies of this document or providing support or educational services to others. This document is supplied as a guide for the editing application. Reasonable care has been taken in preparing the information it contains. However, this document may contain omissions, technical inaccuracies, or typographical errors. Avid Technology, Inc. does not accept responsibility of any kind for customers’ losses due to the use of this document. Product specifications are subject to change without notice.
Copyright © 2007 Avid Technology, Inc. and its licensors. All rights reserved.
Attn. Government User(s). Restricted Rights LegendU.S. GOVERNMENT RESTRICTED RIGHTS. This Software and its documentation are “commercial computer software” or “commercial computer software documentation.” In the event that such Software or documentation is acquired by or on behalf of a unit or agency of the U.S. Government, all rights with respect to this Software and documentation are subject to the terms of the License Agreement, pursuant to FAR §12.212(a) and/or DFARS §227.7202-1(a), as applicable.
Trademarks888 I/O, Adrenaline, AirPlay, AirSPACE, AirSPACE HD, AirSpeed, AniMatte, AudioSuite, AudioVision, AutoSync, Avid, Avid DNA, Avid DNxcel, Avid DNxHD, AVIDdrive, AVIDdrive Towers, Avid DS Assist Station, Avid ISIS, Avid Learning Excellerator, Avid Liquid, Avid Mojo, AvidNet, AvidNetwork, Avid Remote Response, AVIDstripe, Avid Unity, Avid Unity ISIS, Avid Xpress, AVoption, AVX, CamCutter, ChromaCurve, ChromaWheel, DAE, Dazzle, Deko, DekoCast, D-Fi, D-fx, DigiDelivery, Digidesign, Digidesign Audio Engine, Digidesign Intelligent Noise Reduction, DigiDrive, Digital Nonlinear Accelerator, DigiTranslator, DINR, DNxchange, do more, D-Verb, Equinox, ExpertRender, Face Robot, FieldPak, Film Composer, FilmScribe, FluidMotion, HIIP, HyperSPACE, HyperSPACE HDCAM, IllusionFX, Image Independence, iNEWS, iNEWS ControlAir, Instinct, Interplay, Intraframe, iS9, iS18, iS23, iS36, LaunchPad, Lightning, Lo-Fi, Magic Mask, make manage move | media, Marquee, Matador, Maxim, MCXpress, Media Browse, Media Composer, MediaDock, MediaDock Shuttle, Media Fusion, Media Illusion, MediaLog, Media Reader, Media Recorder, MEDIArray, MediaShare, MediaStream, Meridien, MetaSync, MissionControl, NaturalMatch, Nearchive, NetReview, NewsCutter, Nitris, OMF, OMF Interchange, OMM, Open Media Framework, Open Media Management, PCTV, Pinnacle MediaSuite, Pinnacle Studio, Pinnacle Systems, ProEncode, Pro Tools, QuietDrive, Recti-Fi, RetroLoop, rS9, rS18, Sci-Fi, ScriptSync, SecureProductionEnvironment, Show Center, Softimage, Sound Designer II, SPACE, SPACEShift, SpectraGraph, SpectraMatte, SteadyGlide, Symphony, TARGA, Thunder, Trilligent, UnityRAID, Vari-Fi, Video RAID, Video Slave Driver, VideoSPACE, and Xdeck are either registered trademarks or trademarks of Avid Technology, Inc. in the United States and/or other countries.
Adobe and Photoshop are either registered trademarks or trademarks of Adobe Systems Incorporated in the United States and/or other countries. Apple and Macintosh are trademarks of Apple Computer, Inc., registered in the U.S. and other countries. Windows is either a registered trademark or trademark of Microsoft Corporation in the United States and/or other countries. All other trademarks contained herein are the property of their respective owners.
Avid NewsCutter Products ReadMe • 0130-07852-01 Rev. M • March 2008 • 03/17/08 12:25

80