ats-909x 2 - sangean
TRANSCRIPT
中文GB
Version 1
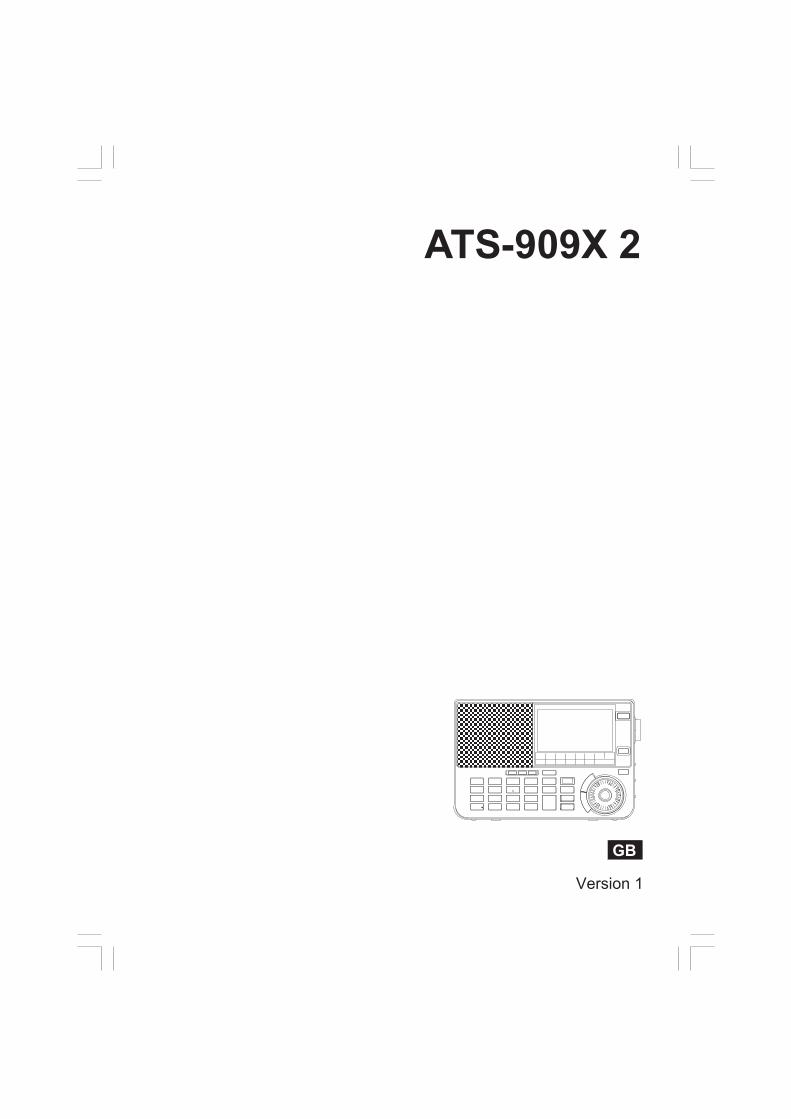
ATS-909X 2
01
1 2 3
4
23
22
2120
65 8 25 262410
12
11
13
14
15
97
31 30 29 28 273217 161819
33 34 3635
4143
3738
39
40
42444546 47 48
A B C D E G H I J K LF
Z
Ab
AcAd
Aa
Y
M
N
O
P
QW T RSUVX
02
GB
F
E
NL
D
Table of Contents
1. IMPORTANT .......................................................... 03IMPORTANT SAFETY INSTRUCTIONS ............... 03
2. YOUR ATS-909X2 RADIO ............................... 03-06INTRODUCTION ................................................... 03WHAT'S IN THE BOX ........................................... 04CONTROLS ..................................................... 05-06INFORMATION ON DISPLAY ............................... 06
3. GETTING STARTED ........................................ 06-08POWERING THE RADIO ................................. 06-07OPTION 1: BATTERIES ................................... 06-07
OPTION 2: USING AN EXTERNAL POWER
ADAPTER .............................................................. 07
SETTING THE CLOCK FORMAT ......................... 07SETTING THE TIME ............................................. 07SETTING YOUR LOCAL TIME AND TIME
ZONE ..................................................................... 07
SETTING A WORLD TIME .................................... 07
DAYLIGHT SAVING TIME ..................................... 07
RENAMING TIME ZONE CITIES ..................... 07-08
4. LISTENING TO THE RADIO ............................ 08-11TUNING TO RADIO STATIONS ....................... 08-10USING THE AUTOMATIC TUNING
SYSTEM (ATS) – MW / LW / FM ........................... 08
USING THE AUTOMATIC TUNING
SYSTEM (ATS) – SW ............................................ 08
USING SCAN TUNING .......................................... 09
USING MANUAL TUNING ..................................... 09
SETTING THE TUNING STEP .............................. 09
STEREO RECEPTION ..................................... 09-10
ADJUSTING THE VOLUME .................................. 10
USING PRESET STATIONS ............................. 10-11STORING PRESET STATIONS IN MEMORY –
MW / LW / FM / AIR ............................................... 10
STORING PRESET STATIONS IN MEMORY –
SW ONLY .............................................................. 10
RECALLING PRESET STATIONS – MW / LW /
FM / AIR ................................................................. 10
RECALLING PRESET STATIONS – SW ONLY ..... 11
LOCKING PRESET STATIONS .............................. 11
DELETING PRESET STATIONS ............................ 11
MOVING PRESET STATIONS TO ANOTHER
POSITION .............................................................. 11
RENAMING PRESET STATIONS – MW / LW /
FM / AIR ................................................................. 11
RENAMING PRESET PAGES – SW ONLY ........... 11
5. ADVANCED TUNING FEATURES ................... 11-13SETTING THE METER BAND – SW ONLY ..... 11-12SINGLE SIDE BAND (SSB) RECEPTION – SW / MW / LW ....................................................... 12SETTING THE SINGLE SIDE BAND TUNINGSTEP – SW / MW / LW .......................................... 12SETTING THE BANDWIDTH ........................... 12-13PERFORMING A PAGE SCAN – AIR ONLY.......... 13SETTING THE SQUELCH LEVEL ........................ 13SETTING THE RF GAIN ....................................... 13
6. USING THE MENU .......................................... 13-14
7. OTHER FEATURES ......................................... 14-17USING ALARM TIMERS .................................. 14-15SETTING AN ALARM TIMER ........................... 14-15
WHEN AN ALARM SOUNDS ............................... 15DEACTIVATING AN ALARM TIMER ..................... 15
SETTING THE SLEEP TIMER .............................. 15
DISPLAYING SIGNAL INFORMATION ................ 15USING THE RDS FEATURE – FM ONLY ........ 15-16USING THE RADIO TO CHARGE BATTERIES ... 16SETTING THE DISPLAY BRIGHTNESSLEVEL ................................................................... 16CHECKING THE SOFTWARE VERSION ............. 16
USING THE TONE CONTROL SWITCH ............... 16
USING THE LOCK SWITCH ................................. 16USING THE AUX IN JACK ................................... 17USING THE REC STANDBY / LINE-OUT JACKS ................................................................... 17USING THE HEADPHONES JACK ...................... 17USING THE RESET SWITCH ............................... 17
8. TECHNICAL DATA AND SPECIFICATIONS ... 17-18TECHNICAL DATA ................................................ 17SPECIFICATIONS ................................................. 18DISPOSAL OF YOUR OLD PRODUCT ................ 18
03
GB
F
E
NL
D
1. IMPORTANTIMPORTANT SAFETY INSTRUCTIONS
1. Read and understand all safety and operating instructions before the radio is operated.
2. Retain instruction: The safety and operating instructions should be retained for future reference.
3. Heed warnings. All warnings on the appliance and operating instructions should be followed.
4. Follow all operations and use instructions.
5. Water and moisture: The appliance should not be used near water. Do not use near a bathtub, washbowl, laundry tub, kitchen sink, wet basement, swimming pool, etc.
6. Unplug the radio from the AC power outlet before cleaning. Use only a damp cloth for cleaning the exterior of the radio.
7. Do not place the radio on an unstable cart, stand, bracket or table. The radio may fall, causing serious personal injury and damage to the radio.
8. Ventilation: This radio should be situated so that its location or position does not interfere with its proper ventilation. For example, the radio should not be used on a bed, sofa, rug or other soft surfaces that may block the ventilation openings. It should not be placed in a built-in situation like a cabinet that may reduce air flow through the ventilation openings.
9. Power sources: The radio should be operated only from the type of power source indicated on the marking label. If you are not sure of the type of power supply to your home, consult your radio dealer, Power Company or Sangean.
10. AC adaptor: The AC adaptor should be positioned so it is not walked on, pinched, or items placed on top of it. Pay particular attention to wires at plugs, convenience receptacles, and the point where they exit from the unit. Unplug the AC adaptor by gripping the adaptor, not the wire. Operate the radio using only the current type of power source indicated. If you are not sure of the type of power supply to your home, consult your dealer, local power company or Sangean.
11. Do not overload wall outlets or extension cords. This can result in a risk of fire or electrical shock. Never insert objects of any kind into the radio through any openings. The objects may touch dangerous voltage points or short out parts. This could cause a fire or electrical shock and damage the radio.
12. If the radio is left unattended or unused for long periods of time, unplug it from the wall outlet. This will prevent damage caused by lightning or power line surges.
13. If the radio is left unattended and unused for a long period of time, remove the batteries. The batteries may leak and damage furniture of your radio.
14. Do not attempt to service the receiver yourself. Removing the cover may expose you to dangerous voltage and will void the warranty.
15. Never push objects of any kind into this radio through openings as they may touch dangerous voltage points or short-out parts that could result in a fire or electric shock and damage the radio. Never spill liquid of any kind on the product.
16. The appliance should be serviced by qualified service personnel only when:
A. The AC power supply cord or the plug has been damaged.
B. Objects have fallen or liquid has been spilled into the radio.
C. The radio has been exposed to rain or water.
D. The radio does not appear to operate normally or exhibits a marked change in performance.
E. The radio has been dropped, or the enclosure is damaged.
17. Be careful when connecting an external antenna for outdoor use. High-voltage power lines and lightning strikes constitute a risk of electric shock.
2. YOUR ATS-909X2 RADIOINTRODUCTION
The Sangean ATS-909X2 PLL synthesized receiver provides the following range of features:
● Radio for Air / FM / LW / MW / SW broadcasts
● Automatic Tuning System for FM / LW / MW / SW band
● Total of 1674 radio station presets
● 3 memory banks for preset stations allow the radio to store presets for different users and / or different areas
● Local / World Time with 2 customizable city names
● FM RDS with PS, PTY, RT and CT features
● Comes with RF Gain Control for AM band
● SSB (Single Side Band): USB / LSB, 10/20 Hz / Tuning step
● 3 alarm timers with snooze feature
● Large LCD screen with backlight
● Built-in battery charger allows charging rechargeable batteries (not included)
04
GB
F
E
NL
D
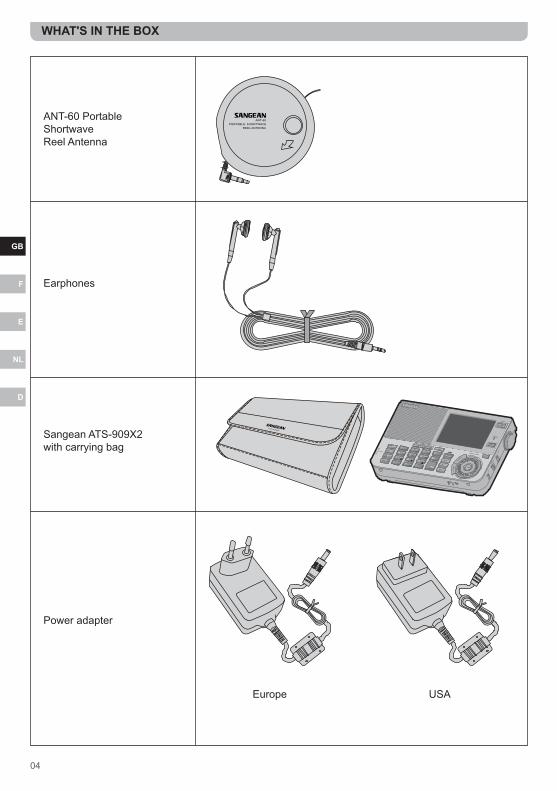
WHAT'S IN THE BOX
ANT-60 Portable Shortwave Reel Antenna
Earphones
Sangean ATS-909X2 with carrying bag
Power adapter
Europe USA
05
GB
F
E
NL
D
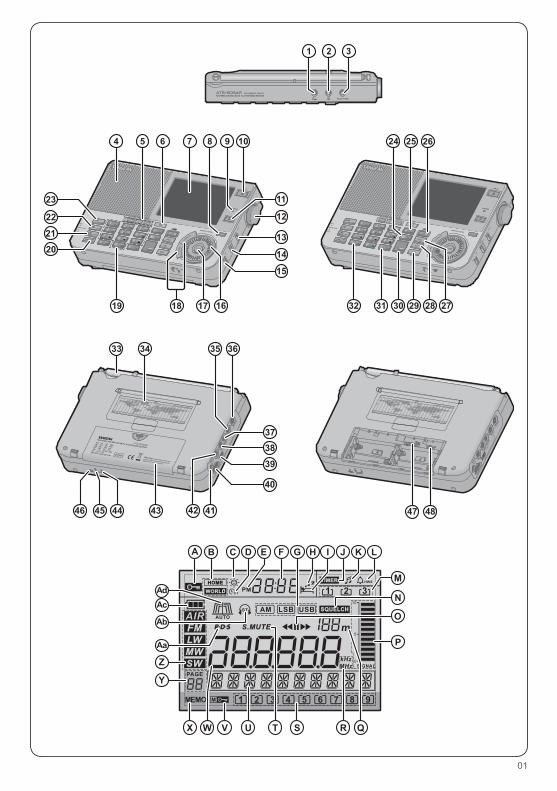
CONTROLS1 Time Set button
● Set the time
2 Daylight Saving Time button ● Enable / disable Daylight Saving Time
3 Home / World button ● Select home time or world time
4 Speaker5 Timer buttons
● Set alarm timers (1, 2, 3)
● View alarm timer settings
6 Single Side Band (SSB) / Alarm mode button ● Switch between the single side bands
● Configure the alarm mode when setting alarm timers
7 LCD display8 Squelch button
● Set squelch level
9 Charge indicator10 Power / Sleep timer button
● Turn the radio on / off
● Set the sleep timer
11 Backlight button ● Set backlight brightness level
● Turn on backlight (when turned off)
12 Volume Control ● Set the volume
13 Bandwidth Control switch ● Select auto or manual mode for bandwidth control
14 Tone Control switch ● Select tone (music / normal / news)
15 Lock switch ● Enable / disable button lock
16 Rotary Tuning knob ● Highlight items in menus
● Adjust frequency
● Select page on the SW band
17 Step button ● Select tuning step
● Disable tuning using the Rotary Tuning knob
● Confirm menu selection
18 Tuning Up / Down buttons ● Tune up / down
● Scan for radio station with higher / lower frequency
● Select page on SW band
● Select Home / World city
● Go to next / previous character when editing text
19 Numeric buttons ● Input digits 0-9
● Select preset stations
● Select SW meter bands
20 ATS / METER / SW button ● Select SW band
● Enable selection of SW meter band
● Use Automatic Tuning System for SW band
21 ATS / MW / LW button ● Select MW / LW band
● Use Automatic Tuning System for MW / LW band
22 ATS / FM button ● Select FM band
● Use Automatic Tuning System for FM band
23 AIR button ● Select AIR band
● Perform page scan on AIR band
24 Memo button ● Store radio stations as preset station
● Store radio station for alarm timer
● Select SW 25 meter band
25 Freq button ● Direct tune to a frequency
● Select SW 60 meter band
26 Bandwidth / Memory Lock button ● Select bandwidth
● Lock preset stations
27 Page button ● Change the preset page on MW / FM / AIR band
● Enable page selection on SW band
28 Edit button ● Create / edit station name on MW / LW / FM / AIR band
● Edit home / world city name
● Create / edit page name on SW band
29 Info / Menu button ● Display information about signal
● Display RDS information
● Open / close the menu
30 Enter button ● Confirm user input
31 Cancel button ● Erase user input
● Delete preset station
● Select SW 11 meter band
● Disable the alarm function
06
GB
F
E
NL
D
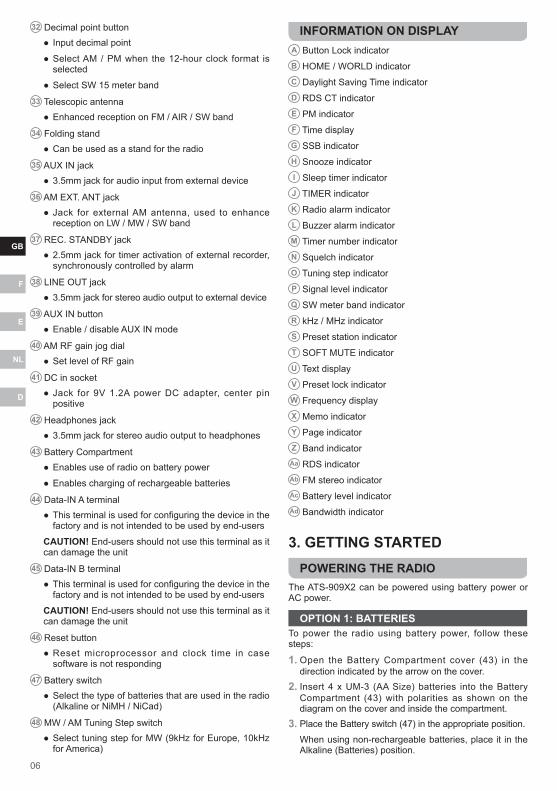
32 Decimal point button ● Input decimal point
● Select AM / PM when the 12-hour clock format is selected
● Select SW 15 meter band
33 Telescopic antenna ● Enhanced reception on FM / AIR / SW band
34 Folding stand ● Can be used as a stand for the radio
35 AUX IN jack ● 3.5mm jack for audio input from external device
36 AM EXT. ANT jack ● Jack for external AM antenna, used to enhance reception on LW / MW / SW band
37 REC. STANDBY jack ● 2.5mm jack for timer activation of external recorder, synchronously controlled by alarm
38 LINE OUT jack ● 3.5mm jack for stereo audio output to external device
39 AUX IN button ● Enable / disable AUX IN mode
40 AM RF gain jog dial ● Set level of RF gain
41 DC in socket ● Jack for 9V 1.2A power DC adapter, center pin positive
42 Headphones jack ● 3.5mm jack for stereo audio output to headphones
43 Battery Compartment ● Enables use of radio on battery power
● Enables charging of rechargeable batteries
44 Data-IN A terminal ● This terminal is used for configuring the device in the factory and is not intended to be used by end-users
CAUTION! End-users should not use this terminal as it can damage the unit
45 Data-IN B terminal ● This terminal is used for configuring the device in the factory and is not intended to be used by end-users
CAUTION! End-users should not use this terminal as it can damage the unit
46 Reset button ● Reset microprocessor and clock time in case software is not responding
47 Battery switch ● Select the type of batteries that are used in the radio (Alkaline or NiMH / NiCad)
48 MW / AM Tuning Step switch ● Select tuning step for MW (9kHz for Europe, 10kHz for America)
INFORMATION ON DISPLAYA Button Lock indicatorB HOME / WORLD indicatorC Daylight Saving Time indicatorD RDS CT indicatorE PM indicatorF Time displayG SSB indicatorH Snooze indicatorI Sleep timer indicatorJ TIMER indicatorK Radio alarm indicatorL Buzzer alarm indicatorM Timer number indicatorN Squelch indicatorO Tuning step indicatorP Signal level indicatorQ SW meter band indicatorR kHz / MHz indicatorS Preset station indicatorT SOFT MUTE indicatorU Text displayV Preset lock indicatorW Frequency displayX Memo indicatorY Page indicatorZ Band indicatorAa RDS indicatorAb FM stereo indicatorAc Battery level indicatorAd Bandwidth indicator
3. GETTING STARTEDPOWERING THE RADIO
The ATS-909X2 can be powered using battery power or AC power.
OPTION 1: BATTERIESTo power the radio using battery power, follow these steps:
1. Open the Battery Compartment cover (43) in the direction indicated by the arrow on the cover.
2. Insert 4 x UM-3 (AA Size) batteries into the Battery Compartment (43) with polarities as shown on the diagram on the cover and inside the compartment.
3. Place the Battery switch (47) in the appropriate position.
When using non-rechargeable batteries, place it in the Alkaline (Batteries) position.
07
GB
F
E
NL
D
When using rechargeable batteries, place it in the NIMH / NICAD (Charger) position.
4. Close the Battery Compartment (43).
The battery level indicator (Ac) on the display shows the battery level. The batteries should be replaced when battery level is low or the battery level indicator (Ac) flashes.
NOTEDo not mix different types of batteries or rechargeable batteries with different capacities.
NOTEWhen replacing batteries, batteries must be replaced within 3 minutes in order to retain the clock time. Other information stored in the radio's memory will not be lost.
OPTION 2: EXTERNAL POWER ADAPTERWhen using AC power, please use the AC power adapter included with this radio or any equivalent power adapter capable of providing DC 9V, 1.2A, center pin positive.
Before connecting the power adapter to a wall socket, please ensure that the voltage that the socket supplies is within the supported range (100~240 Vac, 50 / 60Hz). Connect the power AC adapter to the DC IN socket (41) and a wall socket. When the AC power adapter is connected, any batteries inserted in the radio will automatically be disconnected.
SETTING THE CLOCK FORMATThe Time display (F) that displays the time can be set to 12 or 24-hour format when the radio is powered on or off. By default, the clock format is set to the 24-hour format and this setting only needs to be changed if the 12-hour format is preferred.
Perform the following steps to change the clock format:
1. Press and hold the Menu button (29) to open the menu.
2. Use the Rotary Tuning knob (16) to select "24H" in the Text display (U).
3. Press the Step button (17) or Enter button (30) to start configuring the setting. The current setting ("24H") will now blink in the Text display (U).
4. Use the Rotary Tuning knob (16) to select the desired time format.
5. Press the Step button (17) or Enter button (30) to confirm your choice.
6. Press the Menu button (29) to close the menu.
SETTING THE TIMEThe time can be set when the radio is powered on or off.
SETTING YOUR LOCAL TIME AND TIME ZONE
In order to enter the correct local time, first set your local time zone and then set your local time.
Do this by performing the following steps:
1. Press the Home / World button (3) once.
The HOME indicator (B) will now be blinking on the display and a city and time zone will be shown in the Text display (U).
2. Use the Rotary Tuning knob (16) or Tuning Up / Down buttons (18) to select your city or a city that is in the same time zone as you are.
3. Press the Enter button (30) to confirm your choice.
4. Set the time by pressing the Time Set button (1).
The HOME indicator (B) will be blinking on the display again.
5. Use the numeric buttons (19) to enter a time (e.g. to enter 11:00, press 1-1-0-0).
6. If the radio is set to use the 12-hour clock format, press the Decimal point button (32) to set either AM or PM. When PM is selected, the PM indicator (E) will be shown on the display.
7. After entering the time, press the Enter button (30) to confirm it and complete setting your local time and time zone.
NOTEIf you have made a mistake while entering a digit or character, press the Cancel button (31) to erase the last entered or selected digit or character. Press this button multiple times to erase more than one digit or character.
SETTING A WORLD TIMEAside from setting your local time zone, the ATS-909X2 also allows you to set a second time zone and display the time in this time zone. This time is referred to as world time.
To select a time zone for the world time, follow these steps:
1. Press the Home / World button (3) twice.
The WORLD indicator (B) will now be blinking on the display and a city and time zone will be shown in the Text display (U).
2. Use the Rotary Tuning knob (16) or Tuning Up / Down buttons (18) to select the city which is in the time zone of which you want the time to be displayed on your radio.
3. Press the Enter button (30) to confirm your choice and complete setting the time zone for the world time.
4. To switch between your local time and the world time, press the Home / World button (3) twice and then press the Enter button (30).
DAYLIGHT SAVING TIMEThis radio comes with a Daylight Saving Time feature that can be activated or deactivated by pressing the Daylight Saving Time button (2). When Daylight Saving Time is activated, the Daylight Saving Time indicator (C) will be shown on the display.
RENAMING TIME ZONE CITIESThe ATS-909X2 allows you to customize the names of the cities that are pre-programmed into the radio's memory.
If you have selected a time zone city that you would like to rename, follow these steps:
1. Press the Home / World button (3) either once or twice, depending on which city name you want to change.
2. Press the Edit button (28).
The first letter of the city name will now be blinking in the Text display (U).
08
GB
F
E
NL
D
3. Use the Rotary Tuning knob (16) or the numeric buttons (19) to change the character and input your desired character.
4. Press the Tuning Up / Down buttons (18) to go to the next / previous character and repeat the instructions in step 3 to edit the selected character.
5. If the name you want to enter is shorter than the original name, use the Tuning Up / Down buttons (18) and Cancel button (31) to select and erase any unwanted characters.
6. Press the Enter button (30) to confirm the city name.
4. LISTENING TO THE RADIOTUNING TO RADIO STATIONS
The ATS-909X2 is capable of tuning to radio stations on the SW, MW, LW, FM and AIR bands. The radio features an Automatic Tuning System (ATS) that can be used to automatically store preset stations when the SW, MW, LW or FM band is selected. When the AIR band is selected, only manual tuning and scan tuning can be used to search for stations and preset stations must be stored manually. NOTEListening to airband frequencies (118-137 MHz) without a license is prohibited in some countries. Only use this device to listen to airband frequencies when this is allowed under local laws and regulations.
NOTEFor the best reception, please make sure the telescopic antenna on the back of the radio (33) is fully extended when listening to the FM, SW or AIR band. When listening to the SW, MW or LW band, make sure the included external AM antenna is connected to the AM EXT. ANT jack (36) and that the antenna is placed as high as possible and is not being obstructed.
USING THE AUTOMATIC TUNING SYSTEM (ATS) – MW / LW / FM
The Automat ic Tun ing Sys tem can be used to automatically scan for radio stations with a strong signal on the MW, LW or FM band and store these stations as preset stations. Since the MW and LW share the same button, simply press this button (21) twice to switch between the medium wave and the long wave.
Follow these steps to use the Automatic Tuning System on the MW / LW / FM band:
1. Turn on the radio using the Power button (10).
2. Press and hold either the ATS / MW / LW (21) or ATS / FM (22) button to activate the Automatic Tuning System for the corresponding band.
3. The radio will now search for all strong signals on the selected waveband and store the stations it finds as preset stations.
4. When the scan is completed, the radio will play the first preset on the first page (which is the station with the best reception).
NOTEWhen using the ATS feature on the MW / LW / FM band, all existing presets that have not been locked on that waveband will be cleared.
NOTEWhen using the ATS feature on the MW / LW / FM band, the radio will store preset stations based on signal strength. If more stations are found than there are presets available, the stations with the weakest signals will not be stored.
USING THE AUTOMATIC TUNING SYSTEM (ATS) – SW ONLY
The Automatic Tuning System can also be used on the SW band. The process for using it is slightly different from the process on the other bands.
Follow these steps to use the Automatic Tuning System on the SW band:
1. Turn on the radio using the Power button (10).
2. Press and hold the ATS / METER / SW button (20).
The message "ATS START- " will be shown in the Text display (U).
3. Use the Rotary Tuning knob (16) to select the start frequency from 1.7MHz to 29.9MHz.
4. Press the Step button (17) or Enter button (30) to confirm the start frequency.The message "ATS END- " will be shown in the Text display (U).
5. Rotate the Rotary Tuning knob (16) to select the end frequency from 2.7MHz to 29.9MHz. The end frequency is always at least 1MHz higher than the selected start frequency, as the selected ATS frequency range must be larger than 1MHz.
6. Press the Step button (17) or Enter button (30) to confirm the end frequency.
7. Rotate the Rotary Tuning knob (16) to select the desired ATS preset page number.By default, page 30 will be selected.
8. Press the Step button (17) or Enter button (30) to confirm the page number.
9. When the scan is completed, the Text display (U) will show the message "FINISHED", the selected preset page will be renamed to "ATS-PRESET" and the first preset on the selected page will automatically be played.
NOTEWhen using the ATS feature on the SW band, all existing presets that have not been locked on the selected page number will be cleared.
NOTEWhen using the ATS feature on the SW band, the radio will store preset stations based on signal strength. If more stations are found than there are presets available on a preset page, the stations with the weakest signal will not be stored. If no stations are found during the scan, the radio will tune to the start frequency of the set ATS scan range.
NOTEIt is recommended to use a frequency range of approximately 5MHz for ATS scans and repeat scanning this range on different pages until no new presets are found. This way, several preset pages can be populated with presets and the entire SW band can be covered in a quick manner.
09
GB
F
E
NL
D
USING SCAN TUNINGThe scan tuning feature of the ATS-909X2 can be used on any band to automatically scan from the current frequency to the nearest strong station with a higher / lower frequency.
Follow these steps to use the scan feature:
1. Turn on the radio using the Power button (10).
2. Select the desired waveband by pressing the corresponding button.
3. Press and hold one of the Tuning Up / Down buttons (18).
4. The radio now automatically scans for the nearest station with a strong signal and a higher / lower frequency and will play this station once it has been found.
5. Repeat step 4 to find to tune to other radio stations. NOTEThe sensitivity of the scan tuning feature can be adjusted by setting the squelch level. See "SETTING THE SQUELCH LEVEL" section in chapter 5 for more information.
USING MANUAL TUNINGManual tuning can be used on any band to either input the frequency of a radio station directly or to manually tune or fine-tune to a station using small steps.
DIRECT TUNINGFollow these steps to directly tune to a radio station of which you know the frequency:
1. Turn on the radio using the Power button (10).
2. Press the Freq button (25).
3. Use the numeric buttons (19) and the Decimal point button (32) to enter the frequency.Examples:
FM 107.85MHz: Press Freq (25) → 1 → 0 → 7 → . → 8 → 5 → Enter
SW 25785kHz: Press Freq (25) → 2 → 5 → 7 → 8 → 5 → Enter
Or Press Freq (25) → 2 → 5 → . → 7 → 8 → 5 → Enter
AIR 123.450MHz: Press Freq (25) → 1 → 2 → 3 → . → 4 → 5 → Enter
AM 1620kHz: Press Freq (25) → 1 → 6 → 2 → 0 → Enter
LW 257kHz: Press Freq (25) → 2 → 5 → 7 → Enter NOTEIf the desired frequency is on the FM band, a decimal point must be added when inputting the frequency.
MANUAL TUNINGTo tune to a radio station of which you know the frequency or to fine-tune to a station, follow these steps:
1. Turn on the radio using the Power button (10).
2. Select the desired waveband by pressing the corresponding button.
3. Use the Rotary Tuning knob (16) or Tuning Up / Down buttons (18) to tune to a higher / lower frequency.
SETTING THE TUNING STEPWhen using manual tuning, the frequency change per tuning step using the Rotary Tuning knob (16) and the FM tuning step using the Tuning Up / Down buttons (18) can be adjusted.
To adjust the Rotary Tuning knob (16) tuning step for the SW, MW, LW, FM and AIR band, simply press the Step button (17) when listening to a radio station. The Tuning step indicator (O) on the display shows which tuning step is currently selected. In addition, you can press and hold the Step button (17) to disable tuning with the Rotary Tuning knob (16). Hold the Step button (17) again to enable tuning with the Rotary Tuning knob (16) again.
To adjust the FM tuning step of the Tuning Up / Down buttons (18), follow these steps:
1. Press and hold the Menu button (29) to open the menu.
2. Use the Rotary Tuning knob (16) to select "FM STEP" in the Text display (U).
3. Press the Step button (17) or Enter button (30) to start configuring the setting.The current FM tuning step will now blink in the Text display (U).
4. Use the Rotary Tuning knob (16) to select 50kHz, 100kHz or 200kHz.
5. Press the Step button (17) or Enter button (30) to confirm your choice.
6. Press the Menu button (29) to close the menu.
The MW / AM tuning step can be adjusted using the MW / AM tuning step switch (48), which is located inside the battery compartment. This switch can be placed in either the 9kHz or 10kHz position. In Europe and most other parts of the world this switch must be placed in the 9kHz position, while in America this switch must be placed in the 10kHz position.
Finally, the ATS-909X2 also features a quick tuning feature. This feature can be used by pressing and holding the Enter button (30) while simultaneously rotating the Rotary Tuning knob (16). Quick tuning allows for even larger frequency steps, but it can only be used on the AIR, FM and SW bands.
The following table shows the available tuning steps for the Rotary Tuning knob (16) and the Tuning Up / Down buttons (18) for each of the wavebands:
AIR FM LW MW SW
Rotary Tuning knob
STOP 0 0 0 0 0
FAST 25kHz 100kHz 9kHz9kHz
10kHz5kHz
SLOW 5kHz 50kHz 1kHz 1kHz 1kHz
Tuning Up / Down (scan or
seek)25kHz
50kHz 100kHz 200kHz
9kHz 9kHz
10kHz5kHz
Quick Tuning 1MHz 1MHz - - 100kHz
STEREO RECEPTIONThe ATS-909X2 is designed to receive FM stereo broadcasts. When the radio is tuned to an FM station of sufficient strength, the FM stereo indicator (Ab) will be

10
GB
F
E
NL
D
shown on the display and the broadcast will be played in stereo if headphones are connected or an external device is connected to the LINE OUT jack (38). NOTEThe radio can be forced to play FM radio stations in mono by using the "FM STEREO" setting in the menu. This can help reduce noise when listening to FM stations. More details on how to enable this feature can be found in chapter 6 "USING THE MENU".
ADJUSTING THE VOLUMEThe volume of the radio can be adjusted by rotating the Volume Control knob (12) clockwise to increase the volume or counterclockwise to decrease the volume.
USING PRESET STATIONSThe ATS-909X2 allows you to store up to 1674 radio stations in the memory of the radio. The radio has three memory banks that can each store up to 558 preset stations.
The following table gives an overview of the number of stations that can be stored in one memory bank for each of the wavebands:
WAVEBAND PRESET PAGES (9 PRESETS P PAGE)
TOTAL NO. OF PRESETS
AIR 5 45
FM 4 36
MW 3 27
LW 1 9
SW 49 441
STORING PRESET STATIONS IN MEMORY – MW / LW / FM / AIR
Follow these steps to save preset stations on the MW, LW, FM and AIR bands:
1. Turn on the radio using the Power button (10).
2. Select the desired waveband by pressing the corresponding button.
3. Tune to the station you want to store in the preset memory as described earlier.
4. Press the Memo button (24).
The Memo indicator (X) and the first available preset position (S) will now be blinking on the display.
5. To store the station at the first available position, press the Enter button (30) to confirm and store the preset to that position.To store the station to a different preset position:
6. Press the Page button (27) to select the desired page.
7. Press any of the numeric buttons (19) to save the station to the corresponding preset position.
NOTEIf another station has already been stored at a preset position that is selected, then the station that was previously stored at that preset position will be moved to the first available empty preset position (even if that preset position is located on another page).
STORING PRESET STATIONS IN MEMORY – SW ONLY
The procedure for storing stations on the SW band is slightly different from the procedure for the other bands described above. Follow these steps to store stations on the SW band:
1. Turn on the radio using the Power button (10).
2. Select the SW band by pressing the SW button (20).
3. Tune to the station you want to store in the preset memory as described earlier.
4. Press the Memo button (24).
The Memo indicator (X) and the first available preset position (S) will now be blinking on the display.
5. To store the station at the first available position, press the Enter button (30) to confirm and store the preset to that position.To store the station to a different preset position:
6. Use the Rotary Tuning knob (16) or Tuning Up / Down buttons (18) to select a page number.
7. Now either press the Enter button (30) to save the station to the first available position (S) on that page or press any of the numeric buttons (19) to save the station to the corresponding preset position.
If another station has already been stored at a preset position that is selected, then the station that was previously stored at that preset position will be moved to the first available empty preset position on the same page.
If a page on the SW band already has 9 stations preset in the radio's memory, then you will have to either select a different page manually or overwrite one of the existing presets by pressing and holding the numeric button of that preset position. Overwritten presets will be moved to a different page if there are pages left with available preset positions.
NOTE
NOTEBecause shortwave reception can be affected by weather conditions, radio stations on the shortwave band may have different frequencies on which they can be received depending on the conditions. It is therefore a good idea to store several frequencies for the same radio station on the same preset page, as the radio will automatically scan for the preset with the strongest signal when a page is selected on the SW band.
RECALLING PRESET STATIONS – MW / LW / FM / AIR
Follow these steps to recall a preset station on the MW, LW, FM and AIR bands:
1. Turn on the radio using the Power button (10).
2. Select the desired waveband by pressing the corresponding button.
3. Select the page that the preset station is on (if applicable) by repeatedly pressing the Page button (27).
4. Press any of the numeric buttons (19) to recall the corresponding preset station.
11
GB
F
E
NL
D
RECALLING PRESET STATIONS – SW ONLY
Follow these steps to recall a preset station on the SW band:
1. Turn on the radio using the Power button (10).
2. Select the desired waveband by pressing the corresponding button.
3. Press the Page button (27) once and then use the Rotary Tuning knob (16) or Tuning Up / Down buttons (18) to select the desired page number.
4. Press the Enter button (30) to confirm the page number.The radio will now scan the selected page and automatically select the preset with the strongest signal on the selected page.
5. Press any of the numeric buttons (19) to recall the corresponding preset station.
LOCKING PRESET STATIONSAfter storing preset stations, it is possible to lock them in order to prevent accidentally deleting them, for instance because of accidentally starting the ATS feature.
1. Turn on the radio and recall the desired preset station as previously described.
2. Press the Memo button (24).
The Memo indicator (X) and the preset position of the selected station (S) will now be blinking on the display.
3. Press the Memory Lock button (26).
After locking a preset station, the Preset lock indicator (V) will be shown on the display to indicate the preset station is locked and cannot be deleted.
Repeat this procedure to unlock preset stations again.
DELETING PRESET STATIONSTo delete a preset station from the radio's memory, follow these steps:
1. Turn on the radio and recall the desired preset station as previously described.
2. Press the Memo button (24).
The Memo indicator (X) and the preset position of the selected station (S) will now be blinking on the display.
3. Press the Cancel button (31). NOTELocked stations cannot be deleted using this method. When trying to delete a locked preset station, the Text display (U) will show the message "MEMO LOCK". In this case the preset station can only be deleted by unlocking it first.
MOVING PRESET STATIONS TO ANOTHER POSITION
Preset stations can be moved to another preset position and / or page. If another station is already saved at the desired preset position, then the stations will switch positions if they are on the same page. If they are not on the same page, the station that was originally saved at the selected preset position will be moved to the first available preset position.
You can move a preset station in memory by following these steps:
1. Turn on the radio and recall the desired preset station as previously described.
2. Press the Memo button (24).
The Memo indicator (X) and the preset position of the selected station (S) will now be blinking on the display.
3. Select the desired page using the Page button (27).
4. Press the numeric button (19) corresponding to the desired preset number.
NOTEAlthough locked preset stations cannot be deleted, they can be moved using this feature.
RENAMING PRESET STATIONS – MW / LW / FM / AIR
The names of preset stations on the MW, LW, FM and AIR bands can be changed by following these steps:
1. Turn on the radio, select the MW, LW, FM or AIR band and recall the desired preset station as previously described.
2. Press the Edit button (28).
The first character of the preset name will now blink in the Text display (U).
3. Use the Rotary Tuning knob (16) or numeric buttons (19) and Tuning Up / Down buttons (18) to select characters, edit them and enter the desired name.
4. Press the Enter button (30) to confirm and save the name.
RENAMING PRESET PAGES – SW ONLYOn the SW band, only preset pages have names. To change the name of a preset page, follow these steps:
1. Turn on the radio, select the SW band and recall the desired preset page as previously described.
2. Press the Edit button (28).
The first character of the page name will now blink in the Text display (U).
3. Use the Rotary Tuning knob (16) or numeric buttons (19) and Tuning Up / Down buttons (18) to select characters, edit them and enter the desired name.
4. Press the Enter button (30) to save the name.
5. ADVANCED TUNING FEATURESSETTING THE METER BAND – SW ONLY
When the SW band is selected, a meter band can also be selected to adjust the frequency range of the radio. In total, there are 14 meter bands available that can be selected as follows:
1. Turn on the radio using the Power button (10).
2. Press the ATS / METER / SW button (20) to select the SW band.
3. Press the ATS / METER / SW button (20) again.
12
GB
F
E
NL
D
The SW meter band indicator (Q) will now be blinking on the display.
4. Press one of the numeric buttons (19), the Memo button (24), the Freq button (25) or the Cancel button (31) to select the corresponding meter band.The following table shows which buttons (mentioned in step 4 above) correspond to which meter band and frequency range:
USER INPUT METER BAND FREQUENCY RANGE (MHz)
1 120m 2.300-2.495
2 90m 3.200-3.400
3 75m 3.900-4.000
Freq 60m 4.750-5.060
4 49m 5.900-6.200
5 41m 7.100-7.350
6 31m 9.400-9.990
Memo 25m 11.600-12.100
7 21m 13.500-13.870
8 19m 15.100-15.800
9 16m 17.480-17.900
● 15m 18.900-19.020
0 13m 21.450-21.750
Cancel 11m 25.600-26.100
NOTEAfter selecting a meter band, the selected band will remain on the display as long as the radio is tuned within this meter band. When using scan tuning, the automatic scan will also loop within the selected meter band, unless you continue pressing one of the Tuning Up / Down buttons (18) till the frequency crosses the range of the meter band.
SINGLE SIDE BAND (SSB) RECEPTION – SW / MW / LW
SSB is very popular among ham and business radio users because of its efficiency. Amateurs who use SSB and transmit below 10MHz generally use the lower side band (LSB), while amateur and commercial stations transmitting above 10MHz generally use the upper side band (USB). Your ATS-909X2 is capable of receiving all USB and LSB transmissions.
To receive SSB stations:
1. Turn on the radio using the Power button (10).
2. Rotate the AM RF Gain jog dial (40) to the maximum position.
3. Select the SW, MW, or LW band by pressing the corresponding button.
4. Tune to an SSB station in accordance with earlier instructions.
5. As soon as you have tuned to an SSB station (you will not be able to clearly hear any speech), switch to SSB reception by pressing the SSB button (6) repeatedly to
switch between AM, USB and LSB. The SSB indicator (G) on the display shows which band is currently selected.
6. After selecting the correct mode, use the STEP button (17) to select SLOW stepping and then use the Rotary Tuning knob (16) to fine-tune to the station.
NOTEThe minimum tuning step is set to 20Hz by default, but it can be changed to 10Hz in the menu. Refer to the next section for more information on setting the SSB tuning step.
SETTING THE SINGLE SIDE BAND TUNING STEP – SW / MW / LW
When using manual tuning on either of the single side bands, the frequency change per tuning step when using the Rotary Tuning knob (16) can be adjusted by following these steps:
1. Press and hold the Menu button (29) to open the menu.
2. Use the Rotary Tuning knob (16) to select "SSB STEP" in the Text display (U).
3. Press the Step button (17) or Enter button (30) to start configuring the setting.The current setting will now blink in the Text display (U).
4. Use the Rotary Tuning knob (16) to select 10Hz or 20Hz.
5. Press the Step button (17) or Enter button (30) to confirm your choice.
6. Press the Menu button (29) to close the menu.
The following table shows the available tuning steps for the Rotary Tuning knob (16) and the Tuning Up / Down buttons (18) for the single side bands:
LSB / USB
LW MW SW
Rotary Tuning knob
STOP 0 0 0
FAST 1kHz 1kHz 1kHz
SLOW20Hz /
10Hz
20Hz /
10Hz
20Hz /
10Hz
Tuning Up / Down 9kHz 9kHz / 10kHz 5kHz
SETTING THE BANDWIDTHThe Bandwidth Control switch (13) allows you to choose whether the bandwidth for the various bands should be automatically set or manually set. When the switch is placed in the manual position, the Bandwidth Control button (26) can be used to change the bandwidth on the SW, MW, LW, FM and AIR bands.
A wide bandwidth can increase sound quality when receiving a strong signal, while a narrow bandwidth can make it easier to receive weak signals and overcome problems caused by interference. When selecting the narrowest bandwidth on the FM band, stereo playback is not always available.
13
GB
F
E
NL
D
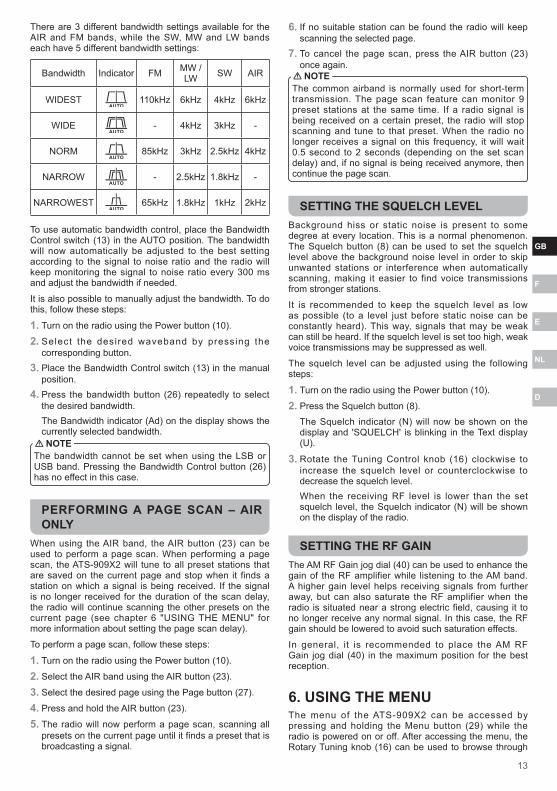
There are 3 different bandwidth settings available for the AIR and FM bands, while the SW, MW and LW bands each have 5 different bandwidth settings:
Bandwidth Indicator FM MW / LW SW AIR
WIDEST 110kHz 6kHz 4kHz 6kHz
WIDE - 4kHz 3kHz -
NORM 85kHz 3kHz 2.5kHz 4kHz
NARROW - 2.5kHz 1.8kHz -
NARROWEST 65kHz 1.8kHz 1kHz 2kHz
To use automatic bandwidth control, place the Bandwidth Control switch (13) in the AUTO position. The bandwidth will now automatically be adjusted to the best setting according to the signal to noise ratio and the radio will keep monitoring the signal to noise ratio every 300 ms and adjust the bandwidth if needed.
It is also possible to manually adjust the bandwidth. To do this, follow these steps:
1. Turn on the radio using the Power button (10).
2. Select the desired waveband by pressing the corresponding button.
3. Place the Bandwidth Control switch (13) in the manual position.
4. Press the bandwidth button (26) repeatedly to select the desired bandwidth. The Bandwidth indicator (Ad) on the display shows the currently selected bandwidth.
NOTEThe bandwidth cannot be set when using the LSB or USB band. Pressing the Bandwidth Control button (26) has no effect in this case.
PERFORMING A PAGE SCAN – AIR ONLY
When using the AIR band, the AIR button (23) can be used to perform a page scan. When performing a page scan, the ATS-909X2 will tune to all preset stations that are saved on the current page and stop when it finds a station on which a signal is being received. If the signal is no longer received for the duration of the scan delay, the radio will continue scanning the other presets on the current page (see chapter 6 "USING THE MENU" for more information about setting the page scan delay).
To perform a page scan, follow these steps:
1. Turn on the radio using the Power button (10).
2. Select the AIR band using the AIR button (23).
3. Select the desired page using the Page button (27).
4. Press and hold the AIR button (23).
5. The radio will now perform a page scan, scanning all presets on the current page until it finds a preset that is broadcasting a signal.
6. If no suitable station can be found the radio will keep scanning the selected page.
7. To cancel the page scan, press the AIR button (23) once again.
NOTEThe common airband is normally used for short-term transmission. The page scan feature can monitor 9 preset stations at the same time. If a radio signal is being received on a certain preset, the radio will stop scanning and tune to that preset. When the radio no longer receives a signal on this frequency, it will wait 0.5 second to 2 seconds (depending on the set scan delay) and, if no signal is being received anymore, then continue the page scan.
SETTING THE SQUELCH LEVELBackground hiss or static noise is present to some degree at every location. This is a normal phenomenon. The Squelch button (8) can be used to set the squelch level above the background noise level in order to skip unwanted stations or interference when automatically scanning, making it easier to find voice transmissions from stronger stations.
It is recommended to keep the squelch level as low as possible (to a level just before static noise can be constantly heard). This way, signals that may be weak can still be heard. If the squelch level is set too high, weak voice transmissions may be suppressed as well.
The squelch level can be adjusted using the following steps:
1. Turn on the radio using the Power button (10).
2. Press the Squelch button (8).
The Squelch indicator (N) will now be shown on the display and 'SQUELCH' is blinking in the Text display (U).
3. Rotate the Tuning Control knob (16) clockwise to increase the squelch level or counterclockwise to decrease the squelch level.When the receiving RF level is lower than the set squelch level, the Squelch indicator (N) will be shown on the display of the radio.
SETTING THE RF GAINThe AM RF Gain jog dial (40) can be used to enhance the gain of the RF amplifier while listening to the AM band. A higher gain level helps receiving signals from further away, but can also saturate the RF amplifier when the radio is situated near a strong electric field, causing it to no longer receive any normal signal. In this case, the RF gain should be lowered to avoid such saturation effects.
In general, it is recommended to place the AM RF Gain jog dial (40) in the maximum position for the best reception.
6. USING THE MENUThe menu of the ATS-909X2 can be accessed by pressing and holding the Menu button (29) while the radio is powered on or off. After accessing the menu, the Rotary Tuning knob (16) can be used to browse through
14
GB
F
E
NL
D
the available settings and to select settings, while the Step button (17) or Enter button (30) can be used start configuring settings or confirm selected settings.
The following settings can be found in the menu:
MANUAL / RDS CT
[RDS CT]: Set the clock using RDS CT when available.
[MANUAL]*: Set the clock manually and ignore RDS CT.
FORMAT [24H]*: Use the 24-hour clock format.
[12H]: Use the 12-hour clock format with PM indicator.
BACK LIGHT
[LIGHT 10S]: backlight timeout 10 seconds.
[LIGHT 20S]*: backlight timeout 20 seconds.
[LIGHT 30S]: backlight timeout 30 seconds.
Use th is set t ing to conf igure the backlight timeout when using battery power.
FM STEREO
[FM.ST AUTO]*: Use FM stereo mode when available
[FM.ST MONO]: Force the radio to use FM mono mode.
Use this setting to allow for stereo playback (when headphones or an external device are connected) or force mono playback. Forcing mono can sometimes help reduce noise.
SOFT MUTE
[S. MUTE ON]: FM softmute enabled.
[S. MUTE OFF]*: FM softmute disabled.
Softmute can reduce background hiss / noise of fading FM signals.
MEMOBANK A / B / C
[MEMOBANK A]*: Select memory bank A.
[MEMOBANK B]: Select memory bank B.
[MEMOBANK C]: Select memory bank C.
The ATS-909X2 features 3 memory banks each capable of storing 558 preset stations. Use all 3 of them to store up to 1674 preset stations.
FM STEP
[FM 50kHz]: Tuning Up / Down button FM tuning step 50kHz.
[FM 100kHz]*: Tuning Up / Down button FM tuning step 100kHz.
[FM 200kHz]: Tuning Up / Down button FM tuning step 200kHz.
FM RANGE
[FM 64-108 M]: Set the FM range to 64-108 MHz.
[FM 76-108 M]: Set the FM range to 76-108 MHz.
[FM 87-108 M]: Set the FM range to 87-108 MHz.
This setting can be used to configure the FM range, based on the country that you are currently in.
SSB STEP
[SSB 10Hz]: Tuning Up / Down button SSB tuning step 10Hz.
[SSB 20Hz]*: Tuning Up / Down button SSB tuning step 20Hz.
BEEP ON / OFF
[BEEP ON]: Turn on the confirmation beep for certain operations.
[BEEP OFF]: Turn off the confirmation beep for certain operations.
SCAN DELAY
[P.SCAN 0.5S]: Set the page scan delay to 0.5s.
[P.SCAN 1.0S]*: Set the page scan delay to 1.0s.
[P.SCAN 1.5S]: Set the page scan delay to 1.5s.
[P.SCAN 2.0S]: Set the page scan delay to 2.0s.
This setting can be used to configure the page scan delay for the AIR band. This is the time the radio waits for a signal on a preset frequency (when no signal is being received) before continuing a page scan.
VER XXXThis sett ing displays the software version. The software version is only for reference and cannot be changed.
FACTORY
[RESET NO]*: Do not perform a factory reset.
[RESET YES]: Perform a factory reset.
A factory reset restores the clock time / alarm / menu settings to the factory defaults. Preset stations and memory banks will not be deleted.
Note: The default settings are indicated with an asterisk (*).
7. OTHER FEATURESUSING ALARM TIMERS
SETTING AN ALARM TIMERThe ATS-909X2 features three alarm timers which can be set when the radio is powered on or off using the timer buttons (5). The alarm timers can be configured to use either the radio's buzzer or a radio station to wake you up.
To set an alarm timer, follow these steps:
1. Press one of the timer buttons (5).
15
GB
F
E
NL
D
The TIMER indicator (J), the corresponding Timer number indicator (M) and the Alarm source indicator (K / L) of the selected alarm source will now blink on the display.
2. Select the alarm source (radio or buzzer) using the SSB button (6).The indicator of the selected alarm source (K / L) will be blinking on the display.
3. Use the numeric buttons (19) to set the alarm time (e.g. to enter 11:00, press 1-1-0-0).
4. Press the Enter button (30) to confirm the alarm time and the alarm source.
5. The radio will produce a beep to indicate that the settings have been saved and the alarm is activated.
6. If the radio is set to use the 12-hour clock format, press the Decimal point button (32) to set either AM or PM. When PM is selected, the PM indicator (E) will be shown on the display.If the alarm source has been set to radio in step 2, a radio station should still be added to the alarm. To do this:
7. Tune to a radio station as previously described.
8. Press the Memo button (24).
The Memo indicator (X) and preset indicator (S) will now be blinking on the display.
9. Press the timer button (5) of the alarm timer that you want to assign the station to.When an alarm timer has been set and is active, the corresponding Timer number indicator (M) will permanently be shown on the radio's display. The alarm timer that is closest to the current time is marked with a rectangle in the Timer number Indicator (M).
NOTEThe buzzer alarm uses the Humane Wake System (HWS). This means that when the buzzer alarm activates, the alarm will start softly and gradually increase in volume. It will repeatedly sound for 1 minute and be muted for 1 minute over a period of 30 minutes, unless the alarm is stopped. If a radio station is used as the alarm source, then the radio will sound non-stop at the selected time for 60 minutes, unless the alarm is stopped.
WHEN AN ALARM SOUNDS
STOPPING AN ALARMWhen an alarm sounds, press the POWER button (10) to stop the sounding alarm.
USING THE SNOOZE FEATUREWhen an alarm sounds, press any button (except the Power button (10) or Backlight button (11)) to snooze the alarm for 5 minutes. This procedure can be repeated during the alarm period. The Snooze indicator (H) is shown on the display while the snooze feature is active.
DEACTIVATING AN ALARM TIMERIf an alarm timer is activated, press the corresponding timer button (5) followed by the Cancel button (31) to deactivate the alarm timer. The corresponding Timer
number indicator (M) will now no longer be shown on the display.
SETTING THE SLEEP TIMERThe sleep timer allows you to automatically turn off the radio after a preset time has elapsed. It can be set from 90 minutes to 10 minutes in 10 minute decrements.
To set the sleep timer, press and hold the Power button (10) and release it when the desired sleep time is shown in the Text display (U) on the display. An active sleep timer is indicated on the display by the Sleep timer indicator (I).
DISPLAYING SIGNAL INFORMATIONThe Info button (29) can be used in all modes to display basic information about the signal that is being received. After tuning to a radio station on the SW, MW, LW or AIR band, or an FM station that is not broadcasting RDS / RBDS information, repeatedly press the Info button (29) to display the following information in sequence:
1. Preset or page name - Display the name of the preset or preset page.
2. Signal RF strength - Displays the signal strength in dB.
3. Signal to Noise ratio - Displays the signal to noise ratio in dB.
4. Memory bank A / B / C - Displays the memory bank that is currently being used.
The available layers of information and the information that is displayed are also shown in the table below:
Layer SW / MW / LW / AIR / FM without RDS or RBDS
1 Preset or page name
2 RSSI -- xxDB
3 SNR -- xxDB
4 MEMOBANK - A / B / C
Note: RSSI: Radio Signal Strength Indication
SNR: Signal to Noise Ratio
NOTEIf your radio is tuned to an FM station that broadcasts RDS / RBDS information, the Info button (29) can show additional information. Refer to the next section for more information about RDS and additional information it offers.
USING THE RDS FEATURE – FM ONLYRadio Data System (RDS) is a service that allows FM stations to broadcast additional information. The ATS-909X2 is capable of receiving RDS / RBDS signals. When receiving an FM radio station that broadcasts RDS data, the station name will be displayed in the Text display (U) and the display will show the RDS indicator (Aa).
If the RDS CT indicator (D) is shown on the display, this means that the radio's clock has been automatically synchronized with the clock signal broadcasted by the FM radio station. This feature must be enabled (it is disabled by default) for the radio to be able to synchronize its clock
16
GB
F
E
NL
D
using the signal (see chapter 6 "USING THE MENU" for more information). The RDS CT feature is a convenient feature that enables you to always have the correct time set when tuning in to an FM station that broadcasts an RDS CT signal. NOTENot all stations broadcast the CT and many are not always accurate, this is the fault the broadcast signal not the radio.
When tuned to an FM station with RDS, additional information that is being broadcasted can be shown in the Text display (U) by repeatedly pressing the Info button (29). The radio will show the following information in sequence:
1. Preset name - Displays the name of the preset.
2. Program service name - Displays the name that is broadcasted by the radio station.
3. Program Type - Displays the type of program that is being received.
4. Radio Text - Displays text message that is broadcasted by the radio station.
5. Signal strength - Displays the signal strength.6. Signal-noise ratio - Displays the signal to noise
ratio.7. Memory bank A / B / C - Displays the memory bank
that is currently being used.
The available layers of information and the information that is displayed are also shown in the table below:
Layer FM with RDS or RBDS
1 Preset name
2 RDS / RBDS PS
3 RDS / RBDS PTY
4 RDS / RBDS RT
5 RSSI -- xxDB
6 SNR -- xxDB
7 MEMOBANK - A / B / C
Note: RSSI: Radio Signal Strength Indication
SNR: Signal to Noise Ratio
RDS: Radio Data System for Europe area
RBDS: Radio Broadcast Data System
USING THE RADIO TO CHARGE BATTERIES
The ATS-909X2 can be used to charge rechargeable NI-MH or NI-CAD batteries when the radio is powered off. Before charging batteries using the ATS-909X2, please first make sure that the batteries that are being used are rechargeable NI-MH or NI-CAD batteries.
Then follow these steps to charge the batteries:
1. Open the Battery Compartment cover (43) in the direction indicated by the arrow on the cover.
2. Insert 4 x NI-MH or NI-CAD (AA Size) batteries into the
Battery Compartment (43) with polarities as shown on the diagram on the cover and inside the compartment.
3. Place the Battery switch (47) in the NIMH / NICAD (Charger) position.
4. Close the Battery Compartment (43) again.
5. Make sure the radio is turned off to charge the batteries.
The Charge indicator (9) will blink in red when the batteries are being charged.
6. When the batteries are fully charged, the Text display (U) will show the message "BATT FULL".
NOTEIf any abnormalities are detected while charging batteries, the Text display (U) will show the message "BT-X-CHECK", where "X" represents the number of the battery that needs to be checked and / or replaced (e.g. "BT-1-CHECK" means that battery 1 needs to be checked and / or replaced). Which battery corresponds to which battery number is shown both on the battery compartment cover (43) and inside the battery compartment (43).
SETTING THE DISPLAY BRIGHTNESS LEVEL
The Backlight button (11) can be used to illuminate the display or to set the brightness level of the display. Press the Backlight button (11) repeatedly to select the desired brightness level or to illuminate the display when the backlight has turned off.
CHECKING THE SOFTWARE VERSIONThe radio's software version can be shown both in the menu and by performing these steps:
1. Make sure the radio is powered off.
2. Press the Enter button (30), the radio shows the software version on its display.The version display cannot be altered and is just for your reference.
USING THE TONE CONTROL SWITCHThe Tone Control switch (14) at the right side of the radio allows you to adjust the tone of the radio based on the broadcasted programs. The switch has three settings: Music, Normal and News. NOTEThis switch can also be used to reduce noise on the AM / USB / LSB bands by placing it in the News position. This can enhance the voice quality as well.
USING THE LOCK SWITCHThe Lock switch (15) can be used to prevent unintentional operation of the radio. This can come in handy to prevent the radio from being turned on when it is being transported or to prevent the radio from accidentally being powered off.
When the Lock switch (15) is placed in the ON position, the radio will not respond to any user input and the Button Lock indicator (A) will be shown on the radio's display. To unlock the radio, place the switch in the OFF position. The Button Lock indicator (A) will now no longer be shown and the radio can be operated again using its buttons.
17
GB
F
E
NL
D
USING THE AUX IN JACKYou can listen to the sound of an external device through your ATS-909X2's speaker. To do this, simply connect the external device (such as iPod, MP3 player or CD player) to the radio's AUX IN jack (35) using a 3.5mm audio cable and then press the AUX IN button (39). The audio output of the external device will now be played through the speaker of your ATS-909X2 and the volume can be adjusted using the radio's Volume Control (12).
USING THE REC STANDBY / LINE-OUT JACKS
These jacks on the left side of the radio can be used to output audio (LINE OUT/38) and activate an external recorder using a timer (REC. STANDBY / 37) utilizing a 2.5 or 3.5mm audio cable.
Both jacks can be connected to the LINE IN (or AUX IN) jack of an external device to record or play the programs received by the ATS-909X2. The REC. STANDBY jack has the additional benefit of being able to activate certain external recorders, such as Sangean’s DAR-101, using an alarm timer on the ATS-909X2.
Refer to your external recorder's user manual to determine whether your external recording device is compatible with timer activated recording. More details about how to set the alarm of the ATS-909X2 can be found in the "SETTING AN ALARM TIMER" section above.
● For more information on the SANGEAN DAR-101 Digital Audio Recorder, which supports timer recordings using the REC. STANDBY (37) and LINE OUT (38) jacks, go to: https://www.sangean.com/products/product.asp?mid=166&cid=9
NOTEThe LINE OUT jack (38) differ from the Headphones jack (42). The volume level of the Headphones jack (42) varies depending on the volume of the radio. The LINE OUT jack (38) have a fixed volume level, so the output level is consistent regardless of the position of the Volume Control (12) or Tone Control switch (14).
WARNINGDon't connect the AUX IN jack (35) of the ATS-909X2 to a LINE OUT jack of an external recorder, while also connecting either the LINE OUT jack (38) to the AUX IN jack of an external recorder.
USING THE HEADPHONE JACKPlug a pair of headphones with a 3.5mm plug into the Headphones jack (42) on the left side of the ATS-909X2 to listen to the radio using headphones. When a pair of headphones is connected to the radio, the internal speaker is automatically muted.
USING THE RESET SWITCHThe Reset Switch (46) at the bottom of the radio will reset the time and microprocessor of the radio only. All settings, alarm timers and preset stations will still be available in the radio's memory. After using this switch, the time can be reprogrammed following the instructions in the "SETTING YOUR LOCAL TIME AND TIME ZONE" section in chapter 3.
8. T E C H N I C A L D A T A A N D SPECIFICATIONS
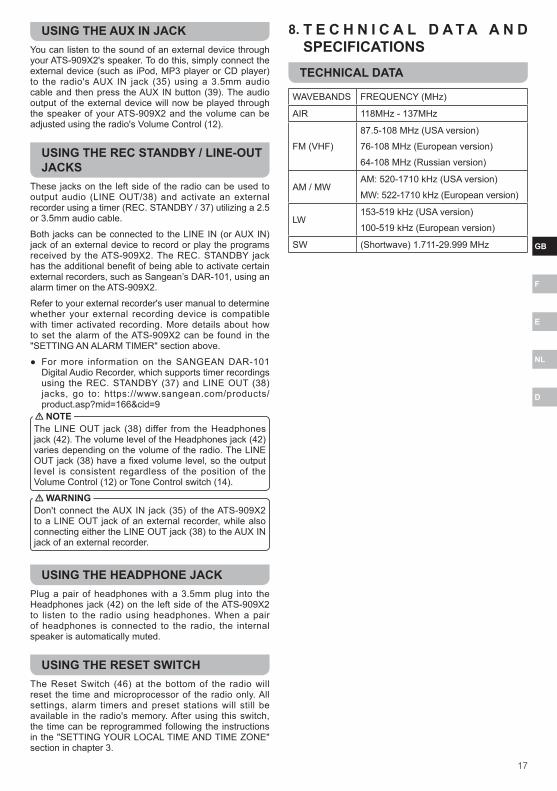
TECHNICAL DATA
WAVEBANDS FREQUENCY (MHz)
AIR 118MHz - 137MHz
FM (VHF)
87.5-108 MHz (USA version)
76-108 MHz (European version)
64-108 MHz (Russian version)
AM / MWAM: 520-1710 kHz (USA version)
MW: 522-1710 kHz (European version)
LW153-519 kHz (USA version)
100-519 kHz (European version)
SW (Shortwave) 1.711-29.999 MHz
18
GB
F
E
NL
D
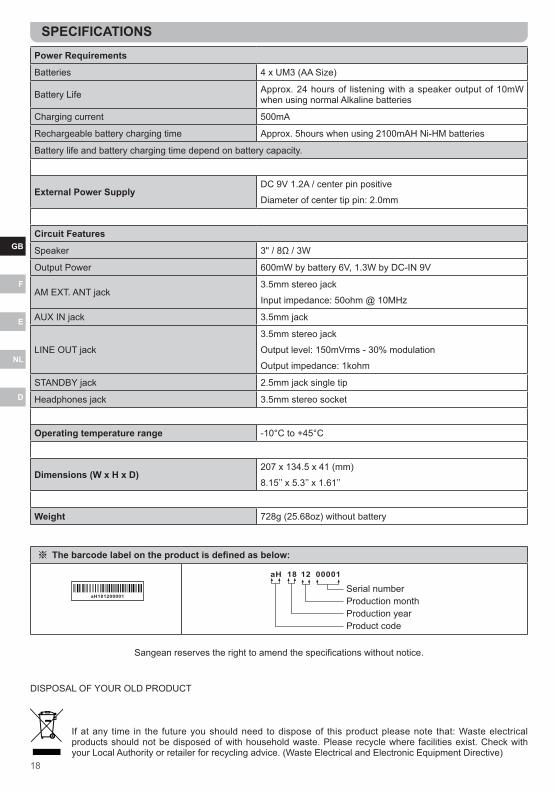
SPECIFICATIONSPower Requirements
Batteries 4 x UM3 (AA Size)
Battery Life Approx. 24 hours of listening with a speaker output of 10mW when using normal Alkaline batteries
Charging current 500mA
Rechargeable battery charging time Approx. 5hours when using 2100mAH Ni-HM batteries
Battery life and battery charging time depend on battery capacity.
External Power SupplyDC 9V 1.2A / center pin positive
Diameter of center tip pin: 2.0mm
Circuit Features
Speaker 3" / 8Ω / 3W
Output Power 600mW by battery 6V, 1.3W by DC-IN 9V
AM EXT. ANT jack3.5mm stereo jack
Input impedance: 50ohm @ 10MHz
AUX IN jack 3.5mm jack
LINE OUT jack
3.5mm stereo jack
Output level: 150mVrms - 30% modulation
Output impedance: 1kohm
STANDBY jack 2.5mm jack single tip
Headphones jack 3.5mm stereo socket
Operating temperature range -10°C to +45°C
Dimensions (W x H x D)207 x 134.5 x 41 (mm)
8.15’’ x 5.3’’ x 1.61’’
Weight 728g (25.68oz) without battery
If at any time in the future you should need to dispose of this product please note that: Waste electrical products should not be disposed of with household waste. Please recycle where facilities exist. Check with your Local Authority or retailer for recycling advice. (Waste Electrical and Electronic Equipment Directive)
Sangean reserves the right to amend the specifications without notice.
※ The barcode label on the product is defined as below:
Serial number Production month Production year Product code
DISPOSAL OF YOUR OLD PRODUCT