an unusual pearl
TRANSCRIPT
An Unusual Pearl Nick Sturman
GIA Laboratory, Bangkok
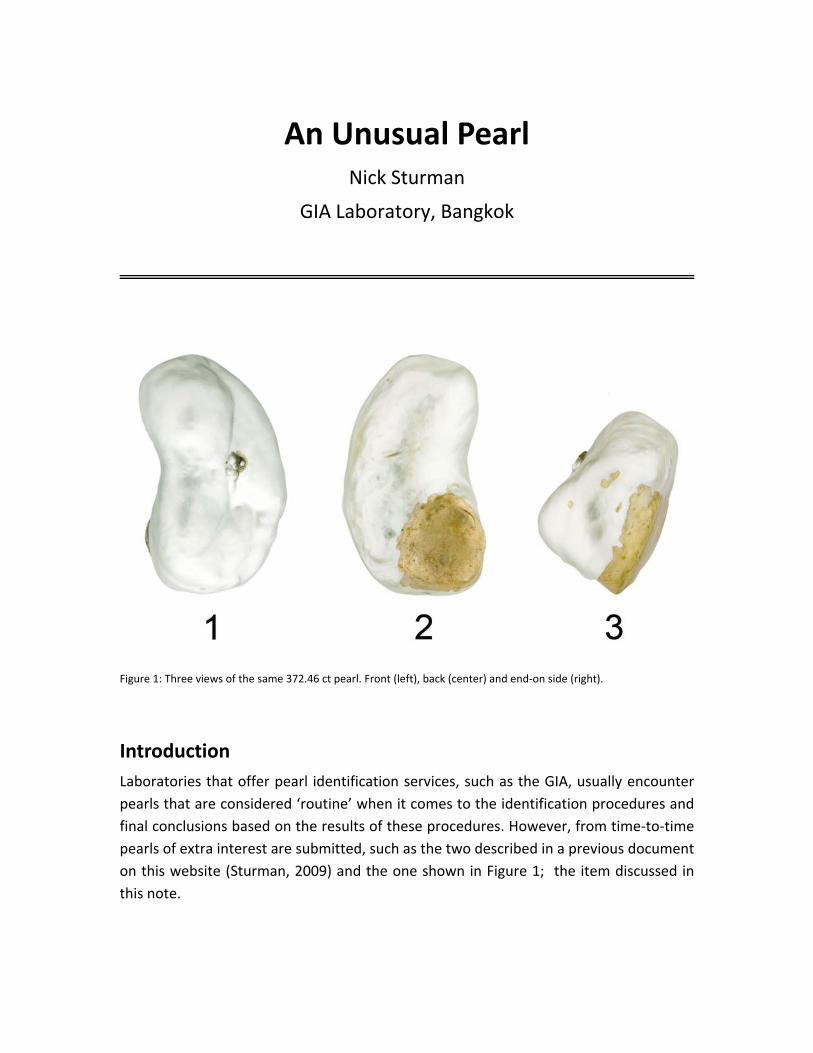
Figure 1: Three views of the same 372.46 ct pearl. Front (left), back (center) and end‐on side (right).
Introduction Laboratories that offer pearl identification services, such as the GIA, usually encounter pearls that are considered ‘routine’ when it comes to the identification procedures and final conclusions based on the results of these procedures. However, from time‐to‐time pearls of extra interest are submitted, such as the two described in a previous document on this website (Sturman, 2009) and the one shown in Figure 1; the item discussed in this note.
Prior to the pearl’s submission the client sent us some images of the pearl via e‐mail correspondence to ensure that we were able to test the item and to provide an idea on the cost of testing such a large piece. On reviewing the images sent, it was apparent that this was going to be an interesting job, not only because of the size, but also due to the fact that it appeared as though ‘something’ had already been done to alter the pearl’s surface in one area. This is evident in two of the three directions in which the pearl was photographed in Figure 1. Since the client was also requesting a quotation on examining the pearl under GIA’s ‘Classification Report’ scale, which details a pearl’s luster, surface condition and matching (when applicable, which obviously wasn’t in this case), in addition to the usual information provided in a standard ‘Pearl Identification Report’, it also became clear to the Client Services Representative (CSR) staff who look after all of the GIA’s valued clients, that a some explanation of GIA’s policies was required in this instance. Why? Because ‘Classification Reports’ can only be issued for pearls that are not treated, other than with minor to average polishing which most pearls appear to go through these days, and hence the large suspect area on the pearl would, if we were correct in our assumptions, mean that a ‘Classification Report’ could not be issued on this particular pearl and only a ‘Pearl Identification’ report could be issued. Therefore the CSR staff informed the client that a ‘Classification Report’ would only be issued if no treatment were detected during the course of the analysis. After considering this new information for a while the identification staffs were told that the client thought that it was completely natural with no treatments and this would not be a concern! We hoped the client was correct.
The Pearl As the client was keen to point out, the pearl was big! Indeed it was. In fact it weighed‐in at 372.46 carats (74.50 grams) and measured 58.21 x 32.70 x 20.97 mm. However, the first significant indication that something was “wrong” was immediately apparent as soon as anyone held the pearl in their hand(s). It just weighed too much for its size and did not feel ‘right’. This was made even more suspicious when the pearl was turned over from its frontal view and the back was examined. Sure enough a very strange yellow area of what appeared to be a completely different material was immediately visible (Figure 1). Things were not looking too promising.
Experience with handling large loose pearls, usually baroque like this example, over many years has shown gemologists involved in pearl identification that they are often hollow and also quite often blister (formed attached to the shell and then removed at some point) in nature. Experience has also shown that a number of such pearls have also been filled with various materials in the past (Scarratt, 1984, Scarratt, 1986). Hence,
considering the excess weight of the piece and the size, we predicted that once microradiographed we were sure to see some kind of filling within an internal cavity and that an opening in the pearl’s surface had been covered with the yellow material to conceal the evidence. The yellow material did seem to be an odd choice though as it was not exactly a good color match to the white pearl. However it may have altered from a more realistic/convincing original color to its present appearance over time.
Microradiographs – The Answer Whenever a pearl tester is in the position of revealing the inner structure if a pearl there is always some anticipation as to what will become visible. Nobody actually knows until the film is developed or in our case the image appears on the computer monitor of the GIA’s Faxitron CS‐100AC Real‐Time X‐ray System. This anticipation increases even more when a pearl that is known to be ‘different’ from the usual pearls submitted is about to reveal its inner secrets. Such was the case with this example and the time for guessing was about to come to an end!
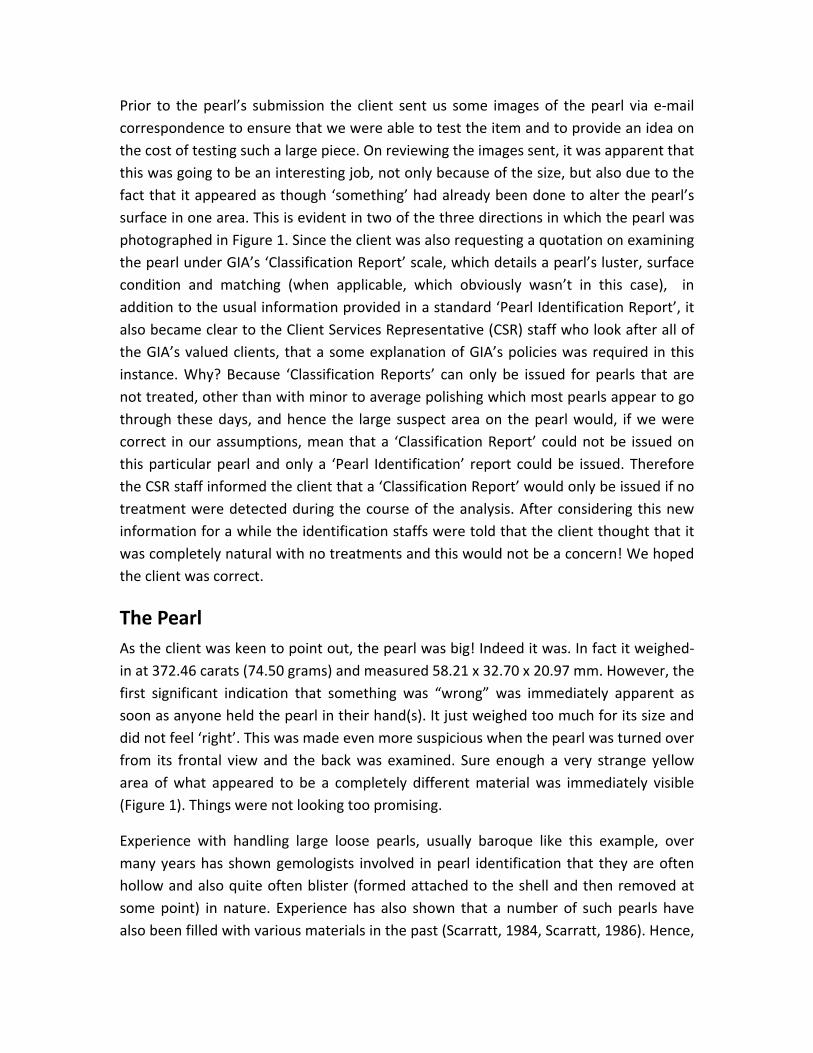
Sure enough the first thing that became apparent when the image appeared on the monitor was a large opaque (metals or anything composed of elements with a high atomic number appear this way) object within a large cavity (Figure 2). Our prediction had been confirmed. Yet, the work was not complete. A more detailed picture of the inner situation was required and so the pearl was examined in the various directions, including those shown in Figure 1, to form an overall three‐dimensional idea of the pearl and its filling. This was to prove important.
Figure 2: Opaque (white areas) metallic structure within the pearl's large internal cavity.
Not only was examination in three directions important, but since the pearl was so large it also exceeded the minimum Field of View range for the machine and hence as can be seen in Figure 2, only part of the pearl could be examined at one time. This situation is rarely encountered with this particular X‐ray machine as most pearls are much smaller and need to be magnified to see the structure even more clearly. Yet magnification would still prove useful, even on such a large pearl as this, as will be seen later.
By combining two of the separate images it is possible to reproduce a composite image of the pearl’s whole inner structure (Figure 3).
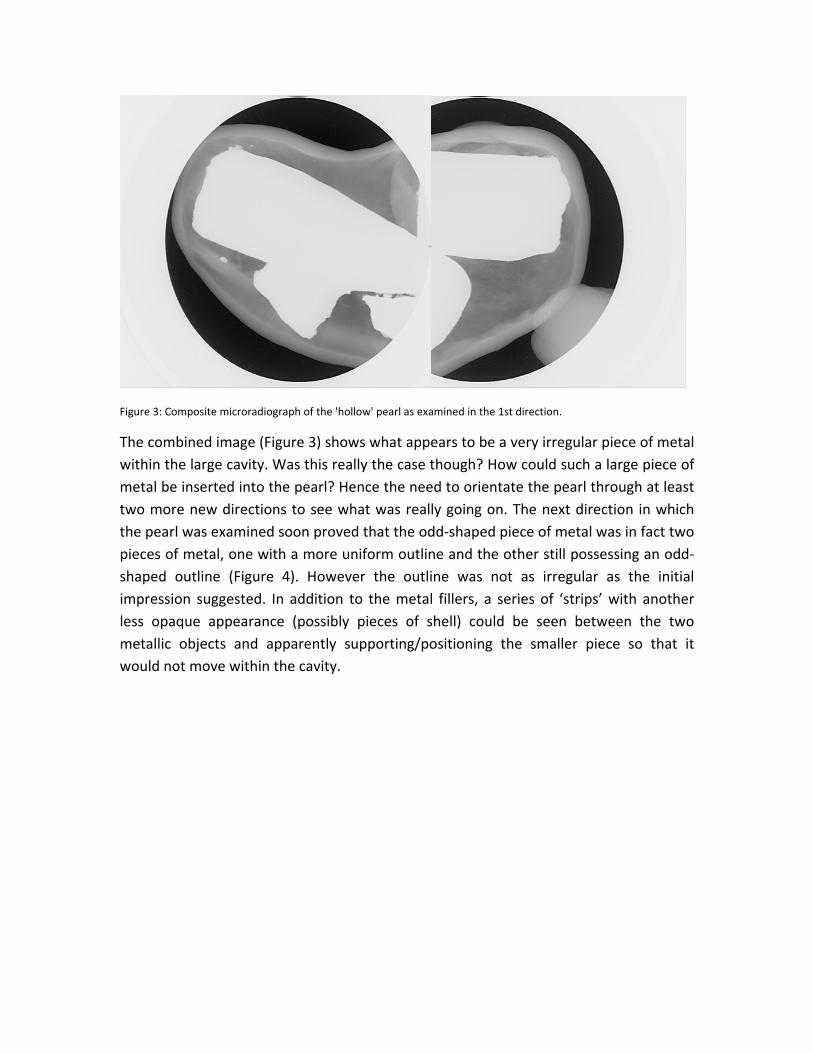
Figure 3: Composite microradiograph of the 'hollow' pearl as examined in the 1st direction.
The combined image (Figure 3) shows what appears to be a very irregular piece of metal within the large cavity. Was this really the case though? How could such a large piece of metal be inserted into the pearl? Hence the need to orientate the pearl through at least two more new directions to see what was really going on. The next direction in which the pearl was examined soon proved that the odd‐shaped piece of metal was in fact two pieces of metal, one with a more uniform outline and the other still possessing an odd‐shaped outline (Figure 4). However the outline was not as irregular as the initial impression suggested. In addition to the metal fillers, a series of ‘strips’ with another less opaque appearance (possibly pieces of shell) could be seen between the two metallic objects and apparently supporting/positioning the smaller piece so that it would not move within the cavity.
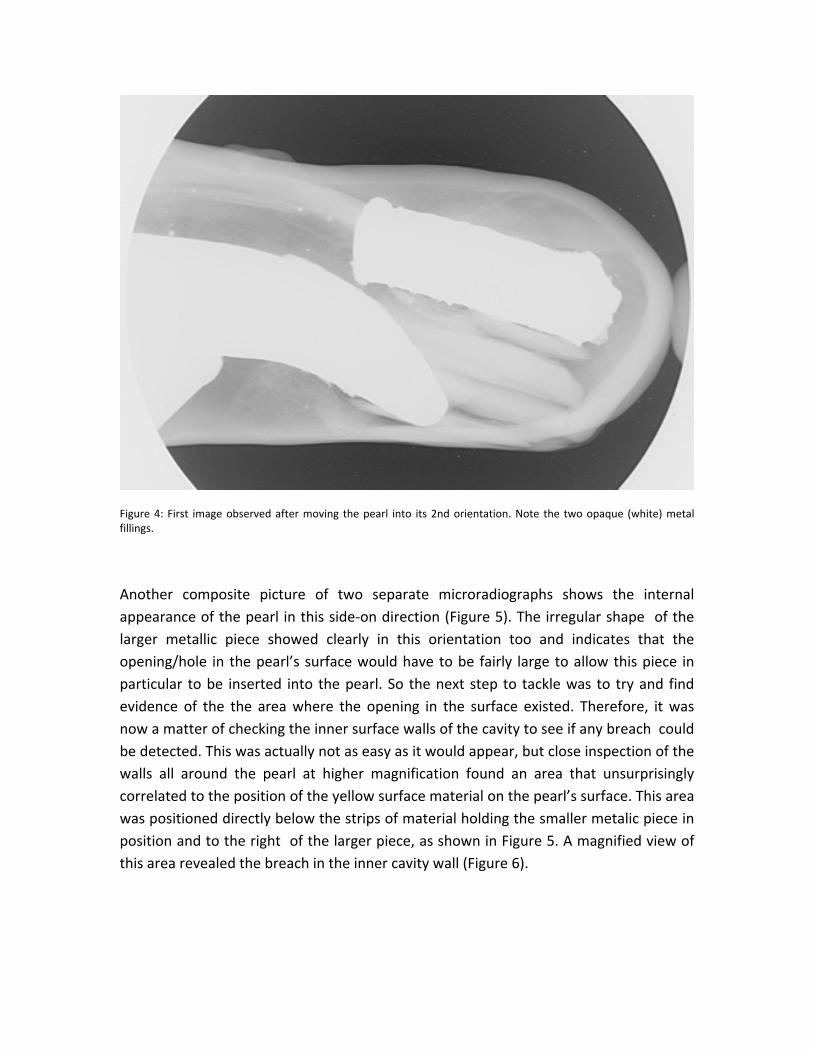
Figure 4: First image observed after moving the pearl into its 2nd orientation. Note the two opaque (white) metal fillings.
Another composite picture of two separate microradiographs shows the internal appearance of the pearl in this side‐on direction (Figure 5). The irregular shape of the larger metallic piece showed clearly in this orientation too and indicates that the opening/hole in the pearl’s surface would have to be fairly large to allow this piece in particular to be inserted into the pearl. So the next step to tackle was to try and find evidence of the the area where the opening in the surface existed. Therefore, it was now a matter of checking the inner surface walls of the cavity to see if any breach could be detected. This was actually not as easy as it would appear, but close inspection of the walls all around the pearl at higher magnification found an area that unsurprisingly correlated to the position of the yellow surface material on the pearl’s surface. This area was positioned directly below the strips of material holding the smaller metalic piece in position and to the right of the larger piece, as shown in Figure 5. A magnified view of this area revealed the breach in the inner cavity wall (Figure 6).
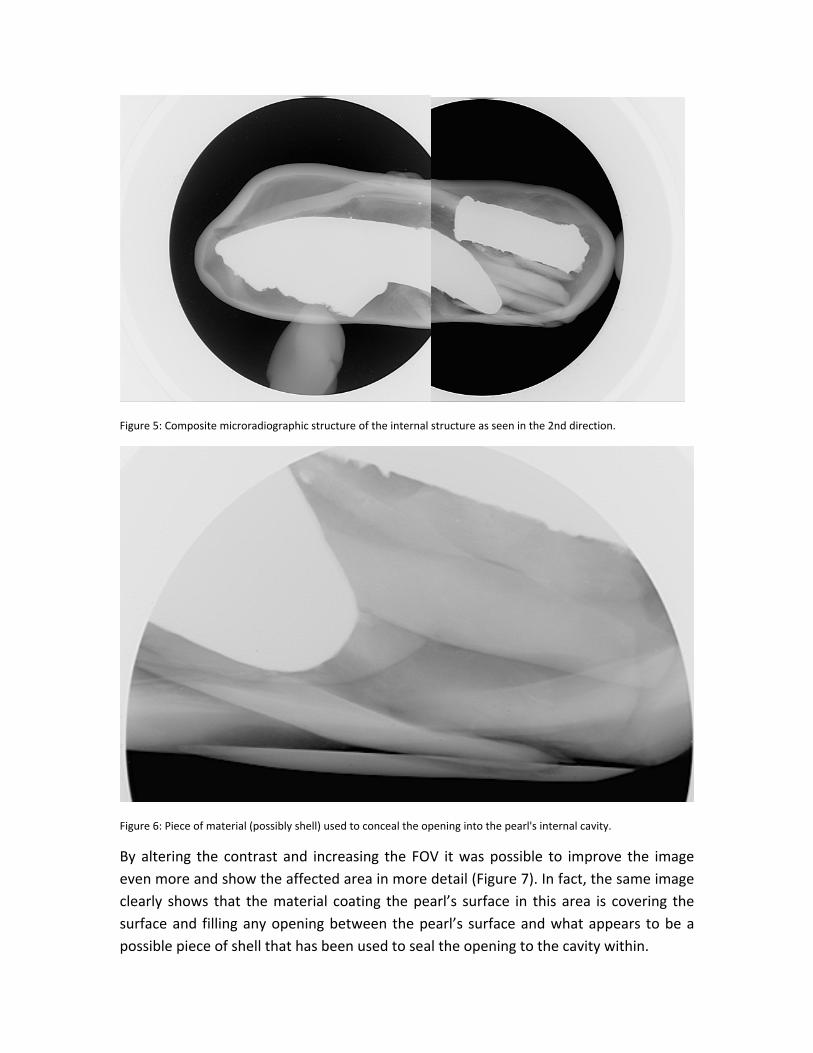
Figure 5: Composite microradiographic structure of the internal structure as seen in the 2nd direction.
Figure 6: Piece of material (possibly shell) used to conceal the opening into the pearl's internal cavity.
By altering the contrast and increasing the FOV it was possible to improve the image even more and show the affected area in more detail (Figure 7). In fact, the same image clearly shows that the material coating the pearl’s surface in this area is covering the surface and filling any opening between the pearl’s surface and what appears to be a possible piece of shell that has been used to seal the opening to the cavity within.
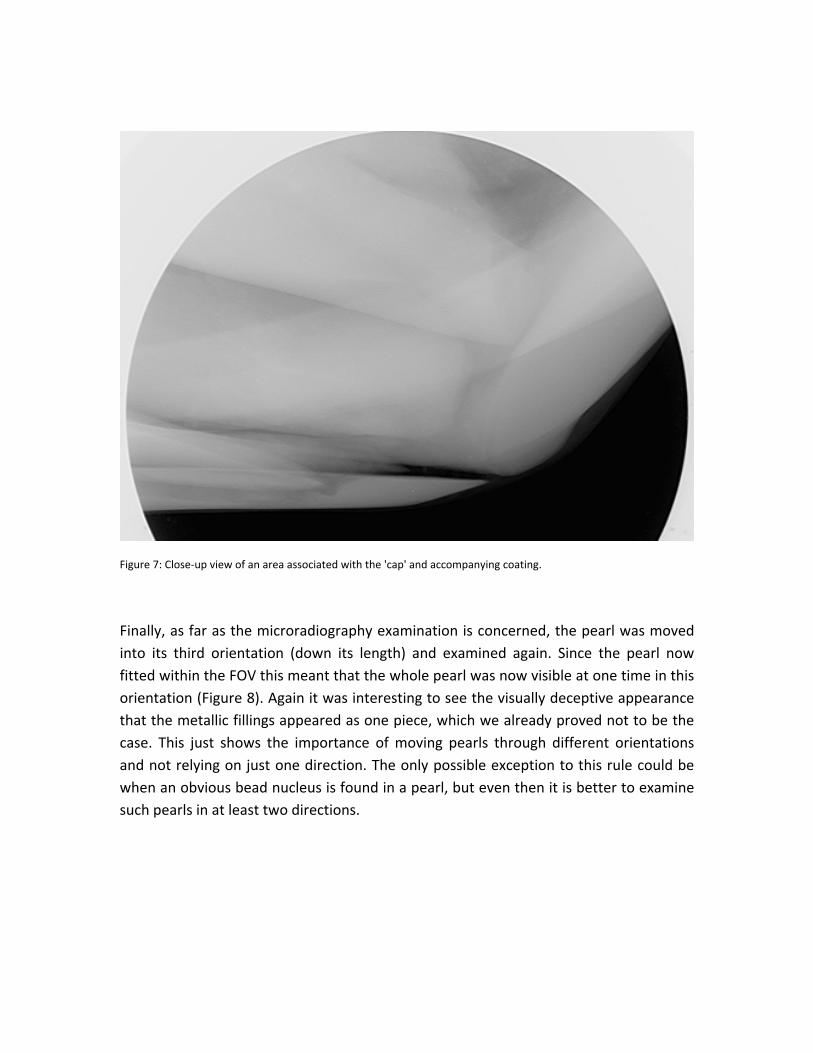
Figure 7: Close‐up view of an area associated with the 'cap' and accompanying coating.
Finally, as far as the microradiography examination is concerned, the pearl was moved into its third orientation (down its length) and examined again. Since the pearl now fitted within the FOV this meant that the whole pearl was now visible at one time in this orientation (Figure 8). Again it was interesting to see the visually deceptive appearance that the metallic fillings appeared as one piece, which we already proved not to be the case. This just shows the importance of moving pearls through different orientations and not relying on just one direction. The only possible exception to this rule could be when an obvious bead nucleus is found in a pearl, but even then it is better to examine such pearls in at least two directions.
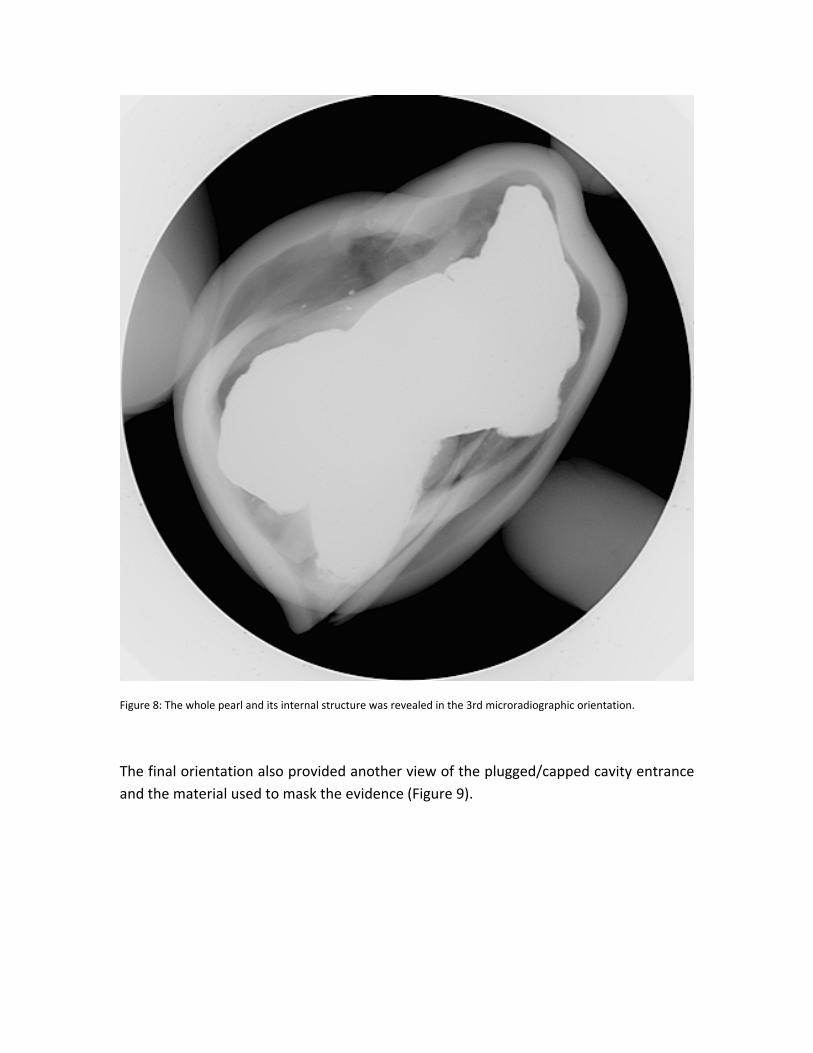
Figure 8: The whole pearl and its internal structure was revealed in the 3rd microradiographic orientation.
The final orientation also provided another view of the plugged/capped cavity entrance and the material used to mask the evidence (Figure 9).
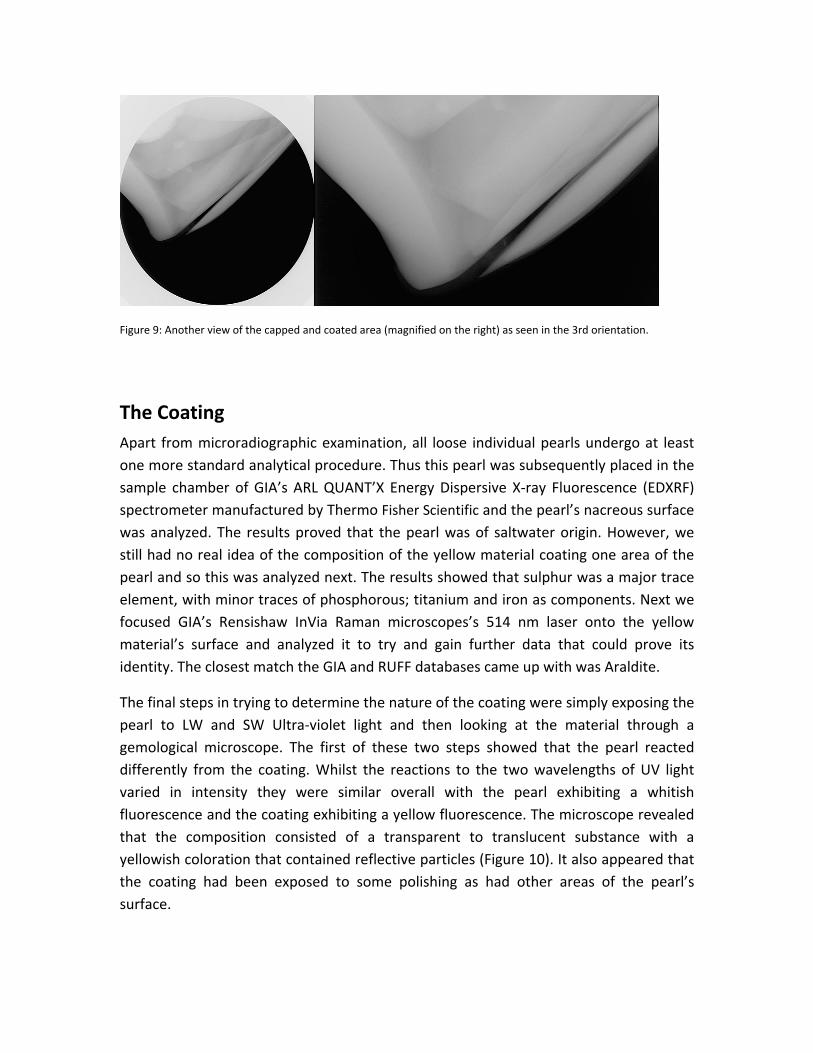
Figure 9: Another view of the capped and coated area (magnified on the right) as seen in the 3rd orientation.
The Coating Apart from microradiographic examination, all loose individual pearls undergo at least one more standard analytical procedure. Thus this pearl was subsequently placed in the sample chamber of GIA’s ARL QUANT’X Energy Dispersive X‐ray Fluorescence (EDXRF) spectrometer manufactured by Thermo Fisher Scientific and the pearl’s nacreous surface was analyzed. The results proved that the pearl was of saltwater origin. However, we still had no real idea of the composition of the yellow material coating one area of the pearl and so this was analyzed next. The results showed that sulphur was a major trace element, with minor traces of phosphorous; titanium and iron as components. Next we focused GIA’s Rensishaw InVia Raman microscopes’s 514 nm laser onto the yellow material’s surface and analyzed it to try and gain further data that could prove its identity. The closest match the GIA and RUFF databases came up with was Araldite.
The final steps in trying to determine the nature of the coating were simply exposing the pearl to LW and SW Ultra‐violet light and then looking at the material through a gemological microscope. The first of these two steps showed that the pearl reacted differently from the coating. Whilst the reactions to the two wavelengths of UV light varied in intensity they were similar overall with the pearl exhibiting a whitish fluorescence and the coating exhibiting a yellow fluorescence. The microscope revealed that the composition consisted of a transparent to translucent substance with a yellowish coloration that contained reflective particles (Figure 10). It also appeared that the coating had been exposed to some polishing as had other areas of the pearl’s surface.
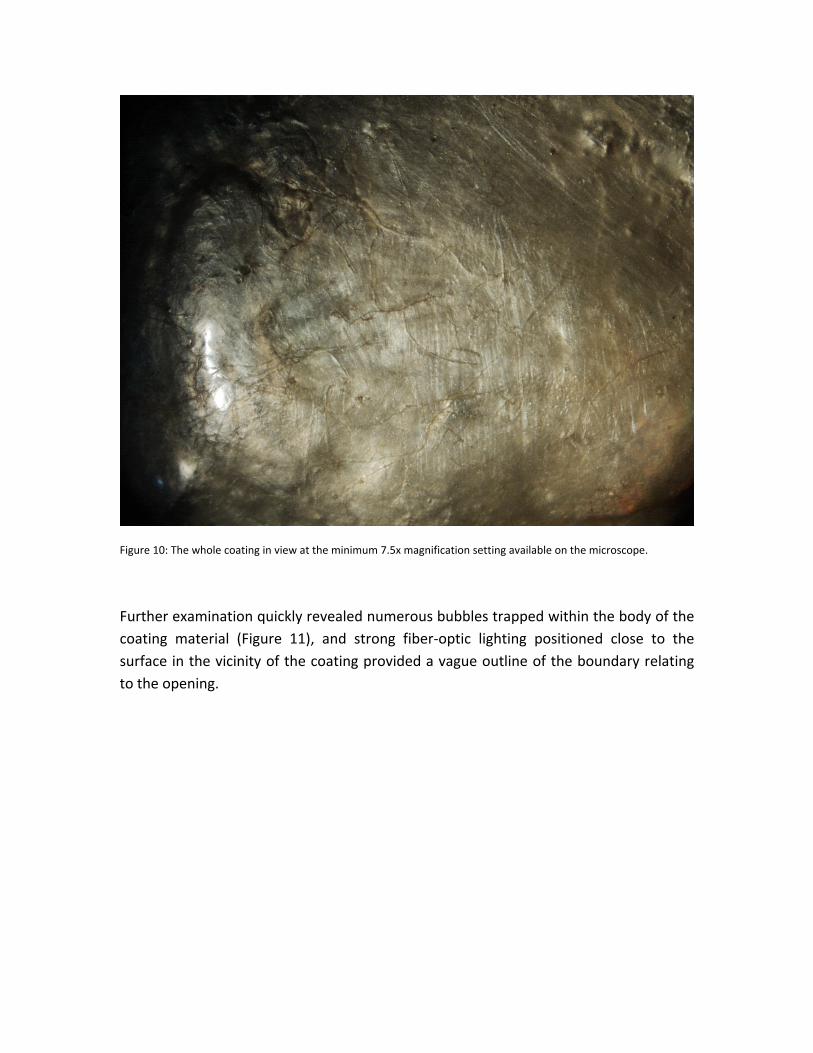
Figure 10: The whole coating in view at the minimum 7.5x magnification setting available on the microscope.
Further examination quickly revealed numerous bubbles trapped within the body of the coating material (Figure 11), and strong fiber‐optic lighting positioned close to the surface in the vicinity of the coating provided a vague outline of the boundary relating to the opening.
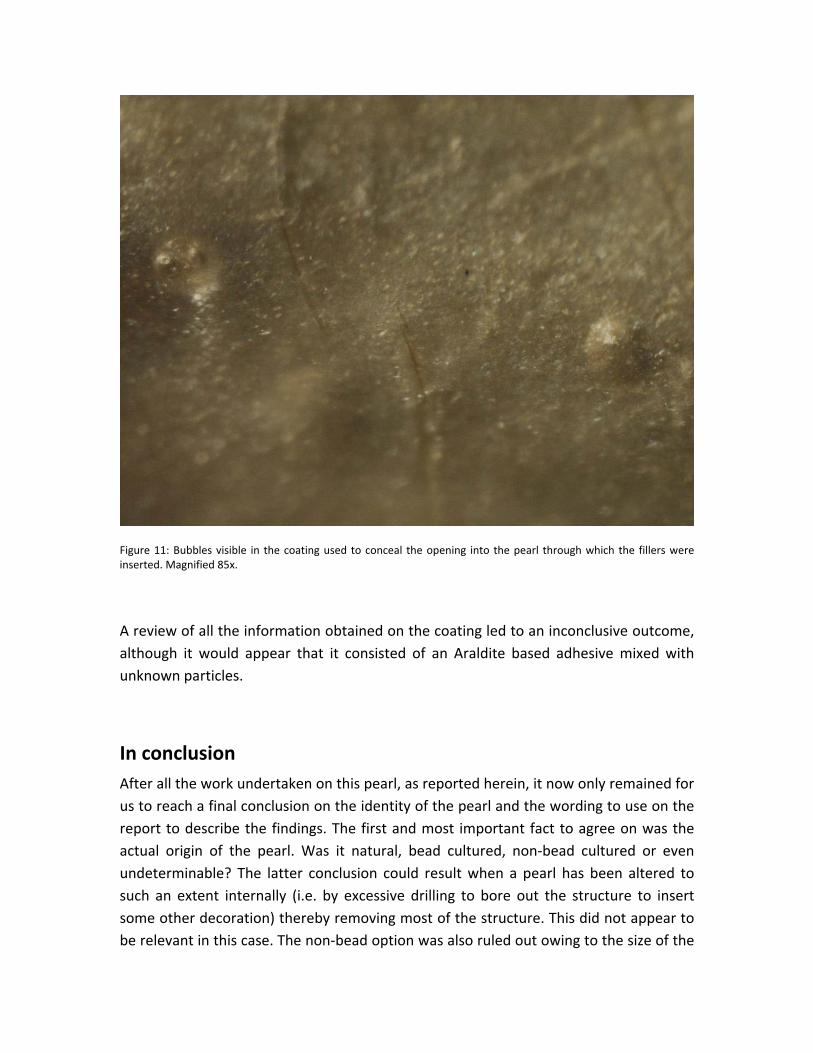
Figure 11: Bubbles visible in the coating used to conceal the opening into the pearl through which the fillers were inserted. Magnified 85x.
A review of all the information obtained on the coating led to an inconclusive outcome, although it would appear that it consisted of an Araldite based adhesive mixed with unknown particles.
In conclusion After all the work undertaken on this pearl, as reported herein, it now only remained for us to reach a final conclusion on the identity of the pearl and the wording to use on the report to describe the findings. The first and most important fact to agree on was the actual origin of the pearl. Was it natural, bead cultured, non‐bead cultured or even undeterminable? The latter conclusion could result when a pearl has been altered to such an extent internally (i.e. by excessive drilling to bore out the structure to insert some other decoration) thereby removing most of the structure. This did not appear to be relevant in this case. The non‐bead option was also ruled out owing to the size of the
cavity and the fact that the pearl followed the shape of the cavity, a feature associated more with natural pearls from experience (Kennedy, 1998). This only left the natural and bead cultured options. After seriously considering the possibility that a bead nucleus could have been removed from the large cavity and the pearl subsequently was filled, this was also decided against because it was highly unlikely that a pearl of this size would form undetected in a mollusk’s gonad for the period of time such a pearl would require, and that if it was a cultured pearl that it was even less likely it would be of a blister type. Only one large bead cultured pearl that we are aware of has reached anywhere near this sample’s size (Unknown, 2008). Thus in all probability this pearl would have formed as a hollow natural pearl, most likely attached to its host at the point where it was eventually worked and filled with the foreign fillers now within it and subsequently coated to hide evidence of this working and filling.
Hence a report was issued on this particular pearl stating that it was a “Natural ‘hollow’ blister pearl” in the reports identification field, and that it was “Filled, partially coated, worked and polished” in the treatment field with further statements in the comments field stating that it was “filled with foreign materials” and that the “weight was significantly affected by the fillers”.
References Kennedy, S. J. (1998) Pearl identification. Australian Gemmologist. 20. 1. 2‐19 Scarratt, K. (1984) Notes from the Laboratory: A filled pearl. Journal of Gemmology. 19. 2. 113‐114 Scarratt, K. (1986) Notes from the Laboratory: Filled pearls. Journal of Gemmology. 20. 2. Sturman, N. (2009) Pearls with Unpleasant Odors. http://www.giathai.net/pdf/Pearls_with_unpleasant_odours.pdf. 30 March 2009 Unknown. (2008) Largest Cultured Pearl and Largest Natural Blister Pearl. Myanmar Pearl Enterprise. http://myanmarpearl.com/largestpearl.htm.