ajce, 2013, 3(1) issn 2227-5835 - african journals online
TRANSCRIPT
AJCE, 2013, 3(1) ISSN 2227-5835
96
SUCCESSFUL PRACTICAL WORK IN CHALLENGING CIRCUMSTAN CES LESSONS TO BE LEARNED FROM UGANDA
Robert Worley and Mary Owen, United Kingdom
Email: [email protected] Abstract
This article is written in support of the argument that to encourage practical work in chemistry in schools where previously little had taken place, teachers should be taught basic workshop skills that they can use to safely improvise equipment suitable for use in their own school environment. These skills include cutting and bending glass tubing, inserting tubing through bungs and soldering electrical components. With these skills, teachers can make equipment to prepare gases, make spirit burners, and complete electrical connections. By empowering the teachers with these skills, they can train enthusiastic students to assist as technicians and with the teachers, visit other schools to pass on these skills. This process will compliment any government initiatives in this field of professional development. Prior to our visit to Uganda we anticipated that there could be issues with equipment and laboratory services but were surprised by the poor quality of the chemicals we found in the schools. This would make teaching practical chemistry a challenge even with the right equipment. [AJCE, 3(1), January 2013]
AJCE, 2013, 3(1) ISSN 2227-5835
97
Fig 1
INTRODUCTION
Jean Johnson (1) has been promoting chemistry practical work in the schools in Uganda
which she visits regularly. Jean invited Bob Worley and Mary Owen from the United Kingdom
to visit two of the schools she works with regularly. Bob and Mary have experience teaching
practical skills to teachers and technicians in the UK through their work with CLEAPSS (2).
The aim of the visit was to see if these skills and techniques could be transferred to the situation
in the secondary schools of Uganda. The specific objectives were:
• To build and consolidate previous work carried out in
visits and initiatives to these schools in alternative
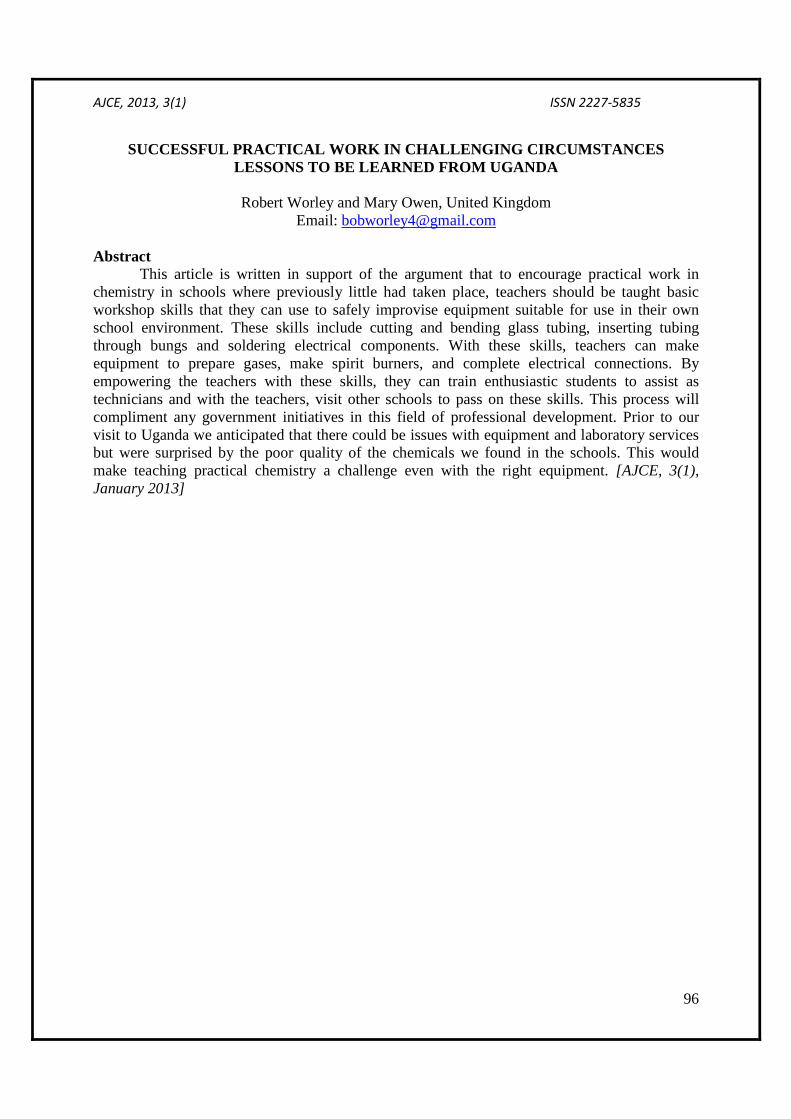
methods of practical chemistry including “drop chemistry”
and the use of Petri dishes to work with toxic gases. In
“drop chemistry” (3) the chemical reactions are not carried out in
glass test tubes but in drops on a plastic sheet or folder with the instructions underneath
(see Fig 1).
• To provide a range of simple, cheaper, safer yet effective experimental techniques for
activities such as making and collecting gases.
• To provide training in the workshop skills needed to make simple apparatus, such as
spirit burners, gas-making equipment and micro-electrolysis equipment, often from
materials that are easily obtained locally.
• To introduce teachers to more micro and small scale practical chemistry techniques to
manage the activities involving toxic gases required by the syllabus safely without the
need for expensive fume cupboards
• To encourage the teachers to spread their skills and expertise to other schools in the area.
AJCE, 2013, 3(1) ISSN 2227-5835
98
GENERAL COMMENTS
We were told and we expected to find challenging conditions in Uganda when compared
to the UK where every secondary school has several laboratories dedicated to the teaching of
science and sourced with chemicals, equipment, dependable supplies of water, gas and electricity
and a fume cupboard. All the teachers in the UK are expected to carry out practical work with
their classes and to do demonstrations at regular intervals (weekly) assisted by technicians.
1. Equipment in the school laboratories
The schools visited in Uganda do have one or two rooms dedicated to science. There is
equipment in these rooms, usually charitable gifts, but much of it is unsuitable. These donations
should not stop, example burettes, pipette, conical flasks, etc are always useful. However,
donations of redundant or over-complicated electrical equipment that can only be repaired at
great expense and by an experienced engineer should be discouraged. We noticed that as
equipment was at a premium it is only used when it has to be and there was anecdotal evidence
that the students did not get to practice with it themselves beforehand.
As we were preparing the course, two articles in the African Journal of Chemical
Education (4-5) served to confirm our initial ideas for our workshops suggesting that teachers
making their own equipment and having pride in their creative abilities was important spur that
could built on. The articles showed that much of the chemistry can be carried out with equipment
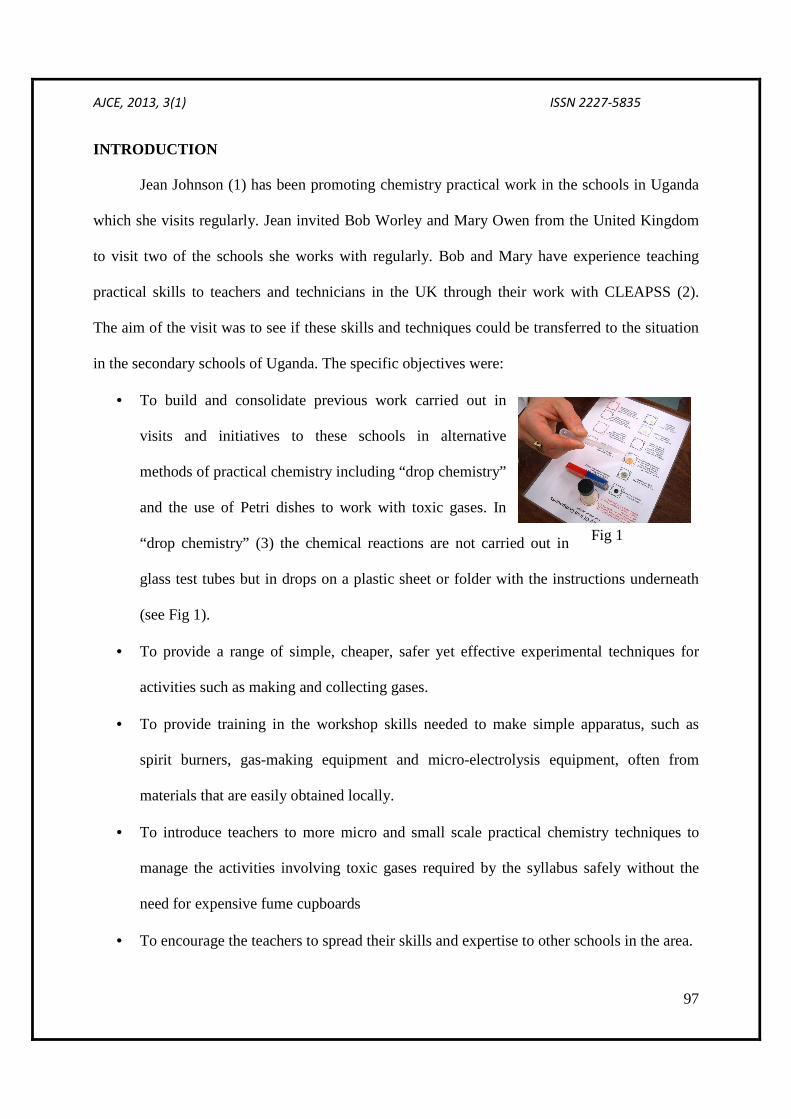
that was obtainable for domestic use. For instance, the crown bottle top used as a deflagrating
spoon (Fig. 2) to burn sulphur in oxygen. We had been using crown bottle tops for several years
as a substitute for crucibles (6-7) (Fig. 3).
AJCE, 2013, 3(1) ISSN 2227-5835
99
Fig 4
Fig 2 Fig 3
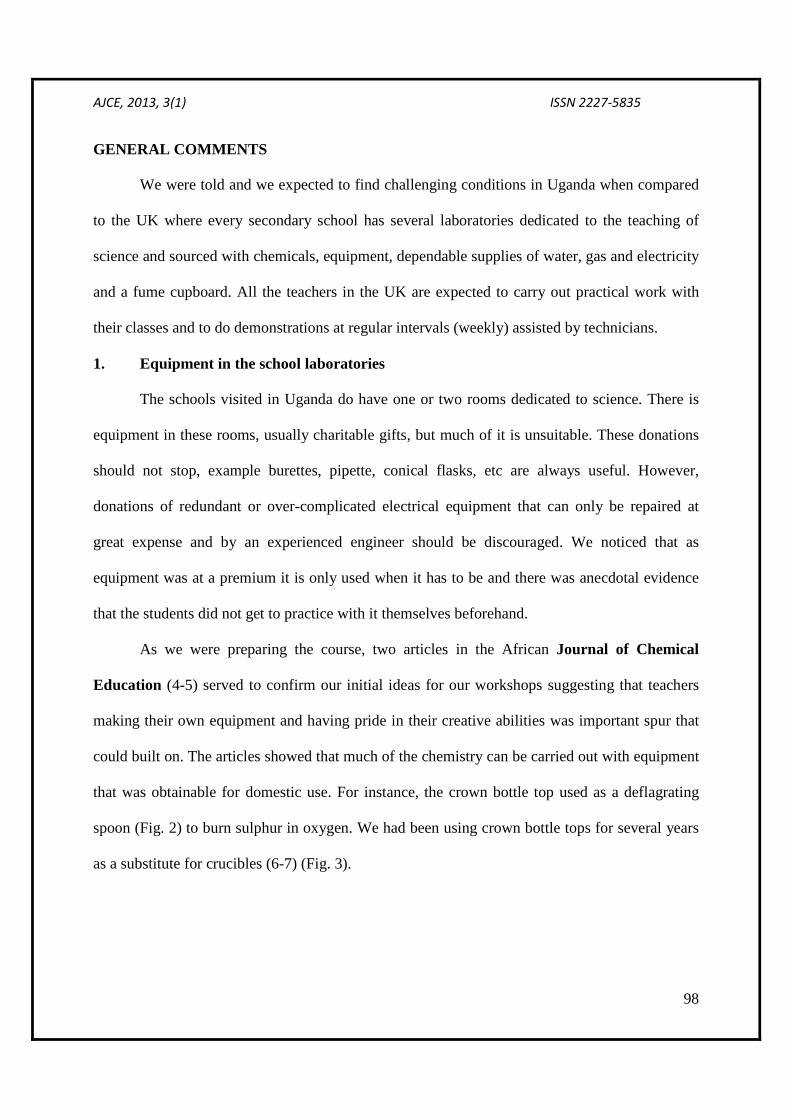
New electrical equipment is often better designed and relatively inexpensive compared to
equipment used several years ago. For example, “pocket” digital balances
weighing to 2 decimal places (Fig 4) can be obtained online for less than 10GBP
whereas traditional laboratory balances were 20 times that value.
Plastic lab ware is now overtaking glass in many areas. Many traditional
chemists are still suspicious that the volume measurements are not as “accurate” as in glass.
Any lab ware which provides measurement should have International Standard Organisation
marks (ISO) on it so that chemists can depend on the accuracy of the equipment. However, if the
item is just being used to store water on the bench, cut-off plastic bottles can be used instead of
expensive lab ware.
2. Chemicals in the school laboratories
This was a source of great concern. Some of the chemicals supplied to the schools were
of very poor quality. Iron filings were unsuitable bits of rusty iron of various sizes; the local iron
wool from the supermarket was far superior. The so-called marble chips turned out to be quartz.
AJCE, 2013, 3(1) ISSN 2227-5835
100
The hydrogen peroxide solution from suppliers was useless (it does not store well) but the
hydrogen peroxide in smaller bottles form the local pharmacy was excellent. Some powdered
calcium carbonate did not fizz with acid and appeared to be more like talc. Calcium hydroxide
had chemically changed to calcium carbonate under storage. Clear vinegar on sale locally was
1M ethanoic acid and can be used. In contrast, in the UK, much of the vinegar sold in shops
comes from fermented sugars and so is not a suitable substitute.
In the UK it is recommended not to store chemical solutions in plastic water bottles. The
reason is that if this bad practice was transferred to homes or industry with a bottle of an
unlabelled toxic, the chemical could be mistaken for a bottle of water, with tragic consequences.
However financial constraints may compel teachers in Uganda to use this practice so there must
be real care over the correct labelling of bottles and the drinking of any water should take place
outside of the laboratory.
3. Services in the school laboratories
The schools use LPG as a fuel but many cases the burners supplied (as charitable gifts)
were designed for methane gas. The jet for a methane burner has a wider diameter and so, if LPG
is used, the flame is dangerously high and it is difficult to obtain the classic hot flame with the air
hole open. In one school, the LPG container was used inside the classroom. This is dangerous
(because of possible leaks leading to explosive air/mixtures) and would not be acceptable in the
UK.
Water supplies will depend on where the school is located. If practical exams are set, the
intention is that solutions should be made with good chemicals using pure water, however
examiners should realise that this might not be always possible. In Thailand there is an excellent
organic chemistry kit which uses a pump to re-circulate the water through the condensers as an
AJCE, 2013, 3(1) ISSN 2227-5835
101
alternative to a continuous flow of fresh water which is a best wasteful and in many situations
not possible at all. CLEAPSS has made use of this approach to solve specific water supply issues
in the UK.
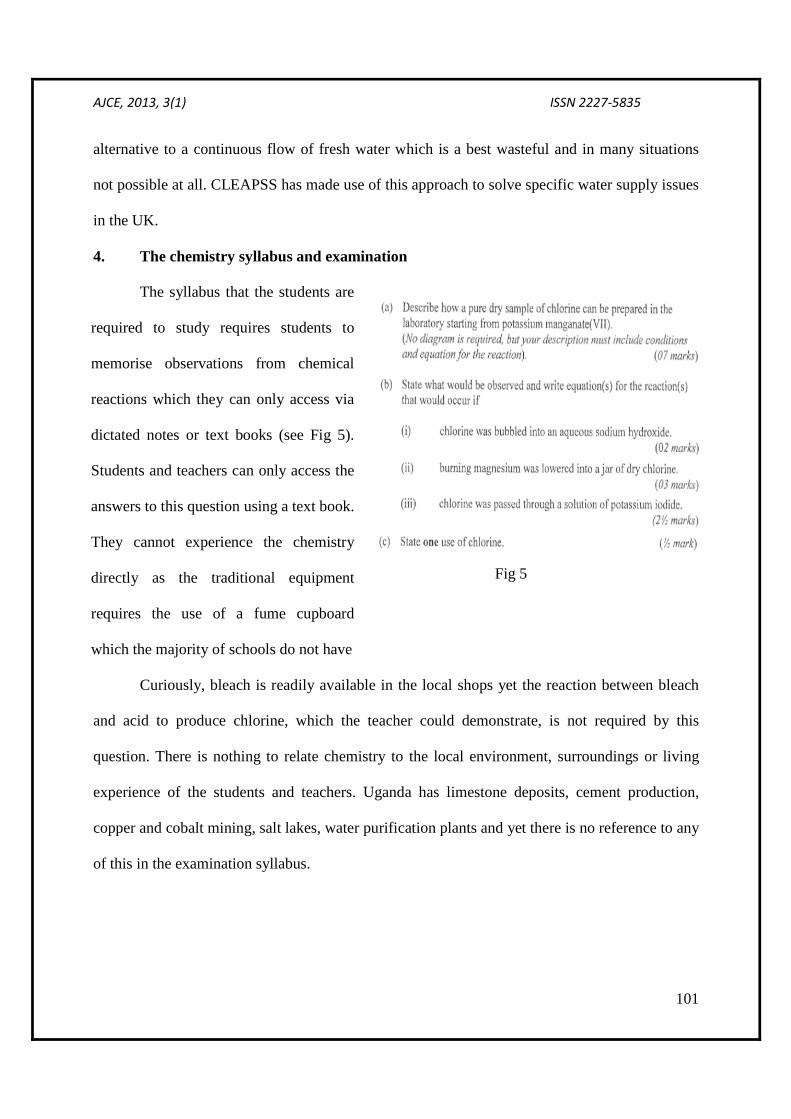
4. The chemistry syllabus and examination
The syllabus that the students are
required to study requires students to
memorise observations from chemical
reactions which they can only access via
dictated notes or text books (see Fig 5).
Students and teachers can only access the
answers to this question using a text book.
They cannot experience the chemistry
directly as the traditional equipment
requires the use of a fume cupboard
which the majority of schools do not have
Curiously, bleach is readily available in the local shops yet the reaction between bleach
and acid to produce chlorine, which the teacher could demonstrate, is not required by this
question. There is nothing to relate chemistry to the local environment, surroundings or living
experience of the students and teachers. Uganda has limestone deposits, cement production,
copper and cobalt mining, salt lakes, water purification plants and yet there is no reference to any
of this in the examination syllabus.
Fig 5
AJCE, 2013, 3(1) ISSN 2227-5835
102
5. Technician support
Adult technicians were very poorly paid and, in most cases, did not stay at the post for
more than a few weeks. One school used students who were in their final two years to provide
technical support. They had an enthusiasm for the subject and were extremely good at their
work, for which they received a small reward. This approach does require good supervision by
the science teacher as they have the duty of care to the student.
6. The Teachers
Teaching teachers (even in the UK) is not always easy. Some expect that having been
trained, that is it; nothing more needs to be learned. However, we were overjoyed with the
attitude of the teachers we met. Teaching the workshop skills to the teachers struck a chord with
them.
PRESENTING AND ORGANISING WORKSHOP SKILLS
This was a complex visit to plan. We spent several hours of discussion and conducting
practical trials in the CLEAPSS laboratory in the UK after having been warned of the practical
challenges we might encounter.
Once in Uganda we allowed one day setting up equipment before the 2 days of courses
and this proved essential. The preparation day was more exhausting than the teaching! We had to
improvise quickly and safely and this can only be done by very experienced visiting technicians
and teachers. The problems with the chemicals took longest to solve.
Although we took small laptop computers with PowerPoint presentations and videos, we
found it impossible to adequately display the material because of lighting and sighting problems.
We decided this was over-complicating matters. Fortunately we had taken paper copies of slides
AJCE, 2013, 3(1) ISSN 2227-5835
103
on which the teachers could write. In the end we used the time honoured teaching method of
demonstration followed by hands on practice and it seemed that it worked.
The essential workshop skills
Using 6 mm (outer diameter) medium-wall borosilicate glass tubing
Even in the UK, those ordering equipment try to cut corners by buying cheaply. It is a
false economy. Glass equipment is a good example. Soda glass is cheaper than borosilicate glass
but it easily cracks when subjected to thermal shock and the sharp edges can cause nasty cuts.
Borosilicate glass many be more expensive but its lower coefficient of expansion means it
withstands thermal shock and will survive much longer in a school laboratory.
Borosilicate glass tubing softens in a Bunsen burner flame but does not collapse as soda
glass tubing does. As the tubing bends in the hot flame, the outer curve becomes thinner. Using
medium wall glass ensures that it does not become so thin that it shatters on cooling or in use.
Cutting glass tubing (less than 10mm outside diameter)
• Wear eye protection.
• Place the glass on the bench protector and measure the length of glass you require.
• Using a file:-with one bold stroke (if possible) make a mark. (There is no need to mark
right round the glass.) You should be able to see the mark and hear the grinding of glass.
• If a glass knife is used, score about a third of the way round the glass.
• Keep looking at the mark and wet the mark, this is said to give a smoother break.
• Turn the glass slightly so that the mark is pointing away from the body. Pull the tube
apart while at the same time exert slight pressure behind the scratch with the thumbs. It
will break cleanly!
AJCE, 2013, 3(1) ISSN 2227-5835
104
Fig 6
• Examine the glass to see if there are any sharp points. It there are, just rub the end of the
glass tubing with gauze. Do the same to the other piece.
Flame (or fire) polishing to ensure there are no sharp edges
• This is very important as it ensures there are no sharp edges on the cut ends of the tubing.
• Wear eye protection
• Hold the glass with a tongs if it is short. Place the other end of the glass at the top of the
roaring Bunsen flame and lower it down so it is just above the blue cone.
• Rotate (if it is held with fingers) and keep it there until the end of the glass just melts.
• If the glass is short, place the glass on a heat proof mat to cool, otherwise, turn the tubing
round and “fire polish” the other end.
• Leave the tubing on the bench protector to cool.
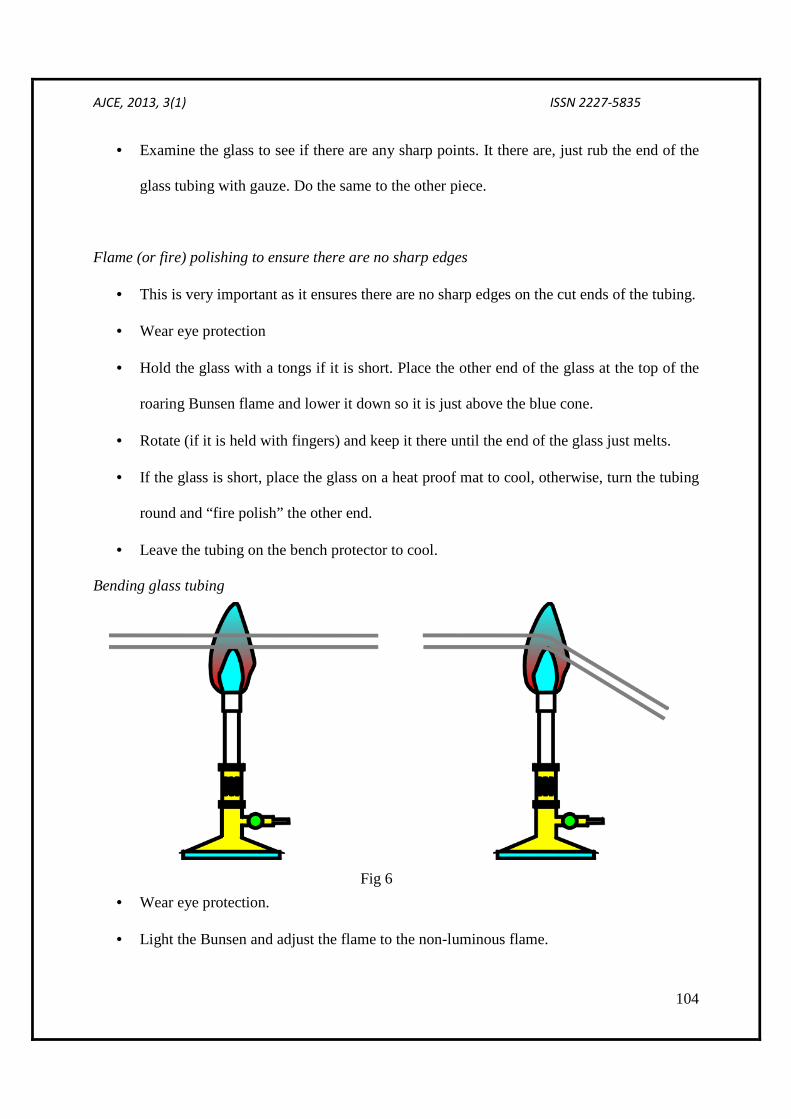
Bending glass tubing
• Wear eye protection.
• Light the Bunsen and adjust the flame to the non-luminous flame.
AJCE, 2013, 3(1) ISSN 2227-5835
105
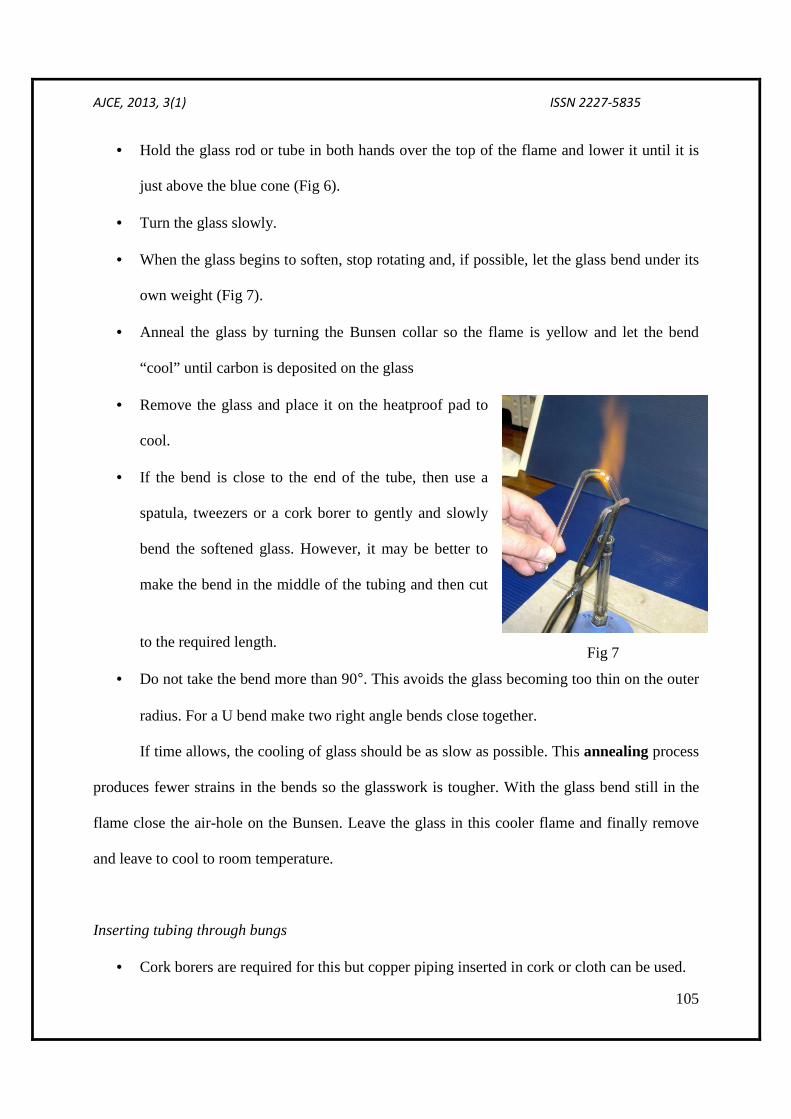
Fig 7
• Hold the glass rod or tube in both hands over the top of the flame and lower it until it is
just above the blue cone (Fig 6).
• Turn the glass slowly.
• When the glass begins to soften, stop rotating and, if possible, let the glass bend under its
own weight (Fig 7).
• Anneal the glass by turning the Bunsen collar so the flame is yellow and let the bend
“cool” until carbon is deposited on the glass
• Remove the glass and place it on the heatproof pad to
cool.
• If the bend is close to the end of the tube, then use a
spatula, tweezers or a cork borer to gently and slowly
bend the softened glass. However, it may be better to
make the bend in the middle of the tubing and then cut
to the required length.
• Do not take the bend more than 90°. This avoids the glass becoming too thin on the outer
radius. For a U bend make two right angle bends close together.
If time allows, the cooling of glass should be as slow as possible. This annealing process
produces fewer strains in the bends so the glasswork is tougher. With the glass bend still in the
flame close the air-hole on the Bunsen. Leave the glass in this cooler flame and finally remove
and leave to cool to room temperature.
Inserting tubing through bungs
• Cork borers are required for this but copper piping inserted in cork or cloth can be used.
AJCE, 2013, 3(1) ISSN 2227-5835
106
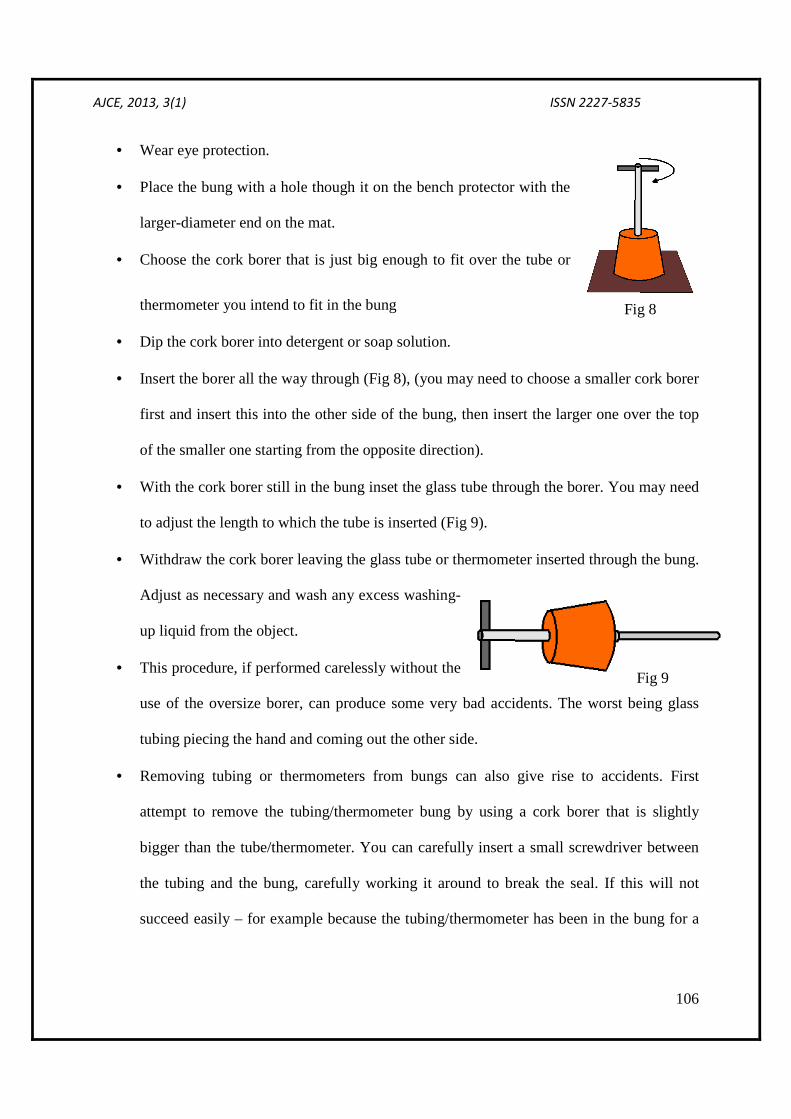
Fig 8
Fig 9
• Wear eye protection.
• Place the bung with a hole though it on the bench protector with the
larger-diameter end on the mat.
• Choose the cork borer that is just big enough to fit over the tube or
thermometer you intend to fit in the bung
• Dip the cork borer into detergent or soap solution.
• Insert the borer all the way through (Fig 8), (you may need to choose a smaller cork borer
first and insert this into the other side of the bung, then insert the larger one over the top
of the smaller one starting from the opposite direction).
• With the cork borer still in the bung inset the glass tube through the borer. You may need
to adjust the length to which the tube is inserted (Fig 9).
• Withdraw the cork borer leaving the glass tube or thermometer inserted through the bung.
Adjust as necessary and wash any excess washing-
up liquid from the object.
• This procedure, if performed carelessly without the
use of the oversize borer, can produce some very bad accidents. The worst being glass
tubing piecing the hand and coming out the other side.
• Removing tubing or thermometers from bungs can also give rise to accidents. First
attempt to remove the tubing/thermometer bung by using a cork borer that is slightly
bigger than the tube/thermometer. You can carefully insert a small screwdriver between
the tubing and the bung, carefully working it around to break the seal. If this will not
succeed easily – for example because the tubing/thermometer has been in the bung for a
AJCE, 2013, 3(1) ISSN 2227-5835
107
long time, sacrifice the bung by cutting it away with a sharp knife or similar – this is far
preferable than breaking the tubing/thermometer with the potential for injury that carries.
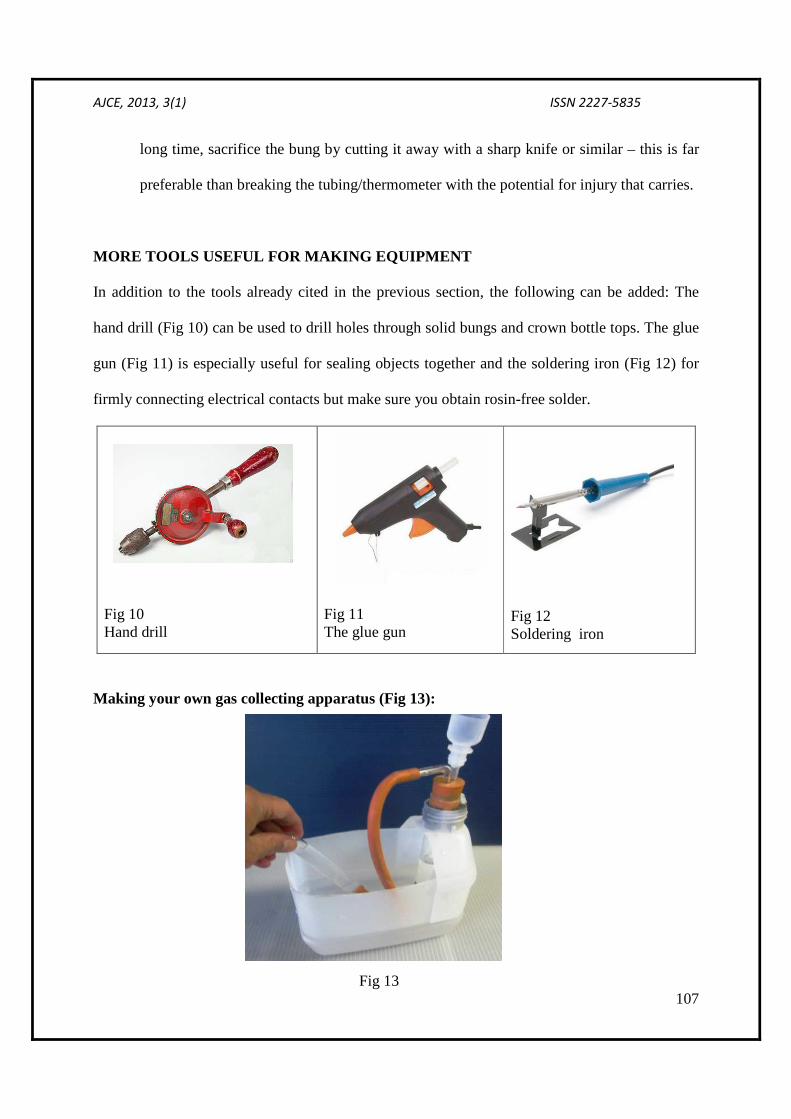
MORE TOOLS USEFUL FOR MAKING EQUIPMENT
In addition to the tools already cited in the previous section, the following can be added: The
hand drill (Fig 10) can be used to drill holes through solid bungs and crown bottle tops. The glue
gun (Fig 11) is especially useful for sealing objects together and the soldering iron (Fig 12) for
firmly connecting electrical contacts but make sure you obtain rosin-free solder.
Fig 10 Hand drill
Fig 11 The glue gun
Fig 12 Soldering iron
Making your own gas collecting apparatus (Fig 13):
Fig 13
AJCE, 2013, 3(1) ISSN 2227-5835
108
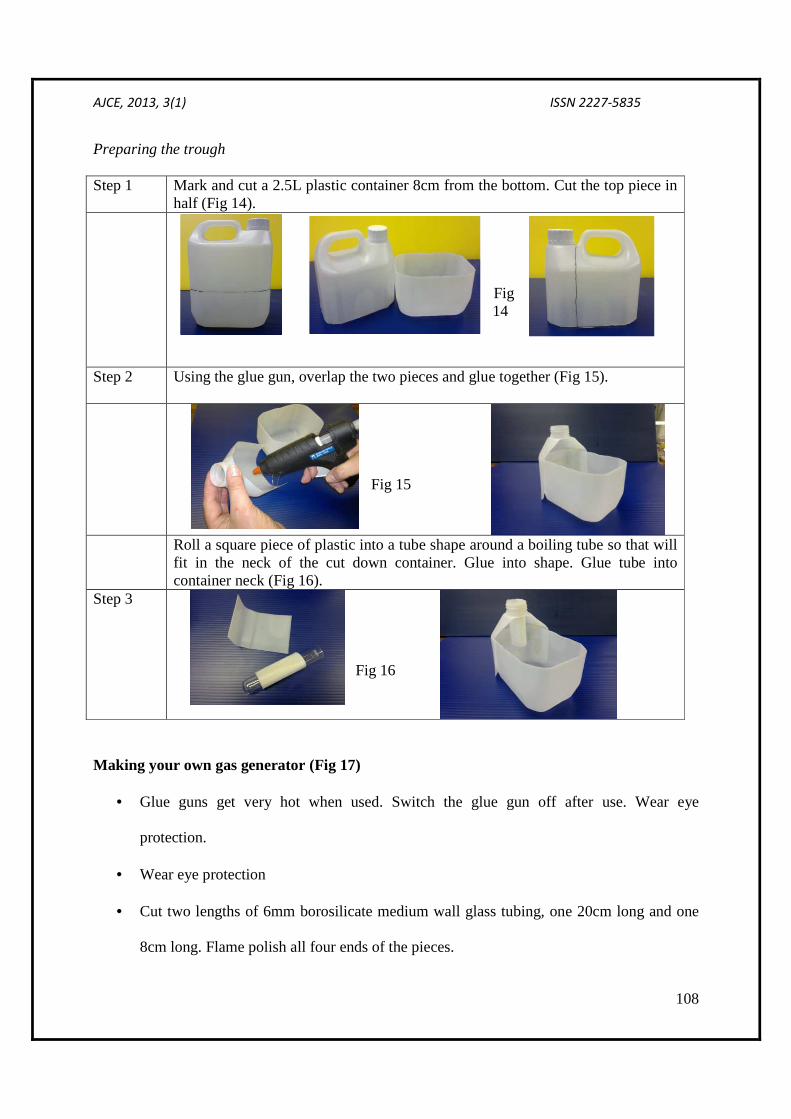
Preparing the trough
Step 1 Mark and cut a 2.5L plastic container 8cm from the bottom. Cut the top piece in half (Fig 14).
Fig 14
Step 2 Using the glue gun, overlap the two pieces and glue together (Fig 15).
Fig 15
Roll a square piece of plastic into a tube shape around a boiling tube so that will fit in the neck of the cut down container. Glue into shape. Glue tube into container neck (Fig 16).
Step 3 Fig 16
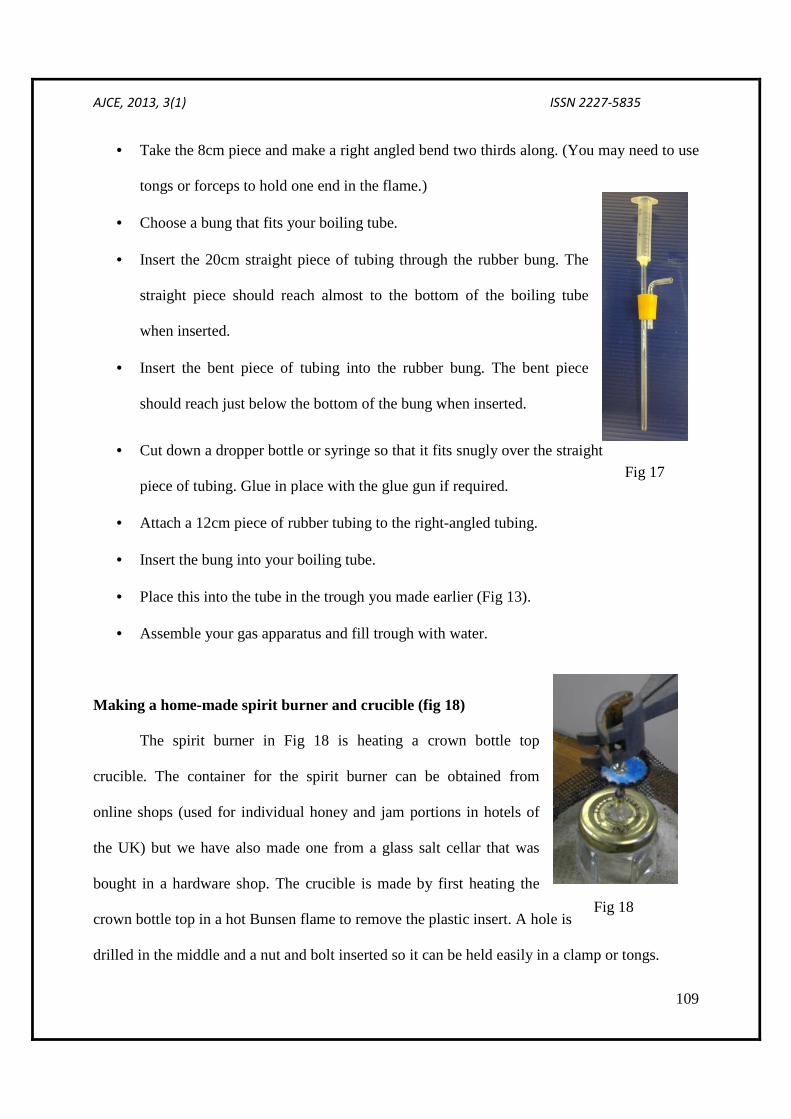
Making your own gas generator (Fig 17)
• Glue guns get very hot when used. Switch the glue gun off after use. Wear eye
protection.
• Wear eye protection
• Cut two lengths of 6mm borosilicate medium wall glass tubing, one 20cm long and one
8cm long. Flame polish all four ends of the pieces.
AJCE, 2013, 3(1) ISSN 2227-5835
109
Fig 18
Fig 17
• Take the 8cm piece and make a right angled bend two thirds along. (You may need to use
tongs or forceps to hold one end in the flame.)
• Choose a bung that fits your boiling tube.
• Insert the 20cm straight piece of tubing through the rubber bung. The
straight piece should reach almost to the bottom of the boiling tube
when inserted.
• Insert the bent piece of tubing into the rubber bung. The bent piece
should reach just below the bottom of the bung when inserted.
• Cut down a dropper bottle or syringe so that it fits snugly over the straight
piece of tubing. Glue in place with the glue gun if required.
• Attach a 12cm piece of rubber tubing to the right-angled tubing.
• Insert the bung into your boiling tube.
• Place this into the tube in the trough you made earlier (Fig 13).
• Assemble your gas apparatus and fill trough with water.
Making a home-made spirit burner and crucible (fig 18)
The spirit burner in Fig 18 is heating a crown bottle top
crucible. The container for the spirit burner can be obtained from
online shops (used for individual honey and jam portions in hotels of
the UK) but we have also made one from a glass salt cellar that was
bought in a hardware shop. The crucible is made by first heating the
crown bottle top in a hot Bunsen flame to remove the plastic insert. A hole is
drilled in the middle and a nut and bolt inserted so it can be held easily in a clamp or tongs.
AJCE, 2013, 3(1) ISSN 2227-5835
110
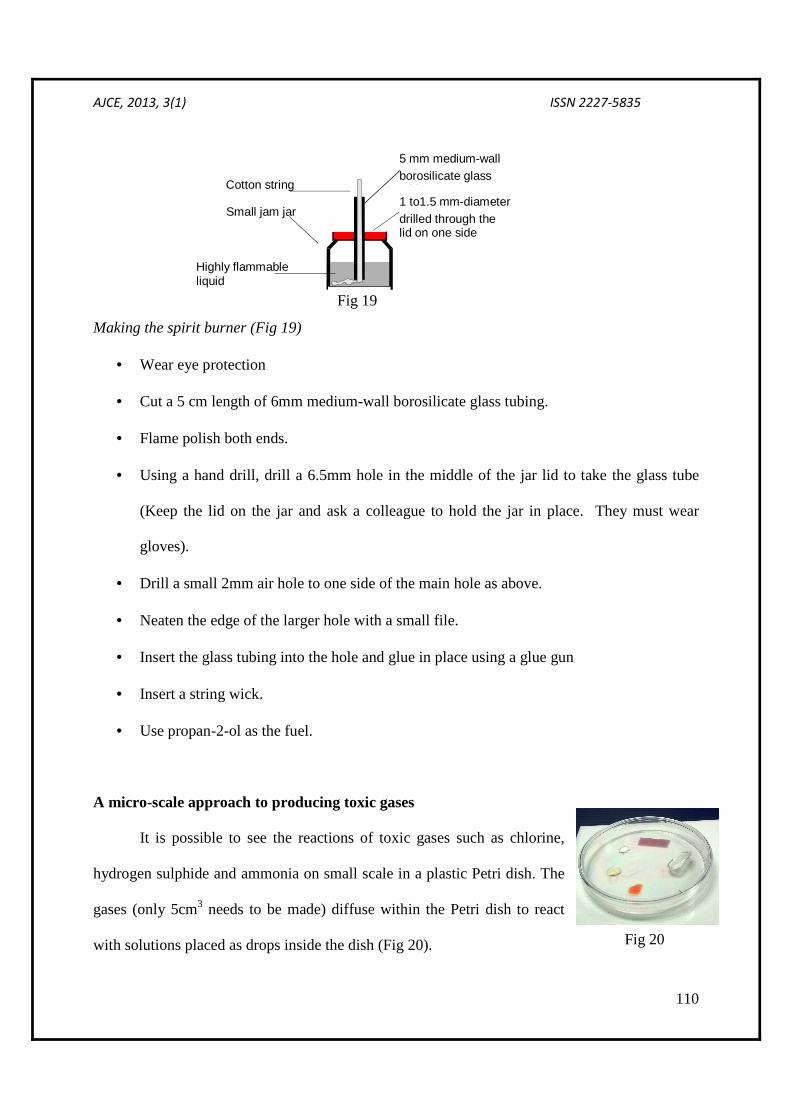
Making the spirit burner (Fig 19)
• Wear eye protection
• Cut a 5 cm length of 6mm medium-wall borosilicate glass tubing.
• Flame polish both ends.
• Using a hand drill, drill a 6.5mm hole in the middle of the jar lid to take the glass tube
(Keep the lid on the jar and ask a colleague to hold the jar in place. They must wear
gloves).
• Drill a small 2mm air hole to one side of the main hole as above.
• Neaten the edge of the larger hole with a small file.
• Insert the glass tubing into the hole and glue in place using a glue gun
• Insert a string wick.
• Use propan-2-ol as the fuel.
A micro-scale approach to producing toxic gases
It is possible to see the reactions of toxic gases such as chlorine,
hydrogen sulphide and ammonia on small scale in a plastic Petri dish. The
gases (only 5cm3 needs to be made) diffuse within the Petri dish to react
with solutions placed as drops inside the dish (Fig 20).
Cotton string wick
5 mm medium-wall borosilicate glass tubing 1 to1.5 mm-diameter hole drilled through the lid on one side
Highly flammable liquid
Small jam jar
Fig 19
Fig 20

AJCE, 2013, 3(1) ISSN 2227-5835
111
Fig 22
This approach can also be applied to electrolysis.
The picture (Fig 21) shows the apparatus made by one of
the teachers in Bukinda. A hot needle is applied to the sides
of a plastic Petri dish to melt the plastic and make small
holes through which the electrodes are pushed. The
electrodes in the Fig 21 are carbon fiber rods, obtained from
online kite shops but straightened paper clips can be used.
There are drops of potassium bromide solution (which turns yellow when reacting with
chlorine), potassium iodide solution (which turns dark brown), universal indicator solution or
moist blue litmus paper which goes clear (bleaches) along with a
Ugandan flower (which was originally blue). The electrodes are
connected to a low voltage source. The teachers on the course used
soldering ions to make leads for use with low voltage power packs but you
could attach battery connectors (Fig 22) to crocodile clips to connect to a 9 volt battery.
CONCLUSIONS
Teacher trainers should provide instruction either at University or to groups of teachers in
schools in practical workshop skills that will enable them to make simple equipment to enrich
chemistry lessons. Those delivering these sessions will need to allow time on site for a lot of
rehearsal. Preparation for the course will need to take place in the room where the course is to be
delivered.
Fig 21
AJCE, 2013, 3(1) ISSN 2227-5835
112
Teachers who receive such instruction should be encouraged to train other teachers in
their immediate area, perhaps by establishing local self-help groups. These would complement
existing or future government schemes. Wherever possible local education departments should
cover travel expenses for teachers to meet together and share practice. Teachers who receive
such instruction should also be encouraged to train enthusiastic and competent students in their
schools to act as technicians on a rolling two-year basis. The student technicians could receive
small financial rewards or special privileges within the school.
Syllabuses from examination boards should reflect the conditions; equipment and
chemicals the teachers and pupils have available to them. Syllabuses in chemistry should reflect
the industry, commerce and general daily life of the country.
University chemistry departments, professional groups of chemists and local industries
often refer to tertiary education in their mission statements but often neglect to mention
secondary education from where they will obtain their next batch of students. Lectures, simple
demonstrations and discussions at local schools would help to inspire students and teachers in
their work.
Teachers should examine the quality of chemicals. Chemicals should come with proper
assay and hazard warnings on the label. Any equipment that has been sent to the school from
abroad (and not been used for 5 years} should be recycled as it may be more suitable for a local
University or Industry or disposed of in the correct manner.
ACKNOWLEDGEMENTS The authors would like to acknowledge Miss Jean Johnson for her work in arranging the
courses, providing invaluable advice and support, Analytical Chemistry Trust Fund of the Royal Society of Chemistry for financing the project, CLEAPSS, especially the director, Steve Jones, for allowing the authors time to prepare for the visit and the two weeks in Uganda, the assistance of Alex Byamugisha and Fred Nikwenseri, two committed science teachers in Uganda who
AJCE, 2013, 3(1) ISSN 2227-5835
113
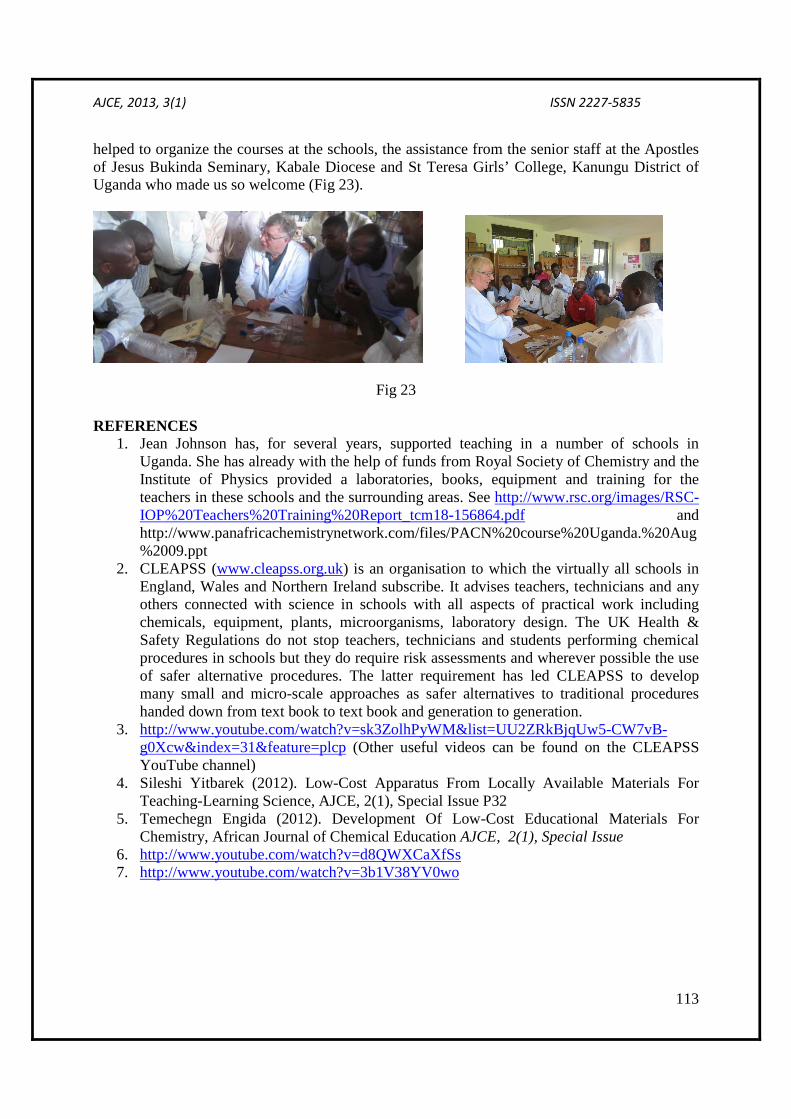
helped to organize the courses at the schools, the assistance from the senior staff at the Apostles of Jesus Bukinda Seminary, Kabale Diocese and St Teresa Girls’ College, Kanungu District of Uganda who made us so welcome (Fig 23).
Fig 23
REFERENCES 1. Jean Johnson has, for several years, supported teaching in a number of schools in
Uganda. She has already with the help of funds from Royal Society of Chemistry and the Institute of Physics provided a laboratories, books, equipment and training for the teachers in these schools and the surrounding areas. See http://www.rsc.org/images/RSC-IOP%20Teachers%20Training%20Report_tcm18-156864.pdf and http://www.panafricachemistrynetwork.com/files/PACN%20course%20Uganda.%20Aug%2009.ppt
2. CLEAPSS (www.cleapss.org.uk) is an organisation to which the virtually all schools in England, Wales and Northern Ireland subscribe. It advises teachers, technicians and any others connected with science in schools with all aspects of practical work including chemicals, equipment, plants, microorganisms, laboratory design. The UK Health & Safety Regulations do not stop teachers, technicians and students performing chemical procedures in schools but they do require risk assessments and wherever possible the use of safer alternative procedures. The latter requirement has led CLEAPSS to develop many small and micro-scale approaches as safer alternatives to traditional procedures handed down from text book to text book and generation to generation.
3. http://www.youtube.com/watch?v=sk3ZolhPyWM&list=UU2ZRkBjqUw5-CW7vB-g0Xcw&index=31&feature=plcp (Other useful videos can be found on the CLEAPSS YouTube channel)
4. Sileshi Yitbarek (2012). Low-Cost Apparatus From Locally Available Materials For Teaching-Learning Science, AJCE, 2(1), Special Issue P32
5. Temechegn Engida (2012). Development Of Low-Cost Educational Materials For Chemistry, African Journal of Chemical Education AJCE, 2(1), Special Issue
6. http://www.youtube.com/watch?v=d8QWXCaXfSs 7. http://www.youtube.com/watch?v=3b1V38YV0wo