accutrack / accusql reference manual - attendance
TRANSCRIPT

http://www.engineerica.com
Reference Manual for AccuSQL/AccuTrack 2019
Version 1.0.0
January, 2019
© 2002 - 2019 Engineerica Systems, Inc.
All Rights Reserved

2
< Back to Contents >
Engineerica Systems, Incorporated
7250 Red Bug Lake Road
Oviedo, FL 32765
Phone: (321) 214-0012
Fax: (407) 678-0287
Web: http://www.engineerica.com
Email: [email protected]
© 1998-2019 Engineerica Systems, Inc. All rights reserved.
Engineerica Systems, Inc. (“Developer”) has made every effort to ensure the accuracy of this document. Developer makes no warranties with respect to this documentation and disclaims any implied warranties of merchantability and fitness for a particular purpose. The information in this document is subject to change without notice. Developer assumes no responsibility for any errors that may appear in this document. Names and data used in examples herein are fictitious unless otherwise noted.
The information contained herein is the exclusive and confidential property of Engineerica Systems, Inc. and, except as otherwise indicated, shall not be disclosed or reproduced in whole or in part. No part of this document may be reproduced or transmitted in any form or by any means, electronic or mechanical, for any purpose, without the express written permission of Engineerica Systems, Inc.
Due to our continuous effort for improving the software, some of the images or descriptions in this manual may not match your version of AccuSQL/AccuTrack.
Trademarks
AccuSQL/AccuTrack and the Engineerica Systems, Inc. logos are trademarks of Engineerica Systems, Inc.
All other trademarks acknowledged.

ACCUSQL/ACCUTRACK 2019 REFERENCE MANUAL
3
< Back to Contents >
CONTENTS
CONTENTS ............................................................................................................................................... 3
WELCOME TO THE WORLD OF ACCUSQL & ACCUTRACK ........................................................................ 18
WHAT IS THE DIFFERENCE BETWEEN ACCUSQL AND ACCUTRACK? ........................................................ 20
HOW TO USE THIS MANUAL................................................................................................................... 20
INSTALLATION........................................................................................................................................ 20
HARDWARE REQUIREMENTS ............................................................................................................................. 21
INSTALLING ACCUSQL/ACCUTRACK ................................................................................................................... 21
LAUNCHING ACCUSQL/ACCUTRACK .................................................................................................................. 30
Shared Data Installation ........................................................................................................................ 31
Uninstalling AccuSQL/AccuTrack ........................................................................................................... 31
SWITCHING TO A BLANK DATABASE .................................................................................................................... 32
USING DATA FILES FROM AN OLDER VERSION OF ACCUSQL/ACCUTRACK ................................................................. 33
USING AN ID-READER ..................................................................................................................................... 33
CONFIGURING ACCUSQL/ACCUTRACK FOR YOUR CENTER ...................................................................................... 34
Setting up the student attendance tracking module ............................................................................. 34
Setting up feedback on services ............................................................................................................. 35
Setting up tutor ratings ......................................................................................................................... 35
Setting up work-hours tracking / pay calculations: ............................................................................... 35
Setting up appointments management ................................................................................................. 35
Setting up the media checkouts module ................................................................................................ 36
Setting up other modules: ..................................................................................................................... 36
MAINTAINING ACCUSQL/ACCUTRACK ............................................................................................................... 36
USING CONTROLS ........................................................................................................................................... 36
List boxes ............................................................................................................................................... 36
Option buttons ....................................................................................................................................... 37
ACCUSQL/ACCUTRACK 2019 REFERENCE MANUAL
4
< Back to Contents >
Check Boxes ........................................................................................................................................... 37
Text Boxes .............................................................................................................................................. 37
Spinners ................................................................................................................................................. 38
Page frames ........................................................................................................................................... 38
SPECIAL ACCUSQL/ACCUTRACK CONTROLS ........................................................................................................ 39
Selection List Boxes ................................................................................................................................ 39
Quick Locate Box ................................................................................................................................... 39
SuperTable ............................................................................................................................................. 40
Multiple Selection Table ........................................................................................................................ 44
Date and Time Entry Box ....................................................................................................................... 45
Calendar Date and Time Entry Box ........................................................................................................ 46
Period Selection Box .............................................................................................................................. 47
USING ACCUSQL/ACCUTRACK SCREENS ............................................................................................................. 48
THE INTRO SCREEN ................................................................................................................................ 49
MAIN SIGN-IN SCREEN ........................................................................................................................... 49
SIGNING IN OR OUT CONFIRMATION MESSAGE .................................................................................................... 51
TUTOR SIGN-IN .............................................................................................................................................. 52
SIGN-IN SCREEN BUTTONS ................................................................................................................................ 53
NEW STUDENT SCREEN .......................................................................................................................... 54
ACTIVITY SELECTION SCREEN ................................................................................................................. 55
TUTOR SELECTION SCREEN ..................................................................................................................... 57
FEEDBACK SCREEN ................................................................................................................................. 59
SEMINAR SIGN-UP ................................................................................................................................. 60
APPOINTMENTS SIGN-UP ....................................................................................................................... 61
Scheduling an Appointment Using Quick Scheduler .............................................................................. 63
TUTORS SIGN-IN .................................................................................................................................... 66
CLASS SIGN-IN ............................................................................................................................................... 67
CLASS SIGN OUT ............................................................................................................................................ 69
ACCUSQL/ACCUTRACK 2019 REFERENCE MANUAL
5
< Back to Contents >
SEMINAR SIGN IN ........................................................................................................................................... 70
SYSTEM ADMINISTRATION SCREEN ....................................................................................................... 72
ORGANIZATION OF THE SYSTEM ADMINISTRATION SCREEN ..................................................................................... 74
CUSTOMIZING THE MAIN MENU OPTIONS .......................................................................................................... 77
USERS SETUP.......................................................................................................................................... 80
STUDENTS ..................................................................................................................................................... 81
Adding a Student ................................................................................................................................... 82
Editing a Student ................................................................................................................................... 82
Making a Student Inactive ..................................................................................................................... 83
Hide Inactive Students (Pin) ................................................................................................................... 83
Deleting a Student ................................................................................................................................. 83
Changing the capitalization of the entered names ................................................................................ 84
Show Web (Registrations) ..................................................................................................................... 84
Set Active/inactive ................................................................................................................................. 85
Adding Profile Data to a Student Record ............................................................................................... 87
Assign Picture ........................................................................................................................................ 87
Attachments .......................................................................................................................................... 88
Change Password .................................................................................................................................. 89
Using the Students Central Toolbar ....................................................................................................... 90
TUTORS ........................................................................................................................................................ 92
Adding a Tutor ....................................................................................................................................... 92
PAY RATES .................................................................................................................................................... 92
ADD/REMOVE ASSIGNMENTS ........................................................................................................................... 93
Hide Inactive Activities ........................................................................................................................... 94
DUPLICATING ACTIVITY ASSIGNMENTS ................................................................................................................. 95
Editing a Tutor ....................................................................................................................................... 96
Making a Tutor inactive ......................................................................................................................... 97
ACCUSQL/ACCUTRACK 2019 REFERENCE MANUAL
6
< Back to Contents >
Deleting a Tutor ..................................................................................................................................... 97
ENTERING TUTOR SCHEDULES ........................................................................................................................... 97
Scheduler (Classic) ................................................................................................................................. 97
Tutor Schedule screen ............................................................................................................................ 99
DUPLICATING A SCHEDULE ............................................................................................................................. 102
ADDING A CUSTOM SCHEDULE ........................................................................................................................ 104
TUTOR OFF-TIMES ........................................................................................................................................ 107
ALLOW TUTOR SCHEDULING USING WEB GATEWAY MVC ................................................................................... 108
Attachments ........................................................................................................................................ 108
Change Password ................................................................................................................................ 108
Using the Tutor Central Toolbar .......................................................................................................... 109
INSTRUCTORS............................................................................................................................................... 110
SYSTEM ADMINISTRATORS ............................................................................................................................. 111
STUDENT GROUPS ........................................................................................................................................ 112
Adding a Student Group ...................................................................................................................... 113
Editing a Student Group ...................................................................................................................... 113
Deleting a Student Group .................................................................................................................... 113
Setting Group Members to Inactive ..................................................................................................... 113
Student Athletes .................................................................................................................................. 113
Adding a Sport ..................................................................................................................................... 114
Editing a Sport ..................................................................................................................................... 115
Deleting a Sport ................................................................................................................................... 115
Required Hours Screen ......................................................................................................................... 116
GRANTS RECIPIENTS ...................................................................................................................................... 118
Modify Grants ...................................................................................................................................... 118
TUTOR GROUPS ........................................................................................................................................... 119
Adding a Tutor Group .......................................................................................................................... 119
ACCUSQL/ACCUTRACK 2019 REFERENCE MANUAL
7
< Back to Contents >
Deleting a Tutor Group ........................................................................................................................ 120
Setting Group Members to Inactive ..................................................................................................... 120
USERS SETUP OPTIONS ........................................................................................................................ 120
NEW STUDENT OPTIONS ................................................................................................................................ 122
TUTOR SIGN-IN OPTIONS ............................................................................................................................... 124
VISIT TRACKING MODULE OPTIONS .................................................................................................................. 126
SESSION LOG OPTIONS .................................................................................................................................. 128
STUDENT AND TUTOR PAD OPTIONS ................................................................................................................ 129
SIGN-IN SETUP ..................................................................................................................................... 130
CATEGORIES & ACTIVITIES SCREEN ................................................................................................................... 130
Working with Categories ..................................................................................................................... 131
Adding a Category ............................................................................................................................... 131
Editing a Category ............................................................................................................................... 132
Deleting a Category ............................................................................................................................. 132
Making a Category Inactive ................................................................................................................. 133
working with Activities ........................................................................................................................ 133
Adding an Activity ................................................................................................................................ 134
Editing an Activity ................................................................................................................................ 135
Deleting an Activity.............................................................................................................................. 135
Making an Activity Inactive ................................................................................................................. 136
Activity (Class) Schedules Screen ......................................................................................................... 136
Using the Activity Central Buttons ....................................................................................................... 139
REGISTRATION SCREEN .................................................................................................................................. 141
Registering a Student Group ................................................................................................................ 142
Registration Sources ............................................................................................................................ 144
REGISTRATION (MULTI) SCREEN ...................................................................................................................... 145
SERVICE TYPE SCREEN ................................................................................................................................... 147
ACCUSQL/ACCUTRACK 2019 REFERENCE MANUAL
8
< Back to Contents >
COURSE COVERAGE ...................................................................................................................................... 148
SCHEDULE BUILDER ....................................................................................................................................... 149
TUTOR AVAILABILITY ..................................................................................................................................... 152
SIGN-IN SETUP OPTIONS ...................................................................................................................... 155
WELCOME SCREEN OPTIONS .......................................................................................................................... 156
Welcome Message............................................................................................................................... 157
Announcements Box ............................................................................................................................ 157
Show these Buttons ............................................................................................................................. 158
ACTIVITY SCREEN OPTIONS ............................................................................................................................. 159
Removing the Activities Selection screen entirely ................................................................................ 159
Labels Box ............................................................................................................................................ 159
Tutor Selection Screen Options ............................................................................................................ 164
NEW STUDENT SCREEN OPTIONS ..................................................................................................................... 166
TUTOR SIGN-IN OPTIONS ............................................................................................................................... 168
WAITING OPTIONS ....................................................................................................................................... 170
STUDENT VISITS TRACKING .................................................................................................................. 172
WHO’S IN SCREEN ........................................................................................................................................ 173
SIGN IN (STUDENTS) SCREEN .......................................................................................................................... 174
ROUND-TRIP SIGN-INS ................................................................................................................................... 176
SIGN STUDENTS OUT SCREEN ......................................................................................................................... 177
EDIT (STUDENT) SIGN-IN LOGS SCREEN ............................................................................................................ 180
ACTIVITIES WAITING LIST SCREEN .................................................................................................................... 185
STUDENT VISITS TRACKING SETUP OPTIONS ........................................................................................ 189
TUTOR VISITS TRACKING ...................................................................................................................... 191
WHO’S IN SCREEN ........................................................................................................................................ 191
SIGN IN (TUTORS) SCREEN .............................................................................................................................. 193
SIGN OUT (TUTORS) SCREEN .......................................................................................................................... 195
ACCUSQL/ACCUTRACK 2019 REFERENCE MANUAL
9
< Back to Contents >
EDIT (TUTOR) SIGN-IN LOGS SCREEN ................................................................................................................ 197
TUTOR TASKS SCREEN ................................................................................................................................... 199
PAY RATES SCREEN ....................................................................................................................................... 204
TUTOR VISITS TRACKING SETUP OPTIONS ............................................................................................ 205
STUDENT DEMOGRAPHICS ................................................................................................................... 207
PROFILE SETUP ..................................................................................................................................... 207
Question Navigator ............................................................................................................................. 208
Question Preview box .......................................................................................................................... 209
Question Box ........................................................................................................................................ 209
Status Box ............................................................................................................................................ 209
Font Box ............................................................................................................................................... 210
Answers Box......................................................................................................................................... 211
Modifying a Question .......................................................................................................................... 211
Entering the Answers to a Question .................................................................................................... 212
Using Profile Fields for Local Labs ........................................................................................................ 213
STUDENT PROFILE ......................................................................................................................................... 217
PROFILE QUERY ............................................................................................................................................ 219
Period Filter ......................................................................................................................................... 222
Output Options .................................................................................................................................... 222
View: .................................................................................................................................................... 223
Show Report: ....................................................................................................................................... 223
Export Data: ......................................................................................................................................... 224
Create a Student Group ....................................................................................................................... 224
STUDENT DEMOGRAPHICS SETUP OPTIONS ......................................................................................... 225
SET APPOINTMENTS SCREEN ............................................................................................................... 228
APPOINTMENTS WIZARD SCREEN .................................................................................................................... 228
Using the appointment Wizard............................................................................................................ 228
ACCUSQL/ACCUTRACK 2019 REFERENCE MANUAL
10
< Back to Contents >
Set By Activity Screen ........................................................................................................................... 238
Set By Student ...................................................................................................................................... 247
Quick Scheduler ................................................................................................................................... 247
Appointments Central Screen .............................................................................................................. 249
SET APPOINTMENTS SETUP OPTIONS .................................................................................................. 261
APPOINTMENTS OPTIONS............................................................................................................................... 262
EMAIL CONFIRMATIONS SETUP OPTIONS .......................................................................................................... 266
EMAIL REMINDERS SETUP OPTIONS ................................................................................................................. 272
Appointments Reminders .................................................................................................................... 272
No-Show Notifications ......................................................................................................................... 273
RESTRICTIONS OPTIONS ................................................................................................................................. 274
VIEW APPOINTMENTS SCREEN ............................................................................................................ 275
VIEW/CANCEL ............................................................................................................................................. 276
CANCEL APPOINTMENT .................................................................................................................................. 277
RESCHEDULE ................................................................................................................................................ 278
REPEAT APPOINTMENT .................................................................................................................................. 278
CHANGE TUTOR ........................................................................................................................................... 279
CHANGE LOCATION ....................................................................................................................................... 280
DAILY VIEWER (DETAILED) SCREEN ................................................................................................................... 281
DAILY VIEWER (SUMMARY) SCREEN ................................................................................................................. 282
WEEKLY VIEWER .......................................................................................................................................... 283
MONTHLY VIEWER ....................................................................................................................................... 284
Reading the Chart ................................................................................................................................ 284
Zooming in on a Day ............................................................................................................................ 286
APPOINTMENTS QUICK DAILY VIEW ................................................................................................................. 288
APPOINTMENT NOTES ................................................................................................................................... 290
VIEW CANCELLATIONS ................................................................................................................................... 291
ACCUSQL/ACCUTRACK 2019 REFERENCE MANUAL
11
< Back to Contents >
VIEW NO-SHOWS ......................................................................................................................................... 293
No-Show Definition .............................................................................................................................. 294
No-Show Comments ............................................................................................................................ 294
VOIDING NO-SHOWS .................................................................................................................................... 295
NO-SHOW TO CANCELLATION ......................................................................................................................... 296
VIEW APPOINTMENTS SETUP OPTIONS ............................................................................................... 296
MEDIA CHECK-OUT OPTIONS ............................................................................................................... 297
MEDIA STOCK SCREEN ................................................................................................................................... 297
MEDIA CHECK-IN/OUT SCREEN ....................................................................................................................... 301
EXPRESS MEDIA CHECKOUT SCREEN ................................................................................................................. 304
MEDIA CHECK-OUT SETUP OPTIONS .................................................................................................... 306
FEEDBACK SURVEYS SETUP .................................................................................................................. 307
CREATE FEEDBACK SURVEY ............................................................................................................................. 308
QUESTION PREVIEW ...................................................................................................................................... 308
QUESTION ................................................................................................................................................... 309
STATUS BOX ................................................................................................................................................ 309
FONT BOX ................................................................................................................................................... 309
QUESTION NAVIGATOR .................................................................................................................................. 310
OTHER TEXT ................................................................................................................................................ 310
Changing the Header ........................................................................................................................... 311
Changing the Survey Instructions ........................................................................................................ 311
Changing the Open Comments Text .................................................................................................... 311
SCALE DEFINITION ........................................................................................................................................ 311
SURVEY TYPE SELECTION ................................................................................................................................ 312
DEFINING THE SURVEY SCALE .......................................................................................................................... 312
Tutor Evaluation Survey ....................................................................................................................... 313
Entering the Tutor Survey Questions ................................................................................................... 313
ACCUSQL/ACCUTRACK 2019 REFERENCE MANUAL
12
< Back to Contents >
CUSTOM SURVEYS ........................................................................................................................................ 314
Publish Custom Survey ......................................................................................................................... 320
Custom Survey Reports ........................................................................................................................ 323
FEEDBACK SURVEYS SETUP ............................................................................................................................. 325
FEEDBACK SURVEY SETUP OPTIONS ..................................................................................................... 326
ACTIVITY FEEDBACK SETUP OPTIONS ................................................................................................................ 327
TUTOR FEEDBACK SETUP OPTIONS ................................................................................................................... 329
SESSION LOG SCREEN ........................................................................................................................... 330
SESSION LOG ............................................................................................................................................... 330
USING FILTERS ............................................................................................................................................. 331
How Tutors Enter Comments ............................................................................................................... 333
SESSION QUESTIONNAIRE SETUP ...................................................................................................................... 334
How Tutors Use the Session Questionnaire ......................................................................................... 337
Additional Features Available with Session Questionnaires for 2019.................................................. 338
PROGRAM ASSESSMENT SCREEN ......................................................................................................... 341
PROGRAM ASSESSMENT ................................................................................................................................ 342
ENTERING THE GRADES .................................................................................................................................. 343
VIEWING ENTERED GRADES ............................................................................................................................ 345
GPA DEFINITIONS ........................................................................................................................................ 346
COMMUNICATIONS SCREEN ................................................................................................................ 346
MESSAGING CENTER ..................................................................................................................................... 347
Sending Messages ............................................................................................................................... 349
Receiving Messages ............................................................................................................................. 351
STUDENT CONTACTS ..................................................................................................................................... 352
COMMUNICATIONS SETUP OPTIONS ................................................................................................... 353
EMAIL SETTINGS OPTIONS .............................................................................................................................. 353
Mail Server Selection ........................................................................................................................... 354
ACCUSQL/ACCUTRACK 2019 REFERENCE MANUAL
13
< Back to Contents >
Testing Email Settings.......................................................................................................................... 355
Email Log ............................................................................................................................................. 357
TEXT MESSAGING CONFIGURATION .................................................................................................................. 358
Testing Nexmo ..................................................................................................................................... 359
TUTORING REQUESTS SCREEN ............................................................................................................. 359
TUTORING REQUESTS .................................................................................................................................... 360
Entering a Request ............................................................................................................................... 361
Entering Assignments .......................................................................................................................... 361
TUTORING REQUESTS SETUP OPTIONS ................................................................................................ 362
TUTORING REQUEST EMAIL TEMPLATE ............................................................................................................. 362
SEMINARS SCREEN ............................................................................................................................... 363
SEMINARS ................................................................................................................................................... 364
View Attendance.................................................................................................................................. 366
SEMINARS STATUS ........................................................................................................................................ 367
COMPUTER RESERVATIONS SCREEN .................................................................................................... 368
COMPUTERS ................................................................................................................................................ 369
COMPUTER RESERVATIONS ............................................................................................................................. 370
SYSTEM SCREEN ................................................................................................................................... 373
SEMESTERS ................................................................................................................................................. 373
Adding a new semester ....................................................................................................................... 374
Modifying a semester .......................................................................................................................... 374
Deleting a semester ............................................................................................................................. 375
Registering activities to a semester ..................................................................................................... 375
OFF TIMES .................................................................................................................................................. 375
ROOMS ...................................................................................................................................................... 376
Adding a new room ............................................................................................................................. 377
Modifying a room ................................................................................................................................ 377
ACCUSQL/ACCUTRACK 2019 REFERENCE MANUAL
14
< Back to Contents >
Deleting a Room .................................................................................................................................. 377
LAB IDS ...................................................................................................................................................... 377
Advantages of Using Local Labs .......................................................................................................... 378
Creating a Local Lab ............................................................................................................................ 379
View/Modify Local Lab ID .................................................................................................................... 380
View/Modify Activities held in this lab ................................................................................................ 381
View/Modify Services held in this lab .................................................................................................. 382
Local Lab Usage Example .................................................................................................................... 382
REMOTE SHUTDOWN STATIONS ...................................................................................................................... 389
EXPORT REPORTS ......................................................................................................................................... 391
IMPORT REPORTS ......................................................................................................................................... 393
NEW AUTOMATED TASK SCHEDULER – ACCUTASK SCHEDULER ............................................................................. 396
SYSTEM SETUP OPTIONS ...................................................................................................................... 400
TEXT MESSAGING CONFIGURATION .................................................................................................................. 401
Testing Nexmo ..................................................................................................................................... 402
ID SETTINGS OPTIONS ................................................................................................................................... 403
WAITING OPTIONS ....................................................................................................................................... 405
STUDENT AND TUTOR PAD OPTIONS ................................................................................................................ 406
SYSTEM OPTIONS ......................................................................................................................................... 408
Background Image ............................................................................................................................... 410
Set Title bar and Button Colors ............................................................................................................ 411
Terminology ......................................................................................................................................... 415
SIGN-OUT OPTIONS ...................................................................................................................................... 416
SHUTDOWN OPTIONS .................................................................................................................................... 418
ADD-ONS SCREEN ................................................................................................................................ 420
COMPUTER LAB STATUS- TEST ....................................................................................................................... 420
TIME CLOCK ................................................................................................................................................ 422
ACCUSQL/ACCUTRACK 2019 REFERENCE MANUAL
15
< Back to Contents >
ADD-ONS SETUP OPTIONS ................................................................................................................... 424
COMPUTER LAB PLUG-IN OPTIONS .................................................................................................................. 425
WEB GATEWAY OPTIONS ............................................................................................................................... 427
SUCCESS PLANS SCREEN ....................................................................................................................... 428
STUDENT PLANS ........................................................................................................................................... 429
Add New Assignment(s) ....................................................................................................................... 430
Complete Assignment .......................................................................................................................... 432
Remove Assignment ............................................................................................................................ 433
ACTION ITEMS .............................................................................................................................................. 433
Creating an Action Package from Action Items ................................................................................... 434
BULK ASSIGNMENT ....................................................................................................................................... 437
INDIVIDUAL EDUCATIONAL ACTION PLAN REPORT ............................................................................................... 441
SUCCESS PLANS OPTIONS..................................................................................................................... 441
SYSTEM MENU OPTIONS ...................................................................................................................... 442
HELP CENTER OPTIONS ........................................................................................................................ 443
DOWNLOAD UPDATES ................................................................................................................................... 444
OPTIONS WIZARD ......................................................................................................................................... 444
SEND ERROR FILE ......................................................................................................................................... 445
TIP OF THE DAY VIEW .................................................................................................................................... 446
SUPPORT INFO ............................................................................................................................................. 446
SOFTWARE MANUALS .................................................................................................................................... 446
ADD-ONS INFO............................................................................................................................................. 446
LICENSING INFO ........................................................................................................................................... 446
TECHNICAL CONTACTS ................................................................................................................................... 447
REPORTS OPTIONS ............................................................................................................................... 447
CONTROL PANEL OPTIONS ................................................................................................................... 448
DATABASE OPTIONS ...................................................................................................................................... 449
ACCUSQL/ACCUTRACK 2019 REFERENCE MANUAL
16
< Back to Contents >
IMPORT ...................................................................................................................................................... 449
Step 1: Select file to import and target table to import info. .............................................................. 451
Step 2: Specify type of file to import. ................................................................................................... 454
Step 3: Specify Field Mapping .............................................................................................................. 455
Step 4: Select records and finish .......................................................................................................... 456
STUDENT INFORMATION IMPORT ..................................................................................................................... 458
ACTIVITIES (CLASSES) TABLE IMPORT ................................................................................................................ 460
STUDENT REGISTRATION IMPORT ..................................................................................................................... 462
GRADES (PROGRAM ASSESSMENT) TABLE IMPORT .............................................................................................. 463
MEDIA STOCK IMPORT .................................................................................................................................. 464
STUDENT PHOTOS IMPORT ............................................................................................................................. 466
STAFF (TUTORS) TABLE IMPORT ...................................................................................................................... 468
STUDENT-ACTIVITY-REGISTRATION (COMBINED) IMPORT ..................................................................................... 469
STUDENT GROUPS IMPORT ............................................................................................................................. 470
INSTRUCTORS TABLE IMPORT .......................................................................................................................... 470
SEMINAR INFORMATION IMPORT ..................................................................................................................... 471
TUTOR ACTIVITY ASSIGNMENTS IMPORT ........................................................................................................... 471
ACTIVITY – LAB REGISTRATION IMPORT ............................................................................................................ 472
CLASS SCHEDULES IMPORT ............................................................................................................................. 472
DATABASE LOCATION .................................................................................................................................... 475
Native Mode Details ............................................................................................................................ 476
SQL Server Mode Details ...................................................................................................................... 478
BACK UP ..................................................................................................................................................... 480
LAST BACKUP LOCATION ................................................................................................................................ 481
CLEAN ........................................................................................................................................................ 481
DELETE ....................................................................................................................................................... 481
PURGE ....................................................................................................................................................... 487
ACCUSQL/ACCUTRACK 2019 REFERENCE MANUAL
17
< Back to Contents >
REPAIR ....................................................................................................................................................... 488
TRANSFER DB TO SQL ................................................................................................................................... 488
CREATE BLANK SQL DB ................................................................................................................................. 491
SYSTEM ACCESS ................................................................................................................................... 493
MY ADMIN ID ............................................................................................................................................. 493
MY PASSWORD ............................................................................................................................................ 494
SYSTEM ADMINISTRATORS ............................................................................................................................. 495
SYSTEM ACCESS GROUPS ............................................................................................................................... 496
REPORTS ACCESS .......................................................................................................................................... 498
RESET STUDENT PASSWORDS .......................................................................................................................... 499
ACCESS BY SIGN-IN STATIONS ......................................................................................................................... 500
CUSTOM QUERIES ................................................................................................................................ 501
LOADING A CUSTOM QUERY ........................................................................................................................... 502
CUSTOM REPORT OUTPUT OPTIONS ................................................................................................................ 505
CREATING A NEW CUSTOM QUERY .................................................................................................................. 512
CUSTOM QUERY EXAMPLE ............................................................................................................................. 517
FIND ..................................................................................................................................................... 522
TECHNICAL SUPPORT ........................................................................................................................... 523
TROUBLESHOOTING GUIDE .................................................................................................................. 525
COMMON ISSUES ................................................................................................................................. 526
ACCUSQL/ACCUTRACK 2019 REFERENCE MANUAL
18
< Back to Contents >
WELCOME TO THE WORLD OF ACCUSQL & ACCUTRACK
Congratulations! You have acquired a very powerful software solution for your center. We are sure you
and your visitors will enjoy and benefit greatly from the many features of AccuSQL/AccuTrack. From the
beginning, this software was built on the feedback of administrators and staff members in academic
centers such as yours. AccuSQL/AccuTrack has grown over the years from a basic attendance program to
truly comprehensive learning center software.
Here are just a few of its capabilities:
Tracking and reporting on students' attendance.
Reporting on the usage and utilization of your services.
Providing a student intake system (waiting list)
Managing appointments, including matching students and staff, scheduling, email notification
and reminders, room reservations, and no-show tracking.
Enabling staff to submit their own appointment schedules for review and approval by system
administrators.
Tracking walk-in sessions.
Keeping a session log and session questionnaire
Tracking loaned material.
Analyzing traffic and peak usage times via Excel charts and tables.
Rating staff.
Tracking staff work-hours and calculating pay.
Collecting feedback via periodic visitors surveys.
Reporting on visitors’ demographics / profile information with custom queries.
Program Assessments.
Tracking student athletes and their required hours.
Managing registration and attendance tracking for seminars or workshops.
Automatic report delivery scheduling for instructors.
Sophisticated capabilities for controlling how each of your centers’ are configured and behave
using Local Lab Assignments, all in one database!
ACCUSQL/ACCUTRACK 2019 REFERENCE MANUAL
19
< Back to Contents >
Aiding in student retention through the use of Student Success Plans.
Providing a Messaging Center with multiple delivery methods.
Portable attendance tracking with Apple devices using iAccu.
Powerful custom query generator.
And much more!
All in one convenient package!
With your help and support, we will continue to improve and expand AccuSQL/AccuTrack. Please submit
your suggestions via the online suggestion box:
http://accu.uservoice.com
Finally, we would like to thank you for ordering AccuSQL/AccuTrack. We hope you will enjoy using the
software as much as we enjoy developing it.
Sincerely,
Mon Nasser,
Product Manager
ACCUSQL/ACCUTRACK 2019 REFERENCE MANUAL
20
< Back to Contents >
WHAT IS THE DIFFERENCE BETWEEN ACCUSQL AND ACCUTRACK?
AccuSQL and AccuTrack usage is almost identical. The difference between the two programs is related to
the database they use. AccuSQL uses a Microsoft SQL Server database while AccuTrack uses a Microsoft
VFP 9 database. While this manual uses AccuSQL for most of the screen shots in the program, the
functionality of those screens is almost identical to AccuTrack. Sections in this manual that are specific to
AccuTrack will be indicated with a “For AccuTrack only” tag. The “For AccuTrack only” sections are related
exclusively to database operations.
HOW TO USE THIS MANUAL
This manual contains detailed descriptions of the AccuSQL/AccuTrack screens and functions. Before using
this manual we recommend that you go through the accompanying AccuSQL/AccuTrack Quick Start
Manual. The Quick Start manual shows the “big picture” and how the various AccuSQL/AccuTrack parts
fit together. It also provides a quicker introduction to AccuSQL/AccuTrack.
After reading the Quick Start Manual read this manual for a detailed look at the software. This manual
has the same structure as the AccuSQL/AccuTrack screens. You can use this manual as a reference for
detailed information on a certain screen by going to the pages describing it.
AccuSQL/AccuTrack can be customized via its options screen to match your center’s needs. One of the
many items you can customize is terminology. For example, a tutoring center can use the term “tutor”,
while an advising center can use the term “advisor” Other terms you can change include category,
activity, semester, and seminar. Further, as of version 2016, you can even control terminology at the Local
Labs level. Keep this in mind while you read the manuals. For example, if you are using the software in
an advising center, think “advisor” whenever you see the word “tutor”, and so on.
Also keep in mind that the background image of the software and also the button colors and title bars can
be customized, so these elements might be different for you than the one shown in this manual. For this
manual, the background of AccuSQL/AccuTrack has been set to the default Gray background and the
button and title bar colors are the default blue.
Finally, if you find errors in this manual or if you have ideas on improving it, please email us at
[email protected]. We look forward to hearing from you!
INSTALLATION
For AccuSQL/AccuTrack, you will be installing the software on all of the various sign in stations and
administrator computers that will be using it. The other part of the installation involves transferring a
database to SQL Server. This can be either an older AccuTrack database, if you are upgrading from
AccuTrack, or creating a new blank database. If you have an older AccuSQL database that you want to
upgrade for use with a newer version of AccuSQL, there is a file called SQLDataUpdater.exe that you
would run against the database to upscale it to the latest version.
ACCUSQL/ACCUTRACK 2019 REFERENCE MANUAL
21
< Back to Contents >
If you have an older version of AccuTrack or AccuSQL installed on the PC, you can install the 2019 version
alongside the older version. If you intend however to uninstall the older product first, it is recommended
that you do so before installing the newer version.
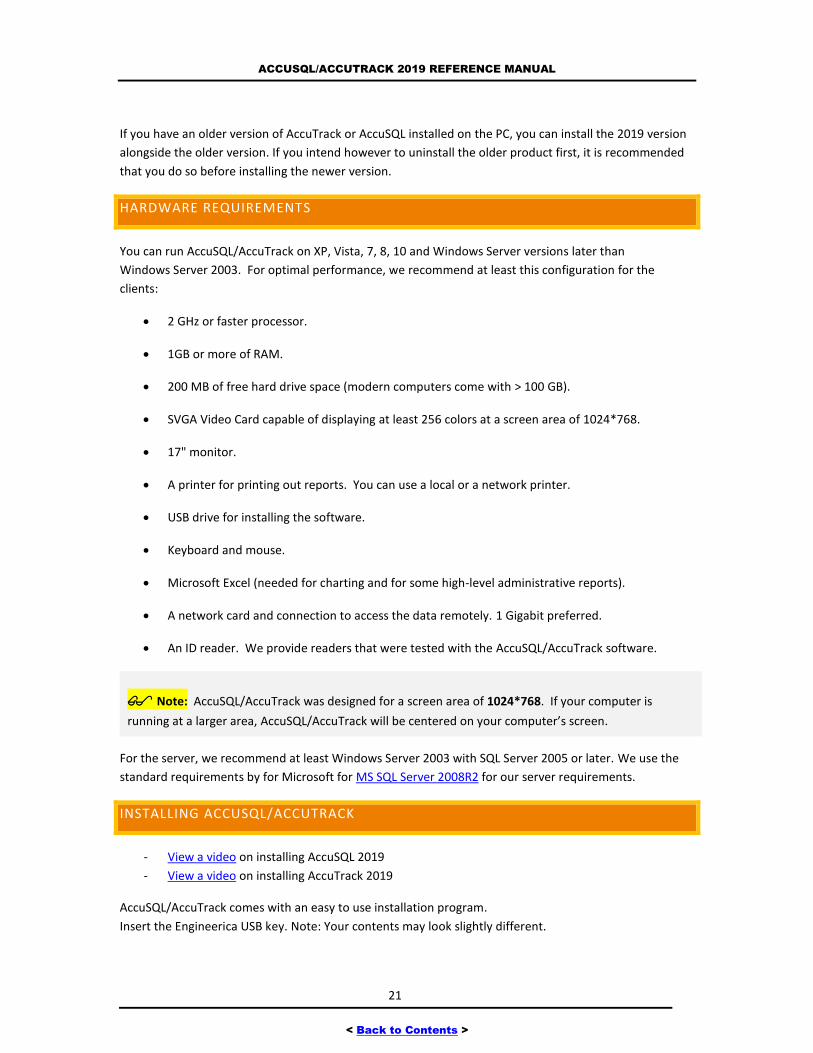
HARDWARE REQUIREMENTS
You can run AccuSQL/AccuTrack on XP, Vista, 7, 8, 10 and Windows Server versions later than
Windows Server 2003. For optimal performance, we recommend at least this configuration for the
clients:
2 GHz or faster processor.
1GB or more of RAM.
200 MB of free hard drive space (modern computers come with > 100 GB).
SVGA Video Card capable of displaying at least 256 colors at a screen area of 1024*768.
17" monitor.
A printer for printing out reports. You can use a local or a network printer.
USB drive for installing the software.
Keyboard and mouse.
Microsoft Excel (needed for charting and for some high-level administrative reports).
A network card and connection to access the data remotely. 1 Gigabit preferred.
An ID reader. We provide readers that were tested with the AccuSQL/AccuTrack software.
Note: AccuSQL/AccuTrack was designed for a screen area of 1024*768. If your computer is
running at a larger area, AccuSQL/AccuTrack will be centered on your computer’s screen.
For the server, we recommend at least Windows Server 2003 with SQL Server 2005 or later. We use the
standard requirements by for Microsoft for MS SQL Server 2008R2 for our server requirements.
INSTALLING ACCUSQL/ACCUTRACK
- View a video on installing AccuSQL 2019
- View a video on installing AccuTrack 2019
AccuSQL/AccuTrack comes with an easy to use installation program.
Insert the Engineerica USB key. Note: Your contents may look slightly different.

ACCUSQL/ACCUTRACK 2019 REFERENCE MANUAL
22
< Back to Contents >
1. Click on the option to “Open folder to view files”
ACCUSQL/ACCUTRACK 2019 REFERENCE MANUAL
23
< Back to Contents >
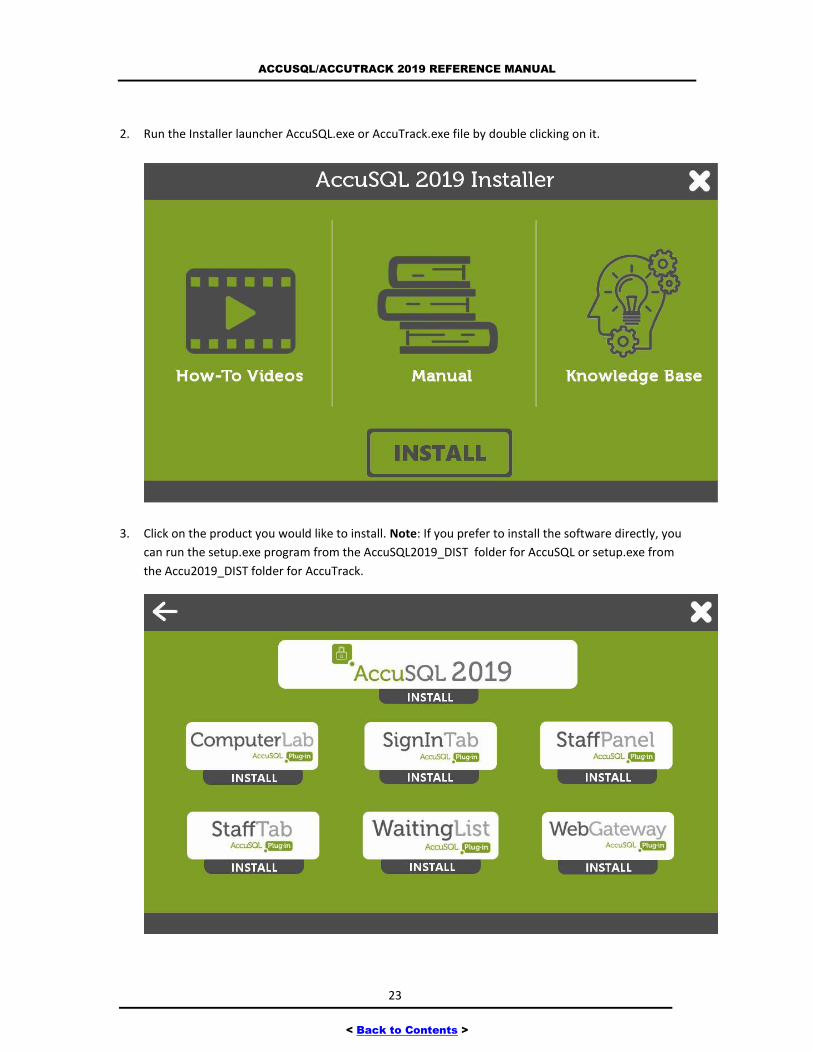
2. Run the Installer launcher AccuSQL.exe or AccuTrack.exe file by double clicking on it.
3. Click on the product you would like to install. Note: If you prefer to install the software directly, you
can run the setup.exe program from the AccuSQL2019_DIST folder for AccuSQL or setup.exe from
the Accu2019_DIST folder for AccuTrack.

ACCUSQL/ACCUTRACK 2019 REFERENCE MANUAL
24
< Back to Contents >
4. Follow the onscreen instructions to install AccuSQL/AccuTrack, Staff Panel. Staff Tab,Computer Lab
Plug-in, or Web Gateway MVC. Note: Depending your license type, you may not have all of these
options available.
Tip: You can go directly to the AccuSQL2019_DIST folder and run setup.exe to install AccuSQL
2019 or for AccuTrack, go to the Accu2019_DIST folder and run setup.exe to install AccuTrack 2019.
Note: If you need to install the software at more than one lab or center, make sure that you
have a license that allows that. If you are not sure what type of license you have, contact the
AccuSQL/AccuTrack support team.
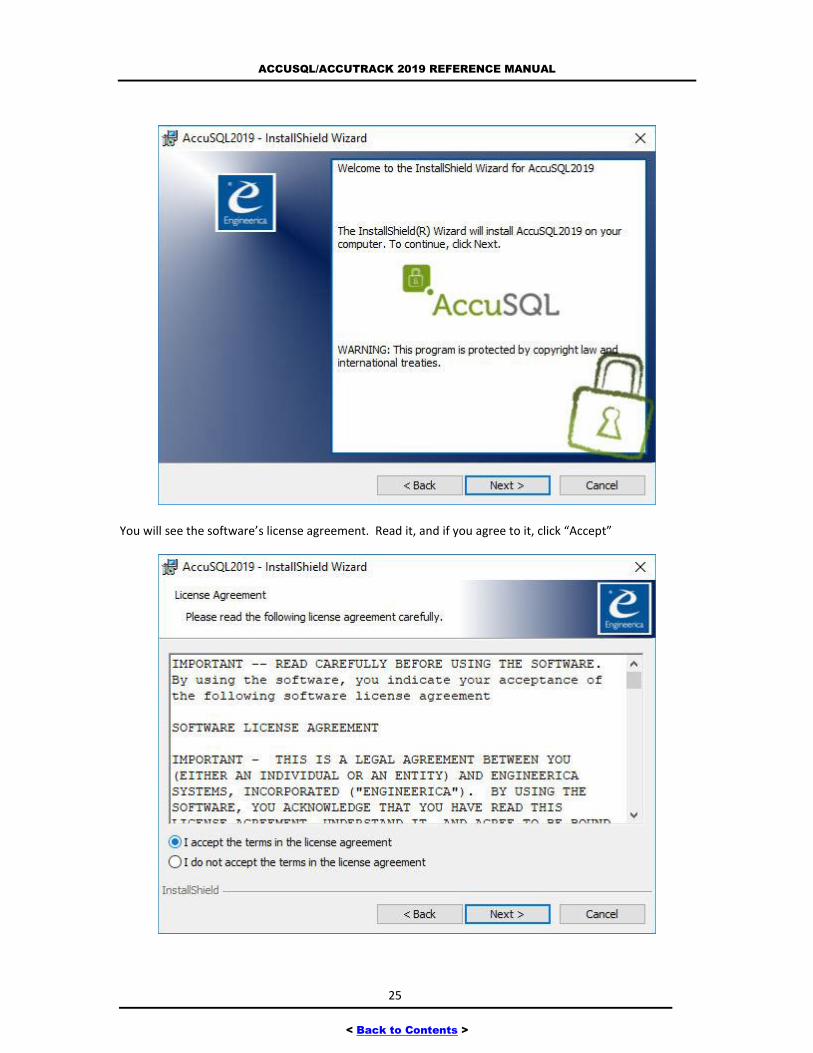
Here is a walk-through of the installation wizard for AccuSQL 2019. AccuTrack would have very similar
screens and the same functionality.
ACCUSQL/ACCUTRACK 2019 REFERENCE MANUAL
25
< Back to Contents >
You will see the software’s license agreement. Read it, and if you agree to it, click “Accept”
ACCUSQL/ACCUTRACK 2019 REFERENCE MANUAL
26
< Back to Contents >
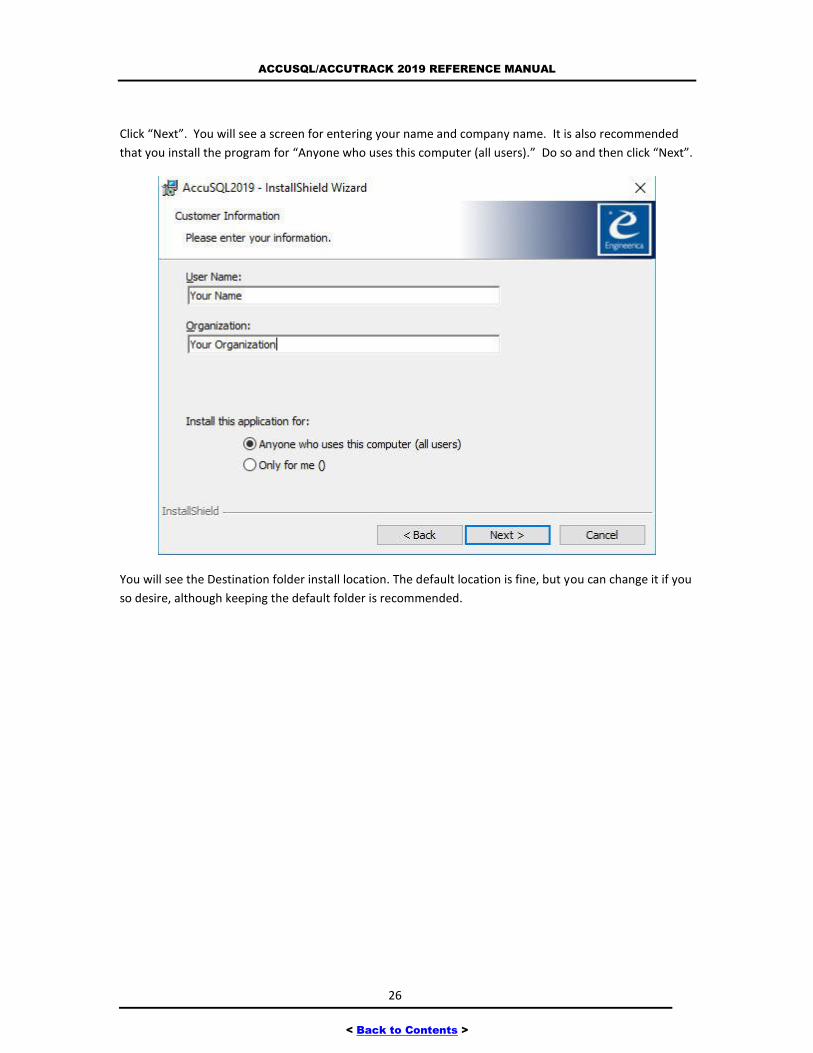
Click “Next”. You will see a screen for entering your name and company name. It is also recommended
that you install the program for “Anyone who uses this computer (all users).” Do so and then click “Next”.
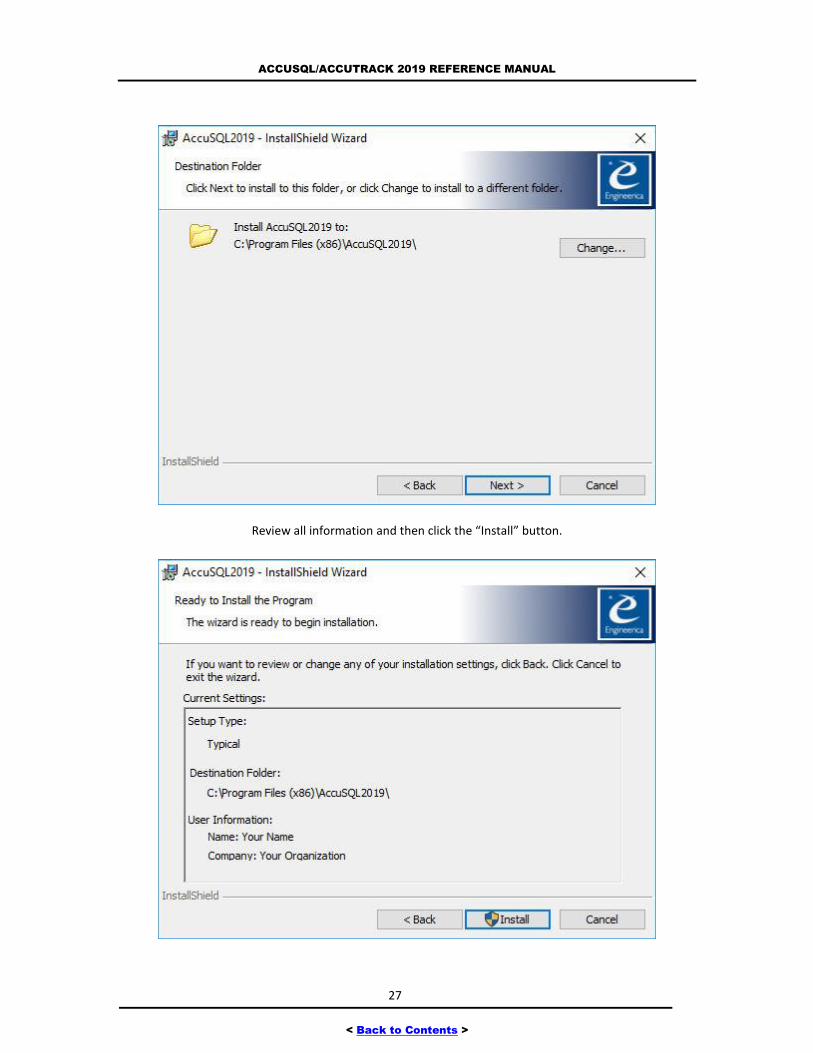
You will see the Destination folder install location. The default location is fine, but you can change it if you
so desire, although keeping the default folder is recommended.
ACCUSQL/ACCUTRACK 2019 REFERENCE MANUAL
27
< Back to Contents >
Review all information and then click the “Install” button.
ACCUSQL/ACCUTRACK 2019 REFERENCE MANUAL
28
< Back to Contents >
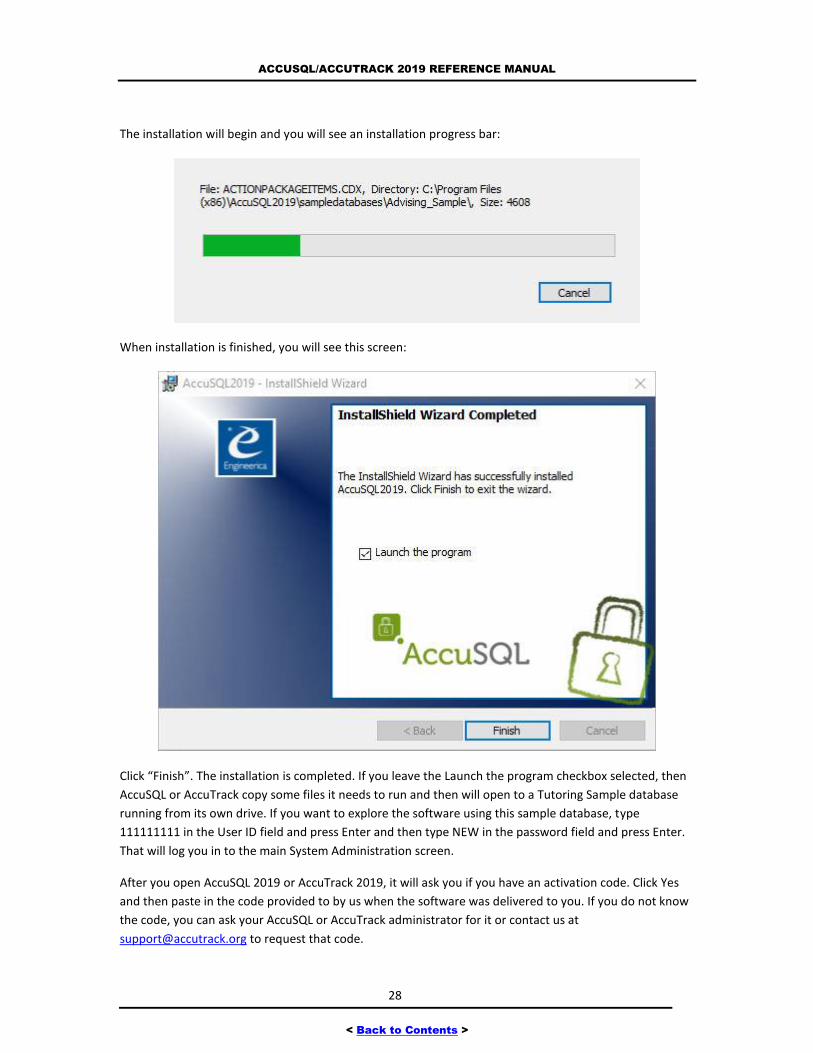
The installation will begin and you will see an installation progress bar:
When installation is finished, you will see this screen:
Click “Finish”. The installation is completed. If you leave the Launch the program checkbox selected, then
AccuSQL or AccuTrack copy some files it needs to run and then will open to a Tutoring Sample database
running from its own drive. If you want to explore the software using this sample database, type
111111111 in the User ID field and press Enter and then type NEW in the password field and press Enter.
That will log you in to the main System Administration screen.
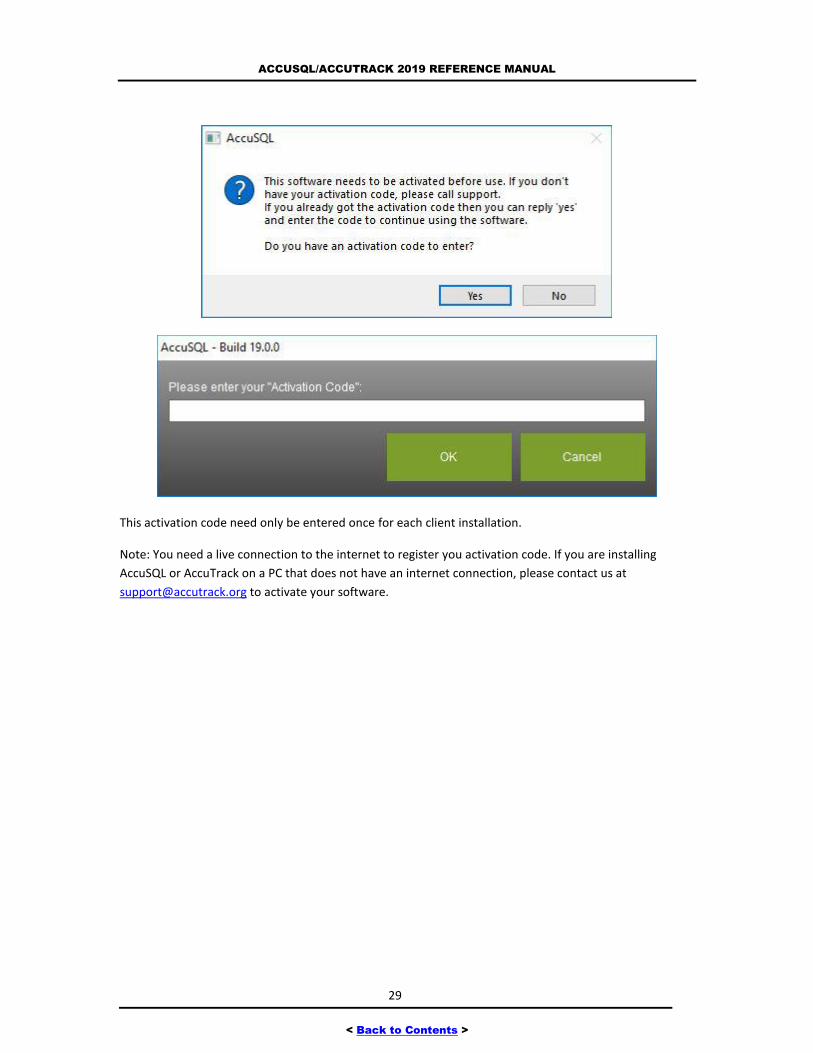
After you open AccuSQL 2019 or AccuTrack 2019, it will ask you if you have an activation code. Click Yes
and then paste in the code provided to by us when the software was delivered to you. If you do not know
the code, you can ask your AccuSQL or AccuTrack administrator for it or contact us at
[email protected] to request that code.
ACCUSQL/ACCUTRACK 2019 REFERENCE MANUAL
29
< Back to Contents >
This activation code need only be entered once for each client installation.
Note: You need a live connection to the internet to register you activation code. If you are installing
AccuSQL or AccuTrack on a PC that does not have an internet connection, please contact us at
[email protected] to activate your software.
ACCUSQL/ACCUTRACK 2019 REFERENCE MANUAL
30
< Back to Contents >
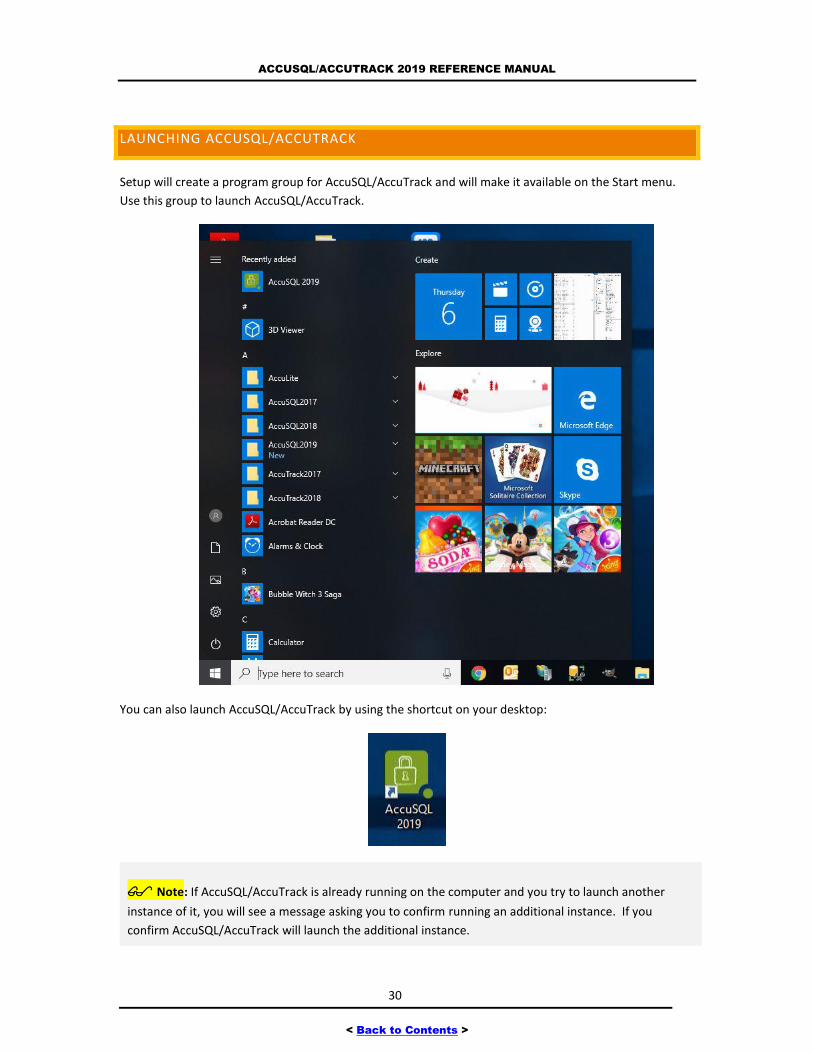
LAUNCHING ACCUSQL/ACCUTRACK
Setup will create a program group for AccuSQL/AccuTrack and will make it available on the Start menu.
Use this group to launch AccuSQL/AccuTrack.
You can also launch AccuSQL/AccuTrack by using the shortcut on your desktop:
Note: If AccuSQL/AccuTrack is already running on the computer and you try to launch another
instance of it, you will see a message asking you to confirm running an additional instance. If you
confirm AccuSQL/AccuTrack will launch the additional instance.

ACCUSQL/ACCUTRACK 2019 REFERENCE MANUAL
31
< Back to Contents >
SHARED DATA INSTALLATION
While you can open AccuSQL 2019 and run it in “native mode”, you will want an SQL Server Administrator
to transfer a database to MSSQL Server for you as soon as he or she can so you can use the product in SQL
Server mode. The SQL Server Administrator would need “sa” access to be able to do the transfer and
he/she uses AccuSQL itself to perform the work. This only applies to the AccuSQL version of the software.
Tip: If you cannot get an SQL Administrator to transfer your database right away, you can still begin
setting up AccuSQL/AccuTrack in native mode. Any of the settings that you have created or records you
have either entered or imported would be transferred to SQL Server, so you would not lose any work that
you have already completed.
UNINSTALLING ACCUSQL/ACCUTRACK
To remove AccuSQL/AccuTrack from a client machine, run the Windows Programs and Features and
then select AccuSQL 2019 or AccuTrack 2019 from the list and click “Uninstall”.
ACCUSQL/ACCUTRACK 2019 REFERENCE MANUAL
32
< Back to Contents >
SWITCHING TO A BLANK DATABASE
When you first open AccuSQL/AccuTrack after you install it, you may notice that it copies some files into
your ”C:\Users\Public\Public Documents” document area. It is copying the Tutoring_Sample database, the
Advising_Sample database, and some other support files it needs to run into that area in a folder called
ACCUTRACK. After it is done, AccuSQL or AccuTrack will open in “native” (non SQL server database mode)
and automatically be pointing to the tutoring sample database. AccuTrack does not have a “native” and
SQL Server mode and can thought of as running “native” only. The tutoring_sample database is a great
place to practice using AccuSQL/AccuTrack, but you will at some point want to point AccuSQL/AccuTrack
to a blank database so you can begin building your own center.
To do so for the AccuSQL version:
You will need your SQL Server system administrator to login to AccuSQL and then select Database >>
Create Blank DB in SQL.
If you already have a database you have been using for an older version of AccuSQL, you can continue
using that database however, you will need to run the SQLDataUpdater.exe located in the folder where
AccuSQL 2019 is installed with sa permissions in order to add the new tables, columns, triggers, etc. that
the 2017 version of AccuSQL needs to run properly.
For detailed information on the above for AccuSQL, please see:
For AccuTrack Only: You will need to copy the AccuData and the DataDic folder from the installation
folder of AccuTrack 2019 (default is C:\Program Files(x86)\Accu2019) out to the server where you want to
put the database. You can then set the AccuTrack 2019 computers to that shared data path. You should
create a folder above the folder where you will be putting to AccuData and DataDic folders. You also can
use either a unc path or drive mapping to connect to the database.
Important: You must give read/write/modify access to the user accounts that will be signing into
AccuTrack and using the shared database.
Here are some examples using a unc path and a mapped drive to connect to the shared database.
1) Using a unc path: Let’s say you have a server on the network called MYSERVER. On the
MYSERVER computer, you create a folder called AccuFiles. Under the AccuFiles folder, you copy
the AccuData (a blank database) and the DataDic folder from the folder where you installed
AccuTrack on your client computer (default is C:\Program Files(x86)\Accu2019). You would login
to AccuTrack on your client computer and then go to Database >> Database Location and enter
\\MYSERVER\AccuFiles\AccuData for the Data Path. Click Save and then completely exit and
reopen AccuTrack for the changes to take effect.
2) Using a mapped drive: You create a mapped drive (let’s say Z:\) that resolves to the
MYSERVER\AccuFiles folder. You would login to AccuTrack on your client computer and then go
to Database >> Database Location and enter Z:\AccuData for the Data Path. Click Save and then
completely exit and reopen AccuTrack for the changes to take effect. Note: Since drive mapping

ACCUSQL/ACCUTRACK 2019 REFERENCE MANUAL
33
< Back to Contents >
can change, it is recommended that you use a unc path to connect to the database folder on
your network.
For detailed information on the above for AccuSQL, please see:
USING DATA FILES FROM AN OLDER VERSION OF ACCUSQL/ACCUTRACK
AccuSQL 2019 includes a built-in data upgrade tool for users of previous versions of AccuSQL. This data
upgrade tool will automatically convert your older AccuSQL data 12, 14, or 15) into version 16 (2017)
format. This preserves your current data and even configuration. To upgrade an existing AccuSQL
database, we provide a utility in your AccuSQL installation folder called SQLDataUpdater.exe. This utility
allows you to pick the SQL Server database you want to upgrade, then will add alter the table structures
as needed to upgrade the database for use with the current version. This utility must be run against the
database with “sa” permissions so you would need to have your SQL Server Administrator perform the
upgrade.
For AccuTrack, the upgrade process is run based on the data version of the database versus the Data
dictionary (DataDic). In the database folder (typically AccuData), you can open the file dataversion.inf in
Notepad to determine the data version. You can do the same in the DataDic folder to determine its
version. Please review the video below for details about the upgrade process.
Important: You must upgrade your older AccuSQL or AccuTrack database prior to using it, or
AccuSQL/AccuTrack 2019 will give you errors when it opens. The errors are related to the program looking
for tables and fields in the database that do not yet exist. If you see errors when you open
AccuSQL/AccuTrack, the chances are very good that the data has not been upgraded yet.
- View a video on how to install AccuTrack and also upgrade an older AccuTrack database to
version 2019. Note: If this is a new installation, then you would merely copy the AccuData (blank
database folder) and DataDic folder from the folder where AccuTrack 2019 is installed and then
put them out on the server under a folder called AccuFiles (or whatever you want). All AccuTrack
stations that are going to be pointing to that database must have read/write/modify access to
the top lever folder (AccuFiles) and all folders and files under it. Learn about all of these topics in
the AccuTrack 2019 Database Operations video at:
https://www.youtube.com/watch?v=JIBLF1b6glw
- View a video on how to install AccuSQL 2019. If you want to know how to update an older
AccuSQL database to version 2019, please review the AccuSQL database operations video.
USING AN ID-READER
The ID-reader speeds up the sign-in and sign-out process by automating the ID number entry into
AccuSQL/AccuTrack. Instead of typing the ID numbers manually, students only need to “swipe” their ID
card into the reader.
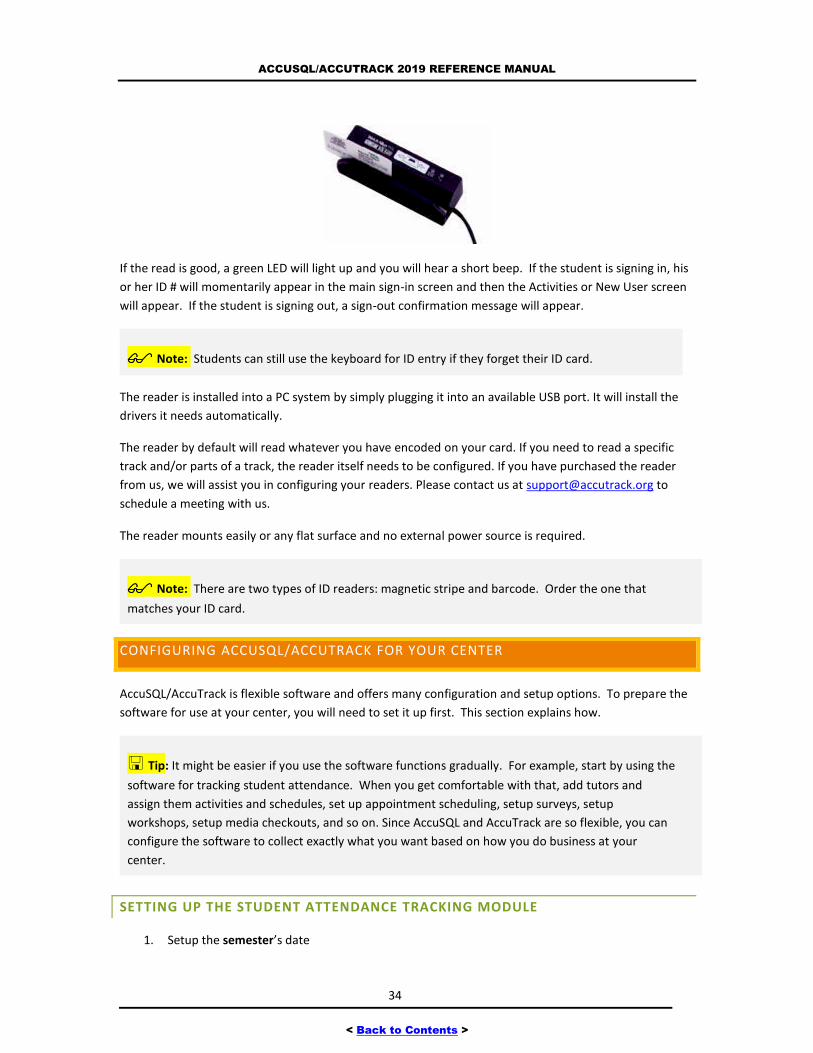
ACCUSQL/ACCUTRACK 2019 REFERENCE MANUAL
34
< Back to Contents >
If the read is good, a green LED will light up and you will hear a short beep. If the student is signing in, his
or her ID # will momentarily appear in the main sign-in screen and then the Activities or New User screen
will appear. If the student is signing out, a sign-out confirmation message will appear.
Note: Students can still use the keyboard for ID entry if they forget their ID card.
The reader is installed into a PC system by simply plugging it into an available USB port. It will install the
drivers it needs automatically.
The reader by default will read whatever you have encoded on your card. If you need to read a specific
track and/or parts of a track, the reader itself needs to be configured. If you have purchased the reader
from us, we will assist you in configuring your readers. Please contact us at [email protected] to
schedule a meeting with us.
The reader mounts easily or any flat surface and no external power source is required.
Note: There are two types of ID readers: magnetic stripe and barcode. Order the one that
matches your ID card.
CONFIGURING ACCUSQL/ACCUTRACK FOR YOUR CENTER
AccuSQL/AccuTrack is flexible software and offers many configuration and setup options. To prepare the
software for use at your center, you will need to set it up first. This section explains how.
Tip: It might be easier if you use the software functions gradually. For example, start by using the
software for tracking student attendance. When you get comfortable with that, add tutors and
assign them activities and schedules, set up appointment scheduling, setup surveys, setup
workshops, setup media checkouts, and so on. Since AccuSQL and AccuTrack are so flexible, you can
configure the software to collect exactly what you want based on how you do business at your
center.
SETTING UP THE STUDENT ATTENDANCE TRACKING MODULE
1. Setup the semester’s date
ACCUSQL/ACCUTRACK 2019 REFERENCE MANUAL
35
< Back to Contents >
2. Enter the student's categories and activities
3. Set up the sign-in screen options.
4. If you want to track which tutor the student meets with during the visit, enter the tutors, their
schedule, and turn on the Tutor Selection option.
5. If you want to show instructors in the Activities screen, enter the instructors and turn on that
option.
6. If you want to track demographics data, set up the profile questions.
SETTING UP FEEDBACK ON SERVICES
1. Set up the student’s survey / feedback question.
2. Set up the survey frequency and options.
SETTING UP TUTOR RATINGS
1. Set up the staff-rating questions.
2. Set up the survey frequency and options.
SETTING UP WORK-HOURS TRACKING / PAY CALCULATIONS:
1. Enter tutors.
2. If you are planning on tracking tutor activities, enter the tutor’s tasks. .
3. Turn the tutor activities screen on or off and check the maximum tutor sign-in period.
4. If you want to calculate pay with AccuSQL/AccuTrack, enter the tutor’s pay scales and rounding
rules.
SETTING UP APPOINTMENTS MANAGEMENT
1. Enter tutors.
2. Enter tutor schedules.
3. If you want to send appointment confirmation or reminders by email, configure the email
parameters.
4. Set up the appointments options.
5. If you want AccuSQL/AccuTrack to send appointment reminder, set up the appointment
reminder utility.

ACCUSQL/ACCUTRACK 2019 REFERENCE MANUAL
36
< Back to Contents >
SETTING UP THE MEDIA CHECKOUTS MODULE
1. Enter your media stock. .
2. Set up the checkout options.
SETTING UP OTHER MODULES:
Program Assessment module – enter the student’s grades.
Student Athletes tracking – enter the sports, team members, and required hours.
Seminar registration tracking – enter seminars.
Also don’t forget to change the default administrator ID and password and be careful, it can be easy to
lock yourself out!
MAINTAINING ACCUSQL/ACCUTRACK
AccuSQL/AccuTrack requires little maintenance. If you will be running in SQL Server mode, almost all of
the maintenance is performed in MSSQL Server. Your dba will automate backups and also perform various
maintenance tasks for you using SQL Server Management Studio (SSMS).
If you are running AccuTrack, you can use the Database >> Clean feature to commit any deletions and to
re-index the database. If you ever get a message that something becomes corrupted in your AccuTrack
database, use Database >> Repair. Important: You must have exclusive access to the AccuTrack database
to perform either of these operations.
USING CONTROLS
AccuSQL/AccuTrack uses two types of controls: standard Windows controls and special controls. The
following explains the controls you will encounter while using AccuSQL or AccuTrack.
LIST BOXES
List boxes are used to display items in a scrollable window. The items appear in alphabetical order. If
there are more items than the list box can show, use the up and down buttons in the vertical scroll
bar to see all the choices. For a faster movement, drag the scroll button in the scroll bar up and down. To
select an item from the list, click on it. The selected item will appear highlighted.
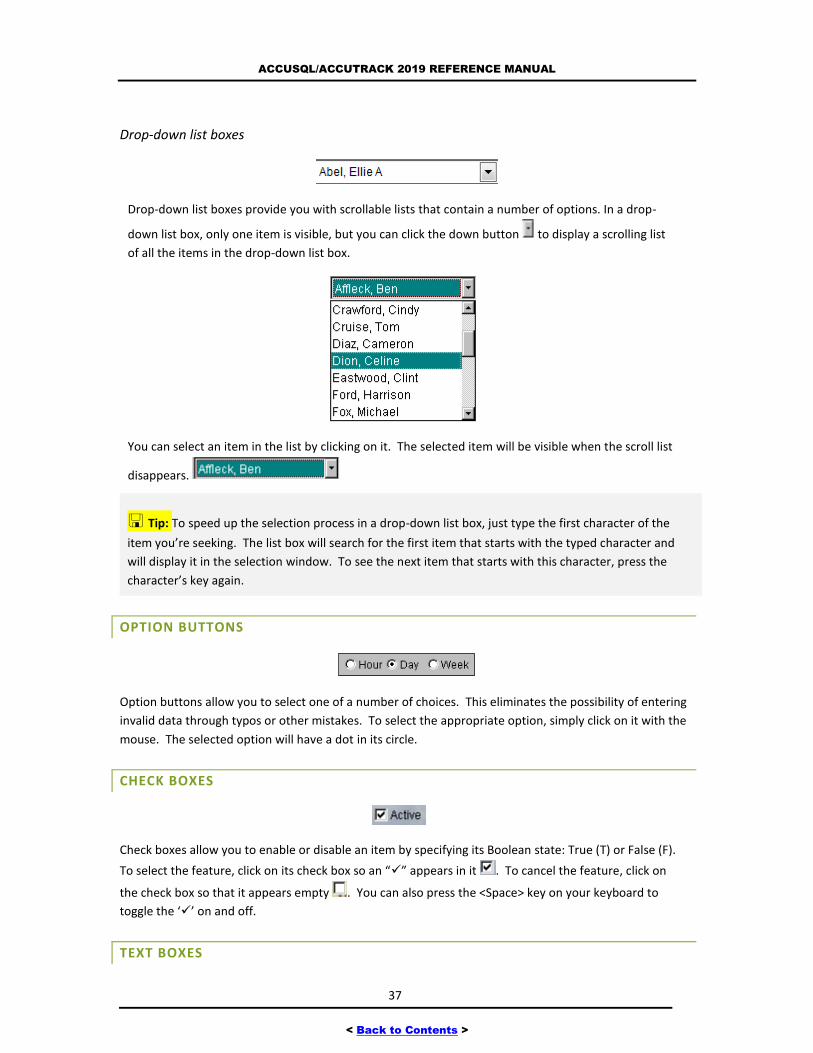
ACCUSQL/ACCUTRACK 2019 REFERENCE MANUAL
37
< Back to Contents >
Drop-down list boxes
Drop-down list boxes provide you with scrollable lists that contain a number of options. In a drop-
down list box, only one item is visible, but you can click the down button to display a scrolling list
of all the items in the drop-down list box.
You can select an item in the list by clicking on it. The selected item will be visible when the scroll list
disappears.
Tip: To speed up the selection process in a drop-down list box, just type the first character of the
item you’re seeking. The list box will search for the first item that starts with the typed character and
will display it in the selection window. To see the next item that starts with this character, press the
character’s key again.
OPTION BUTTONS
Option buttons allow you to select one of a number of choices. This eliminates the possibility of entering
invalid data through typos or other mistakes. To select the appropriate option, simply click on it with the
mouse. The selected option will have a dot in its circle.
CHECK BOXES
Check boxes allow you to enable or disable an item by specifying its Boolean state: True (T) or False (F).
To select the feature, click on its check box so an “” appears in it . To cancel the feature, click on
the check box so that it appears empty . You can also press the <Space> key on your keyboard to
toggle the ‘’ on and off.
TEXT BOXES
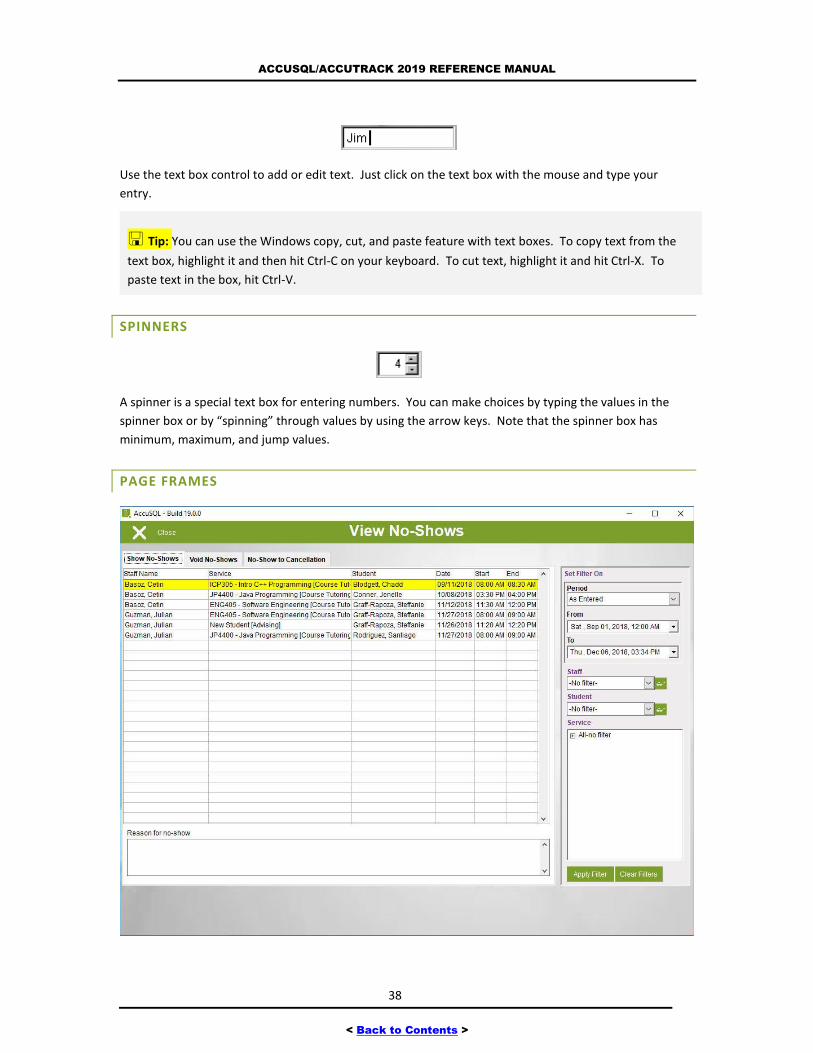
ACCUSQL/ACCUTRACK 2019 REFERENCE MANUAL
38
< Back to Contents >
Use the text box control to add or edit text. Just click on the text box with the mouse and type your
entry.
Tip: You can use the Windows copy, cut, and paste feature with text boxes. To copy text from the
text box, highlight it and then hit Ctrl-C on your keyboard. To cut text, highlight it and hit Ctrl-X. To
paste text in the box, hit Ctrl-V.
SPINNERS
A spinner is a special text box for entering numbers. You can make choices by typing the values in the
spinner box or by “spinning” through values by using the arrow keys. Note that the spinner box has
minimum, maximum, and jump values.
PAGE FRAMES
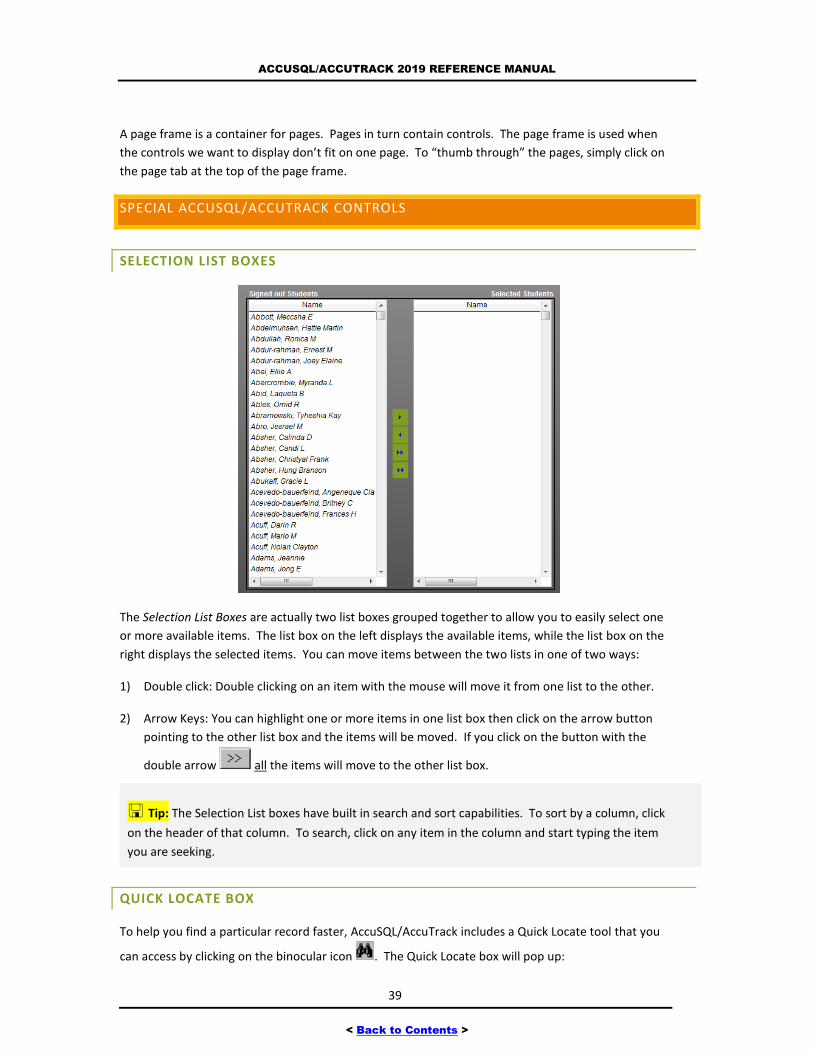
ACCUSQL/ACCUTRACK 2019 REFERENCE MANUAL
39
< Back to Contents >
A page frame is a container for pages. Pages in turn contain controls. The page frame is used when
the controls we want to display don’t fit on one page. To “thumb through” the pages, simply click on
the page tab at the top of the page frame.
SPECIAL ACCUSQL/ACCUTRACK CONTROLS
SELECTION LIST BOXES
The Selection List Boxes are actually two list boxes grouped together to allow you to easily select one
or more available items. The list box on the left displays the available items, while the list box on the
right displays the selected items. You can move items between the two lists in one of two ways:
1) Double click: Double clicking on an item with the mouse will move it from one list to the other.
2) Arrow Keys: You can highlight one or more items in one list box then click on the arrow button
pointing to the other list box and the items will be moved. If you click on the button with the
double arrow all the items will move to the other list box.
Tip: The Selection List boxes have built in search and sort capabilities. To sort by a column, click
on the header of that column. To search, click on any item in the column and start typing the item
you are seeking.
QUICK LOCATE BOX
To help you find a particular record faster, AccuSQL/AccuTrack includes a Quick Locate tool that you
can access by clicking on the binocular icon . The Quick Locate box will pop up:
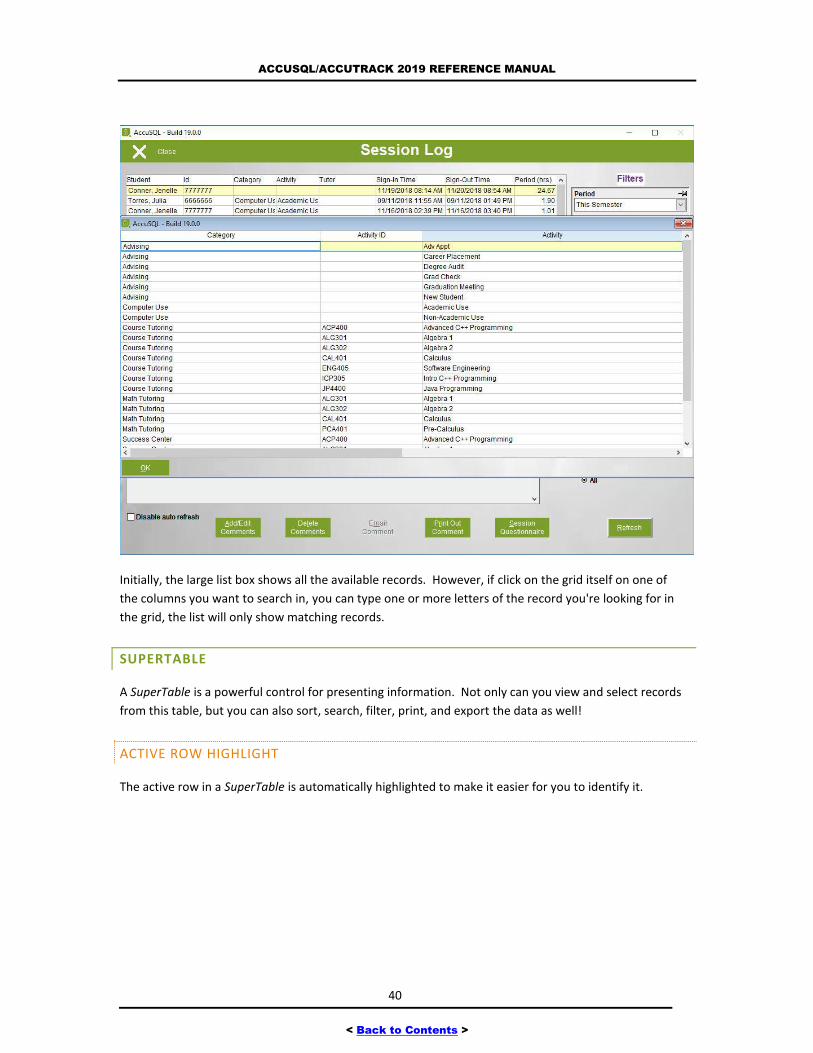
ACCUSQL/ACCUTRACK 2019 REFERENCE MANUAL
40
< Back to Contents >
Initially, the large list box shows all the available records. However, if click on the grid itself on one of
the columns you want to search in, you can type one or more letters of the record you're looking for in
the grid, the list will only show matching records.
SUPERTABLE
A SuperTable is a powerful control for presenting information. Not only can you view and select records
from this table, but you can also sort, search, filter, print, and export the data as well!
ACTIVE ROW HIGHLIGHT
The active row in a SuperTable is automatically highlighted to make it easier for you to identify it.
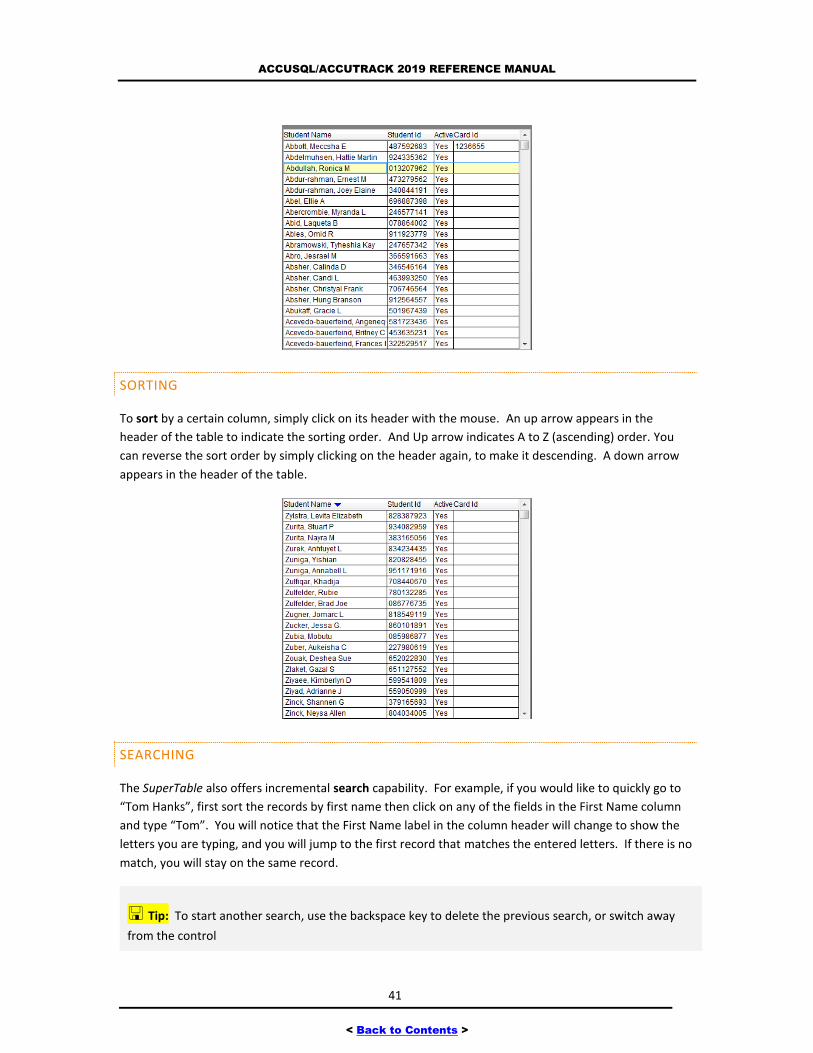
ACCUSQL/ACCUTRACK 2019 REFERENCE MANUAL
41
< Back to Contents >
SORTING
To sort by a certain column, simply click on its header with the mouse. An up arrow appears in the
header of the table to indicate the sorting order. And Up arrow indicates A to Z (ascending) order. You
can reverse the sort order by simply clicking on the header again, to make it descending. A down arrow
appears in the header of the table.
SEARCHING
The SuperTable also offers incremental search capability. For example, if you would like to quickly go to
“Tom Hanks”, first sort the records by first name then click on any of the fields in the First Name column
and type “Tom”. You will notice that the First Name label in the column header will change to show the
letters you are typing, and you will jump to the first record that matches the entered letters. If there is no
match, you will stay on the same record.
Tip: To start another search, use the backspace key to delete the previous search, or switch away
from the control
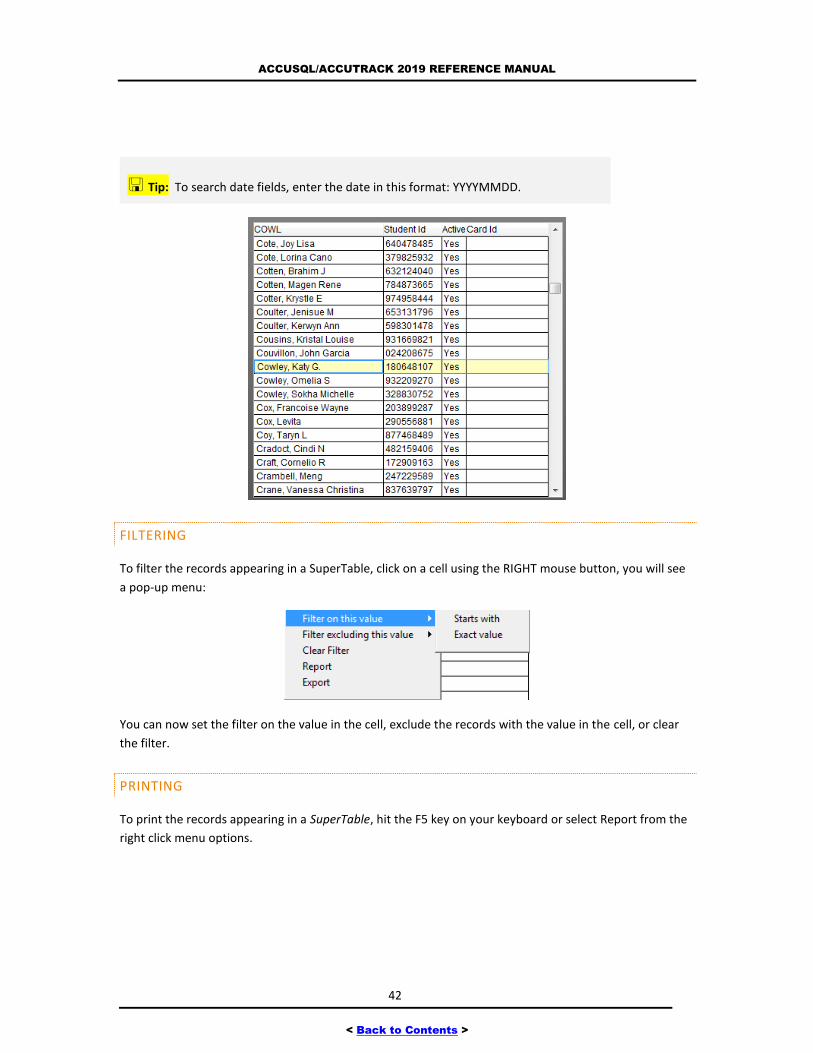
ACCUSQL/ACCUTRACK 2019 REFERENCE MANUAL
42
< Back to Contents >
Tip: To search date fields, enter the date in this format: YYYYMMDD.
FILTERING
To filter the records appearing in a SuperTable, click on a cell using the RIGHT mouse button, you will see
a pop-up menu:
You can now set the filter on the value in the cell, exclude the records with the value in the cell, or clear
the filter.
PRINTING
To print the records appearing in a SuperTable, hit the F5 key on your keyboard or select Report from the
right click menu options.
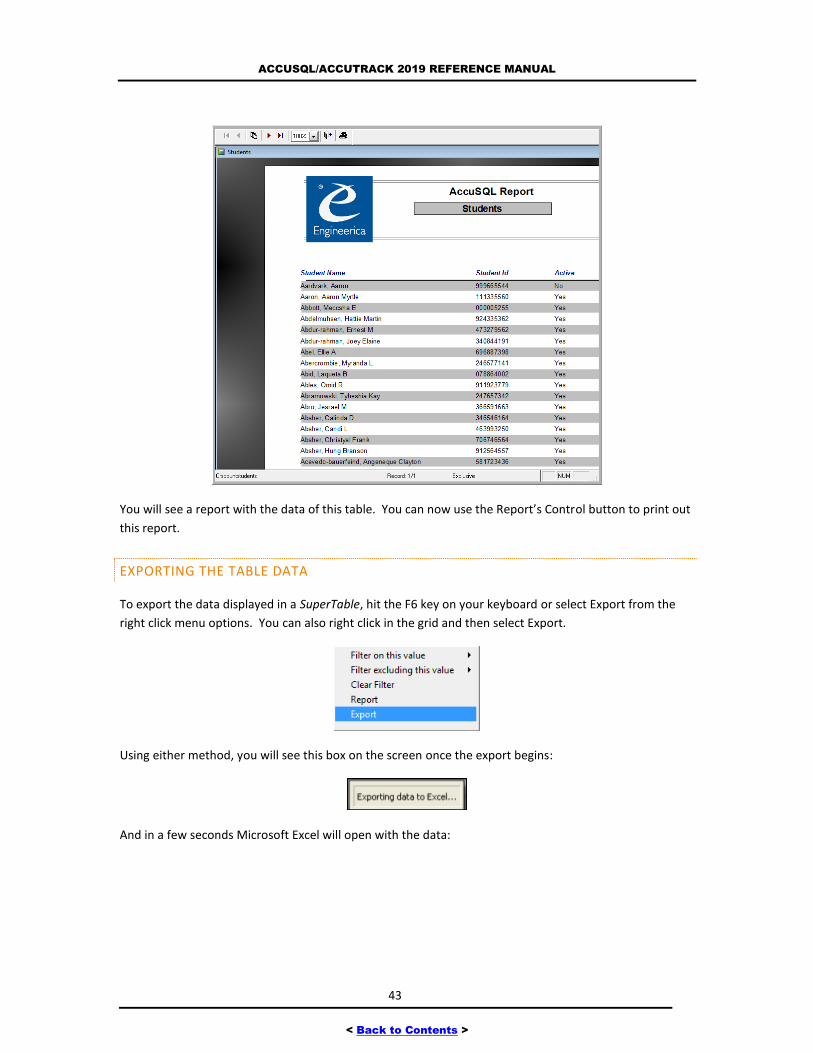
ACCUSQL/ACCUTRACK 2019 REFERENCE MANUAL
43
< Back to Contents >
You will see a report with the data of this table. You can now use the Report’s Control button to print out
this report.
EXPORTING THE TABLE DATA
To export the data displayed in a SuperTable, hit the F6 key on your keyboard or select Export from the
right click menu options. You can also right click in the grid and then select Export.
Using either method, you will see this box on the screen once the export begins:
And in a few seconds Microsoft Excel will open with the data:
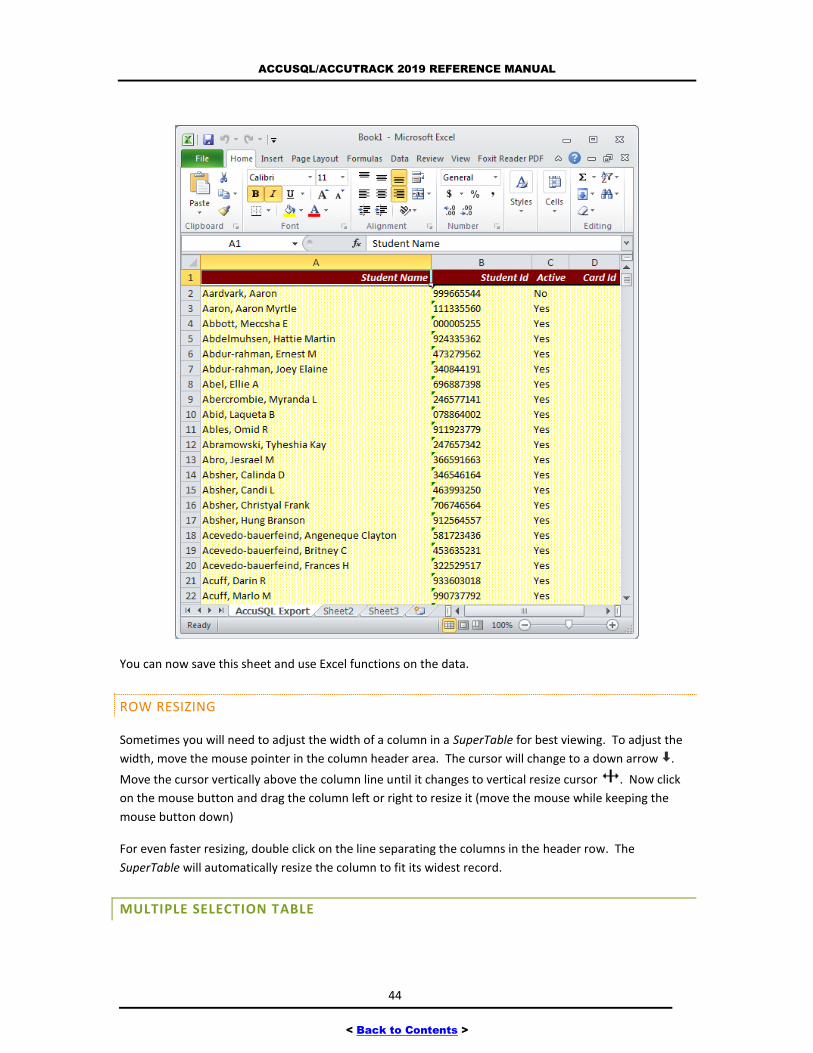
ACCUSQL/ACCUTRACK 2019 REFERENCE MANUAL
44
< Back to Contents >
You can now save this sheet and use Excel functions on the data.
ROW RESIZING
Sometimes you will need to adjust the width of a column in a SuperTable for best viewing. To adjust the
width, move the mouse pointer in the column header area. The cursor will change to a down arrow .
Move the cursor vertically above the column line until it changes to vertical resize cursor . Now click
on the mouse button and drag the column left or right to resize it (move the mouse while keeping the
mouse button down)
For even faster resizing, double click on the line separating the columns in the header row. The
SuperTable will automatically resize the column to fit its widest record.
MULTIPLE SELECTION TABLE
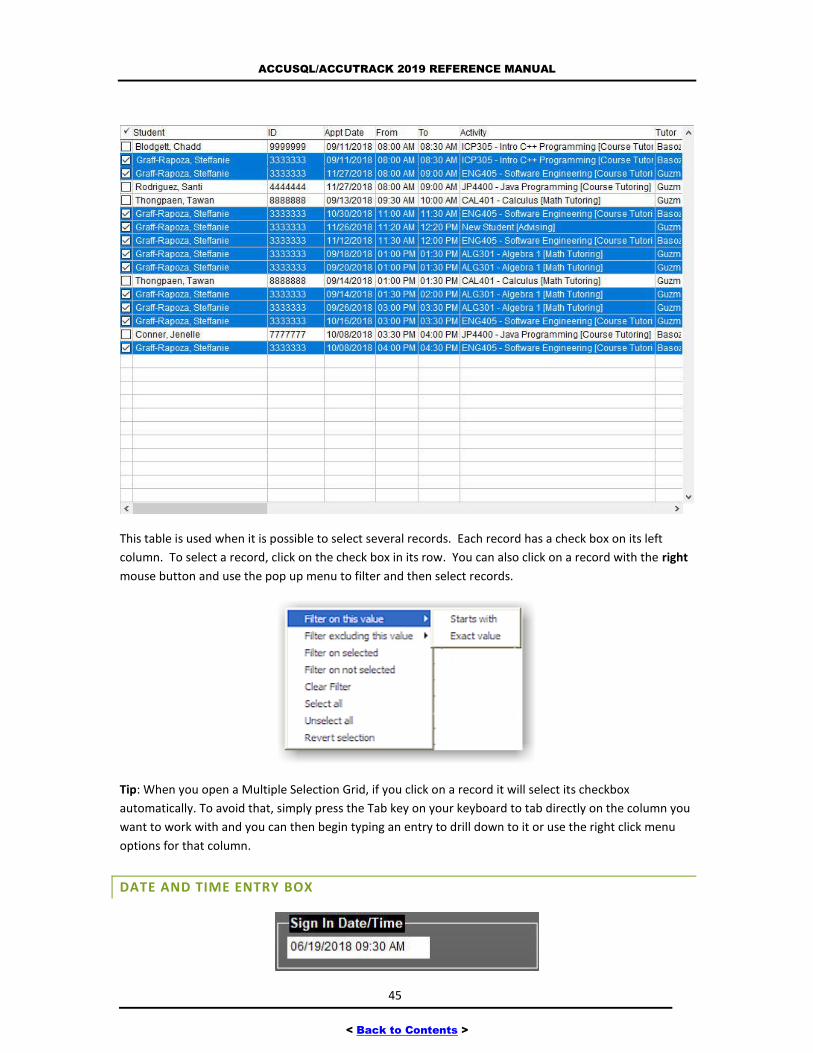
ACCUSQL/ACCUTRACK 2019 REFERENCE MANUAL
45
< Back to Contents >
This table is used when it is possible to select several records. Each record has a check box on its left
column. To select a record, click on the check box in its row. You can also click on a record with the right
mouse button and use the pop up menu to filter and then select records.
Tip: When you open a Multiple Selection Grid, if you click on a record it will select its checkbox
automatically. To avoid that, simply press the Tab key on your keyboard to tab directly on the column you
want to work with and you can then begin typing an entry to drill down to it or use the right click menu
options for that column.
DATE AND TIME ENTRY BOX
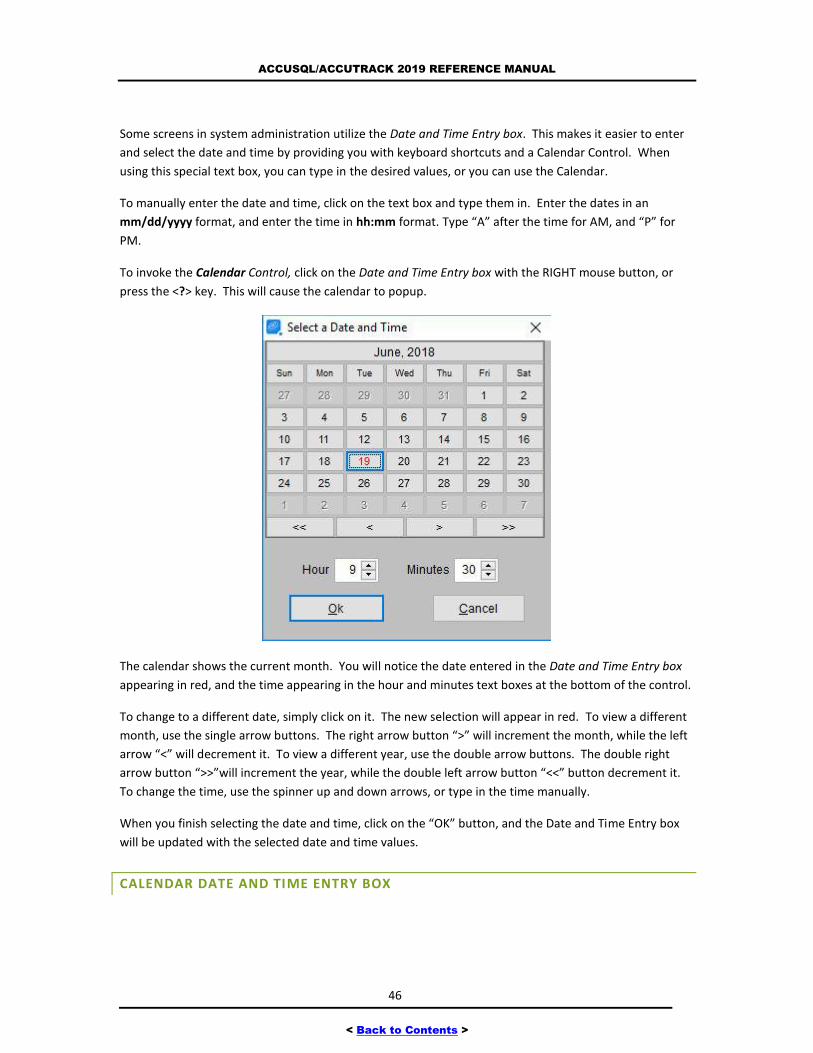
ACCUSQL/ACCUTRACK 2019 REFERENCE MANUAL
46
< Back to Contents >
Some screens in system administration utilize the Date and Time Entry box. This makes it easier to enter
and select the date and time by providing you with keyboard shortcuts and a Calendar Control. When
using this special text box, you can type in the desired values, or you can use the Calendar.
To manually enter the date and time, click on the text box and type them in. Enter the dates in an
mm/dd/yyyy format, and enter the time in hh:mm format. Type “A” after the time for AM, and “P” for
PM.
To invoke the Calendar Control, click on the Date and Time Entry box with the RIGHT mouse button, or
press the <?> key. This will cause the calendar to popup.
The calendar shows the current month. You will notice the date entered in the Date and Time Entry box
appearing in red, and the time appearing in the hour and minutes text boxes at the bottom of the control.
To change to a different date, simply click on it. The new selection will appear in red. To view a different
month, use the single arrow buttons. The right arrow button “>” will increment the month, while the left
arrow “<” will decrement it. To view a different year, use the double arrow buttons. The double right
arrow button “>>”will increment the year, while the double left arrow button “<<” button decrement it.
To change the time, use the spinner up and down arrows, or type in the time manually.
When you finish selecting the date and time, click on the “OK” button, and the Date and Time Entry box
will be updated with the selected date and time values.
CALENDAR DATE AND TIME ENTRY BOX
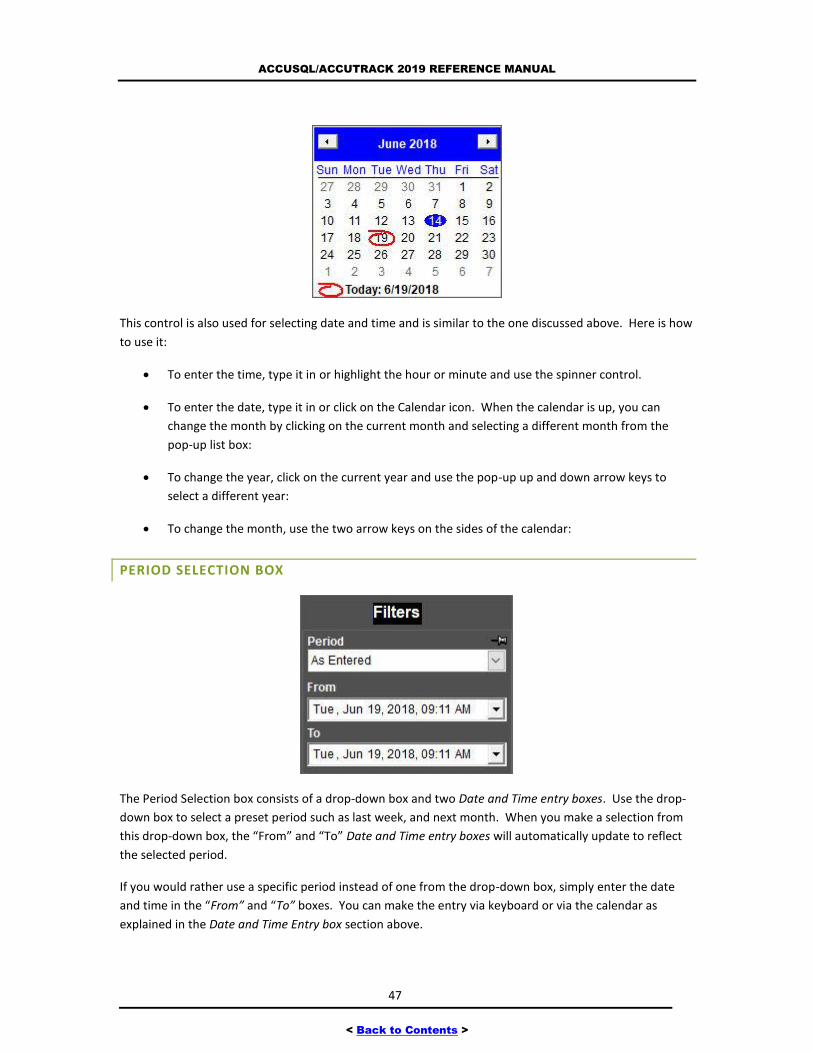
ACCUSQL/ACCUTRACK 2019 REFERENCE MANUAL
47
< Back to Contents >
This control is also used for selecting date and time and is similar to the one discussed above. Here is how
to use it:
To enter the time, type it in or highlight the hour or minute and use the spinner control.
To enter the date, type it in or click on the Calendar icon. When the calendar is up, you can
change the month by clicking on the current month and selecting a different month from the
pop-up list box:
To change the year, click on the current year and use the pop-up up and down arrow keys to
select a different year:
To change the month, use the two arrow keys on the sides of the calendar:
PERIOD SELECTION BOX
The Period Selection box consists of a drop-down box and two Date and Time entry boxes. Use the drop-
down box to select a preset period such as last week, and next month. When you make a selection from
this drop-down box, the “From” and “To” Date and Time entry boxes will automatically update to reflect
the selected period.
If you would rather use a specific period instead of one from the drop-down box, simply enter the date
and time in the “From” and “To” boxes. You can make the entry via keyboard or via the calendar as
explained in the Date and Time Entry box section above.

ACCUSQL/ACCUTRACK 2019 REFERENCE MANUAL
48
< Back to Contents >
Tip: The dates appearing when “This Semester” is selected are set up via the Setup – Center
Setup – Semesters Setup screen.
USING ACCUSQL/ACCUTRACK SCREENS
To make it easier for you to use AccuSQL/AccuTrack, we designed a standard interface for their screens.
Once you learn how to use this interface, you can easily use any AccuSQL/AccuTrack screen using this
interface.
The standard interface will have a SuperTable (see above for info on this powerful control). Under this
table you will see controls for data entry – usually text boxes. In most screens you will also see a check
box marked “Active”. Under the data entry controls, you will see three buttons marked “Add”, “Edit”, and
“Delete”.
Tip: You can use the standard SuperTable functions to locate a specific record. These include
sorting, searching, and filtering. You can also print the data in the SuperTable and export it.
When you have data records to view, the SuperTable will display these records. When you select one of
these records by clicking on it, its information will appear in the data entry controls under the SuperTable.
This way you can see the details of each record by simply clicking on it.
To add new records, simply click “Add”. The data entry controls will be enabled and blanked out. Also
the “Add” and “Edit” buttons will change to “Save” and “Cancel” (or “Revert”)
You can now use the text entry controls to enter the information. For example, type in the text boxes.
When finished, click the “Save” button. The text entry boxes will be disabled again, and you will see the
new record appear in the SuperTable. The new record will be highlighted in the table.
To edit an existing record, first select it in the SuperTable and then click on the “Edit” button. The record’s
info will appear in the data entry controls. You can now update the records and click “Save” to keep the
changes or “Revert” to undo them.
Tip: You can also edit a record by simply double clicking on it in the SuperTable.
To delete a record, simply select it and click “Delete”. AccuSQL/AccuTrack will ask you to confirm this
action. If you answer “Yes” the record will be deleted.
Note that in most screens, the data entry controls include a check box labeled “Active”. Active records
are those currently used in your system. If you no longer need a record, it is highly recommended that
you make it inactive instead of deleting it. This way the record will no longer show in most screens, but it
will still be available for historical reporting.
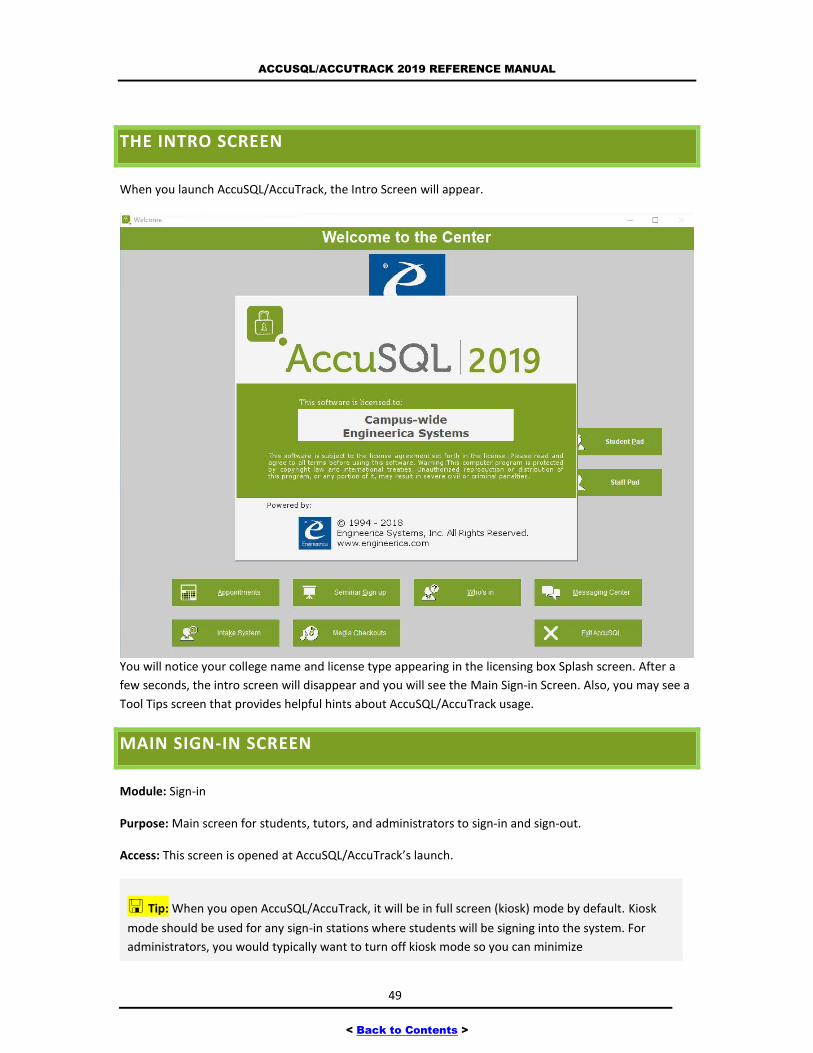
ACCUSQL/ACCUTRACK 2019 REFERENCE MANUAL
49
< Back to Contents >
THE INTRO SCREEN
When you launch AccuSQL/AccuTrack, the Intro Screen will appear.
You will notice your college name and license type appearing in the licensing box Splash screen. After a
few seconds, the intro screen will disappear and you will see the Main Sign-in Screen. Also, you may see a
Tool Tips screen that provides helpful hints about AccuSQL/AccuTrack usage.
MAIN SIGN-IN SCREEN
Module: Sign-in
Purpose: Main screen for students, tutors, and administrators to sign-in and sign-out.
Access: This screen is opened at AccuSQL/AccuTrack’s launch.
Tip: When you open AccuSQL/AccuTrack, it will be in full screen (kiosk) mode by default. Kiosk
mode should be used for any sign-in stations where students will be signing into the system. For
administrators, you would typically want to turn off kiosk mode so you can minimize
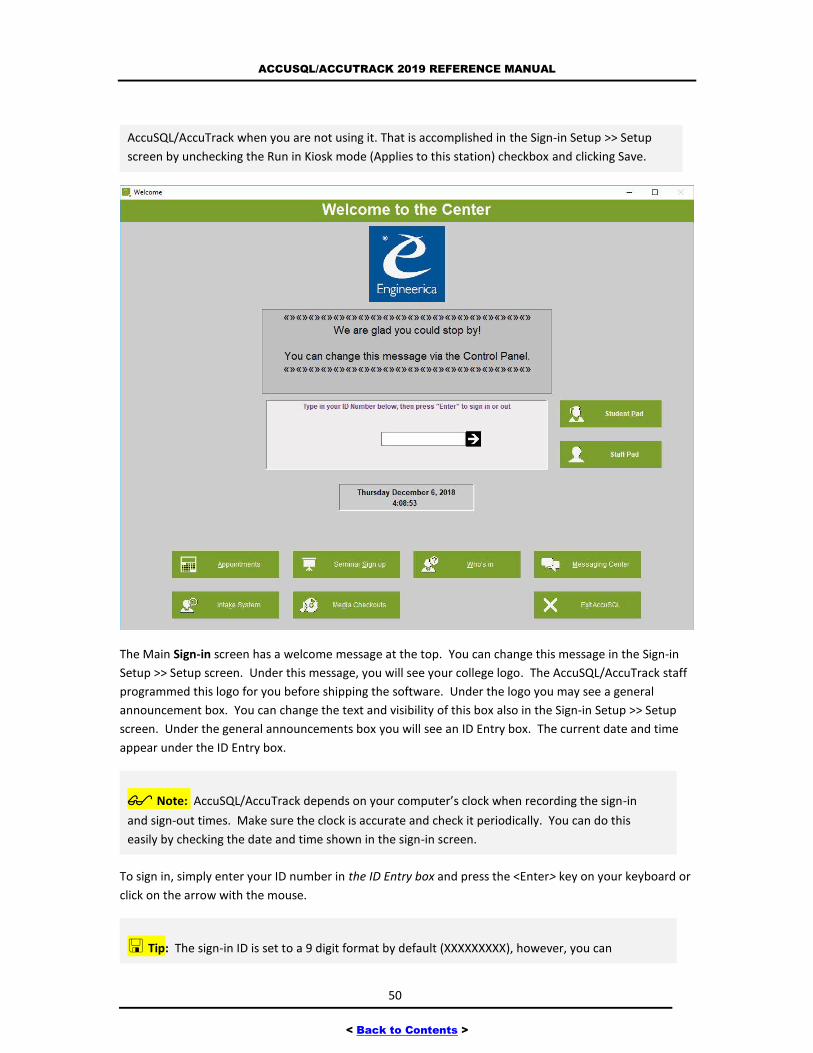
ACCUSQL/ACCUTRACK 2019 REFERENCE MANUAL
50
< Back to Contents >
AccuSQL/AccuTrack when you are not using it. That is accomplished in the Sign-in Setup >> Setup
screen by unchecking the Run in Kiosk mode (Applies to this station) checkbox and clicking Save.
The Main Sign-in screen has a welcome message at the top. You can change this message in the Sign-in
Setup >> Setup screen. Under this message, you will see your college logo. The AccuSQL/AccuTrack staff
programmed this logo for you before shipping the software. Under the logo you may see a general
announcement box. You can change the text and visibility of this box also in the Sign-in Setup >> Setup
screen. Under the general announcements box you will see an ID Entry box. The current date and time
appear under the ID Entry box.
Note: AccuSQL/AccuTrack depends on your computer’s clock when recording the sign-in
and sign-out times. Make sure the clock is accurate and check it periodically. You can do this
easily by checking the date and time shown in the sign-in screen.
To sign in, simply enter your ID number in the ID Entry box and press the <Enter> key on your keyboard or
click on the arrow with the mouse.
Tip: The sign-in ID is set to a 9 digit format by default (XXXXXXXXX), however, you can
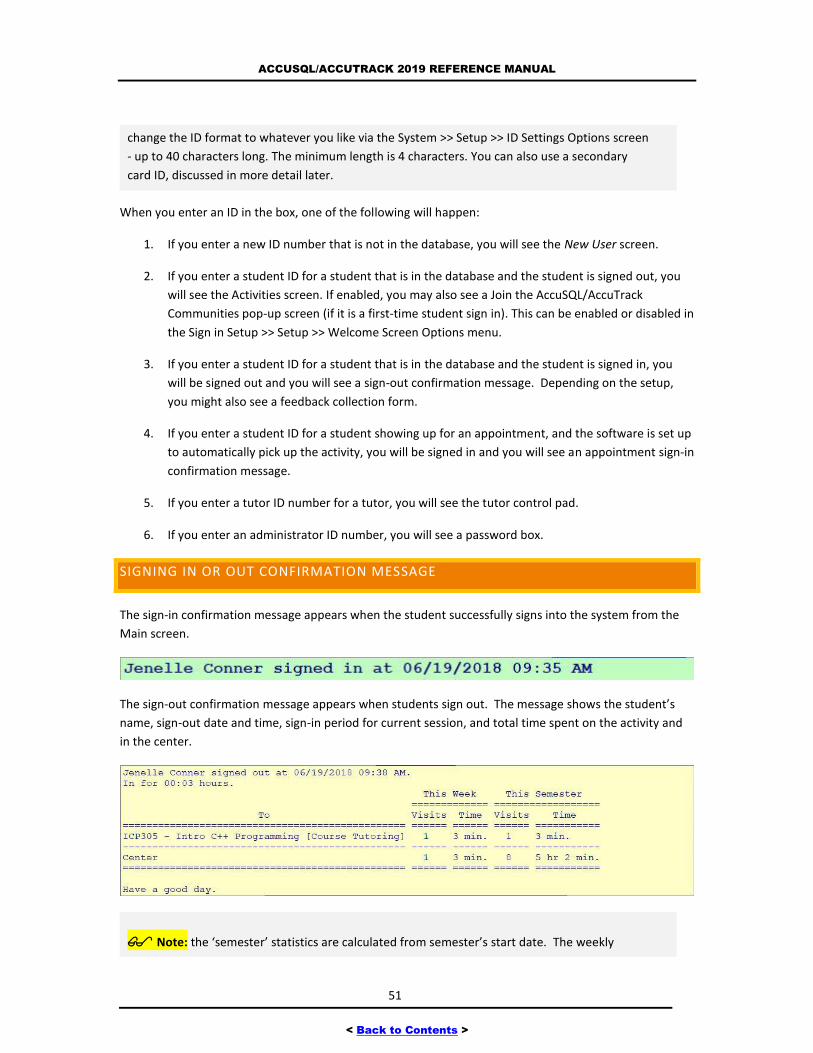
ACCUSQL/ACCUTRACK 2019 REFERENCE MANUAL
51
< Back to Contents >
change the ID format to whatever you like via the System >> Setup >> ID Settings Options screen
- up to 40 characters long. The minimum length is 4 characters. You can also use a secondary
card ID, discussed in more detail later.
When you enter an ID in the box, one of the following will happen:
1. If you enter a new ID number that is not in the database, you will see the New User screen.
2. If you enter a student ID for a student that is in the database and the student is signed out, you
will see the Activities screen. If enabled, you may also see a Join the AccuSQL/AccuTrack
Communities pop-up screen (if it is a first-time student sign in). This can be enabled or disabled in
the Sign in Setup >> Setup >> Welcome Screen Options menu.
3. If you enter a student ID for a student that is in the database and the student is signed in, you
will be signed out and you will see a sign-out confirmation message. Depending on the setup,
you might also see a feedback collection form.
4. If you enter a student ID for a student showing up for an appointment, and the software is set up
to automatically pick up the activity, you will be signed in and you will see an appointment sign-in
confirmation message.
5. If you enter a tutor ID number for a tutor, you will see the tutor control pad.
6. If you enter an administrator ID number, you will see a password box.
SIGNING IN OR OUT CONFIRMATION MESSAGE
The sign-in confirmation message appears when the student successfully signs into the system from the
Main screen.
The sign-out confirmation message appears when students sign out. The message shows the student’s
name, sign-out date and time, sign-in period for current session, and total time spent on the activity and
in the center.
Note: the ‘semester’ statistics are calculated from semester’s start date. The weekly
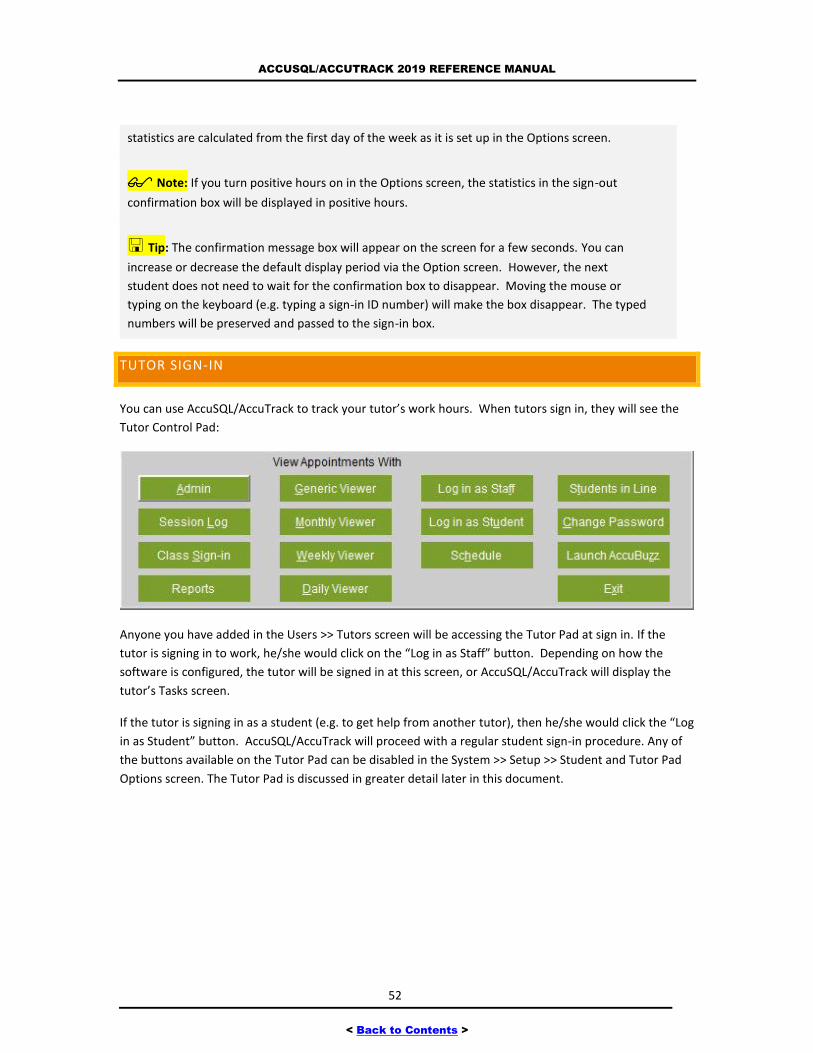
ACCUSQL/ACCUTRACK 2019 REFERENCE MANUAL
52
< Back to Contents >
statistics are calculated from the first day of the week as it is set up in the Options screen.
Note: If you turn positive hours on in the Options screen, the statistics in the sign-out
confirmation box will be displayed in positive hours.
Tip: The confirmation message box will appear on the screen for a few seconds. You can
increase or decrease the default display period via the Option screen. However, the next
student does not need to wait for the confirmation box to disappear. Moving the mouse or
typing on the keyboard (e.g. typing a sign-in ID number) will make the box disappear. The typed
numbers will be preserved and passed to the sign-in box.
TUTOR SIGN-IN
You can use AccuSQL/AccuTrack to track your tutor’s work hours. When tutors sign in, they will see the
Tutor Control Pad:
Anyone you have added in the Users >> Tutors screen will be accessing the Tutor Pad at sign in. If the
tutor is signing in to work, he/she would click on the “Log in as Staff” button. Depending on how the
software is configured, the tutor will be signed in at this screen, or AccuSQL/AccuTrack will display the
tutor’s Tasks screen.
If the tutor is signing in as a student (e.g. to get help from another tutor), then he/she would click the “Log
in as Student” button. AccuSQL/AccuTrack will proceed with a regular student sign-in procedure. Any of
the buttons available on the Tutor Pad can be disabled in the System >> Setup >> Student and Tutor Pad
Options screen. The Tutor Pad is discussed in greater detail later in this document.

ACCUSQL/ACCUTRACK 2019 REFERENCE MANUAL
53
< Back to Contents >
SIGN-IN SCREEN BUTTONS
The buttons at the bottom of the Main Sign-in screen give students the ability to use certain screens in
AccuSQL/AccuTrack. If you like, you can make some or all of these buttons disappear by updating the
settings in the Options screen. Here is an explanation of the functionality of these buttons:
Guest Sign in: Clicking this button will allow visitors to sign in who have not been entered yet as students.
They would get the normal student sign-in screens. In reports, all sign-ins for guests are listed under the
heading “AccuTrack Guest”.
Appointments: Click to enter a student ID, view appointments, and open either the Quick Scheduler or
Appointments Wizard, which is used for scheduling appointments. Enable this button if you want
students to be able to schedule appointments from the Main Sign-in screen.
Seminar Sign-up: Clicking this box will bring up the seminar registration screen. Useful if you want
students or student groups to be able to sign up for seminars or workshops via AccuSQL/AccuTrack.
Who’s in: Brings up a list of tutors who are signed in. You can also make this screen display students who
are signed in by changing an option in Options screen.
Messaging Center: Brings up the Messaging Center to enable students to send email and
AccuSQL/AccuTrack messages to other AccuSQL/AccuTrack users.
Intake System: Clicking this button allows students to see where they are in line if you are using the
Intake System option. Admins can also sign students in using this option.
Intake System: Clicking this button will bring up the tutor waiting list screen.
Media Checkouts: Use to check media in or out. Useful if system is used by tutors who signs students in
and out and check media out.
Activity Waiting List: If you enable the Waiting List function, this button will show students who are
currently on the waiting list.
Exit AccuSQL/AccuTrack: If you want students to exit the software from the Main Sign-in screen, enable
this button.
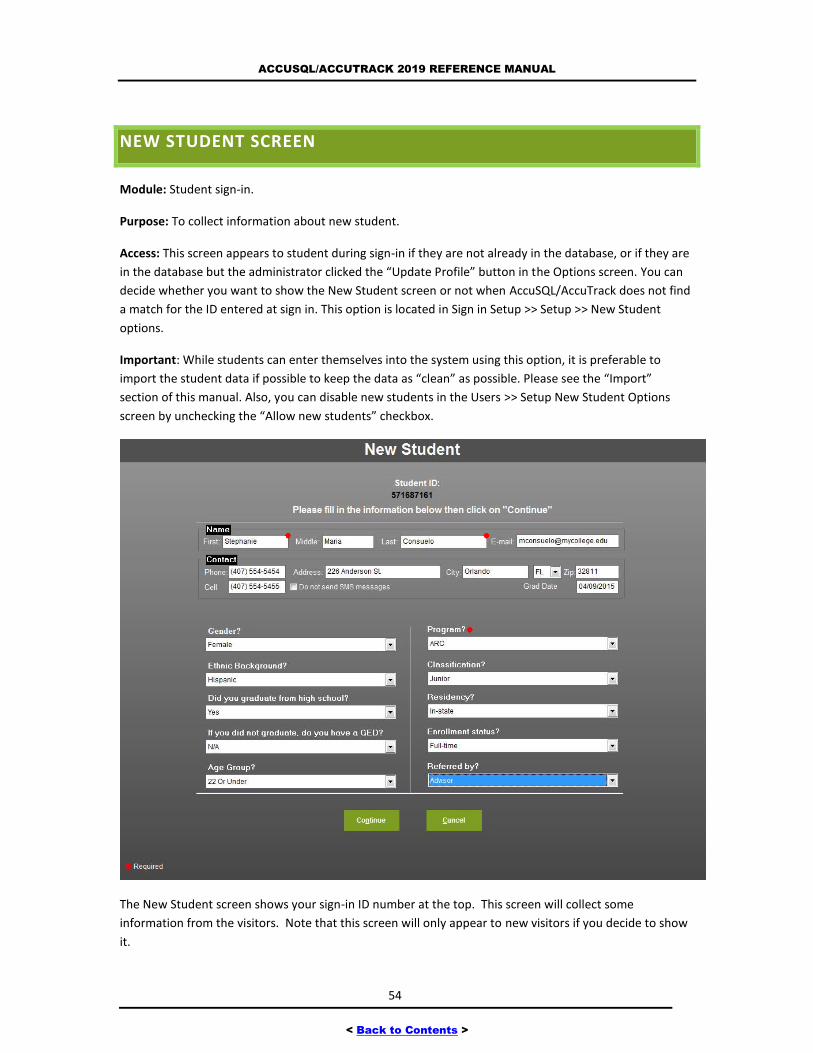
ACCUSQL/ACCUTRACK 2019 REFERENCE MANUAL
54
< Back to Contents >
NEW STUDENT SCREEN
Module: Student sign-in.
Purpose: To collect information about new student.
Access: This screen appears to student during sign-in if they are not already in the database, or if they are
in the database but the administrator clicked the “Update Profile” button in the Options screen. You can
decide whether you want to show the New Student screen or not when AccuSQL/AccuTrack does not find
a match for the ID entered at sign in. This option is located in Sign in Setup >> Setup >> New Student
options.
Important: While students can enter themselves into the system using this option, it is preferable to
import the student data if possible to keep the data as “clean” as possible. Please see the “Import”
section of this manual. Also, you can disable new students in the Users >> Setup New Student Options
screen by unchecking the “Allow new students” checkbox.
The New Student screen shows your sign-in ID number at the top. This screen will collect some
information from the visitors. Note that this screen will only appear to new visitors if you decide to show
it.
ACCUSQL/ACCUTRACK 2019 REFERENCE MANUAL
55
< Back to Contents >
Tip: The minimum information required in this screen is the visitor’s first and last name. The
rest of the fields can be set as optional. The administrator can even remove all other fields on
this screen.
Starting with the field on the left, type in your first name, use the mouse or <Tab> button on the keyboard
to move to the next field and fill in your middle and then your last name.
Tip: You do not need to hold the <Shift> key down while entering the first letter of the
name. AccuSQL/AccuTrack will automatically capitalize the first letter as you type it. You can
also configure the software to automatically fix the capitalization of all the names at once.
After typing the name, enter the rest of the contact information such as the e-mail address, city state, zip,
etc. If the software is configured to send email notifications when appointments are set or canceled, the
Email address you enter here will be used to send these notifications. If you are going to use text
messaging, the Cell field will be the number used to send text messages to the student.
If your center tracks demographics, you will also see the student profile questions. For each question,
select the answer that applies to you from the drop-down list box.
Tip: Depending on how the software is configured, the profile questions may or may not be
visible. The configuration will also determine whether an answer is required for the question.
Required questions are shown with a red dot next to them.
Tip: The phone prefix, email suffix, city and state can be prefilled by entering the
information in the Sign in Setup >> Setup >> New Student options screen. You can also show or
hide these options for new students in the same setup screen.
After filling in all the information, click on the “Continue” button to proceed with the sign in. This will
take you to the Activities screen.
ACTIVITY SELECTION SCREEN
Module: Student sign-in
Purpose: To allow the student to select the activity he/she will be using.
Access: This screen can appear to student during sign in, or if so desired, you can bypass it completely. In
that case, however, you would only be collecting the sign in and sign out times.
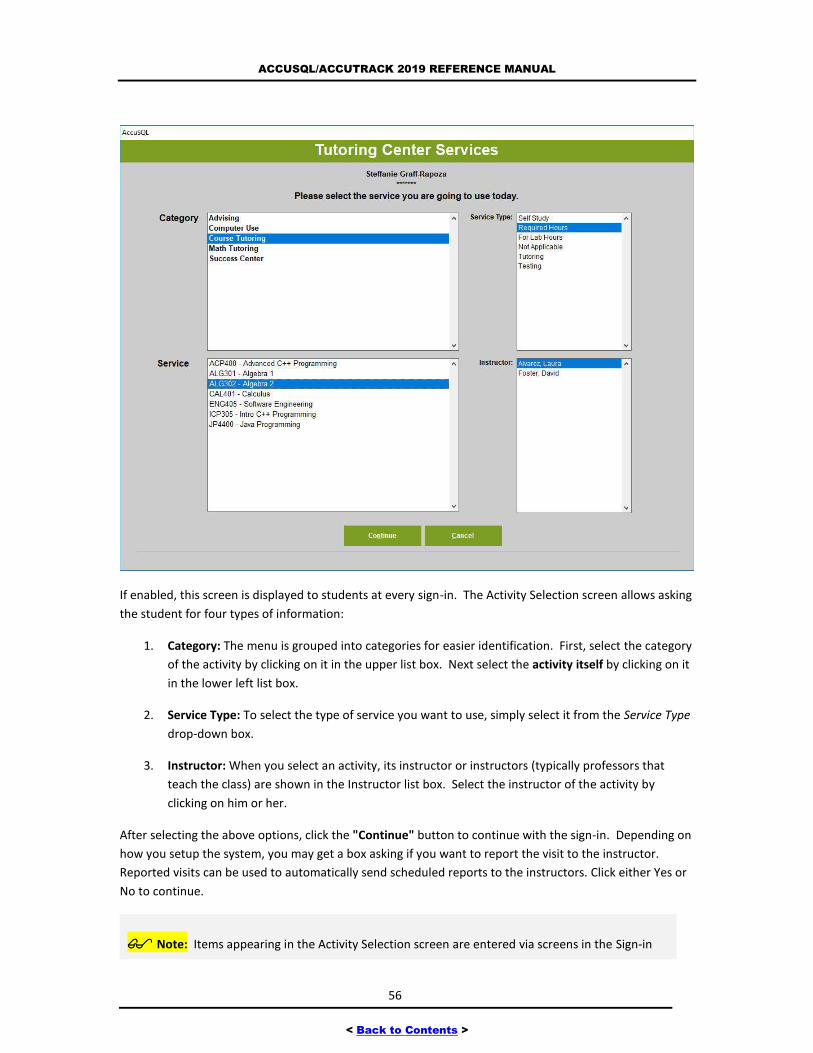
ACCUSQL/ACCUTRACK 2019 REFERENCE MANUAL
56
< Back to Contents >
If enabled, this screen is displayed to students at every sign-in. The Activity Selection screen allows asking
the student for four types of information:
1. Category: The menu is grouped into categories for easier identification. First, select the category
of the activity by clicking on it in the upper list box. Next select the activity itself by clicking on it
in the lower left list box.
2. Service Type: To select the type of service you want to use, simply select it from the Service Type
drop-down box.
3. Instructor: When you select an activity, its instructor or instructors (typically professors that
teach the class) are shown in the Instructor list box. Select the instructor of the activity by
clicking on him or her.
After selecting the above options, click the "Continue" button to continue with the sign-in. Depending on
how you setup the system, you may get a box asking if you want to report the visit to the instructor.
Reported visits can be used to automatically send scheduled reports to the instructors. Click either Yes or
No to continue.
Note: Items appearing in the Activity Selection screen are entered via screens in the Sign-in
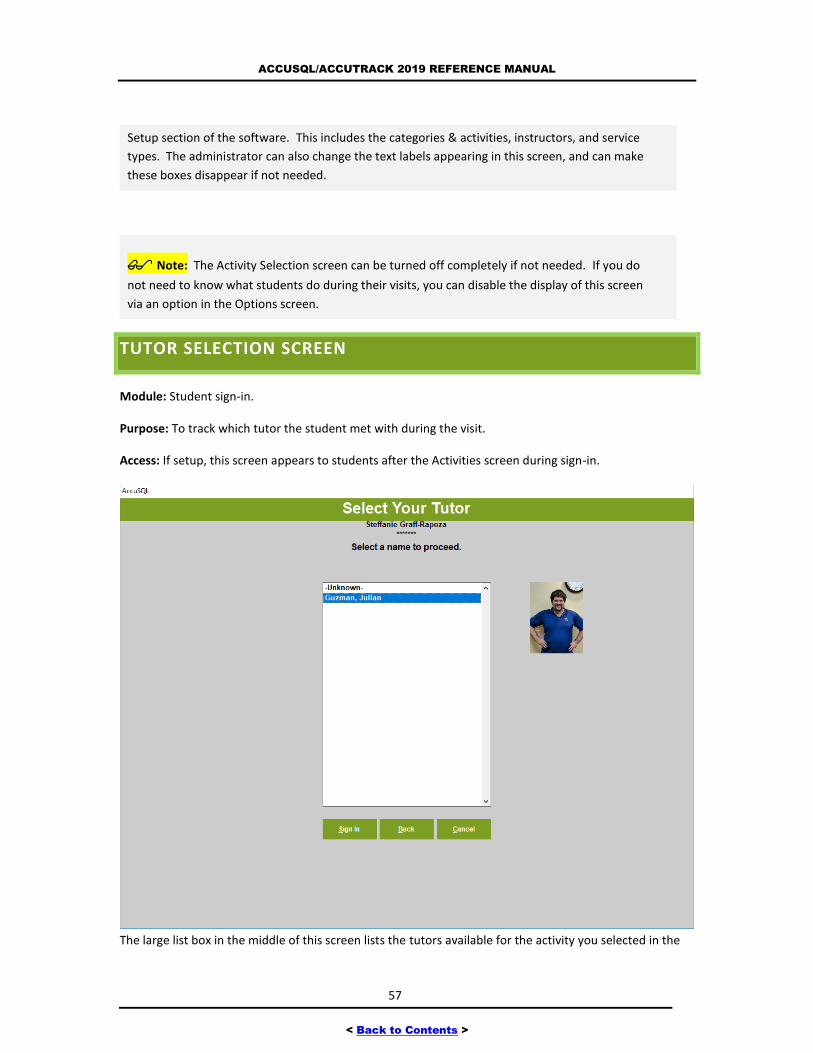
ACCUSQL/ACCUTRACK 2019 REFERENCE MANUAL
57
< Back to Contents >
Setup section of the software. This includes the categories & activities, instructors, and service
types. The administrator can also change the text labels appearing in this screen, and can make
these boxes disappear if not needed.
Note: The Activity Selection screen can be turned off completely if not needed. If you do
not need to know what students do during their visits, you can disable the display of this screen
via an option in the Options screen.
TUTOR SELECTION SCREEN
Module: Student sign-in.
Purpose: To track which tutor the student met with during the visit.
Access: If setup, this screen appears to students after the Activities screen during sign-in.
The large list box in the middle of this screen lists the tutors available for the activity you selected in the
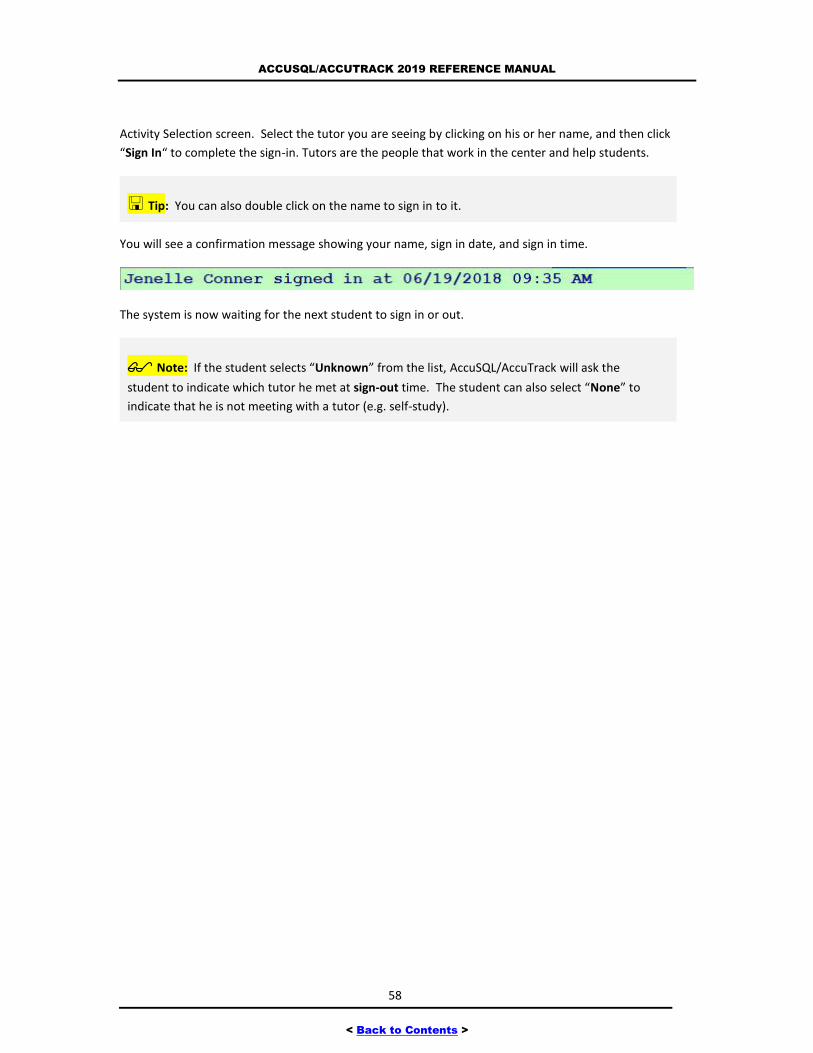
ACCUSQL/ACCUTRACK 2019 REFERENCE MANUAL
58
< Back to Contents >
Activity Selection screen. Select the tutor you are seeing by clicking on his or her name, and then click
“Sign In“ to complete the sign-in. Tutors are the people that work in the center and help students.
Tip: You can also double click on the name to sign in to it.
You will see a confirmation message showing your name, sign in date, and sign in time.
The system is now waiting for the next student to sign in or out.
Note: If the student selects “Unknown” from the list, AccuSQL/AccuTrack will ask the
student to indicate which tutor he met at sign-out time. The student can also select “None” to
indicate that he is not meeting with a tutor (e.g. self-study).
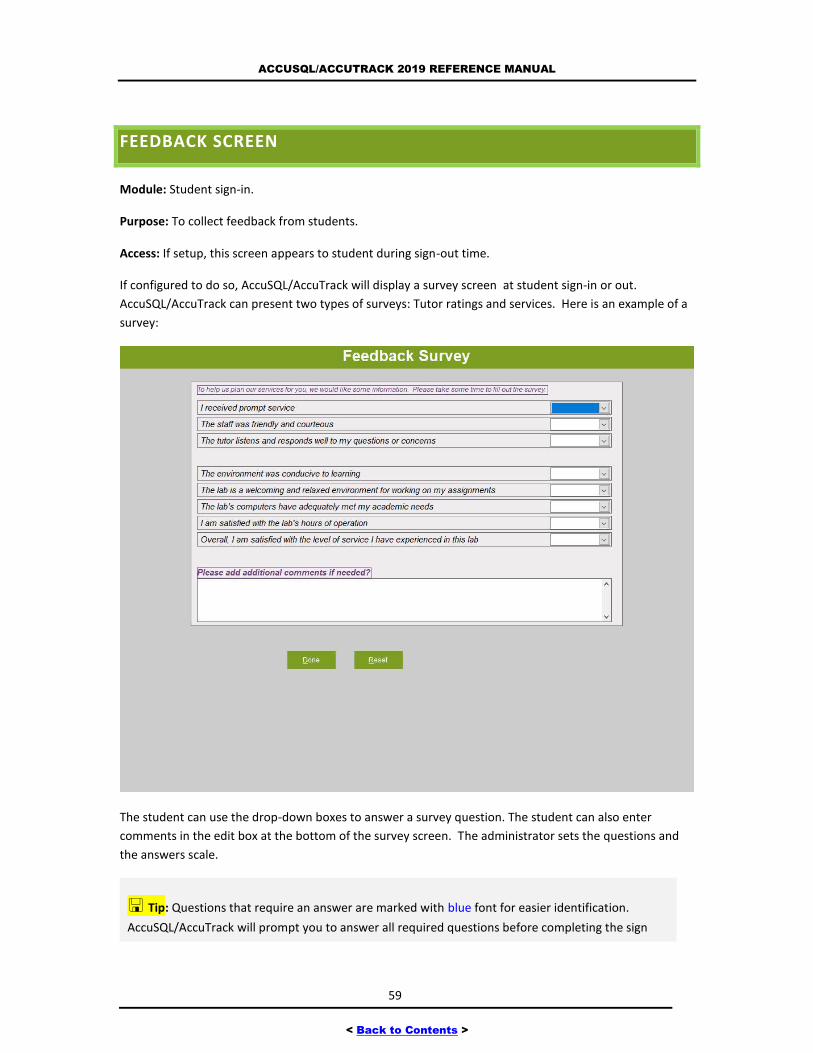
ACCUSQL/ACCUTRACK 2019 REFERENCE MANUAL
59
< Back to Contents >
FEEDBACK SCREEN
Module: Student sign-in.
Purpose: To collect feedback from students.
Access: If setup, this screen appears to student during sign-out time.
If configured to do so, AccuSQL/AccuTrack will display a survey screen at student sign-in or out.
AccuSQL/AccuTrack can present two types of surveys: Tutor ratings and services. Here is an example of a
survey:
The student can use the drop-down boxes to answer a survey question. The student can also enter
comments in the edit box at the bottom of the survey screen. The administrator sets the questions and
the answers scale.
Tip: Questions that require an answer are marked with blue font for easier identification.
AccuSQL/AccuTrack will prompt you to answer all required questions before completing the sign
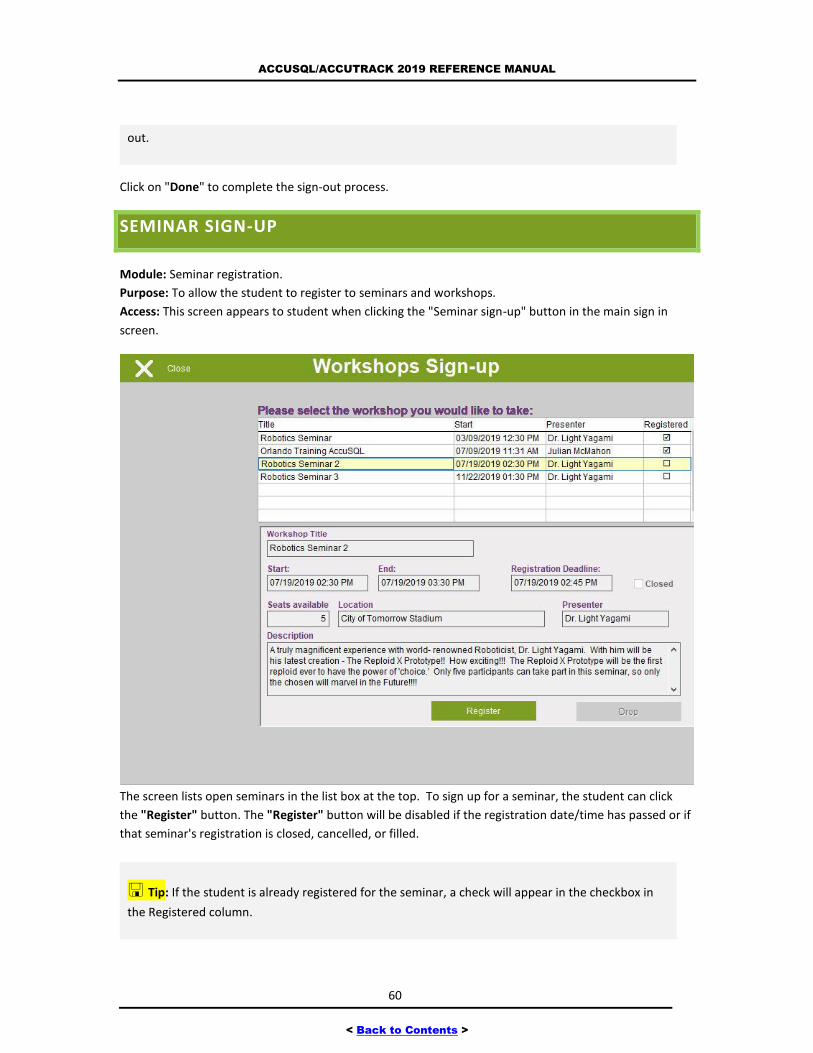
ACCUSQL/ACCUTRACK 2019 REFERENCE MANUAL
60
< Back to Contents >
out.
Click on "Done" to complete the sign-out process.
SEMINAR SIGN-UP
Module: Seminar registration.
Purpose: To allow the student to register to seminars and workshops.
Access: This screen appears to student when clicking the "Seminar sign-up" button in the main sign in
screen.
The screen lists open seminars in the list box at the top. To sign up for a seminar, the student can click
the "Register" button. The "Register" button will be disabled if the registration date/time has passed or if
that seminar's registration is closed, cancelled, or filled.
Tip: If the student is already registered for the seminar, a check will appear in the checkbox in
the Registered column.
ACCUSQL/ACCUTRACK 2019 REFERENCE MANUAL
61
< Back to Contents >
After registering to the seminar, the student should click on the "Close" button to return to the main sign-
in screen.
Note: New for version 2016 and later, you can now initiate a Seminar Sign-in from the Tutor
Pad and then determine which students that signed up for the seminar actually showed up for it.
You can also allow only select students or a student group to be allowed to register.
APPOINTMENTS SIGN-UP
Module: Appointments.
Purpose: To allow the student to find open slots and schedule appointments.
Access: This screen appears to student when clicking the "Appointments" button in the main sign in
screen.
Clicking on “Appointments” in the student main sign-in screen will bring up a box asking the student for
his or her ID number. Once entered, the student has the options to view and or cancel existing
appointments, or to create new ones.
If View/Cancel Appointment is selected, then the Cancel Appointment window will open. To cancel an
appointment, the student would click the checkboxes next to one or more of the appointments then click
the Cancel Appointment button at the bottom of the screen.

ACCUSQL/ACCUTRACK 2019 REFERENCE MANUAL
62
< Back to Contents >
Tip: You can set rules about appointment cancellations in the View Appointments >> Setup >>
Restriction Options screen.
Note: If you want to enable students to be able to make appointments via a Web-browser,
the Web Gateway MVC plugin is a perfect solution for you. Please contact us at
[email protected] to get the details.
If Schedule New Appointment is selected, then either the Appointment Wizard or the Quick Scheduler
screen will open, depending in which scheduler you choose to present to your students in the Set
Appointments >> Setup screen.
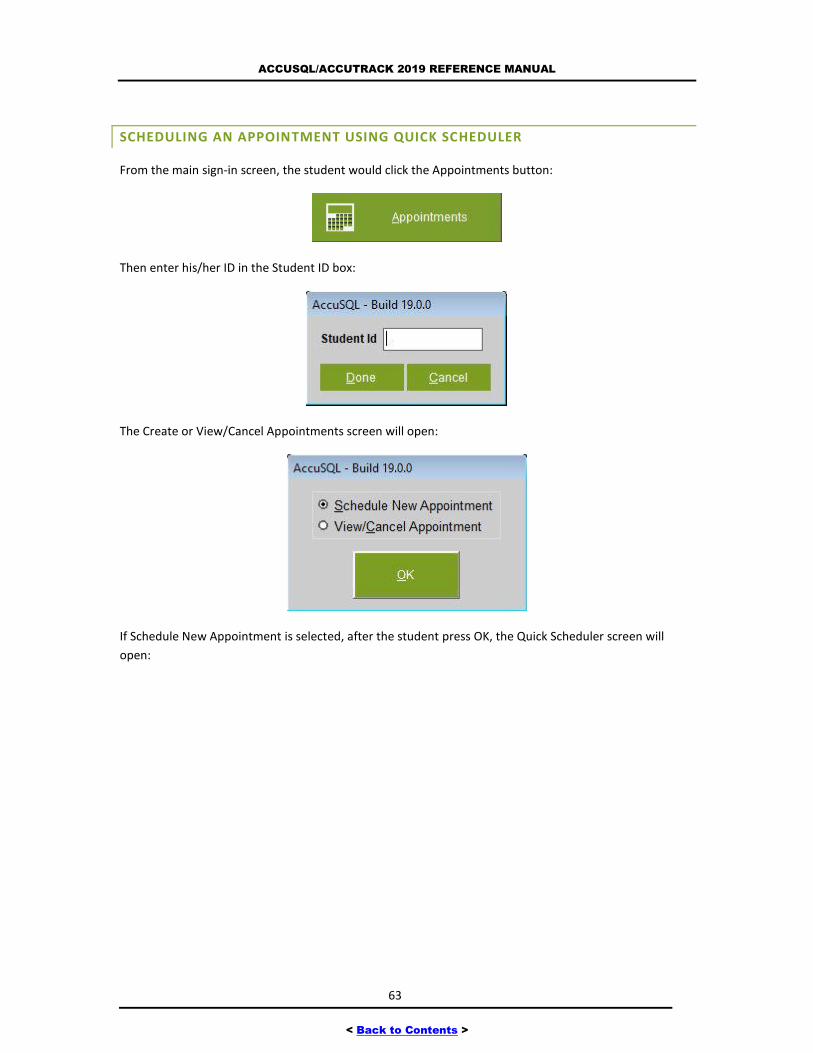
ACCUSQL/ACCUTRACK 2019 REFERENCE MANUAL
63
< Back to Contents >
SCHEDULING AN APPOINTMENT USING QUICK SCHEDULER
From the main sign-in screen, the student would click the Appointments button:
Then enter his/her ID in the Student ID box:
The Create or View/Cancel Appointments screen will open:
If Schedule New Appointment is selected, after the student press OK, the Quick Scheduler screen will
open:
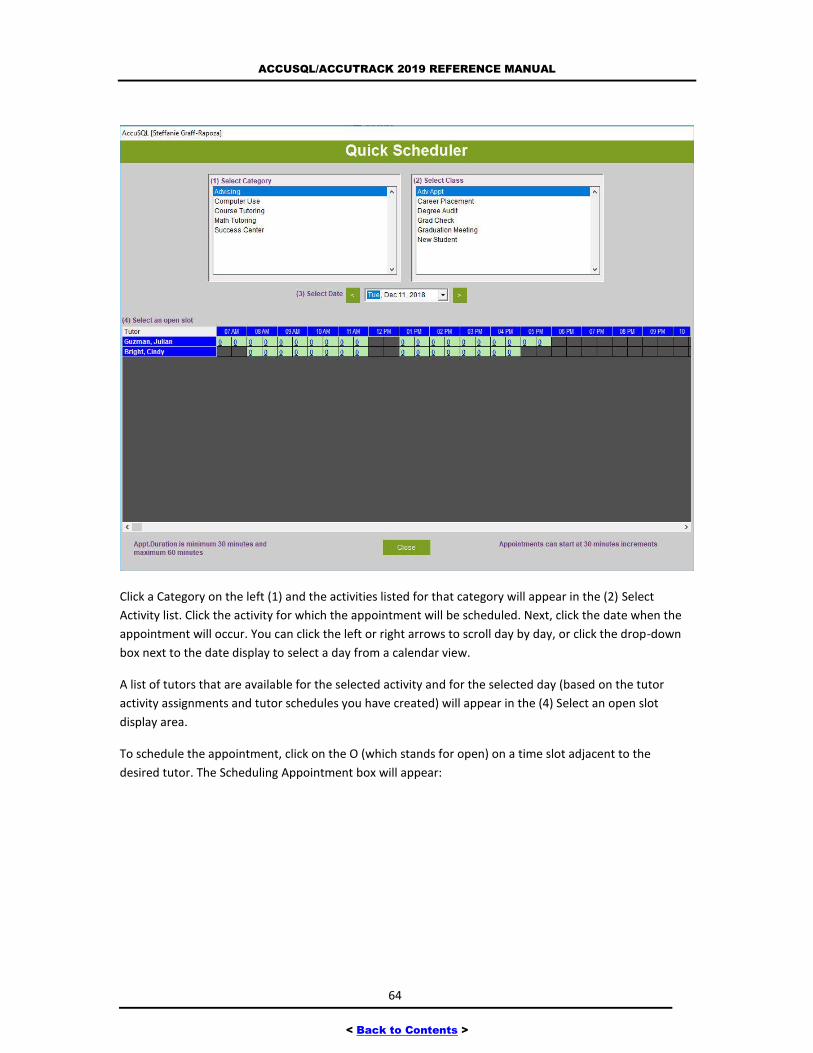
ACCUSQL/ACCUTRACK 2019 REFERENCE MANUAL
64
< Back to Contents >
Click a Category on the left (1) and the activities listed for that category will appear in the (2) Select
Activity list. Click the activity for which the appointment will be scheduled. Next, click the date when the
appointment will occur. You can click the left or right arrows to scroll day by day, or click the drop-down
box next to the date display to select a day from a calendar view.
A list of tutors that are available for the selected activity and for the selected day (based on the tutor
activity assignments and tutor schedules you have created) will appear in the (4) Select an open slot
display area.
To schedule the appointment, click on the O (which stands for open) on a time slot adjacent to the
desired tutor. The Scheduling Appointment box will appear:
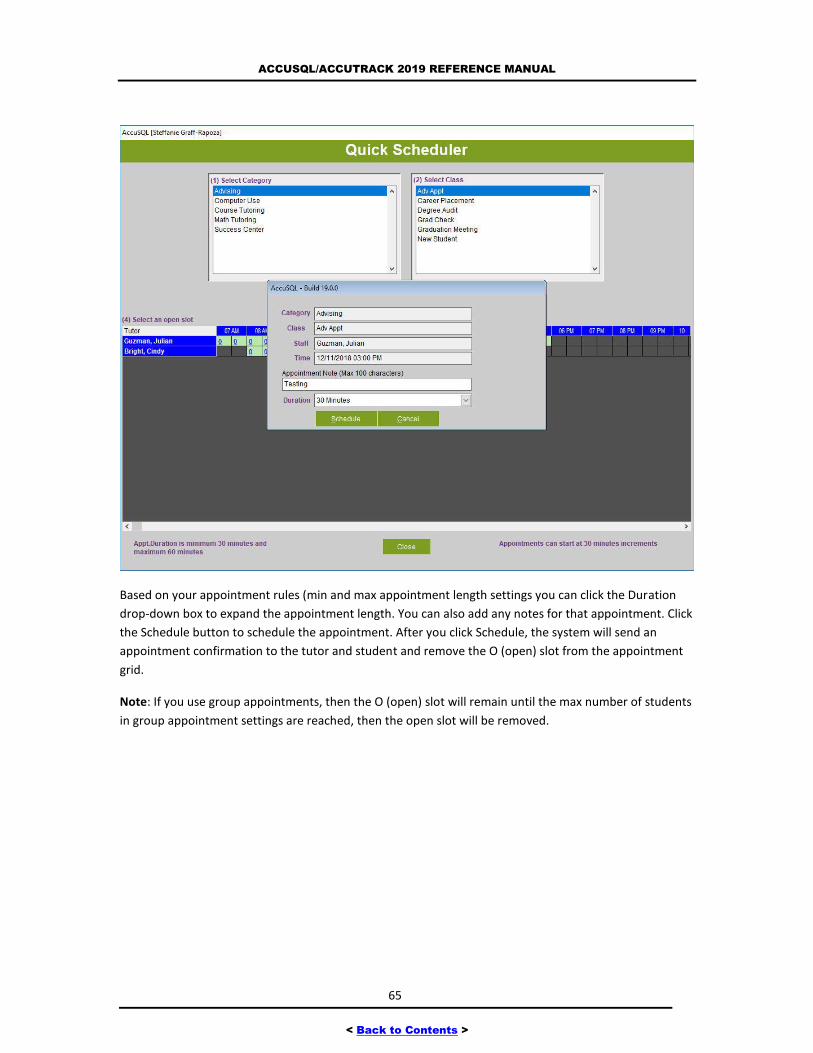
ACCUSQL/ACCUTRACK 2019 REFERENCE MANUAL
65
< Back to Contents >
Based on your appointment rules (min and max appointment length settings you can click the Duration
drop-down box to expand the appointment length. You can also add any notes for that appointment. Click
the Schedule button to schedule the appointment. After you click Schedule, the system will send an
appointment confirmation to the tutor and student and remove the O (open) slot from the appointment
grid.
Note: If you use group appointments, then the O (open) slot will remain until the max number of students
in group appointment settings are reached, then the open slot will be removed.
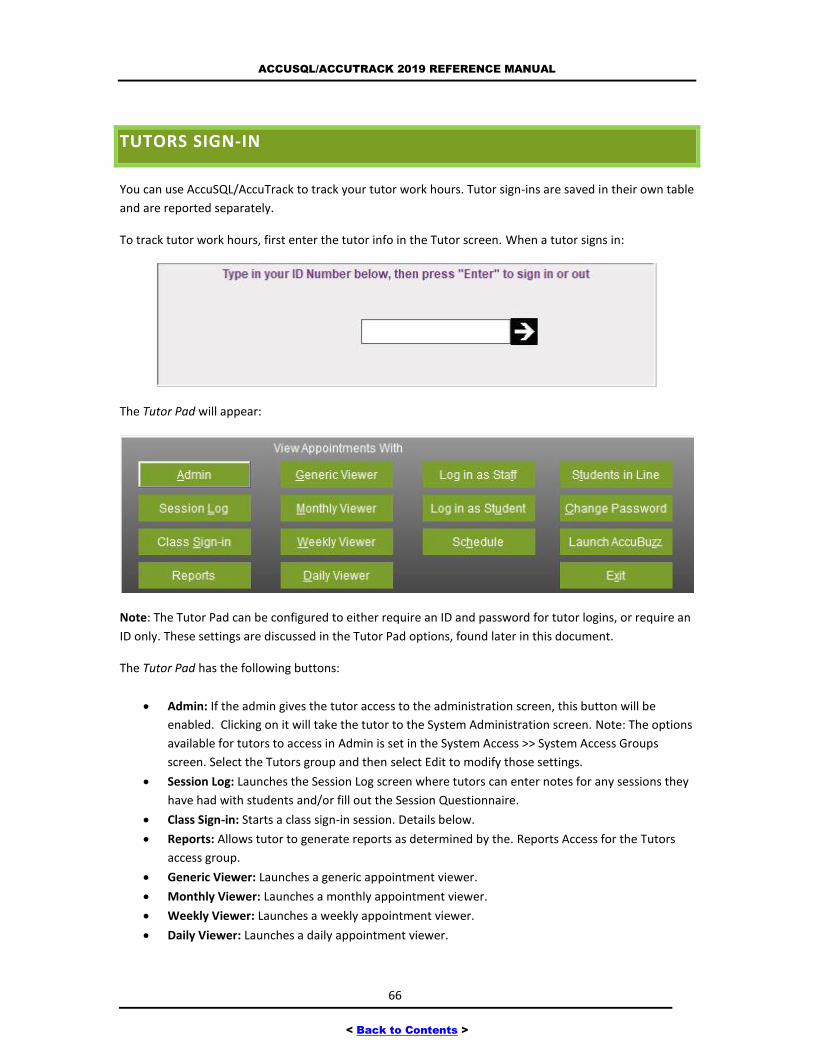
ACCUSQL/ACCUTRACK 2019 REFERENCE MANUAL
66
< Back to Contents >
TUTORS SIGN-IN
You can use AccuSQL/AccuTrack to track your tutor work hours. Tutor sign-ins are saved in their own table
and are reported separately.
To track tutor work hours, first enter the tutor info in the Tutor screen. When a tutor signs in:
The Tutor Pad will appear:
Note: The Tutor Pad can be configured to either require an ID and password for tutor logins, or require an
ID only. These settings are discussed in the Tutor Pad options, found later in this document.
The Tutor Pad has the following buttons:
Admin: If the admin gives the tutor access to the administration screen, this button will be
enabled. Clicking on it will take the tutor to the System Administration screen. Note: The options
available for tutors to access in Admin is set in the System Access >> System Access Groups
screen. Select the Tutors group and then select Edit to modify those settings.
Session Log: Launches the Session Log screen where tutors can enter notes for any sessions they
have had with students and/or fill out the Session Questionnaire.
Class Sign-in: Starts a class sign-in session. Details below.
Reports: Allows tutor to generate reports as determined by the. Reports Access for the Tutors
access group.
Generic Viewer: Launches a generic appointment viewer.
Monthly Viewer: Launches a monthly appointment viewer.
Weekly Viewer: Launches a weekly appointment viewer.
Daily Viewer: Launches a daily appointment viewer.
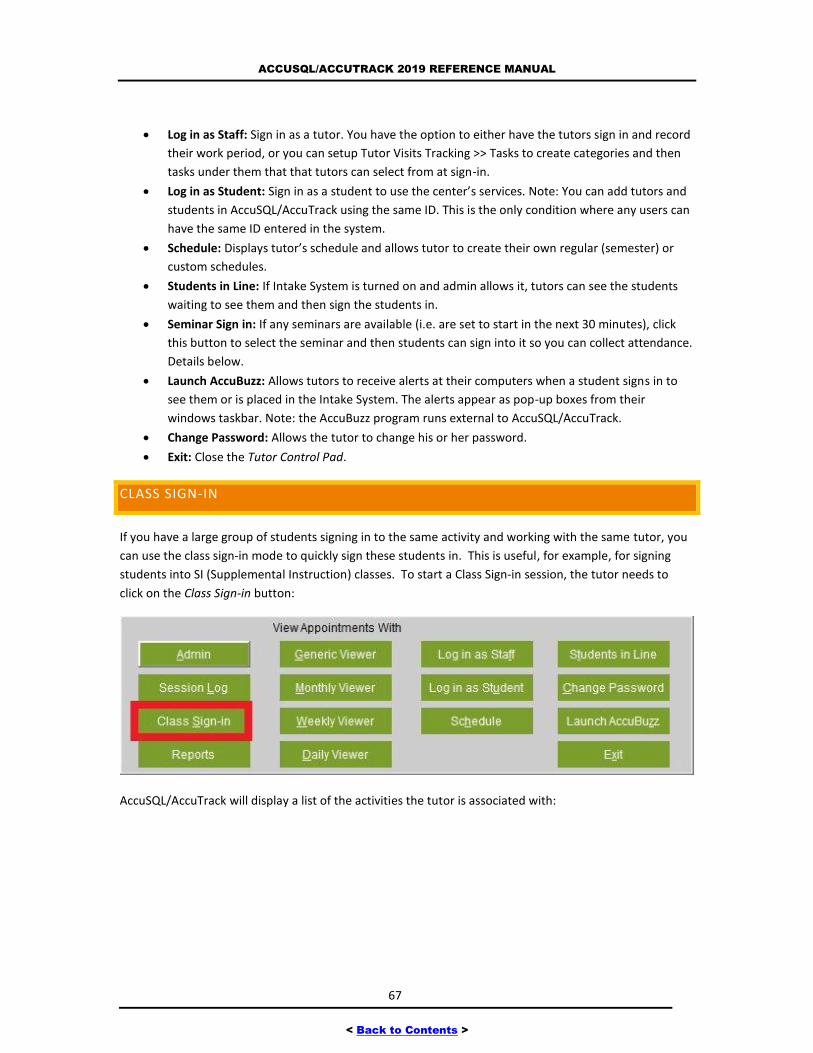
ACCUSQL/ACCUTRACK 2019 REFERENCE MANUAL
67
< Back to Contents >
Log in as Staff: Sign in as a tutor. You have the option to either have the tutors sign in and record
their work period, or you can setup Tutor Visits Tracking >> Tasks to create categories and then
tasks under them that that tutors can select from at sign-in.
Log in as Student: Sign in as a student to use the center’s services. Note: You can add tutors and
students in AccuSQL/AccuTrack using the same ID. This is the only condition where any users can
have the same ID entered in the system.
Schedule: Displays tutor’s schedule and allows tutor to create their own regular (semester) or
custom schedules.
Students in Line: If Intake System is turned on and admin allows it, tutors can see the students
waiting to see them and then sign the students in.
Seminar Sign in: If any seminars are available (i.e. are set to start in the next 30 minutes), click
this button to select the seminar and then students can sign into it so you can collect attendance.
Details below.
Launch AccuBuzz: Allows tutors to receive alerts at their computers when a student signs in to
see them or is placed in the Intake System. The alerts appear as pop-up boxes from their
windows taskbar. Note: the AccuBuzz program runs external to AccuSQL/AccuTrack.
Change Password: Allows the tutor to change his or her password.
Exit: Close the Tutor Control Pad.
CLASS SIGN-IN
If you have a large group of students signing in to the same activity and working with the same tutor, you
can use the class sign-in mode to quickly sign these students in. This is useful, for example, for signing
students into SI (Supplemental Instruction) classes. To start a Class Sign-in session, the tutor needs to
click on the Class Sign-in button:
AccuSQL/AccuTrack will display a list of the activities the tutor is associated with:
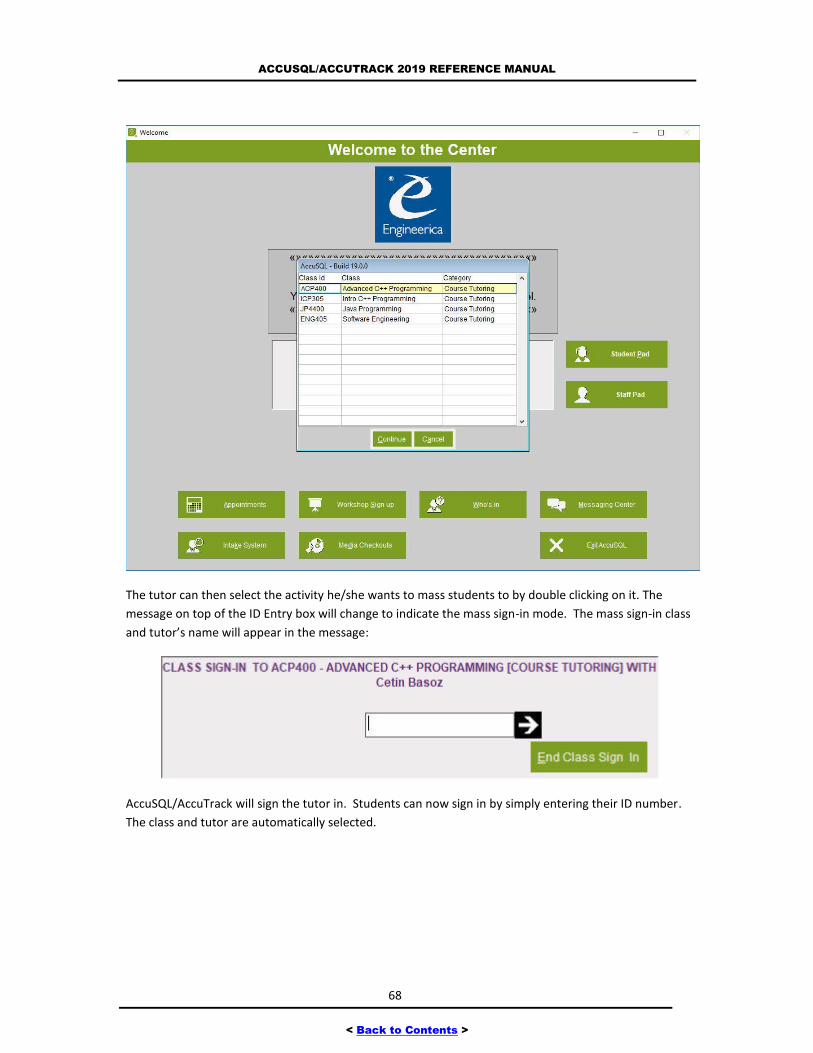
ACCUSQL/ACCUTRACK 2019 REFERENCE MANUAL
68
< Back to Contents >
The tutor can then select the activity he/she wants to mass students to by double clicking on it. The
message on top of the ID Entry box will change to indicate the mass sign-in mode. The mass sign-in class
and tutor’s name will appear in the message:
AccuSQL/AccuTrack will sign the tutor in. Students can now sign in by simply entering their ID number.
The class and tutor are automatically selected.
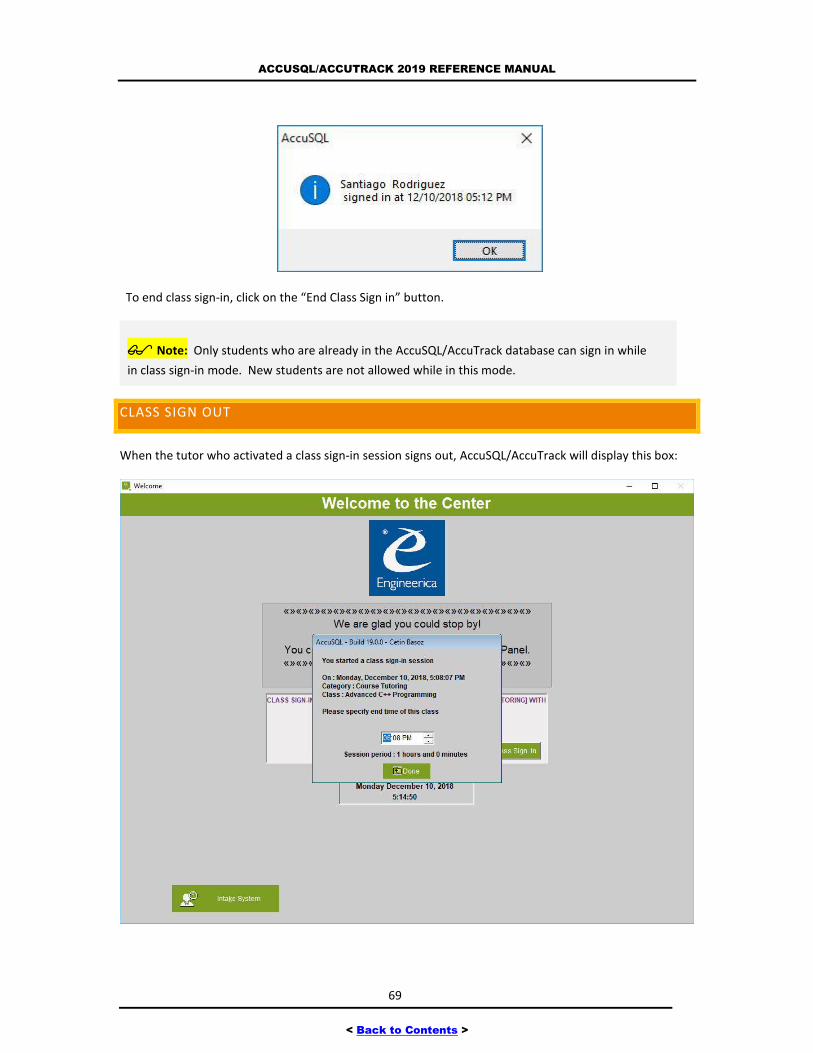
ACCUSQL/ACCUTRACK 2019 REFERENCE MANUAL
69
< Back to Contents >
To end class sign-in, click on the “End Class Sign in” button.
Note: Only students who are already in the AccuSQL/AccuTrack database can sign in while
in class sign-in mode. New students are not allowed while in this mode.
CLASS SIGN OUT
When the tutor who activated a class sign-in session signs out, AccuSQL/AccuTrack will display this box:
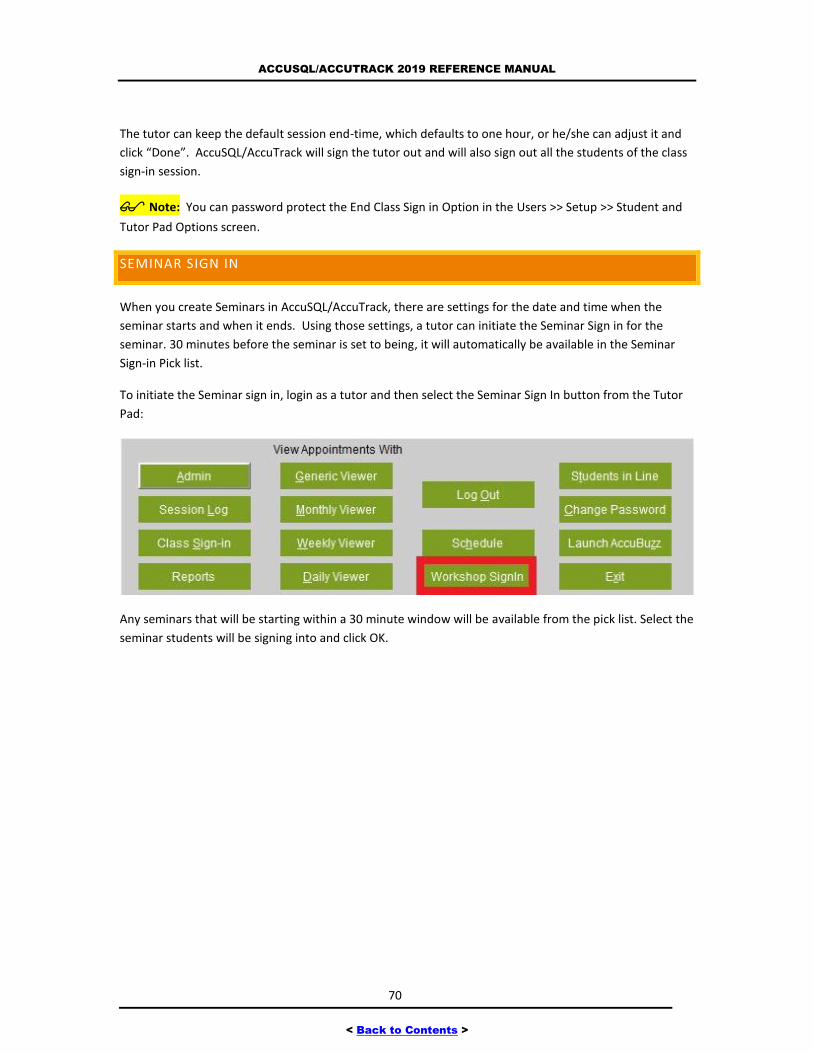
ACCUSQL/ACCUTRACK 2019 REFERENCE MANUAL
70
< Back to Contents >
The tutor can keep the default session end-time, which defaults to one hour, or he/she can adjust it and
click “Done”. AccuSQL/AccuTrack will sign the tutor out and will also sign out all the students of the class
sign-in session.
Note: You can password protect the End Class Sign in Option in the Users >> Setup >> Student and
Tutor Pad Options screen.
SEMINAR SIGN IN
When you create Seminars in AccuSQL/AccuTrack, there are settings for the date and time when the
seminar starts and when it ends. Using those settings, a tutor can initiate the Seminar Sign in for the
seminar. 30 minutes before the seminar is set to being, it will automatically be available in the Seminar
Sign-in Pick list.
To initiate the Seminar sign in, login as a tutor and then select the Seminar Sign In button from the Tutor
Pad:
Any seminars that will be starting within a 30 minute window will be available from the pick list. Select the
seminar students will be signing into and click OK.
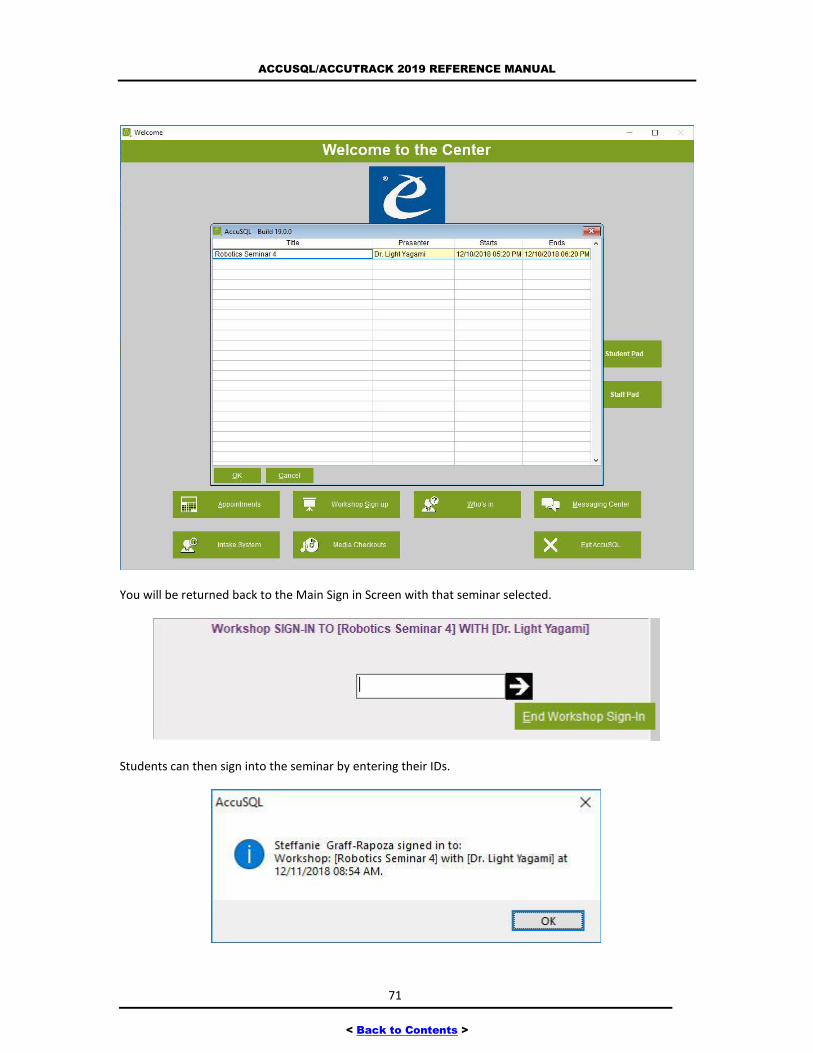
ACCUSQL/ACCUTRACK 2019 REFERENCE MANUAL
71
< Back to Contents >
You will be returned back to the Main Sign in Screen with that seminar selected.
Students can then sign into the seminar by entering their IDs.
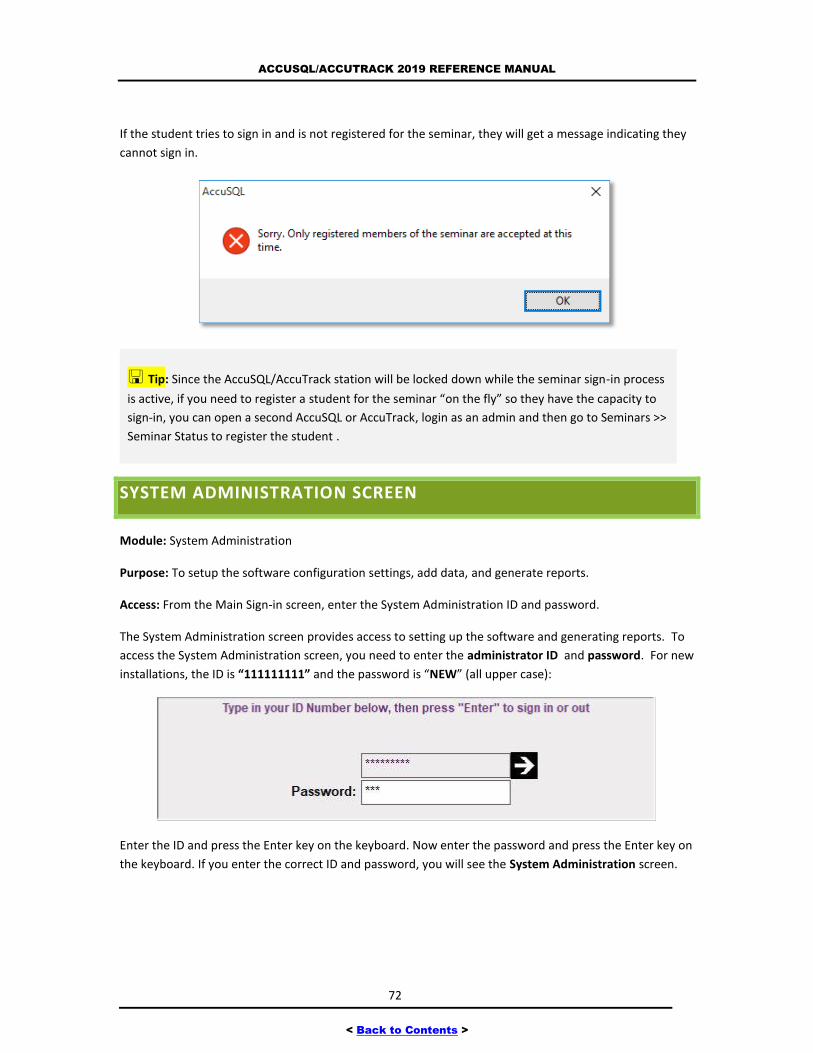
ACCUSQL/ACCUTRACK 2019 REFERENCE MANUAL
72
< Back to Contents >
If the student tries to sign in and is not registered for the seminar, they will get a message indicating they
cannot sign in.
Tip: Since the AccuSQL/AccuTrack station will be locked down while the seminar sign-in process
is active, if you need to register a student for the seminar “on the fly” so they have the capacity to
sign-in, you can open a second AccuSQL or AccuTrack, login as an admin and then go to Seminars >>
Seminar Status to register the student .
SYSTEM ADMINISTRATION SCREEN
Module: System Administration
Purpose: To setup the software configuration settings, add data, and generate reports.
Access: From the Main Sign-in screen, enter the System Administration ID and password.
The System Administration screen provides access to setting up the software and generating reports. To
access the System Administration screen, you need to enter the administrator ID and password. For new
installations, the ID is “111111111” and the password is “NEW” (all upper case):
Enter the ID and press the Enter key on the keyboard. Now enter the password and press the Enter key on
the keyboard. If you enter the correct ID and password, you will see the System Administration screen.

ACCUSQL/ACCUTRACK 2019 REFERENCE MANUAL
73
< Back to Contents >

ACCUSQL/ACCUTRACK 2019 REFERENCE MANUAL
74
< Back to Contents >
ORGANIZATION OF THE SYSTEM ADMINISTRATION SCREEN
The System Administration screen contains several elements. Please review the following screen to see
how these elements are organized.
The left side of the System Administration screen contains the System Administrative Modules you will be
accessing in AccuSQL/AccuTrack. If you click on one of the available modules, then the buttons associated
with that module will appear in the center. For example, if you clicked on Sign-in Setup, then the modules
associated with Sign-in Setup will appear in the center area.
Since the Sign-in Setup module was selected from the System Administrative Modules, if you click the
Report link or the Reports Center link (both at the bottom right of the screen) you will be accessing the
Sign-in Setup Reports available in AccuSQL/AccuTrack.
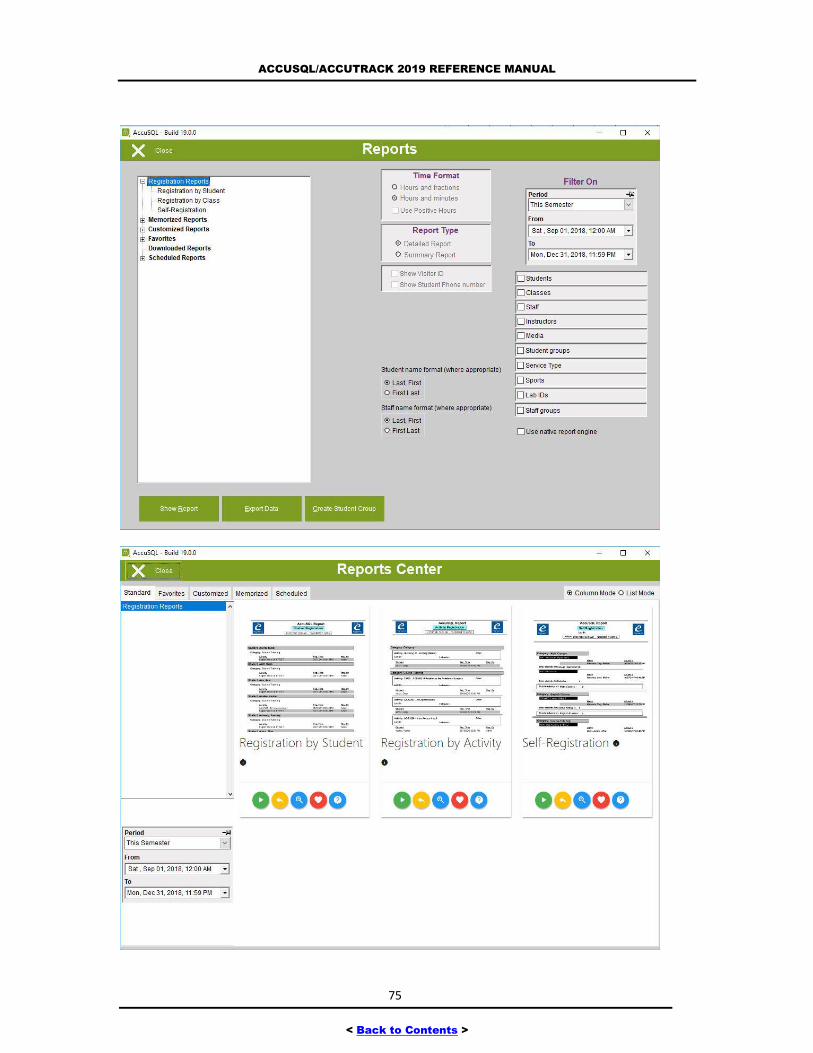
ACCUSQL/ACCUTRACK 2019 REFERENCE MANUAL
75
< Back to Contents >
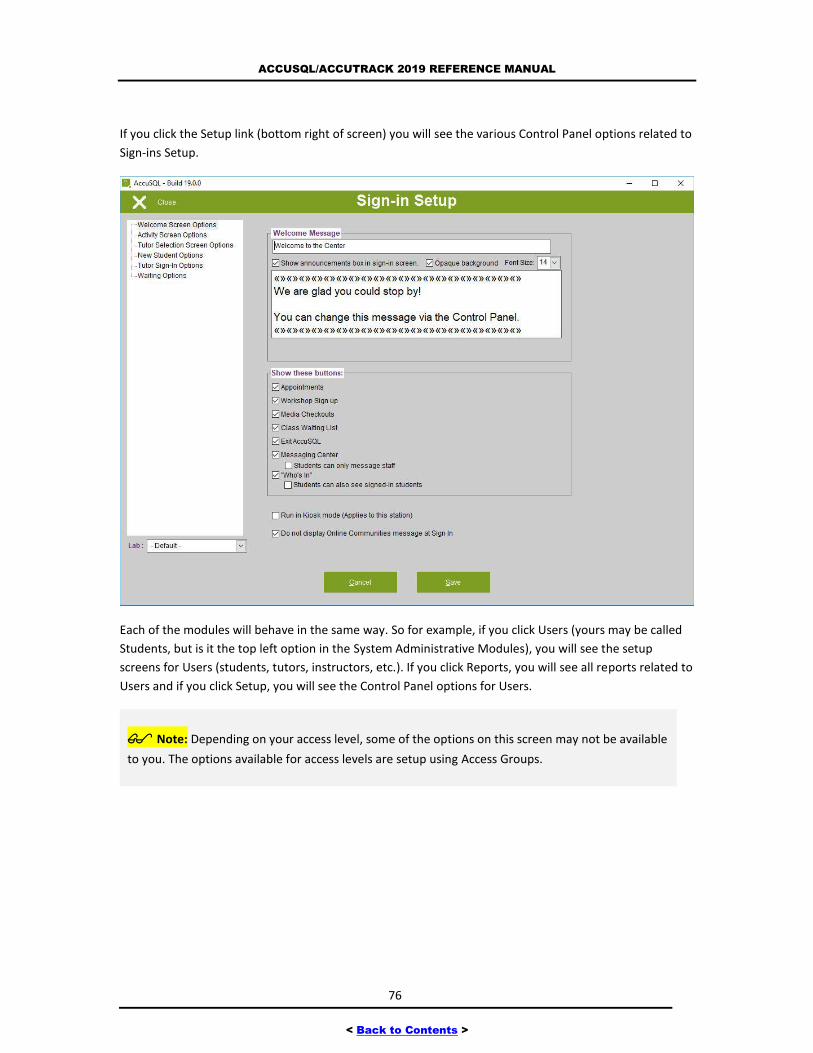
ACCUSQL/ACCUTRACK 2019 REFERENCE MANUAL
76
< Back to Contents >
If you click the Setup link (bottom right of screen) you will see the various Control Panel options related to
Sign-ins Setup.
Each of the modules will behave in the same way. So for example, if you click Users (yours may be called
Students, but is it the top left option in the System Administrative Modules), you will see the setup
screens for Users (students, tutors, instructors, etc.). If you click Reports, you will see all reports related to
Users and if you click Setup, you will see the Control Panel options for Users.
Note: Depending on your access level, some of the options on this screen may not be available
to you. The options available for access levels are setup using Access Groups.
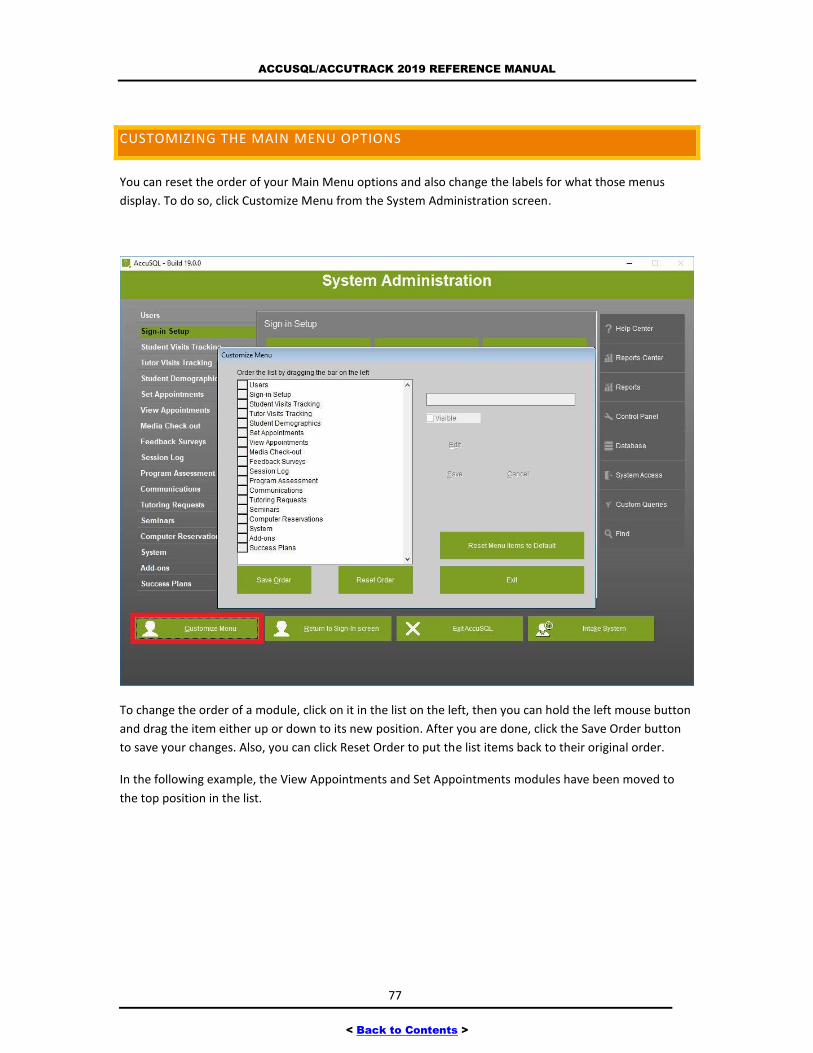
ACCUSQL/ACCUTRACK 2019 REFERENCE MANUAL
77
< Back to Contents >
CUSTOMIZING THE MAIN MENU OPTIONS
You can reset the order of your Main Menu options and also change the labels for what those menus
display. To do so, click Customize Menu from the System Administration screen.
To change the order of a module, click on it in the list on the left, then you can hold the left mouse button
and drag the item either up or down to its new position. After you are done, click the Save Order button
to save your changes. Also, you can click Reset Order to put the list items back to their original order.
In the following example, the View Appointments and Set Appointments modules have been moved to
the top position in the list.
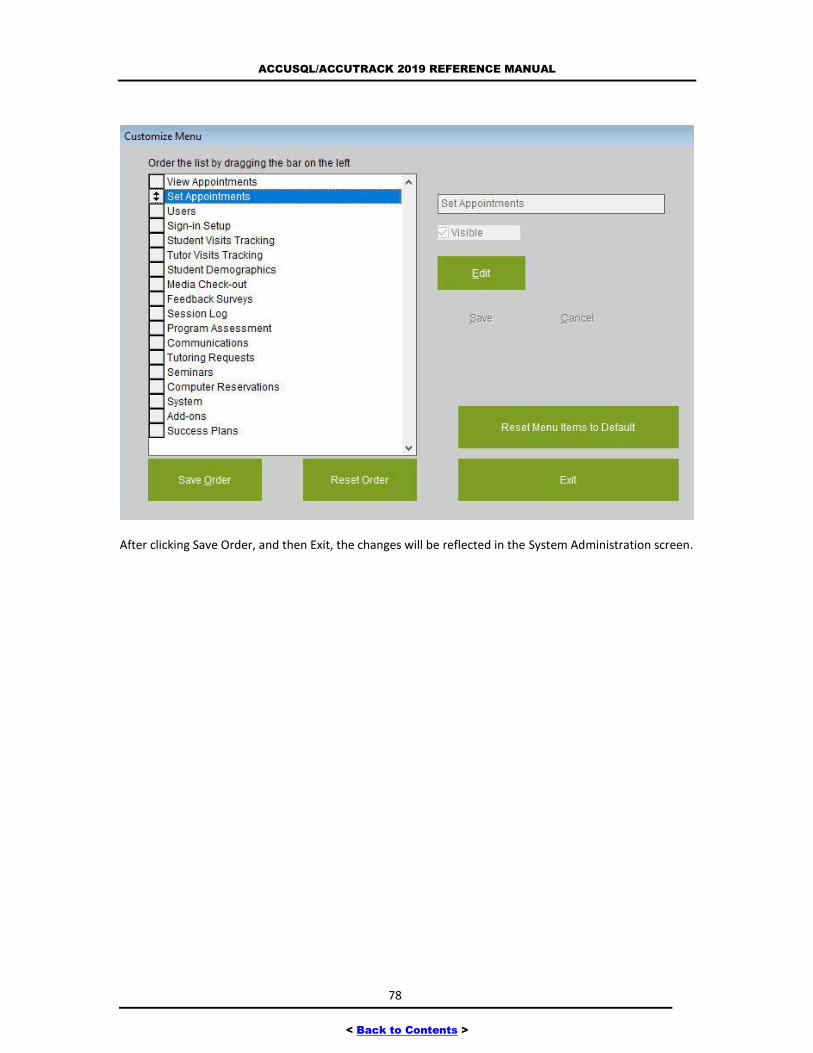
ACCUSQL/ACCUTRACK 2019 REFERENCE MANUAL
78
< Back to Contents >
After clicking Save Order, and then Exit, the changes will be reflected in the System Administration screen.
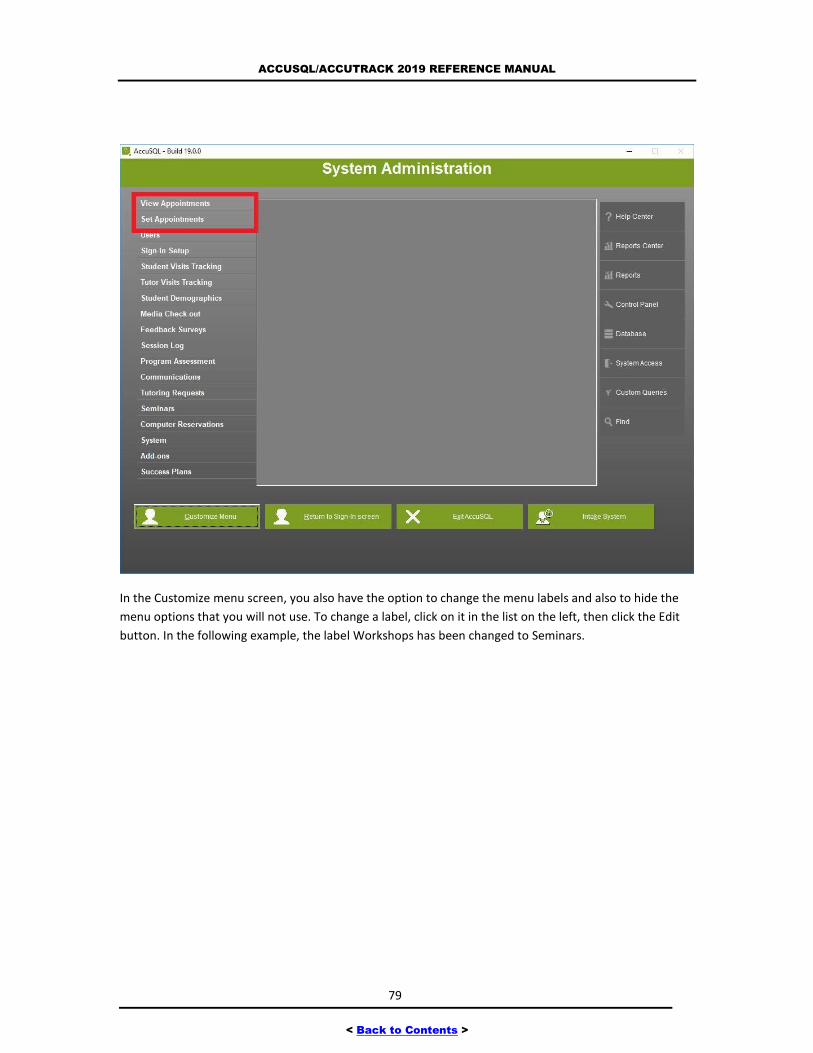
ACCUSQL/ACCUTRACK 2019 REFERENCE MANUAL
79
< Back to Contents >
In the Customize menu screen, you also have the option to change the menu labels and also to hide the
menu options that you will not use. To change a label, click on it in the list on the left, then click the Edit
button. In the following example, the label Workshops has been changed to Seminars.
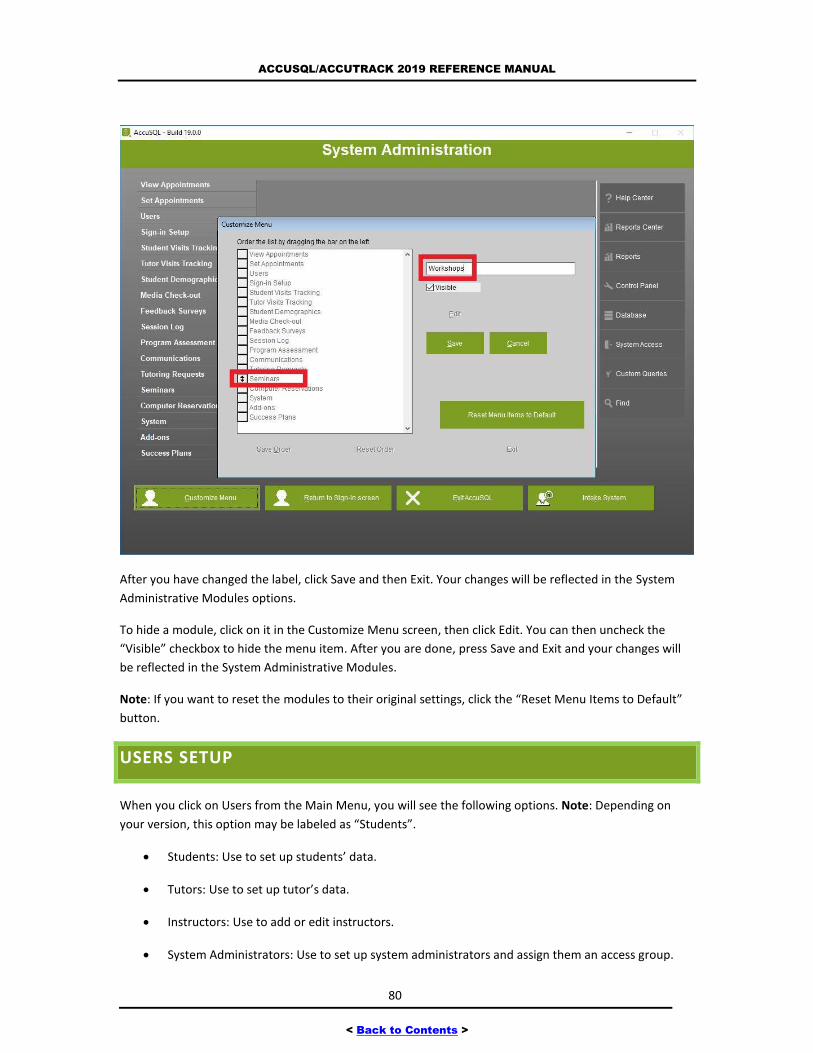
ACCUSQL/ACCUTRACK 2019 REFERENCE MANUAL
80
< Back to Contents >
After you have changed the label, click Save and then Exit. Your changes will be reflected in the System
Administrative Modules options.
To hide a module, click on it in the Customize Menu screen, then click Edit. You can then uncheck the
“Visible” checkbox to hide the menu item. After you are done, press Save and Exit and your changes will
be reflected in the System Administrative Modules.
Note: If you want to reset the modules to their original settings, click the “Reset Menu Items to Default”
button.
USERS SETUP
When you click on Users from the Main Menu, you will see the following options. Note: Depending on
your version, this option may be labeled as “Students”.
Students: Use to set up students’ data.
Tutors: Use to set up tutor’s data.
Instructors: Use to add or edit instructors.
System Administrators: Use to set up system administrators and assign them an access group.
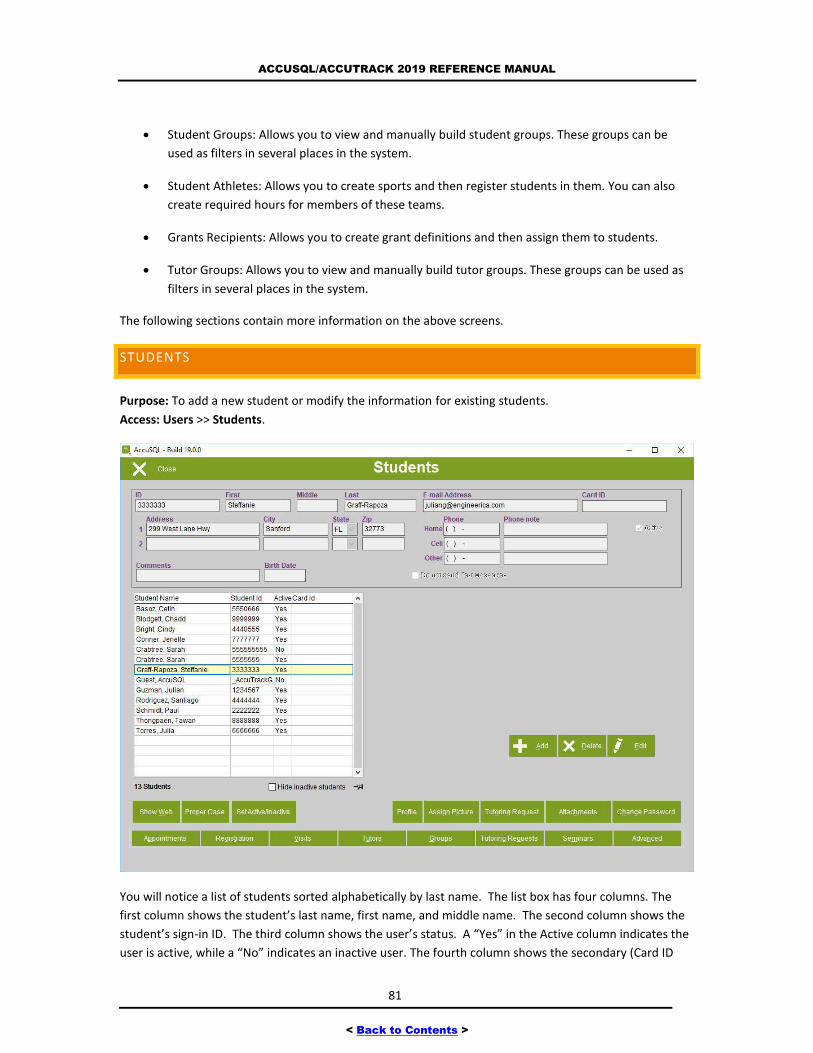
ACCUSQL/ACCUTRACK 2019 REFERENCE MANUAL
81
< Back to Contents >
Student Groups: Allows you to view and manually build student groups. These groups can be
used as filters in several places in the system.
Student Athletes: Allows you to create sports and then register students in them. You can also
create required hours for members of these teams.
Grants Recipients: Allows you to create grant definitions and then assign them to students.
Tutor Groups: Allows you to view and manually build tutor groups. These groups can be used as
filters in several places in the system.
The following sections contain more information on the above screens.
STUDENTS
Purpose: To add a new student or modify the information for existing students.
Access: Users >> Students.
You will notice a list of students sorted alphabetically by last name. The list box has four columns. The
first column shows the student’s last name, first name, and middle name. The second column shows the
student’s sign-in ID. The third column shows the user’s status. A “Yes” in the Active column indicates the
user is active, while a “No” indicates an inactive user. The fourth column shows the secondary (Card ID
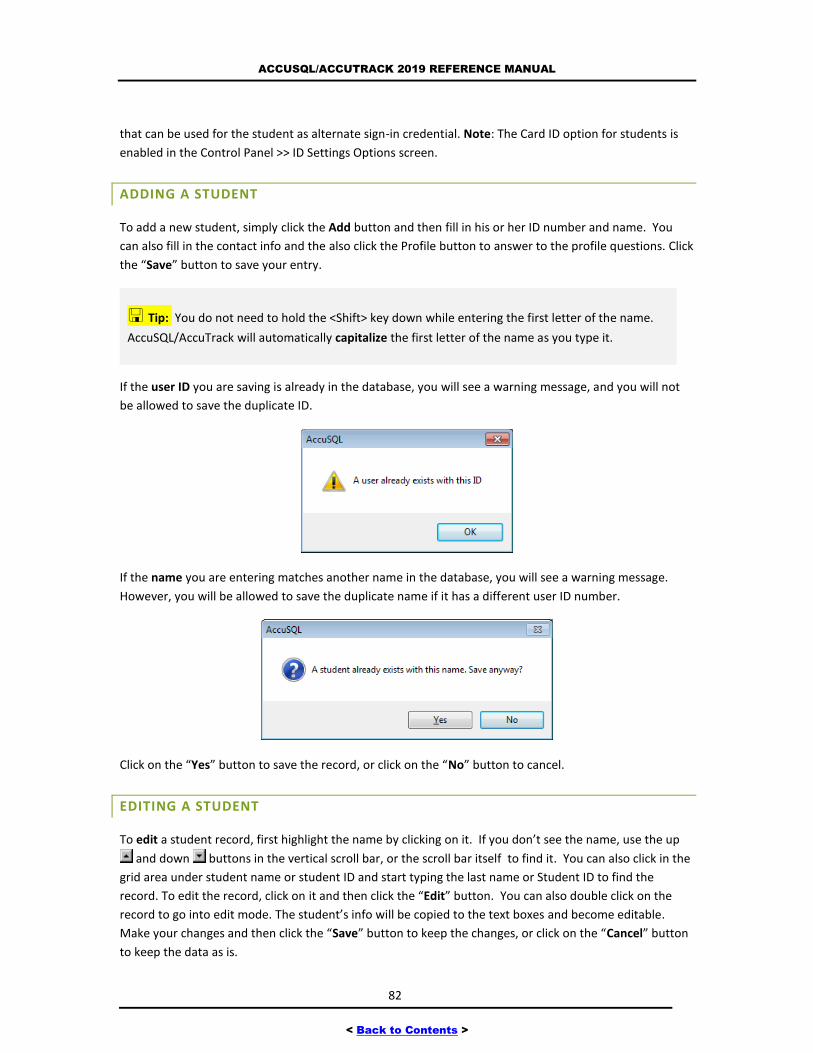
ACCUSQL/ACCUTRACK 2019 REFERENCE MANUAL
82
< Back to Contents >
that can be used for the student as alternate sign-in credential. Note: The Card ID option for students is
enabled in the Control Panel >> ID Settings Options screen.
ADDING A STUDENT
To add a new student, simply click the Add button and then fill in his or her ID number and name. You
can also fill in the contact info and the also click the Profile button to answer to the profile questions. Click
the “Save” button to save your entry.
Tip: You do not need to hold the <Shift> key down while entering the first letter of the name.
AccuSQL/AccuTrack will automatically capitalize the first letter of the name as you type it.
If the user ID you are saving is already in the database, you will see a warning message, and you will not
be allowed to save the duplicate ID.
If the name you are entering matches another name in the database, you will see a warning message.
However, you will be allowed to save the duplicate name if it has a different user ID number.
Click on the “Yes” button to save the record, or click on the “No” button to cancel.
EDITING A STUDENT
To edit a student record, first highlight the name by clicking on it. If you don’t see the name, use the up
and down buttons in the vertical scroll bar, or the scroll bar itself to find it. You can also click in the
grid area under student name or student ID and start typing the last name or Student ID to find the
record. To edit the record, click on it and then click the “Edit” button. You can also double click on the
record to go into edit mode. The student’s info will be copied to the text boxes and become editable.
Make your changes and then click the “Save” button to keep the changes, or click on the “Cancel” button
to keep the data as is.
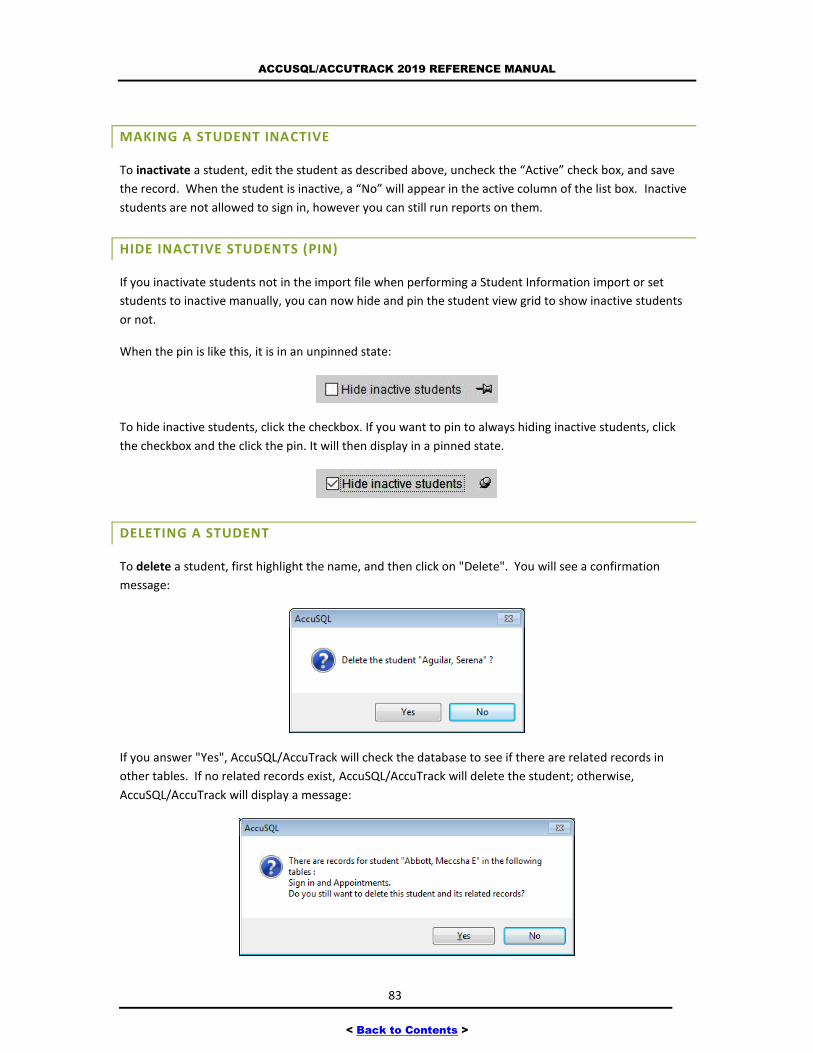
ACCUSQL/ACCUTRACK 2019 REFERENCE MANUAL
83
< Back to Contents >
MAKING A STUDENT INACTIVE
To inactivate a student, edit the student as described above, uncheck the “Active” check box, and save
the record. When the student is inactive, a “No” will appear in the active column of the list box. Inactive
students are not allowed to sign in, however you can still run reports on them.
HIDE INACTIVE STUDENTS (PIN)
If you inactivate students not in the import file when performing a Student Information import or set
students to inactive manually, you can now hide and pin the student view grid to show inactive students
or not.
When the pin is like this, it is in an unpinned state:
To hide inactive students, click the checkbox. If you want to pin to always hiding inactive students, click
the checkbox and the click the pin. It will then display in a pinned state.
DELETING A STUDENT
To delete a student, first highlight the name, and then click on "Delete". You will see a confirmation
message:
If you answer "Yes", AccuSQL/AccuTrack will check the database to see if there are related records in
other tables. If no related records exist, AccuSQL/AccuTrack will delete the student; otherwise,
AccuSQL/AccuTrack will display a message:
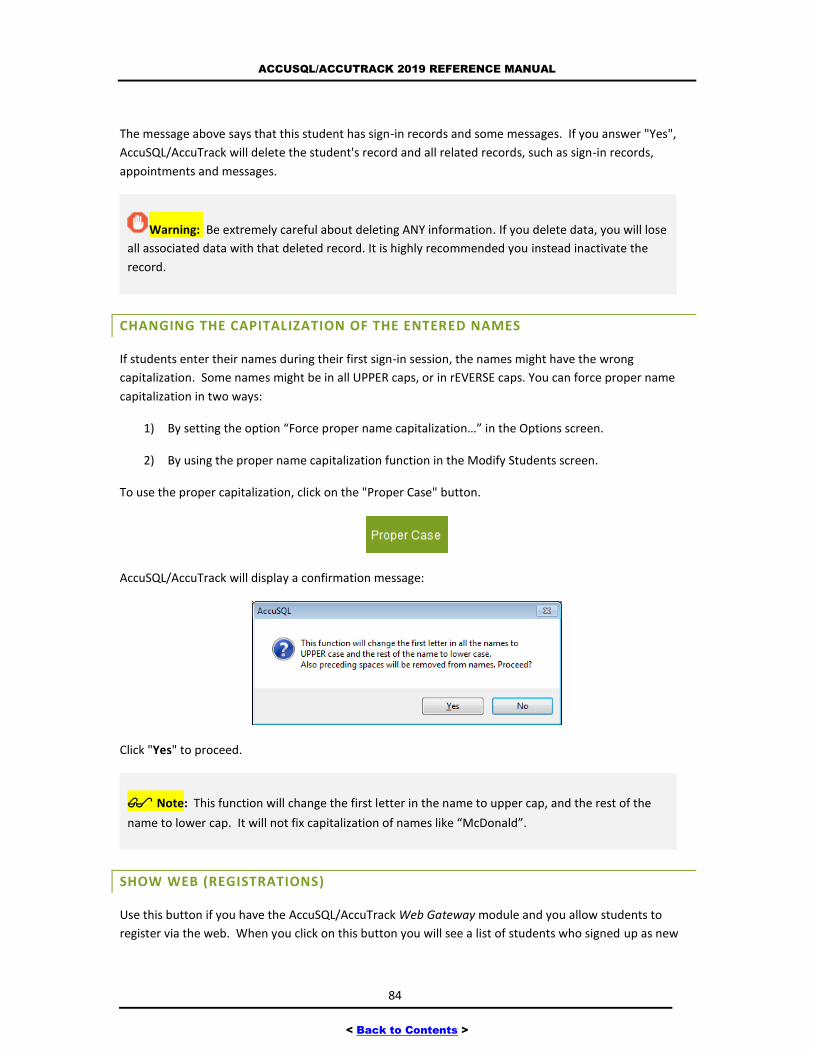
ACCUSQL/ACCUTRACK 2019 REFERENCE MANUAL
84
< Back to Contents >
The message above says that this student has sign-in records and some messages. If you answer "Yes",
AccuSQL/AccuTrack will delete the student's record and all related records, such as sign-in records,
appointments and messages.
Warning: Be extremely careful about deleting ANY information. If you delete data, you will lose
all associated data with that deleted record. It is highly recommended you instead inactivate the
record.
CHANGING THE CAPITALIZATION OF THE ENTERED NAMES
If students enter their names during their first sign-in session, the names might have the wrong
capitalization. Some names might be in all UPPER caps, or in rEVERSE caps. You can force proper name
capitalization in two ways:
1) By setting the option “Force proper name capitalization…” in the Options screen.
2) By using the proper name capitalization function in the Modify Students screen.
To use the proper capitalization, click on the "Proper Case" button.
AccuSQL/AccuTrack will display a confirmation message:
Click "Yes" to proceed.
Note: This function will change the first letter in the name to upper cap, and the rest of the
name to lower cap. It will not fix capitalization of names like “McDonald”.
SHOW WEB (REGISTRATIONS)
Use this button if you have the AccuSQL/AccuTrack Web Gateway module and you allow students to
register via the web. When you click on this button you will see a list of students who signed up as new
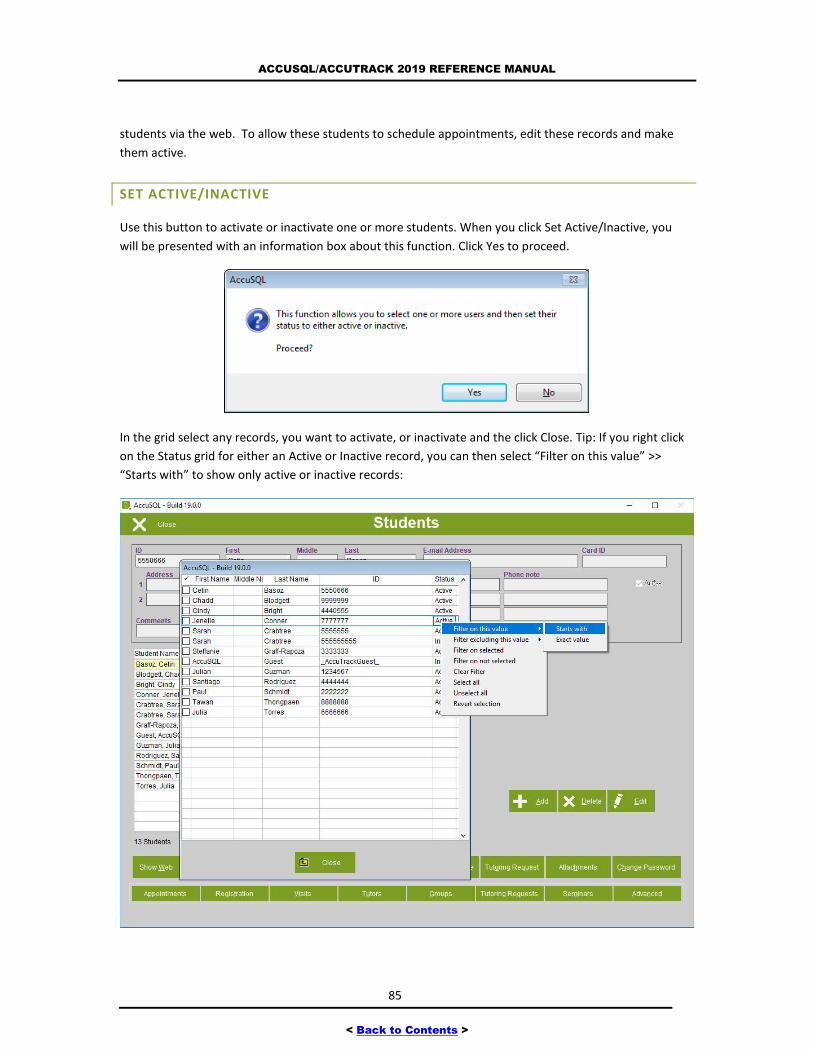
ACCUSQL/ACCUTRACK 2019 REFERENCE MANUAL
85
< Back to Contents >
students via the web. To allow these students to schedule appointments, edit these records and make
them active.
SET ACTIVE/INACTIVE
Use this button to activate or inactivate one or more students. When you click Set Active/Inactive, you
will be presented with an information box about this function. Click Yes to proceed.
In the grid select any records, you want to activate, or inactivate and the click Close. Tip: If you right click
on the Status grid for either an Active or Inactive record, you can then select “Filter on this value” >>
“Starts with” to show only active or inactive records:
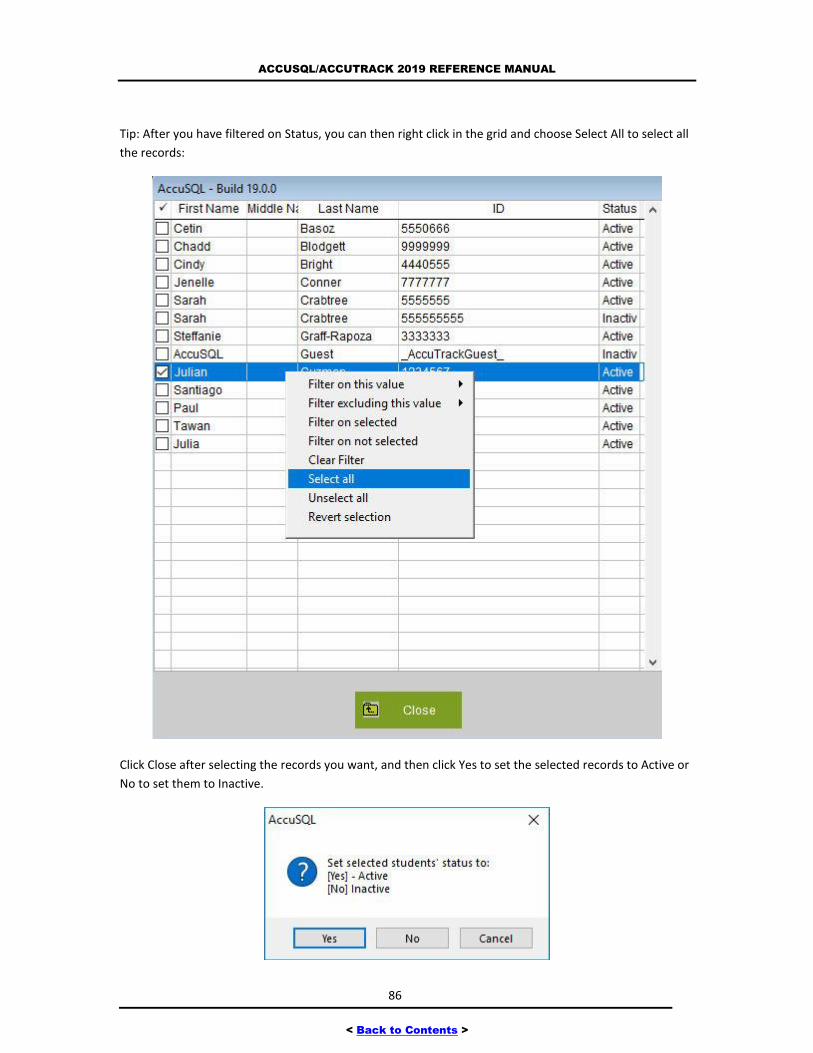
ACCUSQL/ACCUTRACK 2019 REFERENCE MANUAL
86
< Back to Contents >
Tip: After you have filtered on Status, you can then right click in the grid and choose Select All to select all
the records:
Click Close after selecting the records you want, and then click Yes to set the selected records to Active or
No to set them to Inactive.
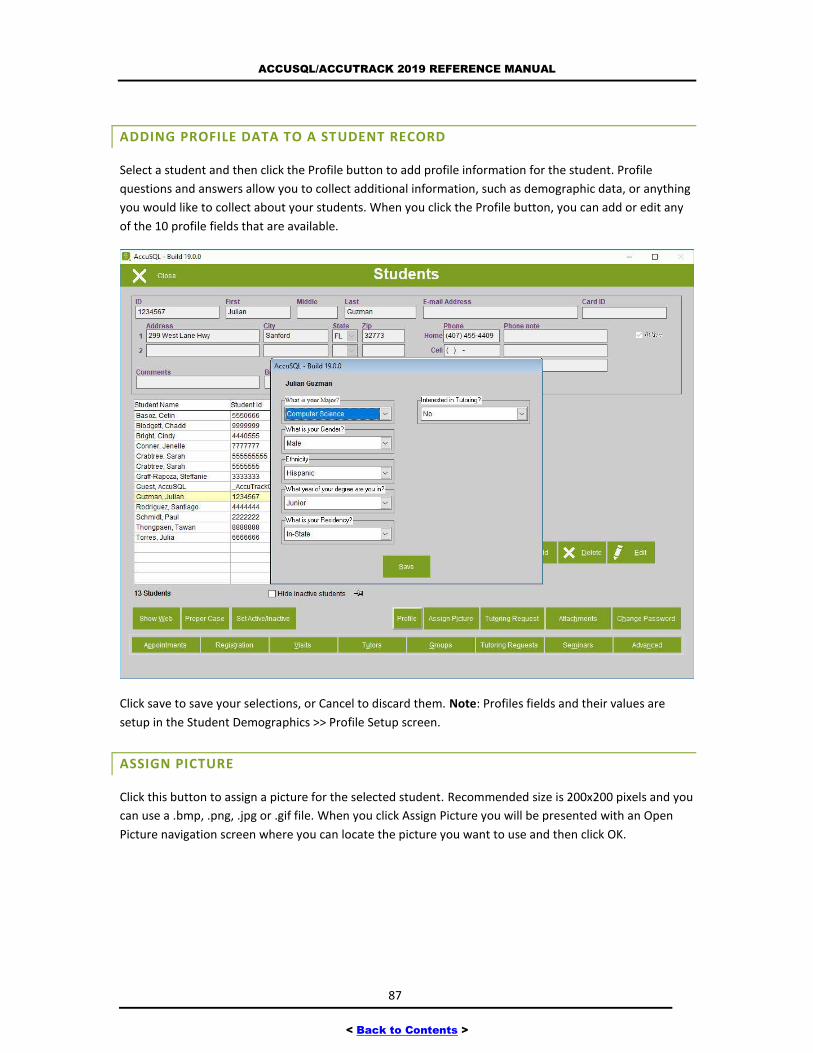
ACCUSQL/ACCUTRACK 2019 REFERENCE MANUAL
87
< Back to Contents >
ADDING PROFILE DATA TO A STUDENT RECORD
Select a student and then click the Profile button to add profile information for the student. Profile
questions and answers allow you to collect additional information, such as demographic data, or anything
you would like to collect about your students. When you click the Profile button, you can add or edit any
of the 10 profile fields that are available.
Click save to save your selections, or Cancel to discard them. Note: Profiles fields and their values are
setup in the Student Demographics >> Profile Setup screen.
ASSIGN PICTURE
Click this button to assign a picture for the selected student. Recommended size is 200x200 pixels and you
can use a .bmp, .png, .jpg or .gif file. When you click Assign Picture you will be presented with an Open
Picture navigation screen where you can locate the picture you want to use and then click OK.
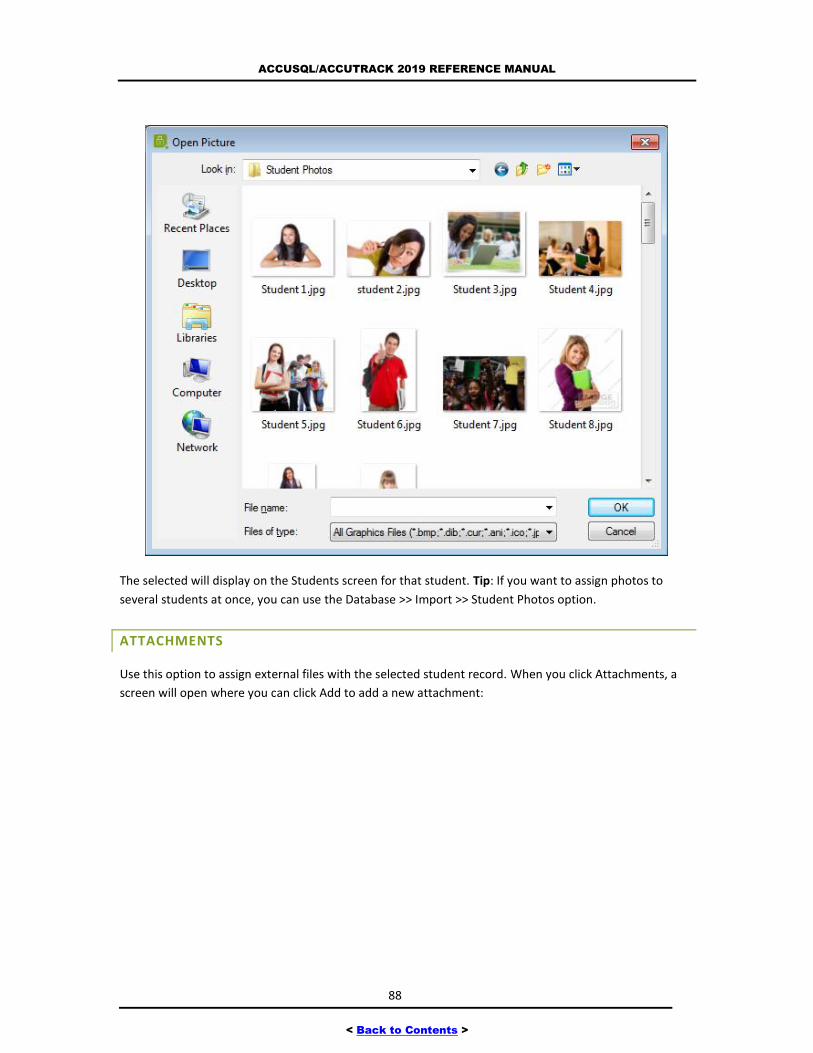
ACCUSQL/ACCUTRACK 2019 REFERENCE MANUAL
88
< Back to Contents >
The selected will display on the Students screen for that student. Tip: If you want to assign photos to
several students at once, you can use the Database >> Import >> Student Photos option.
ATTACHMENTS
Use this option to assign external files with the selected student record. When you click Attachments, a
screen will open where you can click Add to add a new attachment:
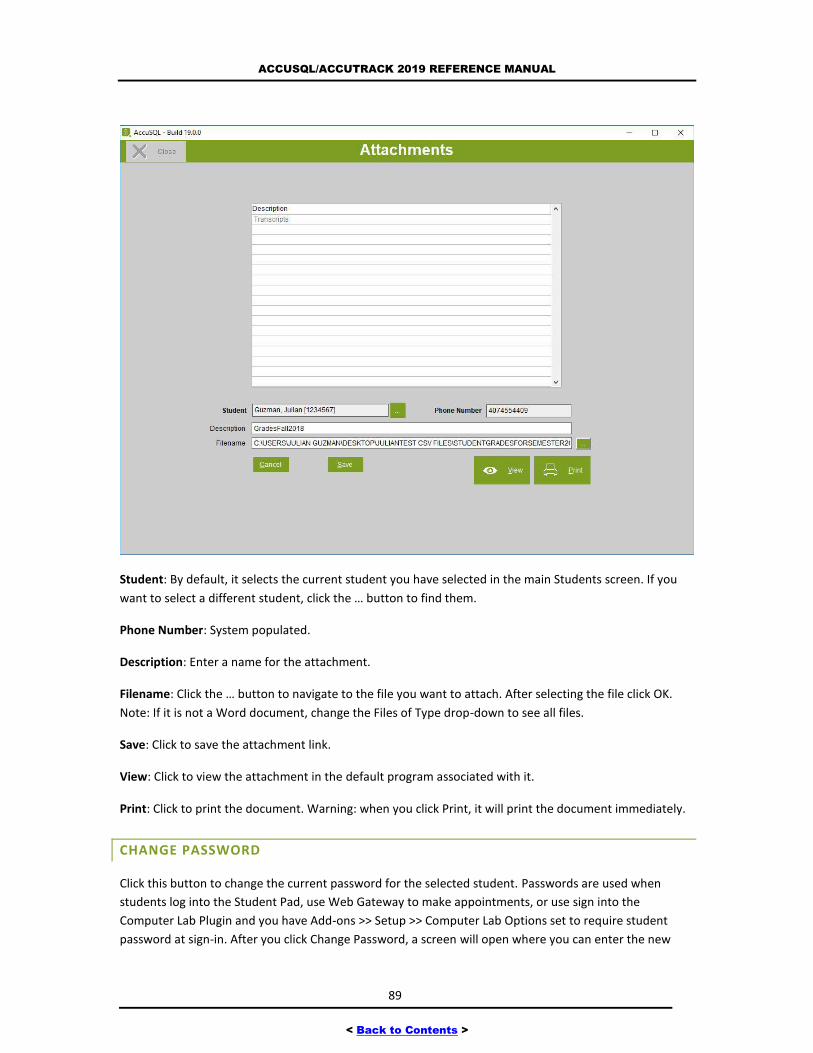
ACCUSQL/ACCUTRACK 2019 REFERENCE MANUAL
89
< Back to Contents >
Student: By default, it selects the current student you have selected in the main Students screen. If you
want to select a different student, click the … button to find them.
Phone Number: System populated.
Description: Enter a name for the attachment.
Filename: Click the … button to navigate to the file you want to attach. After selecting the file click OK.
Note: If it is not a Word document, change the Files of Type drop-down to see all files.
Save: Click to save the attachment link.
View: Click to view the attachment in the default program associated with it.
Print: Click to print the document. Warning: when you click Print, it will print the document immediately.
CHANGE PASSWORD
Click this button to change the current password for the selected student. Passwords are used when
students log into the Student Pad, use Web Gateway to make appointments, or use sign into the
Computer Lab Plugin and you have Add-ons >> Setup >> Computer Lab Options set to require student
password at sign-in. After you click Change Password, a screen will open where you can enter the new
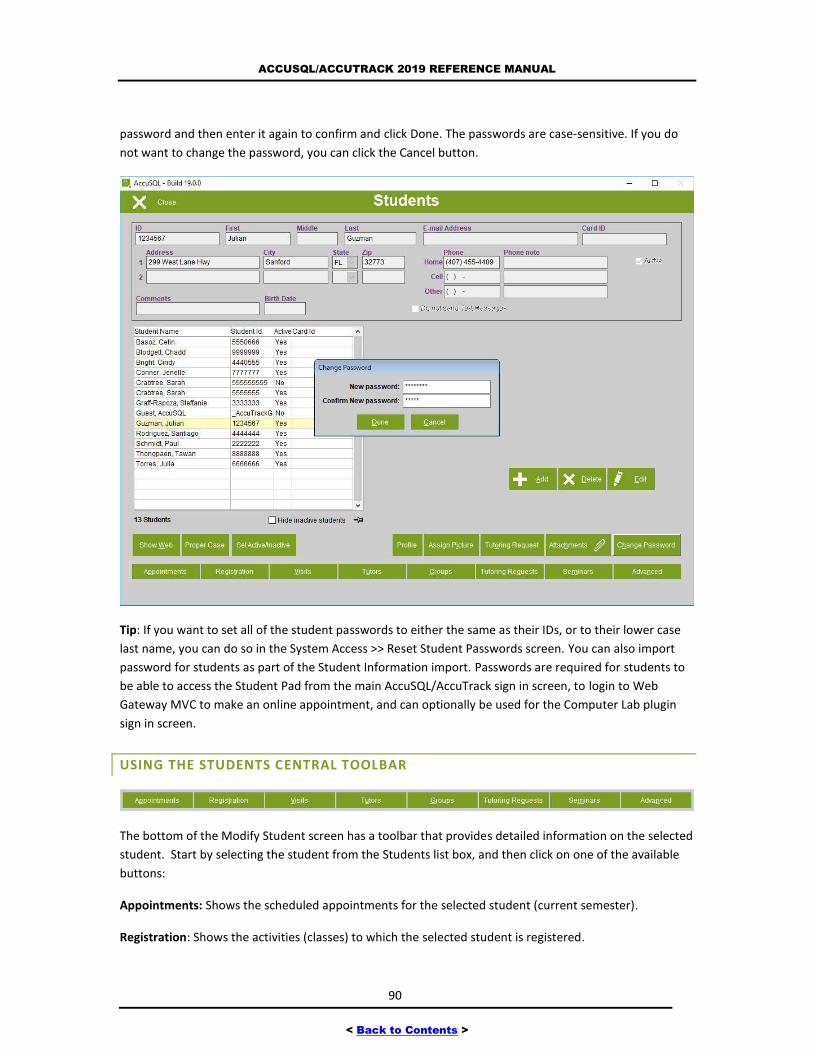
ACCUSQL/ACCUTRACK 2019 REFERENCE MANUAL
90
< Back to Contents >
password and then enter it again to confirm and click Done. The passwords are case-sensitive. If you do
not want to change the password, you can click the Cancel button.
Tip: If you want to set all of the student passwords to either the same as their IDs, or to their lower case
last name, you can do so in the System Access >> Reset Student Passwords screen. You can also import
password for students as part of the Student Information import. Passwords are required for students to
be able to access the Student Pad from the main AccuSQL/AccuTrack sign in screen, to login to Web
Gateway MVC to make an online appointment, and can optionally be used for the Computer Lab plugin
sign in screen.
USING THE STUDENTS CENTRAL TOOLBAR
The bottom of the Modify Student screen has a toolbar that provides detailed information on the selected
student. Start by selecting the student from the Students list box, and then click on one of the available
buttons:
Appointments: Shows the scheduled appointments for the selected student (current semester).
Registration: Shows the activities (classes) to which the selected student is registered.

ACCUSQL/ACCUTRACK 2019 REFERENCE MANUAL
91
< Back to Contents >
Visits: Shows the visits for the selected student (current semester).
Tutors: Shows the tutors that helped the student this semester.
Groups: Shows the student groups of which the student is a member.
Tutoring Requests: Shows the tutoring requests the selected student made this semester.
Advanced: Provides you with more control on the reports, including changing the reporting period and
exporting the report to an html form, a Word document, or an Excel sheet.
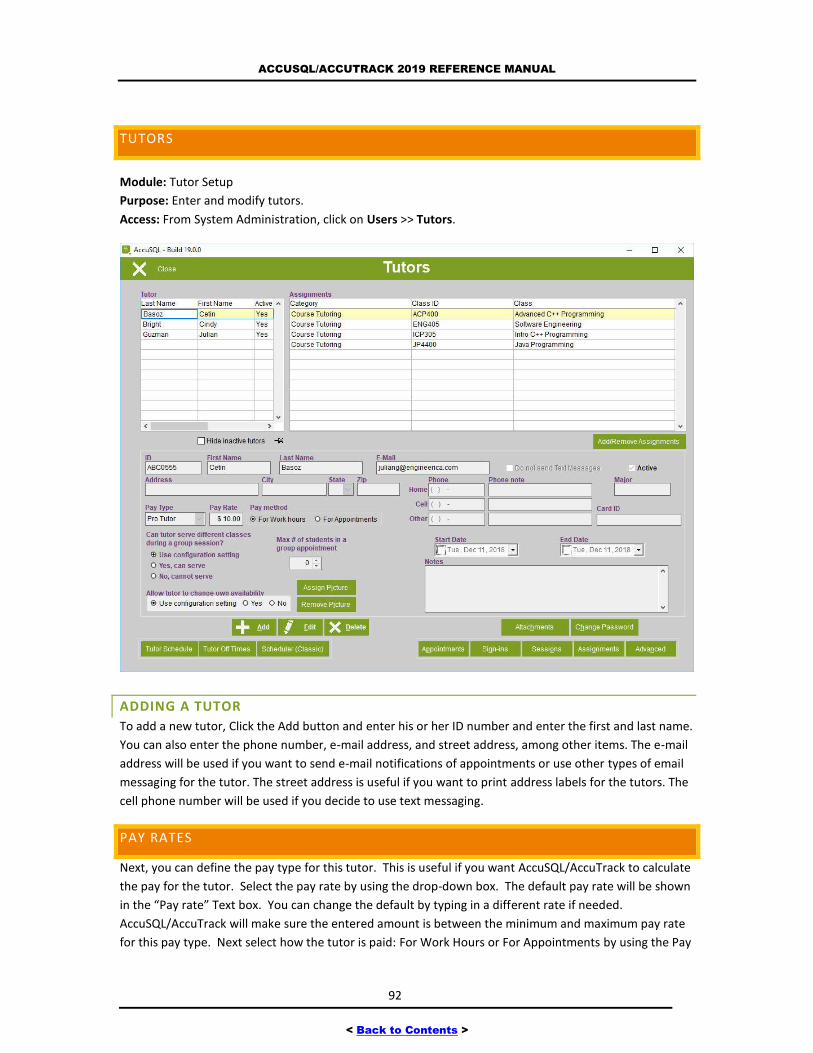
ACCUSQL/ACCUTRACK 2019 REFERENCE MANUAL
92
< Back to Contents >
TUTORS
Module: Tutor Setup
Purpose: Enter and modify tutors.
Access: From System Administration, click on Users >> Tutors.
ADDING A TUTOR
To add a new tutor, Click the Add button and enter his or her ID number and enter the first and last name.
You can also enter the phone number, e-mail address, and street address, among other items. The e-mail
address will be used if you want to send e-mail notifications of appointments or use other types of email
messaging for the tutor. The street address is useful if you want to print address labels for the tutors. The
cell phone number will be used if you decide to use text messaging.
PAY RATES
Next, you can define the pay type for this tutor. This is useful if you want AccuSQL/AccuTrack to calculate
the pay for the tutor. Select the pay rate by using the drop-down box. The default pay rate will be shown
in the “Pay rate” Text box. You can change the default by typing in a different rate if needed.
AccuSQL/AccuTrack will make sure the entered amount is between the minimum and maximum pay rate
for this pay type. Next select how the tutor is paid: For Work Hours or For Appointments by using the Pay
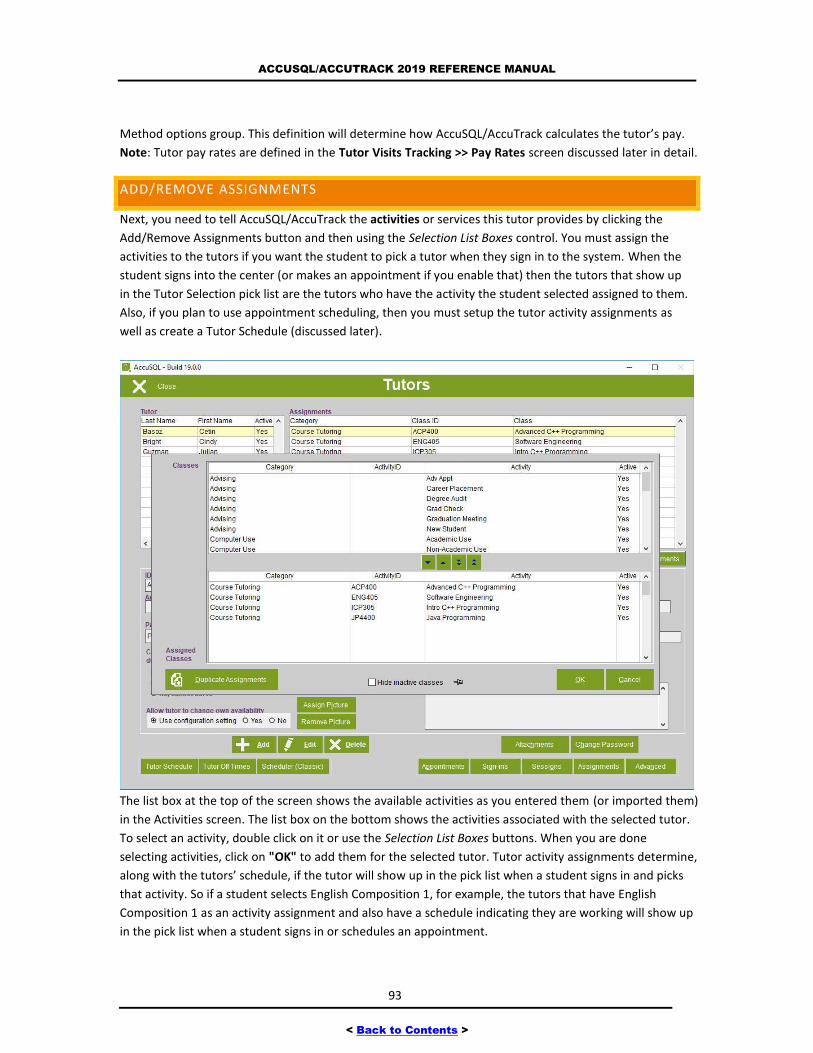
ACCUSQL/ACCUTRACK 2019 REFERENCE MANUAL
93
< Back to Contents >
Method options group. This definition will determine how AccuSQL/AccuTrack calculates the tutor’s pay.
Note: Tutor pay rates are defined in the Tutor Visits Tracking >> Pay Rates screen discussed later in detail.
ADD/REMOVE ASSIGNMENTS
Next, you need to tell AccuSQL/AccuTrack the activities or services this tutor provides by clicking the
Add/Remove Assignments button and then using the Selection List Boxes control. You must assign the
activities to the tutors if you want the student to pick a tutor when they sign in to the system. When the
student signs into the center (or makes an appointment if you enable that) then the tutors that show up
in the Tutor Selection pick list are the tutors who have the activity the student selected assigned to them.
Also, if you plan to use appointment scheduling, then you must setup the tutor activity assignments as
well as create a Tutor Schedule (discussed later).
The list box at the top of the screen shows the available activities as you entered them (or imported them)
in the Activities screen. The list box on the bottom shows the activities associated with the selected tutor.
To select an activity, double click on it or use the Selection List Boxes buttons. When you are done
selecting activities, click on "OK" to add them for the selected tutor. Tutor activity assignments determine,
along with the tutors’ schedule, if the tutor will show up in the pick list when a student signs in and picks
that activity. So if a student selects English Composition 1, for example, the tutors that have English
Composition 1 as an activity assignment and also have a schedule indicating they are working will show up
in the pick list when a student signs in or schedules an appointment.
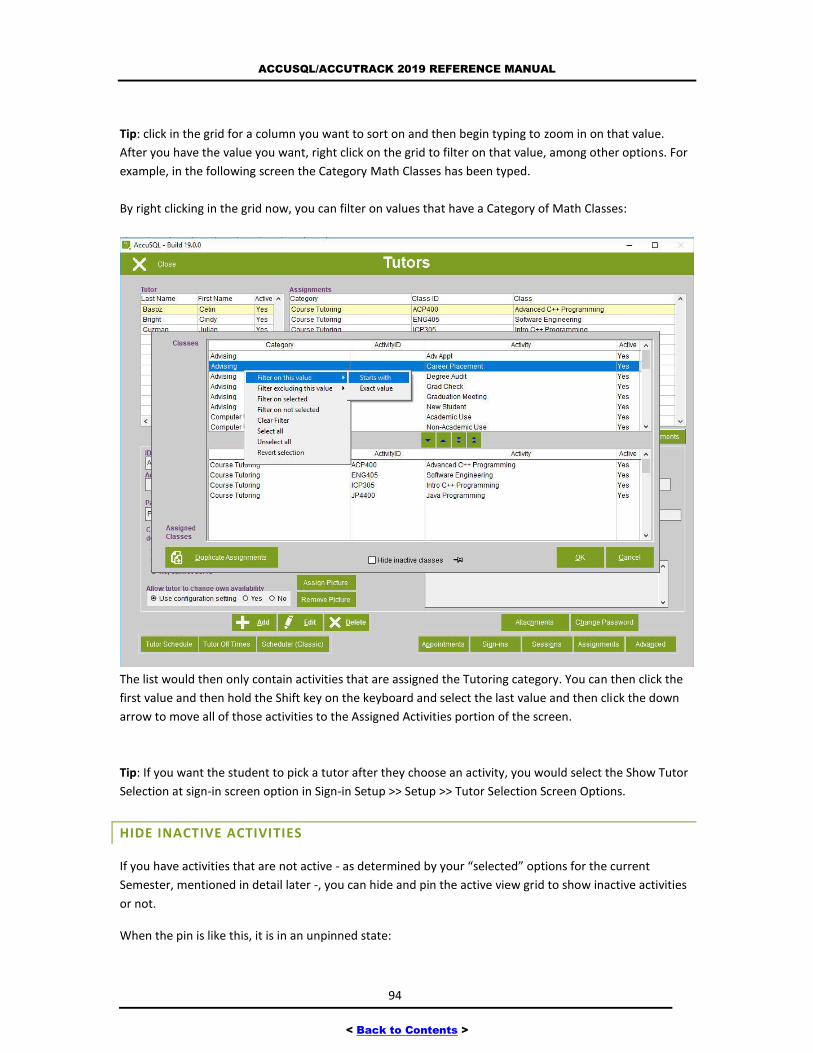
ACCUSQL/ACCUTRACK 2019 REFERENCE MANUAL
94
< Back to Contents >
Tip: click in the grid for a column you want to sort on and then begin typing to zoom in on that value.
After you have the value you want, right click on the grid to filter on that value, among other options. For
example, in the following screen the Category Math Classes has been typed.
By right clicking in the grid now, you can filter on values that have a Category of Math Classes:
The list would then only contain activities that are assigned the Tutoring category. You can then click the
first value and then hold the Shift key on the keyboard and select the last value and then click the down
arrow to move all of those activities to the Assigned Activities portion of the screen.
Tip: If you want the student to pick a tutor after they choose an activity, you would select the Show Tutor
Selection at sign-in screen option in Sign-in Setup >> Setup >> Tutor Selection Screen Options.
HIDE INACTIVE ACTIVITIES
If you have activities that are not active - as determined by your “selected” options for the current
Semester, mentioned in detail later -, you can hide and pin the active view grid to show inactive activities
or not.
When the pin is like this, it is in an unpinned state:
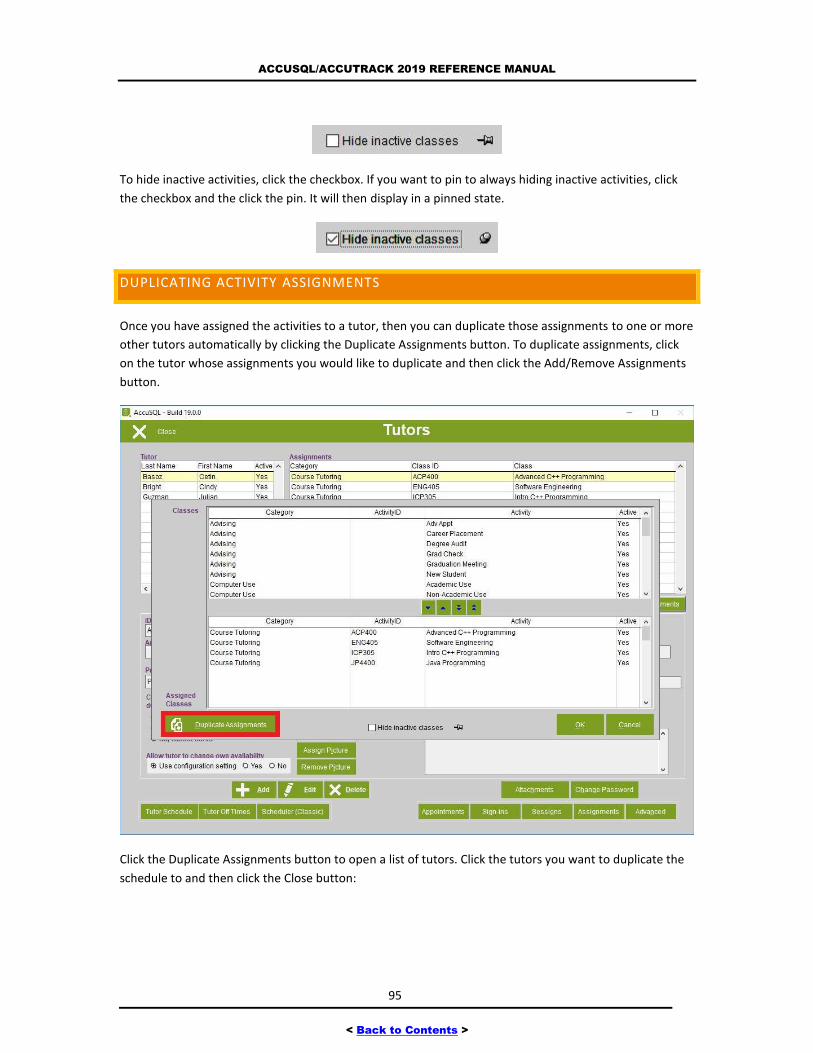
ACCUSQL/ACCUTRACK 2019 REFERENCE MANUAL
95
< Back to Contents >
To hide inactive activities, click the checkbox. If you want to pin to always hiding inactive activities, click
the checkbox and the click the pin. It will then display in a pinned state.
DUPLICATING ACTIVITY ASSIGNMENTS
Once you have assigned the activities to a tutor, then you can duplicate those assignments to one or more
other tutors automatically by clicking the Duplicate Assignments button. To duplicate assignments, click
on the tutor whose assignments you would like to duplicate and then click the Add/Remove Assignments
button.
Click the Duplicate Assignments button to open a list of tutors. Click the tutors you want to duplicate the
schedule to and then click the Close button:
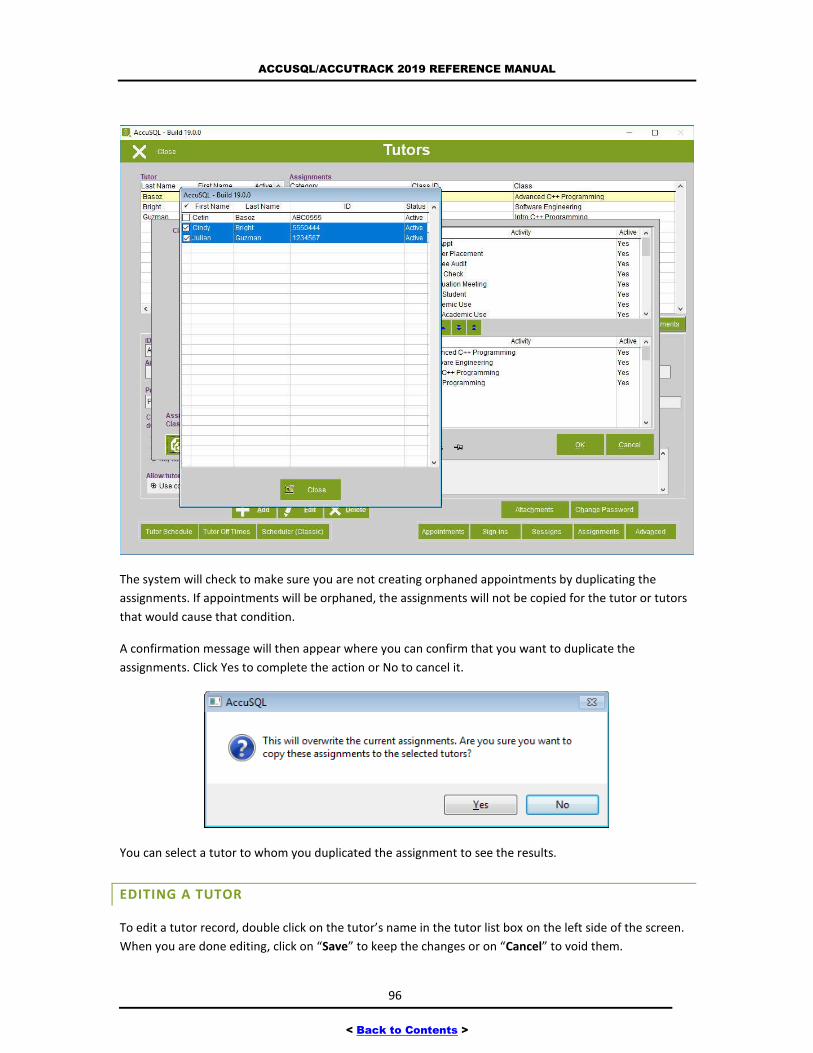
ACCUSQL/ACCUTRACK 2019 REFERENCE MANUAL
96
< Back to Contents >
The system will check to make sure you are not creating orphaned appointments by duplicating the
assignments. If appointments will be orphaned, the assignments will not be copied for the tutor or tutors
that would cause that condition.
A confirmation message will then appear where you can confirm that you want to duplicate the
assignments. Click Yes to complete the action or No to cancel it.
You can select a tutor to whom you duplicated the assignment to see the results.
EDITING A TUTOR
To edit a tutor record, double click on the tutor’s name in the tutor list box on the left side of the screen.
When you are done editing, click on “Save” to keep the changes or on “Cancel” to void them.
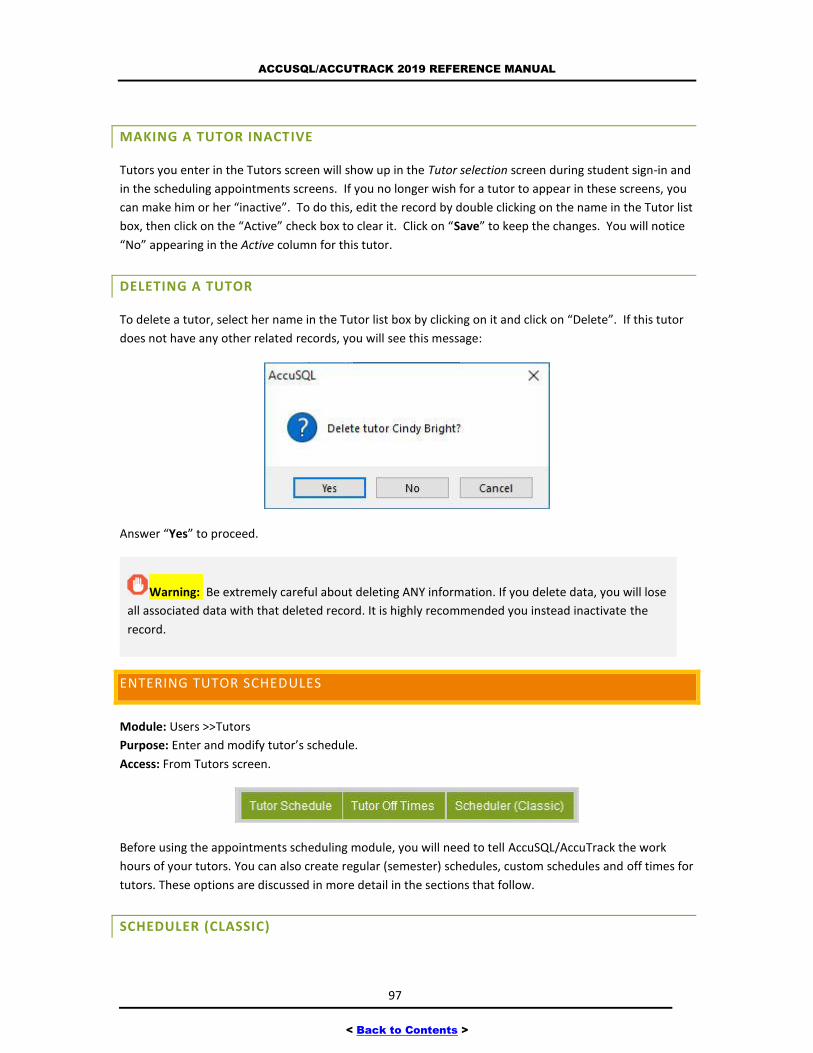
ACCUSQL/ACCUTRACK 2019 REFERENCE MANUAL
97
< Back to Contents >
MAKING A TUTOR INACTIVE
Tutors you enter in the Tutors screen will show up in the Tutor selection screen during student sign-in and
in the scheduling appointments screens. If you no longer wish for a tutor to appear in these screens, you
can make him or her “inactive”. To do this, edit the record by double clicking on the name in the Tutor list
box, then click on the “Active” check box to clear it. Click on “Save” to keep the changes. You will notice
“No” appearing in the Active column for this tutor.
DELETING A TUTOR
To delete a tutor, select her name in the Tutor list box by clicking on it and click on “Delete”. If this tutor
does not have any other related records, you will see this message:
Answer “Yes” to proceed.
Warning: Be extremely careful about deleting ANY information. If you delete data, you will lose
all associated data with that deleted record. It is highly recommended you instead inactivate the
record.
ENTERING TUTOR SCHEDULES
Module: Users >>Tutors
Purpose: Enter and modify tutor’s schedule.
Access: From Tutors screen.
Before using the appointments scheduling module, you will need to tell AccuSQL/AccuTrack the work
hours of your tutors. You can also create regular (semester) schedules, custom schedules and off times for
tutors. These options are discussed in more detail in the sections that follow.
SCHEDULER (CLASSIC)

ACCUSQL/ACCUTRACK 2019 REFERENCE MANUAL
98
< Back to Contents >
Use Scheduler (Classic) to drag the tutor schedules into the days of the week indicating when tutors will
be available for appointments. The Scheduler (Classic) is used to creating recurring schedules through the
end of the current semester. If you need to create custom schedules that change from week to week or
month to month, you can define the semester schedule here and then create custom schedules over top
of the semester schedule using the Tutor Schedule Option.
Note: The schedule you create using Scheduler (Classic) is the same as the Regular schedule
you define using the Tutor Schedule option. Think of is as the “now until the end of the semester”
schedule. If you update a schedule using Scheduler (Classic), that schedule will also be updated for
Regular schedule in the Tutor Schedule screen and vice-versa. Custom schedules can only be
defined using the Tutor Schedule screen. Custom schedules are handy if your tutors work different
hours from week to week.
On the left of the screen you will see the tutor you are currently working with. The list box next to it
shows the activities assigned to the selected tutor. To the right of this list box you will see the "Hours" list
box. You can use this box to select the work hours for the tutor. On the right side of the screen you will
see seven small boxes representing the days of the week. The selected tutor’s work hours are dragged
into these boxes.
Entering Tutor Schedule
ACCUSQL/ACCUTRACK 2019 REFERENCE MANUAL
99
< Back to Contents >
To enter the schedule for a tutor, follow these steps:
1. Select the time period of the first shift in the Hours list box. For example, if the tutor is scheduled
to work 8:00 AM to 12:00 PM, click on the 8:00AM time with the mouse, and press the Shift key
and hold it down and then click on the 12:00 PM time. This will highlight all of the time values
between 8AM and 12PM.
2. Drag the highlighted time to the appropriate day list box. For example, If the selected tutor works 8 AM to 12 PM Mondays, Wednesdays and Fridays, click on one of the highlighted times above once with the mouse and hold the left mouse button down and move the mouse pointer to the Monday list box and let go of the mouse button. You will see the hours 8:00 AM to 12:00 PM appear in the Monday box. Next drag and drop the same value to the Wednesday and to the Friday boxes.
3. Enter the rest of the times following steps 2 and 3 above. For example, if the tutor works from 1:00PM to 5:00 PM on Monday, Wednesday, and Friday, follow the steps to add this time period to the appropriate day boxes.
4. Click on "Save" to keep the changes.
Adjusting Tutor Schedule
You can add hours to an entered schedule by simply dragging the new time and dropping it in the
appropriate day box. To remove a time period from one of the Day list boxes highlight the period then
press the Delete key on your keyboard. Click on "Save" to keep the changes.
You can use the History and Appointment buttons at the bottom of the screen to see the past sign-ins
and scheduled appointments by students for the selected tutor.
Allow Tutor to change own Availability
New for version 2017, you can enable tutors access to create their own custom schedules using either
AccuSQL or Web Gateway MVC. If enabled, tutors can use the Schedule button from the Tutor Pad in
AccuSQL to set their schedules on a weekly basis or in Web Gateway MVC, they would use the Custom
Weekly Availability option to set their weekly schedules. Any schedules created by the tutors using this
method will be added as automatically as Custom schedules in the Tutor Schedule screen.
There are three options for determining if tutors can set their own custom schedules or not. Use
configuration settings will apply the rules for the tutor as determined by the Appointments Options >>
Allow tutor to change own availability X days in advance settings. Yes means the selected tutor can add
his/her own schedule regardless of the Appointments Options >> Allow tutor to change own availability X
days in advance settings. No means the selected tutor cannot add his/her own schedule regardless of the
Appointments Options >> Allow tutor to change own availability X days in advance settings.
TUTOR SCHEDULE SCREEN
The Tutor Schedule screen is used if you would like to define a regular (semester) and/or a custom
schedule for the tutor. For tutors to show in in the students pick list when they sign in to
AccuTrack/AccuSQL or when they schedule an appointment, the tutors must typically have two items:
activity assignments and schedule
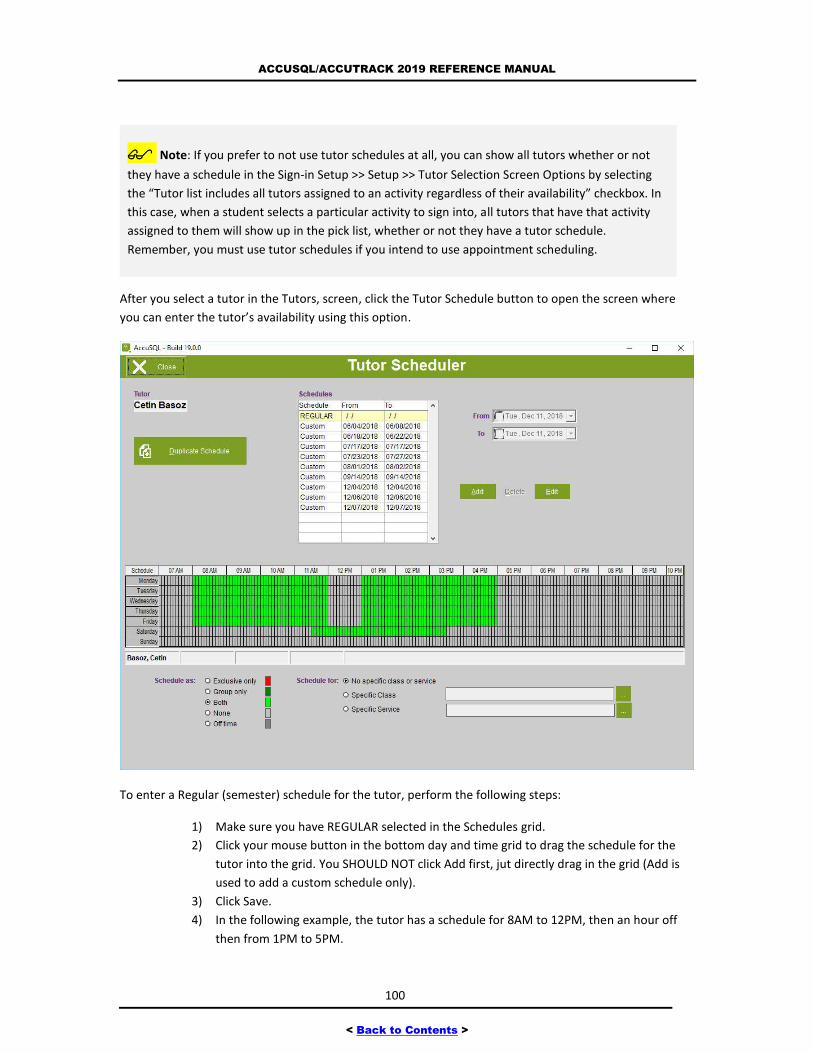
ACCUSQL/ACCUTRACK 2019 REFERENCE MANUAL
100
< Back to Contents >
Note: If you prefer to not use tutor schedules at all, you can show all tutors whether or not
they have a schedule in the Sign-in Setup >> Setup >> Tutor Selection Screen Options by selecting
the “Tutor list includes all tutors assigned to an activity regardless of their availability” checkbox. In
this case, when a student selects a particular activity to sign into, all tutors that have that activity
assigned to them will show up in the pick list, whether or not they have a tutor schedule.
Remember, you must use tutor schedules if you intend to use appointment scheduling.
After you select a tutor in the Tutors, screen, click the Tutor Schedule button to open the screen where
you can enter the tutor’s availability using this option.
To enter a Regular (semester) schedule for the tutor, perform the following steps:
1) Make sure you have REGULAR selected in the Schedules grid.
2) Click your mouse button in the bottom day and time grid to drag the schedule for the
tutor into the grid. You SHOULD NOT click Add first, jut directly drag in the grid (Add is
used to add a custom schedule only).
3) Click Save.
4) In the following example, the tutor has a schedule for 8AM to 12PM, then an hour off
then from 1PM to 5PM.
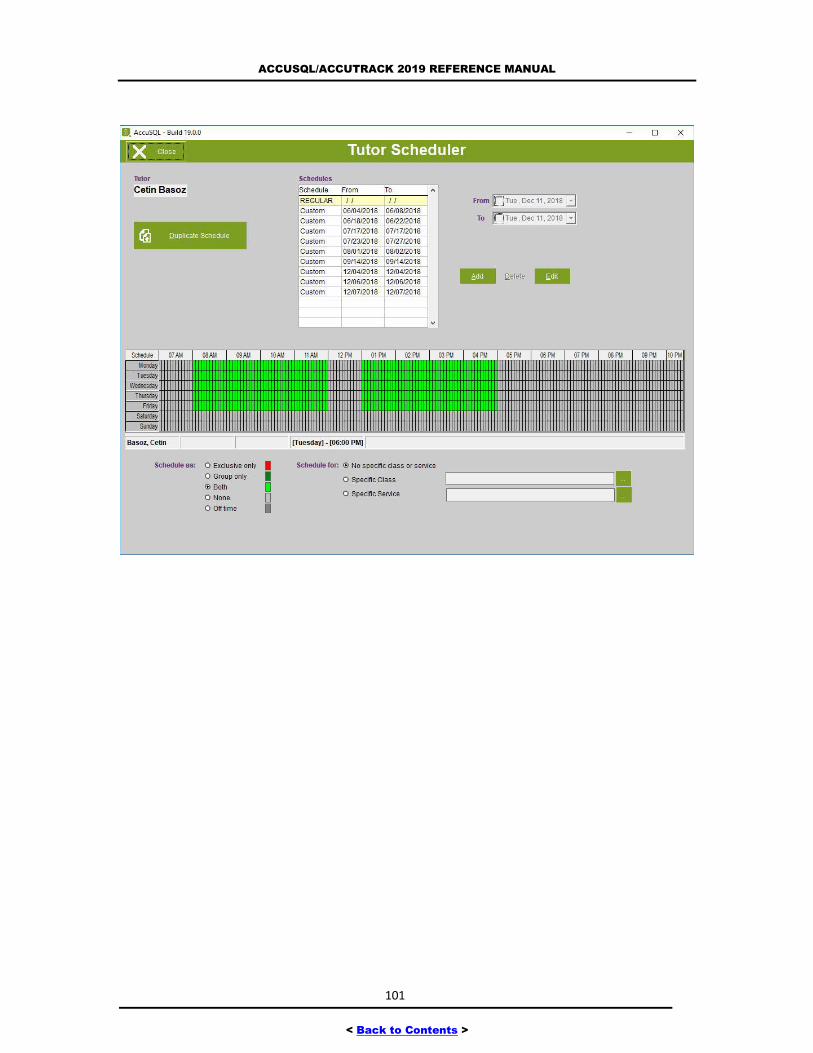
ACCUSQL/ACCUTRACK 2019 REFERENCE MANUAL
101
< Back to Contents >
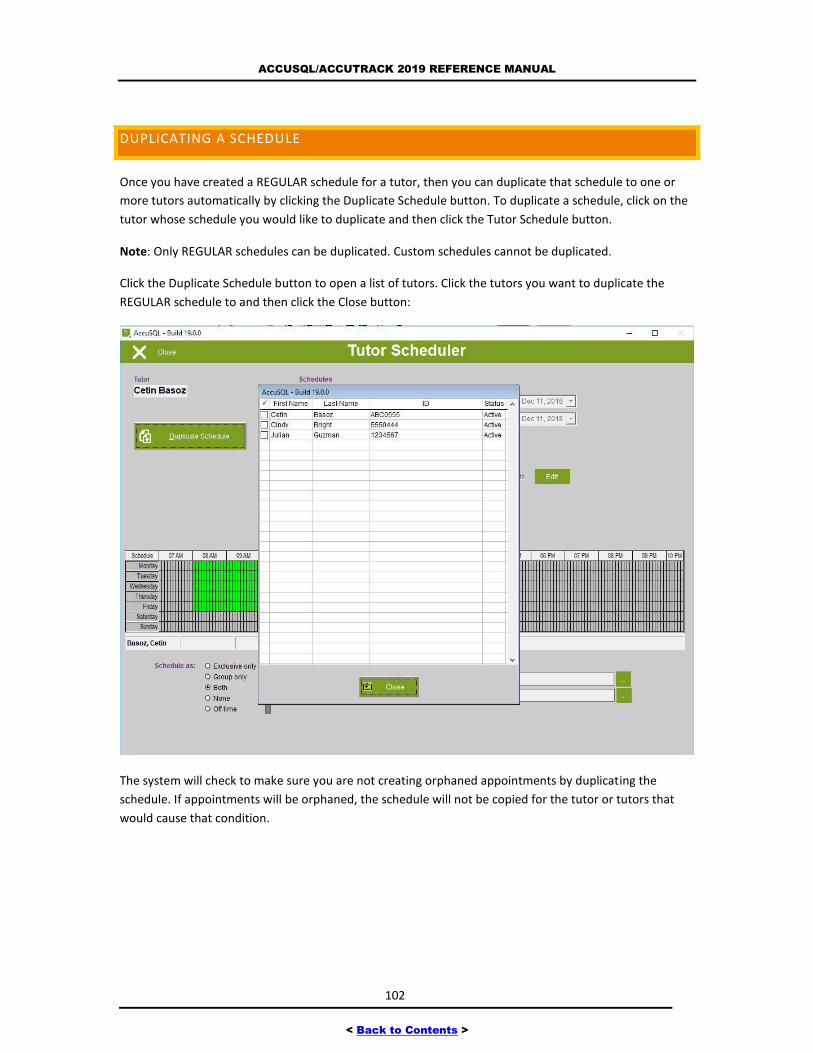
ACCUSQL/ACCUTRACK 2019 REFERENCE MANUAL
102
< Back to Contents >
DUPLICATING A SCHEDULE
Once you have created a REGULAR schedule for a tutor, then you can duplicate that schedule to one or
more tutors automatically by clicking the Duplicate Schedule button. To duplicate a schedule, click on the
tutor whose schedule you would like to duplicate and then click the Tutor Schedule button.
Note: Only REGULAR schedules can be duplicated. Custom schedules cannot be duplicated.
Click the Duplicate Schedule button to open a list of tutors. Click the tutors you want to duplicate the
REGULAR schedule to and then click the Close button:
The system will check to make sure you are not creating orphaned appointments by duplicating the
schedule. If appointments will be orphaned, the schedule will not be copied for the tutor or tutors that
would cause that condition.
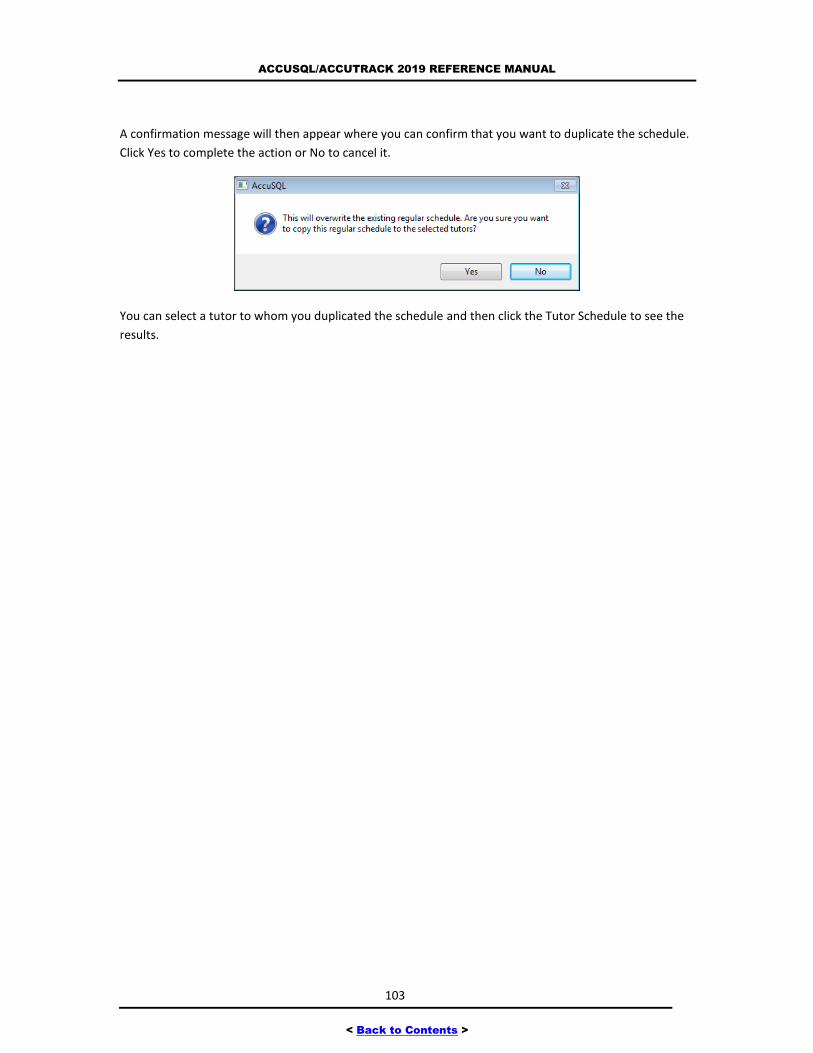
ACCUSQL/ACCUTRACK 2019 REFERENCE MANUAL
103
< Back to Contents >
A confirmation message will then appear where you can confirm that you want to duplicate the schedule.
Click Yes to complete the action or No to cancel it.
You can select a tutor to whom you duplicated the schedule and then click the Tutor Schedule to see the
results.

ACCUSQL/ACCUTRACK 2019 REFERENCE MANUAL
104
< Back to Contents >
ADDING A CUSTOM SCHEDULE
The Default option in the Schedules grid shows the REGULAR “semester” schedule (if any) for the tutor as
defined in the Tutor Schedule screen.
To add a custom schedule for a specific date range, click the Add button. In the From and To boxes click
the start and end date for this schedule (or can be for a week, a month, or whatever range works for you)
and then you will drag in the grid for when the tutor works for that date range then click Save. Look at the
display below the grid to see the time you are dragging for. Now click Add again and go through the same
process for the next From and To period of time (if necessary) until you have built the schedule the way
you want. In the following example, the tutor has a REGULAR schedule from 8AM to 5:00PM. If however,
you click on the Custom schedule in the grid, the tutor works also from 8AM to 12PM and 1PM to 4PM
from December 13th.

ACCUSQL/ACCUTRACK 2019 REFERENCE MANUAL
105
< Back to Contents >
Green in the grid indicates you are scheduling the tutor for both drop-in only (one on one) and group
appointments. You can choose the Schedule as radio buttons on the bottom left of the screen to create
the time as something different than that. In the Schedule for: area you can specify the tutor schedule for
a specific activity and/or service. That means the student will only see the tutor as available if they select
that specific activity and/or service and 1) the tutor has that activity assignment and 2) the tutor has that
specific activity scheduled here. In the following example a tutor has a schedule from 8AM to 12PM then
1PM to 4PM. He is only available for both exclusive and group tutoring for Java Programming since a
specific activity was selected for that Custom schedule.
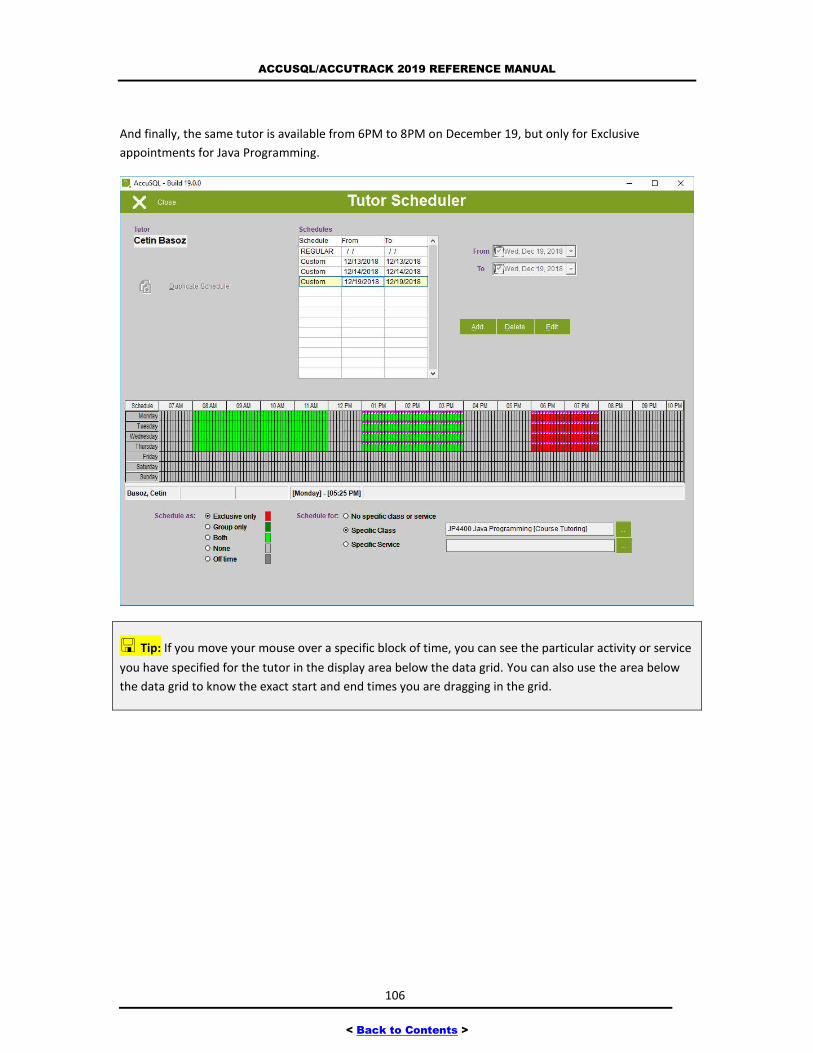
ACCUSQL/ACCUTRACK 2019 REFERENCE MANUAL
106
< Back to Contents >
And finally, the same tutor is available from 6PM to 8PM on December 19, but only for Exclusive
appointments for Java Programming.
Tip: If you move your mouse over a specific block of time, you can see the particular activity or service
you have specified for the tutor in the display area below the data grid. You can also use the area below
the data grid to know the exact start and end times you are dragging in the grid.
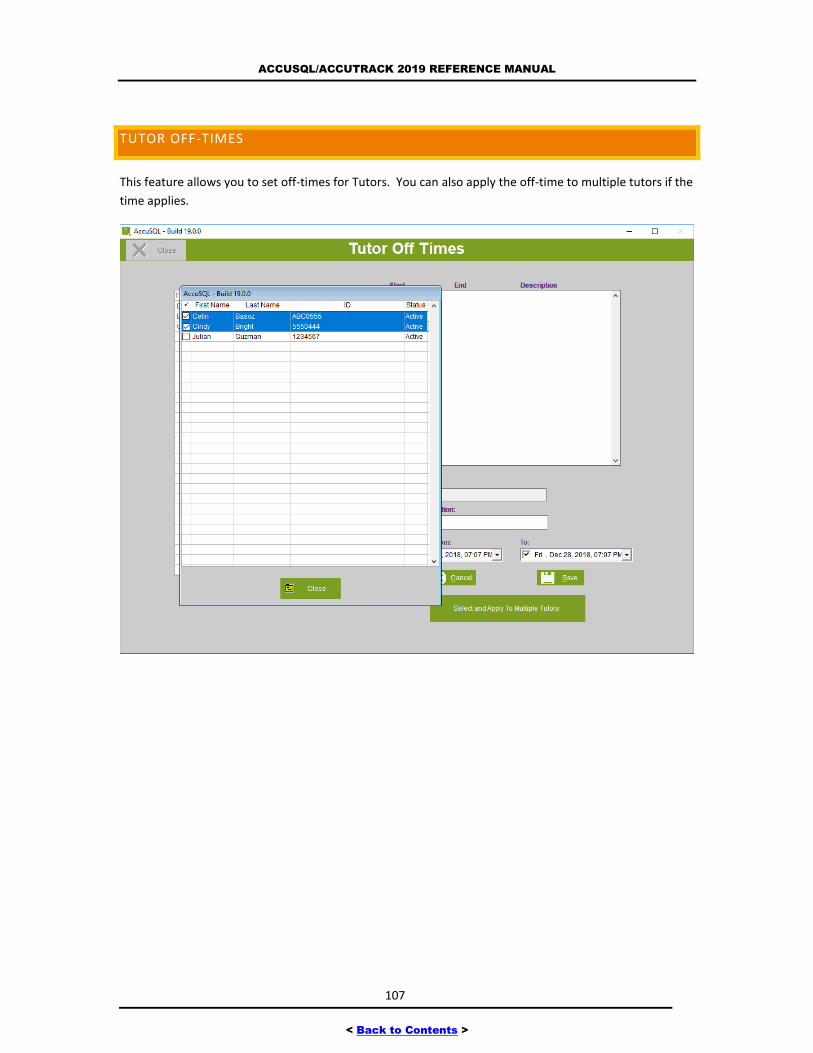
ACCUSQL/ACCUTRACK 2019 REFERENCE MANUAL
107
< Back to Contents >
TUTOR OFF-TIMES
This feature allows you to set off-times for Tutors. You can also apply the off-time to multiple tutors if the
time applies.
ACCUSQL/ACCUTRACK 2019 REFERENCE MANUAL
108
< Back to Contents >
ALLOW TUTOR SCHEDULING USING WEB GATEWAY MVC
Web Gateway MVC is a plugin module for AccuSQL that allows students to schedule appointments,
register for seminars/workshops, take surveys, and more all from the convenience of a web browser. New
for version 2019 and later, you can no allow tutors to create their own “semester” or custom schedules
through Web Gateway. These schedules are then reviewed and approved by AccuSQL admins.
ATTACHMENTS
Use this option to assign external files with the selected tutor record. When you click Attachments, a
screen will open where you can click Add to add a new attachment:
Student: By default, it selects the current tutor you have selected in the main Students screen. If you want
to select a different tutor, click the … button to find them.
Phone Number: System populated.
Description: Enter a name for the attachment.
Filename: Click the … button to navigate to the file you want to attach. After selecting the file click OK.
Note: If it is not a Word document, change the Files of Type drop-down to see all files.
Save: Click to save the attachment link.
View: Click to view the attachment in the default program associated with it.
Print: Click to print the document. Warning: when you click Print, it will print the document immediately.
CHANGE PASSWORD
Click this button to change the current password for the selected tutor. Passwords are used when tutors
log into the Tutor Pad, or use Web Gateway to view or cancel appointments. After you click Change
Password, a screen will open where you can enter the new password and then enter it again to confirm
and click Done. The passwords are case-sensitive. If you do not want to change the password, you can
click the Cancel button.
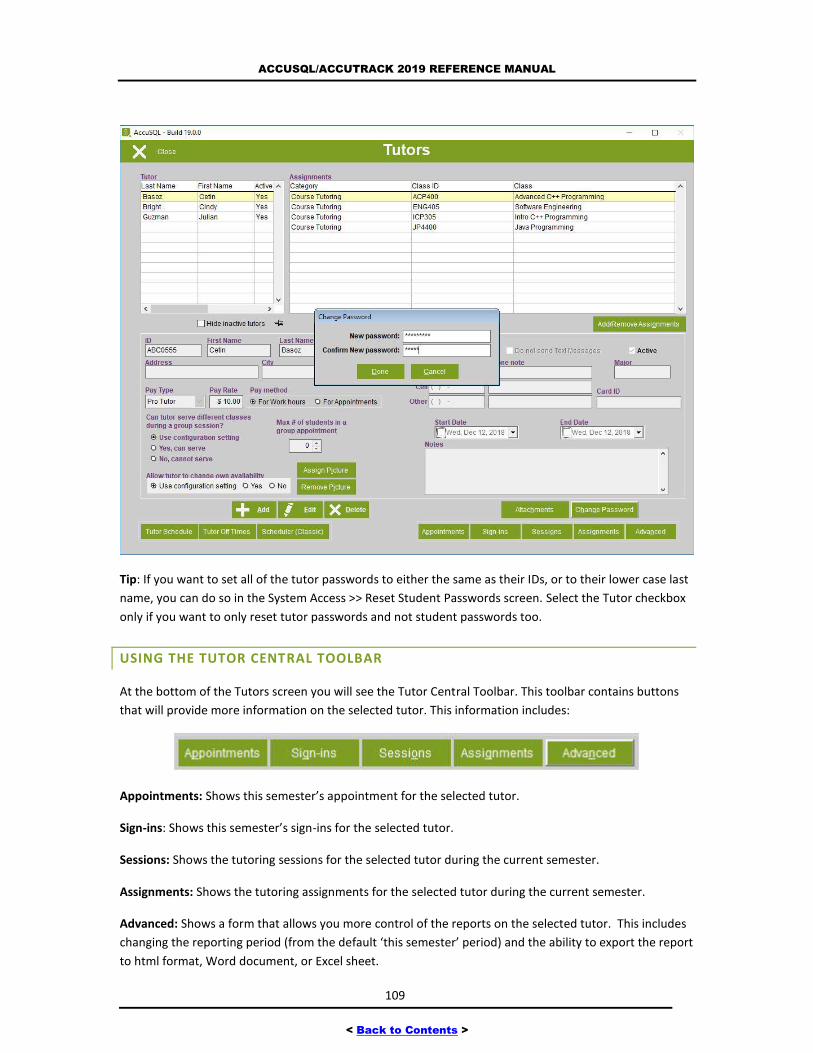
ACCUSQL/ACCUTRACK 2019 REFERENCE MANUAL
109
< Back to Contents >
Tip: If you want to set all of the tutor passwords to either the same as their IDs, or to their lower case last
name, you can do so in the System Access >> Reset Student Passwords screen. Select the Tutor checkbox
only if you want to only reset tutor passwords and not student passwords too.
USING THE TUTOR CENTRAL TOOLBAR
At the bottom of the Tutors screen you will see the Tutor Central Toolbar. This toolbar contains buttons
that will provide more information on the selected tutor. This information includes:
Appointments: Shows this semester’s appointment for the selected tutor.
Sign-ins: Shows this semester’s sign-ins for the selected tutor.
Sessions: Shows the tutoring sessions for the selected tutor during the current semester.
Assignments: Shows the tutoring assignments for the selected tutor during the current semester.
Advanced: Shows a form that allows you more control of the reports on the selected tutor. This includes
changing the reporting period (from the default ‘this semester’ period) and the ability to export the report
to html format, Word document, or Excel sheet.
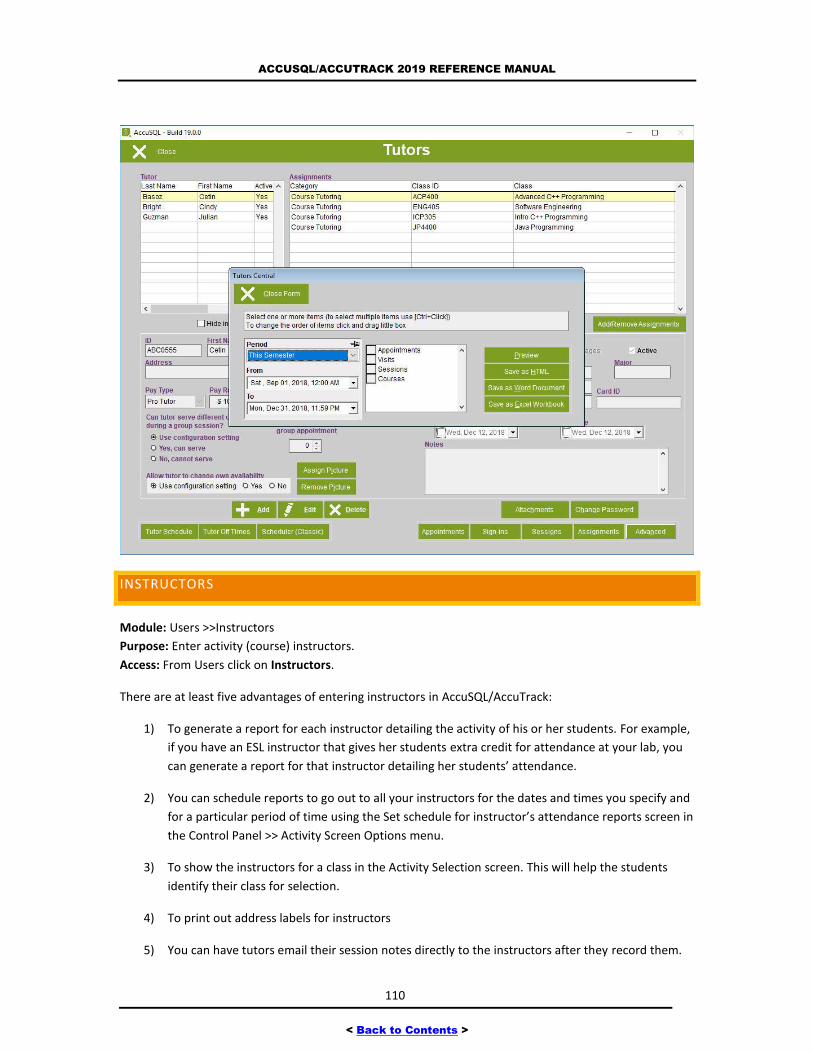
ACCUSQL/ACCUTRACK 2019 REFERENCE MANUAL
110
< Back to Contents >
INSTRUCTORS
Module: Users >>Instructors
Purpose: Enter activity (course) instructors.
Access: From Users click on Instructors.
There are at least five advantages of entering instructors in AccuSQL/AccuTrack:
1) To generate a report for each instructor detailing the activity of his or her students. For example,
if you have an ESL instructor that gives her students extra credit for attendance at your lab, you
can generate a report for that instructor detailing her students’ attendance.
2) You can schedule reports to go out to all your instructors for the dates and times you specify and
for a particular period of time using the Set schedule for instructor’s attendance reports screen in
the Control Panel >> Activity Screen Options menu.
3) To show the instructors for a class in the Activity Selection screen. This will help the students
identify their class for selection.
4) To print out address labels for instructors
5) You can have tutors email their session notes directly to the instructors after they record them.
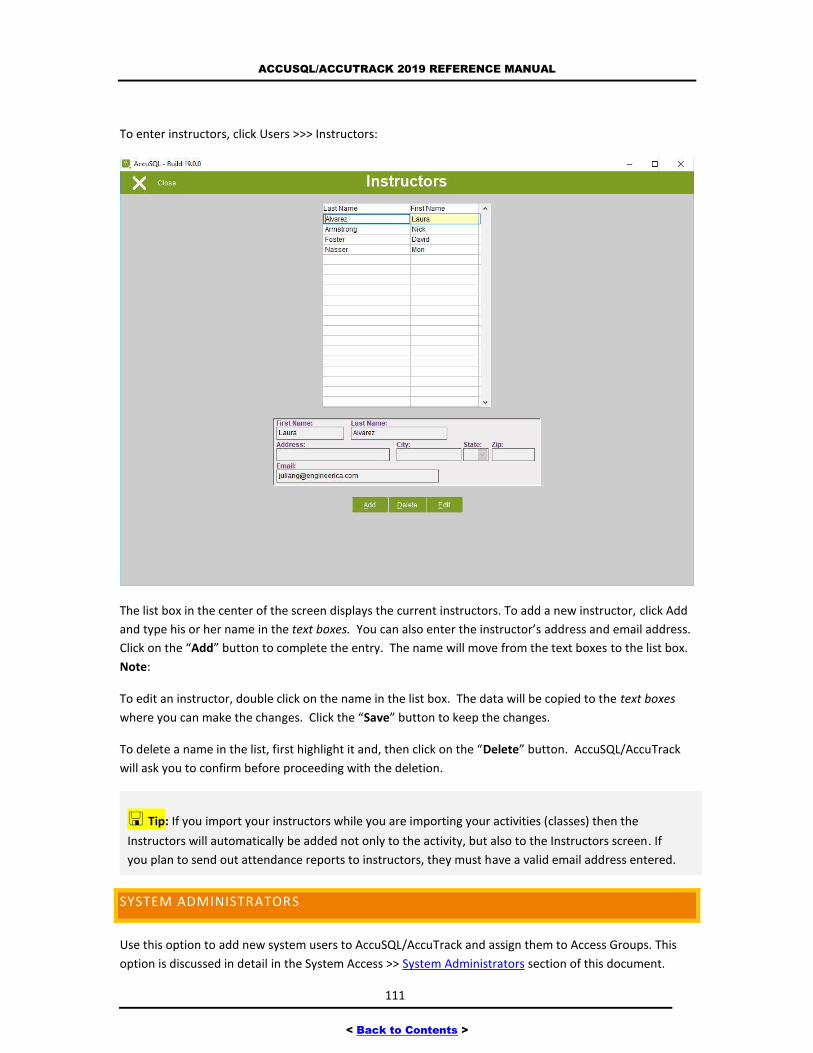
ACCUSQL/ACCUTRACK 2019 REFERENCE MANUAL
111
< Back to Contents >
To enter instructors, click Users >>> Instructors:
The list box in the center of the screen displays the current instructors. To add a new instructor, click Add
and type his or her name in the text boxes. You can also enter the instructor’s address and email address.
Click on the “Add” button to complete the entry. The name will move from the text boxes to the list box.
Note:
To edit an instructor, double click on the name in the list box. The data will be copied to the text boxes
where you can make the changes. Click the “Save” button to keep the changes.
To delete a name in the list, first highlight it and, then click on the “Delete” button. AccuSQL/AccuTrack
will ask you to confirm before proceeding with the deletion.
Tip: If you import your instructors while you are importing your activities (classes) then the
Instructors will automatically be added not only to the activity, but also to the Instructors screen. If
you plan to send out attendance reports to instructors, they must have a valid email address entered.
SYSTEM ADMINISTRATORS
Use this option to add new system users to AccuSQL/AccuTrack and assign them to Access Groups. This
option is discussed in detail in the System Access >> System Administrators section of this document.
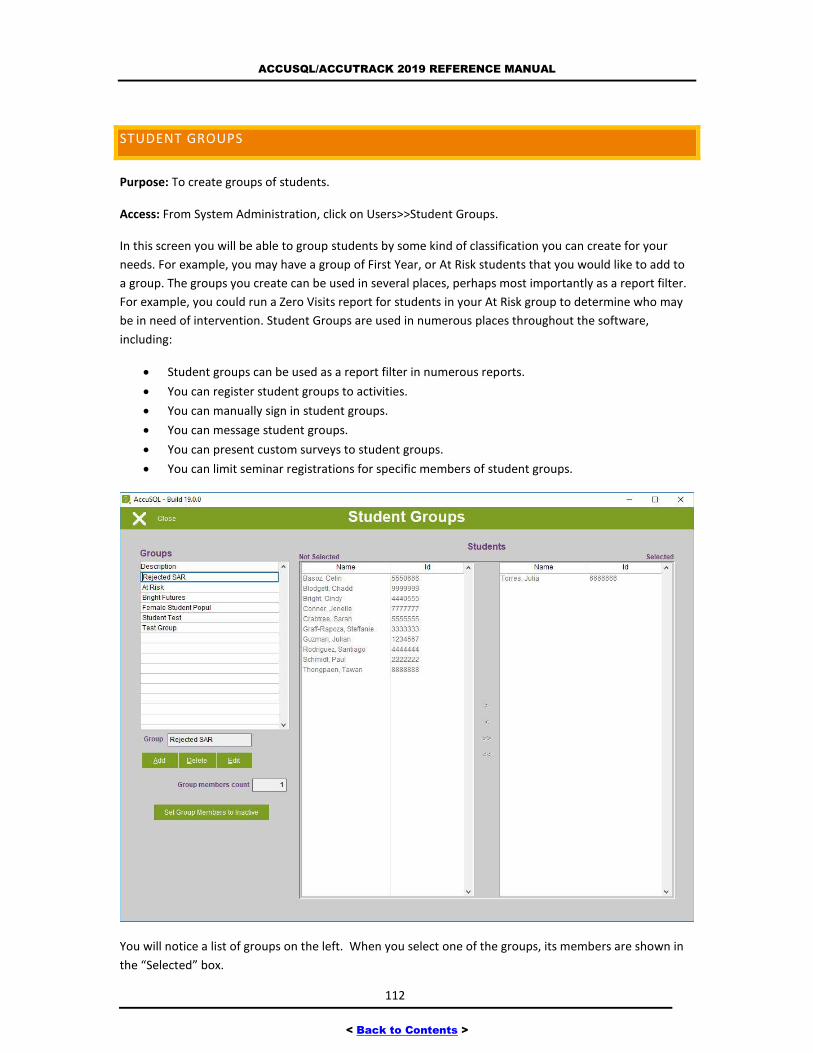
ACCUSQL/ACCUTRACK 2019 REFERENCE MANUAL
112
< Back to Contents >
STUDENT GROUPS
Purpose: To create groups of students.
Access: From System Administration, click on Users>>Student Groups.
In this screen you will be able to group students by some kind of classification you can create for your
needs. For example, you may have a group of First Year, or At Risk students that you would like to add to
a group. The groups you create can be used in several places, perhaps most importantly as a report filter.
For example, you could run a Zero Visits report for students in your At Risk group to determine who may
be in need of intervention. Student Groups are used in numerous places throughout the software,
including:
Student groups can be used as a report filter in numerous reports.
You can register student groups to activities.
You can manually sign in student groups.
You can message student groups.
You can present custom surveys to student groups.
You can limit seminar registrations for specific members of student groups.
You will notice a list of groups on the left. When you select one of the groups, its members are shown in
the “Selected” box.
ACCUSQL/ACCUTRACK 2019 REFERENCE MANUAL
113
< Back to Contents >
ADDING A STUDENT GROUP
To add a new group, click on “Add” and enter the group name. Next select the students you want to add
to this group using the Selection List Boxes control. Click the "Save" button to add your entry.
Tip: You can also create a group from an import file using the Import Wizard, via the Reports
screen and/or via the Profile Query screen.
EDITING A STUDENT GROUP
To edit a group record, first highlight the group by clicking on it. If you don't see the group, use the up
and down buttons in the vertical scroll bar to find it. To edit the record, click on the "Edit" button. The
group's description will be copied to the text boxes. Make your changes there and add or remove group
members if needed. Click on the "Save" button to keep the changes, or click on the "Cancel" button to
keep the data as is.
DELETING A STUDENT GROUP
To delete a group, first highlight the group, and then click on "Delete". You will see a confirmation
message. Click “Yes” to delete the group.
SETTING GROUP MEMBERS TO INACTIVE
If you click the Set Group Members to Inactive button, you can set every member of the Student Group to
inactive. Setting to inactive will inactivate the student record for each student in the group. Remember, if
students are set to inactive you will still retain all of their sign in and other data, but they will be unable to
sign into the system.
STUDENT ATHLETES
Purpose: To add and edit Sports for athlete tracking and required hours.
Access: From System Administration, click on Users>>Student Athletes.
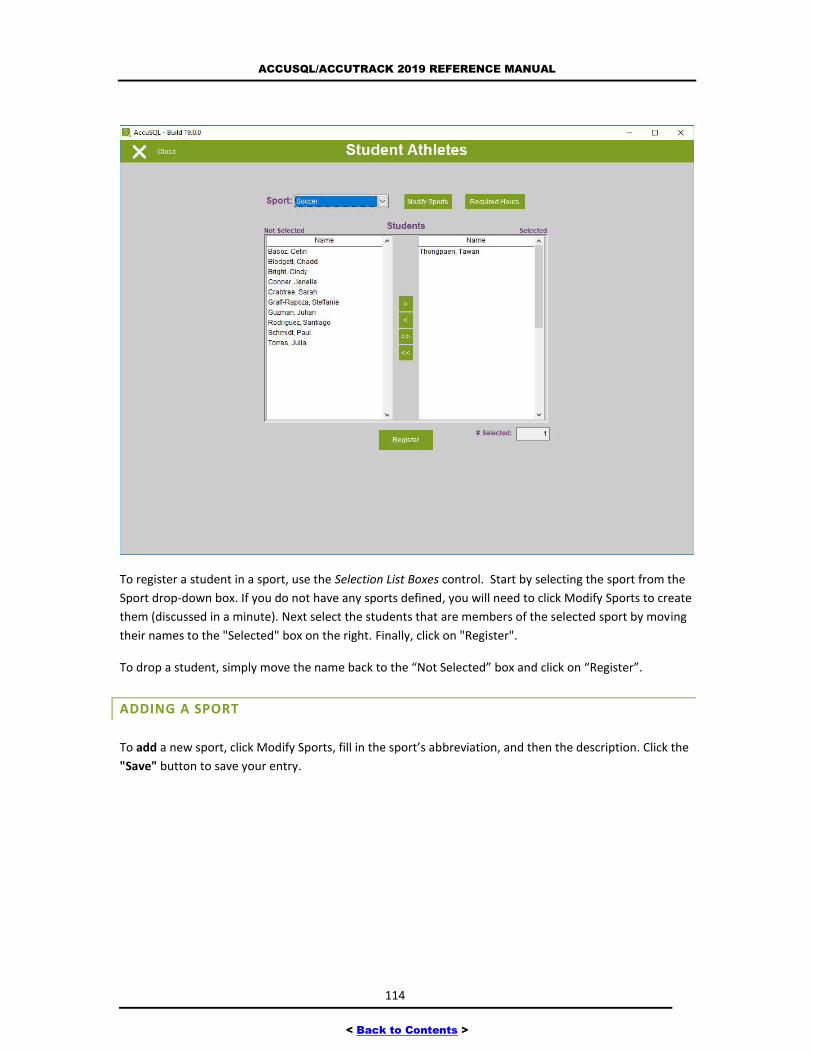
ACCUSQL/ACCUTRACK 2019 REFERENCE MANUAL
114
< Back to Contents >
To register a student in a sport, use the Selection List Boxes control. Start by selecting the sport from the
Sport drop-down box. If you do not have any sports defined, you will need to click Modify Sports to create
them (discussed in a minute). Next select the students that are members of the selected sport by moving
their names to the "Selected" box on the right. Finally, click on "Register".
To drop a student, simply move the name back to the “Not Selected” box and click on “Register”.
ADDING A SPORT
To add a new sport, click Modify Sports, fill in the sport’s abbreviation, and then the description. Click the
"Save" button to save your entry.
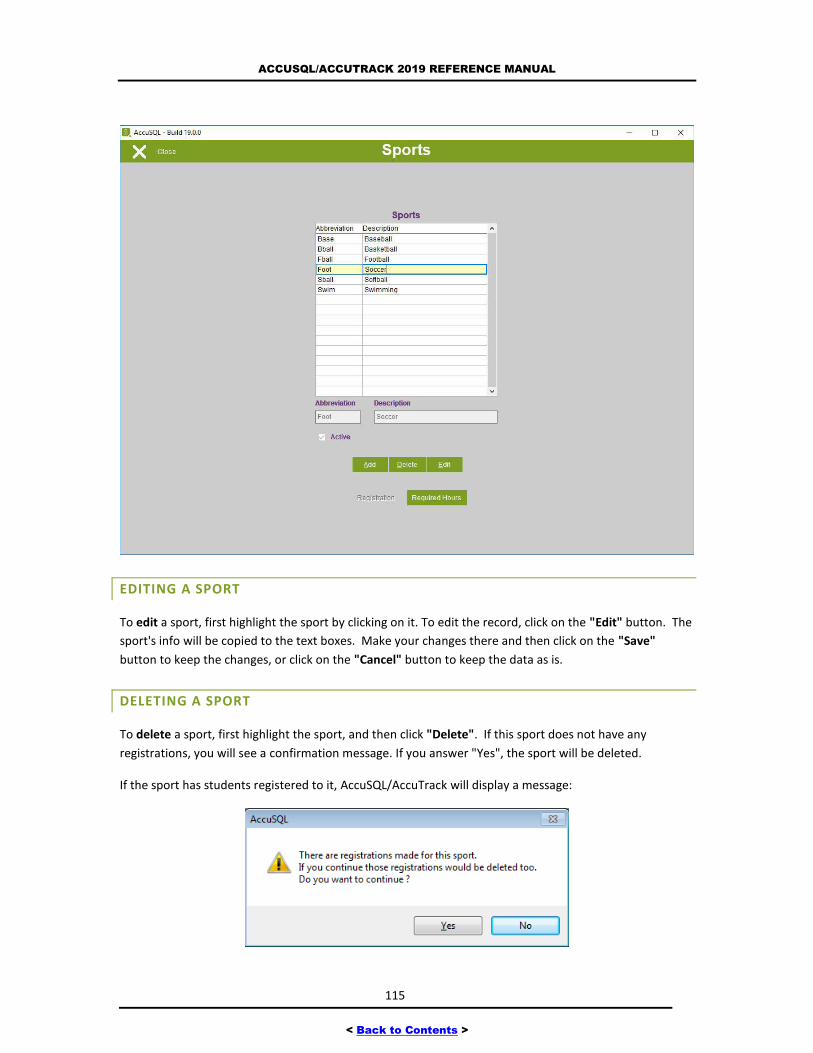
ACCUSQL/ACCUTRACK 2019 REFERENCE MANUAL
115
< Back to Contents >
EDITING A SPORT
To edit a sport, first highlight the sport by clicking on it. To edit the record, click on the "Edit" button. The
sport's info will be copied to the text boxes. Make your changes there and then click on the "Save"
button to keep the changes, or click on the "Cancel" button to keep the data as is.
DELETING A SPORT
To delete a sport, first highlight the sport, and then click "Delete". If this sport does not have any
registrations, you will see a confirmation message. If you answer "Yes", the sport will be deleted.
If the sport has students registered to it, AccuSQL/AccuTrack will display a message:
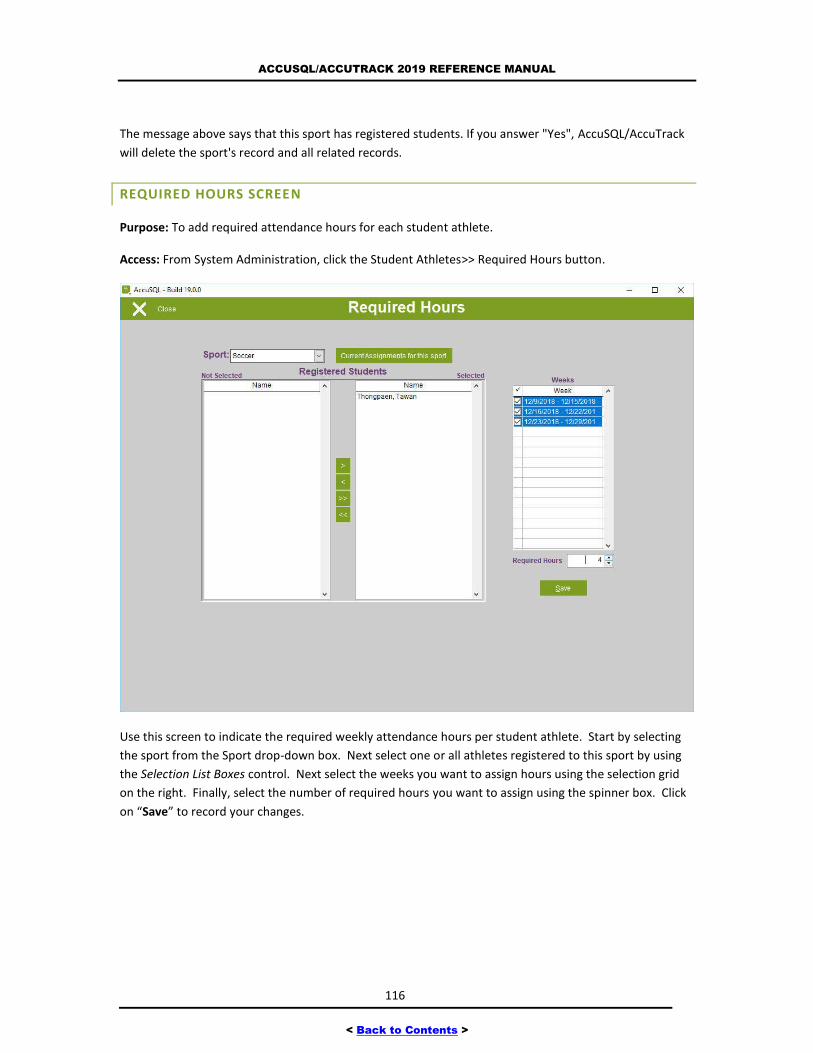
ACCUSQL/ACCUTRACK 2019 REFERENCE MANUAL
116
< Back to Contents >
The message above says that this sport has registered students. If you answer "Yes", AccuSQL/AccuTrack
will delete the sport's record and all related records.
REQUIRED HOURS SCREEN
Purpose: To add required attendance hours for each student athlete.
Access: From System Administration, click the Student Athletes>> Required Hours button.
Use this screen to indicate the required weekly attendance hours per student athlete. Start by selecting
the sport from the Sport drop-down box. Next select one or all athletes registered to this sport by using
the Selection List Boxes control. Next select the weeks you want to assign hours using the selection grid
on the right. Finally, select the number of required hours you want to assign using the spinner box. Click
on “Save” to record your changes.
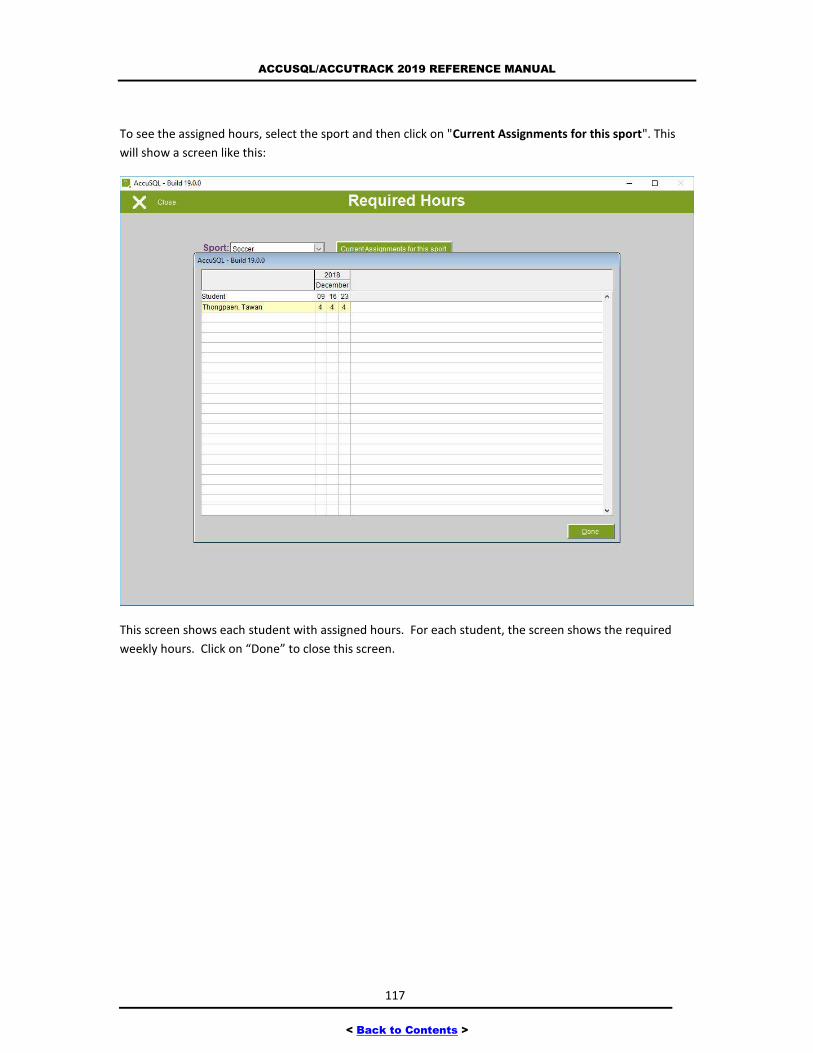
ACCUSQL/ACCUTRACK 2019 REFERENCE MANUAL
117
< Back to Contents >
To see the assigned hours, select the sport and then click on "Current Assignments for this sport". This
will show a screen like this:
This screen shows each student with assigned hours. For each student, the screen shows the required
weekly hours. Click on “Done” to close this screen.
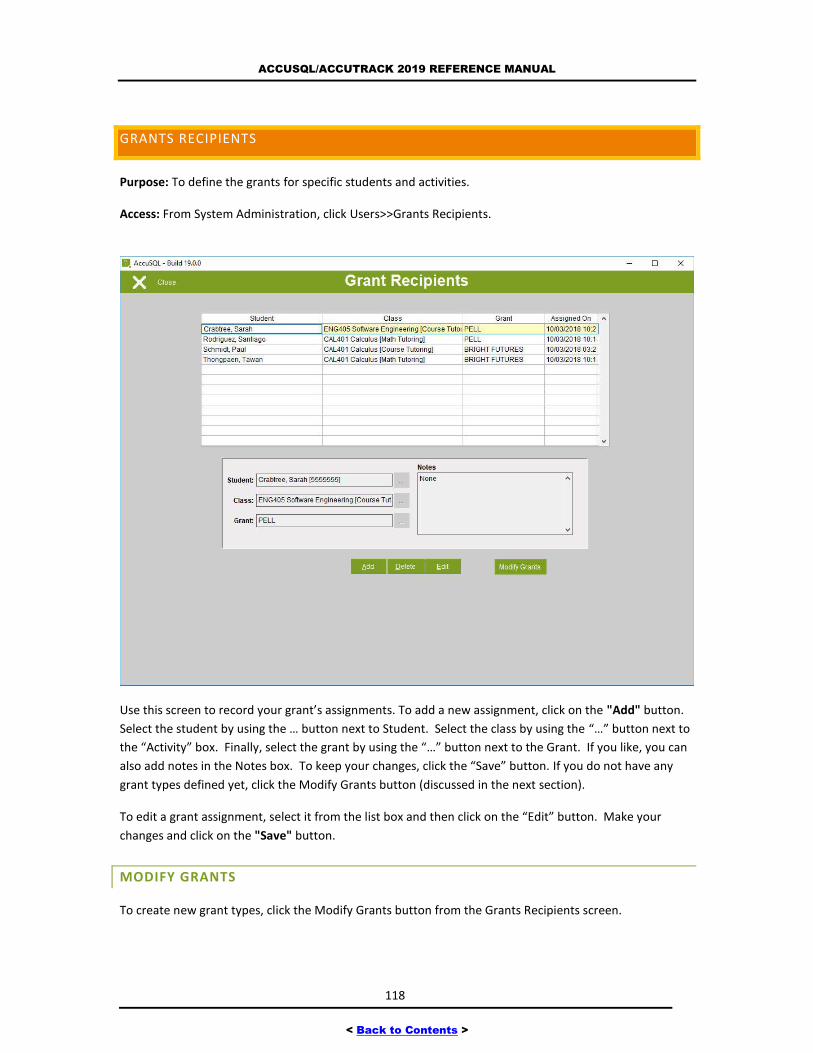
ACCUSQL/ACCUTRACK 2019 REFERENCE MANUAL
118
< Back to Contents >
GRANTS RECIPIENTS
Purpose: To define the grants for specific students and activities.
Access: From System Administration, click Users>>Grants Recipients.
Use this screen to record your grant’s assignments. To add a new assignment, click on the "Add" button.
Select the student by using the … button next to Student. Select the class by using the “…” button next to
the “Activity” box. Finally, select the grant by using the “…” button next to the Grant. If you like, you can
also add notes in the Notes box. To keep your changes, click the “Save” button. If you do not have any
grant types defined yet, click the Modify Grants button (discussed in the next section).
To edit a grant assignment, select it from the list box and then click on the “Edit” button. Make your
changes and click on the "Save" button.
MODIFY GRANTS
To create new grant types, click the Modify Grants button from the Grants Recipients screen.
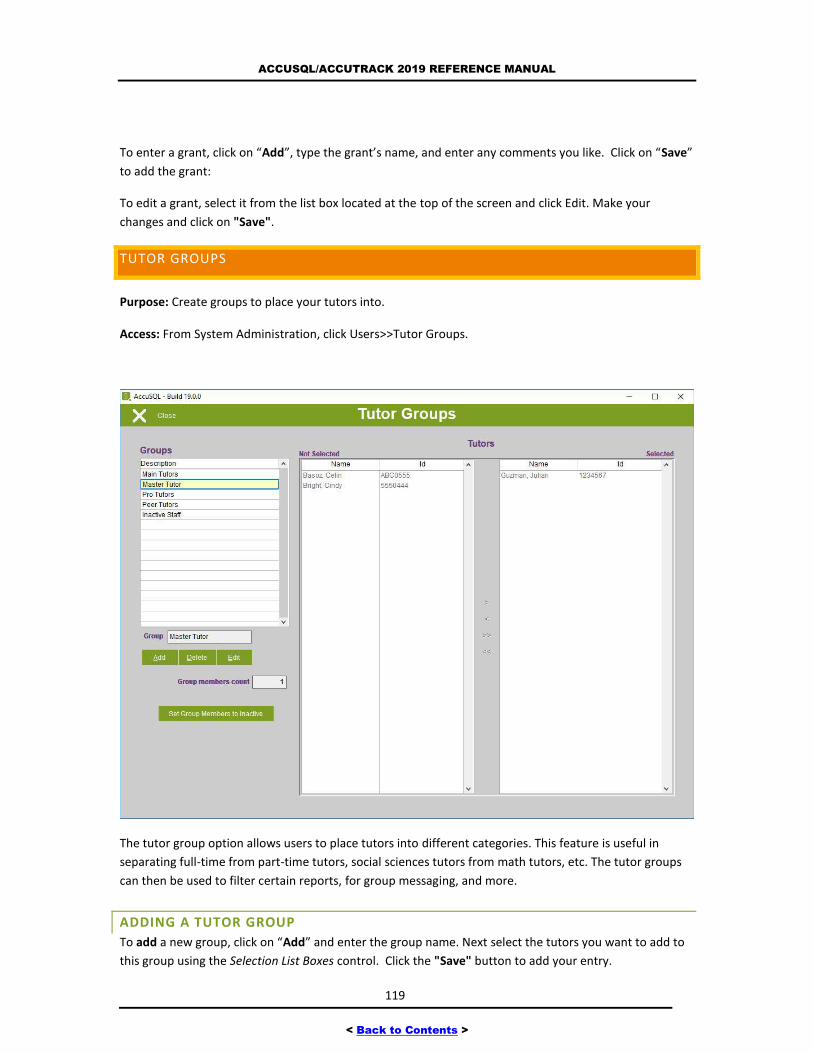
ACCUSQL/ACCUTRACK 2019 REFERENCE MANUAL
119
< Back to Contents >
To enter a grant, click on “Add”, type the grant’s name, and enter any comments you like. Click on “Save”
to add the grant:
To edit a grant, select it from the list box located at the top of the screen and click Edit. Make your
changes and click on "Save".
TUTOR GROUPS
Purpose: Create groups to place your tutors into.
Access: From System Administration, click Users>>Tutor Groups.
The tutor group option allows users to place tutors into different categories. This feature is useful in
separating full-time from part-time tutors, social sciences tutors from math tutors, etc. The tutor groups
can then be used to filter certain reports, for group messaging, and more.
ADDING A TUTOR GROUP
To add a new group, click on “Add” and enter the group name. Next select the tutors you want to add to
this group using the Selection List Boxes control. Click the "Save" button to add your entry.
ACCUSQL/ACCUTRACK 2019 REFERENCE MANUAL
120
< Back to Contents >
Editing a Tutor Group
To edit a group record, first highlight the group by clicking on it. To edit the record, click on the "Edit"
button. The group's description will be copied to the text boxes. Make your changes there and add or
remove group members if needed. Click on the "Save" button to keep the changes, or click on the
"Revert" button to keep the data as is.
DELETING A TUTOR GROUP
To delete a group, first highlight the group, and then click on "Delete". You will see a confirmation
message. Click “Yes” to delete the group.
SETTING GROUP MEMBERS TO INACTIVE
If you click the Set Group Members to Inactive button, you can set every member of the Tutor Group to
inactive. Setting to inactive will inactivate the tutor record for each tutor in the group. Remember, if
tutors are set to inactive you will still retain all of their sign in and other data, but they will be unable to
sign into the system.
Tip: If you have a tutor that is also a student with the same ID number and you inactivate the tutor record,
then they tutor will not be able to sign in as a student or a tutor. You can get around that by editing the
tutor record and changing the ID number perhaps by changing the first digit to an I for inactive. By
changing the tutor ID, it will enable the user to sign into the system in a student capacity as long as their
student record is still active.
USERS SETUP OPTIONS
While you can use the Control Panel option on the right side of the System Administration screen to
access all of the various setup options in the system, there is a better way. First, select an option on the
left menu, then click the Setup option at the bottom right of the System Administration screen to show all
of the Control Panel settings for that option. If you click Users (your terminology may say Students) from
the main System Administration screen, then select Setup, you will be presented with a Control Panel
Options view that shows context specific setup options for the Users screens.
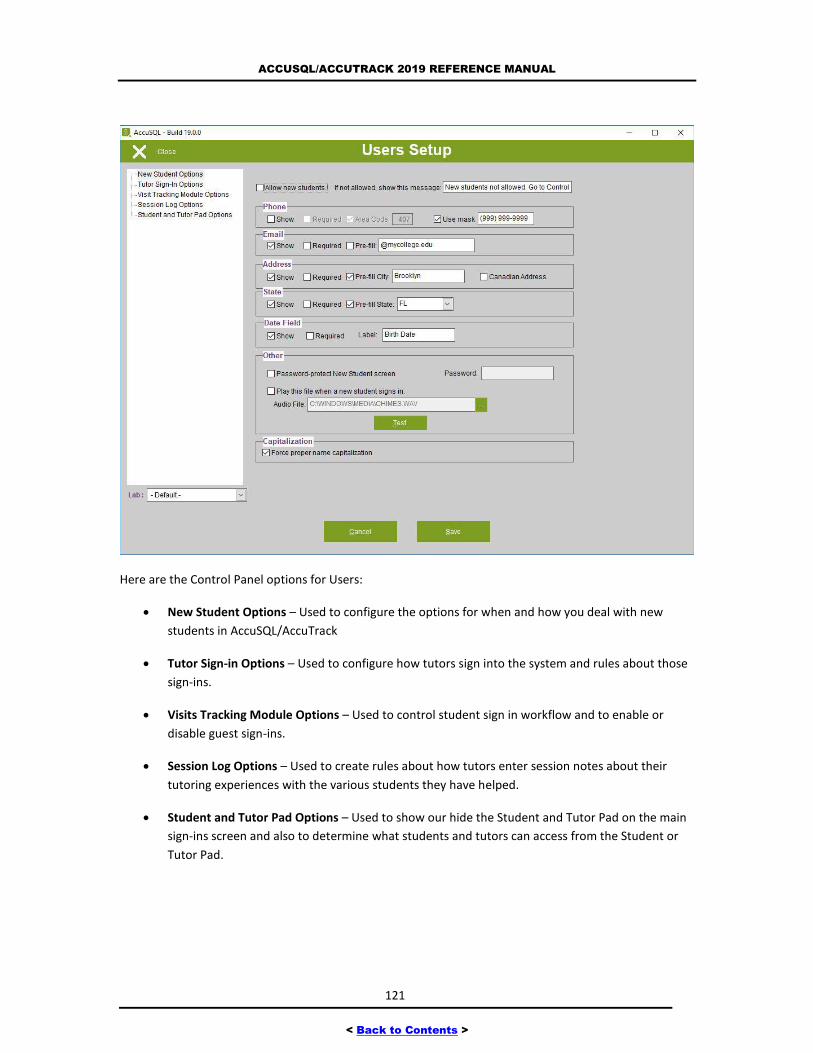
ACCUSQL/ACCUTRACK 2019 REFERENCE MANUAL
121
< Back to Contents >
Here are the Control Panel options for Users:
New Student Options – Used to configure the options for when and how you deal with new
students in AccuSQL/AccuTrack
Tutor Sign-in Options – Used to configure how tutors sign into the system and rules about those
sign-ins.
Visits Tracking Module Options – Used to control student sign in workflow and to enable or
disable guest sign-ins.
Session Log Options – Used to create rules about how tutors enter session notes about their
tutoring experiences with the various students they have helped.
Student and Tutor Pad Options – Used to show our hide the Student and Tutor Pad on the main
sign-ins screen and also to determine what students and tutors can access from the Student or
Tutor Pad.
ACCUSQL/ACCUTRACK 2019 REFERENCE MANUAL
122
< Back to Contents >
NEW STUDENT OPTIONS
To access the New Student Setup options, click Users in System Administration, then the Setup tab. The
New Student Options screen should be selected by default. If not, click on it on the left side of the Options
screen.
Use this screen to configure the New Student screen. Among other things, you can decide whether to
collect contact information, and if so the default values for these entry boxes.
Allow new students: Check this box if you want students who are not already in the AccuSQL/AccuTrack
database to be able to sign in. Whether a student (or any other users for that matter) exists in the system
is determined by checking against their ID. If the ID does not already exist as a student, then students will
be allowed to enter their own information at first sign in if this option is checked. If this option is not
checked, you can enter the message that AccuSQL/AccuTrack will display when a new student tries to sign
in. If you have the capability to import students into the system, then the Allow new students box would
typically be set to unchecked. Note: Importing data is the preferred method to ensure data integrity. Go
the Database >> Import screen and then click the Need help? Click here button to find out all about
imports.
ACCUSQL/ACCUTRACK 2019 REFERENCE MANUAL
123
< Back to Contents >
Phone:
Show: Check to show the phone box. Required: Check if you want to require students to enter their
phone number. Area Code: Enter the default area code here. If you like, you can also change the phone
mask from the default US format. This is useful if you are in a country outside of the U.S. Click the Use
mask box if you want to format the way phone numbers display. Use 9 as a placeholder. Note: If you use a
mask, then if you import student records, do so only as numbers, i.e. 5554443434.
Email:
Show: Check to show the email box. Required: Check if you want to require students to enter their Email
address. Pre-fill: You can put the common college email address extension here (e.g. @yourcollege.edu).
Address:
Show: Check to show the address box. Required: Check if you want to require students to enter their
address. Pre-fill City: Enter a default city. Canadian Address: Check if you want to show Canadian
provinces instead of US states.
State:
Show: Check to show the state drop-down. Required: Check if you want to require students to select a
state. Pre-fill State: Select the default state from the drop-down.
Date Field:
Show: Check to show a date entry box in the New Student screen. Required: Check if you want to require
students to enter a date. Label: Enter the label of the date box (e.g. Birth Date or Grad Date).
Password-protect New Student screen:
Turn this option on if you want to control the addition of new students to the AccuSQL/AccuTrack
database. If this option is on, when a new student signs in, AccuSQL/AccuTrack will display a password
entry box. If the correct password is entered, then the New Student screen will be displayed and the
student will be able to proceed. This feature is useful if you want to approve the addition of new students
after verifying they are eligible for your services. You can have one of your staff members verify the
student and then enter the password to allow the sign-in. If this option is enabled, enter the password
you want to use in the Password text box.
Play this file when a new student signs in:
Use this box if you want AccuSQL/AccuTrack to flag new students by playing a sound file when they first
sign in. Use the Audio File entry box to type the path and name of the audio file. You can also use the
browse “…” button to select the file. To test the audio file, click the Test button.
Note: The sound file must be in wave (.WAV) format. Use this feature to alert you when new
users sign-in. This is useful if you offer first-time users need special assistance or instructions.
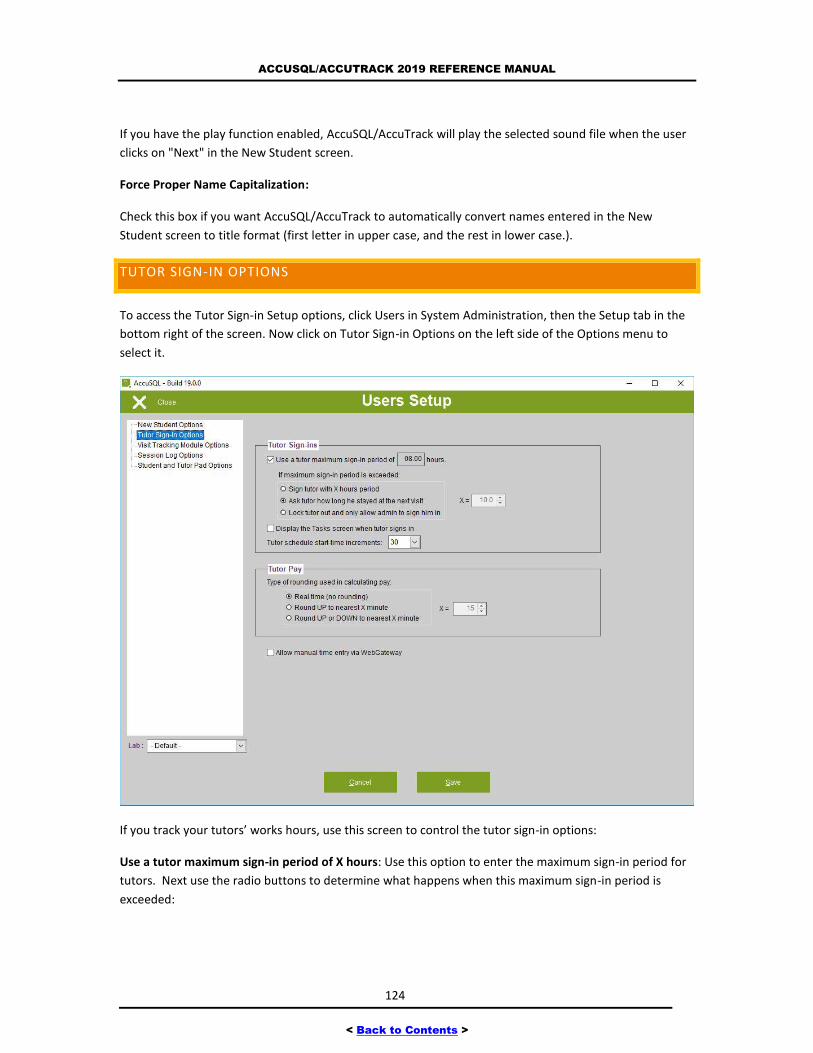
ACCUSQL/ACCUTRACK 2019 REFERENCE MANUAL
124
< Back to Contents >
If you have the play function enabled, AccuSQL/AccuTrack will play the selected sound file when the user
clicks on "Next" in the New Student screen.
Force Proper Name Capitalization:
Check this box if you want AccuSQL/AccuTrack to automatically convert names entered in the New
Student screen to title format (first letter in upper case, and the rest in lower case.).
TUTOR SIGN-IN OPTIONS
To access the Tutor Sign-in Setup options, click Users in System Administration, then the Setup tab in the
bottom right of the screen. Now click on Tutor Sign-in Options on the left side of the Options menu to
select it.
If you track your tutors’ works hours, use this screen to control the tutor sign-in options:
Use a tutor maximum sign-in period of X hours: Use this option to enter the maximum sign-in period for
tutors. Next use the radio buttons to determine what happens when this maximum sign-in period is
exceeded:
ACCUSQL/ACCUTRACK 2019 REFERENCE MANUAL
125
< Back to Contents >
Sign tutor with X hour period: Choose this option if you want tutors who exceed the maximum
sign-in period to get signed out with X sign-in period. Set X to whatever you like using the X=
spinner box.
Ask tutor how long he stayed at the next visit: Choose this option to have AccuSQL/AccuTrack ask
the tutor at the next visit to enter the sign-in period for the previous visit in which the maximum
sign-in period was exceeded.
Lock tutor out and only allow admin to sign him in: Choose this option for maximum control over
the accuracy of the sign-in records. With this option selected, when a tutor exceeds the
maximum sign-in period AccuSQL/AccuTrack will lock the tutor out. To unlock the tutor’s record,
the tutor must be signed out via the System Administration – Edit Sign-in Logs – Tutors – Sign out
screen.
Important: Tutor auto sign outs and numerous other automated tasks in AccuSQL/AccuTrack rely on a
background process called AccuTaskRunner. AccuTaskRunner (or optionally the standalone
AccuTRConsole.exe located in the folder where AccuSQL or AccuTrack is installed) must be running for
these background processes to work. Please see Installing AccuTaskRunner (PDF) for more information.
Display the Tasks screen when tutor sign in: Check this box if you want to track what tutors do with their
work time. If you only want to track the sign-in and sign-out times, uncheck this box.
Note: If you use this option, make sure to enter the staff Tasks via the Tutor Visits Tracking >>
Tasks screen.
Tutor schedule start-time increment: Use the drop-down box to select the increment of the list box used
to enter the tutor’s schedule. For example, if you use “30”, then the tutor’s schedule can start and end at
8:00, 8:30, 9:00, and so on. Tutor schedules, along with tutor activity assignments, are used to determine
when and if a tutor is available to assist a student either through a sign in from the main screen or to via
appointment scheduling.
Tutor Pay rounding: Use this box to determine the rounding rules when calculating the tutor’s pay.
Rounding is applied to each session and not to the accumulated time. Select the first option if you do not
want to do any rounding. Select the second option if you want to round the time up (e.g. if X=15, 47
minutes are counted as one hour for pay purposes). Select the third option if you want to round up or
down to the nearest X minutes (e.g. if X=15, 47 minutes are counted as 45 minutes, while 53 minutes are
counted as 60 minutes).
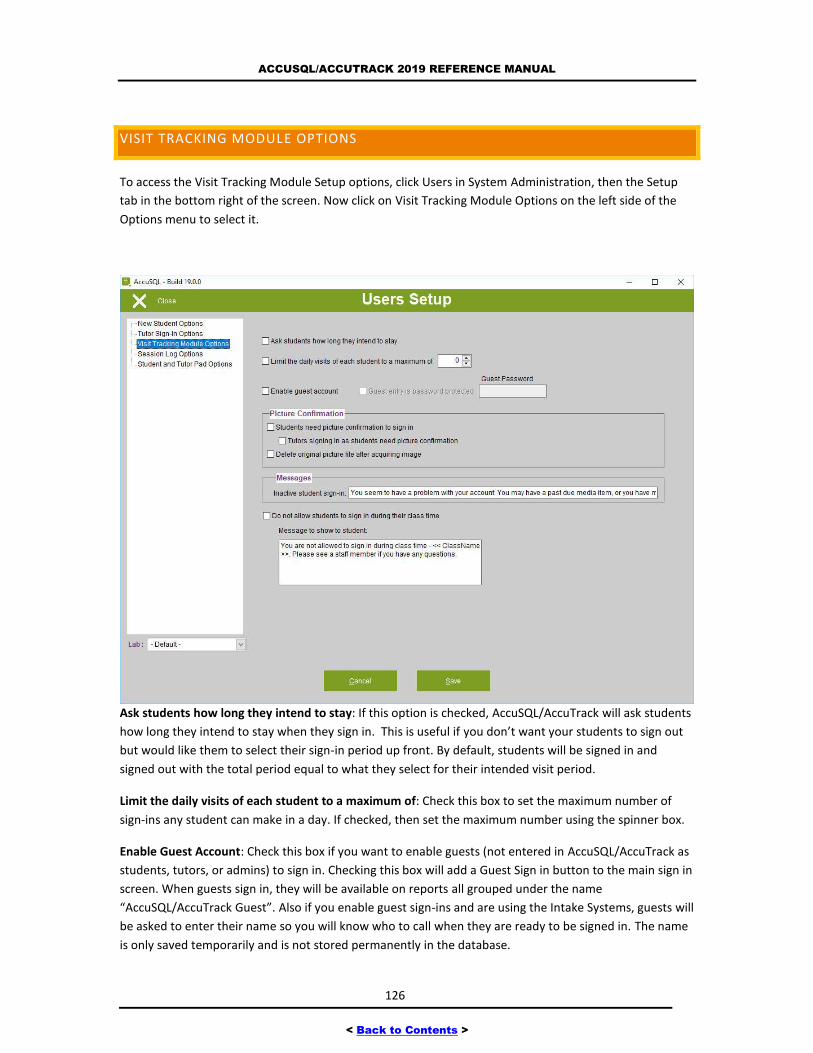
ACCUSQL/ACCUTRACK 2019 REFERENCE MANUAL
126
< Back to Contents >
VISIT TRACKING MODULE OPTIONS
To access the Visit Tracking Module Setup options, click Users in System Administration, then the Setup
tab in the bottom right of the screen. Now click on Visit Tracking Module Options on the left side of the
Options menu to select it.
Ask students how long they intend to stay: If this option is checked, AccuSQL/AccuTrack will ask students
how long they intend to stay when they sign in. This is useful if you don’t want your students to sign out
but would like them to select their sign-in period up front. By default, students will be signed in and
signed out with the total period equal to what they select for their intended visit period.
Limit the daily visits of each student to a maximum of: Check this box to set the maximum number of
sign-ins any student can make in a day. If checked, then set the maximum number using the spinner box.
Enable Guest Account: Check this box if you want to enable guests (not entered in AccuSQL/AccuTrack as
students, tutors, or admins) to sign in. Checking this box will add a Guest Sign in button to the main sign in
screen. When guests sign in, they will be available on reports all grouped under the name
“AccuSQL/AccuTrack Guest”. Also if you enable guest sign-ins and are using the Intake Systems, guests will
be asked to enter their name so you will know who to call when they are ready to be signed in. The name
is only saved temporarily and is not stored permanently in the database.
ACCUSQL/ACCUTRACK 2019 REFERENCE MANUAL
127
< Back to Contents >
Guest Entry is password protected: If you enable guest sign-ins, you can require the guests to enter a
password to access the sign in options. That password is entered here and is case sensitive.
Picture Confirmation Box
Students need picture confirmation to sign in: check this box if you want to display student’s picture at
sign in.
Tutors signing in as students need picture confirmation: check this box if you want to show tutor’s
pictures too when these tutors sign in as students.
Delete original picture file after acquiring image: Check to delete original file after copying it.
Messages:
Inactive student sign-in: type in the message you want to appear when inactive students attempt to sign
in.
Do not allow students to sign in during their class time
If you are using Activity Schedules for your activities (classes) then check this box if you want to disable
the students’ ability to sign in when they are supposed to be in class. The system uses the activity
schedule in conjunction with Sign-in Setup >> Registration to make this determination.
Message to show to student: If you are not allowing sign-ins during scheduled class time, enter the
message you want to display to students when they attempt to sign in when they are supposed to be in
class. Note: <<ClassName>> is a merge field that will show the class the student is supposed to be in when
they attempt the sign in.
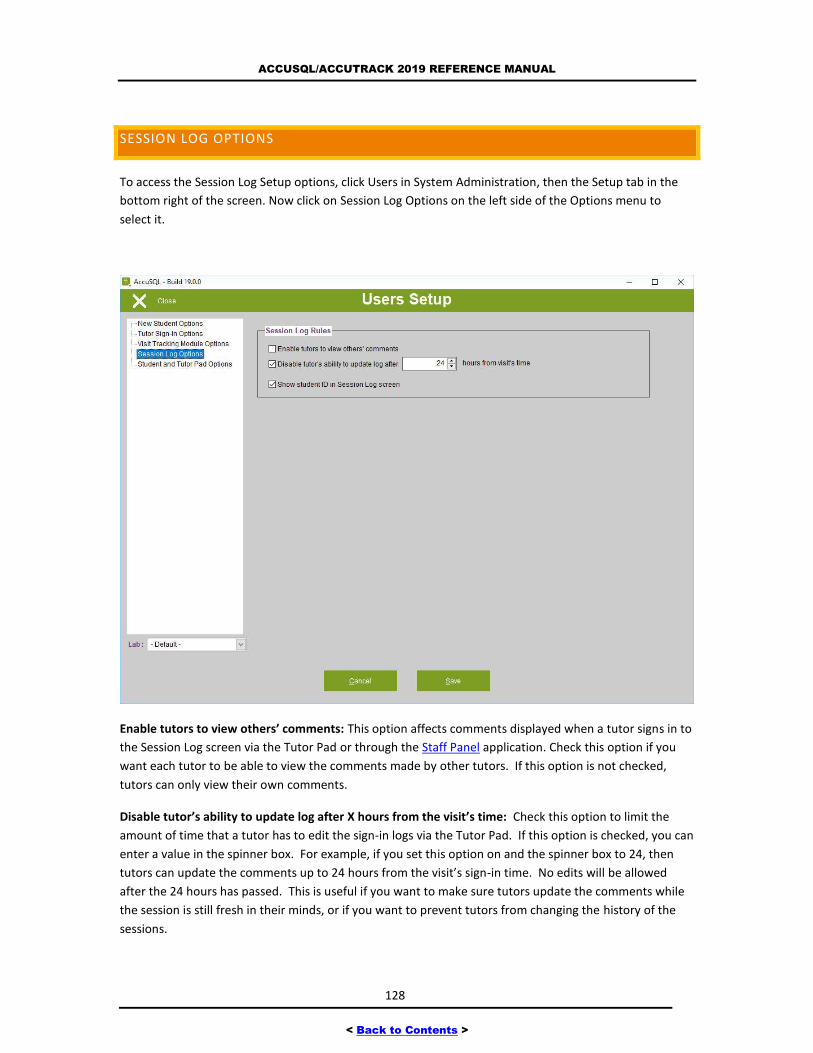
ACCUSQL/ACCUTRACK 2019 REFERENCE MANUAL
128
< Back to Contents >
SESSION LOG OPTIONS
To access the Session Log Setup options, click Users in System Administration, then the Setup tab in the
bottom right of the screen. Now click on Session Log Options on the left side of the Options menu to
select it.
Enable tutors to view others’ comments: This option affects comments displayed when a tutor signs in to
the Session Log screen via the Tutor Pad or through the Staff Panel application. Check this option if you
want each tutor to be able to view the comments made by other tutors. If this option is not checked,
tutors can only view their own comments.
Disable tutor’s ability to update log after X hours from the visit’s time: Check this option to limit the
amount of time that a tutor has to edit the sign-in logs via the Tutor Pad. If this option is checked, you can
enter a value in the spinner box. For example, if you set this option on and the spinner box to 24, then
tutors can update the comments up to 24 hours from the visit’s sign-in time. No edits will be allowed
after the 24 hours has passed. This is useful if you want to make sure tutors update the comments while
the session is still fresh in their minds, or if you want to prevent tutors from changing the history of the
sessions.
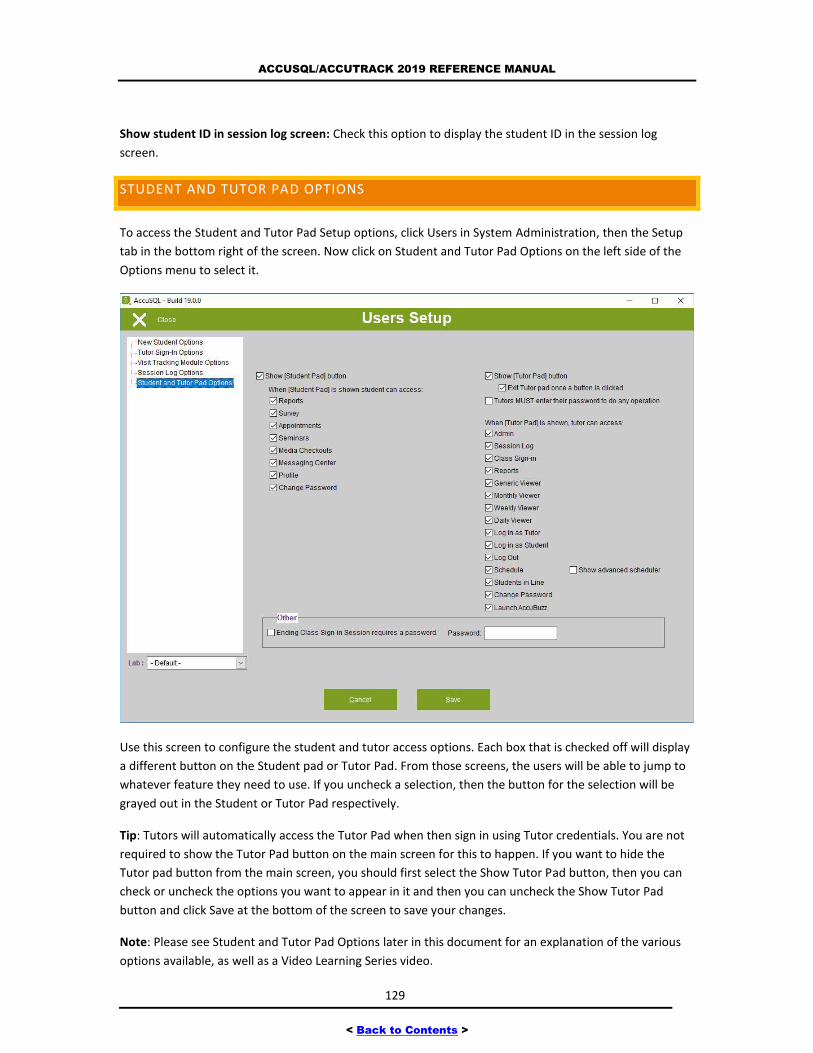
ACCUSQL/ACCUTRACK 2019 REFERENCE MANUAL
129
< Back to Contents >
Show student ID in session log screen: Check this option to display the student ID in the session log
screen.
STUDENT AND TUTOR PAD OPTIONS
To access the Student and Tutor Pad Setup options, click Users in System Administration, then the Setup
tab in the bottom right of the screen. Now click on Student and Tutor Pad Options on the left side of the
Options menu to select it.
Use this screen to configure the student and tutor access options. Each box that is checked off will display
a different button on the Student pad or Tutor Pad. From those screens, the users will be able to jump to
whatever feature they need to use. If you uncheck a selection, then the button for the selection will be
grayed out in the Student or Tutor Pad respectively.
Tip: Tutors will automatically access the Tutor Pad when then sign in using Tutor credentials. You are not
required to show the Tutor Pad button on the main screen for this to happen. If you want to hide the
Tutor pad button from the main screen, you should first select the Show Tutor Pad button, then you can
check or uncheck the options you want to appear in it and then you can uncheck the Show Tutor Pad
button and click Save at the bottom of the screen to save your changes.
Note: Please see Student and Tutor Pad Options later in this document for an explanation of the various
options available, as well as a Video Learning Series video.

ACCUSQL/ACCUTRACK 2019 REFERENCE MANUAL
130
< Back to Contents >
Ending a Class Sign-in Session requires a password. If you check this box, then the tutor will be required to
enter a password to end a sign in for a class. This is helpful to prevent students who are signing into the
class from inadvertently ending the class sign-in prematurely. BUBBA
SIGN-IN SETUP
When you click on Sign-in Setup from the Main Menu, you will see the following options:
1. Categories & Activities: Use to set the activities (or courses) that are available for students to
select at sign-in.
2. Registration: Use to manually register students for classes. Typically this information is entered
via a data import.
3. Service Type: Use to add or edit Services. You can present the Services to students at sign-in in
the Services selection box.
4. Course Coverage: Use to check the tutors that are assigned schedules for the various
appointment scheduling blocks.
5. Schedule Builder: Use to review the schedules that have submitted by your tutors, edit the
submissions as necessary, save the schedules, save them as the default schedule and to email
tutors with their approved schedules.
6. Tutor Availability: Use to create available or preferred time for tutor schedules which at then
reviewed and approved in the Schedule Builder screen. Admins can use this screen to manually
assign schedules per tutor, and tutor can access this screen from the Tutor Pad where they can
modify inly their schedules.
The following sections have more information on the above screens.
CATEGORIES & ACTIVITIES SCREEN
Purpose: To add new activities or modify current student activities.
Access: From System Administration, click on Sign-in Setup then on Categories & Activities.
Activities represent what students do at your center. If you have a tutoring center, the activities are the
tutored classes. If you have an advising center, the activities are the advising services you offer. When
students sign in, AccuSQL/AccuTrack will display a list of activities and ask the student to select the one
they are using. Collecting this data makes it possible for AccuSQL/AccuTrack to report on the usage of
your services. See other parts of this manual for sample Activity reports.
AccuSQL/AccuTrack gives you the flexibility to define and enter activities as appropriate for your center.
Related activities are grouped together under “Categories”. Each category consists of at least one
activity. You can have as many categories and activities as you like. However, you should make the
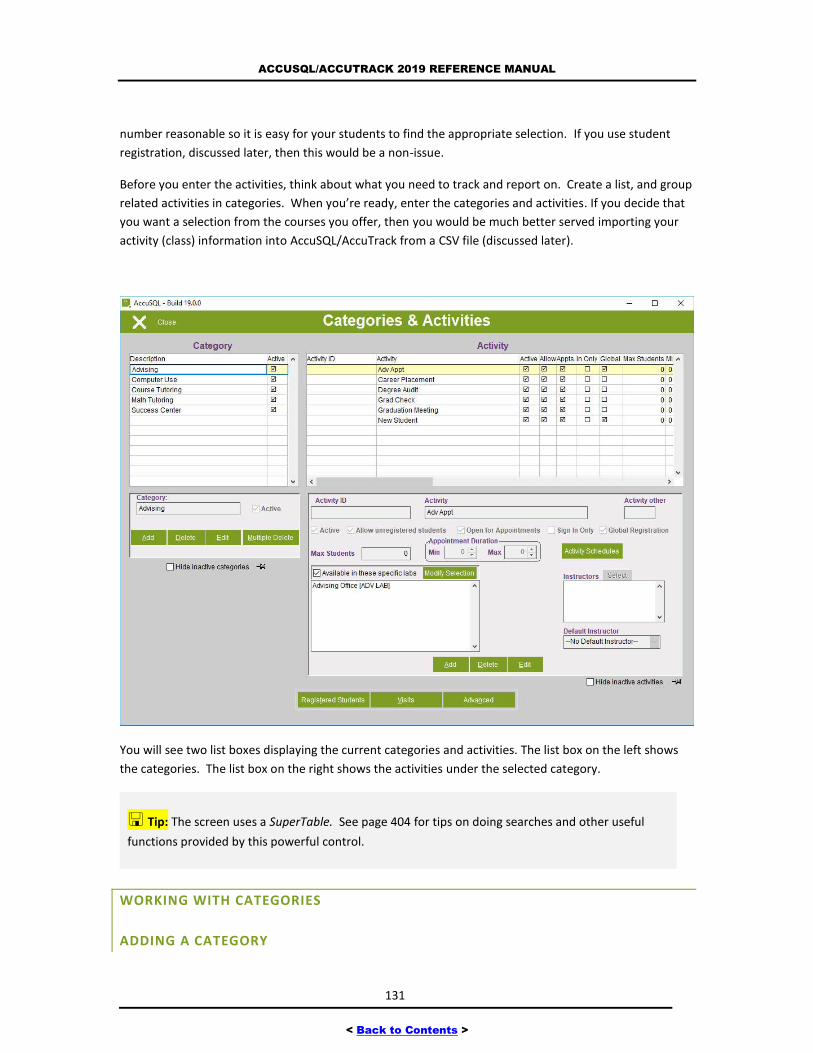
ACCUSQL/ACCUTRACK 2019 REFERENCE MANUAL
131
< Back to Contents >
number reasonable so it is easy for your students to find the appropriate selection. If you use student
registration, discussed later, then this would be a non-issue.
Before you enter the activities, think about what you need to track and report on. Create a list, and group
related activities in categories. When you’re ready, enter the categories and activities. If you decide that
you want a selection from the courses you offer, then you would be much better served importing your
activity (class) information into AccuSQL/AccuTrack from a CSV file (discussed later).
You will see two list boxes displaying the current categories and activities. The list box on the left shows
the categories. The list box on the right shows the activities under the selected category.
Tip: The screen uses a SuperTable. See page 404 for tips on doing searches and other useful
functions provided by this powerful control.
WORKING WITH CATEGORIES
ADDING A CATEGORY
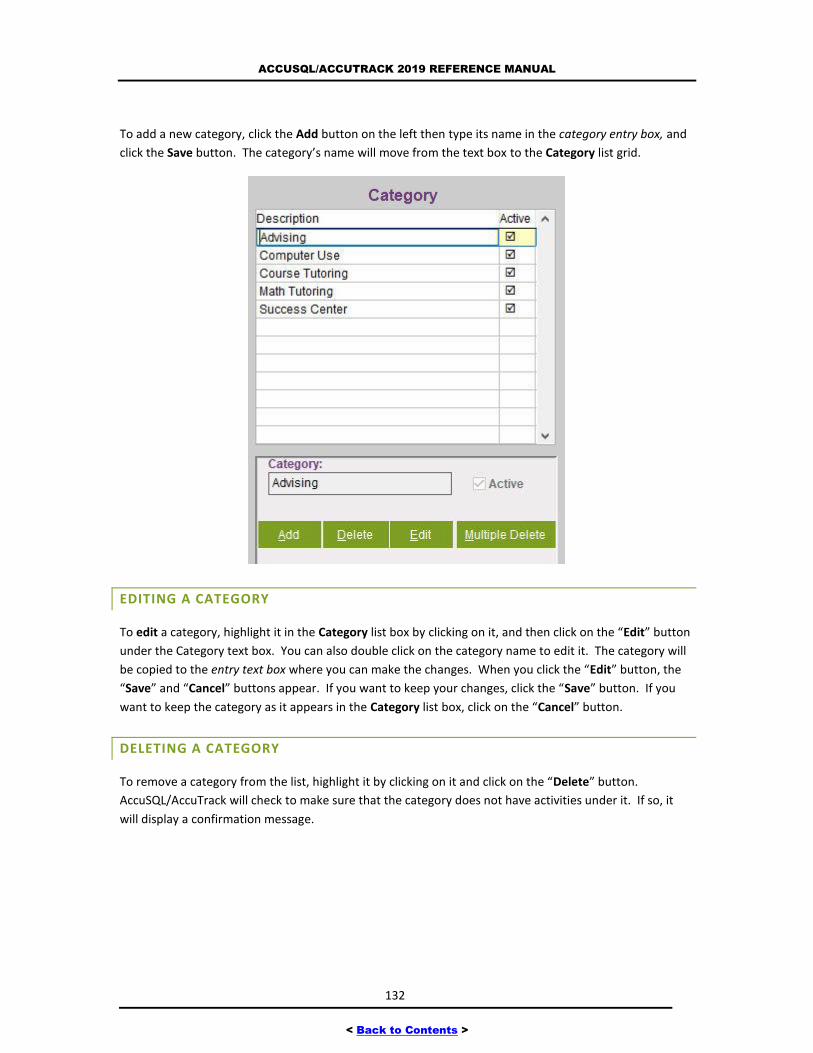
ACCUSQL/ACCUTRACK 2019 REFERENCE MANUAL
132
< Back to Contents >
To add a new category, click the Add button on the left then type its name in the category entry box, and
click the Save button. The category’s name will move from the text box to the Category list grid.
EDITING A CATEGORY
To edit a category, highlight it in the Category list box by clicking on it, and then click on the “Edit” button
under the Category text box. You can also double click on the category name to edit it. The category will
be copied to the entry text box where you can make the changes. When you click the “Edit” button, the
“Save” and “Cancel” buttons appear. If you want to keep your changes, click the “Save” button. If you
want to keep the category as it appears in the Category list box, click on the “Cancel” button.
DELETING A CATEGORY
To remove a category from the list, highlight it by clicking on it and click on the “Delete” button.
AccuSQL/AccuTrack will check to make sure that the category does not have activities under it. If so, it
will display a confirmation message.
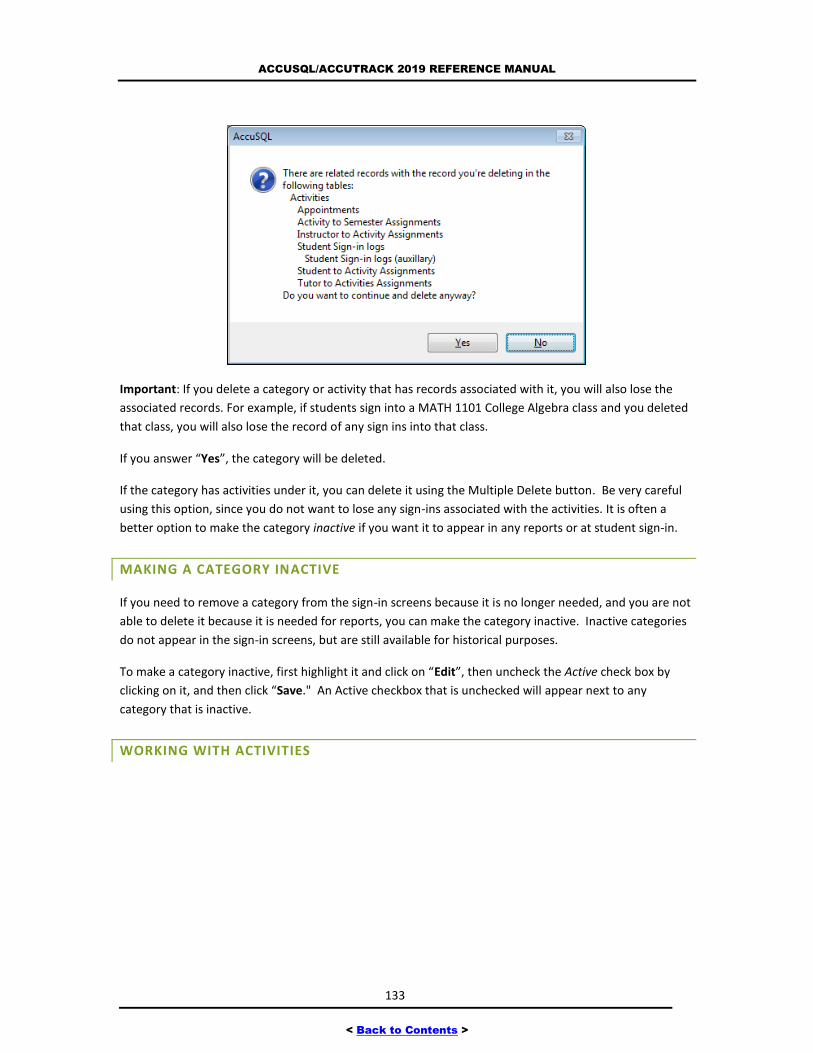
ACCUSQL/ACCUTRACK 2019 REFERENCE MANUAL
133
< Back to Contents >
Important: If you delete a category or activity that has records associated with it, you will also lose the
associated records. For example, if students sign into a MATH 1101 College Algebra class and you deleted
that class, you will also lose the record of any sign ins into that class.
If you answer “Yes”, the category will be deleted.
If the category has activities under it, you can delete it using the Multiple Delete button. Be very careful
using this option, since you do not want to lose any sign-ins associated with the activities. It is often a
better option to make the category inactive if you want it to appear in any reports or at student sign-in.
MAKING A CATEGORY INACTIVE
If you need to remove a category from the sign-in screens because it is no longer needed, and you are not
able to delete it because it is needed for reports, you can make the category inactive. Inactive categories
do not appear in the sign-in screens, but are still available for historical purposes.
To make a category inactive, first highlight it and click on “Edit”, then uncheck the Active check box by
clicking on it, and then click “Save." An Active checkbox that is unchecked will appear next to any
category that is inactive.
WORKING WITH ACTIVITIES
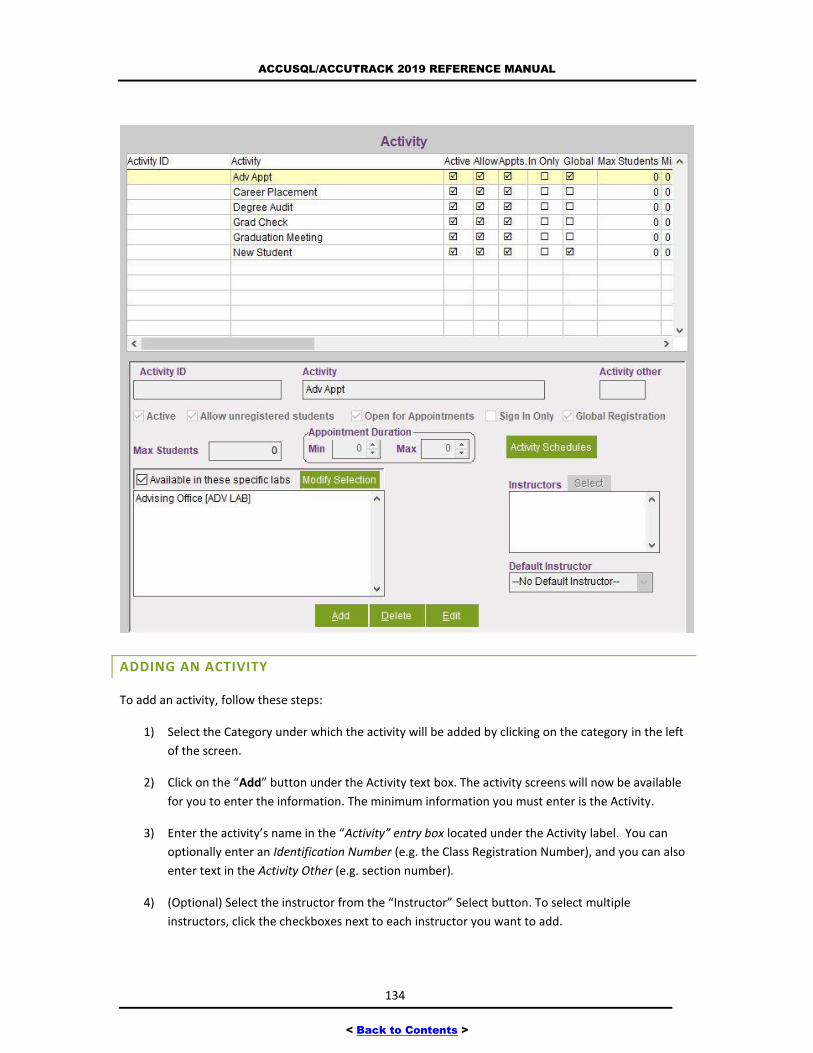
ACCUSQL/ACCUTRACK 2019 REFERENCE MANUAL
134
< Back to Contents >
ADDING AN ACTIVITY
To add an activity, follow these steps:
1) Select the Category under which the activity will be added by clicking on the category in the left
of the screen.
2) Click on the “Add” button under the Activity text box. The activity screens will now be available
for you to enter the information. The minimum information you must enter is the Activity.
3) Enter the activity’s name in the “Activity” entry box located under the Activity label. You can
optionally enter an Identification Number (e.g. the Class Registration Number), and you can also
enter text in the Activity Other (e.g. section number).
4) (Optional) Select the instructor from the “Instructor” Select button. To select multiple
instructors, click the checkboxes next to each instructor you want to add.
ACCUSQL/ACCUTRACK 2019 REFERENCE MANUAL
135
< Back to Contents >
5) (Optional) If this activity is only offered at a certain lab, select the Available in these specific labs
checkbox and then click the Modify Selection button to select in which other labs you offer this
activity. You may associate each activity to multiple labs, if necessary. If you are not using the
Local Labs feature, leave the lab empty. Tip: You can make multiple activities available in a Local
Lab in the System >> Lab IDs screen, discussed later in this document.
6) If you do not want new students to sign in to this activity, clear the “Allow unregistered students”
check box.
7) If you want this activity to appear in the appointments screen, make sure the “Open for
Appointments” check box is checked.
8) If you want people to only sign in to this activity without having to sign out, check the “Sign in
Only” check box.
9) If you want this activity to be available for all students to select at sign-in regardless of whether
they are registered for that activity or not, make sure the “Global Registration” box ix checked. If
you have “only show registered activities checked in the Sign-in Setup >> Setup >> Activity Screen
Options screen, then students will see the classes (activities) they are registered for and also any
activities set to Global Registration.
10) You can assign this activity to one or more labs by checking the “Available in these specific labs”
checkbox and then clicking Select labs button to select the lab(s) where is should be available.
Local labs are discussed later in this document.
Tip: The items available in the instructor’s selection box are set up in the Instructors screen.
Activities and their instructors are also importable.
EDITING AN ACTIVITY
To edit an activity, highlight it in the Activity list box by clicking on it, and then click on the “Edit” button
under the Activity List box. You can also double click on the activity’s name to edit it. The activity will be
copied to the Activity entry box where you can make the changes. If you want to keep your changes, click
the “Save” button. If you want to keep the activity as it appears in the list box, click on the “Cancel”
button.
DELETING AN ACTIVITY
If you enter an activity by mistake, and wish to remove it from the list, highlight it by clicking on it and
click on the “Delete” button under the activity list box. AccuSQL/AccuTrack will check to see whether
anyone signed in to this activity. If so, it will show this message:
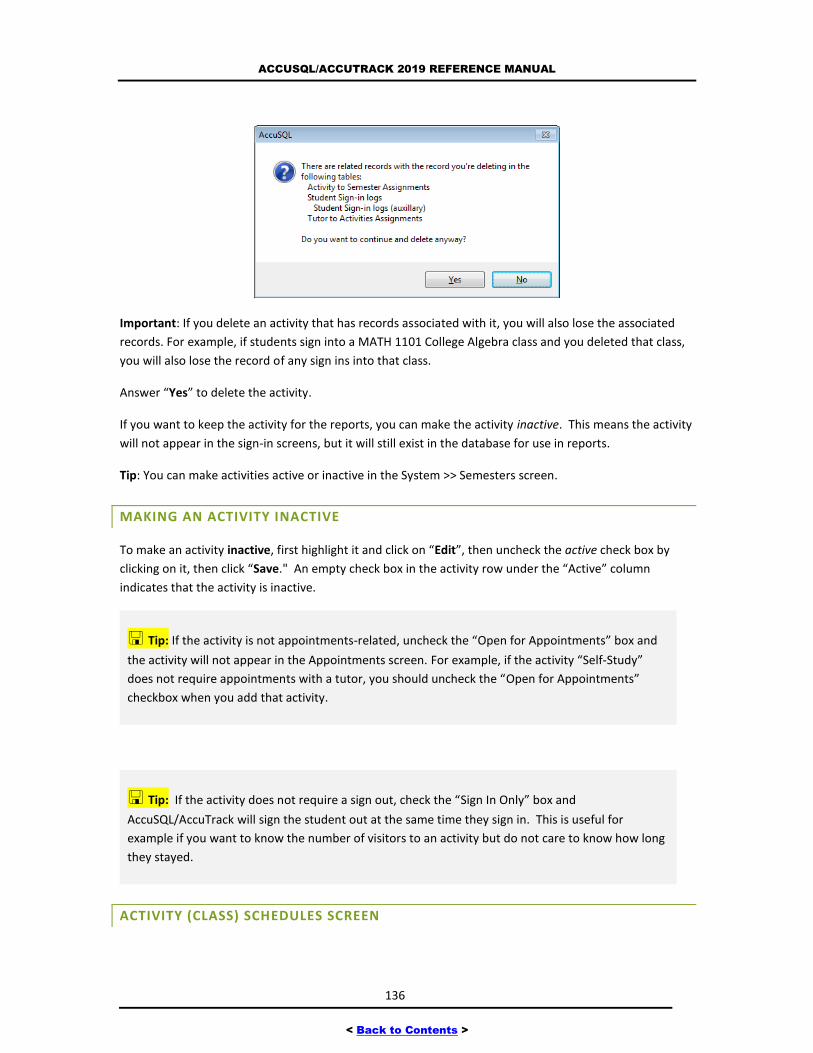
ACCUSQL/ACCUTRACK 2019 REFERENCE MANUAL
136
< Back to Contents >
Important: If you delete an activity that has records associated with it, you will also lose the associated
records. For example, if students sign into a MATH 1101 College Algebra class and you deleted that class,
you will also lose the record of any sign ins into that class.
Answer “Yes” to delete the activity.
If you want to keep the activity for the reports, you can make the activity inactive. This means the activity
will not appear in the sign-in screens, but it will still exist in the database for use in reports.
Tip: You can make activities active or inactive in the System >> Semesters screen.
MAKING AN ACTIVITY INACTIVE
To make an activity inactive, first highlight it and click on “Edit”, then uncheck the active check box by
clicking on it, then click “Save." An empty check box in the activity row under the “Active” column
indicates that the activity is inactive.
Tip: If the activity is not appointments-related, uncheck the “Open for Appointments” box and
the activity will not appear in the Appointments screen. For example, if the activity “Self-Study”
does not require appointments with a tutor, you should uncheck the “Open for Appointments”
checkbox when you add that activity.
Tip: If the activity does not require a sign out, check the “Sign In Only” box and
AccuSQL/AccuTrack will sign the student out at the same time they sign in. This is useful for
example if you want to know the number of visitors to an activity but do not care to know how long
they stayed.
ACTIVITY (CLASS) SCHEDULES SCREEN
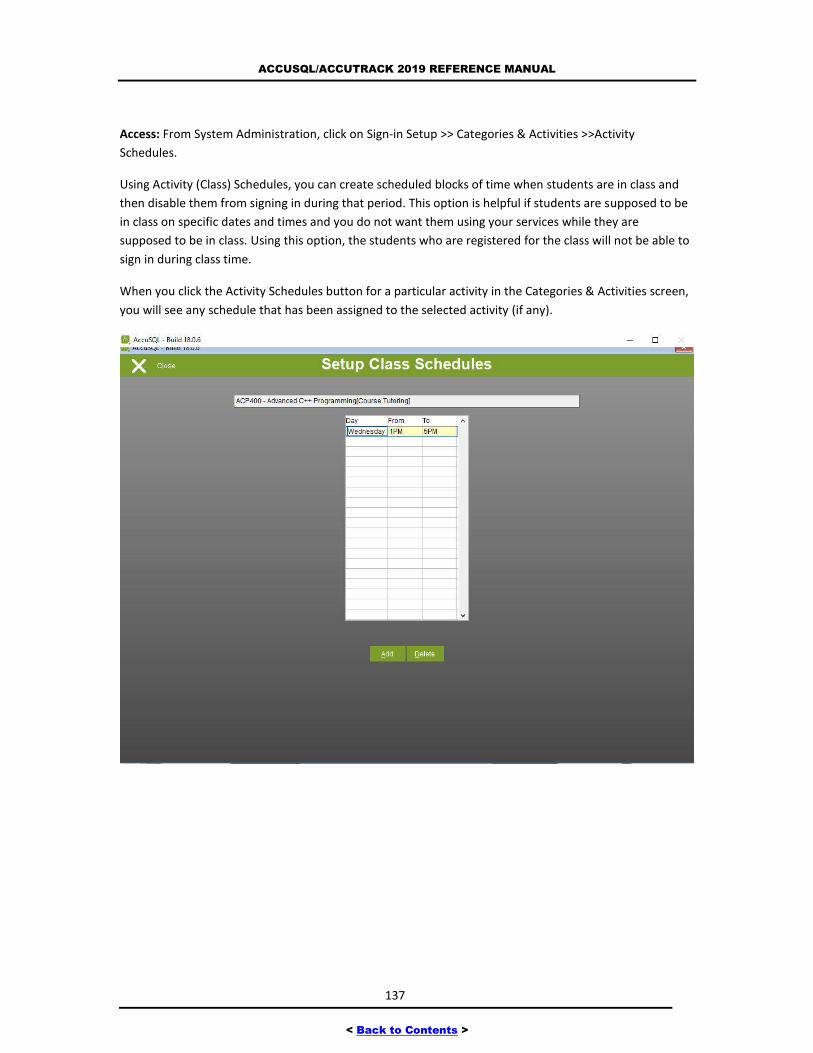
ACCUSQL/ACCUTRACK 2019 REFERENCE MANUAL
137
< Back to Contents >
Access: From System Administration, click on Sign-in Setup >> Categories & Activities >>Activity
Schedules.
Using Activity (Class) Schedules, you can create scheduled blocks of time when students are in class and
then disable them from signing in during that period. This option is helpful if students are supposed to be
in class on specific dates and times and you do not want them using your services while they are
supposed to be in class. Using this option, the students who are registered for the class will not be able to
sign in during class time.
When you click the Activity Schedules button for a particular activity in the Categories & Activities screen,
you will see any schedule that has been assigned to the selected activity (if any).
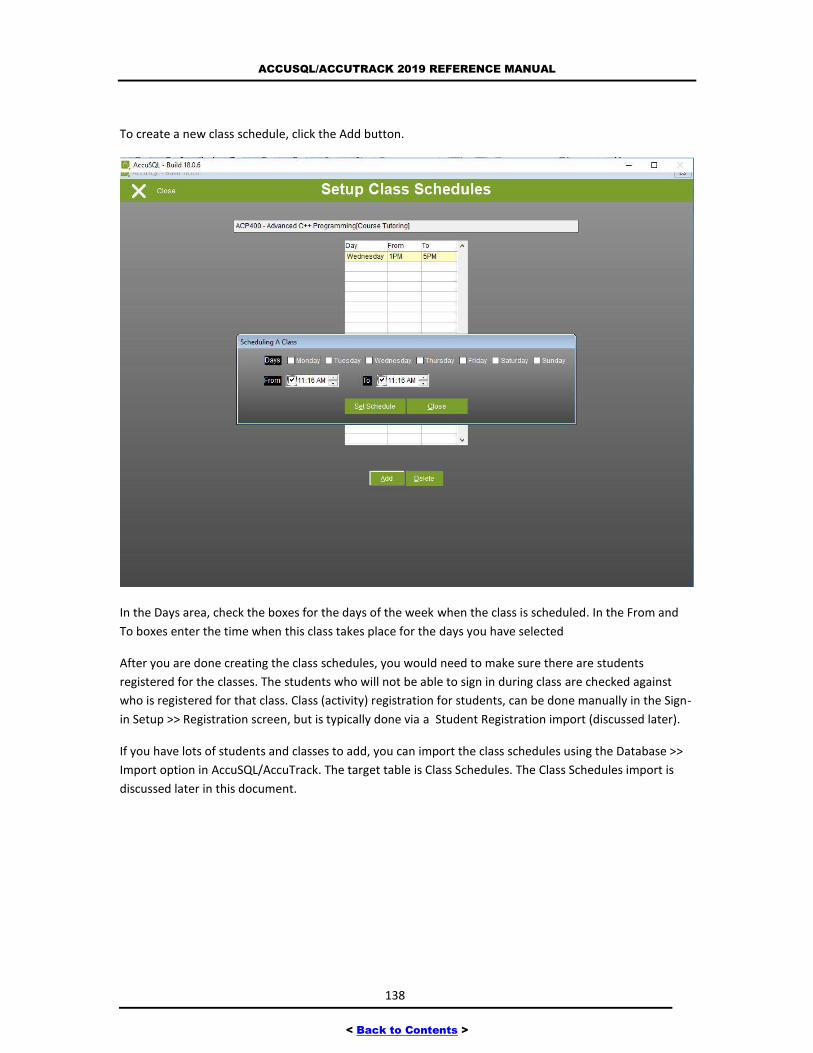
ACCUSQL/ACCUTRACK 2019 REFERENCE MANUAL
138
< Back to Contents >
To create a new class schedule, click the Add button.
In the Days area, check the boxes for the days of the week when the class is scheduled. In the From and
To boxes enter the time when this class takes place for the days you have selected
After you are done creating the class schedules, you would need to make sure there are students
registered for the classes. The students who will not be able to sign in during class are checked against
who is registered for that class. Class (activity) registration for students, can be done manually in the Sign-
in Setup >> Registration screen, but is typically done via a Student Registration import (discussed later).
If you have lots of students and classes to add, you can import the class schedules using the Database >>
Import option in AccuSQL/AccuTrack. The target table is Class Schedules. The Class Schedules import is
discussed later in this document.
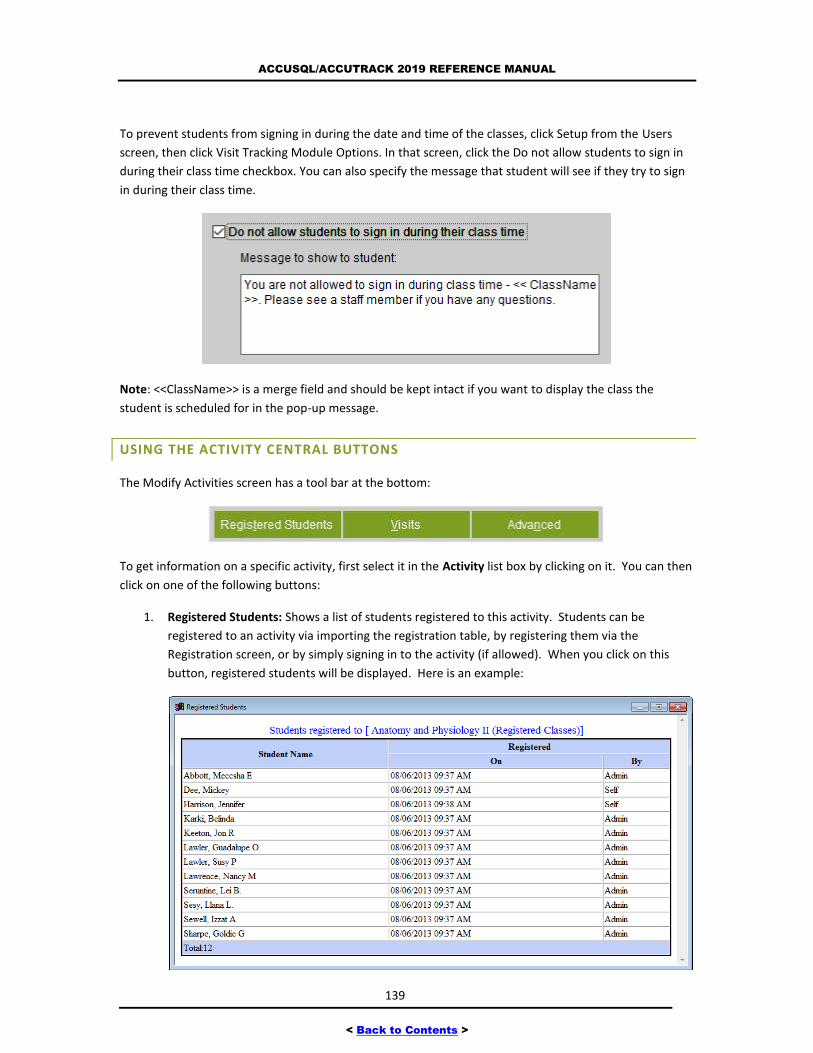
ACCUSQL/ACCUTRACK 2019 REFERENCE MANUAL
139
< Back to Contents >
To prevent students from signing in during the date and time of the classes, click Setup from the Users
screen, then click Visit Tracking Module Options. In that screen, click the Do not allow students to sign in
during their class time checkbox. You can also specify the message that student will see if they try to sign
in during their class time.
Note: <<ClassName>> is a merge field and should be kept intact if you want to display the class the
student is scheduled for in the pop-up message.
USING THE ACTIVITY CENTRAL BUTTONS
The Modify Activities screen has a tool bar at the bottom:
To get information on a specific activity, first select it in the Activity list box by clicking on it. You can then
click on one of the following buttons:
1. Registered Students: Shows a list of students registered to this activity. Students can be
registered to an activity via importing the registration table, by registering them via the
Registration screen, or by simply signing in to the activity (if allowed). When you click on this
button, registered students will be displayed. Here is an example:
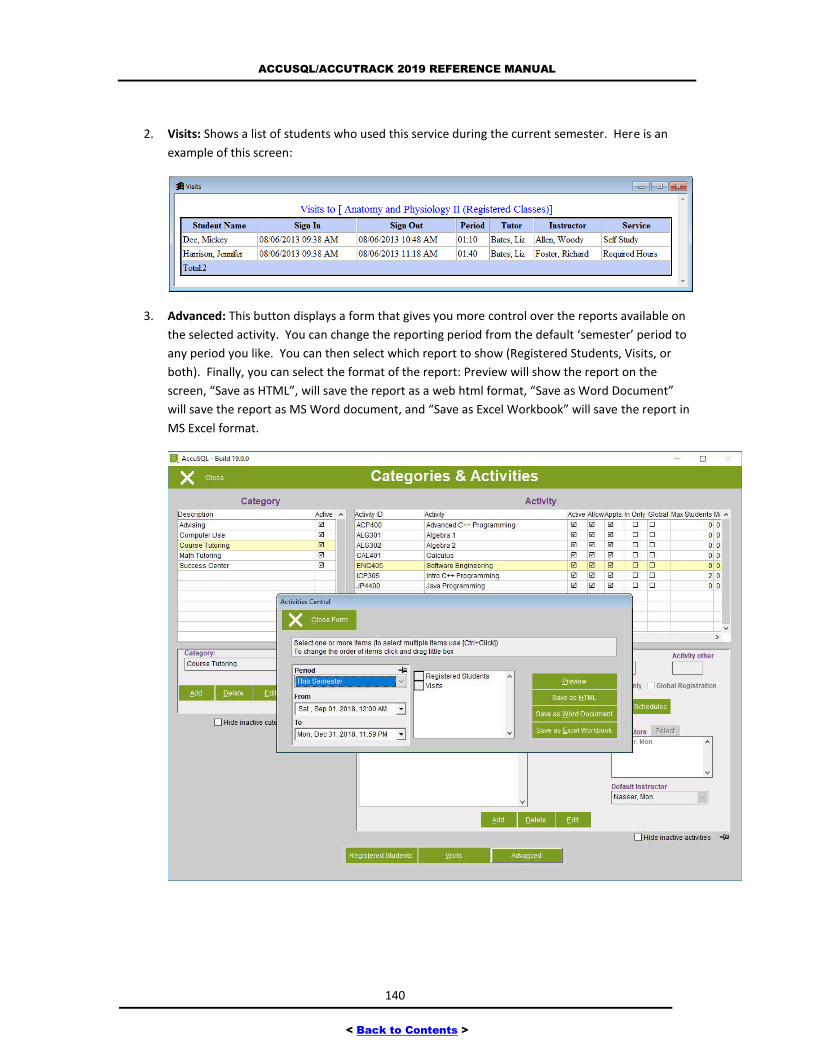
ACCUSQL/ACCUTRACK 2019 REFERENCE MANUAL
140
< Back to Contents >
2. Visits: Shows a list of students who used this service during the current semester. Here is an
example of this screen:
3. Advanced: This button displays a form that gives you more control over the reports available on
the selected activity. You can change the reporting period from the default ‘semester’ period to
any period you like. You can then select which report to show (Registered Students, Visits, or
both). Finally, you can select the format of the report: Preview will show the report on the
screen, “Save as HTML”, will save the report as a web html format, “Save as Word Document”
will save the report as MS Word document, and “Save as Excel Workbook” will save the report in
MS Excel format.
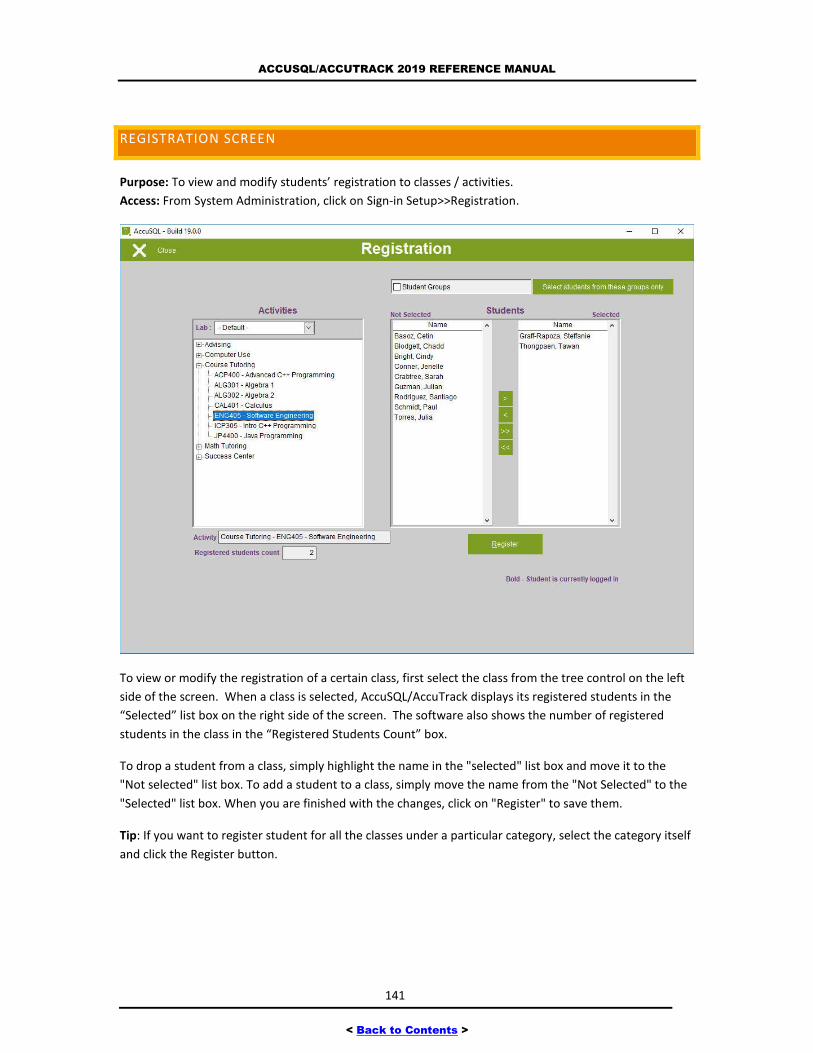
ACCUSQL/ACCUTRACK 2019 REFERENCE MANUAL
141
< Back to Contents >
REGISTRATION SCREEN
Purpose: To view and modify students’ registration to classes / activities.
Access: From System Administration, click on Sign-in Setup>>Registration.
To view or modify the registration of a certain class, first select the class from the tree control on the left
side of the screen. When a class is selected, AccuSQL/AccuTrack displays its registered students in the
“Selected” list box on the right side of the screen. The software also shows the number of registered
students in the class in the “Registered Students Count” box.
To drop a student from a class, simply highlight the name in the "selected" list box and move it to the
"Not selected" list box. To add a student to a class, simply move the name from the "Not Selected" to the
"Selected" list box. When you are finished with the changes, click on "Register" to save them.
Tip: If you want to register student for all the classes under a particular category, select the category itself
and click the Register button.
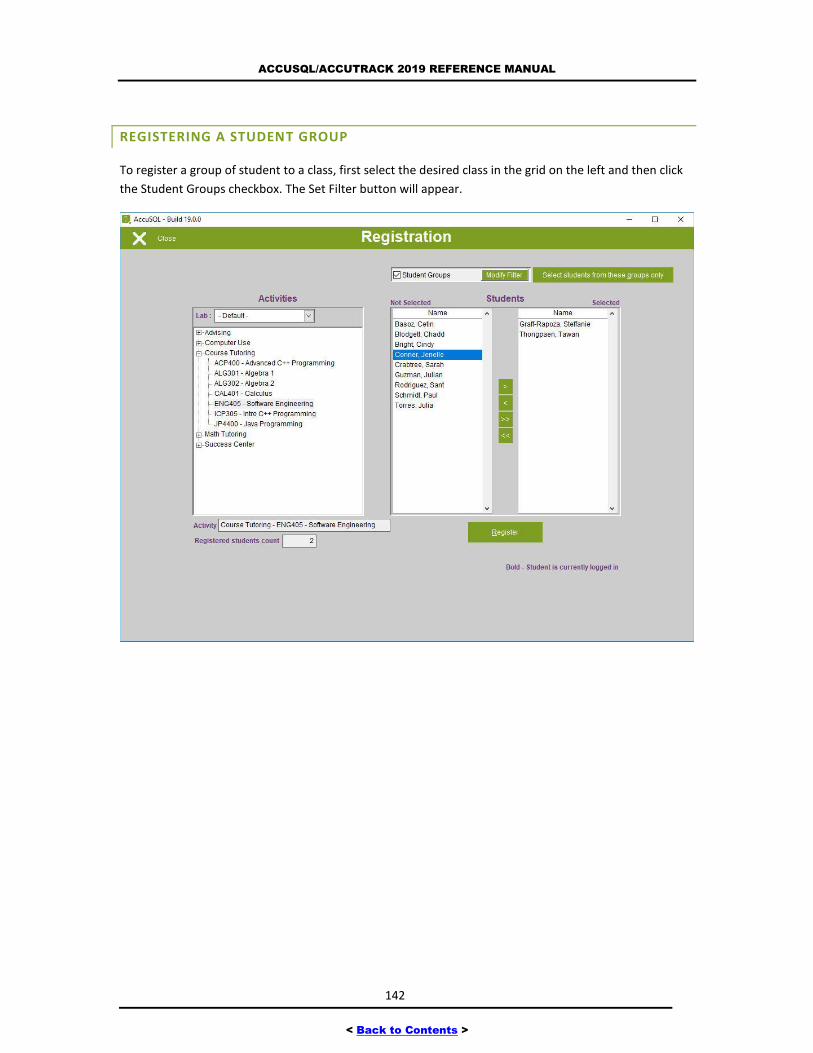
ACCUSQL/ACCUTRACK 2019 REFERENCE MANUAL
142
< Back to Contents >
REGISTERING A STUDENT GROUP
To register a group of student to a class, first select the desired class in the grid on the left and then click
the Student Groups checkbox. The Set Filter button will appear.
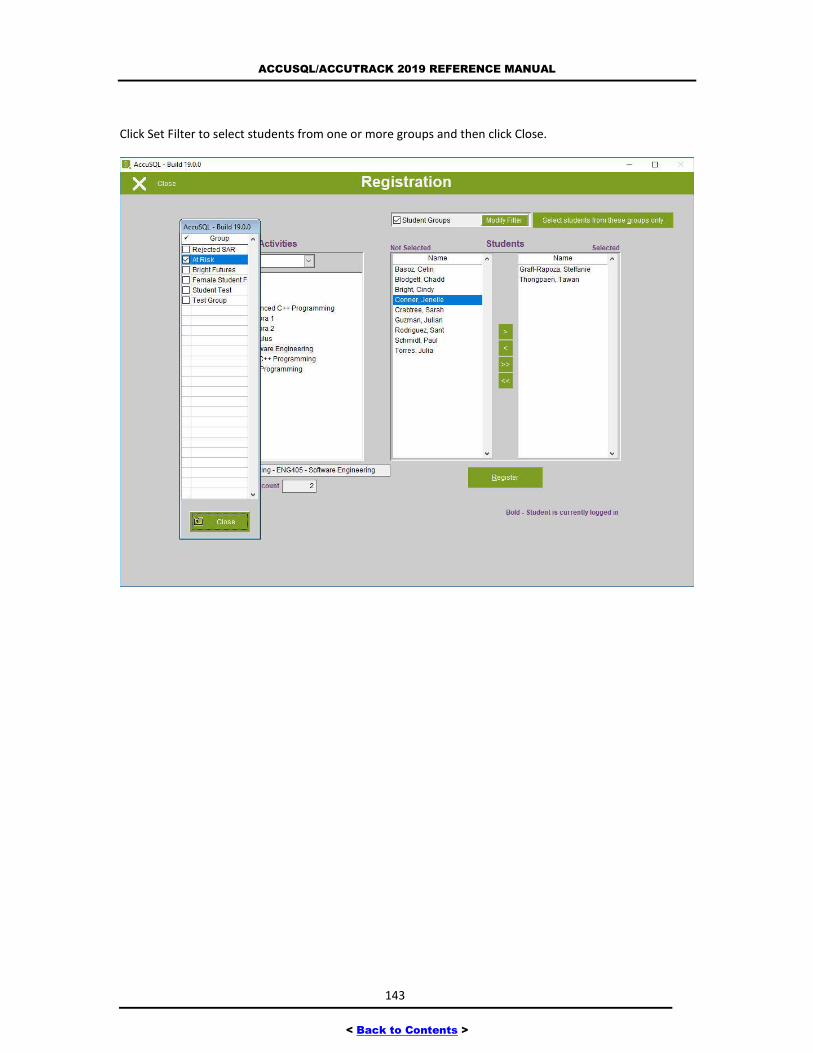
ACCUSQL/ACCUTRACK 2019 REFERENCE MANUAL
143
< Back to Contents >
Click Set Filter to select students from one or more groups and then click Close.
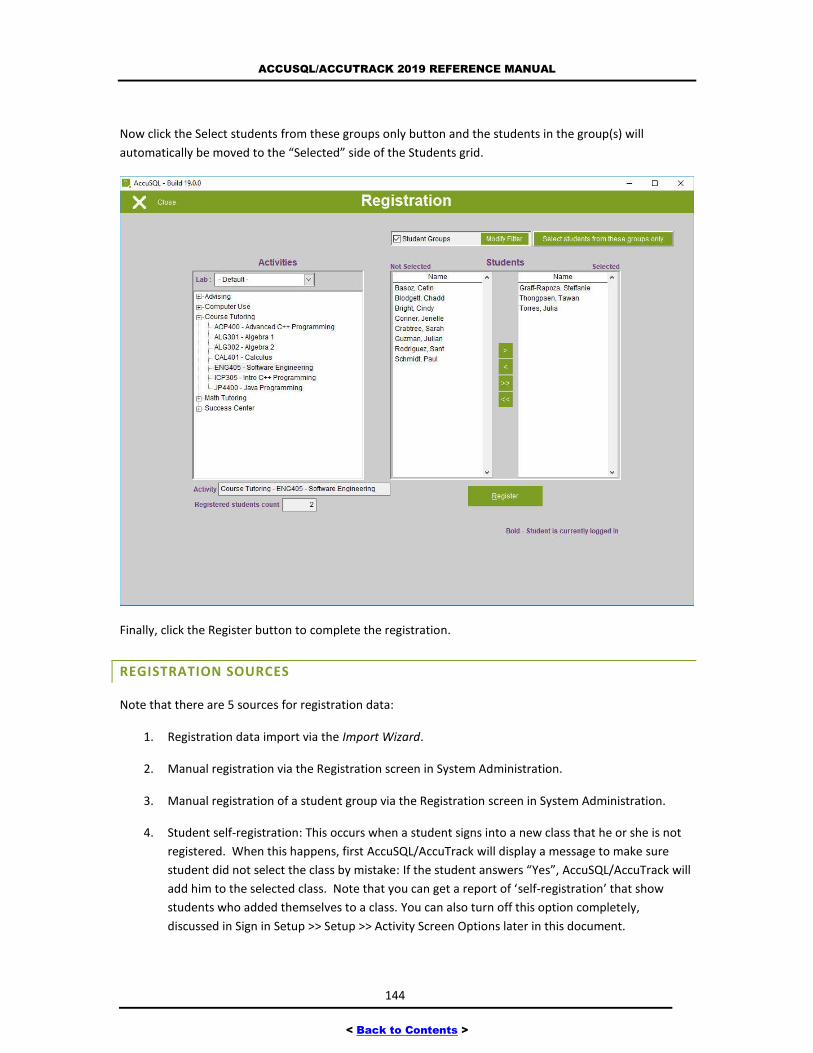
ACCUSQL/ACCUTRACK 2019 REFERENCE MANUAL
144
< Back to Contents >
Now click the Select students from these groups only button and the students in the group(s) will
automatically be moved to the “Selected” side of the Students grid.
Finally, click the Register button to complete the registration.
REGISTRATION SOURCES
Note that there are 5 sources for registration data:
1. Registration data import via the Import Wizard.
2. Manual registration via the Registration screen in System Administration.
3. Manual registration of a student group via the Registration screen in System Administration.
4. Student self-registration: This occurs when a student signs into a new class that he or she is not
registered. When this happens, first AccuSQL/AccuTrack will display a message to make sure
student did not select the class by mistake: If the student answers “Yes”, AccuSQL/AccuTrack will
add him to the selected class. Note that you can get a report of ‘self-registration’ that show
students who added themselves to a class. You can also turn off this option completely,
discussed in Sign in Setup >> Setup >> Activity Screen Options later in this document.
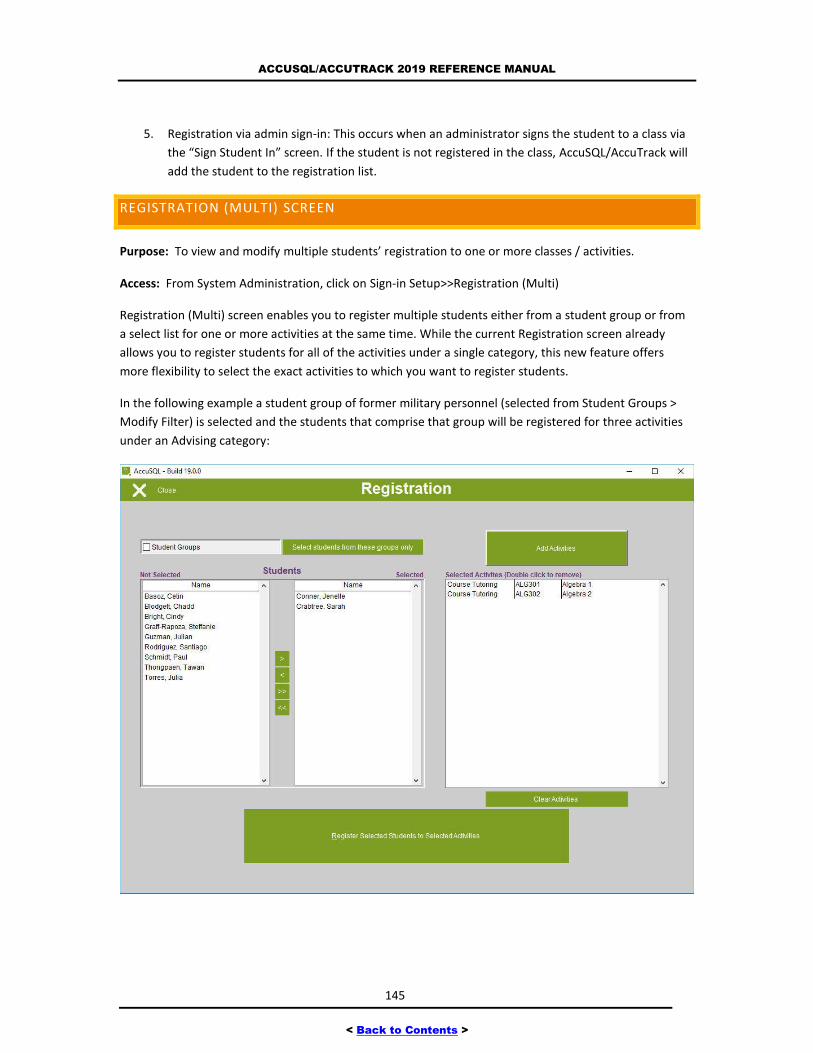
ACCUSQL/ACCUTRACK 2019 REFERENCE MANUAL
145
< Back to Contents >
5. Registration via admin sign-in: This occurs when an administrator signs the student to a class via
the “Sign Student In” screen. If the student is not registered in the class, AccuSQL/AccuTrack will
add the student to the registration list.
REGISTRATION (MULTI) SCREEN
Purpose: To view and modify multiple students’ registration to one or more classes / activities.
Access: From System Administration, click on Sign-in Setup>>Registration (Multi)
Registration (Multi) screen enables you to register multiple students either from a student group or from
a select list for one or more activities at the same time. While the current Registration screen already
allows you to register students for all of the activities under a single category, this new feature offers
more flexibility to select the exact activities to which you want to register students.
In the following example a student group of former military personnel (selected from Student Groups >
Modify Filter) is selected and the students that comprise that group will be registered for three activities
under an Advising category:
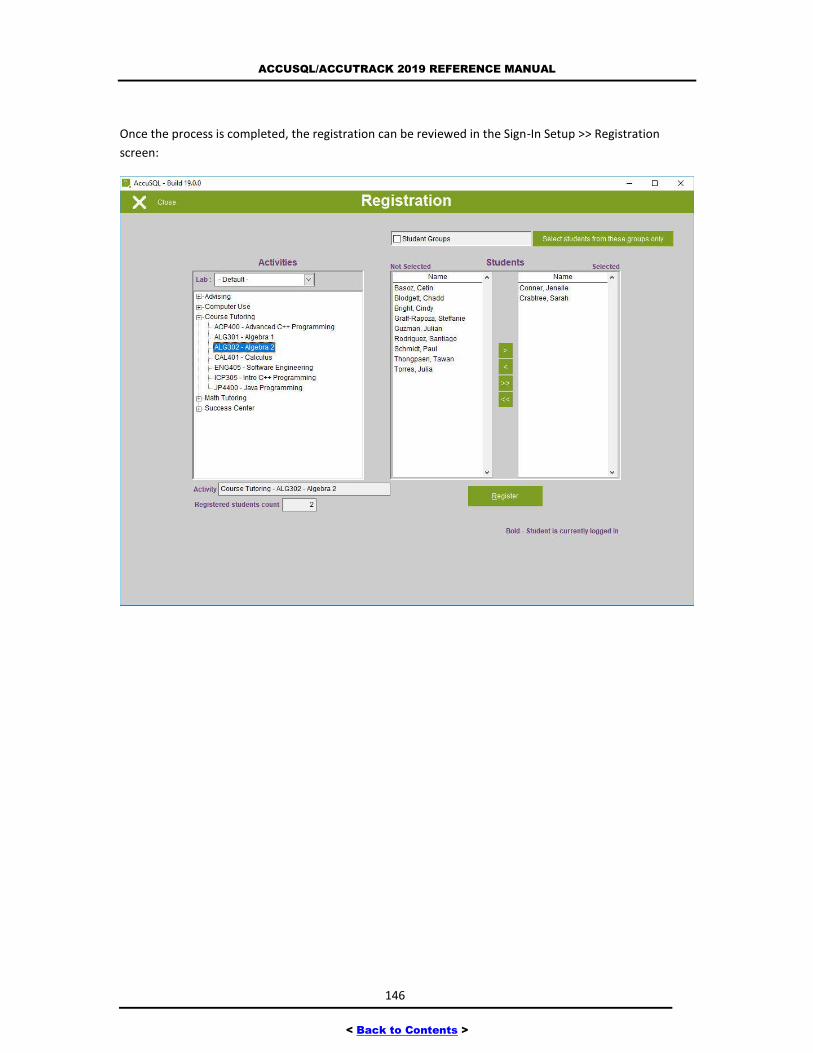
ACCUSQL/ACCUTRACK 2019 REFERENCE MANUAL
146
< Back to Contents >
Once the process is completed, the registration can be reviewed in the Sign-In Setup >> Registration
screen:
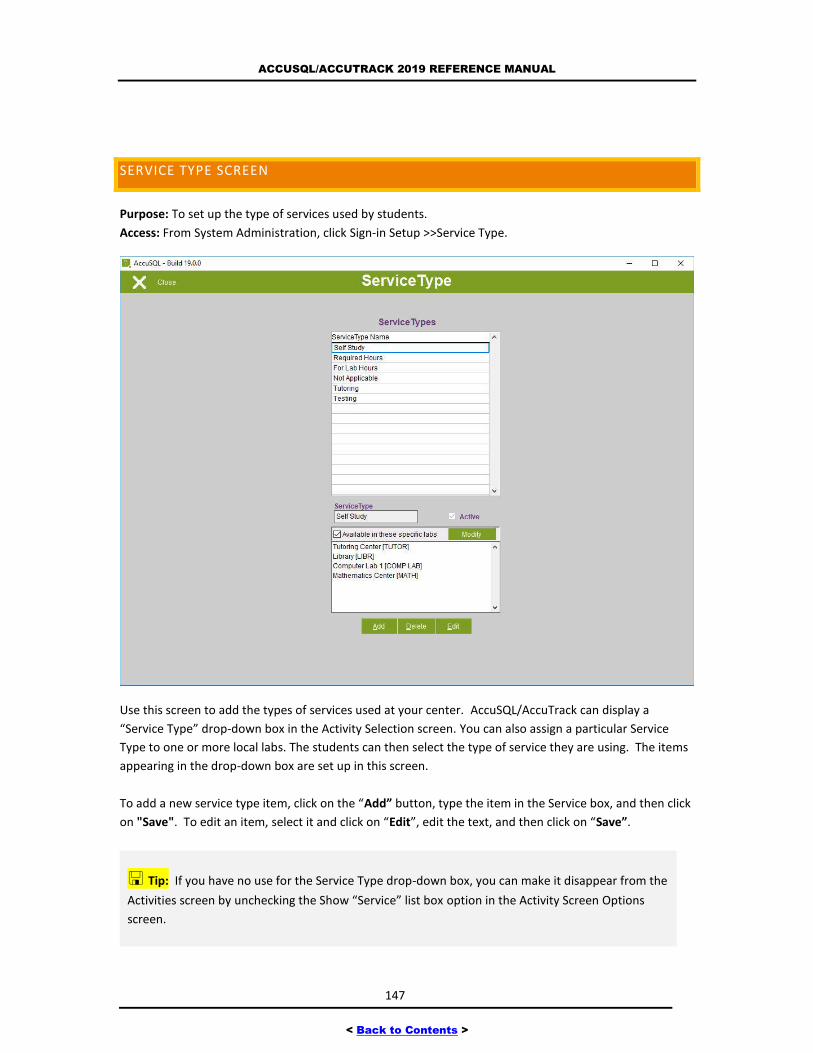
ACCUSQL/ACCUTRACK 2019 REFERENCE MANUAL
147
< Back to Contents >
SERVICE TYPE SCREEN
Purpose: To set up the type of services used by students.
Access: From System Administration, click Sign-in Setup >>Service Type.
Use this screen to add the types of services used at your center. AccuSQL/AccuTrack can display a
“Service Type” drop-down box in the Activity Selection screen. You can also assign a particular Service
Type to one or more local labs. The students can then select the type of service they are using. The items
appearing in the drop-down box are set up in this screen.
To add a new service type item, click on the “Add” button, type the item in the Service box, and then click
on "Save". To edit an item, select it and click on “Edit”, edit the text, and then click on “Save”.
Tip: If you have no use for the Service Type drop-down box, you can make it disappear from the
Activities screen by unchecking the Show “Service” list box option in the Activity Screen Options
screen.
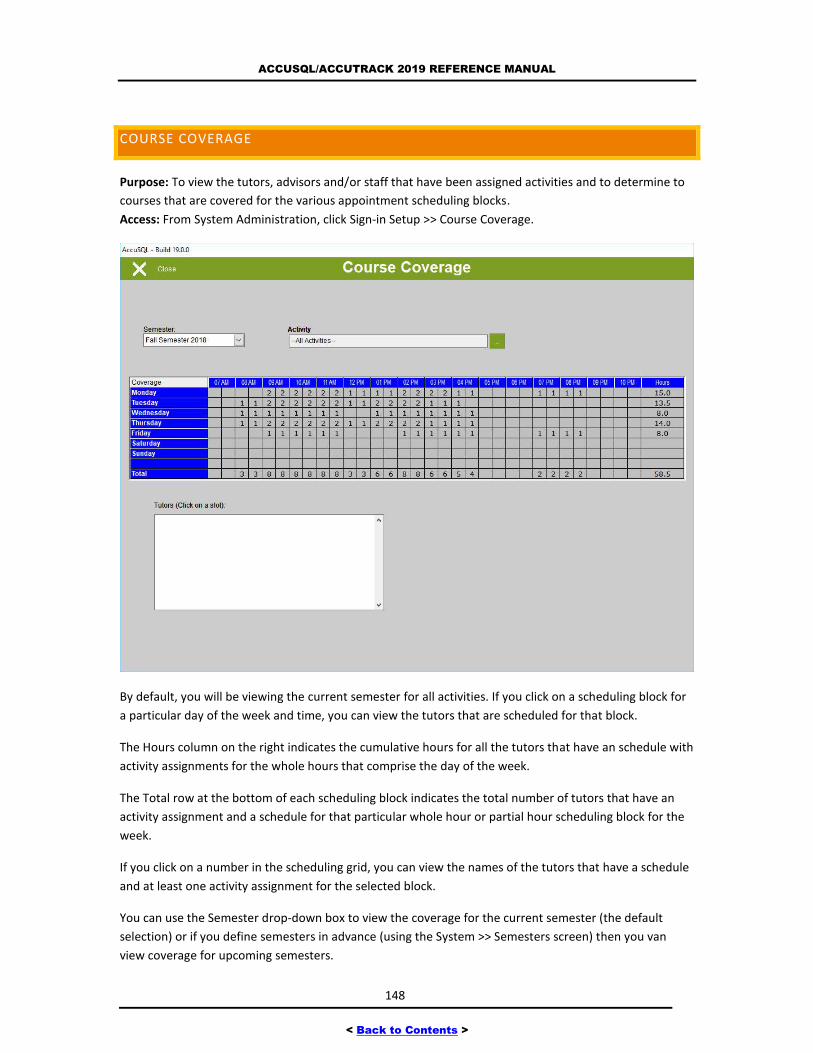
ACCUSQL/ACCUTRACK 2019 REFERENCE MANUAL
148
< Back to Contents >
COURSE COVERAGE
Purpose: To view the tutors, advisors and/or staff that have been assigned activities and to determine to
courses that are covered for the various appointment scheduling blocks.
Access: From System Administration, click Sign-in Setup >> Course Coverage.
By default, you will be viewing the current semester for all activities. If you click on a scheduling block for
a particular day of the week and time, you can view the tutors that are scheduled for that block.
The Hours column on the right indicates the cumulative hours for all the tutors that have an schedule with
activity assignments for the whole hours that comprise the day of the week.
The Total row at the bottom of each scheduling block indicates the total number of tutors that have an
activity assignment and a schedule for that particular whole hour or partial hour scheduling block for the
week.
If you click on a number in the scheduling grid, you can view the names of the tutors that have a schedule
and at least one activity assignment for the selected block.
You can use the Semester drop-down box to view the coverage for the current semester (the default
selection) or if you define semesters in advance (using the System >> Semesters screen) then you van
view coverage for upcoming semesters.
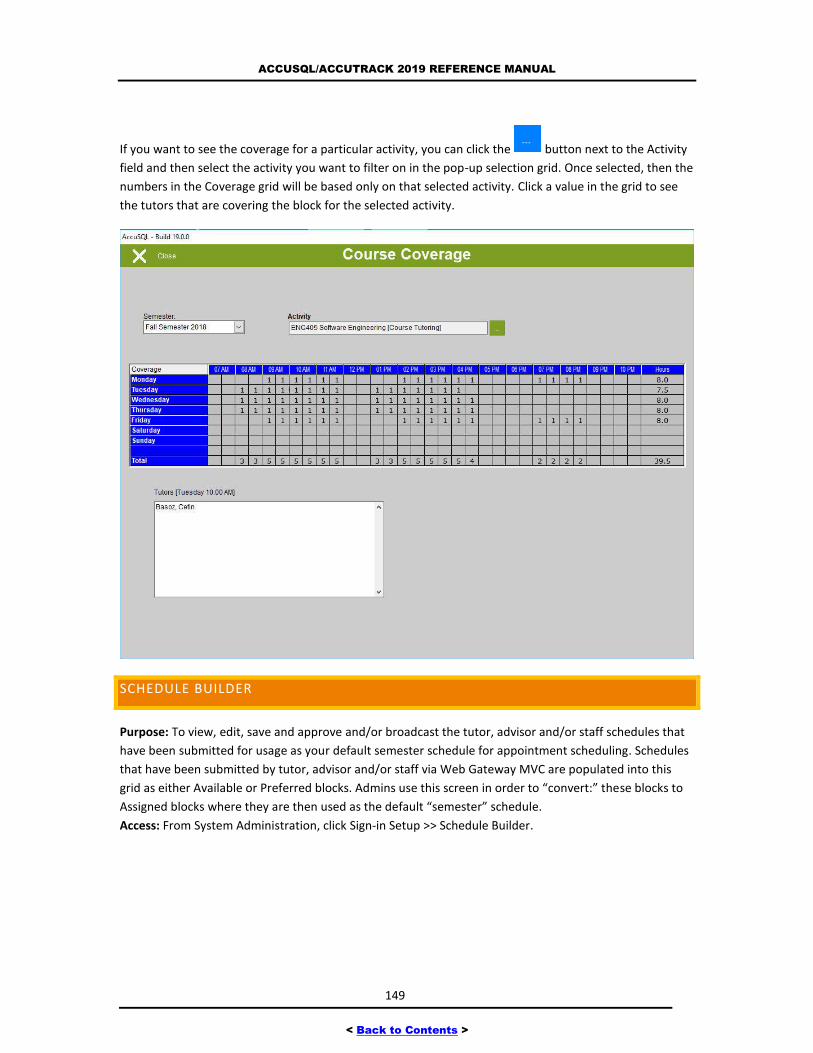
ACCUSQL/ACCUTRACK 2019 REFERENCE MANUAL
149
< Back to Contents >
If you want to see the coverage for a particular activity, you can click the button next to the Activity
field and then select the activity you want to filter on in the pop-up selection grid. Once selected, then the
numbers in the Coverage grid will be based only on that selected activity. Click a value in the grid to see
the tutors that are covering the block for the selected activity.
SCHEDULE BUILDER
Purpose: To view, edit, save and approve and/or broadcast the tutor, advisor and/or staff schedules that
have been submitted for usage as your default semester schedule for appointment scheduling. Schedules
that have been submitted by tutor, advisor and/or staff via Web Gateway MVC are populated into this
grid as either Available or Preferred blocks. Admins use this screen in order to “convert:” these blocks to
Assigned blocks where they are then used as the default “semester” schedule.
Access: From System Administration, click Sign-in Setup >> Schedule Builder.
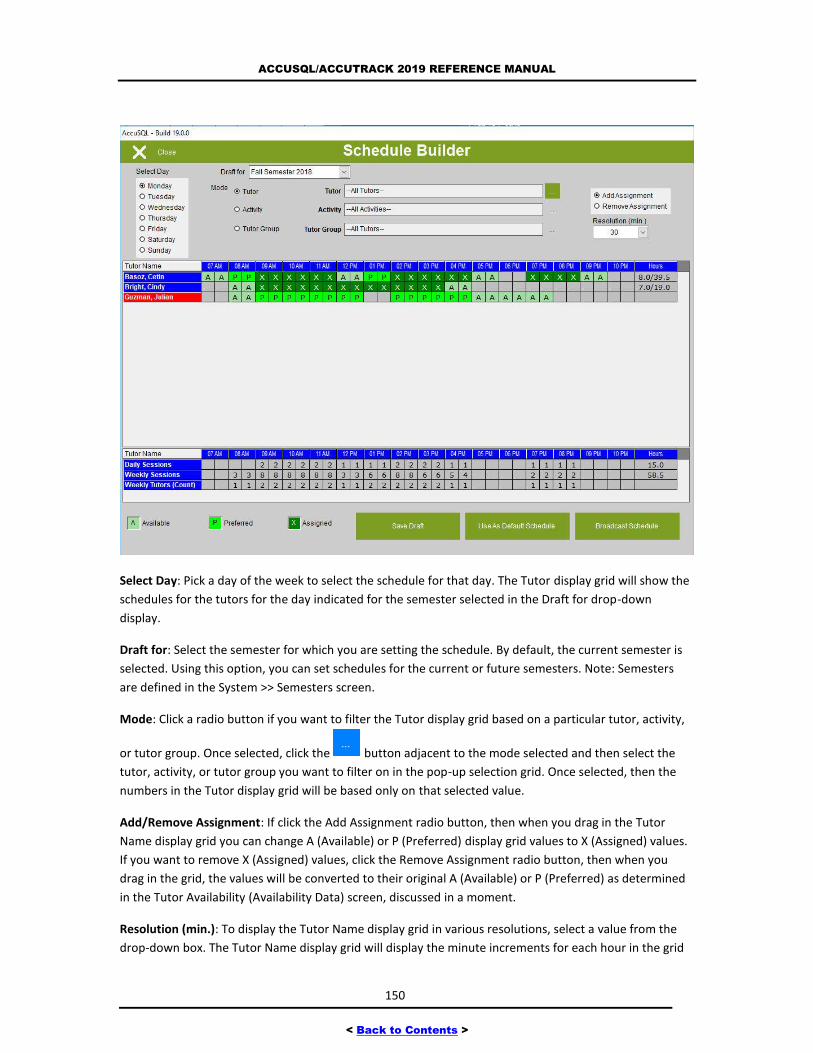
ACCUSQL/ACCUTRACK 2019 REFERENCE MANUAL
150
< Back to Contents >
Select Day: Pick a day of the week to select the schedule for that day. The Tutor display grid will show the
schedules for the tutors for the day indicated for the semester selected in the Draft for drop-down
display.
Draft for: Select the semester for which you are setting the schedule. By default, the current semester is
selected. Using this option, you can set schedules for the current or future semesters. Note: Semesters
are defined in the System >> Semesters screen.
Mode: Click a radio button if you want to filter the Tutor display grid based on a particular tutor, activity,
or tutor group. Once selected, click the button adjacent to the mode selected and then select the
tutor, activity, or tutor group you want to filter on in the pop-up selection grid. Once selected, then the
numbers in the Tutor display grid will be based only on that selected value.
Add/Remove Assignment: If click the Add Assignment radio button, then when you drag in the Tutor
Name display grid you can change A (Available) or P (Preferred) display grid values to X (Assigned) values.
If you want to remove X (Assigned) values, click the Remove Assignment radio button, then when you
drag in the grid, the values will be converted to their original A (Available) or P (Preferred) as determined
in the Tutor Availability (Availability Data) screen, discussed in a moment.
Resolution (min.): To display the Tutor Name display grid in various resolutions, select a value from the
drop-down box. The Tutor Name display grid will display the minute increments for each hour in the grid
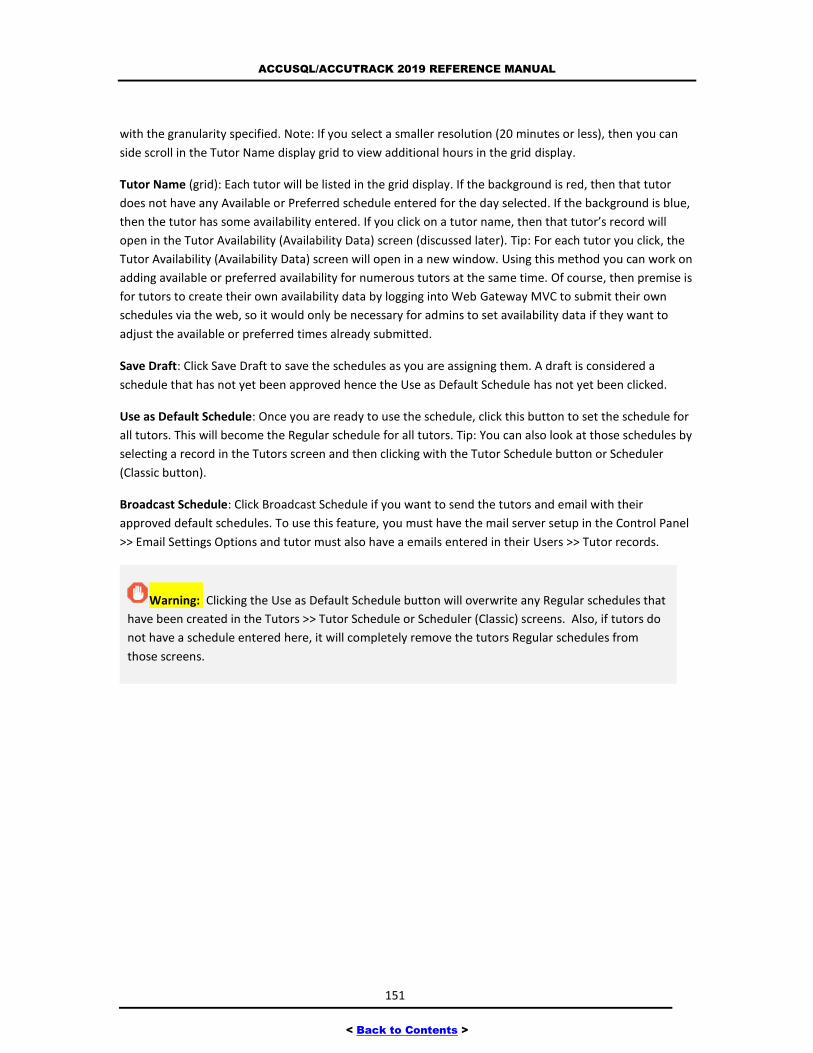
ACCUSQL/ACCUTRACK 2019 REFERENCE MANUAL
151
< Back to Contents >
with the granularity specified. Note: If you select a smaller resolution (20 minutes or less), then you can
side scroll in the Tutor Name display grid to view additional hours in the grid display.
Tutor Name (grid): Each tutor will be listed in the grid display. If the background is red, then that tutor
does not have any Available or Preferred schedule entered for the day selected. If the background is blue,
then the tutor has some availability entered. If you click on a tutor name, then that tutor’s record will
open in the Tutor Availability (Availability Data) screen (discussed later). Tip: For each tutor you click, the
Tutor Availability (Availability Data) screen will open in a new window. Using this method you can work on
adding available or preferred availability for numerous tutors at the same time. Of course, then premise is
for tutors to create their own availability data by logging into Web Gateway MVC to submit their own
schedules via the web, so it would only be necessary for admins to set availability data if they want to
adjust the available or preferred times already submitted.
Save Draft: Click Save Draft to save the schedules as you are assigning them. A draft is considered a
schedule that has not yet been approved hence the Use as Default Schedule has not yet been clicked.
Use as Default Schedule: Once you are ready to use the schedule, click this button to set the schedule for
all tutors. This will become the Regular schedule for all tutors. Tip: You can also look at those schedules by
selecting a record in the Tutors screen and then clicking with the Tutor Schedule button or Scheduler
(Classic button).
Broadcast Schedule: Click Broadcast Schedule if you want to send the tutors and email with their
approved default schedules. To use this feature, you must have the mail server setup in the Control Panel
>> Email Settings Options and tutor must also have a emails entered in their Users >> Tutor records.
Warning: Clicking the Use as Default Schedule button will overwrite any Regular schedules that
have been created in the Tutors >> Tutor Schedule or Scheduler (Classic) screens. Also, if tutors do
not have a schedule entered here, it will completely remove the tutors Regular schedules from
those screens.
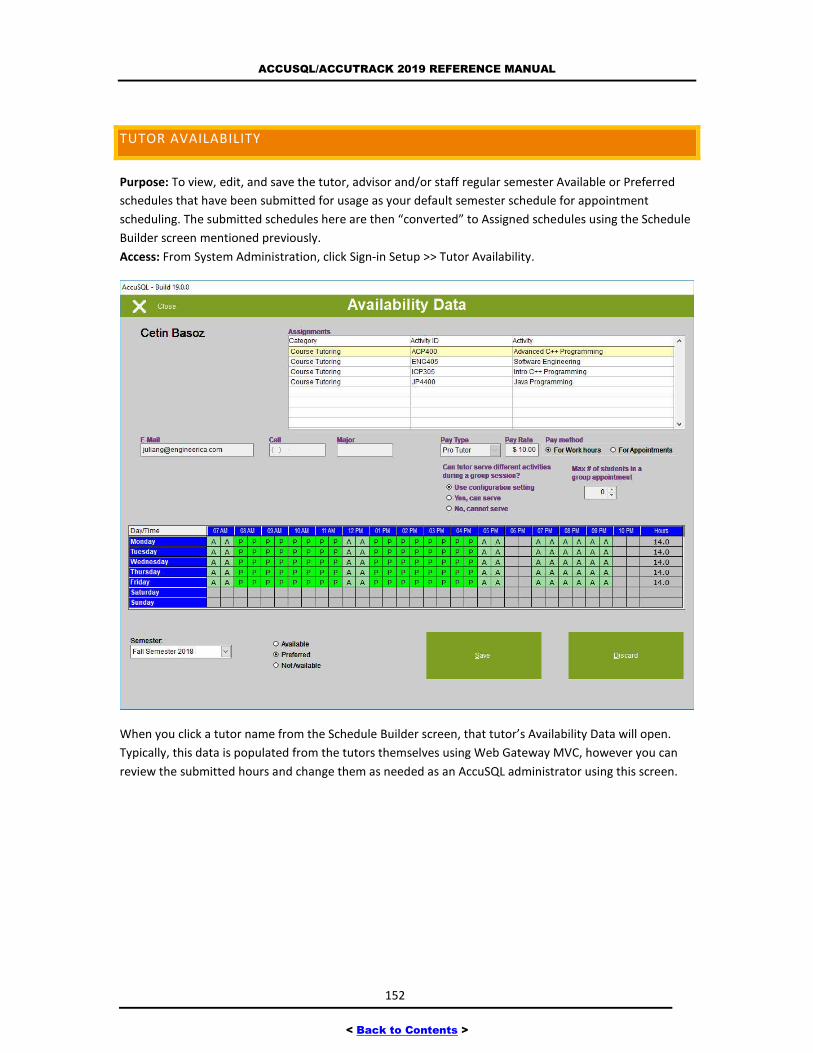
ACCUSQL/ACCUTRACK 2019 REFERENCE MANUAL
152
< Back to Contents >
TUTOR AVAILABILITY
Purpose: To view, edit, and save the tutor, advisor and/or staff regular semester Available or Preferred
schedules that have been submitted for usage as your default semester schedule for appointment
scheduling. The submitted schedules here are then “converted” to Assigned schedules using the Schedule
Builder screen mentioned previously.
Access: From System Administration, click Sign-in Setup >> Tutor Availability.
When you click a tutor name from the Schedule Builder screen, that tutor’s Availability Data will open.
Typically, this data is populated from the tutors themselves using Web Gateway MVC, however you can
review the submitted hours and change them as needed as an AccuSQL administrator using this screen.
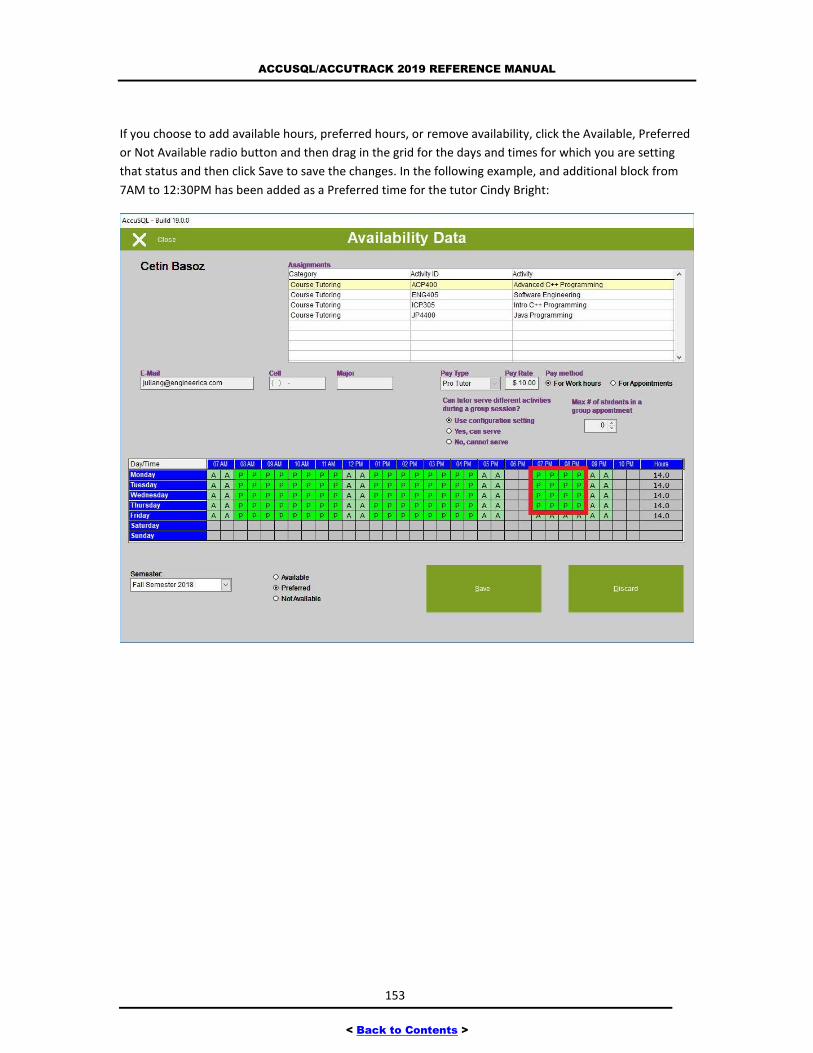
ACCUSQL/ACCUTRACK 2019 REFERENCE MANUAL
153
< Back to Contents >
If you choose to add available hours, preferred hours, or remove availability, click the Available, Preferred
or Not Available radio button and then drag in the grid for the days and times for which you are setting
that status and then click Save to save the changes. In the following example, and additional block from
7AM to 12:30PM has been added as a Preferred time for the tutor Cindy Bright:
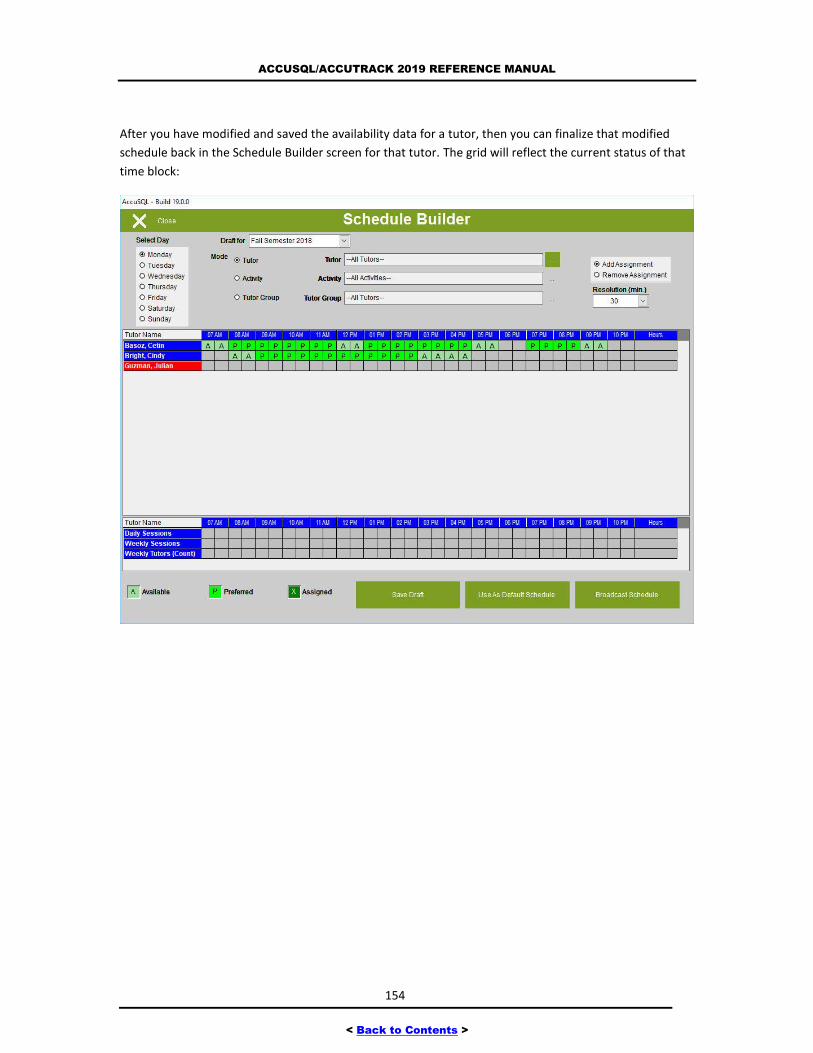
ACCUSQL/ACCUTRACK 2019 REFERENCE MANUAL
154
< Back to Contents >
After you have modified and saved the availability data for a tutor, then you can finalize that modified
schedule back in the Schedule Builder screen for that tutor. The grid will reflect the current status of that
time block:
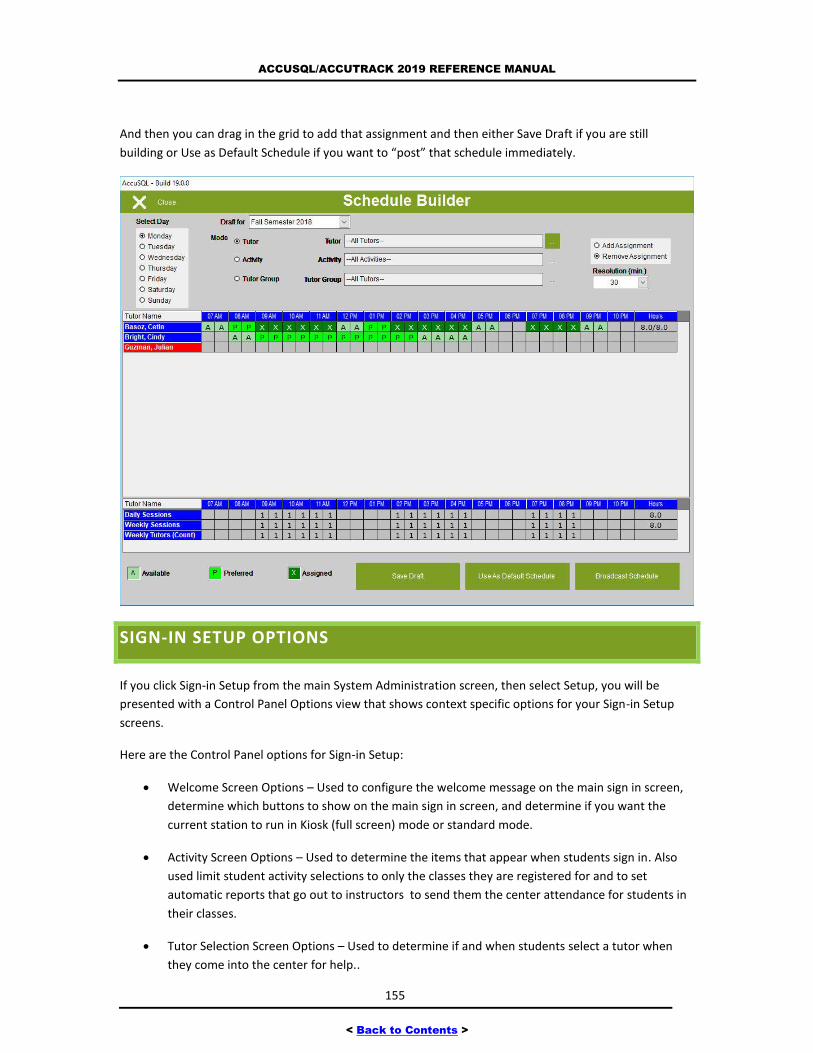
ACCUSQL/ACCUTRACK 2019 REFERENCE MANUAL
155
< Back to Contents >
And then you can drag in the grid to add that assignment and then either Save Draft if you are still
building or Use as Default Schedule if you want to “post” that schedule immediately.
SIGN-IN SETUP OPTIONS
If you click Sign-in Setup from the main System Administration screen, then select Setup, you will be
presented with a Control Panel Options view that shows context specific options for your Sign-in Setup
screens.
Here are the Control Panel options for Sign-in Setup:
Welcome Screen Options – Used to configure the welcome message on the main sign in screen,
determine which buttons to show on the main sign in screen, and determine if you want the
current station to run in Kiosk (full screen) mode or standard mode.
Activity Screen Options – Used to determine the items that appear when students sign in. Also
used limit student activity selections to only the classes they are registered for and to set
automatic reports that go out to instructors to send them the center attendance for students in
their classes.
Tutor Selection Screen Options – Used to determine if and when students select a tutor when
they come into the center for help..
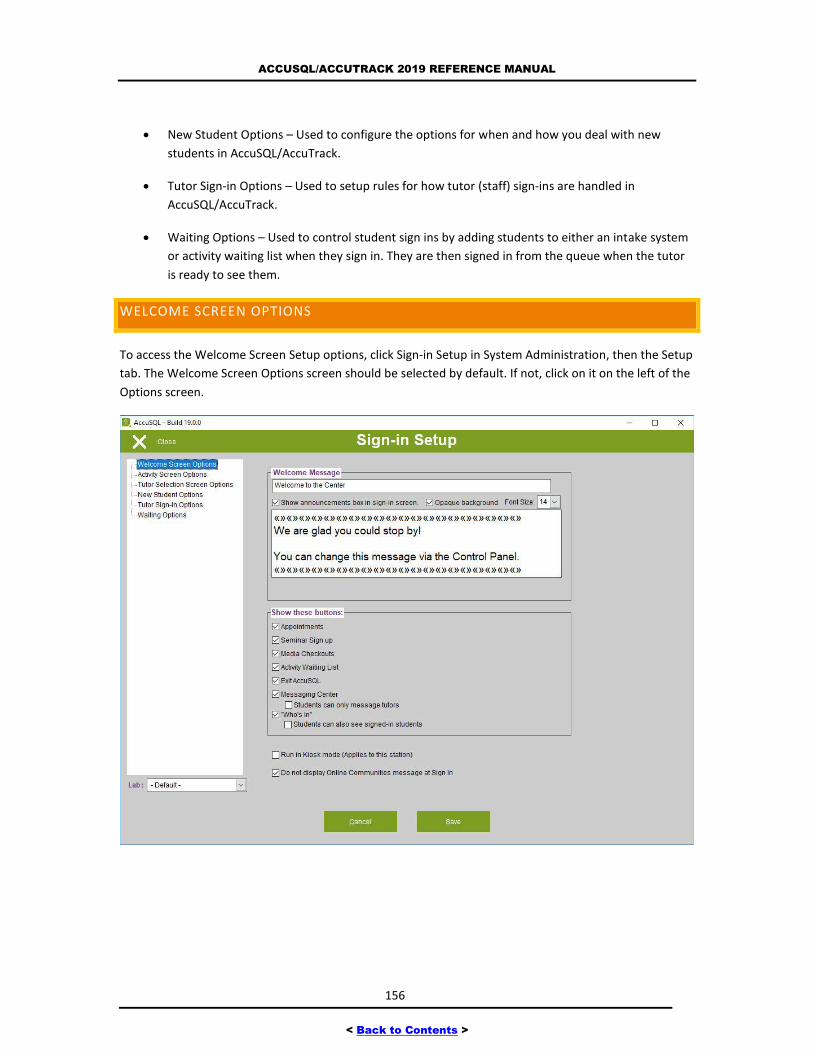
ACCUSQL/ACCUTRACK 2019 REFERENCE MANUAL
156
< Back to Contents >
New Student Options – Used to configure the options for when and how you deal with new
students in AccuSQL/AccuTrack.
Tutor Sign-in Options – Used to setup rules for how tutor (staff) sign-ins are handled in
AccuSQL/AccuTrack.
Waiting Options – Used to control student sign ins by adding students to either an intake system
or activity waiting list when they sign in. They are then signed in from the queue when the tutor
is ready to see them.
WELCOME SCREEN OPTIONS
To access the Welcome Screen Setup options, click Sign-in Setup in System Administration, then the Setup
tab. The Welcome Screen Options screen should be selected by default. If not, click on it on the left of the
Options screen.
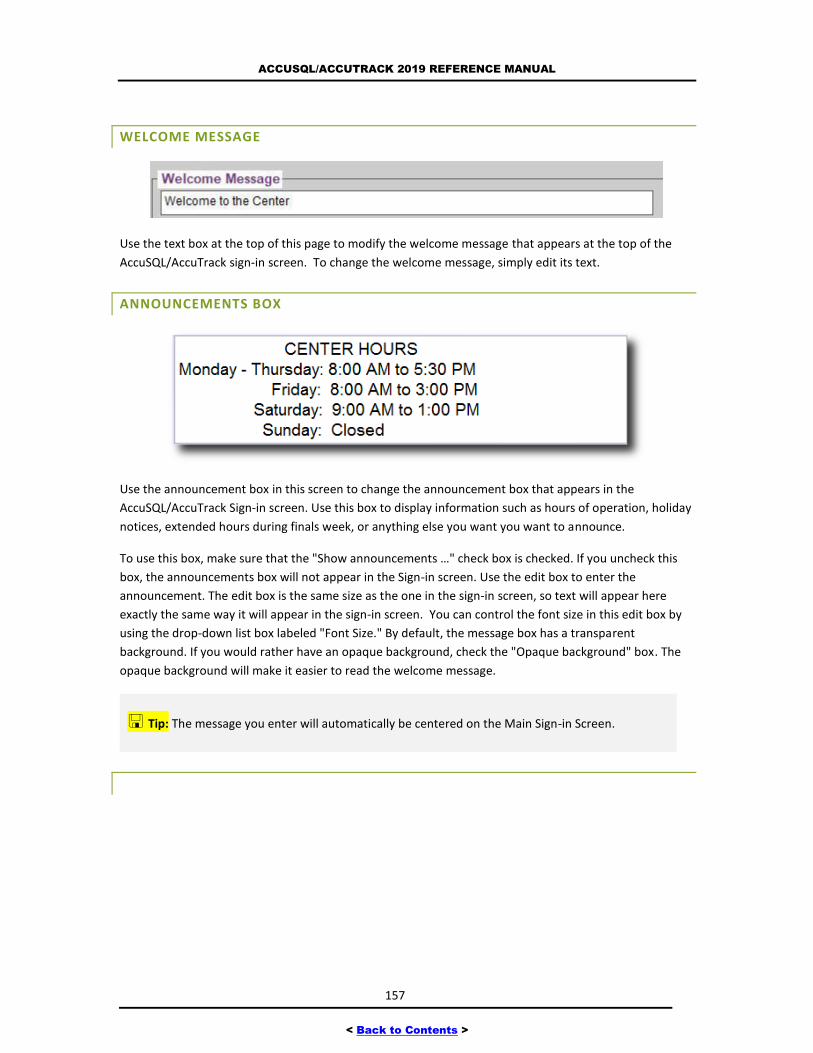
ACCUSQL/ACCUTRACK 2019 REFERENCE MANUAL
157
< Back to Contents >
WELCOME MESSAGE
Use the text box at the top of this page to modify the welcome message that appears at the top of the
AccuSQL/AccuTrack sign-in screen. To change the welcome message, simply edit its text.
ANNOUNCEMENTS BOX
Use the announcement box in this screen to change the announcement box that appears in the
AccuSQL/AccuTrack Sign-in screen. Use this box to display information such as hours of operation, holiday
notices, extended hours during finals week, or anything else you want you want to announce.
To use this box, make sure that the "Show announcements …" check box is checked. If you uncheck this
box, the announcements box will not appear in the Sign-in screen. Use the edit box to enter the
announcement. The edit box is the same size as the one in the sign-in screen, so text will appear here
exactly the same way it will appear in the sign-in screen. You can control the font size in this edit box by
using the drop-down list box labeled "Font Size." By default, the message box has a transparent
background. If you would rather have an opaque background, check the "Opaque background" box. The
opaque background will make it easier to read the welcome message.
Tip: The message you enter will automatically be centered on the Main Sign-in Screen.

ACCUSQL/ACCUTRACK 2019 REFERENCE MANUAL
158
< Back to Contents >
SHOW THESE BUTTONS
The show these buttons checkboxes control the display of buttons in the main Sign-in screen. The
following is an explanation of these buttons:
Appointments: Display this button if you want the students to schedule their own appointments.
Seminar Sign-up: Display this button if you want to enable students to register for seminars or
workshops via AccuSQL/AccuTrack.
Media Checkouts: Display this button if you want students to check media out themselves.
Activity Waiting List: Display this button if you want to use the waiting list feature of
AccuSQL/AccuTrack.
Exit AccuSQL/AccuTrack: Display this button if you want students or other users to have the ability to
exit AccuSQL/AccuTrack.
Messaging Center: Display this button if you want students to send messages to tutors and possibly to
other students.
Who’s In: Display this button if you want students to check the sign-in status of tutors and/or other
students.
Run in Kiosk mode (Applies to this station). Check this box if you want the current station to display in
full screen mode. In this mode, the main sign in screen of AccuSQL or AccuTrack will take up the entire
monitor. Typically, you would set your student sign-in stations to run in Kiosk mode and your admin
computers would not.
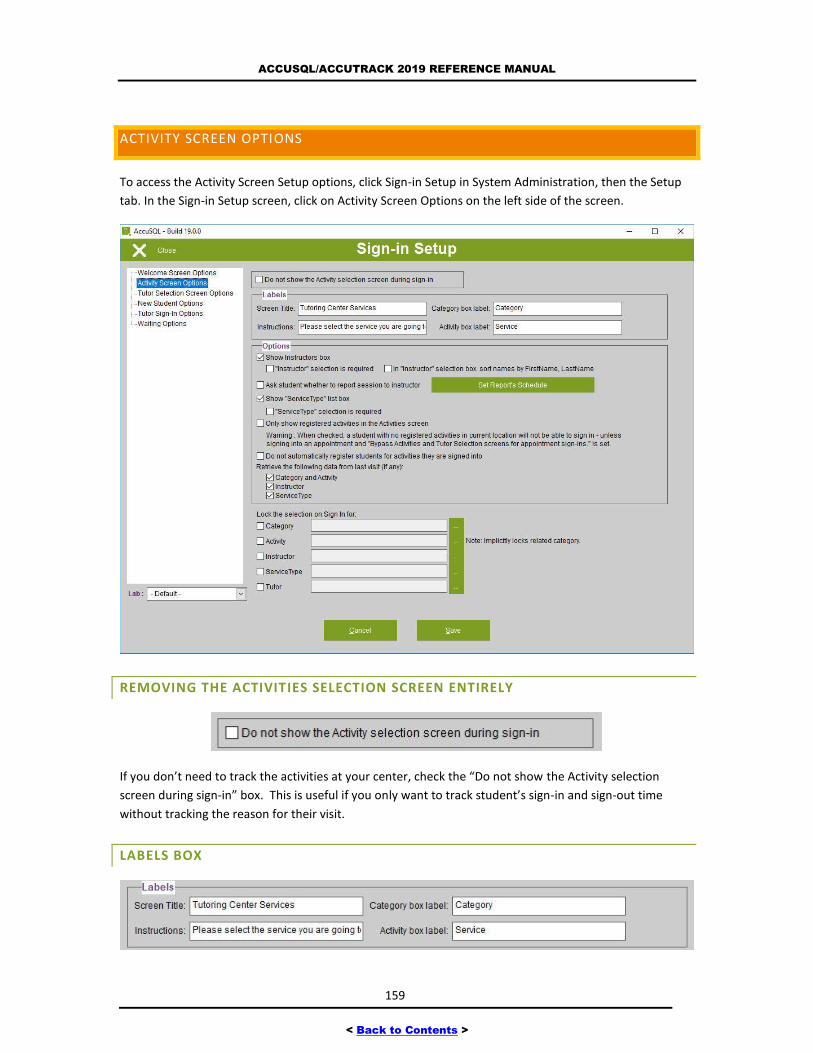
ACCUSQL/ACCUTRACK 2019 REFERENCE MANUAL
159
< Back to Contents >
ACTIVITY SCREEN OPTIONS
To access the Activity Screen Setup options, click Sign-in Setup in System Administration, then the Setup
tab. In the Sign-in Setup screen, click on Activity Screen Options on the left side of the screen.
REMOVING THE ACTIVITIES SELECTION SCREEN ENTIRELY
If you don’t need to track the activities at your center, check the “Do not show the Activity selection
screen during sign-in” box. This is useful if you only want to track student’s sign-in and sign-out time
without tracking the reason for their visit.
LABELS BOX
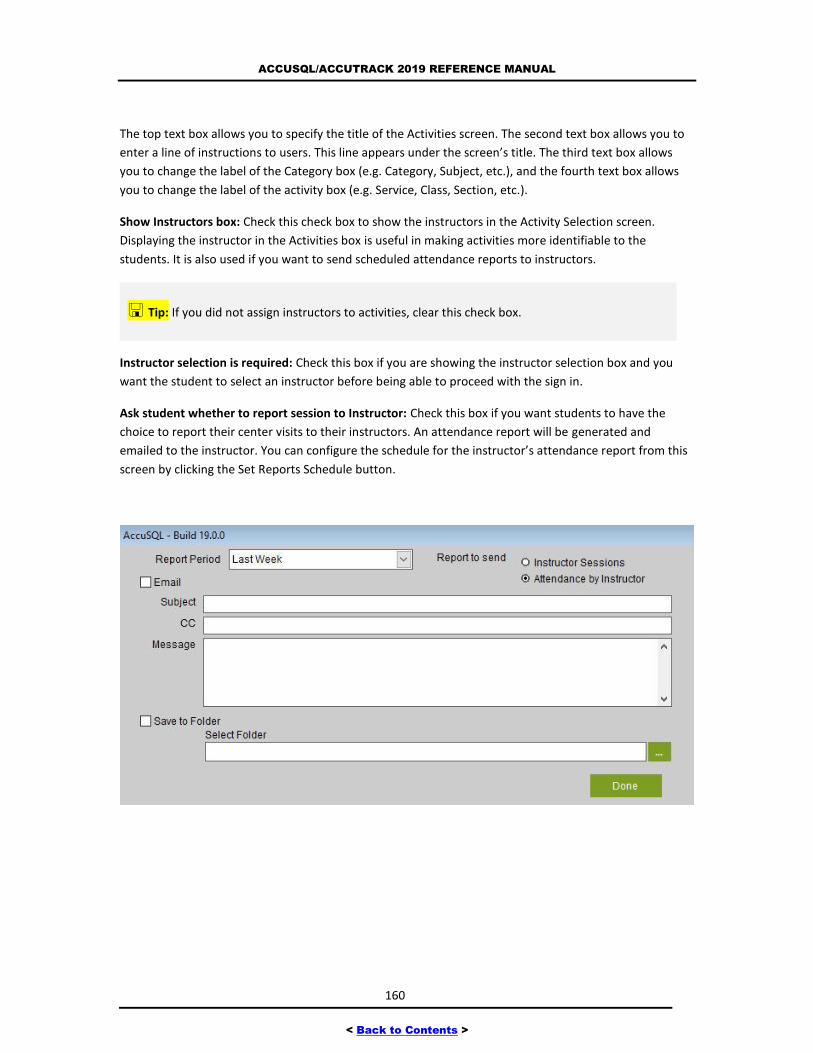
ACCUSQL/ACCUTRACK 2019 REFERENCE MANUAL
160
< Back to Contents >
The top text box allows you to specify the title of the Activities screen. The second text box allows you to
enter a line of instructions to users. This line appears under the screen’s title. The third text box allows
you to change the label of the Category box (e.g. Category, Subject, etc.), and the fourth text box allows
you to change the label of the activity box (e.g. Service, Class, Section, etc.).
Show Instructors box: Check this check box to show the instructors in the Activity Selection screen.
Displaying the instructor in the Activities box is useful in making activities more identifiable to the
students. It is also used if you want to send scheduled attendance reports to instructors.
Tip: If you did not assign instructors to activities, clear this check box.
Instructor selection is required: Check this box if you are showing the instructor selection box and you
want the student to select an instructor before being able to proceed with the sign in.
Ask student whether to report session to Instructor: Check this box if you want students to have the
choice to report their center visits to their instructors. An attendance report will be generated and
emailed to the instructor. You can configure the schedule for the instructor’s attendance report from this
screen by clicking the Set Reports Schedule button.

ACCUSQL/ACCUTRACK 2019 REFERENCE MANUAL
161
< Back to Contents >
Click done when you have completed the configuration in the screenshot above, and you will be taken to
the Windows Task Scheduler screen to create the task. After the task is created, you can go through the
AccuTask Scheduler feature to edit the task or look at the logs for that task. AccuTask Scheduler will be
discussed later in this reference manual.
Tip: Instructors are typically the professors that teach a particular course and one or more of them
can be tied to each course in the Sign-in Setup >> Categories & Activities screen. The student picks their
instructor at sign in to that course and then the instructors are emailed an instructor attendance report
based on the students that picked them. If you want to use this feature, each instructor needs to have a
valid email address in the Instructors setup screen.
Show Service list box: Check this box if you want to display the “Service” selection box at sign-in. The
Service selection can be used to collect more information regarding the visit.
Service selection is required: Check this box if you are showing the service selection and want to force the
student to select a service type.
Note: To enter items appearing in the service type selection box, use the “Service” screen
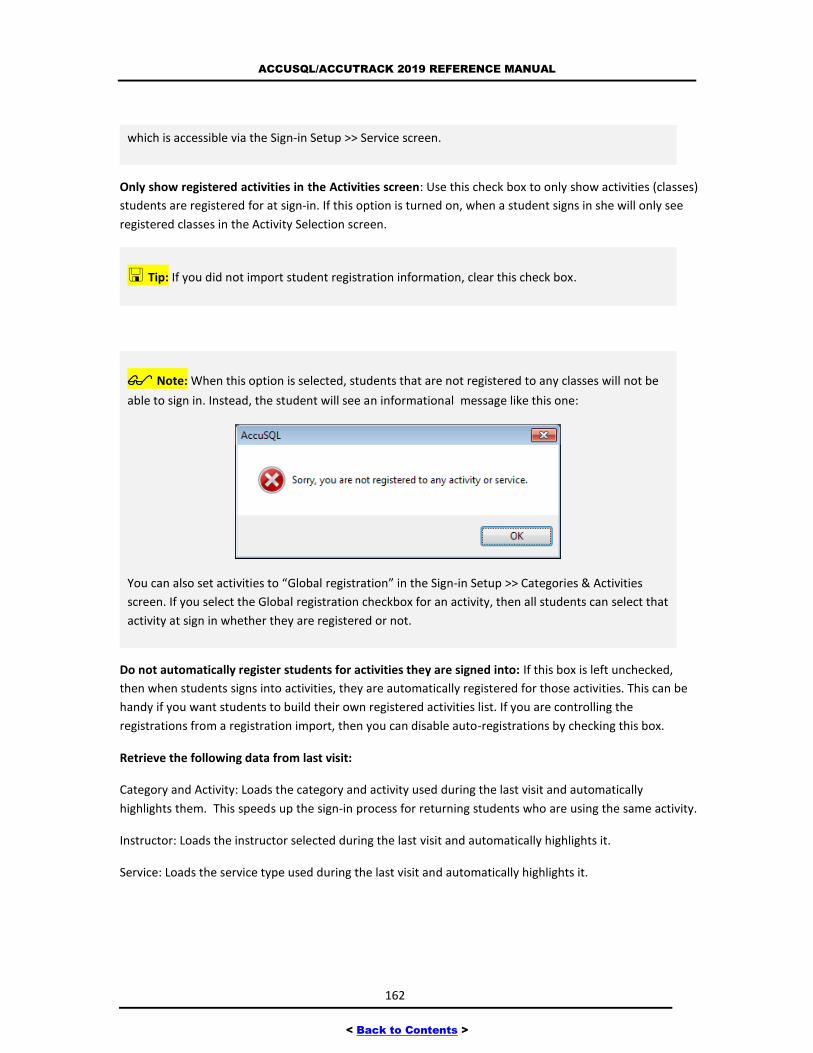
ACCUSQL/ACCUTRACK 2019 REFERENCE MANUAL
162
< Back to Contents >
which is accessible via the Sign-in Setup >> Service screen.
Only show registered activities in the Activities screen: Use this check box to only show activities (classes)
students are registered for at sign-in. If this option is turned on, when a student signs in she will only see
registered classes in the Activity Selection screen.
Tip: If you did not import student registration information, clear this check box.
Note: When this option is selected, students that are not registered to any classes will not be
able to sign in. Instead, the student will see an informational message like this one:
You can also set activities to “Global registration” in the Sign-in Setup >> Categories & Activities
screen. If you select the Global registration checkbox for an activity, then all students can select that
activity at sign in whether they are registered or not.
Do not automatically register students for activities they are signed into: If this box is left unchecked,
then when students signs into activities, they are automatically registered for those activities. This can be
handy if you want students to build their own registered activities list. If you are controlling the
registrations from a registration import, then you can disable auto-registrations by checking this box.
Retrieve the following data from last visit:
Category and Activity: Loads the category and activity used during the last visit and automatically
highlights them. This speeds up the sign-in process for returning students who are using the same activity.
Instructor: Loads the instructor selected during the last visit and automatically highlights it.
Service: Loads the service type used during the last visit and automatically highlights it.
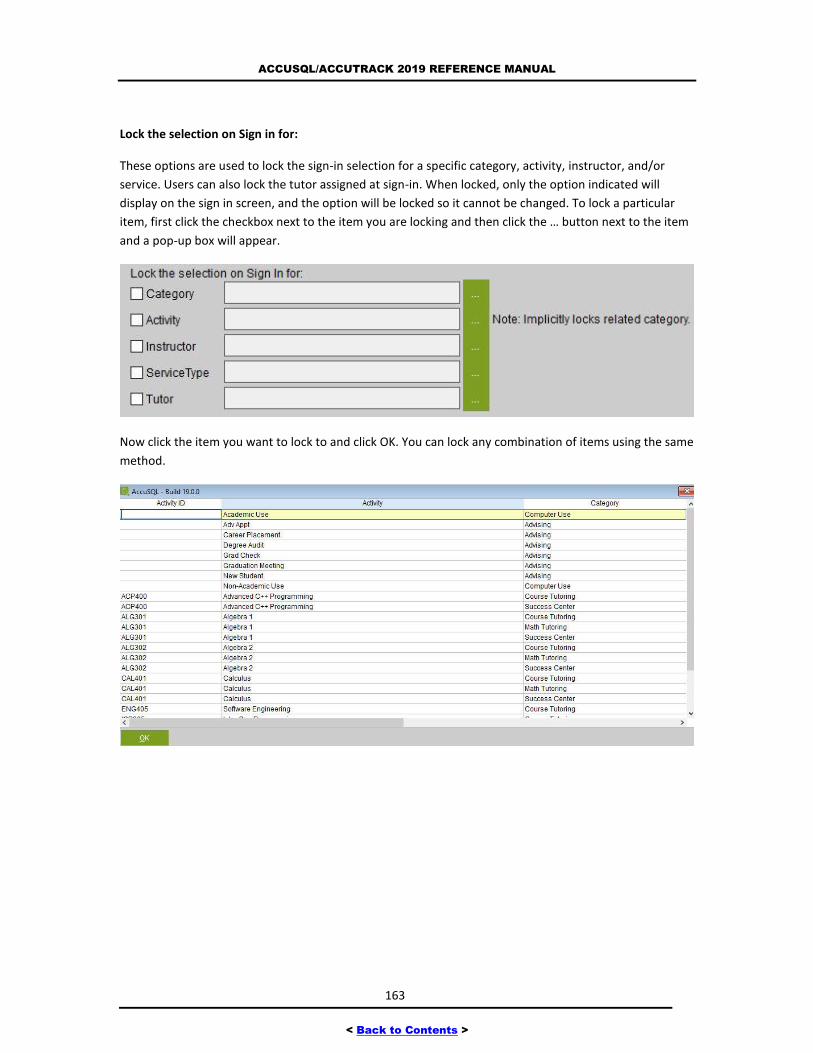
ACCUSQL/ACCUTRACK 2019 REFERENCE MANUAL
163
< Back to Contents >
Lock the selection on Sign in for:
These options are used to lock the sign-in selection for a specific category, activity, instructor, and/or
service. Users can also lock the tutor assigned at sign-in. When locked, only the option indicated will
display on the sign in screen, and the option will be locked so it cannot be changed. To lock a particular
item, first click the checkbox next to the item you are locking and then click the … button next to the item
and a pop-up box will appear.
Now click the item you want to lock to and click OK. You can lock any combination of items using the same
method.
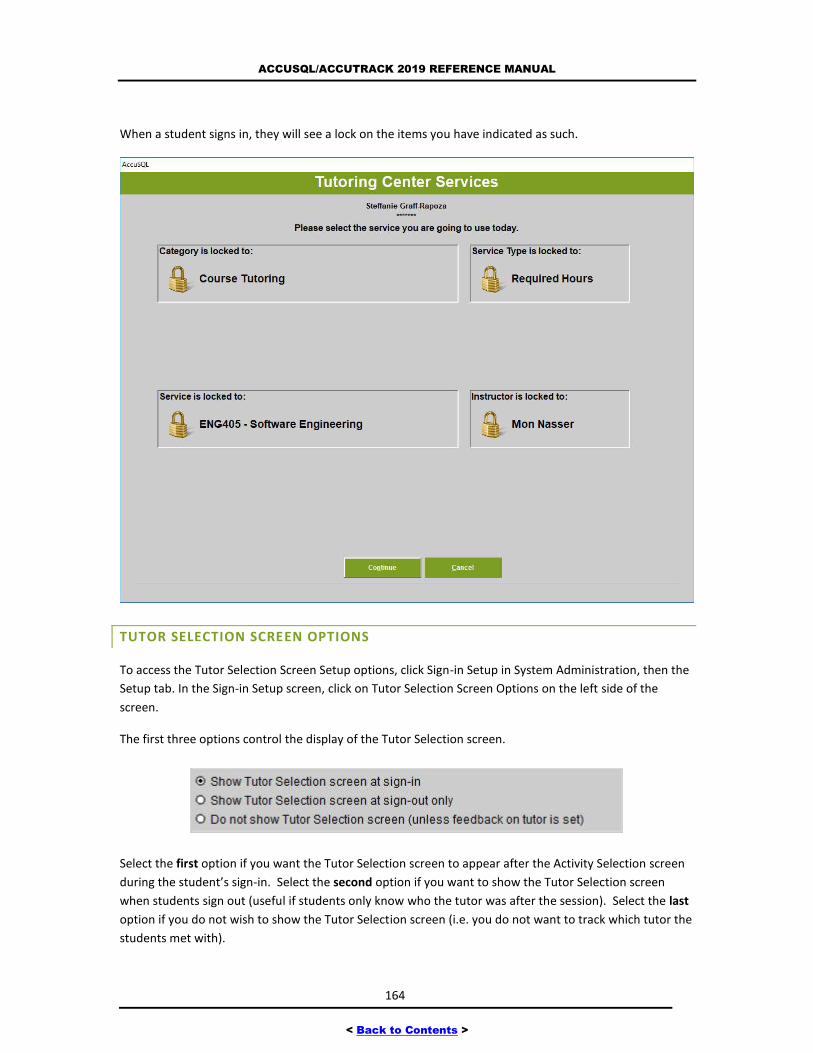
ACCUSQL/ACCUTRACK 2019 REFERENCE MANUAL
164
< Back to Contents >
When a student signs in, they will see a lock on the items you have indicated as such.
TUTOR SELECTION SCREEN OPTIONS
To access the Tutor Selection Screen Setup options, click Sign-in Setup in System Administration, then the
Setup tab. In the Sign-in Setup screen, click on Tutor Selection Screen Options on the left side of the
screen.
The first three options control the display of the Tutor Selection screen.
Select the first option if you want the Tutor Selection screen to appear after the Activity Selection screen
during the student’s sign-in. Select the second option if you want to show the Tutor Selection screen
when students sign out (useful if students only know who the tutor was after the session). Select the last
option if you do not wish to show the Tutor Selection screen (i.e. you do not want to track which tutor the
students met with).
ACCUSQL/ACCUTRACK 2019 REFERENCE MANUAL
165
< Back to Contents >
If you do decide to show the Tutor Selection list, you can control other options:
Add “None” as an option to the tutor list: With this option selected, AccuSQL/AccuTrack will add “None”
and also “Unknown” to the tutor’s list. This is useful if some students don’t meet with tutors.
Do not show activities that do not have an assigned tutor: If this option is selected, AccuSQL/AccuTrack
will only show activities that have associated tutors. Activities that don’t have associated tutors will not
be displayed in the Activity Selection screen.
Tutor selection lists all tutors assigned to an activity regardless of the availability: Check this box to
show all tutors regardless of their tutor schedules. Tutors will be displayed in this case strictly based on
their activity assignments.
Screen Title: Enter the title for the Tutor Selection screen here.
Instructions: You can change the instructions line in the Tutor Selection screen here.
Email tutor when a student signs in to see him: Tutors will receive an email at the time a student selects
him or her during the sign-in process.
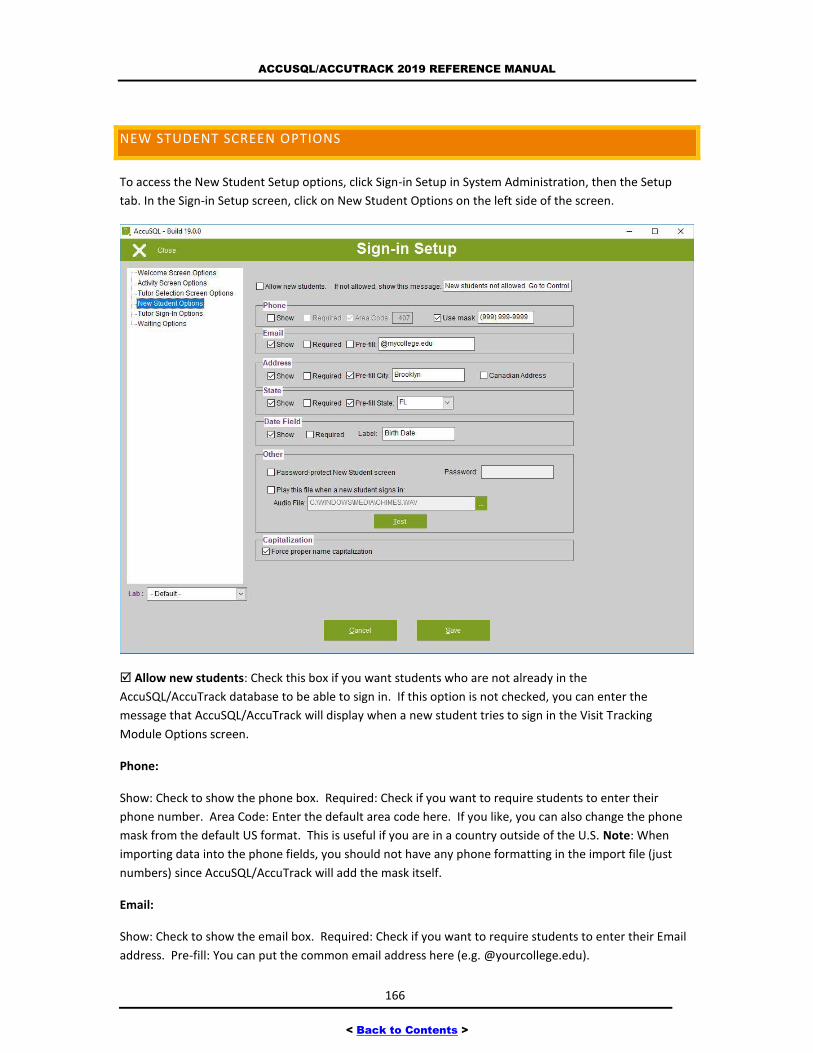
ACCUSQL/ACCUTRACK 2019 REFERENCE MANUAL
166
< Back to Contents >
NEW STUDENT SCREEN OPTIONS
To access the New Student Setup options, click Sign-in Setup in System Administration, then the Setup
tab. In the Sign-in Setup screen, click on New Student Options on the left side of the screen.
Allow new students: Check this box if you want students who are not already in the
AccuSQL/AccuTrack database to be able to sign in. If this option is not checked, you can enter the
message that AccuSQL/AccuTrack will display when a new student tries to sign in the Visit Tracking
Module Options screen.
Phone:
Show: Check to show the phone box. Required: Check if you want to require students to enter their
phone number. Area Code: Enter the default area code here. If you like, you can also change the phone
mask from the default US format. This is useful if you are in a country outside of the U.S. Note: When
importing data into the phone fields, you should not have any phone formatting in the import file (just
numbers) since AccuSQL/AccuTrack will add the mask itself.
Email:
Show: Check to show the email box. Required: Check if you want to require students to enter their Email
address. Pre-fill: You can put the common email address here (e.g. @yourcollege.edu).
ACCUSQL/ACCUTRACK 2019 REFERENCE MANUAL
167
< Back to Contents >
Address:
Show: Check to show the address box. Required: Check if you want to require students to enter their
address. Pre-fill City: Enter a default city. Canadian Address: Check if you want to show Canadian
provinces instead of US states.
State: Show: Check to show the state drop-down. Required: Check if you want to require students to
select a state. Pre-fill State: Select the default state from the drop-down.
Date Field:
Show: Check to show a date entry box in the New Student screen. Required: Check if you want to require
students to enter a date. Label: Enter the label of the date box (e.g. Birth date or Grad date).
Password-protect New Student screen: Turn this option on if you want to control the addition of new
students to the AccuSQL/AccuTrack database. If this option is on, when a new student signs in,
AccuSQL/AccuTrack will display a password entry box. If the correct password is entered, then the New
Student screen will be displayed and the student will be able to proceed. This feature is useful if you want
to approve the addition of new students after verifying they are eligible for your services. You can have
one of your staff members verify the student and then enter the password to allow the sign-in. If this
option is enabled, you can enter the password in the Password text box.
Play this file when a new student signs in:
Use this box if you want AccuSQL/AccuTrack to flag new students by playing a sound file when they first
sign in. Use the Audio File entry box to type the path and name of the sound file. You can also use the
browse “…” button to select the file. To test the sounds file, click the Test button.
Note: The sound file must be in wave (.WAV) format. Use this feature to alert you when new
users sign-in. This is useful if you offer first-time users special assistance or instructions.
If you have the play function enabled, AccuSQL/AccuTrack will play the selected sound file when the user
clicks on "Next" in the New Student screen.
CAPITALIZATION
Force Proper Name Capitalization: Check this box if you want AccuSQL/AccuTrack to automatically
convert names entered in the New Student screen to proper format (first letter upper case, and the rest
in lower case).
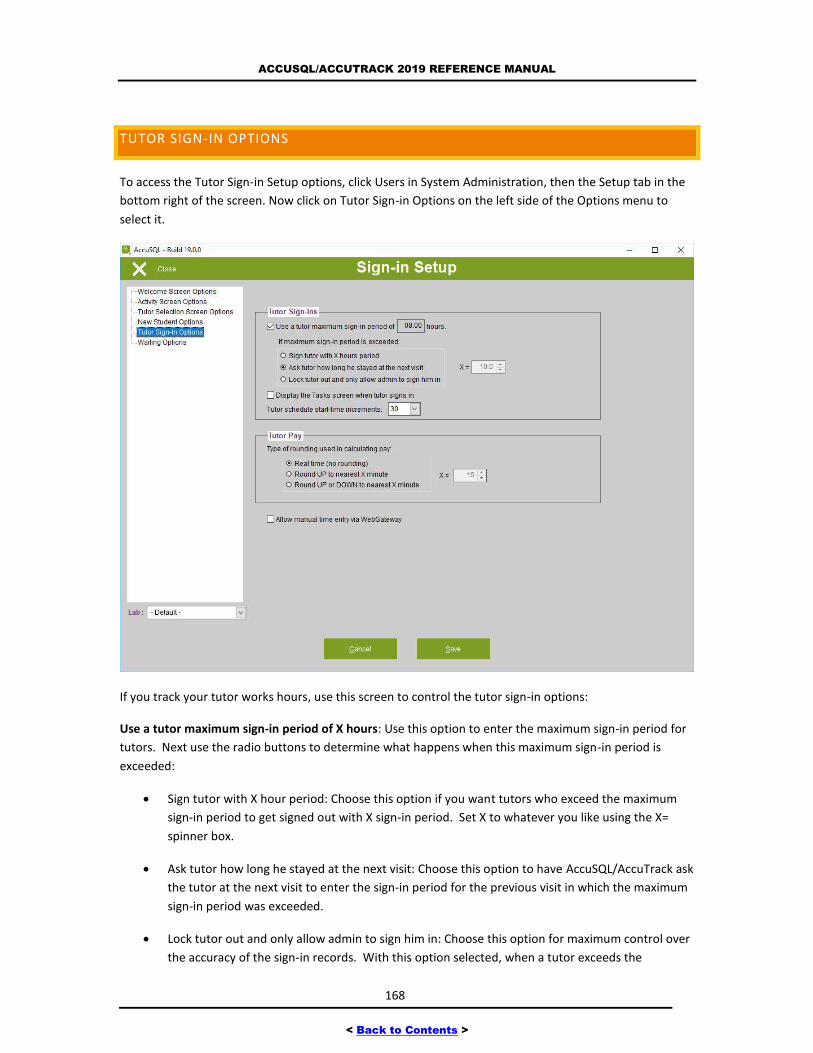
ACCUSQL/ACCUTRACK 2019 REFERENCE MANUAL
168
< Back to Contents >
TUTOR SIGN-IN OPTIONS
To access the Tutor Sign-in Setup options, click Users in System Administration, then the Setup tab in the
bottom right of the screen. Now click on Tutor Sign-in Options on the left side of the Options menu to
select it.
If you track your tutor works hours, use this screen to control the tutor sign-in options:
Use a tutor maximum sign-in period of X hours: Use this option to enter the maximum sign-in period for
tutors. Next use the radio buttons to determine what happens when this maximum sign-in period is
exceeded:
Sign tutor with X hour period: Choose this option if you want tutors who exceed the maximum
sign-in period to get signed out with X sign-in period. Set X to whatever you like using the X=
spinner box.
Ask tutor how long he stayed at the next visit: Choose this option to have AccuSQL/AccuTrack ask
the tutor at the next visit to enter the sign-in period for the previous visit in which the maximum
sign-in period was exceeded.
Lock tutor out and only allow admin to sign him in: Choose this option for maximum control over
the accuracy of the sign-in records. With this option selected, when a tutor exceeds the
ACCUSQL/ACCUTRACK 2019 REFERENCE MANUAL
169
< Back to Contents >
maximum sign-in period AccuSQL/AccuTrack will lock the tutor out. To unlock the tutor’s record,
the tutor must be signed out via the Tutor Visits Tracking >> Sign Out screen.
Display the Tasks screen when tutor sign in: Check this box if you want to track what tutors do with their
work time. If you only want to track the sign-in and sign-out times, uncheck this box.
Note: If you use this option, make sure to enter the staff Tasks via the Tutor Visits Tracking >>
Tasks screen. If you enable the Tasks screen at sign in, but have not created the tasks the tutors
would select at sign-in, you will get a “no tasks defined” message.
Tutor schedule start increment: Use the drop-down box to select the increment of the list box used to
enter the tutor’s schedule. For example, if you use “30”, then the tutor’s schedule can start and end at
8:00, 8:30, 9:00, and so on.
Tutor Pay rounding: Use this box to determine the rounding rules when calculating the tutor’s pay.
Rounding is applied to each session and not to the accumulated time. Select the first option if you do not
want to do any rounding. Select the second option if you want to round the time up (e.g. if X=15, 47
minutes are counted as one hour for pay purposes). Select the third option if you want to round up or
down to the nearest X minutes (e.g. if X=15, 47 minutes are counted as 45 minutes, while 53 minutes are
counted as 60 minutes).
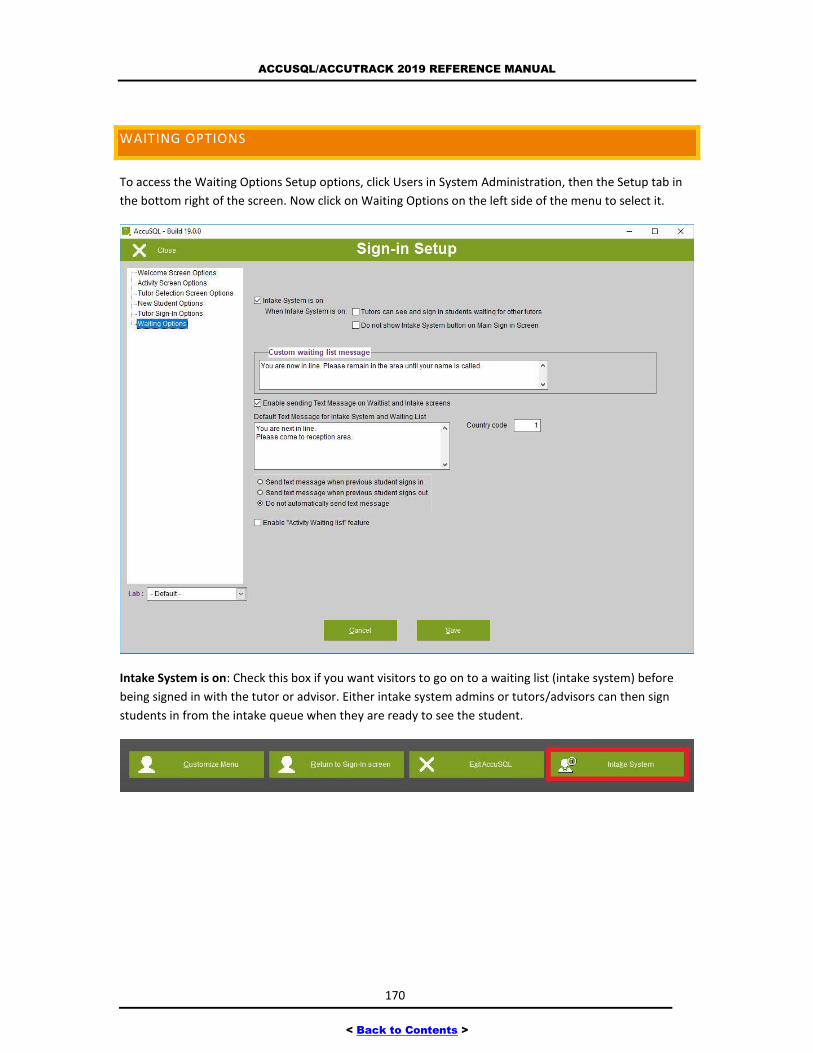
ACCUSQL/ACCUTRACK 2019 REFERENCE MANUAL
170
< Back to Contents >
WAITING OPTIONS
To access the Waiting Options Setup options, click Users in System Administration, then the Setup tab in
the bottom right of the screen. Now click on Waiting Options on the left side of the menu to select it.
Intake System is on: Check this box if you want visitors to go on to a waiting list (intake system) before
being signed in with the tutor or advisor. Either intake system admins or tutors/advisors can then sign
students in from the intake queue when they are ready to see the student.
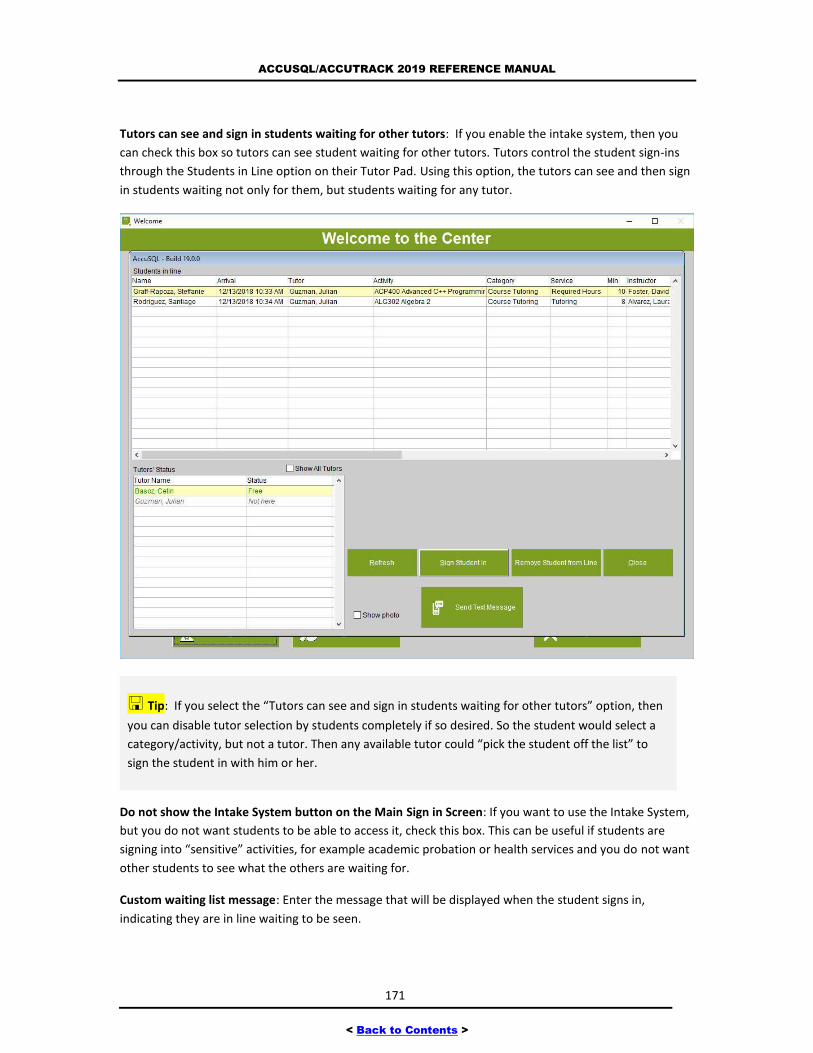
ACCUSQL/ACCUTRACK 2019 REFERENCE MANUAL
171
< Back to Contents >
Tutors can see and sign in students waiting for other tutors: If you enable the intake system, then you
can check this box so tutors can see student waiting for other tutors. Tutors control the student sign-ins
through the Students in Line option on their Tutor Pad. Using this option, the tutors can see and then sign
in students waiting not only for them, but students waiting for any tutor.
Tip: If you select the “Tutors can see and sign in students waiting for other tutors” option, then
you can disable tutor selection by students completely if so desired. So the student would select a
category/activity, but not a tutor. Then any available tutor could “pick the student off the list” to
sign the student in with him or her.
Do not show the Intake System button on the Main Sign in Screen: If you want to use the Intake System,
but you do not want students to be able to access it, check this box. This can be useful if students are
signing into “sensitive” activities, for example academic probation or health services and you do not want
other students to see what the others are waiting for.
Custom waiting list message: Enter the message that will be displayed when the student signs in,
indicating they are in line waiting to be seen.
ACCUSQL/ACCUTRACK 2019 REFERENCE MANUAL
172
< Back to Contents >
Enable sending Text Message on Waitlist and Intake screens: Check this box if you would like to send
text messages from either the Activity Waiting List or Intake System in AccuSQL/AccuTrack. If you select
this option, you can customize the message that will be sent in the edit box. If you are in the U.S. you
would leave the country code as 1. Using this method, the students will receive a text message on their
cell phones when they are ready to be helped.
Note: For this feature to work, you will need to configure text messaging in the
Communications >> Setup >> Text Messaging Configuration screen. Students will also need to have
their cell phone number entered in their student records.
Enable Activity Waiting list feature: Check this box is you want to restrict the number of students signing
into a certain activity. The number of students that can be in the activity at any one time is controlled by
the Max Students field value entered for the activity in the Sign-in Setup >> Categories & Activities screen.
Tip: The Intake System will place all students signing in into a waiting list where they are then
signed in by staff members as they are ready to see them. The Activity Waiting List allows you to
control how many students are allowed to be signed into any one activity at the same time.
STUDENT VISITS TRACKING
When you click on Student Visits Tracking from the Main Menu, you will see the following options:
Who’s In: See who is currently signed into AccuSQL/AccuTrack.
Sign In: Used to manually sign students in.
Sign Out: Used to manually sign students out.
Edit Sign-in Logs: To view and edit the student sign-ins that have been recorded in the system.
Activities Waiting List: If enabled, allows you to sign students in who are waiting for an open slot
for a particular activity.
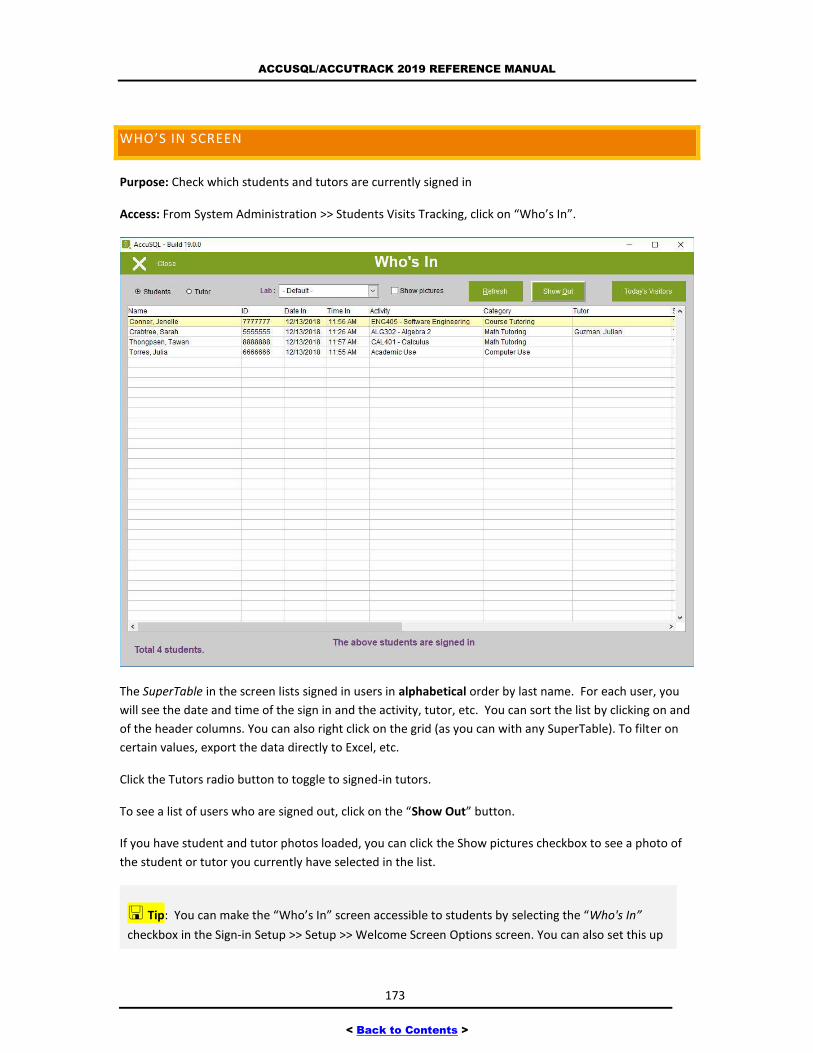
ACCUSQL/ACCUTRACK 2019 REFERENCE MANUAL
173
< Back to Contents >
WHO’S IN SCREEN
Purpose: Check which students and tutors are currently signed in
Access: From System Administration >> Students Visits Tracking, click on “Who’s In”.
The SuperTable in the screen lists signed in users in alphabetical order by last name. For each user, you
will see the date and time of the sign in and the activity, tutor, etc. You can sort the list by clicking on and
of the header columns. You can also right click on the grid (as you can with any SuperTable). To filter on
certain values, export the data directly to Excel, etc.
Click the Tutors radio button to toggle to signed-in tutors.
To see a list of users who are signed out, click on the “Show Out” button.
If you have student and tutor photos loaded, you can click the Show pictures checkbox to see a photo of
the student or tutor you currently have selected in the list.
Tip: You can make the “Who’s In” screen accessible to students by selecting the “Who's In”
checkbox in the Sign-in Setup >> Setup >> Welcome Screen Options screen. You can also set this up
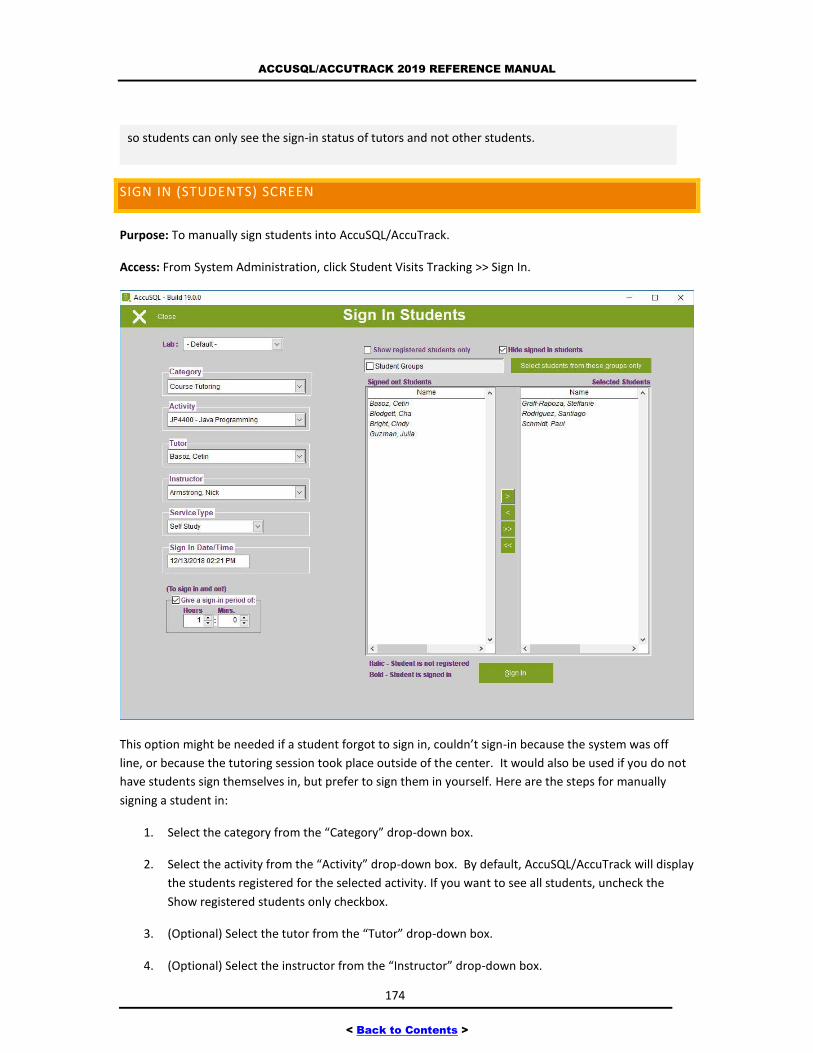
ACCUSQL/ACCUTRACK 2019 REFERENCE MANUAL
174
< Back to Contents >
so students can only see the sign-in status of tutors and not other students.
SIGN IN (STUDENTS) SCREEN
Purpose: To manually sign students into AccuSQL/AccuTrack.
Access: From System Administration, click Student Visits Tracking >> Sign In.
This option might be needed if a student forgot to sign in, couldn’t sign-in because the system was off
line, or because the tutoring session took place outside of the center. It would also be used if you do not
have students sign themselves in, but prefer to sign them in yourself. Here are the steps for manually
signing a student in:
1. Select the category from the “Category” drop-down box.
2. Select the activity from the “Activity” drop-down box. By default, AccuSQL/AccuTrack will display
the students registered for the selected activity. If you want to see all students, uncheck the
Show registered students only checkbox.
3. (Optional) Select the tutor from the “Tutor” drop-down box.
4. (Optional) Select the instructor from the “Instructor” drop-down box.
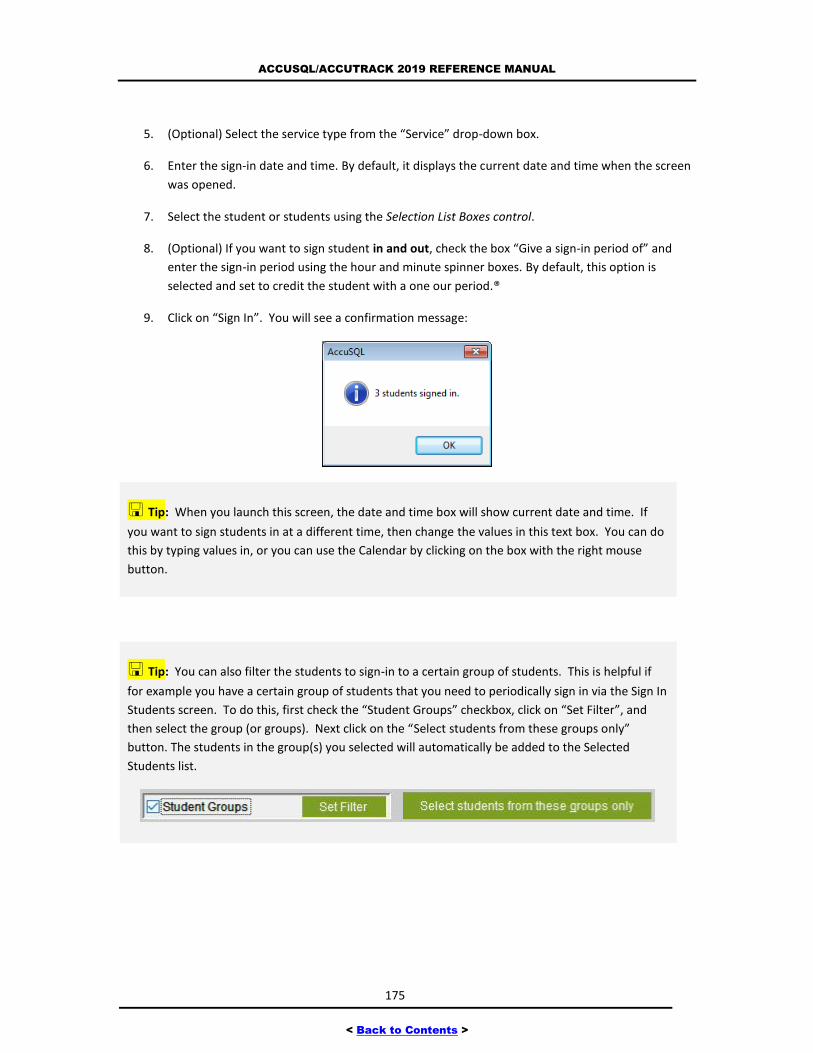
ACCUSQL/ACCUTRACK 2019 REFERENCE MANUAL
175
< Back to Contents >
5. (Optional) Select the service type from the “Service” drop-down box.
6. Enter the sign-in date and time. By default, it displays the current date and time when the screen
was opened.
7. Select the student or students using the Selection List Boxes control.
8. (Optional) If you want to sign student in and out, check the box “Give a sign-in period of” and
enter the sign-in period using the hour and minute spinner boxes. By default, this option is
selected and set to credit the student with a one our period.®
9. Click on “Sign In”. You will see a confirmation message:
Tip: When you launch this screen, the date and time box will show current date and time. If
you want to sign students in at a different time, then change the values in this text box. You can do
this by typing values in, or you can use the Calendar by clicking on the box with the right mouse
button.
Tip: You can also filter the students to sign-in to a certain group of students. This is helpful if
for example you have a certain group of students that you need to periodically sign in via the Sign In
Students screen. To do this, first check the “Student Groups” checkbox, click on “Set Filter”, and
then select the group (or groups). Next click on the “Select students from these groups only”
button. The students in the group(s) you selected will automatically be added to the Selected
Students list.
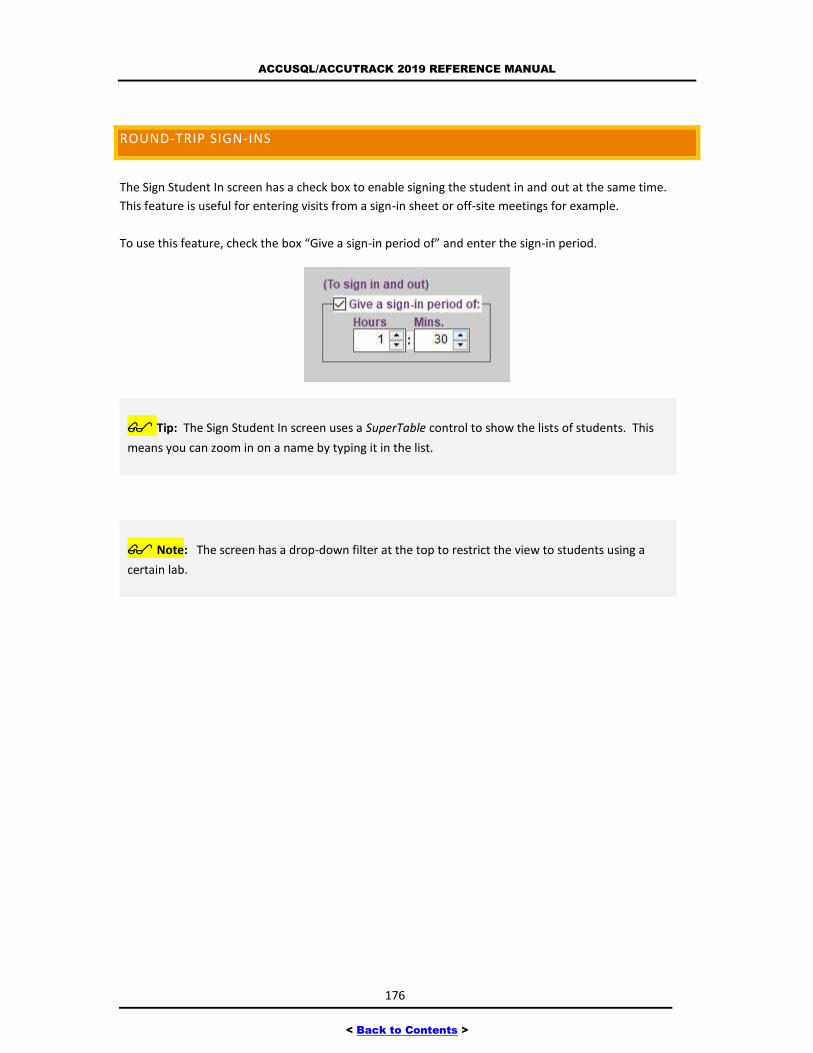
ACCUSQL/ACCUTRACK 2019 REFERENCE MANUAL
176
< Back to Contents >
ROUND-TRIP SIGN-INS
The Sign Student In screen has a check box to enable signing the student in and out at the same time.
This feature is useful for entering visits from a sign-in sheet or off-site meetings for example.
To use this feature, check the box “Give a sign-in period of” and enter the sign-in period.
Tip: The Sign Student In screen uses a SuperTable control to show the lists of students. This
means you can zoom in on a name by typing it in the list.
Note: The screen has a drop-down filter at the top to restrict the view to students using a
certain lab.
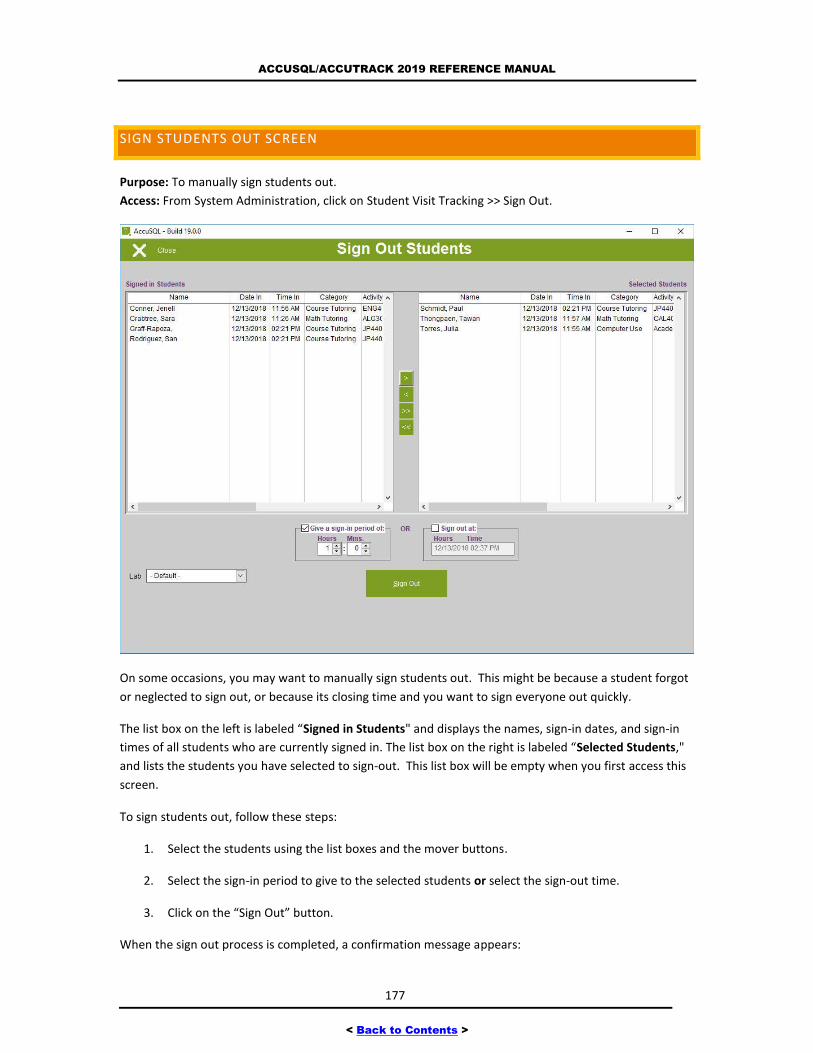
ACCUSQL/ACCUTRACK 2019 REFERENCE MANUAL
177
< Back to Contents >
SIGN STUDENTS OUT SCREEN
Purpose: To manually sign students out.
Access: From System Administration, click on Student Visit Tracking >> Sign Out.
On some occasions, you may want to manually sign students out. This might be because a student forgot
or neglected to sign out, or because its closing time and you want to sign everyone out quickly.
The list box on the left is labeled “Signed in Students" and displays the names, sign-in dates, and sign-in
times of all students who are currently signed in. The list box on the right is labeled “Selected Students,"
and lists the students you have selected to sign-out. This list box will be empty when you first access this
screen.
To sign students out, follow these steps:
1. Select the students using the list boxes and the mover buttons.
2. Select the sign-in period to give to the selected students or select the sign-out time.
3. Click on the “Sign Out” button.
When the sign out process is completed, a confirmation message appears:
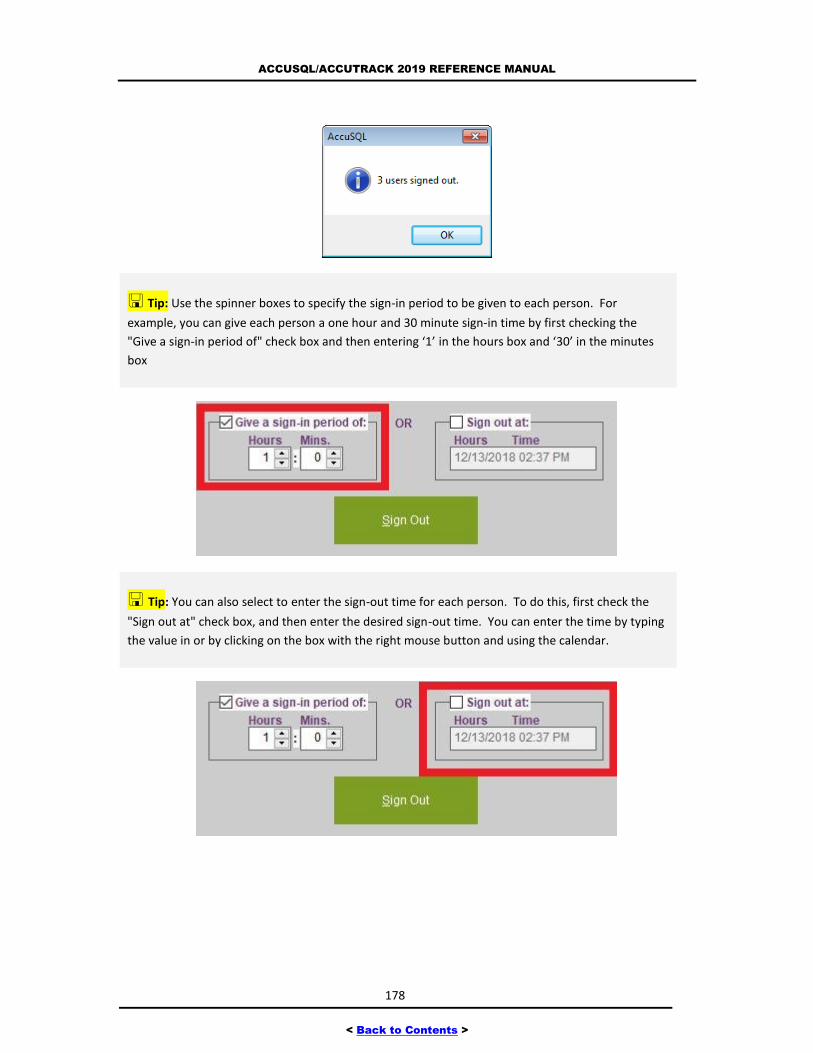
ACCUSQL/ACCUTRACK 2019 REFERENCE MANUAL
178
< Back to Contents >
Tip: Use the spinner boxes to specify the sign-in period to be given to each person. For
example, you can give each person a one hour and 30 minute sign-in time by first checking the
"Give a sign-in period of" check box and then entering ‘1’ in the hours box and ‘30’ in the minutes
box
Tip: You can also select to enter the sign-out time for each person. To do this, first check the
"Sign out at" check box, and then enter the desired sign-out time. You can enter the time by typing
the value in or by clicking on the box with the right mouse button and using the calendar.
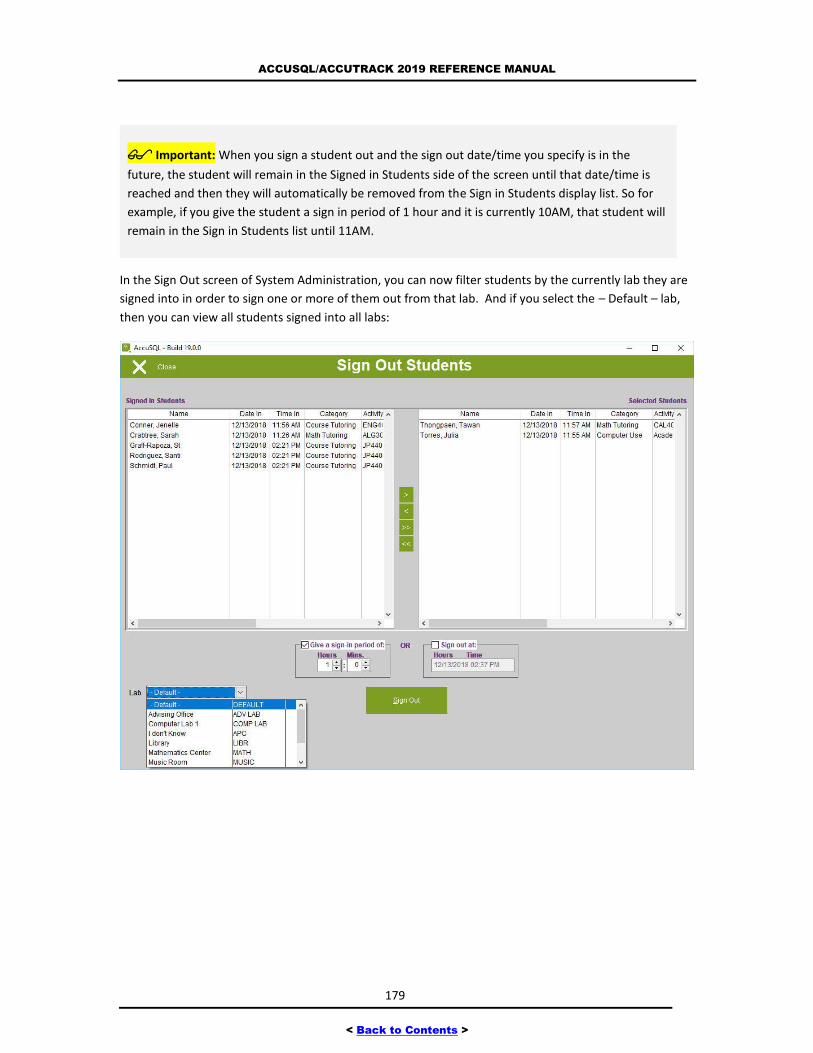
ACCUSQL/ACCUTRACK 2019 REFERENCE MANUAL
179
< Back to Contents >
Important: When you sign a student out and the sign out date/time you specify is in the
future, the student will remain in the Signed in Students side of the screen until that date/time is
reached and then they will automatically be removed from the Sign in Students display list. So for
example, if you give the student a sign in period of 1 hour and it is currently 10AM, that student will
remain in the Sign in Students list until 11AM.
In the Sign Out screen of System Administration, you can now filter students by the currently lab they are
signed into in order to sign one or more of them out from that lab. And if you select the – Default – lab,
then you can view all students signed into all labs:
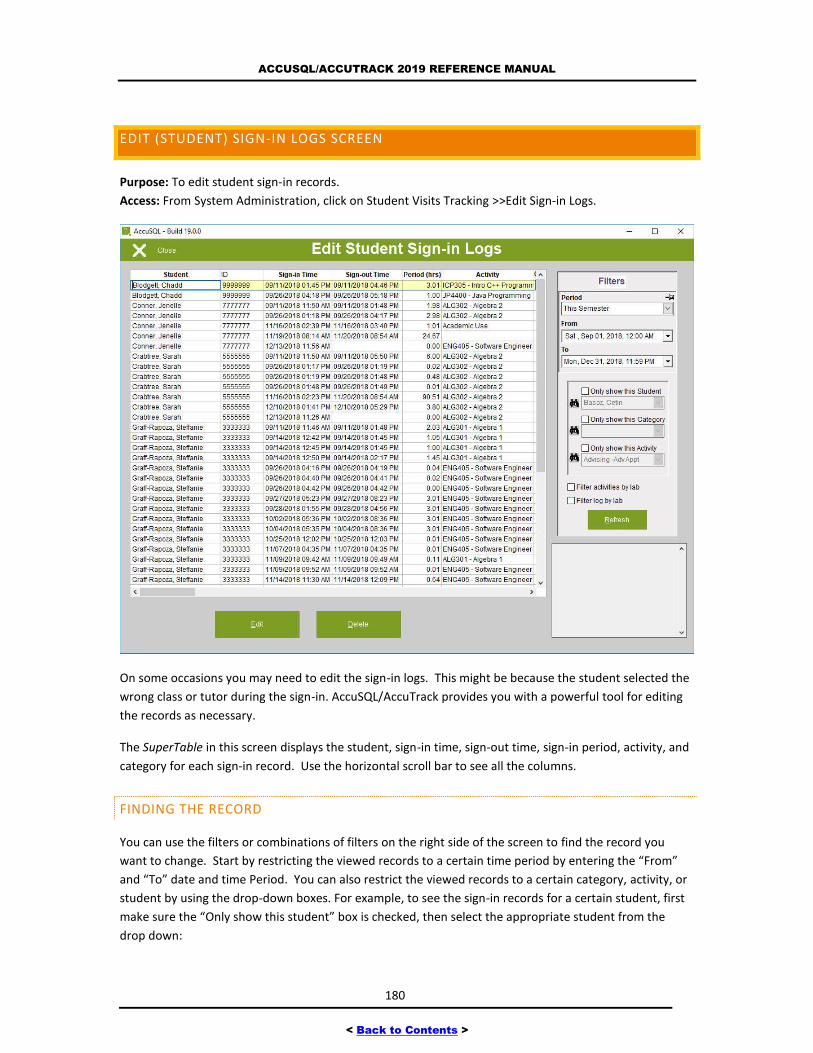
ACCUSQL/ACCUTRACK 2019 REFERENCE MANUAL
180
< Back to Contents >
EDIT (STUDENT) SIGN-IN LOGS SCREEN
Purpose: To edit student sign-in records.
Access: From System Administration, click on Student Visits Tracking >>Edit Sign-in Logs.
On some occasions you may need to edit the sign-in logs. This might be because the student selected the
wrong class or tutor during the sign-in. AccuSQL/AccuTrack provides you with a powerful tool for editing
the records as necessary.
The SuperTable in this screen displays the student, sign-in time, sign-out time, sign-in period, activity, and
category for each sign-in record. Use the horizontal scroll bar to see all the columns.
FINDING THE RECORD
You can use the filters or combinations of filters on the right side of the screen to find the record you
want to change. Start by restricting the viewed records to a certain time period by entering the “From”
and “To” date and time Period. You can also restrict the viewed records to a certain category, activity, or
student by using the drop-down boxes. For example, to see the sign-in records for a certain student, first
make sure the “Only show this student” box is checked, then select the appropriate student from the
drop down:
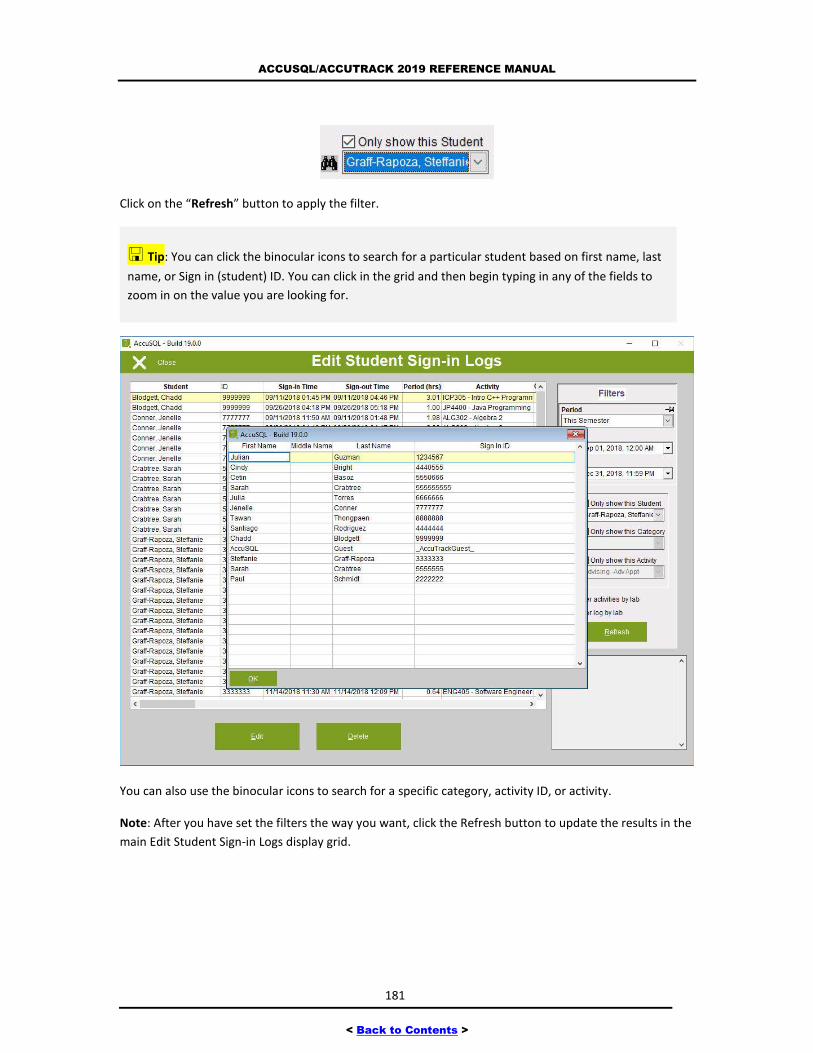
ACCUSQL/ACCUTRACK 2019 REFERENCE MANUAL
181
< Back to Contents >
Click on the “Refresh” button to apply the filter.
Tip: You can click the binocular icons to search for a particular student based on first name, last
name, or Sign in (student) ID. You can click in the grid and then begin typing in any of the fields to
zoom in on the value you are looking for.
You can also use the binocular icons to search for a specific category, activity ID, or activity.
Note: After you have set the filters the way you want, click the Refresh button to update the results in the
main Edit Student Sign-in Logs display grid.
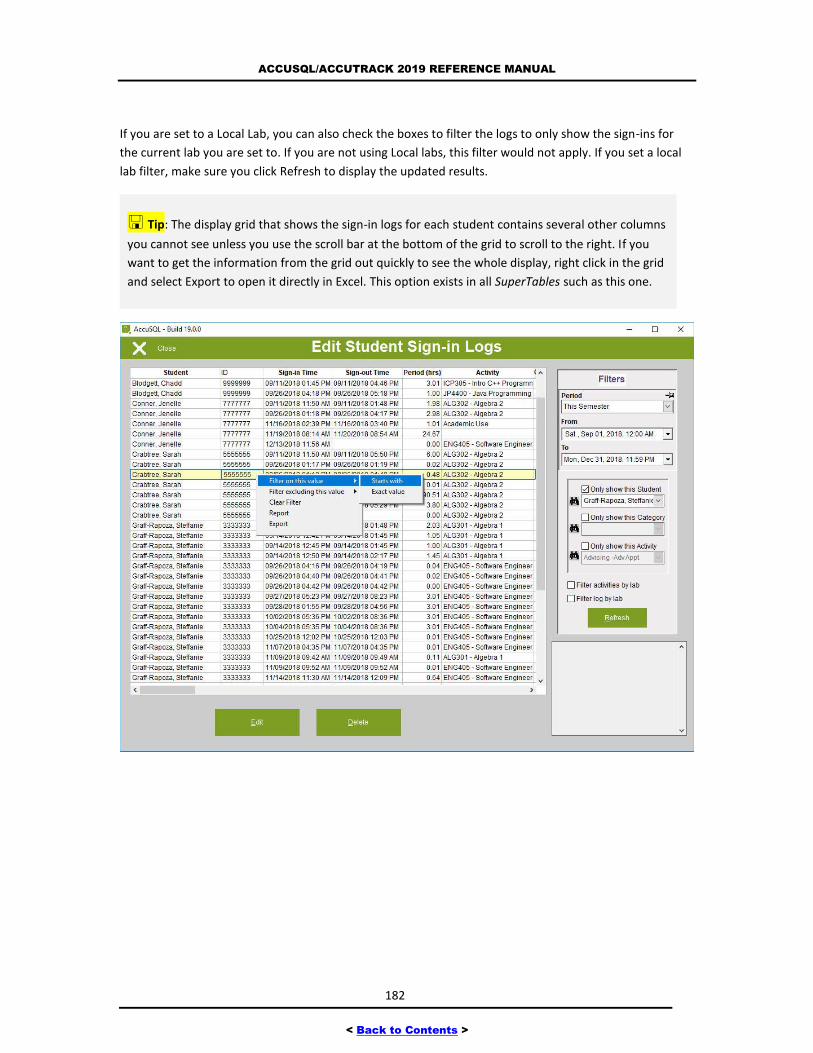
ACCUSQL/ACCUTRACK 2019 REFERENCE MANUAL
182
< Back to Contents >
If you are set to a Local Lab, you can also check the boxes to filter the logs to only show the sign-ins for
the current lab you are set to. If you are not using Local labs, this filter would not apply. If you set a local
lab filter, make sure you click Refresh to display the updated results.
Tip: The display grid that shows the sign-in logs for each student contains several other columns
you cannot see unless you use the scroll bar at the bottom of the grid to scroll to the right. If you
want to get the information from the grid out quickly to see the whole display, right click in the grid
and select Export to open it directly in Excel. This option exists in all SuperTables such as this one.
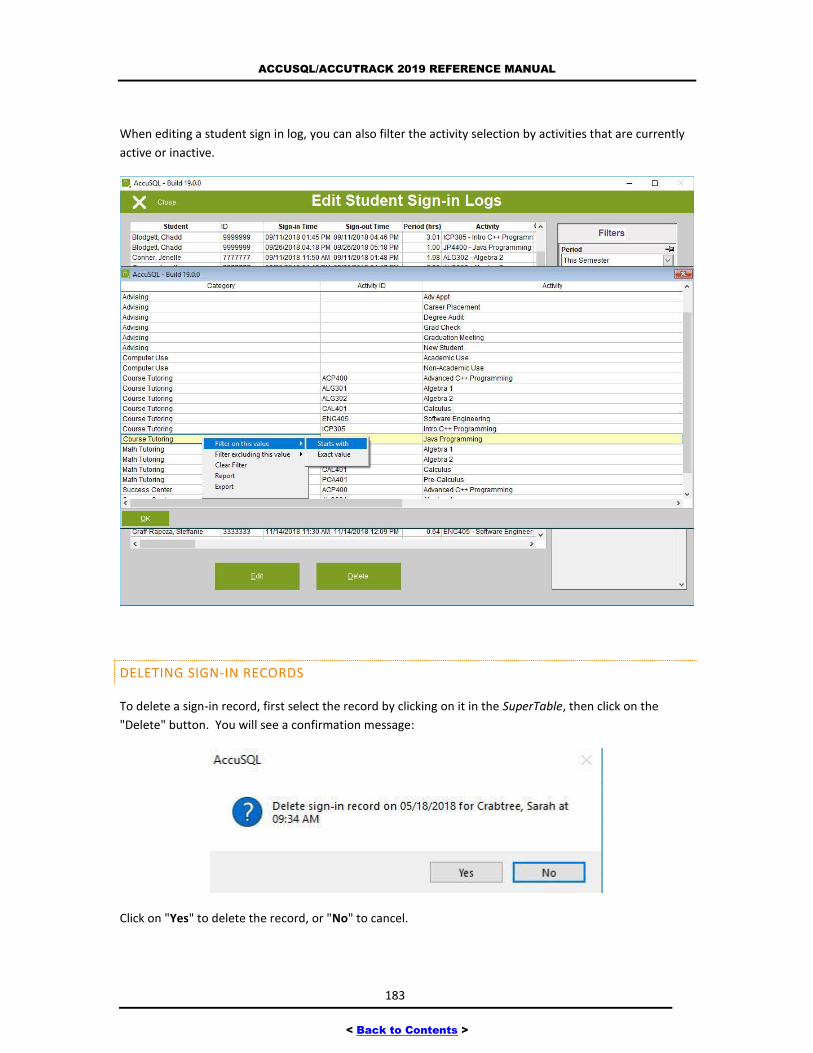
ACCUSQL/ACCUTRACK 2019 REFERENCE MANUAL
183
< Back to Contents >
When editing a student sign in log, you can also filter the activity selection by activities that are currently
active or inactive.
DELETING SIGN-IN RECORDS
To delete a sign-in record, first select the record by clicking on it in the SuperTable, then click on the
"Delete" button. You will see a confirmation message:
Click on "Yes" to delete the record, or "No" to cancel.

ACCUSQL/ACCUTRACK 2019 REFERENCE MANUAL
184
< Back to Contents >
Warning: If you delete a sign-in record, it will be gone forever, so be careful using this option.
EDITING STUDENT SIGN-IN RECORDS
To edit a record, select it by clicking on it in the grid, then click on the "Edit" button. This will bring up the
Edit Record box.
The box shows the sign-in record. The first box is labeled "In" and shows the sign-in date and time. The
second box is labeled "Out" and shows the sign-out date and time. If the out box is empty then the
student has not signed out yet. The third box is labeled "Period" and shows the sign-in period in hours
and fraction of an hour.
Under these boxes you will see six drop-down boxes. The first drop-down is labeled "Category" and
shows the category signed into. The second drop-down is labeled "Activity" and shows the activity signed
into. The third drop-down is labeled "Name" and shows the name of the student. The fourth drop-down
is labeled "Tutor" and shows the name of the tutor if a tutor was selected at the time of sign-in. The fifth
is the Service Type that was selected. The sixth is the Instructor that was selected.
To change the sign-in date or time, simply enter the corrections in the box. The same can be done with
the sign-out date and time. As usual, you can right click on the date boxes to use the calendar. Note that
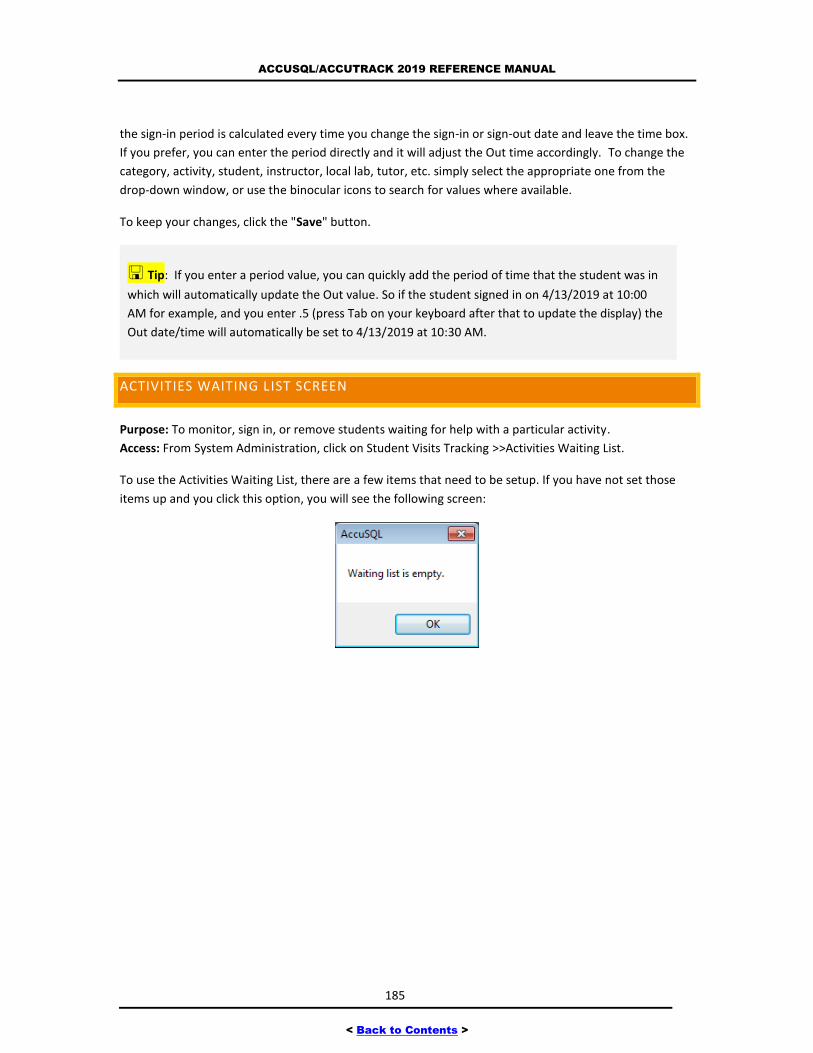
ACCUSQL/ACCUTRACK 2019 REFERENCE MANUAL
185
< Back to Contents >
the sign-in period is calculated every time you change the sign-in or sign-out date and leave the time box.
If you prefer, you can enter the period directly and it will adjust the Out time accordingly. To change the
category, activity, student, instructor, local lab, tutor, etc. simply select the appropriate one from the
drop-down window, or use the binocular icons to search for values where available.
To keep your changes, click the "Save" button.
Tip: If you enter a period value, you can quickly add the period of time that the student was in
which will automatically update the Out value. So if the student signed in on 4/13/2019 at 10:00
AM for example, and you enter .5 (press Tab on your keyboard after that to update the display) the
Out date/time will automatically be set to 4/13/2019 at 10:30 AM.
ACTIVITIES WAITING LIST SCREEN
Purpose: To monitor, sign in, or remove students waiting for help with a particular activity.
Access: From System Administration, click on Student Visits Tracking >>Activities Waiting List.
To use the Activities Waiting List, there are a few items that need to be setup. If you have not set those
items up and you click this option, you will see the following screen:
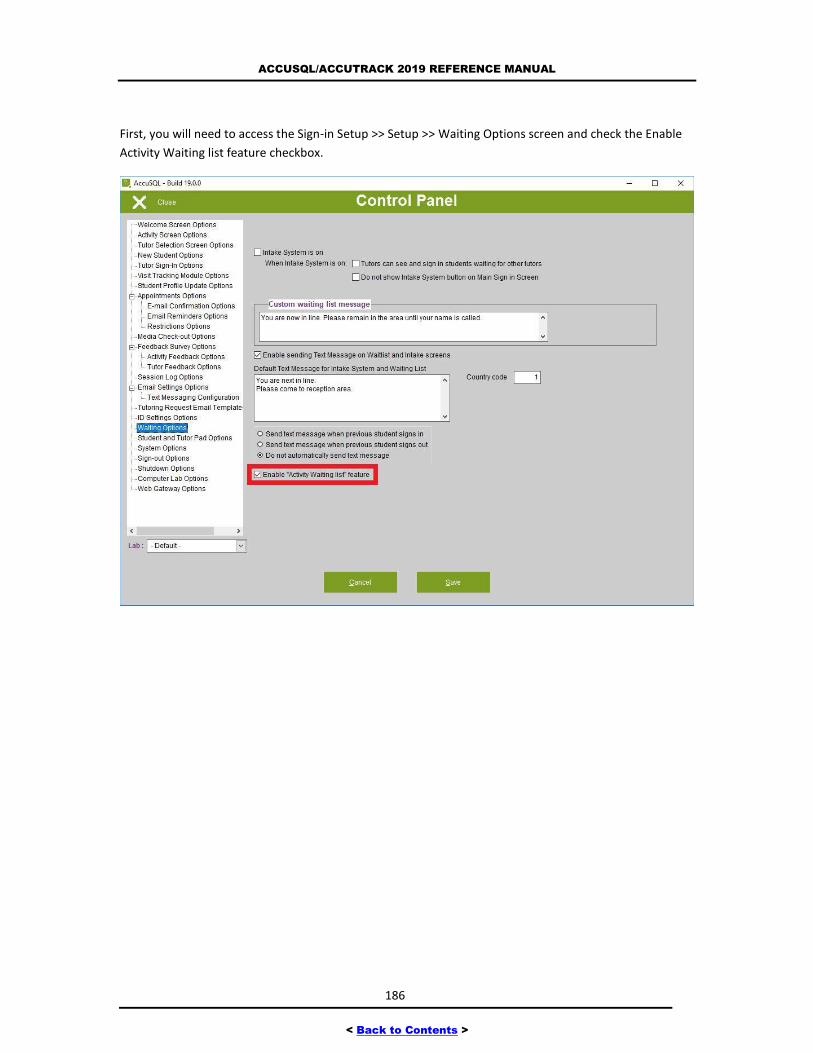
ACCUSQL/ACCUTRACK 2019 REFERENCE MANUAL
186
< Back to Contents >
First, you will need to access the Sign-in Setup >> Setup >> Waiting Options screen and check the Enable
Activity Waiting list feature checkbox.
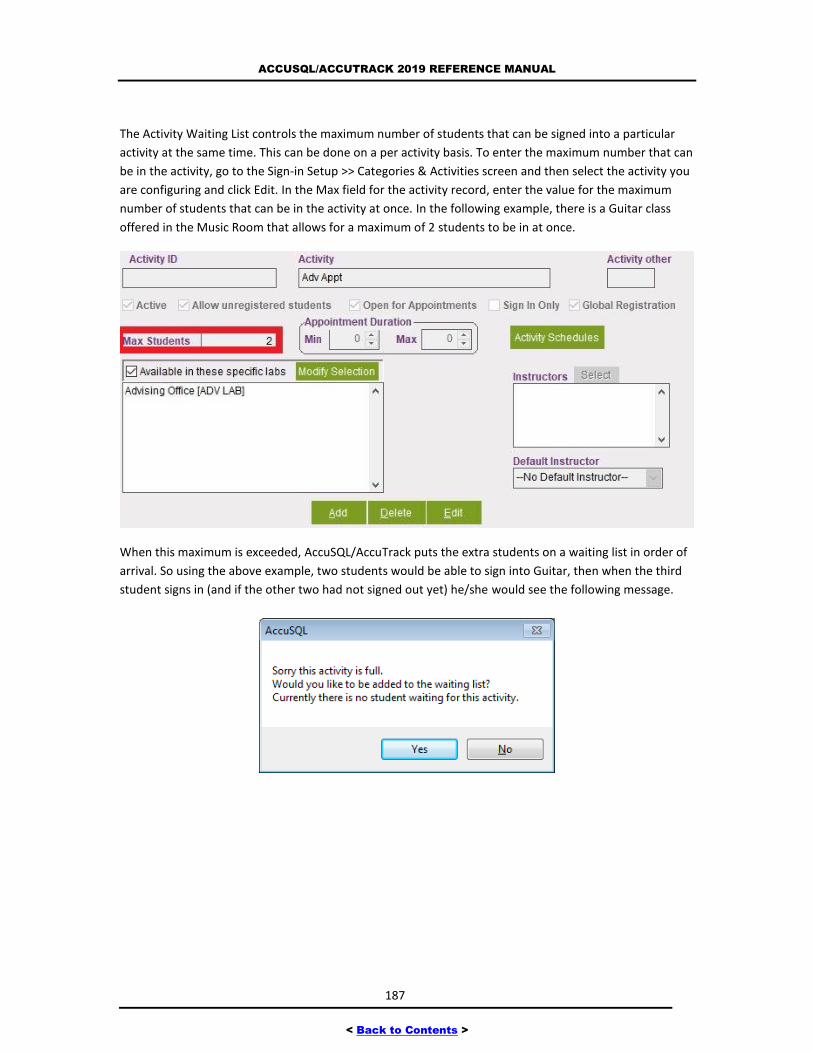
ACCUSQL/ACCUTRACK 2019 REFERENCE MANUAL
187
< Back to Contents >
The Activity Waiting List controls the maximum number of students that can be signed into a particular
activity at the same time. This can be done on a per activity basis. To enter the maximum number that can
be in the activity, go to the Sign-in Setup >> Categories & Activities screen and then select the activity you
are configuring and click Edit. In the Max field for the activity record, enter the value for the maximum
number of students that can be in the activity at once. In the following example, there is a Guitar class
offered in the Music Room that allows for a maximum of 2 students to be in at once.
When this maximum is exceeded, AccuSQL/AccuTrack puts the extra students on a waiting list in order of
arrival. So using the above example, two students would be able to sign into Guitar, then when the third
student signs in (and if the other two had not signed out yet) he/she would see the following message.
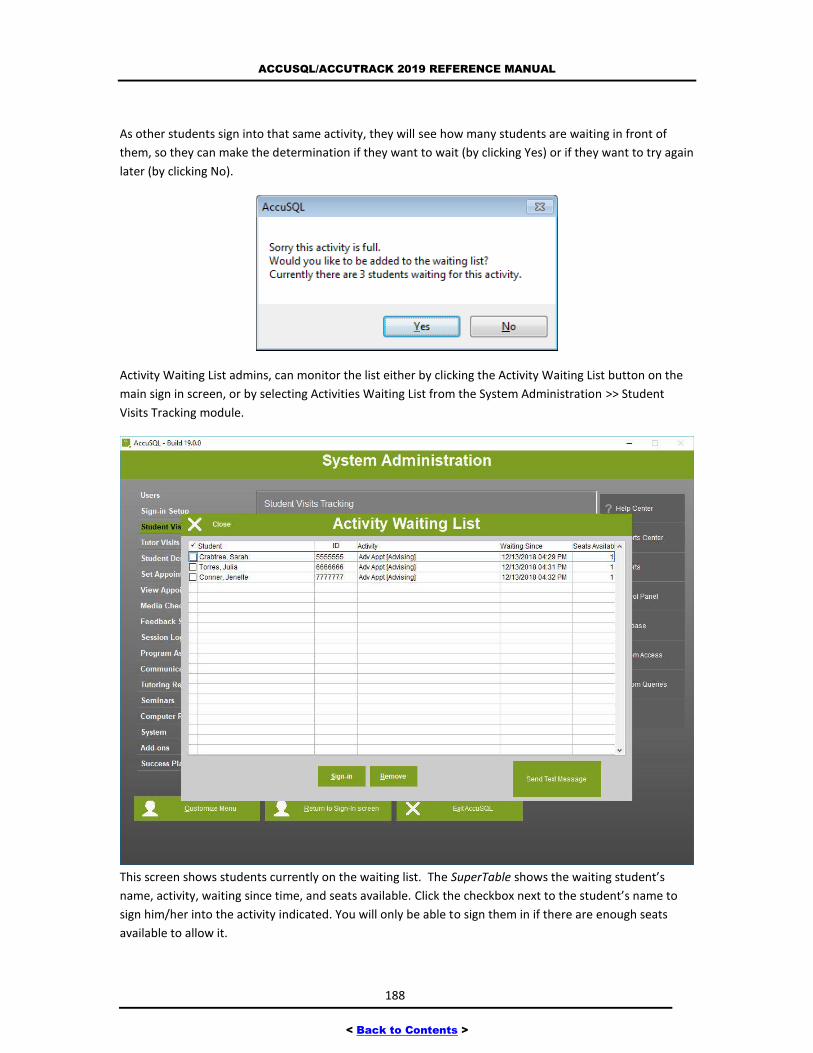
ACCUSQL/ACCUTRACK 2019 REFERENCE MANUAL
188
< Back to Contents >
As other students sign into that same activity, they will see how many students are waiting in front of
them, so they can make the determination if they want to wait (by clicking Yes) or if they want to try again
later (by clicking No).
Activity Waiting List admins, can monitor the list either by clicking the Activity Waiting List button on the
main sign in screen, or by selecting Activities Waiting List from the System Administration >> Student
Visits Tracking module.
This screen shows students currently on the waiting list. The SuperTable shows the waiting student’s
name, activity, waiting since time, and seats available. Click the checkbox next to the student’s name to
sign him/her into the activity indicated. You will only be able to sign them in if there are enough seats
available to allow it.
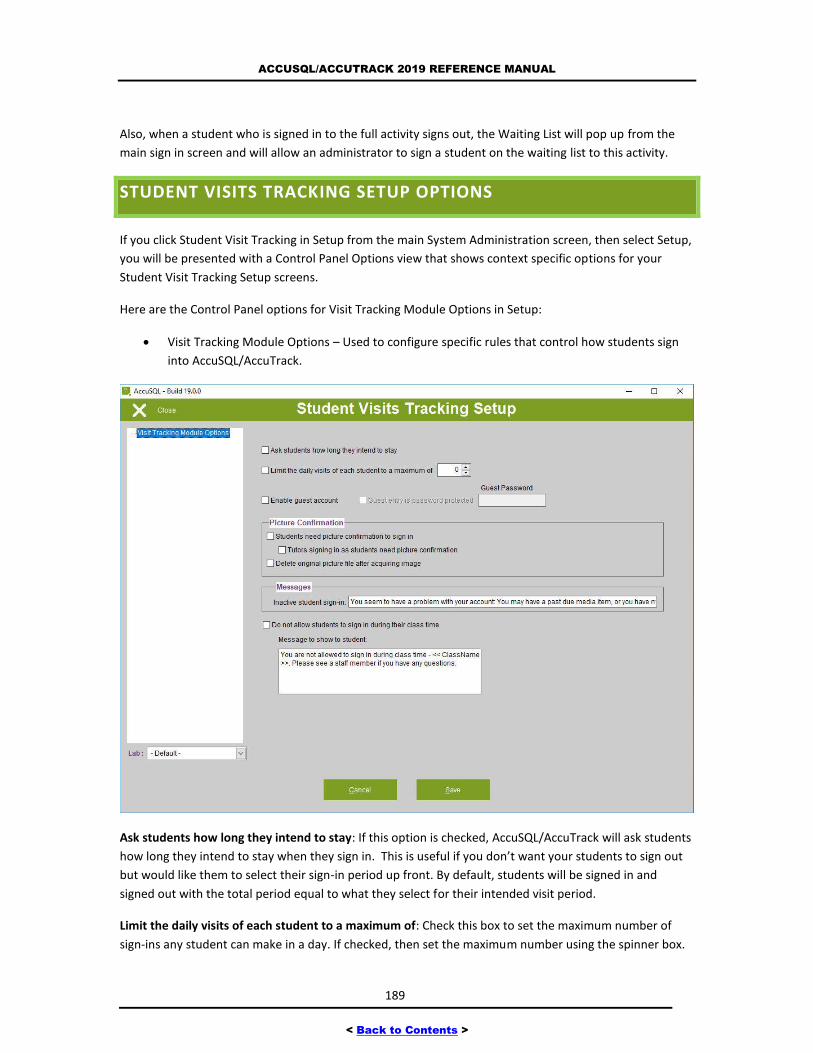
ACCUSQL/ACCUTRACK 2019 REFERENCE MANUAL
189
< Back to Contents >
Also, when a student who is signed in to the full activity signs out, the Waiting List will pop up from the
main sign in screen and will allow an administrator to sign a student on the waiting list to this activity.
STUDENT VISITS TRACKING SETUP OPTIONS
If you click Student Visit Tracking in Setup from the main System Administration screen, then select Setup,
you will be presented with a Control Panel Options view that shows context specific options for your
Student Visit Tracking Setup screens.
Here are the Control Panel options for Visit Tracking Module Options in Setup:
Visit Tracking Module Options – Used to configure specific rules that control how students sign
into AccuSQL/AccuTrack.
Ask students how long they intend to stay: If this option is checked, AccuSQL/AccuTrack will ask students
how long they intend to stay when they sign in. This is useful if you don’t want your students to sign out
but would like them to select their sign-in period up front. By default, students will be signed in and
signed out with the total period equal to what they select for their intended visit period.
Limit the daily visits of each student to a maximum of: Check this box to set the maximum number of
sign-ins any student can make in a day. If checked, then set the maximum number using the spinner box.
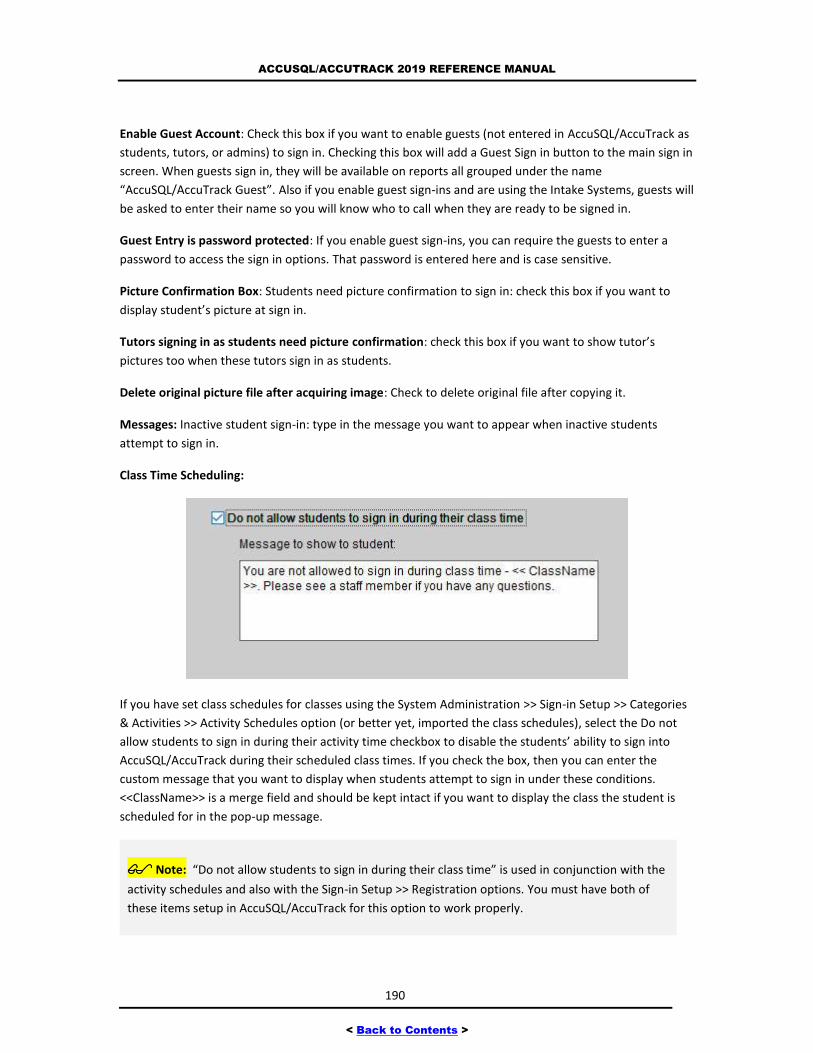
ACCUSQL/ACCUTRACK 2019 REFERENCE MANUAL
190
< Back to Contents >
Enable Guest Account: Check this box if you want to enable guests (not entered in AccuSQL/AccuTrack as
students, tutors, or admins) to sign in. Checking this box will add a Guest Sign in button to the main sign in
screen. When guests sign in, they will be available on reports all grouped under the name
“AccuSQL/AccuTrack Guest”. Also if you enable guest sign-ins and are using the Intake Systems, guests will
be asked to enter their name so you will know who to call when they are ready to be signed in.
Guest Entry is password protected: If you enable guest sign-ins, you can require the guests to enter a
password to access the sign in options. That password is entered here and is case sensitive.
Picture Confirmation Box: Students need picture confirmation to sign in: check this box if you want to
display student’s picture at sign in.
Tutors signing in as students need picture confirmation: check this box if you want to show tutor’s
pictures too when these tutors sign in as students.
Delete original picture file after acquiring image: Check to delete original file after copying it.
Messages: Inactive student sign-in: type in the message you want to appear when inactive students
attempt to sign in.
Class Time Scheduling:
If you have set class schedules for classes using the System Administration >> Sign-in Setup >> Categories
& Activities >> Activity Schedules option (or better yet, imported the class schedules), select the Do not
allow students to sign in during their activity time checkbox to disable the students’ ability to sign into
AccuSQL/AccuTrack during their scheduled class times. If you check the box, then you can enter the
custom message that you want to display when students attempt to sign in under these conditions.
<<ClassName>> is a merge field and should be kept intact if you want to display the class the student is
scheduled for in the pop-up message.
Note: “Do not allow students to sign in during their class time” is used in conjunction with the
activity schedules and also with the Sign-in Setup >> Registration options. You must have both of
these items setup in AccuSQL/AccuTrack for this option to work properly.
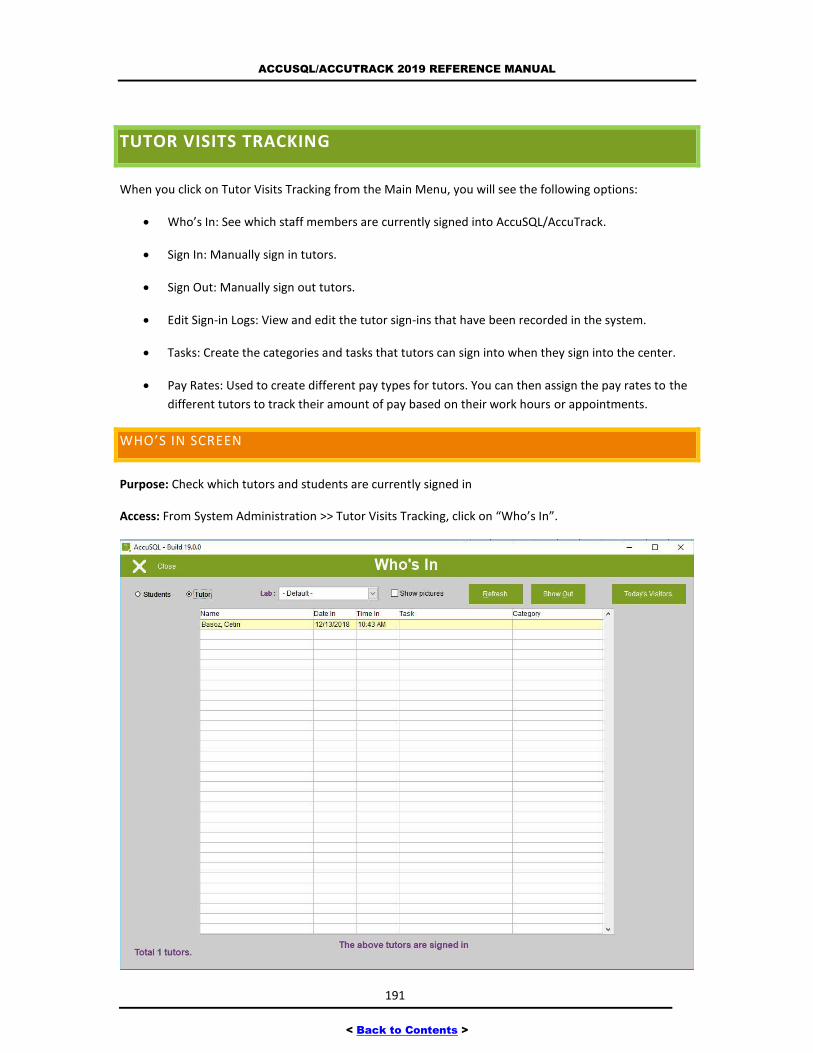
ACCUSQL/ACCUTRACK 2019 REFERENCE MANUAL
191
< Back to Contents >
TUTOR VISITS TRACKING
When you click on Tutor Visits Tracking from the Main Menu, you will see the following options:
Who’s In: See which staff members are currently signed into AccuSQL/AccuTrack.
Sign In: Manually sign in tutors.
Sign Out: Manually sign out tutors.
Edit Sign-in Logs: View and edit the tutor sign-ins that have been recorded in the system.
Tasks: Create the categories and tasks that tutors can sign into when they sign into the center.
Pay Rates: Used to create different pay types for tutors. You can then assign the pay rates to the
different tutors to track their amount of pay based on their work hours or appointments.
WHO’S IN SCREEN
Purpose: Check which tutors and students are currently signed in
Access: From System Administration >> Tutor Visits Tracking, click on “Who’s In”.
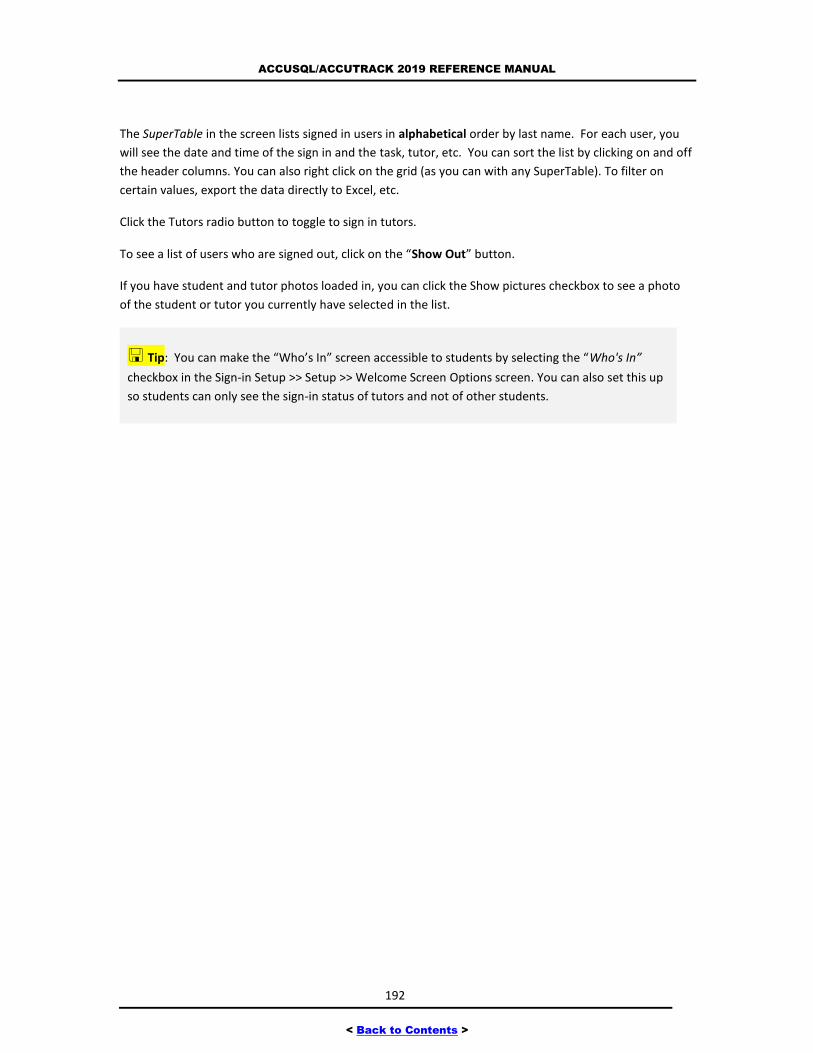
ACCUSQL/ACCUTRACK 2019 REFERENCE MANUAL
192
< Back to Contents >
The SuperTable in the screen lists signed in users in alphabetical order by last name. For each user, you
will see the date and time of the sign in and the task, tutor, etc. You can sort the list by clicking on and off
the header columns. You can also right click on the grid (as you can with any SuperTable). To filter on
certain values, export the data directly to Excel, etc.
Click the Tutors radio button to toggle to sign in tutors.
To see a list of users who are signed out, click on the “Show Out” button.
If you have student and tutor photos loaded in, you can click the Show pictures checkbox to see a photo
of the student or tutor you currently have selected in the list.
Tip: You can make the “Who’s In” screen accessible to students by selecting the “Who's In”
checkbox in the Sign-in Setup >> Setup >> Welcome Screen Options screen. You can also set this up
so students can only see the sign-in status of tutors and not of other students.
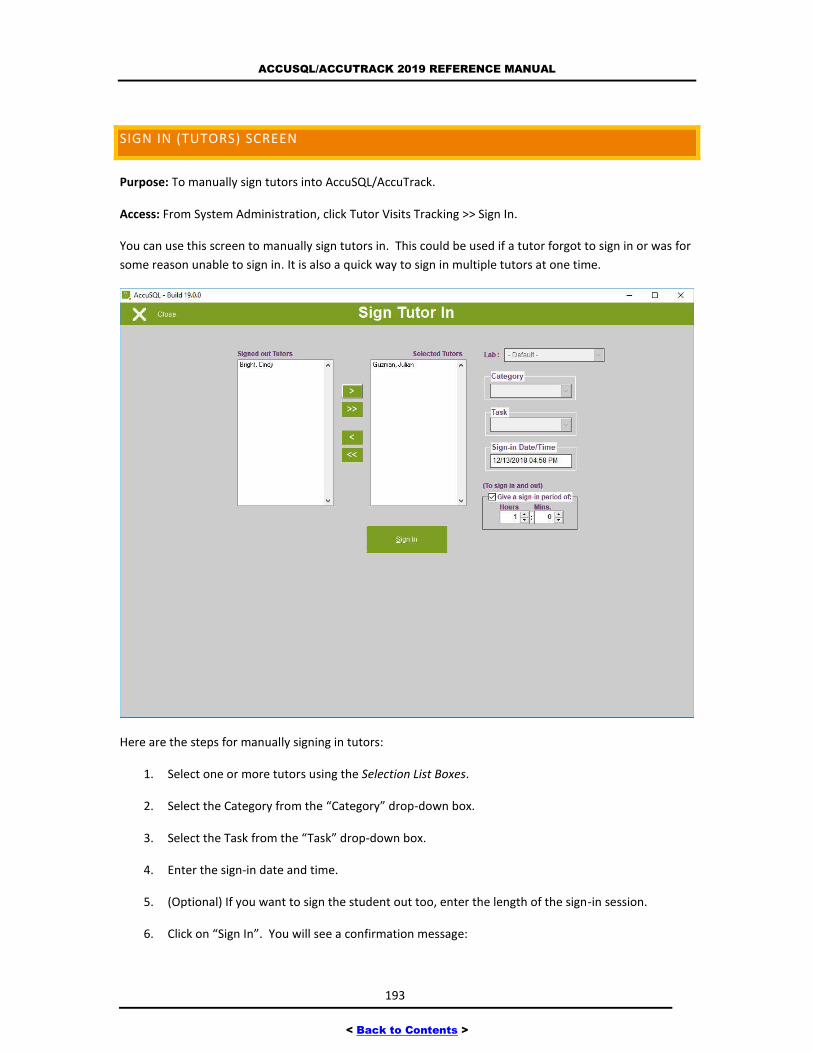
ACCUSQL/ACCUTRACK 2019 REFERENCE MANUAL
193
< Back to Contents >
SIGN IN (TUTORS) SCREEN
Purpose: To manually sign tutors into AccuSQL/AccuTrack.
Access: From System Administration, click Tutor Visits Tracking >> Sign In.
You can use this screen to manually sign tutors in. This could be used if a tutor forgot to sign in or was for
some reason unable to sign in. It is also a quick way to sign in multiple tutors at one time.
Here are the steps for manually signing in tutors:
1. Select one or more tutors using the Selection List Boxes.
2. Select the Category from the “Category” drop-down box.
3. Select the Task from the “Task” drop-down box.
4. Enter the sign-in date and time.
5. (Optional) If you want to sign the student out too, enter the length of the sign-in session.
6. Click on “Sign In”. You will see a confirmation message:

ACCUSQL/ACCUTRACK 2019 REFERENCE MANUAL
194
< Back to Contents >
Tip: When you launch this screen, the date and time box will show the current date and time.
If you want to sign students in at a different date and/or time, change the values in this text box by
typing values in, or you can use the Calendar by clicking on the box with the right mouse button.
Tip: The tutor category and task drop-down boxes will be disabled if you choose not to ask
tutors to select a task when they sign in. Otherwise the boxes will be enabled.
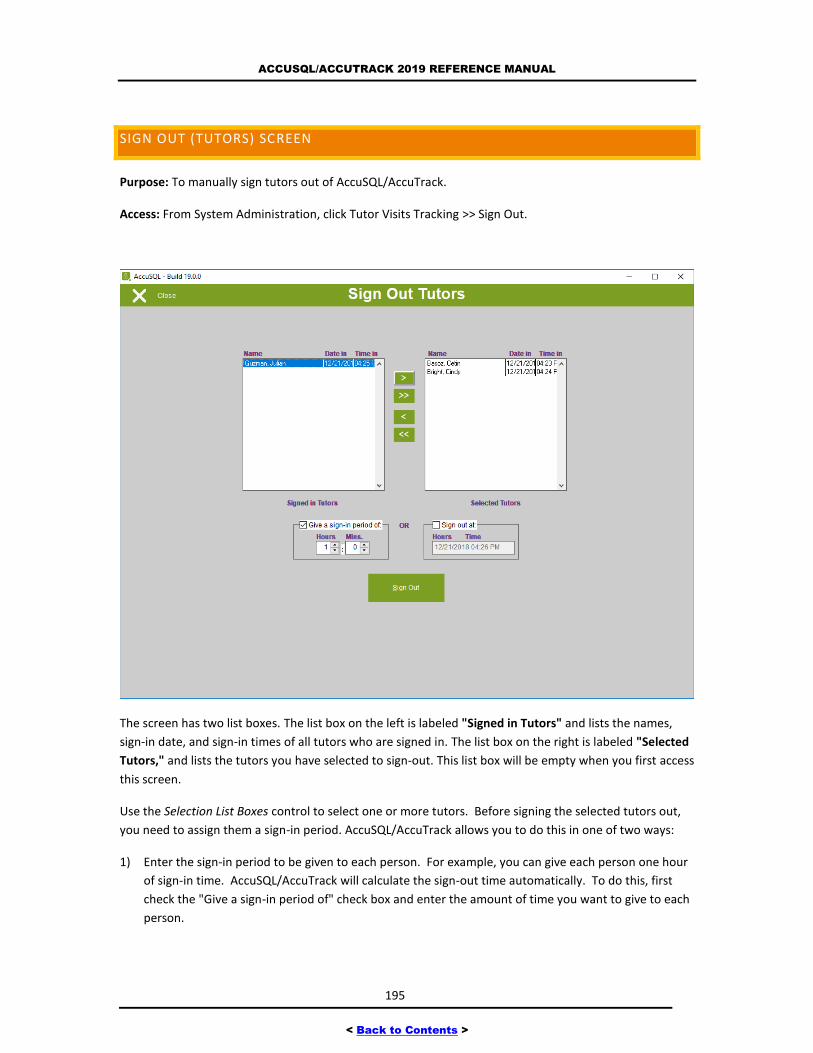
ACCUSQL/ACCUTRACK 2019 REFERENCE MANUAL
195
< Back to Contents >
SIGN OUT (TUTORS) SCREEN
Purpose: To manually sign tutors out of AccuSQL/AccuTrack.
Access: From System Administration, click Tutor Visits Tracking >> Sign Out.
The screen has two list boxes. The list box on the left is labeled "Signed in Tutors" and lists the names,
sign-in date, and sign-in times of all tutors who are signed in. The list box on the right is labeled "Selected
Tutors," and lists the tutors you have selected to sign-out. This list box will be empty when you first access
this screen.
Use the Selection List Boxes control to select one or more tutors. Before signing the selected tutors out,
you need to assign them a sign-in period. AccuSQL/AccuTrack allows you to do this in one of two ways:
1) Enter the sign-in period to be given to each person. For example, you can give each person one hour
of sign-in time. AccuSQL/AccuTrack will calculate the sign-out time automatically. To do this, first
check the "Give a sign-in period of" check box and enter the amount of time you want to give to each
person.
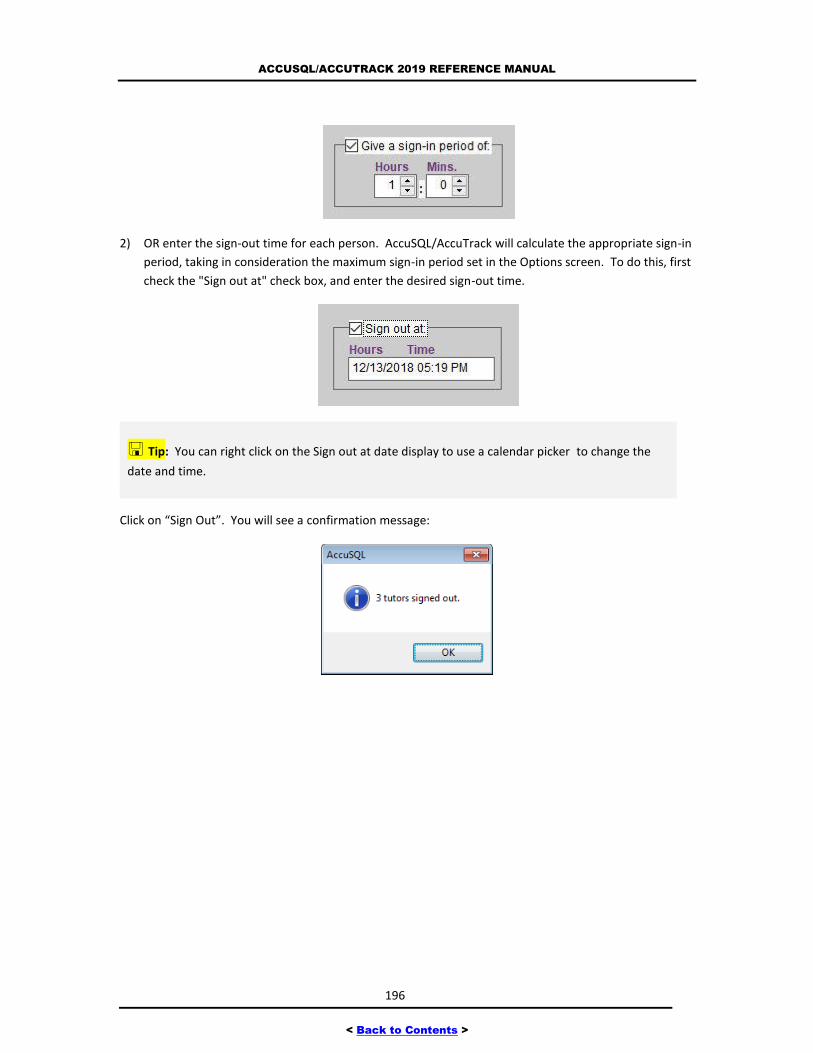
ACCUSQL/ACCUTRACK 2019 REFERENCE MANUAL
196
< Back to Contents >
2) OR enter the sign-out time for each person. AccuSQL/AccuTrack will calculate the appropriate sign-in
period, taking in consideration the maximum sign-in period set in the Options screen. To do this, first
check the "Sign out at" check box, and enter the desired sign-out time.
Tip: You can right click on the Sign out at date display to use a calendar picker to change the
date and time.
Click on “Sign Out”. You will see a confirmation message:
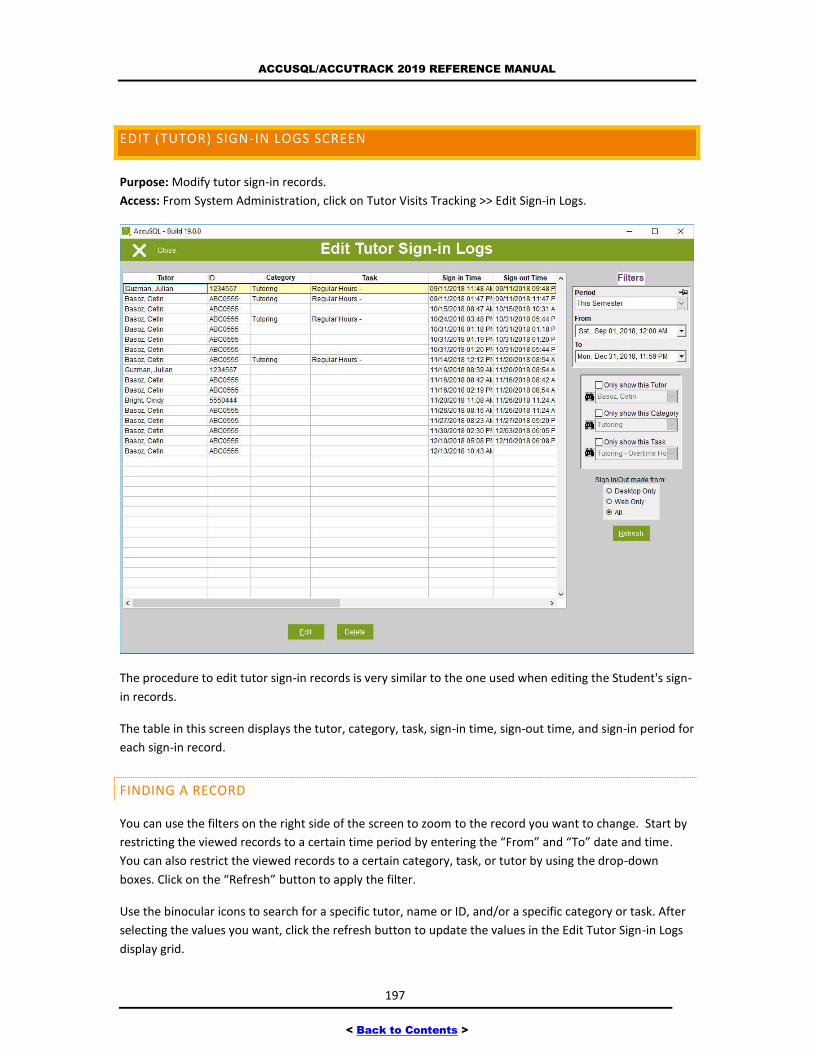
ACCUSQL/ACCUTRACK 2019 REFERENCE MANUAL
197
< Back to Contents >
EDIT (TUTOR) SIGN-IN LOGS SCREEN
Purpose: Modify tutor sign-in records.
Access: From System Administration, click on Tutor Visits Tracking >> Edit Sign-in Logs.
The procedure to edit tutor sign-in records is very similar to the one used when editing the Student's sign-
in records.
The table in this screen displays the tutor, category, task, sign-in time, sign-out time, and sign-in period for
each sign-in record.
FINDING A RECORD
You can use the filters on the right side of the screen to zoom to the record you want to change. Start by
restricting the viewed records to a certain time period by entering the “From” and “To” date and time.
You can also restrict the viewed records to a certain category, task, or tutor by using the drop-down
boxes. Click on the “Refresh” button to apply the filter.
Use the binocular icons to search for a specific tutor, name or ID, and/or a specific category or task. After
selecting the values you want, click the refresh button to update the values in the Edit Tutor Sign-in Logs
display grid.
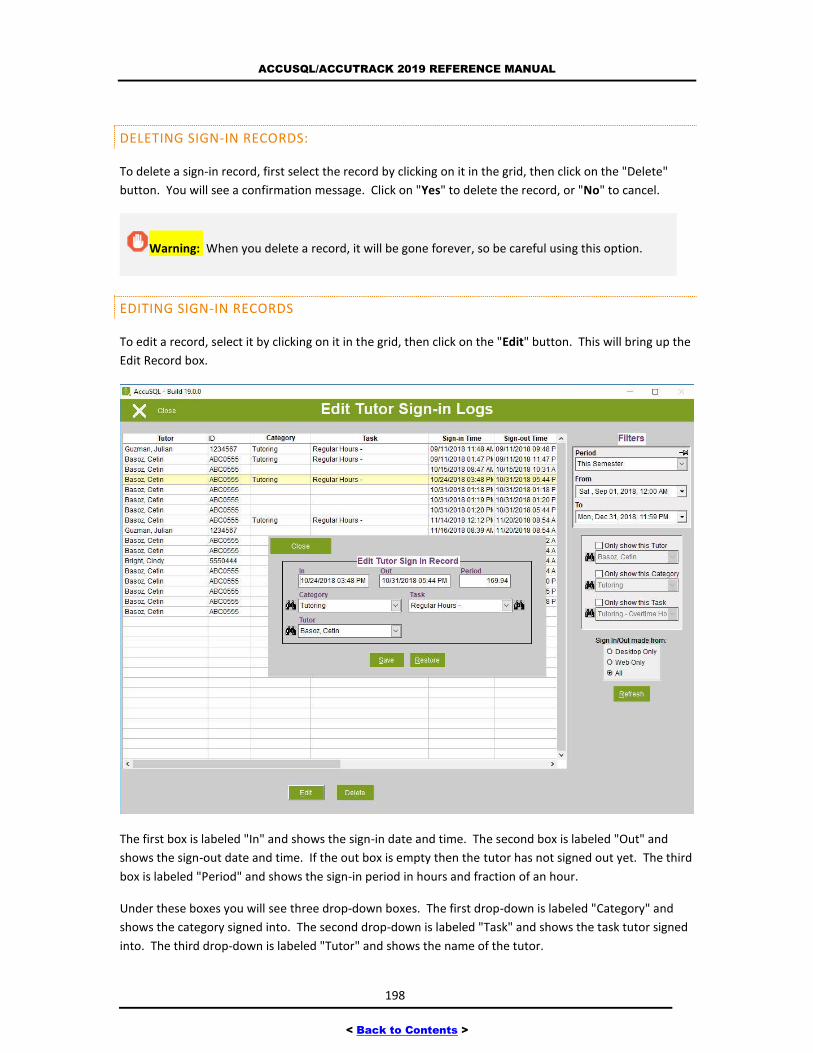
ACCUSQL/ACCUTRACK 2019 REFERENCE MANUAL
198
< Back to Contents >
DELETING SIGN-IN RECORDS:
To delete a sign-in record, first select the record by clicking on it in the grid, then click on the "Delete"
button. You will see a confirmation message. Click on "Yes" to delete the record, or "No" to cancel.
Warning: When you delete a record, it will be gone forever, so be careful using this option.
EDITING SIGN-IN RECORDS
To edit a record, select it by clicking on it in the grid, then click on the "Edit" button. This will bring up the
Edit Record box.
The first box is labeled "In" and shows the sign-in date and time. The second box is labeled "Out" and
shows the sign-out date and time. If the out box is empty then the tutor has not signed out yet. The third
box is labeled "Period" and shows the sign-in period in hours and fraction of an hour.
Under these boxes you will see three drop-down boxes. The first drop-down is labeled "Category" and
shows the category signed into. The second drop-down is labeled "Task" and shows the task tutor signed
into. The third drop-down is labeled "Tutor" and shows the name of the tutor.
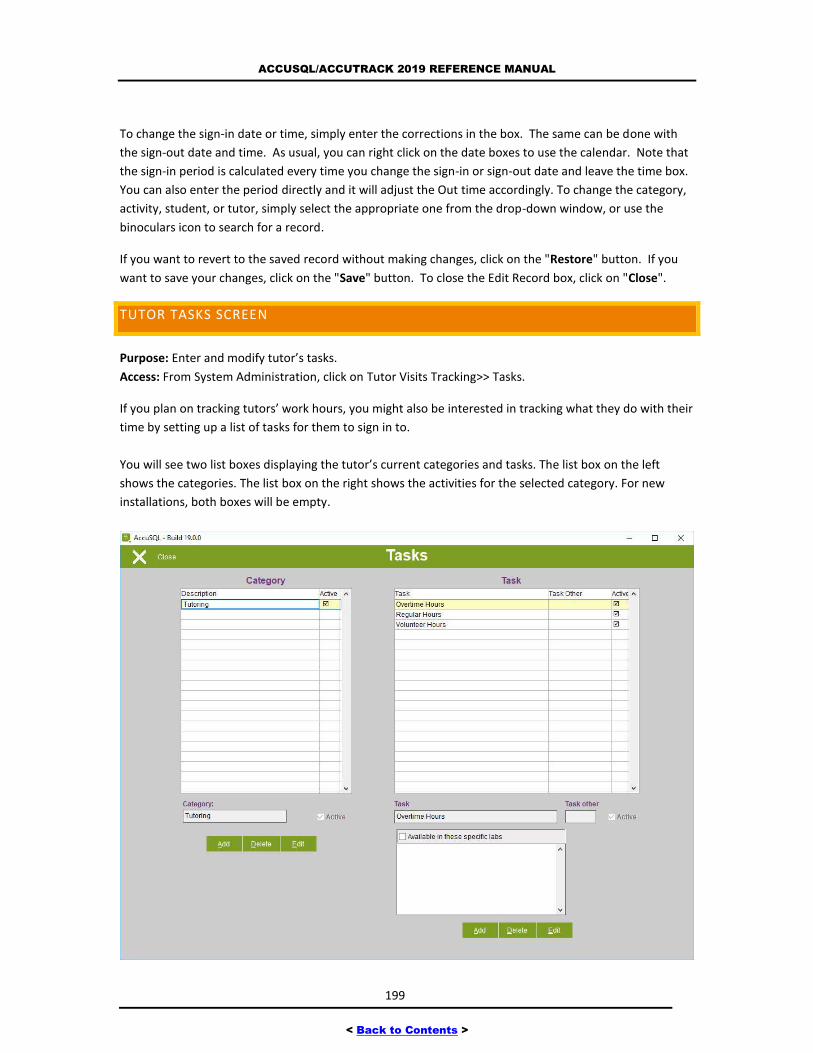
ACCUSQL/ACCUTRACK 2019 REFERENCE MANUAL
199
< Back to Contents >
To change the sign-in date or time, simply enter the corrections in the box. The same can be done with
the sign-out date and time. As usual, you can right click on the date boxes to use the calendar. Note that
the sign-in period is calculated every time you change the sign-in or sign-out date and leave the time box.
You can also enter the period directly and it will adjust the Out time accordingly. To change the category,
activity, student, or tutor, simply select the appropriate one from the drop-down window, or use the
binoculars icon to search for a record.
If you want to revert to the saved record without making changes, click on the "Restore" button. If you
want to save your changes, click on the "Save" button. To close the Edit Record box, click on "Close".
TUTOR TASKS SCREEN
Purpose: Enter and modify tutor’s tasks.
Access: From System Administration, click on Tutor Visits Tracking>> Tasks.
If you plan on tracking tutors’ work hours, you might also be interested in tracking what they do with their
time by setting up a list of tasks for them to sign in to.
You will see two list boxes displaying the tutor’s current categories and tasks. The list box on the left
shows the categories. The list box on the right shows the activities for the selected category. For new
installations, both boxes will be empty.
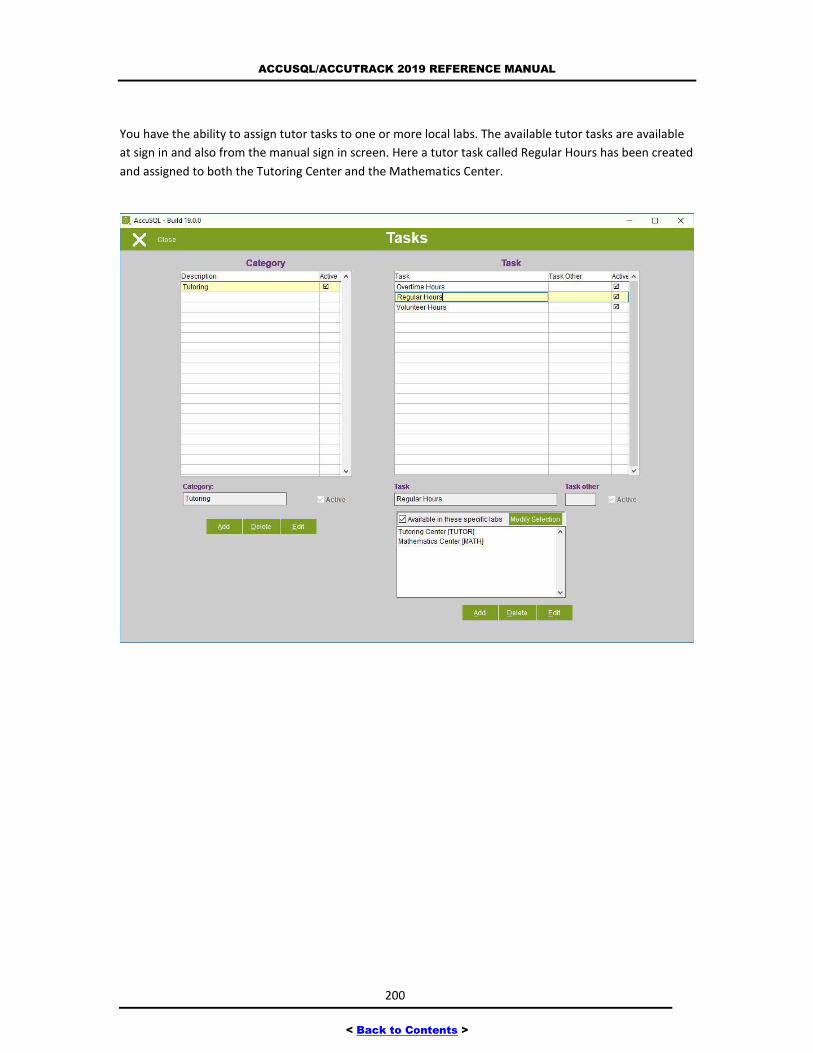
ACCUSQL/ACCUTRACK 2019 REFERENCE MANUAL
200
< Back to Contents >
You have the ability to assign tutor tasks to one or more local labs. The available tutor tasks are available
at sign in and also from the manual sign in screen. Here a tutor task called Regular Hours has been created
and assigned to both the Tutoring Center and the Mathematics Center.
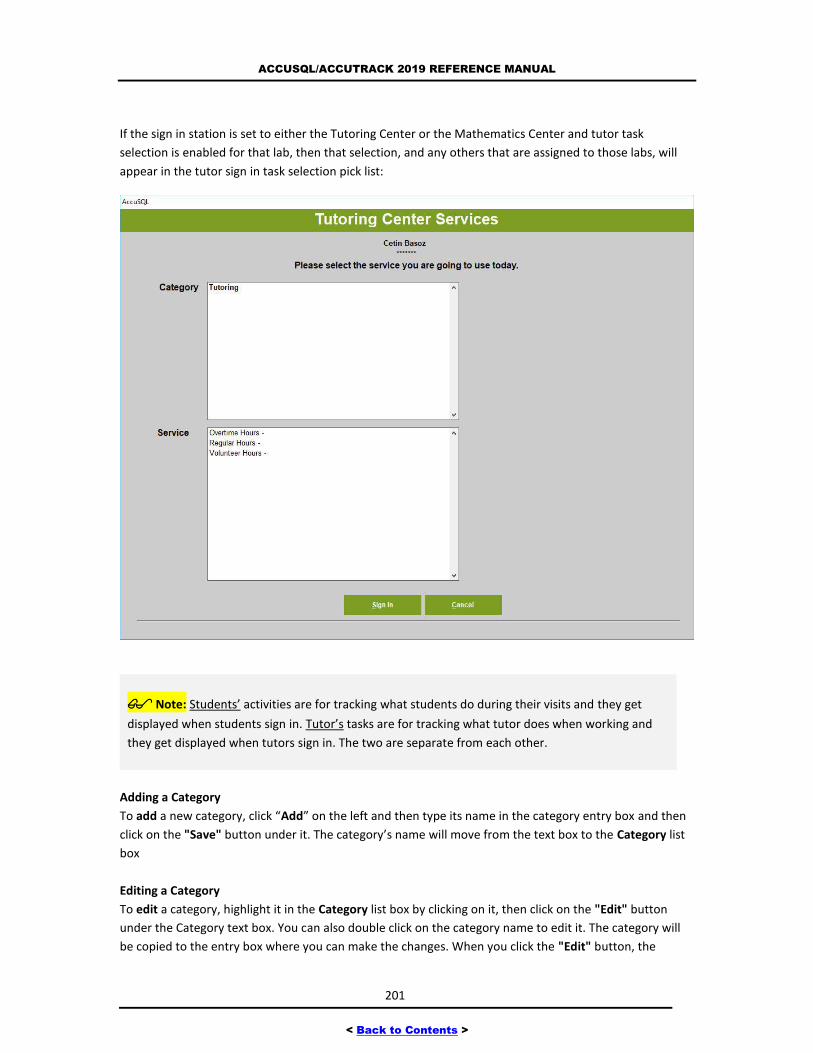
ACCUSQL/ACCUTRACK 2019 REFERENCE MANUAL
201
< Back to Contents >
If the sign in station is set to either the Tutoring Center or the Mathematics Center and tutor task
selection is enabled for that lab, then that selection, and any others that are assigned to those labs, will
appear in the tutor sign in task selection pick list:
Note: Students’ activities are for tracking what students do during their visits and they get
displayed when students sign in. Tutor’s tasks are for tracking what tutor does when working and
they get displayed when tutors sign in. The two are separate from each other.
Adding a Category
To add a new category, click “Add” on the left and then type its name in the category entry box and then
click on the "Save" button under it. The category’s name will move from the text box to the Category list
box
Editing a Category
To edit a category, highlight it in the Category list box by clicking on it, then click on the "Edit" button
under the Category text box. You can also double click on the category name to edit it. The category will
be copied to the entry box where you can make the changes. When you click the "Edit" button, the
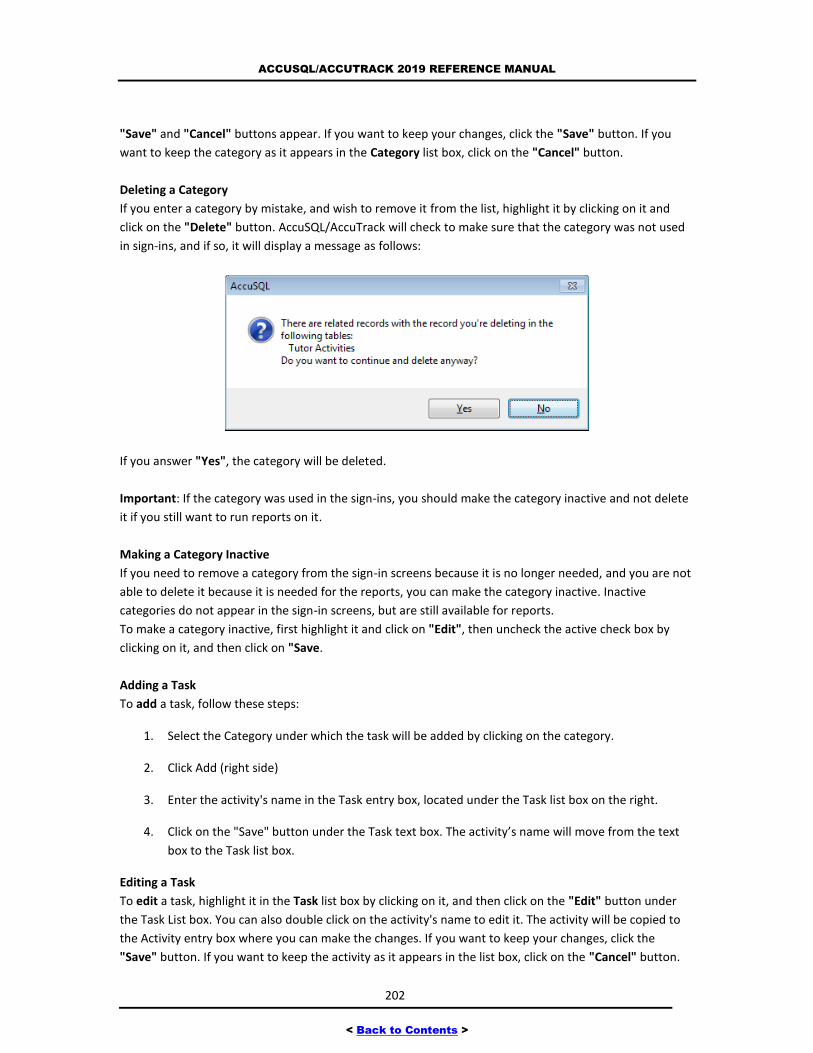
ACCUSQL/ACCUTRACK 2019 REFERENCE MANUAL
202
< Back to Contents >
"Save" and "Cancel" buttons appear. If you want to keep your changes, click the "Save" button. If you
want to keep the category as it appears in the Category list box, click on the "Cancel" button.
Deleting a Category
If you enter a category by mistake, and wish to remove it from the list, highlight it by clicking on it and
click on the "Delete" button. AccuSQL/AccuTrack will check to make sure that the category was not used
in sign-ins, and if so, it will display a message as follows:
If you answer "Yes", the category will be deleted.
Important: If the category was used in the sign-ins, you should make the category inactive and not delete
it if you still want to run reports on it.
Making a Category Inactive
If you need to remove a category from the sign-in screens because it is no longer needed, and you are not
able to delete it because it is needed for the reports, you can make the category inactive. Inactive
categories do not appear in the sign-in screens, but are still available for reports.
To make a category inactive, first highlight it and click on "Edit", then uncheck the active check box by
clicking on it, and then click on "Save.
Adding a Task
To add a task, follow these steps:
1. Select the Category under which the task will be added by clicking on the category.
2. Click Add (right side)
3. Enter the activity's name in the Task entry box, located under the Task list box on the right.
4. Click on the "Save" button under the Task text box. The activity’s name will move from the text
box to the Task list box.
Editing a Task
To edit a task, highlight it in the Task list box by clicking on it, and then click on the "Edit" button under
the Task List box. You can also double click on the activity's name to edit it. The activity will be copied to
the Activity entry box where you can make the changes. If you want to keep your changes, click the
"Save" button. If you want to keep the activity as it appears in the list box, click on the "Cancel" button.
ACCUSQL/ACCUTRACK 2019 REFERENCE MANUAL
203
< Back to Contents >
Deleting a Task
If you enter a task by mistake, and wish to remove it from the list, highlight it by clicking on it and click on
the "Delete" button under the activity list box. AccuSQL/AccuTrack will check to make sure that no one
has signed in to this task before, and if so, you will see a confirmation message. Answer "Yes" to delete
the activity.
If the task was signed in to, it will be needed for the reports, and you will not be allowed to delete it. In
this case you can make the task inactive. This means it will not appear in the sign-in screens anymore, but
it will still exist in the database for use in reports.
Making an Task Inactive
To make an activity inactive, first highlight it and click on "Edit", then uncheck the active check box by
clicking on it, and then click on "Save.
Tip: Displaying the Tutor Tasks screen is optional. If you want to display it, make sure that the
option "Display the Task screen when tutor sign in" is checked in the Tutor Visits Tracking >> Setup
>> Tutor Sign in Options screen. If this box is not checked, AccuSQL/AccuTrack will not display the
Tasks screen to tutors and will record their sign-in time without recording any task selection.
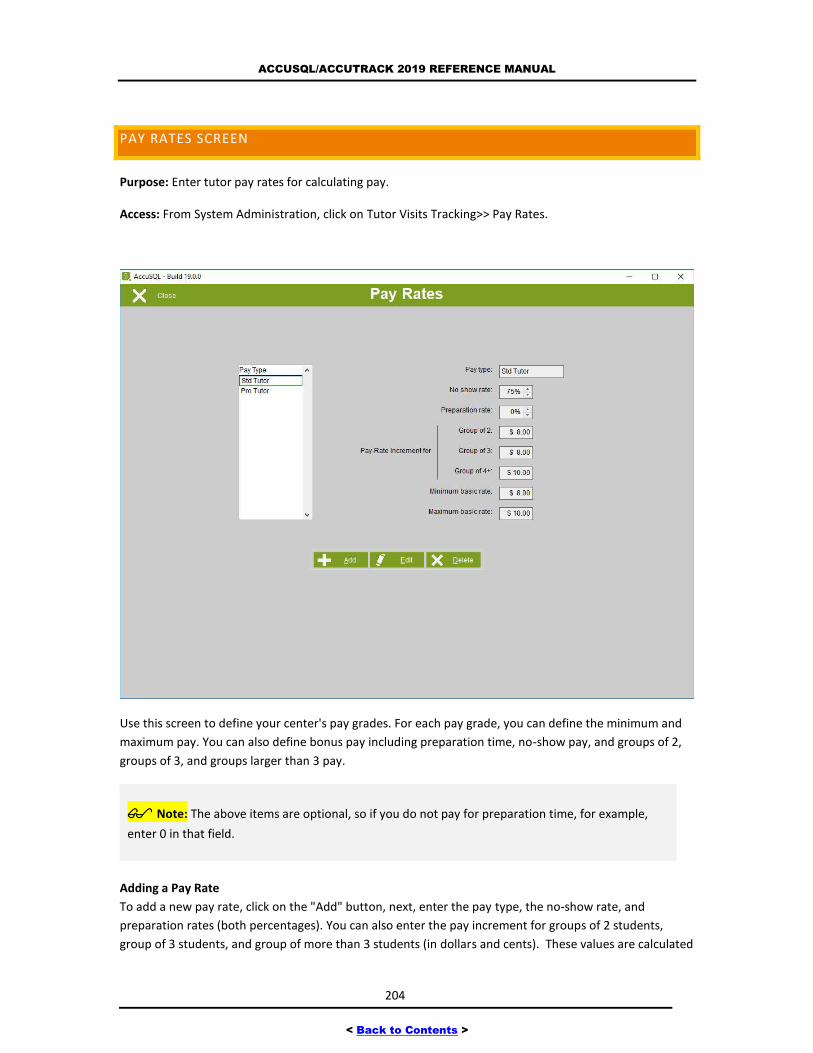
ACCUSQL/ACCUTRACK 2019 REFERENCE MANUAL
204
< Back to Contents >
PAY RATES SCREEN
Purpose: Enter tutor pay rates for calculating pay.
Access: From System Administration, click on Tutor Visits Tracking>> Pay Rates.
Use this screen to define your center's pay grades. For each pay grade, you can define the minimum and
maximum pay. You can also define bonus pay including preparation time, no-show pay, and groups of 2,
groups of 3, and groups larger than 3 pay.
Note: The above items are optional, so if you do not pay for preparation time, for example,
enter 0 in that field.
Adding a Pay Rate
To add a new pay rate, click on the "Add" button, next, enter the pay type, the no-show rate, and
preparation rates (both percentages). You can also enter the pay increment for groups of 2 students,
group of 3 students, and group of more than 3 students (in dollars and cents). These values are calculated
ACCUSQL/ACCUTRACK 2019 REFERENCE MANUAL
205
< Back to Contents >
based on tutor group appointments and will be added to the basic pay rate of the tutors. Next, enter the
minimum and maximum pay rates for this group. Click on Save to add the new pay rate.
Editing a Pay Rate
The list box at the left side of the screen shows the current pay rates. To edit the information for one of
these pay rates, click it and then click Edit. AccuSQL/AccuTrack will enable the data fields and copy the
data to them. You can then make your changes. When you are done editing click on "Save" to keep the
changes.
Note: After you have the pay rates created, they are then added to the tutor records in the
Users >> Tutors screen in the Pay Type and Pay Rate field. The pay rate will populate with the
minimum basic rate but can be adjust up to the maximum basic rate you have entered for that pay
type.
TUTOR VISITS TRACKING SETUP OPTIONS
If you click Tutors Visit Tracking in from the main System Administration screen, then select Setup, you
will be presented with a Control Panel Options view that shows context specific options for your Tutor
Visits Tracking Setup screens.
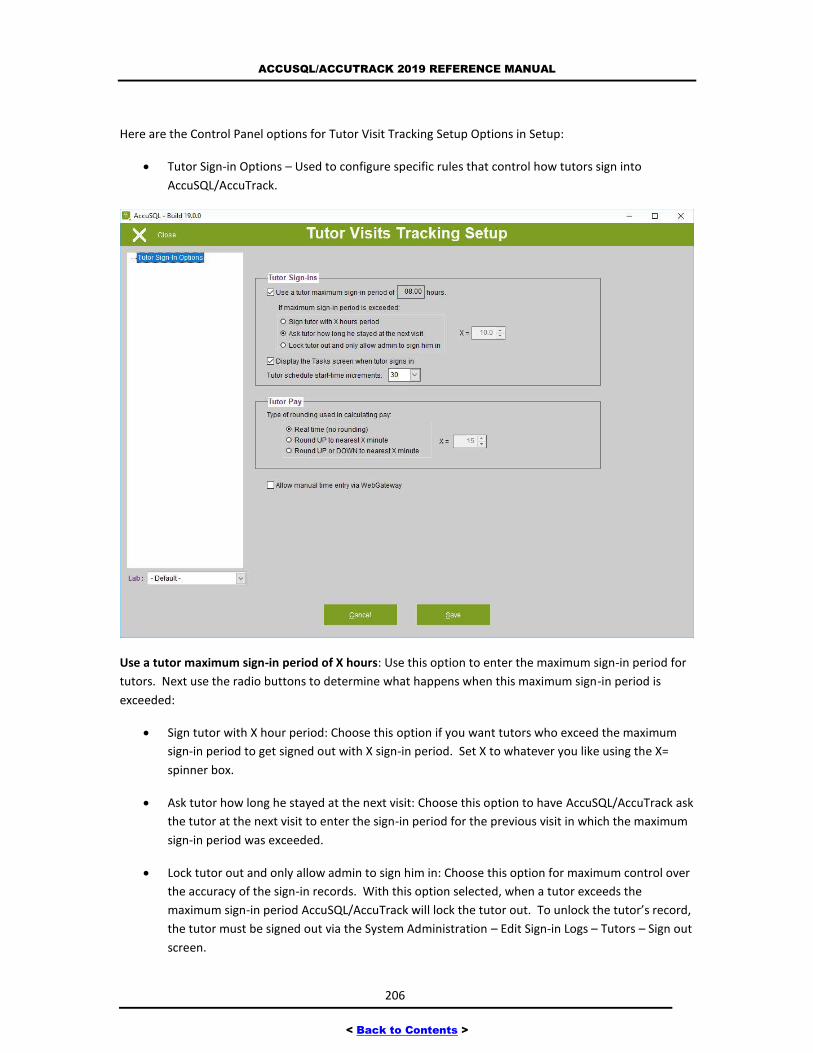
ACCUSQL/ACCUTRACK 2019 REFERENCE MANUAL
206
< Back to Contents >
Here are the Control Panel options for Tutor Visit Tracking Setup Options in Setup:
Tutor Sign-in Options – Used to configure specific rules that control how tutors sign into
AccuSQL/AccuTrack.
Use a tutor maximum sign-in period of X hours: Use this option to enter the maximum sign-in period for
tutors. Next use the radio buttons to determine what happens when this maximum sign-in period is
exceeded:
Sign tutor with X hour period: Choose this option if you want tutors who exceed the maximum
sign-in period to get signed out with X sign-in period. Set X to whatever you like using the X=
spinner box.
Ask tutor how long he stayed at the next visit: Choose this option to have AccuSQL/AccuTrack ask
the tutor at the next visit to enter the sign-in period for the previous visit in which the maximum
sign-in period was exceeded.
Lock tutor out and only allow admin to sign him in: Choose this option for maximum control over
the accuracy of the sign-in records. With this option selected, when a tutor exceeds the
maximum sign-in period AccuSQL/AccuTrack will lock the tutor out. To unlock the tutor’s record,
the tutor must be signed out via the System Administration – Edit Sign-in Logs – Tutors – Sign out
screen.
ACCUSQL/ACCUTRACK 2019 REFERENCE MANUAL
207
< Back to Contents >
Display the Tasks screen when tutor sign in: Check this box if you want to track what tutors do with their
work time. If you only want to track the sign-in and sign-out times, uncheck this box.
Note: If you use this option, make sure to enter the staff Tasks via the Tutor Visits Tracking >>
Tasks screen.
Tutor schedule start increment: Use the drop-down box to select the increment of the list box used to
enter the tutor’s schedule. For example, if you use “30”, then the tutor’s schedule can start and end at
8:00, 8:30, 9:00, and so on.
Tutor Pay rounding: Use this box to determine the rounding rules when calculating the tutor’s pay.
Rounding is applied to each session and not to the accumulated time. Select the first option if you do not
want to do any rounding. Select the second option if you want to round the time up (e.g. if X=15, 47
minutes are counted as one hour for pay purposes). Select the third option if you want to round up or
down to the nearest X minutes (e.g. if X=15, 47 minutes are counted as 45 minutes, while 53 minutes are
counted as 60 minutes).
STUDENT DEMOGRAPHICS
When you click on Student Demographics from the Main Menu, you will see the following options:
1. Profile Setup: Used to setup the profile questions and their values to assign to your student
records.
2. Student Profile: Used to view and assign profile values to your students.
3. Profile Query: Used to run searches based on your various profiles and then report on, or create
student groups with those searches.
PROFILE SETUP
Purpose: Setup profile questions and answers to collect additional information for students.
Access: From System Administration >> Student Demographics, click on Profile Setup.
When a new student signs-in, AccuSQL/AccuTrack will display the “New Student” screen used to collect
contact information and demographics data. AccuSQL/AccuTrack gives you the flexibility to define up to
10 demographics questions in this screen. You can have students update their own profile values, you can
assign them manually, and you can also import them.
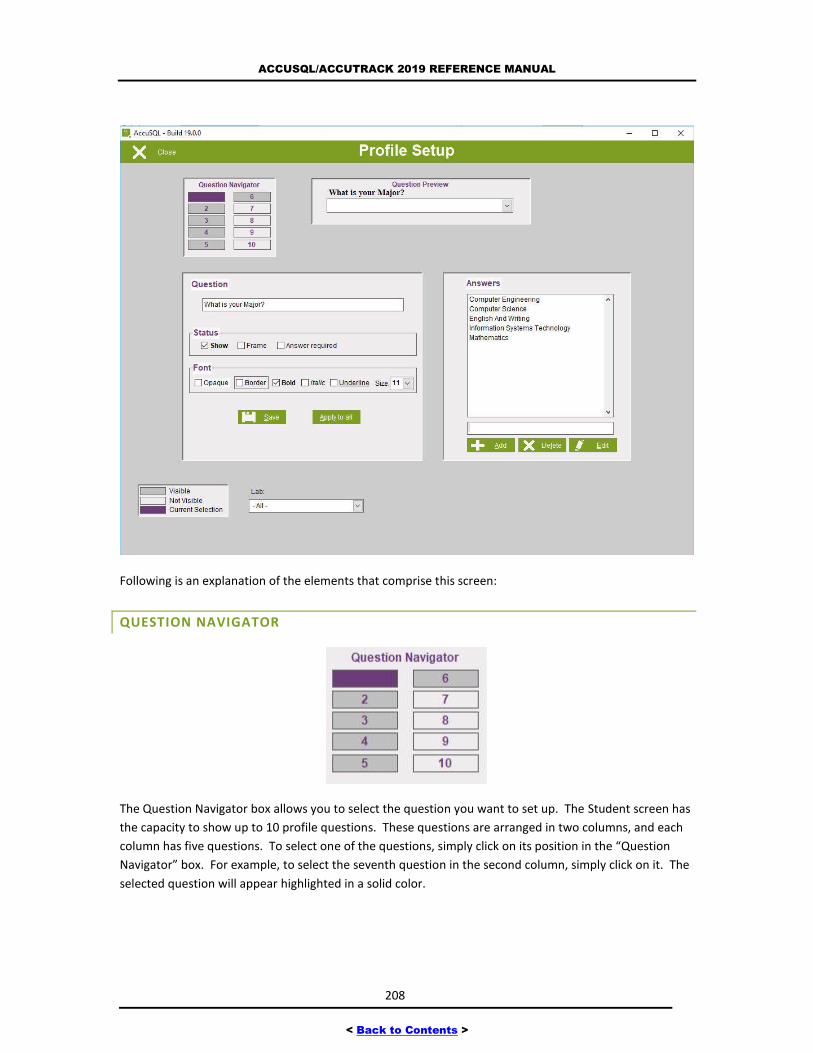
ACCUSQL/ACCUTRACK 2019 REFERENCE MANUAL
208
< Back to Contents >
Following is an explanation of the elements that comprise this screen:
QUESTION NAVIGATOR
The Question Navigator box allows you to select the question you want to set up. The Student screen has
the capacity to show up to 10 profile questions. These questions are arranged in two columns, and each
column has five questions. To select one of the questions, simply click on its position in the “Question
Navigator” box. For example, to select the seventh question in the second column, simply click on it. The
selected question will appear highlighted in a solid color.
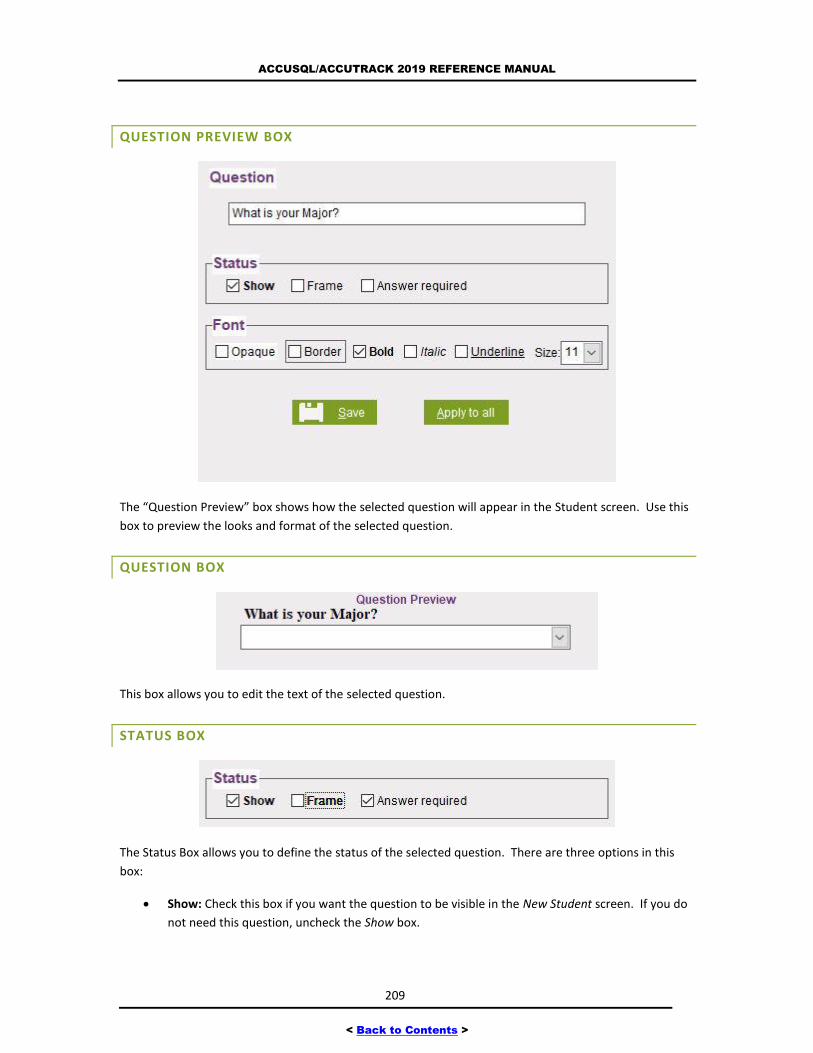
ACCUSQL/ACCUTRACK 2019 REFERENCE MANUAL
209
< Back to Contents >
QUESTION PREVIEW BOX
The “Question Preview” box shows how the selected question will appear in the Student screen. Use this
box to preview the looks and format of the selected question.
QUESTION BOX
This box allows you to edit the text of the selected question.
STATUS BOX
The Status Box allows you to define the status of the selected question. There are three options in this
box:
Show: Check this box if you want the question to be visible in the New Student screen. If you do
not need this question, uncheck the Show box.
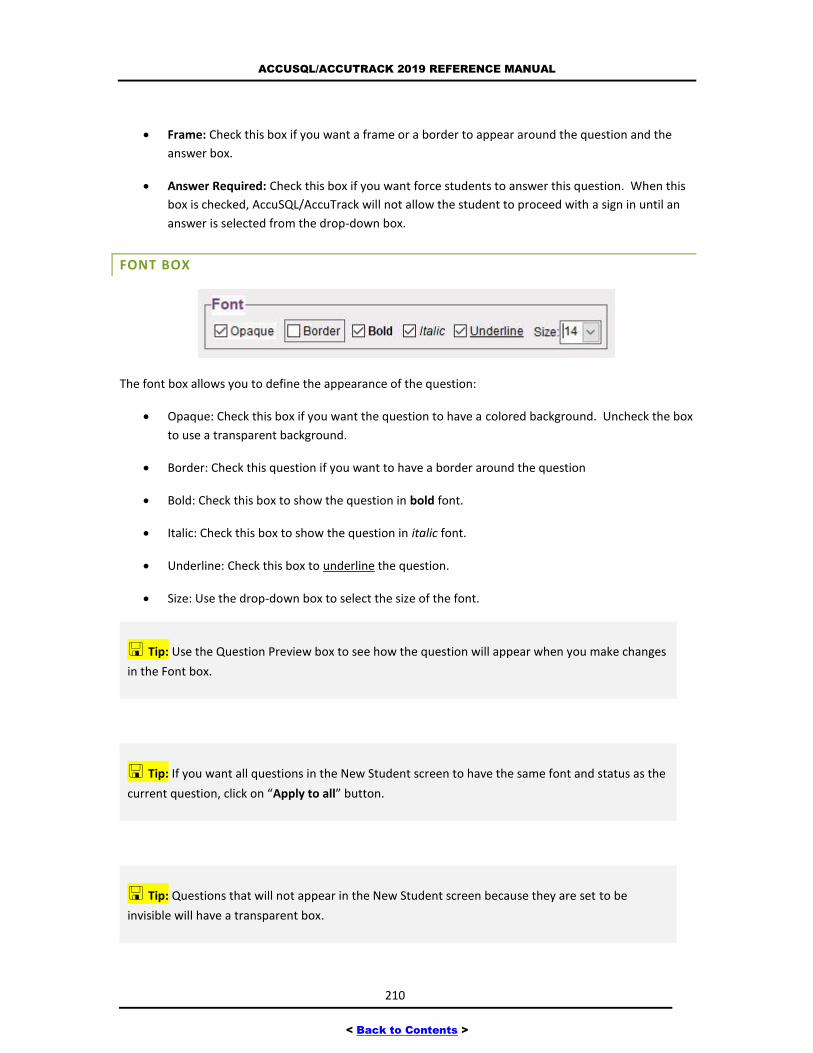
ACCUSQL/ACCUTRACK 2019 REFERENCE MANUAL
210
< Back to Contents >
Frame: Check this box if you want a frame or a border to appear around the question and the
answer box.
Answer Required: Check this box if you want force students to answer this question. When this
box is checked, AccuSQL/AccuTrack will not allow the student to proceed with a sign in until an
answer is selected from the drop-down box.
FONT BOX
The font box allows you to define the appearance of the question:
Opaque: Check this box if you want the question to have a colored background. Uncheck the box
to use a transparent background.
Border: Check this question if you want to have a border around the question
Bold: Check this box to show the question in bold font.
Italic: Check this box to show the question in italic font.
Underline: Check this box to underline the question.
Size: Use the drop-down box to select the size of the font.
Tip: Use the Question Preview box to see how the question will appear when you make changes
in the Font box.
Tip: If you want all questions in the New Student screen to have the same font and status as the
current question, click on “Apply to all” button.
Tip: Questions that will not appear in the New Student screen because they are set to be
invisible will have a transparent box.
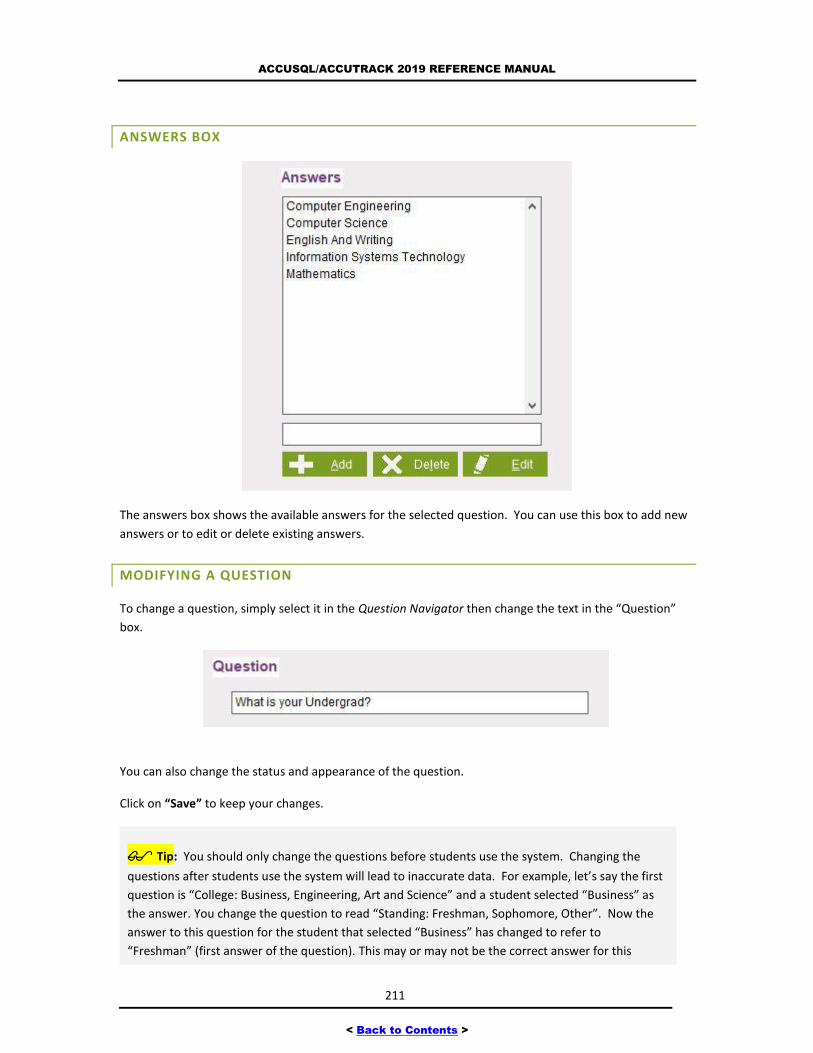
ACCUSQL/ACCUTRACK 2019 REFERENCE MANUAL
211
< Back to Contents >
ANSWERS BOX
The answers box shows the available answers for the selected question. You can use this box to add new
answers or to edit or delete existing answers.
MODIFYING A QUESTION
To change a question, simply select it in the Question Navigator then change the text in the “Question”
box.
You can also change the status and appearance of the question.
Click on “Save” to keep your changes.
Tip: You should only change the questions before students use the system. Changing the
questions after students use the system will lead to inaccurate data. For example, let’s say the first
question is “College: Business, Engineering, Art and Science” and a student selected “Business” as
the answer. You change the question to read “Standing: Freshman, Sophomore, Other”. Now the
answer to this question for the student that selected “Business” has changed to refer to
“Freshman” (first answer of the question). This may or may not be the correct answer for this
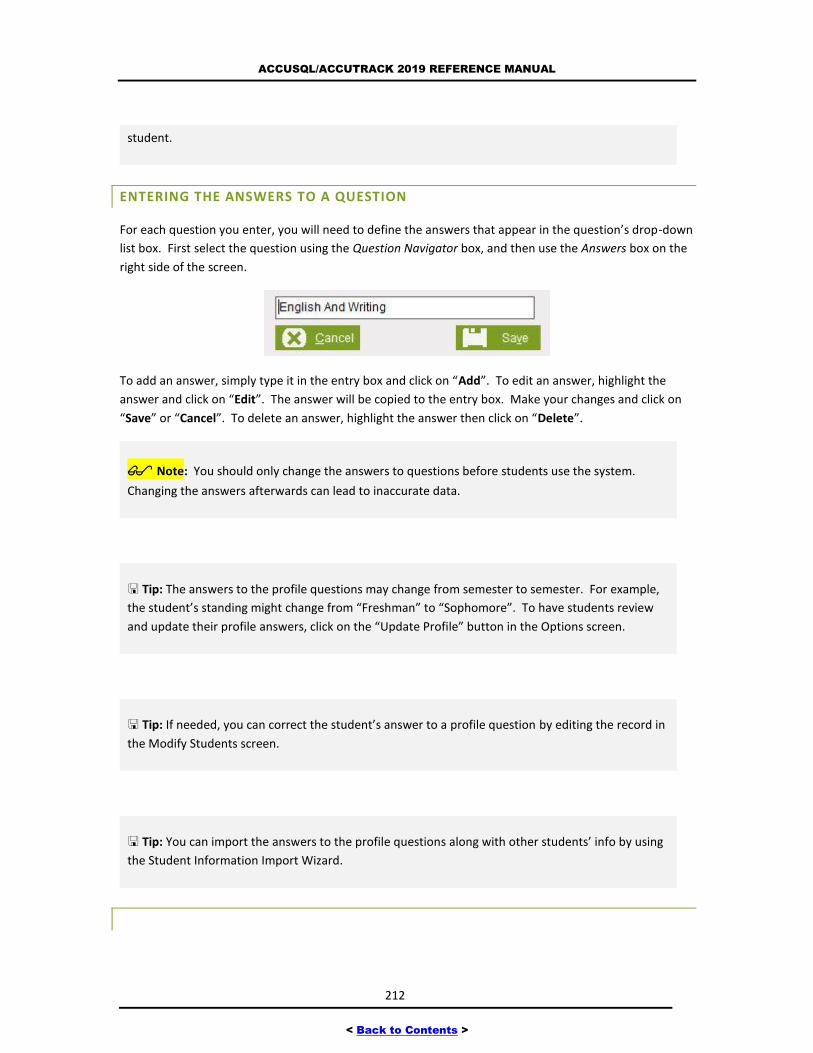
ACCUSQL/ACCUTRACK 2019 REFERENCE MANUAL
212
< Back to Contents >
student.
ENTERING THE ANSWERS TO A QUESTION
For each question you enter, you will need to define the answers that appear in the question’s drop-down
list box. First select the question using the Question Navigator box, and then use the Answers box on the
right side of the screen.
To add an answer, simply type it in the entry box and click on “Add”. To edit an answer, highlight the
answer and click on “Edit”. The answer will be copied to the entry box. Make your changes and click on
“Save” or “Cancel”. To delete an answer, highlight the answer then click on “Delete”.
Note: You should only change the answers to questions before students use the system.
Changing the answers afterwards can lead to inaccurate data.
Tip: The answers to the profile questions may change from semester to semester. For example,
the student’s standing might change from “Freshman” to “Sophomore”. To have students review
and update their profile answers, click on the “Update Profile” button in the Options screen.
Tip: If needed, you can correct the student’s answer to a profile question by editing the record in
the Modify Students screen.
Tip: You can import the answers to the profile questions along with other students’ info by using
the Student Information Import Wizard.
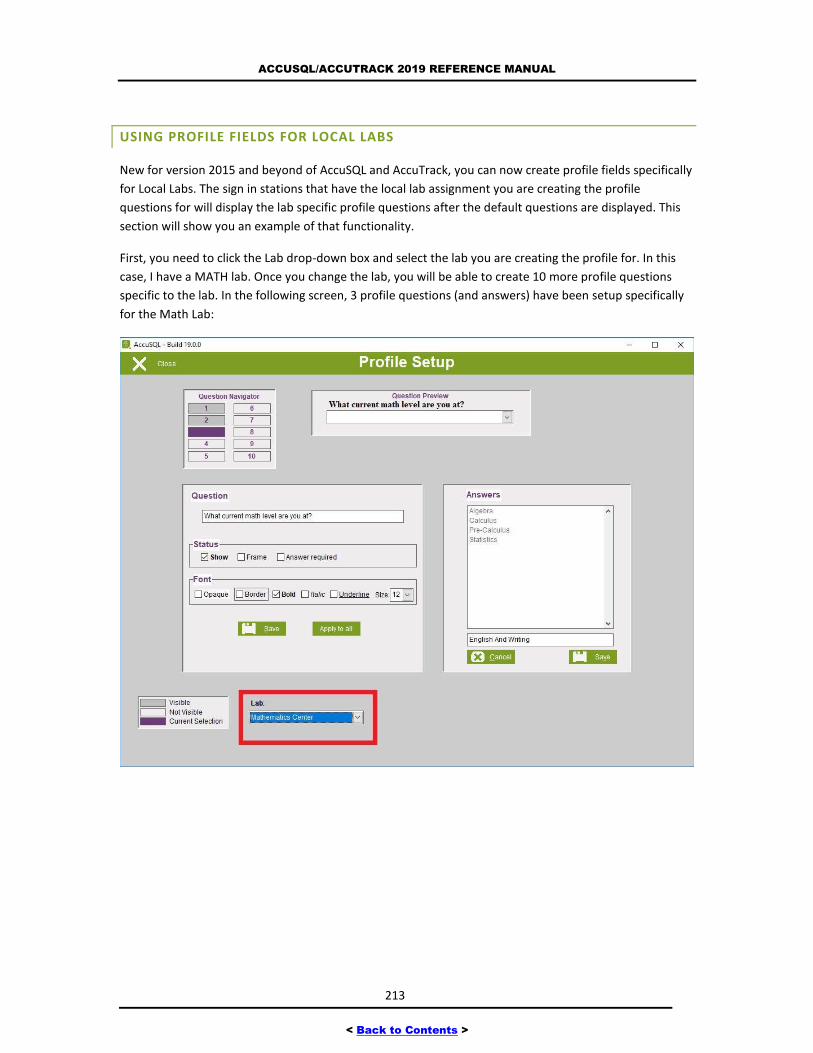
ACCUSQL/ACCUTRACK 2019 REFERENCE MANUAL
213
< Back to Contents >
USING PROFILE FIELDS FOR LOCAL LABS
New for version 2015 and beyond of AccuSQL and AccuTrack, you can now create profile fields specifically
for Local Labs. The sign in stations that have the local lab assignment you are creating the profile
questions for will display the lab specific profile questions after the default questions are displayed. This
section will show you an example of that functionality.
First, you need to click the Lab drop-down box and select the lab you are creating the profile for. In this
case, I have a MATH lab. Once you change the lab, you will be able to create 10 more profile questions
specific to the lab. In the following screen, 3 profile questions (and answers) have been setup specifically
for the Math Lab:
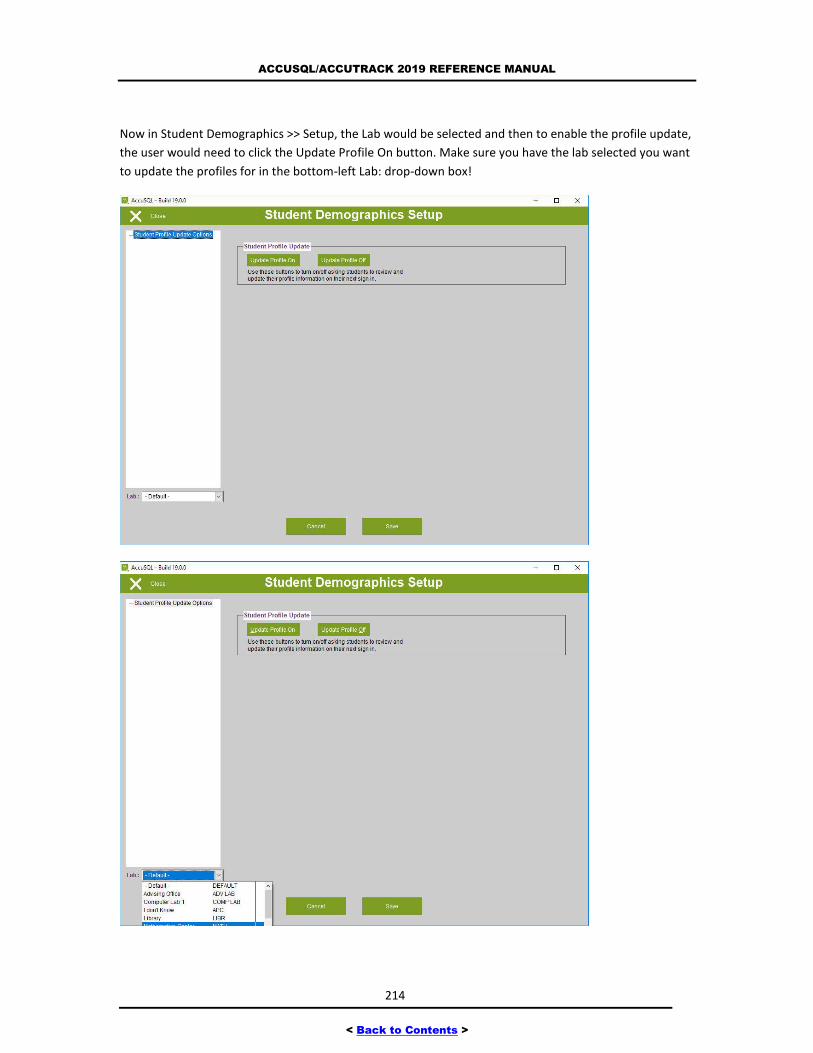
ACCUSQL/ACCUTRACK 2019 REFERENCE MANUAL
214
< Back to Contents >
Now in Student Demographics >> Setup, the Lab would be selected and then to enable the profile update,
the user would need to click the Update Profile On button. Make sure you have the lab selected you want
to update the profiles for in the bottom-left Lab: drop-down box!
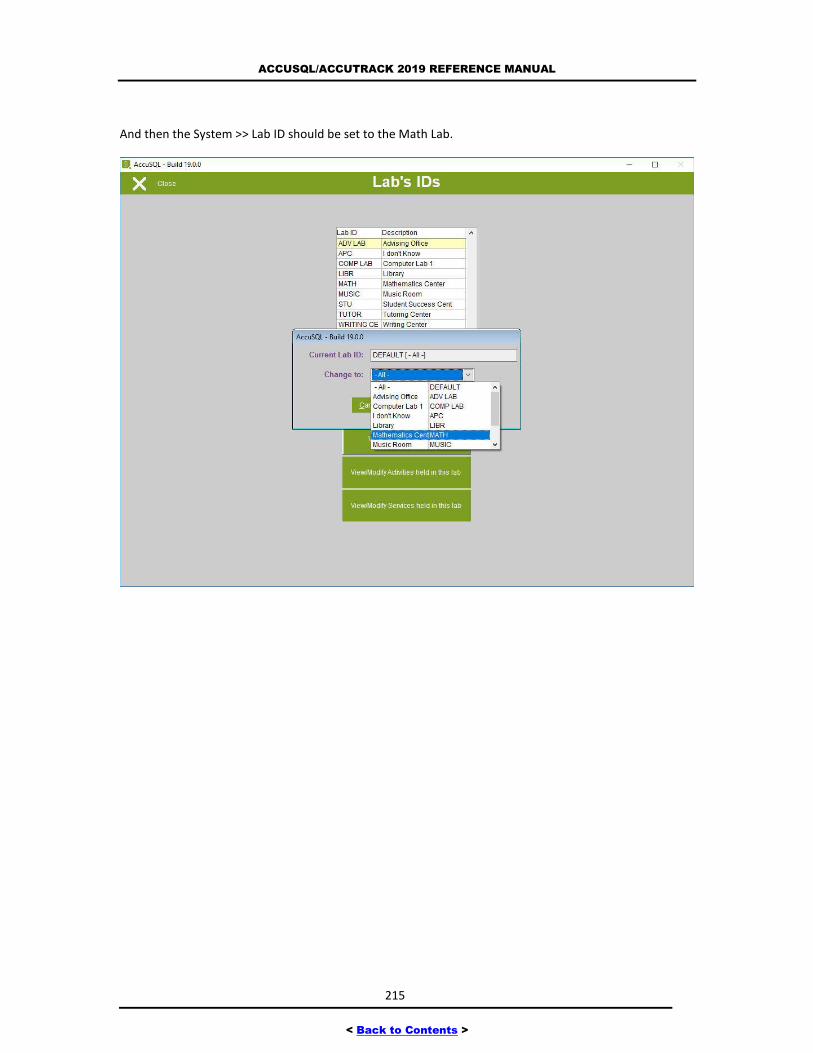
ACCUSQL/ACCUTRACK 2019 REFERENCE MANUAL
215
< Back to Contents >
And then the System >> Lab ID should be set to the Math Lab.
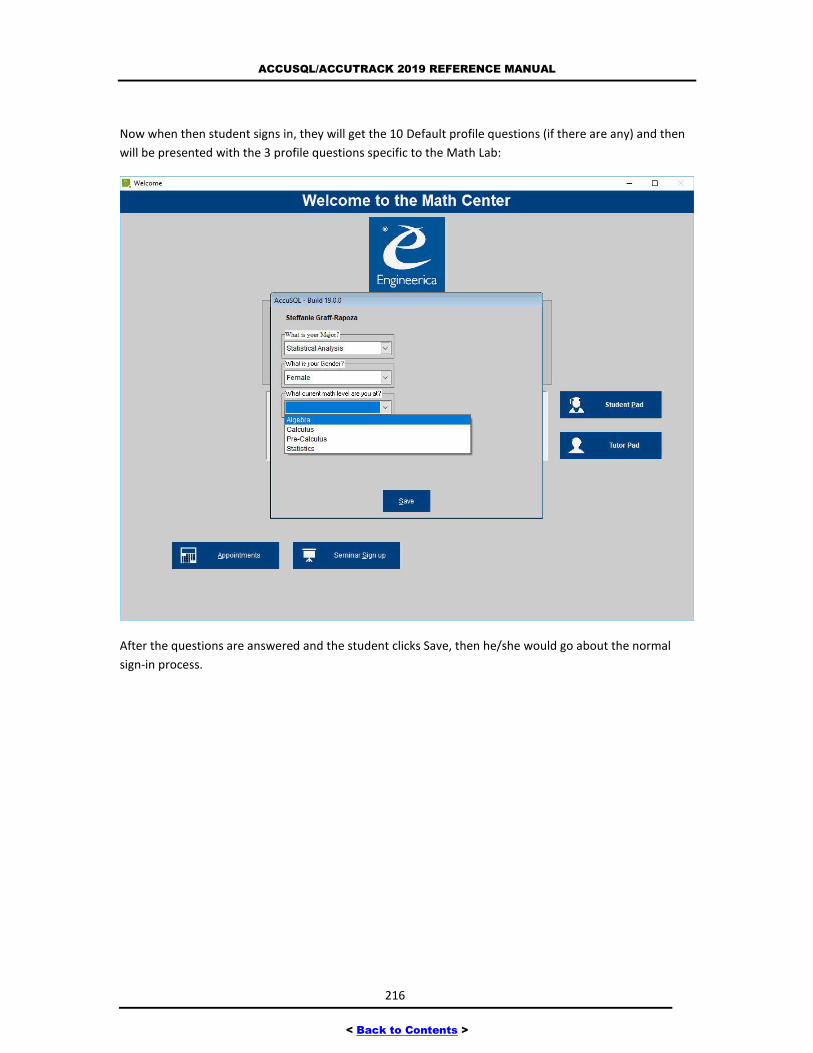
ACCUSQL/ACCUTRACK 2019 REFERENCE MANUAL
216
< Back to Contents >
Now when then student signs in, they will get the 10 Default profile questions (if there are any) and then
will be presented with the 3 profile questions specific to the Math Lab:
After the questions are answered and the student clicks Save, then he/she would go about the normal
sign-in process.
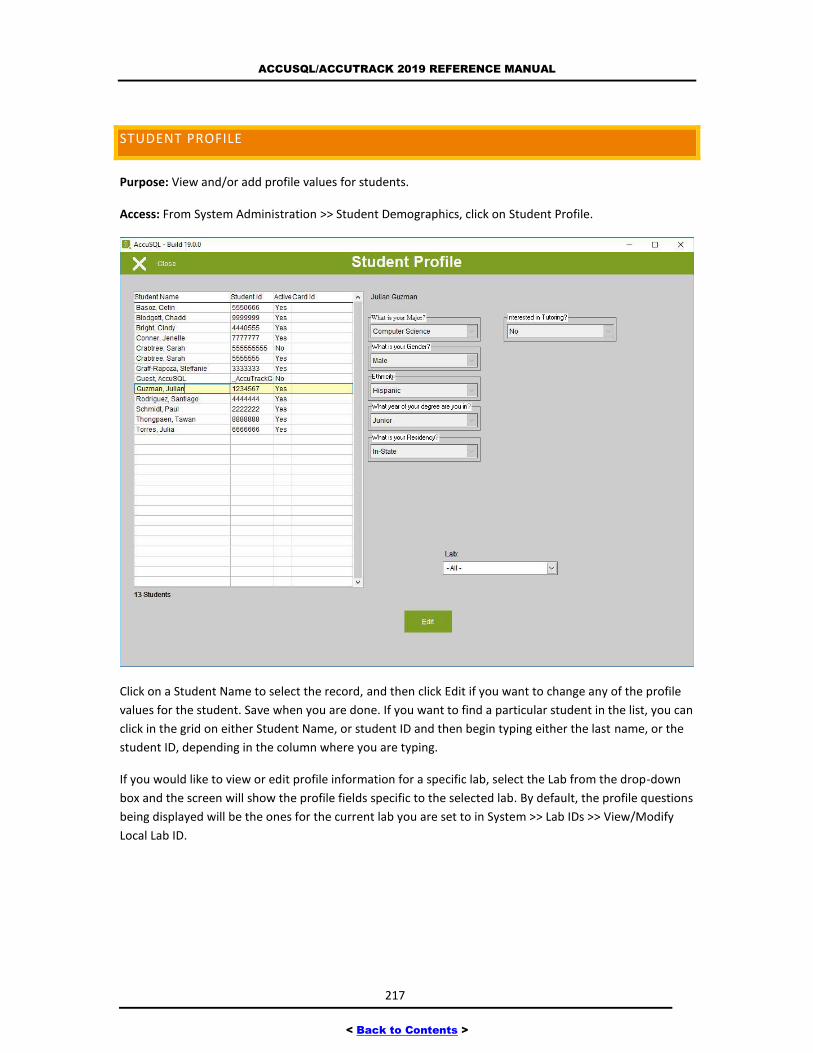
ACCUSQL/ACCUTRACK 2019 REFERENCE MANUAL
217
< Back to Contents >
STUDENT PROFILE
Purpose: View and/or add profile values for students.
Access: From System Administration >> Student Demographics, click on Student Profile.
Click on a Student Name to select the record, and then click Edit if you want to change any of the profile
values for the student. Save when you are done. If you want to find a particular student in the list, you can
click in the grid on either Student Name, or student ID and then begin typing either the last name, or the
student ID, depending in the column where you are typing.
If you would like to view or edit profile information for a specific lab, select the Lab from the drop-down
box and the screen will show the profile fields specific to the selected lab. By default, the profile questions
being displayed will be the ones for the current lab you are set to in System >> Lab IDs >> View/Modify
Local Lab ID.

ACCUSQL/ACCUTRACK 2019 REFERENCE MANUAL
218
< Back to Contents >
Note: If you have lots of students you want to assign profile values for, you would be much
better served importing that data into AccuSQL/AccuTrack. Data Imports are discussed later in this
document.
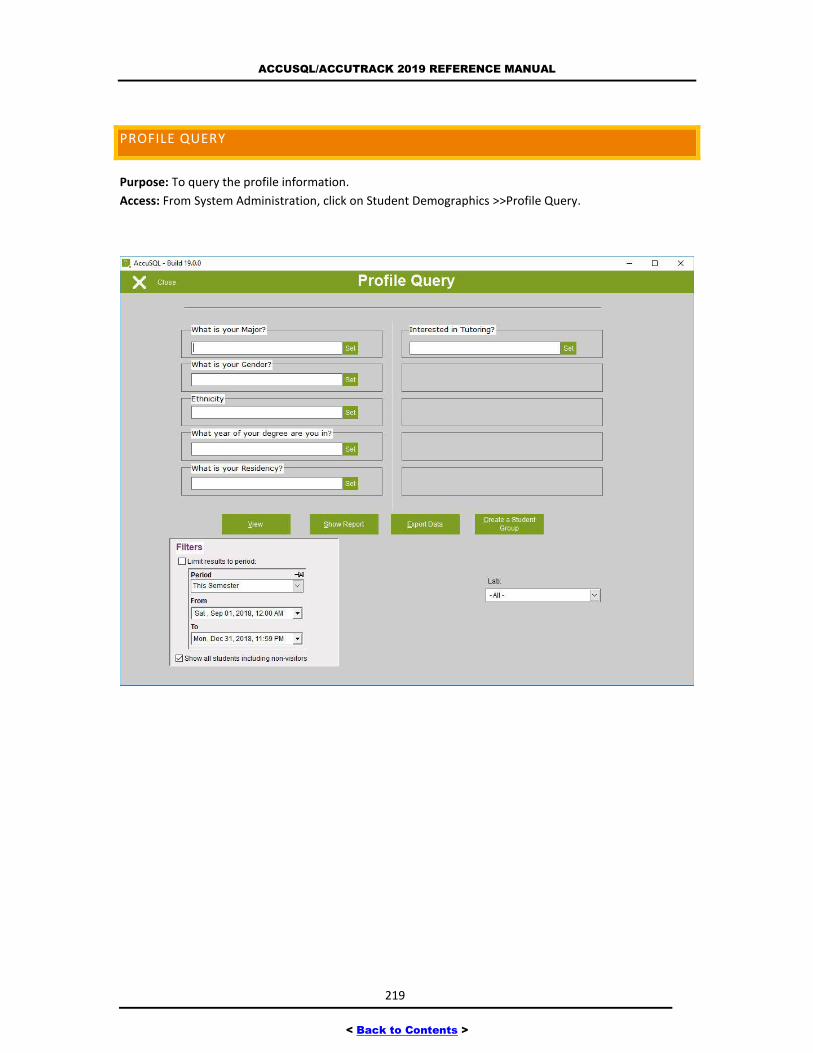
ACCUSQL/ACCUTRACK 2019 REFERENCE MANUAL
219
< Back to Contents >
PROFILE QUERY
Purpose: To query the profile information.
Access: From System Administration, click on Student Demographics >>Profile Query.
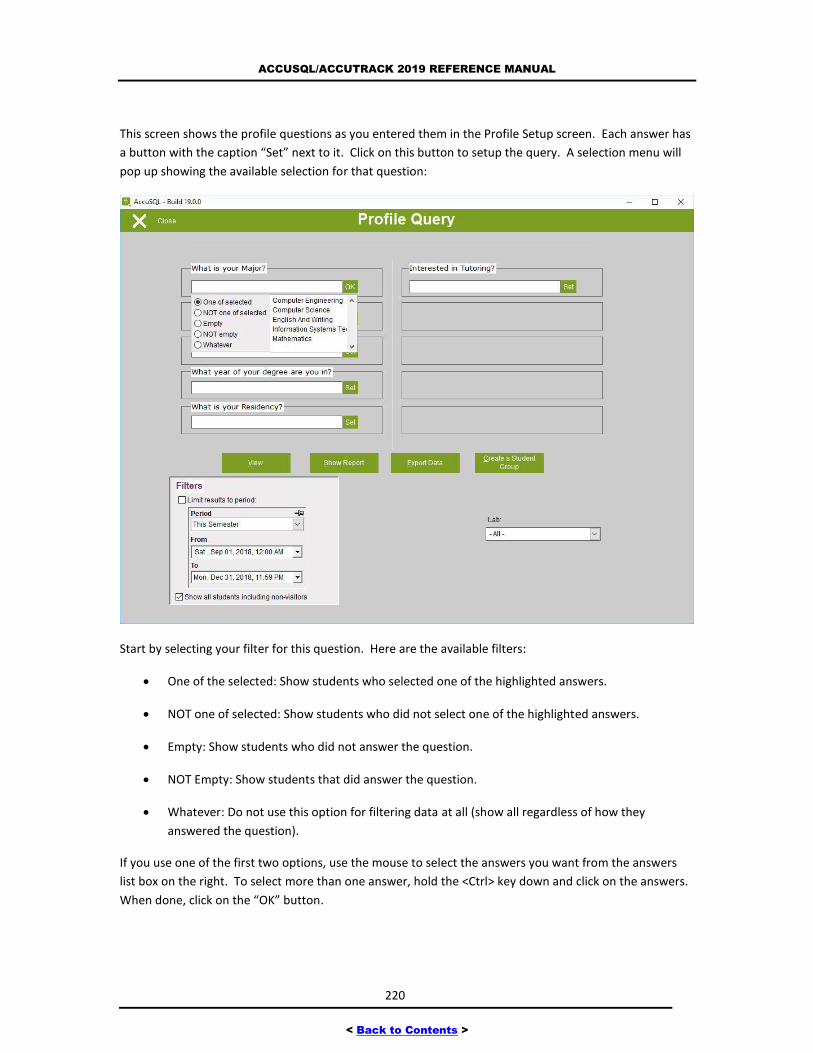
ACCUSQL/ACCUTRACK 2019 REFERENCE MANUAL
220
< Back to Contents >
This screen shows the profile questions as you entered them in the Profile Setup screen. Each answer has
a button with the caption “Set” next to it. Click on this button to setup the query. A selection menu will
pop up showing the available selection for that question:
Start by selecting your filter for this question. Here are the available filters:
One of the selected: Show students who selected one of the highlighted answers.
NOT one of selected: Show students who did not select one of the highlighted answers.
Empty: Show students who did not answer the question.
NOT Empty: Show students that did answer the question.
Whatever: Do not use this option for filtering data at all (show all regardless of how they
answered the question).
If you use one of the first two options, use the mouse to select the answers you want from the answers
list box on the right. To select more than one answer, hold the <Ctrl> key down and click on the answers.
When done, click on the “OK” button.
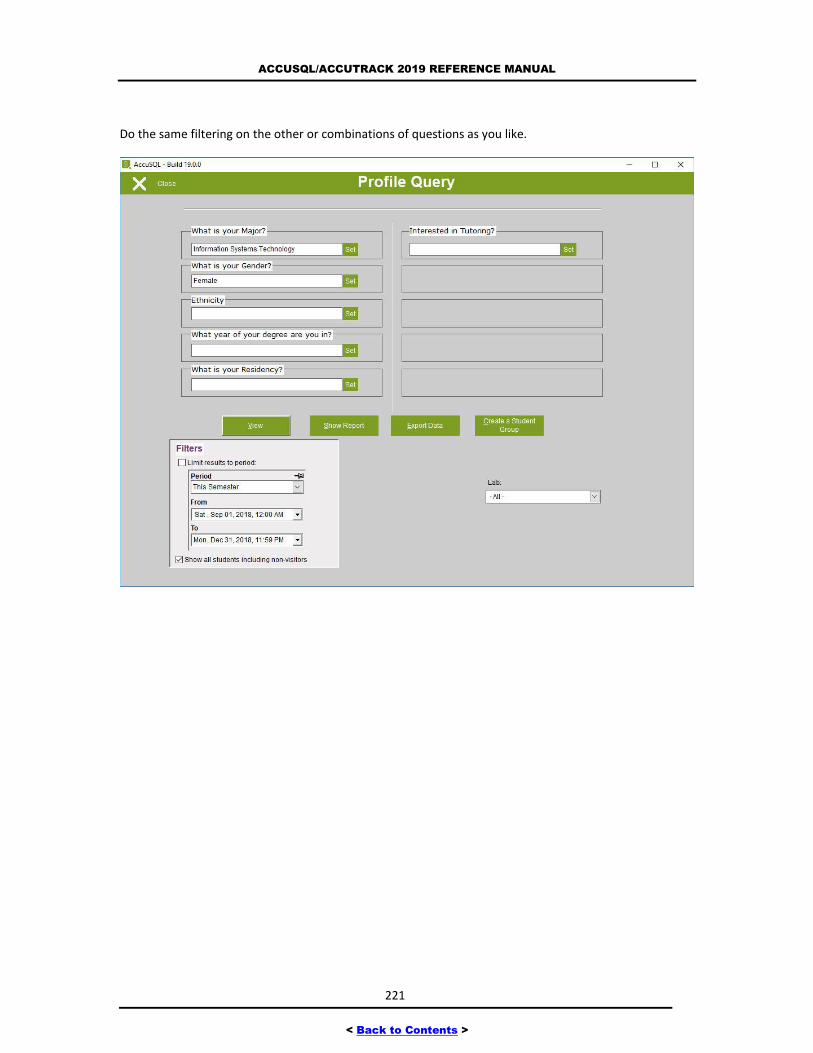
ACCUSQL/ACCUTRACK 2019 REFERENCE MANUAL
221
< Back to Contents >
Do the same filtering on the other or combinations of questions as you like.
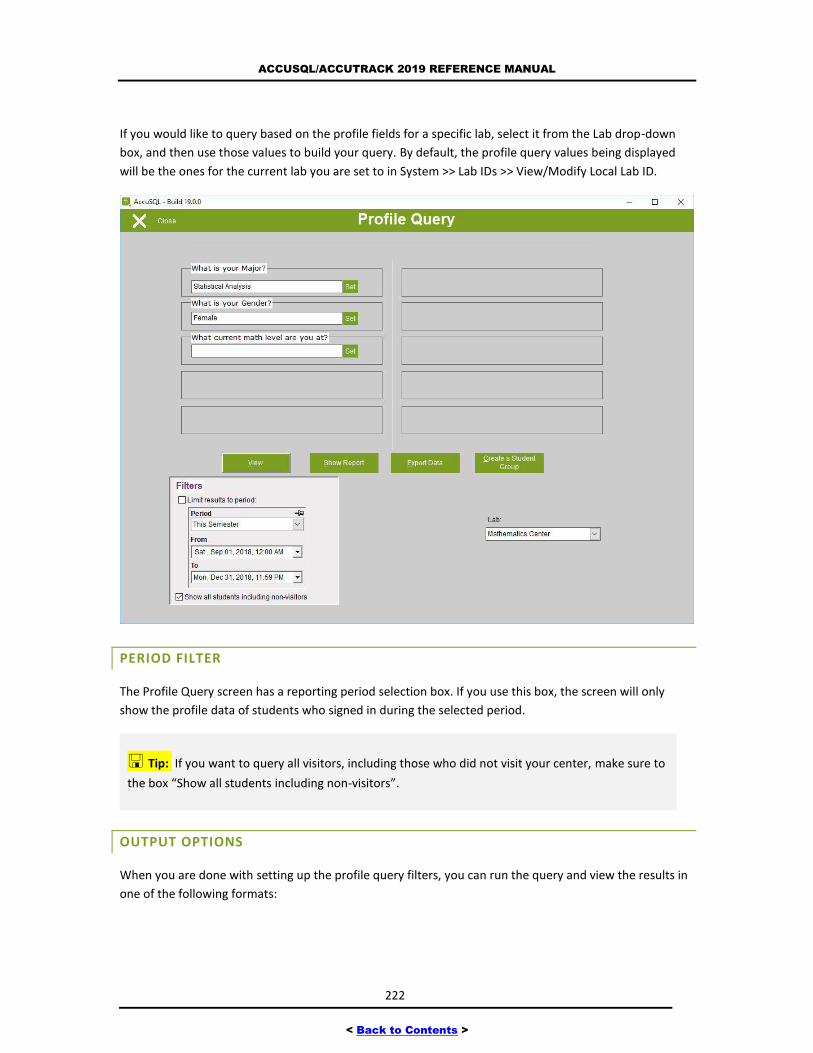
ACCUSQL/ACCUTRACK 2019 REFERENCE MANUAL
222
< Back to Contents >
If you would like to query based on the profile fields for a specific lab, select it from the Lab drop-down
box, and then use those values to build your query. By default, the profile query values being displayed
will be the ones for the current lab you are set to in System >> Lab IDs >> View/Modify Local Lab ID.
PERIOD FILTER
The Profile Query screen has a reporting period selection box. If you use this box, the screen will only
show the profile data of students who signed in during the selected period.
Tip: If you want to query all visitors, including those who did not visit your center, make sure to
the box “Show all students including non-visitors”.
OUTPUT OPTIONS
When you are done with setting up the profile query filters, you can run the query and view the results in
one of the following formats:
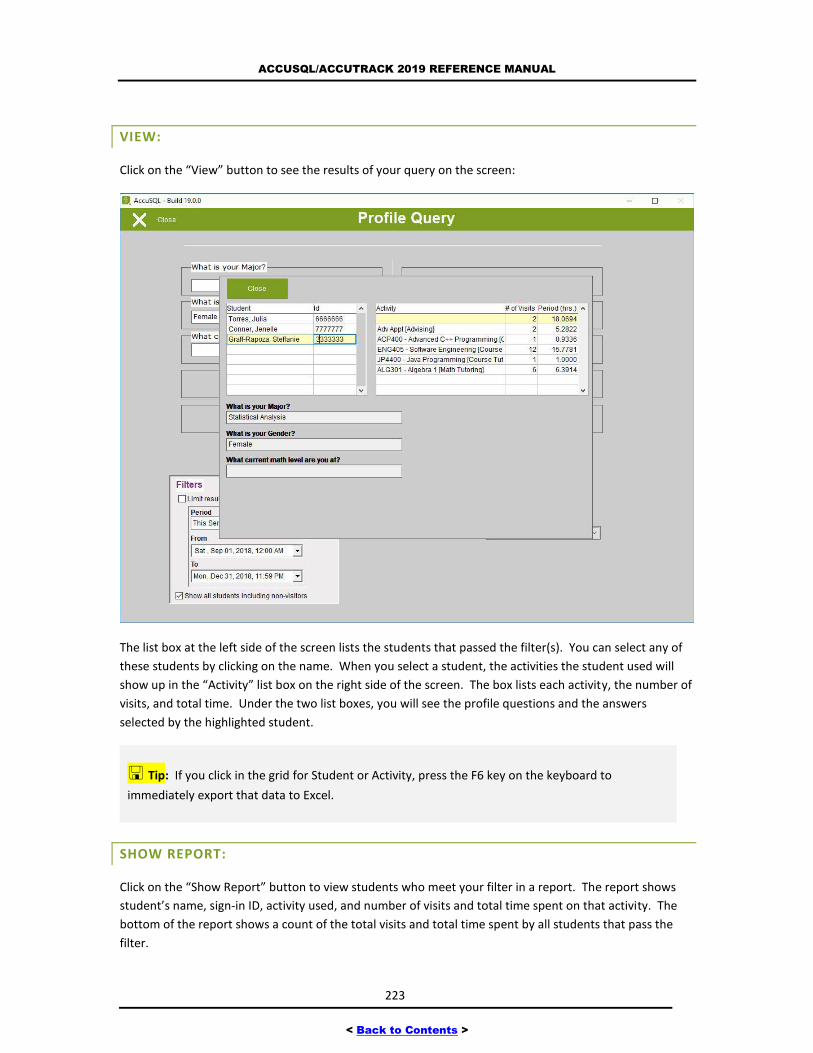
ACCUSQL/ACCUTRACK 2019 REFERENCE MANUAL
223
< Back to Contents >
VIEW:
Click on the “View” button to see the results of your query on the screen:
The list box at the left side of the screen lists the students that passed the filter(s). You can select any of
these students by clicking on the name. When you select a student, the activities the student used will
show up in the “Activity” list box on the right side of the screen. The box lists each activity, the number of
visits, and total time. Under the two list boxes, you will see the profile questions and the answers
selected by the highlighted student.
Tip: If you click in the grid for Student or Activity, press the F6 key on the keyboard to
immediately export that data to Excel.
SHOW REPORT:
Click on the “Show Report” button to view students who meet your filter in a report. The report shows
student’s name, sign-in ID, activity used, and number of visits and total time spent on that activity. The
bottom of the report shows a count of the total visits and total time spent by all students that pass the
filter.
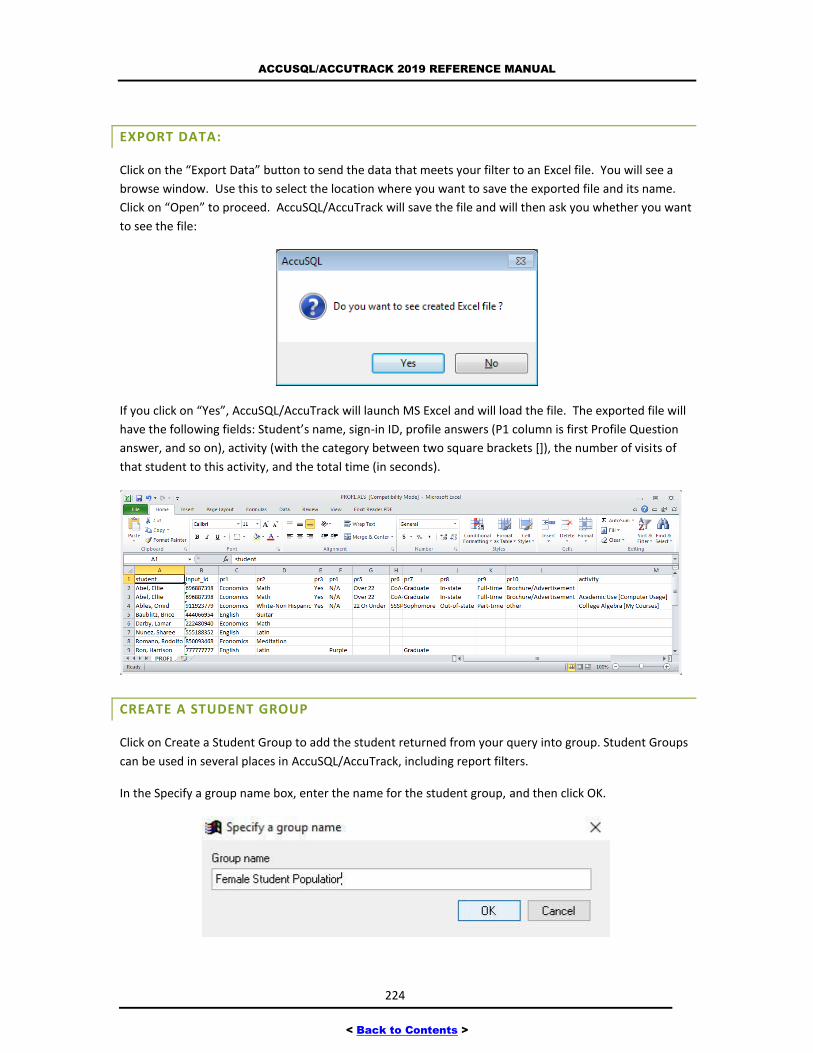
ACCUSQL/ACCUTRACK 2019 REFERENCE MANUAL
224
< Back to Contents >
EXPORT DATA:
Click on the “Export Data” button to send the data that meets your filter to an Excel file. You will see a
browse window. Use this to select the location where you want to save the exported file and its name.
Click on “Open” to proceed. AccuSQL/AccuTrack will save the file and will then ask you whether you want
to see the file:
If you click on “Yes”, AccuSQL/AccuTrack will launch MS Excel and will load the file. The exported file will
have the following fields: Student’s name, sign-in ID, profile answers (P1 column is first Profile Question
answer, and so on), activity (with the category between two square brackets []), the number of visits of
that student to this activity, and the total time (in seconds).
CREATE A STUDENT GROUP
Click on Create a Student Group to add the student returned from your query into group. Student Groups
can be used in several places in AccuSQL/AccuTrack, including report filters.
In the Specify a group name box, enter the name for the student group, and then click OK.
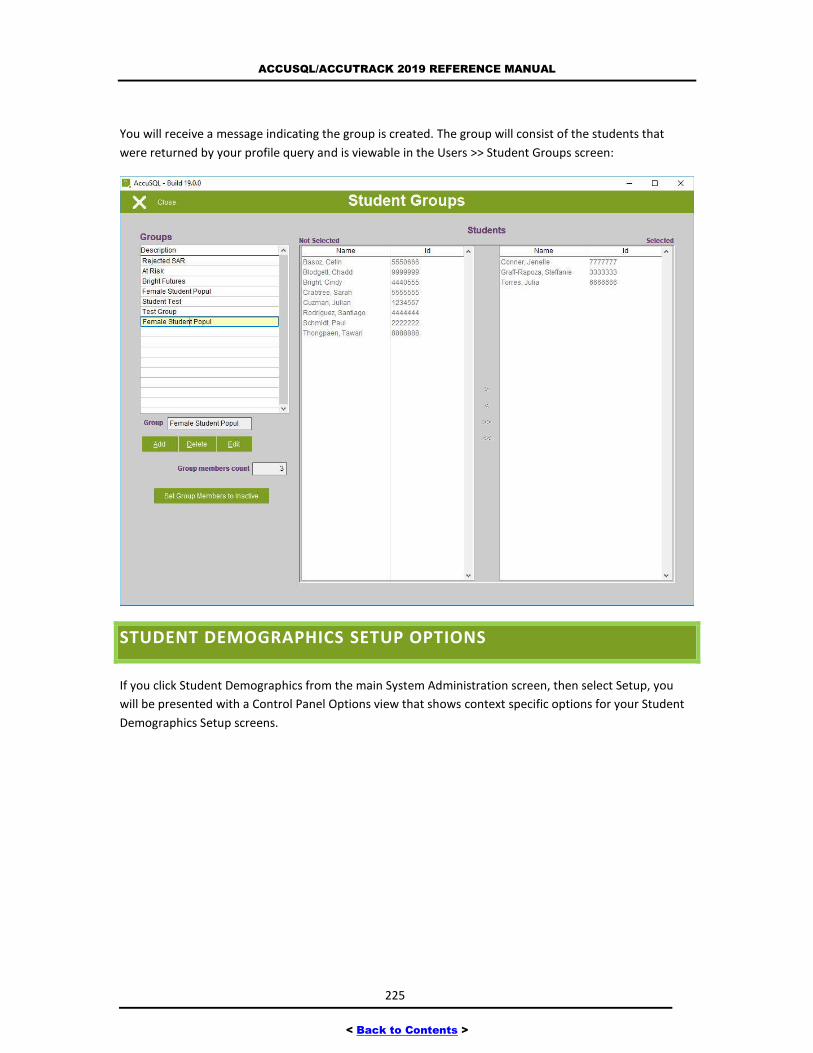
ACCUSQL/ACCUTRACK 2019 REFERENCE MANUAL
225
< Back to Contents >
You will receive a message indicating the group is created. The group will consist of the students that
were returned by your profile query and is viewable in the Users >> Student Groups screen:
STUDENT DEMOGRAPHICS SETUP OPTIONS
If you click Student Demographics from the main System Administration screen, then select Setup, you
will be presented with a Control Panel Options view that shows context specific options for your Student
Demographics Setup screens.
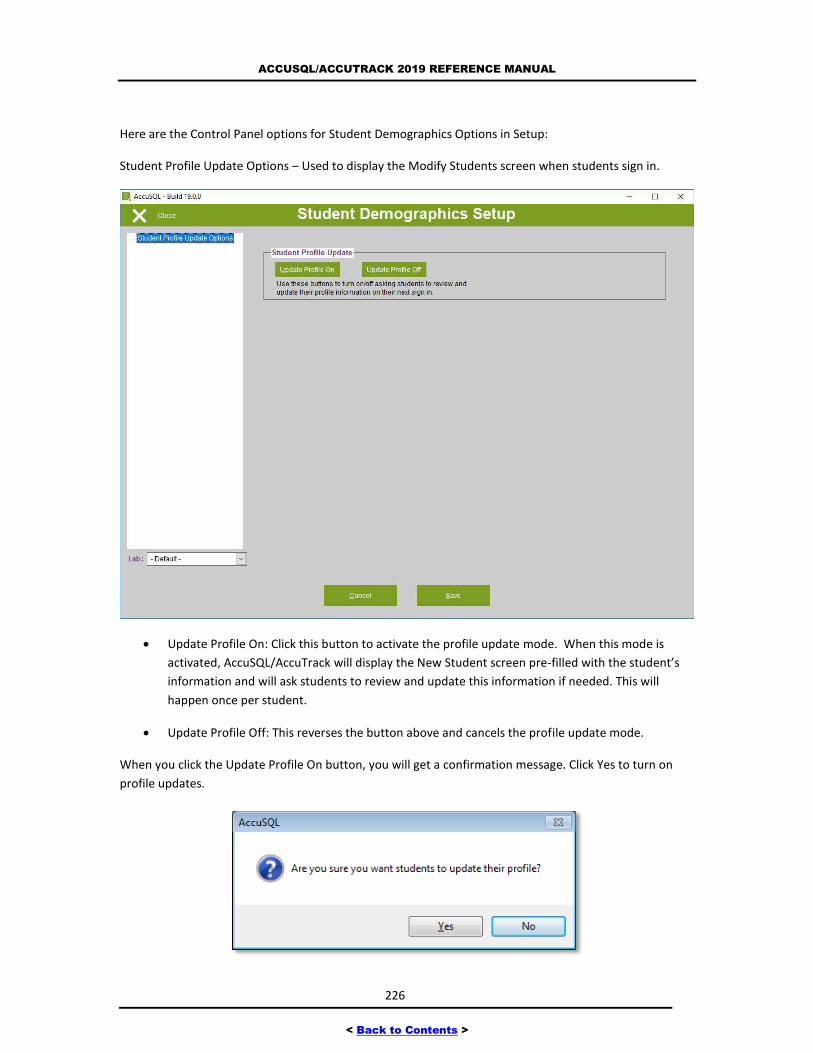
ACCUSQL/ACCUTRACK 2019 REFERENCE MANUAL
226
< Back to Contents >
Here are the Control Panel options for Student Demographics Options in Setup:
Student Profile Update Options – Used to display the Modify Students screen when students sign in.
Update Profile On: Click this button to activate the profile update mode. When this mode is
activated, AccuSQL/AccuTrack will display the New Student screen pre-filled with the student’s
information and will ask students to review and update this information if needed. This will
happen once per student.
Update Profile Off: This reverses the button above and cancels the profile update mode.
When you click the Update Profile On button, you will get a confirmation message. Click Yes to turn on
profile updates.
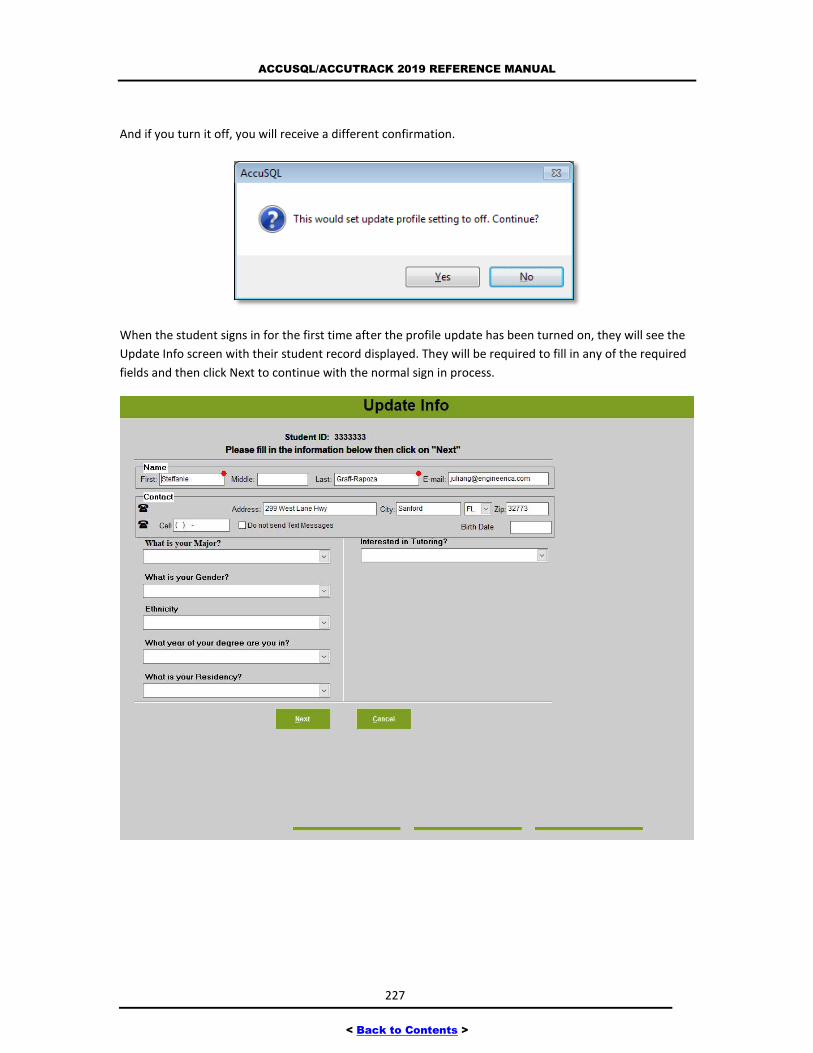
ACCUSQL/ACCUTRACK 2019 REFERENCE MANUAL
227
< Back to Contents >
And if you turn it off, you will receive a different confirmation.
When the student signs in for the first time after the profile update has been turned on, they will see the
Update Info screen with their student record displayed. They will be required to fill in any of the required
fields and then click Next to continue with the normal sign in process.
ACCUSQL/ACCUTRACK 2019 REFERENCE MANUAL
228
< Back to Contents >
SET APPOINTMENTS SCREEN
When you click on Set Appointments from the Main Menu, you will see the following options:
Appointment Wizard: Use to set up an appointment for a student using the Appointment Wizard.
Set by Activity: Use to set up an appointment for a student by first selecting the activity.
Set by Student: Use to set up an appointment for a student by first selecting the student.
Quick Scheduler: Use a quick method to setup an appointment for a student.
Appointments Central: Use to access many appointments features all in one screen.
The following sections have more information on the above screens.
APPOINTMENTS WIZARD SCREEN
Purpose: To view open slots and schedule appointments.
Access: From System Administration, click on Set Appointments>>Appointment Wizard.
The Appointment Wizard offers a centralized interface for appointment scheduling. You can use the
Wizard to select a class, or a class and a tutor, and see the available open slots. Either the Appointment
Wizard or the Quick Scheduler (discussed in a bit) can be specified as the method students use to
schedule Appointments through the main sign in screen when they click the Appointments button.
USING THE APPOINTMENT WIZARD
To use the Appointments Wizard, click on Set Appointments in System Administration then click
Appointment Wizard.
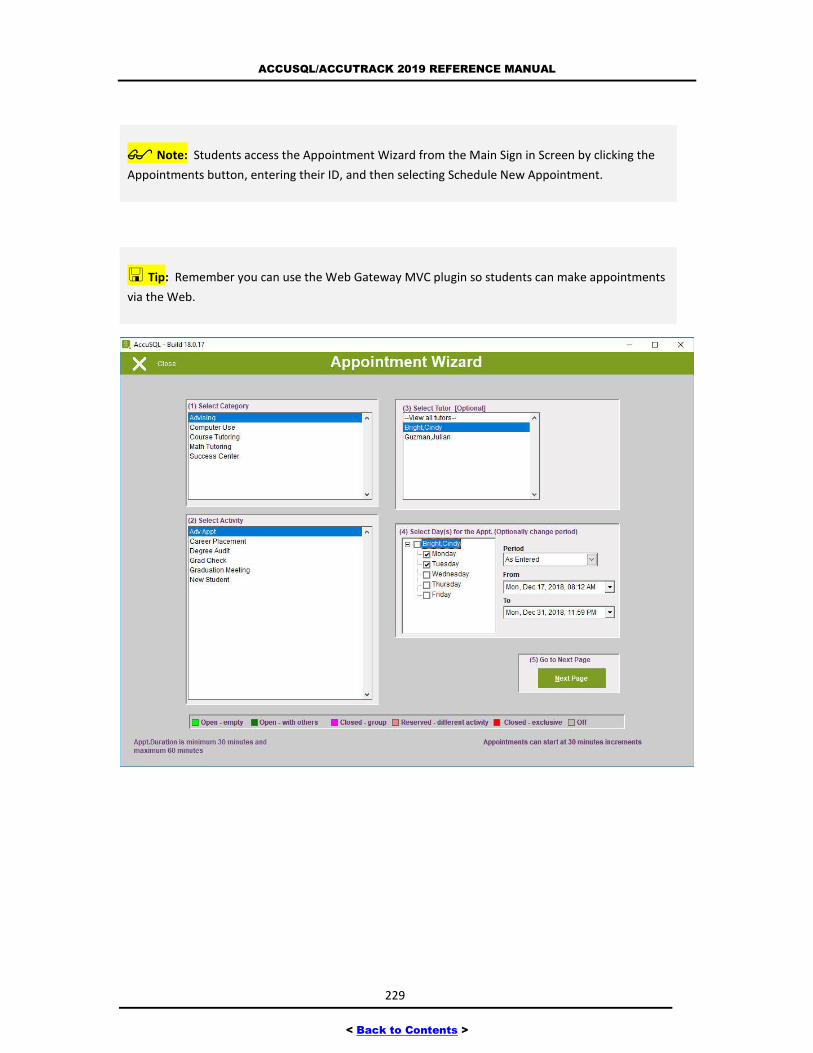
ACCUSQL/ACCUTRACK 2019 REFERENCE MANUAL
229
< Back to Contents >
Note: Students access the Appointment Wizard from the Main Sign in Screen by clicking the
Appointments button, entering their ID, and then selecting Schedule New Appointment.
Tip: Remember you can use the Web Gateway MVC plugin so students can make appointments
via the Web.
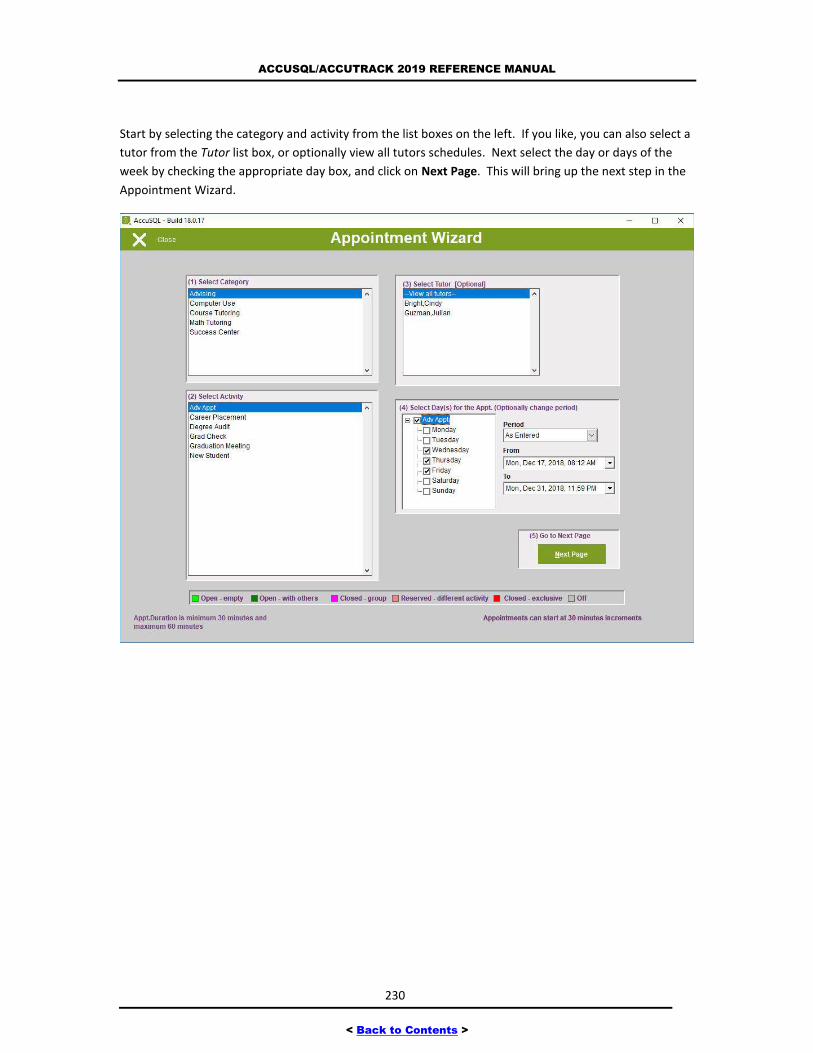
ACCUSQL/ACCUTRACK 2019 REFERENCE MANUAL
230
< Back to Contents >
Start by selecting the category and activity from the list boxes on the left. If you like, you can also select a
tutor from the Tutor list box, or optionally view all tutors schedules. Next select the day or days of the
week by checking the appropriate day box, and click on Next Page. This will bring up the next step in the
Appointment Wizard.
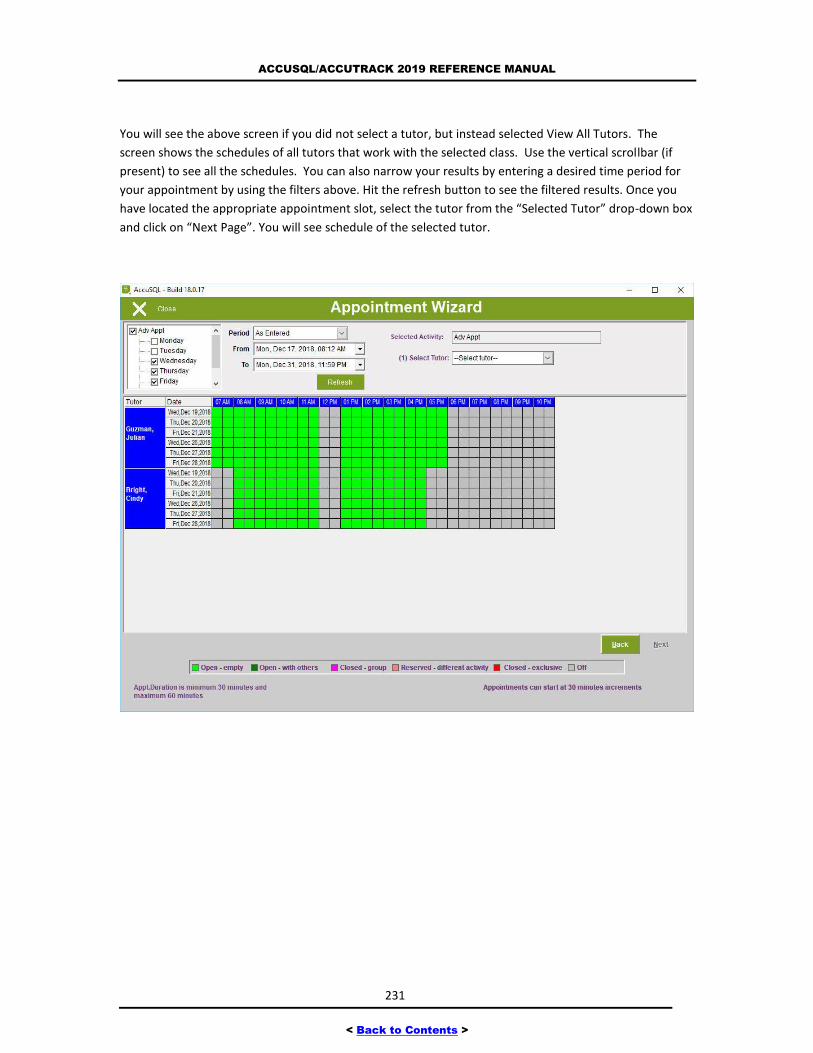
ACCUSQL/ACCUTRACK 2019 REFERENCE MANUAL
231
< Back to Contents >
You will see the above screen if you did not select a tutor, but instead selected View All Tutors. The
screen shows the schedules of all tutors that work with the selected class. Use the vertical scrollbar (if
present) to see all the schedules. You can also narrow your results by entering a desired time period for
your appointment by using the filters above. Hit the refresh button to see the filtered results. Once you
have located the appropriate appointment slot, select the tutor from the “Selected Tutor” drop-down box
and click on “Next Page”. You will see schedule of the selected tutor.
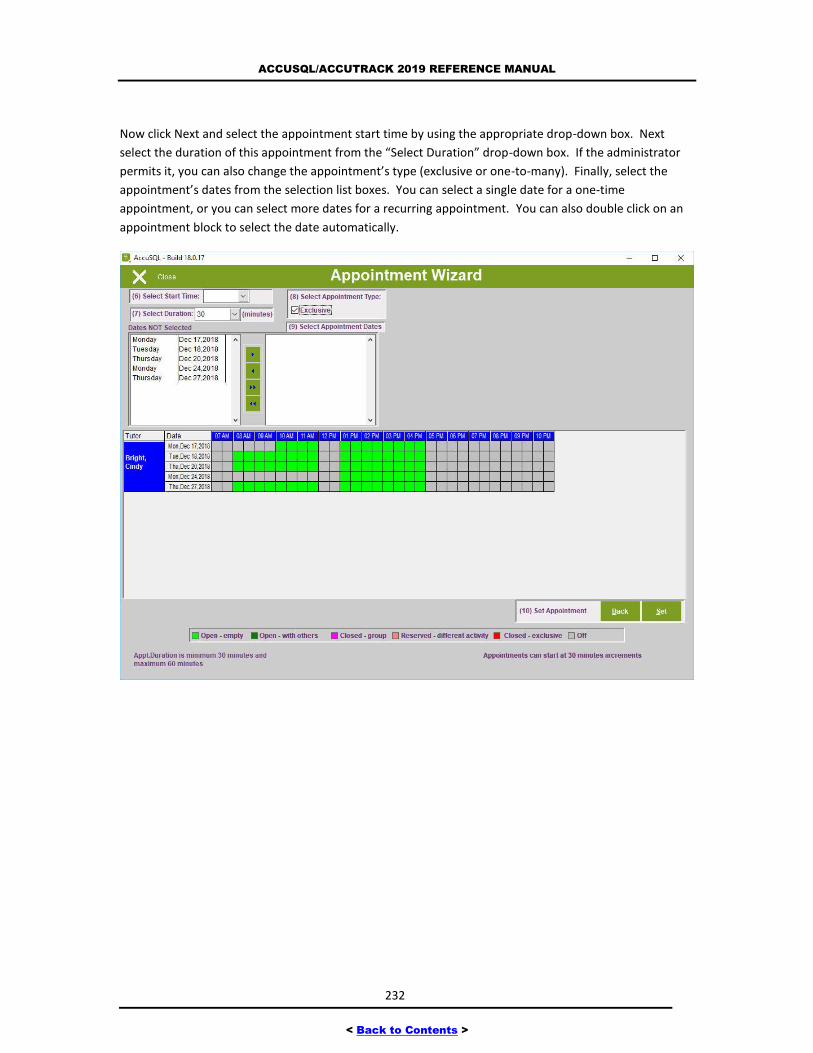
ACCUSQL/ACCUTRACK 2019 REFERENCE MANUAL
232
< Back to Contents >
Now click Next and select the appointment start time by using the appropriate drop-down box. Next
select the duration of this appointment from the “Select Duration” drop-down box. If the administrator
permits it, you can also change the appointment’s type (exclusive or one-to-many). Finally, select the
appointment’s dates from the selection list boxes. You can select a single date for a one-time
appointment, or you can select more dates for a recurring appointment. You can also double click on an
appointment block to select the date automatically.
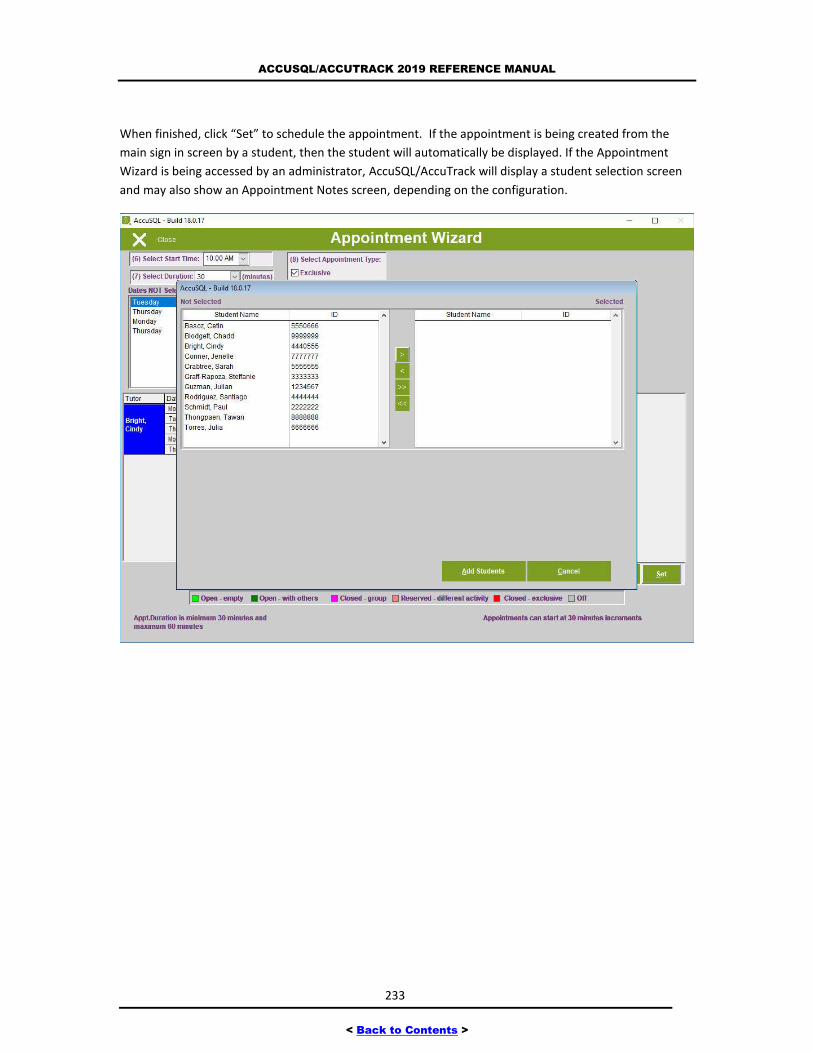
ACCUSQL/ACCUTRACK 2019 REFERENCE MANUAL
233
< Back to Contents >
When finished, click “Set” to schedule the appointment. If the appointment is being created from the
main sign in screen by a student, then the student will automatically be displayed. If the Appointment
Wizard is being accessed by an administrator, AccuSQL/AccuTrack will display a student selection screen
and may also show an Appointment Notes screen, depending on the configuration.
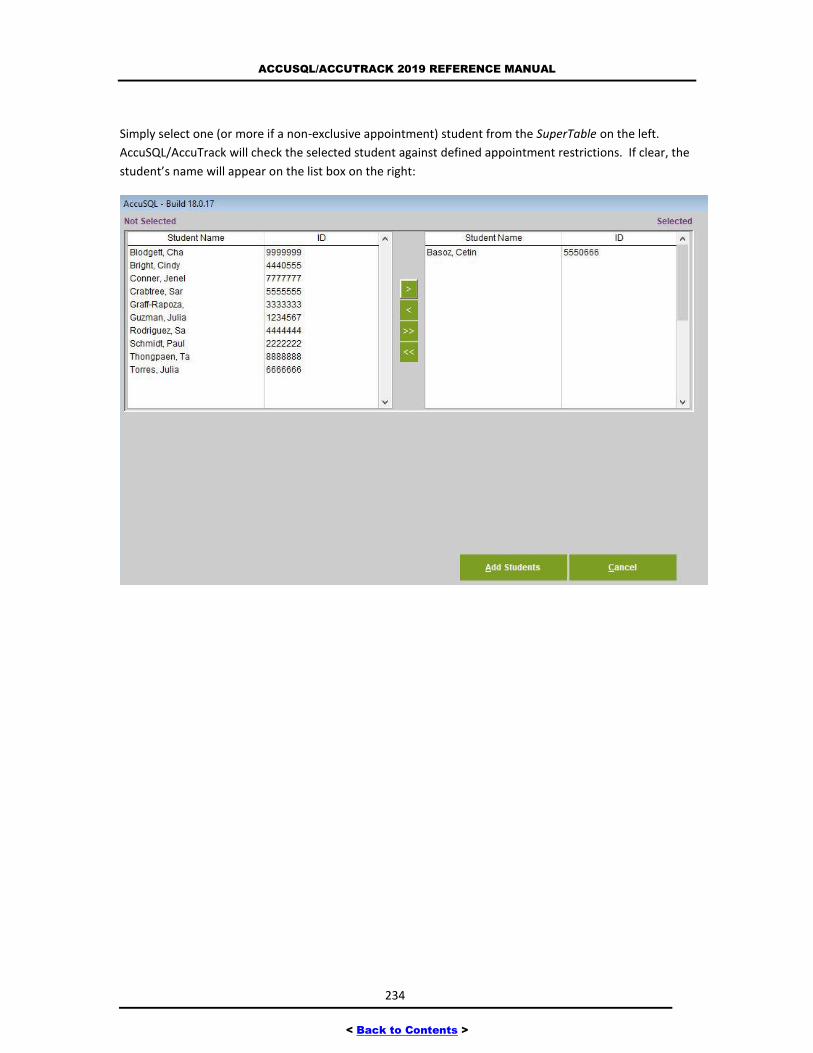
ACCUSQL/ACCUTRACK 2019 REFERENCE MANUAL
234
< Back to Contents >
Simply select one (or more if a non-exclusive appointment) student from the SuperTable on the left.
AccuSQL/AccuTrack will check the selected student against defined appointment restrictions. If clear, the
student’s name will appear on the list box on the right:
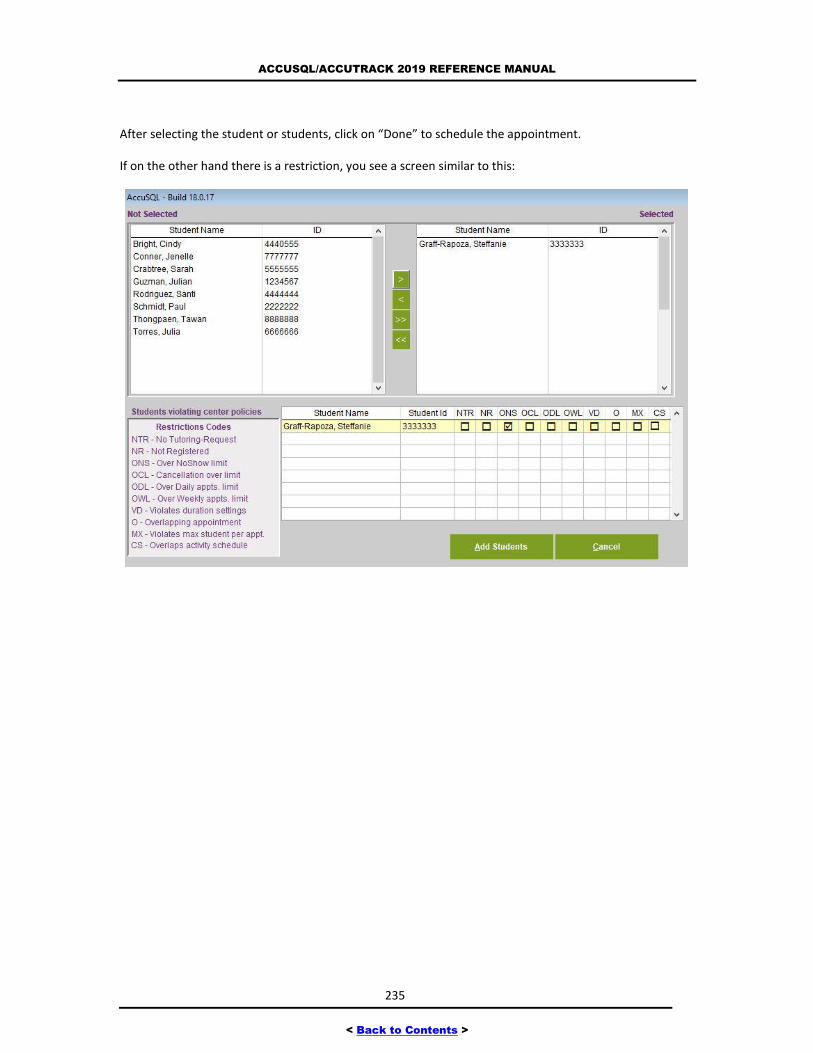
ACCUSQL/ACCUTRACK 2019 REFERENCE MANUAL
235
< Back to Contents >
After selecting the student or students, click on “Done” to schedule the appointment.
If on the other hand there is a restriction, you see a screen similar to this:
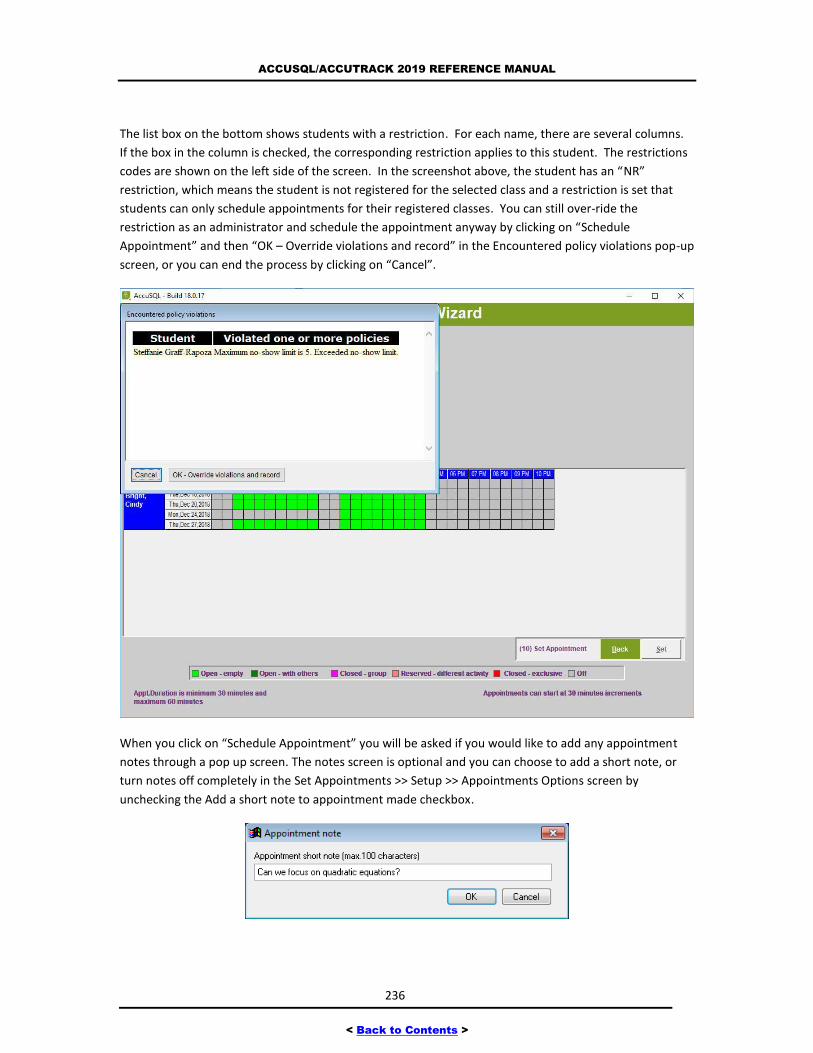
ACCUSQL/ACCUTRACK 2019 REFERENCE MANUAL
236
< Back to Contents >
The list box on the bottom shows students with a restriction. For each name, there are several columns.
If the box in the column is checked, the corresponding restriction applies to this student. The restrictions
codes are shown on the left side of the screen. In the screenshot above, the student has an “NR”
restriction, which means the student is not registered for the selected class and a restriction is set that
students can only schedule appointments for their registered classes. You can still over-ride the
restriction as an administrator and schedule the appointment anyway by clicking on “Schedule
Appointment” and then “OK – Override violations and record” in the Encountered policy violations pop-up
screen, or you can end the process by clicking on “Cancel”.
When you click on “Schedule Appointment” you will be asked if you would like to add any appointment
notes through a pop up screen. The notes screen is optional and you can choose to add a short note, or
turn notes off completely in the Set Appointments >> Setup >> Appointments Options screen by
unchecking the Add a short note to appointment made checkbox.

ACCUSQL/ACCUTRACK 2019 REFERENCE MANUAL
237
< Back to Contents >
If you have the option to schedule rooms for appointments turned on and you are making the
appointment as an admin and not a student, you will be able to assign a room for the scheduled
appointments:
Using the above box, you can select a room for each appointment. Note: Rooms are created in the
System >> Rooms screen. To select a room for an appointment, simply select the room from the Room
drop-down in the same row. If you would like to assign all the appointments to the same room, use the
drop-down box at the bottom of this screen. Click on “Done” to complete the room assignments. This
will complete the appointment scheduling process.
You will then see a screen where you can print out an appointment confirmation slip. Do this by checking
the appropriate student or tutor checkbox and clicking on “Print.” This step can also be bypassed by
hitting the Cancel button and can be turned off completely in the Set Appointments >> Setup >> Email
Confirmation Options screen by unchecking Show Appointment Confirmation Slip print-out box.
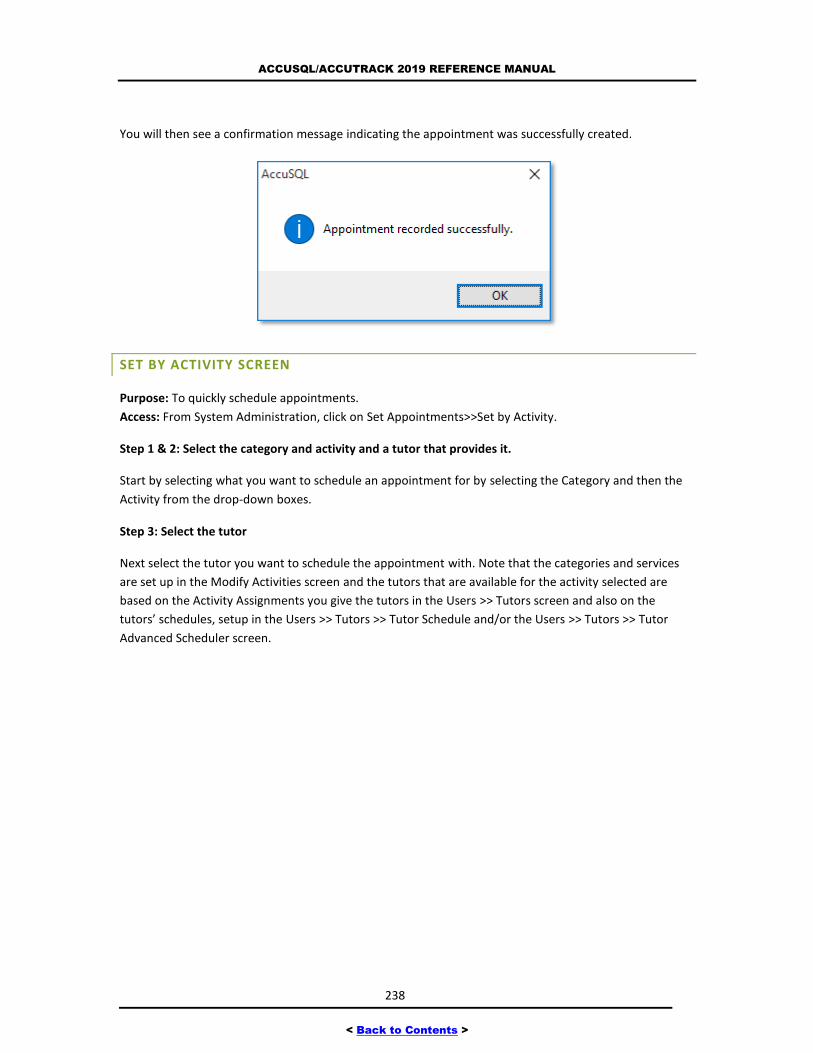
ACCUSQL/ACCUTRACK 2019 REFERENCE MANUAL
238
< Back to Contents >
You will then see a confirmation message indicating the appointment was successfully created.
SET BY ACTIVITY SCREEN
Purpose: To quickly schedule appointments.
Access: From System Administration, click on Set Appointments>>Set by Activity.
Step 1 & 2: Select the category and activity and a tutor that provides it.
Start by selecting what you want to schedule an appointment for by selecting the Category and then the
Activity from the drop-down boxes.
Step 3: Select the tutor
Next select the tutor you want to schedule the appointment with. Note that the categories and services
are set up in the Modify Activities screen and the tutors that are available for the activity selected are
based on the Activity Assignments you give the tutors in the Users >> Tutors screen and also on the
tutors’ schedules, setup in the Users >> Tutors >> Tutor Schedule and/or the Users >> Tutors >> Tutor
Advanced Scheduler screen.
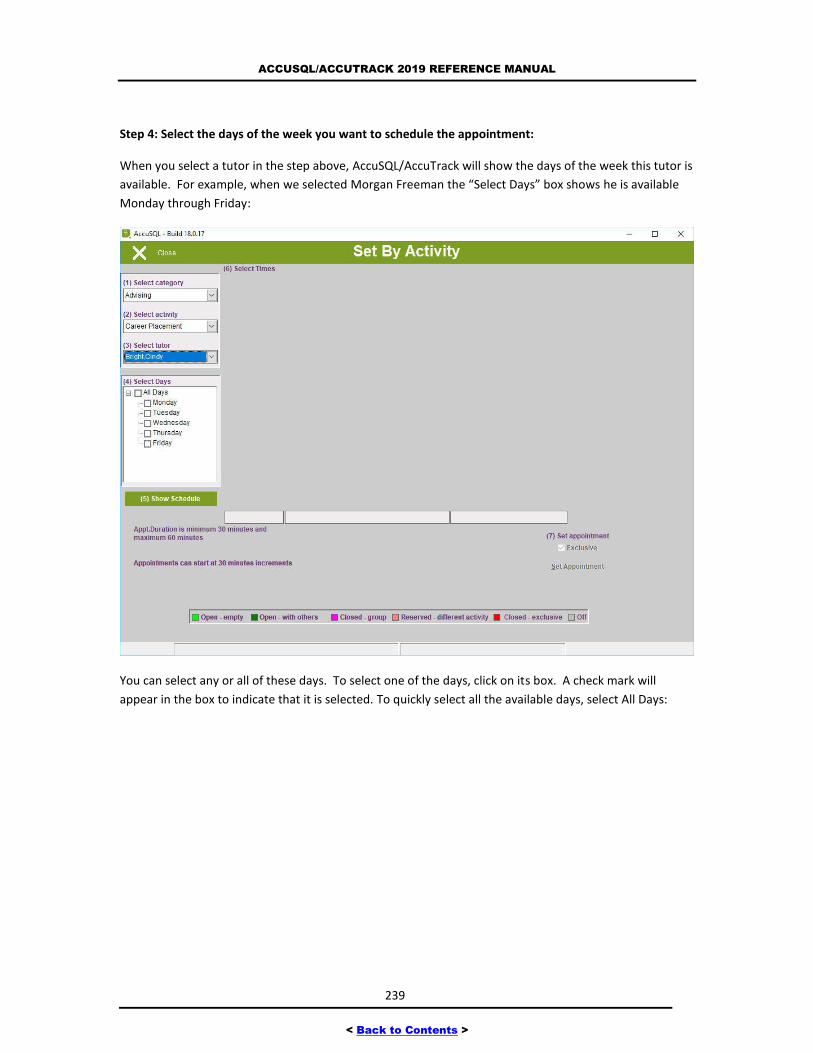
ACCUSQL/ACCUTRACK 2019 REFERENCE MANUAL
239
< Back to Contents >
Step 4: Select the days of the week you want to schedule the appointment:
When you select a tutor in the step above, AccuSQL/AccuTrack will show the days of the week this tutor is
available. For example, when we selected Morgan Freeman the “Select Days” box shows he is available
Monday through Friday:
You can select any or all of these days. To select one of the days, click on its box. A check mark will
appear in the box to indicate that it is selected. To quickly select all the available days, select All Days:
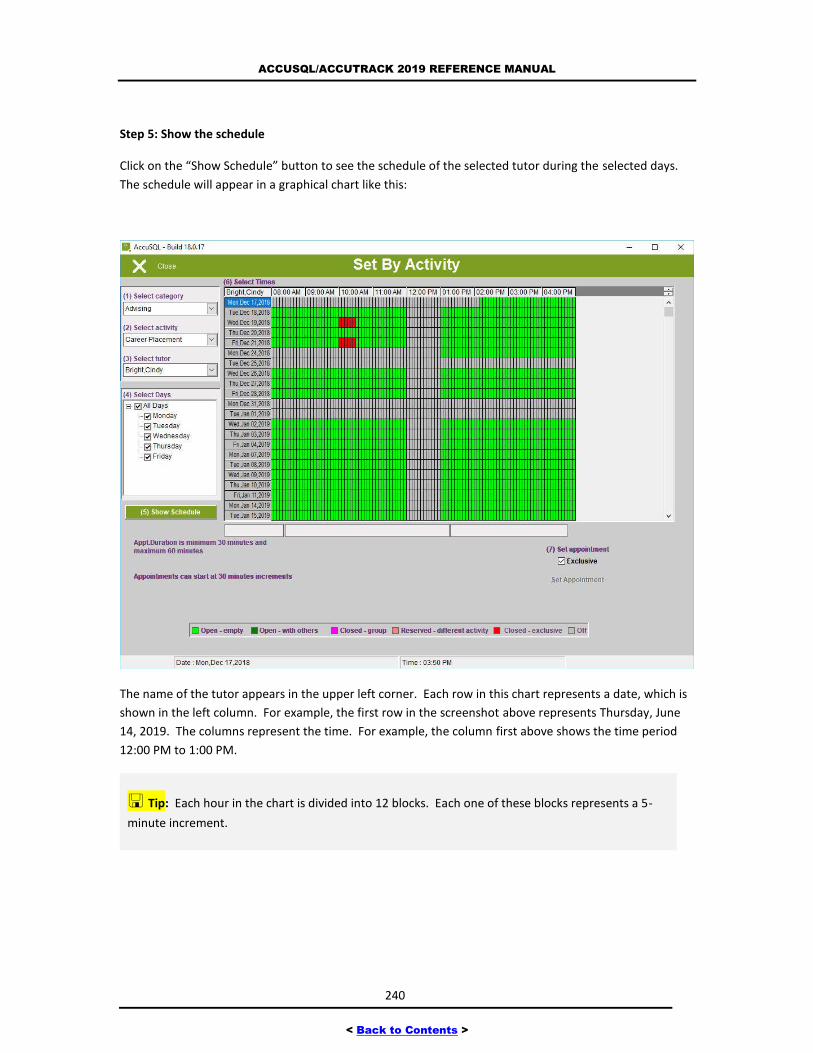
ACCUSQL/ACCUTRACK 2019 REFERENCE MANUAL
240
< Back to Contents >
Step 5: Show the schedule
Click on the “Show Schedule” button to see the schedule of the selected tutor during the selected days.
The schedule will appear in a graphical chart like this:
The name of the tutor appears in the upper left corner. Each row in this chart represents a date, which is
shown in the left column. For example, the first row in the screenshot above represents Thursday, June
14, 2019. The columns represent the time. For example, the column first above shows the time period
12:00 PM to 1:00 PM.
Tip: Each hour in the chart is divided into 12 blocks. Each one of these blocks represents a 5-
minute increment.
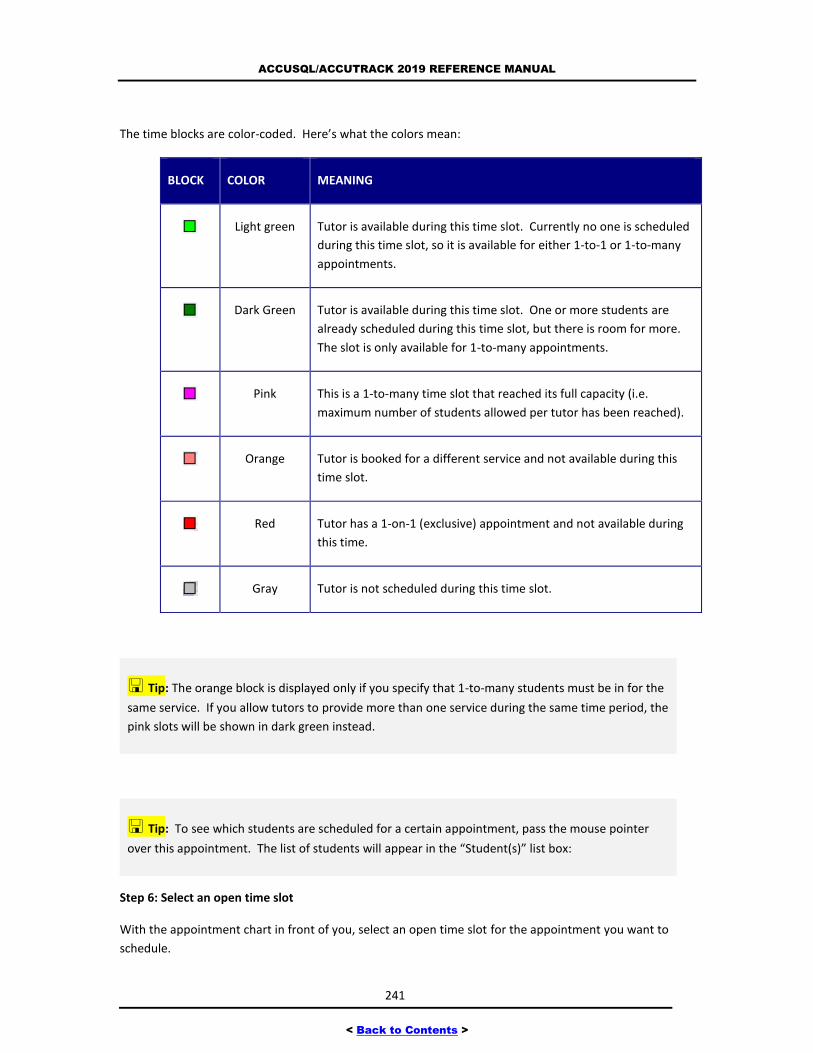
ACCUSQL/ACCUTRACK 2019 REFERENCE MANUAL
241
< Back to Contents >
The time blocks are color-coded. Here’s what the colors mean:
BLOCK COLOR MEANING
Light green Tutor is available during this time slot. Currently no one is scheduled
during this time slot, so it is available for either 1-to-1 or 1-to-many
appointments.
Dark Green Tutor is available during this time slot. One or more students are
already scheduled during this time slot, but there is room for more.
The slot is only available for 1-to-many appointments.
Pink This is a 1-to-many time slot that reached its full capacity (i.e.
maximum number of students allowed per tutor has been reached).
Orange Tutor is booked for a different service and not available during this
time slot.
Red Tutor has a 1-on-1 (exclusive) appointment and not available during
this time.
Gray Tutor is not scheduled during this time slot.
Tip: The orange block is displayed only if you specify that 1-to-many students must be in for the
same service. If you allow tutors to provide more than one service during the same time period, the
pink slots will be shown in dark green instead.
Tip: To see which students are scheduled for a certain appointment, pass the mouse pointer
over this appointment. The list of students will appear in the “Student(s)” list box:
Step 6: Select an open time slot
With the appointment chart in front of you, select an open time slot for the appointment you want to
schedule.
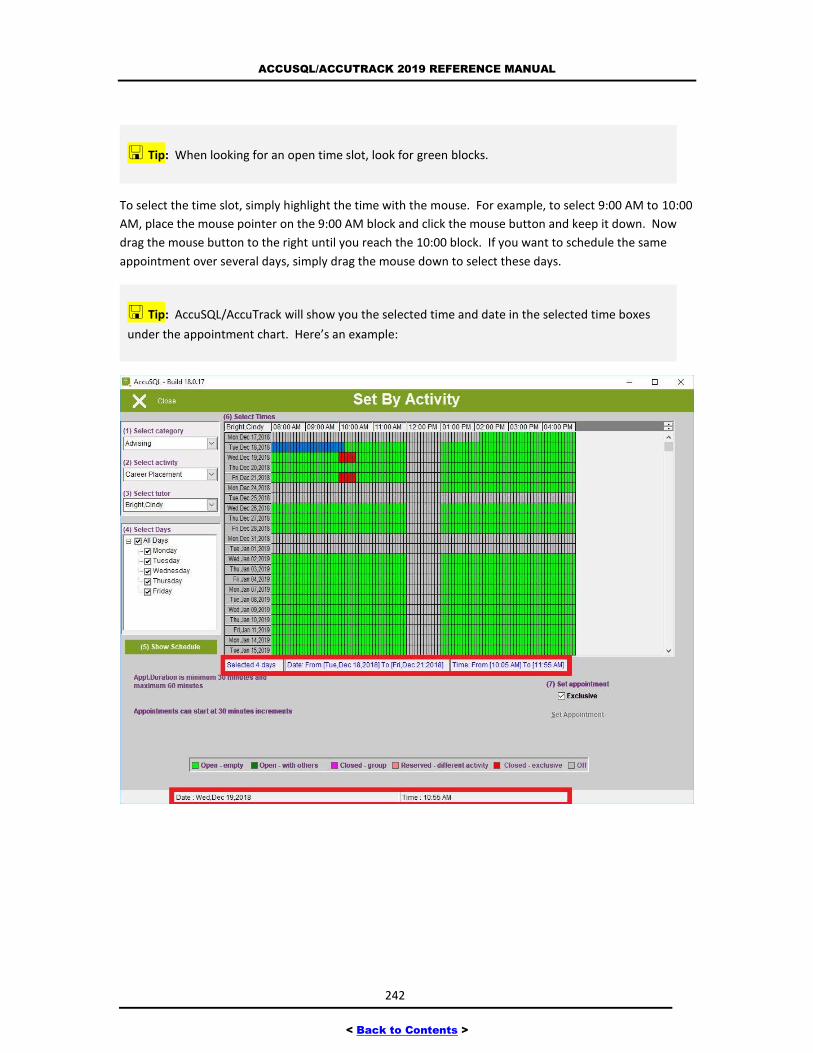
ACCUSQL/ACCUTRACK 2019 REFERENCE MANUAL
242
< Back to Contents >
Tip: When looking for an open time slot, look for green blocks.
To select the time slot, simply highlight the time with the mouse. For example, to select 9:00 AM to 10:00
AM, place the mouse pointer on the 9:00 AM block and click the mouse button and keep it down. Now
drag the mouse button to the right until you reach the 10:00 block. If you want to schedule the same
appointment over several days, simply drag the mouse down to select these days.
Tip: AccuSQL/AccuTrack will show you the selected time and date in the selected time boxes
under the appointment chart. Here’s an example:
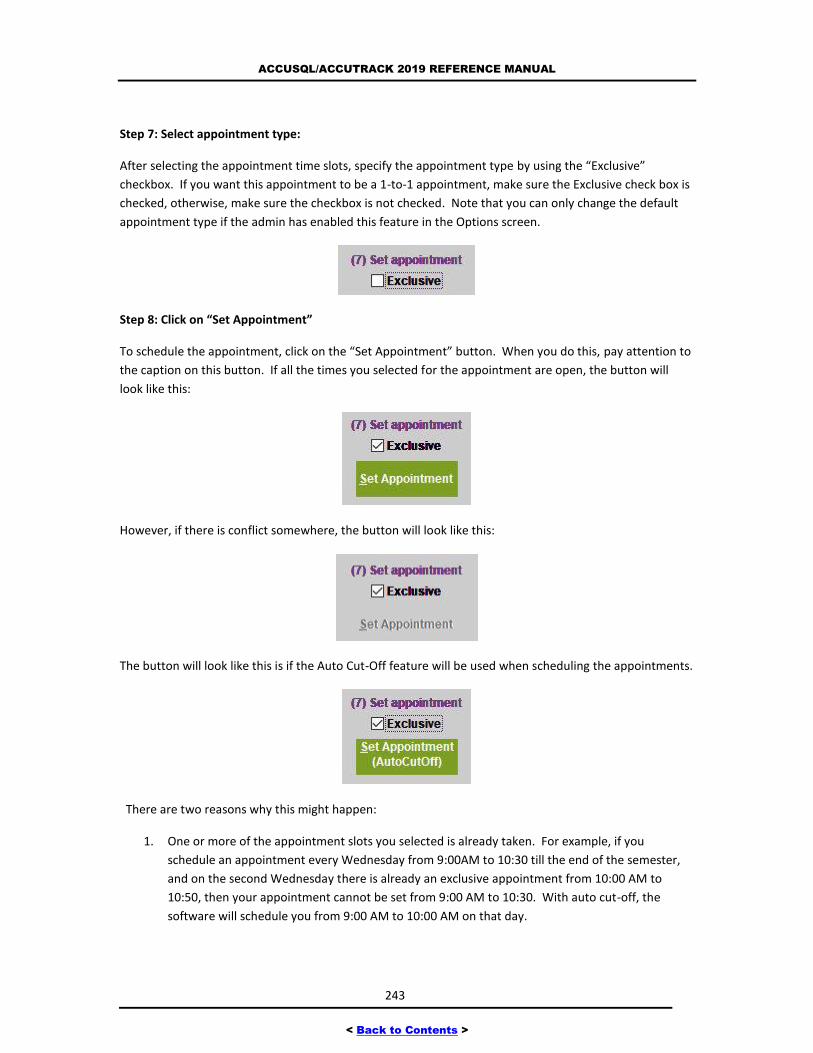
ACCUSQL/ACCUTRACK 2019 REFERENCE MANUAL
243
< Back to Contents >
Step 7: Select appointment type:
After selecting the appointment time slots, specify the appointment type by using the “Exclusive”
checkbox. If you want this appointment to be a 1-to-1 appointment, make sure the Exclusive check box is
checked, otherwise, make sure the checkbox is not checked. Note that you can only change the default
appointment type if the admin has enabled this feature in the Options screen.
Step 8: Click on “Set Appointment”
To schedule the appointment, click on the “Set Appointment” button. When you do this, pay attention to
the caption on this button. If all the times you selected for the appointment are open, the button will
look like this:
However, if there is conflict somewhere, the button will look like this:
The button will look like this is if the Auto Cut-Off feature will be used when scheduling the appointments.
There are two reasons why this might happen:
1. One or more of the appointment slots you selected is already taken. For example, if you
schedule an appointment every Wednesday from 9:00AM to 10:30 till the end of the semester,
and on the second Wednesday there is already an exclusive appointment from 10:00 AM to
10:50, then your appointment cannot be set from 9:00 AM to 10:30. With auto cut-off, the
software will schedule you from 9:00 AM to 10:00 AM on that day.
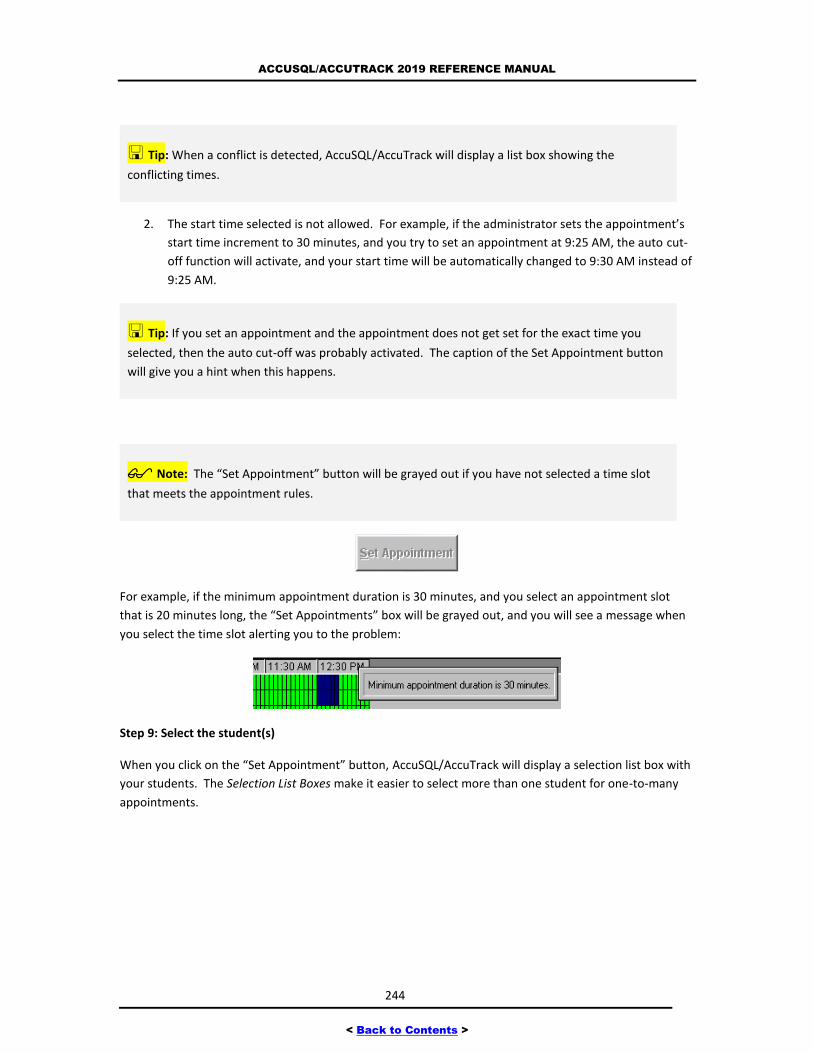
ACCUSQL/ACCUTRACK 2019 REFERENCE MANUAL
244
< Back to Contents >
Tip: When a conflict is detected, AccuSQL/AccuTrack will display a list box showing the
conflicting times.
2. The start time selected is not allowed. For example, if the administrator sets the appointment’s
start time increment to 30 minutes, and you try to set an appointment at 9:25 AM, the auto cut-
off function will activate, and your start time will be automatically changed to 9:30 AM instead of
9:25 AM.
Tip: If you set an appointment and the appointment does not get set for the exact time you
selected, then the auto cut-off was probably activated. The caption of the Set Appointment button
will give you a hint when this happens.
Note: The “Set Appointment” button will be grayed out if you have not selected a time slot
that meets the appointment rules.
For example, if the minimum appointment duration is 30 minutes, and you select an appointment slot
that is 20 minutes long, the “Set Appointments” box will be grayed out, and you will see a message when
you select the time slot alerting you to the problem:
Step 9: Select the student(s)
When you click on the “Set Appointment” button, AccuSQL/AccuTrack will display a selection list box with
your students. The Selection List Boxes make it easier to select more than one student for one-to-many
appointments.

ACCUSQL/ACCUTRACK 2019 REFERENCE MANUAL
245
< Back to Contents >
If the selected student has a restriction, you will see another Selection List Boxes that shows the
restriction:
The list box on the bottom shows students with a restriction. For each name, there are several columns.
If the box in the column is checked, the corresponding restriction applies to this student. The restrictions
codes are shown on the left side of the screen. In the screenshot above, the student has an “NR”
restriction, which means the student is not registered for the activity for which you are scheduling the
appointment and you have that restriction activated. The following are the restriction codes used in this
box:
NTR – No Tutoring Requests:
NR – Not Registered: Restriction applies if admin selects the option to only allow registered
students for appointments:
ONS – Over No-show Limit: Student exceeded the maximum number of no-shows allowed.
OCL – Over Cancellation Limit: Student exceeded the maximum number of appointment
cancellations allowed.
ODL – Over Daily appointments Limit: Student has other appointments on the selected day and
the maximum number of daily appointment is exceeded.
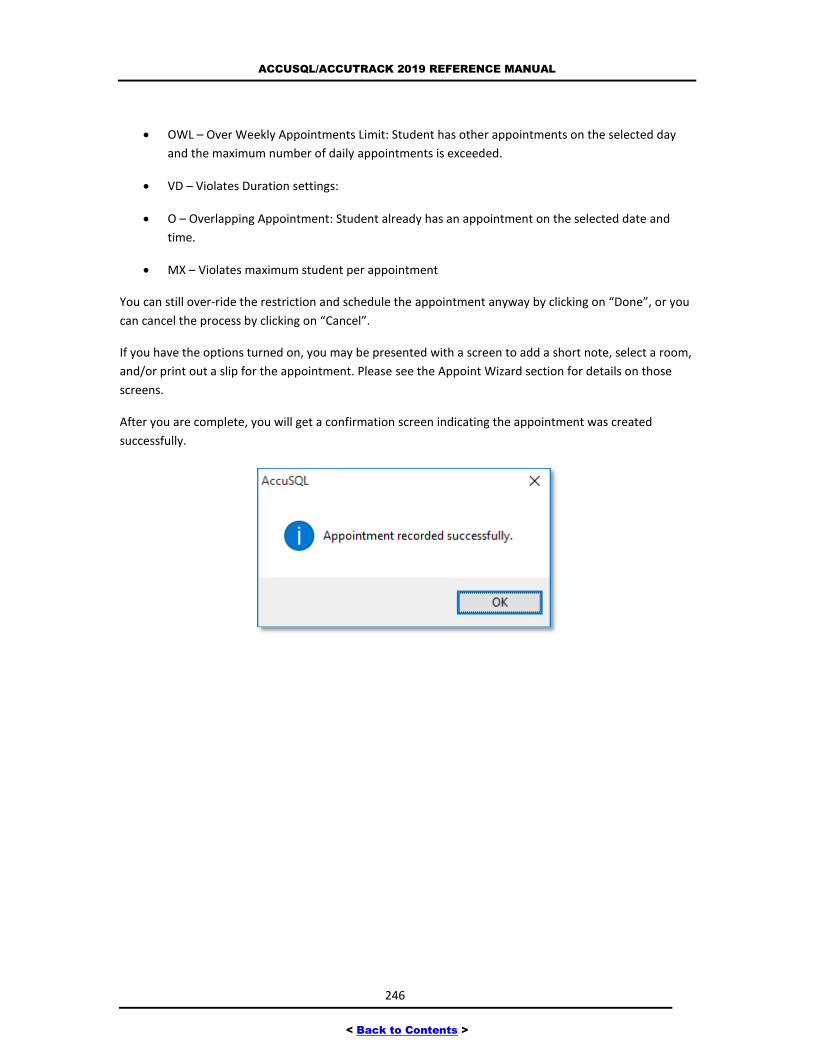
ACCUSQL/ACCUTRACK 2019 REFERENCE MANUAL
246
< Back to Contents >
OWL – Over Weekly Appointments Limit: Student has other appointments on the selected day
and the maximum number of daily appointments is exceeded.
VD – Violates Duration settings:
O – Overlapping Appointment: Student already has an appointment on the selected date and
time.
MX – Violates maximum student per appointment
You can still over-ride the restriction and schedule the appointment anyway by clicking on “Done”, or you
can cancel the process by clicking on “Cancel”.
If you have the options turned on, you may be presented with a screen to add a short note, select a room,
and/or print out a slip for the appointment. Please see the Appoint Wizard section for details on those
screens.
After you are complete, you will get a confirmation screen indicating the appointment was created
successfully.

ACCUSQL/ACCUTRACK 2019 REFERENCE MANUAL
247
< Back to Contents >
SET BY STUDENT
Purpose: Another method for quickly scheduling appointments.
Access: From System Administration, click on Set Appointments >>Set by Student.
First click on the student(s) you are scheduling the appointment for and then click OK.
From this point forward, the appointment scheduler behaves exactly like the Set by Activity option. Please
see the previous section, Set by Activity for detailed information.
QUICK SCHEDULER
Purpose: Another method for quickly scheduling appointments.
Access: From System Administration, click on Set Appointments >>Quick Scheduler.
Click a Category on the left (1) and the activities listed for that category will appear in the (2) Select
Activity list. Click the activity for which the appointment will be scheduled. Next, click the date when the
appointment will occur. You can click the left or right arrows to scroll day by day, or click the drop-down
box next to the date display to select a day from a calendar view.
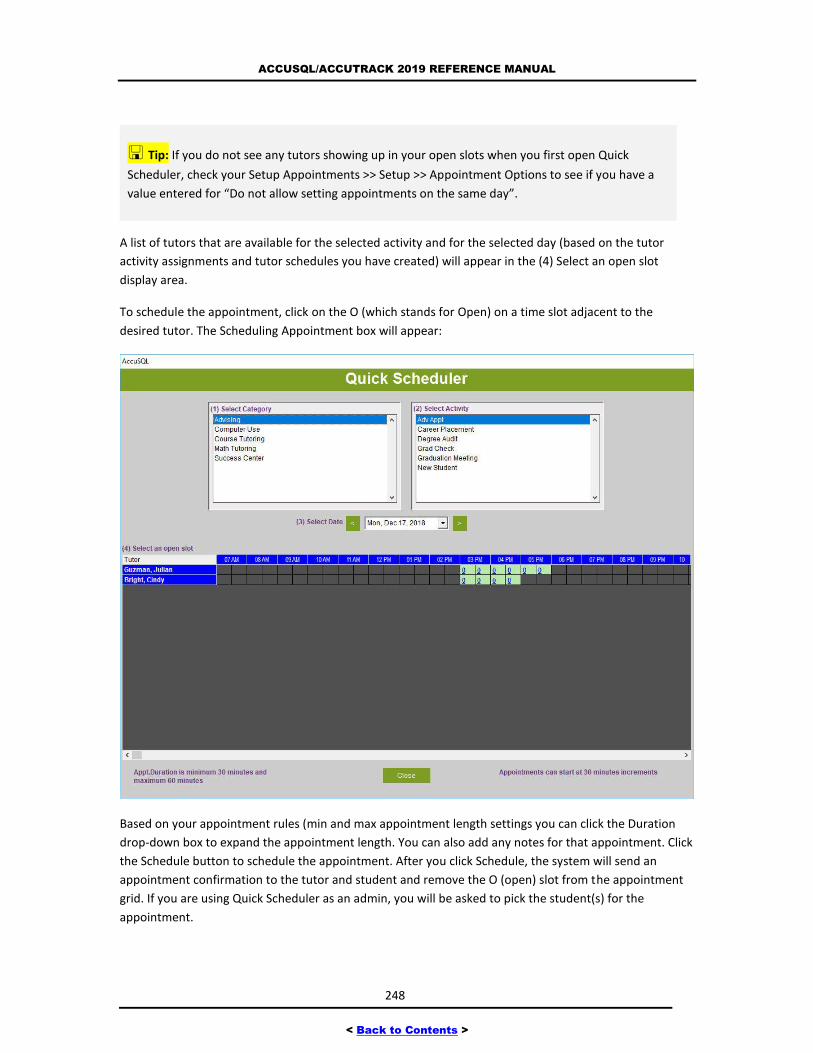
ACCUSQL/ACCUTRACK 2019 REFERENCE MANUAL
248
< Back to Contents >
Tip: If you do not see any tutors showing up in your open slots when you first open Quick
Scheduler, check your Setup Appointments >> Setup >> Appointment Options to see if you have a
value entered for “Do not allow setting appointments on the same day”.
A list of tutors that are available for the selected activity and for the selected day (based on the tutor
activity assignments and tutor schedules you have created) will appear in the (4) Select an open slot
display area.
To schedule the appointment, click on the O (which stands for Open) on a time slot adjacent to the
desired tutor. The Scheduling Appointment box will appear:
Based on your appointment rules (min and max appointment length settings you can click the Duration
drop-down box to expand the appointment length. You can also add any notes for that appointment. Click
the Schedule button to schedule the appointment. After you click Schedule, the system will send an
appointment confirmation to the tutor and student and remove the O (open) slot from the appointment
grid. If you are using Quick Scheduler as an admin, you will be asked to pick the student(s) for the
appointment.
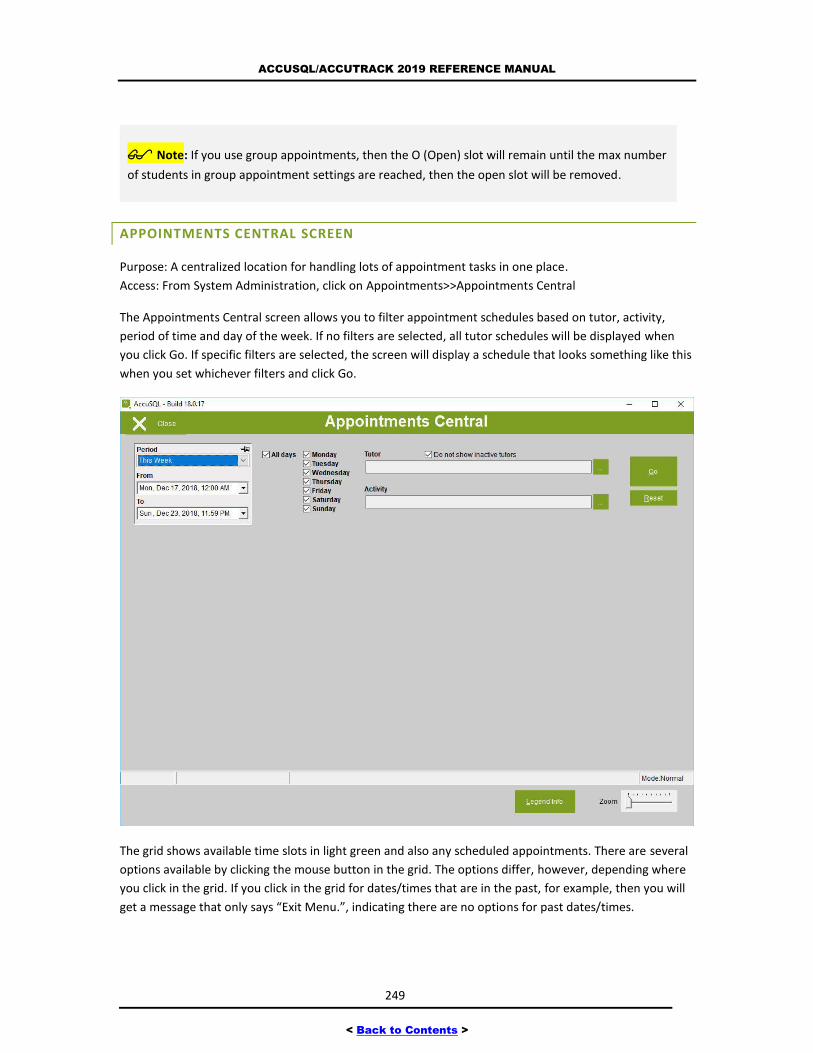
ACCUSQL/ACCUTRACK 2019 REFERENCE MANUAL
249
< Back to Contents >
Note: If you use group appointments, then the O (Open) slot will remain until the max number
of students in group appointment settings are reached, then the open slot will be removed.
APPOINTMENTS CENTRAL SCREEN
Purpose: A centralized location for handling lots of appointment tasks in one place.
Access: From System Administration, click on Appointments>>Appointments Central
The Appointments Central screen allows you to filter appointment schedules based on tutor, activity,
period of time and day of the week. If no filters are selected, all tutor schedules will be displayed when
you click Go. If specific filters are selected, the screen will display a schedule that looks something like this
when you set whichever filters and click Go.
The grid shows available time slots in light green and also any scheduled appointments. There are several
options available by clicking the mouse button in the grid. The options differ, however, depending where
you click in the grid. If you click in the grid for dates/times that are in the past, for example, then you will
get a message that only says “Exit Menu.”, indicating there are no options for past dates/times.
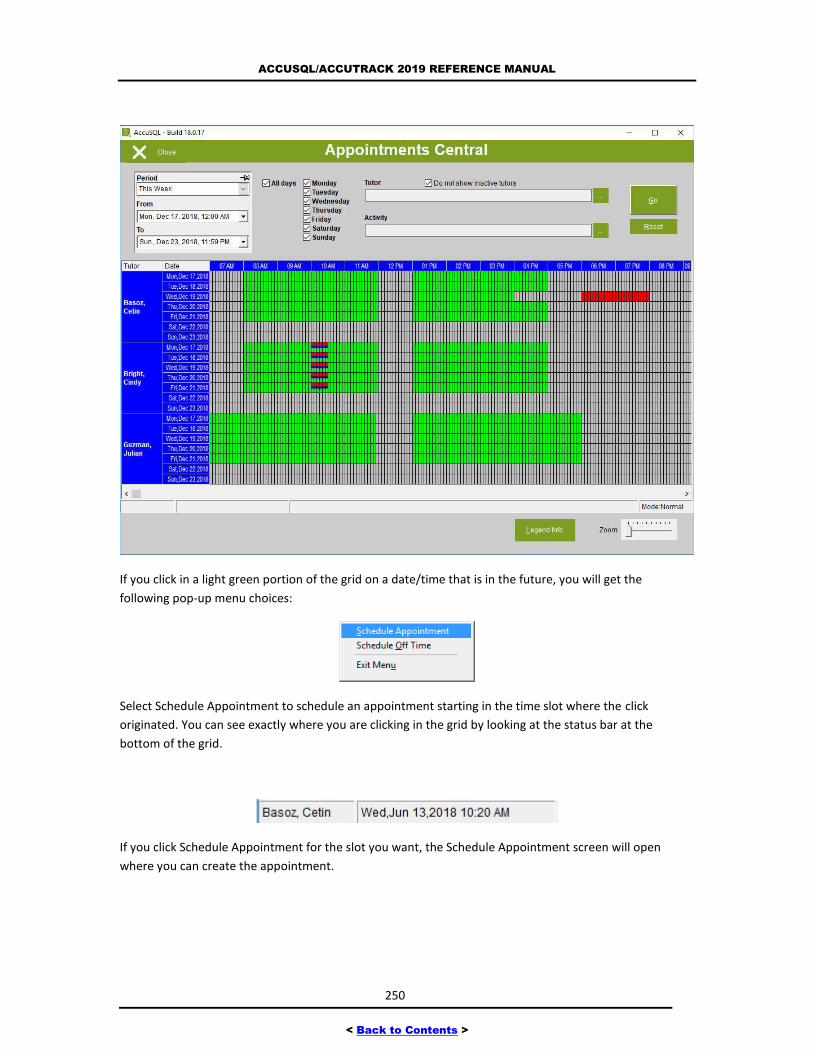
ACCUSQL/ACCUTRACK 2019 REFERENCE MANUAL
250
< Back to Contents >
If you click in a light green portion of the grid on a date/time that is in the future, you will get the
following pop-up menu choices:
Select Schedule Appointment to schedule an appointment starting in the time slot where the click
originated. You can see exactly where you are clicking in the grid by looking at the status bar at the
bottom of the grid.
If you click Schedule Appointment for the slot you want, the Schedule Appointment screen will open
where you can create the appointment.
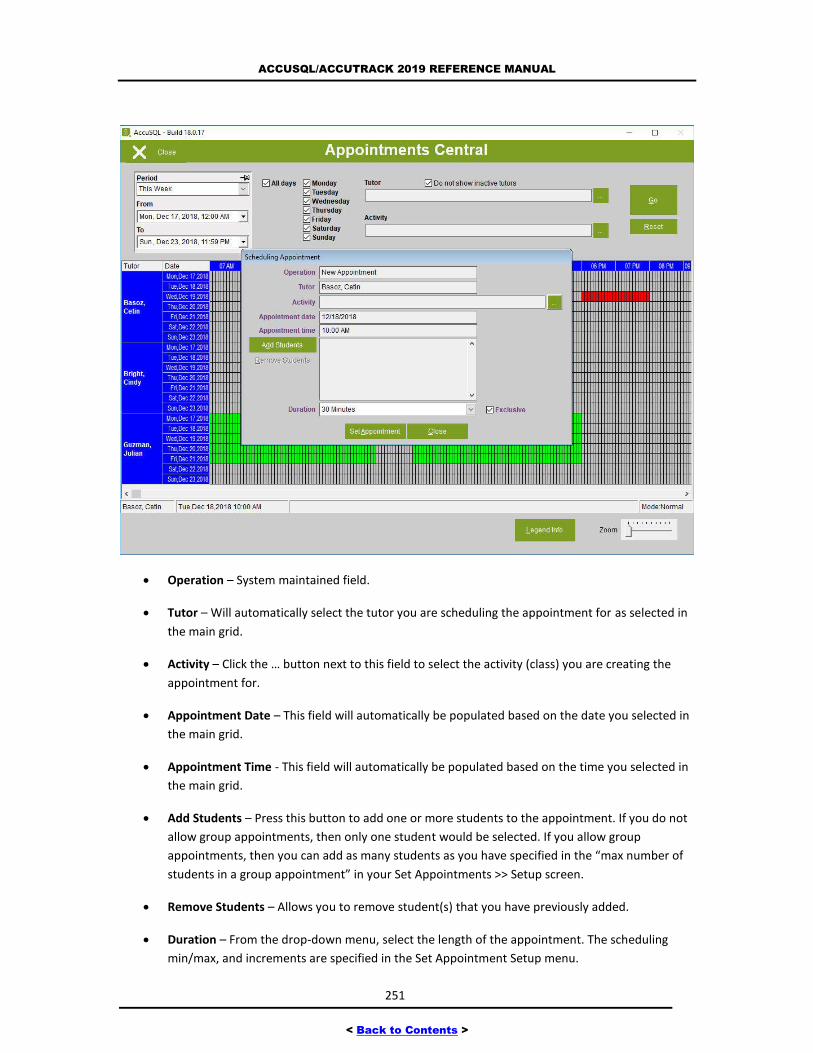
ACCUSQL/ACCUTRACK 2019 REFERENCE MANUAL
251
< Back to Contents >
Operation – System maintained field.
Tutor – Will automatically select the tutor you are scheduling the appointment for as selected in
the main grid.
Activity – Click the … button next to this field to select the activity (class) you are creating the
appointment for.
Appointment Date – This field will automatically be populated based on the date you selected in
the main grid.
Appointment Time - This field will automatically be populated based on the time you selected in
the main grid.
Add Students – Press this button to add one or more students to the appointment. If you do not
allow group appointments, then only one student would be selected. If you allow group
appointments, then you can add as many students as you have specified in the “max number of
students in a group appointment” in your Set Appointments >> Setup screen.
Remove Students – Allows you to remove student(s) that you have previously added.
Duration – From the drop-down menu, select the length of the appointment. The scheduling
min/max, and increments are specified in the Set Appointment Setup menu.
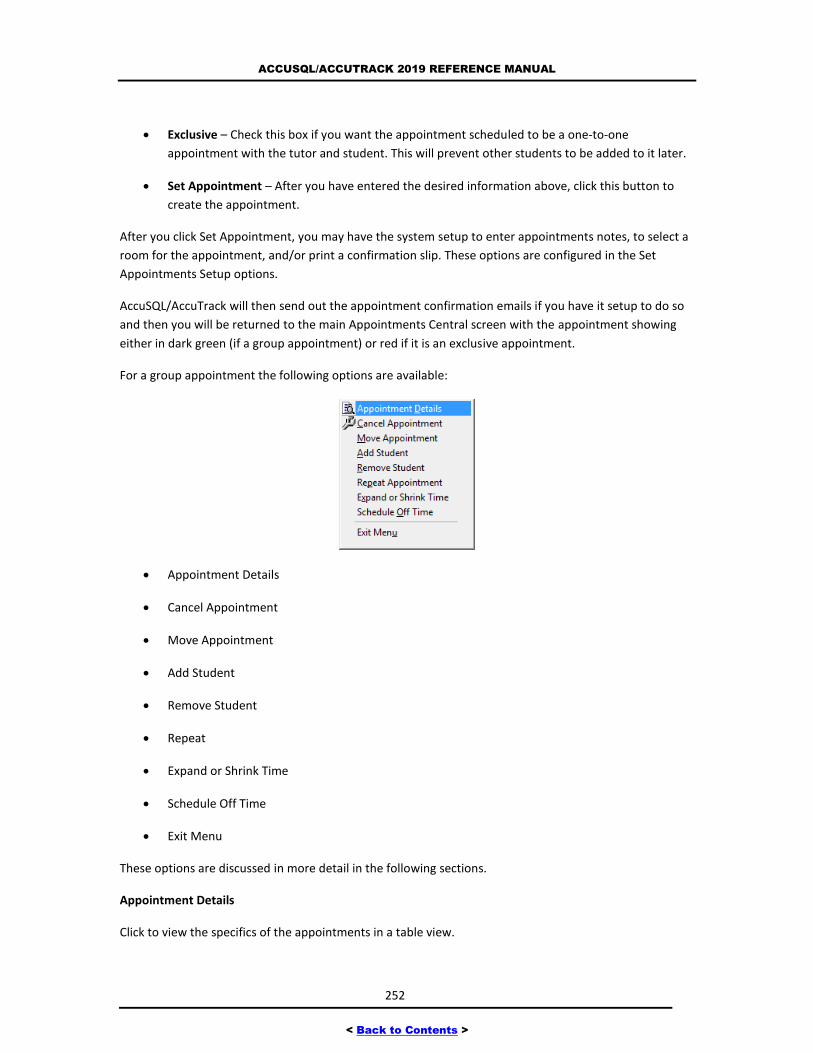
ACCUSQL/ACCUTRACK 2019 REFERENCE MANUAL
252
< Back to Contents >
Exclusive – Check this box if you want the appointment scheduled to be a one-to-one
appointment with the tutor and student. This will prevent other students to be added to it later.
Set Appointment – After you have entered the desired information above, click this button to
create the appointment.
After you click Set Appointment, you may have the system setup to enter appointments notes, to select a
room for the appointment, and/or print a confirmation slip. These options are configured in the Set
Appointments Setup options.
AccuSQL/AccuTrack will then send out the appointment confirmation emails if you have it setup to do so
and then you will be returned to the main Appointments Central screen with the appointment showing
either in dark green (if a group appointment) or red if it is an exclusive appointment.
For a group appointment the following options are available:
Appointment Details
Cancel Appointment
Move Appointment
Add Student
Remove Student
Repeat
Expand or Shrink Time
Schedule Off Time
Exit Menu
These options are discussed in more detail in the following sections.
Appointment Details
Click to view the specifics of the appointments in a table view.
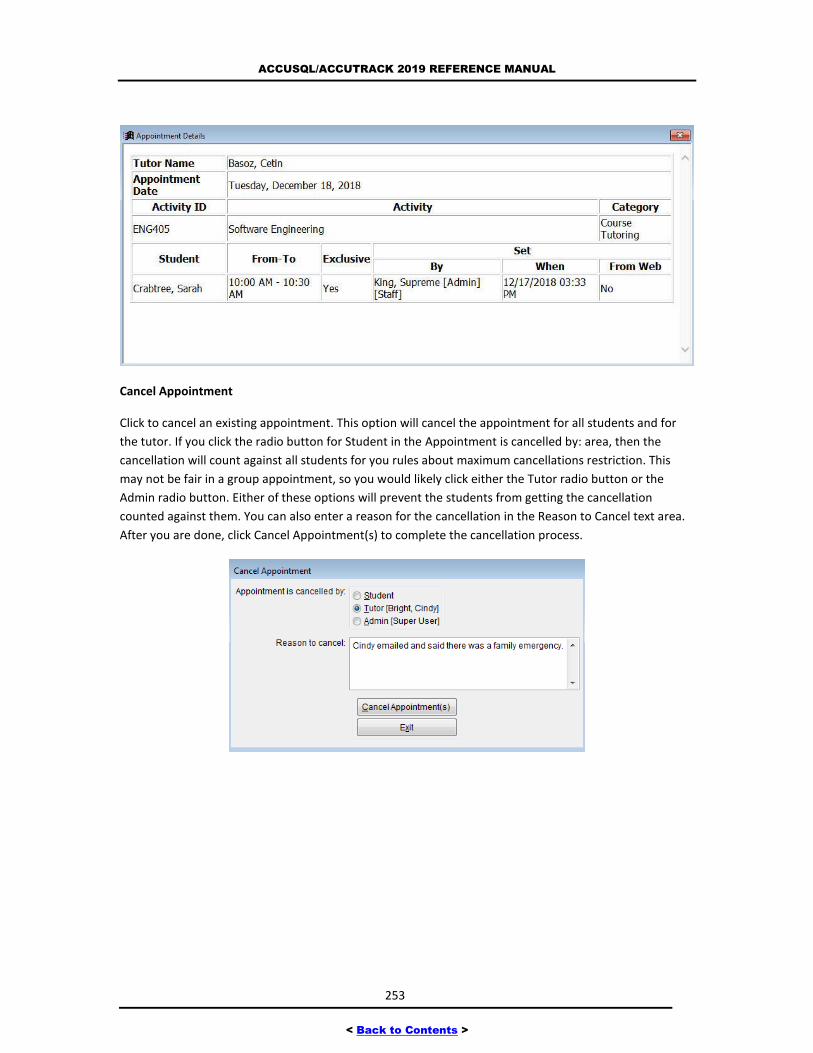
ACCUSQL/ACCUTRACK 2019 REFERENCE MANUAL
253
< Back to Contents >
Cancel Appointment
Click to cancel an existing appointment. This option will cancel the appointment for all students and for
the tutor. If you click the radio button for Student in the Appointment is cancelled by: area, then the
cancellation will count against all students for you rules about maximum cancellations restriction. This
may not be fair in a group appointment, so you would likely click either the Tutor radio button or the
Admin radio button. Either of these options will prevent the students from getting the cancellation
counted against them. You can also enter a reason for the cancellation in the Reason to Cancel text area.
After you are done, click Cancel Appointment(s) to complete the cancellation process.
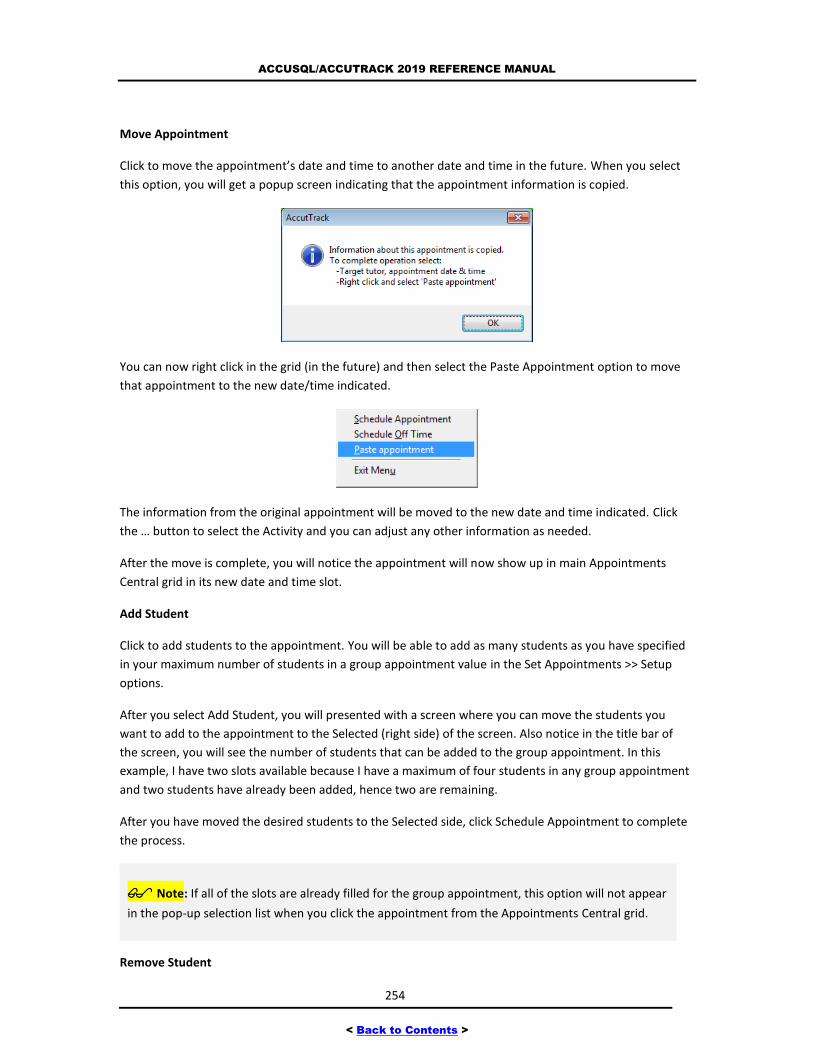
ACCUSQL/ACCUTRACK 2019 REFERENCE MANUAL
254
< Back to Contents >
Move Appointment
Click to move the appointment’s date and time to another date and time in the future. When you select
this option, you will get a popup screen indicating that the appointment information is copied.
You can now right click in the grid (in the future) and then select the Paste Appointment option to move
that appointment to the new date/time indicated.
The information from the original appointment will be moved to the new date and time indicated. Click
the … button to select the Activity and you can adjust any other information as needed.
After the move is complete, you will notice the appointment will now show up in main Appointments
Central grid in its new date and time slot.
Add Student
Click to add students to the appointment. You will be able to add as many students as you have specified
in your maximum number of students in a group appointment value in the Set Appointments >> Setup
options.
After you select Add Student, you will presented with a screen where you can move the students you
want to add to the appointment to the Selected (right side) of the screen. Also notice in the title bar of
the screen, you will see the number of students that can be added to the group appointment. In this
example, I have two slots available because I have a maximum of four students in any group appointment
and two students have already been added, hence two are remaining.
After you have moved the desired students to the Selected side, click Schedule Appointment to complete
the process.
Note: If all of the slots are already filled for the group appointment, this option will not appear
in the pop-up selection list when you click the appointment from the Appointments Central grid.
Remove Student

ACCUSQL/ACCUTRACK 2019 REFERENCE MANUAL
255
< Back to Contents >
Click to remove student(s) from the appointment. After you click this option, you will be presented with a
pop-up screen that shows the students currently scheduled for the appointment. Click the checkboxes
next to the students you want to remove, then click Close.
The Cancel Appointment screen will then appear, where you can specify who cancelled the appointment
and the reason for the cancellation.
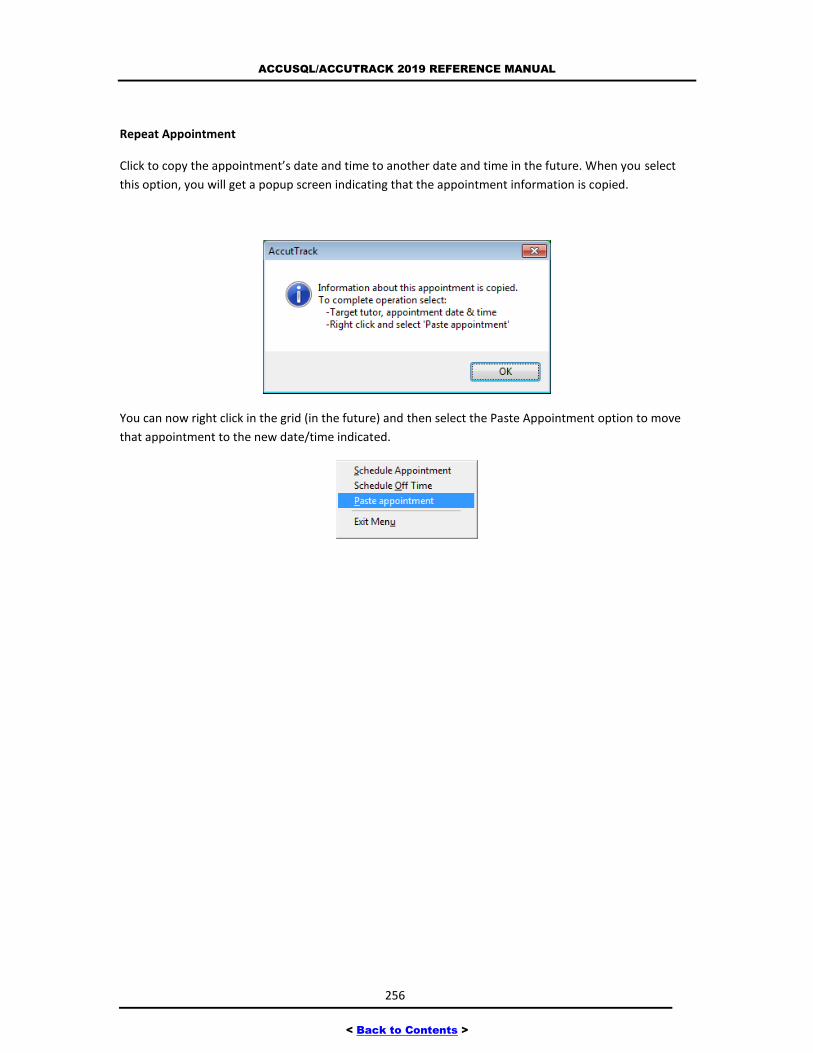
ACCUSQL/ACCUTRACK 2019 REFERENCE MANUAL
256
< Back to Contents >
Repeat Appointment
Click to copy the appointment’s date and time to another date and time in the future. When you select
this option, you will get a popup screen indicating that the appointment information is copied.
You can now right click in the grid (in the future) and then select the Paste Appointment option to move
that appointment to the new date/time indicated.
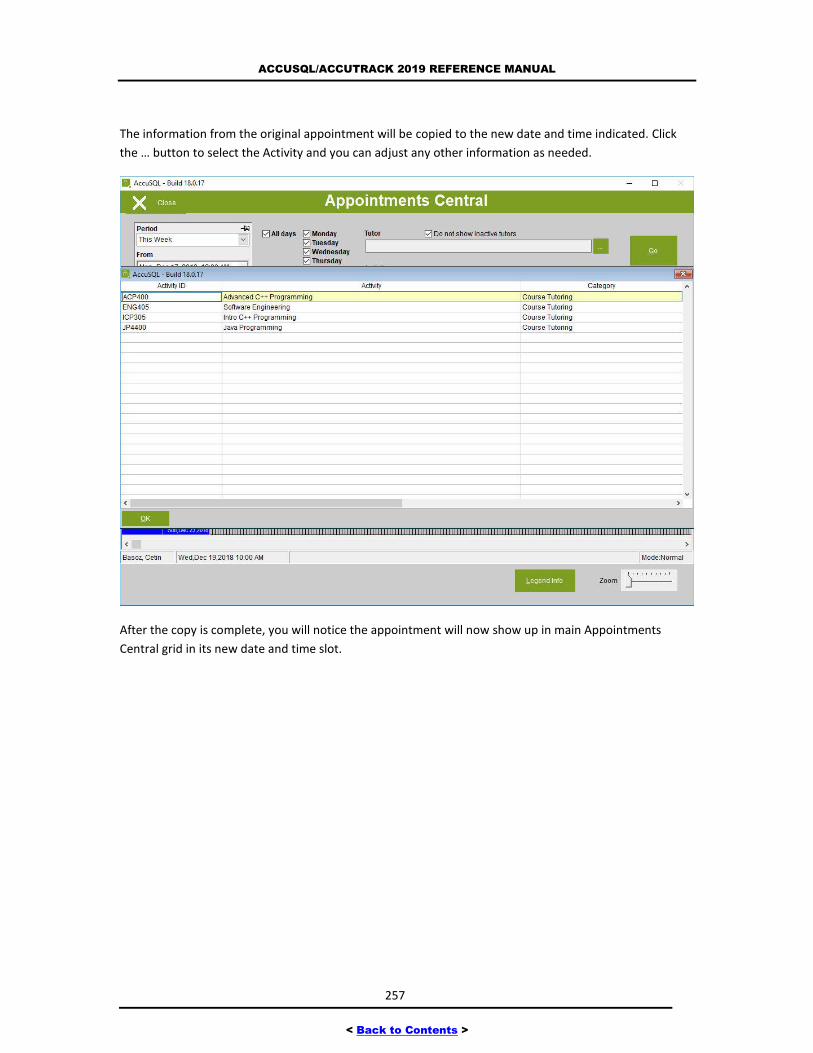
ACCUSQL/ACCUTRACK 2019 REFERENCE MANUAL
257
< Back to Contents >
The information from the original appointment will be copied to the new date and time indicated. Click
the … button to select the Activity and you can adjust any other information as needed.
After the copy is complete, you will notice the appointment will now show up in main Appointments
Central grid in its new date and time slot.
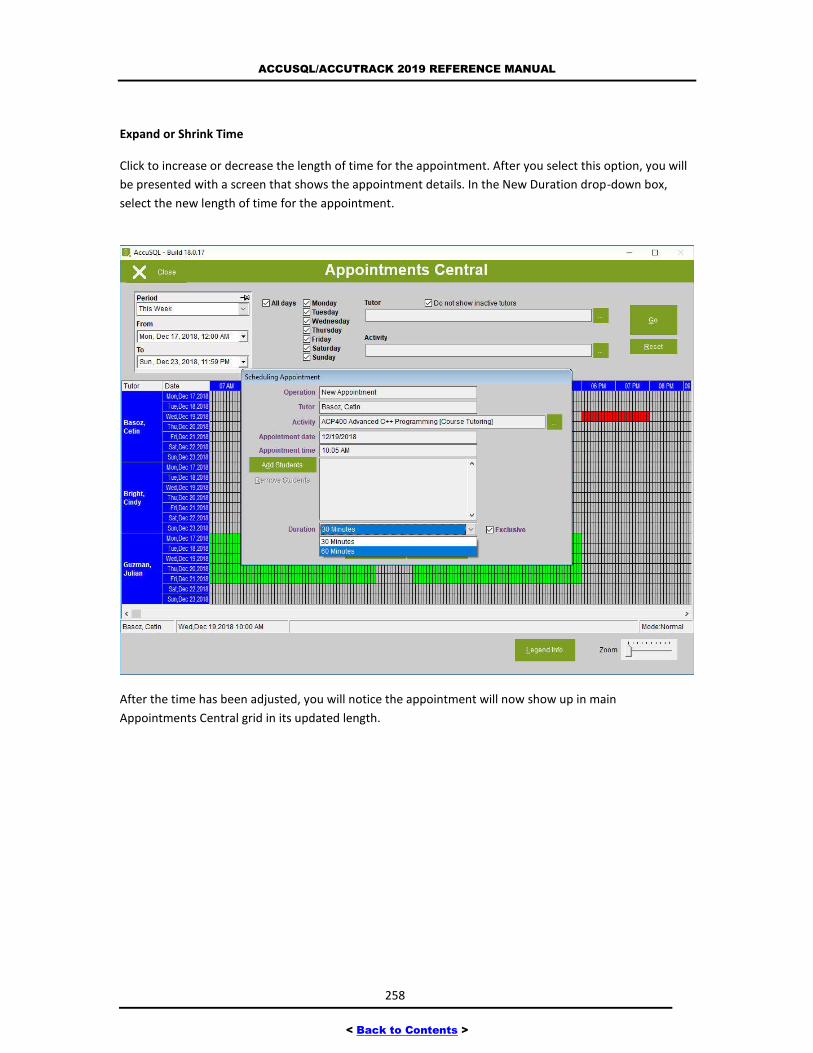
ACCUSQL/ACCUTRACK 2019 REFERENCE MANUAL
258
< Back to Contents >
Expand or Shrink Time
Click to increase or decrease the length of time for the appointment. After you select this option, you will
be presented with a screen that shows the appointment details. In the New Duration drop-down box,
select the new length of time for the appointment.
After the time has been adjusted, you will notice the appointment will now show up in main
Appointments Central grid in its updated length.
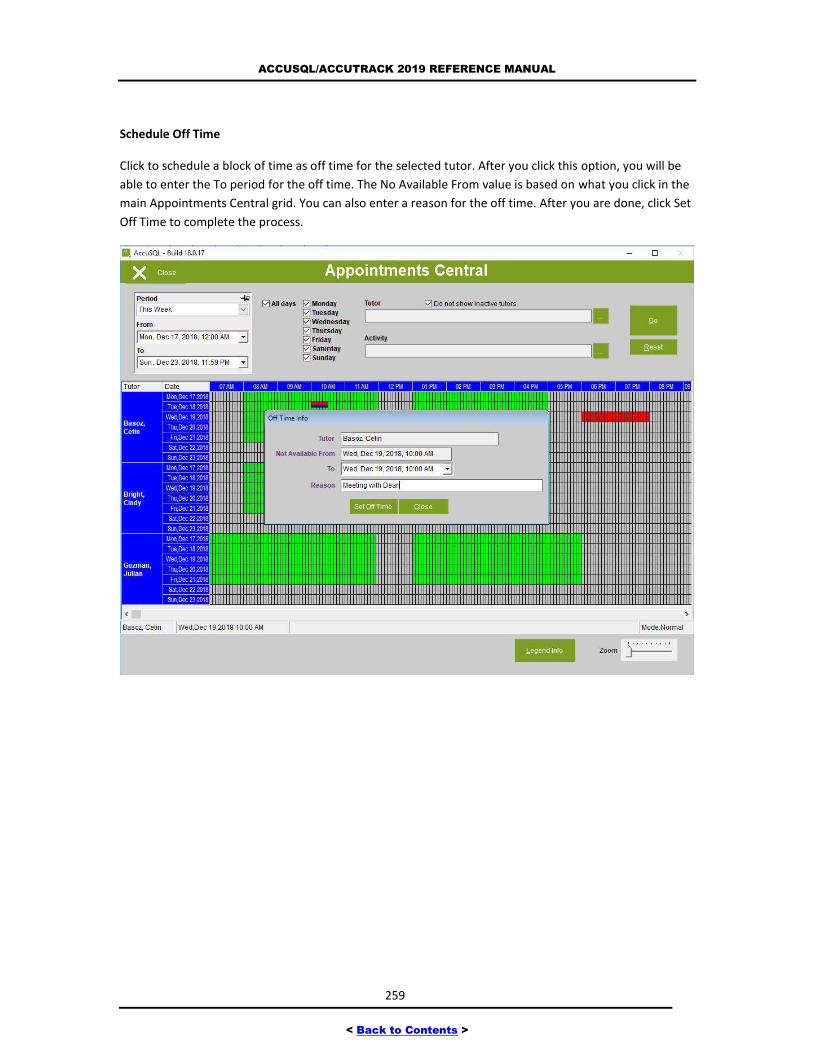
ACCUSQL/ACCUTRACK 2019 REFERENCE MANUAL
259
< Back to Contents >
Schedule Off Time
Click to schedule a block of time as off time for the selected tutor. After you click this option, you will be
able to enter the To period for the off time. The No Available From value is based on what you click in the
main Appointments Central grid. You can also enter a reason for the off time. After you are done, click Set
Off Time to complete the process.
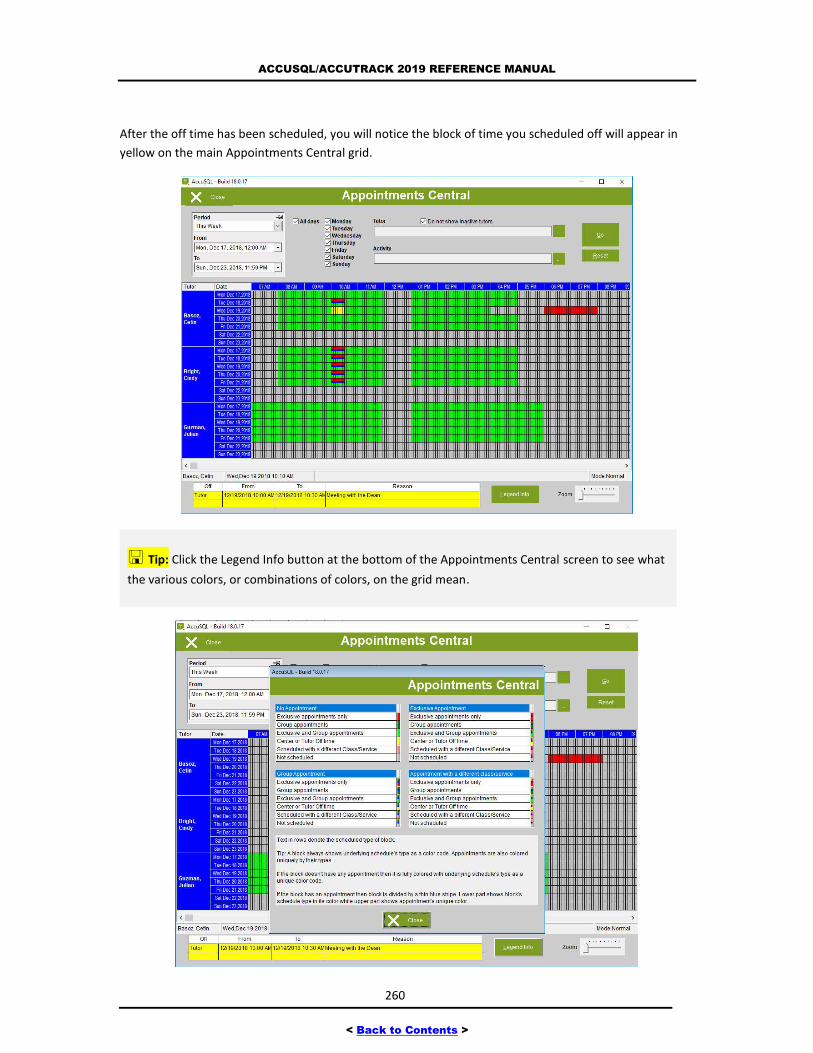
ACCUSQL/ACCUTRACK 2019 REFERENCE MANUAL
260
< Back to Contents >
After the off time has been scheduled, you will notice the block of time you scheduled off will appear in
yellow on the main Appointments Central grid.
Tip: Click the Legend Info button at the bottom of the Appointments Central screen to see what
the various colors, or combinations of colors, on the grid mean.

ACCUSQL/ACCUTRACK 2019 REFERENCE MANUAL
261
< Back to Contents >
For an exclusive appointment (colored in Red in the Appointments Central grid), the options are exactly
like those you would see when you click on a group appointment, with the following exceptions:
Add Student Details – Since it is an exclusive appointment, there would be no need to add more
students to the appointment.
Remove – Since it is an exclusive appointment, there would be no need to remove the student
from the appointment. In this case, you would select Cancel Appointment or perhaps Move
Appointment.
SET APPOINTMENTS SETUP OPTIONS
Before creating appointments, you will need to enter your tutors, their schedules, and the services they
provide (their activity assignments). See other sections in this manual for instructions on how to do this.
You will also need to set up your appointments preferences as explained below.
If you click Set Appointments from the main System Administration screen, then select Setup, you will be
presented with a Control Panel Options view that shows context specific options for your Set
Appointments screens.
Here are the Control Panel options for Set Appointments in Setup:
Appointments Options – Used to configure how appointments can be scheduled, including when
and for how long. Also used to setup how you handle group appointments and to make rules to
determine how early or late the student can be and still receive credit for the appointment.
Email Confirmation Options – Used to configure the various emails that go out for students and
tutors when appointments are created, rescheduled, or cancelled.
Email Reminders Options – Used configure the emails that can go out to students reminding
them of their upcoming appointments and/or configure the emails that go out when students fail
to show up appointments.
Restrictions Options – Used to configure various appointment restriction settings.
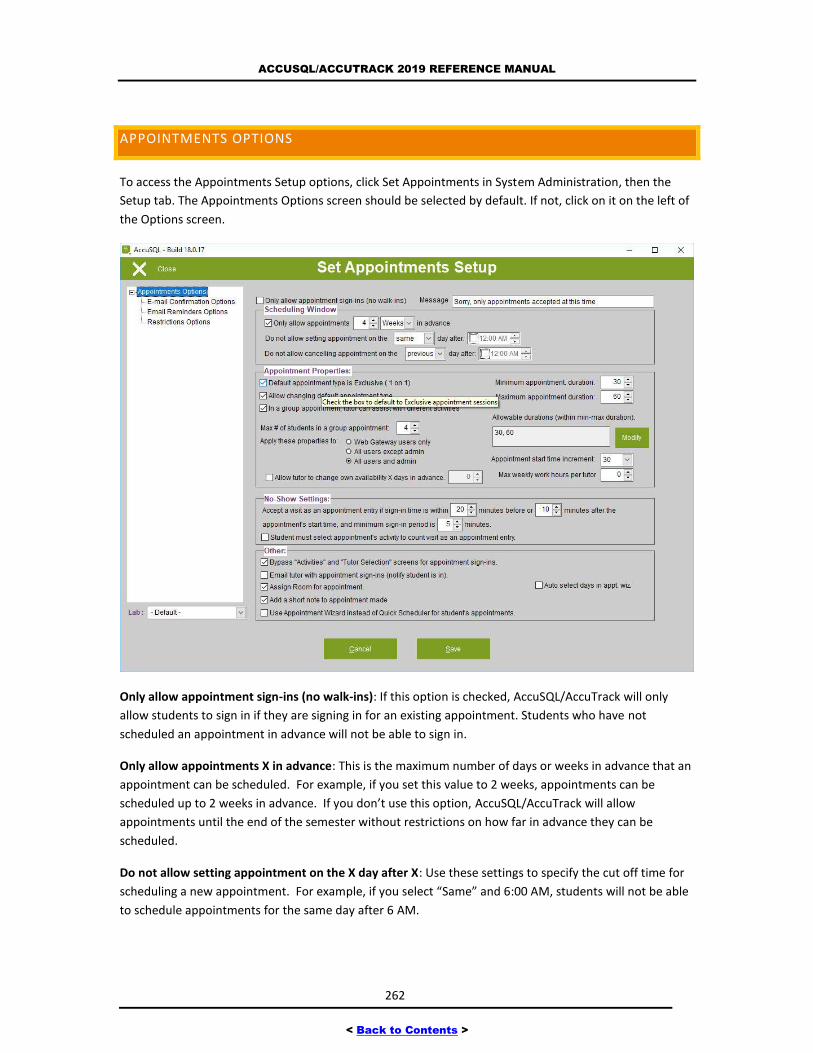
ACCUSQL/ACCUTRACK 2019 REFERENCE MANUAL
262
< Back to Contents >
APPOINTMENTS OPTIONS
To access the Appointments Setup options, click Set Appointments in System Administration, then the
Setup tab. The Appointments Options screen should be selected by default. If not, click on it on the left of
the Options screen.
Only allow appointment sign-ins (no walk-ins): If this option is checked, AccuSQL/AccuTrack will only
allow students to sign in if they are signing in for an existing appointment. Students who have not
scheduled an appointment in advance will not be able to sign in.
Only allow appointments X in advance: This is the maximum number of days or weeks in advance that an
appointment can be scheduled. For example, if you set this value to 2 weeks, appointments can be
scheduled up to 2 weeks in advance. If you don’t use this option, AccuSQL/AccuTrack will allow
appointments until the end of the semester without restrictions on how far in advance they can be
scheduled.
Do not allow setting appointment on the X day after X: Use these settings to specify the cut off time for
scheduling a new appointment. For example, if you select “Same” and 6:00 AM, students will not be able
to schedule appointments for the same day after 6 AM.
ACCUSQL/ACCUTRACK 2019 REFERENCE MANUAL
263
< Back to Contents >
Do not allow cancelling appointment on the X day after X: Use these settings to specify the cut off time
for appointment cancellations. For example, if you select “Previous” and 12:00 AM, the ability for
students to cancel appointments will end at 12:00 AM on the day before the appointment.
Default appointment type is Exclusive (1 on1): Use this option to indicate the default appointment type.
If checked, the default appointment will be exclusive (1 tutor working with 1 student). If not checked, the
default appointment type will be a group appointment.
Allow changing default appointment type: If you want students to be able to change the appointment
type (from group to exclusive or vice-versa), check this box.
Tip: If you only do one type of appointments in your center, set the default appointment type to
the allowed type and uncheck the "Allow changing default appointment type" box. For example, if
you only do 1-on-1 appointments check the box "Default appointment type is Exclusive" and
uncheck the box "Allow changing…" This will restrict the appointments to only the type you use.
Minimum and Maximum appointment duration: Use these boxes to set the minimum and maximum
appointment duration. For example, the screen above shows that the minimum allowed appointment
type is 30 minutes, and the maximum is 60 minutes.
Tip: If the duration of appointments at your center is fixed, set the minimum and maximum
values to this fixed duration. For example, if all your appointments are always 30 minutes long, set
the minimum and maximum appointment duration to 30.
In a group appointment, tutor can assist with different activities: If this option is checked, tutors will be
able to help students with different classes during the same time slot. For example, a tutor who helps
with Algebra and Calculus can meet with students from both these classes during the same time slot. If
this option is not checked, then the tutor will only be able to provide assistance with a single class (the
first class selected for that time slot) during the same time slot.
Max # of students in a group appointment: Use this option to specify the maximum number of students
than can have an appointment with the same tutor during the same time slot. For example, if this value is
set to 4, the tutor can meet with up to 4 students at the same time slot. This option would only apply if
you allow for group appointments.
Apply these properties to: If one of these options is checked, the previous appointment restrictions will
only apply to the selected option: Web Gateway users only, All users except admin, All user and admin.
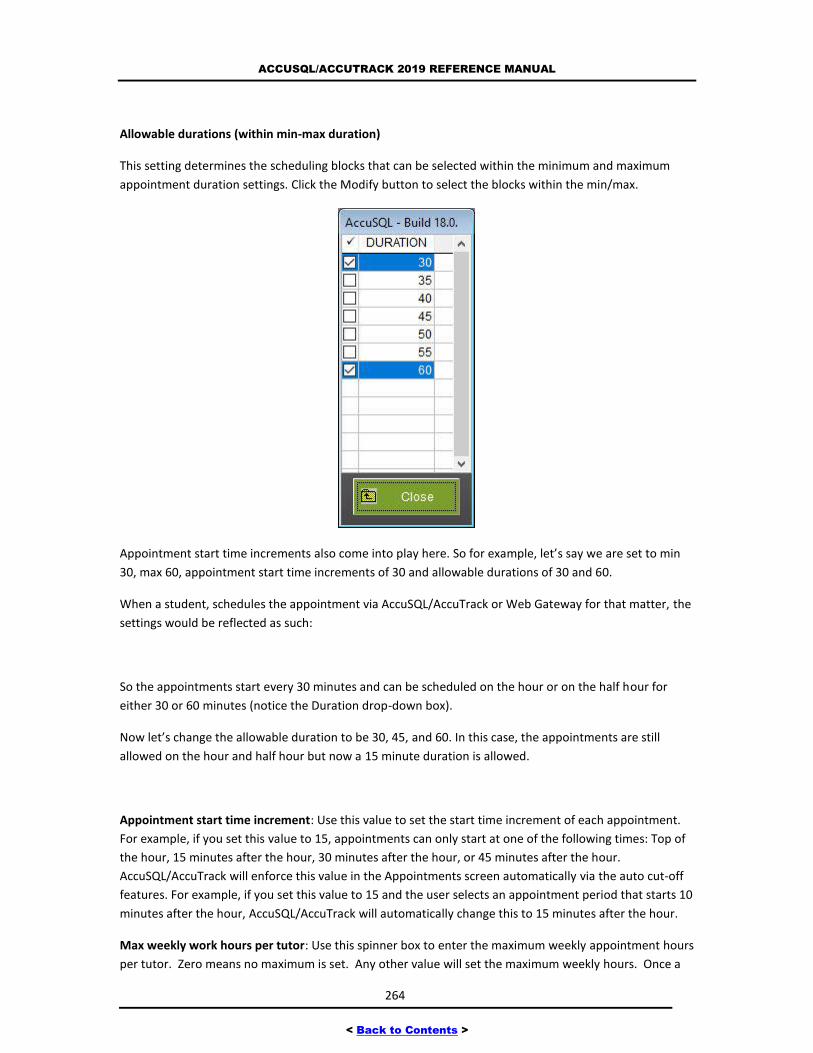
ACCUSQL/ACCUTRACK 2019 REFERENCE MANUAL
264
< Back to Contents >
Allowable durations (within min-max duration)
This setting determines the scheduling blocks that can be selected within the minimum and maximum
appointment duration settings. Click the Modify button to select the blocks within the min/max.
Appointment start time increments also come into play here. So for example, let’s say we are set to min
30, max 60, appointment start time increments of 30 and allowable durations of 30 and 60.
When a student, schedules the appointment via AccuSQL/AccuTrack or Web Gateway for that matter, the
settings would be reflected as such:
So the appointments start every 30 minutes and can be scheduled on the hour or on the half hour for
either 30 or 60 minutes (notice the Duration drop-down box).
Now let’s change the allowable duration to be 30, 45, and 60. In this case, the appointments are still
allowed on the hour and half hour but now a 15 minute duration is allowed.
Appointment start time increment: Use this value to set the start time increment of each appointment.
For example, if you set this value to 15, appointments can only start at one of the following times: Top of
the hour, 15 minutes after the hour, 30 minutes after the hour, or 45 minutes after the hour.
AccuSQL/AccuTrack will enforce this value in the Appointments screen automatically via the auto cut-off
features. For example, if you set this value to 15 and the user selects an appointment period that starts 10
minutes after the hour, AccuSQL/AccuTrack will automatically change this to 15 minutes after the hour.
Max weekly work hours per tutor: Use this spinner box to enter the maximum weekly appointment hours
per tutor. Zero means no maximum is set. Any other value will set the maximum weekly hours. Once a
ACCUSQL/ACCUTRACK 2019 REFERENCE MANUAL
265
< Back to Contents >
tutor reaches this maximum, he or she will no longer appear in the appointment scheduling screen. In
other words, the tutor will no longer be available for appointments that week.
Accept a visit as an appointment if sign-in time is within X minutes before or X minutes after the
appointment’s start time and the minimum sign-in period is X: This option controls how appointment's
no-shows are calculated. The first two values define the appointment's sign-in window. If the student
does not sign in during this window, he or she will be considered a no-show. For example, if the first value
is 20 and the second value is 15 and the appointment's start time is 9:00, then the appointment window is
8:40 to 9:15. The third value defines the minimum sign-in period for the appointment. For example, if this
value is 10, then sign-in period must be at least 10 minutes.
Note: Here's how AccuSQL/AccuTrack calculates the appointment's sign-in period for no-show
determination:
Sign-in Period = End Time - Start Time, where:
End Time = earlier of (sign-out time and appointment's scheduled end time)
Start Time = later of (actual sign-in time and the appointment's scheduled start time).
Note: A student must be signed in for a period that includes some time of the actual appointment,
else he/she will be considered a no-show. For example, if a student has an appointment from 9AM
to 10AM and then signs in at 8:45AM and then signs out at 8:59AM, then the appointment will be a
no show since the student signed out one minute before the appointment actually started.
Student must select appointment’s activity to count as an appointment entry: If this option is checked,
then the student must sign in to the appointment's activity to be considered as present for the
appointment. If this option is not checked, then student can sign in to any class and still be considered as
present for the appointment (as long as the sign-in was during the appointment window).
Bypass Activities and Tutor Selection screens for appointment sign-ins: If this option is checked and the
student is signing in during his or her appointment's window, AccuSQL/AccuTrack will sign the student
into the appointment's activity and tutor automatically. For example, if the appointment is scheduled for
Tutoring - College Algebra with Cindy Bright, AccuSQL/AccuTrack will automatically sign the student to
this activity and tutor without asking the student to select them. Note: At sign in, the student will get a
message indicating they are signing in for the appointment but he/she will not be required to select an
activity or a tutor.
Email tutor with the appointment sign-ins (notify student is in): Check this box if you want
AccuSQL/AccuTrack to automatically send an email message to the tutor when a student signs in for a
scheduled appointment.
Assign Room for appointment: If you want to schedule a room for appointments, make sure this
checkbox is checked. Rooms are setup in the System >> Rooms screen. Note: Rooms are only assigned
when an admin makes the appointment for the student.
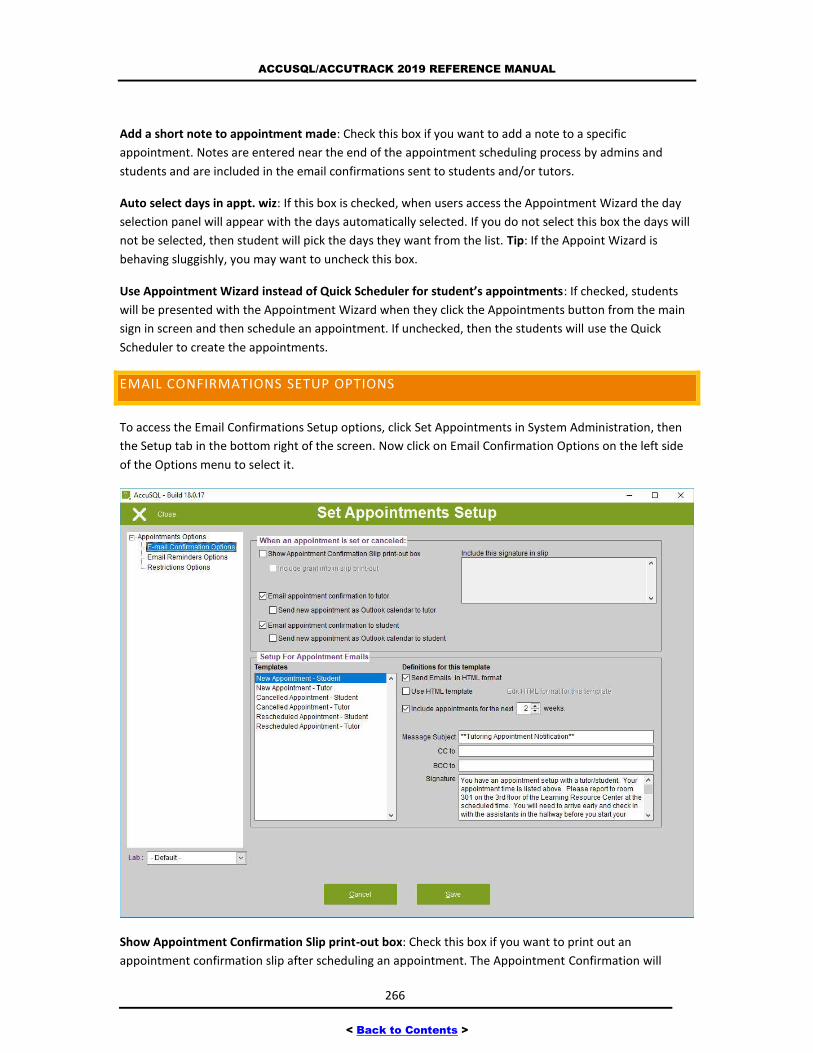
ACCUSQL/ACCUTRACK 2019 REFERENCE MANUAL
266
< Back to Contents >
Add a short note to appointment made: Check this box if you want to add a note to a specific
appointment. Notes are entered near the end of the appointment scheduling process by admins and
students and are included in the email confirmations sent to students and/or tutors.
Auto select days in appt. wiz: If this box is checked, when users access the Appointment Wizard the day
selection panel will appear with the days automatically selected. If you do not select this box the days will
not be selected, then student will pick the days they want from the list. Tip: If the Appoint Wizard is
behaving sluggishly, you may want to uncheck this box.
Use Appointment Wizard instead of Quick Scheduler for student’s appointments: If checked, students
will be presented with the Appointment Wizard when they click the Appointments button from the main
sign in screen and then schedule an appointment. If unchecked, then the students will use the Quick
Scheduler to create the appointments.
EMAIL CONFIRMATIONS SETUP OPTIONS
To access the Email Confirmations Setup options, click Set Appointments in System Administration, then
the Setup tab in the bottom right of the screen. Now click on Email Confirmation Options on the left side
of the Options menu to select it.
Show Appointment Confirmation Slip print-out box: Check this box if you want to print out an
appointment confirmation slip after scheduling an appointment. The Appointment Confirmation will
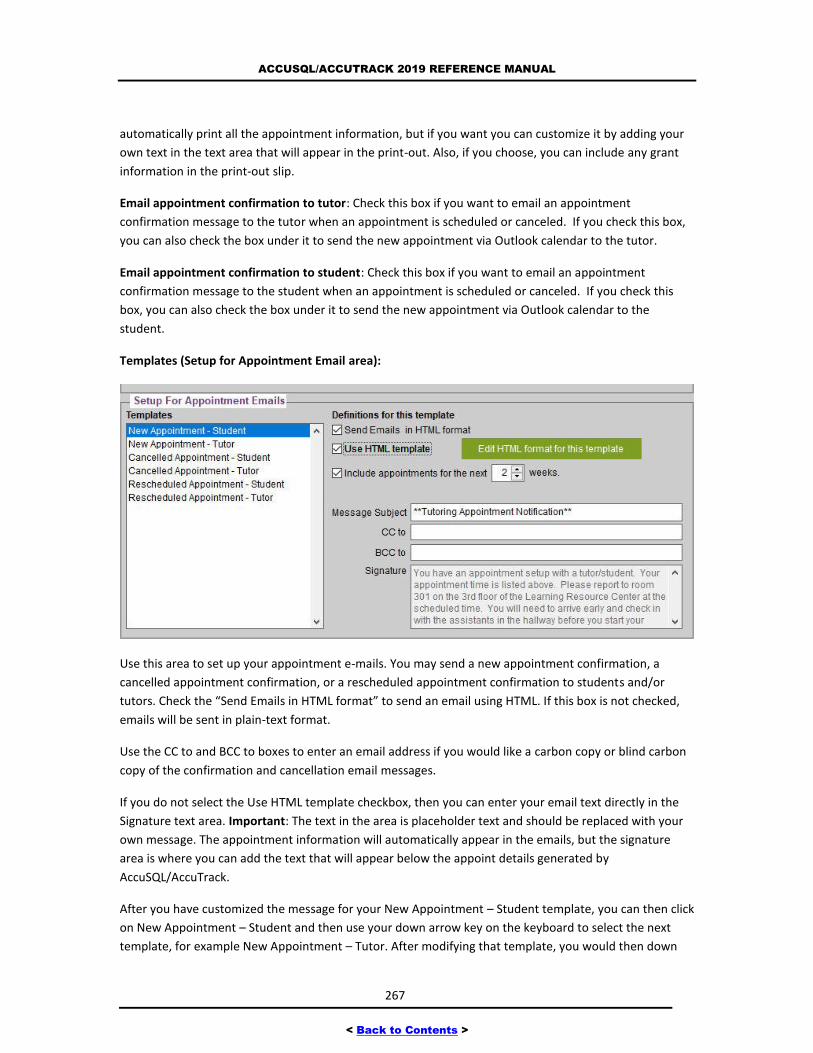
ACCUSQL/ACCUTRACK 2019 REFERENCE MANUAL
267
< Back to Contents >
automatically print all the appointment information, but if you want you can customize it by adding your
own text in the text area that will appear in the print-out. Also, if you choose, you can include any grant
information in the print-out slip.
Email appointment confirmation to tutor: Check this box if you want to email an appointment
confirmation message to the tutor when an appointment is scheduled or canceled. If you check this box,
you can also check the box under it to send the new appointment via Outlook calendar to the tutor.
Email appointment confirmation to student: Check this box if you want to email an appointment
confirmation message to the student when an appointment is scheduled or canceled. If you check this
box, you can also check the box under it to send the new appointment via Outlook calendar to the
student.
Templates (Setup for Appointment Email area):
Use this area to set up your appointment e-mails. You may send a new appointment confirmation, a
cancelled appointment confirmation, or a rescheduled appointment confirmation to students and/or
tutors. Check the “Send Emails in HTML format” to send an email using HTML. If this box is not checked,
emails will be sent in plain-text format.
Use the CC to and BCC to boxes to enter an email address if you would like a carbon copy or blind carbon
copy of the confirmation and cancellation email messages.
If you do not select the Use HTML template checkbox, then you can enter your email text directly in the
Signature text area. Important: The text in the area is placeholder text and should be replaced with your
own message. The appointment information will automatically appear in the emails, but the signature
area is where you can add the text that will appear below the appoint details generated by
AccuSQL/AccuTrack.
After you have customized the message for your New Appointment – Student template, you can then click
on New Appointment – Student and then use your down arrow key on the keyboard to select the next
template, for example New Appointment – Tutor. After modifying that template, you would then down
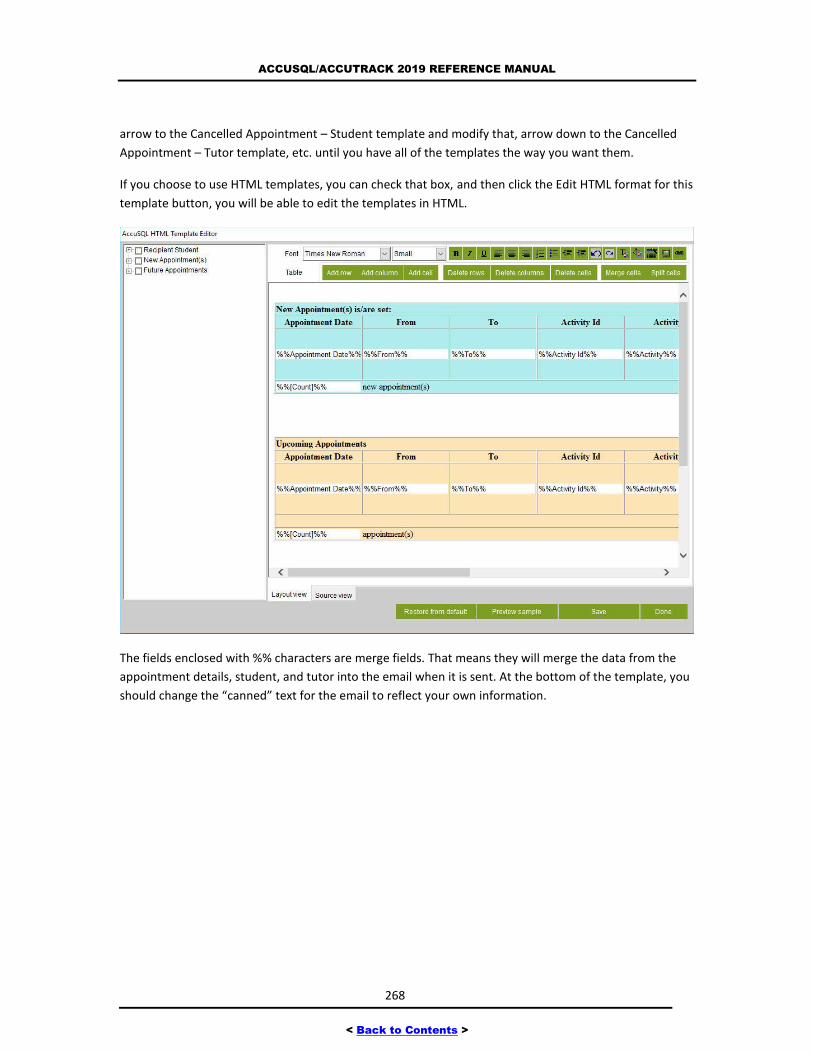
ACCUSQL/ACCUTRACK 2019 REFERENCE MANUAL
268
< Back to Contents >
arrow to the Cancelled Appointment – Student template and modify that, arrow down to the Cancelled
Appointment – Tutor template, etc. until you have all of the templates the way you want them.
If you choose to use HTML templates, you can check that box, and then click the Edit HTML format for this
template button, you will be able to edit the templates in HTML.
The fields enclosed with %% characters are merge fields. That means they will merge the data from the
appointment details, student, and tutor into the email when it is sent. At the bottom of the template, you
should change the “canned” text for the email to reflect your own information.

ACCUSQL/ACCUTRACK 2019 REFERENCE MANUAL
269
< Back to Contents >
On the left of the screen are various other merge fields you can add to the template. To do so, click the +
sign to expand the desired tree element, and then click the checkbox next the merge field you want to
add to select it. Now click on the merge field and hold the left mouse and then drag it where you want it
to appear in the template. In the following example next was added to indicate how the student can email
the tutor and the Tutor Email merge field was added to the template:
After you are done editing the template, click the Save button to keep your changes. If you want to set
the template back to its default settings, you can click the Restore from default button.
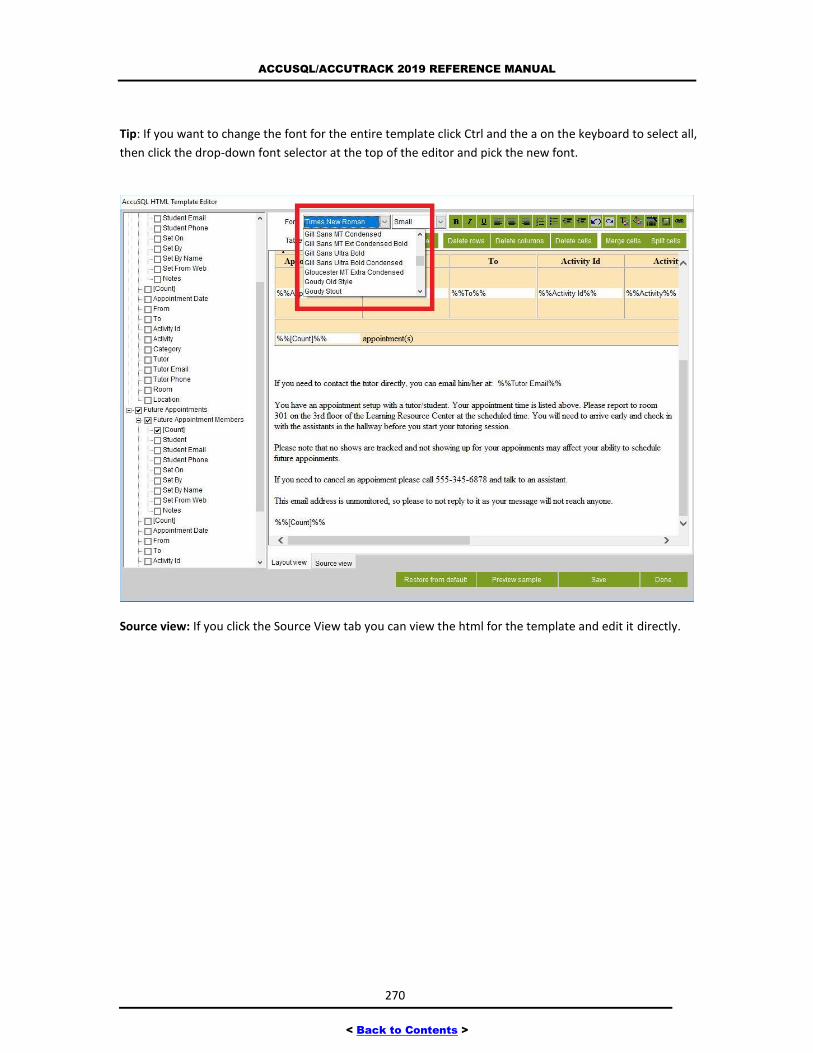
ACCUSQL/ACCUTRACK 2019 REFERENCE MANUAL
270
< Back to Contents >
Tip: If you want to change the font for the entire template click Ctrl and the a on the keyboard to select all,
then click the drop-down font selector at the top of the editor and pick the new font.
Source view: If you click the Source View tab you can view the html for the template and edit it directly.
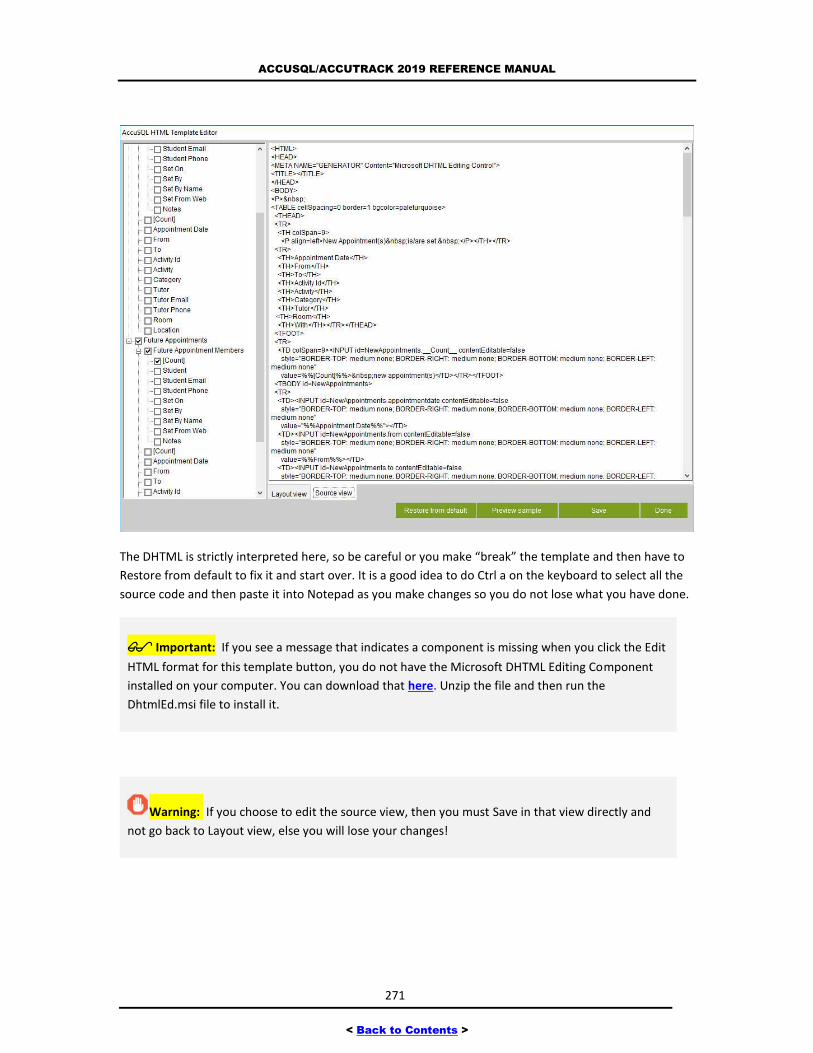
ACCUSQL/ACCUTRACK 2019 REFERENCE MANUAL
271
< Back to Contents >
The DHTML is strictly interpreted here, so be careful or you make “break” the template and then have to
Restore from default to fix it and start over. It is a good idea to do Ctrl a on the keyboard to select all the
source code and then paste it into Notepad as you make changes so you do not lose what you have done.
Important: If you see a message that indicates a component is missing when you click the Edit
HTML format for this template button, you do not have the Microsoft DHTML Editing Component
installed on your computer. You can download that here. Unzip the file and then run the
DhtmlEd.msi file to install it.
Warning: If you choose to edit the source view, then you must Save in that view directly and
not go back to Layout view, else you will lose your changes!
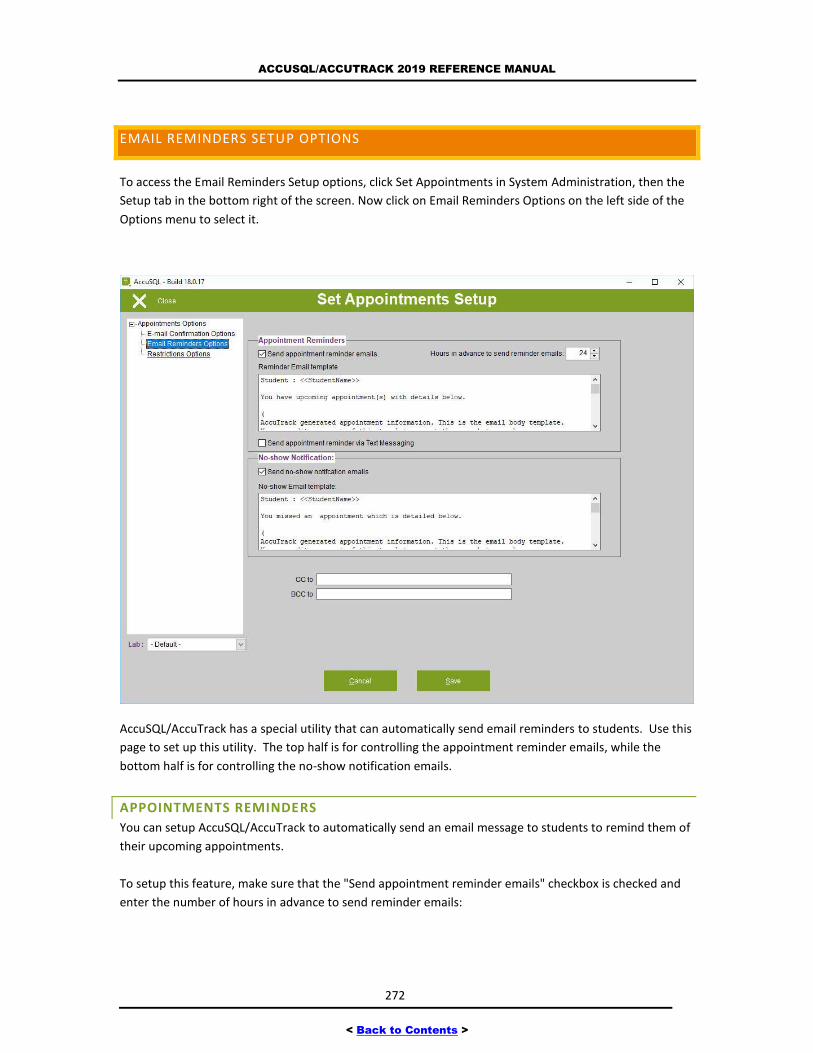
ACCUSQL/ACCUTRACK 2019 REFERENCE MANUAL
272
< Back to Contents >
EMAIL REMINDERS SETUP OPTIONS
To access the Email Reminders Setup options, click Set Appointments in System Administration, then the
Setup tab in the bottom right of the screen. Now click on Email Reminders Options on the left side of the
Options menu to select it.
AccuSQL/AccuTrack has a special utility that can automatically send email reminders to students. Use this
page to set up this utility. The top half is for controlling the appointment reminder emails, while the
bottom half is for controlling the no-show notification emails.
APPOINTMENTS REMINDERS
You can setup AccuSQL/AccuTrack to automatically send an email message to students to remind them of
their upcoming appointments.
To setup this feature, make sure that the "Send appointment reminder emails" checkbox is checked and
enter the number of hours in advance to send reminder emails:
ACCUSQL/ACCUTRACK 2019 REFERENCE MANUAL
273
< Back to Contents >
You can also change the email template of the text of the email reminder message. You can type in any
text you like. For variables that depend on the appointment, use the following (do not leave blank spaces
between opening and closing angle brackets):
<<StudentName>>: This will be replaced by the student's name.
<<AppointmentInfoList>>: This will be replaced by the appointment's date, from date-time, to date-time,
class and tutor.
<<DateTimeGenerated>>: This will be replaced by date and time appointment message is generated.
You also have the option of send the appointment reminders via text messaging by clicking the Send
appointment reminder via Text Messaging checkbox. For text messaging, you will need to setup the
Nexmo messaging service in the System Administration Communications >>Setup >> Text Messaging
Configuration screen. You also need to have a cell phone number entered for your students and tutors.
NO-SHOW NOTIFICATIONS
You can setup AccuSQL/AccuTrack to automatically email a message to students who miss their
appointments. To setup this feature, make sure that the "Send no-show notification emails" checkbox is
checked.
To change the text of the no-show message, use the message template. See above for a detailed
explanation on using the template.
Important: In AccuSQL/AccuTrack 2014 and later, the appointment reminders and no-show
notifications are sent by a utility called AccuTaskRunner. This is utility is installed as a Windows
Service, typically on the server. For detailed information about installing and configuring the
AccuTaskRunner service, consult the Installing AccuTaskRunner document.
You can schedule the frequency of the emails via an option in the System >> Setup >> System
Options >> Scheduled Tasks screen.

ACCUSQL/ACCUTRACK 2019 REFERENCE MANUAL
274
< Back to Contents >
RESTRICTIONS OPTIONS
To access the Restrictions Options, click Set Appointments in System Administration, then the Setup tab in
the bottom right of the screen. Now click on Restrictions Options on the left side of the Options menu to
select it. This page allows you to configure restrictions on appointments:
Only allow students to schedule appointments with tutors assigned to them in the Tutoring Requests
screen: Check this option if you would like to allow scheduling appointments only to students who have
tutoring request assignments. Use this option if you are using the Tutoring Requests and Assignment
function of AccuSQL/AccuTrack, else leave this unchecked.
Only allow registered students to schedule appointments: Check this option if you want to restrict
appointments only to students registered in the class. With this option selected, students not registered
in a class will not be allowed to schedule appointments for that class.
Freeze new appointments if no shows exceed X: With this option you can freeze future appointments
when a maximum number of no-shows is reached. The number of no-shows is counted from the
beginning of the semester. You can set the maximum no-shows here by typing the number in the box.
Note: You can over-write this restriction and void excused no-shows in the View Appointments >> View
No-Shows screen.
ACCUSQL/ACCUTRACK 2019 REFERENCE MANUAL
275
< Back to Contents >
Freeze new appointments if cancellations exceed X: You can set up AccuSQL/AccuTrack to freeze future
appointments when a certain number of cancellations is reached. The number of cancellations is counted
from the beginning of the semester. You can set the maximum cancellations here by typing the number in
the box. Note: You can over-write this restriction and void excused cancellations in the View
Appointments >> View Cancellations screen.
Maximum number of appointments per day: Use this box to set the maximum number of appointments
allowed per day per student.
Maximum number of appointments per week: Use this box to set the maximum number of
appointments per week per student.
VIEW APPOINTMENTS SCREEN
When you click on View Appointments from the Main Menu, you will see the following options:
View/Cancel: Use to find, view, and modify appointments and also to cancel them.
Daily Viewer (detailed): Use to view tutor’s daily appointment schedules.
Daily Viewer (summary): Use to view tutor’s daily appointment schedules.
Weekly Viewer: View tutors' weekly schedules.
Monthly Viewer: Launches a monthly appointment viewer.
Appointments Quick Daily View: Launches a daily appointment viewer.
Appointment Notes: View notes entered when appointments were scheduled
View Cancellations: Use to view and void cancelled appointments
View No-Shows: Use to view and void appointment no-shows, or to convert no-shows to
cancellations.
The following sections have more information on the above screens.
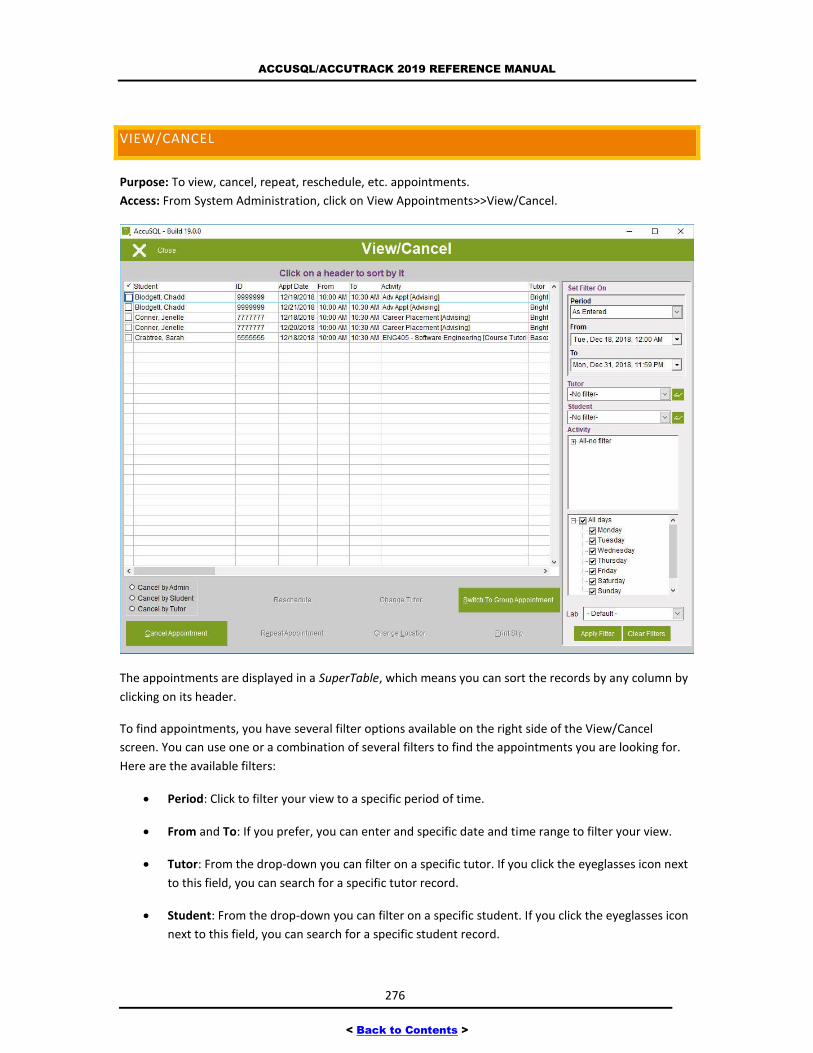
ACCUSQL/ACCUTRACK 2019 REFERENCE MANUAL
276
< Back to Contents >
VIEW/CANCEL
Purpose: To view, cancel, repeat, reschedule, etc. appointments.
Access: From System Administration, click on View Appointments>>View/Cancel.
The appointments are displayed in a SuperTable, which means you can sort the records by any column by
clicking on its header.
To find appointments, you have several filter options available on the right side of the View/Cancel
screen. You can use one or a combination of several filters to find the appointments you are looking for.
Here are the available filters:
Period: Click to filter your view to a specific period of time.
From and To: If you prefer, you can enter and specific date and time range to filter your view.
Tutor: From the drop-down you can filter on a specific tutor. If you click the eyeglasses icon next
to this field, you can search for a specific tutor record.
Student: From the drop-down you can filter on a specific student. If you click the eyeglasses icon
next to this field, you can search for a specific student record.
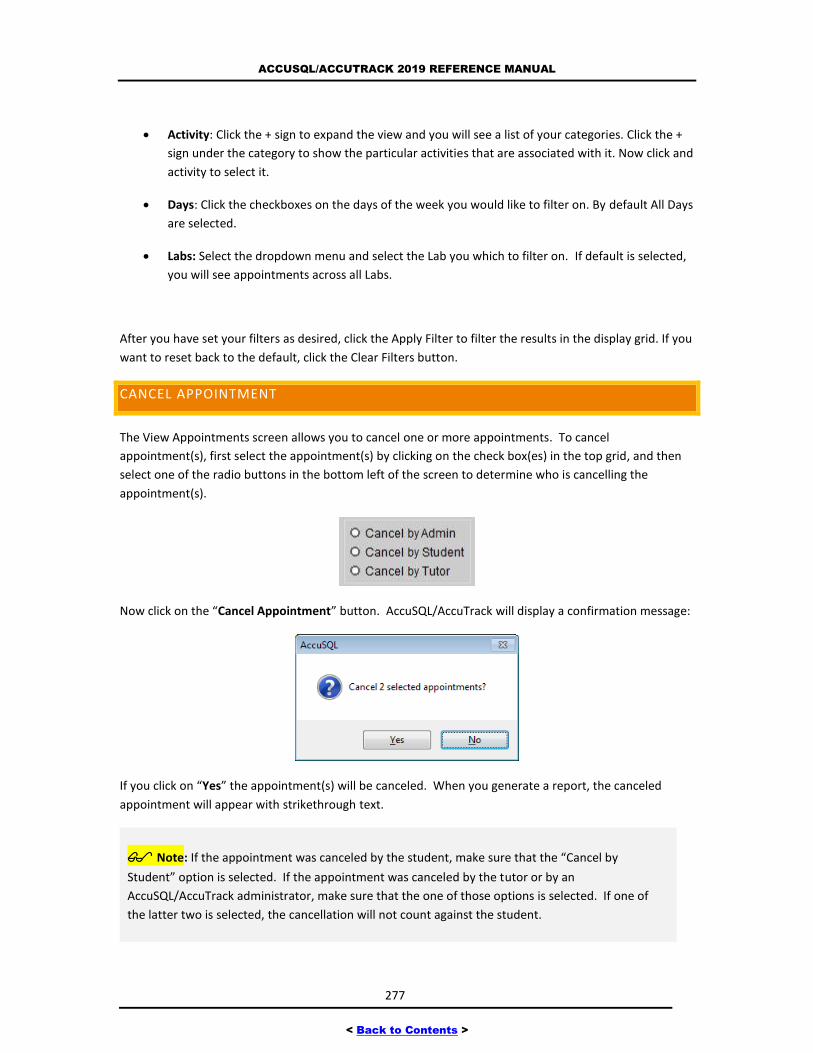
ACCUSQL/ACCUTRACK 2019 REFERENCE MANUAL
277
< Back to Contents >
Activity: Click the + sign to expand the view and you will see a list of your categories. Click the +
sign under the category to show the particular activities that are associated with it. Now click and
activity to select it.
Days: Click the checkboxes on the days of the week you would like to filter on. By default All Days
are selected.
Labs: Select the dropdown menu and select the Lab you which to filter on. If default is selected,
you will see appointments across all Labs.
After you have set your filters as desired, click the Apply Filter to filter the results in the display grid. If you
want to reset back to the default, click the Clear Filters button.
CANCEL APPOINTMENT
The View Appointments screen allows you to cancel one or more appointments. To cancel
appointment(s), first select the appointment(s) by clicking on the check box(es) in the top grid, and then
select one of the radio buttons in the bottom left of the screen to determine who is cancelling the
appointment(s).
Now click on the “Cancel Appointment” button. AccuSQL/AccuTrack will display a confirmation message:
If you click on “Yes” the appointment(s) will be canceled. When you generate a report, the canceled
appointment will appear with strikethrough text.
Note: If the appointment was canceled by the student, make sure that the “Cancel by
Student” option is selected. If the appointment was canceled by the tutor or by an
AccuSQL/AccuTrack administrator, make sure that the one of those options is selected. If one of
the latter two is selected, the cancellation will not count against the student.
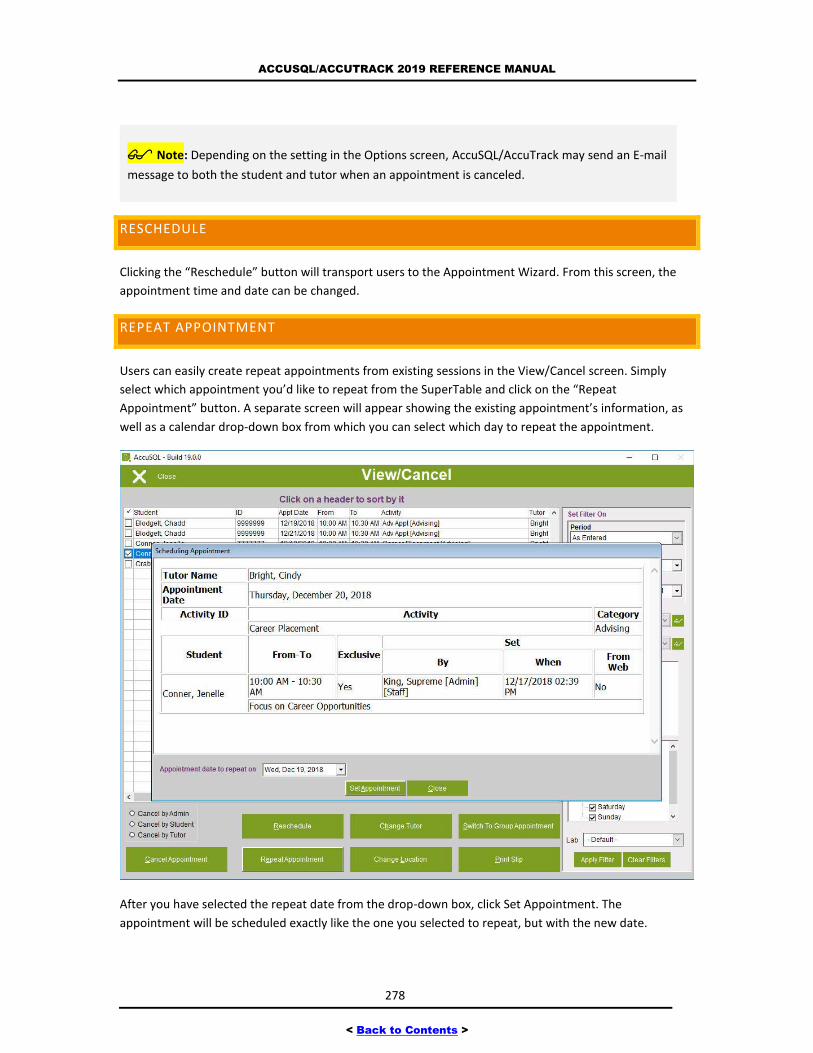
ACCUSQL/ACCUTRACK 2019 REFERENCE MANUAL
278
< Back to Contents >
Note: Depending on the setting in the Options screen, AccuSQL/AccuTrack may send an E-mail
message to both the student and tutor when an appointment is canceled.
RESCHEDULE
Clicking the “Reschedule” button will transport users to the Appointment Wizard. From this screen, the
appointment time and date can be changed.
REPEAT APPOINTMENT
Users can easily create repeat appointments from existing sessions in the View/Cancel screen. Simply
select which appointment you’d like to repeat from the SuperTable and click on the “Repeat
Appointment” button. A separate screen will appear showing the existing appointment’s information, as
well as a calendar drop-down box from which you can select which day to repeat the appointment.
After you have selected the repeat date from the drop-down box, click Set Appointment. The
appointment will be scheduled exactly like the one you selected to repeat, but with the new date.
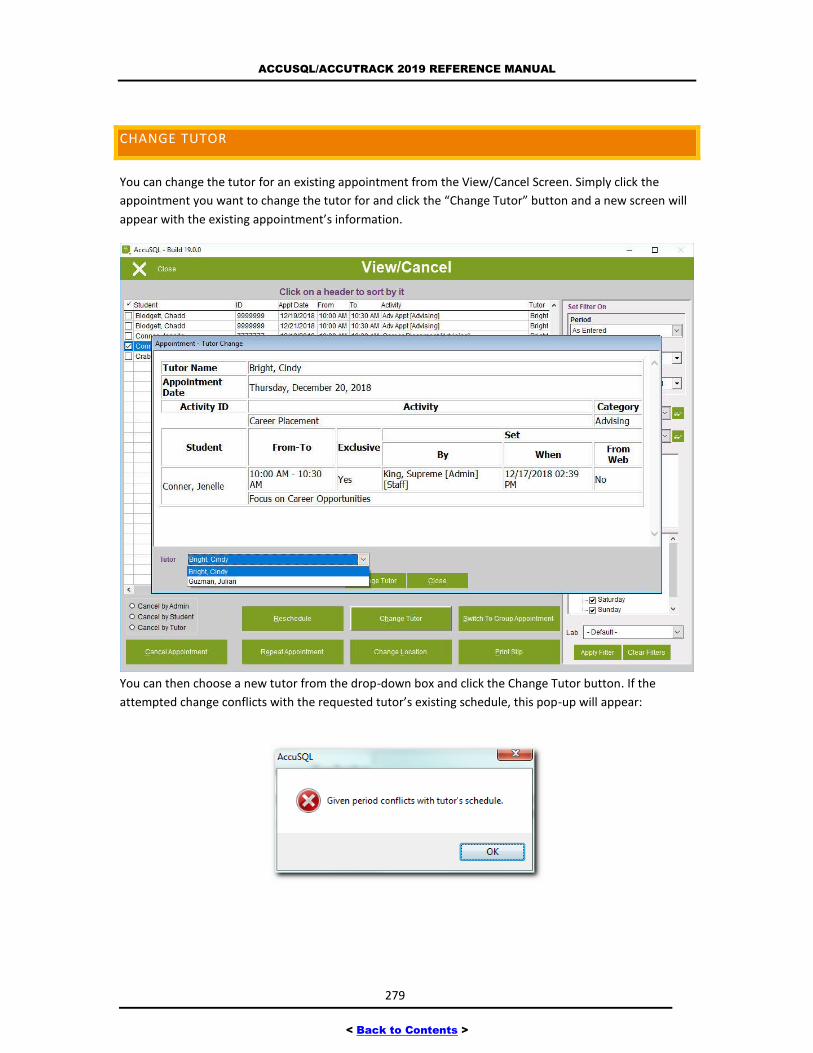
ACCUSQL/ACCUTRACK 2019 REFERENCE MANUAL
279
< Back to Contents >
CHANGE TUTOR
You can change the tutor for an existing appointment from the View/Cancel Screen. Simply click the
appointment you want to change the tutor for and click the “Change Tutor” button and a new screen will
appear with the existing appointment’s information.
You can then choose a new tutor from the drop-down box and click the Change Tutor button. If the
attempted change conflicts with the requested tutor’s existing schedule, this pop-up will appear:
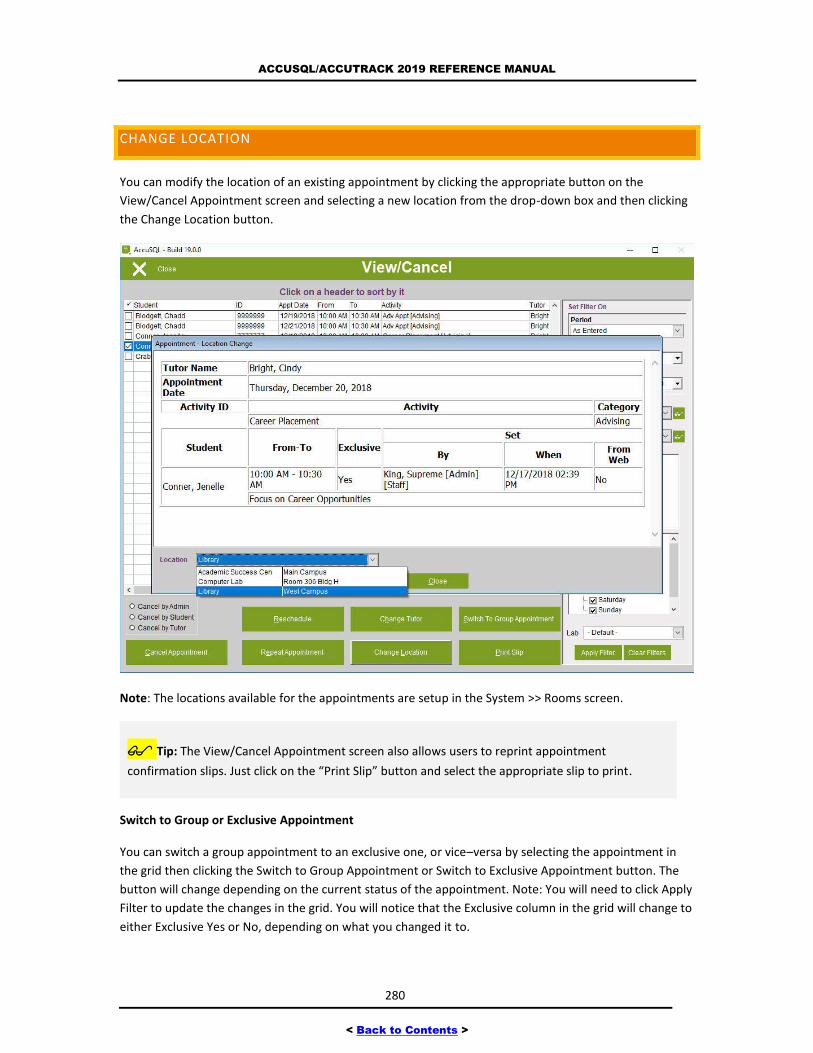
ACCUSQL/ACCUTRACK 2019 REFERENCE MANUAL
280
< Back to Contents >
CHANGE LOCATION
You can modify the location of an existing appointment by clicking the appropriate button on the
View/Cancel Appointment screen and selecting a new location from the drop-down box and then clicking
the Change Location button.
Note: The locations available for the appointments are setup in the System >> Rooms screen.
Tip: The View/Cancel Appointment screen also allows users to reprint appointment
confirmation slips. Just click on the “Print Slip” button and select the appropriate slip to print.
Switch to Group or Exclusive Appointment
You can switch a group appointment to an exclusive one, or vice–versa by selecting the appointment in
the grid then clicking the Switch to Group Appointment or Switch to Exclusive Appointment button. The
button will change depending on the current status of the appointment. Note: You will need to click Apply
Filter to update the changes in the grid. You will notice that the Exclusive column in the grid will change to
either Exclusive Yes or No, depending on what you changed it to.
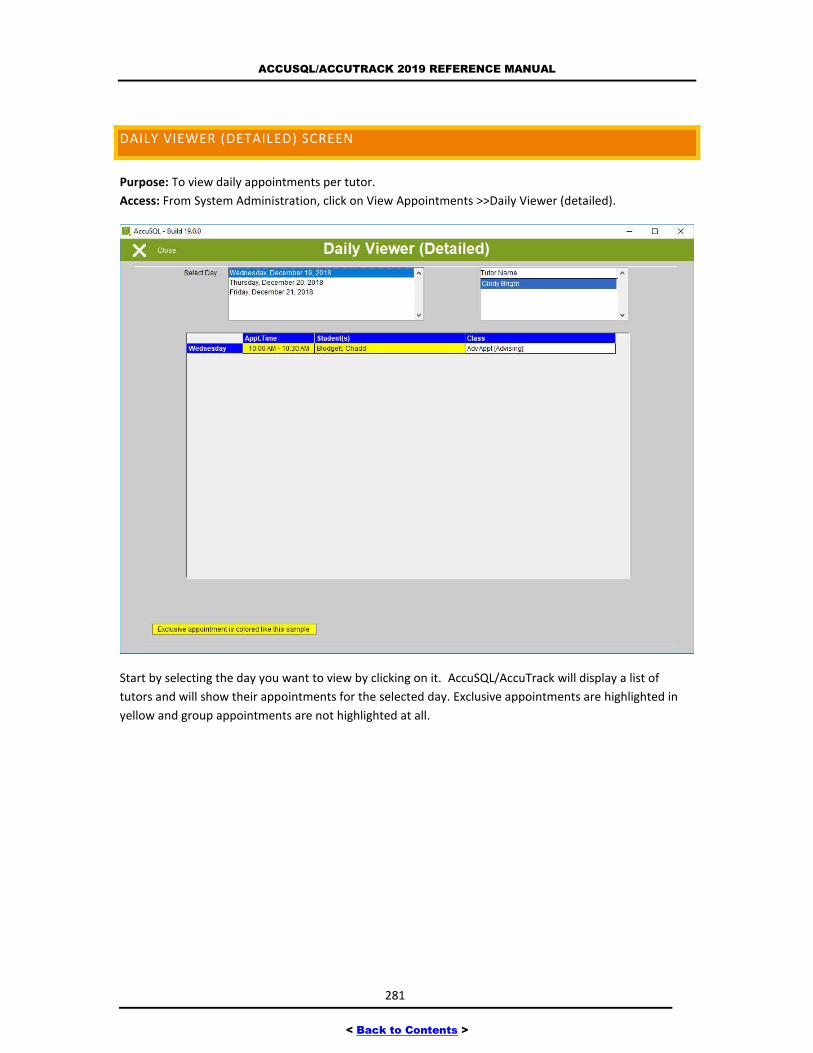
ACCUSQL/ACCUTRACK 2019 REFERENCE MANUAL
281
< Back to Contents >
DAILY VIEWER (DETAILED) SCREEN
Purpose: To view daily appointments per tutor.
Access: From System Administration, click on View Appointments >>Daily Viewer (detailed).
Start by selecting the day you want to view by clicking on it. AccuSQL/AccuTrack will display a list of
tutors and will show their appointments for the selected day. Exclusive appointments are highlighted in
yellow and group appointments are not highlighted at all.
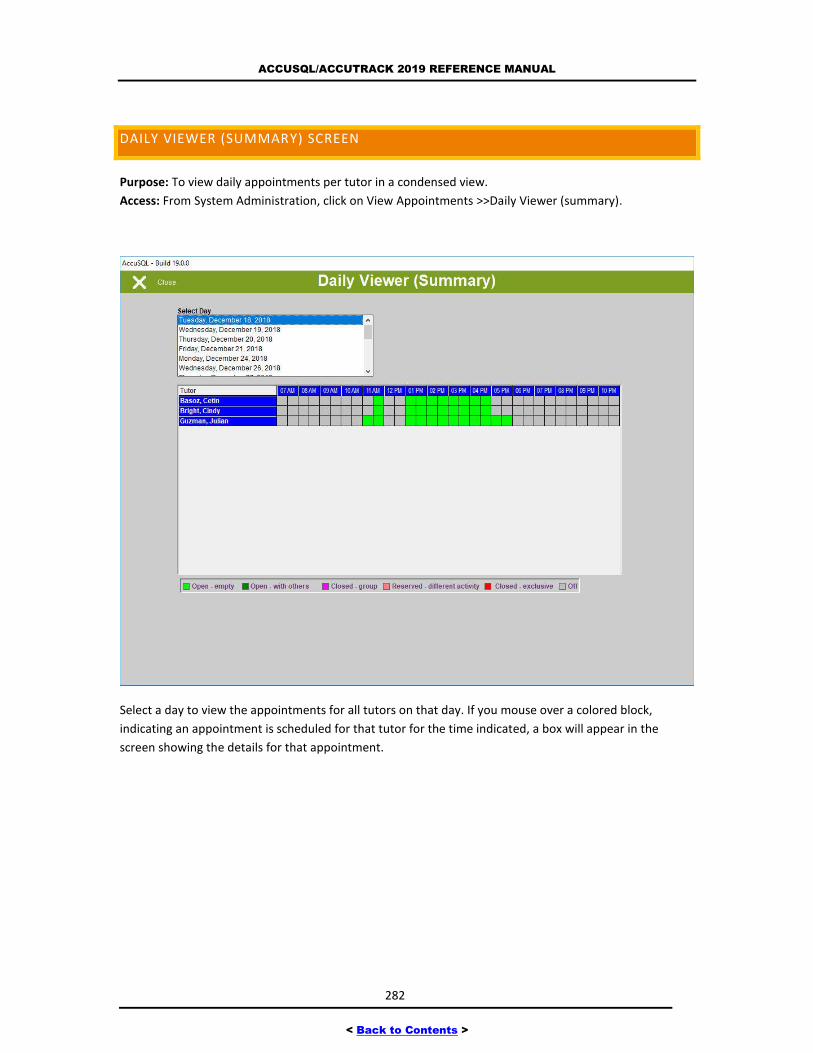
ACCUSQL/ACCUTRACK 2019 REFERENCE MANUAL
282
< Back to Contents >
DAILY VIEWER (SUMMARY) SCREEN
Purpose: To view daily appointments per tutor in a condensed view.
Access: From System Administration, click on View Appointments >>Daily Viewer (summary).
Select a day to view the appointments for all tutors on that day. If you mouse over a colored block,
indicating an appointment is scheduled for that tutor for the time indicated, a box will appear in the
screen showing the details for that appointment.
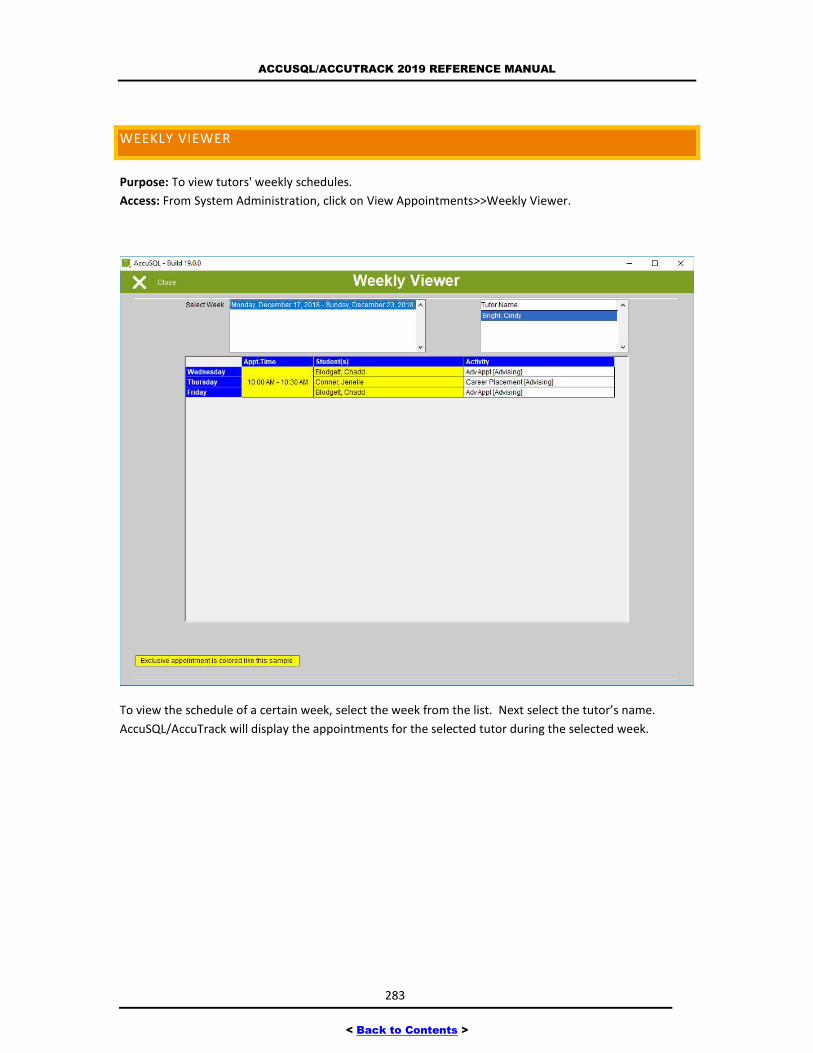
ACCUSQL/ACCUTRACK 2019 REFERENCE MANUAL
283
< Back to Contents >
WEEKLY VIEWER
Purpose: To view tutors' weekly schedules.
Access: From System Administration, click on View Appointments>>Weekly Viewer.
To view the schedule of a certain week, select the week from the list. Next select the tutor’s name.
AccuSQL/AccuTrack will display the appointments for the selected tutor during the selected week.
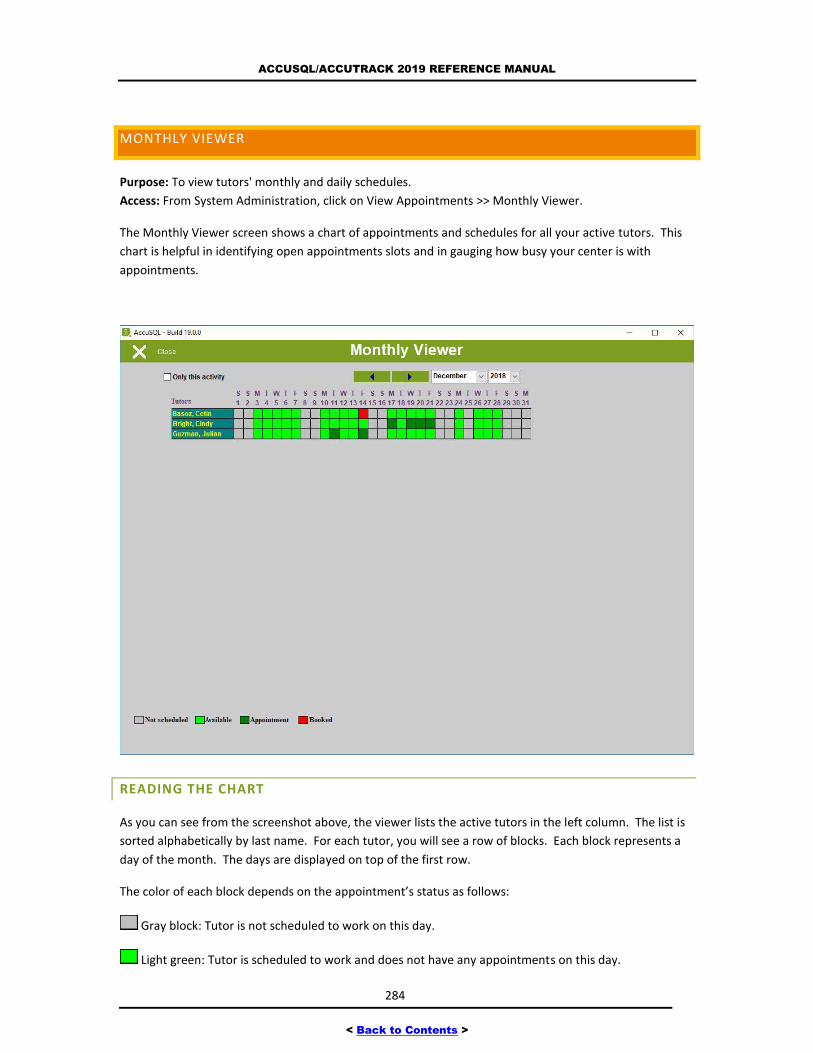
ACCUSQL/ACCUTRACK 2019 REFERENCE MANUAL
284
< Back to Contents >
MONTHLY VIEWER
Purpose: To view tutors' monthly and daily schedules.
Access: From System Administration, click on View Appointments >> Monthly Viewer.
The Monthly Viewer screen shows a chart of appointments and schedules for all your active tutors. This
chart is helpful in identifying open appointments slots and in gauging how busy your center is with
appointments.
READING THE CHART
As you can see from the screenshot above, the viewer lists the active tutors in the left column. The list is
sorted alphabetically by last name. For each tutor, you will see a row of blocks. Each block represents a
day of the month. The days are displayed on top of the first row.
The color of each block depends on the appointment’s status as follows:
Gray block: Tutor is not scheduled to work on this day.
Light green: Tutor is scheduled to work and does not have any appointments on this day.

ACCUSQL/ACCUTRACK 2019 REFERENCE MANUAL
285
< Back to Contents >
Dark green: Tutor is scheduled to work and has one or more appointments on this day.
Red: Tutor is scheduled to work, but is completely booked on this day.
Tip: You can restrict the displayed tutors in the Monthly Viewer to the tutors of a certain
activity. To do this, click on the “Only this activity” check box at the top.
To display all tutors again, simply uncheck the check box.
To see the schedules and appointments of a different month, you can use the next and previous month
navigation buttons at the top or the month and year drop-down list boxes.
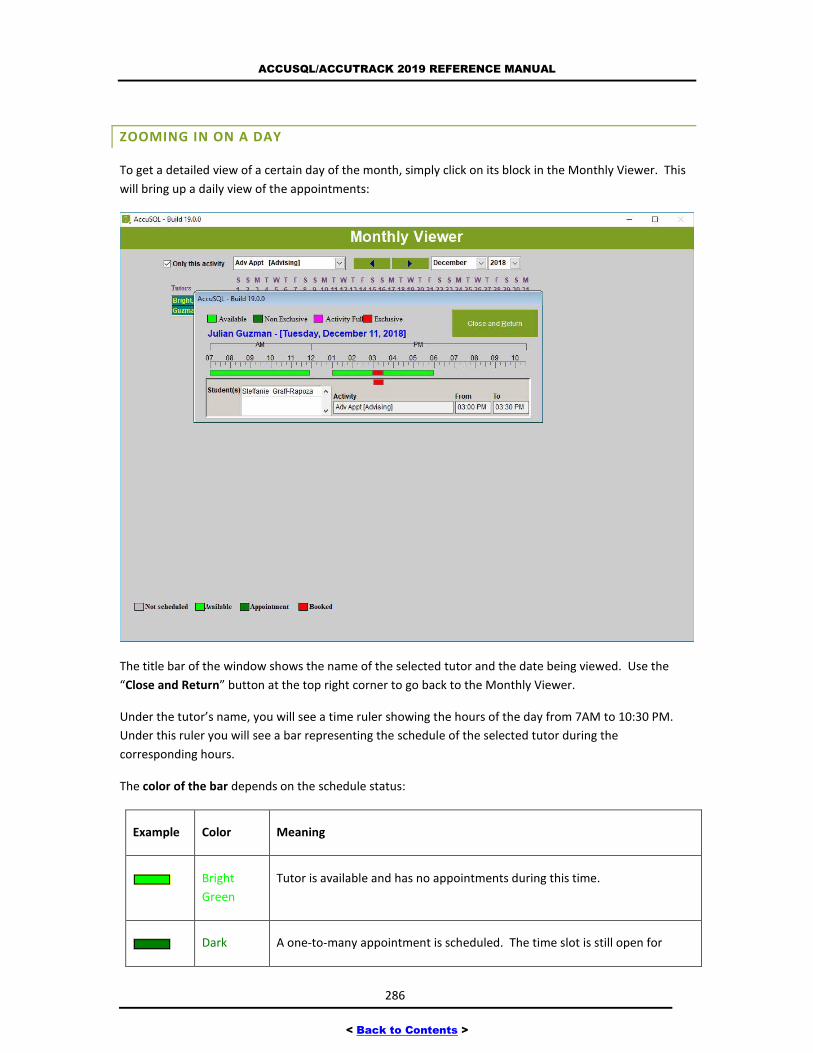
ACCUSQL/ACCUTRACK 2019 REFERENCE MANUAL
286
< Back to Contents >
ZOOMING IN ON A DAY
To get a detailed view of a certain day of the month, simply click on its block in the Monthly Viewer. This
will bring up a daily view of the appointments:
The title bar of the window shows the name of the selected tutor and the date being viewed. Use the
“Close and Return” button at the top right corner to go back to the Monthly Viewer.
Under the tutor’s name, you will see a time ruler showing the hours of the day from 7AM to 10:30 PM.
Under this ruler you will see a bar representing the schedule of the selected tutor during the
corresponding hours.
The color of the bar depends on the schedule status:
Example Color Meaning
Bright
Green
Tutor is available and has no appointments during this time.
Dark A one-to-many appointment is scheduled. The time slot is still open for
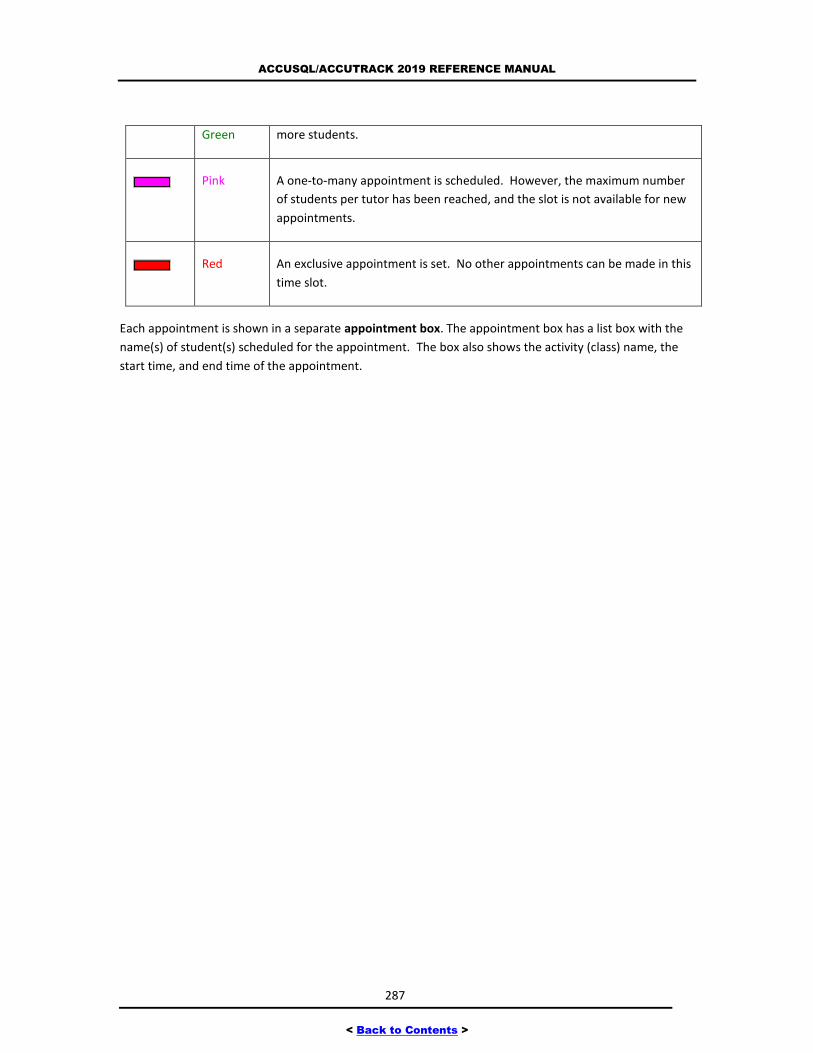
ACCUSQL/ACCUTRACK 2019 REFERENCE MANUAL
287
< Back to Contents >
Green more students.
Pink A one-to-many appointment is scheduled. However, the maximum number
of students per tutor has been reached, and the slot is not available for new
appointments.
Red An exclusive appointment is set. No other appointments can be made in this
time slot.
Each appointment is shown in a separate appointment box. The appointment box has a list box with the
name(s) of student(s) scheduled for the appointment. The box also shows the activity (class) name, the
start time, and end time of the appointment.
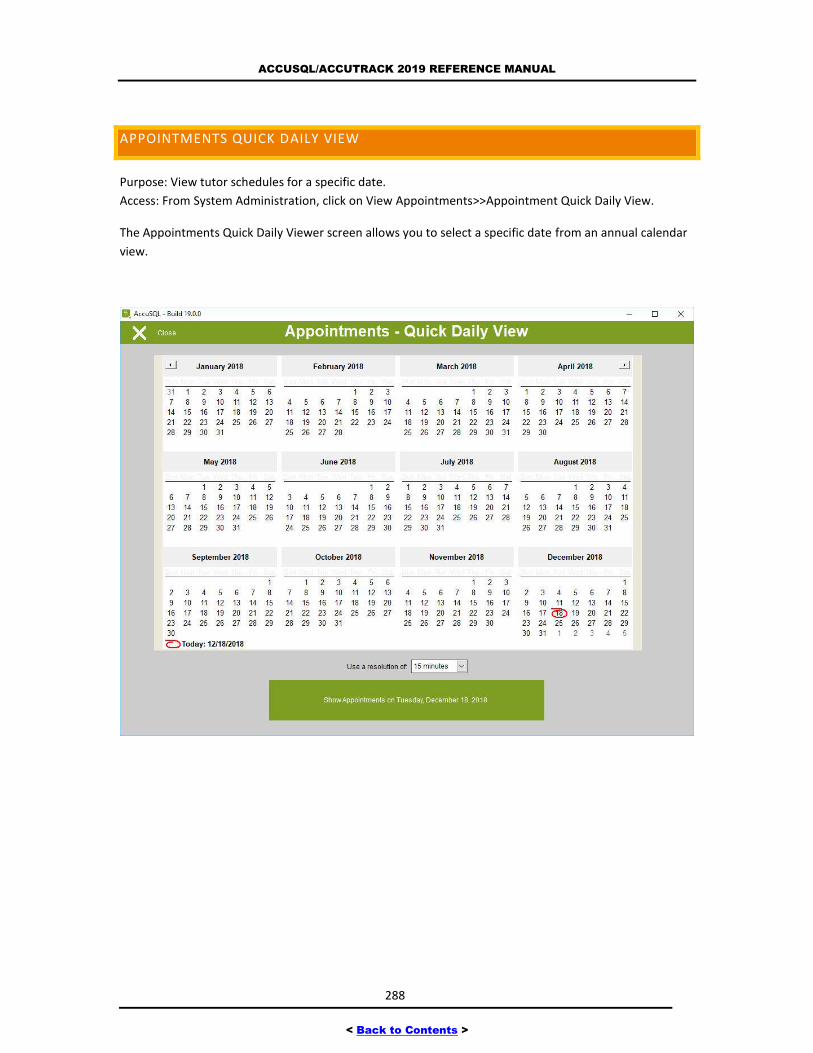
ACCUSQL/ACCUTRACK 2019 REFERENCE MANUAL
288
< Back to Contents >
APPOINTMENTS QUICK DAILY VIEW
Purpose: View tutor schedules for a specific date.
Access: From System Administration, click on View Appointments>>Appointment Quick Daily View.
The Appointments Quick Daily Viewer screen allows you to select a specific date from an annual calendar
view.
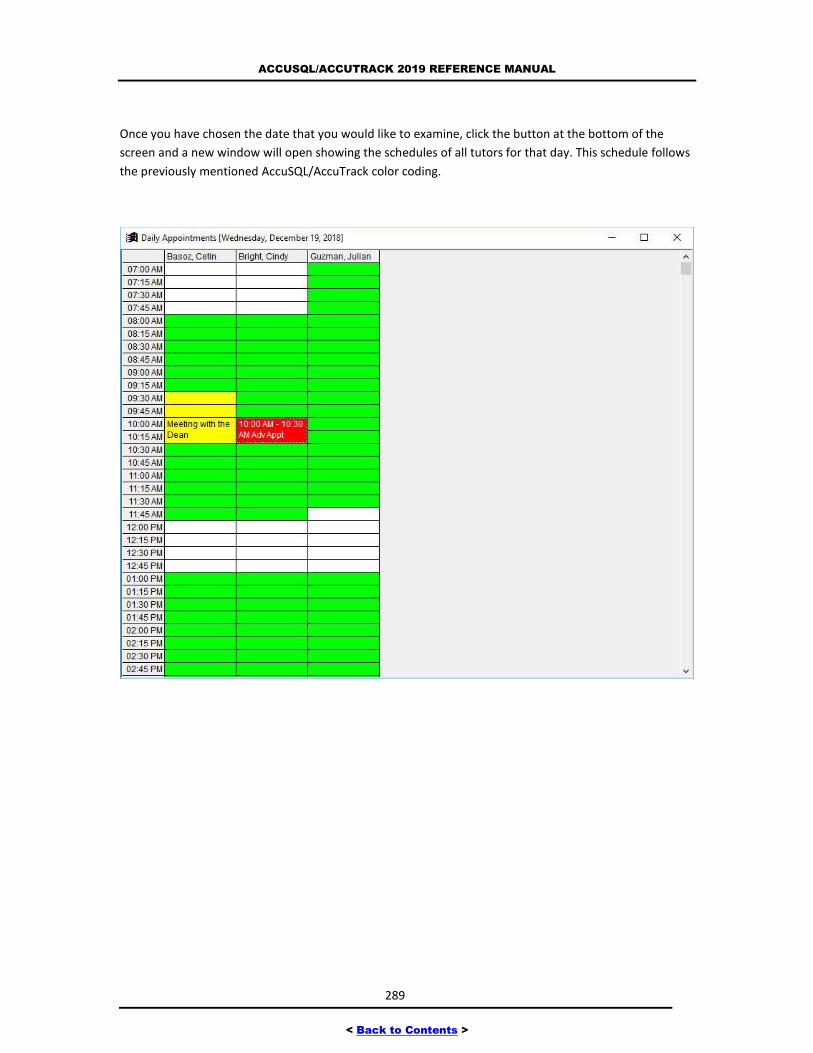
ACCUSQL/ACCUTRACK 2019 REFERENCE MANUAL
289
< Back to Contents >
Once you have chosen the date that you would like to examine, click the button at the bottom of the
screen and a new window will open showing the schedules of all tutors for that day. This schedule follows
the previously mentioned AccuSQL/AccuTrack color coding.
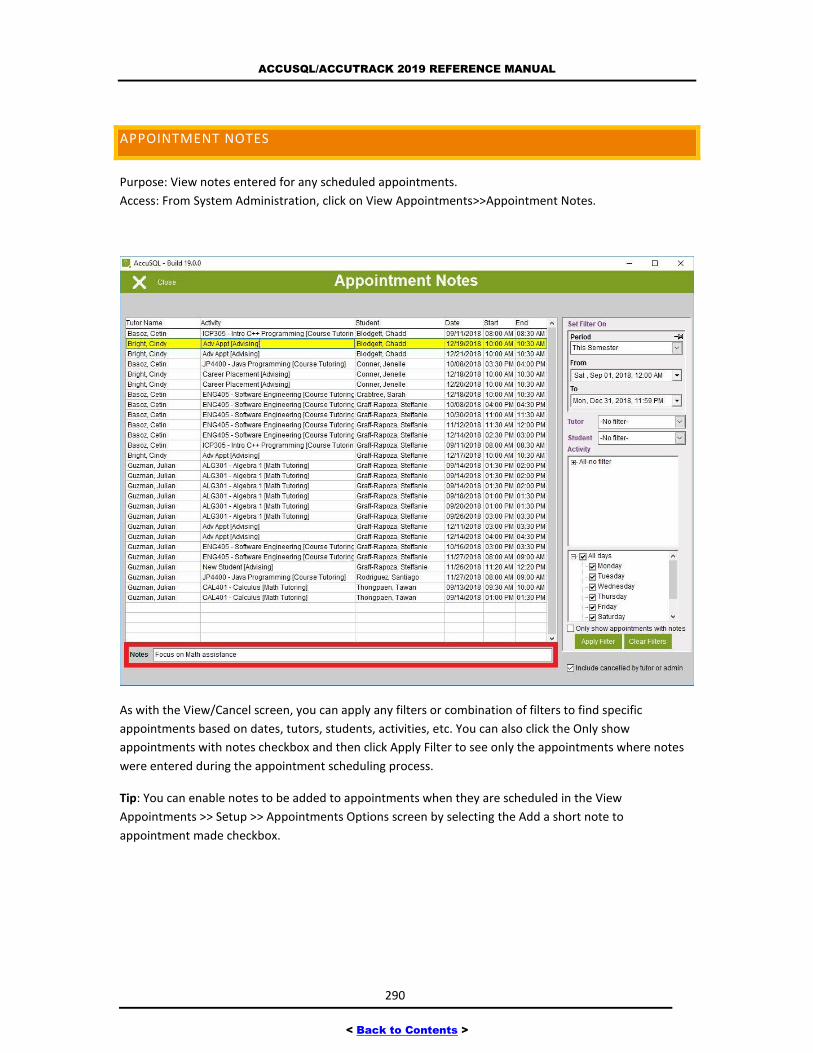
ACCUSQL/ACCUTRACK 2019 REFERENCE MANUAL
290
< Back to Contents >
APPOINTMENT NOTES
Purpose: View notes entered for any scheduled appointments.
Access: From System Administration, click on View Appointments>>Appointment Notes.
As with the View/Cancel screen, you can apply any filters or combination of filters to find specific
appointments based on dates, tutors, students, activities, etc. You can also click the Only show
appointments with notes checkbox and then click Apply Filter to see only the appointments where notes
were entered during the appointment scheduling process.
Tip: You can enable notes to be added to appointments when they are scheduled in the View
Appointments >> Setup >> Appointments Options screen by selecting the Add a short note to
appointment made checkbox.
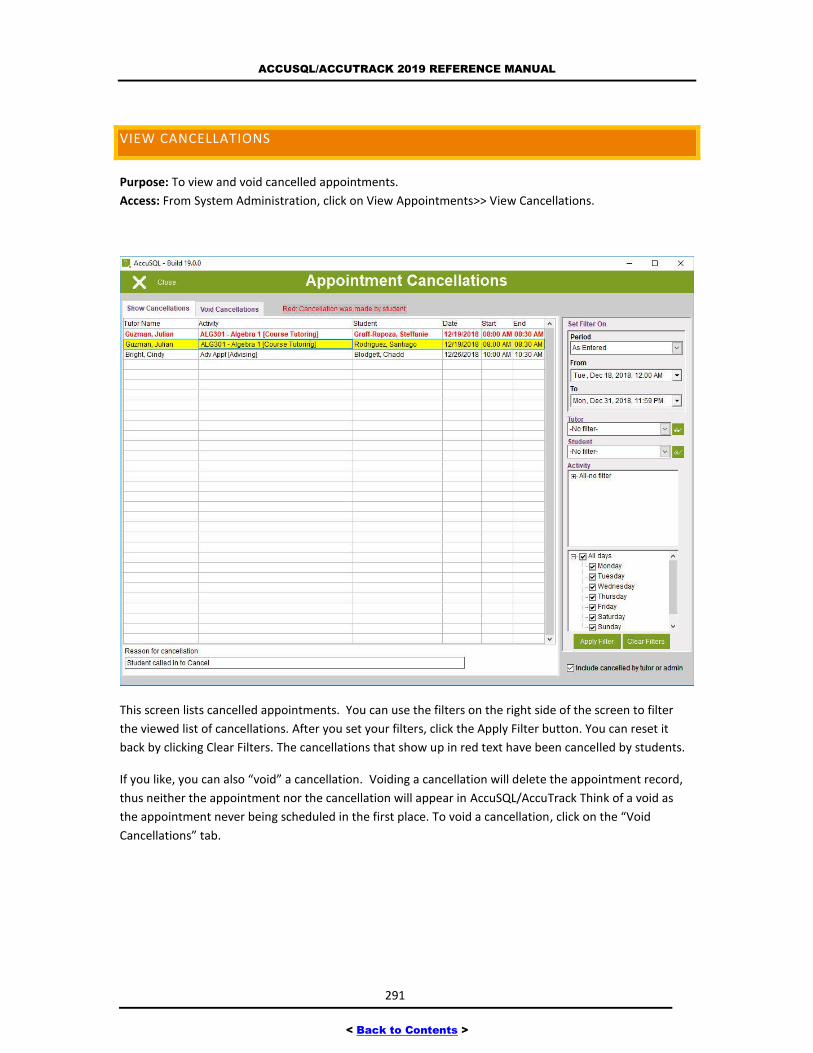
ACCUSQL/ACCUTRACK 2019 REFERENCE MANUAL
291
< Back to Contents >
VIEW CANCELLATIONS
Purpose: To view and void cancelled appointments.
Access: From System Administration, click on View Appointments>> View Cancellations.
This screen lists cancelled appointments. You can use the filters on the right side of the screen to filter
the viewed list of cancellations. After you set your filters, click the Apply Filter button. You can reset it
back by clicking Clear Filters. The cancellations that show up in red text have been cancelled by students.
If you like, you can also “void” a cancellation. Voiding a cancellation will delete the appointment record,
thus neither the appointment nor the cancellation will appear in AccuSQL/AccuTrack Think of a void as
the appointment never being scheduled in the first place. To void a cancellation, click on the “Void
Cancellations” tab.
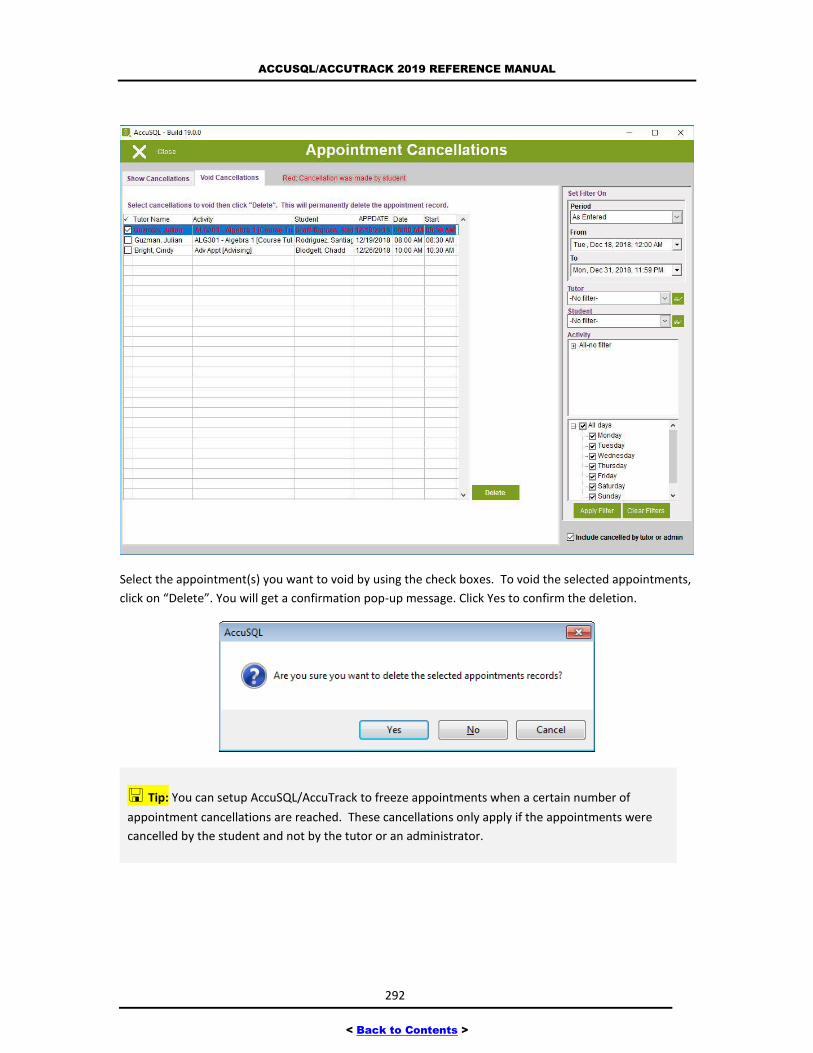
ACCUSQL/ACCUTRACK 2019 REFERENCE MANUAL
292
< Back to Contents >
Select the appointment(s) you want to void by using the check boxes. To void the selected appointments,
click on “Delete”. You will get a confirmation pop-up message. Click Yes to confirm the deletion.
Tip: You can setup AccuSQL/AccuTrack to freeze appointments when a certain number of
appointment cancellations are reached. These cancellations only apply if the appointments were
cancelled by the student and not by the tutor or an administrator.
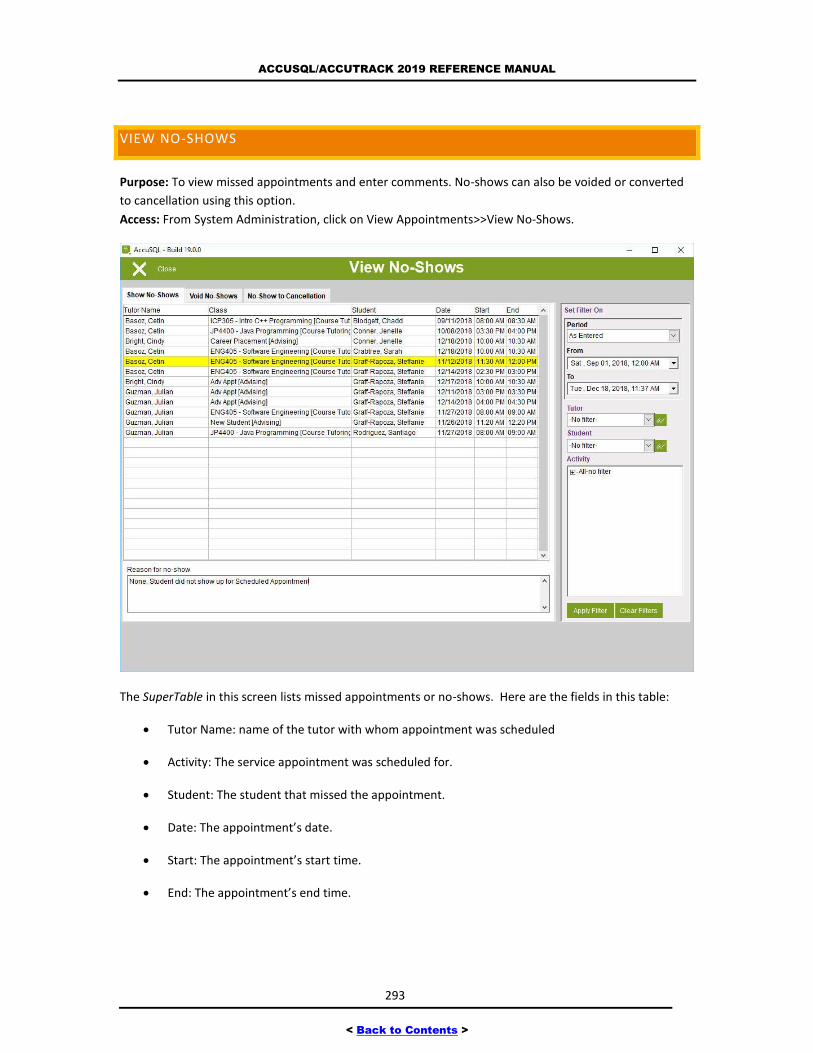
ACCUSQL/ACCUTRACK 2019 REFERENCE MANUAL
293
< Back to Contents >
VIEW NO-SHOWS
Purpose: To view missed appointments and enter comments. No-shows can also be voided or converted
to cancellation using this option.
Access: From System Administration, click on View Appointments>>View No-Shows.
The SuperTable in this screen lists missed appointments or no-shows. Here are the fields in this table:
Tutor Name: name of the tutor with whom appointment was scheduled
Activity: The service appointment was scheduled for.
Student: The student that missed the appointment.
Date: The appointment’s date.
Start: The appointment’s start time.
End: The appointment’s end time.
ACCUSQL/ACCUTRACK 2019 REFERENCE MANUAL
294
< Back to Contents >
Tip: You can use the SuperTable built-in search and sort functions.
NO-SHOW DEFINITION
AccuSQL/AccuTrack calculates missed appointments by comparing the sign-in records with appointments
records and will consider a student as showing up for the appointment if all three conditions below are
met:
1. Student signed in within the appointment’s sign-in window: The window is a period of X minutes before
the appointment's time to Y minutes after it. The administrator defines the appointment’s sign-in
window by setting X and Y in the Setup page of the Set Appointments module, or through the Control
Panel. For example, if X is set to 10 and Y is set to 15 and an appointment is scheduled at 9:00 AM, then
the appointment’s sign-in window is 8:50 AM to 9:15 AM. The student must sign in within this time
period to satisfy the first condition.
2. Student signed out before some period of the actual appointment time: The student must be present for
at least some portion of the actual appointment time. So if an appointment is from 9AM to 9:30AM, the
student must be signed in at least until 9AM or the system would mark them as a no-show for the
appointment and their sign in/our period would be logged as a walk-in.
3. Student stayed more than the minimum time period: The student must sign in for a minimum period of
Z minutes during the appointment's time. The administrator defines this minimum period by entering it
in the Setup page of the Set Appointments module, or through the Control Panel. For example, if the
minimum period is set to 30 minutes, the student must sign in for 30 minutes or longer to satisfy this
condition.
4. Student signs in to the appropriate class: When the student signs in for the appointment, the student
must sign in to the same class the appointment is scheduled. For example, if the appointment is
scheduled for Algebra 1, the student must select “Algebra 1” in the Activity Selection screen. If the
student selects English Comp 1 instead, the student will be flagged as no-show for the Algebra 1
appointment. If you choose, you can select the Bypass Activities and Tutor Selection screens for
appointments sign-ins checkbox in the View Appointments >> Setup >> Appointment Options screen and
the activity and the tutor selected at the time the appointment was made will automatically be used at
the time of the appointment sign in, hence making this a non- item.
NO-SHOW COMMENTS
Use the edit box under the no-show table to enter the reason for the no-show. To enter a reason, simply
select the appointment by clicking on it. The selected record will appear highlighted. After selecting, type
the no-show reason in the edit box. The entry is saved automatically.
Tip: The comments you enter here will appear in the no-show report.
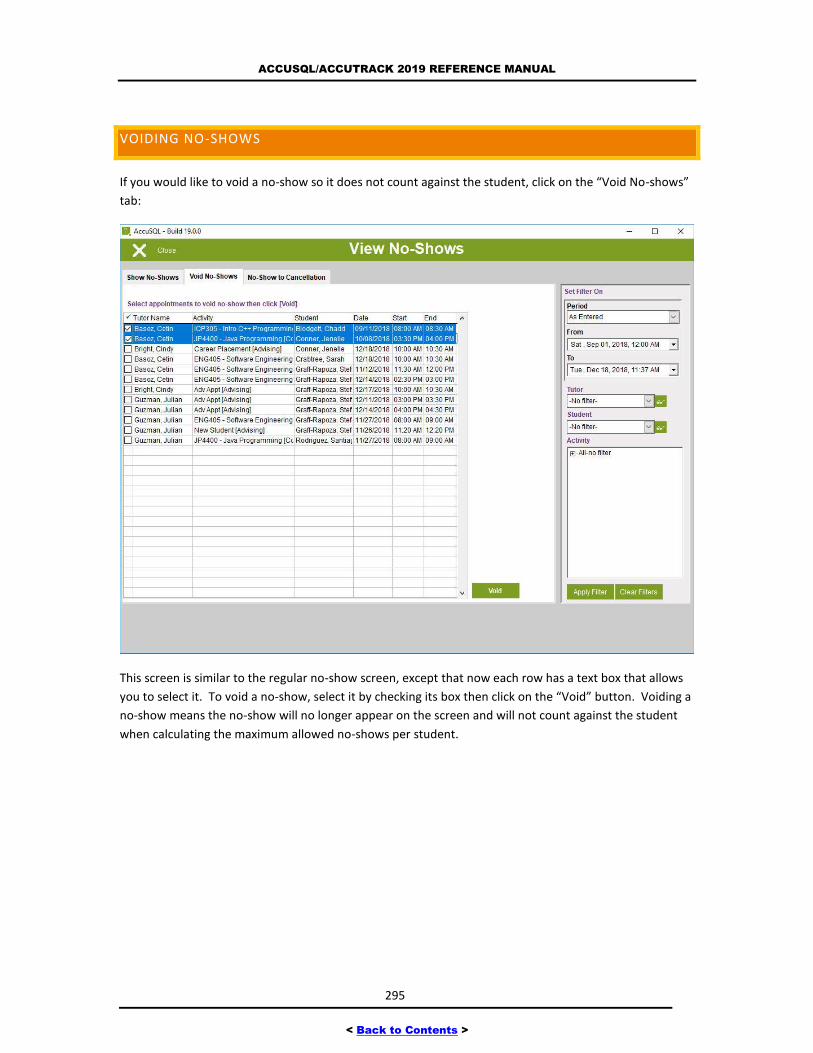
ACCUSQL/ACCUTRACK 2019 REFERENCE MANUAL
295
< Back to Contents >
VOIDING NO-SHOWS
If you would like to void a no-show so it does not count against the student, click on the “Void No-shows”
tab:
This screen is similar to the regular no-show screen, except that now each row has a text box that allows
you to select it. To void a no-show, select it by checking its box then click on the “Void” button. Voiding a
no-show means the no-show will no longer appear on the screen and will not count against the student
when calculating the maximum allowed no-shows per student.
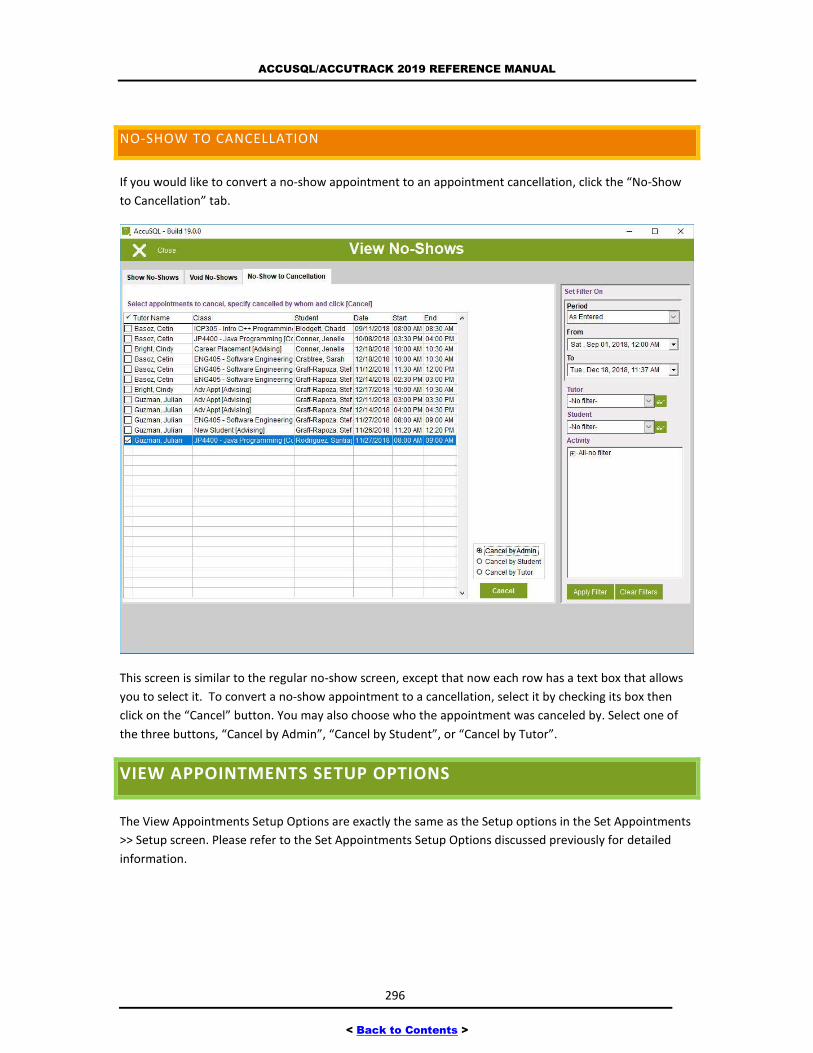
ACCUSQL/ACCUTRACK 2019 REFERENCE MANUAL
296
< Back to Contents >
NO-SHOW TO CANCELLATION
If you would like to convert a no-show appointment to an appointment cancellation, click the “No-Show
to Cancellation” tab.
This screen is similar to the regular no-show screen, except that now each row has a text box that allows
you to select it. To convert a no-show appointment to a cancellation, select it by checking its box then
click on the “Cancel” button. You may also choose who the appointment was canceled by. Select one of
the three buttons, “Cancel by Admin”, “Cancel by Student”, or “Cancel by Tutor”.
VIEW APPOINTMENTS SETUP OPTIONS
The View Appointments Setup Options are exactly the same as the Setup options in the Set Appointments
>> Setup screen. Please refer to the Set Appointments Setup Options discussed previously for detailed
information.
ACCUSQL/ACCUTRACK 2019 REFERENCE MANUAL
297
< Back to Contents >
MEDIA CHECK-OUT OPTIONS
When you click on Media Check-out from the Main Menu, you will see the following options:
Media Stock: Allows you to create the media items you checkout to students.
Media Check-In/Out: Allows you to check the media out to students.
Express Media Checkout: A quicker method for checking out media to students.
The following sections have more information on the above screens.
MEDIA STOCK SCREEN
Purpose: To enter and maintain your media stock.
Access: From System Administration, click on Media Check-out Media Stock.
You can use AccuSQL/AccuTrack to checkout and track loaned materials. For example, you can track
laptops, DVDs, reference books, headphones, tablets, and anything else you loan to students. The
software will track the material, report on checkouts, and tell you which material is past due.
To start tracking your loaned material with AccuSQL/AccuTrack, you need to assign each piece a unique ID
number. Label each item with its number. The ID number will make the checkout and check-in process
much quicker and more accurate.
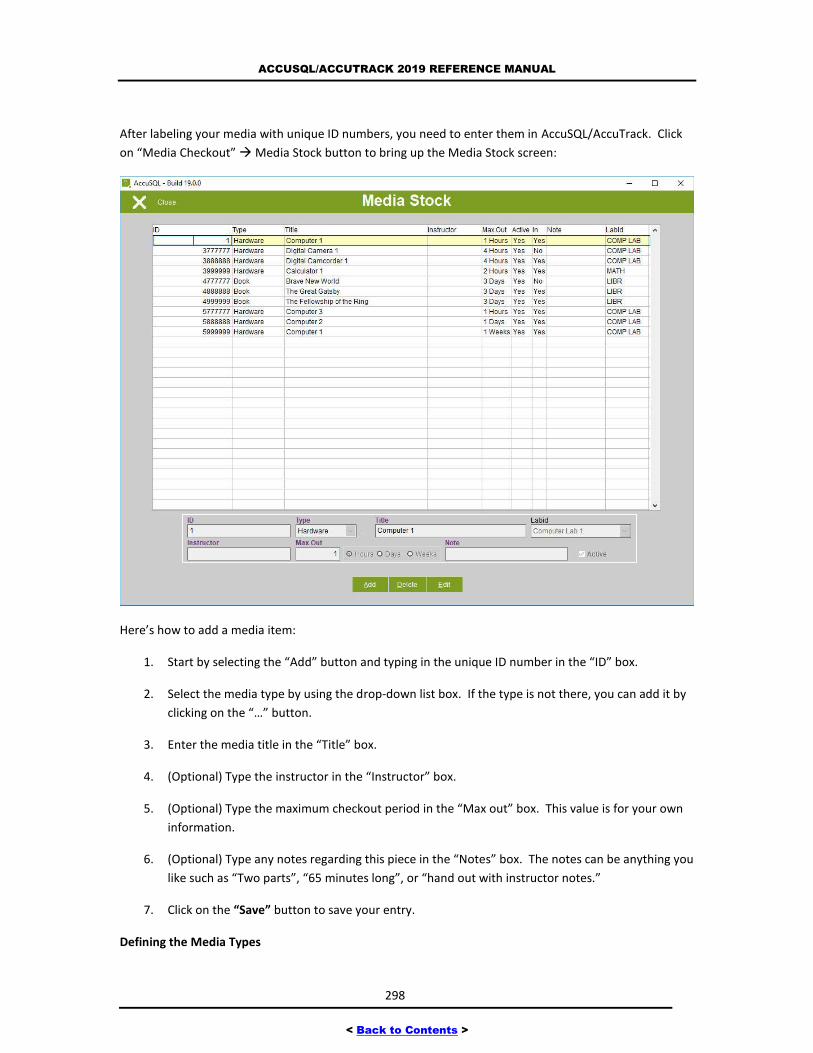
ACCUSQL/ACCUTRACK 2019 REFERENCE MANUAL
298
< Back to Contents >
After labeling your media with unique ID numbers, you need to enter them in AccuSQL/AccuTrack. Click
on “Media Checkout” Media Stock button to bring up the Media Stock screen:
Here’s how to add a media item:
1. Start by selecting the “Add” button and typing in the unique ID number in the “ID” box.
2. Select the media type by using the drop-down list box. If the type is not there, you can add it by
clicking on the “…” button.
3. Enter the media title in the “Title” box.
4. (Optional) Type the instructor in the “Instructor” box.
5. (Optional) Type the maximum checkout period in the “Max out” box. This value is for your own
information.
6. (Optional) Type any notes regarding this piece in the “Notes” box. The notes can be anything you
like such as “Two parts”, “65 minutes long”, or “hand out with instructor notes.”
7. Click on the “Save” button to save your entry.
Defining the Media Types
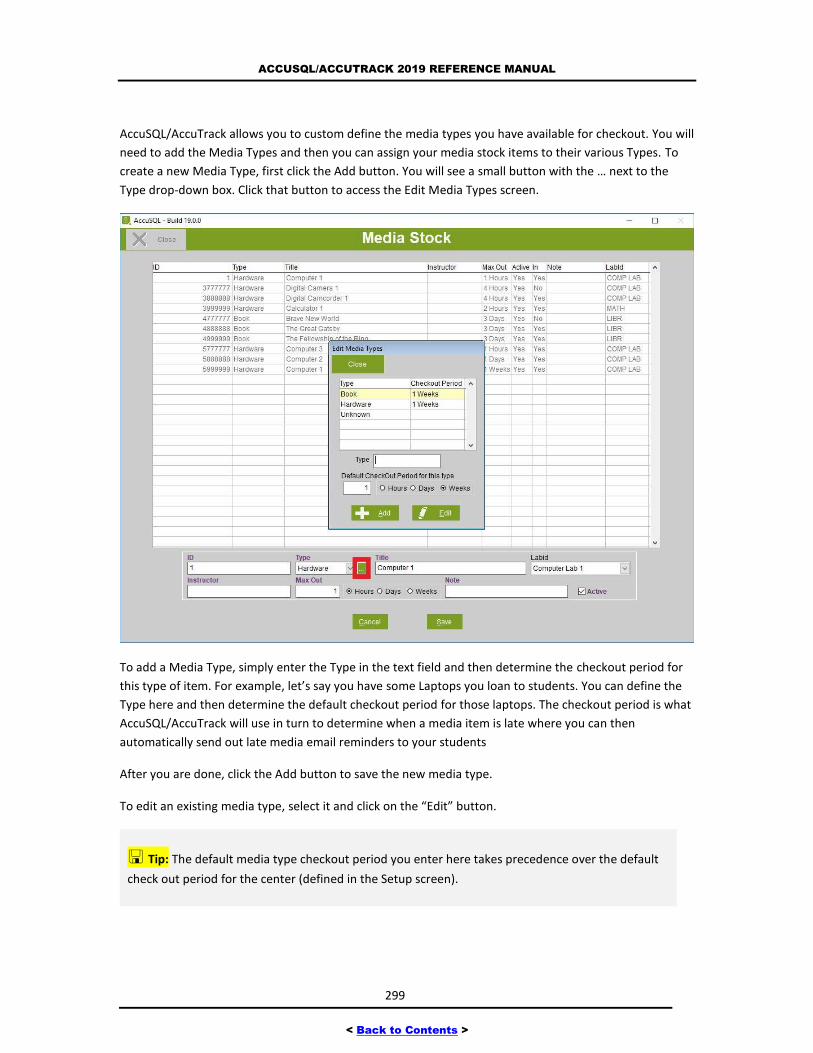
ACCUSQL/ACCUTRACK 2019 REFERENCE MANUAL
299
< Back to Contents >
AccuSQL/AccuTrack allows you to custom define the media types you have available for checkout. You will
need to add the Media Types and then you can assign your media stock items to their various Types. To
create a new Media Type, first click the Add button. You will see a small button with the … next to the
Type drop-down box. Click that button to access the Edit Media Types screen.
To add a Media Type, simply enter the Type in the text field and then determine the checkout period for
this type of item. For example, let’s say you have some Laptops you loan to students. You can define the
Type here and then determine the default checkout period for those laptops. The checkout period is what
AccuSQL/AccuTrack will use in turn to determine when a media item is late where you can then
automatically send out late media email reminders to your students
After you are done, click the Add button to save the new media type.
To edit an existing media type, select it and click on the “Edit” button.
Tip: The default media type checkout period you enter here takes precedence over the default
check out period for the center (defined in the Setup screen).
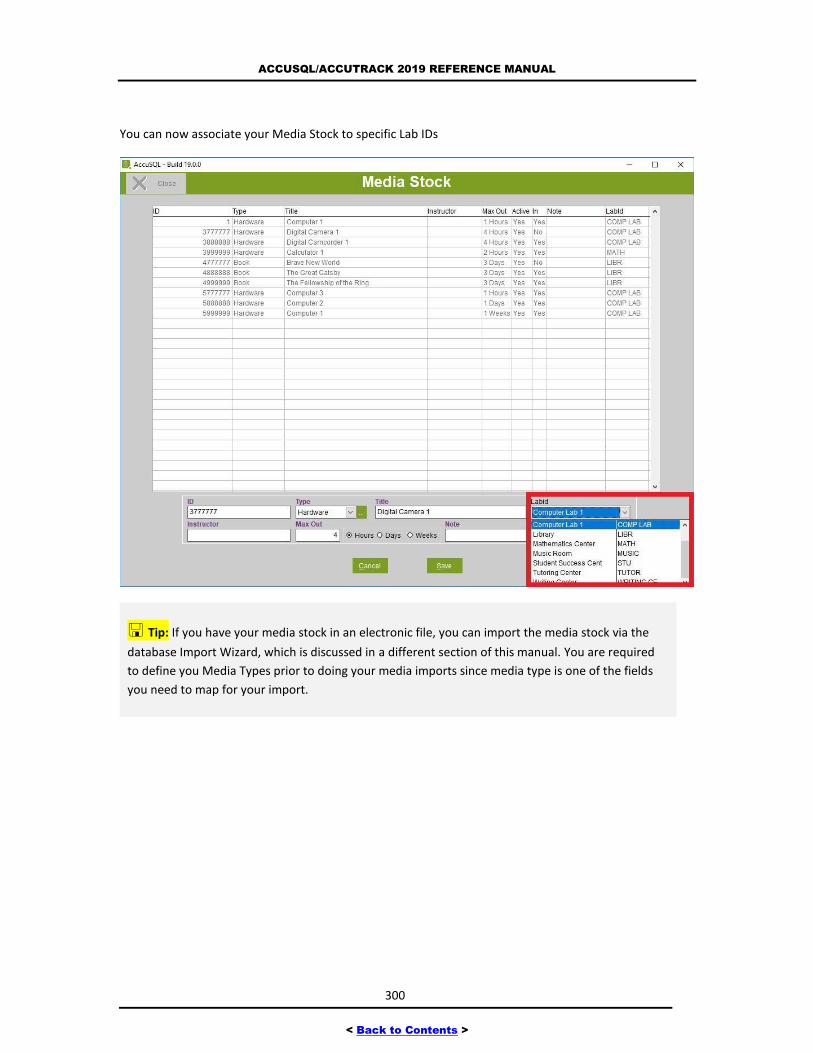
ACCUSQL/ACCUTRACK 2019 REFERENCE MANUAL
300
< Back to Contents >
You can now associate your Media Stock to specific Lab IDs
Tip: If you have your media stock in an electronic file, you can import the media stock via the
database Import Wizard, which is discussed in a different section of this manual. You are required
to define you Media Types prior to doing your media imports since media type is one of the fields
you need to map for your import.
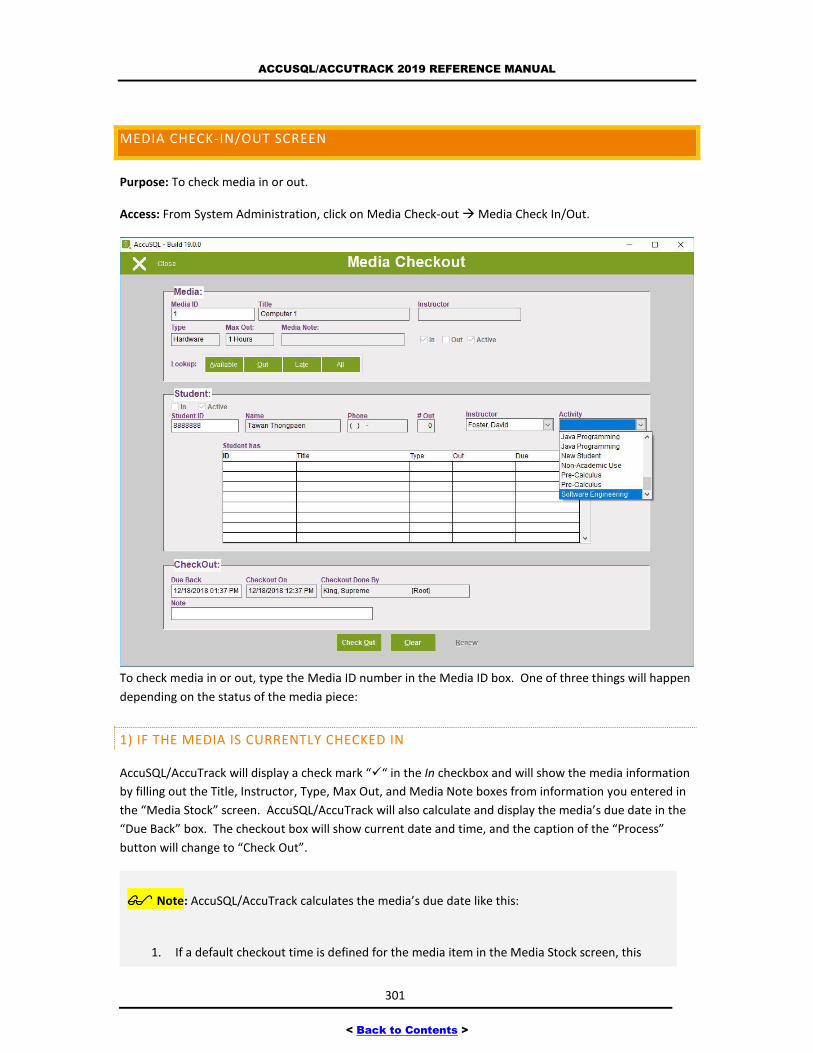
ACCUSQL/ACCUTRACK 2019 REFERENCE MANUAL
301
< Back to Contents >
MEDIA CHECK-IN/OUT SCREEN
Purpose: To check media in or out.
Access: From System Administration, click on Media Check-out Media Check In/Out.
To check media in or out, type the Media ID number in the Media ID box. One of three things will happen
depending on the status of the media piece:
1) IF THE MEDIA IS CURRENTLY CHECKED IN
AccuSQL/AccuTrack will display a check mark ““ in the In checkbox and will show the media information
by filling out the Title, Instructor, Type, Max Out, and Media Note boxes from information you entered in
the “Media Stock” screen. AccuSQL/AccuTrack will also calculate and display the media’s due date in the
“Due Back” box. The checkout box will show current date and time, and the caption of the “Process”
button will change to “Check Out”.
Note: AccuSQL/AccuTrack calculates the media’s due date like this:
1. If a default checkout time is defined for the media item in the Media Stock screen, this
ACCUSQL/ACCUTRACK 2019 REFERENCE MANUAL
302
< Back to Contents >
default time is used.
2. If the item does not have a default check out time, and the media type has a default
checkout time defined, the default media type checkout time is used.
3. If the default media type checkout time is not defined, the default center checkout time is
used.
To check the media out, follow these steps:
1. Adjust the due back time if needed. You can do this by typing the adjusted value in the “Due
Back” box or by clicking on the box with the right mouse button and using the calendar.
2. (Optional) Enter a checkout note in the “Note” box.
3. Enter the ID number of the student who wants to check out this piece in the “Student ID” box.
When you enter the ID, AccuSQL/AccuTrack will automatically load the student’s name, phone
number, and the number of media items the student currently have checked out.
AccuSQL/AccuTrack will also list these media items in the “Student has” box.
4. (Optional) Select the student’s instructor from the Instructor’s drop-down box.
5. (Optional) Select the student’s class from the Class drop-down box.
6. Click on the “Check Out” button.
The software will also display information about the student who checked out the media including ID,
name, phone, instructor, class, and whether the student is currently signed-in. The software will also
change the caption of the “Process” button to “Check In”
2) IF THE MEDIA IS CURRENTLY CHECKED OUT
AccuSQL/AccuTrack will display a check mark ““ in the Out checkbox and will show the media
information by filling out the Title, Instructor, Type, Max Out, and Media Note boxes from information
you entered in the “Media Stock” screen. AccuSQL/AccuTrack will also display the checkout information
including the checkout time and due time and information on the student who has the media checked
out. The caption of the “Process” button will change to “Check In”.
Checking Media In
To check the media in, all you need to do is click on the “Check In” button, and AccuSQL/AccuTrack will
record the check-in date and time. AccuSQL/AccuTrack will show a confirmation message and will then
clear the text boxes.
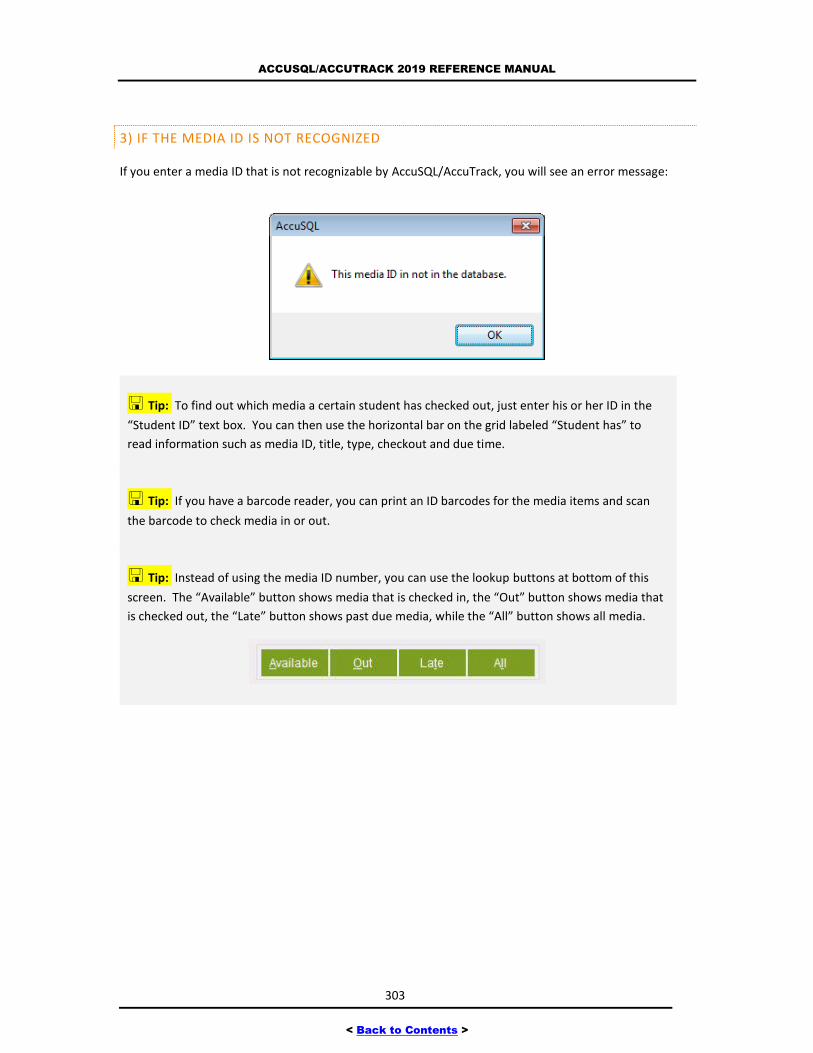
ACCUSQL/ACCUTRACK 2019 REFERENCE MANUAL
303
< Back to Contents >
3) IF THE MEDIA ID IS NOT RECOGNIZED
If you enter a media ID that is not recognizable by AccuSQL/AccuTrack, you will see an error message:
Tip: To find out which media a certain student has checked out, just enter his or her ID in the
“Student ID” text box. You can then use the horizontal bar on the grid labeled “Student has” to
read information such as media ID, title, type, checkout and due time.
Tip: If you have a barcode reader, you can print an ID barcodes for the media items and scan
the barcode to check media in or out.
Tip: Instead of using the media ID number, you can use the lookup buttons at bottom of this
screen. The “Available” button shows media that is checked in, the “Out” button shows media that
is checked out, the “Late” button shows past due media, while the “All” button shows all media.
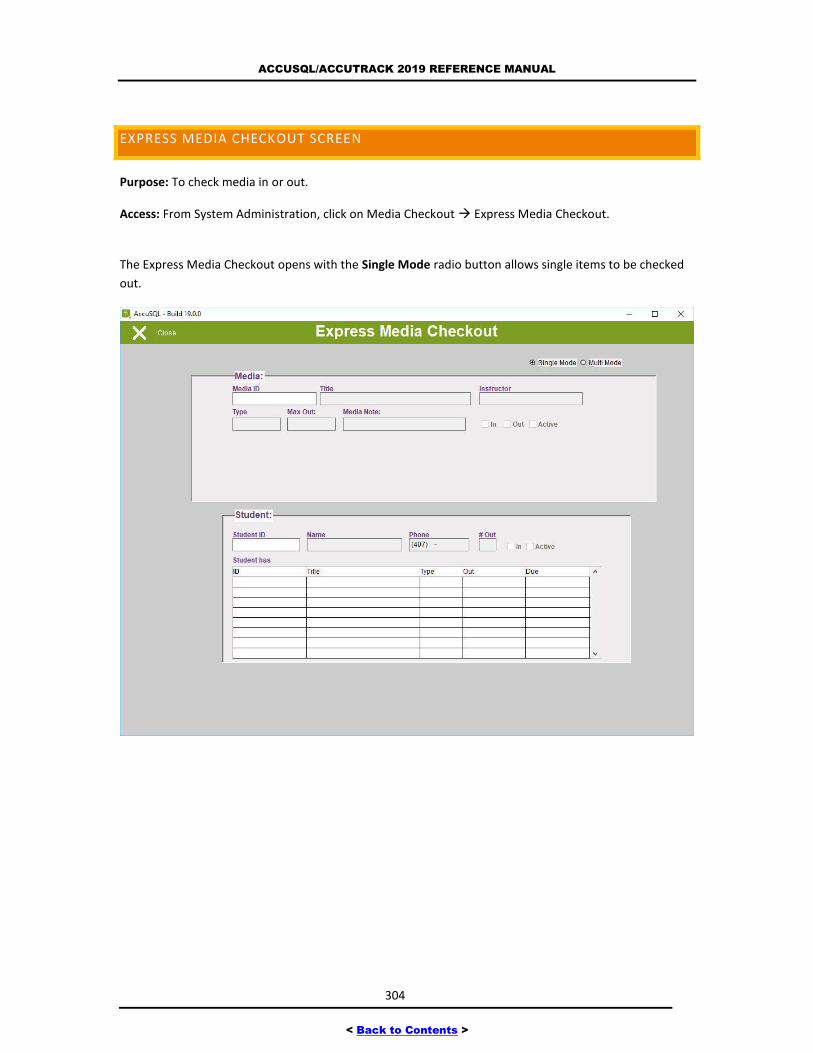
ACCUSQL/ACCUTRACK 2019 REFERENCE MANUAL
304
< Back to Contents >
EXPRESS MEDIA CHECKOUT SCREEN
Purpose: To check media in or out.
Access: From System Administration, click on Media Checkout Express Media Checkout.
The Express Media Checkout opens with the Single Mode radio button allows single items to be checked
out.
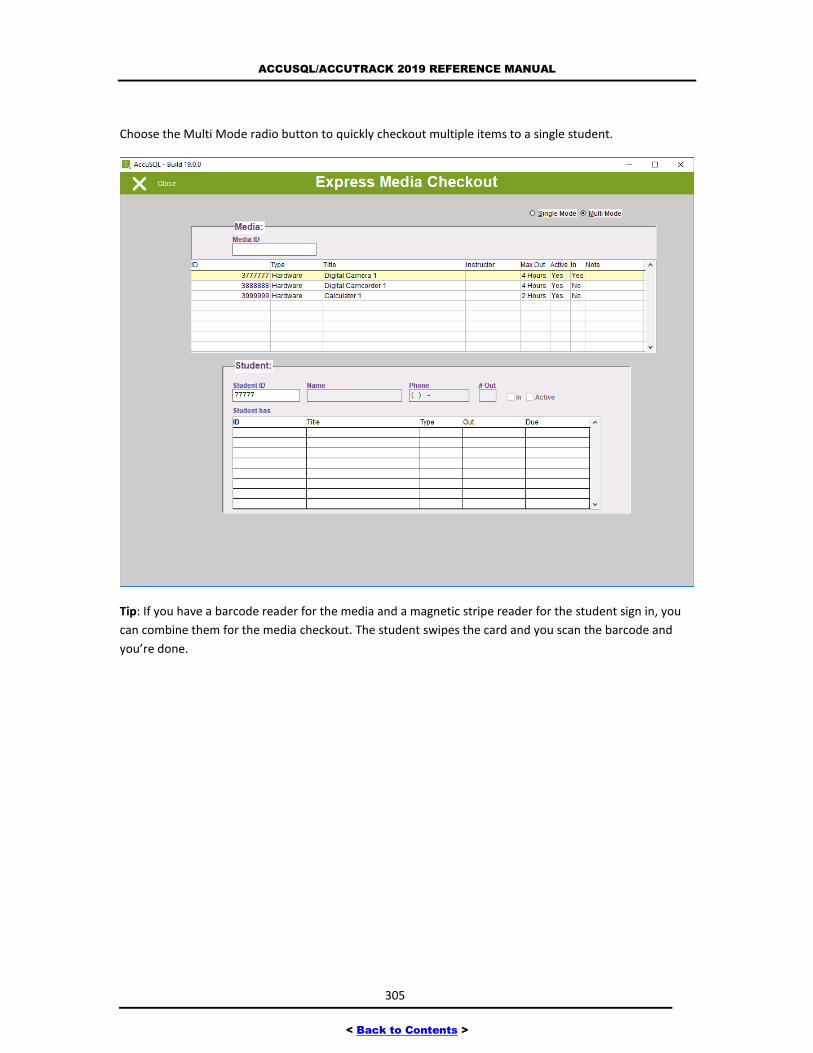
ACCUSQL/ACCUTRACK 2019 REFERENCE MANUAL
305
< Back to Contents >
Choose the Multi Mode radio button to quickly checkout multiple items to a single student.
Tip: If you have a barcode reader for the media and a magnetic stripe reader for the student sign in, you
can combine them for the media checkout. The student swipes the card and you scan the barcode and
you’re done.
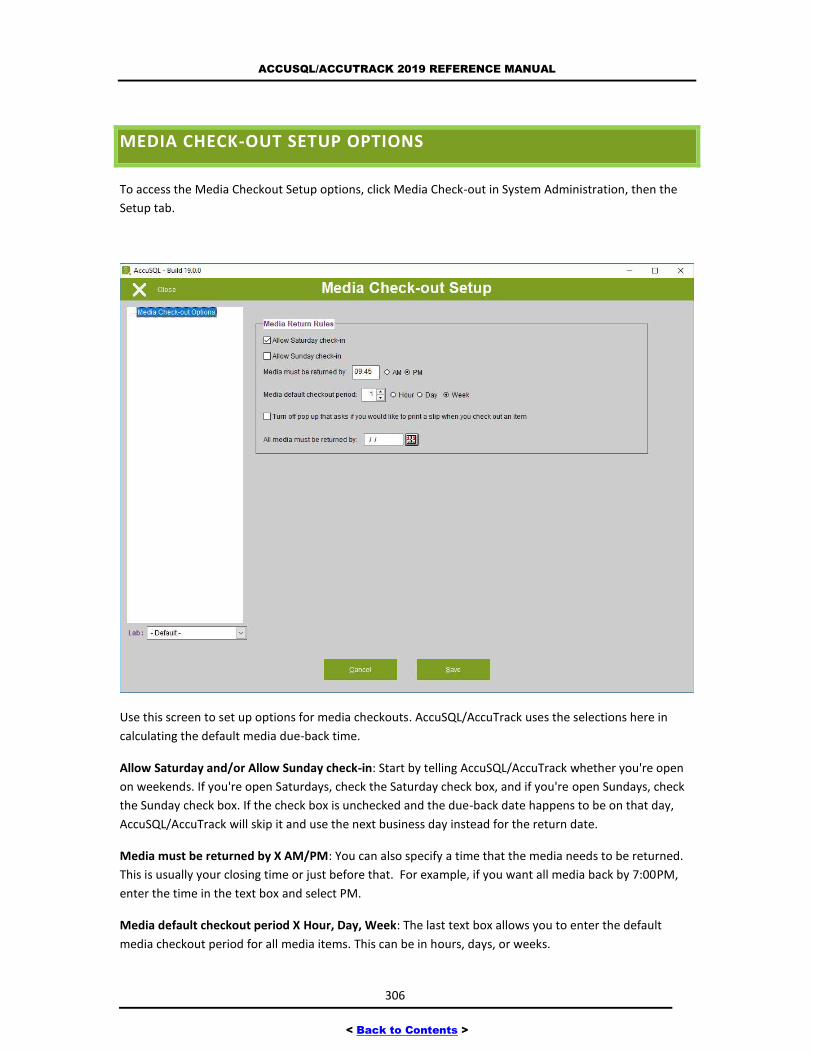
ACCUSQL/ACCUTRACK 2019 REFERENCE MANUAL
306
< Back to Contents >
MEDIA CHECK-OUT SETUP OPTIONS
To access the Media Checkout Setup options, click Media Check-out in System Administration, then the
Setup tab.
Use this screen to set up options for media checkouts. AccuSQL/AccuTrack uses the selections here in
calculating the default media due-back time.
Allow Saturday and/or Allow Sunday check-in: Start by telling AccuSQL/AccuTrack whether you're open
on weekends. If you're open Saturdays, check the Saturday check box, and if you're open Sundays, check
the Sunday check box. If the check box is unchecked and the due-back date happens to be on that day,
AccuSQL/AccuTrack will skip it and use the next business day instead for the return date.
Media must be returned by X AM/PM: You can also specify a time that the media needs to be returned.
This is usually your closing time or just before that. For example, if you want all media back by 7:00PM,
enter the time in the text box and select PM.
Media default checkout period X Hour, Day, Week: The last text box allows you to enter the default
media checkout period for all media items. This can be in hours, days, or weeks.
ACCUSQL/ACCUTRACK 2019 REFERENCE MANUAL
307
< Back to Contents >
Turn off pop up that asks you if you would like to print a slip when you check out an item: Checking this
option will turn off the pop up asking if you would like to print a slip when checking out an item.
All media must be returned by X: This allows you to set a default date by which all media must be
returned.
Note: If you use the "Hour" selection, AccuSQL/AccuTrack assumes the media must be
returned the same day, and will use the shorter of the closing time or media checkout period when
calculating due-time. For example, if you select 2 Hours as the checkout period and 7:00 PM as the
media-return time, and a student checks out the media at 6:00 PM, AccuSQL/AccuTrack will show
7:00 PM as the media due-back time.
AccuSQL/AccuTrack will use this time as the due time for all media unless you define a default per media
type checkout time or a per media item checkout time in the Media Stock screen.
Note: The default due back time you define here applies only if there is no default per-media-
type time or a default per media item defined.
Note: The calculated due-back time is shown in the media checkout screen and can be over-
written by the user.
FEEDBACK SURVEYS SETUP
When you click on Feedback Surveys from the Main Menu, you will see the following options:
Create Feedback Survey: Allows you to create surveys to present to students for activities and/or
for tutor feedback collection.
Custom Surveys: Allows you to create your own surveys using various form elements.
Publish Custom Surveys: Used to determine when, where and to whom your custom surveys will
be presented.
Custom Survey Reports: Allows you to view reports for the publications of your custom surveys.
The following sections have more information on the above screens.
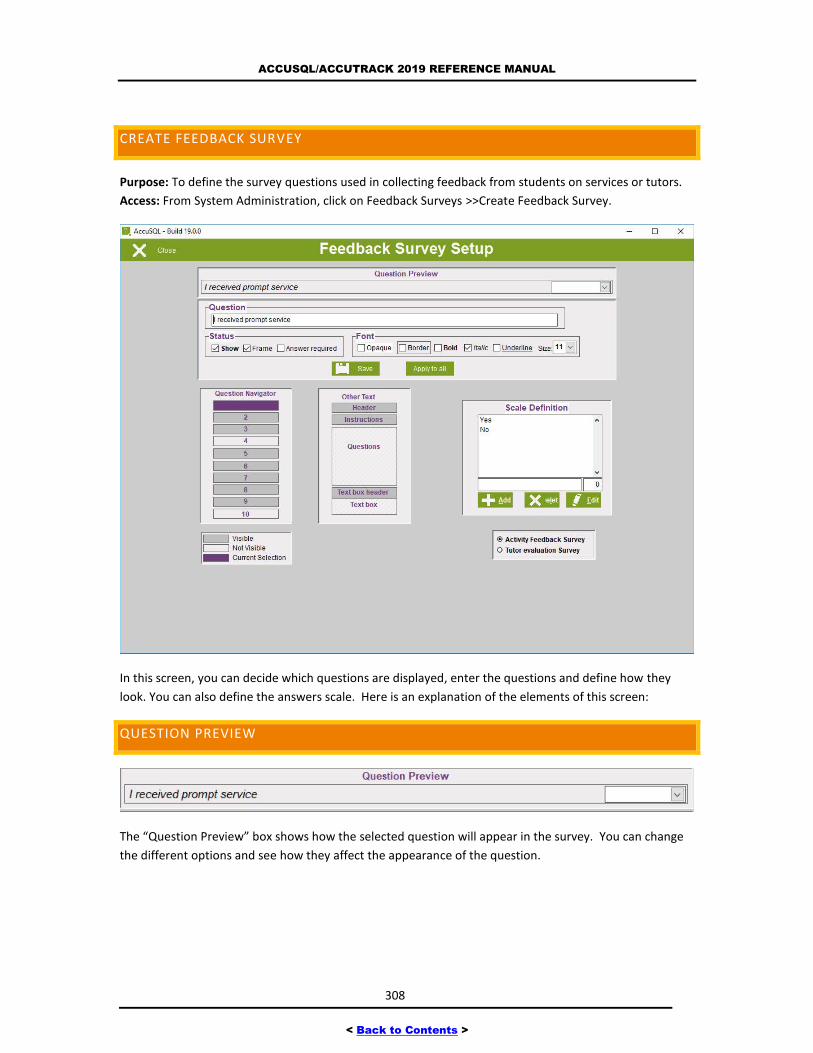
ACCUSQL/ACCUTRACK 2019 REFERENCE MANUAL
308
< Back to Contents >
CREATE FEEDBACK SURVEY
Purpose: To define the survey questions used in collecting feedback from students on services or tutors.
Access: From System Administration, click on Feedback Surveys >>Create Feedback Survey.
In this screen, you can decide which questions are displayed, enter the questions and define how they
look. You can also define the answers scale. Here is an explanation of the elements of this screen:
QUESTION PREVIEW
The “Question Preview” box shows how the selected question will appear in the survey. You can change
the different options and see how they affect the appearance of the question.
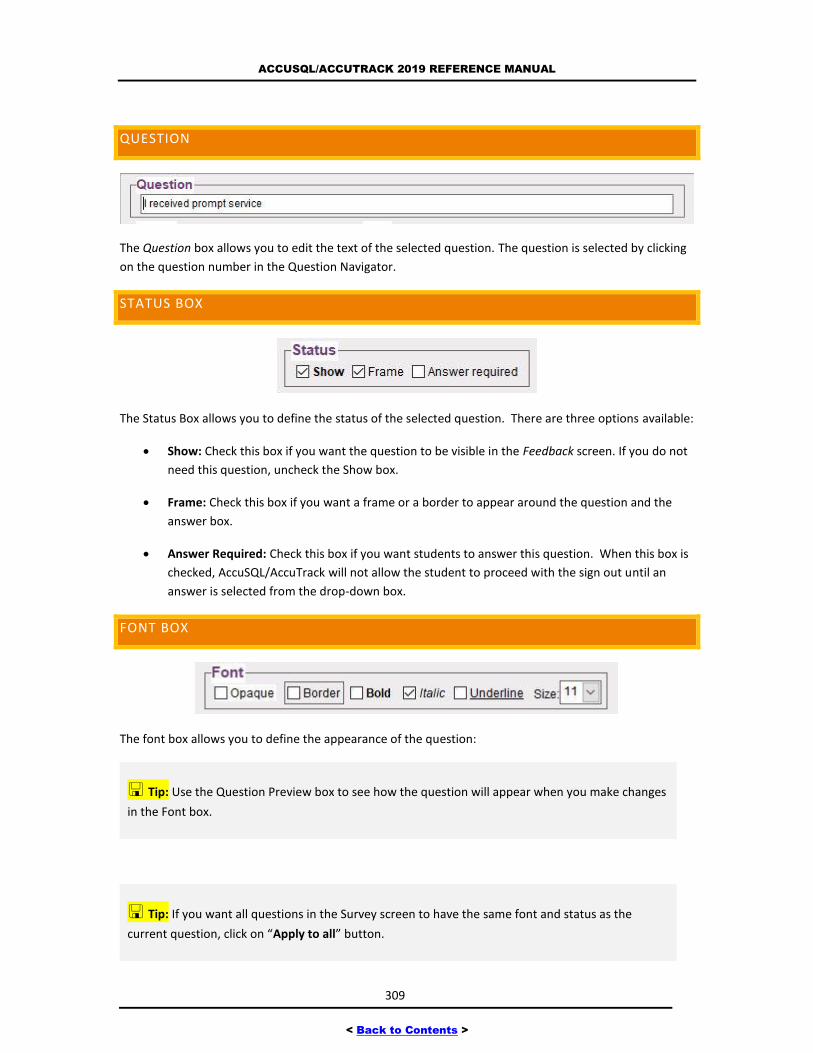
ACCUSQL/ACCUTRACK 2019 REFERENCE MANUAL
309
< Back to Contents >
QUESTION
The Question box allows you to edit the text of the selected question. The question is selected by clicking
on the question number in the Question Navigator.
STATUS BOX
The Status Box allows you to define the status of the selected question. There are three options available:
Show: Check this box if you want the question to be visible in the Feedback screen. If you do not
need this question, uncheck the Show box.
Frame: Check this box if you want a frame or a border to appear around the question and the
answer box.
Answer Required: Check this box if you want students to answer this question. When this box is
checked, AccuSQL/AccuTrack will not allow the student to proceed with the sign out until an
answer is selected from the drop-down box.
FONT BOX
The font box allows you to define the appearance of the question:
Tip: Use the Question Preview box to see how the question will appear when you make changes
in the Font box.
Tip: If you want all questions in the Survey screen to have the same font and status as the
current question, click on “Apply to all” button.
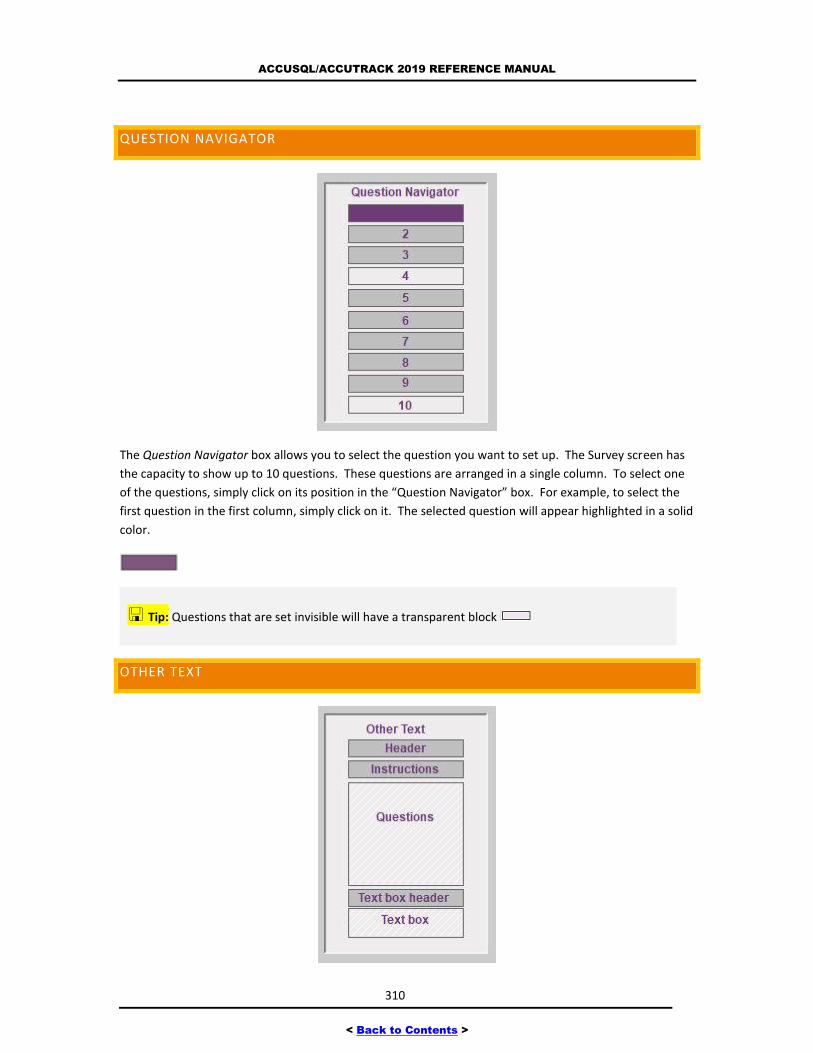
ACCUSQL/ACCUTRACK 2019 REFERENCE MANUAL
310
< Back to Contents >
QUESTION NAVIGATOR
The Question Navigator box allows you to select the question you want to set up. The Survey screen has
the capacity to show up to 10 questions. These questions are arranged in a single column. To select one
of the questions, simply click on its position in the “Question Navigator” box. For example, to select the
first question in the first column, simply click on it. The selected question will appear highlighted in a solid
color.
Tip: Questions that are set invisible will have a transparent block
OTHER TEXT
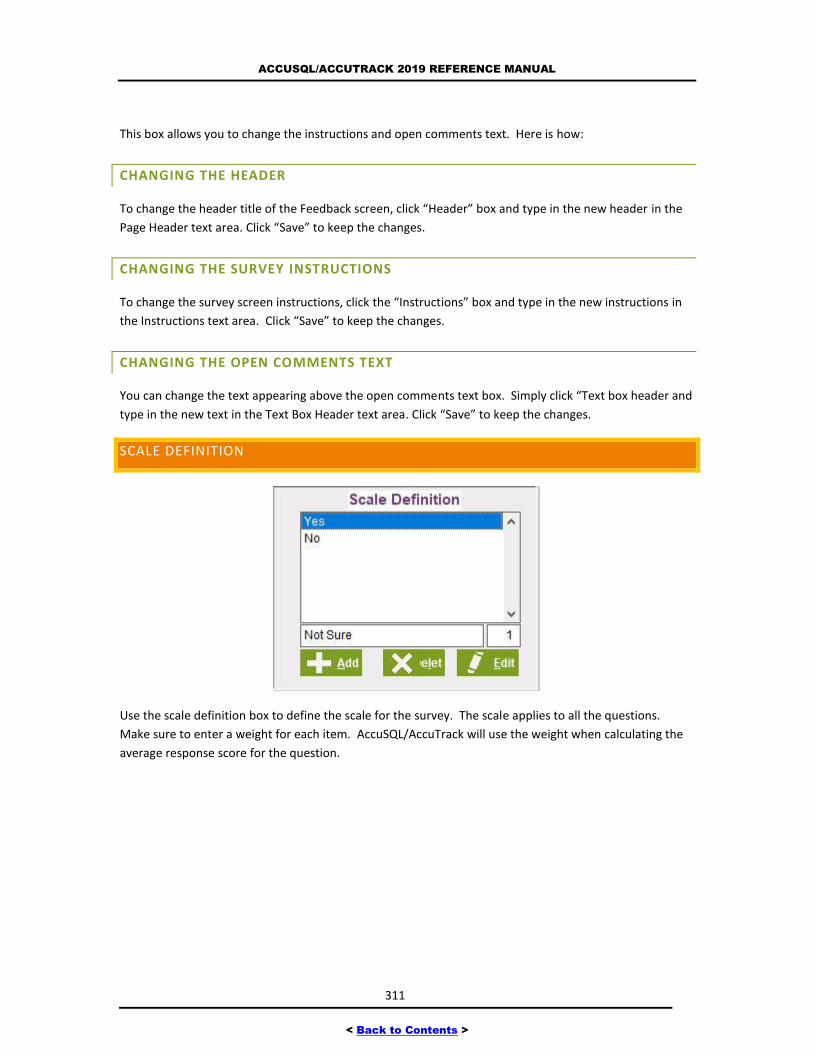
ACCUSQL/ACCUTRACK 2019 REFERENCE MANUAL
311
< Back to Contents >
This box allows you to change the instructions and open comments text. Here is how:
CHANGING THE HEADER
To change the header title of the Feedback screen, click “Header” box and type in the new header in the
Page Header text area. Click “Save” to keep the changes.
CHANGING THE SURVEY INSTRUCTIONS
To change the survey screen instructions, click the “Instructions” box and type in the new instructions in
the Instructions text area. Click “Save” to keep the changes.
CHANGING THE OPEN COMMENTS TEXT
You can change the text appearing above the open comments text box. Simply click “Text box header and
type in the new text in the Text Box Header text area. Click “Save” to keep the changes.
SCALE DEFINITION
Use the scale definition box to define the scale for the survey. The scale applies to all the questions.
Make sure to enter a weight for each item. AccuSQL/AccuTrack will use the weight when calculating the
average response score for the question.
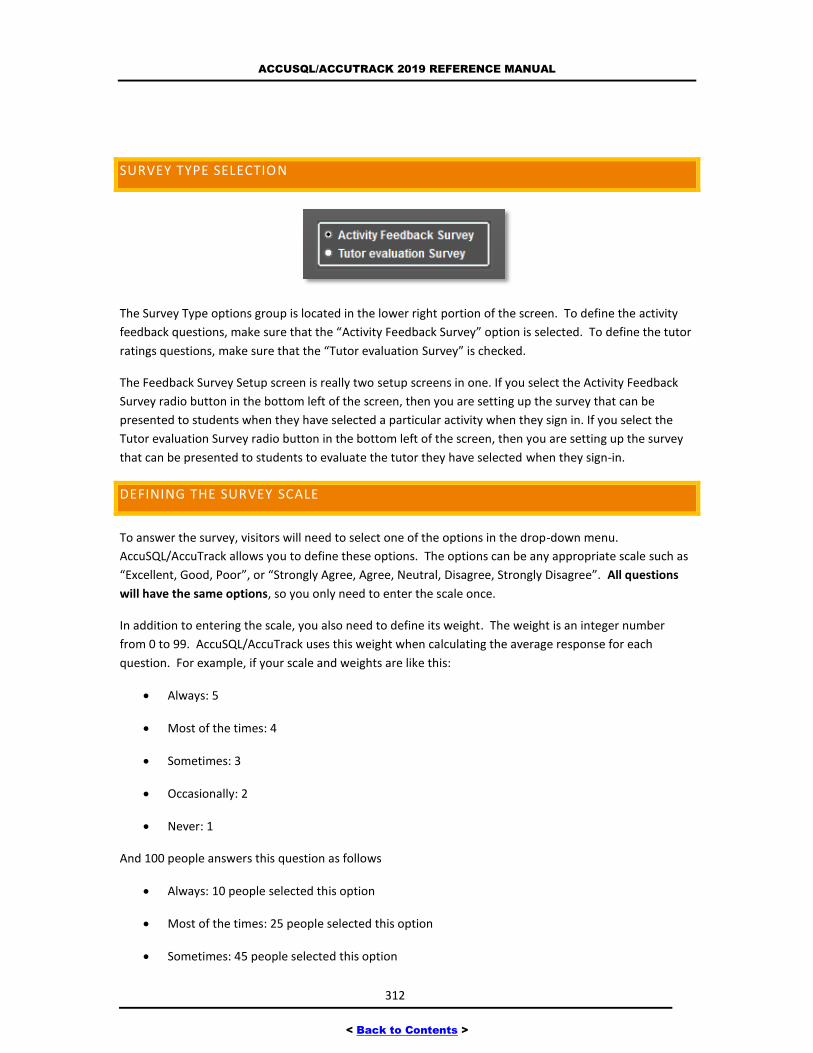
ACCUSQL/ACCUTRACK 2019 REFERENCE MANUAL
312
< Back to Contents >
SURVEY TYPE SELECTION
The Survey Type options group is located in the lower right portion of the screen. To define the activity
feedback questions, make sure that the “Activity Feedback Survey” option is selected. To define the tutor
ratings questions, make sure that the “Tutor evaluation Survey” is checked.
The Feedback Survey Setup screen is really two setup screens in one. If you select the Activity Feedback
Survey radio button in the bottom left of the screen, then you are setting up the survey that can be
presented to students when they have selected a particular activity when they sign in. If you select the
Tutor evaluation Survey radio button in the bottom left of the screen, then you are setting up the survey
that can be presented to students to evaluate the tutor they have selected when they sign-in.
DEFINING THE SURVEY SCALE
To answer the survey, visitors will need to select one of the options in the drop-down menu.
AccuSQL/AccuTrack allows you to define these options. The options can be any appropriate scale such as
“Excellent, Good, Poor”, or “Strongly Agree, Agree, Neutral, Disagree, Strongly Disagree”. All questions
will have the same options, so you only need to enter the scale once.
In addition to entering the scale, you also need to define its weight. The weight is an integer number
from 0 to 99. AccuSQL/AccuTrack uses this weight when calculating the average response for each
question. For example, if your scale and weights are like this:
Always: 5
Most of the times: 4
Sometimes: 3
Occasionally: 2
Never: 1
And 100 people answers this question as follows
Always: 10 people selected this option
Most of the times: 25 people selected this option
Sometimes: 45 people selected this option
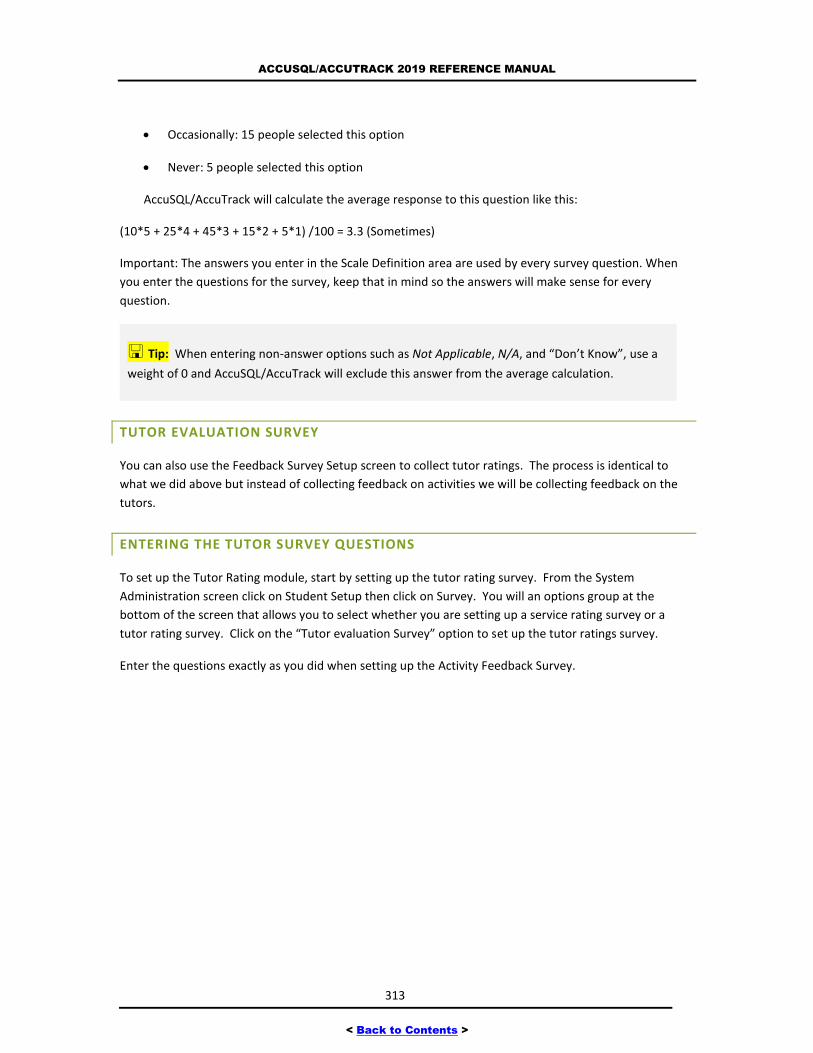
ACCUSQL/ACCUTRACK 2019 REFERENCE MANUAL
313
< Back to Contents >
Occasionally: 15 people selected this option
Never: 5 people selected this option
AccuSQL/AccuTrack will calculate the average response to this question like this:
(10*5 + 25*4 + 45*3 + 15*2 + 5*1) /100 = 3.3 (Sometimes)
Important: The answers you enter in the Scale Definition area are used by every survey question. When
you enter the questions for the survey, keep that in mind so the answers will make sense for every
question.
Tip: When entering non-answer options such as Not Applicable, N/A, and “Don’t Know”, use a
weight of 0 and AccuSQL/AccuTrack will exclude this answer from the average calculation.
TUTOR EVALUATION SURVEY
You can also use the Feedback Survey Setup screen to collect tutor ratings. The process is identical to
what we did above but instead of collecting feedback on activities we will be collecting feedback on the
tutors.
ENTERING THE TUTOR SURVEY QUESTIONS
To set up the Tutor Rating module, start by setting up the tutor rating survey. From the System
Administration screen click on Student Setup then click on Survey. You will an options group at the
bottom of the screen that allows you to select whether you are setting up a service rating survey or a
tutor rating survey. Click on the “Tutor evaluation Survey” option to set up the tutor ratings survey.
Enter the questions exactly as you did when setting up the Activity Feedback Survey.
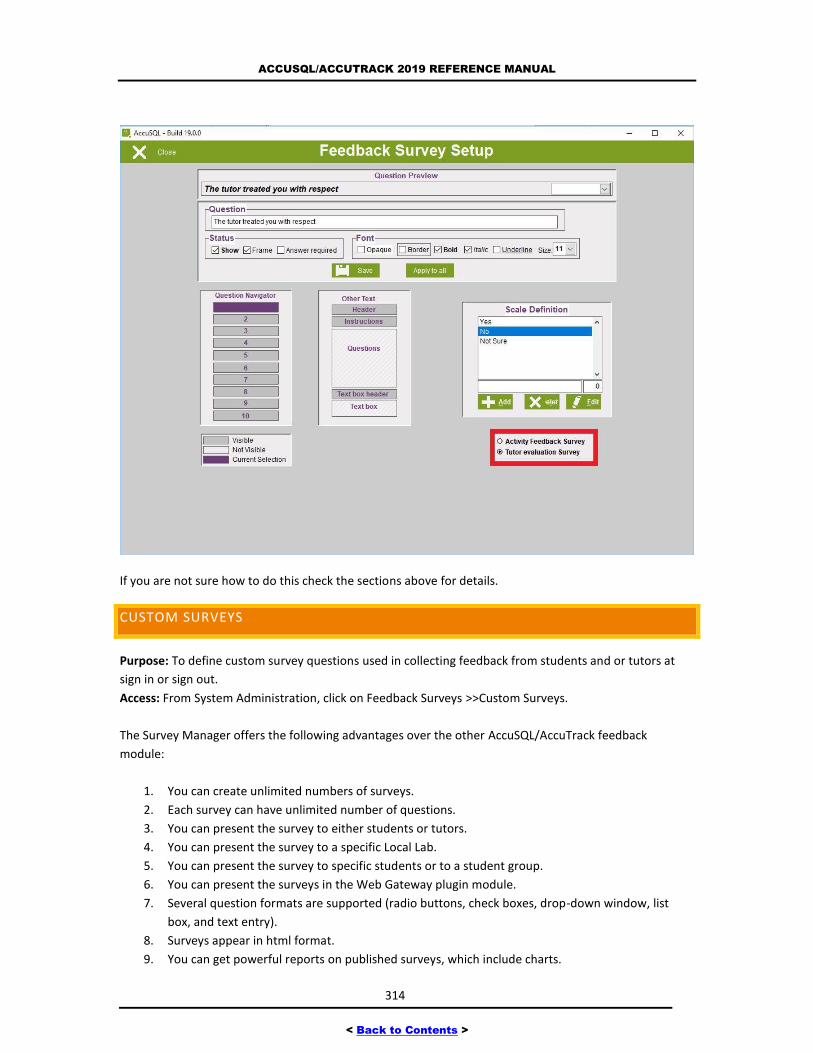
ACCUSQL/ACCUTRACK 2019 REFERENCE MANUAL
314
< Back to Contents >
If you are not sure how to do this check the sections above for details.
CUSTOM SURVEYS
Purpose: To define custom survey questions used in collecting feedback from students and or tutors at
sign in or sign out.
Access: From System Administration, click on Feedback Surveys >>Custom Surveys.
The Survey Manager offers the following advantages over the other AccuSQL/AccuTrack feedback
module:
1. You can create unlimited numbers of surveys.
2. Each survey can have unlimited number of questions.
3. You can present the survey to either students or tutors.
4. You can present the survey to a specific Local Lab.
5. You can present the survey to specific students or to a student group.
6. You can present the surveys in the Web Gateway plugin module.
7. Several question formats are supported (radio buttons, check boxes, drop-down window, list
box, and text entry).
8. Surveys appear in html format.
9. You can get powerful reports on published surveys, which include charts.
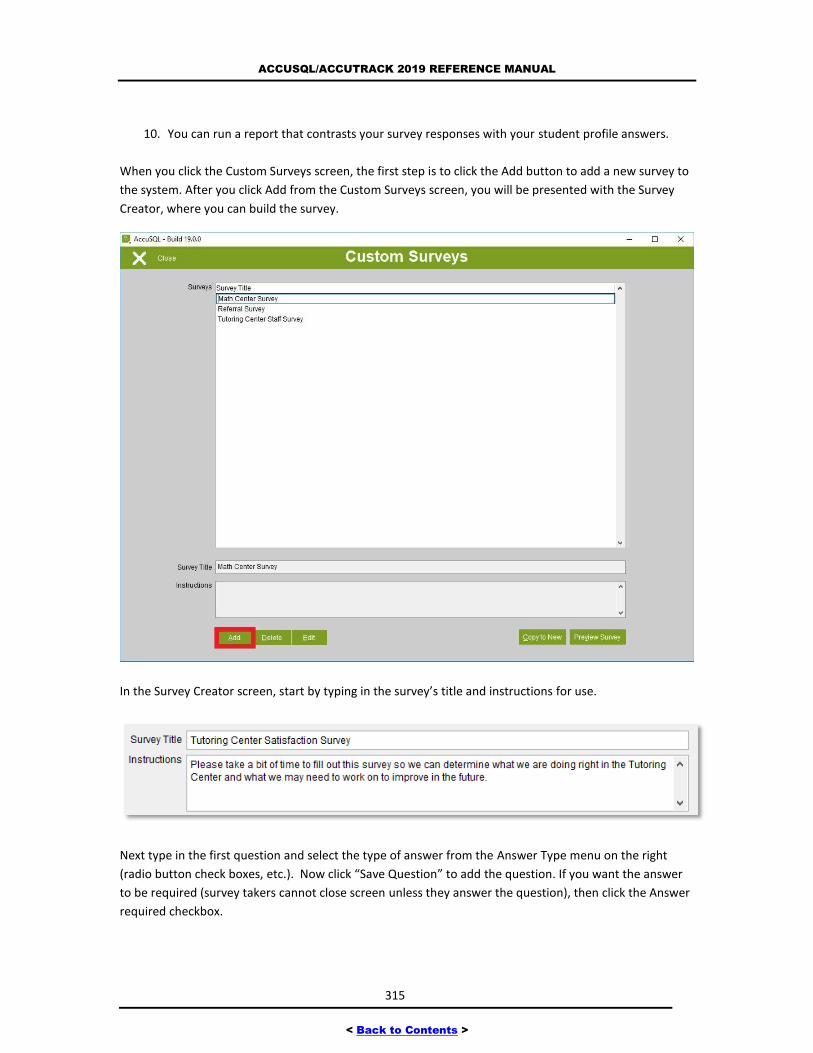
ACCUSQL/ACCUTRACK 2019 REFERENCE MANUAL
315
< Back to Contents >
10. You can run a report that contrasts your survey responses with your student profile answers.
When you click the Custom Surveys screen, the first step is to click the Add button to add a new survey to
the system. After you click Add from the Custom Surveys screen, you will be presented with the Survey
Creator, where you can build the survey.
In the Survey Creator screen, start by typing in the survey’s title and instructions for use.
Next type in the first question and select the type of answer from the Answer Type menu on the right
(radio button check boxes, etc.). Now click “Save Question” to add the question. If you want the answer
to be required (survey takers cannot close screen unless they answer the question), then click the Answer
required checkbox.
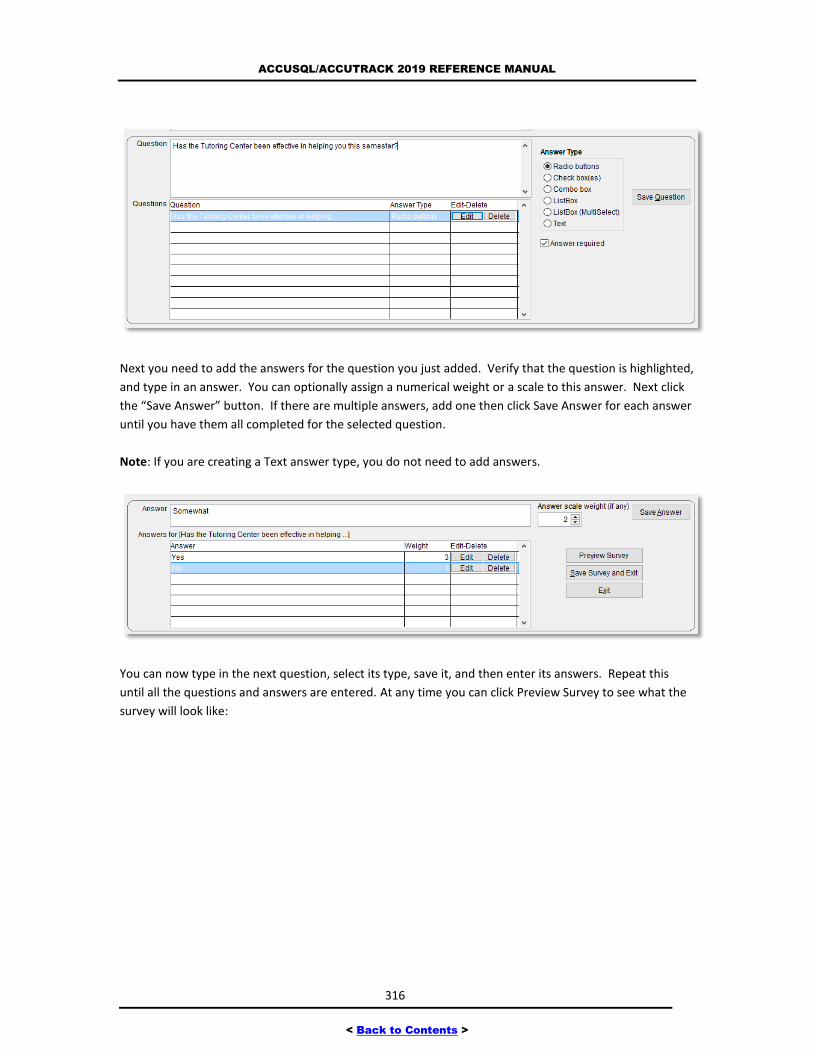
ACCUSQL/ACCUTRACK 2019 REFERENCE MANUAL
316
< Back to Contents >
Next you need to add the answers for the question you just added. Verify that the question is highlighted,
and type in an answer. You can optionally assign a numerical weight or a scale to this answer. Next click
the “Save Answer” button. If there are multiple answers, add one then click Save Answer for each answer
until you have them all completed for the selected question.
Note: If you are creating a Text answer type, you do not need to add answers.
You can now type in the next question, select its type, save it, and then enter its answers. Repeat this
until all the questions and answers are entered. At any time you can click Preview Survey to see what the
survey will look like:
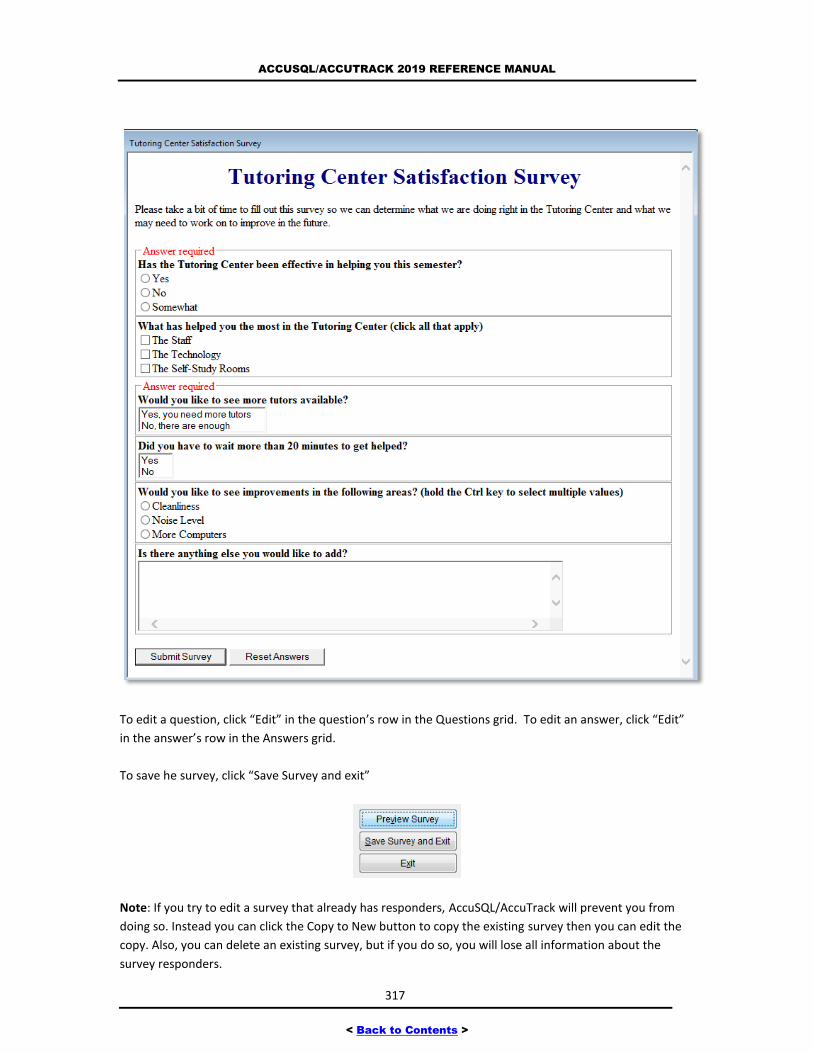
ACCUSQL/ACCUTRACK 2019 REFERENCE MANUAL
317
< Back to Contents >
To edit a question, click “Edit” in the question’s row in the Questions grid. To edit an answer, click “Edit”
in the answer’s row in the Answers grid.
To save he survey, click “Save Survey and exit”
Note: If you try to edit a survey that already has responders, AccuSQL/AccuTrack will prevent you from
doing so. Instead you can click the Copy to New button to copy the existing survey then you can edit the
copy. Also, you can delete an existing survey, but if you do so, you will lose all information about the
survey responders.

ACCUSQL/ACCUTRACK 2019 REFERENCE MANUAL
318
< Back to Contents >
Once you are happy with your survey, the next step is to publish it. If the students and/or tutors fill out
the survey via AccuSQL/AccuTrack, it will look just like the preview. In Web Gateway, when the
student/tutor signs in, they will first see that a new survey is available:
and when they click the survey, they can fill it out online.
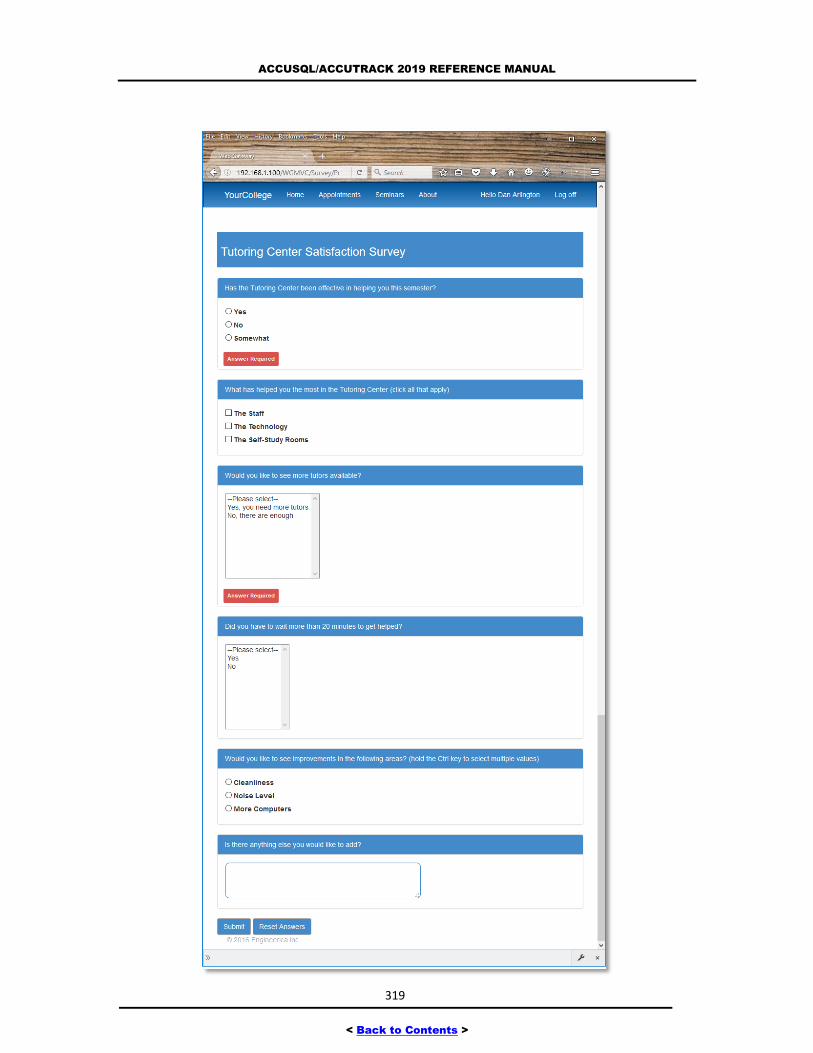
ACCUSQL/ACCUTRACK 2019 REFERENCE MANUAL
319
< Back to Contents >
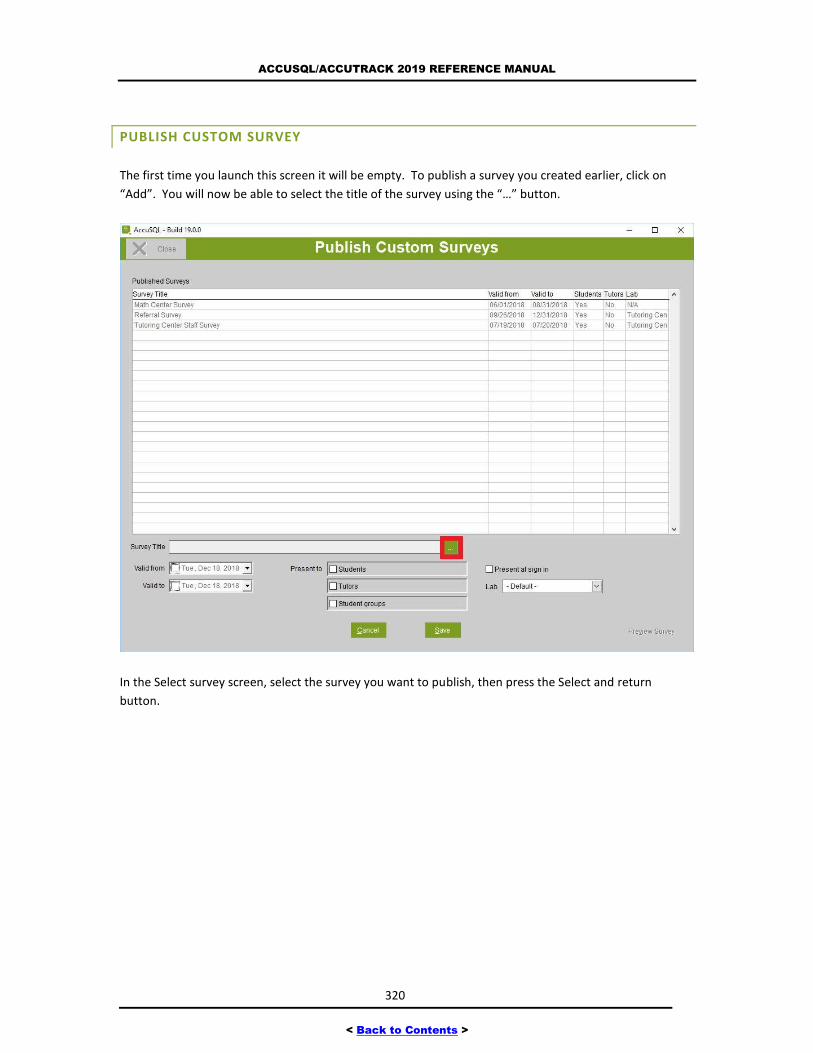
ACCUSQL/ACCUTRACK 2019 REFERENCE MANUAL
320
< Back to Contents >
PUBLISH CUSTOM SURVEY
The first time you launch this screen it will be empty. To publish a survey you created earlier, click on
“Add”. You will now be able to select the title of the survey using the “…” button.
In the Select survey screen, select the survey you want to publish, then press the Select and return
button.
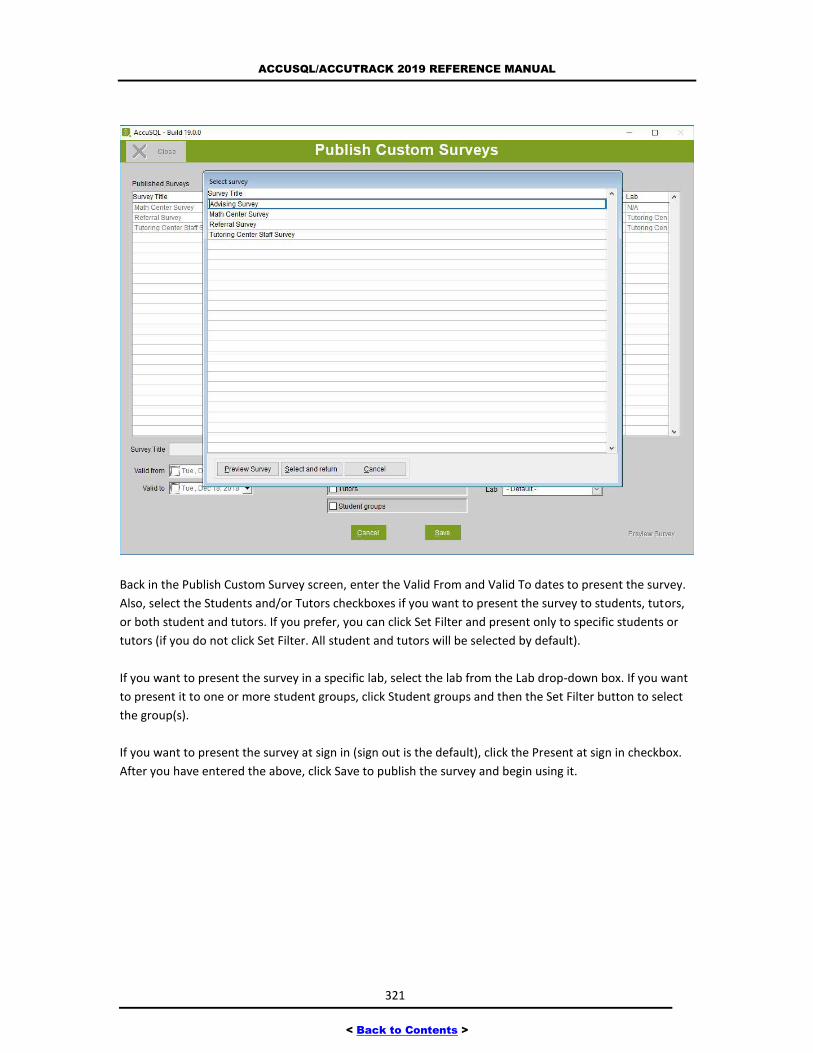
ACCUSQL/ACCUTRACK 2019 REFERENCE MANUAL
321
< Back to Contents >
Back in the Publish Custom Survey screen, enter the Valid From and Valid To dates to present the survey.
Also, select the Students and/or Tutors checkboxes if you want to present the survey to students, tutors,
or both student and tutors. If you prefer, you can click Set Filter and present only to specific students or
tutors (if you do not click Set Filter. All student and tutors will be selected by default).
If you want to present the survey in a specific lab, select the lab from the Lab drop-down box. If you want
to present it to one or more student groups, click Student groups and then the Set Filter button to select
the group(s).
If you want to present the survey at sign in (sign out is the default), click the Present at sign in checkbox.
After you have entered the above, click Save to publish the survey and begin using it.
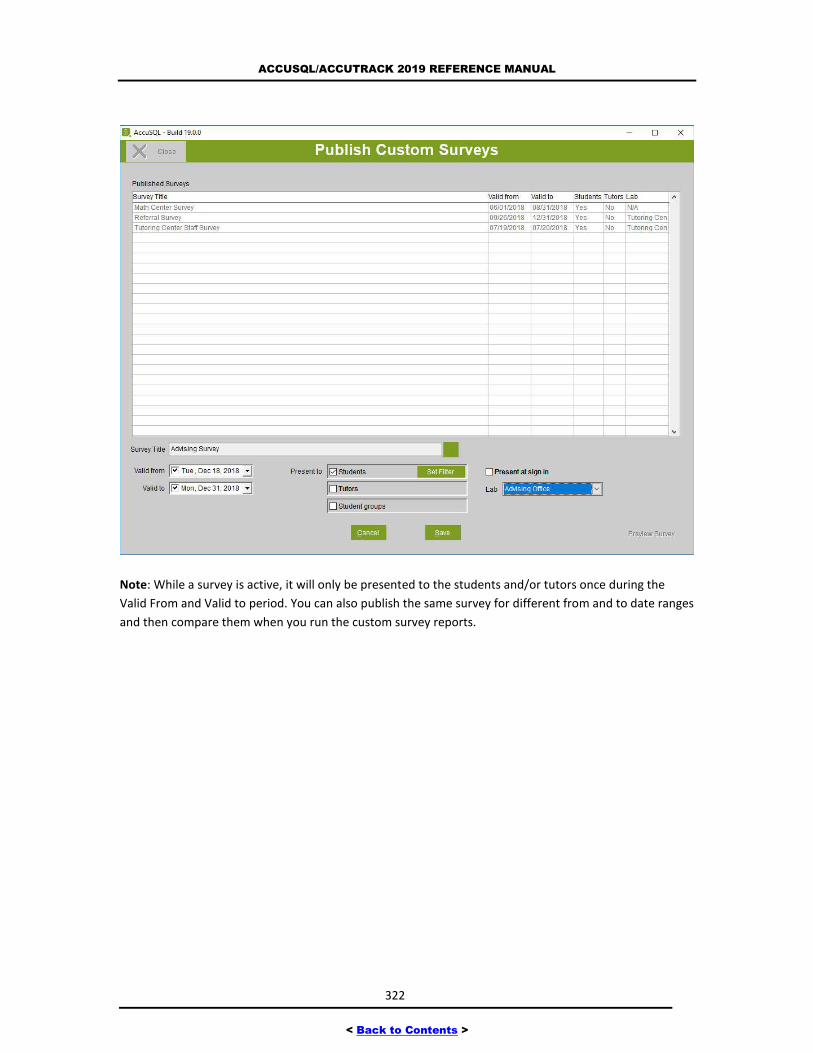
ACCUSQL/ACCUTRACK 2019 REFERENCE MANUAL
322
< Back to Contents >
Note: While a survey is active, it will only be presented to the students and/or tutors once during the
Valid From and Valid to period. You can also publish the same survey for different from and to date ranges
and then compare them when you run the custom survey reports.
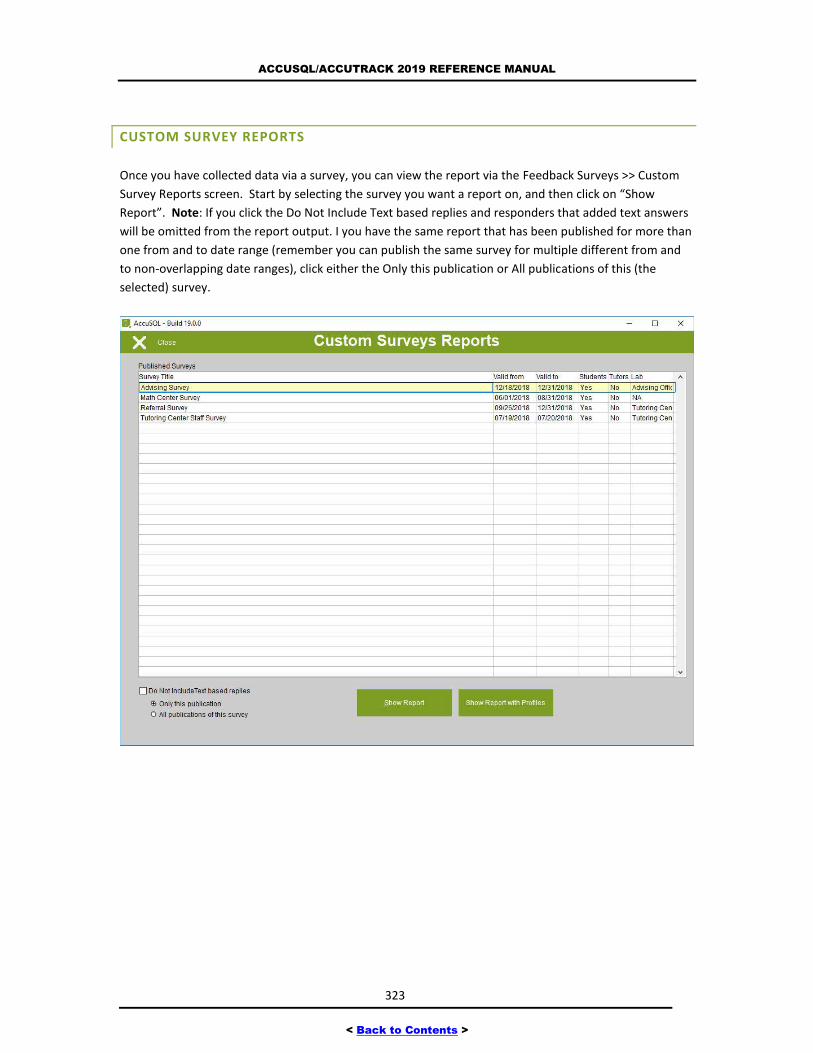
ACCUSQL/ACCUTRACK 2019 REFERENCE MANUAL
323
< Back to Contents >
CUSTOM SURVEY REPORTS
Once you have collected data via a survey, you can view the report via the Feedback Surveys >> Custom
Survey Reports screen. Start by selecting the survey you want a report on, and then click on “Show
Report”. Note: If you click the Do Not Include Text based replies and responders that added text answers
will be omitted from the report output. I you have the same report that has been published for more than
one from and to date range (remember you can publish the same survey for multiple different from and
to non-overlapping date ranges), click either the Only this publication or All publications of this (the
selected) survey.

ACCUSQL/ACCUTRACK 2019 REFERENCE MANUAL
324
< Back to Contents >
Here is a sample portion of a report:
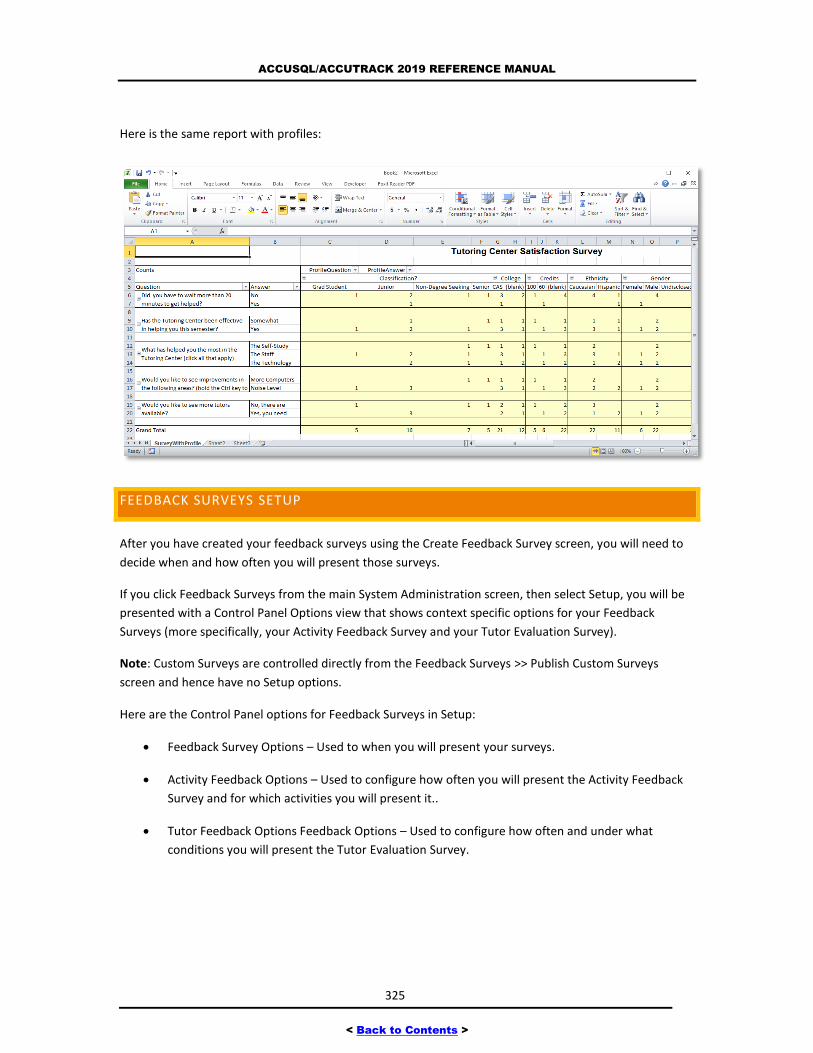
ACCUSQL/ACCUTRACK 2019 REFERENCE MANUAL
325
< Back to Contents >
Here is the same report with profiles:
FEEDBACK SURVEYS SETUP
After you have created your feedback surveys using the Create Feedback Survey screen, you will need to
decide when and how often you will present those surveys.
If you click Feedback Surveys from the main System Administration screen, then select Setup, you will be
presented with a Control Panel Options view that shows context specific options for your Feedback
Surveys (more specifically, your Activity Feedback Survey and your Tutor Evaluation Survey).
Note: Custom Surveys are controlled directly from the Feedback Surveys >> Publish Custom Surveys
screen and hence have no Setup options.
Here are the Control Panel options for Feedback Surveys in Setup:
Feedback Survey Options – Used to when you will present your surveys.
Activity Feedback Options – Used to configure how often you will present the Activity Feedback
Survey and for which activities you will present it..
Tutor Feedback Options Feedback Options – Used to configure how often and under what
conditions you will present the Tutor Evaluation Survey.

ACCUSQL/ACCUTRACK 2019 REFERENCE MANUAL
326
< Back to Contents >
FEEDBACK SURVEY SETUP OPTIONS
To access the Feedback Survey Setup Options, click Feedback Surveys on the left of the main System
Administration screen, then click the Setup tab.
Use this page to configure when the activity and tutor feedback surveys will be displayed to students. The
survey is used to collect information from the student about his or her experience at your center and with
the tutor. You have the option to display the survey at sign in, sign out or only as an option on the Student
Pad using the radio buttons.
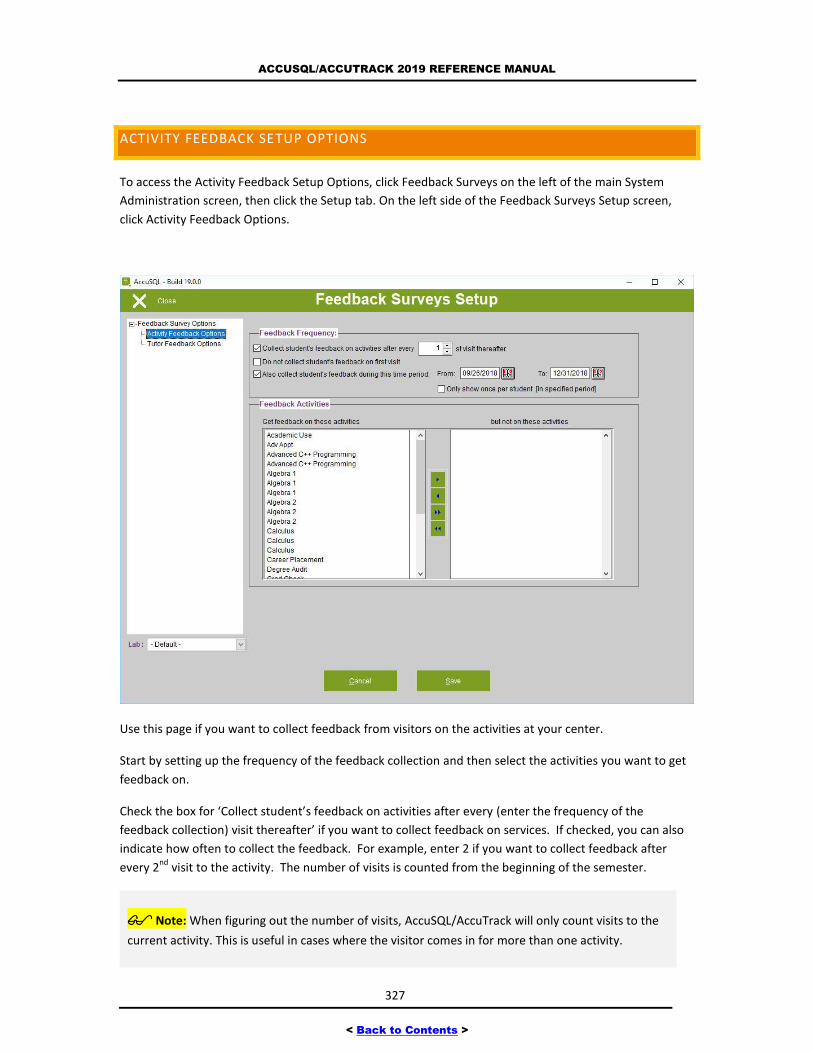
ACCUSQL/ACCUTRACK 2019 REFERENCE MANUAL
327
< Back to Contents >
ACTIVITY FEEDBACK SETUP OPTIONS
To access the Activity Feedback Setup Options, click Feedback Surveys on the left of the main System
Administration screen, then click the Setup tab. On the left side of the Feedback Surveys Setup screen,
click Activity Feedback Options.
Use this page if you want to collect feedback from visitors on the activities at your center.
Start by setting up the frequency of the feedback collection and then select the activities you want to get
feedback on.
Check the box for ‘Collect student’s feedback on activities after every (enter the frequency of the
feedback collection) visit thereafter’ if you want to collect feedback on services. If checked, you can also
indicate how often to collect the feedback. For example, enter 2 if you want to collect feedback after
every 2nd
visit to the activity. The number of visits is counted from the beginning of the semester.
Note: When figuring out the number of visits, AccuSQL/AccuTrack will only count visits to the
current activity. This is useful in cases where the visitor comes in for more than one activity.
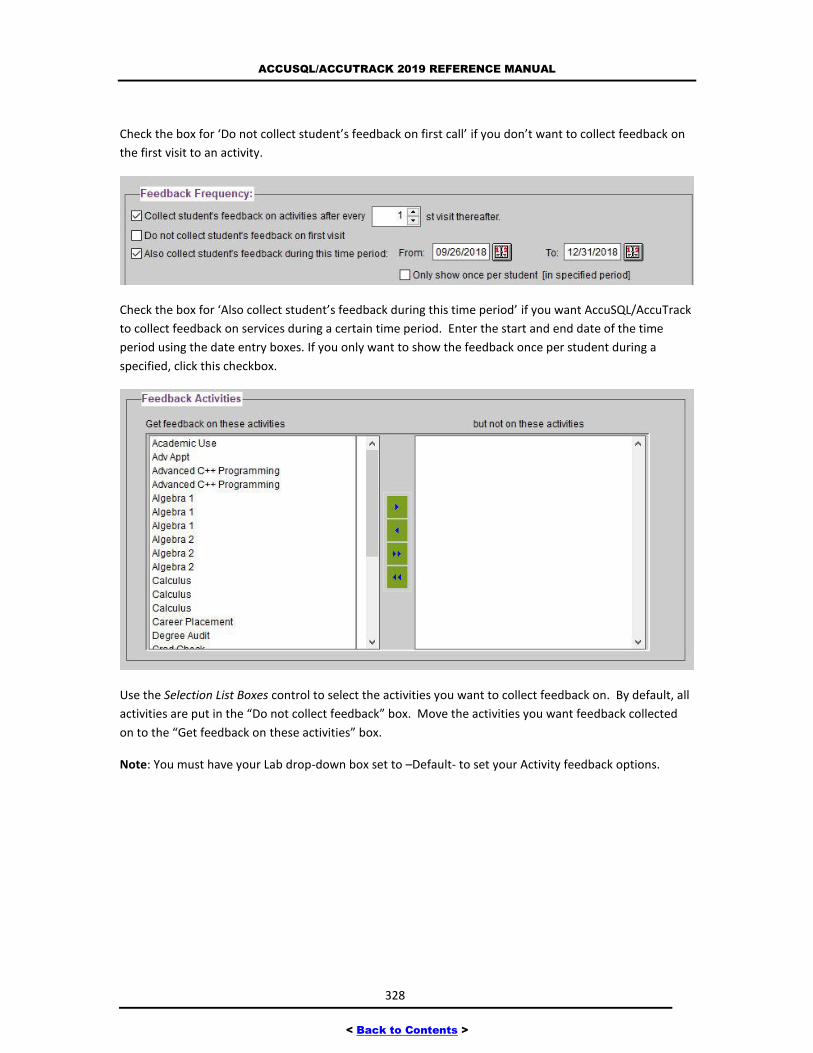
ACCUSQL/ACCUTRACK 2019 REFERENCE MANUAL
328
< Back to Contents >
Check the box for ‘Do not collect student’s feedback on first call’ if you don’t want to collect feedback on
the first visit to an activity.
Check the box for ‘Also collect student’s feedback during this time period’ if you want AccuSQL/AccuTrack
to collect feedback on services during a certain time period. Enter the start and end date of the time
period using the date entry boxes. If you only want to show the feedback once per student during a
specified, click this checkbox.
Use the Selection List Boxes control to select the activities you want to collect feedback on. By default, all
activities are put in the “Do not collect feedback” box. Move the activities you want feedback collected
on to the “Get feedback on these activities” box.
Note: You must have your Lab drop-down box set to –Default- to set your Activity feedback options.
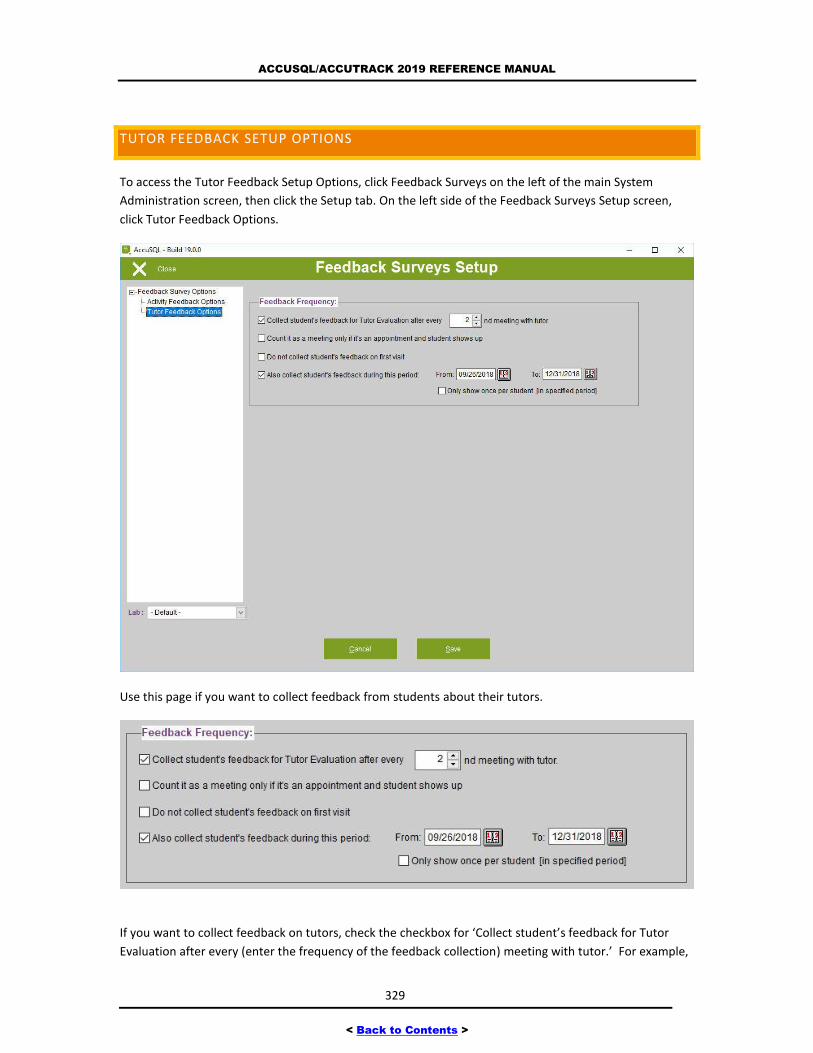
ACCUSQL/ACCUTRACK 2019 REFERENCE MANUAL
329
< Back to Contents >
TUTOR FEEDBACK SETUP OPTIONS
To access the Tutor Feedback Setup Options, click Feedback Surveys on the left of the main System
Administration screen, then click the Setup tab. On the left side of the Feedback Surveys Setup screen,
click Tutor Feedback Options.
Use this page if you want to collect feedback from students about their tutors.
If you want to collect feedback on tutors, check the checkbox for ‘Collect student’s feedback for Tutor
Evaluation after every (enter the frequency of the feedback collection) meeting with tutor.’ For example,
ACCUSQL/ACCUTRACK 2019 REFERENCE MANUAL
330
< Back to Contents >
if you enter "2", AccuSQL/AccuTrack will collect feedback from the user on every 2nd visit with the tutor.
If you do not wish to collect feedback from visitors on the tutors, simply uncheck this box.
Check the checkbox for ‘Count it as a meeting only if it’s an appointment and student shows up’ if you
want AccuSQL/AccuTrack to not count no-shows when counting the number of visits for determining
whether to collect feedback.
If the checkbox for ‘Do not collect student’s feedback on first visit’ is checked, AccuSQL/AccuTrack will not
collect feedback after the first visit or meeting with the tutor.
Check the checkbox for ‘Also collect students feedback during this period’ to collect feedback during a
certain time period. For example, you might select the final week of the semester here.
Tip: Tutor Feedback surveys are used to collect information from students about their experience with
a particular tutor. If you want to collect information from tutors about their experiences with students,
you would direct the tutors to enter session notes using the Session Log. You can also create tutor Session
Questionnaires in the Session Log >> Session Questionnaire Setup screen.
SESSION LOG SCREEN
When you click on Session Log from the Main Menu, you will see the following options:
Session Log: Use to enter notes and answer a questionnaire about sessions with students.
Session Questionnaire Setup: Use to set up the session questionnaire that is presented to tutors
to answer questions about their sessions with students.
The following sections have more information on the above screens.
SESSION LOG
Purpose: To enter comments on sign-in sessions.
Access: From System Administration, click on Session Log >> Session Log.
If you wish, you can enter comments on each sign-in session AccuSQL/AccuTrack logs. This option is
handy if you want to keep a journal of each sign-in session. For example, if you have a tutoring center,
tutors can use this feature to keep track of what they did during their meeting with each student. These
session notes could serve as a progress tracker for tutors, a method for tracking meetings for
administrators, and as a record for the center.
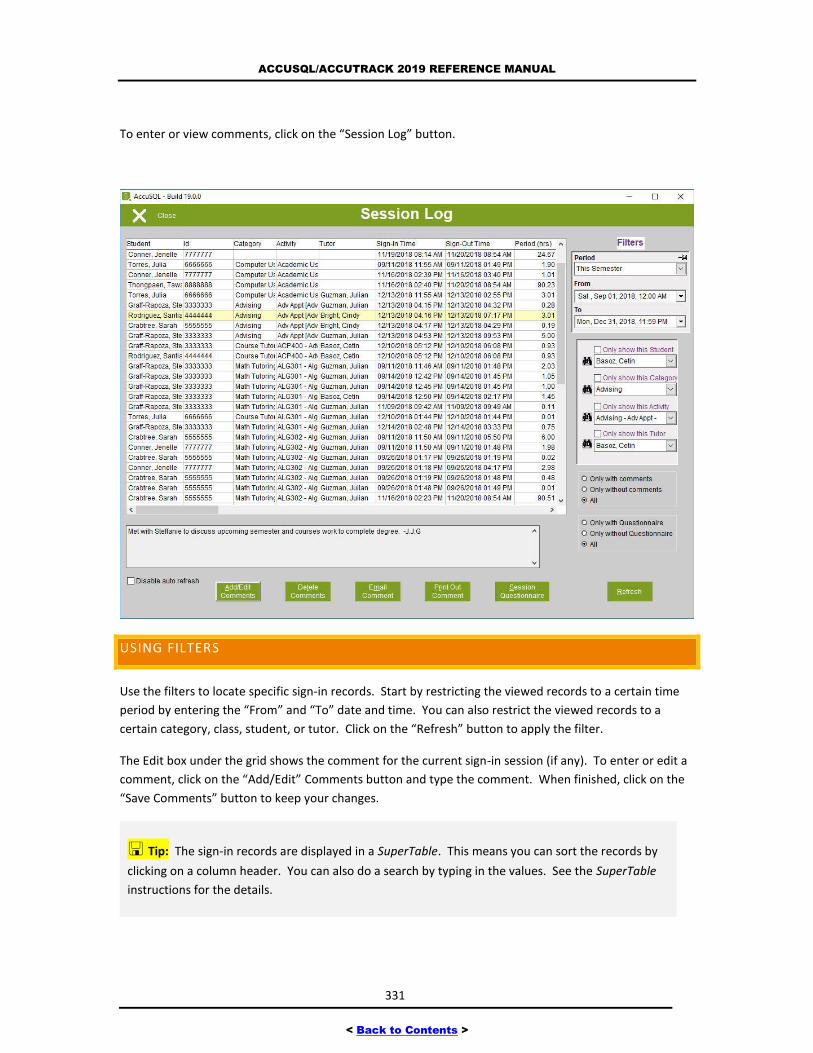
ACCUSQL/ACCUTRACK 2019 REFERENCE MANUAL
331
< Back to Contents >
To enter or view comments, click on the “Session Log” button.
USING FILTERS
Use the filters to locate specific sign-in records. Start by restricting the viewed records to a certain time
period by entering the “From” and “To” date and time. You can also restrict the viewed records to a
certain category, class, student, or tutor. Click on the “Refresh” button to apply the filter.
The Edit box under the grid shows the comment for the current sign-in session (if any). To enter or edit a
comment, click on the “Add/Edit” Comments button and type the comment. When finished, click on the
“Save Comments” button to keep your changes.
Tip: The sign-in records are displayed in a SuperTable. This means you can sort the records by
clicking on a column header. You can also do a search by typing in the values. See the SuperTable
instructions for the details.
ACCUSQL/ACCUTRACK 2019 REFERENCE MANUAL
332
< Back to Contents >
Tip: You can generate a report with session log comments that also includes the session
questionnaire answers. See the “Session Log” reports for details.
Only show sessions with/without comments or all
Click this box and then click the Refresh button to only show session logs that contain comments, no
comments, or all sessions regardless of comments.
Only show sessions with/without questionnaire or all
Click this box and then click the Refresh button to only show session logs that contain an answered
session questionnaire, and unanswered session questionnaire, or all sessions regardless of the session
questionnaire.
Disable auto refresh
By default the Session Log screen will refresh its data every 30 seconds. If you need more time to work
with a record, you can disable this feature, and then simply click the Refresh button manually to load ant
new records.
Add/Edit Comments
To enter a new comment, first select the sign-in session by clicking on it, and then click on the “Add/Edit
Comment” button. You can now type your comment in the entry box under the sign-in table. You can
edit an existing comment by following the same steps above. To view a comment, simply highlight the
session by clicking on it.
Delete Comments
To delete a comment, first highlight the sign-in session then click on the “Delete Comment” button.
Email Comment
To email a selected comment to the instructor, click on the “Email Comment” button in the Session Log
screen. For this to work, you need to assign an instructor to the class and enter the instructor’s email
address. You must also have the correct parameters entered for your email server. If the instructor does
not have an email entered for him or her in the Users >> Instructors screen, you can enter the email at the
time you send to comments. If the instructor already has an emailed entered, then the comments will be
sent automatically to the instructor.
Print Out Comments
Click this button to send the selected comments to the default printer.
Session Questionnaire
Click to fill out the predefined session questionnaire for the tutoring session. If you do not have a
questionnaire already created, please see Session Log >> Session Questionnaire Setup.
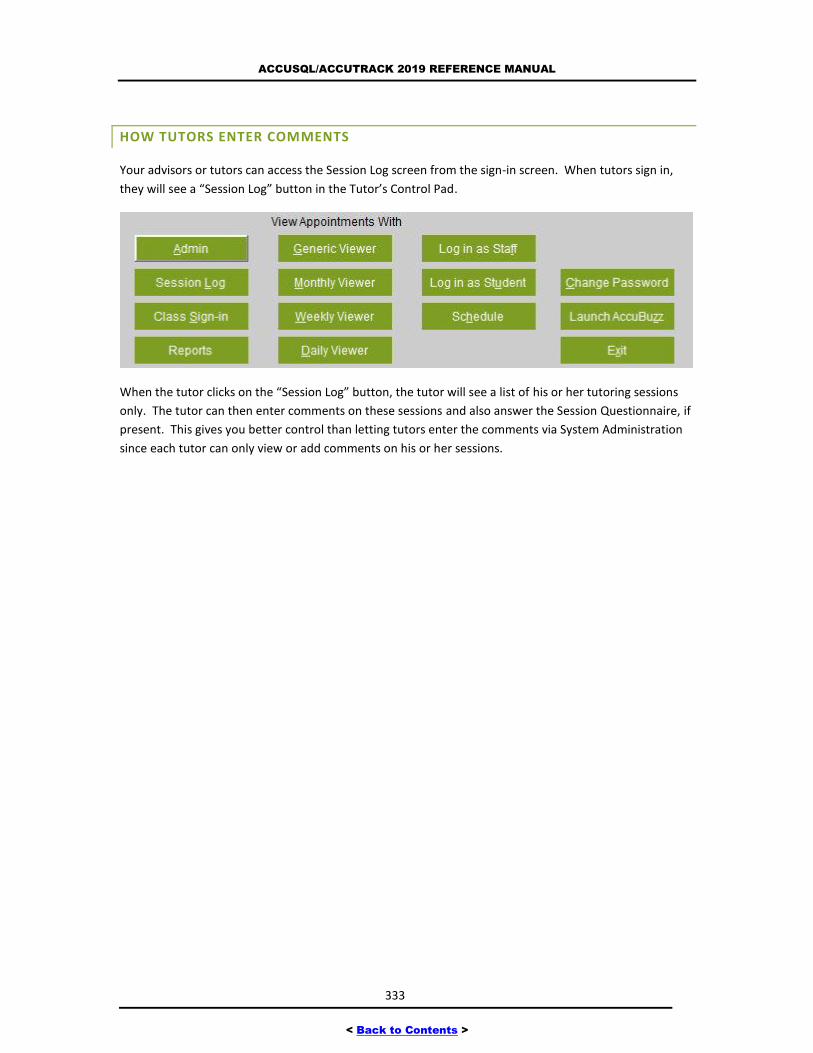
ACCUSQL/ACCUTRACK 2019 REFERENCE MANUAL
333
< Back to Contents >
HOW TUTORS ENTER COMMENTS
Your advisors or tutors can access the Session Log screen from the sign-in screen. When tutors sign in,
they will see a “Session Log” button in the Tutor’s Control Pad.
When the tutor clicks on the “Session Log” button, the tutor will see a list of his or her tutoring sessions
only. The tutor can then enter comments on these sessions and also answer the Session Questionnaire, if
present. This gives you better control than letting tutors enter the comments via System Administration
since each tutor can only view or add comments on his or her sessions.
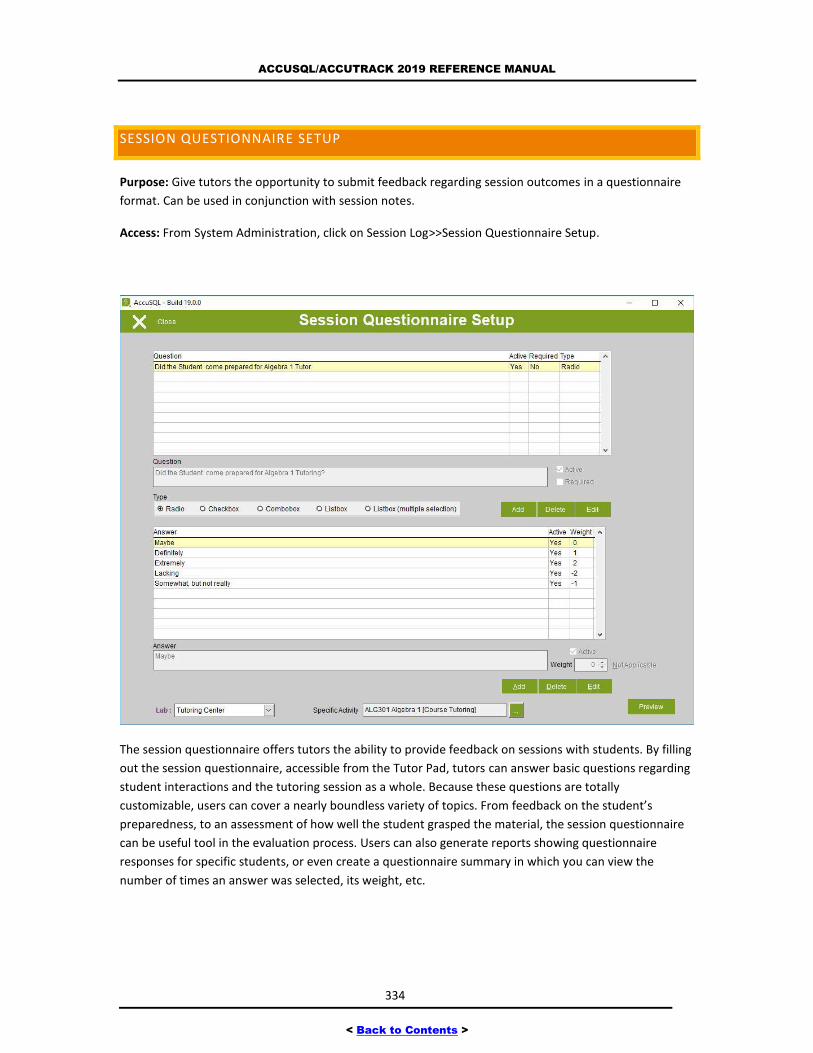
ACCUSQL/ACCUTRACK 2019 REFERENCE MANUAL
334
< Back to Contents >
SESSION QUESTIONNAIRE SETUP
Purpose: Give tutors the opportunity to submit feedback regarding session outcomes in a questionnaire
format. Can be used in conjunction with session notes.
Access: From System Administration, click on Session Log>>Session Questionnaire Setup.
The session questionnaire offers tutors the ability to provide feedback on sessions with students. By filling
out the session questionnaire, accessible from the Tutor Pad, tutors can answer basic questions regarding
student interactions and the tutoring session as a whole. Because these questions are totally
customizable, users can cover a nearly boundless variety of topics. From feedback on the student’s
preparedness, to an assessment of how well the student grasped the material, the session questionnaire
can be useful tool in the evaluation process. Users can also generate reports showing questionnaire
responses for specific students, or even create a questionnaire summary in which you can view the
number of times an answer was selected, its weight, etc.

ACCUSQL/ACCUTRACK 2019 REFERENCE MANUAL
335
< Back to Contents >
To create the session questionnaire, first click Add in the Question section, type your questions and then
click Save. If you want the question to show up, make sure Active is selected. You can also make the
question required by checking that box.
After you have saved the question, click Add in the Answer section and enter the first answer and click
Save. If you wish to collect the weighted average for the responses, enter the value for the answer in the
Weight spinner box.

ACCUSQL/ACCUTRACK 2019 REFERENCE MANUAL
336
< Back to Contents >
Continue adding answers until you have them all completed. You can then add your next question and
answers using the same process. Click the Preview button to see what the questionnaire will look like.
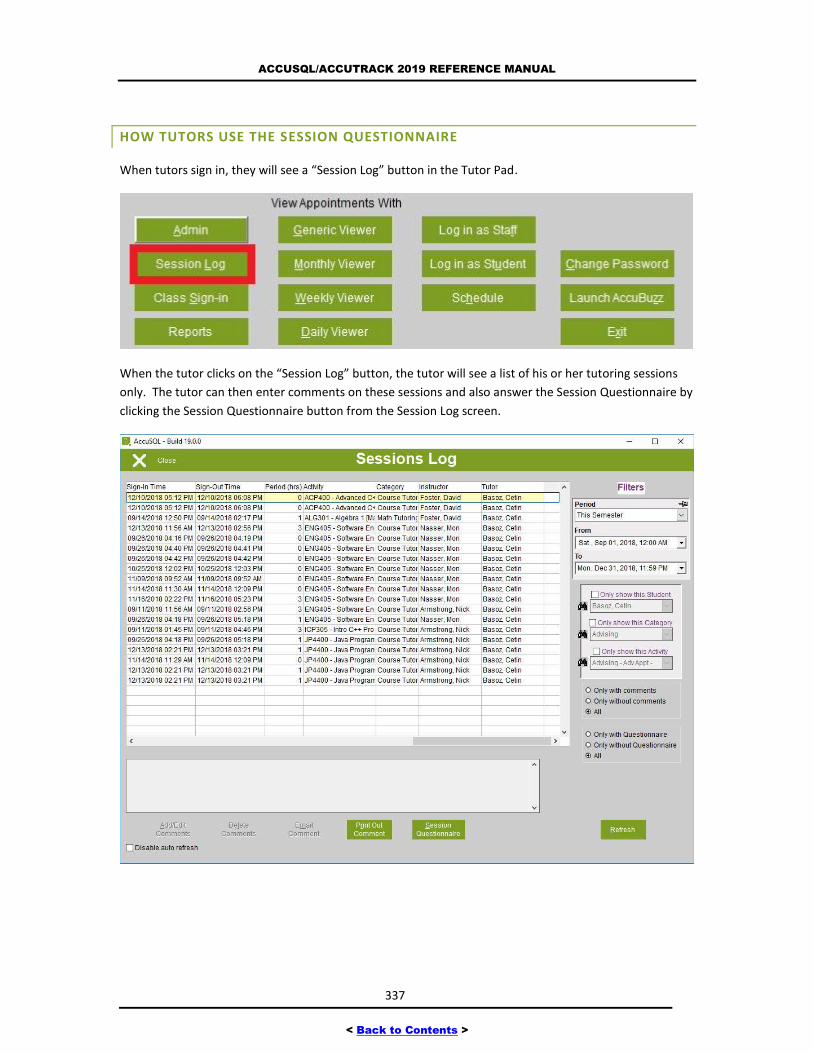
ACCUSQL/ACCUTRACK 2019 REFERENCE MANUAL
337
< Back to Contents >
HOW TUTORS USE THE SESSION QUESTIONNAIRE
When tutors sign in, they will see a “Session Log” button in the Tutor Pad.
When the tutor clicks on the “Session Log” button, the tutor will see a list of his or her tutoring sessions
only. The tutor can then enter comments on these sessions and also answer the Session Questionnaire by
clicking the Session Questionnaire button from the Session Log screen.
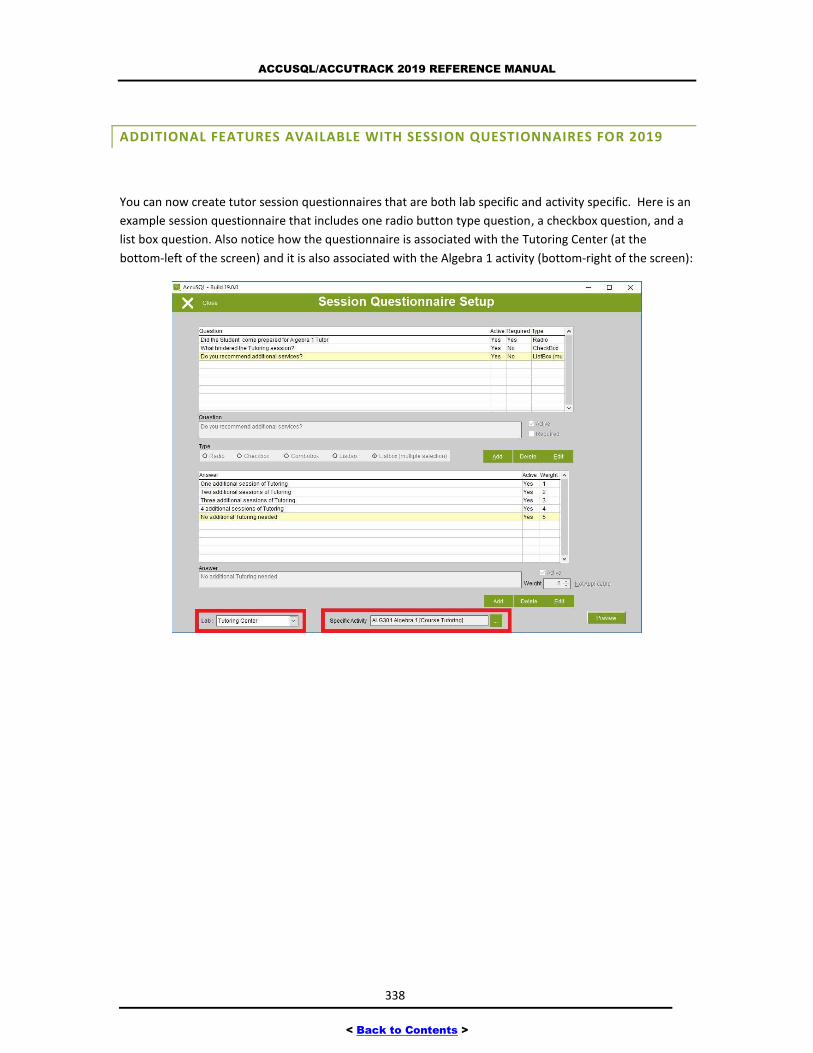
ACCUSQL/ACCUTRACK 2019 REFERENCE MANUAL
338
< Back to Contents >
ADDITIONAL FEATURES AVAILABLE WITH SESSION QUESTIONNAIRES FOR 2019
You can now create tutor session questionnaires that are both lab specific and activity specific. Here is an
example session questionnaire that includes one radio button type question, a checkbox question, and a
list box question. Also notice how the questionnaire is associated with the Tutoring Center (at the
bottom-left of the screen) and it is also associated with the Algebra 1 activity (bottom-right of the screen):
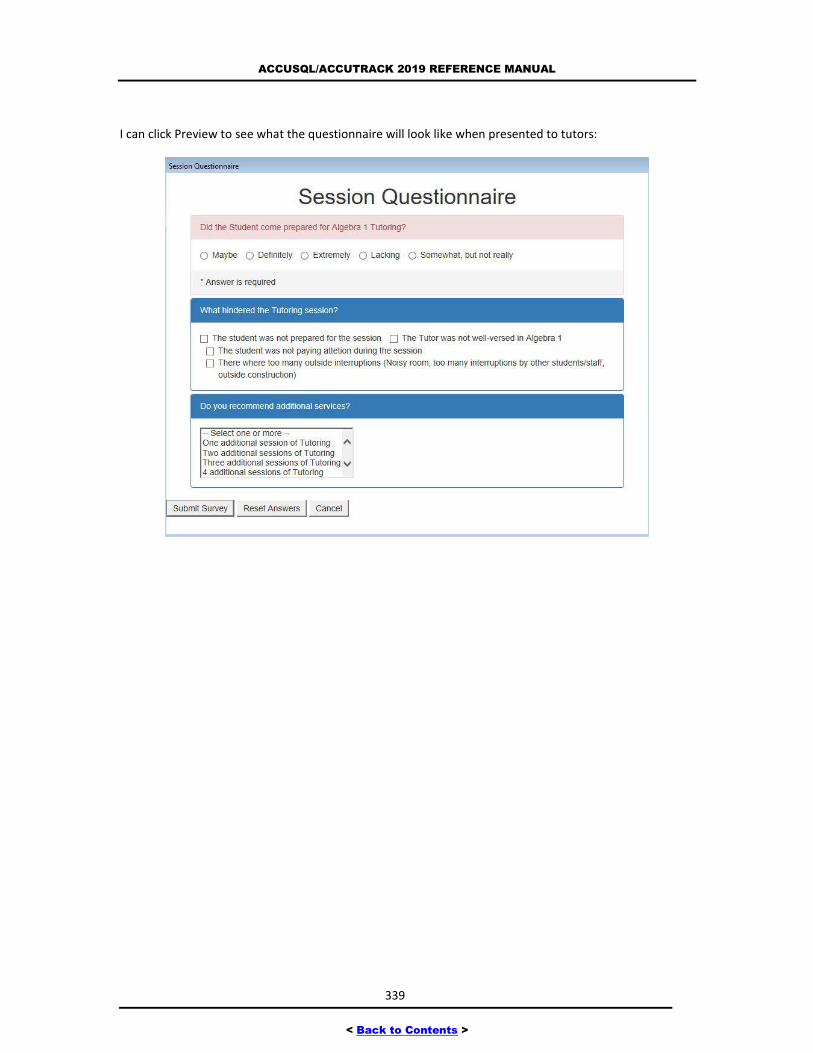
ACCUSQL/ACCUTRACK 2019 REFERENCE MANUAL
339
< Back to Contents >
I can click Preview to see what the questionnaire will look like when presented to tutors:
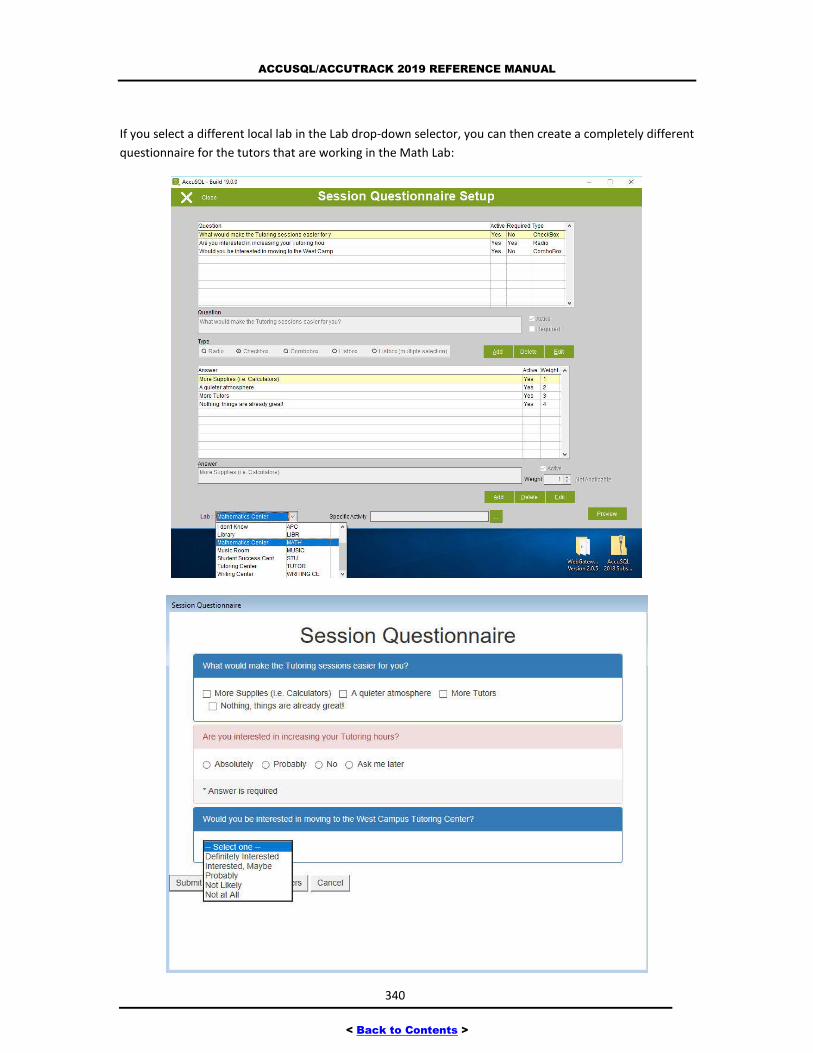
ACCUSQL/ACCUTRACK 2019 REFERENCE MANUAL
340
< Back to Contents >
If you select a different local lab in the Lab drop-down selector, you can then create a completely different
questionnaire for the tutors that are working in the Math Lab:
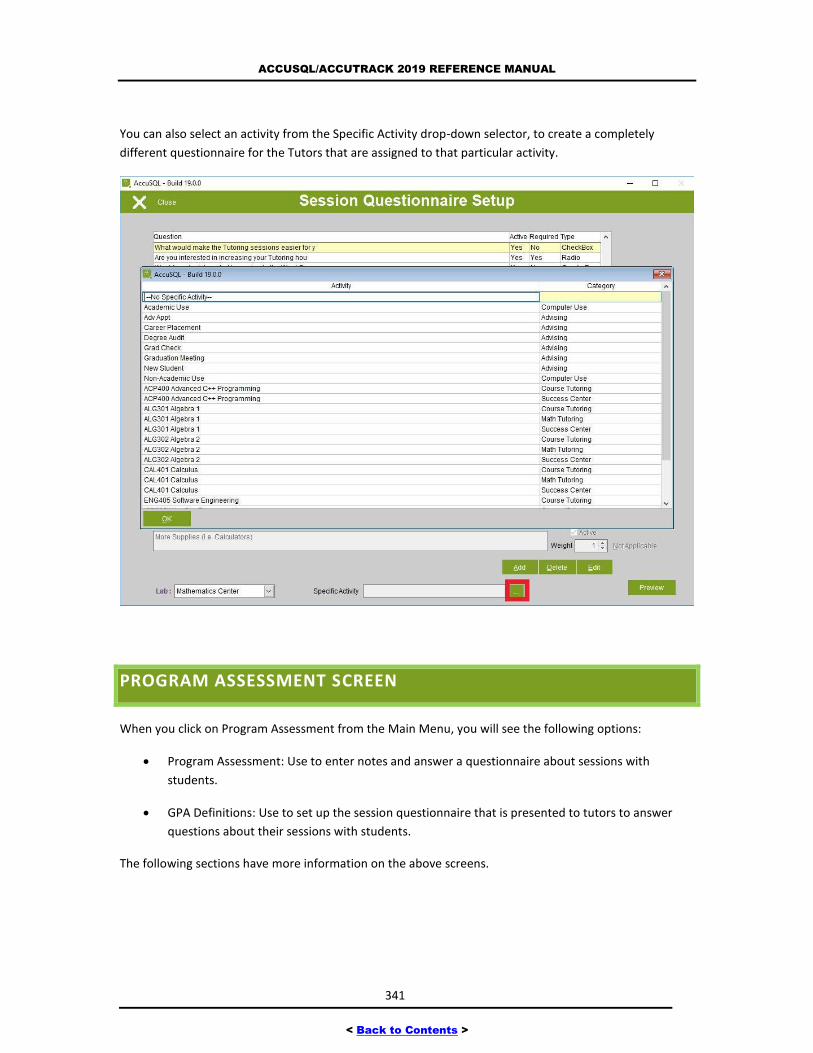
ACCUSQL/ACCUTRACK 2019 REFERENCE MANUAL
341
< Back to Contents >
You can also select an activity from the Specific Activity drop-down selector, to create a completely
different questionnaire for the Tutors that are assigned to that particular activity.
PROGRAM ASSESSMENT SCREEN
When you click on Program Assessment from the Main Menu, you will see the following options:
Program Assessment: Use to enter notes and answer a questionnaire about sessions with
students.
GPA Definitions: Use to set up the session questionnaire that is presented to tutors to answer
questions about their sessions with students.
The following sections have more information on the above screens.
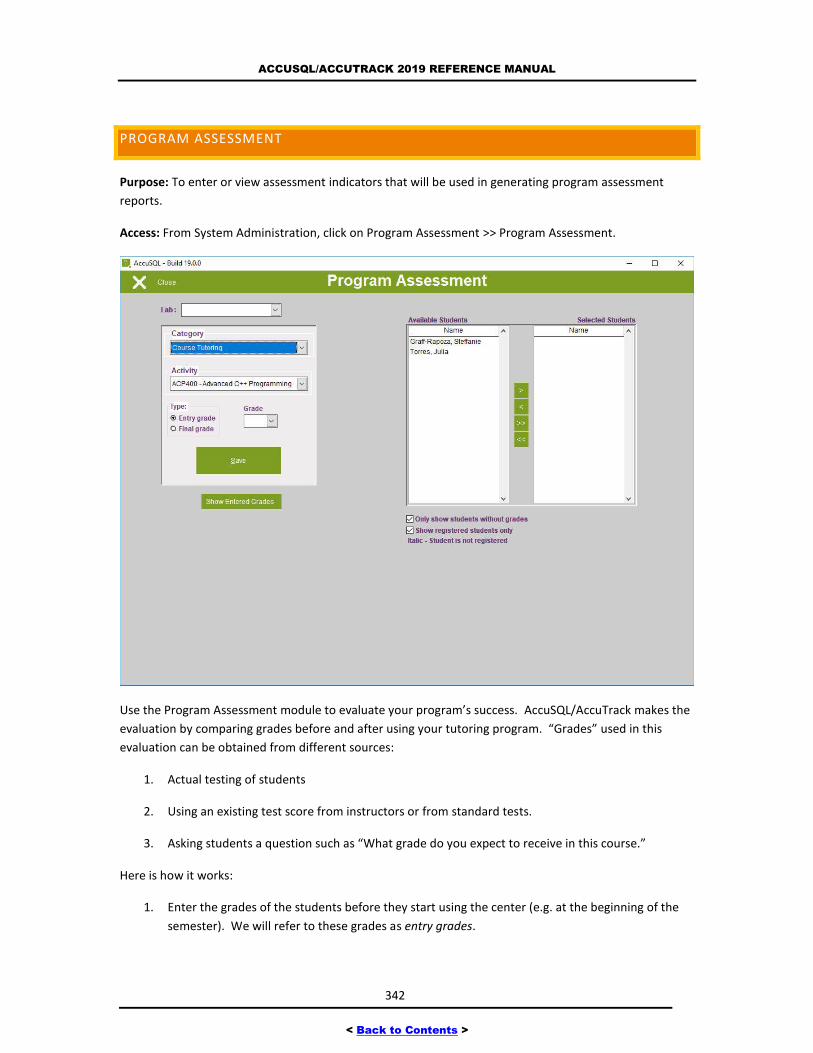
ACCUSQL/ACCUTRACK 2019 REFERENCE MANUAL
342
< Back to Contents >
PROGRAM ASSESSMENT
Purpose: To enter or view assessment indicators that will be used in generating program assessment
reports.
Access: From System Administration, click on Program Assessment >> Program Assessment.
Use the Program Assessment module to evaluate your program’s success. AccuSQL/AccuTrack makes the
evaluation by comparing grades before and after using your tutoring program. “Grades” used in this
evaluation can be obtained from different sources:
1. Actual testing of students
2. Using an existing test score from instructors or from standard tests.
3. Asking students a question such as “What grade do you expect to receive in this course.”
Here is how it works:
1. Enter the grades of the students before they start using the center (e.g. at the beginning of the
semester). We will refer to these grades as entry grades.
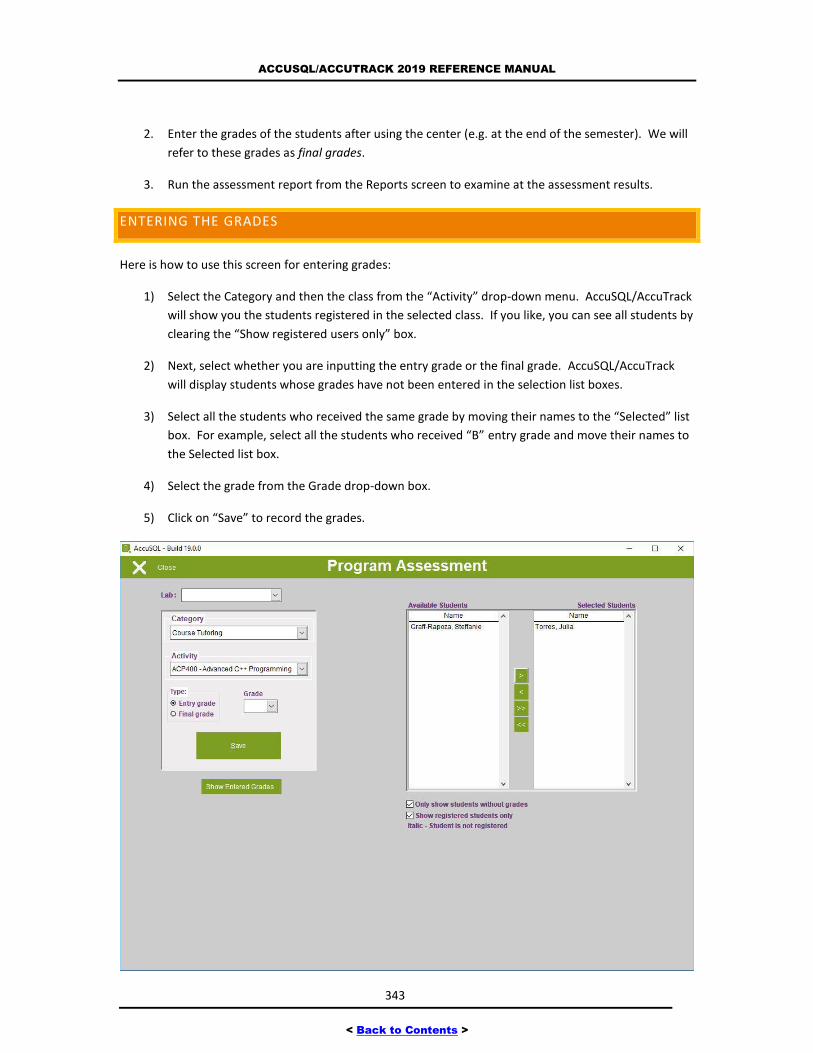
ACCUSQL/ACCUTRACK 2019 REFERENCE MANUAL
343
< Back to Contents >
2. Enter the grades of the students after using the center (e.g. at the end of the semester). We will
refer to these grades as final grades.
3. Run the assessment report from the Reports screen to examine at the assessment results.
ENTERING THE GRADES
Here is how to use this screen for entering grades:
1) Select the Category and then the class from the “Activity” drop-down menu. AccuSQL/AccuTrack
will show you the students registered in the selected class. If you like, you can see all students by
clearing the “Show registered users only” box.
2) Next, select whether you are inputting the entry grade or the final grade. AccuSQL/AccuTrack
will display students whose grades have not been entered in the selection list boxes.
3) Select all the students who received the same grade by moving their names to the “Selected” list
box. For example, select all the students who received “B” entry grade and move their names to
the Selected list box.
4) Select the grade from the Grade drop-down box.
5) Click on “Save” to record the grades.

ACCUSQL/ACCUTRACK 2019 REFERENCE MANUAL
344
< Back to Contents >
Repeat the above procedure for entering both grades (entry and final) for all the students.
Tip: Check the “only show students without grades” box if you only want to see names of
students whose grades have not been entered. Uncheck the Show registered students only box if
you want to see all students whether or not they are registered for the selected class.
Tip: If you have the grades in electronic format, you can import them using the
AccuSQL/AccuTrack Import Wizard.
To correct a grade, clear the “Only show students without grades” box, select the student and re-enter
the grade. The new grade will replace the older one.
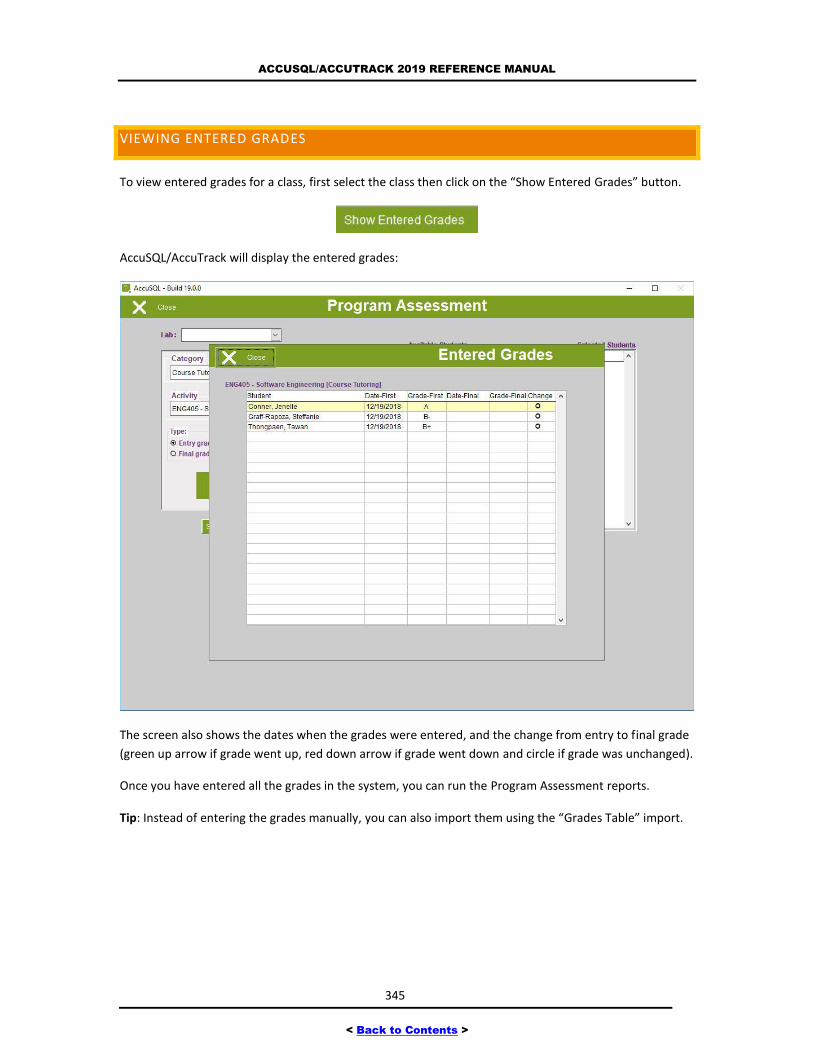
ACCUSQL/ACCUTRACK 2019 REFERENCE MANUAL
345
< Back to Contents >
VIEWING ENTERED GRADES
To view entered grades for a class, first select the class then click on the “Show Entered Grades” button.
AccuSQL/AccuTrack will display the entered grades:
The screen also shows the dates when the grades were entered, and the change from entry to final grade
(green up arrow if grade went up, red down arrow if grade went down and circle if grade was unchanged).
Once you have entered all the grades in the system, you can run the Program Assessment reports.
Tip: Instead of entering the grades manually, you can also import them using the “Grades Table” import.
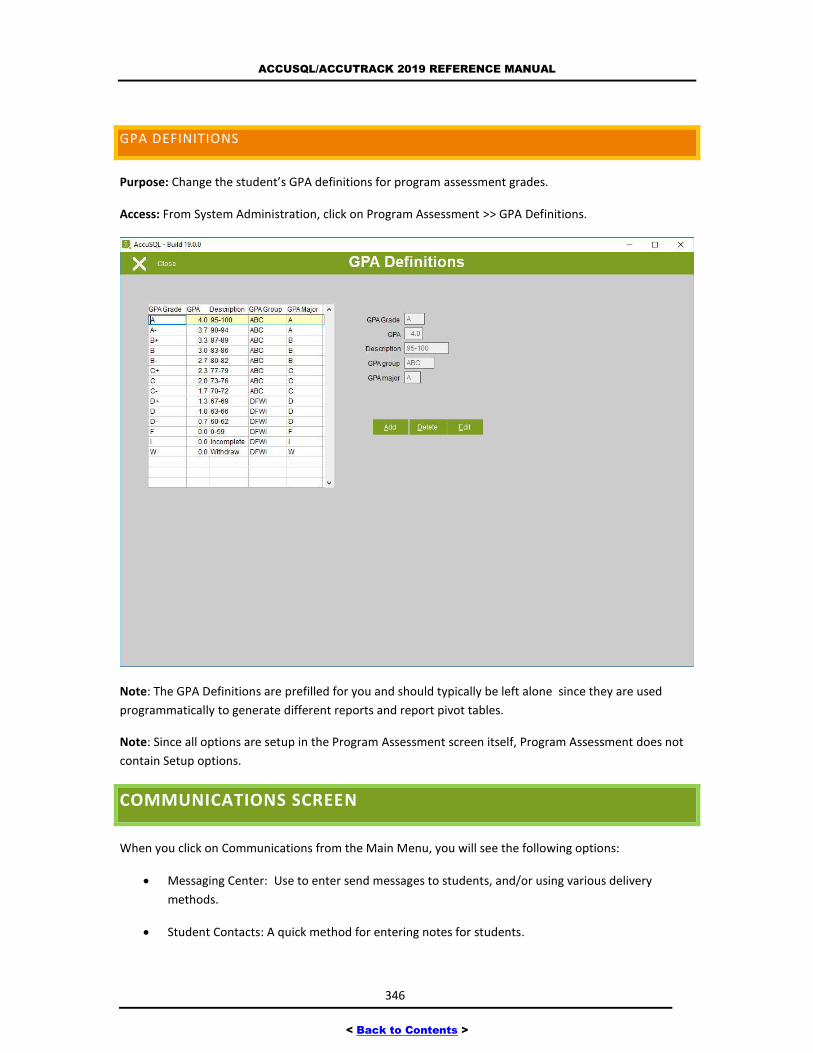
ACCUSQL/ACCUTRACK 2019 REFERENCE MANUAL
346
< Back to Contents >
GPA DEFINITIONS
Purpose: Change the student’s GPA definitions for program assessment grades.
Access: From System Administration, click on Program Assessment >> GPA Definitions.
Note: The GPA Definitions are prefilled for you and should typically be left alone since they are used
programmatically to generate different reports and report pivot tables.
Note: Since all options are setup in the Program Assessment screen itself, Program Assessment does not
contain Setup options.
COMMUNICATIONS SCREEN
When you click on Communications from the Main Menu, you will see the following options:
Messaging Center: Use to enter send messages to students, and/or using various delivery
methods.
Student Contacts: A quick method for entering notes for students.
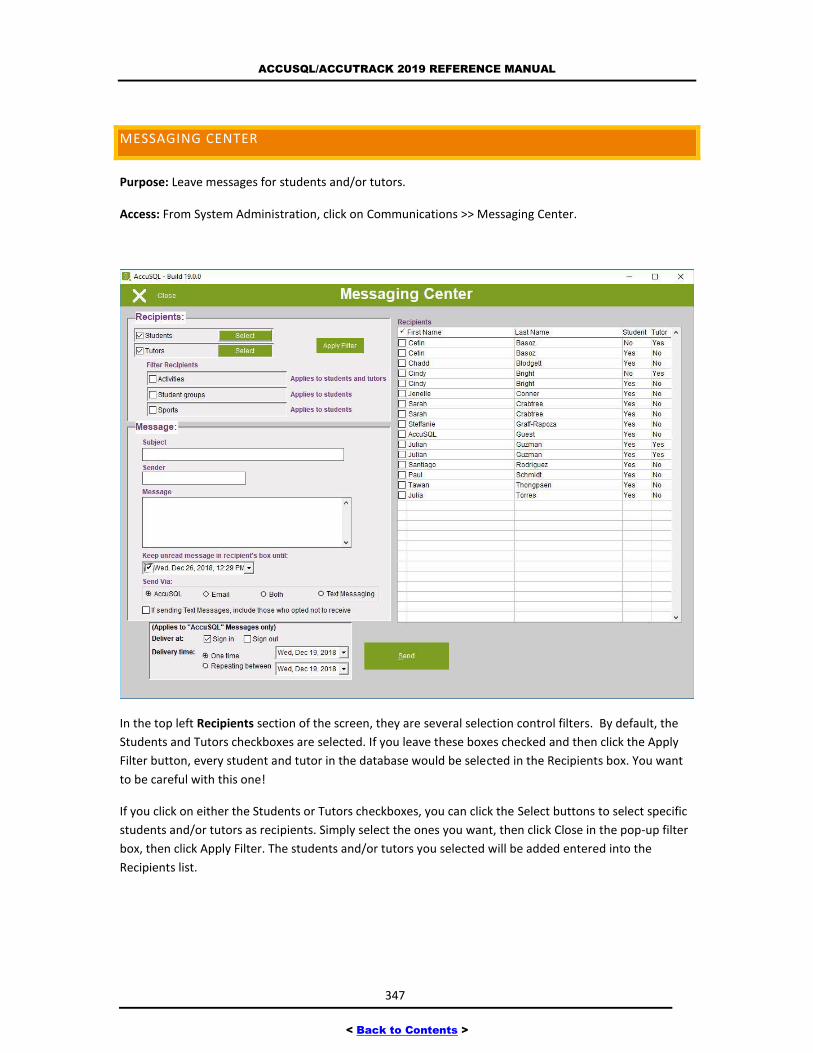
ACCUSQL/ACCUTRACK 2019 REFERENCE MANUAL
347
< Back to Contents >
MESSAGING CENTER
Purpose: Leave messages for students and/or tutors.
Access: From System Administration, click on Communications >> Messaging Center.
In the top left Recipients section of the screen, they are several selection control filters. By default, the
Students and Tutors checkboxes are selected. If you leave these boxes checked and then click the Apply
Filter button, every student and tutor in the database would be selected in the Recipients box. You want
to be careful with this one!
If you click on either the Students or Tutors checkboxes, you can click the Select buttons to select specific
students and/or tutors as recipients. Simply select the ones you want, then click Close in the pop-up filter
box, then click Apply Filter. The students and/or tutors you selected will be added entered into the
Recipients list.
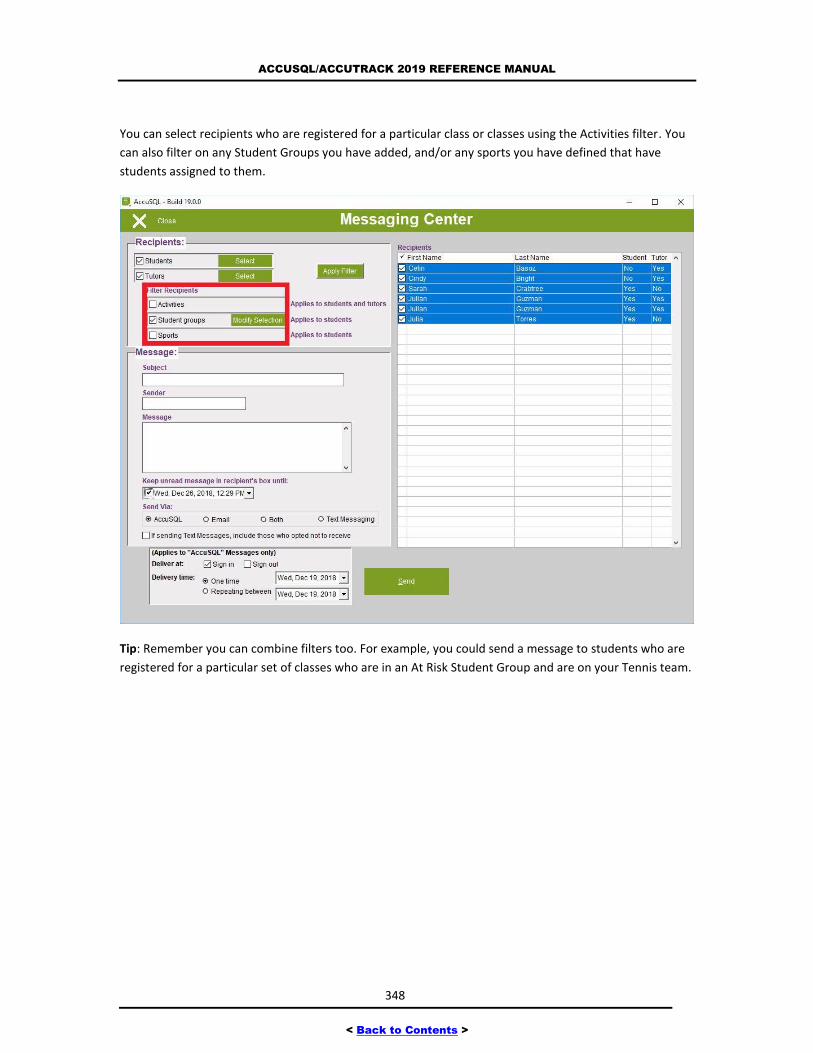
ACCUSQL/ACCUTRACK 2019 REFERENCE MANUAL
348
< Back to Contents >
You can select recipients who are registered for a particular class or classes using the Activities filter. You
can also filter on any Student Groups you have added, and/or any sports you have defined that have
students assigned to them.
Tip: Remember you can combine filters too. For example, you could send a message to students who are
registered for a particular set of classes who are in an At Risk Student Group and are on your Tennis team.
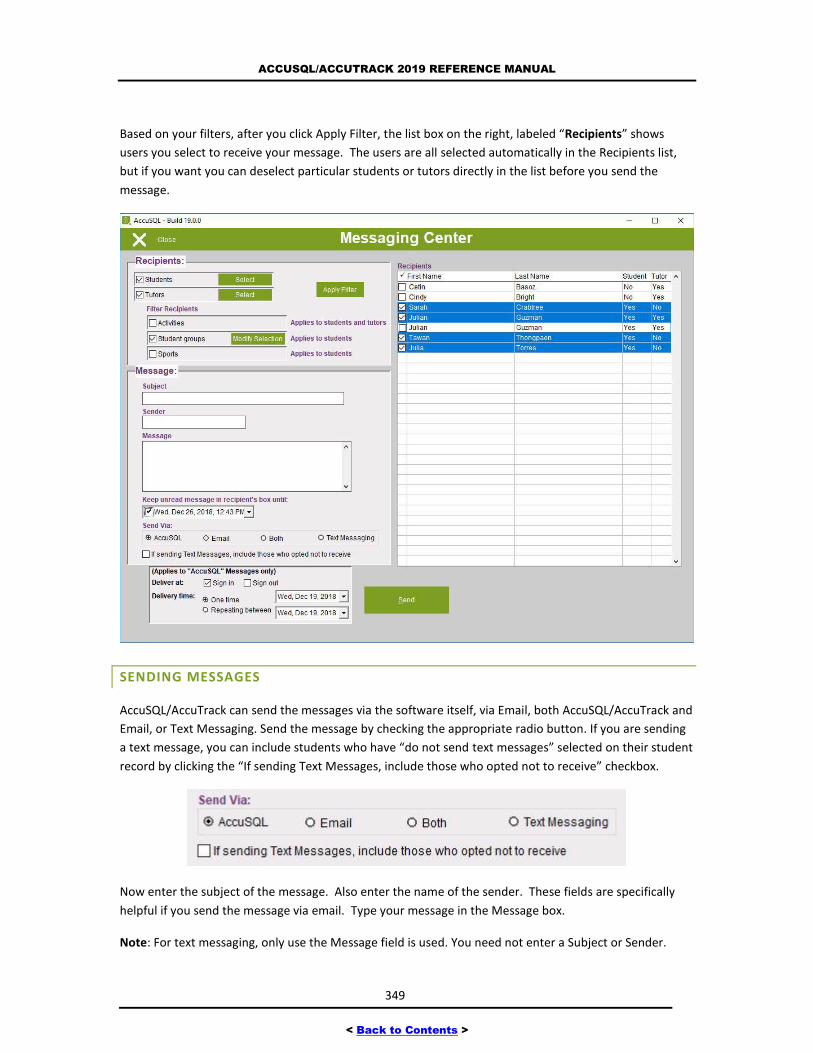
ACCUSQL/ACCUTRACK 2019 REFERENCE MANUAL
349
< Back to Contents >
Based on your filters, after you click Apply Filter, the list box on the right, labeled “Recipients” shows
users you select to receive your message. The users are all selected automatically in the Recipients list,
but if you want you can deselect particular students or tutors directly in the list before you send the
message.
SENDING MESSAGES
AccuSQL/AccuTrack can send the messages via the software itself, via Email, both AccuSQL/AccuTrack and
Email, or Text Messaging. Send the message by checking the appropriate radio button. If you are sending
a text message, you can include students who have “do not send text messages” selected on their student
record by clicking the “If sending Text Messages, include those who opted not to receive” checkbox.
Now enter the subject of the message. Also enter the name of the sender. These fields are specifically
helpful if you send the message via email. Type your message in the Message box.
Note: For text messaging, only use the Message field is used. You need not enter a Subject or Sender.
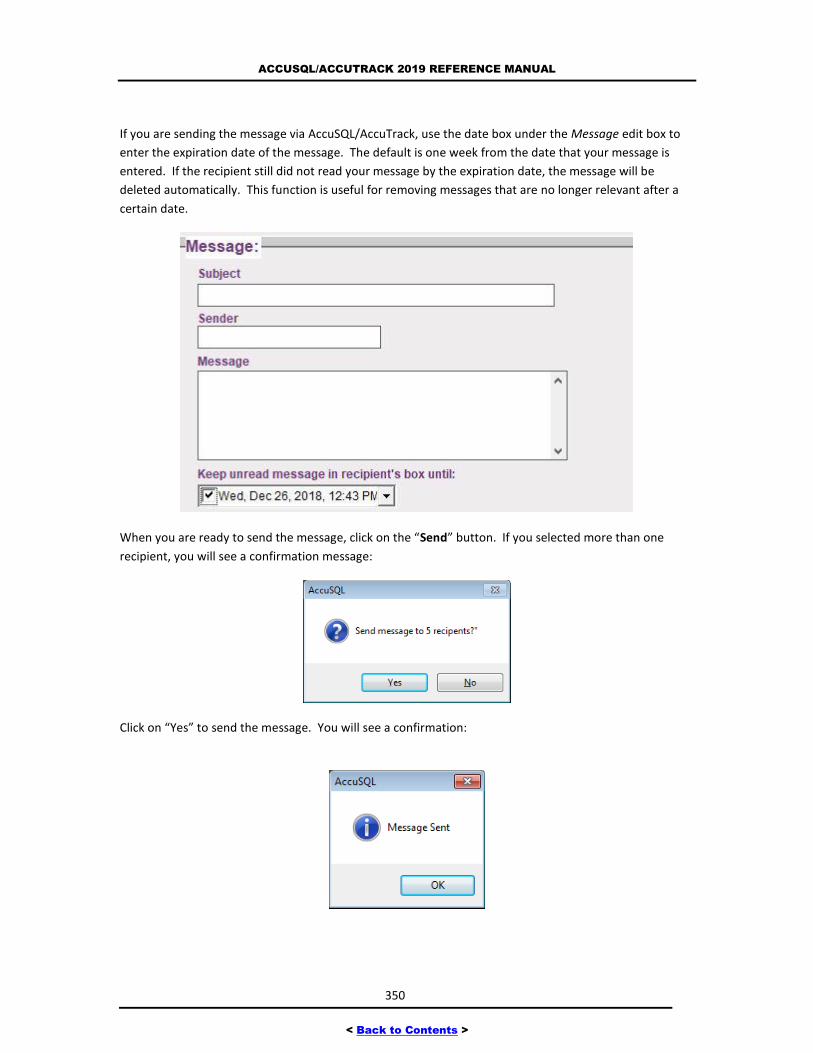
ACCUSQL/ACCUTRACK 2019 REFERENCE MANUAL
350
< Back to Contents >
If you are sending the message via AccuSQL/AccuTrack, use the date box under the Message edit box to
enter the expiration date of the message. The default is one week from the date that your message is
entered. If the recipient still did not read your message by the expiration date, the message will be
deleted automatically. This function is useful for removing messages that are no longer relevant after a
certain date.
When you are ready to send the message, click on the “Send” button. If you selected more than one
recipient, you will see a confirmation message:
Click on “Yes” to send the message. You will see a confirmation:
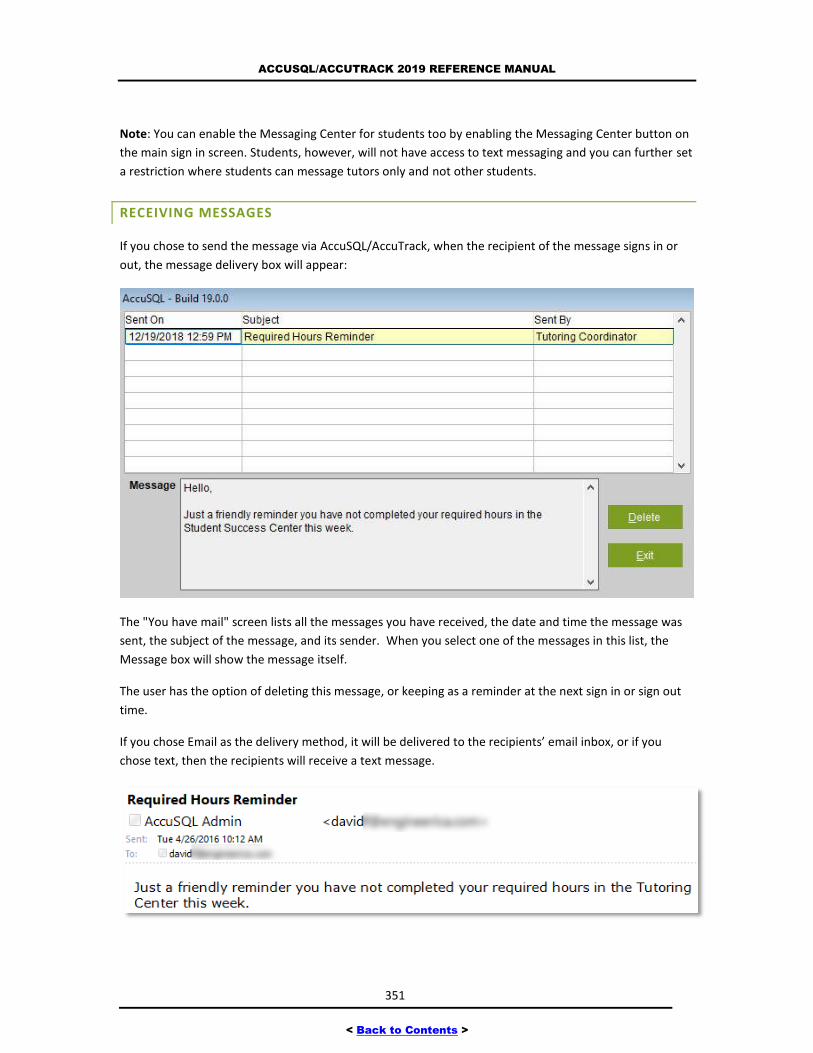
ACCUSQL/ACCUTRACK 2019 REFERENCE MANUAL
351
< Back to Contents >
Note: You can enable the Messaging Center for students too by enabling the Messaging Center button on
the main sign in screen. Students, however, will not have access to text messaging and you can further set
a restriction where students can message tutors only and not other students.
RECEIVING MESSAGES
If you chose to send the message via AccuSQL/AccuTrack, when the recipient of the message signs in or
out, the message delivery box will appear:
The "You have mail" screen lists all the messages you have received, the date and time the message was
sent, the subject of the message, and its sender. When you select one of the messages in this list, the
Message box will show the message itself.
The user has the option of deleting this message, or keeping as a reminder at the next sign in or sign out
time.
If you chose Email as the delivery method, it will be delivered to the recipients’ email inbox, or if you
chose text, then the recipients will receive a text message.
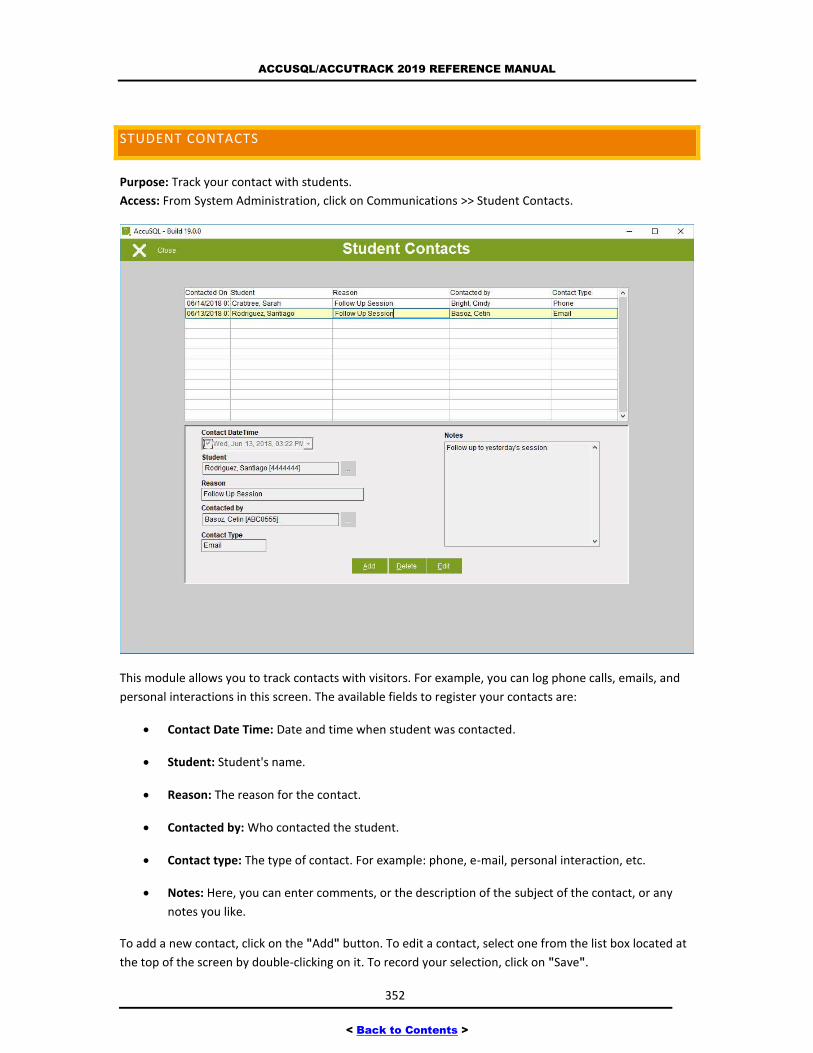
ACCUSQL/ACCUTRACK 2019 REFERENCE MANUAL
352
< Back to Contents >
STUDENT CONTACTS
Purpose: Track your contact with students.
Access: From System Administration, click on Communications >> Student Contacts.
This module allows you to track contacts with visitors. For example, you can log phone calls, emails, and
personal interactions in this screen. The available fields to register your contacts are:
Contact Date Time: Date and time when student was contacted.
Student: Student's name.
Reason: The reason for the contact.
Contacted by: Who contacted the student.
Contact type: The type of contact. For example: phone, e-mail, personal interaction, etc.
Notes: Here, you can enter comments, or the description of the subject of the contact, or any
notes you like.
To add a new contact, click on the "Add" button. To edit a contact, select one from the list box located at
the top of the screen by double-clicking on it. To record your selection, click on "Save".
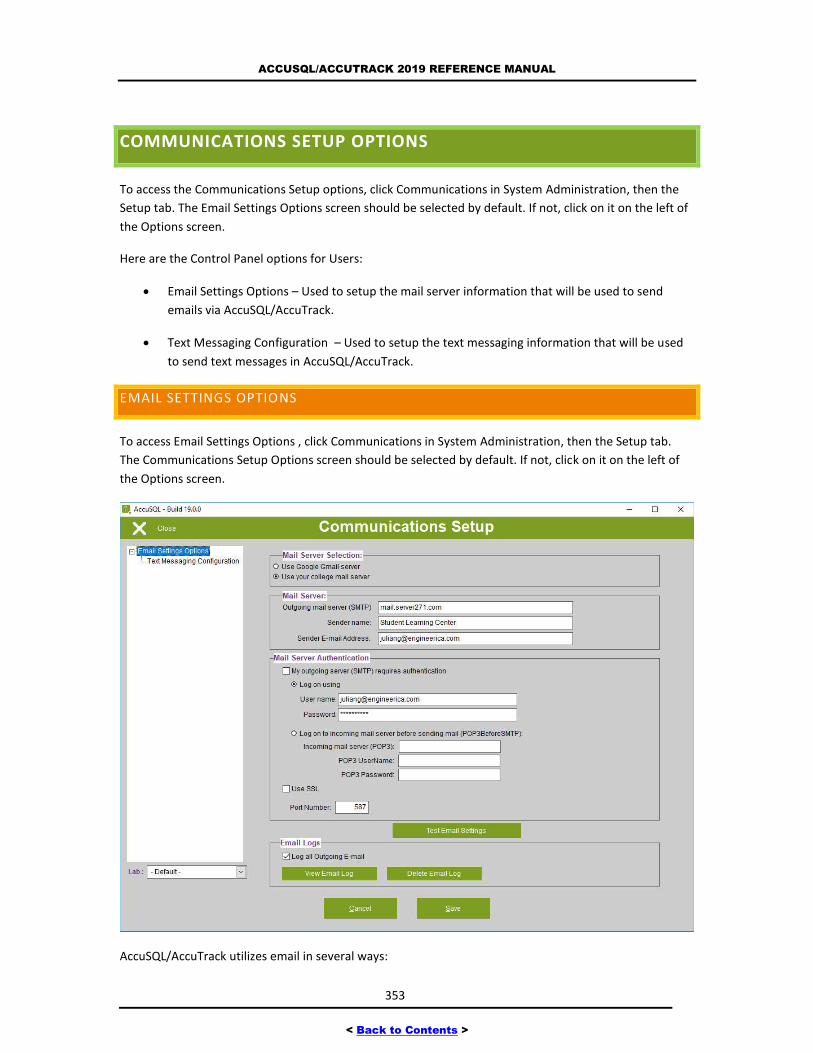
ACCUSQL/ACCUTRACK 2019 REFERENCE MANUAL
353
< Back to Contents >
COMMUNICATIONS SETUP OPTIONS
To access the Communications Setup options, click Communications in System Administration, then the
Setup tab. The Email Settings Options screen should be selected by default. If not, click on it on the left of
the Options screen.
Here are the Control Panel options for Users:
Email Settings Options – Used to setup the mail server information that will be used to send
emails via AccuSQL/AccuTrack.
Text Messaging Configuration – Used to setup the text messaging information that will be used
to send text messages in AccuSQL/AccuTrack.
EMAIL SETTINGS OPTIONS
To access Email Settings Options , click Communications in System Administration, then the Setup tab.
The Communications Setup Options screen should be selected by default. If not, click on it on the left of
the Options screen.
AccuSQL/AccuTrack utilizes email in several ways:
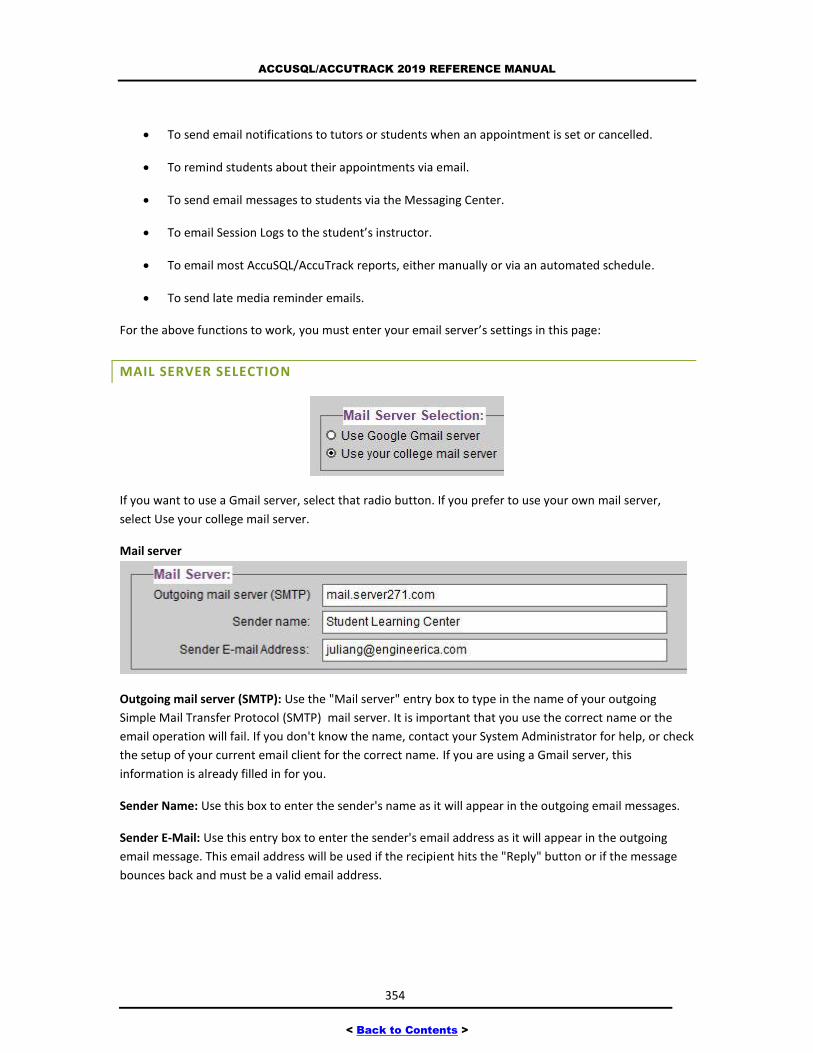
ACCUSQL/ACCUTRACK 2019 REFERENCE MANUAL
354
< Back to Contents >
To send email notifications to tutors or students when an appointment is set or cancelled.
To remind students about their appointments via email.
To send email messages to students via the Messaging Center.
To email Session Logs to the student’s instructor.
To email most AccuSQL/AccuTrack reports, either manually or via an automated schedule.
To send late media reminder emails.
For the above functions to work, you must enter your email server’s settings in this page:
MAIL SERVER SELECTION
If you want to use a Gmail server, select that radio button. If you prefer to use your own mail server,
select Use your college mail server.
Mail server
Outgoing mail server (SMTP): Use the "Mail server" entry box to type in the name of your outgoing
Simple Mail Transfer Protocol (SMTP) mail server. It is important that you use the correct name or the
email operation will fail. If you don't know the name, contact your System Administrator for help, or check
the setup of your current email client for the correct name. If you are using a Gmail server, this
information is already filled in for you.
Sender Name: Use this box to enter the sender's name as it will appear in the outgoing email messages.
Sender E-Mail: Use this entry box to enter the sender's email address as it will appear in the outgoing
email message. This email address will be used if the recipient hits the "Reply" button or if the message
bounces back and must be a valid email address.
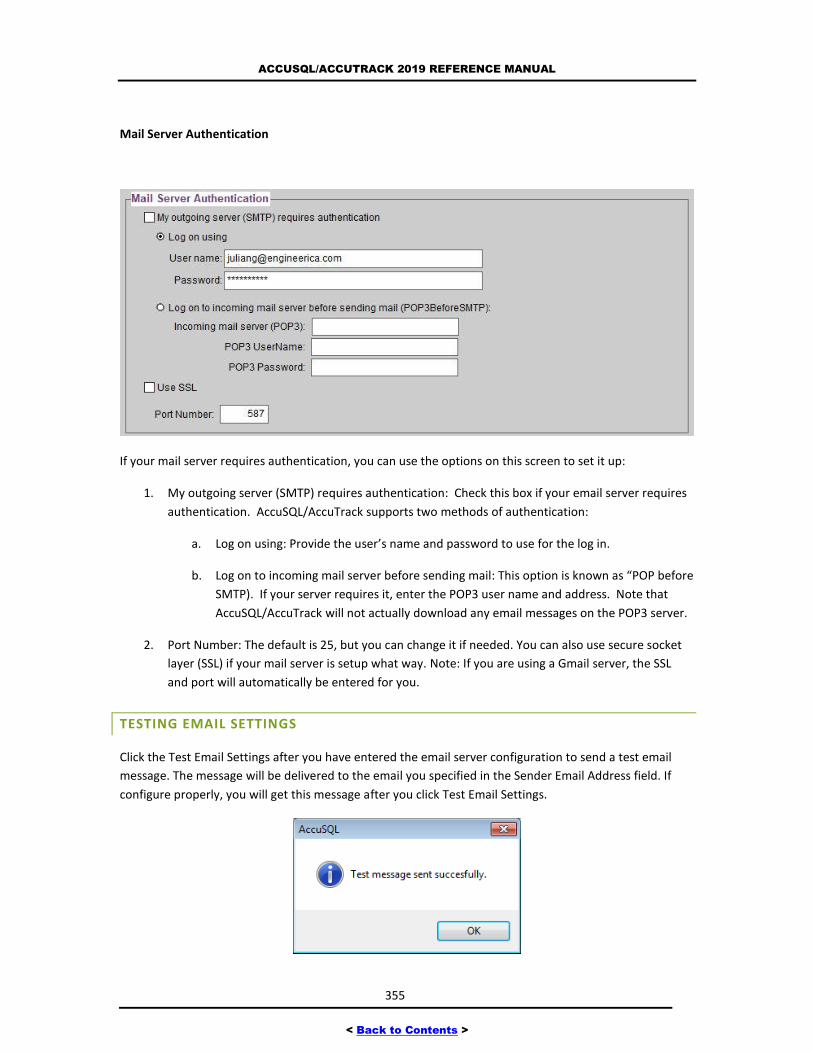
ACCUSQL/ACCUTRACK 2019 REFERENCE MANUAL
355
< Back to Contents >
Mail Server Authentication
If your mail server requires authentication, you can use the options on this screen to set it up:
1. My outgoing server (SMTP) requires authentication: Check this box if your email server requires
authentication. AccuSQL/AccuTrack supports two methods of authentication:
a. Log on using: Provide the user’s name and password to use for the log in.
b. Log on to incoming mail server before sending mail: This option is known as “POP before
SMTP). If your server requires it, enter the POP3 user name and address. Note that
AccuSQL/AccuTrack will not actually download any email messages on the POP3 server.
2. Port Number: The default is 25, but you can change it if needed. You can also use secure socket
layer (SSL) if your mail server is setup what way. Note: If you are using a Gmail server, the SSL
and port will automatically be entered for you.
TESTING EMAIL SETTINGS
Click the Test Email Settings after you have entered the email server configuration to send a test email
message. The message will be delivered to the email you specified in the Sender Email Address field. If
configure properly, you will get this message after you click Test Email Settings.
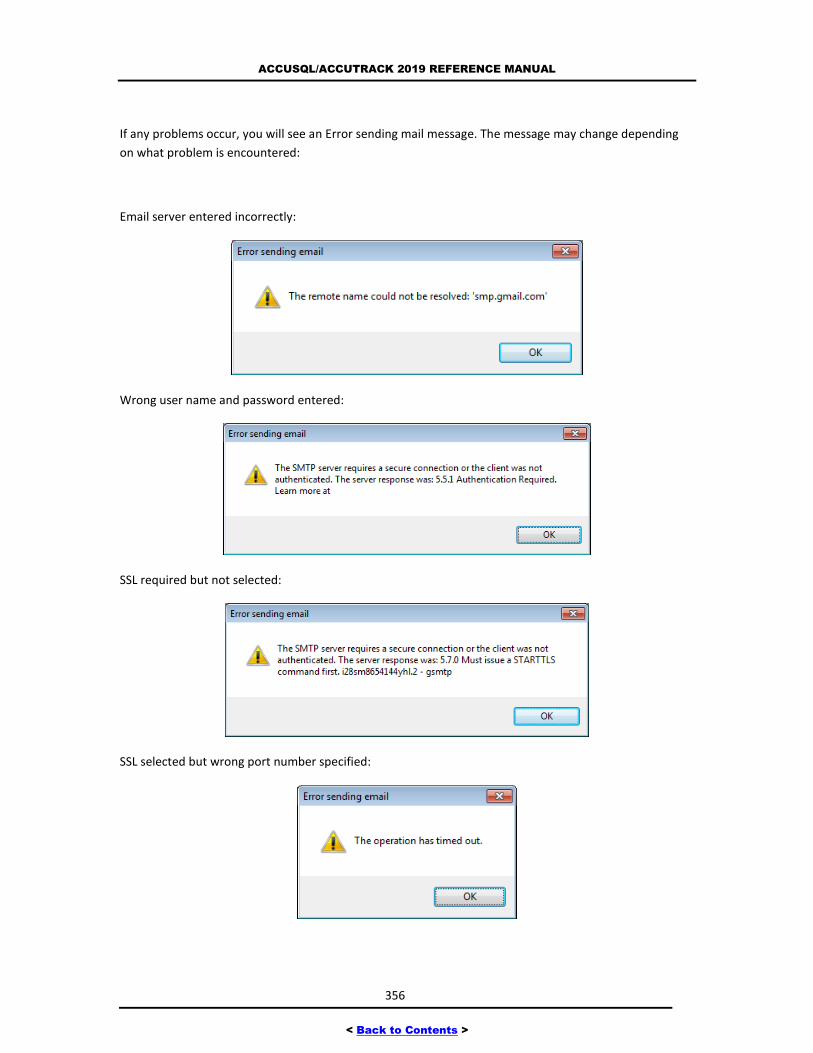
ACCUSQL/ACCUTRACK 2019 REFERENCE MANUAL
356
< Back to Contents >
If any problems occur, you will see an Error sending mail message. The message may change depending
on what problem is encountered:
Email server entered incorrectly:
Wrong user name and password entered:
SSL required but not selected:
SSL selected but wrong port number specified:

ACCUSQL/ACCUTRACK 2019 REFERENCE MANUAL
357
< Back to Contents >
Use any error messages to troubleshoot your email settings. Depending on how your mail server is
configured, you may need to get an IT person to unblock a port or adjust your firewall settings to allow for
the outgoing mail.
Note: If you use a Gmail server, remember you must have a Gmail account available. If you do not have a
Gmail account, you can sign up for one free at Google.com.
EMAIL LOG
If you want AccuSQL/AccuTrack to log all outgoing email, check this box. Use the buttons to view or
delete the log. If you are not getting emails, then you can check the log to further analyze what may be
going wrong. All successful and unsuccessful email will be written to the log.
Tech Tip: More detailed logs are contained in the AutomatedLogs and AutomatedTasks tables.
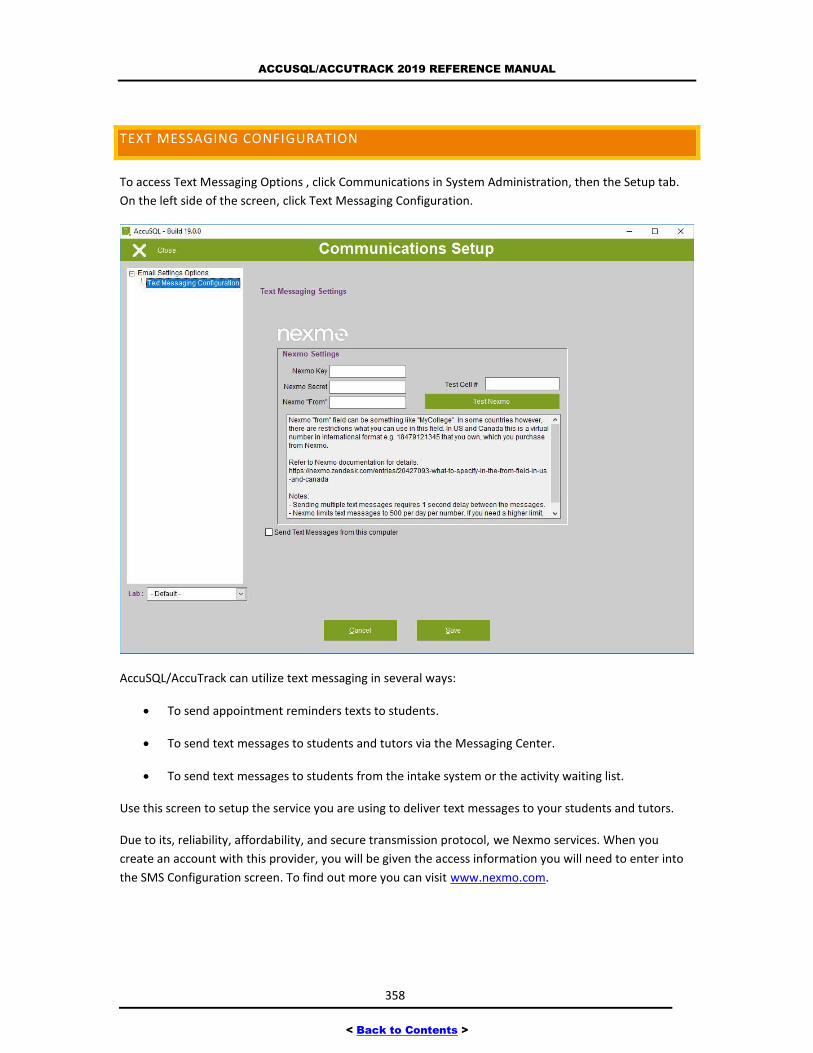
ACCUSQL/ACCUTRACK 2019 REFERENCE MANUAL
358
< Back to Contents >
TEXT MESSAGING CONFIGURATION
To access Text Messaging Options , click Communications in System Administration, then the Setup tab.
On the left side of the screen, click Text Messaging Configuration.
AccuSQL/AccuTrack can utilize text messaging in several ways:
To send appointment reminders texts to students.
To send text messages to students and tutors via the Messaging Center.
To send text messages to students from the intake system or the activity waiting list.
Use this screen to setup the service you are using to deliver text messages to your students and tutors.
Due to its, reliability, affordability, and secure transmission protocol, we Nexmo services. When you
create an account with this provider, you will be given the access information you will need to enter into
the SMS Configuration screen. To find out more you can visit www.nexmo.com.

ACCUSQL/ACCUTRACK 2019 REFERENCE MANUAL
359
< Back to Contents >
If you intend to enable text messaging right away, select the Send Text Messages from this computer to
enable the messaging and click Save.
TESTING NEXMO
After you enter the Nexmo Key, Nexmo Secret, and Nexmo From information (provided by Nexmo after
you have created a valid account) you can enter your own cell number (make sure to add a 1 in front of it)
to test the messaging.
After you click Test Nexmo, you should see a pop-up message indicating the message was sent and you
should also get a test message on your phone for the number you entered.
If you get a different message, check your Nexmo settings and retry. You may also want to check with IT
to make sure there is no security or firewall policy in place that will prevent the outbound SMS traffic.
TUTORING REQUESTS SCREEN
When you click on Tutoring Requests from the Main Menu, you will see the following options:
Tutoring Requests: Use to track service requests and assignments.
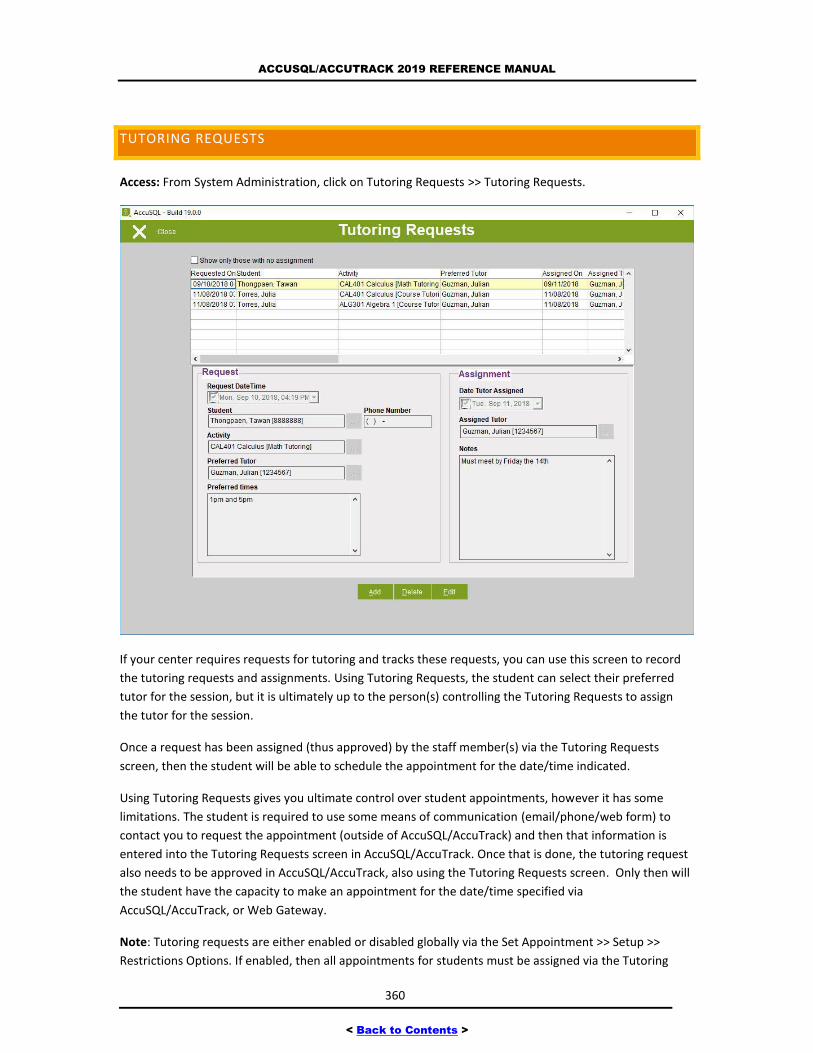
ACCUSQL/ACCUTRACK 2019 REFERENCE MANUAL
360
< Back to Contents >
TUTORING REQUESTS
Access: From System Administration, click on Tutoring Requests >> Tutoring Requests.
If your center requires requests for tutoring and tracks these requests, you can use this screen to record
the tutoring requests and assignments. Using Tutoring Requests, the student can select their preferred
tutor for the session, but it is ultimately up to the person(s) controlling the Tutoring Requests to assign
the tutor for the session.
Once a request has been assigned (thus approved) by the staff member(s) via the Tutoring Requests
screen, then the student will be able to schedule the appointment for the date/time indicated.
Using Tutoring Requests gives you ultimate control over student appointments, however it has some
limitations. The student is required to use some means of communication (email/phone/web form) to
contact you to request the appointment (outside of AccuSQL/AccuTrack) and then that information is
entered into the Tutoring Requests screen in AccuSQL/AccuTrack. Once that is done, the tutoring request
also needs to be approved in AccuSQL/AccuTrack, also using the Tutoring Requests screen. Only then will
the student have the capacity to make an appointment for the date/time specified via
AccuSQL/AccuTrack, or Web Gateway.
Note: Tutoring requests are either enabled or disabled globally via the Set Appointment >> Setup >>
Restrictions Options. If enabled, then all appointments for students must be assigned via the Tutoring
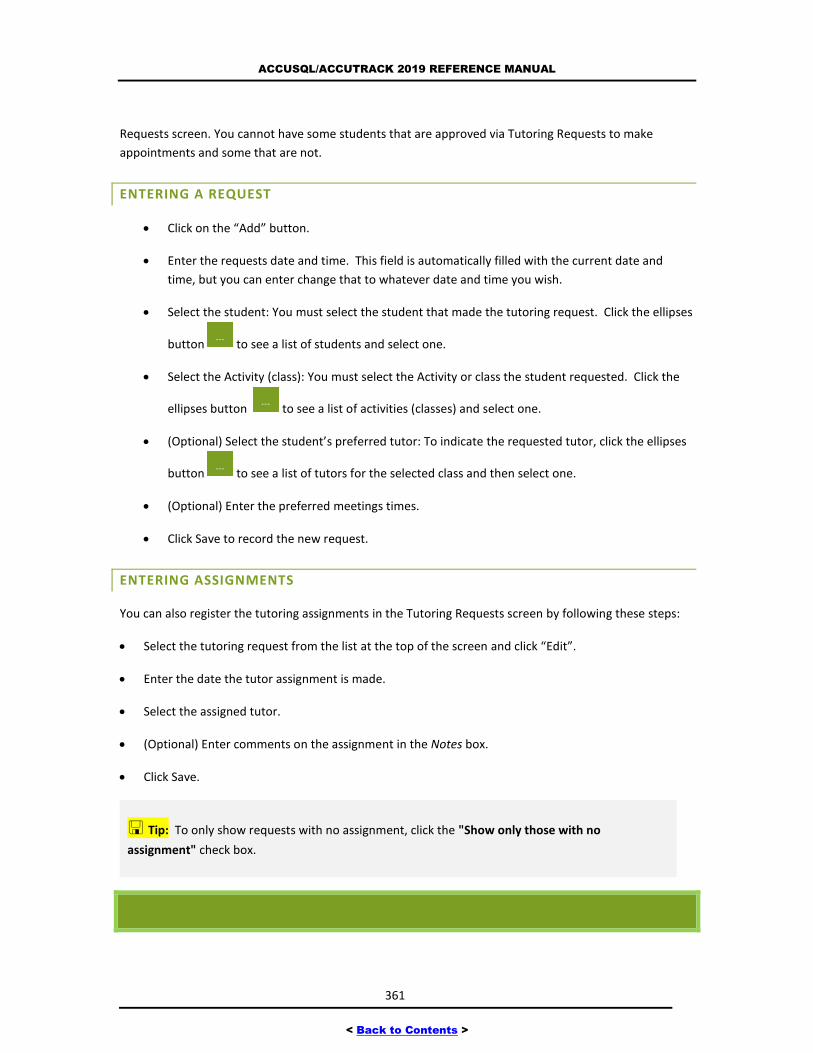
ACCUSQL/ACCUTRACK 2019 REFERENCE MANUAL
361
< Back to Contents >
Requests screen. You cannot have some students that are approved via Tutoring Requests to make
appointments and some that are not.
ENTERING A REQUEST
Click on the “Add” button.
Enter the requests date and time. This field is automatically filled with the current date and
time, but you can enter change that to whatever date and time you wish.
Select the student: You must select the student that made the tutoring request. Click the ellipses
button to see a list of students and select one.
Select the Activity (class): You must select the Activity or class the student requested. Click the
ellipses button to see a list of activities (classes) and select one.
(Optional) Select the student’s preferred tutor: To indicate the requested tutor, click the ellipses
button to see a list of tutors for the selected class and then select one.
(Optional) Enter the preferred meetings times.
Click Save to record the new request.
ENTERING ASSIGNMENTS
You can also register the tutoring assignments in the Tutoring Requests screen by following these steps:
Select the tutoring request from the list at the top of the screen and click “Edit”.
Enter the date the tutor assignment is made.
Select the assigned tutor.
(Optional) Enter comments on the assignment in the Notes box.
Click Save.
Tip: To only show requests with no assignment, click the "Show only those with no
assignment" check box.
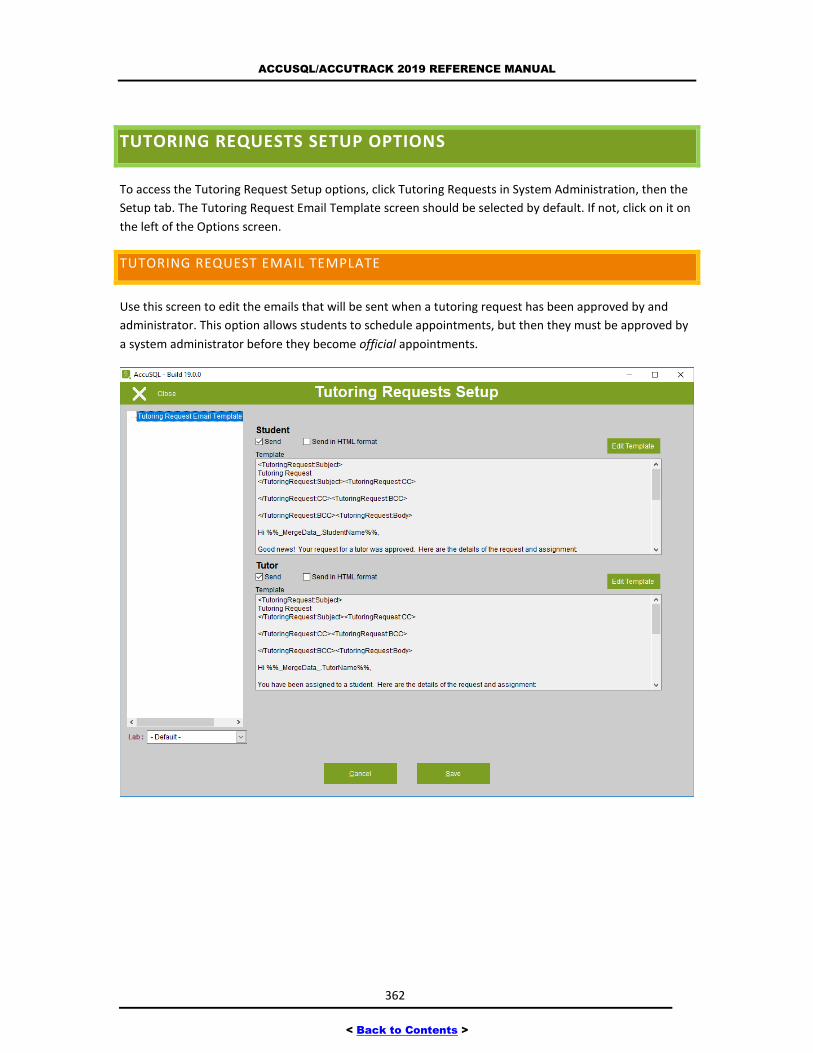
ACCUSQL/ACCUTRACK 2019 REFERENCE MANUAL
362
< Back to Contents >
TUTORING REQUESTS SETUP OPTIONS
To access the Tutoring Request Setup options, click Tutoring Requests in System Administration, then the
Setup tab. The Tutoring Request Email Template screen should be selected by default. If not, click on it on
the left of the Options screen.
TUTORING REQUEST EMAIL TEMPLATE
Use this screen to edit the emails that will be sent when a tutoring request has been approved by and
administrator. This option allows students to schedule appointments, but then they must be approved by
a system administrator before they become official appointments.
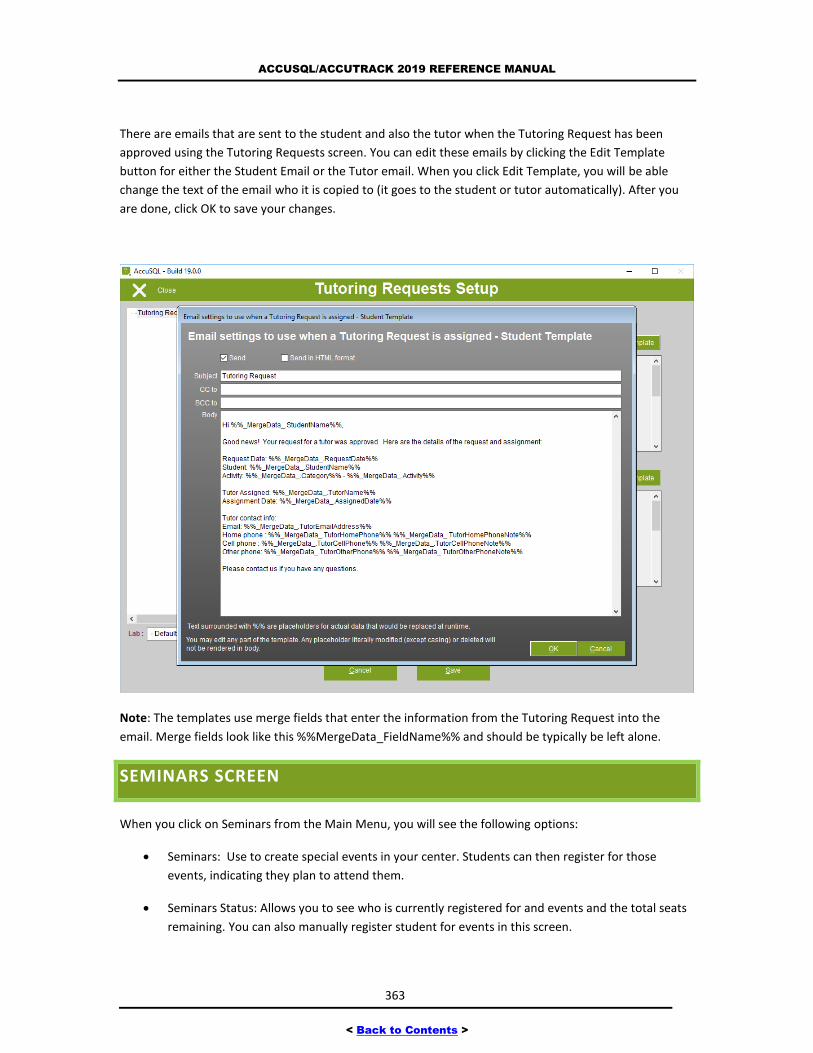
ACCUSQL/ACCUTRACK 2019 REFERENCE MANUAL
363
< Back to Contents >
There are emails that are sent to the student and also the tutor when the Tutoring Request has been
approved using the Tutoring Requests screen. You can edit these emails by clicking the Edit Template
button for either the Student Email or the Tutor email. When you click Edit Template, you will be able
change the text of the email who it is copied to (it goes to the student or tutor automatically). After you
are done, click OK to save your changes.
Note: The templates use merge fields that enter the information from the Tutoring Request into the
email. Merge fields look like this %%MergeData_FieldName%% and should be typically be left alone.
SEMINARS SCREEN
When you click on Seminars from the Main Menu, you will see the following options:
Seminars: Use to create special events in your center. Students can then register for those
events, indicating they plan to attend them.
Seminars Status: Allows you to see who is currently registered for and events and the total seats
remaining. You can also manually register student for events in this screen.
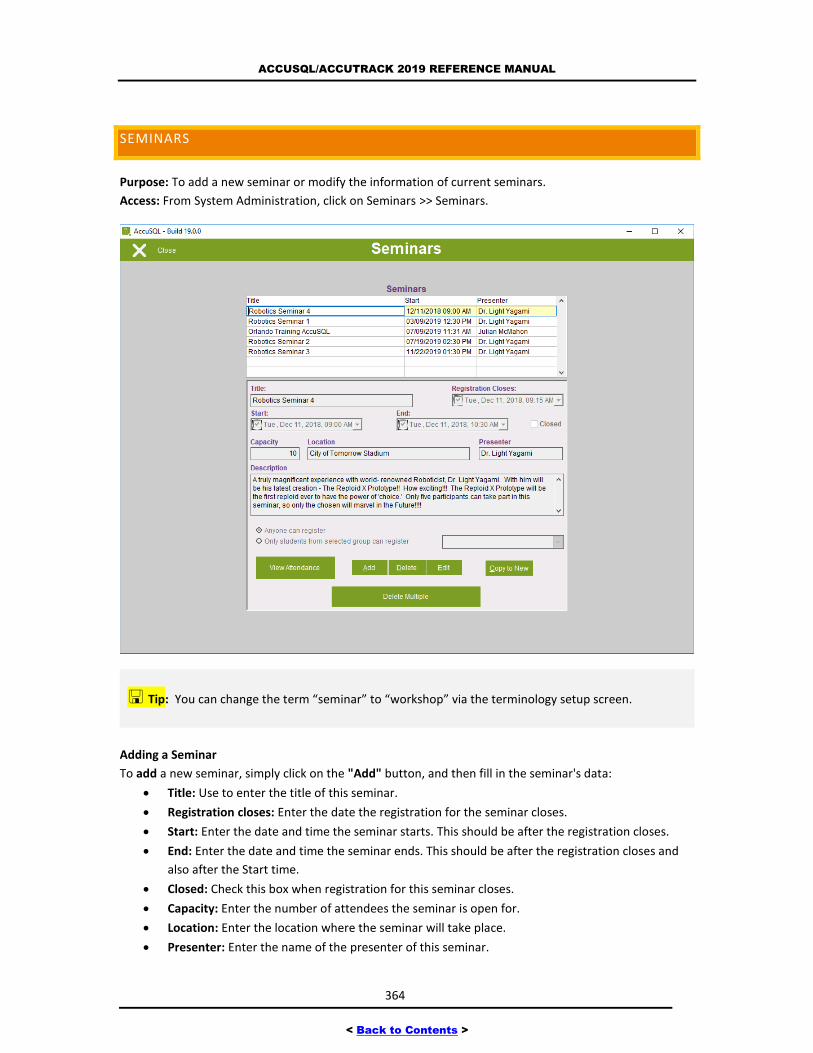
ACCUSQL/ACCUTRACK 2019 REFERENCE MANUAL
364
< Back to Contents >
SEMINARS
Purpose: To add a new seminar or modify the information of current seminars.
Access: From System Administration, click on Seminars >> Seminars.
Tip: You can change the term “seminar” to “workshop” via the terminology setup screen.
Adding a Seminar
To add a new seminar, simply click on the "Add" button, and then fill in the seminar's data:
Title: Use to enter the title of this seminar.
Registration closes: Enter the date the registration for the seminar closes.
Start: Enter the date and time the seminar starts. This should be after the registration closes.
End: Enter the date and time the seminar ends. This should be after the registration closes and
also after the Start time.
Closed: Check this box when registration for this seminar closes.
Capacity: Enter the number of attendees the seminar is open for.
Location: Enter the location where the seminar will take place.
Presenter: Enter the name of the presenter of this seminar.
ACCUSQL/ACCUTRACK 2019 REFERENCE MANUAL
365
< Back to Contents >
Description: Use this box to enter a description of the seminar.
Anyone can register: Select this value if you want the seminar to be available for all students.
Only students from selected groups can register: Select this value if you only want students that
are members of one or more student groups to be able to register for the seminar.
After filling those text boxes, click on the "Save" button to save the new seminar.
Editing a Seminar
To edit a seminar, first highlight the title of the seminar in the list. To edit the record, click on the "Edit"
button. The seminar's info will be copied to the text boxes. Make your changes there and then click on the
"Save" button to keep the changes, or click on the "Cancel" button to keep the data as is.
Tip: You can also double click on a seminar‘s title name to edit its data.
Closing a Seminar
AccuSQL/AccuTrack will close registration to the seminar when any of these events occur:
1. When the number of registered students reaches the seminar’s capacity.
2. When the date and time specified in the "Registration Closes" box arrives.
3. When the seminar’s start date passes.
4. When admin checks the “Closed” box.
Deleting a Seminar
To delete a seminar, first highlight the name, and then click on "Delete". You will see a confirmation
message. Answer "Yes" to delete the seminar.
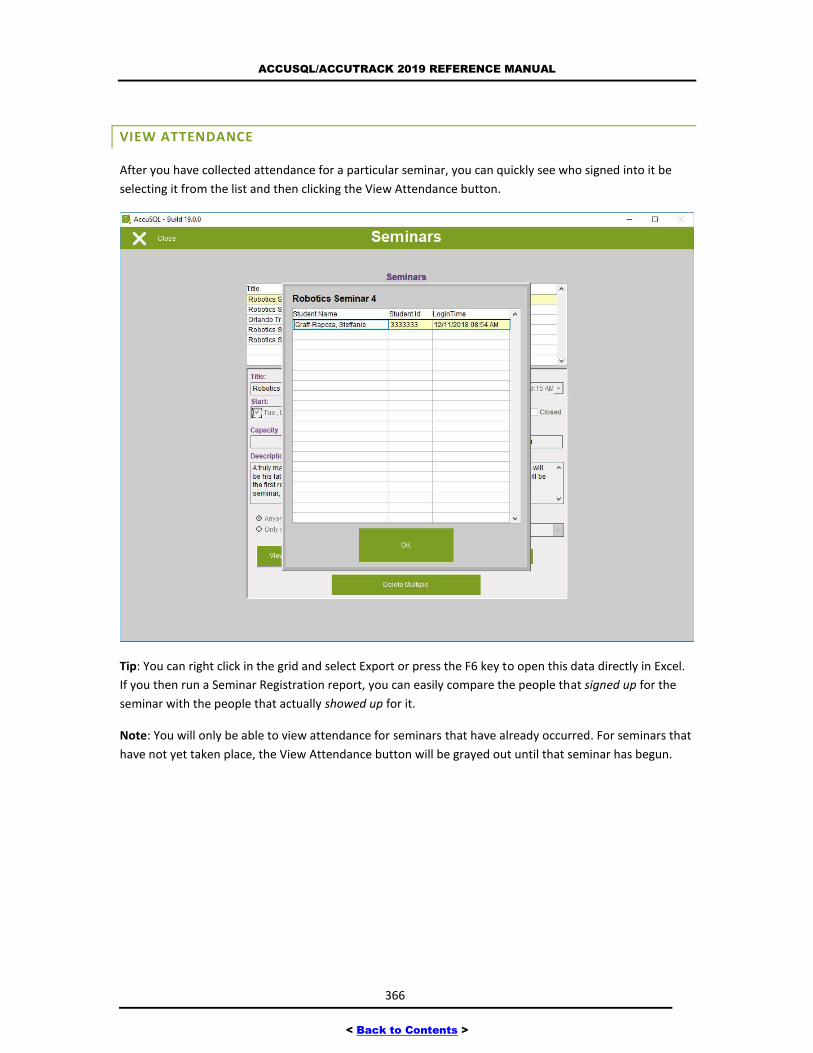
ACCUSQL/ACCUTRACK 2019 REFERENCE MANUAL
366
< Back to Contents >
VIEW ATTENDANCE
After you have collected attendance for a particular seminar, you can quickly see who signed into it be
selecting it from the list and then clicking the View Attendance button.
Tip: You can right click in the grid and select Export or press the F6 key to open this data directly in Excel.
If you then run a Seminar Registration report, you can easily compare the people that signed up for the
seminar with the people that actually showed up for it.
Note: You will only be able to view attendance for seminars that have already occurred. For seminars that
have not yet taken place, the View Attendance button will be grayed out until that seminar has begun.

ACCUSQL/ACCUTRACK 2019 REFERENCE MANUAL
367
< Back to Contents >
SEMINARS STATUS
Purpose: To track the status of seminars and edit registration.
Access: From System Administration, click on Seminars>>Seminars Status.
Use the “Please select the seminar” area to select the seminar in the grid you want to access. You will only
see seminars that have not taken place yet in this grid and not seminars that have already occurred.
The Selection List Boxes control above shows students who are either unregistered or registered for the
selected seminar. To edit the registration info, use the Selection List Boxes control to move people

ACCUSQL/ACCUTRACK 2019 REFERENCE MANUAL
368
< Back to Contents >
between the Unregistered list box on the left and the Registered list box on the right. Click the Register
button to save your changes.
The bottom portion of the screen shows the seminar's availability information: number of registered
students, seminar’s capacity, and number of available seats. You can also either close or cancel the
seminar by checking either of those boxes. Of course, be careful with these options if students have
already registered for the seminar.
If you would like to get a quick report for the seminar registrations, click the “Print” button.
Closing a seminar
You can close the registration to any seminar just by clicking the "Closed" check box. When you close a
seminar, AccuSQL/AccuTrack will not allow you, the user, or any other student to register for the selected
seminar.
Canceling a seminar
Sometimes, a seminar needs to be cancelled for some reason, e.g., the presenter is not going to be there,
or the quantity of registered students is not what was required. You can cancel any seminar just by
clicking the "Cancelled" check box.
Note: Seminars do not have any Setup Options since all setup is handled through Seminars >> Seminar
Status button.
COMPUTER RESERVATIONS SCREEN
When you click on Computer Reservations from the Main Menu, you will see the following options:
Computers: Use to create computer names that are then used for you to reserve time for
students.
Computer Reservations: Allows you to see allocate computer use to students for the computers
you have created.
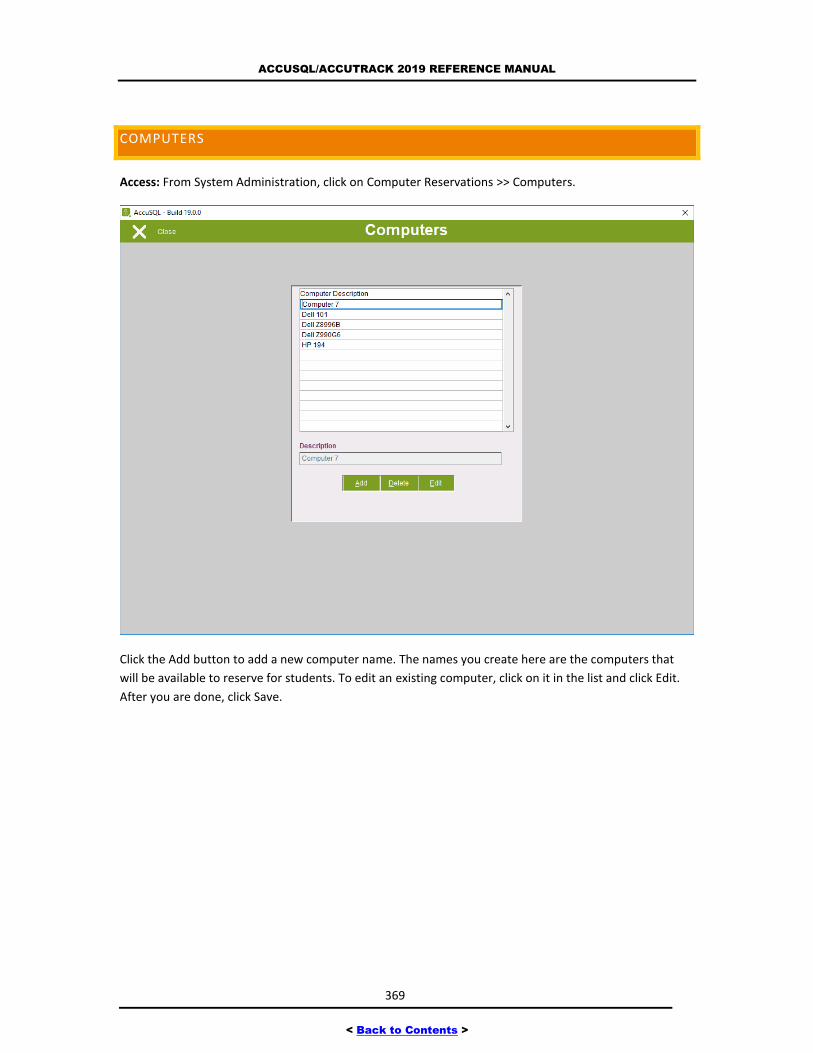
ACCUSQL/ACCUTRACK 2019 REFERENCE MANUAL
369
< Back to Contents >
COMPUTERS
Access: From System Administration, click on Computer Reservations >> Computers.
Click the Add button to add a new computer name. The names you create here are the computers that
will be available to reserve for students. To edit an existing computer, click on it in the list and click Edit.
After you are done, click Save.
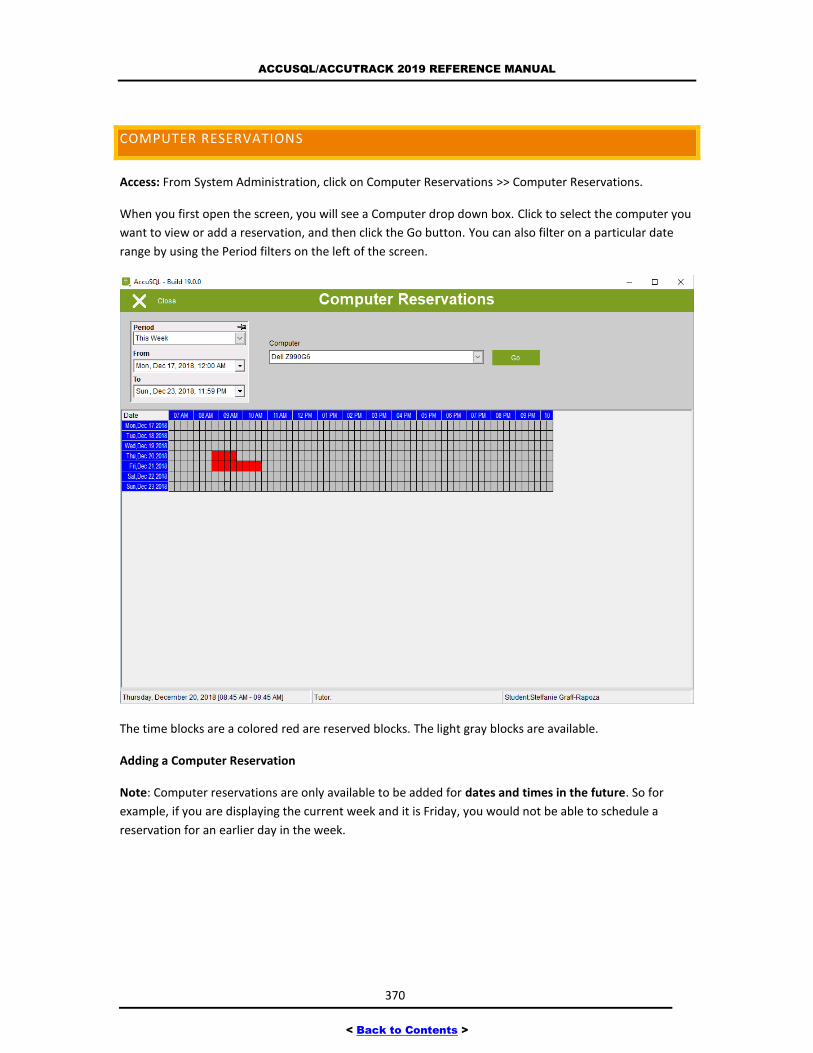
ACCUSQL/ACCUTRACK 2019 REFERENCE MANUAL
370
< Back to Contents >
COMPUTER RESERVATIONS
Access: From System Administration, click on Computer Reservations >> Computer Reservations.
When you first open the screen, you will see a Computer drop down box. Click to select the computer you
want to view or add a reservation, and then click the Go button. You can also filter on a particular date
range by using the Period filters on the left of the screen.
The time blocks are a colored red are reserved blocks. The light gray blocks are available.
Adding a Computer Reservation
Note: Computer reservations are only available to be added for dates and times in the future. So for
example, if you are displaying the current week and it is Friday, you would not be able to schedule a
reservation for an earlier day in the week.
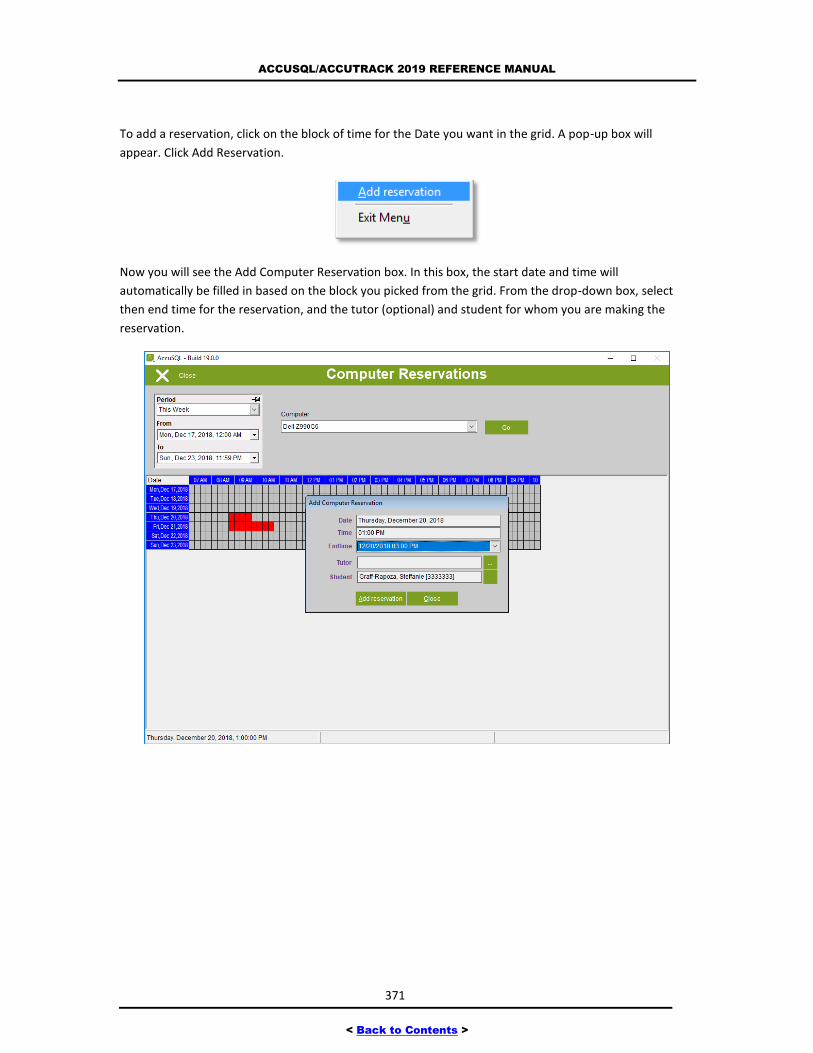
ACCUSQL/ACCUTRACK 2019 REFERENCE MANUAL
371
< Back to Contents >
To add a reservation, click on the block of time for the Date you want in the grid. A pop-up box will
appear. Click Add Reservation.
Now you will see the Add Computer Reservation box. In this box, the start date and time will
automatically be filled in based on the block you picked from the grid. From the drop-down box, select
then end time for the reservation, and the tutor (optional) and student for whom you are making the
reservation.
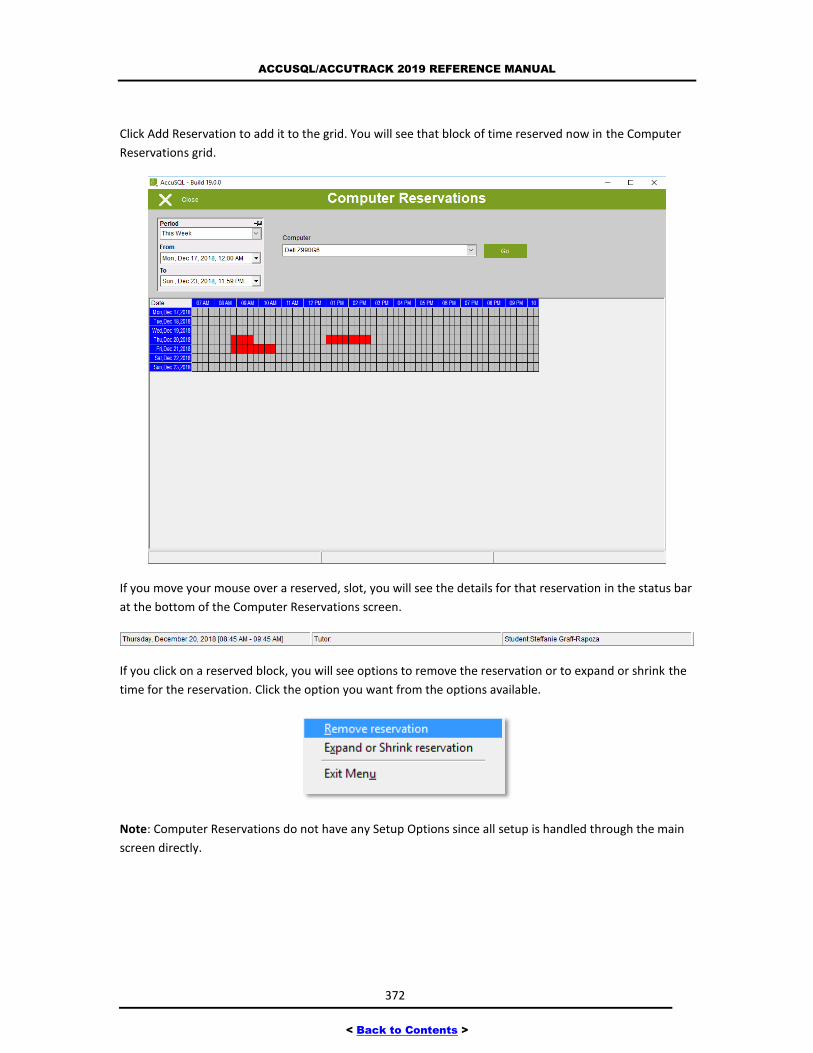
ACCUSQL/ACCUTRACK 2019 REFERENCE MANUAL
372
< Back to Contents >
Click Add Reservation to add it to the grid. You will see that block of time reserved now in the Computer
Reservations grid.
If you move your mouse over a reserved, slot, you will see the details for that reservation in the status bar
at the bottom of the Computer Reservations screen.
If you click on a reserved block, you will see options to remove the reservation or to expand or shrink the
time for the reservation. Click the option you want from the options available.
Note: Computer Reservations do not have any Setup Options since all setup is handled through the main
screen directly.
ACCUSQL/ACCUTRACK 2019 REFERENCE MANUAL
373
< Back to Contents >
SYSTEM SCREEN
When you click on System from System Administration screen, you will see the following options:
Semesters: Use to create the From and To date ranges for your various semesters.
Off Times: Allows you to create off times for the entire center. Students will not be able to
schedule appointments during center off times.
Rooms: Allows you to create rooms that can then be used during appointment scheduling.
Lab IDs: Used to create local labs.
Remote Shutdown Stations: Used to shut log off or shutdown computers connected to
AccuSQL/AccuTrack. Note: Based on Windows or Group Policy security settings, this may not be
functional in all environments.
Export Reports: Allows you to export any custom or memorized reports to a file where they can
then be imported by other AccuSQL/AccuTrack users.
Import Reports: Allows you to import custom or memorized reports created by other
AccuSQL/AccuTrack users into your reports.
SEMESTERS
Purpose: To set up the semesters and the activities that will be available during those semesters.
Access: From System Administration, click on System >> Semesters.
Note: The semester dates are used to determine which activities are available for the given date. When
AccuSQL/AccuTrack opens, it determines what today’s date is and then any activities that are not selected
for that day are automatically set to inactive in the system. If you get a “no activities are active” message
when a student signs in, then you probably do not have any active activities or a semester setup that
includes today.
Tip: The semesters you define can also be used for report filters.
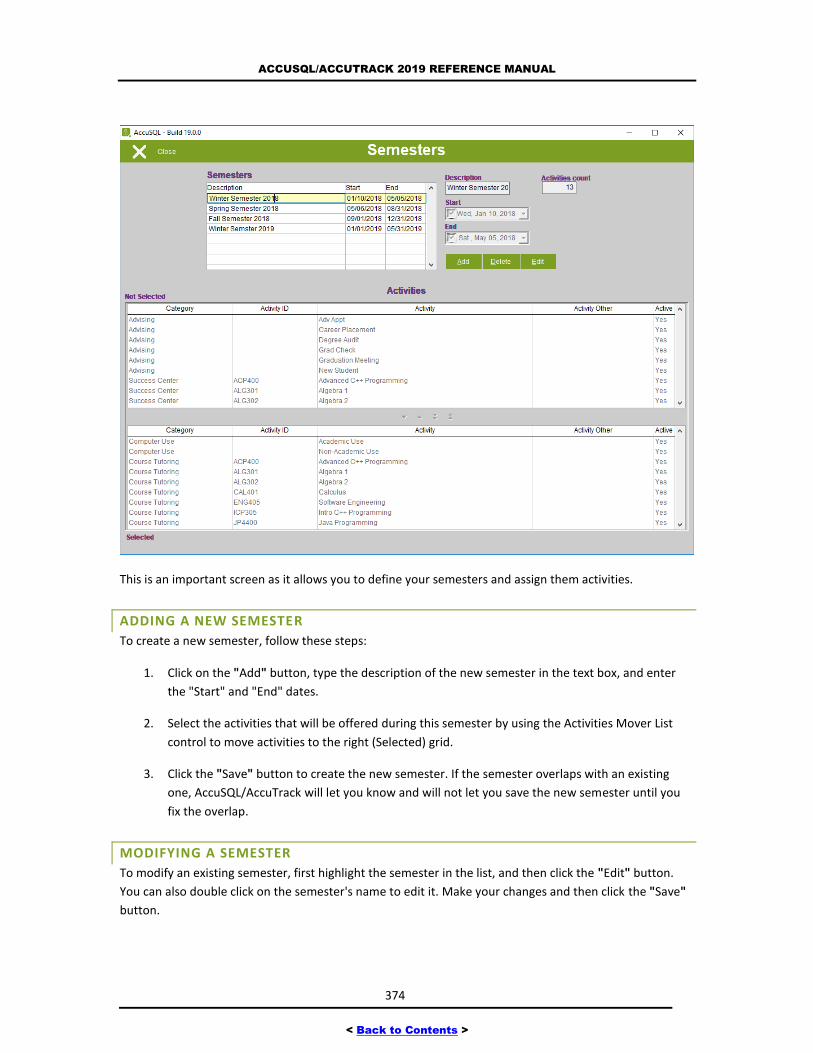
ACCUSQL/ACCUTRACK 2019 REFERENCE MANUAL
374
< Back to Contents >
This is an important screen as it allows you to define your semesters and assign them activities.
ADDING A NEW SEMESTER
To create a new semester, follow these steps:
1. Click on the "Add" button, type the description of the new semester in the text box, and enter
the "Start" and "End" dates.
2. Select the activities that will be offered during this semester by using the Activities Mover List
control to move activities to the right (Selected) grid.
3. Click the "Save" button to create the new semester. If the semester overlaps with an existing
one, AccuSQL/AccuTrack will let you know and will not let you save the new semester until you
fix the overlap.
MODIFYING A SEMESTER
To modify an existing semester, first highlight the semester in the list, and then click the "Edit" button.
You can also double click on the semester's name to edit it. Make your changes and then click the "Save"
button.
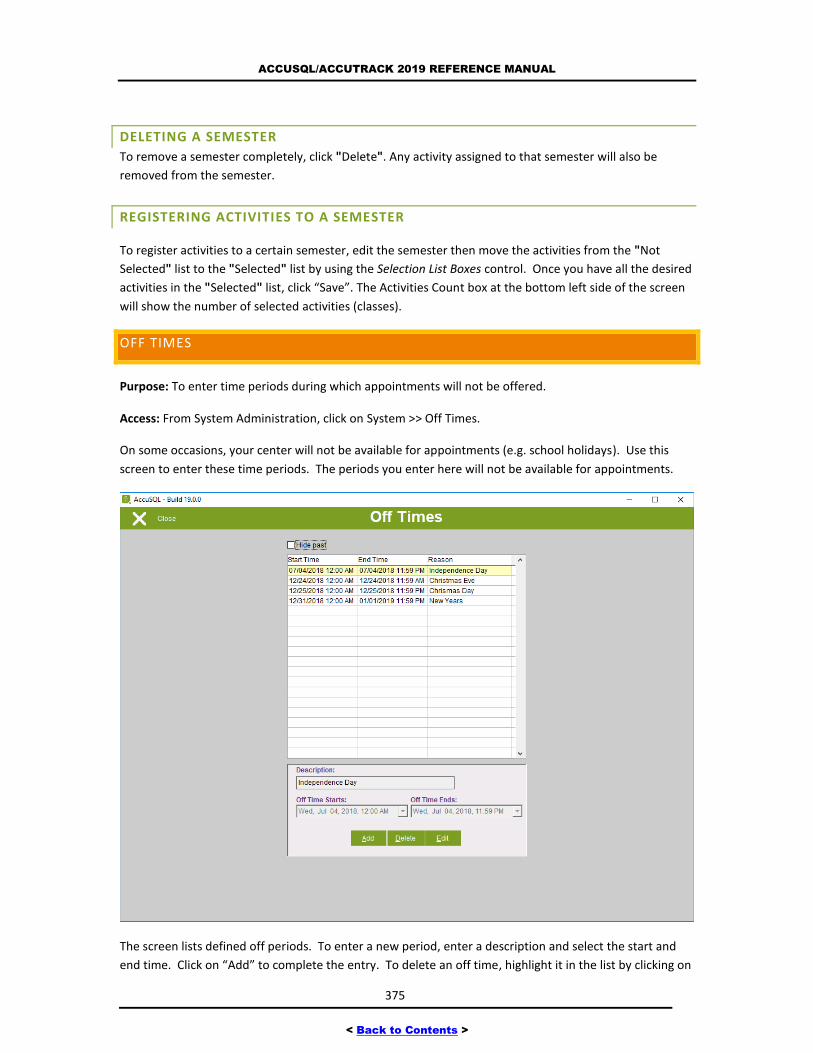
ACCUSQL/ACCUTRACK 2019 REFERENCE MANUAL
375
< Back to Contents >
DELETING A SEMESTER
To remove a semester completely, click "Delete". Any activity assigned to that semester will also be
removed from the semester.
REGISTERING ACTIVITIES TO A SEMESTER
To register activities to a certain semester, edit the semester then move the activities from the "Not
Selected" list to the "Selected" list by using the Selection List Boxes control. Once you have all the desired
activities in the "Selected" list, click “Save”. The Activities Count box at the bottom left side of the screen
will show the number of selected activities (classes).
OFF TIMES
Purpose: To enter time periods during which appointments will not be offered.
Access: From System Administration, click on System >> Off Times.
On some occasions, your center will not be available for appointments (e.g. school holidays). Use this
screen to enter these time periods. The periods you enter here will not be available for appointments.
The screen lists defined off periods. To enter a new period, enter a description and select the start and
end time. Click on “Add” to complete the entry. To delete an off time, highlight it in the list by clicking on
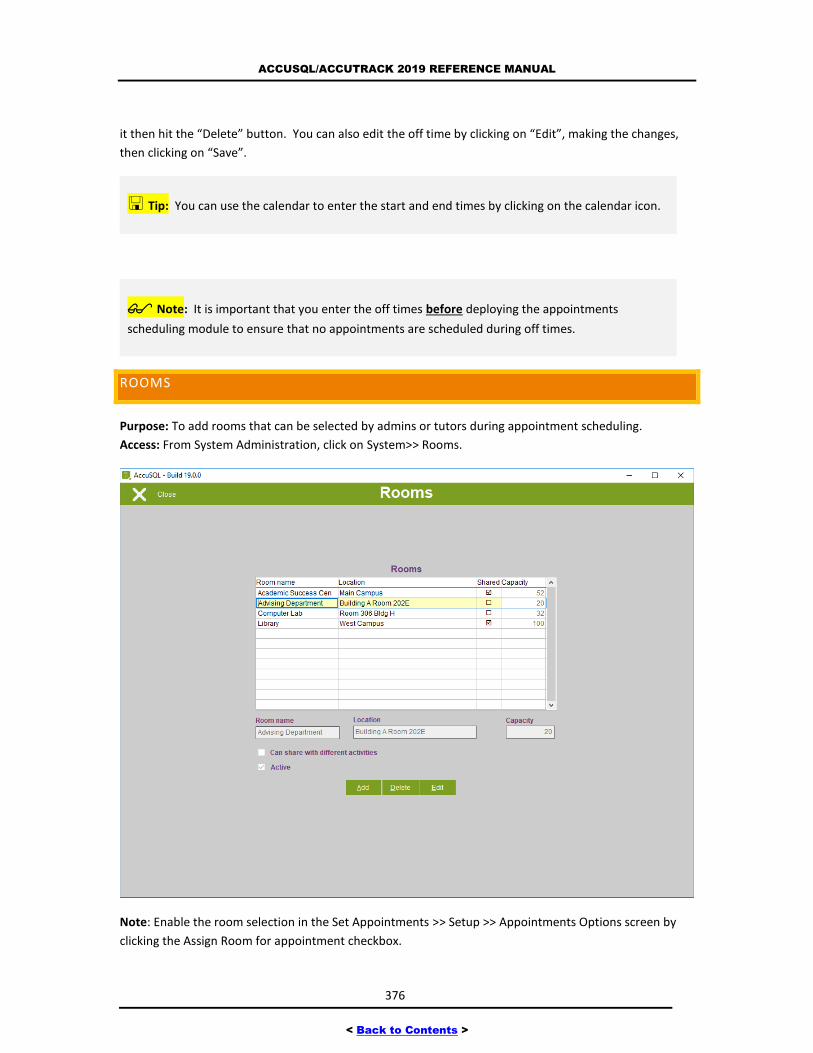
ACCUSQL/ACCUTRACK 2019 REFERENCE MANUAL
376
< Back to Contents >
it then hit the “Delete” button. You can also edit the off time by clicking on “Edit”, making the changes,
then clicking on “Save”.
Tip: You can use the calendar to enter the start and end times by clicking on the calendar icon.
Note: It is important that you enter the off times before deploying the appointments
scheduling module to ensure that no appointments are scheduled during off times.
ROOMS
Purpose: To add rooms that can be selected by admins or tutors during appointment scheduling.
Access: From System Administration, click on System>> Rooms.
Note: Enable the room selection in the Set Appointments >> Setup >> Appointments Options screen by
clicking the Assign Room for appointment checkbox.
ACCUSQL/ACCUTRACK 2019 REFERENCE MANUAL
377
< Back to Contents >
ADDING A NEW ROOM
To create a new room, follow these steps:
1. Click the "Add" button, type the room’s name, the location and the capacity (number of students
that the room can hold). These text boxes are below the "Rooms" list:
2. Indicate whether the room can be shared with different activities by checking the appropriate
box:
3. After you enter the required data, click the "Save" button to create the new room.
MODIFYING A ROOM
To modify an already registered room, first highlight the room in the list, then click on the "Edit" button.
You can also double click on the room's name to edit it. Make your changes and then click on the "Save"
button.
DELETING A ROOM
To remove a room completely, select it and click on "Delete".
LAB IDS
Purpose: To enter IDs of different labs sharing the same database.
Access: From System Administration, click on System>> Lab IDs.
If you are planning on using AccuSQL/AccuTrack in different areas (e.g. math area, reading area) or in
multiple labs (e.g. Math Lab, Writing Lab), and you want all these areas and labs to share the same
database, you will need to setup these areas in AccuSQL/AccuTrack
Note: If you are only running one center in AccuSQL/AccuTrack, then you would have no need to setup
and use local labs at all.
Using local labs, you can have different sign in options, different activities (courses) displayed, different
profile questions and answers, different custom surveys, and even a different look for each lab, all in one
database. AccuSQL/AccuTrack knows which lab information to display by you setting the local lab
assignment on the sign in stations to the local lab where that sign in station physically resides. For
example, if you are setting up a Math Lab and a Writing Lab, you would create each local lab and set them
up the way you want, and on the computer that is used for students to sign in in the Math Lab, you would
set that computers local lab assignment to Math Lab in AccuSQL/AccuTrack. In the Writing Lab, you would
set the lab on the sign in station to Writing Lab. A more detailed example of local labs appears later in the
section.
When thinking whether or not to use local labs, you need to keep a few things in mind. Local labs have
some advantages and also some disadvantages. If you have various centers and they are not concerned
ACCUSQL/ACCUTRACK 2019 REFERENCE MANUAL
378
< Back to Contents >
about each other - for example, your Advising Center is collecting its own sign ins and is not interested in
running reports for what is happening in the Tutoring Center - your best approach would not be local labs
at all, but instead two different databases.
ADVANTAGES OF USING LOCAL LABS
The main advantage of using local labs is the ability to filter report information based on sign ins in those
labs. For example, you might have a Math Lab and a Tutoring Center that offers help with College Algebra.
Using local lab assignments, you can filter reports based on who received College Algebra help in either
the Math Lab, the Tutoring Center, or both. SO, since you are using one database, if you need to run
reports for the Math Lab and Tutoring center, you could do so without changing the database you where
you are pointing AccuSQL/AccuTrack. Using the two different databases approach, that would be
necessary.
Another advantage of using local labs is the ability to change the sign in workflow for various labs. For
example, you could have a Tutoring Center and a Computer Lab. In the Tutoring Center you could have
the students select form their registered courses and select, then select an available tutor and be put in
an intake queue until they are called to be helped. In the Computer Lab you could have the students sign
in and pick no activity or tutor at all. The reason you have this capability is because most the setup
options in AccuSQL/AccuTrack can be applied differently to different labs.
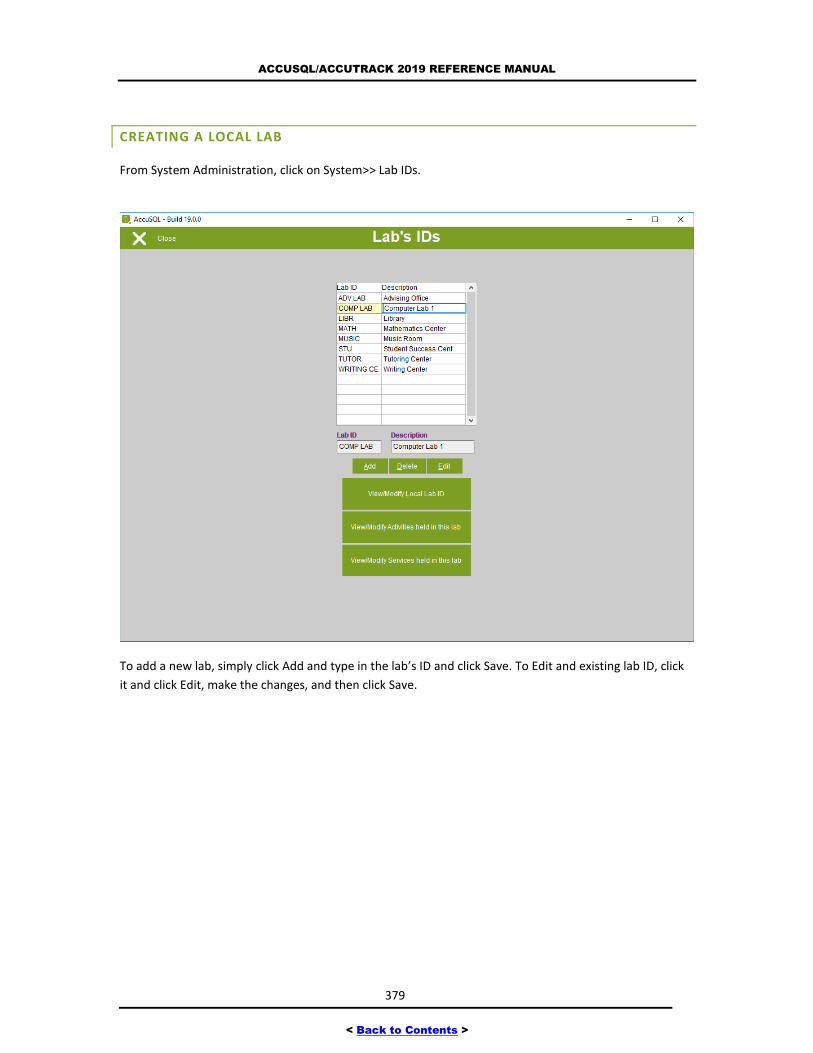
ACCUSQL/ACCUTRACK 2019 REFERENCE MANUAL
379
< Back to Contents >
CREATING A LOCAL LAB
From System Administration, click on System>> Lab IDs.
To add a new lab, simply click Add and type in the lab’s ID and click Save. To Edit and existing lab ID, click
it and click Edit, make the changes, and then click Save.
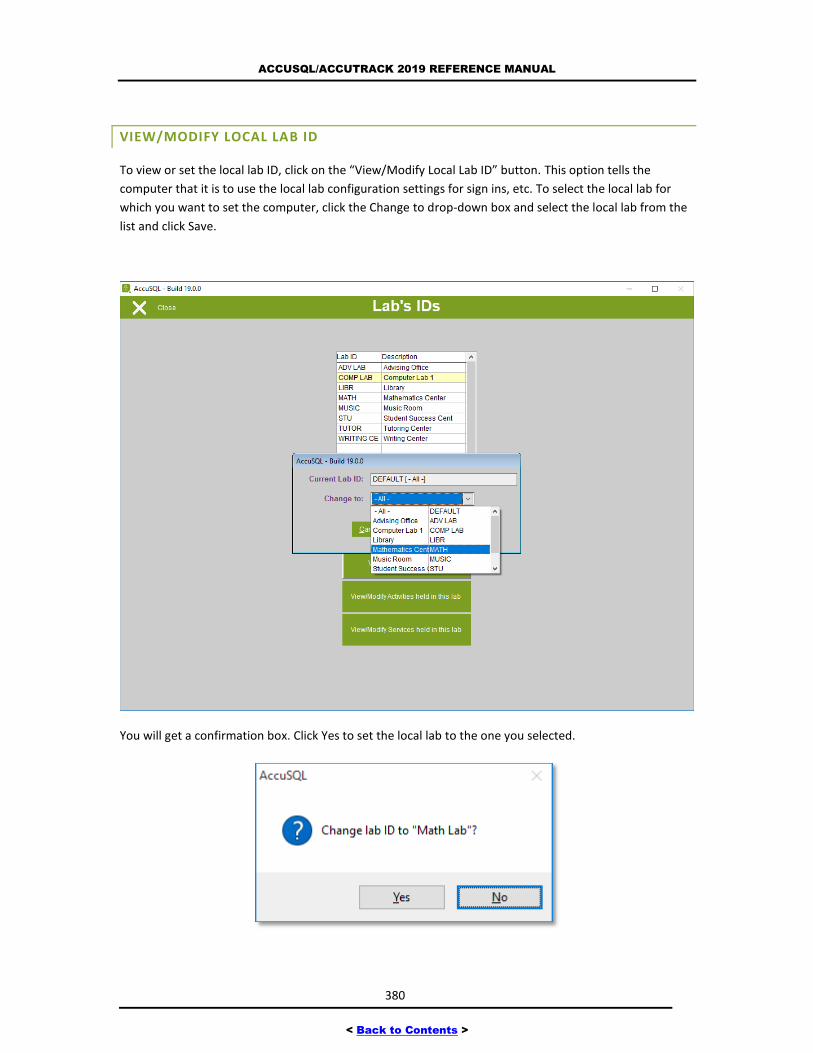
ACCUSQL/ACCUTRACK 2019 REFERENCE MANUAL
380
< Back to Contents >
VIEW/MODIFY LOCAL LAB ID
To view or set the local lab ID, click on the “View/Modify Local Lab ID” button. This option tells the
computer that it is to use the local lab configuration settings for sign ins, etc. To select the local lab for
which you want to set the computer, click the Change to drop-down box and select the local lab from the
list and click Save.
You will get a confirmation box. Click Yes to set the local lab to the one you selected.
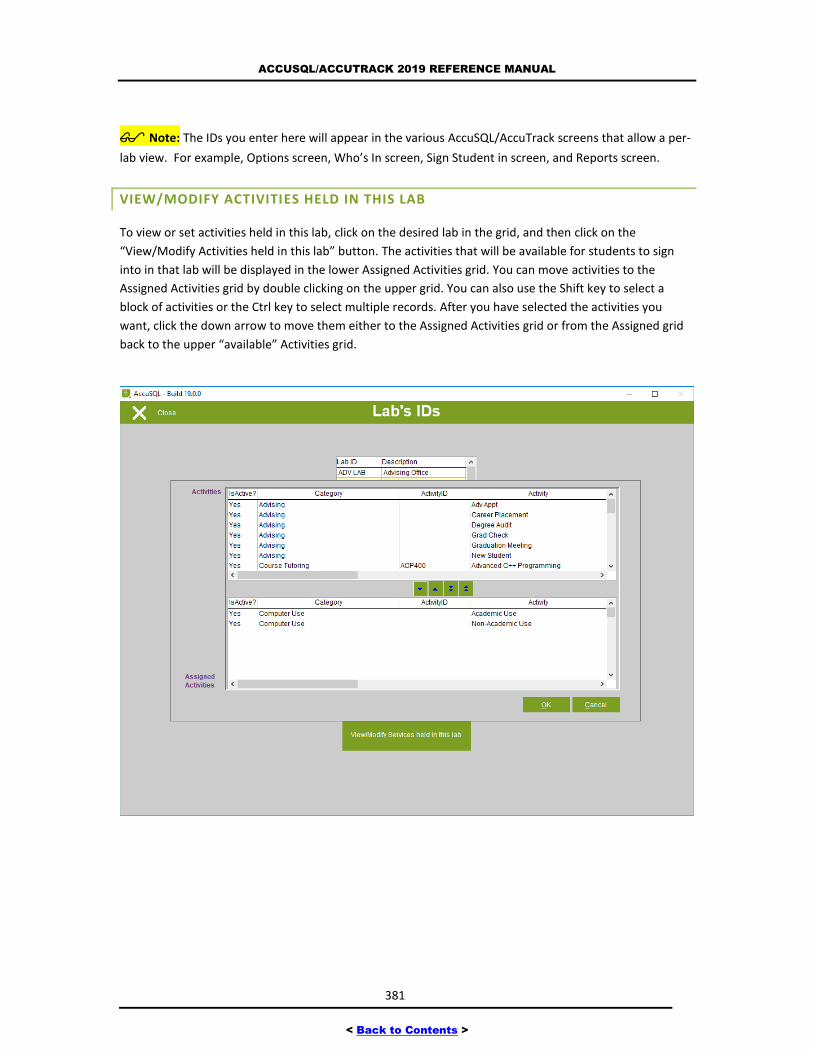
ACCUSQL/ACCUTRACK 2019 REFERENCE MANUAL
381
< Back to Contents >
Note: The IDs you enter here will appear in the various AccuSQL/AccuTrack screens that allow a per-
lab view. For example, Options screen, Who’s In screen, Sign Student in screen, and Reports screen.
VIEW/MODIFY ACTIVITIES HELD IN THIS LAB
To view or set activities held in this lab, click on the desired lab in the grid, and then click on the
“View/Modify Activities held in this lab” button. The activities that will be available for students to sign
into in that lab will be displayed in the lower Assigned Activities grid. You can move activities to the
Assigned Activities grid by double clicking on the upper grid. You can also use the Shift key to select a
block of activities or the Ctrl key to select multiple records. After you have selected the activities you
want, click the down arrow to move them either to the Assigned Activities grid or from the Assigned grid
back to the upper “available” Activities grid.
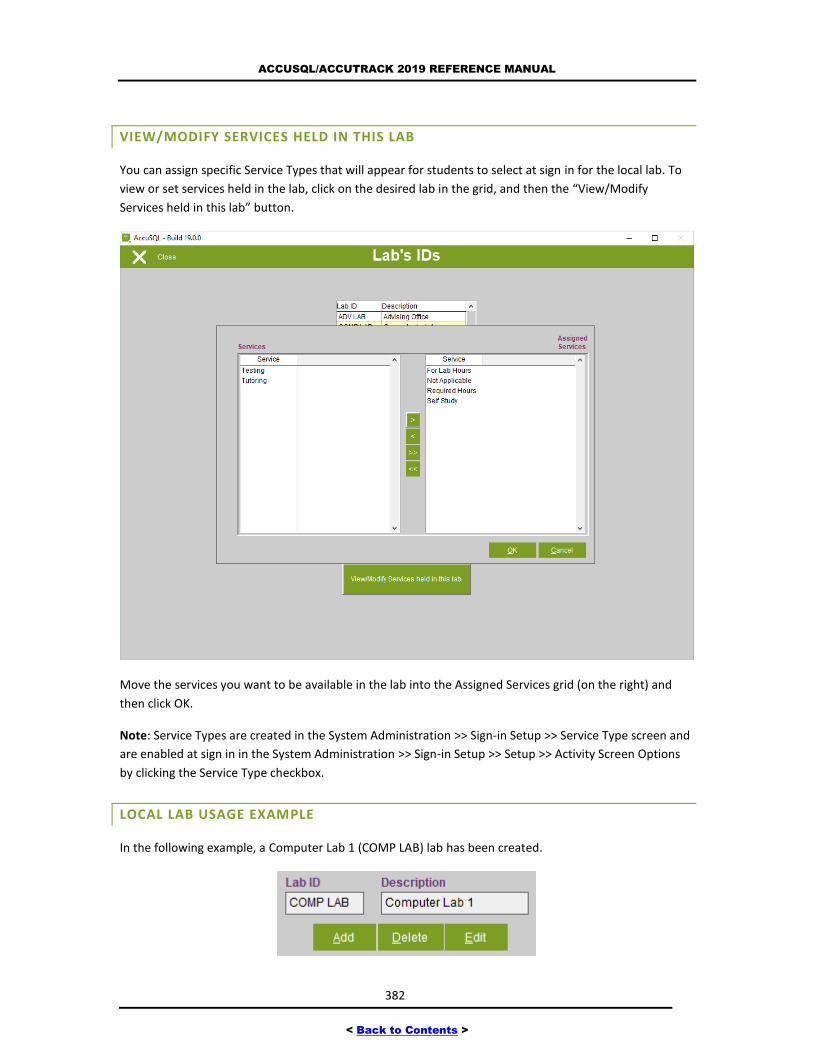
ACCUSQL/ACCUTRACK 2019 REFERENCE MANUAL
382
< Back to Contents >
VIEW/MODIFY SERVICES HELD IN THIS LAB
You can assign specific Service Types that will appear for students to select at sign in for the local lab. To
view or set services held in the lab, click on the desired lab in the grid, and then the “View/Modify
Services held in this lab” button.
Move the services you want to be available in the lab into the Assigned Services grid (on the right) and
then click OK.
Note: Service Types are created in the System Administration >> Sign-in Setup >> Service Type screen and
are enabled at sign in in the System Administration >> Sign-in Setup >> Setup >> Activity Screen Options
by clicking the Service Type checkbox.
LOCAL LAB USAGE EXAMPLE
In the following example, a Computer Lab 1 (COMP LAB) lab has been created.
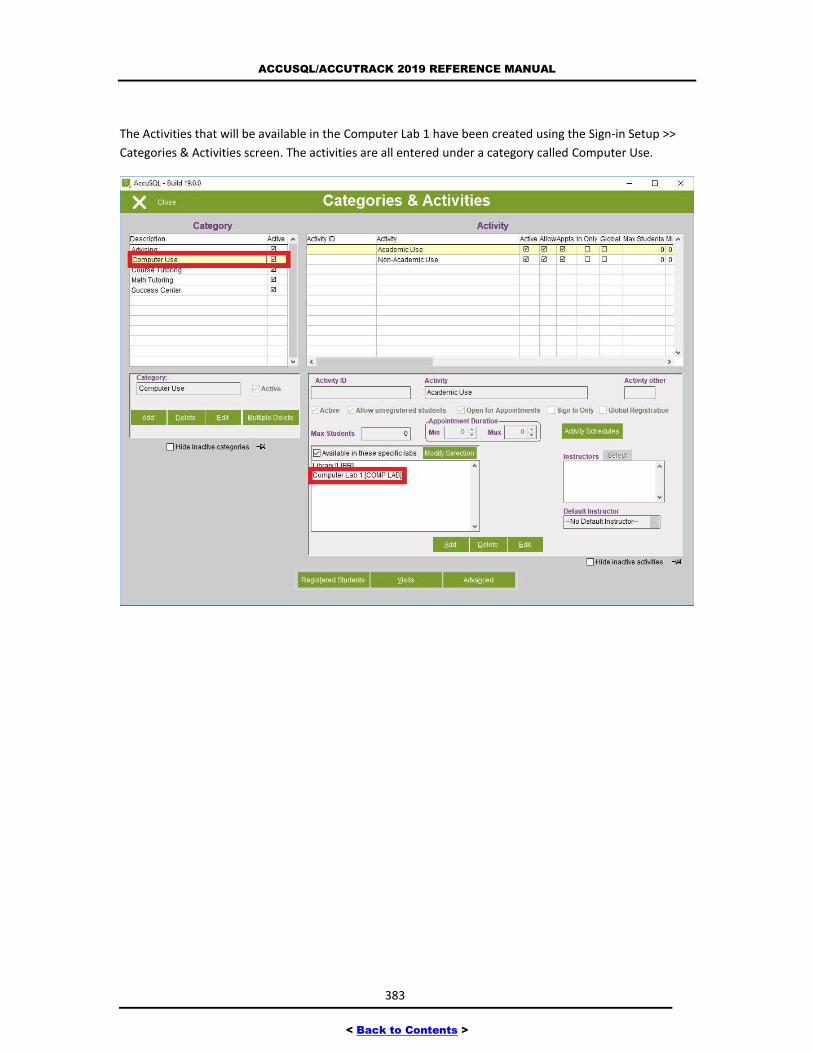
ACCUSQL/ACCUTRACK 2019 REFERENCE MANUAL
383
< Back to Contents >
The Activities that will be available in the Computer Lab 1 have been created using the Sign-in Setup >>
Categories & Activities screen. The activities are all entered under a category called Computer Use.
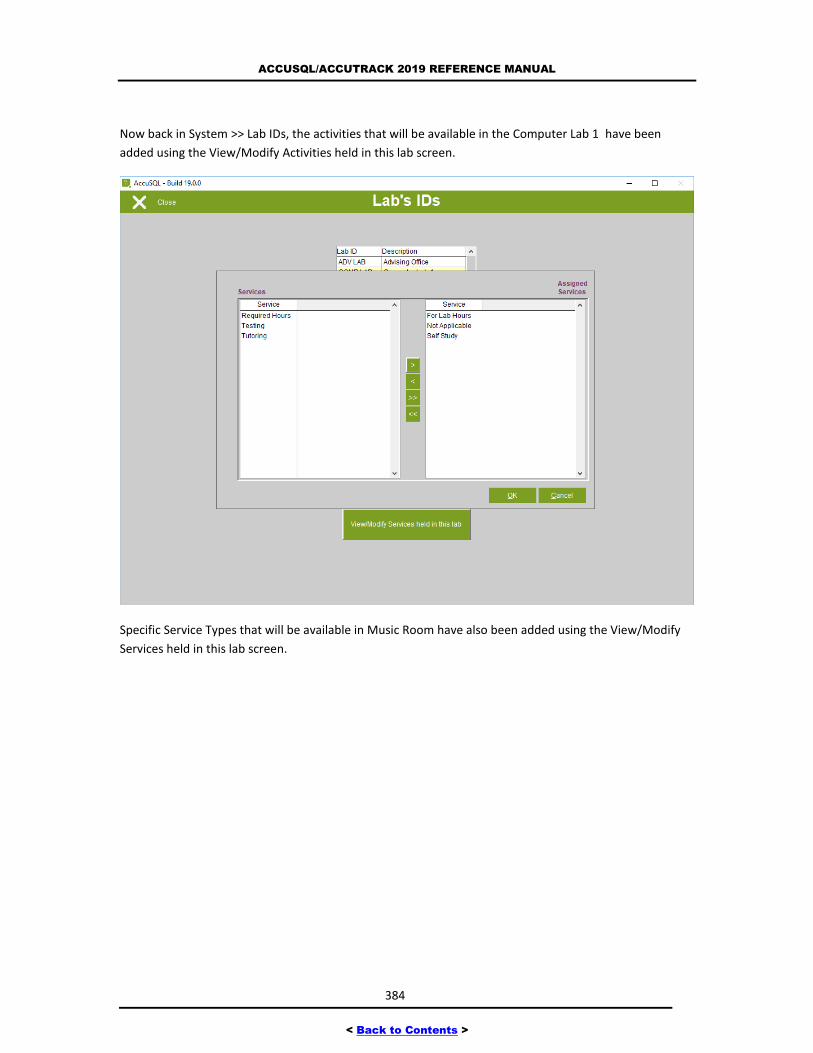
ACCUSQL/ACCUTRACK 2019 REFERENCE MANUAL
384
< Back to Contents >
Now back in System >> Lab IDs, the activities that will be available in the Computer Lab 1 have been
added using the View/Modify Activities held in this lab screen.
Specific Service Types that will be available in Music Room have also been added using the View/Modify
Services held in this lab screen.
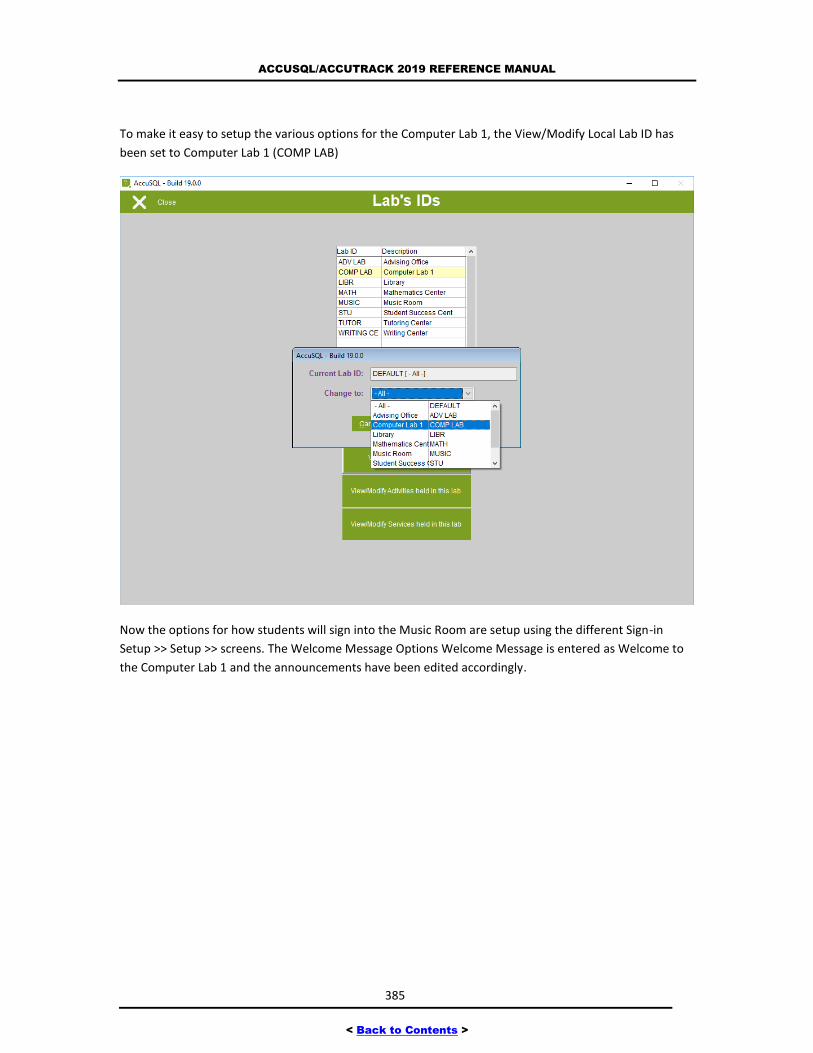
ACCUSQL/ACCUTRACK 2019 REFERENCE MANUAL
385
< Back to Contents >
To make it easy to setup the various options for the Computer Lab 1, the View/Modify Local Lab ID has
been set to Computer Lab 1 (COMP LAB)
Now the options for how students will sign into the Music Room are setup using the different Sign-in
Setup >> Setup >> screens. The Welcome Message Options Welcome Message is entered as Welcome to
the Computer Lab 1 and the announcements have been edited accordingly.
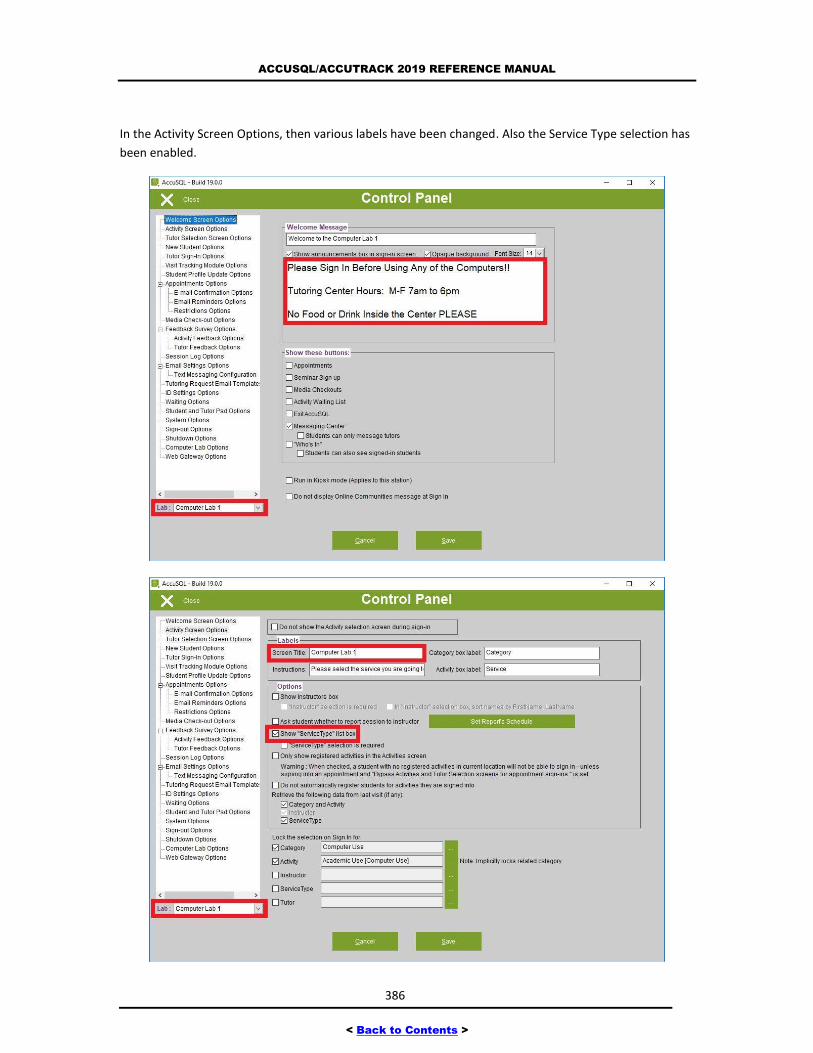
ACCUSQL/ACCUTRACK 2019 REFERENCE MANUAL
386
< Back to Contents >
In the Activity Screen Options, then various labels have been changed. Also the Service Type selection has
been enabled.
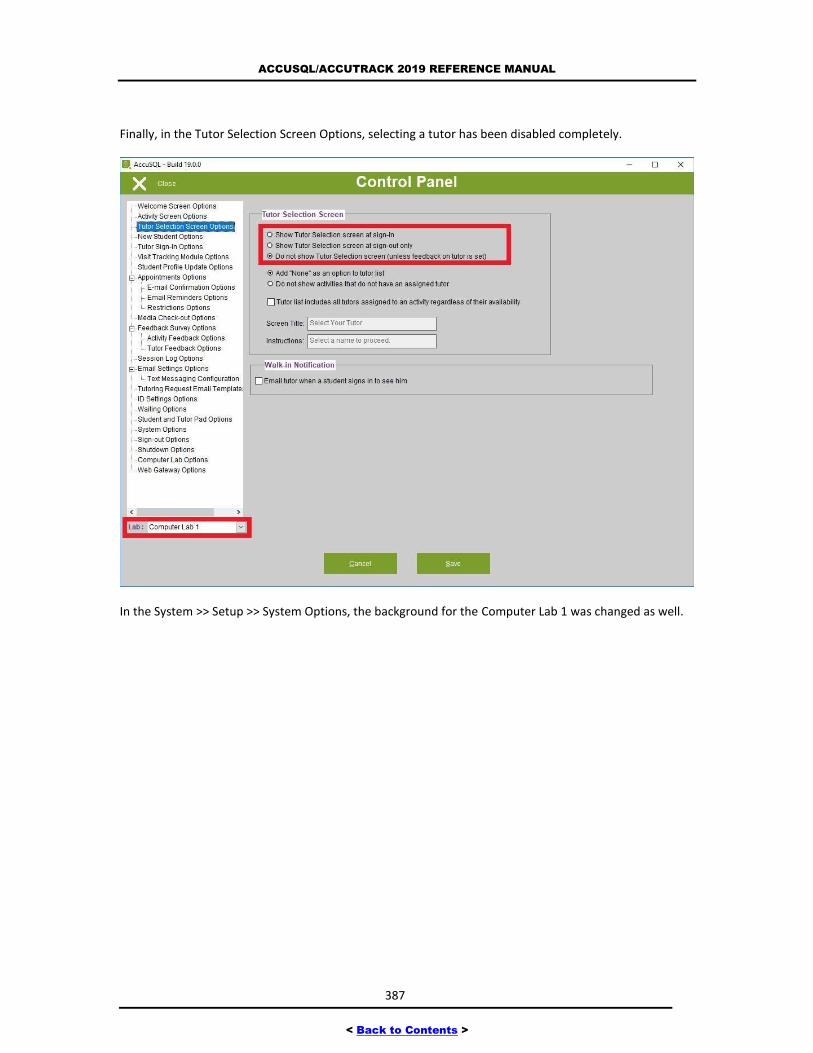
ACCUSQL/ACCUTRACK 2019 REFERENCE MANUAL
387
< Back to Contents >
Finally, in the Tutor Selection Screen Options, selecting a tutor has been disabled completely.
In the System >> Setup >> System Options, the background for the Computer Lab 1 was changed as well.
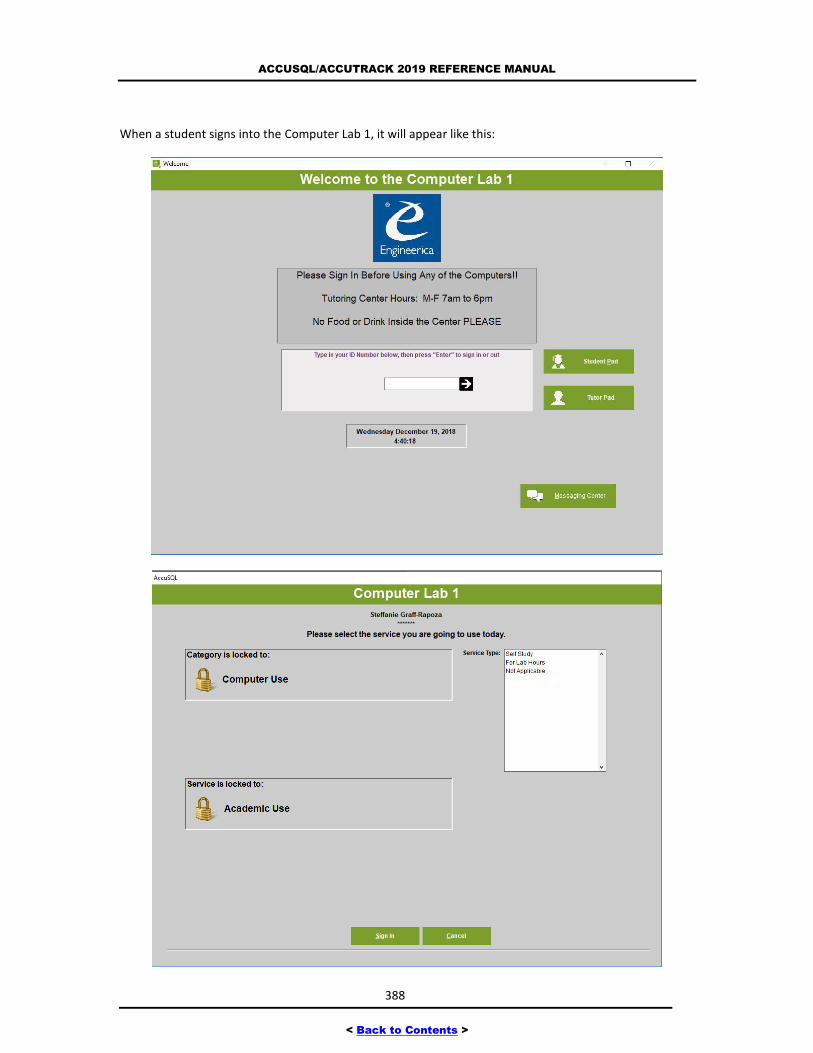
ACCUSQL/ACCUTRACK 2019 REFERENCE MANUAL
388
< Back to Contents >
When a student signs into the Computer Lab 1, it will appear like this:

ACCUSQL/ACCUTRACK 2019 REFERENCE MANUAL
389
< Back to Contents >
Now I can run reports for what is happening specifically in the Music Room using the Lab IDs report filter
and setting it to Music Room.
REMOTE SHUTDOWN STATIONS
Purpose: To display information about computers sharing the database and to remotely shutdown
administrator computers for maintenance
Access: From System Administration, click on System Remotely Shutdown Stations.
Use Remote Shutdown to see which administrator computers are currently logged into
AccuSQL/AccuTrack and to initiate remote shutdowns of those computers.
To make it more convenient for you to run database operations, this screen will display the computer
stations currently sharing the database and it will allow you to exit AccuSQL/AccuTrack on these stations.
The SuperTable in this screen lists all computers using the database. This includes the computer’s name,
the user’s name, the time AccuSQL/AccuTrack was launched on that computer, and Ethernet address of
the computer running AccuSQL/AccuTrack. This list will periodically refresh itself.
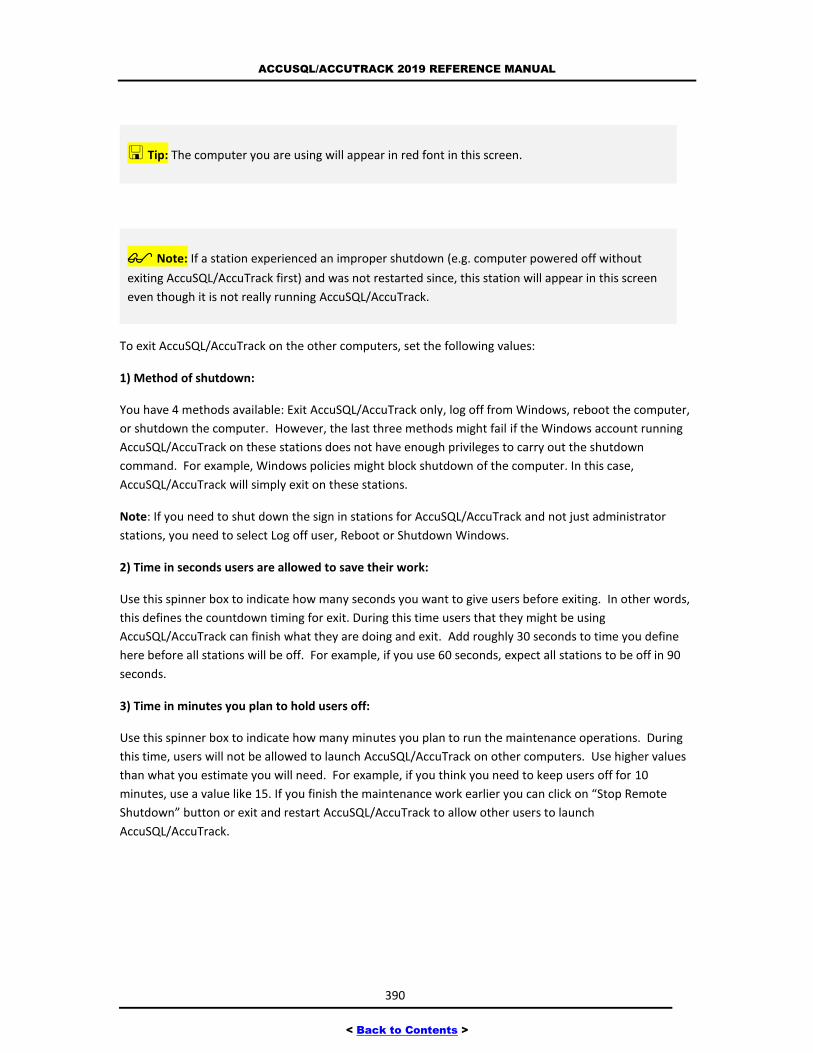
ACCUSQL/ACCUTRACK 2019 REFERENCE MANUAL
390
< Back to Contents >
Tip: The computer you are using will appear in red font in this screen.
Note: If a station experienced an improper shutdown (e.g. computer powered off without
exiting AccuSQL/AccuTrack first) and was not restarted since, this station will appear in this screen
even though it is not really running AccuSQL/AccuTrack.
To exit AccuSQL/AccuTrack on the other computers, set the following values:
1) Method of shutdown:
You have 4 methods available: Exit AccuSQL/AccuTrack only, log off from Windows, reboot the computer,
or shutdown the computer. However, the last three methods might fail if the Windows account running
AccuSQL/AccuTrack on these stations does not have enough privileges to carry out the shutdown
command. For example, Windows policies might block shutdown of the computer. In this case,
AccuSQL/AccuTrack will simply exit on these stations.
Note: If you need to shut down the sign in stations for AccuSQL/AccuTrack and not just administrator
stations, you need to select Log off user, Reboot or Shutdown Windows.
2) Time in seconds users are allowed to save their work:
Use this spinner box to indicate how many seconds you want to give users before exiting. In other words,
this defines the countdown timing for exit. During this time users that they might be using
AccuSQL/AccuTrack can finish what they are doing and exit. Add roughly 30 seconds to time you define
here before all stations will be off. For example, if you use 60 seconds, expect all stations to be off in 90
seconds.
3) Time in minutes you plan to hold users off:
Use this spinner box to indicate how many minutes you plan to run the maintenance operations. During
this time, users will not be allowed to launch AccuSQL/AccuTrack on other computers. Use higher values
than what you estimate you will need. For example, if you think you need to keep users off for 10
minutes, use a value like 15. If you finish the maintenance work earlier you can click on “Stop Remote
Shutdown” button or exit and restart AccuSQL/AccuTrack to allow other users to launch
AccuSQL/AccuTrack.
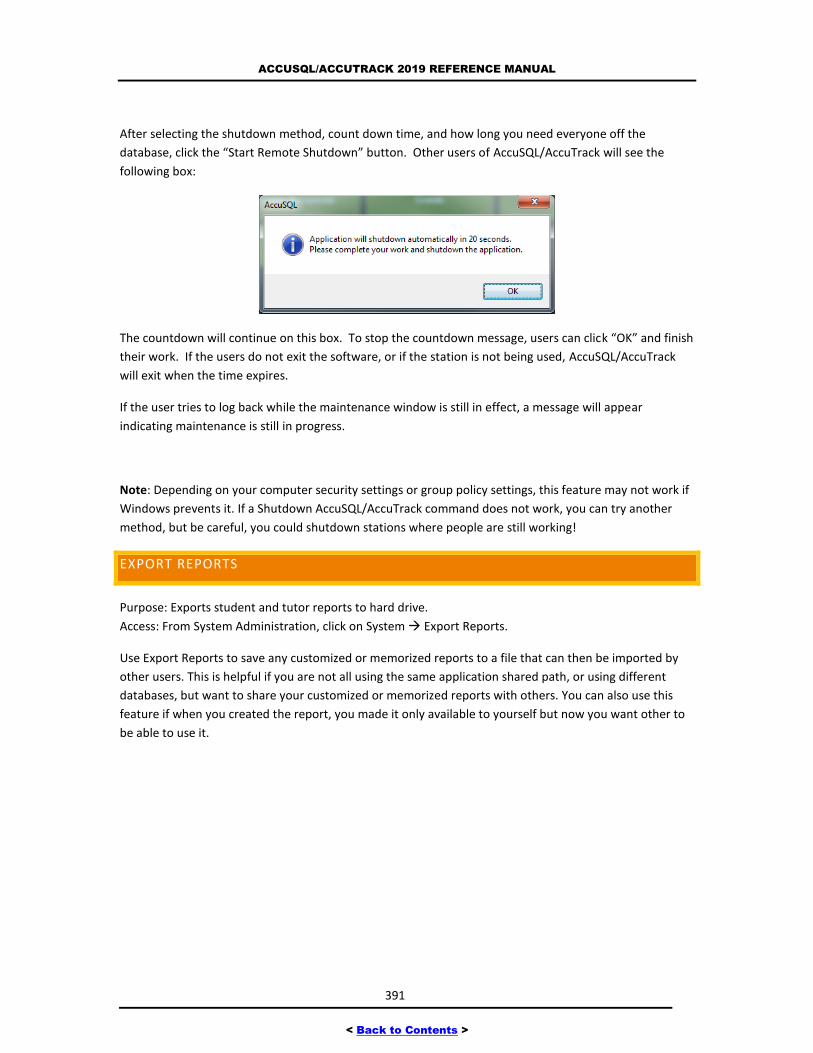
ACCUSQL/ACCUTRACK 2019 REFERENCE MANUAL
391
< Back to Contents >
After selecting the shutdown method, count down time, and how long you need everyone off the
database, click the “Start Remote Shutdown” button. Other users of AccuSQL/AccuTrack will see the
following box:
The countdown will continue on this box. To stop the countdown message, users can click “OK” and finish
their work. If the users do not exit the software, or if the station is not being used, AccuSQL/AccuTrack
will exit when the time expires.
If the user tries to log back while the maintenance window is still in effect, a message will appear
indicating maintenance is still in progress.
Note: Depending on your computer security settings or group policy settings, this feature may not work if
Windows prevents it. If a Shutdown AccuSQL/AccuTrack command does not work, you can try another
method, but be careful, you could shutdown stations where people are still working!
EXPORT REPORTS
Purpose: Exports student and tutor reports to hard drive.
Access: From System Administration, click on System Export Reports.
Use Export Reports to save any customized or memorized reports to a file that can then be imported by
other users. This is helpful if you are not all using the same application shared path, or using different
databases, but want to share your customized or memorized reports with others. You can also use this
feature if when you created the report, you made it only available to yourself but now you want other to
be able to use it.
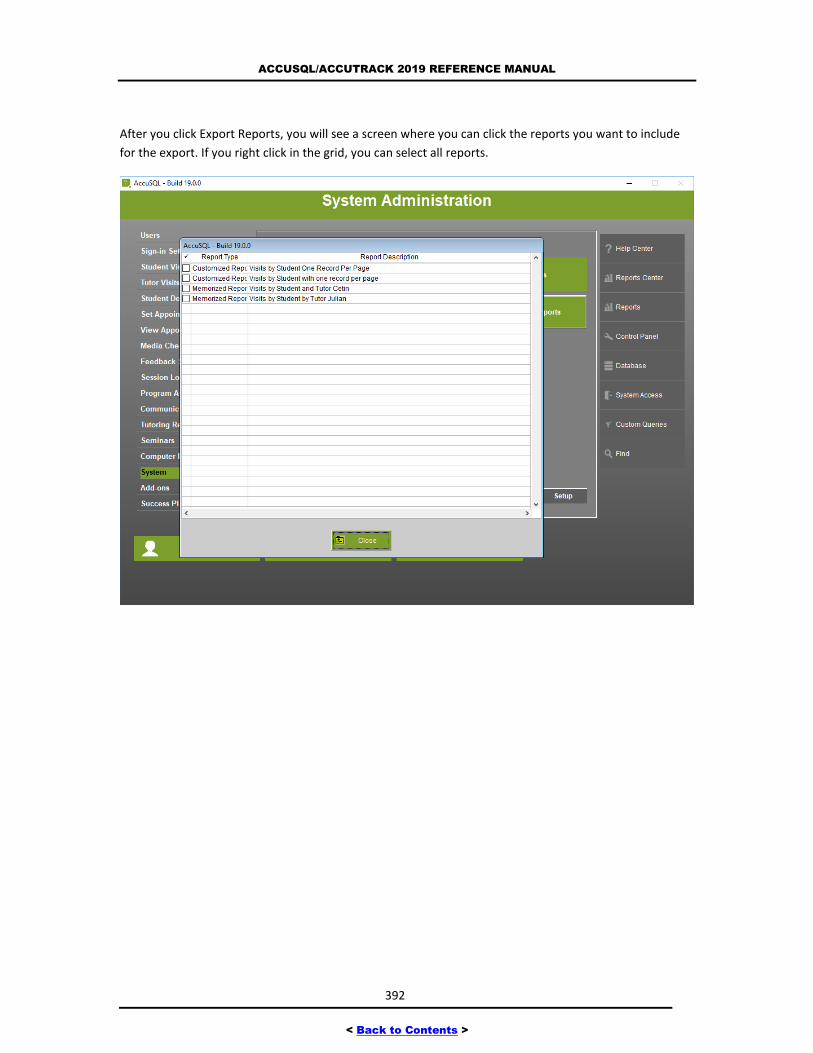
ACCUSQL/ACCUTRACK 2019 REFERENCE MANUAL
392
< Back to Contents >
After you click Export Reports, you will see a screen where you can click the reports you want to include
for the export. If you right click in the grid, you can select all reports.
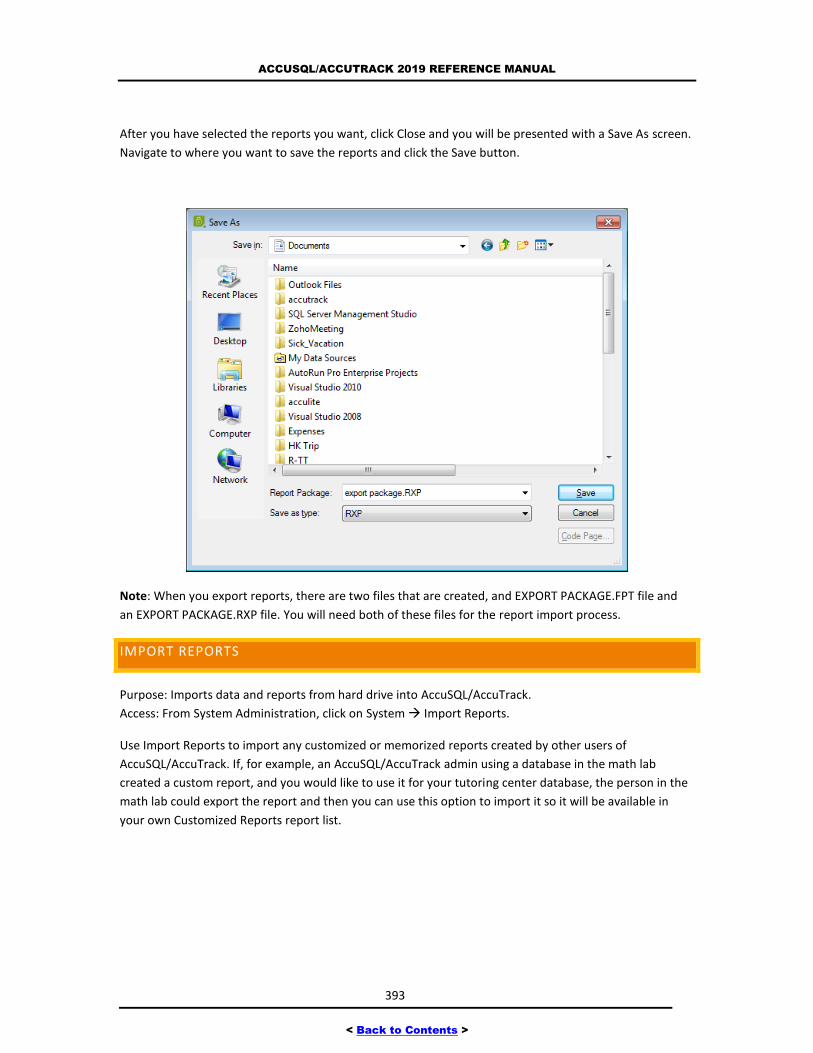
ACCUSQL/ACCUTRACK 2019 REFERENCE MANUAL
393
< Back to Contents >
After you have selected the reports you want, click Close and you will be presented with a Save As screen.
Navigate to where you want to save the reports and click the Save button.
Note: When you export reports, there are two files that are created, and EXPORT PACKAGE.FPT file and
an EXPORT PACKAGE.RXP file. You will need both of these files for the report import process.
IMPORT REPORTS
Purpose: Imports data and reports from hard drive into AccuSQL/AccuTrack.
Access: From System Administration, click on System Import Reports.
Use Import Reports to import any customized or memorized reports created by other users of
AccuSQL/AccuTrack. If, for example, an AccuSQL/AccuTrack admin using a database in the math lab
created a custom report, and you would like to use it for your tutoring center database, the person in the
math lab could export the report and then you can use this option to import it so it will be available in
your own Customized Reports report list.
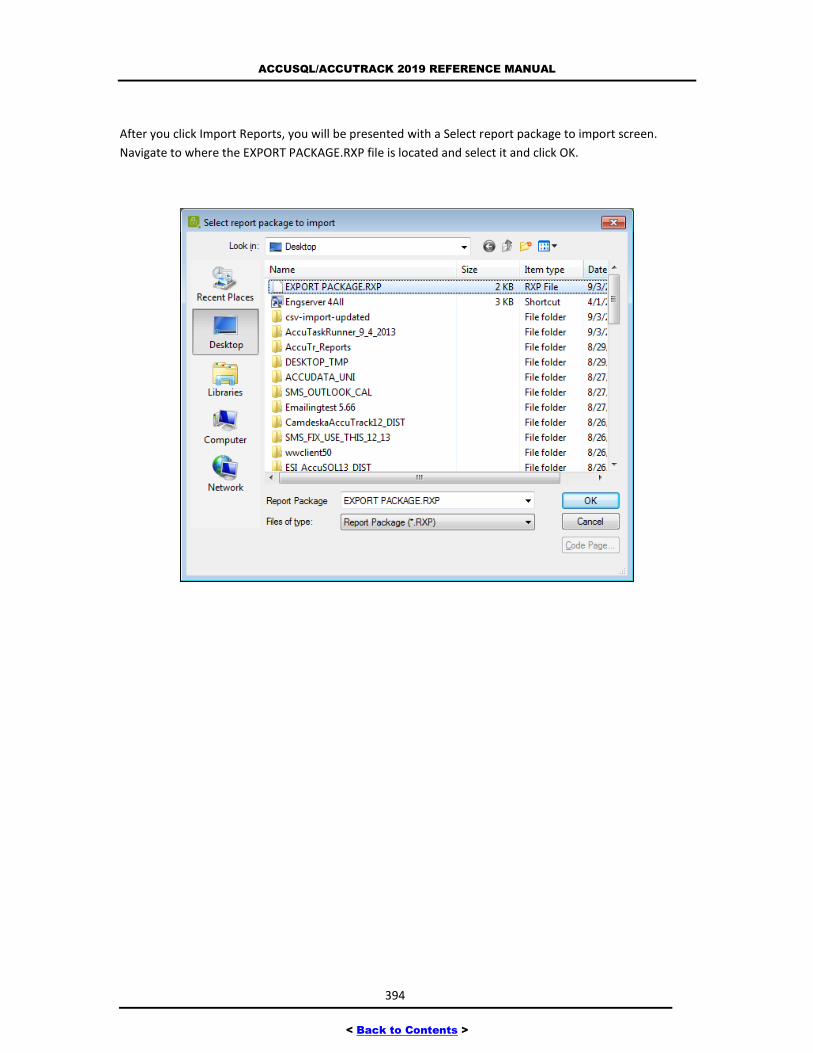
ACCUSQL/ACCUTRACK 2019 REFERENCE MANUAL
394
< Back to Contents >
After you click Import Reports, you will be presented with a Select report package to import screen.
Navigate to where the EXPORT PACKAGE.RXP file is located and select it and click OK.
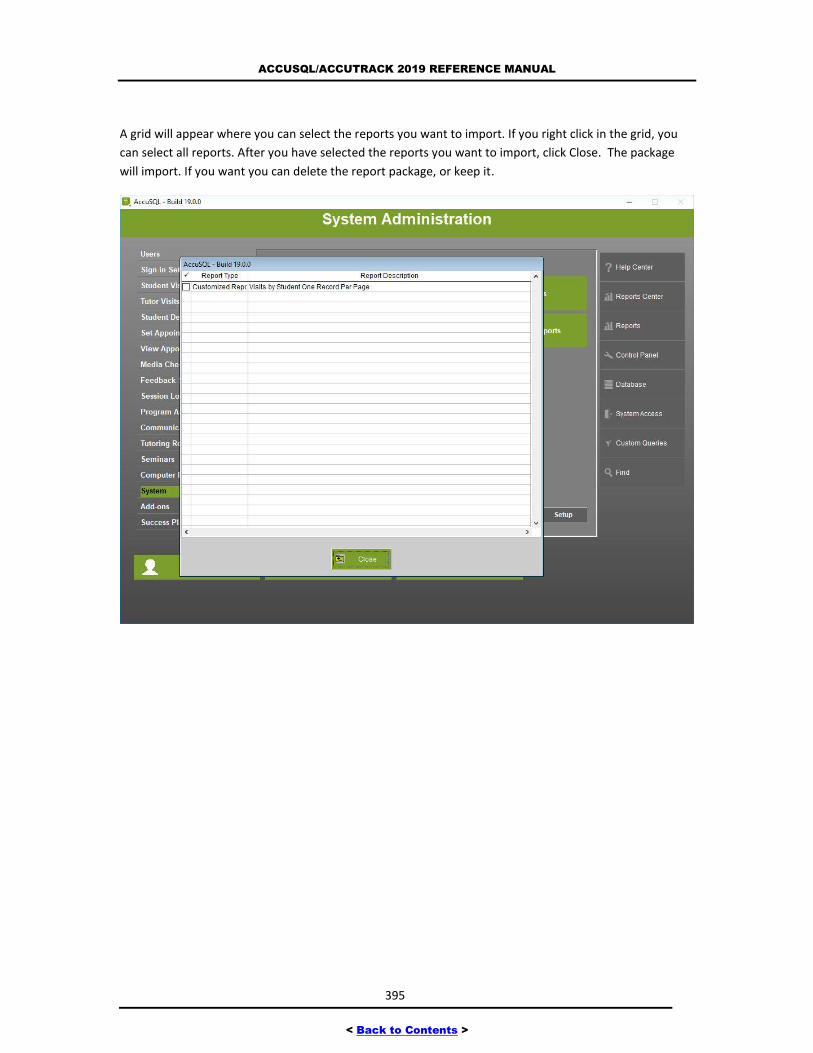
ACCUSQL/ACCUTRACK 2019 REFERENCE MANUAL
395
< Back to Contents >
A grid will appear where you can select the reports you want to import. If you right click in the grid, you
can select all reports. After you have selected the reports you want to import, click Close. The package
will import. If you want you can delete the report package, or keep it.

ACCUSQL/ACCUTRACK 2019 REFERENCE MANUAL
396
< Back to Contents >
NEW AUTOMATED TASK SCHEDULER – ACCUTASK SCHEDULER
Purpose: Set automated tasks for Appointment Reminder, Auto Sign Out, Late Media Reminder, No-Show
Reminder, Periodic Imports, Scheduled Instructor Reports, Scheduled Reports, Seminar Reminder, Success
Plans
Access: From System Administration, click on System Task Handler.
Click on Task Handler to launch the Scheduled Tasks screen. From this screen, you can select which task
you would like to setup as an Automated Task.
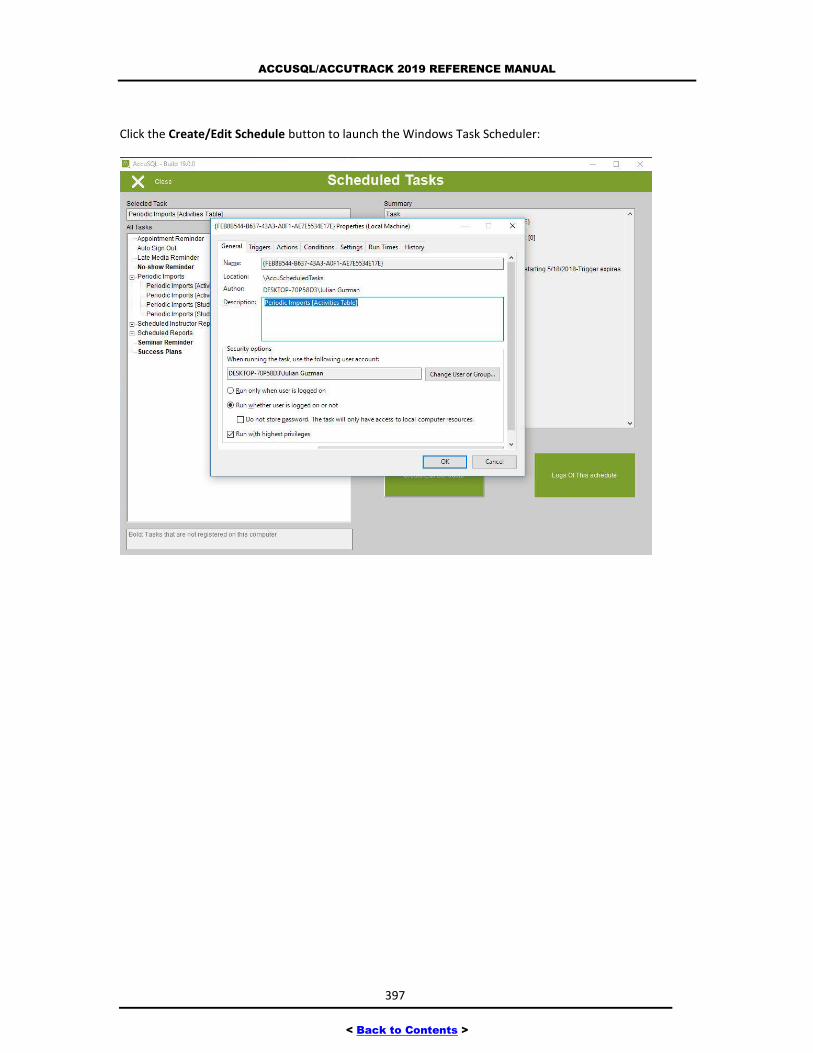
ACCUSQL/ACCUTRACK 2019 REFERENCE MANUAL
397
< Back to Contents >
Click the Create/Edit Schedule button to launch the Windows Task Scheduler:
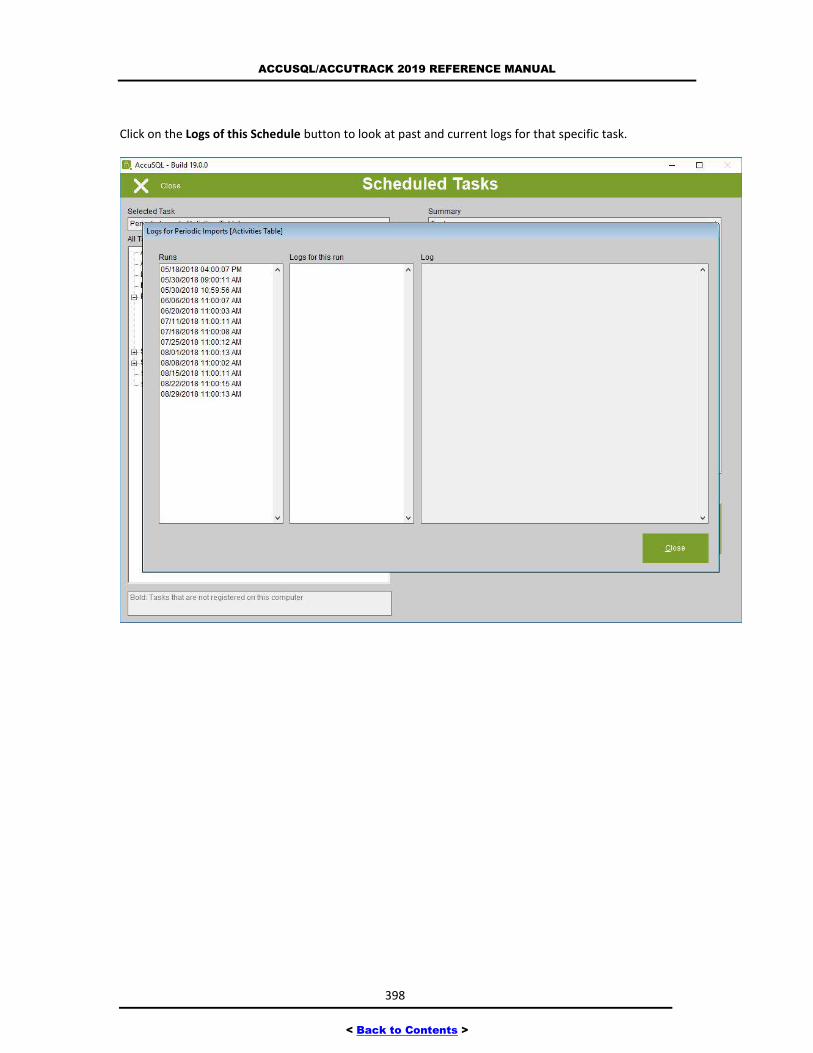
ACCUSQL/ACCUTRACK 2019 REFERENCE MANUAL
398
< Back to Contents >
Click on the Logs of this Schedule button to look at past and current logs for that specific task.
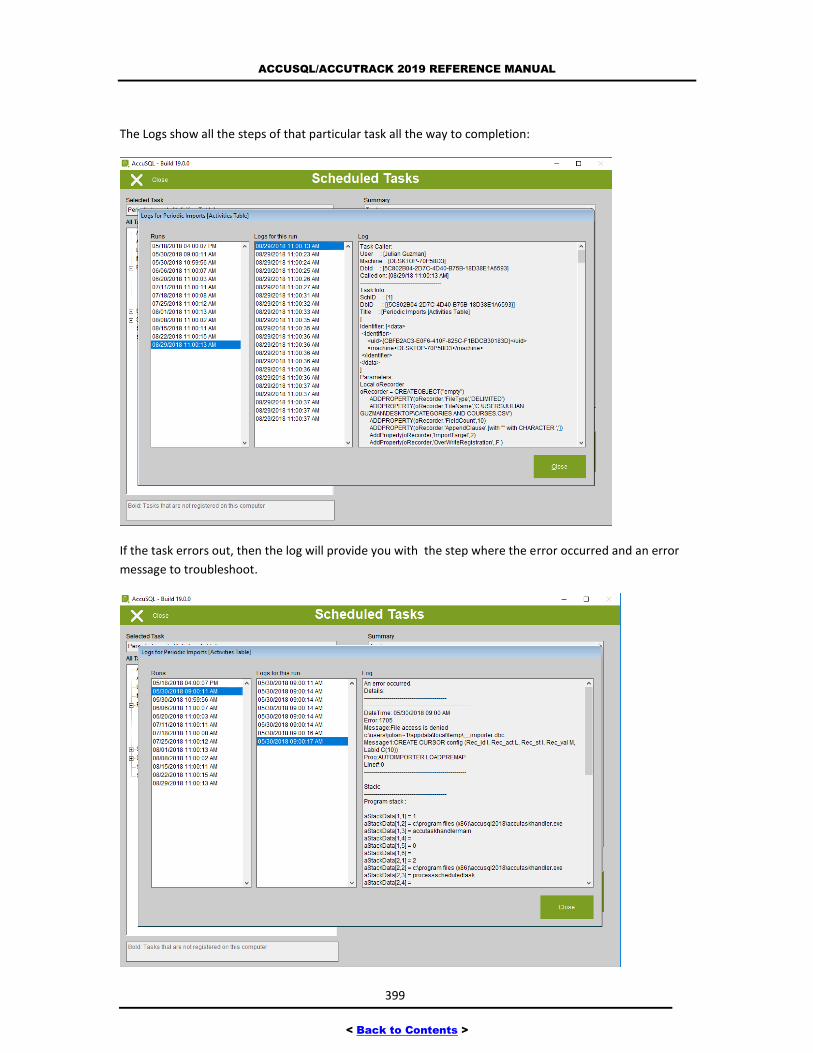
ACCUSQL/ACCUTRACK 2019 REFERENCE MANUAL
399
< Back to Contents >
The Logs show all the steps of that particular task all the way to completion:
If the task errors out, then the log will provide you with the step where the error occurred and an error
message to troubleshoot.
ACCUSQL/ACCUTRACK 2019 REFERENCE MANUAL
400
< Back to Contents >
SYSTEM SETUP OPTIONS
If you click System from the main System Administration screen, then select Setup, you will be presented
with a System Setup Options view that shows context specific options for your System screens.
Here are the Control Panel options for System Setup:
Test Messaging Configuration – Used to setup the text messaging information that will be used
to send text messages in AccuSQL/AccuTrack.
ID Settings Options – Used to setup the ID length and mask parameters for the people that will
be logging into AccuSQL/AccuTrack, either as students, tutors, or administrators.
Waiting Options – Used to enable either an intake queue or an activity waiting list in
AccuSQL/AccuTrack. Using these methods, students sign in and then are placed in a waiting
queue until they are ready to be seen by available staff.
Student and Tutor Pad Options – Used to display or hide the Student and Tutor Pad buttons on
the main sign in screen.
System Options – Used to configure software updates, startup settings, and various system
display settings.
Sign-out Options – Used to setup rules for log in display statistics, and how to handle students
that forget to sign out.
Shutdown Options – Used to setup rules that run at for system shutdown.
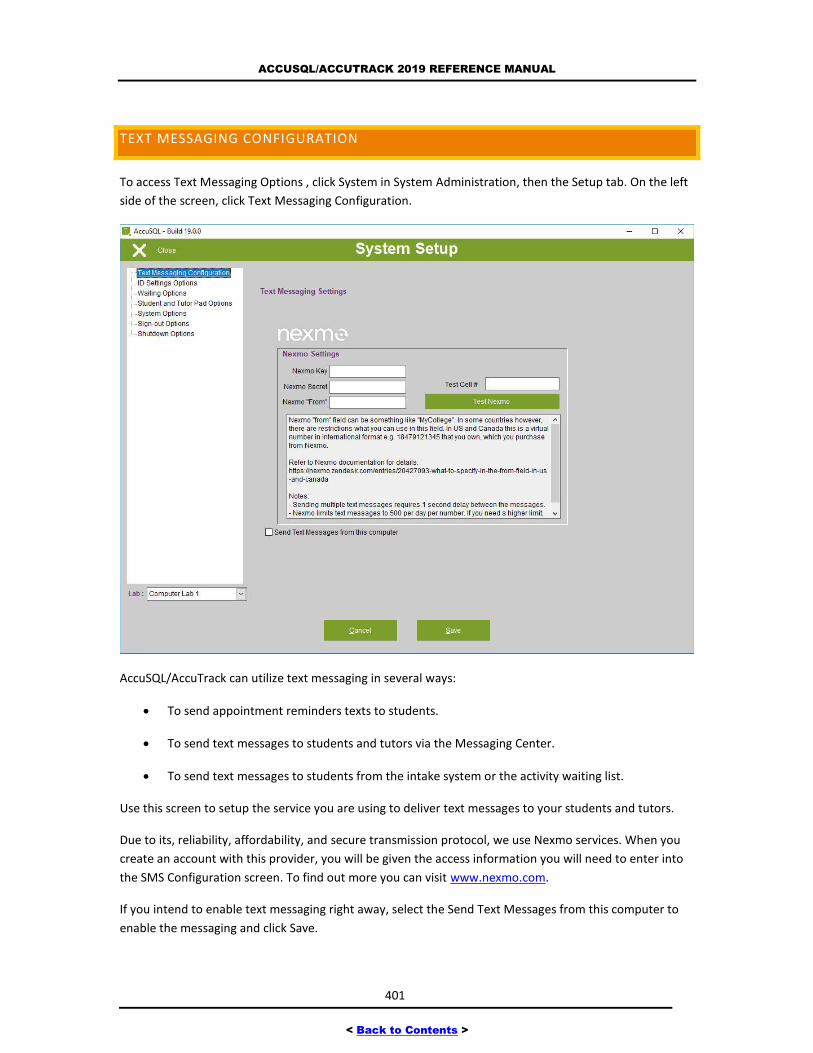
ACCUSQL/ACCUTRACK 2019 REFERENCE MANUAL
401
< Back to Contents >
TEXT MESSAGING CONFIGURATION
To access Text Messaging Options , click System in System Administration, then the Setup tab. On the left
side of the screen, click Text Messaging Configuration.
AccuSQL/AccuTrack can utilize text messaging in several ways:
To send appointment reminders texts to students.
To send text messages to students and tutors via the Messaging Center.
To send text messages to students from the intake system or the activity waiting list.
Use this screen to setup the service you are using to deliver text messages to your students and tutors.
Due to its, reliability, affordability, and secure transmission protocol, we use Nexmo services. When you
create an account with this provider, you will be given the access information you will need to enter into
the SMS Configuration screen. To find out more you can visit www.nexmo.com.
If you intend to enable text messaging right away, select the Send Text Messages from this computer to
enable the messaging and click Save.
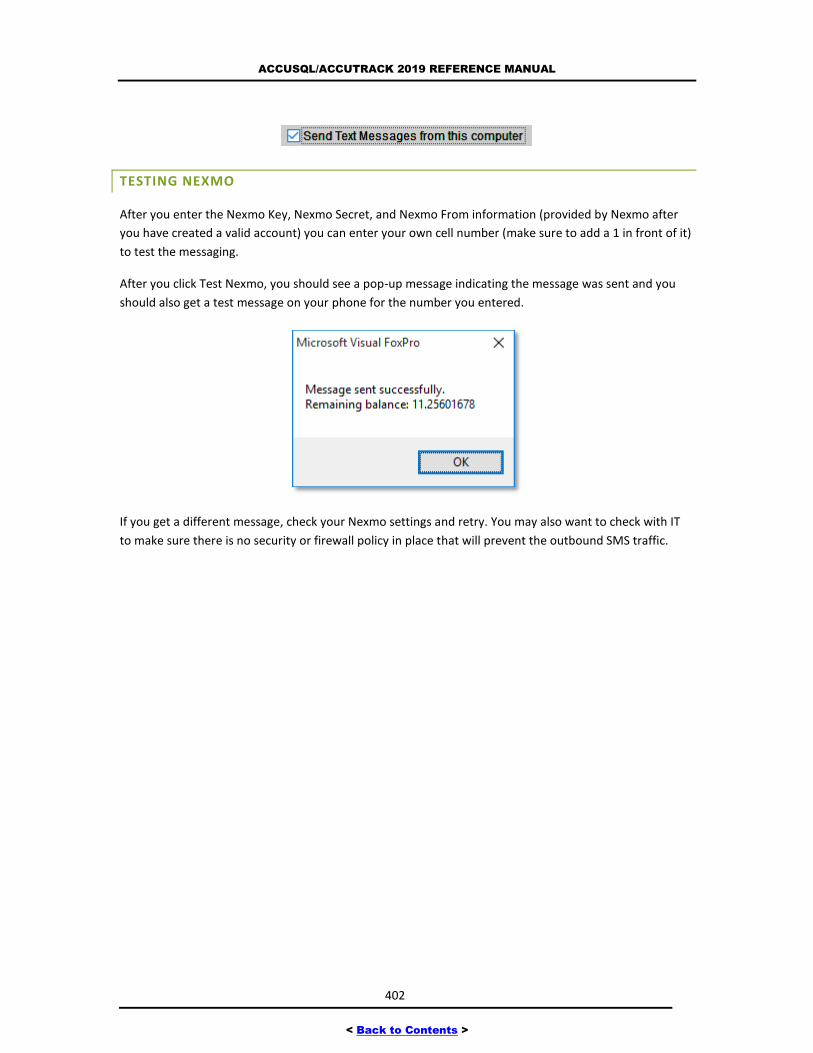
ACCUSQL/ACCUTRACK 2019 REFERENCE MANUAL
402
< Back to Contents >
TESTING NEXMO
After you enter the Nexmo Key, Nexmo Secret, and Nexmo From information (provided by Nexmo after
you have created a valid account) you can enter your own cell number (make sure to add a 1 in front of it)
to test the messaging.
After you click Test Nexmo, you should see a pop-up message indicating the message was sent and you
should also get a test message on your phone for the number you entered.
If you get a different message, check your Nexmo settings and retry. You may also want to check with IT
to make sure there is no security or firewall policy in place that will prevent the outbound SMS traffic.
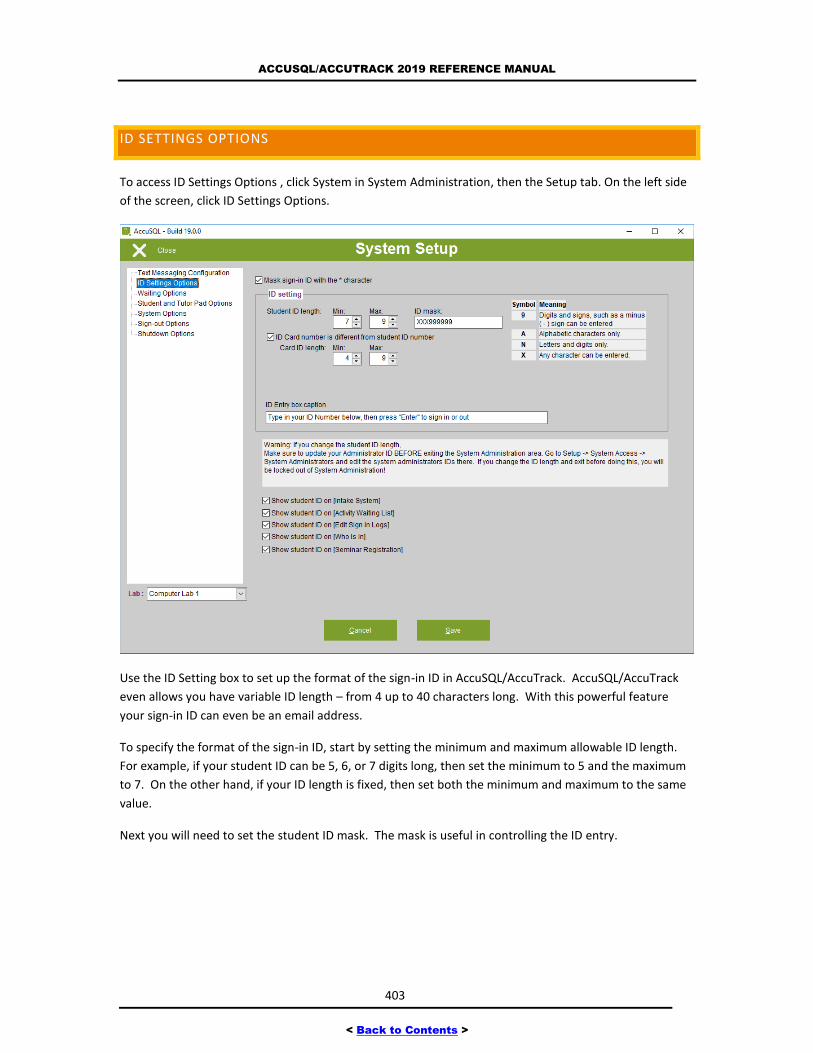
ACCUSQL/ACCUTRACK 2019 REFERENCE MANUAL
403
< Back to Contents >
ID SETTINGS OPTIONS
To access ID Settings Options , click System in System Administration, then the Setup tab. On the left side
of the screen, click ID Settings Options.
Use the ID Setting box to set up the format of the sign-in ID in AccuSQL/AccuTrack. AccuSQL/AccuTrack
even allows you have variable ID length – from 4 up to 40 characters long. With this powerful feature
your sign-in ID can even be an email address.
To specify the format of the sign-in ID, start by setting the minimum and maximum allowable ID length.
For example, if your student ID can be 5, 6, or 7 digits long, then set the minimum to 5 and the maximum
to 7. On the other hand, if your ID length is fixed, then set both the minimum and maximum to the same
value.
Next you will need to set the student ID mask. The mask is useful in controlling the ID entry.
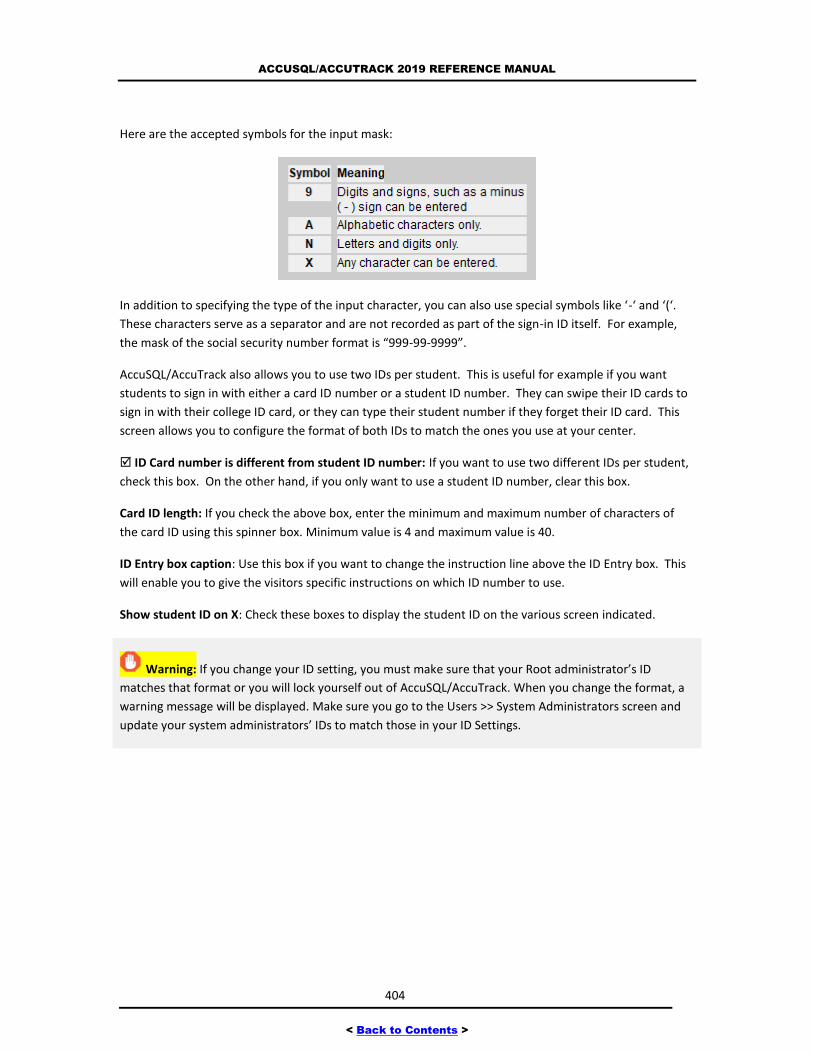
ACCUSQL/ACCUTRACK 2019 REFERENCE MANUAL
404
< Back to Contents >
Here are the accepted symbols for the input mask:
In addition to specifying the type of the input character, you can also use special symbols like ‘-‘ and ‘(‘.
These characters serve as a separator and are not recorded as part of the sign-in ID itself. For example,
the mask of the social security number format is “999-99-9999”.
AccuSQL/AccuTrack also allows you to use two IDs per student. This is useful for example if you want
students to sign in with either a card ID number or a student ID number. They can swipe their ID cards to
sign in with their college ID card, or they can type their student number if they forget their ID card. This
screen allows you to configure the format of both IDs to match the ones you use at your center.
ID Card number is different from student ID number: If you want to use two different IDs per student,
check this box. On the other hand, if you only want to use a student ID number, clear this box.
Card ID length: If you check the above box, enter the minimum and maximum number of characters of
the card ID using this spinner box. Minimum value is 4 and maximum value is 40.
ID Entry box caption: Use this box if you want to change the instruction line above the ID Entry box. This
will enable you to give the visitors specific instructions on which ID number to use.
Show student ID on X: Check these boxes to display the student ID on the various screen indicated.
Warning: If you change your ID setting, you must make sure that your Root administrator’s ID
matches that format or you will lock yourself out of AccuSQL/AccuTrack. When you change the format, a
warning message will be displayed. Make sure you go to the Users >> System Administrators screen and
update your system administrators’ IDs to match those in your ID Settings.
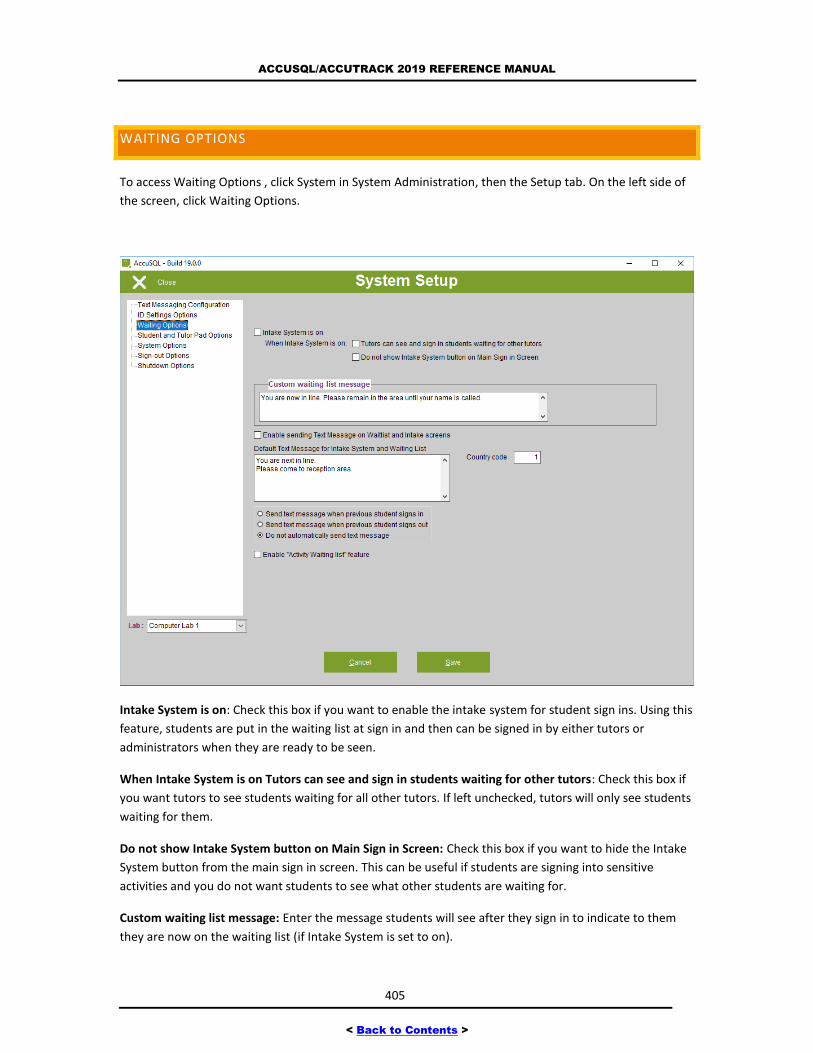
ACCUSQL/ACCUTRACK 2019 REFERENCE MANUAL
405
< Back to Contents >
WAITING OPTIONS
To access Waiting Options , click System in System Administration, then the Setup tab. On the left side of
the screen, click Waiting Options.
Intake System is on: Check this box if you want to enable the intake system for student sign ins. Using this
feature, students are put in the waiting list at sign in and then can be signed in by either tutors or
administrators when they are ready to be seen.
When Intake System is on Tutors can see and sign in students waiting for other tutors: Check this box if
you want tutors to see students waiting for all other tutors. If left unchecked, tutors will only see students
waiting for them.
Do not show Intake System button on Main Sign in Screen: Check this box if you want to hide the Intake
System button from the main sign in screen. This can be useful if students are signing into sensitive
activities and you do not want students to see what other students are waiting for.
Custom waiting list message: Enter the message students will see after they sign in to indicate to them
they are now on the waiting list (if Intake System is set to on).
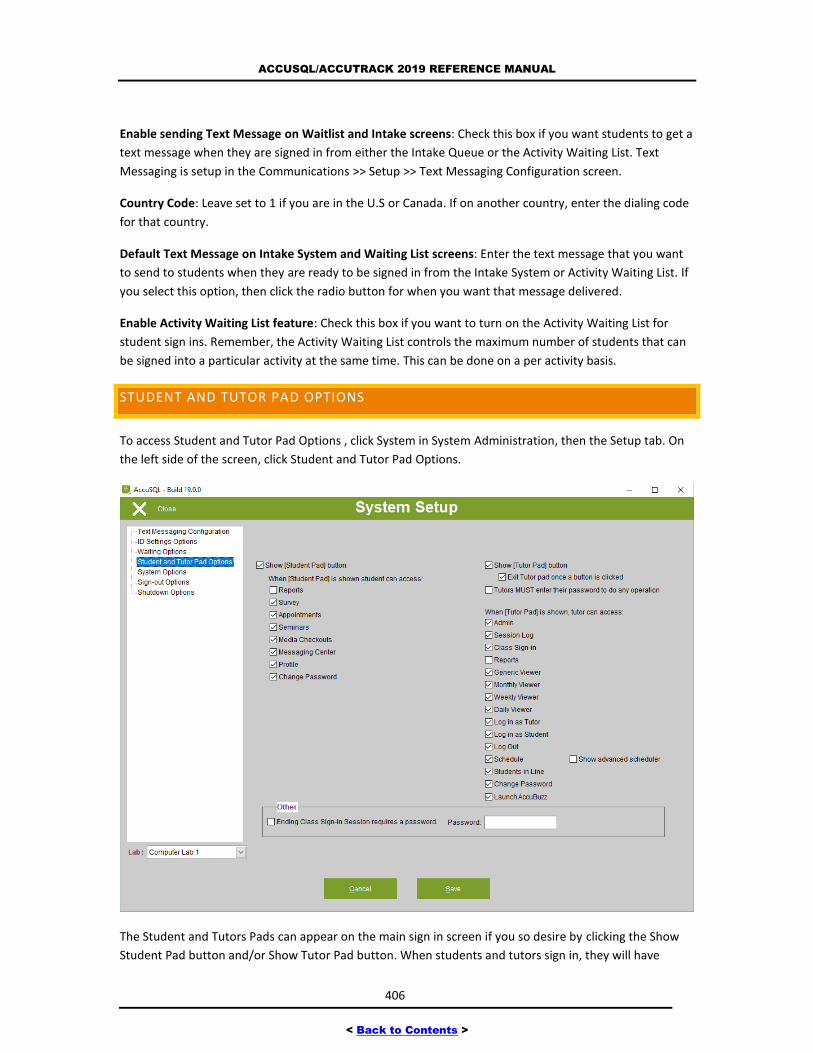
ACCUSQL/ACCUTRACK 2019 REFERENCE MANUAL
406
< Back to Contents >
Enable sending Text Message on Waitlist and Intake screens: Check this box if you want students to get a
text message when they are signed in from either the Intake Queue or the Activity Waiting List. Text
Messaging is setup in the Communications >> Setup >> Text Messaging Configuration screen.
Country Code: Leave set to 1 if you are in the U.S or Canada. If on another country, enter the dialing code
for that country.
Default Text Message on Intake System and Waiting List screens: Enter the text message that you want
to send to students when they are ready to be signed in from the Intake System or Activity Waiting List. If
you select this option, then click the radio button for when you want that message delivered.
Enable Activity Waiting List feature: Check this box if you want to turn on the Activity Waiting List for
student sign ins. Remember, the Activity Waiting List controls the maximum number of students that can
be signed into a particular activity at the same time. This can be done on a per activity basis.
STUDENT AND TUTOR PAD OPTIONS
To access Student and Tutor Pad Options , click System in System Administration, then the Setup tab. On
the left side of the screen, click Student and Tutor Pad Options.
The Student and Tutors Pads can appear on the main sign in screen if you so desire by clicking the Show
Student Pad button and/or Show Tutor Pad button. When students and tutors sign in, they will have
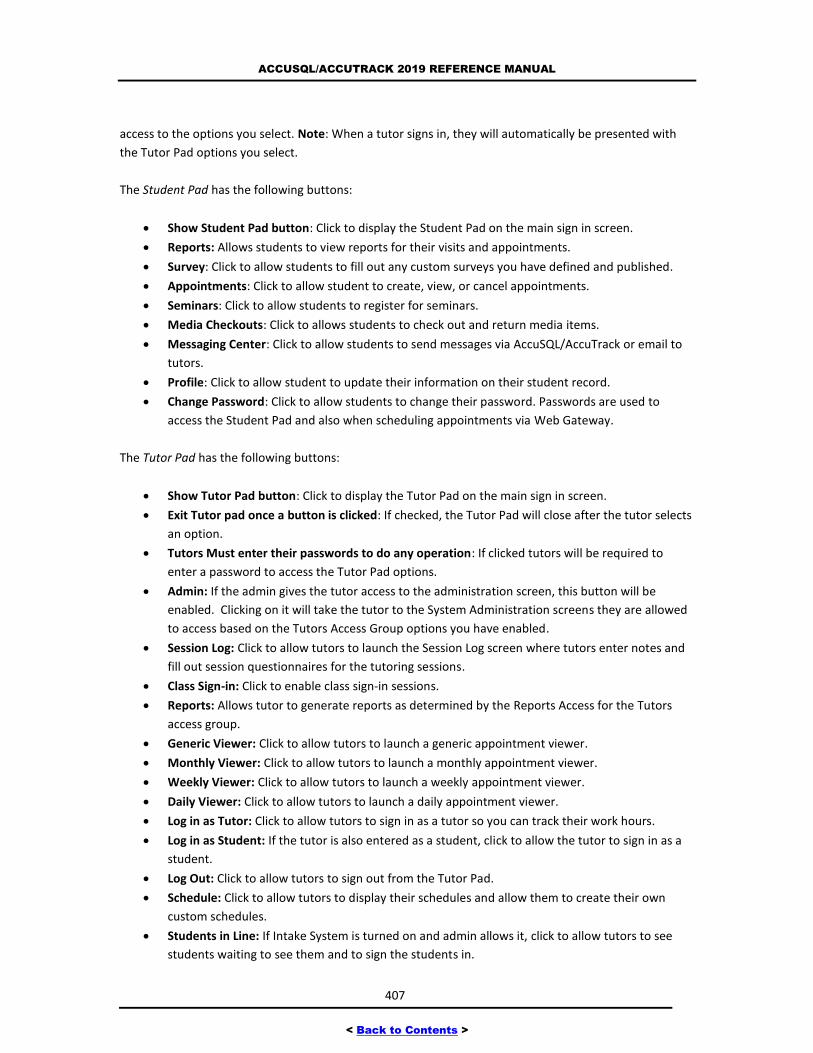
ACCUSQL/ACCUTRACK 2019 REFERENCE MANUAL
407
< Back to Contents >
access to the options you select. Note: When a tutor signs in, they will automatically be presented with
the Tutor Pad options you select.
The Student Pad has the following buttons:
Show Student Pad button: Click to display the Student Pad on the main sign in screen.
Reports: Allows students to view reports for their visits and appointments.
Survey: Click to allow students to fill out any custom surveys you have defined and published.
Appointments: Click to allow student to create, view, or cancel appointments.
Seminars: Click to allow students to register for seminars.
Media Checkouts: Click to allows students to check out and return media items.
Messaging Center: Click to allow students to send messages via AccuSQL/AccuTrack or email to
tutors.
Profile: Click to allow student to update their information on their student record.
Change Password: Click to allow students to change their password. Passwords are used to
access the Student Pad and also when scheduling appointments via Web Gateway.
The Tutor Pad has the following buttons:
Show Tutor Pad button: Click to display the Tutor Pad on the main sign in screen.
Exit Tutor pad once a button is clicked: If checked, the Tutor Pad will close after the tutor selects
an option.
Tutors Must enter their passwords to do any operation: If clicked tutors will be required to
enter a password to access the Tutor Pad options.
Admin: If the admin gives the tutor access to the administration screen, this button will be
enabled. Clicking on it will take the tutor to the System Administration screens they are allowed
to access based on the Tutors Access Group options you have enabled.
Session Log: Click to allow tutors to launch the Session Log screen where tutors enter notes and
fill out session questionnaires for the tutoring sessions.
Class Sign-in: Click to enable class sign-in sessions.
Reports: Allows tutor to generate reports as determined by the Reports Access for the Tutors
access group.
Generic Viewer: Click to allow tutors to launch a generic appointment viewer.
Monthly Viewer: Click to allow tutors to launch a monthly appointment viewer.
Weekly Viewer: Click to allow tutors to launch a weekly appointment viewer.
Daily Viewer: Click to allow tutors to launch a daily appointment viewer.
Log in as Tutor: Click to allow tutors to sign in as a tutor so you can track their work hours.
Log in as Student: If the tutor is also entered as a student, click to allow the tutor to sign in as a
student.
Log Out: Click to allow tutors to sign out from the Tutor Pad.
Schedule: Click to allow tutors to display their schedules and allow them to create their own
custom schedules.
Students in Line: If Intake System is turned on and admin allows it, click to allow tutors to see
students waiting to see them and to sign the students in.
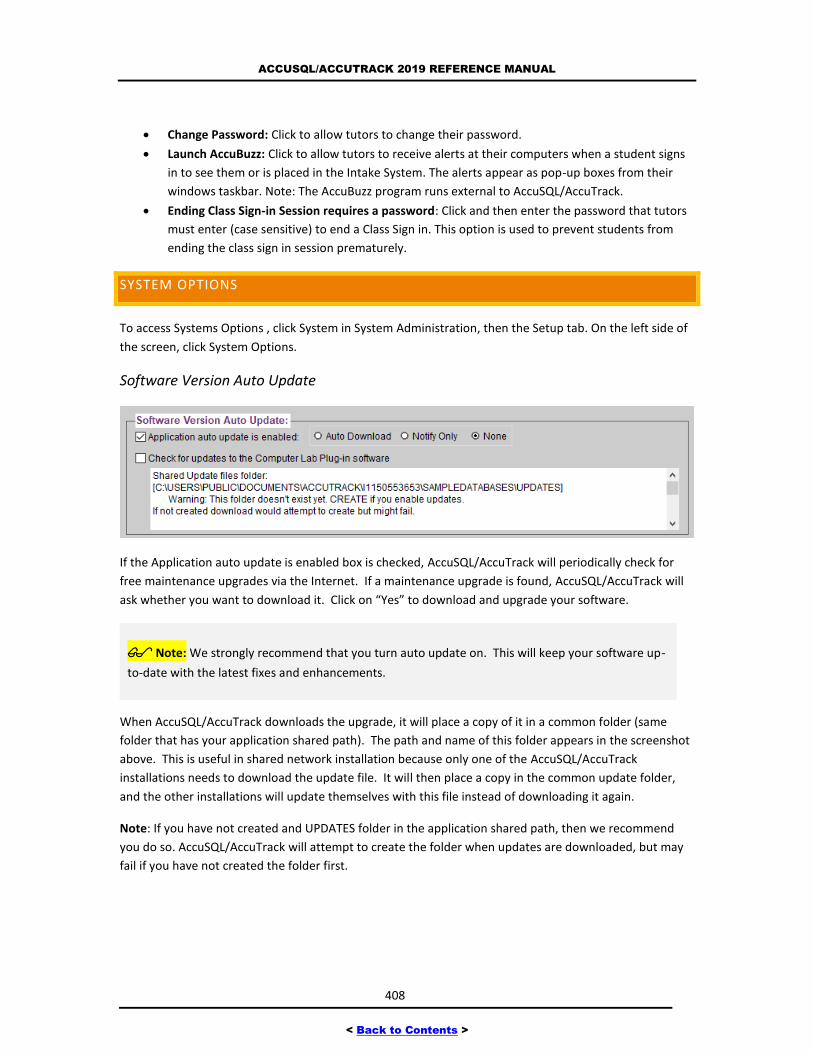
ACCUSQL/ACCUTRACK 2019 REFERENCE MANUAL
408
< Back to Contents >
Change Password: Click to allow tutors to change their password.
Launch AccuBuzz: Click to allow tutors to receive alerts at their computers when a student signs
in to see them or is placed in the Intake System. The alerts appear as pop-up boxes from their
windows taskbar. Note: The AccuBuzz program runs external to AccuSQL/AccuTrack.
Ending Class Sign-in Session requires a password: Click and then enter the password that tutors
must enter (case sensitive) to end a Class Sign in. This option is used to prevent students from
ending the class sign in session prematurely.
SYSTEM OPTIONS
To access Systems Options , click System in System Administration, then the Setup tab. On the left side of
the screen, click System Options.
Software Version Auto Update
If the Application auto update is enabled box is checked, AccuSQL/AccuTrack will periodically check for
free maintenance upgrades via the Internet. If a maintenance upgrade is found, AccuSQL/AccuTrack will
ask whether you want to download it. Click on “Yes” to download and upgrade your software.
Note: We strongly recommend that you turn auto update on. This will keep your software up-
to-date with the latest fixes and enhancements.
When AccuSQL/AccuTrack downloads the upgrade, it will place a copy of it in a common folder (same
folder that has your application shared path). The path and name of this folder appears in the screenshot
above. This is useful in shared network installation because only one of the AccuSQL/AccuTrack
installations needs to download the update file. It will then place a copy in the common update folder,
and the other installations will update themselves with this file instead of downloading it again.
Note: If you have not created and UPDATES folder in the application shared path, then we recommend
you do so. AccuSQL/AccuTrack will attempt to create the folder when updates are downloaded, but may
fail if you have not created the folder first.
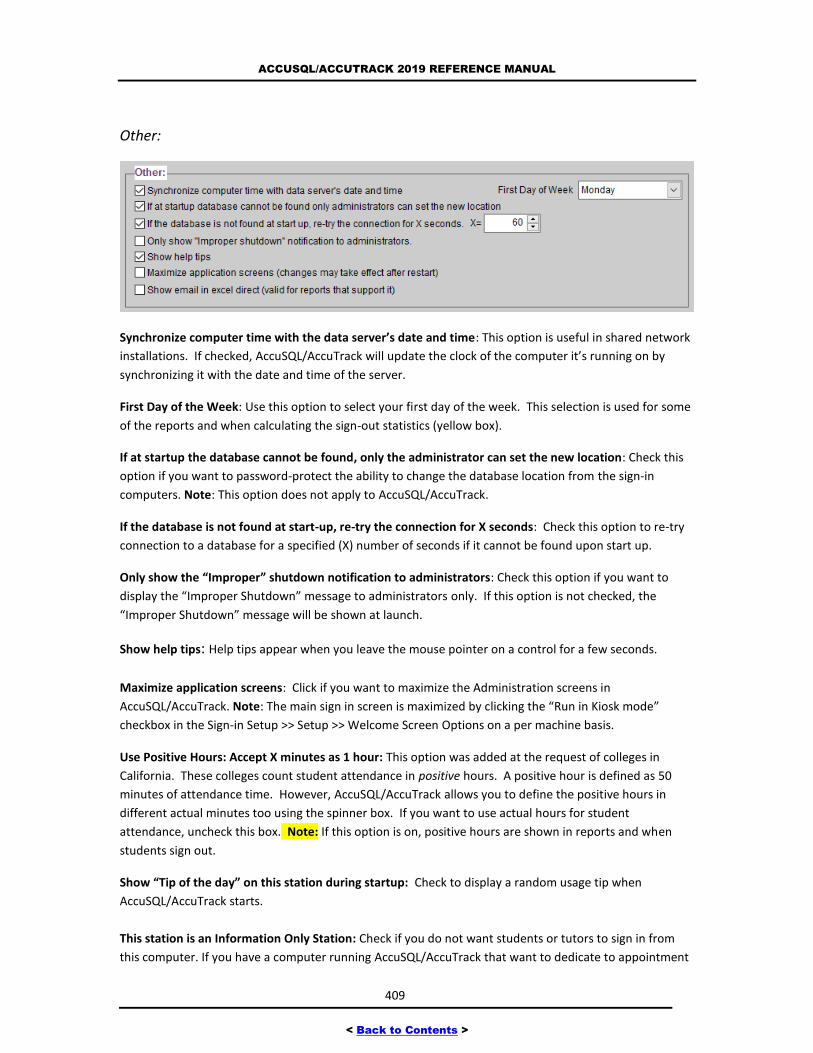
ACCUSQL/ACCUTRACK 2019 REFERENCE MANUAL
409
< Back to Contents >
Other:
Synchronize computer time with the data server’s date and time: This option is useful in shared network
installations. If checked, AccuSQL/AccuTrack will update the clock of the computer it’s running on by
synchronizing it with the date and time of the server.
First Day of the Week: Use this option to select your first day of the week. This selection is used for some
of the reports and when calculating the sign-out statistics (yellow box).
If at startup the database cannot be found, only the administrator can set the new location: Check this
option if you want to password-protect the ability to change the database location from the sign-in
computers. Note: This option does not apply to AccuSQL/AccuTrack.
If the database is not found at start-up, re-try the connection for X seconds: Check this option to re-try
connection to a database for a specified (X) number of seconds if it cannot be found upon start up.
Only show the “Improper” shutdown notification to administrators: Check this option if you want to
display the “Improper Shutdown” message to administrators only. If this option is not checked, the
“Improper Shutdown” message will be shown at launch.
Show help tips: Help tips appear when you leave the mouse pointer on a control for a few seconds.
Maximize application screens: Click if you want to maximize the Administration screens in
AccuSQL/AccuTrack. Note: The main sign in screen is maximized by clicking the “Run in Kiosk mode”
checkbox in the Sign-in Setup >> Setup >> Welcome Screen Options on a per machine basis.
Use Positive Hours: Accept X minutes as 1 hour: This option was added at the request of colleges in
California. These colleges count student attendance in positive hours. A positive hour is defined as 50
minutes of attendance time. However, AccuSQL/AccuTrack allows you to define the positive hours in
different actual minutes too using the spinner box. If you want to use actual hours for student
attendance, uncheck this box. Note: If this option is on, positive hours are shown in reports and when
students sign out.
Show “Tip of the day” on this station during startup: Check to display a random usage tip when
AccuSQL/AccuTrack starts.
This station is an Information Only Station: Check if you do not want students or tutors to sign in from
this computer. If you have a computer running AccuSQL/AccuTrack that want to dedicate to appointment
ACCUSQL/ACCUTRACK 2019 REFERENCE MANUAL
410
< Back to Contents >
scheduling, or media checkouts, for example, you could check box to allow for those options but not
allows sign ins. If student or tutors try to sign in and this box is checked, they will receive a message
indicating that the computer is designated as an ”information only” terminal.
BACKGROUND IMAGE
Click this button if you want to change the background image for the AccuSQL/AccuTrack screens. There
are 3 options available:
1. Gray background: (recommended): Clicking this option uses the default graphical background
from AccuSQL/AccuTrack screens.
2. AccuSQL/AccuTrack Classic This option loads the default AccuSQL/AccuTrack12 background.
3. From File: This option allows you to browse and select an image file for the background. This
allows you to customize the background to your liking.
If you change the background, make sure you click on “Save” in the System Setup screen.
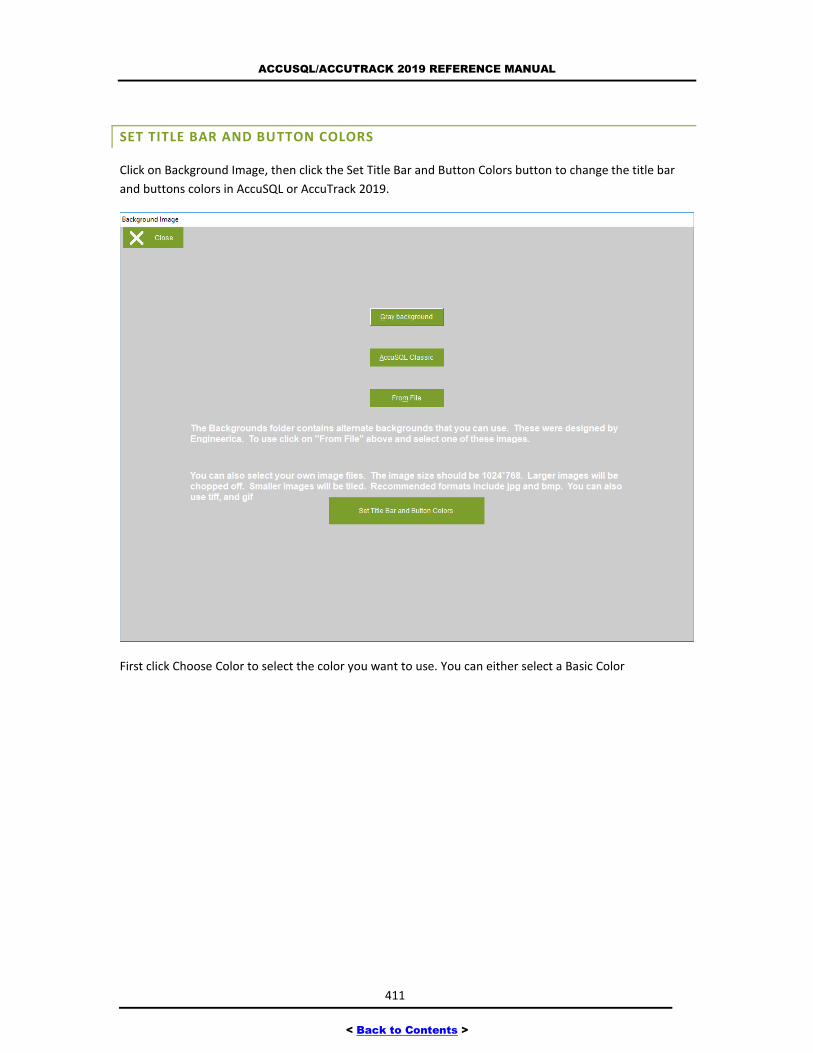
ACCUSQL/ACCUTRACK 2019 REFERENCE MANUAL
411
< Back to Contents >
SET TITLE BAR AND BUTTON COLORS
Click on Background Image, then click the Set Title Bar and Button Colors button to change the title bar
and buttons colors in AccuSQL or AccuTrack 2019.
First click Choose Color to select the color you want to use. You can either select a Basic Color
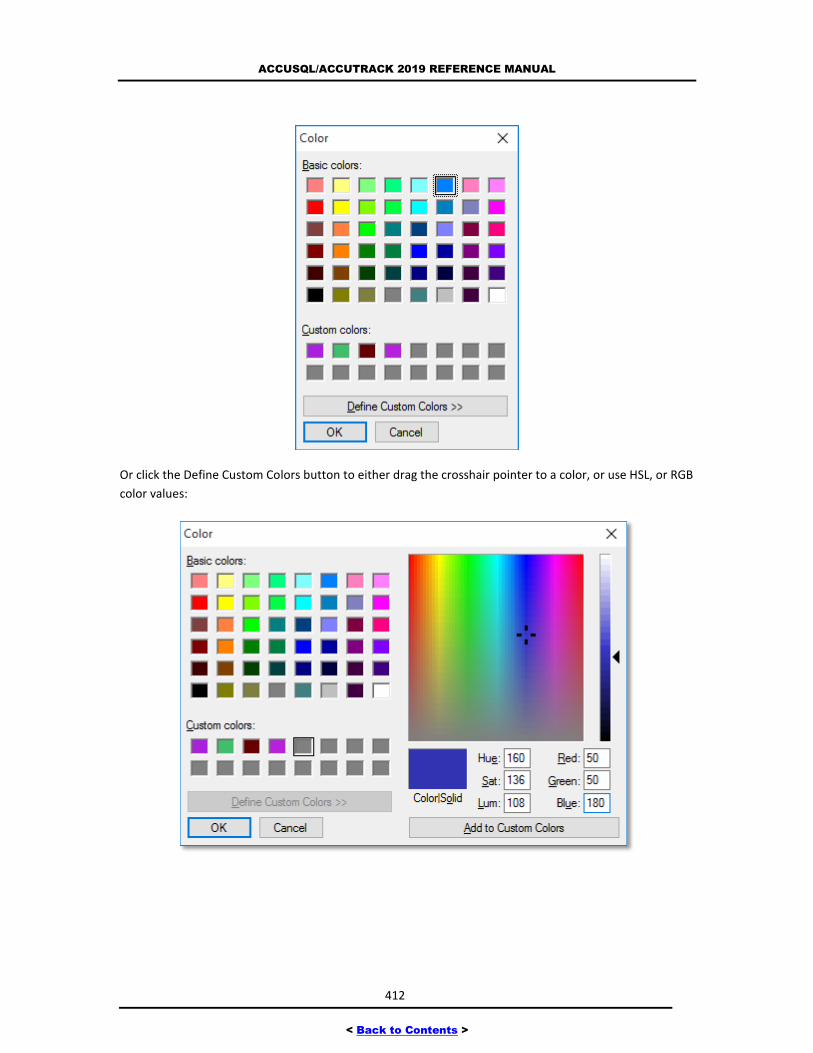
ACCUSQL/ACCUTRACK 2019 REFERENCE MANUAL
412
< Back to Contents >
Or click the Define Custom Colors button to either drag the crosshair pointer to a color, or use HSL, or RGB
color values:
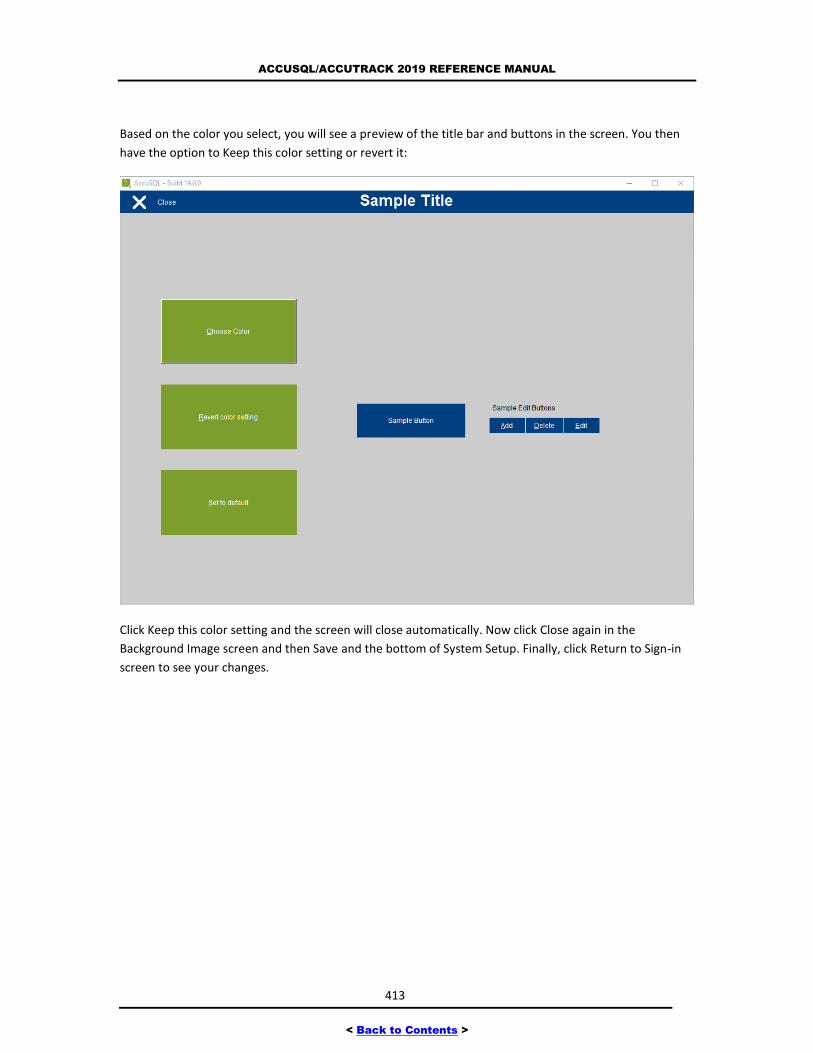
ACCUSQL/ACCUTRACK 2019 REFERENCE MANUAL
413
< Back to Contents >
Based on the color you select, you will see a preview of the title bar and buttons in the screen. You then
have the option to Keep this color setting or revert it:
Click Keep this color setting and the screen will close automatically. Now click Close again in the
Background Image screen and then Save and the bottom of System Setup. Finally, click Return to Sign-in
screen to see your changes.
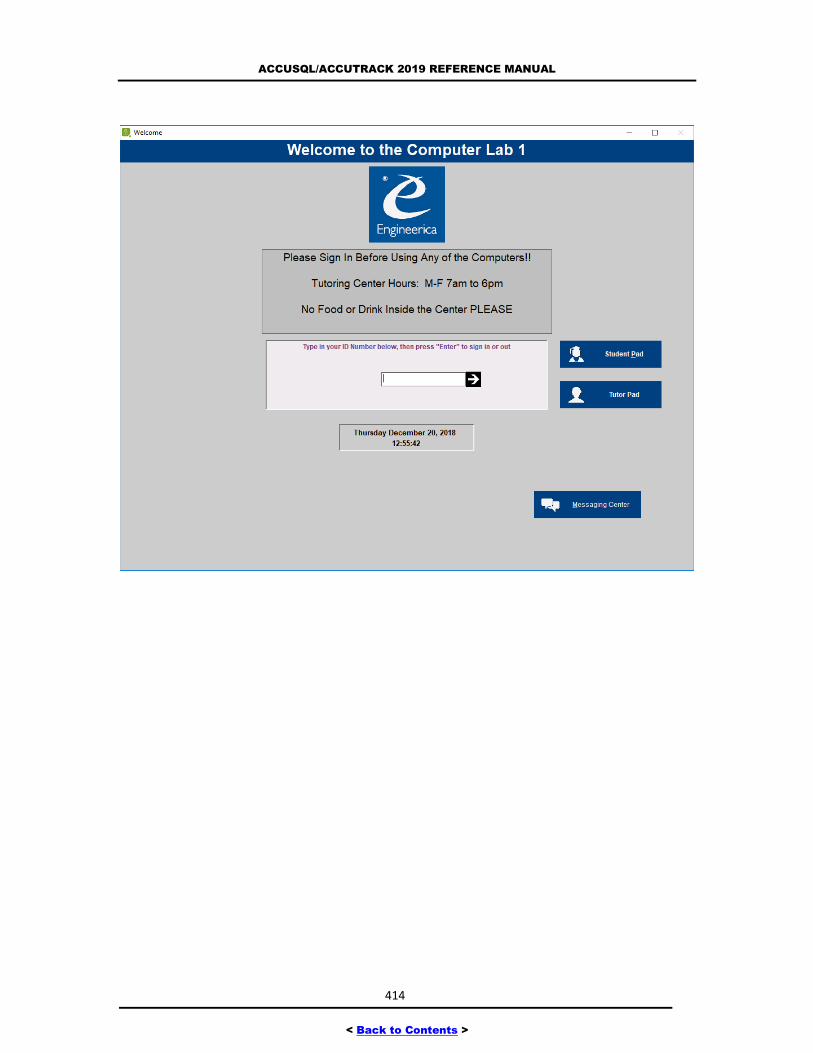
ACCUSQL/ACCUTRACK 2019 REFERENCE MANUAL
414
< Back to Contents >
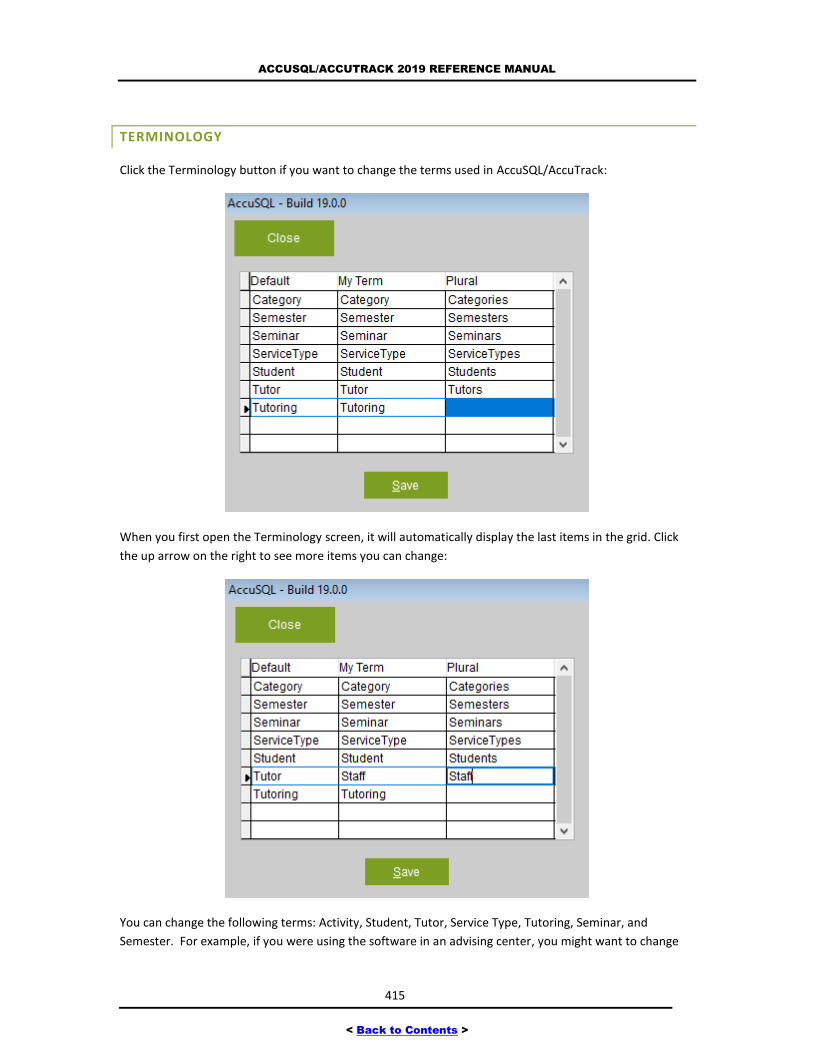
ACCUSQL/ACCUTRACK 2019 REFERENCE MANUAL
415
< Back to Contents >
TERMINOLOGY
Click the Terminology button if you want to change the terms used in AccuSQL/AccuTrack:
When you first open the Terminology screen, it will automatically display the last items in the grid. Click
the up arrow on the right to see more items you can change:
You can change the following terms: Activity, Student, Tutor, Service Type, Tutoring, Seminar, and
Semester. For example, if you were using the software in an advising center, you might want to change
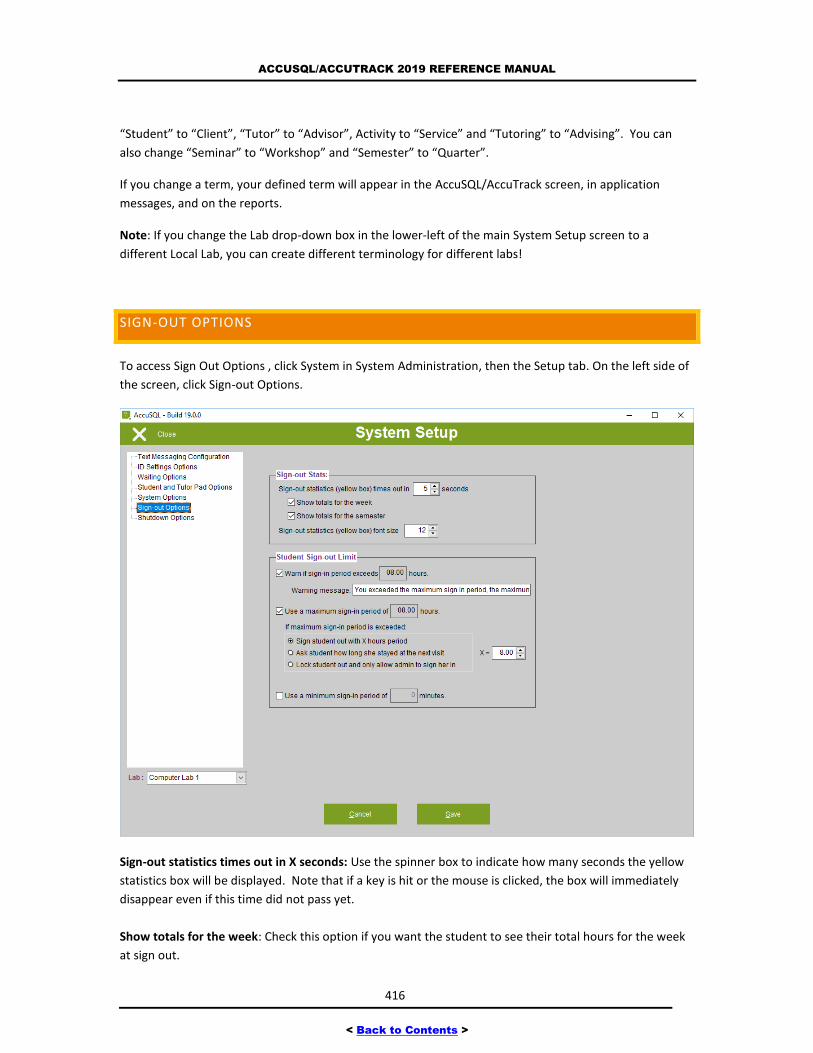
ACCUSQL/ACCUTRACK 2019 REFERENCE MANUAL
416
< Back to Contents >
“Student” to “Client”, “Tutor” to “Advisor”, Activity to “Service” and “Tutoring” to “Advising”. You can
also change “Seminar” to “Workshop” and “Semester” to “Quarter”.
If you change a term, your defined term will appear in the AccuSQL/AccuTrack screen, in application
messages, and on the reports.
Note: If you change the Lab drop-down box in the lower-left of the main System Setup screen to a
different Local Lab, you can create different terminology for different labs!
SIGN-OUT OPTIONS
To access Sign Out Options , click System in System Administration, then the Setup tab. On the left side of
the screen, click Sign-out Options.
Sign-out statistics times out in X seconds: Use the spinner box to indicate how many seconds the yellow
statistics box will be displayed. Note that if a key is hit or the mouse is clicked, the box will immediately
disappear even if this time did not pass yet.
Show totals for the week: Check this option if you want the student to see their total hours for the week
at sign out.
ACCUSQL/ACCUTRACK 2019 REFERENCE MANUAL
417
< Back to Contents >
Show totals for the semester: Check this option if you want the students to see their total hours for the
semester at sign out.
Sign-out statistics font size: Use the spinner box to determine the size of the font that will be used to
display the sign out statistics.
Warn if sign-in period exceeds: Check this box if you want to display a warning message when the
student’s sign-in period exceeds a certain period. If selected, enter the max period in hours and fractions
of hours in the text box.
Warning message: If you checked the box above, then enter the warning message that will be displayed
when the maximum sign-in period is exceeded.
Use a maximum sign-in period: Check this box if you want to enter a maximum sign-in period for students.
If selected, enter the max period in hours and fractions of hours in the text box. You can specify the action
when this maximum is exceeded via one of the three radio buttons:
Sign student with X hour period: Choose this option if you want students who exceed the
maximum sign-in period to get signed out with X sign-in period. Set X to whatever you like using
the X= spinner box.
Ask student how long he stayed at the next visit: Choose this option to have AccuSQL/AccuTrack
ask the student at the next visit to enter the sign-in period for the previous visit in which the
maximum sign-in period was exceeded.
Lock student out and only allow admin to sign her in: Choose this option for maximum control
over the accuracy of the sign-in records. With this option selected, when a student exceeds the
maximum sign-in period AccuSQL/AccuTrack will lock him or her out. To unlock the record, the
student must be signed out via the Student Visits Tracking >> Sign out screen.
Use a minimum sign-in period: Check this box if you want to enter a minimum sign-in period for students.
If they try to sign out before the minimum is reached, they will receive a warning message.
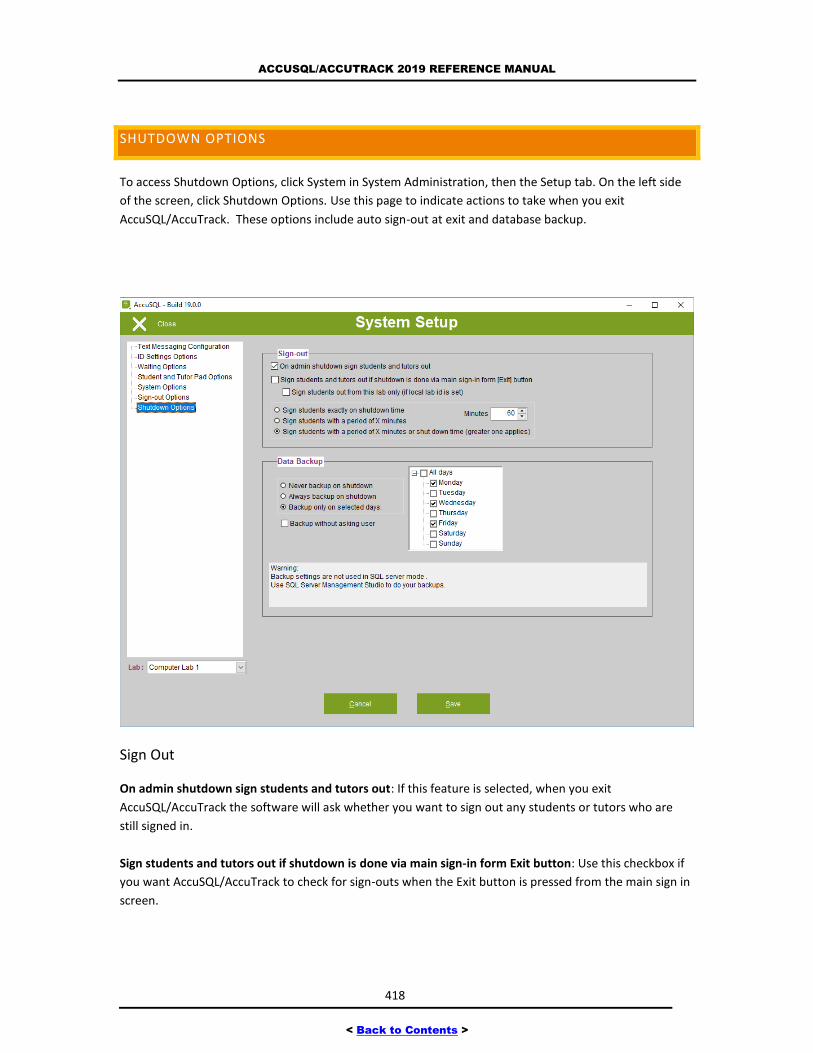
ACCUSQL/ACCUTRACK 2019 REFERENCE MANUAL
418
< Back to Contents >
SHUTDOWN OPTIONS
To access Shutdown Options, click System in System Administration, then the Setup tab. On the left side
of the screen, click Shutdown Options. Use this page to indicate actions to take when you exit
AccuSQL/AccuTrack. These options include auto sign-out at exit and database backup.
Sign Out
On admin shutdown sign students and tutors out: If this feature is selected, when you exit
AccuSQL/AccuTrack the software will ask whether you want to sign out any students or tutors who are
still signed in.
Sign students and tutors out if shutdown is done via main sign-in form Exit button: Use this checkbox if
you want AccuSQL/AccuTrack to check for sign-outs when the Exit button is pressed from the main sign in
screen.
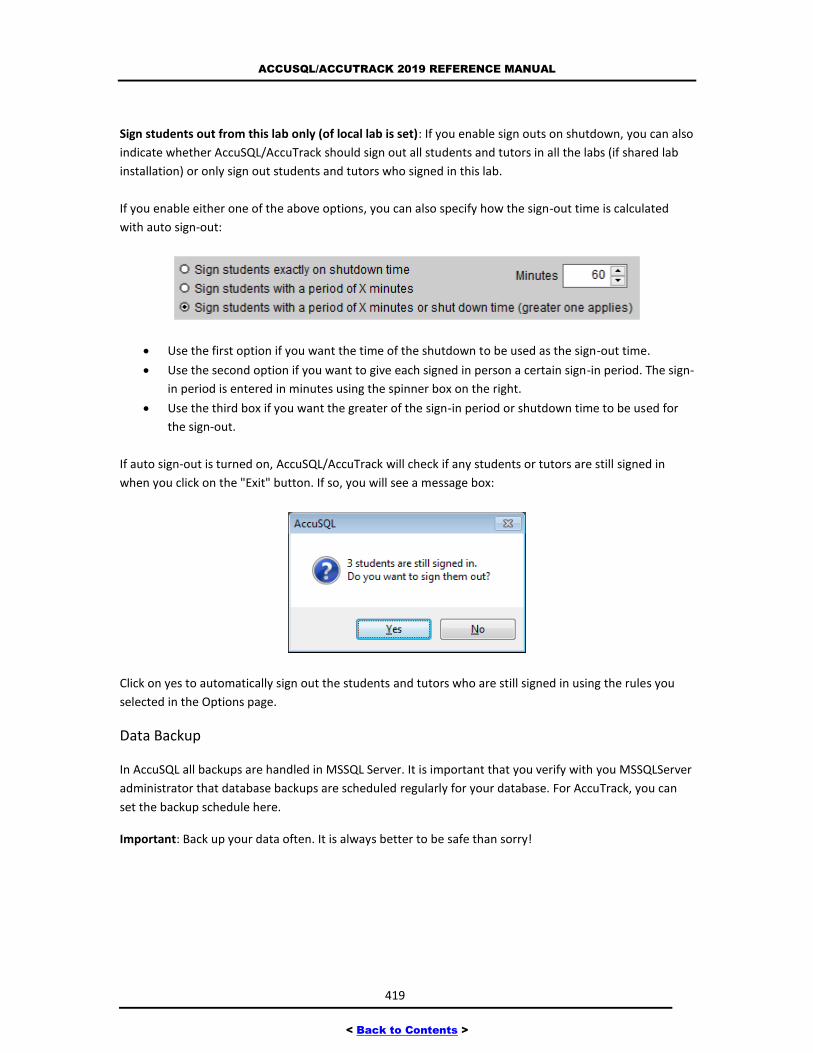
ACCUSQL/ACCUTRACK 2019 REFERENCE MANUAL
419
< Back to Contents >
Sign students out from this lab only (of local lab is set): If you enable sign outs on shutdown, you can also
indicate whether AccuSQL/AccuTrack should sign out all students and tutors in all the labs (if shared lab
installation) or only sign out students and tutors who signed in this lab.
If you enable either one of the above options, you can also specify how the sign-out time is calculated
with auto sign-out:
Use the first option if you want the time of the shutdown to be used as the sign-out time.
Use the second option if you want to give each signed in person a certain sign-in period. The sign-
in period is entered in minutes using the spinner box on the right.
Use the third box if you want the greater of the sign-in period or shutdown time to be used for
the sign-out.
If auto sign-out is turned on, AccuSQL/AccuTrack will check if any students or tutors are still signed in
when you click on the "Exit" button. If so, you will see a message box:
Click on yes to automatically sign out the students and tutors who are still signed in using the rules you
selected in the Options page.
Data Backup
In AccuSQL all backups are handled in MSSQL Server. It is important that you verify with you MSSQLServer
administrator that database backups are scheduled regularly for your database. For AccuTrack, you can
set the backup schedule here.
Important: Back up your data often. It is always better to be safe than sorry!
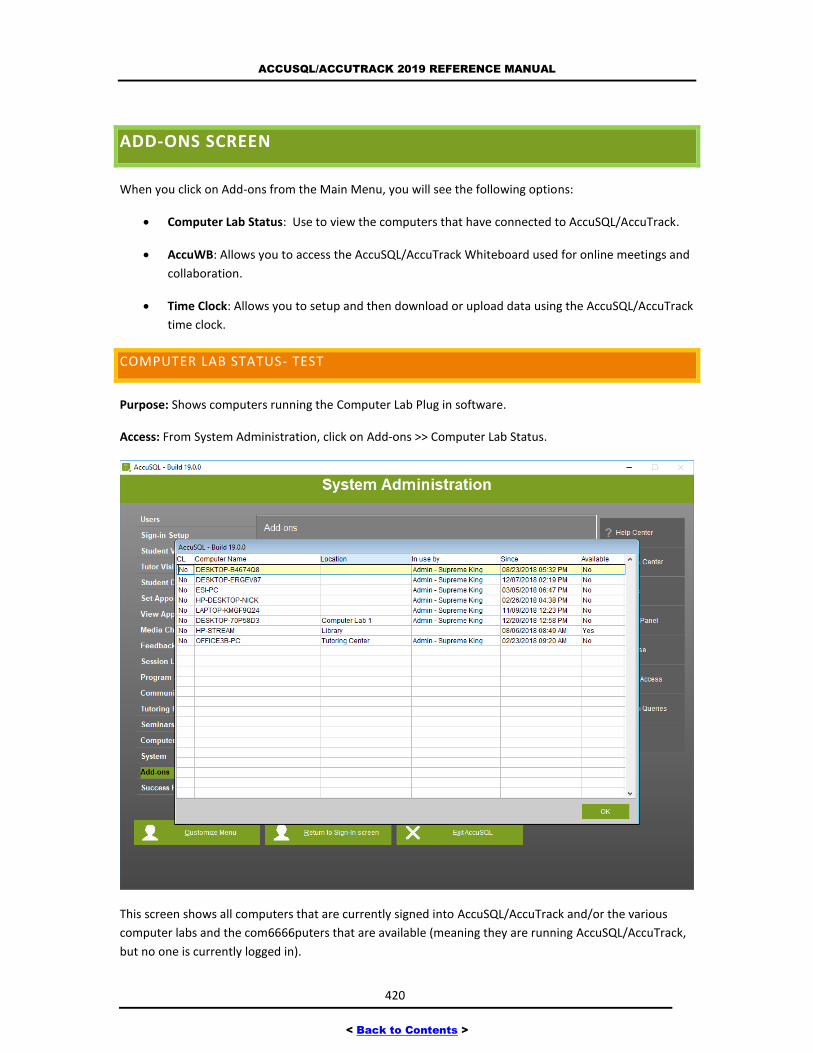
ACCUSQL/ACCUTRACK 2019 REFERENCE MANUAL
420
< Back to Contents >
ADD-ONS SCREEN
When you click on Add-ons from the Main Menu, you will see the following options:
Computer Lab Status: Use to view the computers that have connected to AccuSQL/AccuTrack.
AccuWB: Allows you to access the AccuSQL/AccuTrack Whiteboard used for online meetings and
collaboration.
Time Clock: Allows you to setup and then download or upload data using the AccuSQL/AccuTrack
time clock.
COMPUTER LAB STATUS- TEST
Purpose: Shows computers running the Computer Lab Plug in software.
Access: From System Administration, click on Add-ons >> Computer Lab Status.
This screen shows all computers that are currently signed into AccuSQL/AccuTrack and/or the various
computer labs and the com6666puters that are available (meaning they are running AccuSQL/AccuTrack,
but no one is currently logged in).

ACCUSQL/ACCUTRACK 2019 REFERENCE MANUAL
421
< Back to Contents >
CL: If Yes, indicates the computer listed is running the ComputerLab Plugin software. If No, computer is
running AccuSQL/AccuTrack itself.
Computer Name: The name of the computer accessing either the Plugin or AccuSQL/AccuTrack.
Location: If the location is blank, it indicates the user is (or was) connected to the “Default All” local lab,
else the location will show the local lab to which the user is (or was) connected.
In use by: The AccuSQL/AccuTrack user (student, tutor, or admin) that accessed either the ComputerLab
or AccuSQL/AccuTrack.
Since: Shows the last login for the Computer Name indicated.
Available: If Yes, the computer indicated is available for sign ins. If No, the computer is currently sign into
by either a student, tutor (if AccuSQL/AccuTrack), or an admin
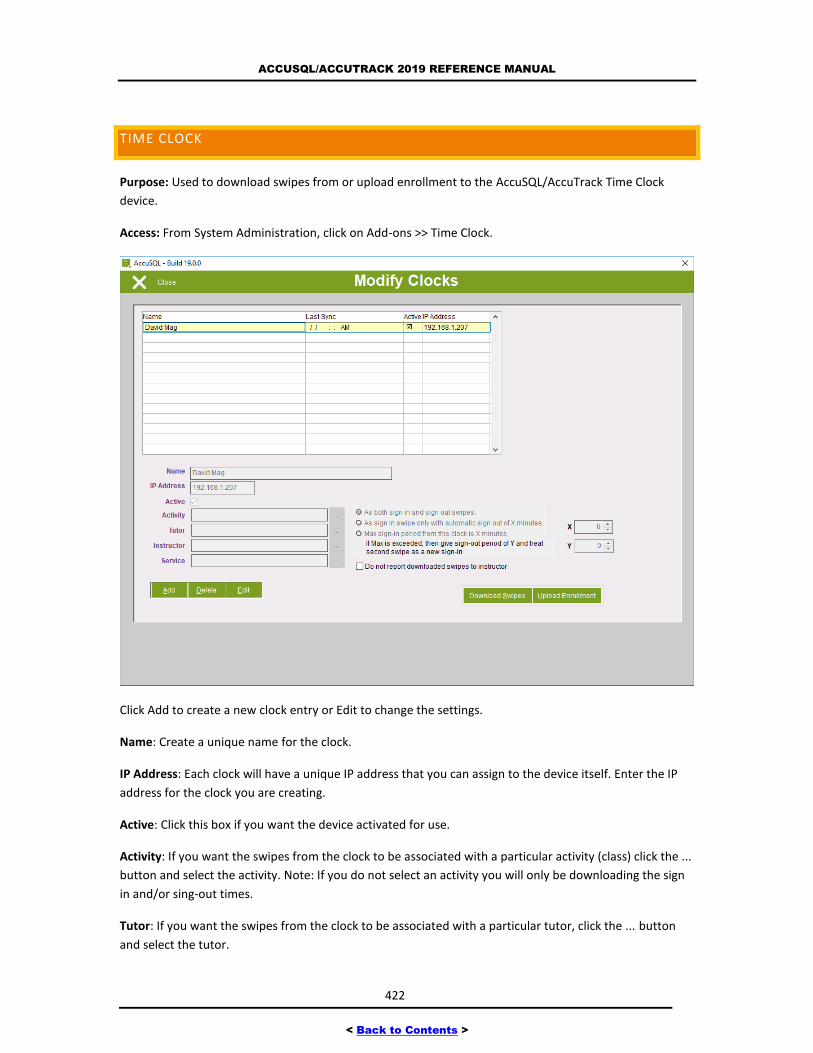
ACCUSQL/ACCUTRACK 2019 REFERENCE MANUAL
422
< Back to Contents >
TIME CLOCK
Purpose: Used to download swipes from or upload enrollment to the AccuSQL/AccuTrack Time Clock
device.
Access: From System Administration, click on Add-ons >> Time Clock.
Click Add to create a new clock entry or Edit to change the settings.
Name: Create a unique name for the clock.
IP Address: Each clock will have a unique IP address that you can assign to the device itself. Enter the IP
address for the clock you are creating.
Active: Click this box if you want the device activated for use.
Activity: If you want the swipes from the clock to be associated with a particular activity (class) click the ...
button and select the activity. Note: If you do not select an activity you will only be downloading the sign
in and/or sing-out times.
Tutor: If you want the swipes from the clock to be associated with a particular tutor, click the ... button
and select the tutor.
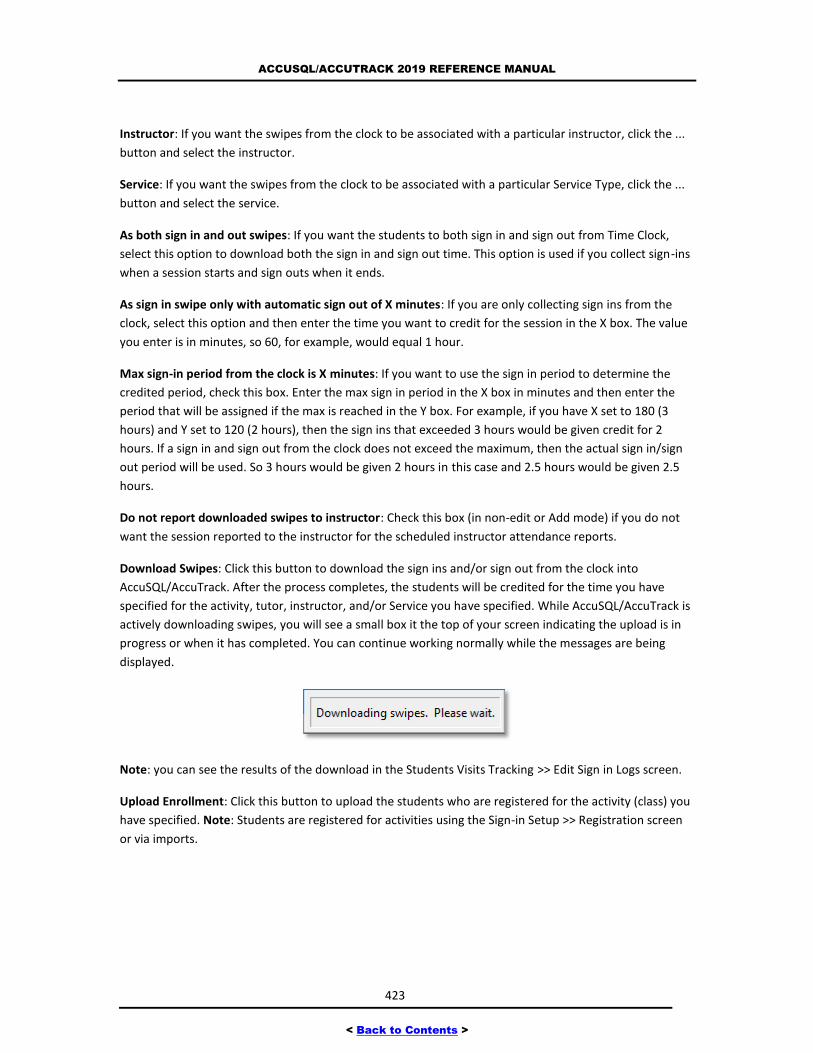
ACCUSQL/ACCUTRACK 2019 REFERENCE MANUAL
423
< Back to Contents >
Instructor: If you want the swipes from the clock to be associated with a particular instructor, click the ...
button and select the instructor.
Service: If you want the swipes from the clock to be associated with a particular Service Type, click the ...
button and select the service.
As both sign in and out swipes: If you want the students to both sign in and sign out from Time Clock,
select this option to download both the sign in and sign out time. This option is used if you collect sign-ins
when a session starts and sign outs when it ends.
As sign in swipe only with automatic sign out of X minutes: If you are only collecting sign ins from the
clock, select this option and then enter the time you want to credit for the session in the X box. The value
you enter is in minutes, so 60, for example, would equal 1 hour.
Max sign-in period from the clock is X minutes: If you want to use the sign in period to determine the
credited period, check this box. Enter the max sign in period in the X box in minutes and then enter the
period that will be assigned if the max is reached in the Y box. For example, if you have X set to 180 (3
hours) and Y set to 120 (2 hours), then the sign ins that exceeded 3 hours would be given credit for 2
hours. If a sign in and sign out from the clock does not exceed the maximum, then the actual sign in/sign
out period will be used. So 3 hours would be given 2 hours in this case and 2.5 hours would be given 2.5
hours.
Do not report downloaded swipes to instructor: Check this box (in non-edit or Add mode) if you do not
want the session reported to the instructor for the scheduled instructor attendance reports.
Download Swipes: Click this button to download the sign ins and/or sign out from the clock into
AccuSQL/AccuTrack. After the process completes, the students will be credited for the time you have
specified for the activity, tutor, instructor, and/or Service you have specified. While AccuSQL/AccuTrack is
actively downloading swipes, you will see a small box it the top of your screen indicating the upload is in
progress or when it has completed. You can continue working normally while the messages are being
displayed.
Note: you can see the results of the download in the Students Visits Tracking >> Edit Sign in Logs screen.
Upload Enrollment: Click this button to upload the students who are registered for the activity (class) you
have specified. Note: Students are registered for activities using the Sign-in Setup >> Registration screen
or via imports.
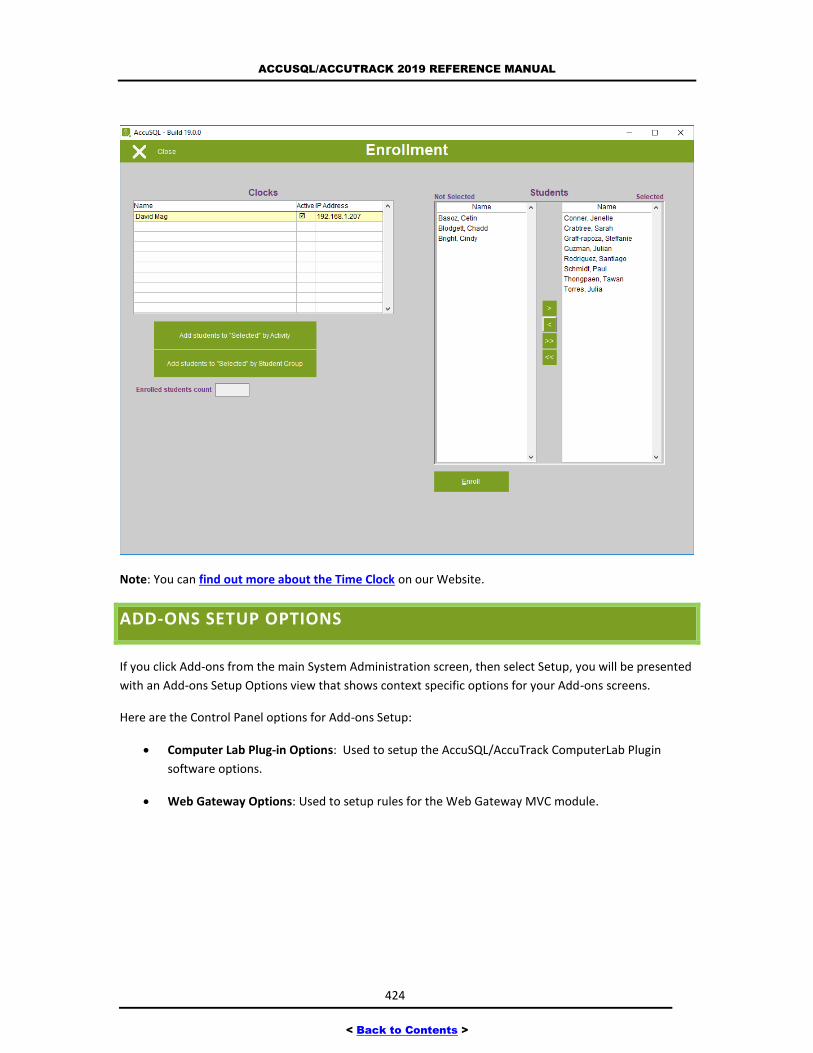
ACCUSQL/ACCUTRACK 2019 REFERENCE MANUAL
424
< Back to Contents >
Note: You can find out more about the Time Clock on our Website.
ADD-ONS SETUP OPTIONS
If you click Add-ons from the main System Administration screen, then select Setup, you will be presented
with an Add-ons Setup Options view that shows context specific options for your Add-ons screens.
Here are the Control Panel options for Add-ons Setup:
Computer Lab Plug-in Options: Used to setup the AccuSQL/AccuTrack ComputerLab Plugin
software options.
Web Gateway Options: Used to setup rules for the Web Gateway MVC module.
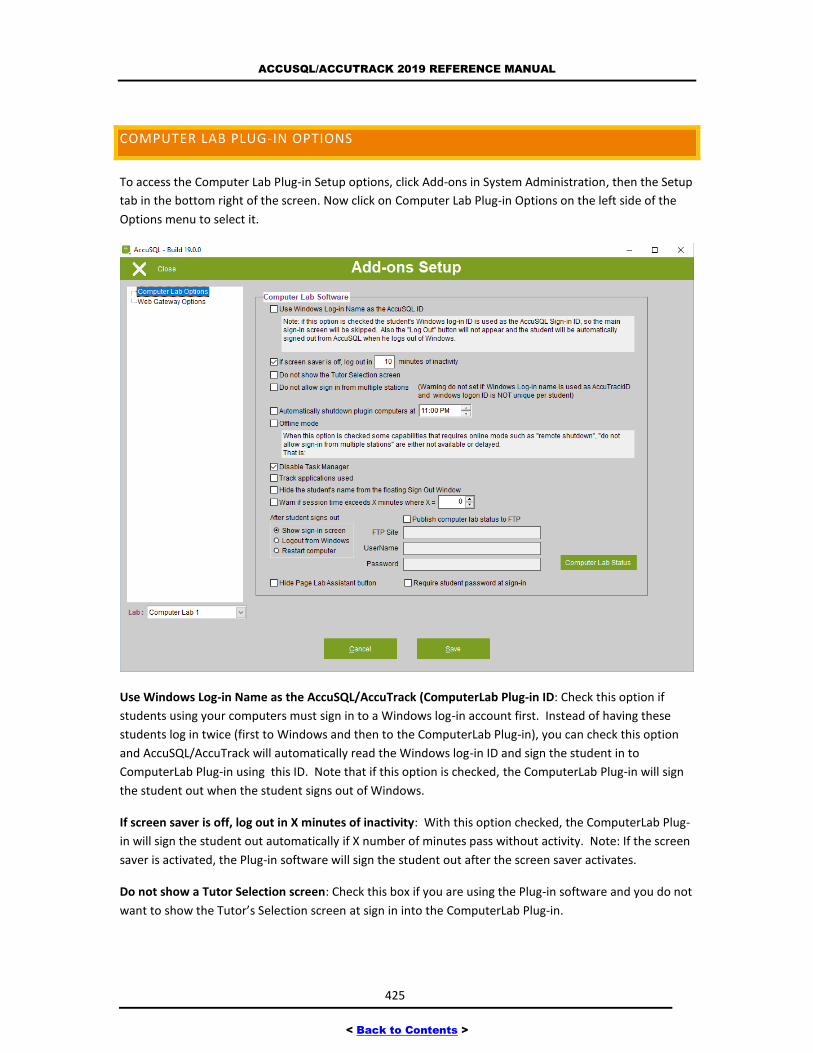
ACCUSQL/ACCUTRACK 2019 REFERENCE MANUAL
425
< Back to Contents >
COMPUTER LAB PLUG-IN OPTIONS
To access the Computer Lab Plug-in Setup options, click Add-ons in System Administration, then the Setup
tab in the bottom right of the screen. Now click on Computer Lab Plug-in Options on the left side of the
Options menu to select it.
Use Windows Log-in Name as the AccuSQL/AccuTrack (ComputerLab Plug-in ID: Check this option if
students using your computers must sign in to a Windows log-in account first. Instead of having these
students log in twice (first to Windows and then to the ComputerLab Plug-in), you can check this option
and AccuSQL/AccuTrack will automatically read the Windows log-in ID and sign the student in to
ComputerLab Plug-in using this ID. Note that if this option is checked, the ComputerLab Plug-in will sign
the student out when the student signs out of Windows.
If screen saver is off, log out in X minutes of inactivity: With this option checked, the ComputerLab Plug-
in will sign the student out automatically if X number of minutes pass without activity. Note: If the screen
saver is activated, the Plug-in software will sign the student out after the screen saver activates.
Do not show a Tutor Selection screen: Check this box if you are using the Plug-in software and you do not
want to show the Tutor’s Selection screen at sign in into the ComputerLab Plug-in.
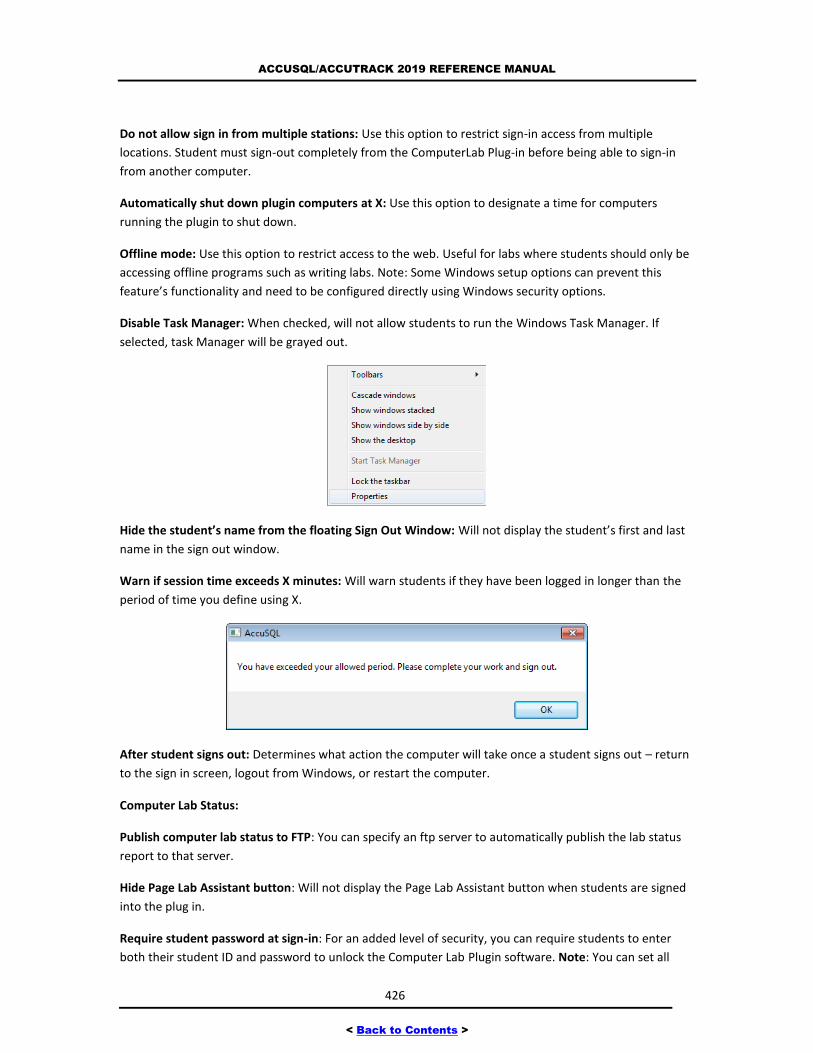
ACCUSQL/ACCUTRACK 2019 REFERENCE MANUAL
426
< Back to Contents >
Do not allow sign in from multiple stations: Use this option to restrict sign-in access from multiple
locations. Student must sign-out completely from the ComputerLab Plug-in before being able to sign-in
from another computer.
Automatically shut down plugin computers at X: Use this option to designate a time for computers
running the plugin to shut down.
Offline mode: Use this option to restrict access to the web. Useful for labs where students should only be
accessing offline programs such as writing labs. Note: Some Windows setup options can prevent this
feature’s functionality and need to be configured directly using Windows security options.
Disable Task Manager: When checked, will not allow students to run the Windows Task Manager. If
selected, task Manager will be grayed out.
Hide the student’s name from the floating Sign Out Window: Will not display the student’s first and last
name in the sign out window.
Warn if session time exceeds X minutes: Will warn students if they have been logged in longer than the
period of time you define using X.
After student signs out: Determines what action the computer will take once a student signs out – return
to the sign in screen, logout from Windows, or restart the computer.
Computer Lab Status:
Publish computer lab status to FTP: You can specify an ftp server to automatically publish the lab status
report to that server.
Hide Page Lab Assistant button: Will not display the Page Lab Assistant button when students are signed
into the plug in.
Require student password at sign-in: For an added level of security, you can require students to enter
both their student ID and password to unlock the Computer Lab Plugin software. Note: You can set all
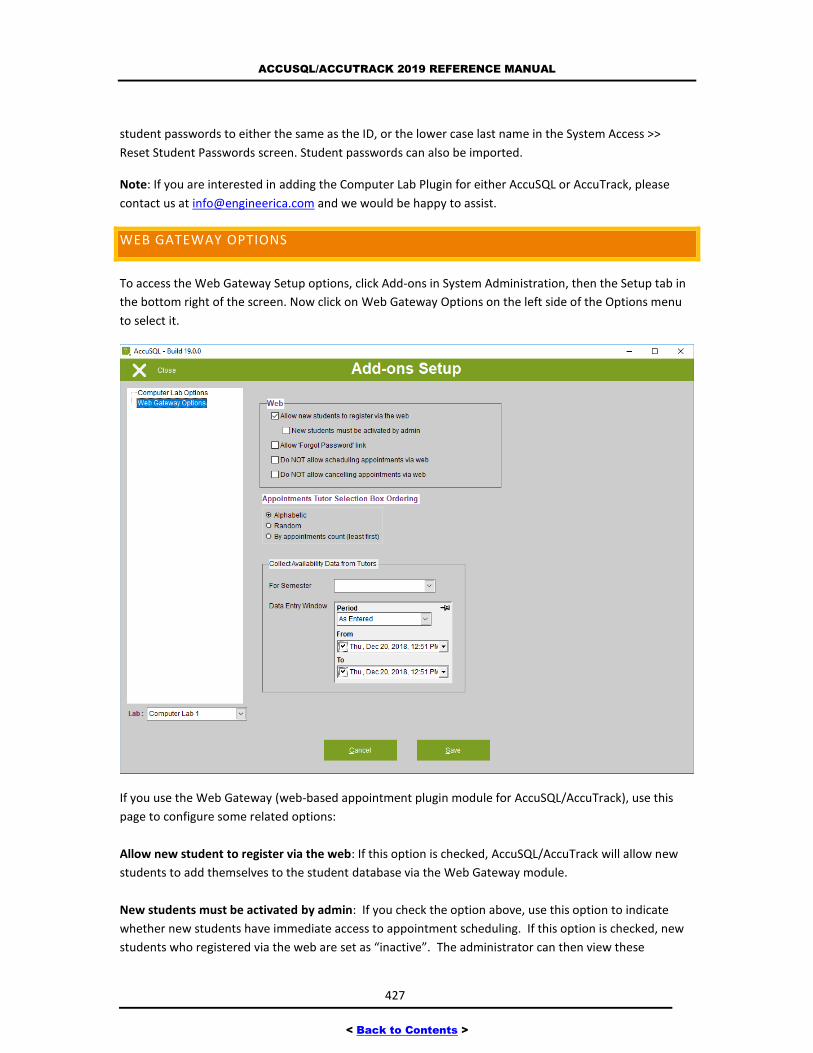
ACCUSQL/ACCUTRACK 2019 REFERENCE MANUAL
427
< Back to Contents >
student passwords to either the same as the ID, or the lower case last name in the System Access >>
Reset Student Passwords screen. Student passwords can also be imported.
Note: If you are interested in adding the Computer Lab Plugin for either AccuSQL or AccuTrack, please
contact us at [email protected] and we would be happy to assist.
WEB GATEWAY OPTIONS
To access the Web Gateway Setup options, click Add-ons in System Administration, then the Setup tab in
the bottom right of the screen. Now click on Web Gateway Options on the left side of the Options menu
to select it.
If you use the Web Gateway (web-based appointment plugin module for AccuSQL/AccuTrack), use this
page to configure some related options:
Allow new student to register via the web: If this option is checked, AccuSQL/AccuTrack will allow new
students to add themselves to the student database via the Web Gateway module.
New students must be activated by admin: If you check the option above, use this option to indicate
whether new students have immediate access to appointment scheduling. If this option is checked, new
students who registered via the web are set as “inactive”. The administrator can then view these
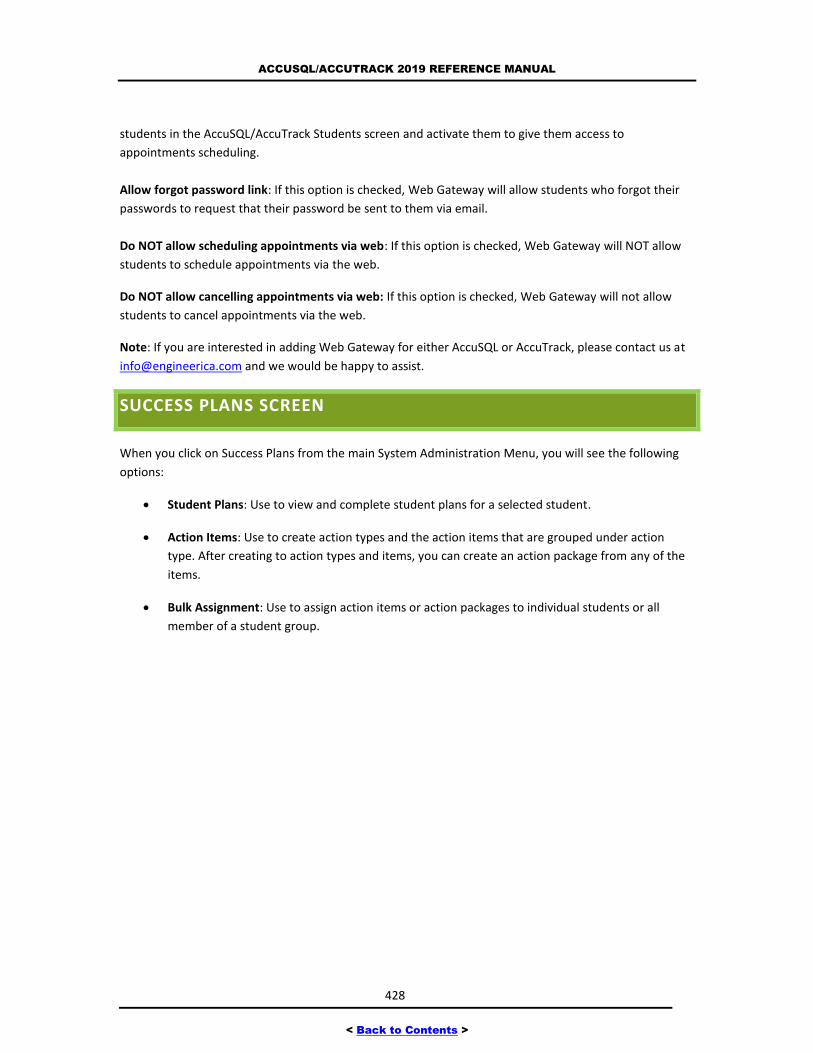
ACCUSQL/ACCUTRACK 2019 REFERENCE MANUAL
428
< Back to Contents >
students in the AccuSQL/AccuTrack Students screen and activate them to give them access to
appointments scheduling.
Allow forgot password link: If this option is checked, Web Gateway will allow students who forgot their
passwords to request that their password be sent to them via email.
Do NOT allow scheduling appointments via web: If this option is checked, Web Gateway will NOT allow
students to schedule appointments via the web.
Do NOT allow cancelling appointments via web: If this option is checked, Web Gateway will not allow
students to cancel appointments via the web.
Note: If you are interested in adding Web Gateway for either AccuSQL or AccuTrack, please contact us at
[email protected] and we would be happy to assist.
SUCCESS PLANS SCREEN
When you click on Success Plans from the main System Administration Menu, you will see the following
options:
Student Plans: Use to view and complete student plans for a selected student.
Action Items: Use to create action types and the action items that are grouped under action
type. After creating to action types and items, you can create an action package from any of the
items.
Bulk Assignment: Use to assign action items or action packages to individual students or all
member of a student group.
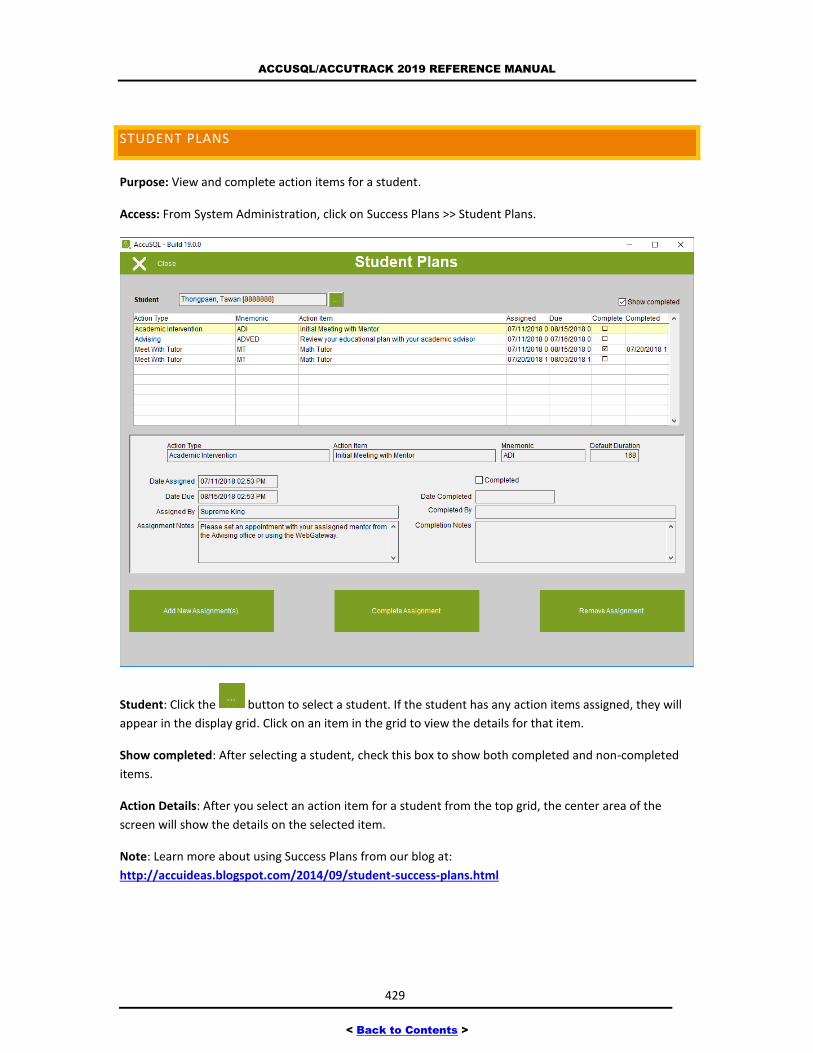
ACCUSQL/ACCUTRACK 2019 REFERENCE MANUAL
429
< Back to Contents >
STUDENT PLANS
Purpose: View and complete action items for a student.
Access: From System Administration, click on Success Plans >> Student Plans.
Student: Click the button to select a student. If the student has any action items assigned, they will
appear in the display grid. Click on an item in the grid to view the details for that item.
Show completed: After selecting a student, check this box to show both completed and non-completed
items.
Action Details: After you select an action item for a student from the top grid, the center area of the
screen will show the details on the selected item.
Note: Learn more about using Success Plans from our blog at:
http://accuideas.blogspot.com/2014/09/student-success-plans.html

ACCUSQL/ACCUTRACK 2019 REFERENCE MANUAL
430
< Back to Contents >
ADD NEW ASSIGNMENT(S)
Use this button to add a new Action Item or Action Package for the selected student.
Action Items: If you would like to add a single Action item for the student, click this radio button. Action
Items are created in the Success Plans >> Action Items screen and then assigning them here.
Action Package: If you would like to add a group of actions for the student, click this radio button. Action
Packages are created in the Success Plans >> Action Items screen by first creating the Action Types and
Action Items, creating an Action Package from the items, and then assigning them here.
Select: After you have selected either the Action Items, or Action Package radio button, click the Select
button to add the item or package for the student. A screen will appear where you can select the action
items you would like to add:
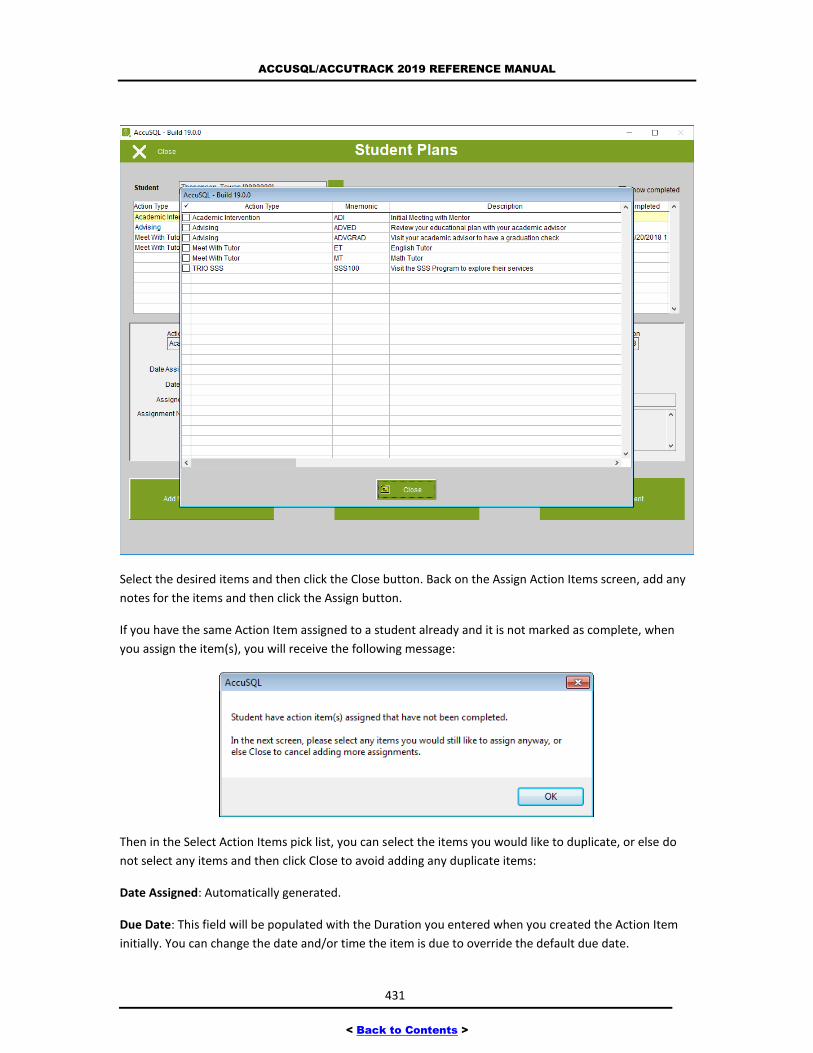
ACCUSQL/ACCUTRACK 2019 REFERENCE MANUAL
431
< Back to Contents >
Select the desired items and then click the Close button. Back on the Assign Action Items screen, add any
notes for the items and then click the Assign button.
If you have the same Action Item assigned to a student already and it is not marked as complete, when
you assign the item(s), you will receive the following message:
Then in the Select Action Items pick list, you can select the items you would like to duplicate, or else do
not select any items and then click Close to avoid adding any duplicate items:
Date Assigned: Automatically generated.
Due Date: This field will be populated with the Duration you entered when you created the Action Item
initially. You can change the date and/or time the item is due to override the default due date.
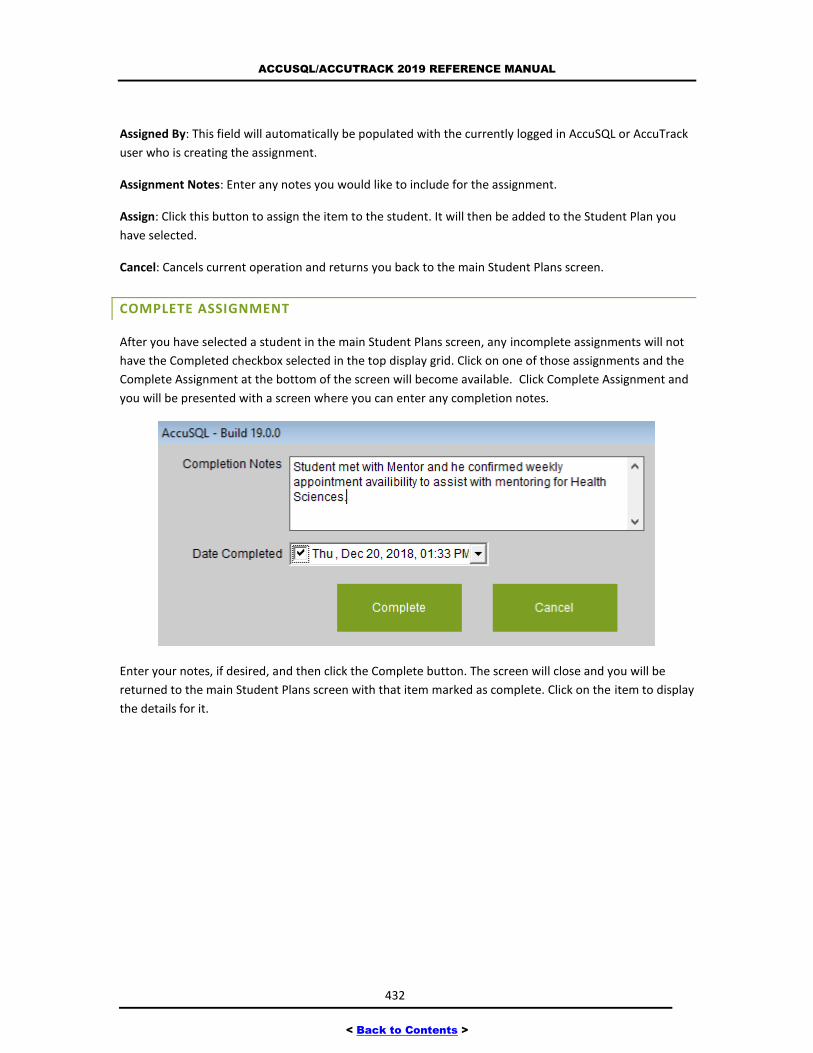
ACCUSQL/ACCUTRACK 2019 REFERENCE MANUAL
432
< Back to Contents >
Assigned By: This field will automatically be populated with the currently logged in AccuSQL or AccuTrack
user who is creating the assignment.
Assignment Notes: Enter any notes you would like to include for the assignment.
Assign: Click this button to assign the item to the student. It will then be added to the Student Plan you
have selected.
Cancel: Cancels current operation and returns you back to the main Student Plans screen.
COMPLETE ASSIGNMENT
After you have selected a student in the main Student Plans screen, any incomplete assignments will not
have the Completed checkbox selected in the top display grid. Click on one of those assignments and the
Complete Assignment at the bottom of the screen will become available. Click Complete Assignment and
you will be presented with a screen where you can enter any completion notes.
Enter your notes, if desired, and then click the Complete button. The screen will close and you will be
returned to the main Student Plans screen with that item marked as complete. Click on the item to display
the details for it.
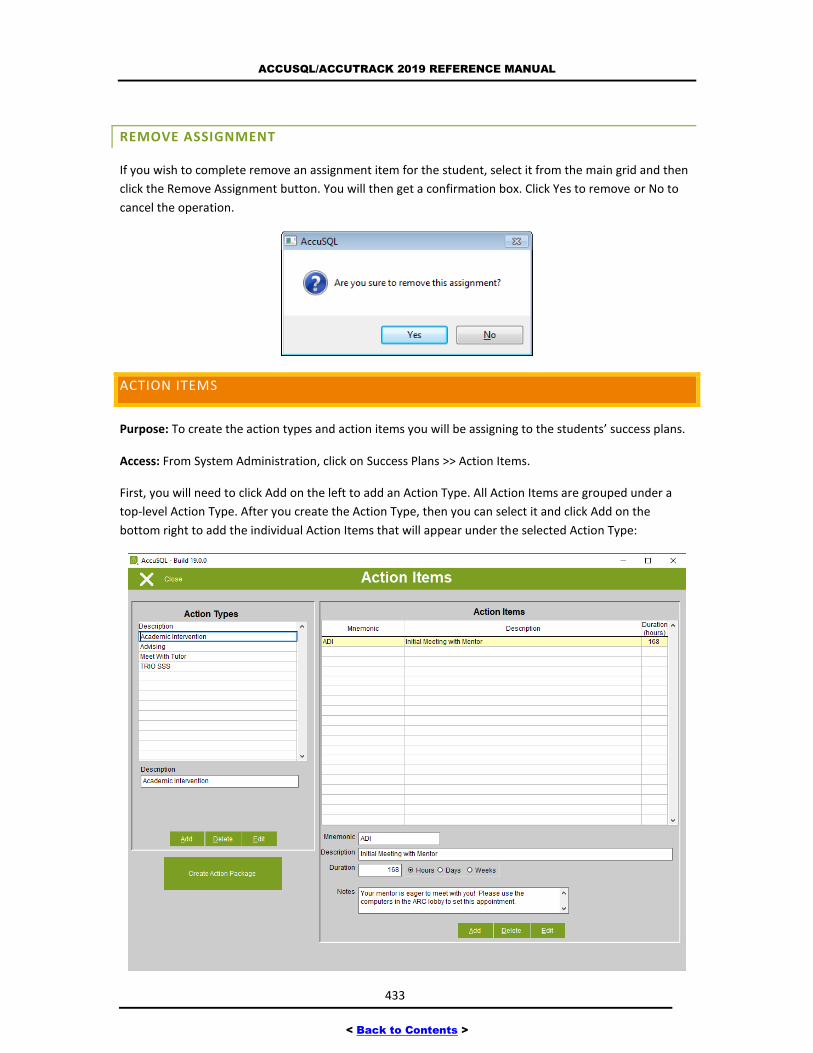
ACCUSQL/ACCUTRACK 2019 REFERENCE MANUAL
433
< Back to Contents >
REMOVE ASSIGNMENT
If you wish to complete remove an assignment item for the student, select it from the main grid and then
click the Remove Assignment button. You will then get a confirmation box. Click Yes to remove or No to
cancel the operation.
ACTION ITEMS
Purpose: To create the action types and action items you will be assigning to the students’ success plans.
Access: From System Administration, click on Success Plans >> Action Items.
First, you will need to click Add on the left to add an Action Type. All Action Items are grouped under a
top-level Action Type. After you create the Action Type, then you can select it and click Add on the
bottom right to add the individual Action Items that will appear under the selected Action Type:
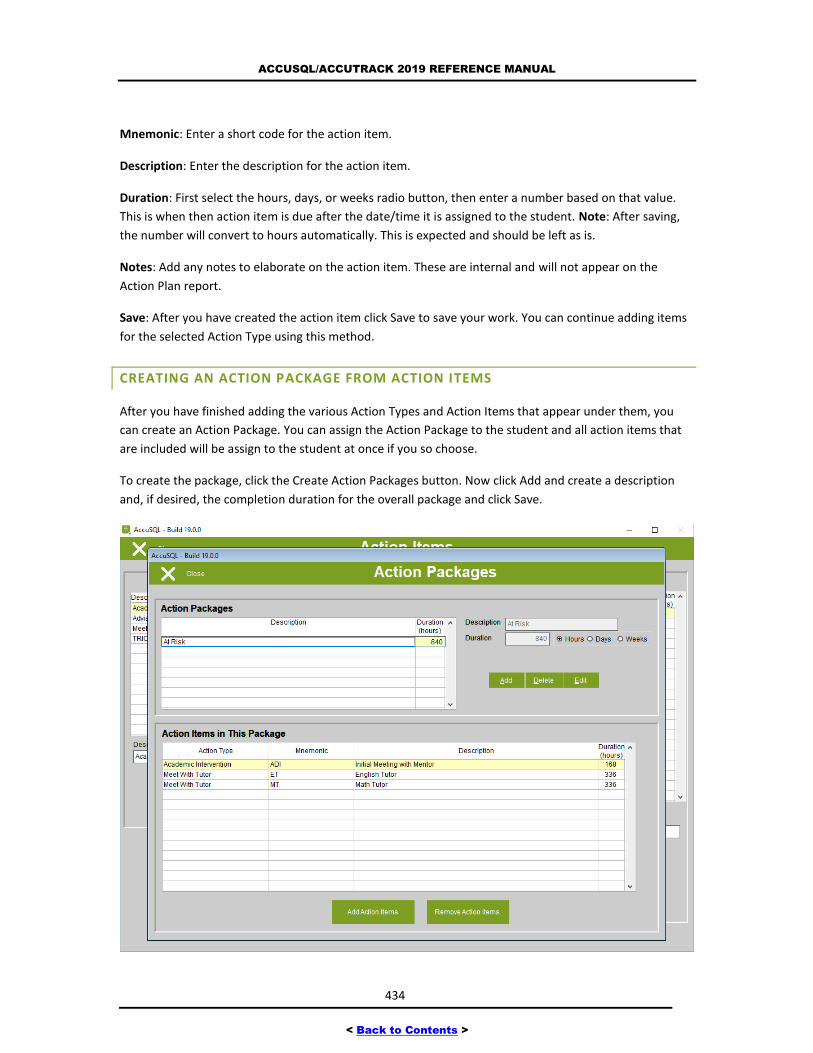
ACCUSQL/ACCUTRACK 2019 REFERENCE MANUAL
434
< Back to Contents >
Mnemonic: Enter a short code for the action item.
Description: Enter the description for the action item.
Duration: First select the hours, days, or weeks radio button, then enter a number based on that value.
This is when then action item is due after the date/time it is assigned to the student. Note: After saving,
the number will convert to hours automatically. This is expected and should be left as is.
Notes: Add any notes to elaborate on the action item. These are internal and will not appear on the
Action Plan report.
Save: After you have created the action item click Save to save your work. You can continue adding items
for the selected Action Type using this method.
CREATING AN ACTION PACKAGE FROM ACTION ITEMS
After you have finished adding the various Action Types and Action Items that appear under them, you
can create an Action Package. You can assign the Action Package to the student and all action items that
are included will be assign to the student at once if you so choose.
To create the package, click the Create Action Packages button. Now click Add and create a description
and, if desired, the completion duration for the overall package and click Save.
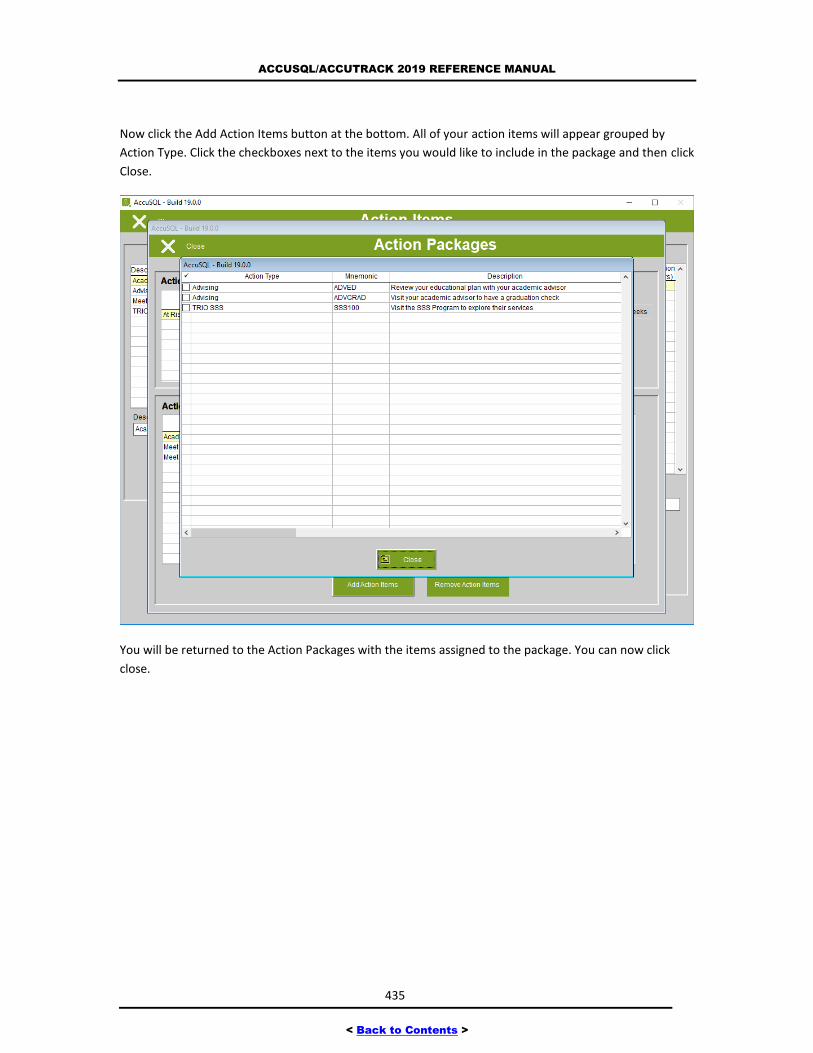
ACCUSQL/ACCUTRACK 2019 REFERENCE MANUAL
435
< Back to Contents >
Now click the Add Action Items button at the bottom. All of your action items will appear grouped by
Action Type. Click the checkboxes next to the items you would like to include in the package and then click
Close.
You will be returned to the Action Packages with the items assigned to the package. You can now click
close.
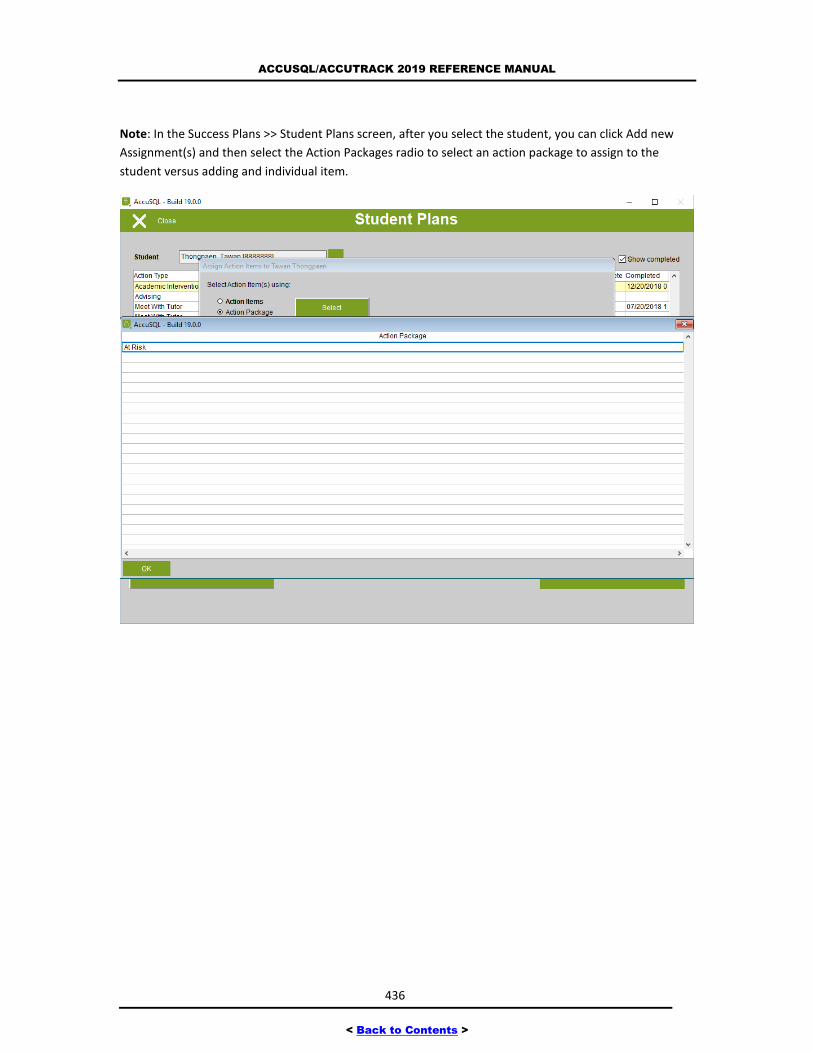
ACCUSQL/ACCUTRACK 2019 REFERENCE MANUAL
436
< Back to Contents >
Note: In the Success Plans >> Student Plans screen, after you select the student, you can click Add new
Assignment(s) and then select the Action Packages radio to select an action package to assign to the
student versus adding and individual item.

ACCUSQL/ACCUTRACK 2019 REFERENCE MANUAL
437
< Back to Contents >
BULK ASSIGNMENT
Purpose: Assign an action item or action package to several students at once using either a pick list of
students or student group list.
Access: From System Administration, click on Success Plans >> Bulk Assignment.
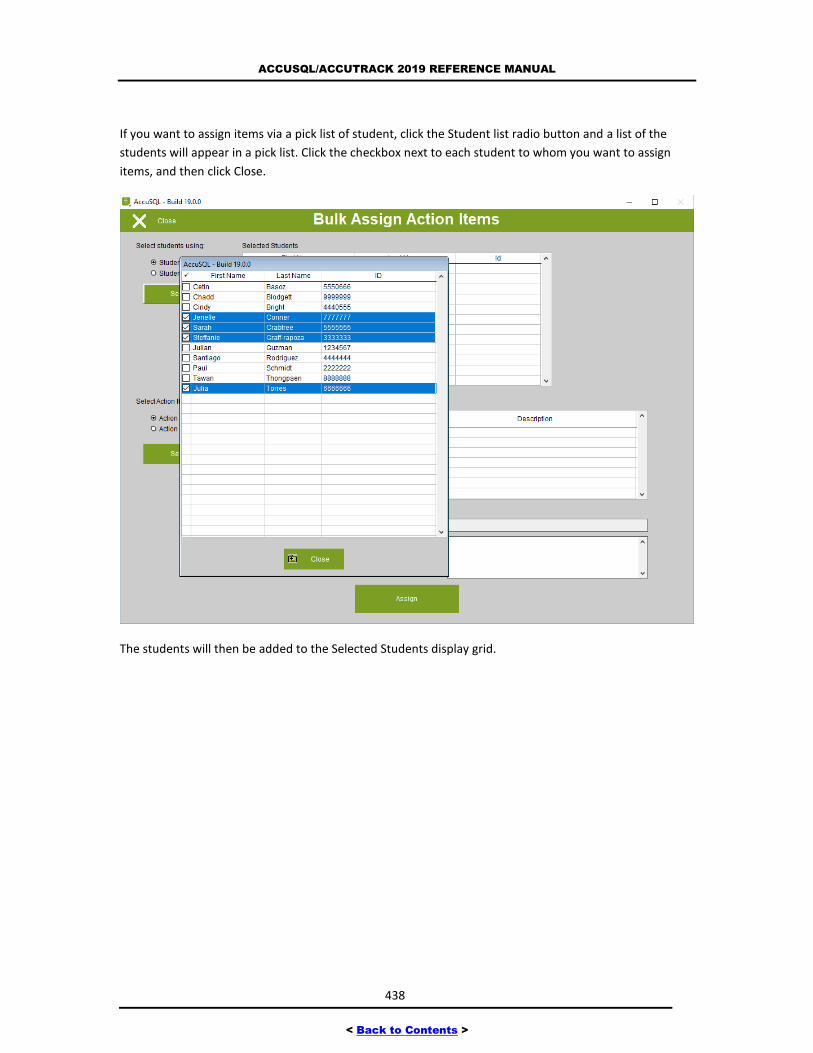
ACCUSQL/ACCUTRACK 2019 REFERENCE MANUAL
438
< Back to Contents >
If you want to assign items via a pick list of student, click the Student list radio button and a list of the
students will appear in a pick list. Click the checkbox next to each student to whom you want to assign
items, and then click Close.
The students will then be added to the Selected Students display grid.
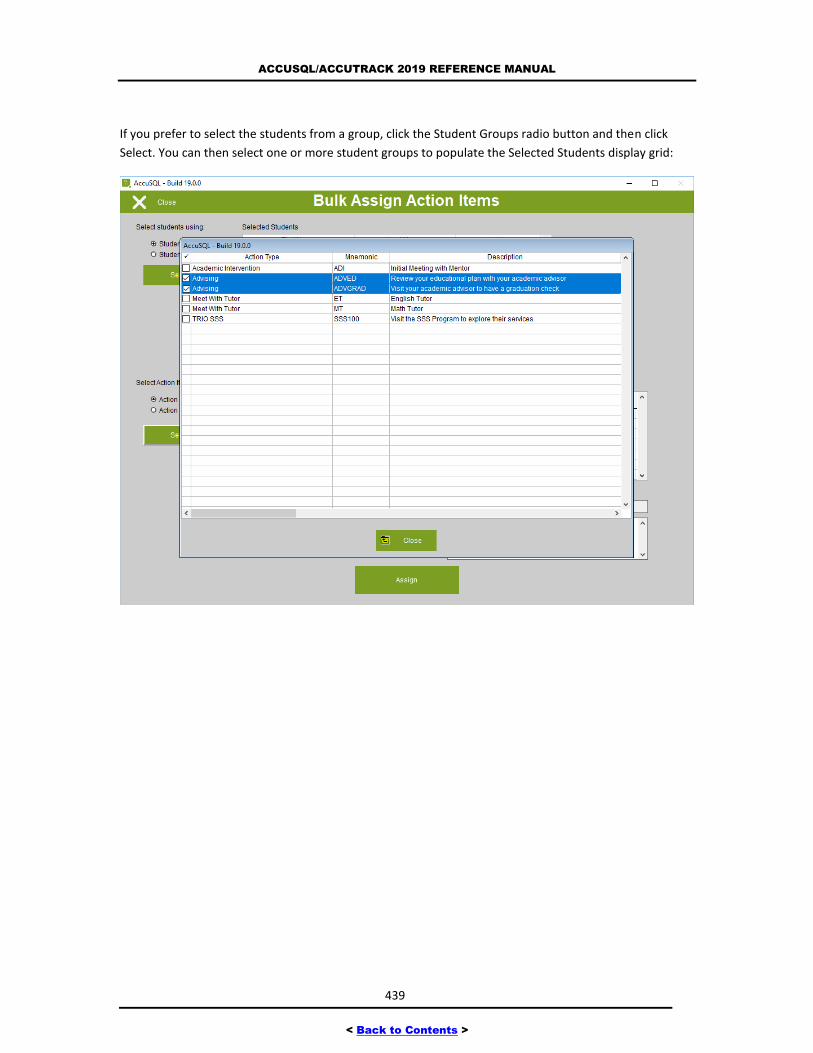
ACCUSQL/ACCUTRACK 2019 REFERENCE MANUAL
439
< Back to Contents >
If you prefer to select the students from a group, click the Student Groups radio button and then click
Select. You can then select one or more student groups to populate the Selected Students display grid:
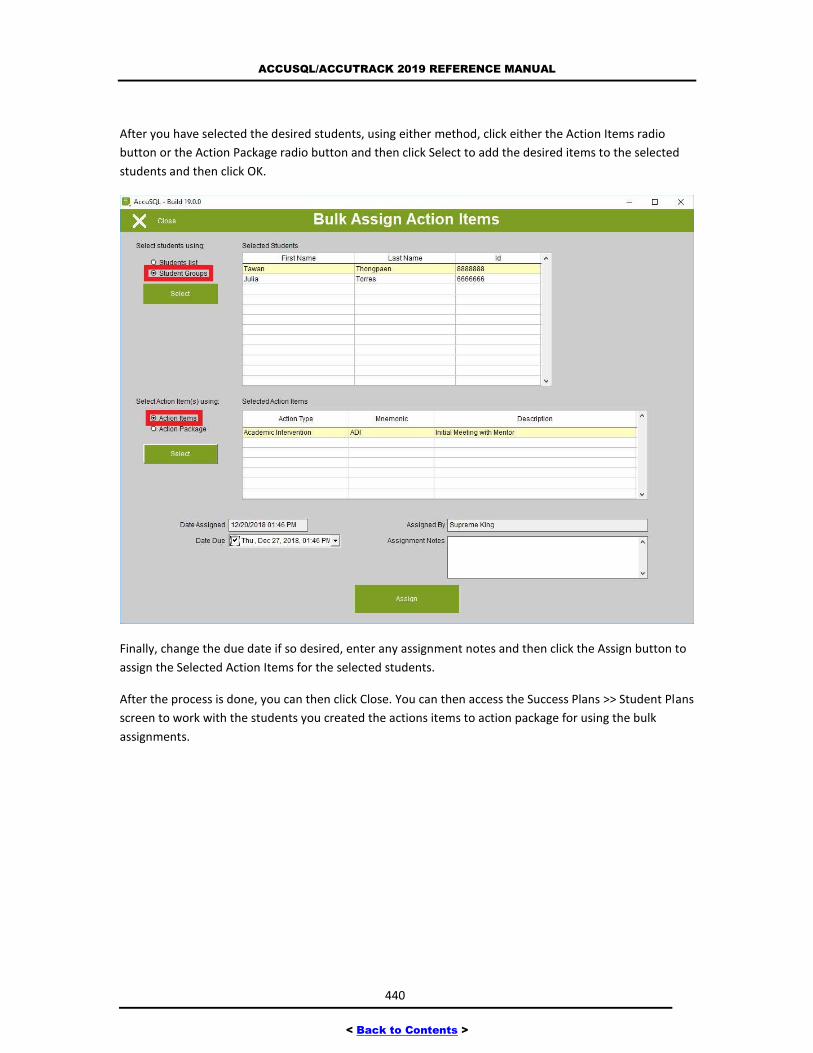
ACCUSQL/ACCUTRACK 2019 REFERENCE MANUAL
440
< Back to Contents >
After you have selected the desired students, using either method, click either the Action Items radio
button or the Action Package radio button and then click Select to add the desired items to the selected
students and then click OK.
Finally, change the due date if so desired, enter any assignment notes and then click the Assign button to
assign the Selected Action Items for the selected students.
After the process is done, you can then click Close. You can then access the Success Plans >> Student Plans
screen to work with the students you created the actions items to action package for using the bulk
assignments.
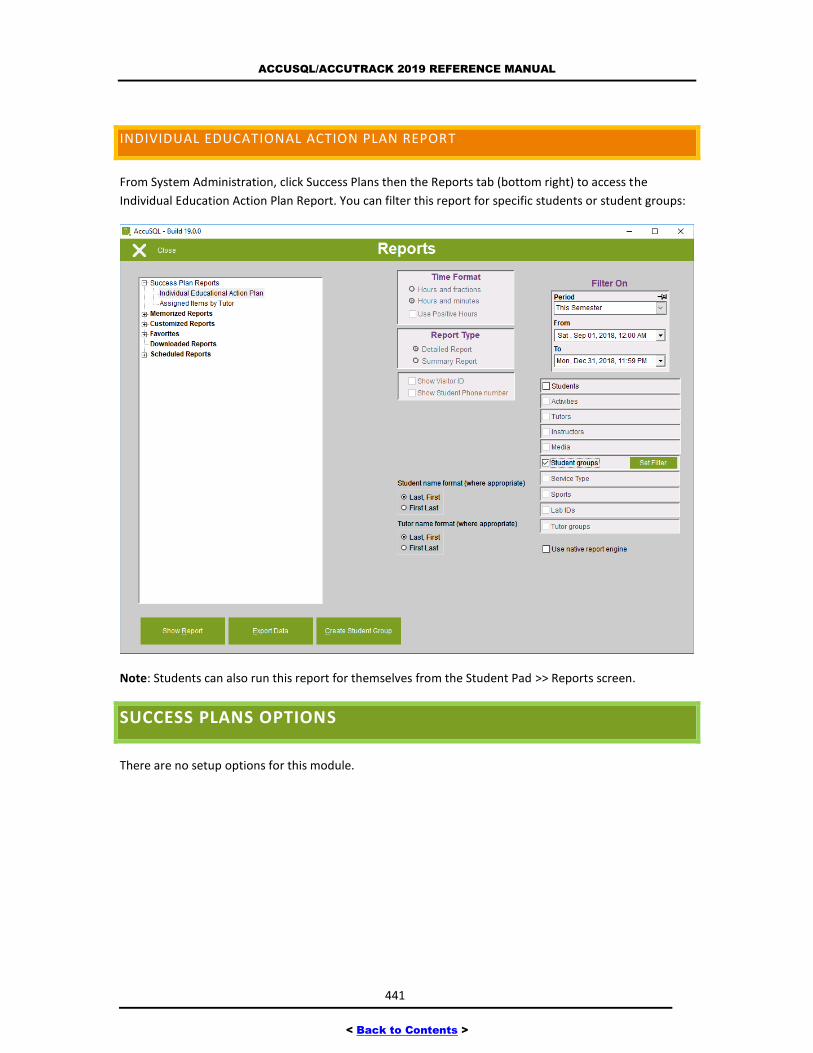
ACCUSQL/ACCUTRACK 2019 REFERENCE MANUAL
441
< Back to Contents >
INDIVIDUAL EDUCATIONAL ACTION PLAN REPORT
From System Administration, click Success Plans then the Reports tab (bottom right) to access the
Individual Education Action Plan Report. You can filter this report for specific students or student groups:
Note: Students can also run this report for themselves from the Student Pad >> Reports screen.
SUCCESS PLANS OPTIONS
There are no setup options for this module.
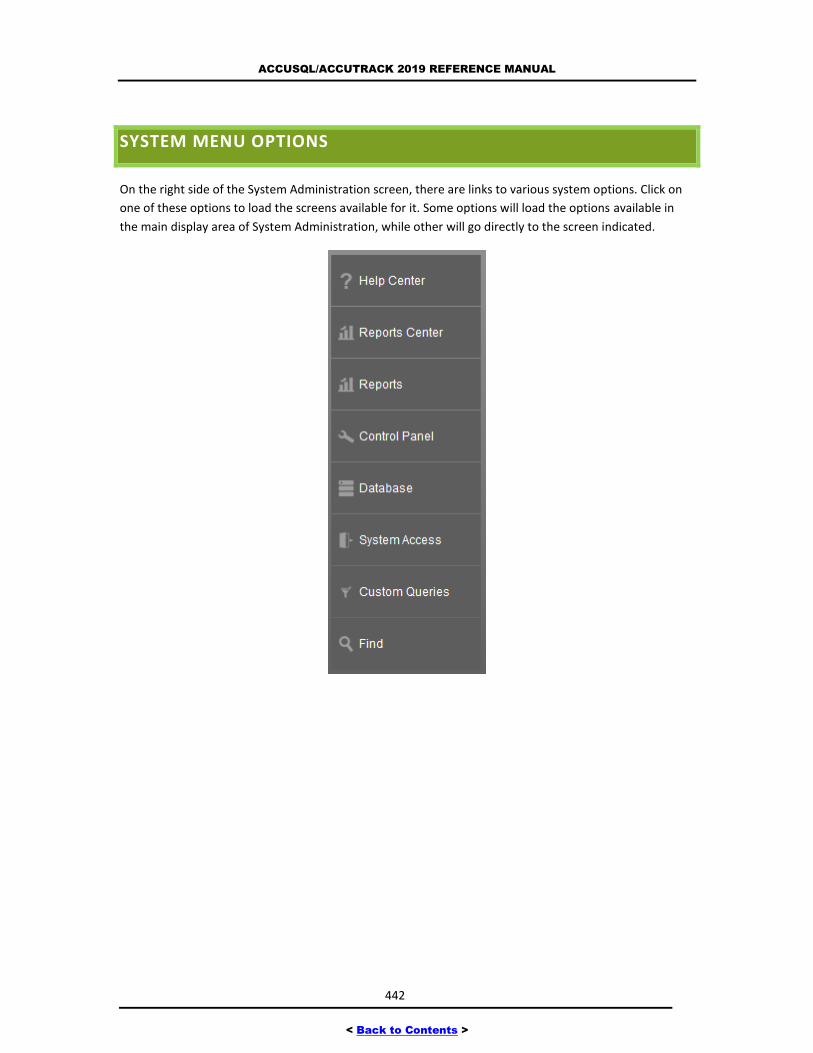
ACCUSQL/ACCUTRACK 2019 REFERENCE MANUAL
442
< Back to Contents >
SYSTEM MENU OPTIONS
On the right side of the System Administration screen, there are links to various system options. Click on
one of these options to load the screens available for it. Some options will load the options available in
the main display area of System Administration, while other will go directly to the screen indicated.
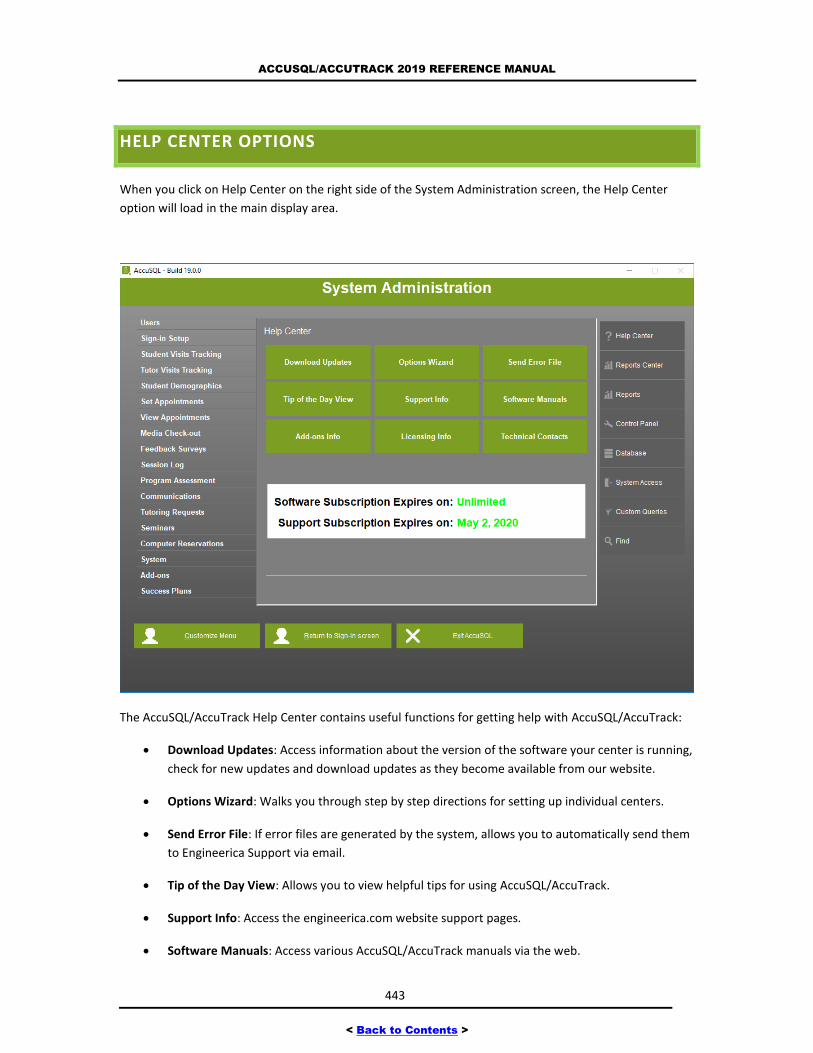
ACCUSQL/ACCUTRACK 2019 REFERENCE MANUAL
443
< Back to Contents >
HELP CENTER OPTIONS
When you click on Help Center on the right side of the System Administration screen, the Help Center
option will load in the main display area.
The AccuSQL/AccuTrack Help Center contains useful functions for getting help with AccuSQL/AccuTrack:
Download Updates: Access information about the version of the software your center is running,
check for new updates and download updates as they become available from our website.
Options Wizard: Walks you through step by step directions for setting up individual centers.
Send Error File: If error files are generated by the system, allows you to automatically send them
to Engineerica Support via email.
Tip of the Day View: Allows you to view helpful tips for using AccuSQL/AccuTrack.
Support Info: Access the engineerica.com website support pages.
Software Manuals: Access various AccuSQL/AccuTrack manuals via the web.
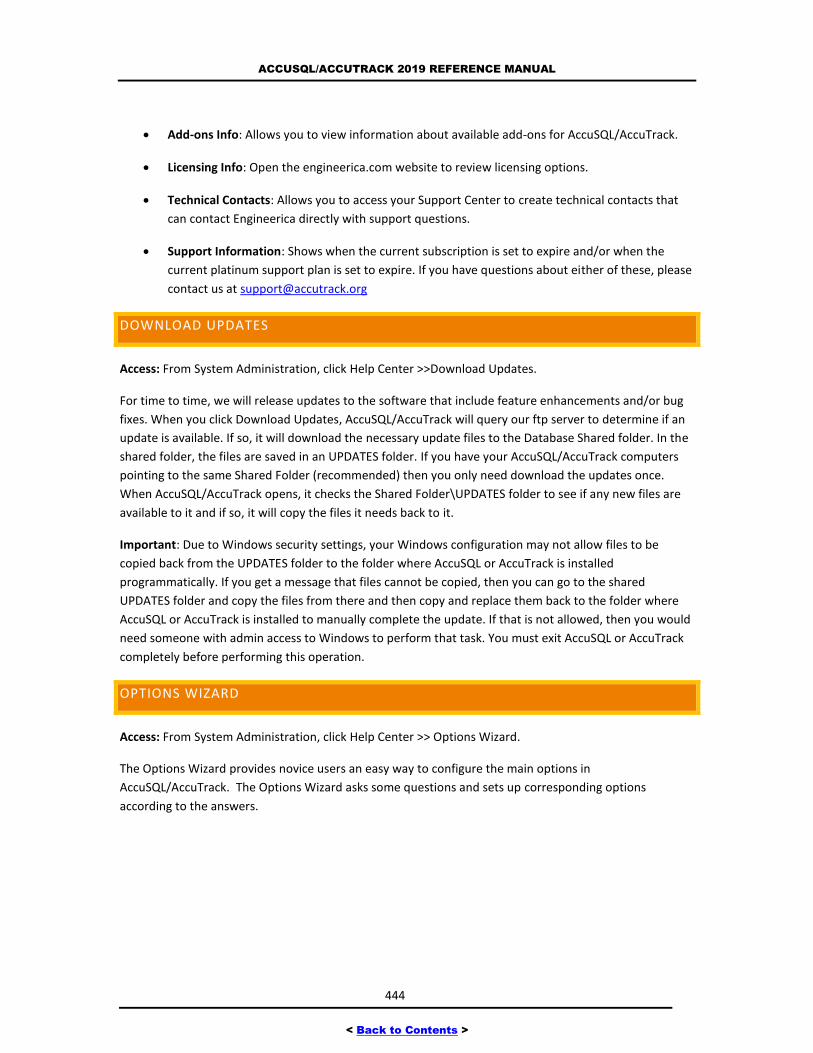
ACCUSQL/ACCUTRACK 2019 REFERENCE MANUAL
444
< Back to Contents >
Add-ons Info: Allows you to view information about available add-ons for AccuSQL/AccuTrack.
Licensing Info: Open the engineerica.com website to review licensing options.
Technical Contacts: Allows you to access your Support Center to create technical contacts that
can contact Engineerica directly with support questions.
Support Information: Shows when the current subscription is set to expire and/or when the
current platinum support plan is set to expire. If you have questions about either of these, please
contact us at [email protected]
DOWNLOAD UPDATES
Access: From System Administration, click Help Center >>Download Updates.
For time to time, we will release updates to the software that include feature enhancements and/or bug
fixes. When you click Download Updates, AccuSQL/AccuTrack will query our ftp server to determine if an
update is available. If so, it will download the necessary update files to the Database Shared folder. In the
shared folder, the files are saved in an UPDATES folder. If you have your AccuSQL/AccuTrack computers
pointing to the same Shared Folder (recommended) then you only need download the updates once.
When AccuSQL/AccuTrack opens, it checks the Shared Folder\UPDATES folder to see if any new files are
available to it and if so, it will copy the files it needs back to it.
Important: Due to Windows security settings, your Windows configuration may not allow files to be
copied back from the UPDATES folder to the folder where AccuSQL or AccuTrack is installed
programmatically. If you get a message that files cannot be copied, then you can go to the shared
UPDATES folder and copy the files from there and then copy and replace them back to the folder where
AccuSQL or AccuTrack is installed to manually complete the update. If that is not allowed, then you would
need someone with admin access to Windows to perform that task. You must exit AccuSQL or AccuTrack
completely before performing this operation.
OPTIONS WIZARD
Access: From System Administration, click Help Center >> Options Wizard.
The Options Wizard provides novice users an easy way to configure the main options in
AccuSQL/AccuTrack. The Options Wizard asks some questions and sets up corresponding options
according to the answers.
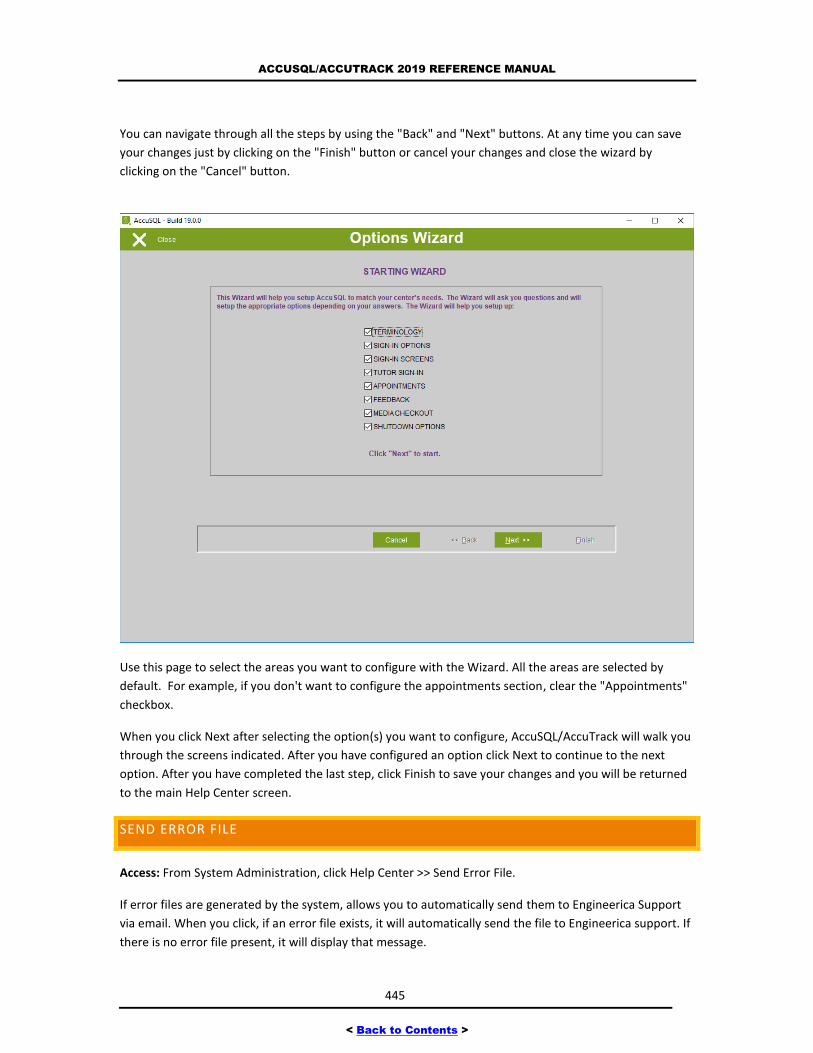
ACCUSQL/ACCUTRACK 2019 REFERENCE MANUAL
445
< Back to Contents >
You can navigate through all the steps by using the "Back" and "Next" buttons. At any time you can save
your changes just by clicking on the "Finish" button or cancel your changes and close the wizard by
clicking on the "Cancel" button.
Use this page to select the areas you want to configure with the Wizard. All the areas are selected by
default. For example, if you don't want to configure the appointments section, clear the "Appointments"
checkbox.
When you click Next after selecting the option(s) you want to configure, AccuSQL/AccuTrack will walk you
through the screens indicated. After you have configured an option click Next to continue to the next
option. After you have completed the last step, click Finish to save your changes and you will be returned
to the main Help Center screen.
SEND ERROR FILE
Access: From System Administration, click Help Center >> Send Error File.
If error files are generated by the system, allows you to automatically send them to Engineerica Support
via email. When you click, if an error file exists, it will automatically send the file to Engineerica support. If
there is no error file present, it will display that message.
ACCUSQL/ACCUTRACK 2019 REFERENCE MANUAL
446
< Back to Contents >
TIP OF THE DAY VIEW
Access: From System Administration, click Help Center >> Tip of the Day View.
Use the left and right arrow keys to access helpful tips of using AccuSQL/AccuTrack. If you check the Show
tips on startup (default), the Tip of the day screen will be displayed when starting up AccuSQL/AccuTrack.
SUPPORT INFO
Access: From System Administration, click Help Center >> Support Info.
Click to open the AccuSQL/AccuTrack Support pages at www.engineerica.com.
SOFTWARE MANUALS
Access: From System Administration, click Help Center >> Software Manuals.
Click to open various AccuSQL/AccuTrack help manuals online.
ADD-ONS INFO
Access: From System Administration, click Help Center >> Add-ons Info.
Click to view information about the various plug-ins that are available for AccuSQL/AccuTrack.
LICENSING INFO
Access: From System Administration, click Help Center >> Licensing Info.
Click to view information about the various AccuSQL/AccuTrack licensing options.
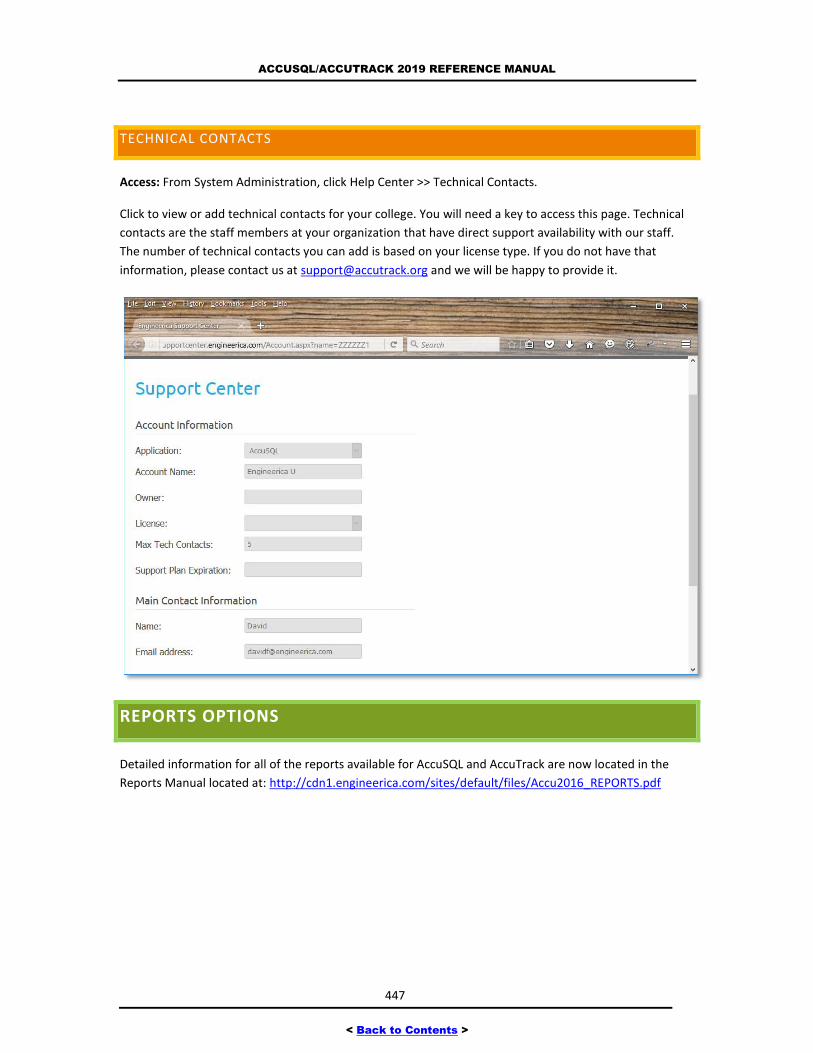
ACCUSQL/ACCUTRACK 2019 REFERENCE MANUAL
447
< Back to Contents >
TECHNICAL CONTACTS
Access: From System Administration, click Help Center >> Technical Contacts.
Click to view or add technical contacts for your college. You will need a key to access this page. Technical
contacts are the staff members at your organization that have direct support availability with our staff.
The number of technical contacts you can add is based on your license type. If you do not have that
information, please contact us at [email protected] and we will be happy to provide it.
REPORTS OPTIONS
Detailed information for all of the reports available for AccuSQL and AccuTrack are now located in the
Reports Manual located at: http://cdn1.engineerica.com/sites/default/files/Accu2016_REPORTS.pdf

ACCUSQL/ACCUTRACK 2019 REFERENCE MANUAL
448
< Back to Contents >
CONTROL PANEL OPTIONS
Remember, if you click an item on the left of the System Administration and then click the Setup tab, you
will load the context specific control panel setup options for the item indicated.
If you click Control Panel directly from System Administration, you can access all of the setup options
available for AccuSQL/AccuTrack.
The various setup screens are explained in detail throughout this manual. Please consult the “Setup
Options” section of the manual for the item you have selected on the left menu of System Administration
for detailed information about the setup option for that item.
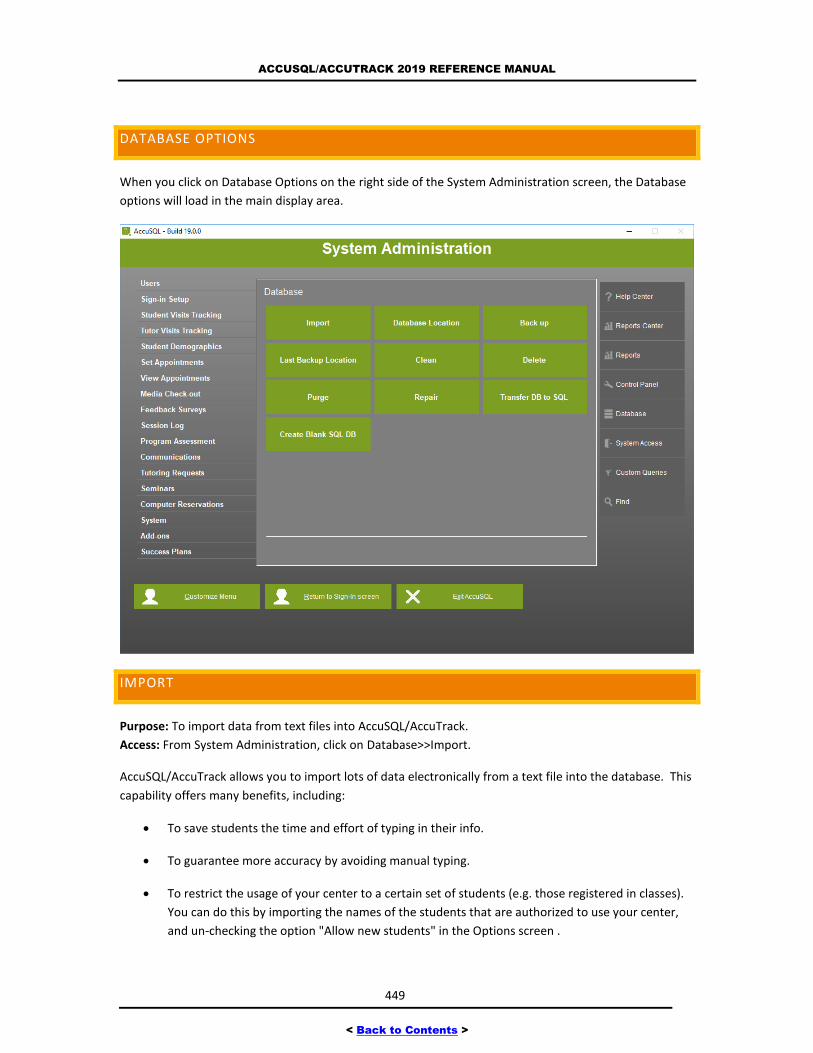
ACCUSQL/ACCUTRACK 2019 REFERENCE MANUAL
449
< Back to Contents >
DATABASE OPTIONS
When you click on Database Options on the right side of the System Administration screen, the Database
options will load in the main display area.
IMPORT
Purpose: To import data from text files into AccuSQL/AccuTrack.
Access: From System Administration, click on Database>>Import.
AccuSQL/AccuTrack allows you to import lots of data electronically from a text file into the database. This
capability offers many benefits, including:
To save students the time and effort of typing in their info.
To guarantee more accuracy by avoiding manual typing.
To restrict the usage of your center to a certain set of students (e.g. those registered in classes).
You can do this by importing the names of the students that are authorized to use your center,
and un-checking the option "Allow new students" in the Options screen .
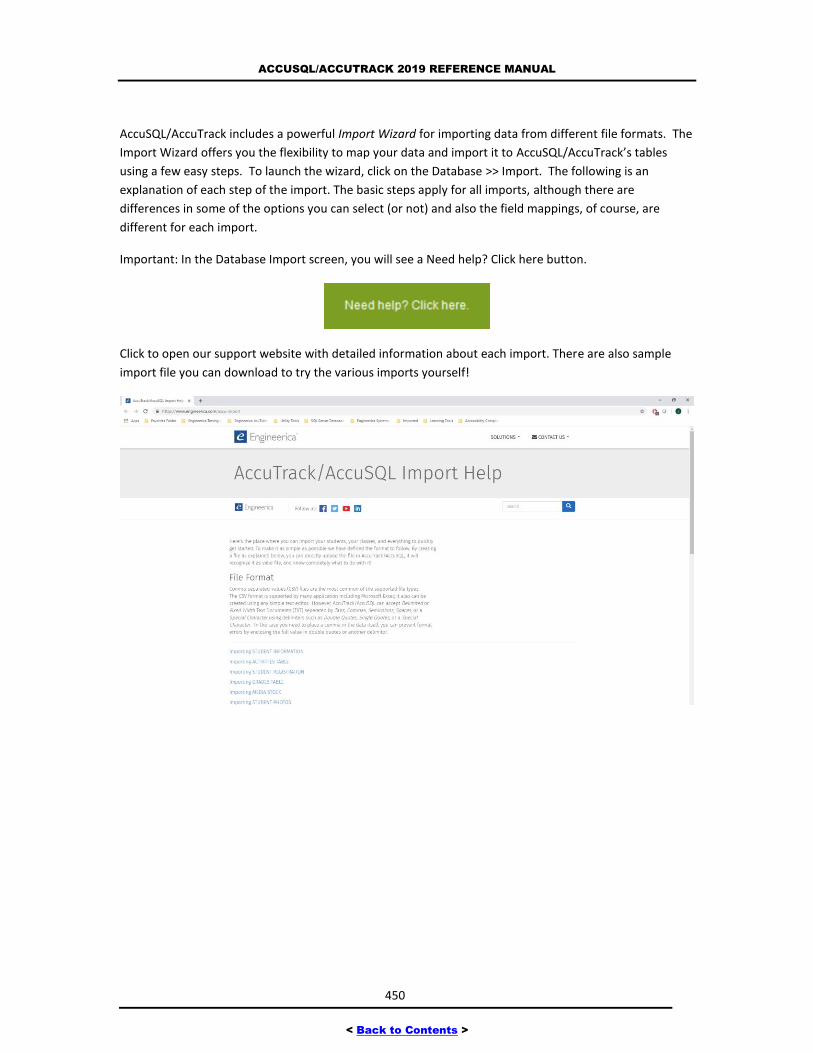
ACCUSQL/ACCUTRACK 2019 REFERENCE MANUAL
450
< Back to Contents >
AccuSQL/AccuTrack includes a powerful Import Wizard for importing data from different file formats. The
Import Wizard offers you the flexibility to map your data and import it to AccuSQL/AccuTrack’s tables
using a few easy steps. To launch the wizard, click on the Database >> Import. The following is an
explanation of each step of the import. The basic steps apply for all imports, although there are
differences in some of the options you can select (or not) and also the field mappings, of course, are
different for each import.
Important: In the Database Import screen, you will see a Need help? Click here button.
Click to open our support website with detailed information about each import. There are also sample
import file you can download to try the various imports yourself!
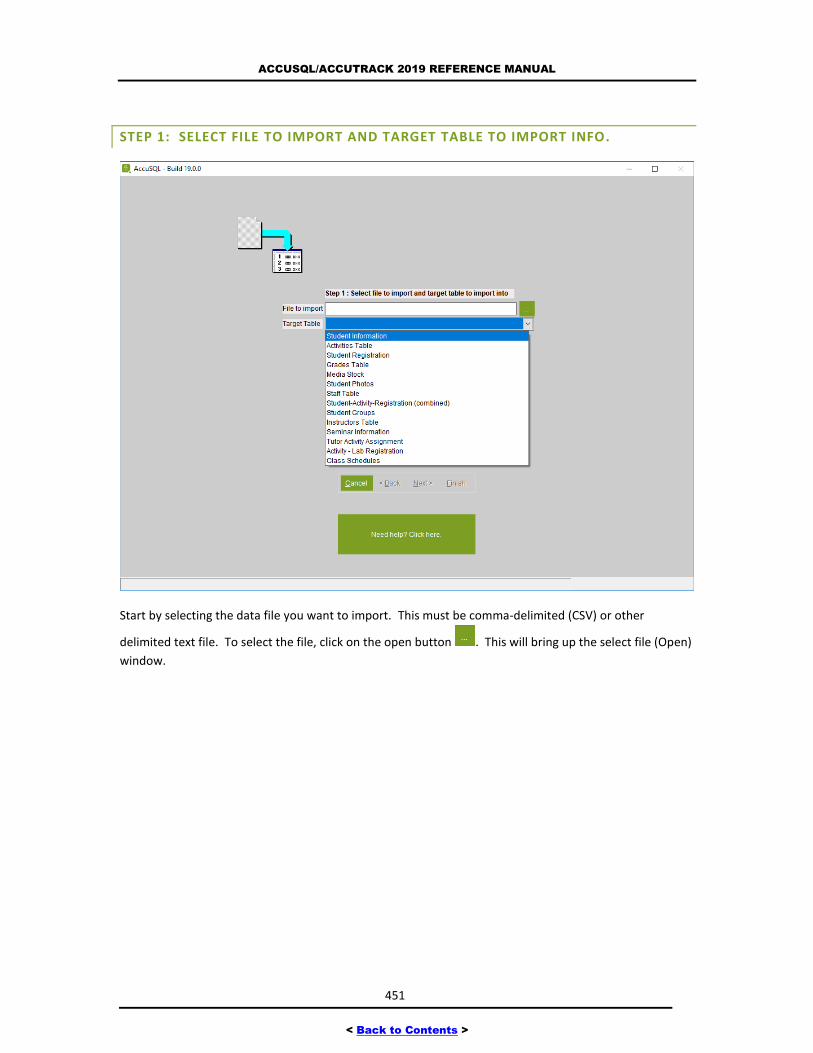
ACCUSQL/ACCUTRACK 2019 REFERENCE MANUAL
451
< Back to Contents >
STEP 1: SELECT FILE TO IMPORT AND TARGET TABLE TO IMPORT INFO.
Start by selecting the data file you want to import. This must be comma-delimited (CSV) or other
delimited text file. To select the file, click on the open button . This will bring up the select file (Open)
window.

ACCUSQL/ACCUTRACK 2019 REFERENCE MANUAL
452
< Back to Contents >
Use this window to find and highlight the appropriate file, and then click on "OK". If the file you are
importing is a .txt file, then you will see it in the list when you go to its folder location. If it is another type
of file (such as .csv) click the Files of type drop-down box and then click All Files to display it.
Next select the table where the imported data will be added from the drop-down list box. Here are the
available options:
Option Import Details
Student Information Student's data, including name, ID, contact info, and profile
data.
Activities Table Student Activities that students see when they sign in. Can
be used for classes.
Student Registration Class registration data.
Grades Table Grades used in assessment reports. You can import two sets
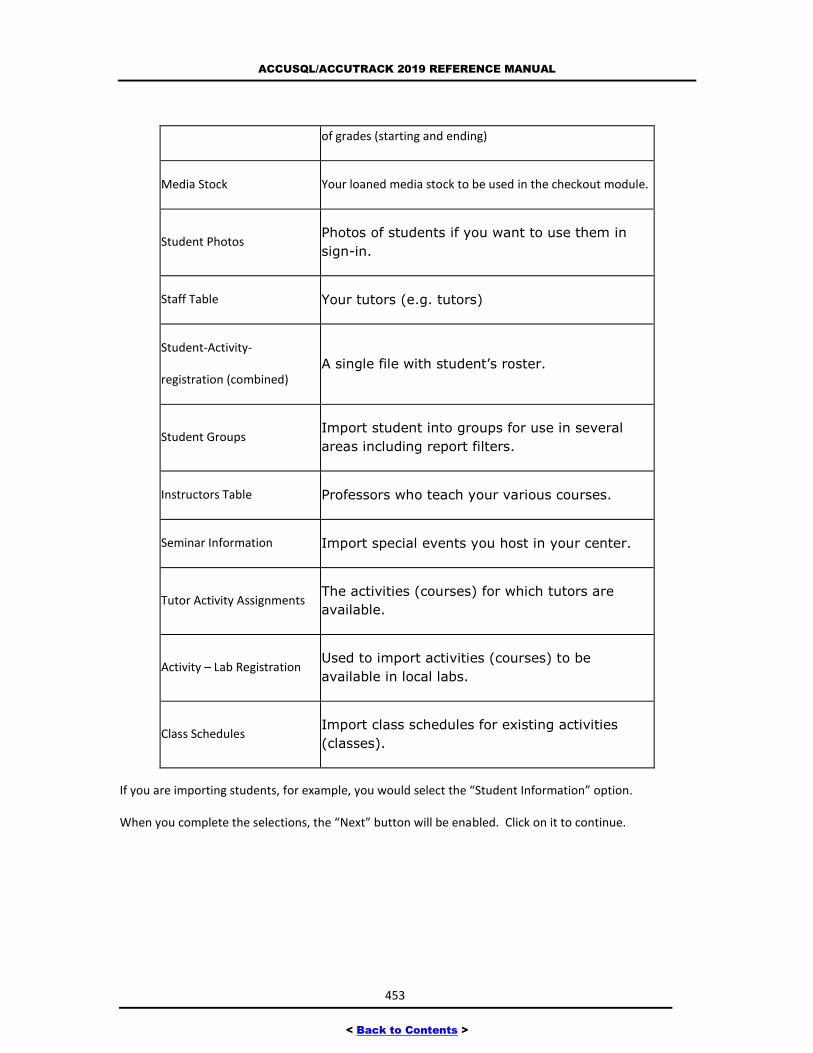
ACCUSQL/ACCUTRACK 2019 REFERENCE MANUAL
453
< Back to Contents >
of grades (starting and ending)
Media Stock Your loaned media stock to be used in the checkout module.
Student Photos Photos of students if you want to use them in
sign-in.
Staff Table Your tutors (e.g. tutors)
Student-Activity-
registration (combined) A single file with student’s roster.
Student Groups Import student into groups for use in several
areas including report filters.
Instructors Table Professors who teach your various courses.
Seminar Information Import special events you host in your center.
Tutor Activity Assignments The activities (courses) for which tutors are
available.
Activity – Lab Registration Used to import activities (courses) to be
available in local labs.
Class Schedules Import class schedules for existing activities
(classes).
If you are importing students, for example, you would select the “Student Information” option.
When you complete the selections, the “Next” button will be enabled. Click on it to continue.
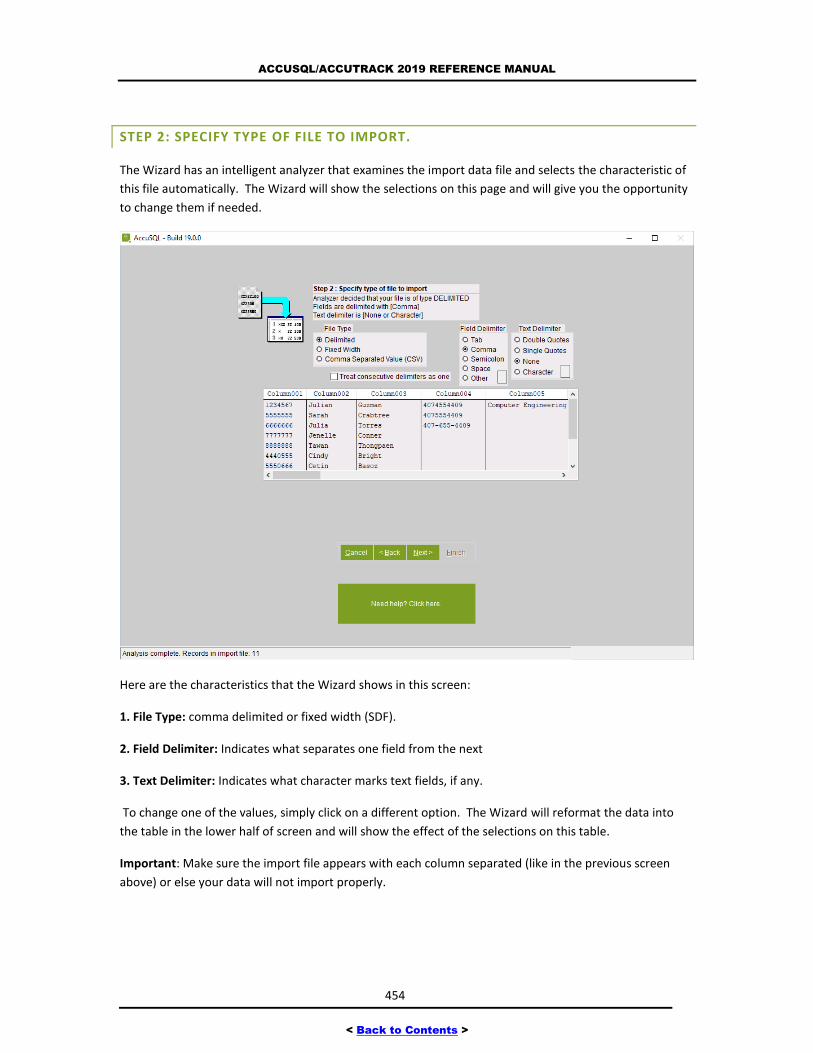
ACCUSQL/ACCUTRACK 2019 REFERENCE MANUAL
454
< Back to Contents >
STEP 2: SPECIFY TYPE OF FILE TO IMPORT.
The Wizard has an intelligent analyzer that examines the import data file and selects the characteristic of
this file automatically. The Wizard will show the selections on this page and will give you the opportunity
to change them if needed.
Here are the characteristics that the Wizard shows in this screen:
1. File Type: comma delimited or fixed width (SDF).
2. Field Delimiter: Indicates what separates one field from the next
3. Text Delimiter: Indicates what character marks text fields, if any.
To change one of the values, simply click on a different option. The Wizard will reformat the data into
the table in the lower half of screen and will show the effect of the selections on this table.
Important: Make sure the import file appears with each column separated (like in the previous screen
above) or else your data will not import properly.
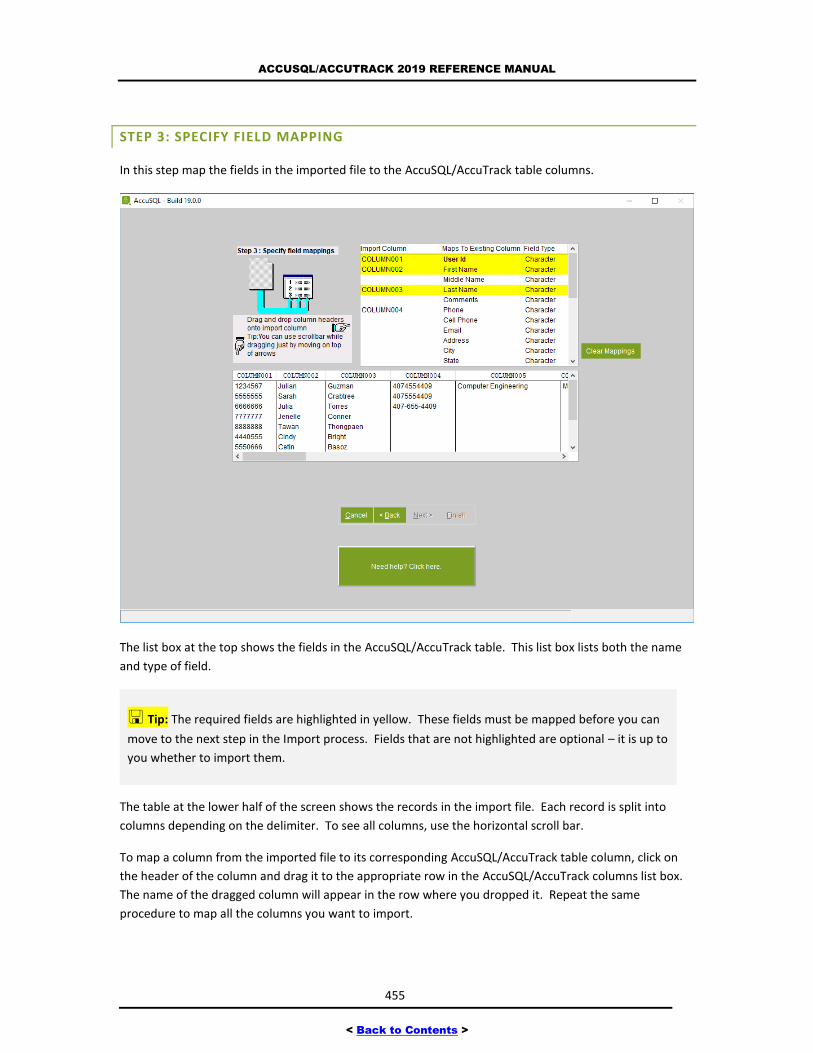
ACCUSQL/ACCUTRACK 2019 REFERENCE MANUAL
455
< Back to Contents >
STEP 3: SPECIFY FIELD MAPPING
In this step map the fields in the imported file to the AccuSQL/AccuTrack table columns.
The list box at the top shows the fields in the AccuSQL/AccuTrack table. This list box lists both the name
and type of field.
Tip: The required fields are highlighted in yellow. These fields must be mapped before you can
move to the next step in the Import process. Fields that are not highlighted are optional – it is up to
you whether to import them.
The table at the lower half of the screen shows the records in the import file. Each record is split into
columns depending on the delimiter. To see all columns, use the horizontal scroll bar.
To map a column from the imported file to its corresponding AccuSQL/AccuTrack table column, click on
the header of the column and drag it to the appropriate row in the AccuSQL/AccuTrack columns list box.
The name of the dragged column will appear in the row where you dropped it. Repeat the same
procedure to map all the columns you want to import.
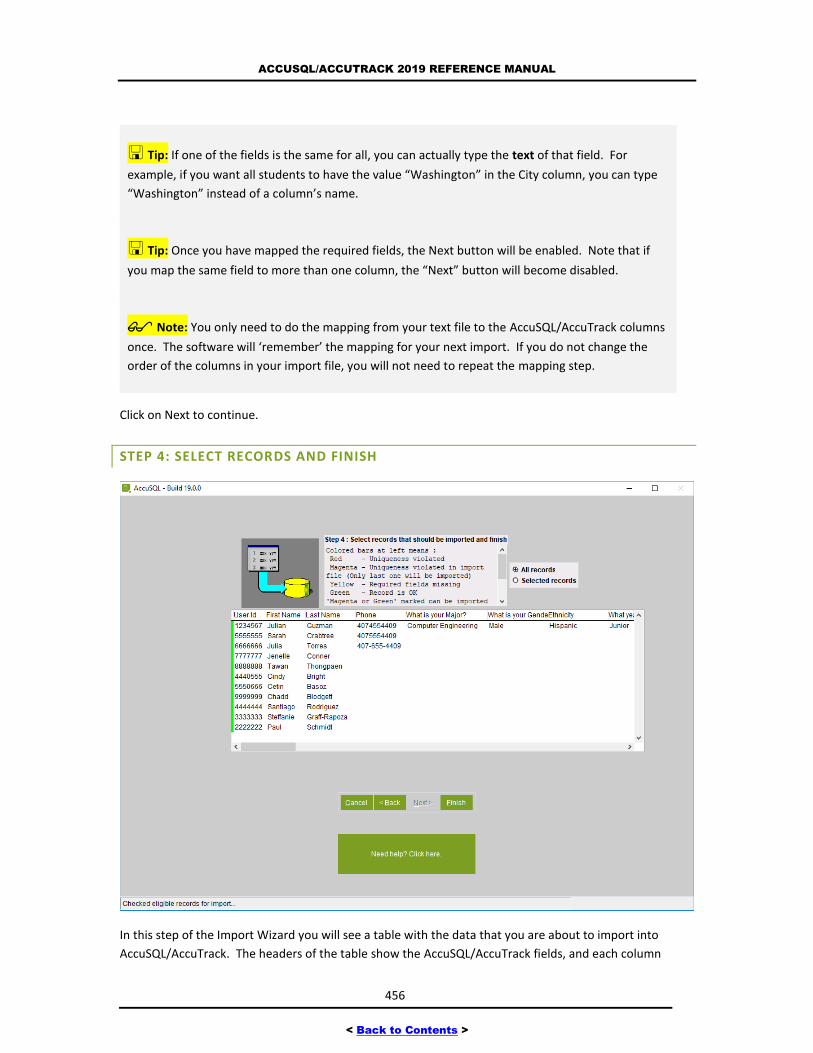
ACCUSQL/ACCUTRACK 2019 REFERENCE MANUAL
456
< Back to Contents >
Tip: If one of the fields is the same for all, you can actually type the text of that field. For
example, if you want all students to have the value “Washington” in the City column, you can type
“Washington” instead of a column’s name.
Tip: Once you have mapped the required fields, the Next button will be enabled. Note that if
you map the same field to more than one column, the “Next” button will become disabled.
Note: You only need to do the mapping from your text file to the AccuSQL/AccuTrack columns
once. The software will ‘remember’ the mapping for your next import. If you do not change the
order of the columns in your import file, you will not need to repeat the mapping step.
Click on Next to continue.
STEP 4: SELECT RECORDS AND FINISH
In this step of the Import Wizard you will see a table with the data that you are about to import into
AccuSQL/AccuTrack. The headers of the table show the AccuSQL/AccuTrack fields, and each column
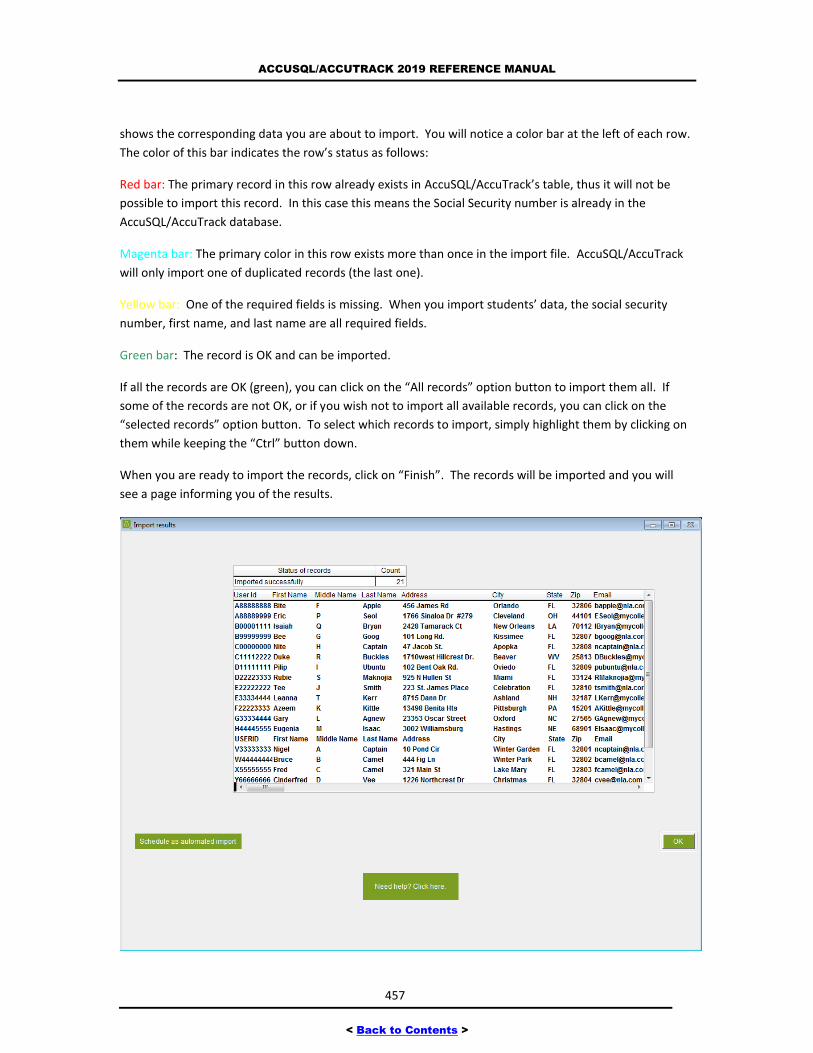
ACCUSQL/ACCUTRACK 2019 REFERENCE MANUAL
457
< Back to Contents >
shows the corresponding data you are about to import. You will notice a color bar at the left of each row.
The color of this bar indicates the row’s status as follows:
Red bar: The primary record in this row already exists in AccuSQL/AccuTrack’s table, thus it will not be
possible to import this record. In this case this means the Social Security number is already in the
AccuSQL/AccuTrack database.
Magenta bar: The primary color in this row exists more than once in the import file. AccuSQL/AccuTrack
will only import one of duplicated records (the last one).
Yellow bar: One of the required fields is missing. When you import students’ data, the social security
number, first name, and last name are all required fields.
Green bar: The record is OK and can be imported.
If all the records are OK (green), you can click on the “All records” option button to import them all. If
some of the records are not OK, or if you wish not to import all available records, you can click on the
“selected records” option button. To select which records to import, simply highlight them by clicking on
them while keeping the “Ctrl” button down.
When you are ready to import the records, click on “Finish”. The records will be imported and you will
see a page informing you of the results.

ACCUSQL/ACCUTRACK 2019 REFERENCE MANUAL
458
< Back to Contents >
The box at the top of this screen gives you statistics on the status of this import:
The larger box lists the records in the import file. Any problematic records are highlighted for your
review.
STUDENT INFORMATION IMPORT
When importing student info, Step 1 will have 2 extra options:
1. Update student data from import file if student already exists: If you check this option,
AccuSQL/AccuTrack will update the student’s data (e.g. contact info and profile values) of
existing students in the database. If this option is not checked, AccuSQL/AccuTrack will skip
records of students who are already in the database.
2. Inactivate students that are not in import file: If this option is checked, AccuSQL/AccuTrack will
mark student records as inactive in the database if they are not in the import file.
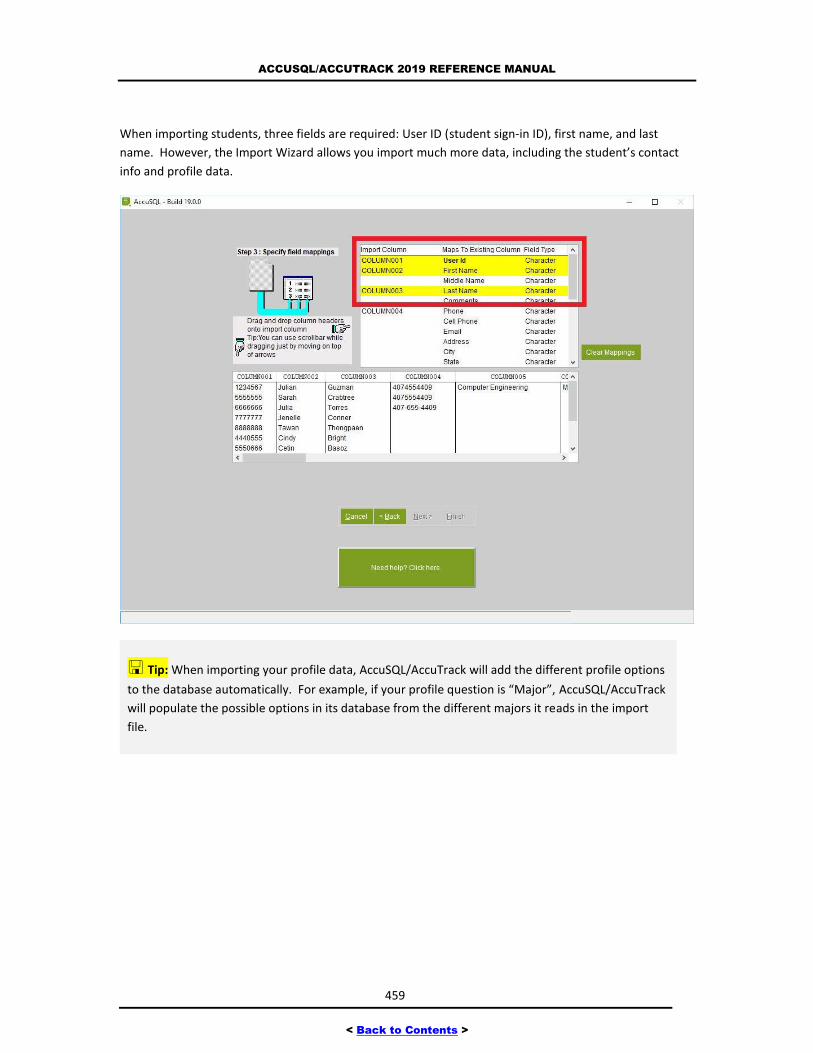
ACCUSQL/ACCUTRACK 2019 REFERENCE MANUAL
459
< Back to Contents >
When importing students, three fields are required: User ID (student sign-in ID), first name, and last
name. However, the Import Wizard allows you import much more data, including the student’s contact
info and profile data.
Tip: When importing your profile data, AccuSQL/AccuTrack will add the different profile options
to the database automatically. For example, if your profile question is “Major”, AccuSQL/AccuTrack
will populate the possible options in its database from the different majors it reads in the import
file.
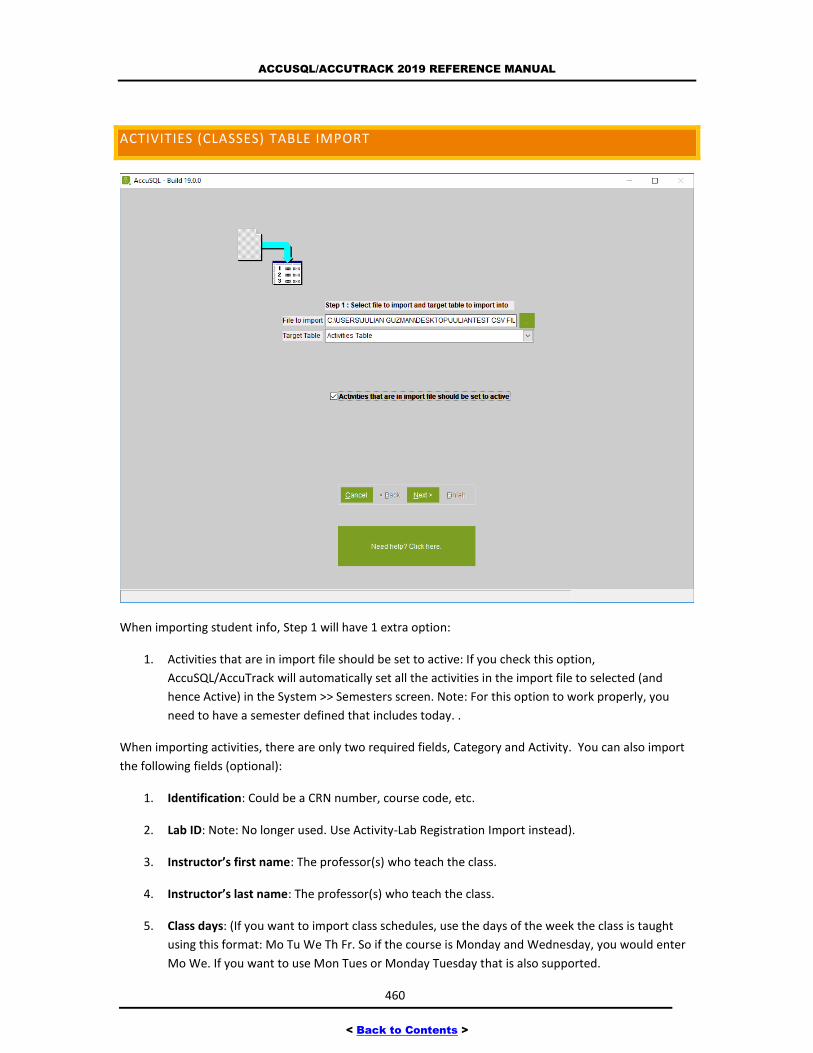
ACCUSQL/ACCUTRACK 2019 REFERENCE MANUAL
460
< Back to Contents >
ACTIVITIES (CLASSES) TABLE IMPORT
When importing student info, Step 1 will have 1 extra option:
1. Activities that are in import file should be set to active: If you check this option,
AccuSQL/AccuTrack will automatically set all the activities in the import file to selected (and
hence Active) in the System >> Semesters screen. Note: For this option to work properly, you
need to have a semester defined that includes today. .
When importing activities, there are only two required fields, Category and Activity. You can also import
the following fields (optional):
1. Identification: Could be a CRN number, course code, etc.
2. Lab ID: Note: No longer used. Use Activity-Lab Registration Import instead).
3. Instructor’s first name: The professor(s) who teach the class.
4. Instructor’s last name: The professor(s) who teach the class.
5. Class days: (If you want to import class schedules, use the days of the week the class is taught
using this format: Mo Tu We Th Fr. So if the course is Monday and Wednesday, you would enter
Mo We. If you want to use Mon Tues or Monday Tuesday that is also supported.
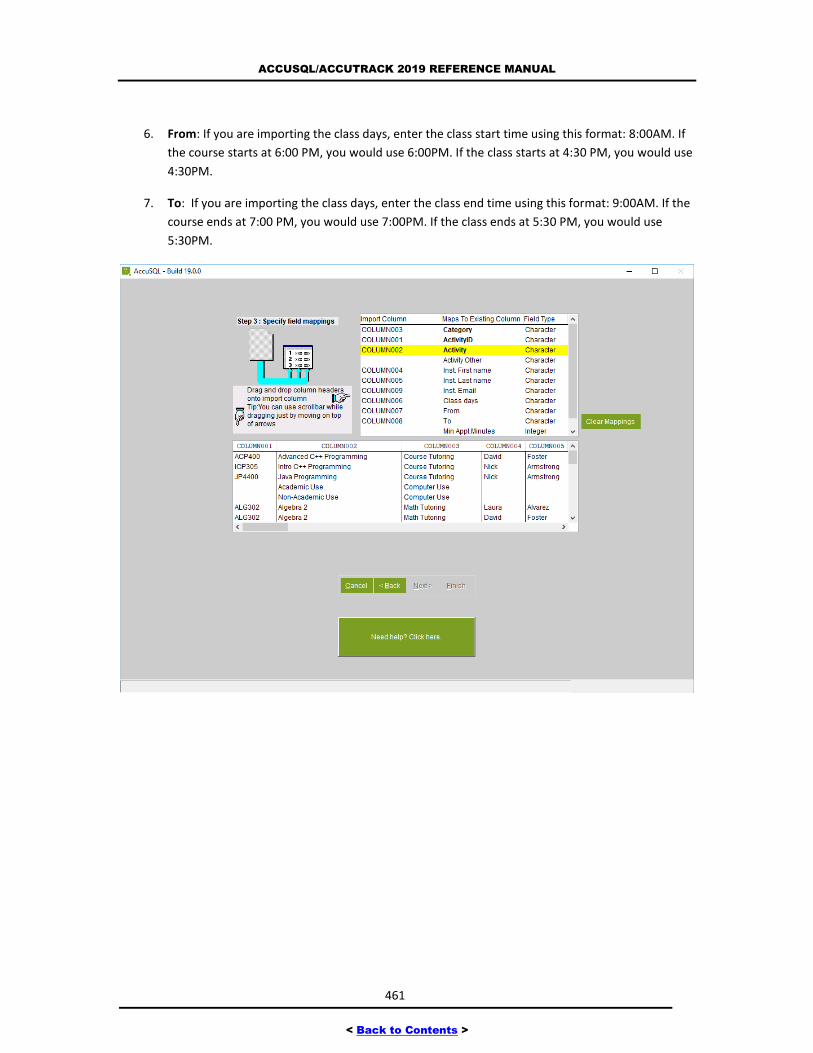
ACCUSQL/ACCUTRACK 2019 REFERENCE MANUAL
461
< Back to Contents >
6. From: If you are importing the class days, enter the class start time using this format: 8:00AM. If
the course starts at 6:00 PM, you would use 6:00PM. If the class starts at 4:30 PM, you would use
4:30PM.
7. To: If you are importing the class days, enter the class end time using this format: 9:00AM. If the
course ends at 7:00 PM, you would use 7:00PM. If the class ends at 5:30 PM, you would use
5:30PM.
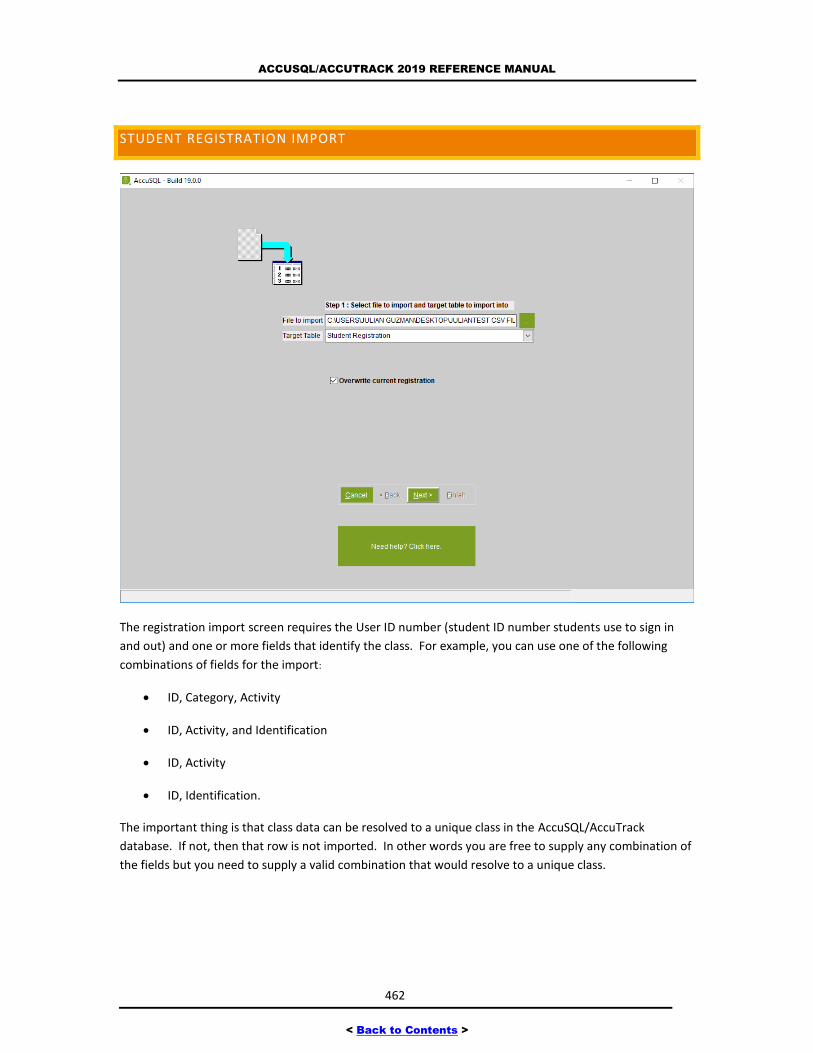
ACCUSQL/ACCUTRACK 2019 REFERENCE MANUAL
462
< Back to Contents >
STUDENT REGISTRATION IMPORT
The registration import screen requires the User ID number (student ID number students use to sign in
and out) and one or more fields that identify the class. For example, you can use one of the following
combinations of fields for the import:
ID, Category, Activity
ID, Activity, and Identification
ID, Activity
ID, Identification.
The important thing is that class data can be resolved to a unique class in the AccuSQL/AccuTrack
database. If not, then that row is not imported. In other words you are free to supply any combination of
the fields but you need to supply a valid combination that would resolve to a unique class.
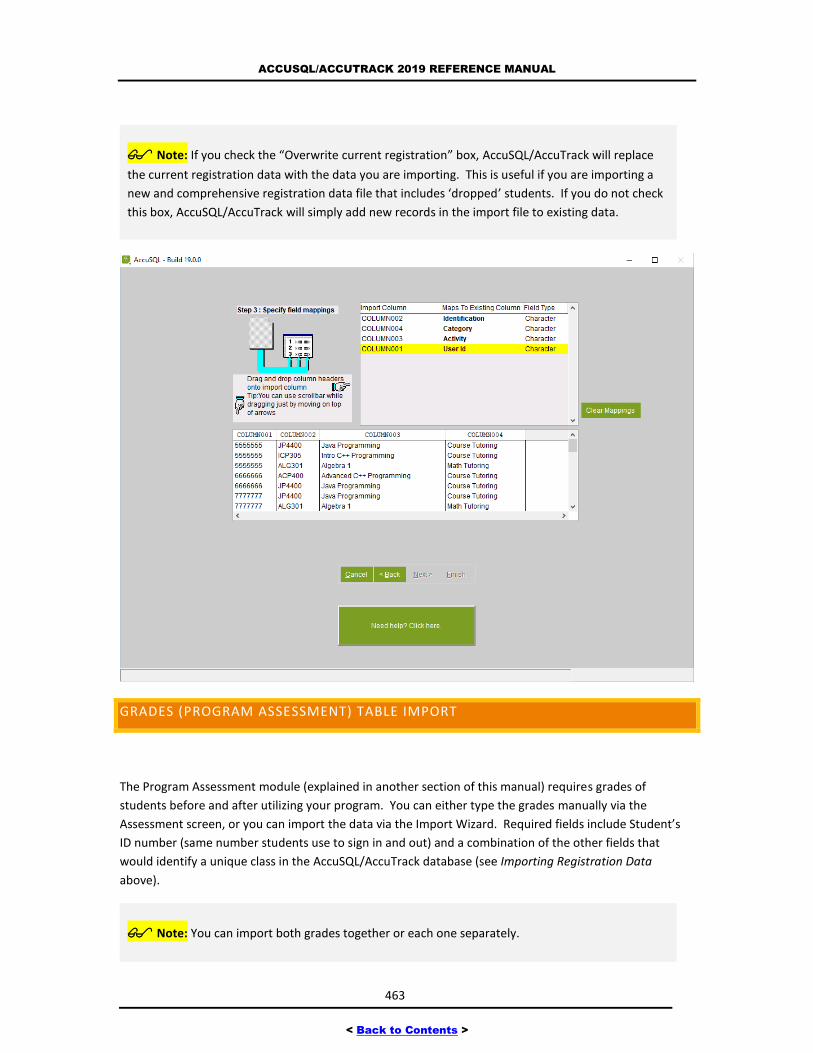
ACCUSQL/ACCUTRACK 2019 REFERENCE MANUAL
463
< Back to Contents >
Note: If you check the “Overwrite current registration” box, AccuSQL/AccuTrack will replace
the current registration data with the data you are importing. This is useful if you are importing a
new and comprehensive registration data file that includes ‘dropped’ students. If you do not check
this box, AccuSQL/AccuTrack will simply add new records in the import file to existing data.
GRADES (PROGRAM ASSESSMENT) TABLE IMPORT
The Program Assessment module (explained in another section of this manual) requires grades of
students before and after utilizing your program. You can either type the grades manually via the
Assessment screen, or you can import the data via the Import Wizard. Required fields include Student’s
ID number (same number students use to sign in and out) and a combination of the other fields that
would identify a unique class in the AccuSQL/AccuTrack database (see Importing Registration Data
above).
Note: You can import both grades together or each one separately.

ACCUSQL/ACCUTRACK 2019 REFERENCE MANUAL
464
< Back to Contents >
MEDIA STOCK IMPORT
If you use AccuSQL/AccuTrack for tracking media, you can import your media stock from a text file.
Required field includes the Media ID # (unique number you assign to each piece of media), and media
title, type, Instructor’s name and notes you have for this media.
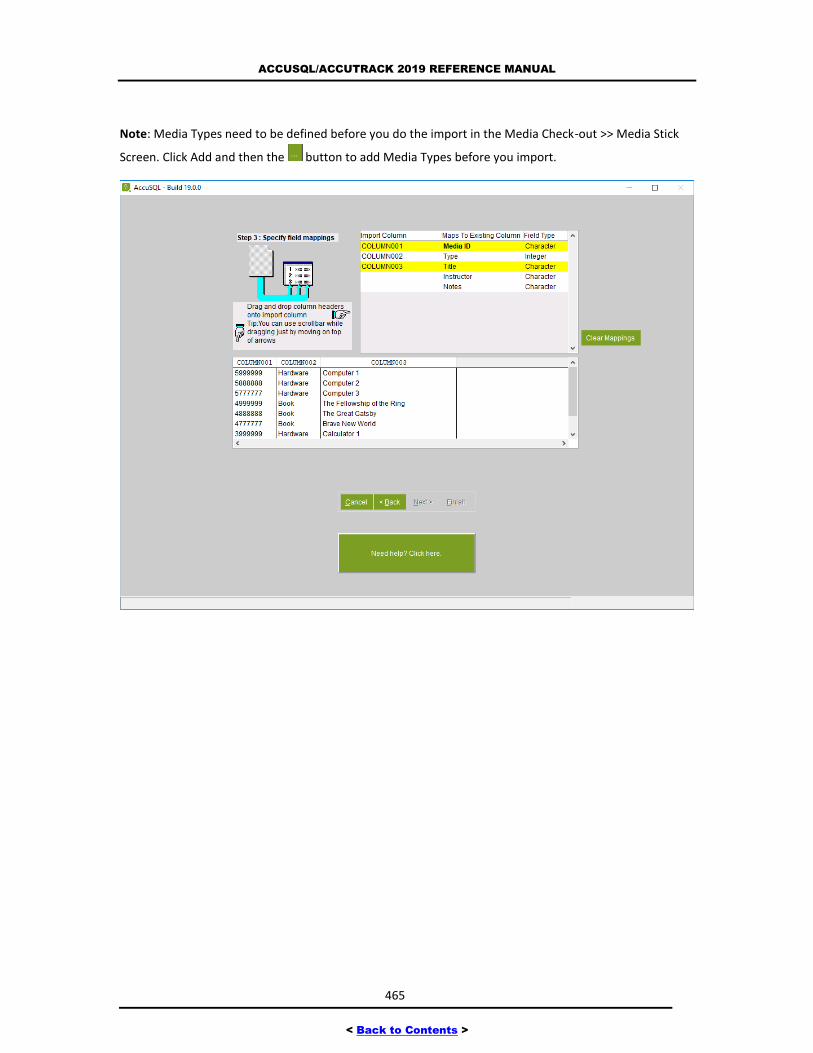
ACCUSQL/ACCUTRACK 2019 REFERENCE MANUAL
465
< Back to Contents >
Note: Media Types need to be defined before you do the import in the Media Check-out >> Media Stick
Screen. Click Add and then the button to add Media Types before you import.
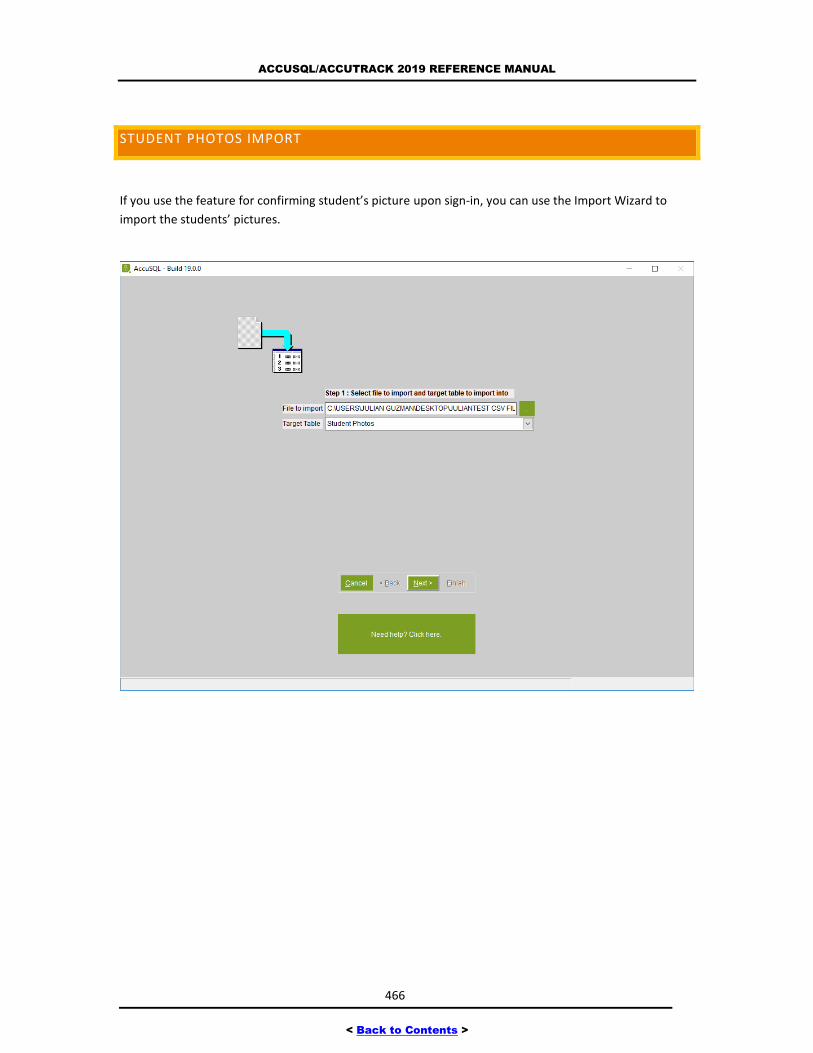
ACCUSQL/ACCUTRACK 2019 REFERENCE MANUAL
466
< Back to Contents >
STUDENT PHOTOS IMPORT
If you use the feature for confirming student’s picture upon sign-in, you can use the Import Wizard to
import the students’ pictures.
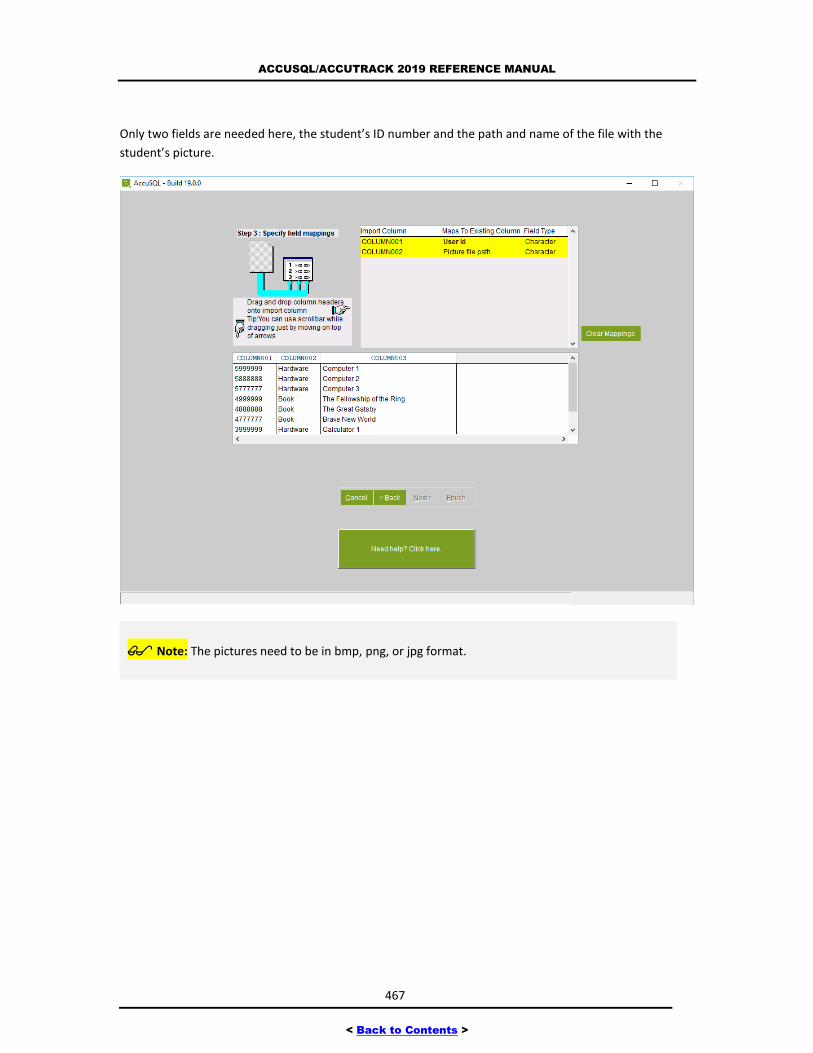
ACCUSQL/ACCUTRACK 2019 REFERENCE MANUAL
467
< Back to Contents >
Only two fields are needed here, the student’s ID number and the path and name of the file with the
student’s picture.
Note: The pictures need to be in bmp, png, or jpg format.
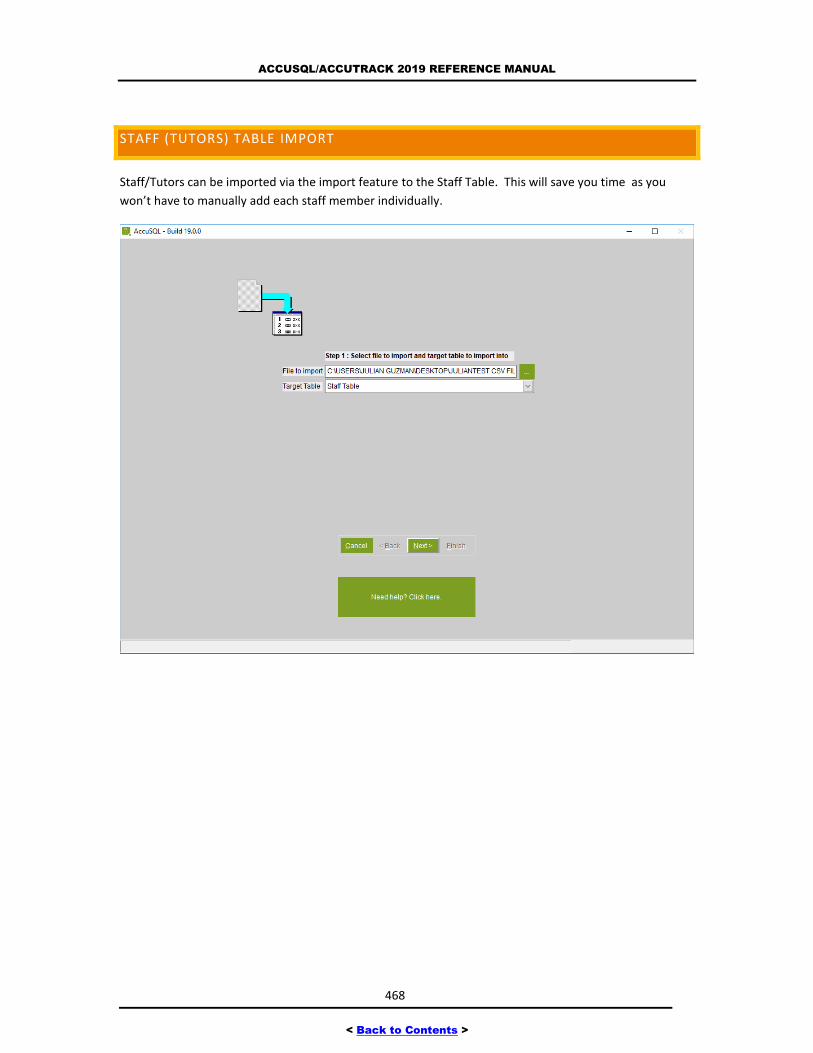
ACCUSQL/ACCUTRACK 2019 REFERENCE MANUAL
468
< Back to Contents >
STAFF (TUTORS) TABLE IMPORT
Staff/Tutors can be imported via the import feature to the Staff Table. This will save you time as you
won’t have to manually add each staff member individually.
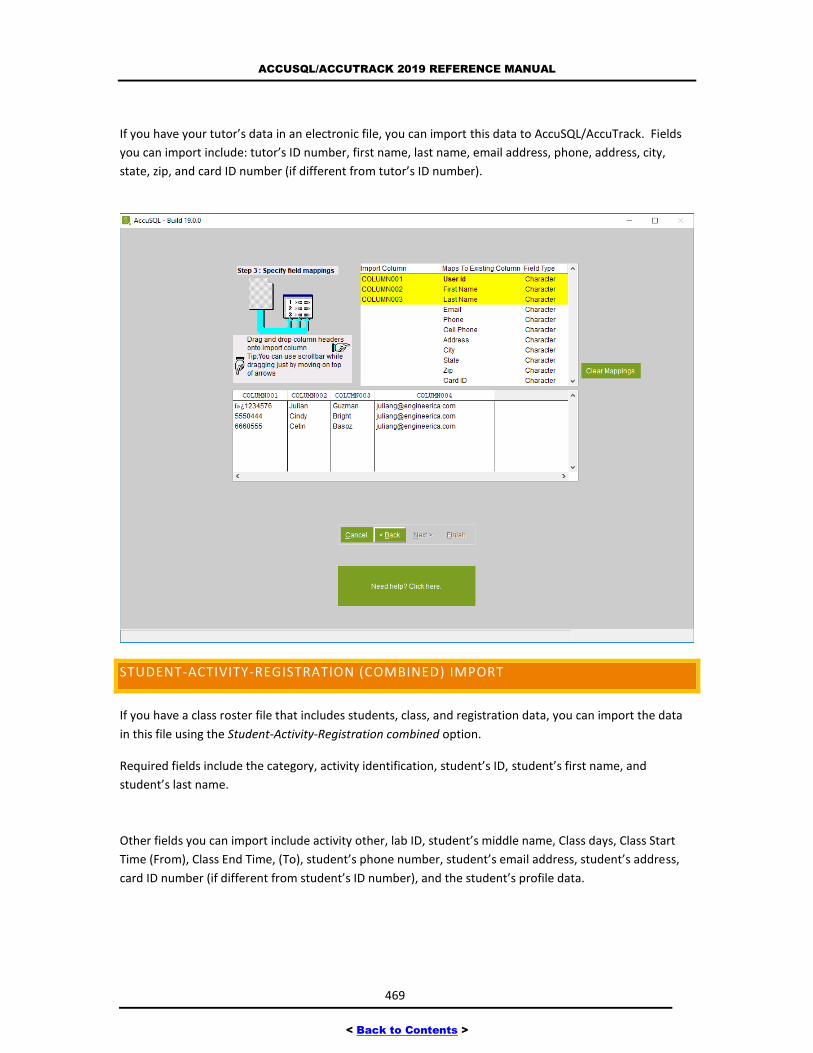
ACCUSQL/ACCUTRACK 2019 REFERENCE MANUAL
469
< Back to Contents >
If you have your tutor’s data in an electronic file, you can import this data to AccuSQL/AccuTrack. Fields
you can import include: tutor’s ID number, first name, last name, email address, phone, address, city,
state, zip, and card ID number (if different from tutor’s ID number).
STUDENT-ACTIVITY-REGISTRATION (COMBINED) IMPORT
If you have a class roster file that includes students, class, and registration data, you can import the data
in this file using the Student-Activity-Registration combined option.
Required fields include the category, activity identification, student’s ID, student’s first name, and
student’s last name.
Other fields you can import include activity other, lab ID, student’s middle name, Class days, Class Start
Time (From), Class End Time, (To), student’s phone number, student’s email address, student’s address,
card ID number (if different from student’s ID number), and the student’s profile data.
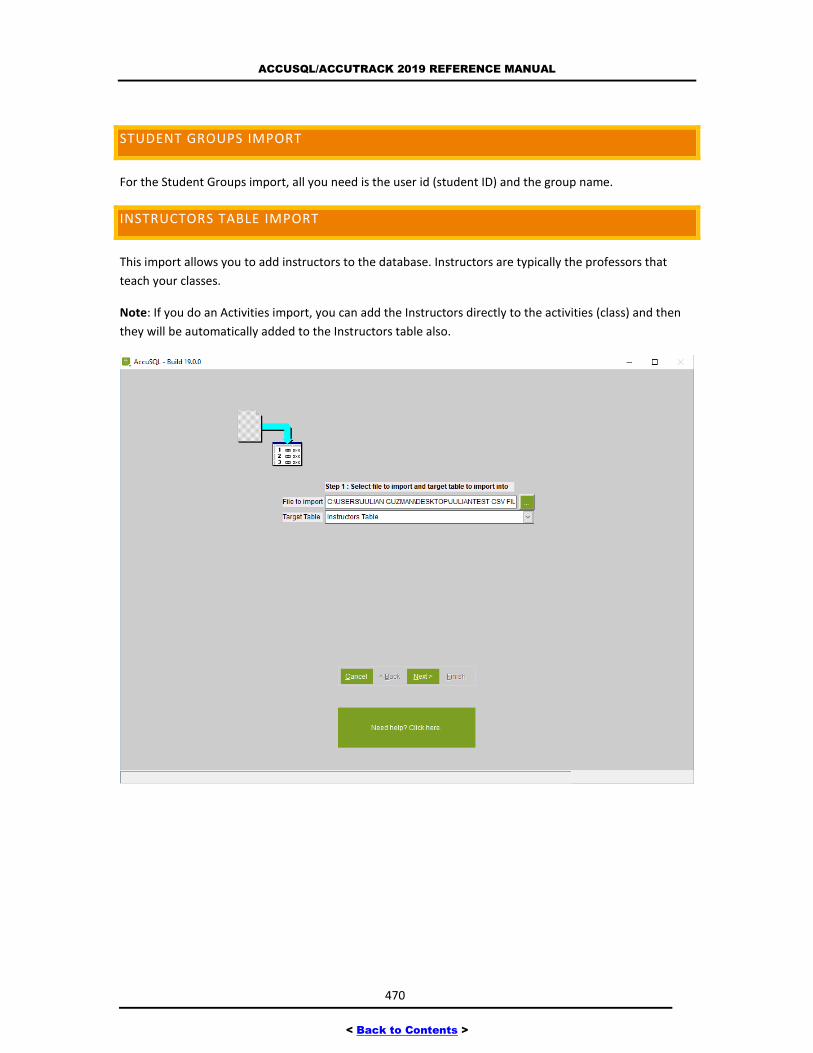
ACCUSQL/ACCUTRACK 2019 REFERENCE MANUAL
470
< Back to Contents >
STUDENT GROUPS IMPORT
For the Student Groups import, all you need is the user id (student ID) and the group name.
INSTRUCTORS TABLE IMPORT
This import allows you to add instructors to the database. Instructors are typically the professors that
teach your classes.
Note: If you do an Activities import, you can add the Instructors directly to the activities (class) and then
they will be automatically added to the Instructors table also.

ACCUSQL/ACCUTRACK 2019 REFERENCE MANUAL
471
< Back to Contents >
Required fields include the First Name and the Last Name.
SEMINAR INFORMATION IMPORT
Use this import for special events you are hosting in your center.
For the Start, End, and Registration End fields, you would create them as follows: 11/01/2019 1:00PM, or
11/15/2019 16:00.
TUTOR ACTIVITY ASSIGNMENTS IMPORT
Use this import to assign your activities (classes) to the tutors who will be available to assist students with
them. This would prevent you from having to manually do Add/Remove Assignments for each tutor in the
Tutors screen.
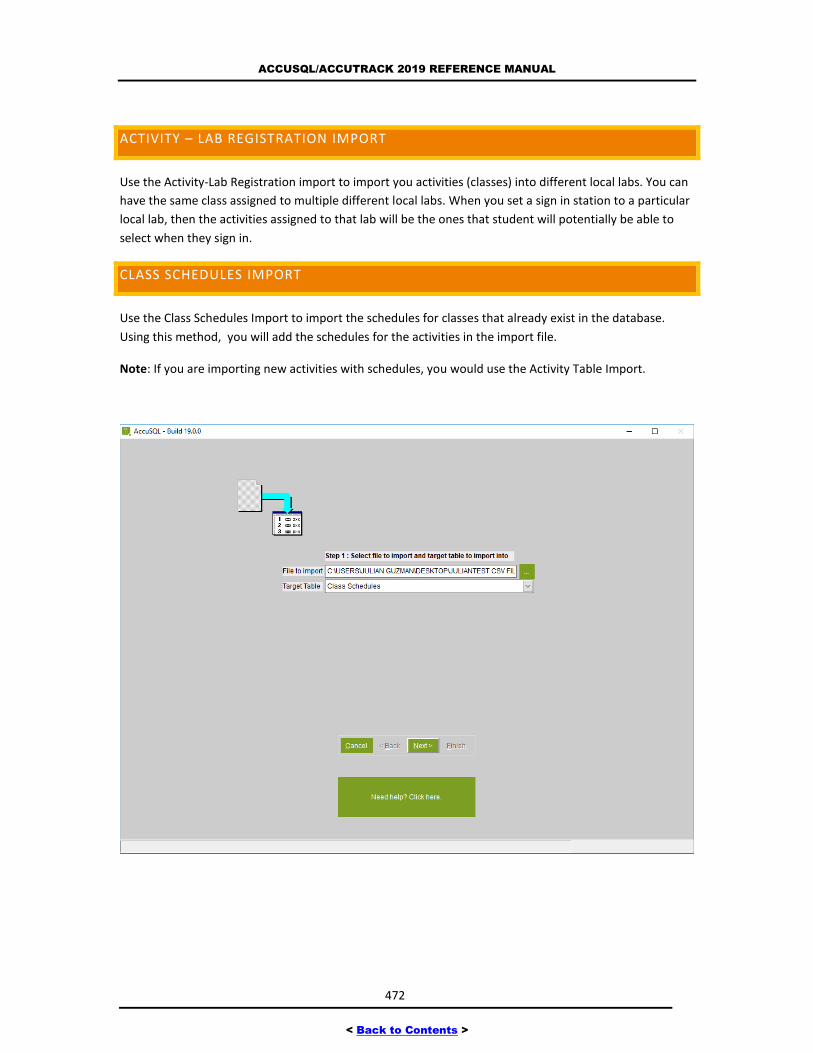
ACCUSQL/ACCUTRACK 2019 REFERENCE MANUAL
472
< Back to Contents >
ACTIVITY – LAB REGISTRATION IMPORT
Use the Activity-Lab Registration import to import you activities (classes) into different local labs. You can
have the same class assigned to multiple different local labs. When you set a sign in station to a particular
local lab, then the activities assigned to that lab will be the ones that student will potentially be able to
select when they sign in.
CLASS SCHEDULES IMPORT
Use the Class Schedules Import to import the schedules for classes that already exist in the database.
Using this method, you will add the schedules for the activities in the import file.
Note: If you are importing new activities with schedules, you would use the Activity Table Import.
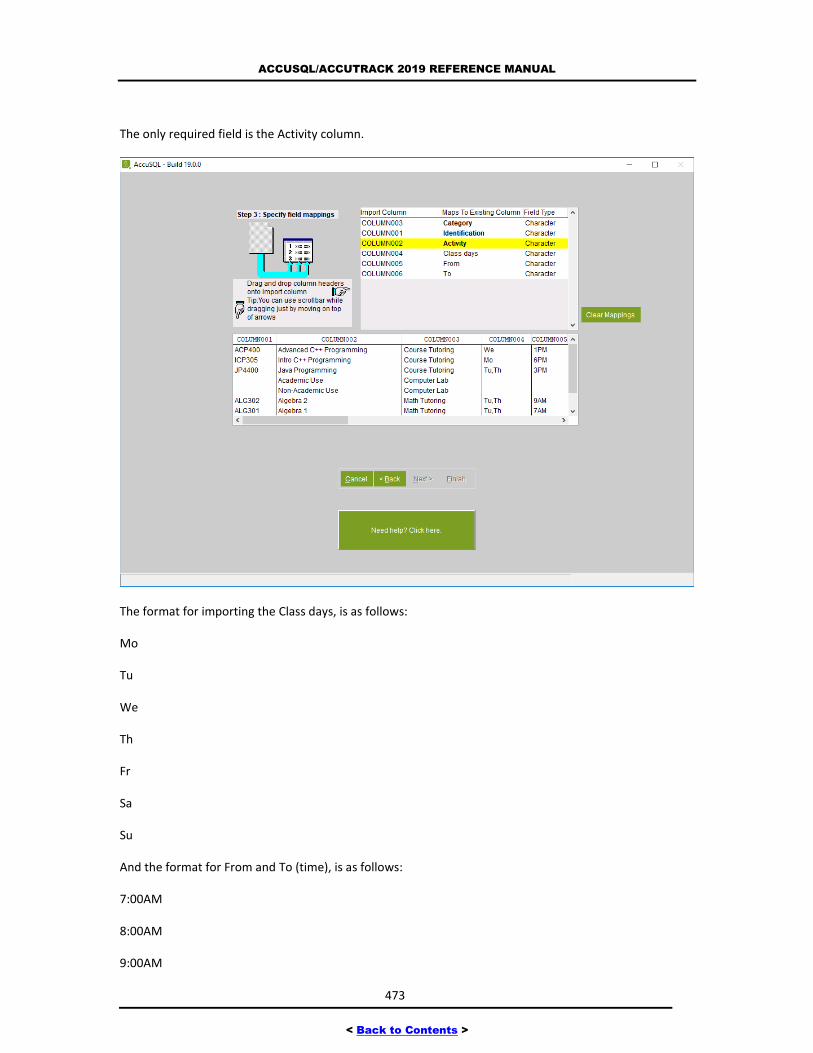
ACCUSQL/ACCUTRACK 2019 REFERENCE MANUAL
473
< Back to Contents >
The only required field is the Activity column.
The format for importing the Class days, is as follows:
Mo
Tu
We
Th
Fr
Sa
Su
And the format for From and To (time), is as follows:
7:00AM
8:00AM
9:00AM

ACCUSQL/ACCUTRACK 2019 REFERENCE MANUAL
474
< Back to Contents >
10:00AM
11:00AM
12:00PM
1:00PM
2:00PM
3:00PM
etc.
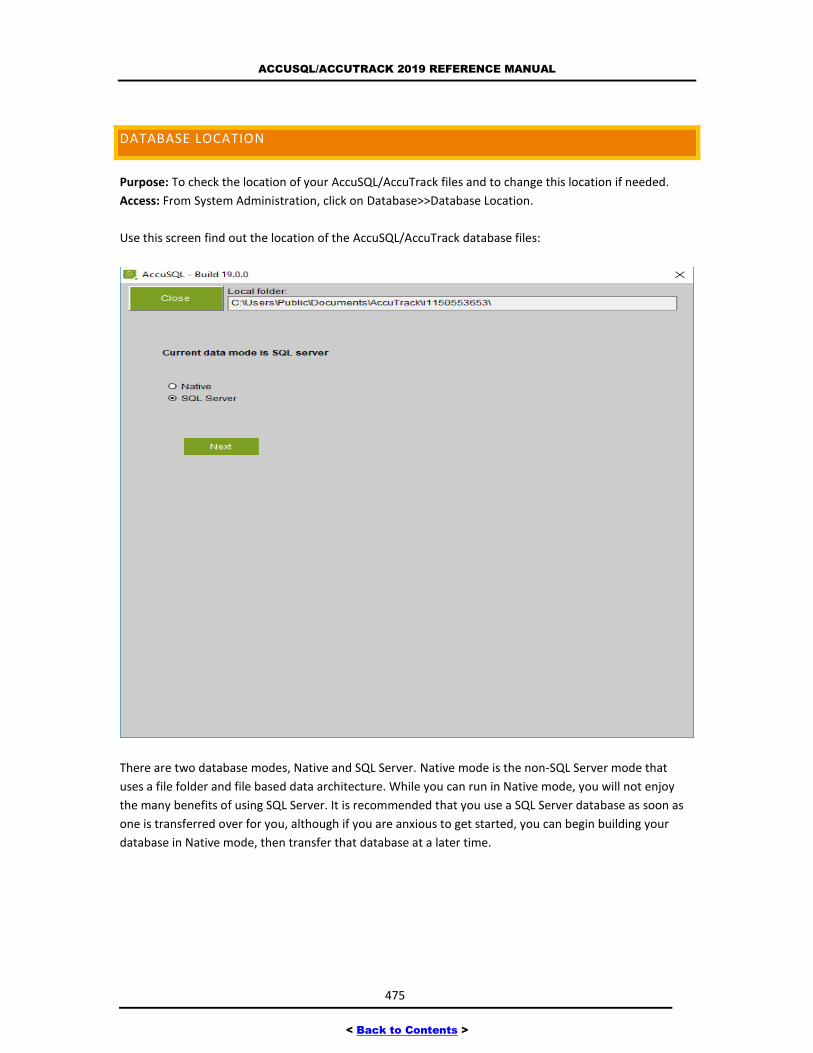
ACCUSQL/ACCUTRACK 2019 REFERENCE MANUAL
475
< Back to Contents >
DATABASE LOCATION
Purpose: To check the location of your AccuSQL/AccuTrack files and to change this location if needed.
Access: From System Administration, click on Database>>Database Location.
Use this screen find out the location of the AccuSQL/AccuTrack database files:
There are two database modes, Native and SQL Server. Native mode is the non-SQL Server mode that
uses a file folder and file based data architecture. While you can run in Native mode, you will not enjoy
the many benefits of using SQL Server. It is recommended that you use a SQL Server database as soon as
one is transferred over for you, although if you are anxious to get started, you can begin building your
database in Native mode, then transfer that database at a later time.
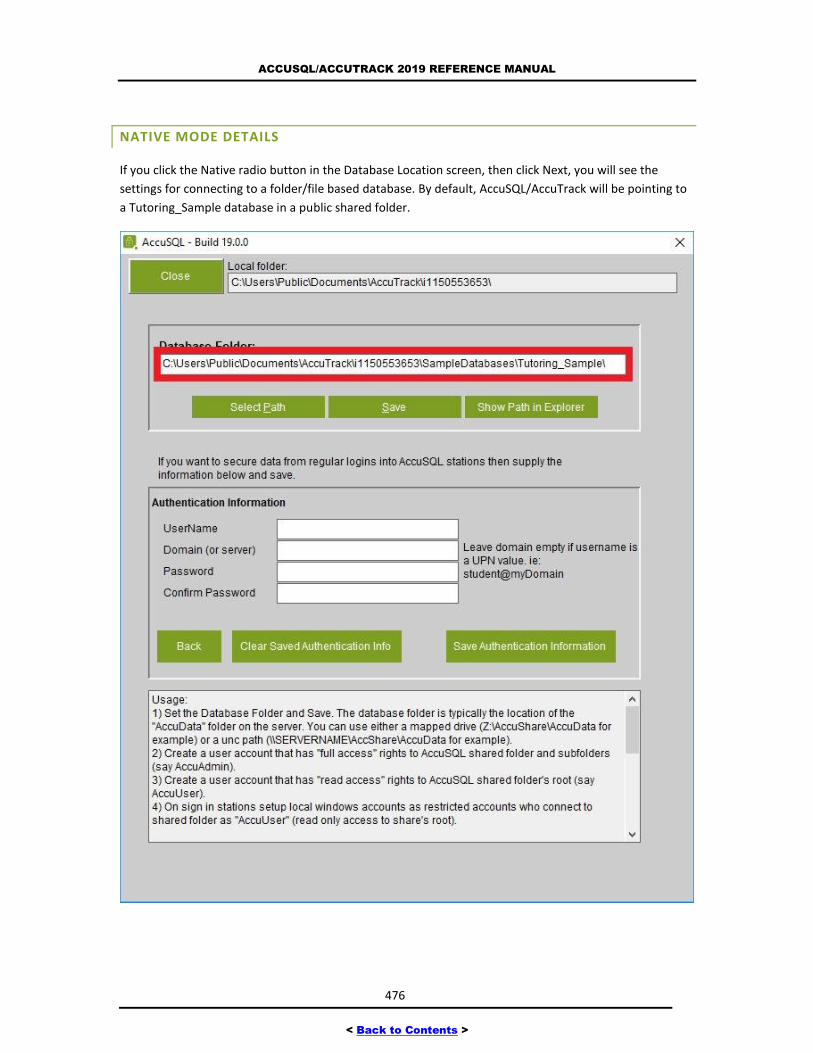
ACCUSQL/ACCUTRACK 2019 REFERENCE MANUAL
476
< Back to Contents >
NATIVE MODE DETAILS
If you click the Native radio button in the Database Location screen, then click Next, you will see the
settings for connecting to a folder/file based database. By default, AccuSQL/AccuTrack will be pointing to
a Tutoring_Sample database in a public shared folder.
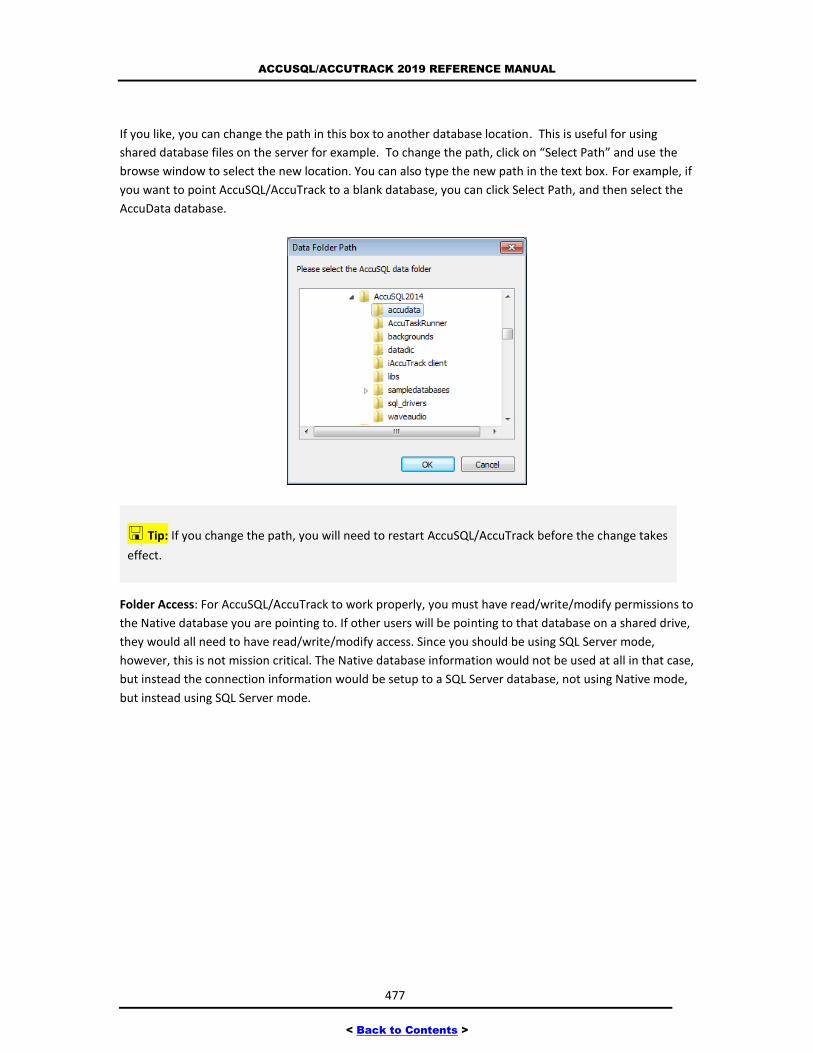
ACCUSQL/ACCUTRACK 2019 REFERENCE MANUAL
477
< Back to Contents >
If you like, you can change the path in this box to another database location. This is useful for using
shared database files on the server for example. To change the path, click on “Select Path” and use the
browse window to select the new location. You can also type the new path in the text box. For example, if
you want to point AccuSQL/AccuTrack to a blank database, you can click Select Path, and then select the
AccuData database.
Tip: If you change the path, you will need to restart AccuSQL/AccuTrack before the change takes
effect.
Folder Access: For AccuSQL/AccuTrack to work properly, you must have read/write/modify permissions to
the Native database you are pointing to. If other users will be pointing to that database on a shared drive,
they would all need to have read/write/modify access. Since you should be using SQL Server mode,
however, this is not mission critical. The Native database information would not be used at all in that case,
but instead the connection information would be setup to a SQL Server database, not using Native mode,
but instead using SQL Server mode.
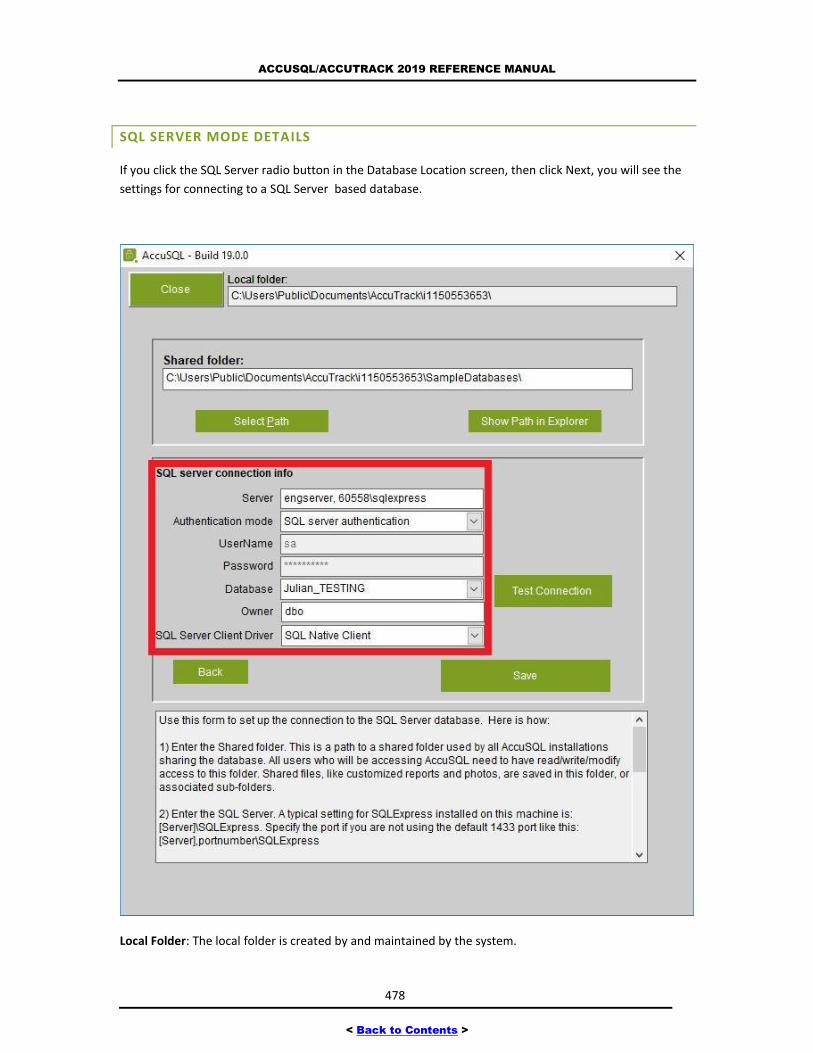
ACCUSQL/ACCUTRACK 2019 REFERENCE MANUAL
478
< Back to Contents >
SQL SERVER MODE DETAILS
If you click the SQL Server radio button in the Database Location screen, then click Next, you will see the
settings for connecting to a SQL Server based database.
Local Folder: The local folder is created by and maintained by the system.
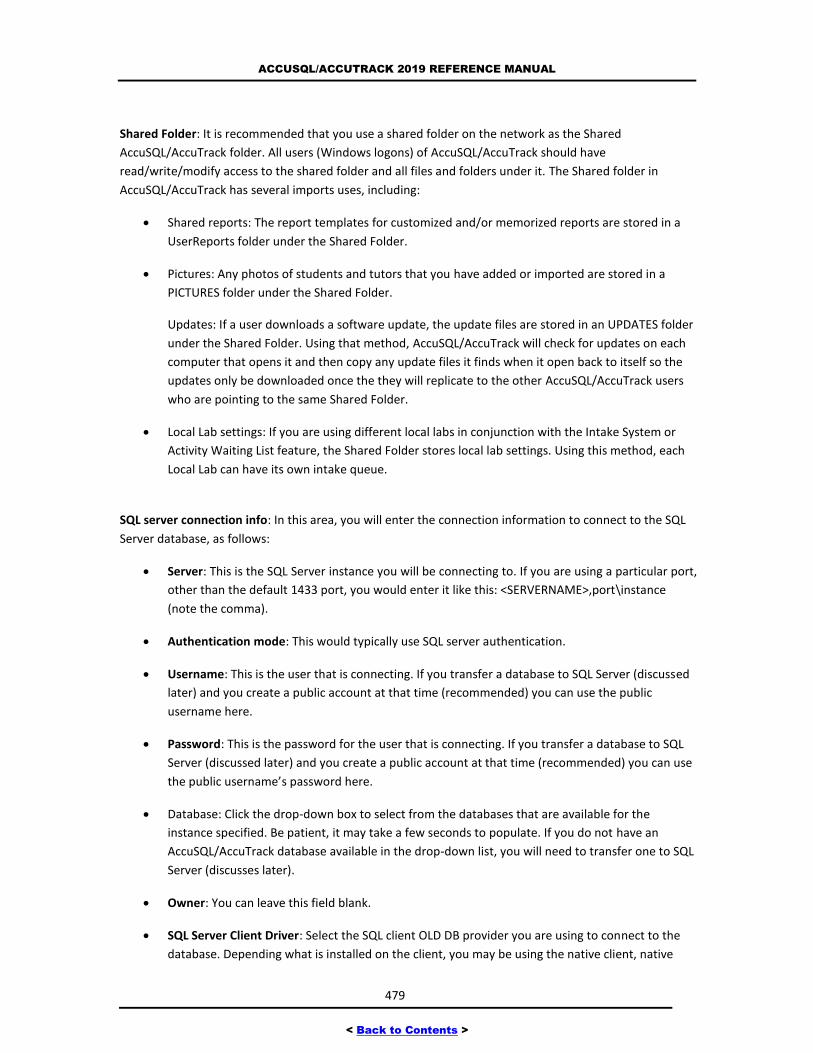
ACCUSQL/ACCUTRACK 2019 REFERENCE MANUAL
479
< Back to Contents >
Shared Folder: It is recommended that you use a shared folder on the network as the Shared
AccuSQL/AccuTrack folder. All users (Windows logons) of AccuSQL/AccuTrack should have
read/write/modify access to the shared folder and all files and folders under it. The Shared folder in
AccuSQL/AccuTrack has several imports uses, including:
Shared reports: The report templates for customized and/or memorized reports are stored in a
UserReports folder under the Shared Folder.
Pictures: Any photos of students and tutors that you have added or imported are stored in a
PICTURES folder under the Shared Folder.
Updates: If a user downloads a software update, the update files are stored in an UPDATES folder
under the Shared Folder. Using that method, AccuSQL/AccuTrack will check for updates on each
computer that opens it and then copy any update files it finds when it open back to itself so the
updates only be downloaded once the they will replicate to the other AccuSQL/AccuTrack users
who are pointing to the same Shared Folder.
Local Lab settings: If you are using different local labs in conjunction with the Intake System or
Activity Waiting List feature, the Shared Folder stores local lab settings. Using this method, each
Local Lab can have its own intake queue.
SQL server connection info: In this area, you will enter the connection information to connect to the SQL
Server database, as follows:
Server: This is the SQL Server instance you will be connecting to. If you are using a particular port,
other than the default 1433 port, you would enter it like this: <SERVERNAME>,port\instance
(note the comma).
Authentication mode: This would typically use SQL server authentication.
Username: This is the user that is connecting. If you transfer a database to SQL Server (discussed
later) and you create a public account at that time (recommended) you can use the public
username here.
Password: This is the password for the user that is connecting. If you transfer a database to SQL
Server (discussed later) and you create a public account at that time (recommended) you can use
the public username’s password here.
Database: Click the drop-down box to select from the databases that are available for the
instance specified. Be patient, it may take a few seconds to populate. If you do not have an
AccuSQL/AccuTrack database available in the drop-down list, you will need to transfer one to SQL
Server (discusses later).
Owner: You can leave this field blank.
SQL Server Client Driver: Select the SQL client OLD DB provider you are using to connect to the
database. Depending what is installed on the client, you may be using the native client, native
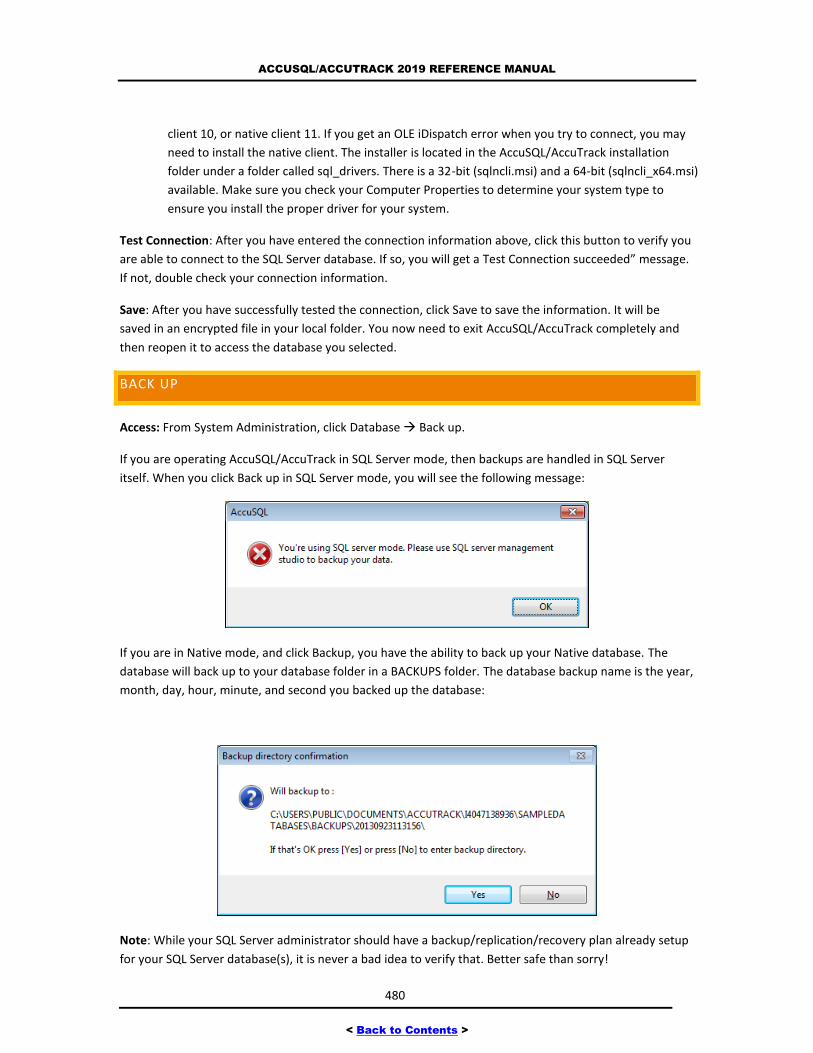
ACCUSQL/ACCUTRACK 2019 REFERENCE MANUAL
480
< Back to Contents >
client 10, or native client 11. If you get an OLE iDispatch error when you try to connect, you may
need to install the native client. The installer is located in the AccuSQL/AccuTrack installation
folder under a folder called sql_drivers. There is a 32-bit (sqlncli.msi) and a 64-bit (sqlncli_x64.msi)
available. Make sure you check your Computer Properties to determine your system type to
ensure you install the proper driver for your system.
Test Connection: After you have entered the connection information above, click this button to verify you
are able to connect to the SQL Server database. If so, you will get a Test Connection succeeded” message.
If not, double check your connection information.
Save: After you have successfully tested the connection, click Save to save the information. It will be
saved in an encrypted file in your local folder. You now need to exit AccuSQL/AccuTrack completely and
then reopen it to access the database you selected.
BACK UP
Access: From System Administration, click Database Back up.
If you are operating AccuSQL/AccuTrack in SQL Server mode, then backups are handled in SQL Server
itself. When you click Back up in SQL Server mode, you will see the following message:
If you are in Native mode, and click Backup, you have the ability to back up your Native database. The
database will back up to your database folder in a BACKUPS folder. The database backup name is the year,
month, day, hour, minute, and second you backed up the database:
Note: While your SQL Server administrator should have a backup/replication/recovery plan already setup
for your SQL Server database(s), it is never a bad idea to verify that. Better safe than sorry!
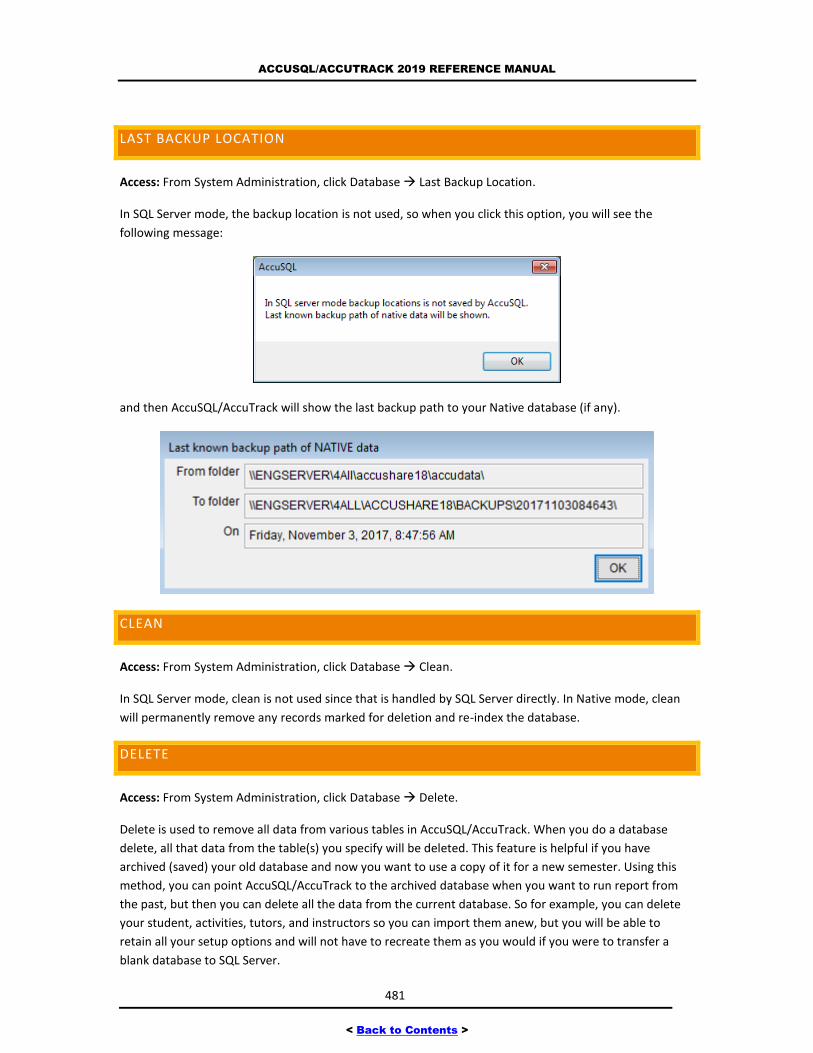
ACCUSQL/ACCUTRACK 2019 REFERENCE MANUAL
481
< Back to Contents >
LAST BACKUP LOCATION
Access: From System Administration, click Database Last Backup Location.
In SQL Server mode, the backup location is not used, so when you click this option, you will see the
following message:
and then AccuSQL/AccuTrack will show the last backup path to your Native database (if any).
CLEAN
Access: From System Administration, click Database Clean.
In SQL Server mode, clean is not used since that is handled by SQL Server directly. In Native mode, clean
will permanently remove any records marked for deletion and re-index the database.
DELETE
Access: From System Administration, click Database Delete.
Delete is used to remove all data from various tables in AccuSQL/AccuTrack. When you do a database
delete, all that data from the table(s) you specify will be deleted. This feature is helpful if you have
archived (saved) your old database and now you want to use a copy of it for a new semester. Using this
method, you can point AccuSQL/AccuTrack to the archived database when you want to run report from
the past, but then you can delete all the data from the current database. So for example, you can delete
your student, activities, tutors, and instructors so you can import them anew, but you will be able to
retain all your setup options and will not have to recreate them as you would if you were to transfer a
blank database to SQL Server.
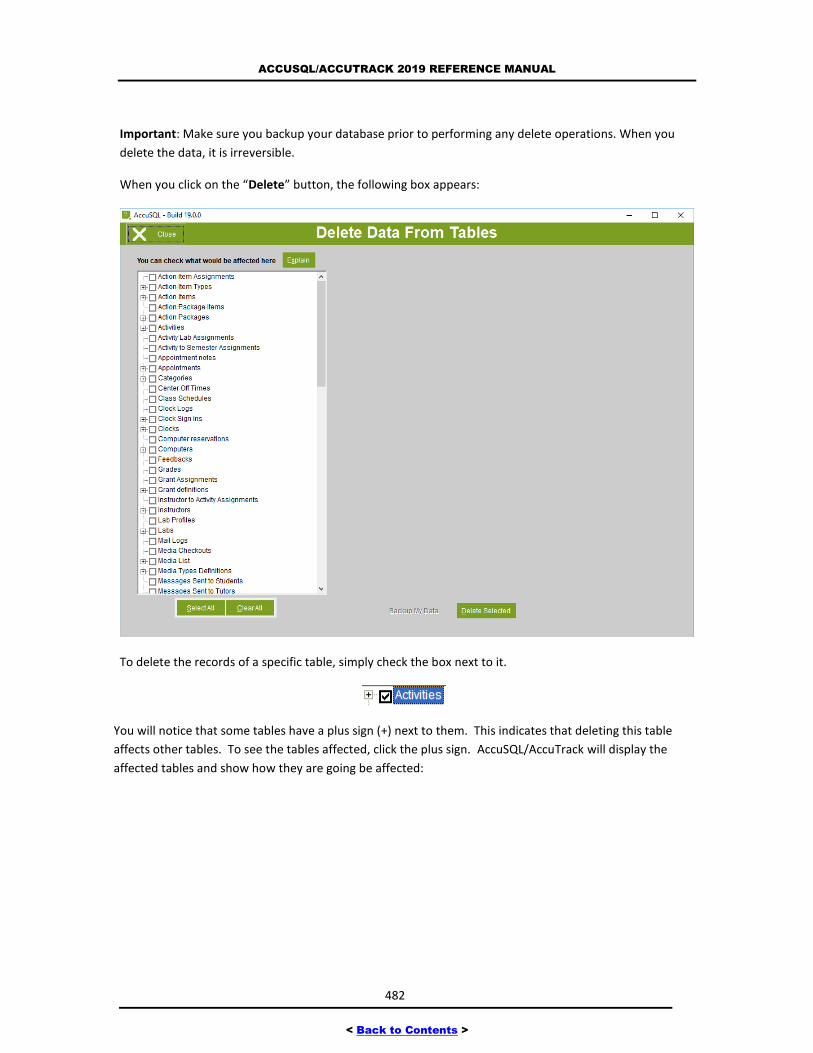
ACCUSQL/ACCUTRACK 2019 REFERENCE MANUAL
482
< Back to Contents >
Important: Make sure you backup your database prior to performing any delete operations. When you
delete the data, it is irreversible.
When you click on the “Delete” button, the following box appears:
To delete the records of a specific table, simply check the box next to it.
You will notice that some tables have a plus sign (+) next to them. This indicates that deleting this table
affects other tables. To see the tables affected, click the plus sign. AccuSQL/AccuTrack will display the
affected tables and show how they are going be affected:
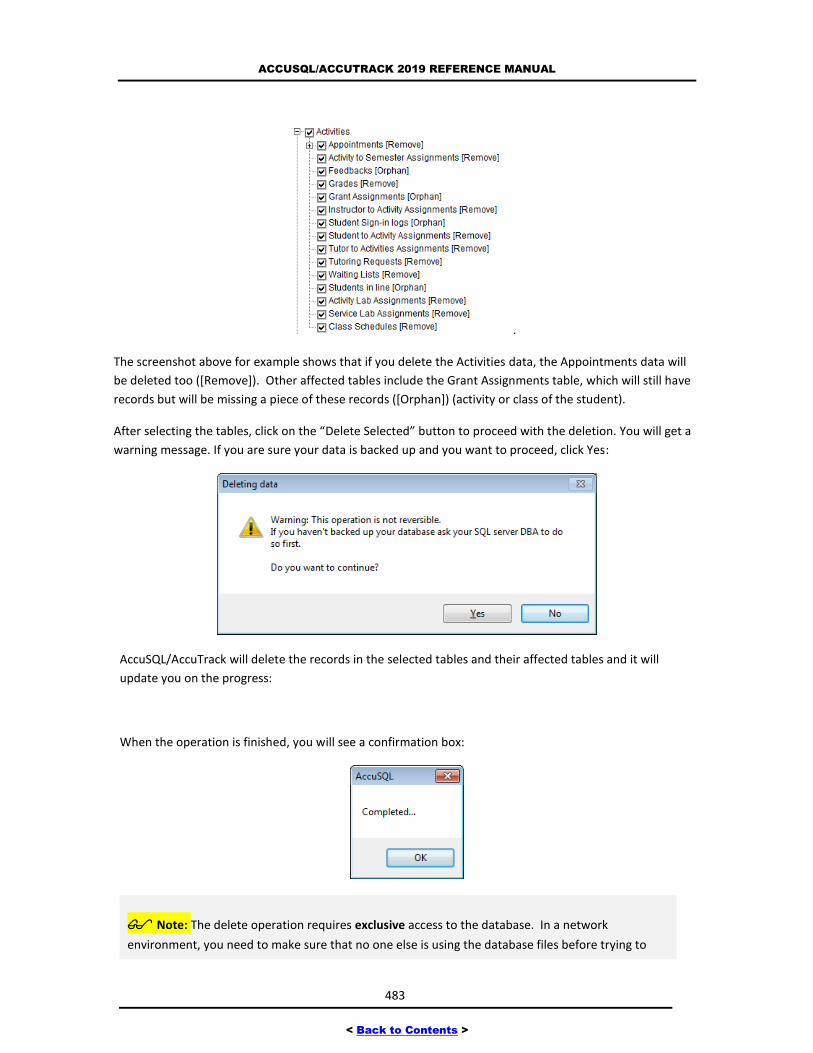
ACCUSQL/ACCUTRACK 2019 REFERENCE MANUAL
483
< Back to Contents >
.
The screenshot above for example shows that if you delete the Activities data, the Appointments data will
be deleted too ([Remove]). Other affected tables include the Grant Assignments table, which will still have
records but will be missing a piece of these records ([Orphan]) (activity or class of the student).
After selecting the tables, click on the “Delete Selected” button to proceed with the deletion. You will get a
warning message. If you are sure your data is backed up and you want to proceed, click Yes:
AccuSQL/AccuTrack will delete the records in the selected tables and their affected tables and it will
update you on the progress:
When the operation is finished, you will see a confirmation box:
Note: The delete operation requires exclusive access to the database. In a network
environment, you need to make sure that no one else is using the database files before trying to
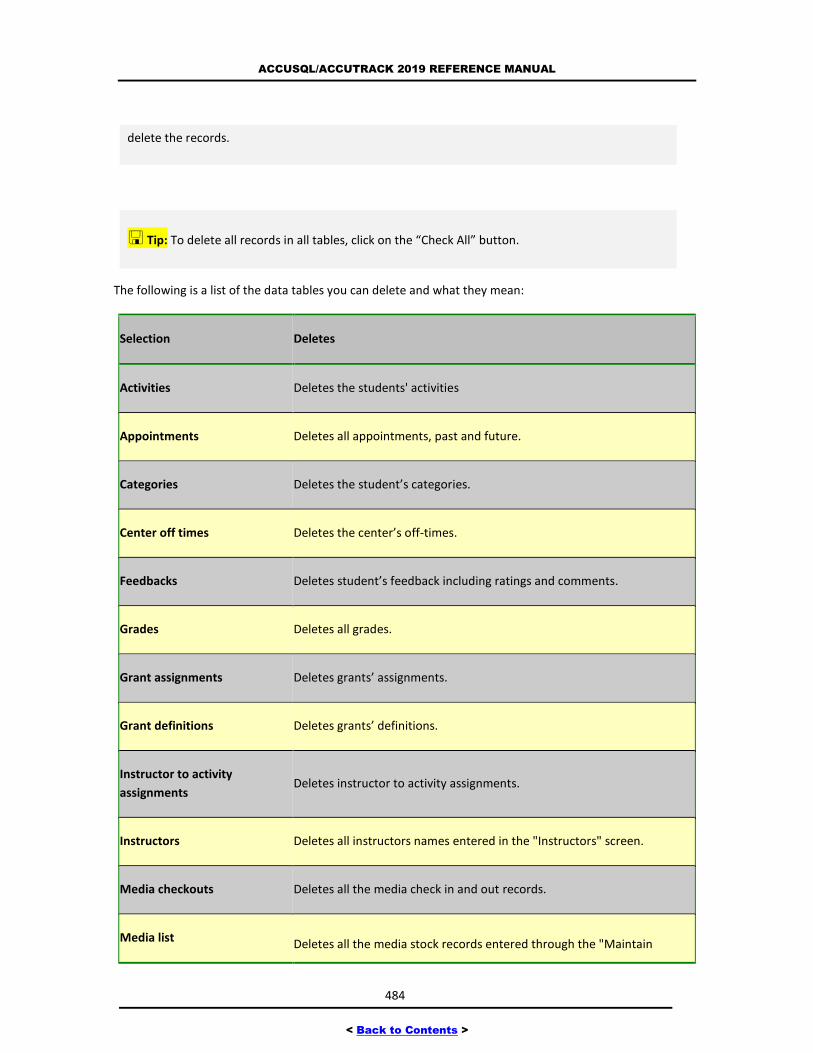
ACCUSQL/ACCUTRACK 2019 REFERENCE MANUAL
484
< Back to Contents >
delete the records.
Tip: To delete all records in all tables, click on the “Check All” button.
The following is a list of the data tables you can delete and what they mean:
Selection Deletes
Activities Deletes the students' activities
Appointments Deletes all appointments, past and future.
Categories Deletes the student’s categories.
Center off times Deletes the center’s off-times.
Feedbacks Deletes student’s feedback including ratings and comments.
Grades Deletes all grades.
Grant assignments Deletes grants’ assignments.
Grant definitions Deletes grants’ definitions.
Instructor to activity
assignments Deletes instructor to activity assignments.
Instructors Deletes all instructors names entered in the "Instructors" screen.
Media checkouts Deletes all the media check in and out records.
Media list Deletes all the media stock records entered through the "Maintain
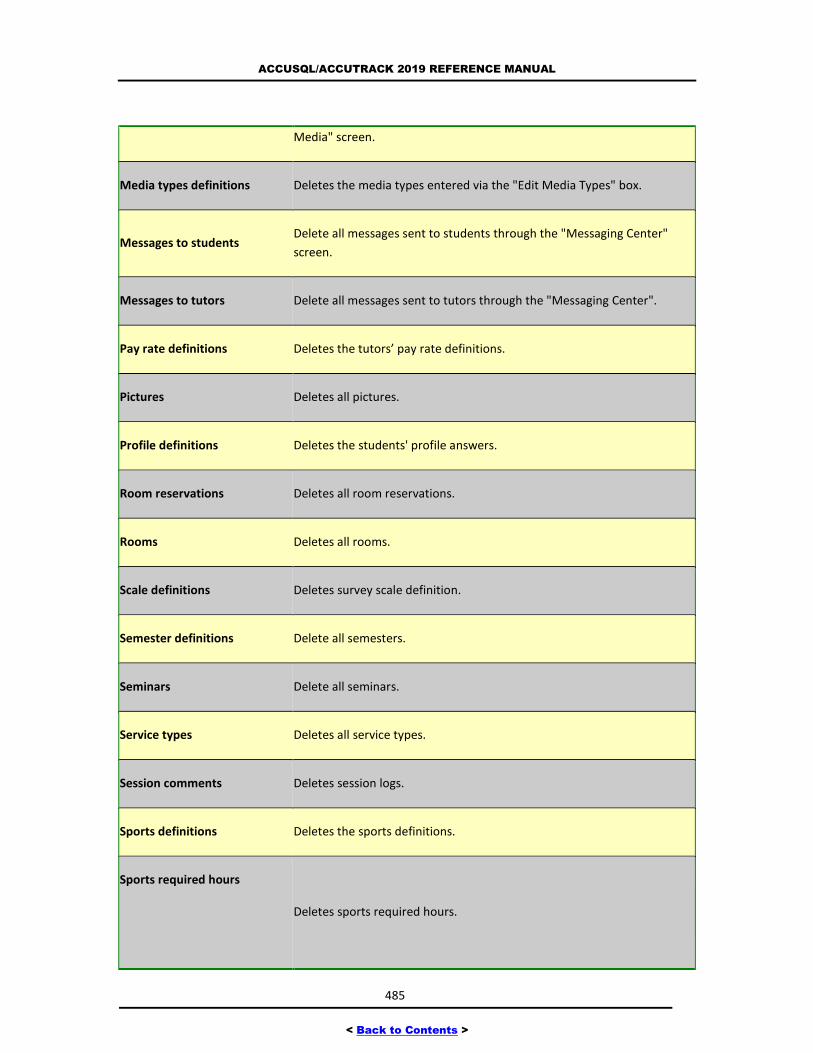
ACCUSQL/ACCUTRACK 2019 REFERENCE MANUAL
485
< Back to Contents >
Media" screen.
Media types definitions Deletes the media types entered via the "Edit Media Types" box.
Messages to students Delete all messages sent to students through the "Messaging Center"
screen.
Messages to tutors Delete all messages sent to tutors through the "Messaging Center".
Pay rate definitions Deletes the tutors’ pay rate definitions.
Pictures Deletes all pictures.
Profile definitions Deletes the students' profile answers.
Room reservations Deletes all room reservations.
Rooms Deletes all rooms.
Scale definitions Deletes survey scale definition.
Semester definitions Delete all semesters.
Seminars Delete all seminars.
Service types Deletes all service types.
Session comments Deletes session logs.
Sports definitions Deletes the sports definitions.
Sports required hours
Deletes sports required hours.

ACCUSQL/ACCUTRACK 2019 REFERENCE MANUAL
486
< Back to Contents >
Student contacts Deletes the students’ contacts.
Student group assignments Deletes students’ assignments to groups.
Student group definitions Deletes student’s groups.
Student sign-in logs Deletes all students' sign-in and sign-out records.
Student to activity
assignments Deletes students’ registration info.
Student to seminar
registrations Deletes students’ registration to seminars.
Student to sports assignments Deletes student’s registration to sports.
Students Deletes all students.
Tutor activities Deletes all the tutor’s tasks entered through the Staff "Modify Tasks"
screen
Tutor categories Delete all the tutor’s categories.
Tutor off times Deletes all tutors' off times.
Tutor schedules Deletes all the schedules entered through the "Schedules" screen.
Tutor sign-in logs Deletes all tutor sign-in and sign-out records.
Tutor to activities assignments Deletes tutor’s service assignments.
Tutoring requests Deletes tutoring requests.
Tutors Delete all the tutors.
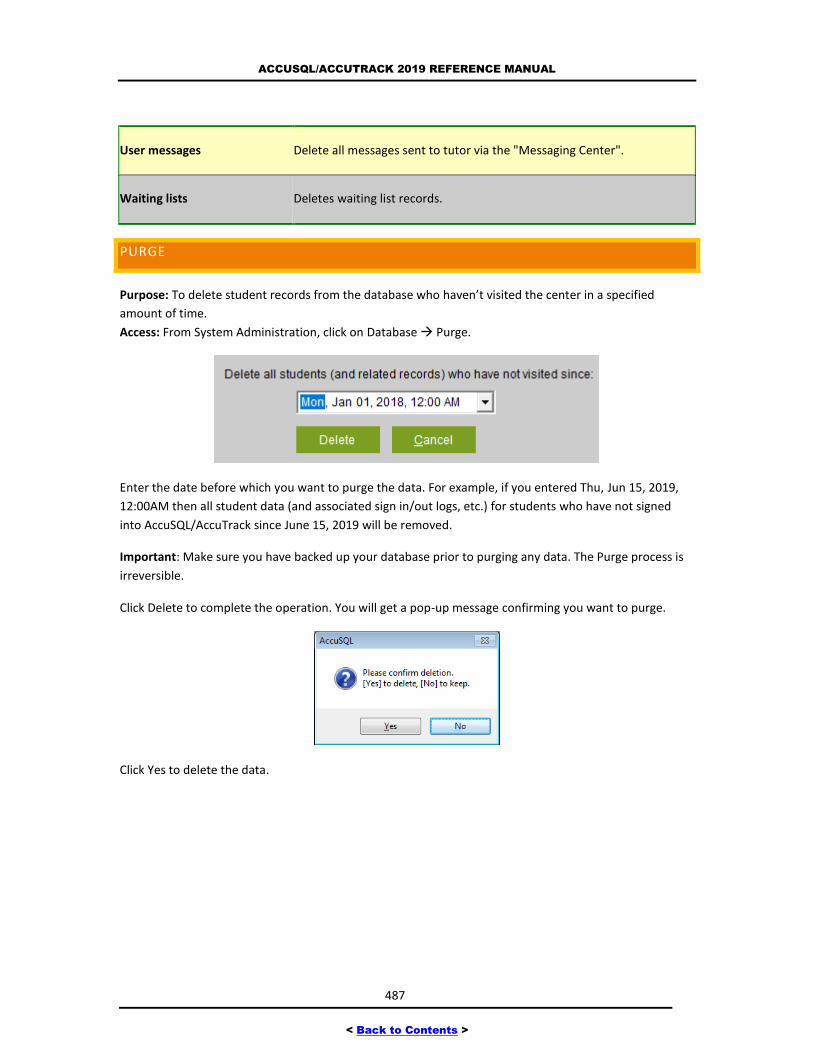
ACCUSQL/ACCUTRACK 2019 REFERENCE MANUAL
487
< Back to Contents >
User messages Delete all messages sent to tutor via the "Messaging Center".
Waiting lists Deletes waiting list records.
PURGE
Purpose: To delete student records from the database who haven’t visited the center in a specified
amount of time.
Access: From System Administration, click on Database Purge.
Enter the date before which you want to purge the data. For example, if you entered Thu, Jun 15, 2019,
12:00AM then all student data (and associated sign in/out logs, etc.) for students who have not signed
into AccuSQL/AccuTrack since June 15, 2019 will be removed.
Important: Make sure you have backed up your database prior to purging any data. The Purge process is
irreversible.
Click Delete to complete the operation. You will get a pop-up message confirming you want to purge.
Click Yes to delete the data.
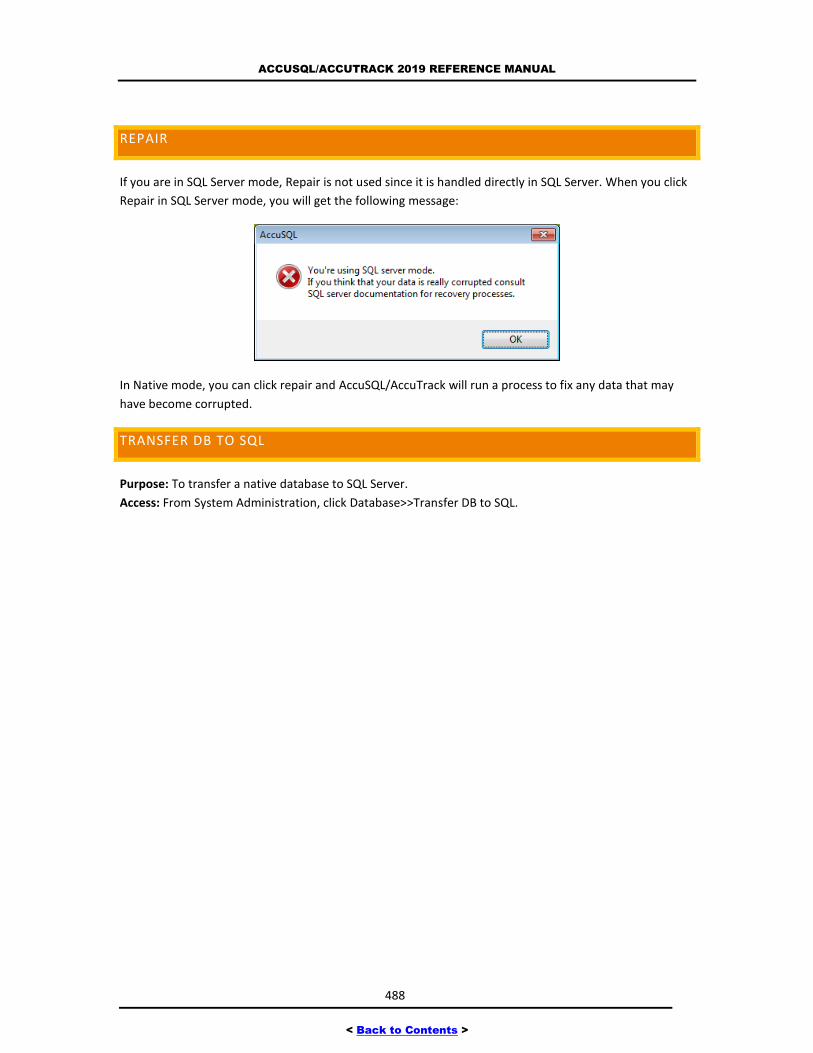
ACCUSQL/ACCUTRACK 2019 REFERENCE MANUAL
488
< Back to Contents >
REPAIR
If you are in SQL Server mode, Repair is not used since it is handled directly in SQL Server. When you click
Repair in SQL Server mode, you will get the following message:
In Native mode, you can click repair and AccuSQL/AccuTrack will run a process to fix any data that may
have become corrupted.
TRANSFER DB TO SQL
Purpose: To transfer a native database to SQL Server.
Access: From System Administration, click Database>>Transfer DB to SQL.
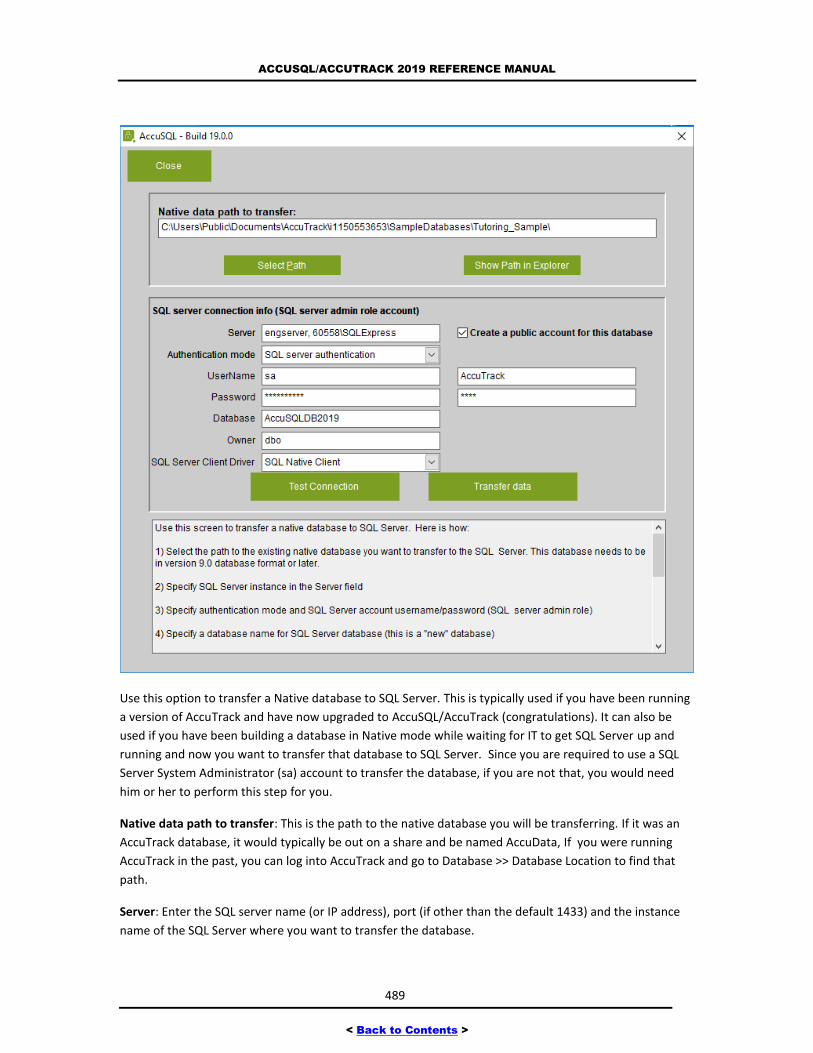
ACCUSQL/ACCUTRACK 2019 REFERENCE MANUAL
489
< Back to Contents >
Use this option to transfer a Native database to SQL Server. This is typically used if you have been running
a version of AccuTrack and have now upgraded to AccuSQL/AccuTrack (congratulations). It can also be
used if you have been building a database in Native mode while waiting for IT to get SQL Server up and
running and now you want to transfer that database to SQL Server. Since you are required to use a SQL
Server System Administrator (sa) account to transfer the database, if you are not that, you would need
him or her to perform this step for you.
Native data path to transfer: This is the path to the native database you will be transferring. If it was an
AccuTrack database, it would typically be out on a share and be named AccuData, If you were running
AccuTrack in the past, you can log into AccuTrack and go to Database >> Database Location to find that
path.
Server: Enter the SQL server name (or IP address), port (if other than the default 1433) and the instance
name of the SQL Server where you want to transfer the database.
ACCUSQL/ACCUTRACK 2019 REFERENCE MANUAL
490
< Back to Contents >
Authentication mode: From the drop down list, select if you want to connect to SQL Server either using
Windows authentication or else SQL server authentication. You use either, but are required to have sa
access to create the database, else the process will fail.
Username: If you are using SQL Server authentication, enter the sa account you are using to transfer the
database.
Password: If you are using SQL Server authentication, enter the password for the sa account you are using
to transfer the database.
Database: Type the name you want to give the database. The name cannot already exist in SQL Server, or
the process will fail.
Owner: You can leave this field blank.
SQL Server Client Driver: Select the SQL client OLD DB provider you are using to connect to the database.
Depending what is installed on the client, you may be using the native client, native client 10, or native
client 11. If you get an OLE iDispatch error when you try to connect, you may need to install the native
client. The installer is located in the AccuSQL/AccuTrack installation folder under a folder called
sql_drivers. There is a 32-bit (sqlncli.msi) and a 64-bit (sqlncli_x64.msi) available. Make sure you check
your Computer Properties to determine your system type to ensure you install the proper driver for your
system.
Create a public account for this database: Check this box if you want to create a public account to use to
connect the clients to the database. It is recommended you let AccuSQL/AccuTrack create the public
account at this time since we are writing specific grant executes for the public account. If you create the
public account, enter the username and password (both case sensitive) for the account.
Test Connection: After you have entered the connection information above, click this button to verify you
are able to connect to the SQL Server database. If so, you will get a Test Connection succeeded” message.
If not, double check your connection information.
Transfer data: Click this button to transfer the database to SQL Server. After you click Transfer data, you
will see a couple of screens appear. The first is the quick transfer of data for the tables that typically have
a large number of rows:
Followed by a transfer of the remaining tables.
After the transfer is complete you will get a message indicating the database is now ready for use.
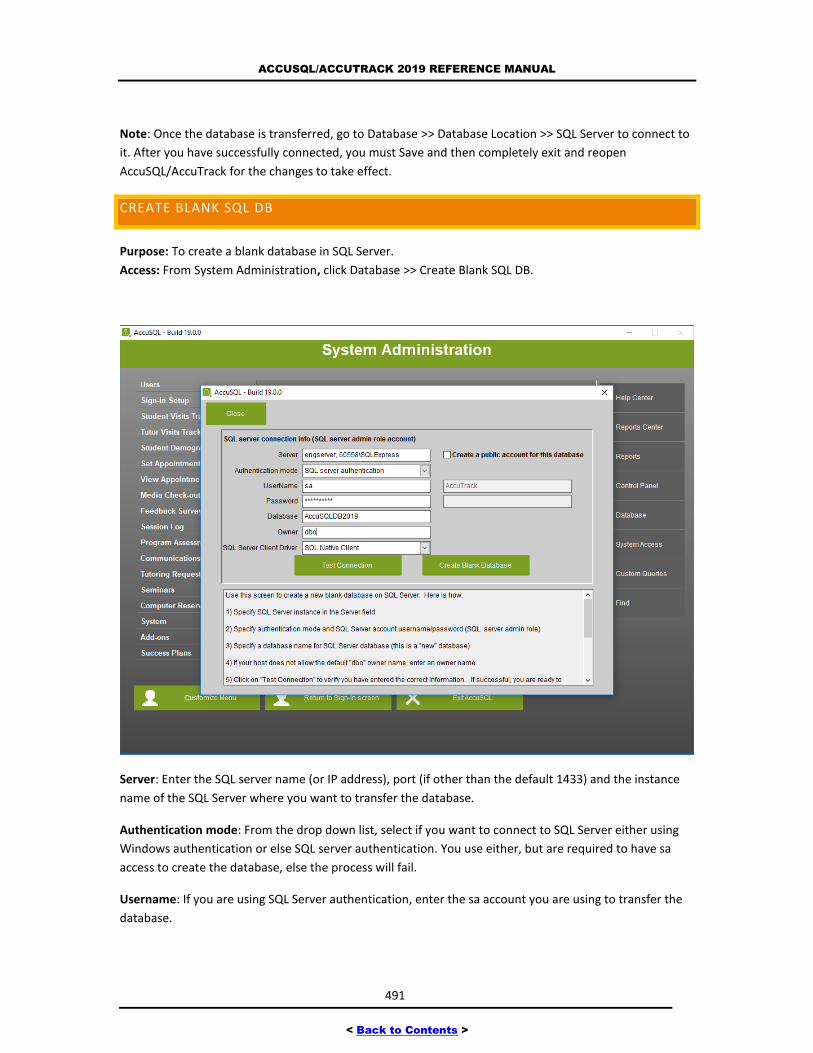
ACCUSQL/ACCUTRACK 2019 REFERENCE MANUAL
491
< Back to Contents >
Note: Once the database is transferred, go to Database >> Database Location >> SQL Server to connect to
it. After you have successfully connected, you must Save and then completely exit and reopen
AccuSQL/AccuTrack for the changes to take effect.
CREATE BLANK SQL DB
Purpose: To create a blank database in SQL Server.
Access: From System Administration, click Database >> Create Blank SQL DB.
Server: Enter the SQL server name (or IP address), port (if other than the default 1433) and the instance
name of the SQL Server where you want to transfer the database.
Authentication mode: From the drop down list, select if you want to connect to SQL Server either using
Windows authentication or else SQL server authentication. You use either, but are required to have sa
access to create the database, else the process will fail.
Username: If you are using SQL Server authentication, enter the sa account you are using to transfer the
database.
ACCUSQL/ACCUTRACK 2019 REFERENCE MANUAL
492
< Back to Contents >
Password: If you are using SQL Server authentication, enter the password for the sa account you are using
to transfer the database.
Database: Type the name you want to give the database. The name cannot already exist in SQL Server, or
the process will fail.
Owner: You can leave this field blank.
SQL Server Client Driver: Select the SQL client OLD DB provider you are using to connect to the database.
Depending what is installed on the client, you may be using the native client, native client 10, or native
client 11. If you get an OLE iDispatch error when you try to connect, you may need to install the native
client. The installer is located in the AccuSQL/AccuTrack installation folder under a folder called
sql_drivers. There is a 32-bit (sqlncli.msi) and a 64-bit (sqlncli_x64.msi) available. Make sure you check
your Computer Properties to determine your system type to ensure you install the proper driver for your
system.
Create a public account for this database: Check this box if you want to create a public account to use to
connect the clients to the database. It is recommended you let AccuSQL/AccuTrack create the public
account at this time since we are writing specific grant executes for the public account. If you create the
public account, enter the username and password (both case sensitive) for the account.
Test Connection: After you have entered the connection information above, click this button to verify you
are able to connect to the SQL Server database. If so, you will get a Test Connection succeeded” message.
If not, double check your connection information.
Create Blank Database: Click this button to create the database in SQL Server. After you click Create Blank
Database, the tables will transfer over to SQL Server.
After the transfer is complete you will get a message indicating the database is now ready for use.
Note: Once the database is transferred, go to Database >> Database Location >> SQL Server to connect to
it. After you have successfully connected, you must Save and then completely exit and reopen
AccuSQL/AccuTrack for the changes to take effect.
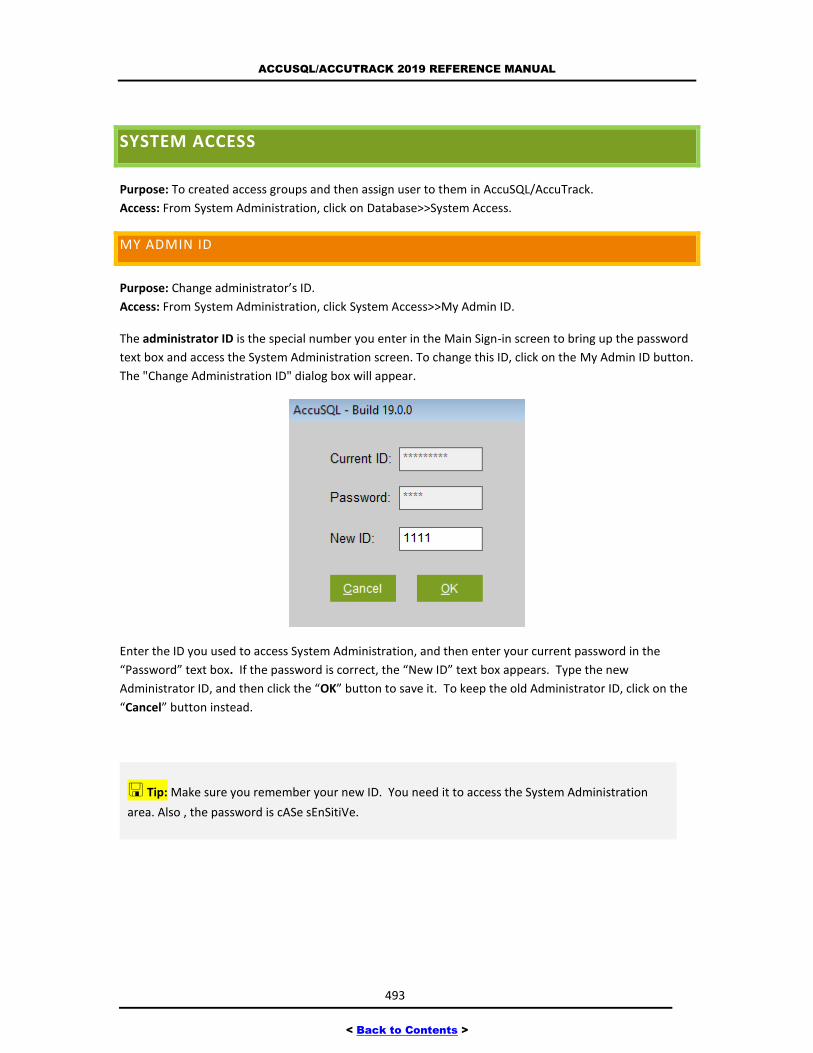
ACCUSQL/ACCUTRACK 2019 REFERENCE MANUAL
493
< Back to Contents >
SYSTEM ACCESS
Purpose: To created access groups and then assign user to them in AccuSQL/AccuTrack.
Access: From System Administration, click on Database>>System Access.
MY ADMIN ID
Purpose: Change administrator’s ID.
Access: From System Administration, click System Access>>My Admin ID.
The administrator ID is the special number you enter in the Main Sign-in screen to bring up the password
text box and access the System Administration screen. To change this ID, click on the My Admin ID button.
The "Change Administration ID" dialog box will appear.
Enter the ID you used to access System Administration, and then enter your current password in the
“Password” text box. If the password is correct, the “New ID” text box appears. Type the new
Administrator ID, and then click the “OK” button to save it. To keep the old Administrator ID, click on the
“Cancel” button instead.
Tip: Make sure you remember your new ID. You need it to access the System Administration
area. Also , the password is cASe sEnSitiVe.
ACCUSQL/ACCUTRACK 2019 REFERENCE MANUAL
494
< Back to Contents >
MY PASSWORD
Purpose: Change administrator’s password.
Access: From System Administration, click on Setup>>System Access>>Password.
The administrator password is used to access the System Administration screen. Use this screen to change
the password.
Enter the ID you used to access the System Administration area in the first text box. Next type in your
current password then hit the <Enter> key. The “New Password” and “Confirm” text boxes will appear.
Type in the new password in the “New Password” text box, and then type it again in the “Confirm” text
box. Hit the <Enter> key or Click on “OK”. If the passwords in both text boxes match, the password will
be changed, and a confirmation message will appear.
Tip: The password is case-sensitive. This means capitalization of the letters is important!
Tip: Make sure you remember your new password. You need this password to access the
System Administration area. You might want to write it down and store it in a safe place.
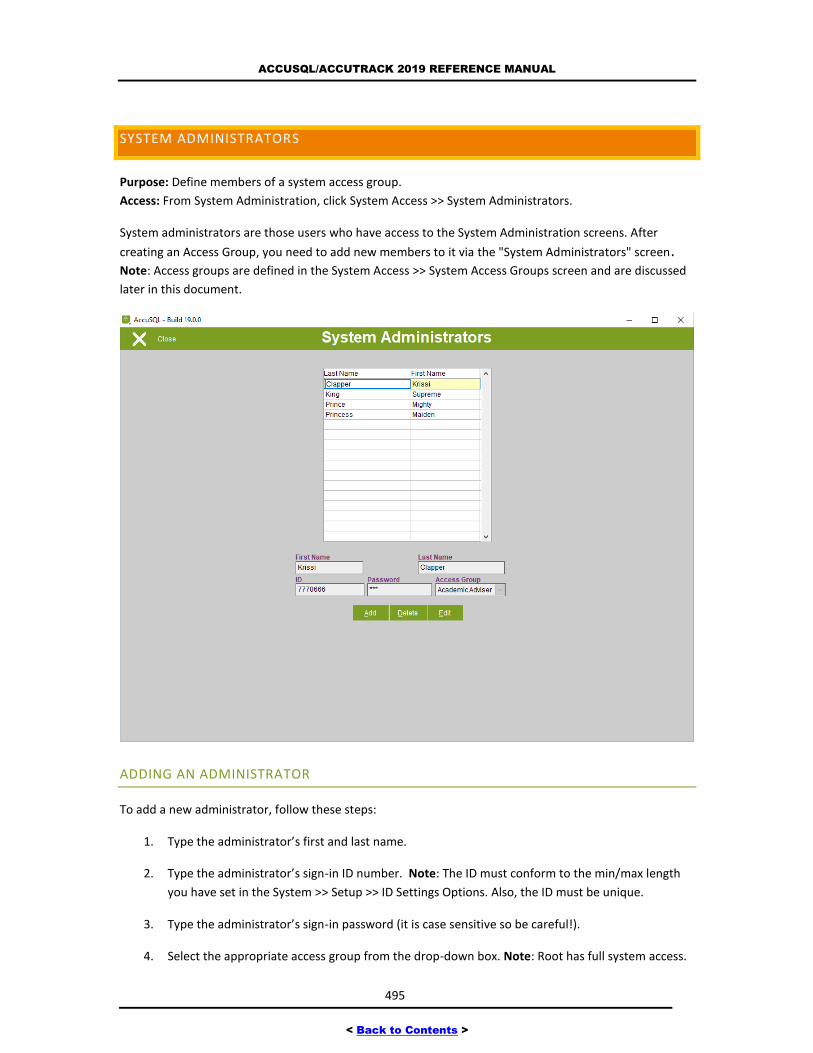
ACCUSQL/ACCUTRACK 2019 REFERENCE MANUAL
495
< Back to Contents >
SYSTEM ADMINISTRATORS
Purpose: Define members of a system access group.
Access: From System Administration, click System Access >> System Administrators.
System administrators are those users who have access to the System Administration screens. After
creating an Access Group, you need to add new members to it via the "System Administrators" screen.
Note: Access groups are defined in the System Access >> System Access Groups screen and are discussed
later in this document.
ADDING AN ADMINISTRATOR
To add a new administrator, follow these steps:
1. Type the administrator’s first and last name.
2. Type the administrator’s sign-in ID number. Note: The ID must conform to the min/max length
you have set in the System >> Setup >> ID Settings Options. Also, the ID must be unique.
3. Type the administrator’s sign-in password (it is case sensitive so be careful!).
4. Select the appropriate access group from the drop-down box. Note: Root has full system access.
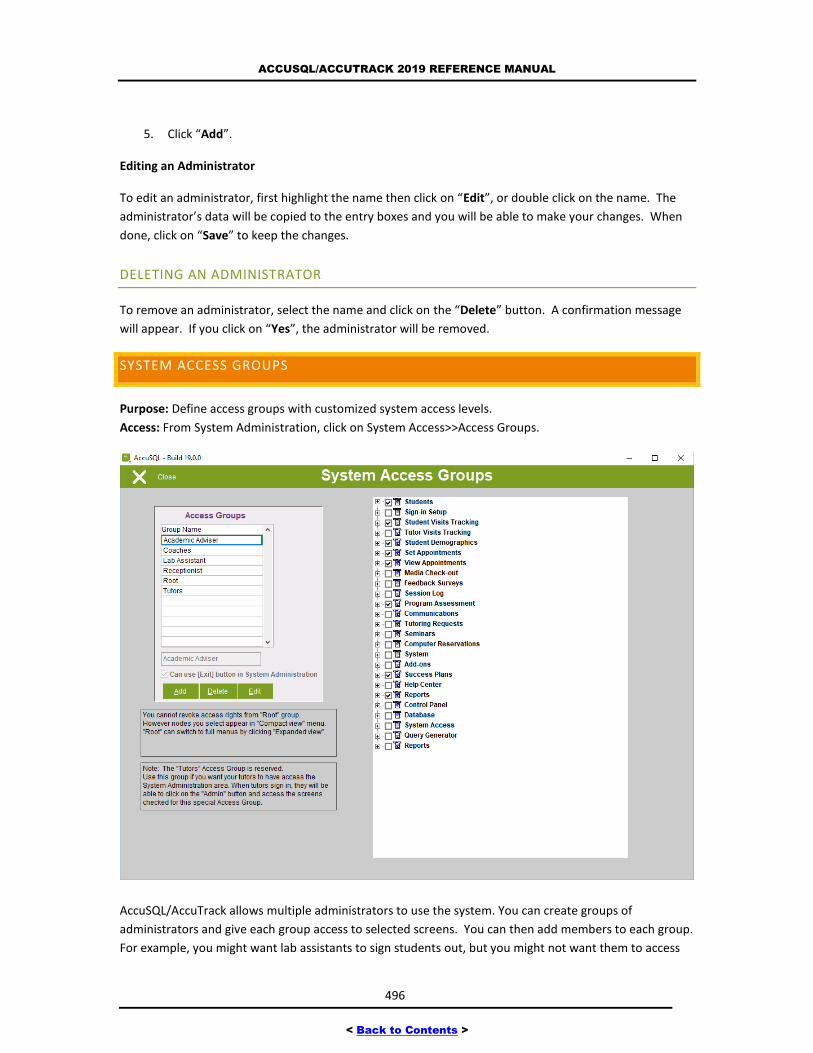
ACCUSQL/ACCUTRACK 2019 REFERENCE MANUAL
496
< Back to Contents >
5. Click “Add”.
Editing an Administrator
To edit an administrator, first highlight the name then click on “Edit”, or double click on the name. The
administrator’s data will be copied to the entry boxes and you will be able to make your changes. When
done, click on “Save” to keep the changes.
DELETING AN ADMINISTRATOR
To remove an administrator, select the name and click on the “Delete” button. A confirmation message
will appear. If you click on “Yes”, the administrator will be removed.
SYSTEM ACCESS GROUPS
Purpose: Define access groups with customized system access levels.
Access: From System Administration, click on System Access>>Access Groups.
AccuSQL/AccuTrack allows multiple administrators to use the system. You can create groups of
administrators and give each group access to selected screens. You can then add members to each group.
For example, you might want lab assistants to sign students out, but you might not want them to access
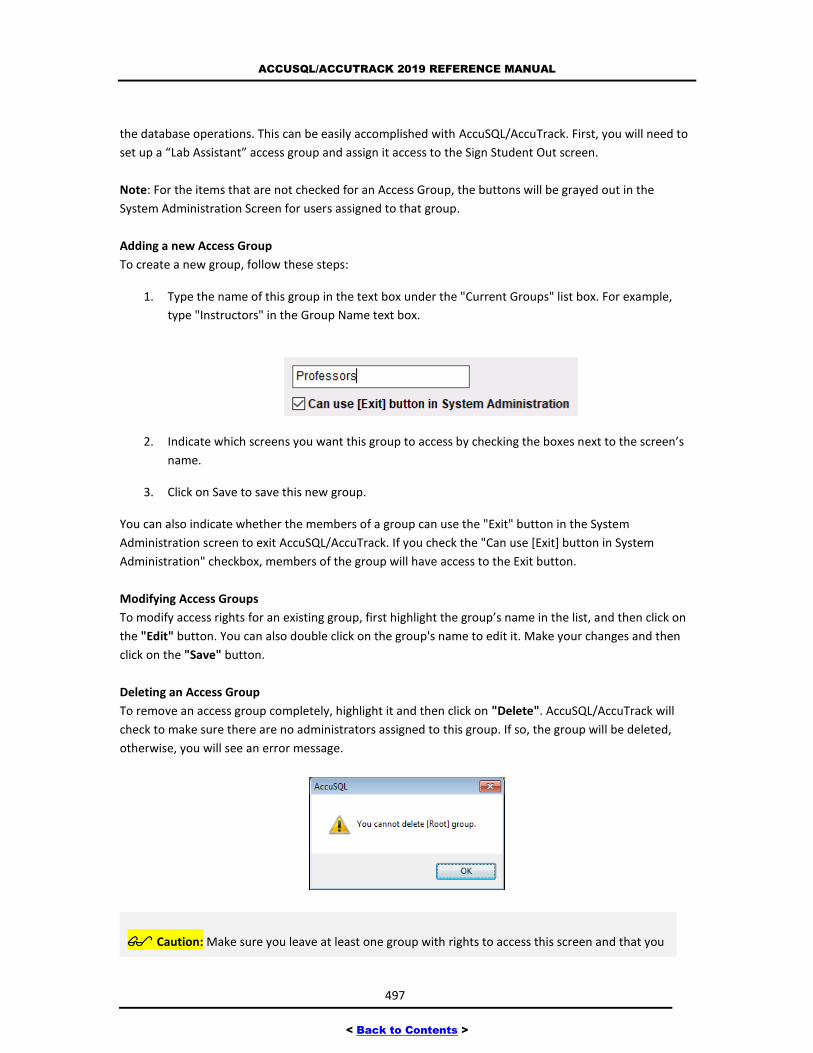
ACCUSQL/ACCUTRACK 2019 REFERENCE MANUAL
497
< Back to Contents >
the database operations. This can be easily accomplished with AccuSQL/AccuTrack. First, you will need to
set up a “Lab Assistant” access group and assign it access to the Sign Student Out screen.
Note: For the items that are not checked for an Access Group, the buttons will be grayed out in the
System Administration Screen for users assigned to that group.
Adding a new Access Group
To create a new group, follow these steps:
1. Type the name of this group in the text box under the "Current Groups" list box. For example,
type "Instructors" in the Group Name text box.
2. Indicate which screens you want this group to access by checking the boxes next to the screen’s
name.
3. Click on Save to save this new group.
You can also indicate whether the members of a group can use the "Exit" button in the System
Administration screen to exit AccuSQL/AccuTrack. If you check the "Can use [Exit] button in System
Administration" checkbox, members of the group will have access to the Exit button.
Modifying Access Groups
To modify access rights for an existing group, first highlight the group’s name in the list, and then click on
the "Edit" button. You can also double click on the group's name to edit it. Make your changes and then
click on the "Save" button.
Deleting an Access Group
To remove an access group completely, highlight it and then click on "Delete". AccuSQL/AccuTrack will
check to make sure there are no administrators assigned to this group. If so, the group will be deleted,
otherwise, you will see an error message.
Caution: Make sure you leave at least one group with rights to access this screen and that you
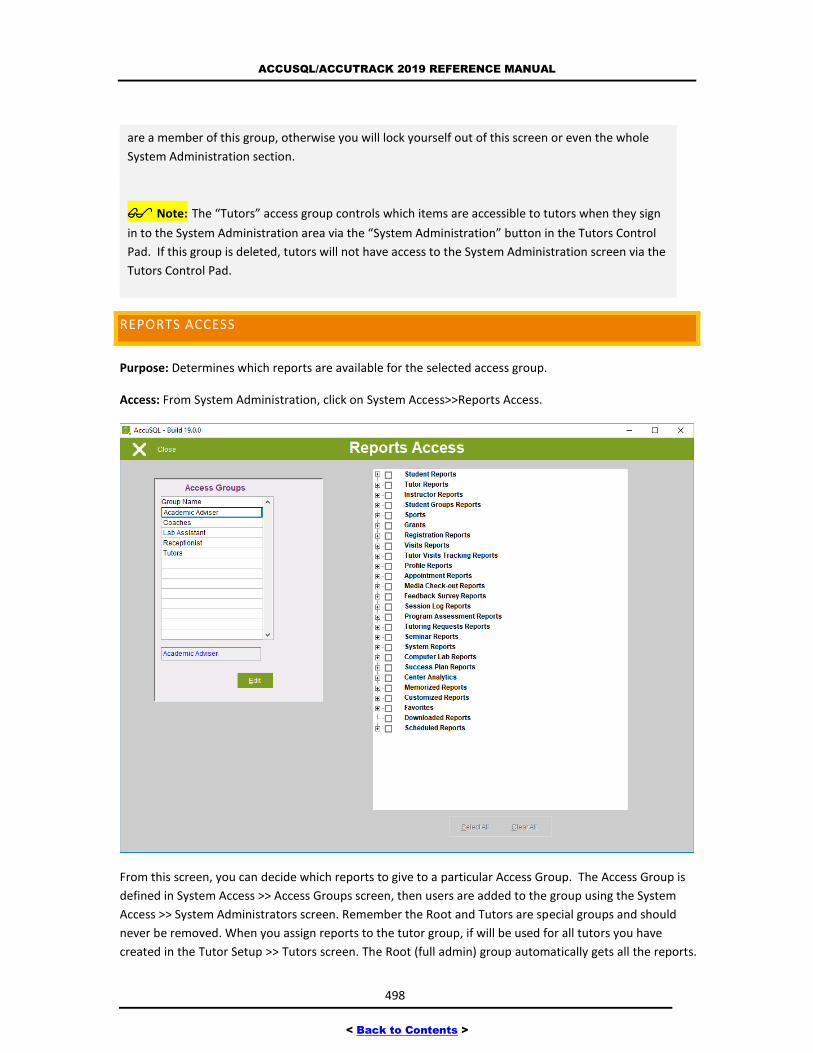
ACCUSQL/ACCUTRACK 2019 REFERENCE MANUAL
498
< Back to Contents >
are a member of this group, otherwise you will lock yourself out of this screen or even the whole
System Administration section.
Note: The “Tutors” access group controls which items are accessible to tutors when they sign
in to the System Administration area via the “System Administration” button in the Tutors Control
Pad. If this group is deleted, tutors will not have access to the System Administration screen via the
Tutors Control Pad.
REPORTS ACCESS
Purpose: Determines which reports are available for the selected access group.
Access: From System Administration, click on System Access>>Reports Access.
From this screen, you can decide which reports to give to a particular Access Group. The Access Group is
defined in System Access >> Access Groups screen, then users are added to the group using the System
Access >> System Administrators screen. Remember the Root and Tutors are special groups and should
never be removed. When you assign reports to the tutor group, if will be used for all tutors you have
created in the Tutor Setup >> Tutors screen. The Root (full admin) group automatically gets all the reports.
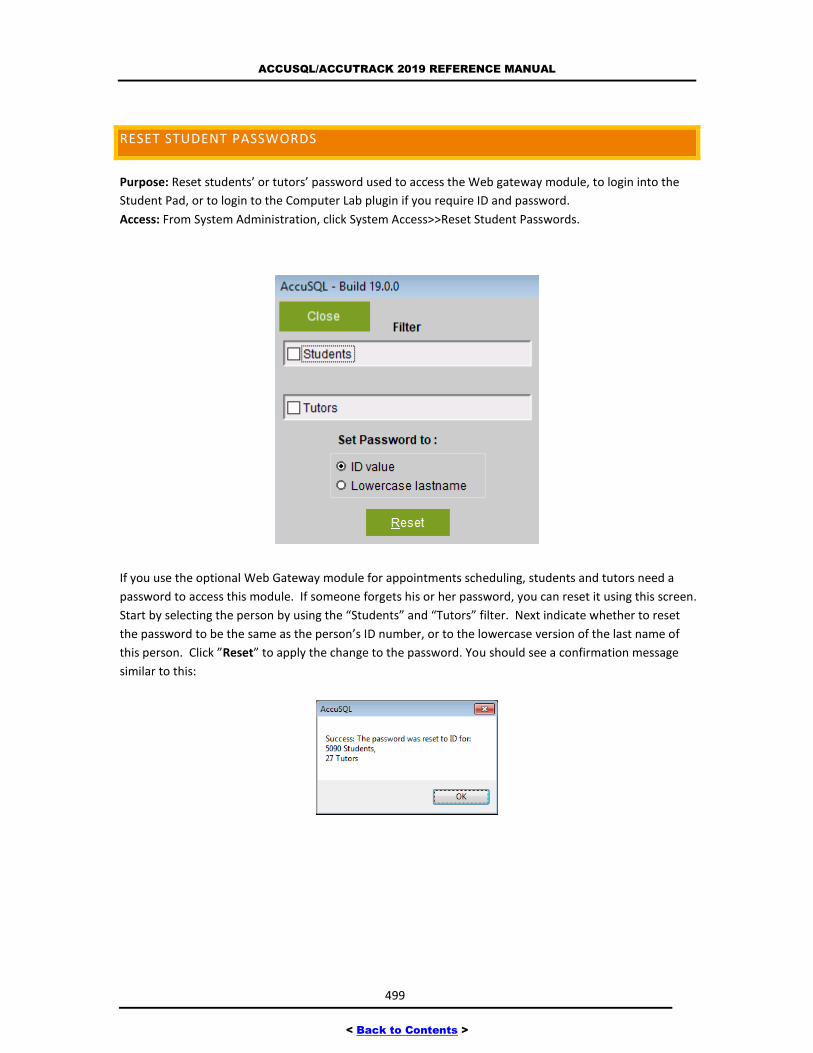
ACCUSQL/ACCUTRACK 2019 REFERENCE MANUAL
499
< Back to Contents >
RESET STUDENT PASSWORDS
Purpose: Reset students’ or tutors’ password used to access the Web gateway module, to login into the
Student Pad, or to login to the Computer Lab plugin if you require ID and password.
Access: From System Administration, click System Access>>Reset Student Passwords.
If you use the optional Web Gateway module for appointments scheduling, students and tutors need a
password to access this module. If someone forgets his or her password, you can reset it using this screen.
Start by selecting the person by using the “Students” and “Tutors” filter. Next indicate whether to reset
the password to be the same as the person’s ID number, or to the lowercase version of the last name of
this person. Click ”Reset” to apply the change to the password. You should see a confirmation message
similar to this:
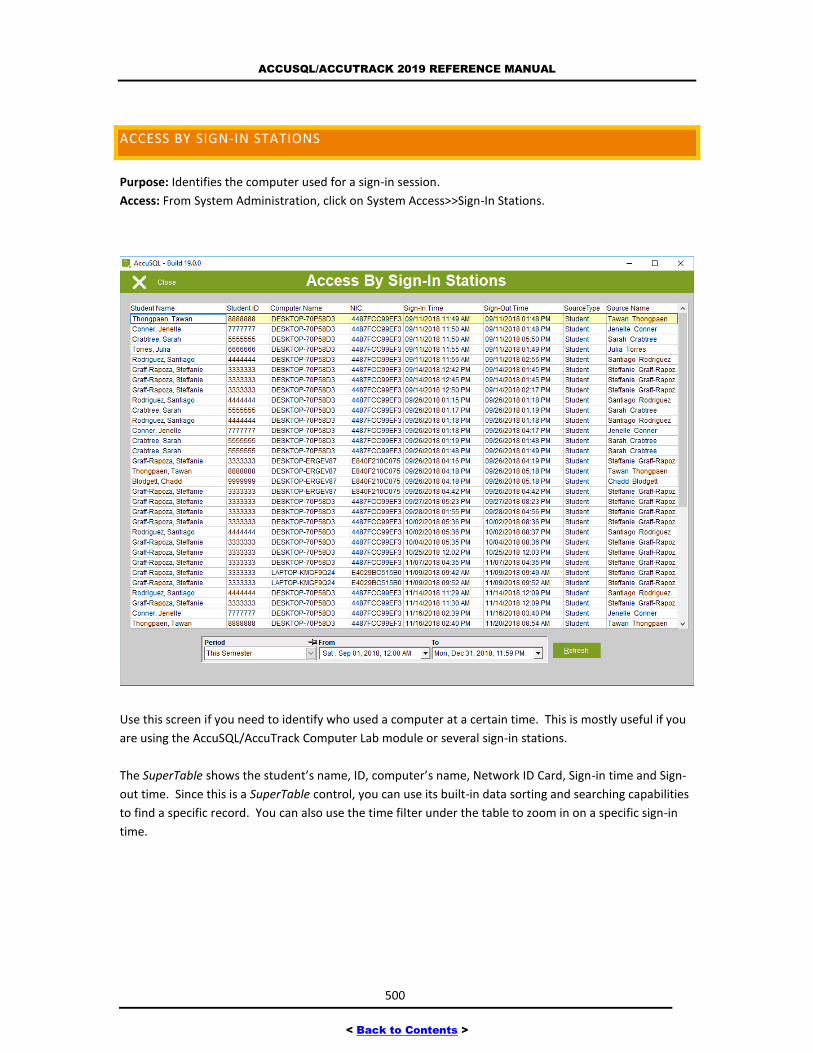
ACCUSQL/ACCUTRACK 2019 REFERENCE MANUAL
500
< Back to Contents >
ACCESS BY SIGN-IN STATIONS
Purpose: Identifies the computer used for a sign-in session.
Access: From System Administration, click on System Access>>Sign-In Stations.
Use this screen if you need to identify who used a computer at a certain time. This is mostly useful if you
are using the AccuSQL/AccuTrack Computer Lab module or several sign-in stations.
The SuperTable shows the student’s name, ID, computer’s name, Network ID Card, Sign-in time and Sign-
out time. Since this is a SuperTable control, you can use its built-in data sorting and searching capabilities
to find a specific record. You can also use the time filter under the table to zoom in on a specific sign-in
time.
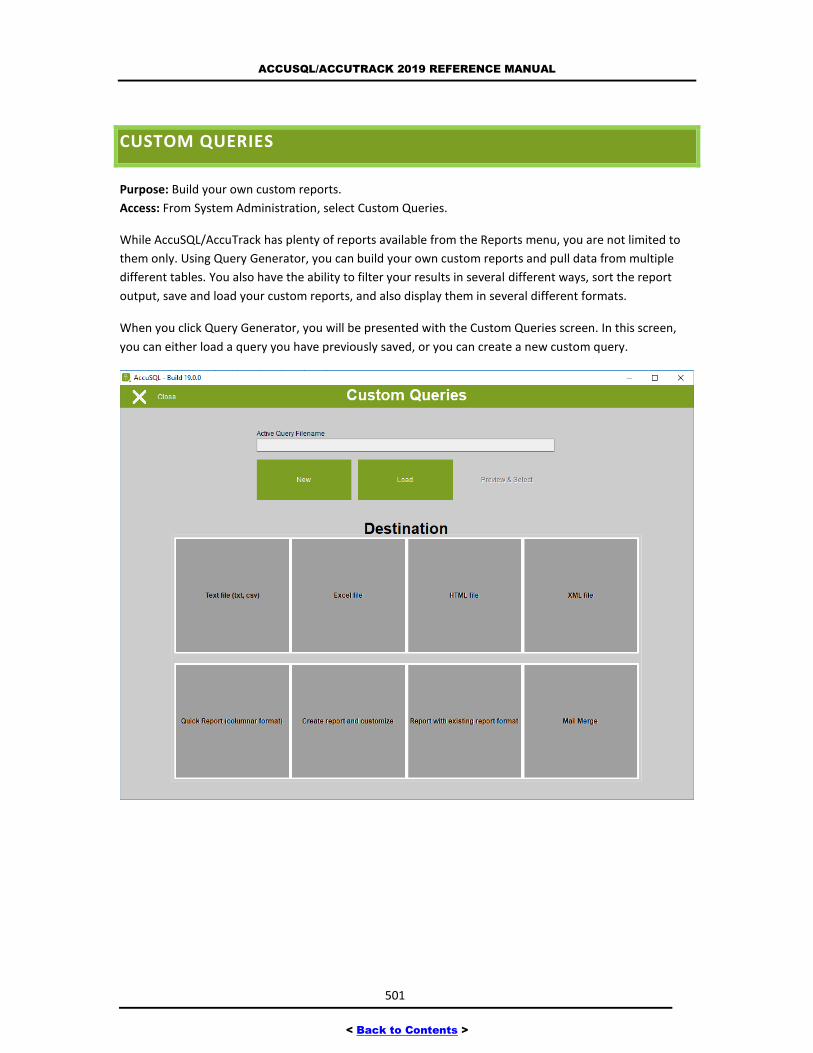
ACCUSQL/ACCUTRACK 2019 REFERENCE MANUAL
501
< Back to Contents >
CUSTOM QUERIES
Purpose: Build your own custom reports.
Access: From System Administration, select Custom Queries.
While AccuSQL/AccuTrack has plenty of reports available from the Reports menu, you are not limited to
them only. Using Query Generator, you can build your own custom reports and pull data from multiple
different tables. You also have the ability to filter your results in several different ways, sort the report
output, save and load your custom reports, and also display them in several different formats.
When you click Query Generator, you will be presented with the Custom Queries screen. In this screen,
you can either load a query you have previously saved, or you can create a new custom query.
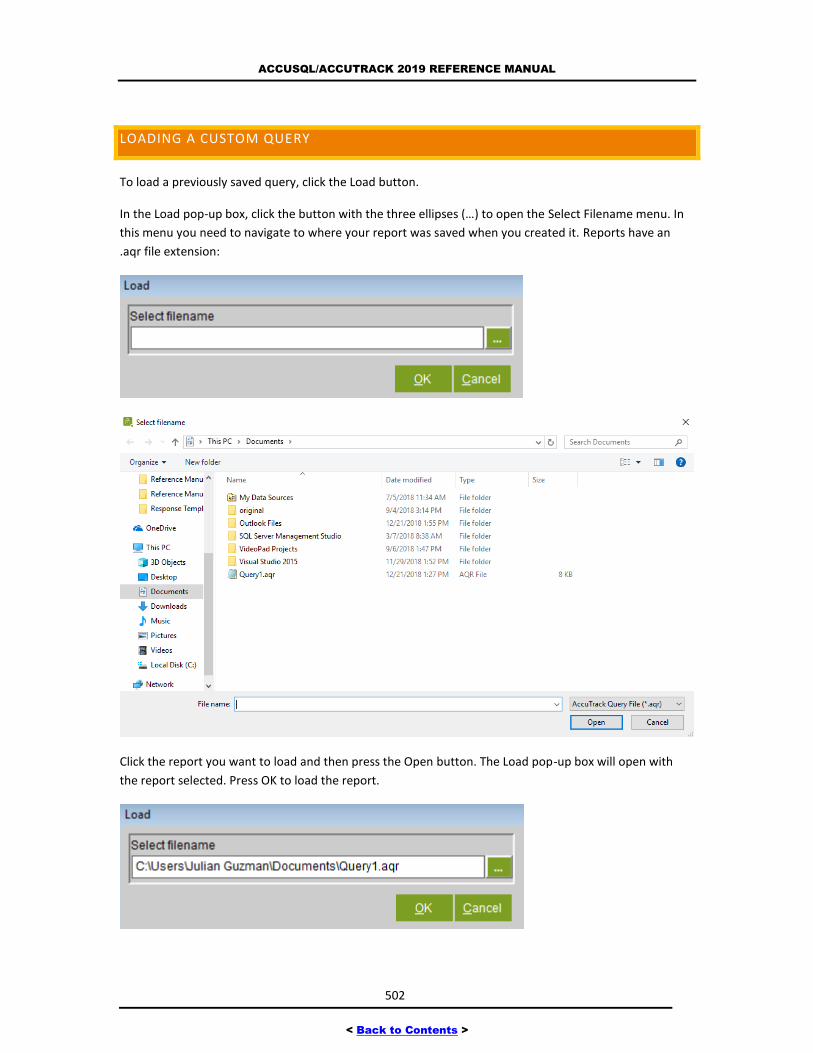
ACCUSQL/ACCUTRACK 2019 REFERENCE MANUAL
502
< Back to Contents >
LOADING A CUSTOM QUERY
To load a previously saved query, click the Load button.
In the Load pop-up box, click the button with the three ellipses (…) to open the Select Filename menu. In
this menu you need to navigate to where your report was saved when you created it. Reports have an
.aqr file extension:
Click the report you want to load and then press the Open button. The Load pop-up box will open with
the report selected. Press OK to load the report.
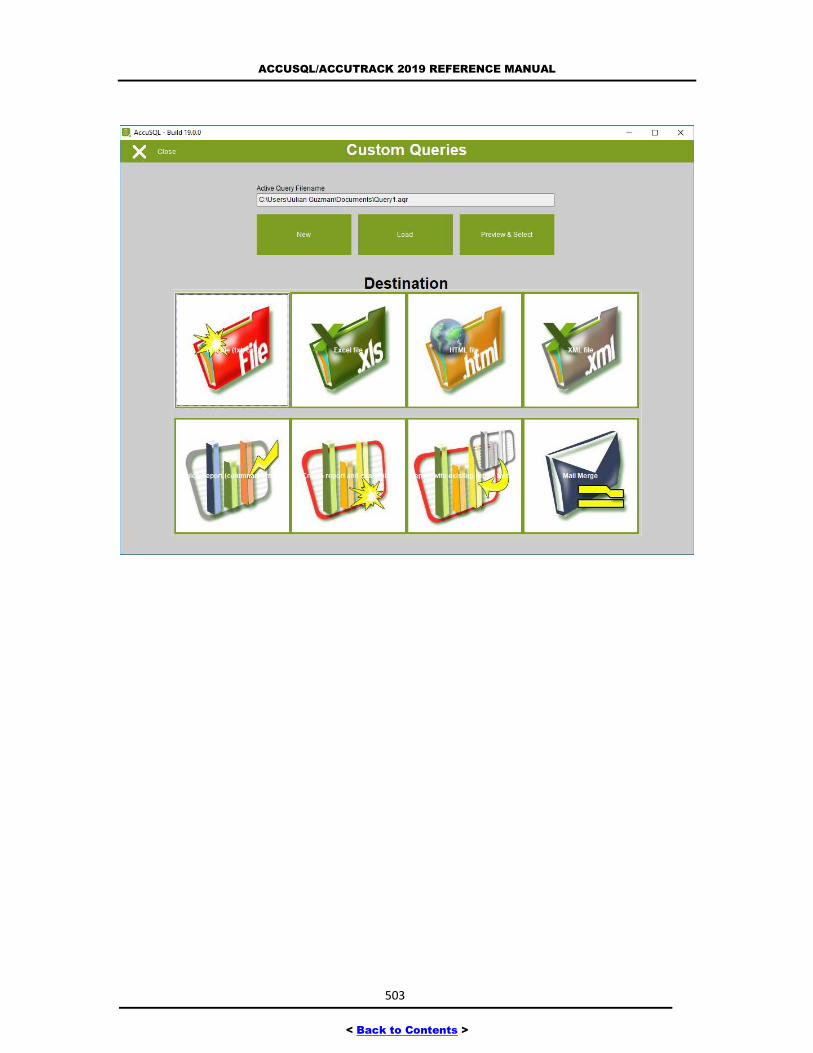
ACCUSQL/ACCUTRACK 2019 REFERENCE MANUAL
503
< Back to Contents >
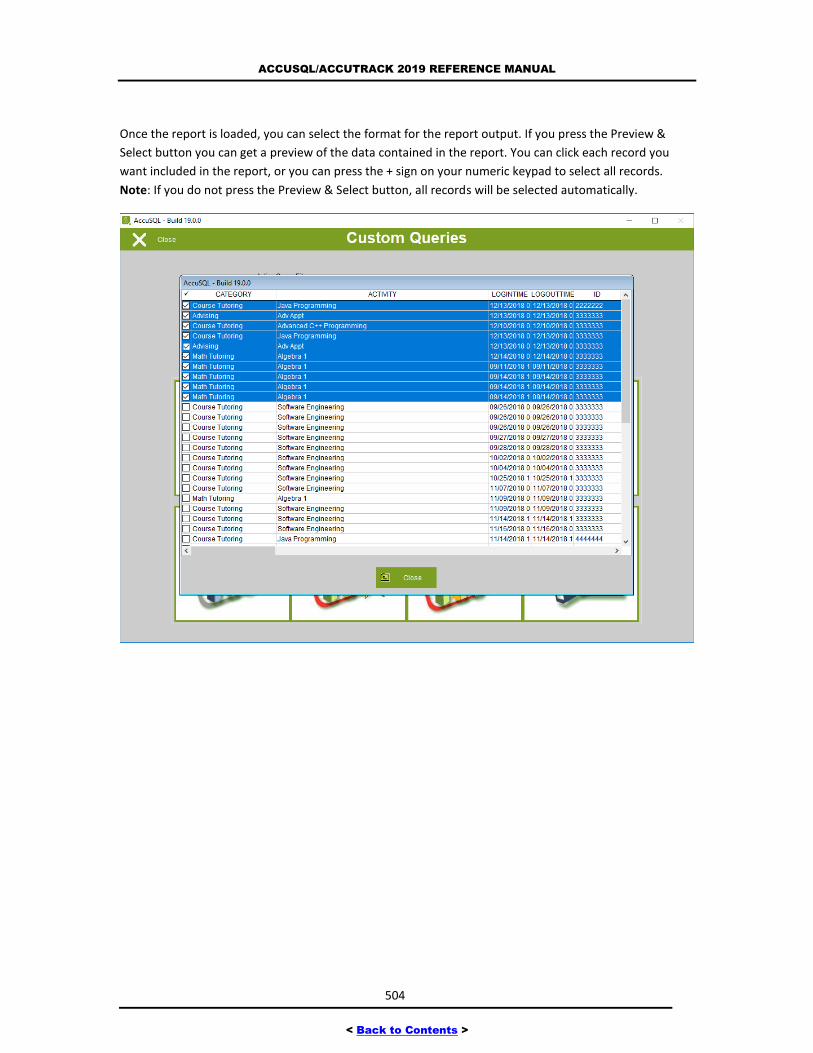
ACCUSQL/ACCUTRACK 2019 REFERENCE MANUAL
504
< Back to Contents >
Once the report is loaded, you can select the format for the report output. If you press the Preview &
Select button you can get a preview of the data contained in the report. You can click each record you
want included in the report, or you can press the + sign on your numeric keypad to select all records.
Note: If you do not press the Preview & Select button, all records will be selected automatically.
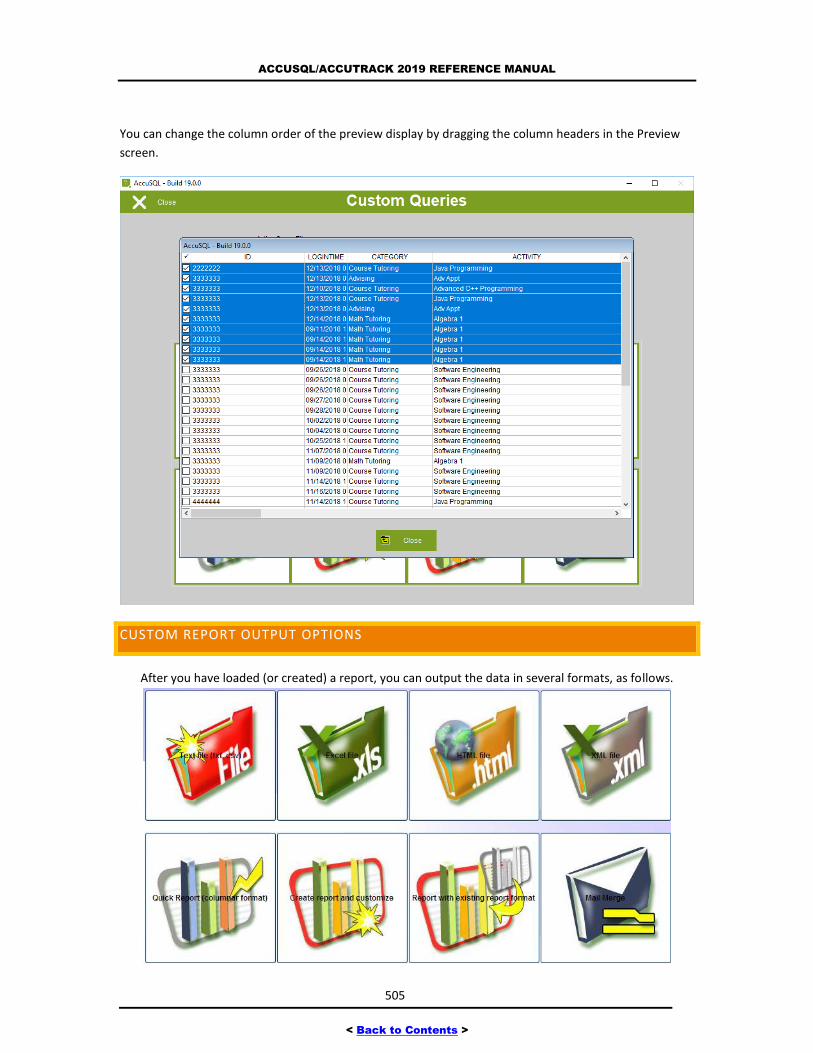
ACCUSQL/ACCUTRACK 2019 REFERENCE MANUAL
505
< Back to Contents >
You can change the column order of the preview display by dragging the column headers in the Preview
screen.
CUSTOM REPORT OUTPUT OPTIONS
After you have loaded (or created) a report, you can output the data in several formats, as follows.
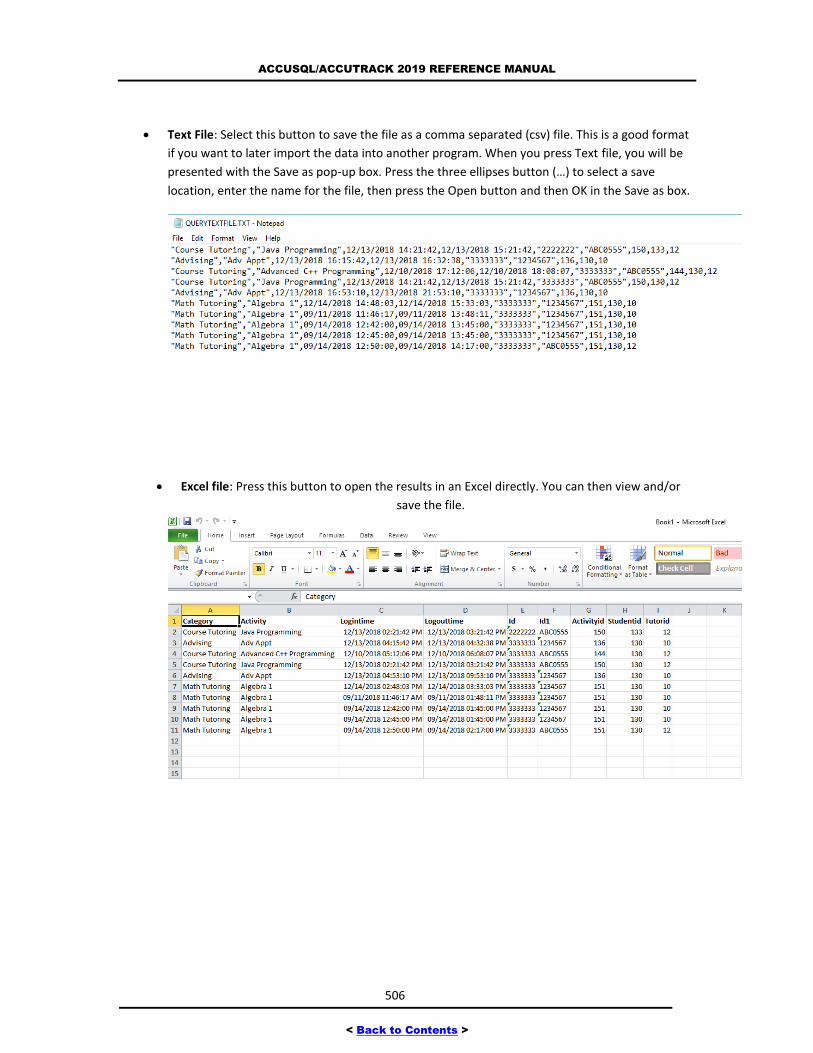
ACCUSQL/ACCUTRACK 2019 REFERENCE MANUAL
506
< Back to Contents >
Text File: Select this button to save the file as a comma separated (csv) file. This is a good format
if you want to later import the data into another program. When you press Text file, you will be
presented with the Save as pop-up box. Press the three ellipses button (…) to select a save
location, enter the name for the file, then press the Open button and then OK in the Save as box.
Excel file: Press this button to open the results in an Excel directly. You can then view and/or
save the file.
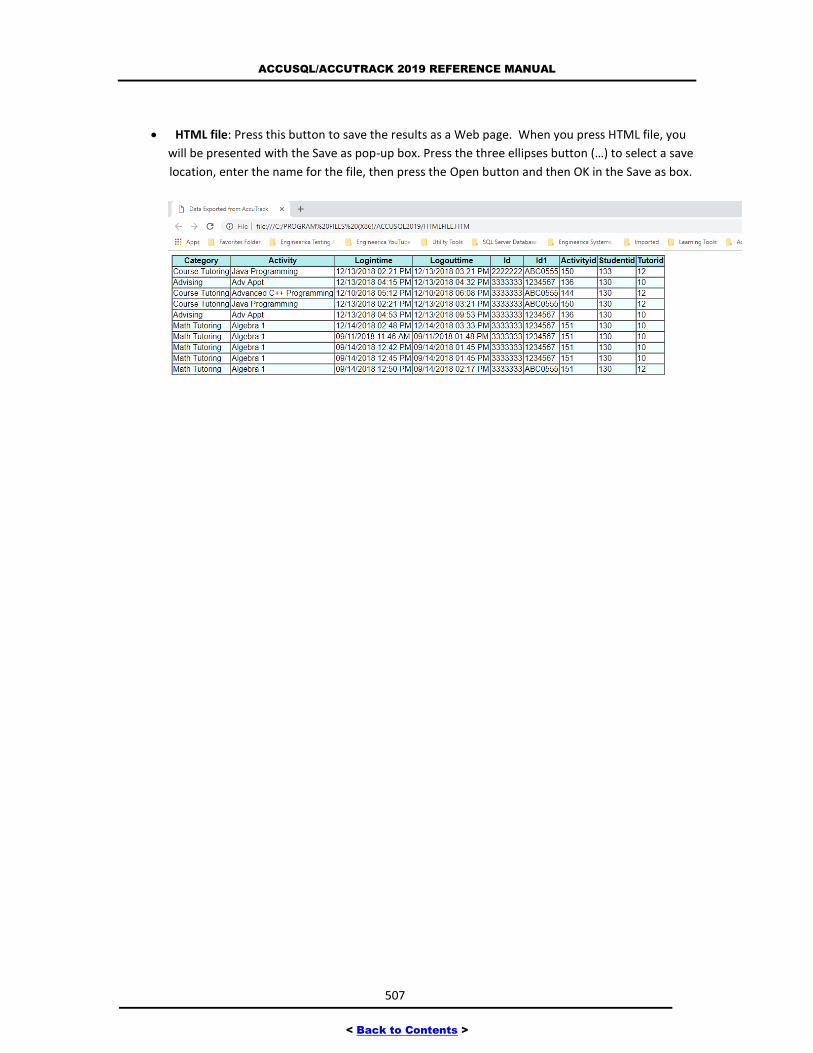
ACCUSQL/ACCUTRACK 2019 REFERENCE MANUAL
507
< Back to Contents >
HTML file: Press this button to save the results as a Web page. When you press HTML file, you
will be presented with the Save as pop-up box. Press the three ellipses button (…) to select a save
location, enter the name for the file, then press the Open button and then OK in the Save as box.
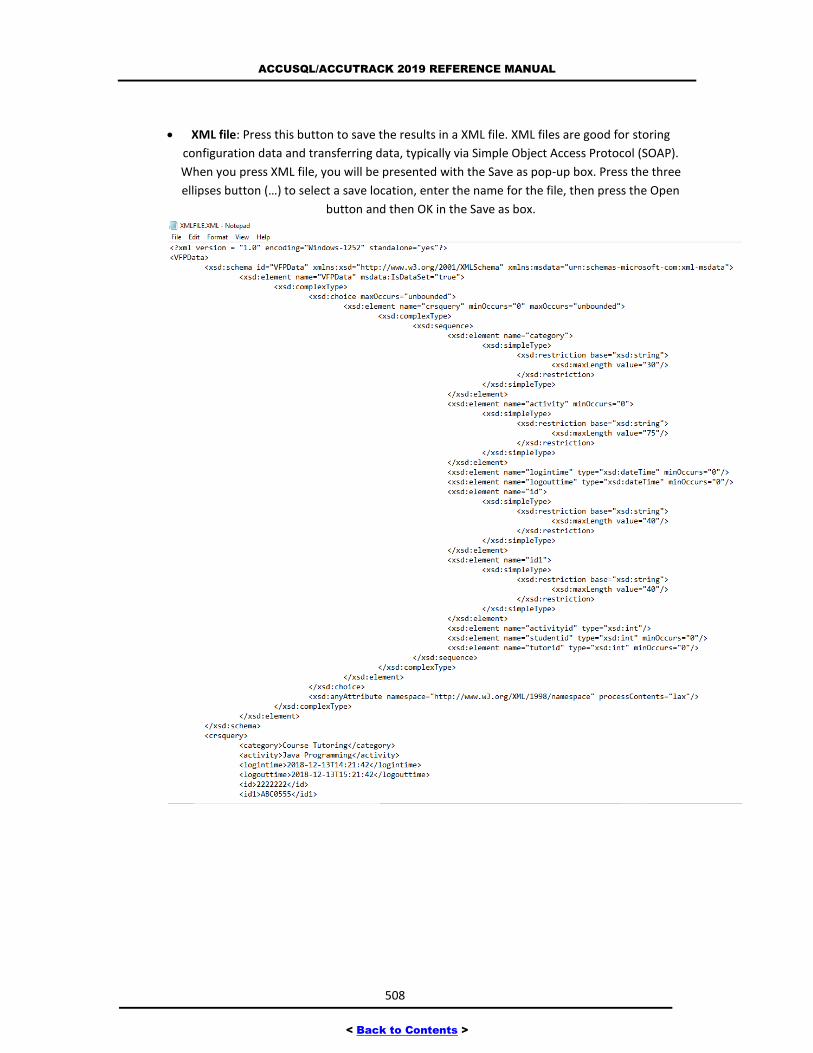
ACCUSQL/ACCUTRACK 2019 REFERENCE MANUAL
508
< Back to Contents >
XML file: Press this button to save the results in a XML file. XML files are good for storing
configuration data and transferring data, typically via Simple Object Access Protocol (SOAP).
When you press XML file, you will be presented with the Save as pop-up box. Press the three
ellipses button (…) to select a save location, enter the name for the file, then press the Open
button and then OK in the Save as box.
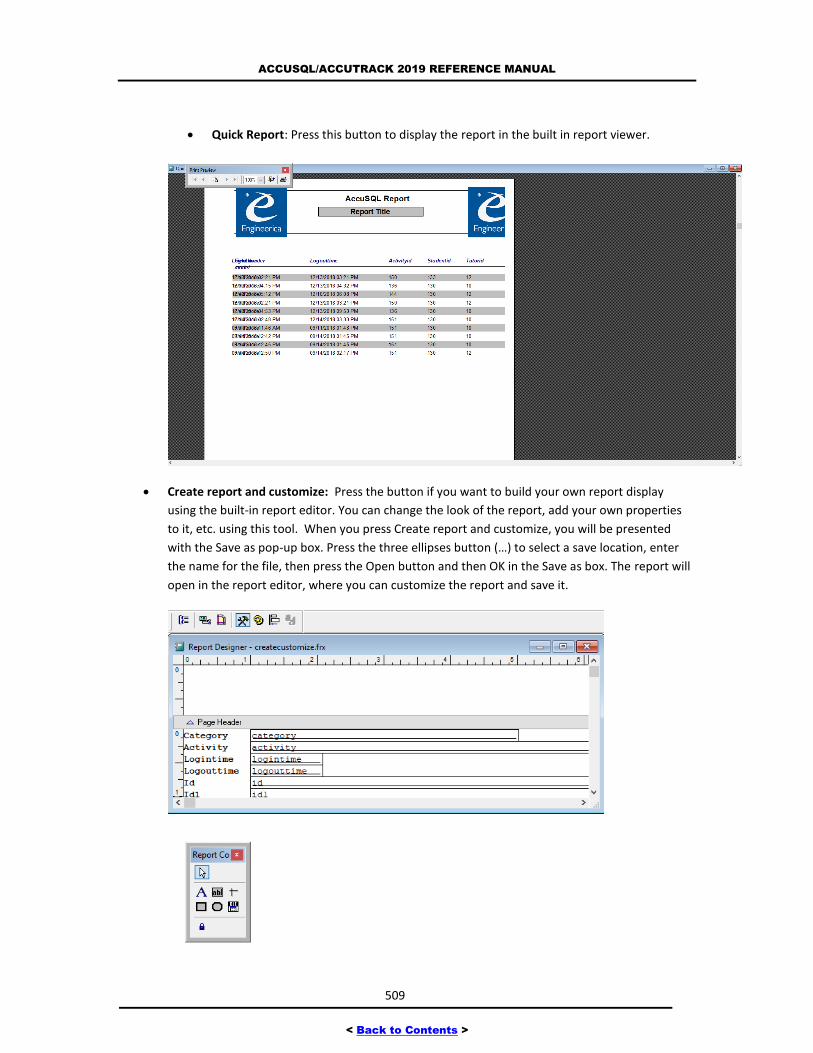
ACCUSQL/ACCUTRACK 2019 REFERENCE MANUAL
509
< Back to Contents >
Quick Report: Press this button to display the report in the built in report viewer.
Create report and customize: Press the button if you want to build your own report display
using the built-in report editor. You can change the look of the report, add your own properties
to it, etc. using this tool. When you press Create report and customize, you will be presented
with the Save as pop-up box. Press the three ellipses button (…) to select a save location, enter
the name for the file, then press the Open button and then OK in the Save as box. The report will
open in the report editor, where you can customize the report and save it.
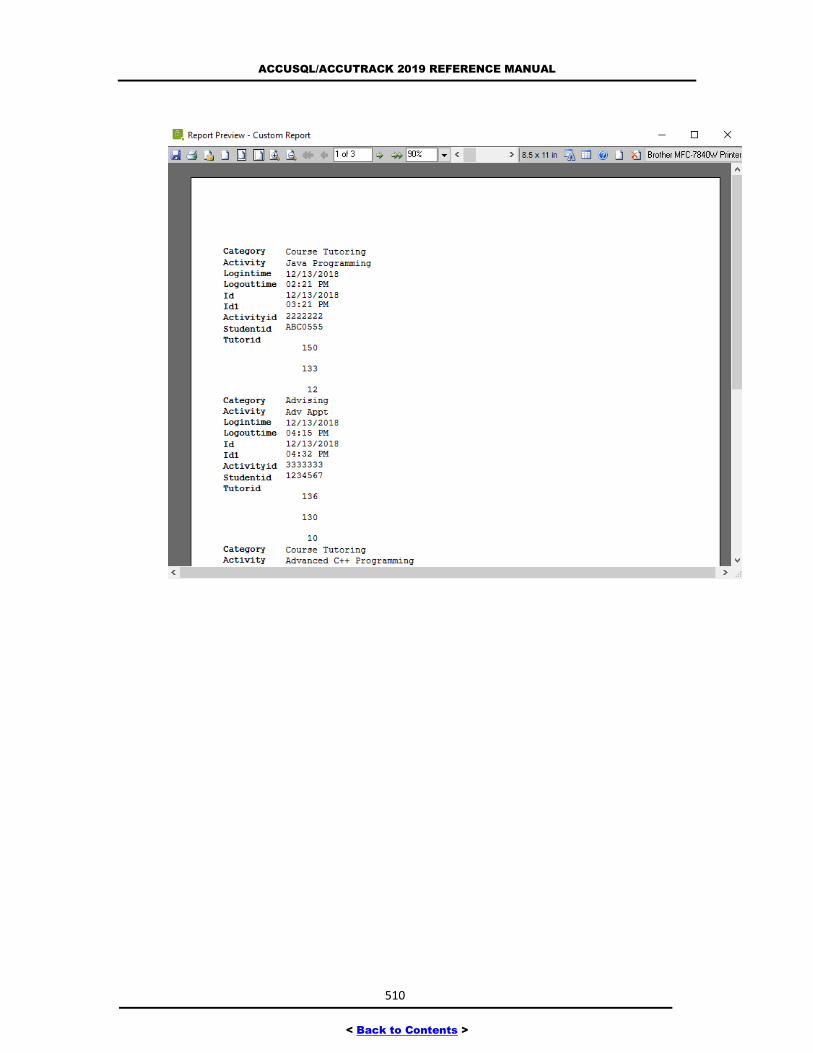
ACCUSQL/ACCUTRACK 2019 REFERENCE MANUAL
510
< Back to Contents >
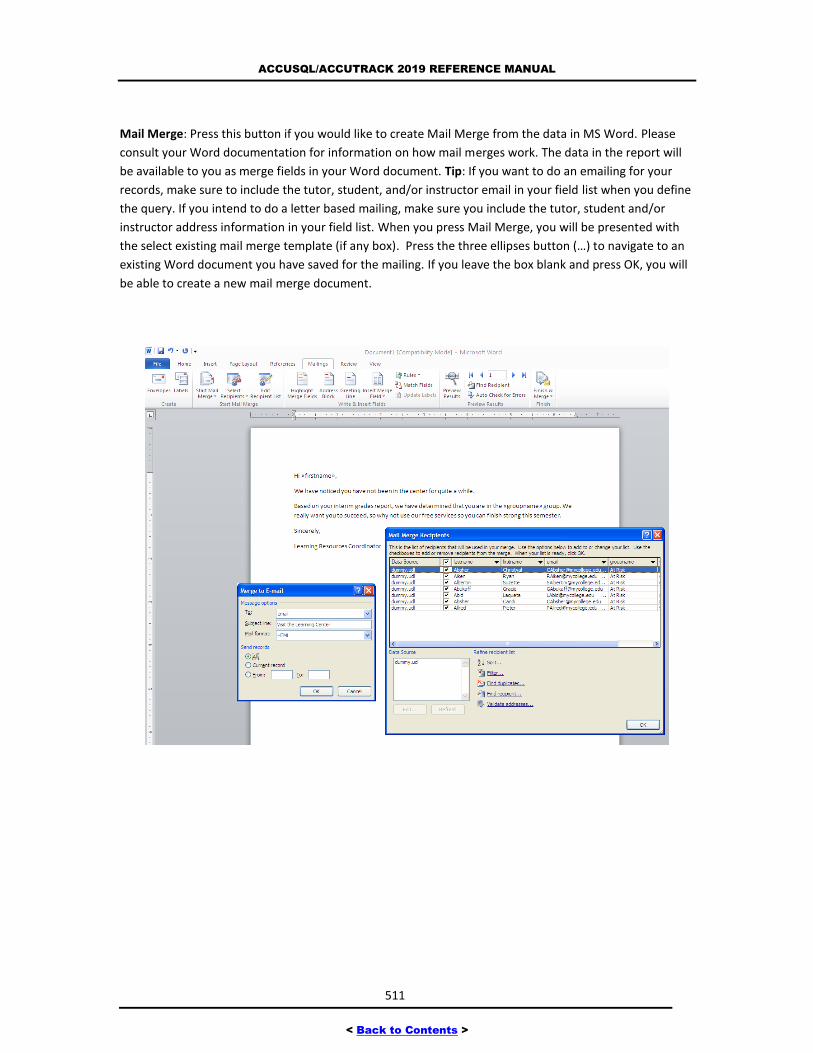
ACCUSQL/ACCUTRACK 2019 REFERENCE MANUAL
511
< Back to Contents >
Mail Merge: Press this button if you would like to create Mail Merge from the data in MS Word. Please
consult your Word documentation for information on how mail merges work. The data in the report will
be available to you as merge fields in your Word document. Tip: If you want to do an emailing for your
records, make sure to include the tutor, student, and/or instructor email in your field list when you define
the query. If you intend to do a letter based mailing, make sure you include the tutor, student and/or
instructor address information in your field list. When you press Mail Merge, you will be presented with
the select existing mail merge template (if any box). Press the three ellipses button (…) to navigate to an
existing Word document you have saved for the mailing. If you leave the box blank and press OK, you will
be able to create a new mail merge document.
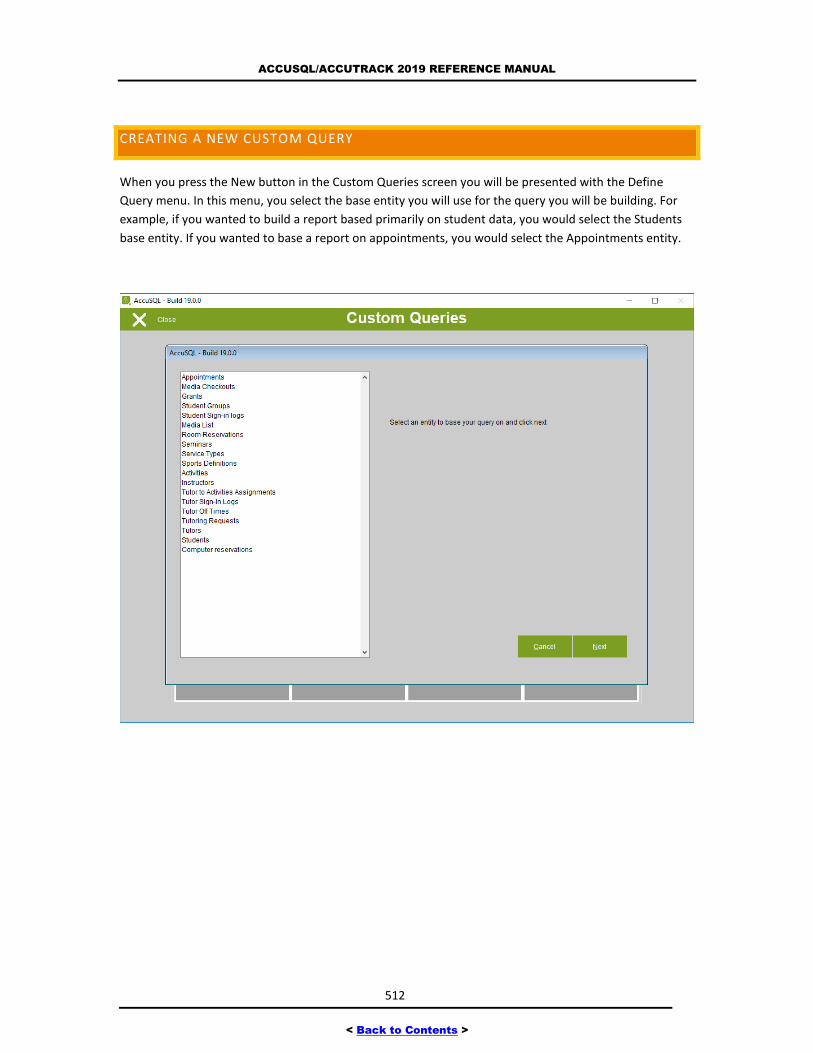
ACCUSQL/ACCUTRACK 2019 REFERENCE MANUAL
512
< Back to Contents >
CREATING A NEW CUSTOM QUERY
When you press the New button in the Custom Queries screen you will be presented with the Define
Query menu. In this menu, you select the base entity you will use for the query you will be building. For
example, if you wanted to build a report based primarily on student data, you would select the Students
base entity. If you wanted to base a report on appointments, you would select the Appointments entity.

ACCUSQL/ACCUTRACK 2019 REFERENCE MANUAL
513
< Back to Contents >
Click Next and you will be presented with the Define Query screen. In this screen you can select the fields
you want to add to the report from different tables. Click the + sign next to the base entity to see the
fields available from the various table. Check the boxes next to the fields you want to include in the
report. Tip: If you click or unclick the box next to a top-level entity, you will select or deselect all fields for
that entity.
Note: You can click the Previous button to go back to the previous screen. This is a new feature for 2019.
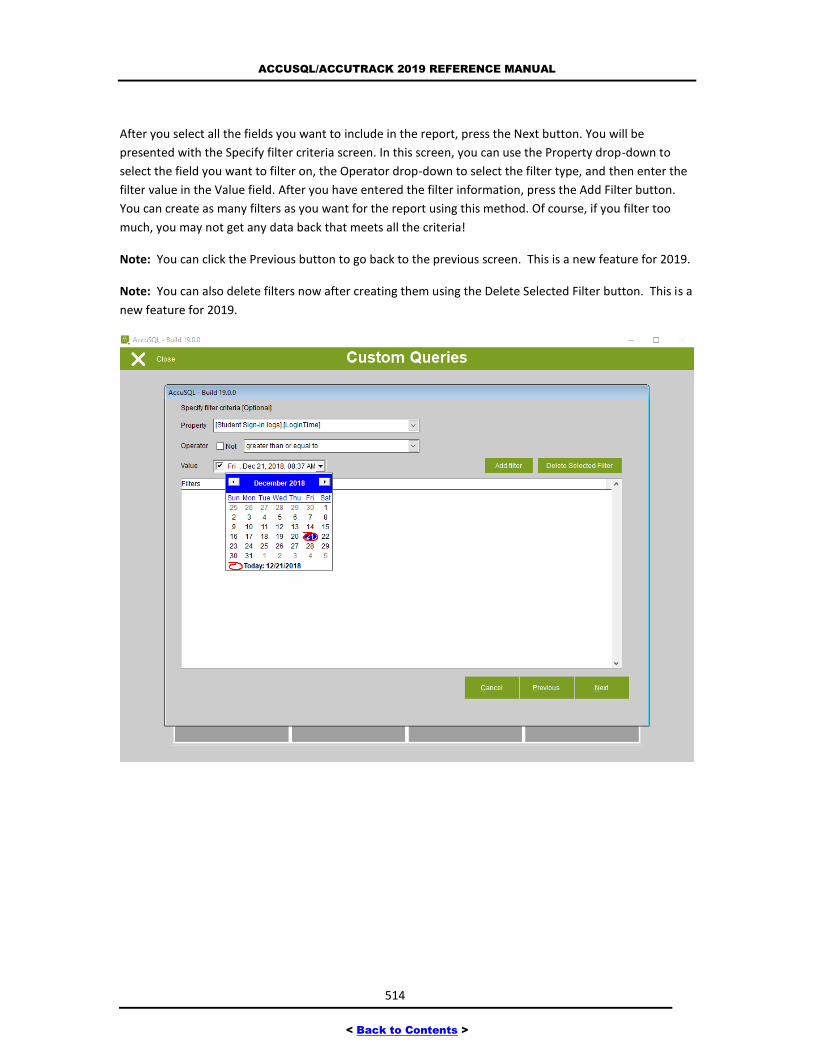
ACCUSQL/ACCUTRACK 2019 REFERENCE MANUAL
514
< Back to Contents >
After you select all the fields you want to include in the report, press the Next button. You will be
presented with the Specify filter criteria screen. In this screen, you can use the Property drop-down to
select the field you want to filter on, the Operator drop-down to select the filter type, and then enter the
filter value in the Value field. After you have entered the filter information, press the Add Filter button.
You can create as many filters as you want for the report using this method. Of course, if you filter too
much, you may not get any data back that meets all the criteria!
Note: You can click the Previous button to go back to the previous screen. This is a new feature for 2019.
Note: You can also delete filters now after creating them using the Delete Selected Filter button. This is a
new feature for 2019.
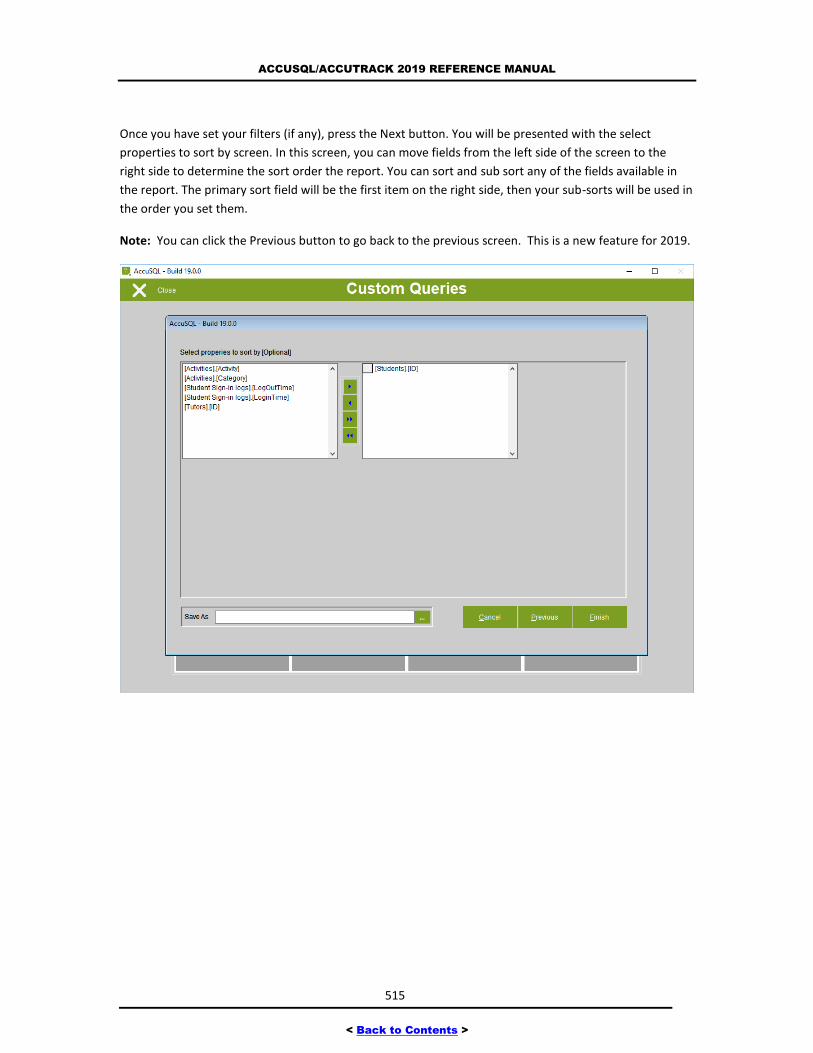
ACCUSQL/ACCUTRACK 2019 REFERENCE MANUAL
515
< Back to Contents >
Once you have set your filters (if any), press the Next button. You will be presented with the select
properties to sort by screen. In this screen, you can move fields from the left side of the screen to the
right side to determine the sort order the report. You can sort and sub sort any of the fields available in
the report. The primary sort field will be the first item on the right side, then your sub-sorts will be used in
the order you set them.
Note: You can click the Previous button to go back to the previous screen. This is a new feature for 2019.
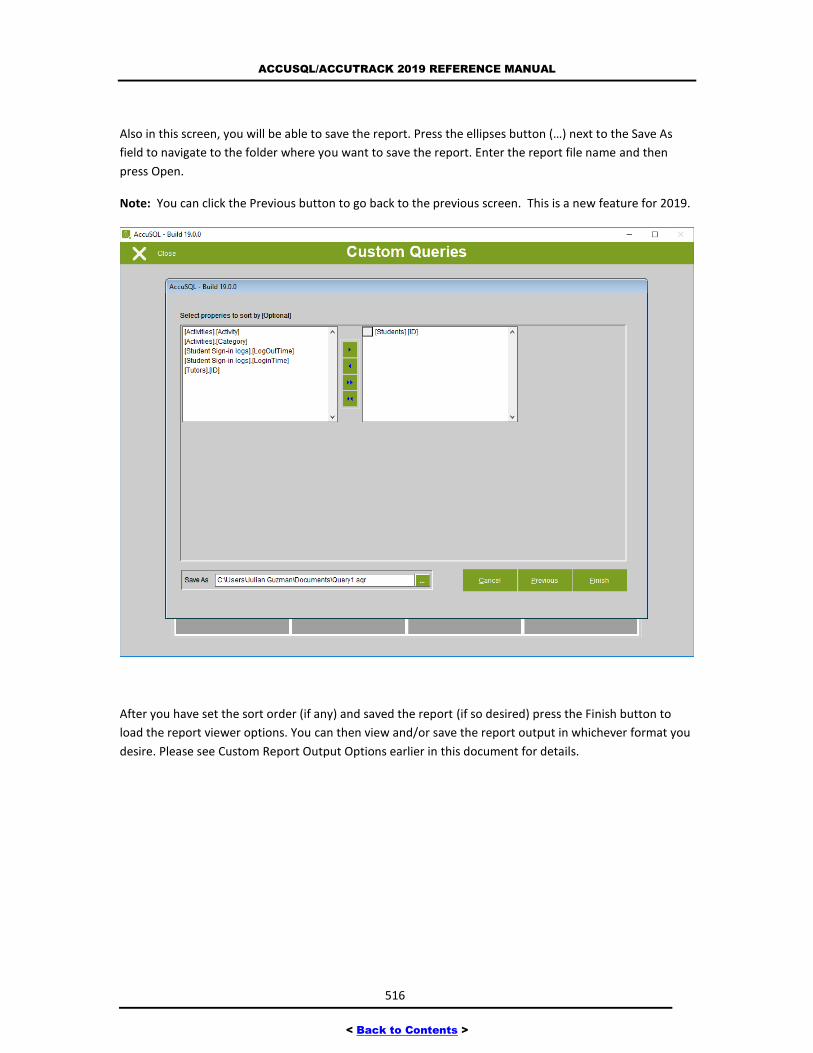
ACCUSQL/ACCUTRACK 2019 REFERENCE MANUAL
516
< Back to Contents >
Also in this screen, you will be able to save the report. Press the ellipses button (…) next to the Save As
field to navigate to the folder where you want to save the report. Enter the report file name and then
press Open.
Note: You can click the Previous button to go back to the previous screen. This is a new feature for 2019.
After you have set the sort order (if any) and saved the report (if so desired) press the Finish button to
load the report viewer options. You can then view and/or save the report output in whichever format you
desire. Please see Custom Report Output Options earlier in this document for details.
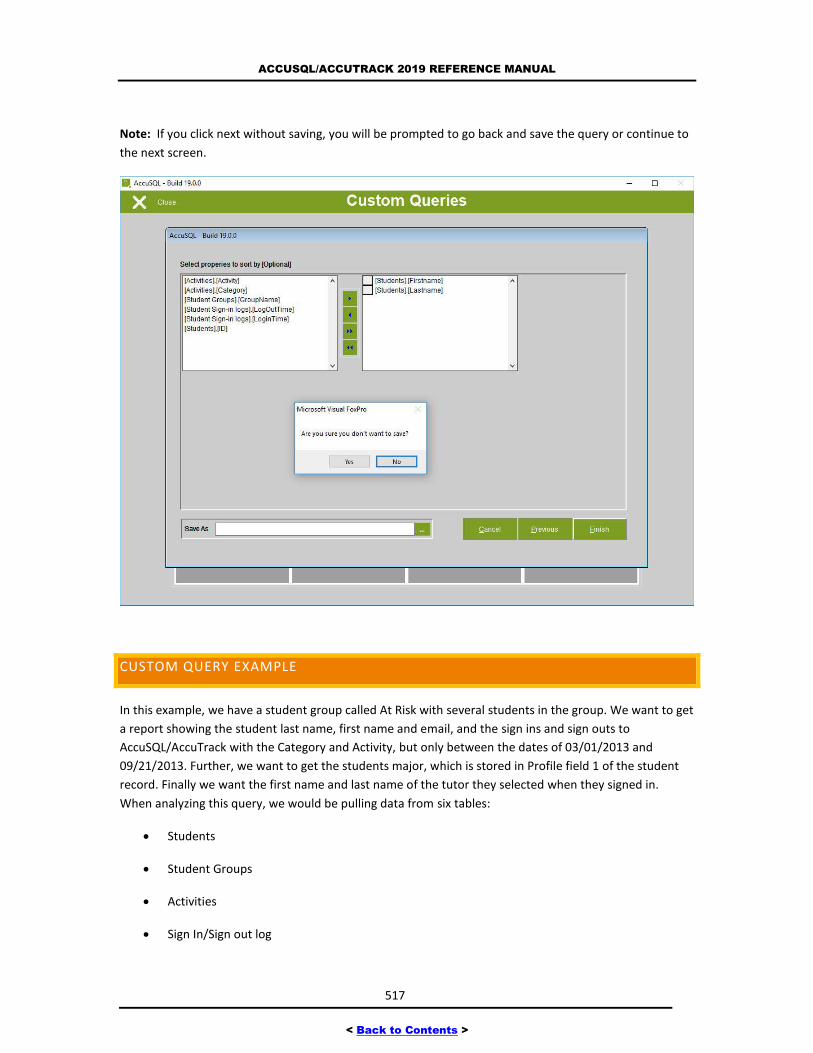
ACCUSQL/ACCUTRACK 2019 REFERENCE MANUAL
517
< Back to Contents >
Note: If you click next without saving, you will be prompted to go back and save the query or continue to
the next screen.
CUSTOM QUERY EXAMPLE
In this example, we have a student group called At Risk with several students in the group. We want to get
a report showing the student last name, first name and email, and the sign ins and sign outs to
AccuSQL/AccuTrack with the Category and Activity, but only between the dates of 03/01/2013 and
09/21/2013. Further, we want to get the students major, which is stored in Profile field 1 of the student
record. Finally we want the first name and last name of the tutor they selected when they signed in.
When analyzing this query, we would be pulling data from six tables:
Students
Student Groups
Activities
Sign In/Sign out log
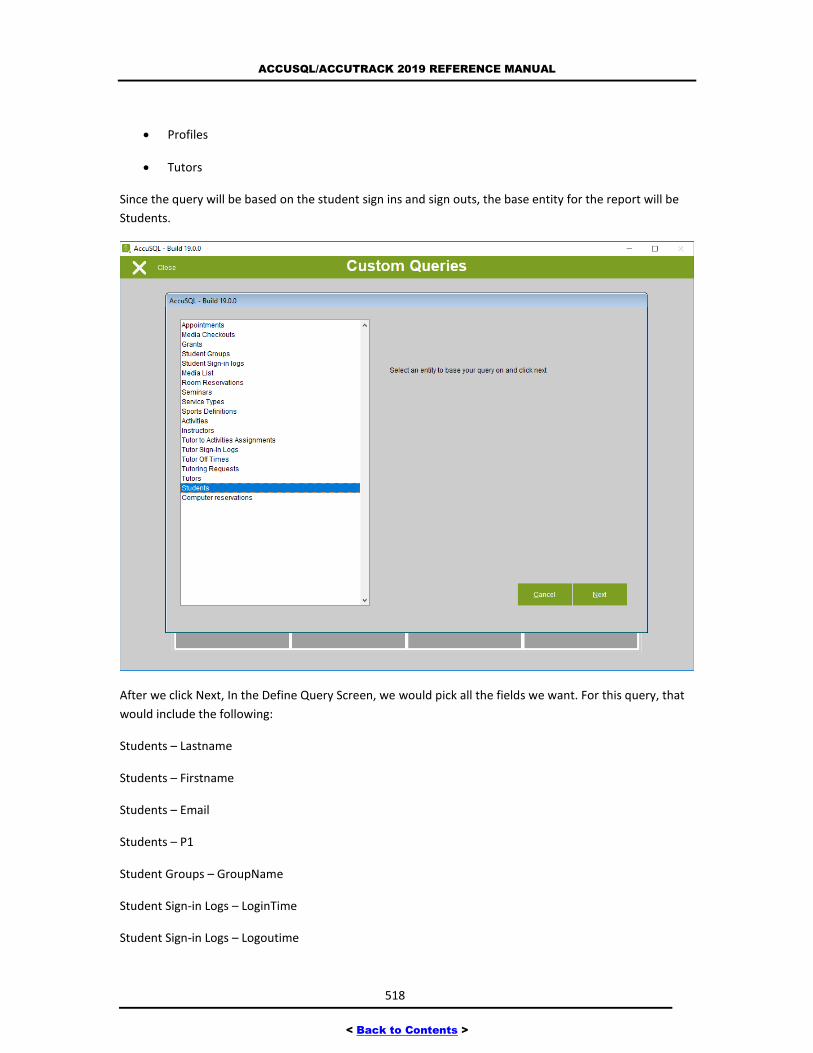
ACCUSQL/ACCUTRACK 2019 REFERENCE MANUAL
518
< Back to Contents >
Profiles
Tutors
Since the query will be based on the student sign ins and sign outs, the base entity for the report will be
Students.
After we click Next, In the Define Query Screen, we would pick all the fields we want. For this query, that
would include the following:
Students – Lastname
Students – Firstname
Students – Email
Students – P1
Student Groups – GroupName
Student Sign-in Logs – LoginTime
Student Sign-in Logs – Logoutime
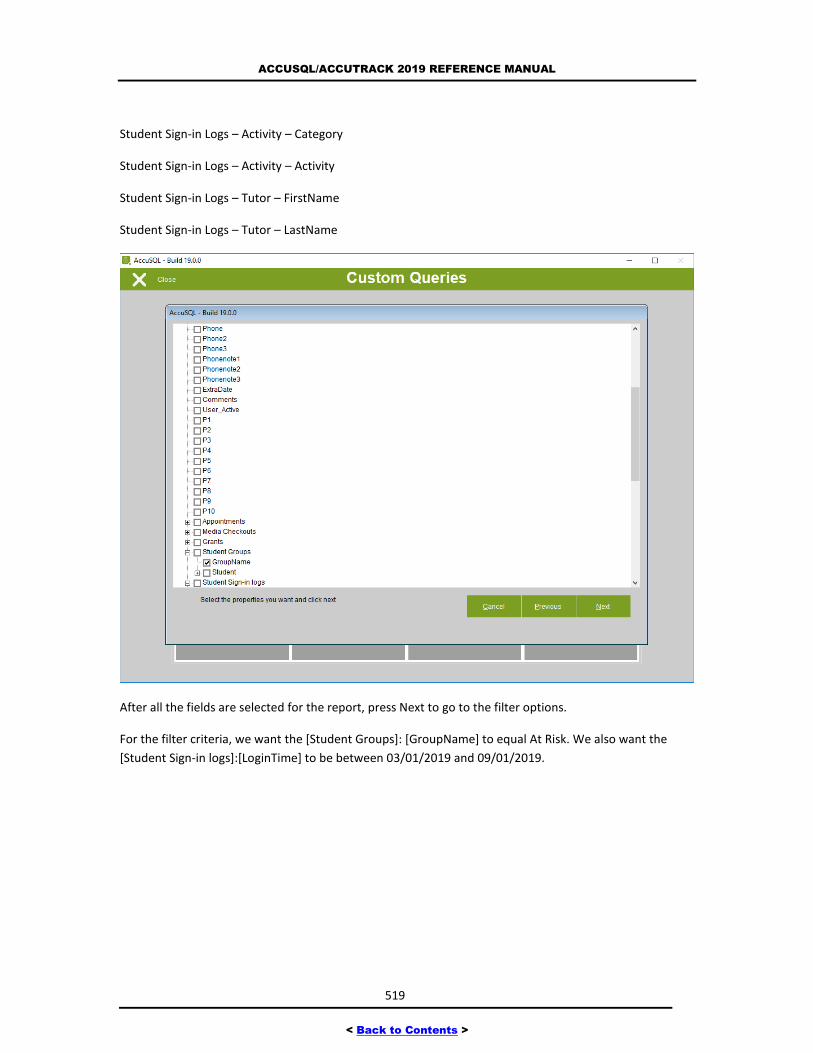
ACCUSQL/ACCUTRACK 2019 REFERENCE MANUAL
519
< Back to Contents >
Student Sign-in Logs – Activity – Category
Student Sign-in Logs – Activity – Activity
Student Sign-in Logs – Tutor – FirstName
Student Sign-in Logs – Tutor – LastName
After all the fields are selected for the report, press Next to go to the filter options.
For the filter criteria, we want the [Student Groups]: [GroupName] to equal At Risk. We also want the
[Student Sign-in logs]:[LoginTime] to be between 03/01/2019 and 09/01/2019.
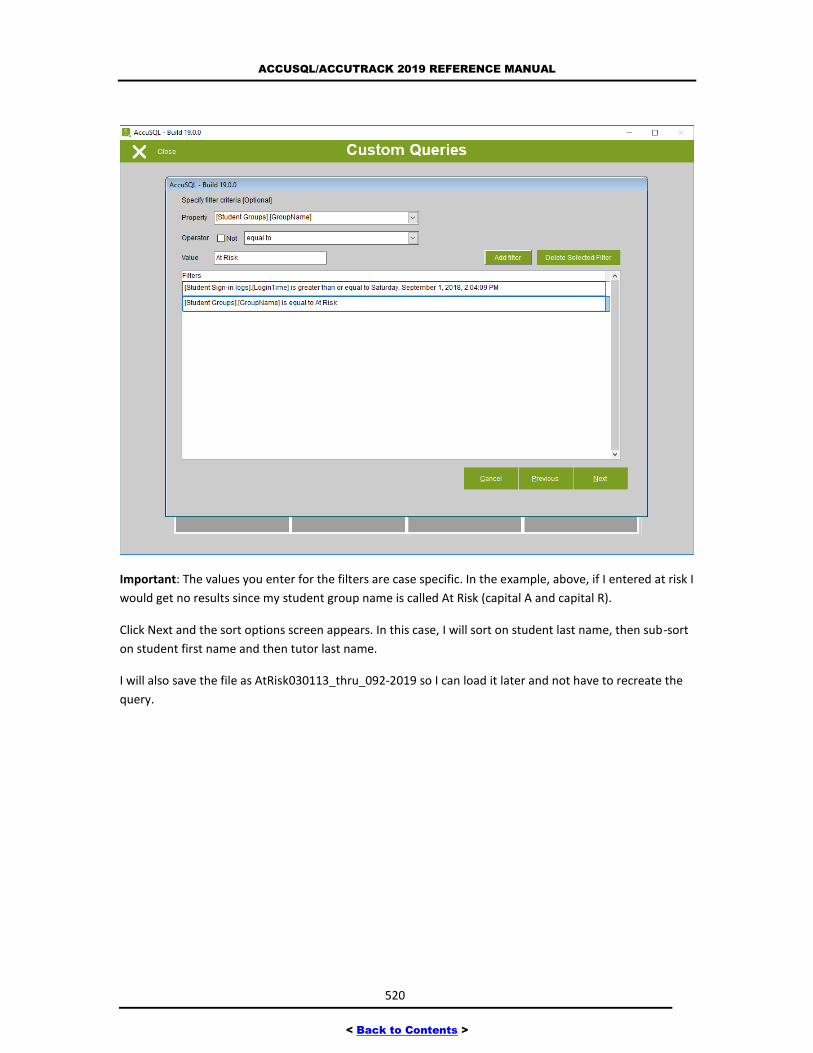
ACCUSQL/ACCUTRACK 2019 REFERENCE MANUAL
520
< Back to Contents >
Important: The values you enter for the filters are case specific. In the example, above, if I entered at risk I
would get no results since my student group name is called At Risk (capital A and capital R).
Click Next and the sort options screen appears. In this case, I will sort on student last name, then sub-sort
on student first name and then tutor last name.
I will also save the file as AtRisk030113_thru_092-2019 so I can load it later and not have to recreate the
query.
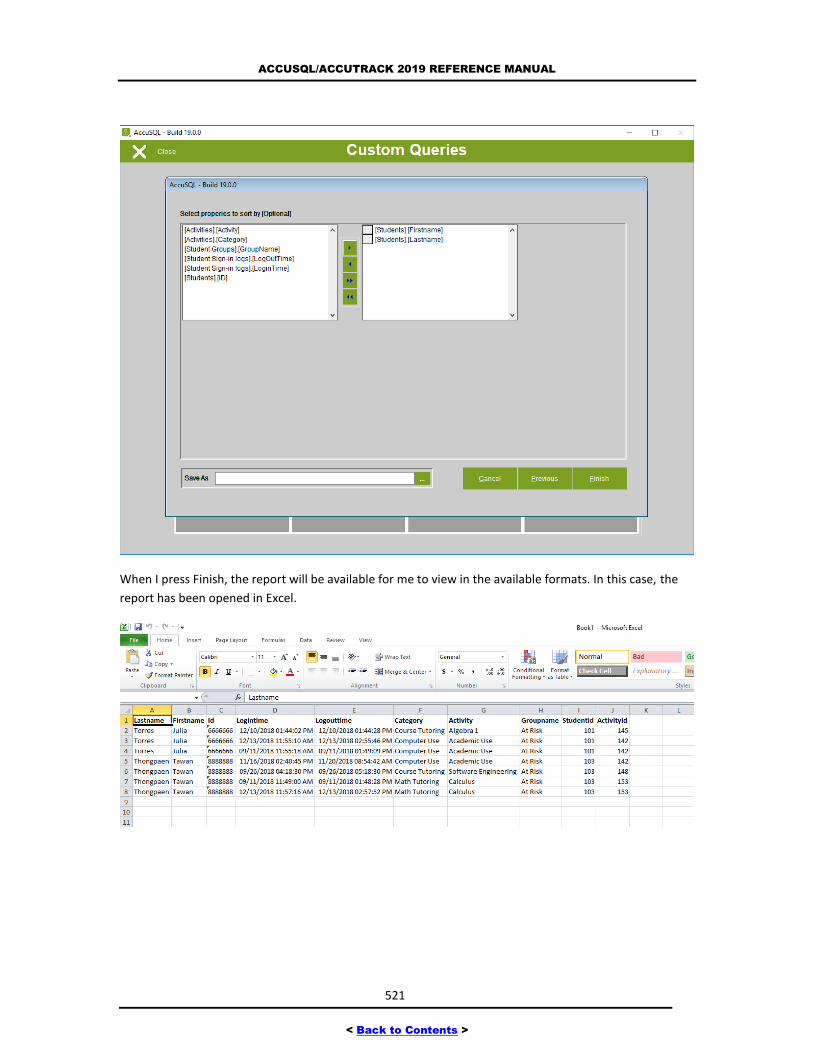
ACCUSQL/ACCUTRACK 2019 REFERENCE MANUAL
521
< Back to Contents >
When I press Finish, the report will be available for me to view in the available formats. In this case, the
report has been opened in Excel.
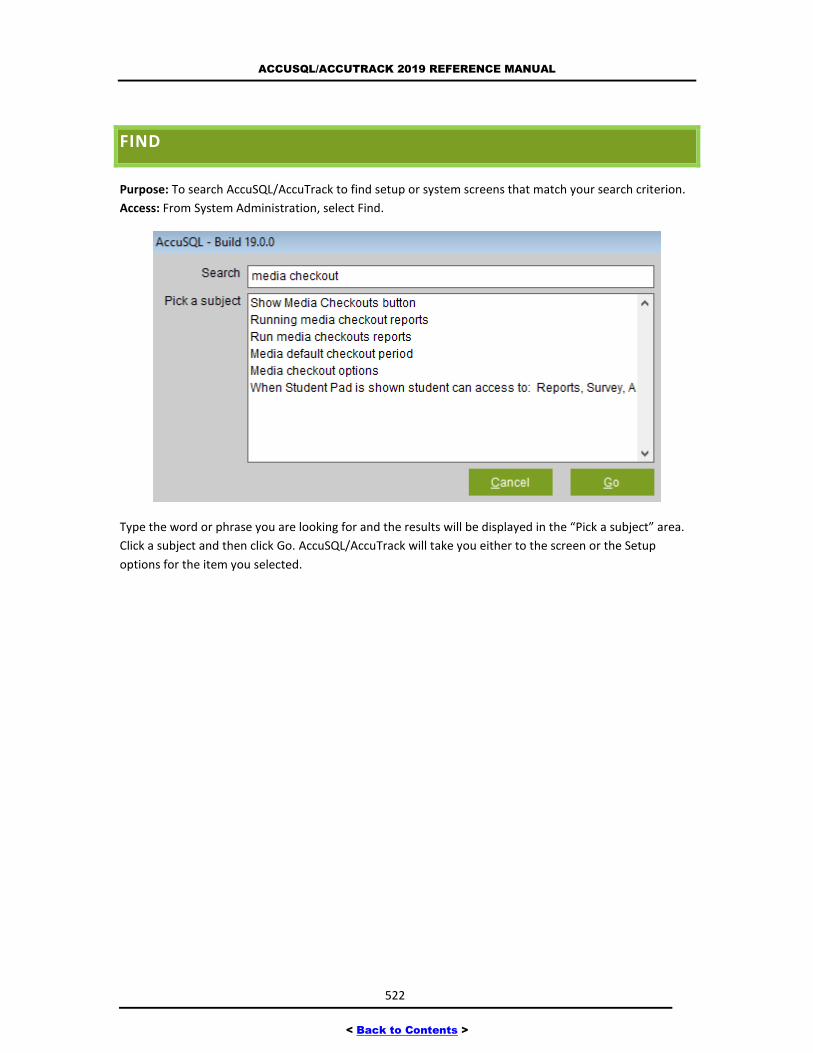
ACCUSQL/ACCUTRACK 2019 REFERENCE MANUAL
522
< Back to Contents >
FIND
Purpose: To search AccuSQL/AccuTrack to find setup or system screens that match your search criterion.
Access: From System Administration, select Find.
Type the word or phrase you are looking for and the results will be displayed in the “Pick a subject” area.
Click a subject and then click Go. AccuSQL/AccuTrack will take you either to the screen or the Setup
options for the item you selected.
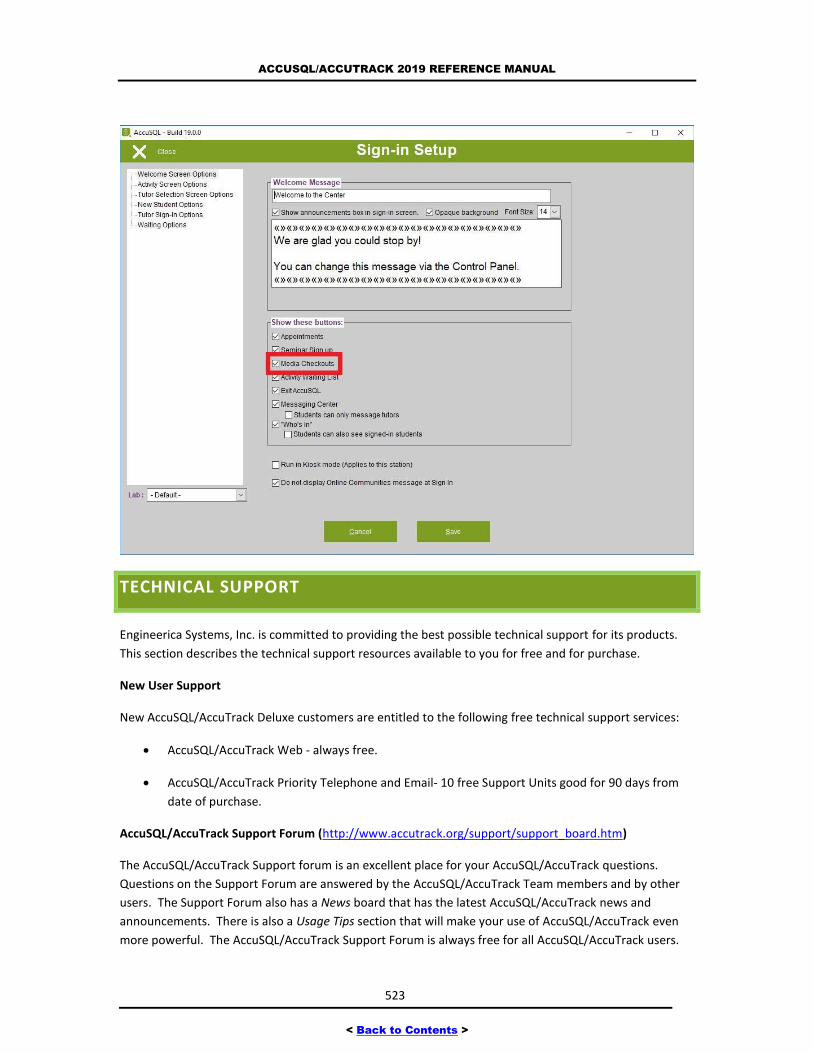
ACCUSQL/ACCUTRACK 2019 REFERENCE MANUAL
523
< Back to Contents >
TECHNICAL SUPPORT
Engineerica Systems, Inc. is committed to providing the best possible technical support for its products.
This section describes the technical support resources available to you for free and for purchase.
New User Support
New AccuSQL/AccuTrack Deluxe customers are entitled to the following free technical support services:
AccuSQL/AccuTrack Web - always free.
AccuSQL/AccuTrack Priority Telephone and Email- 10 free Support Units good for 90 days from
date of purchase.
AccuSQL/AccuTrack Support Forum (http://www.accutrack.org/support/support_board.htm)
The AccuSQL/AccuTrack Support forum is an excellent place for your AccuSQL/AccuTrack questions.
Questions on the Support Forum are answered by the AccuSQL/AccuTrack Team members and by other
users. The Support Forum also has a News board that has the latest AccuSQL/AccuTrack news and
announcements. There is also a Usage Tips section that will make your use of AccuSQL/AccuTrack even
more powerful. The AccuSQL/AccuTrack Support Forum is always free for all AccuSQL/AccuTrack users.
ACCUSQL/ACCUTRACK 2019 REFERENCE MANUAL
524
< Back to Contents >
AccuSQL/AccuTrack Priority Support
If you need support assistance on a priority basis after your free Priority Support expires, you can
purchase AccuSQL/AccuTrack Priority Support. Priority Support can be purchased on a per incident basis
or on an annual basis. Priority Support provides the following support services:
Telephone support from 9:00a.m. to 5:00 p.m. EST Monday through Friday.
Priority Response provides access to senior AccuSQL/AccuTrack staff.
Priority Email Support lets you submit support requests via email.
Our goal is to respond to Priority Support requests within 24 hours.
If you need priority telephone support, call (407) 678-0936. Telephone support hours are from 9:00AM to
5:00PM EST Monday through Friday.
You can also get Priority Technical Support via Internet email. Send Internet email to
When you purchase AccuSQL/AccuTrack Deluxe, you receive 10 free Priority Support Units for your use
during the 90 days following the date of purchase. A support Unit is 30 minutes of AccuSQL/AccuTrack
staff time; any part of a Support Unit used counts as a full unit. Each telephone call and each private
email uses at least one Support Unit.
Priority Support Plans
To help you purchase AccuSQL/AccuTrack Priority Support most cost effectively, we have put together
several Priority Support Plans. See the AccuSQL/AccuTrack web site for descriptions of the Support Plans
and pricing options. The address is:
http://www.accutrack.org/support/priority_support.htm
ACCUSQL/ACCUTRACK 2019 REFERENCE MANUAL
525
< Back to Contents >
TROUBLESHOOTING GUIDE
AccuSQL/AccuTrack should run smoothly without errors or interruptions. If you encounter an error, then
one of the following has occurred:
1. Programming or Logic errors: These are caused by an error in design or coding and are known as
“bugs” in the computer world. Bugs can be as simple as a typo in a label to a critical error that
causes the software to shutdown. If you discover a bug, report it to the AccuSQL/AccuTrack
team as soon as possible via the on-line Support Forum:
http://www.accutrack.org/support/support_board.htm
We investigate all reported bugs and provide fixes via maintenance releases. These
releases are provided for free. Due to limitations of programming resources, we can only
provide maintenance releases to the latest version of the software, so make sure you
report bugs ASAP to guarantee a fix.
2. Data Corruption errors: If a feature of the software that used to work fine in the past no longer
works, then most likely you have a data or index corruption problem. Symptoms of data and
index corruption range from software not recognizing users who signed in to AccuSQL/AccuTrack
in the past to total lock-ups. The most common causes of data corruption are improper system
shutdowns and network or hardware crashes. AccuSQL/AccuTrack 8 will inform you about these
improper shutdowns via the Improper Shutdown report. If you encounter a data corruption
error you must repair your data files ASAP to avoid data loss. Use the built in data repair utility,
which you can launch via the Database screen, to fix data or index corruption.
3. User errors: In some cases errors are caused by misuse or misunderstanding of the software
operations. To minimize operator errors, make sure to read the AccuSQL/AccuTrack Quick Start
Manual and this Reference Manual. Also visit the AccuSQL/AccuTrack support forum to get
familiar with common software issues and procedures. The AccuSQL/AccuTrack support forum is
provided for free to all AccuSQL/AccuTrack users. Visit the support forum at this web page:
http://www.accutrack.org/support/support_board.htm
ACCUSQL/ACCUTRACK 2019 REFERENCE MANUAL
526
< Back to Contents >
COMMON ISSUES
The following is a list of common issues and their solution.
Problem: AccuSQL/AccuTrack is not covering the whole screen. It appears in the center and I can see
the rest of my desktop from the sides.
Answer: Your computer is set for a larger screen area (1024*768, 1280*1024, etc.) The larger the area
the smaller AccuSQL/AccuTrack will appear. However, it will always be in the center. To make
AccuSQL/AccuTrack cover the whole screen, change its area to 800*600.
Problem: The colors don’t look right. The font is not crisp, the images are pixilated, and the background
has shades of gray on it like a photo negative.
Answer: Your computer is running at low colors (16 or 256 colors). Change the setting to high color (16
bit) or true color (32 bit).
Problem: I am trying to delete one of the data items in the list box but the software wouldn’t let me.
Why?
Answer: AccuSQL/AccuTrack will not let you delete data that it needs for reports. For example, if
students used to sign-in to a certain class last semester, AccuSQL/AccuTrack will need the class name for
last semester reports, and won’t let you delete it. If you no longer wish the display the class name to the
students, make the class “inactive”. See the appropriate section to see hot to make a list item inactive.
Problem: The system is not accepting my administration password, even though it used to work a short
while ago.
Answer: Passwords are case sensitive. Make sure you are entering the password in the correct
capitalization.
Problem: I forgot my administration password / ID.
Answer: If someone else in the center has high administrative privileges, he or she can change your
password. If you’re the only one with access to the system, you will need to contact Engineerica Systems,
Inc.
Problem: The report is not showing a sign-in, even though I entered the record.
Answer: Check the reporting period and make sure your sign-in was within this period. Also check the
report filters to make sure the data you’re looking for was not excluded.
Problem: I signed in the system, but it does not show me as signed-in.
Answer: You probably did not complete your sign-in and pressed the "Cancel" button instead of "Done".
If you signed in correctly, you will see a confirmation message with your name and sign-in time.
ACCUSQL/ACCUTRACK 2019 REFERENCE MANUAL
527
< Back to Contents >
Problem: I changed an option in the Options screen but the changes were not reflected in the
software?
Answer: You need to save your changes in the Options screen by clicking on the “Save” button after you
make the changes. Also, most changes will not take effect until you restart the application.
Problem: When I started AccuSQL/AccuTrack I got an error message "Resource file not valid. Replace
with a new one?" What does this mean and how do we respond?
Answer: AccuSQL/AccuTrack uses the resource file to save settings such as the Window's position and
state. For some reason, this file got corrupted and AccuSQL/AccuTrack can't read it. Click on "Yes" to
overwrite with a new one. If you prefer, you can edit the config.fpw file in the folder where
AccuSQL/AccuTrack is installed using notepad to bypass the resource file. This has no effect on the
software. Add an entry on a new line in the file like this: RESOURCE=OFF
Problem: While using the software we got an error message and the program exited. What do we do?
Answer: You might have discovered a bug in the program. Write down the error message and what you
were doing when the problem occurred and post the info on the AccuSQL/AccuTrack Support Forum.
Question: I have an idea for improving the software. How can I tell you about it?
Answer: We would like to hear about your suggestions and ideas for improving AccuSQL/AccuTrack.
Please e-mail them to us at [email protected].
Question: How do I contact you?
Answer: Best way to reach us is by e-mail. Since we spend most of our time in front of a computer
screen, e-mail is convenient and quick. If you need support, post your questions on the
AccuSQL/AccuTrack on-line Support Forum. For other inquires e-mail [email protected]. For our
latest contact info, visit the AccuSQL or AccuTrack website:
www.engineerica.com/accusql or www.engineerica.com/accutrack