a photography manual
TRANSCRIPT


2
IMAGE – INATION
Teaching photography Manual
Save the Children Jordan
2015

3
INTRODUCTION
Why teaching photography to young refugees and in general to youth who have undergone trauma is important?
Many young refugees have experienced conflicts and suffered traumas. They have fled their country where major conflicts have taken place and where major human right abuses have occurred.
They experience difficulties due to displacement, which may include the following problems:
- Living in poverty - Poor housing - Emotional and mental health problems - Social isolation - Discrimination - Living with parents experiencing emotional problems themselves - Separation from family and friends - Loss and bereavement - Loss of identity - Concerns about the future
The top priorities of young refugees are to rebuild their self-confidence and to overcome their trauma as well as to integrate in their new community, make friends and go back to school. And photography helps to do just that.
Photography is not just about techniques; it is about perception, expression and communication. Creating, viewing or sharing photographs create new ways to communicate and greatly contribute to the process of healing. A photograph is an actual depiction of an experience or feeling that is not suppressed by the perimeters of language.
Photography is also a powerful tool for integration and education. Through photography, children meet, share, and make friends. They learn how to express viewpoint, to solve problems, to focus.
This curriculum is the result of two and an half years experience working with Syrian refugees in Jordan. It seeks to take into account the specific needs of refugee children, insisting on the four aspects of photography: healing, communication, education and fun.
As students learn about photography, they benefit from an integrated learning experience that nurtures their minds, hearts and souls.

4
While photography education offers many of the same rewards as art education in general, there are also several aspects particular to photography:
- Active learning: students must work hands-on with cameras in a setting where they can create images. This encourages students to interact with and know about the world.
- Point of view: creating an image with a camera trains the photographer to select a point of view, to frame a picture in the particular way that communicates what s/he wants to say. This has a tremendous personal benefit for students, as they broaden their communication skills and see value in their perspectives.
- Applications of the medium: because the use of photography is widespread, learning to create and understand images is a powerful, relevant skill. To move beyond the snapshot and comprehend more complex visual statements offers students access to communication skill that is part of their education, family lives, community history and future careers.
In high-quality photographic education, educators will see many areas of personal growth in their students:
- Mastery of photographic skills, techniques and concepts - Deeper understanding of self-identity and connection to the world - Enhanced problem solving and communication skills - Increased self-confidence and motivation to learn
In a refugee camp, new and emerging values and identities are evident among the younger generation. The confluence of increased access and exposure to popular culture and media, involvement of international NGOs in the camp and specifically in the schools, have exposed these young people to an entirely new set of perspectives and worldviews. Gender and familial relations, personal goals and priorities, and notions of individual and community identity all come up for critical review. It is believed that the process of taking, analyzing, and communicating through photography provides an effective medium for exploration and self-reflection.
The curriculum is divided in five chapters. The first one deals with the organization and the running or the workshop itself. The other four chapters aim at giving the children not only a good grasp of photography techniques but also at making them visually literate, a necessity in today’s world: being able to read pictures and to produce pictures that could be meaningful.

5
Each chapter includes:
- Explanations
“Remind the children that the word photography means writing with light.”
- Activities
Activity 3 Seeing
- Theoretical backgrounds: these are mainly for the trainers but can be shared with the children especially if there are questions that require more information
Light
Light in a picture is of paramount importance…
- Advices to trainers
Always let the children speak first. You can express your opinion but after everybody else has done it…
The USB key contained photographic documents to be used with the children. They are divided in folders that carry the name of the chapter they refer to.
Agnes Montanari/Save the Children Jordan

6
OUTLINES
Introduction
I. The Workshop 8
I.1 Organization of the workshop 8
- Duration - Time and Venue - Trainers - Participants - Equipment
I.2 Monitoring and evaluation 10
- Monitoring and Evaluation - Exit strategies: hand over/take over - Advised to trainers
1.3 Before you start: breaking ice games 12
II. Good practice of camera use 14
II.1 What is photography? 14 II.2 A brief history of photography 20 II.3 Handling a camera 23 Documents 27
III. Visual Literacy: learning to read and produce images 40
III.1 Learning how to see 40 III.2 The language of photography 44
- Light - Point of view - Composition (rule of thirds, perspectives, framing) - Colors, shapes and lines

7
III.3 The Subject - How to discover what is the subject of the picture? 60 - Meaning, message 61
Techniques ‘tree’ 64
IV. Portraits 65 V. Making Stories: Reviewing and Editing
V.1 Editing: how do we know a picture works? 70 V.2 Making stories with pictures 72
- Single image - Multiple images - Captioning
Annexes
Annex I Glossary of photographic terms 79
Annex II How to make your pictures known 80
Annex III Resources 82

8
I THE WORKSHOP
“Also planning is best, it is important not to stick too rigidly to it.” Photovoice trainer
I.1 Organization of the workshop
! Duration
Experience shows that longer-term photography projects are more likely to make a sustainable contribution to refugee integration than short-term projects. Time allows for the building of confidence, trust, skills and relationships. Nevertheless, smaller projects are often more realistic, due to time and resource constraints.
This module is based on 20 sessions of 2 hours each.
Trainers should keep in mind that young people have various levels of concentration and the duration of the sessions must be planned and organized to ensure that the children remain engaged. Sessions need to be structured with appropriate breaks and flexibility.
The 20 sessions can be spread in various ways:
- 3 weeks with one session every day - 4 weeks with 5 sessions per week (20 sessions) and a wrap-up session
on the fifth week - 7 weeks with 3 sessions per week
! Time and Venue
It is important to ensure that workshops fit in with the young children’ timetables. Their availability will depend on whether or not they are going to school or working.
! Trainers
This curriculum is designed:

9
- To conduct workshop with children - To train trainers
While no specific experience in photography is necessary, it is advisable to select the trainers according to the following criteria:
- Experience of working with young people - Showing some interest in photography - Showing flexibility and a capacity to follow up ideas put forward - Good interaction skills - Creativity
During the workshop, 1 or 2 facilitators chosen among the most advanced photography students from previous sessions should assist the trainers.
! Children
Deciding on a group composition can be complex and will depend on the context, the needs of the individuals and the project objectives. In addition to these considerations, there should be more practical criteria for selection such as availability, interest and age.
The children to the workshops should not be younger than 12 years old. No other specific criteria should be applied to choosing the children.
Children will be divided into two groups, one group of boys and one group of girls. It has proven to be difficult to mix girls and boys. Whenever possible, this is a solution that should be preferred.
Each group should not exceed 15 children. Beyond this number, it becomes difficult to give each child the individual attention her/his work deserves.
It is strongly advisable to organize a meeting with the children and their parents in order for the later to understand the why and what of the workshop and get their support. Parents involvement is essential to assure a regular attendance of the children or for example that their camera is well looked after.
! Equipment
- Simple point and shoot cameras, 16 MP - Rechargeable batteries with charger - 8 GB memory cards - Computers: 2, one for each group

10
- Projector - Colour printer - Blank CDs - A good stock of images to be used during discussions and exercises - Notebooks, one per child
The ideal situation is that each child gets a camera. Sharing cameras is not easy for children. They do not necessarily live near to one another. If providing a camera for each child is not possible, the solution is to give a memory card to each.
If children are to continue in one way or another after the end of the workshop, they need to be able to keep their cameras. It is wise not to let the children to take their cameras home at the beginning, at least for the first week. It is important that they first learn how to use them and to look after them. It is also a way to see who among the children intends to attend the whole workshop. Very often children come to the photography classes just to get a camera and stop to attend as soon as they have it.
It is always desirable to be able to work with prints. Prints can be laid out on a table or on the floor and new ideas and ways of looking at them are revealed by moving them around. It is also important to have prints for editing purposes.
Working with a group with digital cameras, a projector is a valuable workshop resource. It can be used to enlarge images, share images, view edits and sequences of images. It is a good tool for bringing the whole group together to look at each other’s work and give feedback.
I.2 Monitoring and Evaluation
! Monitoring and Evaluation
Monitoring and evaluation can happen at two levels, among the project trainers/facilitators and with the project children.
The trainers/facilitators can use journals to record their comments on the workshop.
Every workshop should be immediately preceded by a briefing session involving all the staff and facilitators who will be present in the workshop. The purpose of this is to review the workshop plan, anticipate any issues, ensure all roles are clearly allocated and go over all the practicalities and timings.

11
Throughout the workshop, it is important to document the various activities to provide a valuable record of students at work, which may reveal some of the excitement and impact of photographic education. This can also indicate how students are learning and how they are growing as individuals.
A debriefing, again involving all staff and facilitators, should follow every workshop. This involves a practical review of what went well in each workshop, what could have gone better, and what changes need to be made. Lessons from one workshop are then incorporated into ongoing activities.
Children to the workshops should be also involved in the evaluation process.
It is important to ascertain children’ expectations at the outset of a project. Exercises can explore whether expectations were met, what the young people gain from the project and how it could have been improved.
! Exit Strategies: hand over and take over
Children need to understand that the project will end, and they need to know how it will end. ‘Exit’ strategies should be discussed in advance with trainers/facilitators and children at a very early stage: photo club, ongoing classes …
All children should be given a CD/DVD with all the photographs taken during the project.
Advices to trainers
- Workshops should take place in a friendly and non-hierarchical atmosphere
- Trainers should pay attention to the needs of the children and adapt their teaching accordingly
- The trainers need to balance the needs in between individual needs and the needs of the group
- Trainers are in a position of responsibility; they should recognize the extent and the limits to their responsibility
- Trainers need to lay clear boundaries with the children. It is professionally inappropriate for trainers to offer friendship to children but entirely right to work in a way which is open and friendly
- Trust is essential to a successful project and children must feel sure that confidentiality will be respected
- Make sure that the children do understand by repeating and asking them to explain the ‘concept’ with their own words

12
- Projects should be not only introduced to the children but also discussed - Always ask questions about the topic before telling the children about it.
Assess their knowledge first.
The questioning strategy
It is of the utmost importance to ask questions to the children before delivering information. Questions keep the thinking going whereas statements tend to undercut new observations.
The goals of the questioning strategy are:
- To advance children’ knowledge of photography - To develop children’ critical thinking and communication skills - To help children to discover the pleasure and power of finding multiple
meanings in photography
It is important to stress to the children:
- Photography is fun - Their vision of the world is unique - They are the photographers and they have control over their images. The
harder they work, the more control they will have - They should always take credit for their images, whether they are
intentional or ‘lucky accidents’ - To learn from their mistakes - To think critically about your pictures and to talk about their work - To talk about what you have created
I.3 Before you start: Breaking Ice Games
START BY ASKING THE CHILDREN TO INTRODUCE THEMSELVES TO EACH OTHER

13
1. Children sit in a tight circle with one person in the middle. The person in the middle shouts out “the sun shines on…” and names a colour or articles of clothing that some in the group possess. For example, “the sun shines on all those wearing blue” or “the sun shines on all those with brown eyes”. All the children who have that attribute must change places with one another. The person in the middle tries to take one of their places as they move, so that there is another person left in the middle without a chair. The new person in the middle starts again.
2. Divide the children in small groups. Ask each group to search for objects around them, or on them, ranging from A to Z and to make a list. Decide how long they have, for example 5 minutes. The first group to get the most letters wins.
3. Ask the children to get up on their feet and to line up in different orders according to shoe size, birthday, colour of their shirt…
4. Give each child a piece of paper to hold in front of them. Ask them to close their eyes and to follow directions given to them. No questions allowed:
-‐ Fold your paper in half -‐ Tear off the upper right hand corner -‐ Fold it in half again and tear off the upper left corner -‐ Fold again in half. Tear off the lower right corner
Open your eyes. Compare the results and explain. 5. Children sit in a circle. One person volunteers to leave the room. After s/he has left, the rest of the group chooses a ‘leader’. The leader must perform a series of action such as clapping, tapping a foot, etc. that are copied by the whole group but without being noticed. The volunteer comes back into the room, stands in the middle and has to guess who is the leader. 6. Children break into pairs. Partners observe one another and try to memorise the appearance of each other. Then one turns his/her back while the other makes three changes to his/her appearance. For example, putting their watch on the other wrist, removing their glasses, rolling up their sleeves… The other player then turns around and has to try to spot the three changes. Then the players switch roles.
14
II GOOD PRACTICE OF CAMERA USE
‘Photography seems like magic but photographs are possible because of scientific processes.’
Unknown
“Before seeing with a camera, you have to see with your eyes.”
Unknown
Goal: To introduce the students to the tools and techniques of a 35 mm camera To teach them to start how to see
Material: a camera for each participant, pictures in ‘Doc’ part of the chapter, cardboard, scissors, computer, projector
II.1 What is photography?
What do we need to produce an image?
To be able to take a picture, two things are needed:
- A camera - Light
Trainers: Do not give the answers to the children. The children will easily say that a camera is needed but will most probably not know about light. Find ways to have them discover it. Ask questions related to the action of seeing. If they do not find the answer, turn of the light in the room without telling them and see what their reaction is.
Photography means in Greek ‘writing with light’ (photo = light; graphy = writing). The camera is the pen; the light is the ink. Let’s start with the ink.

15
! The Light
Photography is about light, and in fact, it can be defined as recording the light. No light, no photograph.
- Ask the children what do they know about light (sources of light for example)
- Explain how the light enters the camera to form a picture comparing the way our eyes work and the camera works. How does the light travel?

16
Light
When we are very young, we have a very simple idea about light: the world is either light or dark and we can change from one to the other just by flicking a switch on the wall or closing curtains. But we soon learn that light is more complex than this.
Light is either natural (the sun, the moon) or artificial (electrical light, fire, torch lamp, neon…).
Light arrives on our planet after a speedy trip from the Sun, 149 million km (93 million miles away). Light travels at 300,000 km (186,000 miles) per second, so the light you're seeing now was still tucked away in the Sun about eight minutes ago. Put it another way, light takes roughly twice as long to get from the Sun to Earth as it does to make a cup of coffee!
Light travels in straight lines and penetrates our eye and the lens of the camera in very similar ways, including:
- A diaphragm to control the amount of light that gets through the lens, the equivalent of the iris for the eye
- A lens to focus the light and create an image. In the same way, eye and camera, the image is real and inverted
- A method of sensing the image. In a camera, the film or light detector (digital camera) records the image. In the eye, the image is recorded on the retina.
The most famous practitioner of geometrical optics was Ibn Al Haytham, who lived in present day Iraq between AD 965 and 1039. Ibn Al Haytham identified the optical components of the human eye and correctly described vision as a process involving light rays bouncing from an object to a person’s eye. The Arab scientist also invented the pinhole camera.
! The Camera
- Give a camera to each child and ask him or her to describe what s/he sees
- Introduce the words: shutter release, lens, monitor LCD, digital (see Glossary in Annex 1)
- What is inside a camera?

17
Activity 1 Camera parts
Material: multiple copies of picture A and B (down below) according to the number of children
- Give each child a copy of the ‘inside’ of a camera and the list of the components
- Ask the children to place the various parts on the camera by putting the right number on the list of the various components
Encourage the children to comment and to try to explain how the various parts work together to produce an image.
Ask the children if cameras were always like the one they have in their hands.
Every time a question is asked to the children, it is important to give them plenty of time to answer. Most of the time, they will find the answer themselves, which gives more guarantee of remembering it.

18
19
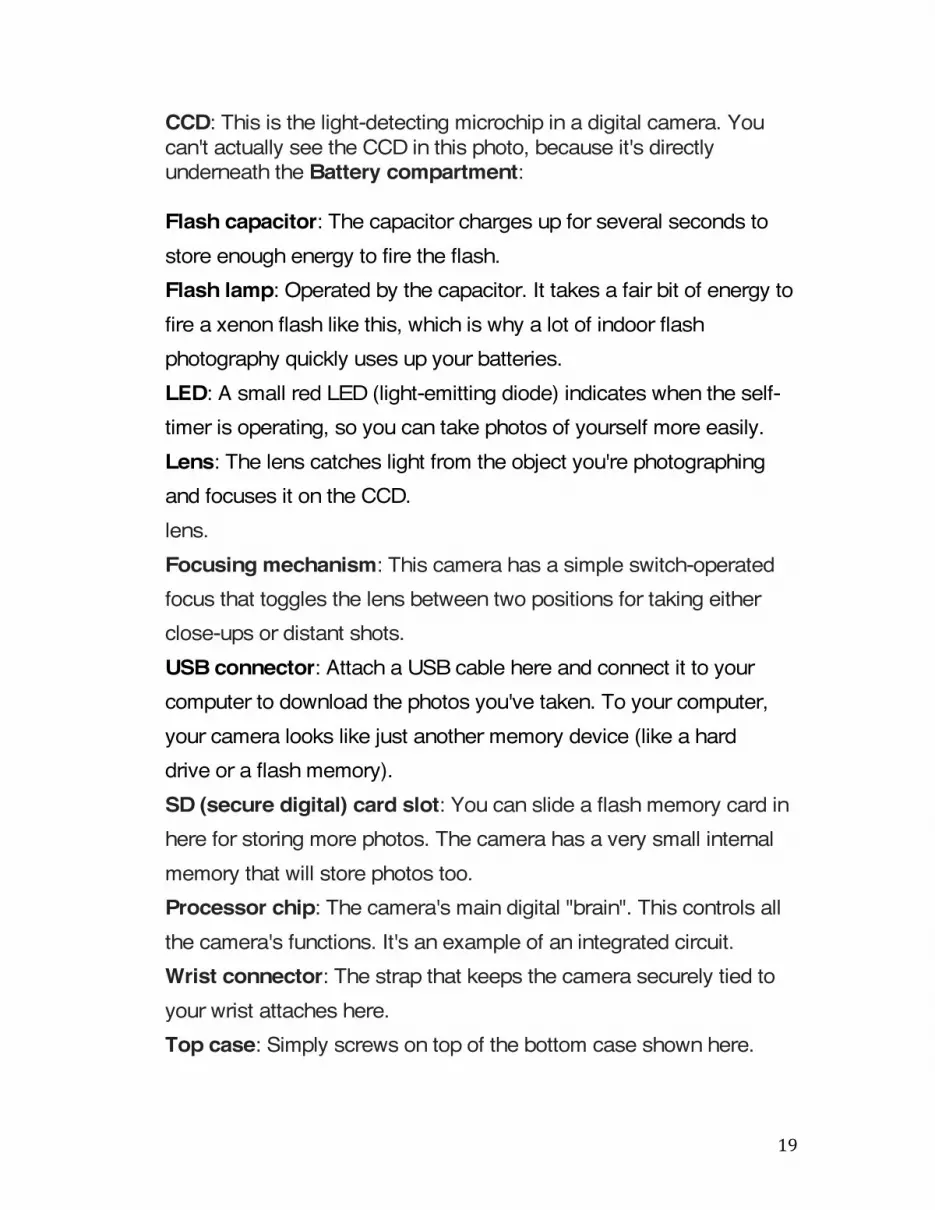
CCD: This is the light-detecting microchip in a digital camera. You can't actually see the CCD in this photo, because it's directly underneath the Battery compartment:
Flash capacitor: The capacitor charges up for several seconds to store enough energy to fire the flash. Flash lamp: Operated by the capacitor. It takes a fair bit of energy to fire a xenon flash like this, which is why a lot of indoor flash photography quickly uses up your batteries. LED: A small red LED (light-emitting diode) indicates when the self-timer is operating, so you can take photos of yourself more easily. Lens: The lens catches light from the object you're photographing and focuses it on the CCD. lens. Focusing mechanism: This camera has a simple switch-operated focus that toggles the lens between two positions for taking either close-ups or distant shots. USB connector: Attach a USB cable here and connect it to your computer to download the photos you've taken. To your computer, your camera looks like just another memory device (like a hard drive or a flash memory). SD (secure digital) card slot: You can slide a flash memory card in here for storing more photos. The camera has a very small internal memory that will store photos too. Processor chip: The camera's main digital "brain". This controls all the camera's functions. It's an example of an integrated circuit. Wrist connector: The strap that keeps the camera securely tied to your wrist attaches here. Top case: Simply screws on top of the bottom case shown here.

20
II.2 A brief history of photography
It is up to the trainers to give the following information to the children once they have completed activities 2, 3 and 4 below.
It is important to realize that the whole art of photography has been closely linked to the development of technologies in this field.
Hundred years ago, artists discovered the Camera Obscura. They noticed that light coming through a keyhole into a dark room cast an inverted image on the wall. This is the same principle as a pinhole camera.
In 1826, Joseph Niepce of France invented the heliographs, or sun prints. Niepce placed an engraving onto a metal plate coated in bitumen and then exposed it to light. The shadowy areas of the engraving block the light while the whiter areas permitted light to react.
In 1839, Daguerre, another French man, used a silver-plated copper that he polished with a chemical called iodine, thus creating a surface that was sensitive to light. Then the plate was put in a camera and exposed it for a few minutes to light. The plate was then placed in a solution of silver chloride to produce a lasting image (illustration B)
A glass then replaced the copper plate. The glass was covered with a wet solution sensitive to light so it needed to be processed quickly. The photographer had to carry with him a portable darkroom. The camera remained very heavy.
In 1888, the Kodak camera was invented. It was a much smaller camera and could be hand-held so became the first “compact camera”. The photographer could take 100 shots. Once taken, it had to be sent to the company for processing. The slogan of Kodak was: “You press the button, we do the rest” (illustration C).
The Leica camera was then invented in the 1920s/1930s. It was small and light. These cameras were using plastic film (illustration D).
From the 1990s, cameras have become more and more complicated and the film camera has been replaced by digital camera (illustration E).

21
Be careful at the transitions, at how you introduce the next activity. Be sure to establish a link in between them.
Activity 2 Old to new
Material: multiple copies of pictures A, B, C, D, E
- Divide the children into three groups (4/5 children in each group - Give each group a set of pictures of old cameras (see in ‘Documents’ at
the end of this chapter) - Ask the children to order the pictures from the oldest to the newest model
of camera - Check and discuss the order with each group - Once the pictures of the cameras are in order, pin a set of pictures on the
board for all the children to see - Ask the children to talk about the differences
While the children comment on the differences, place the various cameras in their historical context and explain how they work.
Activity 3 Film v/ Digital
Material: pictures N and Q
- Ask the children if they know what are the differences in between a film camera and a digital camera
- Make a table with 2 columns: Film/Digital - Write in each column what the children tell you about each kind of camera - Discuss

22
How digital camera works? Digital cameras look very much like film cameras but they work in a different way. When you press the button, the light penetrates into the camera in the same way as in a film camera. In a film camera, the picture is printed/stored onto a film, in a ‘negative’ form. In order to obtain the ‘positive’ print, the film needs to be processed in a dark room via the use of chemicals. (A dark room is a room that can be made completely dark to allow the processing of light sensitive films/pictures.) From this point on, everything is different. There is no film in a digital camera but instead there is a piece of electronic equipment that captures the rays of light and turns them into electrical signals and numbers through a light detector. The light detector breaks the light into millions called pixels. Once a picture is stored on a memory card, you can do all kind of things with it. You can download the images, re-work them, and change them in all kind of ways.
Activity 4 Match the pictures
Material: one copy of pictures Pic A, Pic B, Pic C, Pic D and Pic E
- Using the set of pictures of old cameras, ask the children to match these pictures with the sample of photographs
- Ask the children to explain their choice - Once the match is done, ask the children to comment the pictures: what
do they notice, how are they different from one another?
Introduce the concept of negative/positive pictures using sample (in ‘Documents’ at the end of the chapter). Do we still need a negative and a positive picture with digital camera?
The negative image
In photography, a negative is an image, usually on a strip or sheet of transparent plastic film, in which the lightest areas of the photographed subject appear darkest and the darkest areas appear lightest. This reversed order occurs

23
because of the extremely sensitive chemicals a camera film must use to capture the image, which are darkened when exposed to light. In case of color negatives, the colors are also reversed into their respective complementary colors.
Negatives are normally used to make positive prints of photographic paper by projecting the negative onto the paper using a photographic enlarger.
II. 3 Handling a camera
Try to demystify the camera and make students comfortable with using it as a tool.
- Let the children play with the controls of the camera - Explain the steps to create an image
1. Choose your point of view (check with the student if they know what ‘point of view’ means)
2. Focus on your subject
3. Frame the image
4. Press the shutter release
5. Show the children how to hold their camera: horizontally or vertically
6. Insist on the importance to put the strap of the camera either around their wrist either around their neck if it is long enough. Explain that it will prevent the camera to fall.
7. Show the children how to put the batteries and the memory card in the camera and discuss the size of the memory card as well as the speed
8. What is a memory card?
9. What do we mean by ‘size’ when talking about a memory card?
10. What do we mean by ‘speed’?

24
Memory card
A memory card is a small storage medium used to store data, in photography, pictures. There are many different kinds of memory cards.
What size?
When referring to the size of the memory card, we do not refer so much to its physical size but to its storage capacity.
Most available cards are supposed to have a ‘non volatile’ memory, i.e. a memory that will not change. Because memory card are solid-state media, they have no moving parts, so they should not suffer any mechanical difficulties. But this is not completely true. Memory card can be damaged or loose memory. In order to keep the original memory, it is important to format the memory card instead of simply deleting the pictures, using the ‘format’ command in the menu of your camera.
What speed?
The speed of a memory card refers to the speed at which the information will be transferred once you press on the shutter release. Higher is the speed, faster you will be able to take another picture.
Activity 5 Camera options
Material: cameras Ask the children to take pictures using various camera options. Ask the children to write in their journal the number of the picture and the option they have used to take it. Download the pictures on the computer and show the children the pictures they have taken. Ask them to comment. Trainers: Do not tell children what option to use, let them experiment freely. Just make sure that they record in their journal the option used. Make them realize that pictures are numbered automatically.

25
Seeing through the camera
To take a picture, you will either use a viewfinder or look on the screen. It is important to make the student understand that the camera does not work alone. They are the one pressing on the shutter release; they are the one to choose the subject of the picture.
Before taking a picture, the photographer sees with his/her eyes.
Activity 6 Seeing
Material: cardboard, scissors Using pieces of cardboard, ask the children to make a small rectangle, more or less 8 cm x 4 cm. Cut a rectangle inside the rectangle, leaving a border of approximately 1 cm all round.
Ask the children to practice looking through the rectangle to develop their way of seeing and to keep it as it will be used later during the workshop.

26
Wrapping up (use the journal)
- Review with the children the different notions learned during the sessions - Vocabulary: shutter release, viewfinder, monitor LCD, batteries, memory
card, strap, lens, digital, film, negative/positive

27
Documents
Camera Use

28
A

29
B

30
C

31
D

32
E

33
Pic A

34
Pic B

35
Pic C

36
Pic D

37
Pic E

38
Positive

39
Negative

40
III VISUAL LITERACY: LEARNING TO READ AND PRODUCE IMAGES
“A knowledge of photography is just as important as that of the alphabet.” Moholy-Nagy
“The illiteracy of the future will be ignorance not of reading or writing, but of photography.”
Unknown
Objectives: To make the children
- Understand the language of photography - Understand how the visual image communicates - Learn how to produce meaningful pictures - Express feelings and ideas about images
Material: cameras, sample images, children’ s journals, pencils, paper, computer, and projector
III.1 Learning how to see
“By looking longer and in more refined, informed, systematic ways, we can come to see what at first we missed.” (Unknown)
Ask the children the following questions:
- Do we see images everyday? - Where do we see them? - What do these image mean to us?
Then ask them to make a list in their journal of where they see images in one day, from the time they get up until the time they go to bed.

41
Visual literacy
Visual literacy is the ability to decode visual symbols into meaning. We see with our eyes, senses, brain and emotions. When we say that students are ‘seeing photographically’ and have developed ‘visual literacy skills’, it means that in their photographs and responses, they demonstrate that they have developed the perceptual and thinking skills to understand how the visual image communicates meaning.
Why is visual literacy important?
Contemporary culture has become increasingly dependent on the visual especially for its capacity to communicate instantly and universally. A very high percentage of all sensory learning is visual. The proliferation of images means that visual literacy is now crucial for obtaining information, constructing knowledge and building successful educational outcomes.
When we look at an image, we should behave like detectives, trying to assemble clues until we finally see. Seeing means coming to an understanding, and each one of us does that differently.
Activity 1 Decoding a picture
Material: in Documents, picture ‘Decoding’, computer, projector, paper, pencils
Look at the photograph closely for one minute. Then use the following questions to guide the children to see. Ask the children to write down their answers in their journal. If some questions seem too difficult, do not hesitate to skip them and to come back to them later. This exercise can be done either in groups or individually. Some questions should nevertheless be answered individually (in red). These are more personal questions and the children may like to keep the answer for themselves.
Questions: (do not mention to the children that the questions are about techniques, the subject or the meaning)
Techniques
1) List 10 details that you see in the photograph 2) What else do you see?

42
3) Describe the picture more thoroughly, saying what details are important and what details are not important
4) Describe the shapes and the colours you see in the pictures 5) Look away and then look at the photograph again. What catches
your eyes first? 6) Can you tell why? 7) What sort of light you can see in the picture? 8) Where does the light come from? 9) What time of the day is it? 10) What does the lighting draw your attention to? 11) Describe the mood created by the lighting 12) Can you guess where the photographer was standing when s/he
took the picture? Above the subject, looking down? Or below the subject, looking up?
13) What is clear in the picture and what is not? 14) Why do you think some information is in focus and some is not?
Subject/Context
15) What is included in the picture, what is not? 16) What is the subject of the picture? 17) How do you know this is the subject? 18) What do you see behind the subject? 19) What do you see in front of the subject? 20) Where was the picture taken? 21) At what period was this photograph taken? If the picture is from
a different time, ask the children to compare past and present
It is important again to give plenty of time to the children to answer these questions. By looking longer and in more refined, informed systematic ways, the children can come to see what at first they missed. Very often when ask to describe a picture, children start by talking about what the picture make them feel. In this case, make sure to remind the children that there are two ways of looking at a picture, of seeing: ‘seeing with the eyes’ and ‘seeing with the brain’. Do not hesitate to redirect the children to what they see IN the picture when necessary by asking questions.

43
Meaning
22) What is going on in this picture? 23) What makes you say that? 24) What was the photographer’s purpose? 25) Can you guess what is the intended use of the image? 26) What is the photography saying? 27) Would you have approach the topic the same way? 28) How does the picture make you feel? 29) What does the picture make you think of? 30) Does this picture remind you of anything? 31) Does this picture inspire you? 32) Do you have questions to ask about the picture, the subject or
the photographer? 33) Were there questions difficult to answer? If yes, which one?
Talk about what the children observed. Ask them to back up their ideas with evidence. Do not hesitate to make up new questions based on what the children say. It is important that they listen to and consider the views of others. Discuss many possible interpretations. Make a personal connection in between the picture and their life. Do not forget to keep it FUN

44
III.2 The language of photography
Wrong assumptions
Start by talking about assumptions people often make when looking at pictures:
1/ Photographs are snapshots, taken quickly. They do not involve much thought or technique (in Documents, pictures Snap 1, Snap 2 and Snap 3)
Define what a snapshot is, show example and introduce other types of photography, showing examples again. Ask the children to tell the differences in between snapshots and ‘real’ pictures.
Snapshot
A snapshot is an informal photograph taken quickly, most of the time with a small camera or a phone. It is said that the photograph is ‘shot’ spontaneously and quickly, most often without artistic or journalistic intent. Snapshots are commonly considered to be technically ‘imperfect’ or amateurish. They will often be either out of focus, poorly framed or composed.
2/ Photographs show reality, like documents, and when used in newspapers or magazines, they represent the way things are.
This is a very important question. You can expect most of the children to have had a first hand experience on how photographs, and in general accounts of an event, can be distorted.

45
Activity 2 Point of view
Material: nothing special
- Ask 5 children to leave the room and wait outside - While the children are out, organize the room in a special way
with the people in the room sitting or standing. Do not make it too complicated.
- Ask the people outside to come in one by one and to observe the scene for 1-2 minutes. Then s/he is asked to go out again but should not be allowed to communicate with people waiting to come in
- When all 5 children have seen the scene, go back to your normal seats as before
- Ask them to come in and to describe what they have seen - Discuss the different versions of what they have seen
Ask the children if they want to share an example of a ‘distorted’ event.
Show the children pictures Real 1, Real 2, Real 3, Real 4. Discuss what part of the reality each photographer has chosen to show.
3/ The trainers, the specialists, know more that the students themselves.
Building up from the previous exercise, it is important to make the children understand that their interpretation of pictures is as valid as the ‘teacher’s’.
Techniques v/s Subject
Activity 3 Techniques v/ Subject
Material: board, felt pens Make a table on the board with 2 columns: one column for the techniques and one column for the subject. Ask the children to tell you, among the questions asked above, what are the questions that are about the techniques used by the photographer and what are the questions about the subject. Write them in the appropriate column.

46
Ask the children what is the relation in between the techniques and the subject. Why learning the techniques of photography is important?
Using different color of felt pens, mark the questions/answers that relate to the same technique (one color for each technique). Then list the various techniques a photographer can use.
Ask the children which technique they see as being the most important.
Techniques
Techniques are meant to help the photographer attract attention onto the subjects. They can be compared to the tools a carpenter would use to build a table: the tools are the photography techniques and the table is the subject. The carpenter can choose to use all of them or only few of them.
What are the techniques you can use when you take a picture?
- Light - Point of view - Composition (rule of 1/3, 3 dimension and framing) - Colors, shapes - Focus
1/ Light
Remind the children that the word photography means writing with light and tell them that light is the essential element of photography. No light, no picture.
Ask the children to tell you what sort of lights can be used to take a picture.
Activity 4 Light 1
Material: board, sample images (Light 1 to Light 11), sticky tape
- Divide the children in groups of 4/5 - Give each group a set of sample images (3 each) of different
lightning techniques - Ask the groups to discuss the light in the sample images
answering the following questions:
47
- 1/ What kind of light is used? 2/ Where does the light come from? 3/ Is the light hard or soft? 4/ How does the light make you feel? 5/ Do you notice differences in the color of the light?
Light Light in a picture is of paramount importance. Light is more than just how bright or dark it is. It is also the key to the look, mood and atmosphere of your images. The direction of the light will affect how the shape and texture of your subject appears, while the color and how soft or harsh the light is can totally change a shot’s appearance. There are three basic characteristics of light that determine how your shot will look: the quality of the light (harsh or soft), the direction and the color. It is easier to tell the quality of the light by looking at the shadows rather than the areas in the light. Harsh light creates strong, well-defined shadows, while the shadows created by a more diffuse light are much softer. It is important that the children understand that if using natural light (sun), there are in a day better moments than other to take pictures: to avoid strong light, it is better to take pictures in the morning or in the late afternoon. But again, all depends on the wanted result. The location of the shadows tells you where the light is coming from, as they appear on the opposite side to the light. The direction of a light source will affect how the subject will appear. It can be direct or indirect. Along with the quality and the direction of the light, the color of different light sources can have an effect on the appearance and mood of the image (for example, the sun does not project the same color of light than neon light). Be careful: too much light or not enough light in a picture is not good.
Ask the groups to present their observations to the other groups. Discuss their findings.
Always let the children speak first. You can express your opinion but after everybody else has done it in order not to influence the children.

48
Ask the groups to choose one image only:
- Would you imagine the image with more or less light? - If more light, what would be different? Mood, atmosphere? - Could the image have been taken with less light? What would
be different?
Activity 5 Light 2
Material: hard-boiled eggs, blue tack, camera, computer, projector
- Divide the children in groups - Give each group an egg - Ask each group to take 5 pictures of the egg without the egg
changing place - Download the pictures - Compare the images: where is the shadow, how big is it, do you
notice any difference in the background?
Use of the flash
Ask the children:
- If they know what a flash is - Ask them to show it on the camera (make sure they know how
to use it or to suppress it) - When do you use the flash?
The flash
The flash on a camera is normally there to give extra light when there is not enough. But, even in this situation, to use the flash is not always the best solution.
Indoor, the flash may be often needed, as the light is not sufficient. But by using the flash, your subject may stick out too much from the background. This may not look the way you wanted. As a precaution, always take one picture with flash and one picture without, so you will have a choice.

49
Outdoor, the flash can be used when the contrast in between the foreground and the background is too important, the foreground being darker than the background.
Activity 6 Light 3
Material: hard-boiled eggs, blue tack, camera, computer, projector Time:
- Divide the children in groups (same groups as for Activity 4) - Ask the children to take pictures of the egg with flash and
without flash, 2 in a dark corner of the room then 2 in front of the window
- Download and compare the pictures
Wrapping up: (journals)
- Is light important? - Why? - Different sources of light? - Vocabulary: harsh light, soft light, artificial light, natural light,
flash
2/ Point of view
Choose a topic to discuss common to all the children (for example: school, siblings etc.). Ask each participant to talk about it, to give his/her own opinion on the topic, his/her own point of view.
Go back to the questions/answers regarding the point of view in the reference picture:
- How was the photographer when he took the picture? Standing, lying, crouching etc.
- Did the photographer take the picture from above, below etc.?

50
- How was the photographer holding the camera, did s/he tilt it or not?
- Can you guess what is the photographer’s attitude towards the subject?
- How does the point of view affect your way to look at the subject (inferiority, superiority°?
Show sample images and discuss (Angle 1 to 5)
Activity 7 Angle
Material: camera, paper, bag Prepare a list of simple objects that are easily found in the workshop room and write them on slips of paper to be drawn out of a bag by children. For example: window, table, glass of water, a door handle, a table, a chair, books, a pair of glasses etc. Each child (if there are too many children, form groups of 3) then takes 3 different pictures of the same object: high angle, low angle and normal height. Make sure that the object stay at the same place.
Download and compare the pictures. Ask the children to choose a photograph they like, print it and ask them to stick it in their journal. Then they should write about the point of view, what it means for them.
Point of View
The point of view in photography is similar to how your opinion about something affects the tone of your voice and the language you use to communicate.
The vantage point or point of view is the photographer’s stance, both in terms of how the photographer is positioned when s/he takes the picture and what the photographer is towards the subject.
How the photographer perceives the subject influences how the photographer chooses to position him/herself in relation to the subject.
The point of view shows that young people have the creative control and power to reveal their perspectives through the camera.

51
The objective of this exercise is to encourage the children to look at things in different ways and to develop confidence in moving around with the camera and express their own perspective. Indirectly, this exercise could help the children to look at their own life, past and present, in various ways.
Project: Mapping your area (1)
Material: camera, paper, pens, computer, printer, projector, map of the area Time: This project will be done in 2 sessions. The aim of this activity is to get the children to create an image map of their local area using the various techniques learned as well as teaching them to look from different perspectives. Initially the project should be discussed together as a group and the objectives explained. The final product could either be a big map that everyone contributes to or maps made in small groups. The final maps could take the form of large collages.
Have a discussion with the children over what to shoot. Make a list of things to photograph using a mind map (a diagram used to virtually organized information, see example in ‘Doc/Visual literacy’ at the end of this chapter), where children list things/places from memory: places where they eat, where they go, schools, shops, cafes, doctors/hospitals etc.
Then, the children should choose either to photograph what they want or to be given specific places to shoot. This should be done during their time out of the class, with a specific deadline.
Wrapping up: (consider the use of the journals)
- What do we mean by point of view? - Mention different point of views? - What impressions, feelings do these points of views give? - Vocabulary: low angle, high angle, point of view

52
3/ Composition
The way the different elements of a picture are organized is what we call composition.
Activity 8 Composition
Material: various objects
Divide the children into groups. Give each group few objects (pencils, rubber, paper etc.). The objects given to each group have to be the same. Ask them to display the objects the way they want on the table. Ask the groups to look at each other’s ‘composition’.
Photographs are not just a ‘gathering’ of different elements. The different elements in the picture should be organized in a way to make the subject stand out.
When we talk about composition in photography, we refer to 3 main rules:
- Rule of thirds - Perspectives (3D) - Framing
! Rule of Thirds
Activity 9 Rule of thirds
Material: sample images (RuleThird 1 to 6), paper, pencil Divide the children into groups and give few pictures to each group (3/4). Ask the children to draw lines on a piece of paper as per the graph below and to place the graph on the pictures.
- What do they notice? - Does it make a rule?

53
- Look more carefully, see if the rule is always applied - Look at the close-up portraits: does the same rule apply?
The rule applies also to close-up portraits as most of the time, the important part of the face, the eyes, are on the upper line.
The Rule of Thirds
The ‘rule of thirds’ is perhaps the most well known rule of photographic composition.
The basic principle behind the rule is to imagine breaking an image down into thirds (both horizontally and vertically° so that you have 9 parts as follow.
With this grid in mind, the rule of third identifies four important intersections of the image where you should consider placing points of interest in as you compose your image. If you place points of interest in the intersections or along the lines, you photo become not only more balanced but also more interesting.

54
! Perspectives (3D)
Start by asking the children: Why do they have two eyes?
Two eyes
Each eye sees the world from a different angle, creating slightly different pictures. The brain combines these two pictures into a single, three-dimensional image.
If they do not find the answer, ask three children to stand up and to stand one behind the other, slightly to the right or to the left. Ask the rest of the children to form a line opposite and to close an eye.
What do the children see?
Ask them to look with their two eyes. Is it different? What is different?

55
It normally takes sometime for the children to find the answer. Again, give them time; try to ask them questions that will put them on the right track. Always start from one remark/answer given by the children. It does not matter if they do not find the answer. Go to activity 10 anyway.
Activity 10 3D
Material: paper, pencils
Place a table in such a way that all the children can see it. Give each child a piece of paper and a pencil. Ask the children to look carefully at the table as if they were looking at it from above, and to draw it (drawings 1).
Pin the drawings on the board.
Then ask the children to draw the table looking at it from the side (drawings 2).
Compare drawings 1 with drawings 2: ask the children to talk about the differences there are. Introduce the notion of two-dimensional view and three-dimensional view.
What drawings are 2 dimensional and what drawings are 3 dimensional: ask the children to sort out the drawings following these criteria.
Ask the question: how do we see: 2D or 3D?
By then, the children should have understood what we mean by two-dimension and three-dimension. If it is not clear for everyone, ask one of the children to explain to the others.
Compare the way the eyes and a camera see:
- How many eyes does a camera have? - How does a camera see, 2D or 3D?

56
Show sample images to the children (3D 1 to 5). Ask them:
- Do the photographs look flat, 2D or do they seem a 3D world in which you could slip? Do you think you could hold the objects in your hand?
- What techniques are used to render the 3D dimension?
3 D
When we see a photograph on a computer screen or on prints, we are looking at a 2-dimensional representation of a real 3-dimensional scene. And that is what photography is all about – capturing a 3D scene onto a 2D image. How do we achieve that result?
- Superimposing: when we see an object ‘blocking’ the way to another one, the first object will appear near than the second one. This ‘distance’ clue in between the object can be applied to a photograph by placing different objects at different distances
- Using lines: lines that are parallel to each other gives us the sensation of meeting (at vanishing points), for example rail tracks, roads, rivers etc. This ‘converging parallel lines’ illusion can be used to show depth in the photo
- Using light and shadows: a sense of depth can also come from areas of light and shadow as well as from the clarity or details or focus
! Framing
Show to the children images of the same subject taken in different ways, including different elements (Cf. ‘Cause of Death’ by John Hilliard 1974).
Ask the children:
- To give their interpretations of the pictures

57
- To discuss how the photographer presents us with a subjective point of view just by simply moving the subject, ‘framing’ the picture differently
Ask the children to hold the empty frame in front of their eyes and to look around them through it.
Activity 11 Framing
Material: paper (better if A3), pencils, sample images taken randomly in the Documents section Ask the children to each choose an image.
- Draw a rectangle representing the borders of the image in the center of the paper (if A3 paper, place the image in the center of the paper and draw the borders)
- Draw the outlines of forms that you see in the photograph - Outside of the rectangle, draw what you imagine is outside of
the frame
Discuss the results.
Framing
Framing is primarily concerned with the position and perspective of the photographer. The position of the photographer has tremendous impact on the perception of the main subject. But framing is also using other objects in your photograph to frame the main subject, a technique used to attract attention on the subject most of the time and for aesthetic purposes.
Creating a natural frame:
- Remind the children what do we normally mean by frame (a rigid structure that surrounds something such as a photograph)
- What natural frame can you find? Look around you (windows, doors, tree branches etc.)
- Show examples (sample images Framing 1 to 4)

58
4/ Colors, Shapes, and Lines
Colors
Show images to the children sample images Color 1 to 4).
Ask them:
- What color attracts their attention? - If the color were changed, would it change the picture? If yes,
how?
Color
Color is one of the most obvious elements of composition. Everyone knows that intense colors make people take notice of your images. In a photograph, color has 2 functions:
- It attracts attention of the viewer - It sets the mood of an image To attract attention, you will usually use a saturated and intense color. Different colors create different moods. Since there are a huge number of colors, it is not possible to cover all the colors and their impact on the viewer’s mood. Let’s just see some of them. BLUE: It tends to bring forth feelings of calm or cold GREEN: It often communicates a feeling of lushness and freshness YELLOW, ORANGE AND RED: These colors are associated with feelings of warmth and comfort
Shapes and lines
Show images (sample images Shapes 1 to 4) to the children. Ask them:
- What shapes do you see in the picture (s)? - Do you see lines? Where do the lines guide you?

59
Shapes often give structure to a photograph. The way people connect to each other in a photo forms a shape that draws the eye from subject to subject. If a photograph composition lacks shape, the photo becomes too ‘busy’ and difficult to appreciate.
Vertical, diagonal, horizontal, and curved lines create different moods. Vertical lines communicate a sense of strength, rigidity, power, and solidarity to the viewer. On the other hand, horizontal lines represent peace, tranquility, and quietness. A generally accepted practice is to use a vertical format for pictures having predominantly vertical lines and horizontal format for pictures having predominantly horizontal lines. This is a generally accepted practice, NOT a rule.
Wrapping up: (consider the use of the journals)
- Review terms such as light, point of view, rule of thirds, perspectives, framing
- Ask the children to take pictures in the next few days keeping in mind the techniques learned (pictures for the ‘Mapping’ project)
- Vocabulary: rule of thirds, perspective, framing
Project: Mapping your area (2)
During this second session, the children are going to create their map/s.
- Download all the pictures the children have taken - Have a look at the pictures all together - Select the pictures to put on the map asking the children to justify their
choice - Print the pictures - Place the pictures on the map/s
It is important to discuss how the shooting went – places they liked, places they did not know before, pictures they like or they do not like.

60
This is a good time to introduce the subject by going back to the questionnaire done at the very beginning. The questions were divided into two categories: technical questions and questions about the subject. Tell the children that all the techniques discussed have only one main goal: to attract the attention of the viewer onto the subject.
III.3 The Subject
Asking what is the subject of the picture can be trickier than you think. What do we mean by subject? The subject in a photograph is what your photograph is about. And you have to remember that it is entirely up to you.
! How to discover what is the subject of the picture?
Activity 12 What is the subject?
Material: 5 sample images (sample images Subject 1 to 5), board, felt pens Ask the children to sit quiet and to close their eyes. Prepare to show the first image. Ask them to open their eyes. Count mentally up to 5 and then hide the image. Ask them what was the image about. Write their answers on the board and then repeat the same for the other 2 images.
Once you have shown all the images, go back to them one by one. Discuss their answers by asking the following questions:
- When you look at the image, what are your eyes drawn to? Why?
- Do you think this is the subject? Discuss the various answers - Do you think there can be more than one subject? - What else can you see in the picture? - Do these details give you information about the subject/s?

61
Subject
Normally there should be only one subject per picture. This does not mean that there is only one object or person on the picture. It just means that, looking at the photograph, we know what the photographer is talking about. There should be a hierarchy in between the various elements in the pictures meaning that one element is the most important and the other are related to it, giving information about it.
After giving the children some technical background (unity of the subject etc.) go back first to the pictures for which they said there was more than one subject. Ask the children to find the only subject in the picture.
Write again the subject for each picture on the board. Discuss the kind of subjects.
- Is the subject a concrete subject? - Is the subject an abstract subject?
Explain the difference in between concrete and abstract subjects. Give examples.
Concrete subject and abstract subject
In a photograph, the subject is not necessarily ‘concrete’, meaning it is not necessarily about what we literally see in the image. The photograph’s subject can be about an idea that the photographer is trying to communicate. It can be about feelings. We will call it the ‘abstract’ subject.
! Meaning, message
Activity 13 Meaning and message
Material: paper/journal, pen, sample images (Subject 1 to 5)
Looking at the 5 pictures used in activity 12, ask the children to imagine a concrete title and an abstract title for the 5 photographs. Compare the captions and discuss their relevance to the picture.

62
Go back to the very first image used at the beginning of this chapter:
- What is the photographer drawing your attention to? - How does s/he do that? - What do you notice about the subject? - What is the photograph saying? Does anyone have a different
interpretation? - Does the photographer succeed in stating clearly his/her
message? - Can you imagine another picture to express the same
message? - What is the impact of the picture? - How does the photograph make you feel? - What does the photograph make you think of? - Does the photograph inspire you?
The transitions in between techniques, subject and meaning should be fluid. They all work together and it is important to make the children realize that.
Wrapping up (journals):
- Each picture should only have one subject - Why are the photographic techniques important? - Review concrete and abstract subject - To prepare the next session: develop a project theme with the
group and ask the children to have pictures ready for next time. (24 hrs, my neighborhood etc. It is important to use the life stories of the children, stories with which they can connect)
- Vocabulary: subject, concrete subject, abstract subject
Alternatives project
Campaign project:
The aim of this exercise is to produce powerful and imaginative images.
Look at the picture of the boy (Campaign image for Barnardo’s):

63
- How has the photographer made a very simple image very powerful?
- What do you feel when you look at this image? - Do you think the boy is treated with dignity? - How about if we could see more detail in the boy’s
surroundings?
The story of this image: Barnado is a man that has founded an association in the XIX century to protect children against exploitation. The association still exists.
Do your own campaign:
- The children should choose a theme they wish to work on - What important messages do you want to convey? - What images could fit such messages? Describe/draw - How can you take the images you want: think about light,
framing, camera position, timing - Take various pictures for the same message (the children
should keep re-taking the photographs until they feel they have the most powerful and influential composition possible)

64

65
IV PORTRAITS
“A portrait is not made in the camera but on either side of it.” Edward Steichen
Objectives:
- To explore identity - To develop confidence in self-representation
Material: cameras, sample images (in the ‘Doc’ section of this chapter), children’s journals, pencils, paper, computer, projector
Portrait or not a portrait?
Start by asking the children what they think a portrait is?
Then show them few ‘portraits’ (sample images Portrait 1 to 15) and ask them to tell which picture is a portrait, which picture is not.
Portrait
A portrait is a photograph of a person or a group of people that shows expression, personality, and the mood of the subject. It is not just a picture with someone in it.
A portrait must achieve a certain communication in between the subject, the photographer and the viewer.
A portrait does not have necessarily to show the face of the person. Hands for example are very meaningful and will tell a lot about the person. It is also possible to take a picture of someone’s back and it will still a portrait.

66
Spend time as a whole group looking at the various examples of portraits, discussing different styles, techniques and the many ways a portrait can be taken.
Ask the following questions:
- What can we learn about a person from his/her portrait? - What kind of details is communicated about them (characteristics,
personality?) - Is it a posed portrait or a spontaneous portrait? - How is the portrait framed? Do you see the whole body? - How do these portraits make you feel? - Does the background contribute to give you information about the person? - If the person could speak, what would s/he say? (Give time to the children
to find an answer, ask them to write it in their journal)
In portrait, part of the excitement comes from the opportunity to present the self in a photograph. Who I am? How do others see me? How do I look today? These are important questions for young people. This exercise can help them to find the answer.
Activity 1 Describe yourself
Material: journals, pencils Ask the children to write in their journals how they would like their own portrait to look like? What would they like to include, where they would like to be photographed? The following categories can help.
- Identity: I describe myself as … (Syrian, boy, young, sporty etc.) - Emotions: I am … (happy, sad, angry etc.) - Actions: Things I like to do are … (sport, entertainment, hobbies etc.) - Aspirations: I dream of …
Activity 2 Taking portraits
Material: cameras, computer, projector/printer

67
Based on the discussion about the portraits and on the information about the children, each child decides where they want to be photographed, how, what they want to include in the frame, what expression they want.
Working in pairs, the children will shoot self-portraits and then take pictures of each other.
Once finished, download the portraits. Discuss: everyone should have the opportunity to express him/herself on his/her portrait, to explain why s/he wanted to be taken like that.
Ask the children to choose the portrait s/he prefers. Print and put in the journals close to the description they made of themselves.
Introduce the children to the project ‘Inside Za’atari: Starting Over’ (see Facebook page) Ask the children what is the biggest challenge? Taking picture of people you do not know.
Wait before giving the answer. When they know the answer, ask the children how they would do it? Discuss their answers.
On photographing people
Before you can even think about what to do to photograph someone, you have to convince him/her to be in front of the camera. A lot of people find it very hard.
How to convince people to be photographed by you?
You have to make people trust you as it takes an incredible amount of trust to let someone take your picture. You have to reassure people. The way you ask people to take their picture often makes all the difference. For example, do not just say “Can I take your picture?” but instead, introduce yourself, say who you are, explain why you want to take the picture, what you are going to do with it. Spend time with your subject; be as open as possible. Tell the person that s/he is free to refuse.
After you have taken the picture, show it to your subject. It is a way to show that you care.
In all circumstances, show respect.

68
Projects: Family Album or Inside Za’atari
Ask the children to bring few pictures of their family (one is enough if they have a picture showing their whole family). Have each child describe to the class what s/he sees in the family portrait: who is in the picture? What does this picture mean for your family? What story does it tell (look at the place, think about when the picture was taken)?
Ask the children for the following time to take pictures of their family. How does this picture compare to the previous one?
Ask them to choose one family picture, to stick it in their journal and to try to guess what the members on the picture are thinking. Write it down in the journal.
Light and portraits Depending on where the light falls on a face, it can give different feelings:

69
V MAKING STORIES: REVIEWING AND EDITING
“Pictures could not be accessories to the story; they had to contain the story within the frame. The best picture contained a whole war within one frame.”
Tatjana Soli
Objectives:
- Building critical thinking and observation skills - Empowering students to articulate their interpretations in their own words - To build the children’s confidence about their own interpretative powers - To develop an understanding of the relationship in between pictures and
words
Material: cameras, sample images, computer, projector
Learning to edit, to choose pictures – which involves judging the relative qualities of different images and developing an understanding of how to put together a body of work – is as important a skill as taking pictures.
- Leave plenty of time to look at images - See editing as part of the skills development process, not as something to be squeezed at the end - Ensure that you work together with the children, asking questions and listening - Ask the children to edit in pairs. This encourages the children to engage with each other’s work - Encourage the children to discuss their photos and to find positive qualities in each other’s work, using a simple language - Review all final edits using the computer

70
V.1 Editing: how do we know a picture works?
It is challenging to take a picture but even more challenging to explain why it might be seen as good. Instead of using the value judgments of ‘good’ and ‘bad’, it is important to focus on techniques and effect, on how the photograph works. Activity 1 Word game Material: a small ball Ask the children to get into a circle. Each child throws the ball to someone saying a word than can describe a picture, and so on. It is forbidden to use the words ‘good, beautiful’ or ‘bad, awful’. Help the children by mentioning the different techniques and what can be said about them (light, composition, subject, point of view). During the game, one of the facilitators writes the words on the board. Examples of words than can be used to describe a photograph: abstract, inspiring, clear, meaningful, colorful, digital, dramatic, joyful, interesting, expressive, scenic, structured, vibrant, warm, cold, unique, delicate, simple, bold, contrasting, dramatic, subtle, strong, classic, comforting, audacious, flat, 3D, boring, astonishing, captivating, dull, disturbing, bright, dynamic, provocative, symbolic, traditional, striking, warm, truthful, manipulated, sophisticated, original, ordinary, strange, lively, glamorous, soft, humanistic, documentary, breathtaking, clear, detailed, complicated, harmonious, impressive, lively, well-composed, bright, amateurish, sad Review the words written on the board at the end of the game. Explain their meaning if not known by the children. Activity 2 Does it work? Material: sample pictures (sample images Story 1 to 4) Pin few pictures on the board, Ask the children to choose one picture they like the most. Let each one of them express why they like it. Ask the children to tell you if the picture works.

71
Before starting, it is important to set the rules: it is important that the children listen to each other and do it with respect, without mocking or laughing. While talking about the picture, the children are going to talk about themselves without, most of the time, noticing it. T Do not hesitate to help the children, reminding them to talk about the R techniques used, the subject, their feelings etc. Ask questions about the A subject, the techniques, and the formal qualities such as: I - Where is your eye drawn? N - What is the subject of this picture? E - What do you see? R - What is the photograph about? S - What techniques were used to attract attention onto the subject? - What sort of light, where does it come from, what intensity? What effect does the lightning have?
- Can you describe the composition? - Does it work (right use of techniques to convey the message)
What makes a great photograph? What makes a great photograph is a subject of much debate. There is however some general agreement on things that one should consider when viewing and evaluating a photograph. The subject of the photograph has to be clear; if one has to look for it or the photographer has to explain it, then there may be a problem. Most of the time, the subject should be in focus, sharp. About the composition, ask yourself if your eyes move easily within the photograph or do they jump around? Does the lighting support the main elements in the picture or do any of the lighting elements create a distraction? How does the photograph make you feel? Does it create a mood or generate an emotional response? ‘Good’ photographs usually evoke an emotional response at some level. Activity 3 Is it what it is supposed to be? Material: children’s pictures

72
Ask each child to select his/her favorite photograph and to write in his/her journal what s/he thinks the subject of his/her picture is and what feeling does it create? Print the picture. Pin all the pictures on the board and number them. Ask the children to say if the pictures work, what they feel? Then ask the authors of the pictures to say if it is right or not.
If a child does not want to show a picture, do not force him/her. It should be a fun exercise. It is important to explain to the children that the best way to improve their pictures is to show them to others and to underline that they are all in the same situation. Both are photographers and critics. Again, the words ‘bad’ or ‘good’ should not be used and the children should show respect to each other, like real professionals.
V.2 Making stories with pictures Pictures have the ability to convey stories to those that view them, because a photograph generates emotions, mood, ideas and messages. Debate with the children what is the meaning of the following sentence: ‘A picture is worth a thousand words’? What do they think? True, not true, sometimes true? ‘A picture is worth a thousand words’ The expression seems to have appeared the first time in a 1911 newspaper article quoting the editor Arthur Brisbane discussing journalism and publicity. It was later labelled a Chinese proverb so people would take it more seriously. Single image Stories come in all shapes and sizes. Some are long; others are very short. In photography, the short stories can mean only one picture. Such shots need to have something in them that grab the attention of the viewer. They let often the viewers wondering what, not because they do not understand but because they make people want to know

73
- What has happened before, and - What will happen after the picture was taken.
Activity 4 Single image story Material: sample images Single story 1 to 5, paper, pencils Divide the children in groups and ask each group to choose one image and to place it in the middle of an A3 page. Ask them then to write all the information they see in the image. Help them by asking the following questions if necessary, the main questions being always where, when, what, why.
- List 5 things you see in the picture - What is happening in the picture - What do you think happened before the picture was taken? - What do you think will happen next? - Describe the people in the picture (clothing, expression, mood) - What are the people in the picture doing? Why? - When is the action taking place?
Once the groups have all the details they need (setting, characters, action), ask them to write a short creative story based on the picture.. Remind the children to use the information found in the picture. Then discuss. Multiple images Good stories do not just happen. They need planning and some kind of structure. Before starting, you need to know what you are going to do. A picture story, like any other stories, normally includes a beginning, a body and an end. 1/ Beginning: It should set the context and introduce the characters and the theme of the story. 2/ Body: It will probably make the majority of the story. These pictures will explore ideas, feelings and emotions. It is important to show again and again where the action is taking place. The characters of the story should be at the centre of these pictures.

74
3/ End: The last impression counts and it is worth considering what lasting image you want to leave with the viewer of the photos. You do not have to finish your story neatly but you do have to know how you want to end it.
Tips - Plan your story before taking pictures. If it can help, write a short
‘synopsis’ and make a list of the pictures you need (‘hip list’). This does not mean that these are the only pictures you are going to take
- Do not forget to take the same picture from different points of view - Take picture from far and from close. Do not forget to show details - Take more than one picture of the same thing - Edit your story properly: you have to choose what picture you want to keep
and what picture you do not want to keep for your story - Choose criteria for editing: your pictures have ultimately to be presented in
a sequence; they have to work together. Keep in mind that the chronological order may not be the most interesting
When you want to tell a story, you have to find your angle. The angle is the way you are going to tell the story.
Show few examples of different ways to tell a story to the children. Choose examples in their life: school, family, friends, activities… If the children wanted to do a story about their school, what would they choose to talk about?
Activity 5 What is the story? Material: sample images Multiple 1 to 8, paper, pencils Divide the children in 3 groups. Give each group one image only from a story (the image should be the same for each group). Ask the children to imagine what is the picture about, what is the story behind it and to write it down. Then give two more pictures. Ask the children to order the pictures and to complete their story (it may change). Give the children the last 2 pictures. Ask them again to put the pictures in sequence and to write the story.

75
Compare the groups’ stories. Discuss the process (1picture, then 2 more and 2 more): did their story change a lot from the 1st picture to the last? Was it difficult and if yes, what was difficult? Activity 6 24 hours Material: cameras, computer, projector, printer Start by explaining the project to the children: to document a day in their life. Ask them what it means. Rules:
- They can start at any time during the day as long as they end at the same time (more or less) the following day
- The final story should include no more than 12 pictures - While taking pictures, ask them to write in their journal any comment they
may have, problems they have encountered etc. - They do not need to show themselves - Remind them that details can be important
Ask the children
- To write few lines in their journal about what a day in their life is made of. It is not only about what they do, it is also about what they do not do and their feelings (for example: being bored, getting cross with their siblings, being lazy)
- To make a list of what pictures they need to tell their story - To think about the angle
The children should work outside of the classroom. Give them 2/3 days to complete their project. Once they all have their pictures, download them onto the computer and start the editing process with each one of them. If easier, print the pictures in a ‘contact sheet’ format (few small format pictures on the same page).
It is interesting to create stories around personal themes but the children should never feel pressured to tell their personal story, to talk with a ‘refugee voice’, as it can be very difficult to expose one’s self. A photo workshop fulfils different things for different children. For some, it may be a way to forget worries, make friends. For others, it is a way to exercise their creativity and have fun.

76
Captioning The meaning of a photograph is not fixed and much is left to the interpretation of the viewer. Nevertheless, the potential to use images to communicate is greatly increased when images are used in combination with words. Captioning can be a very rewarding experience, encouraging a deeper sense of self-expression. This maybe an area where trainers need to play a more active role.
Trainers/facilitators can help generate captions by - Acting as a scribe, discussing the image with the child, writing down and then checking with him/her - Encouraging the children to work in groups so they can help each other - Making it simple by starting with single word captions
Activity 7 What is the right caption? Material: 10 sample images (any image you want), captions prepared by the trainers Choose at least 10 pictures from the ‘Doc’ sections. Write at least 2 captions for each picture. Put all the captions in a box and ask the children to draw one caption each. Put all the pictures on the floor. The children have to try to match their caption with a picture.
When writing the captions, choose to write two different styles of captions. For example, a photo of a group of people could have the captions ‘Family’ and ‘When people are poor they have no choice’. Make sure that the children understand the captions.

77
Activity 8 Writing your own captions Material: images from the 24 hours project, journal Ask the children to write two captions for the selected pictures from the 24 hours project. One caption should be a ‘concrete’ caption and the other one an ‘abstract’ caption. Concrete and abstract captions Concrete captions take into consideration what can be seen in the picture. It is an objective caption. It describes what you see. Abstract captions reflect the mood of the picture, what the photographer wants his/her picture to convey as a message. Wrapping up:
- Review the process of editing - Review the vocabulary used to talk about a picture - Exhibit the project 24 hours

78
ANNEXES

79
Annex I GLOSSARY OF PHOTOGRAPHIC TERMS
Angle This is the way a photographer decides to tell a story
Camera A device used to create photographs, a dark box with a small opening through which the light enters
Composition The plan, the placement or arrangement of the various elements in a photograph
Shutter release The button on a camera that is pressed to make the shutter open
Viewfinder The small rectangle through which the photographer looks when taking a picture
Monitor LCD The screen at the back of a digital camera
Memory card A small storage medium used to store data
Lens An optical lens used in conjunction with a camera body to make images
Light The illumination of scenes to be photographed. The light can be harsh or soft, natural (sun) or artificial (electric, flash, fire, neon etc.)
Rule of thirds Rule of composition, which consists of breaking an image down into thirds
Framing Using the camera frame to include or exclude information
Perspective The art of representing three-dimensional objects on a two- dimensional surface as to give the right impression of height, width, depth and position in relation to each other
Subject What the photography is about. The subject can be concrete (something you see on the picture) or abstract (an idea)
Point of view It is the photographer’s stance, both in terms of how the photographer is positioned when s/he takes the picture and what the photographer is towards the subject

80
Annex II HOW TO MAKE YOUR PICTURES KNOWN
There are possibly two main ways to ‘expose’ your pictures, to make them known by the public.
- Digital media - Participating in photographic contests
1. Using digital media
The main 3 digital platforms for photography are
- Facebook - Instagram - Pinterest
There are many others but let’s concentrate on these 3.
I would expect most children to know how to use Facebook, how to post photos, to create albums but, if you want your pictures to be seen, do not forget to
- Add hashtags, meaning simple keywords related to your photo preceded by a # before
- Tag your friends
Instagram is an online mobile photo-sharing, video-sharing and social networking service that enables its users to take pictures and videos, and share them on a variety of social networking platforms.
How to quickly get popular on Instagram?

81
- Build a portfolio: when you start, upload 15 to 20 pictures at a time but make sure that they are really good photos. It is far better to post nothing rather than to post bad photos. Some kind of photos does better on Instagram than others, for example reflection photos or sunset photos.
Before posting your photos on Instagram, make sure that your account is public.
- Get noticed: reach out to your existing friends and followers from other social networks, post your photos onto Facebook via Instagram, use hashtags with keywords (ex: #children), post regularly but one or two photos at a time.
Pinterest is a free website. Users can upload, save, sort, and manage images known as pins, through collections known as pinboards. Users can interact with each other.
2. Participating in photo contests
Participating in photo contests is a good way for people to look at your pictures.
Few photo contests do not necessitate any payment of fees:
-‐ National Geographic yourshot.nationalgeographic.com -‐ Better photo betterphoto.com -‐ View bug viewbug.com
There are many more.

82
Annex III RESOURCES
- photo.stockexchange.com - www.strobist.blogspot.com - learnmyshot.com - www.digitalcameraworld.com - digital-photography-school.com - baltic-review.com - cpinetwork.org - www.canadainternational.gc.ca - www.flickr.com - www.indiegogo.com - beyondvervexpectations.wordpress.com - blog.moyer-toensing.com - press.nationalgeorgraphic.com - www.rescue.org - matadornetwork.com - openideo.com - www.photovoice.org - www.culturalsurvival.org - www.ajaproject.org - www.bl.uk/campaign

83