研磨 red hat certified architect–rh436 篇
TRANSCRIPT

RHEL5 上的 iSCSI 環境
1/16 <2008-11-25 > Alex YM Lin
「研磨 Red Hat Certified Architect–RH436 篇」
【RHEL5 上的 iSCSI 環境】
最近看了大前研一的「研磨商業力」,想要成為一個好的 Architect,真的是得
好好研磨研磨,所以筆者東施效顰地把專欄名稱改為「研磨 RHCA」!上期文章
介紹如何 iSCSI 槪念及如何在 RHEL 4 上建置 iSCSI 環境,這期文章接著介紹
在 RHEL 5 上如何實作 iSCSI 環境。
RHEL5 上的 iSCSI 環境
2/16 <2008-11-25 > Alex YM Lin
1 在 RHEL 5.1 上實作 iSCSI 環境
1.1 iSCSI on RHEL 5.1 環境規劃
老話一句,先規劃!先將下列表格填好。
表 1:iSCSI 環境規劃表
功能 作業系統 主機名稱 IP Address
iSCSI-target server RHEL 5.1 server1.example.com 192.168.0.254
iSCSI Initiator (node1) RHEL 5.1 node1.example.com 192.168.0.101
1.2 實作 iSCSI Target Server on RHEL 5.1
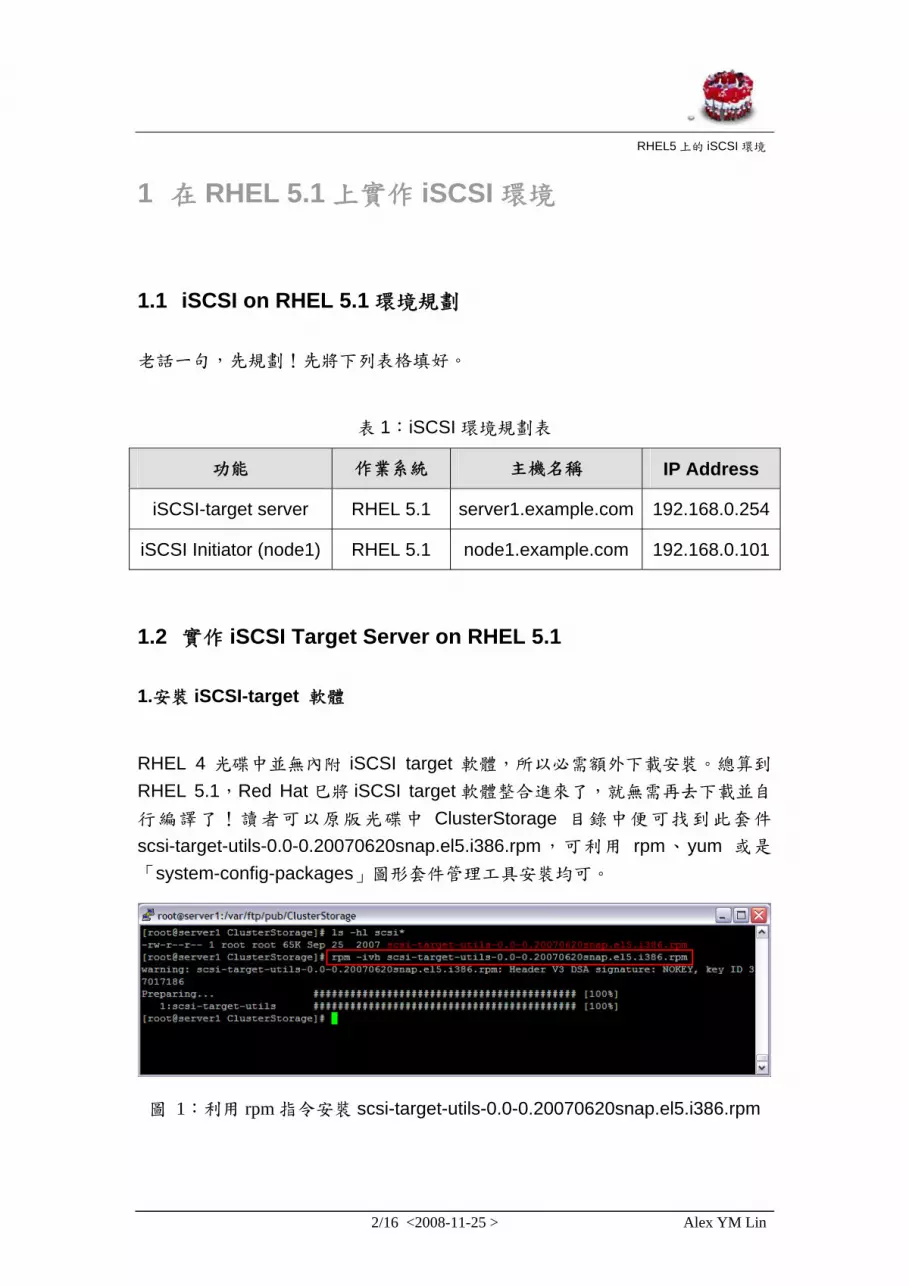
1.安裝 iSCSI-target 軟體
RHEL 4 光碟中並無內附 iSCSI target 軟體,所以必需額外下載安裝。總算到
RHEL 5.1,Red Hat 巳將 iSCSI target 軟體整合進來了,就無需再去下載並自
行編譯了!讀者可以原版光碟中 ClusterStorage 目錄中便可找到此套件
scsi-target-utils-0.0-0.20070620snap.el5.i386.rpm,可利用 rpm、yum 或是
「system-config-packages」圖形套件管理工具安裝均可。
圖 1:利用 rpm 指令安裝 scsi-target-utils-0.0-0.20070620snap.el5.i386.rpm

RHEL5 上的 iSCSI 環境
3/16 <2008-11-25 > Alex YM Lin
圖 2:利用 yum 指令安裝 scsi-target-utils-0.0-0.20070620snap.el5.i386.rpm

RHEL5 上的 iSCSI 環境
4/16 <2008-11-25 > Alex YM Lin
圖 3:利用 system-config-packages 安裝 scsi-target-utils 套件
2.利用 fdisk 及 partprobe 指令新增 Partiton。
在 target Server 新增兩個硬碟分割區,無需格式化,讓給 iSCSI Initiator 存取,
此將會成為 Initiator 中的兩顆硬碟。筆者新增兩個各為 1GB (/dev/sdb2)及
2GB 的 partition(/dev/sdb3)。
3.啟動 tgtd 服務
# # service tgtd start
# chkconfig tgtd on
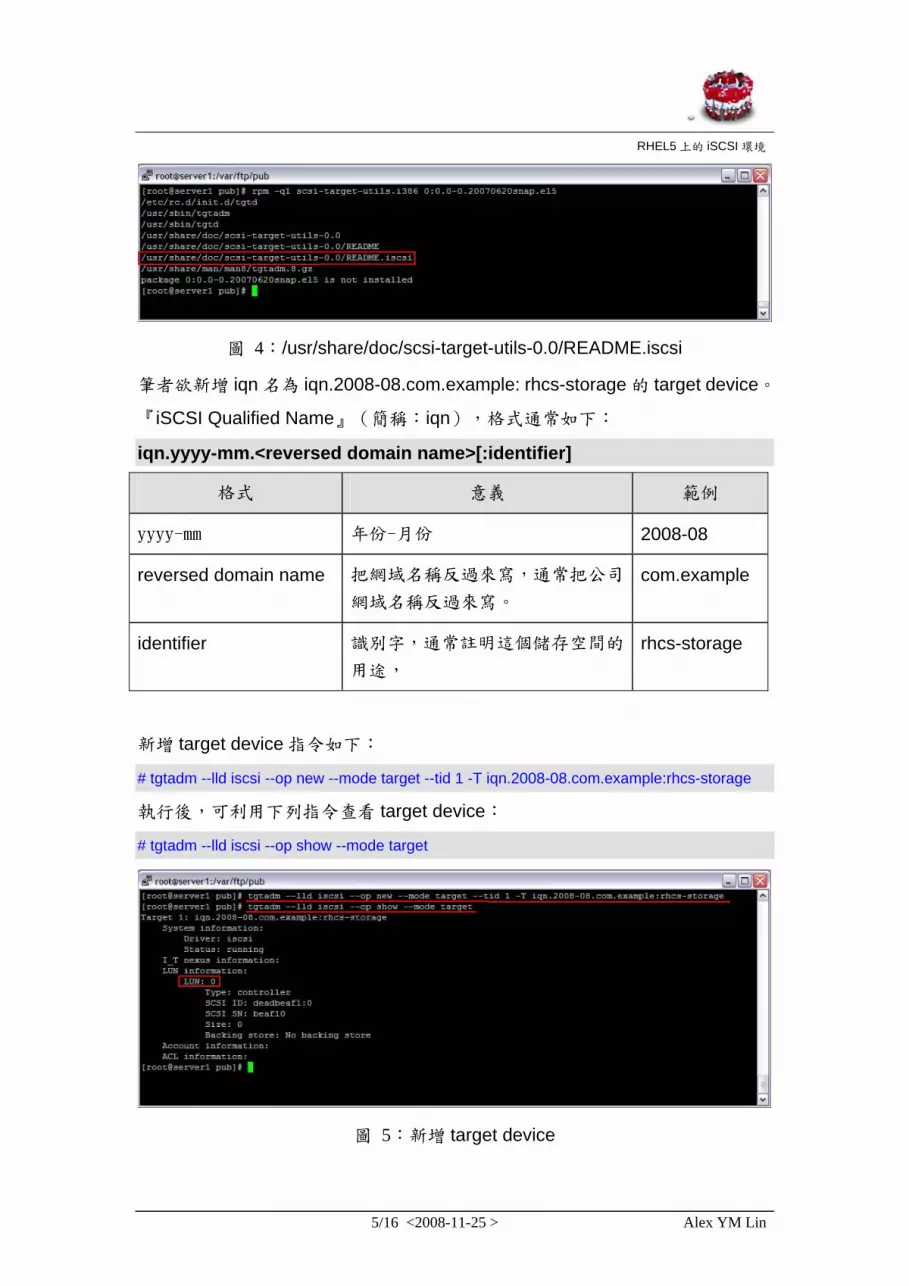
4.建立 target device
接下來的步驟,和 RHEL 4 上的作法差異頗大,RHEL 5 是利用「tgtadm」指令
來設定而不是編寫 vi /etc/ietd.conf。筆者覺得 tgtadm 指令相關參數真的是有點
難記!幸好 scsi-target-utils 套件中包含如何利用 tgtadm 指令建立 target device的步驟,建議讀者一定要把/usr/share/doc/scsi-target-utils-0.0/README.iscsi打開閱讀。
RHEL5 上的 iSCSI 環境
5/16 <2008-11-25 > Alex YM Lin
圖 4:/usr/share/doc/scsi-target-utils-0.0/README.iscsi
筆者欲新增 iqn 名為 iqn.2008-08.com.example: rhcs-storage 的 target device。
『iSCSI Qualified Name』(簡稱:iqn),格式通常如下:
iqn.yyyy-mm.<reversed domain name>[:identifier]
格式 意義 範例
yyyy-mm 年份-月份 2008-08
reversed domain name 把網域名稱反過來寫,通常把公司
網域名稱反過來寫。
com.example
identifier 識別字,通常註明這個儲存空間的
用途,
rhcs-storage
新增 target device 指令如下:
# tgtadm --lld iscsi --op new --mode target --tid 1 -T iqn.2008-08.com.example:rhcs-storage
執行後,可利用下列指令查看 target device:
# tgtadm --lld iscsi --op show --mode target
圖 5:新增 target device

RHEL5 上的 iSCSI 環境
6/16 <2008-11-25 > Alex YM Lin
5.將 target Server 新建的 partition 加入 target device。
# tgtadm --lld iscsi --op new --mode logicalunit --tid 1 --lun 1 -b /dev/sdb2
# tgtadm --lld iscsi --op new --mode logicalunit --tid 1 --lun 2 -b /dev/sdb3
將兩個 partitions 加入 target device 後,而利用下列指令查看 target device 的內
容:
# tgtadm --lld iscsi --op show --mode target
圖 6:新增 target device 內的 disk
5.允許 initiator 主機 node1 (192.168.0.1)可以存取此 Target device。
# tgtadm --lld iscsi --op bind --mode target --tid 1 -I 192.168.0.101

RHEL5 上的 iSCSI 環境
7/16 <2008-11-25 > Alex YM Lin
圖 7:target device ACL information
6.修改/etc/rc.local
因為上述指令的設定結果,重新開機後便會消失,而且現版本的 target server,Red Hat 尚未修改成 System V 服務,所以如果需要重新開機上述設定仍有效,
只能將上述指令寫至/etc/rc.local,讓系統重新開機時再自動執行一次。
[root@server1 ~]# cat /etc/rc.local
#!/bin/sh
#
# This script will be executed *after* all the other init scripts.
# You can put your own initialization stuff in here if you don't
# want to do the full Sys V style init stuff.
touch /var/lock/subsys/local
#iSCSI target device setting - Alex YM Lin (2008.08.21)
tgtadm --lld iscsi --op new --mode target --tid 1 -T iqn.2008-08.com.example:rhcs-storage
tgtadm --lld iscsi --op new --mode logicalunit --tid 1 --lun 1 -b /dev/sdb2
tgtadm --lld iscsi --op new --mode logicalunit --tid 1 --lun 2 -b /dev/sdb3

RHEL5 上的 iSCSI 環境
8/16 <2008-11-25 > Alex YM Lin
tgtadm --lld iscsi --op bind --mode target --tid 1 -I 192.168.0.101
1.3 實作 iSCSI Initiator on RHEL 5.1
在 RHEL 5.1 上實作 initiator 步驟就簡單多了,詳細過程如下:
1.安裝 iscsi-initiator-utils 軟體
iscsi-initiator-utils 軟體位於原版光碟中 Server 目錄中,利用 rpm 或 yum 指令安
裝即可。
圖 8:安裝 iscsi-initiator-utils 軟體
2.在指 iSCSI initiator 主機上指定 initiator alias name
# echo "InitiatorAlias=node1" >> /etc/iscsi/initiatorname.iscsi
3.啟動 iscsi daemon
# service iscsi start
# chkconfig iscsi on
圖 9:啟動 iscsi daemon
4.利用 iscsiadm 指令偵測 target Server 的允許 node1 存取的 iSCSI Device。
# iscsiadm -m discovery -t sendtargets -p 192.168.0.254:3260

RHEL5 上的 iSCSI 環境
9/16 <2008-11-25 > Alex YM Lin
圖 10:偵測 target Server 所設定的 iSCSI device
5.登入 iSCSI targer Server
# iscsiadm -m node -T <target_iqn_name> -p 192.168.0.254:3260 –u
登入成功之後,利用 fdisk –l 或是 hwbrowser 檢查可以發現多出兩個硬碟。
圖 11:登入 iSCSI target Server

RHEL5 上的 iSCSI 環境
10/16 <2008-11-25 > Alex YM Lin
圖 12:利用 hwbrowser 檢查 iSCSI 硬碟
若是不再存取這個 target device,只需要利用下列指令 Log out,利用 fdisk –l再檢查,新增的兩個硬碟就消失了!
# iscsiadm -m node -T iqn.2008-08.com.example:rhcs-storage -p 192.168.0.254:3260 –u
RHEL5 上的 iSCSI 環境
11/16 <2008-11-25 > Alex YM Lin
2 Open-E DSS Lite
看完上述在 RHEL 5 上建置 iSCSI target server 的步驟,有些讀者可能會覺得好
像不是那麼人性化;六月號的 Run PC 針對市面的 iSCSI 儲存設備有專欄介紹,
iThome 也有「IP SAN 產品介紹與實測」的專文,可參考下列網址:
http://www.ithome.com.tw/001/0423/index2.html。不過這些產品一般讀者也是
所費不貲。所以筆者接下來介紹兩種「免費」又好用的 iSCSI target solution「Open-E DSS Lite」及「openfiler」。
首先登場的是「Open-E DSS Lite」,open-e(http://www.open-e.com/)開發
了 iSCSI 嵌入式作業系統 flash rom OS,只要把 flash rom 插在一般的電腦上,就立刻變成一台 iSCSI Server;其實這 flash rom 就是 Linux 作業系統加上 iSCSI target 軟體加上 Web 的管理工具。
Open-E 目前由幾年前的十幾種版本, 目前整合成三種正式產品:
Open-E iSCSI-R3(4TB, 8TB, 16TB…最大授權可至 64TB)
Open-E NAS-R3(4TB, 8TB, 16TB…最大授權可至 64TB)
Open-E DSS(4TB, 8TB, 16TB…最大授權可至 64TB)
註:DSS 產品包含了 NAS 及與 ISCSI 兩種功能
如果單獨就產品功能來說, Open-E iSCSI 或許不是目前市面上功能最完整, 但就產品穩定度與效能,應該是算不錯,支援 Online update 套件及 Restore CD(Restore CD可用來將Open-E ISCSI寫回出廠預設值, 也可以拿來更新至最
新的版本)。
由下列網址 http://www.open-e.com/service-and-support/product-compatibility/可得知 Open-E iSCSI 所支援硬体很廣泛,尤其是 2008 年更開始大力支援 IBM, DELL, HP 三家的硬體,這點對企業是很重要的,因為很多企業大都採購這三家
的 PC 伺服器,Open-E iSCSI 支援這三家廠商常採用的 raid controller,對這些
企業而言,便可利用 Open-E iSCSI 直接控制伺服器上的 raid controller 來建置
Hardware RAID。

RHEL5 上的 iSCSI 環境
12/16 <2008-11-25 > Alex YM Lin
圖 13:Open-E iSCSI 所支援 IBM hardware RAID 列表
Open-E 正式版產品約在 3 萬~5 萬之間,算是價格適中,如果讀者有 iSCSI 的需求,暫時又沒有預算採購 Open-E 正式版產品。可至
http://www.open-e.com/products/open-e-dss-lite/ 註冊下載 Open-E DSS Lite(dss_lite_win_setup_20080201.exe,支援至 1TB 容量之免費版),然後將其
安裝至 USB 隨身碟(300MB 左右即可),執行
dss_lite_win_setup_20080201.exe,便會將 iSCSI Target O.S 安裝至此 USB隨身碟。將 USB 隨身碟插至閒置的 PC 上,BIOS 設定由 USB HDD 開機,便可
擁有一台企業級的 iSCSI 儲存設備(圖 14)。

RHEL5 上的 iSCSI 環境
13/16 <2008-11-25 > Alex YM Lin
圖 14:Open-E DSS Lite 安裝畫面
待 USB 姆指碟開機完成後,不用安裝額外軟體也不用下指令,打開瀏灠器鍵入:
https:// iSCSI Target 主機的 IP
輸入密碼:「admin」,便可管理此台 iSCSI Targer Server。

RHEL5 上的 iSCSI 環境
14/16 <2008-11-25 > Alex YM Lin
圖 15:Open-E DSS Lite 登入畫面

RHEL5 上的 iSCSI 環境
15/16 <2008-11-25 > Alex YM Lin
3 Openfiler
Openfiler 是由 Xinit Systems 公司所開發的軟體,這是一套能讓 PC 伺服器變成
AS 或 iSCSI 設備的儲存管理作業系統。支援的檔案系統包括 Unix 的 Network File System和微軟的Common Internet File System,並且也支援LDAP和微軟的Active Directory 等目錄服務,以及 Kerberos 5 的驗證功能。
Openfiler安裝方式跟Open-E DSS Lite不同,首先到「http://www.openfiler.com/」下載 ISO 檔,燒成光碟,利用光碟安裝,其過程跟安裝 RHEL 並無太大差別,
下列網址「http://www.openfiler.com/learn/how-to/graphical-installation」
有詳細的安裝過程及圖示。
圖 16:openfiler 安裝畫面
安裝完畢後,亦是利用瀏灠器來進行管理,登入資訊如下:
Management Interface: https://<ip of openfiler host>:446

RHEL5 上的 iSCSI 環境
16/16 <2008-11-25 > Alex YM Lin
Administrator Username: openfiler
Administrator Password: password
至於如何管理 openfiler,可參考「http://wwwold.openfiler.com/docs/manual/」的
手冊。
【後記】
筆者認為 Open-E DSS Lite 和 openfiler 建置 iSCSI 儲存媒體的方式,其實還蠻
直覺;不過還是得了解 LVM 的觀念,兩者皆有運用 LVM 的觀念,若是看完文
件還是不得其門而入,那只好期待筆者的下期文章的介紹了!^-^
作者簡介
林彥明(Alex YM Lin):現任職於 IBM,負責 HPC 超級電腦、Linux 叢集系統
建置、效能調校及技術支援等工作,近來參與 NCHC IBM Cluster 1350(亞洲
運算能力僅次日本的超級電腦)及中山大學 p595 HPC 超級電腦專案。具有
RHCA(Red Hat 架構師)、RHCDS(Red Hat Certified Datacenter Specialist)、RHCX(Red Hat 認證主考官)、RHCE、NCLP(Novell Linux 認證專家)、LPIC、IBM AIX …等國際認證。