docave® 6 service pack 1 job monitor - · pdf file1 docave 6: job monitor revision c...
TRANSCRIPT
1
DocAve 6: Job Monitor
Revision C Issued September 2012
DocAve® 6 Service Pack 1
Job Monitor
Reference Guide
2
DocAve 6: Job Monitor
Table of Contents
About Job Monitor ........................................................................................................................................ 4
Submitting Documentation Feedback to AvePoint ...................................................................................... 4
Before You Begin ........................................................................................................................................... 5
Configuration ............................................................................................................................................ 5
Agents ....................................................................................................................................................... 5
Getting Started .............................................................................................................................................. 6
Launching Job Monitor ............................................................................................................................. 6
Understanding Job Monitor ...................................................................................................................... 7
Job Monitor Interface ........................................................................................................................... 7
Job Monitor vs. Scheduled Job Monitor ............................................................................................... 8
Configuring the Viewing Pane ................................................................................................................... 8
The View Toolbar .................................................................................................................................. 8
The Filter Toolbar .................................................................................................................................. 9
Searching Jobs ........................................................................................................................................... 9
Managing Jobs ............................................................................................................................................ 10
Operations in the Job Monitor Tab ......................................................................................................... 10
The Manage Toolbar ........................................................................................................................... 10
The Actions Toolbar ............................................................................................................................ 11
The Settings Toolbar ........................................................................................................................... 11
Operations in the Scheduled Job Monitor Tab ....................................................................................... 12
The Actions Toolbar ............................................................................................................................ 12
The Filter Toolbar ................................................................................................................................ 12
Integrated Job Monitor ............................................................................................................................... 13
Additional Job Monitor Features in Platform Backup & Restore............................................................ 13
Additional Job Monitor Features in Administrator ................................................................................. 14
Admin Search or Security Search Jobs ................................................................................................ 14
Delete Orphan Site Jobs ...................................................................................................................... 14
Dead Account Cleaner Jobs ................................................................................................................. 15
Import Configuration File Jobs ............................................................................................................ 16
3
DocAve 6: Job Monitor
Search Web Part Jobs.......................................................................................................................... 16
Additional Job Monitor Features in Content Manager ........................................................................... 16
Content Manager Jobs ........................................................................................................................ 17
Content Manager Move Jobs .............................................................................................................. 17
Additional Job Monitor Features in Deployment Manager .................................................................... 17
Additional Job Monitor Features in Replicator ....................................................................................... 17
Additional Job Monitor Features in Report Center ................................................................................ 18
Workflow Status Jobs from Usage Reports ......................................................................................... 18
Storage Analyzer Jobs from Infrastructure Reports............................................................................ 18
Compliance Reports ............................................................................................................................ 18
Additional Job Monitor Features in eDiscovery ...................................................................................... 19
Additional Job Monitor Features in Archiver .......................................................................................... 19
SharePoint Search or Archiver Search Jobs ........................................................................................ 19
Accessing Hot Key Mode ............................................................................................................................. 20
Job Monitor Page .................................................................................................................................... 20
Schedule Job Monitor Page .................................................................................................................... 21
Special Hot Keys for Some Products ....................................................................................................... 21
Platform Backup and Restore ............................................................................................................. 21
Administrator ...................................................................................................................................... 22
Content Manager ................................................................................................................................ 22
Deployment Manager ......................................................................................................................... 23
Replicator ............................................................................................................................................ 23
Report Center ...................................................................................................................................... 23
eDiscovery ........................................................................................................................................... 24
Index............................................................................................................................................................ 25
Notices and Copyright Information ............................................................................................................ 27
4
DocAve 6: Job Monitor
About Job Monitor Job Monitor allows you to view the status or details of jobs, download reports, and manage the jobs all from a central interface.
Job Monitor is also integrated into other DocAve products, which enables you to manage the jobs inside its corresponding modules with additional features specific to the product itself. These additional features are also available in the stand-alone Job Monitor module.
Submitting Documentation Feedback to AvePoint AvePoint encourages customers to provide feedback regarding our product documentation. Click the following URL to access the Submit Your Feedback form on our website:
http://www.avepoint.com/resources/documentation-feedback/?flush=1
5
DocAve 6: Job Monitor
Before You Begin Refer to the sections for system and farm requirements that must be in place prior to installing and using DocAve Job Monitor for SharePoint.
Configuration In order to use DocAve Job Monitor for SharePoint, the DocAve 6 platform must be installed and configured properly on your farm. Job Monitor will not function without DocAve 6.
Agents SharePoint Agents are responsible for running DocAve jobs and interacting with the SharePoint object model. DocAve Agents enable DocAve Manager to communicate with the respective servers, allowing for Job Monitor commands to function properly.
*Note: The use of system resources on a server increases when the installed agent is performing actions. This may affect server performance. However, if the agent installed on a server is not being used, the use of system resources is very low; therefore, the effect on server performance is negligible.
For instructions on installing DocAve Platform, DocAve Manager, and DocAve module Agents, see the DocAve 6 Installation Guide.

6
DocAve 6: Job Monitor
Getting Started Refer to the sections below for important information on getting started with Job Monitor, including launching the module, understanding the interface, configuring your view, and searching for jobs.
Launching Job Monitor To launch Job Monitor and access its functionality, follow the instructions below:
1. Log in to DocAve. If you are already in the software, click the DocAve tab.
2. From the DocAve tab, click Job Monitor to launch the module.
Alternatively, you can click the Job Monitor icon ( ) from anywhere within the DocAve software to launch Job Monitor.
Figure 1: DocAve module launch window.
7
DocAve 6: Job Monitor
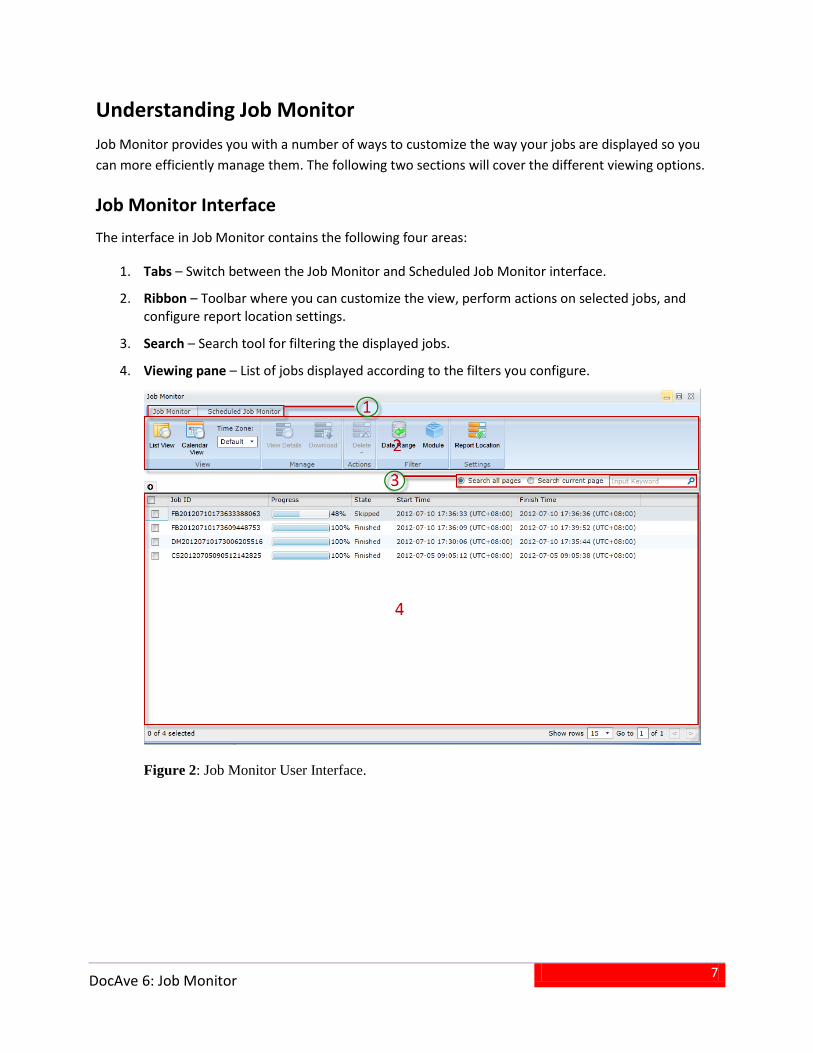
Understanding Job Monitor Job Monitor provides you with a number of ways to customize the way your jobs are displayed so you can more efficiently manage them. The following two sections will cover the different viewing options.
Job Monitor Interface The interface in Job Monitor contains the following four areas:
1. Tabs – Switch between the Job Monitor and Scheduled Job Monitor interface.
2. Ribbon – Toolbar where you can customize the view, perform actions on selected jobs, and configure report location settings.
3. Search – Search tool for filtering the displayed jobs.
4. Viewing pane – List of jobs displayed according to the filters you configure.
Figure 2: Job Monitor User Interface.
8
DocAve 6: Job Monitor
Job Monitor vs. Scheduled Job Monitor The Job Monitor module interface contains two tabs:
• Job Monitor – Allows you to access all of the current and previous jobs.
• Scheduled Job Monitor – Allows you to exclusively access jobs that are scheduled to run in the future.
*Note: Differentiate between scheduled jobs (jobs scheduled to run in the future) and recurring jobs. Scheduled jobs will only show up on the Scheduled Job Monitor tab. Recurring jobs will show up on both tabs.
Configuring the Viewing Pane In both the Job Monitor and Scheduled Job Monitor tabs, there is a View toolbar and a Filter toolbar on the ribbon with further configurable options to help you more efficiently manage your current and previous jobs.
The View Toolbar This toolbar allows you to choose to have your jobs displayed in List View or Calendar View:
• List View – Displays your jobs in a table. You can add or remove a column to customize your view by clicking the icon. Select the desired column for this view by checking the checkbox next to its name in the drop-down menu. Click OK to save your choices, or click Cancel to close the drop-down menu without saving your choices.
• Calendar View – Displays your jobs in a calendar. You can configure Calendar View to display in Day, Week, or Month format by clicking the respective button in the upper right-hand corner. To see detailed information about a job, place your mouse cursor over its time slot.
You can also configure the Time Zone in this toolbar by specifying one of the options below to display in the job information.
• Default – Displays the time zone of the machine where the control service is installed. In the Scheduled Job Monitor tab, the default time zone is based on the time zone configured for each schedule.
• Local – Displays the time zone that the Internet Explorer (IE) browser used to access DocAve.
By default, the time zone of the job information is set to Default. Note that in Calendar View, the time zone is set to Local and cannot be altered. To change the time zone, click the drop-down menu, and select Local.
9
DocAve 6: Job Monitor
The Filter Toolbar This toolbar allows you to filter the jobs listed in the viewing pane by Date Range or Module.
• Date Range – Allows you to limit the jobs displayed by specifying a time frame.
• Module – Allows you to limit the jobs displayed by specifying the module where the jobs are run.
Searching Jobs Job Monitor also allows you to search for jobs to further customize which jobs are displayed to you. The search interface is located under the toolbar ribbon. Select the corresponding radio button to either Search all pages or Search current page. Placing your cursor over the Search text box will bring up a tooltip informing you of the searchable parameters.
*Note: The search function is not case sensitive.
Since the Job ID includes the start time for the job, you can search for a job by start time. Enter the time as a numerical string in the text box, then click (for example: search for 2011-01-01 17:05:10 by typing 20110101170510 in the search text box).

10
DocAve 6: Job Monitor
Managing Jobs The Job Monitor tab and the Scheduled Job Monitor tab offer different sets of tools more suitable for managing the different types of jobs.
*Note: If one tool is not supported for the selected job of the specified product, the corresponding button of this tool will be greyed out and not clickable.
Operations in the Job Monitor Tab The Job Monitor tab provides you with a number of tools that allow you to perform actions to jobs you are currently running or have run in the past.
*Note: The tools explained here only cover the general ones in Job Monitor. To access the tools that are specific to the DocAve products, you can access the Integrated Job Monitor in each of the DocAve products. You can also access Job Monitor from the welcome page, click the Module button, select the specified module by checking the appropriate checkbox, and then choose from jobs run by that module. For details about tools specific to each DocAve product, see the Integrated Job Monitor section of this guide.
The Manage Toolbar This toolbar provides you with the following functionality:
• View Details – Allows you to view a job report of the selected job. Select the job by checking the corresponding checkbox. Click View Details on the ribbon. The Job Details tab appears with the job report displayed in the viewing pane with the Summary tab selected. The Summary tab displays general information about the job. For more in-depth information, click the Details tab in the viewing pane. Click Download to download the job report. Select TXT, CSV or XLS as the format for the report, then select to download the Current columns or All columns from the Details tab, and then click OK to download the report, or Cancel to return to the Job Details tab.
• Download – Allows you to download the job report of the selected job(s) to a specified location. You have the option to set the Report Format to download in TXT, CSV or XLS format. Here you can only choose to download All columns from the Details tab.
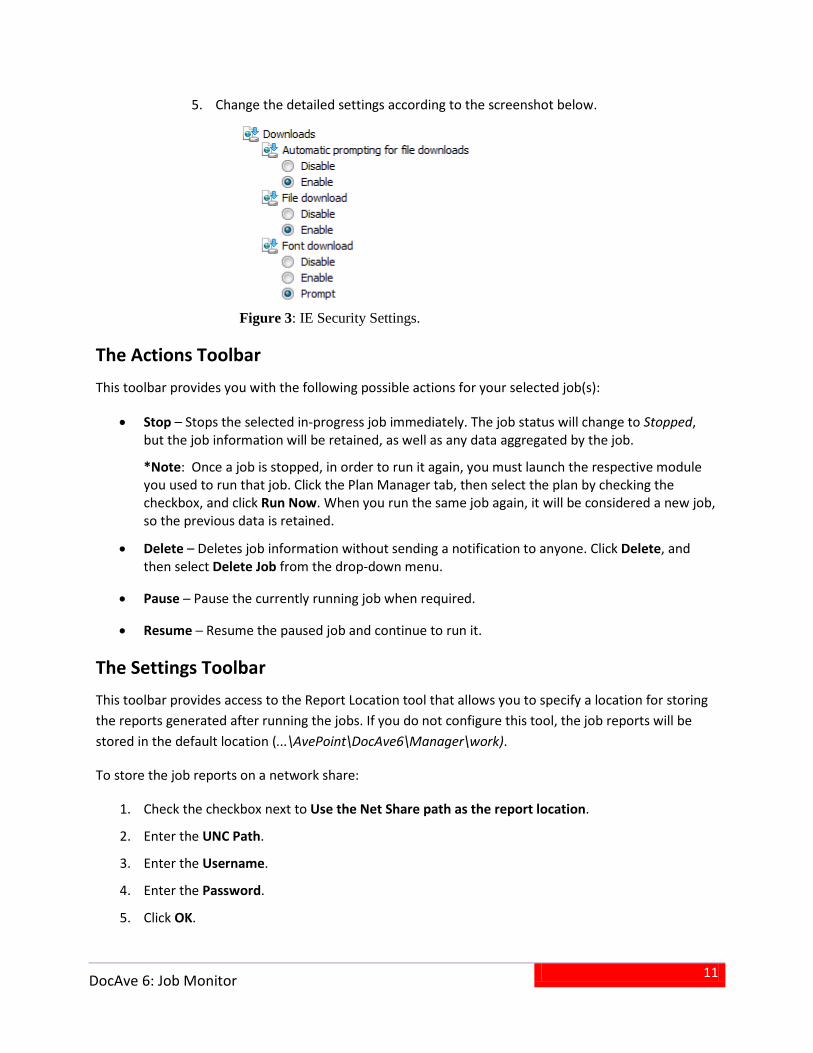
*Note: Prior to downloading the job report, make sure the Internet Explorer (IE) download settings are configured properly. You can configure the download settings for IE by following the steps below.
1. Navigate to Internet Explorer > Tools > Internet Options.
2. Switch to the Security tab and select a zone.
3. Click the Custom level button inside the Security level for this zone field.
4. Scroll down to the Downloads setting.
11
DocAve 6: Job Monitor
5. Change the detailed settings according to the screenshot below.
Figure 3: IE Security Settings.
The Actions Toolbar This toolbar provides you with the following possible actions for your selected job(s):
• Stop – Stops the selected in-progress job immediately. The job status will change to Stopped, but the job information will be retained, as well as any data aggregated by the job.
*Note: Once a job is stopped, in order to run it again, you must launch the respective module you used to run that job. Click the Plan Manager tab, then select the plan by checking the checkbox, and click Run Now. When you run the same job again, it will be considered a new job, so the previous data is retained.
• Delete – Deletes job information without sending a notification to anyone. Click Delete, and then select Delete Job from the drop-down menu.
• Pause ─ Pause the currently running job when required.
• Resume ─ Resume the paused job and continue to run it.
The Settings Toolbar This toolbar provides access to the Report Location tool that allows you to specify a location for storing the reports generated after running the jobs. If you do not configure this tool, the job reports will be stored in the default location (...\AvePoint\DocAve6\Manager\work).
To store the job reports on a network share:
1. Check the checkbox next to Use the Net Share path as the report location.
2. Enter the UNC Path.
3. Enter the Username.
4. Enter the Password.
5. Click OK.

12
DocAve 6: Job Monitor
Operations in the Scheduled Job Monitor Tab The Scheduled Job Monitor tab provides you with two toolbars that allow you to perform actions to jobs that you have scheduled to run in the future. The following sections explain what these tools do in detail.
*Note: The tools explained here only cover those in the main Job Monitor module. For details about tools specific to Job Monitor that are integrated into other DocAve products, see the Integrated Job Monitor section of this guide.
The Actions Toolbar This toolbar provides the following actions for a scheduled job:
• Enable – If the status of the selected job(s) is disabled, you will have the option to click this button to enable it.
• Disable – If the status of the selected job(s) is enabled, you will have the option to click this button to disable it.
The Filter Toolbar This toolbar provides the following filter options for a scheduled job:
• Date Range – Allows you to limit the jobs displayed by specifying a time frame.
• Module – Allows you to limit the jobs displayed by specifying the module where the jobs are run.

13
DocAve 6: Job Monitor
Integrated Job Monitor While Job Monitor is able to access and organize jobs across different DocAve products, it is also integrated into the products in order to provide easy access and additional functionalities tailored to each product and its modules. When Job Monitor is accessed from the interface of a given product’s module, it only displays jobs executed by that module and allows you to access related jobs without leaving your current interface. The integrated Job Monitor modules contain all of the same functionalities of the stand-alone Job Monitor module. The following modules include integrated Job Monitor:
Product Module Data Protection Platform Backup & Restore
Administration
Administrator Content Manager Deployment Manager Replicator
Report Center
Usage Reports Infrastructure Reports Administration Reports DocAve Reports Compliance Reports
Compliance eDiscovery Storage Optimization Archiver
Additional Job Monitor Features in Platform Backup & Restore In Job Monitor, certain platform backup jobs in Platform Backup & Restore allow you to configure maintenance settings after the job has run. Select an appropriate platform backup job, and then click Maintenance on the ribbon. The Maintenance tab opens, allowing you to configure the following settings:
• Maintenance Action – Select the maintenance action(s) for this job by checking one of the following checkboxes:
o Generate InstaMount mapping
o Generate index mapping
o Copy snapshot data
• Staging SQL Server – Choose to use the SQL Server for backup or choose Customize SQL Server to use a custom SQL server as the staging SQL server.
• Maintenance Notification – Configure the notification settings for this job. Select a previously-configured notification profile from the Select a profile with address only drop-down list, or
14
DocAve 6: Job Monitor
create a new e-mail notification profile by clicking the New Notification Profile link. Click View to view the detailed configuration of the selected notification profile.
When you are finished configuring settings in the Maintenance tab, click OK to save the configurations, or click Cancel to close the Maintenance tab without saving any changes.
Additional Job Monitor Features in Administrator Job Monitor provides the following additional job types for Administrator: Admin Search or Security Search, Delete Orphan Site, Dead Account Cleaner, Import Configuration File, and Search Web Part. Refer to the following sections for a detailed description of each of these additional features.
Admin Search or Security Search Jobs In Job Monitor, selecting an Admin Search job or a Security Search job allows you to click Search Result on the ribbon. This button brings you to the Search Result Tools tab of Administrator. Here you can perform the following actions on the search results:
• Edit user permissions
• Remove user permissions
• Download report
• Export for editing
• Import configuration file
For more details on these actions, see the DocAve 6 Administrator User Guide.
Delete Orphan Site Jobs In Job Monitor, selecting a Delete Orphan Site job allows you to click Orphan Site Deletion on the ribbon. This button brings you to the Orphan Site Deletion tab of Job Monitor where you can view and manage the deleted orphan sites. Click Close on the ribbon to close the tab.
In the viewing pane, you can customize how the deleted orphan sites are displayed in the following ways:
• Search – Allows you to filter the sites displayed by the keyword you designate; the keyword must be contained in a column value. At the top of the Orphan Site Deletion viewing pane, type in the keyword for the plan(s) you want to display. You can select to Search all pages or Search current page. *Note: The search function is not case sensitive.
• – Manages which columns are displayed in the list in order to control the information you want to view. Click +, then check the checkbox next to the column name to have that column appear in the list.
15
DocAve 6: Job Monitor
• – Allows you to filter which item in the list is displayed. Unlike Search, you can filter whichever item you want, rather than search based on a keyword. Click the of the column you want to filter, then check the checkbox next to the item name to display in the list.
If you want to delete an Orphan Site job(s), select the orphan sites you want to delete, then click Next. Configure the Schedule and Notification settings for this deletion job, then click Next. Review your configurations in the Overview page and click Finish to save these configurations, click Finish and Run Now to save these configurations and run the job immediately, or click Cancel to close the Orphan Sites Deletion tab without saving these configurations.
Dead Account Cleaner Jobs In Job Monitor, selecting a Dead Account Cleaner job allows you to click Dead Account Deletion on the ribbon. This button brings you to the Dead Account Deletion tab of Job Monitor where you can clone the deleted account’s permissions to another user(s). Click Close on the ribbon to close the tab.
In the viewing pane, you can customize how the deleted dead accounts are displayed in the following ways:
• Search – Allows you to filter the sites displayed by the keyword you designate; the keyword must be contained in a column value. At the top of the Dead Account Deletion viewing pane, type in the keyword for the account(s) you want to display. You can select to Search all pages or Search current page. *Note: The search function is not case sensitive.
• – Manages which columns are displayed in the list in order to control the information you want to view. Click +, then check the checkbox next to the column name to have that column appear in the list.
• – Allows you to filter which item in the list is displayed. Unlike Search, you can filter whichever item you want, rather than search based on a keyword. Click the of the column you want to filter, then check the checkbox next to the item name to display in the list.
Select a deleted account to enable user permissions cloning, then perform the following configuration:
1. In the Clone User Permissions text box for its respective account, enter the name of the user(s) you want to clone the permissions to. Click to check the names, or click to browse for the user(s) you want to clone the permissions to.
2. Click Next to save these configurations and configure Options for Transfer Permissions.
3. In Permissions Option, select Append to add the source permissions to the destination permissions, or Replace to substitute the destination permissions with the source permissions.
4. In Include Alerts, select Yes or No for whether or not to have the source user’s alerts sent to the destination user(s).
5. In Change Metadata, select Yes or No for whether or not to transfer the corresponding source user’s metadata to the destination user.
16
DocAve 6: Job Monitor
6. In Permission Rule, select the rule(s) you want to apply. You can choose to include permissions inherited from groups, which will then enable you to select Add user to the same groups in the destination.
7. Click OK to save these configurations, or click Cancel to close the Dead Account Deletion tab without saving the configurations.
Import Configuration File Jobs In Job Monitor, selecting an Import Configuration File job allows you to click Rollback Changes on the ribbon. This feature can change permissions back to the state before a selected job was executed.
Search Web Part Jobs In Job Monitor, selecting a Search Web Part job allows you to click Web Part Management on the ribbon. This button brings you to the Web Part Management tab of Job Monitor where you can view information about the Web Parts in the selected job. Click Close on the ribbon to close the tab.
By default, the Search Result tab is selected in the viewing pane. Click the Web Part Usage tab to view the Web Parts by their usage information. In the viewing pane, you can customize how the Web Parts are displayed in the following ways:
• Search – Allows you to filter the Web Parts displayed by the keyword you designate; the keyword must be contained in a column value. At the top of the Web Part Management viewing pane, type in the keyword for the Web Part(s) you want to display. You can select to Search all pages or Search current page. *Note: The search function is not case sensitive.
• – Manages which columns are displayed in the list in order to control the information you want to view. Click +, then check the checkbox next to the column name to have that column appear in the list.
• – Allows you to filter which item in the list is displayed. Unlike Search, you can filter whichever item you want, rather than search based on a keyword. Click the of the column you want to filter, then check the checkbox next to the item name to display in the list.
Select a Web Part, then click Remove Web Part, Reset Web Part, or Close Web Part to perform the action on the selected Web Part(s). A popup window will appear to confirm the action. Click OK to proceed with the action, or Cancel to return to the Web Part Management tab.
Additional Job Monitor Features in Content Manager In Job Monitor, selecting certain types of Content Manager jobs will provide you with additional features.
17
DocAve 6: Job Monitor
Content Manager Jobs In Job Monitor, selecting a Content Manager job allows you to click Rollback on the ribbon. This button brings you to the View Mapping tab of Job Monitor where you can view information about the replication plans in the selected job. Click Close on the ribbon to close the tab.
Click Rollback to return the sites in the executed plan to their state before the job was executed.
Content Manager Move Jobs In Job Monitor, selecting a Content Manager Move job will allow you to click Delete Content on the ribbon. Since move jobs are performed by first copying the content from the source node to the destination node then deleting the content from the source node, some move jobs can be configured to only execute the copying process then manually delete the content from the source node. Use this option only after you have verified that the copying process was successful.
Additional Job Monitor Features in Deployment Manager In Job Monitor, select a Deployment Manager job, then click View Details. You will be brought to the Plan Details tab of Job Monitor with the Summary tab selected in the viewing pane. Here you can review general information about the Deployment Manager plan. Click on the Queue tab in the viewing pane to see the status of the job in the queue.
Click Rollback to return the deployed content in the executed plan to their state before the job was executed.
Additional Job Monitor Features in Replicator In Job Monitor, selecting a Replicator job will allow you to click View Mapping on the ribbon. You will be brought to the View Mapping tab of Job Monitor where you can view information about the replication plans in the selected job. Click Close on the ribbon to close the tab.
In the viewing pane, you can customize how the replication plans are displayed in a number of ways:
• Search – Allows you to filter the replication plans displayed by the keyword you designate; the keyword must be contained in a column value. At the top of the View Mappings viewing pane, type in the keyword for the process(es) you want to display. You can select to Search all pages or Search current page. *Note: The search function is not case sensitive.
• – Manages which columns are displayed in the list in order to control the information you want to view. Click +, then check the checkbox next to the column name to have that column appear in the list.
• – Allows you to filter which item in the list is displayed. Unlike Search, you can filter whichever item you want, rather than search based on a keyword. Click the of the column

18
DocAve 6: Job Monitor
you want to filter, then check the checkbox next to the item name to have that item shown in the list.
Select a replication plan and choose from the following actions:
• Click View Details to see more information about the execution of the replication plan. In the Mapping Details page, you can view general information about the plan’s execution in the Summary tab, or click Details to see information about items within the plan. Click Download to download the job report. Select TXT, CSV or XLS as the format for the report, then select to download the Current columns or All columns from the Details tab, and then click OK to download the report, or Cancel to return to the Mapping Details page.
• Click Download to download the job report. Select TXT, CSV or XLS as the format for the report, then select to download the Current columns or All columns from the Details tab, and then click OK to download the report, or Cancel to return to the Mapping Details page.
• Click Rollback to return the source and destination nodes to the state in the backup. Backup is configured in the Replicator plan configurations and is performed prior to the replication process.
Additional Job Monitor Features in Report Center In Job Monitor, selecting certain Report Center jobs will provide you with additional options.
Workflow Status Jobs from Usage Reports In Job Monitor, select a Workflow Status report job, then click View Workflow Status Report on the ribbon. You will be brought to the Usage Reports tab of Report Center where you can review the Workflow Status report for the selected job.
Storage Analyzer Jobs from Infrastructure Reports In Job Monitor, select a Storage Analyzer report job then click View Storage Analyzer Reports on the ribbon. You will be brought to the Infrastructure Reports tab of Report Center where you can review the size and location of the data in SharePoint databases and external devices for the selected plan.
Compliance Reports In Job Monitor, selecting a Compliance Report job provides you with the following options depending on the type of Compliance Report job that was run. Select one of the following types of reports:
• User Lifecycle Report – Select the job, then click View User Life. You will be brought to the Compliance Reports tab of Report Center where you can review the action report for that user in the selected job.
• List Access Report – Select the job, then click View List Access. You will be brought to the Compliance Reports tab of Report Center where you can review the usage information report for that list in the selected job.

19
DocAve 6: Job Monitor
• Item Life Report – Select the job, then click View Item Life. You will be brought to the Compliance Reports tab of Report Center where you can review entire item life report for that item in the selected job.
• Site Access Report – Select the job, then click View Site Access. You will be brought to the Compliance Reports tab of Report Center where you can review the usage information report for that site in the selected job.
• List Deletion Report – Select the job, then click View List Deletion. You will be brought to the Compliance Reports tab of Report Center where you can review the deletion information report for that list in the selected job.
• Customized Report – Select the job, then click View Customized Report. You will be brought to the Compliance Reports tab of Report Center where you can review the customized report you have configured.
Additional Job Monitor Features in eDiscovery Job Monitor provides the following additional job type for eDiscovery: SharePoint Search or Archiver Search Jobs. Refer to the following section for a detailed description of the additional feature.
Additional Job Monitor Features in Archiver In Job Monitor, select a Merge Index job from Archiver, then click Start to begin the selected job.
SharePoint Search or Archiver Search Jobs In Job Monitor, selecting a SharePoint Search job or an Archiver Search job allows you to click Search Result on the ribbon. This button brings you to the Search Result Tools tab of eDiscovery. Here you can perform the following actions on the search results:
• Apply Legal Hold
• Export the Search Result
20
DocAve 6: Job Monitor
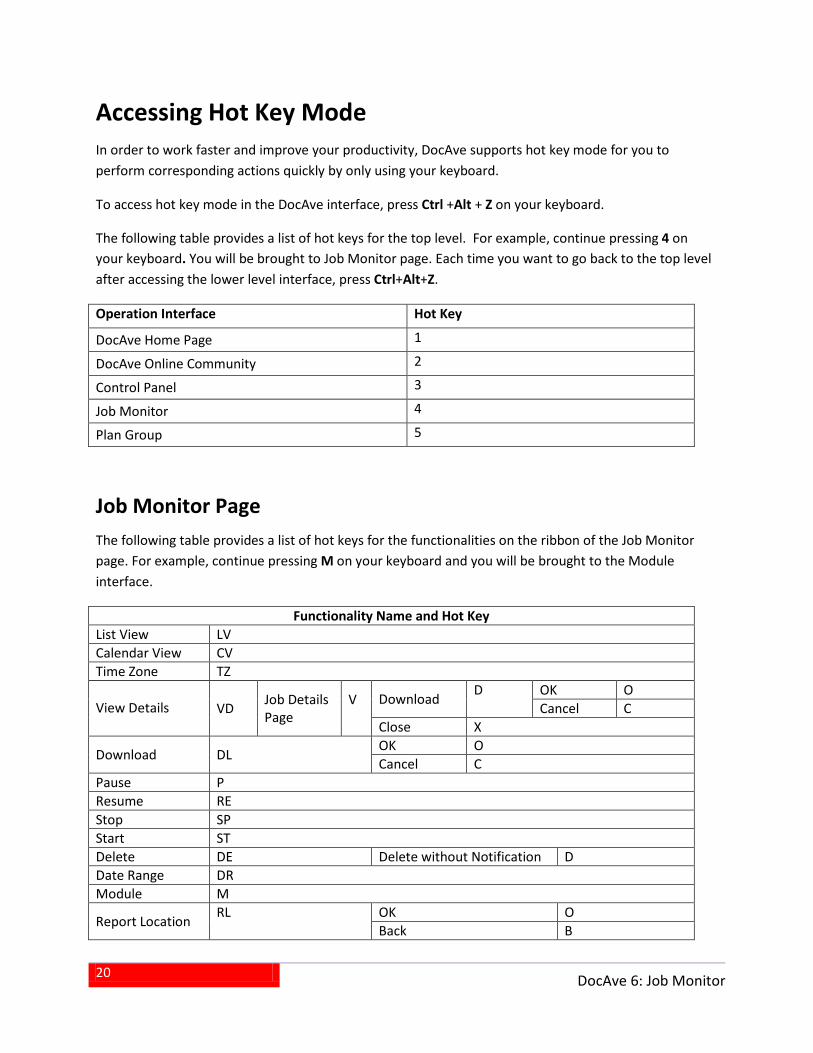
Accessing Hot Key Mode In order to work faster and improve your productivity, DocAve supports hot key mode for you to perform corresponding actions quickly by only using your keyboard.
To access hot key mode in the DocAve interface, press Ctrl +Alt + Z on your keyboard.
The following table provides a list of hot keys for the top level. For example, continue pressing 4 on your keyboard. You will be brought to Job Monitor page. Each time you want to go back to the top level after accessing the lower level interface, press Ctrl+Alt+Z.
Operation Interface Hot Key
DocAve Home Page 1
DocAve Online Community 2
Control Panel 3
Job Monitor 4
Plan Group 5
Job Monitor Page The following table provides a list of hot keys for the functionalities on the ribbon of the Job Monitor page. For example, continue pressing M on your keyboard and you will be brought to the Module interface.
Functionality Name and Hot Key List View LV Calendar View CV Time Zone TZ
View Details VD Job Details
Page V
Download D OK O Cancel C
Close X
Download DL OK O Cancel C
Pause P Resume RE Stop SP Start ST Delete DE Delete without Notification D Date Range DR Module M
Report Location RL OK O Back B
21
DocAve 6: Job Monitor
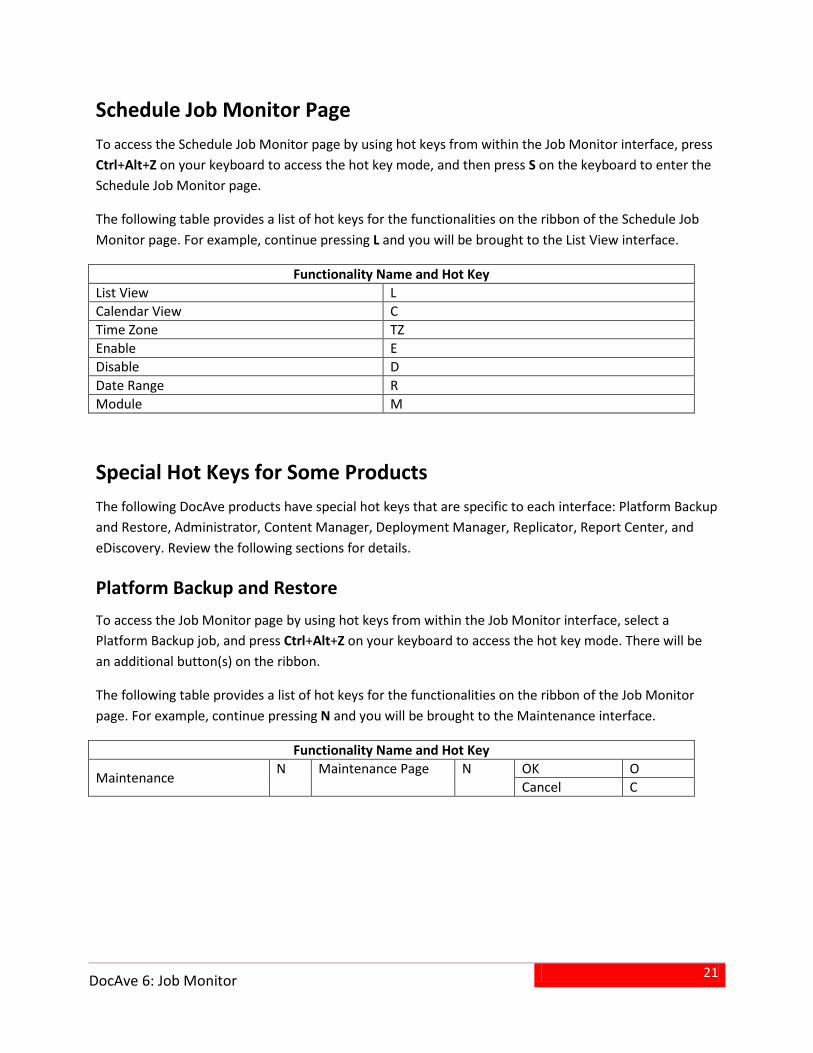
Schedule Job Monitor Page To access the Schedule Job Monitor page by using hot keys from within the Job Monitor interface, press Ctrl+Alt+Z on your keyboard to access the hot key mode, and then press S on the keyboard to enter the Schedule Job Monitor page.
The following table provides a list of hot keys for the functionalities on the ribbon of the Schedule Job Monitor page. For example, continue pressing L and you will be brought to the List View interface.
Functionality Name and Hot Key List View L Calendar View C Time Zone TZ Enable E Disable D Date Range R Module M
Special Hot Keys for Some Products The following DocAve products have special hot keys that are specific to each interface: Platform Backup and Restore, Administrator, Content Manager, Deployment Manager, Replicator, Report Center, and eDiscovery. Review the following sections for details.
Platform Backup and Restore To access the Job Monitor page by using hot keys from within the Job Monitor interface, select a Platform Backup job, and press Ctrl+Alt+Z on your keyboard to access the hot key mode. There will be an additional button(s) on the ribbon.
The following table provides a list of hot keys for the functionalities on the ribbon of the Job Monitor page. For example, continue pressing N and you will be brought to the Maintenance interface.
Functionality Name and Hot Key
Maintenance N Maintenance Page N OK O Cancel C
22
DocAve 6: Job Monitor
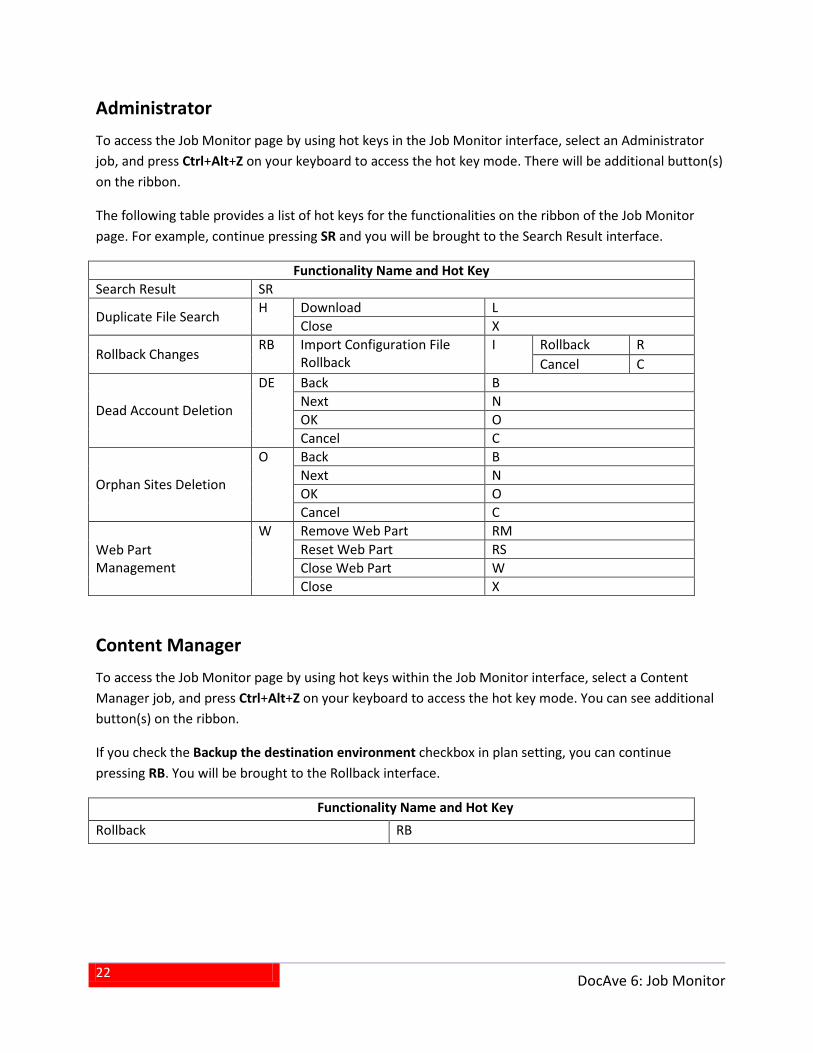
Administrator To access the Job Monitor page by using hot keys in the Job Monitor interface, select an Administrator job, and press Ctrl+Alt+Z on your keyboard to access the hot key mode. There will be additional button(s) on the ribbon.
The following table provides a list of hot keys for the functionalities on the ribbon of the Job Monitor page. For example, continue pressing SR and you will be brought to the Search Result interface.
Functionality Name and Hot Key Search Result SR
Duplicate File Search H Download L Close X
Rollback Changes RB Import Configuration File
Rollback I Rollback R
Cancel C
Dead Account Deletion
DE Back B Next N OK O Cancel C
Orphan Sites Deletion
O Back B Next N OK O Cancel C
Web Part Management
W Remove Web Part RM Reset Web Part RS Close Web Part W Close X
Content Manager To access the Job Monitor page by using hot keys within the Job Monitor interface, select a Content Manager job, and press Ctrl+Alt+Z on your keyboard to access the hot key mode. You can see additional button(s) on the ribbon.
If you check the Backup the destination environment checkbox in plan setting, you can continue pressing RB. You will be brought to the Rollback interface.
Functionality Name and Hot Key Rollback RB
23
DocAve 6: Job Monitor
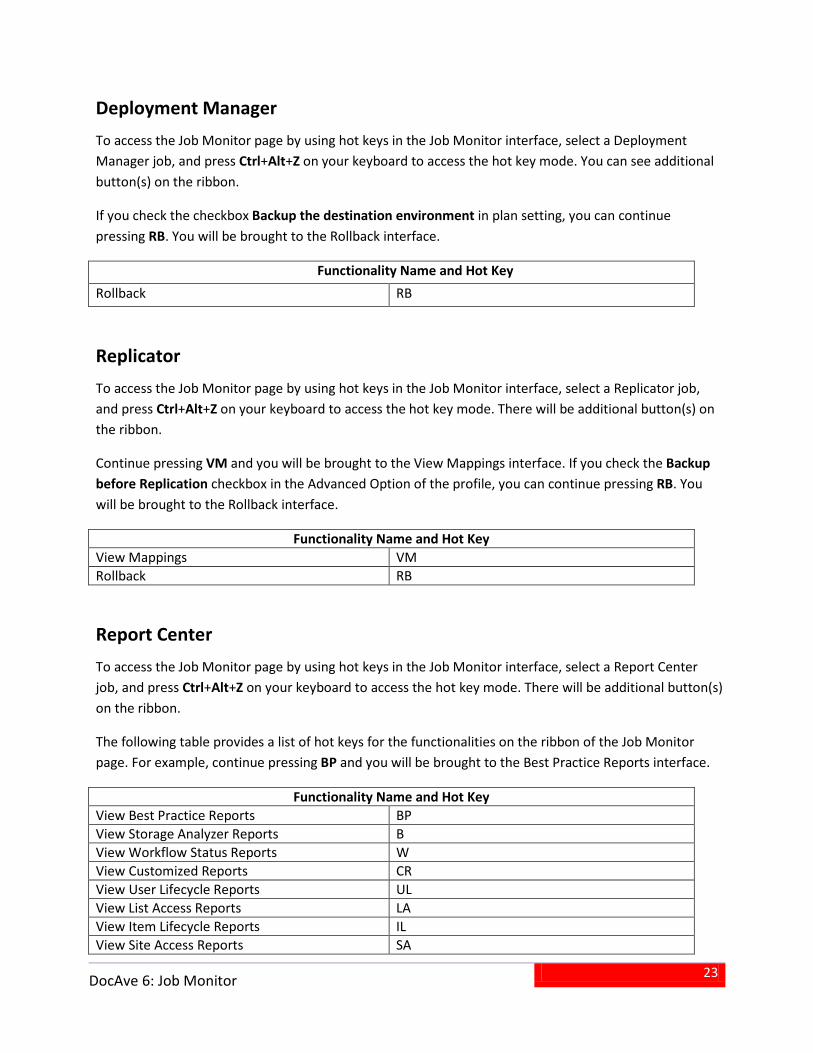
Deployment Manager To access the Job Monitor page by using hot keys in the Job Monitor interface, select a Deployment Manager job, and press Ctrl+Alt+Z on your keyboard to access the hot key mode. You can see additional button(s) on the ribbon.
If you check the checkbox Backup the destination environment in plan setting, you can continue pressing RB. You will be brought to the Rollback interface.
Functionality Name and Hot Key Rollback RB
Replicator To access the Job Monitor page by using hot keys in the Job Monitor interface, select a Replicator job, and press Ctrl+Alt+Z on your keyboard to access the hot key mode. There will be additional button(s) on the ribbon.
Continue pressing VM and you will be brought to the View Mappings interface. If you check the Backup before Replication checkbox in the Advanced Option of the profile, you can continue pressing RB. You will be brought to the Rollback interface.
Functionality Name and Hot Key View Mappings VM Rollback RB
Report Center To access the Job Monitor page by using hot keys in the Job Monitor interface, select a Report Center job, and press Ctrl+Alt+Z on your keyboard to access the hot key mode. There will be additional button(s) on the ribbon.
The following table provides a list of hot keys for the functionalities on the ribbon of the Job Monitor page. For example, continue pressing BP and you will be brought to the Best Practice Reports interface.
Functionality Name and Hot Key View Best Practice Reports BP View Storage Analyzer Reports B View Workflow Status Reports W View Customized Reports CR View User Lifecycle Reports UL View List Access Reports LA View Item Lifecycle Reports IL View Site Access Reports SA
24
DocAve 6: Job Monitor
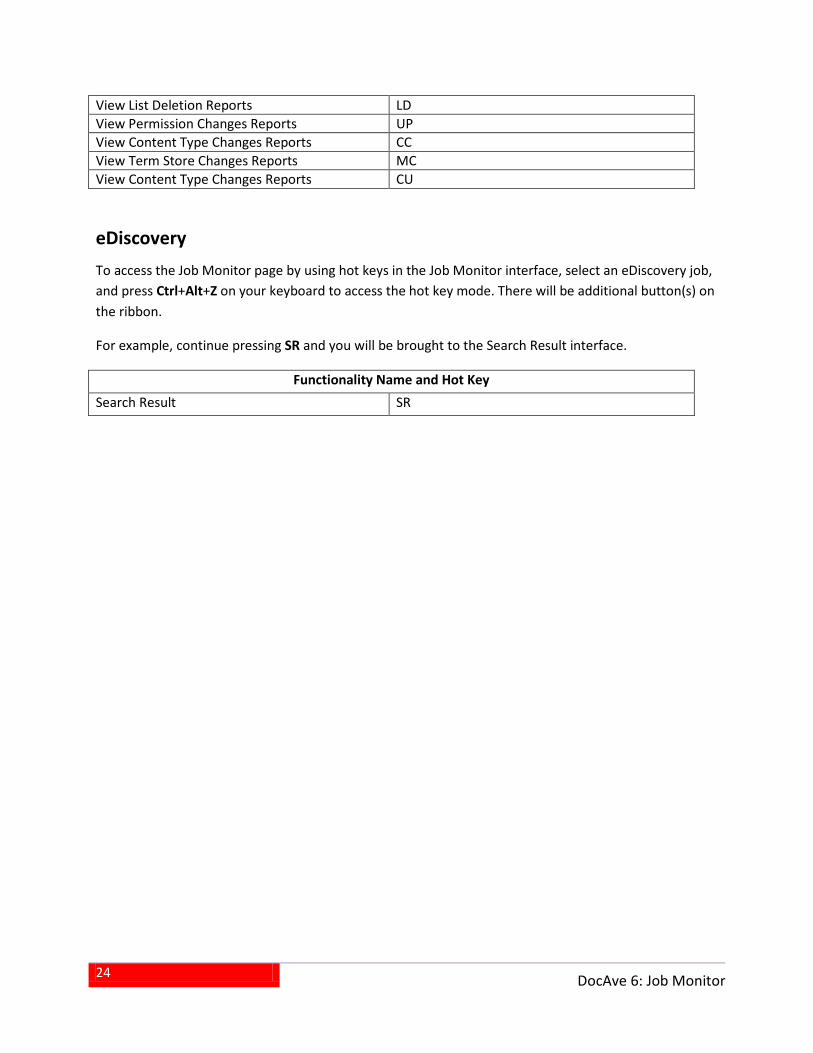
View List Deletion Reports LD View Permission Changes Reports UP View Content Type Changes Reports CC View Term Store Changes Reports MC View Content Type Changes Reports CU
eDiscovery To access the Job Monitor page by using hot keys in the Job Monitor interface, select an eDiscovery job, and press Ctrl+Alt+Z on your keyboard to access the hot key mode. There will be additional button(s) on the ribbon.
For example, continue pressing SR and you will be brought to the Search Result interface.
Functionality Name and Hot Key Search Result SR
25
DocAve 6: Job Monitor
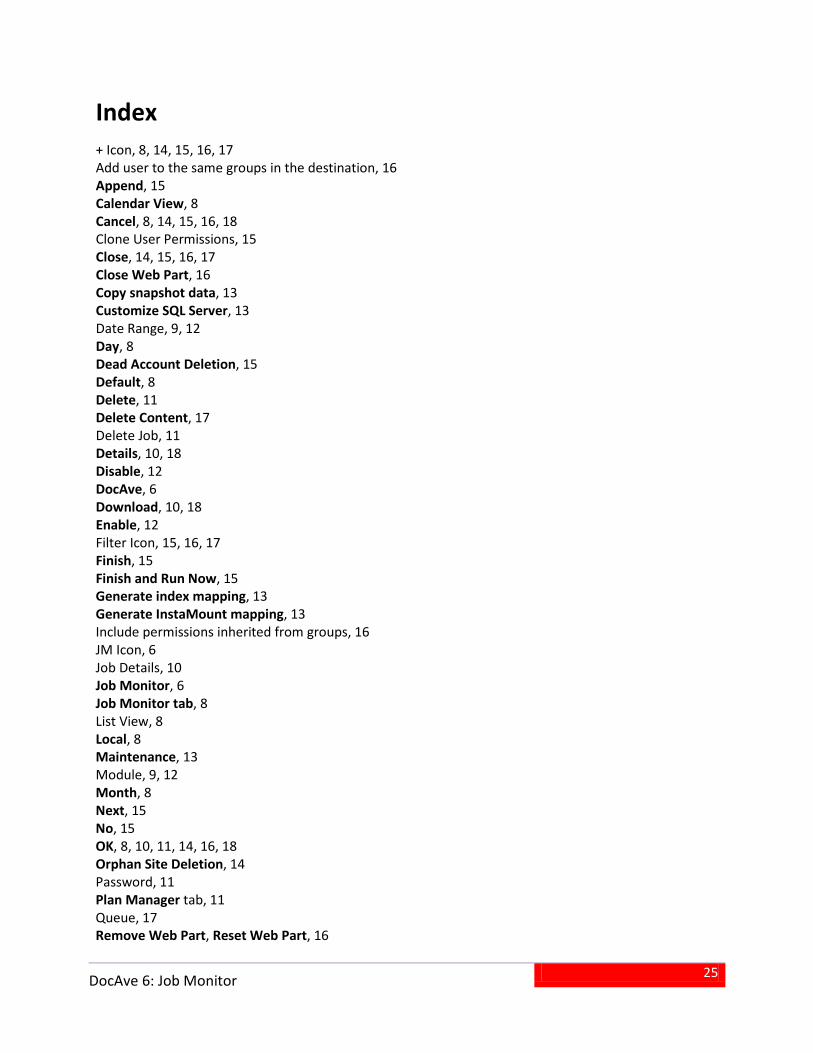
Index + Icon, 8, 14, 15, 16, 17 Add user to the same groups in the destination, 16 Append, 15 Calendar View, 8 Cancel, 8, 14, 15, 16, 18 Clone User Permissions, 15 Close, 14, 15, 16, 17 Close Web Part, 16 Copy snapshot data, 13 Customize SQL Server, 13 Date Range, 9, 12 Day, 8 Dead Account Deletion, 15 Default, 8 Delete, 11 Delete Content, 17 Delete Job, 11 Details, 10, 18 Disable, 12 DocAve, 6 Download, 10, 18 Enable, 12 Filter Icon, 15, 16, 17 Finish, 15 Finish and Run Now, 15 Generate index mapping, 13 Generate InstaMount mapping, 13 Include permissions inherited from groups, 16 JM Icon, 6 Job Details, 10 Job Monitor, 6 Job Monitor tab, 8 List View, 8 Local, 8 Maintenance, 13 Module, 9, 12 Month, 8 Next, 15 No, 15 OK, 8, 10, 11, 14, 16, 18 Orphan Site Deletion, 14 Password, 11 Plan Manager tab, 11 Queue, 17 Remove Web Part, Reset Web Part, 16

26
DocAve 6: Job Monitor
Replace, 15 Report Format, 10 Report Location, 11 Rollback, 17, 18 Rollback Changes, 16 Run Now, 11 Scheduled Job Monitor tab, 8 Search all pages, 9, 14, 15, 16, 17 Search current, 14 Search current page, 9, 15, 16, 17 Search Icon, 9 Search Result, 14, 16, 19 SQL Server for backup, 13 Start, 19 Stop, 11 Summary, 10, 17, 18 Time Zone, 8 UNC Path, 11 Use the Net Share path as the report location, 11 Username, 11 View BLOB Calculator, 18 View Customized Report, 19 View Details, 10, 18 View Item Life, 19 View List Access, 18 View List Deletion, 19 View Mapping, 17 View Site Access, 19 View User Life, 18 View Workflow Status Report, 18 Web Part Management, 16 Web Part Usage, 16 Week, 8 Yes, 15
27
DocAve 6: Job Monitor
Notices and Copyright Information Notice The materials contained in this publication are owned or provided by AvePoint, Inc. and are the property of AvePoint or its licensors, and are protected by copyright, trademark and other intellectual property laws. No trademark or copyright notice in this publication may be removed or altered in any way.
Copyright Copyright © 2012 AvePoint, Inc. All rights reserved. All materials contained in this publication are protected by United States copyright law and no part of this publication may be reproduced, modified, displayed, stored in a retrieval system, or transmitted in any form or by any means, electronic, mechanical, photocopying, recording or otherwise, without the prior written consent of AvePoint, 3 Second Street, Jersey City, NJ 07311, USA or, in the case of materials in this publication owned by third parties, without such third party’s consent.
Trademarks AvePoint®, DocAve®, the AvePoint logo, and the AvePoint Pyramid logo are registered trademarks of AvePoint, Inc. with the United States Patent and Trademark Office. These registered trademarks, along with all other trademarks of AvePoint used in this publication are the exclusive property of AvePoint and may not be used without prior written consent.
Microsoft, MS-DOS, Internet Explorer, Microsoft Office SharePoint Servers 2007/2010, SharePoint Portal Server 2003, Windows SharePoint Services, Windows SQL server, and Windows are either registered trademarks or trademarks of Microsoft Corporation.
Adobe Acrobat and Acrobat Reader are trademarks of Adobe Systems, Inc.
All other trademarks contained in this publication are the property of their respective owners and may not be used such party’s consent.
Changes The material in this publication is for information purposes only and is subject to change without notice. While reasonable efforts have been made in the preparation of this publication to ensure its accuracy, AvePoint makes no representation or warranty, expressed or implied, as to its completeness, accuracy, or suitability, and assumes no liability resulting from errors or omissions in this publication or from the use of the information contained herein. AvePoint reserves the right to make changes in the Graphical User Interface of the AvePoint software without reservation and without notification to its users.
AvePoint, Inc. 3 Second Street Jersey City, NJ 07311 USA