dipfit cpa111 operating instructions - endress+hauser
TRANSCRIPT
Products Solutions Services
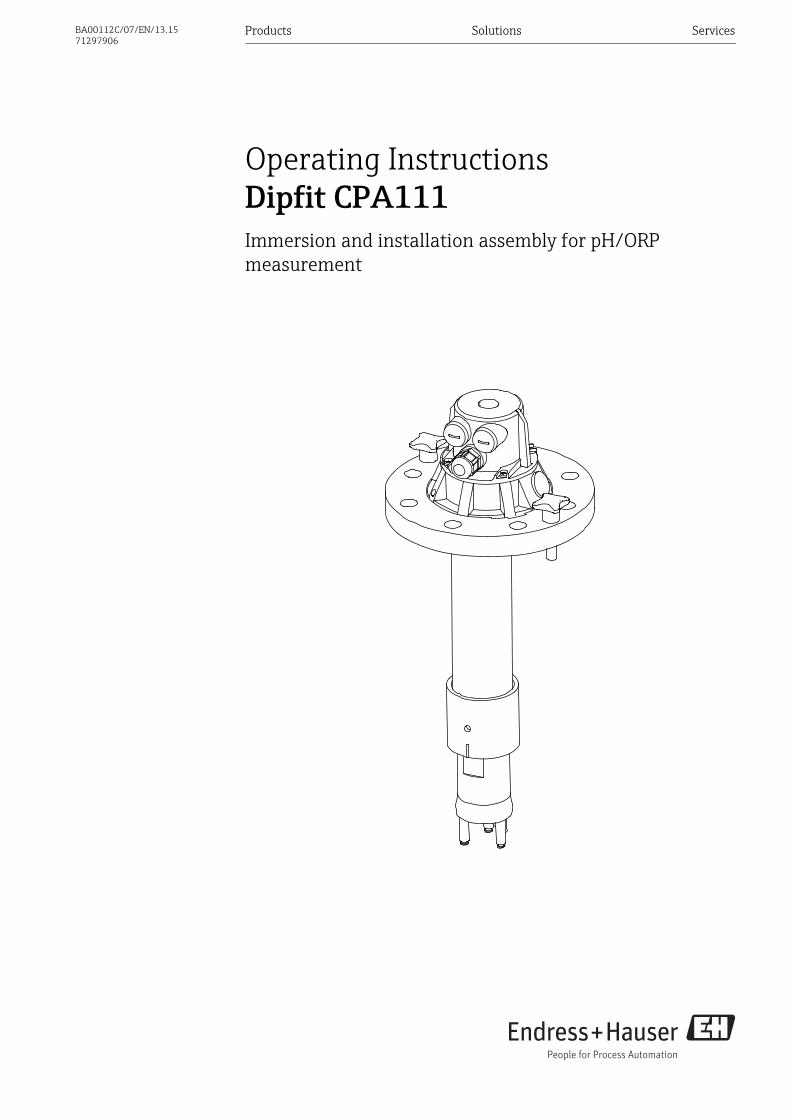
Operating InstructionsDipfit CPA111Immersion and installation assembly for pH/ORPmeasurement
BA00112C/07/EN/13.1571297906
Table of contents Dipfit CPA111
2 Endress+Hauser
Table of contents
1 Document information . . . . . . . . . . . . . . 31.1 Safety information . . . . . . . . . . . . . . . . . . . . . . 31.2 Symbols . . . . . . . . . . . . . . . . . . . . . . . . . . . . . . 3
2 Basic safety instructions . . . . . . . . . . . . 42.1 Requirements for personnel . . . . . . . . . . . . . . . 42.2 Designated use . . . . . . . . . . . . . . . . . . . . . . . . 42.3 Occupational safety . . . . . . . . . . . . . . . . . . . . . 42.4 Operational safety . . . . . . . . . . . . . . . . . . . . . . 52.5 Product safety . . . . . . . . . . . . . . . . . . . . . . . . . 5
3 Incoming acceptance and productidentification . . . . . . . . . . . . . . . . . . . . . . . 6
3.1 Incoming acceptance . . . . . . . . . . . . . . . . . . . . 63.2 Product identification . . . . . . . . . . . . . . . . . . . . 63.3 Scope of delivery . . . . . . . . . . . . . . . . . . . . . . . 7
4 Installation . . . . . . . . . . . . . . . . . . . . . . . . 84.1 Installation conditions . . . . . . . . . . . . . . . . . . . 84.2 Installing the assembly . . . . . . . . . . . . . . . . . 114.3 Installing the sensor . . . . . . . . . . . . . . . . . . . 144.4 Installing the spray cleaning system CPR31 . . 164.5 Post-installation check . . . . . . . . . . . . . . . . . . 17
5 Maintenance . . . . . . . . . . . . . . . . . . . . . . 185.1 Servicing the assembly . . . . . . . . . . . . . . . . . . 185.2 Cleaning the sensor . . . . . . . . . . . . . . . . . . . . 19
6 Repairs . . . . . . . . . . . . . . . . . . . . . . . . . . . 196.1 Return . . . . . . . . . . . . . . . . . . . . . . . . . . . . . . 196.2 Disposal . . . . . . . . . . . . . . . . . . . . . . . . . . . . 19
7 Accessories . . . . . . . . . . . . . . . . . . . . . . . 207.1 Installation accessories . . . . . . . . . . . . . . . . . 207.2 Seals . . . . . . . . . . . . . . . . . . . . . . . . . . . . . . . 207.3 Sensors . . . . . . . . . . . . . . . . . . . . . . . . . . . . . 217.4 Extension cable . . . . . . . . . . . . . . . . . . . . . . . 227.5 Calibration accessories . . . . . . . . . . . . . . . . . . 237.6 Chemoclean . . . . . . . . . . . . . . . . . . . . . . . . . . 24
8 Technical data . . . . . . . . . . . . . . . . . . . . 25
Index . . . . . . . . . . . . . . . . . . . . . . . . . . . . . . . . . . 26

Dipfit CPA111 Document information
Endress+Hauser 3
1 Document information
1.1 Safety information
Structure of information Meaning
LDANGERCauses (/consequences)Consequences of non-compliance(if applicable)‣ Corrective action
This symbol alerts you to a dangerous situation.Failure to avoid the dangerous situation will result in a fatal or seriousinjury.
LWARNINGCauses (/consequences)Consequences of non-compliance(if applicable)‣ Corrective action
This symbol alerts you to a dangerous situation.Failure to avoid the dangerous situation can result in a fatal or seriousinjury.
LCAUTIONCauses (/consequences)Consequences of non-compliance(if applicable)‣ Corrective action
This symbol alerts you to a dangerous situation.Failure to avoid this situation can result in minor or more serious injuries.
NOTICECause/situationConsequences of non-compliance(if applicable)‣ Action/note
This symbol alerts you to situations which may result in damage toproperty.
1.2 Symbols
Symbol Meaning
Additional information, tips
Permitted or recommended
Not permitted or not recommended
Reference to device documentation
Reference to page
Reference to graphic
Result of a step
Basic safety instructions Dipfit CPA111
4 Endress+Hauser
2 Basic safety instructions
2.1 Requirements for personnel• Installation, commissioning, operation and maintenance of the measuring system may
be carried out only by specially trained technical personnel.• The technical personnel must be authorized by the plant operator to carry out the
specified activities.• The electrical connection may be performed only by an electrical technician.• The technical personnel must have read and understood these Operating Instructions
and must follow the instructions contained therein.• Measuring point faults may be repaired only by authorized and specially trained
personnel.
Repairs not described in the Operating Instructions provided may only be carried outdirectly by the manufacturer or by the service organization.
2.2 Designated useThe assembly is suitable for universal use in water and wastewater applications. Thanks toits design, it can be used in pressurized systems (→ 25).
Use of the device for any purpose other than that described, poses a threat to the safety ofpeople and of the entire measuring system and is therefore not permitted.
The manufacturer is not liable for damage caused by improper or non-designated use.
2.3 Occupational safetyAs the user, you are responsible for complying with the following safety conditions:• Installation guidelines• Local standards and regulations
Dipfit CPA111 Basic safety instructions
Endress+Hauser 5
2.4 Operational safety1. Before commissioning the entire measuring point, verify that all connections are
correct. Ensure that electrical cables and hose connections are undamaged.
2. Do not operate damaged products, and safeguard them to ensure that they are notoperated inadvertently. Label the damaged product as defective.
3. If faults cannot be rectified:Take the products out of operation and safeguard them to ensure that they are notoperated inadvertently.
2.5 Product safetyThe product is designed to meet state-of-the-art safety requirements, has been tested, andleft the factory in a condition in which it is safe to operate. The relevant regulations andEuropean standards have been observed.

Incoming acceptance and product identification Dipfit CPA111
6 Endress+Hauser
3 Incoming acceptance and productidentification
3.1 Incoming acceptance1. Verify that the packaging is undamaged.
Notify your supplier of any damage to the packaging.Keep the damaged packaging until the matter has been settled.
2. Verify that the contents are undamaged. Notify your supplier of any damage to the delivery contents.
Keep the damaged products until the matter has been settled.
3. Check the delivery for completeness. Check it against the delivery papers and your order.
4. Pack the product for storage and transportation in such a way that it is protectedagainst impact and moisture. The original packaging offers the best protection.
The permitted ambient conditions must be observed (see "Technical data").
If you have any questions, please contact your supplier or your local sales center.
3.2 Product identification
3.2.1 NameplateThe nameplate provides you with the following information on your device:• Manufacturer identification• Order code• Extended order code• Serial number• Ambient and process conditions• Safety information and warnings
Compare the data on the nameplate with your order.
3.2.2 Product identification
Product pagewww.endress.com/cpa111
Interpreting the order codeThe order code and serial number of your product can be found in the following locations:• On the nameplate• In the delivery papers
Obtaining information on the product1. Go to the product page for your product on the Internet.
2. In the navigation area on the right-hand side, select "Check your device features"under "Device support". An additional window opens.
3. Enter the order code from the nameplate into the search field. You will receive information on each feature (selected option) of the order code.

Dipfit CPA111 Incoming acceptance and product identification
Endress+Hauser 7
3.3 Scope of deliveryThe delivery comprises:• Assembly in the version ordered• Operating Instructions
If you have any questions, please contact your supplier or your local sales center.
Installation Dipfit CPA111
8 Endress+Hauser
4 Installation
4.1 Installation conditions
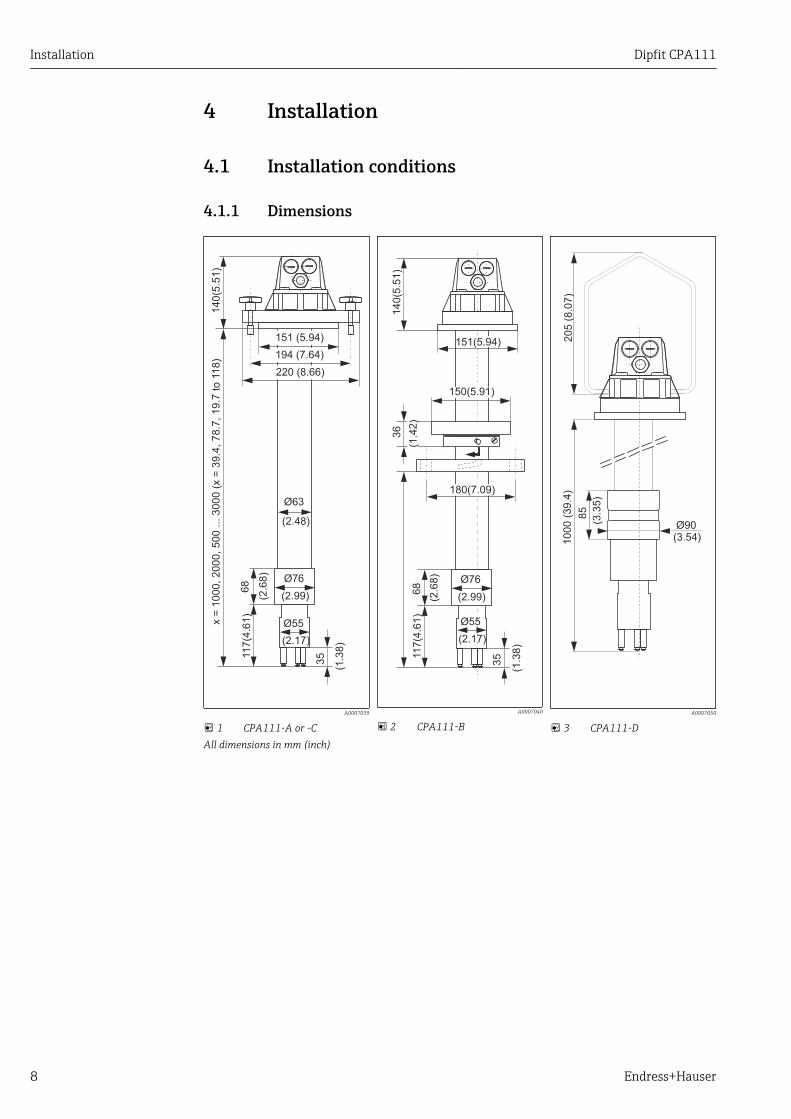
4.1.1 Dimensions140(5
.51)
117(4
.61)
68
(2.6
8)
Ø63
(2.48)
Ø76
(2.99)
Ø55
(2.17)
35
(1.3
8)
151 (5.94)
220 (8.66)
194 (7.64)
x =
1000, 2000, 500 ... 3
000
(x =
39.4
, 78.7
, 19.7
to 1
18)
A0007039
1 CPA111-A or -C
140(5
.51)
36
117(4
.61)
Ø76
(2.99)
68
(2.6
8)
Ø55
(2.17)
35
(1.3
8)
151(5.94)
150(5.91)
180(7.09)
(1.4
2)
A0007040
2 CPA111-B
205 (
8.0
7)
85
(3.3
5)
Ø90(3.54)1
000 (
39.4
)
A0007050
3 CPA111-DAll dimensions in mm (inch)

Dipfit CPA111 Installation
Endress+Hauser 9
Ø18(0.71)
24(0
.94)133(5.24)
180(7.09)220(8.66)
A0007041
4 Pressurized flange DN 100for CPA111-C
a
a
194(7.64)
133(5.24)
180(7.09)220(8.66)
Ø18(0.71)
24(0
.94)
A0007046
5 Flange DN 100 forCPA111-A/B
All dimensions in mm (inch) a = bore holes for cross formed screws

Installation Dipfit CPA111
10 Endress+Hauser
4.1.2 Measuring system
5
A0027136
6 Example of a measuring system1 Assembly holder CYH112 (with chain) 4 Sensor CPS11D (pH)2 Sensorkabel CYK10 5 Sensor CPS12D (ORP)3 Transmitter CM442 with weather protection
cover6 Assembly CPA111-D (with suspension bracket)

Dipfit CPA111 Installation
Endress+Hauser 11
4.2 Installing the assembly
4.2.1 Versions with a flange
1 2
3
4
5
6
7
8
910
11
12
13
14
15
16
17
A0007047
7 Version A and C with flange DN 100
1 Phillips screw (x 4)2 Perforation for electrolyte vessel CPY73 Gland Pg 13.54 Quick connect coupling for Chemoclean cleaning5 Assembly pipe6 Bore hole for wetting cup7 Dummy plug8 O-ring for electrode installation9 Chemoclean CPR30 accessory10 Potential matching pin11 Electrode holder (3 mounting slots)12 O-ring13 AMP connector for PML connection14 Flange DN 100, A: standard C: pressurized flange15 Cross formed screws M10 (not for pressurized
version)16 Assembly head17 Dummy plug Pg 16
1 2
3
45
6
A0007048
8 Version B with adjustable flange DN 100
1 Adjustable flange adapter (2 half-shells)2 O-ring for tolerance compensation3 Tensioning screws (x 2)4 Flange DN 1005 Sensor holder6 Bayonet lock
Installing the assembly with flange DN 100 (version A and C)
‣ Use the drawing as a guide (→ 7).

Installation Dipfit CPA111
12 Endress+Hauser
Installing the assembly with adjustable flange DN 100 (version B)
1 2
34
A0007049
9 Adjustable flange adapter
1234
Phillips screwsHalf-shellsAssembly pipe"Final position" marker
1. Mount the flange DN 100 on the frame.
2. Fit the half-shells (→ 9, item 2) of the adapter in the desired position on the pipe.
3. Tighten the half-shells with the two Phillips screws (item 1).
4. Insert the O-ring into the O-ring groove (adjustable flange adapter on outside).
5. Insert the assembly into the ready-mounted flange DN 100.
6. Holding the assembly by the assembly head, screw the assembly clockwise into thebayonet lock as far as the "final position" marker (item 4).
Removing the assembly1. Leave the mounted flange DN 100 on the frame.
2. Holding the assembly by the assembly head, screw the assembly counter-clockwiseout of the bayonet lock and remove the assembly from the medium.
Dipfit CPA111 Installation
Endress+Hauser 13
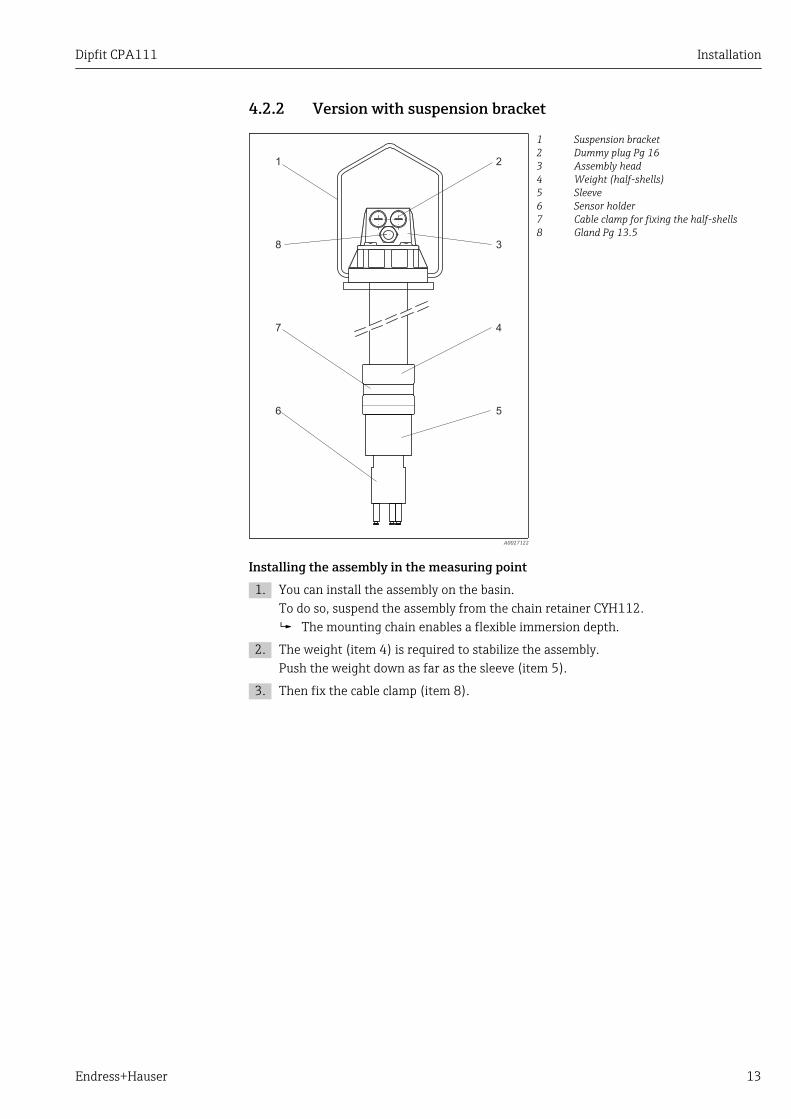
4.2.2 Version with suspension bracket
1 2
3
4
56
7
8
A0027122
12345678
Suspension bracketDummy plug Pg 16Assembly headWeight (half-shells)SleeveSensor holderCable clamp for fixing the half-shellsGland Pg 13.5
Installing the assembly in the measuring point1. You can install the assembly on the basin.
To do so, suspend the assembly from the chain retainer CYH112. The mounting chain enables a flexible immersion depth.
2. The weight (item 4) is required to stabilize the assembly.Push the weight down as far as the sleeve (item 5).
3. Then fix the cable clamp (item 8).
Installation Dipfit CPA111
14 Endress+Hauser
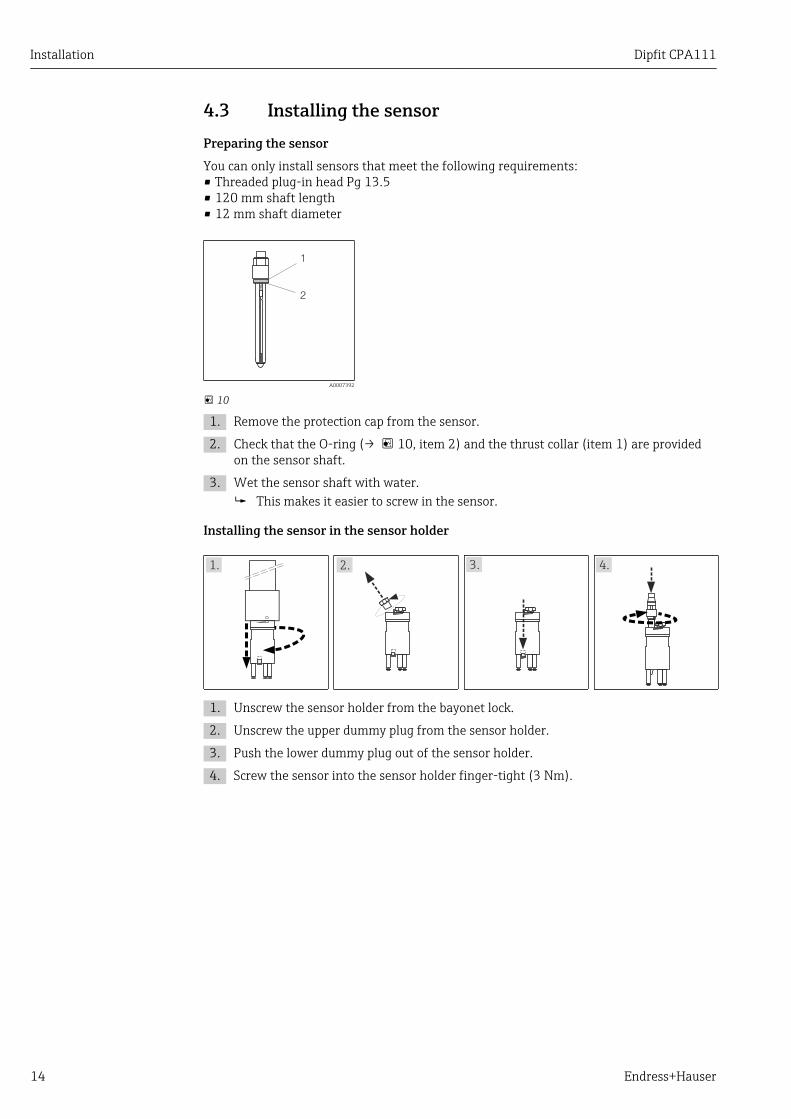
4.3 Installing the sensorPreparing the sensorYou can only install sensors that meet the following requirements:• Threaded plug-in head Pg 13.5• 120 mm shaft length• 12 mm shaft diameter
2
1
A0007392
10
1. Remove the protection cap from the sensor.
2. Check that the O-ring (→ 10, item 2) and the thrust collar (item 1) are providedon the sensor shaft.
3. Wet the sensor shaft with water. This makes it easier to screw in the sensor.
Installing the sensor in the sensor holder
1. 2. 3. 4.
1. Unscrew the sensor holder from the bayonet lock.
2. Unscrew the upper dummy plug from the sensor holder.
3. Push the lower dummy plug out of the sensor holder.
4. Screw the sensor into the sensor holder finger-tight (3 Nm).

Dipfit CPA111 Installation
Endress+Hauser 15
Mounting the sensor cable
1. 2. 3.
100(3.94)
1. Unscrew the cover from the assembly head.
2. Push the connector side of the measuring cable through the assembly pipe.
3. Screw the connector of the measuring cable onto the sensor head.
4. Only for analog sensors with PML:Attach the connector of the potential matching cable to the AMP connector.
5. Screw the electrode holder into the bayonet lock.
6. Push the other end of the measuring cable through the Pg 13.5 cable gland. Leaveapprox. 10 cm of measuring cable in the assembly pipe (is required to remove thesensor).
7. Screw the cover onto the assembly head.
8. Tighten the Pg gland.
Refer to the sensor Operating Instructions for information on how to connect thesensor to the transmitter.
Installation Dipfit CPA111
16 Endress+Hauser
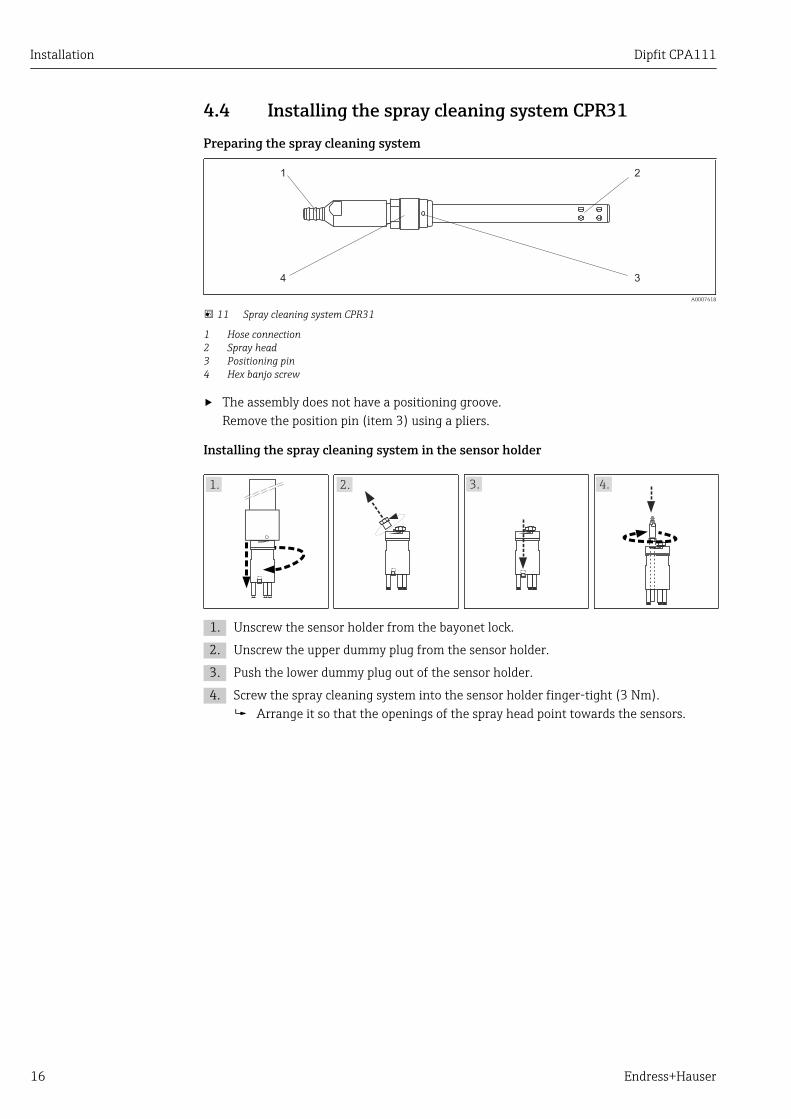
4.4 Installing the spray cleaning system CPR31Preparing the spray cleaning system
1 2
34
A0007418
11 Spray cleaning system CPR31
1 Hose connection2 Spray head3 Positioning pin4 Hex banjo screw
‣ The assembly does not have a positioning groove.Remove the position pin (item 3) using a pliers.
Installing the spray cleaning system in the sensor holder
1. 2. 3.
1. Unscrew the sensor holder from the bayonet lock.
2. Unscrew the upper dummy plug from the sensor holder.
3. Push the lower dummy plug out of the sensor holder.
4. Screw the spray cleaning system into the sensor holder finger-tight (3 Nm). Arrange it so that the openings of the spray head point towards the sensors.

Dipfit CPA111 Installation
Endress+Hauser 17
Connecting the water hose
1.
1. Unscrew the cover from the assembly head.
2. Replace a dummy plug Pg 16 with a cable gland Pg 16.
3. Push the hose through the Pg 16 gland from below and through the assembly pipe.
4. Fit the hose onto the hose connection of the spray cleaning system. Secure the hose with a hose clip.
5. Screw the electrode holder into the bayonet lock.
6. Screw the cover onto the assembly head.
7. Tighten the Pg 16 gland.
4.5 Post-installation check1. After mounting, check all the connections to ensure they are secure and leak-tight.
2. Make sure that the hose of the (optional) spray cleaning system cannot be removedunless force is applied. This pipe is in open contact with the medium and must besecured accordingly.
3. Check the hoses for damage.
Maintenance Dipfit CPA111
18 Endress+Hauser
5 MaintenanceLWARNING
Risk of injury if medium escapes‣ Before every maintenance task make sure that the process pipe or container is empty
and rinsed.
Take all the necessary precautions in time to ensure the operational safety and reliabilityof the entire measuring system.
NOTICEEffects on process and process control‣ When carrying out any work on the system, take into account possible repercussions
for process control or the process itself.‣ For your own safety, only use genuine accessories. With genuine parts, the function,
accuracy and reliability are also ensured after maintenance work.
5.1 Servicing the assemblyThe assembly must be serviced at regular intervals. The frequency and type of servicingdepend on the medium.
1. Remove buildup on the assembly from time to time.
2. Keep O-rings and sealing surfaces clean.
3. Replace damaged O-rings. Versehen Sie trockene O-Ringe mit einem dünnen Fettfilm (z.B. Syntheso Glep).
4. Replace damaged parts of the assembly.
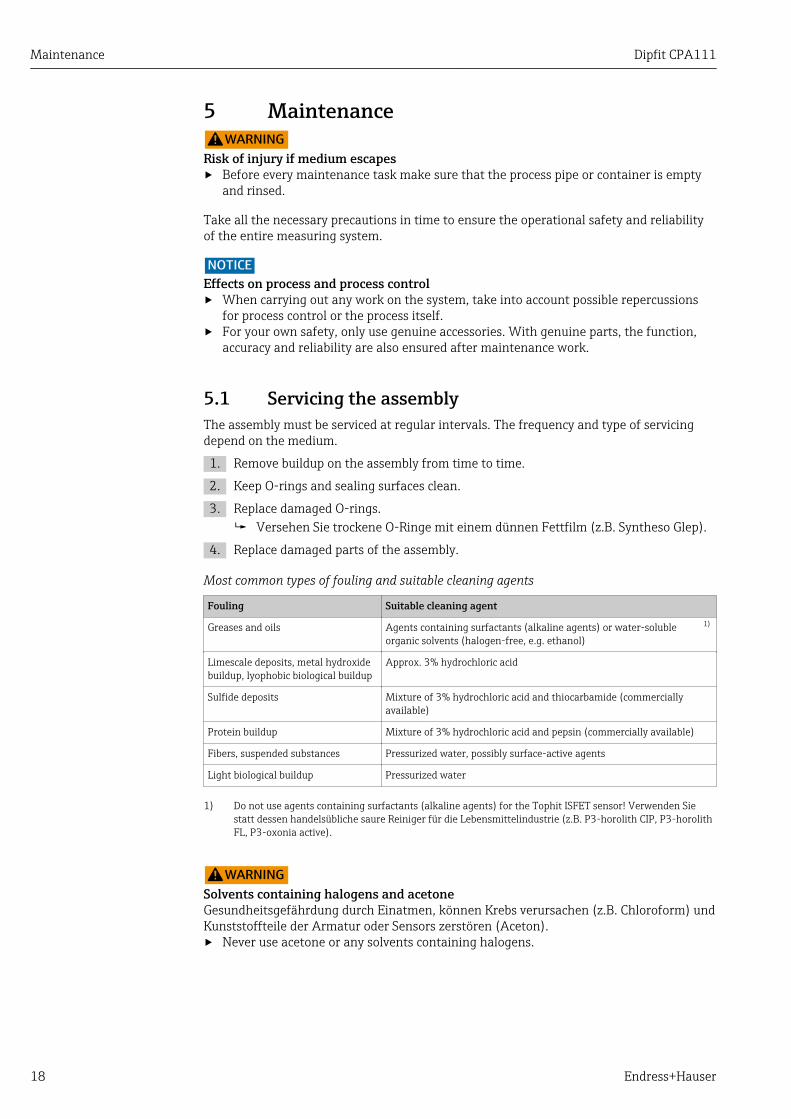
Most common types of fouling and suitable cleaning agents
Fouling Suitable cleaning agent
Greases and oils Agents containing surfactants (alkaline agents) or water-solubleorganic solvents (halogen-free, e.g. ethanol)
1)
Limescale deposits, metal hydroxidebuildup, lyophobic biological buildup
Approx. 3% hydrochloric acid
Sulfide deposits Mixture of 3% hydrochloric acid and thiocarbamide (commerciallyavailable)
Protein buildup Mixture of 3% hydrochloric acid and pepsin (commercially available)
Fibers, suspended substances Pressurized water, possibly surface-active agents
Light biological buildup Pressurized water
1) Do not use agents containing surfactants (alkaline agents) for the Tophit ISFET sensor! Verwenden Siestatt dessen handelsübliche saure Reiniger für die Lebensmittelindustrie (z.B. P3-horolith CIP, P3-horolithFL, P3-oxonia active).
LWARNINGSolvents containing halogens and acetoneGesundheitsgefährdung durch Einatmen, können Krebs verursachen (z.B. Chloroform) undKunststoffteile der Armatur oder Sensors zerstören (Aceton).‣ Never use acetone or any solvents containing halogens.
Dipfit CPA111 Repairs
Endress+Hauser 19
5.2 Cleaning the sensor‣ Clean the ORP electrodes mechanically only and always use water. Never clean with
chemical cleaning agents. Such cleaning agents cause a potential to build up at theelectrode which takes a few hours to dissipate. The potential causes errors in themeasurement.
‣ Do not use abrasive cleaners. These can cause irreparable damage to the sensor.‣ Where necessary, perform a new calibration following the cleaning process.
You must clean the sensor:• Before every calibration• Regularly during operation• Before returning it for repairs
You can remove the sensor and clean it manually. Alternatively you can use theChemoclean automatic spray cleaning system for cyclic sensor cleaning. The completecleaning system includes:• Spray head CPR30• Cleaning injector CYR10• Cleaning control, e.g. internally via transmitter Liquisys CPM223/253 with a Plus
Package.
6 Repairs
6.1 ReturnThe product must be returned if repairs or a factory calibration are required, or if thewrong product was ordered or delivered. As an ISO-certified company and also due to legalregulations, Endress+Hauser is obliged to follow certain procedures when handling anyreturned products that have been in contact with medium.
To ensure swift, safe and professional device returns, please read the return proceduresand conditions at www.endress.com/support/return-material.
6.2 DisposalThe device contains electronic components and must therefore be disposed of inaccordance with regulations on the disposal of electronic waste.
Observe the local regulations.

Accessories Dipfit CPA111
20 Endress+Hauser
7 AccessoriesThe following are the most important accessories available at the time thisdocumentation was issued. For accessories not listed here, please contact your serviceor sales office.
7.1 Installation accessoriesFlexdip CYH112• Modular holder system for sensors and assemblies in open basins, channels and tanks• For Flexdip CYA112 water and wastewater assemblies• Can be affixed anywhere: on the ground, on the capstone, on the wall or directly onto
railings.• Stainless steel version• Product Configurator on the product page: www.endress.com/cyh112
Technical Information TI00430C
Mounting frameFor CPA111, CPA510, CPA530 and CLA111• Material: stainless steel 1.4301 (AISI 304)• Order number: 50066561
300 (11.8)300 (
11.8
)
165 (6.50)
52.5 (2.07)
30 (
1.1
8)
40 (
1.5
7)
10 (0.39) 10 (0.39)
10 (
0.3
9)
30 (1.18)
2 x M10
144 (5.67)
4 x Ø9 (0.35)150 (5.91)35 (1.38)
150 (
5.9
1)
10 (
0.3
9)
10 (
0.3
9)
7.5
(0.3
0)
15 (0.59)
A0007060
12 Mounting frame in mm (inch)
Adjustable flange adapter DN 100• For CPA111 and CLA111 for variable immersion depths• Order number: 50070514
Flange DN 100, unpressurized• For CPA111 and CLA111 suitable for adjustable flange adapter• Order number: 50066632
7.2 SealsO-ring set for CPA111• Material: EPDM• Order number: 50091993
Dipfit CPA111 Accessories
Endress+Hauser 21
7.3 Sensors
7.3.1 Glass electrodesOrbisint CPS11D/ CPS11• pH electrode for process technology• Optional SIL version for connecting to SIL transmitter• With dirt-repellent PTFE diaphragm• Product Configurator on the product page: www.endress.com/cps11d or
www.endress.com/cps11
Technical Information TI00028C
Ceraliquid CPS41D/ CPS41• pH electrode with ceramic junction and KCl liquid electrolyte• Product Configurator on the product page: www.endress.com/cps41d or
www.endress.com/cps41
Technical Information TI00079C
Ceragel CPS71D/ CPS71• pH electrode with double-chamber reference system and integrated bridge electrolyte• Product Configurator on the product page: www.endress.com/cps71d or
www.endress.com/cps71
Technical Information TI00245C
Orbipore CPS91D/ CPS91• pH electrode with open aperture for media with high dirt load• Product Configurator on the product page: www.endress.com/cps91d or
www.endress.com/cps91
Technical Information TI00375C
Orbisint CPS12D/ CPS12• ORP sensor for process technology• Product Configurator on the product page: www.endress.com/cps12d or
www.endress.com/cps12
Technical Information TI00367C
Ceraliquid CPS42D/ CPS42• ORP electrode with ceramic junction and KCl liquid electrolyte• Product Configurator on the product page: www.endress.com/cps42d or
www.endress.com/cps42
Technical Information TI00373C
Ceragel CPS72D/ CPS72• ORP electrode with double-chamber reference system and integrated bridge electrolyte• Product Configurator on the product page: www.endress.com/cps72d or
www.endress.com/cps72
Technical Information TI00374C
Orbipore CPS92D/ CPS92• ORP electrode with open aperture for media with high dirt load• Product Configurator on the product page: www.endress.com/cps92d or
www.endress.com/cps92
Technical Information TI00435C

Accessories Dipfit CPA111
22 Endress+Hauser
7.3.2 ISFET sensorsTophit CPS441D/ CPS441• Sterilizable ISFET sensor for low-conductivity media• Liquid KCl electrolyte• Product Configurator on the product page: www.endress.com/cps441d or
www.endress.com/cps441
Technical Information TI00352C
Tophit CPS471D/ CPS471• Sterilizable and autoclavable ISFET sensor for food and pharmaceutics, process
engineering• Water treatment and biotechnology• Product Configurator on the product page: www.endress.com/cps471d or
www.endress.com/cps471
Technical Information TI00283C
Tophit CPS491D/ CPS491• ISFET sensor with open aperture for media with high dirt load• Product Configurator on the product page: www.endress.com/cps491d or
www.endress.com/cps491
Technical Information TI00377C
7.3.3 Combined sensorsMemosens CPS16D• Combined pH/ORP sensor for process technology• With dirt-repellent PTFE diaphragm• With Memosens technology• Product Configurator on the product page: www.endress.com/cps16D
Technical Information TI00503C
Memosens CPS76D• Combined pH/ORP sensor for process technology• Hygienic and sterile applications• With Memosens technology• Product Configurator on the product page: www.endress.com/cps76d
Technical Information TI00506C
Memosens CPS96D• Combined pH/ORP sensor for chemical processes• With poison-resistant reference with ion trap• With Memosens technology• Product Configurator on the product page: www.endress.com/cps96d
Technical Information TI00507C
7.4 Extension cableMemosens data cable CYK11• Extension cable for digital sensors with Memosens protocol• Product Configurator on the product page: www.endress.com/cyk11
Technical Information TI00118C

Dipfit CPA111 Accessories
Endress+Hauser 23
7.5 Calibration accessories
Wetting cup for CPA111• Prevents the sensors from drying out if water level is too low• For use in open vessels, tanks and channels• Material: PP• Order number: 50066569
305 / 12.0Ø90 /
3.54
Ø75.6/
2.98
96 /
3.78
204 / 8
.03
185 / 7
.28
338/
13.3
1
A0007058
13 Dimensions in mm (inch)
Calibration cap for CPA111• For the calibration of pH/ORP electrodes• Temporary fastening capability to spacer bolts of the electrode holder• Material: PP• Order number: 50066570
Ø60.5 / 2.38
45 / 1
.77
A0007059
14 Dimensions in mm (inch)

Accessories Dipfit CPA111
24 Endress+Hauser
7.6 Chemoclean
Chemoclean CPR30
48(1.89)
Ø10(0.39)
32(1
.26)
~70
(2.76)
Automatic spray cleaning system for cleaning the sensorsOrder according to product structure
Materials in contact with the medium
Spray head PP-GF20
O-rings EPDM / VITON
Operating data
Process pressure Max. 4 bar (58 psi) absolute, at 20 °C(68 °F)
Process temperature Max. 80 °C (176 °F) at ambientpressure
Cleaner pressure 4 to 6 bar (58 to 87 psi) absolute, at20 °C (68 °F)
CPR31
Materials in contact with the medium
Spray head, check valve PVDF
O-rings EPDM / VITON
Hose EPDM, reinforced
Operating data
Process pressure Max. 8 bar (116 psi) absolute, at 50°C (122 °F)
Process temperature Max. 120 °C (248 °F) at ambientpressure
Process pressure when cleaning Max. 3 bar (43 psi) absolute
Cleaner pressure 3 to 6 bar (43 to 87 psi) absolute, at20 °C (68 °F)
Cleaner temperature Max. 30 °C (86 °F)

Dipfit CPA111 Technical data
Endress+Hauser 25
8 Technical data
8.1 Environment
Ambient temperaturerange
-10 to +80 °C (+10 to +180 °F)
8.2 Process
Process temperature -10 to +80 °C (+10 to +180 °F)
Process pressure CPA111-A/B/D UnpressurizedCPA111-C Max. 5 bar (72 psi) abs. at 20 °C (68 °F),
unpressurized up to 80 °C (176 °F)
8.3 Mechanical construction
Dimensions → 8
Weight Approx. 4.0 kg (8.8 lbs)
Materials Sensor holder PP-GF 20Immersion tube PPO-ring VITONOnly version CPA111-D:Half-shells Cast iron, PVC-coatedCable clamp Stainless steel 1.4401 (AISI 316)
Cable entries 1 x Pg 13.5 and 2 x Pg 16
Sensors suitable for use 12 mm glass electrodes, ISFET sensors and combined sensors
Immersion depth Standard 1000 mm (39.4 inch), 2000 mm (78.8 inch)Other length 500 to 3000 mm (19.7 to 118 inch)
Process connections CPA111-A Flange DN 100, additionally with captive crossformed screws
CPA111-B Adjustable flange DN 100CPA111-C Pressurized flange DN 100CPA111-D Stainless steel suspension bracket (1.4571 (AISI 316
Ti))
Index Dipfit CPA111
26 Endress+Hauser
Index
AAmbient temperature range . . . . . . . . . . . . . . . . . . . 25Assembly
Installation . . . . . . . . . . . . . . . . . . . . . . . . . . . . . 11Servicing . . . . . . . . . . . . . . . . . . . . . . . . . . . . . . . 18
CCheck
Installation . . . . . . . . . . . . . . . . . . . . . . . . . . . . . 17Chemoclean . . . . . . . . . . . . . . . . . . . . . . . . . . . . 16, 24
DDesignated use . . . . . . . . . . . . . . . . . . . . . . . . . . . . . . 4Disposal . . . . . . . . . . . . . . . . . . . . . . . . . . . . . . . . . . 19
IIncoming acceptance . . . . . . . . . . . . . . . . . . . . . . . . . 6Installation
Check . . . . . . . . . . . . . . . . . . . . . . . . . . . . . . . . . . 17Installation conditions . . . . . . . . . . . . . . . . . . . . . . 8Installing the assembly . . . . . . . . . . . . . . . . . . . . . 11Sensor . . . . . . . . . . . . . . . . . . . . . . . . . . . . . . . . . 14
Installation conditionsDimensions . . . . . . . . . . . . . . . . . . . . . . . . . . . . . . 8Measuring system . . . . . . . . . . . . . . . . . . . . . . . . 10
MMaintenance . . . . . . . . . . . . . . . . . . . . . . . . . . . . . . . 18
NNameplate . . . . . . . . . . . . . . . . . . . . . . . . . . . . . . . . . 6
PProcess pressure . . . . . . . . . . . . . . . . . . . . . . . . . . . . 25Process temperature . . . . . . . . . . . . . . . . . . . . . . . . . 25Product identification . . . . . . . . . . . . . . . . . . . . . . . . . 6
RRepairs . . . . . . . . . . . . . . . . . . . . . . . . . . . . . . . . . . . 19Return . . . . . . . . . . . . . . . . . . . . . . . . . . . . . . . . . . . 19
SSafety information . . . . . . . . . . . . . . . . . . . . . . . . . . . 3Safety instructions . . . . . . . . . . . . . . . . . . . . . . . . . . . . 4Scope of delivery . . . . . . . . . . . . . . . . . . . . . . . . . . . . . 7Seals . . . . . . . . . . . . . . . . . . . . . . . . . . . . . . . . . . . . . 20Sensor
Accessories . . . . . . . . . . . . . . . . . . . . . . . . . . . . . 21Cleaning . . . . . . . . . . . . . . . . . . . . . . . . . . . . . . . 19Installing . . . . . . . . . . . . . . . . . . . . . . . . . . . . . . . 14
Suspension bracket . . . . . . . . . . . . . . . . . . . . . . . . . . 13Symbols . . . . . . . . . . . . . . . . . . . . . . . . . . . . . . . . . . . 3
TTechnical data
Environment . . . . . . . . . . . . . . . . . . . . . . . . . . . . 25Mechanical construction . . . . . . . . . . . . . . . . . . . . 25
Process . . . . . . . . . . . . . . . . . . . . . . . . . . . . . . . . 25
UUse . . . . . . . . . . . . . . . . . . . . . . . . . . . . . . . . . . . . . . . 4


www.addresses.endress.com
*71297906*71297906