digital key telephone system user guide - cts home
TRANSCRIPT
●●●● aria–24IP DIGITAL KEY TELEPHONE SYSTEM USER’S GUIDE
1
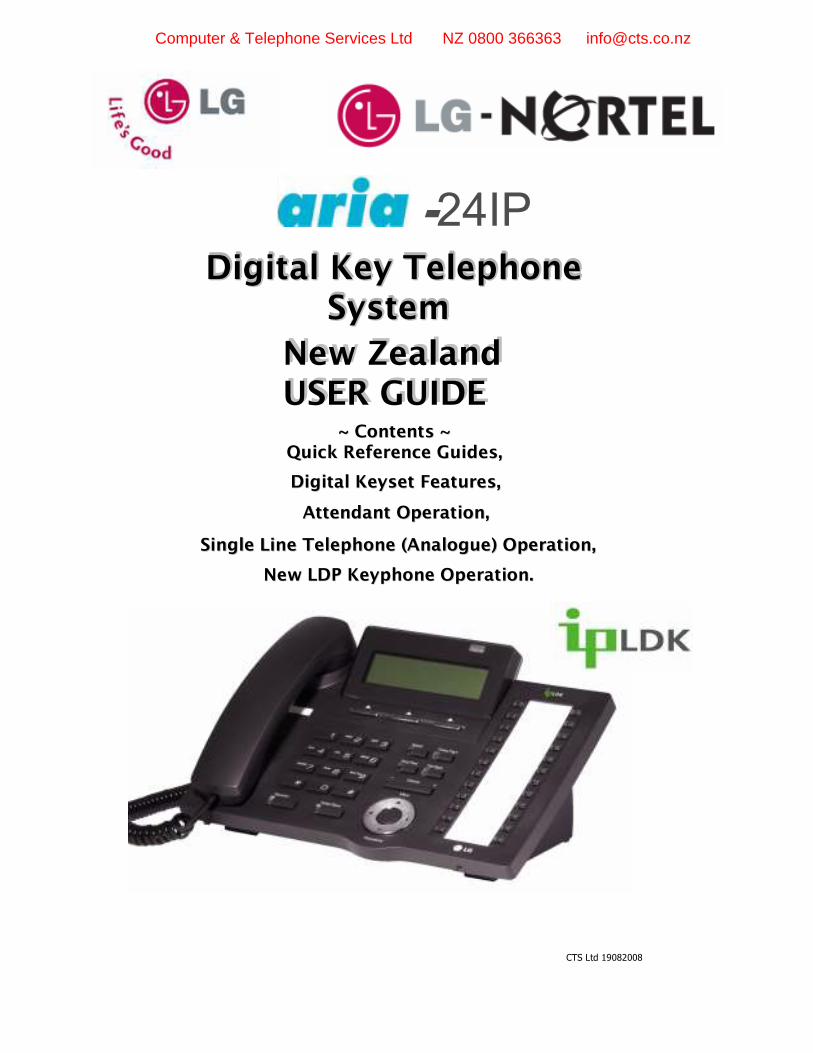
New ZealandUSER GUIDENew ZealandUSER GUIDE
~ Contents ~ ~ Contents ~
Quick Reference Guides,Quick Reference Guides,
Digital Keyset Features,Digital Keyset Features,Digital Keyset Features,
Attendant Operation,Attendant OperationAttendant Operation,
Single Line Telephone (Analogue) Operation,Single Line Telephone (Analogue) Operation,Single Line Telephone (Analogue) Operation,
Digital Key TelephoneDigital Key Telephone
System System
CTS Ltd 19082008
-24IP
New LDP Keyphone Operation.New LDP Keyphone Operation.
Digital Key TelephoneDigital Key Telephone
System System
Computer & Telephone Services Ltd NZ 0800 366363 [email protected]

●●●● aria–24IP DIGITAL KEY TELEPHONE SYSTEM USER’S GUIDE
2
ariaaria--24IP24IP
NB: Although every effort is made to keep this Guide up to date, Features and Functions are subject to change without notice. An inclusion of a feature or function in this guide does not imply it is operational on your system. Some features require specific hardware or software installation.
Please check with your aria dealer for further details.
A list of authorised aria Dealers near you can be found at www.lgaria.co.nz , through the `Who Sells Aria` link.
The The ariaaria 2424--IP Key Service Unit. (With side covers)IP Key Service Unit. (With side covers)

●●●● aria–24IP DIGITAL KEY TELEPHONE SYSTEM USER’S GUIDE
3
Quick Reference Guide ……..............................................................................................................……. LDP series Digital Keyset Family ……................................................................................................……. LDP Keyset Programming Menu.......................................................................................................……. LDP Keyset Navigation Key Programming Menu..................................................................................
Answering & Making CO Calls ………………………………………………………………………………….Station Features …………………………………………………………………………………………………..System features ……………………………………………………………………………………………………Station Key (Flex Button) Programming ………………………………………………………………………VMIB (In System Voice Messaging Board) User Guide …………………………………………………….
Answering & Making CO (Outside Line) CallsAnswering an Outside CO (Line) Call ...........................................................................................………….Call Hold ………………………………………………………………………………………………………………Call Park ………………….................................................................................................…………………...
Call Transfer .................................................................................................................………………………Dial By Name ……....................................................................................................................……………..Flash to Line ……….................................................................................................................……………..Last Number Redial ..............................................................................................…….......………………….Making an Outside CO (Line) Call ...................................................................................................…........Queueing to a Busy CO Line ........................................................................................................…………Saving a Dialed Number .....................................................................................................................……..Storing & using Speed Dial Numbers ..........................................................................................................
Universal Night Answer........................................................................................................………………..
Station Features Account Code Entry .............................................................................................................................…...Background Music (BGM) Selection .....................................................................................................…..Call Forward ………………...................................................................................................................…..Call Pickup; Directed & Group Pickup ....................................................................................….…………..Camp On (Call Wait) ………..................................................................................................................…...Conference Calling .................................................................................................………………………….
Dial By Name ……………………………..................................................................................................…..Do Not Disturb ……...............................................................................................................................…...Forced Hands Free Mode .....................................................................................................................…...Hands Free (On Hook) Dialing ...........................................................................................................…….Intercom Answer Mode ........................................................................................................................…...Intercom Calls; Making, Answering & Putting Calls on Hold ................................................……………….Intercom Group (Hunt group) Calling .....................................................................………………………..Message Waiting / Call Back .........................................................................................………………….
Mute …........................................................................................................…………………………………...Outside Call Blocking ............................................................................................………………………….Paging ……………………………....................................................................................................…………Password – Authorisation Code .....................................................................................…………………….Ringing Options ……………………………………………………………………….…………………………….Station Name Programming ................................................................................................................…..Step Calling; ICM & CO …………………………………………………………………………………………….Voice Over …………………………………………………………………………………………………………..
Volume Controls; Speaker, Ringer, Handset ……………………………………………………………………Walking Class of Service (Toll Bar Over-ride) ………………………………………………………………….
System FeaturesAlarm Reset ...........................................................................................................….……………………...CLI Message Wait (CO Message Wait) ………………………………………………………………..………….CO-CO Call timer Extension ………………………………………………………………………………………..Conference Room ……………………..................................................................................................…….DISA (Direct Inwards System Access) CO Call Out ........................................................…………………..
Hot Desk …...................................................................................................…………………………………LCD Language Change for Keyset .………………………………………………………………………………Two-way Recording (to VMIB) ………………………………………………………………………………………Voice Board (VMIB) Features ………………………………………………………………………………………
CONTENTS
6, 78
8, 9101114212425
11
1111111111121212
1212 1313
141414141515151616161617171717
18181818191919202020
21212121222222222223

●●●● aria–24IP DIGITAL KEY TELEPHONE SYSTEM USER’S GUIDE
4
Station Programming Menu
Flexible Button Programming.............................................................................................………………….
Codes for Flexible Button Programming............................................................................………………….
VMIB Quick Reference Guide
VMIB Guide for LDP-7016 & 7024 Keysets ……................................................................................…….
VMIB Guide for LDP-7004 & 7008 Keysets ……................................................................................……...
VMIB Password Protected Mailbox ……………………………………….................................................……
VMIB Remote Access Guide ……………………................................................................................…….
Attendant Operation
Attendant Cancel Station Feature ......................................................................................………………….
Attendant Intrusion ...........................................................................................................................….…...
Attendant Remote Call Forward ....................................................................…………………………………
CO – Disable Outgoing Lines .............................................................................................................……..
Day Night Switching (CO Ringing Mode Selection) ............................................................................….….
Intercom Box BGM Selection .................................................................................................…... …………
LCD Language (Applying 2nd Language) ..................................................................................…... ……….
Overriding a Key Telephone in Do Not Disturb ......................................................................................……
Paging Port BGM Selection by Attendant ………………………………………………………………………….
Pre-Selected Message Editing ………………………………………..……………………………………………..
SMDR Records Management ……………............................................................................…………………
Station Name Editing by Attendant .......................................................................................................……
System Greetings for DISA and Hunt Groups ............................................................…….................……..
System Speed Dial Entry ..………………………………………………………………………….……………...
Temporary Class of Service Change ……………………………………………………………………………..
Time & Date Setting (Attendant Clock Set) ......................................................................................……….
Time & Date Format .............................................................................……………………………………….
Traffic Analysis …………………...........................................................................................................…..
Transferring an Outside Line to Another Station......................................................………………………….
Additional Attendant Codes for Flexible Button Programming (see pg 25 for others) …………………….……
Attendant Programming Menu Table
Analogue Single Line Telephone Operation
CONTENTS
24
24
24
25
25
25
25
26
27
27
27
27
27
28
28
28
28
28
29
29
29
29, 30
30
30
30
31
31
31
32
33, 34
35, 36, 37

●●●● aria–24IP DIGITAL KEY TELEPHONE SYSTEM USER’S GUIDE
5
CONTENTS
Supplementary LDP Keyset Section (7016 & 7024) for Soft Key usage
Keyset Devices and Buttons ...............................................................………………………….……………….
Keyset Devices and Button Description ……………………………………………………………………………..
Soft-key Usage …………..……………………………………………………………………………………………..
Navigation Key………………………………………………………………………………………………………….
Softkey Functions:
Idle Keyset ………………............................…........................................…………………………….....………..
Cal Pick Up ………….....................……...............................………………………………………..………………..
Conference …………………...................................................................…………………………….....………..
Redial ………………….......................................................………………………………………..………………..
Off Hook State …………….....................................................................…………………………….....………..
Intercom Dialing …..….......................................................………………………………………..………………..
Intercom Ring-back ……….....................................................................…………………………….....……….
Intercom Busy ………….......................................................………………………………………..………………..
Intercom DND ……………...................................................................…………………………….....………..
Intercom Dialing Error .......................................................………………………………………..………………..
Intercom Receiving ………....................................................................…………………………….....………..
Intercom Talk ……….….......................................................………………………………………..………………..
CO Line Busy ...…………............................…........................................…………………………….....………..
CO Dialing/Co Talk .....................……...............................………………………………………..………………..
Checking Messages ………...................................................................…………………………….....………..
Paging ………………….......................................................………………………………………..………………..
Call Log …………………….....................................................................…………………………….....………..
Received Call ..…..….......................................................………………………………………..………………..
Dialed Call ………………….....................................................................…………………………….....………..
Lost Call Log .……….......................................................………………………………………..………………..
Lost Call Answer ……………...................................................................…………………………….....………..
Lost Call Delete Current ......................................................………………………………………..………………..
Lost Call Delete All …………....................................................................…………………………….....……….
Lost Call Save ……….….......................................................………………………………………..………………..
Lost Call Name / Tel …….…....................................................................…………………………….....………..
Navigation Menu …….….......................................................………………………………………..………………..
Commonly Used Telephony Acronyms
DOCUMENT REVISION
Customised for Computer & Telephone Services Ltd21-FEB-2008g.p.
1st 24IP user guide.26-JAN-2006m.w.
3838394040
414141, 424242434343434344444444454545464647474748484849
50~52

●●●● aria–24IP DIGITAL KEY TELEPHONE SYSTEM USER’S GUIDE
6
Fixed Feature Buttons
�Speed key provides you with access to speed dialing, save
number redial and last number redial.
�Trans/Pgm (Transfer) button is used to Transfer an outside
call from a station to another.
�DndFwd (Do Not Disturb/Forward) button allows you to
forward your calls to another destination, or make DND mode.
�Call Back button allows you to leave a callback indication at a
station that is busy, unattended, or in DND.
Quick Reference Guide for aria-24IP24IP Digital Key Telephone
�Speaker button enables you to make a phone call with-out
lifting handset. It turns the telephone on and off when using
the speakerphone.
�Hold/Save button enables you to place an outside caller on
hold.
� -Volume + bar allows you to adjust speakerphone and
handset volume.
Call Forward
� Dial � 4 9
- 0 : Follow me
- 1 : Unconditional
- 2 : Busy calls
- 3 : No answer calls
- 4 : Busy/no answer calls
- 5 : Station off-net, unconditional
- 6 : Station off-net, no answer
- 7 : Incoming outside line to off-net (Sys. ATD only))
- # : Cancel previous call forward
� Dial the station number or press DSS button or
intercom group where calls are forwarded.
� To make Call forward to VMIB, press # key after
dialing call forward type (1~4).
Call Wait (Camp-on)If you dial a busy station, you may alert it to your call.
� After receiving intercom busy tone, dial � or the last
digit of called station number or press DSS button.
�When the called party answers, consult with them
or hang up to Transfer the call, if any.
Conference� Call the desired party (internal or outside). When
called party answers, press CONF soft key.
� Add next conference party by selecting another
outside line or intercom station.
�When the party answers, press CONF soft key twice.
All parties are connected.
To terminate a conference,
The conference initiator should be actively in the
conference.
� Hang up, or press CONF soft key to finish the
conference (only for conference initiator).
Leaving a Message Waiting IndicationIf you dial a station that is unattended or in Do
Not Disturb, you can leave a message waiting
indication.
� Dial the desired intercom station. Busy tone or
DND tone is heard.
� Press Call Back key. The called party’s Call Back
key LED will flash.
To answer a Message Waiting Indication,
� Press flashing Call Back key and the station that
left message will be signaled with tone ringing.
�If called station does not answer, press the Call Back key
once to leave a message.
Placing an Outside Call on HoldWhile connected to an outside line,
� Press Hold/Save button.
- Once for system hold
- Twice for exclusive hold
� Reverse if hold preference is programmed to system hold.
� Press Hold/Save button.
Last Number RedialThe last dialed number on an outside line is saved.
� Press REDIAL Soft key. Or,
� Dial 5 2
�Each station with LCD has 10 last dialed number directory.
You may find a dialed number by pressing Volume key. And
press Hold/Save button to dial the number.
Save Number Redial If you wish to save a number you dialed,
� After dialing the number of an outside party, don’t hang up
� Press Speed key twice (saves number in SNR Buffer)
To dial a saved number (in SNR Buffer),
� Press Speed key and dial #.
Call TransferWhile connected to an outside call,
� Press Trans/Pgm button.
� Dial station number or DSS button.
(You can select a screened or unscreened Transfer.)
Screened Transfer
When that extension answers, announce the Transfer and hang
up to complete call Transfer.
Unscreened Transfer
When the called extension begins to signal, hang up to complete
call Transfer.
Navigation Key (LDP-7016,7024 series Keysets)
�Navigation button provides you with access to Keyset programming and features.
In many cases the OK button provides the same function as the Hold/ Save key.
Soft Key (LDP-7016,7024 series Keysets)
�Soft Keys provides LCD prompted menu access when a specific feature is available.
Such as Flash/ Mute/ Redial/ Conference/ VMIB rewind etc.

●●●● aria–24IP DIGITAL KEY TELEPHONE SYSTEM USER’S GUIDE
7
Storing Speed Dial Numbers� Press Trans/Pgm key and then Speed key .
� Dial the speed number bin.
- Station Speed Number bins are 000~099
- System Speed Number bin are 2000~2499
� Dial the phone numbers to be stored.
�Press Hold/Save button to save the number.
To erase an existing speed bin,
� Press Trans/Pgm key and then Speed key .
� Dial speed number bin to be erased.
� Press Hold/Save button.
Dialing a Speed Number � Press Speed key and dial the speed number bin.
�When the called party answers, pick up the handset or
use speakerphone.
Voice Over It is available when the station has been programmed with
voice over.
�When a busy Keyset engaged in an internal or external
call is called through camp-on by a caller, Hold/Save
key of busy Keyset is flashing.
� After tone, the busy Keyset will be connected to both
parties.
Queuing You see that a particular line is busy and want to be placed
on a list waiting for the first line in the group or station to
become available.
� Lift handset or press Speaker key.
� Press the busy outside line button, specific line group
button or DSS button.
� Pressing Call Back key, your Call Back key flashes
and confirmation tone is heard.
�Hang up or press Speaker key.
To answer a queue request,
�When the busy outside line button, specific line
group button or DSS button returns to idle, you
hear ringing and the queued line button flashes.
� Lift handset and dial outside line.
Attendant Clock SetThe attendant can set the Time/Date without entering
Admin Programming.
� Press Trans/Pgm key.
� Dial 0 4 1
� Enter Date (YYMMDDHH) and press Hold/Save key.
� Enter Time (HHmm) and press Hold/Save button.
If there is no need to change date or time, do not dial
current date/time and press Hold/Save button.
Entering Account CodeTo enter Acc Code prior to a call,
� Press {Acc Code} flexible button.
� Dial the account code (1-12 digits)
�� to end digit entry
�Access the Line
To enter Acc Code during a call,
�Press {Acc Code} flex Key (conversation may continue)
OR Dial Trans/Pgm 5 5 0 (line is on hold)
�Dial the account code (1-12 digits)
�� to end digit entry
�Recommence conversation
Quick Reference Guide for aria-24IP24IP Digital Key Telephone
Direct Station Select 700~727
Call Park 950~957
Call Pick Up � 1
Call Pick Up – Directed �4 2 (Station Number or DSS)
Speed Dial � 9
Station Speed Dial SPEED + bin no. (000~099)
System Speed Dial SPEED + bin no. (2000~2499)
All Call Page # 6
Universal Night Answer 2
Last Number Redial SPEED + �
Save Number Redial SPEED + #
Account Code Trans/Pgm + 8 0
Call Wait (Camp-on) Trans/Pgm + 8 5
Speakerphone/Headset Trans/Pgm + 7 5
UCD Group (only) DND Trans/Pgm + 8 7 + (UCD Gp#)
Loop Key Trans/Pgm + 84
For LDP-7004,7008 series Keysets
Conference key Trans/Pgm + 9 1
Call Back key Trans/Pgm + 9 2
Dnd/Fwd key Trans/Pgm + 9 3
Flash key Trans/Pgm + 9 4
Mute key Trans/Pgm + 9 5
Redial key Trans/Pgm + 9 7
To erase a flexible button,
� Press Trans/Pgm key.
� Press the flexible button to be erased.
� Press Hold/Save key
To enter Acc Code during a call,
�Press {Acc Code} flex Key (conversation may continue),
OR Dial Trans/Pgm 5 5 0 (line is on hold)
�Dial the account code (1-12 digits)
�� to end digit entry
�Recommence conversation
Flexible Buttons Programming� Press Trans/Pgm key.
� Press a flexible button to be programmed.
� See the below chart and dial the desired code.
� Press Hold/Save key.
MY aria-24IP NOTES: (More note space on the back page)

●●●● aria–24IP DIGITAL KEY TELEPHONE SYSTEM USER’S GUIDE
8
Digital Keyset Programming Menu Table
The aria 50-IP system supports multiple hierarchical menus based on station programming. A user can make station
programming by selecting desired menu. Pressing [Trans/Pgm ] button in a Keyset with LCD displays the menu.
4) COS Change
Enter COS Override Code (Supplied by Admin)3) Walking COS
Requires Current Password (for Station)2) COS Restore
ICM only Press [Hold]1) COS Down
[2] COS
Extended tones for ICM Ringing
Dial 01~159) CO Ring
Extended tones for ICM Ringing
Dial 01~158) ICM Ring
1:ON 0:OFF7) Ear-Mic Headset
For Large Display phones, SMS scrolling speed6) Scroll Speed
5) SMS/Notice Display
ISDN enblock - Off for NZ1:ON 0:OFF4) Enblock Mode
Displays any SMS received while Station unavailable3) SMS Message Display
1 Hands-free
2 Tone
3 Private
Dial 1~32) Answer Mode
Ring ToneDial 1~41) Type
[1] RING
RemarkSelectionSub MenuMain Menu
LDP-7000 Series Digital Key Telephone Family
LDP-7004D
LDP-7008D
LDP-7016D
LDP-7024DLDP-7024LD
LDP-7048DSS on Pedestal Base
LDP-7024LD on Pedestal Base (also fits LDP-7016)
LDP-7048DSS

●●●● aria–24IP DIGITAL KEY TELEPHONE SYSTEM USER’S GUIDE
9
Digital Keyset Programming Menu Table (cont)
Change Password (requires old password)2) Auth Change
1st time Password Registration1) Auth Register
[3] AUTH / MOBL EXTN (Enabled at system) enter cell phone number3) Reg Mobile Extn
Activate Mobile Extension Link4) Active Mobile Extn
E:000 / D:000 (Soft-Phone Seats Unlocked)9) PC_Phone Lock Key
System Key & Unlocked Features8) Serial Number
7) WTU Station Number RCVR
Sets Ringing Device(1:S / 2:H / 3:Both) :16) Headset Ring Mode
Default Speaker(1:SPK 0:Headset) :15) Speaker / Headset
Displayed instead of Station Number on ICM calls4) Register Station Name
Selects BGM sourceSelect BGM 00~113) BGM
Shows MPB S/W version2) MPB Version Display
Toggles LCD from English to 2nd Language1) LCD Display Language
[7] SUPPLEMENT
4)Bluetooth Login
Requires BTU Module (for LDP-7024D, LD only)3) Register Bluetooth
Retrieve Station Data for Relocate (New Port)2) Relocation In
Load Station Data for Relocate (before moving)1) Relocation Out
[*] SYSTEM
Requires Station be a Hot Desk (Dummy) Station*) Hot desk Logout
Requires Station be a Hot Desk (Dummy) Station0) Hot desk Login
VMIB plays current time/ date2) Listen Time / Date
VMIB m/box greetingRecord Greeting1) Record User Greeting
[6] VMIB /
Announcement
00 (enter message)2) Set Custom Message
Press [Hold]
[DND] to cancelEnter Message Number1) Set Preselected Message
[5] MSG
6) Erase User Greeting
VMIB Page MessageRecord Page5) Record Page Message
VMIB plays the status of the Station4) Listen Station Status
VMIB plays number of the Station3) Listen Station Number
[OK]/[Hold/Save]Dial 1~9 & Password if set4) Deactivate Confr Room
& 5 digit pswd if req.Dial 1~9 (Room number)3) Activate Conference Room
Press [OK]2) Wake Up Disable
LCD shows flashing * by Time
HH:MM (# for Continuous)1) Set Wake Up Time
[4] TIME / CONFR RM
7) Erase Page Greeting
RemarkSelectionSub MenuMain Menu

●●●● aria–24IP DIGITAL KEY TELEPHONE SYSTEM USER’S GUIDE
10
Programming Menu Table For LDP Keyset Navigation Key
Requires Admin Programming1) Mobile Extn Number 4) Mobile Extension PGM
Edit Station Speed DialEnter Speed Bin(000)3) Speed Programme
Dial 1~9 & Pswd (optional)Back (goes back) OK (to set)
1) Create Conference Room
5) Conference Room PGM
Requires Admin Programming2) Mobile Extn Enable
SPEAKER MODE Back (goes back) Next (to change) OK (to set)
4) Speaker/Headset PGM
COS Down Mode Back (goes back) Next (to change) OK (to set)
3) Station COS PGM
Select by Up/Down Key Back (goes back) OK (to set)
2) Preselected Message PGM
Enter wake up time HH:MM Back Erase (deletes) OK (to set)
1) Wake Up PGM
2) Advanced Programming
Dial 1~9 & Pswd (optional)Back (goes back) OK (to set)
2) Delete Conference Room
>OFF Back (goes back)Next (to change) OK (to set)
5) Ear Mic PGM
English Back (goes back)Next (to change) OK (to set)
5) Language PGM
Password Register/Change BackNext (to change) OK (to set)
4) Password PGM
Tone Mode Back (goes back) Next (to change) OK (to set)
3) MODE (H/T/P) PGM(Hands free,Tone,Private)
4 CO Melody
3 CO Ring
2 ICM Melody
1 ICM Ring
Ring Type: 01~15 Back (goes back) Next (to change) OK (to set)
Ring Type: 01~15 Back (goes back) Next (to change) OK (to set)
Ring Type: 01~15 Back (goes back) Next (to change) OK (to set)
Ring Type: 01~15 Back (goes back) Next (to change) OK (to set)
2) Ring PGM
Activate Mobile Extension Link2) Hot desk Log Out
(Enabled at system) enter cell phone number
1) Hot desk Log In6) Hot Desk PGM
Enblock Mode OFF BackNext (to change) OK (to set)
6) Enblock PGM
Enter Name Back (goes back)
OK (to set)1) Station Name PGM
1) Basic Programming
����
3) By System Speed Name
2) By Station Speed NamePhone Book:Arrow up or down to bring cursor the desired Name. OR Use 2 digit alpha plan to 1st letter of Name
1) Dial By ICM Name
����
Remarks: LD has a unigue MENUOnly available on LDP-7024D & LD, 7016D Nav Key
The LDP-7016D, 7024D, 7024LD user can make station programming changes by selecting the
desired menu, by pressing the `Nav` button in a Keyset. The user can see the menu on the LCD.

●●●● aria–24IP DIGITAL KEY TELEPHONE SYSTEM USER’S GUIDE
11
Answering an Outside CO (Line) Call
Button Procedures Range
� Lift handset or press Speaker key to use speakerphone.
� Press flashing CO line button or loop key. (NB: If the Preferred Line Answer feature is
ON for your station, you may answer just by lifting handset, or press Speaker.)
Off hook
Call Park
Button Procedures
While connected to an outside call,
� Press Trans/Pgm key.
� Dial parking location.
Range
950~957
A call can be parked in a parking location and the call will be retrieved by dialing the location number. (The call can be
picked up by other extension with making a page announcement to inform the parking location.)
Answ
er &
Makin
g C
O C
alls
Call Transfer
Button Procedures
To Transfer an outside call to the other extension,
� Press Trans/Pgm button. (The outside call is put on hold.)
� Dial station number or appropriate DSS button. (or dial 1 and PSTN # for External Transfer)
� You can make a screened or unscreened Transfer.
When the called extension answers, announce the call, and hang up to complete call Transfer.
OR
While the station you called rings, hang up to complete call Transfer. (Unscreened)
To answer screened Transfer,
�When a station rings according to Intercom Answer Mode selection, answer the intercom call.
� The Transferring party hangs up, the call will be connected.
Range
700~727
Unscreened
OR
Screened Transfer
Sta. # (or DSS key)
Dial By Name
Button Procedures
To Call another Station using Dial By Name:
� Press SPEED key Twice
� Dial 1 (ICM)
� Scroll through -volume+ Station Name List and Press Hold/Save at the desired Name
OR
� Hot Key to the 1st Letter of the Name using the 2 digit Alpha Scheme (see Storing & Using
Speed Dial Numbers)
� Then Scroll via –volume+ key, or hotkey again to the 2nd letter of the Name.
� Press Hold/Save when the cursor indicated the desired name.
To Call a Speed Dial using Dial By Name:
� Press SPEED key Twice � Dial 2 (Station Speed Dial) or 3 (System Speed Dial)� Scroll through -volume+ Station Name List and Press Hold/Save at the desired NameOR
� Hot Key to the 1st Letter of the Name using the 2 digit Alpha Scheme (see Storing & Using Speed Dial Numbers)
� Then Scroll via –volume+ key, or hotkey again to the 2nd letter of the Name.� Press Hold/Save when the cursor indicated the desired name.
Range
1
An ICM call can be placed to a Station utilising the Station’s Name, or a Speed Dial Call can be placed via the Speed Dial Name.
2 or 3
Placing a CO (Outside Line) Call on Hold
� You may put a CO cal call on hold by pressing Hold/Save button.
To retrieve the Held CO Line
�From the Holding Station: Press the {CO} button, OR
� Dial 4 # and the CO number from another Keyset.
Call Hold
Button Procedures Range

●●●● aria–24IP DIGITAL KEY TELEPHONE SYSTEM USER’S GUIDE
12
Last Number Redial
Button Procedures
To use one of dialed numbers in the directory by scrolling,
� Press REDIAL or Soft key.
OR,
� Dial 5 2
When the last dialed number is displayed.
�Press - Volume + button to find the phone number.
�Press Hold/Save button then, the number is dialed.
To Clear a Number off the Redial List,
� Press REDIAL or Softkey, OR SPEED *� Press - Volume + button to find the phone number.� Press SPEED, the number is Deleted.
Range
Saving a Dialled Number (to Station Speed Dial)
Button Procedures Range
If you want to save a number you dialed,
� After dialing the number of an outside party, keep handset off-hook. (Don’t hang up.)
� Press Speed key twice. (Saving the number into the Save Number Redial Memory)
� Hang up.
To dial the saved number,
� Press SPEED + #.
REDAIL Softkey or/
�
x2
#
Each station with an LCD has 10 individual last dialed number (or LNR - Last Number Redial) directory.
Answ
er &
Makin
g C
O C
alls
Range
Flash to Line
Button Procedures
�While connected to an outside line, press FLASH Soft key.
� Or FLASH fixed key on older LKD Series Keysets
Note: Some Enhanced Line features utilise this function, e.g. Centrex Call transfer
This feature may disconnect an outside line and re-seize dial tone if programmed, or it can be used to send a recall to line, when
the system is connected with a PBX or Enhanced Feature Analogue Line.
Flash Softkey
Making an Outside CO (Line) Call
� Lift handset or press Speaker key.
� Press outside line button, pool button or dial CO line access code.
� Dial desired party.
�When called party answers, lift handset or use speakerphone.
1
OR: 4 + 01~24
Or, 48 + 01~40
Button Procedures Range
1(or 401..)
Off hook
Queuing to a Busy CO Line
Button Procedures
When accessing a CO Line, and no line is available,
� The LCD shows `CO LINE xx BUSY QUEUEING (CALLBACK)`
� Press the Call Back key, your Call Back key flashes, and confirmation tone is heard.
The LCD shows `PLACED IN QUEUE FOR LINE xx`
A LDP 7004,7008 series may press Trans/Pgm * 6 6 (or 5 6 6 in some Arias)
To answer a queue request,
�When the busy CO line or specific line group returns to idle, you hear ring and the queued
line button is flashing. The LCD shows `QUEUE CALLBACK LINE xx`
� Lift handset and dial a desired phone number.
When a CO line is busy, you can request a call back when the CO line is available. As soon as it becomes idle, you can be the
first extension to get the CO line.
Range
Off hook
or,
* 6 6

●●●● aria–24IP DIGITAL KEY TELEPHONE SYSTEM USER’S GUIDE
13
Button Procedures Range
Each extension can program up to 100 individual speed dial numbers in the station. The numbers are entered and stored by
the user and it can be recalled at any time.
Storing & Using Speed Dial Numbers
To store Station (or System) Speed Dial Numbers,
� Press Trans/Pgm key.
� Press Speed key .
�Dial speed number bin. (000-099) (ATD may dial 2000~2499 for System Speed Dials)
� (Optional): Press desired outside line or specific line group button. (Speed bin will
always use this line/ line group if applied)
� Dial the phone numbers to be stored.
� Press Hold/Save key
�Enter name for Dial by Name. (optional)
� Press Hold/Save key
Station Speed bin
000~ 099
System Speed bins
2000~2499
Station Speed bin 000~099(Ph #)
(name if reqd.)
Answ
er &
Makin
g C
O C
allsStation Speed bin
000~ 099
To use station speed numbers,
� Lift handset or press Speaker key.
� Press Speed key .
� Dial speed number bin. (000-099)
To use system speed numbers,
� Lift handset or press Speaker key.
� Press Speed key .
� Dial speed number bin. (2000-3499)
To erase station speed numbers,
� Press Trans/Pgm button.
� Press Speed key .
� Dial speed number bin to be erased.
�Press Hold/Save button.
To Re-Edit speed numbers,
� Press Trans/Pgm button.
� Press Speed key .
� Dial speed number bin to be edited
� Over write the number,then press Hold/Save
� Edit the Name, if required (as per alpha scheme below,)
� Press Hold/Save button.
System Speed bins
2000~2499
Additional Speed Dial Entries:
Pause (P) is Call Back key
Flash (F) is Dnd/Fwd key
Security (S) is * key
# is #
Pause and Flash are available by soft key
Off hook
(Speed bin #)
Station: 000~099 System 2000~2499
(Speed bin)
(Speed bin) Overwrite #
Q - 11Z - 12. - 131 - 10
A - 21B - 22C - 232 - 20
D - 31E - 32F - 333 - 30
G - 41H - 42I - 434 - 40
J - 51K - 52L - 535 - 50
M - 61N - 62O - 636 - 60
P - 71R - 72S - 73Q - 7*7 - 70
T - 81U - 82V - 838 - 80
W - 91X - 92Y - 93Z - 9#9 - 90
*1 - Blank*2 - :*3 - ,
0-00 #
Example: A is 2 then 1 B is 2 then 2 W is 9 then 1
Button Procedures
When another Station is ringing with a CO (Outside Line) Call,� Lift handset or press Speaker key.
� Press flashing CO line button, OR dial 2.
�You will be connected to ringing outside line.
Note: Facility may be available in Night Mode Only.
Range
Universal Night Answer
When CO lines are programmed for UNA and the system is placed into night mode, users can answer incoming CO line
calls employing dial code regardless of pick-up group.
Off hook
●●●● aria–24IP DIGITAL KEY TELEPHONE SYSTEM USER’S GUIDE
14
Sta
tion (IC
M) F
eatu
res
Account Code Entry
Button Procedures
To enter an Account Code before accessing a Line,
� Press the {Account Code} Flexible Key
� Dial the Account Code (Flexible max 12 digits) ending the string with *� Seize a CO Line and make the call.
To enter an Account Code after the call is initiated,
� Press the {Account Code} Flexible Key, and dial the Account Code,
� Press the {Account Code} Flex Key again, the external party is re-connected.
� If there is no {Account Code} Flex Key programmed, Dial [Trans/Pgm] 5 5 0 instead.
Range
An Account Code may be used to identify outgoing calls for billing purposes. The Account Code is appended to SMDR Call Records.
{Account Code}
{Account Code}
Button Procedures Range
00~11
A station can receive audio, generally music from an internal or external source (e.g. MOH) while idle.
Background Music (BGM) Selection
� Press Trans/Pgm button.
� Dial 7 3 and select BGM channel (00~11).
� Press Hold/Save button.
7 3 (00~11)
Button Procedures
� Lift handset or press Speaker key. (The Speaker key is illuminated.)
� Press Dnd/Fwd key. (OR Dial � 4 9 if there is no Dnd/Fwd Key)
� Press the call forward type:
0 - Follow me
1 - Unconditional
2 - Busy calls
3 - No answer calls
4 - Busy / no answer calls
5 - Station off-net, Unconditional
6 - Station off-net, No Answer
7 - Incoming outside line to off-net (Attendant only)
8 - Unconditional Off Net to telephone Number *9 - No Answer Off Net to telephone Number *
� Dial station number or press DSS button or intercom group.
� Confirmation tone is heard and Dnd/Fwd key is flashing.
� Hang up.
To activate call forward to VMIB,
� Lift handset or press Speaker key.
� Dial � 4 9.� Dial desired Call Forward code (1~4).
� Dial VMIB selection code # to receive the call.
�Hang up. (NB Requires VMIB Access, & Mailbox Greeting recorded.)
Range
Sta. No.
700~727
ICM. Group
620~629
Call Forward
A call can be forwarded to the other station, station group or VMIB depending on the call forward type. Some programming
in Admin. Programming may be required to use some of the Call Forward types.
0~7, Station /Group/ #/ Speed Dial.
OR8~9,
CO Assess (eg 1),Tel Number.
Off hook
- For Follow-me, programme the station that you will be forwarded to i.e. if your extension is
702 and you are forwarding to 704, then you will need to go to 704 to program the feature. Also,
this feature requires authorisation code and requires system programming.
- For Station Off-net, the number you are forwarding to should be saved as a speed dial
number first. (Please see Speed Dial Number.)
- For Incoming outside line to Off-net, it requires system programming.
-For Off Net Forwards to Telephone Number, Dial a Line access code (eg 1, or 402 for CO
Group 2), then the Telephone number (the Speed dial number is being saved to is displayed).
-To cancel call forwards,
� Lift handset or press Speaker key.
� Dial � 4 9 and then #.-To cancel Incoming Outside line to Off-net (at system attendant),
Press MON + DND/FWD + CO line code (CO group/CO line no. /CO BTN) + #
Sta. No.
700~727
ICM. Group
620~629
(or � 4 9 )
# Hang Up
Off hook
* Not yet available for Aria 24-IP
●●●● aria–24IP DIGITAL KEY TELEPHONE SYSTEM USER’S GUIDE
15
Button Procedures
�When You hear intercom or Outside line (CO) ring at a station.
� Lift handset or press Speaker key.
�Dial �42 and the ringing station number OR Press the flashing DSS key of the
ringing station
� You will be connected to the party calling the target of the Directed Call pickup.
Range
700~727
Call Pick-up: Directed & Group Pickup
* 4 2 ( Station #)
(or press flashing DSS)
Off hook
Directed Call Pickup specifies which ringing station you pick the call from.
To use Group Call Pickup, you must be a member of the same Pick Up Group
as the Ringing Station,
� You hear an unattended phone ringing.
� Lift handset or press Speaker key.
� Dial �1* 1
Off hook
Camp-On (Call Wait)
Button Procedures
� After receiving intercom busy tone, dial “� ” or last digit of called station number, or press DSS
button.
� Camp-on tone is heard in called station.
�When called party answers, talk or hang up to Transfer the call.
Note: If you release a call (transfer) to the Busy Station, the Camp On finishes, and the
Transferred Party waits at the Busy Station to be answered.
If you dial a busy station, you may alert it to your call by leaving a message wait indication
Range
�
Conference Calling
Button Procedures Range
To establish a conference,
� Call desired party. (internal or outside)
� Press CONF soft key. (the called party is put on exclusive hold.)
� Call the next party.
� Press CONF soft key twice. (once if adding additional parties)
� Conference is established.
To add another party in the conference,
� Press CONF soft key.
� Call the next party.
� Press CONF soft key twice.
To exit a conference (unsupervised),
� Press CONF soft key in the supervisor station and hang up. Other parties are still connected.
CONF Softkey
CONF Softkey
CONF Softkey
CONF Softkey
CONF Softkey
Re-entering a conference,
� Lift handset or press Speaker key.
� Press CONF soft key.
To drop an outside party,
(You should be active in the conference.)
� Press outside line of party you wish to drop.
� Hang up or press Speaker key.
To terminate the conference,
� Hang up or, press CONF soft key if unsupervised.
�Conference feature can be accomplished by programming a flexible key as CONF key:
� Trans/Pgm Flex-key Trans/Pgm 9 1 (Trans/Pgm + 91).
For LDP-7004,7008 series Keysets,
CONF Softkey
Pgm CONF key:
Off hook
Some Older
Keysets may use a
CONF Fixed Key
Sta
tion (IC
M) F
eatu
res

●●●● aria–24IP DIGITAL KEY TELEPHONE SYSTEM USER’S GUIDE
16
Procedures Range
Each station and speed dial number can be assigned to a name. When names are programmed, you may select a speed dial
number by the stored name.
Button
Dial By Name
� Press Speed key twice.
� On the display, you will see the following.
DIAL BY NAME
ICM : 1 U_SPD : 2 S_SPD : 3
� Select desired type.
1 : Intercom (Station Name List)
2 : User (Station Speed Dial)
3 : System (System Speed Dial)
� Confirmation tone is heard and you will see the following.
1 : XXXX XXXX XXXXXX
2 : YYYY YYYY YYYYYY
� Pressing VOLUME button, the cursor will be moved to the next name. When the cursor
underscores the desired name or a dial number to call, press Hold/Save button. Then,
the stored number is dialed.
� OR You may enter characters using the alpha scheme in “Storing Dial by Name” (pg12).
The LCD will display the first two names which match your input. (You may delete the last
letter of your input by pressing Call Back key. And then, the previous matched name is
displayed.) Use Name/Tel Soft key to toggle Number & Name.
x2
1/2/3
(select target)
Button Procedures
� Press Dnd/Fwd key while on-hook or your phone is ringing.
� The LED is illuminated and your phone is in DND.
To remove Do Not Disturb,
� Press Dnd/Fwd key while on-hook.
� The LED is extinguished and DND at your phone is removed.
Range
(For Keysets without a DND Key,)
� Dial 5 3 instead of pressing Dnd/Fwd key (on/off toggle setting).
Do Not Disturb
For LDP-7004,7008 series Keysets,
5 5 3
Forced Hands Free Mode
Button Procedures
�When calling a Digital Keyset (DKTU) in tone mode, Ring Back Tone is supplied
� Dial # (Forced Hands Free Code)
� The called DKTU stops ringing, the speaker and microphone are activated. (Operates as
hands Free Mode.)
Note: Requires some system programming. Not available on Linked Stations.
Range
When calling a Digital Keyset, the caller may temporarily change the answer mode of the called Station, from Tone mode (TN)
to Hands Free mode (HF).
#
To activate speakerphone,
� Press Speaker key.
� Dial outside line number or intercom number to talk (if a microphone is available on the Keyset.)
To On-Hook dial,
Just dial the outside line number or intercom number, the speaker is connected, lifting the handset when
you wish to speak.
Button Procedures Range
Hands free (On Hook) DialingPressing an outside line button, a Speed key , a station button or dialing a station number will automatically activate the
speakerphone. (LDP-7004D has no microphone and doesn’t function as Hands-free unit. It can On Hook Dial, utilising it’s speaker)
Sta
tion (IC
M) F
eatu
res

●●●● aria–24IP DIGITAL KEY TELEPHONE SYSTEM USER’S GUIDE
17
Press Trans/Pgm button.
� Dial 1 2
� Dial 1 (HF) for Hands-free, 2 (TN) for Tone ring, or 3 (PV) for Privacy announce.
� Press Hold/Save button.
Button Procedures
Intercom Answer Mode
Range
ICM Answer Mode determines how the Keyset responds when receiving a call. Available Modes are: Hands Free; Tone;
Privacy. HF: After a burst of tone, the user can answer hands free. TN: Station rings normally, & is answered by lifting the
handset or pressing Monitor Key. PV: Station receives a burst of tone & voice is connected through the speaker, but the
microphone is deactivated for privacy. The user must lift the handset or press the Mute key to answer the call.
1 2
1 (or 2 or 3)
Button Procedures
Placing an ICM Call,
� Dial intercom number or press programmed DSS button.
� You will hear,
- Ring back tone in TN (Tone) mode. Wait for called station to answer the ringing.
- 3 bursts of tone in HF(Hands-free) or PV(Privacy) mode. Begin your announcement
after the tone.
Intercom Calls: Making, Answering & putting a call on Hold
Answering an ICM Call,
�With your intercom answer mode setting,
- in TN mode, intercom ring is heard. Lift handset to talk.
- in PV mode, 3 bursts of tone and one-way announcement is heard. Lift handset to talk.
- in HF mode, 3 bursts of tone and announcement is heard. Reply with Hands-free mode
or lift handset for privacy.
Placing An ICM Call on Hold
� You may put an intercom call on hold by pressing Hold/Save button.
To retrieve intercom call on hold,
� Hang Up, the held call will recall.
Range
Off hook
Button Procedures Range
To make an intercom group call,
� Lift handset or press Speaker key.
� Dial the intercom group number. (Hunt Group Number)
ICM. Group No.
620~629
Intercom Group (Hunt Group) Calling
Off hook
Message Waiting / Callback
Procedures
� If a called party does not answer, press Call Back key. (If you’re system has a
voice card, you may be prompted to leave a message.)
� Hang up.
� At that time, the LED of Call Back key in the called station is flashing.
Range
For LDP-7004,7008 series Keysets,
(For Keysets without a Call Back Key,)
�If a called party does not answer, press Trans/Pgm button and dial *6 6 (or 5 6 6 on some Arias)
To answer a message waiting,
The LCD shows MSG: (Station Number)
� Press flashing Call Back key. or Dial 6 7 (or 5 6 7 on some Arias).
� The Station that left the Call Back will be signaled with tone ring.
When the called extension does not answer the call, you can leave a message wait indication at the station.
Button
Hang Up
* 6 6
Sta
tion (IC
M) F
eatu
res

●●●● aria–24IP DIGITAL KEY TELEPHONE SYSTEM USER’S GUIDE
18
Range
Mute
Button Procedures
� Press MUTE Soft key when prompted by the LCD to activate.
� Press MUTE Soft key again to deactivate.
It provides privacy during speakerphone or handset operation (while in conversation) by disabling the microphone.
Mute Softkey
Procedures
� Press Trans/Pgm key and dial 2 1 (LCD shows: ICM Only Mode)
� Press Hold/Save key . (Confirmation tone is heard.)
The system will not accept any dialing to CO line.
Range
A Station may temporarily restrict access to outside lines. Note : An access authorisation code must be registered.
Outside Call Blocking
Button
To Restore Outside Line Access,
� Press Trans/Pgm key and dial 2 2.
�Dial your current access authorization code.
� Press Hold/Save key.
LCD shows: Original COS Restored. Confirmation tone is heard. CO line access is restored.
2 2
(& auth. Code)
2 1
Paging
Button Procedures
To make a page,
� Lift handset.
� Dial page zone. (See below chart.) And you will hear warning tone.
� After the tone, speak your message.
� Hang up.
Range
All Call # 6 Internal Zone 1 # 0 1
Internal Zone 2 # 0 2 to ….. Internal Zone 10 # 1 0
Internal All Call # 7 External Zone 1 # 4 1
Meet Me Page # #
Conference Paging Zones Use Page Zones 06 ~ 10 # 0 6 ~ # 1 0
Internal Zones:
01~10
A station, which is allowed to access page facilities, can connect and make voice announcement to any or all of the system
external/internal page zones.
To answer paging, (meet me page)
� Go to the nearest key telephone.
� Lift handset and dial # # or Hold/Save button, and you will be connected to the paging party.
# #
(Page Code) -Speak-
Off hook
Off hook
To join a Conference Page
�When receiving the Page Press CONF Key
� Lift the handset, the paging input is conference to the Keyset.
�For SLTs (they may receive a conference page as a ring), use the Conference Page Join Code:
5 8 , the page path is joined to the SLT. *
# #
Off hook
To prevent unauthorised outside calling, DISA access or Trunk access on your station by others, the system provides a
means to lock/unlock a station by access authorisation code.
RangeButton Procedures
To register access authorisation code,
� Press Trans/Pgm key and dial 3 1
� Dial your own 5 digits access authorisation code.
� Press Hold/Save key.
� Confirmation tone is heard.
Password - Authorisation Code
To change access authorisation code,
� Press Trans/Pgm key and dial 3 2
� Dial your current access authorisation code. You will hear
confirmation tone.
� Dial your new 5 digits access authorisation code.
� Press Hold/Save key.
� You will hear confirmation tone.
3 2 (old Auth. Code)
(new code)
3 1(& 5 digit Code)
Sta
tion (IC
M) F
eatu
res

●●●● aria–24IP DIGITAL KEY TELEPHONE SYSTEM USER’S GUIDE
19
Button Procedures
All Digital Keysets have 4 basic Station ringing options,
� Press Trans/Pgm button.
� Dial 1 1
� Select the ring type by dialing 1~4.
�Press Hold/Save button.
Additional tones for CO and ICM ringing are available for LDP-7000 series Keysets:
� Press Trans/Pgm 1 8 (dial 01 ~ 15) for ICM Ringing
�Press Trans/Pgm 1 9 (dial 01 ~ 15) for CO Ringing
� Press Hold/Save button
LDP-7016D, 7024D & 724LD Keysets support an additional Melody (or Melody/ Full Duplex)
Unit, allowing further Ring Tone Options,
�Press NAV Key (down) 1 2 2 (dial 01 ~ 15) for ICM Ringing�Press NAV Key (down) 1 2 4 (dial 01 ~ 15) for CO Ringing(Requires the optional Melody or Melody/ Full Duplex unit fitted.)
Range
1 1, (1~4)
1 8 or 9,(01~15)
Ringing Options
Station Name Programming
Button Procedures Range
� Press Trans/Pgm button.
� Dial 7 4.
� Enter your name. (to 12 letters using the alpha scheme in “Storing & using Speed Dial
Numbers” (pg 13.)
� Press Hold/Save button.
7 4
(name-alpha)
You can program your name and people using display phones will see your name instead of your station number, when you call.
Button Procedures Range
� Dialing an extension number, and the station is busy.
� After hearing ICM busy tone, dial the last digit of the next extension number in the same
10’s group. (ex. If station “712” is busy, dial digit “4” to call station “714”.)
� It can be used for CO line call by pressing Speed key + last digit.
When an extension is busy, you can make a call to a different station by dialing only the last digit of new station number.
Step Calling; ICM & CO
Sta
tion (IC
M) F
eatu
res
Button Procedures
�When a busy Keyset receives a camp-on by another station, the Hold/Save key of busy Keyset
flashes.
After a tone, the busy Keyset can connect to both parties inbound speech path.
� Press Hold/Save key in the busy Keyset to converse with new call, the 1ts caller receives MOH
�Press Hold/Save key again to alternate & converse with original call.
� If one caller hangs up, the other caller will be connected.
This feature provides voice announcement to a busy station without interrupting the existing conversation. The announcement
is received over the existing conversation so that only the busy station hears both incoming parties.
Range
Voice Over

●●●● aria–24IP DIGITAL KEY TELEPHONE SYSTEM USER’S GUIDE
20
Button Procedures
To adjust the Speaker Volume,
� Press MON or Speaker Key, press -Volume+ button to control the speakerphone volume.
� Adjust the volume from 00~12, or increase/ decrease the bar meter.
Volume Controls: Speaker, Ringer, Handset.
To adjust the Ringer Volume,
�When the Station is ringing, Press -Volume+ button to control the speakerphone volume.
� Adjust the volume from 00~50, or increase/ decrease the bar meter.
To adjust the Handset Volume,
� Lift the Handset, press - Volume + button to control the speakerphone volume.
� Adjust the volume from 00~12, or increase/ decrease the bar meter.
Button Procedures
A toll call may be made from a toll barred station, using the authorisation code of a non barred station. The Station returns to
its normal Class of Service (Toll Barred) after one call is made.
Walking Class of Service (Toll Bar Over-ride)
� Lift handset.
� Dial Trans/Pgm 2 3 then the 5 digit authorisation code (assigned by supervisor or
engineer)
� Press Hold/Save key, confirmation tone is heard
� Hang up
� Select a line and dial the number required
Range
Off hook
2 3 (Auth. code)
1, Dial the number
Sta
tion (IC
M) F
eatu
res

●●●● aria–24IP DIGITAL KEY TELEPHONE SYSTEM USER’S GUIDE
21
Syste
m Featu
res
Button Procedures
Alarm Reset
Range
To terminate alarm signal while idle state,
� At the Alarming Station: Dial � 5 6 5
� Confirmation tone is heard and the alarm signal is terminated at all assigned stations.
� 5 6 5
CLI Message Wait (CO Message Wait)
Button Procedures Range
When a call is received with DISA/DID, the Calling Line Identification (CLI) of the incoming call is displayed on the LCD of thestation. If the DISA/DID external party hangs up the call before being answered, the CLI will be stored in the CO message wait queue in the called party.
To retrieve CLI Message,
� Press Call Back key.
� The stored message will be shown on the LCD.
To delete the current CLI message and see the next one,
� Press CONF soft key.
To make a callback,
� Press Hold/Save key.
� The stored number is dialed as speed dialing.
To see the next/previous CLI message,
� Press - Volume + key.
To delete all CLI messages,
� Press Speed key twice.
� If VMIB message is stored with CLI message, the CLI message will not be deleted by
pressing Speed key .
CONF Softkey
x2
Conference Room
Button Procedures Range
Conference Room allows internal users, and external DDI callers to join into a conference independently without being invited by a conference supervisor.
To Activate a Conference Room,
� Press [Trans/Pgm] 4 3 + Room Number (1~9)
�Dial a 5 digit Access Code, if required. (An access code is optional)
� Press [Hold/Save] Key
To Deactivate a Conference Room,
� Press [Trans/Pgm] 4 4 + Room Number (1~9)
To Join a Conference Room,
� An internal Station user may Dial the conference room Code + Room Number (571 ~ 579)
�An external Party must enter via a pre-programmed DDI with the Conference Room as the
Destination
To Leave an Conference Room,
� Press - Volume + key.
571 ~ 579
4 3 (1~9)
4 4 (1~9)
CO to CO Call time Extension
Button Procedures Range
Systems with Analogue CO Lines, may give a caller the ability to extend the allowed talk time of an unsupervised CO to CO connection. See Supervisor or System Engineer for CO-CO Extn Code.
To use the Co-Co Call timer extension,
� A party using a CO to Co line connection (eg two external parties of a 3 way conference, is
unsupervised when the initiating station withdraws form the conference) receives warning tone 15 sec
before the unsupervised conference timer (U-S Confr Timer) expires and the connection is dropped.
� After the tone either party may dial the CO-CO Call timer extension code.
� Followed by a digit for the appropriate multiple of the U-S Confr Timer required.
� The total allowable call time is extended to the multiple of U-S Confr TimerE.g. Unsupervised Conference Timer of 10 min: User dials (CO-Co Call Timer Extn Code) 4. Max
talk time allowed is now 40 min.
CO-Co Call Timer Extn Code
(Timer extn multiple)1~9

●●●● aria–24IP DIGITAL KEY TELEPHONE SYSTEM USER’S GUIDE
22
DISA (Direct Inward System Access) CO Call Out
If enabled an inbound caller may access an outgoing CO Line for calling via the Aria,
�When calling in on the assigned DISA line, Dial the CO access code after hearing dial tone or
voice guide from DVU.
�Or, dial the CO access code after dialing the programmed authorization code (when
required) for outgoing call. (Used to restrict access to this feature.)
Button Procedures
DISA Service allow Outside callers access to a variety of System resources and caller controlled call routing.
Range
Password(if required)
1
Hot Desk
Button Procedures Range
The Virtual Station user may Log On at any available Dummy (or Hot Desk) Station,
� At the Dummy Station, lift the handset or Press [Speaker] Key (or MON Key at older keysets)
� Dial your Virtual Station Authorisation Code
� The Dummy Station will take on the Attributes of your Virtual Station and is now an Agent Station.
The Virtual Station user may Log Out from their Agent Station,
� At the Agent Station (a Dummy Station Logged on as a Virtual Station)
� Press [Trans/Pgm] * * to Log Out
� The LCD will prompt for a verity of log out with Call Forward options:
AGENT LOGOUT WITH (Options)
No Forward Set Forward to Sta … Forward to Mobile-Ext Forward to Speed 000
Forward to VM … Forward to VMIB
� Press [Hold/Save] to return the Station to Dummy Station mode.
Authorisation Code
Hot Desk Facility allows user who does not require a permanent station, to be allocated a virtual station, which is enabled as required
and used as a normal station. A Hot Desk (or Dummy Station) allows the user access to their virtual station.
Off hook
* *
LCD Language Change at Keyset
Button Procedures Range
� Press Trans/Pgm key and dial 7 1
� The language in LCD is toggled between default country Language and the System’s 2nd Language.
7 1
Two-way Recording (to VMIB)
To record the conversation,
�Press the programmed {RECORD} button.
� To program the {RECORD} button, Trans/Pgm + Flexkey + Trans/Pgm +5 4 + Hold/Save
To finish the recording (while still connected to CO call),
�Press the programmed {RECORD} button again.
�Or, replace the handset, and end the call
Button Procedures
While a CO line call, (if service is enabled at your station) you can record the conversation. It will be saved in your station mailbox.
By default a warning tone is played before recording begins.Range
{RECORD}
{RECORD}
Syste
m Featu
res

●●●● aria–24IP DIGITAL KEY TELEPHONE SYSTEM USER’S GUIDE
23
Syste
m Featu
res
Date & Time Prompt ;
� Press Trans/Pgm key and dial 6 2.
� You will hear the time prompt, “Date is December, 20th, Time is XX : XX PM.”
Station Number Prompt ;
� Press Trans/Pgm key and dial 6 3.
� You will hear the station number prompt, “This is station XXXX.”
Station Status Prompt ;
�Press Trans/Pgm key and dial 6 4. (You will hear below list (a-j).
NB: c-i items will be omitted if not active.)
a) Station number XXXX b) Intercom Answer Mode
c) Listed message X d) Wake-up time XX:XX AM or PM
e) Do not disturb f) Forwarded to station XXXX
g) Forwarded to speed bin XXX h) Queued CO XXX
i) Locked (temporary COS change) j) COS X
Record your greeting,
� Press Trans/Pgm key and dial 6 1.
� “Press # button to record” is heard and any current greeting will be played.
� Press # button and record your greeting after hearing confirmation tone.
� Press Hold/Save button or Speaker key to finish recording, then confirmation tone is heard
� Pressing Speed key while playing, the greeting is deleted, confirmation tone is heard.
Delete your greeting,
� Press Trans/Pgm key and dial 6 6.
Activate Call Forward to VMIB,
� Lift handset or press Speaker key.
� Press Dnd/Fwd key.
� Dial Call Forward type code (1~4).
� Dial # key . (Confirmation tone is heard.)
Deactivate Call Forward to VMIB,
� Press Dnd/Fwd key.
Leave a Voice Message Wait (at a busy station),
�When Busy tone is returned, Press [Call Back]
� After beep tone, record your message with normal voice, press [Hold/Save]
� (You may choose not to press [Hold/Save] and instead receive a Call Back. Hang up.
Button Procedures Range
Voice Board (VMIB) Features
The Aria's VMIB (Voice Messaging Interface Board) provides many useful voice facilities..
To listen to a recorded message,
� Press the flashing Call Back key. (LCD shows MSG: VMIB (no. of msgs)
�The recorded message is heard with the time and date.
� Soft keys: Next Repeat Delete Add Rewind Call Back are available.
� Pressing Hold/Save button, the current message is saved, the next message is heard.
� Pressing Call Back key, the current message is played again.
� Pressing CONF soft key, the current message is deleted and the next message is heard.
To append and forward a recorded message, *�While listening to the recorded message press Add soft key, (arrow Nav key > for next page
of LCD), Record preamble, press Soft key Save. During the replay of the message, dial
recipient’s station number. The message and preamble are sent.
Record VMIB Paging Message,
� Press Trans/Pgm key and dial 6 5.
�“Press # button to record” is heard and if there is a recorded paging message, it is played.
� Press # button and record paging message after hearing confirmation tone.
� Press Hold/Save button or Speaker key to finish recording, confirmation tone is heard.
� Pressing Speed key while playing, the greeting is deleted, confirmation tone is heard.
Activate VMIB Message Paging,
� Dial the desired page zone (5XX) and lift handset.
� The recorded VMIB message is paged.
Delete VMIB Paging Message,
� Press Trans/Pgm key and dial 6 7.
� The recorded message is deleted.
� Or, press Speed key while playing, then the message is deleted.
6 2
6 3
6 4
6 1
# (record greeting)
6 6
Off hook
1~4 #
Softkeys: Next Repeat Delete Add Rewind CallBk
Softkeys: Add , Save (Station #)
6 5#
(record greeting)
Off hook
5 x x
6 7

●●●● aria–24IP DIGITAL KEY TELEPHONE SYSTEM USER’S GUIDE
24
Flexible Button Programming
To program flexible buttons,
� Press Trans/Pgm button.
� Press a flexible key to program.
� See the below table and enter the desired code.
� Press Hold/Save button.
To erase a flexible button,
� Press Trans/Pgm button.
� Press the flexible button to be erased.
� Press Hold/Save button.
Button Procedures Range
Codes for Flexible Button Programming
{Flexi-key} (Pgm Code)
{Flexi-key}
Direct Station Select 700 ~ 727
(station number )
Call Park 950-957
(parking location)
Hunt Group 620 ~ 629
(internal hunt group)
Alarm Reset � 5 6 5
Group Call Pick-up � 1
Direct Call Pick Up � 4 2 <station #>
Universal Night Answer 2
Speed Dial � 7
Station speed dial SPEED+000~099
System speed dial SPEED+2000~2499
Outside Line Access 1
Group access 4 + ...
E.g. Group #1~24 4 0 1~4 2 4
Individual Line Access 4 8 + 01~40
E.g. Lines #1~40 4 8 0 0 1~4 8 4 00
Button Assignment for LDP-7004,7008 series
CONF soft key
Call Back key
DND button
FLASH button
MUTE button
Speaker key
REDIAL Soft key
Button Assignment
Ring Type
Ring Answer Mode
ICM Ring
CO Ring
COS Down
COS Restore
Walking COS
COS Change
Auth. Code Register
Auth. Code Change
Set Wake-up Time
Wake-up Disable
Conf Room Active
Button Assignment (cont)
Conf Room De-Active
Set Preselected MSG
Set Customer MSG
CLIR Key
2 Way Recording
ATD DND (Attendant)
ATD Camp On (Attendant)
Record VMIB User Greeting
Listen Time & Date
Listen Station Number
Listen Station Status
Record Page MSG
Erase User Greeting
Erase Page MSG
Answer Machine - Ring
Answer Machine - Speaker
DVM – One Touch Record
DVM Pause/Resume
LCD Display Language
MPB Version Display
Background Music
Register Station Name
Speakerphone/Headset
Headset Ring Mode
Account Code
DDI Call Wait
ICM Hold
LOOP button
Camp-on
Intrusion (Attendant)
UCD DND (+ Group number)
Keypad Facility
ACD Status (for Supervisor)
Pager Call
DDI Restriction
DISA Restriction
Call Record
Agent Log Out
Agent Log In
Bluetooth Register
Bluetooth Usage
Trans/Pgm + 44
Trans/Pgm + 51
Trans/Pgm + 52
Trans/Pgm + 53
Trans/Pgm + 54
Trans/Pgm + 56
Trans/Pgm + 57
Trans/Pgm + 61
Trans/Pgm + 62
Trans/Pgm + 63
Trans/Pgm + 64
Trans/Pgm + 65
Trans/Pgm + 66
Trans/Pgm + 67
Trans/Pgm + 68
Trans/Pgm + 69
Trans/Pgm + 6*
Trans/Pgm + 6#
Trans/Pgm + 71
Trans/Pgm + 72
Trans/Pgm + 73
Trans/Pgm + 74
Trans/Pgm + 75
Trans/Pgm + 76
Trans/Pgm + 80
Trans/Pgm + 81
Trans/Pgm + 83
Trans/Pgm + 84
Trans/Pgm + 85
Trans/Pgm + 86
Trans/Pgm + 87
Trans/Pgm + 89
Trans/Pgm + 8*
Trans/Pgm + 8#
Trans/Pgm + 98
Trans/Pgm + 99
Trans/Pgm + 9*
Trans/Pgm + **
Trans/Pgm +*0
Trans/Pgm + *3
Trans/Pgm +*4
Trans/Pgm + 91
Trans/Pgm + 92
Trans/Pgm + 93
Trans/Pgm + 94
Trans/Pgm + 95
Trans/Pgm + 96
Trans/Pgm + 97
Trans/Pgm + 11
Trans/Pgm + 12
Trans/Pgm + 18
Trans/Pgm + 19
Trans/Pgm + 21
Trans/Pgm + 22
Trans/Pgm + 23
Trans/Pgm + 24
Trans/Pgm + 31
Trans/Pgm + 32
Trans/Pgm + 41
Trans/Pgm + 42
Trans/Pgm + 43
Fle
xib
le B
utto
n Pro
gra
mm
ing

●●●● aria–24IP DIGITAL KEY TELEPHONE SYSTEM USER’S GUIDE
25
Voice Mail (VMIB) Quick Reference Guide –
To Record Out Going Greeting
� Press Trans/Pgm button.
� Dial 6 1
Follow the voice Prompts,
Press Hold/Save when you have finished
recording your greeting.
To Forward calls to the Voice Mail (VMIB)
� Press Speaker key.
� Dial � 4 9
Dial one of the following forward types:
For Unconditional Forward dial……….. 1 #
For Forward on Busy dial ………………2 #
For Forward on No Answer dial ……….3 #
For Forward on Busy/ No Answer dial ..4 #
Voice Mail Controls:
While listening to Messages
To Save a Message
�Press Hold/Save button or Next Softkey, during the message
playback, or after the message & confirmation tone have played
(but before the next message/ time stamp is played).
� The next message is played. If you are listening to the last of
multiple messages, the 1st message is replayed.
To Replay the Message
� Press CALL BK button, or Replay Softkey, during the message
playback, or after the message & confirmation tone have played
(but before the next message/ time stamp is played).
� the message will play again (including the time/ date stamp).
To Delete the Message
� Press Delete soft key to delete the message. The VMIB will
hang up when all messages are deleted, or hang up the station.
To Rewind the Message
�While replaying the message, Press the Rewind Softkey.
� The Rewind time is set at Admin programming
To Append a forwarded message (pre-amble)
�While replaying the message, Press the Add Soft key, record
your preamble, press Save Softkey.
To Call Back the Message Originator
� Press Call Back soft key to initiate a call to the party who left
the message.
LDP-7004D & 7008D Digital Key Telephones & Analogue (SLT) Telephones
To Record Out Going Greeting
� Press Trans/Pgm key (SLT Dial � 3)
� Dial 6 1
Follow the voice Prompts,
Press Hold/Save when you have finished
recording your greeting. (SLT press Recall or Hook-flash)
To Retrieve your Voice Mail (VMIB) Messages
� The flashing CALL BK button and LCD will alert a
VMIB message or Dial * 6 7 ( 5 6 7 on some systems)
If required, enter you Authorisation Code (Password)
The Time and Date will play (if programmed)
The message will begin playing.
Voice Mail Controls:
� Press # 3 to replay the message again.
� Press # 2 to save the message.
� Press # 1 to delete the message.
The VMIB will hang up when all messages are
deleted, or hang up the station.
To Remove the Call Forward to the Voice Mail (VMIB)
� Press Speaker key.
� Dial � 4 9 then #
To Remove the Call Forward to the Voice
Mail (VMIB)
� Press Speaker key.
� Dial * 49#
Voice Mail (VMIB) - Password Protection
Accessing a Password Protected Mailbox
� A station’s mailbox may be flagged by your installer as password protected. To access your mailbox, you will need to k
ey in your authorisation code (see above).
Changing your Authorisation Code
�Use Trans/Pgm 3 2 (or 5 6 3 3 2 for SLT's & 2 button phone’s) to change your authorisation code (your station’s
current code authorisation code is required for this feature.)
To Retrieve your Voice Mail (VMIB) Messages
�Press the flashing CALL BK button.
� LCD also will indicate a VMIB message. If required, enter
you Authorisation Code (Password). The Time and Date will
play (if programmed). The message will begin playing.
LDP-7016D, 7024D, 7024LD Digital Phones VM
IB -
Quic
k R
ef. G
uid
e
To Forward calls to the Voice Mail (VMIB)
� Press Speaker key.
� Dial � 4 9
Dial one of the following forward types:
For Unconditional Forward dial……….. 1 #
For Forward on Busy dial ………………2 #
For Forward on No Answer dial ……….3 #
For Forward on Busy/ No Answer dial ..4 #

●●●● aria–24IP DIGITAL KEY TELEPHONE SYSTEM USER’S GUIDE
26
Enter your Authorisation Code (of your Station)
Before you can remotely access your voice mail you will need to enter an ‘authorisation code’ this is done at your extension.
� Press Trans/Pgm, Dial 3 1 (or Dial � 3 3 1 for SLT & 2 button phones)
� Dial your 5 digit Authorisation code (unique to your station)
� Press Hold/Save button (or hook flash / recall at slt)
Remote Accessing Your Mailbox
You can dial into your voice mail through DISA or using your DID number. When you hear your greeting press the * button
you will be asked to enter your ‘authorisation code’ The system will respond with the number of messages in your voice mail,
if the correct code was entered. (NB ver 3.5+ SW Authorisation code is followed by `#` key)
When you have a message: When there is no message:
Dial 1 to retrieve your messages Dial 1 to listen to the current message again
Dial 2 to listen to the next message Dial 2 to listen to or change your greeting
Dial 3 to delete the current message Dial 3 to remove the forward to your voice mail
Dial 4 to delete all messages Dial # during greeting to change the greeting
Dial ���� to exit voice mail remote control mode
Voice Mail (VMIB) - Remote Access Quick Reference Guide
VM
IB -
Quic
k R
ef. G
uid
e
●●●● aria–24IP DIGITAL KEY TELEPHONE SYSTEM USER’S GUIDE
27
Atte
ndant O
pera
tion
Attendant Intrusion
Button ProcedureAn ATD Intrusion flexible key must be assigned
� Press Trans/Pgm button.
� Press the desired flexible key to be registered.
� Press Trans/Pgm button.
� Dial 8 6.
� Press Hold/Save button.
To activate attendant intrusion
� Press DSS button corresponding to the busy station you wish to call. (Busy tone is heard.)
� Press ATD INTRUSION button. (Intrusion warning tone is heard in the busy station, then a 3-way
conference is set up.)
Attendant may intrude into any station which is in conversation with a CO line. This feature needs System Programming to be
enabled.
{Flex-key}
8 6
{DSS} {ATD INTRUDE}
Button Procedure
The attendant can cancel the features, DND, Call forward and pre-selected messages activated at other stations.
� Press Trans/Pgm button.
� Dial 0 7 1
� Dial the desired station range to be canceled.
� Press Hold/Save button.
Attendant Cancel Station Feature
Range
0 7 1 (Station range)
Attendant Remote Call Forward (not available at Aria-24IP yet)
Button Procedure
To Set a Call Forward of another Station,
�Press [Trans/Pgm] 0 9 1
� Dial the Station RangeStation RangeStation RangeStation Range to be forwarded (or Station number twice for one station)� Dial 1 – 4 for the Forward type (1:Unconditional 2: Busy 3:No Ansr 4: Busy/No Ansr)
� Dial the Station Number/ Hunt Group Number or # for VMIB Destination
� Press [Hold/Save] (# option for VMIB requires Sta has VMIB access and Station OGM recorded.)
To Remove a Call Forward of another Station,� Press [Trans/Pgm] 0 9 1 � Dial the Station Range for the Forward to be removed from� Dial # [Hold/Save]
Range
An Attendant may set and remove a Call Forward of another Station. This Feature requires ver 3.5 or higher SW level.
0 9 1
(Station Range)1 ~ 4
Sta/Hunt/ #
0 9 1
(Station Range) #
CO - Disable Outgoing Lines
Button Procedure
To disable outgoing calls a CO line,
� Press Trans/Pgm button.
� Dial 0 7 3
� Press the desired outside line button. (Confirmation tone is heard.)
� After hearing confirmation tone, selected outside line button is disabled.
To enable a disabled outgoing call CO line,
� Repeat the process to enable the CO line.
0 7 3
{DLS key} (Direct Line Select)
(As Above)
The Attendant may disallow outbound access to Co Lines. For example if the line is faulty it can be disabled from being selected
as a line out.

●●●● aria–24IP DIGITAL KEY TELEPHONE SYSTEM USER’S GUIDE
28
Button Procedures
The attendant station can the system into night service mode allowing ring assignments and answering privileges to station
not having the privileges in the day mode. Or, can be placed into on-demand service mode allowing ring assignments and
answering privileges to station not having the privileges in the night mode.
The system can be placed in Day/On-demand/Night/Weekend/Auto mode operation manually by pressing [DND/FWD] button
at attendant station. In Auto ring mode, the ring mode will follow the Weekly Time Table (PGM 233).
To activate/deactivate Day/Night/On-demand/Weekend/Auto mode manually,
� Pressing Dnd/Fwd key, the ring mode is changed to
On-demand � Night � Weekend � Auto � Day mode in sequence.
� On-demand mode is not activated automatically.
To activate Auto Ring Mode with Attendant PGM mode,
� Press Trans/Pgm button.
� Dial 0 7 4.
� Dial 1 and press Hold/Save button.
(The Weekly Time Table should be entered by Admin Programming.)
Day Night Switching (CO Ringing Mode Selection)
Range
x1 ~ x4
0 7 4 1
FOR Ver 3.5 or higher SW:
To activate/deactivate Day/Night/On-demand/Weekend/Auto mode manually,
� Pressing Dnd/Fwd key,
� Select Ring Mode (1 ~ 5) the LCD Displays the Choice
1:Day 2:Night 3:On Demand 4:Weekend 5:Auto Ring Mode
� Press [Hold/Save] when the desired choice is displayed
1 ~ 5
Button Procedure
To set ICM box music,
� Press Trans/Pgm button.
� Dial 0 7 5
� Dial the music channel 01~11
� Press Hold/Save button.
The attendant can select the music channel source for an ICM box (Door Phone).
Intercom Box BGM Selection
Range
0 7 500 ~11
Button Procedure
LCD Language (Apply 2nd Language)
To change the LCD language at attendant,
� Press Trans/Pgm button.
� Dial 0 7 �
� Dial the station range to be changed.
� Select the language type with the following codes.
� Press Hold/Save button.
aria 50 Languages
0 0 English
0 1 Italian
0 2 Finnish
0 3 Dutch
0 4 Swedish
0 5 Danish
0 6 Norwegian
0 7 Hungarian
0 8 Germany
0 9 French
1 0 Portuguese
1 1 Spanish
1 2 Korean
1 3 Estonia
1 4 Russian
0 7 �
(Station range) 00 ~14
The attendant can set 2nd Language for other stations. The 2nd language applied,
is set by system programming.
Overriding a Key Telephone in Do Not Disturb
Button Procedure
Upon calling a busy station, Busy tone is returned
� Dial � to override the station in DND or in busy.
� The target station rings.
{DSS}
�
Range
When calling a Station in DND the Attendant may Override the DND and force the Station to ring.
Button Procedure
To allow back Ground Music to an External Page Port,
� Press Trans/Pgm button.
�Dial 0 7 6 (External Port 1)
�� Dial the music channel 01~08.
� Press Hold/Save button.
Paging Port BGM Selection by Attendant
Range0 7 6
00 ~08
Atte
ndant O
pera
tion
Current Aria-24IP method.

●●●● aria–24IP DIGITAL KEY TELEPHONE SYSTEM USER’S GUIDE
29
Pre-Selected Message Editing
Button Procedure
� Press Trans/Pgm button.
� Dial 0 5 3
� Dial the number of the desired message (11~20).
� Enter the desired message using the code in Dial by Name.
�Press Hold/Save button.
Range
0 5 3 (message #) (edit message)
Pre-Selected Messaged 11 ~ 20 are customizable for Site specific usage. These messages are edited at the Attendant Station
Button Procedures
SMDR Records Management
To manually Print SMDR Records by station,
� Dial Trans/Pgm + 0 1 1 1
� Enter the desired station range.
� Press Hold/Save button. Accumulated SMDR records will be printed to SMDR port)
Station Message Detail Recording(SMDR) can provide details on both incoming and outgoing calls.
To print SMDR Records by account group,
� Dial Trans/Pgm + 0 1 1 3
� Enter the desired account group to be printed.
� Press Hold/Save button. (Accumulated SMDR records will be printed SMDR port) 01~99
To erase SMDR Data by call account group,
� Dial Trans/Pgm + 0 1 1 4
� Enter the desired account group. (SMDR records will be erased for all stations in the range.)
� Press Hold/Save button.
To erase SMDR Data by station,
� Dial Trans/Pgm + 0 1 1 2
� Enter the desired station range. (SMDR records will be erased for all stations in the range.)
� Press Hold/Save button.
0 1 1 1 (Station range)
0 1 1 3 (Acc Group #)
Range
0 1 1 2 (Station range)
0 1 1 4 (Acc Group #)
Button Procedure
� Press Trans/Pgm
button.
� Dial 0 7 2
�Dial the station number
and enter the name
using the code shown.
�Press Hold/Save button.
(Also see the Alpha Entry Scheme described on pg 13.)
Q - 11Z - 12. - 131 - 10
A - 21B - 22C - 232 - 20
D - 31E - 32F - 333 - 30
G - 41H - 42I - 434 - 40
J - 51K - 52L - 535 - 50
M - 61N - 62O - 636 - 60
Station Name Edit by Attendant
Range
0 7 2 (edit name)
P - 71R - 72S - 73Q - 7 *7 - 70
T - 81U - 82V - 838 - 80
W - 91X - 92Y - 93Z - 9#9 - 90
*1 - Blank*2 - :*3 - ,
0-00 #
To record system greetings,
� Press Trans/Pgm button.
� Dial 0 6.
� Dial the announcement number (001~100).
�“Press # button to record” is heard. Then press # button to start recording.
�OR to record from MPB MOH port, press � then # button to start recording.
� Record your greeting and press Hold/Save button to finish the recording.
The System Prompt messages are 071~100 (Please refer to the next page for Details)
System Greetings (for DISA & Group Greetings)
Button Procedures
VMIB allows for announcements for Hunt service (UCD/Circular/Terminal) and DISA. Only the system attendant can record
this message, and only when no other VMIB channels are in use.
Range
0 6 (001~100)
#
To Delete VMIB System Prompt
� To delete, press Speed key while the prompt is played. (See above)
Lift HandsetRecording Begins
Atte
ndant O
pera
tion

●●●● aria–24IP DIGITAL KEY TELEPHONE SYSTEM USER’S GUIDE
30
085: No Answer Prompt
086: Reserved
087: Reserved
088: Remote VMIB Control Main Menu Prompt
089: Remote VMIB Sub-menu for digit 1 in Main Menu Prompt
090: Reserved
091: Reserved
092: Reserved
093: Remote VMIB Sub-menu for digit 2 in Main Menu Prompt
094: Remote VMIB Sub-menu for digit 3 in Main Menu Prompt
095: Remote VMIB Sub-menu for digit � in Main Menu Prompt
096: Leave Message after Tone Prompt (mailbox)
097: Message Waiting Prompt (SLT mailbox)
098: Recordable Default Greeting Prompt for Mailboxes
099~100: Reserved
071: VMIB MOH
072: Reserved
073: Invalid Number Prompt
074: Time out Prompt
075: Retry Prompt
076: Transfer to Attendant Prompt
077: Reserved
078: Leave Message Prompt
079: Record Start Prompt
080: Authorization Code Prompt
081: Busy Prompt
082: Reserved
083: Station Off-net Forward Prompt
084: DND Prompt
System Greetings (cont)
The System Prompt messages are 071~100
Button Procedure
To store system speed numbers,
� Press Trans/Pgm button.
� Dial Speed key .
� Dial speed number bin.
� If required, Press desired outside line or CO Group button. (If this setting is applied, the
speed dial will only use this line/line group. To skip, just go to the next step)
� Dial the phone numbers to be stored.
� Dial Hold/Save button.
� Enter Speed Dial NAME (to 16 characters). Hold/Save.
To use system speed numbers,
� Press Speed key .
�Dial speed number bin.
A group of speed dial numbers can be stored within the system for access by allowed stations. These numbers provide
speedy access to often used outgoing CO dialing numbers.
System Speed
Dial Range:
2000~2499
System Speed Dial Entry
Range
2000~2499(Ph Number)
2000~2499
To activate temporary COS change, (to ICM only, no CO access, COS 7)
� Press Trans/Pgm button.
� Dial 0 2 1
� Enter the station range.
� Press Hold/Save button.
Button Procedures
The System Attendant can change the class of service of another Station to Class of Service 7 (COS 7) to prevent
unauthorized use of that station.
To remove temporary COS change, (restore to original COS)
� Press Trans/Pgm button.
� Dial 0 2 2
� Enter the station range.
� Press Hold/Save button.
Temporary COS Change
Range
0 2 1 (Station range)
0 2 2 (Station range)
Button Procedure
This feature allows the attendant to set the Time/Date without entering Admin Programming.
� Press Trans/Pgm button.
� Dial 0 4 1
� Enter Date as MMDDYY (6 digits) and press Hold/Save button.
� Enter Time as military format (4 digits) and press Hold/Save button.
� If there is no need to change date or time, press Hold/Save button to go to the next step.
Time and Date Setting (Attendant Clock Set)
0 4 1 (MMDDYY)
(HHMM (24hr))
Range
Atte
ndant O
pera
tion

●●●● aria–24IP DIGITAL KEY TELEPHONE SYSTEM USER’S GUIDE
31
Button Procedure
To change the date format on the LCD (System wide),
� Press Trans/Pgm button.
� Dial 0 4 4
� The format toggles between DDMMYY and MMDDYY. (YY : year, MM : month, DD : date)
Time & Date Format
To change the time format on the LCD (System wide),
� Press Trans/Pgm button.
� Dial 0 4 5
� The format toggles between 12-hour mode and 24-hour mode. (YY : year, MM : month, DD : date)
Range
0 4 4
0 4 5
Button Procedure
To print all summary at system attendant,
� Press Trans/Pgm button.
� Dial 0 1 2 1. & Select Measurement Time type.
�Press Hold/Save button.
To print all summary traffic report periodically at system attendant,
� Press Trans/Pgm button.
� Dial 0 1 2 2.
�Press Hold/Save button.
To cancel periodic printing of all summary traffic reports,
� Press Trans/Pgm button.
� Dial 0 1 2 3.
�Press Hold/Save button.
To print the traffic report,� Press Trans/Pgm button.
� Dial 0 1 2 4 (Attendant Traffic Report) 0 1 2 5 (Call Summary Report)
0 1 2 6 (Call Hourly Report) 0 1 2 7 (Hardware Unit Usage Summary Report)
0 1 2 8 (CO Traffic Report) 0 1 2 9 (CO Traffic Hourly Report)
� Press Hold/Save button.
Traffic Analysis
The system can monitor and print various system activate based on the attendant’s request. The traffic-monitoring program is
activated only when enabled and will continue accumulating statistics until disabled. The traffic data is output to the RS-232C port
upon manual request. The system will support the following traffic reports; Attendant Traffic Report, Call Summary Report, Call
Hourly Report, H/W Unit Usage Summary Report, CO Traffic Report and CO Traffic Hourly Report.
(select time type)
0 1 2 1
0 1 2 2
0 1 2 3
0 1 2 4 to
0 1 2 9
Range
Button Procedure
Transferring an Outside Line to Another Station
�While connecting an outside line, press the desired DSS station button.
� You can wait to announce the Transfer or hang up.{DSS}
Range
Atte
ndant O
pera
tion

●●●● aria–24IP DIGITAL KEY TELEPHONE SYSTEM USER’S GUIDE
32
Flexible Button Codes for Attendant
Many of the following Attendant Station Programming codes can be programmed to an Attendants Flexible keys.
To program flexible buttons,
� Press Trans/Pgm button.
�Press a flexible key to program.
� Press Trans/Pgm button.� Enter the desired code, from the table below.
�Press Hold/Save button.
To erase a flexible button,
� Press Trans/Pgm button.
� Press the flexible button to be erased.
� Press Hold/Save button.
Button Procedures Range
{Flexi-key} (Pgm Code)
{Flexi-key}
ICM BOX BGM Channel select075
Automatic Day/Night/Weekend Mode Program074
DELETE CONF – ROOM048
MONITOR CONF – ROOM 047
Use Network Time & Date046
Wake-up Time Cancel043
Wake-up Time Registration (One-time /Continuous)042
System Date/Time Setting 041
Authorization Code Cancel031
Station COS Restore022
Station COS Down (COS 7)021
Print CO Hourly0129
Print CO Summary0128
Print H/W Usage0127
Print All Hourly0126
Print Call Summary0125
Print ATD Traffic0124
Abort Periodic Printing0123
Print All Periodically0122
Print All Summary0121
Delete Lost Call0118
Print Lost Call0117
Abort Printing0116
Display Call Charge0115
Delete SMDR (Group Base)0114
Print SMDR (Group Base)0113
Delete SMDR (Station Base)0112
Print SMDR (Station Base)0111
ITEM (FOR ATTENDANT)CODE:
Atte
ndant O
pera
tion
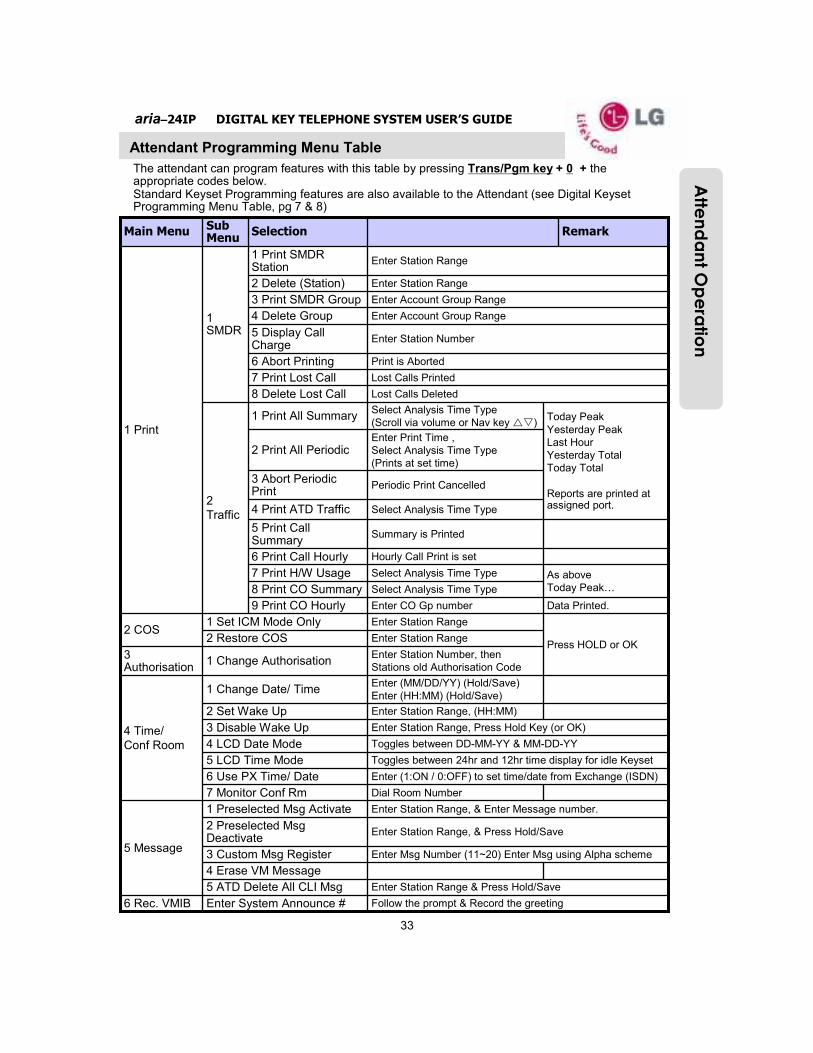
●●●● aria–24IP DIGITAL KEY TELEPHONE SYSTEM USER’S GUIDE
33
Attendant Programming Menu Table
The attendant can program features with this table by pressing Trans/Pgm key + 0 + the appropriate codes below.Standard Keyset Programming features are also available to the Attendant (see Digital Keyset Programming Menu Table, pg 7 & 8)
Follow the prompt & Record the greetingEnter System Announce # 6 Rec. VMIB
Toggles between 24hr and 12hr time display for idle Keyset5 LCD Time Mode
Toggles between DD-MM-YY & MM-DD-YY4 LCD Date Mode
Enter Station Range, Press Hold Key (or OK)3 Disable Wake Up
Enter Station Range, (HH:MM)2 Set Wake Up
Enter (MM/DD/YY) (Hold/Save)
Enter (HH:MM) (Hold/Save)1 Change Date/ Time
4 Time/
Conf Room
Enter Station Number, then
Stations old Authorisation Code1 Change Authorisation
3 Authorisation
4 Erase VM Message
Enter Msg Number (11~20) Enter Msg using Alpha scheme3 Custom Msg Register
Enter Station Range, & Press Hold/Save2 Preselected Msg Deactivate
Enter Station Range, & Enter Message number.1 Preselected Msg Activate
5 Message
Dial Room Number7 Monitor Conf Rm
Enter (1:ON / 0:OFF) to set time/date from Exchange (ISDN)6 Use PX Time/ Date
Hourly Call Print is set6 Print Call Hourly
Summary is Printed5 Print Call Summary
Select Analysis Time Type4 Print ATD Traffic
Periodic Print Cancelled3 Abort Periodic Print
Enter Print Time ,
Select Analysis Time Type
(Prints at set time)
2 Print All Periodic
Enter Station Range2 Restore COSPress HOLD or OK
Enter Station Range1 Set ICM Mode Only2 COS
Data Printed.Enter CO Gp number9 Print CO Hourly
Select Analysis Time Type8 Print CO Summary
As above
Today Peak…
Select Analysis Time Type7 Print H/W Usage
Enter Station Range & Press Hold/Save5 ATD Delete All CLI Msg
Today Peak
Yesterday Peak
Last Hour
Yesterday Total
Today Total
Reports are printed at assigned port.
Select Analysis Time Type
(Scroll via volume or Nav key ��)1 Print All Summary
2
Traffic
Lost Calls Deleted8 Delete Lost Call
Lost Calls Printed7 Print Lost Call
Print is Aborted6 Abort Printing
Enter Station Number5 Display Call Charge
Enter Account Group Range4 Delete Group
Enter Account Group Range3 Print SMDR Group
Enter Station Range2 Delete (Station)
Enter Station Range1 Print SMDR Station
1 SMDR
1 Print
RemarkSelectionSub Menu
Main Menu
Atte
ndant O
pera
tion

●●●● aria–24IP DIGITAL KEY TELEPHONE SYSTEM USER’S GUIDE
34
Attendant Programming Menu Table (Cont'd)
Toggles Board between Normal and Service states
(0:Normal/1:Service)Enter Slot Number (01~12)
* Board Svc Sw
Enter Station Range, Toggles English/ 2nd language* LCD Language Display
Enter Station Range, enter amount9 Prepaid Call
Select BGM source (00~11)8 BGM to ext port 3
Select BGM source (00~11)7 BGM to Extn port 2
Select BGM source (00~11)6 BGM to Ext port 1
Select BGM source (00~11)5 ICM Box BGM
Auto Day/ Night?/etc switching(1:ON / 0:OFF)4 Auto Ring Mode
Press CO Btn (toggles Disable/Enable state)3 Disable Outgoing CO
Enter Sta Number, Use alpha scheme, enter Name2 Register Station Name
Enter Station Range, Press Hold/Save1 Cancel Features
7
Supplementary
RemarksSelectionSub MenuMain Menu Atte
ndant O
pera
tion

●●●● aria–24IP DIGITAL KEY TELEPHONE SYSTEM USER’S GUIDE
35
Last Number Redial� Lift handset.
� Dial 5 2
Storing Station Speed Dial Numbers� Lift handset.
� Dial � 4 0� Dial station speed dial number. 000~099
� Dial speed dial number you wish to store.
� ‘Flash’ the hook switch.
� You will hear confirmation tone and hang up.
Using Station Speed Dial Numbers� Lift handset.
� Dial � 9
� Dial the desired station speed dial number, 000~099,
Using System Speed Dial Numbers� Lift handset.
� Dial � 9
� Dial the desired system speed dial number, 2000~3499,
Establishing a Conference CallThe system allows you to set up a 3-way conference call.
� Lift handset.
� Call the desired party. (outside or internal)
� ‘Flash’ the hook switch.
� Dial the internal extension number.
�When the other party answers, ‘flash’ hook switch
twice in 2 seconds. (All three parties are now connected.)
Message Waiting� Lift handset.
� Dial the desired extension number.
�No reply from a key station or busy tone from an SLT station.
� ‘Flash’ the hook switch.
� Dial � 6 6 .
� Hang up.
Call Forward� Lift handset.
� Dial � 4 9� Dial the desired call forward number.
1 - Unconditional, 2 - Busy calls
3 - No answer calls, 4 - Busy/no answer calls
5 - Station off-net, unconditional
6 - Station off-net, no answer
7 - Incoming outside line off-net (ATD only)
# - Cancel previous forward
To make Call forward to VMIB, press # key after
dialing call forward type (1~4).
� Dial the station / group number to forward calls to.
Station numbers: 700~727 / Group numbers: 620~624
� Hang up.
� To cancel Call Forward, lift handset and Dial � 4 9 then #.
For “Follow Me” Call Forward
� Go to the forwarding station and lift handset.
� Dial � 4 9� Dial 0.
� Dial the station number that calls are to be forwarded.
� Dial the authorization code of forwarded extension.
(The authorization code should be registered
before "Follow Me" Call Forward can be set.)
� Dial the extension number that will receive the call.
� Hang up.
Placing an Outside Call� Lift handset.
� Dial 1.
� Dial the desired number.
Placing an Intercom Call� Lift handset.
� Dial intercom number.
Placing an Outside Call on Hold �While connected to an extension call, briefly depress and
release the hook switch (‘flash’ the hook switch).
OR ‘Flash’ 5 6 0 for System Hold.
Retrieving a Held Outside (CO) Call� Lift handset.
� Dial 4 # and CO line number. Eg 4#01~4#40
� On SLT, you can dial 4 � in case you don't remember the
held CO number.
Placing an Outside Call via CO Group Access� Lift handset.
� Dial 4 and CO group number. Eg 401~424
� Dial the desired number.
Placing an Outside Call via CO Individual Access� Lift handset.
� Dial 4 8 and CO line number. Eg 4801~4840
� Dial the desired number.
Re-directing an Incoming Call (Call Pick-up)When you hear a phone ringing in your area,
� Lift handset.
� Dial � 4 2
� Dial the extension number of the ringing phone.
Group Call Pick-upWhen hearing an unattended phone ringing in your area,
� Lift handset.
� Dial � 1
� You will be connected to an incoming extension or outside line
call. (NB: You must be in the same pick-up group. – check with
your installer.)
Call Wait (Camp-on)� After receiving intercom busy tone, dial �.
� Camp-on tone is heard in the called station.
� The called station receives the ringing from camped on call
when hanging up from original call.
Answering a Waiting Call� You will receive warning tone in handset.
� Hang up the present call to take a new one.
Making a Screened Transfer�While connected to an outside line, ‘flash’ the hook switch.
� Dial the desired extension number and wait to be answered.
� Announce the call.
� Hang up to complete call Transfer.
Making an Unscreened Transfer�While connected to an outside line, ‘flash’ the hook switch.
� Dial the desired extension number
� Hang up to complete call Transfer.
Sin
gle
Line (A
nalo
gue) Te
lephone
Analogue (Single Line Telephone) User’s Guide

●●●● aria–24IP DIGITAL KEY TELEPHONE SYSTEM USER’S GUIDE
36
Do Not Disturb (DND)� Lift handset.
� Dial 5 3
� Place the handset.
To cancel Do Not Disturb,
� Lift handset.
� Dial 5 3
� Hang up.
Shuttle Call� An extension user engaged in an internal or external call, should
briefly press hook switch to hold a call (‘flash’ the hook switch).
� The holding party hears music on hold. (If equipped)
� Dial the second number of another internal or external call.
�When the second call is connected, the extension user may
alternate the call between holding parties by ‘flashing’ the hook
switch.
� Then, you may make a conference by ‘flashing’ the hook switch.
Universal Night AnswerWhen hearing an incoming signal on other phone or
night bell, when system is in night ringing mode
� Lift handset.
� Dial Universal Night Answer Access Code 2 .
� You will be connected to an incoming call if it was programmed as
an Universal Night Answer line.
Paging� Lift handset.
� Dial the desired page zone number.
� Give your message.
� Hang up to complete paging.
Page Zones
Call All zones: # 6
Call All Internal zones: # 7
Internal zone 1 : # 0 1
Internal zone 2 : # 0 2
: :
Internal zone 15 : # 1 5 (to maximum zone)
External zone 1 : # 4 1
External zone 2 : # 4 2
External zone 3 : # 4 3
Call all external zones : # 5
Meet Me” PagingWhen hearing a paging announcement,
� Dial # #.
Returning Call to Host System (FLASH to Line)If your aria system is connected to another system, you can use this
feature to Transfer a call back to an extension on the other system.
(Your installer will tell you if you need this feature.)
�While connected to an extension call, ‘flash’ the hook switch.
� Dial 5 5 1
� Hearing new dial tone from the other system, dial the extension
number on the required system.
�When the station answers, (See Screened Transfer) speak or
hang up (See Unscreened Transfer) to Transfer the call.
Analogue (Single Line Telephone) User’s Guide
Queuing If you access a busy line, you may request the system
to place you on hold, until the next line becomes idle.
� Lift handset.
� ‘Flash’ the hook switch.
� Dial � 6 6 .
� You will hear confirmation tone when the call is
accepted.
� Hang up.
Call ParkWhile connected to an outside call,
� Lift handset.
� ‘Flash’ the hook switch.
� Dial parking location. 950~957
� Hang up.
� To retrieve a parked call, dial parking location.
Handset Off-hook Alarm Should the handset be left off the cradle unattended,
for any length of time, the user will receive a high
pitched signal.
�To cancel the signal, hang up.
Walking Class of ServiceA toll call may be made from a toll barred station,
using the authorisation code of a non barred station.
The Station returns to its normal Class of Service
(Toll Barred) after 1 call is made.
� Lift handset.
� Dial 5 6 3 2 3 then the 5 digit authorisation code
� Hook-flash the station, confirmation tone is heard
� Hang up
� Dial the outside line code (1) then the number required.
Sin
gle
Line (A
nalo
gue) Te
lephone

●●●● aria–24IP DIGITAL KEY TELEPHONE SYSTEM USER’S GUIDE
37
Voice Announcement Date & Time Prompt;
� Lift handset.
� Dial � 3
� After hearing confirmation tone, dial 6 2. You'll hear date
& time prompt, " Date is March, 20th and Time is 00:00.“
Extension Number Prompt;
� Lift handset.
� Dial � 3.
� After hearing confirmation tone, dial 6 3. You'll hear extn
number prompt, "This extension is XXXX.”
Extension Status Prompt;
� Lift handset.
� Dial � 3.
� After hearing confirmation tone, dial 6 4.
You'll hear items listed below. (a~h)
a) Extension number
b) Intercom Answer Mode
c) Listed message X
d) Wake-up time XX:XX AM or PM
e) Do Not Disturb
f) Forwarded to extension XXXX
g) Forwarded to speed bin XXX
h) Queued CO XXX
i) Locked (Temporary Class of Service Charge)
j) COS X
Recording Your Message;
� Lift handset.
� Dial � 3.
� After hearing confirmation tone, dial 6 1.
� Record your message.
�Place the handset.
Deleting Your Message;
� Lift handset.
� Dial � 3.
�After hearing confirmation tone, dial 6 6.
Recording Paging Message;
� Lift handset.
� Dial � 3.
� After hearing confirmation tone, dial 6 5.
� Record paging message.
�Place the handset.
Deleting Your Message;
� Lift handset.
� Dial � 3.
�After hearing confirmation tone, dial 6 6.
Deleting Paging Message;
� Lift handset.
� Dial � 3.
�After hearing confirmation tone, dial 6 7.
To activate Call Forward to Internal Voice Mail,
� Lift handset.
� Dial � 4 9
� Dial Call Forward type number (1~4)
� Dial # .
�Hang up.
Analogue (Single Line Telephone) User’s Guide
Voice Announcement (cont)To deactivate Call Forward to Internal Voice Mail,
� Lift handset.
� Dial � 4 9� Dial # .
� Hang up.
Programming Authorization Code� Lift handset.
� Dial � 3
� Dial 3 1 for new code, 3 2 to change
� Dial 5 digits as authorization code.
� ‘Flash’ the hook switch
Programming Your Name� Lift handset.
� Dial � 3
� Dial 7 4
� Enter your name using the same codes as keysets.
� ‘Flash’ hook switch. (Confirmation tone is heard.)
� Hang up.
Entering an Account Code To identify a call, system provides the user with an account
code field in the Call Logging printout by entering an account
code while on an outside call.
After dialing or during a conversation with an external party,
� ‘Flash’ the hook switch.
� Dial 5 5 0 and your account code.
(An account code can be 1 - 12 digits.)
� Dial � (for end of Account Code)
� Continue conversation and hang up to finish the call.
Sin
gle
Line (A
nalo
gue) Te
lephone

●●●● aria–24IP DIGITAL KEY TELEPHONE SYSTEM USER’S GUIDE
38
LDP-7016/7024 Keysets. Input / Output Devices and Button
1
2
3
4
5
6
7
8
9
1
Handset
Earphone
Speaker
Speed Button
Dnd/Fwd Button
Speaker Button
Hold/Save Button
3 Soft Button
LCD Display
10
11
12
13
14
15
16
17
Ring LED
Trans/Pgm Button
Flexible
Call back Button
Volume Button
MIC
Menu
Phonebook
(Same operate as ‘Speed’)
8
11
12
13
3
4
5
6
7
2
9
14
15
16
17
10
LDP K
eyse
ts
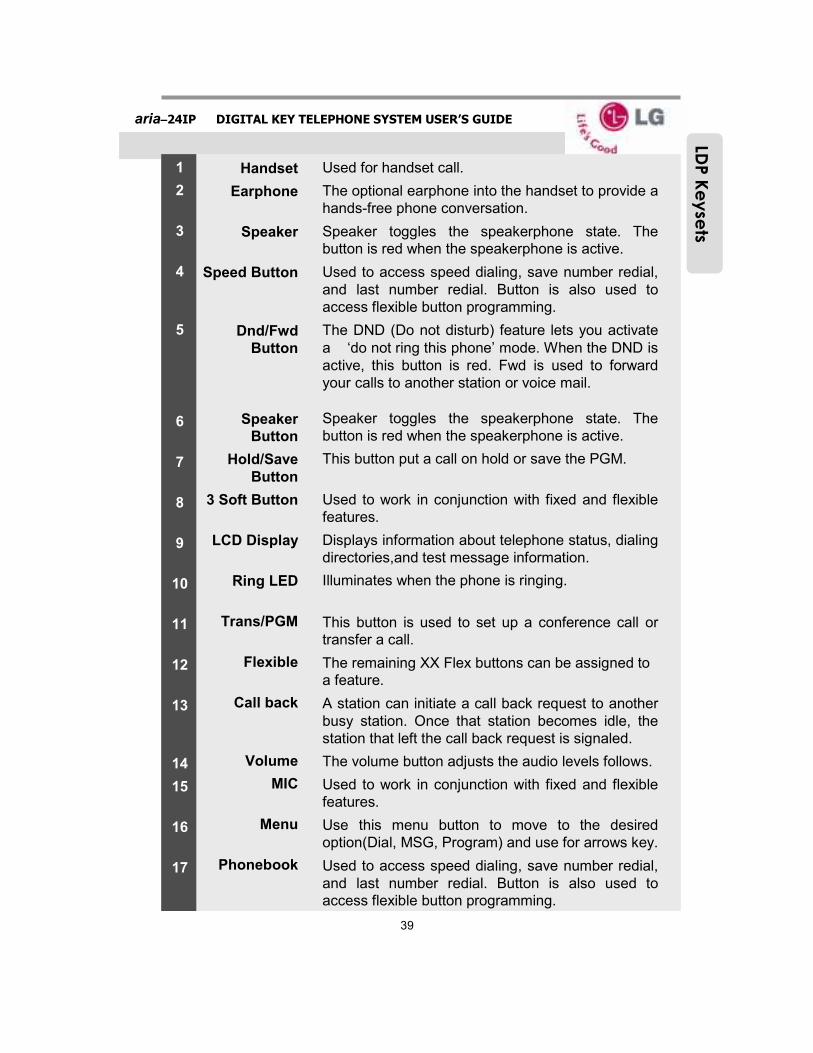
●●●● aria–24IP DIGITAL KEY TELEPHONE SYSTEM USER’S GUIDE
39
Used for handset call.
The optional earphone into the handset to provide a
hands-free phone conversation.
Speaker toggles the speakerphone state. The
button is red when the speakerphone is active.
Used to access speed dialing, save number redial,
and last number redial. Button is also used to
access flexible button programming.
The DND (Do not disturb) feature lets you activate
a ‘do not ring this phone’ mode. When the DND is
active, this button is red. Fwd is used to forward
your calls to another station or voice mail.
Speaker toggles the speakerphone state. The
button is red when the speakerphone is active.
This button put a call on hold or save the PGM.
Used to work in conjunction with fixed and flexible
features.
Displays information about telephone status, dialing
directories,and test message information.
Illuminates when the phone is ringing.
This button is used to set up a conference call or
transfer a call.
The remaining XX Flex buttons can be assigned to
a feature.
A station can initiate a call back request to another
busy station. Once that station becomes idle, the
station that left the call back request is signaled.
The volume button adjusts the audio levels follows.
Used to work in conjunction with fixed and flexible
features.
Use this menu button to move to the desired
option(Dial, MSG, Program) and use for arrows key.
Used to access speed dialing, save number redial,
and last number redial. Button is also used to
access flexible button programming.
Handset
Earphone
Speaker
Speed Button
Dnd/Fwd
Button
Speaker
Button
Hold/Save
Button
3 Soft Button
LCD Display
Ring LED
Trans/PGM
Flexible
Call back
Volume
MIC
Menu
Phonebook
1
2
3
4
5
6
7
8
9
10
11
12
13
14
15
16
17
LDP K
eyse
ts
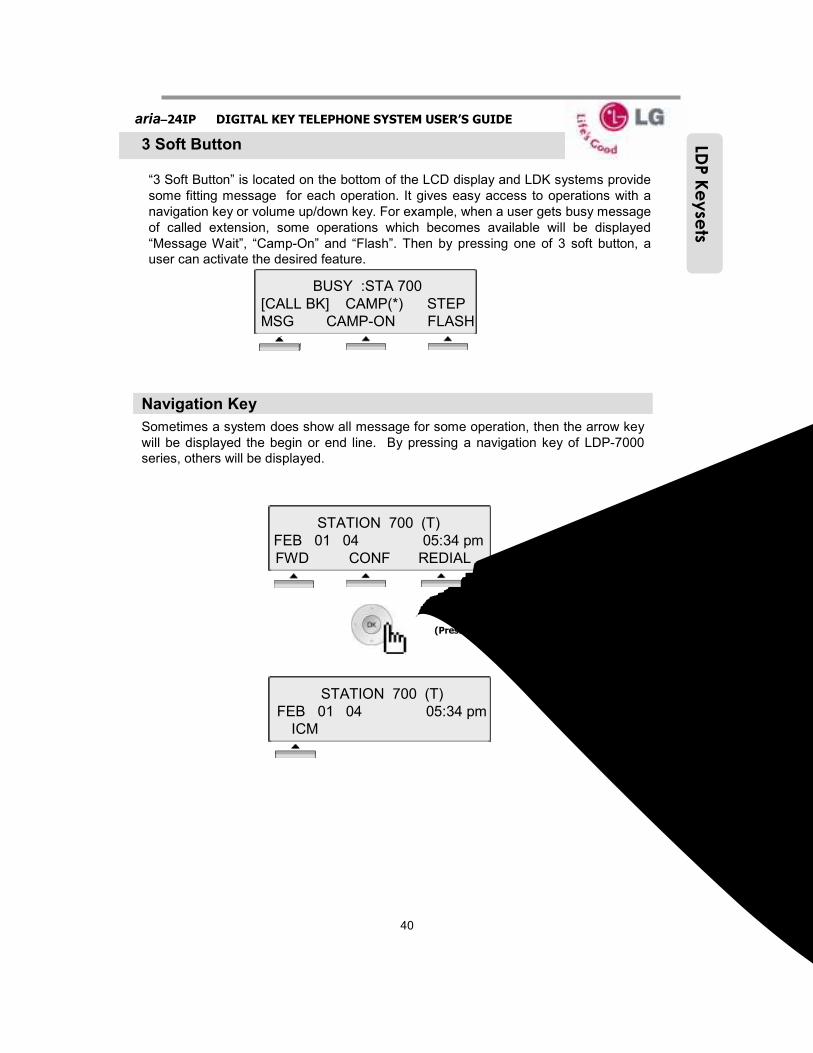
●●●● aria–24IP DIGITAL KEY TELEPHONE SYSTEM USER’S GUIDE
40
“3 Soft Button” is located on the bottom of the LCD display and LDK systems provide
some fitting message for each operation. It gives easy access to operations with a
navigation key or volume up/down key. For example, when a user gets busy message
of called extension, some operations which becomes available will be displayed
“Message Wait”, “Camp-On” and “Flash”. Then by pressing one of 3 soft button, a
user can activate the desired feature.
3 Soft Button
Navigation Key
Sometimes a system does show all message for some operation, then the arrow key
will be displayed the begin or end line. By pressing a navigation key of LDP-7000
series, others will be displayed.
BUSY :STA 700
[CALL BK] CAMP(*) STEP
MSG CAMP-ON FLASH
STATION 700 (T)
FEB 01 04 05:34 pm
FWD CONF REDIAL →
STATION 700 (T)
FEB 01 04 05:34 pm
← ICM
LDP K
eyse
ts
(Press for next screen)

●●●● aria–24IP DIGITAL KEY TELEPHONE SYSTEM USER’S GUIDE
41
The 3 soft button enables you to select the various function. For instance, if you want
to select the pickup, press the first button on the left as below shown. And if there are
more than three functions and displays an arrow on LCD, use navigation key to move
the next or previous function.
3 Soft Button is located on the bottom of the LCD display and LDK systems provide.
1. Idle
PICKUP : press the [PICKUP] button to pickup
the ring in the same pickup group.
CONF : press the [CONF] button to make a
conference.
REDIAL : press the [REDIAL] button to make a last
number redial.
1.1 Pickup
CALL TO STA 704
FROM 700 05:37pm
TRANS CONF MUTE
A station can pickup a call ringing to an unattended station within the same pickup
group by using the pickup procedure.
The pickup can be programmed in program 190.
Press the [PICKUP] button.
Talk
STATION 700 (T)
FEB 01 04 05:34 pm
PICKUP CONF REDIAL
STATION 700 (T)
FEB 01 04 05:34 pm
PICKUP CONF REDIAL
LDP K
eyse
ts
Soft Button Feature of LDP 7016/ 7024 Keysets
1.2 Conference
CALL TO STA 700
FEB 01 04 05:34 pm
MSG FLASH
CALL TO STA 700
FEB 01 04 05:34 pm
TRANS CONF MUTE
Dial the desired phone number.
e.g.)700
Press the [CONF] button.

●●●● aria–24IP DIGITAL KEY TELEPHONE SYSTEM USER’S GUIDE
42
1.2 Conference (cont)
1.3 Redial
Press the [REDIAL] button.
>123456789
BACK NEXT SEND
Use the [SEND] button to select the desired
number and press the [SEND] button to make
a call.
123456789
LINE 008 00:00:10
TRANS CONF MUTE →
Talk
STATION 700 (T)
FEB 01 04 05:34 pm
PICKUP CONF REDIAL
CONFERENCE
FEB 01 04 05:34 pm
FWD CONF REDIAL →
Dial the phone number of the desired party
e.g.)704
CONFERENCE
FEB 01 04 05:34 pm
CONF MUTE
For making a 3-party conference, press
[CONF] button two times.
LDP K
eyse
ts
2. Off Hook
STATION 700 (T)
FEB 01 04 05:34 pm
FWD CONF REDIAL→
FWD : press the [FWD] button to forward a call to
another station.
CONF : press the [CONF] button to make a conference.
REDIAL : press the [REDIAL] button to make a last
number redial.
STATION 700 (T)
FEB 01 04 05:34 pm
← ICM
ICM : press the [ICM] button to retrieve the ICM
[HOLD] button.

●●●● aria–24IP DIGITAL KEY TELEPHONE SYSTEM USER’S GUIDE
43
3. Intercom Dialing
STATION 700 (T)
FEB 01 04 05:34 pm
FLASH
FLASH : press the [FLASH] button to disconnect the
outside line and reseize and outside line dial
tone. Note may be used for Centrex features,
check with your System Administrator.
4. Intercom Ring Back
CALL TO STA 700
FEB 01 04 05:34 pm
MSG FLASH
MSG : press the [MSG] button to leave a message.
FLASH : press the [FLASH] button to disconnect the
outside line and reseize and outside line dial
tone. Note may be used for Centrex features,
check with your System Administrator.
5. Intercom Busy
BUSY : STA 700
[CALL BK] CAMP ( * ) STEP
MSG CAMP-ON FLASH
MSG : press the [MSG] button to leave a message.
CAMP-ON : press the [CAMP-ON] button to allows
you to send a call waiting tone to a busy
station indicating that they have a call
waiting.
FLASH : press the [FLASH] button to disconnect the
outside line and reseize and outside line
dial tone. Note may be used for Centrex features,
check with your System Administrator.
LDP K
eyse
ts
7. Intercom Dialing Error
INVALID
FEB 01 04 05:34 pm
FLASH
FLASH : press the [FLASH] button to disconnect the
outside line and reseize and outside line dial
tone. Note may be used for Centrex features,
check with your System Administrator.
6. Intercom Do Not Disturb
DO NOT DISTURB STA 700
CALL BK FLASH
CALL BK : press the [CALL BK] button to leave the
call back request or message.
FLASH : press the [FLASH] button to disconnect the
outside line and reseize and outside line dial
tone. Note may be used for Centrex features,
check with your System Administrator.

●●●● aria–24IP DIGITAL KEY TELEPHONE SYSTEM USER’S GUIDE
44
9. Intercom Talk
CALL FROM STA XXX
FEB 01 04 05:34 pm
TRANS CONF MUTE
TRANS : press the [TRANS] button to transfer the
incoming call to another station.
CONF : press the [CONF] button to make a conference.MUTE : press the [MUTE] button to mute the handset,
speakerphone, or headset but does not affect
the speech coming over the speaker or
handset. Pressing the [MUTE] button again
activates the microphone.
10. CO Line Busy
CO LINE 001 BUSY
QUEUING ([CALLBK])
CALL BK
CALL BK : press the [CALL BK] button to leave the
call back request or message.
LDP K
eyse
ts
8. Intercom Receiving
CALL FROM STA XXX
FEB 01 04 05:34 pm
DND
DND : press the [DND] button to prevent other parties
from disturbing you.
11. CO Dialing/ CO Talk
123456789
LINE 125 00:00:03
TRANS CONF MUTE →
123456789
LINE 125 00:00:03
← RECORD FLASH ACNR
TRANS : press the [TRANS] button to transfer the
incoming call to another station.
CONF : press the [CONF] button to make a conference.
MUTE : press the [MUTE] button to mute the handset,
speakerphone, or headset but does not affect
the speech coming over the speaker or
handset. Pressing the [MUTE] button again
activates the microphone.
RECORD : press the [RECORD] button to record the
current calling.
FLASH : press the [FLASH] button to disconnect the
outside line and reseize and outside line dial
tone. Note may be used for Centrex features,
check with your System Administrator.
ACNR : press the [ACNR]button to set the automatic
call number redial.

●●●● aria–24IP DIGITAL KEY TELEPHONE SYSTEM USER’S GUIDE
45
12. Checking messages
VMIB MSG FROM EXTERNAL
NEXT REPEAT DELETE →
VMIB MSG FROM EXTERNAL
← ADD REWIND CALL BK
ADD : press the [ADD] button to leave a message to
the party who leave a message to me.
REWIND : press the [REWIND] button to hear the
message from the beginning.
CALL BK : press the [CALL BK] button to leave the
call back request or message.
13. Paging
PAGE FROM STA 703
20 AUG 04 11:51am
MEET ME
NEXT : press the [NEXT] button to move to the next
message.
REPEAT : press the [REPEAT] button to hear the
message again.
DELETE : press the [DELETE] button to erase the
message.
MEET ME : press the [MEET] button to answer the
current paging.
LDP K
eyse
ts
Press the [Call Log] button.
To programme a key: Trans/Pgm Flexi-key Trans/Pgm 5 7 Hold/Save
3. LOST CALL
∧OK
RECEIVED CALL : Received call list
DIALED CALL : Dialed call list
LOST CALL : CLI message wait list
11. RECEIVED CALL
2. DIALED CALL
OK
14. Call Log

●●●● aria–24IP DIGITAL KEY TELEPHONE SYSTEM USER’S GUIDE
46
14.1. Received Call
123456789
02/01 09:02
BACK OK
NOTE Return to the previous BACK
Press the [OK] or [OK] button.
Press the [OK] or [OK] button.
123456789
LINE 125 00:00:03
TRANS CONF MUTE →
11. RECEIVED CALL
2. DIALED CALL
OK
LDP K
eyse
ts
14.2. Dialed Call
123456789
02/01 09:02
BACK OK
Press the [OK] or [OK] button.
Press the [OK] or [OK] button.
123456789
LINE 125 00:00:03
TRANS CONF MUTE →
21. RECEIVED CALL
2. DIALED CALL
OK
NOTE Return to the previous BACK

●●●● aria–24IP DIGITAL KEY TELEPHONE SYSTEM USER’S GUIDE
47
14.3. Lost Call
Press the [OK] or [OK] button.
Return to the previous BACK
33. LOST CALL
∧OK
0123456789
03/10 16:02 CNT :01
BACK SELECT> ANSWER
Press the [SELECT] button.
※ Use the [SELECT] button to select
the following item;
-. DEL CUR
-. DEL ALL
-. SAVE
-. NAME / TEL14.3.1 ANSWER
0123456789
LINE XXX 00:00:03
TRANS CONF MUTE →
Press the [ANSWER] button you can
make a call to CLI.
0123456789
03/10 16:02 CNT :01
BACK SELECT > ANSWER
14.3.2 DELETE CURRRENT
STATION 100 (T)
FEB 01 04 05:34 pm
PICKUP CONF REDIAL
Press the [DEL CUR] button, current
message is erased.
0123456789
03/10 16:02 CNT :01
BACK SELECT > DEL CUR
LDP K
eyse
ts
NOTE

●●●● aria–24IP DIGITAL KEY TELEPHONE SYSTEM USER’S GUIDE
48
14.3.3 DEL ALL
ALL CLI DELETE
Press HOLD Key
BACK SELECT > DEL ALL
Press the [HOLD] button, current all
message is erased.
0123456789
14/07 16:02 CNT :01
BACK SELECT > DEL ALL
14.3.4 SAVE
ENTER SPD BIN NO (000)
CLI MSG USED
PAUSE FLASH D-TONE
14.3.5 NAME/TEL
EDWARD
03/10 16:02 CNT :01
BACK SELECT > NAME/TEL
Press the or [HOLD] button,
speed dial is registered.
0123456789
03/10 16:02 CNT :01
BACK SELECT > NAME/TEL
※ See the page 39.
To save CLI, press the [SAVE] button.0123456789
03/10 16:02 CNT :01
BACK SELECT > SAVE
On the contrary, to check the number of the
selected name, press the [NAME/TEL] button.
14.3 3. Lost Call (cont)
NOTENOTEReturn to the previous BACK
Select the [DEL ALL] button by pressing
[SELECT] button.
To check the name of the selected number,
press the [NAME/TEL] button.
LDP K
eyse
ts
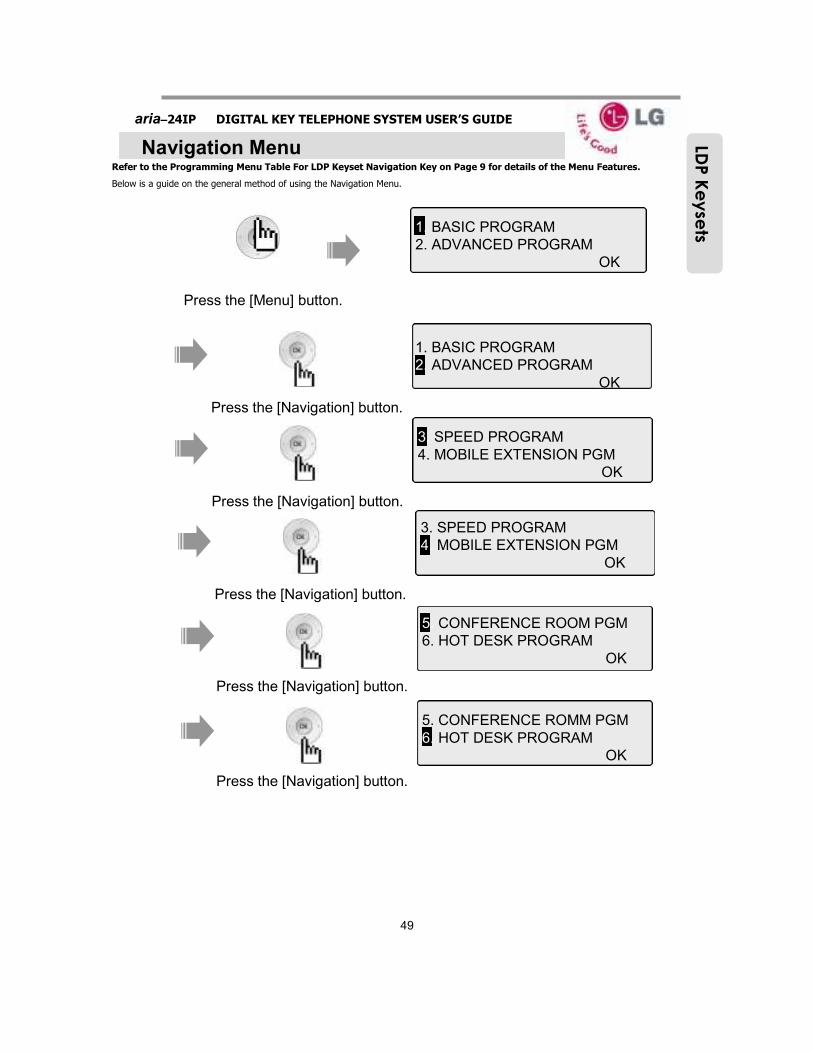
●●●● aria–24IP DIGITAL KEY TELEPHONE SYSTEM USER’S GUIDE
49
Navigation Menu
Press the [Menu] button.
Press the [Navigation] button.
Press the [Navigation] button.
1
Press the [Navigation] button.
Press the [Navigation] button.
2
3
4
Press the [Navigation] button.
5
6
3. SPEED PROGRAM
4. MOBILE EXTENSION PGM
OK
5. CONFERENCE ROOM PGM
6. HOT DESK PROGRAM
OK
3. SPEED PROGRAM
4. MOBILE EXTENSION PGM
OK
1. BASIC PROGRAM
2. ADVANCED PROGRAM
OK
5. CONFERENCE ROMM PGM
6. HOT DESK PROGRAM ∧OK
1. BASIC PROGRAM
2. ADVANCED PROGRAM
OK
LDP K
eyse
ts
Refer to the Programming Menu Table For LDP Keyset Navigation Key on Page 9 for details of the Menu Features.
Below is a guide on the general method of using the Navigation Menu.
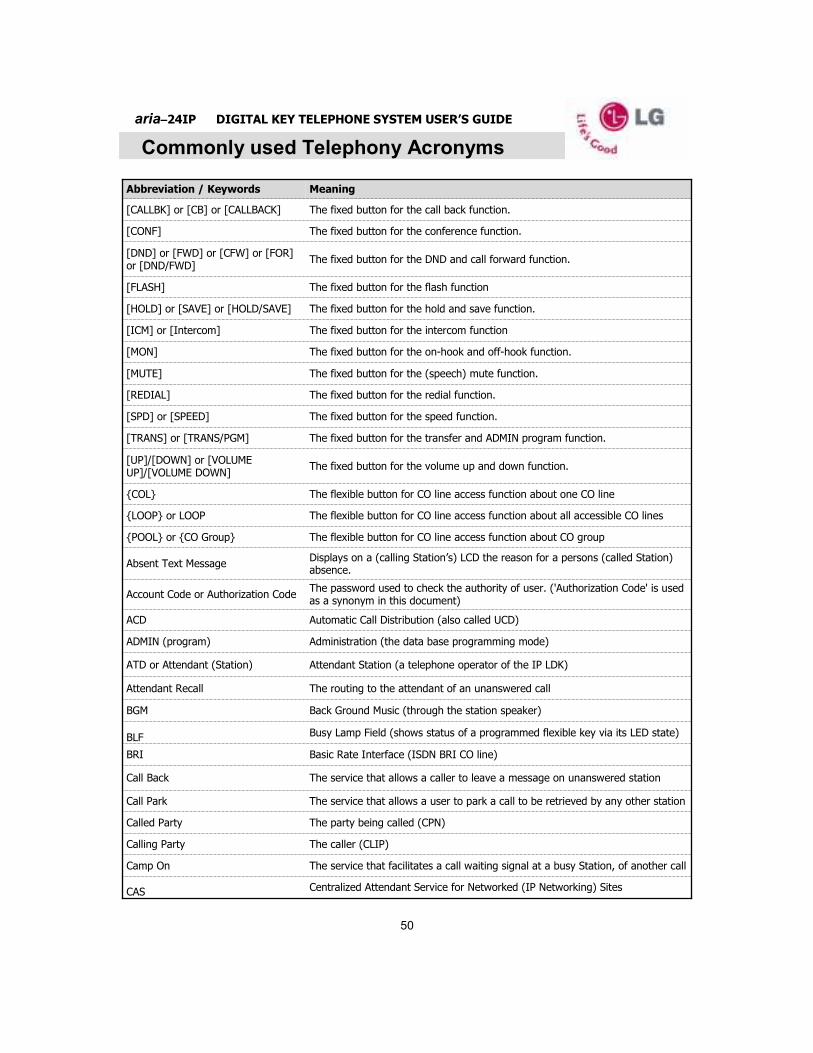
●●●● aria–24IP DIGITAL KEY TELEPHONE SYSTEM USER’S GUIDE
50
Commonly used Telephony Acronyms
Centralized Attendant Service for Networked (IP Networking) SitesCAS
The service that facilitates a call waiting signal at a busy Station, of another callCamp On
The caller (CLIP)Calling Party
The party being called (CPN)Called Party
The service that allows a user to park a call to be retrieved by any other stationCall Park
The service that allows a caller to leave a message on unanswered stationCall Back
Basic Rate Interface (ISDN BRI CO line)BRI
Busy Lamp Field (shows status of a programmed flexible key via its LED state)BLF
Back Ground Music (through the station speaker)BGM
The routing to the attendant of an unanswered callAttendant Recall
Attendant Station (a telephone operator of the IP LDK)ATD or Attendant (Station)
Administration (the data base programming mode)ADMIN (program)
Automatic Call Distribution (also called UCD)ACD
The password used to check the authority of user. ('Authorization Code' is used as a synonym in this document)
Account Code or Authorization Code
Displays on a (calling Station’s) LCD the reason for a persons (called Station) absence.
Absent Text Message
The flexible button for CO line access function about CO group{POOL} or {CO Group}
The flexible button for CO line access function about all accessible CO lines{LOOP} or LOOP
The flexible button for CO line access function about one CO line{COL}
The fixed button for the volume up and down function.[UP]/[DOWN] or [VOLUME UP]/[VOLUME DOWN]
The fixed button for the transfer and ADMIN program function.[TRANS] or [TRANS/PGM]
The fixed button for the speed function.[SPD] or [SPEED]
The fixed button for the redial function.[REDIAL]
The fixed button for the (speech) mute function.[MUTE]
The fixed button for the on-hook and off-hook function.[MON]
The fixed button for the intercom function[ICM] or [Intercom]
The fixed button for the hold and save function.[HOLD] or [SAVE] or [HOLD/SAVE]
The fixed button for the flash function[FLASH]
The fixed button for the DND and call forward function.[DND] or [FWD] or [CFW] or [FOR] or [DND/FWD]
The fixed button for the conference function.[CONF]
The fixed button for the call back function.[CALLBK] or [CB] or [CALLBACK]
MeaningAbbreviation / Keywords
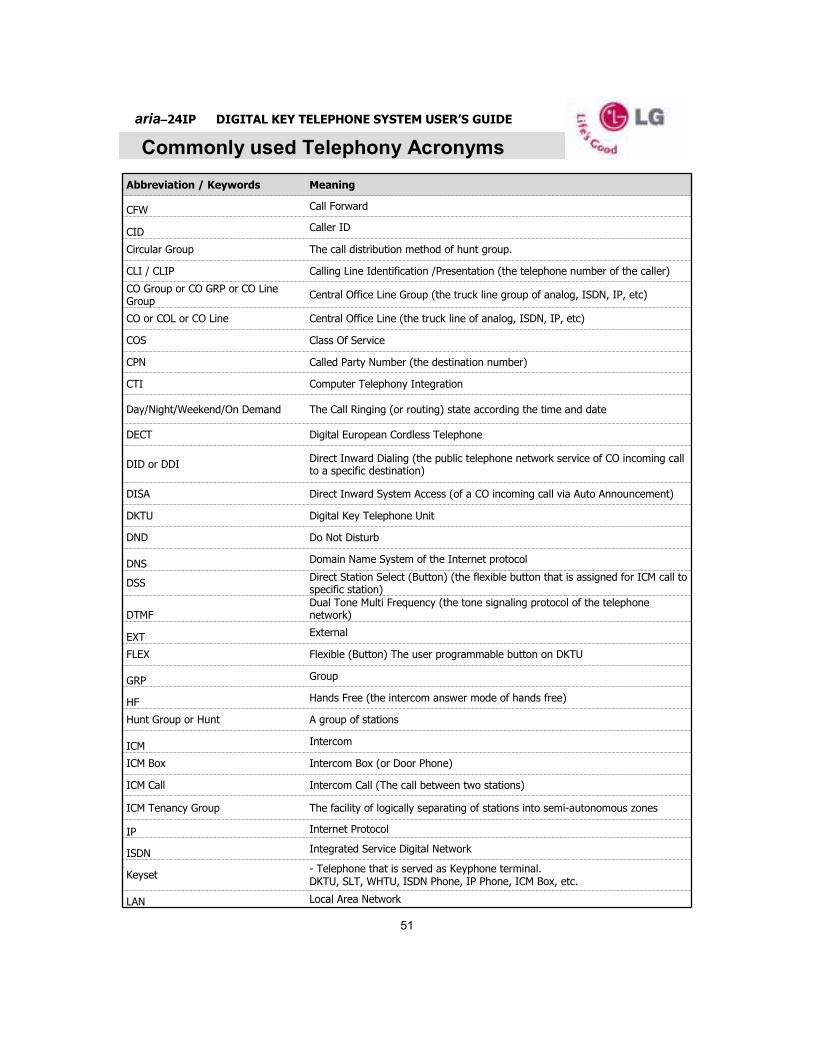
●●●● aria–24IP DIGITAL KEY TELEPHONE SYSTEM USER’S GUIDE
51
Commonly used Telephony Acronyms
Local Area NetworkLAN
- Telephone that is served as Keyphone terminal.DKTU, SLT, WHTU, ISDN Phone, IP Phone, ICM Box, etc.
Keyset
Integrated Service Digital NetworkISDN
Internet ProtocolIP
The facility of logically separating of stations into semi-autonomous zonesICM Tenancy Group
Intercom Call (The call between two stations)ICM Call
Intercom Box (or Door Phone)ICM Box
IntercomICM
A group of stationsHunt Group or Hunt
Hands Free (the intercom answer mode of hands free)HF
GroupGRP
Flexible (Button) The user programmable button on DKTUFLEX
ExternalEXT
Dual Tone Multi Frequency (the tone signaling protocol of the telephone network)DTMF
Direct Station Select (Button) (the flexible button that is assigned for ICM call to specific station)
DSS
Domain Name System of the Internet protocolDNS
Do Not DisturbDND
Digital Key Telephone UnitDKTU
Direct Inward System Access (of a CO incoming call via Auto Announcement)DISA
Direct Inward Dialing (the public telephone network service of CO incoming call to a specific destination)
DID or DDI
Digital European Cordless TelephoneDECT
The Call Ringing (or routing) state according the time and dateDay/Night/Weekend/On Demand
Computer Telephony IntegrationCTI
Called Party Number (the destination number)CPN
Class Of ServiceCOS
Central Office Line (the truck line of analog, ISDN, IP, etc)CO or COL or CO Line
Central Office Line Group (the truck line group of analog, ISDN, IP, etc)CO Group or CO GRP or CO Line Group
Calling Line Identification /Presentation (the telephone number of the caller)CLI / CLIP
The call distribution method of hunt group.Circular Group
Caller IDCID
Call ForwardCFW
MeaningAbbreviation / Keywords

●●●● aria–24IP DIGITAL KEY TELEPHONE SYSTEM USER’S GUIDE
52
Commonly used Telephony Acronyms
The speed dial data that is saved by attendant station (and may be available system wide)
System Speed Dial
Uniform Call Distribution (a Hunt Group method)UCD (Group)
Universal Night Answer (allows a station to pick up a ringing CO (Line) call) UNA
Voice Mail Group (for external, or adjunct, Voice Mail Devices)VM or VM Group or Voice Mail Group
The table that is saved the day working time and work finish time during weekWeekly Time Table
Wireless Hand Telephone Unit (System Wireless DECT telephone terminal)WHTU
Plain Ordinary Telephone Service (of a Public Exchange)POTS
The first programmed attendant among the main attendantSystem Attendant
An extension (terminal) of IP LDKStation
Station, an extension (terminal) of IP LDKSTA
A System or Station index used for saving Co (Line) dialling dataSpeed Bin
Station Message Detail Record (provides detailed station log information about incoming/outgoing CO call)
SMDR
Simplified Message Desk InterfaceSMDI
Single Line TelephoneSLT
The serial communication interface protocolRS-232C
A call distribution method of hunt group.Ring Group
Ring Back ToneRBT
Public Switched Telephone NetworkPSTN
Primary Rate Interface (ISDN)PRI
Preferred Line AnswerPLA
The service allowing a station to answer a call ringing at anther stationPick Up
Program (the abbreviated presentation of 'ADMIN program' or 'station program‘)
PGM
Private Automatic Branch ExchangePABX
The software service of dialing at the dial pad without lifting handsetOn Hook Dialing
An intercom call over an IP network connectionNet Call
Networking) (the software service of QSIG and H.450 networking)NET
Multiple Subscriber Number of public ISDN network serviceMSN
Music On HoldMOH
Last Number RedialLNR
Light Emitting DiodeLED
LG Internet Protocol Digital Key Telephone SystemIP LDK
Least Cost RoutingLCR
Liquid Crystal DisplayLCD
MeaningAbbreviation / Keywords
●●●● aria–24IP DIGITAL KEY TELEPHONE SYSTEM USER’S GUIDE
53
NOTES:

●●●● aria–24IP DIGITAL KEY TELEPHONE SYSTEM USER’S GUIDE
54
Electronics Inc.
aria Digital Telephone Systems
Proudly Imported, Distributed By:
Atlas Gentech (NZ) LimitedPrivate Bag 14927, Panmure, Auckland
NOTES:
ARIA INSTALLED BY:
INSTALL DATE:
Please Note your first level of support is your Aria Dealer. A list of Aria Dealers can be found at www.lgaria.co.nz at the `who sells aria` link.
Computer & Telephone Services Ltd NZ 0800 366363 [email protected]