digifant i - oldbluesblog.comoldbluesblog.com/files/digifantprotrainingmanual_singlesided.pdf ·...
TRANSCRIPT

Digifant I
Digifant II
ProTraining

Editor's note: The original ProTraining manual from the late 1980s/early 1990s contained a few errors and missing information. The manual has been painstakingly reproduced with this 2019 revised edition thanks to KamzKreationz. It now includes colorized accents in the text and illustrations, an enhanced troubleshooting table, color wiring diagrams for each generation that more accurately depict what those years have, the gray background has been eliminated to reduce printer ink usage, and the manual has been formatted for both single- and double-sided printing (available separately). In addition to all of the above, the manual now also contains a DIY guide for the 1988-1989 Vanagons that originally came equipped with a 5-pin power supply relay. This relay is rather expensive, and that's if you can even locate a new one. It is recommended that these vans be converted to use a 4-pin relay, the same as the fuel pump relay, which is what the other years of vans utilize.

Index
System Components/Operation System Description ..................................................................................................................................................... 1 Electronic Control Unit (ECU) ..................................................................................................................................... 3 Coolant Temperature Sensor ..................................................................................................................................... 4 Fuel Pump ................................................................................................................................................................... 4 Airflow Sensor ............................................................................................................................................................ 5 Intake Air Temperature Sensor .................................................................................................................................. 5 Fuel Pressure Regulator .............................................................................................................................................. 6 Fuel Injectors .............................................................................................................................................................. 6 Throttle Switch ........................................................................................................................................................... 7 Fuel Filter .................................................................................................................................................................... 7 Oxygen Sensor ............................................................................................................................................................ 8 Ignition System ........................................................................................................................................................... 9 Idle Stabilization ....................................................................................................................................................... 10 Crankcase Emission Control/Vent-line Heating Element ......................................................................................... 11 Evaporative Emissions System ................................................................................................................................. 12
Checking/Adjusting Throttle Valve ........................................................................................................................................................... 13 Throttle Switch (Adjusting) ....................................................................................................................................... 14 Throttle Switch (Wiring and ECU Check) .................................................................................................................. 16 Coolant Temperature Sensor ................................................................................................................................... 17 Airflow Sensor/Intake Air Temperature Sensor ....................................................................................................... 18 Fuel Injectors (Spray Pattern, Quantity) ................................................................................................................... 19 Fuel Injectors (Leak Checking, Wiring Test) .............................................................................................................. 20 Deceleration Fuel Cut-Off ......................................................................................................................................... 22 Full Throttle Enrichment ........................................................................................................................................... 23 Oxygen Sensor System ............................................................................................................................................. 24 Fuel Pump (Pressure, Volume Test, Current Draw) ................................................................................................. 25 Fuel Pump (Electrical) ............................................................................................................................................... 25 Fuel Pressure Regulator ............................................................................................................................................ 27 Residual Fuel Pressure .............................................................................................................................................. 27 Ignition System ......................................................................................................................................................... 28 Idle Stabilization System ........................................................................................................................................... 30 Evaporative Emission System ................................................................................................................................... 34
Basic Engine Adjustments Ignition Timing, Idle Speed, CO Content .................................................................................................................. 35
System Check With Volt/Ohm Meter System Test Chart ..................................................................................................................................................... 40
1988-1989 Power Supply Relay Replacement/Modification ................................................................................... 42
Wiring Diagrams ....................................................................................................................................................... 43
Special Tools Required ............................................................................................................................................. 49
Glossary/Component Location ................................................................................................................................. 50
i

General Troubleshooting Guidelines
Fuel systems can be repaired by following the step-by-step procedures shown in this book.
Make Sure You Understand The Customer's Complaint Identify the symptoms as you follow the diagnosis procedure. Try to determine the cause of the problem.
Repair the problem after you have identified the symptoms.
After completing repairs, always road test the vehicle before returning to the customer.
Preliminary Checks A complaint may be caused by a minor detail. Before starting the fault finding procedure, make a few visual checks, such
as:
Are all electrical connections clean and tight? Spark plug wires not hanging loose, etc.
Are all hoses OK? Check vacuum, crankcase ventilation, fuel tank ventilation, and air intake hoses for
restrictions, cracks, or looseness.
Are all the ground connections OK?
Is there adequate fuel supply?
Pinpointing The Problem Remember the basics:
No matter how advanced the system, to start and run the engine you need correct spark timing and the proper
fuel-to-air ratio.
Get as much information as possible from the customer.
Gather as many symptoms as possible.
Check the simple things first.
Look for spark.
Listen for the fuel pump.
Feel the injectors operating.
Make logical deductions, not assumptions.
Intermittent Engine Performance Complaints Intermittent performance complaints can be caused by any part of the electrical, ignition, or fuel systems. Therefore, obtain as much information as possible from the customer. Find out under what conditions the problem occurs, how often, and for what duration. For example: engine?, during warm-up?, under load?, light acceleration?, highway driving?, only in hot weather?, only at high altitude?, etc. If possible, road test the vehicle to duplicate the condition. When troubleshooting intermittent engine performance complaints:
Pay very close attention to electrical connections on the fuel injection harness. Connectors which have
insufficient tension, are bent, or show signs of corrosion should be replaced and not repaired.
Corroded and/or loose ground connections should be cleaned and tightened.
The complete fuel system should be checked, including fuel quality.
ii

General Troubleshooting Guidelines
Engine will not start, hot or cold 1. No fuel
Page 25 Fuel System (Circuit Tests)
Page 20 Injectors (Circuit Tests)
Page 18 Airflow Sensor 2. No spark
Page 28 Ignition System
Hard starting, hot or cold 1. Insufficient or excessive fuel
Page 17 Coolant Temperature Sensor
Page 25 Fuel System
Page 27 Residual Pressure Test
Page 34 Evaporative Emission System 2. Weak or no spark
Page 28 Ignition System
Poor idle 1. At operating temperature
Page 14 Throttle Switch
Page 30 Idle Stabilization System
Page 34 Evaporative Emission System 2. Cold engine
Page 17 Coolant Temperature Sensor
Page 30 Idle Stabilization System
Engine stalls at highway speeds Page 25 Fuel System (Pressure, Volume, Current Draw)
Page 34 Evaporative Emission System
Page 35 Basic Engine Adjustments
Page 40 Ground and Terminal Connections
iii

General Troubleshooting Guidelines
Poor performance 1. During warm-up
Page 35 Basic Engine Adjustments
Page 17 Coolant Temperature Sensor
Page 14 Throttle Switch
Page 30 Idle Stabilization System 2. At operating temperature
Page 35 Basic Engine Adjustments
Page 14 Throttle Switch
Page 24 Oxygen Sensor System
Page 28 Ignition System
Page 25 Fuel System (Pressure, Volume, Current Draw)
Page 30 Idle Stabilization System 3. At full throttle
Page 23 Full Throttle Enrichment
Page 28 Ignition System
High fuel consumption Page 24 Oxygen Sensor System
Page 25 Fuel System (Pressure, Volume Tests)
Page 19 Fuel Injectors (Spray Pattern, Leakage)
Page 23 Full Throttle Enrichment
Page 34 Evaporative Emission System
Note: Drivability problems that occur even when all engine specifications are in order may be caused by injector tip gum-up or carbon build-up on the intake valves and injector tips. These deposits are related to the use of gasoline with insufficient cleaning additives and can be prevented by:
Using only major gasoline brands that advertise their additive packages are effective for cleaning fuel injection systems.
Avoid using fuels that contain alcohol. Regular use of supplemental additives such as
Autobahn Fuel Additive, which is specially formulated to prevent carbon, gum, or varnish build-up and help break down existing deposits.
Once formed, many deposits cannot be removed by normal preventative measures, such as the use of fuel additives. Most injector deposits can be removed by using a special cleaning system like our G-16 Fuel Injection System Cleaner. Carbon build-up may require mechanical removal. Check Group 24 of your Technical Information Book for further information on injection system cleaning and de-carbonization.
iv

System Components/Operation
System Description
The 2.1 liter Vanagon engine is equipped with Digifant fuel and ignition control system. Digifant is a development of the Digi-jet fuel injection system combined with the map controlled digital ignition system. Through the use of a single control unit, all of the functions of the fuel system, ignition system, and oxygen sensor system are carefully controlled to provide optimum mixture and ignition control for spacce
improvements in acceleration, deceleration, and overall drivability. The Digifant system features a larger throttle bore diameter, increased from 45mm to 50mm. An idle stabilization system has been incorporated to further streamline the system and eliminates the need for a digital idle stabilizer and auxiliary air regulator.
1

System Components/Operation
The individual components of the Digifant system work together to manage all aspects of engine operation. Fuel injection control is electronic and is based on the measurement of air entering the intake and on engine speed measured by the Hall sender. The coolant temperature sensor provides correction during engine starting and warm-up. The oxygen sensor, intake air temperature sensor
and throttle switch provide the control unit with additional information to assure smooth performance under all driving conditions. A separate control unit is used for the idle stabilization valve. Ignition timing control is determined by an engine speed signal from the Hall sender, and a load signal from the air sensor. A signal from the coolant temperature sensor provides a correction factor.
2

System Components/Operation
The Digifant electronic control unit incorporates all the functions of the fuel system and ignition system and provides both the actuation signal for the fuel injectors and optimum ignition timing point for all engine operating conditions. Injection duration opening signals are provided based on the following inputs:
Engine speed
Intake air volume
Coolant temperature
Oxygen content in the exhaust gas
Battery voltage
Throttle position
Intake air temperature The injector opening time is taken from a program in the control unit at 16 points for RPM and 16 points for load for a total of 256 operational points. Injection times can be determined between these fixed points for a total of 65,000 theoretical different opening duration points.
3

System Components/Operation
Fuel Pump/Power Supply Relays
When energized by the ignition switch and grounded by the Digifant ECU, the fuel pump relay provides battery voltage to the fuel pump, injectors, idle stabilization control unit, oxygen sensor heating element, and the power steering pressure switch. When energized by the ignition switch, the power supply relay provides battery voltage to the Digifant ECU.
Coolant Temperature Sensor
The coolant temperature sensor is a negative temperature coefficient resistor (NTC). The resistance
signal it produces is used by the control unit to determine:
The amount of cold start and warm-up enrichment
Ignition timing and idle stabilization during warm-up
When the oxygen sensor, idle stabilization, and full throttle enrichment functions are activated
Fuel Pump
The fuel pump is a roller cell design. It is driven by a permanent magnet electric motor and is located near the fuel tank.
Steel rollers are held in "cut-outs" on the rotor. Centrifugal force seals the rollers against the walls of the pressure chamber as the rotor spins. Fuel that is trapped between the rollers is forced out the delivery port. The pump is designed to be both cooled and lubricated by the fuel flowing through it. The pump delivers several times the amount of fuel needed to operate the engine at any time. Excess fuel is returned to the fuel tank via the fuel pressure regulator.
4

System Components/Operation
Airflow Sensor
The airflow sensor measures the amount of air entering the intake manifold and sends a voltage signal to the control unit. Intake air opens the airflow sensor flap which actuates the potentiometer to determine the voltage signal. This signal and the engine speed information supplied by the Hall sender are used as the principal inputs for the determination of fuel injector opening duration and ignition timing points. A compensation flap connected to the air sensor dampens sudden movements of the air sensor flap due to oscillations of the intake air.
Intake Air Temperature Sensor
An intake air temperature sensor is mounted in the airflow sensor housing. It is a negative temperature coefficient (NTC) resistor, which means its resistance value drops as its temperature increases. The signal it supplies to the control unit is used to modify fuel injection rate depending on intake air temperature. The sensor can be tested by measuring the resistance value of the sensor and comparing the reading to a graph.
5

System Components/Operation
Fuel Pressure Regulator
The system pressure regulator maintains a constant fuel pressure to all injectors by regulating the quantity of fuel returned to the fuel tank. The regulator is connected to the intake manifold. It responds to manifold vacuum fluctuations, and thereby compensates for engine-load changes. When the engine is shut off, the regulator closes and seals to maintain residual fuel pressure in the injector lines for improved hot-start capability.
Fuel Injectors
Digifant fuel injectors are electronically-controlled on/off valves. A solenoid actuates a needle valve allowing fuel to be forced through the injector nozzle. All four injectors open at the same time and inject fuel directly into the intake manifold near the intake valve. Injection quantity is controlled by the amount of time the injectors stay open. Injector opening time is regulated by the ECU, based on inputs from the various engine sensors. Note: Digifant injectors (yellow body) are not interchangeable with A.F.C. injectors (blue body).
6
System Components/Operation
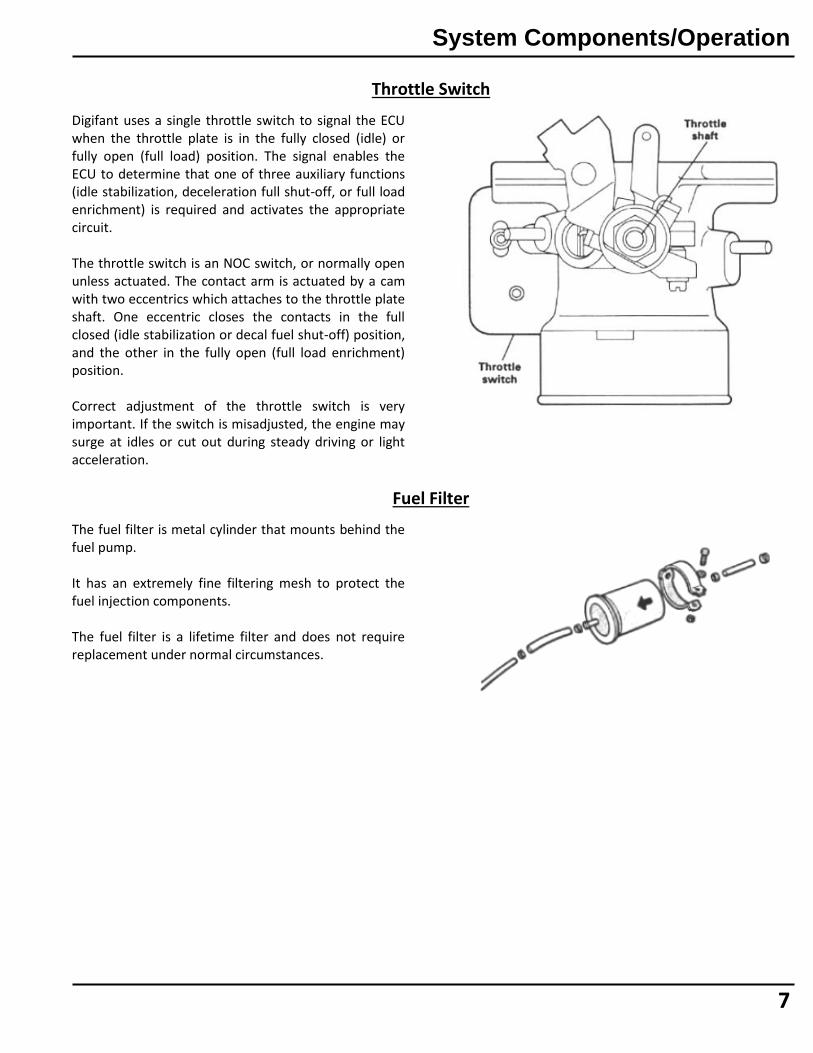
Throttle Switch
Digifant uses a single throttle switch to signal the ECU when the throttle plate is in the fully closed (idle) or fully open (full load) position. The signal enables the ECU to determine that one of three auxiliary functions (idle stabilization, deceleration full shut-off, or full load enrichment) is required and activates the appropriate circuit. The throttle switch is an NOC switch, or normally open unless actuated. The contact arm is actuated by a cam with two eccentrics which attaches to the throttle plate shaft. One eccentric closes the contacts in the full closed (idle stabilization or decal fuel shut-off) position, and the other in the fully open (full load enrichment) position. Correct adjustment of the throttle switch is very important. If the switch is misadjusted, the engine may surge at idles or cut out during steady driving or light acceleration.
Fuel Filter
The fuel filter is metal cylinder that mounts behind the fuel pump. It has an extremely fine filtering mesh to protect the fuel injection components. The fuel filter is a lifetime filter and does not require replacement under normal circumstances.
7

System Components/Operation
Oxygen Sensor
The oxygen sensor is made of a ceramic material called Zirconium dioxide. The inner and outer surfaces of the ceramic material are coated with platinum. The outer platinum surface is exposed to the exhaust gas, while the inner surface is exposed to the outside air. The difference in the amount of oxygen contacting the inner and outer surfaces of the oxygen sensor creates a pressure differential, which results in a small voltage signal in the range of 175 to 1100mV (0.175-1.1V) being supplied to the ECU. The amount of voltage that is produced is determined by the fuel mixture. A high voltage signal indicates a rich mixture. A low voltage signal indicates a lean mixture. The oxygen sensor is heated electrically to keep it at a constant operating temperature. This ensures continuous and accurate reaction of the sensor during all operating conditions. The heated oxygen sensor has three wires, two for the heating element (ground and power), and a signal wire for the oxygen sensor. Power is supplied to the heating element whenever the ignition is on. The oxygen sensor has a 90,000 miles replacement interval. A mileage counter (1986-1987 only) will activate a warning light on the dash at 90,000 miles. At this time, the oxygen sensor should be replaced and the mileage counter reset.
8

System Components/Operation
Ignition System
The ignition system operates on the principle of a timing map programmed into the ECU. Information on engine load, speed, and coolant temperature are provided to the ECU in the form of voltage signals. In the ECU these signals are processed so that the ignition coil is controlled via terminal 1 in accordance with the programmed ignition map. The separate ignition control unit and digital idle stabilizer used in the past have been eliminated. An engine speed signal comes from the Hall sender in the distributor. Measurement of engine load is accomplished through a signal from the air sensor potentiometer. These two signals establish the ignition
timing point. They are stored in the ignition map in the control unit's memory as 256 single operational points, 16 fixed points for each engine load point and 16 for each RPM point. The engine coolant temperature sensor signals the control unit to determine ignition timing based on engine temperature. Throughout the engine warm-up phase, ignition timing is constantly being corrected. Once the engine reaches operating temperature, the timing is determined by the map shown.
9

System Components/Operation
Idle Stabilization
The idle stabilization system used on the Digifant system ensures that the idle speed remains constant at predetermined levels. The system controls the amount of air bypassing the throttle plate. If engine idle speed varies from the value stored in the control unit, the idle stabilizer valve will adjust the volume of air entering the engine at idle. This maintains idle speed within certain limits. The idle stabilizer valve is operated by a control unit located in front of the right-hand taillight assembly.
The control unit receives inputs from the following components:
Throttle switch
Coolant temperature sensor
A/C compressor clutch
Ignition coil terminal #1
Power steering pressure switch With this system, the auxiliary air regulator and digital idle stabilizer are eliminated and any periodic idle adjustment is no longer required.
10

System Components/Operation
Crankcase Emission Control
The crankcase emission system is a closed system. No crankcase emissions are discharged into the atmosphere. The control valve allows crankcase emissions to enter the intake air boot any time the engine is running to help control crankcase pressure.
The crankcase vapors vent to atmosphere during adjustment. When checking or adjusting CO content, the hose from the crankcase emission control valve is disconnected and plugged.
Vent Line Heating Element
A heating element is used in the crankcase vent line to prevent icing during cold engine operation. This element has a 5.5 mm hole in the restrictor plate. The element can be checked with ohm meter. Resistance should be between 4 ohms and 17 ohms at 25°C (77°F). The circuitry to operate the heating element is protected by an in-line, 5 amp fuse (SAE type), located in the wiring connector box in the engine compartment.
11

System Components/Operation
Evaporative Emission System
12
Fuel vapors are collected in the expansion tanks. There, any liquid gasoline collects and flows back to the tank through the vent lines. Fuel vapors are drawn from the tops of the expansions tanks and flow to the carbon canister where they are stored when the engine is not running. After the engine is started, the control valve is opened by throttle vacuum. Fresh air is drawn into the bottom of the canister. There it collects fuel vapors from the canister and is then drawn into the intake manifold.

Checking / Adjusting
Throttle Valve – Basic Adjustment
Note: The stop screw is set at the factory and should not be moved. If the screw position has been altered, check basic adjustments as follows:
Remove purple vacuum line from purge control fitting of the throttle valve (1).
Install vacuum pump US 8026, or equivalent, to fitting.
Start engine and let idle.
At idle, vacuum should be 0 in. Hg (up to 1 in. Hg is acceptable).
If there is 1 in. Hg or more vacuum, or if the tamper-proof paint on the throttle stop screw is broken, adjust the throttle valve as follows:
Turn the throttle stop screw (2) out until a gap exists between the screw and the stop.
Place a piece of paper between the screw and the stop.
Turn the screw in until you feel a very slight drag on the paper.
Turn the stop screw in an additional ½ turn.
Repeat the vacuum test at the purge fitting. If OK, Reapply paint to the stop screw.
Check idle speed and CO content.
Adjust, if necessary.
13

Checking / Adjusting
Throttle Switch – Checking and Adjusting
Note: If the throttle valve switch is misadjusted, the engine may surge at idle or cut out during steady driving or light throttle application.
Checking:
Check that the throttle stop screw is adjusted properly (see page 13).
Disconnect throttle switch connector.
Connect US 1119 multi-meter between male terminals of throttle switch connector plug (1). Set meter to 200 ohms scale.
When the throttle valve is closed (idle), meter must read 0.0 ohms (continuity through switch).
If not OK, switch must be replaced or adjusted so it is closed at idle.
Open throttle valve far enough to open throttle valve switch.
Multi-meter must read ohms (OL on US 1119).
Insert a 0.05 mm (0.002 in) feeler gauge between the stop screw and stop (A) and let throttle valve close completely.
The throttle valve switch must close (multi-meter reads 0.0 ohms).
Open throttle valve and insert a 0.10 mm (0.004 in) feeler gauge and let throttle valve close completely.
The throttle valve switch must remain open
(multi-meter reads ohms, OL on US 1119). If not OK, Adjust the switch as follows (on next page):
14

Checking / Adjusting
Throttle Switch – Checking and Adjusting (Cont'd.)
Note: Excessive throttle shaft wear can cause the idle speed to increase when the A/C is on. It can also cause the engine to buck or jerk during light throttle. If the throttle switch can be activated by moving the shaft forward and backward or side to side, the throttle housing will need to be replaced.
Adjusting:
Do not use the throttle valve stop screw for adjusting the throttle switch.
Loosen screw 2.
Insert 0.07 mm feeler gauge between throttle stop screw and throttle stop A.
The closing point of the throttle switch is: 0.05 – 1.0 mm (0.002 – 0.004 in).
Adjust the throttle switch so it closes at 0.07 mm by using screw 3.
Ohm meter should read 0.0 ohm.
Tighten screw 2.
Verify the adjustment by opening and closing the throttle valve.
Ohm meter should read 0.0 ohm with a 0.07 mm feeler gauge installed.
If not OK,
Repeat adjustment and re-check.
Check the operation of the throttle valve switches USING THE ACCELERATOR PEDAL as follows (on next page):
15

Checking / Adjusting
Throttle Switch – Checking and Adjusting (Cont'd.)
Press the accelerator pedal fully to the floor.
Ohm meter must read 0.0 ohms.
Check that the throttle switch closes when the accelerator cable is released.
If not OK, either the accelerator cable needs adjustment, or there is a problem with the throttle switch actuating cam. Press the accelerator pedal from idle to full throttle
position.
Ohm meter must read 0.0 ohms at idle.
Ohm meter must read ohms (OL on US 1119)
when accelerator pedal is between idle and full throttle positions. If not OK, there may be a problem with either the throttle switch, the actuating cam, or with excessive play between the throttle shaft and throttle housing.
Wiring and ECU Check
Coolant temperature above 60C (140F).
Switch ignition ON.
Disconnect throttle switch connector.
Measure voltage between the two female terminal ends of the wiring from the ECU (1).
Approximately 5.0 volts.
Note: Do not use a test light to check for voltage or throttle switch operation or the ECU will be damaged.
If voltage is OK, Turn ignition OFF, replace Digifant ECU and re-test.
If voltage is not OK, Check wiring to terminals 6 and 11 of Digifant ECU
and repair as necessary.
16

Checking / Adjusting
Coolant Temperature Sensor – Checking
The following checks verify proper function of the coolant temperature sensor, related wiring, and connectors.
Switch ignition OFF.
Disconnect the multi-pin connector from ECU.
Measure temperature of coolant temperature sensor with probe-type thermometer.
Connect ohm meter to terminals 6 and 10 of ECU plug.
Resistance should correspond with graph. If resistance is not within specifications:
Disconnect coolant temperature sensor (do not let connector touch exhaust manifold).
Bridge terminals of coolant temperature sensor with ohm meter.
Resistance should correspond with graph. If not OK,
Replace sensor. If resistance value is OK,
Check wiring to ECU.
17

Checking / Adjusting
Airflow Sensor / Intake Air Temperature Sensor – Checking
The following tests are to verify proper function of the airflow sensor, related wiring, and connectors. Switch ignition OFF.
Disconnect multi-pin connector from Digifant ECU.
Connect ohm meter to terminals of multi-pin connector to test wiring through airflow sensor. (See column A for terminal numbers.)
If readings do not meet specifications:
Disconnect connector at airflow sensor.
Connect ohm meter to terminals shown in column B to connector pins of airflow sensor.
If readings do meet specifications:
Check wiring. If readings do not meet specifications:
Replace airflow sensor and re-test.
Column A Connections at ECU Multi-pin Connector
Column B Connections at Airflow Sensor
Terminal Numbers Terminal Numbers Description Specification
6 and 17 3 and 4 Potentiometer – Total Resistance
500 o 1000 ohms
17 and 21 2 and 3 Potentiometer – Resistance Measured Through Wiper Arm
Ohms Fluctuate As Sensor Flap Is Opened (Flap Must Move Freely)
6 and 9 1 and 4 Intake Air Temperature Sensor Ohm Meter Reading Corresponds to Graph
18

Checking / Adjusting
Fuel Injectors – Checking
Spray Pattern / Delivery Quantity
Remove fuel injectors in pairs (left or right).
Disconnect the electrical plugs from the fuel injectors.
Place the injector to be tested in a graduated container.
Connect self-made jumper harness (see Special Tools in Digifant II section for details).
Connect one lead to terminal 15 of the ignition coil and the other lead to ground.
Remove the fuel pump relay and install US 4480/3 in its place.
Switch ignition ON.
Switch US 4480/3 ON for exactly 30 seconds and observe injector spray pattern.
Spray pattern must be even and cone-shaped.
Delivery quantity for each injector must be a minimum of 87 cc after 30 seconds.
Difference between high and low injection quantities must not exceed 9 cc.
If any of the specifications are not met,
Check fuel pump pressure and delivery rate if delivery quantity is low for all injectors.
Clean fuel injection system using Volkswagen solvent G 001 600.00 with adapter kit USG16.
WARNING Fire hazard. Do not smoke or have anything in the area that can ignite fuel when working on the fuel system.
Note: Use new sealing rings when re-installing fuel injectors.
19

Checking / Adjusting
Fuel Injectors – Checking (Cont'd.)
Leak Testing
Remove electrical plugs at fuel injectors.
Remove injectors in pairs, but leave connected to fuel rail.
Switch ignition ON for about 5 seconds (fuel pump operates briefly).
Check that no more than 2 drops leak from each injector in one minute.
WARNING Fire hazard. Do not smoke or have anything in the area that can ignite fuel when working on the fuel system.
Component Tests
Remove electrical plugs at fuel injectors.
Connect ohm meter across injector terminals.
Reading should be approximately 16 ohms (14-18 ohms).
Wiring Test
Hall sender OK (ignition coil produces spark while cranking).
Voltage supply from terminal 87 of fuel pump relay OK.
Disconnect all electrical plugs from injectors.
Bridge contacts of one plug with US 1115 LED tester (or equivalent).
Operate starter briefly (the diode must flicker) and repeat procedure on remaining plug contacts.
Note:
If diode does not flicker, reverse test leads and repeat procedure to ensure correct polarity of tester connections.
If not OK,
Switch the ignition OFF.
Remove the connector from the Digifant ECU.
Reconnect the electrical connectors to the fuel injectors.
20

Checking / Adjusting
Fuel Injectors – Checking
Wiring Test (Cont'd.)
To check total resistance of all 4 injectors, including wiring to the ECU and fuel pump relay:
Connect US 1119 to terminal 12 of the ECU connector and to terminal 87 of the fuel pump relay and set to 200 ohm scale.
Resistance should be approximately 3-5 ohms.
If not OK,
Repair wiring using wiring diagram.
If resistance is OK,
Ensure ignition is OFF, replace ECU, and re-test.
21

Checking / Adjusting
Deceleration Fuel Cut-off – Checking
Coolant temperature must be at least 60 C (140 F) and resistance of temperature sensor 550 ohms or less.
Start engine, raise engine speed above 3000 RPM once, then it idle.
Disconnect throttle switch connector (2).
Bridge the two female terminals of the throttle switch connector together using the bridge-end of tool VW 1490.
Slowly increase engine speed.
At 2100-2500 RPM, injectors will be cut off and RPM will drop.
At 1300-1800 RPM, injectors will re-activate and RPM will rise.
This cycle will repeat as long as you attempt to hold a steady 2500 RPM. If not,
Check ECU and wiring according to page 16.
22

Checking / Adjusting
Full Throttle Enrichment – Checking
Coolant temperature must be at least 60 C (140 F) and resistance of temperature sensor 550 ohms or less.
Connect CO tester, VW 1367 with VW 1473.
Start engine and let idle for approx. 2 minutes.
Disconnect throttle switch connector (2).
Slowly increase engine speed to at least 4500 RPM.
CO must read 0.3 to 1.1% (note reading).
While still maintaining at least 4500 RPM, bridge the two female terminals of the throttle switch connector together using the bridge-end of tool VW 1490.
Within a few seconds, CO reading must increase in volume by approximately 1% (or more).
If not,
Check ECU and wiring according to page 16.
23

Checking / Adjusting
Oxygen Sensor – Checking
Fuel pressure regulator OK.
Engine at operating temperature.
Oxygen sensor connected.
Start engine and run for 2 minutes.
Remove vacuum hose (1) from pressure regulator (2) and plug hose end.
CO value should increase briefly, then drop in value to 0.3 to 1.0%.
If fuel leaks from hose or regulator vacuum port, regulator is faulty and should be replaced.
If not OK,
Shut engine OFF.
Disconnect oxygen sensor.
Note:
The oxygen sensor must be disconnected with the ignition off to cancel the Digifant ECU memory.
Start engine.
Hold disconnected oxygen sensor wire from ECU to ground.
CO content must rise.
If CO content rises,
Replace oxygen sensor and re-test.
If CO content does not rise,
Check for continuity of wire to terminal 2 of the Digifant ECU.
If CO continuity is OK,
Turn ignition OFF, replace Digifant ECU, and re-test.
24

Checking / Adjusting
Fuel Pump – Checking
Pressure Test
Connect pressure gauge US 1076 or VW 1318 (or equivalent) to fuel line T-piece.
Note: If using VW 1318 pressure gauge, the lever must be in a closed position.
Remove fuel pump relay and bridge socket terminals 30 and 87 with US 4480/3 (or equivalent).
Run fuel pump and observe pressure.
Pressure must be a minimum of 2.5 bar (36 PSI).
If not OK,
Continue with next test.
Volume Test (Fuel Tank At Least Half Full)
Disconnect fuel return line at pressure regulator.
Attach approx. 4 feet of fuel line to return line port of pressure regulator. Place other end of fuel line into a 1 liter measuring container.
Remove fuel pump relay and bridge socket terminals 30 and 87 with US 4480/3 (or equivalent).
Run fuel pump exactly 30 seconds.
Delivery quantity should be at least 500 cc. If delivery quantity is not to specifications, check fuel flow from tank before and after fuel filter(s). If fuel flow from tank is not obstructed, continue to Fuel Pump Electrical Testing below.
Fuel Pump Electrical
Battery should be fully charged.
Connect ammeter to fuel pump in series with power supply to fuel pump.
Remove fuel pump relay and bridge socket terminals 30 and 87 with US 4480/3 (or equivalent).
Ammeter readings should be approximately 2.5 to 3.5 amps.
Lower reading may indicate poor ground. Higher reading may indicate dragging pump motor. Pump must be replaced.
25

Checking / Adjusting
Fuel Pump – Checking (Cont'd)
Wiring Check
Relay installed. Refer to relay socket diagrams below.
Check terminal 30 of the Digifant power supply relay for battery voltage.
If there is no voltage,
Check continuity between terminal 30 and B+ at alternator and at post in junction box. If no continuity, repair wiring.
Check continuity of the wire to terminal 15 of the ignition coil.
If the voltage was OK,
Check terminal 85 of the power supply relay for ground.
If the ground circuit is not OK,
Check continuity of the wire to ground on the left side of the engine compartment (below coil).
If the ground circuit was OK,
Switch ignition ON (see warning below – voltage will be present for about 5 seconds).
Check power supply relay for switched battery voltage.
1988-1989: Terminals 87a and 87.
All other years: Terminal 87.
If there is no (or low) voltage,
Replace the power supply relay. (1988-1989 vans with 5-pin relay: turn to page 42 for replacement instructions.)
WARNING: Wrap meter probe with electrical tape, leaving just the tip exposed. Not taking this precaution when testing power supply relay terminal 87 and 87a can lead to irreparable Digifant ECU and relay damage.
Fuel Pump Relay
Ignition coil produces spark while cranking starter.
Check terminals 86 and 30 of fuel pump relay for battery voltage.
If the voltage was OK,
Switch ignition ON and check terminal 87 for battery voltage. (Battery voltage will only be present for about 5 seconds after switching the ignition ON.)
If voltage was OK, proceed to next check.
If voltage was not OK, replace fuel pump relay and re-test.
Remove fuel pump relay and check terminal 85 for ground from terminal 3 of the Digifant ECU while cranking the starter.
If the ground was not OK,
Check continuity of the wire from terminal 85 of the fuel pump relay socket to terminal 3 of the Digifant ECU.
If the continuity was OK,
Switch ignition OFF and replace ECU.
Re-install the fuel pump relay.
26
Your '88-'89 van may have been converted to a 4-pin relay. If so, use the "All Other Years" instructions and diagrams.

Checking / Adjusting
Fuel Pressure Regulator – Checking
Connect pressure gauge US 1076 or VW 1318 (or equivalent) to fuel line T-piece.
Note: If using VW 1318 pressure gauge, the lever must be in a closed position during measurement procedure.
Run engine at idle speed and check pressure.
Specifications:
Bar (PSI) Vacuum Hose on Pressure Regulator
2.2 (33) Connected
2.5 (36) Disconnected
Residual Pressure Test
Stop engine, wait 10 minutes.
Pressure should be 2.0 - 2.5 bar (29-36 PSI). If not, there are three possible problems:
Fuel pump check valve – Test by clamping off line from fuel pump.
Fuel pressure regulator – Test by clamping off return line to tank.
Fuel injector(s) – Test by clamping off lines from injectors to pressure regulator. If necessary, go to page 20 for instructions on leak testing individual injectors.
Observe pressure gauge while clamping off each of these individual lines. If pressure drop ceases, or slows dramatically, problem is in the indicated component. Use care not to damage lines with clamping device.
Note: If fuel exits the vacuum hose/port of the fuel pressure regulator, the regulator is faulty and should be replaced.
27
Checking / Adjusting
Ignition System – Checking
If there is no spark at terminal #4 of the ignition coil wire when cranking the engine, do the following checks:
Check for battery voltage at terminal 15 of ignition coil with ignition ON.
If there is no voltage present,
Test the relays (page 26).
Repair wiring using wiring diagram.
If the voltage was OK,
Connect US 1115 LED tester (or equivalent) to terminal 1 of ignition coil and crank engine.
Diode must flash while cranking.
If the diode flashes,
Replace ignition coil.
If the diode does not flash,
Check Hall sender system as follows:
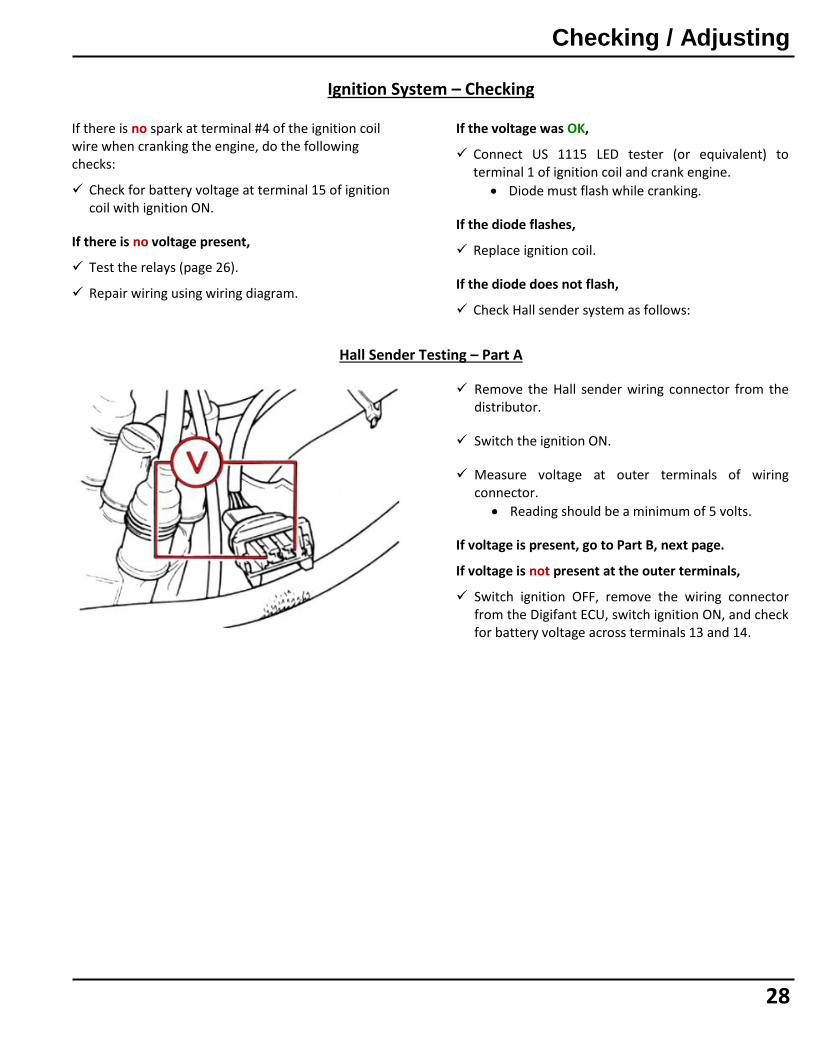
Hall Sender Testing – Part A
Remove the Hall sender wiring connector from the distributor.
Switch the ignition ON.
Measure voltage at outer terminals of wiring connector.
Reading should be a minimum of 5 volts.
If voltage is present, go to Part B, next page.
If voltage is not present at the outer terminals,
Switch ignition OFF, remove the wiring connector from the Digifant ECU, switch ignition ON, and check for battery voltage across terminals 13 and 14.
28

Checking / Adjusting
Ignition System – Checking (Cont'd.)
If voltage is not present across Digifant ECU connector terminals 13 and 14,
Test the relays (page 26).
Repair the wiring using wiring diagram.
If there is voltage present across ECU terminals 13 and 14,
Check the wire for continuity from terminal 6 of the Digifant ECU to terminal 1 at the Hall sender connector (BR/W wire).
If there is no continuity,
Repair wiring using wiring diagram.
If there is continuity,
Check wire from terminal 8 of the Digifant ECU to terminal 3 at the Hall sender connector (G or R/BK wire).
If there is no continuity,
Repair wiring using wiring diagram.
If there is continuity,
Ensure the ignition is OFF, replace the Digifant ECU, and re-test.
Hall Sender Testing – Part B
Reconnect wiring connector to Hall sender and peel back rubber boot.
Connect a volt meter between the center terminal of the wiring connector and battery.
Crank engine with starter.
Volt meter reading should fluctuate.
If the volt meter reading does not fluctuate,
Replace Hall sender and re-test. If voltage reading does fluctuate,
Check continuity of the wiring between the center terminal (G or R/G wire) of the Hall sender wiring connector and terminal 18 of the Digifant ECU.
If wiring is OK, ensure ignition is switched OFF and replace the Digifant ECU.
29
Checking / Adjusting
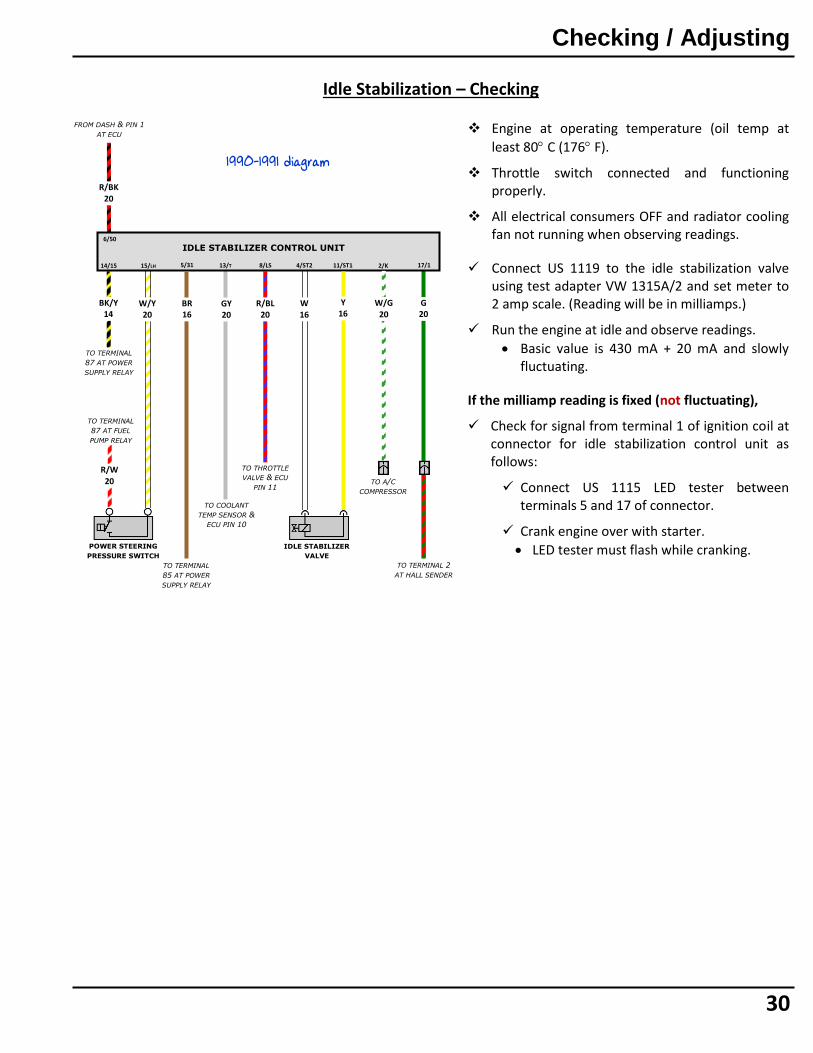
Idle Stabilization – Checking
Engine at operating temperature (oil temp at
least 80 C (176 F).
Throttle switch connected and functioning properly.
All electrical consumers OFF and radiator cooling fan not running when observing readings.
Connect US 1119 to the idle stabilization valve using test adapter VW 1315A/2 and set meter to 2 amp scale. (Reading will be in milliamps.)
Run the engine at idle and observe readings.
Basic value is 430 mA + 20 mA and slowly fluctuating.
If the milliamp reading is fixed (not fluctuating),
Check for signal from terminal 1 of ignition coil at connector for idle stabilization control unit as follows:
Connect US 1115 LED tester between terminals 5 and 17 of connector.
Crank engine over with starter.
LED tester must flash while cranking.
30
IDLE STABILIZER CONTROL UNIT
GY 20
W/Y 20
R/BL 20
W/G 20
G 20
W 16
BR 16
R/BK 20
Y 16
5/31 14/15 15/LH 13/T 8/LS 4/ST2 11/ST1 2/K 17/1
6/50
R/W 20
POWER STEERING
PRESSURE SWITCH
TO A/C
COMPRESSOR
BK/Y 14
IDLE STABILIZER
VALVE
TO THROTTLE
VALVE & ECU
PIN 11
TO TERMINAL
87 AT POWER
SUPPLY RELAY
TO TERMINAL
87 AT FUEL
PUMP RELAY
TO COOLANT
TEMP SENSOR &
ECU PIN 10
TO TERMINAL
85 AT POWER
SUPPLY RELAY
TO TERMINAL 2
AT HALL SENDER
FROM DASH & PIN 1
AT ECU
1990-1991 diagram

Checking / Adjusting
Idle Stabilization – Checking (Cont'd.)
If LED tester does flash,
Replace the idle stabilization control unit and continue.
If the LED tester does not flash,
Repair open circuit between terminal 18 of the Digifant ECU and terminal 17 of the idle stabilization control unit.
If there is no milliamp reading and the idle is low and/or surging,
Check the power supply to the idle stabilization control unit from terminal 87 of the fuel pump relay as follows:
Connect US 1115 LED tester between terminal 14 of the idle stabilization control unit connector and ground.
Switch the ignition ON.
The LED tester must come on for approximately 5 seconds.
If LED tester does not light:
Repair open circuit between terminal 18 of the Digifant ECU and terminal 17 of the idle stabilization control unit.
31
1986 - 1987 diagram

Checking / Adjusting
Idle Stabilization – Checking (Cont'd.)
The amount of increase in the milliamp readings for the following steps is dependent on many factors. Of primary concern is that the milliamp readings do increase for each step. This indicates that the idle stabilization control unit is compensating for load changes.
If the idle stabilization control unit is functioning properly, but the idle lowers drastically, or the engine stalls when a load is applied, the problem is with the idle stabilizer valve itself.
Milliamp Increases While Cranking Starter
Idle stabilizer valve OK (the valve must vibrate and hum with the engine running).
Connect digital multi-meter to idle stabilizer using
adapter VW 1315A/2 and set to 5 or 10 amp scale (reading will be in milliamps).
Ground ignition coil terminal #4 wire.
Crank starter motor.
Stabilizer current should increase beyond 430 mA while cranking starter.
If not OK,
Disconnect multi-pin connector from the Digifant ECU.
Check the continuity of the wire from terminal 6 of the idle stabilizer control unit connector to terminal 1 of the ECU connector.
If the continuity is OK,
Check the continuity of the wire from terminal 1 of the ECU connector to terminal 50 of the starter motor.
If the continuity is OK,
Switch ignition OFF, replace Digifant ECU, and re-test.
32

Checking / Adjusting
Idle Stabilization – Checking (Cont'd.)
Air Conditioning
Connect VW 1315/2 and US 1119 to idle stabilizer valve and set meter to mA scale.
Start engine and let idle.
Switch A/C ON while observing multi-meter.
Milliamp reading should increase.
If milliamp reading does not increase,
Remove idle stabilization control unit.
Connect US 1115 LED tester between terminals 2 and 5 of idle stabilization control unit connector.
Start engine and switch A/C ON and OFF.
LED must light when the A/C is ON and go out when the A/C is OFF.
If OK,
Replace idle stabilization control valve.
If not OK,
Check wiring from A/C compressor clutch to terminal 2 of the idle stabilization control unit connector.
Check that A/C compressor clutch is functioning properly; repair, if necessary, and re-test.
Power Steering
Connect VW 1315/2 and US 1119 to idle stabilizer valve and set meter to mA scale.
Start engine and let idle.
Turn steering wheel hard to the left (or right) to stop while observing multi-meter.
Milliamp reading should increase. If milliamp reading does not increase,
Bridge the terminals of the power steering pressure switch with a jumper wire.
Milliamp reading should increase. If milliamp reading does increase,
Replace the power steering pressure switch and re-test without a jumper wire. If still no milliamp increase,
Check the steering pump pressure.
If milliamp reading does not increase,
Switch the ignition OFF.
Check continuity of the wiring from the power steering switch to terminals 14 and 15 of the idle stabilizer control unit using the wiring diagram.
If the continuity is OK,
Replace the idle stabilization control unit and re-test.
33

Checking / Adjusting
Evaporative Emission System – Checking
Control Valve
Engine idling, at normal operating temperature.
Remove white nylon purge line from rubber boot at right rear of intake air distributor.
Connect vacuum pump US 8026, or equivalent, to open end of purge line and apply 5-10 in. Hg of vacuum.
Control valve must maintain vacuum.
If no,
Remove purple vacuum line from fitting on throttle body and install vacuum pump US 8026, or equivalent.
At idle, there should be 0 in. Hg (up to 1 in. Hg vacuum is acceptable).
If OK,
Replace control valve.
If not OK,
Adjust throttle valve stop screw (according to page 13).
Repeat first check.
The control valve should maintain vacuum at idle.
Accelerate engine by hand.
Control valve must release vacuum.
If not OK, either vacuum fitting on throttle body is plugged, or control valve is stuck in the closed position.
Checking For Leaks
Remove small hose "A" from top of charcoal filter. Connect to leak tester US 4487.
Set leak tester scale to "0".
Pressurize system with hand pump to 3.3 cm (1.3 in) of mercury.
System OK if pressure is 2.54 (1.0 in.) or greater after 5 minutes.
System leaking if pressure drops below 2.54 (1.0 in.) after 5 minutes.
Note: Check system for leaks using soap solution at spots
marked with *. Seal if necessary.
34

Basic Engine Adjustments
Specifications / Adjustments
Basic Settings
Note:
Check and adjust the basic engine settings in the following order:
Ignition timing
Idle speed
CO content
Test and adjustment conditions:
Engine oil temperature minimum 80 C (176 F)).
All electrical consumers switched OFF (radiator cooling fan should not be running while performing checks and adjustments).
Crankcase breather hose removed from breather valve and plugged.
Throttle valve switch operating properly (closed in idle position).
Idle stabilizer operating properly (with engine idling, valve should vibrate and hum).
Throttle stop screw is properly adjusted.
Connecting test equipment:
WARNING Switch ignition OFF when connecting test equipment.
Connect VW 1367 using adapter VW 1473 to connect tester to terminal 1 of the ignition coil.
Connect CO tester to fitting on left exhaust pipe using only adapter Sun 120.239, or equivalent (with high temperature silicone connecting hose).
Note:
Non-approved hoses may dramatically alter your readings.
Non-approved hoses may overheat and create vapors that will cause false CO% readings.
35

Basic Engine Adjustments
Specifications / Adjustments (Cont'd.)
Ignition Timing – Checking And Adjusting
With the engine idling:
Disconnect coolant temperature sensor (arrow).
Caution Do not let temperature sensor connector hang down on exhaust manifold.
Increase engine speed to 2300 200 RPM and observe reading.
Checking 3 to 7 BTDC
Adjusting 5 1 BTDC
Reconnect coolant temperature sensor.
Increase engine speed to 3500 RPM and observe reading.
40 5 BTDC (timing must advance 35 from base setting).
If not OK,
Ensure ignition is switched OFF, replace Digifant ECU, and re-test.
36

Basic Engine Adjustments
Specifications / Adjustments (Cont'd.)
Idle Speed And CO Content – Checking And Adjusting
With ignition switched OFF:
Disconnect the oxygen sensor.
Note: The oxygen sensor must be disconnected with the ignition OFF to cancel the memory function of the Digifant ECU.
Connect US 1119 to idle stabilizer using adapter harness VW 1315A/2.
Set US 1119 to 2 amp scale (reading will be in milliamps).
Run engine at idle and observe the readings.
With idle speed of 880 50 RPM (cooling fan not running), the milliamp reading should be
430 20 milliamps.
If not OK,
Adjust to specification by turning the idle adjusting screw on the throttle housing (1).
Note: Turning the idle adjusting screw (1) out will lower the milliamp reading. Turning the idle screw in will raise the milliamp reading.
Always allow time for the reading to stabilize when checking or adjusting.
37

Basic Engine Adjustments
Specifications / Adjustments (Cont'd.)
Idle Speed And CO Content – Checking And Adjusting
Check the CO and HC values.
CO should be 0.3% - 1.2% at sea level. (For altitudes above sea level, use the graph.)
If not OK, Correct the base CO setting by turning the CO
adjusting screw in the airflow sensor housing.
Note: To adjust the CO, remove tamper-proof plug as follows:
Drill plug using 2.5 mm (0.098 in.) bit.
Thread 3 mm (0.137 in.) sheet metal screw into drilled hole.
Grasp screw with pliers and pull plug out.
Repeat idle and CO adjustments until both are within specifications.
Reconnect oxygen sensor.
CO reading must go to 0.7% 0.4% (at any altitude).
If not OK,
Check oxygen sensor function (page 24).
Install a new tamper-proof plug over CO adjusting screw.
38

Basic Engine Adjustments
Specifications / Adjustments (Cont'd.)
Idle Speed And CO Content – Checking And Adjusting
Re-check the idle speed setting as follows:
Disconnect the yellow in-line idle stabilizer control unit connector in the engine compartment.
Milliamp reading must be approximately 430 mA and fixed (non-fluctuating).
Idle speed should remain steady at 880 50 RPM.
If not OK,
Repeat idle set and CO procedure.
If still not OK,
Check the idle stabilization system (page 30).
39

System Check With Volt/Ohm Meter The entire Digifant electrical system can be checked by measuring voltage and resistance at the Digifant ECU multi-pin connector and its related components.
VOLT METER TO TERMINAL
COMPONENTS CHECKS/TEST CONDITIONS SPECIFICATIONS RESULTS
13 and 14 at ECU Power Supply Ignition ON Battery voltage
14 and 19 at ECU
B+ at Alternator Power Supply Ignition OFF Battery voltage
Stud in Junction Box Power Supply Ignition OFF Battery voltage
Red Wire at 2-pin Connector at Relay Box
Power Supply Ignition OFF Battery voltage
87 at Digifant Power Supply Relay
Power Supply
Wrap metal meter probe with electrical tape, leaving just the tip exposed for relay connection
Ignition ON (connect meter to relay first!)
Battery voltage
13 and 25 at ECU Coil wiring, terminal 1 Ignition ON Battery voltage
1 and 13 at ECU Wiring from Starter Disconnect wiring form
injectors
Operate starter
Cranking voltage, minimum of 8V
3 and 13 at ECU bridged Fuel Pump Relay Ignition ON Fuel pump runs
1 and 3 at Hall Sender Connector
Hall Sender Ignition ON 10V or more
1 and 15 at Ignition Coil ECU Ignition Switching Function
Ignition ON
Disconnect Hall Sender and ground center terminal in connector for 3 seconds
Voltage should briefly increase to approx. 4.5V
OHM METER TO TERMINAL
COMPONENTS CHECKS/TEST CONDITIONS SPECIFICATIONS RESULTS
12 at ECU and 87 at Fuel Pump Relay
Fuel Injectors and Wiring
Total resistance 3 to 5 ohms
At components Individual Fuel Injectors Resistance (each) 14 to 20 ohms
13 at ECU and Ground Control Unit Ground Connection
Wiring 0 ohms
6 and 9 at ECU Intake Air Temp Sensor Resistance
Corresponding with graph on next page
6 and 10 at ECU Coolant Temp II Sensor
40

System Check With Volt/Ohm Meter
OHM METER TO TERMINAL
COMPONENTS CHECKS/TEST CONDITIONS SPECIFICATIONS RESULTS
6 and 11 at ECU Throttle Switch
Closed
Idle position
Full throttle position
0 ohms
ohms 0 ohms
6 and 17 at ECU Airflow Sensor Total resistance 500 to 1000 ohms
17 and 21 at ECU Airflow Sensor Resistance through
potentiometer
Ohms fluctuate as sensor plate is opened
2 and 13 at ECU Oxygen Sensor Connector disconnected and
green wire grounded
Connector connected
0 ohms
ohms
CONTINUITY METER TO TERMINAL
COMPONENTS CHECKS/TEST CONDITIONS SPECIFICATIONS RESULTS
At components Fuel Pump Wiring Wiring between fuel pump
relay/ground and 2-pin connector
Continuity on both wires, individually
6 and 8 at ECU Hall Sender Wiring Terminals 1 and 3 bridged at
Hall Sender Continuity
6 and 18 at ECU Hall Sender Wiring Terminals 1 and 2 bridged at
Hall Sender Continuity
ADDITIONAL TESTS COMPONENTS CHECKS/TEST CONDITIONS SPECIFICATIONS RESULTS
Disconnect Center Wire from Distributor Cap
Coil
Place wire terminal near a ground point
Have friend turn ignition switch to START to crank engine for a few seconds
Spark
41

Power Supply Relay Replacement / Modification
USA – 1988-1989
The 1988-1989 Vanagons sold in the USA came with a 40A 5-pin Digifant power supply relay (part #321919505A). This relay utilizes an 87a terminal along with a diode. If your testing has indicated that this relay is faulty, it cannot be easily replaced due to it being unavailable new (never mind it's high price tag if you do find one).
Because this relay is directly related to the defunct OBD-I system (i.e. it was never fully implemented by Volkswagen and is, therefore, useless), it is more worthwhile to convert your power supply relay and socket to a 4-pin version that all other van years utilize. This modification will allow you to replace the relay anytime, anywhere, as most auto parts stores carry generic, multi-purpose 4-pin relays.
To convert your van to a 4-pin, you will be swapping the current black (87a) and black/white (86) wire terminals (or leaving the black/white wire disconnected and capped off). Follow the instructions in the next column. If you do this modification, a revised diagram is available on the secondary pages 45-46.
Procedure:
1. Purchase a 40A 4-pin relay (it is a multi-purpose relay, but is the same as the fuel pump relay – VW part #141951253B).
2. Disconnect the main/starting battery, ensuring the negative clamp will not touch the battery post, or the body of the van.
3. Open the relay box and remove the 5-pin Digifant power supply relay.
4. Using a jeweler's (aka tiny) flat screwdriver, or the proper terminal removal tool, insert it into the terminal 87a slot in the socket. You will be pressing down on a locking tab while tugging on the black wires on the other side. Once removed, gently bend the locking tab back up into position (about a
30 angle).
5. Repeat step 3 with terminal 86 and the black/white wire. Once this wire is removed, put a couple of layers of electrical tape thoroughly over the terminal and leave the wire disconnected in the box (this is the preferred method for ECU safety).
6. Insert the black wire terminal you removed from 87a in Step 3 into the 86 terminal slot in the socket.
7. Insert your new 40A 4-pin relay into the socket.
8. Reconnect the main/starting battery.
9. Turn the ignition key to ON. If you hear the fuel pump prime, your modification has been a success. If the van then starts, take it for a test drive and be glad you won't have a nightmare on your hands if the power supply relay ever dies in the middle of nowhere.
Always carry a spare 40A 4-pin relay with you… just in case one of the relays goes bad.
If you are uncertain about this modification being sound advice, please see this topic on TheSamba: https://www.thesamba.com/vw/forum/viewtopic.php?p=9167841#9167841 .
42

Wiring Diagram – 1986-1987
43
BELOW COIL
HE
AT
IN
G E
LEM
EN
T
THROTTLE
VALVE
ENRICHMENT
SWITCH
COOLANT
TEMP
SENSOR
IGNITION DISTRIBUTOR
SPARK PLUGS
SPARK PLUG
CONNECTORS
IGNITION COIL
DIGIFANT ELECTRONIC CONTROL UNIT
1 4
15 15
3/+ 2/0 1/-
INTAKE
AIR
TEMP SENSOR
AIRFLOW SENSOR
1 2 3 4
HALL
GENERATOR
25 8 18 6 9 21 17 10 11
OXYGEN
SENSOR
3
13 19 2 14 12
1
BELOW
COIL
NEAR ECU
ENGINE,
LEFT
TO MAIN RELAY PANEL IN DASH
Note: Some 1986 Vanagons may have slight deviations from what is shown here.

Wiring Diagram – 1986-1987
44
FUEL
PUMP
BELOW
COIL BELOW
COIL
DIGIFANT
POWER SUPPLY RELAY
FUEL PUMP
RELAY
85
86 87
30
87
30
85
86
IDLE STABILIZER CONTROL UNIT 6
POWER STEERING
PRESSURE
SWITCH
TO A/C
COMPRESSOR
IDLE
STABILIZER
VALVE
TO B+ ON ALTERNATOR
VIA JUNCTION BOX
5 14 15 13 8 4 11 2 17

Wiring Diagram – 1988-1989
45
BELOW
COIL
HE
AT
IN
G E
LEM
EN
T
THROTTLE VALVE
ENRICHMENT
SWITCH
COOLANT
TEMP SENSOR
IGNITION
DISTRIBUTOR
SPARK PLUGS
SPARK PLUG
CONNECTORS
IGNITION
COIL
DIGIFANT ELECTRONIC CONTROL UNIT
1 4
15 15
3/+ 2/0 1/-
INTAKE AIR
TEMP
SENSOR
AIRFLOW
SENSOR
1 2 3 4
HALL
GENERATOR
25 8 18 6 9 21 17 10 11
OXYGEN SENSOR
3
13 19 2 14 12
1
BELOW COIL
NEAR
ECU ENGINE,
LEFT
TO MAIN RELAY PANEL IN DASH
23 20
TO DASH TO POWER
SUPPLY RELAY
OBD-I DIAGNOSTICS ~UNUSED~

Wiring Diagram – 1988-1989
46
FUEL
PUMP
BELOW
COIL BELOW
COIL
DIGIFANT
POWER SUPPLY RELAY
FUEL PUMP
RELAY
85
86 87
30
87
30
85
86
IDLE STABILIZER CONTROL UNIT 6
POWER STEERING
PRESSURE
SWITCH
TO A/C
COMPRESSOR
IDLE
STABILIZER
VALVE
TO B+ ON
ALTERNATOR VIA
JUNCTION BOX
5 14 15 13 8 4 11 2 17
TO PIN 23 AT ECU
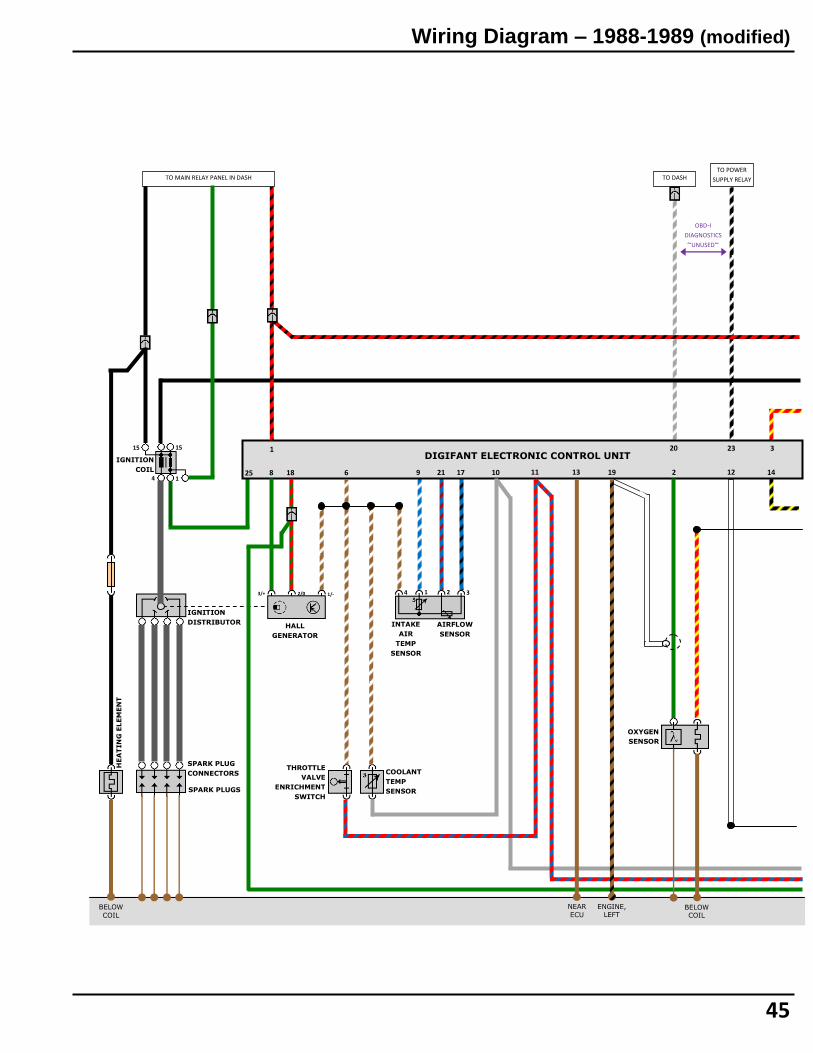
Wiring Diagram – 1988-1989 (modified)
45
BELOW
COIL
HE
AT
IN
G E
LEM
EN
T
THROTTLE VALVE
ENRICHMENT
SWITCH
COOLANT
TEMP SENSOR
IGNITION
DISTRIBUTOR
SPARK PLUGS
SPARK PLUG
CONNECTORS
IGNITION
COIL
DIGIFANT ELECTRONIC CONTROL UNIT
1 4
15 15
3/+ 2/0 1/-
INTAKE AIR
TEMP
SENSOR
AIRFLOW
SENSOR
1 2 3 4
HALL
GENERATOR
25 8 18 6 9 21 17 10 11
OXYGEN SENSOR
3
13 19 2 14 12
1
BELOW COIL
NEAR
ECU ENGINE,
LEFT
TO MAIN RELAY PANEL IN DASH
23 20
TO DASH TO POWER
SUPPLY RELAY
OBD-I DIAGNOSTICS ~UNUSED~

Wiring Diagram – 1988-1989 (modified)
46
CAPPED; WIRE NO
LONGER IN USE
FUEL
PUMP
BELOW
COIL BELOW
COIL
DIGIFANT
POWER SUPPLY RELAY
FUEL PUMP
RELAY
85
86 87
30
87
30
85
86
IDLE STABILIZER CONTROL UNIT 6
POWER STEERING
PRESSURE
SWITCH
TO A/C
COMPRESSOR
IDLE
STABILIZER
VALVE
TO B+ ON
ALTERNATOR VIA
JUNCTION BOX
5 14 15 13 8 4 11 2 17
FROM PIN 23 AT ECU

Wiring Diagram – 1990-1991
47
BELOW COIL
HE
AT
IN
G E
LEM
EN
T
THROTTLE
VALVE
ENRICHMENT
SWITCH
COOLANT
TEMP
SENSOR
IGNITION DISTRIBUTOR
SPARK PLUGS
SPARK PLUG
CONNECTORS
IGNITION COIL
DIGIFANT ELECTRONIC CONTROL UNIT
1 4
15 15
3/+ 2/0 1/-
INTAKE
AIR
TEMP SENSOR
AIRFLOW SENSOR
1 2 3 4
HALL
GENERATOR
25 8 18 6 9 21 17 10 11
OXYGEN
SENSOR
3
13 19 2 14 12
1
BELOW
COIL
NEAR ECU
ENGINE,
LEFT
TO MAIN RELAY PANEL IN DASH
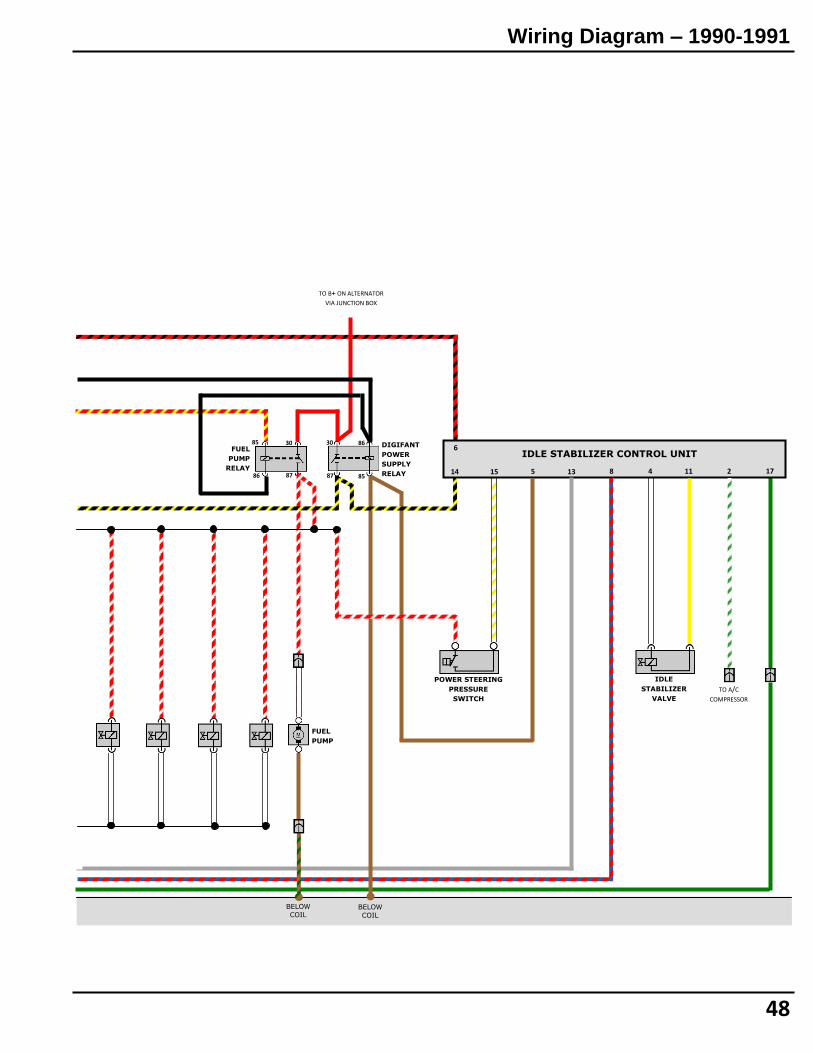
Wiring Diagram – 1990-1991
48
FUEL
PUMP
BELOW
COIL BELOW
COIL
DIGIFANT
POWER SUPPLY RELAY
FUEL PUMP
RELAY
85
86 87
30
87
30
85
86
IDLE STABILIZER CONTROL UNIT 6
POWER STEERING
PRESSURE
SWITCH
TO A/C
COMPRESSOR
IDLE
STABILIZER
VALVE
TO B+ ON ALTERNATOR
VIA JUNCTION BOX
5 14 15 13 8 4 11 2 17

Special Tools Required
Minimum Requirement
US 1115 LED Test Light (leads must be connected RED to positive and BLACK to negative)
VW 1367 Tester
US 1119 Multi-meter (digital)
US 1076 or VW 1318 with Adapter VW 1318/17 Pressure Gauge
VW 1473 Voltage Splitter
Sun 120.239 CO Adapter
VW 1315A/2 Adapter Harness
Sun 105 CO Tester
US 8026 Hand Vacuum Pump
US 4487 Evaporator System Leak Tester (slack tube)
VW 1490 Resistance Block (15K ohms/0 ohms)
US 4480/3 Fuel Pump Switch (optional)
Obtain Locally
1 Liter Graduated Glass Container
49

Glossary / Component Location
AIR FLAP POTENTIOMETER
A variable resistor connected to the airflow sensor that provides a signal for determining fuel system enrichment. Location: Internal component of airflow sensor (not available separately).
AIRFLOW SENSOR
Measures the amount of air entering the intake manifold and sends a voltage signal to the electronic control unit. Location: Attached to air filter housing.
BAR
Unit of measurement pressure – 1 bar is approx. 14.5 PSI.
COOLANT TEMPERATURE SENSOR
A sensor for measuring engine coolant temperature to determine cold running engine operation. Location: Left, lower side of thermostat housing.
ELECTRONIC CONTROL UNIT (ECU)
Provides the proper actuation signal to the injectors and optimum ignition timing point based on inputs from other system components. Location: Under left side of rear seat (inside vehicle).
FUEL FILTER
A filter that removes foreign particles from the fuel system. Location: Inboard side of right frame member, directly behind fuel pump.
FUEL INJECTOR
Electronically activated valve that directs a cone-shaped mist of fuel into the intake port near each intake valve. Location: Mounted into intake manifold at cylinder head.
FUEL PRESSURE REGULATOR
A diaphragm-type of regulator used to maintain system pressure at a given value. Location: Bolted to rear of intake air distributor, directly adjacent to ignition distributor.
FUEL PUMP RELAY
When energized by the ignition switch and grounded by the Digifant ECU, the fuel pump relay provides battery voltage to the fuel pump, fuel injectors, idle stabilization control unit, oxygen sensor heating element, and power steering switch. Location: It is the right-side relay inside the black plastic relay box, directly above the ignition coil on the left side of the engine compartment. IDLE STABILIZATION CONTROL UNIT
Controls operation of idle stabilizer valve based on pre-programmed idle speed values and various other component inputs. Location: Behind right rear taillight assembly, mounted just forward of air cleaner intake hose. IDLE STABILIZATION VALVE
Electronically controlled valve used to maintain idle speed at a pre-determined level by regulating intake air at idle. Location: Mounted to top of intake air distributor.
OXYGEN SENSOR
Used to detect the amount of oxygen in the exhaust gases. Location: Threads into catalytic converter.
50

Glossary / Component Location
OXYGEN SENSOR MILEAGE COUNTER (1986-1987)
Activates a warning light to indicate oxygen sensor replacement is required. Location: Next to left side radius rod in front of vehicle.
POWER SUPPLY RELAY
When energized by the ignition switch, the power supply relay provides battery voltage to the Digifant ECU. Location: It is the left-side relay inside the black plastic relay box, directly above the ignition coil on the left side of the engine compartment.
RESIDUAL PRESSURE
Fuel pressure in the fuel injection lines after the engine has been turned off.
THROTTLE SWITCH
Provides closed throttle and full throttle signals to ECU for idle stabilization, deceleration fuel shut-off, and full load enrichment. Location: Mounted to underside of throttle valve housing.
51