differences in use between writer and word
TRANSCRIPT

Differences in use betweenWriter and Word
Title: Differences in use between Writer and Word: Version: 1.0First edition: October 2004

Contents
Overview..................................................................................................................................... 3
Acknowledgments.................................................................................................................. 3
Modifications and updates......................................................................................................3
Views...........................................................................................................................................1
Status bar.....................................................................................................................................1
Navigator.....................................................................................................................................1
Stylist...........................................................................................................................................2
Keyboard..................................................................................................................................... 2
Multiple selections and tables................................................................................................ 3
Comparison of key short-cuts.................................................................................................3
Mouse use....................................................................................................................................4
Tables.......................................................................................................................................... 4
Header Rows.......................................................................................................................... 4
Turning off header rows......................................................................................................... 5
Adjusting column widths and row heights using the keyboard..............................................5
Copying and pasting cells in a table....................................................................................... 5
Inserting and deleting rows or columns..................................................................................5
Equal row heights and column widths....................................................................................6
Splits and merges....................................................................................................................6
Preventing accidental change to cell contents........................................................................ 6
Sorting.................................................................................................................................... 6
Entering numbers and formulas..............................................................................................6
Creating a table from a data source........................................................................................ 7
Charts in Writer...........................................................................................................................7
Customizing the user interface....................................................................................................8
Write, edit, and review documents..............................................................................................9
Control page layout................................................................................................................... 10
Word notion of page layout.................................................................................................. 10
Writer notion of page layout.................................................................................................10
Differences in use between Writer and Word i

Comparison for page layout................................................................................................. 11
Use templates and styles............................................................................................................12
Font size............................................................................................................................... 12
Space between paragraphs and page breaks before.............................................................. 13
Fields......................................................................................................................................... 13
Work with large or complex documents................................................................................... 14
Work with graphics................................................................................................................... 14
Mail Merge................................................................................................................................15
Creation of the Mail Template (main document)................................................................. 15
Selecting records for the merge............................................................................................ 16
Viewing merged data............................................................................................................16
Eliminating blank lines.........................................................................................................16
Merging................................................................................................................................ 16
Mailing Labels......................................................................................................................16
Merge to e-mail.................................................................................................................... 17
Envelopes.................................................................................................................................. 17
Adding an envelope.............................................................................................................. 17
Removing an envelope......................................................................................................... 17
Page styles and page numbering................................................................................................18
Modify a page style.............................................................................................................. 18
Create a style........................................................................................................................ 18
The Page style dialog............................................................................................................18
Page breaks and page numbering.............................................................................................. 19
Changing the style used for a page and changing the numbering sequence......................... 19
To insert page numbering..................................................................................................... 20
Page numbers on portrait and landscape pages in the same place and orientation...............20
Conditional text.........................................................................................................................21
Master documents..................................................................................................................... 22
Differences in use between Writer and Word ii

Overview
Overview
This document summarizes the differences in use between OpenOffice.org Writer 1.1.x andMicrosoft Word (various versions).
AcknowledgmentsThis document was written by Ian Laurenson.
Vast chunks of this chapter were copied (with minor changes only) from a document by JeanHollis Weber, titled “Comparison of ways to do things using Microsoft Word andOOoWriter,” which is available at http://www.taming-openoffice-org.com/writer/wcompare.htm. That document is also a chapter titled “Moving fromMicrosoft Word” in Ms Weber’s book, OpenOffice.org Writer: The Free Alternative toMicrosoft Word, published by O’Reilly Community Press, July 2004, ISBN 0596008260.
The section on mail merge is based on a “how-to” document written by Sophie Gautier.
Modifications and updates
Version Date Description of Change
1.0 3 October 2004 First publication.
Differences in use between Writer and Word iii

Overview
Views
Word has 4 views (depending on the version) called:
Normal: Recommended view (by Microsoft) for doing most of your typing and editing.Writer has no real equivalent view.
Page or Print Layout: This shows the document (more or less) as it will print. This is theclosest equivalent to the main view in Writer.
Online Layout: In theory, this shows the document as if viewed on-line. Writer's equivalent isa view option called Online Layout. To access this view, select View > Online Layout.
Outline View: For working with heading hierarchies. Writer has the Navigator, which isdetailed later in this chapter.
Writer also has an HTML source view that only shows when editing an HTML document. Toaccess this view, select View > HTML – Source.
When field codes are turned on, Writer displays less information about the field than doesWord. To get detailed information, right click the field > Fields... (or select field > Edit >Fields...).
Status bar
The status bar is similar to Word's except it does not show the current location of the cursoron the page (row number and number of characters across). It does however show theposition within a table in spreadsheet style format, e.g., Top left cell =A1.
Navigator
Word doesn't have a similar concept to the Navigator and, in the author's opinion, it is such auseful tool it is worth taking the time to learn more about it.
To launch the Navigator, press F5 or click the navigator icon on the Function Bar. To get adetailed description of what each of the buttons do, press Shift + F1 and hover over thebuttons.
The Headings at the top of the list box in the Navigator are the closest equivalent to Word’sOutline View.
With the List Box on there is a drop-down list box at the bottom of the navigator. With thislist box it is possible to select any of the open Writer documents so that their contents areavailable for dragging and dropping. What happens when the selection is dropped isdetermined by the drag mode specified by the Drag Mode button. Press and hold the DragMode button to see the available options.
When viewing a master document the Navigator is quite different. For more details see thechapter on Master Documents.
Differences in use between Writer and Word 1

Overview
Note: Graphics, indexes, OLE objects, and references cannot be dragged and dropped when inthe Insert as link or Insert as Copy modes.
Stylist
For a more detailed guide on using styles, see “Use templates and styles” on page 12.
Use Shift + F1 to check out the different buttons on the Stylist. Use the bottom list box tochange the style group that is displayed. For example, Applied Styles only shows those stylesthat have been used in the document.
Keyboard
When some text has a character attribute at the end of a paragraph (say bold or a hyperlink)but the new text doesn't require that attribute then press the right arrow key before typing.
Deleting paragraph marks: pressing Delete at the end of a paragraph effectively moves thetext of the following paragraph into the current paragraph, and the paragraph formating of thetop paragraph remains. Press Backspace at the start of a paragraph and the format of thelower paragraph remains.
Hint: An aid to remember this is: the format of the paragraph that has the cursor will be theformat of the combined paragraph, unless the current paragraph is empty; in that case,backspacing will leave the previous paragraph's formatting.
Control + Home when in tables: In Word Control + Home always positions the cursor to thetop of the document, in Writer Control + Home first positions the cursor at the start of thecell, then the start of the table and then the start of the document. Control + End has similarbehavior.
How to select multiple parts of the text
To copy, cut, format, or delete parts of the text in different areas of the document use:
• Control + selection with one click, double-click or sliding.
or
1) Click once on the field "STD" (STanDard) in the status barThe field now shows "EXT" (EXTended selection).
2) Another click and it changes to "ADD" (ADD to selection).
Note: the ADD mode is the equivalent to Control + click and EXT is equivalent to Shift + click.
Differences in use between Writer and Word 2

Overview
Multiple selections and tablesThe following limitations apply when selections involve tables:
• It is possible to have multiple selections within a cell, but only one selection ispossible that involves more than one cell.
• A selection that starts in a table can not extend beyond the table.
• A selection that starts outside a table will include the entire table (that is, a selectioncannot start outside a table and also contain a portion of a table).
Comparison of key short-cutsTable 1: Word vs Writer different default key shortcuts (incomplete)
Function Word standardshortcut
Writer standardshortcut
Underline words not spaces Control + Shift + W No equivalent
Change font size Control + Shift + P No standard equivalent
Thesaurus Shift + F7 Control + F7
Show/hide non-printingcharacters
Control + Shift + * Control + F10
Hanging Indent Control + T No standard equivalent
“Unhang” Indent Control + Shift + T No standard equivalent
Indent Control + M No standard equivalent
“UnIndent” Control + Shift + M No standard equivalent
Superscript Control + Shift = Control+Shift+P
Subscript Control + = Control + Shift + B
Remove character formatting Control + Spacebar Right click > DefaultRemove paragraph formatting Control + Q No equivalent
Jump to previous edit point Shift + F5 Need to use the reminderson the Navigator
Shift paragraph up No equivalent Control + UpShift paragraph down No equivalent Control + Down
See AltKeyHandler.sxw (available from http://homepages.paradise.net.nz/hillview/OOo/) formacros that extend Writer's key shortcut ability.
Differences in use between Writer and Word 3

Overview
Mouse use
Some differences are:
• Right click displays a context menu, but for the current cursor position not the pointerposition.
• No quick selection of rows or columns in tables.
• Triple click selects current line or current cell when cursor is in a table.
• No quick selection of paragraphs or lines by clicking to the left of the paragraph.
• Control + Click doesn't select a sentence.
To select sentences easily, customize the keyboard:
1) Tools > Configure... > Keyboard.
2) For Category select Navigate.
3) Assign key shortcuts for Select to Next/Previous sentence.
4) Alternatively assign key shortcuts for To next/previous sentence and use F8 (extendselection) and the assigned keys.
Tables
The menu option to insert a table is in the Insert menu. The other menu options for tables arein the Format menu (rather than having their own menu). The menu options and Tablesobject toolbar become visible when the cursor is in a table.
Tables are like one special paragraph so when selecting text using the keyboard (Shift +arrow) from, say, above the paragraph, the whole table is selected followed by the line belowit.
Tables without borders can be hard to spot – they don't have a thin gray line like tables inWord. To display the thin gray line, use Tools > Options > OpenOffice.org > Appearance andselect the "Table boundaries" checkbox.
The page formatting of long skinny tables into newspaper style columns when the tablecrosses a page break appears to be unreliable.
Header RowsBy default new tables have a header row.
To have more than one row for a header row (copied from help):
1) Select the first row of the table.
2) Right-click and choose Cell – Split.
Differences in use between Writer and Word 4

Overview
3) In the Split area, enter the number of rows that you want to include in the header.
4) In the Direction area, click in the Horizontally check box. If you want the rows tohave equal heights, select the Into equal proportions check box.
5) Click OK.
Turning off header rowsSimply delete the rows. To keep the contents of the header rows, insert the required numberof rows, copy and paste the heading rows into the new rows, then delete.
Adjusting column widths and row heights using thekeyboardUse the 3 buttons on the Table object toolbar to set what happens to the overall width of thetable:
• Table: Fixed: Overall width of the table stays the same, but the adjoining columnshrinks or grows correspondingly.
• Table: Fixed Proportional: The current column and the end column change bycorresponding amounts, keeping the overall width the same.
• Table: Variable: Only the current column changes so the overall width of the tablechanges.
Use Alt and the arrow keys as follows to adjust the width of columns (or height of rows):
• Alt and arrow keys adjusts the right side (bottom for rows).
• Alt + Shift and arrow keys adjusts the left side (top for rows).
• Alt + Control + left or right arrow keys adjusts the current cell only.
Copying and pasting cells in a tableWriter never inserts new rows or columns when pasting data – it always overwrites thecontents of the cells. This makes it clear as to what will happen. To avoid overwriting cells,first insert the required number of rows or columns.
Inserting and deleting rows or columnsInserting is always below for rows and to the right for columns (opposite of Word).
Note: This is a surprising inconsistency as Calc inserts above and to the left.
To insert rows or columns using the keyboard: Alt + Insert, arrow key. To delete rows orcolumns using the keyboard: Alt + Delete, arrow key. The insertion or deletion is in thedirection of the arrow key. For example, Alt + Insert, Up inserts a row above the current row.
Differences in use between Writer and Word 5

Overview
Equal row heights and column widthsOn the Tables object toolbar there is a long click button called Optimize. This presents atear-off menu for easily adjusting row heights and column widths to being the same.
Splits and mergesTo merge cells – do this last, as you would in Word..
To split or merge cells: Select cells to be merged then Format > Cell.
To split a table (horizontally): Format > Split Table.
To join two tables they need to be one below the other, then Format > Merge Tables. Ifthere is a table above and below the current table the user will be prompted which one theywish to join.
Preventing accidental change to cell contentsTo prevent accidental change to cell contents: Select the cells, Format > Cells > Protect.
This is not a security feature as the cells aren't password protected but does preventaccidentally changing a cell.
SortingTo sort a table:
1) Select the cells to be sorted; don't include the headings. The option to sort onlybecomes available when there is something selected.
2) Tools > Sort.
Unlike Word, the sort dialog uses column number rather than the names of the column.
Entering numbers and formulasUnlike Word, tables in Writer can work much more like spreadsheets. For examplecalculated values change as the data is input (no more selecting and pressing F9 to updatecalculated results).
With number recognition turned on, when entering a number Writer will automaticallyformat the number according to a specified number format. To change this behavior, right-click when the cursor is in a table > Number Recognition.
To change the number format: Select the cells, Format > Number Format...
Differences in use between Writer and Word 6

Overview
To enter a formula like SUM():
1) Select the cell where the result is to go.
2) Press F2 to display the Formula bar.
3) Click and hold Formula button to display formula menu.
4) Select desired function (list separator is for separating constants, e.g. =mean 5 | 12 |20).
5) Click and drag on cells to input ranges.
6) Press Enter to finish.
To enter a formula like “this cell plus that cell minus that cell”:
1) Select the cell where the result is to go.
2) Press F2 to display the Formula bar.
3) Click on a cell.
4) Type or select the desired operator.
5) Click on the next cell.
6) Repeat steps 4 and 5 until done.
7) Press Enter to finish.
Creating a table from a data sourceTo create a table from a data source:
1) Display the Data source viewer (F4).
2) In the Data explorer window navigate to the desired table or query.
3) Drag the name of the table or query into the document.
4) Select the desired fields and set other properties as required in the dialog.
Charts in Writer
Charts copied from a Calc spreadsheet and pasted into a Writer document are, by default,embedded objects. Unlike doing this in Microsoft Office, only the relevant data for the chartis embedded. In Microsoft Office copying and pasting a chart also embeds it, but if the Excelworkbook was 8 mb in size (not unrealistic for a spreadsheet) then each chart pasted into aWord document would increase the Word document by 8 mb.
Linking of charts does not exist.
Differences in use between Writer and Word 7

Overview
Customizing the user interface
Most functions are found in similar places in both programs, but a few are slightly different,and the degree of control varies. This table summarizes where to find the setup choices.
Table 2: Customizing the user interface
To do this... In Word... In Writer...Change measurement system Tools > Options... > General Tools > Options... > Text
Document > GeneralTurn off Autocompletion Not applicable Tools > AutoCorrect/AutoFormat.
In the “Word completion” tab, untickWord Completion.
Turn on/off Help Agent Help > Microsoft Word Help> Options
Help > Help Agent
Set up document window (rulers,status bar, default toolbars, etc)
View > select required items View > select required items
Customize toolbars Tools > Customize Tools > Configure
Customize menus Tools > Customize Tools > Configure
Display font names in their font(in toolbar drop-down font list)
Tools > Customize > Options Tools > Options > OpenOffice.org> View, select Preview in fonts lists
Always show full menus (includeunavailable and little-used items)
Tools > Customize > Options Tools > Options > OpenOffice.org> View, select Inactive menu items
Show/hide ScreenTips(ToolTips) on toolbars
Tools > Customize > Options Help > Tips to uncheck
Always create backup copy Tools > Options > Save Tools > Options > Load/Save >General
Autosave every x minutes Tools > Options > Save Tools > Options > Load/Save >General
Show paragraph marks, tabs, etc. Tools > Options > View Tools > Options > Text Document> Formatting Aids
Change file locations Tools > Options > FileLocations
Tools > Options > OpenOffice.org> Paths
Change user information Tools > Options > UserInformation
Tools > Options > OpenOffice.org> User Data
Set up AutoCorrect andAutoFormat options
Tools > AutoCorrect Options Tools > AutoCorrect/AutoFormat> Options
Differences in use between Writer and Word 8

Overview
Write, edit, and review documents
Most writing, editing, and reviewing techniques in OOoWriter are similar to those inMicrosoft Word, but the details often vary.
Table 3: Write, edit and review documents
To do this... In Word... In Writer...Jump quickly to other parts of adocument
Edit > Go to Edit > Navigator (or F11), double-click on required heading, figure,table, etc.
Choose language for spellingchecker
Tools > Language > SetLanguage
Tools > Options > LanguageSettings > Language. (Note:OpenOffice.org has no grammarchecker.)
Ignore some text when checkingspelling
Select text; Tools >Language > Set Language >Do not check(or) Format > Style >Modify> Format > Language
Select text; right-click > Character> Font > Language = [None] or thereal language of the selected text, ifthat is foreign.
Recheck spelling Tools > Spelling & Grammar> Recheck Document
Always rechecks
Find and replace text, formatting,and styles
Edit > Replace > More;choices as needed
Edit > Find & Replace; details are abit different
Use wildcards in find and replace Edit > Replace > More >select Use Wildcardscheckbox
Edit > Find & Replace, selectRegular expressions; wildcardsthemselves are different See thesection on Regular expressions in thedifferences in use between MicrosoftOffice & OpenOffice.org .
Choose, create, or edit a customdictionary
Tools > Options > Spelling& Grammar > CustomDictionaries
Tools > Options > LanguageSettings > Writing Aids
Create exception (exclude)dictionary
File > New, type words, SaveAs > text only, fileextension .EXC
As for custom dictionary, but selectException [-] checkbox
Track changes (choose options) Tools > Options > TrackChanges
Tools > Options > Text Document> Changes
Protect document for editing Tools > Protect Document Edit > Changes > Protect Records(Password needs to be at least 5characters)
Mark and track changes (Word 2000) Tools > TrackChanges > HighlightChanges
Edit > Changes > Record
Insert comments associated witha change
Highlight text; Insert >Comment
Edit > Changes >Comment
Insert notes (comments notassociated with a change)
Highlight text; Insert >Comment
Insert > Note
Differences in use between Writer and Word 9

Overview
To do this... In Word... In Writer...Show changes as pop-up text Options > View > Screentips Help > Tips (and) Help > Extended
TipsMerge documents Tools > Merge Documents Edit > Changes > Merge Document
Accept or reject changes View > Toolbars >Reviewing
Edit > Changes > Accept or Reject
Change document properties File > Properties File > Properties
Get a word count Tools > Word Count (can getword count for selection)
File > Properties > Statistics tab.1
Create AutoText entry Select text; Insert >AutoText > New
Edit > AutoText (or) Control + F3
Insert AutoText Type shortcut and press F3 Type shortcut and press F3; or typeName and press Enter. Writerdistinguishes between the “name”and the “shortcut” of an autotext.Word does not.
AutoText in Writer always ends with a paragraph mark. So for a short in-line shortcut, betterto use AutoCorrect.
Control page layout
This section covers such things as margins, headers, and footers.
Writer and Word have somewhat different notions of page layout.
Word notion of page layoutPage layout is a property of the document as a whole. If you change the page layout (forinstance, set the document to landscape), it changes for the entire document. You can thenarrange for specific sections to have a different layout.
Writer notion of page layoutPage layout is a property of the page style (for example, First Page, Index and Default). If youchange the page layout for one page style (for instance, set Default to have a header with pagenumbers) only that style will be affected.
Using page styles gives Writer some very useful features. For instance, you can define theFirst Page page style so that, after you have typed the first page, the style switches to Index(or any other style you choose). You can then set Index so that it is followed by Default.
1To get word count for selection, use the wordcount macro at:http://www.darwinwars.com/lunatic/bugs/oo_macros.html. This does selections, and will do footnotes forOOo1.1 and above. OOo 2.0 will have a Word Count feature for selections.
Differences in use between Writer and Word 10

Overview
Comparison for page layoutTable 4: Control page layout
To do this... In Word... In Writer...Define margins File > Page Setup > Margins Format > Page >Page
Specify different headers andfooters on first, odd, andeven pages
File > Page Setup > Layout >Headers and Footers section
Define different page styles forFirst, Left (even), and Right (odd)pages, using Header and Footertabs
Edit headers and footers View > Headers and Footers, thentype or insert fields; can also double-click in existing header or footerregions
After you have specified Headerand Footer areas for a page, theyare always active. Single-click totype or insert fields
Change from roman to arabicpage numbers in the footer ofa page
Insert a section break, deselect“Same as Previous” in the secondsection, define a new footer withpage numbers restarting at 1 inarabic numerals
Insert a manual page break andapply a different page style
Use paragraph styles for pagelayout
Can define paragraph styles withoffset from left margin, with headingstyles aligned left or right
Can define paragraph styles withoffset from left margin, withheading styles aligned left or right
Use columns for page layout Insert continuous sections to switchfrom single to multiple columns onone page
Format > Page > Columns (or)Insert/Format > Section >Columns (or) other methods
Use frames or text boxes forpage layout
Frames are used in Word 97 butmostly replaced by text boxes inWord2000 and 2002; can be linkedto flow text from one to next, as in anewsletter
Insert > Frame (can link framesto flow text from one to next, asin a newsletter); “text boxes” arefields, not positioning devices
Use tables for page layout Table > Insert > Table (use dialog toformat)
Insert > Table (use dialog toformat)
Put portrait headers onlandscape pages
Use rotated text box linked to header Use rotated text in a frame
Set first page number togreater than 1
Insert > Page Numbers > Format In first paragraph on first page,Format > Paragraph > TextFlow > Breaks, select Enableand With Page Style, choose thepage style, specify the pagenumber
View and edit facing pages File > Print Preview; click Zoombutton to enable editing
File > Page Preview; cannot editwhen previewing; shows pages onwrong sides of screen
Reduce page count by 1 File > PagePreview, ClickShrinkToFit button.
Seehttp://homepages.paradise.net.nz/hillview/OOo/ShrinkToFit.sxw.
Differences in use between Writer and Word 11
Overview
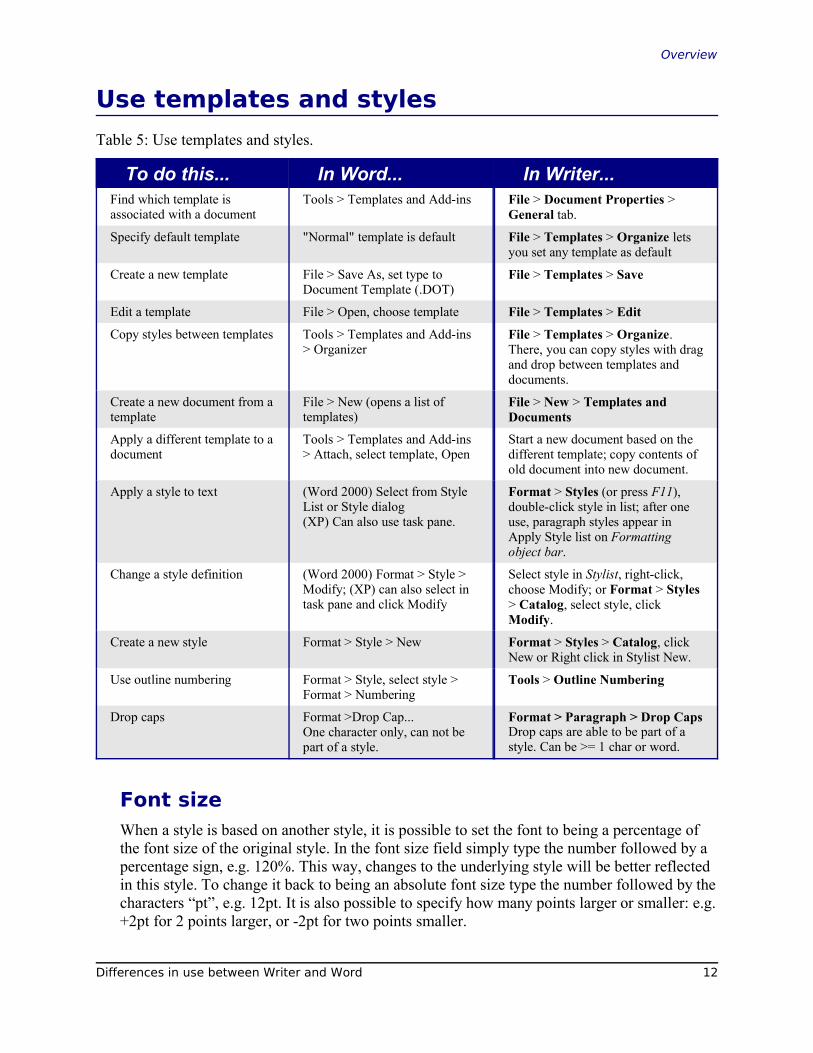
Use templates and styles
Table 5: Use templates and styles.
To do this... In Word... In Writer...Find which template isassociated with a document
Tools > Templates and Add-ins File > Document Properties >General tab.
Specify default template "Normal" template is default File > Templates > Organize letsyou set any template as default
Create a new template File > Save As, set type toDocument Template (.DOT)
File > Templates > Save
Edit a template File > Open, choose template File > Templates > Edit
Copy styles between templates Tools > Templates and Add-ins> Organizer
File > Templates > Organize.There, you can copy styles with dragand drop between templates anddocuments.
Create a new document from atemplate
File > New (opens a list oftemplates)
File > New > Templates andDocuments
Apply a different template to adocument
Tools > Templates and Add-ins> Attach, select template, Open
Start a new document based on thedifferent template; copy contents ofold document into new document.
Apply a style to text (Word 2000) Select from StyleList or Style dialog(XP) Can also use task pane.
Format > Styles (or press F11),double-click style in list; after oneuse, paragraph styles appear inApply Style list on Formattingobject bar.
Change a style definition (Word 2000) Format > Style >Modify; (XP) can also select intask pane and click Modify
Select style in Stylist, right-click,choose Modify; or Format > Styles> Catalog, select style, clickModify.
Create a new style Format > Style > New Format > Styles > Catalog, clickNew or Right click in Stylist New.
Use outline numbering Format > Style, select style >Format > Numbering
Tools > Outline Numbering
Drop caps Format >Drop Cap...One character only, can not bepart of a style.
Format > Paragraph > Drop CapsDrop caps are able to be part of astyle. Can be >= 1 char or word.
Font sizeWhen a style is based on another style, it is possible to set the font to being a percentage ofthe font size of the original style. In the font size field simply type the number followed by apercentage sign, e.g. 120%. This way, changes to the underlying style will be better reflectedin this style. To change it back to being an absolute font size type the number followed by thecharacters “pt”, e.g. 12pt. It is also possible to specify how many points larger or smaller: e.g.+2pt for 2 points larger, or -2pt for two points smaller.
Differences in use between Writer and Word 12

Overview
Space between paragraphs and page breaks beforeIn Writer, some paragraph properties behave differently to the way they behave in Word.Specifically:
• Space before if at the top of a page is ignored.
• Space between paragraphs: the greatest of space above and space below for the twoparagraphs is applied.
• Page break before: if at the top of a page, doesn't create a blank page.
This makes using styles possible without having to apply direct paragraph formating to fixissues afterwards.
Fields
For a comparison of fields between Writer and Word see the File Sharing chapter.
Table 6: Use of fields
To do this... In Word... In Writer...Insert a field Insert > Field
(or) CTRL+F9 for blankfield
Insert > Fields
Define a number range field Insert > Field, use SEQ(sequence)
Insert > Fields > Other > Variables> Number range
Insert a bookmark Select text; Insert >Bookmark
Select text; Insert > Bookmark
Insert a cross-reference to abookmark
Insert > Cross Reference,choose Bookmark as type
Insert > Cross Reference >Bookmark2
Insert a cross-reference to aheading
Insert > Cross Reference,choose Heading as type
Either bookmark the heading or useInsert > Cross Reference > SetReference to mark the heading, thenInsert > Cross Reference > InsertReference.
Insert a cross-reference to afigure or table
Insert > Cross Reference,choose type
Insert > Cross Reference > InsertReference > Figure (or Table)
Use conditional content Use IF or other fields, orstyles (all workarounds)
Insert > Fields > Other > Variables(among other ways)
2 For macros that aid in working with references see http://homepages.paradise.net.nz/hillview/OOo/. For a moredetailed discussion on references see the latest document available fromhttp://www.openoffice.org/issues/show_bug.cgi?id=28058.
Differences in use between Writer and Word 13

Overview
Work with large or complex documents
Major differences exist in the use of master documents. The table does not attempt tosummarize all these differences.
Table 7: Work with large or complex documents.
To do this... In Word... In Writer...Create a table of contents, list offigures, or an alphabetic index
Insert > Index and Tables Insert > Indexes and Tables >Indexes and Tables
Insert index entries ALT+SHIFT+X Insert > Indexes and Tables >Entry (or) click Insert IndexMarker icon
Create a bibliographic database Need to use other package Tools > Bibliography Database
Insert bibliographic referencesinto text
Link to field in database Insert > Indexes and Tables >Bibliographic Entry
Insert footnotes and endnotes Insert > Footnote Insert > Footnote (or) click InsertEndnote Directly icon
Insert other files Insert > File, choose Insert orAs Link
Insert > File
Cross-reference betweendocuments
Use Includetext fields Currently have to remember thename of the set reference. Referencewill show correctly when in masterdocument.
Use master documents Some experts do notrecommend using MasterDocuments in Word.
File > Send > Create MasterDocument; use Navigator to insertsubdocuments
Work with graphics
Most graphics work should be done outside Word or Writer, with the graphic files embeddedor linked to the Word or Writer file. However, you can do some simple graphics using thedrawing tools in Word or Writer. This table covers the basics.
Table 8: Work with graphics.
Differences in use between Writer and Word 14

Overview
To do this... In Word... In Writer...Create Drawing objects (Word 2000) View > Toolbars >
Drawing; (XP) Insert > Picture >New Drawing
Click Show Draw Functions icon
Combine graphics objects anddrawing objects
(Word 2000) Edit > Picture >Reset Picture Boundary; (XP) Usedrawing canvas
Place all objects in a frame
Insert graphics files into a textdocument (embed or link)
Insert > Picture > From File,choose Insert or As Link
Insert > Graphics > From File
Anchor graphics Format > Picture > Layout >Advanced > Picture Position
Use icons on Graphics object bar,or right-click and choose frompop-up menu, or click Format >Graphics
Wrap text around graphics Format > Picture (or Object) >Layout
Use icons on Graphics object bar,or right-click and choose frompop-up menu, or click Format >Graphics > Wrap
Crop graphics Format > Picture > Crop, (or) clickCrop tool on Picture toolbar
Format > Graphics > Crop(No tool for dragging crop area)
Create captions for graphics Select graphic; Insert > Reference> Caption
Select graphic; Insert > Caption
Annotate graphics Use drawing objects; group, orplace in frame or on drawingcanvas (XP)
Place all objects in a frame
Insert watermark Format > Background > PrintedWatermark > Picture (or Text)Watermark
Format > Page Style >Background(or) create drawing object,Arrange > To Background,Anchor > To Page
Mail Merge
A lot of this section is based on a “howto” written by Sophie Gautier, titled “How to do a“mail merge” from a Calc spreadsheet”. The original is at:http://documentation.openoffice.org/HOW_TO/word_processing/writer2_EN.html.
Creation of the Mail Template (main document)1) In Writer create a document that is going to be the mail template.
2) Save the file but don't close it.
3) View > Data Sources (or press the F4 key). The registered data sources will bedisplayed in the data source viewer.
4) Select the source of data for the mail merge. Click on the little cross next to the datasource name to display its content tree. Clicking on the name of a table to display the
Differences in use between Writer and Word 15

Overview
fields and their records in the right side of the data source viewer. See the chapter onData Sources for information on registering a data source.
To add the fields into your document
Click and drag the desired fields (one at a time) to the desired places in your document.
Selecting records for the mergeTo select a record, click on the gray rectangle to its right. A small arrow will be displayed andthe record will be highlighted.
To select records that are not consecutive, hold the Control key down while makingselections.
Note: For selecting records based on a criteria see the chapter on Data Sources.
Viewing merged data
To see your document as it will be when merged, click the Data to fields button
To view different records, simply select the records in the data source viewer.
Eliminating blank linesIf a field might be blank, then the process to suppress the potentially blank line is:
1) In the mail template, place the cursor before the field.
2) Control+F2 (or Insert > Fields > Other... ) to open the Fields dialog.
3) Switch to the Functions tab.
4) Select the field style Hidden Paragraph and type in the Condition area “not(fieldname)”.
5) Click on the Insert button to insert the function into the document.
Merging
1) Click the mail merge button .
2) Choose whether to use all the records, the currently selected records (option becomesavailable when records are selected; see Selecting records for the merge above).
3) Choose whether to send the merge to printer or file. When sending to file, a separatefile is created for each record; the files are named according to your options but withan appended number to ensure that they are unique.
Differences in use between Writer and Word 16

Overview
Mailing LabelsThe easiest way to create mailing labels is:
1) File > New > Labels.
2) Select database from the list of registered databases (see the chapter on Data Sources).
3) Select the table within the database.
4) Select each field and click the left facing arrow to move the field into the Label textarea.
5) Tidy the Label text area (press Enter between the address fields).
6) Select the brand and type of label for the labels to be printed on. If the correct brandand type isn't listed use the Format tab to specify the layout.
7) Click the Options tab, ensure Entire page is chosen. The Synchronize contentscheckbox is so that changes made to the first label are propagated through theremaining labels.
8) Click New Document.
9) Merge as above.
Merge to e-mailThere is no option for merging to e-mail.
Envelopes
From the forums some people have had difficulty with envelopes. From briefexperimentation the author hasn't had any problems with OpenOffice.org 1.1.1 and above.
Adding an envelopeInsert > Envelope...
Removing an envelope1) Place the cursor at the beginning of the envelope page.
2) If the Stylist is not open, press F11 or use Format > Stylist to display it.
3) Change to the Page Styles options. It's the fourth icon from the left.
4) Double Click on Default.
5) Remove the remaining elements.
Differences in use between Writer and Word 17

Overview
Page styles and page numbering
Modify a page styleIn Writer all pages have a page style. To modify the page style of the page where the cursor ispositioned, use Format > Page.
Warning: As the page style is being changed, all pages with this style will be changed as well.
Create a styleTo create a new page style:
1) If the Stylist isn't currently displayed, press F11 to display it.
2) Click Page Styles in the Stylist (fourth icon from left).
3) Right click in the Stylist > New.
The Page style dialogOrganizer tab
Name: Nothing tricky here, simply a name to help the user remember what the settings arefor.
Next style: This setting specifies what page style to use at the next page break (manual orautomatic) for any page that has this page style. Set it to a different page style when the pagestyle is only for one page (such as the first page of each chapter), otherwise this should be thesame as Name to keep the same page style for the following pages.
Page tab
Paper format settings: Format is the paper size, the other settings have the same names inWord (on the paper size tab of page setup).
Margin settings: Same as for Word. Each setting represents the distance from the edge of thepage, but see Header/footer tabs below as the location of headers and footers relative to themargins is different.
Layout settings: Page Layout is for specifying whether the page style is mirrored – used forleft and right pages. There are more options here than in Word, but there isn't a different firstpage option – that's because it is handled by the Next style setting as mentioned above inOrganizer tab. Format refers to the format of page numbers. Register true is to make the textline up better at the top of the page (see help for more details).
Background tab
For specifying a background color or graphic (watermark). (An alternative to this with moreflexibility is to create a drawing object, then use Arrange > To Background, Anchor > ToPage.)
Differences in use between Writer and Word 18

Overview
Header/footer tabs
Headers and footers are printed between the margins of the page rather than in the top orbottom margins as they are in Word. Another way of saying this is that for the top of a pagethe area between the edge of the page and the top margin is always blank, next is the header,and after the header, the main text area for the page.
Auto height allows the header or footer to grow and shrink depending on their contents.
Spacing specifies the distance between the header/footer and the main text area on the page.Dynamic spacing allows the header/footer to expand into the area between the header/footerand the main text area.
The left and right margins are indenting from the margins of the page and cannot havenegative values.
The More button is for specifying borders and backgrounds for the header/footer area. Insome versions of Word this approach was used to create a watermark. Since it is possible tohave graphics in the background of the main document, this is not the required way of havinga watermark in Writer.
Borders/columns footnote tabs
These tabs are for specifying the borders (lines around the outside), number and widths ofnewspaper style columns and defining the area for footnotes (if any) for the page style.
Page breaks and page numbering
Changing the style used for a page and changingthe numbering sequenceTo insert a page break and change page style or page numbering method1:
1) Control + Enter.
2) Cursor will be in the first paragraph of the new page.
3) Format > Paragraph...
4) Breaks will be enabled.
5) Select With Page style, specify the page style to use and specify the page number tostart from.
To insert a page break and change page style or page numbering method2:
1) Insert > Manual break...
2) By default it will specify Page breaks.
3) Choose the Page style.
4) Select Change page number.
Differences in use between Writer and Word 19

Overview
5) Enter the new starting page number.
To insert page numbering1) Define a page style with header or footer turned on.
2) Position the cursor in the header or footer (use the mouse or key shortcut Control +PageUp for Header or Control + PageDown for footer).
3) Optionally type: “Page” space.
4) Insert > Fields > Page Number.
5) Optionally type space “of” space “ Insert > Fields > Page Count.
To insert a field that calculates a different page count (for example, when you have a titlepage but want to have the remaining pages say page 1 of 2 (instead of page 1 of3 ):
1) Press F2 to display the text formula bar.
2) Type =page – 1.
3) Press Enter.
Note: Unfortunately this field doesn't automatically update, so press F9 to update it beforeprinting.
Page numbers on portrait and landscape pages inthe same place and orientation
1) Create a style for landscape pages. Set the margins for the landscape style such thatthey correspond with the portrait style when rotated (top = left, bottom = right, left =bottom and right = top). For page numbering on left, turn on headers; on right –footers. Select Use dynamic spacing.
2) Create a style for the landscape header or footer based on the style for the portraitheader or footer. (In the Stylist, select the style that is used for the portrait header orfooter > right click > New.) Change the font position to 2700. If the page numbering ison the bottom choose left alignment, for the top choose right.
3) Insert the page break and choose the page style just created (see above); don't changethe numbering.
4) In the relevant header/footer (as per step 1) insert the page number field.
Differences in use between Writer and Word 20

Overview
Conditional text
In Word the only way to have conditional text is with the “if” field3. The equivalent in Writeris the field “Conditional text”.
To insert a conditional field in Writer: Insert > Fields > Other > Functions > Conditionaltext or Control + F2 > Functions >Conditional text.
There is also a field “Hidden text” that hides the text when the condition is true.
Working with the relevant fields for conditional text, both in Word and in Writer, means thatonly small amounts of text can be conditional. However, there are times when having wholeparagraphs or sections of text be conditionally hidden is very convenient. Some examples:
• A test so that the same document can be used for the test itself and for the modelanswers.
• Technical documents where the same document with variations can be used for similarmodels of equipment.
Writer provides a field for conditionally hiding paragraphs and the ability to conditionallyhide sections. Here's an example to show how this could be done:
1) Ensure that hidden text is viewable: Tools > Options > Text Document >Formatting Aids, tick both “Hidden text” and “Hidden paragraphs”.
Note: Conditionally hidden sections are not visible regardless of these settings if the conditionfor hiding them is true.
2) At the top of the document: Insert > Fields > Other > Variables.
3) Name: DocType. Value: Model Answers.
4) At the start of a one paragraph answer: Insert > Fields > Other > Functions >Hidden Paragraph. For the condition type DocType == “Test” (To make this easierto insert repeatedly, create an autocorrect entry).
5) For longer answers: Enter the model answer, select it, Insert > Section..., tick Hide,and enter DocType == “Test” for the condition.
6) To print the document for a test, double click the field at the top of the documentcreated in steps 2 and 3, and change the value to Test. Print as usual.
Note 1: The field “Input list” has a name but this is not a variable so its value cannot be used inthe condition.
Note 2: It is easiest if the selection doesn't include the last paragraph to keep adding sections.But if the last paragraph is selected simply move to the end of the document (Control + End)then press Alt + Enter.
3 To the best of the Author's knowledge.
Differences in use between Writer and Word 21

Overview
Master documents
Help covers using the basics of using master documents, or see “Work with large or complexdocuments” on page 14, or for even more information see the chapter on Master Documentsin the User’s Guide.
It is possible to insert cross-references across sub-documents but the names of the referencesmust be typed in rather than selected from a list.
Use Insert > Fields > Other... > References.
A macro to help insert references to headings, including references across documents thatwill be sub documents, in a master document, is available in a document calledOutlineCrossRef3.sxw available from http://homepages.paradise.net.nz/hillview/OOo/.
Note: There is no way to have a landscape page in a sub-document and that page remaining alandscape page when included in the master document. The only workaround is to have thelandscape page be part of the master document rather than a sub-document.
Differences in use between Writer and Word 22