descriptive writing sample
DESCRIPTION
pdfTRANSCRIPT

TheMasterTeacherSeries
Descriptive Writingby
John Schacter, Ph.D.
TO PURCHASE THE BOOK AND CD-ROM GO TO WWW.TEACHINGDOCTORS.COM OR CALL 650.323.1378
Copyright John Schacter, Ph.D.
TheMasterTeacherSeries
Descriptive Writing
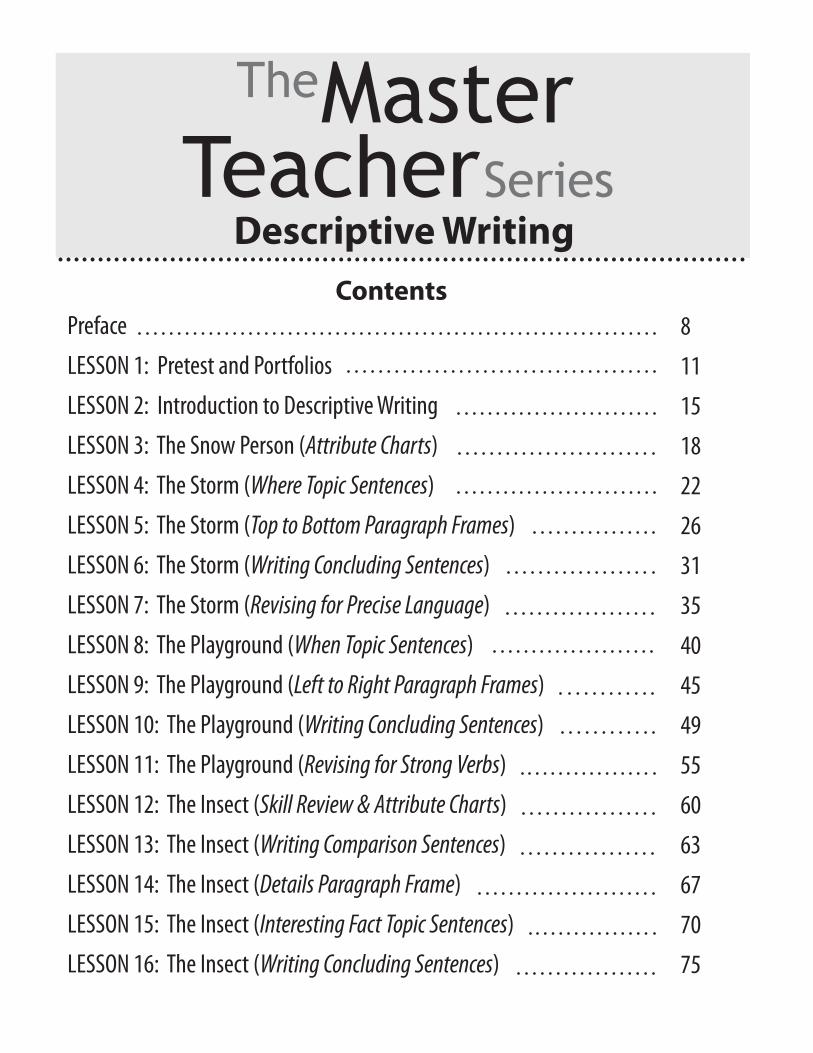
Preface
LESSON 1: Pretest and Portfolios
LESSON 2: Introduction to Descriptive Writing
LESSON 3: The Snow Person (Attribute Charts)
LESSON 4: The Storm (Where Topic Sentences)
LESSON 5: The Storm (Top to Bottom Paragraph Frames)
LESSON 6: The Storm (Writing Concluding Sentences)
LESSON 7: The Storm (Revising for Precise Language)
LESSON 8: The Playground (When Topic Sentences)
LESSON 9: The Playground (Left to Right Paragraph Frames)
LESSON 10: The Playground (Writing Concluding Sentences)
LESSON 11: The Playground (Revising for Strong Verbs)
LESSON 12: The Insect (Skill Review & Attribute Charts)
LESSON 13: The Insect (Writing Comparison Sentences)
LESSON 14: The Insect (Details Paragraph Frame)
LESSON 15: The Insect (Interesting Fact Topic Sentences)
LESSON 16: The Insect (Writing Concluding Sentences)
8
11
15
18
22
26
31
35
40
45
49
55
60
63
67
70
75
Contents
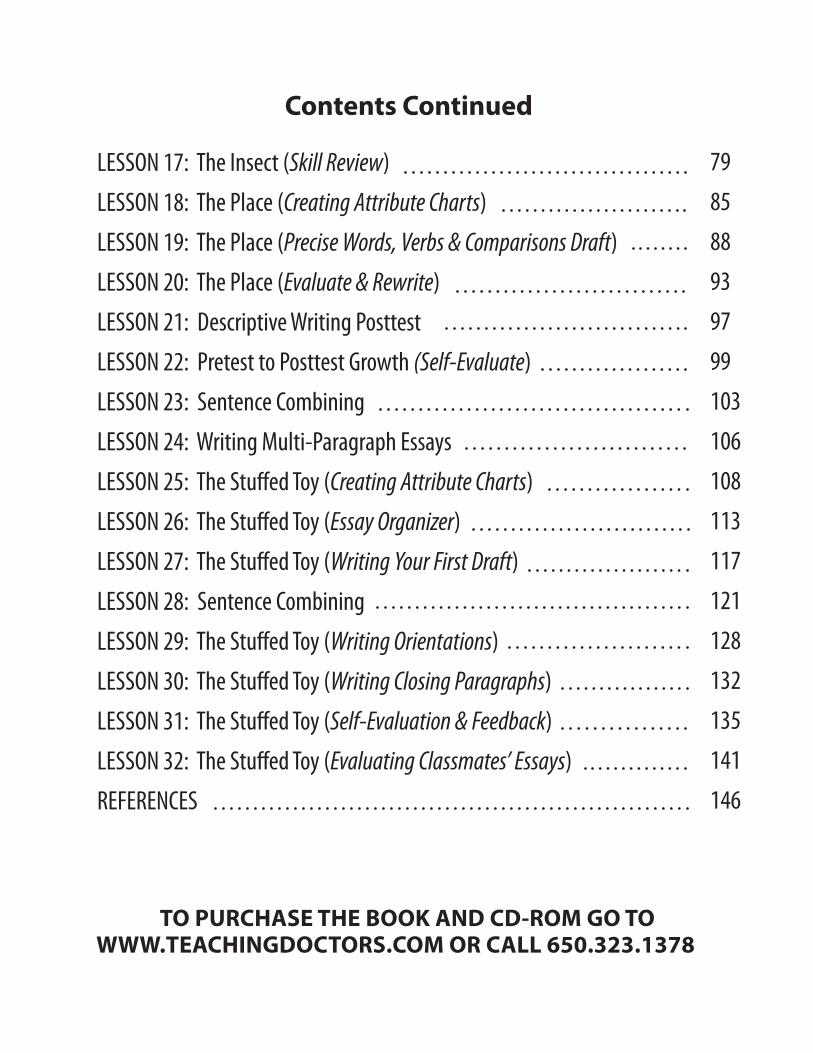
Contents Continued
LESSON 17: The Insect (Skill Review)
LESSON 18: The Place (Creating Attribute Charts)
LESSON 19: The Place (Precise Words, Verbs & Comparisons Draft)
LESSON 20: The Place (Evaluate & Rewrite)
LESSON 21: Descriptive Writing Posttest
LESSON 22: Pretest to Posttest Growth (Self-Evaluate)
LESSON 23: Sentence Combining
LESSON 24: Writing Multi-Paragraph Essays
LESSON 25: The Stuffed Toy (Creating Attribute Charts)
LESSON 26: The Stuffed Toy (Essay Organizer)
LESSON 27: The Stuffed Toy (Writing Your First Draft)
LESSON 28: Sentence Combining
LESSON 29: The Stuffed Toy (Writing Orientations)
LESSON 30: The Stuffed Toy (Writing Closing Paragraphs)
LESSON 31: The Stuffed Toy (Self-Evaluation & Feedback)
LESSON 32: The Stuffed Toy (Evaluating Classmates’ Essays)
REFERENCES
79
85
88
93
97
99
103
106
108
113
117
121
128
132
135
141
146
TO PURCHASE THE BOOK AND CD-ROM GO TO WWW.TEACHINGDOCTORS.COM OR CALL 650.323.1378

4 Preface
Preface
Model Texts, Pictures and Skill Development Activities Teaching writing involves careful selection of pictures, model texts, prompts, rubrics, and skill development activities. Consider-able time and effort were spent creating the Teacher PowerPoint Slides and Student Workbooks that house these materials. While the descriptive writing skills taught in this book remain the same each year, the model texts, activities, and perfor-mance demands change based on grade- level expectations.
Lesson ProgressionLessons progress from writing simple descriptive sentences to paragraphs to multi-paragraph essays. Skill development exercises range from generating descrip-tive attributes to sentence combining to including comparisons and hyperbole.
Some first-and second-grade students may not be ready to compose multi-paragraph descriptions. Others may. We encourage teachers to use their judgment to decide how far through this curriculum each stu-dent is prepared to advance. As educators, we know that students learn at different rates and enter every grade with different performance levels. That being said, a pos-sible ending point for lower elementary students (grades 1 to 3) is Lesson 21.
This book and accompanying CD ROM incorporate the best in educational research with classroom practices that show the theory in action. In this volume, we present 32 lessons on how to teach descriptive writ-ing in grades 1 to 5. Each lesson is guided by experimentally proven writing strategies that increase student achievement from 13 to 86 percent (see reviews by Hillocks,1984, and Graham & Perin, 2007). In the pages that follow, lessons are described through visual storyboards. All lessons include Teacher PowerPoint Slides (with grade-level-specific model texts, prompts, pictures, and activities), and Student Workbooks stored on the accompanying CD ROM.
Writing this book and developing the teach-ing examples would not have been possible without the creativity of classroom teachers, researchers, and state department educa-tors. Thank you, Dr. Gina Koency, Katie Welch, Janet Grevious, Dr. Phyllis Veith, Ellen Oderman, Paula Wykle, and Kathy Mears for your instructive comments and encourage-ment! Appreciation is also expressed to Jennifer Duke for her graphic design, Paul Kepple for his innovative cover artwork, and Joanne Michiuye for her meticulous copyediting. Lastly, thank you Nikki Serafin for your abundant creativity and wealth of ideas.
TO PURCHASE THE BOOK AND CD-ROM GO TO WWW.TEACHINGDOCTORS.COM OR CALL 650.323.1378

5
Defining Descriptive Writing and How to Use This Book
In a recent review of experimental writ-ing studies, Graham & Perin (2007) dem-onstrated that students taught the Goals and Progress Feedback approach gained on average 26 percent more on a variety of writing assessments than similar students randomly assigned to control groups. The Goals and Progress Feedback writing ap-proach includes: 1. INTRODUCING THE WRITING GOAL2. MODELING THE WRITING SKILL3. PRACTICING THE SKILL OUT OF CONTEXT 4. USING THE SKILL IN CONTEXT5. RECEIVING IMMEDIATE FEEDBACK 6. RETEACHING AND/OR EXTENDING SKILL USE
Improving Writing Requires Expert Instruction and PracticeDon’t expect your students to master all the descriptive writing skills introduced in this eight-week curriculum. These skills need to be retaught and reinforced throughout students’ elementary education.
How to Use This Book This book is a curriculum with 32 descrip-tive writing lessons. Accompanying this book are grade-level-specific Teacher PowerPoint Slides and Student Workbooks. While the writing skills and strategies are the same each year, the prompts, pictures, model texts, examples, and writing exer-cises change for each grade level.
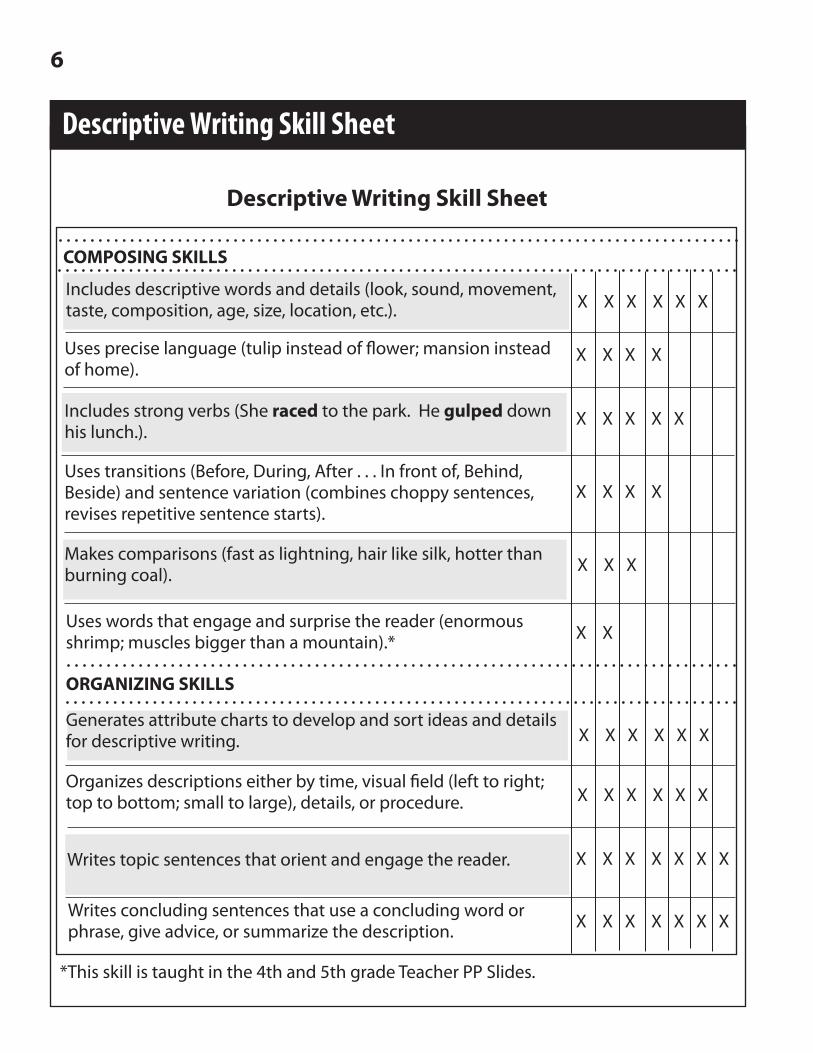
The Descriptive Writing Skill Sheet on the next page shows the writing skills you will teach. Each “X” represents how many times that skill is introduced.
What Is Descriptive Writing?Descriptive writing describes a person, place, or thing in a way that enables the reader to visualize it. This type of writing is characterized by:
• sensory details,• precise language (tulip instead of flower;
mansion instead of home),• comparisons (under the jeweled sky;
speaks like a queen),• strong verbs (He slammed the book
down.), and • hyperbole (faster than a speeding bullet;
strong as an ox).
Why Write Descriptively?Writing descriptively teaches students to:
• organize their thinking, • search for and communicate details, • define people, places and things, and • write with clarity and purpose.
Teaching Descriptive Writing Rather than teach writing using a singu-lar approach (e.g. process writing, rubrics, study of models, collaborative writing, self-regulation strategies, scaffolds, etc.) we employ a variety of experimentally proven strategies (see Reference section).
While your students will experience ele-ments of process writing, study of models, rubrics, collaborative writing, and self-reg-ulation strategies, the guiding instructional approach in this book is called Goals and Progress Feedback (Schunk & Swartz, 1993).
6
Descriptive Writing Skill Sheet
Generates attribute charts to develop and sort ideas and details for descriptive writing.
Writes concluding sentences that use a concluding word or phrase, give advice, or summarize the description.
Organizes descriptions either by time, visual field (left to right; top to bottom; small to large), details, or procedure.
Writes topic sentences that orient and engage the reader.
ORGANIZING SKILLS
Uses precise language (tulip instead of flower; mansion instead of home).
Uses transitions (Before, During, After . . . In front of, Behind, Beside) and sentence variation (combines choppy sentences, revises repetitive sentence starts).
Uses words that engage and surprise the reader (enormous shrimp; muscles bigger than a mountain).*
Includes strong verbs (She raced to the park. He gulped down his lunch.).
Includes descriptive words and details (look, sound, movement, taste, composition, age, size, location, etc.).
Makes comparisons (fast as lightning, hair like silk, hotter than burning coal).
COMPOSING SKILLS
Descriptive Writing Skill Sheet
X X X X X X
X X X X
X X X X X
X X X X
X X X
X X X X X X
X X X X X X
X X X X X X X
X X X X X X X
X X
*This skill is taught in the 4th and 5th grade Teacher PP Slides.
1
Lesson 4 7
2
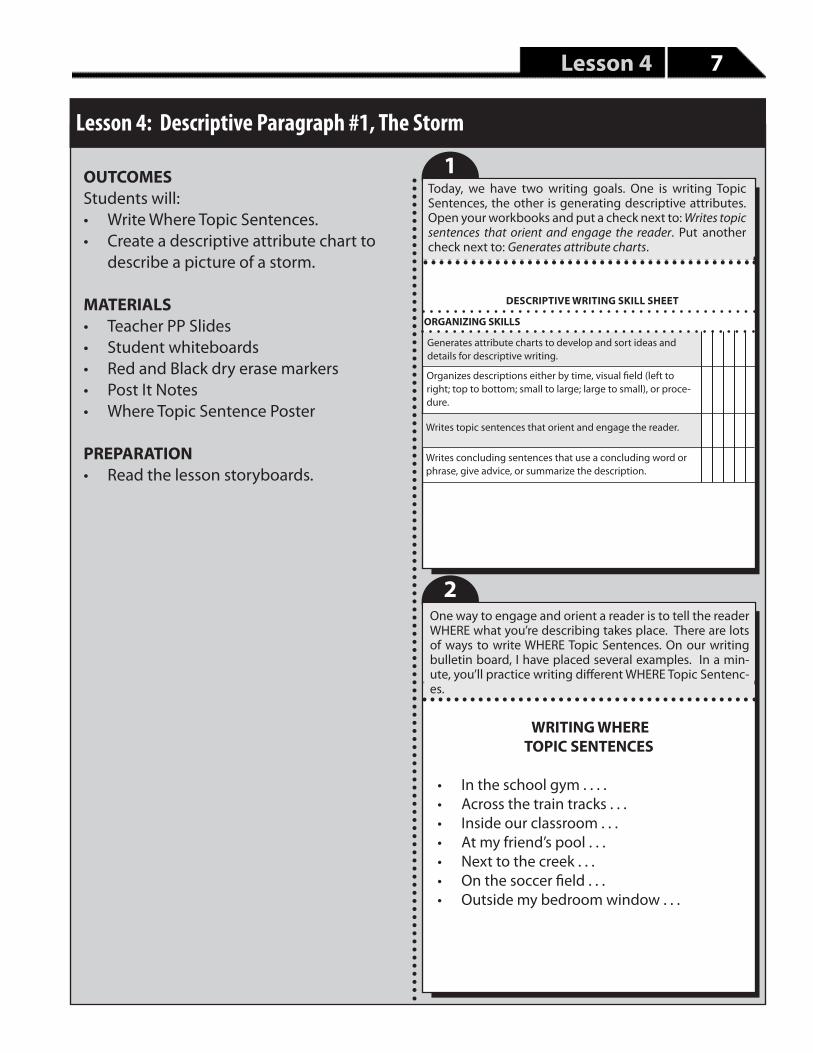
Lesson 4: Descriptive Paragraph #1, The Storm
OUTCOMESStudents will:• Write Where Topic Sentences. • Create a descriptive attribute chart to
describe a picture of a storm.
MATERIALS• Teacher PP Slides• Student whiteboards• Red and Black dry erase markers• Post It Notes• Where Topic Sentence Poster
PREPARATION• Read the lesson storyboards.
Today, we have two writing goals. One is writing Topic Sentences, the other is generating descriptive attributes. Open your workbooks and put a check next to: Writes topic sentences that orient and engage the reader. Put another check next to: Generates attribute charts.
Writes concluding sentences that use a concluding word or phrase, give advice, or summarize the description.
Writes topic sentences that orient and engage the reader.
Generates attribute charts to develop and sort ideas and details for descriptive writing.
ORGANIZING SKILLS
DESCRIPTIVE WRITING SKILL SHEET
Organizes descriptions either by time, visual field (left to right; top to bottom; small to large; large to small), or proce-dure.
One way to engage and orient a reader is to tell the reader WHERE what you’re describing takes place. There are lots of ways to write WHERE Topic Sentences. On our writing bulletin board, I have placed several examples. In a min-ute, you’ll practice writing different WHERE Topic Sentenc-es.
WRITING WHERE TOPIC SENTENCES
• In the school gym . . . . • Across the train tracks . . . • Inside our classroom . . . • At my friend’s pool . . . • Next to the creek . . . • On the soccer field . . . • Outside my bedroom window . . .

8 Lesson 4
65
43I’m going to write a WHERE Topic Sentence for this picture (volcano). When you write a WHERE Topic Sentence, first look at the Topic Sentence Poster for an idea. I’m going to start with “On the soccer field . . . “ But this isn’t a picture of a soccer field it’s “On the big island of Hawaii . . . “ I’ll write this with my BLACK marker on my dry erase board.
Here’s another picture (CITY). On your whiteboards, make an organizer that looks like this. First write the WHERE part of your Topic Sentence in BLACK, then write the WHAT HAPPENED part in RED. Share your topic sentence with your neighbor, then hold up your whiteboards.
After I write WHERE, I need to write what happened. I’ll say “the volcano erupted,” and write that in RED. Watch me write another WHERETopic Sentence. This time I’ll start with Next to . . . “Next to my grandpa’s sugar cane field. . .” Now, I need to write what happened in RED, “I heard the volcano rumble.”
Nice work on writing WHERE Topic Sentences. Remember, we have two writing goals today. 1. Write WHERE Topic Sentences. 2. Generate descriptive attributes. Today you are going to describe this picture, The Storm. To help us come up with details that describe this picture we’ll make an attribute chart, just like we did with the snow charac-ters.
Here is the next picture (AMUSEMENT PARK). First write the WHERE part in BLACK, then WHAT HAPPENED in RED. Share your topic sentence with a different person. This is the last picture (STORM).
WHEREOn the big island of Hawaii
WHERENext to my grandpa’s sugar cane field
WHAT HAPPENEDthe volcano erupted
WHAT HAPPENEDI heard the volano rumble
CITY
AMUSEMENT PARK
STORM
WHERE WHAT HAPPENED
WHERE WHAT HAPPENED
WHERE WHAT HAPPENED
+

Lesson 4 9
109
87I’m passing out small Post-It Notes. In your workbook, open to the page, The Storm Attribute Chart. As I look at the picture, I’m going to write down descriptions for the attribute, TEMPERATURE.
Watch and listen as I think and record ideas on my Post-It, and then stick the ideas under the Temperature column on my attribute chart.
THE STORM ATTRIBUTE CHART
Hear See Location Movement Temp-cold-wet- 40 degrees
-rain clouds-icy winds
At your table, study the picture of The Storm, then write down one descriptive word on a Post-It for one of the at-tributes. Next, pass your attribute chart to the person on your left. Write a different descriptive word for another attribute on a Post-It, and stick that Post-It on your table-mate’s chart.
Keep passing your charts around the table until there are at least 2 descriptive words for each attribute in the chart.
Let’s have some tables share the descriptive words they recorded. I’ll write them on a big class chart. Tomorrow, we’re going to use these ideas to write a descriptive para-graph about the picture, The Storm.
THE STORM ATTRIBUTE CHART
Hear See Location Movement Temp-cold-wet- 40 degrees
-rain clouds-icy winds
-thunder-rain on roof-wind howling- horses neighing
-lightning-farm -house-barn-trees-rain- dark clouds
-country-farm-field-Midwest
- rain falling- wind whirling
- lightning streaking
- trees swaying
Today we had two writing goals. Goal #1 was to write a WHERE Topic Sentence. Goal #2 was to generate descrip-tive attributes. Make sure you checked these two skills on your Descriptive Writing Skill Sheet.
Writes concluding sentences that use a concluding word or phrase, give advice, or summarize the description.
Writes topic sentences that orient and engage the reader.
Generates attribute charts to develop and sort ideas and details for descriptive writing.
ORGANIZING SKILLS
DESCRIPTIVE WRITING SKILL SHEET
Organizes descriptions either by time, visual field (left to right; top to bottom; small to large; large to small), or proce-dure.
10 Lesson 5
2
1
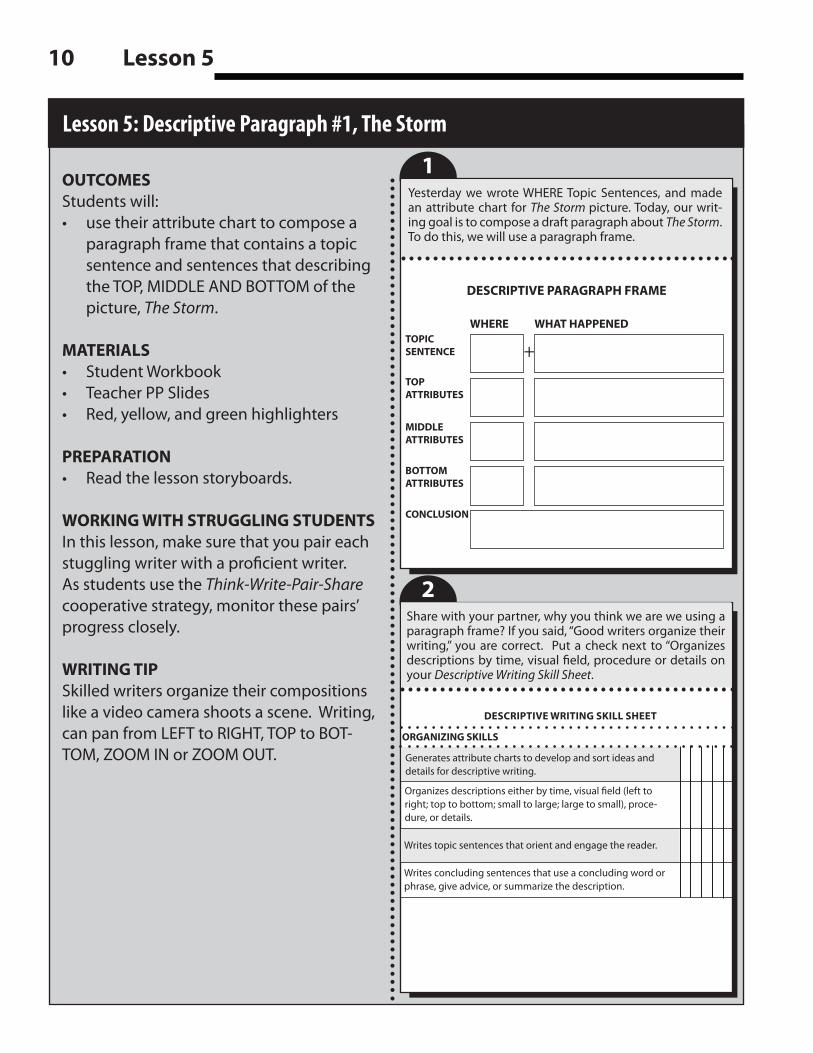
Lesson 5: Descriptive Paragraph #1, The Storm
OUTCOMESStudents will:• use their attribute chart to compose a
paragraph frame that contains a topic sentence and sentences that describing the TOP, MIDDLE AND BOTTOM of the picture, The Storm.
MATERIALS• Student Workbook• Teacher PP Slides• Red, yellow, and green highlighters
PREPARATION• Read the lesson storyboards.
WORKING WITH STRUGGLING STUDENTSIn this lesson, make sure that you pair each stuggling writer with a proficient writer. As students use the Think-Write-Pair-Share cooperative strategy, monitor these pairs’ progress closely. WRITING TIPSkilled writers organize their compositions like a video camera shoots a scene. Writing, can pan from LEFT to RIGHT, TOP to BOT-TOM, ZOOM IN or ZOOM OUT.
Yesterday we wrote WHERE Topic Sentences, and made an attribute chart for The Storm picture. Today, our writ-ing goal is to compose a draft paragraph about The Storm. To do this, we will use a paragraph frame.
DESCRIPTIVE PARAGRAPH FRAME
MIDDLE ATTRIBUTES
TOPIC SENTENCE
CONCLUSION
TOP ATTRIBUTES
BOTTOM ATTRIBUTES
WHERE WHAT HAPPENED
+
Share with your partner, why you think we are we using a paragraph frame? If you said, “Good writers organize their writing,” you are correct. Put a check next to “Organizes descriptions by time, visual field, procedure or details on your Descriptive Writing Skill Sheet.
Writes concluding sentences that use a concluding word or phrase, give advice, or summarize the description.
Writes topic sentences that orient and engage the reader.
Generates attribute charts to develop and sort ideas and details for descriptive writing.
ORGANIZING SKILLS
DESCRIPTIVE WRITING SKILL SHEET
Organizes descriptions either by time, visual field (left to right; top to bottom; small to large; large to small), proce-dure, or details.

Lesson 5 11
65
43
RECIPE FOR COOKIES
If your descriptions are not organized, readers get con-fused. Here’s an example of a recipe for cookies. It’s in your workbook. Notice that it’s out of order.
With a partner, cut out the steps, then organize the sen-tences into an order that will result in good-tasting cook-ies.
Like a recipe, your descriptions need to be organized to help the reader understand. Paragraph frames help us or-ganize our writing. This frame starts with a Topic Sentence, then describes the picture from top to bottom, and fin-ishes with a conclusion.
DESCRIPTIVE PARAGRAPH FRAME
MIDDLE ATTRIBUTES
TOPIC SENTENCE
CONCLUSION
TOP ATTRIBUTES
BOTTOM ATTRIBUTES
WHERE WHAT HAPPENED
+
Let’s start by writing a Topic Sentence. First, look at the picture. Next, choose a WHERE Topic Sentence starter from the poster. I’ll choose, “Outside . . . ” Then, add what happened, “there was a storm.” Now it’s your turn. Look at the picture, use the WHERE Topic Sentence Poster, and write your topic sentence in your Storm paragraph frame.
WHERE TOPIC SENTENCES
• In the school gym . . . . • Across the train tracks . . . • Inside our classroom . . . • At my friend’s pool . . . • Next to the creek . . . • On the soccer field . . . • Outside of the classroom . . .
TOPIC SENTENCE
WHERE WHAT HAPPENED
+Outside there was a storm.
DESCRIPTIVE PARAGRAPH FRAME
MIDDLE ATTRIBUTES
TOPIC SENTENCE
CONCLUSION
TOP ATTRIBUTES
BOTTOM ATTRIBUTES
WHERE WHAT HAPPENED
+Outside there was a storm.
Now that we have our Topic Sentence, we need to de-scribe the picture in an organized way. Our organization is from TOP to BOTTOM.
Place the baking pans in the oven and bake.
Beat in eggs, one at a time.
Preheat oven to 375 degrees.
Let the cookies cool after baking.
Mix butter and eggs with the dry ingredients.
Scoop one tablespoon of cookie dough onto a baking sheet one inch apart.

12 Lesson 5
109
87Watch as I show you how to use the attribute chart we made yesterday to describe the picture from TOP to BOT-TOM. First, I’ll look at the TOP of the picture.
Second, I’ll highlight the words that relate to the TOP part of the picture in red.
THE STORM ATTRIBUTE CHART
Hear See Location Movement Temp.coldwet40 degreesdreary
ThunderRain on roofWind howlingHorses neighing
LightningFarm HouseBarnTreesRainDark Clouds
CountryFarmFieldMidwest
rain fallingwind whirlinglightning streakingtrees swaying
Next, I’ll write the descriptive words I highlighted in the box, TOP ATTRIBUTES. Now, I’ll write a sentence or two that includes these descriptive words. My sentences are, “Lightning came from the dark clouds,” and “The sound of thunder was loud.”
DESCRIPTIVE PARAGRAPH FRAME
MIDDLEATTRIBUTES
TOPIC SENTENCE
CONCLUSION
TOP ATTRIBUTES
BOTTOM ATTRIBUTES
WHERE WHAT HAPPENED
+Outside there was a storm.
Dark cloudsThunder Lightningstreaking
Lightning came from the dark clouds. The sound of thunder was loud.
Are you ready to describe the TOP part of the picture? First, THINK and highlight in red the details and words in your attribute chart that describe the TOP of the picture. Now PAIR up and discuss the attributes you highlighted.
WRITE the top attributes in the TOP ATTRIBUTES box, then write a sentence or two. SHARE your sentences with oth-ers at your table.
THINK-PAIR-WRITE-SHARE
Think - Highlight the words from your at-tribute chart that describe the TOP of the picture.Pair - Discuss the words you highlighted with a partner.Write - Write your ideas in the TOP Attributes box, then use them to write a sentence or two.Share - Share your sentences with different members at your table.
Let’s look at the middle of the picture. I’m going to high-light in yellow the words that describe the MIDDLE of the picture.
THE STORM ATTRIBUTE CHART
Hear See Location Movement Tempcoldwet40 degreesdreary
ThunderRain on roofWind howlingHorses neighing
LightningFarm HouseBarnTreesRainDark Clouds
CountryFarmFieldMidwest
rain fallingwind whirlinglightning streakingtrees swaying
Lesson 5 13
1413
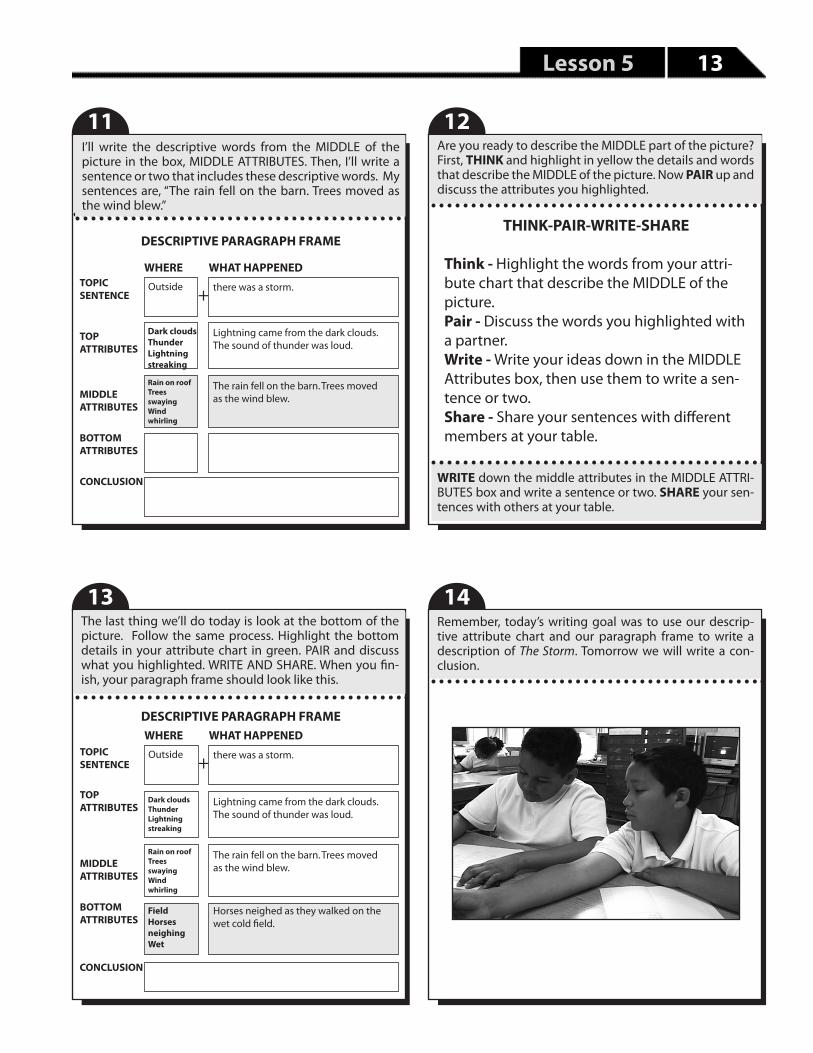
1211I’ll write the descriptive words from the MIDDLE of the picture in the box, MIDDLE ATTRIBUTES. Then, I’ll write a sentence or two that includes these descriptive words. My sentences are, “The rain fell on the barn. Trees moved as the wind blew.”
Are you ready to describe the MIDDLE part of the picture? First, THINK and highlight in yellow the details and words that describe the MIDDLE of the picture. Now PAIR up and discuss the attributes you highlighted.
The last thing we’ll do today is look at the bottom of the picture. Follow the same process. Highlight the bottom details in your attribute chart in green. PAIR and discuss what you highlighted. WRITE AND SHARE. When you fin-ish, your paragraph frame should look like this.
Remember, today’s writing goal was to use our descrip-tive attribute chart and our paragraph frame to write a description of The Storm. Tomorrow we will write a con-clusion.
WRITE down the middle attributes in the MIDDLE ATTRI-BUTES box and write a sentence or two. SHARE your sen-tences with others at your table.
THINK-PAIR-WRITE-SHARE
Think - Highlight the words from your attri-bute chart that describe the MIDDLE of the picture.Pair - Discuss the words you highlighted with a partner.Write - Write your ideas down in the MIDDLE Attributes box, then use them to write a sen-tence or two.Share - Share your sentences with different members at your table.
DESCRIPTIVE PARAGRAPH FRAME
MIDDLE ATTRIBUTES
TOPIC SENTENCE
CONCLUSION
TOP ATTRIBUTES
BOTTOM ATTRIBUTES
WHERE WHAT HAPPENED
+Outside there was a storm.
Dark cloudsThunder Lightningstreaking
Lightning came from the dark clouds. The sound of thunder was loud.
Rain on roofTrees swayingWind whirling
The rain fell on the barn. Trees moved as the wind blew.
FieldHorses neighingWet
Horses neighed as they walked on the wet cold field.

Lesson 6: Descriptive Paragraph #1, The Storm
14 Lesson 6
2OUTCOMESStudents will:• Write different concluding sentences for
a series of short text selections.• Write a concluding sentence for their
Storm paragraph.• Use their Storm Paragraph Frame to write
a descriptive paragraph.
MATERIALS• Sentence strips• Student Workbook• Teacher PP Slides• Writing Conclusions Poster
WORKING WITH STRUGGLING STUDENTSIn storyboard’s 4 to 6 reteach a group of 4 to 8 students the skill of writing conclusions.
1Last night, I used the sentences in my frame to write a paragraph about The Storm. Let’s read it. What’s wrong with the ending?
Good writers finish their descriptions. There are lots of ways to complete your paragraph. Writing “The end,” is not one of them.
THE STORM Outside there was a storm. Lightning came from the dark clouds. The sound of thunder was loud. The rain fell on the house. Trees moved as the wind blew. Horses neighed as they walked on the grass. The end.
Today’s goal is writing Concluding Sentences. The Con-clusion Poster lists 9 different ways to write Concluding Sentences. Let’s practice one way, writing conclusions that USE A CONCLUDING PHRASE OR WORD.
CONCLUSION POSTER
1. Tell how you feelExample - When I saw that my robot worked, I was proud of all the effort I put into building it.2. Summarize the main pointExample - Mammals have hair, are warm blooded and are born alive.3. Offer adviceExample - Wearing a helmet when you ride your bike will protect you if an accident happens.4. Challenge the reader to thinkExample - If a tornado were to strike your home, make a list of the things you need to be prepared.5. Ask a questionExample - I love playing in the park. Where is your favorite place to play?6. Use a concluding phrase or wordExample - To sum up . . . In conclusion. . . All in all . . . Always. . . Everybody . . . Clearly. . . Obviously . . . Surely . . . In fact . . . No one7. Encourage the reader to take actionExample - One way you can prevent pollution is to recycle.8. Convince the reader of your pointExample - Clearly smoking is bad for your health.9. Make a predictionExample - I think that if our school is full, they’ll use trailers for classrooms instead of sending children to a different school.

Lesson 6 15
1 143Watch how I USE A CONCLUDING PHRASE OR WORD to write a Concluding Sentence for the paragraph, Siti The Orangutan. First, I’ll read the paragraph. Second, I’ll look at the Conclusion Poster. Third, I’ll choose a CONCLUD-ING PHRASE OR WORD and write a Concluding Sentence on one of my sentence strips.
SITI THE ORANGUTAN
After being saved from people who kept her illegally as a pet, Siti the orangutan tried to crack open a coconut. Unable to do it, she handed it to the rescue worker. The worker handed it back because he was trying to teach Siti how to live on her own in the forest. Siti poked the coconut with a stick then gave it back to him. Again, the worker played dumb and handed the coconut back. Siti then picked up another stick and swung at the coconut as one would with a long knife. She showed the worker what she wanted him to do, something she’d seen him do many times.
I was able to write three different Concluding Sentenc-es by using three different CONCLUDING PHRASES OR WORDS. Remember to look at the Conclusion Poster un-der Concluding Phrases or Words for ideas.
Conclusion #1To sum up, Siti knew how to open the coconut, but didn’t want to do the work.
Conclusion #2Clearly, Siti was smart enough to open the coconut on her own.
Conclusion #3In conclusion, intelligent animals can learn how to do something just by watching.
ELEPHANT PROBLEM SOLVERS
A wild baby elephant fell into a mud hole in Kenya, Africa. Luckily, the calf didn’t get hurt, but it was too little to walk out. The elephant’s mother ran into the hole and shouted. Two other elephants heard the noise and rushed over to help. First, they studied the problem. It wasn’t a deep hole, but the sides were too steep to climb out. Then, the elephants climbed into the pit, dug out one side of the hole with their tusks, and formed a ramp. When they finished, the mother pushed her calf up the ramp. “Elephants are very cooperative,” says Erin Moss, the scientist who saw this event.
Conclusion #1
Conclusion #2
I am placing you in pairs. Open your Writing Workbook and read the paragraph about Elephant Problem Solvers. I’m handing out one sentence strip to each person. Indi-vidually, read the paragraph and write a conclusion US-ING A CONCLUDING PHRASE OR WORD on the sentence strip. Next, pass your sentence strip to your partner. That person will read your conclusion, and write a different conclusion on the back. I WOULD LIKE THE FOLLOW-ING STUDENTS TO COME WORK WITH ME.
Pairs, share your Concluding Sentences with another pair. Read all the Concluding Sentences and choose the best one to share with the class.
TO PURCHASE THE BOOK AND CD-ROM GO TO WWW.TEACHINGDOCTORS.COM OR CALL 650.323.1378
16 Lesson 6
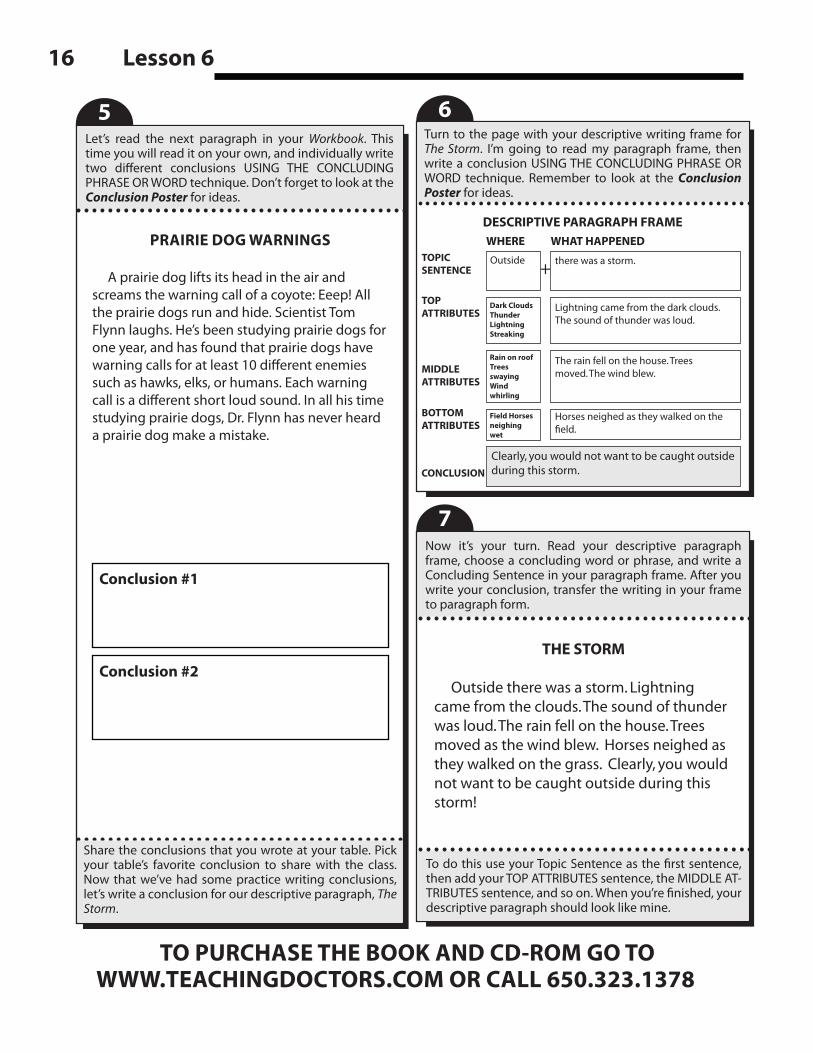
5Let’s read the next paragraph in your Workbook. This time you will read it on your own, and individually write two different conclusions USING THE CONCLUDING PHRASE OR WORD technique. Don’t forget to look at the Conclusion Poster for ideas.
Conclusion #1
Conclusion #2
PRAIRIE DOG WARNINGS
A prairie dog lifts its head in the air and screams the warning call of a coyote: Eeep! All the prairie dogs run and hide. Scientist Tom Flynn laughs. He’s been studying prairie dogs for one year, and has found that prairie dogs have warning calls for at least 10 different enemies such as hawks, elks, or humans. Each warning call is a different short loud sound. In all his time studying prairie dogs, Dr. Flynn has never heard a prairie dog make a mistake.
Share the conclusions that you wrote at your table. Pick your table’s favorite conclusion to share with the class. Now that we’ve had some practice writing conclusions, let’s write a conclusion for our descriptive paragraph, The Storm.
6
7
Turn to the page with your descriptive writing frame for The Storm. I’m going to read my paragraph frame, then write a conclusion USING THE CONCLUDING PHRASE OR WORD technique. Remember to look at the Conclusion Poster for ideas.
DESCRIPTIVE PARAGRAPH FRAME
MIDDLEATTRIBUTES
TOPIC SENTENCE
CONCLUSION
TOP ATTRIBUTES
BOTTOM ATTRIBUTES
WHERE WHAT HAPPENED
+Outside there was a storm.
Dark CloudsThunder LightningStreaking
Lightning came from the dark clouds. The sound of thunder was loud.
Rain on roofTrees swayingWind whirling
The rain fell on the house. Trees moved. The wind blew.
Horses neighed as they walked on the field.
Field Horses neighingwet
Clearly, you would not want to be caught outside during this storm.
Now it’s your turn. Read your descriptive paragraph frame, choose a concluding word or phrase, and write a Concluding Sentence in your paragraph frame. After you write your conclusion, transfer the writing in your frame to paragraph form.
To do this use your Topic Sentence as the first sentence, then add your TOP ATTRIBUTES sentence, the MIDDLE AT-TRIBUTES sentence, and so on. When you’re finished, your descriptive paragraph should look like mine.
THE STORM Outside there was a storm. Lightning came from the clouds. The sound of thunder was loud. The rain fell on the house. Trees moved as the wind blew. Horses neighed as they walked on the grass. Clearly, you would not want to be caught outside during this storm!
TO PURCHASE THE BOOK AND CD-ROM GO TO WWW.TEACHINGDOCTORS.COM OR CALL 650.323.1378