dark attraction component design
TRANSCRIPT

SECTION I
DARKATTRACTIONCOMPONENT
DESIGN
JBCORNPublic Domain, Edited version (c) 2005, Antonio Gonzalez jr.

DARK ATTRACTION COMPONENT DESIGN2
§
JB CORNPublic Domain, Edited version (c) 2005 Antonio Gonzalez jr.
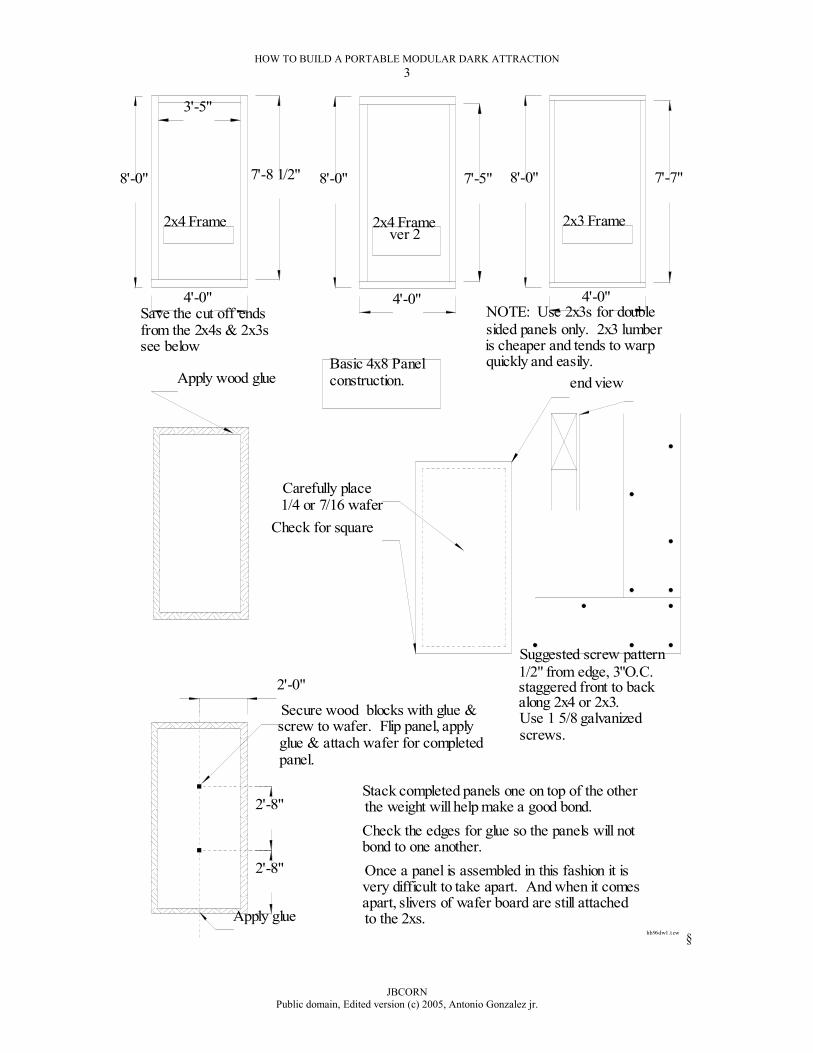
HOW TO BUILD A PORTABLE MODULAR DARK ATTRACTION3
along 2x4 or 2x3.Use 1 5/8 galvanizedscrews.
staggered front to back1/2" from edge, 3"O.C.Suggested screw pattern
end view
Carefully place1/4 or 7/16 wafer
Check for square
4'-0"
8'-0"
2x4 Frame
Stack completed panels one on top of the otherthe weight will help make a good bond.Check the edges for glue so the panels will notbond to one another.Once a panel is assembled in this fashion it isvery difficult to take apart. And when it comesapart, slivers of wafer board are still attachedto the 2xs.
Apply wood glue
hh96dw1.t cw
7'-8 1/2"
Apply glue
2'-8"
2'-8"
2'-0"
Secure wood blocks with glue &screw to wafer. Flip panel, applyglue & attach wafer for completedpanel.
3'-5"
8'-0" 7'-7"
4'-0"
2x3 Frame
NOTE: Use 2x3s for doublesided panels only. 2x3 lumberis cheaper and tends to warpquickly and easily.
Save the cut off ends
see belowfrom the 2x4s & 2x3s
Basic 4x8 Panelconstruction.
4'-0"
7'-5"
2x4 Framever 2
8'-0"
§
JBCORNPublic domain, Edited version (c) 2005, Antonio Gonzalez jr.

DARK ATTRACTION COMPONENT DESIGN4
FIRST Every municipality, city, county and state has different rules for the construction and operation of
a dark attraction more popularly known as a haunted house. The term haunted house is not used here because it tends to limit the uses of a true dark attraction and it makes the attraction seasonal, good for Halloween only. Work with local officials, talk with the building department and fire department, to find out what they will and will not allow before beginning construction. They will have strict rules and regulations. The insurance coverage is void should the attraction not be in full compliance with the existing codes.
A working knowledge of the type of people (volunteers or hired employees) who are available to work in the house is a must. Do not "assume" that, because the house is built properly, it will be operated correctly. Only strict hands-on management will work. Continually monitor and direct the talent. Take your eyes off them and they will do exactly what they should not do. The longer the house is open the worse they will become.
Construction is the easy part. Proper operation is the one thing that will take the most time and energy. Improper operation will sink the house and, worse yet, may cause an injury to a customer ... Maybe a lawsuit.
GENERAL CONSTRUCTION NOTEWhen building the components of the house, take the necessary time to complete each unit
correctly. Make it as strong as possible. Do not use any nails or staples (they will come loose and work their way out, weakening the unit and causing a potential threat to the customers). Use 1 5/8 inch deck screws* to attach wafer board to 2x4s (at least grade two lumber) and glue units together whenever practical. Make sure each unit is square. Inspect the surface and edges of the wafer board for loose pieces and splinters and rough sand the exposed edges to prevent further splintering. Paint all exposed wood surfaces, getting the paint into all cracks. Use a spray paint rig, not a roller. The money saved on paint and labor will make it more than worth the cost to rent or purchase a spray rig. Use good quality hardware (nuts, bolts, latches, springs, hinges, etc.) when building units to last. The design of this system allows for great creativity. A well planned and constructed house is a safer house and much more enjoyable to work in and be scared in.
Follow with care all tool handling safety tips and operating instructions. Wear safety goggles and gloves. Keep the work area clean, well ventilated and never work alone. All drawings approximate scale. 11x17 drawings are 1/8 inch scale.
* CONSTRUCTION NOTE: 1 1/4" DRYWALL SCREWS MAY BE USED; HOWEVER, THEY WILL RUST INSIDE THE SCREW HOLE CAUSING THE SCREW TO LOSE ITS GRIP. THE RUSTY HEADS MAY POP OFF DURING ASSEMBLY OR WHEN A FRIGHTENED CUSTOMER BOUNCES OFF THE WALL.
THE ART OF THE HOUSEOne may wonder, "Why try to scare someone?" Well, if you're like me, you may enjoy it. You
JB CORNPublic Domain, Edited version (c) 2005 Antonio Gonzalez jr.

HOW TO BUILD A PORTABLE MODULAR DARK ATTRACTION5
may also wish to make a fair amount of money. It helps to both enjoy scaring people and have a desire for making money.
The attraction should reflect the creator's personality. Maybe you enjoy the dark ages: knights, castles, wizards & such; Halloween: witches, ghosts, goblins & monsters; the supernatural: spirits, possession, poltergeists & demons; or science fiction/fact: space creatures, bionic people, teleportation, & other races. I can go on & on, but you get the point.
You are the creator, taking what you enjoy and projecting it into reality. Make a world that customers will want to walk through and look forward to being scared in, rich in detail and inhabited by creatures, sets and props out of your imagination. For some, this may be too much to do alone. You may need a partner or associate to help in the creation. It is best to do the creation alone and have others help you in the execution of the project. The best thing about the dark attraction is that it can grow with you each year, get better and become more horrific. In your spare time, working out of a garage or small shop, you can create new terrors, investing only your time and a small amount of money.
The beauty of this design is its flexibility. Most of the house can be redesigned/rearranged each year. The design is easy to add to.
CONCEPT OF CONSTRUCTIONThe creator must be serious to enter this venture. Build each unit with care and consideration, not
only for the budget, but for the customers that will be experiencing it and for each unit to last year after year with a minimum of maintenance.
BASIC WALL UNIT CONSTRUCTIONEach basic wall unit consists of 2- 4x8' 1/4(or 7/16) wafer boards, 2- 2x4x92.5" , 1- 2x4x48" & 1-
2x4x48" boards (2x4 stock may be substituted with 2x3 stock) and approximately 200 1 5/8" deck screws if 3" on center (o/c). Refer to page 5 for assembly. Notice that the two small blocks of wood are the cut off ends from the 8' studs. Studs are usually cheaper than full length eight foot 2x4s.
The blocks of wood are important for strength and keep the center of the panels from sagging when stacked for storage. Use the block on singled sided panels, also.
Do not use Masonite or particle board for these panels. They both break easily, absorb water readily (thus melting) and will not last. Particle board also weighs much more than wafer board. Sheet rock should never be considered for a portable attraction such as this.
If you are very confident of the design and wish to add additional strength and longevity to the basic wall units, consider using wood glue around the edges. This takes some of the stress off the screw heads and they are less likely to pop off when the panels are being set up or taken down. Make sure that the unit is perfectly square.
2x4"1/4" wafer
Carefully square 2x4s to wafer
Bottom edge view
§Another way to build panels is to slip the base 2x4 about 1/4" past the wafer. Make up for the 1/4"
when you cut the 8' 2x4 to size. The panels are 1/4" taller, but the lower edge of the wafer is protected from damage.
JBCORNPublic domain, Edited version (c) 2005, Antonio Gonzalez jr.

DARK ATTRACTION COMPONENT DESIGN6
2x4"1/4" wafer
1/4" space§
BASIC WINDOW UNITMake the basic window unit (square, rectangle or arch) by modifying the basic wall unit. Note
that additional lumber is required to frame in the window. To build the arch window: draw the arch on the wafer board after assembly, then lay in 2x6s or 2x8s as shown, screw and glue all framing pieces in place, then cut the window pattern out with a saber saw.
If this is a dedicated unit; i.e., one that will always face customers with its back to the employee area, it is not necessary to place wafer board on both sides. Use 4x8" or 12x12" triangle plates as noted.
Once the basic window unit is laid out, drill holes for bars. The top of the window is stationary and secured first. Line up the window base, insert the bars and push the window base board up into place, forcing the bars to be seated. If the holes are the correct depth, attach the board but do not glue it. The bars may become damaged or may need to be removed to make an unforeseen change. The bars should be cut from 3/4" conduit. Do not use half inch, as it bends easily. Bars should be installed even if shutters are to be installed on the windows. The bars will keep customers from climbing in on the actors.
JB CORNPublic Domain, Edited version (c) 2005 Antonio Gonzalez jr.

HOW TO BUILD A PORTABLE MODULAR DARK ATTRACTION7
Functional shutters should always swing into the actor/employee area, never out towards the customers. Decorative shutters should be firmly attached to the outside.
Note upper level windows in photo havea slight curve inward, these are painted on muslin.The lower level window is painted on wafer.
4'-0"
3'-5"
4'-0"
2'-0"8'-0"
Full width window
2'-0"
Block
Framed in window
16"2x437" 2x6
3'-0"
1'-8"
Arch window
8'-0"
§
JBCORNPublic domain, Edited version (c) 2005, Antonio Gonzalez jr.

DARK ATTRACTION COMPONENT DESIGN8
If single sideduse 1/2" plywoodplates on the backcut as 4x8" &12x12" triangles.
2'-0"
2'-0"
3'-8"
2'-4" 1'-0"
Glue adds strength to singlesided panels. Apply to allsurfaces generously.
Assemble panel, thendraw arch on wafer &cut out wafer & 2xs atsame time.
Window openings should vary in style & shape.h h 9 6 d w 2 . tc w
Window withbars, note topof center bar.Hole is drilleddeeper for barremoval.
Deeperhole allowsbar to bepushed up& removed.4"-8" O.C.
2X6
2X6
Small windowboarded up
1X4
1X6
Arch windowvariation, higher& narrower
2X6
§
2x3 frameWire mesh
Use wire meshin large openingsto keepcustomers out.
Add variety withimagination.Variations givecustomerssomething toworry about.
8'-0"
4'-0"§BA
JB CORNPublic Domain, Edited version (c) 2005 Antonio Gonzalez jr.

HOW TO BUILD A PORTABLE MODULAR DARK ATTRACTION9
R UNITMost dark attractions contain creatures too dangerous to place out with the customers. These
creatures are placed behind bars. The best bar unit would be completely welded. However, these units are not only heavy, but expensive and something that can always be added later. A good basic bar unit is assembled like the bars in the window unit.
Determine the design and the amount of bar exposure wanted. It may be a 4x8' or an 8x8' unit. This design will depend upon the projected use. Several of each size is best. Use only 3/4" conduit, as it is light and strong. Each ten foot piece will provide at least two bars.
To install the unit in the house, secure the top section to its supports, place the bars in the bottom unit and slide up into place while guiding the bars into their individual holes. If this is just a 4x8' unit, an option is to drill snug holes and create the unit in one piece allowing for tension to hold the unit together.
Another modification for this unit is to drill the center top hole deeper than the rest and not as snug. This will allow the actors to actually remove a bar and look like they are going to escape. Placing the bars higher up and exposing more wall down low, will give the actor(s) a place to hide behind and jump up from. Bar units constructed in this manner will last about four seasons. Use 1/2" plywood on the actor's side to prolong useful life.
8'-0"
1'-0"
4'-10"
2'-2"
Top view2" 4"o.c.
4x8' Bar Unit
8x8' Bar Unit
1/4" Wafer
1/2" Plywoodback
front
Glue wafer to front &1/2" plywood toback. Use 1 5/8"screws.
Side view
2x6
1" Deep
Cut 3/4" conduit into 5' sectionswith a tube cutter. Drill snugholes 1" deep top & bottom.Except center bar hole in topunit, make it 2" deep so barmay be removed. Paint barsblack. hh96dw3.tcw
§
MISC. UNITSBelow are four more wall unit ideas. The first unit has a small block brick pattern. Notice
JBCORNPublic domain, Edited version (c) 2005, Antonio Gonzalez jr.

DARK ATTRACTION COMPONENT DESIGN10
the darker mortar area at the bottom. This is a cut out allowing for a lighting effect or an actor to wiggle an object in the crack, creating the scare or making the diversion.
The next panel uses a larger brick pattern. Whenever possible, use hidden effects/items in the design of the standard panel.
The large arch could be used for a two way mirror. Monitor your customers in the waiting area or cross fade a creature into a customer's view while he/she is viewing him/herself in the mirror.
Displays and illusions need protection from customers. An arched window with bars is more attractive than an arched window with wire mesh.
8"
1'-0"
1'-0" 1'-4"
8'-0"
1'-0"
5'-4"
2'-0"
4'-8"
2'-8"
Other panel ideashh96dw6.tcw
§
DOOR UNITDoor units may be solid or with bars. Door units are primarily for the use of employees/actors to
gain access to certain areas from the employee central corridor. Solid door units should not be used in the house customer path area if at all possible. Of course, there are exceptions.
One of the main problems with employee/actor doors is that customers tend to want to go through them, being either a wise-aker or just plain lost. Many times they see an employee/actor go through the door and follow them. The door design is important. It must not look like a door. It should look like a regular wall unit.
Look closely at the design. Note how it is built. The door portion is constructed of the same materials as the wall unit. The door wafer board, when cut, overlaps the door jamb by at least one inch on the latch end/employee side and by a half inch on the hinge end/customer side. This conceals the normal door crack and prevents light leaks. The use of door molding would surely give away the existence of the door, add to its cost, and make the unit thicker, taking up more space in storage.
JB CORNPublic Domain, Edited version (c) 2005 Antonio Gonzalez jr.

HOW TO BUILD A PORTABLE MODULAR DARK ATTRACTION11
1'6"
8'-0"6'-6"
3'-1"
4'-0"
2x42x3
3'-0 1/2"
6'-3 1/2"
Door detail. Note 1/4" wafercut to overlap door jamb &block light.
2x6
2'-0"Door Variation
§A 3/4" door trim does not sound like very much, but figure approximately 20 doors times 3/4" and
the doors have added more than one foot to the storage space required to store the doors. Also, note that the doors always swing into the employee/actor area, not out into the customer path. As the door pushes to enter the area, no customer visible door hardware can be seen. Include a sliding latch to secure doors not used by actors and a spring/tension latch to secure doors that are used by actors. The stiffer (more force required) the latch, the better. None of the interior doors are to be used as exit or emergency exit doors. All doors inside the customer pathway must open in the direction the customer is traveling once the customer is in the house.
HIDDEN ACTOR DOOR ENTRY INTO SCENEAnother interior door is the actor entry into a scene. This particular door is disguised as a picture
frame. It can be locked on the employee corridor side or kept closed with tension style hinges. This type of hidden door is difficult for customers to detect and, if left open, most (not all) customers will not try to pass through it. Others will at least hesitate before trying to pass through.
The door portion itself is disguised as a painting. The frame is attached to the wall and the picture/door swings into the central corridor. When closed, the frame conceals the door edges.
This type of concealed door is important when using the central corridor system. It allows four or five actors to participate in several scenes in the attraction during slow operating periods. They can do this because the scenes with actors are spaced out and the actors can leapfrog ahead of the customers, often changing masks or costumes.
Picture framedoor for actors2x3 1x4 masks
door joint & creates pictureframe.
hinge
Doors must be constructed withsquare lumber. Use glue for alljoints.
1x4 frame must have 45 degreemitered corners to completepicture frame look.
Picture frame door may be singlesided, but use 1/2" plywoodplates on back side.
hh96dw4.tcw
8'-0"
§EXIT DOORS
All customer exit or emergency exit doors must open to the outside of the house. These doors will have hardware (the hinges) exposed to the outside. The pins on these hinges should be of the fixed type or
JBCORNPublic domain, Edited version (c) 2005, Antonio Gonzalez jr.

DARK ATTRACTION COMPONENT DESIGN12
welded to prevent removal.Note that these exit doors are secured by a traveling half inch bolt concealed inside the door frame
(I use two such bolts). A small screwdriver is used to slide the concealed bolt in and out of the locked position. The bolt must rest in the jamb in its unlocked position, not in the door. The doors should have a closing gate style spring to hold them shut; however, placing a spring on employee/actor doors may give customers their location.
Bolt
Side View End ViewWafer
2x4
Notch
Side View
Depressionin bolt forscrewdriverto slide bolt.
§
Do not place any hardware below six feet on the interior (customer side) of any door as this could be a hazard to the customers.
Emergency exit and exit door units must have an exit light installed above the door and another one in the door frame no more than 8" above the floor.
With a routercreate a pathfor wire. 2circuits, 1- forEXIT light, 2-for Low LevelEXIT light.
8'-0"
Hole in waferlarge enough for wire withwire nuts. At least 1/2"deep into 2x. Mount exitlight over lower hole.
Frame in forExit light2x32x6
Cut hole for Exitlight throughwafer. Waferwill concealwire & hold EXITsign in place.Do not gluepanel side withwire & Exit sign.
EXIT
EXIT
8'-0"
Note plywoodoverlaps door
§ Pre cut all the pieces as noted, lay them out as indicated and complete construction of the exterior side of the unit first, gluing and screwing all the pieces. Turn the unit over and install the electrical box as
indicated. The low level exit light is the hardest to install. Use a router to cut a 1/2" wide by 3/8" deep groove down the middle of the 2x6" past the top of the door as indicated. Starting from the electrical box, lay in the wire and cover with 1" wide masking tape to hold it in place. Tie a knot in the end of the wire to
JB CORNPublic Domain, Edited version (c) 2005 Antonio Gonzalez jr.

HOW TO BUILD A PORTABLE MODULAR DARK ATTRACTION13
prevent it from slipping out of the box. Be careful not to drive any screws into the wire. Use only wood screws on this side to complete the unit. Drill an exit hole in the wafer board jamb cover for the wire.
Attach the low level exit light after the unit is in place in the house. Use wire nuts. Remove the unit before tearing the house down.
The regular exit light is installed in the door unit. Frame in a light box, paint the inside bright white, install the illuminating unit, run the wire to the electrical box, tie a knot in the end to prevent the wire from slipping out and screw the metal exit sign on top. The exit light is tied into the 12 vac/dc power system and the low level exit light is tied into the 12 vdc emergency lighting system. Make sure that the wires are labeled or use a color code scheme (preferred). The electrical box plate should fit flush over the wafer board edge completely concealing its cutout. Also read dark attraction systems.
Design and construction of all door units is very important. That they swing open and close freely is a must. The 2" gap at the door bottom is necessary to allow for the unevenness and drain slope of most parking lots. Door units require care and attention to detail in their construction. The door units will take the most abuse. Do not purchase commercial doors, frames, jambs and hardware. Commercial hollow core doors will absorb moisture, the cardboard inside will melt and the door will come apart. Painting them may slow down the process, but not by much. Commercial solid core doors are expensive, have a veneer that will peel off, weigh too much, look like doors and invite trouble.
FULL PANEL WIDTH EXIT DOORThis unit is easier to construct, costs less and offers a full 48" wide exit door. The only drawback
is the low level exit light mounted inside the door itself. Use a 4-6" spring to protect the wire from damage due to door opening and closing.
The upper unit houses the exit light and pass-through wiring for the low level exit light and fire alarm strobe and/or siren. Install wiring from door to door before obstructing wall units are put in place, then place wire on top of wall units.
6'-4"
1'-4"
8'-0"
3'-11"4'-0"
EXIT
Attach metalplates tooutside of unit.Leaving insidefor electricalconnections.
"A" Countersink holes into 2x forwire nuts. As before rout a pathfor wires. Cover opening withmetal plate and secure wireswith conduit style cable fastner.
EXIT sign side
hh96dw5
Note"A" EXIT
EXIT
Do not use glue on wire side.§
WALL AND UNIT ASSEMBLYThe 4x8 panels must be joined together to form the house. Once the floor plan and all unit sub-
assemblies are completed, assembly of the dark attraction can begin. I have used several different methods of assembly: wood plate, sheet metal plate and 60 degree custom fasteners.
I recommend having a sheet metal shop cut 4x8" and 2x4" units from sheet metal stock of 20 to 22 gauge. These are the assembly plates. Drill holes in the sheet metal plates then have them bent to 60 degrees before assembly.
JBCORNPublic domain, Edited version (c) 2005, Antonio Gonzalez jr.

DARK ATTRACTION COMPONENT DESIGN14
120 60
60 Degree plate
Flat plateAssembly plates may varyin size from 4x8" to 2x4".Use heavy galvanized steel.Pre drill holes for screws.
§
METAL ROOFSome will say "What is wrong with a tent?" Tents rent for about $1,500. Tent money is money
spent year after year for a portable parking lot dark attraction. A 4,000 square foot dark attraction can be covered with galvanized steel roofing for about $1,000 or $25 a square (100 sq. ft). You own the steel roofing and store it with the house. The flat steel roof system is not water tight, so align the roof with the slope of the parking lot for proper drainage. Page 68 has interior and page 70 has exterior roof reference photos.
The sprinkler system is installed before the flat roof is set in place. Use 2xs to space around the sprinkler pipe (Page 14) and raise the roof above the sprinkler pipe. The 2xs may be flat or on edge.
Parking lot
Roof drains with parking lot
§
Remember the house is in a parking lot, rain water will run under the walls and through the house. When was the last time you were in a tent that did not have several leaks? My biggest gripe against tents is the ropes, posts and stakes. These items are a hazard people tend to trip over. In planning the house, the floor plan must allow for the posts to keep customers from running into them. Sure, a tent makes for a larger visual object, but use the money to rent search lights for a month at about the same cost instead.
Metal roof rests directly on walls
Wide spans need additional support
2x6
2x4s are screwed to wall tops***
§
JB CORNPublic Domain, Edited version (c) 2005 Antonio Gonzalez jr.
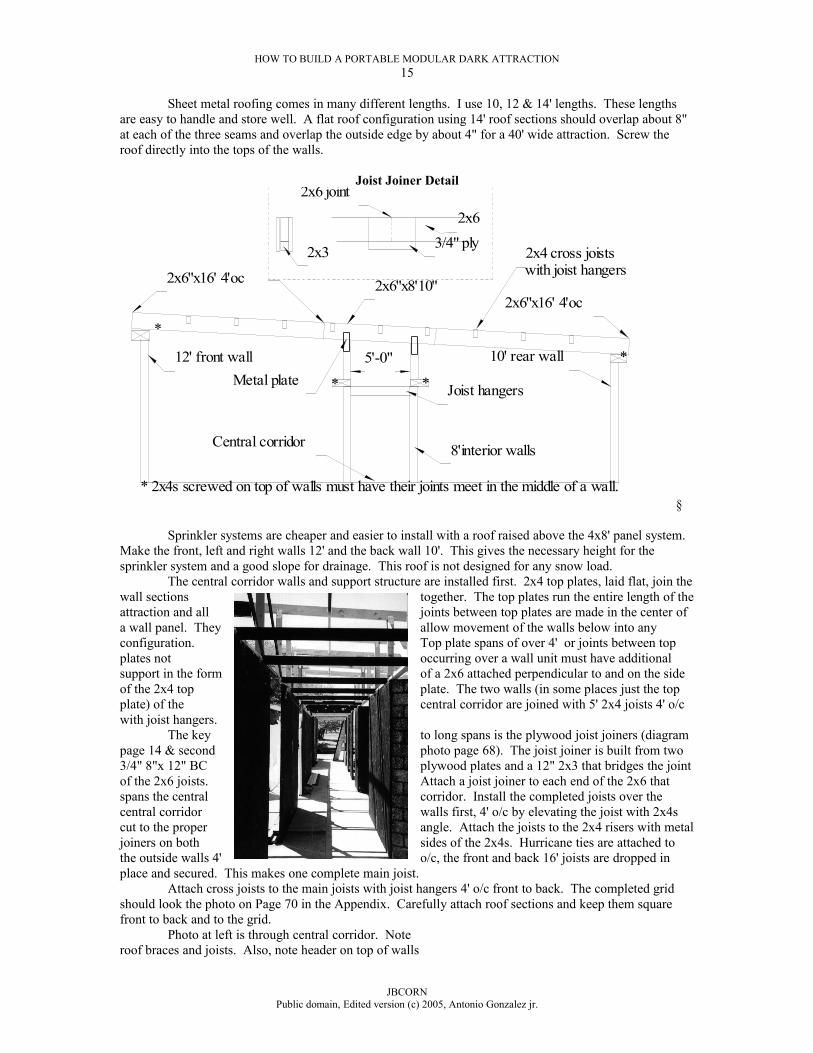
HOW TO BUILD A PORTABLE MODULAR DARK ATTRACTION15
Sheet metal roofing comes in many different lengths. I use 10, 12 & 14' lengths. These lengths are easy to handle and store well. A flat roof configuration using 14' roof sections should overlap about 8" at each of the three seams and overlap the outside edge by about 4" for a 40' wide attraction. Screw the roof directly into the tops of the walls.
Joist Joiner Detail
12' front wall
Central corridor
10' rear wall
8'interior walls
2x6"x16' 4'oc2x6"x16' 4'oc
2x6"x8'10"
3/4" ply2x6
2x3
2x6 joint
Metal plateJoist hangers
2x4 cross joistswith joist hangers
5'-0"
*
* *
*
* 2x4s screwed on top of walls must have their joints meet in the middle of a wall.§
Sprinkler systems are cheaper and easier to install with a roof raised above the 4x8' panel system. Make the front, left and right walls 12' and the back wall 10'. This gives the necessary height for the sprinkler system and a good slope for drainage. This roof is not designed for any snow load.
The central corridor walls and support structure are installed first. 2x4 top plates, laid flat, join the wall sections together. The top plates run the entire length of the attraction and all joints between top plates are made in the center of a wall panel. They allow movement of the walls below into any configuration. Top plate spans of over 4' or joints between top plates not occurring over a wall unit must have additional support in the form of a 2x6 attached perpendicular to and on the side of the 2x4 top plate. The two walls (in some places just the top plate) of the central corridor are joined with 5' 2x4 joists 4' o/c with joist hangers.
The key to long spans is the plywood joist joiners (diagram page 14 & second photo page 68). The joist joiner is built from two 3/4" 8"x 12" BC plywood plates and a 12" 2x3 that bridges the joint of the 2x6 joists. Attach a joist joiner to each end of the 2x6 that spans the central corridor. Install the completed joists over the central corridor walls first, 4' o/c by elevating the joist with 2x4s cut to the proper angle. Attach the joists to the 2x4 risers with metal joiners on both sides of the 2x4s. Hurricane ties are attached to the outside walls 4' o/c, the front and back 16' joists are dropped in place and secured. This makes one complete main joist.
Attach cross joists to the main joists with joist hangers 4' o/c front to back. The completed grid should look the photo on Page 70 in the Appendix. Carefully attach roof sections and keep them square front to back and to the grid.
Photo at left is through central corridor. Noteroof braces and joists. Also, note header on top of walls
JBCORNPublic domain, Edited version (c) 2005, Antonio Gonzalez jr.

DARK ATTRACTION COMPONENT DESIGN16
and joists joining walls.
TICKET WINDOWA combination of door and window. Build a basic window unit to the desired height no more than
24" in width. I use a height of 4'. This is a good workable height for a ticket booth and it doubles as child control. I use height to determine child from adult. Adults are 48" and over, children are under 48".
NOTE: Rout a 1/4" deep by 1/2" wide notch in the inside edge of the sides of the window frame. Rout a 2" wide by 1/4" deep notch in the top of the window frame. Let the wafer board overlap the Plexi and hold it in place. Cut the Plexi to be 1" short, so that the Plexi will slide up and down in the window. Cut two 3/4" plywood pieces 12 x 24" and make a pair of shutters that will open to the inside. Add latches to hold them open.
Next, build the money slip shelf to fit inside the window. Note that the upper shelf top section is 3/4" 24"x12" BC plywood and has a 6" square hole in it. Rout two edges at 45 degrees as shown. The lower piece is 1/4" BC plywood glued to the 3/4" piece. Sand till smooth and paint completed unit.
The money slip shelf does not extend into the ticket booth. The 1x4 rear top shelf aligns and is flush to the back of the money slip shelf and extends the length of the ticket booth. The low level shelf is for the cash drawer, tickets and supplies. Mine is 18" deep and the entire length of the ticket booth. The double shelf system improves security as customers cannot see below the ticket shelf to the lower shelf.
Install the money slip shelf by sliding the Plexi up. After the shelf is in place lower the Plexi into the 1/8" deep notch. Secure the money slip shelf to the ticket window with two 2" screws on either end. The removable money slip shelf allows for easy storage of the panel.SPECIAL UNITS
Construction of special design units should follow the same criteria as the standard units.
REVOLVING WALLThe revolving wall unit is actually two wall units, a revolving door with top support and a circular
floor piece. The left and right sections have slots in their tops and bottoms for a 12' 2x4 to tie all three units together and make a solid, stable wall. The center piece is actually three pieces: the door, top section and the floor. The small upper piece is stationary and acts as the upper shaft support. The floor piece provides the lower shaft support and a platform for actor(s).
JB CORNPublic Domain, Edited version (c) 2005 Antonio Gonzalez jr.
4'-0"3'-0"
2'-0" 2'-0"
Ticket windowshelf fits withinwindow.
Rear shelf linesup with front shelfbut extends fullwidth of wall.
Low level shelfis supported byshelf braces.
2x4
Note
Ticket shelf
Money slip 3/4"
1/4"Notch forplexiglaswindow.
Note: Rout edges of frame for plexiglas.

HOW TO BUILD A PORTABLE MODULAR DARK ATTRACTION17
3'-11 1/2"
6'-4"
1/2"conduit
Bolt
NotchRevolving door
Shaft
Bolt
Revolving door
Metal plate
12' 2x4
Frame with 2x3s
hh96dw8.tcw§
This unit allows a standing character to appear out of nowhere or a character to transform right before the customers' eyes. The effects are controlled by the wall. A magnetic alarm style switch is built into the wall edges. When the door is closed, the switch is engaged. When the actor moves the wall just a bit, the switch opens, activating a relay that turns off theatrical lighting and turns on a strobe.
The area directly behind the revolving door has to be light tight. The three units should be covered with a three dimensional design that is mirrored in several locations on all three panels. Do not forget to make both sides of the revolving door the same.
The raised floor may be square (rather than round as shown), but place two posts on the outside corners of the floor in the customer area. These are a must for a square based unit. No matter how the room is lighted or what color the floor piece is painted, customers will trip and fall over the floor piece. I don't know why, I just know that it is the way it is (I built the square based unit first and the customers were falling all over the floor piece, even with a monster stomping all over it). This is not to say that some customers will not find a way to trip over the round based unit as well.REVOLVING WALL WITH CHAIR
Another version of the same idea is the sitting revolving wall. Note that the center section is now 6 feet wide and the two supporting units on either side are 3 feet wide each (may also be 5 feet center and 3.5 feet sides).
JBCORNPublic domain, Edited version (c) 2005, Antonio Gonzalez jr.

DARK ATTRACTION COMPONENT DESIGN18
8'-0"
3'-0" 6'-0" 3'-0"
1'-4"2'-0"
1'-10"
1'-8" 3/4" Plywood2x2 fakeleg, notattachedto floor.
Side panelssupport chairfrom above.Bolt chairs thrurevolving panelframe to eachother.
Alternate plan for panels3'-6" 5'-0" 3'-6"
1/2" Steel support shaft.Revolving wall with chair
3'-0"4'-0"
Back of wall
Customer side of wallhh96dw10.tcw
§This is to allow enough room for the chair and the actor's knees to clear the edges while the wall is
rotating. Note that the chair does not actually rest on the floor. It is attached to the wall and the actor uses his/her feet to begin the motion that breaks the switch contact and then continues to spin the wall around. The raised floor is circular and offset as indicated to save building materials.
This quick transformation has an actor on the customer side and another actor or a deformed dummy on the other side . Use special effects lighting to cover the transition. Controls for a dummy can be built into the actor's chair so that the actor can control the arms of the dummy on the other side while sitting. This way, one actor controls both the lighting and the dummy effects after making the transformation. The process could be reversed starting with the dummy on the customer side. The room should be brightly illuminated so that when the lights go out the customers will not detect the wall rotating. Strobe lights should come on as soon as the transformation is complete.
BOO UNITThis design creates lost triangular spaces. Any dark attraction using the 60 degree design system
will have too many of these triangles. Some people who use this design leave one of the sides open to place an actor for scaring customers. Actors placed in these locations get lonely, bored and sometimes leave the location. As the actor is physically isolated from other actors and close to customers via the customer path, a confrontation often leads to the actor getting hit accidentally or on purpose by a panicked customer. If you must place an actor in these lost spaces, use a Boo Unit with a raised platform, to provide some protection for the actor.
The Boo Unit is for static or mechanical displays. The unit is not easy to build, but saves building material, storage space and provides two natural displays. Advanced construction skills are required. Be extremely careful when ripping the 2x6s. The Boo Unit also provides a strong triangular structure for general support. Be creative, create horror sculpture and things to light.
The Boo Unit requires a full 4x8' sheet of wafer to cover the back and two 3/4" floor pieces for the displays. place the openings at different levels. Large mid-level openings should have a wire mesh covering the opening.
JB CORNPublic Domain, Edited version (c) 2005 Antonio Gonzalez jr.

HOW TO BUILD A PORTABLE MODULAR DARK ATTRACTION19
Disp la y R
ig ht
Solid panel back
Dis
p la y
Le f
t
Ripped 2x6 Hinges
1/4 or 7/16"
Ripped 2x6"
Loose wafer
60
30 degree linear ripped 2x6
Display shelf is 3/4" plywood. Cut front corner offand notch rear corners for ripped 2x6.
Back edge of shelf uses a 2x4 for support
Unit folds for storage.
When placed in the attraction, back wafer panelshould be screwed to shelf base as well as theBoo Unit edges.
§
Each Boo Unit has two display sides.They may be large or small, placedhigh, middle or low. Vary the shapeand size of the openings.
Boo Units used as pure displaysshould have a wire mesh coveringthe opening. Chicken wire or hardwire cloth may be used and thenpainted black.
Use Glue!Frameopeningswith 2x3s
Shelf support 2x4 is on each hingedpanel, not on loose wafer for back.
Small openingsmay not needwire mesh.
Don't forgetblocks.
hh96dw10.tcw
§LA
JBCORNPublic domain, Edited version (c) 2005, Antonio Gonzalez jr.

DARK ATTRACTION COMPONENT DESIGN20
VA FLOORNot an easy project and very expensive but one of the most unusual effects. The first challenge is
building the light box.Lay out the 1/2" BC plywood cover & the 3/4" CDX plywood sub-floor, attach the pieces to a 2x4
temporary support frame with screws. The design may be anything. Remember that the more complex the design the more difficult it will be to complete. Each cutout must be framed for support. Make sure both layers of plywood are aligned properly and that the "B" side of the BC is up and the best side of the CDX plywood is up. Allow space between the support 2x4s to cut the design with a saber saw. Once the pattern is cut, disconnect the plywood cover and sub-floor from the temporary frame. Lay out the outer edge of the lava floor light boxes on the 3/4" sub-floor with 2x4s. Cut a 1 3/4" deep notch in the 2x4s where the pattern continues to another lava floor section.
COMPLEX DESIGN
§Seal the BC floor top and all edges, then paint the top black. Also seal and paint the CDX
plywood edges. Paint the inside edges of the crack of both plywood layers red. In order to assure proper assembly, place the BC floor piece over the wafer board back and trace the design onto the wafer board. Maintain pattern orientation by repeating the process with the opposite side of the wafer back. Using a straight edge, draw in the locations for the support 2x4s. Allow for the width of the 1x4s.
Build the 2x4 box frame. Attach the 2x4s to one another with 3" screws. Attach the 1/4" wafer back to the frame with 1 1/4" screws, 3"oc and glue. Maintain proper pattern alignment.
Flip the box over and temporarily attach the 2x4 support braces to the wafer back with double sticky scotch tape. Attach with 3" screws where they butt up to the outside box frame . Align the 3/4" CDX to the frame and tack the corners in place. Do not attach to the support braces at this time. Frame in the cracks with 1x4s. Use double sticky tape on the bottom of the 1x4s to hold them in place temporarily. Carefully align the CDX plywood layer to the 1x4s.
Untack the corners. Depending upon the width of the crack cut out, use 1/8" or 1/4" Plexi between the BC and CDX layers of plywood (Page 20). Carefully align the Plexi to the CDX, then align the BC on top of it. Pre-drill 1/8" holes through the floor sandwich (1/2" BC, Plexi & 3/4" CDX) at the corners. Retack the four corners. Continue to drill 1/8" holes through the sandwich 3" o/c around the perimeter. Repeat the process for the 1x4s and interior 2x4s. Do not let the 1/8" holes go into the 2x4 or 1x4 support.
After drilling all the 1/8" holes, remove the top BC plywood floor piece and drill 1/4" holes through the Plexi wherever an 1/8" hole was drilled. This relieves some of the stress on the Plexi caused by the screw. Remove the Plexi and paint liberal amounts of mixed casting resin as glue on to the CDX plywood. Quickly place the Plexi back on top of the CDX, check alignment, place several sheets of plywood on top as weight and let the resin set-up. The Plexi is now bonded to the CDX. Repeat the process and bond the top BC floor piece to the Plexi. The Plexi is now bonded with clear cast resin to both sheets of plywood creating a completed floor sandwich section. Temporarily attach completed sandwich unit to 1x4s and 2x4s with 2 1/2" screws in at least every other hole.
JB CORNPublic Domain, Edited version (c) 2005 Antonio Gonzalez jr.
Use 2x4s to brace open spaces.

HOW TO BUILD A PORTABLE MODULAR DARK ATTRACTION21
1/2" BC plywood1/4" (1/8") plexiglass3/4" CDX plywood2x4 Box frame1/4" wafer
Resin with fill
Cut out notch
Lava Floor layer side view
1x4
§Look around for different kinds of things to embed in the crack: bugs, flowers, pebbles, etc. This
makes the crack more interesting and acts as fill to reduce the amount of clear cast resin used.Prepare the edges where the crack travels from one unit to the next. Take a scrap of wafer board,
sandwich a piece of aluminum foil and screw it to the edge to form a dam.Prepare a small amount of clear cast resin. Fiberglas resin is not as clear, but can be used and is
cheaper. Mix the clear cast resin properly, following the directions. Failure to do so may cause the resin not to dry completely. Pour small amounts at the joints of the Plexi along the edges where the wood and Plexi meet and brush it in. Let it set up. Do this as many times as necessary to seal the edge.
Prepare a batch of resin to pre dip items to be placed in the crack. Place dipped rock, bugs, gravel, latex body pieces, etc. in the crack.
Add clear cast resin 1/8" layer at a time, allow each layer to set up and cool off. Fill till even with the cover piece of BC plywood. Remove the dams. Wait at least 24 hours.
Flip the completed floor unit over. With the pattern as a guide, use 1 1/4" screws through the back wafer to attach the 1x4s and 2x4s 3"oc. This attaches the crack frame and floor supports to the wafer independent of the floor sandwich top. Flip the unit over again.
Remove the completed floor sandwich unit from the box frame. Paint the inside of 1x4s that define the crack red. Attach crumpled aluminum foil to the bottom of the crack with double sticky carpet tape. The foil helps to diffuse the light and acts as a reflector.
Install low voltage lights wrapped in red floral plastic into the crack. The layers of floral wrap will determine the amount of light and shade of red. Have excess red floral wrap at the joints between floor sections. The excess will be pulled into the next section during installation to make a more uniform transition. Run wires from unit to unit in the crack. Use wire nuts to join units and hide the wire under the floral wrap. Prepare a hole for 12vac electrical input in one of the ramp floor pieces. The connection will be hidden by the ramp (Page 21). Once the lava floor unit is installed in the attraction, the tops may be removed to replace burned out light bulbs.
BENEATH THE CRACKMake a wider crack and place part of a skull, a hand or some bit of horror under the opening as a
visual treat for customers to view as they walk over. Use 1" thick Plexi for large openings. Note the use of 1/4" plywood to frame the large opening. This will save on resin. Another way to save resin is to let it thicken and use it like putty around the edges and slope the transition. Make sure to light it well. The part of this floor section that is a regular crack will be constructed as above. Seal the joint between 1/8" Plexi and 1" Plexi with resin.
As this is a great diversion, surprise customers as they exit at the giant crack. Most customers will try to avoid stepping on the giant crack. Use it to force them to walk down one side and close to the scare.
Rout 2x4 edge
Resin fill1" Plexiglass
1/4" BC plywood3/4" CDX plywood2x4 frame1/4" wafer back
Giant Crack
§RAMPS
Creating levels like the lava floor add another dimension. Never use steps and limit any rise to8" or less. Ramp rise ratio is 4 to 1. I.E. for every one inch of height their is four inches of ramp.
JBCORNPublic domain, Edited version (c) 2005, Antonio Gonzalez jr.

DARK ATTRACTION COMPONENT DESIGN22
Raised floor2x6"2x4"
Attach with 3" screws
Simple ramp3/4" Plywood
§WALLS/FACADE WITH SCALE
Part of the illusion is establishing the motif visually before the customer ever enters the house. These exterior units should be big and bold.
DEPTHAdd depth to walls by making them appear to be thicker. Actually there are two single sided walls
with a wafer board side piece to separate them. Wafer board will also bend, if handled correctly, to create the inside curve of an arch. This unit gives the customer the illusion of thicker walls, this illusion will carry over into the house and should be reinforced with in selected room designs.
One way to reinforce thickness is with custom 4x8 panels. "a" is a 2x4 or 2x6. "b" is a 2x4. The panel is wider on one end. Use these panels at the end of a wall where customers turn. The illusion is that the walls are thicker.
End wall panel
"A"
"B"
End view of two single sidedpanels covered with loose wafer.
Singled sided panelsstay seperated untilplaced in attraction.The loose waferdetermines the thicknessof the wall.
§THE FACADE
The facade involves special construction techniques. Use this information to help design the facade units. Remember, the grander the entry/facade, the more customer interest will be created. In this business, looks are everything.
The tall facade walls are assembled in units. The bottom piece is a slightly modified standard unit and each additional piece becomes more specialized. The number of additional pieces will depend upon the height of the ceiling in the main entry.
Facade units take more stress than other units. All facade units must be glued and attached with 1 5/8" deck screws, 3" o/c and staggered front to back along the 2x4. Single sided units must have steel plates on the backside at all joints.
The entire lower level of the facade should be assembled and secured first. After the metal plates are in place, attach 2x4s as noted on the next page. If needed, extra temporary supports will add stability during construction. 10' or 12' base units may be substituted for the standard 8' panel. Advanced facade construction methods are covered in book three.
Remember, the taller the facade, the greater the wind load. Consult with an architect on the safety of your finished design.
JB CORNPublic Domain, Edited version (c) 2005 Antonio Gonzalez jr.

HOW TO BUILD A PORTABLE MODULAR DARK ATTRACTION23
FACADE LOWER LEVEL WALL PIECES AND ROOF/CEILINGNote the differences between the regular wall unit and the facade wall unit. The top 2x4 is below
the wafer board edge and creates a space wide enough for other 2x4s to slide down into the base unit. This permits addition of facade pieces on top of this base unit and tying them together into a sound structure.
In order to attach these units in the safest manner possible, assemble all the main entry/facade units for the ground level first. Tie them together with 2x4s from the inside where the panels meet. Assure that the walls are square.
Set the 8' second level facade pieces in place. If the second level panel is single sided, add a wafer board spacer in the center of each panel and secure the 2x4 joining first level panels to one another to the 2x4 in the second level panel. This joining 2x4 now attaches the lower level facade pieces to the second level facade pieces. Attach joist hangers, joists, flooring and continue to assemble the facade from a secure second story floor.
JBCORNPublic domain, Edited version (c) 2005, Antonio Gonzalez jr.
Middle unit
Back plate2x4 attached to inside offacade to join individual units together Use 3"screws. Also, attachjoist hangers to it.
Base unit

Install joist hangers 16" o/c.
When making an 8' span use 2x4s, 12' - 2x6s and 16' - 2x8s, all 16"oc. I do not recommend an entry area with a width greater than 16'. 20' members are expensive and hard to handle. Install a suitable floor, 5/8" to 3/4" CDX or T&G plywood painted both sides and screw it down.
For a ceiling higher than 8', a scaffolding or work platform will be needed to put the next level of facade in place before the ceiling joists can be installed. Taller base units 10' to 12' high can be used but will be heavier and hard to work with.
Do not use extension ladders or "A" frame ladders. They are not safe enough when working with 4x8' panels that will catch the slightest breeze and send the worker crashing to the ground.
8'-0"8'-0"
1'-0"
9'-0"
7'-0"
Single sidedpanel.
Single sidedhalf panel.
§
JBCORNPublic Domain, Edited version (c) 2005, Antonio Gonzalez jr.

Make doors 2" short§
These double entry doors make a good impression as potential customers drive by. Learn to think in modular form. Note the multiple sections and how they relate to one another.
FACADE UPPER LEVEL WINDOW UNITS & OTHER COMPONENTSThe facade upper window units are different. Only one side has wafer board and the window
opening is covered with white muslin cloth (common bed sheets), more expensive sharks tooth scrim or Plexiglas. Carefully paint the window details.
The second level should have windows, use different sizes.Leave the window part out. Insert window part after secondlevel panels are secured in place. This will make it easierto install these units.
§Wind pressure increases with the height of the structure. The fabric provides a partial wind
release and, should the wind really get blowing, can rip and let the wind through. Plexiglas may be used if you build a four sided second level and lock the units together with 2x4s.
The real reason for the fabric or Plexi is for back lighting the windows and giving the house an appearance of a second story. With a sturdy floor and upper level railing, an actor can be placed on the roof for his shadow to entertain the customers while they wait. Slide or film projectors may used to project images.
The other units are made to size and painted on both sides. Facade pieces do not have to have wafer board on both sides. Use metal plates at all joints.
JBCORNPublic domain, Edited version, (c) 2005, Antonio Gonzalez jr.

DARK ATTRACTION COMPONENT DESIGN26
Top view of 2nd level facade panels.
Cross brace attaching two outer edges of facade.
2x4 ties all panels together, 2-10'12' 2x4
Side view
10' back brace
90 plate
§
Note the cross bracing & load shifting wall bracing for the second level. Place back braces 4' o/c. Cross brace will be made from several 2x4s tied together. If you add another level, move back braces up to mid point of 3rd level half panels. This method is not designed for facades higher than 20 feet.Use metal 90s on both sides of each 2x4 at top and bottom to attach 2 xs to the facade. Use 3" screws to attach at least two rows of 2x4s for tying facade panels together.
Start with a partially enclosed 2nd level facade and work up to an enclosed 2nd level. Then add a roof and increase the ceiling size in the entry area. The advanced design book contains more options for the main entry area and facade.
CAVE WALLSIt is a must when and wherever wood is to be screwed to wood that liberal amounts of wood glue
JB CORNPublic domain, Edited version, (c) 2005, Antonio Gonzalez jr.

HOW TO BUILD A PORTABLE MODULAR DARK ATTRACTION27
are used. These units are very hard to make and repairing defective units will be even more difficult.
DESIGN THE CAVE FIRSTOnce the room has been designed, construction may begin. Note that this room is not flexible at
all. No matter where the room is placed in the house, it will go together the same way. The wall units are not interchangeable among themselves or other wall units. See cave divider on page 28.
Using 60 degree system, layout cave system.
Cave divider
§
§Skull Cavern Partially assembled.
CAVE BASE UNIT
JBCORNPublic domain, Edited version (c) 2005, Antonio Gonzalez jr.

DARK ATTRACTION COMPONENT DESIGN28
Construction begins with a 4x8'x 1/2" BC plywood back. Attach pre-cut 1x6" (or 2x6) wood forms to the front, a 2x4 or 2x3 frame to the back and a 3/4" wood base cut to shape.
Purchase 12' treated 1x6s and cut them in half. C-clamp two 1x6"x6' pieces together. Cut an irregular pattern with peaks and valleys using a commercial grade saber saw.
Back side is framedwith 2x3s. Note 4 cutouts for attachingadjoining units withbolts. Place loosewafer over back sideof cave units afterassembly.
Rip 1x6x6' (or 2x6).Clamp two togetherthen cut.
1'-4"
6'-0"
2'-0"
3/4" plywood base
Ripped 1x6s
§When completed, there will be two pairs of identical pieces approximately 6' in length. The length
is not as important as the two identical pieces. Note that identical pieces are used on matching edges of the cave wall units to
minimize visible seams.As there will be more identical pieces than needed, split
the rest up so no one unit has more than half of one pair in the center area of the panel. Attach the pieces to the 1/2" back board with wood blocks using screws and glue.
Extend the base width of the 1x6 with 3/4" plywood. This will also increase the height. Cut matching pieces at the same time.
Carefully attach 2x4s or 2x3s to frame the back of the plywood base unit using screws and glue.
Next, cut the 3/4" floor base, match the edges and attach the base to the bottom of the cave panel.
CAVE PRE COMPLETION UNIT ASSEMBLYAfter all the sections are completed, assemble them in the
correct order and placement. Use c-clamps to hold the units together.Once all the units are together, assure correct alignment and drill assembly bolt holes. Insert the
bolts and tighten. Mark the locations for holes to be cut in the plywood backs so that bolts may be inserted to assemble units from behind. Test to make sure there is room to insert bolts, tighten and remove them from behind.
CAVE BASE UNIT CHICKEN WIRETake the units apart and attach chicken wire or hardwire cloth to the
form. Because all of this will be covered with hydracal reinforced with burlap, galvanized roofing nails or staples may be used to secure the chicken wire to the form. However, the best way to secure the wire to the form is by drilling 1/8" holes through the 1x6 supports and tying the chicken wire to the form with wire.
REMEMBER: NEVER USE NAILS OR STAPLES IN AN EXPOSED
JB CORNPublic domain, Edited version, (c) 2005, Antonio Gonzalez jr.
Increase depth atbase with 3/4"plywood. Doubleit for use with 2x6.
3/4"
Bolt holes
Insert blocks of2x2 of differentlengths to createadditional rise inthe chicken wire.
Chicken wire orhard wire cloth
Burlap soakedin hydracal.
hh96dw14.tcw

HOW TO BUILD A PORTABLE MODULAR DARK ATTRACTION29
SITUATION
Stretch and attach the wire, pulling it down into all the valleys of the 1x6" runners and to the 3/4" base.
After the wire is secured, add another dimension to the cave wall. Place several random 6" pieces of 2x2" in between the cut 1x6s and drive a roofing nail or staple into the end capturing part of the chicken wire to keep it in place. These will help to break up the pattern created by the 1x6s.
Run the chicken wire all the way to the top or stop at about 6'6" as I have done. This makes for easier storage of the units, saves money and labor and customers really do not notice much above this point.
CAVE BASE UNIT HYDRACAL COVERINGNow comes the fun part. Pre cut all the burlap to the length of the chicken wire plus about 6" to
tuck under the end of the chicken wire at the top and to a little more than half the width of the unit or 28" to 30". Lay all the units to be covered with hydracal on their backs so gravity will work for you.
Do not do this in sunlight or in warm to hot conditions as heat will speed up the hardening process and will give less time to work with the hydracal. Application of the hydracal should be done by two people.
Using cold water (do not use chemicals to extend set-up time), mix a batch of hydracal, following the instructions closely. Do not make it thin. Pre soak all burlap pieces in water. Remove excess water from the burlap before dipping into the hydracal.
Prepare a small container with dry hydracal and mix with water as needed to fill in cracks after all the burlap for one panel is in place and all the hydracal from the tub has been used. Submerge one of the strips of burlap into the hydracal. Completely work the hydracal into the burlap fabric with your hands. Remove the burlap piece from the tub and let the assistant dip his/her piece while you are carefully placing the first piece on the form.
Mix only enough to do one wall unit at a time. Line the edges up, stretch the fabric over the form, match the bottom edge and begin to smooth the fabric over the form. When the assistant places his piece, blend the overlapping joint in the middle. Quickly add more hydracal as needed to fill cracks and conceal the fabric. Once the hydracal sets up, additional hydracal will not bond to the unit. It may stick, but it will not bond and will eventually fall off.
Tuck the extra six inches under the chicken wire at the top and curl the burlap and chicken wire together towards the plywood back. This adds strength and dimension to the top. Allow at least 24 hours for each unit to cure. Then spray paint the unit front, back and all edges. I painted my cave event white. Using lights, I can make it any color.
When assembling this room for use in the house, fill the cracks between cave wall sections with regular plaster and the same color paint(s) to cover the patch. The new plaster will not bond properly to the existing hydracal and will mostly fall away when the units are disconnected.
ADDITIONAL CAVE CREATIONSOther cave features may be constructed the same way. Rocks, boulders, stalactites and stalagmites
can all be formed with chicken wire on a wood base, then covered with burlap soaked with hydracal.
JBCORNPublic domain, Edited version (c) 2005, Antonio Gonzalez jr.

DARK ATTRACTION COMPONENT DESIGN30
§I use this creation as the divider in my cave. The customers can see parts of the entire cave but
must walk the path as they are blocked by the stalagmites and stalactites. This makes an excellent visual presentation.
SPLATTER PAINTINGCreating walls that look like brick or giant cut stones is easy. I use a technique called splatter
painting. A splatter painter may already be in the garage, but called a liquid pressure sprayer. It is an air pressure liquid dispenser. Dilute the paint with water.
Spray paint all panels the same base color. Make sure the paint fills all the cracks and panel edges. Create a form for the bricks from 1/2" BC plywood. This form will be placed on top of each panel to mask the base color from receiving any paint and to create the brick outline.
§CUT OUT FORM, ROUND THE CORNERS, MAKE FORM PATTERN AT LEAST 1/" WIDE.
Pour paint into sprayer through a fine filter (like old panty hose). Use at least three other colors and a separate air pressure sprayer for each color. Apply the darkest color first till it reveals about one third of the original color, next darkest color half as much as the first and the lightest color the least. Experiment.
After completion, lift the pattern and place it on the next panel. Do not move the panel until it is dry. The thin paint will run. When all panels are dry, turn them over and do the flip side.
CONVENTIONAL ITEMS IN AN UNCONVENTIONAL USEOne of the places I spend time is Home Depot. It is a warehouse style retail outlet for building
materials, lawn & garden supplies and general home improvement. I look at all these things.
In plumbing, they have 100' rolls of black plastic drain pipe about 4" in diameter. I cut to various lengths and attach to a wood mounting assembly.
JB CORNPublic domain, Edited version, (c) 2005, Antonio Gonzalez jr.
3/4" back screwed to 2x4
4" dia tube attached withscrews and washers.

HOW TO BUILD A PORTABLE MODULAR DARK ATTRACTION31
Many objects have patterns in them (rain gutter guards, wire cloth, wood lattice, chicken wire and metal pieces of various sizes & shapes) or you can make an original pattern: a skull, ghost, tree branches, bat, etc. Frame these or mount them in a useful way so that a light will cast a shadow. Just wander around and look ... You will find more items you can use ...with your imagination.
SCIENCE FICTION/HOSPITAL CONTROL PANELFancy sci-fi control consoles add production value to the house. Short cuts involve Hollywood
techniques of back lighting. Purchase a piece of 1/8" or 1/4" Plexi the size of the framed top. Design it so that the Plexi will fit into the frame and be flush with the top.
Purchase different colors of gel from a stage lighting supply and cut control shapes. Cut white opaque gel to cover the entire control panel back. If it takes two pieces, use black or silver tape to conceal the joint.
Attach the cut control pieces to the white opaque piece with double stick tape, add some self adhesive lettering, then sandwich the unit with another piece of Plexi, put in place and back light.
The best way to do this effect is to have a photo negative made by a silk screen photo negative shop. This gives the black border where needed and a place to tape color gel pieces. The Plexi can be painted or tinted with plastic color stains on the back side.
A cheaper way is to purchase a large assortment of colored translucent glass marbles of various sizes. Make the control top out of plywood. Drill holes of a diameter slightly smaller than the marbles. Take a second piece of plywood and drill holes that match the location of the previous piece, but the same diameter of the marbles and place it over the top. Seal the
marbles in place with some black silicone and back light.
TABLE & CHAIR SET PIECES
A 3/4" piece of plywood is the seat. The edge around the seat is framed with 1x4 or 1x6 to give a fuller look and to support the four 2x4 legs. Screw and glue all contact points. This makes for a very sturdy seat.
JBCORNPublic domain, Edited version (c) 2005, Antonio Gonzalez jr.
1/8" plexi topAssorted cut colored gelsSolid sheet translucentwhite gel.1/4" plexi back
MarbleBlack silicone3/4" BC1/2" BC
Light source
3/4"
1x4"
2x4" 2x4"
1x4"
3/4"Table top
Leg

DARK ATTRACTION COMPONENT DESIGN32
The table is constructed in a similar fashion although it is not as sturdy. It should be attached to a wall or replace the 1x4s with 1x6s. Attach the legs that are away from the wall to the floor with 90 degree connectors.
LOW COST HORROR ITEMSA dark attraction needs scary decorative items. It may seem ridiculous, but the best items come
from the dime or craft store. They have the correct shape, but look cheap and unreal. Purchase aluminum and dark brown spray paint and a small can of glossy red enamel.
Paint the gray portions of the plastic items with aluminum and use brown paint for the handles and wood portions. Dry brush the item with a little flat black and gray paint to age it
Now add the red blood (paint). Place generous amounts on one end and let it run the length of the object.
The item(s) are now ready for display. They should not be used by actors as they are not sturdy enough to last.
TOMBSTONETombstones are a common dark attraction item. Build a wafer board and 2x4 frame with a
plywood base. Note the tombstone is not cut square on either of the two axes. Thus it leans front to back and left to right. Prepare a batch of hydracal and use burlap to cover the frame. Use more hydracal to cover seams, cracks or signs of the fabric and make it smooth. The tombstone shape comes from window cut out scraps.
Add artistic flair and make some with cracks and or breaks in the stone. be sure to place the tombstone(s) where they can be touched. the hydracal turns cold to the touch.
FENCENo graveyard would be complete without the picket fence. The basic fence is 4' wide and 3' high.
Purchase regular 6' fencing material, cut it in half and 45 cut both top corners.
Cut two 4' runners from regular 8' 1x4 stock to attach the fence pieces. Use 1 1/4" screws from the back or runner side into the fence picket applying liberal amounts of glue first. Use a pair of small 3" hinges to connect fence units together and to other portions of the house. Use fence units like wall units as part of the 60 degree design.
COFFINCoffins add a nice touch. The shape of the coffin tells its history. Modern coffins are more like a
box with a curved top. Cheap coffins are just a pine box with loose fitting boards.
6'-6"4'-6"
2'-0"
1'-0"
Cut top and bottomof coffin out of one3/4" BC plywood.Coffin depth varies12" - 18".
JB CORNPublic domain, Edited version, (c) 2005, Antonio Gonzalez jr.
RIP
Front Side
4'-0"

HOW TO BUILD A PORTABLE MODULAR DARK ATTRACTION33
§CUT THE PIECES AS LAID OUT. DETERMINE THE COFFIN'S DEPTH. ASSEMBLE
WITH SCREWS AND GLUE, USING PIANO HINGE FOR THE LID THEN PAINT.
The problem with a coffin is that an actor has to be inside. I use two coffins but attach one to the central corridor wall. A special panel has a cut out that matches a cut out portion of the coffin. The actor can come and go without being seen by the customers.
SPIDER/WEBOne of the simpler effects to build is a spider
web and, of course, the spider. Construct the web about five feet from the ground and slope it to about four feet. Interconnect the web supports. Now place pieces of previous victims in the web. Remember texture. Firmly attach all the items as customers may borrow items not firmly attached. Construct a spider head from foam rubber and liquid rubber latex. Make eyes from a colored liquid plastic and place a low voltage light inside the head for backlight illumination of the eyes.
Build a body of chicken wire and cover it with black fabric. Cut swimming pool hose to appropriate lengths for the legs of the spider. Sew long tubes of fake fur to cover the hose and attach them at the top of each leg with wire wrapped around and through the hose and fur. Stuff fur into the ends of the hose to give a more finished look. Attach firmly to the body with the wire on the top of the legs.
Attach an off-center spring to the spider's back. Hang the spider from the ceiling at an angle with its head tilting down towards the customer entrance. Place something appetizing in its mouth. Attach the legs to the web where they pass through it. Whenever a customer bumps the web, the spider will move. Below, top view of the 1996 Castle Dragon spider web, no spider.
JBCORNPublic domain, Edited version (c) 2005, Antonio Gonzalez jr.
Coffinaccess
Coffin
TableCentralcorridor
IN
OUT
Spider Web, top view.Make web from whitecloth line. Use acomplicated pattern.Hang string, fabricand anything else youcan imagine.
Web entrance of 5',exit of no less than 4'.Low web forcescustomers to duck.Attach overheadspider to ceiling witha spring. Customerswill provide spidermotion as they pullon web.

DARK ATTRACTION COMPONENT DESIGN34
§ AS WITH ALL ITEMS CONSTRUCTED FROM FABRIC, THE COMPLETED ITEM MUST BE FLAME PROOFED. THIS IS NOT AN OPTION. CUSTOMERS ARE STUPID. THEY WILL STRIKE MATCHES AND LIGHTERS TO LOOK AROUND. THE MOST COMMON REASON TO DO THIS IS TO SHOW THAT THEY ARE COOL. THEY ARE NOT !! A FLAME COMING INTO CONTACT WITH AN NON-FLAME PROOFED ITEM WILL START A FIRE THAT COULD KILL CUSTOMERS AND ACTORS AS WELL AS DESTROYING THE ATTRACTION. FOLLOW MANUFACTURERS DIRECTIONS WHEN USING FLAME PROOF PRODUCTS AND THEN TEST THE RESULTS WITH SAMPLES OF ITEMS THAT HAVE BEEN FLAME PROOFED.
ACTION CREATUREThe spring loaded ghost should be fun to watch in action. Construct a rugged horror dummy on a
wooden torso frame. Make it most graphic, but use springs for the arms. Attach the dummy's spring arms to the bars of the prison and then cover the connection with bloody hands. Put a rope around his neck and suspend him from the ceiling.
From the midsection of his back and neck joint where the arms connect to the body, attach a thin, strong black line. Take it through the wall at about a 30 degree up angle to a pulley, up to another pulley, over head to a facing set of bars, to a pulley and down to a latching mechanism.
When the customers arrive they have to walk between two sets of bars. Place an actor on the side the customers see first. As they enter, they will see the actor and place their backs to the bars with the dummy. The actor can then release the mechanism and scare the customers from behind. The actor can also pull on the cord and make the dummy dance. This effect could work as a stand alone operated from behind. The effect is best if the dummy and the prison it's in look harmless and safe. It should look good, but not threatening.PLEXI TO CREATE GHOSTS
For a ghost to be a ghost the customer must be able to see through it. Project the ghost from an area not visible by the customer to an area the customer can see. One of the minor problems with using reflection is that it works best at a 45 degree angle. This house is based on the 60 degree angle, so I compromise. A 4' wide sheet of Plexi will always work in the 60 degree house at 60 degrees. If the angle is changed, the Plexi will no longer fill the space, expose an edge as a point of reference to the customer and reveal how the ghost illusion is created. Purchasing 5' wide Plexi will almost give the 45 degree angle for best reflection but is expensive and heavy. 60 degree reflection works OK.
To get around using full sheets, mount Plexi in different sized window units. This provides
JB CORNPublic domain, Edited version, (c) 2005, Antonio Gonzalez jr.

HOW TO BUILD A PORTABLE MODULAR DARK ATTRACTION35
support and protection for the Plexi.
BASIC GHOSTThe first ghost effect is simple. Reflect an image onto the Plexi and into the customer path.
Light source Ghost
1/4"x4x8' Plexi
Window
Background
Box fan
Cu s
tom
e r d
i rec t
ion
§
SURPRISE GHOSTA ghost hovers in the room, then begins to move and suddenly
appears in the customers face from the opposite direction. Decide the direction that the ghost will be coming from. Construct a frame and build/attach the ghost to the frame.
The mechanism for motion should be very strong, fluid in its motion, very easy to operate, positioned in such a way as to be convenient for the operator to control and provide the operator with a clear view of where the customer has to be to see the ghost appear.
Diagram shown is for use of an air ram to propel the ghost. The opening through which the customer views the ghost must also conceal the ghost's location. The longer the hallway leading to any ghost effect, the better the view for the customer.
HUMAN
TRANSFORMATIONThis age old trick is tried and true. Note the 45
degree Plexi and the girl's placement behind it. Her position must match the gorilla's exactly. The two rooms must be painted and or furnished the same. Actually, a black background is easiest. Set decoration should include the scientist's or wizard's equipment necessary to make the transformation along with sound and lighting effects. The bars are placed in the front opening of the effect and the customers are kept
JBCORNPublic domain, Edited version (c) 2005, Antonio Gonzalez jr.
Plexi
GhostHinge
Cu s tom
e r Di re c t io n
Decorated room,ghost appears tobe floating in. Makeit interesting, socustomers will wantto look in...
4'-0"8'-0"
4'-0"
4'-0"
4'-0"
8'-0"
Gorilla
Girl
2'-10"
Bars
1/4"x4x8' Plexi

DARK ATTRACTION COMPONENT DESIGN36
further back by a low wall or fence.
Use two lights on dimmers, one for the girl and one for the gorilla. Only the light for the girl should be on, slowly bring the gorilla light up and the girl light down. She becomes a gorilla.
Great effect. Too time consuming. You can't make money with this effect. However, it could be used to entertain the crowd while they wait in line. It may also serve to attract customers, say a new show every 15 minutes. Place a few shills in the audience to work the crowd and be chased off by the creature. It is an effect that could also be placed in the interior waiting room as entertainment for those that have already paid. See Long Hall next page and Dual Ghost Page 38.
Note the use of standard panels and how they are staggered to create the rooms based on a 4' wide Plexi panel. The only non-standard panel is the bars panel. The bars are offset and 2'10" wide. A 5' Plexi will make for more standard room sizes, but even it is not wide enough for true use of 4' panels.
The script is the most important part of the show. Second is the blocking and, last but not least the performance level the actors are capable of delivering. The victim should be pulled from the audience as a reluctant participant. She should be briefly interviewed by the scientist and assured that the transformation will only be temporary and that she will be returned to normal. If possible, a video playback of earlier transformations would add production value.
The subject is placed into the machine with fanfare. There should be sound effects as switches, levers and dials are positioned. As comic relief, an assistant should ad-lib problems that have occurred in the past and play the audience. All should go well as the transformation begins . A problem develops that bothers the assistant but not the scientist. Once the transformation is complete the scientist gloats over his achievement.
Then, as the worried boyfriend moves to the stage, the scientist begins to reverse the procedure. The machine makes strange sounds, a loud pop, a flash of smoke and the gorilla/monster begins to go crazy. More sound effects and then the lights go out briefly. During the blackout, the gorilla positions itself directly behind the bars. When the lights come back on, the gorilla is going mad. She bends the bars and scopes up her boyfriend, gives him a big kiss and chases him as he runs for his life... Oh, well why not ?
SIMPLE GHOSTA ghost illusion may be placed almost anywhere. The
60 degree system creates the lost corners we use as boo corners, but if a lost space is bigger than that, put in a ghost.
Positioning of the ghost is important. Sometimes it will be necessary to place a curtain or partial wall (masking) to block a direct view of the ghost by the customer. Adjust the ghost while an assistant plays the part of the customer. Note in this example that the window is offset to one side of the panel.
The boo unit takes up one lost triangular space. This ghost unit takes up three triangular spaces.Experiment with light level, direction and color. Try these units with backgrounds or windows as backgrounds. The window could be in the customer path or employee area where you could mix live actors with ghosts.
JB CORNPublic domain, Edited version, (c) 2005, Antonio Gonzalez jr.
B a c k g ro u n do r w in d o w
Ple
xi
Ghost

HOW TO BUILD A PORTABLE MODULAR DARK ATTRACTION37
GHOST ABOVE
The customers walk under a ghost. The hall should be at least 12' long. Build a light tight box above and to one side of the hall. Paint a background on the wall and hang the ghost in front of it with black cord. Have the ghost stretch out its arms, as if to reach for the customers below.
Use low level lighting in blue and add a flair with red eyes for the ghost and some saliva foaming from his mouth.
Frame a piece of 1/4" 4x6' or 4x8' Plexi, depending on the size of the effect, and place it as indicated in the drawing. Paint the frame black.
There has to be a reason to look up. Add a piece of chain around some part of the ghost, maybe the neck. Let the chain drop to the ghost's floor, tie a black cord to the end, run it through a series of pulleys up and over to an actor. The chain diversion pulls the customers view away from the actor operating the chain and the true area of the scare. When the customers look up, the actor should provide a good scare from behind through a secret panel or window.
Depending upon the abilities of the actors, you could add more animation to the ghost, like arm or leg movement. The greater the diversion, the more intense the scare.
JBCORNPublic domain, Edited version (c) 2005, Antonio Gonzalez jr.
8'-0"
4'-0"
4'-0"
8'-0"
Ghost
Top View
End View
P lexi

DARK ATTRACTION COMPONENT DESIGN38
DUAL GHOST
An automatic version of the human transformation effect for use in the attraction. The pretty ghost is behind the Plexi window. The ugly ghost, wearing the same clothes, is reflected in the Plexi. Illumination should be uniform on both ghosts. Slowly cross fade the lights with an auto fader. Notice the partial wall for blocking direct view of the ugly ghost. The ghosts will have to be aligned from the customer view point. They may have to be adjusted up and down, twisted left/right and tilted front/back in relationship to the Plexi and customer viewpoint. A better orientation will be obtained in a permanent set-up, but in a portable attraction it could take two hours to set up and align this effect.
GHOST EFFECTS
Add motion to the ghosts by directing a fan at them. The ghosts need to have loose flowing wardrobes.
For true motion, purchase a small black & white TV (or for the wealthy, a color TV) and a rear TV projection lens for each ghost. Attach the lens to the front of the TV and project the live recorded ghost on a wall or a cut out the size of the projected ghost.
While the ghost is projected, draw it's outline on the wall. Now paint the wall that is not part of the image black. Feather paint the background into the projection area so there is not a hard line. Paint the projection area white or, for color effect use a pastel color. When the ghost is projected, the white portions of the ghost appear in the pastel color. Another way to do this is place a colored gel over the projection lens.
The ghost may also be projected on sharks tooth scrim and reflected to the Plexi or replace the Plexi with a framed piece of sharks tooth scrim and project the image directly. White netting (purchased from the local fabric store) stretched over a frame will also provide a projection surface for the ghostly image.
Record the ghost actor (well illuminated) in front of a totally black wall. Make the tape 6 hours
JB CORNPublic domain, Edited version, (c) 2005, Antonio Gonzalez jr.
P lex i
PrettyGhost
UglyGhost
Bac
kgro
und
Window unitwith sharkstooth scrimor whitenetting.
Projector
Shelf toblock viewof projector.
Window unitwith wire meshor bars to viewillusion.
hh96dw17.tcw
Projector
Shelf toblock viewof projector.
Window unitwith wire meshor bars to viewillusion.
Bac
kgro
und
Cut out ghostprojection area.Paint bright white.

HOW TO BUILD A PORTABLE MODULAR DARK ATTRACTION39
long. Do not edit "LP" tape. Just pause between recording sessions or record a two hour (or less) session at "SP" and dub it over at "LP". You need two tapes, one for stand-by and one for use. Tape players must be kept dry and in a low humidity area. If necessary place all moisture sensitive equipment in a special enclosure with a fan and a heater.
Add sound while making the video recording. The ghost can speak, scream, cry, beg, you get the idea. Sound effects or music are other options.
Use a stereo receiver and feed one sound channel for the ghost to a point in front of the projection aimed at the customer point of view. Use the other stereo channel for music or sound effects experiment with speaker placement. This is an effect with sound and motion.
OTHER PLEXI MIRROR LIKE EFFECTS
Create a mirror with 1/4" clear Plexi in a long hallway. Illuminate the customers as they approach the Plexi so that they see their reflection in the mirror like Plexi. The room behind the Plexi must be totally light tight. Use an actor or creature dummy in the light tight room. The actor can control a fader to gradually bring up a light on him/herself and create the illusion of customer and actor together in clear Plexi like the mirror. This can also be done automatically with a motion detector and auto fader circuit.
JBCORNPublic domain, Edited version (c) 2005, Antonio Gonzalez jr.
plexi mirror
Light tightroom Curtain
Custom
er Di rection

DARK ATTRACTION COMPONENT DESIGN40
Plexi withreflectivefilm
Empty rocking chair
Raised platform
Motorizedrocking chairwith corpse.
§
An extension of this effect is the ghost in the rocking chair. Two identical rocking chairs, a ghost dummy, a motor and clear Plexi are required. Construct the room as diagrammed. Mechanically link the two rocking chairs, place the dummy in the light tight room and adjust the illumination to the correct level. the customer side of the room must also be illuminated correctly so that the customers see themselves in the clear Plexi-like mirror with the ghost in the rocking chair. Add motion by adding a motor to rock them.
this effect can be used in many more ways. Use your imagination.
OTHER MIRROR EFFECTSMaking large numbers of anything is costly and time consuming. With mirrors, make a few look
like many. The room uses real Plexi mirror. This can be a walk by room with an outside window for the customer to view, a bridge that the customer walks over with objects below, or objects hanging from the ceiling that the customer walks under.
JB CORNPublic domain, Edited version, (c) 2005, Antonio Gonzalez jr.

HOW TO BUILD A PORTABLE MODULAR DARK ATTRACTION41
Raised floor
Ramp
Ramp
S ca ry o b j ec t s
Plexi Mirror2'x4'
Plexi Mirror
§Objects of fear might be bats, alien eggs, skulls, complete freshly severed heads on pikes. You get
the idea. The room should be light tight and, for best effect, illumination should come from the object: glowing eyes, mouth, chest or the like. The effect should work if the objects are made with thin layers of latex rubber. Place a colored bulb inside the object. Practice with cheap wigs and Halloween masks on wire forms . The effect is not as good with direct lighting but it will work.
If using the overhead effect, it is important to create depth of view paintings (say a cave) to match the overhead illusion. This painting effect can be used for other placements as well. For the painting effect to work, it must not reach an area where customers can touch the effect and thus destroy the illusion. Keep the customers on a path away from the painting effect. Line the path with a half wall, stalagmites or a railing. Adding an upward sloping floor line helps to create a greater depth illusion.
EQUIPMENT ROOMDark attractions are not very secure.
During the design stage, find a central location in the central corridor to place a hidden room. This room will have no doors. use removable panels to gain access to the front or rear. The panels will be single sided with the back side secured at the corners by 8x8"
JBCORNPublic domain, Edited version (c) 2005, Antonio Gonzalez jr.
EquipmentRoom
Removablewall concealsequipmentroom.

DARK ATTRACTION COMPONENT DESIGN42
squares of plywood. few people should know of its location. This room has to have a water tight roof. I haven't introduced Murphy yet, so maybe the time is now.
MURPHY'S LAW STATES THAT WHAT EVER CAN GO WRONG, WILL GO WRONG AND IN THE WORST POSSIBLE WAY.
The house electrical, sound and emergency systems will routinely need servicing. Designing easy access to them will make installation, maintenance and removal easier. If you are using a trailer to store your event, place the equipment room in it. It will cost more in wire but it is worth the extra money for safety. Electrical items can cause a fire.
§
Photo was taken from inside the Grand Entry shop area of Castle Dragon looking back towards the entrance. Note sale items in lower left and T-shirt displayed on right side.
JB CORNPublic domain, Edited version, (c) 2005, Antonio Gonzalez jr.