creating a light studio - packt publishing · creating a light studio chapter 5, let there be...
TRANSCRIPT
Creating a light studioChapter 5, Let there be Lights, has tried to show how the different light objects you create in Cinema 4D should be based on lighting setups and techniques that are used in real-world photography. Here's a bonus recipe, which uses all the different skills we've learned in Chapter 5, to create a light studio that is set up to light your scene as if you are in a photography studio photo shoot.
Getting readyOpen the Watch.c4d file from the C4D Content Pack. This is a watch made by some no-name watch company, and it probably won't work once you're done with the tutorial.
How to do it...1. Start by examining the watch. It has already been modeled and the materials have
been applied for you so you can focus just on the lighting. It is gold with a brown leather band the gold areas should pick up the reflections in our scene. We are going to try to make this watch look nice and well-lit, and because we can create any light object, we don't want this to be a problem.
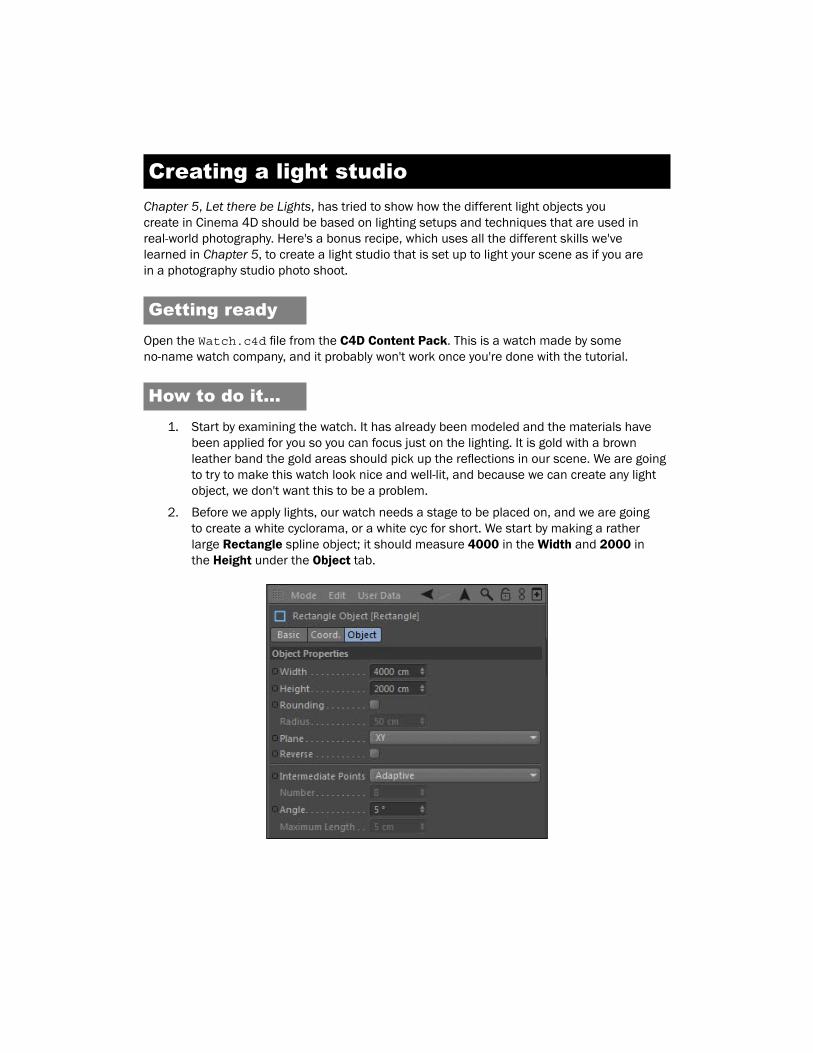
2. Before we apply lights, our watch needs a stage to be placed on, and we are going to create a white cyclorama, or a white cyc for short. We start by making a rather large Rectangle spline object; it should measure 4000 in the Width and 2000 in the Height under the Object tab.

Let there be Lights
2
3. With the rectangle spline highlighted, press the C key to make the object editable, then select the Use Point mode icon in the Command Palette. Click on the upper-right corner point of the rectangle, and press Delete so we remove it. You should now have a triangular spline, but we don't need all three points to be connected, so under the Object tab for the spline deselect the checkbox that says Close Spline.
4. Now we have a spline that is made up of three points, forming a right angle. This sharp corner won't make a nice backdrop for our product. We want a smooth, gradual curve so that shadows fall gradually and not appear too harsh. Switch the Viewer to the Front view and then select the middle point where the two lines of the spline converge. Then, right-click or context-click on it to reveal several editing options. Scroll down and select Chamfer.
5. The Chamfer action takes one point and splits it into multiple points to create a gradual curve. It can simply be activated by clicking-and-dragging the mouse until you are satisfied with the curve. Click-and-drag as much as it takes to get a value of 750 for the Radius, or simply enter this value in the Radius field for the Chamfer tool in the Attribute Manager.

Bonus Recipe
3
6. Next, add an Extrude NURBS object to the scene from the Command Palette and make the Spline a child of it. Rename the object to White Cyc. The Extrude NURBS object has extruded our spline, but we need to really increase this value to make a wider cyclorama. Under the Object tab for the Extrude NURBS, enter a value of 4000 instead of the default 20 for the third Depth value, which extrudes the object in the Z dimension.
Try to cycle between multiple camera views inside the Viewer on your own in this recipe. Get used to using all the available views to position your objects and see your scene from all angles. If you don't have a good angle, pick another one.

Let there be Lights
4
7. You may notice in your render preview that towards the curved part of the Cyc there's some uneven subdivision of the object and it's a little bumpy. The easy fix for this is highlight your White Cyc object and convert it to polygons by pressing the C key. Go to the Mesh menu and select the Knife option inside the Create Tools menu. Switch on Use Point mode in the Command Palette, switch your camera to the left view, and uncheck the box in the Attribute Manager for Visible Only so that we make sure we cut all the way through our White Cyc. Next make roughly 10-12 vertical cuts along the width of your Cyc; the exact location is not important, just so that there are more polygons now going across your object. Hold the Shift key while you do it to make exact vertical cuts.
8. Now, add a HyperNURBS object and place your White Cyc polygon inside it as a child, and rename the HyperNURBS as White Cyc so we know what it is. Then, take our White Cyc and rotate it -90 degrees in the R.H value in the Coordinates tab. Now the Cyc is facing the camera right, but it needs to slide over so the middle is lined up with the origin. Adjust the X position to be -2000 and the Y position to 1000, and the Z position to -500, so now the Cyc is based around the origin.
Bonus Recipe
5
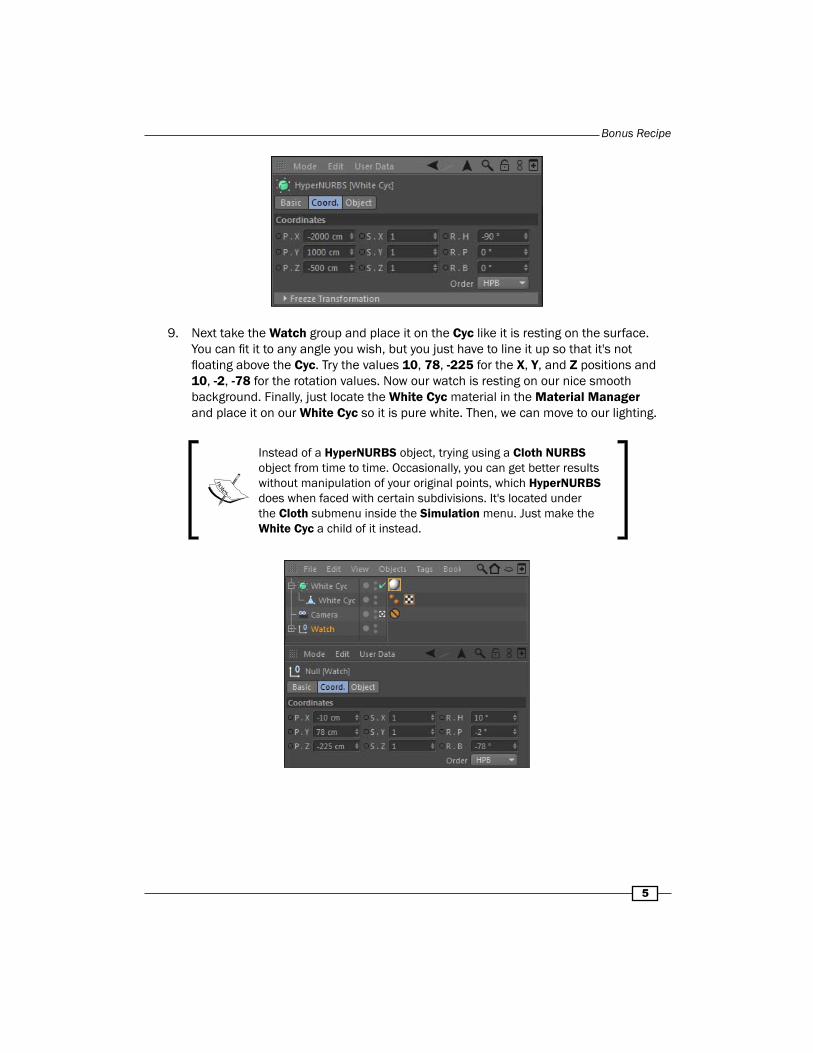
9. Next take the Watch group and place it on the Cyc like it is resting on the surface. You can fit it to any angle you wish, but you just have to line it up so that it's not floating above the Cyc. Try the values 10, 78, -225 for the X, Y, and Z positions and 10, -2, -78 for the rotation values. Now our watch is resting on our nice smooth background. Finally, just locate the White Cyc material in the Material Manager and place it on our White Cyc so it is pure white. Then, we can move to our lighting.
Instead of a HyperNURBS object, trying using a Cloth NURBS object from time to time. Occasionally, you can get better results without manipulation of your original points, which HyperNURBS does when faced with certain subdivisions. It's located under the Cloth submenu inside the Simulation menu. Just make the White Cyc a child of it instead.

Let there be Lights
6
10. There's a myriad of different studio lighting setups you can create. It all depends on what kind of lights you use and where you position them. We are going to add a bunch of different light objects that you can move around freely to get your ideal lighting setup. Let's start by creating our main source of light, our key light, which will be a Target spot light aimed at our watch and placed to the right of it.
11. Add a Target light object to your scene, then delete the Light.Target.1 null object it automatically created in the Object Manager. Reset the position and rotation values of the light to 0, so that it sits perfectly at the origin. Because our watch and White Cyc are in the way, let's hide them for now and turn them back on later. Click on the traffic light icons in the Object Manager so the Watch group and White Cyc object are hidden in the Viewer.
12. Let's add a Cone primitive around our light so it gives it the effect of a lamp, and we'll be able to see where it is easily among our studio. Once you add the Cone, change its name to "Light Cone," change its Orientation to -Z in the object tag so its shape is similar to that of our light. Next, go under the Caps tab in the Attribute Manager and uncheck the Caps option, so now the base is open for our light to shine through. Then, take your Target light and make it a child of the cone so that when you move the cone the light will follow. Apply the black material to it from the Material Manager so it stands out against our White Cyc.
Bonus Recipe
7
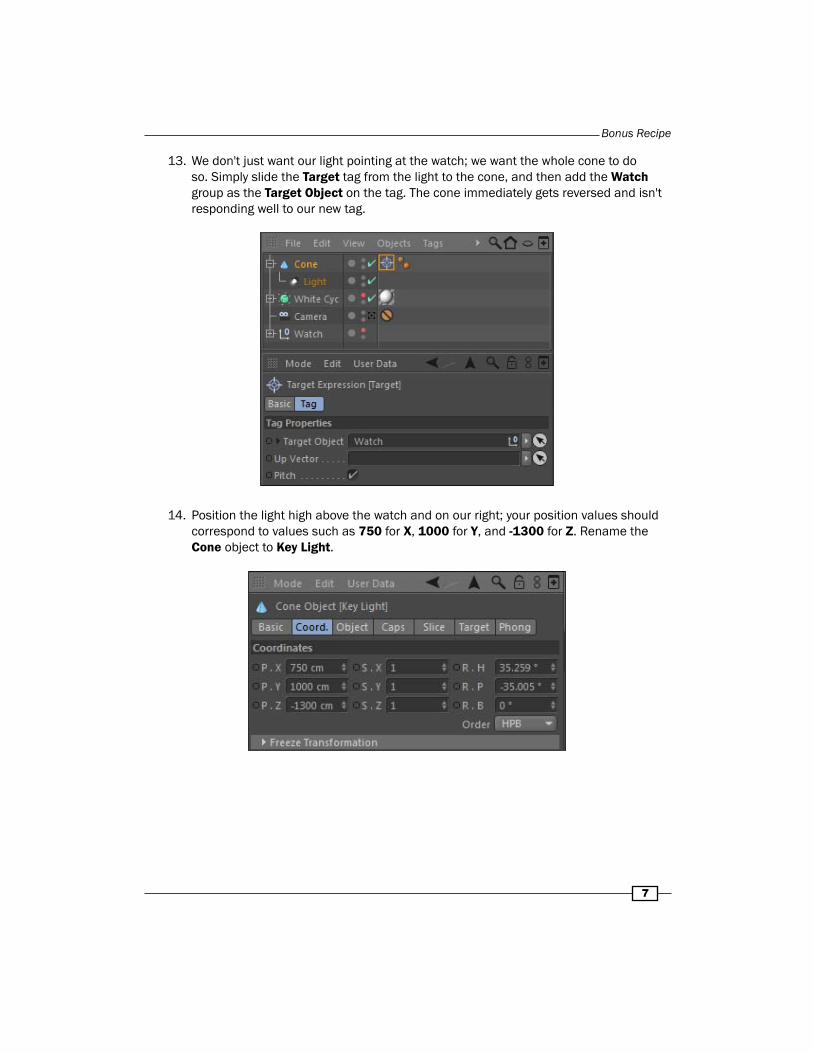
13. We don't just want our light pointing at the watch; we want the whole cone to do so. Simply slide the Target tag from the light to the cone, and then add the Watch group as the Target Object on the tag. The cone immediately gets reversed and isn't responding well to our new tag.
14. Position the light high above the watch and on our right; your position values should correspond to values such as 750 for X, 1000 for Y, and -1300 for Z. Rename the Cone object to Key Light.
Let there be Lights
8
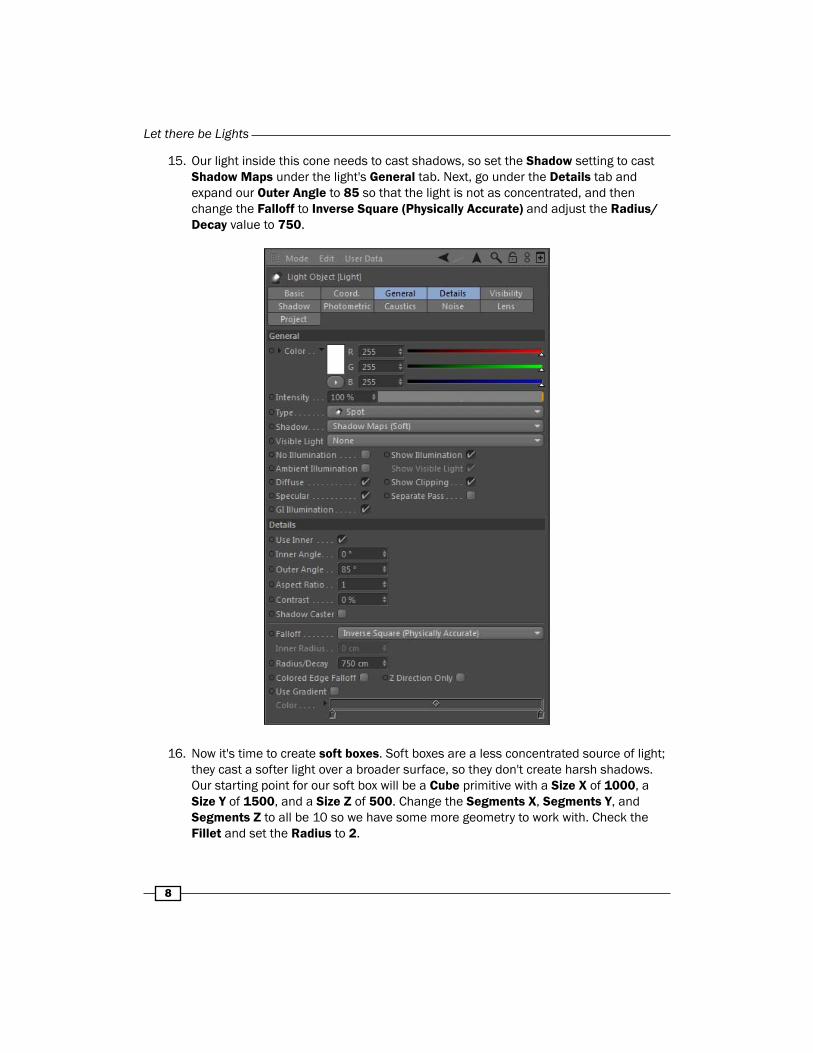
15. Our light inside this cone needs to cast shadows, so set the Shadow setting to cast Shadow Maps under the light's General tab. Next, go under the Details tab and expand our Outer Angle to 85 so that the light is not as concentrated, and then change the Falloff to Inverse Square (Physically Accurate) and adjust the Radius/Decay value to 750.
16. Now it's time to create soft boxes. Soft boxes are a less concentrated source of light; they cast a softer light over a broader surface, so they don't create harsh shadows. Our starting point for our soft box will be a Cube primitive with a Size X of 1000, a Size Y of 1500, and a Size Z of 500. Change the Segments X, Segments Y, and Segments Z to all be 10 so we have some more geometry to work with. Check the Fillet and set the Radius to 2.

Bonus Recipe
9
17. The soft box shouldn't be perfectly rectangular it needs to be tapered. Add a Taper deformer and make it a child of the Cube object. Change the Size of the Taper to 1000 in all Size fields under the Object tab in the Attribute Manager, and then just bump up the Strength to 50%. In the end, just rotate it by 90 degrees in the R.P value so it tapers from front to back. Rename this object to Back and apply the soft box construction material from the Material Manager, and now we have the back of our soft box.

Let there be Lights
10
18. The front of our soft box and the actual light source should be roughly the same size as our front, but without the taper. Simply duplicate the back Cube object and delete the Taper deformer from it, and rename it to Front. Next shrink the Size of it in the Z direction to something smaller like 10, and slide it in front of our back cube so it should have a value of 250 as its Z position. The Taper on the back piece makes this front piece a little larger. There are a number of different ways to fix this, but just simply change the Scale values for the Front cube in the X and the Y directions to 0.97. This way they shrink slightly and the edges line up much better.
19. Go into the Material Manager and replace the current black material with the soft box light material. This material only has a gradient in the Luminance channel; the gradient is white in the middle and then a softer gray towards the edges, so whatever you place it on it will have a very soft light emitting from it. Group the front and back objects together by selecting them both in the Object Manager and using the Alt or Option + G keyboard command, then rename this group Soft Box Light. Finally, deactivate it in the Viewer with the traffic light and let's make some legs for the soft box to stand on.
20. Start with a Cylinder primitive and make it skinny, with a Radius of 10 and a Height of 200, and name it to Center Column. Now, take this cylinder and duplicate it. Then, change this new cylinder's Height to 400 and make it an editable object by hitting the C key with it selected in the Object Manager; name it Leg.

Bonus Recipe
11
21. Now, select the Enable Axis Modification button on the left-hand side of the Command Palette and adjust the cylinder axis to start at the top instead of in the middle; just hold the Shift key and slide the axis up 200 units so it starts at the top. We want the legs to rotate from the top end, so we are changing the point in which this cylinder will rotate.
22. Now, turn off the Enable Axis Modification button and create two copies of the leg, so we'll have a total of three. Now, each of these legs just needs to have a unique rotational value. For one leg, enter the R.B value to be 35, and for the next leg enter the R.B value to be -35, and the last leg should have an R.P value of -35. Now, we have our three legs split out from the center, so just take the center column and slide it up higher so it has a Y position value of 300; it should end up above your three legs.

Let there be Lights
12
23. Now, turn back on your Soft Box Light group and place the box on top of the Center Column; give it a Y position value of about 1000. Take the Soft Box Light group and rotate it downward, about -5 in the R.P value. Now, take the whole bunch of objects we've created pertaining to our soft box and group it together, using Alt or Option + G, and rename this group as Soft Box.
24. We want our soft box over to the opposite side of the watch as the key light, and angle it so it faces the center where it rests. Adjust the X position of the group to be -750, the Y position to be 515 (any value so the legs don't intersect our White Cyc), the Z position to -1500, and the R. H to be -25. Now the soft box is serving as our fill light; it's not as intense as our key light and it gives some balance to our light setup. Turn back on the watch and the White Cyc if you haven't already and check in on our progress.
Bonus Recipe
13
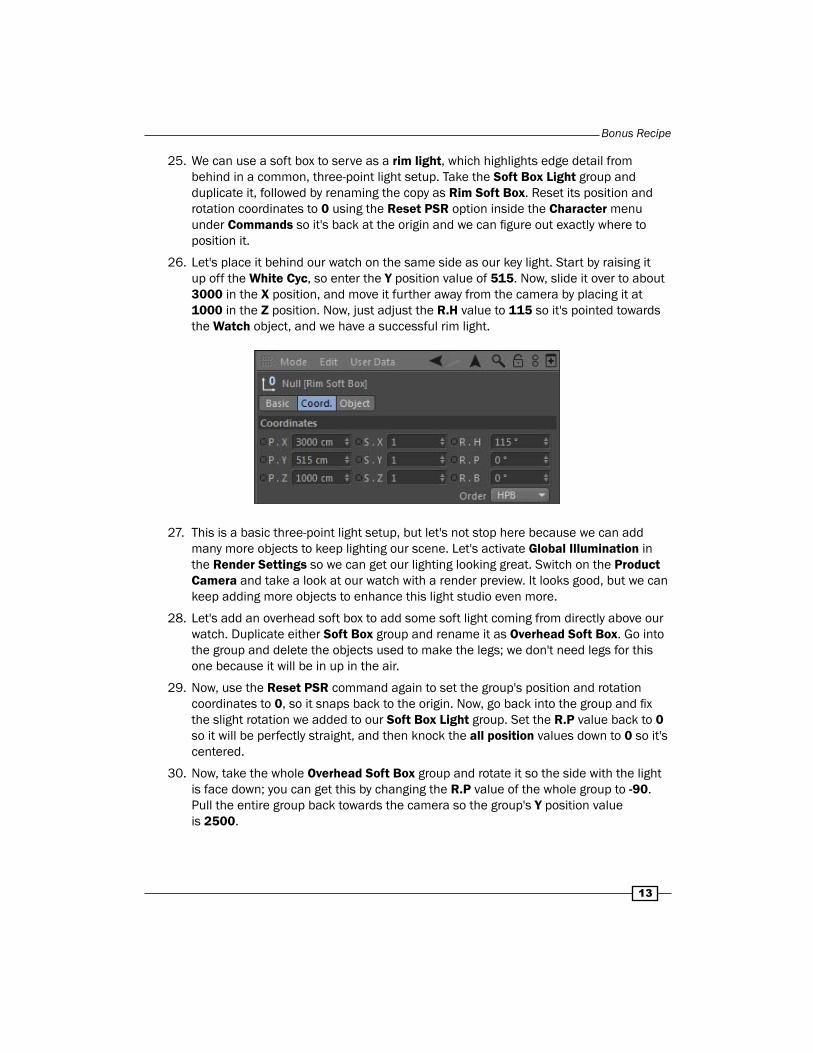
25. We can use a soft box to serve as a rim light, which highlights edge detail from behind in a common, three-point light setup. Take the Soft Box Light group and duplicate it, followed by renaming the copy as Rim Soft Box. Reset its position and rotation coordinates to 0 using the Reset PSR option inside the Character menu under Commands so it's back at the origin and we can figure out exactly where to position it.
26. Let's place it behind our watch on the same side as our key light. Start by raising it up off the White Cyc, so enter the Y position value of 515. Now, slide it over to about 3000 in the X position, and move it further away from the camera by placing it at 1000 in the Z position. Now, just adjust the R.H value to 115 so it's pointed towards the Watch object, and we have a successful rim light.
27. This is a basic three-point light setup, but let's not stop here because we can add many more objects to keep lighting our scene. Let's activate Global Illumination in the Render Settings so we can get our lighting looking great. Switch on the Product Camera and take a look at our watch with a render preview. It looks good, but we can keep adding more objects to enhance this light studio even more.
28. Let's add an overhead soft box to add some soft light coming from directly above our watch. Duplicate either Soft Box group and rename it as Overhead Soft Box. Go into the group and delete the objects used to make the legs; we don't need legs for this one because it will be in up in the air.
29. Now, use the Reset PSR command again to set the group's position and rotation coordinates to 0, so it snaps back to the origin. Now, go back into the group and fix the slight rotation we added to our Soft Box Light group. Set the R.P value back to 0 so it will be perfectly straight, and then knock the all position values down to 0 so it's centered.
30. Now, take the whole Overhead Soft Box group and rotate it so the side with the light is face down; you can get this by changing the R.P value of the whole group to -90. Pull the entire group back towards the camera so the group's Y position value is 2500.

Let there be Lights
14
31. Our soft box needs to be bigger so it can cover the whole stage. We don't have to adjust the sizes of the individual elements of the group. We can just increase the scale of the whole group; just increase all the Scale values up from 1 to 2 so the soft box is now two times bigger.
32. You can apply the Soft Box material to other objects to make them emit light and reflect in our watch. So let's make a bounce card to bounce some light off the front of our watch. Create a Disc primitive from inside the Command Palette, and under the Object tab, increase the Outer Radius to 500 and change the Orientation to +Z. Now, just slide the objects back away from the origin and a little higher so it's not intersecting the White Cyc; use a Z position value of -2500 and a Y position value of 500. Apply the Soft Box material to this reflector and now our watch will reflect this object. Name it as Bounce Card.

Bonus Recipe
15
33. The last step is to make sure our White Cyc is evenly lit so that it doesn't have any dark spots. If you do a render preview, you'll see the watch is lit nice, but the White Cyc has some darker areas that need to be filled in, especially on the left-hand side where our camera setup is aimed at. We're going to use the Include/Exclude technique to selectively light just the White Cyc and nothing else, so we can achieve that even lighting we are hoping for.
34. Add a new Area light to our scene, and then reposition it towards the back left of our White Cyc. Enter values of -750, 750, and 1000 for the X, Y, and Z positions respectively, inside the Coordinates tab. Under the Details tab, change the Area Shape to Sphere and the Falloff to Inverse Square (Physically Accurate), and set the Radius/Decay value to 1000. Now, go under the Project tab and set the Mode to Include, and drop the White Cyc into the Objects field.
Let there be Lights
16
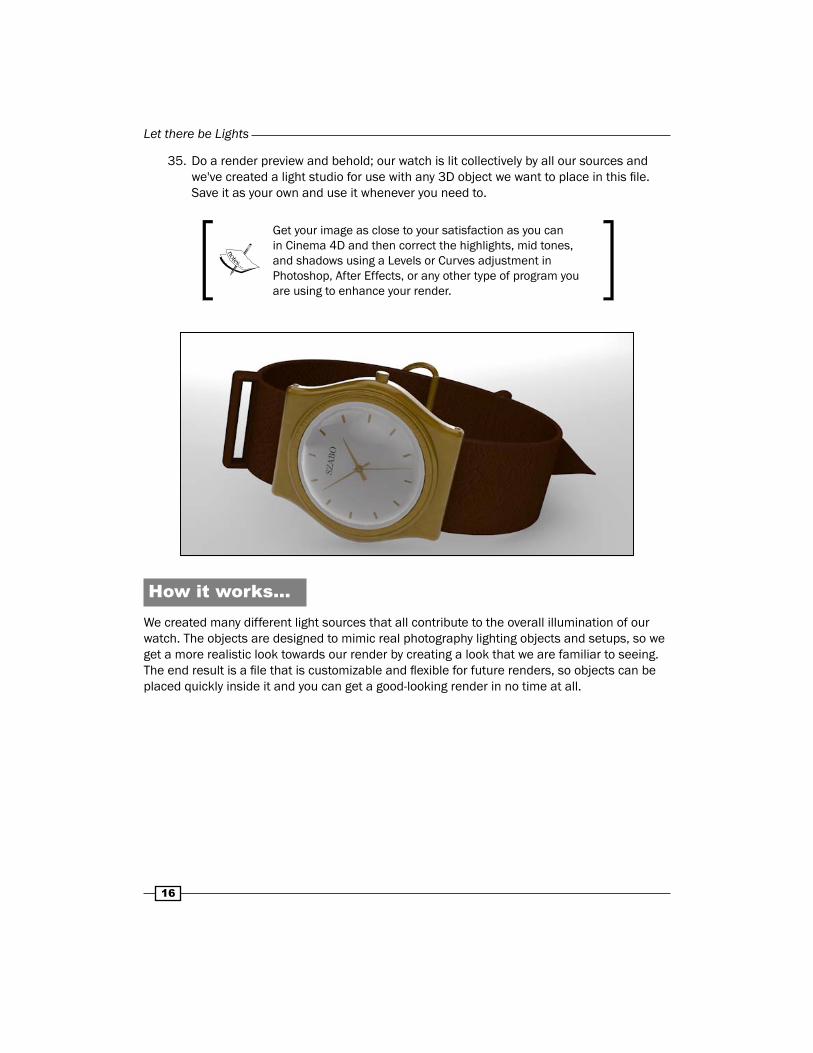
35. Do a render preview and behold; our watch is lit collectively by all our sources and we've created a light studio for use with any 3D object we want to place in this file. Save it as your own and use it whenever you need to.
Get your image as close to your satisfaction as you can in Cinema 4D and then correct the highlights, mid tones, and shadows using a Levels or Curves adjustment in Photoshop, After Effects, or any other type of program you are using to enhance your render.
How it works...We created many different light sources that all contribute to the overall illumination of our watch. The objects are designed to mimic real photography lighting objects and setups, so we get a more realistic look towards our render by creating a look that we are familiar to seeing. The end result is a file that is customizable and flexible for future renders, so objects can be placed quickly inside it and you can get a good-looking render in no time at all.

Bonus Recipe
17
There's more...This was a simple studio light setup. Try experimenting with different light setups. Consult photography resources for more unique lighting techniques. Also, try using fewer lights or isolating the specific lights in your current scene to see what kind of effect they are having on your watch. Here is the watch rendered with just the key light, just the fill soft box, and just the rim soft box. You can see that the watch can look way more dramatic with fewer lights and more shadows. Here's a good resource for lighting setups online:
http://www.diyphotography.net/lighting-diagrams.
