create your house - san gabriel valley habitat for humanity · pdf filemail them, along with...
TRANSCRIPT

Kids can print, color and decorate paper houses. Mail them, along with letters to
your local elected officials, and tell them you want to help families in your
community live in safe and decent homes.
Create your house
A paper house template design of this paper house, generously donated by Marilyn
Scott-Waters, is available at www.thetoymaker.com.
Write a letter
We have created sample letters to mail with your houses to your local elected
officials. The electronic versions can be edited before printing. The handwritten
version can be printed and completed by younger children.


Landscaping Project Building Time: varies Age Level: All ages Materials: -Gardening tools (spade, shovel, hose, hoe, etc.) -Potting soil -Flowers (annuals, perennials, herbs, etc.) *Suggestions: do research and use plants specified to your region as well as plants that will do well in the conditions of the land. -Bricks (to outline landscaping) Procedure: 1. Clean area of weeds, grass, trash, leaves, etc. 2. Make a sketch of what the designated area should look like completed. 3. Read and follow directions on the packets of seeds or containers regarding ideal sunlight, watering directions, etc. 4. Plant and label where you put each type of flower for future reference. 5. Adequately cover the seeds or lightly pack the soil around the plant. 6. Water immediately after planting and water soil daily according to the directions on the flower packages. 7. Maintain the landscape to keep it from being overrun with unwanted weeds. Optional: Outline the landscaping with spare bricks or wood from a Habitat work site. Also, you can use grass clippings, raked leaves, or store bought cedar chips to put around the flowers once they have bloomed to help with controlling weeds.

Key Holder Project Time: 1- 2 hours Age Level: age 5 and up Materials: -1- 1” x 4” x 12” -4 cup hooks -Fine sandpaper -Paint and brush -any other available craft materials -¼” drill bit -Drill Procedure: 1. Take board and make a line 1” from the edge of one of the lengths. 2. Make 4 dots 2 ½” apart along the line. 3. Drill a hole ½” deep on the back of the board near the top (at least ¾” from the top). This will be used to hang the key holder on either a hook or nail. 4. Sand the key holder. 5. Paint or varnish the wood and let dry. Be creative and decorate. 6. Screw the cup hooks into the board at each dot. * Keep in mind that you can make the key holder as big or small as you want.

Birdhouse Project Building Time: 2- 3 hours Age Level: 8 and up Materials: wood scraps to be cut to dimensions in chart (1”x 4”, 1” x 6” and 1” x 8” will work the best) 1 box of 5d nails 1 ½” hole saw for drill Circular or hand saw Hammer Tape measure Pencil Sand Paper Paint/ stain to decorate Procedure: 1. Cut out all the pieces of wood before starting. You will need:
Piece Name Qty Lumber Size Front &Back 2 1 x 4 10” Sides 2 1 x 6 10” Bottom 1 1 x 6 6” Top 1 1 x 8 8”
2. On the Front Piece- Measure 2” across and mark. Measure 3” down and mark. This will be the center of your hole. 3. Use the hole saw to drill a 1 ½” diameter hole.(see Diagram A) 4. Using nails assemble front, sides and back as shown in Diagram B. 5. Using nails, attach the bottom piece to the end farthest from the hole. 6. Using nails attach the top piece. Make sure to leave a 2 “ overhang on the front and
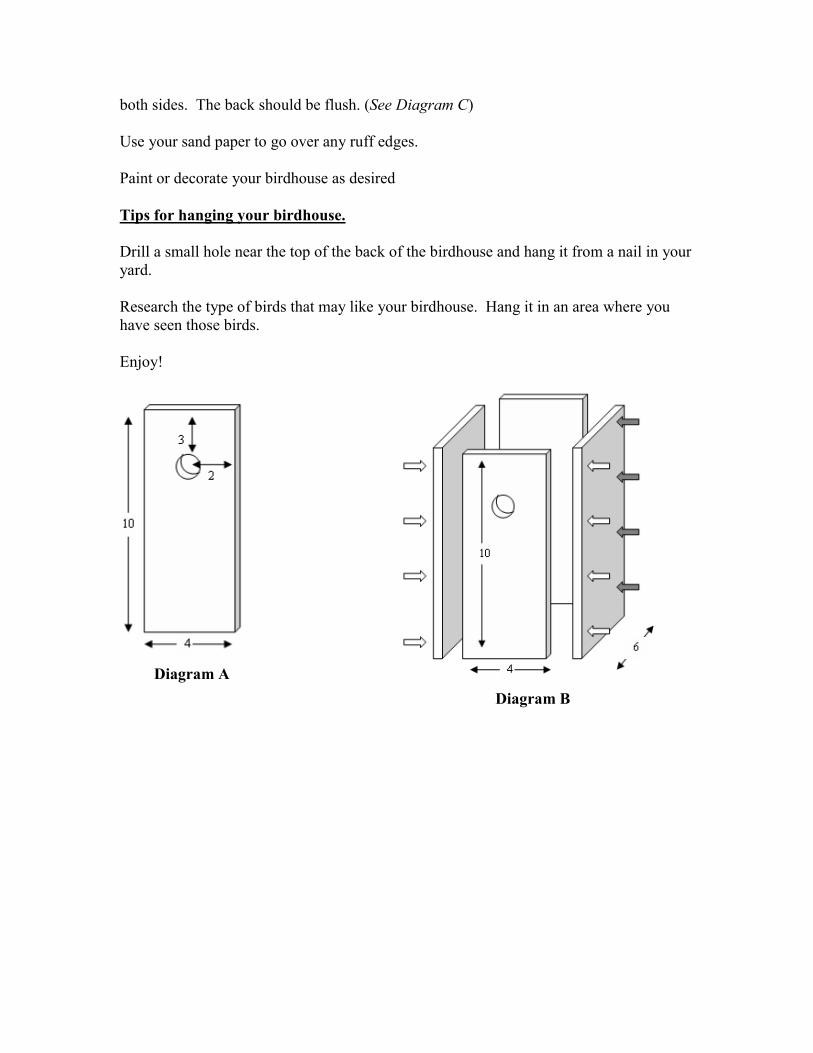
both sides. The back should be flush. (See Diagram C) Use your sand paper to go over any ruff edges. Paint or decorate your birdhouse as desired Tips for hanging your birdhouse. Drill a small hole near the top of the back of the birdhouse and hang it from a nail in your yard. Research the type of birds that may like your birdhouse. Hang it in an area where you have seen those birds. Enjoy!
Diagram A
Diagram B

Diagram C
Completed Bird House

Bench Project Building Time: 2-3 hours Age Level: 10 years and up Materials: -18 2” #8 Phillips flat head wood screws -Sandpaper -Paint or varnish -Paintbrush -Drill and bit -Circular saw -Level -Wood 1 – 1” x 12” x 36” (top) 2 –1” x 6” x 36” (sides rails/ skirt) 1 – 1” x 6” x 24” (inside brace) 2 – 1” x 10” x 17” (legs) Procedure: 1. Gather materials and cut boards to appropriate lengths. 2. Sand and paint/stain (optional) all pieces 3. Take the 2 legs (1”x 10”x 17”) and drill 2 holes in the top of each leg, ¼” from the top and 2 ½” from each side (see Diagram A). 4. Drill 4 holes in each side rail (1”x 6”x 36”), 2 holes on each side 5 ½” from the top and bottom and 1” in from each edge on both pieces (see Diagram B). 5. Drill 4 holes in the top piece (1” x 12” x 36”). Drill 2 holes in the top ¼” from each side and 1” from the top of the board. Drill 2 holes in the bottom of the board, 1” from the bottom and ¼” from the edge (see Diagram C). 6. Place the inside brace (1” x 6” x 24”) on a flat surface and line up the 2 legs (1” x 10” x 17”) flush on either side so that the holes line up with either end of the brace and screw into place (see Diagram D). 7. Line up the holes on either end of the outer side rails with the outside of the legs and

screw into place on each side (see Diagram E). 8. Turn the bench right side up and then place the top piece on the top (see Diagram F). Screw into place.
10
17
2 1/2 2 1/2
Diagram A
Diagram B
6
36
5 1/2 5 1/2 1
1
36 Diagram C
12
1/4
1

Diagram D
Diagram E
Diagram F

Completed Bench

Dog House
Building Time: 2-3 hours
Age Level: 10 years and up Materials:• 1PC - 4'x8' Exterior Grade Plywood Sheathing (5/8" thick) • 1PC - 2"x4"x10' Pressure Treated • 1PC - 2"x2"x10' Untreated • 1 Box (1lb) – 2 ½” Galvanized Deck Screws • 1 Box (1lb) - 1-5/8" Galvanized Deck Screws • 1 Quart - Exterior Grade Paint • 1 Large Garbage bag Tools Needed:• Tape measure • Chalk line • Circular saw • Drill - with drill bit and Phillips head screw driver bit • Spade Bit (3/4" or larger) • Hammer • Paint Brush • Pencil • Safety Glasses • Carpenters Square
Things to Consider:There are a couple of important considerations when building and designing a doghouse. Please keep these in mind if you plan to modify the plans to fit your needs.
1. Pressure treated wood should not be used on any parts the dog may chew.
2. The doghouse should be raised from the ground to keep out moisture and help insulate the dog from the cold.
3. The doghouse should be large enough for the dog to comfortably turn around but small enough to retain the dog's body heat.

Plywood: The doghouse should be built from exterior grade plywood. Most of the plywood you will find at your local hardware store is not exterior grade. Exterior grade plywoods have special glues that prevent the layers from coming apart when they get wet. The best material to use is exterior plywood sheathing. This wood is designed to be used on the outside of a home. It has a "rough cut" surface, sometimes with grooves cut into the surface for decoration.
Foundation: Because the foundation of the doghouse will sit on the ground, we used pressure treated 2"x4"s. It is unlikely that the dog will chew these boards. If you think your dog may gnaw on them, however, you may want to use untreated wood and paint it. We also drilled 1" holes in all sides of the base to allow ground moisture to evaporate and prevent rotting.
Roof: The roof to this doghouse is designed to be removable. This will allow for easy cleaning of the interior.
Procedure:
Cutting Plywood Key to diagrams: Green= Figure title Black= The piece being worked with; numbers in black are measurements Red= Measurements for cuts Blue= Label for each piece 1. Begin with the sheet of plywood. Measure up from the shorter (4’) side 24”. Make a mark there with your pencil. Go to the other side of the sheet and do the same. Pull the chalk line from one measurement to the other, pull tight, and snap the line. You should have a rectangle that is or 48” by 24”. [Fig. 1] 2. Cut this out of the sheet. When cutting, make sure the blade is on the side that you are not currently concerned with. In this case, your blade should be on the 48”x 72” side of the line. This helps make sure all measurements are exact. * On the diagrams the shaded area is the side of the line that your blade should be on. *Ear plugs are suggested while saw is in use. 3. Take your 48”x 24” piece and cut it in half. (When doing this measure 24” from one side, snap a line with your chalk, and in this case cut right down the middle of the line.) Write “side” on each of these pieces. [Fig. 2] 4. Cut the 48”x72” leftover in half. To do this, measure 36” (3 ft) up from the short side and do the same on the other. Snap a line and make your cut. [Fig. 3] 5. Take the 48”x 36” section and measure 22 7/8” from a short side and snap a line. Make your cut, and then measure 24 1/8” from a short side of the same sheet and snap a

line, then make another cut. Label one of these pieces “bottom” and the other “back.” [Fig. 4]
6. Take the “back” and measure up the long side 24”. Make pencil marks at each 24”, but do not snap a line. 7. Measure 11 7/8” on the shorter side of “back” and make a mark with your pencil. 8. Snap a line from one of the 24” marks on “back” to the 11 7/8” mark. Do it with the other measurement. [Fig. 5] 9. Cut both lines on the waste side of your line. You should have a pentagon when done. [Fig. 5] 10. Take your remaining 48”x 36” section. Measure 18” from a 36” side. Snap a line, and make your cut. [Fig. 6] 11. Measure 12” up from the 36” side of the remaining piece, and cut that. You should have two 18”x 36” pieces and a 12” x 36” piece. Write “roof” on each of the 18”x 36” pieces. [Fig. 6] 12. Take the 12”x 36” piece and measure 11 7/16” on one 36” side, and 22 7/8” on the other. Snap a line from the 22 7/8” to the 11 7/16” and cut. Snap a line from the 11 7/16” mark to the corner, and cut that. You should have a triangle when complete. Label this “porch” [Fig. 7] 13. With the last piece, snap a line from the right angle to the 135 degree angle, and cut. [Fig. 8] 14. Using your tape, measure up 6” from the long side of the triangle. Move your tape until it hits the outside of the triangle. Doing this on both sides will give you 6” up. Snap a line, and cut. You should have a trapezoid with measurements of 24” and 12”. Write “brace” on that piece. [Fig. 9] You are done with plywood cutting! Cutting pressure treated 2”x4”x10’ 1. Measure from one side up to 33”. Make a mark with your pencil, and then use your square to make a straight line. (Push the big part of the square against the 2x4 so that it is tight and the straight part is next to your mark. [Fig. 1]
2. Do this again. (Tip: You can measure from each side and make your lines, then cut both.) Cut these pieces out and label them A. 3. On the remaining piece measure up 24” on both sides, and cut those. Label these pieces B. [Fig. 2]

Make sure you label each piece cut with its assigned letter. Untreated 2”x2”x10’ 1. Measure from one side 22 7/8”. Mark and cut. Label it C. [Fig. 3] 2. Measure 22 1/2” from one side, mark, and cut. Do this again. Label these pieces D. [Fig. 4] 3. Measure 10 5/8” from one side, and 31” from the other. Mark and cut. Label these F and E respectively. [Fig. 5]
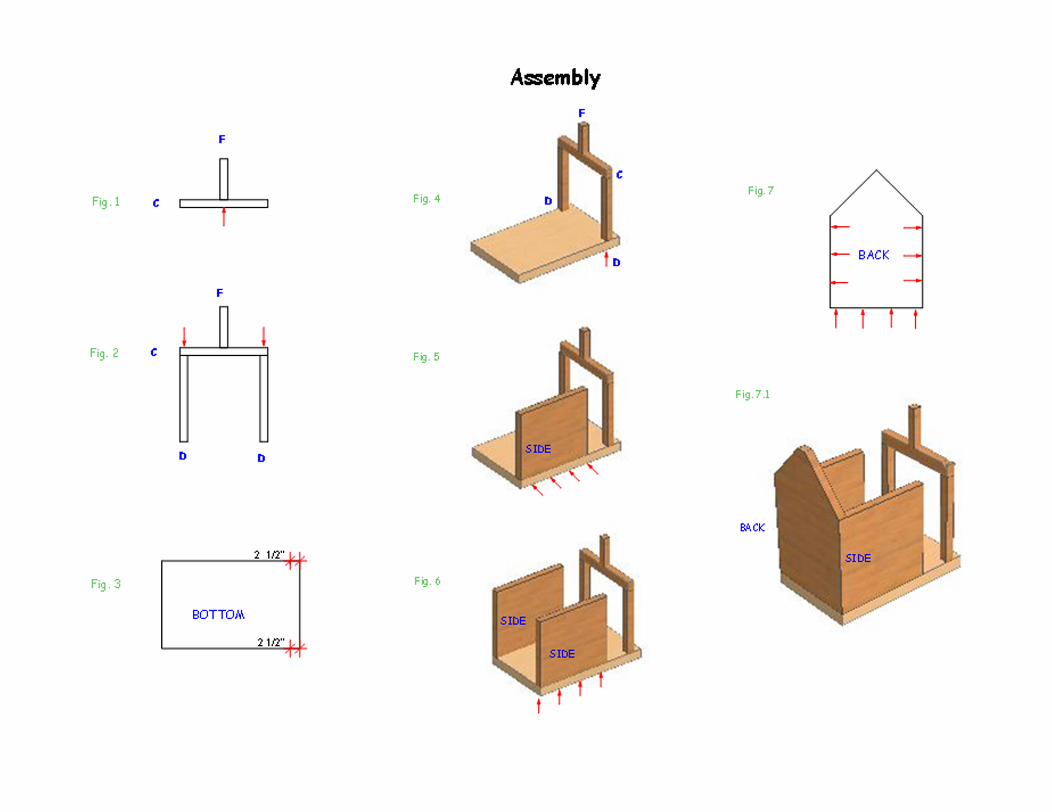
Make sure you label each piece cut with its assigned letter. Assembly Key to diagrams: Green= Figure title Black= The piece being worked with; numbers in black are measurements Blue= Label for each piece Red= Where your screws should go 1. Begin with your 2x2 untreated wood. Take piece C and measure 10 3/4” from each side of it and make a mark. This will create a 1 1/2” space for you to line up piece F. [Fig. 1] 2. Place piece F in between the marks, and screw together with one 2” screw. (It may be helpful to use a small drill bit and make a pilot hole first. This will prevent the wood from splitting.) [Fig. 1] 3. Next line up both D pieces on the ends of C. Screw these together. [Fig. 2] 4. Taking the “bottom” piece of plywood, mark 2 ½” from one of the short sides with your pencil. Make sure to do this on the smoothest side of the plywood, because this will be the floor for your dog. Do the same on the parallel side. [Fig. 3] 5. Place your 2x2 frame so that the outside edge lines up with these lines. [Fig. 4] 6. Screw in 2x2s with 2” screws from below “bottom.” 7. Take one of your “sides,” and line it up with the corner of the “bottom” opposite the side of the 2x2 frame. Screw 1 5/8” screws in from the “side” into the “bottom.” (Again pilot holes may be useful.) Use 4, about 8” apart. [Fig. 5] 8. Do the same with the opposite “side.” [Fig. 6]

9. Take the “back” and have the three square sides lined up with the “bottom” and each “side.” Screw these together every 8” or so. [Fig. 7] 10. Take one B and place it on the ground with the 1 ½” side touching the ground. Place one A at each end so that they are coming off of B making a U that is 24”x 34 ½.” Screw these together from B into the A’s with 2 of the 2 ½” screws. Take the last B and screw it into place in the same way. You should have a 24”x 36” box. [Fig. 8] 11. Take your trash bag and cover the box frame. You might have to cut it down the seams to make it larger. It should overlap the frame. This provides a moisture barrier and more insulation for your dog. 12. Pick up the sides and bottom and place the bottom on top of that framed box. Make sure it lines up with the outsides as close as possible. Using 1 5/8” screws every 8” or so fasten the bottom to that frame from inside the doghouse. You might have to go in at an angle to do this. [Fig. 9]
13. Cut off any excess plastic. 14. Put your ¾” spade (paddle) bit into the drill. Make 2-4 holes in each side of the frame. This helps to release any condensation from below the doghouse. 15. Measure from the tip of the “back” down ¾” and make a mark. Take E and put it between your mark and F. Line the top of E up with that mark and the top of F. Screw E in so that it is secured with 2 ½” screws. This creates a support beam for the roof. [Fig. 10] 16. Take “porch” to the front of the dog house. Screw it to F with 2 of the 1 5/8” screws going into the support piece. The tip of the porch piece should be ¾” higher than the top of F. [Fig. 11] 17. Measure both roof pieces. One should be slightly shorter than the other. Put them together so that two 36” sides are matching in a right angle. Screw in from the larger piece, into the shorter. It should look like a right angle, but if you flip it over it will sit so that the peak of the roof is the 90 degree angle. [Fig. 12] 18. If you do not want your roof to be removable you can screw it into the “back” using 1 5/8” screws, and into “porch.” You may also use “brace.” To do that measure 18” in from “back” on both sides of the roof. Then crawl inside the house and position the “brace” against the inside of the roof. You might have to trim the “brace” a little bit. Have someone put in a screw or two in that 18” mark. (It works to let the screw head poke through just a little bit, then line up the brace and have them finish it off.) [Fig. 13] 19. Paint your dog house, and let your dog make it a home!


Description:The Habitat for Humanity Card Creation Kit is meant for use with youth ages 5 to 9. A brief description of Habitat for Humanity should be explained to the children before they begin so that they have a general understanding of the organization.
This description can be created by visiting www.habitat.org. Check out theFact Sheet and visit the Youth and Habitat section. You can also learn more about Habitat in your area by contacting your local affiliate. For contact information visit www.habitat.org/local.
Great for:• classrooms • baby-sitters/day care/after-school program• church youth groups • Youth United• preexisting youth groups • mentors• affiliates • families
Individual youth or groups may participate in the coloring of the cards and the creation of the pins to attach to the cards. All templates should be printed and copied in advance. (Cards should be printed on card stock or heavier weight paper when possible.) Pin materials (felt or thin foam sheets) may be precut or cut as part of the activity. Pins should be attached to the cards with adult supervision. Completed cards can serve a variety of functions as listed below.
Ideas for use of kit and completed cards:• Send cards home with youth. • Sell cards at an event (proceeds should go to Habitat for Humanity).• Give cards to donors at a fund raiser.• Use as a take-home activity for parents and children to work on together.• Create a card/pin competition.• Donate completed cards to your local affiliate to give to new homeowners.• Donate to an affiliate to use as thank-you cards for an event.
Card Creation Kit Youth Programs
Included in kit: card packet templates
• 6 faith-based message cards
• 11 general giving/thank-you message cards
• 1 blank card (with list of possible sayings for youth to write)
craft templates flyers/inserts list of sample messages
Materials list: heavy-weight paper scissors (if youth are cutting
shapes for pins) colors (crayons, markers or
other) felt sheets or thin foam sheets pin backs (available in local
craft departments) glue
(continued on back)

Optional phrases to be used for blank cards
A bit of fragrance always clings to the hand that gives roses. —Chinese proverb
No one has ever become poor by giving. —Anne Frank
We should give as we would receive, cheerfully, quickly, and without hesitation; for there is no grace in a benefit that sticks to the fingers. —Seneca
Nobody made a greater mistake than he who did nothing because he could do only a little. —Edmund Burke
How wonderful it is that nobody need wait a single moment before starting to improve the world. —Anne Frank
He who wishes to secure the good of others has already secured his own. —Confucius
It is one of the most beautiful compensations of life, that no man can sincerely try to help another without helping himself. —Ralph Waldo Emerson
No person has ever been honored for what he received. Honor is our reward when we give. —Calvin Coolidge
You can do what you have to do, and sometimes you can do it even better than you think you can. —Jimmy Carter
Do what you can to show you care about other people, and you will make our world a better place. —Rosalynn Carter
Flyers/insertsPlease include an insert explaining how the individuals who receive this card can find more information about Habitat for Humanity International.
Also consider including a note about upcoming events that the youth in your area are working on, or that your local Habitat for Humanity affiliate has planned.
Select a card included in this kit or create your own for your group. Remember that you should not duplicate the Habitat logo without specific permission from Habitat for Humanity. (See samples at left. Full-size versions are in the PDF file labeled FlyerIdeas.pdf.)
YOUTH PROGRAMS: 121 Habitat St. Americus, GA 31709-3498 USA (229) 924-6935 (800) HABITAT fax (229) 924-0577 [email protected] www.habitat.org P
DF/
CC
YP
/3 -
06
D O N A T E
Habitat for Humanity works because of the kindness and generosity of people like you. Th rough your donations Habitat is able to provide hard-working
families around the world a home at a cost they, too, can aff ord. Locally or internationally, your help is needed to put an end to substandard housing.
To learn more about Habitat visit us online:
www.habitat.org/ccyp
y o u r t i m e
s u p p l i e s
m o n e y
This card was created especially for you
by youth at:
_________________________________
These students are learning about poverty housing issues and how it affects the communities we live in.
Habitat for Humanity is just one of many organizations dedicated to ending poverty worldwide, and you can help.
Habitat for Humanity works because volunteers like you are willing to provide money, time and supplies.
We encourage you to also consider educating children further on poverty housing issues so that they, too, can get involved.
Visit our Web site for more activities to do with the youth in your life.
www.habitat.org/ccyp
FlyerIdeas.pdf examples

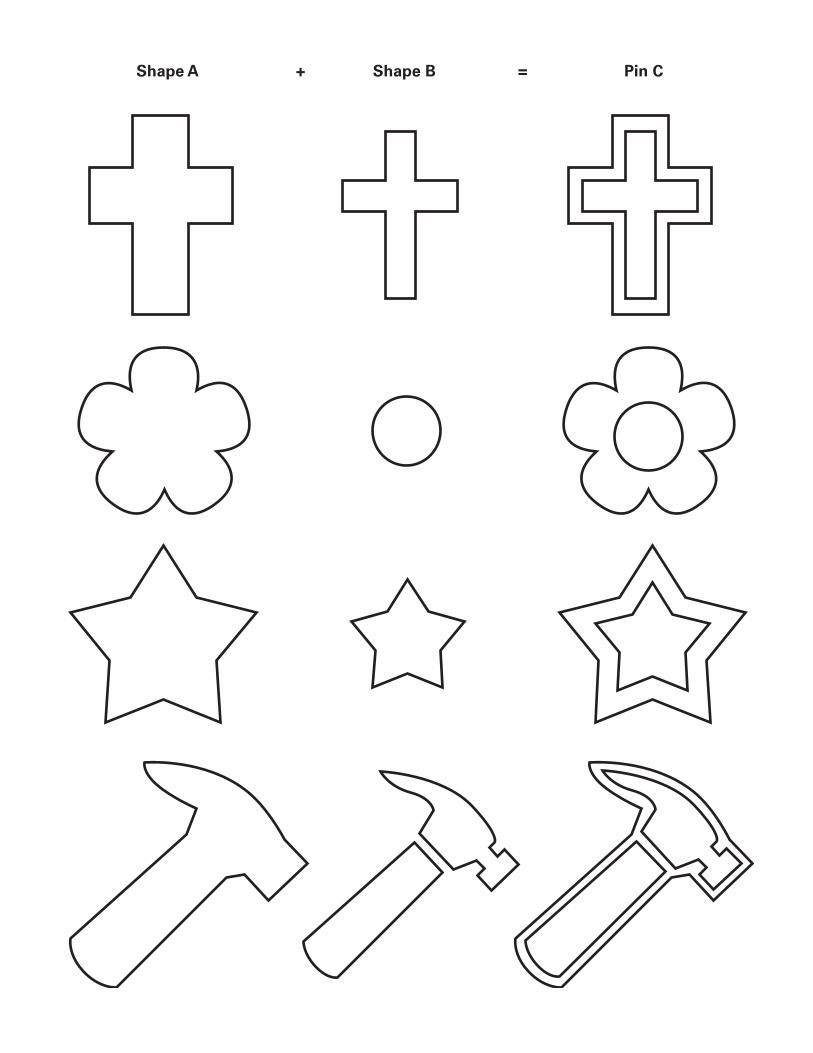
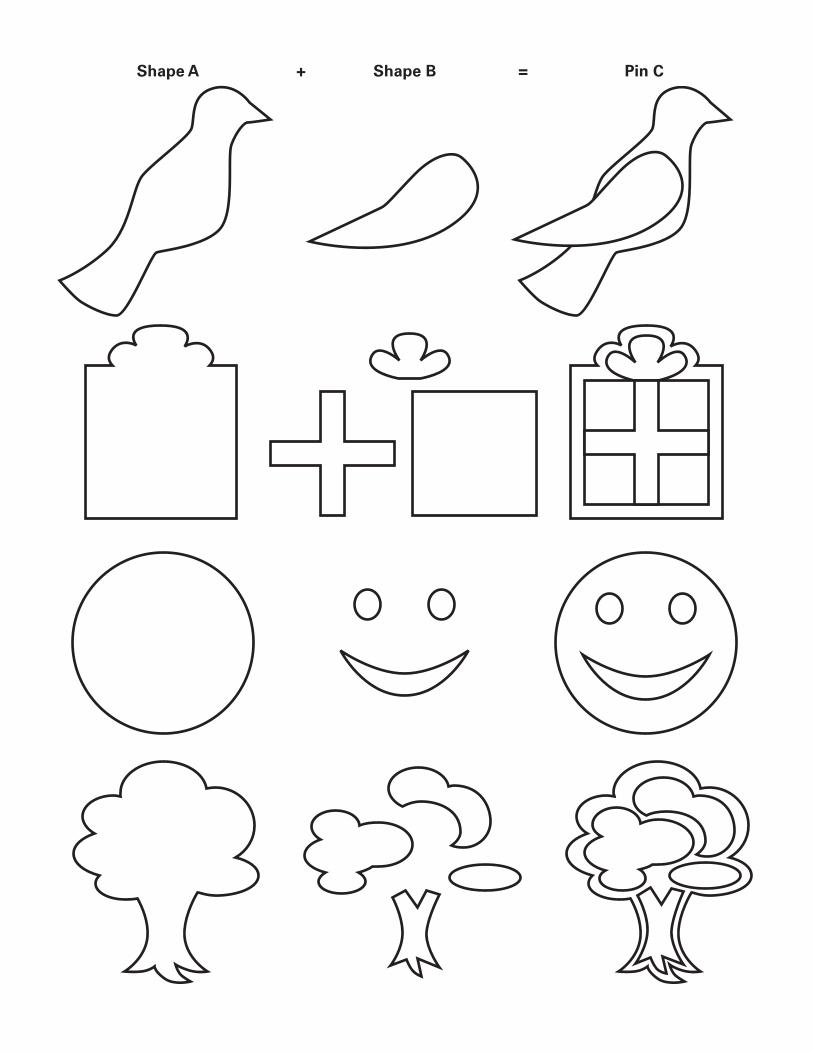
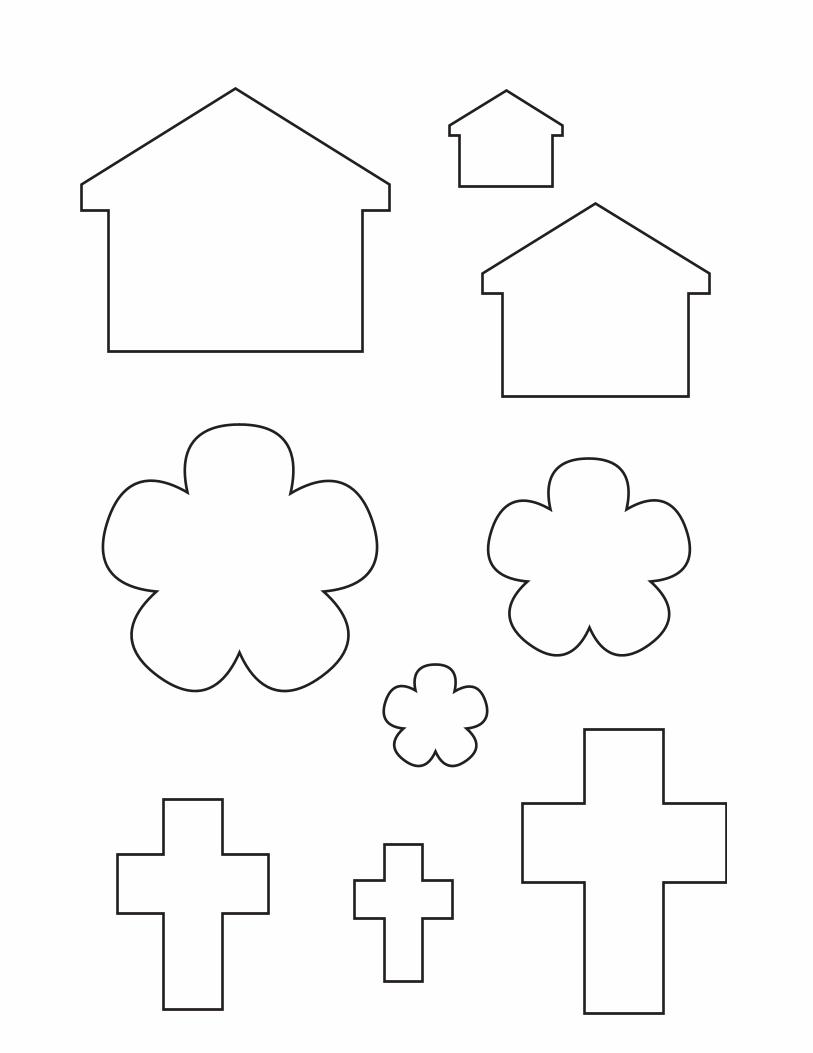
Shape A + Shape B = Pin C
Directions: Cut out Shape A and Shape(s) B. Glue Shape B on top of corresponding Shape A and let dry. Once dry, pin to your card and share!
Pins Templates Youth Programs
Shape A + Shape B = Pin C
Shape A + Shape B = Pin C

Shape A + Shape B = Pin C
Shape A
Pin C
Shape B

Directions: Select two to three shapes of different sizes. Glue in size order with the largest as the base piece, to create a design of your choice. Attach pin to back of base shape. Once dry, pin to your card and share!
Mix-n-match Templates Youth Programs


Tool Caddy Project Building Time: 2-3 hours Age Level: 10 and up Materials: -2- 1” x 8” x 24” for sides -1- 1” x 8” x 22 ½” for bottom -2- 1” x 8” x 12” for ends -16 2” nails -1 ¾” dowel rod -Fine sandpaper -Saw -Hammer -Drill -(Optional) Paint/stain and brush Procedure: Part 1: Cutting 1. Saw each of the pieces (see the materials list). 2. Cut the dowel rod to a 24” length. 3. Sand down all the pieces Part 2: Optional Paint/stain the pieces and let dry Part 3: Pre- Assembly (see Diagram A) 1. Make a dot in the center of the 2 end pieces 1 ½ inches from the top. 2. Drill holes with a ¾” diameter bit for the tool holder and side pieces. Part 4: Assembly (see Diagram B) 1. Tap the dowel into the hole near the top of each end piece to make the handle. 2. Fit the bottom piece evenly at the bottom between the 2 end pieces, parallel to the dowel. 3. Fasten the end pieces to the bottom piece with 2 nails at each end. 4. Fit each side piece to the end and bottom pieces.

5. Put 4 nails evenly spaced out into the side piece along the length of the bottom. 6. Put 2 nails in either end of the side pieces. Part 5: Optional Decorate the tool caddy (use paint, markers, etc.) Also, consider other ways to use this project (example: flower box). Be creative!
Diagram B
Diagram A

Completed Tool Caddy