course planning - british orienteering · course planning graham nilsen ... the course planner is...
TRANSCRIPT
Course Planning
Graham Nilsen
© British Orienteering Federation 1995
with minor updates - February 2006

ContentsAcknowledgements 4
Maps 4
Introduction 5
Before the planning begins 6Many hands, or too many cooks? 6Is the area suitable? 6Positions of start and finish 6Initial reconnaissance 7Choosing your course lengths 8Combining classes 10Restrictions on planning 10The map for planning 10Closing date for entries 11Contacting the controller 11
Armchair planning 12Pleasant, runnable forest 12Variety of terrain used 12Variety of legs 13Long legs 13Shorter legs 14Some pitfalls to avoid 15Functions of controls 17The mechanisms of planning 18The control map 18
Levels of technical difficulty 19TD1 19TD2 19TD1 & TD2 19TD3 20TD4 20TD5 20
Physical difficulty 22
Planning for other types of event 231: Relays 23The main systems 242: Night events 273: Score events 28
Work on the ground 29Taping control sites 29Start and finish 29Crossing points 30Yellow tape features 30Test runs 30
2
Back home again 31Rationalising the controls 31Allocating control codes 31Refreshment points 31Description sheets 31Marking the courses on the maps 32Professional overprinting 33Map corrections 33Final details (for competitors) 34Allocating punch codes 34Master check cards 34Disaster planning 34
The event itself 35Control site layout 35Putting the controls out 35During the event 35Collecting in the controls 35
The post-mortem 36
The controller 37
Timetables 38Badge Event with Overprinted Maps 38Colour-coded Event with Master Maps 39
3

Acknowledgements
Particular thanks are due to:Erik Peckett and Martin Bibby who, as successive chairmen of BOF Technical
Committee, encouraged me to write this book and who have had to wait rather longer than intended before seeing it finished
Barry Elkington and David May for their comments and suggestions on the draft version
Charlie Daniel and Dick Keighley who, more years ago than any of us wish to remember, taught me how to plan courses
the seven members of Deeside who willingly spent an evening running up and down a hill so that I could test out my ideas on the effect of height gain on running speed
Anna Nilsen, for doing virtually all of the typing.Naturally, any mistakes in the book are my responsibility, not theirs.
Maps
The coloured maps used in this book all appear with the consent of the relevant copyright holders, for which I am grateful:BKO, BL, CUOC, DEE, EAOA, HOC, Anthony Kay, MDOC, MEROC, Mike Murray, NWOA, Tony Pennick, SN, SOA, Dick Warner, WOA, WFO.[No, I'm not going to spoil your fun by naming the areas .... ]
4

Introduction
The course planner is probably the event official with the highest profile: the product of his or her work will have the greatest influence on the competitors' views of the success of the event as a whole. How, then, do we ensure that the event is a success? We need to consider on what basis the competitors will form their judgments - in other words, what makes a good orienteering course? The course planner should have two aims:
to leave the competitors feeling that they have enjoyed themselves, having been stimulated both mentally and physically
to plan fair courses which will result in the best orienteer winning.The purpose of this booklet is to consider how these two aims can be achieved. It will concentrate on cross-country orienteering simply because that is the predominant form, and will consider the tasks involved in planning an event in roughly chronological order.The course planner is responsible for everything from the start line to the finish line. With odd exceptions (e.g. map corrections) everything else is up to the organiser - however, what the exceptions are will vary from event to event, so frequent communication between the two is essential.
5

Before the planning begins
Many hands, or too many cooks?The question of whether to have more than one planner is a complicated one: against the advantages of spreading the load, the opportunity to 'ease in' inexperienced planners, and built-in cover against illness close to the event, must be weighed the problems caused by communications - one planner needs to be in overall charge, able to check that everything is done correctly, and acting as the main point of contact for the controller. With more than one planner the total amount of work to be done will always be greater, even though the workload for each individual is reduced.
Is the area suitable?Before the event is definitely decided on, the planner needs to assess the suitability of the area: does it provide terrain simple enough for the easiest courses, yet sufficiently complicated (in other parts) to test the best navigators?
Positions of start and finishThe approximate positions of start and finish should be decided early, for the organiser's benefit (before, indeed, s/he decides their positions for you!). There are several points to consider here:
* access to complex terrain for the harder courses without 'dead running' at the beginning and end of the course
* access to simple terrain for the easiest courses - can beginners get from start to finish without leaving well-defined line features? This point must never be compromised, and may require a separate start and/or finish for the easier courses. Also, the easier courses will need to have their start triangle on a line feature.
* vehicular access to the start - somebody (preferably not a team of sherpas) has to get all the equipment and maps there. Easy access is particularly important if the start is distant from the finish, so that it is necessary to transfer competitors' clothing
* the competitors' route of approach to the start will be the most heavily-used part of the area - will the ground stand up?
* is there room at the start for competitors to warm up?* can the start be laid out in such a way that competitors starting are hidden from
the view of those waiting at the pre-start?* proximity of the finish to the car parking - particularly important in the winter, when
it might not be wise to make tired competitors wearing sodden kit walk long distances back to their cars
* proximity of the finish to where results are being processed - if only to make it easy for you to find out when all the competitors have finished
* if the area is steep, so that courses are likely to have a lot of climb, try to put the start high and the finish low
* competitors must arrive at the finish from a predictable direction: use a finish funnel, with the finish in an obvious place, or use tapes from a simple last control
6

* make the last part of the run-in flat or slightly uphill, to make things easier for the finish team
* all other things being equal, a particularly scenic finish location helps to create a good atmosphere, and should certainly be considered for relays
* for badge events, the finish and results system may require that any EOD/colour-coded courses have a separate finish. Not that this will prevent colour-coded competitors turning up at the main finish - which can complicate the task of checking that all competitors have safely returned - so avoid splitting them off if you can.
It may be that, once you start the planning, you find it difficult to plan certain courses. Don't be afraid to try moving the start (or, less easily, the finish) to another position, at least for some courses.
Initial reconnaissanceHave a look around the whole area before planning, preferably about twelve months before the event so that you are seeing the vegetation at the correct stage of its growth. Try to identify the nicest parts of the area for running through, and the sections where it will be difficult to avoid competitors seeing controls from a long way off. Are there any parts into which you wouldn't send your worst enemy, or where the ground is too rough and/or steep for the more senior competitors? What are any roads in the area like for traffic, and
7
better to use tapes to bring finishers in from predictable directions
or use only those controls from which finishers will naturally come from predictable directions
chaos – finishers come from all directions
for visibility at possible crossing points? Are walls and fences, and any large streams, easily crossable (particularly for younger and older competitors) without risk of damage, or will crossing points be necessary?It is worth at this stage checking likely start and finish sites for suitability.
Choosing your course lengths(see BOF rules: Appendix B section 2.5; Guidelines A4, B4)N.B. For an event in winter, aim for course lengths which are on the short side - it is better for competitors to be out for too short a time in the event of good weather than for them to be out for too long in bad weather.There is no guaranteed route to success, merely suggestions which seem to work reasonably well most of the time.First, assemble your sources of information:
* results of previous events on the same area* results of recent events on similar terrain
For these events, try to find out about any factors which might affect your event differently:* vegetation (forest growth/thinning/brashing; undergrowth)* adverse weather* % height climb* master maps/pre-marked maps used* quality of competitor* were the shorter courses predominantly in faster (or slower) parts of the area?
and treat the results with caution accordingly.Note that one thing in this list - the % height climb - is potentially quantifiable. There have been several attempts over the years to produce a rule of thumb relating height climb to equivalent distance on the flat; course lengths could then be converted to their flat equivalents, allowing a better prediction of running time. Suggested figures have varied, with each 100m of climb being equivalent to anything from 350m to 1000m of flat. Intuitively, it is to be expected that:
the greater the % height climbthe rougher the going underfootthe more competitors are forced to do their climbing off paths
the more likely they are to end up walking, and so the greater the 'flat equivalent' figure needs to be.There is then no thoroughly reliable rule to use in compensating for height climb. If your courses will have a similar % height climb to courses in the earlier events, things like undergrowth will probably have a more significant effect on running times. That being the case, it is probably only worth the effort of converting to flat equivalents when your event will have a significantly different % height climb - e.g. because you are using a high start and a low finish, whereas the earlier event started and finished at the same level.The procedure then is:
If you need to allow for the effect of height climb, convert the previous course lengths to their flat equivalents by adding on 500-800m for each 100m of climb (rougher areas need to have the higher amount added).
For each class, calculate how the previous course lengths would need to be altered to give the recommended winning times/average gold times/times for most finishers (as appropriate), as given in Guidelines A and B. Beware small classes and ignore B classes at this stage.
8

For a colour coded event, that is probably sufficient. Bigger events require more care, however. To check the theoretical lengths for a badge event:
1. for each class, find the ratio of the length of course to the length of M21L, and compare it with the ratios given in Guideline B. (M21L is used since, being the largest class, its results are the most likely to be valid.)Rough areas tend to slow older competitors more than they do M21s. In such areas, expect the older classes to need lower course length ratios than recommended in Guideline B.Similarly, hills affect the less fit disproportionately more - there will be a greater spread of times in a hilly area than in a flat one. This again needs taking into account, particularly for the older classes.
2. for areas where all classes will run on similar terrain (e.g. you haven't got a particularly rough or thick piece of forest being used only for the longer courses), plot a graph of running speed against age to give a 'bath tub' curve:
This curve can prove particularly useful for checking smaller classes where the past results are more vulnerable to unusually slow winning times. As a final check, write down the list of age classes with their projected course lengths, looking for sudden jumps or even things like M65 being longer than M60.
3. For B classes (juniors):course length = (RWT for B RWT for A) x length for A.
4. For short classes (seniors): course length = 2/3 x long course length.
9

Having finally come up with a set of projected course lengths, remember (where relevant) that these are flat equivalents - your final planned courses will need to be shorter by 500-800m for each 100m of climb.
Combining classes(see BOF rules: Guideline B4)Once you have your list of projected course lengths, you can start looking to put more than one class on a particular course. This will reduce the amount of work you have to do. Classes to be combined in this way must:
* have similar projected lengths* require the same technical difficulty* have a likely combined entry small enough to fit in the available start list.
Avoid making significant compromises with course lengths, and ensure that the physical difficulty of the final course matches the lowest of the required physical difficulties for the classes involved.
Restrictions on planningNow is the time to find out about these. They may include:
conservation* areas to avoid because of sensitive vegetation or wildlife* need to leave 'quiet zones' for wildlife (e.g. deer) to retreat into (see Appendix
F for a more thorough discussion)forestry work : is any felling/brashing/thinning planned before the date of the event? This may need checking more than once over the months before the event.crossing points
* are there any walls/fences which, at the request of the landowner, are to be crossed only at special crossing points?
* where can roads be crossed safely, and do they require specific crossing points? The police may have a view on this - ask your organiser to check
* other conditions of use - e.g. out of bounds areas around housing; fields which will have livestock in them at the time of the event - many children are frightened of cattle, for instance
terrain : in particular, are there parts of the area unsuitable for older competitors because of steepness or roughness, or because the map is too difficult to read?Remember also to check on access to the area for checking control sites etc., lest you find yourself in the middle of a pheasant shoot or an army exercise.
The map for planningIf the event is to be on an already existing map, then you're lucky. Check that there are enough copies for the event. If you will be overprinting the courses, you may want to print in excess of the pre-entry numbers to allow for EOD on all courses; maps will be used for drawing up draft courses (before taping) and finalised courses (i.e. 4 maps per course - 2 for yourself, 2 for the controller); maps will be wasted in overprinting (setting up, bad copies etc.); and you will need to leave yourself sufficient spare maps to be able to re-overprint a whole course in the event of a mistake. As a rough guide, the number of maps needed is 1.5 x the projected entry - any less and you will find yourself under too much pressure when overprinting, leading to competitors having to use maps which you would prefer to reject.Life becomes more difficult when a fresh map is to be produced for the event. You have a
10

choice of options:1. use the previous map - a risky business, and to some extent a waste of the
possibilities provided by a more up-to-date survey. Problems are caused not so much by features not appearing on the new map, as by changes in runnability - what looks a good route choice leg on the old map can look completely different on the new map. Basically, don't, unless you know that the new map will be little more than the old one redrawn.
2. use a copy of the draft of the new map. Make sure that this has been reduced to final scale, and that it's in colour.Disadvantages:i. it won't be identical to the printed mapii. it may be hard to read in placesAdvantages:i. you can ask for extra features (e.g. tripods, branch hides) to be added in
featureless parts of the mapii. if control taping is done early enough, any faults in the map can be rectified
before printing.3. wait for the new map to be printed - ultimately the best way of planning, assuming
the map is perfect, but may not be practicable because it would delay planning by too much.
In short, the choice lies between 2 and 3, and will probably be dictated by the timescale for producing the map.Whichever you choose, if your courses will eventually be overprinted, make sure that the cartographer specifies to the printer that one corner of the map be left untrimmed, and that the printer marks the map to show which corner it is. If the overprinting is to be done professionally, ask for a blank space to be left alongside the map so that the description sheet can be overprinted with the course.
Closing date for entriesFor an event with pre-entries and overprinted maps it helps if you can persuade your organiser not to set this too late. Ideally, you would like to know the size of the pre-entry on each class before overprinting, to help in deciding how many maps to overprint (unless late entries and EOD are not being accepted, you will still need to allow a cushion of 50 - 100% extra).Between the closing date and the event you will need:
an extra week for the entries to arrive (most will arrive in the few days after the closing date) and be allocated to classes
time to overprint the maps, stick on the description sheets, and seal them in map cases
time for the controller to check all of the mapsan extra four or five days for 'emergencies' - illness, heat-sealer failure etc.
Contacting the controllerIt is worth doing this at this stage, if only to reassure him/her that something is happening. The controller will wish to vet your intended course lengths and class combinations, and will want to discuss with you the deadlines for completing the major aspects of the planning.
11

Armchair planning
Before starting this, the creative part of your work, you need to have a clear idea of what you are trying to achieve. As stated earlier, the course planner should have two aims:
to leave the competitors feeling that they have enjoyed themselves, having been stimulated both mentally and physically
to plan fair courses which will result in the best orienteer winning.Achieving the first of these two aims probably requires the second to be satisfied anyway. What other factors will colour the competitors' impressions of an event?
Impression producedGood Bad
pleasant, runnable forest Fight / tussocks / bramblesmindless climb
variety of terrain usedvariety of leg length and direction many legs of a similar lengthvariety of techniques tested- route choice- fine map reading, including contours- rough compass to catching feature- rough navigation using detail- compass and pacing
path runs requiring little concentration
The weather
Granted, the last of these is probably the most important, but it's also the one over which the planner has least control...
Pleasant, runnable forestLargely beyond the planner's control, but do make good use of the nicest bits you've got, using a map exchange/second master maps if it helps.
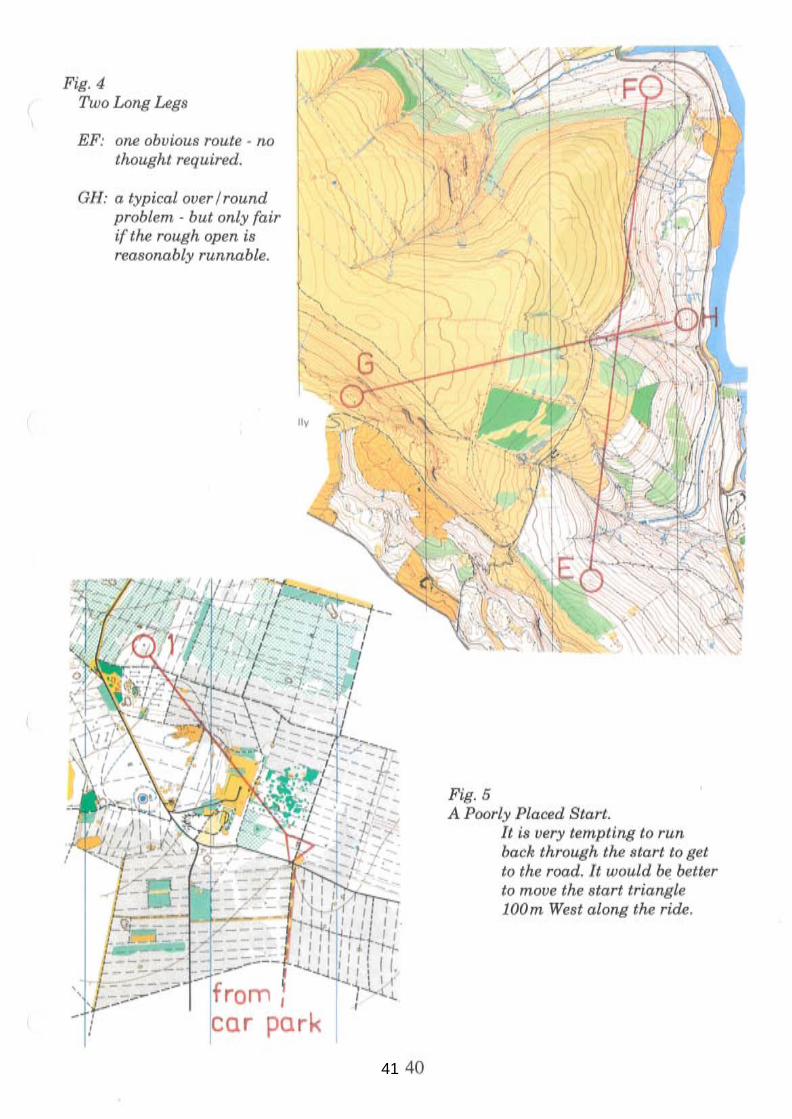
Variety of terrain usedIf you have a mixture of, say, open and wooded, try for repeated changes from one to the other rather than just starting in one and finishing in the other.See Fig.1: In and out of the woods
12

Variety of legsMany legs of similar length and direction lead to boredom. This sort of course:
breaks up the competitor's rhythm far more successfully than this one:
Try also to avoid having all the courses going in the same general direction around an area - it is better to have the competitors going in all sorts of different directions.
Long legsProperly planned, short legs should always be good at testing fine map reading and (if the terrain allows) contour interpretation, as well as compass and pacing skills. Short legs force competitors through the terrain. The best routes will generally be straight-line ones: the problems are in following those routes rather than in selecting them. Route choice is better tested with long legs.What are the attributes of a good long leg?
* several possible routes, with the quickest being navigationally the hardest* routes involve going cross-country over intricate terrain, or linking many different
paths together - mental problems posed throughout the leg
13

* fairness - it must be possible to decide between the available routes solely from the information on the map. What looks the quickest on the map must also be the quickest on the ground
* several choices equivalent as far as possible, to split competitors up with e.g. fast runners following a longer route to use paths whilst a slower but stronger runner goes straight. Competitors with different strengths and weaknesses will consider different routes to be the quickest
* no one leg should be more than 20% of the course length, lest the result of the race hinge on one decision. However, the two longest legs of the course together should be around 33% of the course length, in order that route choice be adequately tested.
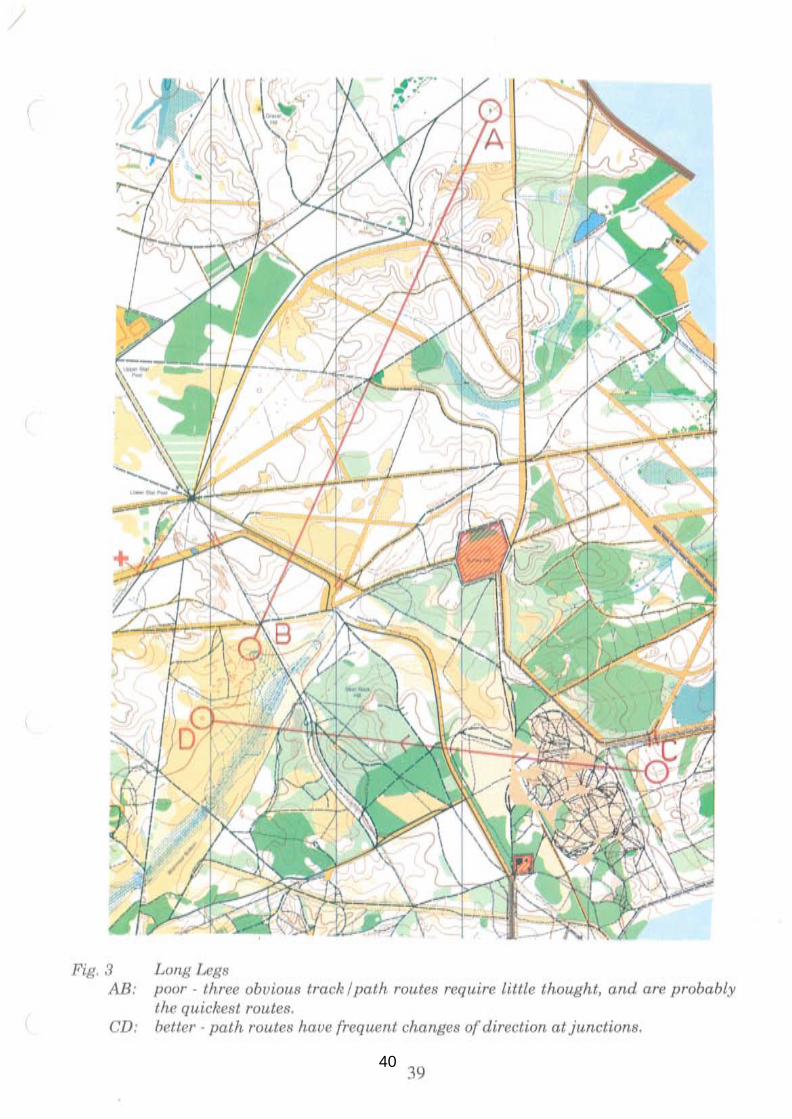
See figs. 3 and 4 for some sample long legs.If the area is so small that crossovers are inevitable, put the long legs early in the course. This prevents competitors recognising where they are at times when they should be rough orienteering. Allow a couple of shorter legs first, so that competitors can get used to the map and the terrain: competitors need some experience of how fast the different grades of runnability are, and how firm the paths etc. are, before they can make valid route-choice decisions.Good long legs are the hardest to plan, consequently they usually need to be planned first, with the rest of the course then built around them.
Shorter legsIdeally (for the harder courses) these should require fine navigation, particularly contour interpretation, and no use of line features, throughout their length. Any 'catching features' should be behind, not in front of, the control.Controls requiring compass and pacing need particular care: even in open forest this technique is accurate only to around ± 5º of bearing, a figure which gets steadily worse as the forest thickens. This means that any feature to be approached on a compass bearing from an attack point needs to be visible to a person missing it by a distance of around 10% of the distance from the attack point, e.g.
If the pit (or, at least, the marker) isn't visible from 20m away, don't use it.For younger/less skilled orienteers, this "collecting front" will obviously need to be bigger. For night events, remember that the range of vision of the competitor is limited by the penetration of the headlamp.
14
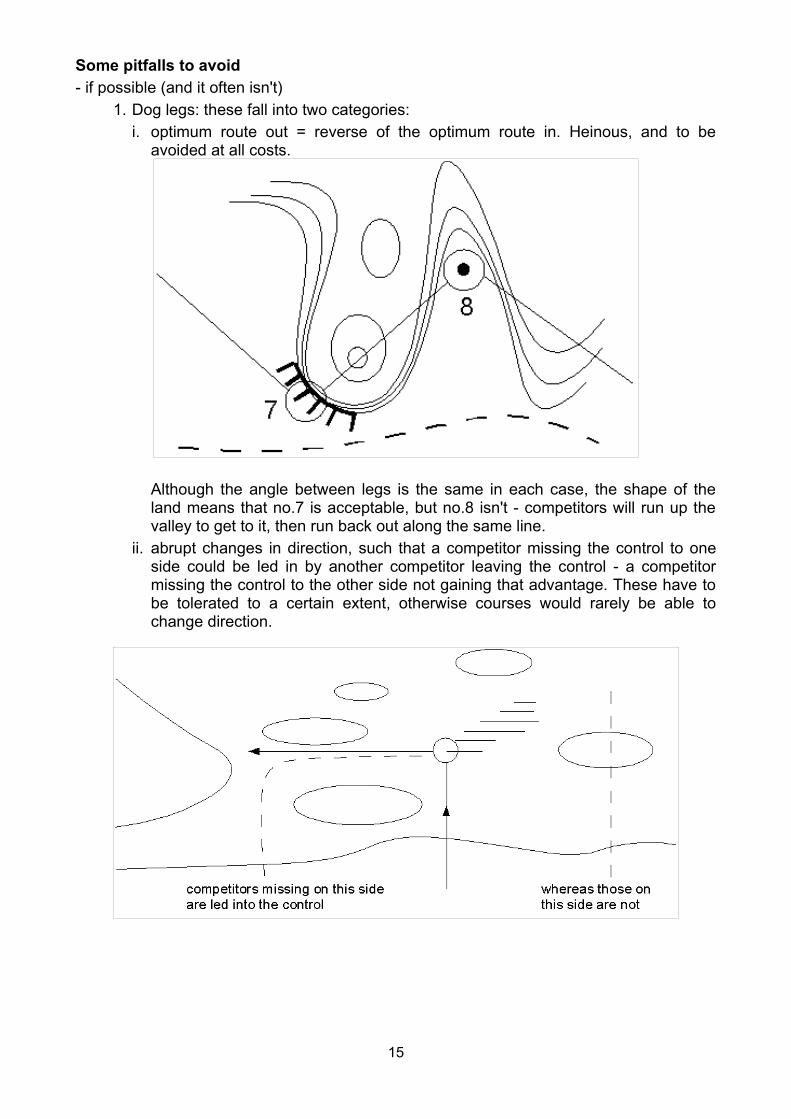
Some pitfalls to avoid- if possible (and it often isn't)
1. Dog legs: these fall into two categories:i. optimum route out = reverse of the optimum route in. Heinous, and to be
avoided at all costs.
Although the angle between legs is the same in each case, the shape of the land means that no.7 is acceptable, but no.8 isn't - competitors will run up the valley to get to it, then run back out along the same line.
ii. abrupt changes in direction, such that a competitor missing the control to one side could be led in by another competitor leaving the control - a competitor missing the control to the other side not gaining that advantage. These have to be tolerated to a certain extent, otherwise courses would rarely be able to change direction.
15

Related to this is the problem of the taped route from the last control: take tapes from the control directly away in the direction opposite to the likely direction of approach, otherwise competitors will navigate to the tapes rather than to the control itself.
2. Hokey-Cokey controls: the difficulty of these depends on whether or not the competitor arrives as someone else is re-emerging onto the path. (See also fig. 6)
3. Contouring legs: these are not particularly difficult (easy end of TD4 on a straight slope, harder TD4 on one with re-entrants and spurs), and tend to produce 'elephant tracks', cutting up the ground if it is soft. Diagonal legs across slopes are harder, and spread competitors out more. CA is a better leg than CB:
16

4. Climb: keep this to below 50m/km on the optimum route(s). If the area is steep, use a high start and a low finish. From the enjoyment point of view, it is probably better to spend more of the course going down than going up - get the climb over with in short bursts, avoid descents so steep that they can't be run. However, particularly for elite courses, avoid long spells of downhill running - the competitors recover too easily, and start to think straight!
5. Crossovers: these are often forced by the constraints of the area. Try to avoid:i. controls close to the crossover - these are too easy to take out of order
(accidentally as well as deliberately). Consider moving the control, or using a map exchange.
ii. courses in which it is advantageous to take the controls out of order. This can only really be solved by using a manned control, but keep things in proportion: because someone is going to pay money to run around a colour coded course, and then cheat him/herself by shortening the course, is it really worth condemning some poor soul (who might never volunteer again) to four hours sitting in some grotty pit in the freezing rain? Beware making empty threats - if a manned control is promised, there should be one!
6. Out of bounds: legs where the competitor can gain advantage by crossing out of bounds areas or 'not to be crossed' fences should be avoided.
7. Chaos at the start (or finish): first legs for which a reasonable route goes straight back through the start system and pre-start never look particularly intelligent (see fig. 5). If necessary, move the start around. Try also to avoid competitors running through the finish in mid-course.
Functions of controlsThere are four:
1. (most importantly) to provide a good leg - one full of map-reading, route choice, etc, through good terrain
2. to move the competitor from the end of one leg to a better starting point for a good leg
3. avoiding dog legs4. 'collecting' - guiding competitors around a sensitive area, or leading them into a
compulsory crossing point.It is the navigating between controls which is important, not the finding of the markers
17
themselves. Having planned your course, consider each control carefully – what is its function? Will the course be just as good, or even better, if the control is left out? (See fig. 7)All of which is wonderful in theory, given an ideal area. As Britain seems markedly lacking in ideal areas, compromises must always be made. The art of the planner is in making the best use of the material available.
The mechanisms of planningThe obvious way to plan a course is to sit down with a map and a pencil, drawing it on as you go along. Unfortunately, every rubbing-out takes some of the ink with it: this becomes very wasteful in maps.A modification of this is to use a piece of acetate film (e.g. overhead projector transparency) or drafting film placed over the map, drawing on that with water-soluble pen.Alternatively, attach the map to a piece of expanded polystyrene (e.g. a couple of ceiling tiles taped together to give a double thickness of polystyrene). Cut a length of cotton, tie a loop at one end, and put a marker on the cotton the right distance from the loop for the required course length; then use needlework or map pins to mark the positions of start, finish and controls. In either case, before planning anything, mark in areas of out of bounds and any areas to be left as 'wildlife refuges'.The hardest legs to plan are long legs. Before trying to plan any courses, spend a few hours planning long legs on the map: even if you subsequently don't use those legs, this will help 'get your eye in' and will alert you to the possibilities available. For each course (except the beginners' courses), first plan the long legs, then build the rest of the course around them, making as much use as possible of the pleasant and technically difficult parts of the area, but trying not to overload any one section with competitors (see fig. 2).
The control mapOnce each course has been planned, draw up a map showing all intended control sites, for use when checking those sites. These then need labelling, for ease of reference. This can be done with the eventual control codes, but this causes problems when control sites prove unusable (unless the number of available marker codes is considerably greater than the number of control sites!); it is perhaps better to label them according to a different system - one which allows a control to be found quickly on the map when discussing it over the telephone with the controller. If the marker codes are to be numbers, then using letters at this stage should eliminate the possibility of confusing the two later on.You will also need to note the preferred part/side of a feature for a control, e.g. a ruin approached from the south would ideally have the marker on its north side.
18

Levels of technical difficulty
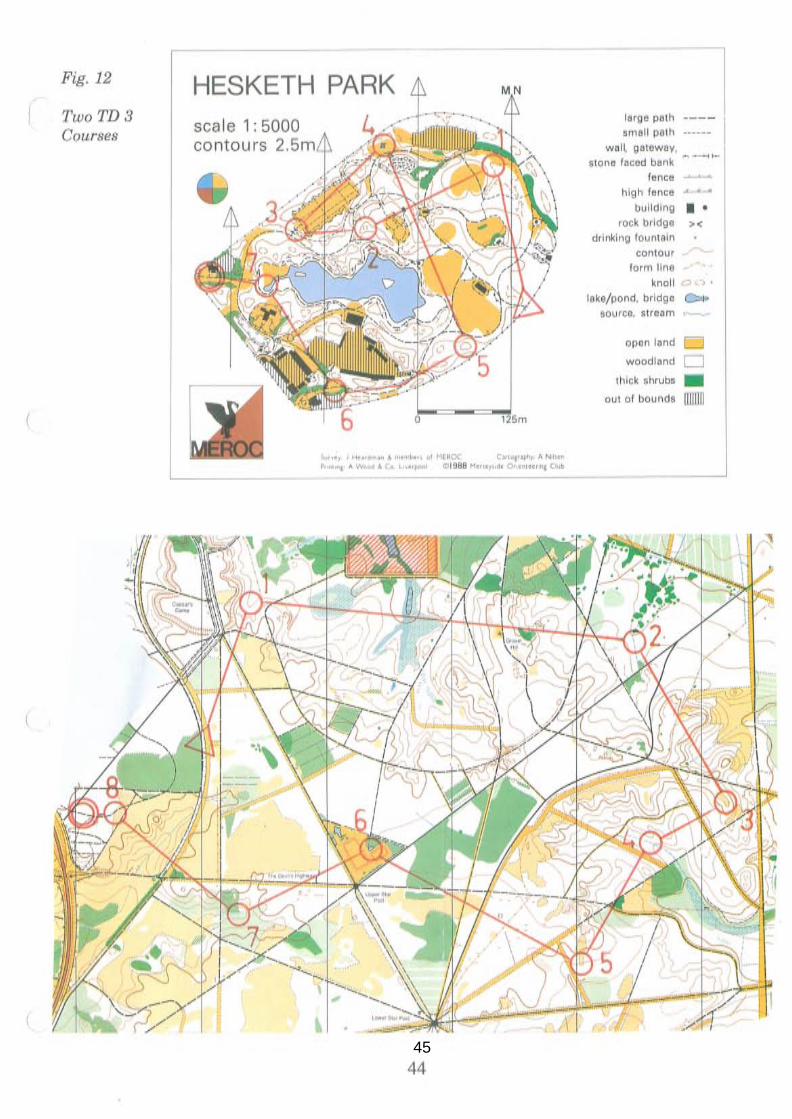
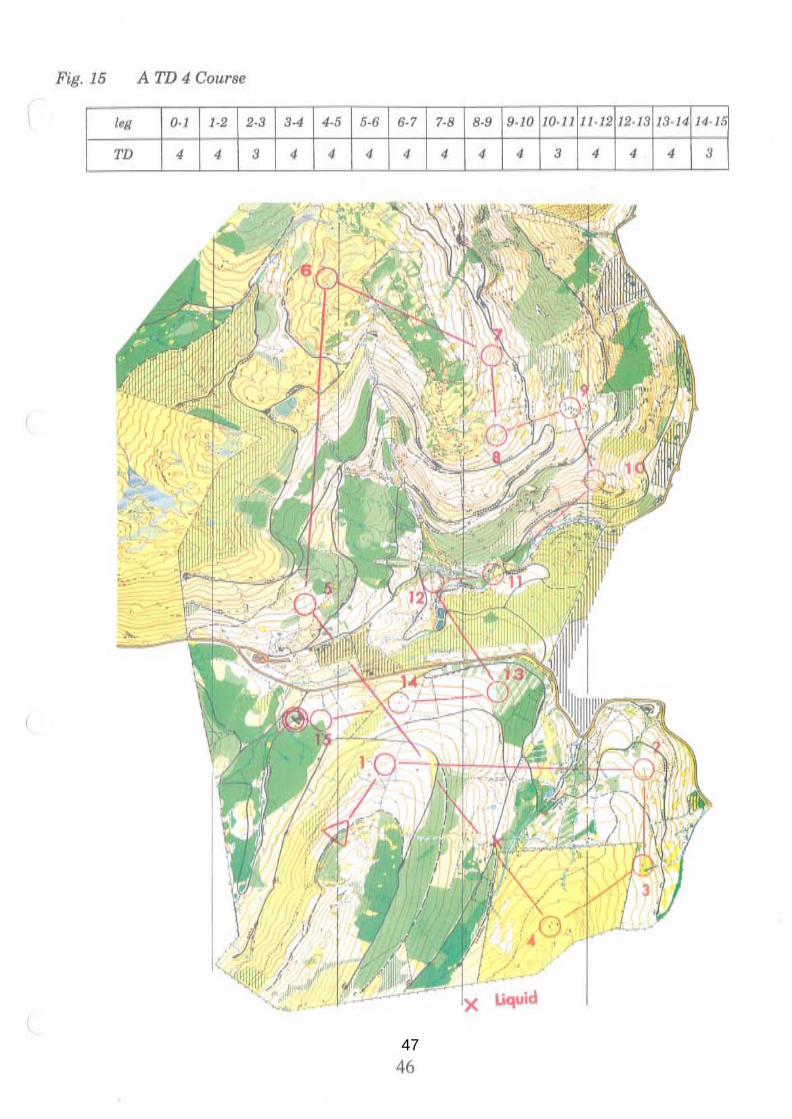
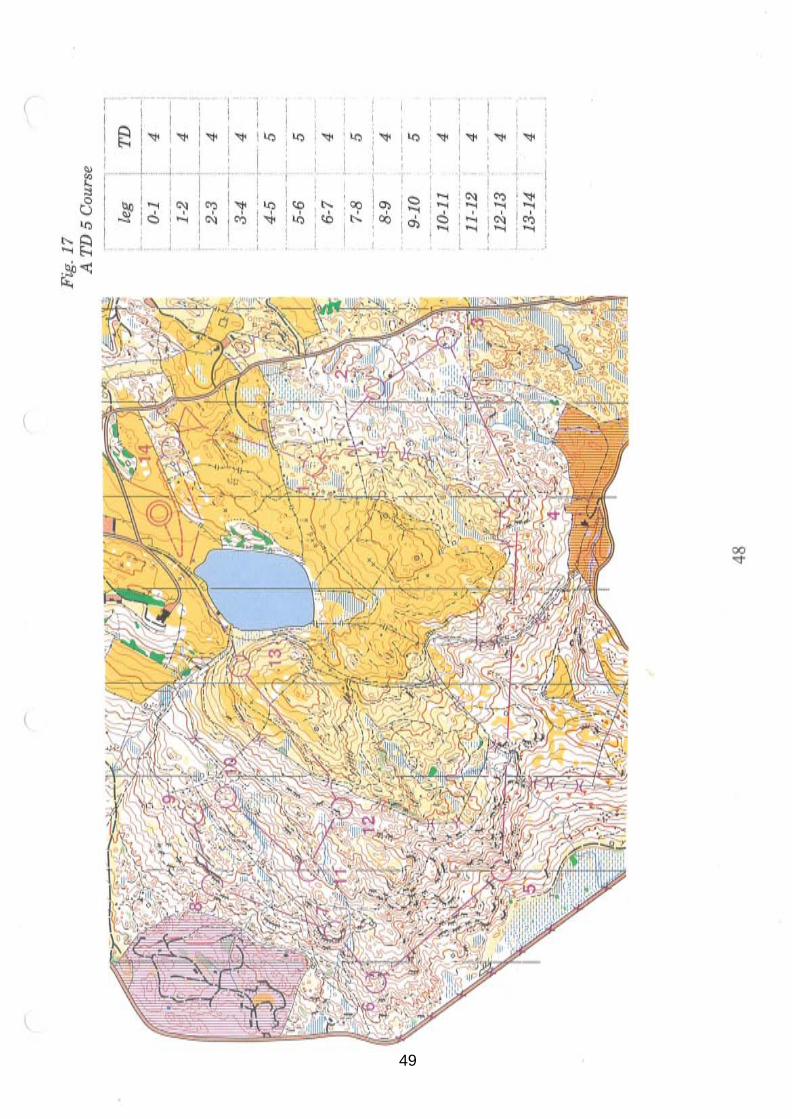
(see BOF rules: Appendix B4, and figs. 8 to 17)As set out in their original form, these have proved difficult to interpret with even experienced controllers disagreeing on the technical difficulty of particular legs. To apply them more consistently, we need to amplify them first. When reading through them, bear in mind the distinction between route choice - deciding between two or more possible routes to a control - and route finding - following a route having chosen it.
TD1* Controls on distinct line features - roads, tracks, paths (and walls and fences
where they are better e.g. in some open areas)* Controls 2-5m beyond, and visible from, junctions rather than on the junctions
themselves so that they automatically put competitors onto the right path for their next leg
* Routes between controls follow line features; no junctions to negotiate between controls
* Controls close together* No route choice problems - line features follow virtually the straight line between
controls.Beginners will have more than enough problems with the map itself - trying to relate all those colours and funny symbols to the ground. For TD1, the course must not add to their problems - it should serve as a guided tour, allowing them to learn how to read the map. The controls are used to keep them on route (hence the idea of putting the controls just beyond a junction where necessary, guiding them into the 'exit') - they should almost fall over them, not have to search for them. If in doubt, make the course too easy - everybody should be successful. Failure on a course at this stage may mean the loss of that competitor to orienteering.
TD2* Controls on distinct line features (i.e. not on linear marshes, vague vegetation
boundaries, streams in areas of other, smaller, unmarked streams etc), or on raised point features immediately visible from an adjacent line feature
* Routes between controls follow line features; no more than two junctions to negotiate between consecutive controls. Try for a variety of line features to make the course more interesting.
* Controls close together* No route choice problems.
TD2 courses should be TD1 for the first two or three legs, allowing confidence to be built up. Anyone competing on a TD2 course should already have done some TD1 courses. The TD2 courses should then be starting the process of teaching them how to use the information on the map - for instance in deciding which path to follow out of a junction.
TD1 & TD2In both cases, remember that the competitor will not necessarily recognise 'jargon' terms (e.g. ride, knoll) - if such features are used as control sites, use the description sheet to explain the term, e.g. "2. 103 Knoll (= a small hill)". Many of the competitors on these courses will be young children, who tend to rush off without thinking first: try to keep the courses in a part of the area with 'hard' boundaries, so
19

that nobody can go too far off the course. And remember that things look different from a height of only 4 feet. To a large extent, these courses need to be planned sequentially - sort out an appropriate route from start to finish, then insert the first control, then the second, and so on. If necessary, use a taped route between controls to cross terrain without a suitable line feature (see fig. 10). It also helps map orientation if the leg to the first control heads approximately northwards.
TD3* Controls may be on prominent point features:
- raised features (knolls, boulders etc.) reasonably close to an attack point on a line feature
- sunken features (pits, depressions etc.) adjacent to attack points on line features
* 'Catching' line features behind those controls which are not themselves on line features
* Simple route choice problems, with the quickest routes being direct through runnable terrain to good catching features; but slightly longer alternatives using line features must be available
* legs vary in lengthNow the competitors should be able to read much of the information on the map, so the courses are teaching them the techniques of the sport - route choice, running direct to a catching feature instead of following line features, using contours for navigation, etc.At TD3, the planner should encourage simple use of contour detail - contouring, following ridges/valleys - on the quickest routes whilst not requiring the use of contour features as attack points. These routes should also require simple compass work - map orientation, and the following of rough compass bearings (e.g. heading NW) but not accurate bearings nor compass and pacing.
TD4* Controls on any features provided that the map permits navigation into the control,
and provided that complex map reading (particularly of contour detail) is not required
* Relocating features near to controls, but not so close as to be used as 'optimum route' attack points. Errors should not be expensive in terms of time lost
* Course as a whole contains legs demanding a range of different techniques (e.g. long route choice legs, short map reading legs)
* Course may use diagonal legs across slopes provided that catching features are available close to the control.
For competitors who are almost ready to navigate through anything. The significant difference between TD4 and TD5 lies in the cost of errors: at TD4, relocation after an error should be reasonably straightforward.At TD4 the courses should require full use of compass skills (i.e. compass and pacing as well as rough compass work) and the ability to use major contour features (picking off hills and valleys, contouring along slopes) for navigation.
TD5* Controls on any features particularly those demanding careful map reading to
locate
20
* Controls far from obvious attack points or catching features, so that errors are expensive; but with the map permitting accurate navigation into the control
* Course as a whole contains legs demanding a range of different techniques.Hard, but fair - competitors should be pushed to the limits of navigational skill, not into the realms of chance (e.g. trying to find a pit on a compass bearing, the pit and marker being visible from 10m and the reliability of the bearing being 20m).The technical difficulty of the course as a whole is the same as the technical difficulty of its hardest leg, although most of its legs should be of the required technical difficulty. See fig. 13.It is important to realise that the technical difficulty is an absolute, not relative, measure - TD5 does not refer to the hardest leg available in a given area. Consequently, TD4 and TD5 may well not be attainable in a particular area.For most planners, it is the courses of TD1 or TD2 which are the hardest to plan - it is all too easy to worry that the course will not be interesting enough and then make the courses too hard. Try to achieve the interest with a variation in the line features followed and the terrain crossed, not by making the navigation more 'interesting'.
21

Physical difficulty
(see BOF rules: Appendix B2.2)This is easier to deal with, and less critical, than technical difficulty. Generally speaking, the level of physical difficulty is fixed by the nature of the terrain. Except for the elite classes (where it is important that competitors are fully tested physically as well as mentally), it is unlikely that anyone will be upset if their course is physically easier than expected - remember the aim for competitors to enjoy themselves.For the more senior competitors, descent is more significant than ascent - because of deteriorating knees, ankles, and eyesight, they may be unhappy about descending slopes which they would happily climb.
22
Planning for other types of event
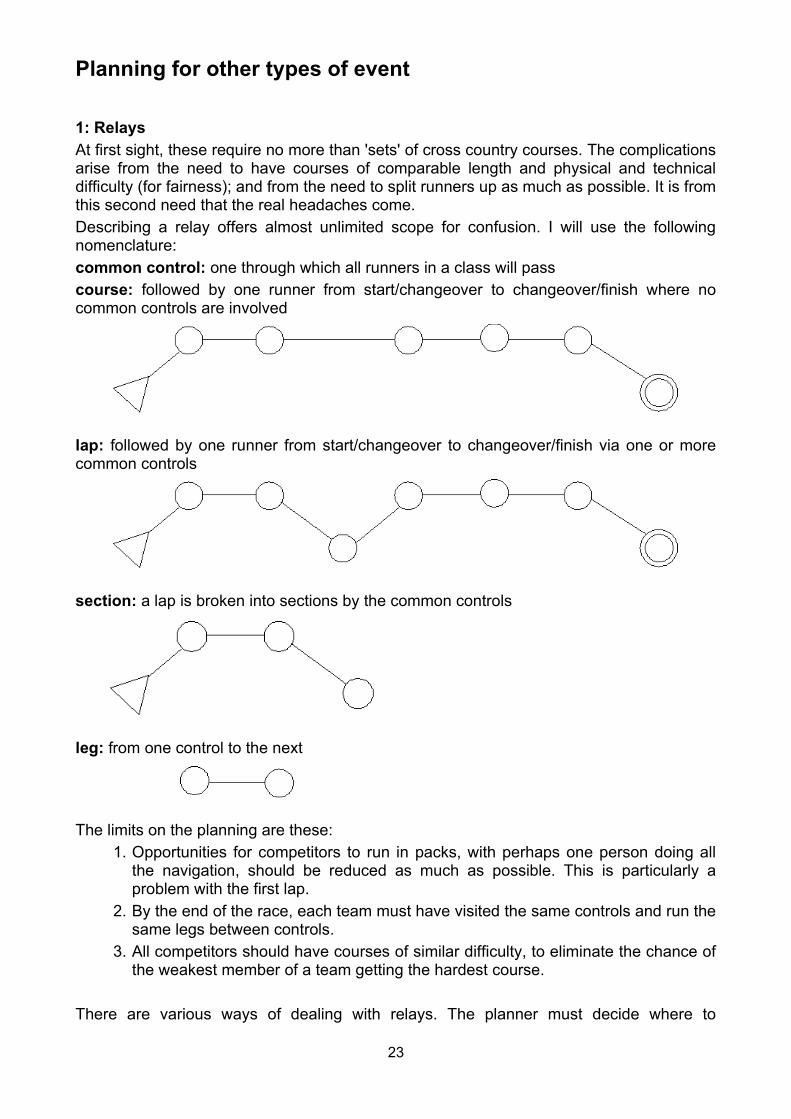
1: RelaysAt first sight, these require no more than 'sets' of cross country courses. The complications arise from the need to have courses of comparable length and physical and technical difficulty (for fairness); and from the need to split runners up as much as possible. It is from this second need that the real headaches come.Describing a relay offers almost unlimited scope for confusion. I will use the following nomenclature:common control: one through which all runners in a class will passcourse: followed by one runner from start/changeover to changeover/finish where no common controls are involved
lap: followed by one runner from start/changeover to changeover/finish via one or more common controls
section: a lap is broken into sections by the common controls
leg: from one control to the next
The limits on the planning are these:
1. Opportunities for competitors to run in packs, with perhaps one person doing all the navigation, should be reduced as much as possible. This is particularly a problem with the first lap.
2. By the end of the race, each team must have visited the same controls and run the same legs between controls.
3. All competitors should have courses of similar difficulty, to eliminate the chance of the weakest member of a team getting the hardest course.
There are various ways of dealing with relays. The planner must decide where to
23
compromise: the more complicated the system, the more the competitors are split up, but the greater the complexity of the task of overprinting, description sheet writing, marrying description sheets to maps, and allocating maps to teams - in short, the greater the chance of making a mistake.
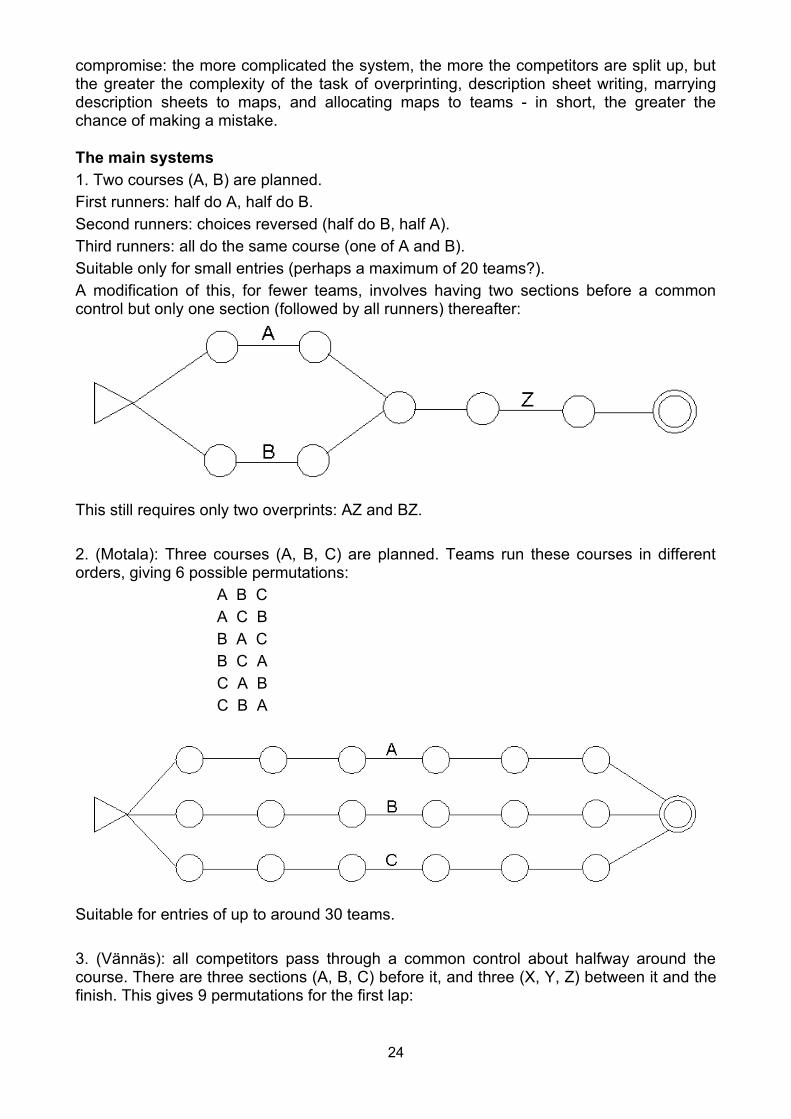
The main systems1. Two courses (A, B) are planned.First runners: half do A, half do B.Second runners: choices reversed (half do B, half A).Third runners: all do the same course (one of A and B).Suitable only for small entries (perhaps a maximum of 20 teams?).A modification of this, for fewer teams, involves having two sections before a common control but only one section (followed by all runners) thereafter:
This still requires only two overprints: AZ and BZ.
2. (Motala): Three courses (A, B, C) are planned. Teams run these courses in different orders, giving 6 possible permutations:
A B CA C BB A CB C AC A BC B A
Suitable for entries of up to around 30 teams.
3. (Vännäs): all competitors pass through a common control about halfway around the course. There are three sections (A, B, C) before it, and three (X, Y, Z) between it and the finish. This gives 9 permutations for the first lap:
24

AX, AY, AZ, BX, BY, BZ, CX, CY, CZand a total of 36 permutations for the whole race (the choice of first lap reduces the choice available for the second lap to 4, e.g. if AX is run on the first lap, no course containing A or X can be run on the second lap - thus only BY, BZ, CY and CZ are available. The third lap must then run the only two sections not yet covered).This is the system most commonly adopted.Six overprints are required: one for each section (so each map is overprinted twice, once for its first section and once for its second section).Note that all three first sections (A, B, and C) need to have the same number of controls. If, for instance, A was to have 2 controls while B and C had 3, then the numbering of the second sections would start at 3 if preceded by A but at 4 when preceded by either of B or C - complicating overprinting and description sheet production.A, B, and C all need to be about the same length; similarly for X, Y, and Z - otherwise the 9 permutations would have a range of lengths, leaving a team whose weakest member had the longest lap at a disadvantage.A modification, still requiring 6 overprints but splitting up the runners to a greater extent, involves having more common controls:
Runners doing the first A section would also do the second A section etc., so that the possible permutations are as before.
4. (Farsta): several common controls, producing patterns of considerable complexity.
Laps are then built up as follows:A1, B, C1, D1, E, F1, G, H, ....or A1, B, C2, D2, E, F1, G, H, ....
25

or A1, B, C3, D3, E, F1, G, H, ....or A1, B, C3, D3, E, F2, G, H, ........(and so on)Sections with two or three consecutive controls in common can be built in. Probably only worth the risk of mental breakdown if large numbers must be catered for, or if you are planning the World Champs.In all cases, the aim should be to force each competitor to do his/her own navigation - courses should not differ only in their control sites, with competitors running in packs between groups of closely-spaced controls:Neither should it be immediately obvious to competitors leaving the start or common control which pack to run with:Instead, try to have the first controls in similar directions but at different distances:Common controls, and the early controls on first laps, will be very busy at times: choose sites which will cope, both in terms of the space available for punches, and in terms of the visibility of the control when surrounded by competitors as compared to when it is not being punched.The changeover needs particular thought. Indeed, the need for a good changeover area and the mechanisms for getting competitors out of it and back in again often prove to be the most significant constraint on relay planning. Because it is impossible to guarantee that incoming runners will be announced correctly every time, you need to ensure that they are visible from the waiting pen for a sufficient length of time for outgoing runners to be ready. Use a contorted run-in if necessary (it helps if it is uphill!); a spectator control, visible from the waiting pen and close to the end of the course (or visible from elsewhere in the field and about 10 minutes from the end of the course) is useful in allowing waiting runners to wear warm clothing until the last moment.The waiting pen needs to be designed so that its occupants have a good view of incoming runners; perhaps the front part should be roped off and reserved for those under 5' tall.Changeover designs can be split into two types:
1. contra-flow systems:
Contra-flow systems have the advantage that competitors can get to/from the changeover area without crossing the paths of incoming/outgoing runners.
2. parallel flow systems:
26

For these, runners' paths must be crossed at some point: either to get to the waiting pen (which then makes it difficult for waiting runners to pass discarded clothing to friends) or or to get out of the finish area (which perhaps has the advantage of keeping the finish and results-processing area isolated from spectators).
Generally, the contra-flow design is the better of the two; however, the geometry of the changeover field and of access routes to/from it may dictate that a particular race uses a parallel system.For junior classes, remember to plan for the youngest competitors in the class (e.g. if the relay classes are W14, W18, W Open, then the W18 class will have W16 competitors in it and so will need to be planned to W16 criteria).For relay course lengths see Guideline E and G.
2: Night eventsThe attraction of night orienteering over its daytime equivalent is the higher premium it places on navigation. It is important that courses are planned which do test the technical rather than the physical side of the sport, but which are soluble by good technique rather than by chance.Safety is of paramount importance: running in the dark increases the chances of injury, and the problems of recovering an injured competitor from rough terrain are magnified. Lower attendance at night events as compared to daytime ones means that the time before an injured competitor is found by another competitor will probably be greater, and the conditions will probably be colder. Consider the problem of how to get an injured competitor off an area, and avoid terrain where you cannot see how to do it.Areas for night orienteering need plenty of catching features which are clear in the dark (vegetation boundaries, for instance, are frequently of no use here), and must provide easy running - traversing boulder fields and undergrowth is far harder by headlight than by daylight.The accuracy of the map is more critical than in daylight: in daylight, isolated mistakes can be coped with because other detail nearby can provide a check on position, whereas that other detail may not lie within the range of a headlight beam.Courses should be planned for running times 15% less than the equivalent daytime events, and also allowing for the slower speeds of competitors in the dark. No course should be provided for age groups younger than M/W16.Compass bearings are harder to follow at night, since features to sight on and run to can only be chosen from within the range of the headlamp beam - this means that a compass bearing has to be followed in more, shorter stages than in daylight, causing an inaccuracy of perhaps ± 10° rather than ± 5°.Control sites need to be considered carefully. Choose sites which the map enables the competitor to navigate into accurately, with the feature found before the marker - this helps reduce the advantage to those with powerful headlights, who can scan from a distance looking for the marker.The terrain available in this country generally does not require controls to have lights inside them - if the marker really needs to be visible from a distance then the feature presumably cannot be found by good navigational technique and so is unsuitable anyway.Control sites need checking initially in daylight. If time allows, the less obvious ones (i.e. not things like road junctions) should also be checked at night, to ensure that the feature can be seen adequately in the dark. At least some courses should also be run in the dark - this will pick up problems such as paths which are invisible to headlights.
27

3: Score eventsThere are two approaches to planning these:
1. Controls scattered more or less evenly around the area. The more distant the control from the start, or the more difficult the control is to find, the greater its points value. Aim to provide just, or only slightly more than, a sufficient number of controls to occupy a fit M21 for the whole of the time available. Try to avoid distributions which provide only two obvious routes - clockwise and anticlockwise: the hope is to have competitors in the car park after their runs disagreeing on the best route around the controls.
2. Controls, all having the same points value, in clusters, with wide gaps between clusters. The more distant the cluster is from the start (or, if appropriate, the more complex the terrain in which it lies), the greater the number of controls in the cluster. This method allows the planner greater control over the balance of long and short legs faced by the competitor.
With either method, provide several easy controls near the start for juniors. Different age groups can be catered for with different time-limits, and by providing maps showing only a selection of the controls out in the area (e.g. M/W21 might not use those easy controls near the start). A compulsory last control makes life more tolerable for the finish team.
28
Work on the ground
Taping control sitesSafety note: if you are going out on the area alone, make sure that someone knows that you are out there, has a map showing which controls you are visiting, and is able to raise help if you become overdue.Every intended control site needs visiting to check that it is suitable. If it is, a tape is put out. This tape serves three purposes:
1. when the controller comes to check the site, the tape confirms that what he or she thinks is the site is also what you think is the site
2. it confirms to whoever is putting out the marker that they are putting it in the right place
3. it confirms to the controller that the marker is hung at the site which s/he has already checked.
At the control site, the following must be checked:* the accuracy of the map between the feature and all attack points, including ones
beyond the control (the competitor who has missed the control once must not be penalised by faults in the map on that side of the control). Does the map permit fair navigation into the control (this includes checking compass bearings into the control)?
* will the site set too high a premium on accurate overprinting - if the circle is off-centre, will the control appear to be on another feature?
* has the feature itself been mapped correctly?* is the feature within 60m of another control on a similar feature, or one which looks
the same? If it is, find a different feature.* (if appropriate) where, in relation to the feature, will the marker be placed? Bear in
mind that the control should be equally visible to incoming runners whether someone is punching it or not. This may mean, for instance, the marker for a pit being on the edge of it rather than inside. If this means that the control will be visible from too far away, then try to find another feature. If the control is to be manned, will the person manning it give its position away?
* (if appropriate) what are the dimensions of the feature (where the feature is mapped symbolically, rather than to scale)? Does the description need qualifying (e.g. shallow, ruined)?
Beware being over-critical of the map: the planner, standing still, will always see mistakes of which the competitor, running, will be blissfully unaware. In particular, faults within metres of the control may well not be significant - once the competitor has seen the marker, map reading is dispensed with. The significant section is that between the attack point and where the marker comes into sight.Having decided that the site is usable, tape it: place the tape precisely where you want the marker to go, using a cane if necessary. (It is a particularly good idea to use a cane at rocky sites, as it allows you to find out quickly if there isn't enough soil to take the control cane.) Make the tape clearly visible, using a bright colour - the controller has to be able to find it afterwards! For night events, use reflective tape - this helps when checking controls in the dark. One problem, yet to be solved satisfactorily: sheep eat tapes...
Start and finishThese also need to be taped, and their layouts probably to be sketched, if the start and
29

finish teams are not to set them out in the wrong places. The start requires a marker at the centre of the start triangle, on a mapped feature. The start line and pre-start then need to be arranged in such a way that those waiting at the pre-start cannot see the directions in which competitors leave the start. Remember to consider where to put master maps or boxes of premarked maps, and to allow some space in which competitors can warm up. The finish is less of a problem: all you need consider is the route from the last control(s), and the exact position of the finish line - the rest is up to the organiser and/or the finish team.
Crossing pointsIn many cases, crossing points will have been decided on before planning - either by the landowner, or because roads etc can only be crossed safely in particular places. What needs checking now are the less obvious ones:
* walls/fences uncrossable by younger/older competitors* streams which could become impassable in the event of heavy rain.
All crossing points also need to be checked for their carrying capacity: will they physically take the likely number of competitors using them, particularly if used in both directions?
Yellow tape featuresAre there any dangerous features which competitors could run into/over/off without seeing them coming? (e.g. mineshafts, concealed crags) If there are, they will need to be taped with yellow tape for the event - estimate how much tape each will need.
Test runsIdeally, all long legs should be checked thoroughly, to make certain that the map does permit a fair choice of route to be made. Beware undergrowth which may have changed drastically by the time of the event. Arguably, some complete courses should also be run to check that they are of the correct length. However, there is some debate as to the value of this: whoever runs the course will not be doing it under race conditions, and will be looking for tapes, not markers. This leads to interesting questions as to the validity of their times.
30
Back home again
Hopefully, you won't have to do too much replanning...
Rationalising the controlsThe fewer controls you use, the less work you and the controller have to do in putting them out and checking them. How many controls can you move onto adjacent sites (already used on other courses) without significantly affecting the quality of the legs? Can any controls be deleted from courses without reducing the course quality? Beware:
* controls, and particularly legs, used in opposite directions by different courses, where the outgoing runner on one course leads in incoming runners on another course. Apply common sense here - don't worry if the feature is so large and obvious as to lead incoming runners in by itself (e.g. a control on a path approached in opposite directions by two junior courses)
* overuse of particular control sites. 200 competitors per hour is perhaps the maximum that any control will stand without competitors being led into it too easily. In some cases, the carrying capacity of the ground will dictate a lower limit.
* control sites which are too close together. The competitor should be able to find the control without recourse to the description sheet, by navigating to the feature at the centre of the circle on the map. Control codes should be redundant. If two markers are, say, 10m apart, then (allowing for the circle probably not being perfectly centred) both may appear to be at the centre - the competitor cannot distinguish between them using his/her map, and must refer to the description sheet. In that case, why use both controls? - it cannot be to avoid the first two problems above, because they will still apply.
Allocating control codesFirst, find out what codes you have available. Thereafter, do what you like, subject to one restraint: two codes which could easily be mistaken for each other should be widely separated on the ground (e.g. EL can read as FI if the marker folds up slightly during the event; 606 and 909 can be confused if on a horizontal plate, even when underlined). One point to note: in detailed areas with a relatively high density of controls, the lost competitor looking for 351 who finds 352 can usually safely bet that s/he is close. Perhaps it would be better to scatter the codes a little more randomly.
Refreshment pointsIf possible, these should be provided one third to halfway around any course with an expected winning time in excess of about an hour, particularly during the summer. The difficulty lies in finding a point through which all the relevant competitors will pass at the right stage in their courses, and to which there is good road access for bringing water in.
Description sheets(see BOF Rules: Rule 6.6 and Appendix A)These provide information in support, never in place, of the map; chiefly:
* which feature the control is on (thus permitting a certain tolerance in the accuracy of overprinting)
* where, in relation to a feature, the control marker is.There are occasions when the planner's interpretation of the ground differs from that of the mapper: the description must match the map, e.g. a re-entrant on the map may look more like a gully on the ground, but must still be described as a re-entrant since that tells the
31

competitor where the centre of the circle lies on the map. If more than one of the relevant feature falls within the circle, the description should indicate which is the correct one, e.g.the middle knoll
This is a safeguard against off-centre circles when overprinting. However, there is little to be gained when the circle, having slipped, appears to be on another 'middle knoll', e.g.
Avoid such control sites unless you are very confident in the accuracy of the overprinting. Avoid, also, control sites which cannot be adequately described, e.g. one boulder of twelve in the circle. Again, the description sheet would not enable the competitor to compensate for poor overprinting.Bear in mind that the same control as shown at two different scales (e.g. on a 1:15,000 map and on a 1:10,000 'blow-up' for older competitors) may have different descriptions, e.g. Northern crag at 1:15,000 may simplify to Crag at 1:10,000.The description sheet should also carry the course closure time: this needs to be decided in consultation with the controller and the organiser, and bearing in mind the length of time needed to collect in markers and (possibly) rescue an injured control collector...When the time comes to do the competitors' copies of the description sheets, only make one master of each sheet: make extra 'masters' for photocopying by photocopying the one original - this reduces the possibility of making mistakes. NEVER type out two copies of the same sheet.
Marking the courses on the maps(see BOF Rules: Rule 5 and Appendix B3)At present there are three main methods of doing this:
* master maps* hand overprinting* professional overprinting from tracings.
Master maps are easy from the planner's point of view, but commonly seen as cheap and nasty by badge event competitors. Use them for events below badge event standard, though even then consider overprinting white/yellow/orange courses - young children are notoriously bad at copying down circles in the right place. If you do use master maps for these courses, have them before the timed start, not after - this reduces the pressure to rush. Agree with the organiser which of you will be responsible for putting out the master maps and for providing cover for them in case of rain.Hand overprinting is a surprisingly easy technique, though a time-consuming one. Setting up a course takes something like half an hour; maps can then be printed off at around 8 per minute, given a team of three to do it. Useful points:
* make sure you know which corner of the map has not been trimmed - this corner is then used for registering the map on the overprinter
* make sure that the top board of the overprinter is sufficiently sticky, and smooth: if
32

necessary, spray with a spray-on glue (e.g. "Spray Mount" by 3M) or replace all the double sided tape
* make sure that the rubbers are clean* be prepared to spend whatever time is necessary to get the circles in exactly the
right places before adding the lines. This often takes four or five attempts.* don't bother with register crosses - correct registering has to be checked using the
control circles anyway* don't press very hard - any more than a light pressure causes smudging. If part of
the course doesn't come out, this usually means that the pad needs re-inking.* don't over-ink the pad* don't overprint in cold, damp rooms - the ink takes ages to dry* take your time!
Professional overprintingThis is the most expensive of the three methods, and the one which gives the best results. Tracings (on drafting film, at the final scale) can be drawn by the planner, or (for a fee) by one of the various orienteering mapping companies. Where a map has been drawn using a computer program the same program can also be used to generate the overprinting tracings.If possible, put the description sheet onto the overprint tracing: this removes the possibility of a map getting the wrong description sheet stuck onto it ( as well as saving the effort of all that sticking). This is particularly valuable for relays, where the complexities of combining sections of courses and description sheets can be a nightmare.If the description sheet cannot be overprinted, then try to put the course letter on the overprint adjacent to where the sheets will be stuck on: this makes it much quicker to check that each map has the correct sheet.Whatever the method chosen, the following points need to be remembered:
* controls on features represented symbolically on the map (e.g. ruins) should be centred on the centre of the symbol, irrespective of which side of the feature the control will be:
* lines between controls are drawn around out of bounds areas, and through any compulsory crossing points (breaking the line for the crossing point itself)
* there is a difference between the crossing point symbol: )( and the forbidden route symbol: X
* mark the finish on any first part maps, in case of retirals* mark all crossing points and out of bounds areas on all maps - competitors making
their way back to the finish to retire may need to know where they are.* If permission has not been sought to use fields on the edge of the map, mark
those out of bounds too if a course goes near.
Map corrections(see BOF Rules: Rule 5.4 and Appendix B3.2)Where overprinted maps are used, all map corrections should appear on those maps. It is not sufficient simply to mark them on the maps in the start lanes, and then expect competitors to remember them - they won't. If something really is discovered at the last moment, precluding altering the competitors' maps, then the competitors should be shown
33

where the change lies in relation to their course - either allow them to pick up their maps early, and then compare them with the start lane map (provide markers etc for them to mark up their maps if they wish); or mark the relevant leg on the start lane map.
Final details (for competitors)These are produced by the organiser, but will require information from the planner:
1. course lengths, height climb, which start each uses, and whether they have a map exchange/second master maps
2. details of the map - scale, contour interval, any non-standard symbols3. whether or not maps will be pre-marked4. type of description sheet to be used; if IOF, definitions for any non-standard
symbols. Are description sheets to be sent out with the final details?5. whether or not any crossing points are compulsory6. comments on the nature of the terrain.
Allocating punch codesDon't use the same punch pattern on adjacent controls.Don't mix two types of punch on the same control - having two different patterns of P, for instance, confuses whoever has to check the control cards.Keep one punch pattern spare - use this for emergency on-the-day replacements. The results team then know that its appearance on a control card doesn't indicate that a wrong control has been visited.
Master check cardsThese are the control cards, one for each course, punched by the planner, against which the results team check the competitors' cards. It is better for these to be punched, rather than having the punch patterns drawn in, to help checking when a punch mark hasn't come out properly. When the punches have been sorted out, ready for putting out with the controls, spread them out on the floor, labelled with their control codes. Take a control card and a description sheet, then work around the 'course', punching the control card at the right controls as you go. In this way, one or two hundred kilometres of orienteering can easily be knocked off in half an hour. Before packing the punches away, check that they all have pins and that their cords do not have knots which might prevent a control card from being put into them properly.
Disaster planningSomething is bound to go wrong on the day: the secret of coping is to have catered for it in advance. Before the event, think of all the things which could possibly go wrong, and decide what you will do about them. These might include:
* theft of a control marker* bad weather making part (or all!) of the area unsafe* description sheets and/or overprinted maps running out* sudden appearance of an irate landowner/tenant from whom someone forgot to
ask permission* heavy rain causing a stream to rise and become impassable in mid-event.
34

The event itself
Control site layoutWhat will the marker be attached to - a convenient branch? (they are rarely where you want them!) A cane? (should its end be covered, in case anyone falls on it?) A stake? (stronger, but much heavier - someone has to carry them and knock them into the ground.)Punches should always be hung separately, not tied to the marker - markers don't stand up to being pulled around during the competition. Never hang more than two punches from the same cane - they get tangled up, and competitors get in each other's way.The number of punches to use is debatable. Erring on the side of caution, let us assume that each person takes 15s to punch: so each punch can be used by 4 people per minute. Taking the average rate of visiting the control to be the total number of visitors divided by the period over which they start, and assuming a peak rate (when they descend in packs) four times greater than the average rate, then you need one punch for every person per minute at the average rate.e.g. in a badge event with a 2½ hour (= 150 mins.) start list, a control which will be visited 400 times requires 400 ÷ 150 = 2.7 punches, so put three punches on it.N.B. two should be the minimum number of punches on a control.
Putting the controls outAny helpers need to be given clear instructions - in particular, if they cannot find a tape and are uncertain as to whether they have found the right place for the control, it is best for them to bring the control back again for you to put out yourself.Make sure that punches are hung in such a way that they will reach a control card attached to any reasonable part of a competitor's anatomy - and that includes 4' tall juniors. Make sure, as well, that someone bending over to grab a punch isn't going to poke their eye out on a cane.Check that the marker has the correct code on it, and that all the punches have the same pin pattern.Leave the tape in place, as a check both for the controller when checking the control, and for you in case the control is stolen.Remember to put out the marker at the start, and any yellow tape, and taped routes.Finally, if the controls are left overnight after checking by the controller, arrange for them all to be visited on the morning of the event to ensure that they are all still in place.
During the eventThe great anticlimax - you stand around, doing little for several hours. Make sure that you are equipped with spare markers (and a way of re-coding them) and punches, in case of problems; and that the finish team (who will be the first to hear of any problems) and the controller know where to find you at all times. It is worth standing by the finish or at the results, asking competitors what routes they took - probably the only feedback you will get on what they thought of your courses.
Collecting in the controlsMake sure that you have nobbled your 'volunteers' before they have had a chance to get cold and wet from a day's helping. Remember to collect in the control tapes as well - to save confusion at future events, as well as for ecological reasons. For reasons of safety, try to ensure that several people stay around until all the control collectors have returned.
35

The post-mortem
Once the immediate post-event drudgery (sorting out, drying and returning markers and punches) is complete, it is time to learn from the event. What things worked well? What went wrong, and how can the problems be overcome next time? How do the course winning times/average gold times/times for most finishers compare with those given in the BOF rules? Ignore B courses here, and be wary of other courses with few entries - times for these are too dependent on just who was competing. How many retired on the junior and beginners' courses? Ideally, there should be none.Most importantly: did you enjoy the experience?
36

The controller
To a large extent, the controller is on a hiding to nothing: if the event goes well, the competitors praise the planner; if it doesn't, it's the controller who gets most of the blame. It is only fair, then, to make the controller's job as easy as possible: provide all information required on time, and don't make the controller do more work than necessary (e.g. don't leave him/her to draw up his/her own set of courses from a list of controls and one map showing where they all are).As laid down in BOF Rule 4.4.1, the controller has a responsibility for ensuring that the courses are fair and that the rules are obeyed. S/he also has an implicit obligation to consider competitors' safety, and to ensure that the courses are of an appropriate standard.The first thing which a controller will usually want is a timetable: a list, for each of the main planning tasks, of deadlines for completing those tasks. Subsequently, s/he will need clear information as soon as it is available on all of the following:
1. A copy of the map, showing the positions of start(s), finish(es), and car parking.2. A breakdown of who will be planning what (including, if it is a badge event, colour
coded and string courses).3. Intended class combinations, and course labelling.4. Intended course lengths, together with a summary of the evidence used in
deciding upon those lengths.5. The courses - before taping. No more than two courses per map, not black and
white photocopies (except where a photocopy of the draft map is all that is available). Include provisional lengths and height climbs. Also include one map showing all the control sites for the whole event, and crossing points, whether or not they are compulsory.
6. After taping, two updated maps of all the control sites (one for taking around the forest, one for working on afterwards). Say what colour tape was used. A list giving, for each control, its description and details of which courses use it.Information on access to the area - can the controller go in to check the tapes at any time, or is access limited?
7. (After the controller has checked all the tapes) the final versions of the courses, drawn exactly as they will be presented to the competitors (i.e. with crossing points and out of bounds marked, position of description sheet shown) - 1 course only per map, using the printed map.Draft final description sheets.One map showing the final control positions and their codes.
8. A photocopy of each description sheet master, prior to duplicating large numbers of them.
9. (If overprinting is to be done professionally, by a printer) an opportunity to check the tracings before they are sent to the printer.
10.The overprinted maps or the master maps (description sheets already attached), for checking. Also map corrections, if any.
11.The programme for putting out the controls, and the layout of the control sites.12.The whereabouts of the planner(s) during the event.
37
Timetables
It is difficult to overstress the importance of deciding on a timetable well in advance, and then sticking to it. Mistakes will always happen when planning - the complexity of the jobs involved makes that inevitable - but working under pressure increases the risk of making the sort of error which will void a whole course. The pressure comes largely through struggling to complete the work in the time available. External sources of pressure - illness, late withdrawal of permission to use part of the area, etc. - can never be predicted. However, they will be easier to cope with if there is 'slack' in the timetable than if the planner and controller are already working flat out to be ready in time.The following are suggested latest possible deadlines for completing each of the main tasks: actual timings will vary from event to event, but ideally should be earlier.
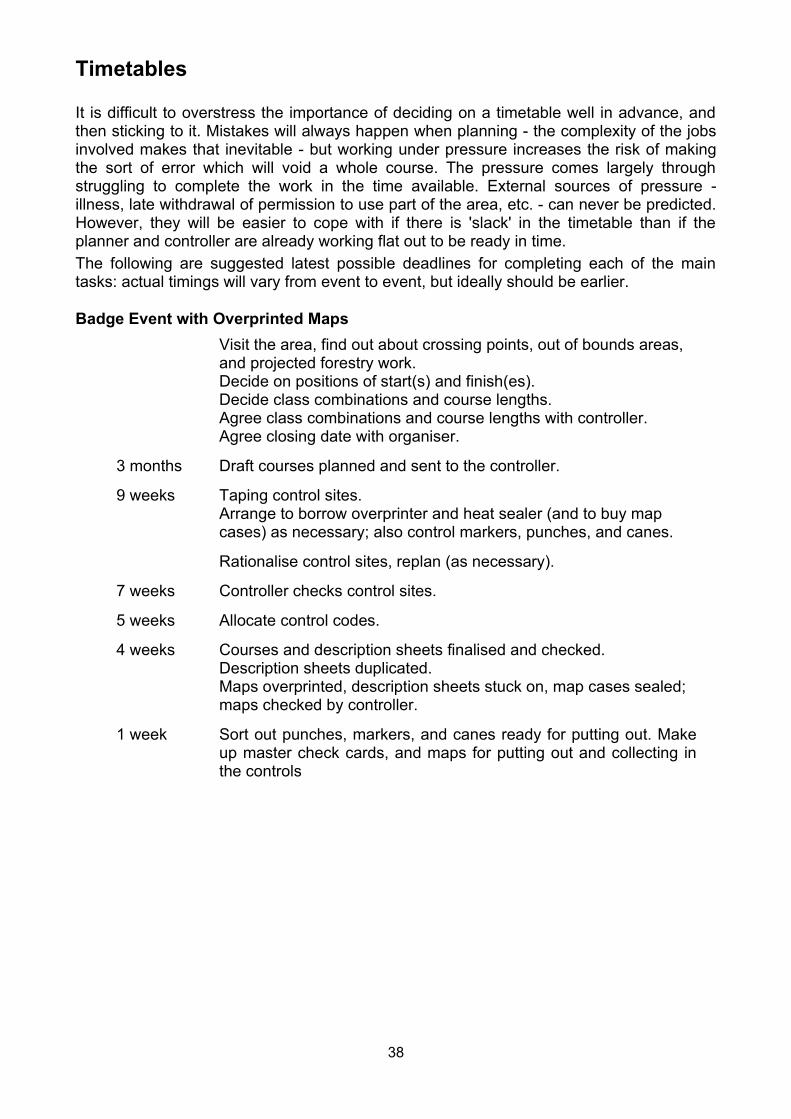
Badge Event with Overprinted MapsVisit the area, find out about crossing points, out of bounds areas, and projected forestry work.Decide on positions of start(s) and finish(es).Decide class combinations and course lengths.Agree class combinations and course lengths with controller.Agree closing date with organiser.
3 months Draft courses planned and sent to the controller.
9 weeks Taping control sites.Arrange to borrow overprinter and heat sealer (and to buy map cases) as necessary; also control markers, punches, and canes.
Rationalise control sites, replan (as necessary).
7 weeks Controller checks control sites.
5 weeks Allocate control codes.
4 weeks Courses and description sheets finalised and checked.Description sheets duplicated.Maps overprinted, description sheets stuck on, map cases sealed; maps checked by controller.
1 week Sort out punches, markers, and canes ready for putting out. Make up master check cards, and maps for putting out and collecting in the controls
38

Colour-coded Event with Master MapsVisit the area, find out about crossing points, out of bounds areas, and projected forestry work.Decide on positions of start and finish.Decide course lengths.Agree course lengths with controller.
8 weeks Draft courses planned and sent to the controller.
6 weeks Taping control sites.Rationalise control sites, replan (as necessary).
4 weeks Controller checks control sites.Arrange to borrow control markers, punches, and canes / get them out of club stock (check codes available).Allocate control codes.Courses and description sheets finalised and checked.
2 weeks Description sheet masters typed up, and checked by the controller before duplicating.Master maps drawn and then checked by controller.
1 week Sort out punches, markers, and canes ready for putting out. Make up master check cards, and maps for putting out and collecting in the controls.
39
40
41

42

43

44
45

46
47

48
49
IndexAAttack point 20CCatching feature 14, 20Changeover area 26Class combinations 10, 38Climb 6, 8, 10, 17Closing date 11, 38Common control 23Compass and pacing 14Compass bearing 14, 27Conservation 10Contouring 16, 20Control cards 34Control codes 31Control map 18Control site layout 35Controller 37Course closure time 32Course lengths 8, 38Crossing point symbol 33Crossing points 8, 10, 30, 38Crossovers 14, 17DDangerous features 30Description sheets 19, 31, 33, 37, 38Dog legs 15FFarsta 25Final details 34Finish 6, 17, 29, 33, 38Forbidden route symbol 33Functions of controls 17HHeight climb 8Hokey-Cokey controls 16LLap 23Last control 16Leg 13, 23
Long legs 13, 18MManned control 17Map corrections 33Map exchange 17Master check cards 34Master maps 32, 39Mechanisms of planning 18Motala 24NNight events 27OOut of bounds 10, 17, 38Overprinting 10, 29, 32PPhysical difficulty 22Pre-start 6Punch codes 34Punches 35RRefreshment points 31Relays 23, 33Route choice 13SScore events 28Short legs 14Start 6, 17, 29, 38TTaped route 16, 20Taping control sites 29, 38Technical difficulty 19Test runs 30Timetables 38VVännäs 24YYellow tape 30
50