corps command rulebook - lost battalion games
TRANSCRIPT

1
Credits 1Introduction to Rally Round the Flag: 2
Overview: 2-3- Campaign Play- Game Play- How to Win
History: 3- Designer
Description of Game Contents: 4Map: 4
- Pikes - March Circles - Areas - Edges
Battle Boards 5Cards: 5-11
- Hand Capacity - Command Cards - Battle Cards - Event Cards
Stands: 12- Generals- Troops
Tracks and Charts: 14- Turn Record Track- Step Losses- Action Point Track- Victory Point Track
Playing the Game: 15Setup 15Turn Sequence: 15-16- Activation
Actions: 16-18- Cavalry Charge- Musketry- Bombardment- Move Infantry- Move Cavalry- Move Artillery
Battle: 19-22- Defender Deploys in Columns- Attacker Deploys in Matching Columns- Attacker Chooses Column to Resolve- Play as Formation Card- Both Players May Bombard- Defender Volley- Attacker Volley- Play Battle Cards- Attacker Must Pass Ranks- Melee- Attacker or Defender Loss- Melee Reaction- Routs- Resolve New Column
Dice Rolls: 22- Action Dice- Battle Dice
Step Losses 23Generals Killed or Captured: 23
- Replacing a GeneralDeck 24Arrival of Forces 25Entering the General 25Scenarios 25
Contents
Game Designer: S. Craig Taylor Jr.Featuring the art of Mort KunstlerPublisher: Jeff BillingsDevelopers: Jeff Billings & Mike BillingsAssisted by Jeff McCullough
Art Director: Becky SiebeLead Illustrator: Alex WilcoxGraphic Design: Alex Freel
Credits
Copyright 2016, Lost Battalion Publishing LLC / Images Copyright 2016 Mort Künstler, Inc.Registered Trademark #4898340

2
Introduction to Rally Round the Flag®
OverviewRally Round the Flag® can be played at three levels. The Corps Command game is played with each unit representing a division, and commanded by Corps and Army Commanders. The Division Command level game is played with each unit representing a brigade of troops, and commanded by Divisional, Corps and Army Commanders. The Brigade Command level game is played with each unit representing a regiment, and commanded by Brigade, Division, Corps and Army Commanders. This Rulebook is for the Corps Command level game for Rally Round the Flag.
Campaign PlayIt is possible to play the Corps Command game of Rally Round the Flag and resolve tactical battles using the Brigade Command game. This allows the Corps Command game to act as a campaign battle generator, which creates tactical battles that can be played in 2 to 3 hours. If you would like to do this please read the Corps Command Campaign section located in the Brigade Command Rulebook.
A normal Corps Command game covering all 3 days of Gettysburg is playable in a little over 4 hours, while the Corps Command Campaign play may take as long as 40 to 60 hours to complete, if you resolve all combats using the Brigade Command Game system. The pace of play for Rally Round the Flag is quite brisk – however playing out every combat in the game is usually not necessary and many actions are resolved using the Corps Command combat system instead of setting up the Brigade Command action for lopsided battles. The ability to “fast-forward” past desultory combats can speed the campaign playing time to 20 hours or less – allowing you to play a larger game in much less time by carving it into 3 hour playing periods and requiring only a kitchen table to set it up.
Game PlayThe Corps Command game of Rally Round the Flag is designed with the ability to take and hold ground. This is represented by controlling the critical road network surrounding Gettysburg. In game terms, this is accomplished by controlling specifi c points along roads called March Circles, whereby Victory Points are scored.
The area around Gettysburg was known by both Lee and Meade, but the disposition of the Army of the Potomac and the Army of Northern Virginia was not known by either commander at the time of contact. Once Heth’s division encountered Buford’s cavalry, a race began to see which army could concentrate on the battlefi eld fi rst and achieve dominance on the prominent terrain. On July 1, 1863, neither army was situated with a clear advantage for control of the battle.
If Reynolds is killed on the fi rst day of play, the Union Army will suffer the historical problems of command confusion. As the First Corps commander and most senior General on the battlefi eld, if Reynold’s survives, the Union will be better positioned than if he were killed to face Lee’s second day’s attacks. To prevent timid use of Reynolds and other Union generals, Rally Round the Flag uses a “General Forward” card to compel Union generals to advance on the enemy positions. This refl ects the general aggression exhibited by the Union Offi cers during the Gettysburg battle.
Because the small divisions and cumbersome organizational structure of the Army of the Potomac makes strong attacks hard to execute, General Meade’s defensive posture will naturally play out in the game. Rally does not predestine the outcome of the game but, the design refl ects
the tactical, organizational, and operational limitations of the armies and their generals.

3
A fi nal note: Several brigades were nearly wiped out during the Battle of Gettysburg, however, even Pickett’s ill-fated charge did not totally eliminate his division from the battlefi eld. As such, the Division-level of Rally does not eliminate divisions. The units are only rendered incapable of further combat. Actual unit elimination occurs during Brigade or Regiment level play of Rally Round the Flag.
How to WinYou can win Rally Round the Flag in one of two ways: force the enemy army to retreat; or control the most Victory Points by the end of the game.
To score victory points, you must control March Circles on the map. There are a total of 43 Victory Points. As you secure the Areas around the March Circles you gain control of their Victory Points. If however, each player controls an Area that shares an Edge with the March Circle neither side scores the Victory Points.
Forcing the enemy army to retreat occurs when your side has double the amount of Victory Points than your opponent at the end of a night turn. When this happens, the enemy army retreats from the fi eld of battle and you win a decisive victory. If neither player is forced to retreat after the last turn of the game is played, then the player with the most Victory Points wins a limited victory.
HistoryIn the summer of 1863, Lee was faced with the disorganized Army of the Potomac. Major General Joseph Hooker had just been relieved of command and the likely successor, Major General John F. Reynolds, declined command. Lincoln settled on Major General George Meade as the commander of the Army of the Potomac. Oddly, this was a development that General Robert E. Lee was not happy to see. Lee had a level of respect for Meade that was unusual, commenting that if “he” (Lee) “made a mistake Meade would beat him.” The promotion of a capable Union General to the Army of the Potomac was compounded by a shakeup in the senior command of the Army of Northern Virginia. With Jackson dead, Second Corps command was assigned to Ewell, recently wounded. This change in generals threw off the precision and timing of the Army of Northern Virginia. The Army’s maneuver was off ever so slightly and this complicated the execution of Lee’s orders on the battlefi eld.
As various corps from each army arrived on the fi eld of battle, command control and communications led to badly deployed troops and hesitancy in maneuver and commitment. Control of the two Round Tops (each with an elevation of over 500 feet) left the Army of the Potomac with a better observation of the confederate deployment and movement. Even so, very poor operational discipline offered up whole regiments from both sides for destruction. Critical areas were at risk of loss, ceding the high ground and meager road network.
Heroism was the only constant on the battlefi eld, and the death toll in both armies was staggering.
DesignerRally Round the Flag took a lifetime to design with more than two decades of research. During development, we progressed from a conventional combat and movement system to a hybrid command (from activating a general) and opportunity (driven by cards) play mechanics.
As you read the rules for Rally Round the Flag, you will see the same game system at all levels of play. Some details will change at each level of play to account for the scale of the action. However, the mechanics are all based on the extensive research and detail underlying the system. Please enjoy this fi nal epic design of master game designer and icon of historical gaming – S. Craig Taylor Jr .

4
Description of Game ContentsMapThe Map of Gettysburg is an actual topographical map of the battlefi eld as surveyed by the Army Corps of Engineers. There are 4 key features of the map; March Circles, Pikes, Areas, and Edges.
PikesPikes are the main highways available to march wagons, guns, and troops along. Because the town streets of Gettysburg are not suited for large troop movements, the Pikes do not extend into the town. Pikes are NOT Area edges. They do not separate any area from any other area. Pikes contain March Circles that are located along them at various intervals and are of the same color as Pikes.
March CirclesEach March Circle serves two purposes: the fi rst is to allow corps of soldiers to March rapidly along Pikes; the second is to establish control of the map for purposes of victory.
When marching (under a March command, explained later), Generals move from Circle to Circle along the Pike being traveled. It is assumed that the soldiers and guns under the command of the General are in a March Column
along the Pike. If a marching General encounters deployed enemy soldiers in an Area that is attached to the March Circle he occupies, then his troops deploy into areas surrounding the march circle and Rout immediately.
Control of a March Circle is achieved by clearing all enemy soldiers from the surrounding attached areas. When this is accomplished a control marker is placed in the March Circle and the VP total is adjusted to refl ect the loss of the ground.
AreasAreas are attached to one or more March Circles. Areas are also attached to other Areas by way of Edges. Additionally, each area is labeled with a name for that Area.
Areas are the locations where troops are deployed. Troops from both sides may be in the same Area. Battle in an Area is resolved using the Battle Boards. Troops that are outnumbered in an area may rout and withdrawal voluntarily or be driven out by losing combat.
EdgesEdges delineate Areas and are indicated by a gray line on the Area’s border. Deployed troops may enter an Area by moving across a shared Edge. Any Edge that is shared between two areas is suffi cient to allow movement between the two areas. March Circles share an Edge with an Area
and allow Soldiers to enter or leave March column to-or-from the Area. The March Circle Edge allows one Offi cer to be in a prominent position and count as being in all Areas that share an Edge with the March Circle.

5
Battle BoardsDuring Corps Command play with area movement, each Area has a Battle Board that abstracts the effects of the terrain on battle resolution. The battle turn track has a list of Areas associated with each Battle Board. Once you determine the Battle Board to use for the fi ght, deploy the troops from the map to the Battle Board.
You start by fi rst placing the Battle Monument in the Area where the battle takes place. The inactive player is the defender and sets his stands of troops up fi rst on his side of the Battle Board.
CardsRally Round the Flag uses cards to affect the operational pace of play and advantage combat results. While drawing and playing the Command and Battle cards, unexpected Events may also occur that the players may exploit or mitigate as the situation demands.
Hand CapacityEach Player has a hand capacity equal to the Commanding General’s Leadership number (White#). The Commanding General may change during play due to the arrival of a new General or play of the Union player’s Command Changes event card. The player never draws above the hand capacity and must immediately discard down to a lower hand capacity of the Commanding General’s Leadership number.
Command CardsGeneral Offi cers exercise battlefi eld control using command cards. Generals of various ranks exert different types of control. Command Cards are added to the deck at the start of the turn when the general enters play. The actions are described by a term and number, such as Draw 4, which allows the player to draw 4 cards from the deck.
All command cards are limited in action to the units under command of the general.
ArmyWhen an Army Card is drawn from the deck, it is played face-up in front of the player. On any turn after the Army Card is drawn, it may be played normally and is discarded like any other card.
DrawDraw allows the player to draw the number of cards indicated on the command card. Once played, if the number of cards in the player’s hand exceeds the hand limit, cards must be discarded until the maximum card limit is reached. The cards discarded may be cards that were in the player’s hand prior to the play of the Draw card.
PlanPlan allows the General indicated on the Command card to activate for movement and combat a number of stands under command. Stands may activate more than once in a turn when using a Plan.
6
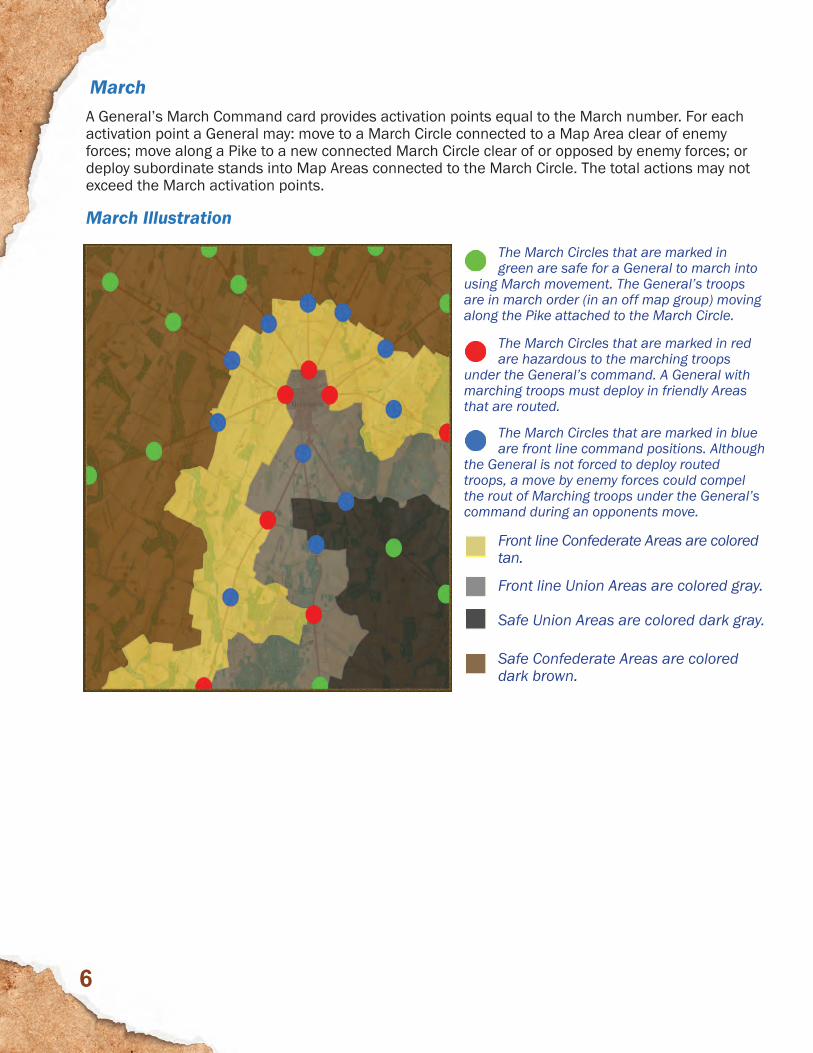
MarchA General’s March Command card provides activation points equal to the March number. For each activation point a General may: move to a March Circle connected to a Map Area clear of enemy forces; move along a Pike to a new connected March Circle clear of or opposed by enemy forces; or deploy subordinate stands into Map Areas connected to the March Circle. The total actions may not exceed the March activation points.
March Illustration
The March Circles that are marked in green are safe for a General to march into
using March movement. The General’s troops are in march order (in an off map group) moving along the Pike attached to the March Circle.
The March Circles that are marked in red are hazardous to the marching troops
under the General’s command. A General with marching troops must deploy in friendly Areas that are routed.
The March Circles that are marked in blue are front line command positions. Although
the General is not forced to deploy routed troops, a move by enemy forces could compel the rout of Marching troops under the General’s command during an opponents move.
Front line Confederate Areas are colored tan.
Front line Union Areas are colored gray.
Safe Union Areas are colored dark gray.
Safe Confederate Areas are colored dark brown.

7
Battle CardsWhen battles are resolved, each column in the battle can be modifi ed by playing Battle cards.
Battle Card Play IllustrationA. The cards to the left show a possible play of Battle Cards to support a column on the Battle Board. The formation troops on the Battle Board Column are “Line” which is found at the bottom of the top card of the stack.
B. The Attack Modifi er is “1” contributed by the red number on the bottom card in the stack.
C. The Defense Modifi er is “5” contributed by the blue numbers on all the cards of the stack being summed together.
D. The “Tactic vs Skirmish” Battle card allows the player to both Play-and-Pass if the opponent is in Skirmish formation.
E. The next Battle card has a “+3 vs Line” conditional modifi er. If the opposing column is in “Line”, the attack changes to “4” and the defense changes to a defense of “8”.
F. The top Battle card has a “+2 vs Skirmish.” If the opposing column is in “Skirmish”, the attack changes to “3” and the defense changes to “7”.
However, if the opponent is unformed, all Battle cards are valid and take effect. In that case, the attack would change to “6” and the defense would change to “10.” (This case would be playable if the Player used an Heroic Charge event to Play a formation and 2 battle cards and then also pass.)
Formation “A”Each Battle card has a formation at the bottom that describes the deployment and tactics. Each column deployed on a battle board can be formed using a formation card. If a formation Battle card is not played then the formation is unformed.
Attack Modifi er “B”The red number on the upper left of the Battle card is used when attacking and is added to the attack strength.
Defense Modifi er “C”The blue number on the upper right of the Battle card is used when defending and is added to the defense strength.

8
Conditional Modifi ers “D”The conditional modifi ers are located between the attack and defense modifi ers. If the opponent has an unformed column — caused by not playing a formation for the column, then all provisional modifi ers count.
For example, a “+2 vs Line” conditional modifi er counts against a column in which the opponent did not play a formation for the column. Otherwise, the conditional modifi er is applied only if the condition listed is met. For instance, “+2 vs Line” counts if the opponent is in Line formation, but does not count if the opponent is in Skirmish formation.
E vent CardsEvent cards are special cards that are shuffl ed into the player’s deck based on instructions found in the scenario. Both the Confederate and Union players have their own event cards. Not all event cards are in the players’ decks all the time. Some events are only used in Night Turns, or only on the afternoon turn of July 3rd. See the scenario for exact details. However, in all cases the changes are made at the start of the Turn. The card backs with a mini-ball bullet on them must be played when drawn.
Reserves ArriveWhen the Reserves Arrive event card is drawn, it and a Reserve Battle card are placed in the discard pile. Over time the tactical options of each player increase because the number of Reserve Battle cards increase in the players draw deck.
During the battle of Gettysburg, the meeting of armies led to combat where almost all available troops were cast into the fi ght. Because of this, reserves were in short supply. The Reserve Battle cards are only added into play as forces arrive on the battlefi eld and as time passes to allow the troops to solidify the command control and disposition of forces.
The Reserves Arrive event card stays in the player’s deck until all Reserve Battle cards have been added to the players deck, at which
point it is discarded out of play.
The Card Backs with a Mini-ball bullet on them must be played when drawn.
9
Night March Moves OnlyDuring the Evening turn, both players shuffl e the Night March Moves Only Event card into their respective decks. When either player draws one of these cards, then no fi ghting or movement of troops may occur with the exception of March actions. Remove these cards from the decks during the Morning turn and add them back into the deck during the Evening turn.
Rain: Turn EndsThe Rain: Turn Ends is an optional event card - it is added to both players’ decks if both players agree to use the variable weather event. If the players are playing with variable weather, the Rain: Turn Ends event cards are shuffl ed into each deck on each Afternoon turn. When a player draws the Rain: Turn Ends event card, they roll 2 dice and on an 11 or 12 the turn ends and the card is removed from play. Each player may only cause an end of Turn due to weather once during the game.
Thunderstorms happened on July 4 during the retreat and may have happened during the period that the battle took place. The optional use of variable weather allows for the possibility of weather playing a factor in the battle.
Cavalry Corps SkirmishOn July 3rd, at the start of the Afternoon, both the Union and Confederate Cavalry Corps Skirmish event cards are shuffl ed into players’ respective decks. When each Cavalry Corps event card is drawn, the player may roll 4 dice summing them to match or exceed the opponents current Victory Points. If the roll is successful, Cavalry Reinforcements specifi ed in the scenario may enter from any Union held Pike. This applies to both the Confederate and Union cavalry.
For example, if the Union player rolls a total of 19 on 4 dice and the Confederate Victory Point total is 17, then the Union player may enter his Cavalry along the Baltimore Pike at the Westminster March Circle.
ADVANCED RULE: If the roll exceeds the opponents Victory Points, the cavalry must mark off losses that are equal to the excess die roll. These losses can be distributed among the dismounted stand, the mounted stand or stands, or the horse holder stand in any manner the player wishes.

10
Heroic ChargeThe Heroic Charge event card can be held by the player and played at the start of any resolution of a battle board column. When the Heroic Charge is played, the player immediately plays two Battle cards and passes. This prevents the opponent from playing any battle cards - just like a provisional modifi er with the term Tactic in it. Play proceeds to step 6 of the battle resolution. Only one side may play an Heroic Charge event per battle board column.
For example, the Union Player advances 3rd Division V Corps into the Round Top Area to clear it of Hood’s Division. The weaker Union force seems doomed to defeat, however the Union Player plays his Heroic Charge Event card allowing him to play 2 Battle Cards and Pass - changing the battle to advantage of the Union player.
Battle PlanThe Battle Plan event card can be held by the Confederate player and played during the action phase. When played, any one general that has yet to be activated may be activated for normal play. The tighter command structure in the Army of Northern Virginia allowed General Lee to exercise better command control than the Army of the Potomac.
For example, the Confederate Player activates A.P. Hill — move stands, moves A.P. Hill and activates the Areas adjacent to A.P. Hill for Battle. After completing the battle resolution, the Confederate Player plays the Battle Plan Event card allowing James Longstreet to activate — move stands, moves James Longstreet and activates the areas adjacent to James Longstreet so that a second round of Battle can take place before the Union Player is allowed to take a turn.
Advanced Rule: The Confederate Player may play the Battle Plan to Cancel a Battle after the Battle cards are played but before resolution. All stands in the Battle return to the Map as if the battle was inconclusive. This allows Lee to commit forces to a holding action meant to draw down the Union Players cards prior to an attack in another sector.
Although unsuccessful in execution, Lee did order a holding attack against Culp’s Hill on the Morning of the July 2.
Command ChangesThe Command Changes Event card must be played when drawn. When it is played, a different Union general takes command of the Army of the Potomac. During the evening or night turn of July 1st, the command changes event card is removed from whenever it is fi rst played. General Meade arrived on the battlefi eld during the night turn of July 1st. Once he arrives the Union command confusion is settled and the command changes event card is permanently removed from play.

11
For example, Maj. Gen. John F. Reynolds was a highly reliable ranking General on the fi eld of battle on July 1st when he was killed suddenly leading to confusion as to who was in charge of the Battlefi eld. Due to the unwieldy command structure, and the confusion caused by Reynolds death and Meade’s absence, command changed 7 times before July 2nd.
Advanced Rule: If Reynolds had not been killed during the morning of July 1st, the command confusion in the Army of the Potomac would have likely not been a factor in the battle. Set the Command Changes Event card aside and only shuffl e it into the remaining draw deck cards if Reynolds is killed. The card is removed from play once Meade arrives on the battlefi eld.
Supplies ArriveThe Supplies Arrive event card must be played when drawn. Routed Confederate stands not in areas containing Union stands may test Military Discipline to Rally.
When Lee moved the Army of Northern Virginia north into Pennsylvania, it was for more than political or strategic reasons. Lee wanted to relieve the burden of Supply off of Virginia by foraging in the Shenandoah valley and the fi elds of Pennsylvania south of Harrisburg.
Advanced Rule: When supplies arrive, one Confederate step loss is regained.
The Confederates were in high spirits when they moved north to take the fi ght to the Union. As a result, the soldiers of the Army of Northern Virginia believed they could win the war with Lee in charge and supplies available.
General Forward The General Forward event card must be played when drawn. On the next available action, the Union General closest to the Cashtown March circle and which is not currently in an area held by opposing troops, must advance all of his command toward the Cashtown March circle. If generals are equidistant, the Union player chooses the General to advance.
Several unfortunate and unwanted cases of Union initiative occurred during the battle. These locally advantageous moves worked against the security of the Army of the Potomac. Because of this, the Union Player must deal with unwanted aggression from the Union Corps Commanders. During the fi rst and second day of the battle. This card is removed at the end of evening on the July 2nd turn.
For example, Major General Daniel E. Sickles’ made an unilateral advance into the Peach Orchard where his 3rd Corps was effectively destroyed. Although the Union Player could be helped by this event, it is a possibility that the event could cause catastrophe for the Union.

12
StandsThe stands are the combat units of Rally Round the Flag, representing soldiers, cavalry, cannons, and generals.
In the Corps Command game of Rally, each artillery standee equals 16 to 20 guns, and each infantry or dismounted cavalry standee equals ~1200 troops.
Generals
The Generals in Rally Round the Flag are the center of action when designated for command during the turn. An activated general allows a player to replenish cards and activate troops using action points.
A. GravestonesGenerals that are killed or wounded have their base marked on the Gravestone. Command and Leadership values on the General are -1, and heroism is increased by +1 for each Gravestone marked on the base.
B. CommandA General has a command number in red on the base of the general. The command number is the number of cards drawn when activated.
C. LeadershipA General has a leadership number in white on the base of the general’s stand. This is used as your hand capacity if he is your commanding General. When the general is activated, the action points marker is set to the value of the leadership number. Also, an activated general is the center of command. All action points spent count outward from the active general.
D. HeroismA General has a heroism number as a green number with a + included. When the general is in a column on a battle board, or in an area on the map, the heroism number modifi es die rolls for battle, fi re or military discipline checks.

13
TroopsThe stands of troops in Rally Round the Flag represent infantry, cavalry and artillery. As troops are lost, they are marked off on the stand reducing the strength of the base.
Military DisciplineThe Military Discipline is a white number in a green circle that refl ects the élan, experience and leadership of the unit. Passing a Military Discipline check allows the unit taking the check to rally, hold in the face of the enemy, maneuver or redeploy.
A Military Discipline check is made by rolling 2 dice, summing them together, and comparing the modifi ed die roll with the modifi ed Military Discipline number of the unit. If the modifi ed roll is equal to or less than the modifi ed Military Discipline number, the unit passes the check.
Modifying the Military Discipline check is done by adding a Generals heroism number to the Military Discipline of the unit.
Modifying the die roll used for the Military Discipline check is done by adding modifi ers to the dice total. These are the modifi ers:
• Always add 1 for each routed unit in the same Battle Board column.
• Always add 1 for each routed unit in the same Map Area when testing Military Discipline on the Map.
• If attacking, add 1 for each rank between the stand that is testing and the enemy front line stand. This is a “passage of lines” check.
FireThe Fire number is a white number in a red circle that refl ects the units drill, marksmanship, and equipped weapons. Passing a Fire check causes the target unit which is hit to take a Military Discipline check.
To pass a fi re check, the Fire number is added to the target stands strength to get a hit number. Two dice are rolled and modifi ed by the closest General’s heroism that is in command range. If the modifi ed roll equals or exceeds the hit number, a Hit is achieved. All fi re hits cause Military Discipline checks, which if failed, cause a unit to lose a strength.
Troop StrengthTroop Strength is measured in steps depicted by the standees on a stand. A stand that contains 4 rifl eman and a fl ag bearer counts as having a strength of 5. As the stand takes hits, the base is marked to record the loss. Troop Strength is measured as the standees minus and marked losses. The same 5 strength base that has 2 marked losses has a strength of 3.
Supported Guns — an artillery stand that is touching an infantry stand counts both stands strengths to determine the Hit Check number. Using the prior example, a stand of 5 strength with 2 losses marked, that is in contact with a gun stand with 1 gun counts as having a Troop Strength of 4.

14
Tracks and ChartsRally Round the Flag uses simple record keeping to keep play as easy as possible.
Turn Record TrackThe game is divided into Morning, Afternoon and Evening turns for each Day of the battle. The turn ends when either player has activated all of their generals, and chosen to pass. Their opponent receives one fi nal activation and then the turn track is advanced.
Action Point TrackWhen a general is activated, the leadership number of the general is used to set the action marker. As action points are expended to activate stands, the value of the marker is adjusted down. When the action points are spent or the player passes the marker is set to zero.
Step LossesStep losses are marked on the base of the stand using a dry erase marker. At the start of the game, insure that all step losses are erased. As a stand is hit, mark a step loss on the stand. Step losses are carried forward between battles and effect only the units strength.
Victory Point TrackThere are 43 Victory Points on the Map contained in the March Circles along the Pikes - controlling the critical road network surrounding Gettysburg. Control of the Victory Points is achieved by controlling all areas that share a common edge with the March Circle containing them. During the game, a circle can be in any of 3 states: uncontrolled, Confederate controlled or Union controlled. All controlled Victory Points are scored immediately. If the ratio of victory points is 2 to 1 at the end of the Evening turn, the losing Army will withdraw from Gettysburg. The remaining side wins an operational victory. The game ends on the end of the Evening turn on July 3rd. Whoever leads in Victory Points wins a tactical victory.

15
Playing the GameRally Round the Flag is an action driven game that uses Battle Cards to resolve battles or Command cards to change the pace of actions.
SetupBoth players separate all Command cards and Reserve Battle Cards from the deck. Check the scenario start instructions for the starting Command cards, Reserve Battle Cards, and Event cards to add to the players’ Draw deck. Then shuffl e the deck, placing it next to the players’ position. Next, place the Control markers on the March Circles indicated in the scenario. Place the Troops and Generals on the map as indicated in the scenario. Finally, set the Turn Record Track to the date and time indicated and set the Victory Point Markers on the Victory Points Track at the level stated by the Scenario. You are now ready for play.
Turn SequenceThe Confederate Player is the fi rst player for all turns of Rally Round the Flag, and as such will take the fi rst Activation Phase. After the Confederate player activates a General, or Generals if he plays a command card, it is the Union player’s Activation Phase. This pattern of activation repeats until one player draws the last card from the Draw Deck, ending the turn.
1. Resolve Events
2. Activate a General:Set the Action Points Marker on the Action Point Track equal to the Leadership rating of the General.Discard a number of cards up to the Command Rating to make room in your hand to draw cards. Draw a number of cards equal to the Command Rating of the General up to the hand maximum, but not above the hand maximum. Discard happens before the draw.
3. Move the General using one of the following methods:The General moves up to 2 Map Areas before activating the stands of Troops under his command.The General moves 1 March circle and may deploy stands of Troops into adjacent Areas.The General moves up to 2 March circles. NOTE: If enemy stands are in areas next to the March circles used by the General, the General is forced to deploy all subordinate stands that have yet to be placed on the map as routed troops in an unoccupied Map Area.
4. Activate a stand, pay the activation cost to perform one of these Actions with a stand:Bombardment by Artillery - perform Fire checks at a stand in an adjacent Area and resultant Military Discipline checks.Musketry by Infantry - perform Fire checks against targets in the same Area and resultant Military Discipline checks.Move a Cavalry stand - move a dismounted Cavalry stand 1 Map Area or a mounted Cavalry stand 2 Map Areas.Move an Infantry stand - move an Infantry stand not in an enemy occupied Map Area to an adjacent Map Area.Move an Artillery stand - move an Artillery stand to a friendly occupied or unoccupied Area.
5. Repeat step 4 until all Action Points are expended or the Player passes:Or after expending all Action Points, play a Command card to activate another General and return to step 2.

16
6. Generals in Command may declare a Battlefi eld in the Map Area they occupy — Active Players Choice:Place a Battle Board corresponding to the Area in play.Place a Battle Monument on the map and deploy the stands to the Battle BoardResolve the Battle.Return the stands to the Map where the Battle Monument was placed.Routed stands must make mandatory retreat moves to friendly Map Areas or are captured and removed.
7. The Opponent takes their turn starting at step 1: Play continues until one side has activated all of their available Generals and Units. Once that occurs, the opposing side receives one fi nal turn prior to End of Turn.
8. End of Turn phase:Test for Operational VictoryRemove the Events that are not used in the next turn.Arrival of Forces — add the General cards for the arrivals to the discard pile.Shuffl e the discard pile and place it on the bottom of the player’s deck.Advance the turn marker.Begin the next turn.
ActivationActivation selects a General to act as the center of command and the activated General stays in command (his Leadership and Heroism numbers are used) for the remainder of the activation. Generals that are in command may declare a Battlefi eld, place a Battle Monument, and resolve a battle on Battle Board. In the case of the General occupying a March circle, then the General may declare more than one Battlefi eld and participate in each resolution. All Action Point expenditures are measured from the General’s location after he has moved during Step 2. To activate a stand, 1 Action Point is spent for each Map Area between the General and the stand. So a General would pay 1 Action Point to activate a stand in the same Map Area and 2 Action Points to activate a stand in an adjacent Map Area.
When a player activates a General, the player receives Action Points equal to the General’s Leadership value, discards a number of cards up to the Command value and then draws a number of cards equal to the General’s Command value up to but not over the hand limit.
For example, if General Robert E. Lee is activated by the Confederate Player, the player receives 11 Action Points to use. The center of command starts wherever Lee is located after he moves during step 2 of the Turn sequence. Units in the same area as Lee would activate using 1 action point. Also, if Lee was in a March Circle, Lee could activate units in any Area connected by an edge for 1 Action Point. Units that were 3 Map Areas away would activate for a cost of 3 Action Points each. The further away the stand is from a General, the more Action Points it costs to activate the stand. Lee could only declare a battlefi eld in the Map Areas either occupied by Lee, or in an adjacent Map Area to a March Circle occupied by General Lee.
ActionsActions are taken during play by using Action Points gained by activating a General. The Action points are used to activate stands on the Map to move, rally, or engage in fi re or bombardment before entering a Battle. The actions that can be taken are:
Cavalry ChargeDuring the Battle of Gettysburg, mounted Cavalry operated in the surrounding battlefi elds while dragoon tactics were employed to great effect. Even though dismounted Cavalry fought to great effect during the battle, mounted tactics were always a possible course of action.

17
Cavalry Charge PriorityMounted Cavalry may attempt a charge against an enemy stand that is in the same Area as the Cavalry stand. The Charge must follow this target priority and no other charges are allowed:
• Enemy Cavalry - The charging Cavalry stands must charge enemy mounted Cavalry stands. The charge move is made on a “closest friendly to closest enemy” mounted stand basis. Once these stands are in contact, the next closest move together. As this process continues, there is a chance that the Cavalry battle will turn into a disorderly mob. This is not only possible but correctly represents many Civil War Cavalry actions.
• Unsupported Artillery - The charging Cavalry stands must charge artillery that is not in contact with a supporting infantry stand. An opportunistic charge to clear an unsupported artillery battery was often done to clear the danger of leaving the enemies guns in battery. This is only done on a 1 stand for 1 stand basis.
• Routing Infantry - The charging Cavalry stands must charge enemy routing infantry stands. Unformed troops presented an opportunity to disperse the enemy force.
The Charging Cavalry must pass a Military Discipline check adding a +1 Die Roll modifi er for each formed enemy Infantry stand in the area. If the check is passed, the Cavalry Charge is resolved using the Cavalry Charge Reaction. If the Military Discipline test is failed, the charging Cavalry retreats to an adjacent area.
Cavalry Charge ReactionA Cavalry Charge Reaction is an involuntary battle in reaction to a successful Cavalry Charge. The responding stands react as listed below:
• Enemy Cavalry will Counter Charge and a Melee Roll (see Battle, Step 10) is made using only the two Cavalry stands. The loser routs. If the loser is doubled, it is destroyed. The winning Cavalry stand remains in the area.
• Unsupported Artillery fi res at the charging enemy Cavalry, resolves the shot, and then conducts Melee. If the Cavalry loses, it routs and the artillery remains in the area. If the Cavalry wins, the guns are destroyed.
• Routed Infantry test Military Discipline to form square. The Military Discipline test is modifi ed by -1 for each steady friendly Infantry stand and +1 for each routed friendly Infantry stand in the map area. If the target routing infantry stand passes the Military Discipline check, it rallies and the Charging Cavalry routs to an adjacent Map Area. If the routed Infantry fails the Military Discipline check, the routing Infantry stand is destroyed.
MusketryDuring the battle of Gettysburg, sustained rifl e musket fi re expended more than fi ve million rounds. The expenditure of ammunition to cause each casualty – it was joked – that you had to fi re a man’s weight in lead to harm him.Infantry and Dismounted Cavalry stands may make a Fire attack against any enemy stand located in the same Map Area. If the Fire attack targets an Artillery stand, the target Artillery may be supported by the strongest enemy Infantry or dismounted Cavalry stand available in the Area - raising its strength for the Fire combat.
For example, Third Corps Artillery with a strength of 1 is supported by Anderson’s Division Strength of 4 from it’s 5 strength - 1 for losses suffered. The target Artillery is treated as a Strength of 1 + 4 for 5. If it is being fi red at by Buford’s 1st Cavalry Division with a fi re strength of 3, it will take a roll of at least 8 or better on two six-sided dice to force a military discipline check. If the Union Player rolls a “10”, the Third Corps Artillery would need to roll a 10 or less to pass its Military Discipline after adding +2 to the die roll total - which is the amount that Buford’s cavalry beat the needed Fire number by. If the Military Discipline is failed, a loss is marked off and the Artillery would be removed from the board from losing it’s 1 Strength.

18
BombardmentDuring the 3 days of battle at Gettysburg, artillery from both sides fi red 55,000 rounds of ammunition. Bombardment uses only shot and shell conducted at extended range and is done by an activated Artillery stand located in an area free of enemy units. A stand of Artillery may Fire at any enemy stand in a Map Area which shares an edge with the Map Area that the fi ring unit occupies, or that shares an edge with the area sharing an edge with the fi ring unit. The target number is modifi ed by the target units area battle board number for each area passed through by the bombardment. In addition, the each die rolled is reduced by 1 for each area passed through beyond the fi ring artillery’s area.
Note: Artillery which is Bombarding does not get the +2 die-roll modifi er to it’s Fire attack that it would otherwise get when in a Battle column on the Battle Board. This is because the Fire is at longer range and is less intense than that of the close range fi re.
Move InfantryAn activated Infantry stand may move. The move may be made from any map area to an adjacent map area if only 1 map area contains a steady enemy troop stand. No move between 2 map Areas can be made if both contain Steady enemy Troop stands.
Move CavalryAn activated dismounted Cavalry moves like Infantry. An activated dismounted Cavalry stand may mount and make a mounted move. A mounted Cavalry stand may move up to 2 Map Areas. Mounted Cavalry may move through any Map Area not occupied by steady enemy Infantry or Cavalry stands.
Move ArtilleryAn activated Artillery stand may move. The move may be made from any map area to an adjacent map area if neither contains an opponent’s troop stand. No move between 2 map Areas can be made if both contain an opponent’s troop stands. Artillery may move into areas with an opponent’s troop stands only when accompanied by a friendly troop stand of the same command;
Confederate: Division or Corps artillery with stands of the same Division or Corps, respectively.Union: 3rd Calvary Division or Corps artillery with stands from the same 3rd Cavalry division or Corps, respectively; or, Reserve artillery with any stands from the Army of the Potomac.

19
BattleMovement on the operational map of Gettysburg is made Map Area to Map Area. Battles in a Map Area occur on a Battle Board that is chosen based on the Map Area in which the battle occurs. The back of the Battle Flow Chart has a list of Map Areas and which Battle Board to use to resolve the Battle in that Area. The non-active player is in control of which, if any, Columns are used on the Battle Board.
Once you determine which Battle Board to use, mark the Map Area on the operational map as a Battle using a Battle Monument, and deploy the stands from the Map Area to the Battle Board. Follow the sequence of play found on the margin of the Battle Board. Perform the following steps to conduct a Battle on the Battle Board.
1) Defender Deploys in ColumnsThe non-active player may deploy up to 2 stands of Infantry or dismounted Cavalry and 1 stand of Artillery in 1 or more columns of the Battle Board. Any remaining stands are placed in the rear — off the Battle Board, and serve as reinforcements. The defender controls the number of formation cards played by both players since only 1 Battle card as the Formation card can be played in each available Formation slot on the Battle Board.

20
2) Attacker Deploys in Matching ColumnsThe active player may now deploy up to 5 stands of Infantry or dismounted Cavalry, and 1 stand of Artillery in each enemy occupied column on the Battle Board.
Unmatched ColumnThe Attacker must place at least 1 stand of Infantry or Cavalry in each Defender occupied column. If the Attacker cannot do so, the Attacker gains 1 red Select die for each unmatched column occupied by a Defender. The red die is used as a Select that can replace any other die that is rolled by the Attacking player - but the defender makes the selection of which dice to use. If the Defending player has an unopposed column, the Attacker must roll 1 red Select die in addition to any dice used for Military Discipline checks, Fire attacks or Melee rolls. The Defender selects the dice the Attacker will use.
For example, McLaws’ Division makes an attack by itself so the 3rd Corps decides to defend all three columns of the Battle Board. Two red Select Dice are added to the Melee roll; one for each unmatched column. The Confederate Player rolls well; a 6 and a 4 on the white battle dice; The red dice that are rolled are a 1 and a 5 so the Defender Selects the white 4 and red 1 for the Attacker to use to resolve Melee, swinging the results by 5 points from 10 to 5. The moral of this example is cover your fl anks.
3) Attacker Chooses the Column to ResolveEach column is resolved one at a time. Steps 4 through 13 are resolved completely for each column. After the Attacker chooses the column to resolve, the Defender may commit any reinforcements to the column equal to the defending stands that are already in the defending column. Only 1 additional stand of artillery may be added.
4) Play a Formation CardBoth players must place a face down Battle card in an open Formation slot on the Battle Board.
No Formation CardIf a player cannot play a Formation card, the stands in the column are treated as unformed. Unformed columns grant the opponent’s Battle cards that have Conditional modifi ers an automatic success on meeting the condition.
For example, +3 vs Line will succeed if the opposing column is in Line or if the column is unformed.
5) Both Players may BombardBoth players may fi re Artillery with a +2 die roll modifi er at the front stand of the opposing column. Use the Fire rules to resolve Bombardment. Test Military Discipline for stands that have suffered hits. If a stand routs, all stands in the column must also test Military Discipline.
6) Defender VolleyThe defender Fires with the front two stands at the attacker’s column. If the attacker’s front stand routs, then the remaining fi re is made against the next stand in the attacker’s column. Use the Fire rules to resolve the Defender Volley. Make a Military Discipline check for stands that have suffered hits. If a stand routs, all stands in the column must also make a Military Discipline
check.

21
7) Attacker VolleyThe attacker fi res with the front stand at the defender’s column. Use the Fire rules to resolve the Attacker Volley. Make a Military Discipline check for a stand that have suffers a hit. If the hit stand routs, all stands in the column must also make a Military Discipline check.
8) Play Battle CardsAfter volleys are complete, the Attacker may play a Battle card or pass. If the Attacker plays a Battle card then the Defender can play a Battle card or pass. As long as the opponent plays a card (with the exception of a Tactic or Heroic Charge), the option to play or pass continues. Once either player passes, Battle card play ends.
9) Attacker MustPass RanksThe attacker’s column may straggle before Melee is resolved which can reduce the attacker’s strength. For each rank past the fi rst, a military discipline check is made with a +1 modifi er for each rank in front of the testing stand and +1 for each router on your side. If the test is failed, the stand holds in place and does not attack. Place the holding stand with the routers in the column facing the enemy. If the attacker is counter attacked, they become steady defenders.
10) MeleeMelee is a test of strength. The base strength is the sum of the all standees in the column. Add 1 for each Artillery, Infantry and Cavalry standee. Do not count supply wagons, limbered Artillery, horse holders, or leaders. The Attacker adds the red Battle card numbers to the attacker’s strength from cards he has played. The defender adds the blue Battle card numbers to the defender’s strength from cards he has played. In addition, the conditional strength adjustment is used if the condition is true, such as — “+3 vs Line” is added if the opponent’s column has played a Line formation card or played no Formation Card.
Both players total their strength and roll 2 dice to sum with the strength total. Select and Re-rolls may be used to alter the dice roll. Once a pair of dice are summed with the Melee strength for each player, the attacker’s Melee strength is compared with the defender’s Melee strength, and the lower total strength loses the Melee and takes a Step Loss. If the difference is double the loser’s largest strength stand, then the loser takes 2 Step Losses on the front stand Routs automatically.
For example, McLaws’ Division is full strength at 5, so if the Union beats the Confederate by 11, the Confederate front division – not necessarily McLaws’ Division – would take 2 losses from Melee and Rout.

22
11) Attacker or Defender LossIf the Attacker or Defender loses the Melee, and no longer has infantry standing in the line of battle, the column’s battle is resolved, proceed to Step 13. If stands still remain, the front unit must make a Military Discipline check modifi ed by the amount of the difference that the winner won the Melee in order to stand. If the Military Discipline check fails, the stand will rout.
12) Melee ReactionIf the defender loses the Melee, but has stands that held their ground by passing the Military Discipline check, or if the Attacker Loses the Melee, but has stands that pass the Military Discipline check, a new Melee phase occurs. The winner of the Melee is now the Attacker (red number modifi ers) and the loser is the Defender (blue number modifi ers). The Melee then continues using the currently played Battle Cards counting only the Red or Blue Strength Adjustments. Conditional modifi ers are not counted in subsequent Melee phases. The Battle cards that are in play are used for the new Melee phase.
13) RoutsAll routing infantry in the column are placed at the rear, facing away from the enemy. Routing cavalry mounts are retired from the battle immediately. Artillery that has no steady infantry or dismounted cavalry must test military discipline. If the artillery fails its Military Discipline check, it is destroyed, otherwise it routs.
14) Resolve New ColumnIf a column has not yet been resolved, go back to step 3. Otherwise, place the routers in Map Areas adjacent to the Map Area with the Battle Markers that are friendly, or that are uncontrolled and not adjacent to, any enemy occupied Map Areas. The defender removes routers from the Map Area fi rst, followed by the attacker.
Once all columns have been resolved, if both sides have unbroken columns after all routers are removed, then the remaining stands are returned to the Map Area marked by the Battle Monument, and play continues.
Dice RollsThe dice rolling conventions used in Rally Round the Flag are based on rolling 2 six-sided dice and summing them with modifi ers.
Action DiceDuring the action portion of play, there are no special conventions used to roll rice. A roll of 2 dice is modifi ed by routs. Remember that heroism does not modify the roll, only the Military Discipline of a Stand.
Battle DiceDuring battle, it is possible to add other dice rolling convention to the Action Dice convention as a result of Battle card play. The use of the Battle dice rolling conventions are optional.
Select DiceWhen selecting dice, more than 2 dice are rolled and then only 2 of the dice are used. A Select 3 rolls 3 dice, and a Select 4 rolls 4 dice. Modifi ers are then summed with the dice total. Selects can only be used once and the decision is made when the dice are rolled.

23
For example, The Union Player plays a Select 3 during a Battle, so three dice are rolled with the results of a 2, 4 and 1. The Union player Selects the 2 and 4 for a total of 6. However the Select could be saved for a Military Discipline check resulting during the Battle. In that case, the Union Player would likely chose the 2 and the 1 for a total of 3. If for some reason failing the Military Discipline Check was the Goal, the Union Player could just as well chose the 2 and 4 for total of 6.
Re-roll DiceRe-rolls are very powerful. A re-roll 3 allows the Player that played the Battle card to gain 3 re-roll points. One re-roll point is spent to re-roll either the players die or the opponent’s die. Once a player is satisfi ed with the dice result, the remaining points are lost. When a re-roll is used to force an opponent to re-roll dice rolled using a Select card the die are separately re-rolled. As long as the player has a re-roll point, any relevant dice roll may be forced to re-roll. Once the “Re-roll” Battle Card is discarded, all the remaining re-roll points are lost.
Step LossesWhen a stand takes a hit from enemy Fire, and also fails a Military Discipline check resulting from that Fire, it marks a Step Loss on the stand that was hit reducing the Strength of the stand. If a stand loses a Melee, the stand takes Step losses based on the Melee loss rules.
Artillery Step LossesWhen an Artillery stand is hit it, makes a Military Discipline check, and if it fails the check takes a Step Loss. If it has marked the last step on the stand, it is removed from play and has no other effect. Artillery may only be fi red on using counter battery fi re from other artillery by expending an activation point. Counter battery fi re is made from an adjacent area. In the rare event of artillery being alone in an area with opposing artillery the counter battery may be undertaken with a +2 die roll modifi er.
Where loss of a Division may cause widespread panic, the loss of a battalion or brigade of guns was a normal event on the battlefi eld and often went unnoticed by the rest of the Army.
Infantry and Cavalry Step LossesIf the last step on a stand is marked, then the stand is removed from play. When a stand is removed from a Battle, the friendly stands in the same column must make a Military Discipline check, and if they fail, they will rout. Otherwise, if a stand is lost due to Fire during the action phase, then friendly units in the same area must make a Military Discipline check, and if they fail, they will rout.
Cavalry may mark any Step Loss: the Dismounted Soldiers, Horse Holders, or Mounted Soldiers. If the Horse Holders stand is removed, the Dismounted Cavalry May only Mount and May not Move. If the Mounted Stands are removed, the Cavalry May not Mount at all — this is due to an excessive loss of horses. If the Dismounted Cavalry stand is removed, the Cavalry has lost its willingness to fi ght and won’t dismount into an effective fi ghting force.
Generals Killed or WoundedIf a General is in a column that breaks from Battle, the player rolls 2 dice to check for being killed or wounded. If the sum of the roll equals the General’s command rating, the General is killed and the opponent is awarded 1 bonus Victory Point. If the roll equals the Leadership rating of the General, the General is wounded.

24
Replacing a GeneralWhen a general is killed or wounded, they are marked on their Gravestone. For each Gravestone marked, the General loses 1 Command Rating point, and 1 Leadership Rating point, but gains 1 Heroism Rating point.
DeckDuring the end of each turn, the discard pile is shuffl ed and added to the bottom of the draw deck. Any remaining un-drawn cards are drawn fi rst during the subsequent turn.
Rally Round the Flag uses the battlefi eld decision cycle as part of play balance. Historians have noted that many of the early confederate victories were a result of a more effi cient decision cycle on the battlefi eld.
Arrival of ForcesAt the end of the turn, arriving forces have the General cards added to the discard pile. The discard pile is shuffl ed separately from the remaining cards in the players deck. After the shuffl e is complete, the opponent can cut the shuffl ed discards and then add them to the bottom of the opponent’s deck.
Entering the GeneralWhen a General’s Command card is played, the General may enter the map on the Pike listed in the scenario. If the Pike is blocked, the General may deploy his forces into the area along the Pike and begin combat operation.
ScenariosRally Round the Flag Corps Command play has several scenarios. Each scenario is playable as a campaign along with the Rally Round the Flag Brigade Command game system or as is usual in a standalone game. Scenarios are found in the scenario book, and may, in the future, have additional scenarios posted online on the Lost Battalion Games website.
Scenario RulesThe scenario specifi c rules cover variants and specifi c application of the rules. All variant rules are elective and should only be used by agreement of both players prior to the start of play.