contentssupportcdn.edmentum.com/platocoursewareqrcs/plato... · 2 contents 1. getting started with...
TRANSCRIPT

1

2
Contents
1. Getting Started with Plato Courseware ................................................................... 4
a. Roles and Permissions.................................................................................... 4
b. Create Users ............................................................................................... 6
c. Manage Users ............................................................................................. 12
d. Password Management .................................................................................. 16
e. Licenses ................................................................................................... 19
2. Plato Courseware Home Page ............................................................................. 26
a. Plato Courseware Tabs ................................................................................. 26
b. My Profile ................................................................................................. 28
c. Header Toolbar .......................................................................................... 30
3. Plato Courseware Content Structure .................................................................... 31
a. Course Overview ......................................................................................... 31
b. View Plato Courseware Content ....................................................................... 31
c. Custom Course Builder .................................................................................. 32
4. Classes Overview............................................................................................ 35
a. How to Create a Class .................................................................................. 35
b. Class Management ....................................................................................... 36
5. Plato Courseware Online Assignments and Activities.................................................. 40
a. Digital Dropbox Activities .............................................................................. 40
b. Graded Discussions ...................................................................................... 44
c. Tutorials .................................................................................................. 46
d. Applications .............................................................................................. 47
e. Assessments .............................................................................................. 47
6. Flex Assignments ............................................................................................ 48
a. Flex Class ................................................................................................. 48
b. Flex Assignments ........................................................................................ 50
7. Plato Courseware Online Communication Tools ........................................................ 54
a. Sensei Messaging ......................................................................................... 54
b. Announcements .......................................................................................... 56

3
8. Virtual Learning Collaboration Space (VLCS) ........................................................... 58
a. Viewing Collaborations ................................................................................. 58
b. Creating Collaborations ................................................................................. 59
c. Facilitating a Collaboration ............................................................................ 60
d. Using the Whiteboard Tool ............................................................................. 61
e. Adding Video to a Collaboration ...................................................................... 63
f. Adding Documents to a Collaboration ................................................................ 64
g. Using the Chat Tool ..................................................................................... 65
9. Grade Tracker ............................................................................................... 66
a. Class Grade Tracker ..................................................................................... 66
b. Category Weightings .................................................................................... 67
c. Grading Scales ........................................................................................... 68
d. Manage Activities ........................................................................................ 68
e. Custom Activities ........................................................................................ 69
f. Manage Credits........................................................................................... 69
g. Remove Assignments .................................................................................... 70
h. Grade Tracker Reporting ............................................................................... 70
10. Plato Courseware Reporting Overview ................................................................. 72
a. How to Run a Report .................................................................................... 72
b. Curriculum Reports ...................................................................................... 72
c. System Reports .......................................................................................... 80
11. Administration ............................................................................................. 82
a. Reports .................................................................................................... 82
b. Manage Users ............................................................................................. 82
c. Import Users .............................................................................................. 83
d. Programs .................................................................................................. 83
e. Licenses ................................................................................................... 84
f. Settings ................................................................................................... 85
12. Plato Courseware Support ............................................................................... 86
a. Plato Courseware Help ................................................................................. 86
b. Plato Courseware Support Site ........................................................................ 86
c. Call Center Support Team .............................................................................. 87

4
1. Getting Started with Plato Courseware
a. Roles and Permissions
Plato Courseware Account Administrator
The Plato Courseware Account Administrator is the main contact within an organization for Plato Courseware implementation. The staff member in this role understands the implementation needs for Plato Courseware and oversees activities related to the implementation process.
The Plato Courseware Account Administrator will clearly articulate the expectations for Plato Courseware instructors in their online teaching roles; understand school policies that determine which students are appropriate to enroll in the Plato
Courseware program; support Plato Courseware instructors and students with the administrative and orientation
requirements for technology; and ensure that instructors receive appropriate training to do their jobs effectively.
Plato Courseware Program Administrator The Plato Courseware Program Administrator can create new users, assign licenses to learners, and manager the course catalog for designated programs. This role can be granted to any instructor in the Plato Courseware program. Plato Courseware Instructor
Plato Courseware instructors facilitate and monitor student learning using Plato's online courses, learning platform, and communication tools. Tutorials To quickly become familiar with how to use the Plato Courseware platform and with specific course content, we encourage you to refer to the tutorials available through the help link at the bottom of the Plato Courseware home page before instructing students. These tutorials will help you navigate the features of Plato Courseware. Click the Show Me icon at the right side of the page to view the video tutorial for the specific page you are on.

5
Logging In
Plato Courseware can be accessed through four different roles: Account Administrator, Program administrator, Instructor, or Learner. Instructors will initially receive login information from their Account Administrator. Accessing the Plato Courseware URL (http://ple.platoweb.com/) will bring up the login screen.
Follow these steps to log in: 1. Enter your Account Login. An Account Login is a simple code (for example, CHSD) that identifies your
organization’s account. 2. Enter your Plato Name. A Plato Name is similar to a username in many other systems. It is simply the way
the system identifies an individual user. 3. Enter your password. 4. Click Login. (Note that clicking the Clear button clears all fields.)
Security Settings: The Security Settings page is displayed after entering the Account Login, Plato Name, and Password, and clicking the Login button. This feature allows you to reset your password. Follow these steps to set your security settings: 1. Choose a question from the drop-down menu that you would easily remember how to answer. 2. Enter the answer for the selected question. 3. Enter your email address. 4. Click the Save and Apply button.

6
Note: You will see this Security Settings window the first time you log into the system.
See the Password Management section for more information about how to reset your password.
b. Create Users Only an Account Administrator can create a new user, who can be a Learner or an Instructor. Follow these steps to create a new user: 1. Click the Administration Center link at the top of the Plato Courseware home page.
2. On the Administration Center page, click the Users drop-down menu and select Manage.

7
3. On the Manage Users page, click the Create a User button.
4. In the Personal Profile section,
a) Enter the following required information: System Role (Select the role from the drop-down menu.) First Name Last Name Grade (Select a grade level from the drop-down menu.)
b) Enter the following optional information:
Grant Program Administrator rights to an instructor for specific programs Middle Name Email Gender Date of Birth SIS, State ID, and Federal ID

8
5. In the Login Credentials section, enter the following required information:
Plato Name (example: PlatoCourseware1) Password Confirm Password

9
6. In the Account Structure Locations section, select the location to assign to the user. 7. Click the Save & Create Another User button to create another user, or click the Save & Close button if you
have finished.
Import Users You can enroll multiple users at the same time from the Administration Center page. The Import History feature allows you to upload spreadsheets containing details for multiple users. The data in these files needs to be entered in a specific way. Follow these steps to view the import history details for a user: 1. Click the Administration Center link at the top of the Plato Courseware home page.
2. On the Administration Center page, click the Users drop-down menu and select Batch Processing.
10
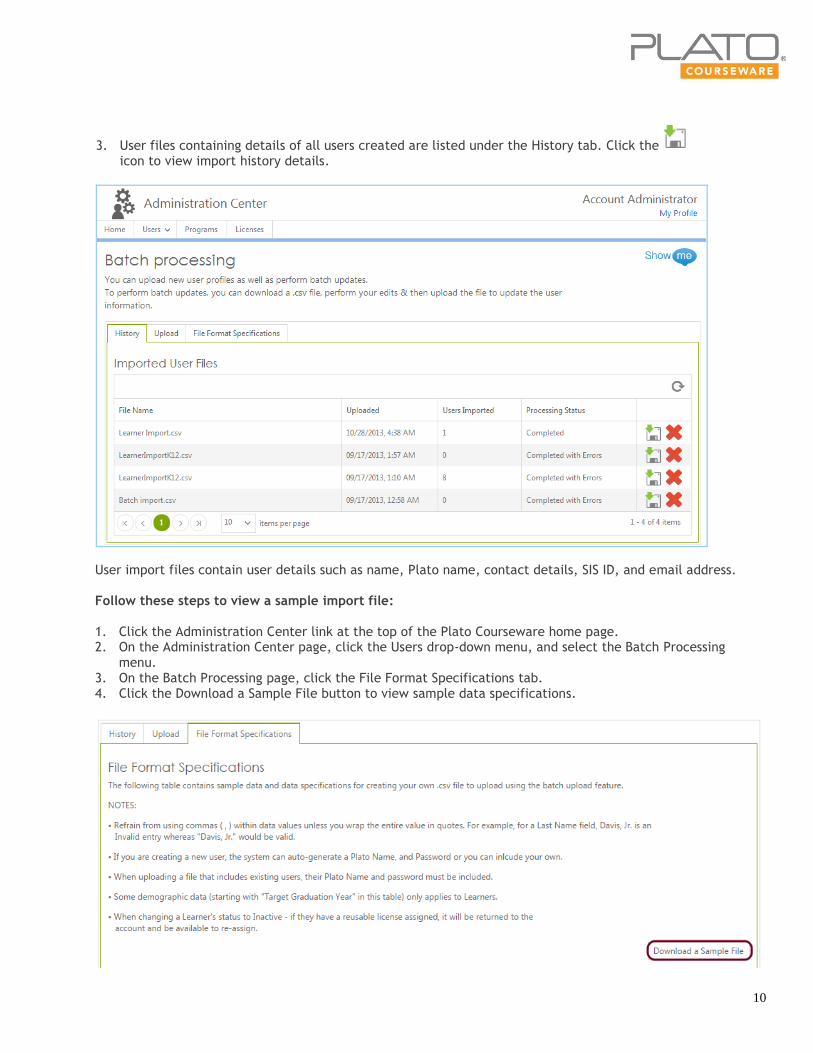
3. User files containing details of all users created are listed under the History tab. Click the icon to view import history details.
User import files contain user details such as name, Plato name, contact details, SIS ID, and email address. Follow these steps to view a sample import file: 1. Click the Administration Center link at the top of the Plato Courseware home page. 2. On the Administration Center page, click the Users drop-down menu, and select the Batch Processing
menu. 3. On the Batch Processing page, click the File Format Specifications tab. 4. Click the Download a Sample File button to view sample data specifications.

11
Here is a sample file:
Follow these steps to import users: 1. Click the Administration Center link at the top of the Plato Courseware home page.
2. On the Administration Center page, click the Users drop-down menu and select Batch Processing.
3. On the Batch Processing page, click the Upload tab. 4. Under the Upload tab, click the Browse button, and select the spreadsheet you’d like to upload. Note: Your
spreadsheet must be in .CSV format. 5. Click the Import the Selected File button.

12
6. A message displays to tell you that the document was uploaded successfully. Click the Refresh button on the Import History tab to monitor the import progress.
c. Manage Users
To view the Manage Users page, follow the steps below: 1. Click the Administration Center link at the top of the Plato Courseware home page.
2. On the Administration Center page, click the Users drop-down menu and select Manage.

13
Search and Select Users Follow these steps to search for a user: 1. On the Manage Users page, enter all or part of the user’s first name or last name, or the Plato name, in the
search box and click the magnifying glass icon. 2. Select the user from the search results.
Instructors, Program Administrators or Account Administrator can search for learners on the Manage Learners page, under the Learners tab. Instructors will only see learners who are assigned to their grade level. Follow these steps to search for and select a learner:
1. Go to the Learners tab on the Plato Courseware home page, and select Manage Learners from the
drop-down menu.

14
2. Type all or part of a learner’s first or last name, or the Plato name, in the search box. 3. Select the learner from the search results. 4. Click ( ) to clear the list.
Edit a Learner Profile A learner profile can be edited any time after the enrollment process is completed. Only Account Administrators can edit learner profiles under the Manage Users page. Follow these steps to access and edit a user profile: 1. Click the Administration Center link at the top of the Plato Courseware home page. 2. On the Administration Center page, click the Users drop-down menu and select Manage. 3. On the Manage Users page, click the Roles drop-down menu under the Filters section. 4. Select Learners from the drop-down menu, and click the Apply Filters button. 5. Click the Actions menu beside the learner’s name and select Edit User. 6. Edit the learner's details and click the Save & Close button.

15
From the Manage Users page in the Administration Center, an administrator can also deactivate and reactivate users. Deactivating users will hide a student’s information from Sensei, Messages, and Groups. Deactivated students are no longer able to be reported on in curriculum reports for student data but will still show in usage reports. Once a student is reactivated, all of the data will repopulate. When deactivating an instructor, administrators will be prompted to add a new instructor if they are deactivating the only instructor in an assignment. Edit an Account Administrator or Instructor Profile Only an account administrator can edit instructor profiles. Follow these steps to access and edit an account administrator or instructor profile: 1. On the Manage Users page, click the ROLES button under the Filters section. 2. Select Account Administrator or Instructor from the drop-down menu, and click the Apply Filters button. A
list of account administrators or instructors will appear. 3. Click the Actions menu next to the account administrator's or instructor’s name and select Edit User. 4. Edit the account administrator's or instructor’s details and click the Save & Close button.
Delete a User Account administrators can delete users. Once deleted, a user cannot log into the system or perform any tasks. Follow these steps to delete a user: 1. Click the Administration Center link at the top of the Plato Courseware home page. 2. On the Administration Center page, click the Users drop-down menu and select Manage. 3. On the Manage Users page, select the check boxes next to the names of the user(s) you would like to
delete.

16
4. Click the Group Actions drop-down menu. 5. Select the Delete User(s) menu. 6. Click Yes in the confirmation message.
d. Password Management Account administrators, as well as instructors, can change their own password. Change or Reset Your Own Password Follow these steps to change your password: 1. Click the My Profile link on the home page.
2. Click the Reset Password button under the Login Credentials & Settings section.
17
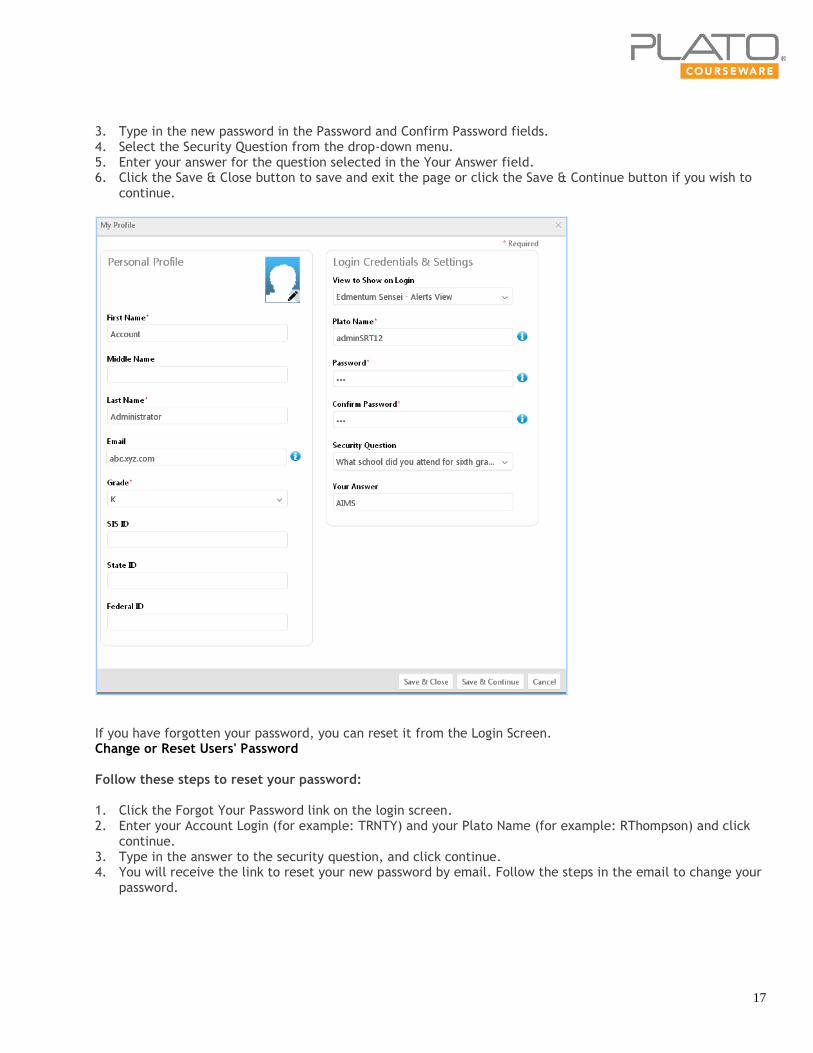
3. Type in the new password in the Password and Confirm Password fields. 4. Select the Security Question from the drop-down menu. 5. Enter your answer for the question selected in the Your Answer field. 6. Click the Save & Close button to save and exit the page or click the Save & Continue button if you wish to
continue.
If you have forgotten your password, you can reset it from the Login Screen. Change or Reset Users' Password Follow these steps to reset your password: 1. Click the Forgot Your Password link on the login screen. 2. Enter your Account Login (for example: TRNTY) and your Plato Name (for example: RThompson) and click
continue. 3. Type in the answer to the security question, and click continue. 4. You will receive the link to reset your new password by email. Follow the steps in the email to change your
password.

18
Account Administrators can also change or reset a user’s password. Change a User’s Password
1. Click the Administration Center link at the top of the Plato Courseware home page. 2. On the Administration Center page, click the Users drop-down menu and select Manage. 3. On the Manage User page, click the Roles drop-down menu under the Filters section. 4. Select the role of the user from the drop-down menu and click the Apply Filters button. 5. Click the Actions Menu to the right of the user’s name, and select Edit User. 6. On the Edit User page, click the Reset Password button under the Login Credentials section. 7. Type the new password in the Password and Confirm Password fields. 8. Click the Save & Close button to save the new password.
Instructors can also reset learner's passwords through the Manage Learners option under the Learners tab. Follow these steps to reset a learner’s password:
1. Go to the Learners tab on the Plato Courseware home page, click the Learners tab, and select Manage
Learners from the drop-down menu.
2. Type all or part of a learner’s first or last name or the Plato name in the search box, and click the Search icon ( ).
3. Select the check box next to the name of the learner from the search results, and click the Quick Actions
magnifying glass icon ( ) to view Learner details.

19
4. On the Learner Details page, click the Reset Learner’s Password button.
5. Type the new password in the New Password and Confirm New Password fields. 6. Click the Save & Reset button to finish.
e. Licenses The Licenses page offers a snapshot of the total available concurrent, consumable, reusable, named user, and site licenses, and allows Account Administrators to manage license distribution. The concurrent and site licenses can be reserved and unreserved to programs. The Reusable licenses can be assigned and unassigned to learners. Once the named user licenses are assigned to learners, they cannot be unassigned.

20
Concurrent Licenses Concurrent licenses allow you to reserve licenses for the program. The unreserved licenses are shared by the account. Follow these steps to reserve or unreserved the concurrent license: 1. On the Administration Center page, click the Licenses tab. 2. On the Licenses page, click the Concurrent tab.
3. To reserve licenses, go to the Reserved Licenses column next to a program. Click the up or down arrow to
adjust the number, or simply enter a number using the keypad. 4. To unreserve licenses, enter zero (0) in the Reserved Licenses column for a program.

21
Reusable Licenses Reusable licenses are reserved for use by individual learners as they progress through a class. The account administrator can reassign reusable licenses to learners or remove licenses from learners at any time. Follow these steps to assign a reusable license to a learner: 1. On the Administration Center page, click the Licenses tab. 2. O the Licenses page, click the Reusable tab.
3. Click the Assign button.

22
4. Select the learner(s) you want to assign the licenses to. 5. Click the Assign button. Note: As you assign the licenses to learner(s), the balance of available licenses count is displayed at the bottom of the Assign licenses to Learners page.
Follow these steps to remove a reusable license from a learner: 1. Click the Reusable tab. 2. Click the Unassign icon ( ) next to the learner whose license you want to remove. 3. Click the Yes button in the confirmation message.

23
Named User Licenses
You can assign learner(s) to named user licenses. Once assigned, they cannot be unassigned. Follow these steps to assign a named user licenses to a learner(s): 1. On the Administration Center page, click the Licenses tab. 2. On the Licenses page, click the Named User tab.
3. Under the Named User section, click the Assign button.

24
4. Select the learner(s) that you want to assign licenses to. 5. Click the Assign button. Note: As you assign licenses to learner(s), the balance of available licenses is shown at the bottom of the Assign licenses to Learners page.

25
Site Licenses
In the site licenses section, you can reserve licenses for the program. The unreserved licenses are shared by the account. Follow these steps to reserve a license to the program(s): 1. On the Administration Center page, click the Licenses tab. 2. On the Licenses page, click the Site tab.
Click the in the Reserved Licenses column to reserve the licenses for a program.

26
2. Plato Courseware Home Page
a. Plato Courseware Tabs
Four tabs appear on the Plato Courseware home page. These tabs provide access to Plato Courseware tools.
Home
The Home tab shows the My Active Tasks section which provides a quick look at the tasks you need to work on. For example, when a learner submits an activity or discussion for review, a notification appears under My Active Tasks.
Courses
Course Catalog: Selecting Course Catalog displays the entire list of available courses. Using Quick Actions, you can create a class within an existing course, as well as view quick reports, such as Course Module Mastery, Graphic Learner Progress, and Detailed Score Report. My Classes: Selecting My Classes displays the list of classes assigned to you. Account Administrators and instructors can enroll learners into any of these classes. Browse Curriculum: Selecting Browse Curriculum displays the entire list of available courses. Clicking on any course title shows the breakdown of the course into units. Custom Course Builder: Selecting Custom Course Builder gives you the option to customize existing content. Learn more about customizing content.

27
Learners
Manage Learners: Selecting Manage Learners displays a list of learners in your school. On the Manage Learners page, you can view learner details. You can also view Graphic Learner Progress and Learner Progress reports for each learner. Other actions, including enrolling and withdrawing learners, are also available from this page through the Actions button .
Reports
Curriculum Reports: Selecting Curriculum Reports displays a list of reports that you can use to monitor learner progress. Curriculum reports are devised to help you understand, analyze, and rationalize results so that you can better prepare for future tasks.
These reports are available: Course Module Mastery Report Grade Report Detailed Score Report Graphic Learner Progress Report Learner Progress Report Test Progress Report Strengths and Needs by Class Report Class Usage Summary Report Learner Portfolio Report Learner Daily Usage Report
Click the report you want to view, and then follow the steps provided to generate the detailed report.

28
System Reports These reports are available under System Reports: Resource Usage Report System Usage Report
b. My Profile
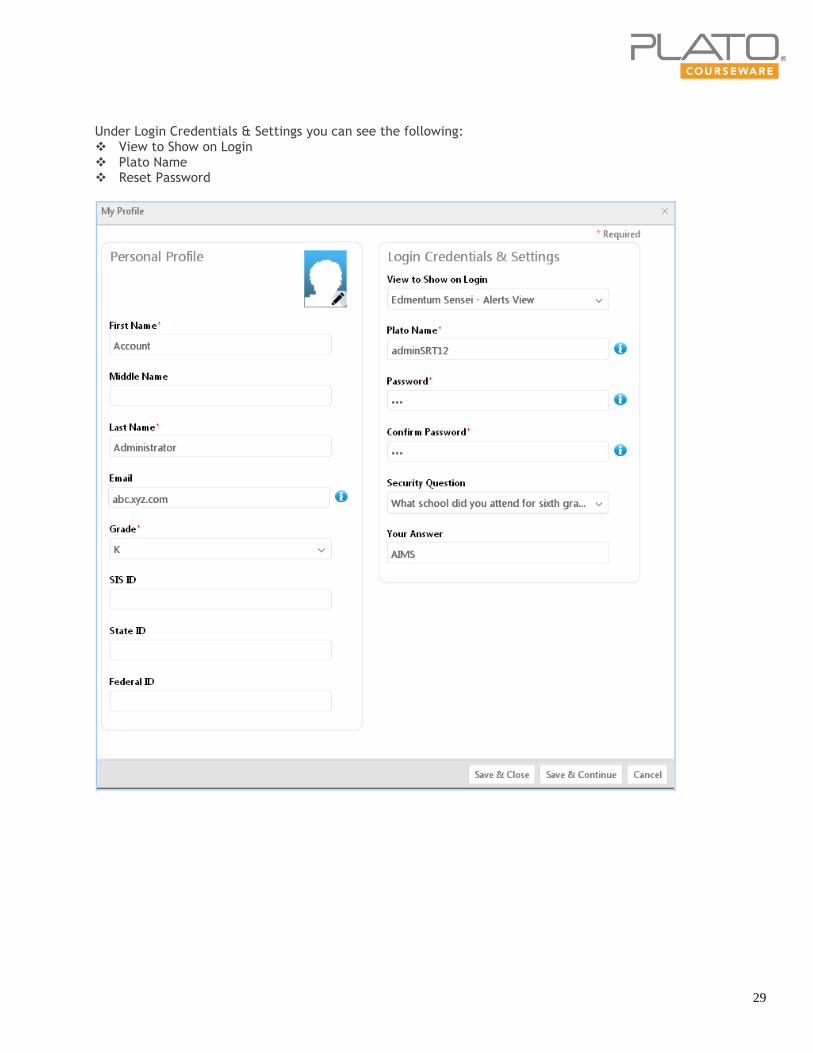
Clicking the My Profile link at the top of the page allows you to view your own profile and make changes to the fields.
As you click the My Profile link, under Personal Profile you can see the following fields: First Name Middle Name Last Name Email Grade SIS ID State ID Federal ID
29
Under Login Credentials & Settings you can see the following: View to Show on Login Plato Name Reset Password

30
c. Header Toolbar
The toolbar at the top of the Plato Courseware home page offers links to Edmentum Sensei, Plato Courseware, Edmentum Assessment, Flex Assignments, Grade Tracker, Sensei Messaging, Seehive, and Sign Out. Toolbar options vary according to the user’s role and the product purchased. An account administrator would see this toolbar on the Plato Courseware home page:
An instructor would see this toolbar on the Plato Courseware home page:
Edmentum Sensei On this page, the account administrator and instructor can view alerts, messages, and details related to learners.
Plato Courseware For more information, see the Plato Courseware Home Page topic. Edmentum Assessments You can manage learners’ work and progress on assessment products. Flex Assignments Flex Assignments allow you to create assignments for various students regardless of current class structure or assigned curriculum. Administration Center (available only to Administrators) For information about managing users, see the Manage Users section. Grade Tracker Grade Tracker houses all student performance and grade data. Instructors can run reports directly from Grade Tracker. Sensei Messaging For more information, see the Sensei Messaging section. Seehive The Seehive link allows you to share ideas that would make the product better. Enter your email address in the field provided to connect to the Seehive website, where you can share your thoughts with others in the Edmentum community.

31
3. Plato Courseware Content Structure
a. Course Overview
All courses offered as part of the Plato Courseware management system are structured and classified based on subjects and subtopics within subject areas. Each course typically consists of five to seven units. Each unit in turn consists of about five to eight lessons. Every lesson is comprised of a tutorial and a mastery test, which helps assess a learner’s mastery of lesson concepts. Learners also have access to tools, such as a calculator and reader support. Other features include discussion topics, unit activities, and unit pretests and posttests.
b. View Plato Courseware Content
You can view all content in your Plato Courseware account by clicking the Courses tab and selecting Browse Curriculum. A complete list of all available courses is displayed in alphabetical order.
Follow these steps to view an individual tutorial: 1. Go to the Courses tab. 2. Select Browse Curriculum from the drop-down menu.

32
3. Click the arrow to the left of a course to expand or collapse the course structure. Continue expanding the structure to view tutorials and other course components.
c. Custom Course Builder Account Administrators and Program Administrators can use the Custom Course Builder to create a new custom course or add a new resource to existing content and save it as a custom course. Resources that can be added using the Custom Course Builder include the following: web site link documents dropbox activities graded discussions curriculum content standards content The drop-down menu in the image below shows this list of resources. You can also modify the existing content in the Plato Courseware management system. Any unit or lesson can be moved up or down within a course. You can rename or delete any unit or lesson if it is not required for a particular learner. Course customization needs to be done before learners are enrolled in that course. However, only an Account Administrator has the authority to perform this action. To customize content, instructors will need to work with their Plato Courseware Account Administrator. Use Flex Assignments if you need to customize assignments after students have been enrolled in a course.

33
Follow these steps to create a new resource: 1. Go to the Courses tab. 2. Select Custom Course Builder from the drop-down menu. 3. Click the Actions button and select Create Custom Course from the drop-down menu.
4. Select the resource type, subject, and grade, or search for content by standards. 5. Expand the course structure and move desired elements to the Custom Course workspace. 6. To add custom resources to the course, click a course or unit folder in the workspace and select a resource
from the menu options. 7. See the Publishing a Custom Resource section for information about how to save a new resource.

34
Follow these steps to modify an unpublished custom course: 1. Go to the Courses tab. 2. Select Custom Course Builder from the drop-down menu. 3. Select the Course that you want to modify. 4. Click the pencil icon to the right of the course you selected. 5. Use the workspace to modify the course. 6. See the Publishing a Custom Resource section below for information about how to save modified content. Publishing a Custom Resource Once an Account Administrator has created a custom course or modified an existing course, it needs to be saved and published to make it available to instructors and learners. After a customized course is published, no further changes can be made to it.
The Save Course Menu has several options: Save & Publish: This feature allows the Account or Program Administrator to publish the course for use in
the account.
Save & Close: This feature allows the Account or Program Administrator to save and mark a course as finished. However, the course is not published and can be modified later.
Save & Continue Working: With this feature, Administrators can save their work as they go.

35
4. Classes Overview a. How to Create a Class
Account Administrators should set up classes before the start of a semester to ensure that all courses have a class and an assigned instructor.
Follow these steps to create a new Class: 1. Go to the Courses tab. 2. Select Course Catalog from the drop-down menu.
3. Under Quick Actions click the icon next to the course for which you want to add a new class.
4. Enter the class details: Class Name Start Date End Date Class Description
5. Each class requires an appropriate and unique name, which you can create by following naming
conventions. For example, one convention may be to include the instructor name or time of the course at the start of the class name. Example: Thompson, Advanced Biology, Semester A (Instructor Name, Year, Course Name, Semester)
6. Assign an instructor to the new class by clicking the +add instructor link. Enter the instructor’s name in the search box, select the instructor from the drop-down menu. You can also remove the assigned instructor(s) by clicking the remove link.
7. Click Save & Close to save the new class.

36
b. Class Management
Edit Class Details Account Administrators can follow these steps to change the details of a Class after it is created: 1. Go to the Courses tab. 2. Select Course Catalog from the drop-down menu. 3. Click the arrow next to the course name to view the classes in the course. 4. Click the pencil icon to edit class details. (Note that clicking the red slash button will clear your Class
selection.) 5. Edit the class details. 6. Users can add an instructor at any time to the class by clicking the +add instructor link and locating the
instructor’s name from the drop-down menu. Click Add when you have found the desired instructor. 7. Click the Save & Close button to save the class with the edited data. You can also cancel the edit and close
the class with the existing details by clicking Cancel.

37
Enrolling Existing Learners Existing learners can be enrolled in a class the following ways: through the Course Catalog page through the Manage Learners page through the My Classes page
Follow these steps to enroll a learner through the Course Catalog page:
1. Go to the Courses tab. 2. Select Course Catalog from the drop-down menu. 3. Click the arrow to the left of the course name. 4. Select the radio button next to the class. (Note that clicking the red slash button will clear your Class
selection).
5. Click the Actions button and select Enroll Learner(s) from the drop-down menu.

38
6. On the Enroll Learner(s) page, select the learner(s) you wish to enroll, and then click the Enroll selected Learner(s) button.
Enrolling a learner through the Manage Learners Page Follow these steps to enroll a learner through the Manage Learners page: 1. Go to the Learners tab. 2. Click Manage Learners from the drop-down menu. 3. On the Manage Learners page, select the learner(s) you wish to enroll. 4. Click the Actions button and select Enroll Learner from the drop-down menu. 5. Click the arrow next to the Course. 6. Select the radio button next to the Class. (Note that clicking the button that has a red circle with a slash
will clear your Class selection.) 7. Click the Add Learner(s) into Class(es) button.

39
Withdrawing Learners
Account Administrators can withdraw a learner from any course at any time. They can enroll the same learner back into a course later. A learner who has been withdrawn from a course can still log in to Plato Courseware. Follow these steps to withdraw a learner from a Class:
1. Go to the Learners tab. 2. Select Manage Learners from the drop-down menu. 3. On the Manage Learners page, select the learner you want to withdraw. 4. Click the Actions button and select Withdraw Learner from the drop-down menu.
5. Select the class from which to withdraw the learner. 6. Click the Withdraw Learners from Class(es) button to complete the process.
40
5. Plato Courseware Online Assignments and Activities a. Digital Dropbox Activities
Plato Courseware provides a number of interactive, online activities to enhance the learning experience. Some of these online activities also help instructors assess a learner’s understanding of a course. Digital dropbox activities allow learners to upload digital files that they have completed for review and grading
by their instructor.
Follow these steps to access a digital dropbox activity:
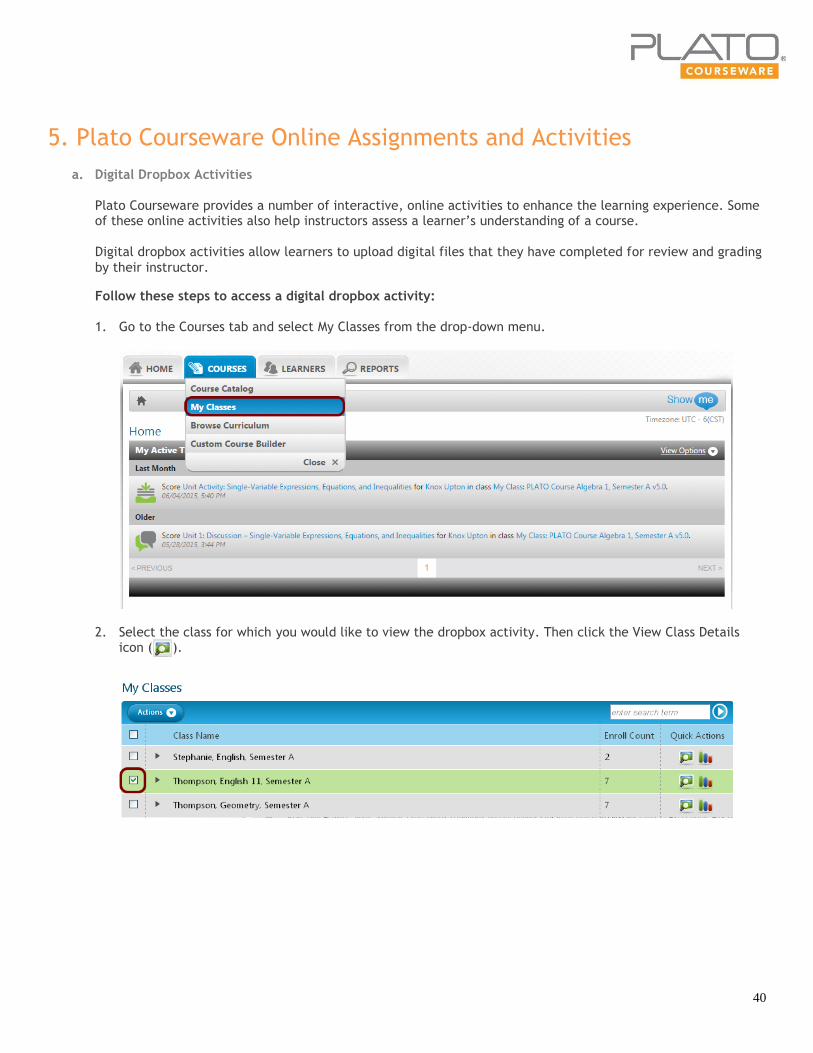
1. Go to the Courses tab and select My Classes from the drop-down menu.
2. Select the class for which you would like to view the dropbox activity. Then click the View Class Details
icon ( ).

41
3. Click the Dropbox Activities button on the left. Click the name of the activity from the drop-down menu.
4. To download and view the assigned activity, click the Download to my computer button.
Reviewing Submitted Dropbox Assignments When learners submit documents to instructors, they indicate whether they want the submission to be reviewed or graded. If a learner has submitted a document for review, you can review the document, include your feedback, and then send it back to the learner with your review comments. This feature gives you a chance to provide feedback on the learner's work before assigning it a final grade. To review a Dropbox assignment, follow these steps: 1. Go to My Classes, select the class for which you would like to view the dropbox activity, and click the View
Class Details icon. You can also access the activity in the My Active Tasks section of the home page. 2. Click the Dropbox Activities button on the left. 3. Click the name of the dropbox activity you want to review. 4. Then select the learner from the drop-down list. 5. You can now review the file and send the learner a notification by selecting the Send Review Notification
option. If you’d like, you can upload a reviewed version of the activity with comments.

42
Grading Submitted Dropbox Assignments After completing an assignment, a learner can submit it through the digital dropbox. When the learner successfully submits the assignment, you will receive an alert. After reviewing the submitted assignment, enter a grade and send it back to the learner with any comments you may have. If the assignment submitted by the learner does not match your expected criteria, you can reject it by selecting the Reject Activity option. Follow these steps to grade a Dropbox assignment: 1. Go to My Classes, select the class for which you would like to view the dropbox activity, and click the View
Class Details icon. You can also access the activity in the My Active Tasks section of your home page. 2. Click the dropbox activities button on the left. 3. Click the name of the dropbox activity you want to review. 4. Then select the learner whose activity you’d like to grade from the drop-down list. 5. You can then score the activity by selecting the Score or Reject Activity option from the Actions
drop-down.

43
6. You can then either score the activity or reject it. Clicking Save and Notify Learner will send a notification to the learner.

44
b. Graded Discussions
The Graded Discussions feature allows instructors to ask complex, open-ended questions and enables learners to respond with their own thoughts and ideas. Both instructors and learners can also respond to posts by others in the class. Monitor or Join a Graded Discussion Follow these steps to join a Graded Discussion:
1. Go to the Courses tab. 2. Select My Classes from the drop-down menu. 3. Click the Quick Actions magnifying glass icon ( ) to view class details. 4. On the Class Details page, select Graded Discussions.
5. From the Discussion Topic drop-down menu, select the discussion topic you wish to join. 6. Click on the Respond to Original Topic button to reply to posts submitted by others.
Scoring a Graded Discussion Discussions encourage students to reflect on concepts, articulate their thoughts, and respond to the views of others. Thus, discussions help assess students’ critical thinking skills. Each unit in a course has one predefined discussion topic, along with a rubric for grading responses. Instructors can include additional discussion topics. When a learner submits the activity for scoring, an alert appears on the instructor’s home page under My Active Tasks.

45
Follow these steps to score a Graded Discussion: 1. Locate and click the notification in the My Active Tasks section of your home page.
2. Click the Score Learner button.

46
3. In the pop-up, enter a score and then click the Score button.
c. Tutorials Tutorials are modules with direct instruction and practice interactions. Videos, animations, interactive timelines, and hotspot graphics make the instruction engaging. Practice interactions include drag-and-drops, click-to-sees, multiple-choice questions, and fill-in-the blank questions that all help students check their progress at mastering new concepts. Some tutorials also include Web links to informational sites, games, and videos, which broaden students' access to information on the topic.
Each screen of a tutorial has a tool bar on the left hand side that provides learners with useful tools. The Notebook allows the student to take notes throughout the tutorial and reference these notes within or outside of the assignment. Reader Support offers access to a dictionary and has text-to-speech and translation capability.

47
d. Applications
An application is an interactive, student-driven practice that reinforces the skills learned in a tutorial.
e. Assessments
Best practices in assessment and testing call for a variety of activities to evaluate student learning. Multiple data points more accurately present an evaluation of students’ strengths and needs. Some assessment activities also serve as learning activities to provide authentic learning and assessment opportunities. These activities are designed to encourage higher-order cognitive thinking, and most focus on real-world applications and/or twenty-first-century skills. Unit Pretests Unit pretests check learners' existing knowledge base and allow them exemption from modules on topics that they already know. These tests are multiple-choice and are provided online. Mastery Tests Mastery tests after each tutorial provide the instructor and the learner with clear indicators of areas of strength and weakness. These multiple-choice tests are taken online. Unit Posttests Unit posttests help instructors track how well students have mastered a unit’s content. The tests are multiple-choice and are provided online and offline.

48
6. Flex Assignments
a. Flex Class The Flex Class feature allows you to group students to complete activities separate from an existing Plato
Course.
Create a Flex Class
Follow these steps to create a Flex Class: 1. Click Flex Assignment from the Top Menu.
2. Click Create a Flex Class.
3. Create a title for the class. 4. Add the course instructor(s).
5. Add students to the class by searching specific students, adding students assigned to a specific curriculum
or title, or adding students from an existing Flex Class.
6. Click Create Flex Class.

49
Edit a Flex Class
Follow these steps to edit a Flex Class: 1. Click the three dots on the Flex Class card. 2. Select Edit Class. 3. Make the necessary changes to the class title, instructors, or learners.
Deactivate a Flex Class
Follow these steps to deactivate a Flex Class: 1. Click the three dots on the Flex Class card. 2. Select Deactivate.

50
b. Flex Assignments Flex assignments are housed within a Flex Class. You can assign each Flex Assignment to select students from
the Flex Class. For example, if a few students in your Flex Class require remediation, you can create a Flex
Assignment for just those students to target a specific skill.
Create a Flex Assignment
Follow these steps to create a Flex Assignment: 1. On the Flex Class Card for your class, click New Assignment.
2. Name the assignment, indicate a start and end date, and note any special instructions for learners. 3. Indicate whether learners who are added to the flex class at a later time should complete the activity.

51
4. Select the learners who are required to complete the activity.
5. To add content by standard, click the By Standards Tab 6. Select your standards and subject. 7. Use the search feature to enter key words or scroll through the standards. All Plato Content aligned to a
standard and available for your use will appear in the content window.
8. Or Add content by Subject, and click the By Subject and Grade tab. 9. Choose both the subject and Grade from the drop-down menus. The content will automatically populate. 10. Expand the Course and Units. 11. Drag the desired content to the workspace.

52
12. Click View to preview materials before assigning them to students. 13. Add a pretest and posttest to the Flex Assignment to measure student success.
14. Click Create Assignment. Edit a Flex Assignment
Follow these steps to edit a Flex Assignment: 1. Click the Flex Class card. 2. Click the three dots to the right of the Flex Assignment. 3. Select Edit Assignment from the menu.
4. Make your changes to the assignment settings or students. Note: You cannot change content once an
assignment has been assigned to students.
53
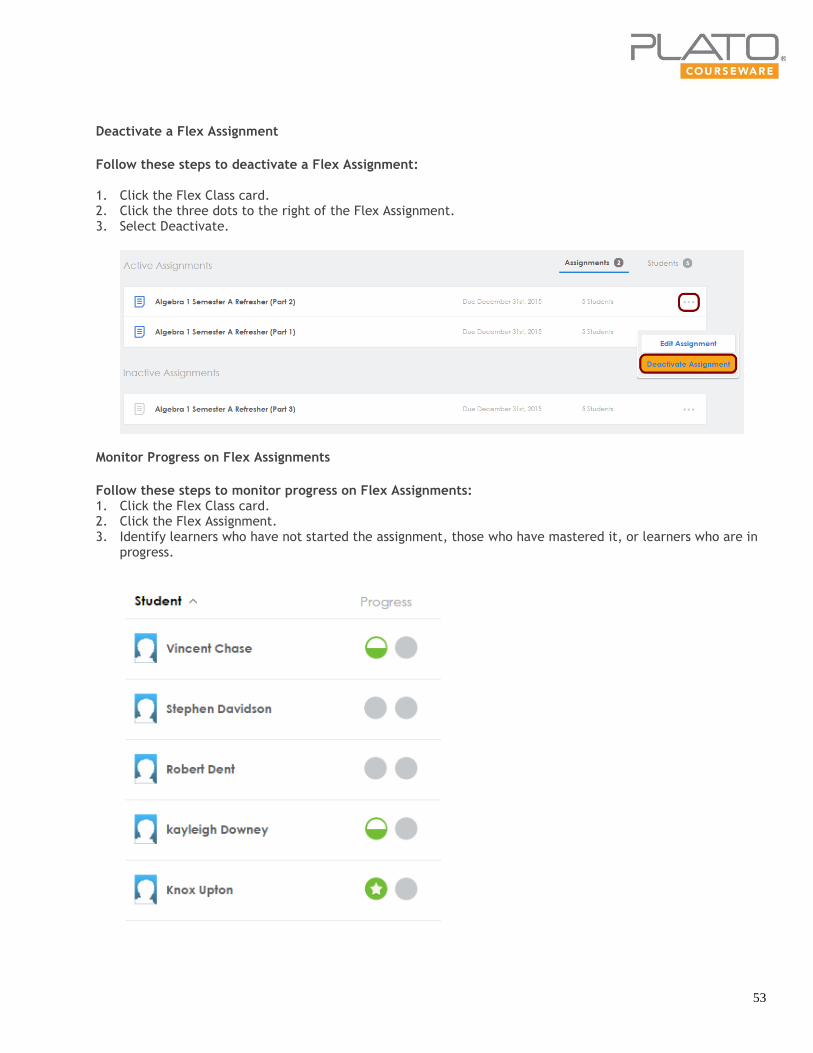
Deactivate a Flex Assignment
Follow these steps to deactivate a Flex Assignment: 1. Click the Flex Class card. 2. Click the three dots to the right of the Flex Assignment. 3. Select Deactivate.
Monitor Progress on Flex Assignments
Follow these steps to monitor progress on Flex Assignments: 1. Click the Flex Class card. 2. Click the Flex Assignment. 3. Identify learners who have not started the assignment, those who have mastered it, or learners who are in
progress.

54
7. Plato Courseware Online Communication Tools
a. Sensei Messaging
Sensei Messaging allows you to read, compose, and archive messages. Only the account administrator and instructor can view and manage the Sensei messaging page. To view your messages, click the Sensei Messaging
icon ( ), or click Edmentum Sensei.
Follow these steps to view your messages:
1. Click the Sensei Messaging icon ( ) on the Header toolbar to get to your Inbox. Under the Inbox tab, you'll see the sender name, date, and subject of the messages you have received.
2. Click a message to display its contents.
Follow these steps to create a new message:
1. Click the Sensei Messaging icon ( ) on the Header toolbar. 2. Under the Inbox tab, click the Create New button.

55
3. Click the To field to view a drop-down menu. 4. Select the recipient(s). 5. Enter the Subject and your message in the spaces provided. 6. Click the Send button.
Follow these steps to view sent messages:
1. Click the Sensei Messaging icon ( ) on the Header toolbar. 2. Click the Sent tab. All messages that you have sent will be displayed.
56
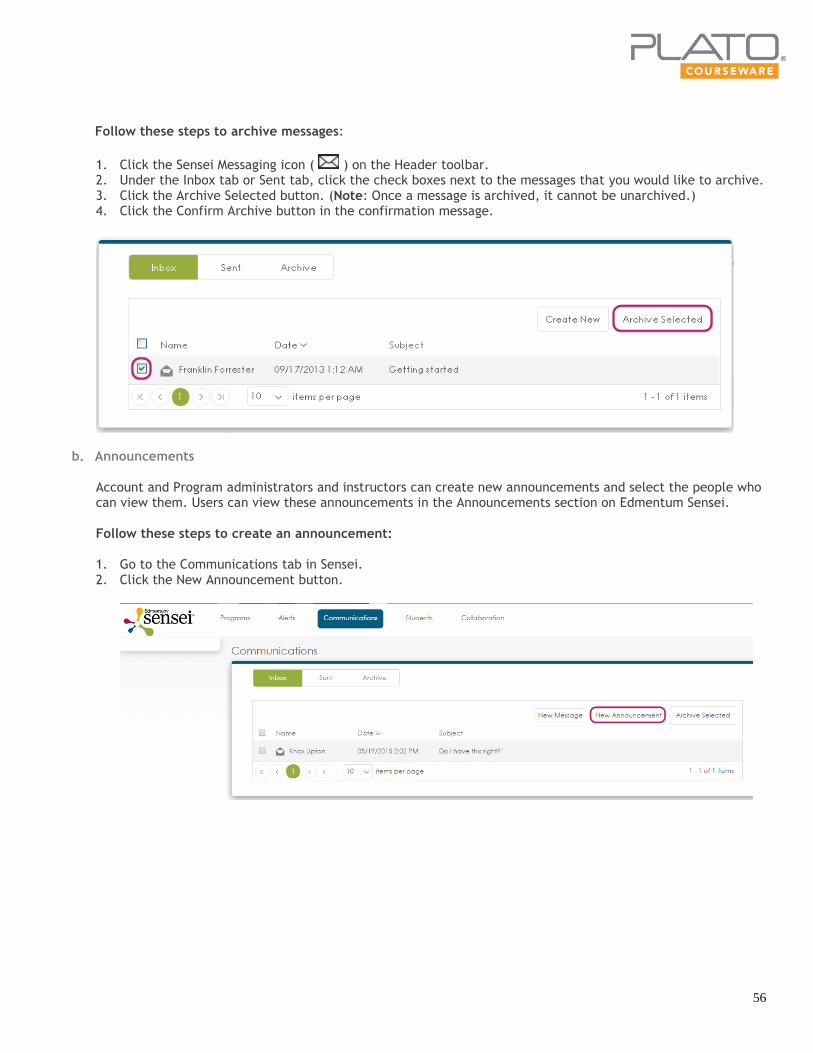
Follow these steps to archive messages:
1. Click the Sensei Messaging icon ( ) on the Header toolbar. 2. Under the Inbox tab or Sent tab, click the check boxes next to the messages that you would like to archive. 3. Click the Archive Selected button. (Note: Once a message is archived, it cannot be unarchived.) 4. Click the Confirm Archive button in the confirmation message.
b. Announcements
Account and Program administrators and instructors can create new announcements and select the people who can view them. Users can view these announcements in the Announcements section on Edmentum Sensei. Follow these steps to create an announcement: 1. Go to the Communications tab in Sensei. 2. Click the New Announcement button.

57
3. Add the announcement title, body, start and end dates, and click Save & Close.
58
8. Virtual Learning Collaboration Space (VLCS)
The Edmentum Collaboration Tools give teachers the opportunity to interact with students and other teachers via
chat and whiteboard features in synchronous or asynchronous sessions. These versatile forums can be used to meet
the diverse needs of virtual learners and educators. Students can use these forums to connect with their instructors
and seek help. Teachers can use the forums to communicate and share resources, similar to the way that they
would use a virtual teacher’s lounge.
Collaborations may have up to 250 invited users but not more than 50 simultaneous users.
a. Viewing Collaborations
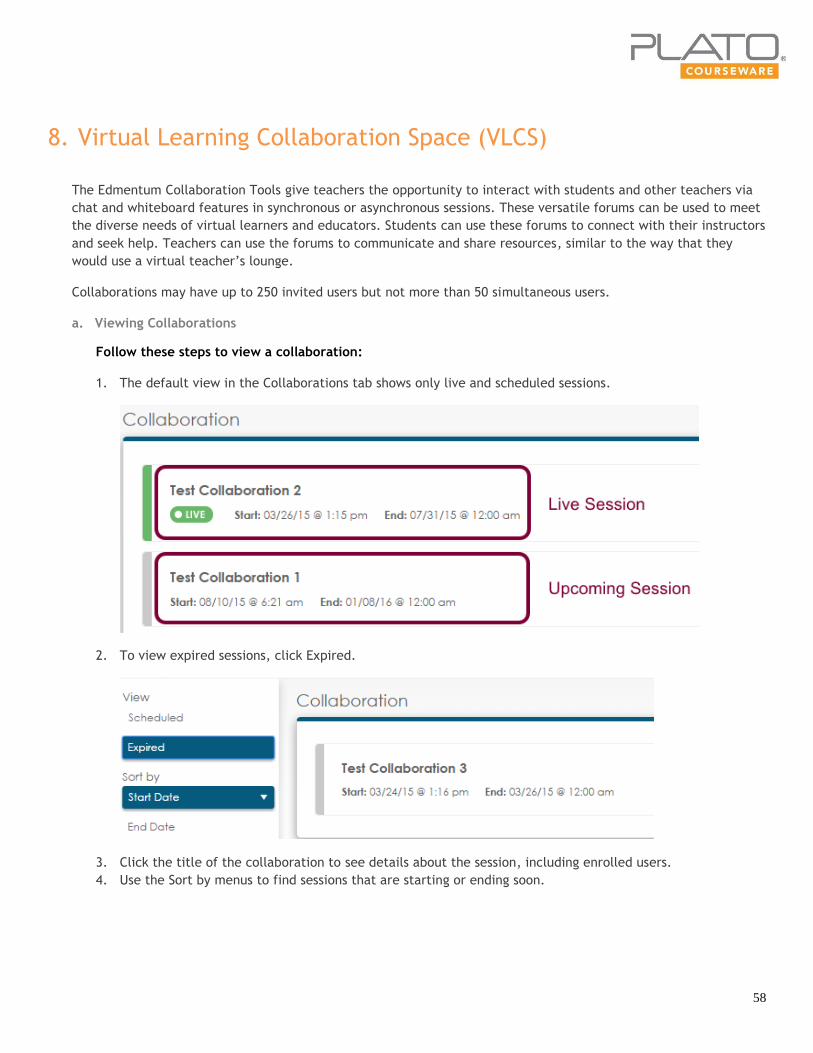
Follow these steps to view a collaboration:
1. The default view in the Collaborations tab shows only live and scheduled sessions.
2. To view expired sessions, click Expired.
3. Click the title of the collaboration to see details about the session, including enrolled users.
4. Use the Sort by menus to find sessions that are starting or ending soon.

59
b. Creating Collaborations Teachers can create collaborations for a subject, for a course with multiple sections, or with selected
students. Teachers have flexibility to set start and end dates for collaborations.
Follow these steps to create a collaboration:
1. On the Collaborations tab, click Create Collaboration.
2. Enter a title and start and end dates for the collaboration.
Best Practice: Create a collaboration that runs the entire year or semester and include all students. Notice
that the start time defaults to the time of day the session is created. Change this time if students need
access at another time.
Note: Collaborations are accessible only between the start and end times. Students cannot access a
collaboration set in the future. Students have read-only access to expired sessions.
3. Optional: Enter a description and choose whether to lock the collaboration when teachers aren’t present.
Best Practice: To increase security, teachers should lock collaborations in which students are enrolled.
Locking collaborations prevents students from posting in an unmonitored environment. Teacher-only
collaborations can be left unlocked, as a teacher will always be present.

60
4. Invite students or other teachers to your collaboration by clicking Add Members.
5. Add students or teachers to the collaboration by clicking the Student or Teacher buttons. Teachers can
search users individually, by class, or by assigned curriculum. When searching by class or assigned
curriculum, teachers can choose Add All to add large batches of students. To add specific users, click the
plus sign in the name box.
6. Added members will appear in the Invited Members list. The star icon indicates a teacher, and the person
icon represents a student. Add up to 100 users, and then click Save & Close to save changes and exit.
c. Facilitating a Collaboration
Follow these steps to facilitate a collaboration:
1. Select Launch on the collaboration session.

61
2. View users who are currently in the session by clicking Who’s Here. Students who are muted appear in light
gray and have mute icons next to their names. Anything those students have posted disappears from other
students’ view.
3. Locate the tool icons in the left-hand menu.
d. Using the Whiteboard Tool
Follow these steps to navigate the Whiteboard Tool:
1. To enable whiteboard features, click the Active Presenter drop-down menu and select a user.
Note: Presentation mode is enabled only when an educator chooses a presenter. Only one user can present
at a time. Students cannot change presenters.

62
2. Click a feature, select a color or style option, and add the item in the whiteboard area.
3. Each icon has a specific whiteboard function. Many icons have menus with colors or other characteristics to
select from.
Feature Tips and Directions Sample
Draw
Draw free-hand using a mouse or stylus. Choose the color
and line width.
Line
Draw lines and arrows. Choose the size, color, and style of
the line.
Highlight
Highlight the selected area in yellow. Choose the width,
and choose straight or free-hand lines.
Shape Draw squares, triangles, or circles. Choose the width and
color of the shape outline.
Erase
Click and drag the mouse to erase small areas of the
screen. Choose the eraser width.
Note Add a note to the screen. Choose the font size and color.
Use the small triangle in the lower right corner to resize.
Textbox
Choose the font size and color for text boxes. Use the
small triangle in the lower right corner to resize the text
box.
Image
Choose an image file from your computer to upload. Then
click Insert.
Grid Click and drag to draw a grid. Choose from four quadrant
and 10 by 10 grids. Choose line thickness and color.
Math
Click the font size to launch the equation editor. Click the
whiteboard. Type the equation or expression in the
editor, and choose a font color.

63
Select
Click and drag to highlight an area on the screen. Click
and drag again to move the selected area. Use the delete
key to delete selected content.
Clear All Clear the entire whiteboard.
e. Adding Video to a Collaboration
Follow these steps to add a video to a collaboration:
1. Click the video icon in the left-hand menu.
2. Click the plus sign in the playlist panel.
3. Paste a URL from a YouTube or Vimeo video, and click Insert.
Note: Only YouTube and Vimeo videos are supported in this feature.
4. Hover over the video thumbnail in the playlist panel to view the video or remove it.
5. Clicking the trash can icon will remove all items from the playlist panel.

64
f. Adding Documents to a Collaboration
Follow these steps to add a document to a Collaboration:
1. Click the document icon on the left-hand menu.
2. Click the plus sign in the documents panel.
3. Locate the file and click open.
4. The uploaded documents appear in the documents panel. Use the scroll bar to view additional uploaded
files.
5. Hover over the file icon and choose to view, download, or remove. Click View to see the file in the
document viewer.
6. To view the document in the Microsoft Web App, click the new window icon. Use the Web App to view,
search, or print files.
7. Clicking the trash can icon will remove all items from the documents panel.
65
g. Using the Chat Tool
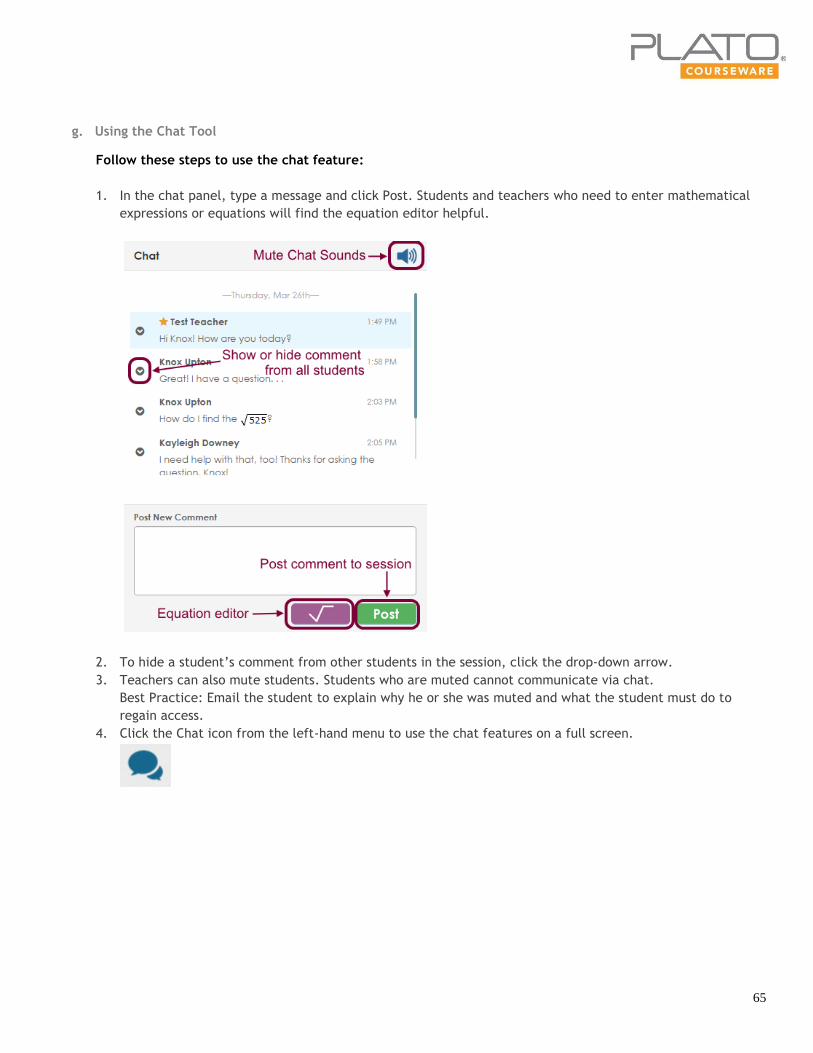
Follow these steps to use the chat feature:
1. In the chat panel, type a message and click Post. Students and teachers who need to enter mathematical
expressions or equations will find the equation editor helpful.
2. To hide a student’s comment from other students in the session, click the drop-down arrow.
3. Teachers can also mute students. Students who are muted cannot communicate via chat.
Best Practice: Email the student to explain why he or she was muted and what the student must do to
regain access.
4. Click the Chat icon from the left-hand menu to use the chat features on a full screen.

66
9. Grade Tracker
The Grade Tracker simplifies the task of grade management, giving you the ability to customize grading scales, manage activities, manage credit settings, and override scores. The system automatically creates a page for each of your courses using the Edmentum default template. The default template lists assignments and settings that should be common to most users. Grades are calculated based on the average of the weighted category scores.
a. Class Grade Tracker
Follow these steps to edit the Grade Tracker:
1. Click Grade Tracker from the top menu.
2. Select the class.
3. View students overall grade and category grades.
4. Click a category to see all activity grades in that category.

67
5. To edit a score, click Edit. Edits are highlighted in yellow prior to saving. Edited scores appear as red text.
b. Category Weightings
Follow these steps to edit category weightings:
1. To modify the default categories or category weighting, click Grade Tracker Options and select Manage Scales and Weights.
2. On the Categories and Weights tab, choose either Weight by Category (edit the percentages), Equal Weight, or No Weight. Click Save.
3. Click Add Category and select the category if the weighting is missing a graded category. 4. Click Load Setting from a template and choose either Account Default or Edmentum Recommended to
reinstate the default weightings.

68
Note: Your Program or Account Administrators may have specific recommendations for weighting to provide
consistency among account users. Please consult your Administrators before making changes.
c. Grading Scales
Follow these steps to edit the grading scale:
1. Open a grade tracker for a class, select Grade Tracker Options, and click Scales and Weights. 2. Click the Grading Scales tab. 3. In the drop-down menu, select either Basic Letter Grade (A, B, C . . .), Advanced Letter
Grade (A+, A, A- . . .), or Pass/Fail. 4. Edit the cutoff scores, and click Save. 5. Click Add New Scale to create another line in your current grading scale. Set the grade and the cutoff
score.
d. Manage Activities
Follow these steps to manage activities:
1. To edit the activities eligible for scoring, click Grade Tracker options and select Manage Activities.
2. To include an activity in the course grade, check the box next to the activity. Ensure that the category for
the activity is included in the Category weighting. If the activity category is not included in the weighting,
a student’s performance on the activity will not affect his or her grade.
69
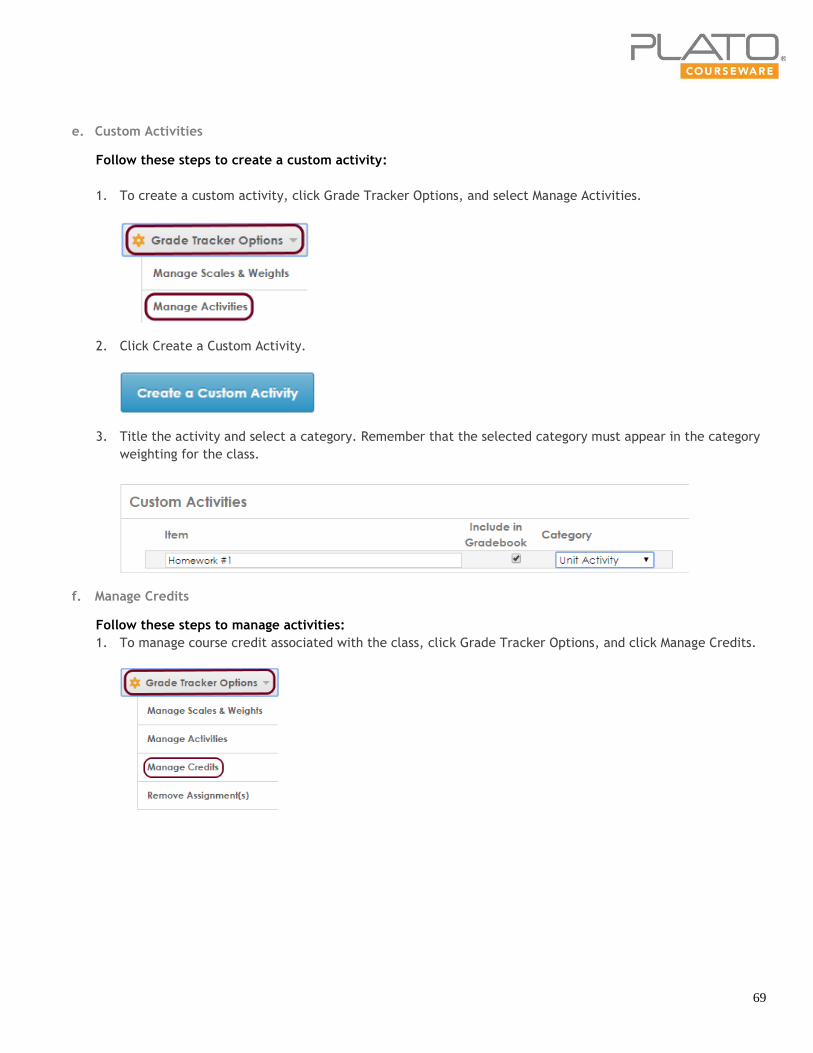
e. Custom Activities
Follow these steps to create a custom activity:
1. To create a custom activity, click Grade Tracker Options, and select Manage Activities.
2. Click Create a Custom Activity.
3. Title the activity and select a category. Remember that the selected category must appear in the category
weighting for the class.
f. Manage Credits
Follow these steps to manage activities:
1. To manage course credit associated with the class, click Grade Tracker Options, and click Manage Credits.

70
2. Select either No Credit, Original Credit, or Credit Recovery. Edit the number of credits to reflect your
school’s practices. Then click Save.
Note: Consult your Program or Account Administrators before editing class credits.
g. Remove Assignments
Follow these steps to remove assignments:
1. Open a tracker for a class, click Grade Tracker Options, and select Remove Assignment.
2. Click the red x next to the assignment, and click Save.
Note that manually edited scores will not be preserved if you need to reinstate this gradebook. Back up the
data, if necessary.
h. Grade Tracker Reporting
Follow these steps to run Grade Tracker reports:
1. To view a learner’s Detailed Grade Report, click the graph icon ( ) next to the student’s name. This
report will show the overall grade, category grades, and activity grades.
2. To view the learner’s scores as a spreadsheet, click the export icon ( ) next to the student’s name. Your
spreadsheet program will open in a new window.

71
3. To view the class grade tracker as a spreadsheet, click Export (.csv), choose whether to include only active
learners, and open the downloaded file.
72
10. Plato Courseware Reporting Overview
a. How to Run a Report
You can generate reports through the Reports tab on the home page. Only Curriculum reports are available to instructors. Account Administrators can also generate Curriculum and System reports.
b. Curriculum Reports
Course Module Mastery Report
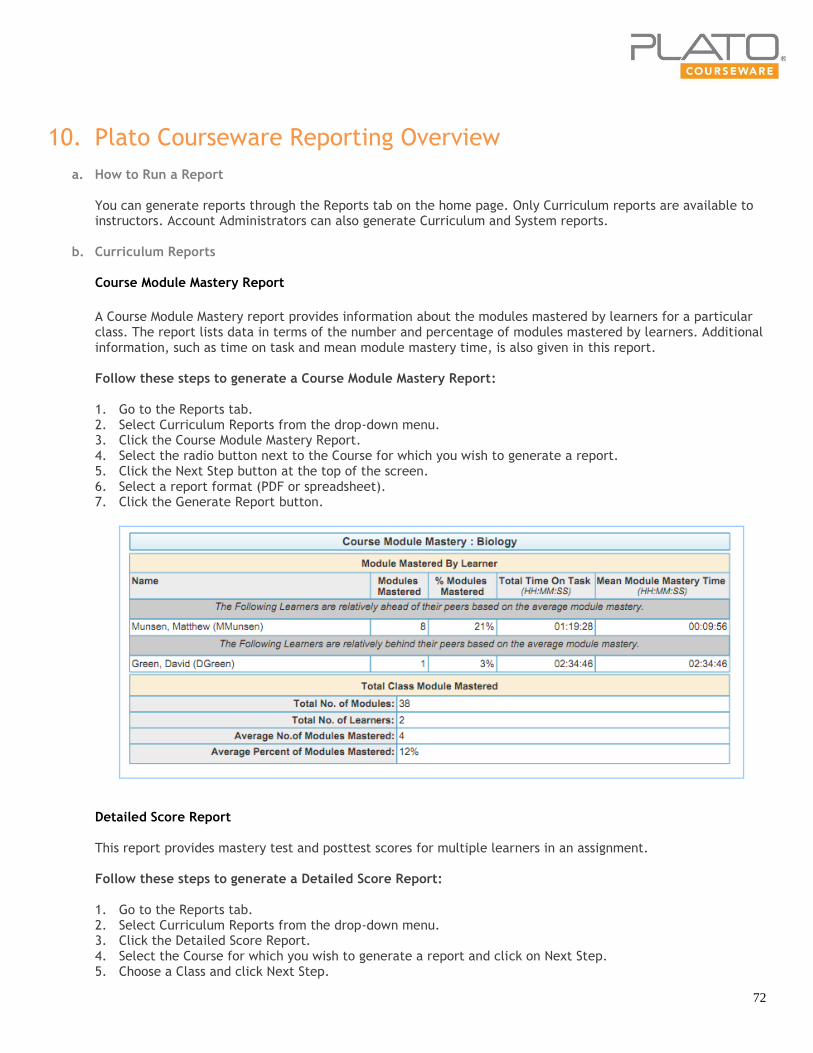
A Course Module Mastery report provides information about the modules mastered by learners for a particular class. The report lists data in terms of the number and percentage of modules mastered by learners. Additional information, such as time on task and mean module mastery time, is also given in this report.
Follow these steps to generate a Course Module Mastery Report: 1. Go to the Reports tab. 2. Select Curriculum Reports from the drop-down menu. 3. Click the Course Module Mastery Report. 4. Select the radio button next to the Course for which you wish to generate a report. 5. Click the Next Step button at the top of the screen. 6. Select a report format (PDF or spreadsheet). 7. Click the Generate Report button.
Detailed Score Report This report provides mastery test and posttest scores for multiple learners in an assignment. Follow these steps to generate a Detailed Score Report: 1. Go to the Reports tab. 2. Select Curriculum Reports from the drop-down menu. 3. Click the Detailed Score Report. 4. Select the Course for which you wish to generate a report and click on Next Step. 5. Choose a Class and click Next Step.

73
6. Click the arrow next to the class name to view enrolled learners. 7. Select the learner(s) and click Next Step. 8. Select a report format (Excel spreadsheet or .CSV). 9. Click the Generate Report button.
Graphic Learner Progress Report The Graphic Learner Progress report allows you to see the progress of a learner in a Class as a graphical progress bar. This report also provides information about the total number of modules assigned to the learner, the number of modules the learner has mastered, and the time the learner spent on the task. Follow these steps to generate a Graphic Learner Progress Report: 1. Go to the Reports tab. 2. Select Curriculum Reports from the drop-down menu. 3. Click Graphic Learner Progress Report. 4. Choose a report path for either a learner or a class. 5. Select the learner(s) and click Next Step. 6. Select the Class. Note that you can select more than one class for report generation. 7. Click the Generate Report button.

74
Learner Progress Report
The Learner Progress Report details the progress of a learner enrolled in a course. This report provides information on the completion status of every lesson and its related mastery test. Details about the learner’s first and last use dates, time on task, and number of tries are also included. The last column of the report provides the score the learner earned for applicable activities. Follow these steps to generate the Learner Progress Report: 1. Go to the Reports tab. 2. Select Curriculum Reports from the drop-down menu. 3. Click Learner Progress Report. 4. Choose a report path for either a learner or a class. 5. Select the learner(s) and click Next Step. 6. Select the Class and click Next Step. Note that you can select more than one class for report generation. 7. Select a report format (PDF or spreadsheet). 8. Click the Generate Report button.
75
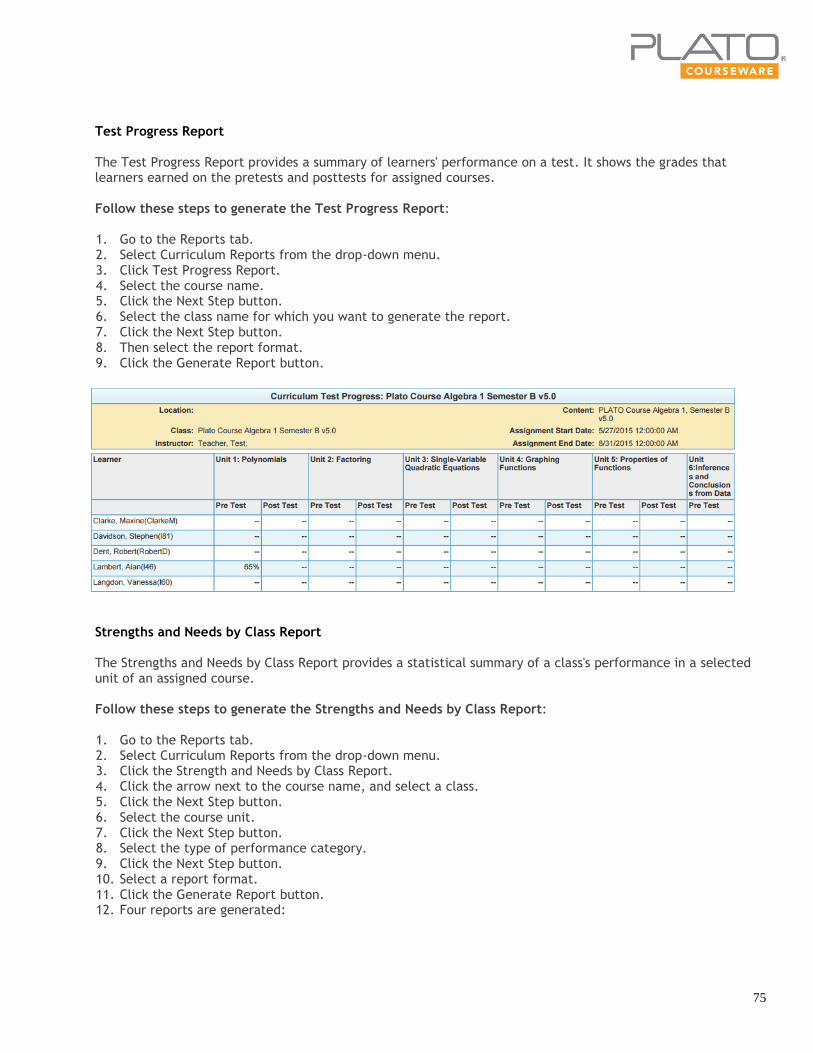
Test Progress Report The Test Progress Report provides a summary of learners' performance on a test. It shows the grades that learners earned on the pretests and posttests for assigned courses. Follow these steps to generate the Test Progress Report: 1. Go to the Reports tab. 2. Select Curriculum Reports from the drop-down menu. 3. Click Test Progress Report. 4. Select the course name. 5. Click the Next Step button. 6. Select the class name for which you want to generate the report. 7. Click the Next Step button. 8. Then select the report format. 9. Click the Generate Report button.
Strengths and Needs by Class Report The Strengths and Needs by Class Report provides a statistical summary of a class's performance in a selected unit of an assigned course. Follow these steps to generate the Strengths and Needs by Class Report: 1. Go to the Reports tab. 2. Select Curriculum Reports from the drop-down menu. 3. Click the Strength and Needs by Class Report. 4. Click the arrow next to the course name, and select a class. 5. Click the Next Step button. 6. Select the course unit. 7. Click the Next Step button. 8. Select the type of performance category. 9. Click the Next Step button. 10. Select a report format. 11. Click the Generate Report button. 12. Four reports are generated:

76
Student Count by Class
Summary by Learner
Summary by Categories
77
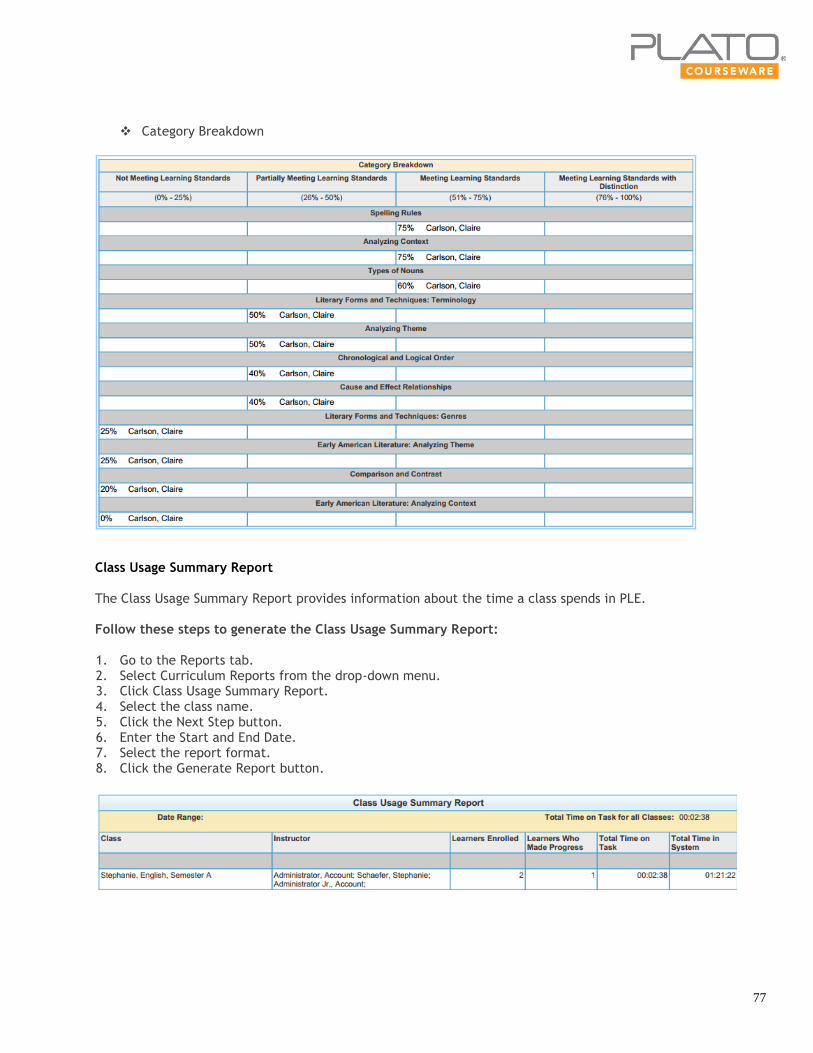
Category Breakdown
Class Usage Summary Report The Class Usage Summary Report provides information about the time a class spends in PLE. Follow these steps to generate the Class Usage Summary Report:
1. Go to the Reports tab. 2. Select Curriculum Reports from the drop-down menu. 3. Click Class Usage Summary Report. 4. Select the class name. 5. Click the Next Step button. 6. Enter the Start and End Date. 7. Select the report format. 8. Click the Generate Report button.

78
Learner Portfolio Report: The Learner Portfolio Report provides a summary of a learner's assessments and assignments. You can generate reports for all courses and classes together. The reports, which are in PDF format, are generated in a zip folder. Follow these steps to generate the Learner Portfolio Report: 1. Go to the Reports tab. 2. Select Curriculum Reports from the drop-down menu. 3. Click Learner Portfolio Report. 4. Select the class(es). 5. Click the Next Step button. 6. Select the learner(s). 7. Click the Next Step button. 8. Click the Generate Report button.

79
Learner Daily Usage Report: The Learner Daily Usage Report provides information about all assignments and assessments the learner has ever performed within this program. Follow these steps to generate the Learner Daily Usage Report: 1. Go to the Reports tab. 2. Select Curriculum Reports from the drop-down menu. 3. Click Learner Daily Usage Report. 4. Select the by Learner or by Class report option. 5. For the by Learner report, select the learner or learners to include. 6. Click the Next Step button. 7. Select the Start and End dates. 8. Choose PDF or Spreadsheet. 9. Click the Generate Report button.
80
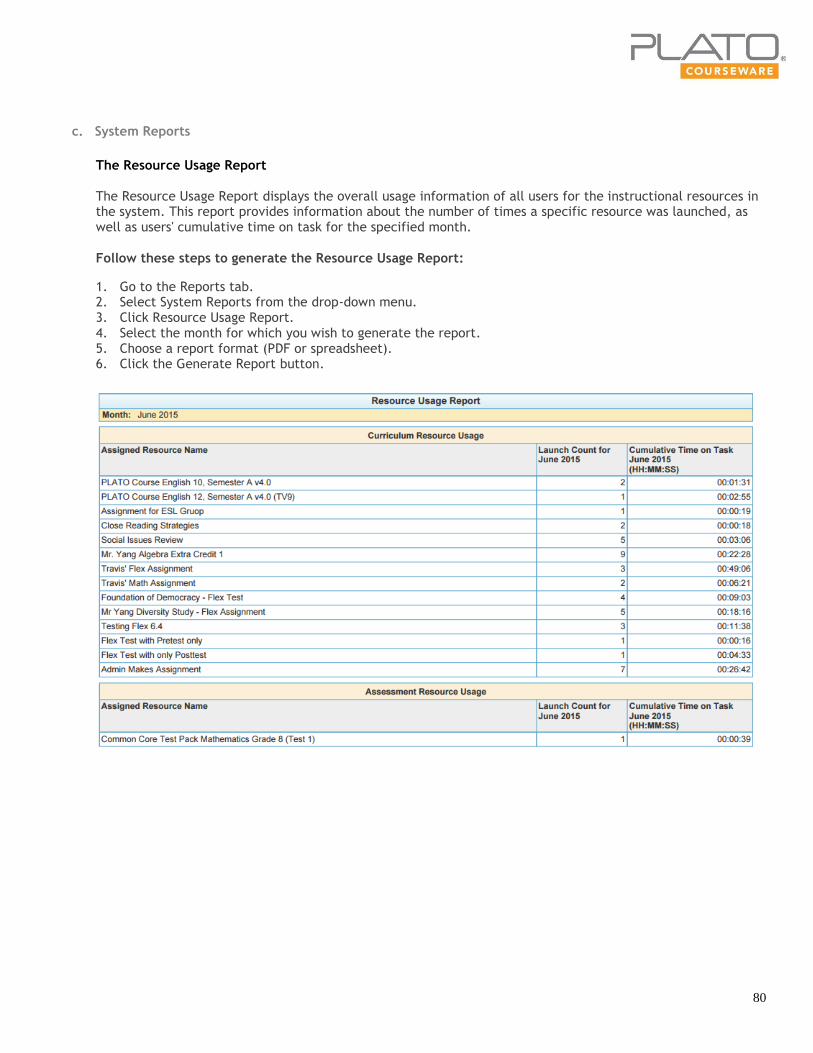
c. System Reports
The Resource Usage Report The Resource Usage Report displays the overall usage information of all users for the instructional resources in the system. This report provides information about the number of times a specific resource was launched, as well as users' cumulative time on task for the specified month.
Follow these steps to generate the Resource Usage Report:
1. Go to the Reports tab. 2. Select System Reports from the drop-down menu. 3. Click Resource Usage Report. 4. Select the month for which you wish to generate the report. 5. Choose a report format (PDF or spreadsheet). 6. Click the Generate Report button.
81
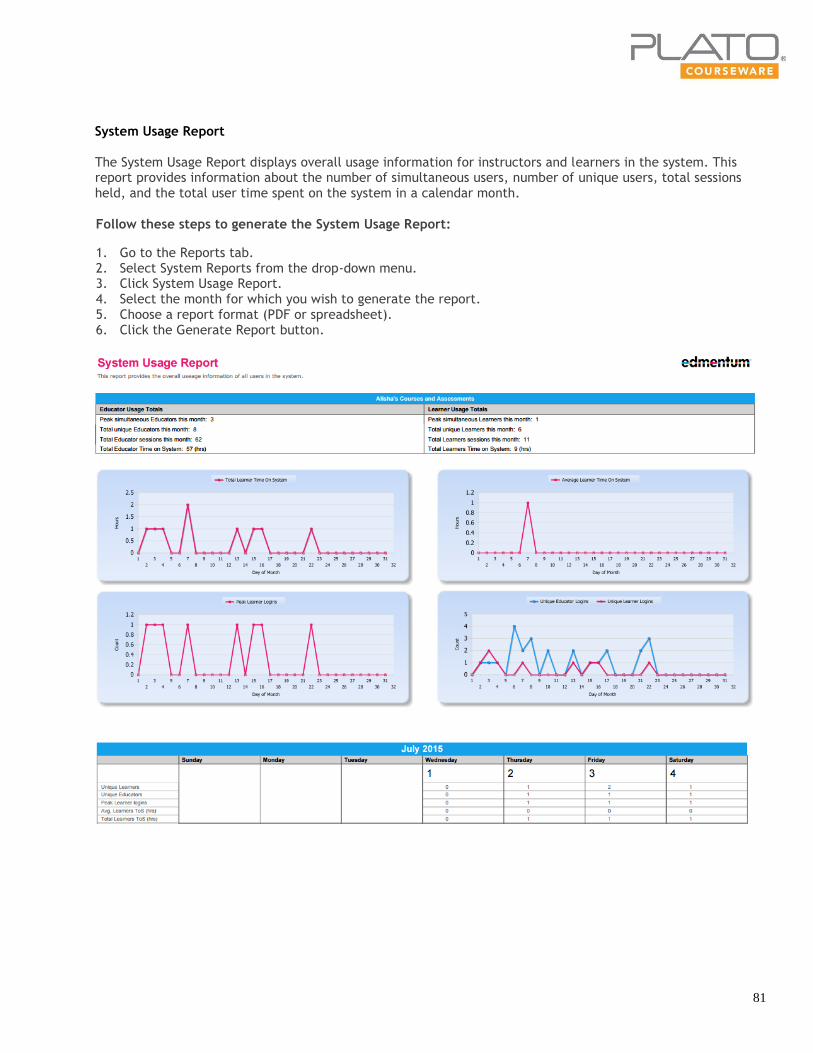
System Usage Report
The System Usage Report displays overall usage information for instructors and learners in the system. This report provides information about the number of simultaneous users, number of unique users, total sessions held, and the total user time spent on the system in a calendar month.
Follow these steps to generate the System Usage Report:
1. Go to the Reports tab. 2. Select System Reports from the drop-down menu. 3. Click System Usage Report. 4. Select the month for which you wish to generate the report. 5. Choose a report format (PDF or spreadsheet). 6. Click the Generate Report button.

82
11. Administration
The Administration Center link is available only to Account Administrators. Account Administrators have access to all Plato Courseware features. They can make changes to Account Settings through the Administration Center.
Account Administrators can create users, manage user memberships, and delete users.
a. Reports
Run Reports
Administrators can run curriculum and system reports from the Reports tab in the Administration Center.
See the Plato Courseware Reporting Overview for more details.
b. Manage Users
Create a User For step-by-step instructions for creating a user, see the Create Users section. Users can be Account Administrators, Program Administrators, Instructors, or Learners. Manage Users For information about managing all users, see the Manage User section.

83
c. Import Users
For more information about importing the users, see the Import User section.
d. Programs
A program can be created by an administrator. After successfully creating a program, administrators can create
classes, enroll learners, and assign instructors under the program.
Follow these steps to create a Program:
1. Click the Administration Center link. 2. On the Administration Center page, click the Programs tab.
3. Click the Create a Program button.

84
4. Enter a name for the program you want to create. 5. From the drop-down menu, select the program deliverables. 6. In the Account Structure Locations section, select the location to associate with the program. 7. Click the Save & Close button.
e. Licenses
For more information on the licenses tab, see the Licenses section.

85
f. Settings
Account Settings
Account Administrators can determine whether learners have access to messaging, notebooks, and assignment scores. Administrators should also decide if family contacts should have access to learner scores. Use the Account Settings page to set the time zone for your school and indicate if your state observes daylight savings time. Follow these steps to adjust the access settings: 1. Go to the Administration Center and select Account Settings from the drop-down menu. 2. Check the boxes next to the features you want to enable. 3. Click the Save Changes button to finish. 4. By clicking Reset Changes, you can restore the default account settings.

86
12. Plato Courseware Support
The Plato Courseware Help feature is the first place to go when you have questions. The Account Administrator in your school is the next point of contact if you are experiencing problems with accessing the system, logging into the product, licensing, or managing assignments.
When students encounter problems with Plato Courseware, they should always contact their instructor to resolve the issue. If the instructor cannot help the student, the instructor should contact the Plato Courseware Account Administrator. The Plato Courseware Support Site and call center support team are also available if questions arise.
a. Plato Courseware Help You can access the Plato Courseware Help page to view videos and materials that explain how to navigate the
Plato Courseware interface by clicking the help link at the bottom of the Plato Courseware home page.
b. Plato Courseware Support Site
87
You can access self-service support at any time through the Edmentum Support Center. It provides general
information, as well as answers to many common questions. The Support Center also contains the essential
materials that you’ll need to understand, troubleshoot, and use the Plato Courseware management system and
Plato Courseware.
Use the search feature to find materials related to a keyword. Use the Instructor Materials section to find materials related to Plato Courseware, including teacher
guides, test and activity answer keys, and learner progress tracking sheets.
Use the Search Solutions feature to find relevant support material for various products.
Use the Troubleshooting & Help section to find answers to your questions about Plato Courseware. This section provides information about workstation readiness, system requirements, login help, and support site orientation.
Use the News & Promos section to stay up to date on company and product news, webinars, and alerts
for Plato Courseware.
Use the Technical Info & Tools section to see if your system meets the requirements to run Plato Courseware.
c. Call Center Support Team
Plato Courseware has an experienced and award-winning team of support professionals to assist you in the event that technical problems arise.
To contact the support team, send an email or call 800-869-2200 (7 a.m. to 7 p.m., central time).