connecting scalance 1 s615 to the wan openvpn tunnel … · enter the entry id of the relevant...
TRANSCRIPT

SCALANCE S615 Getting Started
___________________
___________________
___________
SIMATIC NET
Industrial Ethernet Security SCALANCE S615 Getting Started
Getting Started
03/2015 C79000-G8900-C390-01
Preface
Connecting SCALANCE S615 to the WAN
1
OpenVPN tunnel between SCALANCE S615 and SINEMA RC Server
2

Siemens AG Division Process Industries and Drives Postfach 48 48 90026 NÜRNBERG GERMANY
C79000-G8900-C390-01 Ⓟ 04/2015 Subject to change
Copyright © Siemens AG 2015. All rights reserved
Legal information Warning notice system
This manual contains notices you have to observe in order to ensure your personal safety, as well as to prevent damage to property. The notices referring to your personal safety are highlighted in the manual by a safety alert symbol, notices referring only to property damage have no safety alert symbol. These notices shown below are graded according to the degree of danger.
DANGER indicates that death or severe personal injury will result if proper precautions are not taken.
WARNING indicates that death or severe personal injury may result if proper precautions are not taken.
CAUTION indicates that minor personal injury can result if proper precautions are not taken.
NOTICE indicates that property damage can result if proper precautions are not taken.
If more than one degree of danger is present, the warning notice representing the highest degree of danger will be used. A notice warning of injury to persons with a safety alert symbol may also include a warning relating to property damage.
Qualified Personnel The product/system described in this documentation may be operated only by personnel qualified for the specific task in accordance with the relevant documentation, in particular its warning notices and safety instructions. Qualified personnel are those who, based on their training and experience, are capable of identifying risks and avoiding potential hazards when working with these products/systems.
Proper use of Siemens products Note the following:
WARNING Siemens products may only be used for the applications described in the catalog and in the relevant technical documentation. If products and components from other manufacturers are used, these must be recommended or approved by Siemens. Proper transport, storage, installation, assembly, commissioning, operation and maintenance are required to ensure that the products operate safely and without any problems. The permissible ambient conditions must be complied with. The information in the relevant documentation must be observed.
Trademarks All names identified by ® are registered trademarks of Siemens AG. The remaining trademarks in this publication may be trademarks whose use by third parties for their own purposes could violate the rights of the owner.
Disclaimer of Liability We have reviewed the contents of this publication to ensure consistency with the hardware and software described. Since variance cannot be precluded entirely, we cannot guarantee full consistency. However, the information in this publication is reviewed regularly and any necessary corrections are included in subsequent editions.

SCALANCE S615 Getting Started Getting Started, 03/2015, C79000-G8900-C390-01 3
Preface
Purpose The configuration of the SCALANCE S615 is shown based on examples.
IP settings for the examples
Note
The IP settings used in the examples were freely chosen.
In a real network, you would need to adapt these IP settings to avoid possible address conflicts.
General naming conventions The designation . . . stands for . . . SINEMA RC SINEMA Remote Connect SINEMA RC Server SINEMA Remote Connect server S615 SCALANCE S615
Further Information Apart from the Configuration Manual you are currently reading, the following documentation is also available on the topic of Remote Network:
● "Industrial Ethernet Security - SCALANCE S615 Web Based Management" configuration manual
This document is intended to provide you with the information you require to install, commission and operate the device. It provides you with the information you require to configure the devices.
● "Industrial Remote Communication - TeleControl SINEMA Remote Connect Client" operating instructions
This manual supports you when installing, configuring and operating the application SINEMA RC Client.
● "Industrial Remote Communication - TeleControl SINEMA Remote Connect Server" operating instructions
This manual supports you when installing, configuring and operating the application SINEMA RC Server.
Preface
SCALANCE S615 Getting Started 4 Getting Started, 03/2015, C79000-G8900-C390-01
● Getting Started Industrial Remote Communication - TeleControl - SINEMA Remote Connect"
Based on examples, this document explains the configuration of SINEMA RC.
● The "SIMATIC NET Industrial Ethernet Network Manual" contains information on other SIMATIC NET products that you can operate along with the devices of this product line in an Industrial Ethernet network. There, you will find among other things optical performance data of the communications partners that you require for the installation.
You will find this document on the Internet under the following entry ID: 27069465 (http://support.automation.siemens.com/WW/view/en/27069465)
SIMATIC NET manuals You will find SIMATIC NET manuals on the Internet pages of Siemens Industry Online Support:
● Using the search function:
Link to Siemens Industry Online Support (http://support.automation.siemens.com/)
Enter the entry ID of the relevant manual as the search item.
● In the navigation panel on the left hand side in the area "Industrial Communication":
Link to the area "Industrial Communication" (http://support.automation.siemens.com/WW/view/en/10805878/133400)
Go to the required product group and make the following settings: "Entry list" tab, Entry type "Manuals"
SIMATIC NET glossary Explanations of many of the specialist terms used in this documentation can be found in the SIMATIC NET glossary.
You will find the SIMATIC NET glossary here:
● SIMATIC NET Manual Collection or product DVD
The DVD ships with certain SIMATIC NET products.
● On the Internet under the following entry ID:
50305045 (http://support.automation.siemens.com/WW/view/en/50305045)
Training, Service & Support You will find information on Training, Service & Support in the multi--language document "DC_support_99.pdf" on the data medium supplied with the documentation.

Preface
SCALANCE S615 Getting Started Getting Started, 03/2015, C79000-G8900-C390-01 5
Security information Siemens provides products and solutions with industrial security functions that support the secure operation of plants, solutions, machines, equipment and/or networks. They are important components in a holistic industrial security concept. With this in mind, Siemens’ products and solutions undergo continuous development. Siemens recommends strongly that you regularly check for product updates.
For the secure operation of Siemens products and solutions, it is necessary to take suitable preventive action (e.g. cell protection concept) and integrate each component into a holistic, state-of-the-art industrial security concept. Third-party products that may be in use should also be considered. For more information about industrial security, visit http://www.siemens.com/industrialsecurity.
To stay informed about product updates as they occur, sign up for a product-specific newsletter. For more information, visit http://support.automation.siemens.com.
Trademarks The following and possibly other names not identified by the registered trademark sign ® are registered trademarks of Siemens AG:
SINEMA, SCALANCE

Preface
SCALANCE S615 Getting Started 6 Getting Started, 03/2015, C79000-G8900-C390-01

SCALANCE S615 Getting Started Getting Started, 03/2015, C79000-G8900-C390-01 7
Table of contents
Preface .................................................................................................................................................. 3
1 Connecting SCALANCE S615 to the WAN .............................................................................................. 9
1.1 Procedure in principle ............................................................................................................... 9
1.2 Setting up SCALANCE S615 and network ............................................................................. 11
1.3 Launching Web Based Management...................................................................................... 12
1.4 Logging in to Web Based Management .................................................................................. 15
1.5 Changing the IP settings of the S615 ..................................................................................... 17
1.6 Specifying device information ................................................................................................. 19
1.7 Setting the time ....................................................................................................................... 20
1.8 Creating IP subnet .................................................................................................................. 22
2 OpenVPN tunnel between SCALANCE S615 and SINEMA RC Server ................................................. 25
2.1 Procedure in principle ............................................................................................................. 25
2.2 Configuring access to the SINEMA RC Serve ........................................................................ 29 2.2.1 Configuring a route ................................................................................................................. 29 2.2.2 Activating IP masquerading .................................................................................................... 30 2.2.3 Allow access ........................................................................................................................... 31
2.3 Configure a remote connection on the SINEMA RC Server ................................................... 32 2.3.1 Creating node groups ............................................................................................................. 32 2.3.2 Create devices ........................................................................................................................ 34 2.3.3 Configure communications relations ....................................................................................... 36
2.4 Configure a remote connection on the S615 .......................................................................... 38 2.4.1 Secure OpenVPN connection with fingerprint ........................................................................ 38 2.4.2 Secure OpenVPN connection with CA certificate ................................................................... 41 2.4.2.1 Loading a certificate ................................................................................................................ 41 2.4.2.2 Configure an OpenVPN connection to the SINEMA RC Server ............................................. 42

Table of contents
SCALANCE S615 Getting Started 8 Getting Started, 03/2015, C79000-G8900-C390-01

SCALANCE S615 Getting Started Getting Started, 03/2015, C79000-G8900-C390-01 9
Connecting SCALANCE S615 to the WAN 1 1.1 Procedure in principle
In this example the SCALANCE S615 that is in the factory settings status is assigned an IP address. Following this, the device will be configured using Web Based Management (WBM). Access to the WAN via the Ethernet interface P5 of the S615 will be connected.
Structure
Required devices/components ● 1 x S615 (additional option: a suitably installed standard rail with fittings)
● 1 x 24 V power supply with cable connector and terminal block plug
● 1 x PC for configuring the S615
● The required network cable, TP cable (twisted pair) complying with the IE FC RJ-45 standard for Industrial Ethernet

Connecting SCALANCE S615 to the WAN 1.1 Procedure in principle
SCALANCE S615 Getting Started 10 Getting Started, 03/2015, C79000-G8900-C390-01
Settings used For the configuration example, the devices are given the following IP address settings: Interface IP address LAN1
S615 LAN port P1 (vlan1)
192.168.100.1 255.255.255.0
WAN port P5 (vlan2)
192.168.50.1 255.255.255.0
PC1 LAN port 192.168.100.20 255.255.255.0 Gateway: IP address vlan1
Note
The IP settings used in the example were freely chosen.
In a real network, you would need to adapt these IP settings to avoid possible address conflicts.
Steps in configuration 1. Setting up SCALANCE S615 and network (Page 11)
2. Launching Web Based Management (Page 12)
3. Logging in to Web Based Management (Page 15)
4. Changing the IP settings of the SCALANCE S615 (Page 17)
5. Configuring SCALANCE S615
– Specifying device information (Page 19)
– Setting the time (Page 20)
– Creating IP subnet (Page 22)

Connecting SCALANCE S615 to the WAN 1.2 Setting up SCALANCE S615 and network
SCALANCE S615 Getting Started Getting Started, 03/2015, C79000-G8900-C390-01 11
1.2 Setting up SCALANCE S615 and network
Note
Familiarize yourself with the security instructions before you commission the device. You will find the security instructions in the operating instructions.
Procedure 1. First unpack the S615 and check that it is undamaged.
2. Fit the power supply.
WARNING
Use safety extra-low voltage only
The SCALANCE S615 is designed for operation with safety extra-low voltage. This means that only safety extra-low voltages (SELV) complying with IEC950/EN60950/ VDE0805 can be connected to the power supply terminals.
The power supply unit for the SCALANCE S615 power supply must meet NEC Class 2, according to the National Electrical Code(r) (ANSI / NFPA 70).
3. Wire up the S615, see Setup (Page 9).
4. Connect the device to the local network via the Ethernet ports.
5. Turn the device on. After connecting up, the fault LED (F) is lit red.
6. Now, turn on the PC.

Connecting SCALANCE S615 to the WAN 1.3 Launching Web Based Management
SCALANCE S615 Getting Started 12 Getting Started, 03/2015, C79000-G8900-C390-01
1.3 Launching Web Based Management In the factory settings, the SCALANCE S615 can be reached at the following IP address:
● IP address: 192.168.1.1
● Subnet mask: 255.255.255.0
In this configuration example, the Admin PC has the following IP address setting to allow it to access the Web Based Management of the S615. IP address Subnet mask 192.168.1.20 255.255.255.0
Procedure 1. On the Admin PC, open the Control Panel with the menu command "Start" > "Control
Panel".
2. Click "Network and Sharing Center" and select the "Change Adapter Settings" option in the navigation menu on the left.
3. Right-click on the "LAN Connection" symbol and select the "Properties" menu command.
4. In the "Local Area Connection Properties" dialog, enable the "Internet Protocol Version 4 (TCP/IPv4)" check box.

Connecting SCALANCE S615 to the WAN 1.3 Launching Web Based Management
SCALANCE S615 Getting Started Getting Started, 03/2015, C79000-G8900-C390-01 13
5. Enter the values in the table above.

Connecting SCALANCE S615 to the WAN 1.3 Launching Web Based Management
SCALANCE S615 Getting Started 14 Getting Started, 03/2015, C79000-G8900-C390-01
6. Confirm the dialogs with "OK" and close the Control Panel.
7. Enter the IP address "192.168.1.1" in the address box of the Web browser. If there is a problem-free connection to the device, the login page of Web Based Management (WBM) is displayed.
Connecting SCALANCE S615 to the WAN 1.4 Logging in to Web Based Management
SCALANCE S615 Getting Started Getting Started, 03/2015, C79000-G8900-C390-01 15
1.4 Logging in to Web Based Management
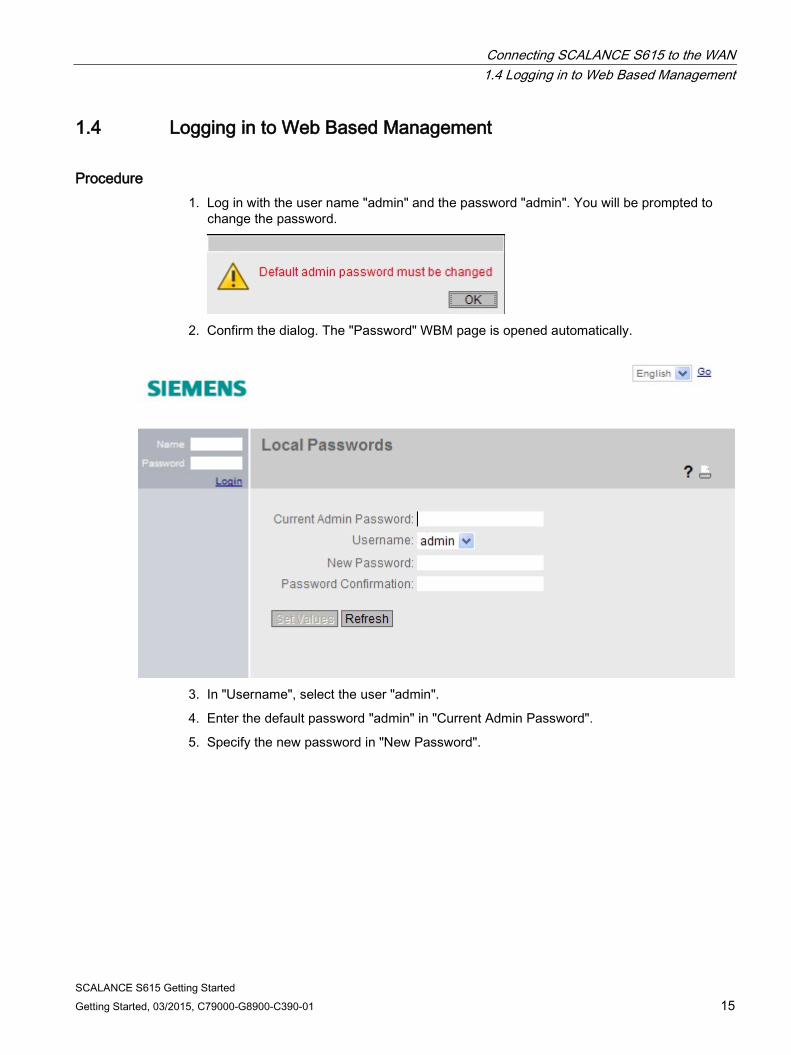
Procedure 1. Log in with the user name "admin" and the password "admin". You will be prompted to
change the password.
2. Confirm the dialog. The "Password" WBM page is opened automatically.
3. In "Username", select the user "admin".
4. Enter the default password "admin" in "Current Admin Password".
5. Specify the new password in "New Password".
Connecting SCALANCE S615 to the WAN 1.4 Logging in to Web Based Management
SCALANCE S615 Getting Started 16 Getting Started, 03/2015, C79000-G8900-C390-01
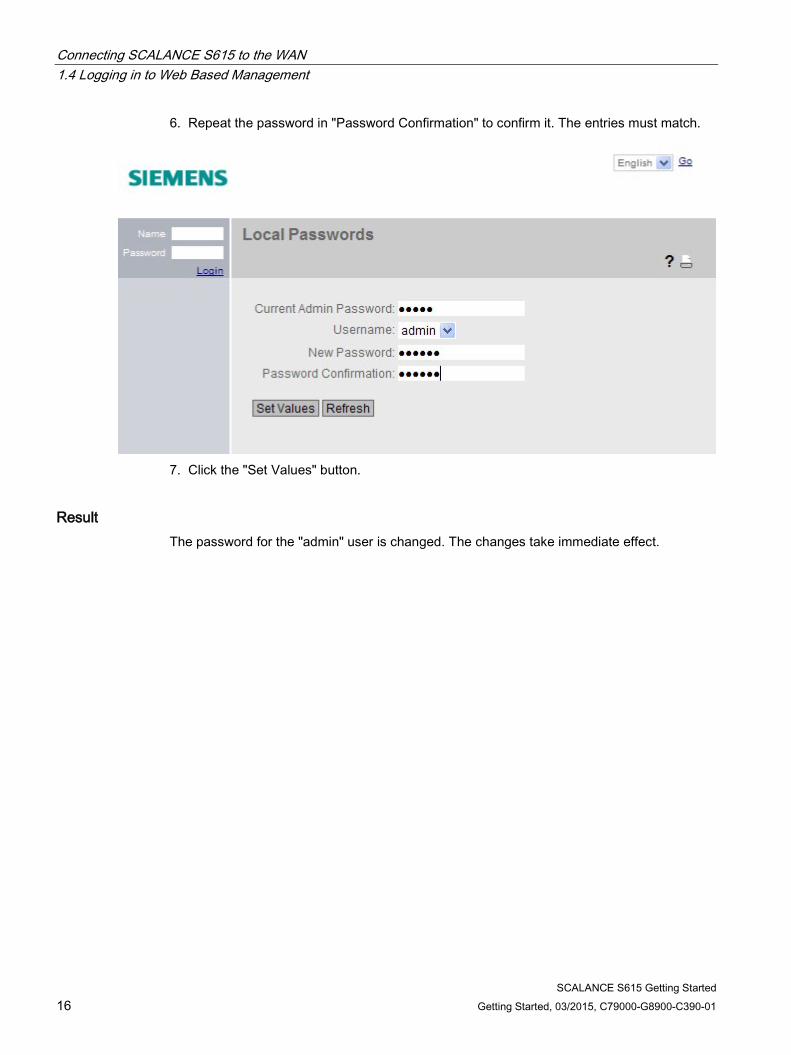
6. Repeat the password in "Password Confirmation" to confirm it. The entries must match.
7. Click the "Set Values" button.
Result The password for the "admin" user is changed. The changes take immediate effect.
Connecting SCALANCE S615 to the WAN 1.5 Changing the IP settings of the S615
SCALANCE S615 Getting Started Getting Started, 03/2015, C79000-G8900-C390-01 17
1.5 Changing the IP settings of the S615
Procedure 1. Click on "Layer 3" > "Subnet" in the navigation area and on the "Configuration" tab in the
content area.
2. Enter the IP address for vlan1 according to the table "Settings used (Page 9)".
3. Click "Set Values".
The IP address is adjusted automatically in the address bar of the Web browser. The Web browser on the Admin PC can no longer access Web Based Management because its IP settings no longer match.
4. On the Admin PC, open the Control Panel with the menu command "Start" > "Control Panel".
5. Click "Network and Sharing Center" and select the "Change Adapter Settings" option in the navigation menu on the left.
6. In the "Local Area Connection Properties" dialog, enable the "Internet Protocol Version 4 (TCP/IPv4)" check box.

Connecting SCALANCE S615 to the WAN 1.5 Changing the IP settings of the S615
SCALANCE S615 Getting Started 18 Getting Started, 03/2015, C79000-G8900-C390-01
7. Enter the values for the PC from the "Settings used (Page 9)" table.
8. Confirm the dialogs with "OK" and close the Control Panel.
9. In the address box of the Web browser, enter the IP address for vlan1, see table "Settings used (Page 9)". If there is a problem-free connection to the device, the login page of Web Based Management (WBM) is displayed.
10.Log in with the user name "admin" and the modified password.

Connecting SCALANCE S615 to the WAN 1.6 Specifying device information
SCALANCE S615 Getting Started Getting Started, 03/2015, C79000-G8900-C390-01 19
1.6 Specifying device information To allow better identification of the SCALANCE S615, specify general device information.
Procedure 1. Click "System" > "General" in the navigation panel and on the "Device" tab in the content
area.
2. In "System Name", enter a system name for the device, e.g. "S615-1".
3. Enter the contact person responsible for the device in "System Contact".
4. Enter the identifier for the location at which the device is installed in "System Location", for example the room number.
5. Click the "Set Values" button.
Result The general device information for the SCALANCE S615 has been specified.

Connecting SCALANCE S615 to the WAN 1.7 Setting the time
SCALANCE S615 Getting Started 20 Getting Started, 03/2015, C79000-G8900-C390-01
1.7 Setting the time The date and time are kept on the SCALANCE S615 to check the validity (time) of certificates and for the time stamps of log entries. You can set the system time yourself manually or have it synchronized automatically with a time server. For this example, the time server is configured using NTP.
Note Manual time setting - reaction after interrupting the power supply
Note that the time is reset to the factory setting if the power supply is interrupted. On return of the power, you need to set the system time again. As result, certificates can lose their validity. Synchronization using a time server
Synchronization of the system time using a public time server creates additional data traffic on the connection. This may result in additional costs, depending on your subscriber contract.
Requirement ● An NTP server can be reached in the local network.
● The IP address of the NTP server is known. For this example, a local time server with the IP address 192.168.100.87 is used.
Procedure 1. Click on "System" > "System Time" in the navigation area and on the "NTP Client" tab in
the content area.
2. In "Time Zone", enter the local time difference to world time (UTC). For Central European
Summer time (CEST) +02:00.
Connecting SCALANCE S615 to the WAN 1.7 Setting the time
SCALANCE S615 Getting Started Getting Started, 03/2015, C79000-G8900-C390-01 21
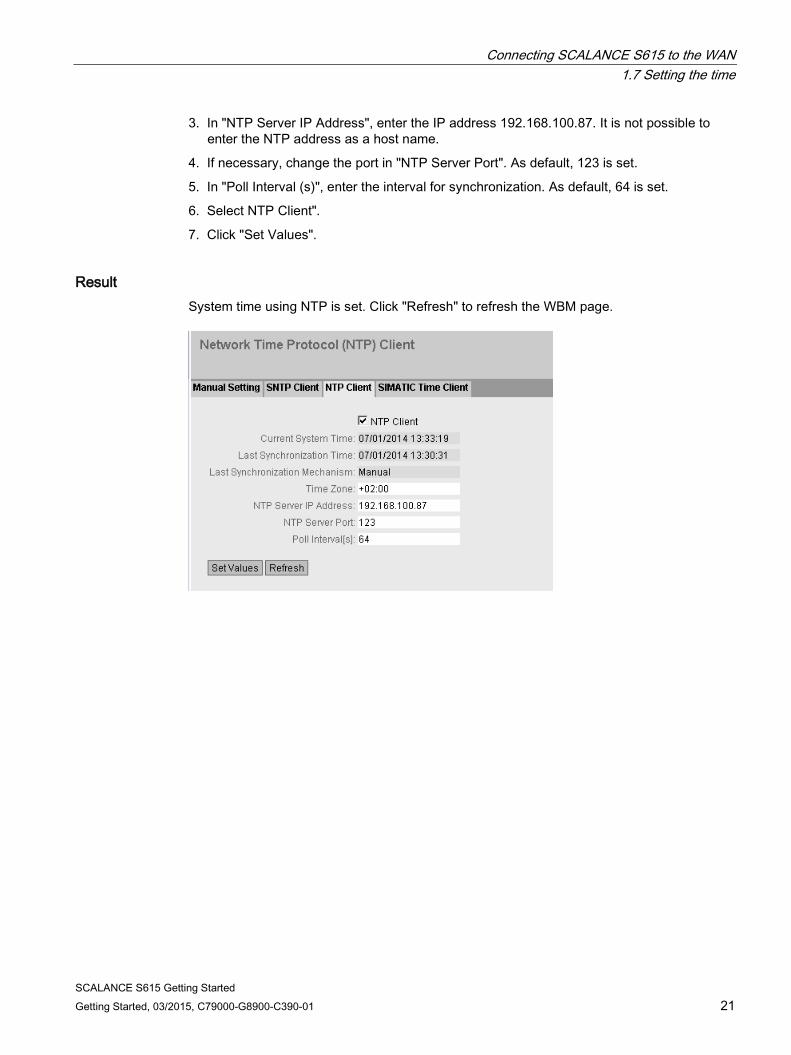
3. In "NTP Server IP Address", enter the IP address 192.168.100.87. It is not possible to enter the NTP address as a host name.
4. If necessary, change the port in "NTP Server Port". As default, 123 is set.
5. In "Poll Interval (s)", enter the interval for synchronization. As default, 64 is set.
6. Select NTP Client".
7. Click "Set Values".
Result System time using NTP is set. Click "Refresh" to refresh the WBM page.

Connecting SCALANCE S615 to the WAN 1.8 Creating IP subnet
SCALANCE S615 Getting Started 22 Getting Started, 03/2015, C79000-G8900-C390-01
1.8 Creating IP subnet The interfaces are handled differently.
● Ethernet interface P1 (vlan1): Connection to LAN
● Ethernet interface P5 (vlan2): Connection to WAN
For this configuration example, only the IP subnet for the Ethernet interface P5 needs to be configured. The IP subnet for the Ethernet interface P1 is already configured.
Procedure 1. Click on "Layer 3" > "Subnets" in the navigation area and on the "Configuration" tab in the
content area.
2. For "Interface" select "vlan2".
3. For "Interface Name" you can enter a name.
4. Enter the IP address for vlan2, see table "Settings used (Page 9)"
5. Click "Set Values".

Connecting SCALANCE S615 to the WAN 1.8 Creating IP subnet
SCALANCE S615 Getting Started Getting Started, 03/2015, C79000-G8900-C390-01 23
Result The IP subnets have been created. The IP subnets are displayed in the "Overview" tab.

Connecting SCALANCE S615 to the WAN 1.8 Creating IP subnet
SCALANCE S615 Getting Started 24 Getting Started, 03/2015, C79000-G8900-C390-01

SCALANCE S615 Getting Started Getting Started, 03/2015, C79000-G8900-C390-01 25
OpenVPN tunnel between SCALANCE S615 and SINEMA RC Server 2 2.1 Procedure in principle
In this sample configuration two distributed stations are connected using a SCALANCE S615. The devices communicate via the SINEMA RC Server located in the master station.
A KEY-PLUG SINEMA Remote Connect is required for each SCALANCE S615 device. The KEY-PLUG enables the connection from SCALANCE S615 to SINEMA RC.
To do this, the devices need to logon to the SINEMA RC Server. The VPN tunnel between the device and the SINEMA RC Server is established only after successful authentication. Depending on the configured communication relations and the security settings, the SINEMA RC server connects the individual VPN tunnels.
Structure

OpenVPN tunnel between SCALANCE S615 and SINEMA RC Server 2.1 Procedure in principle
SCALANCE S615 Getting Started 26 Getting Started, 03/2015, C79000-G8900-C390-01
Master station - connection to SINEMA RC Server
● In the test setup in the internal network, a network node is implemented by a PC connected to the LAN port of the SINEMA RC Server.
– PC: represents a participant in internal network 3
– SINEMA RC Server
● Connection to the external network via a router
Access to the external network is via a router connected to the WAN port of the SINEMA RC Server.
Station 1 / 2 - Connection to SCALANCE S615
● In the test setup in the internal network, a network node is implemented by a PC connected to the Ethernet interface P1 of the S615.
– PC: represents a participant in internal network 1/2
– S615: SCALANCE S module for protection of the internal network 1/2
● Connection to the external network via a router
Access to the external network is via a router connected to the Ethernet interface P5 of the S615.
Required devices/components Use the following components for setup:
● 2 x S615 (additional option: a suitably installed standard rail with fittings)
● 2 x KEY-PLUG SINEMA RC
● 2 x 24 V power supply with cable connector and terminal block plug
● 2 x PC each connected to a SCALANCE S615.
● 1 x PC on which the SINEMA RC Server is installed.
● 1 x PC that is connected to the SINEMA RC Server.
● 3 x router
● The required network cable, TP cable (twisted pair) complying with the IE FC RJ-45 standard for Industrial Ethernet

OpenVPN tunnel between SCALANCE S615 and SINEMA RC Server 2.1 Procedure in principle
SCALANCE S615 Getting Started Getting Started, 03/2015, C79000-G8900-C390-01 27
Settings used For the configuration example, the devices are given the following IP address settings: Name Interface IP address Station -1 LAN1
S615-1 LAN port P1 (vlan1)
192.168.100.1 255.255.255.0
WAN port P5 (vlan2)
192.168.50.1 255.255.255.0 Default gateway is the LAN IP address of the router 192.168.50.2
PC1 LAN port 192.168.100.20 255.255.255.0
Router1 LAN port 192.168.50.2 255.255.255.0
Station-2 LAN2
S615-2
LAN port P1 (vlan1)
192.168.10.1 255.255.255.0
WAN port P5 (vlan2)
192.168.40.1 255.255.255.0 Default gateway is the LAN IP address of the router 192.168.40.2
PC2 Ethernet (LAN 2)
192.168.10.20 255.255.255.0
Router 2 LAN port 192.168.40.2 255.255.255.0
Master station LAN3
SINEMA RC Server
WAN port 192.168.20.250 255.255.255.0 The WAN IP address via which the SINEMA RC Server can be reached is the WAN IP address of the router in this example. 192.168.184.20 Default gateway is the LAN IP address of the router 192.168.20.2
PC3 Ethernet (LAN3)
192.168.20.20 255.255.255.0
Router 3 LAN port 192.168.20.2 255.255.255.0
WAN port 192.168.184.20
Note
The IP settings used in the configuration example were freely chosen.
In a real network, you would need to adapt these IP settings to avoid possible address conflicts.

OpenVPN tunnel between SCALANCE S615 and SINEMA RC Server 2.1 Procedure in principle
SCALANCE S615 Getting Started 28 Getting Started, 03/2015, C79000-G8900-C390-01
Requirement SINEMA RC Server
● The SINEMA RC server is connected to the WAN. You will find the configuration steps in the Getting Started "SINEMA Remote Connect".
SCALANCE S615
● The S615 is connected to the WAN , refer to "Connecting SCALANCE S615 to the WAN (Page 9)".
The steps in configuration are the same for all devices, the only difference being the settings, see table "Settings used (Page 25)".
● The S615 can be reached via PC1 or PC2 and you are logged in to the WBM as "admin".
● A valid KEY-PLUG SINEMA Remote Connect is inserted in the SCALANCE S.
Steps in configuration Configuring access to SINEMA RC server
To allow a VPN connection to the SINEMA RC server, a route must be created on the S615:
1. Configuring a route (Page 29)
For the PC to be able to access the WBM of the SINEMA RC server via S615 as well, the following steps are necessary on the S615:
1. Activate Basic NAT (Page 30)
2. Allow access (Page 31)
Configure a remote connection on the SINEMA RC server
1. Creating participant groups (Page 32)
2. Create devices (Page 34)
3. Configure communication relations (Page 36)
Configure a remote connection on the S615
● Secure OpenVPN connection with fingerprint (Page 38)
● Secure OpenVPN connection with CA certificate
– Loading a certificate (Page 41)
– Configure an OpenVPN connection to the SINEMA RC server (Page 42)

OpenVPN tunnel between SCALANCE S615 and SINEMA RC Server 2.2 Configuring access to the SINEMA RC Serve
SCALANCE S615 Getting Started Getting Started, 03/2015, C79000-G8900-C390-01 29
2.2 Configuring access to the SINEMA RC Serve
2.2.1 Configuring a route The stations and master station are in different IP subnets. So that the stations can communicate with the master station, the appropriate default route is created on the S615.
Procedure 1. In the address box of the Web browser, enter the LAN IP address of the S615, see table
"Settings used (Page 9)".
2. Log in as the "admin" user and the corresponding password.
3. Click "Layer 3" > "Routes" in the navigation area.
4. Configure the route to the router with the following settings:
Destination Network 0.0.0.0 (all IP addresses) Subnetmask 0.0.0.0 Gateway LAN IP address of the router according to the
table "Settings used (Page 9)" Metric -1
5. When you have entered the values, click "Create".
6. To update the display, click "Refresh".
Result The route is created.

OpenVPN tunnel between SCALANCE S615 and SINEMA RC Server 2.2 Configuring access to the SINEMA RC Serve
SCALANCE S615 Getting Started 30 Getting Started, 03/2015, C79000-G8900-C390-01
2.2.2 Activating IP masquerading IP masquerading is used so that the internal IP addresses are not forwarded to external. In addition to this, no further routing settings are necessary on the router.
Procedure 1. Click on "Layer 3" > "NAT" in the navigation area and on the "Masquerading" tab in the
content area.
2. Select "Enable Masquerading" for vlan2.
3. Click "Set Values"
Result Masquerading is activated on the WAN port vlan2. When a packet is sent via this interface, the source address is translated to the IP address assigned to vlan2.

OpenVPN tunnel between SCALANCE S615 and SINEMA RC Server 2.2 Configuring access to the SINEMA RC Serve
SCALANCE S615 Getting Started Getting Started, 03/2015, C79000-G8900-C390-01 31
2.2.3 Allow access So that the PC can access the SINEMA RC Server, access from vlan1 to vlan2 is enabled on the device.
Procedure 1. Click on "Security" > "Firewall" in the navigation area and on the "IP Rules" tab in the
content area.
2. Click "Create". A new entry is created in the table.
3. Configure the firewall rule with the following settings:
Action Accept From vlan1 (internal) To vlan2 (external) Source (Range) 0.0.0.0 (all IP addresses) Destination (Range) 0.0.0.0 (all IP addresses) Service all
As default, the service is always available
4. Click "Set Values".
Result Due to this firewall rule, all services between vlan1 and vlan2 are possible without restrictions, e.g. HTTPS
OpenVPN tunnel between SCALANCE S615 and SINEMA RC Server 2.3 Configure a remote connection on the SINEMA RC Server
SCALANCE S615 Getting Started 32 Getting Started, 03/2015, C79000-G8900-C390-01
2.3 Configure a remote connection on the SINEMA RC Server
2.3.1 Creating node groups Users and devices can be put together in participant groups. You can also specify whether the communication between the participants of an individual group is permitted or forbidden.
For this sample configuration, the following groups are created.
● Station -1
● Station-2
● Service
Requirement ● The SINEMA RC Server is connected to the WAN.
Procedure 1. In the address box of the Web browser, enter the WAN IP address of the SINEMA RC
Server "https://<WAN IP address>", see table "Settings used (Page 25)".
2. Log in as the "admin" user and with the corresponding password.
3. In the navigation area, click "Remote connections" > "Participant groups". The participant groups that have already been created are listed in the content area.
4. Click "Create". The page "New participant group" is opened.
5. Enter "Station 1" for group name and click "Exit".
6. Repeat steps 1 - 3 for the groups "Station-2" and "Service"

OpenVPN tunnel between SCALANCE S615 and SINEMA RC Server 2.3 Configure a remote connection on the SINEMA RC Server
SCALANCE S615 Getting Started Getting Started, 03/2015, C79000-G8900-C390-01 33
Result The participant groups have been created.
OpenVPN tunnel between SCALANCE S615 and SINEMA RC Server 2.3 Configure a remote connection on the SINEMA RC Server
SCALANCE S615 Getting Started 34 Getting Started, 03/2015, C79000-G8900-C390-01
2.3.2 Create devices
Procedure 1. In the navigation area, click "Remote connections" > "Devices". The devices that have
already been created are listed in the content area.
2. Click "Create" button to create a new device.
3. Enter the device name for the device e.g. "S615-1" for station 1 and "S615-2" for station 2.
4. Click "Continue".
5. Enable the option "Connect local subnet"
6. Configure the devices with the following settings:
Local LAN IP address IP address for vlan1 according to the table "Settings used". Network mask 255.255.255.0
7. Click "Continue". The "Group memberships" tab is displayed.
8. Enable the appropriate group.
For the "S615-1" device, the group "Station 1"
For the "S615-2" device, the group "Station 2"
9. Click "Continue". The "Password" tab is displayed.
10.Specify the password for access e.g. An:t_010 for S615-1 and An:t_020 for S615-2.
The password must be made up of uppercase and lowercase letters, numbers and special characters.
11.Click "Exit".
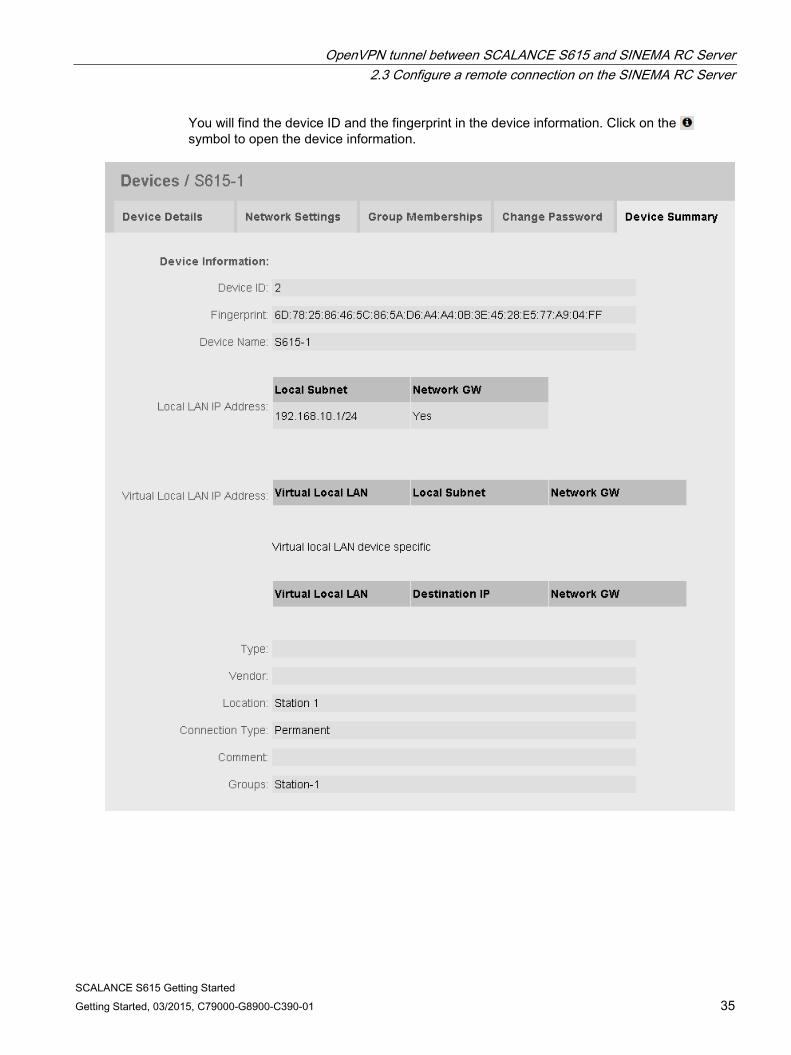
Result The devices are listed with the devices that have already been created.
● Device password
● Device ID
● Fingerprint
OpenVPN tunnel between SCALANCE S615 and SINEMA RC Server 2.3 Configure a remote connection on the SINEMA RC Server
SCALANCE S615 Getting Started Getting Started, 03/2015, C79000-G8900-C390-01 35
You will find the device ID and the fingerprint in the device information. Click on the symbol to open the device information.

OpenVPN tunnel between SCALANCE S615 and SINEMA RC Server 2.3 Configure a remote connection on the SINEMA RC Server
SCALANCE S615 Getting Started 36 Getting Started, 03/2015, C79000-G8900-C390-01
2.3.3 Configure communications relations So that participant groups can communicate with each other, communication relations are necessary. A communication relation can be created for every direction.
For this sample configuration, the following communication relations are created: from group to the destination group Service Station -1
Station-2 Station -1 Station-2
In this configuration example, communication is only from the group "Station 1" to the group "Station 2". In the opposite direction, no communication is possible. For the communication from the group "Station 2" to the group "Station 1" another communication relation is necessary.
The group "Service" can also communicate with the groups "Station 1" and "Station 2" but not the other way round.
Procedure 1. In the navigation area, click "Remote connections" > "Participant groups". The participant
groups that have already been created are listed in the content area.
2. For "Station 1", click the symbol in the "Actions" column. The page "Destination group" is opened.
3. Enable "Station 2" and click on "Save".
4. Click "Exit dialog".
5. For "Service", click the symbol in the "Actions" column. The page "Destination group" is opened.
6. Enable "Station 1" and "Station 2". Click "Save".
7. Click "Exit dialog".
Result The communication relations have been created.

OpenVPN tunnel between SCALANCE S615 and SINEMA RC Server 2.3 Configure a remote connection on the SINEMA RC Server
SCALANCE S615 Getting Started Getting Started, 03/2015, C79000-G8900-C390-01 37
Click "Remote connections" > "Communication relations" in the navigation area. The created relations are listed in the content area.

OpenVPN tunnel between SCALANCE S615 and SINEMA RC Server 2.4 Configure a remote connection on the S615
SCALANCE S615 Getting Started 38 Getting Started, 03/2015, C79000-G8900-C390-01
2.4 Configure a remote connection on the S615
2.4.1 Secure OpenVPN connection with fingerprint
Requirement ● On PC1/2 there are two Web browser windows open.
● Web browser 1:
You are logged on to the WBM of the S615 as "admin".
● Web browser 2:
You are logged on to the WBM of the SINEMA RC Server as user "service" or "admin".
● A valid KEY-PLUG is inserted in the S615.
Procedure 1. Change to Web browser 1.
– In the address box of the Web browser, enter the LAN IP address of the S615, see table "Settings used (Page 25)".
– Log in as the "admin" user and with the corresponding password.
– Click "System" > "SINEMA RC" in the navigation area.
– For "SINEMA RC Address", enter the WAN IP address of the SINEMA RC Server, see table "Settings used (Page 25)".
2. Change to Web browser 2.
– In the address box of the Web browser, enter the WAN IP address of the SINEMA RC Server, see table "Settings used (Page 25)".
– Log in as the "admin" user and the corresponding password.
– In the navigation area, click "Remote connections" > "Devices".
– Click on the symbol in "Actions" to open the device information.
– Holding down the left mouse button, select the entry for device ID.
– Right-click on the selection and in the shortcut menu, select the copy command.

OpenVPN tunnel between SCALANCE S615 and SINEMA RC Server 2.4 Configure a remote connection on the S615
SCALANCE S615 Getting Started Getting Started, 03/2015, C79000-G8900-C390-01 39
3. Change to Web browser 1.
– Right click in the input box of "Device ID".
– In the shortcut menu, select the menu command for inserting.
– In "Device Password", enter the password you have configured for access, An:t_010 for S615-1 and An:t_020 for S615-2.
– Enable "Auto Firewall / NAT Rules".
When enabled, the suitable NAT and firewall rules are created automatically.
For "Verification Type" select "Fingerprint".
4. Change to Web browser 2.
– Holding down the left mouse button, select the entry for fingerprint.
– Right-click on the selection and in the shortcut menu, select the copy command.
5. Change to Web browser 1.
– Right click in the input box of "Fingerprint".
– In the shortcut menu, select the menu command for inserting.
– Select "Enable SINEMA RC" and click on "Set Values".

OpenVPN tunnel between SCALANCE S615 and SINEMA RC Server 2.4 Configure a remote connection on the S615
SCALANCE S615 Getting Started 40 Getting Started, 03/2015, C79000-G8900-C390-01
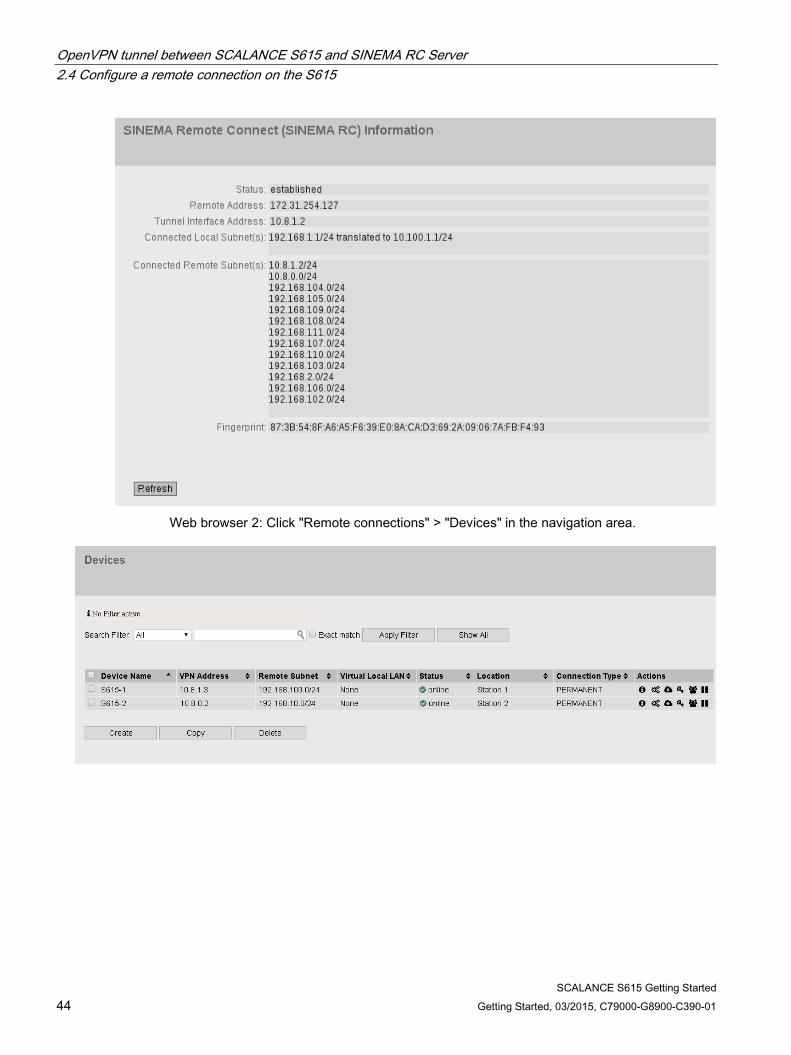
Result The device establishes an OpenVPN tunnel to the SINEMA RC Server.
You can check in the WBM to see whether the connection was successful.
Web browser 1: In the navigation area, click "Information" > "SINEMA RC".
Web browser 2: Click "Remote connections" > "Devices" in the navigation area.

OpenVPN tunnel between SCALANCE S615 and SINEMA RC Server 2.4 Configure a remote connection on the S615
SCALANCE S615 Getting Started Getting Started, 03/2015, C79000-G8900-C390-01 41
2.4.2 Secure OpenVPN connection with CA certificate
2.4.2.1 Loading a certificate
Requirement ● The correct time is set on the S615 and the SINEMA RC Server.
● On PC1/2 there are two Web browser windows open.
● Web browser 1:
You are logged on to the WBM of the S615 as "admin".
● Web browser 2:
You are logged on to the WBM of the SINEMA RC Server as the user "admin".
Procedure 1. Change to Web browser 2.
– In the address box of the Web browser, enter the WAN IP address of the SINEMA RC Server, see table "Settings used (Page 25)".
– Log in as the "admin" user and the corresponding password.
– Click "Security" > "Certificates" in the navigation area.
– Click on the symbol in "Actions" to export the certificate.
2. Change to Web browser 1.
– In the address box of the Web browser, enter the LAN IP address of the S615, see table "Settings used (Page 25)".
– Log in as the "admin" user and with the corresponding password.
– Click on "System" > "Load & Save" in the navigation area and on the "HTTP" tab in the content area.
– Click the "Load" button next to "X509Cert". The dialog for loading a file is opened.
– Navigate to the exported server certificate. Click the "Open" button in the dialog.
The file is now loaded on the device. After loading successfully, confirm the next dialog with "OK".

OpenVPN tunnel between SCALANCE S615 and SINEMA RC Server 2.4 Configure a remote connection on the S615
SCALANCE S615 Getting Started 42 Getting Started, 03/2015, C79000-G8900-C390-01
Result The certificates are loaded. With "Security" > "Certificates", you can display the certificates. The loaded certificates must have the status "valid".
2.4.2.2 Configure an OpenVPN connection to the SINEMA RC Server
Requirement ● A valid KEY-PLUG is inserted in the S615.
Procedure 1. Change to Web browser 1.
– Click "System" > "SINEMA RC" in the navigation area.
– For "SINEMA RC Address", enter the WAN IP address of the SINEMA RC Server, see table "Settings used (Page 25)".
2. Change to Web browser 2.
– In the navigation area, click "Remote connections" > "Devices".
– Click on the symbol in "Actions" to open the device information.
– Holding down the left mouse button, select the entry for device ID.
– Right-click on the selection and in the shortcut menu, select the copy command.

OpenVPN tunnel between SCALANCE S615 and SINEMA RC Server 2.4 Configure a remote connection on the S615
SCALANCE S615 Getting Started Getting Started, 03/2015, C79000-G8900-C390-01 43
3. Change to Web browser 1.
– Right click in the input box of "Device ID".
– In the shortcut menu, select the menu command for inserting.
– In "Device Password", enter the password you have configured for access, An:t_010 for S615-1 and An:t_020 for S615-2.
– Enable "Auto Firewall / NAT Rules".
When enabled, the suitable NAT and firewall rules are created automatically.
In "Verification Type", select "CA Certificate".
– In "CA Certificate" select the server certificate. Only loaded certificates can be selected.
– Select "Enable SINEMA RC" and click on "Set Values".
Result The device establishes an OpenVPN tunnel to the SINEMA RC Server.
You can check in the WBM to see whether the connection was successful.
Web browser 1: In the navigation area, click "Information" > "SINEMA RC".
OpenVPN tunnel between SCALANCE S615 and SINEMA RC Server 2.4 Configure a remote connection on the S615
SCALANCE S615 Getting Started 44 Getting Started, 03/2015, C79000-G8900-C390-01
Web browser 2: Click "Remote connections" > "Devices" in the navigation area.