configuration — using bbi
TRANSCRIPT

Nortel Secure Network Access Switch
Configuration — Using BBIRelease: 2.0Document Revision: 03.02
www.nortel.com
NN47230-500 323857-B.

Nortel Secure Network Access SwitchRelease: 2.0Publication: NN47230-500Document release date: 24 October 2008
Copyright © 2007, 2008 Nortel NetworksAll Rights Reserved.
Sourced in Canada, the United States of America, and India
LEGAL NOTICE
While the information in this document is believed to be accurate and reliable, except as otherwise expresslyagreed to in writing NORTEL PROVIDES THIS DOCUMENT "AS IS "WITHOUT WARRANTY OR CONDITION OFANY KIND, EITHER EXPRESS OR IMPLIED. The information and/or products described in this document aresubject to change without notice.
Nortel, the Nortel logo, and the Globemark are trademarks of Nortel Networks.
All other trademarks are the property of their respective owners.
.

3.
ContentsSoftware license 9
New in this release 13Features 13Other changes 14
Introduction 15Prerequisites 16Text conventions 16Related information 18
Publications 18Online 18
How to get help 19Acronyms 19
Browser-based interface 21Navigation 21Web browser setup 21Starting the BBI 21
GUI lock 23Basics of the browser-based interface 23
System tree view 23Setup wizards 23Basic operation 24Global commands 25
Overview 31Navigation 31The Nortel SNAS 31
The Nortel SNAS navigation 31Elements of the Nortel SNAS 32Supported software 32Role of the Nortel SNAS 33Nortel SNAS clusters 38Interface configuration 39
Nortel SNAS configuration and management tools 40
Nortel Secure Network Access SwitchConfiguration — Using BBI
NN47230-500 03.0224 October 2008
Copyright © 2007, 2008 Nortel Networks
.

4
Nortel SNAS configuration roadmap 41
Management of network access devices 45Navigation 45Before you begin 45Manage network access devices 46
Manage network access devices navigation 46Adding a network access device 47Deleting a network access device 49Configuring the network access devices 49Mapping the VLANs 50Managing SSH keys 53Monitoring switch health 57Controlling communication with the network access devices 59
Configuration of system settings 61Navigation 61Configuring the cluster 61
Configuring the cluster navigation 62Configuring system settings 62Configuring a Nortel SNAS host 63Configuring host interfaces 66Rebooting or halting a host 70Configuring static routes 70Configuring host ports 76Configuring the access list 78Managing date and time settings 80Configuring DNS settings 83Configuring servers 85Configuring administrative settings 94Configuring SRS control settings 94Configuring Nortel SNAS host SSH keys 95Importing an SSH key from a known host 96Adding an SSH key for a known host 97Managing RADIUS authentication of system users 98Configuring auto blacklisting 102Nortel SNAS TPS Interface 107Configuring harden password 108Redistributing switches 110
Configuration of the domain 111Navigation 111Configure the domain 112
Creating a domain 112Deleting a domain 121
Nortel Secure Network Access SwitchConfiguration — Using BBI
NN47230-500 03.0224 October 2008
Copyright © 2007, 2008 Nortel Networks
.

5
Configuring domain parameters 121Configuring VIP addresses 123Configuring VLANs 124Managing DHCP support 126Configuring the Nortel Health Agent check 133Configuring the SSL server 138Configuring HTTP redirect 144Configuring RADIUS accounting 145
Configuration of location 150Configuration of location navigation 150Creating a location 151Editing a location 151Deleting a location 152Creating locations 153Deleting locations 154
Configuring Lumension PatchLink integration 154Deleting a patch link server 155
Configuring syslog server 156Inserting a syslog server 156Deleting a syslog server 157
Configuring advanced settings 158
Configuration of Microsoft NAP Interoperability 159Navigation 159Overview of NAP interoperability 159Configuring NAP 160
Configuring NAP navigation 161Configuring windows system health validators 161Creating a remote policy server 164Creating a system health validator 167
Configuration of RADIUS server 171Navigation 171Overview of RADIUS server 171802.1x functionality 171Configure RADIUS server 171
Configuring RADIUS server navigation 172Creating a client 173Creating a realm 175Creating an authentication method 178Creating an EAP authentication method 180RADIUS server dictionary 183Exporting accounting log 185
Nortel Secure Network Access SwitchConfiguration — Using BBI
NN47230-500 03.0224 October 2008
Copyright © 2007, 2008 Nortel Networks
.

6
Configuration of groups and profiles 189Navigation 189Overview of groups, profiles, and access rules 189
Overview of groups, profiles, and access rules navigation 189Groups 189Linksets 190Nortel Health Agent SRS rule 191Extended profiles 191Ping 192Traceroute 192Dnslookup 192
Before you begin 192Configuring groups and extended profiles 193
Configuring groups 194Using Guest Provisioning Wizard 198Configuring client filters 201Configuring extended profiles 205Configuring Admin Rights 207Mapping linksets to a group or profile 208Creating a default group 214
214Trace 215
Pinging a device 216Viewing the Traceroute 216Viewing the Dnslookup 217
Configuration of authentication 219Navigation 219Overview 219Before you begin 220Configuring authentication 221
Configuring authentication navigation 222Configuring authentication methods 222Configuring RADIUS authentication 224Configuring LDAP authentication 234Configuring NTLM authentication 247Configuring SiteMinder authentication 252Configuring ClearTrust authentication 255Configuring local database authentication 260Specifying authentication fallback order 270Viewing and managing MAC entries 271Importing MAC database 271Exporting MAC Database 272
Nortel Secure Network Access SwitchConfiguration — Using BBI
NN47230-500 03.0224 October 2008
Copyright © 2007, 2008 Nortel Networks
.

7
Configuring RADIUS attributes 273
Management of system users and groups 275Navigation 275User rights and group membership 275Managing system users and groups 276
Managing system users and groups navigation 276Managing user accounts 276Setting password expiry 279Changing your password 280Changing another users password 281Setting the certificate export passphrase 282
Configuring system credentials 283
Customization of the portal and user logon 285Navigation 285
Captive portal and Exclude List 286Portal display 288Managing the end user experience 294
Customize the portal and logon 295Customize the portal and logon navigation 295Configuration of the captive portal 296Configuration of the captive portal 300Changing the portal language 303Exporting or importing cluster configuration 307Configuring the portal display 309Changing the portal colors 314Configuring custom content 316Configuring linksets 320Configuring links 323
Configuration of Nortel SNAS scheduler 327Navigation 327Configuring the scheduler task 327Setting scheduler status 331Deleting a scheduled task 331Viewing or searching a scheduled task 332
Configuration of SNMP 333Navigation 333Configure SNMP settings 333
Configuring SNMP settings navigation 333Configuring SNMP 334Configuring SNMP targets 337Configuring SNMPv3 users 340Configuring SNMP events 344
Nortel Secure Network Access SwitchConfiguration — Using BBI
NN47230-500 03.0224 October 2008
Copyright © 2007, 2008 Nortel Networks
.
8
Configuring SSCP-Lite 347Configuring SSCP-Lite navigation 348Creating an snmp profile 348Creating a community 349Creating an sscplite user 350Deleting an snmp profile 351Editing an snmp profile 352
Management of certificates 353Navigation 353Overview 353
Key and certificate formats 354Creating certificates 354Installing certificates and keys 355Saving or exporting certificates and keys 355Updating certificates 356
Management of private keys and certificates 357Management of private keys and certificates navigation 357Viewing certificates 357Creating a certificate 358Generating and submitting a CSR 359Importing a certificate or key 363Displaying or saving a certificate and key 365Exporting a certificate and key from the Nortel SNAS 366Viewing certificate information 368Importing a revocation list 369
View system information and performance statistics 371Navigation 371Monitor system information and performance statistics 371
Viewing cluster information 372Viewing authentication statistics 378Viewing license usage 385
Viewing IP or MAC session information 385Viewing group session information 387
Switch templates 388Importing or exporting switch templates 389
Charting 390
Maintenance and management of the system 395Navigation 395Manage and maintain the system 395
Perform maintenance 395Managing diagnostics 401
Nortel Secure Network Access SwitchConfiguration — Using BBI
NN47230-500 03.0224 October 2008
Copyright © 2007, 2008 Nortel Networks
.

9.
Software licenseThis section contains the Nortel Networks software license.
Nortel Networks software license agreementThis Software License Agreement ("License Agreement") is betweenyou, the end-user ("Customer") and Nortel Networks Corporation andits subsidiaries and affiliates ("Nortel Networks"). PLEASE READ THEFOLLOWING CAREFULLY. YOU MUST ACCEPT THESE LICENSETERMS IN ORDER TO DOWNLOAD AND/OR USE THE SOFTWARE.USE OF THE SOFTWARE CONSTITUTES YOUR ACCEPTANCE OFTHIS LICENSE AGREEMENT. If you do not accept these terms andconditions, return the Software, unused and in the original shippingcontainer, within 30 days of purchase to obtain a credit for the fullpurchase price.
"Software" is owned or licensed by Nortel Networks, its parent or one ofits subsidiaries or affiliates, and is copyrighted and licensed, not sold.Software consists of machine-readable instructions, its components, data,audio-visual content (such as images, text, recordings or pictures) andrelated licensed materials including all whole or partial copies. NortelNetworks grants you a license to use the Software only in the countrywhere you acquired the Software. You obtain no rights other than thosegranted to you under this License Agreement. You are responsible for theselection of the Software and for the installation of, use of, and resultsobtained from the Software.
1. Licensed Use of Software. Nortel Networks grants Customer anonexclusive license to use a copy of the Software on only onemachine at any one time or to the extent of the activation or authorizedusage level, whichever is applicable. To the extent Software isfurnished for use with designated hardware or Customer furnishedequipment ("CFE"), Customer is granted a nonexclusive license touse Software only on such hardware or CFE, as applicable. Softwarecontains trade secrets and Customer agrees to treat Software asconfidential information using the same care and discretion Customeruses with its own similar information that it does not wish to disclose,publish or disseminate. Customer will ensure that anyone who
Nortel Secure Network Access SwitchConfiguration — Using BBI
NN47230-500 03.0224 October 2008
Copyright © 2007, 2008 Nortel Networks
.

10 Software license
uses the Software does so only in compliance with the terms of thisAgreement. Customer shall not a) use, copy, modify, transfer ordistribute the Software except as expressly authorized; b) reverseassemble, reverse compile, reverse engineer or otherwise translate theSoftware; c) create derivative works or modifications unless expresslyauthorized; or d) sublicense, rent or lease the Software. Licensorsof intellectual property to Nortel Networks are beneficiaries of thisprovision. Upon termination or breach of the license by Customer or inthe event designated hardware or CFE is no longer in use, Customerwill promptly return the Software to Nortel Networks or certify itsdestruction. Nortel Networks may audit by remote polling or otherreasonable means to determine Customer’s Software activation orusage levels. If suppliers of third party software included in Softwarerequire Nortel Networks to include additional or different terms,Customer agrees to abide by such terms provided by Nortel Networkswith respect to such third party software.
2. Warranty. Except as may be otherwise expressly agreed to inwriting between Nortel Networks and Customer, Software is provided"AS IS" without any warranties (conditions) of any kind. NORTELNETWORKS DISCLAIMS ALL WARRANTIES (CONDITIONS)FOR THE SOFTWARE, EITHER EXPRESS OR IMPLIED,INCLUDING, BUT NOT LIMITED TO THE IMPLIED WARRANTIES OFMERCHANTABILITY AND FITNESS FOR A PARTICULAR PURPOSEAND ANY WARRANTY OF NON-INFRINGEMENT. Nortel Networks isnot obligated to provide support of any kind for the Software. Somejurisdictions do not allow exclusion of implied warranties, and, in suchevent, the above exclusions may not apply.
3. Limitation of Remedies. IN NO EVENT SHALL NORTELNETWORKS OR ITS AGENTS OR SUPPLIERS BE LIABLE FOR ANYOF THE FOLLOWING: a) DAMAGES BASED ON ANY THIRD PARTYCLAIM; b) LOSS OF, OR DAMAGE TO, CUSTOMER’S RECORDS,FILES OR DATA; OR c) DIRECT, INDIRECT, SPECIAL, INCIDENTAL,PUNITIVE, OR CONSEQUENTIAL DAMAGES (INCLUDING LOSTPROFITS OR SAVINGS), WHETHER IN CONTRACT, TORT OROTHERWISE (INCLUDING NEGLIGENCE) ARISING OUT OFYOUR USE OF THE SOFTWARE, EVEN IF NORTEL NETWORKS,ITS AGENTS OR SUPPLIERS HAVE BEEN ADVISED OF THEIRPOSSIBILITY. The foregoing limitations of remedies also apply to anydeveloper and/or supplier of the Software. Such developer and/orsupplier is an intended beneficiary of this Section. Some jurisdictionsdo not allow these limitations or exclusions and, in such event, theymay not apply.
4. General
Nortel Secure Network Access SwitchConfiguration — Using BBI
NN47230-500 03.0224 October 2008
Copyright © 2007, 2008 Nortel Networks
.
Nortel Networks software license agreement 11
a. If Customer is the United States Government, the followingparagraph shall apply: All Nortel Networks Software availableunder this License Agreement is commercial computer softwareand commercial computer software documentation and, in theevent Software is licensed for or on behalf of the United StatesGovernment, the respective rights to the software and softwaredocumentation are governed by Nortel Networks standardcommercial license in accordance with U.S. Federal Regulationsat 48 C.F.R. Sections 12.212 (for non-DoD entities) and 48 C.F.R.227.7202 (for DoD entities).
b. Customer may terminate the license at any time. Nortel Networksmay terminate the license if Customer fails to comply with the termsand conditions of this license. In either event, upon termination,Customer must either return the Software to Nortel Networks orcertify its destruction.
c. Customer is responsible for payment of any taxes, includingpersonal property taxes, resulting from Customer’s use of theSoftware. Customer agrees to comply with all applicable lawsincluding all applicable export and import laws and regulations.
d. Neither party may bring an action, regardless of form, more thantwo years after the cause of the action arose.
e. The terms and conditions of this License Agreement form thecomplete and exclusive agreement between Customer and NortelNetworks.
f. This License Agreement is governed by the laws of the country inwhich Customer acquires the Software. If the Software is acquiredin the United States, then this License Agreement is governed bythe laws of the state of New York.
Nortel Secure Network Access SwitchConfiguration — Using BBI
NN47230-500 03.0224 October 2008
Copyright © 2007, 2008 Nortel Networks
.

12 Software license
Nortel Secure Network Access SwitchConfiguration — Using BBI
NN47230-500 03.0224 October 2008
Copyright © 2007, 2008 Nortel Networks
.

13.
New in this releaseThe following sections detail what’s new in Nortel Secure Network AccessSwitch Configuration — Using the BBI () (NN47230-500) for Release 2.0.
• “Features” (page 13)
• “Other changes” (page 14)
FeaturesThis is the second standard release of the document. See the followingsections for information, which are added in this Release.
• “Configuring auto blacklisting” (page 102)
• “Nortel SNAS TPS Interface” (page 107)
• “Configuring harden password” (page 108)
• “Redistributing switches” (page 110)
• “Configuration of location” (page 150)
• “Configuring Lumension PatchLink integration” (page 154)
• “Configuration of Microsoft NAP Interoperability” (page 159)
• “Configuration of RADIUS server” (page 171)
• “802.1x functionality” (page 171)
• “Using Guest Provisioning Wizard” (page 198)
• “Self Service Portal ” (page 291)
• “Configuration of Nortel SNAS scheduler” (page 327)
• “Configuring SSCP-Lite” (page 347)
• “Viewing switches” (page 374)
• “Viewing the connected client list” (page 375)
• “Viewing IP or MAC session information” (page 385)
• “Viewing group session information” (page 387)
Nortel Secure Network Access SwitchConfiguration — Using BBI
NN47230-500 03.0224 October 2008
Copyright © 2007, 2008 Nortel Networks
.

14 New in this release
• “Switch templates” (page 388)
• “Charting” (page 390)
• “Viewing log browser statistics” (page 402)
On-the-fly SRS Policy Change—When a security policy is modifiedon the SNAS using the administrative tool the policy is updated on theNortel Health Agent running on the logged in operating systems. For moreinformation, See the“Configuring the Nortel Health Agent check” (page133).
Multi-OS Applet Support—The Nortel Health captive portal appletsupports Windows and non-Windows operating systems. Fornon-Windows operating systems the applet supports collecting operatingsystems information and VLAN transition.
Other changesAccess Control List Id Parameter's explanationenhanced to reflect thechanges for CR Q01941018.
Nortel Secure Network Access SwitchConfiguration — Using BBI
NN47230-500 03.0224 October 2008
Copyright © 2007, 2008 Nortel Networks
.

15.
IntroductionNortel Secure Network Access Solution (Nortel SNAS) is a clientlesssolution that provides seamless, secure access to the corporate networkfrom inside or outside that network. The Nortel SNAS combines multiplehardware devices and software components to support the followingfeatures:
• partitions the network resources into access zones (authentication,remediation, and full access)
• provides continual device integrity checking using Nortel Health Agent
• supports both dynamic and static IP clients
The Nortel Secure Network Access Switch 4050 or 4070 (Nortel SNAS4050 or 4070) controls operation of the Nortel SNAS.
This guide covers the process of implementing the Nortel SNAS usingthe Nortel SNAS 4050 or 4070 for Nortel Secure Network Access SwitchSoftware Release 2.0. The document includes the following informationabout:
• the overall role of the Nortel SNAS in the Nortel SNAS
• configuring authentication, authorization, and accounting (AAA)features
• managing system users
• customizing the portal
• upgrading the software
• logging and monitoring
The document provides instructions for initializing and customizingbrowser-based interface (BBI).
The BBI is a graphical user interface (GUI) that runs in an online,interactive mode. You can use BBI to manage only one SNAS device oneach browser session.
Nortel Secure Network Access SwitchConfiguration — Using BBI
NN47230-500 03.0224 October 2008
Copyright © 2007, 2008 Nortel Networks
.

16 Introduction
PrerequisitesThis guide is intended for network administrators who have the followingbackground:
• basic knowledge of networks, Ethernet bridging, and IP routing
• familiarity with networking concepts and terminology
• experience with windowing systems or GUIs
• basic knowledge of network topologies
Before using this guide, you must complete the following procedure for anew switch:
Procedure steps
Step Action
1 Install the switch.
For installation instructions, see Nortel Secure Network AccessSwitch 4050 Installation Guide () (NN47230-300).
2 Connect the switch to the network.
For more information, see Nortel Secure Network Access SwitchUsing the Command Line Interface () (NN47230-100).
--End--
Text conventionsThis guide uses the following text conventions:
angle brackets (< >) Enter text based on the description inside thebrackets. Do not type the brackets when enteringthe command.
Example: If the command syntax isping <ip_address>, enter:ping 192.32.10.12
bold text Objects such as window names, dialog box names,and icons, as well as user interface objects suchas buttons, tabs, and menu items.
Nortel Secure Network Access SwitchConfiguration — Using BBI
NN47230-500 03.0224 October 2008
Copyright © 2007, 2008 Nortel Networks
.

Text conventions 17
bold Courier text Command names, options, and text that you mustenter.
Example: Use the dinfo command.
Example: Enter show ip {alerts|routes}.
braces ({}) Required elements in syntax descriptions wheremore than one option exists. You must chooseonly one of the options. Do not type the braceswhen you enter the command.
Example: If the command syntax isshow ip {alerts|routes}, you must entereithershow ip alerts orshow ip routes, but not both.
brackets ([ ]) Optional elements in syntax descriptions. Do nottype the brackets when you enter the command.
Example: If the command syntax isshow ip interfaces [-alerts], you can entereithershow ip interfaces orshow ip interfaces -alerts.
ellipsis points (. . .) Repeat the last element of the command asneeded.
Example: If the command syntax isethernet/2/1 [ <parameter> <value> ]...,you enter ethernet/2/1 and as manyparameter-value pairs as needed.
italic text Variables in command syntax descriptions. Italicsalso indicate new terms and book titles. Wherea variable is two or more words, the words areconnected by an underscore.
Example: If the command syntax isshow at <valid_route>,valid_route is one variable, and you substituteone value for it.
plain Courier text Command syntax and system output, for example,prompts and system messages.
Example: Set Trap Monitor Filters
Nortel Secure Network Access SwitchConfiguration — Using BBI
NN47230-500 03.0224 October 2008
Copyright © 2007, 2008 Nortel Networks
.

18 Introduction
separator ( > ) Menu paths.
Example: Protocols > IP identifies the IPcommand on the Protocols menu.
vertical line ( | ) Options for command keywords and arguments.Enter only one of the options. Do not type thevertical line when you enter the command.
Example: If the command syntax isshow ip {alerts|routes}, you enter eithershow ip alerts or show ip routes, but notboth.
Related informationThis section lists information sources that relate to this document.
PublicationsFor information on the Nortel SNAS, see the following publications:
• Nortel Secure Network Access Switch 2.0 Solution Guide ()(NN47230-200)
• Nortel Secure Network Access Switch 4050 Installation Guide ()(NN47230-300)
• Nortel Secure Network Access Switch Using the Command LineInterface () (NN47230-100)
• Installing and Using the Security and Routing Element Manager ()(NN47230-301)
• Release Notes for Nortel Ethernet Routing Switch 5500 Series,Software Release 5.0.1
• Release Notes for the Ethernet Routing Switch 8300, SoftwareRelease 2.2.8
• Nortel Secure Network Access Switch Release Notes — SoftwareRelease 2.0 () (NN47230-400)
• Release Notes for Enterprise Switch Manager, Software Release 5.2
• Using Enterprise Switch Manager Release 5.1 ()
OnlineTo access Nortel technical documentation online, go to the Nortel Website:
www.nortel.com/support
Nortel Secure Network Access SwitchConfiguration — Using BBI
NN47230-500 03.0224 October 2008
Copyright © 2007, 2008 Nortel Networks
.

Acronyms 19
You can download current versions of technical documentation. To locatedocuments, browse by category or search using the product name ornumber.
You can print technical manuals and release notes for free of cost directlyfrom the Internet. Use Adobe* Reader* to open the manuals and releasenotes, search for the sections you need, and print them on most standardprinters. Go to the Adobe Systems site at www.adobe.com to download afree copy of Adobe Reader.
How to get helpIf you purchased a service contract for your Nortel product from adistributor or authorized reseller, contact the technical support staff for thatdistributor or reseller for assistance.
If you purchased a Nortel service program, use thewww.nortel.com/help Web page to locate information to contact Nortel forassistance:
• To obtain Nortel Technical Support contact information, click theCONTACT US link on the left side of the page.
• To call a Nortel Technical Solutions Center for assistance, click theCALL US link on the left side of the page to find the telephone numberfor your region.
An Express Routing Code (ERC) is available for many Nortel products andservices. When you use an ERC, your call is routed to a technical supportperson who specializes in supporting that product or service. To locatethe ERC for your product or service, go to the www.nortel.com/help Webpage and follow these links:
Procedure steps
Step Action
1 On the left side of the HELP Web page, click CONTACT US.
2 On the CONTACT US Web page, click Technical Support.
3 On the TECHNICAL SUPPORT Web page, click ExpressRouting Codes.
--End--
AcronymsThis guide uses the following acronyms:
Nortel Secure Network Access SwitchConfiguration — Using BBI
NN47230-500 03.0224 October 2008
Copyright © 2007, 2008 Nortel Networks
.

20 Introduction
BBI Browser-Based Interface
CLI Command Line Interface
FTP File Transfer Protocol
GUI Graphical User Interface
SSH Secure Shell
FTP File Transfer Protocol
TFTP Trivial File Transfer Protocol
SFTP Secure File Transfer Protocol
SCP
SSCP Switch to SNAS Communication Protocol
VLAN Virtual Local Area Network
SRS Software Requirement Set
LDAP Lightweight Directory Access Protocol
NHA Nortel Health Agent
SNAS Secure Networks Access Switch
DHCP Dynamic Host Configuration Protocol
TCP Transmission Control Protocol
UDP User Datagram Protocol
SSL Secure Sockets Layer
TLS Transport Layer Security
EPM Enterprise Policy Manager
SREM Security & Routing Element Manager
RSA
DLLs Dynamic Link Libraries
USM
AAA Authentication, Authorization and Accounting
MIP Management IP address
NAP Network Access Protection
Nortel Secure Network Access SwitchConfiguration — Using BBI
NN47230-500 03.0224 October 2008
Copyright © 2007, 2008 Nortel Networks
.

21.
Browser-based interfaceThis chapter provides a general introduction to the browser-basedinterface (BBI), including global commands, general site navigation, andonline help.
Navigation• “Web browser setup” (page 21)
• “Starting the BBI” (page 21)
• “Basics of the browser-based interface” (page 23)
Web browser setupAfter you configure your system for Web access, you can connect to theBBI through a properly configured Web browser. To display the BBI, youmust configure the browser to work with frames and JavaScript. Both theNetscape and Internet Explorer browsers that are verified to work with theBBI, are default-configured to work with frames and JavaScript, and theyrequire no additional setup. However, check the features and configurationof your Web browser to make sure frames and JavaScript are enabled.
Starting the BBIAfter you complete the necessary setup procedures, use the followingprocedure to launch the BBI:
Procedure steps
Step Action
1 Start your Web browser.
2 For https connections, enter https://(host IP:port number) in thebrowser URL field.
3 Log on to the BBI.
The Logon page is displayed.
Nortel Secure Network Access SwitchConfiguration — Using BBI
NN47230-500 03.0224 October 2008
Copyright © 2007, 2008 Nortel Networks
.

22 Browser-based interface
4 Enter the user ID and password.
5 Click Login or press Enter.
The Wizards screen appears in your browser’s viewing area.
--End--
Nortel Secure Network Access SwitchConfiguration — Using BBI
NN47230-500 03.0224 October 2008
Copyright © 2007, 2008 Nortel Networks
.

Basics of the browser-based interface 23
GUI lockThe GUI lock warning message displayed at the top of the screen is onlydisplayed immediately after logon. If you switch to another BBI screenwithout clicking the GUI lock, the message disappears.
On the GUI Lock page, you can lock the current BBIsessions by clickingLock. This step ensures that you own the BBI session and nobody elsecan make changes to the Secure Networks Access Controller through theBBI. The padlock symbol at the top right changes from blue to green.
To provide a message to other administrators who log on to the BBI whileit is locked by you, enter a message in the User Message field. For theseusers, the padlock symbol is red.
To lock or unlock, click Take The Lock/Release The Lock.
ATTENTIONAnother operator can make changes by using the CLI even if the GUI lock isactivated.
Basics of the browser-based interfaceThe following sections provide a general introduction to the navigationpane of the BBI.
System tree viewThe system tree view consists of items (Cluster, Secure Access Domain,and so on) that represent the main categories for viewing information andconfiguring the system. By expanding an item, new items for the categoryavailable forms are displayed. You can expand several items at the sametime, which gives you a good overview when configuring the system.
Setup wizardsYou can setup wizards to create, customize, and launch a working portal ina few steps.
• Portal Linkset Wizard—The Portal Linkset wizard helps you to createa portal link group, such as a set of hypertext links that you can accessfrom the home tab of the portal.
• Nortel Health Agent Wizard—The Nortel Health Agent wizard helpsyou to enable Nortel Health Agent and to configure global Nortel HealthAgent settings for the selected domain.
• Authentication Wizard—The Authentication wizard helps you tocreate different types of authentication servers.
• Domain Wizard—The Domain wizard helps you to create secureaccess domains.
Nortel Secure Network Access SwitchConfiguration — Using BBI
NN47230-500 03.0224 October 2008
Copyright © 2007, 2008 Nortel Networks
.

24 Browser-based interface
• DHCP Wizard—The DHCP wizard helps you to configure the localDHCP services.
• Switch Wizard—The Switch wizard helps you to configure a switch.
• User Group Wizard—The User Group wizard helps you to configureuser access groups for mobile users.
• Guest Provisioning Wizard—The Guest Provisioning wizard helpsyou to configure guest users.
Basic operationYou can administer the Secure Network Access Controller software usingthe BBI in the following manner. To access the full functionality of the BBI,you must log on as administrator:
• Select from a series of pages and sub-pages and modify fields tocreate the desired configuration.
• When you finish making changes on any given page, submit the formusing the appropriate Update buttons. If you select a new screen orend the session without submitting the information, the changes arelost. Most submitted changes are considered pending and are notimmediately put into effect or permanently saved. Only a few types ofchanges take effect as soon as the form is submitted, such as changesto users and passwords.
• Use the global Apply screen to save changes and to make them takeeffect. The administrator can use the Apply screen to make an entireseries of updates on multiple screens and then put them into effect allat once.
• Use the global Diff screen to view pending changes before they areapplied.
• Use the global Revert screen to clear all pending changes, and thencontinue the configuration session or use the global Logout screento exit from the system. Logging out manually is preferred, thoughclosing your browser manually or through inactivity (browser sessionsautomatically close after five minutes of inactivity) also discardspending changes.
ATTENTIONWhen multiple CLI or BBI administrator sessions are open at the same time,only the pending changes made during your current session are affectedby the Diff, Revert, or Logout commands. However, if multiple CLI or BBIadministrators apply changes to the same set of parameters concurrently, thelatest applied changes take precedence.
If the BBI is locked, another operator cannot make any change using the BBI.
Nortel Secure Network Access SwitchConfiguration — Using BBI
NN47230-500 03.0224 October 2008
Copyright © 2007, 2008 Nortel Networks
.

Basics of the browser-based interface 25
Global commandsThe global command links are always available at the top of each screen.
The Figure 1 "Global Command Links screen" (page 25) shows the globalcommand links.
Figure 1Global Command Links screen
These links summon pages that are used for logging out, saving,examining, or aborting configuration changes, and for displaying helpinformation. Each global command page provides options to verify orcancel the command as appropriate.
ApplyThe global Apply command is used for checking the validity of the currentpending configuration changes and for saving the configuration changesand putting them into effect.
The Figure 2 "Apply Pending Configuration Changes screen" (page25) shows the changes that are applied.
Figure 2Apply Pending Configuration Changes screen
The Apply Pending Configuration Changes screen includes the followingitems:
• Apply Changes button—applies the pending changes
• Back button—returns the previously viewed screen
Nortel Secure Network Access SwitchConfiguration — Using BBI
NN47230-500 03.0224 October 2008
Copyright © 2007, 2008 Nortel Networks
.
26 Browser-based interface
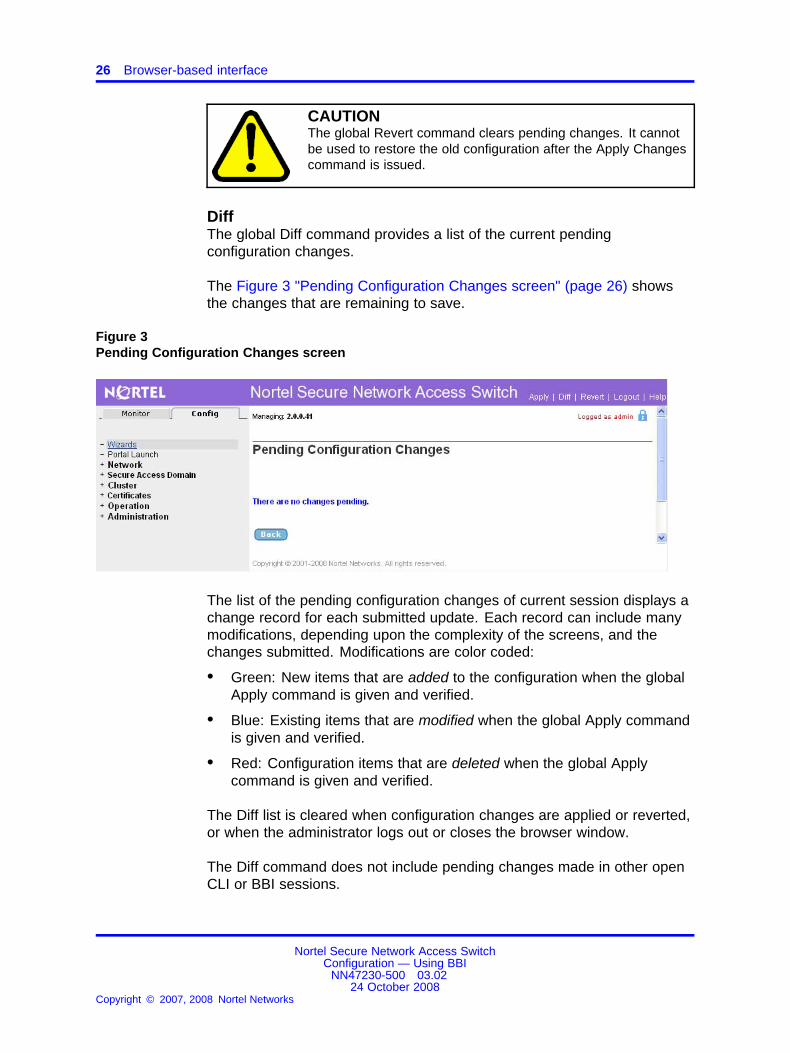
CAUTIONThe global Revert command clears pending changes. It cannotbe used to restore the old configuration after the Apply Changescommand is issued.
DiffThe global Diff command provides a list of the current pendingconfiguration changes.
The Figure 3 "Pending Configuration Changes screen" (page 26) showsthe changes that are remaining to save.
Figure 3Pending Configuration Changes screen
The list of the pending configuration changes of current session displays achange record for each submitted update. Each record can include manymodifications, depending upon the complexity of the screens, and thechanges submitted. Modifications are color coded:
• Green: New items that are added to the configuration when the globalApply command is given and verified.
• Blue: Existing items that are modified when the global Apply commandis given and verified.
• Red: Configuration items that are deleted when the global Applycommand is given and verified.
The Diff list is cleared when configuration changes are applied or reverted,or when the administrator logs out or closes the browser window.
The Diff command does not include pending changes made in other openCLI or BBI sessions.
Nortel Secure Network Access SwitchConfiguration — Using BBI
NN47230-500 03.0224 October 2008
Copyright © 2007, 2008 Nortel Networks
.

Basics of the browser-based interface 27
RevertThe global Revert command is used to cancel pending configurationchanges.
The Figure 4 "Remove Pending Configuration Changes screen" (page27) shows the changes that needs to be reverted.
Figure 4Remove Pending Configuration Changes screen
This command includes the following items:
• Revert button: This button cancels the pending configuration changes.Applied changes are not affected. Pending changes made in otheropen CLI or BBI sessions are not affected.
• Back button: This button returns the previously viewed form withoutcanceling pending changes.
LogoutThe global Logout command is used to terminate the current user session.
The Figure 5 "Logout screen" (page 28) shows the Logout screen.
Nortel Secure Network Access SwitchConfiguration — Using BBI
NN47230-500 03.0224 October 2008
Copyright © 2007, 2008 Nortel Networks
.

28 Browser-based interface
Figure 5Logout screen
The Logout screen includes the following items:
• Logout button: This button terminates the current user session. Anyconfiguration changes made during this session that are not appliedare lost. This command has no effect on pending changes in otheropen CLI or BBI sessions.
• Back button: This button returns to the previously viewed screenwithout logging out.
CAUTIONFor security reasons, close all BBI windows (including Help)after logging out.
HelpThe global Help command provides assistance with screens in the BBI.The help is context sensitive, which means that the help page displaysdetailed information about the screen that is presently displayed.
When you click the Help button, a new window appears with informationappropriate to the current option.
The Figure 6 "Help screen" (page 29) shows the Help screen.
Nortel Secure Network Access SwitchConfiguration — Using BBI
NN47230-500 03.0224 October 2008
Copyright © 2007, 2008 Nortel Networks
.

Basics of the browser-based interface 29
Figure 6Help screen
Nortel Secure Network Access SwitchConfiguration — Using BBI
NN47230-500 03.0224 October 2008
Copyright © 2007, 2008 Nortel Networks
.

30 Browser-based interface
Nortel Secure Network Access SwitchConfiguration — Using BBI
NN47230-500 03.0224 October 2008
Copyright © 2007, 2008 Nortel Networks
.

31.
OverviewThis chapter provides a general introduction to the Nortel Secure NetworkAccess Solution (Nortel SNAS).
Navigation• “The Nortel SNAS” (page 31)
• “Nortel SNAS configuration and management tools” (page 40)
• “Nortel SNAS configuration roadmap” (page 41)
The Nortel SNASNortel Secure Network Access Solution (Nortel SNAS) is a protectiveframework to completely secure the network from endpoint vulnerability.The Nortel SNAS addresses endpoint security and enforces policycompliance. Nortel SNAS delivers endpoint security by enabling onlytrusted, role-based access privileges premised on the security level of thedevice, user identity, and session context. Nortel SNAS enforces policycompliance, such as for Sarbanes-Oxley and COBIT, to ensure that therequired anti-virus applications or software patches are installed beforeusers are granted network access.
For Nortel, success means delivering technologies that provide secureaccess to your information using security-compliant systems. Yoursuccess is measured by increased employee productivity and lowernetwork operations costs. Nortel’s solutions provide your organization withthe network intelligence required for success.
This section provides an overview of the Nortel SNAS:
The Nortel SNAS navigation
• “Elements of the Nortel SNAS” (page 32)
• “Supported software” (page 32)
• “Role of the Nortel SNAS” (page 33)
Nortel Secure Network Access SwitchConfiguration — Using BBI
NN47230-500 03.0224 October 2008
Copyright © 2007, 2008 Nortel Networks
.

32 Overview
• “Nortel SNAS clusters” (page 38)
• “Interface configuration” (page 39)
Elements of the Nortel SNAS
ATTENTIONReferences to the acronym SSCP are made throughout this document. SSCPstands for Switch-SNAS Communication Protocol. This is the protocol usedfor communication between the Nortel SNAS and the various network accessdevices used in the overall solution.
The following devices are essential elements of the Nortel SNAS:
• Nortel Secure Network Access Switch 4050 or 4070 (Nortel SNAS4050 or 4070), which acts as the Policy Decision Point
• network access device, which acts as the Policy Enforcement Point:
— Ethernet Routing Switch 8300
— Ethernet Routing Switch 5510, 5520, or 5530
• DHCP and DNS servers
The following devices are additional, optional elements of the NortelSNAS:
• remediation server
• corporate authentication services such as LDAP or RADIUS services
Each Nortel SNAS device can support up to five network access devices.
Supported softwareThe Nortel SNAS supports the following types of software:
• PCs using the following operating systems:
— Windows 2000 SP4
— Windows XP SP2
— MacIntosh
— Linux
The Nortel SNAS supports the following browsers:
— Internet Explorer version 6.0 or later
— Netscape Navigator version 7.3 or later
— Mozilla Firefox version 1.0.6 or later
Java Runtime Environment (JRE) for all browsers:
Nortel Secure Network Access SwitchConfiguration — Using BBI
NN47230-500 03.0224 October 2008
Copyright © 2007, 2008 Nortel Networks
.

The Nortel SNAS 33
— JRE 1.5.0_04 or later
• VoIP phones
— Nortel IP Phone 2002
— Nortel IP Phone 2004
— Nortel IP Phone 2007
For the minimum firmware versions required for the IP Phonesoperating with different call servers, See Nortel Secure NetworkAccess Switch Release Notes — Software Release 2.0 () .
Each Nortel SNAS-enabled port on a network access devicecan supportone PC (untagged traffic) and one IP Phone (tagged traffic). Softphonetraffic is considered to be the same as PC traffic (untagged).
ATTENTIONWhere there is both an IP Phone and a PC, the PC must be connected throughthe 3-port switch on the IP Phone.
Role of the Nortel SNASThe Nortel SNAS helps to protect the network by ensuring endpointcompliance for devices that connect to the network.
Before allowing a device to have full network access, the Nortel SNASchecks user credentials and host integrity against predefined corporatepolicy criteria. Through tight integration with network access devices, theNortel SNAS can:
• dynamically move the user into a quarantine VLAN
• dynamically grant the user full or limited network access
• dynamically apply per port firewall rules that apply to a deviceconnection
After a device is granted network access, the Nortel SNAS continuallymonitors the health status of the device to ensure continued compliance. Ifa device falls out of compliance, the Nortel SNAS can dynamically movethe device into a quarantine or remediation VLAN.
Nortel SNAS functionsThe Nortel SNAS performs the following functions:
• Acts as a Web server portal, which is accessed by users in clientlessmode for authentication and host integrity check, and which sends
Nortel Secure Network Access SwitchConfiguration — Using BBI
NN47230-500 03.0224 October 2008
Copyright © 2007, 2008 Nortel Networks
.

34 Overview
remediation instructions and guidelines to endpoint clients if they failthe host integrity check.
• Communicates with backend authentication servers to identifyauthorized users and levels of access.
• Acts as a policy server, which communicates with the Nortel HealthPolicy Administrator that verifies host integrity.
• Instructs the network access device to move clients to the appropriateVLAN and, if applicable, to apply additional filters.
• Functions potentially as a DNS proxy in the Red VLAN when the NortelSNAS functions as a captive portal.
• Acts as a DHCP server.
• Performs session management.
• Monitors the health of clients and switches.
• Performs logging and auditing functions.
• Provides High Availability (HA) through IPmig protocol.
Nortel SNAS VLANs and filtersThere are four types of Layer 2 or Layer 3 VLANs in a Nortel SNASnetwork:
• Red—extremely restricted access. If the default filters are used, theuser can communicate only with the Nortel SNAS and the Windowsdomain controller network. There is one Red VLAN for each networkaccess device.
• Yellow—restricted access for remediation purposes if the client PC failsthe host integrity check. Depending on the filters and Nortel HealthAgent rules configured for the network, the client can be directed to aremediation server participating in the Yellow VLAN. There can be upto five Yellow VLANs for each network access device. Each user groupis associated with only one Yellow VLAN.
• Green—full access, in accordance with the user’s access privileges.There can be up to five Green VLANs for each network access device.
• System Green—it is used by the Nortel Desktop Agent.
• VoIP—automatic access for VoIP traffic. The network access deviceplaces VoIP calls in a VoIP VLAN without submitting them to the NortelSNAS authentication and authorization process.
When a client attempts to connect to the network, the network accessdevice places the client in its Red VLAN. The Nortel SNAS authenticatesthe client and then downloads a Nortel Health Policy Administrator to
Nortel Secure Network Access SwitchConfiguration — Using BBI
NN47230-500 03.0224 October 2008
Copyright © 2007, 2008 Nortel Networks
.

The Nortel SNAS 35
check the integrity of the client host. If the integrity check fails, the NortelSNAS instructs the network access device to move the client to a YellowVLAN, with the associated filter. If the integrity check succeeds, the NortelSNAS instructs the network access device to move the client to a GreenVLAN, with the associated filter. The network access device applies thefilters when it changes the port membership.
The VoIP filters allow IP Phone traffic into one of the preconfigured VoIPVLANs for VoIP communication only.
You can modify the default filters to accommodate network requirements,such as Quality of Service (QoS) or specific workstation boot processesand network communications.
For information about configuring VLANs and filters on the network accessdevice, see Release Notes for Nortel Ethernet Routing Switch 5500 Series,Software Release 5.0.1 () or Release Notes for the Ethernet RoutingSwitch 8300, Software Release 2.2.8.
Groups and profilesUsers are organized in groups. Group membership determines:
• user access rights
Within the group, extended profiles further refine access rights,depending on the outcome of the Nortel Health Agent checks.
• number of sessions allowed
• the Nortel Health Agent Software Requirement Set (SRS) rule to beapplied
• what displays on the portal page after the user is authenticated
For information about configuring groups and extended profiles on theNortel SNAS, see “Configuration of groups and profiles” (page 189).
Authentication methodsYou can configure more than one authentication method within a NortelSNAS domain. Nortel Secure Network Access Switch Software Release1.6.1 supports the following authentication methods:
• external: database
— Remote Authentication Dial-In User Service (RADIUS)
— Lightweight Directory Access Protocol (LDAP)
The Nortel SNAS authenticates the user by sending a query to anexternal RADIUS or LDAP server. This makes it possible to useauthentication databases that already exist within the intranet. TheNortel SNAS device includes username and password in the query and
Nortel Secure Network Access SwitchConfiguration — Using BBI
NN47230-500 03.0224 October 2008
Copyright © 2007, 2008 Nortel Networks
.

36 Overview
requires the name of one or more access groups in return. You canconfigure the name of the RADIUS and LDAP access group attribute.
• local database
The Nortel SNAS itself can store up to 1000 user authenticationentries, each defining a username, password, and relevantaccess group. You can populate the database by manually addingentries on the Nortel SNAS, or you can import a database from aTFTP/FTP/SCP/SFTP server.
Use the local authentication method if no external authenticationdatabases exist: for testing purposes, for speedy deployment, oras a fallback for external database queries. You can also use thelocal database for authorization only, if an external server providesauthentication services but cannot be configured to return a list ofauthorized groups.
For information about configuring authentication on the Nortel SNAS,see “Configuration of authentication” (page 219). For more informationabout the Nortel SNAS and the way the Nortel SNAS controls networkaccess, see Nortel Secure Network Access Switch 2.0 Solution Guide ()(NN47230-200).
Nortel Health Agent host integrity checkThe Nortel Health Agent application checks client host integrity by verifyingthat the components you specify are required for the firewall (executables,DLLs, configuration files, and so on) and are installed and active onthe client PC. You can specify the required component entities andengineering rules by configuring a software requirement set (SRS) rule andthen mapping the rule to a user group.
After a client is authenticated, the Nortel SNAS downloads a NortelHealth Agent as an applet to the client PC. The Nortel Health PolicyAdministrator fetches the SRS rule that is applicable for the group to whichthe authenticated user belongs so that Nortel Health Agent can performthe appropriate host integrity check. The Nortel Health Policy Administratorreports the result of the host integrity check to the Nortel SNAS.
If the required components are present on the client system, Nortel HealthAgent reports that the SRS rule check succeeded. The Nortel SNAS theninstructs the network access device to permit access to intranet resourcesin accordance with the access privileges of the user group. The NortelSNAS also requests the Nortel Health Policy Administrator to redo a DHCPrequest in order to renew the DHCP lease of the client with the networkaccess device.
Nortel Secure Network Access SwitchConfiguration — Using BBI
NN47230-500 03.0224 October 2008
Copyright © 2007, 2008 Nortel Networks
.

The Nortel SNAS 37
If the required components are not present on the client system, NortelHealth Agent reports that the SRS rule check failed. You can configurebehavior following a host integrity check failure: the session can be torndown, or the Nortel SNAS can instruct the network access device to grantthe client restricted access to the network for remediation purposes.
The Nortel Health Policy Administrator repeats the host integrity checkperiodically throughout the client session. If the check fails at any time,the client is either evicted or quarantined, depending on the behavior youconfigure. You can configure the recheck interval.
For information about configuring the Nortel Health Agent host integritycheck, see “Configuring the Nortel Health Agent check” (page 133). Forinformation about configuring the SRS rules, see Nortel Health PolicyAdministrator SRS Builder. For information about mapping an SRS rule toa group, see “Configuring groups” (page 194).
Communication channelsCommunications between the Nortel SNAS and key elements of theNortel SNAS are secure and encrypted. The following table shows thecommunication channels in the network.
Table 1Communication channels in the Nortel SNAS network
Communication Communication protocol
Between Nortel SNAS and edge switches SSH
Between Nortel SNAS devices in a cluster TCP and UDP
Between Nortel SNAS and client PC(Nortel Health Policy Administrator)
SSL/TLS
Between Nortel SNAS and BBI SSH
From edge switch to EPM SNMPv3 Inform
From EPM to edge switch Telnet over SSH
From authorized endpoint to DHCP server UDP
You can use telnet or SSH to manage communications between remotePCs and the Nortel SNAS devices.
About SSH The Secure Shell (SSH) protocol provides secure andencrypted communication between the Nortel SNAS and the networkaccess devices, and between Nortel SNAS devices and remotemanagement PCs not using Telnet.
Nortel Secure Network Access SwitchConfiguration — Using BBI
NN47230-500 03.0224 October 2008
Copyright © 2007, 2008 Nortel Networks
.
38 Overview
The SSH uses either password authentication or public key authentication.With public key authentication, pairs of public/private SSH host keysprotect against man in the middle attacks by providing a mechanism forthe SSH client to authenticate the server. SSH clients keep track of thepublic keys used to authenticate different SSH server hosts.
The SSH clients in the Nortel SNAS network do not silently accept newkeys from previously unknown server hosts. Instead, they refuse theconnection if the key does not match their known hosts.
The Nortel SNAS supports the use of three different SSH host key types:
• RSA1
• RSA
• DSA
ATTENTIONSSH protocol version 1 always uses RSA1 keys. SSH protocol version 2uses either RSA or DSA keys.
For management communications in the Nortel SNAS, the Nortel SNAScan act both as SSH server (when a user connects to the CLI using anSSH client) and as SSH client (when the Nortel SNAS initiates file or datatransfers by using the SCP or SFTP protocols).
For information about managing SSH keys for communication betweenthe Nortel SNAS and the network access devices, see “Managing SSHkeys” (page 53).
For information about managing SSH keys for Nortel SNAS managementcommunications, see “Configuring Nortel SNAS host SSH keys” (page 95).
Nortel SNAS clustersFor Release 1.6.1
A cluster is a group of Nortel SNAS 4050 devices that share the sameconfiguration parameters. Nortel Secure Network Access Switch SoftwareRelease 1.6.1 supports four Nortel SNAS 4050 devices, or nodes, in acluster. A network can contain multiple clusters.
For Release 2.0
A cluster is a group of Nortel SNAS 4050 or 4070 devices that share thesame configuration parameters. Nortel Secure Network Access SwitchSoftware Release 2.0 supports a combination of four Nortel SNAS 4050and 4070 devices, or nodes, in a cluster. A Nortel SNAS network cancontain multiple clusters.
Nortel Secure Network Access SwitchConfiguration — Using BBI
NN47230-500 03.0224 October 2008
Copyright © 2007, 2008 Nortel Networks
.
The Nortel SNAS 39
Clustering offers the following benefits:
• manageability—The cluster is a single, seamless unit that automaticallypushes configuration changes to its members.
• scalability—The Nortel SNAS nodes in a cluster share the burdenof resource-intensive operations. The cluster distributes control ofthe network access devices between the Nortel SNASnodes anddistributes handling of session logon. As a result, Nortel SNASdevicesin a cluster can control more switches and handle more user sessions.
• fault tolerance—If a Nortel SNASdevice fails, the failure is detected bythe other node in the cluster, which takes over the switch control andsession handling functions of the failed device. As long as there is onerunning Nortel SNAS, no sessions are lost.
The devices in the cluster can be located anywhere in the network anddo not have to be physically connected to each other. All the NortelSNAS devices in the cluster must be in the same subnet. The cluster iscreated during initial setup of the second node, when you specify thatthe setup is a join operation and you associate the node with an existingManagement IP address (MIP).
For more information about performing the initial setup and adding a nodeto a cluster, see the initial setup details in Nortel Secure Network AccessSwitch Using the Command Line Interface (NN47230-100).
Interface configurationThe Nortel SNAS must interface to two kinds of traffic: client andmanagement. The interface to the client side handles traffic betweenthe Nortel Health Policy Administrator on the client and the portal. Theinterface to the management side handles Nortel SNAS managementtraffic (traffic connecting the Nortel SNAS to internal resources andconfiguring the Nortel SNAS from a management station).
The following section describes the interface configuration method that theNortel SNAS uses. This method is known as a one armed configuration.
One armed configurationIn a one armed configuration, the Nortel SNAS has only one interface,which acts as both the client portal interface and the management trafficinterface.
The Figure 7 "One armed configuration" (page 40) diagram illustrates aone armed configuration.
Nortel Secure Network Access SwitchConfiguration — Using BBI
NN47230-500 03.0224 October 2008
Copyright © 2007, 2008 Nortel Networks
.

40 Overview
Figure 7One armed configuration
Nortel SNAS configuration and management toolsYou can use a number of device and network management tools toconfigure the Nortel SNAS and manage the Nortel SNAS:
• Command Line Interface (CLI)
You must use the CLI to perform initial setup on the Nortel SNAS andto set up the Secure Shell (SSH) connection between the Nortel SNASand the network access devices, and between the Nortel SNAS andthe GUI management tool. You can then continue to use the CLI toconfigure and manage the Nortel SNAS, or you can use the GUI.
For information about using the CLI to configure and manage theNortel SNAS, see Nortel Secure Network Access Switch Using theCommand Line Interface (NN47230-100).
• Security & Routing Element Manager (SREM)
The SREMis a GUI application you can use to configure and managethe Nortel SNAS.
For general information about installing and using the SREM, seeInstalling and Using the Security and Routing Element Manager () .
• Enterprise Policy Manager (EPM) release 4.2
Enterprise Policy Manager (EPM) is a security policy and qualityof service provisioning application. You can use EPM to provisionfilters on the Nortel SNAS network access devices. EPM 4.2 supportsthe preconfiguration of Red, Yellow, and Green VLAN filters prior toenabling the Nortel SNAS feature. In future releases of the Nortel
Nortel Secure Network Access SwitchConfiguration — Using BBI
NN47230-500 03.0224 October 2008
Copyright © 2007, 2008 Nortel Networks
.

Nortel SNAS configuration roadmap 41
SNAS and EPM software, users have the additional ability to addand modify security and quality of service filters while Nortel SNAS isenabled on the device.
For general information about installing and using EPM, see InstallingNortel Enterprise Policy Manager () .
• Simple Network Management Protocol (SNMP) agent
For information about configuring SNMP for the Nortel SNAS, see“Configuration of SNMP” (page 333).
Nortel SNAS configuration roadmapThe following procedure list is an overview of the steps required toconfigure the Nortel SNAS and the Nortel SNAS.
Procedure steps
Step Action
1 Configure the network DNS server to create a forward lookupzone for the Nortel SNAS domain.
For more information, see the configuration examples in NortelSecure Network Access Switch Using the Command LineInterface (NN47230-100).
2 Configure the network DHCP server.
For more information, see the configuration examples in NortelSecure Network Access Switch Using the Command LineInterface (NN47230-100).
For each VLAN:
a Create a DHCP scope.
b Specify the IP address range and subnet mask for thatscope.
c Configure the following DHCP options:
• Specify the default gateway.
• Specify the DNS server to be used by endpoints in thatscope.
Nortel Secure Network Access SwitchConfiguration — Using BBI
NN47230-500 03.0224 October 2008
Copyright © 2007, 2008 Nortel Networks
.

42 Overview
ATTENTIONFor the Red VLANs, the DNS server setting is one of the NortelSNAS portal Virtual IP addresses (pVIP).
While the endpoint is in the Red VLAN, there are limited DNS serverfunctions to be performed, and the Nortel SNAS acts as the DNSserver. When the endpoint is in one of the other VLANs, DNSrequests are forwarded to the corporate DNS servers.
The DNS server setting is required for the captive portal to work.
3 Configure the network core router:
a Create the Red, Yellow, Green, VoIP, and Nortel SNASmanagement VLANs.
b If the edge switches operate in Layer 2 mode, enable 802.1qtagging on the uplink ports to enable them to participate inmultiple VLANs, and then add the ports to the applicableVLANs.
ATTENTIONThe uplink ports must participate in all the VLANs.
c Configure IP addresses for the VLANs.
These IP interfaces are the default gateways that the DHCPRelay uses.
d If the edge switches operate in Layer 2 mode, configureDHCP relay agents for the Red, Yellow, Green, and VoIPVLANs.
Use the applicable show commands on the router to verifythat DHCP relay is activated to reach the correct scope foreach VLAN.
For more information about performing these generalconfiguration steps, see the regular documentation for the typeof router used in your network.
4 Configure the network access devices:
a Configure static routes to all the networks behind the corerouter.
b Configure the switch management VLAN, if necessary.
c Configure and enable SSH on the switch.
d Configure the Nortel SNAS portal Virtual IP address(pVIP)/subnet.
e Configure port tagging, if applicable.
For a Layer 2 switch, the uplink ports must be tagged to allowthem to participate in multiple VLANs.
f Create the port-based VLANs.
Nortel Secure Network Access SwitchConfiguration — Using BBI
NN47230-500 03.0224 October 2008
Copyright © 2007, 2008 Nortel Networks
.

Nortel SNAS configuration roadmap 43
These VLANs are configured as VoIP, Red, Yellow, andGreen VLANs in step i and step j.
g Configure DHCP relay and IP routing if the switch is used inLayer 3 mode.
h (Optional) Configure the Red, Yellow, Green, and VoIP filters.
The filters are configured automatically as predefined defaultswhen you configure the Red, Yellow, and Green VLANs (seestep j). Configure the filters manually only if your particularsystem setup requires you to modify the default filters. Youcan modify the filters after Nortel SNAS is enabled.
i Configure the VoIP VLANs.
j Configure the Red, Yellow, and Green VLANs, associatingeach with the applicable filters.
k Configure the Nortel SNAS ports.
Identify switch ports as either uplink or dynamic. When youconfigure the uplink ports, you associate the Nortel SNASVLANs with those ports. Clients are connected on thedynamic ports. You can configure Nortel SNAS ports (bothdynamic and uplink) after Nortel SNAS is enabled globally.
l Enable Nortel SNAS globally.
For more information about configuring an Ethernet RoutingSwitch 5510, 5520, or 5530 in a Nortel SNAS network, seeRelease Notes for Nortel Ethernet Routing Switch 5500 Series,Software Release 5.0.1.
For more information about configuring an Ethernet RoutingSwitch 8300 in a Nortel SNAS network, see Release Notes forthe Ethernet Routing Switch 8300, Software Release 2.2.8.
For more information about the commands used to create aNortel SNAS configuration using the CLI, see Nortel SecureNetwork Access Switch Using the Command Line Interface(NN47230-100).
5 Perform the initial setup on the Nortel SNAS (see Nortel SecureNetwork Access Switch Using the Command Line Interface(NN47230-100)). Nortel recommends running the quick setupwizard during initial setup in order to create and configure basicsettings for a fully functional portal.
6 Using the CLI, enable SSH and SRS Admin to allowcommunication with the SREM (see Nortel SecureNetwork Access Switch Using the Command Line Interface(NN47230-100)).
7 Generate and activate the SSH key for communicationbetween the Nortel SNAS and the network access devices (see“Managing SSH keys” (page 53)).
Nortel Secure Network Access SwitchConfiguration — Using BBI
NN47230-500 03.0224 October 2008
Copyright © 2007, 2008 Nortel Networks
.
44 Overview
8 Specify the software requirement set (SRS) rule for the defaultNortel Health Agent group (see “Configuring groups” (page194)).
9 Add the network access devices and export the SSH key (see“Adding a network access device” (page 47)).
10 Specify the VLAN mappings (see “Mapping the VLANs” (page50)).
11 Test Nortel SNAS connectivity (see “Checking configuration”(page 400)).
12 Configure groups (see “Configuration of groups and profiles”(page 189)).
13 Configure client filters (see “Configuring client filters” (page201)).
14 Configure extended profiles (see “Configuring extended profiles”(page 205)).
15 Specify the authentication mechanisms (see “Mapping theVLANs” (page 50)).
16 Configure system users (see Management of Nortel HealthAgent rules and expressions).
17 Configure the end user experience (see “Customize the portaland logon” (page 295)).
--End--
Nortel Secure Network Access SwitchConfiguration — Using BBI
NN47230-500 03.0224 October 2008
Copyright © 2007, 2008 Nortel Networks
.

45.
Management of network accessdevices
This chapter provides a general introduction to the Nortel SNAS networkand also contains detailed procedures to manage the network accessdevices.
Navigation• “Before you begin” (page 45)
• “Manage network access devices” (page 46)
Before you beginIn Trusted Computing Group (TCG) terminology, the edge switches in aNortel SNAS function as the Policy Enforcement Point. In this document,the term network access device is used to refer to the edge switch after itis configured for the Nortel SNAS network.
The following edge switches can function as network access devices inthe Nortel SNAS:
• Ethernet Routing Switch 8300
• Ethernet Routing Switch 5510, 5520, and 5530
Before you can configure the edge switches as network access devices inthe Nortel SNAS domain, you must complete the following:
• Create the domain, if applicable. If you use the quick setup wizardduring initial setup, Domain 1 is created. For more information aboutcreating a domain, see “Configuration of the domain” (page 111).
• Configure the edge switches for Nortel SNAS (see “Nortel SNASconfiguration roadmap” (page 41), step 4). For detailed informationabout configuring the edge switches for Nortel SNAS, see ReleaseNotes for the Ethernet Routing Switch 8300, Software Release 2.2.8
Nortel Secure Network Access SwitchConfiguration — Using BBI
NN47230-500 03.0224 October 2008
Copyright © 2007, 2008 Nortel Networks
.
46 Management of network access devices
() or Release Notes for Nortel Ethernet Routing Switch 5500 Series,Software Release 5.0.1.
For secure communication between the Nortel SNAS and the networkaccess device, each must have knowledge of the other’s public SSH key.After you have added the network access device to the Nortel SNASdomain, you must exchange the necessary SSH keys (see “ManagingSSH keys” (page 53)).
You require the following information for each network access device:
• IP address of the switch
• VLAN names and VLAN IDs for the Red, Yellow, and Green VLANs
• the TCP port to be used for Nortel SNAS communication
• a valid rwa user name for the Ethernet Routing Switch 8300 switches
Manage network access devicesThe Nortel SNAS starts communicating with the network access device assoon as you enable the switch on the Nortel SNAS.
You cannot configure the VLAN mappings for a network access deviceinthe Nortel SNAS domain if the switch is enabled. When you add a networkaccess device to the domain, the network access device is disabled bydefault. Do not enable the network access device until you complete theconfiguration. For information about enabling and disabling the networkaccess device, see “Controlling communication with the network accessdevices” (page 59).
ATTENTIONIf you do not enable the network access device after you complete theconfiguration, or the network access device remains inactive.
This section describes the steps to configure the network access devicesin the Nortel SNAS domain.
Manage network access devices navigation
• “Adding a network access device” (page 47)
• “Deleting a network access device” (page 49)
• “Configuring the network access devices” (page 49)
• “Mapping the VLANs” (page 50)
• “Managing SSH keys” (page 53)
• “Monitoring switch health” (page 57)
Nortel Secure Network Access SwitchConfiguration — Using BBI
NN47230-500 03.0224 October 2008
Copyright © 2007, 2008 Nortel Networks
.

Manage network access devices 47
Adding a network access deviceTo add a network access device, use the following procedure:
Procedure steps
Step Action
1 Select the Config tab.
2 Select Secure Access Domain and Switches from theNavigation pane.
The Switches screen appears.
3 Select the secure access domain from the Secure AccessDomain list, and click Refresh.
4 Click Add.
The Add New Switch screen appears.
5 Click Create Switch.
The network access device appears in the Switches table.
6 Click Apply on the toolbar to send the current changes to theNortel SNAS.
--End--
Variable definitionsUse the data in the following table to add a network access device.
Nortel Secure Network Access SwitchConfiguration — Using BBI
NN47230-500 03.0224 October 2008
Copyright © 2007, 2008 Nortel Networks
.

48 Management of network access devices
Variable Value
Switch Id Specifies an integer that uniquely identifies the networkaccess device in the Nortel SNAS domain.
Name Specifies a string that identifies the switch on the NortelSNAS.
The maximum length of the string is 255 characters. Afteryou define a name for the switch, you can use either theswitch name or the switch ID to access the network accessdevice.
ManagementProtocol
Based on the selected management protocol fieldsappears.is sscplite, 3 new fields "switch ports" and "switch-uplinkports" and SNMP Profile appear and values in "Type" listbox too change.Values: sscp and sscplitedefault: sscp
Management Protocol: sscp
Type Specifies the type of network access device. The optionsare ERS8300, ERS 4500, ERS5500 and ERS5600.
IP Address Specifies the network access device IP address.
CommunicationPort
Specifies the TCP port number used for the Switch toNortel SNAS Communication Protocol (SSCP). The defaultsetting is 5000.Value range: (1024-65535)
Management Protocol: sscplite
Switch Ports Select the Set Switch Ports to Default checkbox. You canenter the comma separated values for the switch ports.default: 1/1-23
Switch Uplink Select the Set Switch Uplink Ports to Default checkbox.You can enter the comma separated values for the switchuplink ports.default: 1/24
SNMP Profile Select the SNMP profile for the switch.
Type Specifies the type of network access device. The optionsare BayStack, PassPort, Cisco, and HP-ProCurve.
IP Address Specifies the network access device IP address.
Port Specifies the TCP port number used for the Switch toNortel SNAS Communication Protocol (SSCP). The defaultsetting is 5000.
Nortel Secure Network Access SwitchConfiguration — Using BBI
NN47230-500 03.0224 October 2008
Copyright © 2007, 2008 Nortel Networks
.

Manage network access devices 49
Variable Value
Status Enables or disables the switch.Values: enabled and disableddefault: disabled
Red VLAN ID Specifies the VLAN ID of the Red VLAN configured on thenetwork access device.
Deleting a network access deviceTo remove an existing network access device from the domainconfiguration see “Manage network access devices” (page 46). Use thefollowing procedure:
Procedure steps
Step Action
1 Select the Config tab.
2 Select Secure Access Domain and Switches from theNavigation pane.
The Switches screen appears.
3 Select the network access device from the Switches list.
4 Click Delete.
A dialog box appears to confirm that you want to delete thisnetwork access device.
5 Click Yes.
The network access device is removed from the Switches list.
6 Click Apply on the toolbar to send the current changes to theNortel SNAS.
--End--
Configuring the network access devicesWhen you first add a network access device to the Nortel SNAS domain,the switch is disabled by default. Do not enable the switch until youcomplete its configuration. In particular, do not enable the switch until youmap the VLANs (see “Mapping the VLANs” (page 50)) and exchange thenecessary SSH keys (see “Managing SSH keys” (page 53)).
To reconfigure the VLAN mappings for an existing network access device,first disable it (see “Controlling communication with the network accessdevices” (page 59)). After you disable the network access device, use thefollowing procedure:
Nortel Secure Network Access SwitchConfiguration — Using BBI
NN47230-500 03.0224 October 2008
Copyright © 2007, 2008 Nortel Networks
.

50 Management of network access devices
Procedure steps
Step Action
1 Select the Config tab.
2 Select Secure Access Domain and Switches from theNavigation pane.
The Switch screen appears.
3 Select the secure access domain from the Secure AccessDomain list, and click Refresh.
4 Select the network access device you want to configure and clickEdit.
The Modify Switch screen appears.
5 Enter the network access deviceinformation in the applicablefields.
6 Click Update to save the details.
7 Click Apply on the toolbar to send the current changes to theNortel SNAS.
--End--
Mapping the VLANsThe VLANs are configured on the network access devices. You canspecify the Red VLAN for each network access device when you add theswitch (see “Adding a network access device” (page 47)). After adding theswitch, you must map the Yellow and Green VLANs to the Nortel SNAS(see “Mapping VLANs” (page 51)).
Nortel recommends mapping the VLANs by domain. In this way, if youlater add switches which use the same VLAN IDs, their VLAN mappingscan automatically be picked up.
If you map the VLANs by domain, you can modify the mapping for aparticular network access device at the switch level. Switch-level settingsoverride domain settings.
The Nortel SNAS maintains separate maps for the domain and the switch.If you add a domain-level VLAN, then you must use the domain-levelcommand for all future management of that mapping. Similarly, if you adda switch-level VLAN, then you must use the switch-level command for allfuture management of that mapping.
Nortel Secure Network Access SwitchConfiguration — Using BBI
NN47230-500 03.0224 October 2008
Copyright © 2007, 2008 Nortel Networks
.

Manage network access devices 51
Mapping VLANsTo map VLANs in a domain, select the Secure Access Domain,Switches, and VLANs tab.
The VLANs screen appears, listing all current VLANs applied to thedomain.
This screen allows you to manage VLANs on the domain by adding ordeleting entries to the VLAN Table. For detailed steps on adding orremoving VLANs, see:
• “Adding VLANs” (page 51)
• “Removing VLANs” (page 52)
To add VLANs, use the following procedure:
Procedure steps
Step Action
1 Select the Config tab.
2 Select Secure Access Domain, Switches andVLANs from the Navigation pane.
The VLANs screen appears.
3 Select the secure access domain and theswitch from the respective lists, and clickRefresh.
4 Click Add.
The Add VLAN dialog box appears.
5 Click Create VLAN.
Nortel Secure Network Access SwitchConfiguration — Using BBI
NN47230-500 03.0224 October 2008
Copyright © 2007, 2008 Nortel Networks
.

52 Management of network access devices
The new VLAN appears in the VLAN table.
6 Repeat step 3-5 for each Green and YellowVLAN that you want to configure on the domain.
7 Click Apply on the toolbar to send the currentchanges to the Nortel SNAS.
--End--
Use the data in the following table to add a VLAN.
Variable Value
Name The name of the VLAN, as configured onthe domain.
VLAN ID The ID of the VLAN, as configured on thedomain.
Removing VLANs To remove existing VLANs, use the followingprocedure:
Procedure steps
Step Action
1 Select the Config tab.
2 Select Secure Access Domain, Switches and VLANs from theNavigation pane.
The VLANs screen appears.
3 Select the secure access domain and the switch from therespective lists, and click Refresh.
4 Select the VLAN entry from the VLAN Table.
5 Click Delete.
A dialog box appears to confirm that you want to delete thisVLAN.
6 Click Yes.
The VLAN disappears from the VLAN Table.
7 Click Apply on the toolbar to send the current changes to theNortel SNAS.
--End--
Nortel Secure Network Access SwitchConfiguration — Using BBI
NN47230-500 03.0224 October 2008
Copyright © 2007, 2008 Nortel Networks
.
Manage network access devices 53
Managing SSH keysThe Nortel SNAS and the network access devices controlled by theNortel SNAS domain exchange public keys so that they can authenticatethemselves to each other in future SSH communications.
ATTENTIONWhen you add a new network access device, the SSH fingerprint of the switchis automatically picked up if the switch is reachable. If the fingerprint is notsuccessfully retrieved, then the SSH key is not set for this network accessdevice.
To enable secure communication between the Nortel SNAS and thenetwork access device, use the following procedure:
Procedure steps
Step Action
1 Generate an SSH public key for the Nortel SNAS domain (see“Generating SSH keys for the domain” (page 54)), if necessary.Apply the change immediately.
If you create the domain manually, the SSH key is generatedautomatically (see “Manually creating a domain” (page 113)).
ATTENTIONThe SSH key for the Nortel SNAS domain is not the same as theSSH key generated during initial setup for all Nortel SNAS hosts inthe cluster (for more information about the initial setup, see NortelSecure Network Access Switch Using the Command Line Interface(NN47230-100)).
2 For an Ethernet Routing Switch 8300, you can export the keydirectly to the switch (see “Managing SSH keys for Nortel SNAScommunication” (page 55)).
3 For an Ethernet Routing Switch 5510, 5520, or 5530, upload thekey to a TFTP server for manual retrieval from the switch (see“Exporting SSH keys for the domain” (page 55)).
For information about downloading the key from the server to theswitch, see Release Notes for Nortel Ethernet Routing Switch5500 Series, Software Release 5.0.1.
ATTENTIONIf you regenerate the key at any time, you must re-export the key toeach network access device.
If you export the key after the network access device is enabled, youmay need to disable and reenable the switch in order to activate thechange.
Nortel Secure Network Access SwitchConfiguration — Using BBI
NN47230-500 03.0224 October 2008
Copyright © 2007, 2008 Nortel Networks
.

54 Management of network access devices
4 For each network access device, import its public key into theNortel SNAS domain, if necessary. For more information aboutimporting public keys, see “Managing SSH keys for Nortel SNAScommunication” (page 55).
ATTENTIONIf the network access device is reachable when you add it to thedomain configuration, the SSH key is automatically retrieved.
If the network access device defaults, it generates a new public key.You must reimport the key whenever the switch generates a newpublic key (see “Reimporting the network access device SSH key”(page 56))
In general, click Apply on the toolbar immediately after you changeany of the SSH settings.
--End--
Generating SSH keys for the domainTo generate, view, and export the public SSH key for the domain, use thefollowing procedure:
Procedure steps
Step Action
1 Select the Config tab.
2 Select Administration and SSH Keys from the Navigation pane.
The SSH Key screen appears.
3 Click Apply on the toolbar to send the current changes to theNortel SNAS.
--End--
Use the data in the following table to know the fields andcontrols available from the switch SSH Key screen.
Nortel Secure Network Access SwitchConfiguration — Using BBI
NN47230-500 03.0224 October 2008
Copyright © 2007, 2008 Nortel Networks
.

Manage network access devices 55
Variable Value
Generate NewKeys
Generates an SSH public key for thedomain.
At any one time, only one key canbe in effect for the Nortel SNASdomain. If a key already exists, youare prompted to confirm that you wantto replace it.
Click Apply on the toolbar to save thechange immediately and create thekey.
Show SSH keys Displays the SSH public key generatedfor the domain.
Exporting SSH keys for the domainYou cannot export the domain SSH key directly to an Ethernet RoutingSwitch 5500 series switch. Instead, you must upload the key to a fileexchange server by using the following export procedure.
To export the SSH public key for the domain, use the following procedure:
Procedure steps
Step Action
1 Select the Config tab.
2 Select Secure Access Domain, Switches, and SSH Key fromthe Navigation pane.
The SSH Key screen appears.
3 Select the secure access domain and the switch from therespective lists, and click Refresh.
4 Click Export SSH Key to Switch.
5 Click Apply on the toolbar to begin the export process.
--End--
Managing SSH keys for Nortel SNAS communicationTo retrieve the public key for the network access device and export thepublic key for the domain, use the following procedure:
Nortel Secure Network Access SwitchConfiguration — Using BBI
NN47230-500 03.0224 October 2008
Copyright © 2007, 2008 Nortel Networks
.
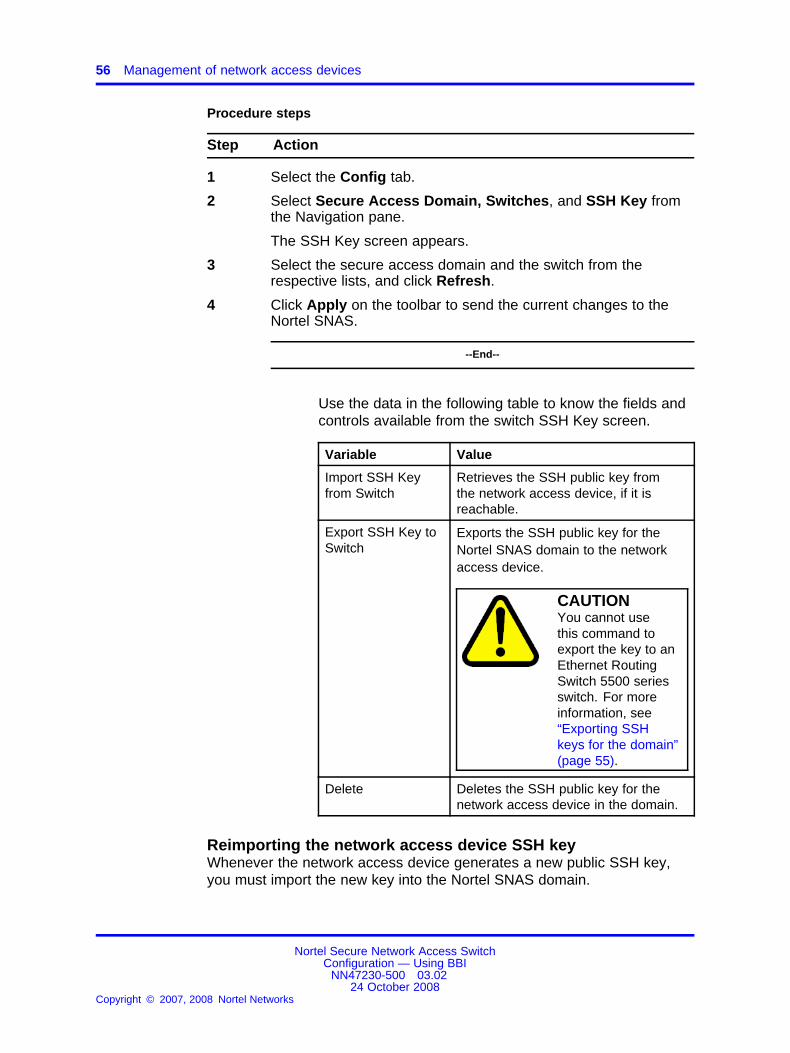
56 Management of network access devices
Procedure steps
Step Action
1 Select the Config tab.
2 Select Secure Access Domain, Switches, and SSH Key fromthe Navigation pane.
The SSH Key screen appears.
3 Select the secure access domain and the switch from therespective lists, and click Refresh.
4 Click Apply on the toolbar to send the current changes to theNortel SNAS.
--End--
Use the data in the following table to know the fields andcontrols available from the switch SSH Key screen.
Variable Value
Import SSH Keyfrom Switch
Retrieves the SSH public key fromthe network access device, if it isreachable.
Export SSH Key toSwitch
Exports the SSH public key for theNortel SNAS domain to the networkaccess device.
CAUTIONYou cannot usethis command toexport the key to anEthernet RoutingSwitch 5500 seriesswitch. For moreinformation, see“Exporting SSHkeys for the domain”(page 55).
Delete Deletes the SSH public key for thenetwork access device in the domain.
Reimporting the network access device SSH keyWhenever the network access device generates a new public SSH key,you must import the new key into the Nortel SNAS domain.
Nortel Secure Network Access SwitchConfiguration — Using BBI
NN47230-500 03.0224 October 2008
Copyright © 2007, 2008 Nortel Networks
.

Manage network access devices 57
To reimport a public SSH key, use the following procedure:
Procedure steps
Step Action
1 Select the Config tab.
2 Select Secure Access Domain, Switches, and SSH Key fromthe Navigation pane.
The SSH Key screen appears.
3 Click Delete Switch SSH Key.
4 Click Apply on the toolbar to send the current changes to theNortel SNAS.
5 Click Import SSH from Switch.
6 Click Apply on the toolbar to send the current changes to theNortel SNAS.
--End--
For more information about the SSH Key commands, see “Managing SSHkeys for Nortel SNAS communication” (page 55).
Monitoring switch healthThe Nortel SNAS continually monitors the health of the network accessdevices. At specified intervals, a health check daemon sends queriesand responses to the switch as a heartbeat mechanism. If no activity(heartbeat) is detected, the daemon retries the health check for a specifiednumber of times (the dead count). If no heartbeat after a further interval(the status-quo interval), the network access device moves all its clientsinto the Red VLAN. When connectivity is reestablished, the Nortel SNASsynchronizes sessions with the network access device.
You can configure the health check interval, dead count, and status-quointerval.
To configure parameters for the Nortel SNAS health checks, use thefollowing procedure:
Procedure steps
Step Action
1 Select the Config tab.
2 Select Secure Access Domain, Switches, and Health Checkfrom the Navigation pane.
Nortel Secure Network Access SwitchConfiguration — Using BBI
NN47230-500 03.0224 October 2008
Copyright © 2007, 2008 Nortel Networks
.

58 Management of network access devices
The Health Check screen appears.
3 Click Update to save the details.
4 Click Apply on the toolbar to send the current changes to theNortel SNAS.
--End--
Variable definitionsUse the data in the following table to configure the health check.
Variable Value
Interval Sets the time interval between checks for switchactivity.
Accepts an integer that indicates the time intervalin seconds (s), minutes (m), or hours (h). The validrange is 60s (1m) to 64800s (18h). The default is 1m(1 minute).
Dead Count Specifies the number of times the Nortel SNASrepeats the check for switch activity when noheartbeat is detected.
Accepts an integer in the range 1–65535 thatindicates the number of retries. The default is 3.
Nortel Secure Network Access SwitchConfiguration — Using BBI
NN47230-500 03.0224 October 2008
Copyright © 2007, 2008 Nortel Networks
.

Manage network access devices 59
Variable Value
If no heartbeat is detected after the specified numberof retries, the Nortel SNAS enters status-quo mode.
Status Quo Interval Sets the time interval for status-quo mode, after whichthe network access device moves all clients into theRed VLAN.
Accepts an integer that indicates the time intervalin seconds (s), minutes (m), or hours (h). The validrange is 0 to 64800s (18h). The default is 1m (1minute).
Controlling communication with the network access devicesTo stop communication between the Nortel SNAS and a network accessdevice, disable the switch. Click Apply to apply the change immediately.
ATTENTIONIf the switch is not used in the Nortel SNAS network, Nortel recommends thatyou delete the switch from the Nortel SNAS domain, rather than just disabling it.
To restart communication between the Nortel SNAS and a network accessdevice, enable the switch. Click Apply to apply the change immediately.
When you first add a network access device to the Nortel SNAS domain,the switch is disabled by default. Do not enable the switch until youcomplete its configuration. In particular, do not enable the switch untilyou have mapped the VLANs (see “Mapping the VLANs” (page 50)) andexchanged the necessary SSH keys (see “Managing SSH keys” (page53)).
To disable or enable the network access device, use the followingprocedure:
Procedure steps
Step Action
1 Select the Config tab.
2 Select Secure Access Domain and Switches from theNavigation pane.
The Switches screen appears.
3 Select the secure access domain from the Secure AccessDomain list, and click Refresh.
4 Ensure the Enable setting is correct.
Nortel Secure Network Access SwitchConfiguration — Using BBI
NN47230-500 03.0224 October 2008
Copyright © 2007, 2008 Nortel Networks
.

60 Management of network access devices
5 Click Update on the toolbar to send the current changes to theNortel SNAS.
--End--
Nortel Secure Network Access SwitchConfiguration — Using BBI
NN47230-500 03.0224 October 2008
Copyright © 2007, 2008 Nortel Networks
.

61.
Configuration of system settingsThis chapter provides detailed procedures to configure the Nortel SNAShost.
ATTENTIONSystem settings apply to a cluster as a whole.
You can log on to either the Management IP address (MIP) or a Nortel SNAShost Real IP address (RIP) in order to configure the system.
Navigation• “Configuring the cluster ” (page 61)
• “Configuring system settings” (page 62)
• “Configuring a Nortel SNAS host” (page 63)
• “Configuring host interfaces” (page 66)
• “Configuring static routes” (page 70)
• “Configuring host ports” (page 76)
• “Configuring the access list” (page 78)
• “Managing date and time settings” (page 80)
• “Configuring DNS settings” (page 83)
• “Configuring servers” (page 85)
• “Configuring administrative settings” (page 94)
• “Configuring Nortel SNAS host SSH keys” (page 95)
• “Adding an SSH key for a known host” (page 97)
• “Managing RADIUS authentication of system users” (page 98)
Configuring the clusterThis section describes how to configure the cluster. Choose from one ofthe following tasks:
Nortel Secure Network Access SwitchConfiguration — Using BBI
NN47230-500 03.0224 October 2008
Copyright © 2007, 2008 Nortel Networks
.

62 Configuration of system settings
Configuring the cluster navigation
• “Configuring system settings” (page 62)
• “Configuring a Nortel SNAS host” (page 63)
• “Configuring host interfaces” (page 66)
• “Configuring static routes” (page 70)
• “Configuring host ports” (page 76)
• “Configuring the access list” (page 78)
• “Managing date and time settings” (page 80)
• “Configuring DNS settings” (page 83)
• “Configuring servers” (page 85)
• “Configuring administrative settings” (page 94)
• “Configuring Nortel SNAS host SSH keys” (page 95)
• “Adding an SSH key for a known host” (page 97)
• “Managing RADIUS authentication of system users” (page 98)
• “Configuring auto blacklisting” (page 102)
• “Configuring harden password” (page 108)
• “Redistributing switches” (page 110)
Configuring system settingsTo view and configure cluster-wide system settings, use the followingprocedure:
Procedure steps
Step Action
1 Select the Config tab.
2 Select Cluster and Host(s) from the Navigation pane.
The Host(s) screen appears.
Nortel Secure Network Access SwitchConfiguration — Using BBI
NN47230-500 03.0224 October 2008
Copyright © 2007, 2008 Nortel Networks
.

Configuring the cluster 63
3 Click Update to save the details.
4 Click Apply on the toolbar to send the current changes to theNortel SNAS.
--End--
Variable definitionsUse the data in the following table to configure the Management IPAddress for the cluster.
Variable Value
MIP Address Sets the MIP for the cluster. The MIP identifiesthe cluster and must be unique on the network.
ATTENTIONNortel does not recommend reconfiguringthis parameter if you are logged on to theMIP because you can lose connectivity. Toreset the MIP, log on to the RIP instead.
Configuring a Nortel SNAS hostTo configure a Nortel SNAS host, use one or more of the followingprocedures:
• “Viewing host information” (page 64)
• “Viewing installed licenses for a particular host” (page 64)
Nortel Secure Network Access SwitchConfiguration — Using BBI
NN47230-500 03.0224 October 2008
Copyright © 2007, 2008 Nortel Networks
.

64 Configuration of system settings
For details about configuring host interfaces, see “Configuring hostinterfaces” (page 66). For details about configuring host ports, see“Configuring host ports” (page 76).
Viewing host informationTo display a list of available Nortel SNAS hosts, use the followingprocedures:
Procedure steps
Step Action
1 Select the Config tab.
2 Select Cluster and Host(s) from the Navigation pane.
The Hosts screen appears, listing all hosts currently in the NortelSNAS configuration.
3 To view detailed host information, select a particular host fromthe navigation tree, or in the Hosts list.
--End--
Viewing installed licenses for a particular hostProcedure steps
Step Action
1 Select the Config tab.
2 To view the licenses applied to a particular Nortel SNAS devicein the cluster, select Cluster, Host(s), and License from theNavigation pane.
The License screen appears, displaying a list of the type andvalue for each license installed on that Nortel SNAS host.
Nortel Secure Network Access SwitchConfiguration — Using BBI
NN47230-500 03.0224 October 2008
Copyright © 2007, 2008 Nortel Networks
.

Configuring the cluster 65
3 Select the host number from the Host Number list, and clickRefresh.
The corresponding details appear.
--End--
Installing a license for a particular host The Nortel SNAS SSL (portaland Nortel SNAS domain client access) license is available for 100, 250,500, and 1000 users.
ATTENTIONBefore you install a new license, you must first purchase a Nortel SNAS SSL(portal and Nortel SNAS domain client access) license key from Nortel TechnicalSupport. To obtain a license key, check the Information screen to find the MACaddress of the Nortel SNAS device. Then, provide the MAC address to NortelTechnical Support and request the key for the desired license type.
To install a new license on a Nortel SNAS device in the cluster, use thefollowing procedure:
Procedure steps
Step Action
1 Open the license key provided by Nortel Technical Support in atext editor.
2 Select and copy the entire license key.
When copying the license key, ensure you include the BEGINLICENSE and END LICENSE lines.
Nortel Secure Network Access SwitchConfiguration — Using BBI
NN47230-500 03.0224 October 2008
Copyright © 2007, 2008 Nortel Networks
.

66 Configuration of system settings
3 Select the Config tab.
4 Select Cluster, Host(s), and License from the Navigation pane.
The License screen appears.
5 Click Paste to insert the license key into the text box.
6 Click Save to add the new license to this Nortel SNAS host.
7 Click Apply on the toolbar to send the current changes to theNortel SNAS.
--End--
Configuring host interfacesThe default IP interface on the Nortel SNAS host is Interface 1. You cancreate additional interfaces and specify the ports to be assigned to eachinterface. If you assign more than one port to an interface, you can choosewhether the ports operates in failover or trunking mode.
To view a list of interfaces on a particular Nortel SNAS host, selectCluster, Host(s), and Interfaces from the Navigation pane. The Interfacesscreen appears.
To continue, choose one of the following procedures:
• “Adding a host interface” (page 66)
• “Configuring an existing host interface” (page 68)
• “Removing a host interface” (page 69)
Adding a host interfaceTo create a host interface, use the following procedure:
Procedure steps
Step Action
1 Select the Config tab.
2 Select Cluster, Host(s), and Interfaces from the Navigationpane.
The Interfaces screen appears.
3 Select the host from the Host Number list, and click Refresh.
4 Click Add.
The Add Network screen appears.
Nortel Secure Network Access SwitchConfiguration — Using BBI
NN47230-500 03.0224 October 2008
Copyright © 2007, 2008 Nortel Networks
.

Configuring the cluster 67
5 Click Update.
The new interface appears in the Interfaces table.
6 Click Apply on the toolbar to send the current changes to theNortel SNAS.
--End--
Use the data in the following table to add a host interface.
Variable Value
Id An integer in the range 1 to 252 that uniquelyidentifies the interface on the Nortel SNAS.
Address Sets the network address for the interface. (ForInterface 1, the network address is the RIP.)
Netmask Sets the subnet mask for the interface.
VLAN Id Specifies the VLAN tag if packets received bythe interface are tagged with a specific VLANtag ID.
Nortel Secure Network Access SwitchConfiguration — Using BBI
NN47230-500 03.0224 October 2008
Copyright © 2007, 2008 Nortel Networks
.

68 Configuration of system settings
Variable Value
Mode Specifies the mode of operation for the portnumbers assigned to this interface. The optionsare:
• failover—only one link is active at any giventime. If the port with an active link fails, theactive link is immediately switched over toone of the other ports configured for theinterface. When you select failover mode,you also have the option of specifying aprimary port.
• trunking—active links are sustained on allconfigured ports simultaneously to increasenetwork throughput.
The default is failover.
Ports Select the available ports.
PrimaryPort
Specifies the primary port in the interfaceon which the active link is set up. If theprimary port fails, the active link is immediatelytransferred to a remaining (secondary) port. Assoon as the primary port regains functionality,the active link is transferred back to the primaryport.
An integer indicating the port number of thephysical port assigned to the interface. Thedefault is 0 (zero).
The default value of zero means that thecurrently active link remains in use until it fails.If the port fails, the link is transferred to anotherport. The link remains active on the port towhich it is transferred, even after the failed portregains functionality.
The primary port setting applies only when youconfigure more than one port in the interface,and the mode is failover.
Configuring an existing host interfaceTo configure an existing host interface, use the following procedure:
Nortel Secure Network Access SwitchConfiguration — Using BBI
NN47230-500 03.0224 October 2008
Copyright © 2007, 2008 Nortel Networks
.

Configuring the cluster 69
Procedure steps
Step Action
1 Select the Config tab.
2 Select Cluster, Host(s), and Interfaces from the Navigationpane.
The Interface screen appears.
3 Select the host number from the Host Number list, and clickRefresh.
4 Select the interface from the Interface table, and click Edit.
The Modify Network screen appears.
5 Enter the interface information in the applicable fields.
6 Click Update to save the details.
7 Click Apply on the toolbar to send the current changes to theNortel SNAS.
--End--
Removing a host interfaceTo delete a host interface, use the following procedure:
Procedure steps
Step Action
1 Select the Config tab.
2 Select Cluster, Host(s), and Interfaces from the Navigationpane.
The Interface screen appears.
3 Select the host number from the Host Number list, and clickRefresh.
4 Select the interface from the list.
5 Click Delete.
A confirmation dialog box appears.
6 Click Yes.
The interface is removed from the Interfaces list.
Nortel Secure Network Access SwitchConfiguration — Using BBI
NN47230-500 03.0224 October 2008
Copyright © 2007, 2008 Nortel Networks
.

70 Configuration of system settings
7 Click Apply on the toolbar to send the current changes to theNortel SNAS.
--End--
Rebooting or halting a hostTo reboot or halt a host, use the following procedure:
Procedure steps
Step Action
1 Select the Config tab.
2 Select Cluster and Host(s) from the Navigation pane.
The Host(s) screen appears.
3 Select NSNAS host from the list.
4 Click Reboot to reboot the host or Halt to halt the host.
--End--
Configuring static routesTo view or configure static routes at a particular level, choose from thefollowing procedures:
• “Viewing static routes for a cluster” (page 70)
• “Adding a static route for a cluster” (page 70)
• “Removing a static route for a cluster” (page 72)
Viewing static routes for a clusterTo configure static routes for the cluster, select Cluster > Routes > StaticRoutes from the Navigation pane.
The Static Routes screen appears, displaying a list of the existing staticroutes on the Nortel SNAS cluster.
From the selected static route screen, complete the following tasks asnecessary:
• “Adding a static route for a cluster” (page 70)
• “Removing a static route for a cluster” (page 72)
To add a static routes, use the following procedure:
Nortel Secure Network Access SwitchConfiguration — Using BBI
NN47230-500 03.0224 October 2008
Copyright © 2007, 2008 Nortel Networks
.

Configuring the cluster 71
ATTENTIONWhen you add a static route to the system, host, or interfaceconfiguration, the route is automatically assigned an indexnumber. There are separate sequences of index numbers forroutes configured for the cluster, for each host, and for eachinterface.
Procedure steps
Step Action
1 Select the Config tab.
2 Select Cluster, Routes, and Static Routesfrom the Navigation pane.
The Static Routes screen appears, displayinga list of the existing static routes on the NortelSNAS cluster.
3 Click Add.
The Add Static Route screen appears.
4 Click Update.
The new route appears in the Static Routetable.
5 Click Apply on the toolbar to send the currentchanges to the Nortel SNAS.
--End--
Use the data in the following table to add a static routefor a cluster.
Nortel Secure Network Access SwitchConfiguration — Using BBI
NN47230-500 03.0224 October 2008
Copyright © 2007, 2008 Nortel Networks
.
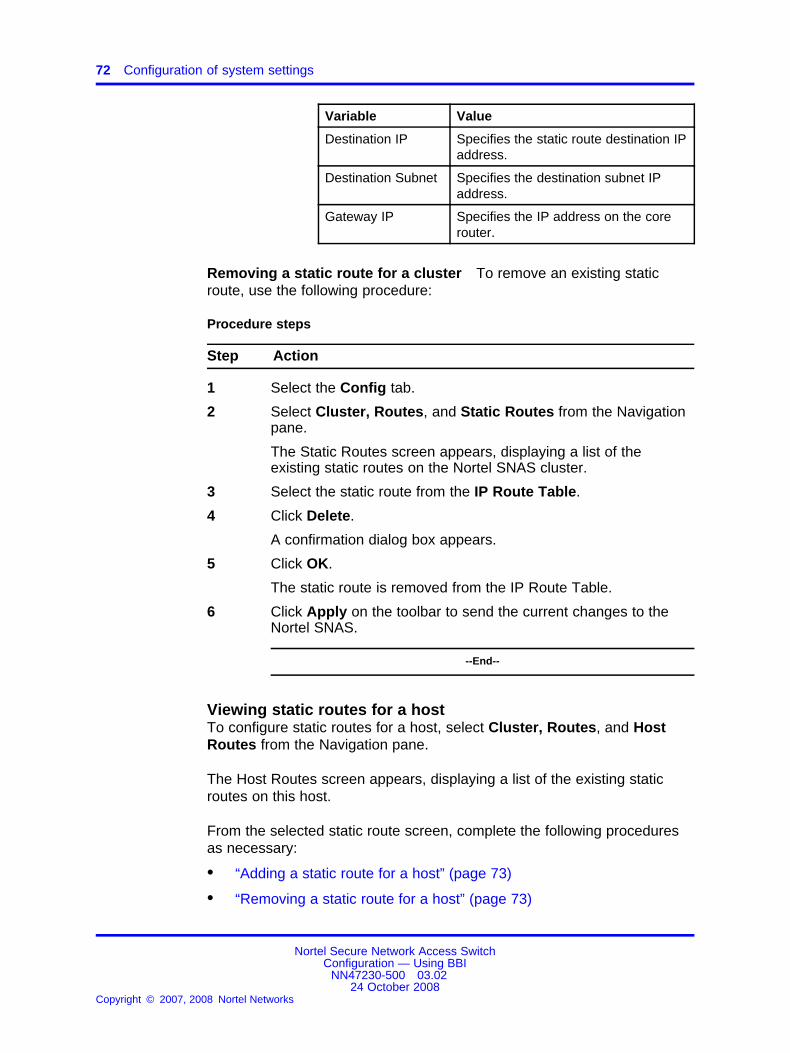
72 Configuration of system settings
Variable Value
Destination IP Specifies the static route destination IPaddress.
Destination Subnet Specifies the destination subnet IPaddress.
Gateway IP Specifies the IP address on the corerouter.
Removing a static route for a cluster To remove an existing staticroute, use the following procedure:
Procedure steps
Step Action
1 Select the Config tab.
2 Select Cluster, Routes, and Static Routes from the Navigationpane.
The Static Routes screen appears, displaying a list of theexisting static routes on the Nortel SNAS cluster.
3 Select the static route from the IP Route Table.
4 Click Delete.
A confirmation dialog box appears.
5 Click OK.
The static route is removed from the IP Route Table.
6 Click Apply on the toolbar to send the current changes to theNortel SNAS.
--End--
Viewing static routes for a hostTo configure static routes for a host, select Cluster, Routes, and HostRoutes from the Navigation pane.
The Host Routes screen appears, displaying a list of the existing staticroutes on this host.
From the selected static route screen, complete the following proceduresas necessary:
• “Adding a static route for a host” (page 73)
• “Removing a static route for a host” (page 73)
Nortel Secure Network Access SwitchConfiguration — Using BBI
NN47230-500 03.0224 October 2008
Copyright © 2007, 2008 Nortel Networks
.

Configuring the cluster 73
To add a static route, use the following procedure:
ATTENTIONWhen you add a static route to the system, host, or interfaceconfiguration, the route is automatically assigned an indexnumber. There are separate sequences of index numbers forroutes configured for the cluster, for each host, and for eachinterface.
Procedure steps
Step Action
1 Select the Config tab.
2 Select Cluster, Routes, and Host Routes fromthe Navigation pane.
The Host Routes screen appears.
3 Select the host from the Host Number list, andclick Refresh.
4 Click Add.
The Add Host Route screen appears.
5 Click Update.
The new route appears in the Add Host Routetable.
6 Click Apply on the toolbar to send the currentchanges to the Nortel SNAS.
--End--
Use the data in the following table to add a host route.
Variable Value
Destination IP Specifies the static route destination IPaddress.
Destination Subnet Specifies the destination subnet IPaddress.
Gateway IP Specifies the IP address on the corerouter.
Removing a static route for a host To remove an existing static route,use the following procedure:
Nortel Secure Network Access SwitchConfiguration — Using BBI
NN47230-500 03.0224 October 2008
Copyright © 2007, 2008 Nortel Networks
.
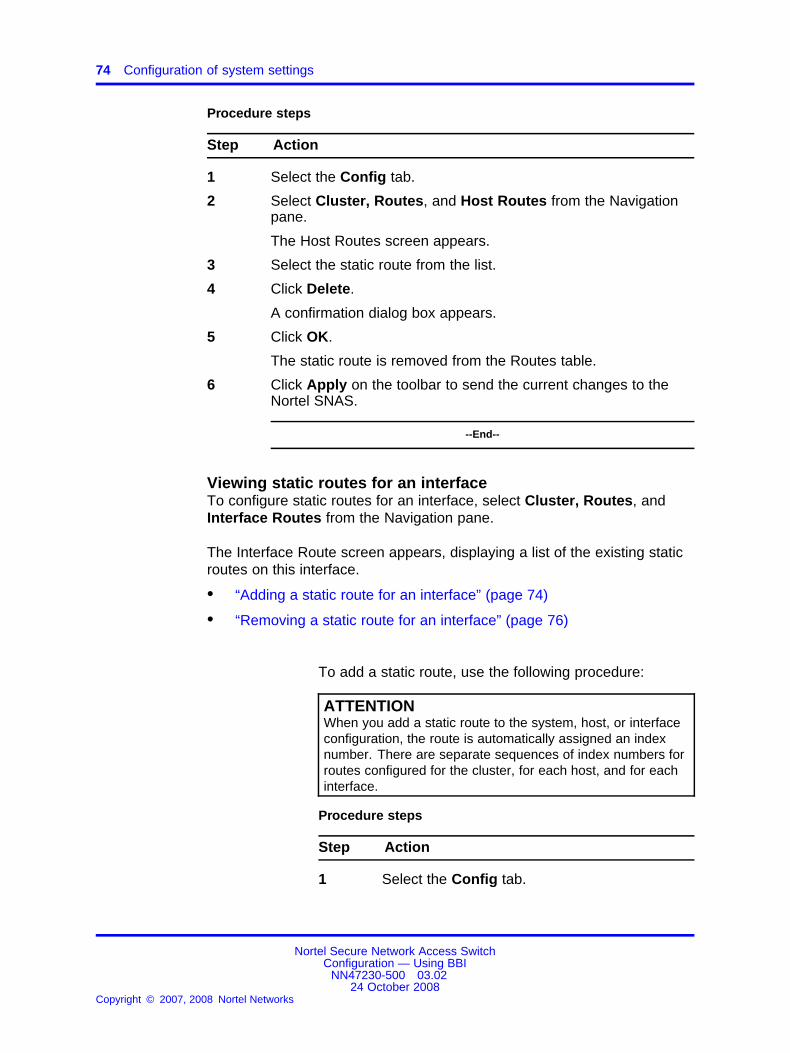
74 Configuration of system settings
Procedure steps
Step Action
1 Select the Config tab.
2 Select Cluster, Routes, and Host Routes from the Navigationpane.
The Host Routes screen appears.
3 Select the static route from the list.
4 Click Delete.
A confirmation dialog box appears.
5 Click OK.
The static route is removed from the Routes table.
6 Click Apply on the toolbar to send the current changes to theNortel SNAS.
--End--
Viewing static routes for an interfaceTo configure static routes for an interface, select Cluster, Routes, andInterface Routes from the Navigation pane.
The Interface Route screen appears, displaying a list of the existing staticroutes on this interface.
• “Adding a static route for an interface” (page 74)
• “Removing a static route for an interface” (page 76)
To add a static route, use the following procedure:
ATTENTIONWhen you add a static route to the system, host, or interfaceconfiguration, the route is automatically assigned an indexnumber. There are separate sequences of index numbers forroutes configured for the cluster, for each host, and for eachinterface.
Procedure steps
Step Action
1 Select the Config tab.
Nortel Secure Network Access SwitchConfiguration — Using BBI
NN47230-500 03.0224 October 2008
Copyright © 2007, 2008 Nortel Networks
.

Configuring the cluster 75
2 Select Cluster, Routes, and Interface Routesfrom the Navigation pane.
The Interface Routes screen appears.
3 Select the host and the interface from therespective lists, and click Refresh.
4 Click Add.
The Add Interface Route screen appears.
5 Enter the static route information in theapplicable fields. The following table describesthe Add Interface Route fields.
6 Click Update.
The new route appears in the Route Table.
7 Click Apply on the toolbar to send the currentchanges to the Nortel SNAS.
--End--
Use the data in the following table to add a static routefor an interface.
Variable Value
Destination IP Specifies the static route destination IPaddress.
Destination Subnet Specifies the destination subnet IPaddress.
Gateway IP Specifies the IP address on the corerouter.
Nortel Secure Network Access SwitchConfiguration — Using BBI
NN47230-500 03.0224 October 2008
Copyright © 2007, 2008 Nortel Networks
.
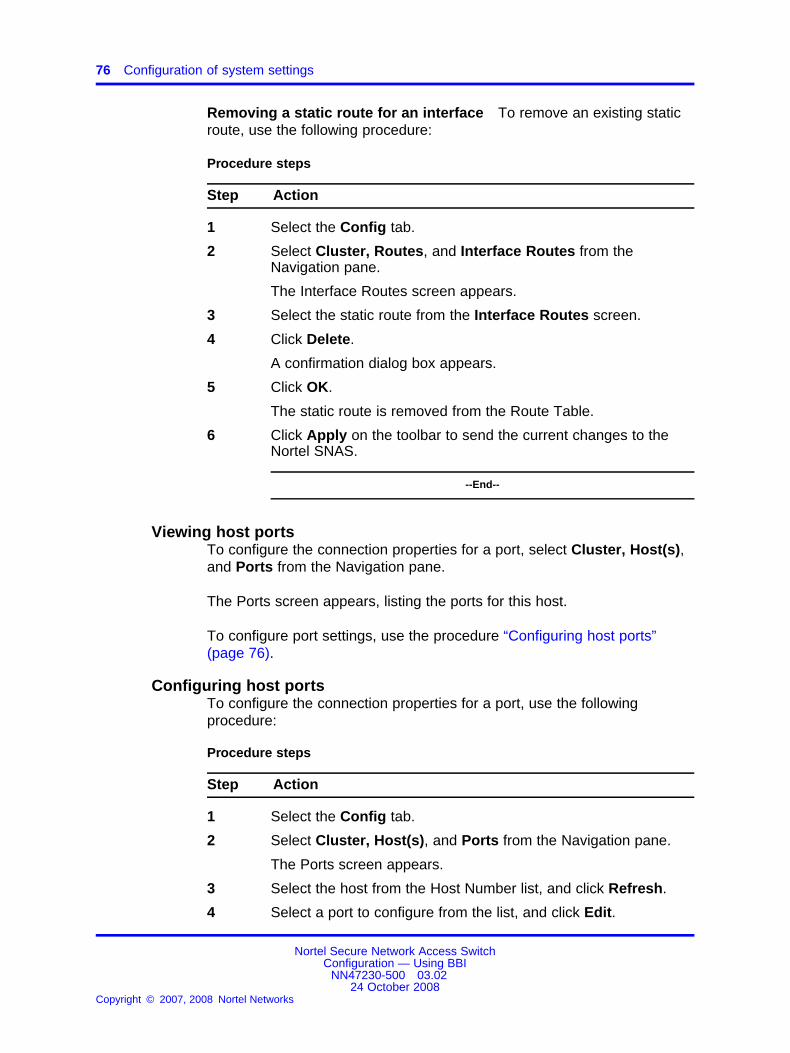
76 Configuration of system settings
Removing a static route for an interface To remove an existing staticroute, use the following procedure:
Procedure steps
Step Action
1 Select the Config tab.
2 Select Cluster, Routes, and Interface Routes from theNavigation pane.
The Interface Routes screen appears.
3 Select the static route from the Interface Routes screen.
4 Click Delete.
A confirmation dialog box appears.
5 Click OK.
The static route is removed from the Route Table.
6 Click Apply on the toolbar to send the current changes to theNortel SNAS.
--End--
Viewing host portsTo configure the connection properties for a port, select Cluster, Host(s),and Ports from the Navigation pane.
The Ports screen appears, listing the ports for this host.
To configure port settings, use the procedure “Configuring host ports”(page 76).
Configuring host portsTo configure the connection properties for a port, use the followingprocedure:
Procedure steps
Step Action
1 Select the Config tab.
2 Select Cluster, Host(s), and Ports from the Navigation pane.
The Ports screen appears.
3 Select the host from the Host Number list, and click Refresh.
4 Select a port to configure from the list, and click Edit.
Nortel Secure Network Access SwitchConfiguration — Using BBI
NN47230-500 03.0224 October 2008
Copyright © 2007, 2008 Nortel Networks
.

Configuring the cluster 77
The Modify Port screen appears displaying configuration detailsfor the selected port.
5 Click Update to save the details.
6 Click Apply on the toolbar to send the current changes to theNortel SNAS.
--End--
Variable definitionsUse the data in the following table to configure host ports.
Variable Value
Port Number Displays an integer in the range 1 to 4, indicatingthe port number of the physical port on the NortelSNAS.
Autonegotiation Specifies the Ethernet autonegotiation setting forthe host and NIC port. The options are:
• on—the port is set to autonegotiate speed andmode. This is the recommended setting.
• off—speed and mode are fixed at a specifiedsetting.
The default is on.
When autonegotiation is on, ensure that thedevice to which the port is connected is also set toautonegotiate.
Nortel Secure Network Access SwitchConfiguration — Using BBI
NN47230-500 03.0224 October 2008
Copyright © 2007, 2008 Nortel Networks
.

78 Configuration of system settings
Variable Value
Speed Specifies the speed in megabits per second for thehost and NIC port when autonegotiation is set tooff.Quick Choice values: 10|100|1000.
Full or half duplex mode Specifies the duplex mode for the host and NICport when autonegotiation is set to off.Values: full and halfdefault: full
Configuring the access listThe access list is a cluster-wide list of IP addresses for hosts authorizedto access the Nortel SNAS devices by Telnet, SSH, BBI, and SREM. Youcan configure the list to allow access by individual systems or a range ofsystems on a specific network.
If the access list is empty, access is open to any system.
For information about enabling Telnet and SSH access, see “Configuringadministrative settings” (page 94).
To configure the access list, select Administration, Access List from theNavigation pane.
The Access List screen appears.
From here, you can manage the access list by using one of the followingprocedures:
• “Adding an access list entry” (page 78)
• “Removing an Access List entry” (page 79)
Adding an access list entryTo add an entry to the access list, use the following procedure:
Procedure steps
Step Action
1 Select the Config tab.
2 Select Administration and Access List from the Navigationpane.
The Access List screen appears.
3 Click Add.
Nortel Secure Network Access SwitchConfiguration — Using BBI
NN47230-500 03.0224 October 2008
Copyright © 2007, 2008 Nortel Networks
.

Configuring the cluster 79
The Add New Client Access screen appears.
4 Click Update.
The new host appears in the table. An index number isautomatically assigned to the entry.
5 Click Apply on the toolbar to send the current changes to theNortel SNAS.
--End--
Use the data in the following table to add an access host.
Variable Value
Client NetworkAddress
Specifies the IP address of the host tobe allowed access.
Client Subnet Mask Specifies the subnet mask. Youcan set the mask to specify a singlesystem or a range of systems on aspecific network.
Removing an Access List entryTo remove an existing entry from the access list, use the followingprocedure:
Procedure steps
Step Action
1 Select the Config tab.
2 Select Administration and Access List from the Navigationpane.
Nortel Secure Network Access SwitchConfiguration — Using BBI
NN47230-500 03.0224 October 2008
Copyright © 2007, 2008 Nortel Networks
.

80 Configuration of system settings
The Access List screen appears.
3 Select an entry from the Access List table to remove.
4 Click Delete.
A confirmation dialog box appears.
5 Click OK.
The entry disappears from the Access List Table.
6 Click Apply on the toolbar to send the current changes to theNortel SNAS.
--End--
Managing date and time settingsTo manage system date and time settings, select Cluster and Time fromthe Navigation pane.
The Time screen appears, allowing you to modify existing system settingsand manage a list of NTP servers.
ATTENTIONYou can add NTP servers to the system configuration to enable the NTP clienton the Nortel SNAS to synchronize its clock. To compensate for discrepancies,it is recommended that NTP has access to at least three NTP servers.
For detailed procedures about managing date and time settings, use oneof the following procedures:
• “Configuring the date and time settings” (page 80)
• “Adding an NTP server” (page 81)
• “Removing an NTP server” (page 82)
Configuring the date and time settingsTo configure the system date and time, use the following procedure:
Procedure steps
Step Action
1 Select the Config tab.
2 Select Cluster and Time from the Navigation pane.
The Time screen appears.
Nortel Secure Network Access SwitchConfiguration — Using BBI
NN47230-500 03.0224 October 2008
Copyright © 2007, 2008 Nortel Networks
.

Configuring the cluster 81
3 Click Save.
4 Click Apply on the toolbar to send the current changes to theNortel SNAS.
--End--
Use the data in the following table to configure thesystem date and time.
Variable Value
Date Specify the system date inMM-DD-YYYY format.
Time Specifies the system time in HH:MMformat, using a 24-hour clock.
Time Zone Select the time zone from the list.
Adding an NTP serverTo add an additional NTP server, use the following procedure:
Nortel Secure Network Access SwitchConfiguration — Using BBI
NN47230-500 03.0224 October 2008
Copyright © 2007, 2008 Nortel Networks
.
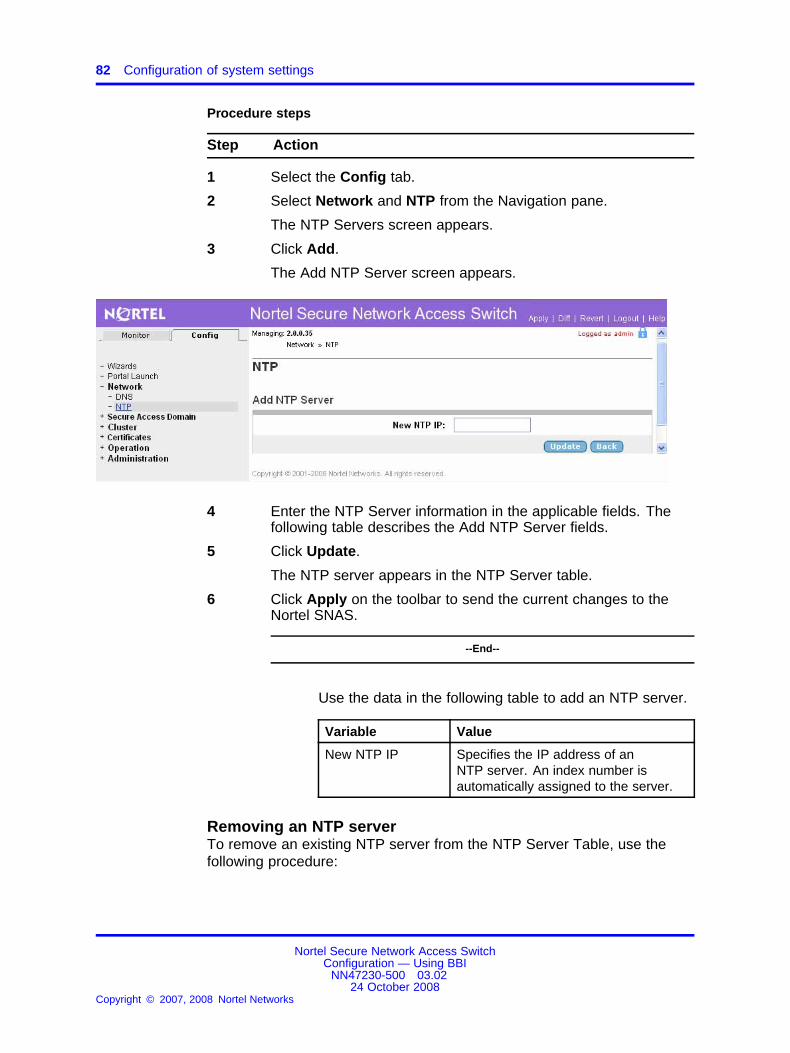
82 Configuration of system settings
Procedure steps
Step Action
1 Select the Config tab.
2 Select Network and NTP from the Navigation pane.
The NTP Servers screen appears.
3 Click Add.
The Add NTP Server screen appears.
4 Enter the NTP Server information in the applicable fields. Thefollowing table describes the Add NTP Server fields.
5 Click Update.
The NTP server appears in the NTP Server table.
6 Click Apply on the toolbar to send the current changes to theNortel SNAS.
--End--
Use the data in the following table to add an NTP server.
Variable Value
New NTP IP Specifies the IP address of anNTP server. An index number isautomatically assigned to the server.
Removing an NTP serverTo remove an existing NTP server from the NTP Server Table, use thefollowing procedure:
Nortel Secure Network Access SwitchConfiguration — Using BBI
NN47230-500 03.0224 October 2008
Copyright © 2007, 2008 Nortel Networks
.
Configuring the cluster 83
Procedure steps
Step Action
1 Select the Config tab.
2 Select Network and NTP from the Navigation pane.
The Time screen appears.
3 Select the NTP server entry that you wish to remove from theNTP Server Table.
4 Click Delete.
A confirmation dialog box appears.
5 Click OK.
The NTP server entry disappears from the NTP Server table.
6 Click Apply on the toolbar to send the current changes to theNortel SNAS.
--End--
Configuring DNS settingsTo configure DNS client settings, use the following procedure:
Procedure steps
Step Action
1 Select the Config tab.
2 Select Network and DNS from the Navigation pane.
The DNS Settings screen appears.
Nortel Secure Network Access SwitchConfiguration — Using BBI
NN47230-500 03.0224 October 2008
Copyright © 2007, 2008 Nortel Networks
.

84 Configuration of system settings
3 Click Update to save the details.
4 Click Apply on the toolbar to send the current changes to theNortel SNAS.
--End--
Variable definitionsUse the data in the following table to configure DNS client settings.
Variable Value
Local DNS Cache size Specifies the maximum number of DNS entriescontained in the local DNS cache. The range is0–10000. The default is 1000.
Retransmit Interval Timer Specifies the interval for retransmitting a DNSquery in seconds (s), minutes (m), hours (h), ordays (d). If you do not specify a measurement unit,seconds is assumed. The default is 2 seconds.
Retransmit Counter Specifies the maximum number of times a DNSquery is retransmitted. The default is 3.
Nortel Secure Network Access SwitchConfiguration — Using BBI
NN47230-500 03.0224 October 2008
Copyright © 2007, 2008 Nortel Networks
.

Configuring the cluster 85
Variable Value
Maximum TTL Specifies the maximum Time-to-live (TTL) value forentries in the DNS cache. After the TTL expires,the entries are discarded. Specify the TTL inseconds (s), minutes (m), hours (h), or days (d).You can enter compound values (for example,2h30m). If you do not specify a measurement unit,seconds is assumed. The default is 3h (3 hours).
Health Check Up Counter Specifies the interval for the Nortel SNAS to checkthe health of the DNS servers. At the specifiedinterval, the Nortel SNAS performs a DNS queryto each DNS server in the system configuration todetermine its health status. Specify the interval inseconds (s), minutes (m), hours (h), or days (d). Ifyou do not specify a measurement unit, seconds isassumed. The default is 10 seconds.
Health Check DownCounter
Specifies the number of times a DNS serverhealth check can time out before the Nortel SNASdetermines that the DNS server is down. Thedefault is 2.
Health Check Up Interval Specifies the number of times a DNS server healthcheck returns a positive response before the NortelSNAS determines that the DNS server is up. Thedefault is 2.
Configuring serversTo configure servers, use one of the following procedures:
• “Managing syslog servers” (page 85)
• “Managing DNS servers” (page 88)
• “Managing RSA servers” (page 89)
Managing syslog serversTo manage syslog servers, select Cluster and Syslog from the Navigationpane.
The Syslog screen appears, displaying a list of active syslog servers.
From this screen, complete the following tasks as necessary:
• “Adding a new syslog server” (page 86)
• “Reordering a new syslog server” (page 87)
• “Removing an existing syslog server” (page 87)
Nortel Secure Network Access SwitchConfiguration — Using BBI
NN47230-500 03.0224 October 2008
Copyright © 2007, 2008 Nortel Networks
.
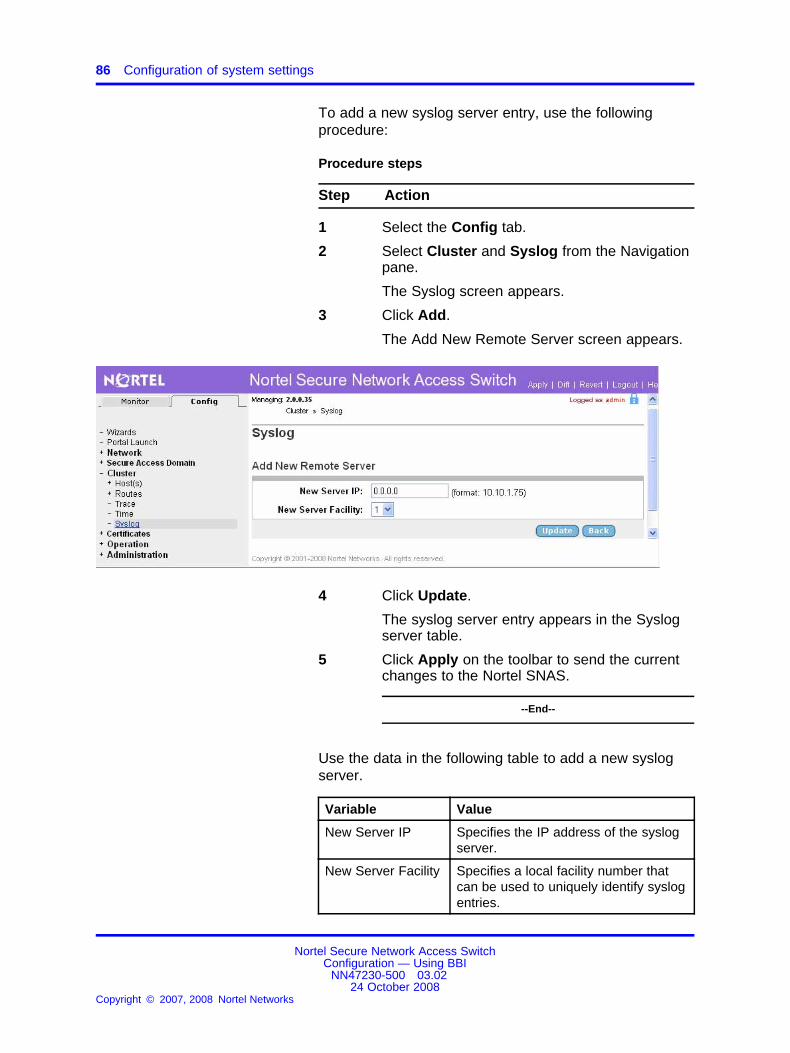
86 Configuration of system settings
To add a new syslog server entry, use the followingprocedure:
Procedure steps
Step Action
1 Select the Config tab.
2 Select Cluster and Syslog from the Navigationpane.
The Syslog screen appears.
3 Click Add.
The Add New Remote Server screen appears.
4 Click Update.
The syslog server entry appears in the Syslogserver table.
5 Click Apply on the toolbar to send the currentchanges to the Nortel SNAS.
--End--
Use the data in the following table to add a new syslogserver.
Variable Value
New Server IP Specifies the IP address of the syslogserver.
New Server Facility Specifies a local facility number thatcan be used to uniquely identify syslogentries.
Nortel Secure Network Access SwitchConfiguration — Using BBI
NN47230-500 03.0224 October 2008
Copyright © 2007, 2008 Nortel Networks
.

Configuring the cluster 87
Reordering a new syslog server To reorder the existing syslog servers,use the following procedure:
Procedure steps
Step Action
1 Select the Config tab.
2 Select Cluster and Syslog from the Navigation pane.
The Syslog screen appears.
3 Select the syslog server entry you want to reorder from theSyslog Server Table.
4 Specify the new facility sequence in the Syslog table.
5 Click Apply on the toolbar to automatically reindex all syslogserver entries.
--End--
Removing an existing syslog server To remove an existing syslogserver entry from the Syslog Server Table, use the following procedure:
Procedure steps
Step Action
1 Select the Config tab.
2 Select Cluster and Syslog from the Navigation pane.
The Syslog screen appears.
3 Select the syslog server entry you want to delete from theSyslog Server Table.
4 Click Delete.
A confirmation dialog box appears.
5 Click OK.
The syslog server entry is immediately removed from the SyslogServer Table.
6 Click Apply on the toolbar to send the current changes to theNortel SNAS.
--End--
Nortel Secure Network Access SwitchConfiguration — Using BBI
NN47230-500 03.0224 October 2008
Copyright © 2007, 2008 Nortel Networks
.
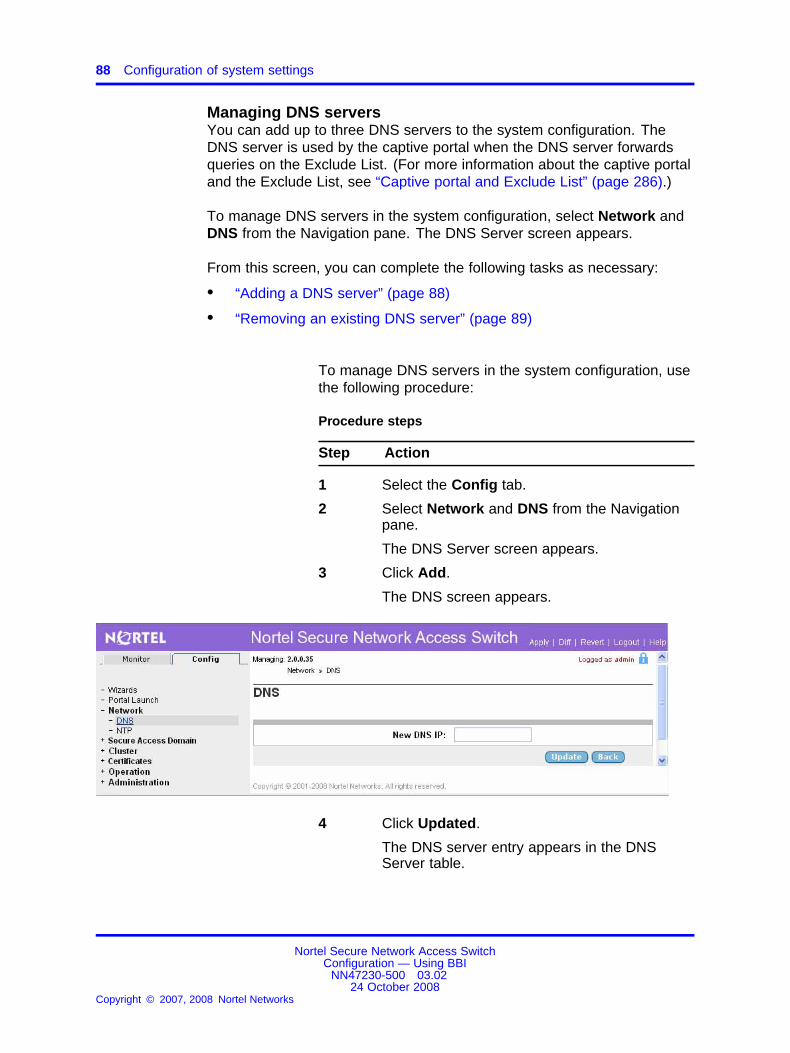
88 Configuration of system settings
Managing DNS serversYou can add up to three DNS servers to the system configuration. TheDNS server is used by the captive portal when the DNS server forwardsqueries on the Exclude List. (For more information about the captive portaland the Exclude List, see “Captive portal and Exclude List” (page 286).)
To manage DNS servers in the system configuration, select Network andDNS from the Navigation pane. The DNS Server screen appears.
From this screen, you can complete the following tasks as necessary:
• “Adding a DNS server” (page 88)
• “Removing an existing DNS server” (page 89)
To manage DNS servers in the system configuration, usethe following procedure:
Procedure steps
Step Action
1 Select the Config tab.
2 Select Network and DNS from the Navigationpane.
The DNS Server screen appears.
3 Click Add.
The DNS screen appears.
4 Click Updated.
The DNS server entry appears in the DNSServer table.
Nortel Secure Network Access SwitchConfiguration — Using BBI
NN47230-500 03.0224 October 2008
Copyright © 2007, 2008 Nortel Networks
.

Configuring the cluster 89
5 Click Apply on the toolbar to send the currentchanges to the Nortel SNAS.
--End--
Use the data in the following table to add a DNS server.
Variable Value
New DNS IP Specifies the IP address for the DNSserver.
Removing an existing DNS server To remove a DNS server from thesystem configuration, use the following procedure:
Procedure steps
Step Action
1 Select the Config tab.
2 Select Network and DNS from the Navigation pane.
The DNS Server screen appears.
3 Select the DNS server you want to remove from the DNS Servertable.
4 Click Delete.
A confirmation dialog box appears.
5 Click OK.
The DNS server entry is immediately removed from the DNSServer Table.
6 Click Apply on the toolbar to send the current changes to theNortel SNAS.
--End--
Managing RSA serversTo manage RSA servers, select Administration and RSA Servers fromthe Navigation pane. The RSA Server screen appears, listing RSA serversthat have already been configured on the Nortel SNAS.
ATTENTIONThis feature is not supported in Nortel Secure Network Access Switch SoftwareRelease 1.6.1.
Nortel Secure Network Access SwitchConfiguration — Using BBI
NN47230-500 03.0224 October 2008
Copyright © 2007, 2008 Nortel Networks
.

90 Configuration of system settings
This screen allows you to view, manage, and configure RSA server entriesby using the following procedures:
• “Adding an RSA server” (page 90)
• “Removing an existing RSA server” (page 91)
• “Removing the RSA node secret” (page 92)
• “Importing sdconf.rec” (page 93)
ATTENTIONThis feature is not supported in Nortel Secure NetworkAccess Switch Software Release 1.6.1.
To configure RSA servers, use the following procedure.
Procedure steps
Step Action
1 Select the Config tab.
2 Select Administration and RSA Servers fromthe Navigation pane.
The RSA Server screen appears.
3 Click Add.
The Add New RSA Server screen appears.
Nortel Secure Network Access SwitchConfiguration — Using BBI
NN47230-500 03.0224 October 2008
Copyright © 2007, 2008 Nortel Networks
.

Configuring the cluster 91
4 Enter the RSA server information in theapplicable fields. The following table describesthe Add New RSA Server fields.
5 Click Update.
The RSA server appears in the RSA Servertable.
6 Click Apply on the toolbar to send the currentchanges to the Nortel SNAS.
--End--
Use the data in the following table to add a RSA server.
Variable Value
Id Specifies the index value for the serverentry.
RSA ServerIP/Hostname
Specifies the hostname of the RSAserver.
ATTENTIONThis feature is not supported in Nortel Secure Network Access Switch SoftwareRelease 1.6.1.
Removing an existing RSA server To remove an existing RSA server,use the following procedure:
Procedure steps
Step Action
1 Select the Config tab.
2 Select Administration and RSA Servers from the Navigationpane.
The RSA Server screen appears.
3 Select the RSA server entry to remove from the RSA Servertable.
4 Click Delete.
A confirmation dialog box appears.
5 Click OK.
The RSA server entry disappears from the RSA Server Table.
Nortel Secure Network Access SwitchConfiguration — Using BBI
NN47230-500 03.0224 October 2008
Copyright © 2007, 2008 Nortel Networks
.

92 Configuration of system settings
6 Click Apply on the toolbar to send the current changes to theNortel SNAS.
--End--
ATTENTIONThis feature is not supported in Nortel Secure Network Access Switch SoftwareRelease 1.6.1.
Removing the RSA node secret You can remove the RSA node secret,if necessary. However, authentication then fails until you clear he Nodesecret created check box in the Edit Agent Host window on the RSAserver.
To remove the RSA node secret, use the following procedure:
Procedure steps
Step Action
1 Select the Config tab.
2 Select Administration and RSA Servers from the Navigationpane.
The RSA Server screen appears.
3 Select the RSA server entry from the RSA Server table, andclick Edit.
The Modify RSA Server screen appears. The screen displaysthe index number and symbolic name assigned to the RSAserver when you added the RSA server.
Nortel Secure Network Access SwitchConfiguration — Using BBI
NN47230-500 03.0224 October 2008
Copyright © 2007, 2008 Nortel Networks
.

Configuring the cluster 93
4 Click Remove Node Secret.
The RSA node secret is immediately removed.
5 Click Update to save the details.
6 Click Apply on the toolbar to send the current changes to theNortel SNAS.
--End--
ATTENTIONThis feature is not supported in Nortel Secure NetworkAccess Switch Software Release 1.6.1.
The sdconf.rec file is a configuration file that containscritical RSA ACE/Server information. Ask your RSAACE/Server administrator to make the file available onthe specified TFTP/FTP/SCP/SFTP server.
To import an sdconf.rec file, use the following procedure:
Procedure steps
Step Action
1 Select the Config tab.
2 Select Administration and RSA Servers fromthe Navigation pane.
The RSA Server screen appears.
3 Select an RSA server from the RSA Servertable and click Edit.
The Modify RSA Server screen appears.
4 Click Import.
5 Click Apply on the toolbar to send the currentchanges to the Nortel SNASand import thesdconf.rec file.
--End--
Use the data in the following table to import sdconf.rec.
Variable Value
Filename Specifies the file name.
Nortel Secure Network Access SwitchConfiguration — Using BBI
NN47230-500 03.0224 October 2008
Copyright © 2007, 2008 Nortel Networks
.

94 Configuration of system settings
Configuring administrative settingsTo manage system administrative settings, choose from one of thefollowing procedures:
• “Configuring SRS control settings” (page 94)
• “Configuring Nortel SNAS host SSH keys” (page 95)
• “Managing RADIUS authentication of system users” (page 98)
Configuring SRS control settingsTo create and modify the Nortel Health Agent Software Requirement Set(SRS) rules, you must use the BBI (see Nortel Health Policy AdministratorSRS Builder). Before you can access the Rule Builder utility, you mustenable support for SRS administration.
To configure support for managing the SRS rules, use the followingprocedure:
Procedure steps
Step Action
1 Select the Config tab.
2 Select Administration and SRS Control Setting from theNavigation pane.
The SRS Control Settings screen appears.
Nortel Secure Network Access SwitchConfiguration — Using BBI
NN47230-500 03.0224 October 2008
Copyright © 2007, 2008 Nortel Networks
.

Configuring the cluster 95
3 Click Update to save the details.
4 Click Apply on the toolbar to send the current changes to theNortel SNAS.
--End--
Variable definitionsUse the data in the following table to configure SRS rules.
Variable Value
HTTP Settings
Port Specifies the TCP port used for communicationwith the SRS administration server.default: 80
Status Enables or disables the SRS administration forcreating and managing SRS rules.Values: enabled and disabled
HTTP/SSL Settings
Port Specifies the TCP port used for communicationwith the SRS administration server.default: 4443.
Status Enables or disables the SRS administration forcreating and managing SRS rules.
Idle Timeout
Web/CLI Timeout Specifies an idle timeout in seconds for Web GUIand CLI logons. The value can be between 300and 604800.
Configuring Nortel SNAS host SSH keysThe Nortel SNAS functions as both SSH client (for importing andexporting logs using SFTP) and SSH server for secure managementcommunications between the Nortel SNAS devices in a cluster.
ATTENTIONSCP is not supported.
The SSH host keys are a set of keys used by all hosts in the cluster inaccordance with the Single System Image (SSI) concept. As a result,connections to the MIP always appear to an SSH client to be to the samehost.
During initial setup, there is an option to generate the SSH host keysautomatically.
Nortel Secure Network Access SwitchConfiguration — Using BBI
NN47230-500 03.0224 October 2008
Copyright © 2007, 2008 Nortel Networks
.

96 Configuration of system settings
Showing SSH keysTo show or copy the existing SSH key, use the following procedure:
Procedure steps
Step Action
1 Select the Config tab.
2 Select Administration and SSH Keys from the Navigation pane.
The SSH Keys screen appears
3 Click Show SSH Keys from the Navigation pane.
The SSH Host Keys screen appears.
The keys display in the following formats:
• RSA1 key—the OpenSSH implementation, except that theline is wrapped.
• RSA and DSA keys—the SECSH Public Key File Format, asdescribed in Internet Draft draft-ietf-secsh-publickeyfile
--End--
Importing an SSH key from a known hostTo import an SSH key from a known host, use the following procedure:
Procedure steps
Step Action
1 Select the Config tab.
2 Select Administration and SSH Keys from the Navigation pane.
The SSH Keys screen appears
3 Click Import .
The New SSH Key screen appears.
4 Enter a value in the IP Address field.
This field specifies the host from which the SSH key is imported.
5 Click Save.
--End--
Nortel Secure Network Access SwitchConfiguration — Using BBI
NN47230-500 03.0224 October 2008
Copyright © 2007, 2008 Nortel Networks
.

Configuring the cluster 97
Adding an SSH key for a known hostAs a convenience, you can paste public SSH keys from remote hosts, sothat are not prompted to accept a new key during a later use of SCP orSFTP for file or data transfer.
To achieve strict man in the middle protection, verify the fingerprint beforeapplying the changes.
To add the public SSH key of a known remote host, use the followingprocedure:
Procedure steps
Step Action
1 Select the Config tab.
2 Select Administration and SSH Keys from the Navigation pane.
The SSH Keys screen appears
3 Click Add .
The New SSH Key screen appears.
4 Click Save.
5 Click Apply on the toolbar to send the current changes to theNortel SNAS.
--End--
Nortel Secure Network Access SwitchConfiguration — Using BBI
NN47230-500 03.0224 October 2008
Copyright © 2007, 2008 Nortel Networks
.

98 Configuration of system settings
Variable definitionsUse the data in the following table to add an SSH key for a known host.
Variable Value
Host name/IP Address Specifies the host for which you are adding theSSH key. You can provide a comma-separated listof names and IP addresses for the host.
SSH Key The SSH key.Valid formats are:
• RSA1 keys—the OpenSSH implementation(native format or with the line wrapped)
• RSA and DSA keys—the SECSH Public KeyFile Format, as described in Internet Draftdraft-ietf-secsh-publickeyfile
Managing RADIUS authentication of system usersYou can configure the Nortel SNAS cluster to use an external RADIUSserver to authenticate system users. Authentication applies to CLI, SREM,and BBI users.
The user name and password defined on the RADIUS server must bethe same as the user name and password defined on the Nortel SNAS.When the user logs on, the RADIUS server authenticates the password.The user group (admin, oper, or certadmin) is picked up from the localdefinition of the user.
For more information about specifying user names, passwords, and groupassignments for Nortel SNAS system users, see “Management of systemusers and groups” (page 275).
When you add an external RADIUS authentication server to theconfiguration, the server is automatically assigned an index number. Youcan add several RADIUS authentication servers, for backup purposes.Nortel SNAS authentication is performed by an available server withthe lowest index number. You can control authentication server usageby reassigning index numbers (see “Managing RADIUS authenticationservers” (page 100)).
To configure the Nortel SNAS to support RADIUS authentication of systemusers, use the following procedures:
• “Configuring RADIUS authentication of system users” (page 99)
• “Managing RADIUS authentication servers” (page 100)
Nortel Secure Network Access SwitchConfiguration — Using BBI
NN47230-500 03.0224 October 2008
Copyright © 2007, 2008 Nortel Networks
.

Configuring the cluster 99
Configuring RADIUS authentication of system usersTo configure RADIUS authentication, use the following procedure:
Procedure steps
Step Action
1 Select the Config tab.
2 Select Administration and RADIUS from the Navigation pane.
The RADIUS screen appears.
3 Enter the RADIUS authentication information in the applicablefields. The following table describes the RADIUS fields.
4 Click Update to save the details.
5 Click Apply on the toolbar to send the current changes to theNortel SNAS.
--End--
Use the data in the following table to configure RADIUSauthentication.
Variable Value
Status Enables or disables RADIUSauthentication of system users.The default is disabled.
Nortel Secure Network Access SwitchConfiguration — Using BBI
NN47230-500 03.0224 October 2008
Copyright © 2007, 2008 Nortel Networks
.

100 Configuration of system settings
Variable Value
Timeout Specifies the timeout interval for aconnection request to a RADIUSserver. At the end of the timeoutperiod, if no connection is established,authentication fails.
Enter a value to indicate the timeinterval in seconds. The range is1–10000 seconds. The default is 10seconds.
Fallback Specifies the desired fallback mode.Valid options are:
• on—if the RADIUS servers areunreachable, the local passwordsdefined on the Nortel SNAS areused as fallback.
• off—if the RADIUS servers areunreachable, the only way toaccess the system is to reinstall thesoftware (boot install).
When checked, the fallback mode ison.
The default is on.
ATTENTIONWith the fallback mode set to on,unwanted access to the Nortel SNASis possible by using a serial cable (ifthe network cable is disconnected)and the local password.
Managing RADIUS authentication serversTo manage RADIUS authentication servers used by the Nortel SNAS,select Administration and RADIUS from the Navigation pane.
The RADIUS screen appears.
Select from the following tasks to manage the RADIUS authenticationservers:
• “Adding a RADIUS authentication server ” (page 101)
• “Removing an existing RADIUS server ” (page 102)
Nortel Secure Network Access SwitchConfiguration — Using BBI
NN47230-500 03.0224 October 2008
Copyright © 2007, 2008 Nortel Networks
.
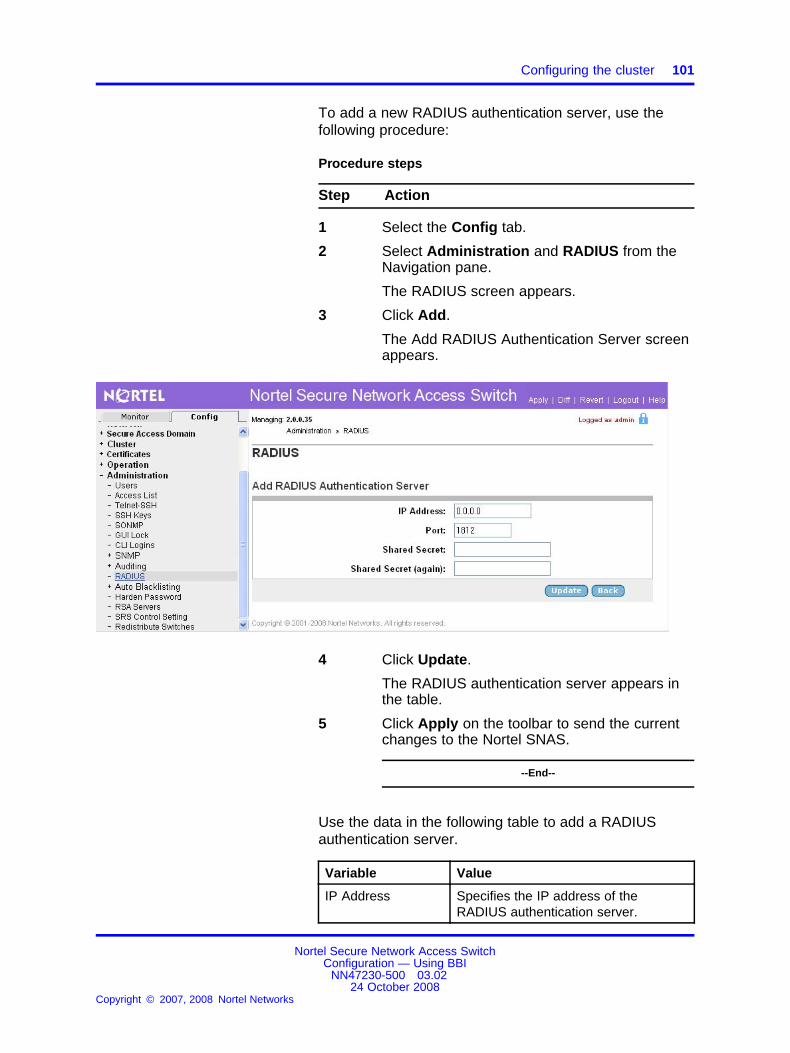
Configuring the cluster 101
To add a new RADIUS authentication server, use thefollowing procedure:
Procedure steps
Step Action
1 Select the Config tab.
2 Select Administration and RADIUS from theNavigation pane.
The RADIUS screen appears.
3 Click Add.
The Add RADIUS Authentication Server screenappears.
4 Click Update.
The RADIUS authentication server appears inthe table.
5 Click Apply on the toolbar to send the currentchanges to the Nortel SNAS.
--End--
Use the data in the following table to add a RADIUSauthentication server.
Variable Value
IP Address Specifies the IP address of theRADIUS authentication server.
Nortel Secure Network Access SwitchConfiguration — Using BBI
NN47230-500 03.0224 October 2008
Copyright © 2007, 2008 Nortel Networks
.

102 Configuration of system settings
Variable Value
Port Specifies the TCP port number usedfor RADIUS authentication. Thedefault is 1813.
Shared Secret Specifies the password used toauthenticate the Nortel SNAS to theauthentication server.
Shared Secret(again)
Confirm the password.
Removing an existing RADIUS server To remove an existing RADIUSauthentication server, use the following procedure:
Procedure steps
Step Action
1 Select the Config tab.
2 Select Administration and RADIUS from the Navigation pane.
The RADIUS screen appears.
3 Select the RADIUS server entry to remove from the RADIUStable.
4 Click Delete.
A dialog box appears, asking for confirmation.
5 Click OK.
The authentication server entry is immediately removed from theRadius Server Table.
6 Click Apply on the toolbar to send the current changes to theNortel SNAS.
--End--
Configuring auto blacklistingTo configure auto blacklisting, use the following procedure:
Procedure steps
Step Action
1 Select the Config tab.
2 Select Administration, Auto Blacklisting, and General fromthe Navigation pane.The General screen appears.
Nortel Secure Network Access SwitchConfiguration — Using BBI
NN47230-500 03.0224 October 2008
Copyright © 2007, 2008 Nortel Networks
.

Configuring the cluster 103
3 Click Update.The auto blacklisting settings appears in the General screen.
4 Click Apply on the toolbar to send the current changes to theNortel SNAS.
--End--
Variable definitionsUse the data in the following table to configure auto blacklisting.
Variable Value
Auto BlackListing Enables or disables the auto blacklisting settings. (default:disabled)
Failed User Attempt Specifies allowed number of failed attempts to a user account.(default: 10/1h attempts/timeperiod)
Failed Host Attempt Specifies allowed number of failed login attempts from a host.(default: 10/1h attempts/timeperiod)
Failed User Purge Specify time period for purging failed user attempt record.(default: 2d)
Failed Host Purge Specify time period for purging failed host attempt record.(default: 2d)
Configuring monitored usersTo configure monitored users, use the following procedure:
Nortel Secure Network Access SwitchConfiguration — Using BBI
NN47230-500 03.0224 October 2008
Copyright © 2007, 2008 Nortel Networks
.

104 Configuration of system settings
Procedure steps
Step Action
1 Select the Config tab.
2 Select Administration, Auto Blacklisting, and Users from theNavigation pane.The Monitored Users screen appears.
3 Click Add.The Add User screen appears.
4 Click Update.The new monitored user appears in the Monitored Users table.
5 Click Apply on the toolbar to send the current changes to theNortel SNAS.
--End--
Use the data in the following table to add a user.
Variable Value
UserName Specify user names to be monitored. You can specify the usernames to be monitored in the following format:• to monitor users write, comma separated names like:
oper,admin
• to monitor all users, enter wild card (*)
• to monitor all users except "root" precede the user with (^)like: ^root
Nortel Secure Network Access SwitchConfiguration — Using BBI
NN47230-500 03.0224 October 2008
Copyright © 2007, 2008 Nortel Networks
.

Configuring the cluster 105
Configuring monitored hostsTo configure monitored hosts, use the following procedure:
Procedure steps
Step Action
1 Select the Config tab.
2 Select Administration, Auto Blacklisting, and Hosts from theNavigation pane.The Monitored Hosts screen appears.
3 Click Add.The Add Host screen appears.
4 Click Update.The new monitored host appears in the Monitored Hosts table.
5 Click Apply on the toolbar to send the current changes to theNortel SNAS.
--End--
Use the data in the following table to add a host.
Variable Value
IP Address Specify hosts (IP Addresses) to be monitored. You canspecify the hosts to be monitored in the following format:• to monitor hosts write, comma separated IPs like:
10.10.2.1,10.10.5.2
• to monitor all hosts, enter wild card (*)
• to monitor all hosts except "10.10.1.2" precede the IPAddress with (^) like: ^10.10.1.2
Nortel Secure Network Access SwitchConfiguration — Using BBI
NN47230-500 03.0224 October 2008
Copyright © 2007, 2008 Nortel Networks
.

106 Configuration of system settings
Deleting monitored users/hostsTo delete monitored users/hosts, use the following procedure:
Procedure steps
Step Action
1 Select the Config tab.
2 Select Administration, Auto Blacklisting, and Users/Hostsfrom the Navigation pane.The Monitored Users/Hosts screen appears.
3 Select the user/host from the Monitored Users/Hosts list.
4 Click Delete.A message appears that Are you sure you want to deleteselected user/host.
5 Click OK.The Auto BlackList User/Host is deleted successfully messageappears.
6 Click Apply on the toolbar to send the current changes to theNortel SNAS.
--End--
Viewing failed login attemptsTo view the details of failed login attempts of users and hosts, use thefollowing procedure:
Procedure steps
Step Action
1 Select the Config tab.
2 Select Administration, Auto Blacklisting, and Show from theNavigation pane.The Failed Login Attempts screen appears.
Nortel Secure Network Access SwitchConfiguration — Using BBI
NN47230-500 03.0224 October 2008
Copyright © 2007, 2008 Nortel Networks
.

Configuring the cluster 107
3 Click Clear, to clear the blacklisted users/hosts.
4 Click Apply on the toolbar to send the current changes to theNortel SNAS.
--End--
Nortel SNAS TPS InterfaceThis supports the blacklisting feature, which allows to configure a time-outvalue for which the specified user or device is not permitted to connectto the network.
You can blacklist a device using ipv4 or MAC address and set the durationof blacklisting the device.
To view the details of blacklisted devices, use the following procedure:
Procedure steps
Step Action
1 Select the Monitor tab.
2 Select Blacklist from the Navigation pane.The Blacklist screen appears.
Nortel Secure Network Access SwitchConfiguration — Using BBI
NN47230-500 03.0224 October 2008
Copyright © 2007, 2008 Nortel Networks
.

108 Configuration of system settings
3 Click Blacklist.The specified device details that needs to be blacklisted appearsin the screen.
4 Click Apply on the toolbar to send the current changes to theNortel SNAS.
--End--
Variable definitionsUse the data in the following table to blacklist.
Variable Value
Enter IPv4 or Mac Address Specify the IPv4 or MAC Address to be blacklisted.
Enter blacklist duration Specify the duration to blacklist the device.Range: 1 minute to 31 days (for example: 20m)
Configuring harden passwordHarden Password provides strong password enforcement. To configureharden password, use the following procedure:
Procedure steps
Step Action
1 Select the Config tab.
2 Select Administration and Harden Password from theNavigation pane.The Harden Password screen appears.
Nortel Secure Network Access SwitchConfiguration — Using BBI
NN47230-500 03.0224 October 2008
Copyright © 2007, 2008 Nortel Networks
.

Configuring the cluster 109
3 Click Update.The harden password settings appears in the Harden Passwordscreen.
4 Click Apply on the toolbar to send the current changes to theNortel SNAS.
--End--
Variable definitionsUse the data in the following table to configure harden password.
Variable Value
Harden Password Enables or disables the harden password settings.(default: disabled)
Minimum Password Length Specify the minimum length of the password. (Range: 1-511)
Minimum Number of LowerCase Characters
Specify the minimum number of lower case characters in thepassword. (Range: 0-511)
Minimum Number of UpperCase Characters
Specify the minimum number of upper case characters in thepassword. (Range: 0-511)
Minimum Number of Digits Specify the minimum number digits in the password.(Range: 0-511)
Minimum Number of OtherCharacters
Specify the minimum number other characters in the password.(Range: 0-511)
Number of Retries Specify the number of retries to enter the password.(Range: 0-15)
Nortel Secure Network Access SwitchConfiguration — Using BBI
NN47230-500 03.0224 October 2008
Copyright © 2007, 2008 Nortel Networks
.
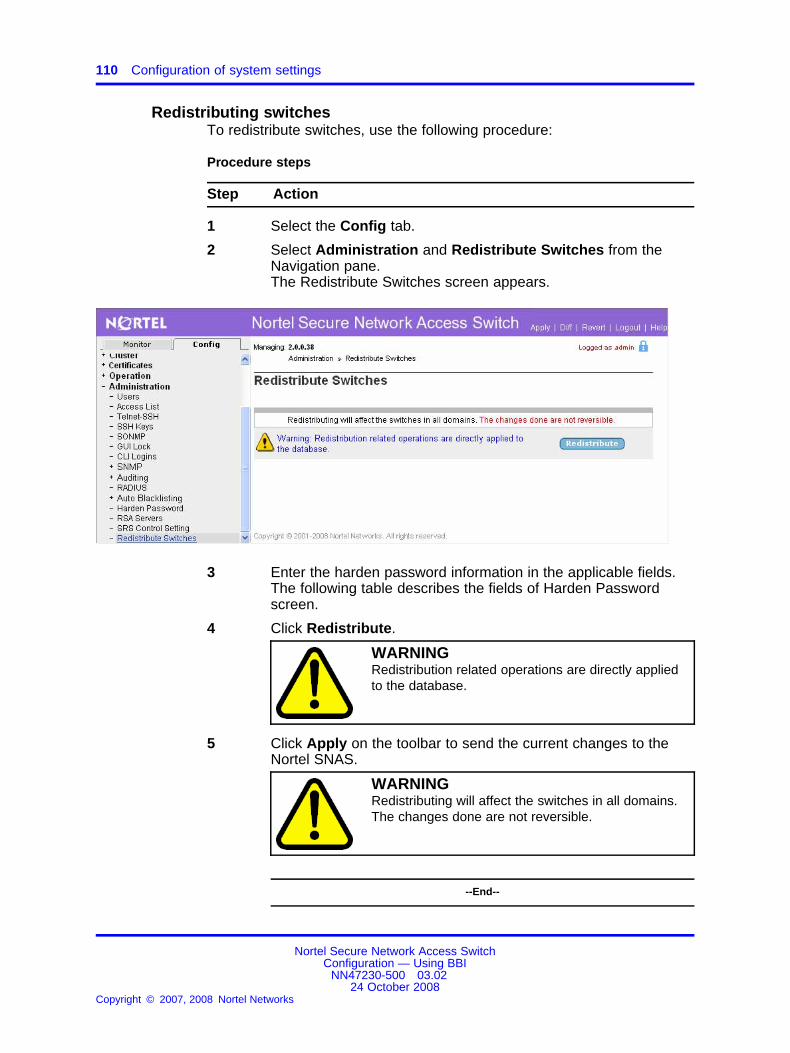
110 Configuration of system settings
Redistributing switchesTo redistribute switches, use the following procedure:
Procedure steps
Step Action
1 Select the Config tab.
2 Select Administration and Redistribute Switches from theNavigation pane.The Redistribute Switches screen appears.
3 Enter the harden password information in the applicable fields.The following table describes the fields of Harden Passwordscreen.
4 Click Redistribute.
WARNINGRedistribution related operations are directly appliedto the database.
5 Click Apply on the toolbar to send the current changes to theNortel SNAS.
WARNINGRedistributing will affect the switches in all domains.The changes done are not reversible.
--End--
Nortel Secure Network Access SwitchConfiguration — Using BBI
NN47230-500 03.0224 October 2008
Copyright © 2007, 2008 Nortel Networks
.

111.
Configuration of the domainThis chapter provides detailed procedures to configure domains.
Navigation• “Creating a domain” (page 112)
• “Configuring domain parameters” (page 121)
• “Deleting a domain” (page 121)
• “Configuring the Nortel Health Agent check” (page 133)
• “Configuring the SSL server” (page 138)
• “Configuring HTTP redirect” (page 144)
• “Configuring RADIUS accounting” (page 145)
• “Configuration of location” (page 150)
• “Configuring Lumension PatchLink integration” (page 154)
Overview of Nortel SNAS domainsA Nortel SNAS domain encompasses all the switches, authenticationservers, and remediation servers associated with that Nortel SNAS cluster.
If you run the quick setup wizard during initial setup, Domain 1 is created.If you do not run the quick setup wizard, you must create at least onedomain. For information about creating a domain, see “Creating a domain”(page 112).
To delete a domain, see “Deleting a domain” (page 121).
ATTENTIONWhen using the Nortel Secure Network Access Switch Software Release 1.6.1,you cannot configure the Nortel SNAS to have more than one domain.
For more information about configuring the domain, see “Configure thedomain” (page 112).
Nortel Secure Network Access SwitchConfiguration — Using BBI
NN47230-500 03.0224 October 2008
Copyright © 2007, 2008 Nortel Networks
.
112 Configuration of the domain
Configure the domainTo configure the domain, select Secure Access Domain from theNavigation pane. The Secure Access Domain screen appears, displayinga list of existing domains.
From the Secure Access Domain screens, you can configure and managethe following:
• domain parameters such as name and portal IP address (pVIP) (see“Configuring domain parameters” (page 121))
• Authentication, Authorization, and Accounting (AAA) features
— for authentication, see “Configuration of authentication” (page 219)
— for authorization, see “Configuration of groups and profiles” (page189)and “Configuring the Nortel Health Agent check” (page 133)
— for accounting, see “Configuring RADIUS accounting” (page 145)
• the SSL server used for the domain portal (see “Configuring the SSLserver” (page 138))
— SSL trace commands
— SSL settings
— logging traffic with syslog messages
• portal settings (see “Customize the portal and logon” (page 295))
— captive portal
— portal look and feel
— linksets
• the network access devices (see “Management of network accessdevices” (page 45))
• the Nortel SNAS VLANs (see “Management of network accessdevices” (page 45))
• SSH keys for the domain (see “Managing SSH keys” (page 53))
• HTTP redirect settings (see “Configuring HTTP redirect” (page 144))
Creating a domainYou can create a domain by using either of the following procedures:
• “Manually creating a domain” (page 113)
• “Using the Domain Quick Wizard” (page 114)
Nortel Secure Network Access SwitchConfiguration — Using BBI
NN47230-500 03.0224 October 2008
Copyright © 2007, 2008 Nortel Networks
.

Configure the domain 113
Manually creating a domainTo create and configure a domain manually, use the following procedure:
Procedure steps
Step Action
1 Select the Config tab.
2 Select Secure Access Domain from the Navigation pane.
The Secure Access Domain screen appears.
3 Click Add.
The Add Secure Access Domain screen appears.
4 Click Create.
The new domain appears in the Secure Access Domain table.
5 Click Apply on the toolbar to send the current changes to theNortel SNAS.
--End--
Use the data in the following table to configure a domain.
Variable Value
Identifier Specifies an integer in the range 1 to256 that uniquely identifies the domainin the Nortel SNAS cluster.
Nortel Secure Network Access SwitchConfiguration — Using BBI
NN47230-500 03.0224 October 2008
Copyright © 2007, 2008 Nortel Networks
.

114 Configuration of the domain
Variable Value
Name Specifies a string that identifies thedomain on the Nortel SNAS. Themaximum length of the string is 255characters.
IP Address Specifies the IP address of the NortelSNAS portal.
You can have more than one portal fora domain. To specify more than one IPaddress, use a comma separator.
The IP address is the address to whichthe client connects for authenticationand host integrity check.
Port Specifies the port on which theportal Web server listens for SSLcommunications.
The default for HTTPS communications is port 442.
SSL Status Specifies whether SSL is enabledon the portal server. The default isenabled.
Certificate Number Specifies the server certificate that theportal server uses. You cannot specifymore than one server certificate for theserver to use at any one time.
Using the Domain Quick WizardThe Nortel SNAS quick setup wizard is similar to the quick setup wizardavailable during initial setup.
You can always modify all settings created by the domain quick setupwizard (see “Configuring domain parameters” (page 121)).
To create a domain using the Nortel SNAS quick setup wizard, use thefollowing procedure:
Procedure steps
Step Action
1 Select the Config tab.
2 Select Wizard from the Navigation pane.
Nortel Secure Network Access SwitchConfiguration — Using BBI
NN47230-500 03.0224 October 2008
Copyright © 2007, 2008 Nortel Networks
.

Configure the domain 115
The Wizard screen appears.
3 Click Domain Quick Wizard.
The Domain Quick Wizard — General Settings screen appears.
4 Click Next.
The Domain Quick Wizard: Configure a Certificate screenappears.
5 Three ways exist to specify certificate information: by specifyingan existing certificate, by creating a test certificate, or by entering
Nortel Secure Network Access SwitchConfiguration — Using BBI
NN47230-500 03.0224 October 2008
Copyright © 2007, 2008 Nortel Networks
.

116 Configuration of the domain
a new server certificate. The following table describes theCertificate fields.
6 Click Next.
The Domain Quick Wizard — Certificate Chain screen appears.
7 Enter the certificate chain information in the applicable fields.The following table describes the Certificate Chain fields.
8 Click Next.
The Domain Quick Wizard — Switch screen appears.
9 If you do not want to add a switch at this time, continue withnext step.
10 Click Next.
Nortel Secure Network Access SwitchConfiguration — Using BBI
NN47230-500 03.0224 October 2008
Copyright © 2007, 2008 Nortel Networks
.

Configure the domain 117
The Domain Quick Wizard — Nortel Health Agent screenappears.
11 Click Finish.
If any information entered is not valid, a dialog box appearsdescribing the errors encountered when completing the wizardprocessing. Click Back to correct the invalid information beforecontinuing.
If there are no problems, then a dialog box appears to indicatethat the wizard is processing the information. The wizard createsthe domain, and assigns the following default VLAN IDs:
• Green VLAN = VLAN ID 110
• Yellow VLAN = VLAN ID 120
ATTENTIONYou can change the VLAN mappings when you add or modify thenetwork access devices (see “Management of network accessdevices” (page 45)).
12 Click Apply on the toolbar to send the current changes to theNortel SNAS.
--End--
Use the data in the following table to create a domainusing the Nortel SNAS quick setup wizard.
Variable Value
General Settings
Domain IP Address Specifies the IP address of the NortelSNAS domain.
Nortel Secure Network Access SwitchConfiguration — Using BBI
NN47230-500 03.0224 October 2008
Copyright © 2007, 2008 Nortel Networks
.
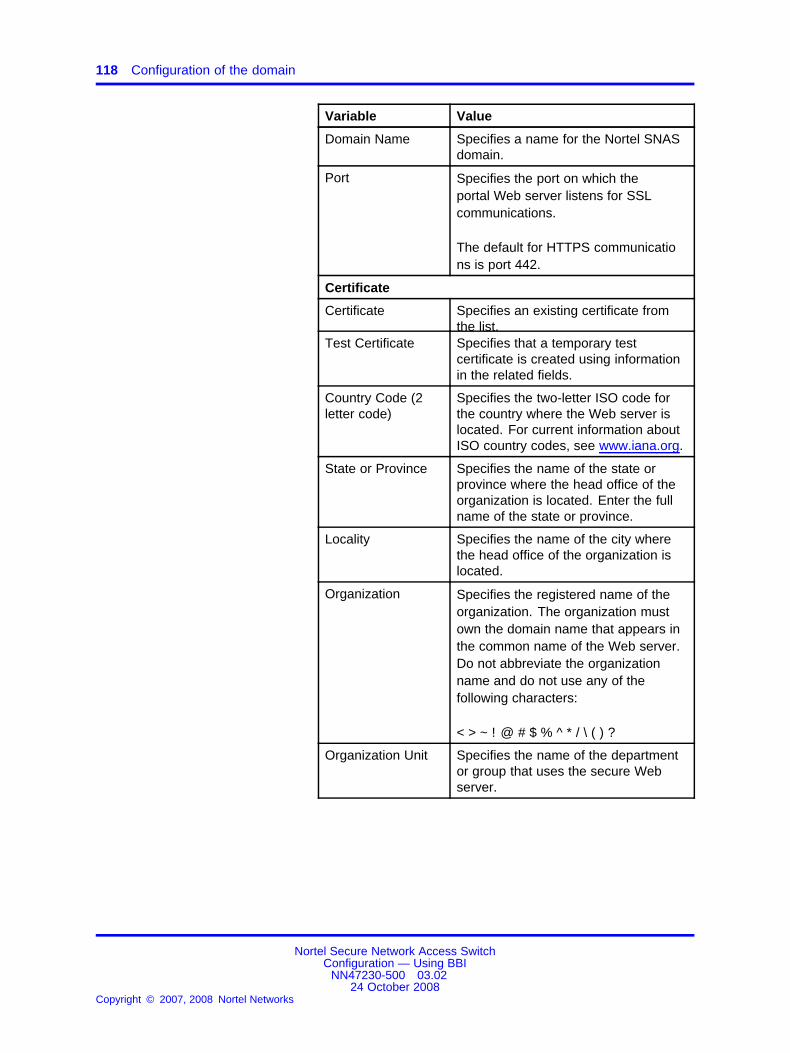
118 Configuration of the domain
Variable Value
Domain Name Specifies a name for the Nortel SNASdomain.
Port Specifies the port on which theportal Web server listens for SSLcommunications.
The default for HTTPS communications is port 442.
Certificate
Certificate Specifies an existing certificate fromthe list.
Test Certificate Specifies that a temporary testcertificate is created using informationin the related fields.
Country Code (2letter code)
Specifies the two-letter ISO code forthe country where the Web server islocated. For current information aboutISO country codes, see www.iana.org.
State or Province Specifies the name of the state orprovince where the head office of theorganization is located. Enter the fullname of the state or province.
Locality Specifies the name of the city wherethe head office of the organization islocated.
Organization Specifies the registered name of theorganization. The organization mustown the domain name that appears inthe common name of the Web server.Do not abbreviate the organizationname and do not use any of thefollowing characters:
< > ~ ! @ # $ % ^ * / \ ( ) ?
Organization Unit Specifies the name of the departmentor group that uses the secure Webserver.
Nortel Secure Network Access SwitchConfiguration — Using BBI
NN47230-500 03.0224 October 2008
Copyright © 2007, 2008 Nortel Networks
.

Configure the domain 119
Variable Value
Common Name Specifies the name of the Web serveras it appears in the URL. The namemust be the same as the domainname of the Web server that requestsa certificate. If the Web server namedoes not match the common name inthe certificate, some browsers refusea secure connection with your site. Donot enter the protocol specifier (http://)or any port numbers or pathnames inthe common name. Wildcards (suchas * or ?) and IP address are notallowed.
Email Address Specifies the user’s e-mail address.
Subject AlternativeName
Specifies alternate information ifyou did not provide a CommonName or e-mail address. Enter acomma-separated list of URI:<uri>,DNS:<fqdn>, IP:<ip-address>,email:<email-address>).
URI Specify the URI for the certificate.
DNS Specify the domain name.
IP Specify the IP address.
Email Specify the email address.
Valid for days Specifies the number of days a testcertificate remains valid.
Key Size Specifies the length of the generatedkey, in bits. Available options are:
• 512
• 1024
• 2048
• 4096
The default value is 1024.
Input ServerCertificate
Select this box to create a newcertificate by pasting the certificate filefrom a text editor.
Server Certificate The area where contents of an existingcertificate file are pasted when theInput Server Certificate option isselected.
Chain Certificate
Nortel Secure Network Access SwitchConfiguration — Using BBI
NN47230-500 03.0224 October 2008
Copyright © 2007, 2008 Nortel Networks
.

120 Configuration of the domain
Variable Value
CA Chain List Specifies whether the SSL server useschain certificates.
Select additional certificates from thelist to force the SSL server to usechain certificates.
Server
Create HTTP orHTTPS RedirectServer
Specifies whether or not to create aredirect server for HTTP to HTTPSredirection.
Switch
Configure a Switch Specifies whether or not to add anetwork access device to the domain.
Type of Switch Specifies the type of network accessdevice from the list. Valid options areERS8300, ERS4500, ERS5500 andERS5600.
Vlan ID Specifies the Red VLAN ID for thenetwork access device.
IP Address ofSwitch
Specifies the IP address of thenetwork access device.
NSNA Communication Port
Specifies the TCP port used forcommunication with the Nortel SNAS.The default is port 5000.
Key For Switch Allows you to paste in the switchpublic SSH key if it is not automaticallyretrieved. Alternatively, you can laterimport the key from the switch (see“Managing SSH keys” (page 53)).
Nortel Health Agent
Nortel Health AgentAction
Specifies the action performed whenan SRS rules check fails. The optionsare:
• restricted—the session remainsintact, but access is resticted inaccordance with the rights specifiedin the access rules for the group.
• teardown—the SSL session is torndown.
Nortel Secure Network Access SwitchConfiguration — Using BBI
NN47230-500 03.0224 October 2008
Copyright © 2007, 2008 Nortel Networks
.

Configure the domain 121
Variable Value
Create NortelHealth Agent TestUser
Specifies to create Nortel Health Agenttest user.
Create NortelHealth AgentSystem Test User
Specifies to create Nortel Health Agentsystem test user.
Deleting a domainTo delete a domain, use the following procedure:
Procedure steps
Step Action
1 Select the Config tab.
2 Select Secure Access Domain from the Navigation pane.
The Secure Access Domain screen appears.
3 Select the domain from the Secure Access Domain list.
4 Click Delete.
A confirmation dialog box appears.
5 Click OK.
The domain is removed from the Secure Access Domain table.
6 Click Apply on the toolbar to send the current changes to theNortel SNAS.
--End--
Configuring domain parametersTo configure a domain, use the following procedure:
Procedure steps
Step Action
1 Select the Config tab.
2 Select Secure Access Domain from the Navigation pane.
The Secure Access screen appears.
3 Select the domain and click Edit.
The Modify Secure Access Domain screen appears.
4 Enter the domain information in the applicable fields.
Nortel Secure Network Access SwitchConfiguration — Using BBI
NN47230-500 03.0224 October 2008
Copyright © 2007, 2008 Nortel Networks
.
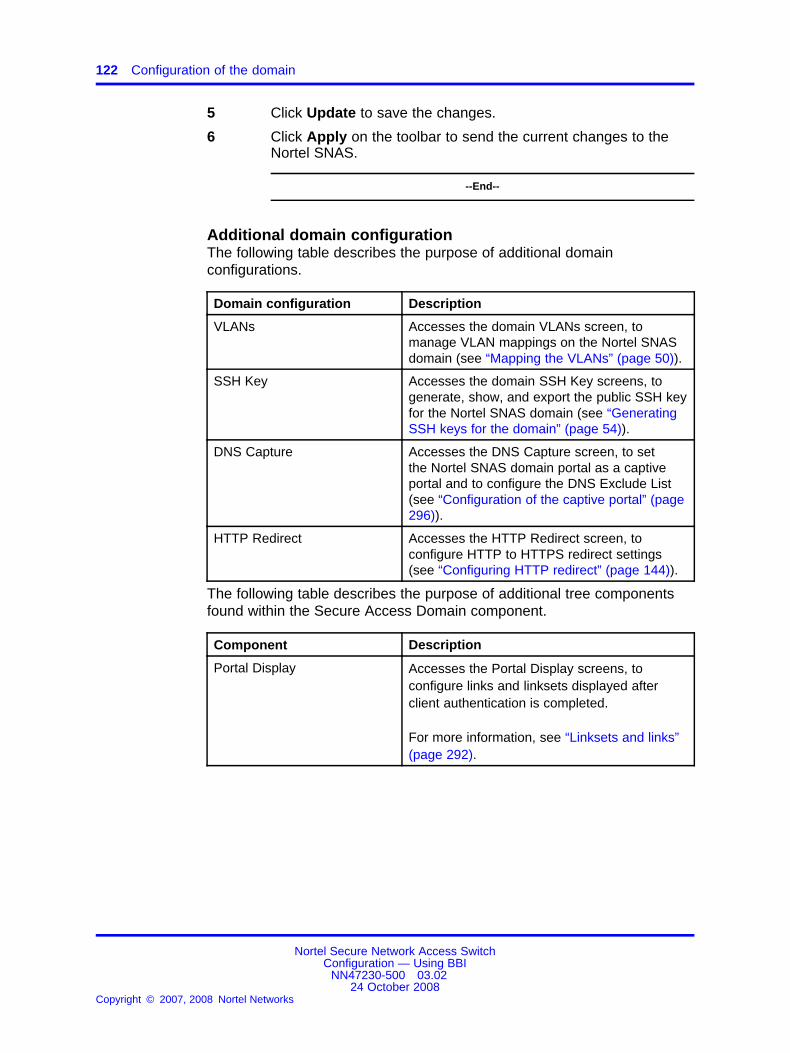
122 Configuration of the domain
5 Click Update to save the changes.
6 Click Apply on the toolbar to send the current changes to theNortel SNAS.
--End--
Additional domain configurationThe following table describes the purpose of additional domainconfigurations.
Domain configuration Description
VLANs Accesses the domain VLANs screen, tomanage VLAN mappings on the Nortel SNASdomain (see “Mapping the VLANs” (page 50)).
SSH Key Accesses the domain SSH Key screens, togenerate, show, and export the public SSH keyfor the Nortel SNAS domain (see “GeneratingSSH keys for the domain” (page 54)).
DNS Capture Accesses the DNS Capture screen, to setthe Nortel SNAS domain portal as a captiveportal and to configure the DNS Exclude List(see “Configuration of the captive portal” (page296)).
HTTP Redirect Accesses the HTTP Redirect screen, toconfigure HTTP to HTTPS redirect settings(see “Configuring HTTP redirect” (page 144)).
The following table describes the purpose of additional tree componentsfound within the Secure Access Domain component.
Component Description
Portal Display Accesses the Portal Display screens, toconfigure links and linksets displayed afterclient authentication is completed.
For more information, see “Linksets and links”(page 292).
Nortel Secure Network Access SwitchConfiguration — Using BBI
NN47230-500 03.0224 October 2008
Copyright © 2007, 2008 Nortel Networks
.

Configure the domain 123
Component Description
AAA Accesses the AAA screens, to configureauthentication, authorization, and accountingfeatures:
• For authentication, see “Configuration ofauthentication” (page 219).
• For authorization, see “Configurationof groups and profiles” (page 189) and“Configuring the Nortel Health Agent check”(page 133).
• For accounting, see “Configuring RADIUSaccounting” (page 145).
Server Accesses the Server screens, in orderto configure the portal SSL server (see“Configuring the SSL server” (page 138).
Switches Accesses the Switch screens, in orderto configure the network access devicescontrolled by the Nortel SNAS domain (see“Manage network access devices” (page 46)).
Portal Accesses the Portal screens, in order tocustomize the portal page that appears in theclient’s Web browser (see “Customization ofthe portal and user logon” (page 285)).
Configuring VIP addressesTo configure a VIP address, use the following procedure:
Procedure steps
Step Action
1 Select the Config tab.
2 Select Secure Access Domain and VIP Addresses from theNavigation pane.
The VIP Addresses screen appears.
3 Select the secure access domain from the Secure AccessDomain list, and click Refresh.
4 Click Add.
The Add Portal IP Address screen appears.
5 Click Add.
The created portal IP address appears in the VIP Addressestable.
Nortel Secure Network Access SwitchConfiguration — Using BBI
NN47230-500 03.0224 October 2008
Copyright © 2007, 2008 Nortel Networks
.
124 Configuration of the domain
6 Click Apply on the toolbar to send the current changes to theNortel SNAS.
--End--
Variable definitionsUse the data in the following table to add a VIP address.
Variable Value
New IP Specifies the VIP address.
Deleting a VIP addressTo delete a VIP address, use the following procedure:
Procedure steps
Step Action
1 Select the Config tab.
2 Select Secure Access Domain and VIP Addresses from theNavigation pane.
The VIP Addresses screen appears.
3 Select the VIP address from the VIP Addresses list.
4 Click Delete.
A dialog box appears to confirm that you want to delete this VIPaddress.
5 Click Yes.
The VIP address is removed from the list.
6 Click Apply on the toolbar to send the current changes to theNortel SNAS.
--End--
Configuring VLANsTo configure a VLAN, use the following procedure:
Procedure steps
Step Action
1 Select the Config tab.
Nortel Secure Network Access SwitchConfiguration — Using BBI
NN47230-500 03.0224 October 2008
Copyright © 2007, 2008 Nortel Networks
.

Configure the domain 125
2 Select Secure Access Domain and VLANs from the Navigationpane.
The VLANs screen appears.
3 Select the secure access domain from the Secure AccessDomain list, and click Refresh.
4 Click Add.
The Add VLAN screen appears.
5 Click Add.
The created portal IP address appears in the VIP Addressestable.
6 Click Apply on the toolbar to send the current changes to theNortel SNAS.
--End--
Variable definitionsUse the data in the following table to add a VLAN.
Variable Value
Name Specifies the Vlan name.
Vlan Id Specifies the Vlan Id.
Deleting a VLANTo delete a VLAN, use the following procedure:
Procedure steps
Step Action
1 Select the Config tab.
2 Select Secure Access Domain and VLANs from the Navigationpane.
The VLANs screen appears.
3 Select the VLAN from the VLANs list.
4 Click Delete.
A dialog box appears to confirm that you want to delete thisVLAN.
5 Click Yes.
The VLAN is removed from the list.
Nortel Secure Network Access SwitchConfiguration — Using BBI
NN47230-500 03.0224 October 2008
Copyright © 2007, 2008 Nortel Networks
.

126 Configuration of the domain
6 Click Apply on the toolbar to send the current changes to theNortel SNAS.
--End--
Managing DHCP supportThe Nortel SNAS acts as a DHCP server for devices connected via hub toNSNA controlled switch ports. SNAS can also act as a DHCP server in anormal mode or to support captive portal and FILTER-ONLY mode.
Adding a DHCP subnetTo add a DHCP subnet, use the following procedure:
Procedure steps
Step Action
1 Select the Config tab.
2 Select Secure Access Domain, DHCP, and Subnet from theNavigation pane.The Subnet screen appears.
3 Select the secure access domain from the Secure AccessDomain list, and click Refresh.
4 Click the Add button.The Add DHCP Subnet screen appears.
Nortel Secure Network Access SwitchConfiguration — Using BBI
NN47230-500 03.0224 October 2008
Copyright © 2007, 2008 Nortel Networks
.

Configure the domain 127
5 Click Update to save the details.
The new DHCP subnet appears in the DHCP Subnet table.
6 Click Apply on the toolbar to send the current changes to theNortel SNAS.
--End--
Use the data in the following table to add a DHCPsubnet.
Variable Value
DHCP Subnet Number Specifies an integer in the range 1 to 256 that uniquely identifiesthe DHCP subnet.
Type Specifies whether the subnet type is hub, filter, or standard.
Subnet Name Specifies the name for the subnet.
Subnet network address Specifies the address to assign
Subnet netmask Specifies the subnet to assign
Subnet Status Specifies whether the subnet is enabled or disabled.
Phone Signature Specifies the phone signature for each type of IP phoneconnected to the network.
External DHCP Server address Specifies the external DHCP IP address to which the clients aredirected.
VLAN Name Specifies the name for the VLAN.
Managing a DHCP SubnetTo manage a DHCP subnet, use the following procedure:
Procedure steps
Step Action
1 Select the Config tab.
2 Select Secure Access Domain, DHCP, and Subnet from theNavigation pane.
3 Select the secure access domain from the Secure AccessDomain list, and click Refresh.
4 Select the DHCP subnet you want to modify and then click Edit.
The Modify DHCP Subnet screen appears.
5 Modify the required information. For more information aboutDHCP Subnet fields.
Nortel Secure Network Access SwitchConfiguration — Using BBI
NN47230-500 03.0224 October 2008
Copyright © 2007, 2008 Nortel Networks
.

128 Configuration of the domain
6 Click Update to save the details.
7 Click Apply on the toolbar to send the current changes to theNortel SNAS.
--End--
Managing DHCP RangesTo manage DHCP ranges, use the following procedure:
Procedure steps
Step Action
1 Select the Config tab.
2 Select Secure Access Domain, DHCP, Subnet, Settings, andRanges from the Navigation pane.
The Subnet range screen appears.
3 Select the secure access domain from the Secure AccessDomain list, and click Refresh.
--End--
From this screen, the following tasks can be performed:
• To add a new range click Add and enter a new upper and lower rangelimit.
• To delete a range select it from the table and click Delete.
• To change the order of precedence of the ranges, select a range andadjust the position using the Up and Down buttons.
Inserting DHCP RangesTo insert a DHCP range, use the following procedure:
Procedure steps
Step Action
1 Select the Config tab.
2 Select Secure Access Domain, DHCP, Subnet, Settings, andRanges from the Navigation pane.
The Subnet screen appears.
3 Select the secure access domain from the Secure AccessDomain list, and click Refresh.
Nortel Secure Network Access SwitchConfiguration — Using BBI
NN47230-500 03.0224 October 2008
Copyright © 2007, 2008 Nortel Networks
.

Configure the domain 129
4 Click Add.
The Add Subnet Range screen appears.
5 Enter the subnet range information in the applicable fields. Thefollowing table describes the fields on this tab.
6 Click Update to save the details.
7 Click Apply on the toolbar to send the current changes to theNortel SNAS.
--End--
Use the data in the following table to insert a DHCPrange.
Variable Value
Enter Lower Address Specifies the lower end of the range.
Enter Upper Address Specifies the upper end of the range.
Managing DHCP Range Standard OptionsTo manage DHCP Range Standard Options, use the following procedure:
Procedure steps
Step Action
1 Select the Config tab.
2 Select Secure Access Domain, DHCP, Subnet, Settings, andStdopts from the Navigation pane.
The Subnet screen appears.
3 Select the secure access domain from the Secure AccessDomain list, and click Refresh. A list of existing range standardoptions table appears.
--End--
From this screen, the following tasks can be performed:
• To delete DHCP range standard option, select the option you want todelete and click Delete.
• To add a DHCP range standard new option, click Add.
Managing DHCP Vendor OptionsTo manage DHCP Vendor Options, use the following procedure:
Nortel Secure Network Access SwitchConfiguration — Using BBI
NN47230-500 03.0224 October 2008
Copyright © 2007, 2008 Nortel Networks
.

130 Configuration of the domain
Procedure steps
Step Action
1 Select the Config tab.
2 Select Secure Access Domain, DHCP, Subnet, Settings, andVendopts from the Navigation pane.
The Subnet screen appears.
3 Select the secure access domain from the Secure AccessDomain list, and click Refresh. A list of existing vendor optionstable appears.
--End--
From this screen, the following tasks can be performed:
• To delete a vendor option, select the vendor option and click Delete.
• To add a vendor option, click Add.
Managing DHCP Standard OptionsTo manage DHCP standard options, perform the followings steps:
Procedure steps
Step Action
1 Select the Config tab.
2 Select Secure Access Domain, DHCP, Subnet, Settings, andStdopts from the Navigation pane.The Subnet screen appears.
3 Select the secure access domain from the Secure AccessDomain list and click Refresh. A list of existing standard optionstable appears.
--End--
From this screen, the following tasks can be performed:
• To add a standard option, click the Add button.
• To delete a standard option, select the options from the table and clickDelete.
Nortel Secure Network Access SwitchConfiguration — Using BBI
NN47230-500 03.0224 October 2008
Copyright © 2007, 2008 Nortel Networks
.

Configure the domain 131
Using the DHCP WizardYou can use the DHCP Wizard to create the DHCP subnet. To use thewizard, use the following procedure:
Procedure steps
Step Action
1 Select the Config tab.
2 Select Wizards from the Navigation pane.
The Wizards screen appears.
3 Click DHCP Wizard.
The DHCP Wizard screen appears.
4 Select the Secure Access Domain and the DHCP Subnet type.
5 Click Next.
The Subnet Setting screen appears.
6 In the fields provided, enter the subnet name, address, andmask.
7 Click Next.
The Configure DHCP screen appears.
8 If necessary, select the Change the global DHCP optionscheck box and enter the global DHCP information in the fieldsprovided.
9 Click Next.
The DHCP Settings screen appears.
10 If the hub subnet type is selected in step 3, perform the followingsteps:
• If IP phones are present on this subnet, select the Are thereany IP phones in this subnet check box and enter theappropriate phone signature in the Phone Signature field.
• On the same screen, enter the configuration information forthe Red, Yellow, and Green partitions.
11 If the filter subnet type is selected in step 4, perform the followingsteps:
• Enter the subnet start and end IP addresses.
• Enter the unknown clients DHCP options.
• Enter the known clients DHCP options.
12 If the standard subnet type is selected in step 4, perform thefollowing steps:
Nortel Secure Network Access SwitchConfiguration — Using BBI
NN47230-500 03.0224 October 2008
Copyright © 2007, 2008 Nortel Networks
.

132 Configuration of the domain
• Enter the standard mode subnet IP addresses.
• Enter the standard mode subnet DHCP options.
13 Click Finish.
--End--
Viewing DHCP leasesTo view information about active DHCP leases, use the followingprocedure:
Procedure steps
Step Action
1 Select the Monitor tab.
2 Select Monitor, DHCP, and DHCP Lease from the Navigationpane.
The DHCP screen appears.
3 Click List to list the DHCP based on leases.
--End--
Use the data in the following table of DHCP leases.
Nortel Secure Network Access SwitchConfiguration — Using BBI
NN47230-500 03.0224 October 2008
Copyright © 2007, 2008 Nortel Networks
.

Configure the domain 133
Variable Value
DHCP Leases Basedon
Select the DHCP leases based onthe available values.Values: All, Address, and Subnet
Viewing DHCP statisticsTo view DHCP statistics, use the following procedure:
Procedure steps
Step Action
1 Select the Monitor tab.
2 Select Monitor, DHCP, and DHCP Statistics from theNavigation pane.
The DHCP screen appears.
3 The DHCP screen shows the DHCP statistics.
--End--
Configuring the Nortel Health Agent checkBefore an authenticated client is allowed into the network, the NortelHealth Agent application checks client host integrity by verifying that thecomponents required for the client’s personal firewall (executables, DLLs,
Nortel Secure Network Access SwitchConfiguration — Using BBI
NN47230-500 03.0224 October 2008
Copyright © 2007, 2008 Nortel Networks
.

134 Configuration of the domain
configuration files, and so on) are installed and active on the client PC. Formore information about how the Nortel Health Agent check operates in theNortel SNAS, see “Nortel Health Agent host integrity check” (page 36).
If you run the quick setup wizard during the initial setup or to create thedomain, the Nortel Health Agent check is configured with default settingsand the check result that you select (teardown or restricted). You canrerun the Nortel Health Agent portion of the quick setup wizard at any timeby using the steps described in “Using the Nortel Health Agent Wizard”(page 137).
To configure settings for the Nortel Health Agent host integrity check andthe check result, use the following procedure:
Procedure steps
Step Action
1 Select the Config tab.
2 Select the Secure Access Domain, Nortel Health Agent, andSetup from the Navigation pane.
3 Select the secure access domain from the Secure AccessDomain list, and click Refresh.
The corresponding Nortel Health Agent Settings screen appears.
4 Click Update to save the changes.
Nortel Secure Network Access SwitchConfiguration — Using BBI
NN47230-500 03.0224 October 2008
Copyright © 2007, 2008 Nortel Networks
.

Configure the domain 135
5 Click Apply on the toolbar to send the current changes to theNortel SNAS.
--End--
Variable definitionsUse the data in the following table to configure Nortel Health Agentsettings.
Variable Value
Fail Action Specifies the action performed if the client failsthe Nortel Health Agent SRS rule check. Theoptions are:
• restricted—the session remains intact butaccess is restricted in accordance with therights specified in the access rules for thegroup.
• teardown—the SSL session is torn down.
default: restricted
Display SRS Failure Details Specifies whether SRS failure details can bedisplayed:
• If selected, then the details are displayed.
• If not selected, the details are notdisplayed.
The default is off (details are not displayed).
If set to on, you can click the TG icon on theportal page to display details about whichelements of the SRS rule check failed.
Heart Beat Retry Count Specifies the number of times the Nortel SNASrepeats the check for client activity when noheartbeat is detected.
The acceptable range is an integer from1–65535. The default is 3.
If no heartbeat is detected after the specifiednumber of retries (the inactivity interval), theNortel SNAS terminates the session.
Nortel Secure Network Access SwitchConfiguration — Using BBI
NN47230-500 03.0224 October 2008
Copyright © 2007, 2008 Nortel Networks
.

136 Configuration of the domain
Variable Value
Recheck Interval Specifies the time interval between SRS rulerechecks made by the Nortel Health PolicyAdministrator on the client system.
Accepts an integer that indicates the timeinterval in seconds (s), minutes (m), hours (h),or days (d). The valid range is 60s (1m) to86400s (1d). The default is 15m (15 minutes).
If a recheck fails, the Nortel SNAS terminatesthe session and evicts the client from theportal.
On-the-fly SRS Policy Enables or disables on-the-fly srs policy.When a security policy is modified on theSNAS using the administrative tool the policy isupdated on the Nortel Health Agent running onthe logged in operating systems.Values: on and offdefault: off
Allow client scriptcustomization
Enables or disables the client scriptcustomization.Values: on and offdefault: on
Log Level Specifies the log level for debug informationfrom the Nortel Health Policy Administrator.The options are:
• fatal—shows fatal errors only.
• error—shows all errors.
• warning—shows warning information aboutconditions that are not error conditions.
• info—shows high-level information aboutprocesses.
• debug—shows detailed information aboutall processes.
The default is info.
The information displays in the client’s JavaConsole window. You can use the informationto track errors in the Nortel Health Agent SRSrules.
Nortel Secure Network Access SwitchConfiguration — Using BBI
NN47230-500 03.0224 October 2008
Copyright © 2007, 2008 Nortel Networks
.

Configure the domain 137
Variable Value
Heart Beat Interval Specifies the time interval between checks forclient activity.
Accepts an integer that indicates the timeinterval in seconds (s), minutes (m), hours (h),or days (d). The valid range is 60s (1m) to86400s (1d). The default is 1m (1 minute).
Status-Quo Specifies whether the Nortel SNAS domainoperates in status-Quo mode. Status-quomode determines the behavior of the NortelSNAS if no client activity is detected after theinactivity interval.
If selected (Status-Quo on), the client sessioncontinues indefinitely.
If not selected (Status-Quo off), the NortelSNAS terminates the session immediately.
The default is Status-Quo off (not selected).
Desktop Agent Enables or disables the desktop agent.Values: on and offdefault: off
Desktop Agent Short CutName
Specify the desktop agent name.default: Nortel Desktop Agent
Persist out-of-boundconnections
Enables or disables the out-of-boundconnection.Values: on and offdefault: on
Nortel Health Agent RulesTable
Lists the SRS rules configured for the domain.
For information about creating SRS rules, seeNortel Health Policy Administrator SRS Builder.
The Nortel Health Policy Administrator canapply different SRS rules for different groups.For information about specifying the SRS ruleto use for the Nortel Health Agent check, see“Configuring groups” (page 194).
Using the Nortel Health Agent WizardTo configure settings for the Nortel Health Agent host integrity check andthe check result, use the following procedure:
Nortel Secure Network Access SwitchConfiguration — Using BBI
NN47230-500 03.0224 October 2008
Copyright © 2007, 2008 Nortel Networks
.

138 Configuration of the domain
Procedure steps
Step Action
1 Select the Config tab.
2 Select Secure Access Domain, Nortel Health Agent, and SRSRules from the Navigation pane.
The Launch Nortel Health Policy Administrator screen appears.
3 Select the secure access domain from the Secure AccessDomain list, and click Refresh.
4 Click Launch.
The Nortel Health Policy Administrator window appears.
5 Click Apply on the toolbar to send the current changes to theNortel SNAS.
--End--
Configuring the SSL serverTo configure settings for the SSL server, use the following procedure:
Procedure steps
Step Action
1 Select Secure Access Domain and Server from the Navigationpane.
The Server screen appears.
2 Select the secure access domain from the Secure AccessDomain list, and click Refresh.
Nortel Secure Network Access SwitchConfiguration — Using BBI
NN47230-500 03.0224 October 2008
Copyright © 2007, 2008 Nortel Networks
.
Configure the domain 139
3 Click Update to save the details.
4 Click Apply on the toolbar to send the current changes to theNortel SNAS.
--End--
Variable definitionsUse the data in the following table to configure the SSL server.
Variable Value
Listen Port Specifies the port to which the portal serverlistens for HTTPS communications.
Accepts an integer in the range 1–65534 thatindicates the TCP port number. The default is443.
DNS Name Specifies a DNS name for the portal IPaddress.
Accepts the fully qualified domain name(FQDN) of the pVIP (for example,nsnas.example.com).
Generally, you need to specify a DNS nameonly if your corporate DNS server is unableto perform reverse lookups of the portal IPaddress.
When you click Apply after specifying theDNS name, the system performs a checkagainst the DNS server included in the systemconfiguration to verify that:
• the FQDN is registered in the DNS.
• the resolved IP address corresponds to thepVIP.
Backend Interface Specifies the backend interface.
Configuring SSL settingsTo configure SSL-specific settings for the portal server, use the followingprocedure:
Nortel Secure Network Access SwitchConfiguration — Using BBI
NN47230-500 03.0224 October 2008
Copyright © 2007, 2008 Nortel Networks
.

140 Configuration of the domain
Procedure steps
Step Action
1 Select the Config tab.
2 Select Secure Access Domain, Server, and SSL from theNavigation pane.
The SSL screen appears.
3 Select the secure access domain from the Secure AccessDomain list, and click Refresh.
4 Click Updated to save the details.
5 Click Apply on the toolbar to send the current changes to theNortel SNAS.
--End--
Variable definitionsUse the data in the following table to configure the server SSL-specificsettings.
Variable Value
Certificate Number Specifies the server certificate that the portalserver uses. You cannot specify more thanone server certificate for the server to use at atime.
Nortel Secure Network Access SwitchConfiguration — Using BBI
NN47230-500 03.0224 October 2008
Copyright © 2007, 2008 Nortel Networks
.

Configure the domain 141
Variable Value
Status Specifies whether SSL is enabled on the portalserver. The default is enabled.
Protocol Specifies the protocol to use when establishingan SSL session with a client. The options are:
• ssl2 — accept SSL 2.0 only
• ssl3 — accept SSL 3.0 and TLS 1.0
• ssl23 — accept SSL 2.0, SSL 3.0, and TLS1.0
• tls1 — accept TLS 1.0 only
Ciphers Specifies the cipher preference list.
Allows expressions that consists of cipherstrings separated by colons. The default cipherlist is ALL@STRENGTH.
Verify Level Specifies the level of client authentication touse when establishing an SSL session. Theoptions are:
• none—no client certificate is required.
• optional—a client certificate is requested,but the client need not present one.
• require—a client certificate is required.
Not supported in Nortel Secure NetworkAccess Switch Software Release 1.6.1.
SSL Cache Size Specifies the size of the SSL cache.
Allows an integer less than or equal to 10000indicating the number of cached sessions. Thedefault is 4000.
If there are many cache misses, increase theCache Size value for better performance.
Nortel Secure Network Access SwitchConfiguration — Using BBI
NN47230-500 03.0224 October 2008
Copyright © 2007, 2008 Nortel Networks
.

142 Configuration of the domain
Variable Value
SSL Cash Timeout Specifies the maximum time to live (TTL) valuefor items in the SSL cache. After the TTL hasexpired, the items are discarded.
Allows an integer that indicates the TTL valuein seconds (s), minutes (m), hours (h), or days(d). If you do not specify a measurement unit,seconds is assumed. The default is 5m (5minutes).
CA Certificate List Specifies which of the available CA certificatesto use for client authentication.
CA Certificate List is not supported in NortelSecure Network Access Switch SoftwareRelease 1.6.1.
CA Chain List Specifies the CA certificate chain of the servercertificate.
Select certificates from the list to create thechain. The chain starts with the issuing CAcertificate of the server certificate and canrange up to the root CA certificate.
ATTENTIONTo use chain certificates on the SSL server,you must set the protocol version to eitherssl3 or ssl23.
Configuring traffic log settingsYou can configure a syslog server to receive User Datagram Protocol(UDP) syslog messages for all HTTP requests handled by the portalserver.
Nortel does not recommend that you routinely enable this functionality forthe following reasons:
• Logging traffic with syslog messages generates a substantial amountof network traffic.
• Logging traffic places an additional CPU load on each Nortel SNASdevice in the cluster.
• In general, syslog servers are not intended for the traffic type of logmessage. Therefore, the syslog server might not be able to cope withthe quantity of syslog messages generated within a cluster of NortelSNAS devices.
Nortel Secure Network Access SwitchConfiguration — Using BBI
NN47230-500 03.0224 October 2008
Copyright © 2007, 2008 Nortel Networks
.

Configure the domain 143
Enable traffic logging with syslog messages in environments where laws orregulations require traffic logging to be performed on the SSL terminatingdevice itself. You can also enable it temporarily for debugging purposes.
Because of the amount of traffic generated, Nortel recommends that youset up syslog on the backend server if possible.
To set up a syslog server to receive UDP syslog messages for all HTTPrequests handled by the portal server, use the following procedure:
Procedure steps
Step Action
1 Select the Config tab.
2 Select Secure Access Domain, Server, and Traffic Log fromthe Navigation pane.
The Traffic Log screen appears.
3 Select the secure access domain from the Secure AccessDomain list, and click Refresh.
4 Click Update to save the details.
5 Click Apply on the toolbar to send the current changes to theNortel SNAS.
--End--
Use the data in the following table to configure the trafficlog settings.
Nortel Secure Network Access SwitchConfiguration — Using BBI
NN47230-500 03.0224 October 2008
Copyright © 2007, 2008 Nortel Networks
.

144 Configuration of the domain
Variable Value
Status Enables or disables traffic loggingwith syslog messages to the specifiedsyslog server.
Traffic logging with syslog messages isdisabled by default.
Syslog Host IP Specifies the host IP address of thesyslog server.
Syslog Port Specifies the UDP port number of thesyslog server.
Accepts an integer in the range1–65534, which indicates the UDP portnumber. The default is 514.
Syslog Priority Specifies the priority level of the syslogmessages that are sent. The optionsare:
• debug—information useful fordebugging purposes only.
• info—informational messages.
• notice—information aboutconditions that are not errorconditions but nevertheless warrantspecial attention.
The default value is info.
Configuring HTTP redirectYou can configure the Nortel SNAS domain to automatically redirect HTTPrequests to the HTTPS server. For example, a client request directed tohttp://nsnas.com is automatically redirected to https://nsnas.com.
To configure the domain to automatically redirect HTTP requests to theHTTPS server specified for the domain, use the following procedure:
Procedure steps
Step Action
1 Select the Config tab.
2 Select Secure Access Domain and HTTP Redirect from theNavigation pane.
The HTTP Redirect screen appears.
Nortel Secure Network Access SwitchConfiguration — Using BBI
NN47230-500 03.0224 October 2008
Copyright © 2007, 2008 Nortel Networks
.

Configure the domain 145
3 Select the secure access domain from the Secure AccessDomain list and click Refresh.
4 Click Update to save the details.
5 Click Apply on the toolbar to send the current changes to theNortel SNAS.
--End--
Variable definitionsUse the data in the following table to configure the HTTP Redirect.
Variable Value
Port Number Specifies the TCP port number on which the portalserver listens for HTTP communications. Thedefault value is 80.
ATTENTIONIf you do not accept the default value and youspecify a different port, you must modify the Redand Yellow filters on the network access devicesaccordingly. Otherwise, the client PC is not ableto reach the portal for user authentication.
Enable Http Redirect Specifies whether HTTP requests are redirected tothe HTTPS server.
Configuring RADIUS accountingYou can configure the Nortel SNAS to provide support for loggingadministrative operations and user session start and stop messages to aRADIUS accounting server.
Nortel Secure Network Access SwitchConfiguration — Using BBI
NN47230-500 03.0224 October 2008
Copyright © 2007, 2008 Nortel Networks
.

146 Configuration of the domain
With RADIUS accounting enabled, the Nortel SNAS sends an accountingrequest start packet to the accounting server for each user whosuccessfully authenticates to the Nortel SNAS domain. The start packetcontains the following information:
• client user name
• Nortel SNASRIP
• session ID
When the user session terminates, the Nortel SNAS sends an accountingrequest stop packet to the accounting server. The stop packet contains thefollowing information:
• session ID
• session time
• cause of termination
Configure the RADIUS server in accordance with the recommendations inRFC 2866.
Certain Nortel SNAS-specific attributes are sent to the RADIUS serverwhen you enable accounting (see “Configuring Nortel SNAS specificattributes” (page 146)). In conjunction with the custom plugins on RADIUS,you can use these attributes for more detailed monitoring of Nortel SNASactivity.
When you add an external RADIUS accounting server to the configuration,the server is automatically assigned an index number. Nortel SNASaccounting is performed by an available server with the lowest indexnumber. You can control accounting server usage by reassigning indexnumbers (see “Managing RADIUS accounting servers” (page 148)).
Configuring Nortel SNAS specific attributesThe RADIUS accounting server uses Vendor-Id and Vendor-Typeattributes in combination to identify the source of the accountinginformation. The attributes are sent to the RADIUS accounting servertogether with the accounting information for the logged on user.
You can assign vendor-specific codes to the Vendor-Id and Vendor-Typeattributes for the Nortel SNAS domain. By using these vendor-specificcodes, the RADIUS accounting server can provide separate accountinginformation for each Nortel SNAS domain.
Nortel Secure Network Access SwitchConfiguration — Using BBI
NN47230-500 03.0224 October 2008
Copyright © 2007, 2008 Nortel Networks
.

Configure the domain 147
Each vendor has a specific dictionary. The Vendor-Id specified for anattribute identifies the dictionary that the RADIUS server uses to retrievethe attribute value. The Vendor-Type indicates the index number of therequired entry in the dictionary file.
The Internet Assigned Numbers Authority (IANA) designates SMI NetworkManagement Private Enterprise Codes that can be assigned to theVendor-Id attribute (see www.iana.org/assignments/enterprise-numbers).
RFC 2866 describes the usage of the Vendor-Type attribute.
Contact your RADIUS system administrator for information about thevendor-specific attributes used by the external RADIUS accounting server.
To configure vendor-specific attributes in order to identify the Nortel SNASdomain, use the following procedure:
Procedure steps
Step Action
1 Select the Config tab.
2 Select Secure Access Domain, AAA, and Radius Accountingfrom the Navigation pane.
The RADIUS Accounting screen appears.
3 Select the secure access domain from the Secure AccessDomain list, and click Refresh.
Nortel Secure Network Access SwitchConfiguration — Using BBI
NN47230-500 03.0224 October 2008
Copyright © 2007, 2008 Nortel Networks
.

148 Configuration of the domain
4 Click Update to save the details.
5 Click Apply on the toolbar to send the current changes to theNortel SNAS.
--End--
Use the data in the following table to configure theRADIUS Accounting.
Variable Value
Status Specifies whether RADIUSaccounting is enabled or not.
Vendor Id Specifies the vendor-specificattribute used by the RADIUSaccounting server to identifyaccounting information from theNortel SNAS domain.
The default Vendor-Id is 1872(Alteon).
Vendor Type Specifies the Vendor-Type valueused in combination with theVendor-Id to identify accountinginformation from the Nortel SNASdomain.
The default Vendor-Type value is 3.
Managing RADIUS accounting serversThere are two steps to manage RADIUS accounting servers:
• “Adding a RADIUS accounting server” (page 148)
• “Deleting a RADIUS accounting server” (page 150)
To configure the Nortel SNAS to use external RADIUSaccounting servers, use the following procedure:
Procedure steps
Step Action
1 Select the Config tab.
Nortel Secure Network Access SwitchConfiguration — Using BBI
NN47230-500 03.0224 October 2008
Copyright © 2007, 2008 Nortel Networks
.
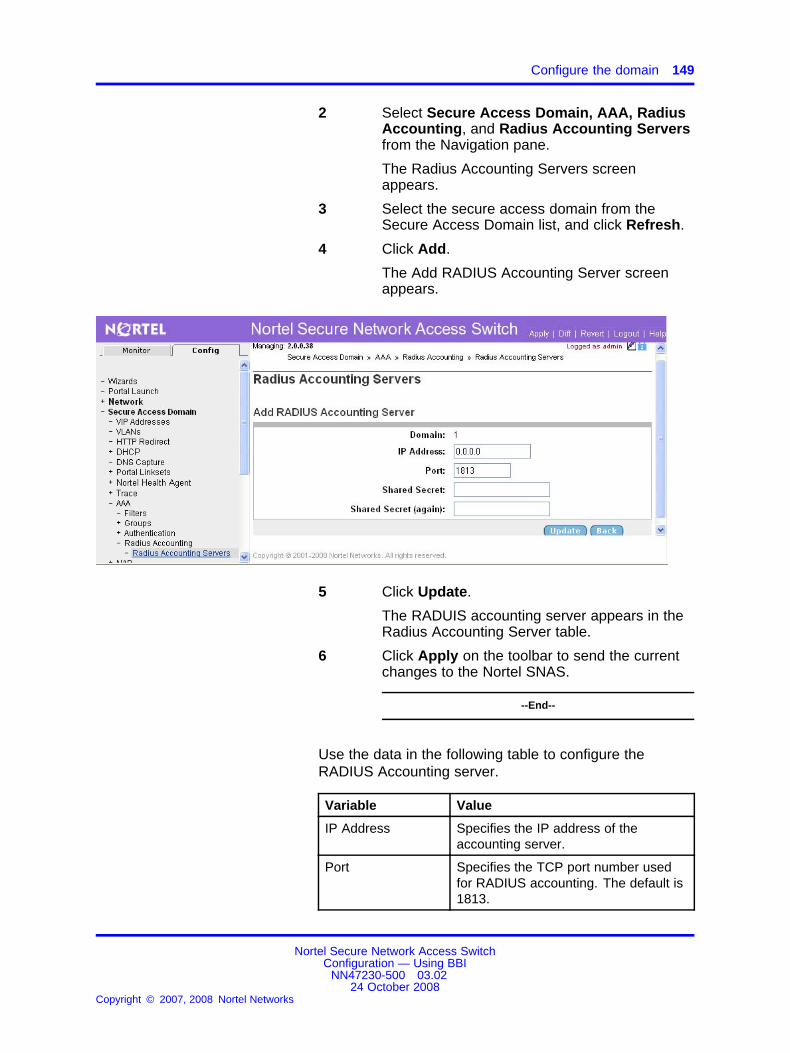
Configure the domain 149
2 Select Secure Access Domain, AAA, RadiusAccounting, and Radius Accounting Serversfrom the Navigation pane.
The Radius Accounting Servers screenappears.
3 Select the secure access domain from theSecure Access Domain list, and click Refresh.
4 Click Add.
The Add RADIUS Accounting Server screenappears.
5 Click Update.
The RADUIS accounting server appears in theRadius Accounting Server table.
6 Click Apply on the toolbar to send the currentchanges to the Nortel SNAS.
--End--
Use the data in the following table to configure theRADIUS Accounting server.
Variable Value
IP Address Specifies the IP address of theaccounting server.
Port Specifies the TCP port number usedfor RADIUS accounting. The default is1813.
Nortel Secure Network Access SwitchConfiguration — Using BBI
NN47230-500 03.0224 October 2008
Copyright © 2007, 2008 Nortel Networks
.

150 Configuration of the domain
Variable Value
Shared Secret Specifies the password used toauthenticate the Nortel SNAS to theaccounting server.
Shared Secret(again)
Confirm the password.
Deleting a RADIUS accounting server To delete a RADIUS accountingserver entry, use the following procedure:
Procedure steps
Step Action
1 Select the Config tab.
2 Select Secure Access Domain, AAA, Radius Accounting, andRadius Accounting Servers from the Navigation pane.
The Radius Accounting Servers screen appears.
3 Select the secure access domain from the Secure AccessDomain list, and click Refresh.
4 Select the RADIUS accounting server entry from the list.
5 Click Delete.
A confirmation dialog box appears.
6 Click OK.
The RADUIS accounting server is removed from the RadiusAccounting Server table.
7 Click Apply on the toolbar to send the current changes to theNortel SNAS.
--End--
Configuration of locationThis section contains the following sections:
Configuration of location navigation
• “Creating a location” (page 151)
• “Editing a location” (page 151)
• “Deleting a location” (page 152)
• “Creating locations” (page 153)
• “Deleting locations” (page 154)
Nortel Secure Network Access SwitchConfiguration — Using BBI
NN47230-500 03.0224 October 2008
Copyright © 2007, 2008 Nortel Networks
.

Configuration of location 151
Creating a locationTo create and configure location, use the following procedure:
Procedure steps
Step Action
1 Select the Config tab.
2 Select Secure Access Domain and Location from theNavigation pane.The Add Location screen appears.
3 Click Add.The Add Location screen appears.
4 Click Create Location.The new location appears in the Location table.
5 Click Apply on the toolbar to send the current changes to theNortel SNAS.
--End--
Variable definitionsUse the data in the following table to add a location.
Variable Value
Location Number Specifies the location number.
Name Specify the name of the location.
Editing a locationTo edit a location, use the following procedure:
Nortel Secure Network Access SwitchConfiguration — Using BBI
NN47230-500 03.0224 October 2008
Copyright © 2007, 2008 Nortel Networks
.

152 Configuration of the domain
Procedure steps
Step Action
1 Select the Config tab
2 Select Secure Access Domain and Location from theNavigation pane.The Location screen appears.
3 Select the location from the Location list.
4 Click Edit.The Modify Location screen appears.
5 Enter the location information in the applicable fields.
6 Click Update Location.Changes appears in the Location table.
7 Click Apply on the toolbar to send the current changes to theNortel SNAS.
--End--
Deleting a locationTo delete a location, use the following procedure:
Procedure steps
Step Action
1 Select the Config tab.
2 Select Secure Access Domain and Location from theNavigation pane.The Location screen appears.
3 Select the location from the location list.
4 Click Delete.A message appears that Are you sure you want to delete allLocations.
5 Click OK.The location(s) deleted successfully message appears.
6 Click Apply on the toolbar to send the current changes to theNortel SNAS.
--End--
Nortel Secure Network Access SwitchConfiguration — Using BBI
NN47230-500 03.0224 October 2008
Copyright © 2007, 2008 Nortel Networks
.

Configuration of location 153
Creating locationsYou can configure groupings of NSNAS controlled switches as the basisfor identity/location networking. Network access is granted or deniedbased on the identity and the location of the user. To grant and deny thenetwork access for the particular ip address and unit/port specify the ipaddress and unit/port of a switch.
To create and configure locations, use the following procedure:
Procedure steps
Step Action
1 Select the Config tab.
2 Select Secure Access Domain, Location, and Locations fromthe Navigation pane.The Locations screen appears.
3 Click Create Location List.The new location list appears in the Locations table.
4 Click Apply on the toolbar to send the current changes to theNortel SNAS.
--End--
Variable definitionsUse the data in the following table to add locations.
Variable Value
Switch IP Specify the switch IP address.
Unit/Port Specify the unit/port for the switch.
Nortel Secure Network Access SwitchConfiguration — Using BBI
NN47230-500 03.0224 October 2008
Copyright © 2007, 2008 Nortel Networks
.

154 Configuration of the domain
Deleting locationsTo delete location(s), use the following procedure:
Procedure steps
Step Action
1 Select the Config tab.
2 Select Secure Access Domain, Location, and Locations fromthe Navigation pane.The Locations screen appears.
3 Select the locations from the locations list.
4 Click Delete.A message appears that Are you sure you want to delete allLocation list.
5 Click OK.The location(s) deleted successfully message appears.
6 Click Apply on the toolbar to send the current changes to theNortel SNAS.
--End--
Configuring Lumension PatchLink integrationNortel SNAS is integrated with the Lumension PatchLink security patchmanagement system, which allows to proactively enforce user and devicecompliance by ensuring that devices are properly patched and up-to-date.
PatchLink server is a patch and vulnerability management solution. Itworks in an Agent mode, where an installed agent (system service)communicates to a central PatchLink server and updates the system asand when patches are available. PatchLink solution is integrated to verifythe compliance status of the client with Nortel SNAS.
To create and configure patch link server, use the following procedure:
Procedure steps
Step Action
1 Select the Config tab.
2 Select Secure Access Domain and Patch Link from theNavigation pane.The Patch Link screen appears.
3 Click Add.The Add PatchLink Server screen appears.
Nortel Secure Network Access SwitchConfiguration — Using BBI
NN47230-500 03.0224 October 2008
Copyright © 2007, 2008 Nortel Networks
.

Configuring Lumension PatchLink integration 155
4 Click Update.The new patchlink server appears in the Patch Link table.
5 Click Apply on the toolbar to send the current changes to theNortel SNAS.
--End--
Variable definitionsUse the data in the following table to configure a patchlink server.
Variable Value
IP Address Specify the IP address for the patch link server.
Username Specify the user name.
Password Specify the password.
Deleting a patch link serverTo delete a patch link server, use the following procedure:
Procedure steps
Step Action
1 Select the Config tab.
2 Select Secure Access Domain and Patch Link from theNavigation pane.The Patch Link screen appears.
3 Select the patch link server from the Patch Link list.
Nortel Secure Network Access SwitchConfiguration — Using BBI
NN47230-500 03.0224 October 2008
Copyright © 2007, 2008 Nortel Networks
.

156 Configuration of the domain
4 Click Delete.A message appears that Are you sure you want to delete allPatchLink Servers.
5 Click OK.The PatchLink Server(s) deleted successfully message appears.
6 Click Apply on the toolbar to send the current changes to theNortel SNAS.
--End--
Configuring syslog serverTo configure a syslog server for a domain, use the following procedure:
Procedure steps
Step Action
1 Select the Config tab.
2 Select Secure Access Domain and Syslog from the Navigationpane.
The Secure Access Domain screen appears.
3 Select the secure access domain from the Secure AccessDomain list, and click Refresh.
4 Click Add.
The Add New Remote Server screen appears.
5 Click Update.
The server appears in the secure access domain table.
6 Click Apply on the toolbar to send the current changes to theNortel SNAS.
--End--
Variable definitionsUse the data in the following table to add a syslog server for a domain.
Variable Value
New Server IP Specifies the server IP address.
New Server Facility Specifies the server facility.
Inserting a syslog serverTo insert a syslog server for a domain, use the following procedure:
Nortel Secure Network Access SwitchConfiguration — Using BBI
NN47230-500 03.0224 October 2008
Copyright © 2007, 2008 Nortel Networks
.

Configuring syslog server 157
Procedure steps
Step Action
1 Select the Config tab.
2 Select Secure Access Domain and Syslog from the Navigationpane.
The Secure Access Domain screen appears.
3 Select the secure access domain from the Secure AccessDomain list, and click Refresh.
4 Click Insert.
Insert Remote Server screen appears.
5 Click Update.
The server appears in the secure access domain table.
6 Click Apply on the toolbar to send the current changes to theNortel SNAS.
--End--
Deleting a syslog serverTo delete a syslog server for a domain, use the following procedure:
Procedure steps
Step Action
1 Select the Config tab.
2 Select Secure Access Domain and Syslog from the Navigationpane.
The Secure Access Domain screen appears.
3 Select the server from the list.
4 Click Delete.
A dialog box appears to confirm that you want to delete thisserver.
5 Click Yes.
The remote server is deleted from the list.
6 Click Apply on the toolbar to send the current changes to theNortel SNAS.
--End--
Nortel Secure Network Access SwitchConfiguration — Using BBI
NN47230-500 03.0224 October 2008
Copyright © 2007, 2008 Nortel Networks
.

158 Configuration of the domain
Configuring advanced settingsTo configure advanced settings for a domain, use the following procedure:
Procedure steps
Step Action
1 Select the Config tab.
2 Select Secure Access Domain and Advanced from theNavigation pane.
The Secure Access Domain screen appears.
3 Select the secure access domain from the Secure AccessDomain list and click Refresh.
4 Enter the information in the respective fields.
5 Click Update.
The server appears in the secure access domain table.
6 Click Apply on the toolbar to send the current changes to theNortel SNAS.
--End--
Variable definitionsUse the data in the following table to configure advanced settings for adomain.
Variable Value
Backend Interface Specifies the backend interface.
Use common AuthenticationServers
Enables or disables the authentication server.Values: enabled and disabledDefault: disabled
Use common Accounting Servers Enables or disables the accounting server.Values: enabled and disabledDefault: disabled
Log Options Specifies the log options.Values: all, http, portal, and reject
Nortel Secure Network Access SwitchConfiguration — Using BBI
NN47230-500 03.0224 October 2008
Copyright © 2007, 2008 Nortel Networks
.

159.
Configuration of Microsoft NAPInteroperability
This chapter provides detailed procedures to configure Network AccessProtection (NAP) interoperability.
Navigation• “Overview of NAP interoperability” (page 159)
• “Configuring NAP” (page 160)
Overview of NAP interoperabilityMicrosoft Network Access Protection (NAP), introduced with WindowsVista and Windows Server is a new set of operating system componentsthat provides a platform for protected access to private networks. TheNAP platform provides an integrated way of detecting the health state ofa network client, which attempts to connect to a network and restricts theaccess of the network client until the policy requirements for connecting tothe network are met.
The NSNA NAP interoperability architecture allows you to deploy both theNSNA solution and the Network Access Protection (NAP) in a symbioticmanner. It also allows you to enforce security policies for network accessusing NSNA and NAP together, leveraging the strengths of both products.
It also deploys the NAP clients with or without a Microsoft NPS serverpresent on your network. If the Microsoft NPS server is available, it isconsulted and its response are used in a configurable way to enhancethe access decision made by the Nortel SNAS. If your system does notcontain a Microsoft NPS server in place, it can still deploy clients with NAPsupport enabled and then adds a Microsoft NPS server if desired.
Nortel Secure Network Access SwitchConfiguration — Using BBI
NN47230-500 03.0224 October 2008
Copyright © 2007, 2008 Nortel Networks
.

160 Configuration of Microsoft NAP Interoperability
Windows 802.1x Supplicant—The Nortel Health Agent integrated withthe Microsoft NAP Agent provides a robust EAP supplicant for WindowsVista and XP Operating Systems.
Configuring NAPTo configure NAP, use the following procedure:
Procedure steps
Step Action
1 Select the Config tab.
2 Select Secure Access Domain and NAP from the Navigationpane.The NAP screen appears.
3 Enter the general settings information in the applicable fields.The following table describes the fields of NAP screen.
4 Click Update.
5 Click Apply on the toolbar to send the current changes to theNortel SNAS.
--End--
Nortel Secure Network Access SwitchConfiguration — Using BBI
NN47230-500 03.0224 October 2008
Copyright © 2007, 2008 Nortel Networks
.

Configuring NAP 161
Variable definitionsUse the data in the following table to configure NAP.
Variable Value
General Settings
Automatic Remediation Sets necessary updates to allow a noncompliant computer to becomecompliant.Values: false and truedefault: false
ATTENTIONWhen Automatic Remediation is set to false Policy Decision Point andTrouble Shooting URL fields will be disabled.
Policy Decision Point Select the policy decision point.Values: local and remotedefault: local
Trouble Shooting URL Specify the trouble shooting url.
Probation Settings
Full Access for aLimited Time
Enables or disables the full access for a limited time.Values: enabled and disableddefault: disabled
Date Specify the probation date.
Time Specify the probation time.
Configuring NAP navigationThis section contains the following sections:
• “Configuring windows system health validators” (page 161)
• “Creating a remote policy server” (page 164)
• “Creating a system health validator” (page 167)
Configuring windows system health validatorsTo configure windows system health validators, use the followingprocedure:
Procedure steps
Step Action
1 Select the Config tab.
Nortel Secure Network Access SwitchConfiguration — Using BBI
NN47230-500 03.0224 October 2008
Copyright © 2007, 2008 Nortel Networks
.

162 Configuration of Microsoft NAP Interoperability
2 Select Secure Access Domain, NAP, and Windows SystemHealth Validators from the Navigation pane.The Windows System Health Validators screen appears.
3 Select the secure access domain from the Secure AccessDomain list and click Refresh.
4 Click Update.
5 Click Apply on the toolbar to send the current changes to theNortel SNAS.
--End--
Variable definitionsUse the data in the following table to configure Windows System HealthValidators.
Variable Value
General Settings
Firewall application Enables or disables the firewall application.Values: on and offdefault: on
Nortel Secure Network Access SwitchConfiguration — Using BBI
NN47230-500 03.0224 October 2008
Copyright © 2007, 2008 Nortel Networks
.

Configuring NAP 163
Variable Value
Automatic update Enables or disables the automatic updates.Values: on and offdefault: on
Virus Protection
Antivirus Enables or disables the antivirus.Values: on and offdefault: on
Antivirus is up to date Specifies whether the antivirus is up to date or not.Values: true and falsedefault: true
Spyware
Antispyware Enables or disables the antispyware.Values: on and offdefault: on
Antispyware is up to date Specifies whether the antispyware is up to date or not.Values: true and falsedefault: true
Security Updates Protection
Security UpdatesProtection
Enables or disables the Windows System Health Verifier (WSHV)to validate the Windows endpoint’s current software security patchlevels. Microsoft Windows security update patches are Windowsupdate patches that fix specific software security vulnerabilities.Values: true and falseIf set to "true" the Windows security patch levels on the endpointbecomes a criteria item for policy compliance.If set to "false," Windows security patch levels reported by theendpoint are ignored.default: false
Security Updates Severity Security Updates Severity instructs the Windows System HealthVerifier (WSHV) to validate the minimum level of all Windowssecurity update patches on the Windows endpoint. For instance,if the Security Updates Severity is set to "critical" the Windowsendpoint must have all Microsoft Windows security update patchesdesignated by the Microsoft Research Center as "critical" installed forthe endpoint to be considered policy complaint.If the Security Updates Severity is set to "important" the Windowsendpoint must have security update patches designated as"important" or higher installed to be considered policy complaint (soall updates designated as either "important" or "critical").This setting is only applicable when Security Updates Protection is"true."Values: critical, important, moderate, low, and alldefault: important
Nortel Secure Network Access SwitchConfiguration — Using BBI
NN47230-500 03.0224 October 2008
Copyright © 2007, 2008 Nortel Networks
.

164 Configuration of Microsoft NAP Interoperability
Variable Value
Duration allowed since lastsync
Designates the duration of time allowed to pass since the Windowsendpoint was last updated its own copy of its Windows securityupdate list from its security update source (Windows Update orWindows Server Update Service). Only if the Windows endpoint hassynchronized its security update information from its update sourcewithin this time is the endpoint considered policy compliant.This setting is only applicable when Security Updates Protection is"true."default: 86400 seconds (1 day)
Updates from WSUS Designates whether Windows Server Update Service (WSUS) is anacceptable source for endpoints to obtain their Windows securityupdate information. When the endpoint reports its security updatestatus, it will do so with respect to the security updates it knowsabout (local copy) and the source where it obtained its securityupdates.Values: true and false
If set to "true" the WSHV considers WSUS as an acceptable sourcefor the endpoint and accepts the endpoint’s security update status.This setting is only applicable when Security Updates Protection is"true."default: false
Windows Update Designates whether Microsoft’s Windows Update is an acceptablesource for endpoints to obtain their Windows security updateinformation. When the endpoint reports its security update status, itwill do so with respect to the security updates it knows about (localcopy) and the source where it obtained its security updates.Values: true and falseIf set to "true" the WSHV considers Windows Update as anacceptable source for the endpoint and accepts the endpoint’ssecurity update status.This setting is only applicable when Security Updates Protection is"true."default: false
Creating a remote policy serverTo create and configure a NAP policy server, use the following procedure:
Procedure steps
Step Action
1 Select the Config tab.
2 Select Secure Access Domain, NAP, and Remote PolicyServers from the Navigation pane.The Remote Policy Servers screen appears.
Nortel Secure Network Access SwitchConfiguration — Using BBI
NN47230-500 03.0224 October 2008
Copyright © 2007, 2008 Nortel Networks
.

Configuring NAP 165
3 Click Add.The Add NAP Server screen appears.
4 Click Update to save the changes.
5 Move Server from moves the value by number, From Indexvalues to To Index values.
6 Click Apply on the toolbar to send the current changes to theNortel SNAS.
--End--
Variable definitionsUse the data in the following table to add a NAP server.
Variable Value
IP Address Specify the IP address for the NAP server.
Port Specify the port for the NAP server.
Shared Secret Specify the shared secret for the NAP server.
Shared Secret (again) Reconfirm the shared secret.
Editing a remote policy serverTo edit a policy server, use the following procedure:
Procedure steps
Step Action
1 Select the Config tab
Nortel Secure Network Access SwitchConfiguration — Using BBI
NN47230-500 03.0224 October 2008
Copyright © 2007, 2008 Nortel Networks
.
166 Configuration of Microsoft NAP Interoperability
2 Select Secure Access Domain, NAP, and Remote PolicyServers from the Navigation pane.The Remote Policy Servers screen appears.
3 Select the server from the Remote Policy Servers list.
4 Click Edit.The Modify NAP Server screen appears.
5 Enter the server information in the applicable fields.
6 Click Update.Changes appears in the Remote Policy Servers list.
7 Click Apply on the toolbar to send the current changes to theNortel SNAS.
--End--
Moving a remote policy serverTo move a remote policy server, use the following procedure:
Procedure steps
Step Action
1 Select the Config tab.
2 Select Secure Access Domain, NAP, and Remote PolicyServers from the Navigation pane.The Remote Policy Servers screen appears.
3 Move Server from moves the value by number, From Indexvalues to To Index values.
4 Click Move.
5 Click Apply on the toolbar to send the current changes to theNortel SNAS.
--End--
Deleting a remote policy serverTo delete a remote policy server, use the following procedure:
Procedure steps
Step Action
1 Select the Config tab.
Nortel Secure Network Access SwitchConfiguration — Using BBI
NN47230-500 03.0224 October 2008
Copyright © 2007, 2008 Nortel Networks
.

Configuring NAP 167
2 Select Secure Access Domain, NAP, and Remote PolicyServers from the Navigation pane.The Remote Policy Servers screen appears.
3 Select the policy server from the Remote Policy Servers list.
4 Click Delete.The Server is deleted successfully message appears.
5 Click Apply on the toolbar to send the current changes to theNortel SNAS.
--End--
Creating a system health validatorTo create and configure system health validator, use the followingprocedure:
Procedure steps
Step Action
1 Select the Config tab.
2 Select Secure Access Domain, NAP, and System HealthValidators from the Navigation pane.The System Health Validators screen appears.
3 Select the secure access domain from the Secure AccessDomain list and click Refresh.
4 Click Add.The Add System Health Validator screen appears.
5 Click Update to save the changes.
6 Move System Health Validator from moves the value bynumber, From Index values to To Index values.
Nortel Secure Network Access SwitchConfiguration — Using BBI
NN47230-500 03.0224 October 2008
Copyright © 2007, 2008 Nortel Networks
.

168 Configuration of Microsoft NAP Interoperability
7 Click Apply on the toolbar to send the current changes to theNortel SNAS.
--End--
Variable definitionsUse the data in the following table to add a system health validator.
Variable Value
Vendor ID Specify the vendor id.
Component ID Specify the component id.
Module Name Specify the module name.
Editing a system health validatorTo edit a location, use the following procedure:
Procedure steps
Step Action
1 Select the Config tab
2 Select Secure Access Domain, NAP, and System HealthValidators from the Navigation pane.The System Health Validators screen appears.
3 Select the Health Validator from the System Health Validatorslist.
4 Click Edit.The Modify System Health Validators screen appears.
5 Enter the health validator information in the applicable fields.
6 Click Update.Changes appears in the System Health Validators list.
7 Click Apply on the toolbar to send the current changes to theNortel SNAS.
--End--
Moving a system health validatorTo move system health validator, use the following procedure:
Nortel Secure Network Access SwitchConfiguration — Using BBI
NN47230-500 03.0224 October 2008
Copyright © 2007, 2008 Nortel Networks
.

Configuring NAP 169
Procedure steps
Step Action
1 Select the Config tab.
2 Select Secure Access Domain, NAP, and System HealthValidators from the Navigation pane.The System Health Validators screen appears.
3 Move System Health Validator from moves the value bynumber, From Index values to To Index values.
4 Click Move.
5 Click Apply on the toolbar to send the current changes to theNortel SNAS.
--End--
Deleting a system health validatorTo delete system health validator, use the following procedure:
Procedure steps
Step Action
1 Select the Config tab.
2 Select Secure Access Domain, NAP, and System HealthValidators from the Navigation pane.The System Health Validators screen appears.
3 Select a system health validator from the System HealthValidators list.
4 Click Delete.The server is deleted successfully message appears.
5 Click Apply on the toolbar to send the current changes to theNortel SNAS.
--End--
Nortel Secure Network Access SwitchConfiguration — Using BBI
NN47230-500 03.0224 October 2008
Copyright © 2007, 2008 Nortel Networks
.
170 Configuration of Microsoft NAP Interoperability
Nortel Secure Network Access SwitchConfiguration — Using BBI
NN47230-500 03.0224 October 2008
Copyright © 2007, 2008 Nortel Networks
.

171.
Configuration of RADIUS serverThis chapter provides detailed procedures to configure RADIUS server.
Navigation• “Overview of RADIUS server” (page 171)
• “802.1x functionality” (page 171)
• “Configure RADIUS server” (page 171)
Overview of RADIUS serverThe Nortel SNAS is integrated with full featured RADIUS server. TheRADIUS server is used to authenticate users through PAP or CHAPauthentication methods. It also works in a more complex 802.1xenvironment, which supports EAP-MD5, TLS, PEAP, and TTLSauthentication methods.
Radius server configuration includes the RADIUS realms, clients,authentication methods, EAP authentication methods, dictionary,accounting logs, and accounting ports components.
802.1x functionalityIntegration of RADIUS server with the Nortel Health Agent’s 802.1xsupports 802.1x for user authentication and health assessment in theNortel SNAS.
Configure RADIUS serverTo create and configure a RADIUS server, use the following procedure:
Procedure steps
Step Action
1 Select the Config tab.
Nortel Secure Network Access SwitchConfiguration — Using BBI
NN47230-500 03.0224 October 2008
Copyright © 2007, 2008 Nortel Networks
.

172 Configuration of RADIUS server
2 Select Secure Access Domain and RADIUS Server from theNavigation pane.The RADIUS Server screen appears.
3 Click Update.
4 Click Apply on the toolbar to send the current changes to theNortel SNAS.
--End--
Variable definitionsUse the data in the following table to configure RADIUS server.
Variable Value
Authentication Port Specify the authentication port. (default: 1812)
Accounting Port Specify the accounting port. (default: 1813)
Server Certificate Select the server certificate from the list.
Server CA Certificate Select the server CA certificate from the list.
Configuring RADIUS server navigationThis section contains the following sections:
• “Creating a client” (page 173)
• “Creating a realm” (page 175)
• “Creating an authentication method” (page 178)
• “Creating an EAP authentication method” (page 180)
Nortel Secure Network Access SwitchConfiguration — Using BBI
NN47230-500 03.0224 October 2008
Copyright © 2007, 2008 Nortel Networks
.
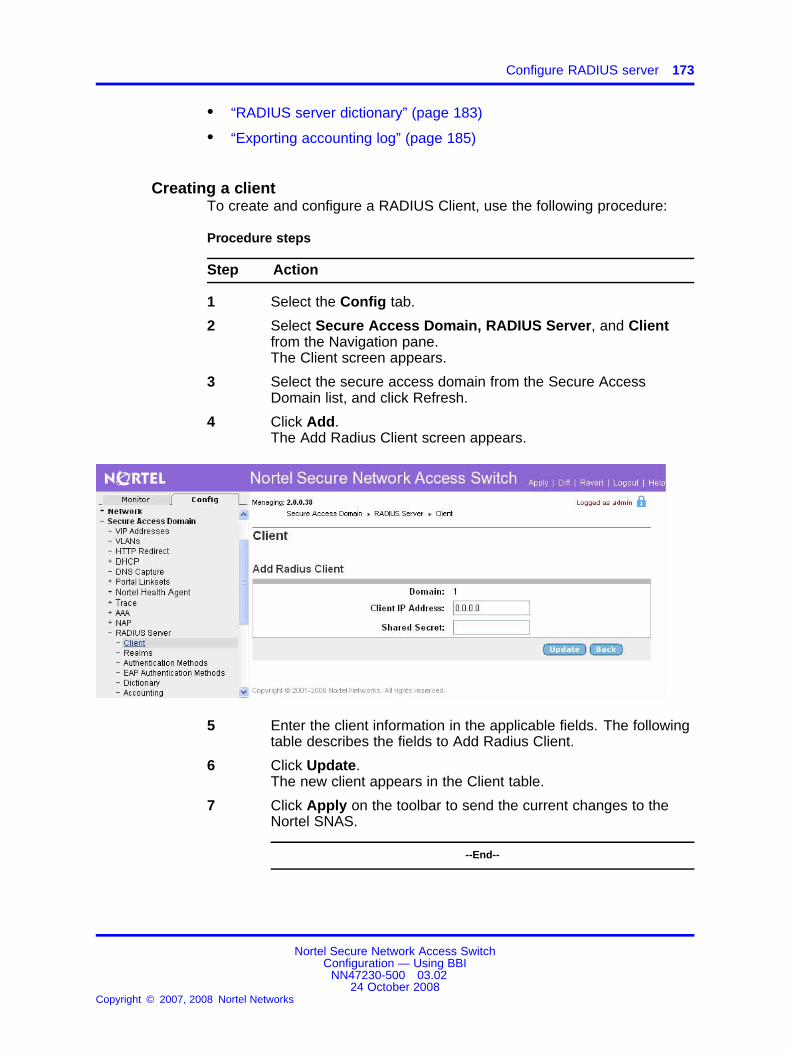
Configure RADIUS server 173
• “RADIUS server dictionary” (page 183)
• “Exporting accounting log” (page 185)
Creating a clientTo create and configure a RADIUS Client, use the following procedure:
Procedure steps
Step Action
1 Select the Config tab.
2 Select Secure Access Domain, RADIUS Server, and Clientfrom the Navigation pane.The Client screen appears.
3 Select the secure access domain from the Secure AccessDomain list, and click Refresh.
4 Click Add.The Add Radius Client screen appears.
5 Enter the client information in the applicable fields. The followingtable describes the fields to Add Radius Client.
6 Click Update.The new client appears in the Client table.
7 Click Apply on the toolbar to send the current changes to theNortel SNAS.
--End--
Nortel Secure Network Access SwitchConfiguration — Using BBI
NN47230-500 03.0224 October 2008
Copyright © 2007, 2008 Nortel Networks
.

174 Configuration of RADIUS server
Variable definitionsUse the data in the following table to add RADIUS client.
Variable Value
Client IP Address Specify the client IP Address.
Shared Secret Specify the shared secret for the radius client.
Inserting a ClientTo insert a RADIUS Client, use the following procedure:
Procedure steps
Step Action
1 Select the Config tab.
2 Select Secure Access Domain, RADIUS Server, and Clientfrom the Navigation pane.The Client screen appears.
3 Click Insert.The Insert Radius Client screen appears.
4 Click Update.The new client appears in the Client table.
5 Click Apply on the toolbar to send the current changes to theNortel SNAS.
--End--
Use the data in the following table to insert a RADIUSclient.
Variable Value
Identifier Specify the index to insert. Index must be a positive number.
Client IP Address Specify the client IP Address.
Shared Secret Specify the shared secret for the radius client.
Moving the RADIUS clientTo move RADIUS Client, use the following procedure:
Procedure steps
Step Action
1 Select the Config tab.
Nortel Secure Network Access SwitchConfiguration — Using BBI
NN47230-500 03.0224 October 2008
Copyright © 2007, 2008 Nortel Networks
.

Configure RADIUS server 175
2 Select Secure Access Domain, RADIUS Server, and Clientfrom the Navigation pane.The Client screen appears.
3 Move Radius Client from moves the value by number, FromIndex values to To Index values.
4 Click Move.
5 Click Apply on the toolbar to send the current changes to theNortel SNAS.
--End--
Deleting a ClientTo delete a RADIUS Client, use the following procedure:
Procedure steps
Step Action
1 Select the Config tab.
2 Select Secure Access Domain, RADIUS Server, and Clientfrom the Navigation pane.The Client screen appears.
3 Select the client from the Client list.
4 Click Delete.The Clients(s) deleted successfully message appears.
5 Click Apply on the toolbar to send the current changes to theNortel SNAS.
--End--
Creating a realmTo create and configure a realm, use the following procedure:
Procedure steps
Step Action
1 Select the Config tab.
2 Select Secure Access Domain, RADIUS Server, and Realmsfrom the Navigation pane.The Realms screen appears.
3 Click Add.The Add RADIUS Proxy Realm screen appears.
Nortel Secure Network Access SwitchConfiguration — Using BBI
NN47230-500 03.0224 October 2008
Copyright © 2007, 2008 Nortel Networks
.

176 Configuration of RADIUS server
4 Click Update to save the changes.
5 Click Apply on the toolbar to send the current changes to theNortel SNAS.
--End--
Variable definitionsUse the data in the following table to add a realm.
Variable Value
Name Specify a realm name.
Authentication Server Select the authentication server id. It displays the list based on theauthentication servers configured on the device.
Inserting a realmTo insert a RADIUS Realm, use the following procedure:
Procedure steps
Step Action
1 Select the Config tab.
2 Select Secure Access Domain, RADIUS Server, and Realmsfrom the Navigation pane.The Realms screen appears.
3 Select the secure access domain from the Secure AccessDomain list, and click Refresh.
4 Click Insert.The Insert RADIUS Proxy Realm screen appears.
Nortel Secure Network Access SwitchConfiguration — Using BBI
NN47230-500 03.0224 October 2008
Copyright © 2007, 2008 Nortel Networks
.

Configure RADIUS server 177
5 Click Update.The new realm appears in the Realms table.
6 Click Apply on the toolbar to send the current changes to theNortel SNAS.
--End--
Use the data in the following table to insert a realm.
Variable Value
Identifier Specify the index to insert. Index must be a positive number.
Name Specify a realm name.
Authentication Server Select the authentication server id. It displays the list basedon the authentication servers configured on the device.
Moving a realmTo move RADIUS realm, use the following procedure:
Procedure steps
Step Action
1 Select the Config tab.
2 Select Secure Access Domain, RADIUS Server, and Realmsfrom the Navigation pane.The Realms screen appears.
3 Move Realm from moves the value by number, From Indexvalues to To Index values.
4 Click Move.
5 Click Apply on the toolbar to send the current changes to theNortel SNAS.
--End--
Deleting a realmTo delete a realm, use the following procedure:
Procedure steps
Step Action
1 Select the Config tab.
Nortel Secure Network Access SwitchConfiguration — Using BBI
NN47230-500 03.0224 October 2008
Copyright © 2007, 2008 Nortel Networks
.

178 Configuration of RADIUS server
2 Select Secure Access Domain, RADIUS Server, and Realmsfrom the Navigation pane.The Realms screen appears.
3 Select the realm from the Realms list.
4 Click Delete.The Realms(s) deleted successfully message appears.
5 Click Apply on the toolbar to send the current changes to theNortel SNAS.
--End--
Creating an authentication methodTo create and configure a authentication method, use the followingprocedure:
Procedure steps
Step Action
1 Select the Config tab.
2 Select Secure Access Domain, RADIUS Server, andAuthentication Methods from the Navigation pane.The Authentication Methods screen appears.
3 Select the secure access domain from the Secure AccessDomain list, and click Refresh.
4 Click Add.The Add Authentication Method screen appears.
5 Click Update to save the changes.
6 Click Apply on the toolbar to send the current changes to theNortel SNAS.
--End--
Variable definitionsUse the data in the following table to add Authentication Method.
Variable Value
Authentication MethodName
Specify the authentication method name.
Inserting an authentication methodTo insert a authentication method, use the following procedure:
Nortel Secure Network Access SwitchConfiguration — Using BBI
NN47230-500 03.0224 October 2008
Copyright © 2007, 2008 Nortel Networks
.

Configure RADIUS server 179
Procedure steps
Step Action
1 Select the Config tab.
2 Select Secure Access Domain, RADIUS Server, andAuthentication Methods from the Navigation pane.The Authentication Methods screen appears.
3 Select the secure access domain from the Secure AccessDomain list and click Refresh.
4 Click Insert.The Insert Authentication Method screen appears.
5 Click Update.The new authentication method appears in the AuthenticationMethods table.
6 Click Apply on the toolbar to send the current changes to theNortel SNAS.
--End--
Use the data in the following table to insert theauthentication method.
Variable Value
Identifier Specify the index to insert. Index must be a positive number.
Authentication Method Name Specify the authentication method name.
Moving an authentication methodTo move an authentication method, use the following procedure:
Procedure steps
Step Action
1 Select the Config tab.
2 Select Secure Access Domain, RADIUS Server, andAuthentication Methods from the Navigation pane.The Authentication Methods screen appears.
3 Move Authentication Method from moves the value bynumber, From Index values to To Index values.
4 Click Move.
Nortel Secure Network Access SwitchConfiguration — Using BBI
NN47230-500 03.0224 October 2008
Copyright © 2007, 2008 Nortel Networks
.

180 Configuration of RADIUS server
5 Click Apply on the toolbar to send the current changes to theNortel SNAS.
--End--
Deleting an authentication methodTo delete a authentication method, use the following procedure:
Procedure steps
Step Action
1 Select the Config tab.
2 Select Secure Access Domain, RADIUS Server, andAuthentication Methods from the Navigation pane.The Authentication Methods screen appears.
3 Select the secure access domain from the Secure AccessDomain list, and click Refresh.
4 Select the authentication method from the AuthenticationMethods list.
5 Click Delete.The Authentication Method(s) deleted successfully messageappears.
6 Click Apply on the toolbar to send the current changes to theNortel SNAS.
--End--
Creating an EAP authentication methodTo create and configure an EAP authentication method, use the followingprocedure:
Procedure steps
Step Action
1 Select the Config tab.
2 Select Secure Access Domain, RADIUS Server, and EAPAuthentication Methods from the Navigation pane.The EAP Authentication Methods screen appears.
3 Select the secure access domain from the Secure AccessDomain list, and click Refresh.
4 Click Add.The Add EAP Authentication Method screen appears.
Nortel Secure Network Access SwitchConfiguration — Using BBI
NN47230-500 03.0224 October 2008
Copyright © 2007, 2008 Nortel Networks
.

Configure RADIUS server 181
5 Click Update to save the changes.
6 Click Apply on the toolbar to send the current changes to theNortel SNAS.
--End--
Variable definitionsUse the data in the following table to add EAP authentication method.
Variable Value
EAP AuthenticationMethod Type
Specify the EAP authentication method type.
EAP AuthenticationModule Name
Specify the EAP authentication module name.
Inserting an EAP authentication methodTo insert an EAP authentication method, use the following procedure:
Procedure steps
Step Action
1 Select the Config tab.
2 Select Secure Access Domain, RADIUS Server, and EAPAuthentication Methods from the Navigation pane.The Authentication Methods screen appears.
3 Select the secure access domain from the Secure AccessDomain list, and click Refresh.
4 Click Insert.The Insert Authentication Method screen appears.
5 Click Update.The new authentication method appears in the AuthenticationMethods table.
6 Click Apply on the toolbar to send the current changes to theNortel SNAS.
--End--
Use the data in the following table to insert EAPauthentication method.
Variable Value
Identifier Specify the index to insert. Index must be a positive number.
Nortel Secure Network Access SwitchConfiguration — Using BBI
NN47230-500 03.0224 October 2008
Copyright © 2007, 2008 Nortel Networks
.
182 Configuration of RADIUS server
Variable Value
EAP Authentication Method Type Specify the EAP authentication method type.
EAP Authentication Module Name Specify the EAP authentication module name.
Moving an EAP authentication methodTo move an EAP authentication method, use the following procedure:
Procedure steps
Step Action
1 Select the Config tab.
2 Select Secure Access Domain, RADIUS Server, andAuthentication Methods from the Navigation pane.The Authentication Methods screen appears.
3 Move Authentication Method from moves the value bynumber, From Index values to To Index values.
4 Click Move.
5 Click Apply on the toolbar to send the current changes to theNortel SNAS.
--End--
Deleting an EAP authentication methodTo delete an EAP authentication method, use the following procedure:
Procedure steps
Step Action
1 Select the Config tab.
2 Select Secure Access Domain, RADIUS Server, and EAPAuthentication Methods from the Navigation pane.The EAP Authentication Methods screen appears.
3 Select the secure access domain from the Secure AccessDomain list, and click Refresh.
4 Select the EAP authentication method from the EAPAuthentication Methods list.
5 Click Delete.The Authentication Method(s) deleted successfully messageappears.
Nortel Secure Network Access SwitchConfiguration — Using BBI
NN47230-500 03.0224 October 2008
Copyright © 2007, 2008 Nortel Networks
.

Configure RADIUS server 183
6 Click Apply on the toolbar to send the current changes to theNortel SNAS.
--End--
RADIUS server dictionaryYou can view, reset, import, and export the dictionary. This sectionincludes the following section:
• “Resetting the dictionary” (page 183)
• “Importing or exporting a dictionary” (page 183)
• “Viewing a dictionary” (page 184)
• “Deleting a dictionary” (page 185)
Resetting the dictionaryThe two options "Vendor Specific" and "Standard Dictionary" are availablein this page.
To reset the dictionary to defaults, use the following procedure:
Procedure steps
Step Action
1 Select the Config tab.
2 Select Secure Access Domain, RADIUS Server, andDictionary from the Navigation pane.The Dictionary screen appears.
3 Select the secure access domain from the Secure AccessDomain list, and click Refresh.
4 Click Set Default, to reset the dictionary to deafults. This willreset the dictionary to defaults and will take a few minutes. Doyou want to proceed?
5 Click OK to proceed. Loaded default RADIUS Attributesmessage appears. It displays the Vendor ID and Vendor Name.
--End--
Importing or exporting a dictionaryTo import or export a dictionary from TFTP/FTP/SCP/SFTP, use thefollowing procedure:
Nortel Secure Network Access SwitchConfiguration — Using BBI
NN47230-500 03.0224 October 2008
Copyright © 2007, 2008 Nortel Networks
.

184 Configuration of RADIUS server
Procedure steps
Step Action
1 Select the Config tab.
2 Select Secure Access Domain, RADIUS Server, andDictionary from the Navigation pane.The Dictionary screen appears.
3 Select the secure access domain from the Secure AccessDomain list, and click Refresh.
4 To import a dictionary, click Import.orTo export a dictionary select a vendor, click Export.The Import / Export dictionary screen appears.
5 Click Import / Export to import or export the dictionary.
--End--
Use the data in the following table to Imoprt or Exportdictionary.
Variable Value
Protocol Select the protocol to import the dictionary.Values: tftp, ftp, scp, and sftp (default: tftp)
Server Specify the hostname or IP address of the server.
File Specify the filename on the server.
Viewing a dictionaryTo view the details of a vendor directory, use the following procedure:
Procedure steps
Step Action
1 Select the Config tab.
2 Select Secure Access Domain, RADIUS Server, andDictionary from the Navigation pane.The Dictionary screen appears.
3 Select the secure access domain from the Secure AccessDomain list, and click Refresh.
Nortel Secure Network Access SwitchConfiguration — Using BBI
NN47230-500 03.0224 October 2008
Copyright © 2007, 2008 Nortel Networks
.

Configure RADIUS server 185
4 To view the details of a vendor, select the vendor from theDictionary list and click Show.
--End--
Deleting a dictionaryTo delete a vendors dictionary, use the following procedure:
Procedure steps
Step Action
1 Select the Config tab.
2 Select Secure Access Domain, RADIUS Server, andDictionary from the Navigation pane.The Dictionary screen appears.
3 Select the vendor to delete dictionary from the Dictionary list.
4 Click Delete. Are you sure you want to delete the selecteddictionar(ies) message appears click OK.The Dictionary(ies) deleted successfully message appears.
--End--
Exporting accounting logTo export accounting log, use the following procedure:
Procedure steps
Step Action
1 Select the Config tab.
2 Select Secure Access Domain, RADIUS Server, andAccounting from the Navigation pane.The Accounting screen appears.
3 Select the secure access domain from the Secure AccessDomain list and click Refresh.
4 Click Export.The Export Accounting Log screen appears.
Nortel Secure Network Access SwitchConfiguration — Using BBI
NN47230-500 03.0224 October 2008
Copyright © 2007, 2008 Nortel Networks
.

186 Configuration of RADIUS server
5 Click Export to export the accounting log.
--End--
Variable definitionsUse the data in the following table to Export Accounting log.
Variable Value
Protocol Select the protocol to import the dictionary.Values: tftp, ftp, scp, sftp (default: tftp)
ATTENTIONThe User and Password get prefixed with the selected protocol type.
ATTENTIONThe User and Password is not displayed while selecting the tftp protocol.
Server Specify the hostname or IP address of the server.
File Specify the filename on the server.
FTP User Specify the FTP User name.
FTP Password Specify the FTP password.
Clearing accounting logTo clear accounting log, use the following procedure:
Procedure steps
Step Action
1 Select the Config tab.
Nortel Secure Network Access SwitchConfiguration — Using BBI
NN47230-500 03.0224 October 2008
Copyright © 2007, 2008 Nortel Networks
.

Configure RADIUS server 187
2 Select Secure Access Domain, RADIUS Server, andAccounting from the Navigation pane.The Accounting screen appears.
3 Click Clear.Cleared accounting log message appears.
4 Click Apply on the toolbar to send the current changes to theNortel SNAS.
--End--
Nortel Secure Network Access SwitchConfiguration — Using BBI
NN47230-500 03.0224 October 2008
Copyright © 2007, 2008 Nortel Networks
.

188 Configuration of RADIUS server
Nortel Secure Network Access SwitchConfiguration — Using BBI
NN47230-500 03.0224 October 2008
Copyright © 2007, 2008 Nortel Networks
.

189.
Configuration of groups and profilesThis chapter provides detailed procedures to configure groups and profiles.
Navigation• “Overview of groups, profiles, and access rules” (page 189)
• “Before you begin” (page 192)
• “Configuring groups and extended profiles” (page 193)
Overview of groups, profiles, and access rulesThis section gives an overview of groups, profiles, and access rules.
For more information about the groups and extended profiles of the NortelSNAS, see Nortel Secure Network Access Switch 2.0 Solution Guide ()(NN47230-200).
Overview of groups, profiles, and access rules navigation
• “Groups” (page 189)
• “Linksets” (page 190)
• “Nortel Health Agent SRS rule” (page 191)
• “Extended profiles” (page 191)
GroupsThe Nortel SNAS determines, which VLANs users are authorized toaccess, based on group membership.
When a user logs on to the Nortel SNAS domain, the authenticationmethod returns the group name associated with the user’s credentials.The Nortel SNAS then maps the user to groups defined on the NortelSNAS. You can define up to 1023 groups in the Nortel SNAS domain.
Nortel Secure Network Access SwitchConfiguration — Using BBI
NN47230-500 03.0224 October 2008
Copyright © 2007, 2008 Nortel Networks
.

190 Configuration of groups and profiles
The data of each group includes the following configurable parameters:
• linksets
• Nortel Health Agent SRS rule
• extended profiles
After the user is authenticated, the Nortel SNAS checks the groups definedfor the domain to match the group name returned from the authenticationdatabase. For the duration of the user’s logon session, the Nortel SNASmaintains a record of the group matched to the user.
When the Nortel SNAS identifies the matching group, it applies group datato the user as follows:
• linksets—All linksets configured for the group of which the user is amember display on the user’s portal page (see “Linksets” (page 190)).
• Nortel Health Agent SRS rule—The Nortel Health Agent host integritycheck uses the criteria specified in the SRS rule assigned to the group.
• extended profiles—The Nortel SNAS checks the group to identify if anapplicable extended profile exists (see “Extended profiles” (page 191)).
For information about configuring a group, see “Configuring groups” (page194).
Default groupYou can configure a group to be the default group, with limited accessrights. If the group name returned from the authentication database doesnot match any group defined on the Nortel SNAS, the Nortel SNAS mapsthe user to the default group.
To create a default group, see “Creating a default group” (page 214).
LinksetsA linkset is a set of links that are displayed on the portal page so thatthe user can easily access internal or external Web sites, servers, orapplications. After the user is authenticated, the user’s portal pagedisplays all the linksets associated with the group to which the userbelongs. The user’s portal page also displays all the linksets associatedwith the user’s extended profile.
When mapping linksets to groups or extended profiles, make sure that theaccess rules specified for the profile do not contradict the links defined forthe linkset.
For information about creating and configuring the linksets, see“Configuring linksets” (page 320).
Nortel Secure Network Access SwitchConfiguration — Using BBI
NN47230-500 03.0224 October 2008
Copyright © 2007, 2008 Nortel Networks
.

Overview of groups, profiles, and access rules 191
For information about mapping the linksets to groups, see “Mappinglinksets to a group or profile” (page 208).
Nortel Health Agent SRS ruleThe SRS rule specified for the group is the set of operating system andother software criteria that constitute the host integrity check performed bythe Nortel Health Policy Administrator. The SRS rule can be a compositeof other rules, but only one SRS rule exists for the group. Each group canhave a different SRS rule.
For information about configuring SRS rules, see Nortel Health PolicyAdministrator SRS Builder. You cannot configure SRS rules by using theCLI.
If you run the quick setup wizard during the initial setup, you specify theaction to occur if the SRS rule check fails. You can rerun the wizard at anytime. You can also change the SRS rule check result (see “Configuring theNortel Health Agent check” (page 133)).
Extended profilesPassing or failing the SRS rule check is the only authorization controlprovided at the group level. This is the base profile. In future releasesof the Nortel SNAS software, extended profiles provide a mechanismto achieve more granular authorization control, based on specificcharacteristics of the user’s connection. You can define up to 63 extendedprofiles for each group.
In Nortel Secure Network Access Switch Software Release 1.6.1, the datafor an extended profile include the following configurable parameters:
• linksets
• the VLAN which the user is authorized to access
Each extended profile references a client filter in a one-to-one relationship.With Nortel Secure Network Access Switch Software Release 1.6.1, youcan configure the Nortel Health Agent check result as the criterion for theclient filters, so to establish the user’s security status.
The client filter referenced in the extended profile determines whether theextended profile data is applied to the user. After the user is authenticatedand the Nortel Health Agent host integrity check is conducted, the NortelSNAS checks the extended profile of the group in sequence, in order ofthe profile IDs, for a match between the client filter conditions and theuser’s security status. When it finds a match, the Nortel SNAS appliesthat particular extended profile data to the user. Data defined for the base
Nortel Secure Network Access SwitchConfiguration — Using BBI
NN47230-500 03.0224 October 2008
Copyright © 2007, 2008 Nortel Networks
.

192 Configuration of groups and profiles
profile (for example, linksets) are appended to the extended profile data. Ifthe Nortel SNAS finds no match in any of the extended profiles, it appliesthe base profile data.
For information about configuring client filters, see “Configuring clientfilters” (page 201).
For information about configuring extended profiles, see “Configuringextended profiles” (page 205).
PingPing is a computer network tool used to test whether a particular host isreachable across an IP network. It is also used to self test the networkinterface card of the computer. It works by sending “echo request” packetsto the target host and listening for “echo response” replies. Ping estimatesthe round-trip time (generally in milliseconds), records any packet loss, andprints a statistical summary when finished.
TracerouteTraceroute is a computer network tool used to determine the route takenby packets across an IP network.
Traceroute is often used for network troubleshooting. By showing a listof routers traversed, it allows the user to identify the path taken to reacha particular destination on the network. This can help to identify routingproblems or firewalls that may be blocking access to a site. Tracerouteis also used by penetration testers to gather information about networkinfrastructure and IP ranges around a given host. It can also be used whendownloading data. If there are multiple mirrors available for the same pieceof data, one can trace each mirror to get a good idea of which mirror wouldbe the fastest to use.
DnslookupTo identify the IP address for a machine whose host name you specify orthe host name of a machine whose IP address you specify. Host is thehost name or IP address of the target station. If a back end interface ismapped to the current Nortel SNAS domain, the check is made throughthe back end interface.
A DNS lookup uses an Internet domain name to find an IP address, wherea reverse DNS lookup uses an Internet IP address to find a domain name.Reverse DNS lookup technique is able to identify whether sending e-mailserver is legitimate and contains a valid host name.
Before you beginBefore you configure groups, client filters, and extended profiles on theNortel SNAS, complete the following tasks:
Nortel Secure Network Access SwitchConfiguration — Using BBI
NN47230-500 03.0224 October 2008
Copyright © 2007, 2008 Nortel Networks
.
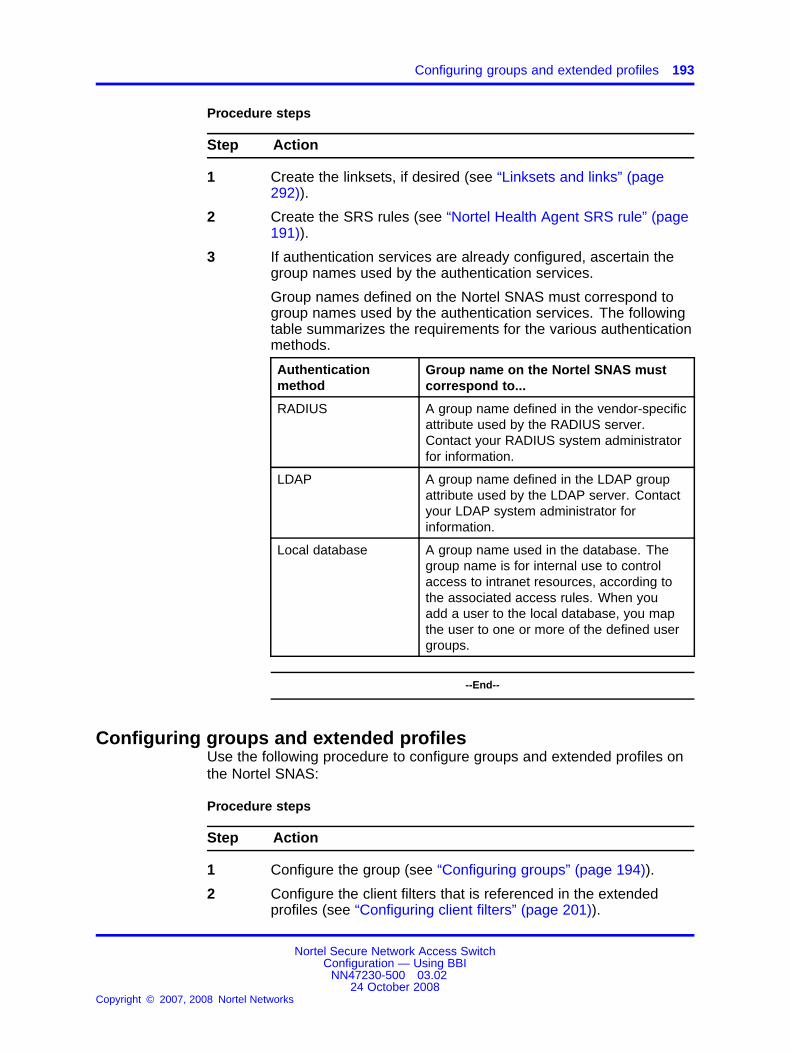
Configuring groups and extended profiles 193
Procedure steps
Step Action
1 Create the linksets, if desired (see “Linksets and links” (page292)).
2 Create the SRS rules (see “Nortel Health Agent SRS rule” (page191)).
3 If authentication services are already configured, ascertain thegroup names used by the authentication services.
Group names defined on the Nortel SNAS must correspond togroup names used by the authentication services. The followingtable summarizes the requirements for the various authenticationmethods.
Authenticationmethod
Group name on the Nortel SNAS mustcorrespond to...
RADIUS A group name defined in the vendor-specificattribute used by the RADIUS server.Contact your RADIUS system administratorfor information.
LDAP A group name defined in the LDAP groupattribute used by the LDAP server. Contactyour LDAP system administrator forinformation.
Local database A group name used in the database. Thegroup name is for internal use to controlaccess to intranet resources, according tothe associated access rules. When youadd a user to the local database, you mapthe user to one or more of the defined usergroups.
--End--
Configuring groups and extended profilesUse the following procedure to configure groups and extended profiles onthe Nortel SNAS:
Procedure steps
Step Action
1 Configure the group (see “Configuring groups” (page 194)).
2 Configure the client filters that is referenced in the extendedprofiles (see “Configuring client filters” (page 201)).
Nortel Secure Network Access SwitchConfiguration — Using BBI
NN47230-500 03.0224 October 2008
Copyright © 2007, 2008 Nortel Networks
.

194 Configuration of groups and profiles
The client filters can be referenced by all extended profiles in thedomain.
3 Configure the extended profiles for the group (see “Configuringextended profiles” (page 205)).
4 Map the linksets to the group and extended profiles (see“Mapping linksets to a group or profile” (page 208)).
5 Create a default group, if desired (see “Creating a default group”(page 214)).
--End--
Configuring groupsThis section describes the procedure to configure group.
Configuring groups navigation
• “Adding a group” (page 194)
• “Modifying a group” (page 197)
Adding a groupTo create and configure a group, use the following procedure:
Procedure steps
Step Action
1 Select the Config tab.
2 Select Secure Access Domain, AAA, and Groups from theNavigation pane.
The Groups screen appears.
3 Select the secure access domain from the Secure AccessDomain list and click Refresh.
4 Click Add.
The Add New Group screen appears.
Nortel Secure Network Access SwitchConfiguration — Using BBI
NN47230-500 03.0224 October 2008
Copyright © 2007, 2008 Nortel Networks
.

Configuring groups and extended profiles 195
5 Click Update.
The new group appears in the list of groups.
6 Click Apply on the toolbar to send the current changes to theNortel SNAS.
--End--
Use the data in the following table to add new group.
Variable Value
Group Id An integer in the range 1 to 1023that uniquely identifies the group inthe Nortel SNAS domain.
Group Name A string that uniquely identifies thegroup on the Nortel SNAS. Thegroup name must match a groupname used by the authenticationservices.
Nortel Secure Network Access SwitchConfiguration — Using BBI
NN47230-500 03.0224 October 2008
Copyright © 2007, 2008 Nortel Networks
.
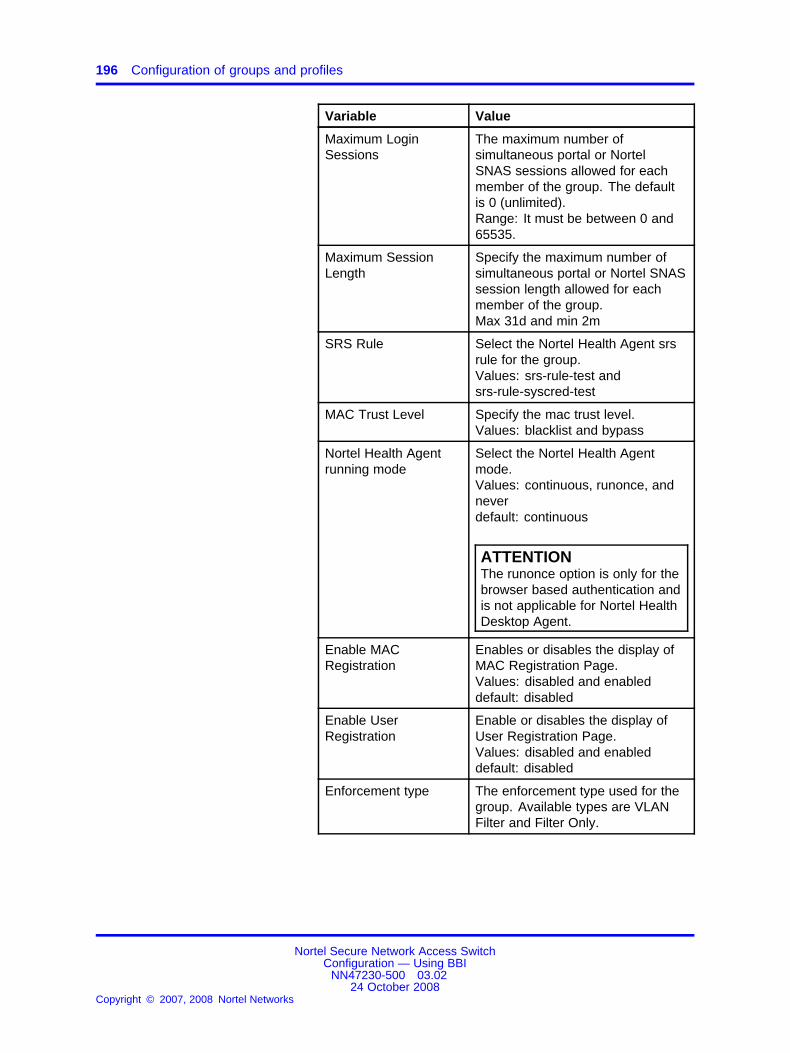
196 Configuration of groups and profiles
Variable Value
Maximum LoginSessions
The maximum number ofsimultaneous portal or NortelSNAS sessions allowed for eachmember of the group. The defaultis 0 (unlimited).Range: It must be between 0 and65535.
Maximum SessionLength
Specify the maximum number ofsimultaneous portal or Nortel SNASsession length allowed for eachmember of the group.Max 31d and min 2m
SRS Rule Select the Nortel Health Agent srsrule for the group.Values: srs-rule-test andsrs-rule-syscred-test
MAC Trust Level Specify the mac trust level.Values: blacklist and bypass
Nortel Health Agentrunning mode
Select the Nortel Health Agentmode.Values: continuous, runonce, andneverdefault: continuous
ATTENTIONThe runonce option is only for thebrowser based authentication andis not applicable for Nortel HealthDesktop Agent.
Enable MACRegistration
Enables or disables the display ofMAC Registration Page.Values: disabled and enableddefault: disabled
Enable UserRegistration
Enable or disables the display ofUser Registration Page.Values: disabled and enableddefault: disabled
Enforcement type The enforcement type used for thegroup. Available types are VLANFilter and Filter Only.
Nortel Secure Network Access SwitchConfiguration — Using BBI
NN47230-500 03.0224 October 2008
Copyright © 2007, 2008 Nortel Networks
.
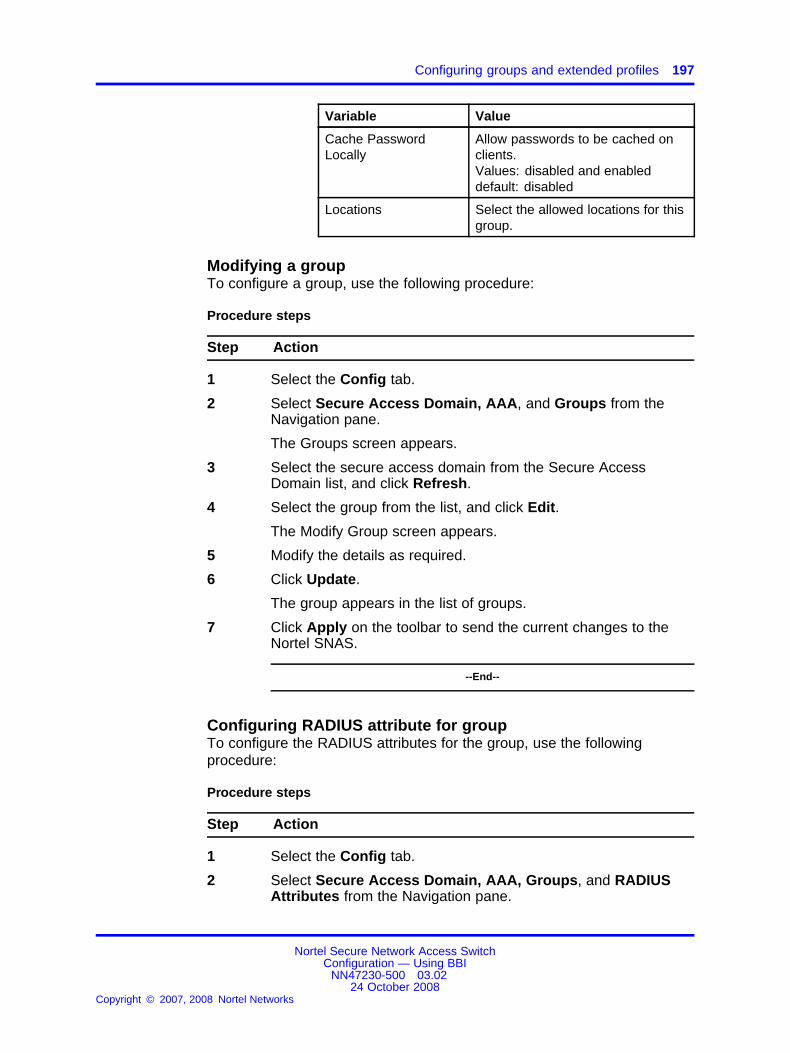
Configuring groups and extended profiles 197
Variable Value
Cache PasswordLocally
Allow passwords to be cached onclients.Values: disabled and enableddefault: disabled
Locations Select the allowed locations for thisgroup.
Modifying a groupTo configure a group, use the following procedure:
Procedure steps
Step Action
1 Select the Config tab.
2 Select Secure Access Domain, AAA, and Groups from theNavigation pane.
The Groups screen appears.
3 Select the secure access domain from the Secure AccessDomain list, and click Refresh.
4 Select the group from the list, and click Edit.
The Modify Group screen appears.
5 Modify the details as required.
6 Click Update.
The group appears in the list of groups.
7 Click Apply on the toolbar to send the current changes to theNortel SNAS.
--End--
Configuring RADIUS attribute for groupTo configure the RADIUS attributes for the group, use the followingprocedure:
Procedure steps
Step Action
1 Select the Config tab.
2 Select Secure Access Domain, AAA, Groups, and RADIUSAttributes from the Navigation pane.
Nortel Secure Network Access SwitchConfiguration — Using BBI
NN47230-500 03.0224 October 2008
Copyright © 2007, 2008 Nortel Networks
.

198 Configuration of groups and profiles
The RADIUS Attributes screen appears.
3 Select the secure access domain and the Auth ID from therespective lists, and click Refresh.
4 Click Add.
The Add RADIUS Attribute screen appears.
5 Click Create RADIUS Attribute.
The created attribute appears in the RADIUS Attributes table.
6 Click Apply on the toolbar to send the current changes to theNortel SNAS.
--End--
Use the data in the following table to configure RADIUSattribute for group.
Variable Value
Vendor Id Specify the vendor Id for the group.default: 0
Attribute Id Specify the attribute Id for the group.
Attribute Value Specify the attribute value for thegroup.
Using Guest Provisioning WizardGuest Provisioning wizard helps you to add a username and associatedpassword to the Nortel SNAS local user database for the guest users, usethe following procedure:
Procedure steps
Step Action
1 Select the Config tab
2 Select Wizard from the Navigation pane.The Wizard screen appears.
3 Click Guest Provisioning Wizard. The Domain Selectionscreen appears.
Nortel Secure Network Access SwitchConfiguration — Using BBI
NN47230-500 03.0224 October 2008
Copyright © 2007, 2008 Nortel Networks
.

Configuring groups and extended profiles 199
4 Select the domain for which guest provision needs to beprovided from the Select Domain for which Guest Provision hasto be Provided field.
5 Click Next.The Group Creation/Selection screen appears.
ATTENTIONIn this page, if the group do not exists for the selected domain then,only "Create a Group" option is visible. If a group already exists thenanother option "Select Existing Group" appears from which the usercan select the group from the existing list for the guest user.
6 Select the Create a Group.
Nortel Secure Network Access SwitchConfiguration — Using BBI
NN47230-500 03.0224 October 2008
Copyright © 2007, 2008 Nortel Networks
.

200 Configuration of groups and profiles
7 Click Next.The Local Authentication & User Configurations screen appears.
8 Click Finish.
9 Click Apply on the toolbar to send the current changes to theNortel SNAS.
--End--
Variable definitionsUse the data in the following table to add new group using guestprovisioning wizard.
Variable Value
Domain Selection
Select the Domain for whichguest provision needs to beProvided
Select the domain for which guest provision needs to be provided.
Group Creation/Selection
Group Id Specify a group id.
Group Name Specify a group name.
Local Authentication & User Configurations
Local Authentication ServerName
Specifies the local authentication server name.
Nortel Secure Network Access SwitchConfiguration — Using BBI
NN47230-500 03.0224 October 2008
Copyright © 2007, 2008 Nortel Networks
.
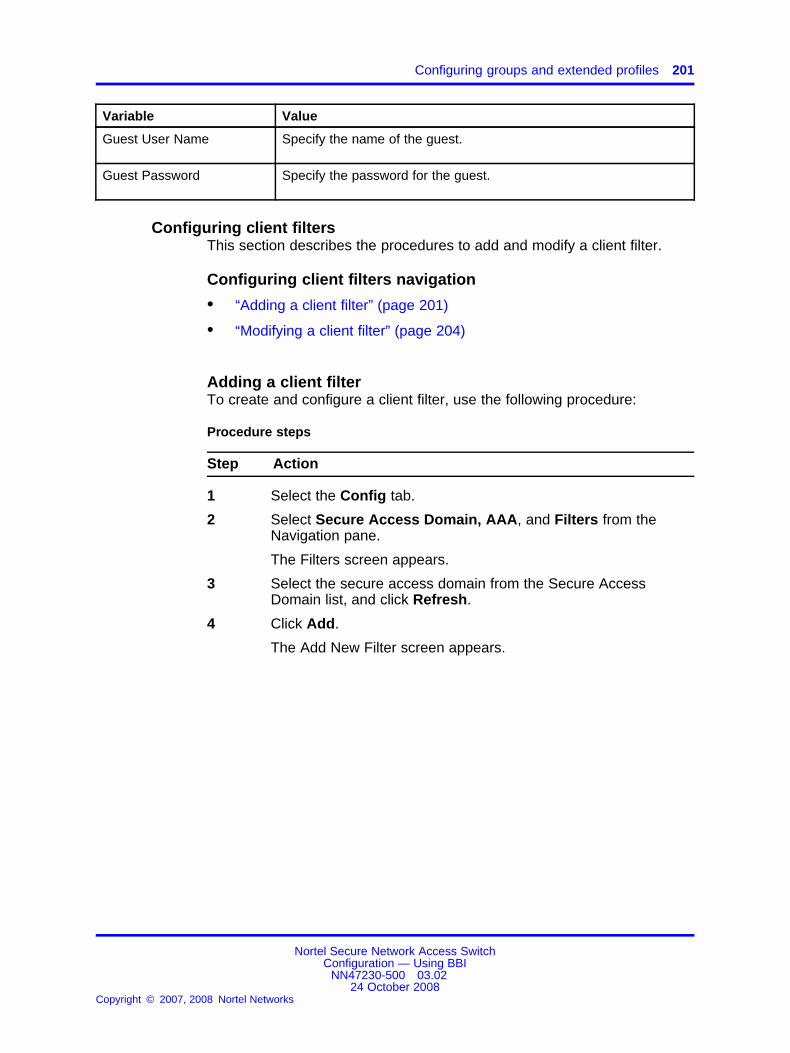
Configuring groups and extended profiles 201
Variable Value
Guest User Name Specify the name of the guest.
Guest Password Specify the password for the guest.
Configuring client filtersThis section describes the procedures to add and modify a client filter.
Configuring client filters navigation
• “Adding a client filter” (page 201)
• “Modifying a client filter” (page 204)
Adding a client filterTo create and configure a client filter, use the following procedure:
Procedure steps
Step Action
1 Select the Config tab.
2 Select Secure Access Domain, AAA, and Filters from theNavigation pane.
The Filters screen appears.
3 Select the secure access domain from the Secure AccessDomain list, and click Refresh.
4 Click Add.
The Add New Filter screen appears.
Nortel Secure Network Access SwitchConfiguration — Using BBI
NN47230-500 03.0224 October 2008
Copyright © 2007, 2008 Nortel Networks
.

202 Configuration of groups and profiles
5 Click Update.
The new client filter appears in the Client Filters table.
6 Click Apply on the toolbar to send the current changes to theNortel SNAS.
--End--
Use the data in the following table to add new client filter.
Variable Value
Filter Id An integer in the range 1 to 63 thatuniquely identifies the filter in theNortel SNAS domain.
Name Names the filter.
• name is a string that must beunique in the domain.
You reference the client filter namewhen you configure the extendedprofile.
Nortel Secure Network Access SwitchConfiguration — Using BBI
NN47230-500 03.0224 October 2008
Copyright © 2007, 2008 Nortel Networks
.

Configuring groups and extended profiles 203
Variable Value
Nortel Health AgentCheck Passed
Specifies whether passing or failingthe Nortel Health Agent host integritycheck triggers the filter:
Values: false, true, and ignoredefault: false• true—the client filter triggers when
the Nortel Health Agent checksucceeds.
• false—the client filter triggers whenthe Nortel Health Agent check fails.
• ignore—passing or failing theNortel Health Agent check does nottrigger the client filter.
For example, to grant limited accessrights to users who fail the NortelHealth Agent check, set the valueto false, create an extended profilethat references this client filter, andthen map the extended profile to arestrictive VLAN.
For information about configuringthe Nortel Health Agent checks, see“Configuring the Nortel Health Agentcheck” (page 133).
PatchLink CheckPassed
Specifies whether passing or failingthe PatchLink check triggers the filter:
Values: false, true, and ignoredefault: false• true—the client filter triggers when
the PatchLink check succeeds.
• false—the client filter triggers whenthe PatchLink check fails.
• ignore—passing or failing thePatchLink check does not triggerthe client filter.
Nortel Secure Network Access SwitchConfiguration — Using BBI
NN47230-500 03.0224 October 2008
Copyright © 2007, 2008 Nortel Networks
.

204 Configuration of groups and profiles
Variable Value
NAP checkspassed
Specifies whether passing or failingthe NAP check triggers the filter:
Values: false, true, and ignoredefault: false• true—the client filter triggers when
the NAP check succeeds.
• false—the client filter triggers whenthe NAP check fails.
• ignore—passing or failing the NAPcheck does not trigger the clientfilter.
Comment Specifies a comment about the clientfilter.
Modifying a client filterTo configure a client filter, use the following procedure:
Procedure steps
Step Action
1 Select the Config tab.
2 Select Secure Access Domain, AAA, and Filters from theNavigation pane.
The Filters screen appears.
3 Select the secure access domain from the Secure AccessDomain list, and click Refresh.
4 Select the client filter from the table, and click Edit.
5 Modify the details as required.
6 Click Update.
The modified client filter appears in the Client Filters table.
7 Click Apply on the toolbar to send the current changes to theNortel SNAS.
--End--
Nortel Secure Network Access SwitchConfiguration — Using BBI
NN47230-500 03.0224 October 2008
Copyright © 2007, 2008 Nortel Networks
.

Configuring groups and extended profiles 205
Configuring extended profilesTo view the extended profiles within a group, select the Secure AccessDomain, AAA, Groups, and Extended Profiles from the Navigation pane.The Extended Profiles screen appears with a list of all profiles for thatgroup.
When you select a profile in the list, the extended profile configurationdetails and linksets are accessible from the tabs that display below the list.You can view or edit details for an extended profile from these additionaltabs.
This section describes the following procedures:
• “Adding an extended profile” (page 205)
• “Modifying an extended profile” (page 207)
Adding an extended profileTo create an extended profile for a group, use the following procedure:
Procedure steps
Step Action
1 Select the Config tab.
2 Select Secure Access Domain, AAA, Groups, and ExtendedProfiles from the Navigation pane.
The Extended Profiles screen appears.
3 Select the secure access domain and the group from therespective lists, and click Refresh.
4 Click Add.
The Add New Profile screen appears.
Nortel Secure Network Access SwitchConfiguration — Using BBI
NN47230-500 03.0224 October 2008
Copyright © 2007, 2008 Nortel Networks
.

206 Configuration of groups and profiles
5 Click Update.
The new extended profile appears in the Extended Profile table.
6 Click Apply on the toolbar to send the current changes to theNortel SNAS.
--End--
Use the data in the following table to add new extendedprofile.
Variable Value
Id An integer in the range 1 to 1064 thatuniquely identifies the profile in thegroup.
The default value for this field is thelowest unused index number available.
Filter Name The name of the predefined client filterthat determines whether the NortelSNAS applies this extended profile tothe user.Values: nha_system_passed andnha_system_failed
Nortel Secure Network Access SwitchConfiguration — Using BBI
NN47230-500 03.0224 October 2008
Copyright © 2007, 2008 Nortel Networks
.

Configuring groups and extended profiles 207
Variable Value
Vlan Name The name of the VLAN to which theNortel SNAS assigns users with thisprofile.Values: yellow and green
Access Control ListID
Specify the name of the filterconfigured on the edge switch tobe applied to the client port afterRADIUS authentication. The valuespecified here is returned as aRADIUS standard Filter-Id attribute(type 11) when authenticating 802.1xclients.
Modifying an extended profileTo modify an extended profile for a group, use the following procedure:
Procedure steps
Step Action
1 Select the Config tab.
2 Select Secure Access Domain, AAA, Groups, and ExtendedProfiles from the Navigation pane.
The Extended Profiles screen appears.
3 Select the secure access domain and the group from therespective lists, and click Refresh.
4 Select the extended profile from the table, and click Edit.
The Modify New Profile screen appears.
5 Modify the details as required.
6 Click Update.
7 Click Apply on the toolbar to send the current changes to theNortel SNAS.
--End--
Configuring Admin RightsYou can configure groups to function with or without Administrator rights.To configure group administrator rights, use the following procedure:
Nortel Secure Network Access SwitchConfiguration — Using BBI
NN47230-500 03.0224 October 2008
Copyright © 2007, 2008 Nortel Networks
.

208 Configuration of groups and profiles
Procedure steps
Step Action
1 Select the Config tab.
2 Select Secure Access Domain, AAA, Groups, and AdminRights from the Navigation pane.The Admin Rights screen appears.
3 Select secure access domain and the group from the respectivelists, and click Refresh.
4 Click Update to save the changes.
5 Click Apply on the toolbar to send the current changes to theNortel SNAS.
--End--
Variable definitionsUse the data in the following table to configure admin rights settings.
Variable Value
Admin User Name Specify the administrator username.
Password Specify the password associated with the username.
Confirm Password Confirm the password.
Action Action to take.Values: no_access and filter_only
Mapping linksets to a group or profileYou can tailor the portal page for different users by mapping preconfiguredlinksets to groups and extended profiles. Linksets configured for a groupdisplay on the portal page after the linksets configured for the user’sextended profile.
For information about configuring linksets, see “Configuring linksets” (page320).
This section describes the following procedures:
• “Mapping linksets to a group” (page 208)
• “Mapping linksets to a profile” (page 210)
Mapping linksets to a groupTo map a linkset to a group, use the following procedure:
Nortel Secure Network Access SwitchConfiguration — Using BBI
NN47230-500 03.0224 October 2008
Copyright © 2007, 2008 Nortel Networks
.
Configuring groups and extended profiles 209
Procedure steps
Step Action
1 Select the Config tab.
2 Select Secure Access Domain, AAA, Groups, and Linksetsfrom the Navigation pane.The Linksets screen appears.
3 Select the secure access domain and the group from therespective lists, and click Refresh.
4 To map a linkset to a group, use the following procedures:
• “Adding linksets to a group” (page 209)
• “Removing linksets from a group” (page 209)
--End--
Adding linksets to a group To add a linkset to a group, use thefollowing procedure:
Procedure steps
Step Action
1 Select the Config tab.
2 Select Secure Access Domain, AAA, Groups, and Linksetsfrom the Navigation pane.
The Linksets screen appears and displays the Linkset table.
3 Select the secure access domain and the group from therespective lists, and click Refresh.
4 Select the portal linksets that you want add to the group and clickAdd.
The new linkset appears in the Linkset table.
5 Click Apply on the toolbar to send the current changes to theNortel SNAS.
--End--
Removing linksets from a group To remove a linkset from a group,use the following procedure:
Nortel Secure Network Access SwitchConfiguration — Using BBI
NN47230-500 03.0224 October 2008
Copyright © 2007, 2008 Nortel Networks
.

210 Configuration of groups and profiles
Procedure steps
Step Action
1 Select the Config tab.
2 Select Secure Access Domain, AAA, Groups, and Linksetsfrom the Navigation pane.
The Linksets screen appears and displays the Linkset table.
3 Select the secure access domain and the group from therespective lists, and click Refresh.
4 Select the linkset that you want to remove from the Linkset table.
5 Click Delete.
The linkset is removed from the Linkset Table.
6 Click Apply on the toolbar to send the current changes to theNortel SNAS.
--End--
Mapping linksets to a profileTo map a linkset to an extended profile, use the following procedure:
Procedure steps
Step Action
1 Select the Config tab.
2 Select Secure Access Domain, AAA, Groups, ExtendedProfiles, and Extended Linksets from the Navigation pane.The Extended Linksets screen appears.
3 Select the secure access domain, the group, and the client filterfrom the respective lists, and click Refresh.
4 To map a linkset to a profile, use the following procedures:
• “Adding linksets to an extended profile” (page 210)
• “Removing linksets from an extended profile” (page 211)
--End--
Adding linksets to an extended profile To add a linkset to an extendedprofile, use the following procedure:
Nortel Secure Network Access SwitchConfiguration — Using BBI
NN47230-500 03.0224 October 2008
Copyright © 2007, 2008 Nortel Networks
.
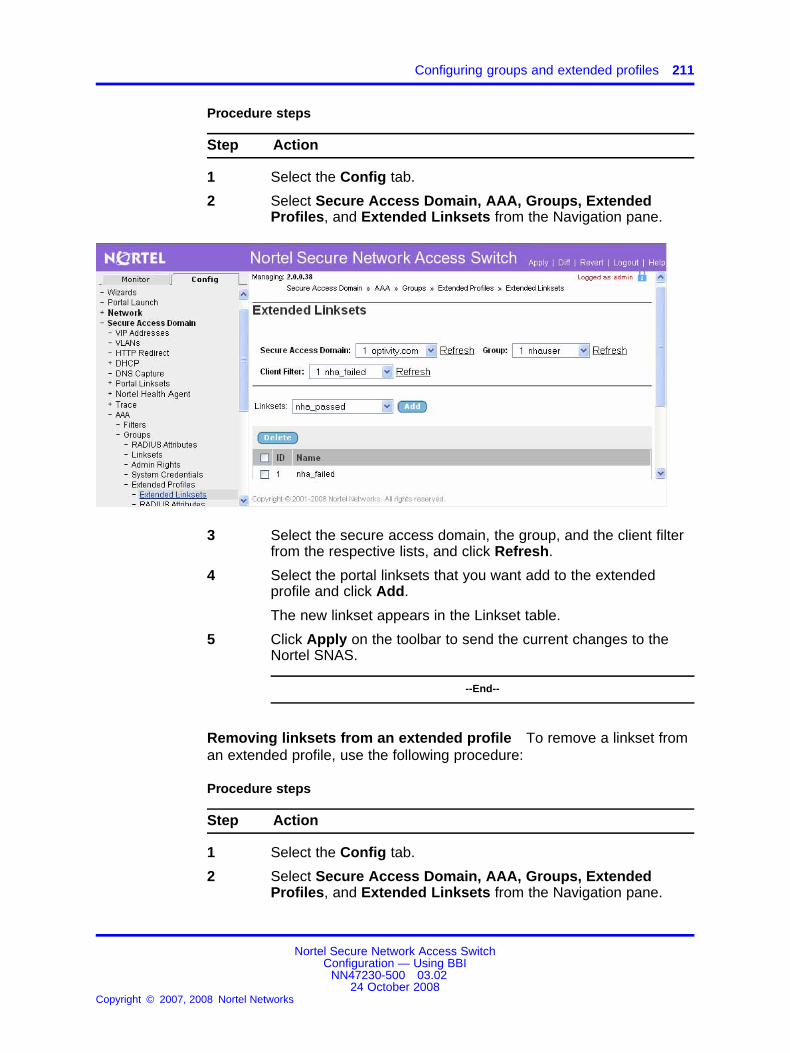
Configuring groups and extended profiles 211
Procedure steps
Step Action
1 Select the Config tab.
2 Select Secure Access Domain, AAA, Groups, ExtendedProfiles, and Extended Linksets from the Navigation pane.
3 Select the secure access domain, the group, and the client filterfrom the respective lists, and click Refresh.
4 Select the portal linksets that you want add to the extendedprofile and click Add.
The new linkset appears in the Linkset table.
5 Click Apply on the toolbar to send the current changes to theNortel SNAS.
--End--
Removing linksets from an extended profile To remove a linkset froman extended profile, use the following procedure:
Procedure steps
Step Action
1 Select the Config tab.
2 Select Secure Access Domain, AAA, Groups, ExtendedProfiles, and Extended Linksets from the Navigation pane.
Nortel Secure Network Access SwitchConfiguration — Using BBI
NN47230-500 03.0224 October 2008
Copyright © 2007, 2008 Nortel Networks
.
212 Configuration of groups and profiles
The Linksets screen appears.
3 Select the secure access domain, the group, and the client filterfrom the respective lists, and click Refresh.
4 Select the linkset that you want to remove from the LinksetTable.
5 Click Delete.
6 Click OK.
The linkset disappears from the Linkset Table.
7 Click Apply on the toolbar to send the current changes to theNortel SNAS.
--End--
Configuring RADIUS Attributes to a profileTo configure a RADIUS Attribute to an extended profile, use the followingprocedure:
Procedure steps
Step Action
1 Select the Config tab.
2 Select Secure Access Domain, AAA, Groups, ExtendedProfiles, and RADIUS Attributes from the Navigation pane.The RADIUS Attributes screen appears.
3 Select the secure access domain, the group, and the client filterfrom the respective lists, and click Refresh.
4 Click Add.The Add RADIUS Attribute screen appears.
5 Enter the information in the respective fields.
6 Click Create RADIUS Attribute.The created attribute appears in the RADIUS Attributes table.
7 Click Apply on the toolbar to send the current changes to theNortel SNAS.
--End--
Use the data in the following table to configure RADIUSattribute for the extended profile.
Nortel Secure Network Access SwitchConfiguration — Using BBI
NN47230-500 03.0224 October 2008
Copyright © 2007, 2008 Nortel Networks
.
Configuring groups and extended profiles 213
Variable Value
Vendor Id Specify the vendor Id for the extended profile.default: 0
Attribute Id Specify the attribute Id for the extended profile.
Attribute Value Specify the attribute value for the extended profile.
To add a RADIUS Attribute to an extended profile, usethe following procedure:
Procedure steps
Step Action
1 Select the Config tab.
2 Select Secure Access Domain, AAA, Groups,Extended Profiles, and RADIUS Attributefrom the Navigation pane.The RADIUS Attributes screen appears.
3 Select the secure access domain, the group,and the client filter from the respective lists, andclick Refresh.
4 Click Insert.The Insert RADIUS Attribute screen appears.
5 Enter the information in the respective fields.
6 Click Update RADIUS Attribute.
7 Click Apply on the toolbar to send the currentchanges to the Nortel SNAS.
--End--
To move a RADIUS Attribute to an extended profile, usethe following procedure:
Procedure steps
Step Action
1 Select the Config tab.
2 Select Secure Access Domain, AAA, Groups,Extended Profiles, and RADIUS Attributefrom the Navigation pane.The RADIUS Attributes screen appears.
Nortel Secure Network Access SwitchConfiguration — Using BBI
NN47230-500 03.0224 October 2008
Copyright © 2007, 2008 Nortel Networks
.
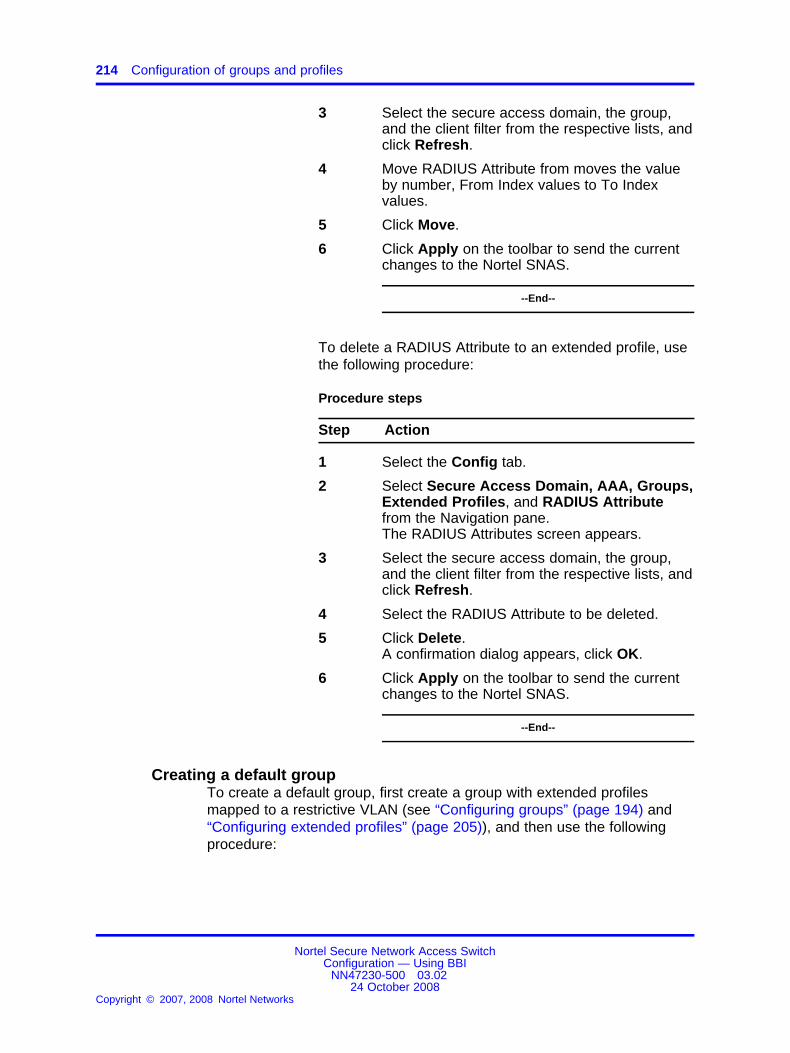
214 Configuration of groups and profiles
3 Select the secure access domain, the group,and the client filter from the respective lists, andclick Refresh.
4 Move RADIUS Attribute from moves the valueby number, From Index values to To Indexvalues.
5 Click Move.
6 Click Apply on the toolbar to send the currentchanges to the Nortel SNAS.
--End--
To delete a RADIUS Attribute to an extended profile, usethe following procedure:
Procedure steps
Step Action
1 Select the Config tab.
2 Select Secure Access Domain, AAA, Groups,Extended Profiles, and RADIUS Attributefrom the Navigation pane.The RADIUS Attributes screen appears.
3 Select the secure access domain, the group,and the client filter from the respective lists, andclick Refresh.
4 Select the RADIUS Attribute to be deleted.
5 Click Delete.A confirmation dialog appears, click OK.
6 Click Apply on the toolbar to send the currentchanges to the Nortel SNAS.
--End--
Creating a default groupTo create a default group, first create a group with extended profilesmapped to a restrictive VLAN (see “Configuring groups” (page 194) and“Configuring extended profiles” (page 205)), and then use the followingprocedure:
Nortel Secure Network Access SwitchConfiguration — Using BBI
NN47230-500 03.0224 October 2008
Copyright © 2007, 2008 Nortel Networks
.

Trace 215
Procedure steps
Step Action
1 Select the Config tab.
2 Select Secure Access Domain and AAA from the Navigationpane.
The AAA screen appears.
3 Select the secure access domain from the Secure AccessDomain list, and click Refresh.
4 Click Update to save the details.
5 Click Apply on the toolbar to send the current changes to theNortel SNAS.
--End--
Variable definitionsUse the data in the following table to configure AAA.
Variable Value
Default Group Specifies name of the group that you want to set as adefault.
TraceYou can trace the device information through pinging, tracerouting andDnslookup options.
Nortel Secure Network Access SwitchConfiguration — Using BBI
NN47230-500 03.0224 October 2008
Copyright © 2007, 2008 Nortel Networks
.

216 Configuration of groups and profiles
Pinging a deviceTo Verify station-to-station connectivity across the network, use thefollowing procedure.
Procedure steps
Step Action
1 Select the Config tab.
2 Select Secure Access Domain, Trace, and Ping from theNavigation pane.
The Ping screen appears.
3 Select the secure access domain from the Secure AccessDomain list, and click Refresh.
4 Click Ping to submit the page.
The ping packets status appears in the Ping Status table.
--End--
Variable definitionsUse the data in the following table to ping.
Variable Value
Ping through Backend Interface
Host Specify IP address or Host name to Ping.
ATTENTIONTo specify host names, you must configure theDNS parameters.
Viewing the TracerouteTo identify the route used for station-to-station connectivity across thenetwork, use the following procedure.
Nortel Secure Network Access SwitchConfiguration — Using BBI
NN47230-500 03.0224 October 2008
Copyright © 2007, 2008 Nortel Networks
.

Trace 217
WARNINGThe traceroute operation may take some time to display theroutes information for an unreachable host.
Procedure steps
Step Action
1 Select the Config tab.
2 Select Secure Access Domain, Trace, and Traceroute fromthe Navigation pane.
The Traceroute screen appears.
3 Select the secure access domain from the Secure AccessDomain list, and click Refresh.
4 Click Traceroute to submit the page.
The traceroutes status appears in the Traceroute Status table.
--End--
Variable definitionsUse the data in the following table to traceroute.
Variable Value
Traceroute through Backend Interface
Host Specify IP address or Host name of the targetstation to traceroute.
ATTENTIONTo specify host names, you must configure theDNS parameters.
Viewing the DnslookupTo identify the IP address for a machine whose host name you specify orthe host name of a machine whose IP address you specify. Host is thehost name or IP address of the target station. If a backend interface ismapped to the current Nortel SNAS domain, the check is made throughthe backend interface.
To view the dnslookup, use the following procedure.
Nortel Secure Network Access SwitchConfiguration — Using BBI
NN47230-500 03.0224 October 2008
Copyright © 2007, 2008 Nortel Networks
.

218 Configuration of groups and profiles
Procedure steps
Step Action
1 Select the Config tab.
2 Select Secure Access Domain, Trace, and Dnslookup fromthe Navigation pane.
The Dnslookup screen appears.
3 Select the secure access domain from the Secure AccessDomain list, and click Refresh.
4 Click Lookup to submit the page.
The DNS lookup status appears in the DNS Lookup Status table.
--End--
Variable definitionsUse the data in the following table to Dnslookup.
Variable Value
Lookup a name in DNS through Backend Interface
Host Specify IP address or Host name to view thednslookup.
Nortel Secure Network Access SwitchConfiguration — Using BBI
NN47230-500 03.0224 October 2008
Copyright © 2007, 2008 Nortel Networks
.

219.
Configuration of authenticationThis chapter provides detailed procedures to configure authentication.
Navigation• “Overview” (page 219)
• “Before you begin” (page 220)
• “Configuring authentication” (page 221)
OverviewThe Nortel SNAS controls the authentication of clients when they log onto the network.
The Nortel SNAS supports the following authentication methods in NortelSecure Network Access Switch Software Release 1.6.1:
• external database
— Remote Authentication Dial-In User Service (RADIUS)
— Lightweight Directory Access Protocol (LDAP)
• local database on the Nortel SNAS
ATTENTIONIf you run the quick setup wizard during initial setup, the Local databaseauthentication method is created as Authentication 1.
You can configure more than one authentication method within a NortelSNAS domain. You determine the order in which the methods areapplied by default. Client credentials are checked against the variousauthentication databases until the first match is found.
You can configure the methods so that their names display on the portallogin page (see “Configuring authentication methods” (page 222)). Youcan then direct clients to select a specific authentication server (forexample, for direction to a specific Windows domain). If the client selects
Nortel Secure Network Access SwitchConfiguration — Using BBI
NN47230-500 03.0224 October 2008
Copyright © 2007, 2008 Nortel Networks
.

220 Configuration of authentication
a Login Service name, the authentication request is directed immediatelyto the specified service. Otherwise, authentication defaults to theauthentication order you have configured (see “Specifying authenticationfallback order” (page 270)).
For general information about authentication within the Nortel SNAS,see Nortel Secure Network Access Switch 2.0 Solution Guide ()(NN47230-200).
Before you beginBefore you configure authentication on the Nortel SNAS, you mustcomplete the following tasks:
Procedure steps
Step Action
1 Create the Nortel SNAS domain, if applicable (see “Creating adomain” (page 112)).
If you run the quick setup wizard during initial setup, Domain 1is created on the Nortel SNAS.
ATTENTIONWith Nortel Secure Network Access Switch Software Release 1.6.1,you cannot configure the Nortel SNAS to include more than onedomain.
2 Create and configure the groups (see “Configuration of groupsand profiles” (page 189)).
3 For external authentication servers, create or modify settings onthe external server as required:
a A free RADIUS server can require specific settings in theclients.conf file and the Users file to match group parametersthat you configure on the Nortel SNAS.
b A Steel-belted RADIUS server requires specific settings in thevendor.ini file, master dictionary, and vendor dictionary.
c An MS IAS RADIUS server may require vendor parameters tobe configured on the Microsoft Management Console (MMC).
4 To configure external authentication, you require the followinginformation about the authentication server configuration:
a RADIUS servers:
• server IP address
• port number used for the service
• shared secret
Nortel Secure Network Access SwitchConfiguration — Using BBI
NN47230-500 03.0224 October 2008
Copyright © 2007, 2008 Nortel Networks
.

Configuring authentication 221
• Vendor-Id attribute
• Vendor-Type
ATTENTIONYou can assign vendor-specific codes to the Vendor-Id andVendor-Type attributes. The RADIUS server uses Vendor-Id andVendor-Type attributes in combination to identify the values itassigns and sends for attributes such as group name and sessiontimeout.
Each vendor has a specific dictionary. The Vendor-Id specifiedfor an attribute identifies that the dictionary the RADIUS serveruses to retrieve the attribute value. The Vendor-Type indicatesthe index number of the required entry in the dictionary file.
The Internet Assigned Numbers Authority (IANA) designatesthat SMI Network Management Private EnterpriseCodes can be assigned to the Vendor-Id attribute (seehttp://www.iana.org/assignments/enterprise-numbers).
RFC 2865 describes the usage of the Vendor-Type attribute.
If you specify Vendor-Id and Vendor-Type on the RADIUSserver and on the Nortel SNAS, the Nortel SNAS retrievesvendor-specific values for the associated attribute. If you set theVendor-Id and Vendor-Type attributes to 0, the RADIUS serversends standard attribute values.
b LDAP servers:
• server IP address
• port number used for the service
• configured accounts and users so that you can specifyappropriate search entries and group and user attributes
--End--
Configuring authenticationThe basic steps for configuring and managing authentication are:
Procedure steps
Step Action
1 Create the authentication methods.
2 Configure specific settings for the methods.
Nortel Secure Network Access SwitchConfiguration — Using BBI
NN47230-500 03.0224 October 2008
Copyright © 2007, 2008 Nortel Networks
.
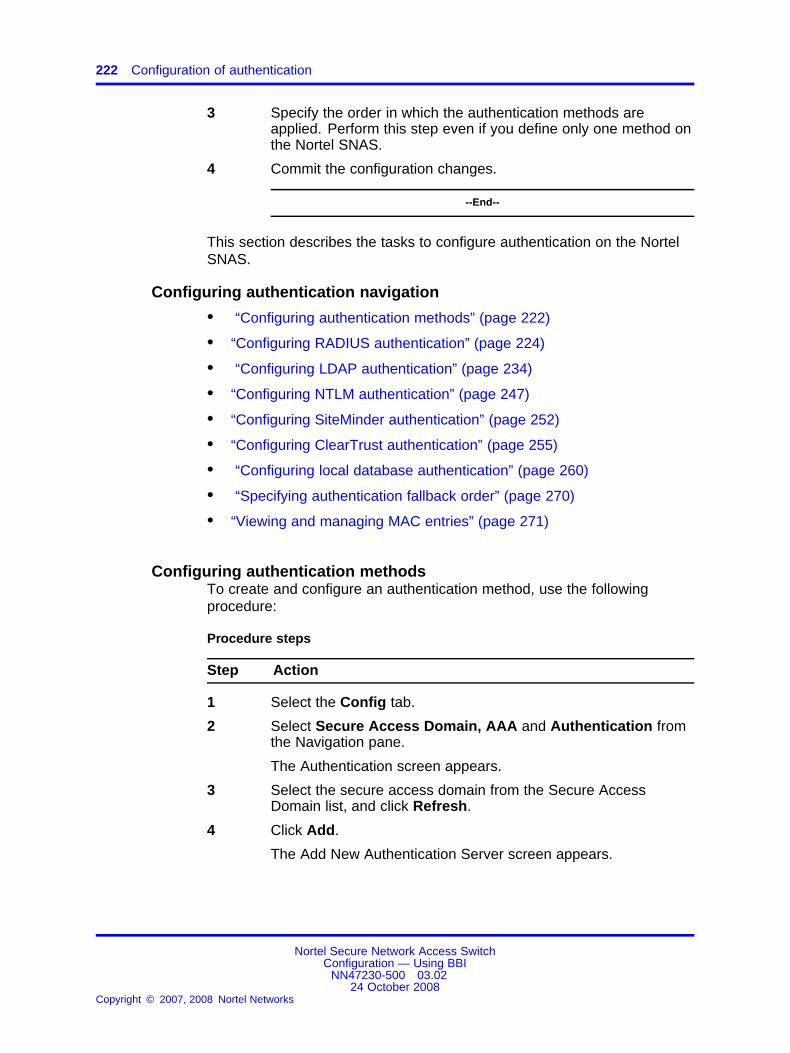
222 Configuration of authentication
3 Specify the order in which the authentication methods areapplied. Perform this step even if you define only one method onthe Nortel SNAS.
4 Commit the configuration changes.
--End--
This section describes the tasks to configure authentication on the NortelSNAS.
Configuring authentication navigation
• “Configuring authentication methods” (page 222)
• “Configuring RADIUS authentication” (page 224)
• “Configuring LDAP authentication” (page 234)
• “Configuring NTLM authentication” (page 247)
• “Configuring SiteMinder authentication” (page 252)
• “Configuring ClearTrust authentication” (page 255)
• “Configuring local database authentication” (page 260)
• “Specifying authentication fallback order” (page 270)
• “Viewing and managing MAC entries” (page 271)
Configuring authentication methodsTo create and configure an authentication method, use the followingprocedure:
Procedure steps
Step Action
1 Select the Config tab.
2 Select Secure Access Domain, AAA and Authentication fromthe Navigation pane.
The Authentication screen appears.
3 Select the secure access domain from the Secure AccessDomain list, and click Refresh.
4 Click Add.
The Add New Authentication Server screen appears.
Nortel Secure Network Access SwitchConfiguration — Using BBI
NN47230-500 03.0224 October 2008
Copyright © 2007, 2008 Nortel Networks
.
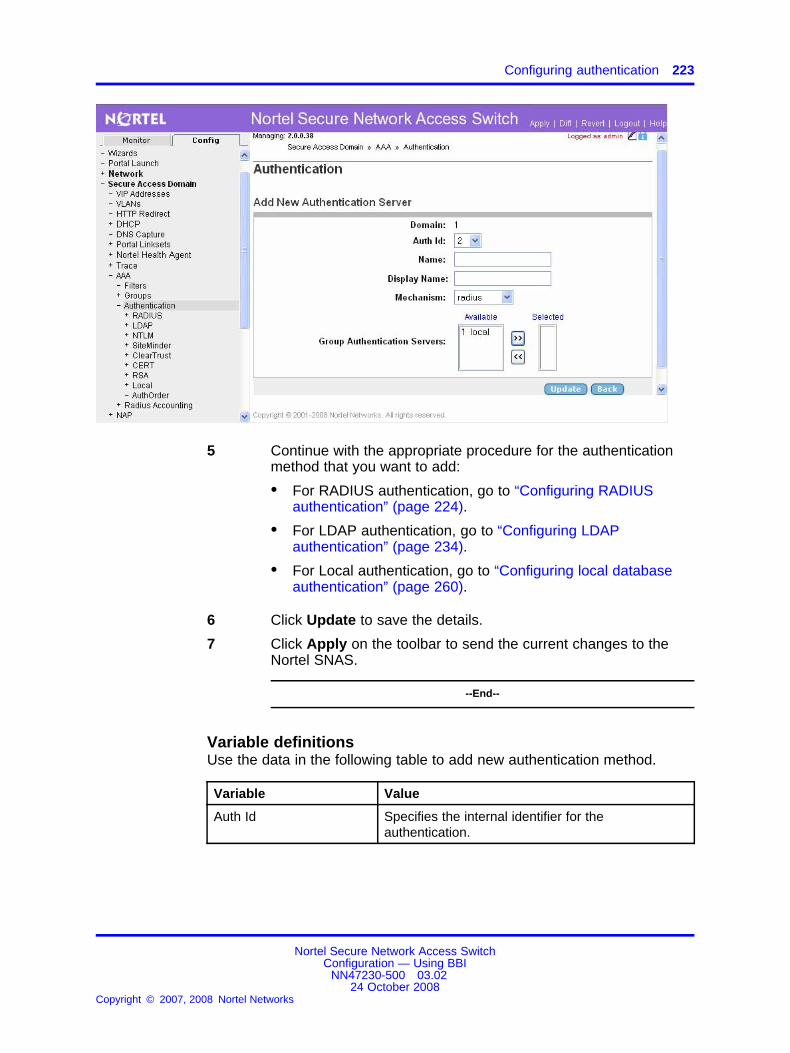
Configuring authentication 223
5 Continue with the appropriate procedure for the authenticationmethod that you want to add:
• For RADIUS authentication, go to “Configuring RADIUSauthentication” (page 224).
• For LDAP authentication, go to “Configuring LDAPauthentication” (page 234).
• For Local authentication, go to “Configuring local databaseauthentication” (page 260).
6 Click Update to save the details.
7 Click Apply on the toolbar to send the current changes to theNortel SNAS.
--End--
Variable definitionsUse the data in the following table to add new authentication method.
Variable Value
Auth Id Specifies the internal identifier for theauthentication.
Nortel Secure Network Access SwitchConfiguration — Using BBI
NN47230-500 03.0224 October 2008
Copyright © 2007, 2008 Nortel Networks
.

224 Configuration of authentication
Variable Value
Name Specifies a name for the authentication method asa mnemonic aid.
The maximum allowable length of the name stringis 255 characters, but Nortel recommends amaximum of 32 characters.
Future releases of the Nortel SNAS softwareallows you to reference this name in a clientfilter, so authentication to this server becomes acondition for access rights for a group.
Display Name Specifies a name for the method to be displayed inthe Login Service list box on the portal login page,together with the names of other authenticationservices available.
Mechanism Specifies the authentication method.
Group AuthenticationServers
Specifies another authentication method to use forretrieving group information.
You can choose any existing Local or LDAPdatabase to retrieve group information. Usergroups that exist in the RADIUS authenticationscheme are added to the user groups found in thespecified authentication schemes.
Configuring RADIUS authenticationTo configure the Nortel SNAS to use RADIUS authentication, use thefollowing procedure:
Procedure steps
Step Action
1 Add the RADIUS method to the domain and specify the RADIUSserver (see “Adding the RADIUS method and server” (page225)).
2 Modify the RADIUS configuration settings, if desired (see“Modifying RADIUS configuration” (page 226)).
3 Add extra RADIUS servers, for redundancy, if desired (see“Managing additional RADIUS servers” (page 231)).
--End--
Nortel Secure Network Access SwitchConfiguration — Using BBI
NN47230-500 03.0224 October 2008
Copyright © 2007, 2008 Nortel Networks
.

Configuring authentication 225
Adding the RADIUS method and serverTo configure the Nortel SNAS to use an external RADIUS or Steel-beltedRADIUS server for authentication, use the following procedure:
Procedure steps
Step Action
1 Select the Config tab.
2 Select Secure Access Domain, AAA, Authentication, andRADIUS from the Navigation pane.
The RADIUS screen appears.
3 Select the secure access domain from the Secure AccessDomain list, and click Refresh.
4 Click Add.
The Add New RADIUS Server screen appears.
5 Click Update.
The RADIUS authentication method displays in theAuthentication Server Table.
6 Click Apply on the toolbar to send the current changes to theNortel SNAS.
--End--
Nortel Secure Network Access SwitchConfiguration — Using BBI
NN47230-500 03.0224 October 2008
Copyright © 2007, 2008 Nortel Networks
.

226 Configuration of authentication
Use the data in the following table to add new RADIUSserver.
Variable Value
Auth Id Specifies the internal identifier forthe authentication.
Name Specifies a name for theauthentication method as amnemonic aid.
The maximum allowable length ofthe name string is 255 characters,but Nortel recommends a maximumof 32 characters.
Future releases of the NortelSNAS software allows you toreference this name in a client filter,so authentication to this serverbecomes a condition for accessrights for a group.
Display Name Specifies a name for the method tobe displayed in the Login Servicelist box on the portal login page,together with the names of otherauthentication services available.
Mechanism Specifies the authentication method.
Group AuthenticationServers
Specifies another authenticationmethod to use for retrieving groupinformation.
You can choose any existing Localor LDAP database to retrieve groupinformation. User groups that exist inthe RADIUS authentication schemeare added to the user groups foundin the specified authenticationschemes.
Modifying RADIUS configurationYou can modify the RADIUS configuration in the following ways:
• modify settings for the authentication method itself (see “ModifyingRADIUS method settings” (page 227) )
• modify settings for the specific RADIUS configuration (see “ModifyingRADIUS configuration settings” (page 228) )
Nortel Secure Network Access SwitchConfiguration — Using BBI
NN47230-500 03.0224 October 2008
Copyright © 2007, 2008 Nortel Networks
.

Configuring authentication 227
To modify settings for an existing RADIUS authenticationmethod, use the following procedure:
Procedure steps
Step Action
1 Select the Config tab.
2 Select the Secure Access Domain, AAA,Authentication, RADIUS, and General fromthe Navigation pane.
The General screen appears, showing currentsettings for the method.
3 Select the secure access domain and the AuthId from the respective lists, and click Refresh.
4 Click Update to save the changes.
5 Click Apply on the toolbar to send the currentchanges to the Nortel SNAS.
--End--
Use the data in the following table to modify RADIUSmethod.
Variable Value
Name Specifies a name for theauthentication method as amnemonic aid.
Future releases of the Nortel SNASsoftware will allow you to referencethis name in a client filter, soauthentication to this server becomesa condition for access rights for agroup.
Display Name Specifies a name for the method tobe displayed in the Login Servicelist box on the portal login page,together with the names of otherauthentication services available.
Mechanism Displays the authentication type forthis method.
Nortel Secure Network Access SwitchConfiguration — Using BBI
NN47230-500 03.0224 October 2008
Copyright © 2007, 2008 Nortel Networks
.
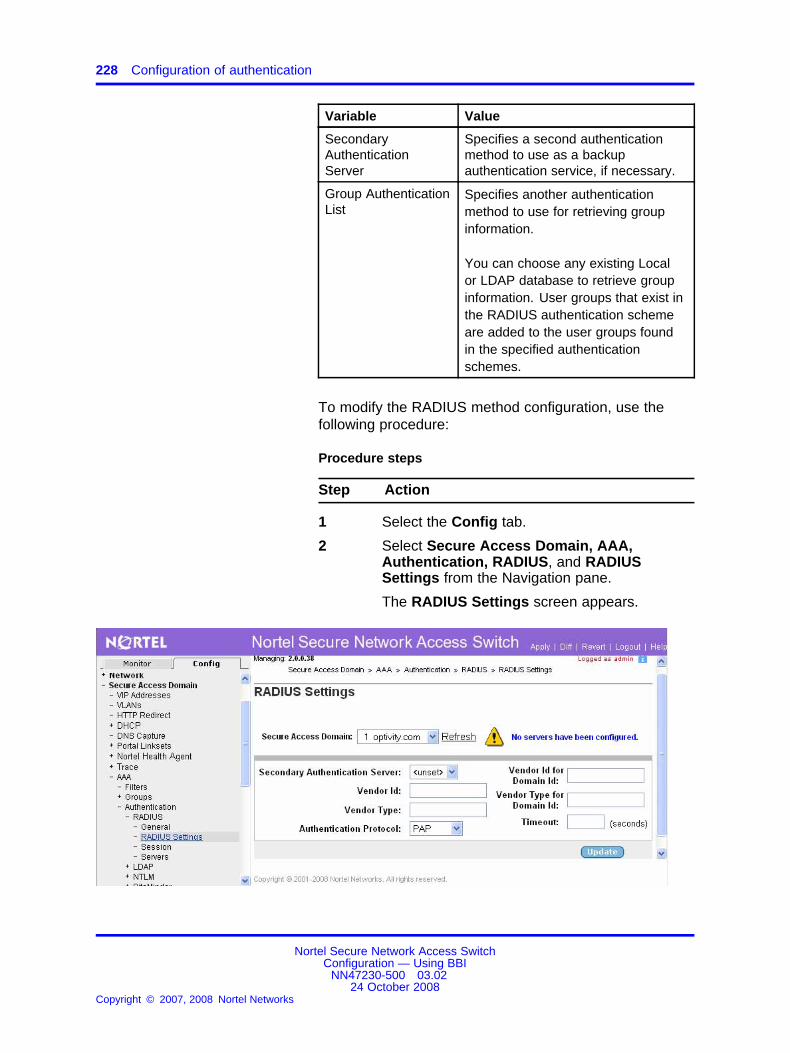
228 Configuration of authentication
Variable Value
SecondaryAuthenticationServer
Specifies a second authenticationmethod to use as a backupauthentication service, if necessary.
Group AuthenticationList
Specifies another authenticationmethod to use for retrieving groupinformation.
You can choose any existing Localor LDAP database to retrieve groupinformation. User groups that exist inthe RADIUS authentication schemeare added to the user groups foundin the specified authenticationschemes.
To modify the RADIUS method configuration, use thefollowing procedure:
Procedure steps
Step Action
1 Select the Config tab.
2 Select Secure Access Domain, AAA,Authentication, RADIUS, and RADIUSSettings from the Navigation pane.
The RADIUS Settings screen appears.
Nortel Secure Network Access SwitchConfiguration — Using BBI
NN47230-500 03.0224 October 2008
Copyright © 2007, 2008 Nortel Networks
.

Configuring authentication 229
3 Select the secure access domain and the AuthID from the respective lists, and click Refresh.
4 Click Update to save the details.
5 Click Apply on the toolbar to send the currentchanges to the Nortel SNAS.
--End--
Use the data in the following table to for RADIUSConfiguration.
Variable Value
SecondaryAuthentication Server
Specifies the second authenticationserver to use after the first onesucceeds.
Vendor Id Specifies the vendor-specificattribute used by the RADIUS serverto send group names to the NortelSNAS. The default Vendor-Id is1872 (Alteon).
To use a standard RADIUS attributerather than the vendor-specific one,set the vendor ID to 0 (see alsovendor type).
ATTENTIONIf the Authentication Protocol isCHAPv2, the Vendor-Id must beset to 311 (Microsoft).
Vendor Type Specifies the Vendor-Type valueused in combination with theVendor-Id to identify the groups towhich the user belongs. The groupnames to which the vendor-specificattribute points to must match thenames you define on the NortelSNAS. The default is 1.
If you set the vendor ID to 0 in orderto use a standard RADIUS attribute(see vendor ID), set the vendortype to a standard attribute type asdefined in RFC 2865. For example,
Nortel Secure Network Access SwitchConfiguration — Using BBI
NN47230-500 03.0224 October 2008
Copyright © 2007, 2008 Nortel Networks
.

230 Configuration of authentication
Variable Value
to use the standard attribute Class,set the vendor ID to 0 and thevendor type to 25.
AuthenticationProtocol
Specifies the protocol used forcommunication between the NortelSNAS and the RADIUS server. Theoptions are:
• PAP—Password AuthenticationProtocol (PAP)
• CHAPv2—Challenge HandshakeAuthentication Protocol (CHAP),version 2
The default is PAP.
Vendor Id for DomainID
Specifies the vendor-specificattribute used by the RADIUS serverto send domain names to the NortelSNAS. The default Vendor-Id is1872 (Alteon).
ATTENTIONIf the Authentication Protocol isCHAPv2, consider setting theVendor-Id for the domain to 10(MS-CHAP-Domain).
Vendor Type forDomain ID
Specifies the Vendor-Type valueused in combination with theVendor-Id to identify the domain.The default is 3.
Timeout Sets the timeout interval for aconnection request to a RADIUSserver. At the end of the timeoutperiod, if no connection isestablished, authentication fails.
Nortel Secure Network Access SwitchConfiguration — Using BBI
NN47230-500 03.0224 October 2008
Copyright © 2007, 2008 Nortel Networks
.

Configuring authentication 231
Variable Value
Acceptable values are an integerthat indicates the time intervalfollowed by a letter to specify themeasurement unit. The options formeasurement units are:
• s—seconds
• m—minutes
• h—hours
If you do not specify a measurementunit, seconds is assumed. Therange is 1–10000 seconds. Thedefault is 10 seconds.
Managing additional RADIUS serversYou can specify additional RADIUS servers for redundancy. In the eventthat the preferred RADIUS server is not responding, the first availableserver in the list is used instead.
To manage additional RADIUS servers, select the Secure AccessDomain, AAA, Authentication, RADIUS, and Servers from theNavigation pane.
The Servers screen appears, displaying a list of the existing RADIUSservers.
To manage additional RADIUS servers, use the following procedures:
• “Adding a RADIUS server” (page 231)
• “Reordering additional RADIUS servers” (page 233)
• “Removing a RADIUS server” (page 233)
To add additional RADIUS servers for redundancy, usethe following procedure:
Procedure steps
Step Action
1 Select the Config tab.
Nortel Secure Network Access SwitchConfiguration — Using BBI
NN47230-500 03.0224 October 2008
Copyright © 2007, 2008 Nortel Networks
.

232 Configuration of authentication
2 Select Secure Access Domain, AAA,Authentication, RADIUS, and Servers fromthe Navigation pane.
The Servers screen appears.
3 Select the secure access domain and the AuthID from the respective lists, and click Refresh.
4 Click Add.
The Add New RADIUS Server screen appears.
5 Click Update.
The new RADIUS server is automaticallyassigned a unique index number, and appearsin the RADIUS Server table.
6 Click Apply on the toolbar to send the currentchanges to the Nortel SNAS.
--End--
Use the data in the following table to add new RADIUSServer.
Variable Value
IP Address Specifies the IP address of the RADIUSserver.
Nortel Secure Network Access SwitchConfiguration — Using BBI
NN47230-500 03.0224 October 2008
Copyright © 2007, 2008 Nortel Networks
.
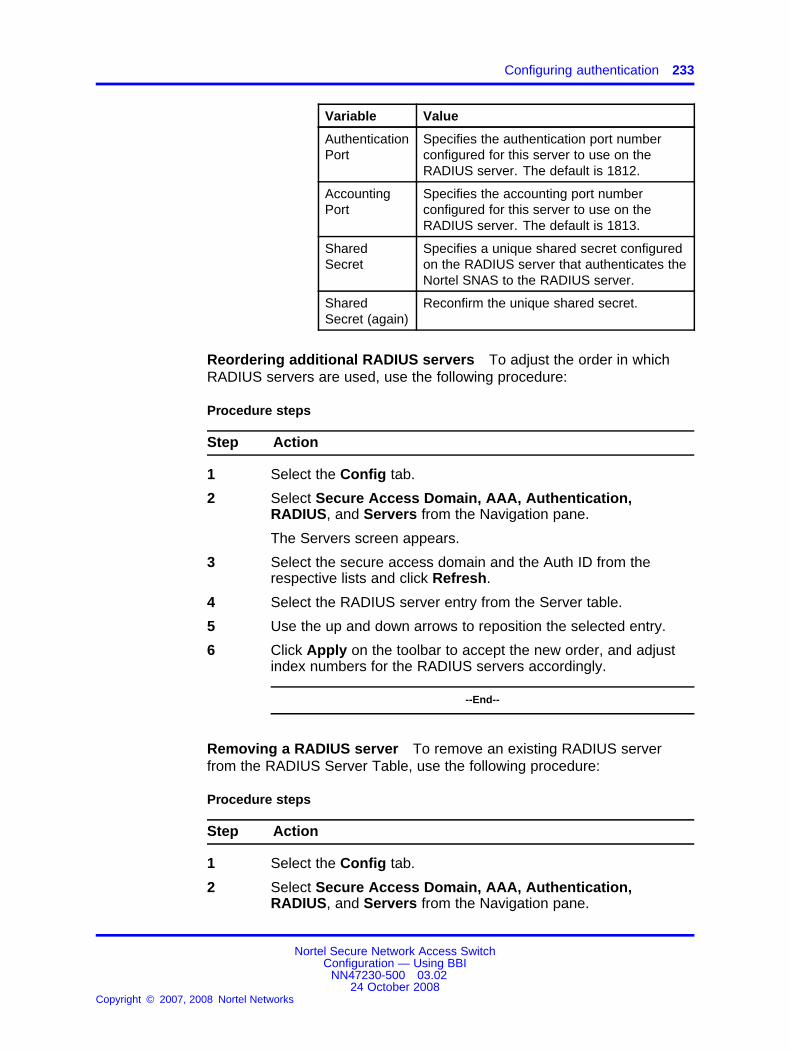
Configuring authentication 233
Variable Value
AuthenticationPort
Specifies the authentication port numberconfigured for this server to use on theRADIUS server. The default is 1812.
AccountingPort
Specifies the accounting port numberconfigured for this server to use on theRADIUS server. The default is 1813.
SharedSecret
Specifies a unique shared secret configuredon the RADIUS server that authenticates theNortel SNAS to the RADIUS server.
SharedSecret (again)
Reconfirm the unique shared secret.
Reordering additional RADIUS servers To adjust the order in whichRADIUS servers are used, use the following procedure:
Procedure steps
Step Action
1 Select the Config tab.
2 Select Secure Access Domain, AAA, Authentication,RADIUS, and Servers from the Navigation pane.
The Servers screen appears.
3 Select the secure access domain and the Auth ID from therespective lists and click Refresh.
4 Select the RADIUS server entry from the Server table.
5 Use the up and down arrows to reposition the selected entry.
6 Click Apply on the toolbar to accept the new order, and adjustindex numbers for the RADIUS servers accordingly.
--End--
Removing a RADIUS server To remove an existing RADIUS serverfrom the RADIUS Server Table, use the following procedure:
Procedure steps
Step Action
1 Select the Config tab.
2 Select Secure Access Domain, AAA, Authentication,RADIUS, and Servers from the Navigation pane.
Nortel Secure Network Access SwitchConfiguration — Using BBI
NN47230-500 03.0224 October 2008
Copyright © 2007, 2008 Nortel Networks
.

234 Configuration of authentication
The Servers screen appears.
3 Select the secure access domain and the Auth ID from therespective lists, and click Refresh.
4 Select the RADIUS server entry from the RADIUS Server Table.
5 Click Delete.
6 Click Apply on the toolbar to send the current changes to theNortel SNAS.
--End--
Next stepsProcedure steps
Step Action
1 Configure additional authentication methods, if desired (see“Configuring LDAP authentication” (page 234) or “Configuringlocal database authentication” (page 260)).
2 Set the authentication order (see “Specifying authenticationfallback order” (page 270)).
--End--
Configuring LDAP authenticationTo configure the Nortel SNAS to use LDAP authentication, use thefollowing procedure:
Procedure steps
Step Action
1 Add the LDAP method to the domain and specify the LDAPserver (see “Adding the LDAP method and server” (page 235)).
2 Modify the LDAP configuration settings, if desired (see“Modifying LDAP configuration” (page 237)).
3 Add extra LDAP servers, for redundancy, if desired (see“Managing additional LDAP servers” (page 242)).
4 Add LDAP macros, if desired (see “Managing LDAP macros”(page 244)).
--End--
Nortel Secure Network Access SwitchConfiguration — Using BBI
NN47230-500 03.0224 October 2008
Copyright © 2007, 2008 Nortel Networks
.

Configuring authentication 235
Adding the LDAP method and serverTo configure the Nortel SNAS to use an external LDAP server forauthentication, use the following procedure:
Procedure steps
Step Action
1 Select the Config tab.
2 Select Secure Access Domain, AAA, Authentication, andLDAP from the Navigation pane.
The LDAP screen appears.
3 Select the secure access domain from the Secure AccessDomain list, and click Refresh.
4 Click Add.
The Add New LDAP Server screen appears.
5 Click Update.
The LDAP authentication method appears in the AuthenticationServer Table.
6 Click Apply on the toolbar to send the current changes to theNortel SNAS.
--End--
Nortel Secure Network Access SwitchConfiguration — Using BBI
NN47230-500 03.0224 October 2008
Copyright © 2007, 2008 Nortel Networks
.

236 Configuration of authentication
Use the data in the following table to add new LDAPServer.
Variable Value
Auth Id Specifies the internal identifier for theauthentication.
Name Specifies a name for theauthentication method as amnemonic aid.
The maximum allowable length ofthe name string is 255 characters,but Nortel recommends a maximumof 32 characters.
Future releases of the NortelSNAS software allows you toreference this name in a client filter,so authentication to this serverbecomes a condition for accessrights for a group.
Display Name Specifies a name for the method tobe displayed in the Login Servicelist box on the portal login page,together with the names of otherauthentication services available.
Mechanism Specifies the authentication method.
Group AuthenticationServers
Specifies another authenticationmethod to use for retrieving groupinformation.
You can choose any existing Localor LDAP database to retrieve groupinformation. User groups that exist inthe RADIUS authentication schemeare added to the user groups foundin the specified authenticationschemes.
Nortel Secure Network Access SwitchConfiguration — Using BBI
NN47230-500 03.0224 October 2008
Copyright © 2007, 2008 Nortel Networks
.

Configuring authentication 237
Modifying LDAP configurationYou can modify the LDAP configuration in the following ways:
• modify settings for the authentication method itself (see “ModifyingLDAP and Local method settings” (page 237) ).
• modify settings for the specific LDAP configuration (see “ModifyingLDAP configuration settings” (page 237) ).
Modifying LDAP and Local method settings The configuration screenused to modify generic authentication method settings is the same forLDAP and Local authentication methods.
To modify settings for an existing LDAP or local authentication method,use the following procedure:
Procedure steps
Step Action
1 Select the Config tab.
2 Select Secure Access Domain, AAA, Authentication, LDAP,and General from the Navigation pane.
The General screen appears showing the current settings for themethod.
3 Select the secure access domain and the Auth ID from therespective lists, and click Refresh.
4 Modify settings for the authentication method, as necessary.
5 Click Update to save the details.
6 Click Apply on the toolbar to send the current changes to theNortel SNAS.
--End--
To modify the LDAP method configuration, use thefollowing procedure:
Procedure steps
Step Action
1 Select the Config tab.
2 Select Secure Access Domain, AAA,Authentication, LDAP, and LDAP Settingsfrom the Navigation pane.
Nortel Secure Network Access SwitchConfiguration — Using BBI
NN47230-500 03.0224 October 2008
Copyright © 2007, 2008 Nortel Networks
.

238 Configuration of authentication
The LDAP Setting screen appears.
3 Click Update to save the details.
4 Click Apply on the toolbar to send the currentchanges to the Nortel SNAS.
--End--
Use the data in the following table for LDAP settings.
Variable Value
Search Base Entry Specifies the Distinguished Name (DN)that points to one of the following:
• the entry that is one level up fromthe user entries (does not requirea Bind ISD DN and Bind ISDPassword)
• if user entries are located in severalplaces in the LDAP DictionaryInformation Tree (DIT), the positionin the DIT from where all userrecords can be found with asubtree search (requires Bind ISDDN and Bind ISD Password)
Group Attribute Specifies the LDAP attribute thatcontains the names of the groups.The group names contained in theLDAP attribute must be defined in theNortel SNAS domain (see “Configuringgroups” (page 194)).
To specify more than one groupattribute name, enter the namesseparated by a comma (,).
User Attribute Refers to one of the following:
1. The LDAP attribute thatcontains the user name usedfor authenticating a client in thedomain.The default user attribute name isuid.
Nortel Secure Network Access SwitchConfiguration — Using BBI
NN47230-500 03.0224 October 2008
Copyright © 2007, 2008 Nortel Networks
.

Configuring authentication 239
Variable Value
Do not use the Bind ISD DN andBind ISD Password fields.
2. If the client’s portal logon nameis different from the RDN (forexample, when using LDAP forauthentication for Active Directory),the LDAP attribute that is used incombination with the client’s logonname to search the DIT.For example, a user record inActive Directory is defined asthe following DN: cn=Bill Smith,ou=Users, dc=example, dc=com.The user record also contains theattribute sAMAccountName=bill.The user’s login name is bill. Ifthe user attribute is defined assAMAccountName, the user recordfor Bill Smith is found.The ISD Bind DN and ISD BindPassword fields are requiredso that the Nortel SNAS canauthenticate itself to the LDAPserver, in order to search the DIT.
iSD Bind DN Specifies an entry in the LDAP serverused to authenticate the Nortel SNASto the LDAP server so that the LDAPDIT can be searched.
The ISD Bind DN corresponds to anentry created in the Schema Adminsaccount (for example, cn=ldap ldap,cn=Users, dc=example, dc=com).
Required for the Search Base Entryand User Attribute method 2.
iSD Bind Password Specifies the password used toauthenticate the Nortel SNAS to theLDAP server. The ISD Bind Passwordis the password, configured in theSchema Admins account, for theentry referenced in the ISD Bind DN.Required for the Search Base Entryand User Attribute method 2.
iSD Bind Password(again)
Reconfirm the ISD Bind password.
Nortel Secure Network Access SwitchConfiguration — Using BBI
NN47230-500 03.0224 October 2008
Copyright © 2007, 2008 Nortel Networks
.

240 Configuration of authentication
Variable Value
Enable LDAPS If selected, allows LDAP requestsbetween the Nortel SNAS and theLDAP server to occur over a secureSSL connection (LDAPS). The defaultis not selected.
ATTENTIONThe default TCP port number usedby the LDAP protocol is 389. IfLDAPS is enabled, change the portnumber to 636.
Server Timeout Sets the timeout interval for aconnection request to an LDAPserver. At the end of the timeoutperiod, if no connection is established,authentication fails.
Accepted value is an integer thatindicates the time interval in seconds(s), minutes (m), or hours (h). If youdo not specify a measurement unit,seconds is assumed. The range is1–10000 seconds. The default is 5seconds.
User Preferences Enables or disables storage ofuser preferences in an externalLDAP/Active Directory database.
If selected, the storage and retrieval ofuser preferences is enabled. When theclient logs off from a portal session,the Nortel SNAS saves any userpreferences accumulated during thesession in the isdUserPrefs attribute.The next time the client successfullylogs on through the portal, the NortelSNAS retrieves the LDAP attributefrom the LDAP database.
If cleared, the storage and retrieval ofuser preferences is disabled.
Nortel Secure Network Access SwitchConfiguration — Using BBI
NN47230-500 03.0224 October 2008
Copyright © 2007, 2008 Nortel Networks
.

Configuring authentication 241
Variable Value
To support storage and retrieval ofuser preferences, you must extend theLDAP server schema with one newObjectClass and one new Attribute.
Values: enabled and disableddefault: disabled
Short GroupFormat
Enables or disables the short groupformats.Values: enabled and disableddefault: disabled
Cut Domain fromUser Name
Specifies whether the domain is cutfrom user names.
Values: enabled and disableddefault: disabled
Managing LDAP active directoryTo mange LDAP active directory, use the following procedure:
Procedure 1Procedure steps
Step Action
1 Select the Config tab.
2 Select Secure Access Domain, AAA, Authentication, LDAP,and Active Directory from the Navigation pane.
The Active Directory screen appears.
3 Select the secure access domain and the Auth ID from therespective lists, and click Refresh.
4 Specify the values in the respective fields and click Update
5 Click Apply on the toolbar to accept the new order, and adjustindex numbers for the LDAP servers accordingly.
--End--
Use the data in the following table to manage LDAPactive directory.
Nortel Secure Network Access SwitchConfiguration — Using BBI
NN47230-500 03.0224 October 2008
Copyright © 2007, 2008 Nortel Networks
.

242 Configuration of authentication
Variable Value
Expired Account Check Enables or disables the account check.Values: enabled and disabledDefault: disabled
Expired Account Group Specify the account group.Values: nhauser and nhasystem
Expired Password Group Specify the password group.Values: nhauser and nhasystem
Recursive GroupMembership
Enables or disables the recursive group membership.Values: enabled and disabledDefault: disabled
Managing additional LDAP serversYou can specify additional LDAP servers for redundancy. In the event thatthe preferred LDAP server is not responding, the first available server inthe list is used instead.
To manage additional LDAP servers, select Secure Access Domain,AAA, Authentication, LDAP, and Servers from the Navigation pane.
The Servers screen appears, displaying a list of the existing LDAP servers.
To manage additional LDAP servers, use the following procedures:
• “Adding an LDAP server” (page 242)
• “Reordering additional LDAP servers” (page 243)
• “Removing an LDAP server” (page 244)
To add an additional LDAP server, use the followingprocedure:
Procedure steps
Step Action
1 Select the Config tab.
2 Select Secure Access Domain, AAA,Authentication, LDAP, and Servers from theNavigation pane.
The LDAP Servers screen appears.
3 Select the secure access domain and the AuthID from the respective lists, and click Refresh.
4 Click Add.
Nortel Secure Network Access SwitchConfiguration — Using BBI
NN47230-500 03.0224 October 2008
Copyright © 2007, 2008 Nortel Networks
.

Configuring authentication 243
The Add New LDAP Server screen appears.
5 Click Update.
The new LDAP server is automatically assigneda unique index number, and the new LDAPserver details appear in the LDAP Server Table.
6 Click Apply on the toolbar to send the currentchanges to the Nortel SNAS.
--End--
Use the data in the following table to add an LDAPserver.
Variable Value
IP Address Specifies the IP address of the LDAP server.
Port Specifies the port number configured for thisserver to use on the LDAP server. The defaultis 389.
Reordering additional LDAP servers To adjust the order in whichLDAP servers are used, use the following procedure:
Procedure steps
Step Action
1 Select the Config tab.
2 Select Secure Access Domain, AAA, Authentication, LDAP,and Servers from the Navigation pane.
Nortel Secure Network Access SwitchConfiguration — Using BBI
NN47230-500 03.0224 October 2008
Copyright © 2007, 2008 Nortel Networks
.

244 Configuration of authentication
The LDAP Servers screen appears.
3 Select the secure access domain and the Auth ID from therespective lists, and click Refresh.
4 Select an LDAP server entry from the LDAP Server Table.
5 Use the up and down arrows to reposition the selected entry.
6 Click Apply on the toolbar to accept the new order, and adjustindex numbers for the LDAP servers accordingly.
--End--
Removing an LDAP server To remove an existing LDAP server fromthe LDAP Server Table, use the following procedure:
Procedure steps
Step Action
1 Select the Config tab.
2 Select Secure Access Domain, AAA, Authentication, LDAP,and Servers from the Navigation pane.
The LDAP Servers screen appears.
3 Select the secure access domain and the Auth ID from therespective lists, and click Refresh.
4 Select an LDAP server entry from the LDAP Server Table.
5 Click Delete.
6 Click Apply on the toolbar to send the current changes to theNortel SNAS.
--End--
Managing LDAP macrosYou can create your own macros (or variables), to retrieve data from theLDAP database. You can use them to map the variable to an LDAP userattribute to create user-specific links on the portal Home tab. When theclient successfully logs on, the variable expands to the value retrieved fromthe LDAP or Active Directory user record. For more information aboutusing macros in portal links, see “Macros” (page 293).
To manage LDAP macro variables, select the Secure Access Domain,AAA, Authentication, LDAP, and Macros tab.
The Macros screen appears and displays a list of existing LDAP macros.
Nortel Secure Network Access SwitchConfiguration — Using BBI
NN47230-500 03.0224 October 2008
Copyright © 2007, 2008 Nortel Networks
.

Configuring authentication 245
The Macro table allows you to manage LDAP macros by performing anyof the following procedures:
• “Adding LDAP macros” (page 245)
• “Reordering LDAP macros” (page 246)
• “Removing LDAP macros” (page 247)
To create an LDAP macro variable, use the followingprocedure:
Procedure steps
Step Action
1 Select the Config tab.
2 Select Secure Access Domain, AAA,Authentication, LDAP, and Macros from theNavigation pane.
The Macros screen appears.
3 Select the secure access domain and the AuthID from the respective lists, and click Refresh.
4 Click Add.
The Add New User-defined Macro screenappears.
5 Click Update.
Nortel Secure Network Access SwitchConfiguration — Using BBI
NN47230-500 03.0224 October 2008
Copyright © 2007, 2008 Nortel Networks
.
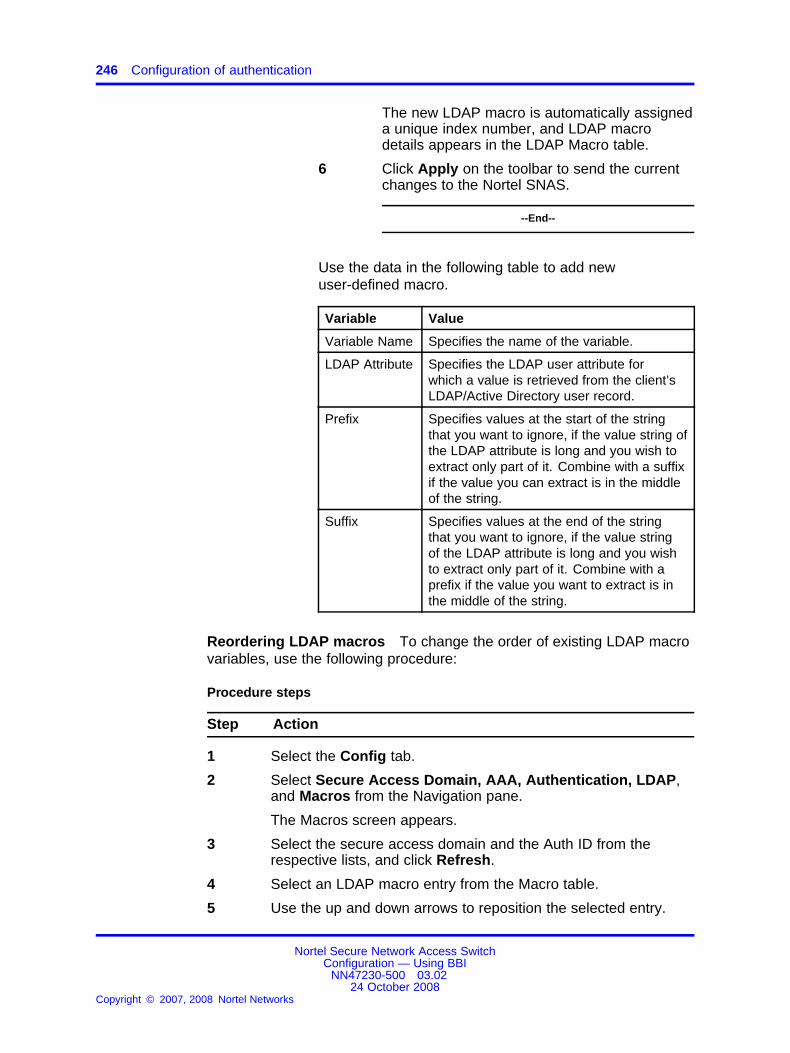
246 Configuration of authentication
The new LDAP macro is automatically assigneda unique index number, and LDAP macrodetails appears in the LDAP Macro table.
6 Click Apply on the toolbar to send the currentchanges to the Nortel SNAS.
--End--
Use the data in the following table to add newuser-defined macro.
Variable Value
Variable Name Specifies the name of the variable.
LDAP Attribute Specifies the LDAP user attribute forwhich a value is retrieved from the client’sLDAP/Active Directory user record.
Prefix Specifies values at the start of the stringthat you want to ignore, if the value string ofthe LDAP attribute is long and you wish toextract only part of it. Combine with a suffixif the value you can extract is in the middleof the string.
Suffix Specifies values at the end of the stringthat you want to ignore, if the value stringof the LDAP attribute is long and you wishto extract only part of it. Combine with aprefix if the value you want to extract is inthe middle of the string.
Reordering LDAP macros To change the order of existing LDAP macrovariables, use the following procedure:
Procedure steps
Step Action
1 Select the Config tab.
2 Select Secure Access Domain, AAA, Authentication, LDAP,and Macros from the Navigation pane.
The Macros screen appears.
3 Select the secure access domain and the Auth ID from therespective lists, and click Refresh.
4 Select an LDAP macro entry from the Macro table.
5 Use the up and down arrows to reposition the selected entry.
Nortel Secure Network Access SwitchConfiguration — Using BBI
NN47230-500 03.0224 October 2008
Copyright © 2007, 2008 Nortel Networks
.

Configuring authentication 247
6 Click Apply on the toolbar to accept the new order, and adjustindex numbers for the LDAP macros accordingly.
--End--
Removing LDAP macros To remove existing LDAP macro variables,use the following procedure:
Procedure steps
Step Action
1 Select the Config tab.
2 Select Secure Access Domain, AAA, Authentication, LDAP,and Macros from the Navigation pane.
The Macros screen appears.
3 Select the secure access domain and the Auth ID from therespective lists, and click Refresh.
4 Select an LDAP macro entry from the LDAP Macro Table.
5 Click Delete.
6 Click Apply on the toolbar to send the current changes to theNortel SNAS.
--End--
Next stepsProcedure steps
Step Action
1 Configure additional authentication methods, if desired (see“Configuring RADIUS authentication” (page 224) or “Configuringlocal database authentication” (page 260)).
2 Set the authentication order (see “Specifying authenticationfallback order” (page 270)).
--End--
Configuring NTLM authenticationTo configure the Nortel SNAS to use an external NTLM server forauthentication, use the following procedure:
Nortel Secure Network Access SwitchConfiguration — Using BBI
NN47230-500 03.0224 October 2008
Copyright © 2007, 2008 Nortel Networks
.

248 Configuration of authentication
Procedure steps
Step Action
1 Select the Config tab.
2 Select Secure Access Domain, AAA, Authentication, andNTLM from the Navigation pane.
The Authentication screen appears.
3 Select the secure access domain from the Secure AccessDomain list, and click Refresh.
4 Click Add.
The Add New NTLM Server screen appears.
5 Click Update.
The NTLM authentication server appears in the AuthenticationServer Table.
6 Click Apply on the toolbar to send the current changes to theNortel SNAS.
--End--
Variable definitionsUse the data in the following table to add an NTLM authentication server.
Variable Value
Auth Id Specifies the internal identifier for the authentication.
Name Specifies a name for the authentication method as a mnemonic aid.
The maximum allowable length of the name string is 255characters, but Nortel recommends a maximum of 32 characters.
Future releases of the Nortel SNAS software allows you toreference this name in a client filter, so authentication to this serverbecomes a condition for access rights for a group.
Display Name Specifies a name for the method to be displayed in the LoginService list box on the portal login page, together with the names ofother authentication services available.
Mechanism Specifies the authentication method.
Group AuthenticationServers
Specifies another authentication method to use for retrieving groupinformation.
Modifying NTLM general settingsTo modify settings for an existing NTLM, use the following procedure:
Nortel Secure Network Access SwitchConfiguration — Using BBI
NN47230-500 03.0224 October 2008
Copyright © 2007, 2008 Nortel Networks
.

Configuring authentication 249
Procedure steps
Step Action
1 Select the Config tab.
2 Select Secure Access Domain, AAA, Authentication, NTLM,and General from the Navigation pane.
The General screen appears showing the current settings for themethod.
3 Select the secure access domain and the Auth ID from therespective lists, and click Refresh.
4 Modify settings for the authentication method, as necessary.
5 Click Update to save the details.
6 Click Apply on the toolbar to send the current changes to theNortel SNAS.
--End--
Configuring NTLM settingsTo configure the NTLM settings, use the following procedure:
Procedure steps
Step Action
1 Select the Config tab.
2 Select Secure Access Domain, AAA, Authentication, NTLM,and NTLM Settings from the Navigation pane.
The Authentication screen appears.
3 Select the secure access domain and the Auth ID from therespective lists, and click Refresh.
4 Click Update.
5 Click Apply on the toolbar to send the current changes to theNortel SNAS.
--End--
Use the data in the following table for NTLM settings.
Variable Value
Windows domain name Specifies the windows domain name.
Nortel Secure Network Access SwitchConfiguration — Using BBI
NN47230-500 03.0224 October 2008
Copyright © 2007, 2008 Nortel Networks
.

250 Configuration of authentication
Variable Value
Windows controller domainname
Specifies the windows controller domain name.
Password Expired Group Specifies the password expired group.Values: nhauser and nhasystem
Configuring NTLM join settingsTo configure the NTLM join settings, use the following procedure:
Procedure steps
Step Action
1 Select the Config tab.
2 Select Secure Access Domain, AAA, Authentication, NTLM,and Join from the Navigation pane.
The Authentication screen appears.
3 Select the secure access domain and the Auth ID from therespective lists, and click Refresh.
4 Click Update.
5 Click Apply on the toolbar to send the current changes to theNortel SNAS.
--End--
Use the data in the following table for NTLM join settings.
Variable Value
Domain administratoraccount
Specifies the domain administrator account name.
Domain administratorpassword
Specifies the domain administrator password.
Domain administratorpassword (again)
Reconfirm the domain administrator password.
Configuring NTLM servers settingsTo add an NTLM servers settings, use the following procedure:
Procedure steps
Step Action
1 Select the Config tab.
Nortel Secure Network Access SwitchConfiguration — Using BBI
NN47230-500 03.0224 October 2008
Copyright © 2007, 2008 Nortel Networks
.

Configuring authentication 251
2 Select Secure Access Domain, AAA, Authentication, NTLM,and Servers from the Navigation pane.
The Authentication screen appears.
3 Select the secure access domain and the Auth ID from therespective lists, and click Refresh.
4 Click Add.
The Add New NTLM Server screen appears.
5 Click Update.
6 Click Apply on the toolbar to send the current changes to theNortel SNAS.
--End--
Use the data in the following table to add an NTLMserver.
Variable Value
IP Address Specifies the IP address of the NTLM server.
To remove an existing NTLM server from the NTLMServer Table, use the following procedure:
Procedure steps
Step Action
1 Select the Config tab.
2 Select Secure Access Domain, AAA,Authentication, NTLM, and Servers from theNavigation pane.
The Authentication screen appears.
3 Select the secure access domain and the AuthID from the respective lists, and click Refresh.
4 Select an NTLM server entry from the NTLMServer Table.
5 Click Delete.
6 Click Apply on the toolbar to send the currentchanges to the Nortel SNAS.
--End--
Nortel Secure Network Access SwitchConfiguration — Using BBI
NN47230-500 03.0224 October 2008
Copyright © 2007, 2008 Nortel Networks
.

252 Configuration of authentication
Configuring SiteMinder authenticationTo configure the Nortel SNAS to use an external SiteMinder server forauthentication, use the following procedure:
Procedure steps
Step Action
1 Select the Config tab.
2 Select Secure Access Domain, AAA, Authentication, andSiteMinder from the Navigation pane.
The Authentication screen appears.
3 Select the secure access domain from the Secure AccessDomain list, and click Refresh.
4 Click Add.
The Add New SiteMinder Server screen appears.
5 Click Update.
The created SiteMinder authentication server appears in theAuthentication Server Table.
6 Click Apply on the toolbar to send the current changes to theNortel SNAS.
--End--
Variable definitionsUse the data in the following table to add a SiteMinder authenticationserver.
Variable Value
Auth Id Specifies the internal identifier for the authentication.
Name Specifies a name for the authentication method as a mnemonic aid.
The maximum allowable length of the name string is 255characters, but Nortel recommends a maximum of 32 characters.
Future releases of the Nortel SNAS software allows you toreference this name in a client filter, so authentication to this serverbecomes a condition for access rights for a group.
Display Name Specifies a name for the method to be displayed in the LoginService list box on the portal login page, together with the names ofother authentication services available.
Nortel Secure Network Access SwitchConfiguration — Using BBI
NN47230-500 03.0224 October 2008
Copyright © 2007, 2008 Nortel Networks
.

Configuring authentication 253
Variable Value
Mechanism Specifies the authentication method.
Group AuthenticationServers
Specifies another authentication method to use for retrieving groupinformation.
Modifying SiteMinder general settingsTo modify settings for an existing SiteMinder, use the following procedure:
Procedure steps
Step Action
1 Select the Config tab.
2 Select Secure Access Domain, AAA, Authentication,SiteMinder, and General from the Navigation pane.
The General screen appears showing the current settings for themethod.
3 Select the secure access domain and the Auth ID from therespective lists, and click Refresh.
4 Modify settings for the authentication method, as necessary.
5 Click Update to save the details.
6 Click Apply on the toolbar to send the current changes to theNortel SNAS.
--End--
Configuring SiteMinder settingsTo configure the SiteMinder settings, use the following procedure:
Procedure steps
Step Action
1 Select the Config tab.
2 Select Secure Access Domain, AAA, Authentication,SiteMinder, and SiteMinder Settings from the Navigation pane.
The Authentication screen appears.
3 Select the secure access domain from the lists, and clickRefresh.
4 Click Update.
Nortel Secure Network Access SwitchConfiguration — Using BBI
NN47230-500 03.0224 October 2008
Copyright © 2007, 2008 Nortel Networks
.
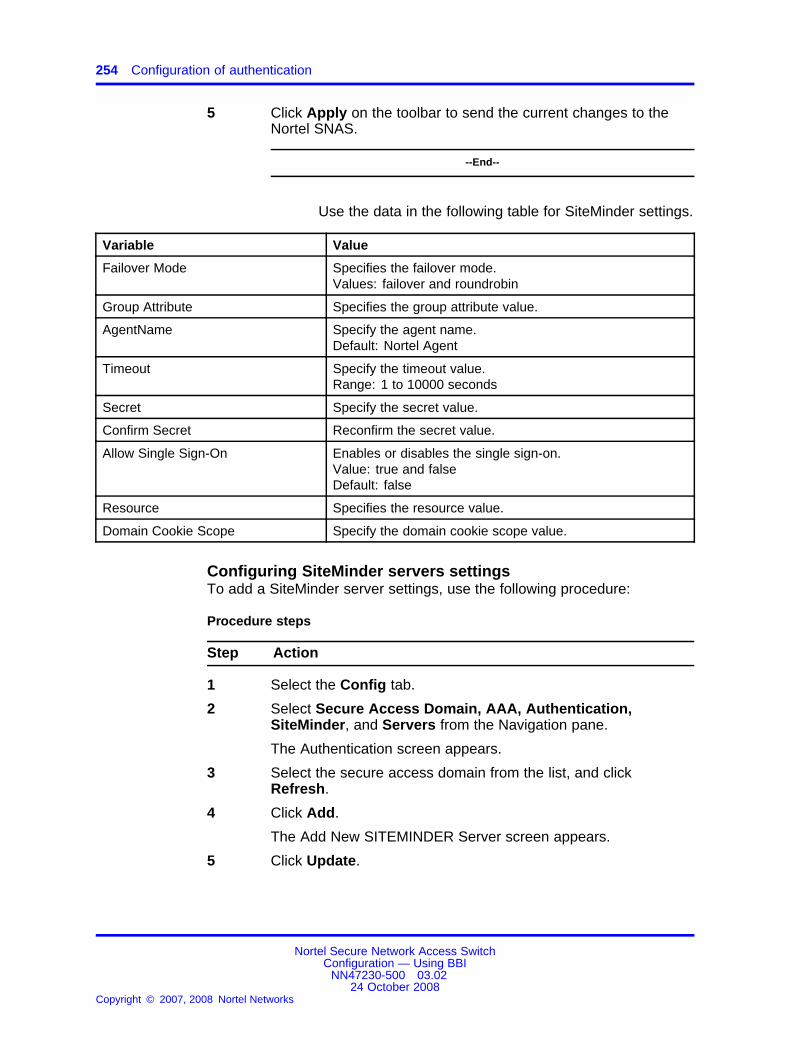
254 Configuration of authentication
5 Click Apply on the toolbar to send the current changes to theNortel SNAS.
--End--
Use the data in the following table for SiteMinder settings.
Variable Value
Failover Mode Specifies the failover mode.Values: failover and roundrobin
Group Attribute Specifies the group attribute value.
AgentName Specify the agent name.Default: Nortel Agent
Timeout Specify the timeout value.Range: 1 to 10000 seconds
Secret Specify the secret value.
Confirm Secret Reconfirm the secret value.
Allow Single Sign-On Enables or disables the single sign-on.Value: true and falseDefault: false
Resource Specifies the resource value.
Domain Cookie Scope Specify the domain cookie scope value.
Configuring SiteMinder servers settingsTo add a SiteMinder server settings, use the following procedure:
Procedure steps
Step Action
1 Select the Config tab.
2 Select Secure Access Domain, AAA, Authentication,SiteMinder, and Servers from the Navigation pane.
The Authentication screen appears.
3 Select the secure access domain from the list, and clickRefresh.
4 Click Add.
The Add New SITEMINDER Server screen appears.
5 Click Update.
Nortel Secure Network Access SwitchConfiguration — Using BBI
NN47230-500 03.0224 October 2008
Copyright © 2007, 2008 Nortel Networks
.

Configuring authentication 255
6 Click Apply on the toolbar to send the current changes to theNortel SNAS.
--End--
Use the data in the following table to add a SiteMinderserver.
Variable Value
IP Address Specifies the IP address of the SiteMinder server.
Authentication Port Specifies the authentication port. Value: 44442
Authorization Port Specifies the authorization port. Value: 44443
Accounting Port Specifies the accounting port. Value: 44441
To remove an existing SiteMinder server from theSiteMinder Server Table, use the following procedure:
Procedure steps
Step Action
1 Select the Config tab.
2 Select Secure Access Domain, AAA,Authentication, SiteMinder, and Servers fromthe Navigation pane.
The Authentication screen appears.
3 Select the secure access domain and the AuthID from the respective lists, and click Refresh.
4 Select an SiteMinder server entry from theSiteMinder Server Table.
5 Click Delete.
6 Click Apply on the toolbar to send the currentchanges to the Nortel SNAS.
--End--
Configuring ClearTrust authenticationTo configure the Nortel SNAS to use an external ClearTrust server forauthentication, use the following procedure:
Nortel Secure Network Access SwitchConfiguration — Using BBI
NN47230-500 03.0224 October 2008
Copyright © 2007, 2008 Nortel Networks
.
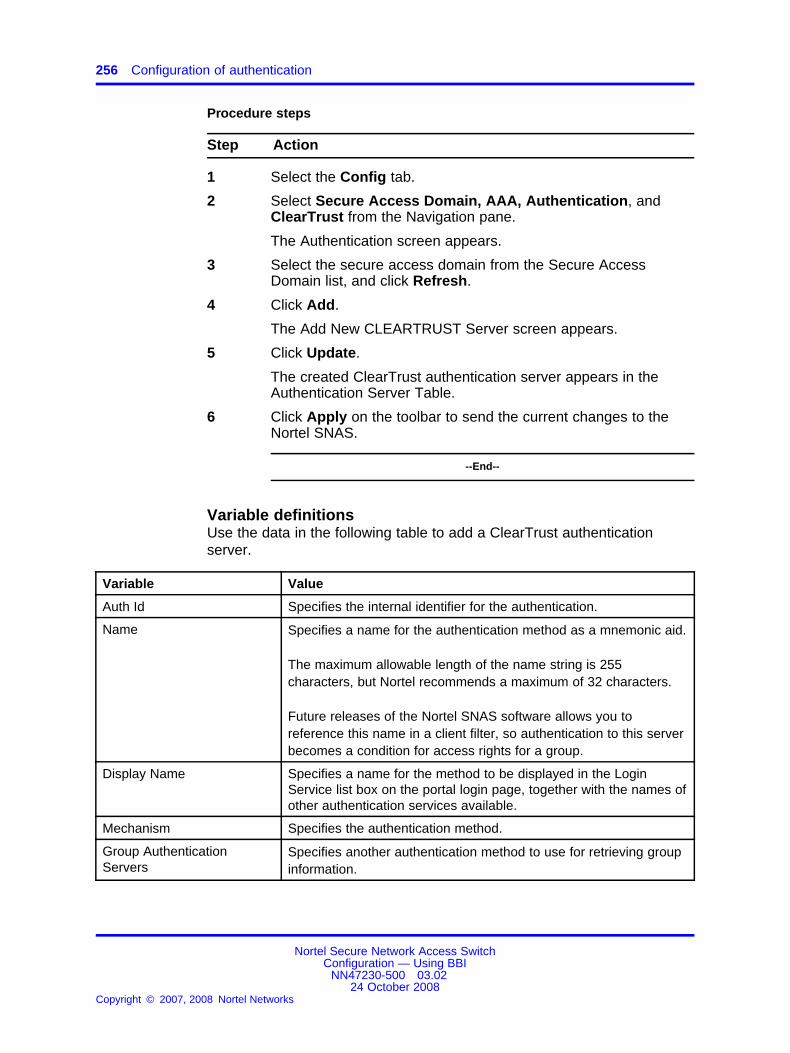
256 Configuration of authentication
Procedure steps
Step Action
1 Select the Config tab.
2 Select Secure Access Domain, AAA, Authentication, andClearTrust from the Navigation pane.
The Authentication screen appears.
3 Select the secure access domain from the Secure AccessDomain list, and click Refresh.
4 Click Add.
The Add New CLEARTRUST Server screen appears.
5 Click Update.
The created ClearTrust authentication server appears in theAuthentication Server Table.
6 Click Apply on the toolbar to send the current changes to theNortel SNAS.
--End--
Variable definitionsUse the data in the following table to add a ClearTrust authenticationserver.
Variable Value
Auth Id Specifies the internal identifier for the authentication.
Name Specifies a name for the authentication method as a mnemonic aid.
The maximum allowable length of the name string is 255characters, but Nortel recommends a maximum of 32 characters.
Future releases of the Nortel SNAS software allows you toreference this name in a client filter, so authentication to this serverbecomes a condition for access rights for a group.
Display Name Specifies a name for the method to be displayed in the LoginService list box on the portal login page, together with the names ofother authentication services available.
Mechanism Specifies the authentication method.
Group AuthenticationServers
Specifies another authentication method to use for retrieving groupinformation.
Nortel Secure Network Access SwitchConfiguration — Using BBI
NN47230-500 03.0224 October 2008
Copyright © 2007, 2008 Nortel Networks
.

Configuring authentication 257
Modifying ClearTrust general settingsTo modify settings for an existing ClearTrust, use the following procedure:
Procedure steps
Step Action
1 Select the Config tab.
2 Select Secure Access Domain, AAA, Authentication,ClearTrust, and General from the Navigation pane.
The General screen appears showing the current settings for themethod.
3 Select the secure access domain and the Auth ID from therespective lists, and click Refresh.
4 Modify settings for the authentication method, as necessary.
5 Click Update to save the details.
6 Click Apply on the toolbar to send the current changes to theNortel SNAS.
--End--
Configuring ClearTrust settingsTo configure the ClearTrust settings, use the following procedure:
Procedure steps
Step Action
1 Select the Config tab.
2 Select Secure Access Domain, AAA, Authentication,ClearTrust, and ClearTrust Settings from the Navigation pane.
The Authentication screen appears.
3 Select the secure access domain from the lists, and clickRefresh.
4 Click Update.
5 Click Apply on the toolbar to send the current changes to theNortel SNAS.
--End--
Use the data in the following table for ClearTrust settings.
Nortel Secure Network Access SwitchConfiguration — Using BBI
NN47230-500 03.0224 October 2008
Copyright © 2007, 2008 Nortel Networks
.

258 Configuration of authentication
Variable Value
Distributed Mode Specifies the failover mode.Values: standard and distributed
Authentication Type Specifies the authentication type.Values: basic, nt, and secureid
Distributed Mode Specifies the distributed mode.Values: clear and ssl_anon
Server Timeout Specify the server timeout value.Range: 1 to 10000 seconds
Single-Sign Enables or disables the single sign-on.Value: on and offDefault: off
Domain Cookie Scope Specify the domain cookie scope value.Value Range: 0 or integer > 1
Configuring ClearTrust dispatcher settingsTo add a ClearTrust dispatcher settings, use the following procedure:
Procedure steps
Step Action
1 Select the Config tab.
2 Select Secure Access Domain, AAA, Authentication,ClearTrust, and Dispatchers from the Navigation pane.
The Authentication screen appears.
3 Select the secure access domain from the list, and clickRefresh.
4 Click Add.
The Add New Dispatcher screen appears.
5 Click Update.
6 Click Apply on the toolbar to send the current changes to theNortel SNAS.
--End--
Use the data in the following table to add a ClearTrustdispatcher.
Nortel Secure Network Access SwitchConfiguration — Using BBI
NN47230-500 03.0224 October 2008
Copyright © 2007, 2008 Nortel Networks
.

Configuring authentication 259
Variable Value
Host Name Specifies the host name.
Authentication Port Specifies the authentication port.Value: 5608
Configuring ClearTrust servers settingsTo add a ClearTrust server settings, use the following procedure:
Procedure steps
Step Action
1 Select the Config tab.
2 Select Secure Access Domain, AAA, Authentication,ClearTrust, and Servers from the Navigation pane.
The Authentication screen appears.
3 Select the secure access domain from the list, and clickRefresh.
4 Click Add.
The Add New Server screen appears.
5 Click Update.
6 Click Apply on the toolbar to send the current changes to theNortel SNAS.
--End--
Use the data in the following table to add a ClearTrustserver.
Variable Value
IP Address Specifies the IP address of the ClearTrust server.
Authentication Port Specifies the authentication port.Value: 5615
To remove an existing ClearTrust server from theClearTrust Server Table, use the following procedure:
Procedure steps
Step Action
1 Select the Config tab.
Nortel Secure Network Access SwitchConfiguration — Using BBI
NN47230-500 03.0224 October 2008
Copyright © 2007, 2008 Nortel Networks
.

260 Configuration of authentication
2 Select Secure Access Domain, AAA,Authentication, ClearTrust, and Servers fromthe Navigation pane.
The Authentication screen appears.
3 Select the secure access domain from the list,and click Refresh.
4 Select a ClearTrust server entry from theSiteMinder Server Table.
5 Click Delete.
6 Click Apply on the toolbar to send the currentchanges to the Nortel SNAS.
--End--
Configuring local database authentication
ATTENTIONIf you run the quick setup wizard during initial setup, local databaseauthentication is created with authentication ID = 1. The database contains onetest user (tg), who belongs to a group called Nortel Health Agent. To continueconfiguring the local database, go to “Populating the database” (page 262).
To configure the Nortel SNAS to use a local database for authentication,use the following procedure:
Procedure steps
Step Action
1 Add the Local method to the domain and create the localdatabase (see “Adding the Local method” (page 260)).
2 Populate the database (see “Populating the database” (page262)).
3 Modify the local database settings, if desired (see “ModifyingLocal database configuration” (page 266)).
4 Export the local database, if desired (see “Exporting thedatabase” (page 268)).
--End--
Adding the Local methodTo configure the Nortel SNAS to use the Local authentication method, usethe following procedure:
Nortel Secure Network Access SwitchConfiguration — Using BBI
NN47230-500 03.0224 October 2008
Copyright © 2007, 2008 Nortel Networks
.

Configuring authentication 261
Procedure steps
Step Action
1 Select the Config tab.
2 Select Secure Access Domain, AAA, Authentication, andLocal from the Navigation pane.
The Local screen appears.
3 Select the secure access domain from the Secure AccessDomain list and click Refresh.
4 Click Add.
The Add New Local Database Server screen appears.
5 Click Update.
The Local authentication method appears in the AuthenticationServer table.
6 Click Apply on the toolbar to send the current changes to theNortel SNAS.
--End--
Use the data in the following table to add anAuthentication Server.
Nortel Secure Network Access SwitchConfiguration — Using BBI
NN47230-500 03.0224 October 2008
Copyright © 2007, 2008 Nortel Networks
.

262 Configuration of authentication
Variable Value
Auth Id Specifies the internal identifier for theauthentication.
Name Specifies a name for theauthentication method as amnemonic aid.
The maximum allowable length of thename string is 255 characters, butNortel recommends a maximum of 32characters.
Future releases of the Nortel SNASsoftware allows you to referencethis name in a client filter, soauthentication to this server becomesa condition for access rights for agroup.
Display Name Specifies a name for the method tobe displayed in the Login Servicelist box on the portal login page,together with the names of otherauthentication services available.
Mechanism Displays the authentication method.
Group AuthenticationServers
Specifies another authenticationmethod to use for retrieving groupinformation.
You can choose any existing Localor LDAP database to retrieve groupinformation. User groups that exist inthe RADIUS authentication schemeare added to the user groups foundin the specified authenticationschemes.
Populating the databaseYou can populate the Local database in two ways:
• adding users manually (see “Adding users to the local database” (page263) )
• importing a database (see “Importing a database” (page 264) )
Nortel Secure Network Access SwitchConfiguration — Using BBI
NN47230-500 03.0224 October 2008
Copyright © 2007, 2008 Nortel Networks
.
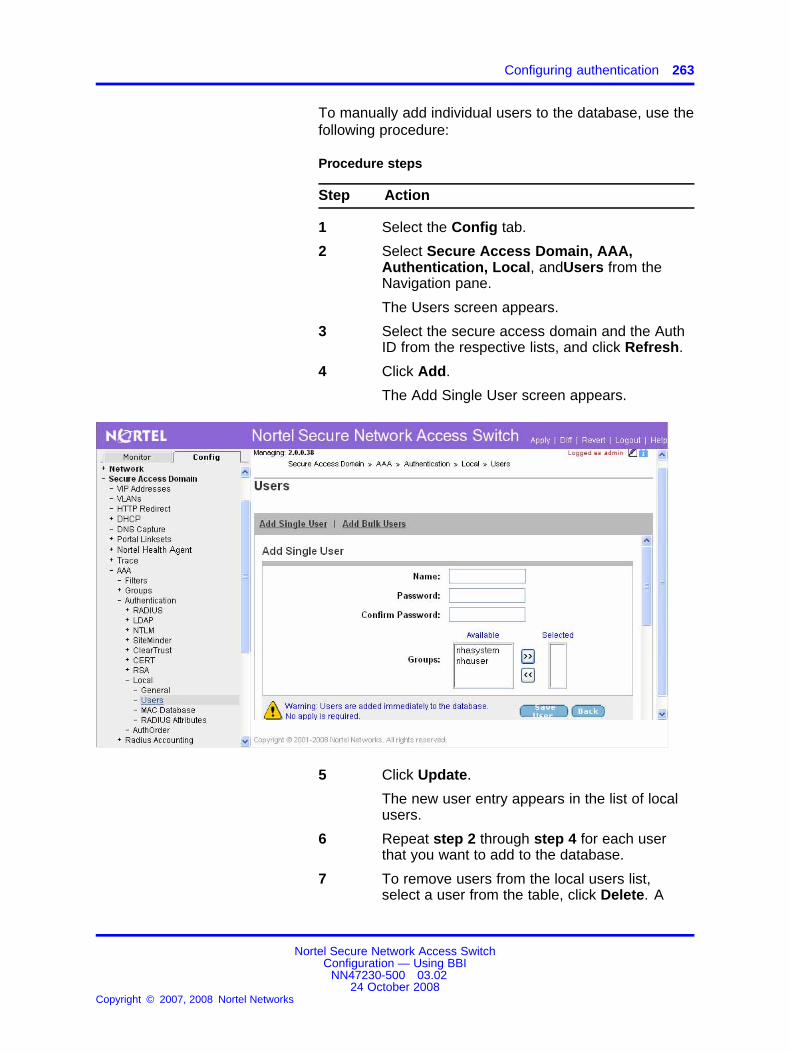
Configuring authentication 263
To manually add individual users to the database, use thefollowing procedure:
Procedure steps
Step Action
1 Select the Config tab.
2 Select Secure Access Domain, AAA,Authentication, Local, andUsers from theNavigation pane.
The Users screen appears.
3 Select the secure access domain and the AuthID from the respective lists, and click Refresh.
4 Click Add.
The Add Single User screen appears.
5 Click Update.
The new user entry appears in the list of localusers.
6 Repeat step 2 through step 4 for each userthat you want to add to the database.
7 To remove users from the local users list,select a user from the table, click Delete. A
Nortel Secure Network Access SwitchConfiguration — Using BBI
NN47230-500 03.0224 October 2008
Copyright © 2007, 2008 Nortel Networks
.

264 Configuration of authentication
confirmation dialog box appears, click OK. Thelocal user is removed from the list.
8 Click Apply on the toolbar to send the currentchanges to the Nortel SNAS.
--End--
Use the data in the following table to add Single User.
Variable Value
Name Specifies a unique user logon name.There are no restrictions on the NortelSNAS regarding acceptable user names.However, if you want the user name inthe local database to mirror the Windowslogin name, observe Windows usernameconventions (for example, keep the lengthto no more than 32 characters).
When the client attempts to log on to theNortel SNAS domain and local databaseauthentication is applied, the client isprompted for the user name and passwordthat you define for the database.
Password Specifies the password that applies to thenew user. To only use the local databasefor authorization after an externalauthentication server has authenticatedthe user, enter an asterisk (*).
ConfirmPassword
Confirms the user password.
Groups Specifies the group to which the newuser belongs. The group must exist in theNortel SNAS domain. The group name isused for authorization.
ATTENTIONThe imported database overwrites existing entries in the localdatabase.
To import a database of local users, use the followingprocedure:
Nortel Secure Network Access SwitchConfiguration — Using BBI
NN47230-500 03.0224 October 2008
Copyright © 2007, 2008 Nortel Networks
.

Configuring authentication 265
Procedure steps
Step Action
1 Select the Config tab.
2 Select Secure Access Domain, AAA,Authentication, Local, and Users from theNavigation pane.
The Users screen appears.
3 Select the secure access domain and the AuthID from the respective lists, and click Refresh.
4 Click Import/Export.
The Import Local User Database from Filescreen appears.
5 Click Import.
6 Click Apply on the toolbar to import thespecified local user database.
--End--
Use the data in the following table to import local userdatabase.
Nortel Secure Network Access SwitchConfiguration — Using BBI
NN47230-500 03.0224 October 2008
Copyright © 2007, 2008 Nortel Networks
.

266 Configuration of authentication
Variable Value
Import Local User Database from File
File System Select the protocol or local toimport the file. Fields appear basedon the selected file system.
File System: Protocol
Protocol Select the protocol to import thefile.Values: tftp, ftp, scp, and sftp(default: tftp)
ATTENTIONThe User and Password getprefixed with the selected protocoltype.
ATTENTIONThe User and Password is notdisplayed while selecting the tftpprotocol.
Server Specify the hostname or IP addressof the server.
File Specify the filename on the server.
FTP User Specify the FTP User name.
FTP Password Specify the FTP password.
Secret Key Specifies the password key for userpassword protection.
File System: Local
File To select the file name, click thebrowse to specify the name of thefile to be downloaded.
Secret Key Specifies the password key for userpassword protection.
Modifying Local database configurationYou can modify the Local configuration in the following ways:
• Modify settings for the authentication method itself (see “ModifyingLocal method settings” (page 267) ).
• Modify user settings in the local database (see “Modifying local users”(page 267) ).
• Modify user passwords in the local database (see “Modifying local userpasswords” (page 268) ).
Nortel Secure Network Access SwitchConfiguration — Using BBI
NN47230-500 03.0224 October 2008
Copyright © 2007, 2008 Nortel Networks
.

Configuring authentication 267
Modifying Local method settings To modify settings for an existinglocal or LDAP authentication method, use the following procedure:
Procedure steps
Step Action
1 Select the Config tab.
2 Select Secure Access Domain, AAA, Authentication, Local,and General from the Navigation pane.
The General screen appears, showing the current settings forthe method.
3 Select the secure access domain and the Auth ID from therespective lists and click Refresh.
4 Modify settings for the authentication method as necessary.
5 Click Update to save the details.
6 Click Apply on the toolbar to send the current changes to theNortel SNAS.
--End--
Modifying local users To edit settings for existing users in thedatabase, use the following procedure:
Procedure steps
Step Action
1 Select the Config tab.
2 Select Secure Access Domain, AAA, Authentication, Local,and Users from the Navigation pane.
The Users screen appears.
3 Select the secure access domain and the Auth ID from therespective lists, and click Refresh.
4 Select the user that you want to modify.
The Modify Local Database User screen appears.
5 Click Edit.
6 Modify the local user information in the applicable fields, asnecessary.
7 Click Update to save the details.
Nortel Secure Network Access SwitchConfiguration — Using BBI
NN47230-500 03.0224 October 2008
Copyright © 2007, 2008 Nortel Networks
.

268 Configuration of authentication
8 Click Apply on the toolbar to send the current changes to theNortel SNAS.
--End--
Modifying local user passwords To modify password settings forexisting users in the database, use the following procedure:
Procedure steps
Step Action
1 Select the Config tab.
2 Select Secure Access Domain, AAA, Authentication, Local,and Users from the Navigation pane.
The Users screen appears.
3 Select the secure access domain and the Auth ID from therespective lists, and clickRefresh.
4 Select the user you want to modify.
5 Click Edit.
The Modify Local Database User screen appears.
6 Modify the local user information in the applicable fields, asnecessary.
7 Click Update to save the details.
8 Click Apply on the toolbar to send the current changes to theNortel SNAS.
--End--
Exporting the databaseTo export the database of local users, use the following procedure:
Procedure steps
Step Action
1 Select the Config tab.
2 Select Secure Access Domain, AAA, Authentication, Local,and Users from the Navigation pane.
The Users screen appears.
3 Select the secure access domain and the Auth ID from therespective lists, and click Refresh.
Nortel Secure Network Access SwitchConfiguration — Using BBI
NN47230-500 03.0224 October 2008
Copyright © 2007, 2008 Nortel Networks
.
Configuring authentication 269
4 Click Export.
The Export Local User Database to File screen appears.
5 To export the file, click Export.
6 Click Apply on the toolbar to export the specified local userdatabase.
--End--
Use the data in the following table to export local userdatabase.
Variable Value
Export Local User Database to File
File System Select the protocol or local toexport the file. Fields appear basedon the selected file system.
File System: Protocol
Protocol Select the protocol to export thefile.Values: tftp, ftp, scp, and sftp(default: tftp)
Server Specify the hostname or IP addressof the server.
File Specify the filename on the server.
Secret Key Specifies the password key for userpassword protection.
File System: Local
Secret Key Specifies the password key for userpassword protection.
Next stepsProcedure steps
Step Action
1 Configure additional authentication methods, if desired (see“Configuring RADIUS authentication” (page 224) or “ConfiguringLDAP authentication” (page 234)).
2 Set the authentication order (see “Specifying authenticationfallback order” (page 270)).
--End--
Nortel Secure Network Access SwitchConfiguration — Using BBI
NN47230-500 03.0224 October 2008
Copyright © 2007, 2008 Nortel Networks
.

270 Configuration of authentication
Specifying authentication fallback orderAuthentication in the Nortel SNAS solution is performed by checking clientcredentials against available authentication databases until the first matchis found. You can specify the order in which the Nortel SNAS applies themethods configured for the Nortel SNAS domain.
Perform this step even if one method is defined on the Nortel SNAS.
ATTENTIONFor best performance, set the authentication order so that the method thatsupports the biggest proportion of users is applied first. However, if you usethe Nortel SNAS local database as one of the authentication methods, Nortelrecommends that you set the Local method to be first in the authenticationorder. The Local method is performed extremely fast, regardless of the numberof users in the database. Response times for the other methods depend onsuch factors as current network load, server performance, and number of usersin the database.
To specify authentication fallback order, perform these steps:
Procedure steps
Step Action
1 Select the Config tab.
2 Select Secure Access Domain, AAA, Authentication, andAuthOrder from the Navigation pane.
The AuthOrder screen appears.
Nortel Secure Network Access SwitchConfiguration — Using BBI
NN47230-500 03.0224 October 2008
Copyright © 2007, 2008 Nortel Networks
.
Configuring authentication 271
3 In the Fallback Order section, specify the authenticationmethods you wish to use.
4 Rearrange the list so that the methods appear in the desiredorder.
5 Click Update to save the details.
6 Click Apply on the toolbar to send the current changes to theNortel SNAS.
--End--
Viewing and managing MAC entriesTo view, add or delete MAC entries, use the following procedure:
Procedure steps
Step Action
1 Select the Config tab.
2 Select Secure Access Domain, AAA, Authentication, Local,and MAC Database from the Navigation pane.The MAC Database screen appears.
3 Select the secure access domain and the Auth ID from therespective lists, and click Refresh.
4 To add an entry, click Add.The Add new MAC Database entry screen appears.
5 In the fields provided, enter the necessary information.
6 To delete an entry, select the entry you wish to delete in theMAC database table and click Delete.
WARNINGOn Delete, the selected entries will be directly deletedfrom the database.
7 To view the details of an individual entry, select the entry in theMAC database table and click Show.
8 To find a particular MAC entry by using available criteria, clickSearch.
--End--
Importing MAC databaseTo manually import MAC database entries, use the following procedure:
Nortel Secure Network Access SwitchConfiguration — Using BBI
NN47230-500 03.0224 October 2008
Copyright © 2007, 2008 Nortel Networks
.

272 Configuration of authentication
Procedure steps
Step Action
1 Select the Config tab.
2 Select Secure Access Domain, AAA, Authentication, Local,and MAC Database from the Navigation pane.
The MAC Database screen appears.
3 Select the secure access domain and the Auth ID from therespective lists, and click Refresh.
4 Click Import. The MAC Database screen appears.
5 Click Import.
--End--
Variable definitionsUse the data in the following table to import MAC database.
Variable Value
Protocol Specifies the protocol used for file transfer.Values: ftp, tftp, scp, and sftp.
Server Specifies the IP address or host name of the server that contains theinformation.
File Specifies the name of the file to be retrieved.
Exporting MAC DatabaseTo manually export MAC database entries, use the following procedure:
Procedure steps
Step Action
1 Select the Config tab.
2 Select Secure Access Domain, AAA, Authentication, Local,and MAC Database from the Navigation pane.The MAC Database screen appears.
3 Select the secure access domain and the Auth ID from therespective lists, and click Refresh.
4 Click Export.The MAC Database screen appears.
5 To export the file, click Export.
6 Click Export.
Nortel Secure Network Access SwitchConfiguration — Using BBI
NN47230-500 03.0224 October 2008
Copyright © 2007, 2008 Nortel Networks
.

Configuring authentication 273
The MAC Database screen appears.
--End--
Variable definitionsUse the data in the following table to export MAC database.
Variable Value
File To select the file name, click the browse to specify thename of the file to be downloaded.
Protocol Specifies the protocol used for file transfer.Values: ftp, tftp, scp, and sftp.
Server Specifies the IP address or host name of the destinationserver.
Configuring RADIUS attributesTo configure the RADIUS attributes for the user, use the followingprocedure:
Procedure steps
Step Action
1 Select the Config tab.
2 Select Secure Access Domain, AAA, Authentication, Local,and RADIUS Attributes from the Navigation pane.
The RADIUS Attributes screen appears.
3 Select the secure access domain and the Auth ID from therespective lists, and click Refresh.
4 Click Add.
The Add RADIUS Attribute screen appears.
Nortel Secure Network Access SwitchConfiguration — Using BBI
NN47230-500 03.0224 October 2008
Copyright © 2007, 2008 Nortel Networks
.

274 Configuration of authentication
5 Click Create RADIUS Attribute.
The created attribute appears in the RADIUS Attributes for Usertable.
6 Click Apply on the toolbar to send the current changes to theNortel SNAS.
--End--
Variable definitionsUse the data in the following table to add RADIUS Attributes.
Variable Value
User Specify the user from the drop-down list.
Vendor Id Specify the vendor Id for the user.
Attribute Id Specify the attribute Id for the user.
Attribute Value Specify the attribute value for the user.
Nortel Secure Network Access SwitchConfiguration — Using BBI
NN47230-500 03.0224 October 2008
Copyright © 2007, 2008 Nortel Networks
.

275.
Management of system users andgroups
This chapter provides detailed procedures on how to manage users andgroups.
Navigation• “User rights and group membership” (page 275)
• “Managing system users and groups” (page 276)
User rights and group membershipThere are three groups of system users who routinely access the systemfor configuration and management:
• admin (administrator)
• certadmin (certificate administrator)
• oper (operator)
ATTENTIONThere are two additional types of users with specialized functions: boot androot. For more information, see Nortel Secure Network Access Switch Using theCommand Line Interface (NN47230-100).
Group membership dictates user rights, as shown in Table 2 "Groupmembership and user rights" (page 276). When a user is a member ofmore than one group, user rights accumulate. The admin user, who bydefault is a member of all three groups, has the same user rights asgranted to members in the certadmin and oper group, in addition to thespecific user rights granted by the admin group membership. The mostpermissive user rights become the effective user rights when a user isa member of more than one group. For more information about defaultuser groups and related access levels, see Nortel Secure Network AccessSwitch Using the Command Line Interface (NN47230-100).
Nortel Secure Network Access SwitchConfiguration — Using BBI
NN47230-500 03.0224 October 2008
Copyright © 2007, 2008 Nortel Networks
.

276 Management of system users and groups
Table 2Group membership and user rights
Rights
System Group PasswordGroupAccount
Useraccount Add
userDeleteuser
Add userDeleteuser
Changeown
Changeothers
admin admin Yes Yes Yes, to owngroup
Yes Yes Yes, ifAdmin is amember ofthe otheruser’s firstgroup
certadmin admin No No Yes, to owngroup
No Yes No
oper oper admin No No Yes, to owngroup
No Yes No
Managing system users and groupsThis section describes the procedures to manage users and groups
Managing system users and groups navigation
• “Managing user accounts” (page 276)
• “Setting password expiry” (page 279)
• “Changing your password” (page 280)
• “Changing another users password” (page 281)
• “Setting the certificate export passphrase” (page 282)
Managing user accountsTo manage user accounts, select Administration and Users from theNavigation pane.
The User screen appears, displaying a list of user accounts added to theNortel SNAS.
Only the admin user can add users to the system.
Only the admin user can delete users from the system. Of the three built-inusers (admin, oper, and root), only the oper user can be deleted.
Nortel Secure Network Access SwitchConfiguration — Using BBI
NN47230-500 03.0224 October 2008
Copyright © 2007, 2008 Nortel Networks
.
Managing system users and groups 277
ATTENTIONWhen you delete a user, the user’s group assignment is also deleted. If youdelete a user who is the sole member of a group, none of the remaining userson the system can then be added to that group. Existing users can only beadded to a group by a user who is already a member of that group. Beforedeleting a user, verify that the user is not the sole member of a group.
To manage Nortel SNAS users, select from the following procedures:
• “Adding new user accounts” (page 277)
• “Modifying details of existing user accounts” (page 279)
• “Removing existing user accounts” (page 279)
Adding new user accountsTo add additional user accounts, use the following procedure:
Procedure steps
Step Action
1 Select the Config tab.
2 Select Administration and Users from the Navigation pane.
The User screen appears.
3 Click Add.
The Add New User screen appears.
Nortel Secure Network Access SwitchConfiguration — Using BBI
NN47230-500 03.0224 October 2008
Copyright © 2007, 2008 Nortel Networks
.

278 Management of system users and groups
4 Click Save.
The new user entry appears in the User table.
--End--
Use the data in the following table to add new User.
Variable Value
Username The user name for the new user. Themaximum length of the user name is 255characters. No spaces are allowed.
Group The group to which the user belongs(which defines the privileges of the user).Users added to the system can eitherbelong to the admin (read/write) or oper(read only) group.
Set Password
admin’s CurrentLogin Password
Specifies the password of the logged onadministrator.
New Password Specifies the password for the new useraccount.
New Password(again)
Reconfirm the password for the new useraccount.
Nortel Secure Network Access SwitchConfiguration — Using BBI
NN47230-500 03.0224 October 2008
Copyright © 2007, 2008 Nortel Networks
.

Managing system users and groups 279
Modifying details of existing user accountsTo modifying details of an existing user accounts, use the followingprocedure:
Procedure steps
Step Action
1 Select the Config tab.
2 Select Administration and Users from the Navigation pane.
The User screen appears.
3 Select the user entry that you want to modify from the Usertable.
4 Click Edit.
The Modify Users screen appears.
5 Modify the information as required.
6 Click Save.
--End--
Removing existing user accountsTo remove an existing user, use the following procedure:
Procedure steps
Step Action
1 Select the Config tab.
2 Select Administration and Users from the Navigation pane.
The User screen appears.
3 Select the user entry that you want to delete from the User table.
4 Click Delete.
--End--
Setting password expiryTo set a password expiry date for all passwords in the system, use thefollowing procedure:
Nortel Secure Network Access SwitchConfiguration — Using BBI
NN47230-500 03.0224 October 2008
Copyright © 2007, 2008 Nortel Networks
.

280 Management of system users and groups
Procedure steps
Step Action
1 Select the Config tab.
2 Select Administration and Users from the Navigation pane.
The Users screen appears.
ATTENTIONThe password expire time is only applicable to the CLI sessions andnot to the BBI sessions.
3 Click Update to save the details.
4 Click Apply on the toolbar to send the current changes to theNortel SNAS.
--End--
Variable definitionsUse the data in the following table for password expiry settings.
Variable Value
Password Expire Time Sets the password expiration interval, in seconds.
A value of 0 indicates that the password neverexpires.
Changing your passwordOnly the admin user can change the passwords of other users. User whoare logged on can change their own passwords.
To change the password for the logged on user, use the followingprocedure:
Procedure steps
Step Action
1 Select the Config tab.
2 Select Administration and Users from the Navigation pane.
The Users screen appears.
3 Select the user from the list whose password you want tochange, and click Edit.
The Modify User screen appears.
Nortel Secure Network Access SwitchConfiguration — Using BBI
NN47230-500 03.0224 October 2008
Copyright © 2007, 2008 Nortel Networks
.

Managing system users and groups 281
4 Click Change Password.
--End--
Variable definitionsUse the data in the following table to change your password.
Variable Value
Current Password The password of the logged on administrator.
Enter New Password Sets the new password. The password mustbe at least four characters and can containspaces. The password is case sensitive.
Confirm Password Confirms the new password.
Changing another users passwordOnly the admin user can change the passwords of other users.
To change the password for another user, use the following procedure:
Procedure steps
Step Action
1 Select the Config tab.
2 Select Administration and Users from the Navigation pane.
The Users screen appears.
3 Select the user from the list whose password you want tochange, and click Edit.
The Modify User screen appears.
4 Click Change Password.
--End--
Variable definitionsUse the data in the following table to change another user password.
Variable Value
Current Login Password The current password of the admin userperforming the change.
Nortel Secure Network Access SwitchConfiguration — Using BBI
NN47230-500 03.0224 October 2008
Copyright © 2007, 2008 Nortel Networks
.

282 Management of system users and groups
Variable Value
New Password Sets the new password. The password mustbe at least four characters and can containspaces. The password is case sensitive.
Confirm Password Confirms the new password.
Setting the certificate export passphraseYou can set a certificate administrator’s passphrase for encrypted privatekeys in a configuration backup, if the certificate administrator role isseparate from the administrator role.
If the admin user is a member of the certadmin group (the default setting),the admin user must provide an export passphrase to protect the privatekeys in the configuration dump, each time the configuration is backed up toan external file server.
You must set a certificate administrator export passphrase only if theadmin user has removed himself or herself from the certadmin group andadded a certificate administrator user with certadmin group rights. Whena configuration backup is performed, the certificate export passphraseis automatically used to protect the encrypted private keys. Whenthe configuration is restored from the file exchange server, the user isprompted for the correct certificate export passphrase.
To set a certificate export passphrase, use the following procedure:
Procedure steps
Step Action
1 Select the Config tab.
2 Select Administration and Users from the Navigation pane.
The Users screen appears.
3 Click Update.
4 Click Apply on the toolbar to send the current changes to theNortel SNAS.
--End--
Variable definitionsUse the data in the following table to set certificate export passphrase.
Nortel Secure Network Access SwitchConfiguration — Using BBI
NN47230-500 03.0224 October 2008
Copyright © 2007, 2008 Nortel Networks
.

Configuring system credentials 283
Variable Value
Passphrase Sets the passphrase. Must be at least fourcharacters.
Confirm Passphrase Confirms the passphrase.
Configuring system credentialsThe system credential information are required to install the Nortel HealthAgent.
To configure system credentials, use the following procedure:
Procedure steps
Step Action
1 Select the Config tab.
2 Select Secure Access Domain, AAA, Groups, and SystemCredentials from the Navigation pane.
The System Credentials screen appears.
3 Select the secure access domain and group from the respectivelists, and click Refresh.
4 Click Update to save the details.
Nortel Secure Network Access SwitchConfiguration — Using BBI
NN47230-500 03.0224 October 2008
Copyright © 2007, 2008 Nortel Networks
.

284 Management of system users and groups
5 Click Apply on the toolbar to send the current changes to theNortel SNAS.
--End--
Variable definitionsUse the data in the following table to configure System Credentials.
Variable Value
System Username Specifies the system username.
System Password Specified the system password.
Confirm System Password Reconfirm the system password.
System Credentials Specifies that the system credential details areenabled or disabled.
System PreviousUsername
Specifies the system previous username.
System PreviousPassword
Specifies the system previous password.
Confirm System PreviousPassword
Reconfirm the system previous password.
Set Passwords Specifies that the system password and the systemprevious password are specified.
Auto Update Clients Enables or disables the auto update for the clients.Values: enabled and disabled
Previous User/PasswordAccepted until
Specify the date until which the previous user andpassword are accepted.
New Password EffectiveOn
Specify the date on which the new password iseffective.
Earliest Date to push newUser/Password
Specify the earliest date a new user and passwordis pushed to a client.
Nortel Secure Network Access SwitchConfiguration — Using BBI
NN47230-500 03.0224 October 2008
Copyright © 2007, 2008 Nortel Networks
.

285.
Customization of the portal and userlogon
This chapter provides detailed procedures on how to customize portal anduser logon.
Navigation• “Overview of the portal and user logon” (page 285)
• “Customize the portal and logon” (page 295)
Overview of the portal and user logonThe end user accesses the Nortel SNAS network through the Nortel SNASportal. You can customize the end user experience by configuring thefollowing logon and portal features:
• “Captive portal and Exclude List” (page 286)
— “Exclude List” (page 286)
• “Portal display” (page 288)
— “Portal look and feel” (page 288)
— “Language localization” (page 291)
— “Linksets and links” (page 292)
— “Macros” (page 293)
— “Automatic redirection to internal sites” (page 293)
— “Examples of redirection URLs and links” (page 294)
• “Managing the end user experience” (page 294)
Nortel Secure Network Access SwitchConfiguration — Using BBI
NN47230-500 03.0224 October 2008
Copyright © 2007, 2008 Nortel Networks
.

286 Customization of the portal and user logon
Captive portal and Exclude ListWhen the Nortel SNAS is configured to function as a captive portal, theNortel SNAS acts as a DNS proxy while clients are in the Red VLAN. Thecaptive Web portal:
• accepts redirected HTTP/HTTPS requests from clients
• resolves unknown names to a fixed IP address
• receives and manages communication requests from the clients tounauthorized network resources
• redirects client requests to an authentication page served by the portal
You must configure the DHCP server to assign the portal Virtual IPaddress (pVIP) as the DNS server when the client is in the Red VLAN.
The DHCP server is configured to specify the regular DNS servers for thescopes for the Green and Yellow VLANs. After the client is authenticatedand is in a Green or Yellow VLAN, DNS requests are forwarded in theregular way to the corporate DNS servers.
For information about configuring the captive portal, see “Configuration ofthe captive portal” (page 296).
Exclude ListThe Exclude List is a configurable list of domain names that cannot becaptured by the Nortel SNAS. The DNS server in the captive portalforwards requests for domain names in the Exclude List directly to thecorporate DNS servers.
In order to speed up client logon, add to the Exclude List any domainnames for URLs that are routinely accessed during client logon or startupsequences. The Exclude List entry can be the full domain name or anexpression.
By default, the captive portal Exclude List includes the following:
• windowsupdate
This matches all automatic Windows update domain names used bybrowsers, for example:
— windowsupdate.com
— windowsupdate.microsoft.com
— download.windowsupdate.microsoft.com
For information about configuring the Exclude List, see “Configuring theDNS Exclude List” (page 297).
Nortel Secure Network Access SwitchConfiguration — Using BBI
NN47230-500 03.0224 October 2008
Copyright © 2007, 2008 Nortel Networks
.

Overview of the portal and user logon 287
The following table lists the regular expressions and escape sequencesthat you can use in an Exclude List entry. The set of allowable regularexpressions is a subset of the set found in egrep and in the AWKprogramming language. The escape sequences are allowed in Erlangstrings.
Table 3Allowed regular expressions and escape sequences
String Usage
Expressions
c Matches the non-metacharacter c.
\c Matches the literal character c (see escape sequence).
. Matches any character.
^ Matches the beginning of a string.
$ Matches the end of a string.
[abc...] Character class, which matches any of the characters abc....
Character ranges are specified by a pair of characters separatedby a hyphen (-).
[^abc...] Negated character class, which matches any character exceptabc....
r1|r2 Alternation—matches either r1 or r2.
r1r2 Concatenation—matches r1 and then r2.
r+ Matches one or more r’s.
r* Matches zero or more r’s.
r? Matches zero or one r’s.
(r) Grouping—matches r.
Escape sequences
\b backspace
\f form feed
\n newline (line feed)
\r carriage return
\t tab
\e escape
\v vertical tab
\s space
\d delete
Nortel Secure Network Access SwitchConfiguration — Using BBI
NN47230-500 03.0224 October 2008
Copyright © 2007, 2008 Nortel Networks
.

288 Customization of the portal and user logon
Table 3Allowed regular expressions and escape sequences (cont’d.)
\ddd the octal value ddd
\ literal character
For example: \c for literal character c, \\ for backslash, \" for doublequotation marks (")
Portal displayYou can modify the following features of the portal display and behavior:
• portal look and feel (see “Portal look and feel” (page 288))
• language used (see “Language localization” (page 291) )
• links (see “Linksets and links” (page 292))
• post-authentication behavior (see “Automatic redirection to internalsites” (page 293))
Portal look and feelYou can customize the colors, logos, icons, and text used on the portalpage. You can also add custom content, such as Java applets, to theportal. You can then add links to the portal page to make the contentavailable to clients.
This section includes information about the following topics:
• “Default appearance” (page 288)
• “Colors” (page 289)
For information about the commands to use to configure the portal lookand feel, see “Configuring the portal display” (page 309).
Default appearance The Figure 8 "Portal Display screen" (page289) shows the default portal Home screen.
Nortel Secure Network Access SwitchConfiguration — Using BBI
NN47230-500 03.0224 October 2008
Copyright © 2007, 2008 Nortel Networks
.

Overview of the portal and user logon 289
Figure 8Portal Display screen
Colors There are four colors used on the portal page:
• the large background area below the tabs
• the background area behind the tab labels
• the fields, information area, and icons on the active tab
• not used area
Five optional color themes exist. The themes are predefined sets ofWeb-safe colors that complement each other:
• aqua
• apple
• jeans
• cinnamon
• candy
You can change the individual colors, but Nortel recommends using thecolor themes to change the look and feel of the portal page. If you changethe portal colors, use colors that are considered Web safe. Also considerhow the applied colors fit with your company logo and brand.
Nortel Secure Network Access SwitchConfiguration — Using BBI
NN47230-500 03.0224 October 2008
Copyright © 2007, 2008 Nortel Networks
.
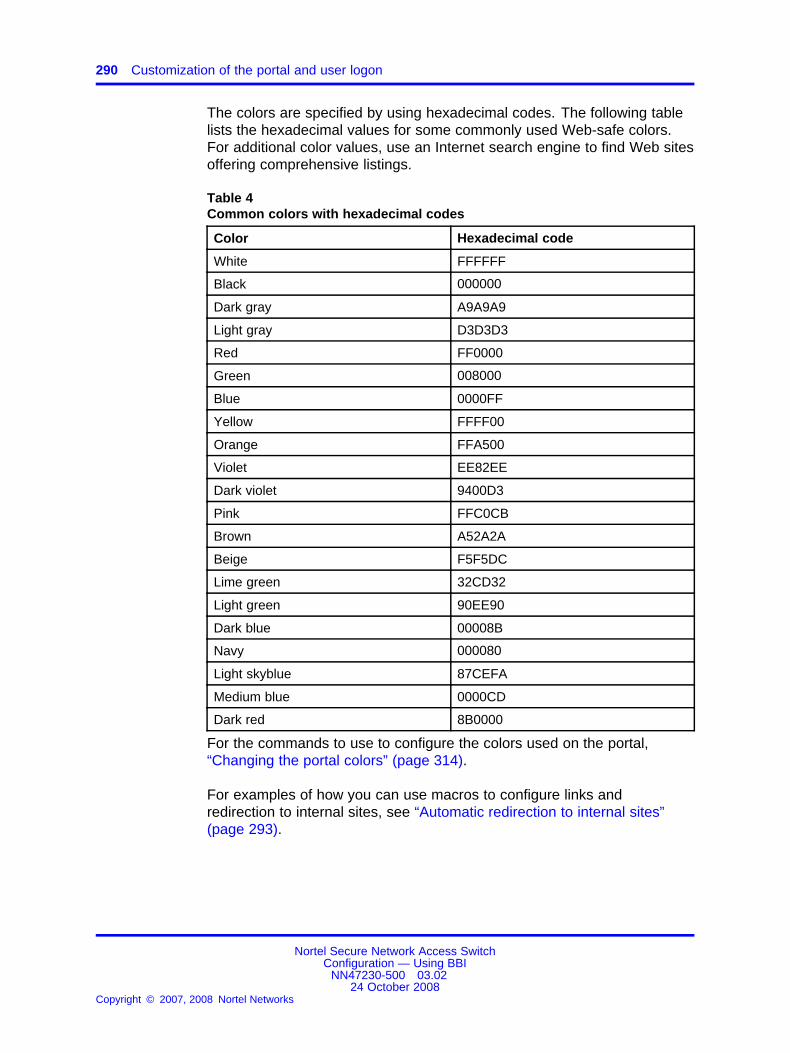
290 Customization of the portal and user logon
The colors are specified by using hexadecimal codes. The following tablelists the hexadecimal values for some commonly used Web-safe colors.For additional color values, use an Internet search engine to find Web sitesoffering comprehensive listings.
Table 4Common colors with hexadecimal codes
Color Hexadecimal code
White FFFFFF
Black 000000
Dark gray A9A9A9
Light gray D3D3D3
Red FF0000
Green 008000
Blue 0000FF
Yellow FFFF00
Orange FFA500
Violet EE82EE
Dark violet 9400D3
Pink FFC0CB
Brown A52A2A
Beige F5F5DC
Lime green 32CD32
Light green 90EE90
Dark blue 00008B
Navy 000080
Light skyblue 87CEFA
Medium blue 0000CD
Dark red 8B0000
For the commands to use to configure the colors used on the portal,“Changing the portal colors” (page 314).
For examples of how you can use macros to configure links andredirection to internal sites, see “Automatic redirection to internal sites”(page 293).
Nortel Secure Network Access SwitchConfiguration — Using BBI
NN47230-500 03.0224 October 2008
Copyright © 2007, 2008 Nortel Networks
.

Overview of the portal and user logon 291
Self Service PortalThe Nortel SNAS self-service portal provides a web-based ‘help desk’ forusers to collect information about their network connection, compliance,user status, and also for provisioning a guest access for users. This canbe customized by using localized language files. The Nortel Health Agentruns on non-English versions of the operating systems.
• “Language localization” (page 291)
Language localization The default English-language dictionary filecontains entries for the text for tab names, general text, messages,buttons, and field labels on the portal page. The entries in the dictionaryfile can be translated into another language. You can then set the portal todisplay the translated text.
The languages supported by the Nortel SNAS are configured for thesystem, but the language selected for the portal is a domain parameter.
The Nortel SNAS uses ISO 639 language codes to track languages thatare added to the configuration. English (en) is the predefined languageand is always present.
To change the language displayed for tab names, general text, messages,buttons, and field labels on the portal page, use the following procedure:
Changing the portal page language
Procedure steps
Step Action
1 Export the language definition template (see “Importing orexporting language definitions” (page 304)).
2 Translate the language definition template file.
a Open the file with a text editor such as Notepad.
b Verify that the charset parameter specified in theContent-Type entry is set according to the character encodingscheme you are using. For example:
"Content-Type: text/plain; charset=iso-8859-1/n"
c Translate the entries displayed under msgstr (messagestring).
ATTENTIONDo not translate the entries under msgid (message id).
Nortel Secure Network Access SwitchConfiguration — Using BBI
NN47230-500 03.0224 October 2008
Copyright © 2007, 2008 Nortel Networks
.

292 Customization of the portal and user logon
Useful Open Source software tools exists for translating pofiles. Search for po files editor in your Web search engine tofind tools that run on Windows and Unix. A translation toolis particularly useful when a new version of the Nortel SNASsoftware is released: you can export the new template filesupplied with the software and merge it with a previouslytranslated language file so that only the new and changedtext strings need to be translated.
3 Import the translated language definition file (see “Importing orexporting language definitions” (page 304)).
4 Set the portal to display the new language (see “Setting theportal display language” (page 306)).
--End--
Linksets and linksYou can add the following types of links to the portal Home tab:
• External—links directly to a Web page. Suitable for external Web sites.
A linkset is a set of one or more links. Each linkset configured for thedomain can be mapped to one or more groups and extended profiles in thedomain. After the client is authenticated, the client’s portal page displaysall the links included in the linksets associated with the client’s group. Theclient’s portal page also displays all the linksets associated with the client’sextended profile. For information about mapping linksets to groups andextended profiles, see “Mapping linksets to a group or profile” (page 208).
Autorun linksets You can enable an autorun feature for a linkset sothat all links defined for that linkset execute automatically after the clientis authenticated. For example, you can configure an autorun linkset toautomatically link to the URL of the remediation server and then map thislinkset to all extended profiles, which filter for clients who fail the NortelHealth Agent host integrity check.
No links for the autorun linkset display on the portal page. Each link in thelinkset opens in a new browser window. If the autorun linkset includesmultiple links, multiple browser windows open. For information aboutconfiguring autorun, see “Configuring linksets” (page 320).
The linkset autorun feature is similar to the portal feature allowingautomatic redirection to internal sites (see “Automatic redirection to internalsites” (page 293)). The linkset feature allows more granular control ofthis functionality. Also, unlike the linkset autorun feature, the automaticredirection feature does not open the link in a new browser window.
Nortel Secure Network Access SwitchConfiguration — Using BBI
NN47230-500 03.0224 October 2008
Copyright © 2007, 2008 Nortel Networks
.

Overview of the portal and user logon 293
Planning the linksets Plan your configuration so that linksets containingcommon links are separate from linksets containing group-specific links.Also, ensure that the links you provide to resources do not contradict theclient’s access rights.
You can control the order in which links display on the portal Home tab.Consider the following in your planning:
• Linksets for the group display after the linksets for the client’s extendedprofile.
• The index number you assign to the linkset controls the order in whichthe linksets display. You assign the index number when you map thelinkset to the group or extended profile (see “Mapping linksets to agroup or profile” (page 208)).
• The index number you assign to the link controls the order in which thelinks display within the linkset. You assign the index number when youinclude the link in the linkset (see “Configuring links” (page 323)).
MacrosMacros are inline functions you can use to insert variable arguments in thetext to customize the portal for individual users.
The following macros are available for use as arguments in parameters forlinks, display text, and redirection commands:
• <var:portal>—expands to the domain name of the portal
• <var:user>—expands to the user name of the currently logged onclient
• <var:password>—expands to the password of the currently loggedon client
• <var:group>—expands to the name of the group of which thecurrently logged on client is a member
Automatic redirection to internal sitesYou can configure the portal to automatically redirect authenticated clientsto an internal site. Unlike the linkset autorun feature, automatic redirectiondoes not open a new browser window. Rather, it replaces the defaultHome page in the internal frame on the portal browser page. As long asthe browser remains open, the session remains logged on.
The commands to configure automatic redirection require you to specifythe URL to which the clients are redirected, prefixed by the portal address(see “Configuring the portal display” (page 309)).
Nortel Secure Network Access SwitchConfiguration — Using BBI
NN47230-500 03.0224 October 2008
Copyright © 2007, 2008 Nortel Networks
.

294 Customization of the portal and user logon
Examples of redirection URLs and linksThe Table 5 "Examples of redirection URLs and link text" (page 294) tableshows example specifications for redirection URLs and associated links. Inthese examples:
• the portal address is nsnas.example.com
• the address to which you want to redirect clients is inside.example.com
Table 5Examples of redirection URLs and link text
Purpose Redirection URL or link text
Redirect the client to an internal site. Redirection URL:
https://nsnas.example.com/http/inside.example.com
or
https://<var:portal>/http/inside.example.com
Redirect the client to a password-protected site.
ATTENTIONThe user name and password on the intranetsite and the portal must be identical.
Redirection URL:
https://<var:portal>/http/<var:user>:<var:password>@inside.example.com/protected
Redirect clients to different sites, depending ontheir group membership (deptA or deptB).
Linktext (static text) entry:
<script>if ("<var:group>" =="deptA") { location.replace("https://nsnas.example.com/http/inside.example.com/deptA.html");}else if ("<var:group>" =="deptB") { location.replace("https://nsnas.example.com/http/inside.example.com/deptB.html");}</script>
Insert a link on the internal site for the client to logoff from the portal.
Link:
<a href=https://nsnas.example.com/logout.yaws> Logout from portal </a>
Managing the end user experienceNortel recommends that you consider the following ways to manage theend user’s experience:
• “Automatic JRE upload” (page 295)
• “Windows domain logon script” (page 295)
Nortel Secure Network Access SwitchConfiguration — Using BBI
NN47230-500 03.0224 October 2008
Copyright © 2007, 2008 Nortel Networks
.

Customize the portal and logon 295
Automatic JRE uploadThe Nortel SNAS portal requires the client device to be running a minimumversion of the Java Runtime Environment (JRE) so that the Nortel HealthPolicy administrator can load properly. Nortel recommends adding therequired JRE version and plugins.html as custom content to the portal.By doing this, if the client does not meet the Java requirement and NortelHealth Agent does not load, the client is presented with a logon screen toautomatically download and install the required JRE.
To configure the portal to automate the process of updating the client’sJRE version, use the following procedure:
Procedure steps
Step Action
1 Create the plugins.html file, with a link to the JRE installer thatyou want.
2 Download the JRE installer from the Sun Microsystems JavaWeb site (www.java.com).
3 Bundle plugins.html and the JRE installer in a zip file.
4 Add the zip file as custom content to the portal.
--End--
For general information about adding custom content to the portal, see“Configuring custom content” (page 316). For information about theminimum JRE requirements, see Nortel Secure Network Access SwitchRelease Notes — Software Release 2.0 () .
Windows domain logon scriptConfigure a Windows domain logon script to automatically launch the enduser’s browser and load the Nortel SNAS portal page as the default page.The exact requirements for the script depend on your particular networksetup and usual modes of end-user access.
Customize the portal and logonThis section describes the procedures to use and customize the portal anduser logon.
Customize the portal and logon navigation
• “Configuration of the captive portal” (page 296)
• “Changing the portal language” (page 303)
• “Configuring the portal display” (page 309)
Nortel Secure Network Access SwitchConfiguration — Using BBI
NN47230-500 03.0224 October 2008
Copyright © 2007, 2008 Nortel Networks
.

296 Customization of the portal and user logon
• “Changing the portal colors” (page 314)
• “Configuring custom content” (page 316)
• “Configuring linksets” (page 320)
• “Configuring links” (page 323)
Configuration of the captive portalBy default, the Nortel SNAS is set up to function as a captive portal. Formore information about the captive portal in the Nortel SNAS domain, see“Captive portal and Exclude List” (page 286).
To configure the Nortel SNAS as a captive portal, use the followingprocedures:
• “Enable DNS capture” (page 296)
• “Configuring the DNS Exclude List” (page 297)
Enable DNS captureTo configure the Nortel SNAS portal as a captive portal, use the followingprocedure:
Procedure steps
Step Action
1 Select the Config tab.
2 Select Secure Access Domain and DNS Capture from theNavigation pane.
The DNS Capture screen appears.
Nortel Secure Network Access SwitchConfiguration — Using BBI
NN47230-500 03.0224 October 2008
Copyright © 2007, 2008 Nortel Networks
.
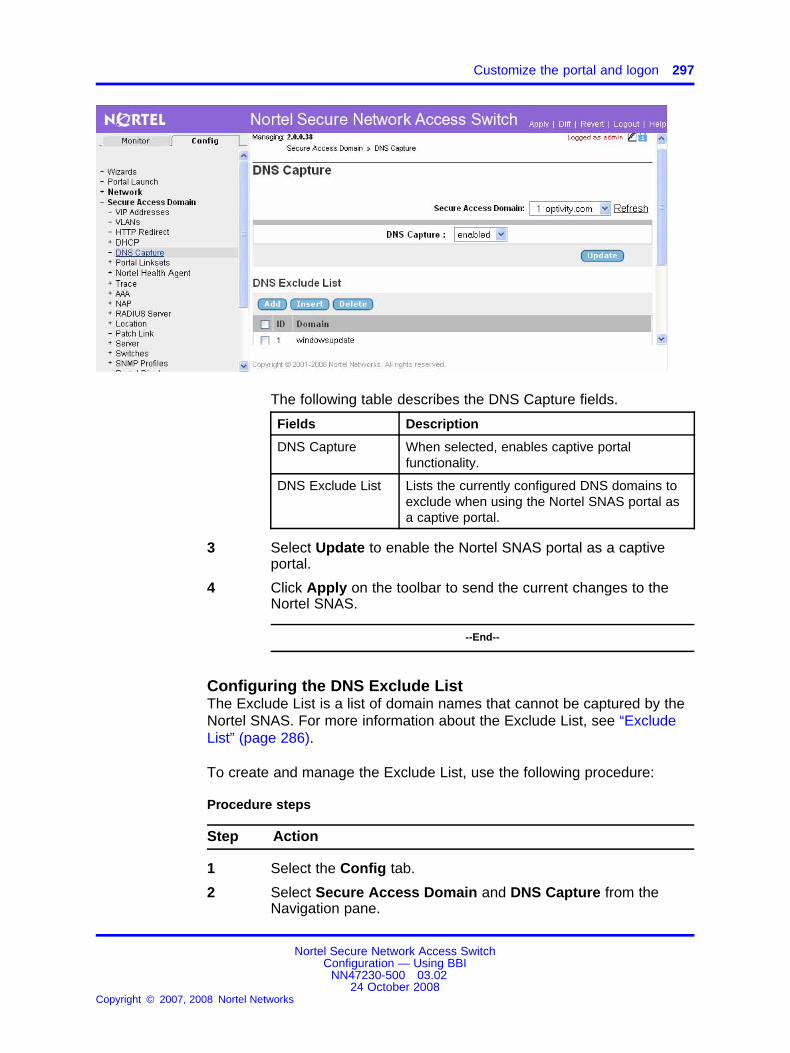
Customize the portal and logon 297
The following table describes the DNS Capture fields.
Fields Description
DNS Capture When selected, enables captive portalfunctionality.
DNS Exclude List Lists the currently configured DNS domains toexclude when using the Nortel SNAS portal asa captive portal.
3 Select Update to enable the Nortel SNAS portal as a captiveportal.
4 Click Apply on the toolbar to send the current changes to theNortel SNAS.
--End--
Configuring the DNS Exclude ListThe Exclude List is a list of domain names that cannot be captured by theNortel SNAS. For more information about the Exclude List, see “ExcludeList” (page 286).
To create and manage the Exclude List, use the following procedure:
Procedure steps
Step Action
1 Select the Config tab.
2 Select Secure Access Domain and DNS Capture from theNavigation pane.
Nortel Secure Network Access SwitchConfiguration — Using BBI
NN47230-500 03.0224 October 2008
Copyright © 2007, 2008 Nortel Networks
.
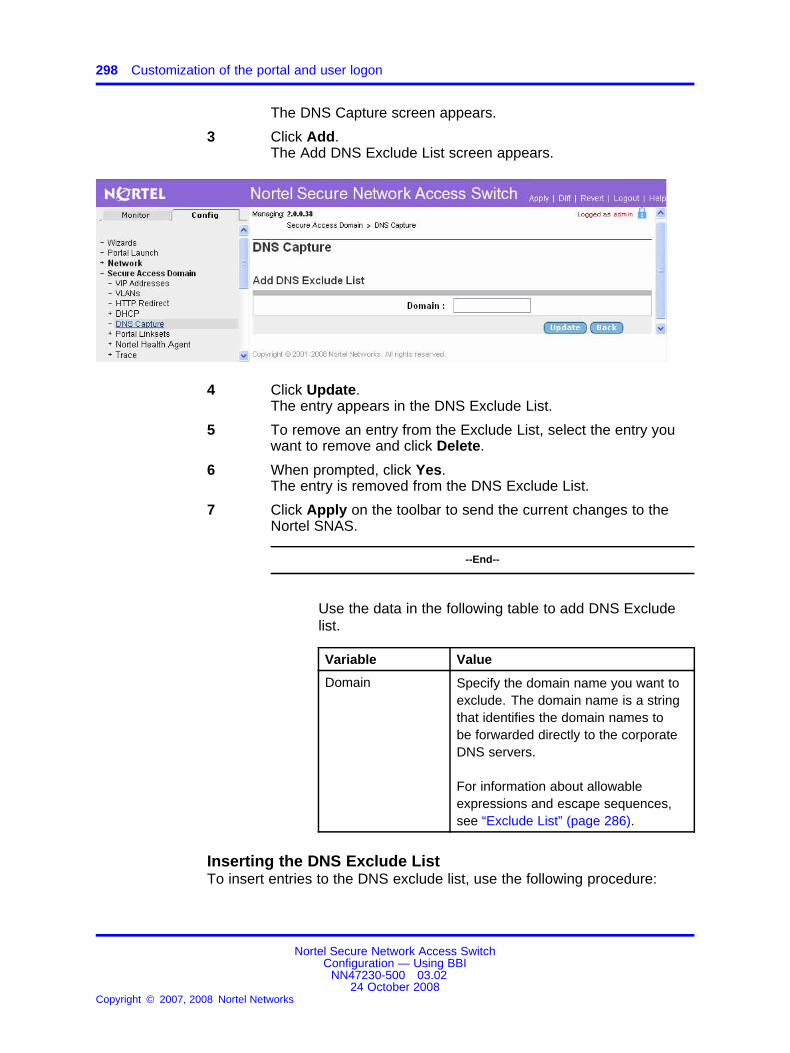
298 Customization of the portal and user logon
The DNS Capture screen appears.
3 Click Add.The Add DNS Exclude List screen appears.
4 Click Update.The entry appears in the DNS Exclude List.
5 To remove an entry from the Exclude List, select the entry youwant to remove and click Delete.
6 When prompted, click Yes.The entry is removed from the DNS Exclude List.
7 Click Apply on the toolbar to send the current changes to theNortel SNAS.
--End--
Use the data in the following table to add DNS Excludelist.
Variable Value
Domain Specify the domain name you want toexclude. The domain name is a stringthat identifies the domain names tobe forwarded directly to the corporateDNS servers.
For information about allowableexpressions and escape sequences,see “Exclude List” (page 286).
Inserting the DNS Exclude ListTo insert entries to the DNS exclude list, use the following procedure:
Nortel Secure Network Access SwitchConfiguration — Using BBI
NN47230-500 03.0224 October 2008
Copyright © 2007, 2008 Nortel Networks
.
Customize the portal and logon 299
Procedure steps
Step Action
1 Select the Config tab.
2 Select Secure Access Domain and DNS Capture from theNavigation pane.
The DNS Capture screen appears.
3 Click Insert.The Insert DNS Exclude List screen appears.
4 Click Update.The new entry appears in the DNS Exclude List table.
5 Move DNS Exclude List from moves the value by number,From Index values to To Index values.
6 Click Apply on the toolbar to send the current changes to theNortel SNAS.
--End--
Use the data in the following table to insert DNS excludelist.
Variable Value
Identifier Specify the index to insert. Index must be a positive number.
Domain Specify the domain name you want to exclude. The domainname is a string that identifies the domain names to beforwarded directly to the corporate DNS servers.
For information about allowable expressions and escapesequences, see “Exclude List” (page 286).
Moving the DNS Exclude ListTo move entries of DNS exclude list, use the following procedure:
Procedure steps
Step Action
1 Select the Config tab.
2 Select Secure Access Domain and DNS Capture from theNavigation pane.
The DNS Capture screen appears.
Nortel Secure Network Access SwitchConfiguration — Using BBI
NN47230-500 03.0224 October 2008
Copyright © 2007, 2008 Nortel Networks
.

300 Customization of the portal and user logon
3 Move DNS Exclude List from moves the value by number,From Index values to To Index values.
4 Click Move.
5 Click Apply on the toolbar to send the current changes to theNortel SNAS.
--End--
Configuration of the captive portalBy default, the Nortel SNAS is set up to function as a captive portal. Formore information about the captive portal in the Nortel SNAS domain, see“Captive portal and Exclude List” (page 286).
To configure the Nortel SNAS as a captive portal, use the followingprocedures:
• “Enable DNS capture” (page 296)
• “Configuring the DNS Exclude List” (page 297)
Enable DNS captureTo configure the Nortel SNAS portal as a captive portal, use the followingprocedure:
Procedure steps
Step Action
1 Select the Config tab.
2 Select Secure Access Domain and DNS Capture from theNavigation pane.
The DNS Capture screen appears.
Nortel Secure Network Access SwitchConfiguration — Using BBI
NN47230-500 03.0224 October 2008
Copyright © 2007, 2008 Nortel Networks
.

Customize the portal and logon 301
The following table describes the DNS Capture fields.
Fields Description
DNS Capture When selected, enables captive portalfunctionality.
DNS Exclude List Lists the currently configured DNS domains toexclude when using the Nortel SNAS portal asa captive portal.
3 Select Update to enable the Nortel SNAS portal as a captiveportal.
4 Click Apply on the toolbar to send the current changes to theNortel SNAS.
--End--
Inserting the DNS Exclude ListTo insert entries to the DNS exclude list, use the following procedure:
Procedure steps
Step Action
1 Select the Config tab.
2 Select Secure Access Domain and DNS Capture from theNavigation pane.
The DNS Capture screen appears.
3 Click Insert.The Insert DNS Exclude List screen appears.
Nortel Secure Network Access SwitchConfiguration — Using BBI
NN47230-500 03.0224 October 2008
Copyright © 2007, 2008 Nortel Networks
.

302 Customization of the portal and user logon
4 Click Update.The new entry appears in the DNS Exclude List table.
5 Move DNS Exclude List from moves the value by number,From Index values to To Index values.
6 Click Apply on the toolbar to send the current changes to theNortel SNAS.
--End--
Use the data in the following table to insert DNS excludein the DNS capture list.
Variable Value
Identifier Specify the index to insert. Index must be a positive number.
Domain Specify the domain name you want to exclude. The domainname is a string that identifies the domain names to beforwarded directly to the corporate DNS servers.
For information about allowable expressions and escapesequences, see “Exclude List” (page 286).
Moving the DNS Exclude ListTo move entries of DNS exclude list, use the following procedure:
Procedure steps
Step Action
1 Select the Config tab.
2 Select Secure Access Domain and DNS Capture from theNavigation pane.
The DNS Capture screen appears.
Nortel Secure Network Access SwitchConfiguration — Using BBI
NN47230-500 03.0224 October 2008
Copyright © 2007, 2008 Nortel Networks
.
Customize the portal and logon 303
3 Move DNS Exclude List from moves the value by number,From Index values to To Index values.
4 Click Move.
5 Click Apply on the toolbar to send the current changes to theNortel SNAS.
--End--
Changing the portal languageTo change the language displayed for tab names, general text, messages,buttons, and field labels on the portal page, complete the followingprocedures:
Procedure steps
Step Action
1 Export the language definition template (see “Importing orexporting language definitions” (page 304)).
2 Translate the language definition template file (see “Languagelocalization” (page 291) ).
3 Import the translated language definition file (see “Importing orexporting language definitions” (page 304)).
4 Set the portal to display the new language (see “Setting theportal display language” (page 306)).
--End--
Configuring language supportTo manage language definition files in the system, use the followingprocedure:
Procedure steps
Step Action
1 Select the Config tab.
2 Select Operation and Language from the Navigation pane.
The Language screen appears.
3 Choose from one of the following tasks:
Nortel Secure Network Access SwitchConfiguration — Using BBI
NN47230-500 03.0224 October 2008
Copyright © 2007, 2008 Nortel Networks
.
304 Customization of the portal and user logon
• “Viewing predefined languages” (page 304)
• “Viewing and removing custom languages” (page 304)
• “Importing or exporting language definitions” (page 304)
--End--
Viewing predefined languages To view predefined languages, selectOperation and Language from the Navigation pane. The Languagescreen appears.
Viewing and removing custom languages To view custom languages,use the following procedure:
Procedure steps
Step Action
1 Select the Config tab.
2 Select Operation and Language from the Navigation pane.
The Language screen appears.
3 To delete a custom language, select the language and clickDelete.
4 Click Apply on the toolbar to send the current changes to theNortel SNAS.
--End--
Importing or exporting language definitionsTo import or export a language definition, use the following procedure:
Procedure steps
Step Action
1 Select Operation and Language from the Navigation pane.
The Import/Export Language Definition screen appears.
Nortel Secure Network Access SwitchConfiguration — Using BBI
NN47230-500 03.0224 October 2008
Copyright © 2007, 2008 Nortel Networks
.
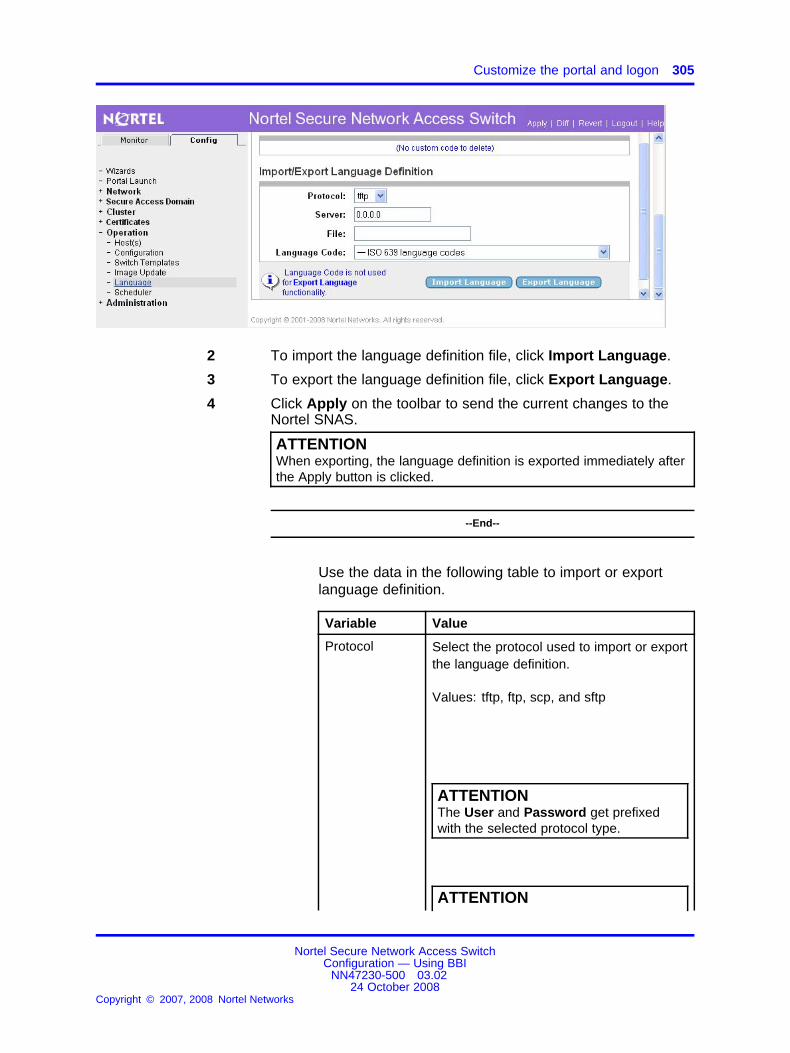
Customize the portal and logon 305
2 To import the language definition file, click Import Language.
3 To export the language definition file, click Export Language.
4 Click Apply on the toolbar to send the current changes to theNortel SNAS.
ATTENTIONWhen exporting, the language definition is exported immediately afterthe Apply button is clicked.
--End--
Use the data in the following table to import or exportlanguage definition.
Variable Value
Protocol Select the protocol used to import or exportthe language definition.
Values: tftp, ftp, scp, and sftp
ATTENTIONThe User and Password get prefixedwith the selected protocol type.
ATTENTION
Nortel Secure Network Access SwitchConfiguration — Using BBI
NN47230-500 03.0224 October 2008
Copyright © 2007, 2008 Nortel Networks
.

306 Customization of the portal and user logon
Variable Value
The User and Password is not displayedwhile selecting the tftp protocol.
Server Specify the host name or IP address of theserver.
File Specify the name of the languagedefinition file.
LanguageCode
Specifies the ISO 639 language code.
Setting the portal display languageTo set the preferred language for the portal display, use the followingprocedure:
Procedure steps
Step Action
1 Select the Config tab.
2 Select Secure Access Domain, Portal Display, Language, andGeneral from the Navigation pane.
The General screen appears.
3 Select the secure access domain from the Secure AccessDomain list, and click Refresh.
4 Click Set Portal Language.
Nortel Secure Network Access SwitchConfiguration — Using BBI
NN47230-500 03.0224 October 2008
Copyright © 2007, 2008 Nortel Networks
.

Customize the portal and logon 307
5 Click Apply on the toolbar to send the current changes to theNortel SNAS.
--End--
Use the data in the following table for portal displaylanguage settings.
Variable Value
Character Set InUse
Specifies the character set currently inuse.
To change or configure this characterset, see “Language localization” (page291)
Language Code(ISO 639)
Specifies the language to be used inthe portal display.
By default, English is the onlylanguage available. Before you canselect a custom language, you mustimport the corresponding languagedefinition file (see “Importing orexporting language definitions” (page304)).
Exporting or importing cluster configurationTo export or import the cluster configuration, use the following procedure:
Procedure steps
Step Action
1 Select Operation and Configuration from the Navigation pane.
The Export/Import Cluster Configuration screen appears.
Nortel Secure Network Access SwitchConfiguration — Using BBI
NN47230-500 03.0224 October 2008
Copyright © 2007, 2008 Nortel Networks
.

308 Customization of the portal and user logon
2 To export the Cluster Configuration, click Export.
3 To import the Cluster Configuration, click Import.
4 Click Apply on the toolbar to send the current changes to theNortel SNAS.
--End--
Variable definitionsUse the data in the following table to export or import thebclusterconfiguration.
Variable Value
Export/Import Cluster Configuration
File System Select the protocol or local to import the file.Fields appear based on the selected filesystem.
File System: Protocol
Nortel Secure Network Access SwitchConfiguration — Using BBI
NN47230-500 03.0224 October 2008
Copyright © 2007, 2008 Nortel Networks
.
Customize the portal and logon 309
Variable Value
Protocol Select the protocol to export/import the file.Values: tftp, ftp, scp, and sftp (default: tftp)
ATTENTIONThe User and Password get prefixed withthe selected protocol type.
ATTENTIONThe User and Password is not displayedwhile selecting the tftp protocol.
Server Specify the hostname or IP address of theserver.
File Specify the filename on the server.
FTP User Specify the FTP User name.
FTP Password Specify the FTP password.
Secret Key Specifies the password key for user passwordprotection.
File System: Local
File To select the file name, click the browse buttonto specify the name of the file to be imported.
ATTENTIONIn File System: Local the File field is notappears in the Export cluster configurationpage.
Secret Key Specifies the key to encrypt/decrypt settings.
Configuring the portal displayTo modify the look and feel of the portal page that appears in the client’sWeb browser, use one of the following procedures:
• “Configuring content” (page 309)
• “Importing banners” (page 313)
Configuring contentTo configure and modify portal content, use the following procedure:
Procedure steps
Step Action
1 Select the Config tab.
Nortel Secure Network Access SwitchConfiguration — Using BBI
NN47230-500 03.0224 October 2008
Copyright © 2007, 2008 Nortel Networks
.

310 Customization of the portal and user logon
2 Select Secure Access Domain, Portal Display, and Generalfrom the Navigation pane.
The General screen appears.
3 Select the secure access domain from the Secure Access List,and click Refresh.
4 Click Update to save the details.
5 Click Apply on the toolbar to send the current changes to theNortel SNAS.
--End--
Use the data in the following table to configure or modifyportal content.
Variable Value
Company Name Specifies the company name todisplay on the portal page.
Use IE ClearAuthenticationCache
Specifies whether IE 6 specialfeature ClearAuthenticationCacheshould be controlled.
Icon Mode Specifies the mode for the iconsrepresenting portal links (forexample, file server links):
• Clean displays simple iconsusing a single color (color3)
• Fancy displays multicolored,shaded, and animated icons
Nortel Secure Network Access SwitchConfiguration — Using BBI
NN47230-500 03.0224 October 2008
Copyright © 2007, 2008 Nortel Networks
.

Customize the portal and logon 311
Variable Value
The default value is fancy.
For more information about linksetsand links, see “Linksets and links”(page 292). For more informationabout configuring links, see“Configuring links” (page 323).
For information about customizingthe colors used on the portal page,see “Changing the portal colors”(page 314).
Configuring login page textTo configure and modify login page text, use the following procedure:
Procedure steps
Step Action
1 Select the Config tab.
2 Select Secure Access Domain, Portal Display, and LoginPage from the Navigation pane.
The Login Page screen appears.
Nortel Secure Network Access SwitchConfiguration — Using BBI
NN47230-500 03.0224 October 2008
Copyright © 2007, 2008 Nortel Networks
.

312 Customization of the portal and user logon
3 Select the secure access domain from the Secure AccessDomain list and click Refresh.
4 Click Update to save the details.
--End--
Use the data in the following table to view Login Page.
Variable Value
Text Specifies custom text to be displayed on theportal logon page. You can type in the text orpaste it in at the prompt. Press Enter to createa new line.
Configuring redirect URLTo configure and modify redirect URL details, use the following procedure:
Procedure steps
Step Action
1 Select the Config tab.
2 Select Secure Access Domain, Portal Display, and RedirectURL from the Navigation pane.
The Redirect URL screen appears.
3 Select the secure access domain from the Secure AccessDomain list and click Refresh.
Nortel Secure Network Access SwitchConfiguration — Using BBI
NN47230-500 03.0224 October 2008
Copyright © 2007, 2008 Nortel Networks
.
Customize the portal and logon 313
4 Click Update to save the details.
--End--
Use the data in the following table to configure redirectURL.
Variable Value
Redirect URL Sets the URL to which clients areautomatically redirected after authenticationby the portal.
For example, if the portal address isnsnas.example.com and you want to redirectclients automatically to inside.example.com,the URL parameter is:
https://nsnas.example.com/http/inside.example.com
Alternatively, you can use the<var:portal> macro to representthe portal address.
With redirection configured, the client cannotaccess tabs on the portal page.
To remove redirection, replace thepreviously specified URL with an emptystring by pressing Enter at the URL prompt.
Importing bannersTo import a banner to display on the portal Home page, use the followingprocedure:
Procedure steps
Step Action
1 Select the Config tab.
2 Select Secure Access Domain, Portal Display, andPresentation from the Navigation pane.
The Portal Display screen appears.
3 Select the secure access domain from the Secure AccessDomain list, and click Refresh.
Nortel Secure Network Access SwitchConfiguration — Using BBI
NN47230-500 03.0224 October 2008
Copyright © 2007, 2008 Nortel Networks
.
314 Customization of the portal and user logon
4 To change the banner, click the Edit Banner link.
5 Click Browse and select the new banner.
6 Click Apply on the toolbar to send the current changes to theNortel SNAS.
When the download is complete and you apply the changes, thenew image replaces the existing banner image on the portal Webpage.
ATTENTIONClients who are currently logged on when the banner is updated donot notice the change unless they reload the portal Web page.
The maximum size of the banner image file is 16 MB. If severalNortel SNAS domains exist, the total size of all imported bannerimage files must not exceed 16 MB. For more information aboutthe customizable elements on the portal Web page, see “Portallook and feel” (page 288).
--End--
Changing the portal colorsTo customize the colors used for portal display, use the followingprocedure:
Procedure steps
Step Action
1 Select the Config tab.
2 Select Secure Access Domain, Portal Display, andPresentation from the Navigation pane.
The Portal Display screen appears.
Nortel Secure Network Access SwitchConfiguration — Using BBI
NN47230-500 03.0224 October 2008
Copyright © 2007, 2008 Nortel Networks
.

Customize the portal and logon 315
3 Enter the color information in the applicable fields. The followingtable describes the Color Settings fields:
4 Click Apply on the toolbar to send the current changes to theNortel SNAS.
For more information about the portal colors and themes, see“Portal look and feel” (page 288).
--End--
Variable definitionsUse the data in the following table for color settings.
Variable Value
Banner Uploads a new banner image to the portal.
Link URL Configures the display mode for the Link URL fieldon the Home tab.
Static Link Text Specifies the static text to display for all NSNAcontroller users on the portal home page. The textis displayed above the links that are specific for auser, depending on the group membership.
Number of Columns Specifies the desired number of columns to bedisplayed in the link table on the home tab of theportal.
Width of the Link Columns Specifies the width of the link table on the hometab of the portal.
Nortel Secure Network Access SwitchConfiguration — Using BBI
NN47230-500 03.0224 October 2008
Copyright © 2007, 2008 Nortel Networks
.

316 Customization of the portal and user logon
Variable Value
Color Customizes the colors of the portal page. Usethe edit color link option provided to customizethe colors. The edit option is provided for theheader, the active area, nonactive area, and thebackground area.
Themes Sets the predefined color themes for the portalpage. The currently available color themes aredefault, aqua, apple, jeans, cinnamon, and candy.
Configuring custom contentTo configure custom content, such as Java applets, on the portal, use thefollowing procedure:
• “Viewing basic information about custom content” (page 316)
• “Importing custom content” (page 318)
• “Exporting custom content” (page 318)
• “Removing custom content” (page 319)
Viewing basic information about custom contentTo view basic information about the existing custom content, use thefollowing procedure:
Procedure steps
Step Action
1 Select the Config tab.
2 Select Secure Access Domain, Portal Display, and CustomContent from the Navigation pane.
The Custom Content screen appears.
Nortel Secure Network Access SwitchConfiguration — Using BBI
NN47230-500 03.0224 October 2008
Copyright © 2007, 2008 Nortel Networks
.
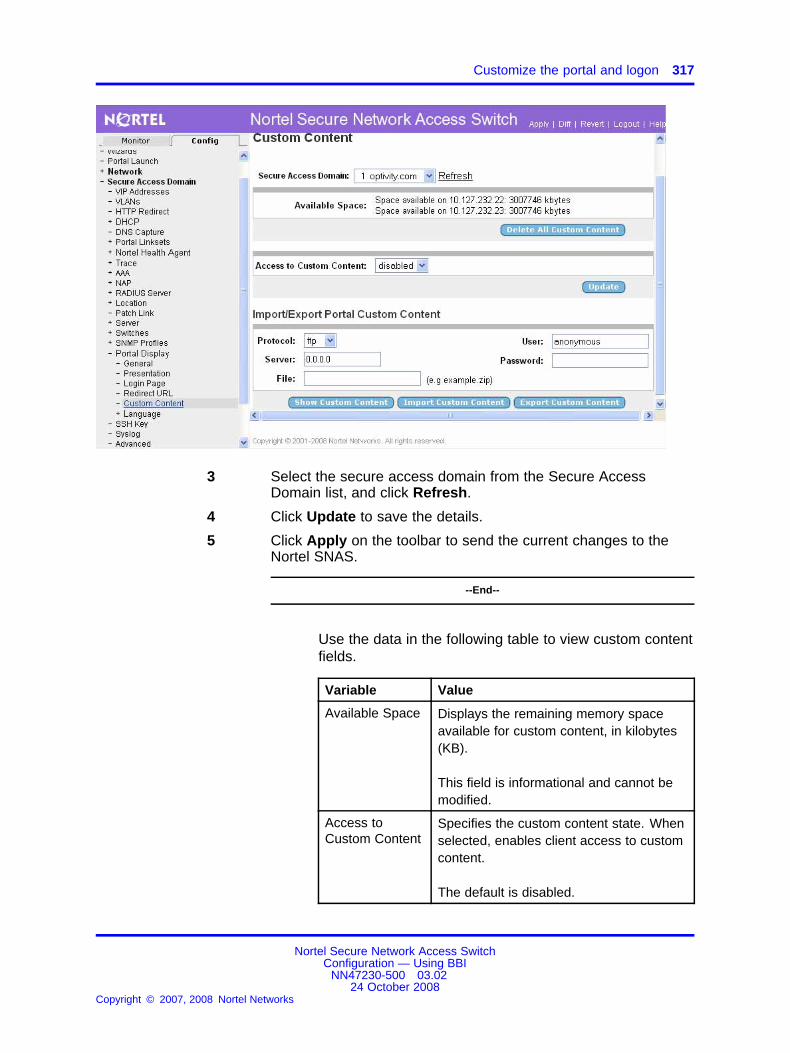
Customize the portal and logon 317
3 Select the secure access domain from the Secure AccessDomain list, and click Refresh.
4 Click Update to save the details.
5 Click Apply on the toolbar to send the current changes to theNortel SNAS.
--End--
Use the data in the following table to view custom contentfields.
Variable Value
Available Space Displays the remaining memory spaceavailable for custom content, in kilobytes(KB).
This field is informational and cannot bemodified.
Access toCustom Content
Specifies the custom content state. Whenselected, enables client access to customcontent.
The default is disabled.
Nortel Secure Network Access SwitchConfiguration — Using BBI
NN47230-500 03.0224 October 2008
Copyright © 2007, 2008 Nortel Networks
.

318 Customization of the portal and user logon
Importing custom contentTo import custom content, use the following procedure:
Procedure steps
Step Action
1 Select the Config tab.
2 Select Secure Access Domain, Portal Display, and CustomContent from the Navigation pane.
The Custom Content screen appears.
3 Select the secure access domain from the Secure AccessDomain, and click Refresh.
4 Click Import Custom Content.
--End--
Use the data in the following table to import customcontent.
Variable Value
Protocol Specifies the import protocol.Values: tftp, ftp, scp, and sftpdefault: ftp
Server Specifies the host name or IP address of theserver.
File Specifies the name of the content file (.zip)on the server.
User Specifies the username used to connect tothe FTP server.
Password Specifies the password used to connect tothe FTP server.
Exporting custom contentTo export custom content, use the following procedure:
Procedure steps
Step Action
1 Select the Config tab.
2 Select Secure Access Domain, Portal Display, and CustomContent from the Navigation pane.
Nortel Secure Network Access SwitchConfiguration — Using BBI
NN47230-500 03.0224 October 2008
Copyright © 2007, 2008 Nortel Networks
.
Customize the portal and logon 319
The Custom Content screen appears.
3 Select the secure access domain from the Secure AccessDomain list, and click Refresh.
4 Click Export Custom Content.
--End--
Use the data in the following table to export customcontent.
Variable Value
Protocol Specifies the import protocol.Values: tftp, ftp, scp, and sftpdefault: ftp
Server Specifies the host name or IP address of theserver.
File Specifies the name of the content file (.zip)on the server.
User Specifies the username used to connect tothe FTP server.
Password Specifies the password used to connect tothe FTP server.
Removing custom contentTo remove all existing custom content from the portal, use the followingprocedure:
Procedure steps
Step Action
1 Select the Config tab.
2 Select Secure Access Domain, Portal Display, and CustomContent from the Navigation pane.
The Custom Content screen appears.
3 Select the secure access domain from the Secure AccessDomain, and click Refresh.
4 Click Delete All Custom Content.
A confirmation dialog box appears.
5 Click OK.
Nortel Secure Network Access SwitchConfiguration — Using BBI
NN47230-500 03.0224 October 2008
Copyright © 2007, 2008 Nortel Networks
.

320 Customization of the portal and user logon
6 Click Apply on the toolbar to send the current changes to theNortel SNAS.
--End--
Configuring linksetsA linkset is a set of links on the portal Home tab. For more informationabout linksets and links, see “Linksets and links” (page 292).
To create or modify a linkset, use one of the following procedures:
• “Creating a linkset” (page 320)
• “Modifying a linkset” (page 322)
Creating a linksetTo create a linkset, use the following procedure:
Procedure steps
Step Action
1 Select the Config tab.
2 Select Secure Access Domain and Portal Linksets from theNavigation pane.
The Portal Linksets screen appears.
3 Select the secure access domain from the Secure AccessDomain list, and click Refresh.
4 Click Add.
The Add New Linkset screen appears.
Nortel Secure Network Access SwitchConfiguration — Using BBI
NN47230-500 03.0224 October 2008
Copyright © 2007, 2008 Nortel Networks
.

Customize the portal and logon 321
5 Click Update.
The new linkset appears in the Linkset table.
6 Click Apply on the toolbar to send the current changes to theNortel SNAS.
--End--
Use the data in the following table to add Linkset.
Variable Value
Id Specifies an integer in the range 1 to1064 that uniquely identifies the linkset inthe Nortel SNAS domain.
Name Specifies a name for the linkset. Thename must be unique in the domain.The maximum length of the string is 255characters.
Reference the linkset name when youmap the linkset to groups or extendedprofiles.
For more details about linksets, see“Linksets and links” (page 292).
Nortel Secure Network Access SwitchConfiguration — Using BBI
NN47230-500 03.0224 October 2008
Copyright © 2007, 2008 Nortel Networks
.

322 Customization of the portal and user logon
Variable Value
Link Text Specifies the text to display as a headingabove the linkset links on the portal Hometab.
Text can be an ordinary string or HTMLcode.
The heading text is optional.
Autorun With autorun support enabled, alllinks defined for the portal link groupare executed automatically when theuser enters the Portal after they aresuccessfully authenticated. In addition,these links are not visible on the Hometab
Modifying a linksetTo modify a linkset, use the following procedure:
Procedure steps
Step Action
1 Select the Config tab.
2 Select Secure Access Domain and Portal Linksets from theNavigation pane.
The Linkset screen appears.
3 Select the secure access domain from the Secure AccessDomain list, and click Refresh.
4 Select the portal linkset you want to modify from the list.
5 Click Edit.
6 Enter the linkset information in the applicable fields.
ATTENTIONIf you run the quick setup wizard during initial setup, two linksets arecreated: tg_passed (linkset ID = 1) and tg_failed (linkset ID = 2).
The linksets are empty.
7 Click Update to save the details.
8 Click Apply on the toolbar to send the current changes to theNortel SNAS.
--End--
Nortel Secure Network Access SwitchConfiguration — Using BBI
NN47230-500 03.0224 October 2008
Copyright © 2007, 2008 Nortel Networks
.
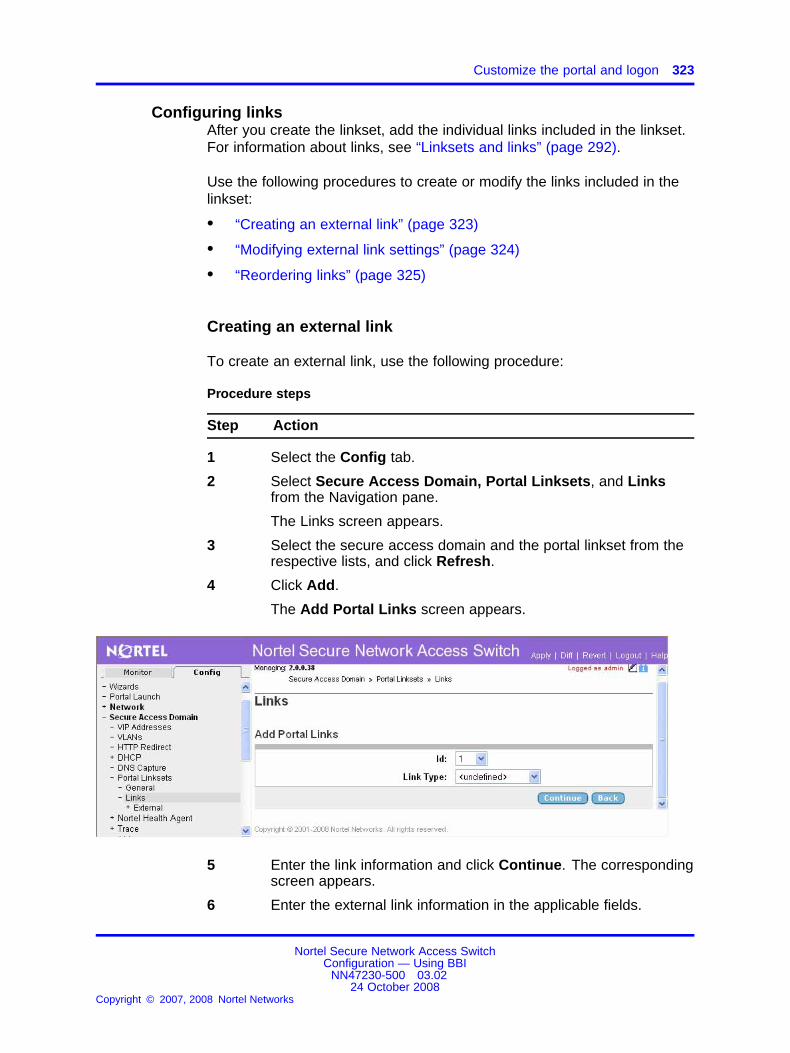
Customize the portal and logon 323
Configuring linksAfter you create the linkset, add the individual links included in the linkset.For information about links, see “Linksets and links” (page 292).
Use the following procedures to create or modify the links included in thelinkset:
• “Creating an external link” (page 323)
• “Modifying external link settings” (page 324)
• “Reordering links” (page 325)
Creating an external link
To create an external link, use the following procedure:
Procedure steps
Step Action
1 Select the Config tab.
2 Select Secure Access Domain, Portal Linksets, and Linksfrom the Navigation pane.
The Links screen appears.
3 Select the secure access domain and the portal linkset from therespective lists, and click Refresh.
4 Click Add.
The Add Portal Links screen appears.
5 Enter the link information and click Continue. The correspondingscreen appears.
6 Enter the external link information in the applicable fields.
Nortel Secure Network Access SwitchConfiguration — Using BBI
NN47230-500 03.0224 October 2008
Copyright © 2007, 2008 Nortel Networks
.

324 Customization of the portal and user logon
7 Click Update.
The new link appears in the Links table.
8 Click Apply on the toolbar to send the current changes to theNortel SNAS.
--End--
Use the data in the following table to add portal links.
Variable Value
Index Specifies an integer in the range 1 to 256that uniquely identifies the link within thelinkset.
Text Specifies the text to display as theclickable link text on the portal Home tab.
Text can be an ordinary string or HTMLcode. The client sees only the link text,not the URL contained in the link.
Link Type Select the Type of link to be configured.
External link information
Link ID Specifies the identifier for the link.
Text: Specifies the clickable link text to appearon the Home screen of the portal.
Protocol Specifies the protocol to be used for theexternal links.
Host Specifies the Web server by IP address orhost name,
Path Specifies the path on the Web server.You must specify a path. A single slash(/) indicates the Web server documentroot.
Modifying external link settingsTo modify a link, use the following procedure:
Procedure steps
Step Action
1 Select the Config tab.
2 Select Secure Access Domain, Portal Linksets, and Linksfrom the Navigation pane.
Nortel Secure Network Access SwitchConfiguration — Using BBI
NN47230-500 03.0224 October 2008
Copyright © 2007, 2008 Nortel Networks
.

Customize the portal and logon 325
The Links screen appears.
3 Select the secure access domain and portal linksets from therespective lists, and click Refresh.
4 Select the link that you want to modify, and click Edit.
5 Enter the link information in the applicable fields.
6 Click Update to save the details.
7 Click Apply on the toolbar to send the current changes to theNortel SNAS.
--End--
Reordering linksTo change the order in which links display in the linkset, use the followingprocedure:
Procedure steps
Step Action
1 Select the Config tab.
2 Select Secure Access Domain, Portal Linksets, and Linksfrom the Navigation pane.
The Links screen appears.
3 Use the arrow up and arrow down buttons to move the link entryto the correct position.
4 Click Apply on the toolbar to send the current changes to theNortel SNAS.
--End--
Nortel Secure Network Access SwitchConfiguration — Using BBI
NN47230-500 03.0224 October 2008
Copyright © 2007, 2008 Nortel Networks
.

326 Customization of the portal and user logon
Nortel Secure Network Access SwitchConfiguration — Using BBI
NN47230-500 03.0224 October 2008
Copyright © 2007, 2008 Nortel Networks
.
327.
Configuration of Nortel SNASscheduler
The Nortel SNAS scheduler allows to run automated system maintenancetasks at scheduled intervals. This chapter provides detailed proceduresto configure scheduler task.
Navigation• “Configuring the scheduler task” (page 327)
• “Setting scheduler status” (page 331)
• “Deleting a scheduled task” (page 331)
• “Viewing or searching a scheduled task” (page 332)
Configuring the scheduler taskThe scheduler lists the currently configured scheduled tasks. You cancreate a scheduled task. To create and configure scheduler task, use thefollowing procedure:
Procedure steps
Step Action
1 Select the Config tab.
2 Select Operation and Scheduler from the Navigation pane.The Scheduler screen appears.
3 Click Add.The Add New Scheduled Task screen appears.
Nortel Secure Network Access SwitchConfiguration — Using BBI
NN47230-500 03.0224 October 2008
Copyright © 2007, 2008 Nortel Networks
.

328 Configuration of Nortel SNAS scheduler
4 Based on the selected scheduled task (Reboot, Stoptrace,Selftest, Upgrade, Ptcfg, Starttrace, and Export) the NewScheduled Task page prompts you with their respective fieldsbased on the selected task type. Enter the scheduled taskinformation in the applicable fields.
5 Click Save.The new scheduler task appears on the top of the Scheduler listtable.
6 Click Apply on the toolbar to send the current changes to theNortel SNAS.
--End--
Variable definitionsUse the data in the following table to add new scheduler task.
Variable Value
Task Specifies the scheduled task.Values: Ptcfg | Reboot | Starttrace | Stoptrace | Selftest | Upgrade | Export
Day of week Select the day of the week. You can select the multiple days in a week.Range: 0 - 6 (Sunday = 0) Every Day (*)
Nortel Secure Network Access SwitchConfiguration — Using BBI
NN47230-500 03.0224 October 2008
Copyright © 2007, 2008 Nortel Networks
.

Configuring the scheduler task 329
Variable Value
Month(s) Select the month. You can select the multiple months.Range: 1 - 12 Every Month (*)
Day(s) Select the day of the month. You can select the multiple days of a month.Range: 1 - 31 Every Day (*)
Hour(s) Specify the hour.Range: 0 - 23
Minute(s) Specify the minute.Range: 0 - 59
Comment Specify the comment.
Selftest
isd to run Specify the isdl.Values: one-isd, and all-isds
Host Id Select the host id.
Items to Check Select the items to check.Values: all, gw, routes, dns, auth, links, and switchesdefault: all
Upgrade
Protocol Specify the protocol.Values: tftp, and ftp
ATTENTIONThe User and Password get prefixed with the selected protocol type.
ATTENTIONThe User and Password is not displayed while selecting the tftp protocol.
Host Specify the hostname or IP address of server.
File Specify the filename on server.
FTP User Specify the FTP User name.
Password Specify the FTP password.
Starttrace
Tags Specify the tag.1 all, 2 aaa, 3 dhcp, 4 dns, 5 ssl, 6 tg, 7 snas, 8 patchlink, 9 radius, and 10napdefault: 1 all
Domain Specify the domain.
Nortel Secure Network Access SwitchConfiguration — Using BBI
NN47230-500 03.0224 October 2008
Copyright © 2007, 2008 Nortel Networks
.

330 Configuration of Nortel SNAS scheduler
Variable Value
Output Mode Specify the output mode.Values: tftp, and ftp
ATTENTIONThe User and Password get prefixed with the selected protocol type.
ATTENTIONThe User and Password is not displayed while selecting the tftp protocol.
TFTP Server Specify the TFTP server.
File Specify the filename on server.
FTP User Specify the FTP User name.
Password Specify the FTP password.
ptcfg
Protocol Specify the protocol.Values: tftp, and ftp
ATTENTIONThe User and Password get prefixed with the selected protocol type.
ATTENTIONThe User and Password is not displayed while selecting the tftp protocol.
Host Specify the hostname or IP address of server.
File Specify the filename on server.
Secret Key Specify the secret key.
Confirm Password Specify the password for private key.
FTP User Specify the FTP User name.
Password Specify the FTP password.
Export
Databse to Export Specify the database to export.Values: user and macdb
ATTENTIONIf the selected value for Database to Export field is User then only Key forUsers Passwords in Db and Reconfirm key fields appear.
Nortel Secure Network Access SwitchConfiguration — Using BBI
NN47230-500 03.0224 October 2008
Copyright © 2007, 2008 Nortel Networks
.
Deleting a scheduled task 331
Variable Value
Protocol Specify the protocol.Values: tftp, and ftp
ATTENTIONThe User and Password get prefixed with the selected protocol type.
ATTENTIONThe User and Password is not displayed while selecting the tftp protocol.
Host Specify the hostname or IP address of server.
File Specify the filename on server.
Specify Domain Specify the domain.
Key for UsersPasswords in Db
Specify the key for the user password in the database.
Reconfirm key Reconfirm the key.
FTP User Specify the FTP User name.
Password Specify the FTP password.
Setting scheduler statusTo set the status for scheduler, use the following procedure:
Procedure steps
Step Action
1 Select the Config tab.
2 Select Operation and Scheduler from the Navigation pane.The Scheduler screen appears.
3 Specify the status from the Scheduler Status drop-down list.Values: enable and disable
4 Click Update.
5 Click Apply on the toolbar to send the current changes to theNortel SNAS.
--End--
Deleting a scheduled taskTo delete an scheduled task, use the following procedure:
Procedure steps
Nortel Secure Network Access SwitchConfiguration — Using BBI
NN47230-500 03.0224 October 2008
Copyright © 2007, 2008 Nortel Networks
.

332 Configuration of Nortel SNAS scheduler
Step Action
1 Select the Config tab.
2 Select Operation and Scheduler from the Navigation pane.The Scheduler screen appears.
3 Select the scheduled task from the Scheduler list.
4 Click Delete.The scheduler task is deleted successfully message appears.
5 Click Apply on the toolbar to send the current changes to theNortel SNAS.
--End--
Viewing or searching a scheduled taskTo view or search the details of a scheduled task, use the followingprocedure:
Procedure steps
Step Action
1 Select the Config tab.
2 Select Operation and Scheduler from the Navigation pane.The Scheduler screen appears.
3 To view the details of a scheduled task, select the scheduledtask from the Scheduler list and click Show.
4 To search for a scheduled task, enter the Scheduler task id inthe search box and click Search.
--End--
Nortel Secure Network Access SwitchConfiguration — Using BBI
NN47230-500 03.0224 October 2008
Copyright © 2007, 2008 Nortel Networks
.

333.
Configuration of SNMPThis chapter provides detailed procedures on how to configure SNMP.
Navigation• “Overview of SNMP” (page 333)
• “Configure SNMP settings” (page 333)
• “Configuring SSCP-Lite” (page 347)
Overview of SNMPSimple Network Management Protocol (SNMP) is a set of protocolsfor managing complex networks. SNMP works by sending messages,called protocol data units (PDU), to different parts of a network. TheSNMP-compliant agents on the Nortel SNAS devices store data aboutthemselves in Management Information Bases (MIB) and return this datato the SNMP requesters.
One SNMP agent exists on each Nortel SNAS device, and the agentlistens to the Real IP address (RIP) of that particular device. On the NortelSNAS that currently holds the cluster Management IP address (MIP), theSNMP agent also listens to the MIP.
The SNMP agent supports SNMP version 1, version 2c, and version 3.You can configure notification targets (the SNMP managers receiving trapmessages sent by the agent) to use SNMP v1, v2c, and v3. The defaultis SNMP v2c. You can specify any number of notification targets on theNortel SNAS.
Configure SNMP settingsThis section contains information about the following procedures:
Configuring SNMP settings navigation
• “Configuring SNMP” (page 334)
• “Configuring SNMP targets” (page 337)
Nortel Secure Network Access SwitchConfiguration — Using BBI
NN47230-500 03.0224 October 2008
Copyright © 2007, 2008 Nortel Networks
.
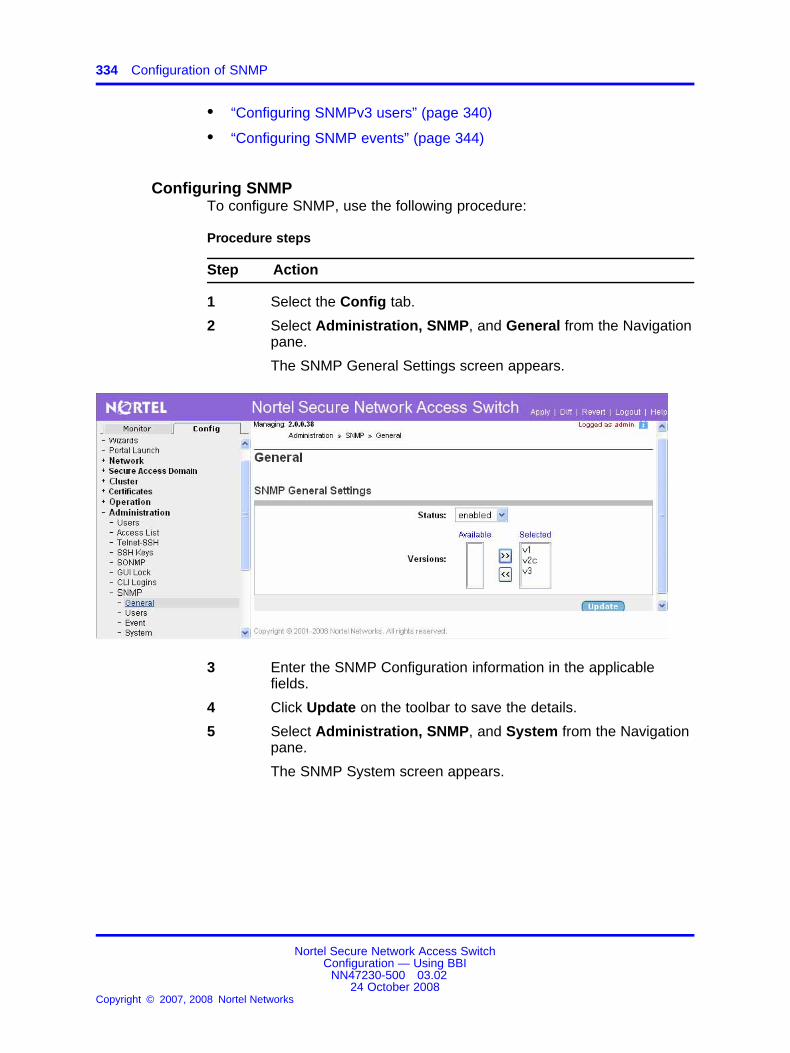
334 Configuration of SNMP
• “Configuring SNMPv3 users” (page 340)
• “Configuring SNMP events” (page 344)
Configuring SNMPTo configure SNMP, use the following procedure:
Procedure steps
Step Action
1 Select the Config tab.
2 Select Administration, SNMP, and General from the Navigationpane.
The SNMP General Settings screen appears.
3 Enter the SNMP Configuration information in the applicablefields.
4 Click Update on the toolbar to save the details.
5 Select Administration, SNMP, and System from the Navigationpane.
The SNMP System screen appears.
Nortel Secure Network Access SwitchConfiguration — Using BBI
NN47230-500 03.0224 October 2008
Copyright © 2007, 2008 Nortel Networks
.

Configure SNMP settings 335
6 Enter the SNMP system information in the applicable fields.
7 Click Update on the toolbar to save the details.
8 Select Administration, SNMP, and Community from theNavigation pane.
The SNMP Community screen appears.
9 Enter the SNMP community information in the applicable fields.
10 Click Update to save the details.
11 Select Administration and SONMP from the Navigation pane.
The SONMP screen appears.
Nortel Secure Network Access SwitchConfiguration — Using BBI
NN47230-500 03.0224 October 2008
Copyright © 2007, 2008 Nortel Networks
.

336 Configuration of SNMP
12 Enter the SONMP information in the applicable fields.
13 Click Update to save the details.
14 Click Apply on the toolbar to send the current changes to theNortel SNAS.
--End--
Variable definitionsUse the data in the following table to configure SNMP.
Table 6
Variable Value
SNMP General settings
Status Enables or disables network management usingSNMP. The default is enabled.
Versions Specifies the SNMP versions allowed. Select one ormore of the following options: v1 (SNMP version 1),v2c (SNMP version 2c), v3 (SNMP version 3).
The default is all versions (v1, v2c, v3).
SNMP System
Contact Designates a contact person for the managed NortelSNAS cluster, together with information about how tocontact this person.
Authentication Traps Enables or disables generation of authentication failuretraps. The default is disabled.
SNMP Community
Nortel Secure Network Access SwitchConfiguration — Using BBI
NN47230-500 03.0224 October 2008
Copyright © 2007, 2008 Nortel Networks
.

Configure SNMP settings 337
Table 6(cont’d.)
Variable Value
Read Specifies the monitor community name that grantsread access to the MIB. If you do not specify a monitorcommunity name, read access is not granted. Thedefault monitor community name is public.
Write Specifies the control community name that grants readand write access to the MIB. If you do not specify acontrol community name, neither read nor write accessis granted.
Trap Specifies the trap community name that accompaniestrap messages sent to the SNMP manager. If you donot specify a trap community name, the sending of trapmessages is disabled. The default trap communityname is trap.
SONMP
Status Enables or disables support for SynOptics NetworkManagement Protocol (SONMP) network topologyinformation. The default is enabled.
Configuring SNMP targetsSNMP managers function as the notification targets for SNMP monitoring.
To configure SNMP notification targets, use the following procedures:
• “Adding SNMP notification targets” (page 337)
• “Managing SNMP notification targets” (page 338)
• “Removing SNMP notification targets” (page 339)
Adding SNMP notification targetsTo add an SNMP notification target, use the following procedure:
Procedure steps
Step Action
1 Select the Config tab.
2 Select Administrative, SNMP, and Notification Target from theNavigation pane.
The Notification Target screen appears.
3 Click Add.
The Add Notification Target screen appears.
Nortel Secure Network Access SwitchConfiguration — Using BBI
NN47230-500 03.0224 October 2008
Copyright © 2007, 2008 Nortel Networks
.

338 Configuration of SNMP
4 Click Save Target.
The new target appears in the table.
5 Click Apply on the toolbar to send the current changes to theNortel SNAS.
--End--
Use the data in the following table to add notificationtarget.
Variable Value
IP Address Specifies the IP address of the SNMPmanager to which trap messages aresent.
Port Specifies the TCP port number used bythe SNMP manager.
The default value is port 162.
Version Specifies the SNMP version used by theSNMP manager. The options are:
• v1—use SNMPv1
• v2c—use SNMPv2c
• v3—use SNMPv3
The default value is v2c.
Managing SNMP notification targetsTo manage SNMP notification targets, use the following procedure:
Nortel Secure Network Access SwitchConfiguration — Using BBI
NN47230-500 03.0224 October 2008
Copyright © 2007, 2008 Nortel Networks
.
Configure SNMP settings 339
Procedure steps
Step Action
1 Select the Config tab.
2 Select the Administration, SNMP, and Notification Target fromthe Navigation pane.
The Notification Target screen appears.
3 Select the SNMP notification target that you want to modify andclick Edit.
The Modify Notification Target screen appears.
4 Modify the SNMP notification target information in the applicablefields.
5 Click Save Target on the toolbar to save the details.
6 Click Apply on the toolbar to send the current changes to theNortel SNAS.
--End--
Removing SNMP notification targetsTo delete an existing SNMP notification target, use the followingprocedure:
Procedure steps
Step Action
1 Select the Config tab.
2 Select the Administration, SNMP, and Notification Target fromthe Navigation pane.
The Notification Target screen appears.
3 Select the SNMP target to remove from the SNMP Target Table.
4 Click Delete.
A confirmation dialog box appears.
5 Click Yes.
6 Click Apply on the toolbar to send the current changes to theNortel SNAS.
--End--
Nortel Secure Network Access SwitchConfiguration — Using BBI
NN47230-500 03.0224 October 2008
Copyright © 2007, 2008 Nortel Networks
.

340 Configuration of SNMP
Configuring SNMPv3 usersThe Nortel SNAS manages SNMPv3 users based on the User-basedSecurity Model (USM) for SNMP version 3. For more information aboutUSM, see RFC2274.
To configure SNMPv3 users, use the following procedures:
• “Adding SNMPv3 users” (page 340)
• “Managing SNMPv3 users” (page 343)
• “Removing SNMPv3 users” (page 343)
Adding SNMPv3 usersTo add an SNMPv3 user, use the following procedure:
Procedure steps
Step Action
1 Select the Config tab.
2 Select the Administration, SNMP, and Users from theNavigation pane.
The SNMPv3 User Table screen appears.
3 Click Add.
The Add SNMP User screen appears.
Nortel Secure Network Access SwitchConfiguration — Using BBI
NN47230-500 03.0224 October 2008
Copyright © 2007, 2008 Nortel Networks
.

Configure SNMP settings 341
4 Click Update.
The new SNMPv3 user appears in the table.
5 Click Apply on the toolbar to send the current changes to theNortel SNAS.
--End--
Use the data in the following table to add SNMP user.
Variable Value
Id Specifies a unique integer in the range 1to 1024 to identify this SNMPv3 User onthe Nortel SNAS cluster.
This field cannot be changed after anSNMPv3 user is added.
Username Specifies a name for the USM user. Thename must be unique in the cluster.
Nortel Secure Network Access SwitchConfiguration — Using BBI
NN47230-500 03.0224 October 2008
Copyright © 2007, 2008 Nortel Networks
.

342 Configuration of SNMP
Variable Value
Security Level Specifies the degree of SNMP USMsecurity. Valid options are:
• none—SNMP access is grantedwithout authentication.
• auth—the SNMP user must providea verified password before SNMPaccess is granted. You are laterprompted to specify the requiredpassword (auth password). SNMPinformation is transmitted in plain text.
• priv—the SNMP user must providea verified password before SNMPaccess is granted, and all SNMPinformation is encrypted with theuser’s individual key. You are laterprompted to specify the requiredpassword (auth password) andencryption key (priv password).
The default is priv.
Permission Specify the permission.Values: get, set, and trap
AuthenticationProtocol
Specifies the protocol to be used toauthenticate the USM user.
Values: md5 and shadefault: md5
AuthenticationPassword
Specifies the password for USM userauthentication. The password is requiredif the security level is set to auth or priv.The password must be at least eightcharacters long.
AuthenticationPassword(again)
Reconfirm the password.
Privacy Protocol Specifies the protocol used for encryption.Valid options are:
• des
• aes
The default is des.
Nortel Secure Network Access SwitchConfiguration — Using BBI
NN47230-500 03.0224 October 2008
Copyright © 2007, 2008 Nortel Networks
.

Configure SNMP settings 343
Variable Value
EncryptionPassword
Specifies the USM user’s individualencryption key. The password isrequired if the security level is set to priv.The password must be at least eightcharacters long.
EncryptionPassword(again)
Reconfirm the USM user’s individualencryption key.
Managing SNMPv3 usersTo manage SNMPv3 users, or configure permission sets for a newSNMPv3 user, use the following procedure:
Procedure steps
Step Action
1 Select the Config tab.
2 Select Administration, SNMP, and Users from the Navigationpane.
The Users screen appears.
3 Select the user whose details you want to modify, and click Edit.
The Modify SNMP user screen appears.
4 Modify SNMPv3 User information in the applicable fields, asrequired.
5 Click Update to save the details.
6 Click Apply on the toolbar to send the current changes to theNortel SNAS.
--End--
Removing SNMPv3 usersTo delete an existing SNMPv3 user, use the following procedure:
Procedure steps
Step Action
1 Select the Config tab.
2 Select Administration, SNMP, and Users from the Navigationpane.
The Users screen appears.
Nortel Secure Network Access SwitchConfiguration — Using BBI
NN47230-500 03.0224 October 2008
Copyright © 2007, 2008 Nortel Networks
.

344 Configuration of SNMP
3 Select a user from the Users table.
4 Click Delete.
A dialog box appears for confirmation.
5 Click OK.
6 Click Apply on the toolbar to send the current changes to theNortel SNAS.
--End--
Configuring SNMP eventsSNMP events can be added to monitor values or give notification ofspecific object identifiers (OID). There are two types of SNMP events toconfigure, as described in the following sections:
• “Managing monitor events” (page 344)
• “Managing notification events” (page 346)
Managing monitor eventsTo manage monitor events, use the following procedures:
• “Adding monitor events” (page 344)
• “Removing monitor events” (page 345)
After you add monitor event, you cannot modify the monitor event. Tochange the settings of an existing monitor, first remove that monitor andthen create a new monitor with the desired changes.
To add monitor events, use the following procedure:
Procedure steps
Step Action
1 Select the Config tab.
2 Select Administration, SNMP, and Event fromthe Navigation pane.
The Event screen appears.
3 Click Add Monitor.
The Add Monitors screen appears.
4 Click Update.
The monitor event appears in the table.
Nortel Secure Network Access SwitchConfiguration — Using BBI
NN47230-500 03.0224 October 2008
Copyright © 2007, 2008 Nortel Networks
.

Configure SNMP settings 345
5 Click Apply on the toolbar to send the currentchanges to the Nortel SNAS.
--End--
Use the data in the following table to add monitor event.
Variable Value
Option • c = Comment
• f = Frequency (in seconds, default is600 [10 minutes])
• o = OID (additional objects to send inthe event)
• e = EventName (the nameof a notificationEvent, only forbool/existence)
• d = OID (delta discontinuity OID)
• D = timeTicks | timeStamp |dateAndTime (delta discontinuitytype)
Other option • b = boolean
• t = threshold
• x = existence
Name The unique name for the monitor.
OID Specifies the OID value that is monitored.
Removing monitor events To delete a monitor event, use the followingprocedure:
Procedure steps
Step Action
1 Select the Config tab.
2 Select Administration, SNMP, and Event from the Navigationpane.
The Event screen appears.
3 Select the monitor event to be removed from the Event list.
4 Click Delete.
A confirmation dialog box appears.
Nortel Secure Network Access SwitchConfiguration — Using BBI
NN47230-500 03.0224 October 2008
Copyright © 2007, 2008 Nortel Networks
.

346 Configuration of SNMP
5 Click Yes.
6 Click Apply on the toolbar to send the current changes to theNortel SNAS.
--End--
Managing notification eventsTo manage notification events, select one of the following procedures:
• “Adding notification events” (page 346)
• “Removing notification events” (page 347)
After you add notification events, you cannot modify notification events.To change the settings of an existing notification event, first remove thatnotification and then create a new notification event with the desiredchanges.
To add notification events, use the following procedure:
Procedure steps
Step Action
1 Select the Config tab.
2 Select the Administration, SNMP, and Eventfrom the Navigation pane.
The Event screen appears.
3 Click Add Event.
The Add Events screen appears.
4 Click Update.
Nortel Secure Network Access SwitchConfiguration — Using BBI
NN47230-500 03.0224 October 2008
Copyright © 2007, 2008 Nortel Networks
.

Configuring SSCP-Lite 347
The notification event appears in the table.
5 Click Apply on the toolbar to send the currentchanges to the Nortel SNAS.
--End--
Use the data in the following table to add notificationevent.
Variable Value
Option Specifies the notification event option.
Name Specifies the notification event name.
OID Specifies the OID that trigger thisnotification event.
Removing notification events To delete a notification event, use thefollowing procedure:
Procedure steps
Step Action
1 Select the Config tab.
2 Select the Administration, SNMP, and Event from theNavigation pane.
The Event screen appears.
3 Select the notification event to be removed.
4 Click Delete.
A confirmation dialog box appears.
5 In the confirmation dialog box, click Yes.
6 Click Apply on the toolbar to send the current changes to theNortel SNAS.
--End--
Configuring SSCP-LiteSSCP-lite is a SNAS enforcement protocol that uses SNMP to restrict ausers network access using dynamically provisioned VLAN’s based onusers credentials and device health assessment. SSCP-Lite supports
Nortel Secure Network Access SwitchConfiguration — Using BBI
NN47230-500 03.0224 October 2008
Copyright © 2007, 2008 Nortel Networks
.

348 Configuration of SNMP
Nortel ES 325, 425, 450, 460, BPS, 470, and ERS 2500, 4500, 5500,8300, and 8600. In addition, SSCP-lite supports Cisco 2900, 3500, and3700 series Ethernet switches.
This section describes to configure SSCP-Lite.
Configuring SSCP-Lite navigation
• “Creating an snmp profile” (page 348)
• “Creating a community” (page 349)
• “Creating an sscplite user” (page 350)
Creating an snmp profileTo create and configure SNMP Profile, use the following procedure:
Procedure steps
Step Action
1 Select the Config tab.
2 Select Secure Access Domain and SNMP Profiles from theNavigation pane.The SNMP Profiles screen appears.
3 Click Add.The Add SNMP Profile screen appears.
Nortel Secure Network Access SwitchConfiguration — Using BBI
NN47230-500 03.0224 October 2008
Copyright © 2007, 2008 Nortel Networks
.

Configuring SSCP-Lite 349
4 Enter the snmp profile information in the applicable fields.
5 Click Create SNMP Profile.The new snmp profile appears in the SNMP profiles table.
6 Click Apply on the toolbar to send the current changes to theNortel SNAS.
--End--
Variable definitionsUse the data in the following table to add an SNMP profile.
Variable Value
SNMP Profile Id Specifies the snmp profile id.
Name Specify the name of the snmp profile.
SNMP versions Specifies the snmp version supported for the profile.Values: v1, v2c, and v3
Port Specify the snmp port to communicate.default: 161
Data Refresh Interval Specifies the data refresh rate interval in seconds.default: 60 seconds
CLI Login User Specifies the CLI user login name.default: admin
CLI Login Password Specifies the CLI user login password.
Confirm CLI Login Password Reconfirm the CLI login password.
CLI Login Type Select the CLI login type.Values: ssh and telnet
Creating a communityTo create and configure SNMP Profile Community settings, use thefollowing procedure:
Procedure steps
Step Action
1 Select the Config tab.
2 Select Secure Access Domain and Community from theNavigation pane.The Community screen appears.
Nortel Secure Network Access SwitchConfiguration — Using BBI
NN47230-500 03.0224 October 2008
Copyright © 2007, 2008 Nortel Networks
.

350 Configuration of SNMP
3 Enter the community information in the applicable fields.
4 Click Update to save the changes.
5 Click Apply on the toolbar to send the current changes to theNortel SNAS.
--End--
Variable definitionsUse the data in the following table to configure the community.
Variable Value
Read Community String Specifies the Read Community String. Enter the communitystring for read-only access. (default: public)
Write Community String Specifies the Write Community String. Enter the communitystring for read/write access. (default: private)
Trap Community String Specifies the Trap Community String. Enter the communitystring to be included in traps. (default: trap)
Creating an sscplite userTo create and configure an sscplite user manually, use the followingprocedure:
ATTENTIONSSCPLite USM User configurations are not applicable when the SNMP Profileversion is not v3.
Procedure steps
Step Action
1 Select the Config tab.
Nortel Secure Network Access SwitchConfiguration — Using BBI
NN47230-500 03.0224 October 2008
Copyright © 2007, 2008 Nortel Networks
.

Configuring SSCP-Lite 351
2 Select Secure Access Domain and SSCPLite User from theNavigation pane.The SSCPLite User screen appears.
3 Enter the sscplite user information in the applicable fields.
4 Click Update to save the changes.
5 Click Apply on the toolbar to send the current changes to theNortel SNAS.
--End--
Variable definitionsUse the data in the following table to configure sscplite user.
Variable Value
Name Specify the user name. (default: public)
Security Level Specifies the security level. The other fields gets displayedbased on the selected security level.Values: none, auth, and priv
Deleting an snmp profileTo delete an snmp profile, use the following procedure:
Procedure steps
Step Action
1 Select the Config tab.
2 Select Secure Access Domain and SNMP Profiles from theNavigation pane.The SNMP Profiles screen appears.
Nortel Secure Network Access SwitchConfiguration — Using BBI
NN47230-500 03.0224 October 2008
Copyright © 2007, 2008 Nortel Networks
.

352 Configuration of SNMP
3 Select the snmp profile from the SNMP Profiles list.
4 Click Delete.The snmp profile is deleted successfully message appears.
5 Click Apply on the toolbar to send the current changes to theNortel SNAS.
--End--
Editing an snmp profileTo edit an snmp profile, use the following procedure:
Procedure steps
Step Action
1 Select the Config tab
2 Select Secure Access Domain and SNMP Profiles from theNavigation pane.The SNMP Profiles screen appears.
3 Select the snmp profile from the SNMP Profiles list.
4 Click Edit.The Modify SNMP Profile screen appears.
5 Enter the snmp profile information in the applicable fields.
6 Click Update SNMP Profile.Changes appears in the SNMP profiles table
7 Click Apply on the toolbar to send the current changes to theNortel SNAS.
--End--
Nortel Secure Network Access SwitchConfiguration — Using BBI
NN47230-500 03.0224 October 2008
Copyright © 2007, 2008 Nortel Networks
.

353.
Management of certificatesThis chapter provides detailed procedures on how to manage certificates.
Navigation• “Overview” (page 353)
• “Management of private keys and certificates” (page 357)
OverviewTo use the encryption capabilities of the Nortel SNAS, you must add a keyand certificate that conforms to the X.509 standard.
The key and certificate apply to the cluster. It does not matter whetheryou connect to the Management IP address (MIP) or Real IP address(RIP) of a Nortel SNAS device in order to manage Secure Socket Layer(SSL) certificates. When you add a key and certificate to one Nortel SNASdevice in the cluster, the information is automatically propagated to allother devices in the cluster.
The Nortel SNAS can support the use of up to 1500 certificates. However,only one server certificate can be mapped to a portal server at any onetime. For information about mapping a certificate to the portal server, see“Configuring SSL settings” (page 139).
If you run the quick setup wizard during initial setup, a test certificate getsinstalled and mapped to the Nortel SNAS portal.
You can install new certificates or import or renew existing certificates.
ATTENTIONThe Nortel SNAS supports keys and certificates created by using Apache-SSL,OpenSSL, or Stronghold SSL. However, for greater security, Nortel recommendscreating keys and generating certificate signing requests from within the NortelSNAS system using the CLI, SREM, or BBI . This way, the encrypted private keynever leaves the Nortel SNAS and is invisible to the user.
Nortel Secure Network Access SwitchConfiguration — Using BBI
NN47230-500 03.0224 October 2008
Copyright © 2007, 2008 Nortel Networks
.

354 Management of certificates
Key and certificate formatsThe Nortel SNAS supports importing, saving, and exporting private keysand certificates in a number of standard formats. The following tablesummarizes the supported formats:
Table 7Supported key and certificate formats
Format Import/Add Export/Save Comment
PEM* Yes Yes Encrypts the private key. Combines theprivate key and certificate in the same file.
DER Yes Yes Does not encrypt the private key. Allowsyou to store the private key and certificatein separate files.
NET Yes Yes Encrypts the private key. Allows you tostore the private key and certificate inseparate files.
PKCS12
(also knownas PFX)
Yes Yes Encrypts the private key. Combines theprivate key and certificate in the samefile. Most browsers allow the importing ofa combined key and certificate file in thePKCS12 format.
PKCS7 Yes No Certificate only.
PKCS8 Yes No Key only (used in WebLogic).
MS IIS 4 Yes No Key only (proprietary format).
NetscapeEnterpriseServer
Yes No Key only (proprietary format). Requiresconversion. For information about theconversion tool, contact Nortel TechnicalSupport (see “How to get help” (page 19)).
iPlanetServer
Yes No Key only (proprietary format). Requiresconversion. For information about theconversion tool, contact Nortel TechnicalSupport (see “How to get help” (page 19)).
*You must use the PEM format when:
• you save keys and certificates by copying
• you add a key or certificate by pasting
Creating certificatesTo create a new certificate, use the following procedure:
Nortel Secure Network Access SwitchConfiguration — Using BBI
NN47230-500 03.0224 October 2008
Copyright © 2007, 2008 Nortel Networks
.
Overview 355
Procedure steps
Step Action
1 Generate a Certificate Signing Request (CSR) (see “Generatingand submitting a CSR” (page 359)).
2 Send the CSR to a Certificate Authority (CA), such as Entrustor VeriSign, for certification (see “Generating and submitting aCSR” (page 359)).
3 Install the signed certificate on the Nortel SNAS cluster (see“Installing certificates and keys” (page 355)).
4 Map the installed certificate to the Nortel SNAS portal server(see “Configuring SSL settings” (page 139)).
--End--
Installing certificates and keysTwo methods are available to install a certificate and key in the NortelSNAS cluster:
• by pasting (this option is only available when using the CLI)
• by importing from a TFTP/FTP/SCP/SFTP server (see “Importing acertificate or key” (page 363))
When you generate the CSR, the private key is created and stored inencrypted form on the Nortel SNAS using the specified certificate number.After you receive the certificate, which contains the corresponding publickey, use the same certificate number when you add the certificate tothe Nortel SNAS. Otherwise, the private key and the public key in thecertificate do not match.
If you do not generate a CSR but obtain the certificate by other means,you must take additional steps to add a private key that corresponds tothe public key of the certificate (for the information about adding a privatekey, see Nortel Secure Network Access Switch Using the Command LineInterface (NN47230-100).
If you use the certificate index number of an installed certificate whenadding a new certificate, the installed certificate is overwritten.
After you install the certificate, map it to the Nortel SNAS portal (see“Configuring SSL settings” (page 139)).
Saving or exporting certificates and keysYou can extract copies of certificates and keys to save as backup or toinstall on another device.
Nortel Secure Network Access SwitchConfiguration — Using BBI
NN47230-500 03.0224 October 2008
Copyright © 2007, 2008 Nortel Networks
.

356 Management of certificates
There are two ways to retrieve a certificate and key from the Nortel SNAScluster:
• by copying (see “Displaying or saving a certificate and key” (page 365))
• by exporting to a TFTP/FTP/SCP/SFTP server (see “Exporting acertificate and key from the Nortel SNAS” (page 366))
The copy-and-paste method saves the certificate and key in PEM format.
You can use the export method to choose from a variety of file formats.Nortel recommends using the PKCS12 format (also known as PFX). MostWeb browsers accept the importation of a combined key and certificate filein the PKCS12 format. For more information about the formats supportedon the Nortel SNAS, see “Key and certificate formats” (page 354).
Updating certificatesTo update or renew an existing certificate, do not replace the existingcertificate by using its certificate number when you generate the CSR oradd the new certificate. Rather, keep the existing certificate until you haveverified that the new certificate works as designed.
To update an existing certificate, use the following procedures:
Procedure steps
Step Action
1 Check the certificate numbers currently in use to identify anunused certificate number.
In the CLI, use the /cfg/cur cert command. In the BBI, usethe Certificates screen to add a new certificate.
2 Create a new certificate by using an unused certificate number(see “Generating and submitting a CSR” (page 359)).
a Generate a CSR.
b Submit the CSR to a CA.
3 When you receive the new signed certificate add it to the NortelSNAS (see “Installing certificates and keys” (page 355)).
4 Map the new certificate to the portal server (see “ConfiguringSSL settings” (page 139)).
5 After testing to verify that the new certificate works as intended,delete the old certificate.
Nortel Secure Network Access SwitchConfiguration — Using BBI
NN47230-500 03.0224 October 2008
Copyright © 2007, 2008 Nortel Networks
.

Management of private keys and certificates 357
In the CLI, use the /cfg/cert <old cert ID> /delcommand.
--End--
Management of private keys and certificatesThis section describes about the certificate management procedures youcan perform.
Management of private keys and certificates navigation
• view existing certificates (see “Viewing certificates” (page 357))
• create a new certificate (see “Creating a certificate” (page 358))
• generate requests for signed certificates (see “Generating andsubmitting a CSR” (page 359))
• import certificates and private keys (see “Importing a certificate or key”(page 363))
• save certificates and private keys (see “Displaying or saving acertificate and key” (page 365))
• export certificates and private keys (see “Exporting a certificate andkey from the Nortel SNAS” (page 366))
• view, validate, and manage certificates and private keys (see “Viewingcertificate information” (page 368))
Viewing certificatesTo view basic information about all certificates configured for the NortelSNAS cluster, select Certificates from the Navigation pane.
The Certificates screen appears, with a list of all the certificates availableon the Nortel SNAS cluster.
Removing an existing certificate
To remove an existing certificate, use the following procedure:
Procedure steps
Step Action
1 Select the Config tab.
2 Select Certificates from the Navigation pane.
The Certificates screen appears.
Nortel Secure Network Access SwitchConfiguration — Using BBI
NN47230-500 03.0224 October 2008
Copyright © 2007, 2008 Nortel Networks
.

358 Management of certificates
3 Select the certificate from the Certificates list.
4 Click Delete.
A confirmation dialog box appears.
5 Click Yes.
The certificate is removed from the Certificates list.
6 Click Apply on the toolbar to send the current changes to theNortel SNAS.
--End--
Creating a certificateTo create a certificate, use the following procedure:
Procedure steps
Step Action
1 Select the Config tab.
2 Select Certificates from the Navigation pane.
The Certificates screen appears.
3 Click Add.
The Add New Certificate screen appears.
4 Enter the certificate information in the applicable fields.
5 Click Update.
The new certificate appears in the Certificates list.
Nortel Secure Network Access SwitchConfiguration — Using BBI
NN47230-500 03.0224 October 2008
Copyright © 2007, 2008 Nortel Networks
.

Management of private keys and certificates 359
6 Click Apply on the toolbar to send the current changes to theNortel SNAS.
--End--
Before this certificate can be used, a certificate signing request (CSR)must be generated, submitted to a CA, and imported into the Nortel SNAS.For details on this process, see “Generating and submitting a CSR” (page359) and “Importing a certificate or key” (page 363).
Variable definitionsUse the data in the following table to add new certificate.
Variable Value
Identifier An integer in the range 1 to 1500 that uniquelyidentifies the certificate in the Nortel SNAS domain.
Name Names the certificate as a mnemonic aid.
Generating and submitting a CSRTo generate a CSR, use the following procedure:
Procedure steps
Step Action
1 Select the Config tab.
2 Select Certificates, Generate... and Request from theNavigation pane.
The Request screen appears.
Nortel Secure Network Access SwitchConfiguration — Using BBI
NN47230-500 03.0224 October 2008
Copyright © 2007, 2008 Nortel Networks
.

360 Management of certificates
3 Select the certificate from the Certificate list and click Refresh.
4 Enter the certificate information in the applicable fields.
5 Click Update to save the details.
The Signed Certificate screen appears.
6 Save the CSR to a file.
a Copy the Signed Certificate text.
b Paste the CA request output into a text editor.
c Save the file with a .csr extension. Nortel recommends usinga file name that indicates the server on which the certificateis to be used.
7 Submit the CSR to a CA such as Entrust or VeriSign.
a In a text editor, open the .csr file you created in step 4.
b Copy the entire CSR, including the -----BEGINCERTIFICATE REQUEST----- and -----ENDCERTIFICATE REQUEST----- lines.
c Use your Web browser to access the CA Web site and followthe online instructions. The process for submitting the CSRvaries with each CA. When prompted, paste the CSR asrequired in the CA online request process. If the CA requiresyou to identify a server software vendor whose software youused to generate the CSR, specify Apache.
Nortel Secure Network Access SwitchConfiguration — Using BBI
NN47230-500 03.0224 October 2008
Copyright © 2007, 2008 Nortel Networks
.

Management of private keys and certificates 361
8 The CA processes the CSR and returns a signed certificate.Create a backup copy of the certificate.
The certificate is ready to be added into the Nortel SNAS cluster(see “Importing a certificate or key” (page 363)).
9 Click Apply on the toolbar to send the information to the NortelSNAS.
If one or more of the CA Request field values are invalid, anerror message appears describing the problem. If all field valuesare acceptable, the CSR output appears in the Output Requestbox.
The private key is created and stored in encrypted form on theNortel SNAS by using the specified certificate number.
--End--
Variable definitionsUse the data in the following table to generate a CSR.
Variable Value
Country (2 letter code) The two-letter ISO code for the countrywhere the Web server is located. For currentinformation about ISO country codes, seewww.iana.org.
State or Province The name of the state or province where thehead office of the organization is located.Enter the full name of the state or province.
Locality The name of the city where the head office ofthe organization is located.
Organization The registered name of the organization. Theorganization must own the domain name thatappears in the common name of the Webserver. Do not abbreviate the organizationname and do not use any of the followingcharacters:
< > ~ ! @ # $ % ^ * / \ ( ) ?
Organization Unit The name of the department or group thatuses the secure Web server.
Nortel Secure Network Access SwitchConfiguration — Using BBI
NN47230-500 03.0224 October 2008
Copyright © 2007, 2008 Nortel Networks
.

362 Management of certificates
Variable Value
Common Name The name of the Web server as it appearsin the URL. The name must be the sameas the domain name of the Web server thatrequests a certificate. If the Web server namedoes not match the common name in thecertificate, some browsers refuse a secureconnection with your site. Do not enter theprotocol specifier (http://) or any port numbersor pathnames in the common name. Wildcards(such as * or ?) and IP address are notallowed.
Email Address Specifies the user’s e-mail address.
Subject Alternative Name Specifies alternate information if you didnot provide a Common Name or e-mailaddress. Enter a comma-separated list ofURI:<uri>, DNS:<fqdn>, IP:<ip-address>,email:<email-address>).
URI Specify the URI for the certificate request.
DNS Specify the domain name.
IP Specify the IP address.
Email Specify the email address.
Generate New Key Pair Specifies whether it generate a new key or not.Values: yes and nodefault: yes
New Key Size Specify the length of the generated key in bits.Available options are:
• 512
• 1024
• 2048
• 4096
The default value is 1024.
Create CA Cert Values: true and falsedefault: false
Challenge Password (optional)
Password The password to be used during manualrevocation of the certificate.
Confirm Password Reconfirm the password.
Nortel Secure Network Access SwitchConfiguration — Using BBI
NN47230-500 03.0224 October 2008
Copyright © 2007, 2008 Nortel Networks
.
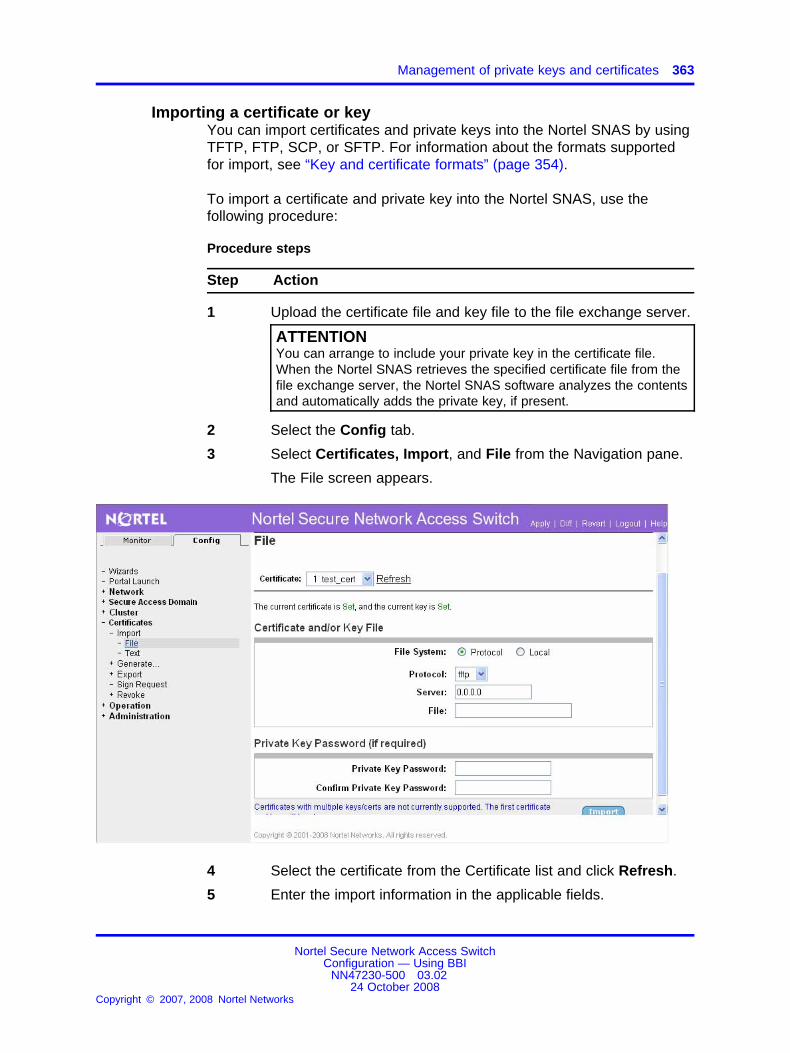
Management of private keys and certificates 363
Importing a certificate or keyYou can import certificates and private keys into the Nortel SNAS by usingTFTP, FTP, SCP, or SFTP. For information about the formats supportedfor import, see “Key and certificate formats” (page 354).
To import a certificate and private key into the Nortel SNAS, use thefollowing procedure:
Procedure steps
Step Action
1 Upload the certificate file and key file to the file exchange server.
ATTENTIONYou can arrange to include your private key in the certificate file.When the Nortel SNAS retrieves the specified certificate file from thefile exchange server, the Nortel SNAS software analyzes the contentsand automatically adds the private key, if present.
2 Select the Config tab.
3 Select Certificates, Import, and File from the Navigation pane.
The File screen appears.
4 Select the certificate from the Certificate list and click Refresh.
5 Enter the import information in the applicable fields.
Nortel Secure Network Access SwitchConfiguration — Using BBI
NN47230-500 03.0224 October 2008
Copyright © 2007, 2008 Nortel Networks
.

364 Management of certificates
6 Click Update on the toolbar to import the certificate.
7 Click Apply on the toolbar to save the imported certificate on theNortel SNAS.
The certificate and private key are now fully installed.
--End--
Variable definitionsUse the data in the following table to import a certificate or key.
Variable Value
Certificate and/or Key File
File System Select the protocol or local to import the file.Fields appear based on the selected filesystem.
File System: Protocol
Protocol Select the protocol to import the file.Values: tftp, ftp, scp, and sftp (default: tftp)
ATTENTIONThe User and Password get prefixed withthe selected protocol type.
ATTENTIONThe User and Password is not displayedwhile selecting the tftp protocol.
Server Specify the hostname or IP address of theserver.
File Specify the filename on the server.
FTP User Specify the FTP User name.
FTP Password Specify the FTP password.
File System: Local
Certificate and/or Key File To select the file name, click the browse tospecify the name of the file to be downloaded.
Private Key Password (if required)
Private Key Password Password used to encrypt the private key(used only if the key is encrypted).
Confirm Private Key Password Confirms the password used to encrypt theprivate key.
Nortel Secure Network Access SwitchConfiguration — Using BBI
NN47230-500 03.0224 October 2008
Copyright © 2007, 2008 Nortel Networks
.

Management of private keys and certificates 365
Displaying or saving a certificate and keyYou can display the current certificate and private key and then savecopies as backup or for export to another device.
When you display the certificate and private key, you have the option toprotect it with a password phrase. Nortel recommends that you add apassword phrase because this adds an extra layer of security.
Save the certificate and private key by copying and pasting into a texteditor and then save the text file with a .PEM extension.
To display the current certificate and key or save a copy, use the followingprocedure:
Procedure steps
Step Action
1 Select the Config tab.
2 Select Certificates, Export, and Text from the Navigation pane.
The Text screen appears.
3 Select the certificate from the Certificate list, and click Refresh.
4 If you want to encrypt the key, specify a password phrase in theapplicable fields. The password phrase must be at least fourcharacters in length.
If you specify a password phrase, the password phrase mustbe provided on all future occasions when the private key file isaccessed (for example, when adding, importing, or exportingprivate keys and certificates).
5 Click Export.
Nortel Secure Network Access SwitchConfiguration — Using BBI
NN47230-500 03.0224 October 2008
Copyright © 2007, 2008 Nortel Networks
.

366 Management of certificates
The private key and certificate are displayed in the text box.
6 Copy the certificate text.
7 Paste the private key and certificate into a text editor.
8 Save the file with a .PEM extension.
9 To save a certificate and key in another format, use the ExportCertificate screen (see “Exporting a certificate and key from theNortel SNAS” (page 366)).
--End--
Variable definitionsUse the data in the following table to display or save a certificate and key.
Variable Value
Password Specifies the password phrase used to encryptthe certificate. The password phrase must beat least four characters in length.
Confirm Password Confirms the password phrase used to encryptthe certificate.
Exporting a certificate and key from the Nortel SNASYou can export certificate files and key files from the Nortel SNAS usingTFTP, FTP, SCP, or SFTP. For information about the formats supportedfor export, see “Key and certificate formats” (page 354).
To export a certificate and key from the Nortel SNAS, use the followingprocedure:
Procedure steps
Step Action
1 Select the Config tab.
2 Select Certificates, Export, and File from the Navigation pane.
The File screen appears.
Nortel Secure Network Access SwitchConfiguration — Using BBI
NN47230-500 03.0224 October 2008
Copyright © 2007, 2008 Nortel Networks
.

Management of private keys and certificates 367
3 Select the certificate from the Certificate list, and click Refresh.
4 Enter the export information in the applicable fields.
5 Click Export on the toolbar to export the certificate.
The certificate and private key are immediately exported.
--End--
Variable definitionsUse the data in the following table to export a certificate and key.
Variable Value
Certificate and/or Key File
Output Format The key and certificate format in which youwant to export the key and certificate.
Values:• PEM
• DER
• NET
• PKCS12 (also known as PFX)
Nortel Secure Network Access SwitchConfiguration — Using BBI
NN47230-500 03.0224 October 2008
Copyright © 2007, 2008 Nortel Networks
.

368 Management of certificates
Variable Value
The PEM and PKCS12 formats alwayscombine the private key and certificate in thesame file.
Nortel recommends that you use the PKCS12format. Most Web browsers accept theimportation of a combined key and certificatefile in the PKCS12 format.
The formats have different capabilitiesregarding private key encryption and the abilityto save the key and certificate in separate files.For more information about the formats, see“Key and certificate formats” (page 354).
File System Select the protocol or local to import the file.Fields appear based on the selected filesystem.
File System: Protocol
Protocol Select the protocol to import the file.Values: tftp, ftp, scp, and sftp (default: tftp)
ATTENTIONThe User and Password get prefixed withthe selected protocol type.
ATTENTIONThe User and Password is not displayedwhile selecting the tftp protocol.
Server Specify the hostname or IP address of theserver.
File Specify the filename on the server.
FTP User Specify the FTP User name.
FTP Password Specify the FTP password.
Key Encryption (if required)
Password Specifies the password phrase used to encryptthe certificate. The password phrase must beat least four characters in length.
Confirm Password Confirms the password phrase used to encryptthe certificate.
Viewing certificate informationTo view a certificate information, use the following procedure:
Nortel Secure Network Access SwitchConfiguration — Using BBI
NN47230-500 03.0224 October 2008
Copyright © 2007, 2008 Nortel Networks
.

Management of private keys and certificates 369
Procedure steps
Step Action
1 Select the Config tab.
2 Select Certificates from the Navigation pane.
The certificate screen appears listing all current certificates.
3 Select the certificate from the list and click Show.
The Certificates screen appears.
--End--
Importing a revocation listTo import a revocation list from the Nortel SNAS, use the followingprocedure:
Procedure steps
Step Action
1 Select the Config tab.
2 Select Certificates, Revoke, and Import from the Navigationpane.
The Import Revocation List screen appears.
3 Enter the import information in the applicable fields.
4 Click Update on the toolbar to import the revocation list.
Nortel Secure Network Access SwitchConfiguration — Using BBI
NN47230-500 03.0224 October 2008
Copyright © 2007, 2008 Nortel Networks
.

370 Management of certificates
5 Click Apply on the toolbar to save the imported certificate on theNortel SNAS.
--End--
Variable definitionsUse the data in the following table to import revocation list.
Variable Value
File System Select the protocol or local to import the file.Fields appear based on the selected filesystem.
File System: Protocol
Protocol Select the protocol to import the revocation list.Values: tftp, ftp, scp, and sftp (default: tftp)
ATTENTIONThe User and Password get prefixed withthe selected protocol type.
ATTENTIONThe User and Password is not displayedwhile selecting the tftp protocol.
Server Specify the hostname or IP address of theserver.
File Specify the filename on the server.
FTP User Specify the FTP User name.
FTP Password Specify the FTP password.
File System: Local
File To select the file name, click the browse tospecify the name of the file to be imported.
Nortel Secure Network Access SwitchConfiguration — Using BBI
NN47230-500 03.0224 October 2008
Copyright © 2007, 2008 Nortel Networks
.

371.
View system information andperformance statistics
This chapter provides detailed procedures on how to view systeminformation and performance statistics.
Navigation• “Overview of Statistics” (page 371)
• “Monitor system information and performance statistics” (page 371)
• “Viewing IP or MAC session information” (page 385)
• “Switch templates” (page 388)
• “Charting” (page 390)
Overview of StatisticsYou can view the current status information and events for the cluster andfor individual Nortel SNAS hosts. You can also view performance statisticsfor the Nortel SNAS cluster as a whole or for individual hosts in the clustersince the system started.
Monitor system information and performance statisticsYou can view configuration, status, and performance information for aNortel SNAS device or for the cluster as a whole:
• To view configuration and status information for the Nortel SNAScluster, see “Viewing cluster information” (page 372).
• To view AAA statistics, see “Viewing authentication statistics” (page378).
• To view Ethernet statistics for an interface, see “Viewing Ethernetstatistics” (page 382).
Nortel Secure Network Access SwitchConfiguration — Using BBI
NN47230-500 03.0224 October 2008
Copyright © 2007, 2008 Nortel Networks
.

372 View system information and performance statistics
Viewing cluster informationTo view cluster information, use one of the following procedures:
• “Viewing the controller list” (page 372)
• “Viewing SONMP topology information” (page 372)
• “Viewing switch distribution” (page 373)
• “Viewing switches” (page 374)
• “Viewing the connected client list” (page 375)
• “Viewing alarms” (page 377)
Viewing the controller listTo view the controller list, use the following procedure:
Procedure steps
Step Action
1 Select the Monitor tab.
2 Select Controller Information from the Navigation pane.
The Controller Information screen appears.
--End--
Viewing SONMP topology informationTo view the SynOptics Network Management Protocol (SONMP) topologyinformation, use the following procedure:
Nortel Secure Network Access SwitchConfiguration — Using BBI
NN47230-500 03.0224 October 2008
Copyright © 2007, 2008 Nortel Networks
.

Monitor system information and performance statistics 373
Procedure steps
Step Action
1 Select the Monitor tab.
2 Select Cluster and SONMP Topology from the Navigationpane.
The SONMP Topology screen appears.
--End--
Use the data in the following table to view SONMPtopology.
Variable Value
SONMP StateTable
Displays information about the systemtopology, including the IP address,MAC address, chassis type, andthe state of all Nortel SNAS andSONMP-enabled network devices inthe system.
Viewing switch distributionTo view the switch distribution status information, use the followingprocedure:
Procedure steps
Step Action
1 Select the Monitor tab.
Nortel Secure Network Access SwitchConfiguration — Using BBI
NN47230-500 03.0224 October 2008
Copyright © 2007, 2008 Nortel Networks
.
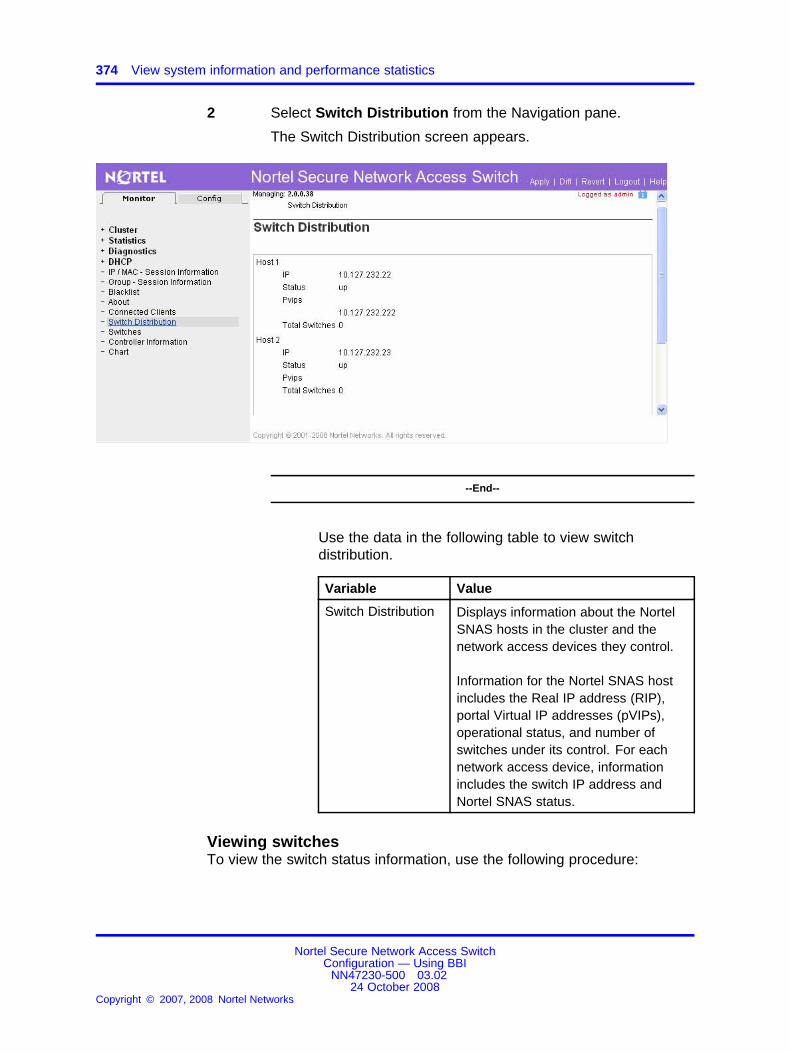
374 View system information and performance statistics
2 Select Switch Distribution from the Navigation pane.
The Switch Distribution screen appears.
--End--
Use the data in the following table to view switchdistribution.
Variable Value
Switch Distribution Displays information about the NortelSNAS hosts in the cluster and thenetwork access devices they control.
Information for the Nortel SNAS hostincludes the Real IP address (RIP),portal Virtual IP addresses (pVIPs),operational status, and number ofswitches under its control. For eachnetwork access device, informationincludes the switch IP address andNortel SNAS status.
Viewing switchesTo view the switch status information, use the following procedure:
Nortel Secure Network Access SwitchConfiguration — Using BBI
NN47230-500 03.0224 October 2008
Copyright © 2007, 2008 Nortel Networks
.
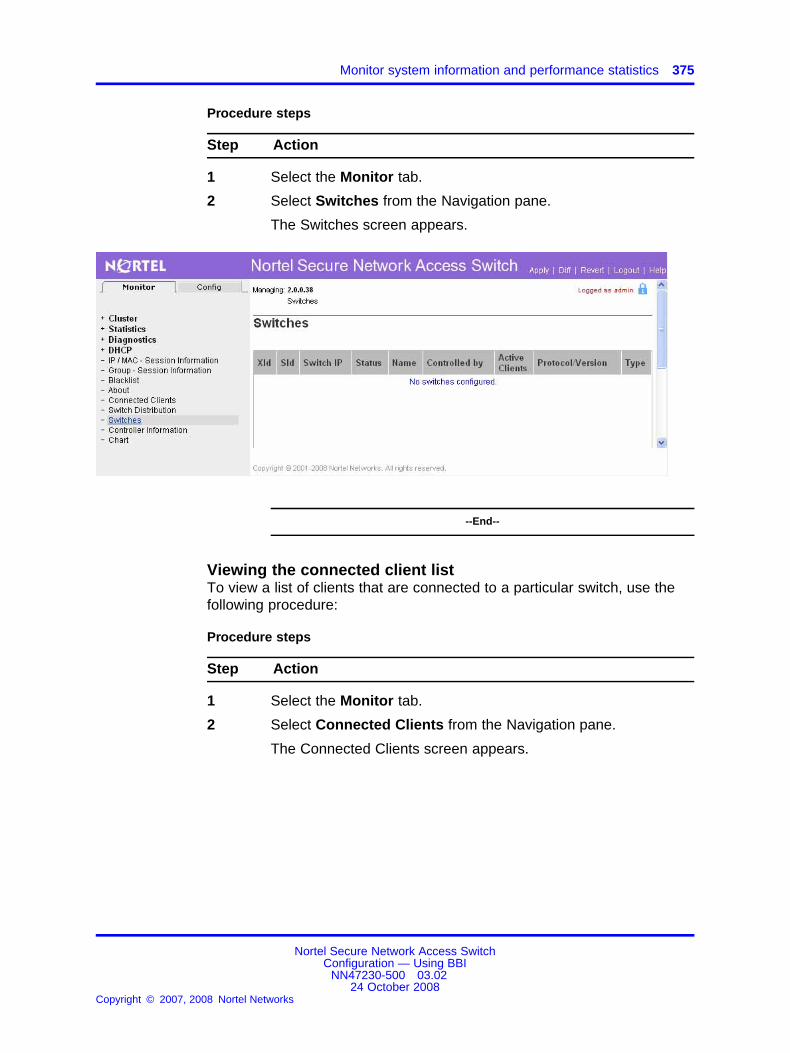
Monitor system information and performance statistics 375
Procedure steps
Step Action
1 Select the Monitor tab.
2 Select Switches from the Navigation pane.
The Switches screen appears.
--End--
Viewing the connected client listTo view a list of clients that are connected to a particular switch, use thefollowing procedure:
Procedure steps
Step Action
1 Select the Monitor tab.
2 Select Connected Clients from the Navigation pane.
The Connected Clients screen appears.
Nortel Secure Network Access SwitchConfiguration — Using BBI
NN47230-500 03.0224 October 2008
Copyright © 2007, 2008 Nortel Networks
.
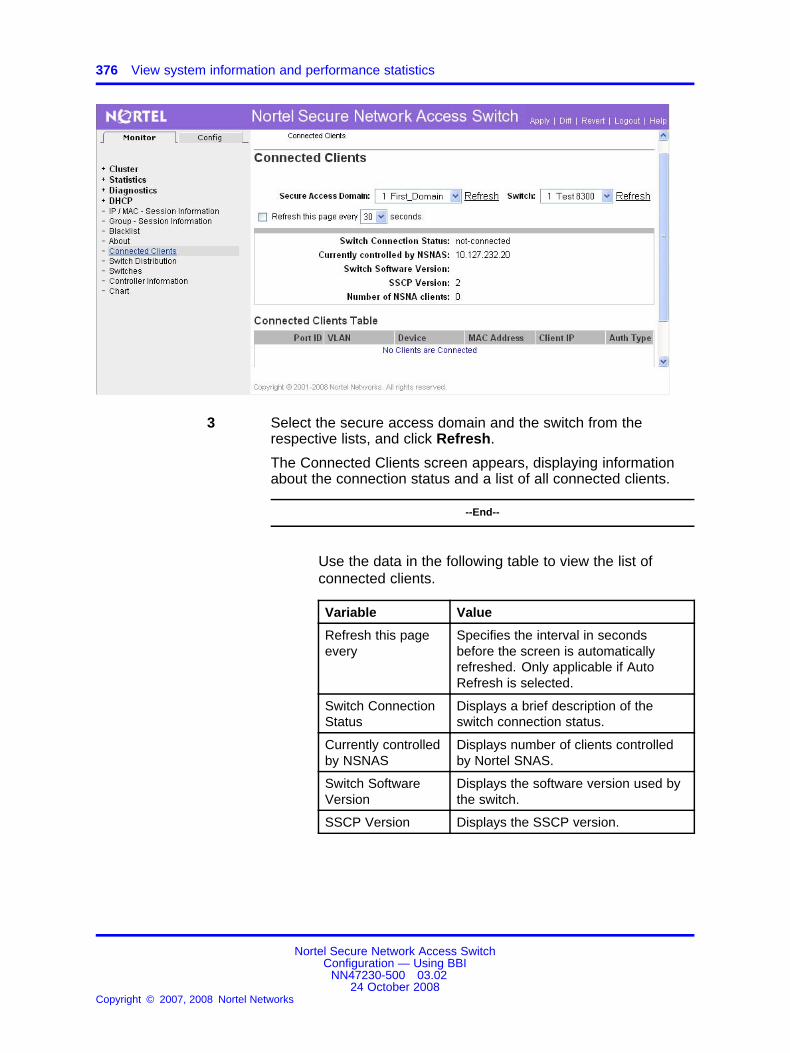
376 View system information and performance statistics
3 Select the secure access domain and the switch from therespective lists, and click Refresh.
The Connected Clients screen appears, displaying informationabout the connection status and a list of all connected clients.
--End--
Use the data in the following table to view the list ofconnected clients.
Variable Value
Refresh this pageevery
Specifies the interval in secondsbefore the screen is automaticallyrefreshed. Only applicable if AutoRefresh is selected.
Switch ConnectionStatus
Displays a brief description of theswitch connection status.
Currently controlledby NSNAS
Displays number of clients controlledby Nortel SNAS.
Switch SoftwareVersion
Displays the software version used bythe switch.
SSCP Version Displays the SSCP version.
Nortel Secure Network Access SwitchConfiguration — Using BBI
NN47230-500 03.0224 October 2008
Copyright © 2007, 2008 Nortel Networks
.

Monitor system information and performance statistics 377
Variable Value
Number of NSNAclients
Displays the number of NSNA clients.
Connected ClientsTable
Displays a list of all connected clients.Information about each client includes:
• Port ID
• VLAN
• Device
• MAC Address
• Client IP
Viewing alarmsYou can view system alarms that are activated. You can also deletealarms.
To alert the operator at system logon, a notice is displayed if active alarmsare present. Alarms are also sent as syslog messages.
To view system alarms, use the following procedures:
• “Viewing active alarms” (page 377)
• “Deleting alarms” (page 378)
To view the active alarms for the Nortel SNAS cluster,use the following procedure:
Procedure steps
Step Action
1 Select Monitor tab.
2 Select Cluster and Alarms from the Navigationpane.
The Alarms screen appears.
Nortel Secure Network Access SwitchConfiguration — Using BBI
NN47230-500 03.0224 October 2008
Copyright © 2007, 2008 Nortel Networks
.

378 View system information and performance statistics
--End--
Use the data in the following table to view the activealarms.
Variable Value
Refresh the pageevery
Specifies the interval in secondsbefore the screen is automaticallyrefreshed.
Procedure steps
Step Action
1 Select the Config tab.
2 To delete an alarm, select Cluster and Alarms from theNavigation pane.
The Alarms screen appears.
3 Select the alarm you want to delete from the Alarms table, andclick Delete.
--End--
Viewing authentication statisticsYou can view authentication statistics for the Nortel SNAS cluster as awhole or for one specific Nortel SNAS host in the cluster.
Nortel Secure Network Access SwitchConfiguration — Using BBI
NN47230-500 03.0224 October 2008
Copyright © 2007, 2008 Nortel Networks
.

Monitor system information and performance statistics 379
For each configured authentication method and authentication server, thefollowing information displays:
• the number of authentication requests accepted and rejected
• for external LDAP and RADIUS servers, the number of authenticationrequests timed out
The external LDAP and RADIUS servers are listed by IP address andTCP port number.
Statistics are reported for all authentication methods configured in thecluster, whether or not they have been included in the authentication orderscheme (see “Specifying authentication fallback order” (page 270)). If thestatistics for a particular authentication method is always zero, this mightbe because the method is not included in the authentication order scheme.
This section includes the following procedures:
• “Viewing AAA statistics for a host” (page 379)
• “Viewing authentication statistics for a cluster” (page 380)
Viewing AAA statistics for a hostTo view AAA statistics for a particular Nortel SNAS host, use the followingprocedure:
Procedure steps
Step Action
1 Select the Config tab.
2 Select Statistics, Authentication, and Host from the Navigationpane.
The Host screen appears.
Nortel Secure Network Access SwitchConfiguration — Using BBI
NN47230-500 03.0224 October 2008
Copyright © 2007, 2008 Nortel Networks
.

380 View system information and performance statistics
3 Select the host number and the secure access domain from therespective lists and click Refresh.
The corresponding details appears.
--End--
Viewing authentication statistics for a clusterProcedure steps
Step Action
1 Select the Monitor tab.
2 Select Statistics, Authentication, and Cluster from theNavigation pane.
The Cluster screen appears.
Nortel Secure Network Access SwitchConfiguration — Using BBI
NN47230-500 03.0224 October 2008
Copyright © 2007, 2008 Nortel Networks
.

Monitor system information and performance statistics 381
3 Select the scecure access domain from the Secure AccessDomain list and click Refresh.
The corresponding details appears.
--End--
Viewing hosts statisticsProcedure steps
Step Action
1 Select the Monitor tab.
2 Select Cluster and Hosts from the Navigation pane.
The Hosts screen appears.
Nortel Secure Network Access SwitchConfiguration — Using BBI
NN47230-500 03.0224 October 2008
Copyright © 2007, 2008 Nortel Networks
.

382 View system information and performance statistics
--End--
Viewing Ethernet statisticsYou can view statistics for the Ethernet network interface card (NIC) onthe particular Nortel SNAS device to which you are connected. If you areconnected to the MIP, the information relates to the Nortel SNAS device inthe cluster that is currently in control of the MIP.
To view Ethernet interface statistics, use the following procedure:
Procedure steps
Step Action
1 Select the Monitor tab.
2 Select Cluster and Ethernet from the Navigation pane.
The Ethernet screen appears.
Nortel Secure Network Access SwitchConfiguration — Using BBI
NN47230-500 03.0224 October 2008
Copyright © 2007, 2008 Nortel Networks
.

Monitor system information and performance statistics 383
3 Select the Ethernet host from the Hosts list and click Refresh.
The corresponding details appear.
--End--
Viewing users statisticsTo view the details of users currently logged into the system, use thefollowing procedure:
Procedure steps
Step Action
1 Select the Monitor tab.
2 Select Cluster and Users from the Navigation pane.
The Users screen appears.
Nortel Secure Network Access SwitchConfiguration — Using BBI
NN47230-500 03.0224 October 2008
Copyright © 2007, 2008 Nortel Networks
.

384 View system information and performance statistics
3 Enter the user information in the applicable fields.
4 To view the user details, click List.
The corresponding details appear.
--End--
Use the data in the following table to view user statistics.
Variable Value
Domain Specifies the domain.
Switch Specifies the switch.
Prefix Specifies one or more initial letters of auser name, directly followed by an asterix(*).
Max Specifies the maximum number of entriesdisplayed.
Current Users
Number OfCurrentlyLogged In Users
Specifies the currently logged in users.
Nortel Secure Network Access SwitchConfiguration — Using BBI
NN47230-500 03.0224 October 2008
Copyright © 2007, 2008 Nortel Networks
.

Viewing IP or MAC session information 385
Variable Value
Kick Users
IP/MACUserGroup
Specify the IP/MAC address, user name,or group to kick the user.
Viewing license usageTo view the license usage details, use the following procedure:
Procedure steps
Step Action
1 Select the Monitor tab.
2 Select Statistics and License Usage from the Navigation pane.
The License Usage screen appears.
--End--
Viewing IP or MAC session informationTo view the details of IP or MAC addresses session information, use thefollowing procedure:
Procedure steps
Step Action
1 Select the Monitor tab.
2 Select the IP / MAC - Session Information from the Navigationpane.
The IP / MAC - Session Information screen appears.
Nortel Secure Network Access SwitchConfiguration — Using BBI
NN47230-500 03.0224 October 2008
Copyright © 2007, 2008 Nortel Networks
.
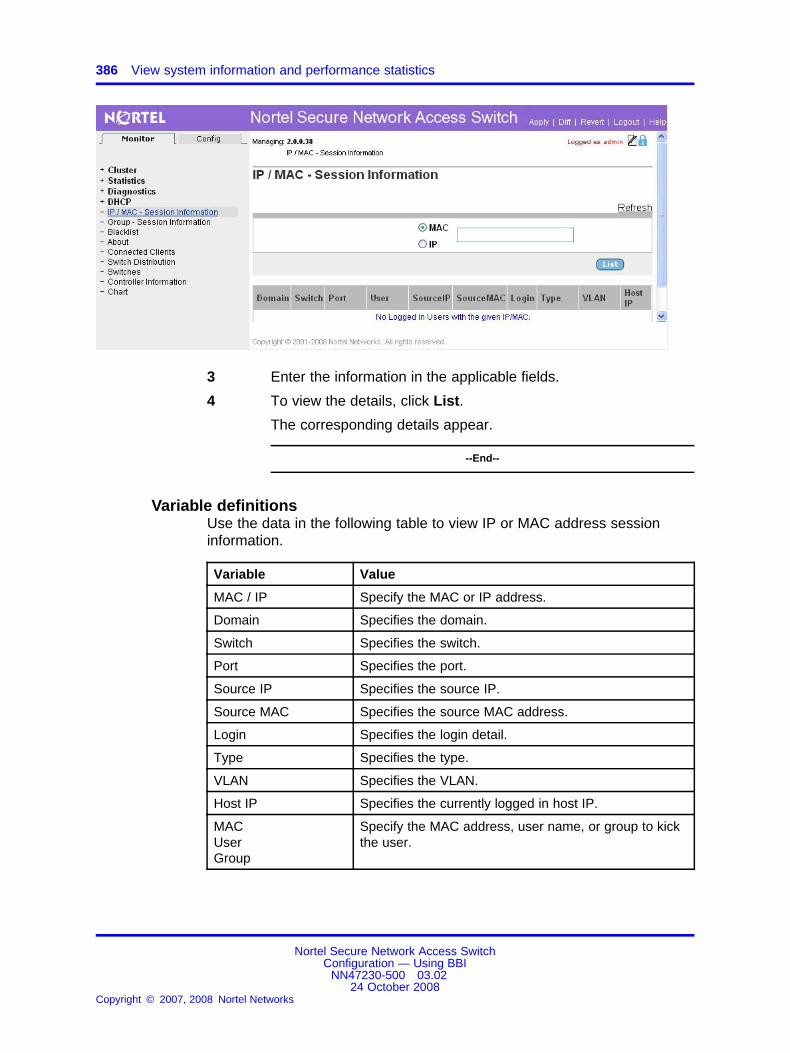
386 View system information and performance statistics
3 Enter the information in the applicable fields.
4 To view the details, click List.
The corresponding details appear.
--End--
Variable definitionsUse the data in the following table to view IP or MAC address sessioninformation.
Variable Value
MAC / IP Specify the MAC or IP address.
Domain Specifies the domain.
Switch Specifies the switch.
Port Specifies the port.
Source IP Specifies the source IP.
Source MAC Specifies the source MAC address.
Login Specifies the login detail.
Type Specifies the type.
VLAN Specifies the VLAN.
Host IP Specifies the currently logged in host IP.
MACUserGroup
Specify the MAC address, user name, or group to kickthe user.
Nortel Secure Network Access SwitchConfiguration — Using BBI
NN47230-500 03.0224 October 2008
Copyright © 2007, 2008 Nortel Networks
.
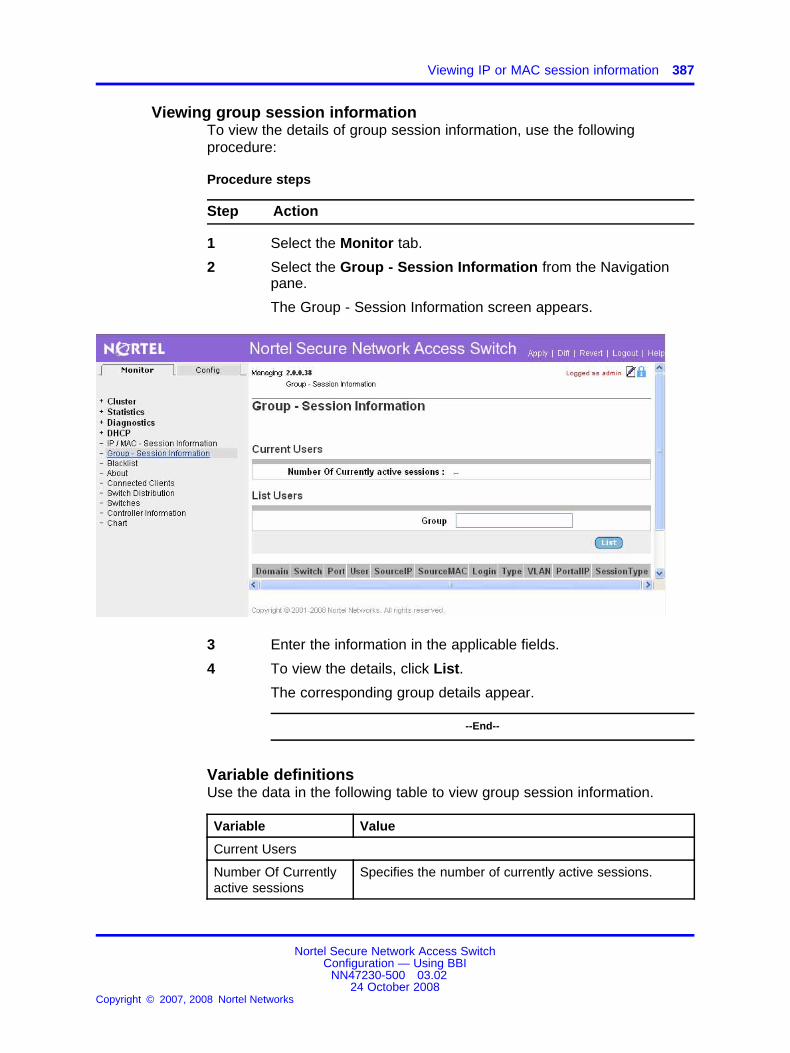
Viewing IP or MAC session information 387
Viewing group session informationTo view the details of group session information, use the followingprocedure:
Procedure steps
Step Action
1 Select the Monitor tab.
2 Select the Group - Session Information from the Navigationpane.
The Group - Session Information screen appears.
3 Enter the information in the applicable fields.
4 To view the details, click List.
The corresponding group details appear.
--End--
Variable definitionsUse the data in the following table to view group session information.
Variable Value
Current Users
Number Of Currentlyactive sessions
Specifies the number of currently active sessions.
Nortel Secure Network Access SwitchConfiguration — Using BBI
NN47230-500 03.0224 October 2008
Copyright © 2007, 2008 Nortel Networks
.

388 View system information and performance statistics
Variable Value
List Users
Group Specify the group to view the details.
Domain Specifies the domain.
Switch Specifies the switch.
Port Specifies the port.
User Specifies the users in the specified group.
Source IP Specifies the source IP.
Source MAC Specifies the source MAC address.
Login Specifies the login detail.
Type Specifies the type.
VLAN Specifies the VLAN.
Portal IP Specifies the currently logged in portal IP.
Session Type Specifies the session type.
Switch templatesIt shows the currently available switch templates. Choose from one of thefollowing tasks:
• “Viewing switch templates” (page 388)
• “Removing switch templates” (page 389)
• “Importing or exporting switch templates” (page 389)
Viewing switch templatesTo view predefined switch templates, select Operation and SwitchTemplates from the Navigation pane. The Switch Templates screenappears.
Nortel Secure Network Access SwitchConfiguration — Using BBI
NN47230-500 03.0224 October 2008
Copyright © 2007, 2008 Nortel Networks
.

Switch templates 389
Removing switch templatesTo delete switch template, use the following procedure:
Procedure steps
Step Action
1 Select the Config tab.
2 Select Operation and Switch Templates from the Navigationpane.
The Switch Templates screen appears.
3 To delete a custom template, select the template and clickDelete.
4 Click Apply on the toolbar to send the current changes to theNortel SNAS.
--End--
Importing or exporting switch templatesTo import or export a switch template, use the following procedure:
Procedure steps
Step Action
1 Select Operation and Switch Templates from the Navigationpane.The Switch Template screen appears.
2 To import a switch template click Import. Are you sure you wantto import a Switch Template to SNAS message appears click
Nortel Secure Network Access SwitchConfiguration — Using BBI
NN47230-500 03.0224 October 2008
Copyright © 2007, 2008 Nortel Networks
.

390 View system information and performance statistics
OK. The Import screen appears.To export a switch template, select a switch template and clickExport. The selected switch templates Export screen appears.
3 Enter the information in the applicable fields.
ATTENTIONDefault Templates and Templates used by SSCPLite Switches cannot deleted.
4 To import the switch template, click Import.
ATTENTIONYou cannot import a switch template if there are any unappliedchanges.
5 To export the switch template, click Export.
--End--
Variable definitionsUse the data in the following table to import/export switch templates.
Variable Value
Protocol Select the protocol used to import or export the switchtemplate.
Values: tftp, ftp, scp, and sftp
ATTENTIONThe User and Password get prefixed with theselected protocol type.
ATTENTIONThe User and Password is not displayed whileselecting the tftp protocol.
Server Specify the host name or IP address of the server.
File Specify the name of the switch template file.
FTP User Specify the FTP User name.
FTP Password Specify the FTP password.
ChartingCharting is used to monitor CPU, Memory and DHCP statistics online. Youcan specify the polling interval, which is used to chart the data.
Nortel Secure Network Access SwitchConfiguration — Using BBI
NN47230-500 03.0224 October 2008
Copyright © 2007, 2008 Nortel Networks
.

Charting 391
To plot the CPU & Memory chart, use the following procedure:
Procedure steps
Step Action
1 Select the Monitor tab.
2 Select Chart from the Navigation pane.The Chart screen appears.
3 Click Chart.The CPU & Memory Chart window appears.
Nortel Secure Network Access SwitchConfiguration — Using BBI
NN47230-500 03.0224 October 2008
Copyright © 2007, 2008 Nortel Networks
.
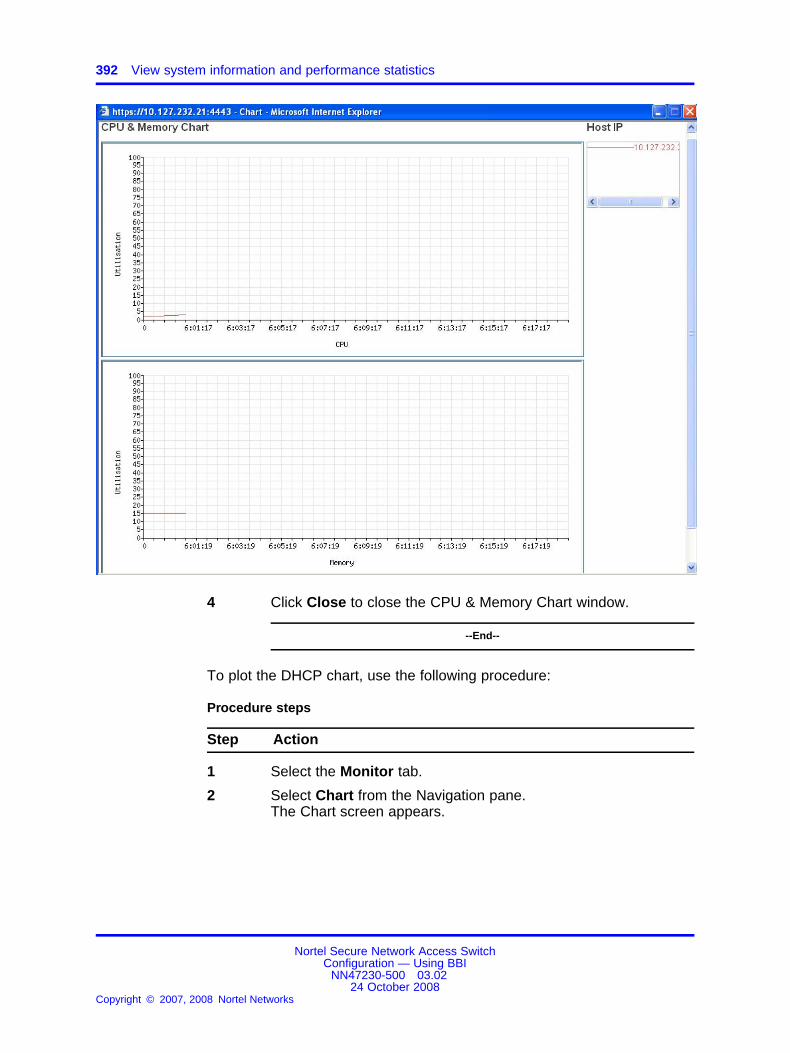
392 View system information and performance statistics
4 Click Close to close the CPU & Memory Chart window.
--End--
To plot the DHCP chart, use the following procedure:
Procedure steps
Step Action
1 Select the Monitor tab.
2 Select Chart from the Navigation pane.The Chart screen appears.
Nortel Secure Network Access SwitchConfiguration — Using BBI
NN47230-500 03.0224 October 2008
Copyright © 2007, 2008 Nortel Networks
.
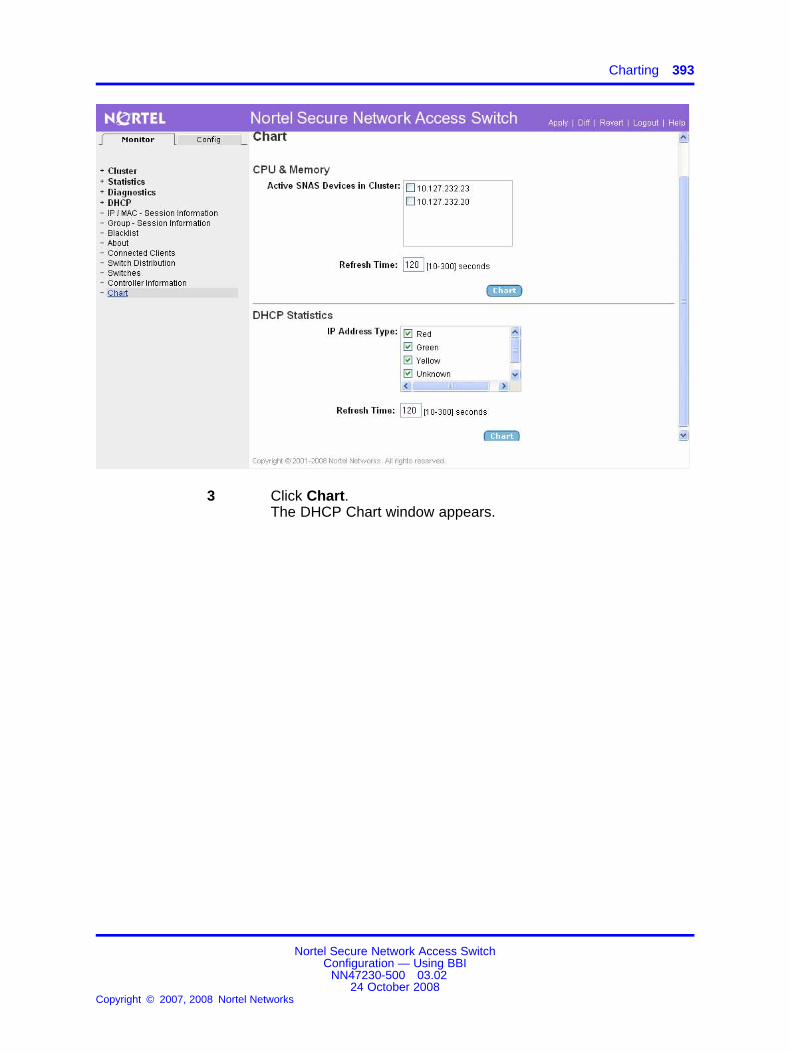
Charting 393
3 Click Chart.The DHCP Chart window appears.
Nortel Secure Network Access SwitchConfiguration — Using BBI
NN47230-500 03.0224 October 2008
Copyright © 2007, 2008 Nortel Networks
.

394 View system information and performance statistics
4 Click Close to close the DHCP Chart window.
--End--
Variable definitionsUse the data in the following table to plot the CPU & Memory chart andDHCP chart.
Variable Value
CPU & Memory chart
Active SNAS Devices inCluster
Specifies the IP address of the device.
Refresh Time Specify the time.Range: 10 - 300 seconds
DHCP chart
IP Address Type Specifies the IP address Type of the device.Values: Red, Green, Yellow, Unknown, Known, and Standard
Refresh Time Specify the time.Range: 10 - 300 seconds
Nortel Secure Network Access SwitchConfiguration — Using BBI
NN47230-500 03.0224 October 2008
Copyright © 2007, 2008 Nortel Networks
.

395.
Maintenance and management of thesystem
This chapter provides detailed procedures on how to manage and maintainthe system and individual Nortel SNAS devices.
Navigation• “Manage and maintain the system” (page 395)
• “Perform maintenance” (page 395)
• “Managing diagnostics” (page 401)
Manage and maintain the systemYou can perform the following activities to collect maintenance informationfor troubleshooting and technical support (see “Perform maintenance”(page 395)):
• Dump log file or system internal status information and send it to a fileexchange server.
• Check connectivity between the Nortel SNAS and all configuredgateways, routers, and servers.
• Start and stop tracing to log information about a client session. Youcan limit the trace to specific features, such as SSL handshake,authentication method, user name, group, and profile, DNS lookups,and the Nortel Health Agent check.
You can use the trace feature as a debugging tool (for example, to findout why authentication fails).
Perform maintenanceThis section describes the procedure to perform maintenance activities.
Nortel Secure Network Access SwitchConfiguration — Using BBI
NN47230-500 03.0224 October 2008
Copyright © 2007, 2008 Nortel Networks
.
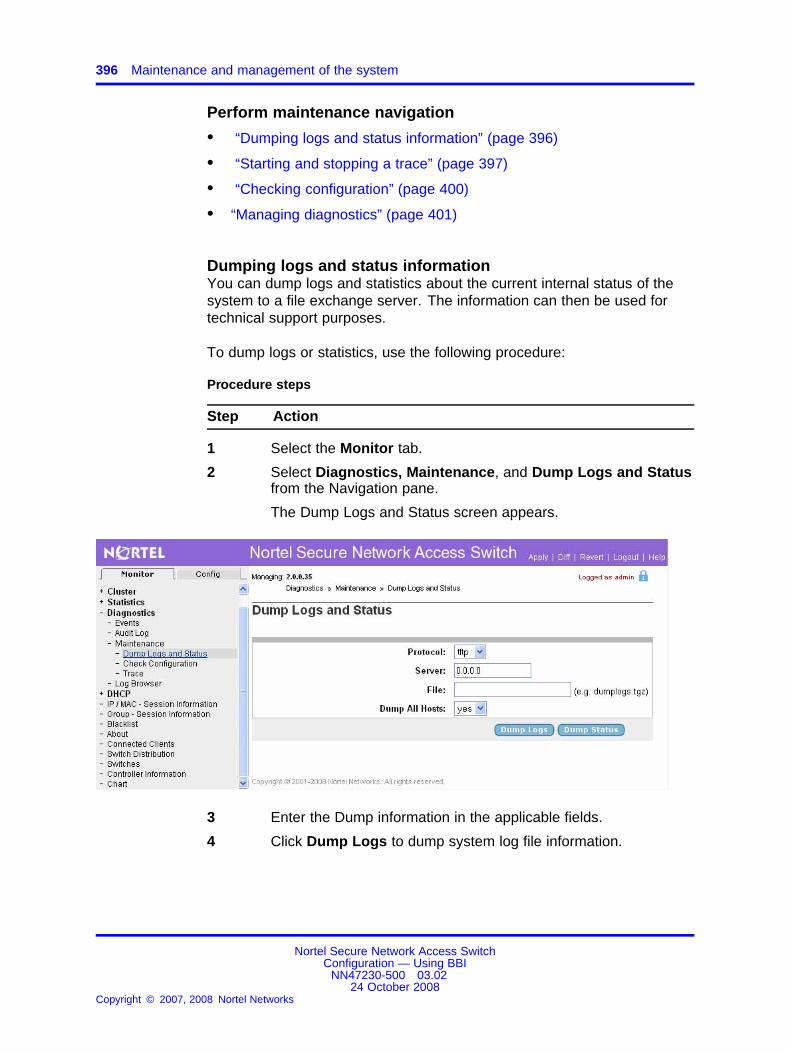
396 Maintenance and management of the system
Perform maintenance navigation
• “Dumping logs and status information” (page 396)
• “Starting and stopping a trace” (page 397)
• “Checking configuration” (page 400)
• “Managing diagnostics” (page 401)
Dumping logs and status informationYou can dump logs and statistics about the current internal status of thesystem to a file exchange server. The information can then be used fortechnical support purposes.
To dump logs or statistics, use the following procedure:
Procedure steps
Step Action
1 Select the Monitor tab.
2 Select Diagnostics, Maintenance, and Dump Logs and Statusfrom the Navigation pane.
The Dump Logs and Status screen appears.
3 Enter the Dump information in the applicable fields.
4 Click Dump Logs to dump system log file information.
Nortel Secure Network Access SwitchConfiguration — Using BBI
NN47230-500 03.0224 October 2008
Copyright © 2007, 2008 Nortel Networks
.

Manage and maintain the system 397
5 Click Dump status to dump system internal status information.
--End--
Use the data in the following table to dump logs andstatus information.
Variable Value
Protocol Select the export protocol.Values: ftp and tftpdefault: tftp
Server Specify the host name or IP address of the fileexchange server.
File Specify the name of the destination file onthe file exchange server. The file is in gzipcompressed tar format.
Dump AllHosts
Enables dumping of information for all hosts inthe cluster or for the local host only.Values: yes and nodefault: yes
Starting and stopping a traceYou can perform a trace to log information about a client session.
To start or stop a trace, use the following procedure:
Procedure steps
Step Action
1 Select the Monitor tab.
2 Select Diagnostics, Maintenance, and Trace from theNavigation pane.
The Trace screen appears.
Nortel Secure Network Access SwitchConfiguration — Using BBI
NN47230-500 03.0224 October 2008
Copyright © 2007, 2008 Nortel Networks
.

398 Maintenance and management of the system
3 Enter the Trace information in the applicable fields.
4 To start the trace, click Start Trace.
5 To stop the trace, click Stop Trace.
--End--
Use the data in the following table to start and stop atrace.
Variable Value
SAD Number Specifies the Nortel SNAS domain towhich you want to limit tracing.
Tags Specifies the specific features orsubsystems to which you want to limittracing. Options are:
• aaa—logs authentication method,user name, group, and extendedprofile
• dhcp
• dns—logs failed DNS lookupsmade during the session
Nortel Secure Network Access SwitchConfiguration — Using BBI
NN47230-500 03.0224 October 2008
Copyright © 2007, 2008 Nortel Networks
.
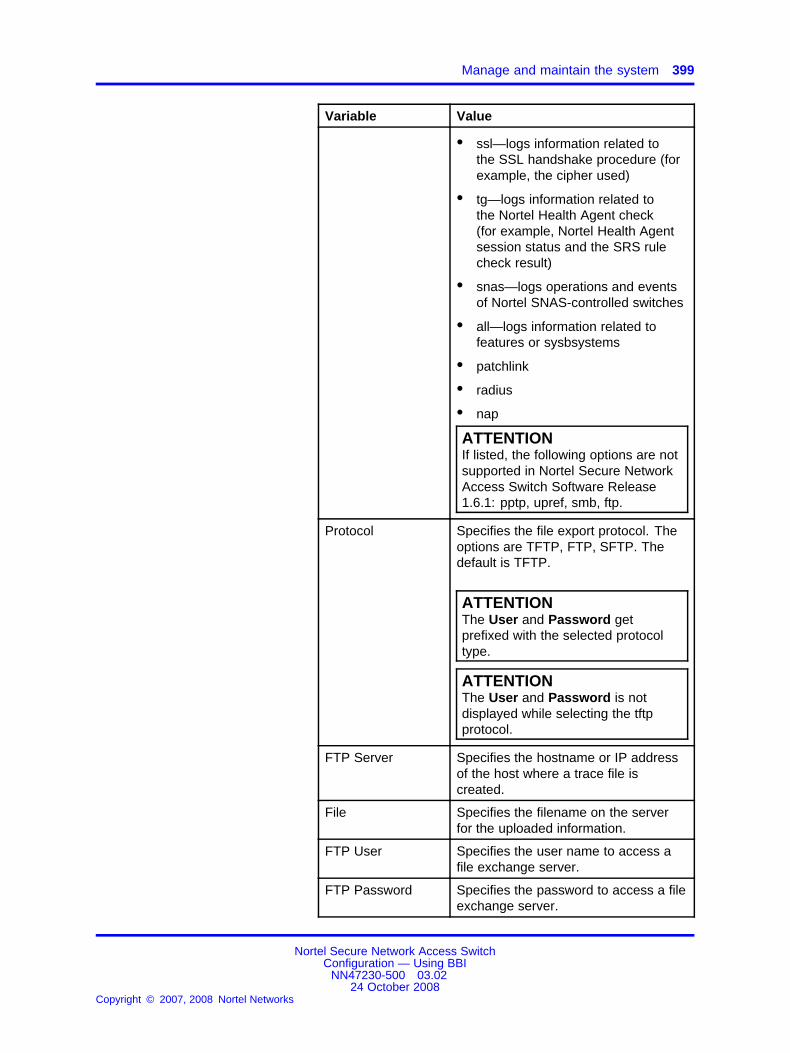
Manage and maintain the system 399
Variable Value
• ssl—logs information related tothe SSL handshake procedure (forexample, the cipher used)
• tg—logs information related tothe Nortel Health Agent check(for example, Nortel Health Agentsession status and the SRS rulecheck result)
• snas—logs operations and eventsof Nortel SNAS-controlled switches
• all—logs information related tofeatures or sysbsystems
• patchlink
• radius
• nap
ATTENTIONIf listed, the following options are notsupported in Nortel Secure NetworkAccess Switch Software Release1.6.1: pptp, upref, smb, ftp.
Protocol Specifies the file export protocol. Theoptions are TFTP, FTP, SFTP. Thedefault is TFTP.
ATTENTIONThe User and Password getprefixed with the selected protocoltype.
ATTENTIONThe User and Password is notdisplayed while selecting the tftpprotocol.
FTP Server Specifies the hostname or IP addressof the host where a trace file iscreated.
File Specifies the filename on the serverfor the uploaded information.
FTP User Specifies the user name to access afile exchange server.
FTP Password Specifies the password to access a fileexchange server.
Nortel Secure Network Access SwitchConfiguration — Using BBI
NN47230-500 03.0224 October 2008
Copyright © 2007, 2008 Nortel Networks
.
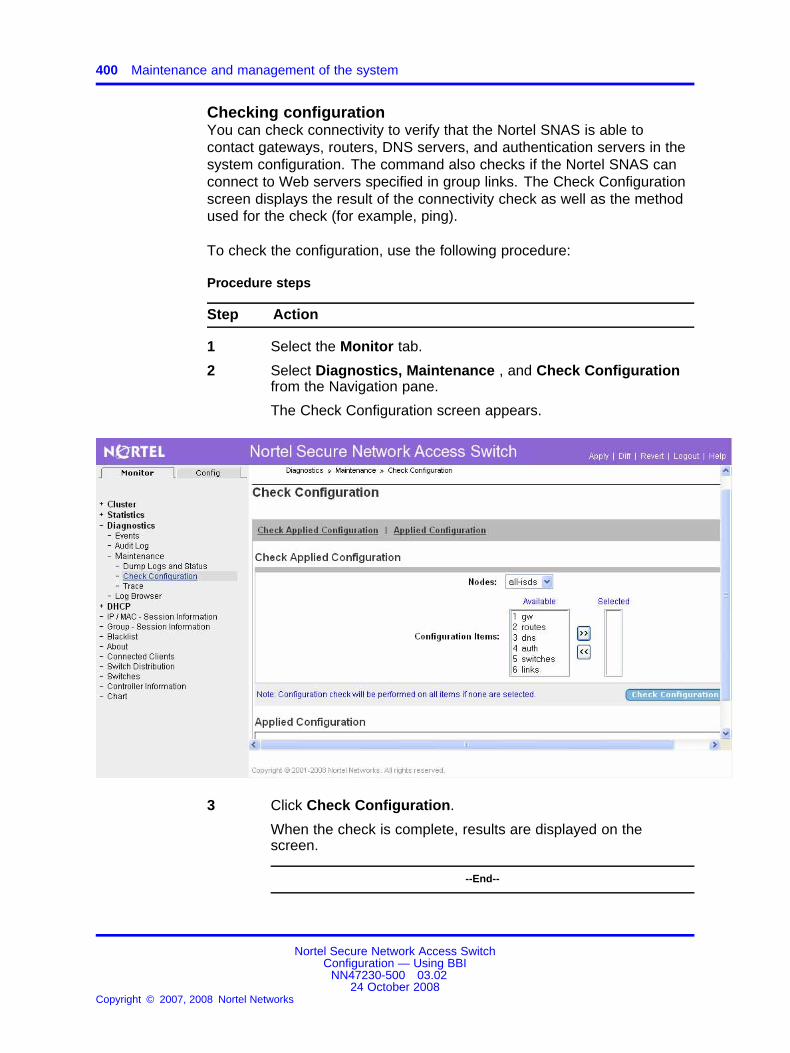
400 Maintenance and management of the system
Checking configurationYou can check connectivity to verify that the Nortel SNAS is able tocontact gateways, routers, DNS servers, and authentication servers in thesystem configuration. The command also checks if the Nortel SNAS canconnect to Web servers specified in group links. The Check Configurationscreen displays the result of the connectivity check as well as the methodused for the check (for example, ping).
To check the configuration, use the following procedure:
Procedure steps
Step Action
1 Select the Monitor tab.
2 Select Diagnostics, Maintenance , and Check Configurationfrom the Navigation pane.
The Check Configuration screen appears.
3 Click Check Configuration.
When the check is complete, results are displayed on thescreen.
--End--
Nortel Secure Network Access SwitchConfiguration — Using BBI
NN47230-500 03.0224 October 2008
Copyright © 2007, 2008 Nortel Networks
.

Manage and maintain the system 401
Managing diagnosticsPerformance statistics are available in real-time via the GUI window oras a CSV (Comma Separated Value), whereas DHCP statistics are onlyavailable through the GUI window.
Viewing events statisticsTo view events statistics, use the following procedure:
Procedure steps
Step Action
1 Select the Monitor tab.
2 Select Diagnostics and Events from the Navigation pane.
The Events screen appears.
3 Select the host from the Host list.
4 Specify the begin and the end time filter for displaying eventinformation.
5 Click Refresh.
The corresponding details appear.
--End--
Viewing audit log statisticsTo view audit log statistics, use the following procedure:
Nortel Secure Network Access SwitchConfiguration — Using BBI
NN47230-500 03.0224 October 2008
Copyright © 2007, 2008 Nortel Networks
.
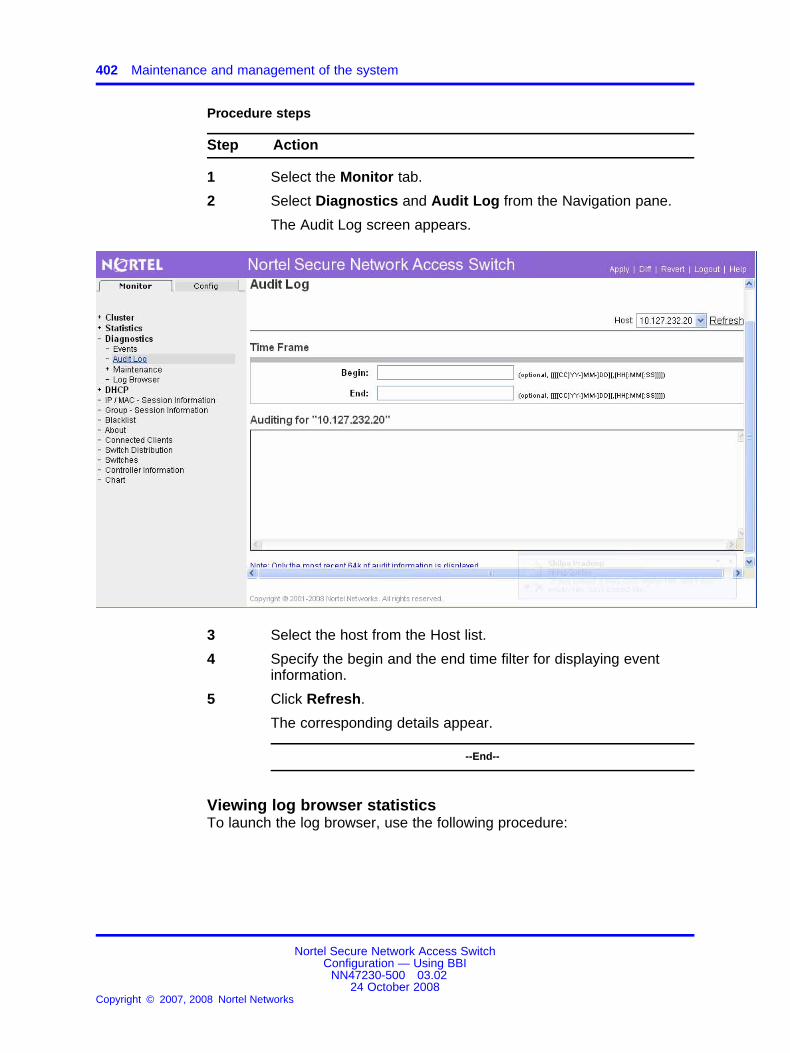
402 Maintenance and management of the system
Procedure steps
Step Action
1 Select the Monitor tab.
2 Select Diagnostics and Audit Log from the Navigation pane.
The Audit Log screen appears.
3 Select the host from the Host list.
4 Specify the begin and the end time filter for displaying eventinformation.
5 Click Refresh.
The corresponding details appear.
--End--
Viewing log browser statisticsTo launch the log browser, use the following procedure:
Nortel Secure Network Access SwitchConfiguration — Using BBI
NN47230-500 03.0224 October 2008
Copyright © 2007, 2008 Nortel Networks
.

Manage and maintain the system 403
Procedure steps
Step Action
1 Select the Monitor tab.
2 Select Diagnostics and Log Browser from the Navigation pane.
The Log Browser screen appears.
3 Click Launch to download the low browser. The Log Browserwindow appears.
--End--
Nortel Secure Network Access SwitchConfiguration — Using BBI
NN47230-500 03.0224 October 2008
Copyright © 2007, 2008 Nortel Networks
.

404 Maintenance and management of the system
Nortel Secure Network Access SwitchConfiguration — Using BBI
NN47230-500 03.0224 October 2008
Copyright © 2007, 2008 Nortel Networks
.


Nortel Secure Network Access Switch
Configuration — Using BBICopyright © 2007, 2008 Nortel NetworksAll Rights Reserved.
Release: 2.0Publication: NN47230-500Document revision: 03.02Document release date: 24 October 2008
To provide feedback or to report a problem in this document, go to www.nortel.com/documentfeedback.
www.nortel.comSourced in Canada, the United States of America, and India
LEGAL NOTICE
While the information in this document is believed to be accurate and reliable, except as otherwise expressly agreed to in writingNORTEL PROVIDES THIS DOCUMENT "AS IS "WITHOUT WARRANTY OR CONDITION OF ANY KIND, EITHER EXPRESSOR IMPLIED. The information and/or products described in this document are subject to change without notice.
Nortel, the Nortel logo, and the Globemark are trademarks of Nortel Networks.
All other trademarks are the property of their respective owners.