configuring and managing the cisco unified ip phone€¦ · cisco unified communications manager...
TRANSCRIPT

Cisco Unified Communications Manager ConfOL-21851-01
C H A P T E R 5
Configuring and Managing the Cisco Unified IP PhoneRevised: June 9, 2015, OL-21851-01
Note This chapter does not apply to systems that use a Touch 12 device for call control or that use software release 6.0.0 or later. Midlets are only used for systems that use a Cisco Unified IP Phone for call control.
ContentsThis chapter describes how to configure and manage the Cisco Unified IP Phone and the Enhanced Phone User Interface that uses Java MIDlets on the Cisco Unified IP phone.
This chapter contains the following information:
• Important Notes, page 5-1
• Configuring the Cisco Unified IP Phone, page 5-2
• Creating MIDlets IP Phone Service in Unified CM, page 5-19
• Configuring MIDlets, page 5-18
• MIDlets Troubleshooting Tips, page 5-21
• Assigning a Directory Number for the Shared-Line Cisco Unified IP Phone, page 5-22
• Verifying and Troubleshooting IP Phone Configuration, page 5-24
Important NotesSee the following advisories and important notes that may affect system behavior:
• MIDlets Software Releases, page 5-1
• Adding a New Phone with MIDlets Capability, page 5-2
MIDlets Software Releases
The supported MIDlets version is embedded in the software files that are available on the Cisco Unified Communications Manager Support page at the following URL:
http://www.cisco.com/en/US/products/sw/voicesw/ps556/tsd_products_support_series_home.html
5-1iguration Guide for the Cisco TelePresence System

Chapter 5 Configuring and Managing the Cisco Unified IP PhoneConfiguring the Cisco Unified IP Phone
Adding a New Phone with MIDlets Capability
If you are using Unified CM release 8.0 and wish to enable MIDlets features on new phone installations, you must first enable Web Access. Web Access is not enabled by default; it must be enabled manually in the Web Access field of the Product Specific Configuration Layout window.
Configuring the Cisco Unified IP PhoneUse the information in this section to perform the following tasks:
• Adding a New Phone, page 5-2
• Managing Cisco Unified IP Phones, page 5-3
Note The Cisco Unified IP Phone is connected to the Cisco TelePresence device with an Ethernet cable. See the cabling chapters in the Cisco TelePresence Assembly guides for more detailed cabling instructions. Go to the Cisco Support Pages to find installation documentation for your Cisco TelePresence System:Support > Cisco TelePresence > Cisco TelePresence System
Adding a New PhoneTo add a new phone:
Step 1 Log in to the Cisco Unified CM Administration interface.
Step 2 From the Device drop-down menu, choose Phone. The Find and List Phones Page appears.
Step 3 Choose the type of Cisco Unified IP Phone you have (Cisco 7970, Cisco 7971, or Cisco 7975) from the Phone Type drop-down menu.
Step 4 Click Next. The Phone Configuration window appears.
Step 5 Choose SIP from the Select the Device Protocol drop-down menu.
Step 6 Click Next. The Phone Configuration window is updated with the following configuration fields:
• Device Information
• Protocol Specific Information
• Certification Authority Proxy Function (CAPF) Information
• Expansion Module Information
• External Data Locations Information
• Extension Information
• MLPP Information
• Do Not Disturb
• Secure Shell Information
• Product Specific Configuration Layout
Step 7 Proceed to “Managing Cisco Unified IP Phones” section on page 5-3 to configure the fields found in the Phone Configuration window.
5-2Cisco Unified Communications Manager Configuration Guide for the Cisco TelePresence System
OL-21851-01
Chapter 5 Configuring and Managing the Cisco Unified IP PhoneConfiguring the Cisco Unified IP Phone
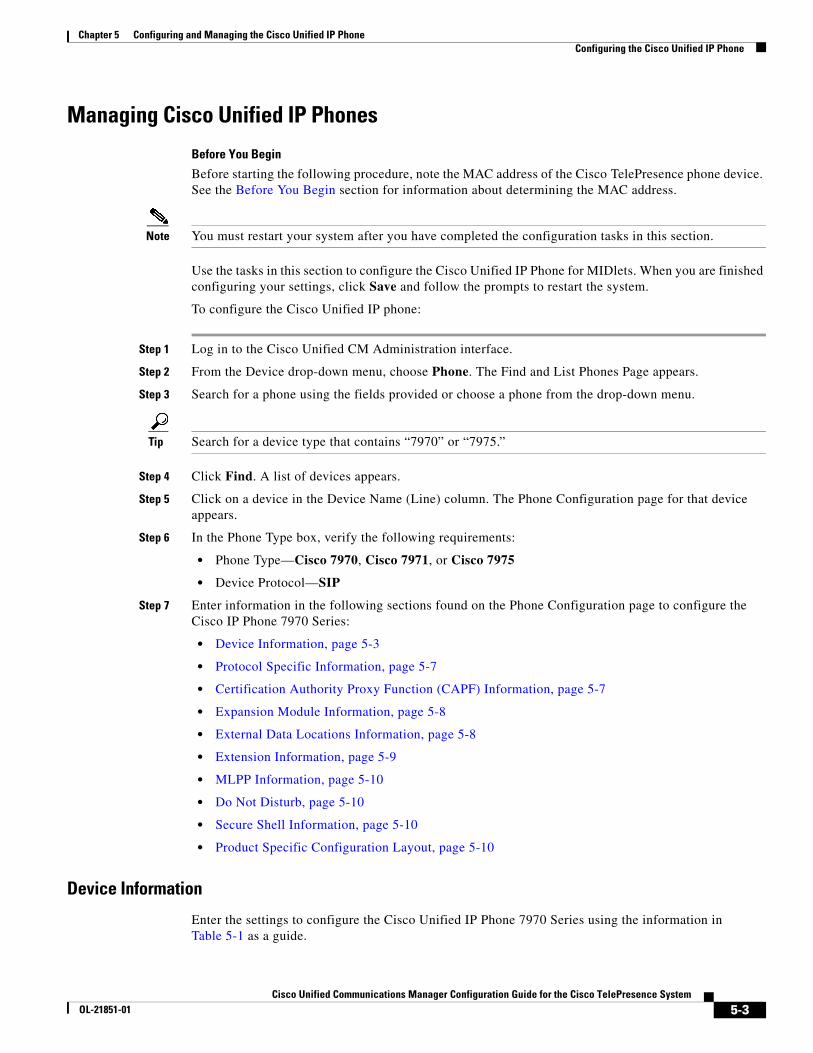
Managing Cisco Unified IP Phones
Before You Begin
Before starting the following procedure, note the MAC address of the Cisco TelePresence phone device. See the Before You Begin section for information about determining the MAC address.
Note You must restart your system after you have completed the configuration tasks in this section.
Use the tasks in this section to configure the Cisco Unified IP Phone for MIDlets. When you are finished configuring your settings, click Save and follow the prompts to restart the system.
To configure the Cisco Unified IP phone:
Step 1 Log in to the Cisco Unified CM Administration interface.
Step 2 From the Device drop-down menu, choose Phone. The Find and List Phones Page appears.
Step 3 Search for a phone using the fields provided or choose a phone from the drop-down menu.
Tip Search for a device type that contains “7970” or “7975.”
Step 4 Click Find. A list of devices appears.
Step 5 Click on a device in the Device Name (Line) column. The Phone Configuration page for that device appears.
Step 6 In the Phone Type box, verify the following requirements:
• Phone Type—Cisco 7970, Cisco 7971, or Cisco 7975
• Device Protocol—SIP
Step 7 Enter information in the following sections found on the Phone Configuration page to configure the Cisco IP Phone 7970 Series:
• Device Information, page 5-3
• Protocol Specific Information, page 5-7
• Certification Authority Proxy Function (CAPF) Information, page 5-7
• Expansion Module Information, page 5-8
• External Data Locations Information, page 5-8
• Extension Information, page 5-9
• MLPP Information, page 5-10
• Do Not Disturb, page 5-10
• Secure Shell Information, page 5-10
• Product Specific Configuration Layout, page 5-10
Device Information
Enter the settings to configure the Cisco Unified IP Phone 7970 Series using the information in Table 5-1 as a guide.
5-3Cisco Unified Communications Manager Configuration Guide for the Cisco TelePresence System
OL-21851-01
Chapter 5 Configuring and Managing the Cisco Unified IP PhoneConfiguring the Cisco Unified IP Phone
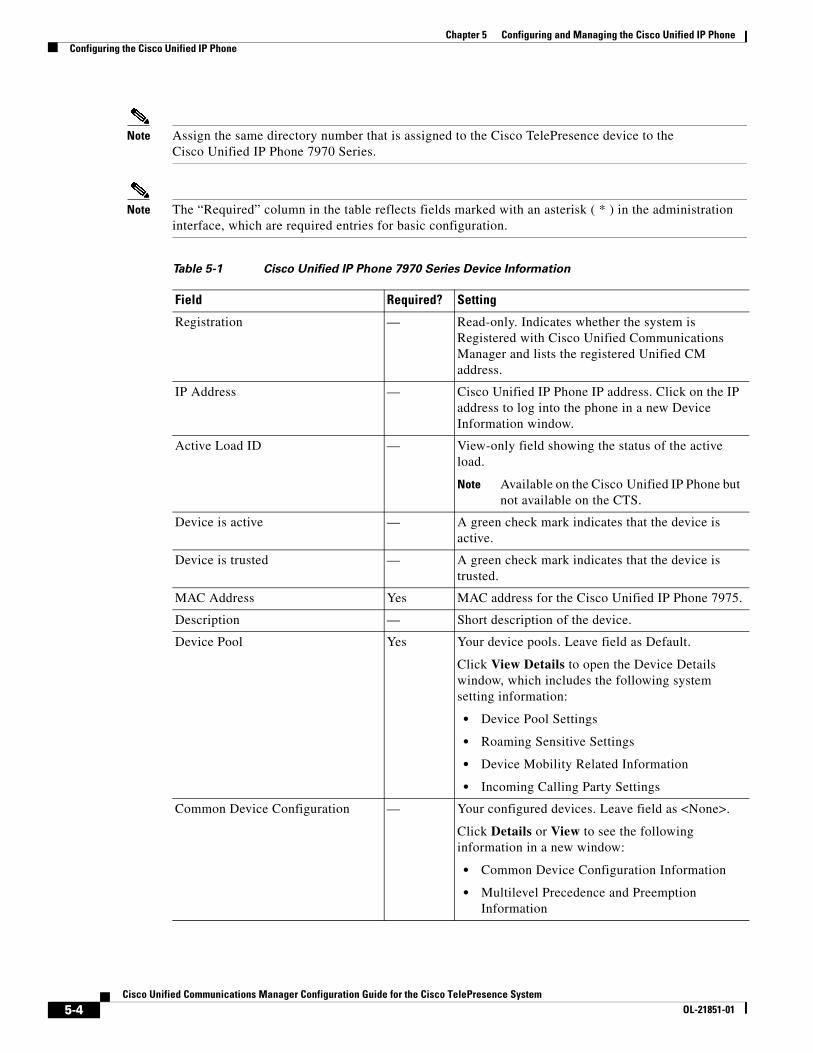
Note Assign the same directory number that is assigned to the Cisco TelePresence device to the Cisco Unified IP Phone 7970 Series.
Note The “Required” column in the table reflects fields marked with an asterisk ( * ) in the administration interface, which are required entries for basic configuration.
Table 5-1 Cisco Unified IP Phone 7970 Series Device Information
Field Required? Setting
Registration — Read-only. Indicates whether the system is Registered with Cisco Unified Communications Manager and lists the registered Unified CM address.
IP Address — Cisco Unified IP Phone IP address. Click on the IP address to log into the phone in a new Device Information window.
Active Load ID — View-only field showing the status of the active load.
Note Available on the Cisco Unified IP Phone but not available on the CTS.
Device is active — A green check mark indicates that the device is active.
Device is trusted — A green check mark indicates that the device is trusted.
MAC Address Yes MAC address for the Cisco Unified IP Phone 7975.
Description — Short description of the device.
Device Pool Yes Your device pools. Leave field as Default.
Click View Details to open the Device Details window, which includes the following system setting information:
• Device Pool Settings
• Roaming Sensitive Settings
• Device Mobility Related Information
• Incoming Calling Party Settings
Common Device Configuration — Your configured devices. Leave field as <None>.
Click Details or View to see the following information in a new window:
• Common Device Configuration Information
• Multilevel Precedence and Preemption Information
5-4Cisco Unified Communications Manager Configuration Guide for the Cisco TelePresence System
OL-21851-01

Chapter 5 Configuring and Managing the Cisco Unified IP PhoneConfiguring the Cisco Unified IP Phone
Phone Button Template Yes Standard_7975 SIP.
Note Unless you have created extra button templates, you will see the default button template for your device.
Softkey Template — <None>
Common Phone Profile Yes Standard Common Phone Profile.
Calling Search Space — <None>
AAR Calling Search Space — <None>
Media Resource Group List — <None>
User Hold MOH Audio Source — <None>
Network Hold MOH Audio Source — <None>
Location Yes Hub_None.
AAR Group — <None>
User Locale — <None>
Note This field user locales in the United States.
Network Locale — <None>
Note This field user locales in the United States.
Built In Bridge Yes Default.
Privacy Yes Default.
Device Mobility Mode Yes Default.
Note Click Current Device Mobility Settings or View to see Device Mobility Details for the current device in a new window:
Owner User ID — Saved User IDs. Leave field as <None>.
Phone Personalization Yes Default.
Services Provisioning Yes Default.
Phone Load Name — Leave default setting.
Single Button Barge — Default.
Join Across Lines — Default.
Use Trusted Relay Point Yes Default.
BLF Audible Alert Setting (Phone Idle)
Yes Default.
BLF Audible Alert Setting (Phone Busy)
Yes Default.
Always Use Prime Line Yes Default.
Always Use Prime Line for Voice Message
Yes Default.
Calling Party Transformation CSS — <None>
Table 5-1 Cisco Unified IP Phone 7970 Series Device Information (continued)
Field Required? Setting
5-5Cisco Unified Communications Manager Configuration Guide for the Cisco TelePresence System
OL-21851-01

Chapter 5 Configuring and Managing the Cisco Unified IP PhoneConfiguring the Cisco Unified IP Phone
Geolocation — <None>
Check-Boxes
Use Device Pool Calling Party Transformation CSS
— Box is checked.
Ignore Presentation Indicators Box is unchecked.
Retry Video Call as Audio Box is checked.
Allow Control of Device from CTI Box is checked.
Logged Into Hunt Group Box is checked.
Remote Device Box is unchecked
Protected Device — A new Softkey template without supplementary service Softkeys must be used for a protected phone.
Hot Line Device — A custom Softkey template without supplementary service Softkeys must be used for a Hot line Device.
Note When you are finished making changes, click Save to save your settings.
Table 5-1 Cisco Unified IP Phone 7970 Series Device Information (continued)
Field Required? Setting
5-6Cisco Unified Communications Manager Configuration Guide for the Cisco TelePresence System
OL-21851-01

Chapter 5 Configuring and Managing the Cisco Unified IP PhoneConfiguring the Cisco Unified IP Phone
Protocol Specific Information
Link the Cisco TelePresence device to Cisco Unified Communications Manager phone profiles for the presence group and security-related SIP phone settings using the information in Table 5-2 as a guide.
Note The “Required” column in the table reflects fields marked with an asterisk ( * ) in the administration interface, which are required entries for basic configuration.
Certification Authority Proxy Function (CAPF) Information
Table 5-3 describes fields found in the Certification Authority Proxy Function (CAPF) Information section on the Phone Configuration page. Leave all fields unchanged.
Table 5-2 Cisco Unified IP Phone 7970 Series Protocol-Specific Information
Field Required? Setting
Packet Capture Mode Yes <None>
Packet Capture Duration — 0
Presence Group Yes Standard Presence group.
SIP Dial Rules — <None>
MTP Preferred Originating Codec Yes 711ulaw
Device Security Profile Yes Use the default setting.
Note For more information about configuring Cisco Unified CM security features, refer to the Cisco Unified Communications Manager Security Guide, Release 7.1(2).
Rerouting Calling Search Space — <None>
SUBSCRIBE Calling Search Space — <None>
SIP Profile Yes Choose from the following:
• Standard SIP Profile
• Standard BFCP SIP Profile
Information in this field reflects SIP profiles that have been created on this Unified CM.
See “Configuring the BFCP over UDP Collaboration Feature” in Chapter 2, “Configuring Cisco TelePresence Features.”
Digest User — <None>
Check-Boxes
Media Termination point Required — Box is un-checked.
Unattended Port
Require DTMF Reception
Note When you are finished making changes, click Save to save your settings.
5-7Cisco Unified Communications Manager Configuration Guide for the Cisco TelePresence System
OL-21851-01

Chapter 5 Configuring and Managing the Cisco Unified IP PhoneConfiguring the Cisco Unified IP Phone
Expansion Module Information
Table 5-4 describes fields found in the Expansion Module Information section on the Phone Configuration page. Leave all fields unchanged.
External Data Locations Information
Define the server locations for external data using the information in the following sections as a guide:
• External Data Location Settings for CTS Release 1.7 and Later—Table 5-5
Note Observe the Following—The server designation can be either the IP address or the hostname of the Cisco TelePresence device that is associated with this phone.
If a server hostname is used, it must be resolvable by the Cisco Unified IP Phone 7970 Series DNS.
• The format for each required field is http://server hostname: or IP address: Followed by the 8080 port address, then a slash and one of the following, depending on the field:
– services.html
– getservicesmenu.jsp
– authenticate.html - For CTS release 1.6 systems with MIDlets and earlier (only allowable option)
– idle.html
• Leave fields in the External Data Locations Information table blank to use the default settings.
Table 5-3 CAPF Settings
Field Required? Setting
Certificate Operation Yes No Pending Operation.
Authentication Mode Yes Leave this field unchanged.
Authentication String —
Key Size (Bits) Yes
Operation Completes By Optional
Certificate Operation Status — <None>
Note Security Profile Contains Additional CAPF Settings. See the “Phone Security Profile CAPF Information” section on page 1-11.
Table 5-4 Expansion Module Information
Field Required? Setting
Module 1 — <None>
Module 1 Load Name — Leave blank.
Module 2 — <None>
Module 2 Load Name — Leave blank.
5-8Cisco Unified Communications Manager Configuration Guide for the Cisco TelePresence System
OL-21851-01
Chapter 5 Configuring and Managing the Cisco Unified IP PhoneConfiguring the Cisco Unified IP Phone
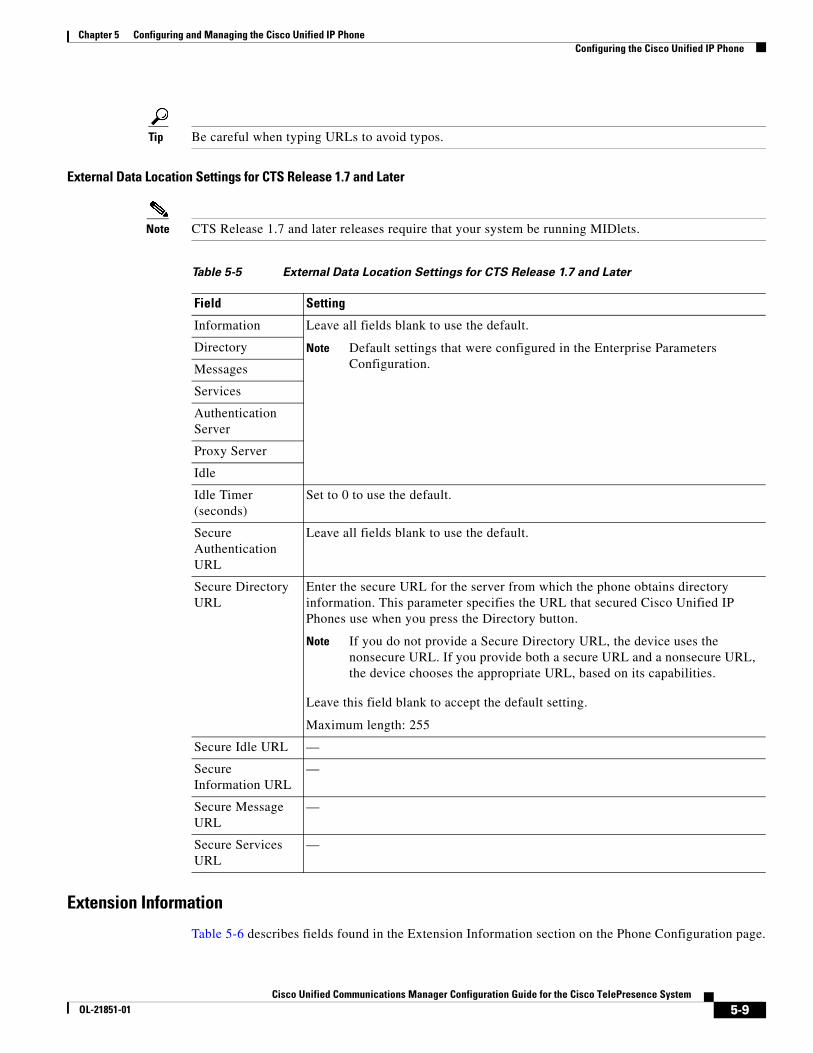
Tip Be careful when typing URLs to avoid typos.
External Data Location Settings for CTS Release 1.7 and Later
Note CTS Release 1.7 and later releases require that your system be running MIDlets.
Extension Information
Table 5-6 describes fields found in the Extension Information section on the Phone Configuration page.
Table 5-5 External Data Location Settings for CTS Release 1.7 and Later
Field Setting
Information Leave all fields blank to use the default.
Note Default settings that were configured in the Enterprise Parameters Configuration.
Directory
Messages
Services
Authentication Server
Proxy Server
Idle
Idle Timer (seconds)
Set to 0 to use the default.
Secure Authentication URL
Leave all fields blank to use the default.
Secure Directory URL
Enter the secure URL for the server from which the phone obtains directory information. This parameter specifies the URL that secured Cisco Unified IP Phones use when you press the Directory button.
Note If you do not provide a Secure Directory URL, the device uses the nonsecure URL. If you provide both a secure URL and a nonsecure URL, the device chooses the appropriate URL, based on its capabilities.
Leave this field blank to accept the default setting.
Maximum length: 255
Secure Idle URL —
Secure Information URL
—
Secure Message URL
—
Secure Services URL
—
5-9Cisco Unified Communications Manager Configuration Guide for the Cisco TelePresence System
OL-21851-01

Chapter 5 Configuring and Managing the Cisco Unified IP PhoneConfiguring the Cisco Unified IP Phone
Note Leave all fields unchanged.
MLPP Information
Leave the multilevel precedence and preemption information (MLPP) Domain field as <None>.
Do Not Disturb
Table 5-7 describes fields found in the Do Not Disturb (DND) section on the Phone Configuration page.
Secure Shell Information
Table 5-8 describes fields found in the Secure Shell Information section on the Phone Configuration page. Leave all fields unchanged.
Product Specific Configuration Layout
Table 5-9 describes fields found in the Product Specific Configuration Layout section on the Phone Configuration page. Leave all fields unchanged. To access this information from the administration interface, click the question mark icon (online help) located at the top of the Product Specific Configuration Layout Area box.
Table 5-6 Cisco Unified IP Phone 7970 Series Extension Information
Field Required? Setting
Check-Box
Enable Extension Mobility
— Leave box unchecked.
Log Out Profile — Current Device Settings.
Log in Time — <None>
Log Out Time
Table 5-7 Cisco Unified IP Phone 7970 Series Do Not Disturb Fields
Field Required? Setting
Check-Box
Do Not Disturb
— Leave box unchecked.
DND Option Yes Common Phone Profile Setting.
DND Incoming Call Alert — <None>
Table 5-8 Cisco Unified IP Phone 7970 Series Secure Shell Information Fields
Field Required? Setting
Secure Shell Admin User — Leave field blank.
Secure Shell Admin Password
5-10Cisco Unified Communications Manager Configuration Guide for the Cisco TelePresence System
OL-21851-01

Chapter 5 Configuring and Managing the Cisco Unified IP PhoneConfiguring the Cisco Unified IP Phone
Table 5-9 Product Specific Configuration Layout Fields
Field Required? Setting Description
Check-Box
Disable Speakerphone
Yes Leave the box checked (speakerphone disabled).
Disable only the speakerphone functionality. Disabling speakerphone functionality will not affect the headset. You can use lines and speed dials with headset/handset.
Check-Box
Disable Speakerphone and Headset
Yes Leave the box checked (speakerphone and headset disabled).
Note The Auto Answer feature does not work if the Disable Speakerphone and Headset box is unchecked.
Disable all speakerphone functions and headset microphone.
Forwarding Delay Yes Disabled. Indicates whether the internal switch begins forwarding packets between the PC port and switched port on your phone when your phone becomes active. When forwarding delay is set to disabled, the internal switch begins forwarding packets immediately. When forwarding delay is set to enabled, the internal switch waits 8 seconds before forwarding packets between the PC port and the SW port. You should set Forwarding Delay to enabled when you connect both ports to switches for redundant uplinks or when you daisy chain phones together.
PC Port Yes Disabled. Indicates whether the PC port on the phone is enabled or disabled. The port labeled “10/100 PC” on the back of the phone connects a PC or workstation to the phone so they can share a single network connection.
Settings Access Yes Enabled. Indicates whether the Settings button on the phone is functional. When Settings Access is enabled, you can change the phone network configuration, ring type, and volume on the phone. When Settings Access is disabled, the Settings button is completely disabled; no options appear when you press the button. Also, you cannot adjust the ringer volume or save any volume settings. When Settings Access is restricted, you can only access User Preferences and volume settings.
5-11Cisco Unified Communications Manager Configuration Guide for the Cisco TelePresence System
OL-21851-01

Chapter 5 Configuring and Managing the Cisco Unified IP PhoneConfiguring the Cisco Unified IP Phone
Gratuitous ARP Yes Disabled. Indicates whether the phone will learn MAC addresses from Gratuitous ARP responses. Disabling the phones ability to accept Gratuitous ARP will prevent applications which use this mechanism for monitoring and recording of voice streams from working. If monitoring capability is not desired, change this setting to Disabled.
PC Voice VLAN Access Yes Enabled. Indicates whether the phone will allow a device attached to the PC port to access the Voice VLAN. Disabling Voice VLAN Access will prevent the attached PC from sending and receiving data on the Voice VLAN. It will also prevent the PC from receiving data sent and received by the phone. Set this setting to Enabled if an application is being run on the PC that requires monitoring of the phones traffic. These could include monitoring and recording applications and use of network monitoring software for analysis purposes.
Video Capabilities Yes Disabled. —
Auto Line Select Yes Disabled. When enabled, indicates that the phone will shift the call focus to incoming calls on all lines. When disabled, the phone will only shift the focus to incoming calls on the currently used line.
Web Access Yes Choose Enabled.
Note If you are using Cisco Unified CM firmware release 8.0 and wish to enable MIDlets features on new phone installations, you must first enable this field.
Indicates whether the phone will accept connections from a web browser or other HTTP client. Disabling the web server functionality of the phone will block access to the phones internal web pages. These pages provide statistics and configuration information. Features, such as QRT (Quality Report Tool), will not function properly without access to the phones web pages. This setting will also affect any serviceability application such as CiscoWorks 2000 that relies on web access.
Days Display Not Active — Choose a day of the week. Allows the user to specify the days that the backlight is to remain off by default. Typically this would be Saturday and Sunday for US corporate customers. Saturday and Sunday should be the default. The list contains all of the days of the week. To turn off backlight on Saturday and Sunday the User would hold down Control and select Saturday and Sunday.
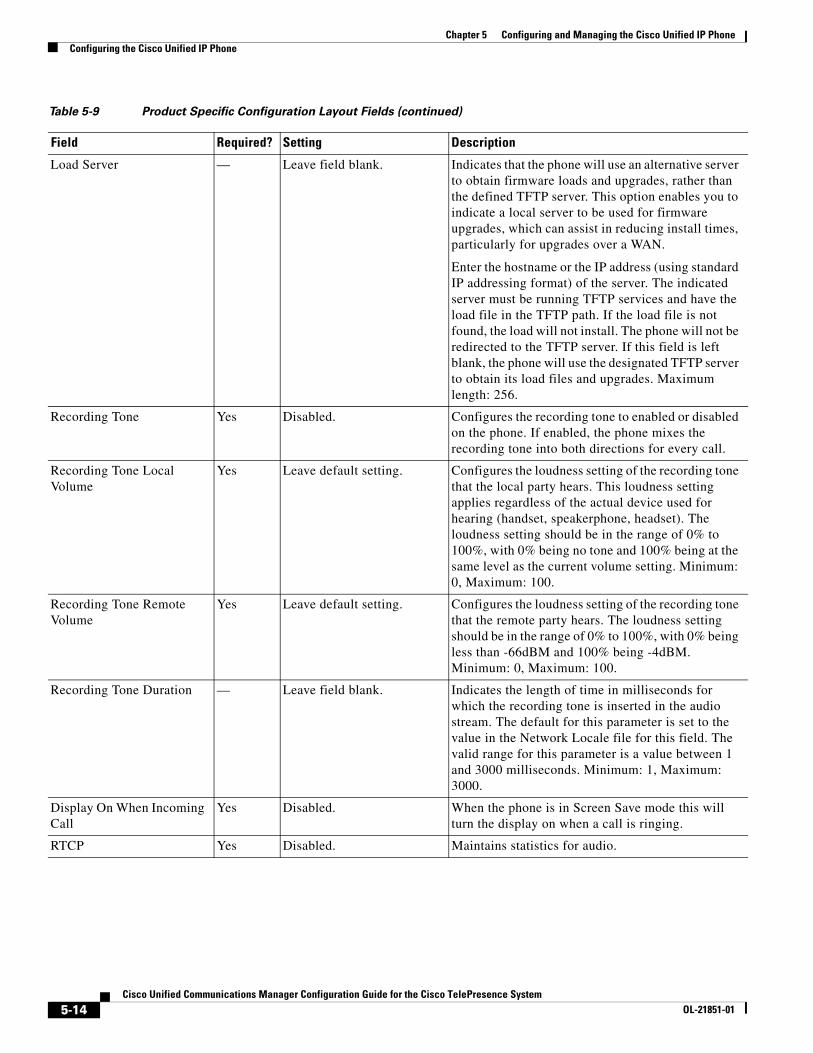
Table 5-9 Product Specific Configuration Layout Fields (continued)
Field Required? Setting Description
5-12Cisco Unified Communications Manager Configuration Guide for the Cisco TelePresence System
OL-21851-01

Chapter 5 Configuring and Managing the Cisco Unified IP PhoneConfiguring the Cisco Unified IP Phone
Display On Time — Leave the default setting. Indicates the time of day the display is to automatically turn itself on for days listed in the off schedule. The value should be in a 24 hour format. Where 0:00 is the beginning of the day and 23:59 is the end of the day. Leaving this field blank will activate the display at the beginning of the day (e.g. - “0:00”). To set the display to turn on at 7:00AM the user would enter “07:00” without the quotes. If you wanted the display to turn on at 2:00PM you would enter “14:00” without the quotes. Maximum length: 5.
Display On Duration — Leave the default setting. Indicates the amount of time the display is to be active for when it is turned on by the programmed schedule. No value indicates the end of the day. Maximum value is 24 hours. This value is in free form hours and minutes. “1:30” would activate the display for one hour and 30 minutes. Maximum length: 5.
Display Idle Timeout — Leave the default setting. Indicates how long to wait before the display is turned off when it was turned on by user activity. This inactivity timer will continually reset itself during user activity. Leaving this field blank will make the phone use a pre-determined default value of one hour. Maximum value is 24 hours. This value can be in free form hours and minutes. “1:30” would turn off the display after one hour and 30 minutes of inactivity. Maximum length: 5.
Span to PC Port Yes Disabled. Indicates whether the phone will forward packets transmitted and received on the Phone Port to the PC Port. Select Enabled if an application is being run on the PC Port that requires monitoring of the IP Phone's traffic such as monitoring and recording applications (common in call center environments) or network packet capture tools used for diagnostic purposes. To use this feature PC Voice VLAN access must be enabled.
Logging Display Yes PC Controlled. Selects what type of console logging is allowed. This option does not control the generation of logs - just whether the logs display. Disabled indicates that logging does not display to the console, nor to the connected downstream port. PC Controlled indicates that the workstation attached to the PC port will control whether logging is enabled. Enabled indicates that logs are always sent both to the console and to downstream port. Use Enabled to force logs on so they can be captured with a packet sniffer.
Table 5-9 Product Specific Configuration Layout Fields (continued)
Field Required? Setting Description
5-13Cisco Unified Communications Manager Configuration Guide for the Cisco TelePresence System
OL-21851-01
Chapter 5 Configuring and Managing the Cisco Unified IP PhoneConfiguring the Cisco Unified IP Phone
Load Server — Leave field blank. Indicates that the phone will use an alternative server to obtain firmware loads and upgrades, rather than the defined TFTP server. This option enables you to indicate a local server to be used for firmware upgrades, which can assist in reducing install times, particularly for upgrades over a WAN.
Enter the hostname or the IP address (using standard IP addressing format) of the server. The indicated server must be running TFTP services and have the load file in the TFTP path. If the load file is not found, the load will not install. The phone will not be redirected to the TFTP server. If this field is left blank, the phone will use the designated TFTP server to obtain its load files and upgrades. Maximum length: 256.
Recording Tone Yes Disabled. Configures the recording tone to enabled or disabled on the phone. If enabled, the phone mixes the recording tone into both directions for every call.
Recording Tone Local Volume
Yes Leave default setting. Configures the loudness setting of the recording tone that the local party hears. This loudness setting applies regardless of the actual device used for hearing (handset, speakerphone, headset). The loudness setting should be in the range of 0% to 100%, with 0% being no tone and 100% being at the same level as the current volume setting. Minimum: 0, Maximum: 100.
Recording Tone Remote Volume
Yes Leave default setting. Configures the loudness setting of the recording tone that the remote party hears. The loudness setting should be in the range of 0% to 100%, with 0% being less than -66dBM and 100% being -4dBM. Minimum: 0, Maximum: 100.
Recording Tone Duration — Leave field blank. Indicates the length of time in milliseconds for which the recording tone is inserted in the audio stream. The default for this parameter is set to the value in the Network Locale file for this field. The valid range for this parameter is a value between 1 and 3000 milliseconds. Minimum: 1, Maximum: 3000.
Display On When Incoming Call
Yes Disabled. When the phone is in Screen Save mode this will turn the display on when a call is ringing.
RTCP Yes Disabled. Maintains statistics for audio.
Table 5-9 Product Specific Configuration Layout Fields (continued)
Field Required? Setting Description
5-14Cisco Unified Communications Manager Configuration Guide for the Cisco TelePresence System
OL-21851-01

Chapter 5 Configuring and Managing the Cisco Unified IP PhoneConfiguring the Cisco Unified IP Phone
“More” Softkey Timer — Leave default setting. Revert the soft keys displayed to the initial set after you touch the more soft key. The valid range of values for this timer are 5 to 30 -- indicating the number of seconds before the softkey set reverts. A value of 0 may also be entered to disable the timer. Maximum length: 2.
Auto Call Select Yes Enabled. Enables or disables the automatic call focus switching feature. When “Enabled,” the phone UI will automatically switch focus to certain calls on the same line if no user interaction has occurred for 10 seconds. If “Disabled”, the phone UI will not automatically switch call focus. Disabling the Auto Call Select feature automatically disables the Auto Line Select feature.
Log Server — Leave field blank. Specifies an IP address and port of a remote system where log messages are sent. Maximum length: 32.
Advertise G.722 Codec Yes Use System Default. Indicates whether Cisco Unified IP Phones will advertise the G.722 codec to Cisco Unified Communications Manager. Codec negotiation involves two steps:
1. The phone must advertise the supported codec(s) to Cisco Unified Communications Manager (not all endpoints support the same set of codecs).
2. When Cisco Unified Communications Manager gets the list of supported codecs from all phones involved in the call attempt, it chooses a commonly-supported codec based on various factors, including the region pair setting.
Valid values specify Use System Default (this phone will defer to the setting specified in the enterprise parameter, Advertise G.722 Codec), Disabled (this phone will not advertise G.722 to Cisco Unified Communications Manager) or Enabled (this phone will advertise G.722 to Cisco Unified Communications Manager).
Wideband Headset UI Control
Yes Enabled. Users can enable or disable Wideband Headset option on phone user interface (UI).
Wideband Headset Yes Enabled. Enables or disables the use of a Wideband Headset on the phone. Used in conjunction with User Control Wideband Headset.
Table 5-9 Product Specific Configuration Layout Fields (continued)
Field Required? Setting Description
5-15Cisco Unified Communications Manager Configuration Guide for the Cisco TelePresence System
OL-21851-01

Chapter 5 Configuring and Managing the Cisco Unified IP PhoneConfiguring the Cisco Unified IP Phone
Peer Firmware Sharing Yes Disabled. PPID. Enables or disables Pee- to-Peer image distribution in order to allow a single phone in a subnet to retrieve an image firmware file then distribute it to its peers - thus reducing TFTP bandwidth and providing for a faster firmware upgrade time.
Cisco Discovery Protocol (CDP): Switch Port
Yes Enabled. Administrators can enable or disable Cisco Discovery Protocol (CDP) on the switch port.
Warning CDP should only be disabled on the Network port if this phone is connected to a non-Cisco switch.
Cisco Discovery Protocol (CDP): PC Port
Yes Enabled. Administrators can enable or disable Cisco Discovery Protocol (CDP) on the PC port.
Warning Disabling CDP on the PC port will prevent Cisco VT Advantage/Unified Video Advantage from working properly on this phone.
Link Layer Discovery Protocol - Media Endpoint Discover (LLDP-MED): Switch Port
Yes Enabled. Administrators can enable or disable Link Layer Discovery Protocol (LLDP-MED) on the switch port.
Link Layer Discovery Protocol (LLDP): PC Port
Yes Enabled. Administrators can enable or disable Link Layer Discovery Protocol (LLDP) on the PC port.
LLDP Asset ID — Leave field blank. Administrators can set Asset ID for Link Layer Discovery Protocol. Maximum length: 32.
LLDP Power Priority Yes Leave the default setting. Administrators can set Power Priority for Link Layer Discovery Protocol.
Wireless Headset Hookswitch Control
Yes Disabled. Administrators can enable or disable Wireless Headset Hookswitch Control.
Table 5-9 Product Specific Configuration Layout Fields (continued)
Field Required? Setting Description
5-16Cisco Unified Communications Manager Configuration Guide for the Cisco TelePresence System
OL-21851-01

Chapter 5 Configuring and Managing the Cisco Unified IP PhoneConfiguring the Cisco Unified IP Phone
IPv6 Load Server — Leave blank. Indicates that the phone will use an alternative IPv6 server to obtain firmware loads and upgrades, rather than the defined TFTP server. This option enables you to indicate a local IPv6 server to be used for firmware upgrades, which can assist in reducing install times, particularly for upgrades over a WAN.
Enter the hostname or the IPv6 address (using standard IPv6 addressing format) of the server. The indicated server must be running TFTP services and have the load file in the TFTP path. If the load file is not found, the load will not install. The phone will not be redirected to the TFTP server. If this field is left blank, the phone will use the designated TFTP server to obtain its load files and upgrades. Maximum length: 256.
IPv6 Log Server — Leave blank. Specifies an IPv6 address and port of a remote system where log messages are sent. The phone sends the log data to the IPv6 server specified in this field. However, as of Unified CM release 7.1(2), the log viewer application cannot receive log data that gets sent to an IPv6 address. You can view the log data by using a network packet sniffer. Maximum length: 256.
802.1x Authentication — User Controlled. Specifies the 802.1x authentication feature status.
Detect Unified CM Connection Failure
Yes Leave the default setting (Normal).
Determines the sensitivity that the phone has for detecting a connection failure to Cisco Unified Communications Manager (Unified CM), which is the first step before device failover to a backup Unified CM/SRST occurs.
Valid values specify Normal (detection of a Unified CM connection failure occurs at the standard system rate) or Delayed (detection of a Unified CM connection failover occurs approximately four times slower than Normal).
For faster recognition of a Unified CM connection failure, choose Normal. If you prefer failover to be delayed slightly to give the connection the opportunity to reestablish, choose Delayed. Note that the precise time difference between Normal and Delayed connection failure detection depends on many variables that are constantly changing.
Table 5-9 Product Specific Configuration Layout Fields (continued)
Field Required? Setting Description
5-17Cisco Unified Communications Manager Configuration Guide for the Cisco TelePresence System
OL-21851-01

Chapter 5 Configuring and Managing the Cisco Unified IP PhoneConfiguring MIDlets
Configuring MIDletsTo use the Enhanced Phone User Interface (MIDlets), your Cisco Unified IP Phone 7970 Series must be configured to run a new application service. This section explains how to implement the MIDlets interface, which is available in Cisco TelePresence System (CTS) Release 1.5 and later releases.
The Cisco Unified IP Phone auto-configures the IP address of the CTS. The CTS obtains the phone IP address using CDP data and CTS sends the command to the Cisco Unified IP Phone to start the MIDlet. The launch command specifies the IP address of the CTS.
Before You Begin
If you are upgrading from an older XML specification identifier (XSI) user interface to MIDlets, you must reset the phone and reset the CTS to allow the Java MIDlets application to work with the Cisco Unified IP Phone. See the “Managing Phone Reset and Codec Connectivity” section on page 4-7 for reset information.
Minimum Ring Volume Yes 0-Silent.
Additional drop-down menu choices:
• 2 through 15.
Controls the minimum ring volume on an IP phone. This value is set by the administrator, and can not be changed by an end user. The end user can increase the ring volume, but may not decrease the ring volume below the level defined. The minimum ring volume range is from 0 to 15, with 0 (silent) being the default value.
HTTPS Server Yes HTTP and HTTPS Enabled. Allows the administrator to permit HTTP and HTTPS or HTTPS-only connections if Web Access is enabled.
Handset/Headset Monitor — Disabled. When handset/headset monitoring is enabled, a supervisor can pick up the inactive handset/headset and hear the call in progress. For example, if an agent is on a call on the headset, a supervisor can hear the other party on the handset. Only the microphone on the active handset/headset is in use. For example, if an agent is active on the headset, then the headset microphone is active and the handset microphone is disabled.
Enbloc Dialing — Enabled. —
Switch Port Remote Configuration
Yes Disabled. —
PC Port Remote Configuration
Yes Disabled. —
Automatic Port Synchronization
Yes Disabled. —
SSH Access Yes Disabled. —
80-bit SRTCP Yes Disabled. —
Table 5-9 Product Specific Configuration Layout Fields (continued)
Field Required? Setting Description
5-18Cisco Unified Communications Manager Configuration Guide for the Cisco TelePresence System
OL-21851-01
Chapter 5 Configuring and Managing the Cisco Unified IP PhoneConfiguring MIDlets
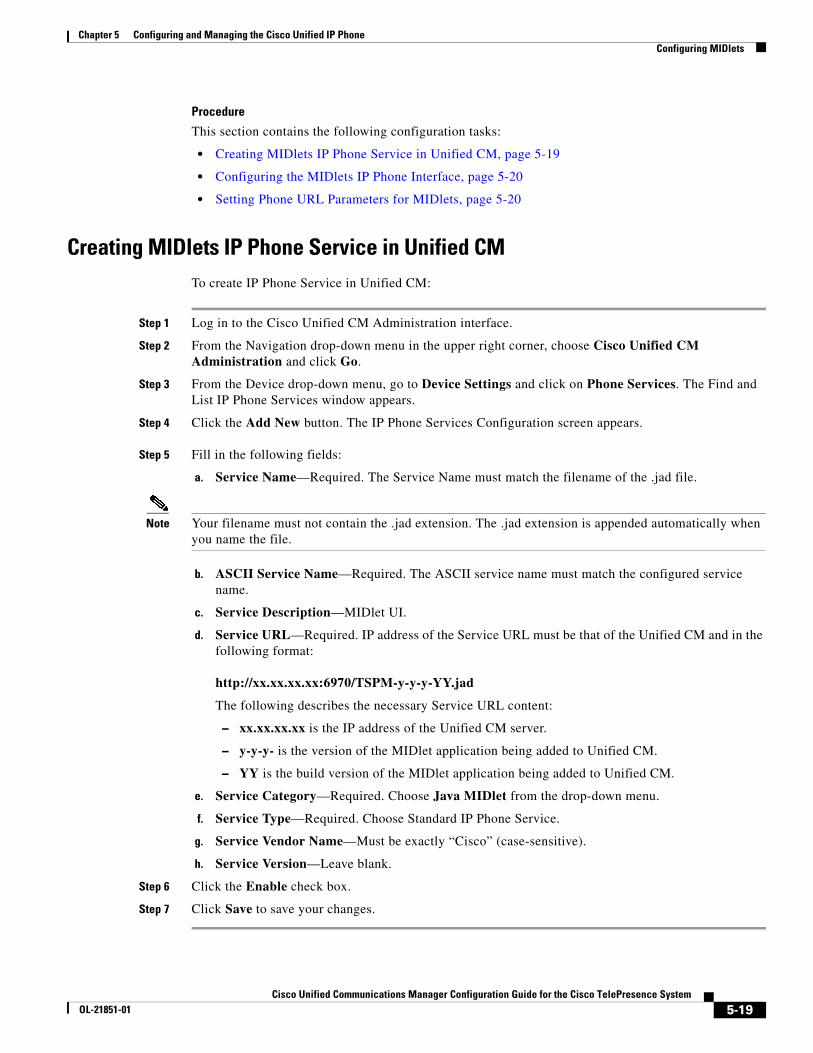
Procedure
This section contains the following configuration tasks:
• Creating MIDlets IP Phone Service in Unified CM, page 5-19
• Configuring the MIDlets IP Phone Interface, page 5-20
• Setting Phone URL Parameters for MIDlets, page 5-20
Creating MIDlets IP Phone Service in Unified CMTo create IP Phone Service in Unified CM:
Step 1 Log in to the Cisco Unified CM Administration interface.
Step 2 From the Navigation drop-down menu in the upper right corner, choose Cisco Unified CM Administration and click Go.
Step 3 From the Device drop-down menu, go to Device Settings and click on Phone Services. The Find and List IP Phone Services window appears.
Step 4 Click the Add New button. The IP Phone Services Configuration screen appears.
Step 5 Fill in the following fields:
a. Service Name—Required. The Service Name must match the filename of the .jad file.
Note Your filename must not contain the .jad extension. The .jad extension is appended automatically when you name the file.
b. ASCII Service Name—Required. The ASCII service name must match the configured service name.
c. Service Description—MIDlet UI.
d. Service URL—Required. IP address of the Service URL must be that of the Unified CM and in the following format:
http://xx.xx.xx.xx:6970/TSPM-y-y-y-YY.jad
The following describes the necessary Service URL content:
– xx.xx.xx.xx is the IP address of the Unified CM server.
– y-y-y- is the version of the MIDlet application being added to Unified CM.
– YY is the build version of the MIDlet application being added to Unified CM.
e. Service Category—Required. Choose Java MIDlet from the drop-down menu.
f. Service Type—Required. Choose Standard IP Phone Service.
g. Service Vendor Name—Must be exactly “Cisco” (case-sensitive).
h. Service Version—Leave blank.
Step 6 Click the Enable check box.
Step 7 Click Save to save your changes.
5-19Cisco Unified Communications Manager Configuration Guide for the Cisco TelePresence System
OL-21851-01
Chapter 5 Configuring and Managing the Cisco Unified IP PhoneConfiguring MIDlets
Configuring the MIDlets IP Phone InterfaceThe Cisco Unified IP Phone auto-configures the IP address of the CTS; the CTS obtains the phone IP address using CDP data and the CTS sends the command to the Cisco Unified IP Phone to start the MIDlet. The system launch command specifies the IP address of the CTS.
To configure each Cisco Unified IP Phone 7970 Series to run the MIDlet IP phone interface:
Step 1 Log in to the Cisco Unified CM Administration interface.
Step 2 From the Navigation drop-down menu in the upper right corner, choose Cisco Unified CM Administration and click Go.
Step 3 From the Device drop-down menu, choose Phone. The Find and List Phones Page appears.
Step 4 Search for a phone using the fields provided or choose a phone from the drop-down menu and click Find. A list of devices appears.
Step 5 Click on a device in the Device Name (Line) column. The Phone Configuration page for that device appears.
Step 6 From the Related Links drop-down menu in the upper right corner, choose Subscribe/Unsubscribe Services and then click Go. The Subscribed Cisco IP Phone Services window for that device appears.
Step 7 In the Service Information box, choose MIDlet IP phone service from the Select a Service drop-down list and click Next. The Subscribed Cisco IP Phone Services window is updated with configurable Service Name and ASCII Service Name fields.
Step 8 Click Subscribe to save your settings or Back to return to the original Subscribed Cisco IP Phone Services window.
If the phone is already subscribed to an older MIDlet version:
a. Unsubscribe the phone from the older service.
b. Subscribe the phone to the new IP phone service that you created in the “Creating MIDlets IP Phone Service in Unified CM” section on page 5-19.
Step 9 Click Save to save your settings.
Note If you are upgrading from an older XML specification identifier (XSI) user interface to MIDlets, you must reset the phone and reset the CTS to allow the Java MIDlets application to work with the Cisco Unified IP Phone. See the “Managing Phone Reset and Codec Connectivity” section on page 4-7 for reset information.
Setting Phone URL Parameters for MIDletsMake sure the default services URL is set for MIDlets. To override default settings:
Step 1 Log in to the Cisco Unified CM Administration interface.
Step 2 Choose System > Enterprise Parameters Configuration.
Step 3 In the Phone URL Parameters box, set the URL Services in the following format:
http://xx.xx.xx.xx:8080/ccmcip/getservicesmenu.jsp
5-20Cisco Unified Communications Manager Configuration Guide for the Cisco TelePresence System
OL-21851-01

Chapter 5 Configuring and Managing the Cisco Unified IP PhoneMIDlets Troubleshooting Tips
Where xx.xx.xx.xx is the IP address of the Unified CM server.
Note You may use a hostname providing the CTS and the phone is provisioned with a DNS name server.
Step 4 Click Save to save your settings.
MIDlets Troubleshooting Tips• If the MIDlet does not come up at all, verify that the Unified CM is subscribed. Reset the phone.
• Verify that the phone has the correct firmware for that MIDlet.
• Verify that the CTS has the correct image for that MIDlet.
• If the MIDlet comes up with a blank white screen, verify that the Service URL for the phone is blank.
• If the phone fails to register, verify that phone type is set correctly. For example, Cisco Unified IP Phone 7970 should not be set as 7975.
• If the phone is stuck in the initializing phase, restart TSPS on the CTS. If after the restart the phone shows “phoneui=xsi,” reboot the CTS.
• Check the Service URL. If it ends with “services.html,” make it blank and apply changes. Reboot the CTS.
• If no services appear on the phone, even though subscribed to a valid service, check the “Services Provisioning” field to make sure it is set to Default.
• If the MIDlet fails to start, make sure that the Enable box checked.
• Make sure the service that you are using to subscribe your phone is pointing to the correct JAD file.
5-21Cisco Unified Communications Manager Configuration Guide for the Cisco TelePresence System
OL-21851-01

Chapter 5 Configuring and Managing the Cisco Unified IP PhoneAssigning a Directory Number for the Shared-Line Cisco Unified IP Phone
Assigning a Directory Number for the Shared-Line Cisco Unified IP Phone
To assign a directory number to a shared-line Cisco Unified IP phone, perform the following tasks using the Cisco Unified Communications Manager Administration interface.
• Adding a New Directory Number, page 5-22
• Configuring the Directory Number for a Shared Line, page 5-22
Adding a New Directory NumberTo add a new directory number:
Step 1 Log in to the Cisco Unified CM Administration interface.
Step 2 From the Device drop-down menu, choose Phone. The Find and List Phones Page appears.
Step 3 Locate and click the highlighted Cisco Unified IP phone device that you created in the “Adding a Cisco TelePresence Image to the Cisco Unified Communications Manager Server” section on page 1-1. The Association Information window appears.
Step 4 In the Association Information window, click Line [1] - Add a new DN. The Directory Number Configuration window appears.
Note Use the device MAC address to help you determine which line to select. The MAC address is also used as a device number (represented by X in this document) for the settings in the Directory Number Configuration window.
Step 5 Proceed to the “Configuring the Directory Number for a Shared Line” section on page 5-22 to configure the directory number for a shared line in the Directory Number Configuration window.
Configuring the Directory Number for a Shared Line
Note You must restart your system after you have completed the configuration tasks in this section.
To configure the directory number for a shared line, perform the tasks in the following sections. When you are finished configuring your settings, click Save and follow the prompts to restart the system.
• Configuring Directory Number Information, page 5-23
• Enabling Auto Answer Option, page 5-23
• Call Forward and Call Pickup Settings, page 5-23
• MLPP Information, page 5-24
• Line X on Device X, page 5-24
• Multiple Call/Call Waiting Settings on Device X, page 5-24
5-22Cisco Unified Communications Manager Configuration Guide for the Cisco TelePresence System
OL-21851-01

Chapter 5 Configuring and Managing the Cisco Unified IP PhoneAssigning a Directory Number for the Shared-Line Cisco Unified IP Phone
• Forwarded Call Information Display on Device X, page 5-24
Configuring Directory Number Information
To configure directory number information:
Step 1 Enter the directory number settings for the shared Cisco Unified IP Phone line using the information in Table 5-10 as a guide.
Step 2 Make sure that the following check box at the bottom of the Directory Number Information window is marked as indicated:
• Active: Checked
Step 3 Click Save to save your settings.
Enabling Auto Answer Option
To enable the Auto Answer option:
Step 1 Choose Auto Answer with Speakerphone in the Auto Answer drop-down menu. Use default settings for all other selections. See the “Directory Number Settings” section on page 1-34.
Step 2 Click Save to save your settings.
Call Forward and Call Pickup Settings
Leave all fields unchanged. See the “Call Forward and Call Pickup Settings” section on page 1-36.
Table 5-10 Shared-Line Directory Number Information
Field Required? Setting
Directory Number Yes Directory number for the Cisco Unified IP Phone 7970 Series.
Route Partition — <Any>
Description
Alerting Name
ASCII Alerting Name
5-23Cisco Unified Communications Manager Configuration Guide for the Cisco TelePresence System
OL-21851-01
Chapter 5 Configuring and Managing the Cisco Unified IP PhoneVerifying and Troubleshooting IP Phone Configuration
MLPP Information
Leave the following fields unchanged:
• Multilevel precedence
• Preemption information
Line X on Device X
Leave all fields unchanged. See the “Line X on Device X” section on page 1-37.
Multiple Call/Call Waiting Settings on Device X
See the “Multiple Call/Call Waiting Settings on Device SEPXXXXXXXXXXXX” procedure on page 1-38.
Forwarded Call Information Display on Device X
Leave the following information unchanged in the Forwarded Call Information Display on Device X Settings box:
• Caller Name
• Caller Number
• Redirected Number
• Dialed Number
Verifying and Troubleshooting IP Phone ConfigurationThe following sections describe how to verify your Cisco TelePresence System (CTS) with Cisco Unified Communications Manager (Unified CM) configuration:
• Verifying Your Configuration, page 5-24
• Troubleshooting Your IP Phone Configuration, page 5-25
• Managing Phone Reset and Codec Connectivity, page 5-27
Verifying Your ConfigurationTo verify that your Cisco TelePresence System is configured successfully:
Step 1 Log in to the Cisco Unified CM Administration interface.
Step 2 From the Device drop-down menu, choose Phone. The Find and List Phones Page appears.
Step 3 Search for a phone using the fields provided or choose a phone from the drop-down menu.
Tip Search for a device type that contains “7970” or “7975.”
5-24Cisco Unified Communications Manager Configuration Guide for the Cisco TelePresence System
OL-21851-01
Chapter 5 Configuring and Managing the Cisco Unified IP PhoneVerifying and Troubleshooting IP Phone Configuration
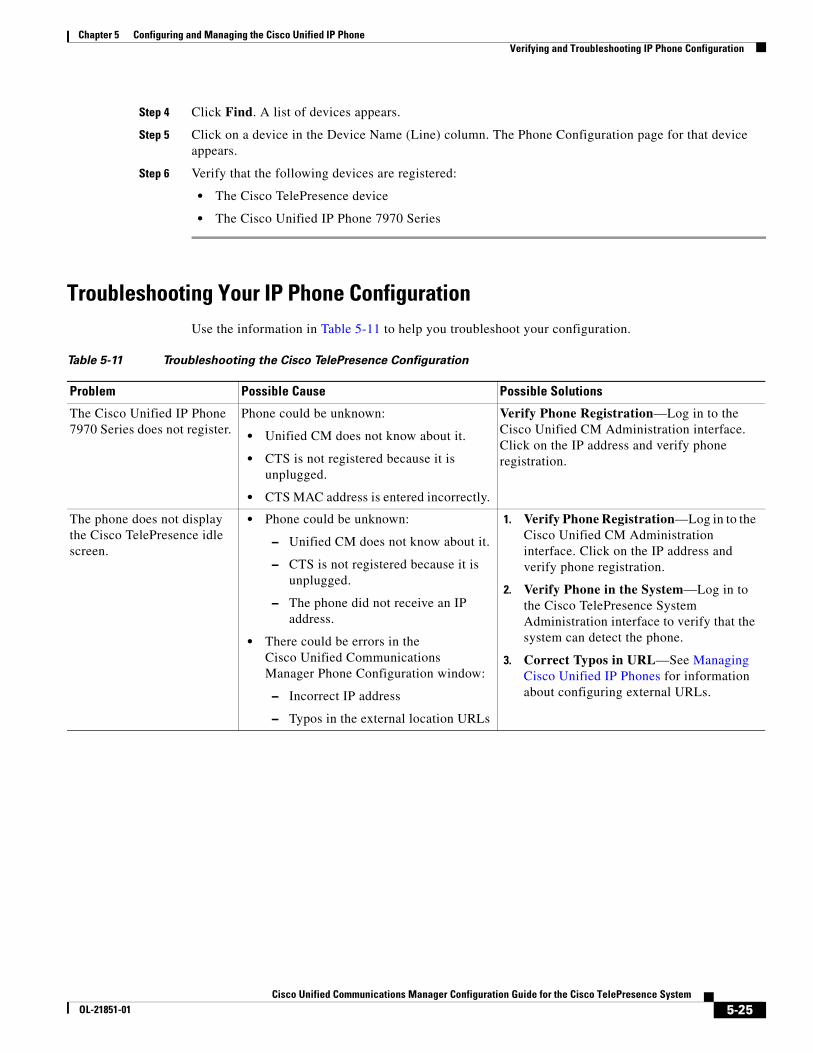
Step 4 Click Find. A list of devices appears.
Step 5 Click on a device in the Device Name (Line) column. The Phone Configuration page for that device appears.
Step 6 Verify that the following devices are registered:
• The Cisco TelePresence device
• The Cisco Unified IP Phone 7970 Series
Troubleshooting Your IP Phone ConfigurationUse the information in Table 5-11 to help you troubleshoot your configuration.
Table 5-11 Troubleshooting the Cisco TelePresence Configuration
Problem Possible Cause Possible Solutions
The Cisco Unified IP Phone 7970 Series does not register.
Phone could be unknown:
• Unified CM does not know about it.
• CTS is not registered because it is unplugged.
• CTS MAC address is entered incorrectly.
Verify Phone Registration—Log in to the Cisco Unified CM Administration interface. Click on the IP address and verify phone registration.
The phone does not display the Cisco TelePresence idle screen.
• Phone could be unknown:
– Unified CM does not know about it.
– CTS is not registered because it is unplugged.
– The phone did not receive an IP address.
• There could be errors in the Cisco Unified Communications Manager Phone Configuration window:
– Incorrect IP address
– Typos in the external location URLs
1. Verify Phone Registration—Log in to the Cisco Unified CM Administration interface. Click on the IP address and verify phone registration.
2. Verify Phone in the System—Log in to the Cisco TelePresence System Administration interface to verify that the system can detect the phone.
3. Correct Typos in URL—See Managing Cisco Unified IP Phones for information about configuring external URLs.
5-25Cisco Unified Communications Manager Configuration Guide for the Cisco TelePresence System
OL-21851-01

Chapter 5 Configuring and Managing the Cisco Unified IP PhoneVerifying and Troubleshooting IP Phone Configuration
CTS does not auto answer when the feature is enabled
• An incoming conference call is ringing and the CTS does not auto answer immediately.
• The call is connected but there is no video.
The CTS rings and auto-answers a call based on how these features were configured in Unified CM.
If the call is connected as audio only, check your IP phone configuration and make sure the “Disable Speaker/Headset” box is checked.
To disable the IP phone speaker/headset:
1. Log on to the Cisco Unified CM Administration interface.
2. Search for your directory number (DN). Two devices are displayed: CTS and IP Phone
3. Click on the IP_Phone device.
4. Scroll down to the Product Specific Configuration Layout Area window.
5. Verify that the following check-boxes are checked in the Product Specific Configuration Layout window:
– Disable Speakerphone
– Disable Speakerphone and Headset
6. Apply and Save the configuration.
7. Reset the device. See the “Managing Phone Reset and Codec Connectivity” section on page 5-27 for reset information.
MIDlet fails to start up properly, shows the following message:
“setting up network connections”
TCP Issues
MIDlet cannot establish TCP connections with the CTS.
CTS IP Address Issues
Possible incorrect CTS IP address is assigned to the phone profile authentication server URL.
1. Ensure that the correct CTS IP address is in the Authentication Server URL for the phone device in Unified CM.
2. Click Save.
3. Reset the phone.
See Managing Cisco Unified IP Phones for information about configuring external URLs.
See also the “Managing Phone Reset and Codec Connectivity” section on page 5-27 for reset information.
MIDlet upgrade hangs, shows the following message:
“Error contact administrator”
MIDlet Upgrade Issues
The phone firmware is unable to uninstall the older version cleanly to make way for the new version. The issue happens during upgrade of the MIDlet if the phone is not reset after the upgrade.
Reset the phone after upgrade.
See the “Managing Phone Reset and Codec Connectivity” section on page 5-27 for reset information.
See also Managing Cisco Unified IP Phones for information about configuring external URLs.
Table 5-11 Troubleshooting the Cisco TelePresence Configuration (continued)
Problem Possible Cause Possible Solutions
5-26Cisco Unified Communications Manager Configuration Guide for the Cisco TelePresence System
OL-21851-01
Chapter 5 Configuring and Managing the Cisco Unified IP PhoneVerifying and Troubleshooting IP Phone Configuration
Managing Phone Reset and Codec ConnectivityThe following sections contain information about managing the following system components:
• Information About Phone Reset, page 5-28
• Resetting the Cisco Unified IP Phone 7970 Series, page 5-28
• Synchronizing a Phone, page 5-28
• Resetting the Cisco Unified IP Phone 7970 Series Factory Image, page 5-29
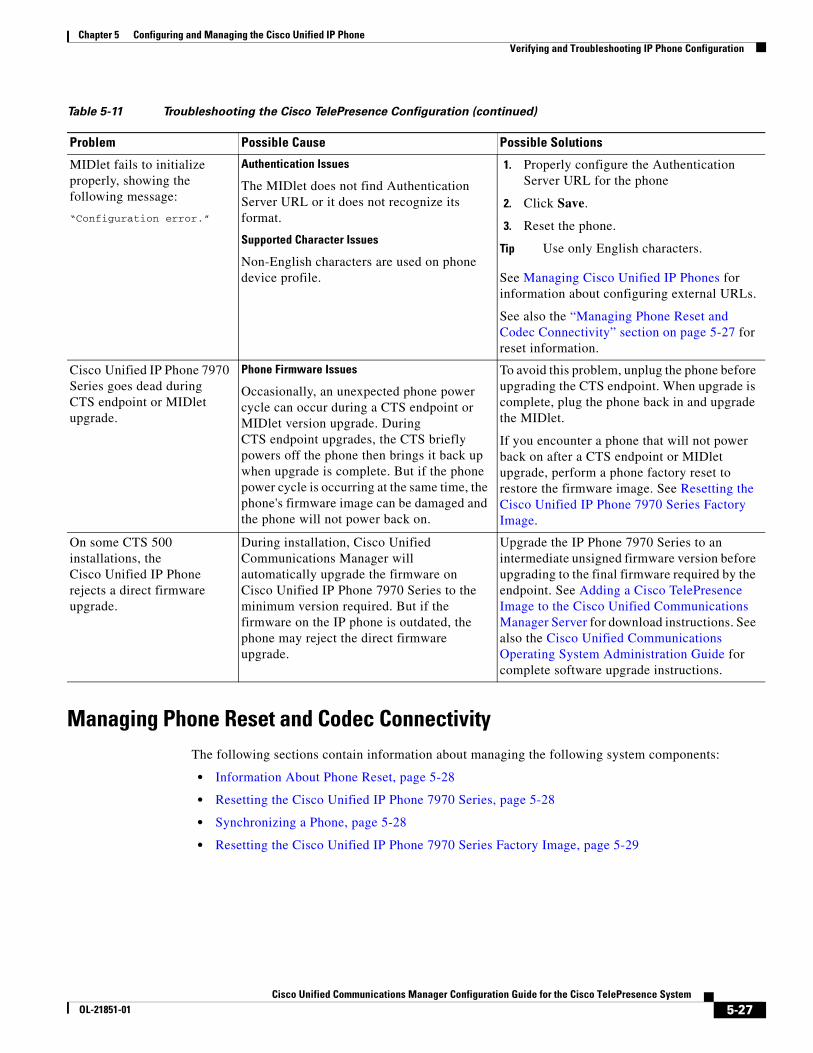
MIDlet fails to initialize properly, showing the following message:
“Configuration error.”
Authentication Issues
The MIDlet does not find Authentication Server URL or it does not recognize its format.
Supported Character Issues
Non-English characters are used on phone device profile.
1. Properly configure the Authentication Server URL for the phone
2. Click Save.
3. Reset the phone.
Tip Use only English characters.
See Managing Cisco Unified IP Phones for information about configuring external URLs.
See also the “Managing Phone Reset and Codec Connectivity” section on page 5-27 for reset information.
Cisco Unified IP Phone 7970 Series goes dead during CTS endpoint or MIDlet upgrade.
Phone Firmware Issues
Occasionally, an unexpected phone power cycle can occur during a CTS endpoint or MIDlet version upgrade. During CTS endpoint upgrades, the CTS briefly powers off the phone then brings it back up when upgrade is complete. But if the phone power cycle is occurring at the same time, the phone's firmware image can be damaged and the phone will not power back on.
To avoid this problem, unplug the phone before upgrading the CTS endpoint. When upgrade is complete, plug the phone back in and upgrade the MIDlet.
If you encounter a phone that will not power back on after a CTS endpoint or MIDlet upgrade, perform a phone factory reset to restore the firmware image. See Resetting the Cisco Unified IP Phone 7970 Series Factory Image.
On some CTS 500 installations, the Cisco Unified IP Phone rejects a direct firmware upgrade.
During installation, Cisco Unified Communications Manager will automatically upgrade the firmware on Cisco Unified IP Phone 7970 Series to the minimum version required. But if the firmware on the IP phone is outdated, the phone may reject the direct firmware upgrade.
Upgrade the IP Phone 7970 Series to an intermediate unsigned firmware version before upgrading to the final firmware required by the endpoint. See Adding a Cisco TelePresence Image to the Cisco Unified Communications Manager Server for download instructions. See also the Cisco Unified Communications Operating System Administration Guide for complete software upgrade instructions.
Table 5-11 Troubleshooting the Cisco TelePresence Configuration (continued)
Problem Possible Cause Possible Solutions
5-27Cisco Unified Communications Manager Configuration Guide for the Cisco TelePresence System
OL-21851-01

Chapter 5 Configuring and Managing the Cisco Unified IP PhoneVerifying and Troubleshooting IP Phone Configuration
Information About Phone Reset
If a device is not registered with Cisco Unified Communications Manager, you cannot reset or restart it. If a device is registered, to restart a device without shutting it down, click the Restart button. To shut down a device and bring it back up, click the Reset button. To return to the previous window without resetting or restarting the device, click Close.
Note Resetting a gateway/trunk/media devices drops any calls in progress that are using that gateway/trunk/media devices. Restarting a gateway/media devices tries to preserve the calls in progress that are using that gateway/media devices, if possible. Other devices wait until calls are complete before restarting or resetting. Resetting/restarting a H323 device does not physically reset/restart the hardware; it only reinitializes the configuration loaded by Cisco Unified Communications Manager.
Resetting the Cisco Unified IP Phone 7970 Series
Reset a Cisco Unified IP Phone at any time by following these steps:
Note If a call is in progress, the phone does not reset until the call completes.
Step 1 Choose Device > Phone. The Find and List Phones window appears.
Step 2 To locate a specific phone, enter search criteria and click Find. A list of phones that match the search criteria displays.
Step 3 Click the check boxes next to the phones that you want to reset. To choose all the phones in the window, click Select All.
Step 4 Click Reset Selected. The Device Reset window appears.
Step 5 Choose Reset from the listed options in the Device Reset window.
This shuts down the chosen devices and brings them back up (performs a complete shutdown and reinitialization of the phones).
Note See the “Synchronizing a Phone” section on page 5-28 for instructions on updating the phone with the latest configuration changes by using the least-intrusive method.
Synchronizing a Phone
To synchronize a phone with the most recent configuration changes, perform the following procedure, which applies any outstanding configuration settings in the least-intrusive manner possible. (For example, a reset/restart may not be required on some affected devices.).
Procedure
Step 1 Choose Device > Phone. The Find and List Phones window appears.
Step 2 Choose the search criteria to use and Click Find. The window displays a list of phones that match the search criteria.
5-28Cisco Unified Communications Manager Configuration Guide for the Cisco TelePresence System
OL-21851-01

Chapter 5 Configuring and Managing the Cisco Unified IP PhoneVerifying and Troubleshooting IP Phone Configuration
Step 3 Check the check boxes next to the phones that you want to synchronize. To choose all phones in the window, check the check box in the matching records title bar.
Step 4 Click Apply Config to Selected. The Apply Configuration Information dialog displays.
Step 5 Click OK.
Resetting the Cisco Unified IP Phone 7970 Series Factory Image
To reset the phone to the factory image:
Step 1 Disconnect the power from the phone.
Step 2 While holding down the “#” key, reconnect the power.
Step 3 As soon as you see the line button lights to the right side of the display cycling yellow, release the “#” key.
Step 4 Press the following buttons in sequence: 3, 4, 9, 1, 6, 7, 2, 8, 5, 0, *, #.
The cycling line button lights then change from yellow to red. Within a few minutes the phone will begin booting.
5-29Cisco Unified Communications Manager Configuration Guide for the Cisco TelePresence System
OL-21851-01

Chapter 5 Configuring and Managing the Cisco Unified IP PhoneVerifying and Troubleshooting IP Phone Configuration
5-30Cisco Unified Communications Manager Configuration Guide for the Cisco TelePresence System
OL-21851-01