composite information server 4 - gerardnico information server 4.6 ... user’s guide describes how...
TRANSCRIPT

CompositeInformation
Server4.6
Installation Guide

Composite Information Server Installation GuideVersion: 4.6Last Revision: March 13, 2008© 2003 - 2008 Composite Software, Inc. All rights reserved.
Restricted RightsTHIS PUBLICATION IS PROVIDED “AS IS” WITHOUT WARRANTY OF ANY KIND, EITHER EXPRESS OR IMPLIED, INCLUDING, BUT NOT LIMITED TO, THE IMPLIED WARRANTIES OF MERCHANTABILITY, FITNESS FOR A PARTICULAR PURPOSE, OR NON-INFRINGEMENT.
THIS PUBLICATION MAY CONTAIN TECHNICAL INACCURACIES OR TYPOGRAPHICAL ERRORS. CHANGES ARE PERIODICALLY ADDED TO THE INFORMATION CONTAINED HEREIN. THESE CHANGES WILL BE INCORPORATED IN THE NEW EDITIONS OF THE PUBLICATION. COMPOSITE SOFTWARE MAY MAKE IMPROVEMENTS AND/OR CHANGES IN THE PRODUCT DESCRIBED IN THIS PUBLICATION AT ANY TIME.
Composite is a trademark of Composite Software, Inc. All other trademarks and product names are property of their respective holders.
Technical Support
You can contact the Technical Support department at Composite Software, Inc. for assistance with using Composite Information Server, filing bug reports, and feature requests.
E-mail: [email protected]

Contents
Preface . . . . . . . . . . . . . . . . . . . . . . . . . . . . . . . . . . . . . . . . . . . . . . . . . . .3Purpose . . . . . . . . . . . . . . . . . . . . . . . . . . . . . . . . . . . . . . . . . . . . . . . . . . . . . . . . . . . . . 3Audience . . . . . . . . . . . . . . . . . . . . . . . . . . . . . . . . . . . . . . . . . . . . . . . . . . . . . . . . . . . . 3Revision History . . . . . . . . . . . . . . . . . . . . . . . . . . . . . . . . . . . . . . . . . . . . . . . . . . . . . . . 3Related Documentation . . . . . . . . . . . . . . . . . . . . . . . . . . . . . . . . . . . . . . . . . . . . . . . . . 4Documentation Conventions . . . . . . . . . . . . . . . . . . . . . . . . . . . . . . . . . . . . . . . . . . . . . 5Getting Support . . . . . . . . . . . . . . . . . . . . . . . . . . . . . . . . . . . . . . . . . . . . . . . . . . . . . . . 6
Chapter 1Pre-Installation Considerations . . . . . . . . . . . . . . . . . . . . . . . . . . . . . .7Supported Platforms and Protocols . . . . . . . . . . . . . . . . . . . . . . . . . . . . . . . . . . . . . . . . 8
Supported Platforms . . . . . . . . . . . . . . . . . . . . . . . . . . . . . . . . . . . . . . . . . . . . . . . . . . . . . . . 8Encryption Support . . . . . . . . . . . . . . . . . . . . . . . . . . . . . . . . . . . . . . . . . . . . . . . . . . . . . . . . 832-Bit and 64-Bit Support . . . . . . . . . . . . . . . . . . . . . . . . . . . . . . . . . . . . . . . . . . . . . . . . . . . 9JRE Support . . . . . . . . . . . . . . . . . . . . . . . . . . . . . . . . . . . . . . . . . . . . . . . . . . . . . . . . . . . . . 11Web Browser Support . . . . . . . . . . . . . . . . . . . . . . . . . . . . . . . . . . . . . . . . . . . . . . . . . . . . . 11
Disk Space and Physical Memory . . . . . . . . . . . . . . . . . . . . . . . . . . . . . . . . . . . . . . . . 12Minimum Disk Space Needed . . . . . . . . . . . . . . . . . . . . . . . . . . . . . . . . . . . . . . . . . . . . . . . 12Physical Memory Requirements . . . . . . . . . . . . . . . . . . . . . . . . . . . . . . . . . . . . . . . . . . . . . 12
Supported Data Sources and Protocols . . . . . . . . . . . . . . . . . . . . . . . . . . . . . . . . . . . 13MySQL Server Support . . . . . . . . . . . . . . . . . . . . . . . . . . . . . . . . . . . . . . . . . . . . . . . . . . . . 13
Supported Repository Databases . . . . . . . . . . . . . . . . . . . . . . . . . . . . . . . . . . . . . . . . 14Upgrading from a Previous CIS Release . . . . . . . . . . . . . . . . . . . . . . . . . . . . . . . . . . 15
Basic Steps for Upgrade and Migration . . . . . . . . . . . . . . . . . . . . . . . . . . . . . . . . . . . . . . . . 15Upgrading and Access Rights . . . . . . . . . . . . . . . . . . . . . . . . . . . . . . . . . . . . . . . . . . . 22Pre-Installation Check List . . . . . . . . . . . . . . . . . . . . . . . . . . . . . . . . . . . . . . . . . . . . . . 23Pre-Installation Task on Linux . . . . . . . . . . . . . . . . . . . . . . . . . . . . . . . . . . . . . . . . . . . 24
Chapter 2Installing Composite . . . . . . . . . . . . . . . . . . . . . . . . . . . . . . . . . . . . . .27Software Components for the Installation . . . . . . . . . . . . . . . . . . . . . . . . . . . . . . . . . . 28
i
Contents
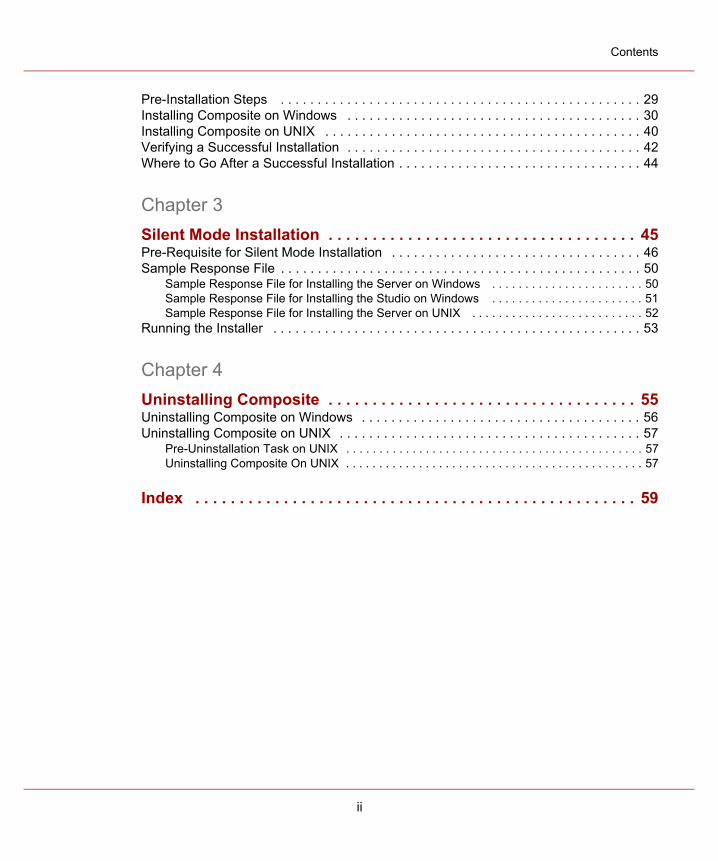
Pre-Installation Steps . . . . . . . . . . . . . . . . . . . . . . . . . . . . . . . . . . . . . . . . . . . . . . . . . 29Installing Composite on Windows . . . . . . . . . . . . . . . . . . . . . . . . . . . . . . . . . . . . . . . . 30Installing Composite on UNIX . . . . . . . . . . . . . . . . . . . . . . . . . . . . . . . . . . . . . . . . . . . 40Verifying a Successful Installation . . . . . . . . . . . . . . . . . . . . . . . . . . . . . . . . . . . . . . . . 42Where to Go After a Successful Installation . . . . . . . . . . . . . . . . . . . . . . . . . . . . . . . . . 44
Chapter 3Silent Mode Installation . . . . . . . . . . . . . . . . . . . . . . . . . . . . . . . . . . . 45Pre-Requisite for Silent Mode Installation . . . . . . . . . . . . . . . . . . . . . . . . . . . . . . . . . . 46Sample Response File . . . . . . . . . . . . . . . . . . . . . . . . . . . . . . . . . . . . . . . . . . . . . . . . . 50
Sample Response File for Installing the Server on Windows . . . . . . . . . . . . . . . . . . . . . . . 50Sample Response File for Installing the Studio on Windows . . . . . . . . . . . . . . . . . . . . . . . 51Sample Response File for Installing the Server on UNIX . . . . . . . . . . . . . . . . . . . . . . . . . . 52
Running the Installer . . . . . . . . . . . . . . . . . . . . . . . . . . . . . . . . . . . . . . . . . . . . . . . . . . 53
Chapter 4Uninstalling Composite . . . . . . . . . . . . . . . . . . . . . . . . . . . . . . . . . . . 55Uninstalling Composite on Windows . . . . . . . . . . . . . . . . . . . . . . . . . . . . . . . . . . . . . . 56Uninstalling Composite on UNIX . . . . . . . . . . . . . . . . . . . . . . . . . . . . . . . . . . . . . . . . . 57
Pre-Uninstallation Task on UNIX . . . . . . . . . . . . . . . . . . . . . . . . . . . . . . . . . . . . . . . . . . . . . 57Uninstalling Composite On UNIX . . . . . . . . . . . . . . . . . . . . . . . . . . . . . . . . . . . . . . . . . . . . . 57
Index . . . . . . . . . . . . . . . . . . . . . . . . . . . . . . . . . . . . . . . . . . . . . . . . . . 59
ii

Preface
PurposeThis book provides the requirements and instructions for installing Composite Information Server which includes Composite Studio.
AudienceThis book is intended for system administrators who are responsible for installing CIS.
Revision HistoryThe revision history of this manual is provided below in reverse order.
Date Version Purpose of Revision
March 13, 2008 4.6.0 • Updated installation doc for CIS 4.6.0.
March 5, 2008 4.6.0 • Final installation doc for CIS 4.6.0.
January 15, 2008 4.6.0 • Beta draft for CIS 4.6.0.
June 21, 2007 4.5.0 • Final installation doc for CIS 4.5.0.
November 12, 2006 4.0.1 • Document installation for CIS 4.0.1.
3

Related Documentation Preface
Related DocumentationAll documents for Composite Information Server and the other Composite products you have installed are available in PDF format. See the docs directory at the root level of the CIS installation directory, as in the following example for Windows:
\<installation_directory>\docs\
The following table lists the documents available for Composite Information Server:
Table 1. Documentation Set for Composite Information Server (CIS)
Title Description Availability
Installation Guide (this manual) Provides instructions for installing Composite on Windows and UNIX systems
In PDF
Administration Guide Provides instructions for Composite administration
In PDFOn-line in Composite Studio
Getting Started with Composite Introduces the Composite software and provides quick steps for obtaining a unified view solution
In PDFOn-line in Composite Studio
User’s Guide Describes how to benefit from Composite’s capabilities, mainly using the Studio
In PDFOn-line in Composite Studio
Reference Manual Contains reference information on the software technologies used in Composite. It is not a programming manual.
In PDFOn-line in Composite Studio
Help Topics Guide you through the Studio UI and data modeling tasks
On-line in Composite Studio
Release Notes Provide updated information about the software
Contact: [email protected]
4

Documentation Conventions Preface
Documentation ConventionsThe following conventions are used in this manual:
Composite Active Cluster Installation and Administration Guide
Documents how to install and set up a cluster of Composite Servers using Composite Active Cluster.
Table 1. Documentation Set for Composite Information Server (CIS)
Title Description Availability
Table 2. Documentation Conventions
Convention Description
CLUSTERS tab Regulare Arial typeface indicates text that appears in the user interface.
Enter Bold type in Arial typeface indicates an action; a key to press, a button to click, or text to enter.
< > (angle brackets) Indicates a value that must be provided.
[ ] (square brackets) Indicates an optional value.
| (pipe) Separates multiple options that can be specified.
-server Courier typeface indicates text that appears in a DOS window (on Windows) or UNIX terminal shell (UNIX).
5

Getting Support Preface
Getting SupportYou can contact the Technical Support department at Composite Software, Inc. for assistance with using Composite, filing bug reports, and submitting feature requests.
E-mail: [email protected]: (650) 227-8255
Before contacting support, be sure to have this information available:
Type of request (help, bug report, or feature request)
Product and current version
Patch level
Composite case number, if one has been assigned
For information about Composite Software, Inc. and its products, see www.compositesw.com.
6

Chapter 1
Pre-Installation Considerations
This chapter focuses on the pre-installation considerations for Composite Information Server (CIS), as follows:
“Supported Platforms and Protocols” on page 8
“Disk Space and Physical Memory” on page 12
“Supported Data Sources and Protocols” on page 13
“Supported Repository Databases” on page 14
“Upgrading from a Previous CIS Release” on page 15
“Upgrading and Access Rights” on page 22
“Pre-Installation Check List” on page 23
“Pre-Installation Task on Linux” on page 24
Composite Information Server 7 Installation Guide

Supported Platforms and Protocols Chapter 1 Pre-Installation Considerations
Supported Platforms and ProtocolsThis section describes the environment in which you can install Composite Information Server, as follows:
“Supported Platforms” on page 8
“Encryption Support” on page 8
“32-Bit and 64-Bit Support” on page 9
“JRE Support” on page 11
“Web Browser Support” on page 11
Supported PlatformsYou can run CIS on any of these platforms:
Microsoft Windows Server 2000 SP4
Microsoft Windows XP Professional SP2
Microsoft Windows Server 2003 SP1
Sun Solaris 9 or higher on SPARC
AIX 5.2 or higher, (5.2 Patch: 5200-07, 5.3 Patch: 5300-03)
HP-UX B.11.11 or higher, Patch: Jun 06 bundle (11.11 support plus)
Red Hat Enterprise Linux AS 3 or higher
SUSE Linux Enterprise Server 9.3 or higher
For updated information, contact: [email protected].
Encryption Support With CIS 4.6, Composite provides a Strong Encryption Pack version of CIS for customers who want to use strong encryption algorithms when using SSL. This version includes three procedures that require WSS4J (EncryptElement, ProcessSecurityHeader, and SignElement).
Composite Information Server 8 Installation Guide

Supported Platforms and Protocols Chapter 1 Pre-Installation Considerations
Note Prior to CIS 4.6, all versions of CIS provided strong encryption by default. However, due to new export restrictions, it was necessary to make strong encryption a separate option that you must install if this is a requirement for your implementation.
To obtain the Strong Encryption Pack, contact Composite Technical Support.
32-Bit and 64-Bit Support As of CIS 4.6, both 32-bit and 64-bit operation are supported. Separate 32-bit and 64-bit installers are provided for each of the Windows and UNIX platforms. In addition, separate JRE versions are provided for each platform (see “JRE Support” on page 11).
Notes
32-bit installers are only supported on 32-bit platforms. Although 32-bit installers might work on 64-bit platforms, they are not officially supported.
64-bit installers are only supported on 64-bit platforms.
Linux and Windows installers are only available on the x86_64 hardware platform.
The installers that are provided and the specific platform versions supported by each are listed in the following table.
Composite Information Server 9 Installation Guide

Supported Platforms and Protocols Chapter 1 Pre-Installation Considerations
These platform installers ... Support these versions ...
AIX
32-bit installer AIX 5.2 or higher, (5.2 Patch: 5200-07, 5.3 Patch: 5300-03)
64-bit installer AIX 5.3 or higher (5.3 Patch: 5300-07)
HP-UX
32-bit and 64-bit installers HP-UX B.11.11 or higher, Patch: Jun 06 bundle
Linux
32-bit and 64-bit installers Red Hat Enterprise Linux AS 3 or higher SUSE Linux Enterprise Server 9.3 or higher
Solaris
32-bit and 64-bit installers Solaris 9 or higher on SPARC
Windows
32-bit installer Microsoft Windows Server 2000 SP4 Microsoft Windows XP Professional SP2 Microsoft Windows Server 2003 SP1
64-bit installer Microsoft Windows Server 2003 R2 SP2 x64 Edition
Composite Information Server 10 Installation Guide

Supported Platforms and Protocols Chapter 1 Pre-Installation Considerations
JRE SupportThe JRE provided with CIS 4.6 for each platform is listed in the following table:
Web Browser Support The Composite Manager Web interface runs on these Web browsers:
Microsoft Internet Explorer 6 and 7
Mozilla Firefox 1.5 and 2.0
These platform installers ... Require this JRE ...
AIX
32-bit installer IBM JRE 1.5.0 j9vmap3223-20071007
64-bit installer IBM JRE 1.5.0 j9vmap6423-20071007
HP-UX
32-bit and 64-bit installers HP RTE 1.5.0_11 PA-RISC
Linux
32-bit installer Sun JRE 1.5.0_14 i386
64-bit installer Sun JRE 1.5.0_14 i686 (AMD64/x64 only)
Solaris
32-bit and 64-bit installers Sun JRE 1.5.0_14 SPARC
Windows
32-bit installer Sun JRE 1.5.0_14i i386
64-bit installer Sun JRE 1.5.0_14i i686 (AMD64/x64 only)
Composite Information Server 11 Installation Guide

Disk Space and Physical Memory Chapter 1 Pre-Installation Considerations
Disk Space and Physical MemoryCIS performance is a direct result of processor speeds, available memory, network bandwidth, data source response times, query join types, view complexities, and many other implementation factors.
Logically, the fastest response times, supporting the largest active user base and largest load bearing limits are achieved with the fastest dual-core CPUs, large amounts of highly available RAM (up to 2+ GB for most CIS production instances), ample disk space, and GB Ethernet network connections on the same subnet as the most heavily trafficked data source. For most development tasks, CIS will function equally well, although more slowly, given less than optimal hardware configurations.
The following sections describe the minimum requirements for disk space and memory.
Minimum Disk Space Needed500MB for Composite installation
300MB for Composite repository database
500MB for cache (recommended only; not required for completing the installation)
Physical Memory Requirements200 MB for design and development
700 MB for deployment
Note that the physical memory requirements noted here are exclusively for running Composite and do not include the memory you might need to run non-Composite applications.
Composite Information Server 12 Installation Guide

Supported Data Sources and Protocols Chapter 1 Pre-Installation Considerations
Supported Data Sources and ProtocolsJDBC
Composite
Custom Java Procedure
IBM DB2 v7, v8, z/OS v8
Informix 9.x
LDAP
Microsoft SQL Server v2000, v2005
MySQL v3.x, v4.0, v4.1
Netezza 2.5, 3.0
Oracle 8i, 9i, 10g
Sybase ASE 12.5
Teradata v2R6.0 and v2R6.1
SOAP 1.1
WSDL 1.1
ODBC (driver version 3.5)
Microsoft Access
Microsoft Excel 2000
For updated information, contact: [email protected].
MySQL Server SupportMySQL Server 4.1.19 standard edition is provided for all platforms.
Composite Information Server 13 Installation Guide

Supported Repository Databases Chapter 1 Pre-Installation Considerations
Supported Repository DatabasesMySQL 4.1
Oracle 10g
Sybase ASE 12.5
For currently supported versions of repository databases, contact: [email protected]
Composite Information Server 14 Installation Guide

Upgrading from a Previous CIS Release Chapter 1 Pre-Installation Considerations
Upgrading from a Previous CIS Release This section is a guide to upgrading the Composite Information Server (CIS) from a previous release. Upgrading CIS refers to steps taken to install a new version of CIS and migrating an existing metadata repository to the new instance. This process is different from many other software vendors' upgrade procedures, which typically modify the existing instance.
On a high level, the upgrade process entails installing a new server in parallel to the existing CIS instance, exporting the metadata from the old server, and then importing the Composite Server backup .CAR file into the new CIS instance.
When you upgrade to a new version of CIS, you can keep the older CIS version up and running in parallel on the same server as the new installation. In fact, Composite recommends that you keep the older version until you are sure the new installation is stable. Keep in mind that:
If you are running two versions of CIS simultaneously, their port numbers must be different.
If you are using Composite Active Cluster, all servers in the cluster must be running the same version and patch level.
As CIS uses an external database as its metadata repository, multiple CIS instances can share the same metadata repository database server. Therefore, by creating a new schema for the newly installed instance in the same repository, the upgraded instance of the server can share the same repository as the old instance.
Basic Steps for Upgrade and MigrationThe basic steps to upgrading and migration are:
1. Catalog the existing CIS instance.
2. Export the metadata from the existing CIS instance.
3. Install the new version of CIS.
4. Import the metadata into the new CIS instance.
5. Test the new CIS instance.
Composite Information Server 15 Installation Guide

Upgrading from a Previous CIS Release Chapter 1 Pre-Installation Considerations
Each of these steps are described in the following sections. Note that these steps are performed by a user with administrator privileges.
Document the Existing CIS Instance Before making a backup of the existing CIS instance, document the key features of the instance. These settings will be applied to the newly installed version to ensure the consistency of the results returned from published resources. Some of the settings to be tracked are:
Ports
Make note of the port numbers for the existing instance. This is important because once the installation of the new server is complete, the port numbers of the new instance might need to be changed.
Authentication mechanism
This setting determines various authentication mechanisms enabled within Composite Server. Make note of the authentication mechanism. If LDAP or another dynamic authentication is used, the same settings need to be applied to the new server.
Users/groups
Note the groups created in Composite Server and the users that belong to these groups. If LDAP authentication is used, note the LDAP groups that were imported into Composite Server.
Metadata repository
Make note of the full path of the repository location and the administrator userid and password.
Custom data sources
Check and catalog any custom data sources that were introspected and if any custom drivers were used to introspect these sources.
External libraries
Make note of any external libraries that were references from the instance.
Composite Information Server 16 Installation Guide
Upgrading from a Previous CIS Release Chapter 1 Pre-Installation Considerations
Customized settings (JRE flags, managed/unmanaged memory, etc.)
Make note of configuration settings for the existing Composite Server from Administration menu. These settings should match the new instance to ensure similar results and performance.
Compatibility of database schemas
Check if the upgrade of the existing CIS version can be performed directly to the new version. Otherwise multiple versions of CIS and multiple export and import processes might be required.
Export Metadata from Existing CIS Instance The first step for upgrade or migration is to export the existing metadata information from the repository. This process writes out a compressed XML file (.CAR) file which comprises of six files containing metadata, scheduling, settings and user information.
To run the export, you use the backup_export command. This command is located in and can be run from <install_directory>\bin directory. You must be an administrator to run this command.
Composite Information Server 17 Installation Guide

Upgrading from a Previous CIS Release Chapter 1 Pre-Installation Considerations
The syntax for backup_export (in Windows) is as follows:backup_export.bat
-server <hostname> [-port <port>] -pkgfile <filename> -user <username> -password <password> [-domain <domain>]
where:
See the “backup_export and backup_import” section in the Utilities chapter of the CIS Administrator Guide for the complete syntax of the backup_export command and additional notes about its usage.
Install the New Version of CIS Follow these basic steps to install a new Composite Information Server when you are upgrading from an earlier release:
1. Determine the repository configuration:1.1 Check if the repository configuration might change. For instance, you might:
move from one repository platform to another.
move from a shared repository to a unique repository per instance.
move from a unique repository per instance to a shared repository.
<hostname> name of the machine hosting the server
<port> service port for CIS (the same port used for Composite Studio login)
<filename> name of the output file to store the export
<username> login name of the user doing the export
<password> password associated with username
<domain> domain to which the username belongs
Composite Information Server 18 Installation Guide
Upgrading from a Previous CIS Release Chapter 1 Pre-Installation Considerations
1.2 Configure the repository if it’s not MySQL.
2. Install the new version of Composite Server as described in Chapter 1 (for a regular installation) or Chapter 2 (for a silent mode installation.)
3. Set up any external libraries, including JDBC drivers, and then shut down and restart the server.
4. Deliver the upgraded drivers (the Composite ODBC driver and the Composite JDBC driver) to the dependent clients.
Note that in order to ensure consistence in results and performance, the configuration of the new server instance should be as similar to old instance as possible.
Import Metadata into the New CIS Instance Once the new CIS instance is successfully installed, the metadata from old CIS instance needs to be imported into the new instance.
To run the import, you use the backup_import command. This command is located in and can be run from <install_directory>\bin directory. You must be an administrator to run this command.
The syntax for backup_import (in Windows) is as follows:backup_import
-server <hostname> [-port <port> ] [-relocate <old path> <new path> ] -pkgfile <filename> -user <username> -password <password> [-domain <domain>] [-printinfo] [-optfile <filename>] [-verbose]
Composite Information Server 19 Installation Guide

Upgrading from a Previous CIS Release Chapter 1 Pre-Installation Considerations
where:
See the “backup_export and backup_import” section in the Utilities chapter of the CIS Administrator Guide for the complete syntax of the backup_import command and additional notes about its usage.
Once the import is successfully completed, settings such JRE configurations, managed memory setting and /or ports may need to be updated on the new instance.
Test the New CIS Instance Determine a set of tests that will touch all published resources and all introspected data sources, and then apply the tests against:
The existing instance as a sanity check.
The new instance of CIS and ensure the same results are produced.
Starting with CIS 4.0, an end-to-end testing program referred to as PubTest (pubtest.java) is included with the CIS installation. This program is located in
<hostname name of the machine hosting the server
<port> service port for CIS (the same port used for Composite Studio login)
<old path> old path of the resource
<new path> new path for the resource
<filename> file to store the export file
<username> login name of the user doing the import
<password> password associated with username
<domain> domain to which the username belongs
<name> name of the package to include the export file
<printinfo> displays the description of the import file
Composite Information Server 20 Installation Guide

Upgrading from a Previous CIS Release Chapter 1 Pre-Installation Considerations
the <install_dir>\apps\jdbc directory. A PubTest.doc file in this directory provides additional documentation about using this tool.
The PubTest program can be configured to test all published resources using JDBC, ODBC, and Web services. Additional configuration might be required to test the ODBC and Web services.
Composite Information Server 21 Installation Guide

Upgrading and Access Rights Chapter 1 Pre-Installation Considerations
Upgrading and Access RightsCIS 4.5 and later releases utilize a role-based user rights and privileges system. User access to Composite tools and data resources is segmented by enterprise-defined roles and group membership. More granular control of administrative rights is provided. It is also possible to deny users access to CIS tools. Nearly all tool functions and APIs are affected by this feature.
In releases prior to 4.5:
The "admin" group in the “composite” domain had all rights. Members of this group had full power over the Composite Server.
The "composite/anonymous" user and all users in the "dynamic" domain had no rights—not even ACCESS_TOOLS.
All other users in the "composite" domain or in any LDAP defined domains had only the ACCESS_TOOLS right.
To preserve this behavior during upgrade, all users (other than "anonymous") imported in the "composite" domain from a release prior to 4.5 are granted ACCESS_TOOLS right. All groups imported in LDAP domains are granted ACCESS_TOOLS right.
Composite Information Server 22 Installation Guide

Pre-Installation Check List Chapter 1 Pre-Installation Considerations
Pre-Installation Check ListBe sure to read the Release Notes for this version of CIS. In addition, review the following notes:
You must have enough disk space and physical memory for the installation. See “Disk Space and Physical Memory” on page 12.
You must have administrative privileges to install Composite Information Server (CIS).
You can have multiple JVMs running on the installation machine.
Composite Server requires a block of nine ports for use by CIS and associated services. By default, ports 9400 through 9408 are utilized. The port setting for the Web services HTTP communication serves as the “base port” from which all other port settings are derived. By default, the HTTP port for Web services is set to 9400, but that can be changed by CIS configuration setting if required after installation.
To see the current base port setting in Composite Studio, choose Configuration from the Administration menu, then go to Composite Server > Web Services Interface > Communications > HTTP > Port (Current).
Caution Changes to the HTTP (base port) will impact all other port settings.
These additional ports are derived from the base port:base port +1 = JDBC and ODBC base port +2 = HTTP SSL base port +3 = JDBC SSL base port +4 = Reservedbase port +5 = Reservedbase port +6 = Monitor base port +7 = Reservedbase port +8 = Default for Repository
Review the following section if you are installing on a Linux operating system.
Composite Information Server 23 Installation Guide

Pre-Installation Task on Linux Chapter 1 Pre-Installation Considerations
Pre-Installation Task on LinuxThis section applies only to the Linux operating system.
Run the following command to determine if localhost can be resolved on the target installation machine before attempting an installation:
ping localhost
Ping differences are given in bold type in the following examples:
Example 1This machine that resolves localhost correctly:
$ ping localhost
PING localhost (127.0.0.1) from 127.0.0.1 : 56(84) bytes of data.
64 bytes from localhost (127.0.0.1): icmp_seq=1 ttl=255 time=0.071 ms
64 bytes from localhost (127.0.0.1): icmp_seq=2 ttl=255 time=0.063 ms
64 bytes from localhost (127.0.0.1): icmp_seq=3 ttl=255 time=0.043 ms
--- localhost ping statistics ---
3 packets transmitted, 3 received, 0% loss, time 1999ms
rtt min/avg/max/mdev = 0.043/0.059/0.071/0.011 ms
Example 2This machine that cannot resolve localhost correctly:
$ ping localhost
PING localhost.localdomain (127.0.0.1) from 127.0.0.1 : 56(84) bytes of data.
64 bytes from localhost.localdomain (127.0.0.1): icmp_seq=1 ttl=255 time=0.080 ms
64 bytes from localhost.localdomain (127.0.0.1): icmp_seq=2 ttl=255 time=0.071 ms
64 bytes from localhost.localdomain (127.0.0.1): icmp_seq=3 ttl=255 time=0.044 ms
--- localhost.localdomain ping statistics ---
3 packets transmitted, 3 received, 0% loss, time 1998ms
Composite Information Server 24 Installation Guide

Pre-Installation Task on Linux Chapter 1 Pre-Installation Considerations
rtt min/avg/max/mdev = 0.044/0.065/0.080/0.015 ms
Entries in the /etc/hosts FileEntry in the /etc/hosts file for Example 1 can be as follows:
127.0.0.1 localhost
IP hostname.domain hostname
OR 127.0.0.1 localhost localhost.localdomain
IP hostname.domain hostname
OR 127.0.0.1 localhost localhost.localdomain localhost
IP hostname.domain hostname
Entry in the /etc/hosts file for Example 2 can be as follows:127.0.0.1 localhost.localdomain
IP hostname.domain hostname
OR 127.0.0.1 localhost.localdomain localhost
IP hostname.domain hostname
If the ping test output looks similar to Example 2, you must add a localhost entry directly after the 127.0.0.1 entry.
127.0.0.1 localhost <optional host name>
Note that the examples of /etc/hosts files for Example 2 illustrate cases where Composite Server will not be able to connect to the MySQL database because of the localhost.localdomain entry preceding the localhost entry (assuming the localhost entry exists at all).
Composite Information Server 25 Installation Guide

Pre-Installation Task on Linux Chapter 1 Pre-Installation Considerations
Composite Information Server 26 Installation Guide

Chapter 2
Installing Composite
This chapter describes how to install Composite Information Server (CIS) and verify a successful installation.
Topics covered in this chapter include:
“Software Components for the Installation” on page 28
“Pre-Installation Steps” on page 29
“Installing Composite on Windows” on page 30
“Installing Composite on UNIX” on page 40
“Verifying a Successful Installation” on page 42
“Where to Go After a Successful Installation” on page 44
Composite Information Server 27 Installation Guide

Software Components for the Installation Chapter 2 Installing Composite
Software Components for the InstallationThe following software components for Composite Information Server (CIS) are available for installation:
Composite Server
The server component of the product.
Composite Studio
The designing component of the product.
Composite JDBC driver
Composite driver that enables client applications to connect to Composite Server through JDBC.
Composite ODBC driver
Composite driver that enables client applications to connect to Composite Server through ODBC.
A MySQL repository database (MySQL 4.1.19 standard edition) is included in the installation.
Note If you have an older version of CIS, you do not need to uninstall it prior to installing this newer version. The two versions can coexist on your computer. Note that subsequent installations of CIS will reuse the mySQL database of the older installation.
Composite Information Server 28 Installation Guide

Pre-Installation Steps Chapter 2 Installing Composite
Pre-Installation Steps Before installing, follow these steps:
1. Stop Composite Server if an earlier version is running.
2. Shut down all other application programs running on the installation machine.
3. Know the host name or the IP address of the installation machine.
Note If you are upgrding from a previous release, be sure to read “Upgrading from a Previous CIS Release” on page 15 for information about the overall installation and upgrade process.
Composite Information Server 29 Installation Guide

Installing Composite on Windows Chapter 2 Installing Composite
Installing Composite on WindowsBefore proceeding with the installation, be sure to review “Pre-Installation Considerations” on page 7 and follow the pre-installation steps in the previous section.
To install Composite Information Server on a Windows computer
1. In your internet browser, navigate to the Composite Web site download page and log in:
www.compositesw.com/support/download
You need a valid username and password to perform a download.
2. Download the Composite software for your Windows platform and architecture.
Two individual installers (32-bit and 64-bit) are provided for Windows: install32.exe and install64.exe.
3. Run the installer executable for your platform.
Composite Information Server 30 Installation Guide

Installing Composite on Windows Chapter 2 Installing Composite
The installation tool InstallAnywhere guides you through the installation of Composite. The first screen of the Composite installation program is the Introduction:
4. Read the instructions on the screen, and click Next. The Composite installation displays the License Agreement.
5. Read the License Agreement, select Accept if you want to proceed with the installation, and click Next.
If the installer detects a previous installation of the software on the installation machine, you are prompted to specify the installation type: creating a new installation or adding to an existing installation. Specify the desired option and click Next to continue the installation.
Composite Information Server 31 Installation Guide

Installing Composite on Windows Chapter 2 Installing Composite
For creating a new installation, the following screen is displayed:
Composite Information Server 32 Installation Guide

Installing Composite on Windows Chapter 2 Installing Composite
6. Accept the default installation folder or specify the path to a new folder for this installation, and click Next. The Composite installation program displays the Composite software components that you can install:
7. Select the software components to install, and click Next:
To see the description of a component, click the Help button.
Server — Composite Server
Studio — Composite Studio (the metadata modeler)
JDBC — Composite JDBC driver that enables a client application to connect to Composite Server
ODBC — Composite ODBC driver that enables a client application to connect to Composite Server.
Composite Information Server 33 Installation Guide

Installing Composite on Windows Chapter 2 Installing Composite
If you chose to install the Composite Server component (Server), the Metadata Repository window is displayed, prompting you for the database administrator’s password. This password is to be used by the database administrator who administers Composite’s metadata repository (the database where the Composite Server stores the metadata created when you use CIS). Each CIS installation has its own metadata repository instance. This metadata repository instance stores the Composite resources that are created during data modeling.
8. In the DBA Password field, type the password for the database administrator and type the same password again in the Confirm DBA Password field. Make a note of this password for later use. Click Next.
Composite Information Server 34 Installation Guide

Installing Composite on Windows Chapter 2 Installing Composite
The Composite installation program displays the Shortcuts window:
9. Specify a location to install the shortcuts for the software components, and click Next.
Composite Information Server 35 Installation Guide

Installing Composite on Windows Chapter 2 Installing Composite
The Composite installation program displays the Pre-Installation Summary window:
10. Review the Pre-Installation Summary, and when you are sure it is what you want, click Install.
Composite Information Server 36 Installation Guide

Installing Composite on Windows Chapter 2 Installing Composite
The Composite installation program displays the Installing Composite Software 4.6.0 window:
During installation, you also see this status window:
Composite Information Server 37 Installation Guide

Installing Composite on Windows Chapter 2 Installing Composite
When the installation is complete, you see:
11. Click Done to exit the Composite installation program.
The Composite system is ready now for your use. Composite Server and Composite Studio are available in the Composite Software 4.6.0 program group (or in a different location if one was specified during the installation process.)
Composite Server starts automatically at the completion of the installation process, provided that the Composite Server component is installed. The Composite Server is installed as a Windows service and by default, starts automatically. You can also start and stop the service using Windows Services or the composite.bat command described in the CIS Administration Guide.
For details on verifying a successful installation, see “Verifying a Successful Installation” on page 42.
Composite Information Server 38 Installation Guide

Installing Composite on Windows Chapter 2 Installing Composite
Installation DirectoryThe installation directory on Windows has the following structure and sub-directories:
Composite Information Server 39 Installation Guide

Installing Composite on UNIX Chapter 2 Installing Composite
Installing Composite on UNIX This section describes how to install Composite on a UNIX-based computer. Before proceeding with the installation, refer to the “Pre-Installation Check List” on page 23.
Composite currently provides installers for these UNIX platforms: AIX, HP-UX, Linux, and Solaris. Note that Composite Studio is not available for UNIX.
Note You might need to setup the composite_server.sh environment on AIX. Set MAX_MEMORY >1500MB in the composite_server.sh script for AIX.
To install Composite Information Server on a UNIX computer
1. In your internet browser, navigate to the Composite Web site download page and log in:
www.compositesw.com/support/download
You need a valid username and password to perform a download.
2. Download the Composite software for your installation machine’s platform and architecture.
Two individual installers (32-bit and 64-bit) are provided for each of the AIX, HP-UX, Linux, and Solaris platforms. See “32-Bit and 64-Bit Support” on page 9 for specific version support for each platform.
3. If necessary, log into the installation machine as a non-root user. Change your working directory to the user’s home directory.
4. Run the following command:chmod 755 install.bin
5. Make sure that you have READ and WRITE permissions on the installation directory.
This document refers to the installation directory as <installation_directory>.
6. Run one of the following commands, and press Enter to continue:./install32.bin or ./install64.bin
Composite Information Server 40 Installation Guide

Installing Composite on UNIX Chapter 2 Installing Composite
7. Choose the option for accepting the license agreement.
Accept the default directory for the installation by pressing the Enter key, or type the absolute path to the installation directory, and press Enter to continue. The default installation directory is:
/opt/Composite_Software/CIS_<version>
8. Select the components for installation by specifying the desired option number, as noted below, and press Enter to continue. If there is more than one option number, separate each one with a comma (,) and without a space.
1 - Server (installs Composite Server)
2 - JDBC (installs Composite JDBC driver)
3 - ODBC (installs Composite ODBC driver)
9. Supply the administrative password for the Composite metadata repository (database where the server would store the metadata when you start using the software), re-type the password to confirm it, and press Enter to continue.
10. Review the pre-installation summary.
Type the word back if you want to return to a previous screen and make any changes to your specifications.
11. If you want to exit the installation process at any time, type the word quit.
12. Press Enter to continue and complete the installation.
13. Press Enter to exit the installer when the installation is completed.
Composite Server starts automatically at the completion of the installation process, provided that the Composite Server component is installed. You can also start and stop Composite Server using the composite.sh command described in the CIS Administration Guide.
Composite Information Server 41 Installation Guide

Verifying a Successful Installation Chapter 2 Installing Composite
Verifying a Successful InstallationTo verify if your installation of the Composite software was successful, follow the steps in this section.
To verify a successful installation
1. Select Start > All Programs > Composite Software (version) > Studio > Start Composite Studio (version) from the Windows desktop.
This command opens the login window.
2. Enter admin in the Username field.
The assumption is that the administrator is the first user. For other user names, use only alpha-numerical characters without spaces. The minimum length of this name is one character, and the maximum is 60 characters.
3. Enter a valid password in the Password field.
The default password for admin is admin. It is highly recommended that you change the default password after successfully logging in. Use the File >
Composite Information Server 42 Installation Guide

Verifying a Successful Installation Chapter 2 Installing Composite
Change Password menu option in Composite Studio to change the password associated with admin. A password must not exceed 20 characters in length.
4. Accept composite as the domain name displayed in the Domain field.
This entry refers to the domain used for authentication into Composite Server. Since you are a Composite administrator, your domain is composite.
5. Specify the host for Composite Server in the Server drop-down list.
This entry is name of the host computer on which you installed Composite Server. It defaults to localhost. You can choose to enter the IP address or the host name of the machine where the server is installed.
6. Click Connect.
If your installation was successful and the log-in credentials are valid, Composite Studio opens.
Composite Information Server 43 Installation Guide

Where to Go After a Successful Installation Chapter 2 Installing Composite
Where to Go After a Successful InstallationAfter you have successfully installed the Composite software, documentation for getting started, using, and administering CIS is provided in the manuals listed below. Some of the tasks and information you might want to be aware of, particularly if you are new to Composite, are noted.
Note that there is a lot of other important and useful information in these manuals. The list above is intended to help you get started with Composite.
Go to... To Learn About... In These Chapters...
Getting Started with Composite
• System architecture Chapter 1—Introduction
• How to log in Chapter 2—Logging into Composite Server
• Built-in examples Chapter 3—Sample Resources
• The steps you follow in a typical usage scenario
Chapter 4—Getting Started with Composite
Administration Guide
• Licensing Composite software (within 30 days)
• Setting up the JDBC, ODBC, and other drivers
Chapter 1—Post-Installation Tasks
• Starting and stopping the Composite Server and the monitor process
Chapter 7—Utilities
• Setting up domains and users
Chapter 3-5—Domain Administration
• Monitoring Composite Server
Chapter 6—System Monitoring
User’s Guide • Using Composite Studio to create and publish resources
All chapters
Composite Information Server 44 Installation Guide

Chapter 3
Silent Mode Installation
You can install Composite Information Server (CIS) in silent mode. A silent mode installation does not require any user input at the time of installation in order to complete the installation process. It does not have a graphical user interface (GUI) but instead uses the values from a response file to perform the installation.
Topics covered in this chapter include:
“Pre-Requisite for Silent Mode Installation” on page 46
“Sample Response File” on page 50
“Running the Installer” on page 53
Composite Information Server 45 Installation Guide

Pre-Requisite for Silent Mode Installation Chapter 3 Silent Mode Installation
Pre-Requisite for Silent Mode Installation Before installing CIS in silent mode, you need to have a text file (also known as the response file) ready with specific key-value pairs, which are detailed in this section.
These variables and corresponding values are necessary to install CIS with pre-defined settings, such as the installation directory, base port, shortcut directory, and so on.
The following tables document the variables and their values. Each table matches a grouping in the response file:
InstallAnywhere variables
Variables for installing all the components
Variables for installing the Composite Server component
Variables for installing the Composite Studio component
Note that some variables are required and others are optional.
Table 3. InstallAnywhere Variables in the Response File
Variable Description and Value
(Install Anywhere) Required Variables
INSTALLER_UI Mode to run the installer.
The value is always silent.
(Install Anywhere) Optional Variables
IATEMPDIR Temporary location for installation files.
Value can be any path.
Composite Information Server 46 Installation Guide

Pre-Requisite for Silent Mode Installation Chapter 3 Silent Mode Installation
Table 4. Variables for All Components in the Response File
Variable Description and Value
(All Components) Required Variables
CSW_INSTALL_DIRECTORY Directory to install the software.
The value can be empty, or the directory can be non-existent.
CSW_INSTALL_COMPONENTS
Components to be installed.
The value(s) can be one or more of the following: server, jdbc, odbc, studio
(All Components) Optional Variables
CSW_CREATE_SHORTCUTS Boolean value to indicate whether to create shortcuts or not. A value of true means to create shortcuts; a value of false means not to create shortcuts.Valid ONLY for an installation on Windows.
Value is: true or false
Composite Information Server 47 Installation Guide

Pre-Requisite for Silent Mode Installation Chapter 3 Silent Mode Installation
Table 5. Variables for the Server Component in the Response File
Variable Description and Value
(Server Component) Required Variables
CSW_DATABASE_ADMIN_PASSWORD Password to access the repository database, which is automatically installed during the installation.
(Server Component) Optional Variables
CSW_MAX_MEMORY Maximum memory in units of megabytes (MB).
Value is greater than 0 (zero).
CSW_WEBSERVICES_HTTP_PORT Specifies the Base Port (default value is 9400) and consequently the block of ports used for all CIS communication. The base port is used for HTTP communication between CIS and both Composite Studio and web services.
Additional ports derived from the base port:base port +1 = JDBC and ODBC base port +2 = HTTP SSL base port +3 = JDBC SSL base port +4 = Reservedbase port +5 = Reservedbase port +6 = Monitor base port +7 = Reservedbase port +8 = Default for Repository
Value is greater than 0 (zero) and unbound.
Composite Information Server 48 Installation Guide

Pre-Requisite for Silent Mode Installation Chapter 3 Silent Mode Installation
CSW_SHORTCUTS_DIRECTORY Directory to install the shortcuts.Valid ONLY for an installation on Windows.
The value is the path to the directory.
CSW_SHORTCUTS_GROUP_NAME Group name for the shortcuts.Valid ONLY for the installation on Windows.
Group name must start with an alphanumeric character.
CSW_DATABASE_SERVICE_NAME Name for the database service.
Valid ONLY for an installation which automatically installs the repository database along with other components.
CSW_SERVICE_NAME Name for the Composite Server service.
Valid ONLY for an installation which automatically installs the repository database along with other components.
Table 6. Variables for the Studio Component in the Response File
Variable Description
(Studio Component) Optional Variables
CSW_WEBSERVICES_HTTP_PORT Port number for a Web service to connect to Composite Server via HTTP.
Value is greater than 0 (zero).
Table 5. Variables for the Server Component in the Response File
Variable Description and Value
Composite Information Server 49 Installation Guide

Sample Response File Chapter 3 Silent Mode Installation
Sample Response File This section provides a sample response file in two flavors (one for Windows and the other for UNIX platforms) for a default silent mode installation of CIS.
Notes
If you want to use the sample response file given here, replace the values rendered in italics with values that are appropriate for your environment.
Values rendered in bold type should not be changed.
You can override the value for the optional setting CSW_MAX_MEMORY as long as the specified setting is greater than 200MB and less than the total physical memory.
Sample Response File for Installing the Server on Windows
#Required -- InstallAnywhere VariableINSTALLER_UI=silent
#Optional -- InstallAnywhere VariableIATEMPDIR=C:\\temp
# Required -- Variables for installing all the components
CSW_INSTALL_DIRECTORY=C:\\Program Files\\Composite Software\\CIS (version)CSW_INSTALL_COMPONENTS=server,studio,jdbc,odbc
# Optional -- Variables for installing the Composite Server componentCSW_MAX_MEMORY=512
CSW_WEBSERVICES_HTTP_PORT=9400
CSW_CREATE_SHORTCUTS=true
Composite Information Server 50 Installation Guide

Sample Response File Chapter 3 Silent Mode Installation
CSW_SHORTCUTS_DIRECTORY=C:\\Documents and Settings\\All Users\\Start Menu\\Programs\\Composite Software
CSW_SHORTCUTS_GROUP_NAME=Composite Software (version)
CSW_DATABASE_SERVICE_NAME=Composite Server Repository (version)
CSW_SERVICE_NAME=Composite Server (version)
Sample Response File for Installing the Studio on Windows
# Required -- InstallAnywhere Variables
INSTALLER_UI=silent
# Optional -- InstallAnywhere Variables
# IATEMPDIR=C:\\temp
# Required -- Variables for installing all the components
CSW_INSTALL_DIRECTORY=C:\\Program Files\\Composite Software\\CIS (version)
CSW_INSTALL_COMPONENTS=studio
# Optional -- Variables for installing the Composite Studio componentCSW_WEBSERVICES_HTTP_PORT=9400
CSW_CREATE_SHORTCUTS=true
CSW_SHORTCUTS_DIRECTORY=C:\\Documents and Settings\\All Users\\Start Menu\\Programs\\Composite Software
CSW_SHORTCUTS_GROUP_NAME=Composite Software (version)
Composite Information Server 51 Installation Guide
Sample Response File Chapter 3 Silent Mode Installation
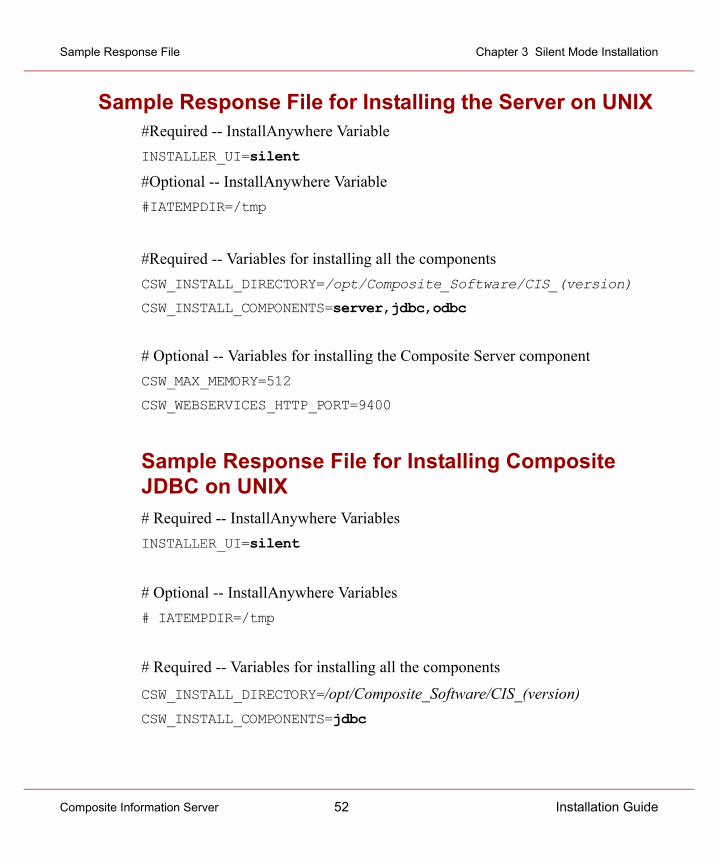
Sample Response File for Installing the Server on UNIX #Required -- InstallAnywhere VariableINSTALLER_UI=silent
#Optional -- InstallAnywhere Variable#IATEMPDIR=/tmp
#Required -- Variables for installing all the componentsCSW_INSTALL_DIRECTORY=/opt/Composite_Software/CIS_(version)
CSW_INSTALL_COMPONENTS=server,jdbc,odbc
# Optional -- Variables for installing the Composite Server componentCSW_MAX_MEMORY=512
CSW_WEBSERVICES_HTTP_PORT=9400
Sample Response File for Installing Composite JDBC on UNIX # Required -- InstallAnywhere VariablesINSTALLER_UI=silent
# Optional -- InstallAnywhere Variables# IATEMPDIR=/tmp
# Required -- Variables for installing all the components
CSW_INSTALL_DIRECTORY=/opt/Composite_Software/CIS_(version)CSW_INSTALL_COMPONENTS=jdbc
Composite Information Server 52 Installation Guide

Running the Installer Chapter 3 Silent Mode Installation
Running the InstallerCreate the response file according to your system environment, and place it anywhere on the installation machine.
Note If you are upgrding from a previous release, be sure to read “Upgrading from a Previous CIS Release” on page 15 for information about the overall installation and upgrade process.
To run the installer
1. Run the following command from the directory where the installation executable is:On Windows:
install.exe -f <PATH>\\installer.properties
On UNIX: install.bin -f <PATH>/installer.properties
where installer.properties is the name of the response file, and <PATH> is the full path to the directory where the response file is.
Running this installer without an appropriate response file generates an error message.
Composite Information Server 53 Installation Guide

Running the Installer Chapter 3 Silent Mode Installation
Composite Information Server 54 Installation Guide

Chapter 4
Uninstalling Composite
This chapter describes the process of uninstalling Composite Information Server (CIS) for Windows and UNIX.
“Uninstalling Composite on Windows” on page 56
“Uninstalling Composite on UNIX” on page 57
Composite Information Server 55 Installation Guide

Uninstalling Composite on Windows Chapter 4 Uninstalling Composite
Uninstalling Composite on WindowsYou uninstall CIS on Windows as described below. Keep these things in mind:
When you uninstall CIS, everything stored in the metadata repository is deleted along with the CIS software.
If you have installed either Composite Active Cluster or any of the Application Data Services (e.g. Data Services for Oracle, Data Services for SAP, Data Services for PeopleSoft, etc.), you must uninstall them before uninstalling CIS.
You follow essentially the same uninstall process, regardless of whether you performed a silent or interactive installation.
To uninstall CIS on Windows
1. Select Start > All Programs > Composite Software (version) > Composite Uninstall, from the Windows Program group or the location where you installed Composite.For a silent uninstall, a message is displayed indicating that the uninstall is occurring. For an interactive uninstall, go to step 2.
2. In the Uninstall CompositeSoftware(version) Introduction window, click the Next button.
3. Click Uninstall to proceed.4. Click Done when the uninstallation process is completed.
Composite Information Server 56 Installation Guide

Uninstalling Composite on UNIX Chapter 4 Uninstalling Composite
Uninstalling Composite on UNIXTwo tasks are described here:
Pre-Uninstallation Task on UNIX
Uninstalling Composite On UNIX
Note You follow essentially the same uninstall process, regardless of whether you performed a silent or interactive installation.
Pre-Uninstallation Task on UNIX Before you uninstall Composite, you may remove the Composite service files from the installation machine because the uninstaller does not remove these files automatically.
To remove the Composite service files csw.repository and csw.server
1. Log into the installation machine as root.2. Change the working directory to <installation_directory>/bin.3. Run the following command:
remove_services.sh
Uninstalling Composite On UNIXDuring the uninstallation process, all the components from the previous installation will be removed. You cannot uninstall the components individually.
Note On an HP machine, the uninstaller does NOT delete the <installation_directory>, because the Java process under <installation_directory>/jre has the directory locked.
Composite Information Server 57 Installation Guide

Uninstalling Composite on UNIX Chapter 4 Uninstalling Composite
To uninstall Composite on UNIX
1. Log into the installation machine as the user that installed the software.2. Run the following command:
<installation_directory>/Uninstall_CompositeSoftware<version>/Uninstall_CompositeSoftware<version>
For a silent uninstall, a message is displayed indicating that the uninstall is occurring. For an interactive uninstall, go to step 2.
3. Press the Enter key.You will see a warning about loss of data.
4. Press the Enter key to complete the uninstallation process and leave the uninstaller.
Composite Information Server 58 Installation Guide

@ A B C D E F G H I J K L M # N O P Q R S T U V W X Y Z
Index
Symbols.CAR file 15
Numerics64-bit installers 964-bit JVM operation 9
Aaccess rights
upgrading 22AIX
JRE provided 11setting the memory 40versions supported 10
AIX 5.2 or higher 8All Components variables 47authentication mechanism
cataloging for upgrade 16authentication, into Composite Server 43
Bbacking up metadata 17backup_export command 17backup_import command 19base port setting 23
Ccatalog a CIS instance 16CIS instance
backing up 17cataloging 16importing 19testing 20
CIS instance settings 16CIS testing program 20command
backup_export 18backup_import 19
compatibility of database schemascataloging for upgrade 17
Composite JDBC response fileUNIX 52
Composite ManagerWeb browsers supported 11
Composite Server
59

D Index
components 28port settings 23Windows service 38
csw.repository and csw.server, remove 57CSW_CREATE_SHORTCUTS, optional
variable, response file 47CSW_DATABASE_ADMIN_PASSWORD,
required variable, response file 48CSW_DATABASE_SERVICE_NAME,
optional variable, response file 49CSW_INSTALL_COMPONENTS, required
variable, response file 47CSW_INSTALL_DIRECTORY, required
variable, response file 47CSW_SERVICE_NAME, optional variable,
response file 49CSW_SHORTCUTS_DIRECTORY,
optional variable, response file 49CSW_SHORTCUTS_GROUP_NAME,
optional variable, response file 49CSW_WEBSERVICES_HTTP_PORT,
optional variable, response file 48, 49custom data sources
cataloging for upgrade 16Custom Java Procedure 13customized settings
cataloging for upgrade 17
Ddata sources
supported 13data sources supported 13DB2 versions 13directory structure
Composite 39disk space
minimum needed 12documentation set 4documenting
a CIS instance 16
driversupgrading 19
Eencryption support 8exporting metadata 17external database 15external libraries 19
cataloging for upgrade 16
HHP 10, 11HP-UX 8
JRE provided 11versions supported 10
IIATEMPDIR, optional variable, response
file 46IBM DB2 versions 13importing metadata 19Informix
versions supported 13Install Anywhere variables 46installation
components 28directory, Windows 39pre, considerations 7pre-installation checklist 23silent 45verifying 42
installation stepsupgrading 18
installerrunning 53
INSTALLER_UI, required variable,
60

J Index
response file 46
JJDBC
data source types, supported 13JDBC driver
upgrading 19JRE flags 17JREs provided 11JVM support 9
LLDAP 13Linux
JRE provided 11versions supported 10
Linux, pre-installation task 24
Mmanaged/unmanaged memory 17memory
CSW_MAX_MEMORY, optional variable, response file 48
MAX_MEMORY setting for AIX 40requirements 12
metadataexporting 17importing 19
metadata repository 34, 41cataloging for upgrade 16external database 15
metadate repositoryupgrading 15
Microsoft Access 13Microsoft Excel 13Microsoft Internet Explorer 11
Microsoft SQL Serverversions supported 13
Microsoft Windows Server 2000 SP4 8Microsoft Windows Server 2003 SP1 8Microsoft Windows XP Professional SP2 8migrating
steps 15migrating from an old release 15migration from earlier releases 22Mozilla Firefox 11multiple CIS instances 15MySQL
repository database versions 14versions supported 13
MySQL support 13
Nnative JVM support 9Netezza
versions supported 13
OODBC
data source types supported 13driver version 13
ODBC driverupgrading 19
Oraclerepository database versions 14versions supported 13
Pplatforms supported 8, 9port numbers
cataloging for upgrade 16port setting assignments 23
61
R Index
port settingschanging 23Composite Server 23
pre-installation steps 29protocols supported 13PubTest 20
RRed Hat Enterprise Linux AS 8repository configuration
upgrade consideration 18repository database 34
types supported 14requirement
uninstalling on UNIX 57requirements
disk space 12installation 23memory 12silent mode installation 46Web browsers 11
response file 45required variables, in 46, 47, 48
response file variables 46running the installer 53
Ssample Composite JDBC response file
UNIX 52sample server response file
UNIX 52Windows 50
sample Studio response fileWindows 51
securityaccess rights 22
Server Component variables 48server response file
UNIX 52Windows 50
service files, csw.repository and csw.server, remove 57
settingsCIS instance 16
silent mode installation 46silent mode installation, Composite
Information Server 45SOAP
version, supported 13Solaris 8
JRE provided 11versions supported 10
SPARC 8steps
upgrading 15Strong Encryption Pack 8Studio Component variables 49Studio response file
Windows 51subdirectories
installation 39support for encryption 8supported platforms 8, 9SUSE Linux Enterprise Server 8Sybase
versions supported 13Sybase ASE
repository database versions 14syntax
backup_export command 18backup_import command 19
TTeradata
versions supported 13testing
new CIS instance 20testing program 20
62

U Index
Uuninstalling 56
on UNIX 57on Windows 56
UNIXComposite Server startup 41running the installer 53sample Composite JDBC response file 52sample server response file 52uninstallation requirement 57uninstalling 57
upgrading 22drivers 19installation steps 18repository configuration 18steps 15
upgrading to a new release 15users/groups
cataloging for upgrade 16
Vvariables
All Components 47Install Anywhere 46Server Component 48Studio Component 49
variables for response file 46verifying installation 42
WWeb browsers 11Web services http 23Windows
Composite Server startup 38JRE provided 11running the installer 53
sample server response file 50sample Studio response file 51uninstalling 56versions supported 10
Windows installation directory 39WSDL
version, supported 13WSS4J 8
63
Composite Software, Inc.2655 Campus Dr. Suite 200
San Mateo, CA 94403
Phone: (650) 227-8200Fax: (650) 227-8199
Web: www.compositesw.com