collabrasuite® - collabraspace
TRANSCRIPT
CollabraSuite®
Installation Guide
Version 7.0


Copyright
Copyright © 2000-2008 CollabraSpace, Inc. All Rights Reserved.
Restricted Rights Legend
This software is protected by copyright, and may be protected by patent laws. No copying or other use of this software is permitted unless you have entered into a license agreement with CollabraSpace authorizing such use. This document is protected by copyright and may not be copied photocopied, reproduced, translated, or reduced to any electronic medium or machine readable form, in whole or in part, without prior consent, in writing, from CollabraSpace, Inc.
Information in this document is subject to change without notice and does not represent a commitment on the part of CollabraSpace. THE DOCUMENTATION IS PROVIDED “AS IS” WITHOUT WARRANTY OF ANY KIND INCLUDING WITHOUT LIMITATION, ANY WARRANTY OF MERCHANTABILITY OR FITNESS FOR A PARTICULAR PURPOSE. FURTHER, COLLABRASPACE DOES NOT WARRANT, GUARANTEE, OR MAKE ANY REPRESENTATIONS REGARDING THE USE, OR THE RESULTS OF THE USE, OF THE DOCUMENT IN TERMS OF CORRECTNESS, ACCURACY, RELIABILITY, OR OTHERWISE.

Installation Guide 5
Contents
IntroductionPrerequisites . . . . . . . . . . . . . . . . . . . . . . . . . . . . . . . . . . . . . . . . . . . . . . . . . . . . . . . . . . . . 1-2
Installing CollabraSuiteInstall CollabraSuite. . . . . . . . . . . . . . . . . . . . . . . . . . . . . . . . . . . . . . . . . . . . . . . . . . . . . . 2-1
Install in Text Mode . . . . . . . . . . . . . . . . . . . . . . . . . . . . . . . . . . . . . . . . . . . . . . . . . . 2-1
Install in Silent Mode . . . . . . . . . . . . . . . . . . . . . . . . . . . . . . . . . . . . . . . . . . . . . . . . . 2-1
Install in GUI Mode . . . . . . . . . . . . . . . . . . . . . . . . . . . . . . . . . . . . . . . . . . . . . . . . . . 2-2
Uninstalling CollabraSuite . . . . . . . . . . . . . . . . . . . . . . . . . . . . . . . . . . . . . . . . . . . . . . . . . 2-7
Configuring CollabraSuiteCreate the Domain . . . . . . . . . . . . . . . . . . . . . . . . . . . . . . . . . . . . . . . . . . . . . . . . . . . . . . . 3-1
Extend the Domain. . . . . . . . . . . . . . . . . . . . . . . . . . . . . . . . . . . . . . . . . . . . . . . . . . . . . . . 3-2
WebLogic 10 Domain. . . . . . . . . . . . . . . . . . . . . . . . . . . . . . . . . . . . . . . . . . . . . . . . . 3-2
WebLogic SIP Server 4 Domain . . . . . . . . . . . . . . . . . . . . . . . . . . . . . . . . . . . . . . . 3-12
Finish Extending the Domain . . . . . . . . . . . . . . . . . . . . . . . . . . . . . . . . . . . . . . . . . . 3-13
Media Server Configuration. . . . . . . . . . . . . . . . . . . . . . . . . . . . . . . . . . . . . . . . . . . . . . . 3-15
Create the Collaborative Environment. . . . . . . . . . . . . . . . . . . . . . . . . . . . . . . . . . . . . . . 3-16
Integrate with Web Applications . . . . . . . . . . . . . . . . . . . . . . . . . . . . . . . . . . . . . . . . . . . 3-17
AppendicesWebLogic Domain Extension Summary . . . . . . . . . . . . . . . . . . . . . . . . . . . . . . . . . . . . . . 4-1
WebLogic Portal Extension Summary. . . . . . . . . . . . . . . . . . . . . . . . . . . . . . . . . . . . . . . . 4-2

6 Installation Guide
Upgrading CollabraSuite. . . . . . . . . . . . . . . . . . . . . . . . . . . . . . . . . . . . . . . . . . . . . . . . . . 4-4
Clustering Configuration. . . . . . . . . . . . . . . . . . . . . . . . . . . . . . . . . . . . . . . . . . . . . . . . . . 4-4
Supported Configurations . . . . . . . . . . . . . . . . . . . . . . . . . . . . . . . . . . . . . . . . . . . . . . . . . 4-5
Special UNIX Instructions . . . . . . . . . . . . . . . . . . . . . . . . . . . . . . . . . . . . . . . . . . . . . . . . 4-5
Special MySQL Instructions . . . . . . . . . . . . . . . . . . . . . . . . . . . . . . . . . . . . . . . . . . . . . . . 4-5
WebLogic 10. . . . . . . . . . . . . . . . . . . . . . . . . . . . . . . . . . . . . . . . . . . . . . . . . . . . 4-5
Installation Guide 1-1
C H A P T E R 1
Introduction
CollabraSuite offers a metaphorical representation of a physical workplace. The virtual environment is made up of rooms, which can be arranged into a virtual floor of unlimited rooms, thus allowing for the grouping of like rooms by functionality or other common means. The floors can then be arranged within a virtual building, and numerous buildings can be grouped to create a virtual campus. Within this campus and its encompassing buildings, floors, and rooms, users can communicate seamlessly. CollabraSuite provides a means of hosting private meetings, group communications, or seminar style conferences for the entire enterprise.
When a user logs into CollabraSuite, they are entering an environment where they can meet other users, text chat with them, share documents, display whiteboards , presentations or desktop areas. Not only can users collaborate with others in their current room, but presence awareness capabilities enable them to see users working in other locations. Users can instantly join others in any room by simply clicking a button. As users move around the collaborative environment, they can bring their private briefcase with them—a repository filled with documents that only they can see. Documents in a user’s briefcase can easily be shared by dropping a document into a room file cabinet. In addition to storing private documents in a user’s briefcase, CollabraSuite provides the ability to store public documents in file cabinets within a room. These documents can then be viewed by users within the same room.
The CollabraSuite environment also offers security aspects of the physical environment. Strong security features make it possible to permit or deny access to all areas of the collaborative environment and its contents. Individual rooms can be locked with Access Control Lists (ACLs). Read and write ACLs control access to documents stored in rooms
In t roduct ion
1-2 Installation Guide
as well. The CollabraSuite environment provides the flexibility and the security of the physical work environment, all while having the freedom to connect users in any location.
CollabraSuite is developed in Java utilizing the Java 2 Enterprise Edition (J2EE) application model, making it deployable to multiple J2EE servers. CollabraSuite integrates seamlessly with existing applications or system frameworks such as portals or other products as a complementary technology.
This version of CollabraSuite is specifically designed for deployment to a WebLogic® application server. However, the media does contain all of the necessary software and scripts to deploy to other application servers. CollabraSpace recommends that you deploy CollabraSuite in a development domain prior to performing a deployment into an existing production environment.
In this document, the directory where WebLogic is installed will be referred to as WL_HOME. For example, WL_HOME=C:\bea\wlserver_10.3. The WebLogic domain directory will be referred to as DOMAIN_HOME. For example, DOMAIN_HOME=C:\bea\user_projects\domains\portalDomain.
The rest of this document will guide you through the process of installing the CollabraSuite software. If you are upgrading an existing installation of CollabraSuite, see the Upgrading CollabraSuite appendix. It is assumed that the installer has some familiarity with J2EE applications and the WebLogic application server.
For additional assistance and information visit us at www.collabraspace.com.
PrerequisitesThe following prerequisites must be satisfied before installing CollabraSuite. Please refer to the Supported Configurations Guide for supported versions of WebLogic and database servers.
Install WebLogic Server.
If using SIP, install WebLogic Communications Server and a media server.
If using WebLogic Portal, install WebLogic Platform.
Install a database accessible by the WebLogic server machine.
Create a database user for CollabraSuite that has permissions to connect to the database and create tables and indexes.

Pre requ is i tes
Installation Guide 1-3
Install WebCenter Interaction (formerly AquaLogic User Interaction), if CollabraSuite is to be integrated with WebCenter Interaction.
Install the Microsoft .NET Framework 3.5 and IIS 4.0 or later, if CollabraSuite presentation capabilities are to be utilized.

In t roduct ion
1-4 Installation Guide
Installation Guide 2-1
C H A P T E R 2
Installing CollabraSuite
The CollabraSuite software installs as a component inside of the BEA Home installation directory.
Install CollabraSuiteThe CollabraSuite installer can be run in three different modes: GUI mode, text mode and silent mode. The installer should start in GUI mode automatically when the installation CD is placed in a Windows machine. If you are running on a different platform or wish to install using text or silent mode, the installer can be started manually:
For Windows, run installer\WebLogic\CollabraSuite-701-windows.exe.
For Solaris, run installer/WebLogic/CollabraSuite-701-solaris.bin.
For Linux, run installer/WebLogic/CollabraSuite-701-linux.bin.
Install in Text ModeOn Linux and Solaris, the installer can be run in text mode by appending -i console to the command line parameters.
Install in Silent ModeThe installer can be run in silent mode by creating an installer.properties file in the same directory as the installer. The properties file must contain the following two lines:
Ins ta l l i ng Co l lab raSu i te
2-2 Installation Guide
INSTALLER_UI=silent
USER_INSTALL_DIR=/path/to/bea/home
Where USER_INSTALL_DIR is set to the absolute path to the BEA home directory.
Note: If running the silent installer on Windows, the USER_INSTALL_DIR path should contain forward slashes instead of backslashes. For example, C:/bea instead of C:\bea.
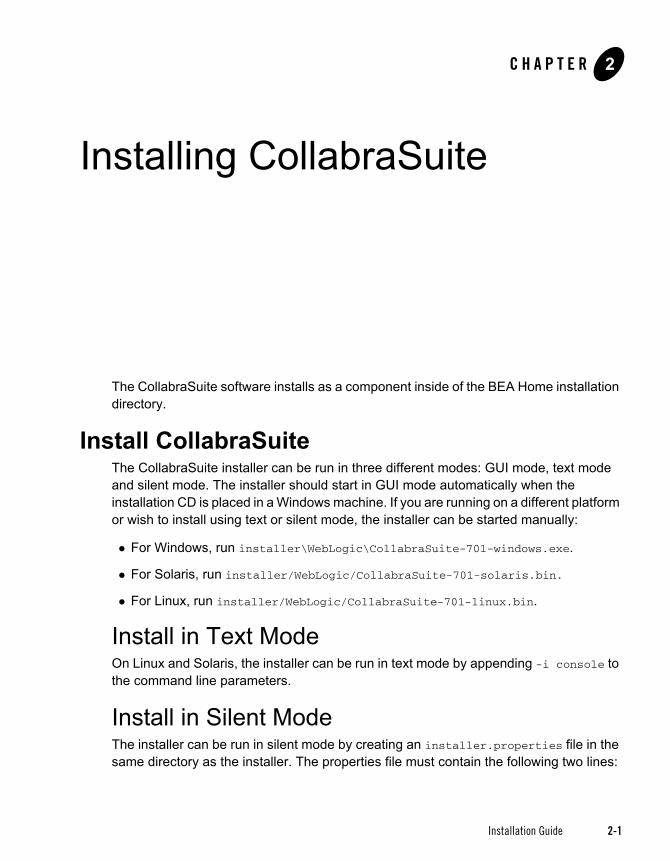
Install in GUI Mode1. Launch the installer and click Next on the Introduction Page.
Figure 2-1 Introduction

Ins ta l l Co l l ab raSu i te
Installation Guide 2-3
2. Read and accept the terms of the license agreement and click Next.
Figure 2-2 License Agreement

Ins ta l l i ng Co l lab raSu i te
2-4 Installation Guide
3. Choose the BEA home directory and click Next. For example: C:\bea or /opt/bea.
Figure 2-3 Locate BEA Home
Ins ta l l Co l l ab raSu i te
Installation Guide 2-5
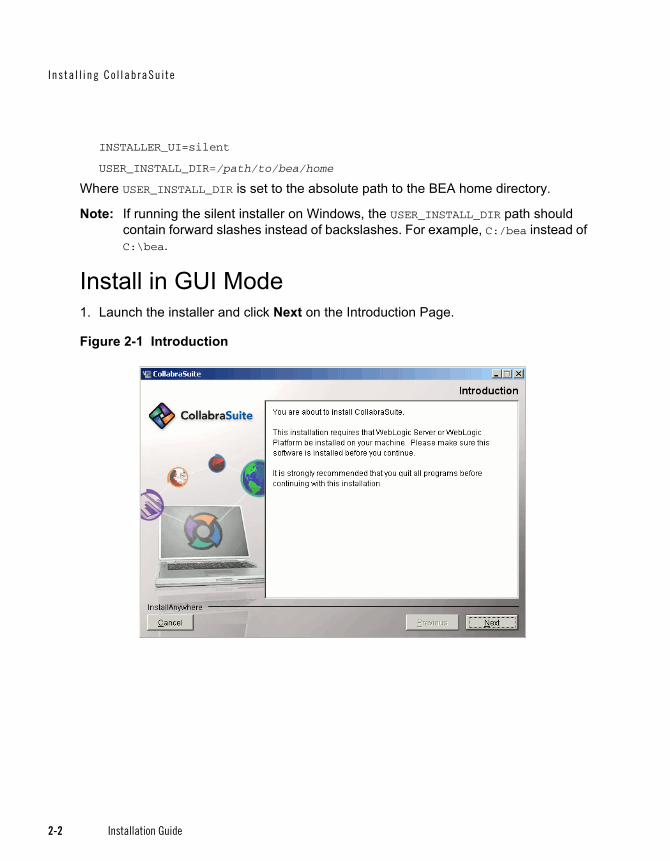
4. Review the pre-installation summary and click Install.
Figure 2-4 Pre-Install Summary
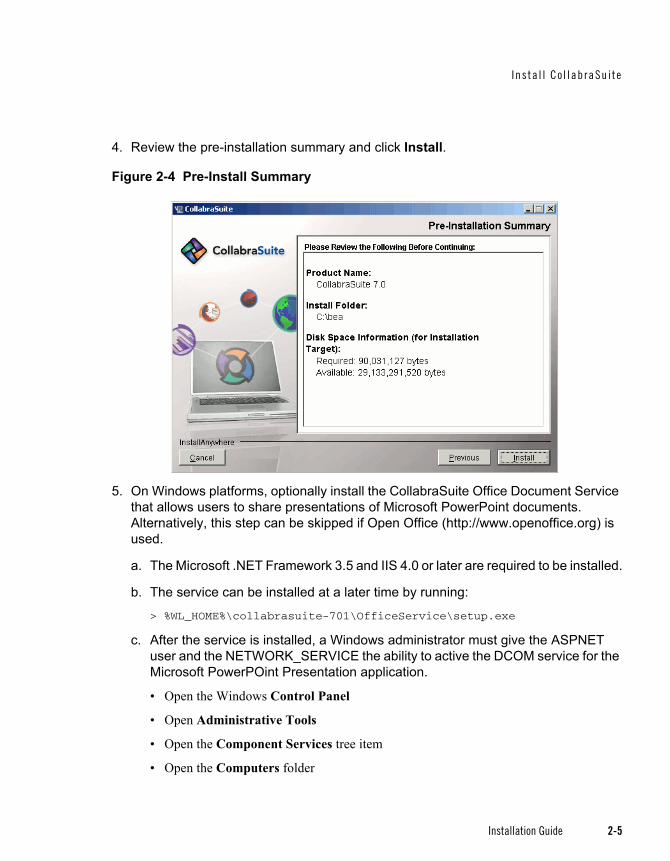
5. On Windows platforms, optionally install the CollabraSuite Office Document Service that allows users to share presentations of Microsoft PowerPoint documents. Alternatively, this step can be skipped if Open Office (http://www.openoffice.org) is used.
a. The Microsoft .NET Framework 3.5 and IIS 4.0 or later are required to be installed.
b. The service can be installed at a later time by running:
> %WL_HOME%\collabrasuite-701\OfficeService\setup.exe
c. After the service is installed, a Windows administrator must give the ASPNET user and the NETWORK_SERVICE the ability to active the DCOM service for the Microsoft PowerPOint Presentation application.
• Open the Windows Control Panel
• Open Administrative Tools
• Open the Component Services tree item
• Open the Computers folder
Ins ta l l i ng Co l lab raSu i te
2-6 Installation Guide
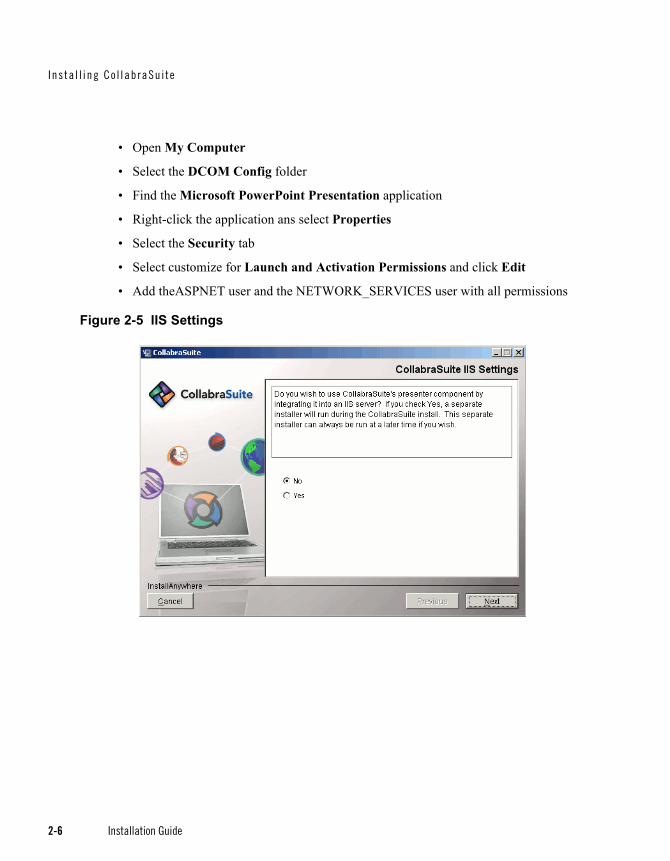
• Open My Computer
• Select the DCOM Config folder
• Find the Microsoft PowerPoint Presentation application
• Right-click the application ans select Properties
• Select the Security tab
• Select customize for Launch and Activation Permissions and click Edit
• Add theASPNET user and the NETWORK_SERVICES user with all permissions
Figure 2-5 IIS Settings

Uninsta l l ing Co l lab raSu i te
Installation Guide 2-7
6. At this point the CollabraSuite software has been successfully installed in the BEA home directory. Click Done to exit the installer.
Figure 2-6 Install Complete
Uninstalling CollabraSuiteUninstalling CollabraSuite removes the software from the BEA home installation directory. This will prevent the creation of new WebLogic domains containing CollabraSuite and may break existing WebLogic domains running CollabraSuite. Prior to uninstalling, WebLogic Workshop and any WebLogic domains should be shutdown. Uninstalling CollabraSuite can be accomplished by running the following scripts:
For Windows:
> %WL_HOME%\collabrasuite-701\uninstall\Uninstall CollabraSuite701.exe
For Solaris:
$ ${WL_HOME}/collabrasuite-701/uninstall/Uninstall\ CollabraSuite701
For Linux:
$ ${WL_HOME}/collabrasuite-701/uninstall/Uninstall\ CollabraSuite701
Ins ta l l i ng Co l lab raSu i te
2-8 Installation Guide
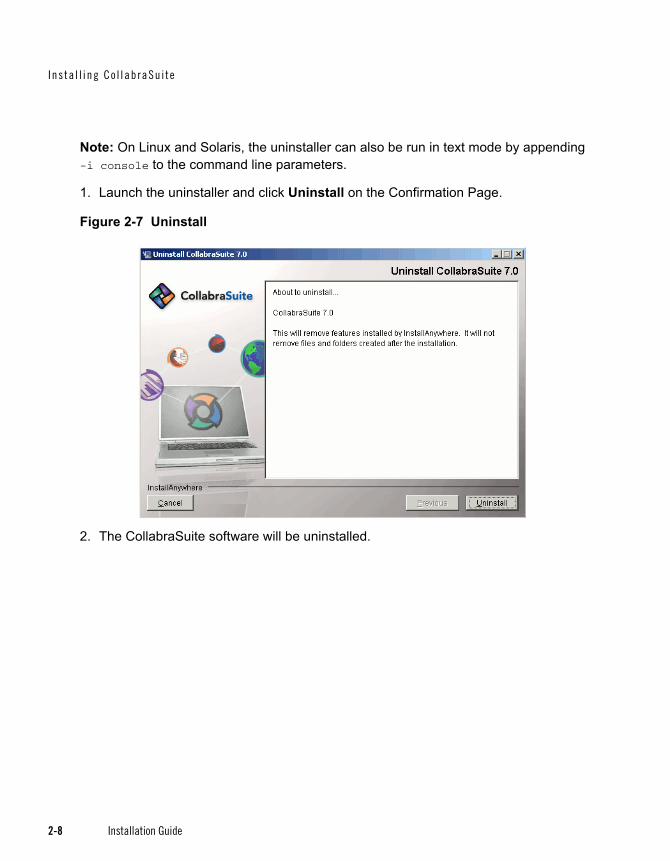
Note: On Linux and Solaris, the uninstaller can also be run in text mode by appending -i console to the command line parameters.
1. Launch the uninstaller and click Uninstall on the Confirmation Page.
Figure 2-7 Uninstall
2. The CollabraSuite software will be uninstalled.

Installation Guide 3-1
C H A P T E R 3
Configuring CollabraSuite
Create the DomainWhile CollabraSuite may be successfully deployed into any type of WebLogic domain, a portal domain is required if CollabraSuite is to be deployed inside a WebLogic Portal. If a WebLogic domain has not yet been created at your site, use the WebLogic Configuration Wizard to create one.
WebLogic 10In WebLogic 10, CollabraSuite can be installed into a domain at creation time, or added later by extending the domain. Refer to the section Extend WebLogic 10 Domain below for instructions on configuring CollabraSuite when creating or extending the domain. Consult Oracle's website for directions on Creating a New WebLogic 10 Domain. (http://edocs.bea.com/common/docs100/confgwiz/index.html).
WebLogic SIP Server 4In WebLogic SIP Server, CollabraSuite can be installed into a domain at creation time, or added later by extending the domain. Refer to the section Extend WebLogic SIP Server Domain below for instructions on configuring CollabraSuite when creating or extending the domain.
Consult Oracle’s website for directions on Creating a New WebLogic SIP Server Domain. (http://edocs.bea.com/wlcp/wlss30/install/quickstart.html#wp1089865)

Conf igur ing Co l labraSui te
3-2 Installation Guide
Extend the DomainWebLogic 10 DomainThis section describes extending a WebLogic 10 domain.
1. Run the WebLogic Configuration Wizard.
a. In Windows, you can use the Start menu to run the Configuration Wizard. For other platforms, you can execute the Configuration Wizard script located in the WebLogic installation directory:
$ cd $WL_HOME/common/bin
$ ./config.sh &

Ex tend the Domain
Installation Guide 3-3
2. Extend an existing WebLogic domain.
a. Choose Extend an existing WebLogic domain.
b. Click Next.
Figure 3-1 Create or Extend WebLogic Domain
Conf igur ing Co l labraSui te
3-4 Installation Guide
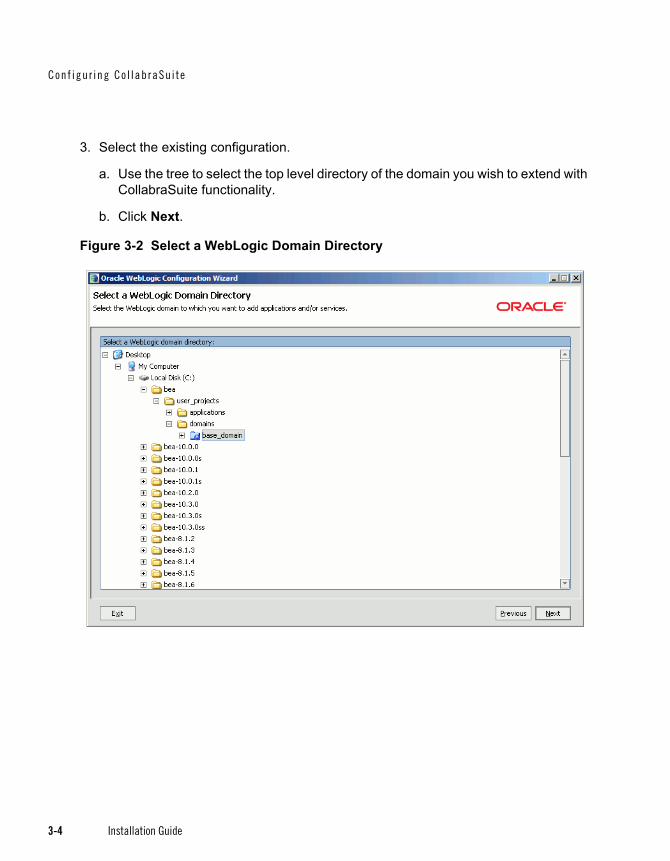
3. Select the existing configuration.
a. Use the tree to select the top level directory of the domain you wish to extend with CollabraSuite functionality.
b. Click Next.
Figure 3-2 Select a WebLogic Domain Directory
Ex tend the Domain
Installation Guide 3-5
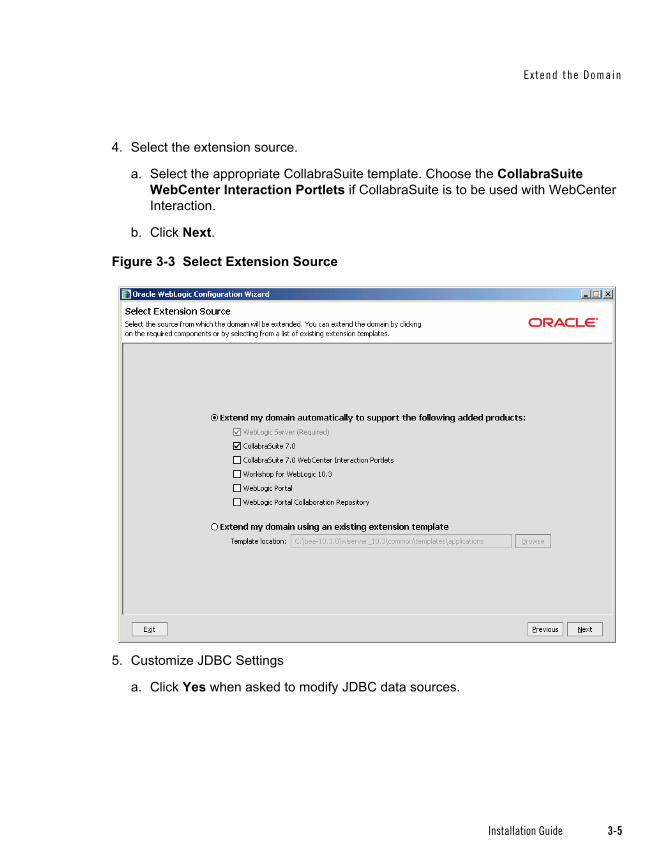
4. Select the extension source.
a. Select the appropriate CollabraSuite template. Choose the CollabraSuite WebCenter Interaction Portlets if CollabraSuite is to be used with WebCenter Interaction.
b. Click Next.
Figure 3-3 Select Extension Source
5. Customize JDBC Settings
a. Click Yes when asked to modify JDBC data sources.
Conf igur ing Co l labraSui te
3-6 Installation Guide
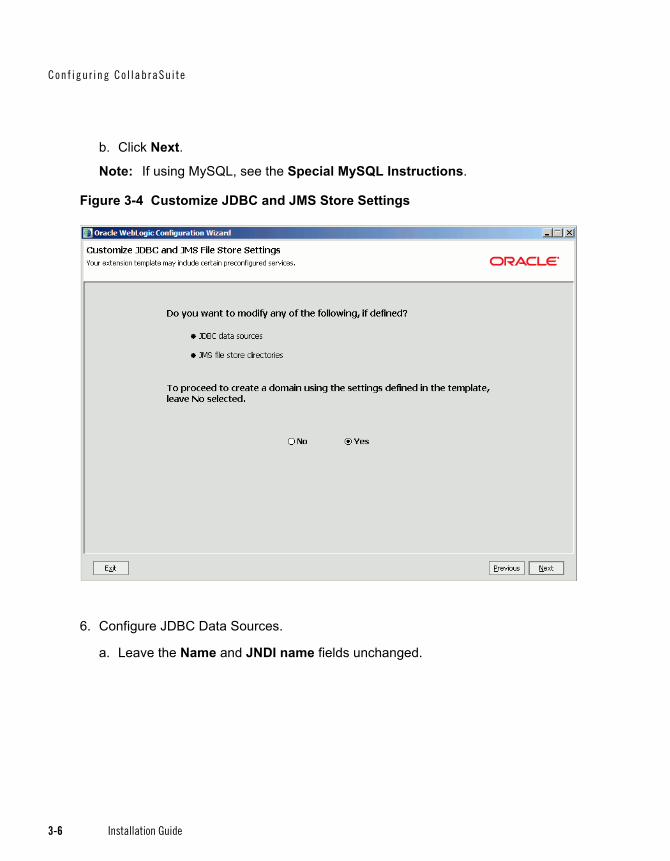
b. Click Next.
Note: If using MySQL, see the Special MySQL Instructions.
Figure 3-4 Customize JDBC and JMS Store Settings
6. Configure JDBC Data Sources.
a. Leave the Name and JNDI name fields unchanged.

Ex tend the Domain
Installation Guide 3-7
b. Fill in the appropriate Database type and Driver.
Note: Refer to the Supported Configurations Guide for supported databases and drivers.
c. Fill in the appropriate values for DBMS name, DBMS host, DBMS port, User name and User password.
d. Check Supports global transactions, then select Emulate two phase commit.
Figure 3-5 Configure JDBC Data Sources
Conf igur ing Co l labraSui te
3-8 Installation Guide
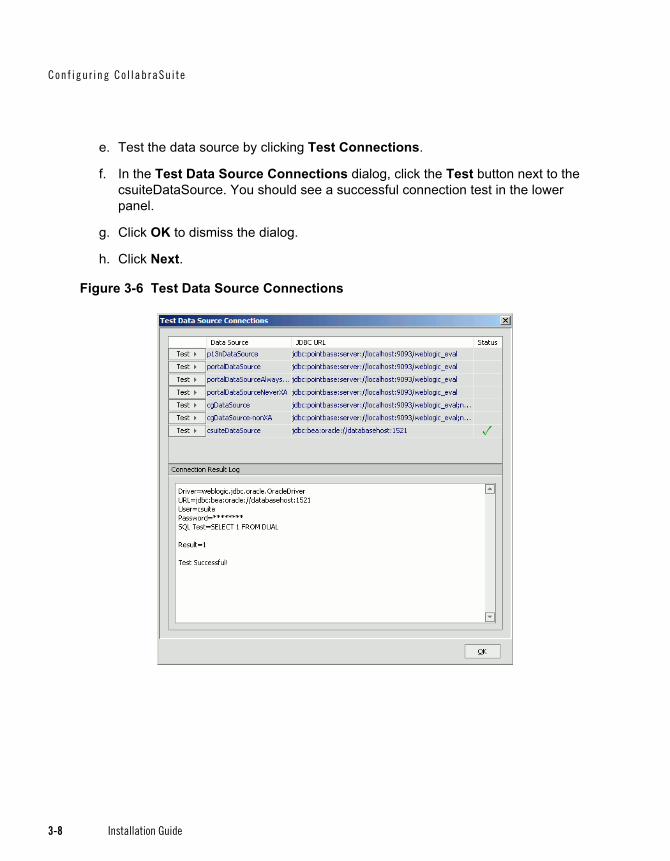
e. Test the data source by clicking Test Connections.
f. In the Test Data Source Connections dialog, click the Test button next to the csuiteDataSource. You should see a successful connection test in the lower panel.
g. Click OK to dismiss the dialog.
h. Click Next.
Figure 3-6 Test Data Source Connections
Ex tend the Domain
Installation Guide 3-9
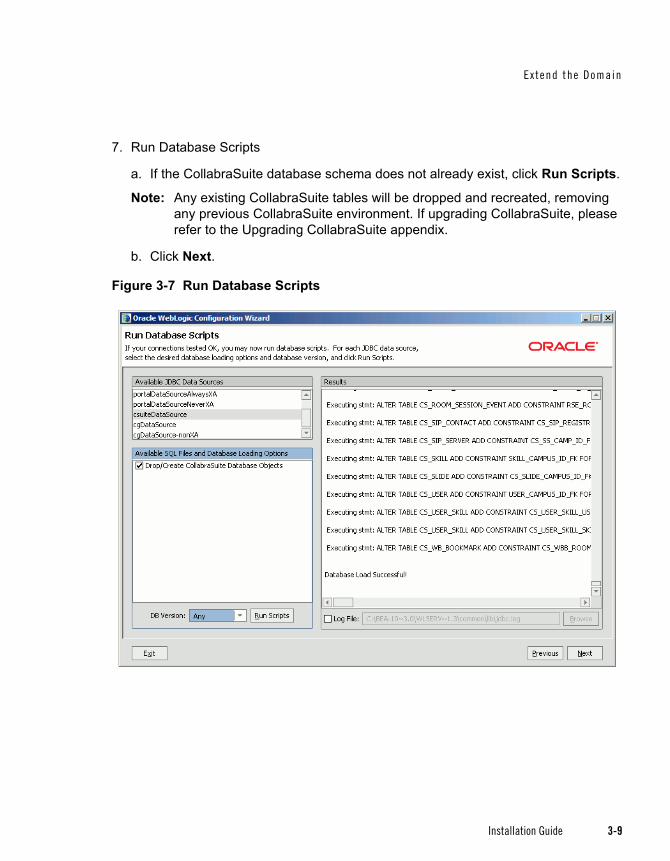
7. Run Database Scripts
a. If the CollabraSuite database schema does not already exist, click Run Scripts.
Note: Any existing CollabraSuite tables will be dropped and recreated, removing any previous CollabraSuite environment. If upgrading CollabraSuite, please refer to the Upgrading CollabraSuite appendix.
b. Click Next.
Figure 3-7 Run Database Scripts

Conf igur ing Co l labraSui te
3-10 Installation Guide
8. Review WebLogic Domain.
a. Click Next.
Figure 3-8 Review WebLogic Domain
9. Extend WebLogic Domain.
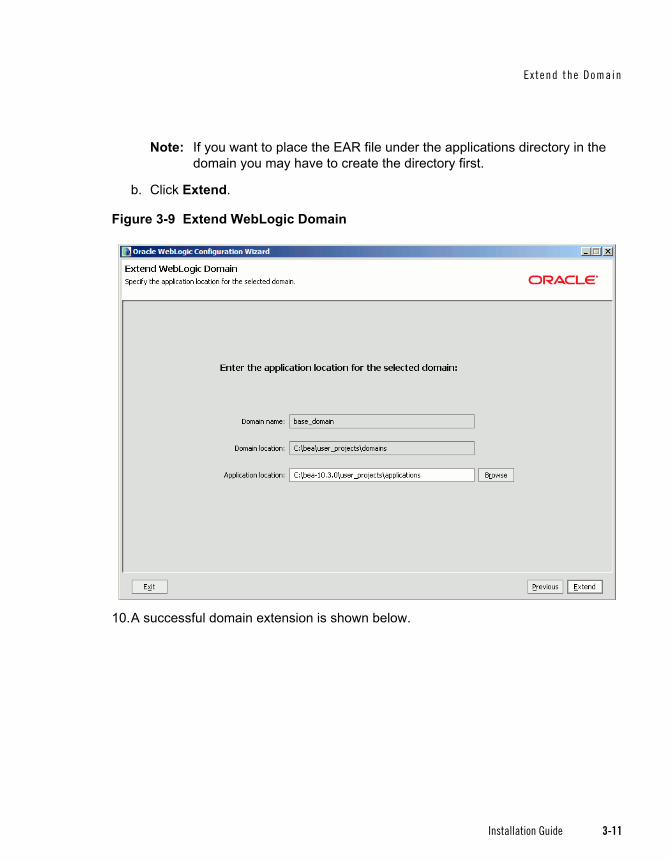
a. Select the desired Application location. This is where the CollabraSuite.ear file will be installed.
Ex tend the Domain
Installation Guide 3-11
Note: If you want to place the EAR file under the applications directory in the domain you may have to create the directory first.
b. Click Extend.
Figure 3-9 Extend WebLogic Domain
10.A successful domain extension is shown below.
Conf igur ing Co l labraSui te
3-12 Installation Guide
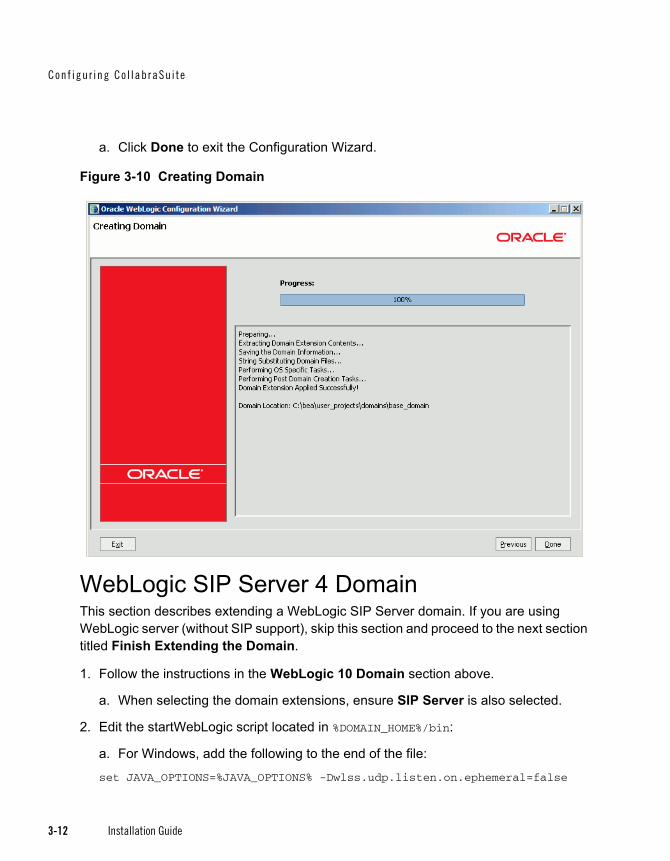
a. Click Done to exit the Configuration Wizard.
Figure 3-10 Creating Domain
WebLogic SIP Server 4 DomainThis section describes extending a WebLogic SIP Server domain. If you are using WebLogic server (without SIP support), skip this section and proceed to the next section titled Finish Extending the Domain.
1. Follow the instructions in the WebLogic 10 Domain section above.
a. When selecting the domain extensions, ensure SIP Server is also selected.
2. Edit the startWebLogic script located in %DOMAIN_HOME%/bin:
a. For Windows, add the following to the end of the file:
set JAVA_OPTIONS=%JAVA_OPTIONS% -Dwlss.udp.listen.on.ephemeral=false

Ex tend the Domain
Installation Guide 3-13
b. For Linux, add the following lines to the end of the file:
JAVA_OPTIONS=%JAVA_OPTIONS% -Dwlss.udp.listen.on.ephemeral=false
export JAVA_OPTIONS
Finish Extending the DomainAfter extending a WebLogic domain, complete the installation via the WebLogic console.
1. Start the WebLogic server
For Windows:> %DOMAIN_HOME%\startWebLogic.cmd
For Unix:$ $DOMAIN_HOME/startWebLogic.sh
Note: Startup will take some time because the CollabraSuite application is precompiled the first time the server is started after CollabraSuite has been deployed.
2. Verify the following groups exist; creating the groups if they are not present:
– CollabraSuiteAdministrators
– CollabraSuiteUsers
– CollabraSuiteRemote
Note: If using an LDAP, create the groups in the LDAP and add users to the appropriate groups within the LDAP manually.
3. Add any existing WebLogic users to the appropriate CollabraSuite groups:
– Users belonging to the CollabraSuiteAdministrators group can create a new CollabraSuite campus and administer any existing campus.
Note: Users belonging to the ‘Administrators’ and ‘PortalSystemAdministrators’ groups also belong to the CollabraSuiteAdministrators group.
– A user account used to initialize a remote campus connection must belong to the CollabraSuiteRemote group. This is the user account listed on the Remote Campus Admin Details page.
4. Modify the mail settings.

Conf igur ing Co l labraSui te
3-14 Installation Guide
a. Some CollabraSuite components generate email and therefore require a Mail Session. The mail session is created by the template and can be edited from the WebLogic Administration Console under Services->Mail->csuiteMailSession. Important properties of the mail session include:
• mail.host: SMTP mail server hostname; default=localhost
• mail.user: The user name used to connect to the mail server; default=empty
• mail.from: The return email address used when the sending user has not filled in their email address; default=collabraSuite@localhost
Note: For further details on the JavaMail API, refer to http://java.sun.com/products/javamail.
b. Advanced Mail options: CollabraSuite contains advanced mail formatting options that can configure email headers and footers; a bcc recipient list to be used; and a standard from address to be used. In order to configure these advanced mail settings, the ejb-jar.xml file within the csuite-ebj.jar in CollabraSuite.ear must be updated and the jars repackaged. The individual options are documented within the ejb-jar.xml file.
5. Verify the HTTP time-outs. CollabraSuite requires an HTTP time-out of at least 30 seconds.
a. The WebLogic default of 10 minutes is well within the requirements for CollabraSuite. If necessary, this setting can be modified from the WebLogic Administration Console under Servers->ServerName->Tuning->Stuck Thread Max Time.
b. This time-out also applies to any HTTP proxies between the client and WebLogic. The HTTP proxy time-out must be greater than or equal to WebLogic's time-out. Again, most defaults are much larger than 30 seconds, so these settings should not have to be modified to accommodate CollabraSuite.
6. Edit the privacy settings to allow CollabraSuite cookies. By default, IE6 and later use a “High” privacy setting for the use of cookies. Either require each user to change the privacy setting to “Medium High”, or set the server’s Platform for Privacy Preferences (P3P) Headers in order for IE to accept cookies in its “High” privacy mode.
a. Each user must perform the following steps to change the IE privacy setting:
• Select Tools -> Internet Options -> Privacy
• Select the Medium High privacy setting.
Media Se rve r Conf igurat ion
Installation Guide 3-15
b. Alternatively, set the P3P compact header in the WebLogic Administration Console:
• Select Domain -> Web Applications and scroll down to P3P Header Value and set it to the following policy:
CP="CAO DSP COR CURa ADMa DEVa OUR IND PHY ONL UNI COM NAV INT DEM PRE"
Note: For further details on Platform for Privacy Preferences (P3P), please see http://www.w3.org/TR/P3P.
Media Server ConfigurationThis section discusses configuring the CollabraSuite environment to utilize the audio and video conferencing capabilities. The following steps must be taken before audio and video conferencing is available in CollabraSuite.
1. CollabraSuite must be installed into a WebLogic Communications Server domain.
2. The CollabraSuite version of the Asterisk Media Server must be installed via an RPM. The RPM can be found on the CollabraSuite installation CD under the media-server directory. Install the media server with:
% rpm -Uvh cs_media_server-7.0-1.i386.rpm
3. The Asterisk media server must be configured by editing /etc/asterisk/sip.conf. The [general] section of the sip.conf file contains configuration data common to all SIP channels. Edit the following network related items:
– bindaddr: specifies the internal IP address of the media server host.
– externip: specifies the host’s external IP address if the media server also has an assigned external IP address.
– bindport: specifies the port number for which the media server will be listening for SIP connections. The standard SIP port is 5060, and this is set to 6060 by default. This must match the Media Server Port value specified in the SIP section of the CollabraSuite Administration.
– localnet: specifies which networks are local to the media server when the media server is available to clients on both internal and external networks. Entries are specified as a dotted decimal IP address and a subnet mask; for example, localnet=192.168.1.0/24. Multiple local networks can be specified by using separate localnet lines in the configuration file.

Conf igur ing Co l labraSui te
3-16 Installation Guide
4. The Asterisk media server must be configured by editing /etc/asterisk/manager.conf. Edit the following items:
– bindaddr: specifies the IP address used by the media server to listen for control messages. This defaults to 0.0.0.0 and does not have to be changed.
– port: specifies the port number used by the media server to listen for control messages. This is located in the [general] section of manager.conf. This defaults to 5038 and must match the Media Server Control Port value specified in the SIP section of the CollabraSuite Administration.
– permit: specifies the hosts permitted to control the media server. This is located in the [sipserver] section of manager.conf. A permit=<ip address> line must be present for each CollabraSuiteserver that uses this media server.
– secret: specifies the password used by CollabraSuite when controlling this media server. This value must match the Media Server Control Password value specified in the SIP section of the CollabraSuite Administration.
5. Start the media server as the root user with:
# /sbin/service asterisk start
6. The SIP Server settings must be configured within CollabraSuite. Please see the Administration Guide for instructions to configure the SIP functionality within CollabraSuite.
7. Users must have a compatible VOIP or soft phone available. Please see the User Guide for instructions on soft phone configuration.
Create the Collaborative EnvironmentOnce the CollabraSuite software has been successfully installed, all other documentation and administration capabilities are available via the deployed CollabraSuite application. A list of all available documentation and links to the documents can be found deployed in the WebLogic server at http://host:port/csuite/docs
1. Create the initial collaborative environment by using the CollabraSuite administration web application.
a. If necessary, create a CollabraSuite administration user in WebLogic that belongs to the CollabraSuiteAdministrators group.

I n tegra te w i th Web App l i cat i ons
Installation Guide 3-17
b. Bring up the CollabraSuite administration web application at http://host:port/csuite/ui/admin and log in as an administrative user.
c. Create the desired campus, buildings, floors, and rooms.
d. Create the desired users
e. In a portal environment, create corresponding WebLogic users in the Portal Administration. Otherwise, create the WebLogic users in the WebLogic Administration Console. The WebLogic user name must match the CollabraSuite user login ID. Alternatively, you can use the <setUserInfo> JSP tag inside a portlet to automatically create a CollabraSuite user that corresponds to the WebLogic user. See CollabraSuite.jspf in the sample portlets for an example of using the <setUserInfo> JSP tag.
Note: Refer to the CollabraSuite Administration Guide for more information on creating a collaborative environment.
Integrate with Web ApplicationsCollabraSuite can be tightly integrated with other web applications such as wikis and portals. The CollabraSuite Developer’s Guide discusses multiple integration strategies for these environments.

Conf igur ing Co l labraSui te
3-18 Installation Guide

Installation Guide 4-1
C H A P T E R 4
Appendices
WebLogic Domain Extension SummaryCollabraSuite J2EE components require specific services and security to be configured and deployed. The following table summarizes the configuration created by the CollabraSuite Domain Extension Template:
Table 4-1 Domain Extension Summary
Component Settings
JDBC Connection Pool Name: csuiteConnectionPool
JDBC Data Source Name: csuitePool
JNDI Name: weblogic.jdbc.jts.csuitePool
JMS Server Name: csuiteJMSServer
JNDI Name: weblogic.jms.csuiteEventTopic
JMS Connection Factory Name: csuiteConnectionFactory
JNDI Name: weblogic.jms.csuiteConnectionFactory
JMS Topic Name: csuiteEventTopic
JNDI Name: weblogic.jms.csuiteEventTopic
JMS Topic Name: csuiteRemoteEventTopic
JNDI Name: weblogic.jms.csuiteRemoteEventTopic
Append ices
4-2 Installation Guide
WebLogic Portal Extension SummaryIntegrating CollabraSuite J2EE components into a WebLogic portal requires specific files to be configured and deployed into the portal application. The following summarizes the configuration performed by the CollabraSuite Portal Extension Template:
The following files are copied into <portalApplication>/<portalProject>/WEB-INF/lib. They can be found on the distribution CD under the lib directory.– csuite-taglib.jar
– common-server.jar
– csuite-client.jar
– csuite-ejb-client.jar
– csuite-i9n-client.jar
– csuite-ria-common.jar
The following taglib is added to <portalApplication>/<portalProject>/WEB-INF/web.xml:
<taglib>
<taglib-uri>csuite-taglib.tld</taglib-uri>
<taglib-location>/WEB-INF/lib/csuite-taglib.jar</taglib-location>
</taglib>
Mail Session Name: csuiteMailSession
JNDI Name: csuiteMail
Admin User Name: csadmin
Default Password: password
Member of: CollabraSuiteUsers, CollabraSuiteAdministrators
User Group Name: CollabraSuiteUsers
Admin Group Name: CollabraSuiteAdministrators
Remote Group Name: CollabraSuiteRemote
Component Settings

WebLog ic Po r ta l Ex tens ion Summary
Installation Guide 4-3
The following ejb-refs are added to <portalApplication>/<portalProject>/WEB-INF/web.xml:
<ejb-ref>
<ejb-ref-name>ejb/CSuiteAdmin</ejb-ref-name>
<ejb-ref-type>Session</ejb-ref-type>
<home>com.collabraspace.csuite.server.i9n.interfaces.CSuiteAdminRemoteHome</home>
<remote>com.collabraspace.csuite.server.i9n.interfaces.CSuiteAdminRemote</remote>
</ejb-ref>
<ejb-ref>
<ejb-ref-name>ejb/CSuiteCollaboration</ejb-ref-name>
<ejb-ref-type>Session</ejb-ref-type>
<home>com.collabraspace.csuite.server.i9n.interfaces.CSuiteCollaborationRemoteHome</home>
<remote>com.collabraspace.csuite.server.i9n.interfaces.CSuiteCollaborationRemote</remote>
</ejb-ref>
The following ejb-refs are added to <portalApplication>/<portalProject>/WEB-INF/weblogic.xml:
<ejb-reference-description>
<ejb-ref-name>ejb/CSuiteAdmin</ejb-ref-name>
<jndi-name>ejb/CSuiteAdmin</jndi-name>
</ejb-reference-description>
<ejb-reference-description>
<ejb-ref-name>ejb/CSuiteCollaboration</ejb-ref-name>
<jndi-name>ejb/CSuiteCollaboration</jndi-name>
</ejb-reference-description>
Sample CollabraSuite portlets are installed under <portalApplication>/<portalProject>/portlets/CollabraSuite.

Append ices
4-4 Installation Guide
Upgrading CollabraSuiteThe process of upgrading an existing installation of CollabraSuite is similar to the process of creating a new installation.
1. Install the new version of CollabraSuite as described in chapter 2.
2. Delete the CollabraSuite application via the WebLogic Administration Console under Deployments/Applications.
3. Connect to the database configured for CollabraSuite and run the necessary upgrade SQL scripts. These scripts can be found under the CollabraSuite installation sql directory and they should be run in order. For example, to upgrade from CollabraSuite 5.1.3 to CollabraSuite 5.3.0, run alter513to520.sql and then run alter520to530.sql.
4. If upgrading a WebLogic 9 or WebLogic 10 portal, upgrade is supported only when using J2EE library modules. In this case, find any files that have been copied into the project from a CollabraSuite library module. Remove and then re-copy them into the local project while applying any local customizations.
5. Install the CollabraSuite application via the WebLogic Administration Console under Deployments/Applications.
6. Perform all steps in Finish Extending the Domain.
7. Upgrade the CollabraSuite license key. Refer to the CollabraSuiteAdministration Guide for details.
Clustering ConfigurationThis section discusses deployment of CollabraSuite into a WebLogic cluster. This section can safely be skipped for single server installations.
Note: Clustering is not supported with the PointBase database.
Use the WebLogic Domain Configuration wizard to extend a cluster domain as described in the Extend the Domain section of this guide.
Confirm the following configuration for the CollabraSuite JMS Connection factory:
General -> 'Server Affinity Enabled' is checked
Transactions -> 'XA Connection Factory Enabled' is checked
Suppor ted Conf igu rat ions
Installation Guide 4-5
When running in a cluster, the system clocks of all server nodes must be synchronized by using Network Timing Protocol (NTP) or some similar means of clock synchronization. When system clocks are not synchronized, incorrect event timestamps will occur and CollabraSuite users may be unexpectedly logged out of the application.
Supported ConfigurationsPlease see the Supported Configurations Guide for supported platforms and known limitations associated with particular configurations.
Special UNIX InstructionsSome UNIX servers ship without a graphics card. These “headless” machines require an extra WebLogic startup parameter in order to support CollabraSuite. This parameter can be passed to WebLogic by adding the following line to startWebLogic.sh:JAVA_OPTIONS=”${JAVA_OPTIONS} -Djava.awt.headless=true”
Special MySQL InstructionsWebLogic 10MySQL is supported by the standard WebLogic 10 installation; no additional configuration is necessary.
Note: See the Known Limitations section of the Supported Configurations Guide for the compatible versions of MySQL.

Append ices
4-6 Installation Guide

Installation Guide Index1-1
Index
CClustering Configuration 4-4Collaborative Environment 3-16CollabraSuite 1-1Configuration clustering 4-4Create Collaborative Environment 3-16Create Domain 2-7, 3-1Create Portal 3-17
DDomain Configure 4-1Domain extend 3-2
EExtend Domain 3-2
IIE
privacy settings 3-14privacy, P3P Headers 3-14
Install CollabraSuite 2-1Introduction 1-1introduction to WebLogic Portal 1-1, 2-1, 3-1
LLimitations 4-5
MMedia Server Configuration 3-15
MySQL Instructions 4-5
PPortal Create 3-17Prerequisites 1-2
UUNIX Instructions 4-5Upgrading CollabraSuite 4-4
WWebLogic Cluster 4-4WebLogic Domain 2-7, 3-1WebLogic Portal
introduction 1-1, 2-1, 3-1

Index1-2 Installation Guide