cluster installation guide - networker information hubnsrd.info/documentation/nw8/networker v8...
TRANSCRIPT
EMC®NetWorker™
Release 8.0
Cluster Installation GuideP/N 300-013-561REV A02

EMC NetWorker Release 8.0 Cluster Installation Guide2
Copyright © 1990 - 2012 EMC Corporation. All rights reserved. Published in the USA.
Published July, 2012
EMC believes the information in this publication is accurate as of its publication date. The information is subject to change without notice.
The information in this publication is provided as is. EMC Corporation makes no representations or warranties of any kind with respect to the information in this publication, and specifically disclaims implied warranties of merchantability or fitness for a particular purpose. Use, copying, and distribution of any EMC software described in this publication requires an applicable software license.
EMC2, EMC, and the EMC logo are registered trademarks or trademarks of EMC Corporation in the United States and other countries. All other trademarks used herein are the property of their respective owners.
For the most up-to-date regulatory document for your product line, go to the technical documentation and advisories section on the EMC online support website.
CONTENTS
Revision History
Chapter 1 PREFACE
Chapter 2 Introduction
About the NetWorker product ...................................................................... 13 NetWorker client ......................................................................................... 13 NetWorker storage node.............................................................................. 14 NetWorker server ........................................................................................ 14 NetWorker Management Console server ...................................................... 15 NetWorker datazone.................................................................................... 15 NetWorker daemons.................................................................................... 15 Supported storage devices.......................................................................... 16 NetWorker cluster services .......................................................................... 16 Enabler codes ............................................................................................. 17
Chapter 3 EMC AutoStart for Microsoft Windows Installation
Software installation roadmap .................................................................... 19 Installation requirements ............................................................................ 19
Software requirements .......................................................................... 20Hardware requirements......................................................................... 20Configuration options ........................................................................... 20System information requirements ......................................................... 21
Update the NetWorker software................................................................... 22Update to the NetWorker software in an AutoStart 5.4 and later cluster . 22
Install a NetWorker virtual server................................................................. 23Task 1: Ensure that the EMC AutoStart software is installed................... 23Task 2: Install the NetWorker software in a cluster................................. 23Task 3: Promote at least one secondary cluster node to primary ............ 24Task 4: Create the resource that will become the managed shared disk. 24Task 5: Define the NetWorker server as highly available ........................ 24Task 6: Configure the NetWorker virtual server ...................................... 26Task 7: Configure the clients of the NetWorker cluster server................. 27Task 8: Register NetWorker licenses for cluster server failover ............... 28
Install only the NetWorker client software in a cluster .................................. 29Task 1: Install the NetWorker cluster client software.............................. 29Task 2: Configure NetWorker client software as cluster aware................ 29
Uninstall the NetWorker software ................................................................ 30 Configure the NetWorker virtual server with a backup device ....................... 30 Troubleshoot the NetWorker software.......................................................... 31
Set the shutdown wait timeout values................................................... 31NetWorker virtual server fails to start nsrmmd ....................................... 31NetWorker server fails to back up a virtual cluster client ........................ 32Roll back changes to the cluster configuration file................................. 32
Chapter 4 EMC AutoStart for UNIX Installation
Software installation roadmap .................................................................... 36
EMC NetWorker Release 8.0 Cluster Installation Guide 3
Contents
Installation requirements ............................................................................ 36Software requirements .......................................................................... 36Hardware requirements......................................................................... 37Configuration options ........................................................................... 37System information requirements ......................................................... 37
Update the NetWorker software in an AutoStart 5.4 and later cluster ........... 39 Install a NetWorker virtual server................................................................. 39
Task 1: Ensure that the AutoStart software is installed .......................... 39Task 2: Install the NetWorker software in a cluster................................. 40Task 3: Define the NetWorker server as highly available ........................ 40Task 4: Grant access to the NetWorker virtual server.............................. 43Task 5: Configure the NetWorker server ................................................. 44Task 6: Configure clients under the NetWorker virtual server ................. 44Task 7: Register NetWorker licenses for virtual server failover................ 45
Install a virtual NetWorker Console server.................................................... 46Task 1: Install the NetWorker Management software in a cluster............ 46Task 2: Define the NetWorker Console server as highly available........... 47
Install only the NetWorker client software in a cluster .................................. 48Task 1: Install the NetWorker cluster client software.............................. 48Task 2: Configure the NetWorker client software as cluster aware.......... 49Task 3: Define the list of trusted NetWorker servers............................... 49Task 4: Configure clients under the NetWorker server ............................ 50
Uninstall the NetWorker software ................................................................ 51AIX Version............................................................................................ 51HP-UX version ....................................................................................... 52Linux version......................................................................................... 52Solaris version ...................................................................................... 52
Configure an external client to back up to a virtual server ............................ 52 Define ownership of a raw partition for virtual clients .................................. 53
Chapter 5 HACMP or PowerHA SystemMirror for AIX Installation
Software installation roadmap .................................................................... 56 Installation requirements ............................................................................ 56
Software requirements .......................................................................... 56Hardware requirements......................................................................... 56Configuration options ........................................................................... 56System information requirements ......................................................... 57
Install a NetWorker virtual server................................................................. 58Task 1: Install the NetWorker software in a cluster................................. 59Task 2: Define the server as highly available ......................................... 59Task 3: Define a NetWorker virtual server .............................................. 59Task 4: Grant access to the NetWorker virtual server.............................. 60Task 5: Configure the NetWorker cluster server...................................... 61Task 6: Configure clients under the NetWorker cluster server................. 62Task 7: Register NetWorker licenses for virtual server failover................ 63
Install only the NetWorker client software in a cluster .................................. 64Task 1: Install the NetWorker cluster client software.............................. 64Task 2: Configure the NetWorker client software as cluster aware.......... 64Task 3: Define the list of trusted NetWorker servers............................... 65Task 4: Configure clients under the NetWorker server ............................ 65
Uninstall the NetWorker software ................................................................ 66 Configure an external client to a virtual server ............................................. 67 Schedule saves for raw volumes.................................................................. 68 Track scheduled saves ................................................................................ 68
4 EMC NetWorker Release 8.0 Cluster Installation Guide
Contents
Chapter 6 MC/ServiceGuard and MC/LockManager Installation
Software installation roadmap .................................................................... 72 Installation requirements ............................................................................ 72
Software requirements for HP-UX .......................................................... 72Hardware requirements......................................................................... 73System information requirements ......................................................... 73
Prepare the system for the NetWorker installation ....................................... 74 Install the NetWorker server as highly available on HP-UX MC/ServiceGuard 74
Task 1: Install the NetWorker server software ........................................ 74Task 2: Configure the NetWorker software ............................................. 75Task 3: Define the NetWorker software as highly available .................... 76Task 4: Change the NetWorker servers with access to a client................ 79Task 5: Make the cluster nodes a client of the NetWorker virtual server . 80Task 6: Register NetWorker licenses for cluster server failover ............... 80
VxVM on HP ServiceGuard clusters .............................................................. 81 Install only the NetWorker client software in a cluster .................................. 84
Task 1: Install the NetWorker software .................................................. 84Task 2: Configure the NetWorker client software in the cluster............... 85Task 3: Change the NetWorker servers with access to a client................ 86Task 4: Configure cluster clients on the NetWorker server...................... 87
Uninstall the NetWorker software ................................................................ 88 Track scheduled saves ................................................................................ 89
Chapter 7 Microsoft Cluster Server (MSCS) Installation
Cluster terminology..................................................................................... 92 Installation requirements ............................................................................ 92 Update the NetWorker software................................................................... 93 Install the NetWorker server ........................................................................ 94
Install a NetWorker server for noncluster mode ..................................... 94Install a NetWorker server for cluster mode ........................................... 94
Configure a backup device for the NetWorker virtual server........................ 101Define a cluster node as a storage node .............................................. 102
Move the NetWorker server to another node.............................................. 103 Register NetWorker licenses for cluster failover.......................................... 103 Restart the NetWorker server services ....................................................... 104 Install only the NetWorker client software in a cluster ................................ 104 Uninstall the NetWorker software from MSCS ............................................ 105
Uninstall the software from all the nodes in the cluster ....................... 105Uninstall the software from only one node in the cluster...................... 105
Troubleshoot the NetWorker software in the MSCS environment ................ 106NetWorker virtual server fails to start nsrmmd ..................................... 106NetWorker server fails to back up a virtual cluster client ...................... 107NetWorker services fail to start in an MSCS environment ..................... 107
Chapter 8 Microsoft Failover Cluster on Windows Server 2008
Installation requirements .......................................................................... 109 Update the NetWorker software................................................................. 109 Install the NetWorker software in a Microsoft Failover Cluster .................... 110
Install a NetWorker server as a highly available application................. 110Install only the NetWorker client software............................................ 117
Uninstall the NetWorker software in a Microsoft Failover Cluster ................ 119
EMC NetWorker Release 8.0 Cluster Installation Guide 5
Contents
Chapter 9 Sun Cluster Version 3.2 Installation
Software installation roadmap .................................................................. 122 Installation requirements .......................................................................... 122
Software requirements ........................................................................ 122Hardware requirements....................................................................... 122Configuration options ......................................................................... 122System information requirements ....................................................... 123
Update from a previous release of the software......................................... 124 Install the NetWorker software in a cluster................................................. 125
Install a NetWorker virtual server......................................................... 125Install a virtual NetWorker Console server ........................................... 137Install only the NetWorker client software in a cluster.......................... 139
Install the NetWorker software in a zone cluster ........................................ 145Install NetWorker software in a whole root zone cluster ....................... 146Install the NetWorker software in a sparse root zone cluster ................ 147
Uninstall the NetWorker software .............................................................. 148 Configure an external client to a virtual server ........................................... 150 Define ownership of a raw partition for virtual clients ................................ 150
Chapter 10 VERITAS Cluster Server Installation
Cluster configuration................................................................................. 154 Software requirements.............................................................................. 155 Install the NetWorker server in a cluster .................................................... 155
Task 1: Install the NetWorker software ................................................ 155Task 2: Define the NetWorker server as a highly available application . 156Task 3: Define a NetWorker service group............................................ 158Task 4 (Optional): Create NetWorker Client resource instances............ 159Task 5: Grant access to the highly available NetWorker server............. 163Task 6: Configure the NetWorker virtual server .................................... 164Task 7: Configure clients under the NetWorker virtual server ............... 165Task 8: Register licenses for the highly available NetWorker server...... 166Task 9: Authorize the software ............................................................ 167
Install only the NetWorker client software in a cluster ................................ 168Task 1: Install the NetWorker cluster client software............................ 168Task 2: Configure NetWorker client software as cluster aware.............. 169Task 3 (Optional): Create NetWorker Client resource instances............ 170Task 4: Define the list of trusted NetWorker servers............................. 170Task 5: Configure clients under the NetWorker server .......................... 171
Tracking scheduled saves.......................................................................... 171 Uninstall the NetWorker software .............................................................. 172
Uninstall the software on Solaris and Linux ......................................... 172Uninstall the software on Windows ..................................................... 173
6 EMC NetWorker Release 8.0 Cluster Installation Guide

REVISION HISTORY
Email your clarifications or suggestions for this document to:
The following table lists the revision history of this document.
Revision Date Description of added or changed sections
A02 July 20, 2012 Updated the following:• In each chapter, added information to consider when modifying the servers file.• Replaced Powerlink references with the EMC Online Support Site.
A01 June 21, 2012 First release of this document for Restricted Availability (RA) of EMC NetWorker Release 8.0.
EMC NetWorker Release 8.0 Cluster Installation Guide 7

Revision History
8 EMC NetWorker Release 8.0 Cluster Installation Guide
PREFACE
As part of an effort to improve its product lines, EMC periodically releases revisions of its software and hardware. Therefore, some functions described in this document might not be supported by all versions of the software or hardware currently in use. The product release notes provide the most up-to-date information on product features.
Contact your EMC representative if a product does not function properly or does not function as described in this document.
This document was accurate at publication time. New versions of this document might be released on the EMC online support website. Check the EMC online support website to ensure that you are using the latest version of this document.
PurposeThis document describes how to uninstall, update and install the NetWorker software in a cluster environment.
AudienceThis document is part of the NetWorker documentation set and is intended for use by system administrators during the installation and setup of NetWorker software in a cluster environment.
Related documentationThe following EMC publications provide additional information:
◆ EMC NetWorker Administration GuideDescribes how to configure and maintain the NetWorker software.
◆ EMC NetWorker Installation GuideProvides information on how to install, uninstall and update the NetWorker software for clients, storage nodes, and servers on all supported operating systems.
◆ EMC NetWorker Release Notes Contains information on new features and changes, fixed problems, known limitations, environment and system requirements for the latest NetWorker software release.
◆ EMC NetWorker Avamar Devices Integration GuideProvides planning and configuration information on the use of Avamar devices in a NetWorker environment.
◆ EMC NetWorker Cloning Integration GuideContains planning, practices, and configuration information for using the NetWorker, NMM, and NMDA cloning feature.
◆ EMC NetWorker Command Reference GuideProvides reference information for NetWorker commands and options.
EMC NetWorker Release 8.0 Cluster Installation Guide 9
PREFACE
◆ EMC NetWorker Data Domain Deduplication Devices Integration Guide Provides planning and configuration information on the use of Data Domain devices for data deduplication backup and storage in a NetWorker environment.
◆ EMC NetWorker Disaster Recovery GuideContains information about preparing for a disaster and recovering NetWorker servers, storage nodes, and clients.
◆ EMC NetWorker Error Message GuideProvides information on common NetWorker error messages.
◆ EMC NetWorker Licensing GuideProvides information about licensing NetWorker products and features.
◆ EMC NetWorker Performance Optimization Planning GuideContains basic performance sizing, planning, and optimizing information for NetWorker environments.
◆ EMC NetWorker Management Console Online HelpDescribes the day-to-day administration tasks performed in the NetWorker Management Console and the NetWorker Administration window. To view Help, click Help in the main menu.
◆ EMC NetWorker User Online HelpThe NetWorker User program is the Windows client interface. Describes how to use the NetWorker User program which is the Windows client interface connect to a NetWorker server to back up, recover, archive, and retrieve files over a network.
◆ NetWorker Procedure GeneratorThe NetWorker Procedure Generator (NPG) is a stand-alone Windows application used to generate precise user driven steps for high demand tasks carried out by customers, support, and the field. With the NPG, each procedure is tailored and generated based on user-selectable prompts. This generated procedure gathers the most critical parts of NetWorker product guides and are combined with the advice of experts in a single document with a standardized format. To access the NetWorker Procedure Generator, log on to: http://support.emc.com You must have a valid service agreement to use this site.
◆ Technical Notes/White PapersTechnical Notes and White Papers provide an in-depth technical perspective of a product or products as applied to critical business issues or requirements. Technical Notes and White paper types include technology and business considerations, applied technologies, detailed reviews, and best practices planning.
Conventions used in this documentEMC uses the following conventions for special notices:
NOTICE is used to present information that is important or essential to software or hardware operation.
10 EMC NetWorker Release 8.0 Cluster Installation Guide
PREFACE
Note: A note presents information that is important, but not hazard-related. Used in tables.
Typographical conventions
EMC uses the following type style conventions in this document:
Where to get helpEMC support, product, and licensing information can be obtained as follows:
Product information — For documentation, release notes, software updates, or information about EMC products, licensing, and service, go to the EMC online support website (registration required) at:
http://support.emc.com
Normal Used in running (nonprocedural) text for:• Names of interface elements, such as names of windows, dialog boxes,
buttons, fields, and menus• Names of resources, attributes, pools, Boolean expressions, buttons,
DQL statements, keywords, clauses, environment variables, functions, and utilities
• URLs, pathnames, filenames, directory names, computer names, links, groups, service keys, file systems, and notifications
Bold Used in running (nonprocedural) text for names of commands, daemons, options, programs, processes, services, applications, utilities, kernels, notifications, system calls, and man pages
Used in procedures for:• Names of interface elements, such as names of windows, dialog boxes,
buttons, fields, and menus• What the user specifically selects, clicks, presses, or types
Italic Used in all text (including procedures) for:• Full titles of publications referenced in text• Emphasis, for example, a new term• Variables
Courier Used for:• System output, such as an error message or script• URLs, complete paths, filenames, prompts, and syntax when shown
outside of running text
Courier bold Used for specific user input, such as commands
Courier italic Used in procedures for:• Variables on the command line• User input variables
< > Angle brackets enclose parameter or variable values supplied by the user
[ ] Square brackets enclose optional values
| Vertical bar indicates alternate selections — the bar means “or”
{ } Braces enclose content that the user must specify, such as x or y or z
... Ellipses indicate nonessential information omitted from the example
EMC NetWorker Release 8.0 Cluster Installation Guide 11

PREFACE
Technical support — For technical support, go to EMC online support and select Support. On the Support page, you will see several options, including one to create a service request. Note that to open a service request, you must have a valid support agreement. Contact your EMC sales representative for details about obtaining a valid support agreement or with questions about your account.
Your commentsYour suggestions will help us continue to improve the accuracy, organization, and overall quality of the user publications. Send your opinions of this document to:
12 EMC NetWorker Release 8.0 Cluster Installation Guide
CHAPTER 5Introduction
This chapter includes these sections:
◆ About the NetWorker product .................................................................................. 13 ◆ NetWorker client ..................................................................................................... 13◆ NetWorker storage node.......................................................................................... 14◆ NetWorker server .................................................................................................... 14◆ NetWorker Management Console server .................................................................. 15◆ NetWorker datazone................................................................................................ 15◆ NetWorker daemons................................................................................................ 15◆ Supported storage devices...................................................................................... 16◆ NetWorker cluster services ...................................................................................... 16◆ Enabler codes ......................................................................................................... 17
About the NetWorker productThe EMC® NetWorker product is a storage management software suite that provides backup, recovery, and other services to machines with a wide variety of operating systems and data types. NetWorker products for different operating systems are interoperable. This provides the flexibility to design a storage management system that works best with the current computing environment.
The NetWorker software is distributed in these formats:
◆ In a media kit that contains the software and electronic documentation for several related NetWorker products.
◆ As a downloadable archive file from the EMC Online Support Site web site.
The NetWorker product has these components:
◆ NetWorker client
◆ NetWorker storage node
◆ NetWorker server
◆ NetWorker management console server
◆ NetWorker language packs
◆ NetWorker license manager
NetWorker clientThe NetWorker client software communicates with the NetWorker server and provides client initiated backup and recover functionality. The NetWorker client software is installed on all machines that are backed up to the NetWorker server.
Introduction 13
Introduction
NetWorker storage nodeData is backed up directly to devices local to a NetWorker server or remotely to a NetWorker storage node. A storage node controls storage devices such as tape drives, disk devices, autochangers, and silos. The NetWorker server is a local storage node.
A remote NetWorker storage node:
◆ Off-loads most of the data movement involved in a backup or recovery operation from the NetWorker server
◆ Improves performance.
◆ Requires high I/O bandwidth to manage the transfer of data transfer from local clients, or network clients to target devices.
◆ Can be a different operating system from the NetWorker server.
NetWorker serverThe NetWorker server provides services to back up and recover data for the NetWorker client machines in a datazone. The NetWorker server can also act as a storage node and control multiple remote storage nodes.
Index and media management operations are some of the primary processes of the NetWorker server:
◆ The client file index tracks the files that belong to a save set. There is one client file index for each client.
◆ The media database tracks:
• The volume name.
• The location of each save set fragment on the physical media (file number/file record).
• The backup dates of the save sets on the volume.
• The file systems in each save set.
◆ Unlike the client file indexes, there is only one media database per server.
◆ The client file indexes and media database can grow to become prohibitively large over time and will negatively impact backup performance.
◆ The NetWorker server schedules and queues all backup operations, tracks real-time backup and restore related activities, and all Console server communication.
This information is stored for a limited amount of time in the jobsdb database which for real-time operations, has the most critical backup server performance impact. The data stored in the jobsdb database is not required for restore operations.
14 EMC NetWorker Release 8.0 Cluster Installation Guide
Introduction
NetWorker Management Console serverThe NetWorker Management Console (NMC) server or Console server, is a Java based web application server that provides centralized:
◆ Management of multiple NetWorker servers across multiple datazones.
◆ Monitoring of multiple NetWorker servers across multiple datazones.
◆ Backup reporting of multiple NetWorker servers across multiple datazones.
The Console server:
◆ Is installed on an AIX, Linux, Solaris, or Microsoft Windows host.
◆ Is accessed through a graphical user interface on a host with a web-enabled browser that has the specified version of Java Runtime configured.
Multiple users can access the Console server concurrently from different browser sessions. A machine that hosts the web-enabled browser can also be a NetWorker client, server, or storage node.
◆ Embeds the Apache server 2.2.21 software.
The apache software is used to:
• Download of the Console jar files.
• Startup of the Console server daemon or service.
◆ Embeds the Sybase SQL Anywhere software.
The Console server database is a Sybase SQL Anywhere database.
NetWorker datazoneA NetWorker datazone is a single NetWorker server and its client and storage node machines.
NetWorker daemonsThe NetWorker software requires processes on Windows or daemons on UNIX to run on the system and facilitate NetWorker operations in the datazone.
Table 1 on page 15 lists the NetWorker daemons for each of the software components.
Table 1 NetWorker daemons
NetWorker packages NetWorker daemons
NetWorker server nsrd, nsrexecd, nsrindexd, nsrmmdbd, nsrmmd, nsrjobd, nsrmmgd, nsrlcpd, nsrlogd
NetWorker client nsrexecd
NetWorker storage node nsrexecd, nsrmmd, nsrlcpd, nsrsnmd
NetWorker Management Console server
gstd, httpd, dbsrv12
NetWorker Management Console server 15
Introduction
Consider the following:
◆ The nsrmmd process or daemon is present when one or more devices are enabled.
◆ The nsrmmgd process or daemon is present on the NetWorker server when a library is enabled.
◆ The nsrlcpd process or daemon is present on a NetWorker server and storage nodes with an attached library.
◆ The nsrcpd process or daemon is present on the NetWorker server during a client push software upgrade.
◆ The Console server daemon, gstd starts these additional processes:
• dbsrv12 — the SQL Anywhere database process.
• httpd — there will be 2 or more httpd processes.
gstsnmptrapd — an optional process that is present on the Console server when SNMP Trap monitoring is configured for a Data Domain system.
•
Supported storage devicesStorage devices are attached to a NetWorker server or to a designated storage node.
The NetWorker software supports a variety of media types and devices including:
◆ Disk devices
◆ Stand-alone tape devices
◆ Tape devices in an autochanger or silo tape library
The term autochanger refers to a variety of backup devices:
• Autoloader
• Carousel
• Datawheel
• Jukebox
• Library
• Near-line storage
The NetWorker 7.3 (and Later) Hardware Compatibility Guide provides the most up-to-date list of supported devices.
NetWorker cluster servicesIn cluster setups on all supported cluster platforms, the cluster services must be running before the NetWorker services start. When the cluster services start after Networker, the NetWorker software will exhibit undesirable behavior.
16 EMC NetWorker Release 8.0 Cluster Installation Guide

Introduction
Enabler codesEnabler codes or licenses activate the functionality of the NetWorker software and are generally sold separately. The NetWorker 8.0 License Guide provides more information.
Enabler codes 17

Introduction
18 EMC NetWorker Release 8.0 Cluster Installation Guide
Chapter 6EMC AutoStart for Microsoft Windows Installation
This chapter includes these sections:
◆ Software installation roadmap ................................................................................ 19◆ Installation requirements ........................................................................................ 19◆ Update the NetWorker software............................................................................... 22◆ Install a NetWorker virtual server............................................................................. 23◆ Install only the NetWorker client software in a cluster .............................................. 29◆ Uninstall the NetWorker software ............................................................................ 30◆ Configure the NetWorker virtual server with a backup device ................................... 30◆ Troubleshoot the NetWorker software...................................................................... 31
EMC AutoStart for Microsoft Windows Installation 19
EMC AutoStart for Microsoft Windows Installation
Software installation roadmapUse the following roadmap when installing the NetWorker software:
1. Review “Installation requirements” on page 19 and note the default directory location.
2. Install the required NetWorker software by following one of these procedures:
• “Install a NetWorker virtual server” on page 23
• “Install only the NetWorker client software in a cluster” on page 29
3. Enable and register all of the NetWorker products. More information is available in the NetWorker Licensing Guide.
Installation requirementsThis section specifies the software and hardware required to install and configure the NetWorker server or client software within an AutoStartTM cluster environment.
The EMC Information Protection Software Compatibility Guide provides the most up-to-date software and hardware requirements.
Software requirements
The following software must be installed on each node in the cluster:
◆ “Software requirements” on page 20
◆ “Hardware requirements” on page 20
◆ “Configuration options” on page 20
◆ “System information requirements” on page 21
Cluster serverThis software must be installed on the cluster server:
◆ Windows 2003 Server/Advanced Server (latest Service Pack installed) or later
◆ EMC AutoStart release 5.3 SP1 or 5.3 SP2
◆ Dedicated shared disk to be used as the NetWorker storage disk (for the nsr folder) connected to all the nodes within the cluster
◆ Device with local affinity for the local bootstrap backup
Ensure that the most recent cluster patch for the operating system is installed.
Cluster clientThis software must be installed on the private disk of each node in the cluster:
◆ Windows 2003 Server/Advanced Server (latest Service Pack installed) or later
◆ EMC AutoStart release 5.3 SP1 or 5.3 SP2.
20 EMC NetWorker Release 8.0 Cluster Installation Guide
EMC AutoStart for Microsoft Windows Installation
Hardware requirements
There are no hardware requirements for the cluster client. The following hardware requirements must be met for server installation only:
◆ Dedicated shared disk that is used as the NetWorker storage disk (for the /nsr directory) is connected to all the nodes within the cluster.
◆ Device with local affinity for the local bootstrap backup is connected to all the nodes within the cluster.
Configuration options
The NetWorker Administration Guide provides information on how to configure:
◆ Tape libraries with a NetWorker virtual server
◆ Remote physical storage node with a NetWorker virtual server
System information requirements
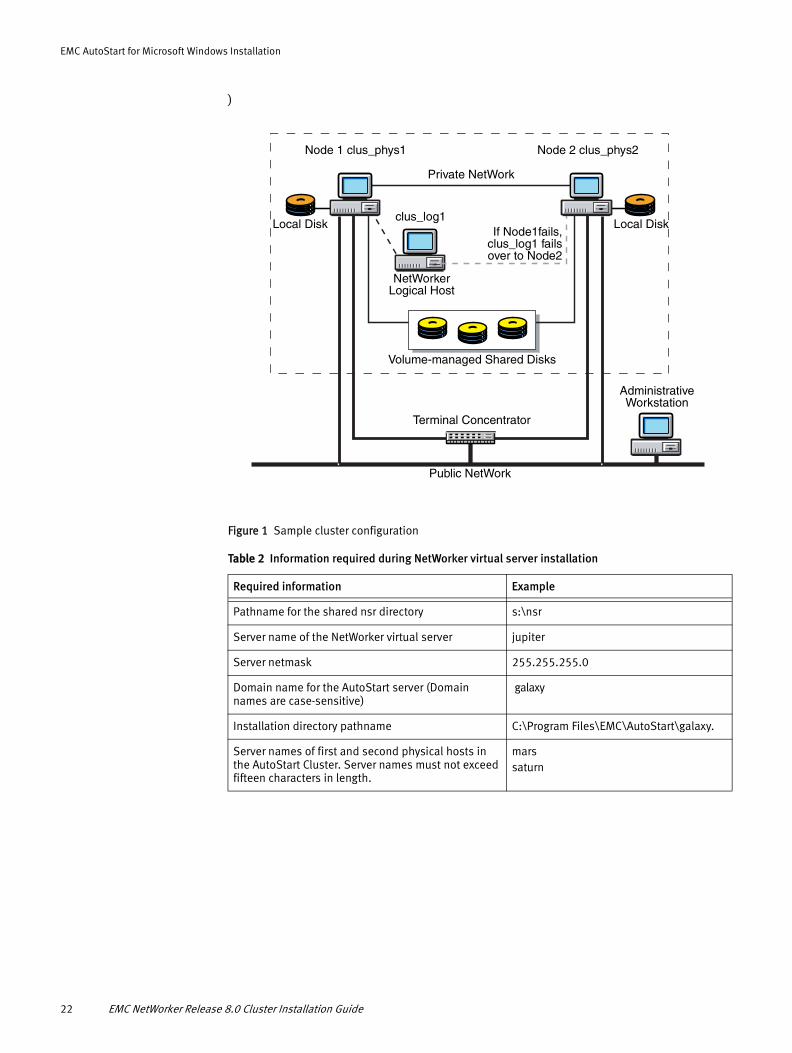
Figure 1 on page 21 and Table 2 on page 21 illustrate the system information needed to install NetWorker software within an AutoStart environment.
Different platforms use different terms for the same cluster concepts. AutoStart refers to:
◆ Physical hosts as nodes
◆ Virtual server as a resource group (application service
Installation requirements 21
EMC AutoStart for Microsoft Windows Installation
)
Figure 1 Sample cluster configuration
Node 1 clus_phys1 Node 2 clus_phys2
Private NetWork
Local Disk Local Diskclus_log1
NetWorker Logical Host
If Node1fails,clus_log1 failsover to Node2
Public NetWork
Volume-managed Shared Disks
Terminal Concentrator
Administrative Workstation
Table 2 Information required during NetWorker virtual server installation
Required information Example
Pathname for the shared nsr directory s:\nsr
Server name of the NetWorker virtual server jupiter
Server netmask 255.255.255.0
Domain name for the AutoStart server (Domain names are case-sensitive)
galaxy
Installation directory pathname C:\Program Files\EMC\AutoStart\galaxy.
Server names of first and second physical hosts in the AutoStart Cluster. Server names must not exceed fifteen characters in length.
marssaturn
22 EMC NetWorker Release 8.0 Cluster Installation Guide
EMC AutoStart for Microsoft Windows Installation
Update the NetWorker softwareTo update the NetWorker server software in an AutoStart environment:
1. Start the EMC AutoStart Console and take the NetWorker server Cluster resource group offline.
2. Rename the NetWorker.clustersvr file to NetWorker.nocluster.
This file is typically located in %SystemDrive%\Program Files\EMC NetWorker\nsr\bin.
3. Upgrade the NetWorker software. The NetWorker Installation Guide provides instructions.
4. Stop the NetWorker Backup and Recover Server service.
5. Open the NetWorker Backup and Recover Server service properties and change the Startup type from Automatic to Manual.
6. Rename the NetWorker.nocluster file back to NetWorker.clustersvr.
7. Repeat step 2 through step 6 on the second node of the cluster.
8. Bring the NetWorker server Cluster resource group back online.
Update to the NetWorker software in an AutoStart 5.4 and later cluster
Beginning in AutoStart release 5.4, AutoStart no longer provides the nwclust.pl script. The NetWorker software includes the script, and as a result the location of the script has changed, and the lcmap script must be updated to point to the new location.
When updating the NetWorker software in an AutoStart 5.4 or later cluster environment, reconfigure the AutoStart cluster to point the generated lcmap script to the correct location of the nwclust.pl script:
1. Run lc_config -r.
2. Run lc_config.
The following example shows the generated lcmap script on Windows after the cluster configuration:
SET FT_DIR=C:\Program Files\EMC\AutoStart\eas54SET FT_DOMAIN=eas54"C:\Program Files\EMC\AutoStart\eas54\bin\ftPerl" "C:\Program
Files\EMC NetWorker\nsr\bin\nwclust.pl"
For a new installation of the NetWorker software, these steps for upgrading do not apply. “Install only the NetWorker client software in a cluster” on page 29 provides instructions on installing the NetWorker software in an AutoStart cluster environment.
Update the NetWorker software 23

EMC AutoStart for Microsoft Windows Installation
Install a NetWorker virtual serverTo install and configure the NetWorker software as a highly available service in a cluster, complete these tasks:
◆ “Task 1: Ensure that the EMC AutoStart software is installed” on page 23
◆ “Task 2: Install the NetWorker software in a cluster” on page 23
◆ “Task 3: Promote at least one secondary cluster node to primary” on page 24
◆ “Task 4: Create the resource that will become the managed shared disk” on page 24
◆ “Task 5: Define the NetWorker server as highly available” on page 24
◆ “Task 6: Configure the NetWorker virtual server” on page 26
◆ “Task 7: Configure the clients of the NetWorker cluster server” on page 27
◆ “Task 8: Register NetWorker licenses for cluster server failover” on page 28
Task 1: Ensure that the EMC AutoStart software is installed
Ensure that the AutoStart software is installed. The AutoStart documentation provides detailed installation instructions.
Task 2: Install the NetWorker software in a cluster
On each node in the cluster, install NetWorker server software in the same location on a private disk, for example, in %SystemDrive%\Program Files\EMC NetWorker\nsr.
To install the NetWorker software:
1. Log in as administrator on one node.
2. Install these NetWorker software packages on each node in the cluster:
• Client
• Storage Node
• Server
• Man pages
The EMC NetWorker 8.0 Installation Guide provides detailed installation instructions.
24 EMC NetWorker Release 8.0 Cluster Installation Guide
EMC AutoStart for Microsoft Windows Installation
3. Obtain the NetWorker hostid:
a. Launch the NetWorker Management Console software.
b. From the Administration windows, select Registration from the Configuration menu.
c. Right-click NetWorker/10 Eval and select Properties.
The value that is displayed in the HostID field is the hostid for the node on which NetWorker server is running. This HostID is required later in the installation.
4. Repeat step 1 through step 3 on the second node.
Task 3: Promote at least one secondary cluster node to primary
Always run two primary controllers. Promote at lease one secondary node to the primary by using the AutoStart Console. If one node fails, the other can be online automatically with all data. The AutoStart documentation provides detailed instructions.
Task 4: Create the resource that will become the managed shared disk
On one of the cluster nodes, create a folder to use later as the managed, shared disk. For example, create the folder s:\nsr.
Do not share the folder at this point, or the installation will fail. If the AutoStart software is already installed and a managed shared disk already exists, remove the share property now.
Task 5: Define the NetWorker server as highly available
To define the NetWorker server as a highly-available application, run the lc_config script on each node. By configuring the NetWorker server as a highly-available application, you create a NetWorker cluster group resource. This allows the NetWorker server to run in cluster mode (that is, with failover capability).
To run the lc_config script:
1. Log in as administrator.
2. Add the virtual hostnames to the hosts file on each cluster node (located in %SystemRoot%\system32 # # \drivers\etc).
3. Ensure that all node names to be used in the cluster, both the physical nodes and the virtual nodes, can be resolved using DNS. To verify that the node names can be resolved by using DNS, type:
nslookup node_name
Install a NetWorker virtual server 25
EMC AutoStart for Microsoft Windows Installation
4. Start the NetWorker Backup and Recover Server services.
If you are upgrading NetWorker software or reinstalling after a partial uninstall of the NetWorker software, the lc_config script prompts for a command to keep, rename or delete each of the old server configuration files. It is safe to delete the old files.
To delete a file, type d when prompted. After you finish typing the choices for each of the old configuration files, continue with step 5 .
5. Run the lc_config script.
When the lc_config script runs, you are prompted to type the information listed in Table 2 on page 21.
lc_configC:\Program Files\EMC NetWorker\nsr\bin>lc_config Checking for C:\Program Files\EMC NetWorker\nsr\bin\lcmap.bat Checking for C:\Program Files\EMC NetWorker\nsr\bin\NetWorker.clustersvrEnter shared nsr dir:s:\nsrEnter the EMC Fulltime Autostart domain name:galaxyEnter the directory in which your EMC Fulltime Autostart software is installed (typically something like C:\galaxy):C:\Program Files\EMC\AutoStart\galaxy
6. Type y to confirm that the information is correct.
If required to make corrections, type n. When lc_config script runs again, retype the information:
You entered the following data:Nsr Dir = s:\nsr,EMC Fulltime Autostart domain = galaxyEMC Fulltime Autostart software location = C:\Program Files\EMC\AutoStart\galaxyIs this OK [y/n]y
7. Stop the NetWorker Backup and Recover Server services.
8. Edit the nw_nt.aam5.imp file and modify these fields:
• Virtual hostname
• Physical cluster node names
• Shared drive letter
The #NW customise label tag appears before each field that requires modification.
26 EMC NetWorker Release 8.0 Cluster Installation Guide
EMC AutoStart for Microsoft Windows Installation
9. On one node only, go to %SystemDrive%\Program Files\EMC NetWorker\nsr\bin and run the following command. For example, if the AutoStart domain name is galaxy, type:
“C:\Program Files\EMC\AutoStart\galaxy\bin\ftcli” -d galaxy -c "import nw_nt.lc.imp"
This information is displayed:
C:\Program Files\EMC NetWorker\nsr\bin>"C:\Program Files\EMC\AutoStart\galaxy\bin\ftcli" -domain galaxy -c "import nw_nt.aam5.imp"IP Address "guiro" CreatedProcess Class "nsrd" CreatedProcess "NSRserver" CreatedConfiguration "NSRserver" CreatedProcess Class "nsrexecd" CreatedProcess "NSRexecd" CreatedConfiguration "NSRexecd" CreatedData Source "networker_ds" CreatedResource Group "networker" CreatedOK
10. Use the AutoStart Console to:
a. Verify that the NetWorker Server resource was created.
b. Share the managed shared disk (for example, s:\nsr).
c. Bring the NetWorker virtual server online.
d. Select the disk to be used for NetWorker virtual server storage and set the disk to be managed as a shared storage for each physical node in the cluster.
11. For each physical node in the cluster, ensure that the AutoStart Console user account, NT AUTHORITY\SYSTEM is included in the valid user list with administrator access.
12. Ensure that the value of the environment variable for the administrator user FT_DOMAIN is set to the AutoStart domain name.
Install a NetWorker virtual server 27

EMC AutoStart for Microsoft Windows Installation
13. From one node in the cluster:
a. Log in as administrator.
b. Ensure that the data source for the NetWorker virtual server is managed by the AutoStart Management Console.
The data source for the NetWorker virtual server is defined as networker_ds in the NetWorker resource group.
c. Run this script from the directory where the NetWorker software was installed:
nwinst.bat
The AutoStart documentation provides instructions on using the AutoStart Console.
AutoStart warning messages are generated when running the nwinst.bat script. The messages do not indicate that any AutoStart functionality is affected, and should be ignored. This is an example of an Autostart warning message:
Connecting to AutoStart domain autostar...Backbone warning on primrose (pid 135) Wed Mar 31 01:52:34 2010 in ISIS_MGT_INTERCL_MODULE .\cl_inter.c/intercl_accept(), line 1927 ID00005235 Intercl IO Queue NULL/IO_DEAD calling resurrect. Process from=1/612 nd dest=1/1352. Backbone warning on primrose (pid 1352) Wed Mar 31 01:52:34 2010 in ISIS_MGT_INTERCL_MODULE .\cl_inter.c/intercl_accept(), line 1927 ID00005235 Intercl IO Queue NULL/IO_DEAD calling resurrect. Process from=2/1868 and dest=1/1352.
Task 6: Configure the NetWorker virtual server
To configure the NetWorker server:
1. Log in as administrator on the cluster node that is currently running the NetWorker server resource group.
2. Start the NetWorker Console software.
3. From the Administration window, select Properties from the File menu.
a. For the Administrator attribute, add entries for any cluster nodes that are not already listed. For example:
root@hostname
b. Click Ok.
28 EMC NetWorker Release 8.0 Cluster Installation Guide
EMC AutoStart for Microsoft Windows Installation
4. Restrict the set of NetWorker servers that can back up a particular client. Edit the %SystemDrive%\Program Files\EMC NetWorker\nsr\res\servers file and add the NetWorker virtual host as well as each cluster node to the list of servers.
Consider the following:
• If no servers are specified, any NetWorker server can backup this client.
• If no servers are specified, any NetWorker server can perform a directed recovery to the client.
• When adding NetWorker servers, specify both the short name and FQDN for each NetWorker server.
Task 7: Configure the clients of the NetWorker cluster server
To configure each client under the NetWorker server:
1. (Optional) Define save groups.
In order for their save sets to restart after a virtual client or NetWorker server failover, save groups must have the Autorestart attribute enabled and the Manual Restart option disabled.
2. Make each physical client within the cluster a client of the NetWorker server.
For each physical client in the cluster:
a. Create a new NetWorker client.
b. For the Name attribute, type the name of the physical client.
3. Make each virtual client within the cluster a client of the virtual NetWorker server.
For each virtual client in the cluster:
a. Create a new NetWorker client.
b. For the Name attribute, type the name of the virtual client.
c. For the Remote Access attribute, add entries for each physical client within the cluster. For example:
root@clus_phys1
d. For the Group attribute, select a group.
The first time the NetWorker application runs, it creates the Client resource for the NetWorker virtual server. The NetWorker 8.0 Administration guide provides more information.
4. Verify that the Client and Group resources are properly configured by running a test probe. On the node where the NetWorker server resides, type:
savegrp -pv -c client_name group_name
If this test does not display the expected scheduled backups and index, create an empty file named pathownerignore in the directory where the NetWorker savefs command is installed. This allows a valid save set on a NetWorker client to be scheduled for backup. For example:
Install a NetWorker virtual server 29
EMC AutoStart for Microsoft Windows Installation
On each node of the cluster, type:
echo NUL: networker_bin_dir\pathownerignore
A NetWorker scheduled save might use a default rather than a specified client index name. To override this default, run a manual save with the -c option: save -c client_name
5. Restrict the set of NetWorker servers that can back up a particular client. Edit the %SystemDrive%\Program Files\EMC NetWorker\nsr\res\servers file and add the NetWorker virtual host as well as each cluster node to the list of servers.
Consider the following:
• If no servers are specified, any NetWorker server can backup this client.
• If no servers are specified, any NetWorker server can perform a directed recovery to the client.
• When adding NetWorker servers, specify both the short name and FQDN for each NetWorker server.
After the client configuration is complete:
◆ The NetWorker cluster server uses the IP address of the NetWorker virtual host regardless of which cluster node currently masters the NetWorker virtual server.
◆ The NetWorker cluster server takes the identity of the NetWorker virtual server’s hostname regardless of which cluster node is currently running the NetWorker service.
◆ The first time NetWorker software runs, it creates the client resource for the NetWorker virtual host. Client resources must be created manually for any cluster node to be backed up by the NetWorker virtual host.
Task 8: Register NetWorker licenses for cluster server failover
To register NetWorker licenses for cluster failover:
1. Ensure that the NetWorker virtual server is defined as part of a cluster.
2. Ensure that the NetWorker service is running.
3. Log in to the cluster node on which the NetWorker virtual server is running.
4. Create a file named hostids in the nsr\res directory.
5. Open the hostids file and add one line. For hostid values, use the NetWorker hostids values that were derived in “Task 2: Install the NetWorker software in a cluster” on page 23.
hostid1:hostid2
6. Restart the NetWorker virtual server by taking it offline and then bringing it back online.
7. Register the NetWorker software for permanent use. More information is available in the NetWorker Licensing Guide.
30 EMC NetWorker Release 8.0 Cluster Installation Guide
EMC AutoStart for Microsoft Windows Installation
Install only the NetWorker client software in a clusterTo install NetWorker cluster client, read and follow the procedures for these tasks:
◆ “Task 1: Install the NetWorker cluster client software” on page 29
◆ “Task 2: Configure NetWorker client software as cluster aware” on page 29
Make sure the NetWorker client software is installed on every node to be backed up in the cluster.
Task 1: Install the NetWorker cluster client software
To install the NetWorker client software on each node in the cluster:
◆ Ensure that the operating system is updated with the most recent cluster patch.
◆ Install the NetWorker client software on the physical disk of each node in the cluster to be backed up. More information is available in the NetWorker Licensing Guide.
Task 2: Configure NetWorker client software as cluster aware
To configure the NetWorker client software as cluster aware:
1. Make each physical client within the cluster a client of the NetWorker server. For each physical client in the cluster:
a. Create a new client.
b. For the Name attribute, type the name of the physical client.
If a physical Client is backed up to a NetWorker server outside the cluster, the name of any virtual service that can run on the physical node must be added to the Remote Access list of the physical Client resource.
2. Add the virtual hostnames to the hosts file on each cluster node (located in %SystemRoot%\system32 # # \drivers\etc).
3. Make each virtual client within the cluster a client of the NetWorker server. For each virtual client in the cluster:
a. Create a new client.
b. For the Name attribute, type the name of the NetWorker server.
c. For the Remote Access attribute, add entries for each physical client within the cluster. For example:
root@clus_phys1
d. For the Group attribute, select a group.
4. Schedule backups by using the NetWorker application.
Install only the NetWorker client software in a cluster 31
EMC AutoStart for Microsoft Windows Installation
5. On each node in the cluster, run the cluster configuration program lc_config.
a. Log in as administrator on each node.
b. Run the lc_config program:
lc_config
When prompted for the shared nsr directory, you can leave the field blank.
c. Type y to confirm the information.
6. For each physical node in the cluster, ensure that the AutoStart Console user account, NT AUTHORITY\SYSTEM is included in the valid user list with administrator access.
Uninstall the NetWorker softwareTo uninstall the NetWorker software from an AutoStart environment:
1. Take the NetWorker Resource Group offline.
2. Select and delete the NetWorker Resource Group from the Current Resource Group list.
3. Select and delete the NSRserver and the NSRexecd services.
4. Select and delete the networker_ds resource.
5. Select and delete the NetWorker virtual server IP Address.
6. On each node in the cluster:
a. Log in as administrator on the computer from which the software is being removed.
b. Undo all changes to the configuration by running the following:
lc_config.exe -r
7. Uninstall the NetWorker Server software from each node. The NetWorker Installation Guide provides instructions.
If the NetWorker software will be reinstalled to the same location, ensure that the required files are deleted from the /bin subdirectory: NetWorker.clustersvr, lcmap.bat and winst.bat.
Configure the NetWorker virtual server with a backup deviceThe NetWorker virtual server must be configured with storage node backup devices. The storage nodes that are used by the NetWorker virtual server can be devices attached to a remote system (external to the cluster). They can also be devices connected locally to any of the physical nodes in the cluster. A storage node device can be a stand-alone tape device or an autochanger. The NetWorker Administration Guide provides information about how to configure storage nodes.
The NetWorker server requires a local backup device to save the bootstrap and the server indexes.
32 EMC NetWorker Release 8.0 Cluster Installation Guide
EMC AutoStart for Microsoft Windows Installation
This is the recommended device configuration for a NetWorker virtual server, release 6.0 or later, that is running in a two-node AutoStart cluster:
◆ Each cluster node must be defined as a storage node for the NetWorker virtual server.
◆ In the AutoStart Console, the Preferences\’Storage Nodes attribute in the NetWorker virtual server Client resource lists the storage nodes that are enabled to store data for the client.
Each of the storage nodes must be listed before you can list the nsrserverhost:
1. One cluster node
2. The other cluster node
3. The nsrserverhost
The nsrserverhost must always be listed last in each client's storage node list.
NetWorker software does not allow the configuration of a storage node on a cluster node that is running the NetWorker server binaries. Consequently, before configuring a cluster node as a storage node, you must move the NetWorker virtual server to another node in the cluster.
Troubleshoot the NetWorker softwareThese sections contain troubleshooting tips for NetWorker software in an AutoStart environment.
Set the shutdown wait timeout values
To prevent timing problems during failover, perform this procedure to increase the shutdown wait timeout value for the NSRserver service.
1. Start the EMC AutoStart Console and select the domain.
2. Select Resource Groups>NetWorker Resource group.
3. Select the Settings tab.
4. Select NSRserver from the list box and click Edit.
5. Increase the value for the Wait until service is stopped item.
Troubleshoot the NetWorker software 33

EMC AutoStart for Microsoft Windows Installation
NetWorker virtual server fails to start nsrmmd
If the NetWorker virtual server fails to start nsrmmd on a NetWorker storage node, the following error messages are sent to the NetWorker server daemon log:
06/08/00 10:00:11 nsrmon #217: connect to nsrexec prog 390113 vers 1 on `uranus' failed: RPC error: Remote system error06/08/00 10:00:11 nsrd: media notice: check storage node: uranus (RPC error: Remote system error)
06/08/00 10:00:11 nsrd: media info: restarting nsrmmd #1 on uranus in 2 minute(s)06/08/00 10:02:12 nsrd: media info: restarting nsrmmd #1 on uranus now06/08/00 10:02:42 nsrmon #183: connect to nsrexec prog 390113 vers 1 on `
The error might be caused by the NetWorker Remote Exec service not running on the storage node. If the service is not running, do the following to restart the service:
1. Select Services from the Control Panel on the storage node.
2. Restart the service.
NetWorker server fails to back up a virtual cluster client
If a NetWorker server fails to backup a virtual cluster client, an error message might appear.
In this example, these names appear:
◆ charon — Virtual cluster client running on pluto
◆ pluto — Physical cluster node
◆ neptune — NetWorker server
06/19/00 12:56:57 nsrd: savegroup alert: test completed, 1 client(s) (charon Failed) charon:Q:\: No save sets with this name were found in the media database; performing a full backup* charon:Q:\ save: RAP error: Unable to extract resource info for client pluto.legato.com.* charon:Q:\ save: Cannot open save session with neptune.legato.com* charon:Q:\ 1 retry attempted* charon:Q:\: No save sets with this name were found in the media database; performing a full backup* charon:Q:\ save: RAP error: Unable to extract resource info for client pluto.legato.com.* charon:Q:\ save: Cannot open save session with neptune.legato.com06/19/00 12:56:57 nsrd: runq: NSR group test exited with return code 1.
This error might occur because the NetWorker Client resources for each of the physical nodes in the cluster are missing. In such cases, perform the following to correct the error:
1. Create a Client resources for each physical node in the cluster that is allowed to own the virtual cluster client.
2. Rerun the backup.
34 EMC NetWorker Release 8.0 Cluster Installation Guide
EMC AutoStart for Microsoft Windows Installation
Roll back changes to the cluster configuration file
To roll back changes to the cluster configuration file (lc_config):
1. Take the NetWorker Resource Group offline.
2. Stop the NetWorker Remote Exec service.
3. Delete or rename these files from the NetWorker installation directory:
• NetWorker.clustersvr
• lcmap.bat
• nwinst.bat.
4. From the AutoStart Console, select and delete:
• NetWorker Resource Group
• NSRserver
• NSRexecd services
• networker_ds data source
• NetWorker virtual server IP address
Troubleshoot the NetWorker software 35

EMC AutoStart for Microsoft Windows Installation
36 EMC NetWorker Release 8.0 Cluster Installation Guide
CHAPTER 7EMC AutoStart for UNIX Installation
This chapter includes these sections:
◆ Software installation roadmap ................................................................................ 36◆ Installation requirements ........................................................................................ 36◆ Update the NetWorker software in an AutoStart 5.4 and later cluster ....................... 39◆ Install a virtual NetWorker Console server................................................................ 46◆ Install only the NetWorker client software in a cluster .............................................. 48◆ Uninstall the NetWorker software ............................................................................ 51◆ Configure an external client to back up to a virtual server ........................................ 52◆ Define ownership of a raw partition for virtual clients .............................................. 53
EMC AutoStart for UNIX Installation 35
EMC AutoStart for UNIX Installation
Software installation roadmapAn EMC AutoStart cluster consists of multiple nodes in a networked configuration and provides additional security with the failover capability. Failover allows another node in the cluster to take over operations from the first node. For information, refer to the AutoStart documentation.
Use the following roadmap to follow when installing NetWorker software:
1. Review “Installation requirements” on page 36 and note the default directory location.
2. Install the required NetWorker software by following one of these procedures:
• “Update the NetWorker software in an AutoStart 5.4 and later cluster” on page 39
For a new installation of the NetWorker, the steps for updating the software do not apply.
• “Install a NetWorker virtual server” on page 39
• “Install a virtual NetWorker Console server” on page 46
• “Install only the NetWorker client software in a cluster” on page 48
3. Enable and register all of the NetWorker products. More information is available in the NetWorker Licensing Guide.
Installation requirementsThis section specifies the software and hardware required to install and configure the NetWorker server or client software within an AutoStart cluster environment.
The EMC Information Protection Software Compatibility Guide provides the most up-to-date information about software and hardware requirements.
Software requirements
The following software must be installed on each node in the cluster:
◆ AIX release 5.1 or later
◆ HP-UX release 11.x
◆ Red Hat Enterprise Linux AS2
◆ Solaris version 2.7 or later
◆ FullTime AutoStart release 5.3 SP1 or 5.3 SP2
◆ NetWorker release 8.0 or later
Ensure that the most recent cluster patch for the operating system is installed.FullTime AutoStart 5.3 and earlier is supported on Linux for the Intel x86 platform but is not supported on other NetWorker Linux platforms. AutoStart 5.3 SP2 and later is supported on both 32-bit and 64-bit Linux platforms.
36 EMC NetWorker Release 8.0 Cluster Installation Guide
EMC AutoStart for UNIX Installation
Hardware requirements
The following hardware requirements must be met for server installation only:
◆ Dedicated shared disk that is used as the NetWorker storage disk (for the /nsr directory) is connected to all the nodes within the cluster.
◆ Device with local affinity for the local bootstrap backup is connected to all the nodes within the cluster.
Configuration options
The EMC NetWorker 8.0 Administration Guide provides information on how to configure:
◆ Tape libraries with a NetWorker virtual server.
◆ Remote physical storage node with a NetWorker virtual server.
System information requirements
Figure 2 on page 38 illustrates a sample cluster configuration and Table 3 on page 38 displays the system information needed to install NetWorker software within an AutoStart environment.
Different operating systems use different terms for the same cluster concepts. AutoStart refers to:
◆ Physical hosts as nodes
◆ Virtual server as a resource group (application service)
Installation requirements 37
EMC AutoStart for UNIX Installation
Figure 2 Sample cluster configuration
LocalDisk 1
Shared Disks 3
Node Bclus_phys2
Node Aclus_phys1
LocalDisk 2
Public Network
NetWorker Virtual Server
(If Node A fails, clus_vir1 fails
over to Node B)
Table 3 Required system information (page 1 of 2)
Information required Example
NetWorker virtual hostname with an IP address
clus_vir1192.168.1.10
NetWorker package mount point for virtual volume
/nsr_shared_mnt_pt
Shared storage disk virtual volume • AIX: /dev/lv1• HP-UX: /dev/dsk/c5t2d0, /dev/vg03/1vol1 (for
Logical Volume Manager)• Linux: /dev/sdc1• Solaris: /dev/dsk/c1t3d0s0
NetWorker control script • AIX: /usr/bin/nw_ux.lc• HP-UX: /opt/networker/bin/nw_ux.lc• Linux: /usr/sbin/nsr/nw_ux.lc• Solaris: /usr/sbin/nw_ux.lc
File containing the hostids of all the cluster members
• AIX: /nsr/res/hostids• HP-UX: /nsr/res/hostids• Linux: /nsr/res/hostids• Solaris: /nsr/res/hostids
NetWorker monitor script • AIX: /usr/bin/nw_ux.lc• HP-UX: /opt/networker/bin/nw_ux.lc• Linux: /usr/sbin/nsr/nw_ux.lc• Solaris: /usr/sbin/nw_ux.lc
38 EMC NetWorker Release 8.0 Cluster Installation Guide
EMC AutoStart for UNIX Installation
Update the NetWorker software in an AutoStart 5.4 and later cluster
Beginning in AutoStart release 5.4, AutoStart no longer provides the nwclust.pl script. The NetWorker software includes the script, and as a result the location of the script has changed and the lcmap script must be updated to point to the new location.
When updating the NetWorker software in an AutoStart 5.4 or later cluster environment, reconfigure the AutoStart cluster to point the generated lcmap script to the correct location of the nwclust.pl script:
1. Run networker.cluster -r.
2. Run networker.cluster.
For a new installation of the NetWorker software, these steps for updating do not apply. “Install only the NetWorker client software in a cluster” on page 48 provides instruction on installing the NetWorker software in an AutoStart cluster.
Install a NetWorker virtual serverUse this roadmap to install and configure the NetWorker software as a highly available service in a cluster:
◆ “Task 1: Ensure that the AutoStart software is installed” on page 39
◆ “Task 2: Install the NetWorker software in a cluster” on page 40
◆ “Task 3: Define the NetWorker server as highly available” on page 40
◆ “Task 4: Grant access to the NetWorker virtual server” on page 43
◆ “Task 5: Configure the NetWorker server” on page 44
◆ “Task 6: Configure clients under the NetWorker virtual server” on page 44
◆ “Task 7: Register NetWorker licenses for virtual server failover” on page 45
Task 1: Ensure that the AutoStart software is installed
Ensure that the AutoStart software is installed. The AutoStart documentation provides detailed installation instructions.
NetWorker Console virtual hostname • Linux: clus_vir2 192.168.1.11• Solaris: clus_vir2 192.168.1.11
NetWorker Console database mount point • Linux: nmc_shared_mnt_pt• Solaris: nmc_shared_mnt_pt
Table 3 Required system information (page 2 of 2)
Information required Example
Update the NetWorker software in an AutoStart 5.4 and later cluster 39
EMC AutoStart for UNIX Installation
Task 2: Install the NetWorker software in a cluster
To install the NetWorker software:
1. Ensure that the most recent cluster patch for the operating system is installed.
2. Install these NetWorker software packages on each node in the cluster:
a. Client
b. Storage Node
c. Server
d. Man pages
The EMC NetWorker 8.0 Installation Guide provides detailed installation instructions.
Task 3: Define the NetWorker server as highly available
To define and configure the NetWorker server as highly available:
1. Log in as root.
2. Ensure that the /etc/hosts file on each cluster node contains the name of the virtual host. The virtual hostname can be published in the Domain Name System (DNS) or Network Information Services (NIS).
3. Set and export the FT_DIR, FT_DOMAIN, and the FT_CONSOLE_DIR environment variables.
Table 4 on page 40 lists the environmental variables that you would type from the Bourne shell:
Table 4 NetWorker server high availability environment variables
Operating System Command Variable description
AIX FT_DIR=/usr/lpp/LGTOaam51FT_CONSOLE_DIR=$FT_DIR/console FT_DOMAIN=domain_nameexport FT_DIR FT_DOMAIN FT_CONSOLE_DIR
domain_name is the AutoStart domain
HP-UX FT_DIR=/opt/LGTOaamxxFT_CONSOLE_DIR=$FT_DIR/consoleFT_DOMAIN=domain_nameexport FT_DIR FT_DOMAIN FT_CONSOLE_DIR
• xx is set to 50 for AutoStart version 5.x
• domain_name is the AutoStart domain name
Linux FT_DIR=/opt/LGTOaamxxFT_CONSOLE_DIR=$FT_DIR/consoleFT_DOMAIN=domain_nameexport FT_DIR FT_DOMAIN FT_CONSOLE_DIR
• xx is set to 50 for AutoStart version 5.x
• domain_name is the AutoStart domain name
Solaris FT_DIR=/opt/LGTOaamxxFT_CONSOLE_DIR=$FT_DIR/consoleFT_DOMAIN=domain_nameexport FT_DIR FT_DOMAIN FT_CONSOLE_DIR
• xx is set to 50 for AutoStart version 5.x or 51 for AutoStart version 5.1
• domain_name is the AutoStart domain name
40 EMC NetWorker Release 8.0 Cluster Installation Guide
EMC AutoStart for UNIX Installation
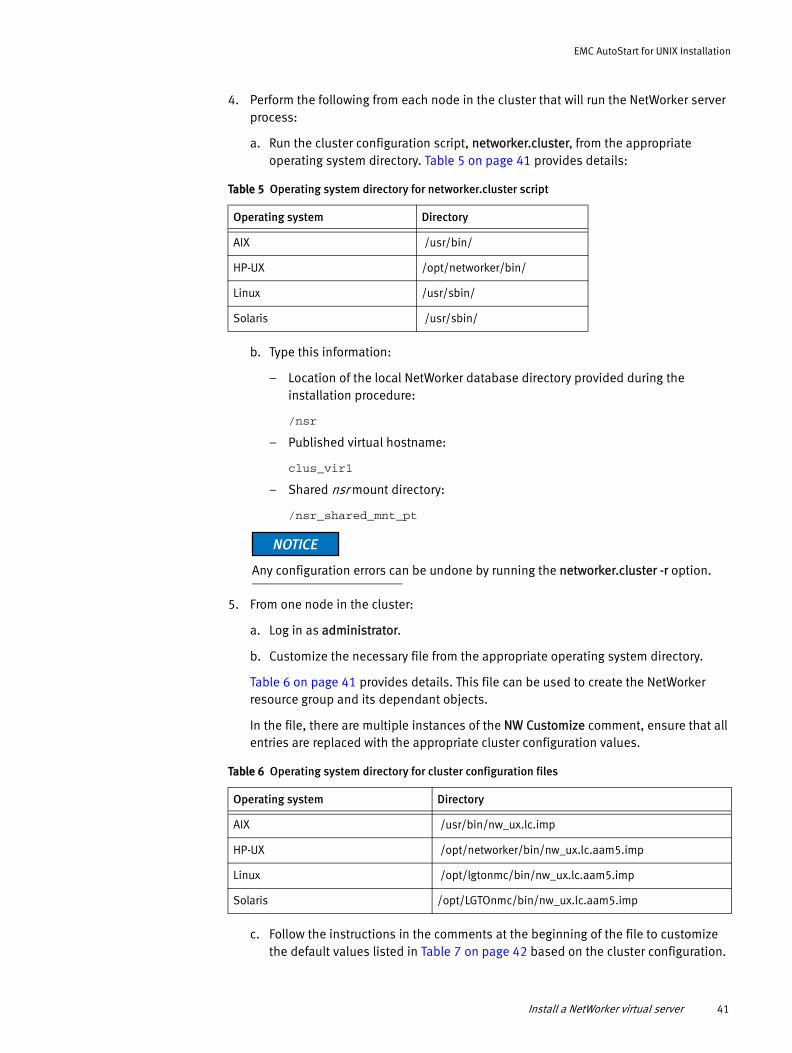
4. Perform the following from each node in the cluster that will run the NetWorker server process:
a. Run the cluster configuration script, networker.cluster, from the appropriate operating system directory. Table 5 on page 41 provides details:
b. Type this information:
– Location of the local NetWorker database directory provided during the installation procedure:
/nsr
– Published virtual hostname:
clus_vir1
– Shared nsr mount directory:
/nsr_shared_mnt_pt
Any configuration errors can be undone by running the networker.cluster -r option.
5. From one node in the cluster:
a. Log in as administrator.
b. Customize the necessary file from the appropriate operating system directory.
Table 6 on page 41 provides details. This file can be used to create the NetWorker resource group and its dependant objects.
In the file, there are multiple instances of the NW Customize comment, ensure that all entries are replaced with the appropriate cluster configuration values.
c. Follow the instructions in the comments at the beginning of the file to customize the default values listed in Table 7 on page 42 based on the cluster configuration.
Table 5 Operating system directory for networker.cluster script
Operating system Directory
AIX /usr/bin/
HP-UX /opt/networker/bin/
Linux /usr/sbin/
Solaris /usr/sbin/
Table 6 Operating system directory for cluster configuration files
Operating system Directory
AIX /usr/bin/nw_ux.lc.imp
HP-UX /opt/networker/bin/nw_ux.lc.aam5.imp
Linux /opt/lgtonmc/bin/nw_ux.lc.aam5.imp
Solaris /opt/LGTOnmc/bin/nw_ux.lc.aam5.imp
Install a NetWorker virtual server 41
EMC AutoStart for UNIX Installation
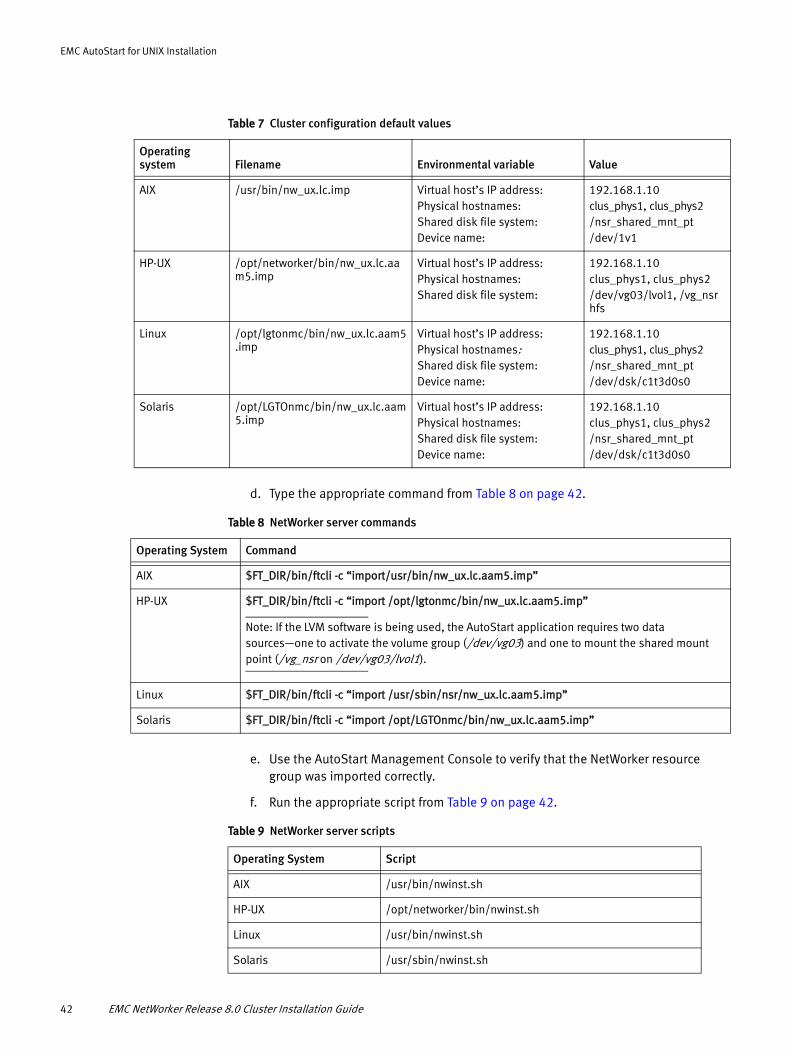
d. Type the appropriate command from Table 8 on page 42.
e. Use the AutoStart Management Console to verify that the NetWorker resource group was imported correctly.
f. Run the appropriate script from Table 9 on page 42.
Table 7 Cluster configuration default values
Operating system Filename Environmental variable Value
AIX /usr/bin/nw_ux.lc.imp Virtual host’s IP address:Physical hostnames:Shared disk file system:Device name:
192.168.1.10clus_phys1, clus_phys2/nsr_shared_mnt_pt/dev/1v1
HP-UX /opt/networker/bin/nw_ux.lc.aam5.imp
Virtual host’s IP address:Physical hostnames:Shared disk file system:
192.168.1.10clus_phys1, clus_phys2/dev/vg03/lvol1, /vg_nsr hfs
Linux /opt/lgtonmc/bin/nw_ux.lc.aam5.imp
Virtual host’s IP address:Physical hostnames:Shared disk file system:Device name:
192.168.1.10clus_phys1, clus_phys2/nsr_shared_mnt_pt/dev/dsk/c1t3d0s0
Solaris /opt/LGTOnmc/bin/nw_ux.lc.aam5.imp
Virtual host’s IP address:Physical hostnames:Shared disk file system:Device name:
192.168.1.10clus_phys1, clus_phys2/nsr_shared_mnt_pt/dev/dsk/c1t3d0s0
Table 8 NetWorker server commands
Operating System Command
AIX $FT_DIR/bin/ftcli -c “import/usr/bin/nw_ux.lc.aam5.imp”
HP-UX $FT_DIR/bin/ftcli -c “import /opt/lgtonmc/bin/nw_ux.lc.aam5.imp”
Note: If the LVM software is being used, the AutoStart application requires two data sources—one to activate the volume group (/dev/vg03) and one to mount the shared mount point (/vg_nsr on /dev/vg03/lvol1).
Linux $FT_DIR/bin/ftcli -c “import /usr/sbin/nsr/nw_ux.lc.aam5.imp”
Solaris $FT_DIR/bin/ftcli -c “import /opt/LGTOnmc/bin/nw_ux.lc.aam5.imp”
Table 9 NetWorker server scripts
Operating System Script
AIX /usr/bin/nwinst.sh
HP-UX /opt/networker/bin/nwinst.sh
Linux /usr/bin/nwinst.sh
Solaris /usr/sbin/nwinst.sh
42 EMC NetWorker Release 8.0 Cluster Installation Guide

EMC AutoStart for UNIX Installation
Task 4: Grant access to the NetWorker virtual server
Before a NetWorker server can back up a client, the server must have access to the client. Access is granted by editing the /nsr/res/servers file.
Consider the following:
◆ If no servers are specified, any NetWorker server can backup this client.
◆ If no servers are specified, any NetWorker server can perform a directed recovery to the client.
◆ When adding NetWorker servers, specify both the short name and FQDN for each NetWorker server.
To grant access to the NetWorker virtual server:
1. On each node in the cluster:
a. Shut down the NetWorker services.
b. Edit or create the /nsr.Networker.local/res/servers file:
– Add the set of NetWorker servers, one per line, that require access to this client.
– For each virtual NetWorker server, add an entry for each physical host and the virtual NetWorker server. For example:
clus_vir1
clus_phys1
clus_phys2
c. Check the NetWorker boot-time startup file to see whether nsrexecd is being run with the -s option. If the -s option exists, remove all occurrences of the following in the file:
-s server_name
2. On one node in the cluster, start the NetWorker service by using the cluster management software:
a. Use the AutoStart Management Console to bring the NetWorker Resource Group online.
b. Edit or create the /nsr/res/servers file:
– Add the set of NetWorker servers, one per line, that require access to this client.
– For each virtual NetWorker server, add an entry for each physical host and the virtual NetWorker server. For example:
clus_vir1
clus_phys1
clus_phys2
Install a NetWorker virtual server 43

EMC AutoStart for UNIX Installation
3. If required, grant access to each NetWorker client that is outside of the cluster:
a. Shut down the NetWorker processes and verify that all NetWorker services have stopped.
b. Edit or create the /nsr/res/servers file:
– Add the set of NetWorker servers, one per line, that require access to this client.
– For each virtual NetWorker server, add an entry for each physical host and the virtual NetWorker server. For example:
clus_vir1
clus_phys1
clus_phys2
Task 5: Configure the NetWorker server
To configure the NetWorker server:
1. Log in as root on the cluster node that is currently running the NetWorker server resource group.
2. Start the NetWorker Console software.
3. From the Administration window, select File>Properties.
a. For the Administrator attribute, add entries for any cluster nodes that are not already listed. For example:
root@hostname
b. Click Ok.
Task 6: Configure clients under the NetWorker virtual server
When the networker.cluster script runs, it creates a symbolic link named /nsr that points to a local disk. It also creates a second link points to the local NetWorker directory. For example, if the local NetWorker directory was created in /var/nsr, each client member has these links:
◆ AIX, HP-UX, Solaris
• /nsr->/nsr.NetWorker.local
• /nsr.NetWorker.local->/var/nsr
◆ Linux
• /nsr->/nsr.NetWorkerBackup.local
• /nsr.NetWorkerBackup.local->/var/nsr
44 EMC NetWorker Release 8.0 Cluster Installation Guide

EMC AutoStart for UNIX Installation
To configure each client under the NetWorker server:
1. (Optional) Define savegroups.
In order for their save sets to restart after a virtual client or NetWorker server failover savegroups must have the Autorestart attribute enabled and the Manual Restart option disabled.
2. Make each physical client within the cluster a client of the NetWorker virtual server. For each physical client in the cluster:
a. Create a new NetWorker client.
b. For the Name attribute, type the name of the physical client.
3. Make each virtual client within the cluster a client of the NetWorker virtual server. For each virtual client in the cluster:
a. Create a new NetWorker client.
b. For the Name attribute, type the name of the virtual client.
c. For the Remote Access attribute, add entries for each physical client within the cluster. For example:
root@clus_phys1
d. For the Group attribute, select a group.
The first time the NetWorker application runs, it creates the Client resource for the NetWorker virtual server. The EMC NetWorker 8.0 Administration Guide provides more information.
4. For AIX only, on each node that the logical volume can be attached, check that the /etc/filesystems file contains the same mount point for the logical volume as the one specified in the FullTime AutoStart Resource group.
To change the entry for the logical volume mount point in the /etc/filesystems file, type:
chfs -n new_mountpoint old_mountpoint
5. Run a test probe to verify that the Client and Group resources have been properly configured.
Type this command on the node on which the NetWorker server resides:
savegrp -pv -c client_name group_name
The EMC NetWorker 8.0 Administration Guide provides information on what to do if the test probe does not display the correct scheduled backups and index.
Task 7: Register NetWorker licenses for virtual server failover
To register a NetWorker server in a cluster environment:
1. Ensure that the NetWorker virtual server is defined as a part of the cluster.
2. Ensure that the NetWorker service is running.
Install a NetWorker virtual server 45
EMC AutoStart for UNIX Installation
3. For each physical node in the cluster, relocate, sequentially, the NetWorker server to this node.
4. From the NetWorker Administration window, note the host ID number for the appropriate cluster license.Log in to the system that is running the NetWorker virtual server and create the /nsr/res/hostids file. This file contains the host IDs of all the cluster nodes. Use this syntax:
hostid1:hostid2:hostid3:... For example:12345678:87654321
5. Restart the server by taking the NetWorker virtual server offline and then putting it back online.
6. From the NetWorker Administration window, note the host ID number for the appropriate cluster license.
7. Register the NetWorker software.
Install a virtual NetWorker Console serverTo install and configure the NetWorker Console software as a highly available service in a cluster, read and follow the procedures for these tasks:
◆ “Task 1: Install the NetWorker Management software in a cluster” on page 46
◆ “Task 2: Define the NetWorker Console server as highly available” on page 47
A highly available NetWorker Console Server in only supported on the Linux and Solaris platforms.
Task 1: Install the NetWorker Management software in a cluster
To install the NetWorker software on each node in the cluster:
1. Ensure that the most recent cluster patch for the operating system is installed.
2. Ensure that the $HOME environment variable is set to the home directory of the root user:
$HOME
3. Install the NetWorker Console server software on each node in the cluster.
• Linux: lgtonmc
• Solaris: LGTOnmc
The NetWorker Installation Guide provides detailed installation instructions.
46 EMC NetWorker Release 8.0 Cluster Installation Guide
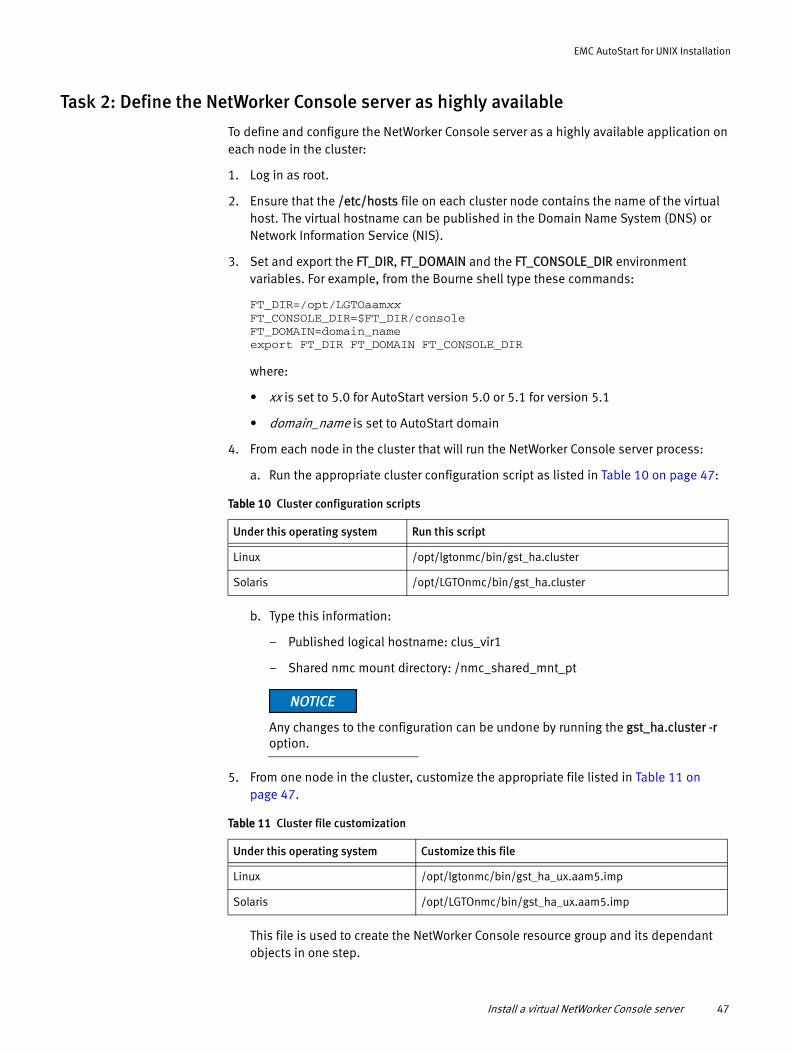
EMC AutoStart for UNIX Installation
Task 2: Define the NetWorker Console server as highly available
To define and configure the NetWorker Console server as a highly available application on each node in the cluster:
1. Log in as root.
2. Ensure that the /etc/hosts file on each cluster node contains the name of the virtual host. The virtual hostname can be published in the Domain Name System (DNS) or Network Information Service (NIS).
3. Set and export the FT_DIR, FT_DOMAIN and the FT_CONSOLE_DIR environment variables. For example, from the Bourne shell type these commands:
FT_DIR=/opt/LGTOaamxxFT_CONSOLE_DIR=$FT_DIR/consoleFT_DOMAIN=domain_nameexport FT_DIR FT_DOMAIN FT_CONSOLE_DIR
where:
• xx is set to 5.0 for AutoStart version 5.0 or 5.1 for version 5.1
• domain_name is set to AutoStart domain
4. From each node in the cluster that will run the NetWorker Console server process:
a. Run the appropriate cluster configuration script as listed in Table 10 on page 47:
b. Type this information:
– Published logical hostname: clus_vir1
– Shared nmc mount directory: /nmc_shared_mnt_pt
Any changes to the configuration can be undone by running the gst_ha.cluster -r option.
5. From one node in the cluster, customize the appropriate file listed in Table 11 on page 47.
This file is used to create the NetWorker Console resource group and its dependant objects in one step.
Table 10 Cluster configuration scripts
Under this operating system Run this script
Linux /opt/lgtonmc/bin/gst_ha.cluster
Solaris /opt/LGTOnmc/bin/gst_ha.cluster
Table 11 Cluster file customization
Under this operating system Customize this file
Linux /opt/lgtonmc/bin/gst_ha_ux.aam5.imp
Solaris /opt/LGTOnmc/bin/gst_ha_ux.aam5.imp
Install a virtual NetWorker Console server 47
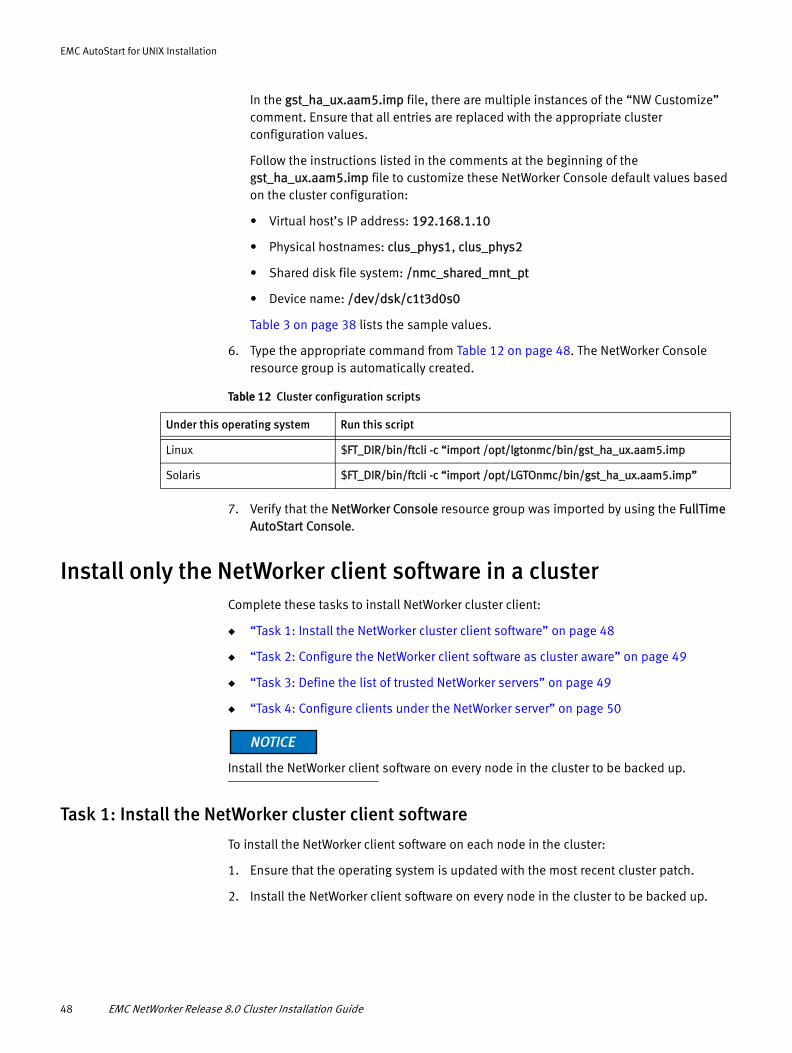
EMC AutoStart for UNIX Installation
In the gst_ha_ux.aam5.imp file, there are multiple instances of the “NW Customize” comment. Ensure that all entries are replaced with the appropriate cluster configuration values.
Follow the instructions listed in the comments at the beginning of the gst_ha_ux.aam5.imp file to customize these NetWorker Console default values based on the cluster configuration:
• Virtual host’s IP address: 192.168.1.10
• Physical hostnames: clus_phys1, clus_phys2
• Shared disk file system: /nmc_shared_mnt_pt
• Device name: /dev/dsk/c1t3d0s0
Table 3 on page 38 lists the sample values.
6. Type the appropriate command from Table 12 on page 48. The NetWorker Console resource group is automatically created.
7. Verify that the NetWorker Console resource group was imported by using the FullTime AutoStart Console.
Install only the NetWorker client software in a clusterComplete these tasks to install NetWorker cluster client:
◆ “Task 1: Install the NetWorker cluster client software” on page 48
◆ “Task 2: Configure the NetWorker client software as cluster aware” on page 49
◆ “Task 3: Define the list of trusted NetWorker servers” on page 49
◆ “Task 4: Configure clients under the NetWorker server” on page 50
Install the NetWorker client software on every node in the cluster to be backed up.
Task 1: Install the NetWorker cluster client software
To install the NetWorker client software on each node in the cluster:
1. Ensure that the operating system is updated with the most recent cluster patch.
2. Install the NetWorker client software on every node in the cluster to be backed up.
Table 12 Cluster configuration scripts
Under this operating system Run this script
Linux $FT_DIR/bin/ftcli -c “import /opt/lgtonmc/bin/gst_ha_ux.aam5.imp
Solaris $FT_DIR/bin/ftcli -c “import /opt/LGTOnmc/bin/gst_ha_ux.aam5.imp”
48 EMC NetWorker Release 8.0 Cluster Installation Guide
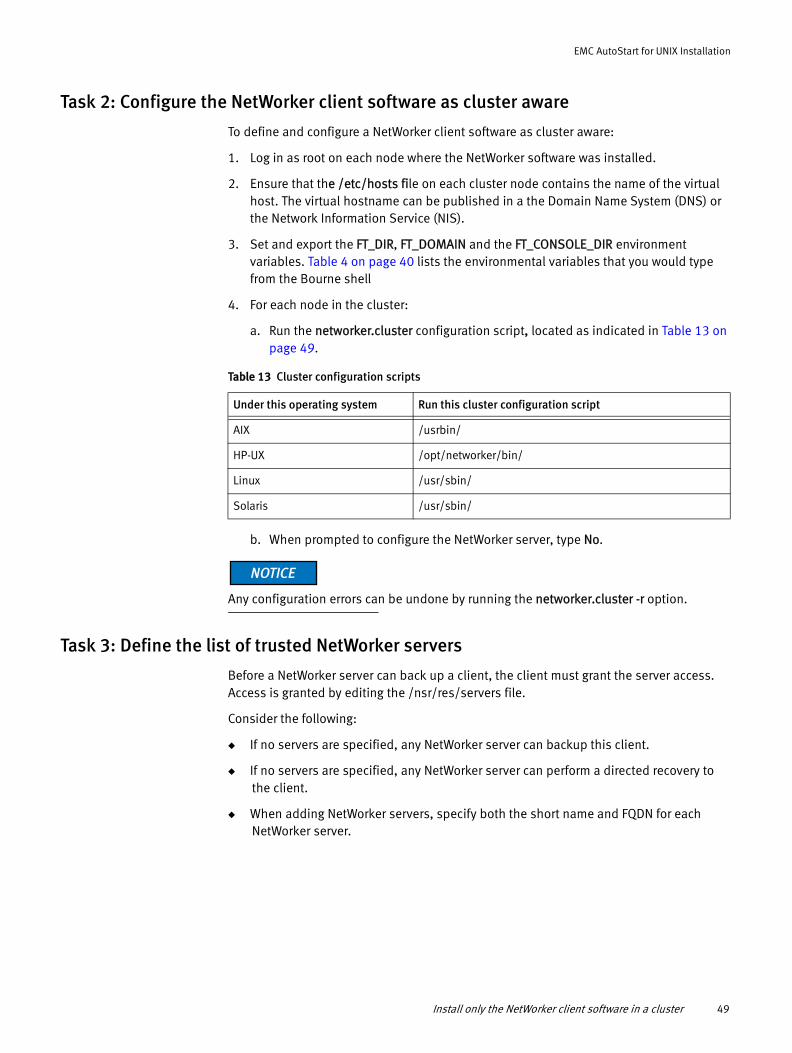
EMC AutoStart for UNIX Installation
Task 2: Configure the NetWorker client software as cluster aware
To define and configure a NetWorker client software as cluster aware:
1. Log in as root on each node where the NetWorker software was installed.
2. Ensure that the /etc/hosts file on each cluster node contains the name of the virtual host. The virtual hostname can be published in a the Domain Name System (DNS) or the Network Information Service (NIS).
3. Set and export the FT_DIR, FT_DOMAIN and the FT_CONSOLE_DIR environment variables. Table 4 on page 40 lists the environmental variables that you would type from the Bourne shell
4. For each node in the cluster:
a. Run the networker.cluster configuration script, located as indicated in Table 13 on page 49.
b. When prompted to configure the NetWorker server, type No.
Any configuration errors can be undone by running the networker.cluster -r option.
Task 3: Define the list of trusted NetWorker servers
Before a NetWorker server can back up a client, the client must grant the server access. Access is granted by editing the /nsr/res/servers file.
Consider the following:
◆ If no servers are specified, any NetWorker server can backup this client.
◆ If no servers are specified, any NetWorker server can perform a directed recovery to the client.
◆ When adding NetWorker servers, specify both the short name and FQDN for each NetWorker server.
Table 13 Cluster configuration scripts
Under this operating system Run this cluster configuration script
AIX /usrbin/
HP-UX /opt/networker/bin/
Linux /usr/sbin/
Solaris /usr/sbin/
Install only the NetWorker client software in a cluster 49
EMC AutoStart for UNIX Installation
To define the list of trusted NetWorker servers, perform the following steps on each node in the cluster:
1. Shut down the NetWorker processes and verify that all NetWorker services have stopped.
2. Edit or create the /nsr/res/servers file:
a. Add the set of NetWorker servers, one per line, that require access to this client.
b. For each virtual NetWorker server, add an entry for each physical host and the virtual NetWorker server. For example:
– clus_vir1
– clus_phys1
– clus_phys2
3. Check the NetWorker boot-time startup file to see whether nsrexecd is being run with the -s option.
If the -s option exists, remove all occurrences of the following:
-s server_name
Task 4: Configure clients under the NetWorker server
To configure each client under the NetWorker server:
1. Make each physical client within the cluster a client of the NetWorker server. For each physical client in the cluster:
a. Create a new NetWorker client.
b. For the Name attribute, type the name of the physical client.
If a physical Client is backed up to a NetWorker server outside the cluster, the name of any virtual service that can run on the physical node must be added to the Remote Access list of the physical Client property sheet.
2. Make each virtual client within the cluster a client of the NetWorker virtual server. For each virtual client in the cluster:
a. Create a new client.
b. For the Name attribute, type the name of the virtual client.
c. For the Remote Access attribute, add entries for each physical client within the cluster. For example:
root@clus_phys1
d. For the Group attribute, select a group.
3. Schedule backups by using the NetWorker software.
Note: The NetWorker server might reside outside of the cluster.
50 EMC NetWorker Release 8.0 Cluster Installation Guide
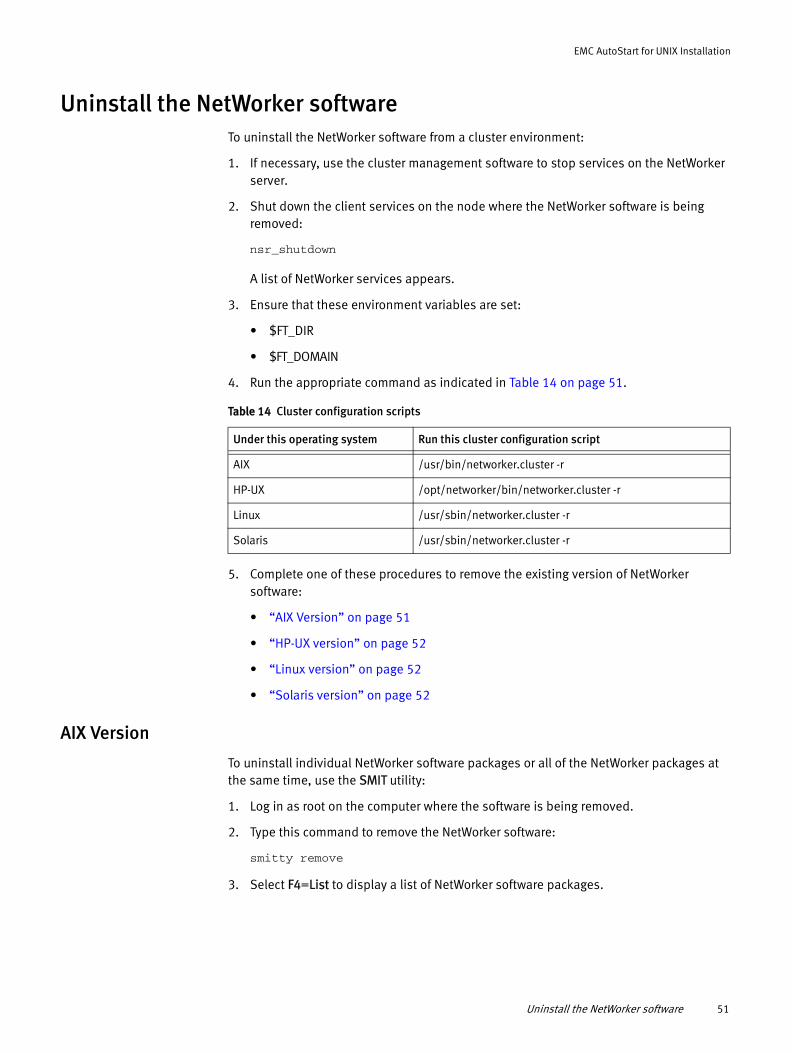
EMC AutoStart for UNIX Installation
Uninstall the NetWorker softwareTo uninstall the NetWorker software from a cluster environment:
1. If necessary, use the cluster management software to stop services on the NetWorker server.
2. Shut down the client services on the node where the NetWorker software is being removed:
nsr_shutdown
A list of NetWorker services appears.
3. Ensure that these environment variables are set:
• $FT_DIR
• $FT_DOMAIN
4. Run the appropriate command as indicated in Table 14 on page 51.
5. Complete one of these procedures to remove the existing version of NetWorker software:
• “AIX Version” on page 51
• “HP-UX version” on page 52
• “Linux version” on page 52
• “Solaris version” on page 52
AIX Version
To uninstall individual NetWorker software packages or all of the NetWorker packages at the same time, use the SMIT utility:
1. Log in as root on the computer where the software is being removed.
2. Type this command to remove the NetWorker software:
smitty remove
3. Select F4=List to display a list of NetWorker software packages.
Table 14 Cluster configuration scripts
Under this operating system Run this cluster configuration script
AIX /usr/bin/networker.cluster -r
HP-UX /opt/networker/bin/networker.cluster -r
Linux /usr/sbin/networker.cluster -r
Solaris /usr/sbin/networker.cluster -r
Uninstall the NetWorker software 51

EMC AutoStart for UNIX Installation
4. Select the NetWorker software packages to remove, as indicated in Table 15 on page 52:
5. Press Return to uninstall the NetWorker software.
HP-UX version
To uninstall individual NetWorker software packages or all of the NetWorker packages simultaneously:
1. To check which NetWorker packages have been installed, type:
swlist | grep LGTO
2. Remove the existing version of NetWorker software.
Linux version
To uninstall a single NetWorker software package or all of the NetWorker packages simultaneously, type:
rpm -e lgtoman-x.x.x lgtolicm-x.x.x lgtoserv-x.x.x lgtonode-x.x.x lgtoclnt-x.x.x
where x.x.x identifies the specific NetWorker release
Solaris version
To uninstall a single NetWorker software package or all of the NetWorker packages simultaneously, type:
pkgrm LGTOman LGTOserv LGTOnode LGTOnmc LGTOlicm LGTOclnt
Table 15 Removing NetWorker software packages
For this NetWorker software package Remove this file
Client software LGTOnw.clnt.rte
Storage node LGTOnw.node.rte
Server LGTOnw.serv.rte
Man pages LGTOnw.man.rte
NetWorker License Manager LGTOnw.licm.rte
52 EMC NetWorker Release 8.0 Cluster Installation Guide
EMC AutoStart for UNIX Installation
Configure an external client to back up to a virtual serverUse this procedure to configure and back up an external client to a NetWorker virtual server.
Before a NetWorker server can back up a client, the client must grant the server access. Access is granted by editing the /nsr/res/servers file.
Consider the following:
◆ If no servers are specified, any NetWorker server can backup this client.
◆ If no servers are specified, any NetWorker server can perform a directed recovery to the client.
◆ When adding NetWorker servers, specify both the short name and FQDN for each NetWorker server.
On each NetWorker client that is outside of the cluster:
1. Shut down the NetWorker processes and verify that all NetWorker services have stopped.
2. Edit or create the /nsr/res/servers file:
a. Add the set of NetWorker servers, one per line, that require access to this client.
b. For each virtual NetWorker server, add an entry for each physical host and the virtual NetWorker server. For example:
– clus_vir1
– clus_phys1
– clus_phys2
Define ownership of a raw partition for virtual clientsTo back up the raw partitions of a NetWorker virtual client, use the IPOverride option in the AutoStart Management Console:
1. Open the AutoStart Console and select Resource Group. The Resource Group Editor window appears.
2. Select Edit View and then select Attributes from the Edit menu. The Define Resource Group Attributes dialog box appears.
3. Add the following line in the Define Resource Group Attributes window:
IPOverride=IP_address=raw_partition_path
For example: IPOverride=135.69.103.149=/dev/rdsk/c1t3d0s1
The IPOverride attribute does not add to the normal list of virtual client-owned paths, but completely overrides them. In the previous example, if the virtual client also owns the /share/web filesystem, set this path:
IPOverrride=135.69.103.149=/dev/rdsk/c1t3d0s1, /share/web
Configure an external client to back up to a virtual server 53

EMC AutoStart for UNIX Installation
54 EMC NetWorker Release 8.0 Cluster Installation Guide

CHAPTER 8HACMP or PowerHA SystemMirror for AIX Installation
This chapter includes these sections:
◆ Software installation roadmap ................................................................................ 56◆ Installation requirements ........................................................................................ 56◆ Install a NetWorker virtual server............................................................................. 58◆ Install only the NetWorker client software in a cluster .............................................. 64◆ Uninstall the NetWorker software ............................................................................ 66◆ Configure an external client to a virtual server ......................................................... 67◆ Schedule saves for raw volumes.............................................................................. 68◆ Track scheduled saves ............................................................................................ 68
HACMP or PowerHA SystemMirror for AIX Installation 55
HACMP or PowerHA SystemMirror for AIX Installation
Software installation roadmapUse the following roadmap to follow when installing NetWorker software:
1. Review “Installation requirements” on page 56 and note the default directory locations.
2. Install the required NetWorker software by following one of these procedures:
• “Install a NetWorker virtual server” on page 58
• “Install only the NetWorker client software in a cluster” on page 64
3. Enable and register all of the NetWorker products. More information is available in the NetWorker Licensing Guide.
Installation requirementsThis section specifies the software and hardware required to install and configure the NetWorker server or client software within an HACMP/PowerHA for AIX environment.
Software requirements
The EMC NetWorker Software Compatibility Guide on the EMC Online Support Site provides information on the supported AIX and HACMP/PowerHA versions.
Hardware requirements
The following hardware requirements must be met:
◆ A dedicated shared volume group and file system used as the NetWorker storage area (for the /nsr directory) must be connected to all the nodes within the cluster (for server installation only).
◆ A device with local affinity for the local bootstrap backup connected to all the nodes within the cluster (for server installation only).
◆ For clusters configured with IP address takeover (IPAT), must be connect to a computer through its boot address if a resource group is not defined. Service addresses are associated with a resource group, not physical nodes.
• The output of the hostname command on a machine must correspond to an IP address that can be pinged.
• The machine hostname must also be set to the name equivalent to the address that is used by the physical client’s dedicated NIC. Configure this NIC as the primary network adapter, for example, en0.
• An extra NIC outside of the control of HACMP/PowerHA for AIX is not required to enable a highly available NetWorker server.
56 EMC NetWorker Release 8.0 Cluster Installation Guide
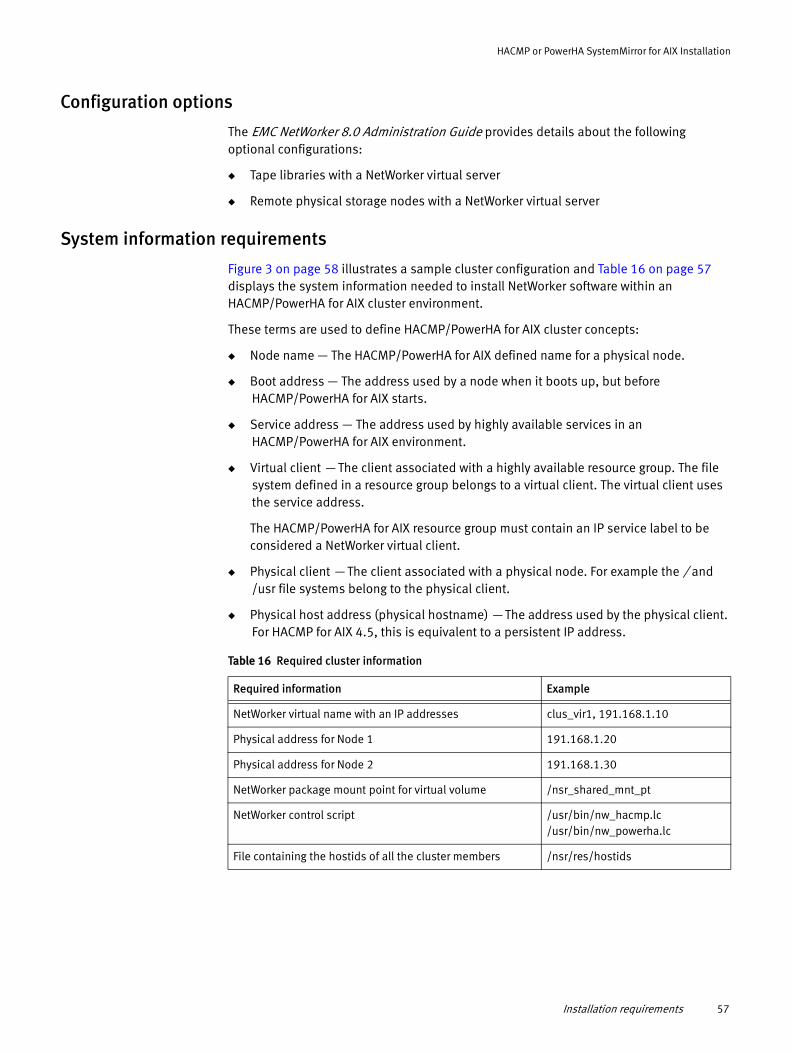
HACMP or PowerHA SystemMirror for AIX Installation
Configuration options
The EMC NetWorker 8.0 Administration Guide provides details about the following optional configurations:
◆ Tape libraries with a NetWorker virtual server
◆ Remote physical storage nodes with a NetWorker virtual server
System information requirements
Figure 3 on page 58 illustrates a sample cluster configuration and Table 16 on page 57 displays the system information needed to install NetWorker software within an HACMP/PowerHA for AIX cluster environment.
These terms are used to define HACMP/PowerHA for AIX cluster concepts:
◆ Node name — The HACMP/PowerHA for AIX defined name for a physical node.
◆ Boot address — The address used by a node when it boots up, but before HACMP/PowerHA for AIX starts.
◆ Service address — The address used by highly available services in an HACMP/PowerHA for AIX environment.
◆ Virtual client — The client associated with a highly available resource group. The file system defined in a resource group belongs to a virtual client. The virtual client uses the service address.
The HACMP/PowerHA for AIX resource group must contain an IP service label to be considered a NetWorker virtual client.
◆ Physical client — The client associated with a physical node. For example the / and /usr file systems belong to the physical client.
◆ Physical host address (physical hostname) — The address used by the physical client. For HACMP for AIX 4.5, this is equivalent to a persistent IP address.
Table 16 Required cluster information
Required information Example
NetWorker virtual name with an IP addresses clus_vir1, 191.168.1.10
Physical address for Node 1 191.168.1.20
Physical address for Node 2 191.168.1.30
NetWorker package mount point for virtual volume /nsr_shared_mnt_pt
NetWorker control script /usr/bin/nw_hacmp.lc/usr/bin/nw_powerha.lc
File containing the hostids of all the cluster members /nsr/res/hostids
Installation requirements 57
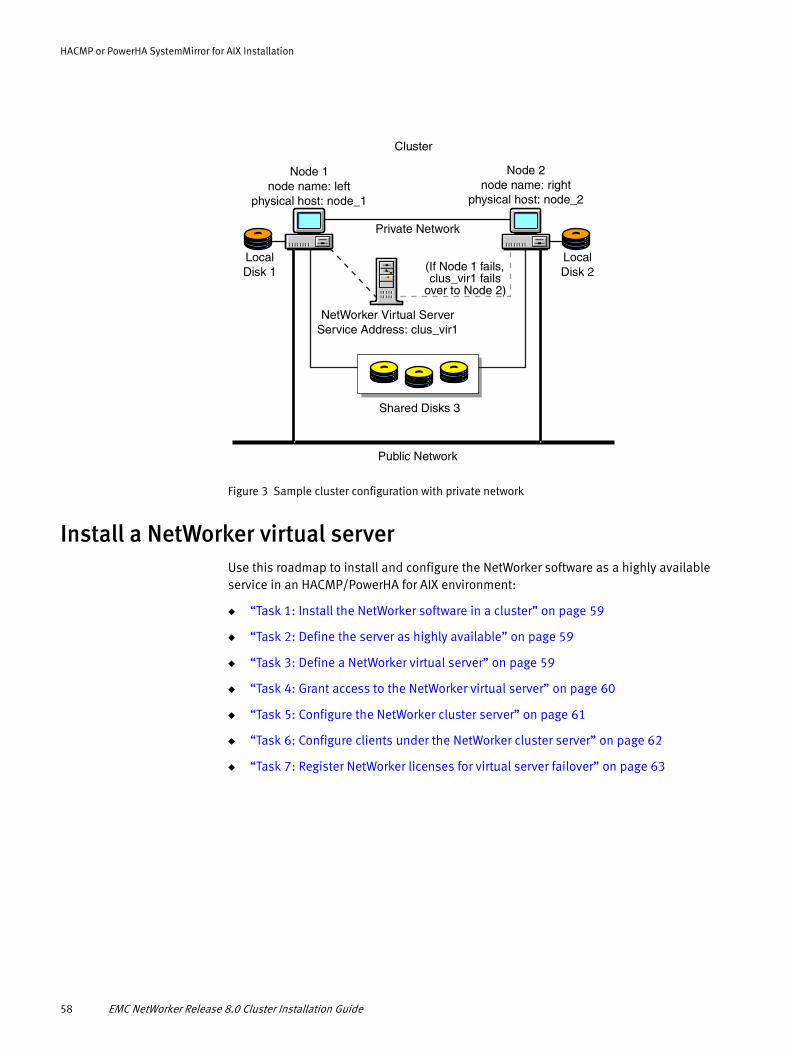
HACMP or PowerHA SystemMirror for AIX Installation
Figure 3 Sample cluster configuration with private network
Install a NetWorker virtual serverUse this roadmap to install and configure the NetWorker software as a highly available service in an HACMP/PowerHA for AIX environment:
◆ “Task 1: Install the NetWorker software in a cluster” on page 59
◆ “Task 2: Define the server as highly available” on page 59
◆ “Task 3: Define a NetWorker virtual server” on page 59
◆ “Task 4: Grant access to the NetWorker virtual server” on page 60
◆ “Task 5: Configure the NetWorker cluster server” on page 61
◆ “Task 6: Configure clients under the NetWorker cluster server” on page 62
◆ “Task 7: Register NetWorker licenses for virtual server failover” on page 63
LocalDisk 1
Cluster
Shared Disks 3
Node 2node name: right
physical host: node_2
Node 1node name: left
physical host: node_1
LocalDisk 2
Public Network
NetWorker Virtual ServerService Address: clus_vir1
(If Node 1 fails, clus_vir1 fails
over to Node 2)
Private Network
58 EMC NetWorker Release 8.0 Cluster Installation Guide
HACMP or PowerHA SystemMirror for AIX Installation
Task 1: Install the NetWorker software in a cluster
To install the NetWorker software in a cluster:
1. Ensure that the most recent HACMP/PowerHA for AIX patch is installed.
2. Install these NetWorker software packages on each node in the cluster:
• Client
• Storage node
• Server
The NetWorker Installation Guide provides installation instructions.
Task 2: Define the server as highly available
To define and configure the NetWorker server as highly available:
1. Log in as root.
2. Ensure that the /etc/hosts file on each cluster node contains the name of the virtual host. The virtual hostname in the DNS or NIS can be published.
3. From each node in the cluster that will run the NetWorker server process:
a. Run the cluster configuration script, networker.cluster, located in the /usr/bin/ directory.
b. Type the following information:
– Location of the local NetWorker database directory provided during the installation procedure:
/nsr
– Published virtual hostname:
clus_vir1
– Shared nsr mount directory:
/nsr_shared_mnt_pt
Any configuration can be undone by running the networker.cluster -r option.
4. Verify that these values are set:
NSR_SERVERHOST = virtual hostname (clus_vir1)
NSR_SHARED_DISK_DIR = shared nsr mount directory (/nsr_shared_mnt_pt)
Task 3: Define a NetWorker virtual server
To define a NetWorker virtual server:
1. Create a shared file system.
2. Define a service IP label.
Install a NetWorker virtual server 59
HACMP or PowerHA SystemMirror for AIX Installation
3. Define a NetWorker application service:
a. Type this command as root:
smit hacmp
b. From the main window, select these options:
For HACMP: Cluster Configuration>Cluster Resource>Define Application Server>Add an Application Server
For PowerHA: Cluster Applications and Resources > Resources>Configure User Applications (Scripts and Monitors)>Application Controller Scripts>Add Application Controller Scripts
c. Complete the following as shown:
Server name: networkerStart script: /usr/bin/nw_hacmp.lc startStop script: /usr/bin/nw_hacmp.lc stop
This application server will be used by the NetWorker resource group.
4. Configure a NetWorker resource group.
The HACMP/PowerHA for AIX documentation provides instructions on defining and monitoring a resource group in an HACMP/PowerHA for AIX environment.
Task 4: Grant access to the NetWorker virtual server
Before a NetWorker server can back up a client, the server must have access to the client. Granting access to the server is controlled by editing the /nsr/res/servers file.
Consider the following:
◆ If no servers are specified, any NetWorker server can backup this client.
◆ If no servers are specified, any NetWorker server can perform a directed recovery to the client.
◆ When adding NetWorker servers, specify both the short name and FQDN for each NetWorker server.
To grant access to the NetWorker virtual server:
1. Perform the following on each node in the cluster:
a. Shut down the NetWorker processes and verify that all NetWorker daemons have stopped.
b. Edit or create the /nsr.NetWorker.local/res/servers file:
– Add the set of NetWorker servers, one per line, that require access to this client.
– For each virtual NetWorker server, add an entry for each physical host and the NetWorker virtual server. For example:
clus_vir1clus_phys1clus_phys2
60 EMC NetWorker Release 8.0 Cluster Installation Guide
HACMP or PowerHA SystemMirror for AIX Installation
c. Check the NetWorker boot-time startup file to see whether nsrexecd is being run with the -s option. If the -s option exists, remove all occurrences of this in the file:
-s server_name
2. Perform the following on one node in the cluster, start the NetWorker service by using the cluster management software:
a. Use the HACMP/PowerHA for AIX software to bring the NetWorker resource group online.
b. Edit or create the /nsr/res/servers file:
– Add the set of NetWorker servers, one per line, that require access to the client.
– For each virtual NetWorker server, add an entry for each physical host and the virtual NetWorker server. For example:
clus_vir1clus_phys1clus_phys2
3. If required, grant access to each NetWorker client that is outside of the cluster:
a. Shut down the NetWorker processes and verify that all NetWorker daemons have stopped:
nsr_shutdownps -ef | grep nsr
b. Edit or create the /nsr/res/servers file:
– Add the set of NetWorker servers, one per line, that require access to the client.
– For each virtual NetWorker server, add an entry for each physical host and the virtual NetWorker server. For example:
clus_vir1clus_phys1clus_phys2
Task 5: Configure the NetWorker cluster server
To configure the NetWorker server:
1. Log in as root on the cluster node that is running the NetWorker virtual server.
2. Start the NetWorker Console software.
a. From the Console window, click Enterprise.
b. From the left pane, select the Enterprise icon.
The NetWorker server appears in the right and left panes.
c. From the left pane, select the NetWorker server.
d. From the right pane, select the NetWorker application.
e. From the Enterprise menu, select Launch Application.
The Administration window launches.
Install a NetWorker virtual server 61

HACMP or PowerHA SystemMirror for AIX Installation
3. From the Administration window, click Configuration:
a. In the left pane, select the NetWorker server.
b. From the File menu, select Properties. The Properties dialog box appears:
– For the Administrator attribute, add entries for any cluster nodes that are not already listed. For example:
root@hostname
– Click Ok.
Task 6: Configure clients under the NetWorker cluster server
When the networker.cluster script runs, it creates a symbolic link named /nsr that points to a local disk. It also creates a second link named nsr.NetWorker.local that points to the local NetWorker directory. For example, if the local NetWorker directory was created in /var/nsr, each client member has these links:
◆ /nsr->/nsr.NetWorker.local
◆ /nsr.NetWorker.local->/var/nsr
To configure clients under the NetWorker cluster server:
1. (Optional) Define savegroups.
In order for their save sets to restart after a virtual client or NetWorker server failover, savegroups must have the Autorestart attribute enabled and the Manual Restart option disabled.
2. Make each physical client within the cluster a client of the NetWorker server. For each physical client in the cluster:
a. Create a new NetWorker client.
b. Type the name of the physical client for the Name attribute.
c. Add the boot adaptor name in the Aliases list.
3. Make each virtual client within the cluster a client of the virtual NetWorker server. For each virtual client in the cluster:
a. Create a new client.
b. Type the name of the service address for the Name attribute.
c. For the Remote Access attribute, the user must be the root user for the boot address.
d. Add entries for each service, boot, and physical address defined within the cluster. For example:
root@clus_phys1
e. For the Group attribute, select a group.
62 EMC NetWorker Release 8.0 Cluster Installation Guide

HACMP or PowerHA SystemMirror for AIX Installation
4. Run a test probe to verify that the Client and Group resources have been properly configured.
On the node on which the NetWorker server resides, type:
savegrp -pv -c client_name group_name
5. If the test probe does not display the scheduled backups and index, see “Track scheduled saves” on page 68.
Task 7: Register NetWorker licenses for virtual server failover
To register a NetWorker server in a cluster environment:
1. Ensure that the NetWorker virtual server is defined as a part of the cluster.
2. Ensure that the NetWorker service is running.
3. For each physical node in the cluster:
a. Relocate, sequentially, the NetWorker server to this node.
b. From the NetWorker Administration window, note the host ID number for the appropriate cluster license.
4. Log in to the system that is running the NetWorker virtual server and create the /nsr/res/hostids file. This file contains the host IDs of all the cluster nodes.
Use this syntax:
hostid1:hostid2:hostid3:...
For example:
12345678:87654321
5. Restart the server by taking the NetWorker virtual server offline and then putting it back online.
6. From the NetWorker Administration window, note the host ID number for the appropriate cluster license.
7. Register the NetWorker software.
Install a NetWorker virtual server 63
HACMP or PowerHA SystemMirror for AIX Installation
Install only the NetWorker client software in a clusterUse this roadmap to install a NetWorker cluster client:
◆ “Task 1: Install the NetWorker cluster client software” on page 64
◆ “Task 2: Configure the NetWorker client software as cluster aware” on page 64
◆ “Task 3: Define the list of trusted NetWorker servers” on page 65
◆ “Task 4: Configure clients under the NetWorker server” on page 65
Ensure that the NetWorker client software is installed on every node in the cluster that needs to be backed up.
Task 1: Install the NetWorker cluster client software
To install the NetWorker client software on each node in the cluster:
1. Ensure that the most recent HACMP/PowerHA for AIX patch is installed.
2. Install the NetWorker client software on every node in the cluster to be backed up.
The NetWorker Installation Guide provides detailed installation instructions.
Task 2: Configure the NetWorker client software as cluster aware
To define and configure a NetWorker client as cluster aware:
1. Log in as root on each node where the NetWorker software is being installed.
2. Ensure that the /etc/hosts file on each cluster node contains the name of the virtual host. The virtual hostname in a DNS or NIS can be published.
3. For each node in the cluster:
a. Run the cluster configuration script, networker.cluster.
b. When prompted to configure the NetWorker server, type No.
If the configuration is not correct, any configuration can be undone by running the networker.cluster -r option. For an example of the script, see “Exit the SMIT program.” on page 67.
64 EMC NetWorker Release 8.0 Cluster Installation Guide
HACMP or PowerHA SystemMirror for AIX Installation
Task 3: Define the list of trusted NetWorker servers
Before a NetWorker server can back up a client, the client must grant the server access. Granting access is controlled by the /nsr/res/servers file.
Consider the following:
◆ If no servers are specified, any NetWorker server can backup this client.
◆ If no servers are specified, any NetWorker server can perform a directed recovery to the client.
◆ When adding NetWorker servers, specify both the short name and FQDN for each NetWorker server.
To define the list of trusted NetWorker servers, perform these steps on each node in the cluster:
1. Shut down the NetWorker processes and verify that all NetWorker daemons have stopped.
2. Edit or create the /nsr/res/servers file:
a. Add the set of NetWorker servers, one per line, that require access to this client.
b. For each NetWorker virtual server, add an entry for each physical host and the NetWorker virtual server. For example:
clus_vir1clus_phys1clus_phys2
3. Check the NetWorker boot-time startup file to see whether nsrexecd is being run with the -s option. If the -s option exists, remove all occurrences of this in the file:
-s server_name
Task 4: Configure clients under the NetWorker server
To configure the NetWorker server:
1. Make each physical client within the cluster a client of the NetWorker server.
For each physical client in the cluster:
a. Create a new client.
b. Type the name of the physical client for the Name attribute.
c. Add the boot adaptor name in the Aliases list.
If a physical Client is backed up to a NetWorker server outside the cluster, the name of any virtual service that can run on the physical node must be added to the Remote Access list of the physical Client property sheet.
Install only the NetWorker client software in a cluster 65
HACMP or PowerHA SystemMirror for AIX Installation
2. Make each virtual client within the cluster a client of the NetWorker server.
For each virtual client in the cluster:
a. Create a new client.
b. For the Name attribute, type the name of the NetWorker server.
c. For the Remote Access attribute, add entries for each service, boot, and physical address defined within the cluster. For example:
root@clus_phys1
d. For the Group attribute, select a group.
3. Schedule backups by using NetWorker.
The NetWorker server might reside outside of the cluster.
Uninstall the NetWorker softwareTo uninstall the NetWorker software from a cluster environment:
1. If necessary, use the cluster management software to stop the NetWorker server services.
2. Shut down the client services on the node with the NetWorker software to be removed:
nsr_shutdown
A list of NetWorker services appears and prompts you to continue with the nsr_shutdown command.
3. Run this command:
/usr/bin/networker.cluster -r
4. Use SMIT to uninstall individual NetWorker software packages or all of the NetWorker packages at the same time.
5. To uninstall the NetWorker software, log in as root on the computer where the software is being removed.
6. To remove the NetWorker software, type:
smitty remove
7. Select F4=List to display a list of NetWorker software packages.
8. Select the NetWorker software packages to remove, as indicated in Table 17 on page 66:
Table 17 Removing NetWorker software packages
For this NetWorker software package Remove this file
Client software LGTOnw.clnt.rte
Storage node LGTOnw.node.rte
66 EMC NetWorker Release 8.0 Cluster Installation Guide
HACMP or PowerHA SystemMirror for AIX Installation
9. To uninstall the NetWorker software, press [Return].
10. Exit the SMIT program.
Configure an external client to a virtual serverIf required, use this procedure to configure and back up an external client to a NetWorker virtual server.
Before a NetWorker server can back up a client, the client must grant the server access. Granting access is controlled by the /nsr/res/servers file.
Consider the following:
◆ If no servers are specified, any NetWorker server can backup this client.
◆ If no servers are specified, any NetWorker server can perform a directed recovery to the client.
◆ When adding NetWorker servers, specify both the short name and FQDN for each NetWorker server.
On each NetWorker client that is outside of the cluster:
1. Shut down the NetWorker processes and verify that all NetWorker daemons have stopped.
2. Edit or create the /nsr/res/servers file:
a. Add the set of NetWorker servers, one per line, that require access to this client.
b. For each virtual NetWorker server, add an entry for each physical host and the virtual NetWorker server. For example:
clus_vir1clus_phys1clus_phys2
Server LGTOnw.serv.rte
Man pages LGTOnw.man.rte
NetWorker License Manager LGTOnw.licm.rte
Table 17 Removing NetWorker software packages
For this NetWorker software package Remove this file
Configure an external client to a virtual server 67
HACMP or PowerHA SystemMirror for AIX Installation
Schedule saves for raw volumesTo enable NetWorker scheduled saves of raw volumes that are owned by a resource group (virtual client), flag the logical volume as follows:
1. Ensure that the volume group to which the logical volume belongs appears under Volume Groups in the resource group configuration.
2. Set the logical volume type to raw by using the chlv command. For example:
chlv -t 'raw' logical_volume_name
In this example, the logical volume ha_rv, that belongs to the volume group havg, will be used as a raw device:
chlv -t’raw’ ha_rvlsvg -l havghavg:
The NetWorker software does not support raw volumes used for concurrent access.
Track scheduled savesTo verify that the Client and Group resources are properly configured, run a test probe for each client from the node where the NetWorker application is running:
savegrp -pv -c client_name group_name
If the test probe does not display all the scheduled save sets:
◆ Check the cluster configuration by using the cluster management software. If necessary, reconfigure the cluster.
◆ Ensure that the save sets defined for the client are owned by that client. If necessary, redistribute the client save sets to the appropriate Client resources.
Misconfiguration of the Cluster resources might cause scheduled save sets to be dropped from the backup. The EMC NetWorker 8.0 Administration Guide provides more information.
◆ Type this command to override scheduled save rules (not path ownership rules):
touch networker_bin_dir/pathownerignore
◆ Run a second test probe to verify the configuration.
This command allows any path to be backed up for a client, whether it is owned by the virtual client or physical node. The EMC NetWorker 8.0 Administration Guide provides more information.
68 EMC NetWorker Release 8.0 Cluster Installation Guide

HACMP or PowerHA SystemMirror for AIX Installation
If the pathownerignore command was used, check that the NetWorker scheduled save uses the correct client index. If the wrong index is used, the save sets can be forced to go to the correct index:
1. From the NetWorker Administration window, select a client and edit its properties.
2. For the Backup Command attribute, type the name of a backup script that contains save -c client_name,
The NetWorker administration guide provides details on the Backup Command attribute.
Track scheduled saves 69

HACMP or PowerHA SystemMirror for AIX Installation
70 EMC NetWorker Release 8.0 Cluster Installation Guide
CHAPTER 9MC/ServiceGuard and MC/LockManager Installation
This chapter includes the following sections:
◆ Software installation roadmap ................................................................................ 72◆ Installation requirements ........................................................................................ 72◆ Install the NetWorker server as highly available on HP-UX MC/ServiceGuard............ 74◆ VxVM on HP ServiceGuard clusters .......................................................................... 81◆ Install only the NetWorker client software in a cluster .............................................. 84◆ Uninstall the NetWorker software ............................................................................ 88◆ Track scheduled saves ............................................................................................ 89
MC/ServiceGuard and MC/LockManager Installation 71
MC/ServiceGuard and MC/LockManager Installation
Software installation roadmapUse the following roadmap when installing the NetWorker software in an HP-UX MC/ServiceGuard or HP-UX MC/LockManager cluster environment.
1. Review the Cluster Support chapter in the NetWorker 8.0 Administration Guide for information regarding Cluster Support with NetWorker.
1. If a previous version of NetWorker is installed on the cluster nodes, remove the NetWorker software on all nodes before installing the newer version of NetWorker. “Uninstall the NetWorker software” on page 88 provides instructions.
2. Review “Installation requirements” on page 72 and note the default directory location.
3. Review “Prepare the system for the NetWorker installation” on page 74
4. Install the required NetWorker software by following one of these procedures:
• “Install the NetWorker server as highly available on HP-UX MC/ServiceGuard” on page 74.
• “Install only the NetWorker client software in a cluster” on page 84
5. Enable and register all of the NetWorker products. More information is available in the NetWorker Licensing Guide.
Installation requirementsThis section provides the software and hardware requirements to install the NetWorker software within an HP-UX MC/ServiceGuard or HP-UX MC/LockManager cluster environment:
◆ “Software requirements for HP-UX” on page 72
◆ “Hardware requirements” on page 73
◆ “System information requirements” on page 73
The EMC Information Protection Software Compatibility Guide provides the most up-to-date information about software requirements.
Software requirements for HP-UX
The Software requirements to consider when installing NetWorker on M/C Service Guard are the same as those outlined in the section “ Task 1: Review the NetWorker software requirements for HP-UX Software requirements” in HP-UX Installation chapter of the NetWorker 8.0 Installation Guide. Review the sections applicable to your HP-UX operating systems.
NetWorker 8.0 and later does not support a MC/ServiceGuard NetWorker server running on the PA_RISC architecture.
72 EMC NetWorker Release 8.0 Cluster Installation Guide
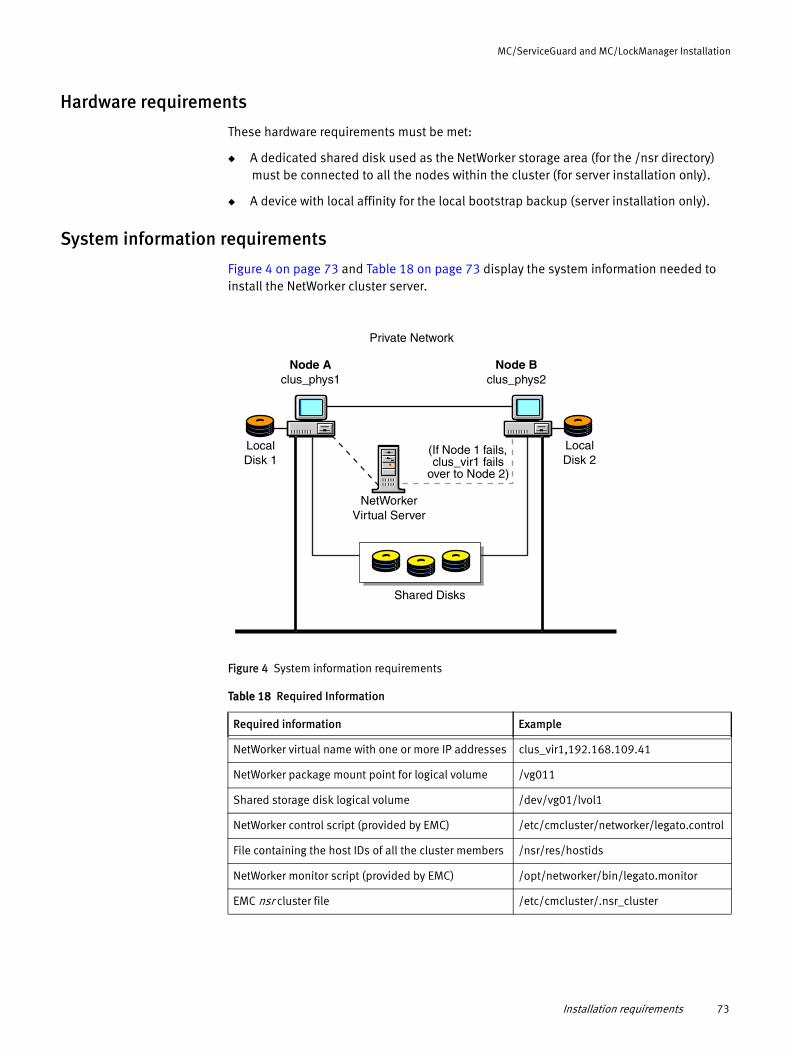
MC/ServiceGuard and MC/LockManager Installation
Hardware requirements
These hardware requirements must be met:
◆ A dedicated shared disk used as the NetWorker storage area (for the /nsr directory) must be connected to all the nodes within the cluster (for server installation only).
◆ A device with local affinity for the local bootstrap backup (server installation only).
System information requirements
Figure 4 on page 73 and Table 18 on page 73 display the system information needed to install the NetWorker cluster server.
Figure 4 System information requirements
LocalDisk 1
Shared Disks
Node Bclus_phys2
Node Aclus_phys1
LocalDisk 2
NetWorkerVirtual Server
(If Node 1 fails, clus_vir1 fails
over to Node 2)
Private Network
Table 18 Required Information
Required information Example
NetWorker virtual name with one or more IP addresses clus_vir1,192.168.109.41
NetWorker package mount point for logical volume /vg011
Shared storage disk logical volume /dev/vg01/lvol1
NetWorker control script (provided by EMC) /etc/cmcluster/networker/legato.control
File containing the host IDs of all the cluster members /nsr/res/hostids
NetWorker monitor script (provided by EMC) /opt/networker/bin/legato.monitor
EMC nsr cluster file /etc/cmcluster/.nsr_cluster
Installation requirements 73
MC/ServiceGuard and MC/LockManager Installation
Different operating systems use different terms for the same cluster concepts. For example, HP-UX MC/ServiceGuard and HP-UX MC/LockManager refer to:
◆ Physical hosts as nodes
◆ Virtual server as a package
Prepare the system for the NetWorker installationBefore installing the NetWorker software, review the following sections in the HP-UX Installation chapter of the NetWorker 8.0 Installation Guide:
◆ Unzip and extract the NetWorker package- for package download and extraction details.
◆ Consider the installation directory - for details regarding the installation of the NetWorker software to a non default location and disk space requirements.
Install the NetWorker server as highly available on HP-UX MC/ServiceGuard
Use this roadmap to install and configure the NetWorker software as a highly available application in a cluster:
◆ “Task 1: Install the NetWorker server software” on page 74
◆ “Task 2: Configure the NetWorker software” on page 75
◆ “Task 4: Change the NetWorker servers with access to a client” on page 79
◆ “Task 5: Make the cluster nodes a client of the NetWorker virtual server” on page 80
◆ “Task 6: Register NetWorker licenses for cluster server failover” on page 80
Task 1: Install the NetWorker server software
The NetWorker server software must be installed on all nodes in the cluster to provide failover support. Refer to the section Installing NetWorker on HP-UX in the NetWorker 8.0 Installation Guide for the installation steps.
Consider the following:
◆ Ensure that the /etc/hosts file on each cluster node contains the name of the virtual host. The virtual hostname can be published in the Domain Name System (DNS) or Network Information Services (NIS).
◆ The cluster services do not automatically start after a reboot. Set the AUTOSTART_CMCLD=1 value in the /etc/rc.config.d/cmcluster file to configure the cluster services to automatically start. If the value is set to 0, the cluster services do not automatically start after a reboot. Setting the value to 1 ensures that the cluster services start after reboot.
74 EMC NetWorker Release 8.0 Cluster Installation Guide
MC/ServiceGuard and MC/LockManager Installation
◆ When the NetWorker software is configured for the cluster on a node, the cluster configuration creates:
• A symbolic link, /nsr.NetWorker.local, that points to the directory that contains the NetWorker configuration files.
• A link, /nsr, that points to the /nsr.NetWorker.local.
For example, if the local NetWorker directory was created in /var/nsr, each client member has the following links after the installation:
• /nsr->/nsr.NetWorker.local
• /nsr.NetWorker.local->/var/nsr
Task 2: Configure the NetWorker software
NetWorker 8.0 and later introduces a new method to configure the NetWorker software in a MC/ServiceGuard environment.
This new method has the following benefits:
◆ Support of multiple IPs in one package. Refer to the “Support for multiple IP addresses for one resource group” in the NetWorker 8.0 Administration Guide for more information.
◆ Support for the lcmap caching mechanism. Refer to the “NetWorker cluster performance issues” section in the NetWorker 8.0 Administration Guide for information about adjusting the cluster cache timeout value.
◆ Does not require the creation and configuration of the NetWorker.clucheck and .nsr_cluster files.
If desired, the previous method to configure the NetWorker software using the NetWorker.clucheck and .nsr_cluster files can still used.
Install the NetWorker server as highly available on HP-UX MC/ServiceGuard 75

MC/ServiceGuard and MC/LockManager Installation
To configure the NetWorker software:
If the previous method of configuring the NetWorker sever as highly available will be used, create the NetWorker.clucheck file and configure the .nsr_cluster file as detailed in Step 1 and 2. If the new method of configuring the NetWorker server will be used, proceed to step .
1. Create the NetWorker.clucheck file in the /etc/cmcluster directory.
2. Configure the .nsr_cluster file in the /etc/cmcluster directory to determine which mount points an MC/ServiceGuard or MC/LockManager package owns. The .nsr_cluster file should have an entry for the NetWorker shared mount point, which is owned by the NetWorker package.
a. Add the name and path of each mount point to the file in the following format:
pkgname:published_ip_address:owned_path [:...]
where published_ip_address is the address assigned to the package owning a shared disk. IPv6 addresses must be enclosed in square brackets, as in the following example:
networker:[3ffe:80c0:22c:74:230:6eff:fe4c:2128]:/share/nw
IPv4 addresses can also be enclosed in square brackets, but it is not necessary.
b. Ensure everyone has read ownership and access permissions for the .nsr_cluster file.
c. Additional paths, preceded by colons, can be added as required. The following is an example of a typical .nsr_cluster file:
networker:192.168.109.41:/vg011 oracle:192.168.109.10:/vg021:/ora_data1:/ora_data2
If an HP-UX MC/ServiceGuard package does not contain a disk resource, it does not require an entry in the .nsr_cluster file. However, if this diskless package is online and the only package on that cluster node, there might be cmgetconf messages generated in the var/admin message file during the backup.To avoid these messages, allocate a file system that is mounted to a mount point and add this mount point along with the package name and IP address into the .nsr_cluster file in the format shown above. This file system is not backed up, but should be mountable on each cluster node that the diskless package might fail over to.
Task 3: Define the NetWorker software as highly available
Define the NetWorker software as highly available in one of two modes:
◆ “Legacy Mode” on page 77
◆ “Modular mode” on page 78
Use the Logical Volume Manager (LVM) to define the logical volumes or volume s the NetWorker software will use. The HP-UX documentation provides more information.
76 EMC NetWorker Release 8.0 Cluster Installation Guide
MC/ServiceGuard and MC/LockManager Installation
Legacy ModeTo define and configure the NetWorker software as highly available in legacy mode:
1. Run the networker.cluster script (located in the /opt/networker/bin directory) on one of the nodes where the NetWorker software is installed.
2. Follow the prompts to configure the NetWorker package in Legacy mode:
a. Do you wish to continue? [Yes]? Press Enter.
b. Enter directory where local NetWorker database is installed [/nsr]? Press Enter.
c. Do you wish to use the updated NetWorker integration framework? Yes or No [Yes]?
– If the previous method to configure the NetWorker software using the NetWorker.clucheck and .nsr_cluster files was performed, enter No at this prompt.
– If the updated method will be used to configure the NetWorker software (Steps 1 and 2) were not performed, enter Yes at this prompt.
d. Select the type of package for the NetWorker Server(1-modular or 2-legacy) [2]? Press Enter.
The networker.cluster script creates a pkg.conf file and a legato.control file on the physical host on which it is running.
3. Copy the legato.control file to all the nodes in the cluster and ensure that execute permissions are set.
4. After the legato.control file is copied to all the nodes in the cluster, run the networker.cluster script on the remaining nodes in the cluster. When prompted to generate a legato.control file, type n.
5. Check each node to determine if the nsrexecd daemon is running:
ps -ef | grep nsrexecd
6. Check each node to determine if the legato.control file was successfully installed on each node:
cd /etc/cmcluster/networkermore legato.control
7. On the node on which the networker.cluster script was initially run:
• Determine if the pkg.conf file was installed correctly:
cd /etc/cmcluster/networkercmcheckconf -P pkg.confcmapplyconf -P pkg.conf
• Run the package:
cmrunpkg networkercmmodpkg -e networker
Install the NetWorker server as highly available on HP-UX MC/ServiceGuard 77
MC/ServiceGuard and MC/LockManager Installation
Modular modeTo define and configure the NetWorker software as highly available in modular mode:
1. Run the networker.cluster script (located in the /opt/networker/bin directory) on one of the nodes where the NetWorker software is installed.
2. Follow the prompts to configure the NetWorker package in Modular mode:
a. Do you wish to continue? [Yes]? Press Enter.
b. Enter directory where local NetWorker database is installed [/nsr]? Press Enter.
c. Do you wish to use the updated NetWorker integration framework? Yes or No [Yes]?
– If the previous method to configure the NetWorker software using the NetWorker.clucheck and .nsr_cluster files was performed, enter No at this prompt.
– If the updated method will be used to configure the NetWorker software (Steps 1 and 2) were not performed, enter Yes at this prompt.
d. Select the type of package for the NetWorker Server(1-modular or 2-legacy) [1]? Press Enter.
e. Do you wish to generate a new package configuration file for NetWorker package [Yes]? Press Enter.
f. Type the IP address to use to monitor this package? 10.5.163.89 (the IP address of the specific cluster.)
g. Enter the IP subnet to monitor for this package? 10.5.163.0 (the subnet of the above IP.)
h. Select the volume management method to be used for the disk resource (1-LVM or 2-VxVM) [1]? Press Enter.
i. Check each node to determine if the nsrexecd daemon is running:
ps -ef | grep nsrexecd
3. Check each node to determine if the legato.control file was successfully installed on each node:
cd /etc/cmcluster/networkermore legato.control
4. On the node on which the networker.cluster script initially ran:
a. Determine if the pkg.conf file was installed correctly:
cd /etc/cmcluster/networkercmcheckconf -P pkg.confcmapplyconf -P pkg.conf
b. Run the package:
cmrunpkg networkercmmodpkg -e networker
78 EMC NetWorker Release 8.0 Cluster Installation Guide
MC/ServiceGuard and MC/LockManager Installation
Task 4: Change the NetWorker servers with access to a client
In a cluster, the NetWorker server software on the active node accesses the global /nsr directory on the shared drive. The passive node will also have the NetWorker server software installed but the node will act as a NetWorker client.
To limit the NetWorker servers authorized to access the cluster nodes, the global /nsr/res/servers file on the shared drive must be modified as well as the /nsr/res/servers file in the local /nsr directory on all passive nodes.
Consider the following:
◆ If no servers are specified, any NetWorker server can backup this client.
◆ If no servers are specified, any NetWorker server can perform a directed recovery to the client.
◆ When adding NetWorker servers, specify both the short name and FQDN for each NetWorker server.
To specify a list of NetWorker servers that can access the cluster:
1. Use the cluster management software to shutdown the NetWorker service on one node in the cluster.
2. On each node in the cluster:
a. Edit or create the local /nsr/res/servers file and specify the NetWorker servers, one per line, that require access to the client. Ensure that the first entry in this file is the virtual hostname for the NetWorker service. This entry becomes the default NetWorker server.
b. Check the NetWorker boot-time startup file for nsrexecd -s arguments and delete any that exist. The nsrexecd -s argument supersedes the /nsr/res/servers file.
For example, delete the arguments for nsrexecd -s in the following file:
vi /etc/init.d/networkernsrexecd -s venus -s mars
The nsrexecd daemon named in the file should appear only as:
nsrexecd
3. On one node in the cluster, start the NetWorker service by using the cluster management software.
4. Repeat steps 2-3 for the global /nsr/res/servers file located shared drive on the active node of the cluster.
Install the NetWorker server as highly available on HP-UX MC/ServiceGuard 79
MC/ServiceGuard and MC/LockManager Installation
Task 5: Make the cluster nodes a client of the NetWorker virtual server
Make all cluster nodes a client of the NetWorker server:
1. While still connect to the NetWorker server in NMC.
2. Configure the Group resource to be used to backup the cluster clients, as required. Enable the Autorestart attribute is enabled and the Manual Restart option disabled. This will ensure that save set backups will restart in the event of a virtual client of NetWorker server failover during backups. The NetWorker 8.0 Administration Guide provides details on defining and configuring s.
3. Create a new NetWorker client for each physical node within the cluster:
a. In the Administration window, click the Configuration button.
b. Create a new NetWorker client.
c. In the Name attribute, type the name of the physical client.
4. Modify the virtual cluster client resource automatically created for the virtual NetWorker server:
a. In the Save set field, specify the shared disk resource.
b. In the Remote Access field under the Globals (1 of 2) tab, specify the root user account for each physical node within the cluster.
For example:
root@<clus_phys1>root@<clus_phys2>
c. In the Group attribute, select the Group configured in Step 1.
d. Define the remaining attributes in the Client properties window as required, then click Apply.
5. Run a test probe to verify that the Client and group resources have been properly configured:
a. On the node on which the NetWorker server resides, run this command:
savegrp -pv -c <client_name> -G <group_name>
b. If the test probe does not display the scheduled backups and index, see “Track scheduled saves” on page 89 for more information.
Task 6: Register NetWorker licenses for cluster server failover
To register a NetWorker server in a cluster environment:
1. Ensure that the NetWorker virtual server is defined as a part of the cluster.
2. Ensure that the NetWorker service is running.
3. For each physical node in the cluster:
a. Relocate, sequentially, the NetWorker server to this node.
b. From the NetWorker Administration window, note the host ID number for the appropriate cluster license.
80 EMC NetWorker Release 8.0 Cluster Installation Guide
MC/ServiceGuard and MC/LockManager Installation
4. Log in to the system that is running the NetWorker virtual server and create a file named /nsr/res/hostids that contains the host IDs of all the cluster nodes.
Use the following syntax:hostid1:hostid2:hostid3:...
For example:12345678:87654321
5. Restart the server by taking the NetWorker virtual server offline and then putting it back online.
6. From the NetWorker Administration window, note the host ID number for the appropriate cluster license.
7. Register the NetWorker software as described in the NetWorker Licensing Guide.
VxVM on HP ServiceGuard clustersThe NetWorker cluster scripts have been modified to support VxVM on HP ServiceGuard clusters. The following procedure outlines how to set up the VxVM file system on the physical nodes in the cluster.
In all examples, the physical nodes in the cluster are dbkpsr01 and dbkpsr02.
1. Mount the VxVM file system as /nsrdata on the dbkpsr01 node (active node) by running the following:
mount /dev/vx/dsk/nsrdg/nsrvol /nsrdata
Do not use /nsr as the mount point.
2. Install the NetWorker server software on both nodes. This will install the software in the /opt/NetWorker/bin directory.
3. Create the /NetWorker.clucheck/etc/cmcluster directory on dbkpsr01 by running:
touch NetWorker.clucheck
4. Create the /NetWorker.clucheck/etc/cmcluster directory on dbkpsr02 by running:
touch NetWorker.clucheck
5. On dbkpsr01, create .nsr_cluster in the /etc/cmcluster directory with the following text:
networker:10.2.6.12:/nsrdata
6. On dbkpsr01, run:
rcp -r -p /etc/cmcluster/.nsr_cluster dbkpsr02:/etc/cmcluster
7. Run networker.cluster on dbkpsr01.
VxVM on HP ServiceGuard clusters 81

MC/ServiceGuard and MC/LockManager Installation
8. Provide these answers to the following questions:
a. Do you wish to continue? [Yes]? Yes
b. Enter directory where local NetWorker database is installed [/nsr]? /nsr
c. Do you wish to generate a new control file for NetWorker package [Yes]? Yes
d. Enter the IP address to use to monitor this package? 10.2.6.12
e. Enter the IP subnet to monitor for this package? 10.2.4.0
f. Enter the DNS name for NetWorker service? dbkpsr
g. Select which Volume Management will be used for the disk resource (1-LVM or 2-VxVM) [1]? 2
h. Enter the VxVM disk resource for this package? nsrdg
i. Enter the mounted logical volume name for this package?
/dev/vx/dsk/nsrdg/nsrdg/nsrvol
j. Enter the mount path for this package? /nsrdata
k. Enter the type of the file system for this package [vxfs]? vxfs
The /etc/cmcluster/networker/legato.control is created.
This file might require modification before starting the NetWorker package. More information is provided in the Cluster Installation Guide.
l. Do you wish to generate a new pkg.conf file for NetWorker package [Yes]? Yes.
m. Enter IP subnet to monitor for NetWorker package? 10.2.4.0.
n. Enter node number 1 for this package [no more]? dbkpsr01.
o. Enter node number 2 for this package [no more]? dbkpsr02.
p. Enter node number 3 for this package [no more]? Press Enter.
The following file is created:
/etc/cmcluster/networker/pkg.conf
This file may need to be modified prior to creating new binary configuration file. More information is provided in the Cluster Installation Guide.
9. On dbkpsr02, create the NetWorker directory in /etc/cmcluster.
10. On dbkpsr01, run:
rcp -r -p /etc/cmcluster/networker/legato.control dbkpsr02:/etc/cmcluster/networker
11. On dbkpsr01, run:
rcp -r -p /opt/networker/bin/networker.cluster dbkpsr02:/opt/networker/bin
12. On dbkpsr02, run the networker.cluster script
82 EMC NetWorker Release 8.0 Cluster Installation Guide
MC/ServiceGuard and MC/LockManager Installation
13. Follow the prompts to complete the configuration:
a. Do you wish to continue? [Yes]? Yes
b. Enter the directory where local NetWorker database is installed [/nsr]? /nsr.
c. Do you wish to generate a new control file for NetWorker package [No]? No.
d. Do you wish to generate a new pkg.conf file for NetWorker package [Yes]? Yes.
e. Enter IP subnet to monitor for NetWorker package? 10.2.4.0.
f. Enter node number 1 for this package [no more]? dbkpsr01.
g. Enter node number 2 for this package [no more]? dbkpsr02.
h. Enter node number 3 for this package [no more]? Press Enter.
The following file is created:
/etc/cmcluster/networker/pkg.conf
This file might require confirmation before creating the new binary configuration file. More information is provided in the Cluster Installation Guide.
14. On each node, check if nsrexecd is running:
ps -ef | grep nsrexecd
15. On dbkpsr01, run the following:
cd /etc/cmcluster/networkercmcheckconf -P pkg.confcmapplyconf -P pkg.confcmrunpkg networkercmmodpkg -e networker
This will install the NetWorker server in the ServiceGuard cluster. When the NetWorker server is not in the cluster, the following appears on both nodes:
nsr -> /nsr.NetWorker.local
When the NetWorker server is in the cluster (the NetWorker server service is running on active node):
• Active node:
nsr -> /nsrdata/nsr
• Passive node:
nsr -> /nsr.NetWorker.local
The nsrd process will start from the cluster.
16. Shut down the NetWorker service using cluster management software. On dbkpsr01, run:
cmhaltpkg networker
17. On dbkpsr01, run:
cd /nsr/res
VxVM on HP ServiceGuard clusters 83
MC/ServiceGuard and MC/LockManager Installation
18. Create a file called servers in this directory and enter dbkpsr as the text (this will be for /nsr.NetWorker.local directory - not in cluster mode).
19. On dbkpsr02, run:
cd /nsr/res
20. Create a file called servers in this directory and enter dbkpsr as the text (this will be for the /nsr.NetWorker.local directory - not in cluster mode).
21. On both nodes, edit /sbin/init.d/networker and search for nsrexecd. It should not have any "-s" parameters
22. On both nodes, run /sbin/init.d/networker stop.
23. On both nodes, run /sbin/init.d/networker start.
24. On dbkpsr01, start the NetWorker service using cluster management software. Run:
cmrunpkg networker
25. On dbkpsr01, run:
cd /nsr/res
Create a file called servers in this directory and enter dbkpsr as the text (this will be for the /nsrdata/nsr directory in cluster mode)
26. On dbkpsr01, run:
rcp -r -p /etc/cmcluster/.nsr_cluster dbkpsr02:/etc/cmcluster
27. Run networker.cluster on dbkpsr01.
28. Install the NetWorker client and NMC on dbkpmg04 (GST service will be on dbkpmg04).
29. Access dbkpsr from NMC.
Install only the NetWorker client software in a cluster Use the following roadmap to install the NetWorker cluster client:
◆ “Task 1: Install the NetWorker software” on page 84
◆ “Task 2: Configure the NetWorker client software in the cluster” on page 85
◆ “Task 3: Change the NetWorker servers with access to a client” on page 86
◆ “Task 4: Configure cluster clients on the NetWorker server” on page 87
Task 1: Install the NetWorker software
The NetWorker client software must be installed on all nodes in the cluster. Refer to the section Installing NetWorker on HP-UX in the NetWorker 8.0 Installation Guide for the installation steps.
84 EMC NetWorker Release 8.0 Cluster Installation Guide
MC/ServiceGuard and MC/LockManager Installation
Task 2: Configure the NetWorker client software in the cluster
NetWorker 8.0 and later introduces a new method to configure the NetWorker software in a MC/ServiceGuard environment.
This new method has the following benefits:
◆ Support of multiple IPs in one package
◆ Support for the lcmap caching mechanism
◆ Does not require the creation and configuration of the NetWorker.clucheck and .nsr_cluster files.
If desired, the previous method to configure the NetWorker software using the NetWorker.clucheck and .nsr_cluster files can still used.
To configure the NetWorker client software in the cluster:
If the previous method of configuring the NetWorker client in a cluster will be used, create the NetWorker.clucheck file and configure the .nsr_cluster file as detailed in Step 1 and 2. If the new method of configuring the NetWorker server will be used, proceed to step 3 .
1. Create the NetWorker.clucheck file in the /etc/cmcluster directory.
2. Configure the .nsr_cluster file in the /etc/cmcluster directory to determine which mount points an MC/ServiceGuard or MC/LockManager package owns. The .nsr_cluster file should have an entry for the NetWorker shared mount point, which is owned by the NetWorker package.
a. Add the name and path of each mount point to the file in the following format:
pkgname:published_ip_address:owned_path [:...]
where published_ip_address is the address assigned to the package owning a shared disk. IPv6 addresses must be enclosed in square brackets, as in the following example:
networker:[3ffe:80c0:22c:74:230:6eff:fe4c:2128]:/share/nw
IPv4 addresses can also be enclosed in square brackets, but it is not necessary.
b. Ensure everyone has read ownership and access permissions for the .nsr_cluster file.
c. Additional paths, preceded by colons, can be added as required. The following is an example of a typical .nsr_cluster file:
networker:192.168.109.41:/vg011 oracle:192.168.109.10:/vg021:/ora_data1:/ora_data2
If an HP-UX MC/ServiceGuard package does not contain a disk resource, it does not require an entry in the .nsr_cluster file. However, if this diskless package is online and the only package on that cluster node, there might be cmgetconf messages generated in the var/admin message file during the backup.To avoid these messages, allocate a file system that is mounted to a mount point and add this mount point along with the package name and IP address into the
Install only the NetWorker client software in a cluster 85
MC/ServiceGuard and MC/LockManager Installation
.nsr_cluster file in the format shown above. This file system is not backed up, but should be mountable on each cluster node that the diskless package might fail over to.
3. Configure the NetWorker client software as cluster aware:
a. Run the networker.cluster script (located in the /opt/networker/bin directory) on one of the nodes where the NetWorker software is installed.
b. Follow the prompts to configure the NetWorker package in Modular mode:
a. Do you wish to continue? [Yes]? Press Enter.
b. Enter directory where local NetWorker database is installed [/nsr]? Press Enter.
c. Do you wish to use the updated NetWorker integration framework? Yes or No [Yes]?
– If the previous method to configure the NetWorker software using the NetWorker.clucheck and .nsr_cluster files was performed, enter No at this prompt.
– If the updated method will be used to configure the NetWorker software (Steps 1 and 2) were not performed, enter Yes at this prompt.
d. Do you wish to configure for both NetWorker server and client? Yes or No [Yes]? Enter No.
Task 3: Change the NetWorker servers with access to a client
On each node in the cluster, modify the /nsr/res/servers file to limit the NetWorker servers authorized to access the NetWorker client.
Consider the following:
◆ If no servers are specified, any NetWorker server can backup this client.
◆ If no servers are specified, any NetWorker server can perform a directed recovery to the client.
◆ When adding NetWorker servers, specify both the short name and FQDN for each NetWorker server.
86 EMC NetWorker Release 8.0 Cluster Installation Guide
MC/ServiceGuard and MC/LockManager Installation
To specify a list of NetWorker servers that can access the cluster, on each node in the cluster:
a. Edit or create the local /nsr/res/servers file and specify the NetWorker servers, one per line, that require access to the client. The first entry becomes the default NetWorker server.
b. Check the NetWorker boot-time startup file for nsrexecd -s arguments and delete any that exist. The nsrexecd -s argument supersedes the /nsr/res/servers file.
For example, delete the arguments for nsrexecd -s in the following file:
vi /etc/init.d/networkernsrexecd -s venus -s mars
The nsrexecd daemon named in the file should appear only as:
nsrexecd
c. Use the NetWorker boot-time startup file to stop and restart the NetWorker software, as follows:
/sbin/init.d/networker stop/sbin/init.d/networker start
Task 4: Configure cluster clients on the NetWorker server
To make the cluster node a client of the NetWorker server:
1. Login to the NetWorker Management console as an administrator and connect to the NetWorker server.
2. Create a new NetWorker client for each physical node within the cluster:
a. In the Administration window, click the Configuration button.
b. Create a new NetWorker client.
c. In the Name attribute, type the name of the physical client.
3. Create a new NetWorker client for each virtual host within the cluster:
a. Create a new NetWorker client.
b. In the Name field, type the name of the virtual client.
c. In the Save set field, specify the shared disk resource.
d. In the Remote Access field under the Globals (1 of 2) tab, specify the root user account for each physical node within the cluster.
For example:
root@<clus_phys1>root@<clus_phys2>
e. In the attribute, select a.
f. Define the remaining attributes in the Client properties window as required, then click Apply.
Install only the NetWorker client software in a cluster 87

MC/ServiceGuard and MC/LockManager Installation
4. Run a test probe to verify that the Client and resources have been properly configured.
On the node on which the NetWorker server resides, run this command:
savegrp -pv -c <client_name> -G <_name>
If the test probe does not display the scheduled backups and index, see “Track scheduled saves” on page 89 for more information.
Uninstall the NetWorker softwareTo remove the NetWorker software from a cluster environment:
1. Halt the NetWorker package:
cmhaltpkg networker
2. Shut down the client services on each node from which the NetWorker software is being removed:
nsr_shutdown
3. To keep the NetWorker server software in the cluster:
a. Migrate it to another node in the cluster, type:
cmrunpkg -n clus_phys1 -v networker
b. Run this command:
/opt/networker/bin/networker.cluster -r
c. If the previous method was used to install the NetWorker software, remove the following file from the /etc/cmcluster directory:
NetWorker.clucheck
4. To avoid running the NetWorker server software in the cluster, remove the NetWorker package software. The EMC NetWorker Installation Guide provides information on how to uninstall the software.
88 EMC NetWorker Release 8.0 Cluster Installation Guide
MC/ServiceGuard and MC/LockManager Installation
Track scheduled savesTo verify that the Client and resources are properly configured, run a test probe for each client from the node where the NetWorker application is running:
savegrp -pv -c client_name _name
If the test probe does not display all the scheduled save sets:
◆ Check the cluster configuration by using the cluster management software. If necessary, reconfigure the cluster.
◆ Ensure that the save sets defined for the client are owned by that client. If necessary, redistribute the client save sets to the appropriate Client resources.
Misconfiguration of the Cluster resources might cause scheduled save sets to be dropped from the backup. The EMC NetWorker administration guide provides more information.
◆ Type this command to override scheduled save rules (not path ownership rules):
touch networker_bin_dir/pathownerignore
◆ Run a second test probe to verify the configuration.
This command allows any path to be backed up for a client, whether it is owned by the virtual client or physical node. The EMC NetWorker administration guide provides more information.
If the pathownerignore command was used, check that the NetWorker scheduled save uses the correct client index. If the wrong index is used, the save sets can be forced to go to the correct index:
1. From the NetWorker Administration window, select a client and edit its properties.
2. For the Backup Command attribute, type the name of a backup script that contains save -c client_name.
The NetWorker administration guide provides details about the Backup Command attribute.
Track scheduled saves 89

MC/ServiceGuard and MC/LockManager Installation
90 EMC NetWorker Release 8.0 Cluster Installation Guide
CHAPTER 10Microsoft Cluster Server (MSCS) Installation
This chapter includes these sections:
◆ Cluster terminology................................................................................................. 92◆ Installation requirements ........................................................................................ 92◆ Update the NetWorker software............................................................................... 93◆ Install the NetWorker server .................................................................................... 94◆ Configure a backup device for the NetWorker virtual server.................................... 101◆ Move the NetWorker server to another node.......................................................... 103◆ Register NetWorker licenses for cluster failover...................................................... 103◆ Restart the NetWorker server services ................................................................... 104◆ Install only the NetWorker client software in a cluster ............................................ 104◆ Uninstall the NetWorker software from MSCS ........................................................ 105◆ Troubleshoot the NetWorker software in the MSCS environment ............................ 106
Microsoft Cluster Server (MSCS) Installation 91

Microsoft Cluster Server (MSCS) Installation
Cluster terminologyNetWorker documentation uses the following cluster terminology:
◆ Node — A physical computer that is a member of a cluster.
◆ Private disk — A local disk on a cluster node. A private disk is not available to other nodes within the cluster.
◆ Shared disk — A disk that is shared by the cluster nodes.
◆ Failover — A means of ensuring application availability by relocating resources in the event of a hardware or software failure. Two-node failover capability allows operations to switch from one cluster node to the other. Failover capability can also be used as a resource management tool.
◆ Highly available application — An application that is installed in a cluster environment and configured for failover capability.
◆ Cluster-aware NetWorker server — A NetWorker server that can recognize cluster clients.
◆ Cluster client — A NetWorker client within a cluster; this can be either a virtual client, or a NetWorker Client resource that backs up the private data that belongs to one of the physical nodes.
◆ Virtual client — A NetWorker Client resource that backs up data that belongs to a highly available service or application within a cluster. Virtual clients can fail over from one cluster node to another.
◆ Stand-alone server — A NetWorker server that is running within a cluster, but not configured as a highly available application. A stand-alone server does not have failover capability.
◆ Virtual server — A NetWorker server configured to run as a highly available application. A virtual server can fail over from one cluster node to another.
Installation requirementsThis section specifies the software and hardware required to install and configure the NetWorker server and client software within a MSCS environment. Consider the following:
◆ The MSCS software must be installed in a Microsoft certified hardware configuration.
◆ NetWorker software must always be installed on the private disk of a node.
92 EMC NetWorker Release 8.0 Cluster Installation Guide

Microsoft Cluster Server (MSCS) Installation
Update the NetWorker software
For more information about MSCS, and detailed procedures for using the Microsoft Management Console (MMC) Cluster Administrator snap-in, refer to the Microsoft documentation.
To update the NetWorker server software in an MSCS environment, on one node in the cluster:
1. In the Cluster Administrator program, take the NetWorker server Cluster resource group offline.
2. Stop the NetWorker Remote Exec Service (nsrexecd) on both nodes.
If nsrexecd is running, the NetWorker.clustersvr file can not be modified.
3. Rename the <NetWorker_install_path>\bin\NetWorker.clustersvr file to <NetWorker_install_path>\bin\NetWorker.nocluster.
4. Update the NetWorker software. The NetWorker Installation Guide provides instructions.
5. Stop the NetWorker Backup and Recover Server service.
6. Open the NetWorker Backup and Recover Server Properties dialog box and change the startup type from Automatic to Manual.
7. Rename the NetWorker.nocluster file to NetWorker.clustersvr.
8. On the second node of the cluster:
a. Rename the <NetWorker_install_path>\bin\NetWorker.clustersvr file to <NetWorker_install_path>\bin\NetWorker.nocluster.
b. Update the NetWorker software.
c. Stop the NetWorker Backup and Recover Server service.
d. Open the NetWorker Backup and Recover Server Properties dialog box and change the startup type from Automatic to Manual.
e. Rename the NetWorker.nocluster file back to NetWorker.clustersvr.
9. Bring the NetWorker server Cluster resource group back online.
Update the NetWorker software 93

Microsoft Cluster Server (MSCS) Installation
Install the NetWorker serverMicrosoft documentation provides information about MSCS and detailed procedures for using the MMC Cluster Administrator snap-in:
◆ “Install a NetWorker server for noncluster mode” on page 94
◆ “Install a NetWorker server for cluster mode” on page 94
Install a NetWorker server for noncluster mode
To run the NetWorker server in noncluster mode within a cluster, the NetWorker server software must be installed as a stand-alone application. The NetWorker Installation Guide provides detailed installation instructions.
If you install NetWorker software without rebooting, running the cluster administrator for the first time can result in an error due to the cluster administrator extension DLL not being reloaded. If this error occurs, close the cluster administrator interface and reload the software by running this from the command line:regsvr32 /u nsrdresex.dll
In this configuration, the NetWorker server software is usually installed on only one of the nodes in the cluster, and the NetWorker client software is installed on each node in the cluster.
The following rules apply:
◆ No failover of the NetWorker server takes place.
◆ The NetWorker server does not have to be configured as a resource managed by the cluster.
◆ The cluster service might or might not be running.
Install a NetWorker server for cluster mode
The following sections explain how to configure a NetWorker server as a highly available application in MSCS:
◆ “Task 1: Install the NetWorker software” on page 95
◆ “Task 2: Create and register the cluster resource type” on page 95
◆ “Task 3: Verify the NetWorker server resource type” on page 95
◆ “Task 4: Create an MSCS Group resource and required components resource” on page 96
◆ “Task 5: Bring the NetWorker server resource online” on page 99
◆ “Task 6: Configure the NetWorker virtual server” on page 99
◆ “Task 7: Configure clients on the NetWorker cluster server” on page 99
94 EMC NetWorker Release 8.0 Cluster Installation Guide
Microsoft Cluster Server (MSCS) Installation
Task 1: Install the NetWorker softwareOn each node in the cluster, install NetWorker software in the same location on a private disk.
To install the software:
1. Log in as administrator to the node on which the NetWorker software will be installed.
2. On one node in the cluster, complete the installation. From the NetWorker Administration window, note the host ID number for the appropriate cluster license.
3. On the second node in the cluster:
a. Complete the installation.
b. From the NetWorker Administration window, note the host ID number for the appropriate cluster license. The NetWorker Installation Guide provides detailed installation instructions.
The host ID is needed for the procedure “Register NetWorker licenses for cluster failover” on page 103.
Task 2: Create and register the cluster resource typeTo create and register the cluster resource type:
1. Verify that NetWorker server software is installed in the same location on each node in the cluster.
2. On one of the cluster nodes, type:
regcnsrd -c
This creates the NetWorker Server cluster resource type. It also registers the resource extension module so the NetWorker Server resource type can be managed from this node.
3. On the second cluster node, type:
regcnsrd -r
If prompted with the following, type Y:
Is this machine a member of the cluster on which you want to register Resource Extension for NetWorker Server resource?
This registers the resource extension module so the NetWorker Server resource type can be managed from this node.
Task 3: Verify the NetWorker server resource typeTo verify that a NetWorker Server resource type exists:
1. In the Cluster Administrator program, select Resource Type under the Cluster Configuration.
2. Verify that NetWorker Server is listed as a resource type.
The resource types: IP Address and Network Name define the NetWorker server’s virtual identity. The Physical Disk resource type is for the shared nsr directory.
Install the NetWorker server 95
Microsoft Cluster Server (MSCS) Installation
Task 4: Create an MSCS Group resource and required components resource.This task describes how to create the NetWorker virtual server Group resource for:
◆ A Typical (full) configuration
◆ An Advanced (minimum) Configuration
Typical (full) configuration
To create the NetWorker virtual server Group resource for a typical (full) configuration:
1. In the Cluster Administrator program, select the Disk Group in the Groups folder that contains the shared disk to associate with the NetWorker server.
2. If required, you can rename this Disk Group. For this procedure, the Disk Group was renamed to NetWorker Group.
The NetWorker server must have its own dedicated Shared Disk resource. The cluster service quorum disk cannot be used for this.
Advanced (minimum) Configuration
To create the NetWorker virtual server Group resource for an advanced (minimum) configuration:
1. Create a new group and name it NetWorker Group.
2. Right-click NetWorker Group and select New > Resource.
3. In the New Resource dialog box complete the fields:
• Disk Name
• Description
• Resource type (Physical disk)
• Group (NetWorker Group)
4. Click Next, and add the nodes to the possible owners.
5. Click Next, and add the shared disk to the dependencies list.
Note: The NetWorker server must have its own dedicated Shared Disk resource. The cluster service quorum disk cannot be used for this.
6. Click Next, and select the shared disk.
7. Click Finish.
96 EMC NetWorker Release 8.0 Cluster Installation Guide
Microsoft Cluster Server (MSCS) Installation
8. Select the NetWorker Group (Disk Group) that was identified in the previous step and create the following resources for the NetWorker Group:
• “NetWorker IP Address resource” on page 97
• “NetWorker Network Name resource” on page 97
• “NetWorker Server resource” on page 98
Do not create multiple instances of the NetWorker Server resources. Creating more than one instance of a NetWorker Server resource interferes with how the existing NetWorker Server resources function.
NetWorker IP Address resource
To create a NetWorker IP Address resource:
1. In the Cluster Administrator program, select File > New > Resource.
2. Complete these attributes:
Name: NSR_IPDescription: NetWorker IP AddressResource Type: IP AddressGroup: NetWorker Group
For the Name attribute, type any descriptive name (without spaces). For the Description attribute, type any descriptive text.
3. Click Next. In the Possible Owners dialog box, type the hostname of each required node in the cluster. For example:
Possible Owners: uranus, pluto
4. Click Next. In the Dependencies dialog box, specify the shared disk you associated with the NetWorker virtual server. For example:
Dependencies: Disk P:
5. Click Next. In the TCP/IP Address Parameters dialog box, type the IP address of the NetWorker virtual server. For example, 10.0.0.4.
NetWorker Network Name resource
To create a NetWorker Network Name resource:
1. In the Cluster Administrator program, select File > New > Resource.
2. Complete the following attributes:
Name: NSR_NetworkNameDescription: NetWorker Network NameResource Type: Network NameGroup: NetWorker Group
For the Name attribute, type any descriptive name (without spaces). For the Description attribute, type any descriptive text.
Install the NetWorker server 97

Microsoft Cluster Server (MSCS) Installation
3. Click Next.
4. In the Possible Owners dialog box, type the hostname of each required node in the cluster. For example:
Possible Owners: pluto, uranus
5. Click Next. In the Dependencies dialog box, type the name of the NetWorker IP Address resource. For example:
Dependencies: NSR_IP
6. Click Next. In the Network Name Parameters dialog box, type the name of the NetWorker virtual server. For example:
Name: neptune
NetWorker Server resource
To create a NetWorker Server resource:
1. In the Cluster Administrator program, select File > New > Resource.
2. Complete these attributes:
Name: NSR_ServerDescription: NetWorker Server Resource Resource Type: NetWorker ServerGroup: NetWorker Group
For the Name attribute, type any descriptive name (without spaces). For the Description attribute, type any descriptive text. For the Resource Type attribute, type the name of the resource type created in “Task 2: Create and register the cluster resource type” on page 95.
3. Click Next. In the Possible Owners dialog box, type the hostname of each required node in the cluster. For example:
Possible Owners: pluto, uranus
4. Click Next. In the Dependencies dialog box, type the name of the NetWorker Network Name resource. For example:
Dependencies: NSR_NetworkName
5. Click Next. In the NetWorker Server Parameters dialog box, complete the following attributes:
Server Name: (leave blank)NsrDir: P:\nsrAdditional Arguments: (leave blank)
The directory path entered for the NsrDir attribute must reside on the NetWorker server shared disk.
98 EMC NetWorker Release 8.0 Cluster Installation Guide
Microsoft Cluster Server (MSCS) Installation
6. After completing these steps, a message appears indicating that the resource was successfully created. Verify that a new NetWorker Server type resource was created in the selected resource group.
The MSCS software provides an option to set up an application of the Generic Application type within a Group resource. Do not create a Generic Application resource for the NetWorker virtual server.
Task 5: Bring the NetWorker server resource onlineTo bring the NetWorker Server resource online:
1. In the Cluster Administrator program, select the resource group where the NetWorker Server resource exists.
2. Select the NetWorker Server resource.
3. Select Bring Online from the File menu to bring the NetWorker server online. The state of the NetWorker Server resource changes to Online Pending.
4. Wait until the state of the NetWorker Server resource changes to Online.
These steps stop the NetWorker Remote Exec service and restart all of the NetWorker services.
Task 6: Configure the NetWorker virtual serverTo configure the NetWorker virtual server:
1. Log in to the cluster node that is running the NetWorker virtual server.
2. Open the Console server on the NetWorker virtual server as described in “Task 5: Bring the NetWorker server resource online” on page 99.
3. From the Administration window, select File > Properties.
a. For the Administrator attribute, add entries for any cluster nodes that are not already listed. For example:
nsraddadmin - u administrator@cluster_phy1
b. Click Ok.
4. Restrict the set of NetWorker servers that can back up a particular client. Edit the %SystemDrive%\Program Files\EMC NetWorker\nsr\res\servers file and add the NetWorker virtual host as well as each cluster node to the list of servers.
Consider the following:
• If no servers are specified, any NetWorker server can backup this client.
• If no servers are specified, any NetWorker server can perform a directed recovery to the client.
• When adding NetWorker servers, specify both the short name and FQDN for each NetWorker server.
Install the NetWorker server 99
Microsoft Cluster Server (MSCS) Installation
Task 7: Configure clients on the NetWorker cluster serverTo configure a NetWorker client to back up the quorum data:
1. In the Cluster Administrator program, verify that the same physical node owns the cluster group and quorum disk.
2. Select the disk group that contains the quorum disk.
3. Drag the quorum disk to the cluster group.
To configure the NetWorker Client resource:
1. Log in to the cluster node that is running the NetWorker virtual server.
2. Add the NetWorker virtual server to the hosts file on each node (located in %SystemRoot%\system32\drivers\etc).
3. Start the NetWorker Management Console software.
Make each physical node within the cluster a client of the NetWorker virtual server. For each physical node in the cluster:
a. Create a new Client resource.
b. For the Name attribute, type the name of the physical host.
The NetWorker 8.0 Administration Guide details how to create a Client resource.
4. Make each virtual server within the cluster a client of the NetWorker virtual server. For each virtual node in the cluster:
a. Create a new Client resource.
b. For the Remote Access attribute, type the user@hostname of each physical node within the cluster.
5. Define one or more NetWorker Group resources to include the NetWorker virtual server and each of the physical nodes in the cluster:
a. Create the necessary groups and define their attributes as appropriate.
b. For each group, select Enabled for the Autorestart attribute.
c. For each group, ensure that Manual Restart is not selected in the Options attribute (under the Preferences tab).
The only save sets that restart after a virtual client failover are those that belong to a group in which Autorestart is enabled and Manual Restart is disabled.
6. Run a test probe to verify that the Client and Group resources are properly configured. On the node on which the NetWorker server resides, run this command:
savegrp -pv -c client_name group_name
If the expected scheduled backups and index do not appear, perform the following workaround:
100 EMC NetWorker Release 8.0 Cluster Installation Guide
Microsoft Cluster Server (MSCS) Installation
a. Create an empty file named pathownerignore in the directory where the NetWorker savefs command is installed (the default location is C:\Program Files\EMC NetWorker\nsr\bin). This allows a valid save set to be scheduled for backup for a NetWorker client.
This file must be created on each NetWorker server and NetWorker client host in the cluster.
b. To bypass the default ownership scheduling rules, run this command:
echo NUL: > NetWorker_install_path\bin\pathownerignore
This command allows any path to be scheduled for backup for a NetWorker client.
A NetWorker scheduled save might use a client index name other than the one you want it to. To override this default, run a manual save with the -c option:save -c client_name.
7. Restrict the set of NetWorker servers that can back up a particular client. Edit the %SystemDrive%\Program Files\EMC NetWorker\nsr\res\servers file and add the NetWorker virtual host as well as each cluster node to the list of servers.
Consider the following:
• If no servers are specified, any NetWorker server can backup this client.
• If no servers are specified, any NetWorker server can perform a directed recovery to the client.
• When adding NetWorker servers, specify both the short name and FQDN for each NetWorker server.
After the client configuration is complete:
◆ The NetWorker cluster server uses the IP address of the NetWorker virtual host, regardless of which cluster node currently masters the NetWorker virtual server.
◆ The NetWorker cluster server takes the identity of the NetWorker virtual server’s hostname, regardless of which cluster node is currently running the NetWorker service.
◆ The first time NetWorker software runs, it creates the Client resource for the NetWorker virtual host. Client resources must be created manually for any cluster node that is to be backed up by the NetWorker virtual host.
Configure a backup device for the NetWorker virtual serverThe NetWorker virtual server must be configured with storage node backup devices. The storage nodes the NetWorker virtual server uses can be devices attached to a remote system (external to the cluster). They can also be devices connected locally to any of the physical nodes in the cluster. A storage node device can be a stand-alone tape drive or an autochanger.
The NetWorker 8.0 Administration Guide details how to configure storage nodes.
Configure a backup device for the NetWorker virtual server 101
Microsoft Cluster Server (MSCS) Installation
MSCS does not support shared tapes. You cannot configure the NetWorker virtual server with tape devices connected to a shared bus.
MSCS does support disk devices connected to a shared bus. However, it is strongly recommended that you not use file type devices connected to a shared bus.
The NetWorker virtual server requires a local backup device to save the bootstrap and the server indexes. Use either of these two methods to backup the bootstrap and the server indexes on a clustered NetWorker server:
◆ Configure a device belongs to the NetWorker virtual server that is shared between the physical nodes so the device is always available regardless of the node on which the NetWorker virtual server is running.
◆ Save the NetWorker virtual server bootstrap and indexes to a storage node. In this method, the storage node device must be attached to the cluster node on which the NetWorker virtual server is currently running. A NetWorker virtual server running on a two-node cluster requires this minimum device configuration:
• Configure each cluster node as a storage node for the NetWorker virtual server. Instructions are available in “Define a cluster node as a storage node” on page 102.
• List the storage nodes enabled to store client data in the Storage Nodes attribute for the NetWorker virtual server in the Preferences tab for the NetWorker virtual server Client resource:
1. One cluster node
2. The other cluster node
3. The nsrserverhost
The nsrserverhost must be listed last in the client’s storage node list.
Do not configure a storage node on a cluster node that is running the NetWorker server software. Before configuring a storage node, move the NetWorker virtual server to another node in the cluster.
Define a cluster node as a storage node
To define each cluster node as a storage node for the NetWorker virtual server:
1. Log in to a cluster node that does not currently own the NetWorker virtual server.
2. Configure the cluster node as a NetWorker storage node. The NetWorker 8.0 Administration Guide provides detailed instructions.
3. In the Cluster Administrator program, move the NetWorker virtual server to another node in the cluster.
4. When the NetWorker virtual server is moved to the other node:
a. Log in to a cluster node that does not currently own the NetWorker virtual server.
b. Configure the cluster node as a NetWorker storage node.
102 EMC NetWorker Release 8.0 Cluster Installation Guide

Microsoft Cluster Server (MSCS) Installation
The NetWorker Remote Exec service must be running on each storage node in the cluster.
Move the NetWorker server to another nodeTo move the NetWorker server from one node to another within the cluster, use the Cluster Administrator program to move the resource group that contains the NetWorker Server resource from one node to another:
1. Select the resource group where the NetWorker Server resource exists.
2. Select Move Group from the File menu to change the state of the resources in this group to Offline Pending.
This brings all the resources in the current node offline. It also brings all the resources in the other node in the cluster online.
3. Wait until the state of all the resources in the group becomes Online again.
Register NetWorker licenses for cluster failover
To register NetWorker licenses for cluster failover, first complete all tasks under “Install a NetWorker server for cluster mode” on page 94.
1. Ensure the NetWorker virtual server is online.
2. Log on to the cluster node on which the NetWorker virtual server is running.
3. Create a file named hostids in the <NetWorker_install_path>\res directory. The file name must not have a file extension.
4. Add one line to the hostids file, in the following format:
hostid1:hostid2
where the host ID are the NetWorker server host ID values obtained in: “Task 1: Install the NetWorker software” on page 95.
5. Restart the NetWorker virtual server by taking it offline and then bringing it back online.
The host ID now displayed in the NetWorker Administrator program (or by running the lgtolic -i command) is the composite hostid. This composite host ID is required for permanent registration in a clustered environment.
6. Register the NetWorker software for permanent use. More information is available in the NetWorker Licensing Guide.
Move the NetWorker server to another node 103
Microsoft Cluster Server (MSCS) Installation
Restart the NetWorker server services
Start the NetWorker server manually in a cluster environment only if it is running as a stand-alone server.
If the NetWorker server is configured as a cluster group resource, then you must start or restart the NetWorker services through the cluster software.
“Task 5: Bring the NetWorker server resource online” on page 99 describes how to start the NetWorker server within cluster mode. Use the Cluster Administrator program to restart the NetWorker server services in the current node by taking the server offline and bringing it back online.
Install only the NetWorker client software in a clusterTo install the NetWorker client software as cluster-aware:
1. Install the NetWorker client software on the private disk of each node in the cluster.
2. Configure each node in the cluster as a client of the NetWorker server. These are physical cluster clients.
If the NetWorker server is configured as a Cluster resource, add the hostname and user of this NetWorker virtual server to these Client resource attributes of the physical cluster clients:
• Remote Access
• Administrator
3. Configure each of the virtual servers in a cluster as a client of the NetWorker virtual server. These are virtual cluster clients.
4. Add the hostname and user of each node to these Client resource attributes of the virtual clients:
• Remote Access
• Administrator
5. If the NetWorker Remote Exec service is started before the cluster service is enabled on the node, restart the NetWorker Remote Exec service on each cluster node.
104 EMC NetWorker Release 8.0 Cluster Installation Guide

Microsoft Cluster Server (MSCS) Installation
Uninstall the NetWorker software from MSCSIf the NetWorker server is configured as a cluster resource, perform the following steps before removing the NetWorker software.
If the NetWorker server is installed as a stand-alone application (not cluster managed) or only the client software is installed, follow the standard uninstall procedure for NetWorker software. The NetWorker Installation Guide provides instructions on how to uninstall the software.
Before uninstalling NetWorker software from a cluster node, close the Cluster Administrator program on the NetWorker server.
Uninstall the software from all the nodes in the cluster
To uninstall NetWorker software from all the nodes in the cluster:
1. Unregister and remove the NetWorker Server resource:
a. In the Cluster Administrator program, select File>Take Offline to bring the NetWorker Server resource Offline.
b. Select File>Delete to delete the NetWorker Server resource from MSCS.
c. Run the regcnsrd -u command on all but the last member of the cluster.
If prompted with this message, type y:
Is this machine a member of the cluster on which you want to un-register Resource Extension for NetWorker Server resource?
d. Run the regcnsrd -d command on the last member of the cluster.
2. Close the Cluster Administrator program on all the nodes where you plan to uninstall NetWorker software.
3. Uninstall the NetWorker software from all nodes.
Uninstall the software from only one node in the cluster
Use the following procedure if the NetWorker server software is installed on more than one node and all these nodes are possible owners that can host the NetWorker Server resource.
To uninstall NetWorker software from only one node in the cluster:
1. From one node in the cluster, run the regcnsrd -u command.
If prompted with this message, type y:
Is this machine a member of the cluster on which you want to un-register Resource Extension for NetWorker Server resource?
2. Log in to another node in the cluster that can host the NetWorker server.
Uninstall the NetWorker software from MSCS 105
Microsoft Cluster Server (MSCS) Installation
3. Remove the node that you are uninstalling from the Possible Owners attribute in the NetWorker Server resource.
To determine the possible owners of the NetWorker Server cluster resource, review the properties of the NetWorker Server resource.
4. Close the Cluster Administrator program on the node where you plan to uninstall the NetWorker software.
5. Uninstall the NetWorker software from the node.
The NetWorker Installation Guide provides detailed instructions.
Troubleshoot the NetWorker software in the MSCS environmentThe following sections provide tips for troubleshooting problems with the NetWorker software in an MSCS environment.
NetWorker virtual server fails to start nsrmmd
If the NetWorker virtual server fails to start nsrmmd on a NetWorker storage node, the following error messages are written into the NetWorker server daemon.raw file:
06/08/00 10:00:11 nsrmon #217: connect to nsrexec prog 390113 vers 1 on `uranus' failed: RPC error: Remote system error06/08/00 10:00:11 nsrd: media notice: check storage node: uranus (RPC error: Remote system error)06/08/00 10:00:11 nsrd: media info: restarting nsrmmd #1 on uranus in 2 minute(s)06/08/00 10:02:12 nsrd: media info: restarting nsrmmd #1 on uranus now06/08/00 10:02:42 nsrmon #183: connect to nsrexec prog 390113 vers 1 on `
The error might be caused by the NetWorker Remote Exec service not running on the storage node.
If the NetWorker Remote Exec service is not running:
1. On the Storage Node, from Control Panel, select Services.
2. Right-click the NetWorker Remote Exec service name and select Start.
106 EMC NetWorker Release 8.0 Cluster Installation Guide
Microsoft Cluster Server (MSCS) Installation
NetWorker server fails to back up a virtual cluster client
If a NetWorker server fails to backup a virtual cluster client, an error message could appear.
In this example, the following names appear:
◆ charon — Virtual cluster client running on pluto
◆ pluto — Physical cluster node
◆ neptune — NetWorker server
06/19/03 12:56:57 nsrd: savegroup alert: test completed, 1 client(s) (charon Failed) charon:Q:\: No save sets with this name were found in the media database; performing a full backup
charon:Q:\ save: RAP error: Unable to extract resource info for client pluto.emc.com.charon:Q:\ save: Cannot open save session with neptune.emc.comcharon:Q:\ 1 retry attemptedcharon:Q:\: No save sets with this name were found in the media database; performing a full backupcharon:Q:\ save: RAP error: Unable to extract resource info for client pluto.emc.com.charon:Q:\ save: Cannot open save session with neptune.EMC.com
06/19/03 12:56:57 nsrd: runq: NSR group test exited with return code 1This error might occur because the NetWorker Client resources for each of the physical nodes in the cluster are missing.
To correct the error:
1. Create a NetWorker Client resource for each physical node that is allowed to own the virtual cluster client.
2. Rerun the backup.
NetWorker services fail to start in an MSCS environment
If the NetWorker services fail to start in an MSCS environment:
1. Check for a file named NetWorker_install_path\bin\NetWorker.clustersvr.
2. If the NetWorker.clustersvr file does not exist, create an empty file with that name.
3. From Control Panel, start the NetWorker Remote Exec service.
Troubleshoot the NetWorker software in the MSCS environment 107

Microsoft Cluster Server (MSCS) Installation
108 EMC NetWorker Release 8.0 Cluster Installation Guide
CHAPTER 11Microsoft Failover Cluster on Windows Server 2008
This chapter includes these sections:
◆ Installation requirements ...................................................................................... 109◆ Update the NetWorker software............................................................................. 109◆ Install the NetWorker software in a Microsoft Failover Cluster ................................ 110◆ Uninstall the NetWorker software in a Microsoft Failover Cluster ............................ 119
Installation requirementsEnsure that the following software is installed on each node in the cluster:
◆ Microsoft Windows Server 2008, Standard, Enterprise, and Datacenter Editions, 32-bit or x64 version
◆ NetWorker release 8.0 and above
The EMC Information Protection Software Compatibility Guide provides the most up-to-date information about the NetWorker software and hardware requirements.
Update the NetWorker software
For more information about MSCS, and detailed procedures for using the Microsoft Management Console (MMC) Failover Cluster Management snap-in, refer to the Microsoft documentation.
To update the NetWorker server software in an MSCS environment, on one node in the cluster:
1. In the Failover Cluster Management program, take the NetWorker server Cluster service offline.
2. Rename the <NetWorker_install_path>\bin\NetWorker.clustersvr file to <NetWorker_install_path>\bin\NetWorker.nocluster.
3. Update the NetWorker software. The NetWorker Installation Guide provides instructions.
4. Stop the NetWorker Backup and Recover Server service.
5. Open the NetWorker Backup and Recover Server Properties dialog box and change the startup type from Automatic to Manual.
6. Rename the NetWorker.nocluster file NetWorker.clustersvr.
Microsoft Failover Cluster on Windows Server 2008 109
Microsoft Failover Cluster on Windows Server 2008
7. On the second node of the cluster:
a. Rename the NetWorker_install_path\bin\NetWorker.clustersvr file to NetWorker_install_path\bin\NetWorker.nocluster.
b. Update the NetWorker software.
c. Stop the NetWorker Backup and Recover Server service.
d. Open the NetWorker Backup and Recover Server Properties dialog box and change the startup type from Automatic to Manual.
e. Rename the NetWorker.nocluster file back to NetWorker.clustersvr.
8. Bring the NetWorker server Cluster service back online.
Install the NetWorker software in a Microsoft Failover ClusterThe following sections provide information on how to install the NetWorker software in a Microsoft Failover Cluster environment:
◆ “Install a NetWorker server as a highly available application” on page 110
◆ “Install only the NetWorker client software” on page 117
Install a NetWorker server as a highly available application
The following tasks explain how to configure a NetWorker server as a highly available application in Microsoft Failover Cluster:
◆ “Task 1: Install the NetWorker software” on page 111
◆ “Task 2: Create and register the NetWorker Server resource type” on page 111
◆ “Task 3: Verify the NetWorker server resource type” on page 112
◆ “Task 4: Create NetWorker Server virtual service and required components resource” on page 112
◆ “Task 5: Set a dependency between the NetWorker server IP address and its shared disk” on page 113
◆ “Task 6: Finish configuring the NetWorker Server resource” on page 113
◆ “Task 7: Bring the NetWorker Server resource online” on page 114
◆ “Task 8: Configure the NetWorker virtual server” on page 114
◆ “Task 9: Configure clients on the NetWorker virtual server” on page 115
◆ “Task 10: Verify that the Client and Group resources have been configured” on page 116
110 EMC NetWorker Release 8.0 Cluster Installation Guide

Microsoft Failover Cluster on Windows Server 2008
Task 1: Install the NetWorker softwareOn each node in the cluster, install NetWorker software in the same location on a private disk.
To install the software:
1. Log in as Administrator to the node on which the NetWorker software will be installed.
2. On one node in the cluster:
a. Complete the installation.
b. From the NetWorker Administration window, note the host ID number for the appropriate cluster license.
3. On the rest of the physical nodes in the cluster:
a. Complete the installation.
b. From the NetWorker Administration window, note the host ID number for the appropriate cluster license.
The NetWorker 8.0 Installation Guide provides detailed installation instructions.
Task 2: Create and register the NetWorker Server resource typeTo create and register the NetWorker Server resource type:
1. Verify that NetWorker server software is installed in the same location on each node in the cluster.
2. On one of the cluster nodes, type:
regcnsrd -c
This creates the NetWorker server resource type. It also registers the NetWorker server resource extension module so that the NetWorker Server resource type can be managed from this node.
3. On the rest of the cluster nodes, type:
regcnsrd -r
If prompted with a message similar to the following, type y:
Is this machine a member of the cluster on which you want to register Resource Extension for NetWorker Server resource?
This registers the NetWorker server resource extension module so the NetWorker Server resource type can be managed from this node.
Install the NetWorker software in a Microsoft Failover Cluster 111
Microsoft Failover Cluster on Windows Server 2008
Task 3: Verify the NetWorker server resource typeTo verify that a NetWorker Server resource type exists on Windows Server 2008:
1. In the Failover Cluster Management program, right-click on the name of the cluster and then select Properties.
2. From the Resource Types tab, verify that the NetWorker Server is listed in the User Defined Resource Types list.
The Client Access Point resource type defines the NetWorker server’s virtual identity. The Storage resource type is for the shared nsr directory.
Task 4: Create NetWorker Server virtual service and required components resource To create the NetWorker Server virtual service:
1. In the Failover Cluster Management program, select the cluster name.
2. From the Action menu, select Configure a Service or Application. The High Availability Wizard is displayed.
3. On the Before You Begin page, click Next.
4. On the Select Service or Application page, select Other Server from the list, and then click Next.
5. On the Client Access Point page, complete the Name and Address attributes, and then click Next. For example:
Name: bu-araNetWorks: 10.5.162.0/23Address: 10.5.163.219
6. On the Select Storage page, check the storage volume for the NetWorker server, and then click Next. For example,
Cluster Disk 2
7. In the Select Resource Type list, select the NetWorker Server resource type that was created in “Task 2: Create and register the NetWorker Server resource type” on page 111, and click Next.
8. On the Confirmation page, confirm the resource configurations and click Next. The High Availability Wizard creates the resources components and the group.
When the Summary page appears, ignore the following message that appears on the page, because the steps in “Task 5: Set a dependency between the NetWorker server IP address and its shared disk” on page 113 detail the required additional configuration steps:
The group will not be brought online since the resources may need additional configuration. Please finish configuration and bring the group online.
9. On the Summary page, click Finish.
Do not create a Generic Application resource for the NetWorker virtual server.
112 EMC NetWorker Release 8.0 Cluster Installation Guide
Microsoft Failover Cluster on Windows Server 2008
Task 5: Set a dependency between the NetWorker server IP address and its shared diskTo set a dependency between NetWorker server IP address and its shared disk:
1. In the Failover Cluster Management program, right-click the IP Address resource just created in the NetWorker virtual service, and then click Properties.
2. On the Dependencies tab:
a. Click Insert to add an empty dependency line.
b. Select the shared disk associated with the NetWorker virtual server from the Resource list. For example:
Cluster Disk 2
3. Click Ok to close the Properties window of the IP Address resource.
Task 6: Finish configuring the NetWorker Server resourceTo finish configuring a NetWorker Server resource:
1. In the Failover Cluster Management program, right-click the new NetWorker Server resource created in the NetWorker virtual service, and then click Properties.
2. On the Dependencies tab:
a. Click Insert to add an empty dependency line.
b. Select the name of the NetWorker Network Name resource from the Resource list. For example:
Name: bu-ara
3. Set the NsrDir parameter.
The steps differ if using a local or remote Microsoft Management Console to configure and manage the cluster.
• If using a local Microsoft Management Console to configure the cluster:
a. On the Parameters tab, specify the following attributes:
Server Name: (leave blank)NsrDir: P:\nsrAdditional Arguments: (leave blank)
Note: The directory path entered for the NsrDir attribute must reside on the NetWorker server shared disk.
b. Click Ok to close the Properties window of the New NetWorker Server resource.
Note: Do not create multiple instances of the NetWorker Server resources. Creating more than one instance of a NetWorker Server resource interferes with how the existing NetWorker Server resources function.
Install the NetWorker software in a Microsoft Failover Cluster 113
Microsoft Failover Cluster on Windows Server 2008
• If using a remote Microsoft Console to configure the cluster:
a. Click Ok to close the Properties window of the New NetWorker Server resource.
Do not create multiple instances of the NetWorker Server resources. Creating more than one instance of a NetWorker Server resource interferes with how the existing NetWorker Server resources function.
b. From one node in the cluster, use the command line to set the NsrDir parameter. For example:
C:\>cluster res <new_NetWorker_server> /priv NsrDir="P:\nsr"
Where <new_NetWorker_server > is the default name of the newly created NetWorker server resource.
The directory path entered for the NsrDir parameter must reside on the NetWorker server shared disk.
Task 7: Bring the NetWorker Server resource onlineTo bring the NetWorker Server resource online:
1. In the Failover Cluster Management program, select the service where the NetWorker Server resource exists.
2. Select the NetWorker Server resource.
3. From the Action menu, select Bring this resource online to bring the NetWorker server online. The state of the NetWorker Server resource changes to Online Pending.
4. Wait until the state of the NetWorker Server resource changes to Online.
These steps stop the NetWorker Remote Exec service and restart all of the NetWorker services.
Task 8: Configure the NetWorker virtual serverTo configure the NetWorker virtual server:
1. Log in to the cluster node that is running the NetWorker virtual server.
2. Start the NetWorker Management Console software.
3. From the NetWorker Administration window, click Configuration.
a. In the left pane, select the NetWorker server.
b. From the File menu, select Properties. The Properties dialog box appears.
c. For the Administrator attribute, add entries for any cluster nodes that are not already listed. For example: administrator@cluster_phy1
4. Click Ok.
114 EMC NetWorker Release 8.0 Cluster Installation Guide
Microsoft Failover Cluster on Windows Server 2008
5. Restrict the set of NetWorker servers that can back up a particular client. Edit the %SystemDrive%\Program Files\EMC NetWorker\nsr\res\servers file and add the NetWorker virtual host as well as each cluster node to the list of servers.
Consider the following:
• If no servers are specified, any NetWorker server can backup this client.
• If no servers are specified, any NetWorker server can perform a directed recovery to the client.
• When adding NetWorker servers, specify both the short name and FQDN for each NetWorker server.
Task 9: Configure clients on the NetWorker virtual serverTo configure the NetWorker Client resource:
1. On each physical node, ensure that the following file contains the names of virtual hosts:
%SystemRoot%\system32\drivers\etc\hosts
2. Start the NetWorker Management Console software.
3. Make each physical node within the cluster a client of the NetWorker virtual server.
For each physical node in the cluster:
a. Create a new Client resource.
b. For the Name attribute, type the name of the physical host.
TheNetWorker administration guide details how to create a Client resource.
4. Make each virtual node within the cluster a client of the NetWorker virtual server.
For each virtual node in the cluster:
a. Create a new Client resource.
b. For the Name attribute, type the name of the virtual host.
c. For the Remote Access attribute, type the user@hostname of each physical node within the cluster.
5. To back up a NetWorker Windows client that has multiple domains that are part of both an Active Directory domain, and a DNS domain, perform one of the following steps:
• Define the Active Directory domain name, which is the Full Computer Name, in the NetWorker server’s hosts file.
• Define the AD domain, which is the Full Computer Name, in the Active Directory DNS. Also, on the NetWorker server, open the Client resource and add the Full Computer Name in the alias list.
6. Define one or more NetWorker Group resources to include the virtual hosts and each of the physical nodes in the cluster:
a. Create the necessary groups and define their attributes as appropriate.
b. For each group, select Enabled for the Autorestart attribute.
Install the NetWorker software in a Microsoft Failover Cluster 115
Microsoft Failover Cluster on Windows Server 2008
c. For each group, ensure that Manual Restart is not selected in the Options attribute (under the Advanced tab).
The only save sets that restart after a virtual server failover are those that belong to a group in which Autorestart is enabled and Manual Restart is disabled.
After the client configuration is complete:
◆ The NetWorker virtual server uses the IP address of the NetWorker virtual host, regardless of which cluster node currently masters the NetWorker virtual server.
◆ The NetWorker virtual server takes the identity of the NetWorker virtual server’s hostname, regardless of which cluster node is currently running the NetWorker service.
◆ The first time NetWorker server runs, it creates the Client resource for the NetWorker virtual host. Client resources must be created manually for any cluster node that is to be backed up by the NetWorker virtual server.
Task 10: Verify that the Client and Group resources have been configuredTo verify that the Client and Group resources are properly configured, run a test probe for each client from the node where the NetWorker application is running:
savegrp -pv -c client_name group_name
If the test probe does not display all the scheduled save sets:
◆ Check the cluster configuration by using the cluster management software. If necessary, reconfigure the cluster.
◆ Ensure that the save sets defined for the client are owned by that client. If necessary, redistribute the client save sets to the appropriate Client resources.
Misconfiguration of the Cluster resources might cause scheduled save sets to be dropped from the backup. The NetWorker administration guide provides more information.
◆ To override scheduled save rules, create an empty text file, pathownerignore in the directory that contains the savefs command. By default the NetWorker bin location is C:\Program Files\EMC NetWorker\nsr\bin.
When this file exists, it allows any path to be backed up for a client, whether it is owned by the virtual client or physical node. The NetWorker 8.0 Administration Guide provides more information.
◆ Run a second test probe to verify the configuration.
If the pathownerignore file was used, check that the NetWorker scheduled save uses the correct client index.
116 EMC NetWorker Release 8.0 Cluster Installation Guide
Microsoft Failover Cluster on Windows Server 2008
If the wrong index is used, the save sets can be forced to go to the correct index:
1. From the NetWorker Administration window, select a client and edit its properties.
2. For the Backup Command attribute, type the name of a backup script that contains: save -c client_name
The NetWorker 8.0 Administration Guide provides details about the Backup Command attribute.
Install only the NetWorker client software
In this configuration, the NetWorker server is running on a node that is not a member of the cluster.
To install NetWorker client on the cluster node, follow the procedures for these tasks:
◆ “Task 1: Install the NetWorker client software” on page 117
◆ “Task 2: Define the list of trusted NetWorker servers” on page 117
◆ “Task 3: Configure clients under the NetWorker server” on page 118
◆ “Task 4: Verify that the Client and Group resources have been configured” on page 118
Ensure the NetWorker client software is installed on every physical node in the cluster to be backed up.
Task 1: Install the NetWorker client softwareTo install the NetWorker client software on each node in the cluster:
1. Ensure that the operating system is updated with the most recent cluster patch.
2. Install the NetWorker client software on the physical disk of each node in the cluster to be backed up.
Task 2: Define the list of trusted NetWorker serversBefore a NetWorker server can back up a client, the client must grant the server access. Granting access is controlled by the servers file.
Consider the following:
◆ If no servers are specified, any NetWorker server can backup this client.
◆ If no servers are specified, any NetWorker server can perform a directed recovery to the client.
◆ When adding NetWorker servers, specify both the short name and FQDN for each NetWorker server.
To define the list of trusted NetWorker servers, perform the following steps on each node in the cluster:
1. Edit or create the %SystemDrive%\Program Files\EMC NetWorker\nsr\res\servers file.
2. Add the NetWorker servers, one per line, that require access to this client.
Install the NetWorker software in a Microsoft Failover Cluster 117

Microsoft Failover Cluster on Windows Server 2008
Task 3: Configure clients under the NetWorker serverTo configure the NetWorker server:
1. (Optional) Define save groups.
2. Make each physical Client within the cluster a client of the NetWorker server.
For each physical client in the cluster:
a. Create a new client.
b. For the Name attribute, type the name of the physical client.
3. Make each virtual client within the cluster a client of the NetWorker server for each virtual client in the cluster:
a. Create a new client.
b. For the Name attribute, type the name of the virtual client.
c. For the Remote Access attribute, enter the user@hostname of each physical node within the cluster.
d. For the Group attribute, select a group.
The first time the NetWorker application runs, it creates the Client resource for the NetWorker virtual server.
4. To back up a NetWorker Windows client that has multiple domains that are part of both an Active Directory domain and a DNS domain, perform one of these steps:
• Define the Active Directory domain name, which is the Full Computer Name, in the NetWorker server’s /etc/hosts file.
• Define the AD domain, which is the Full Computer Name, in the Active Directory DNS. Also, on the NetWorker server, open the Client resource and add the Full Computer Name in the alias list.
5. If the NetWorker Remote Exec service is started before the cluster service is enabled on the node, restart the NetWorker Remote Exec service on each cluster node.
6. Schedule backups by using the NetWorker application.
Task 4: Verify that the Client and Group resources have been configuredTo verify that the Client and Group resources on the NetWorker server are properly configured, run a test probe for each client from the node where the NetWorker server is running:
savegrp -pv -c <client_name> <group_name>
If the test probe does not display all the scheduled save sets:
◆ Check the cluster configuration by using the cluster management software. If necessary, reconfigure the cluster.
◆ Ensure that the save sets defined for the client are owned by that client. If necessary, redistribute the client save sets to the appropriate Client resources.
118 EMC NetWorker Release 8.0 Cluster Installation Guide

Microsoft Failover Cluster on Windows Server 2008
Misconfiguration of the Cluster resources might cause scheduled save sets to be dropped from the backup. The NetWorker administration guide provides more information.
◆ Type this command to override scheduled save rules:
echo NUL: NetWorker_bin_dir\pathownerignore
This command allows any path to be backed up for a client, whether it is owned by the virtual client or physical node. The NetWorker administration guide provides more information.
◆ Run a second test probe to verify the configuration.
If the pathownerignore file was used, check that the NetWorker scheduled save uses the correct client index. If the wrong index is used, the save sets can be forced to go to the correct index:
1. From the NetWorker Administration window, select a client and edit its properties.
2. For the Backup Command attribute, type the name of a backup script that contains: save -c client_name
The NetWorker 8.0 Administration Guide provides details about the Backup Command attribute.
Uninstall the NetWorker software in a Microsoft Failover ClusterIf the NetWorker server is configured as a cluster resource, perform the following steps before removing the NetWorker software. If the NetWorker server is installed as a stand-alone application (not cluster managed) or only the client software is installed, follow the standard uninstall procedure for NetWorker software. The EMC NetWorker Installation Guide provides instructions on how to uninstall the software.
Before uninstalling NetWorker software from a cluster node, close the Failover Cluster Management program.
Uninstall the NetWorker software in a Microsoft Failover Cluster 119
Microsoft Failover Cluster on Windows Server 2008
From all the nodes in the clusterTo uninstall NetWorker software from all the nodes in the cluster:
1. Unregister and remove the NetWorker Server resource:
a. In the Failover Cluster Management program, select Action > Take this resource offline to bring the NetWorker Server resource Offline.
b. Select Action > Delete to delete the NetWorker Server resource from Microsoft Failover Cluster.
c. Run the regcnsrd -d command on the last member of the cluster.
2. Close the Failover Cluster Management program on all the nodes where you plan to uninstall NetWorker software.
3. Uninstall the NetWorker software from all nodes.
Uninstall the software from only one node in the clusterUse the following procedure if the NetWorker server software is installed on more than one node and all these nodes are possible owners that can host the NetWorker Server resource.
To uninstall NetWorker software from only one node in the cluster:
1. From one node in the cluster, run the regcnsrd -u command. If you are prompted with the following message, type y:
Is this machine a member of the cluster on which you want to un-register Resource Extension for NetWorker Server resource?
2. Log in to another node in the cluster that can host the NetWorker server.
3. Remove the node that you are uninstalling from the Possible Owners attribute in the NetWorker Server resource.
To determine the possible owners of the NetWorker Server cluster resource, review the properties of the NetWorker Server resource.
4. Close the Failover Cluster Management program on the node where you plan to uninstall the NetWorker software.
5. Uninstall the NetWorker software from the node. The NetWorker 8.0 Installation Guide provides detailed instructions.
120 EMC NetWorker Release 8.0 Cluster Installation Guide
CHAPTER 12Sun Cluster Version 3.2 Installation
This chapter includes these sections:
◆ Installation requirements ...................................................................................... 122◆ Update from a previous release of the software ..................................................... 124◆ Install the NetWorker software in a cluster............................................................. 125◆ Install a virtual NetWorker Console server.............................................................. 137◆ Install the NetWorker software in a cluster............................................................. 125◆ Install the NetWorker software in a zone cluster .................................................... 145◆ Configure an external client to a virtual server ....................................................... 150◆ Define ownership of a raw partition for virtual clients ............................................ 150◆ Uninstall the NetWorker software .......................................................................... 148
Sun Cluster Version 3.2 Installation 121

Sun Cluster Version 3.2 Installation
Software installation roadmapThese tasks are a roadmap to follow when installing the NetWorker software:
1. Review “Installation requirements” on page 122 and note the default directory location.
2. Install the required NetWorker software by following one of these procedures:
• “Install a NetWorker virtual server” on page 125
• “Install a virtual NetWorker Console server” on page 137
• “Install only the NetWorker client software in a cluster” on page 139
3. Enable and register all of the NetWorker products. More information is available in the NetWorker Licensing Guide.
Installation requirementsThis section specifies the software and hardware required for installing and setting up the NetWorker server or client software within a Sun Cluster environment.
The EMC Information Protection Software Compatibility Guide provides the most up-to-date information about software and hardware requirements.
Software requirements
The following software must be installed on each node in the cluster:
◆ Solaris 10 or 11 operating environment and Sun Cluster version 3.2
◆ Volume Manager software. For example Solstice DiskSuite and Solaris Volume Manager.
Highly available storage nodes are not supported.
Hardware requirements
The following hardware requirements must be met:
◆ A multihosted disk is used as a mount point for the global file systems. These contain the shared /nsr area.
◆ A device with local affinity for the local bootstrap backup that is connected to all the nodes within the cluster.
Configuration options
Refer to the NetWorker Administration Guide for information about:
◆ Tape libraries with a NetWorker virtual server
◆ Remote physical storage node with a NetWorker virtual server
122 EMC NetWorker Release 8.0 Cluster Installation Guide
Sun Cluster Version 3.2 Installation
System information requirements
Table 19 on page 123 and Figure 5 on page 123 display the system information required to install highly available NetWorker server software in a Sun Cluster environment.
Figure 5 Sample cluster configuration
Table 19 System information
Information Required Example
NetWorker virtual hostname with an IP address in the same subnet as the cluster nodes
clus_vir1192.168.1.10
NetWorker globally mounted configuration area /global/nw
NetWorker cluster configuration script /usr/sbin/networker.cluster
File containing the host ID of all the cluster members /nsr/res/hostids
Node 1 clus_phys1
Node 2 clus_phys2
Private Network
Local Disk Local Diskclus_log1
If Node1fails,clus_log1 failsover to Node2
Public NetWork
Volume-managed Shared Disks
Terminal Concentrator
Administrative Workstation
NetWorker Logical Host (Virtual Server)
Installation requirements 123

Sun Cluster Version 3.2 Installation
Update from a previous release of the softwareTo update the NetWorker software from a previous release:
1. Use the scrgadm and scconf commands to provide details about the current cluster configuration and save the output to a file:
clrs show -v >clrs_v.outclrg show -v >clrg_v.outcluster show -v >cluster_v.out
2. If the NetWorker server is configured in a Sun Cluster, determine the location of the NetWorker server global /nsr directory on the shared storage.
For example, on cluster_node1 the global /nsr directory is /global/nw/nsr:
cluster_node1: ls -l /nsrlrwxrwxrwx 1 root root 14 May 30 15:06 /nsr -> /global/nw/nsr
3. If the target machine is a NetWorker server, perform a bootstrap and index backup.
For example:
savegrp -vvv -O group
The specified group contains all of the NetWorker clients in the datazone. This ensures that all client file indexes are backed up.
If a group that contains all of the clients does not exist, run the savegrp command more than once, specifying a different group each time, until all clients indexes are backed up.
Ensure the media pool associated with the group has appendable media available.
4. Remove the NetWorker software cluster configuration files and uninstall the NetWorker software. Do not remove the global and local /nsr directories.
“Uninstall the NetWorker software” on page 148 provides instructions for uninstalling the NetWorker software.
5. If required, upgrade the Sun Cluster software. For instructions, refer to the Sun Cluster documentation.
124 EMC NetWorker Release 8.0 Cluster Installation Guide
Sun Cluster Version 3.2 Installation
6. Install and configure the NetWorker 8.0 software.
Do not relocate the NetWorker software. By default, the NetWorker is installed in the /usr directory.
7. Ensure that:
• You specify the same local /nsr and global /nsr directories.
• The NetWorker Client Type resource properties for Owned_paths and Clientname are the same as before the upgrade.
• The NetWorker Config_dir resource contains the same values as before the upgrade.
• The Network_resources_used property contains the same value that the Resource_dependencies property had before the upgrade.
Install the NetWorker software in a clusterSee these sections to install the NetWorker software in a Sun Cluster environment:
◆ “Install a NetWorker virtual server” on page 125
◆ “Install a virtual NetWorker Console server” on page 137
◆ “Install only the NetWorker client software in a cluster” on page 139
Do not relocate the NetWorker software. By default, the NetWorker is installed in the /usr directory.
Install a NetWorker virtual server
To install and configure the NetWorker software as a highly available service in a cluster, perform these tasks:
◆ “Task 1: Install the NetWorker software” on page 126
◆ “Task 2: Define the NetWorker server as highly available” on page 126
◆ “Task 3: Create an Instance of the NetWorker server resource group” on page 128
◆ “Task 4: (Optional) add a HAStoragePlus resource” on page 130
◆ “Task 5: Grant access to the highly available NetWorker server” on page 131
◆ “Task 6: Configure the NetWorker server” on page 133
◆ “Task 7: Configure clients under the NetWorker server” on page 133
◆ “Task 8: Create instances of the NetWorker Client resource type” on page 134
◆ “Task 9: Register licenses for the highly available NetWorker server” on page 135
◆ “Task 10: Authorize the software” on page 137
Install the NetWorker software in a cluster 125
Sun Cluster Version 3.2 Installation
Task 1: Install the NetWorker softwareThe NetWorker software must be installed on all nodes in the cluster that are required to run the NetWorker resource group.
Ensure that the following apply: - The operating environment and Sun Cluster 3.2 software are already installed on all nodes in the cluster and that those nodes boot in cluster mode.- PATH environment variable includes /usr/sbin and /usr/cluster/bin.
To install the NetWorker software on nodes that will be running the NetWorker resource group:
1. Access the NetWorker software from the distribution media. The NetWorker Installation Guide provides installation instructions.
2. Keep a copy of the current configuration. The NetWorker software installation script modifies the /etc/rpc and /etc/syslog.conf files during the installation process. Type these commands:
cp /etc/rpc /etc/rpc.oldcp /etc/syslog.conf /etc/syslog.conf.old
3. To install the software, type:
pkgadd -d .
4. Press Enter to install all of the packages on the server. Start the NetWorker daemons only after the last NetWorker package is installed.
Install selected software packages in this order:
a. LGTOclnt (client software package)
b. LGTOnode (storage node software package)
c. LGTOserv (server software package)
d. LGTOman (optional man pages)
5. Start the NetWorker daemons:
/etc/init.d/networker start
6. Type q to exit.
Do not relocate the NetWorkersoftware. By default, the NetWorker is installed in the /usr directory.
Task 2: Define the NetWorker server as highly availableTo define and configure the NetWorker server as highly available:
1. Log in as root.
126 EMC NetWorker Release 8.0 Cluster Installation Guide
Sun Cluster Version 3.2 Installation
2. Ensure that the /etc/hosts file on each cluster node contains the name of the logical host. The logical hostname can be published in the Domain Name System (DNS) or Network Information Services (NIS).
3. From each node in the cluster that will run the NetWorker server process:
a. Run the cluster configuration script networker.cluster located in /usr/sbin.
This script defines the LGTOserv and the LGTOclnt resource types that the NetWorker software requires.
b. Type the information specified for each system prompt:
Enter directory where local NetWorker database is installed [/nsr]?
– Type the location of the local NetWorker database directory provided during the installation procedure. For example: /space/nsr
Do you wish to configure for both NetWorker server and client?Yes or No [Yes]?
– Type Yes to configure the server software. This also installs the client software by default:
– Type No to configure only the client software:
Do you wish to add now the site-specific values for:NSR_SHARED_DISK_DIR and NSR_SERVICE_ID Yes or No [Yes]?
– Type Yes to ensure compatibility with other cluster environments:
Enter the Logical Hostname to be used for NetWorker?
– Type the published logical hostname to be used by the highly available NetWorker server. For example: clus_vir1
In what path will this nsr directory be created/located?
– Type the pathname of the globally mounted /nsr directory that will contain the configuration information for the highly available NetWorker server. For example: /global/nw
For more information, see “System information requirements” on page 123.To undo any changes to the configuration, run the networker.cluster -r script and then run the networker.cluster script again.
Install the NetWorker software in a cluster 127
Sun Cluster Version 3.2 Installation
Task 3: Create an Instance of the NetWorker server resource groupA resource group must be created for the highly available NetWorker server. It must contain these resources:
◆ Logical hostname
◆ Globally mounted file system for the /nsr area
◆ LGTO.serv resource
◆ LGTO.clnt resource
◆ HAStoragePlus (optional)
To create an instance of the NetWorker Server resource group, perform these steps on one node in the cluster:
1. Create a resource group:
clresourcegroup create networker
2. Add the logical host resource:
clreslogicalhostname create -g networker clus_vir1
3. (Optional), create an instance of the SUNW.HAStoragePlus resource type:
a. Determine if the HAStoragePlus resource type is registered within the cluster:
clresourcetype list
b. If required, register the HAStoragePlus resource type within the cluster:
clresourcetype register SUNW.HAStoragePlus
c. Create the SUNW.HAStoragePlus resource:
clresource create -g networker -t SUNW.HAStoragePlus -x \FilesystemMountPoints=/global/clus_vir1/nw,\/global/clus_vir1/space -x AffinityOn=True hastorageplus
For more information on the SUNW.HAStoragePlus resource and the setup for locally mounted global systems, refer to the Sun Cluster 3.2 documentation.
128 EMC NetWorker Release 8.0 Cluster Installation Guide
Sun Cluster Version 3.2 Installation
4. Create an instance of the LGTO.clnt resource, type:
clresource create -g networker -t LGTO.clnt -x clientname=clus_vir1 -x owned_paths=/global/clus_vir1/nw,/global/clus_vir1/space client
If the logical host resource name is different than the hostname it specifies, use this command to do the following:
a. Set the client name to the virtual hostname.
b. Set the optional network_resource property to the logical host resource name.
For example:
clresource create -g networker -t LGTO.clnt \-x clientname=virtual_hostname -x network_resource=clus_vir1 \-x owned_paths=/global/clus_vir1/nw,/global/clus_vir1/space client
5. Create an instance of the LGTO.serv resource type:
clresource create -g networker -t LGTO.serv \-y Resource_dependencies=clus_vir1 \-x config_dir=/global/clus_vir1/nw server
If the logical host resource name is different than the hostname it specifies, set the optional servername property to the virtual hostname:
clresource create -g networker -t LGTO.serv \-y Resource_dependencies=clus_vir1 \-x servername=virtual_hostname -x config_dir=/global/clus_vir1/nw \server
If you are using a HAStoragePlus resource, set the resource_dependencies property to the HAStoragePlus resource name.
6. Start the NetWorker resource group:
clresourcegroup online networker
Example 1 A highly available NetWorker server
In this example, a highly available NetWorker server uses the logical hostname backup_server. The highly available NetWorker server uses /global/networker (globally mounted file system) as its configuration directory.
1. Create a resource group with the name backups:
clresourcegroup create backups
2. Add the logical hostname resource type to the resource group created in the previous step:
clreslogicalhostname create -g backups backup_server
Install the NetWorker software in a cluster 129
Sun Cluster Version 3.2 Installation
3. Create an instance of the LGTO.serv resource type with the name networker_server. This resource belongs to the resource group backups and has a dependency on the logical host created in the previous step.
Specify the configuration directory on the globally mounted file system /global/networker:
clresource create -g backups -t LGTO.serv \-y Resource_dependencies=backup_server \-x config_dir=/global/networker networker_server
4. The NetWorker logical host is also a client of the highly available NetWorker server. Create an instance of the LGTO.clnt resource type for the logical host backup_server within the resource group backups. The name of this resource is networker_client:
clresource create -g backups -t LGTO.clnt \-x clientname=backup_server -x owned_paths=/global/networker \networker_client
5. Start the highly available service associated with the resource group backups.
clresourcegroup online backups
Task 4: (Optional) add a HAStoragePlus resourceTo add a SUNW.HAStoragePlus resource to an existing NetWorker server resource group:
1. Determine whether the HAStoragePlus resource type is registered within the cluster:
clresourcetype list
2. If required, register the HAStoragePlus resource type within the cluster:
clresourcetype register SUNW.HAStoragePlus
3. Create the SUNW.HAStoragePlus resource:
clresource create -g networker -t SUNW.HAStoragePlus -x FilesystemMountPoints=/global/clus_vir1/nw,/global/clus_vir1/space -x AffinityOn=True hastorageplus
4. Set up a dependency for the NetWorker Server resource on the HAStoragePlus resource:
clresource set -y Resource_Dependencies=clus_vir1,hastorageplus server
5. Verify that the resource dependencies are correctly set:
clresource show -v server | grep Resource_dependencies
130 EMC NetWorker Release 8.0 Cluster Installation Guide

Sun Cluster Version 3.2 Installation
Task 5: Grant access to the highly available NetWorker serverBefore a NetWorker server can back up a client, the client must grant the server access. Granting access is controlled by the servers file. For the node that is running the NetWorker Server resource group, this file is located in the globally mounted file system. Otherwise, this file is located on a local disk.
Consider the following:
◆ If no servers are specified, any NetWorker server can backup this client.
◆ If no servers are specified, any NetWorker server can perform a directed recovery to the client.
◆ When adding NetWorker servers, specify both the short name and FQDN for each NetWorker server.
To grant access to the highly available NetWorker server:
1. On one node in the cluster:
a. Stop the NetWorker daemon by using the cluster management software, as follows:
clresourcegroup offline networker
b. Edit or create the servers file in the globally mounted /nsr area. For example, /global/nw/res/servers:
– Add the set of NetWorker servers, one per line, to be granted access to this client.
– Add an entry for the NetWorker logical hostname first.
– Add entries for each physical host that can run the NetWorker resource group. For example:
clus_vir1clus_phys1clus_phys2
2. On each node in the cluster:
a. Shut down the NetWorker processes and verify that all NetWorker daemons have stopped:
nsr_shutdownps -ef | grep nsr
b. Check the NetWorker boot-time startup file to see whether nsrexecd is being run with the -s option.
If the -s option exists, remove all occurrences of -s servername in the file.
Install the NetWorker software in a cluster 131
Sun Cluster Version 3.2 Installation
c. Edit or create the /nsr.NetWorker.local/res/servers file:
– Add the set of NetWorker servers, one per line, that require access to this client.
– Add an entry for the NetWorker logical hostname first.
– Add entries for each physical host that can run the NetWorker resource group. For example:
clus_vir1clus_phys1clus_phys2
d. Restart the NetWorker processes:
/etc/init.d/networker start
3. On one node in the cluster, start the NetWorker daemon by using the cluster management software, as follows:
clresourcegroup online networker
4. If required, grant access to the NetWorker virtual server on clients outside of the cluster:
On each client that is outside of the cluster:
a. To shut down the NetWorker processes, type:
nsr_shutdown
b. To verify that all NetWorker daemons have stopped, type:
ps -ef |grep nsr
c. Edit or create the /nsr/res/servers file:
– Add the set of NetWorker servers, one per line, that require access to this client.
– Add an entry for the NetWorker logical hostname first.
– Add entries for each physical host that can run the NetWorker resource group. For example:
clus_vir1clus_phys1clus_phys2
d. Type this command to restart the NetWorker daemons:
/etc/init.d/networker start
132 EMC NetWorker Release 8.0 Cluster Installation Guide
Sun Cluster Version 3.2 Installation
Task 6: Configure the NetWorker serverTo configure the NetWorker server:
1. Log in as root on the cluster node that is currently running the NetWorker server resource group.
2. Start the NetWorker Console software.
3. From the Administration window, select Properties from the File menu.
a. For the Administrator attribute, add entries for any cluster nodes that are not already listed. For example:
root@hostname
b. Click Ok.
Task 7: Configure clients under the NetWorker serverWhen the networker.cluster script runs, it creates a symbolic link named /nsr that points to a local disk. It also creates a second link named nsr.NetWorker.local that points to the local NetWorker directory. For example, if the local NetWorker directory was created in /var/nsr, each client member has these links:
◆ /nsr->/nsr.NetWorker.local
◆ /nsr.NetWorker.local->/var/nsr
To configure each client under the NetWorker server:
1. (Optional) Define save groups.
In order for their save sets to restart after a virtual client or NetWorker server failover, save groups must have the Autorestart attribute enabled and the Manual Restart option disabled.
2. Make each physical client within the cluster a client of the NetWorker server. For each physical client in the cluster:
a. Create a new client.
b. Type the name of the physical client for the Name attribute.
3. Make each virtual client within the cluster a client of the virtual NetWorker server. For each virtual client in the cluster:
a. Create a new NetWorker client.
b. For the Name attribute, type the name of the virtual client.
c. In the Remote Access attribute, add entries for each physical client within the cluster. For example:
root@clus_phys1
d. For the Group attribute, select a group.
Install the NetWorker software in a cluster 133

Sun Cluster Version 3.2 Installation
4. Run a test probe to verify that the Client resource and the Group resource have been properly configured.
Type this command on the node on which the NetWorker server resides:
savegrp -pv -c client_name group_name
If the test probe does not display the correct scheduled backups and index, refer to the NetWorker 8.0 Administration Guide.
Task 8: Create instances of the NetWorker Client resource typeAn instance of the NetWorker Client resource type must be created for each virtual client that accesses data on globally mounted file systems. Virtual clients in Sun Cluster 3.2 are either logical hostnames or shared addresses.
All globally mounted file systems (except the /global/.devices/... file systems) must be owned by a resource group and defined in a NetWorker Client resource type. If the file systems are not properly configured, multiple copies will be backed up for each cluster node.
To back up the data for a virtual client:
1. Create an instance of the NetWorker Client resource as part of an existing resource group that contains a logical host or shared addresses. For example:
clresource create -g resource_group_name -t LGTO.clnt \-x clientname=virtual_hostname -x owned_paths=pathname_1,pathname_2[,...] resource_name
The virtual_hostname variable is a hostname specified by a logical hostname or Shared Address resource. By default, the logical hostname or shared address resource name is the same as the first hostname in the list of hostnames the resource controls.
If the logical hostname or shared address resource was explicitly named, set the optional network_resource property to the resource name:
clresource create -g resource_group_name -t LGTO.clnt \-x clientname=virtual_hostname -x network_resource=logicalhostname_or_SharedAddress_resource_name\-x owned_paths=pathname_1,pathname_2[,...] resource_name
These examples provide more information:
• “A highly available Informix database server” on page 135
• “A scalable Apache web server” on page 135
2. Run a test probe to verify that the Client and Group resources are properly configured.
Type this command on the node on which the NetWorker server resides:
savegrp -pv -c client_name savegroup_name
If the test probe does not display the scheduled backups and index, refer to the NetWorker Administration Guide.
134 EMC NetWorker Release 8.0 Cluster Installation Guide
Sun Cluster Version 3.2 Installation
Example 2 A highly available Informix database server
In this example, the Informix database server is configured to use the DNS registered hostname informix_lhrs.
An existing failover resource group named informix_rg contains a:
◆ SUNW.informix resource named informix_res
◆ SUNW.LogicalHostname resource named informix_lhrs
This SUNW.informix database server can access data on a global file system under /global/informix/config and /global/informix/db.
To add a NetWorker virtual client to the existing resource group informix_rg, type:
clresource create -g informix_rg -t LGTO.clnt \-x clientname=informix_lhrs \-x owned_paths=/global/informix/config,/global/informix/db \informix_clntrs
Example 3 A scalable Apache web server
In this example, an Apache web server is configured to use the DNS registered hostname apache_sars.
An existing scalable resource group named apache_rg contains a:
◆ SUNW.apache resource named apache_res
◆ SUNW.SharedAddress resource named apache_sars
This Apache web server accesses data on a global file system under /global/web/config and /global/web/data.
To add a NetWorker virtual client to the existing resource group apache_rg, type:
clresource create -g apache_rg -t LGTO.clnt \-x clientname=apache_sars \-x owned_paths=/global/web/config,/global/web/data \apache_clntrs
Task 9: Register licenses for the highly available NetWorker serverTo register and license the highly available NetWorker server:
1. Order licenses for the type of NetWorker server and client configuration in use.
2. Log in to the system that is currently running the NetWorker resource group.
Install the NetWorker software in a cluster 135
Sun Cluster Version 3.2 Installation
3. Perform these operations to enter the purchased enabler codes:
a. If you have been evaluating the NetWorker highly available server software and have now purchased the software:
– To upgrade from the base evaluation enabler to the purchased enabler, type:
nsrcap -v -u base_enabler_code
– Delete any remaining evaluation enablers:
nsradmin -s clus_vir1
This eliminates warning messages due to expiring evaluation enablers.
b. For each enabler code, type:
nsrcap -v -c enabler_code
4. Ensure that the highly available NetWorker server is defined as a part of the cluster.
5. Run the following command, and capture the output, on each node that is currently running the NetWorker server resource group:
hostid
The numeric identifier of the current host prints.
6. Log in to the system that is running the NetWorker virtual server and create the /nsr/res/hostids file. This file contains the host IDs of all the cluster nodes.
Use this syntax:
hostid1:hostid2:hostid3:...
For example:
12345678:87654321
7. Type the following commands to restart the server by taking the highly available NetWorker server offline and then putting it back online:
sclresourcegroup offline networkerclresourcegroup online networker
8. On one node in the cluster:
a. Start the NetWorker Console. Use the logical hostname for the highly available NetWorker server.
b. From the NetWorker Administration window, note the host ID number for the appropriate cluster license.
c. Register the NetWorker software.
Do not change the logical hostname for the highly available NetWorker server. If you change it after you update the software, you must permanently license and authorize the highly available NetWorker server.
136 EMC NetWorker Release 8.0 Cluster Installation Guide
Sun Cluster Version 3.2 Installation
Task 10: Authorize the softwareTo enter the permanent authorization code for NetWorker servers and clients:
1. On one node in the cluster, start the NetWorker Console. Use the logical hostname for the highly available NetWorker server.
2. Complete the customer information and contact information fields:
a. Start the NetWorker Console software.
b. From the Administration window, click Configuration.
c. In the left pane, select the NetWorker server.
d. From the File menu, select Properties. The Properties dialog box appears.
e. Select the Customer Information tab and complete your contact information.
f. Click Ok.
3. Review the registration information:
a. From the Administration window, click Configuration.
b. In the left pane, click Registration.
c. In the right pane, right-click the license to be authorized, then select Properties. The Properties dialog box appears.
d. Review the Auth Code attribute.
Install a virtual NetWorker Console server
To install and configure the NetWorker Console server as a highly available service in a cluster, read and follow the procedures for these tasks:
◆ “Task 1: Install the NetWorker Management software in a cluster” on page 137
◆ “Task 2: Define the NetWorker Management server as highly available” on page 138
Task 1: Install the NetWorker Management software in a clusterTo install the NetWorker software on each node in the cluster:
1. Ensure that the most recent cluster patch for the operating system is installed.
2. Install the NetWorker Console server software (LGTOnmc) on each node in the cluster.
The NetWorker 8.0 Installation Guide provides instructions.
Install the NetWorker software in a cluster 137
Sun Cluster Version 3.2 Installation
Task 2: Define the NetWorker Management server as highly availableTo define and configure NetWorker server as a highly available application:
1. From each node in the cluster:
a. Log in as root.
b. Ensure that the /etc/hosts file on each cluster node contains the name of the logical host. The logical hostname can be published in the Domain Name System (DNS) or Network Information Services (NIS).
2. From each node in the cluster that will run the NetWorker server process:
a. Run the cluster configuration script gst_ha.cluster located in /opt/LGTOnmc/bin/nsr.
This script defines the GST_HA.serv resource type that the NetWorker Console server requires:
When running the gst_ha.cluster script, ensure that you use the same values for logical hostname and for the global mounted path for all node in the cluster.
./gst_ha.cluster
NMC Console Server is in the process of being made a Highly Available application within Sun Cluster 3.2.0,REV=2003.03.24.14.50.
To complete this task, the following are required.
A Logical host or virtual IP for the Console Server A globally mounted dir for the LGTOnmc database.
A GST_HA.serv resource type will be created via this process and will be needed to configure NMC as a Highly Available Application within Sun Cluster 3.2.0,REV=2003.03.24.14.50.
Do you wish to continue? [Yes]?
Restarting syslog daemon...
Please enter Logical Hostname to be used by NMC server? hunt
Is the Logical Hostname entered correct (y/n)? y
The lgto_gstdb database should be on a globally mounted filesystem which can be accessible by the cluster nodes which will host the Highly Available NMC server.
Please enter the globally mounted shared directory for the lgto_gstdb database (/global/logicalhost)? /global/hunt/data1
Is the shared directory path entered for the lgto_gstdb database correct (y/n)? y
Moving /bigspace/lgto_gstdb local gstdb directory to globally mounted /global/hunt/data1/lgto_gstdb Resource type GST_HA.serv is not registered Defining GST_HA.serv resource type with RGM.
NMC has been successfully cluster-configured.
138 EMC NetWorker Release 8.0 Cluster Installation Guide
Sun Cluster Version 3.2 Installation
b. Verify that the GST_HA.serv resource type was created:
clrt show GST_HA.serv
=== Registered Resource Types ===Resource Type: GST_HA.serv RT_description: NMC Server for Sun Cluster RT_version: 1.NMC API_version: 2 RT_basedir: /opt/LGTOnmc/bin Single_instance: False Proxy: False Init_nodes: All potential masters Installed_nodes: <All> Failover: False Pkglist: <NULL> RT_system: False Global_zone: False
To undo any changes to the configuration, run the gst_ha.cluster -r script and then run the gst_ha.cluster script again.
3. From one node in the cluster:
a. Create a resource group named "nmc":
clresourcegroup create nmc
b. Create a logical hostname resource: For example:
clreslogicalhostname create -g nmc logical_hostname
c. Create an nmc server resource instance. For example:
clresource create -g nmc -t GST_HA.serv -y Resource_dependencies=logical_hostname -x database_dir=database_dir nmc_server_name
Install only the NetWorker client software in a cluster
In this configuration, the NetWorker server is running on a node that is not a member of the cluster.
To install a NetWorker cluster client, perform these tasks:
◆ “Task 1: Install the NetWorker software” on page 126
◆ “Task 2: Configure NetWorker client software as cluster aware” on page 140
◆ “Task 3: Create instances of the NetWorker Client resource type” on page 141
◆ “Task 4: Define the list of trusted NetWorker servers” on page 144
◆ “Task 5: Configure clients under the NetWorker server” on page 145
Ensure that the NetWorker client software is installed on each node in the cluster. Do not relocate the NetWorker software. By default, the NetWorker is installed in the /usr directory.
Install the NetWorker software in a cluster 139

Sun Cluster Version 3.2 Installation
Task 1: Install the NetWorker cluster client softwareTo install the NetWorker software on the computer that is designated as the NetWorker client:
1. Access the NetWorker software from the distribution media. The NetWorker Installation Guide provides installation instructions.
2. Type the pkgadd -d . command:
Do not press the Enter key for the default response All. Accepting the default installs the server package.
3. Type the appropriate option number to install the client package (LGTOclnt).
4. (Optional) Type the appropriate option number to install the man pages, (LGTOman).
5. Type this command to start the NetWorker daemons:
/etc/init.d/networker start
6. When all the applicable packages have been added, and the prompt appears, type q to exit.
Task 2: Configure NetWorker client software as cluster awareTo define and configure a NetWorker client as cluster aware:
1. Log in as root on each node where the NetWorker software is being installed.
2. Ensure that the /etc/hosts file on each cluster node contains the name of the virtual host. The virtual hostname can be published in the DNS or NIS.
3. For each node in the cluster:
a. Run the cluster configuration script, /usr/sbin/networker.cluster.
This script defines the LGTO.clnt resource types that the NetWorker software requires.
b. When prompted, type the appropriate response:
Enter directory where local NetWorker database is installed [/nsr]?
– Type the location of the local NetWorker database directory is provided during the installation procedure. For example: /space/nsr.
Do you wish to configure for both NetWorker server and client? Yes or No [Yes]?
– Type No. This configures only the client software.
Any changes to the configuration can be undone by running the networker.cluster -r option and then running the networker.cluster script again. For information, see “System information requirements” on page 123.
140 EMC NetWorker Release 8.0 Cluster Installation Guide
Sun Cluster Version 3.2 Installation
Task 3: Create instances of the NetWorker Client resource typeAn instance of the NetWorker Client resource type must be created for each virtual client that accesses data on globally mounted file systems. Virtual clients in Sun Cluster 3.2 are either logical hostnames or shared addresses.
All globally mounted file systems (except the /global/.devices/... file systems) must be owned by a logical host and defined in a NetWorker Client resource type. If the file systems are not properly configured, multiple copies will be backed up for each cluster node.
To back up the data for a virtual client, from any node in the cluster, create an instance of the NetWorker Client resource as part of an existing resource group that contains a logical host or shared address.
For example:
clresource create -g resource_group_name -t LGTO.clnt \-x clientname=virtual_hostname -x owned_paths=pathname_1,pathname_2[,...] resource_name
The virtual_hostname variable is the name of the resource used by the Sun Cluster logical hostname (SUNW.LogicalHostname) or shared address (SUNW.SharedAddress) that you want to configure as a virtual hostname.
Example 4 A highly available Informix database server
In this example, the Informix database server is configured to use the DNS registered hostname informix_lhrs.
An existing failover resource group named informix_rg contains a:
◆ SUNW.informix resource named informix_res
◆ SUNW.LogicalHostname resource named informix_lhrs
This SUNW.informix database server can access data on a global file system under /global/informix/config and /global/informix/db.
To add a NetWorker virtual client to the existing resource group informix_rg, type:
clresource create -g informix_rg -t LGTO.clnt \-x clientname=informix_lhrs \-x owned_paths=/global/informix/config,/global/informix/db \informix_clntrs
Install the NetWorker software in a cluster 141
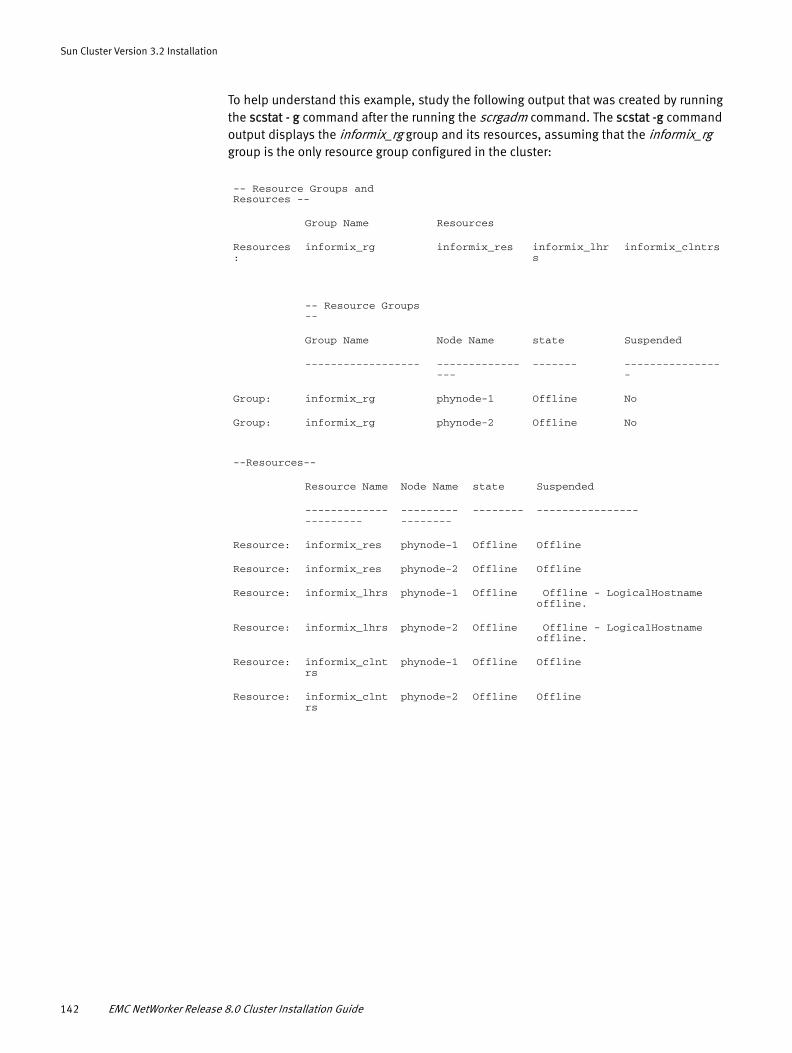
Sun Cluster Version 3.2 Installation
To help understand this example, study the following output that was created by running the scstat - g command after the running the scrgadm command. The scstat -g command output displays the informix_rg group and its resources, assuming that the informix_rg group is the only resource group configured in the cluster:
-- Resource Groups and Resources --
Group Name Resources
Resources:
informix_rg informix_res informix_lhrs
informix_clntrs
-- Resource Groups --
Group Name Node Name state Suspended
------------------ ----------------
------- ----------------
Group: informix_rg phynode-1 Offline No
Group: informix_rg phynode-2 Offline No
--Resources--
Resource Name Node Name state Suspended
----------------------
-----------------
-------- ----------------
Resource: informix_res phynode-1 Offline Offline
Resource: informix_res phynode-2 Offline Offline
Resource: informix_lhrs phynode-1 Offline Offline - LogicalHostname offline.
Resource: informix_lhrs phynode-2 Offline Offline - LogicalHostname offline.
Resource: informix_clntrs
phynode-1 Offline Offline
Resource: informix_clntrs
phynode-2 Offline Offline
142 EMC NetWorker Release 8.0 Cluster Installation Guide

Sun Cluster Version 3.2 Installation
Example 5 A scalable Apache web server
In this example, an Apache web server is configured to use the DNS registered hostname apache_sars. An existing scalable resource group named apache_rg contains a:
◆ SUNW.apache resource named apache_res
◆ SUNW.SharedAddress resource named apache_sars
This Apache web server accesses data on a global file system under /global/web/config and /global/web/data.
To add a NetWorker virtual client to the existing resource group apache_rg, type:
clresource create -g apache_rg -t LGTO.clnt \-x clientname=apache_sars \-x owned_paths=/global/web/config,/global/web/data \apache_clntrs
To help understand this example, study the following output that was created by running the scstat - g command after the running the scrgadm command. The scstat -g command output displays the apache_rg group and its resources, assuming that the apache_rg group is the only resource group configured in the cluster:
-- Resource Groups and Resources --
Group Name Resources
-------------------
--------------
Resource: apache_rg apache_res apache_sars apache_clntrs
-- Resource Groups --
Group Name Node Name state Suspended
------------------
-----------------
------- -----------------
Group: apache_rg phynode-1 Offline No
Group: apache_rg phynode-2 Offline No
--Resources
Resource Name Node Name State Status Message
----------------------
-----------------
-------- -----------------------
Resource: apache_res phynode-1 Offline Offline
Resource: apache_res phynode-2 Offline Offline
Resource: apache_res phynode-1 Offline Offline - SharedAddress offline.
Install the NetWorker software in a cluster 143
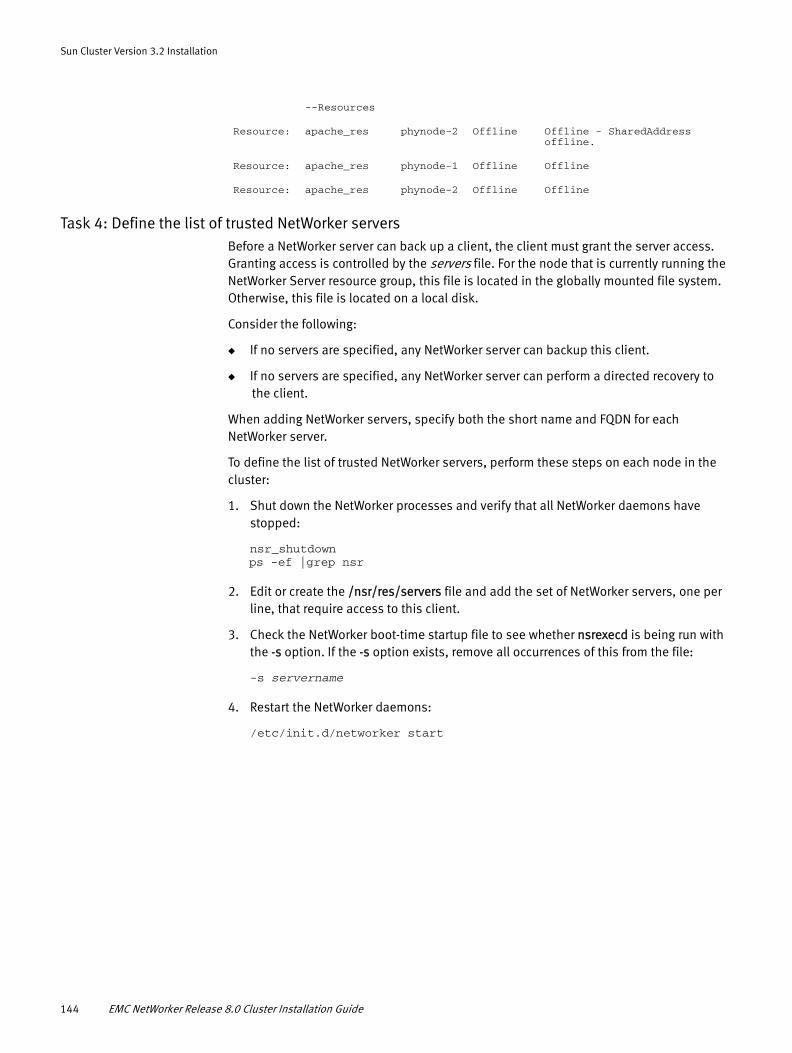
Sun Cluster Version 3.2 Installation
Task 4: Define the list of trusted NetWorker serversBefore a NetWorker server can back up a client, the client must grant the server access. Granting access is controlled by the servers file. For the node that is currently running the NetWorker Server resource group, this file is located in the globally mounted file system. Otherwise, this file is located on a local disk.
Consider the following:
◆ If no servers are specified, any NetWorker server can backup this client.
◆ If no servers are specified, any NetWorker server can perform a directed recovery to the client.
When adding NetWorker servers, specify both the short name and FQDN for each NetWorker server.
To define the list of trusted NetWorker servers, perform these steps on each node in the cluster:
1. Shut down the NetWorker processes and verify that all NetWorker daemons have stopped:
nsr_shutdownps -ef |grep nsr
2. Edit or create the /nsr/res/servers file and add the set of NetWorker servers, one per line, that require access to this client.
3. Check the NetWorker boot-time startup file to see whether nsrexecd is being run with the -s option. If the -s option exists, remove all occurrences of this from the file:
-s servername
4. Restart the NetWorker daemons:
/etc/init.d/networker start
Resource: apache_res phynode-2 Offline Offline - SharedAddress offline.
Resource: apache_res phynode-1 Offline Offline
Resource: apache_res phynode-2 Offline Offline
--Resources
144 EMC NetWorker Release 8.0 Cluster Installation Guide
Sun Cluster Version 3.2 Installation
Task 5: Configure clients under the NetWorker serverTo configure the NetWorker server:
1. Make each physical client within the cluster a client of the NetWorker server. For each physical client in the cluster:
a. Create a new client.
b. For the Name attribute, type the name of the physical client.
If a physical client is backed up to a NetWorker server outside the cluster, the name of any virtual service that can run on the physical node must be added to the Remote Access list of the physical Client resource.
2. Make each virtual client within the cluster a client of the NetWorker server.
For each virtual client in the cluster:
a. Create a new client.
b. For the Name attribute, type the name of the NetWorker server.
c. For the Remote Access attribute, add entries for each physical client in the cluster. For example:
root@clus_phys1
d. For the Group attribute, select a group.
3. Schedule backups by using the NetWorker application.
The NetWorker server might reside outside of the cluster.
Install the NetWorker software in a zone clusterThe NetWorker client and storage node software is supported in a Solaris zone cluster. The NetWorker server software is not supported in a Solaris zone cluster.
It is not required that the global zone cluster be configured for the NetWorker software to support non-global zone clusters. These are the two types of non-global zone root file systems that can be included in a cluster:
◆ whole root
◆ sparse root
Obtain the appropriate documentation from the Sun website for configuration information on Solaris zone clusters.
Install the NetWorker software in a zone cluster 145
Sun Cluster Version 3.2 Installation
Install NetWorker software in a whole root zone cluster
◆ “Task 1: Install the NetWorker software” on page 146
◆ “Task 2: Configure the NetWorker client software as cluster aware” on page 146
◆ “Task 3: Create instances of the NetWorker Client resource type” on page 146
◆ “Task 4: Define the list of trusted NetWorker servers” on page 146
◆ “Task 5: Configure clients under the NetWorker server” on page 146
Task 1: Install the NetWorker softwareInstall the NetWorker software in each global zone in advance.
Install these NetWorker software packages on each zone-cluster node:
◆ Client
◆ Storage node (optional)
The NetWorker installation guide provides installation instructions.
Task 2: Configure the NetWorker client software as cluster awareTo define and configure a NetWorker client as cluster aware:
1. Log in as root on each zone-cluster node on which the NetWorker software is installed.
2. Ensure that the /etc/hosts file on each zone-cluster node contains the name of the virtual host. The virtual hostname can be published in the DNS or the NIS.
3. For each zone-cluster node:
a. Run the cluster configuration script, /usr/sbin/networker.cluster. This script defines the LGTO.clnt resource types that the NetWorker software requires.
b. When prompted, type the appropriate response:
Enter directory where local NetWorker database is installed [/nsr]?
Type the location of the NetWorker database directory provided during the installation. For example: /space/nsr.
Task 3: Create instances of the NetWorker Client resource type“Task 3: Create instances of the NetWorker Client resource type” on page 141 provides instructions on how to create an instance of the NetWorker Client resource type.
Task 4: Define the list of trusted NetWorker servers“Task 4: Define the list of trusted NetWorker servers” on page 144 provides instructions on how to define the list of trusted NetWorker servers.
Task 5: Configure clients under the NetWorker server“Task 5: Configure clients under the NetWorker server” on page 145 provides instructions on how to configure clients under the NetWorker server.
146 EMC NetWorker Release 8.0 Cluster Installation Guide
Sun Cluster Version 3.2 Installation
Install the NetWorker software in a sparse root zone cluster
◆ “Task 1: Install the NetWorker software” on page 147
◆ “Task 2: Configure NetWorker client software as cluster aware” on page 147
◆ “Task 3: Create instances of the NetWorker Client resource type” on page 147
◆ “Task 4: Define the list of trusted NetWorker servers” on page 148
◆ “Task 5: Configure clients under the NetWorker server” on page 148
Task 1: Install the NetWorker softwareInstall the NetWorker software in each global zone in advance.
Install these NetWorker software packages on each node in the zone-cluster:
◆ Client
◆ Storage node (optional)
The NetWorker 8.0 Installation Guide describes how to install the NetWorker software.
Task 2: Configure NetWorker client software as cluster awareTo define and configure a NetWorker client as cluster aware:
1. Log in as root on each zone-cluster node on which the NetWorker software is installed.
2. Ensure that the /etc/hosts file on each zone-cluster node contains the name of the virtual host. The virtual hostname can be published in the DNS or the NIS.
3. If the global zone cluster is not configured for NetWorker for each zone-cluster node:
a. Run the cluster configuration script, /usr/sbin/networker.cluster from the corresponding global zone.
b. When prompted, type the appropriate responses:
– Enter directory where local NetWorker database is installed [/nsr]?
Type the location of the NetWorker database directory provided during the installation. For example: /space/nsr.
– Do you wish to configure for both NetWorker server and client?
Yes or No [Yes]?
Type No to configure only the client software.
4. Register the LGTO.clnt resource type from only one of the zone-cluster nodes by using this command:
clrt register -f /usr/sbin/LGTO.clnt.rtr LGTO.clnt
Task 3: Create instances of the NetWorker Client resource type“Task 3: Create instances of the NetWorker Client resource type” on page 141 provides instructions on how to create an instance of the NetWorker Client resource type.
Install the NetWorker software in a zone cluster 147
Sun Cluster Version 3.2 Installation
Task 4: Define the list of trusted NetWorker servers“Task 4: Define the list of trusted NetWorker servers” on page 144 provides instructions on how to define the list of trusted NetWorker servers.
Task 5: Configure clients under the NetWorker server“Task 5: Configure clients under the NetWorker server” on page 145 provides instructions on how to configure clients under the NetWorker server.
Uninstall the NetWorker softwareTo uninstall the NetWorker software from a cluster environment:
1. Log in to the node in the cluster that is running the nsrd daemon as root.
2. Take the NetWorker resource group offline.
For example:
clresourcegroup offline networker
3. Stop the NetWorker daemons on all of the nodes in the cluster.
For example:
nsr_shutdown
4. Remove the NetWorker resource from the cluster.
For example:
clresource disable nwclientclresource disable nwserverclresource delete nwclientclresource delete nwservernetworker.cluster -r
5. Log in to the other cluster node as root.
6. Remove the NetWorker resource from the cluster.
For example:
networker.cluster -rclresourcegroup delete networker
If the clresourcegroup command results in a message similar to the following: (Error: (C517101) networker: resource group contains resources; cannot delete), the hastorageplus resource might still exist.
148 EMC NetWorker Release 8.0 Cluster Installation Guide
Sun Cluster Version 3.2 Installation
To resolve this issue:
a. Determine if the hastorageplus resource exists and confirm that the resource is offline.
For example:
scstat -g
b. Disable the hastorageplus resource.
For example:
clresource disable hastorageplus
c. Delete the hastorageplus resource.
For example:
clresource delete hastorageplus
d. Remove the NetWorker resource:
networker.cluster -rclresourcegroup delete networker
e. Use the scstat -g command to confirm that the hastorageplus resource is removed.
7. Make a copy of the cluster startup files. Perform this step on all cluster nodes.
cp /usr/lib/nsr/networker* /tmp/
8. Uninstall the NetWorker software.
Remove the NetWorker software packages in this order:- LGTOserv- LGTOnode- LGTOnmc- LGTOclnt
--Resource Groups--
Group Name Node Name State Suspended
Group: networker cluster_node1 Offline No
Group: networker cluster_node2 Offline No
--Resources--
Resource Name
Node Name State Status Message
----------------------
-----------------
-------- -----------------------
Resource:
hastorageplus
cluster_node1 Offline Offline
Resource:
hastorageplus
cluster_node2 Offline Offline
Uninstall the NetWorker software 149
Sun Cluster Version 3.2 Installation
The man pages (LGTOman) and language packages do not have any file dependencies and can be removed at any time.
For example, to remove all of the packages, type:
pkgrm LGTOserv LGTOnode LGTOnmc LGTOclnt LGTOlic LGTOman
Configure an external client to a virtual serverUse this procedure to configure and back up an external NetWorker client to a highly available NetWorker server.
Before a NetWorker server can back up a client, the client must grant the server access. Granting access is controlled by the servers file.
Consider the following:
◆ If no servers are specified, any NetWorker server can backup this client.
◆ If no servers are specified, any NetWorker server can perform a directed recovery to the client.
◆ When adding NetWorker servers, specify both the short name and FQDN for each NetWorker server.
On each NetWorker client that is outside of the cluster:
1. Shut down the NetWorker processes:
nsr_shutdown
2. Verify that all NetWorker daemons have stopped:
ps -ef |grep nsr
3. Edit or create the /nsr/res/servers file:
a. Add the set of NetWorker servers, one per line, that require access to this client.
b. Add an entry for the NetWorker logical hostname first. Then add entries for each physical host that can run the NetWorker resource group. For example:
– clus_vir1
– clus_phys1
– clus_phys2
Define ownership of a raw partition for virtual clientsTo back up the raw partitions of a NetWorker virtual client, ensure that the raw device path appears in the owned paths field of the LGTO.clnt resource.
Example 6 A highly available web server
In this example, a highly available web server uses the shared address web_server.
150 EMC NetWorker Release 8.0 Cluster Installation Guide

Sun Cluster Version 3.2 Installation
The web server services are placed under the control of the apache_rg resource group. The services access files that are kept in two separate globally mounted file systems: /global/web/config and /global/web/data. The web server also accesses the raw partition /dev/md/hunt/rdsk/d30.
To create the NetWorker Client resource named apache_nw, type:
clresource create -g apache_rg -t LGTO.clnt-x clientname=web_server \-x owned_paths=/global/web/config,/global/web/data,/dev/md/hunt/rdsk/d30 apache_nw
For information on backing up raw partitions, refer to the rawasm command as described in the uasm(1m) man page.
Define ownership of a raw partition for virtual clients 151

Sun Cluster Version 3.2 Installation
152 EMC NetWorker Release 8.0 Cluster Installation Guide
CHAPTER 13VERITAS Cluster Server Installation
This chapter includes these sections:
◆ Cluster configuration............................................................................................. 154◆ Software requirements.......................................................................................... 155◆ Install the NetWorker server in a cluster ................................................................ 155◆ Install only the NetWorker client software in a cluster ............................................ 168◆ Tracking scheduled saves...................................................................................... 171◆ Uninstall the NetWorker software .......................................................................... 172
VERITAS Cluster Server Installation 153
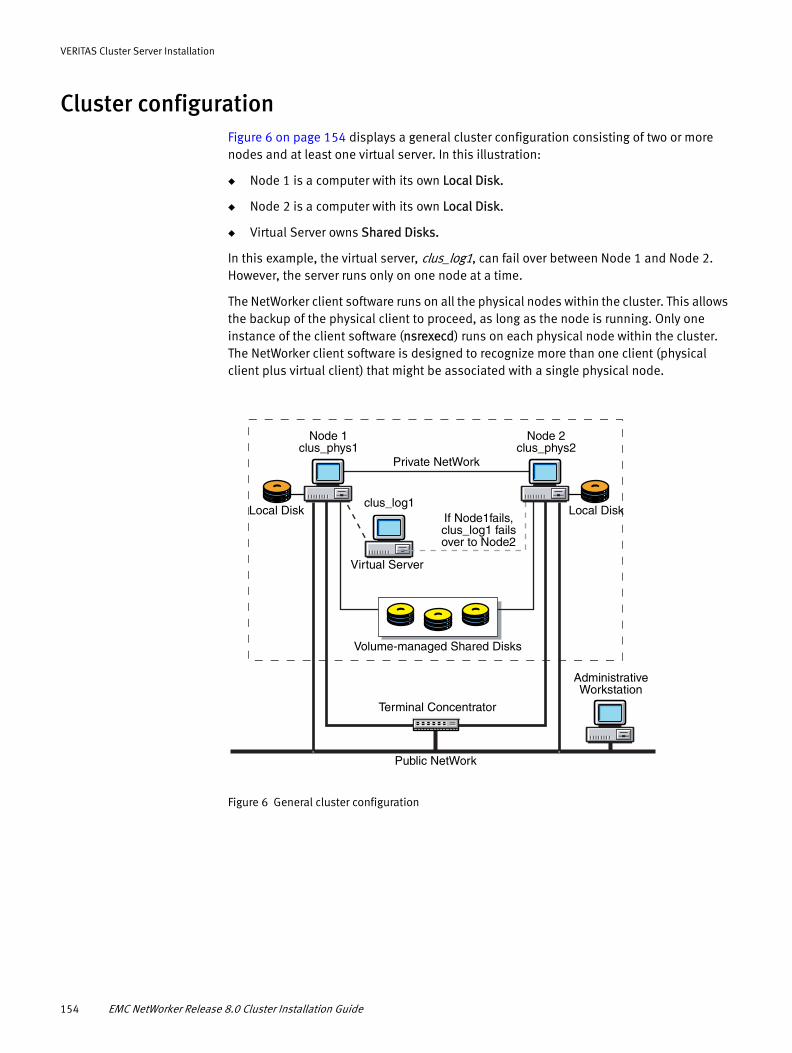
VERITAS Cluster Server Installation
Cluster configurationFigure 6 on page 154 displays a general cluster configuration consisting of two or more nodes and at least one virtual server. In this illustration:
◆ Node 1 is a computer with its own Local Disk.
◆ Node 2 is a computer with its own Local Disk.
◆ Virtual Server owns Shared Disks.
In this example, the virtual server, clus_log1, can fail over between Node 1 and Node 2. However, the server runs only on one node at a time.
The NetWorker client software runs on all the physical nodes within the cluster. This allows the backup of the physical client to proceed, as long as the node is running. Only one instance of the client software (nsrexecd) runs on each physical node within the cluster. The NetWorker client software is designed to recognize more than one client (physical client plus virtual client) that might be associated with a single physical node.
Figure 6 General cluster configuration
Node 1 clus_phys1
Node 2 clus_phys2
Private NetWork
Local Disk Local Diskclus_log1
Virtual Server
If Node1fails, clus_log1 fails over to Node2
Public NetWork
Volume-managed Shared Disks
Terminal Concentrator
Administrative Workstation
154 EMC NetWorker Release 8.0 Cluster Installation Guide
VERITAS Cluster Server Installation
Software requirementsEnsure that the following software is installed on each node in the cluster:
◆ Any Veritas Cluster Server (VCS) required patches for your operating environment
◆ VERITAS Cluster Server 3.5, 4.0, 5.0
◆ NetWorker release 7.5 or above
◆ VERITAS Volume Manager VxVM (optional)
◆ VERITAS File System VxFS (optional)
The EMC Information Protection Software Compatibility Guide provides the most up-to-date software and hardware requirements.
Install the NetWorker server in a clusterTo install and configure the NetWorker server software in a Veritas cluster, perform these tasks:
◆ “Task 1: Install the NetWorker software” on page 155
◆ “Task 2: Define the NetWorker server as a highly available application” on page 156
◆ “Task 3: Define a NetWorker service group” on page 158
◆ “Task 4 (Optional): Create NetWorker Client resource instances” on page 159
◆ “Task 5: Grant access to the highly available NetWorker server” on page 163
◆ “Task 6: Configure the NetWorker virtual server” on page 164
◆ “Task 7: Configure clients under the NetWorker virtual server” on page 165
◆ “Task 8: Register licenses for the highly available NetWorker server” on page 166
◆ “Task 9: Authorize the software” on page 167
Task 1: Install the NetWorker software
The NetWorker software must be installed on all nodes in the cluster that are required to run the NetWorker service group.
On Solaris and Linux
To prepare to install the software:
1. Ensure that the operating environment and the VERITAS Cluster Server 3.5, 4.0 or 5.0 software are already installed and configured on all cluster nodes.
2. If the VERITAS Cluster Server installation and configuration directories are different from the default directories, set the following environment variables:
• VCS_HOME
The default directory is /opt/VRTSvcs.
• VCS_CONF
The default directory is /etc/VRTSvcs.
Software requirements 155
VERITAS Cluster Server Installation
3. Ensure that the PATH environment variable includes /usr/sbin and $VCS_HOME/bin. The the default directory is /opt/VRTSvcs/bin.
To install the NetWorker software on the computer designated as the NetWorker client:
1. Access the NetWorker software from the distribution media.
2. Install the NetWorker client software on the physical disk of each node in the cluster to be backed up.
The NetWorker Installation Guide provides detailed installation instructions.
On Windows
To install the NetWorker client software on each node in the cluster:
1. Ensure that the operating system is updated with the most recent cluster patch.
2. Install the NetWorker client software on the physical disk of each node in the cluster to be backed up.
Task 2: Define the NetWorker server as a highly available application
The following steps define the NetWorker Server as a Highly Available Application on VCS.
On Solaris and Linux
1. Log in as root.
2. Ensure that the /etc/hosts file on each cluster node contains the names of the virtual hosts. The virtual hostnames can be published in the Domain Name System (DNS) or Network Information Services (NIS).
3. From each node in the cluster that will run the NetWorker server process:
a. Run the cluster configuration script networker.cluster located in /usr/sbin.
This script creates NWClient resource types that may need to be added later (see “Task 4 (Optional): Create NetWorker Client resource instances”) to the VERITAS Cluster Server configuration.
b. In response to the following prompts:
Enter the directory where the local NetWorker database is installed [/nsr]?
– Enter the location of the local NetWorker database directory provided during the installation procedure. For example: /space/nsr
Do you wish to configure for both NetWorker server and client?
Yes or No [Yes]?
– Enter Yes to configure the server software. This also installs the client software by default.
Do you wish to add now the site-specific values for: NSR_SHARED_DISK_DIR and NSR_SERVICE_ID Yes or No [Yes]?
– Enter Yes to ensure compatibility with other cluster environments.
In what path will the shared nsr directory be created/located?
156 EMC NetWorker Release 8.0 Cluster Installation Guide
VERITAS Cluster Server Installation
– Enter the pathname of the globally mounted /nsr directory that will contain the configuration information for the highly available NetWorker server. For example: /global/nw.
Enter the Logical Hostname to be used for NetWorker?
– Enter the published logical hostname to be used by the highly available NetWorker server. For example: clus_vir1
To undo any changes to the configuration, run the networker.cluster -r script and then run the networker.cluster script again.
On Windows
1. Log in as Administrator on each node where the NetWorker software is being installed.
2. Ensure that the C:\WINDOWS\system32\drivers\etc\hosts file on each cluster node contains the names of the virtual hosts. The virtual hostnames can be published in the Domain Name System (DNS) or Network Information Services (NIS).
3. For each node in the cluster:
a. Run the cluster configuration binary, <NSR_BIN>\lc_config.exe.
This script creates NWClient resource types that may need to be added later (see “Task 4 (Optional): Create NetWorker Client resource instances”) to the VERITAS Cluster Server configuration.
b. In response to the following prompts:
Do you want to configure NetWorker virtual server?[y/n]
– Enter y. This configures both the server software and the client software.
– Enter shared nsr dir:
– Enter the pathname of the shared nsr directory that will contain the configuration information for the highly available NetWorker server. For example: S:\nsr.
– Enter the directory in which your Veritas Cluster Server software is installed (typically something like C:\Program Files\Veritas\cluster server):
– Enter the location where the Veritas Cluster Server is installed.
Any changes to the configuration can be undone by running the lc_config.exe -r option and then running the lc_config.exe again.
Install the NetWorker server in a cluster 157
VERITAS Cluster Server Installation
Task 3: Define a NetWorker service group
A NetWorker service group should be defined in VCS to make the NetWorker server highly available. For Solaris and Linux platforms, the VCS Application agent is used to control the NetWorker virtual server. For Windows platforms, the VCS Process agent is used to control the NetWorker virtual server. The following are examples of NetWorker service group definitions on Linux and Windows.
Dependencies should be set up between resources — for example, on Solaris and Linux platforms, the Application resource depends on the IP resource, which depends on the Mount resource.
Example 7 An instance of a NetWorker service group definition on Linux
group networker (SystemList = { arrow = 0, canuck = 1 })Application nw_server (
StartProgram = "/usr/sbin/nw_vcs start"StopProgram = "/usr/sbin/nw_vcs stop"CleanProgram = "/usr/sbin/nw_vcs stop_force"MonitorProgram = "/usr/sbin/nw_vcs monitor"MonitorProcesses = {"/usr/sbin/nsrd -k avro"})
IP NW_IP (Device = eth0Address = "137.69.104.104")
Mount NW_Mount (MountPoint = "/mnt/share"BlockDevice = "/dev/sdc3"FSType = ext2FsckOpt = "-n")
NW_IP requires NW_Mountnw_server requires NW_IP// resource dependency tree//// group networker// {// Application nw_server// {// IP NW_IP// {// Mount NW_Mount// }// }
Example 8 An instance of NetWorker service group definition on Windows
group networker (SystemList = { BU-ZEUS32 = 0, BU-HERA32 = 1 })IP NWip1 (
Address = "10.5.163.41"SubNetMask = "255.255.255.0"MACAddress @BU-ZEUS32 = "00-13-72-5A-FC-06"MACAddress @BU-HERA32 = "00-13-72-5A-FC-1E")
MountV NWmount1 (MountPath = "S:\\"VolumeName = SharedVolume1VMDGResName = NWdg_1
158 EMC NetWorker Release 8.0 Cluster Installation Guide
VERITAS Cluster Server Installation
)Process NW_1 (
Enabled = 0StartProgram = "D:\\Program Files\\EMC
NetWorker\\nsr\\bin\\nw_vcs.exe start"StopProgram = "D:\\Program Files\\EMC
NetWorker\\nsr\\bin\\nw_vcs.exe stop"CleanProgram = "D:\\Program Files\\EMC
NetWorker\\nsr\\bin\\nw_vcs.exe stop_force"MonitorProgram = "D:\\program files\\EMC
NetWorker\\nsr\\bin\\nw_vcs.exe monitor"UserName = "bureng\\administrator"Password = BHFlGHdNDpGNkNNnF
)VMDg NWdg_1 (
DiskGroupName = "32dg1")
NWip1 requires NWmount1NWmount1 requires NWdg_1NW_1 requires NWip1// resource dependency tree//// group networker// {// Process NW_1// {// IP NWip1// {// MountV NWmount1// {// VMDg NWdg_1// }// }// }// }
On Windows, it is required to set the CleanProgramTimeout attribute of the NetWorker server process to a minimum value of 180, and the StopProgramTimeout attribute to a minimum of value of 120.
Task 4 (Optional): Create NetWorker Client resource instances
An instance of the NetWorker Client resource (NWClient) might be required for virtual clients that own data on shared devices. Virtual clients in the VERITAS Cluster Server are IP type resources.
Depending on the VERITAS Cluster service group configuration, this task might not be required. If required, create an instance of NWClient resource type in VERITAS Cluster service groups that:
◆ Are parallel with one or more IP type resources.
◆ Contain raw devices or logical volumes to back up.
◆ Contain more than one IP type resource.
◆ Contain storage resources that are not automatically detected such as:
• Storage resources that are defined in dependent groups.
• Storage resources that are not of the type Mount or CFSmount.
Install the NetWorker server in a cluster 159

VERITAS Cluster Server Installation
Creating an instance of NWClient resource type is optional if the following conditions exist:
◆ The failover VERITAS Cluster service group has only one IP type resource.
◆ The owned filesystems on the shared devices are instances of the mount type resource contained in the same service group.
Check the VERITAS Cluster Server configuration to determine which, if any, service groups require one or more NWClient resources. If no such groups require NWClient resources, proceed to “Task 5: Grant access to the highly available NetWorker server” on page 163.
About the NWClient resourceBefore performing this task, review the information in this section to become familiar with the structure of an NWClient resource.
The NWClient resource type definition is:
type NWClient (static str ArgList[] = { IPAddress, Owned_paths }NameRule = NWClient_ + resource.IPAddressstatic str Operations = Nonestr IPAddressstr Owned_paths[]
Table 20 on page 160 describes the required NWClient resource attributes.
Example 9 NWClient resource sample configuration
The following is a sample of a configured NWClient resource:
NWClient nw_helene (IPAddress="137.69.104.251"Owned_paths={ "/shared1", "/shared2", "/dev/rdsk/c1t4d0s4" }
Table 20 NWClient resource required attributes
Required attributesType and dimension Definition
IPAddress string, scalar IP address of the virtual NetWorker client. An IP type resource with a matching Address attribute must exist in the service group.
Owned_paths string, vector A list of filesystems or raw devices on a shared storage device. These filesystems or raw devices are owned by the virtual NetWorker client specified by the IP Address attribute.
160 EMC NetWorker Release 8.0 Cluster Installation Guide
VERITAS Cluster Server Installation
Register resource type and create resource instancesThis section describes how to register the NWClient resource and create NWClient resource instances.
On Solaris and Linux
To register the resource type and create resource instances:
1. Save the existing VERITAS Cluster Server configuration and prevent further changes while main.cf is modified:
haconf -dump -makero
2. Stop the VERITAS Cluster Server software on all nodes and leave the resources available:
hastop -all -force
3. Make a backup copy of the main.cf file:
cd /etc/VRTSvcs/conf/configcp main.cf main.cf.orig
4. Copy the NWClient resource definition file that is in the VERITAS Cluster Server configuration directory:
cp /etc/VRTSvcs/conf/NWClient.cf /etc/VRTSvcs/conf /config/NWClient.cf
5. Add the NWClient resource type and the NWClient resource type instances by editing the main.cf file:
a. Add the NWClient resource type definition by adding an include statement to the main.cf file:
include "NWClient.cf"
b. Save and close the file.
6. Verify the syntax of the file, /etc/VRTSvcs/conf/config/main.cf:
hacf -verify config
7. Start the VERITAS Cluster Server engine:
hastart
8. Log in on the remaining nodes in the cluster and start the VERITAS Cluster Server engine:
hastart
9. Verify the status of all service groups:
hagrp -display
10. Add an NWClient resource instance for service groups that require it.
Install the NetWorker server in a cluster 161

VERITAS Cluster Server Installation
On Windows
To register the resource type and create resource instances:
1. Save the existing VERITAS Cluster Server configuration and prevent further changes while main.cf is modified:
haconf -dump -maker
2. Stop VERITAS Cluster Server on all nodes and leave the resources available:
hastop -all -force
3. Make a backup copy of the main.cf file:
cd C:\Program Files\Veritas\cluster server\conf\configcp main.cf main.cf.orig
4. Copy the NWClient resource definition file which is located in the VERITAS Cluster Server configuration directory:
cp C:\Program Files\Veritas\cluster server\conf\NWClient.cfC:\Program Files\Veritas\cluster server\conf\config\NWClient.cf
5. Add this include statement to the main.cf file and then close and save the file:
include "NWClient.cf"
6. Verify the syntax of the file, C:\Program Files\Veritas\cluster server\conf\config\main.cf:
hacf -verify config
7. Start the VERITAS Cluster Server engine:
hastart
8. Log on to the remaining nodes in the cluster and start the VERITAS Cluster Server engine:
hastart
9. Verify the status of all the service groups:
hagrp -display
10. Add the NWClient resource instance for service groups that require it.
162 EMC NetWorker Release 8.0 Cluster Installation Guide
VERITAS Cluster Server Installation
Task 5: Grant access to the highly available NetWorker server
Before a NetWorker server can back up a client, the client must grant the server access. Granting access is controlled by the servers file. For the node that is running the NetWorker Server service group, this file is located in the shared file system. Otherwise, this file is located on a local disk.
Consider the following:
◆ If no servers are specified, any NetWorker server can backup this client.
◆ If no servers are specified, any NetWorker server can perform a directed recovery to the client.
◆ When adding NetWorker servers, specify both the short name and FQDN for each NetWorker server.
To grant access to the highly available NetWorker server:
1. On one node in the cluster:
a. Stop the NetWorker daemon by using the cluster management software.
b. Edit or create the servers file in the shared nsr area (for example, on Solaris and Linux, /global/nw/res/servers; on Windows, S:\nsr\res\servers):
– Add the set of NetWorker servers, one per line, to be granted access to this client.
– Add an entry for the NetWorker logical hostname first.
– Add entries for each physical host that can run the NetWorker resource group.
For example:
clus_vir1clus_phys1clus_phys2
2. On each node in the cluster:
a. Shut down the NetWorker processes and verify that all NetWorker daemons have stopped. For example, on Solaris and Linux, enter:
nsr_shutdownps -ef | grep nsr
b. Check the NetWorker boot-time startup file to see whether nsrexecd is being run with the -s option.
If the -s option exists, remove all occurrences of -s servername in the file.
Install the NetWorker server in a cluster 163

VERITAS Cluster Server Installation
c. Edit or create the local servers file:
– On Solaris and Linux, the file is /nsr.NetWorker.local/res/servers
– On Windows, it is C:\Program Files\EMC NetWorker\nsr\res\servers
Perform the following to the local servers file:
– Add the set of NetWorker servers, one per line, that require access to this client.
– Add an entry for the NetWorker logical hostname first.
– Add entries for each physical host that can run the NetWorker resource group.
For example:
clus_vir1clus_phys1clus_phys2
3. On one node in the cluster, start the NetWorker daemon by using the cluster management software.
4. If required, grant access to the NetWorker virtual server on clients outside of the cluster on each client:
a. Shut down the NetWorker processes.
b. Verify that all NetWorker daemons have stopped.
c. Edit or create the /nsr/res/servers file:
– Add the set of NetWorker servers, one per line, that require access to this client.
– Add an entry for the NetWorker logical hostname first.
– Add entries for each physical host that can run the NetWorker resource group.
For example:
clus_vir1clus_phys1clus_phys2
Task 6: Configure the NetWorker virtual server
To configure the NetWorker virtual server:
1. Log in as root (on Solaris and Linux) or Administrator (on Windows) on the cluster node that is currently running the NetWorker server resource group.
2. Start the NetWorker Console software:
a. From the Console window, click Enterprise.
b. From the left pane, select the Enterprise icon. The NetWorker server appears in the right and left panes.
c. From the left pane, select the NetWorker server.
d. From the right pane, select the NetWorker application.
e. From the Enterprise menu, select Launch Application.The Administration window launches.
164 EMC NetWorker Release 8.0 Cluster Installation Guide
VERITAS Cluster Server Installation
3. From the Administration window, click Configuration.
a. In the left pane, select the NetWorker server.
b. From the File menu, select Properties. The Properties dialog box appears.
– For the Administrator attribute, add entries for any cluster nodes that are not already listed. For example, on Solaris or Linux, root@hostname.
– Click Ok.
Task 7: Configure clients under the NetWorker virtual server
On Solaris and Linux, when the networker.cluster script runs, it creates:
◆ A symbolic link named /nsr that points to a local disk.
◆ A second link named nsr.NetWorker.local that points to the local NetWorker directory.
For example, if the local NetWorker directory was created in /var/nsr, each client member has these links:
◆ /nsr->/nsr.NetWorker.local
◆ /nsr.NetWorker.local->/var/nsr
To configure each client under the NetWorker virtual server:
1. (Optional) Define save groups.
In order for their save sets to restart after NetWorker server failover, save groups must have the Autorestart attribute enabled and the Manual Restart option disabled.
2. Make each physical client within the cluster a client of the NetWorker virtual server. For each physical client in the cluster:
a. Create a new client.
b. Type the name of the physical client for the Name attribute.
3. Make each virtual client within the cluster a client of the virtual NetWorker server. For each virtual client in the cluster:
a. Create a new NetWorker client.
b. For the Name attribute, type the name of the virtual client.
c. In the Remote Access attribute, add entries for each physical client within the cluster. For example, on Solaris and Linux:
root@clus_phys1
d. For the Group attribute, select a group.
Install the NetWorker server in a cluster 165

VERITAS Cluster Server Installation
4. Run a test probe to verify that the Client resource and the Group resource have been properly configured.
Type this command on the node on which the NetWorker server resides:
savegrp -pv -c client_name group_name
If the test probe does not display the correct scheduled backups and index, refer to the EMC NetWorker 8.0 Administration Guide.
Task 8: Register licenses for the highly available NetWorker server
To register and license the highly available NetWorker server:
1. Order licenses for the type of NetWorker server and client configuration in use.
2. Log in to the system that is currently running the NetWorker resource group.
3. Perform these operations to enter the purchased enabler codes:
a. If you have been evaluating the NetWorker highly available software and have now purchased the software:
– To upgrade from the base evaluation enabler to the purchased enabler, type:
nsrcap -v -u base_enabler_code
– Delete any remaining evaluation enablers:
nsradmin -s clus_vir1
This eliminates warning messages due to expiring evaluation enablers.
b. For each enabler code, type:
nsrcap -v -c enabler_code
4. Ensure that the highly available NetWorker server is defined as a part of the cluster.
5. Run the following command, and capture the output, on each node that is currently running the NetWorker server resource group:
hostid
The numeric identifier of the current host prints.
6. Log in to the system that is running the NetWorker virtual server and create the /nsr/res/hostids file. This file contains the host IDs of all the cluster nodes.
Use this syntax:
hostid1:hostid2:hostid3:...
For example:
12345678:87654321
7. Restart the server by taking the highly available NetWorker server offline and then putting it back online.
166 EMC NetWorker Release 8.0 Cluster Installation Guide
VERITAS Cluster Server Installation
8. On one node in the cluster:
a. Start the NetWorker Console. Use the logical hostname for the highly available NetWorker server.
b. From the NetWorker Administration window, note the host ID number for the appropriate cluster license.
c. Register the NetWorker software.
Do not change the logical hostname for the highly available NetWorker server. If you change it after you update the software, you must permanently license and authorize the highly available NetWorker server.
Task 9: Authorize the software
To enter the permanent authorization code for NetWorker servers and clients:
1. On one node in the cluster, start the NetWorker Console. Use the logical hostname for the highly available NetWorker server.
2. Complete the customer information and contact information fields:
a. Start the NetWorker Console software.
b. From the Administration window, click Configuration.
c. In the left pane, select the NetWorker server.
d. From the File menu, select Properties. The Properties dialog box appears.
e. Select the Customer Information tab and complete your contact information and click Ok.
3. Review the registration information:
a. From the Administration window, click Configuration.
b. In the left pane, click Registration.
c. In the right pane, right-click the license to be authorized, then select Properties. The Properties dialog box appears.
d. Review the Auth Code attribute.
Install the NetWorker server in a cluster 167

VERITAS Cluster Server Installation
Install only the NetWorker client software in a clusterIn this configuration, the NetWorker server is running on a node that is not a member of the cluster.
To install a NetWorker cluster client, perform the following:
◆ “Task 1: Install the NetWorker cluster client software” on page 168
◆ “Task 2: Configure NetWorker client software as cluster aware” on page 169
◆ “Task 3 (Optional): Create NetWorker Client resource instances” on page 170
◆ “Task 4: Define the list of trusted NetWorker servers” on page 170
◆ “Task 5: Configure clients under the NetWorker server” on page 171
Ensure that the NetWorker client software is installed on each node to be backed up in the cluster.
Task 1: Install the NetWorker cluster client software
The steps are different for Solaris and Linux and Windows:
◆ “On Solaris and Linux” on page 168
◆ “On Windows” on page 169
On Solaris and LinuxTo prepare to install the software:
1. Ensure that the operating environment and the VERITAS Cluster Server 3.5, 4.0 or 5.0 software are already installed and configured on all cluster nodes.
2. If the VERITAS Cluster Server installation and configuration directories are different from the default directories, set the following environment variables:
• VCS_HOME
The default directory is /opt/VRTSvcs.
• VCS_CONF
The default directory is /etc/VRTSvcs.
3. Ensure that the PATH environment variable includes /usr/sbin and $VCS_HOME/bin. The the default directory is /opt/VRTSvcs/bin.
Install the software on a designated clientTo install the NetWorker software on the computer designated as the NetWorker client:
1. Access the NetWorker software from the distribution media.
2. Install the NetWorker client software on the physical disk of each node in the cluster to be backed up.
The NetWorker Installation Guide provides detailed installation instructions.
168 EMC NetWorker Release 8.0 Cluster Installation Guide
VERITAS Cluster Server Installation
On WindowsTo install the NetWorker client software on each node in the cluster:
1. Ensure that the operating system is updated with the most recent cluster patch.
2. Install the NetWorker client software on the physical disk of each node in the cluster to be backed up.
Task 2: Configure NetWorker client software as cluster aware
The steps are different for Solaris and Linux and Windows:
◆ “On Solaris and Linux” on page 169
◆ “On Windows” on page 169
On Solaris and LinuxTo define and configure a NetWorker client as cluster aware:
1. Log in as root on each node where the NetWorker software is being installed.
2. Ensure that the /etc/hosts file on each cluster node contains the names of the virtual hosts.
The virtual hostnames can be published in the Domain Name System (DNS) or Network Information Services (NIS).
3. For each node in the cluster:
a. Run the cluster configuration script:
/usr/sbin/networker.cluster
This script creates NWClient resource types that might need to be added later (see “Task 4 (Optional): Create NetWorker Client resource instances”) to the VERITAS Cluster Server configuration.
b. Type the appropriate information in response to the prompts:
Enter directory where local NetWorker database is installed [/nsr]?
– Type the location of the local NetWorker database directory provided during the installation procedure. For example:/space/nsrDo you wish to configure for both NetWorker server and client? Yes or No [Yes]?
– Type No. This configures only the client software.
Any changes to the configuration can be undone by running the networker.cluster -r option and then running the networker.cluster script again.
Install only the NetWorker client software in a cluster 169

VERITAS Cluster Server Installation
On WindowsTo define and configure a NetWorker client as cluster aware, on each node in the cluster:
1. Log in as administrator.
2. Ensure that the C:\WINDOWS\system32\drivers\etc\hosts file contains the names of the virtual hosts.
The virtual hostnames can be published in the Domain Name System (DNS) or Network Information Services (NIS).
3. Run the cluster configuration program, NetWorker_installation_dir\lc_config.exe.
This script creates the NWClient resource type that may need to be added later (see “Task 4 (Optional): Create NetWorker Client resource instances”) to the VERITAS Cluster Server configuration.
4. Enter the appropriate information in response to the prompts:
Do you want to configure NetWorker virtual server? [y/n]
Enter N. This configures only the client software.
Enter the directory in which your Veritas Cluster Server software is installed (typically something like C:\Program Files\Veritas\cluster server).
Enter the location where the Veritas Cluster server is installed.
Any changes to the configuration can be undone by running the lc_config.exe -r option and then running the lc_config.exe again.
Task 3 (Optional): Create NetWorker Client resource instances
Information on how to create the NetWorker client (NWclient) resource instances is provided in the server configuration section under “Task 4 (Optional): Create NetWorker Client resource instances” on page 159.
Task 4: Define the list of trusted NetWorker servers
Before a NetWorker server can back up a client, the client must grant the server access. Granting access is controlled by the servers file.
Consider the following:
◆ If no servers are specified, any NetWorker server can backup this client.
◆ If no servers are specified, any NetWorker server can perform a directed recovery to the client.
◆ When adding NetWorker servers, specify both the short name and FQDN for each NetWorker server.
170 EMC NetWorker Release 8.0 Cluster Installation Guide
VERITAS Cluster Server Installation
To define the list of trusted NetWorker servers, perform the following steps on each node in the cluster:
◆ “On Solaris and Linux” on page 171
◆ “On Windows” on page 171
On Solaris and Linux1. Shut down the NetWorker processes and verify that all daemons have stopped:
nsr_shutdownps -ef |grep nsr
2. Edit or create the /nsr/res/servers file and add the set of NetWorker servers, one per line, that require access to this client.
3. Check the NetWorker boot-time startup file to see whether nsrexecd is being run with the -s option. If the -s option exists, remove all occurrences. For example:
-s servername
4. Restart the NetWorker daemons:
/etc/init.d/networker start
On Windows1. Edit or create the %SystemDrive%\Program Files\EMC NetWorker\nsr\res\servers file.
2. Add the NetWorker servers, one per line, that require access to this client.
Task 5: Configure clients under the NetWorker server
To configure each client under the NetWorker server:
1. (Optional) Define save groups.
2. Make each physical Client within the cluster a client of the NetWorker server. For each physical client in the cluster:
a. Create a new NetWorker client.
b. For the Name attribute, type the name of the physical client.
3. Make each virtual client within the cluster a client of the NetWorker virtual server. For each virtual client in the cluster:
a. Create a new NetWorker client.
b. For the Name attribute, type the name of the virtual client.
c. For the Remote Access attribute, enter the user@hostname for each physical client within the cluster. For example, on Linux or Solaris:
root@clus_phys1
d. For the Group attribute, select a group.
Install only the NetWorker client software in a cluster 171
VERITAS Cluster Server Installation
Tracking scheduled savesTo verify that the Client and Group resources are properly configured, run a test probe for each client from the node where the NetWorker application is running:
savegrp -pv -c client_name group_name
If the test probe does not display all the scheduled save sets:
◆ Check the cluster configuration by using the cluster management software. If necessary, reconfigure the cluster.
◆ Ensure that the save sets defined for the client are owned by that client. If necessary, redistribute the client save sets to the appropriate Client resources.
Misconfiguration of the Cluster resources might cause scheduled save sets to be dropped from the backup. The NetWorker Administration Guide provides more information.
◆ Type this command to override scheduled save rules:
On Solaris and Linux:
touch networker_bin_dir/pathownerignore
On Windows:
echo NUL: networker_bin_dir\pathownerignore
This command allows any path to be backed up for a client, whether it is owned by the virtual client or physical node. The NetWorker Administration Guide provides more information.
◆ Run a second test probe to verify the configuration.
If the pathownerignore file was used, check that the NetWorker scheduled save uses the correct client index. If the wrong index is used, the save sets can be forced to go to the correct index:
1. From the NetWorker Administration window, select a client and edit its properties.
2. For the Backup Command attribute, type the name of a backup script that contains:
save -c client_name
The EMC NetWorker Administration Guide provides details about the Backup Command attribute.
172 EMC NetWorker Release 8.0 Cluster Installation Guide
VERITAS Cluster Server Installation
Uninstall the NetWorker softwareTo uninstall the NetWorker software from a cluster environment:
Uninstall the software on Solaris and Linux
1. On one node in the cluster, remove all the instances of the NWClient resource type and remove the NWClient type definition from the configuration.
For information, refer to the hares (1m) and hatype(1m) man pages.
2. On each node in the cluster:
a. Log in as root on the computer from which the software is being removed.
b. Undo all changes to the configuration by running the networker.cluster -r option.
c. To shut down the NetWorker daemons, type:
nsr_shutdown
A list of NetWorker daemons to be shut down appears, and you are prompted whether to continue.
3. Uninstall the NetWorker client software from each node. The NetWorker installation guide provides instructions.
Uninstall the software on Windows
1. On one node in the cluster, remove all the instances of the NWClient resource type and remove the NWClient type definition from the configuration.
2. On each node in the cluster:
a. Log in as administrator on the computer from which the software is being removed.
b. Undo all changes to the configuration by running this command:
lc_config.exe -r
3. Uninstall the NetWorker client software from each node. The NetWorker 8.0 Installation Guide describes how to remove the NetWorker software.
Uninstall the NetWorker software 173

VERITAS Cluster Server Installation
174 EMC NetWorker Release 8.0 Cluster Installation Guide