cloud control basic installation guide 12c release 2 (12.1...
TRANSCRIPT

Oracle® Enterprise ManagerCloud Control Basic Installation Guide
12c Release 2 (12.1.0.2)
E22624-15
October 2012

Oracle Enterprise Manager Cloud Control Basic Installation Guide, 12c Release 2 (12.1.0.2)
E22624-15
Copyright © 2012, Oracle and/or its affiliates. All rights reserved.
Primary Author: Aravind Jayaraaman
Contributing Author: Namrata Bhakthavatsalam, Pradeep Gopal
Contributor: Anu Vale, Smitha Vishwanathan, Abhishek Suresh Kumar, Srilatha Uravakonda, Pushkar Jha, Prakash Jaganathan, Mohammed Nazim, Rajesh Parasuraman, Maria Teresa Gil Lucientes, Shilpa Thergaonkar, Palem Naga Maheshwara Reddy, Devanand Patil, Kunamalla Thirumaleshwar, Rajiv Kuriakose, Ashish Goel, Atif Jamil, Karthik Somasundaram, Abhishek Vaidya, Smitha Nath, Erik Demember, Bala Kuchibhotla, Raghavendra Nadidare, Amitabh Khare, Suman Kumar Pramanik, Sanjay Ediga, Akanksha Sheoran, Patrick Combs, Nicole Haba, Glen Hawkins, James Kao, Bhavin Desai, Jeff Barber, David Eschliman, Akshai Duggal, Andrew Gregory, Lachlan Williams, Meghan Ede, Frank Montgomery Jr, Courtney Llamas, David Eschliman, Laiju Raghuvaran, Asham Vohra, Mayumi Hayasaka, Qiang Chen
This software and related documentation are provided under a license agreement containing restrictions on use and disclosure and are protected by intellectual property laws. Except as expressly permitted in your license agreement or allowed by law, you may not use, copy, reproduce, translate, broadcast, modify, license, transmit, distribute, exhibit, perform, publish, or display any part, in any form, or by any means. Reverse engineering, disassembly, or decompilation of this software, unless required by law for interoperability, is prohibited.
The information contained herein is subject to change without notice and is not warranted to be error-free. If you find any errors, please report them to us in writing.
If this is software or related documentation that is delivered to the U.S. Government or anyone licensing it on behalf of the U.S. Government, the following notice is applicable:
U.S. GOVERNMENT END USERS: Oracle programs, including any operating system, integrated software, any programs installed on the hardware, and/or documentation, delivered to U.S. Government end users are "commercial computer software" pursuant to the applicable Federal Acquisition Regulation and agency-specific supplemental regulations. As such, use, duplication, disclosure, modification, and adaptation of the programs, including any operating system, integrated software, any programs installed on the hardware, and/or documentation, shall be subject to license terms and license restrictions applicable to the programs. No other rights are granted to the U.S. Government.
This software or hardware is developed for general use in a variety of information management applications. It is not developed or intended for use in any inherently dangerous applications, including applications that may create a risk of personal injury. If you use this software or hardware in dangerous applications, then you shall be responsible to take all appropriate fail-safe, backup, redundancy, and other measures to ensure its safe use. Oracle Corporation and its affiliates disclaim any liability for any damages caused by use of this software or hardware in dangerous applications.
Oracle and Java are registered trademarks of Oracle and/or its affiliates. Other names may be trademarks of their respective owners.
Intel and Intel Xeon are trademarks or registered trademarks of Intel Corporation. All SPARC trademarks are used under license and are trademarks or registered trademarks of SPARC International, Inc. AMD, Opteron, the AMD logo, and the AMD Opteron logo are trademarks or registered trademarks of Advanced Micro Devices. UNIX is a registered trademark of The Open Group.
This software or hardware and documentation may provide access to or information on content, products, and services from third parties. Oracle Corporation and its affiliates are not responsible for and expressly disclaim all warranties of any kind with respect to third-party content, products, and services. Oracle Corporation and its affiliates will not be responsible for any loss, costs, or damages incurred due to your access to or use of third-party content, products, or services.

iii
Contents
Preface ................................................................................................................................................................ vii
Audience...................................................................................................................................................... viiPurpose of the Document.......................................................................................................................... viiDocumentation Accessibility ................................................................................................................... viiiRelated Documents ................................................................................................................................... viiiConventions ................................................................................................................................................. ix
Part I Introduction
1 Overview of Enterprise Manager Cloud Control
1.1 Overview of Enterprise Manager Cloud Control................................................................... 1-11.2 Enterprise Manager Cloud Control Architecture................................................................... 1-2
Part II Preinstallation Requirements
2 Meeting Hardware Requirements
2.1 CPU, RAM, Heap Size, and Hard Disk Space Requirements for OMS .............................. 2-12.2 CPU, RAM, and Hard Disk Space Requirements for Management Agents ...................... 2-22.3 CPU, RAM, and Hard Disk Space Requirements for Management Repository................ 2-2
3 Meeting Package, Kernel Parameter, and Library Requirements
3.1 Package Requirements ............................................................................................................... 3-13.1.1 Identifying Installed Packages........................................................................................... 3-13.1.2 Package Requirements for Oracle Management Service ............................................... 3-23.1.3 Package Requirements for Oracle Management Agent ................................................. 3-73.2 Kernel Parameter Requirements............................................................................................ 3-113.3 Library Requirements.............................................................................................................. 3-123.3.1 Library Requirements for Oracle Management Service.............................................. 3-123.3.2 Library Requirements for Oracle Management Agent ............................................... 3-12
4 Creating Operating System Groups and Users
4.1 What Operating System Groups and Users Are Required? ................................................. 4-14.2 How to Create the Operating System Groups and Users? ................................................... 4-14.2.1 Creating the Oracle Inventory Group............................................................................... 4-2
iv
4.2.1.1 Determining Whether the Oracle Inventory Group Exists..................................... 4-24.2.1.2 Creating the Oracle Inventory Group ....................................................................... 4-24.2.2 Creating the Oracle Software Owner User ...................................................................... 4-24.2.2.1 Determining Whether an Oracle Software Owner User Exists.............................. 4-34.2.2.2 Creating an Oracle Software Owner User ................................................................ 4-34.2.2.3 Modifying an Oracle Software Owner User ............................................................. 4-3
5 Installing Cygwin and Starting SSH Daemon
5.1 Overview...................................................................................................................................... 5-15.2 Before You Begin......................................................................................................................... 5-25.3 Installing Cygwin........................................................................................................................ 5-35.4 Configuring SSH After Installing Cygwin .............................................................................. 5-7
Part III Installation
6 Installing Enterprise Manager System
6.1 Introduction ................................................................................................................................. 6-16.1.1 Overview of the Installation Types ................................................................................... 6-16.1.2 Overview of What Is Installed and Configured.............................................................. 6-36.1.3 Overview of the Directory Structures............................................................................... 6-56.1.3.1 Overview of the Directory Structure for Enterprise Manager Installation .......... 6-56.1.3.2 Overview of the Directory Structure for Management Agent Installation.......... 6-56.2 Before You Begin......................................................................................................................... 6-56.3 Prerequisites ................................................................................................................................ 6-86.4 Installation Procedure ............................................................................................................. 6-136.4.1 Installing with Simple Configuration ............................................................................ 6-136.4.2 Installing with Advanced Configuration ...................................................................... 6-256.4.2.1 Advanced Installer Options ..................................................................................... 6-426.4.2.2 Limitations.................................................................................................................. 6-436.5 After You Install ....................................................................................................................... 6-44
7 Installing Oracle Management Agent
7.1 Overview...................................................................................................................................... 7-17.2 Before You Begin......................................................................................................................... 7-37.3 Prerequisites ................................................................................................................................ 7-57.4 Installation Procedure ............................................................................................................. 7-137.4.1 Format of Host List File .................................................................................................. 7-177.4.2 Supported Additional Parameters ................................................................................. 7-187.5 After You Install ....................................................................................................................... 7-19
8 Adding Additional Oracle Management Service
8.1 Overview...................................................................................................................................... 8-18.2 Before You Begin......................................................................................................................... 8-28.3 Prerequisites ................................................................................................................................ 8-38.4 Installation Procedure ............................................................................................................. 8-108.4.1 Selecting Credentials ........................................................................................................ 8-13

v
8.5 After You Install ....................................................................................................................... 8-14
9 Installing Application Dependency and Performance
9.1 Overview...................................................................................................................................... 9-19.2 Before you Begin ......................................................................................................................... 9-29.3 Prerequisites ................................................................................................................................ 9-29.4 Installation Procedure ................................................................................................................ 9-39.4.1 Deploying ADP Manager on the Same Host as OMS .................................................... 9-39.4.2 Deploying ADP Agents ...................................................................................................... 9-59.5 After You Install .......................................................................................................................... 9-79.5.1 Verifying ADP Manager Installation ................................................................................ 9-79.5.2 Verifying ADP Agent Installation ..................................................................................... 9-7
10 Installing JVM Diagnostics
10.1 Overview................................................................................................................................... 10-110.2 Before you Begin ...................................................................................................................... 10-210.3 Prerequisites ............................................................................................................................. 10-210.4 Installation Procedure ............................................................................................................. 10-310.4.1 Deploying JVMD Manager on the Same Host as OMS............................................... 10-310.4.2 Deploying JVMD Agents................................................................................................. 10-410.5 After You Install ....................................................................................................................... 10-610.5.1 Verifying JVMD Manager Installation........................................................................... 10-610.5.2 Verifying JVMD Agent Installation ............................................................................... 10-6
Part IV Getting Started with Enterprise Manager
11 Getting Started with Enterprise Manager
Part V Appendix
A Overview of EM Prerequisite Kit Utility
A.1 About EM Prerequisite Kit ...................................................................................................... A-1A.2 Running the EM Prerequisite Kit............................................................................................. A-1A.3 Running the EM Prerequisite Kit with Additional Arguments .......................................... A-3A.4 Viewing Prerequisite Check Results ....................................................................................... A-8A.5 Viewing Log Files ...................................................................................................................... A-9A.6 Repository Prerequisites ......................................................................................................... A-10A.6.1 Setting Database Initialization Parameters ................................................................... A-27A.6.1.1 Setting Database Initialization Parameters for Advanced Installation.............. A-27A.6.1.2 Setting Database Initialization Parameters for Simple Installation.................... A-27
B Validating Command Locations
B.1 Overview of Property Files....................................................................................................... B-1B.2 Validating Command Locations.............................................................................................. B-2

vi
C Setting Up Proxy Configuration for Oracle Management Service
D Creating a Database Instance with Preconfigured Repository Using Database Templates
E Accessing the Enterprise Manager Certification Matrix
Index
vii
Preface
Oracle Enterprise Manager Cloud Control Basic Installation Guide enables you to get started with the installation of Enterprise Manager Cloud Control 12c Release 2 (12.1.0.2).
This preface covers the following topics:
■ Audience
■ Documentation Accessibility
■ Related Documents
■ Conventions
AudienceOracle Enterprise Manager Cloud Control Basic Installation Guide is meant for system administrators who want to install a new Enterprise Manager system, an additional Oracle Management Service, or an additional Oracle Management Agent, especially in graphical mode.
Purpose of the DocumentOracle Enterprise Manager Cloud Control Basic Installation Guide describes how you can perform the following operations:
■ Installing Enterprise Manager Cloud Control in graphical mode
■ Installing an additional Oracle Management Service in graphical mode
■ Installing Oracle Management Agent in graphical mode
■ Installing JVM Diagnostics and Application Dependency and Performance
Oracle Enterprise Manager Cloud Control Basic Installation Guide does NOT cover the following procedures. These procedures are documented in the Oracle Enterprise Manager Cloud Control Advanced Installation and Configuration Guide.
■ Installing the following in graphical mode:
Note: For more information on the releases Enterprise Manager Cloud Control has had so far, refer to Oracle Enterprise Manager Cloud Control Advanced Installation and Configuration Guide.
viii
– Enterprise Manager Cloud Control software only so that you can configure it later
– Oracle Management Agent using a shared Oracle home
■ Installing the following in silent mode:
– Enterprise Manager Cloud Control
– Enterprise Manager Cloud Control software only so that you can configure it later
– Oracle Management Service
– Oracle Management Agent
– Oracle Management Agent software only so that you can configure it later
– Oracle Management Agent using a shared Oracle home
■ Cloning Oracle Management Agent in graphical and silent mode
■ Deinstalling Enterprise Manager Cloud Control and Oracle Management Agent in graphical and silent mode
Also, Oracle Enterprise Manager Cloud Control Basic Installation Guide does NOT cover the procedure for upgrading your existing Enterprise Manager system. The upgrade procedure is documented in the Oracle Enterprise Manager Cloud Control Upgrade Guide.
Documentation AccessibilityFor information about Oracle's commitment to accessibility, visit the Oracle Accessibility Program website at http://www.oracle.com/pls/topic/lookup?ctx=acc&id=docacc.
Access to Oracle SupportOracle customers have access to electronic support through My Oracle Support. For information, visit http://www.oracle.com/pls/topic/lookup?ctx=acc&id=info or visit http://www.oracle.com/pls/topic/lookup?ctx=acc&id=trs if you are hearing impaired.
Related DocumentsFor more information, see the following books in the Enterprise Manager Cloud Control documentation library:
■ Oracle Enterprise Manager Cloud Control Advanced Installation and Configuration Guide
■ Oracle Enterprise Manager Cloud Control Upgrade Guide
■ Oracle Enterprise Manager Cloud Control Administrator's Guide
For the latest releases of these and other Oracle documentation, check the Oracle Technology Network at the following URL:
http://www.oracle.com/technetwork/indexes/documentation/index.html
Enterprise Manager also provides extensive online Help. Click Help at the top-right corner of any Cloud Control page to display the online help window.
ix
ConventionsThe following text conventions are used in this document:
Convention Meaning
boldface Boldface type indicates graphical user interface elements associated with an action, or terms defined in text or the glossary.
italic Italic type indicates book titles, emphasis, or placeholder variables for which you supply particular values.
monospace Monospace type indicates commands within a paragraph, URLs, code in examples, text that appears on the screen, or text that you enter.

x
Part IPart I Introduction
This part contains the following chapters:
■ Chapter 1, "Overview of Enterprise Manager Cloud Control"

1
Overview of Enterprise Manager Cloud Control 1-1
1Overview of Enterprise Manager Cloud Control
This chapter provides an overview of Oracle Enterprise Manager Cloud Control (Enterprise Manager Cloud Control) and helps you understand its architecture and the various core components that are integrated within the product.
This chapter contains the following sections:
■ Overview of Enterprise Manager Cloud Control
■ Enterprise Manager Cloud Control Architecture
1.1 Overview of Enterprise Manager Cloud ControlEnterprise Manager Cloud Control is system management software that delivers centralized monitoring, administration, and life cycle management functionality for the complete IT infrastructure, including systems running Oracle and non-Oracle technologies.
Your environment may comprise multiple Oracle Databases, Oracle WebLogic Servers, Web applications deployed on these servers, hosts running these targets, and so on. You can, of course, use the individual product consoles to monitor the status of each of these targets, but it becomes cumbersome to shuttle between multiple console windows and track the performance of each of these targets using so many windows.
Enterprise Manager Cloud Control offers a solution that allows you to monitor and manage the complete Oracle IT infrastructure from a single console. In addition, it provides support for business-driven IT management and business-centric top-down application management to manage your business services, user experience, and infrastructure. It also offers support for monitoring certain non-Oracle products, for example, IBM WebSphere Application Server, Microsoft SQL Server, Juniper Networks NetScreen Firewall, and so on.
Note: For information on the releases Enterprise Manager Cloud Control has had so far, refer to Oracle Enterprise Manager Cloud Control Advanced Installation and Configuration Guide.
Enterprise Manager Cloud Control Architecture
1-2 Oracle Enterprise Manager Cloud Control Basic Installation Guide
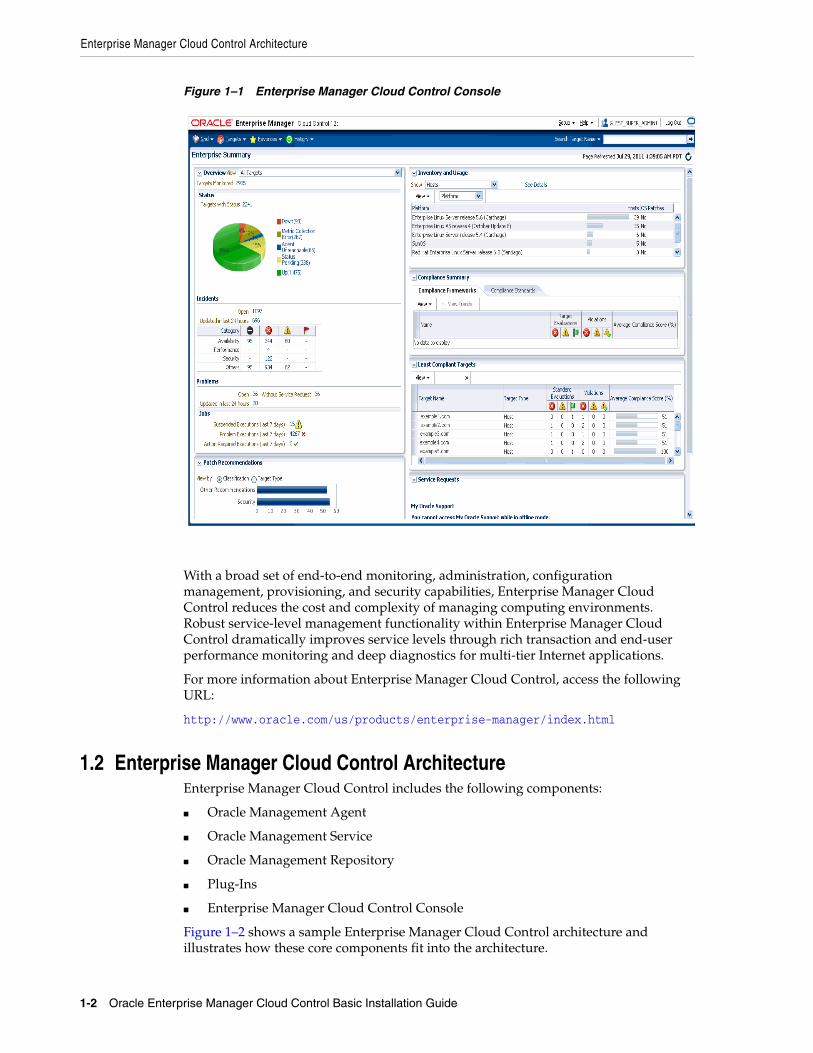
Figure 1–1 Enterprise Manager Cloud Control Console
With a broad set of end-to-end monitoring, administration, configuration management, provisioning, and security capabilities, Enterprise Manager Cloud Control reduces the cost and complexity of managing computing environments. Robust service-level management functionality within Enterprise Manager Cloud Control dramatically improves service levels through rich transaction and end-user performance monitoring and deep diagnostics for multi-tier Internet applications.
For more information about Enterprise Manager Cloud Control, access the following URL:
http://www.oracle.com/us/products/enterprise-manager/index.html
1.2 Enterprise Manager Cloud Control ArchitectureEnterprise Manager Cloud Control includes the following components:
■ Oracle Management Agent
■ Oracle Management Service
■ Oracle Management Repository
■ Plug-Ins
■ Enterprise Manager Cloud Control Console
Figure 1–2 shows a sample Enterprise Manager Cloud Control architecture and illustrates how these core components fit into the architecture.

Enterprise Manager Cloud Control Architecture
Overview of Enterprise Manager Cloud Control 1-3
Figure 1–2 Enterprise Manager Cloud Control Architecture
The following sections describe the core components of Enterprise Manager Cloud Control.
Oracle Management Agent (Management Agent)The Management Agent is an integral software component that enables you to convert an unmanaged host to a managed host in the Enterprise Manager system. The Management Agent works in conjunction with the plug-ins to monitor the targets running on that managed host.
Note: In Figure 1–2, the load balancer and the multiple OMS instances are depicted only to indicate how a sample Enterprise Manager Cloud Control architecture would look in a large organization. They are not a prerequisite or a requirement for an Enterprise Manager system installation. If you do not have a load balancer, then the Management Agents communicate directly with the OMS instances.
Enterprise Manager Cloud Control Architecture
1-4 Oracle Enterprise Manager Cloud Control Basic Installation Guide
Oracle Management Service (OMS)The OMS is a Web-based application that orchestrates with the Management Agents and the Plug-Ins to discover targets, monitor and manage them, and store the collected information in a repository for future reference and analysis. The OMS also renders the user interface for Enterprise Manager Cloud Control. The OMS is deployed to the Oracle Middleware home (Middleware home), which is the parent directory that has the Oracle WebLogic Server home, the OMS home, the Management Agent home, the plug-in home, the Java Development Kit (JDK), the OMS instance base directory, the Oracle WT directory, the Oracle Common directory, and other relevant configuration files and directories. While deploying the OMS, the Enterprise Manager Cloud Control Installation Wizard installs Oracle WebLogic Server if it does not already exist in your environment. As a result, a WebLogic Server admin console is also installed.
Oracle Management Repository (Management Repository)The Management Repository is a storage location where all the information collected by the Management Agent gets stored. It consists of objects such as database jobs, packages, procedures, views, and tablespaces.
The OMS uploads the monitoring data it receives from the Management Agents to the Management Repository. The Management Repository then organizes the data so that it can be retrieved by the OMS and displayed in the Enterprise Manager Cloud Control console. Since data is stored in the Management Repository, it can be shared between any number of administrators accessing the Enterprise Manager Cloud Control.
At the time of installation, the Enterprise Manager Cloud Control Installation Wizard configures the Management Repository in your existing, certified database. The wizard, however, does not install a new database.
Plug-InsPlug-Ins are pluggable entities that offer special management capabilities customized to suit specific target types. Unlike the earlier releases of Enterprise Manager, in Enterprise Manager Cloud Control, the plug-ins work in conjunction with the OMS and the Management Agent to monitor every target in your environment. Therefore, they are deployed to the OMS as well as the Management Agent. In the earlier releases, plug-ins enabled you to monitor only third-party targets, but in Enterprise Manager Cloud Control, plug-ins enable you to monitor all types of targets in your environment.
Plug-ins have independent release cycles, so every time you have a new version of an Oracle product released, you will have a new version of the plug-in released to support monitoring of that new product version in Enterprise Manager Cloud Control. This simplifies things because you no longer have to wait to upgrade your Enterprise Manager system to support a new product version; instead you can upgrade your plug-ins to monitor the new product version.
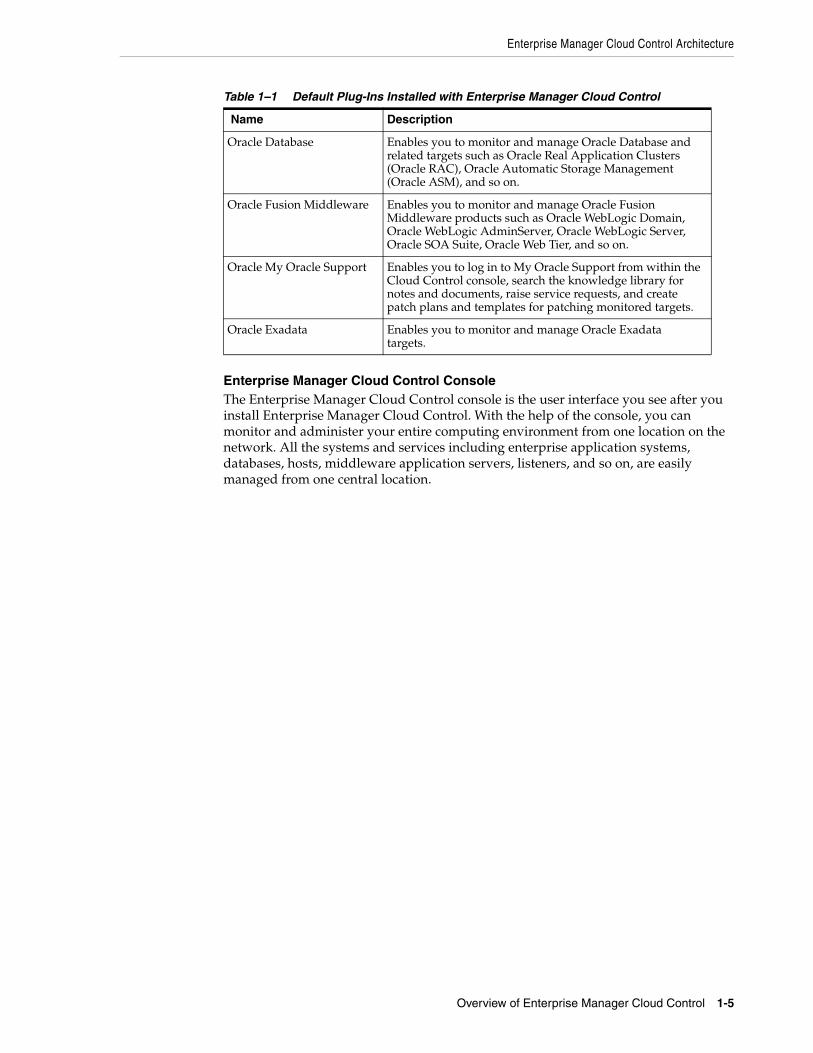
Table 1–1 lists the default plug-ins that are installed with a new Enterprise Manager system. In addition to these plug-ins, you can optionally install other plug-ins available in the software kit (DVD, downloaded software bundle, and so on). The installer offers a screen where you can select the optional plug-ins and install them.
Enterprise Manager Cloud Control Architecture
Overview of Enterprise Manager Cloud Control 1-5
Enterprise Manager Cloud Control ConsoleThe Enterprise Manager Cloud Control console is the user interface you see after you install Enterprise Manager Cloud Control. With the help of the console, you can monitor and administer your entire computing environment from one location on the network. All the systems and services including enterprise application systems, databases, hosts, middleware application servers, listeners, and so on, are easily managed from one central location.
Table 1–1 Default Plug-Ins Installed with Enterprise Manager Cloud Control
Name Description
Oracle Database Enables you to monitor and manage Oracle Database and related targets such as Oracle Real Application Clusters (Oracle RAC), Oracle Automatic Storage Management (Oracle ASM), and so on.
Oracle Fusion Middleware Enables you to monitor and manage Oracle Fusion Middleware products such as Oracle WebLogic Domain, Oracle WebLogic AdminServer, Oracle WebLogic Server, Oracle SOA Suite, Oracle Web Tier, and so on.
Oracle My Oracle Support Enables you to log in to My Oracle Support from within the Cloud Control console, search the knowledge library for notes and documents, raise service requests, and create patch plans and templates for patching monitored targets.
Oracle Exadata Enables you to monitor and manage Oracle Exadata targets.

Enterprise Manager Cloud Control Architecture
1-6 Oracle Enterprise Manager Cloud Control Basic Installation Guide
Part IIPart II Preinstallation Requirements
This part describes the preinstallation requirements you must meet before installing any of the core components of Enterprise Manager Cloud Control. In particular, this part contains the following chapters:
■ Chapter 2, "Meeting Hardware Requirements"
■ Chapter 3, "Meeting Package, Kernel Parameter, and Library Requirements"
■ Chapter 4, "Creating Operating System Groups and Users"
■ Chapter 5, "Installing Cygwin and Starting SSH Daemon"

2
Meeting Hardware Requirements 2-1
2Meeting Hardware Requirements
This chapter describes the hardware requirements you must meet before installing Oracle Management Service (OMS), Oracle Management Agents (Management Agents), and Oracle Management Repository (Management Repository). In particular, this chapter covers the following:
■ CPU, RAM, Heap Size, and Hard Disk Space Requirements for OMS
■ CPU, RAM, and Hard Disk Space Requirements for Management Agents
■ CPU, RAM, and Hard Disk Space Requirements for Management Repository
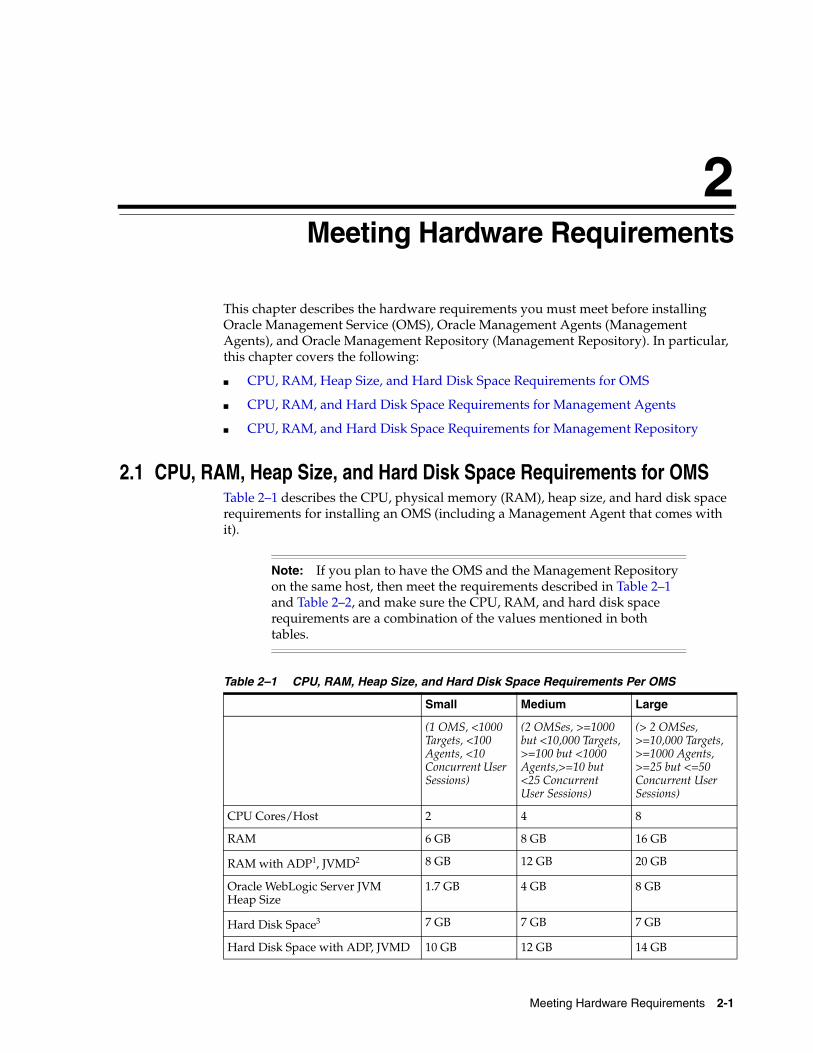
2.1 CPU, RAM, Heap Size, and Hard Disk Space Requirements for OMSTable 2–1 describes the CPU, physical memory (RAM), heap size, and hard disk space requirements for installing an OMS (including a Management Agent that comes with it).
Note: If you plan to have the OMS and the Management Repository on the same host, then meet the requirements described in Table 2–1 and Table 2–2, and make sure the CPU, RAM, and hard disk space requirements are a combination of the values mentioned in both tables.
Table 2–1 CPU, RAM, Heap Size, and Hard Disk Space Requirements Per OMS
Small Medium Large
(1 OMS, <1000 Targets, <100 Agents, <10 Concurrent User Sessions)
(2 OMSes, >=1000 but <10,000 Targets, >=100 but <1000 Agents,>=10 but <25 Concurrent User Sessions)
(> 2 OMSes, >=10,000 Targets, >=1000 Agents, >=25 but <=50 Concurrent User Sessions)
CPU Cores/Host 2 4 8
RAM 6 GB 8 GB 16 GB
RAM with ADP1, JVMD2 8 GB 12 GB 20 GB
Oracle WebLogic Server JVM Heap Size
1.7 GB 4 GB 8 GB
Hard Disk Space3 7 GB 7 GB 7 GB
Hard Disk Space with ADP, JVMD 10 GB 12 GB 14 GB
CPU, RAM, and Hard Disk Space Requirements for Management Agents
2-2 Oracle Enterprise Manager Cloud Control Basic Installation Guide
2.2 CPU, RAM, and Hard Disk Space Requirements for Management Agents
The following are the CPU, RAM, and hard disk space requirements for installing Management Agents.
■ For a standalone Management Agent, ensure that you have 2 CPU cores per host, 512 MB of RAM, and 1 GB of free hard disk space.
■ For a Master Agent, ensure that you have 2 CPU cores per host, 512 MB of RAM, and 1 GB of free hard disk space.
■ For a Shared Agent, ensure that you have 2 CPU cores per host, 512 MB of RAM, and 15 MB of free hard disk space.
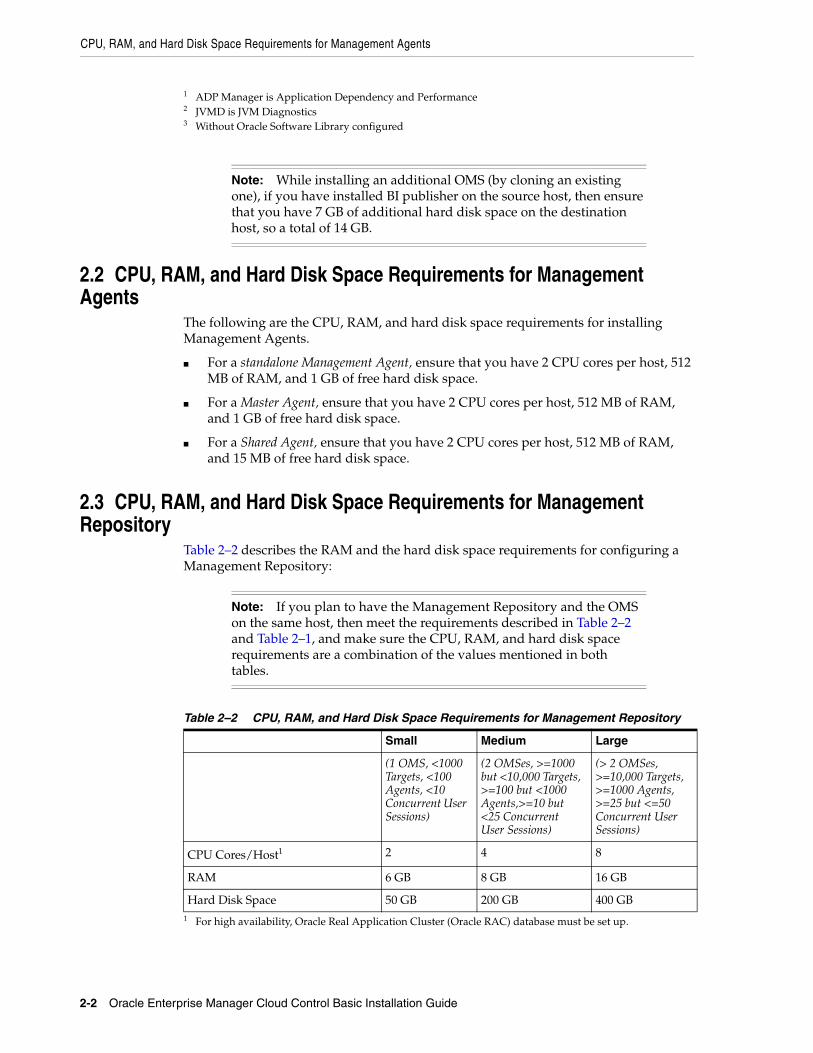
2.3 CPU, RAM, and Hard Disk Space Requirements for Management Repository
Table 2–2 describes the RAM and the hard disk space requirements for configuring a Management Repository:
1 ADP Manager is Application Dependency and Performance2 JVMD is JVM Diagnostics3 Without Oracle Software Library configured
Note: While installing an additional OMS (by cloning an existing one), if you have installed BI publisher on the source host, then ensure that you have 7 GB of additional hard disk space on the destination host, so a total of 14 GB.
Note: If you plan to have the Management Repository and the OMS on the same host, then meet the requirements described in Table 2–2 and Table 2–1, and make sure the CPU, RAM, and hard disk space requirements are a combination of the values mentioned in both tables.
Table 2–2 CPU, RAM, and Hard Disk Space Requirements for Management Repository
Small Medium Large
(1 OMS, <1000 Targets, <100 Agents, <10 Concurrent User Sessions)
(2 OMSes, >=1000 but <10,000 Targets, >=100 but <1000 Agents,>=10 but <25 Concurrent User Sessions)
(> 2 OMSes, >=10,000 Targets, >=1000 Agents, >=25 but <=50 Concurrent User Sessions)
CPU Cores/Host1
1 For high availability, Oracle Real Application Cluster (Oracle RAC) database must be set up.
2 4 8
RAM 6 GB 8 GB 16 GB
Hard Disk Space 50 GB 200 GB 400 GB
3
Meeting Package, Kernel Parameter, and Library Requirements 3-1
3Meeting Package, Kernel Parameter, and Library Requirements
This chapter describes the packages, kernel parameters settings, and libraries required on different platforms (32-bit and 64-bit) for installing a new Enterprise Manager system, an additional Oracle Management Service (OMS), and a standalone Oracle Management Agent (Management Agent).
In particular, this chapter covers the following:
■ Package Requirements
■ Kernel Parameter Requirements
■ Library Requirements
3.1 Package RequirementsThis section lists the packages required on different platforms (32-bit and 64-bit) for installing an OMS or a Management Agent. In particular, this section covers the following:
■ Identifying Installed Packages
■ Package Requirements for Oracle Management Service
■ Package Requirements for Oracle Management Agent
3.1.1 Identifying Installed PackagesTo identify the packages already installed on your system, run the following command. If the command does not list the packages listed in Section 3.1.2 or Section 3.1.3, then install them manually.
Note: The packages and libraries are NOT required for Microsoft Windows platforms.
Note: To manage or monitor database targets on SuSE 10 platform, you must install the packages libaio-32bit-0.3.104-14.2 and libaio-devel-32bit-0.3.104-14.2 on the SuSE 10 host where the Management Agent is running.
Package Requirements
3-2 Oracle Enterprise Manager Cloud Control Basic Installation Guide
rpm -qa --queryformat "%{NAME}-%{VERSION}-%{RELEASE}(%{ARCH})\n" | grep glibc
The command lists all the packages installed on the system. The 32-bit ones are appended with (i386) or (i686), and the 64-bit ones are appended with (x86_64).
For example, if you run the command on a 32-bit system, you should see something similar to the following:
glibc-devel-2.3.4-2.43(i386)glibc-headers-2.3.4-2.43(i386)glibc-2.3.4-2.43(i686)compat-glibc-headers-2.3.2-95.30(i386)glibc-profile-2.3.4-2.43(i386)glibc-utils-2.3.4-2.43(i386)glibc-kernheaders-2.4-9.1.103.EL(i386)glibc-common-2.3.4-2.43(i386)compat-glibc-2.3.2-95.30(i386)
For example, if you run the command on a 64-bit system, you should see something similar to the following:
glibc-common-2.3.4-2.43(x86_64)glibc-devel-2.3.4-2.43(x86_64)glibc-profile-2.3.4-2.43(x86_64)glibc-headers-2.3.4-2.43(x86_64)glibc-utils-2.3.4-2.43(x86_64)glibc-2.3.4-2.43(x86_64)
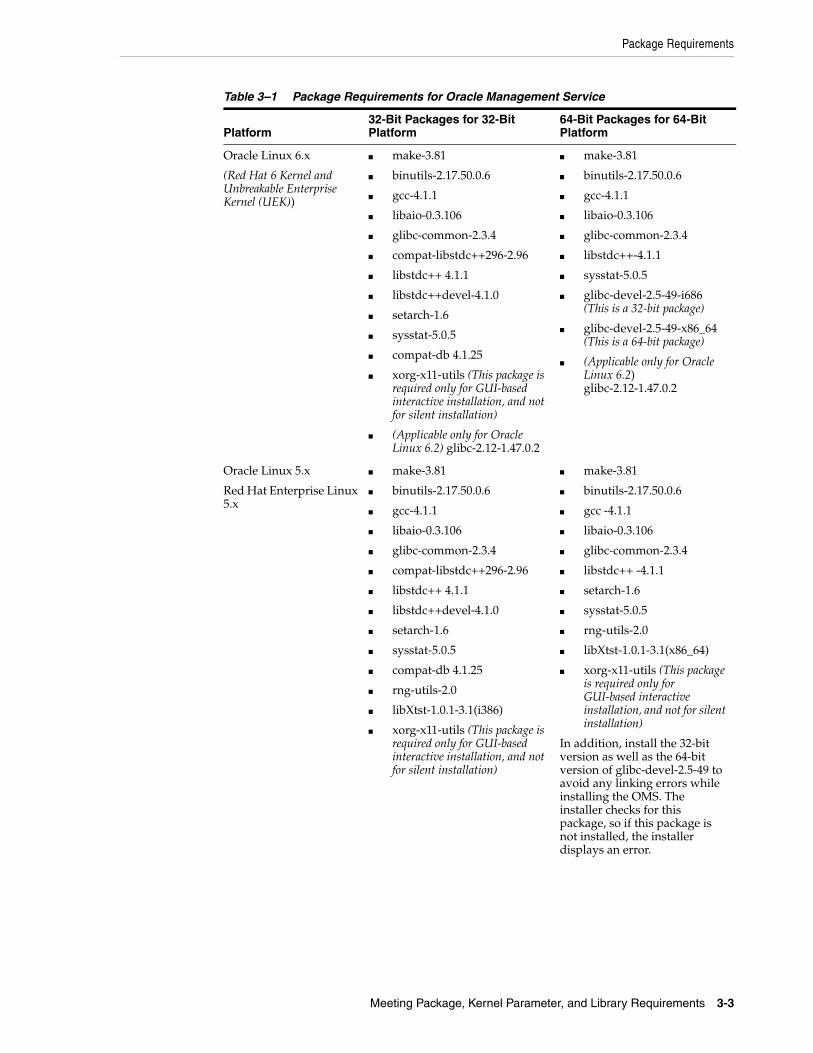
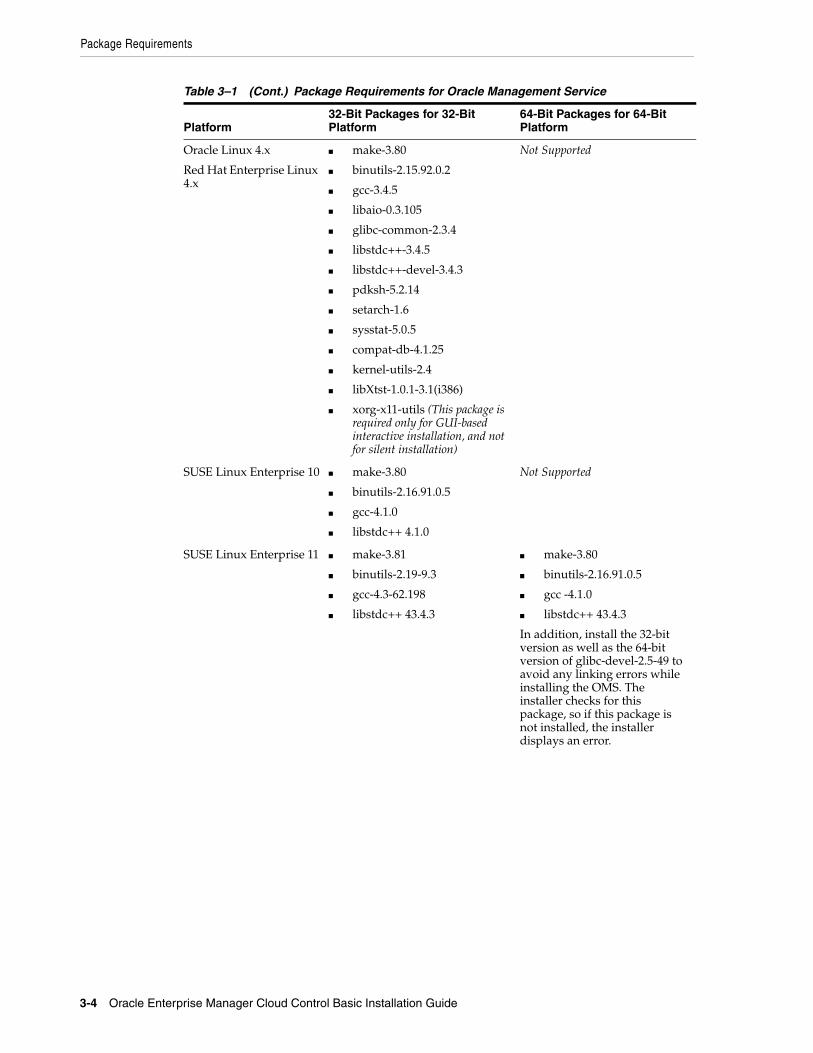
3.1.2 Package Requirements for Oracle Management ServiceTable 3–1 lists the packages required on different platforms (32-bit and 64-bit) for installing a new Enterprise Manager system or an additional OMS.
Note: The following command is meant only for Linux x86 and x86-64 platforms. To know the command for other platforms, contact your system administrator or refer to the platform-specific manual.
Package Requirements
Meeting Package, Kernel Parameter, and Library Requirements 3-3
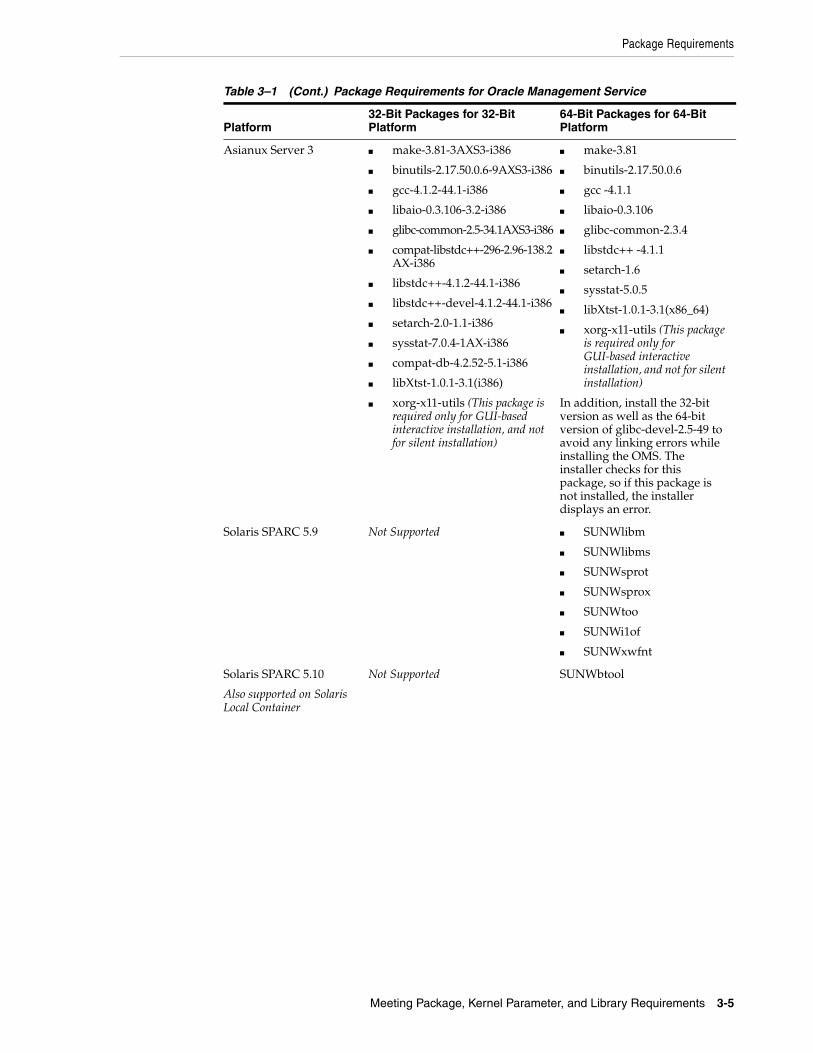
Table 3–1 Package Requirements for Oracle Management Service
Platform32-Bit Packages for 32-Bit Platform
64-Bit Packages for 64-Bit Platform
Oracle Linux 6.x
(Red Hat 6 Kernel and Unbreakable Enterprise Kernel (UEK))
■ make-3.81
■ binutils-2.17.50.0.6
■ gcc-4.1.1
■ libaio-0.3.106
■ glibc-common-2.3.4
■ compat-libstdc++296-2.96
■ libstdc++ 4.1.1
■ libstdc++devel-4.1.0
■ setarch-1.6
■ sysstat-5.0.5
■ compat-db 4.1.25
■ xorg-x11-utils (This package is required only for GUI-based interactive installation, and not for silent installation)
■ (Applicable only for Oracle Linux 6.2) glibc-2.12-1.47.0.2
■ make-3.81
■ binutils-2.17.50.0.6
■ gcc-4.1.1
■ libaio-0.3.106
■ glibc-common-2.3.4
■ libstdc++-4.1.1
■ sysstat-5.0.5
■ glibc-devel-2.5-49-i686 (This is a 32-bit package)
■ glibc-devel-2.5-49-x86_64 (This is a 64-bit package)
■ (Applicable only for Oracle Linux 6.2) glibc-2.12-1.47.0.2
Oracle Linux 5.x
Red Hat Enterprise Linux 5.x
■ make-3.81
■ binutils-2.17.50.0.6
■ gcc-4.1.1
■ libaio-0.3.106
■ glibc-common-2.3.4
■ compat-libstdc++296-2.96
■ libstdc++ 4.1.1
■ libstdc++devel-4.1.0
■ setarch-1.6
■ sysstat-5.0.5
■ compat-db 4.1.25
■ rng-utils-2.0
■ libXtst-1.0.1-3.1(i386)
■ xorg-x11-utils (This package is required only for GUI-based interactive installation, and not for silent installation)
■ make-3.81
■ binutils-2.17.50.0.6
■ gcc -4.1.1
■ libaio-0.3.106
■ glibc-common-2.3.4
■ libstdc++ -4.1.1
■ setarch-1.6
■ sysstat-5.0.5
■ rng-utils-2.0
■ libXtst-1.0.1-3.1(x86_64)
■ xorg-x11-utils (This package is required only for GUI-based interactive installation, and not for silent installation)
In addition, install the 32-bit version as well as the 64-bit version of glibc-devel-2.5-49 to avoid any linking errors while installing the OMS. The installer checks for this package, so if this package is not installed, the installer displays an error.
Package Requirements
3-4 Oracle Enterprise Manager Cloud Control Basic Installation Guide
Oracle Linux 4.x
Red Hat Enterprise Linux 4.x
■ make-3.80
■ binutils-2.15.92.0.2
■ gcc-3.4.5
■ libaio-0.3.105
■ glibc-common-2.3.4
■ libstdc++-3.4.5
■ libstdc++-devel-3.4.3
■ pdksh-5.2.14
■ setarch-1.6
■ sysstat-5.0.5
■ compat-db-4.1.25
■ kernel-utils-2.4
■ libXtst-1.0.1-3.1(i386)
■ xorg-x11-utils (This package is required only for GUI-based interactive installation, and not for silent installation)
Not Supported
SUSE Linux Enterprise 10 ■ make-3.80
■ binutils-2.16.91.0.5
■ gcc-4.1.0
■ libstdc++ 4.1.0
Not Supported
SUSE Linux Enterprise 11 ■ make-3.81
■ binutils-2.19-9.3
■ gcc-4.3-62.198
■ libstdc++ 43.4.3
■ make-3.80
■ binutils-2.16.91.0.5
■ gcc -4.1.0
■ libstdc++ 43.4.3
In addition, install the 32-bit version as well as the 64-bit version of glibc-devel-2.5-49 to avoid any linking errors while installing the OMS. The installer checks for this package, so if this package is not installed, the installer displays an error.
Table 3–1 (Cont.) Package Requirements for Oracle Management Service
Platform32-Bit Packages for 32-Bit Platform
64-Bit Packages for 64-Bit Platform
Package Requirements
Meeting Package, Kernel Parameter, and Library Requirements 3-5
Asianux Server 3 ■ make-3.81-3AXS3-i386
■ binutils-2.17.50.0.6-9AXS3-i386
■ gcc-4.1.2-44.1-i386
■ libaio-0.3.106-3.2-i386
■ glibc-common-2.5-34.1AXS3-i386
■ compat-libstdc++-296-2.96-138.2AX-i386
■ libstdc++-4.1.2-44.1-i386
■ libstdc++-devel-4.1.2-44.1-i386
■ setarch-2.0-1.1-i386
■ sysstat-7.0.4-1AX-i386
■ compat-db-4.2.52-5.1-i386
■ libXtst-1.0.1-3.1(i386)
■ xorg-x11-utils (This package is required only for GUI-based interactive installation, and not for silent installation)
■ make-3.81
■ binutils-2.17.50.0.6
■ gcc -4.1.1
■ libaio-0.3.106
■ glibc-common-2.3.4
■ libstdc++ -4.1.1
■ setarch-1.6
■ sysstat-5.0.5
■ libXtst-1.0.1-3.1(x86_64)
■ xorg-x11-utils (This package is required only for GUI-based interactive installation, and not for silent installation)
In addition, install the 32-bit version as well as the 64-bit version of glibc-devel-2.5-49 to avoid any linking errors while installing the OMS. The installer checks for this package, so if this package is not installed, the installer displays an error.
Solaris SPARC 5.9 Not Supported ■ SUNWlibm
■ SUNWlibms
■ SUNWsprot
■ SUNWsprox
■ SUNWtoo
■ SUNWi1of
■ SUNWxwfnt
Solaris SPARC 5.10
Also supported on Solaris Local Container
Not Supported SUNWbtool
Table 3–1 (Cont.) Package Requirements for Oracle Management Service
Platform32-Bit Packages for 32-Bit Platform
64-Bit Packages for 64-Bit Platform
Package Requirements
3-6 Oracle Enterprise Manager Cloud Control Basic Installation Guide
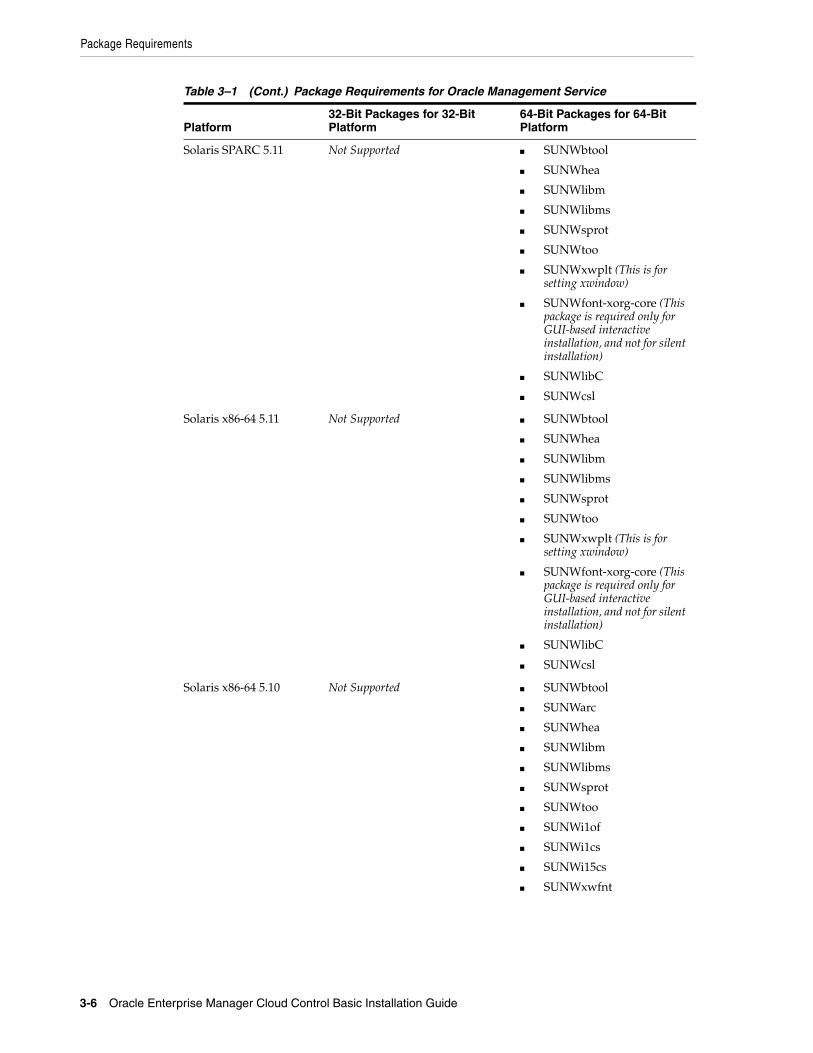
Solaris SPARC 5.11 Not Supported ■ SUNWbtool
■ SUNWhea
■ SUNWlibm
■ SUNWlibms
■ SUNWsprot
■ SUNWtoo
■ SUNWxwplt (This is for setting xwindow)
■ SUNWfont-xorg-core (This package is required only for GUI-based interactive installation, and not for silent installation)
■ SUNWlibC
■ SUNWcsl
Solaris x86-64 5.11 Not Supported ■ SUNWbtool
■ SUNWhea
■ SUNWlibm
■ SUNWlibms
■ SUNWsprot
■ SUNWtoo
■ SUNWxwplt (This is for setting xwindow)
■ SUNWfont-xorg-core (This package is required only for GUI-based interactive installation, and not for silent installation)
■ SUNWlibC
■ SUNWcsl
Solaris x86-64 5.10 Not Supported ■ SUNWbtool
■ SUNWarc
■ SUNWhea
■ SUNWlibm
■ SUNWlibms
■ SUNWsprot
■ SUNWtoo
■ SUNWi1of
■ SUNWi1cs
■ SUNWi15cs
■ SUNWxwfnt
Table 3–1 (Cont.) Package Requirements for Oracle Management Service
Platform32-Bit Packages for 32-Bit Platform
64-Bit Packages for 64-Bit Platform
Package Requirements
Meeting Package, Kernel Parameter, and Library Requirements 3-7
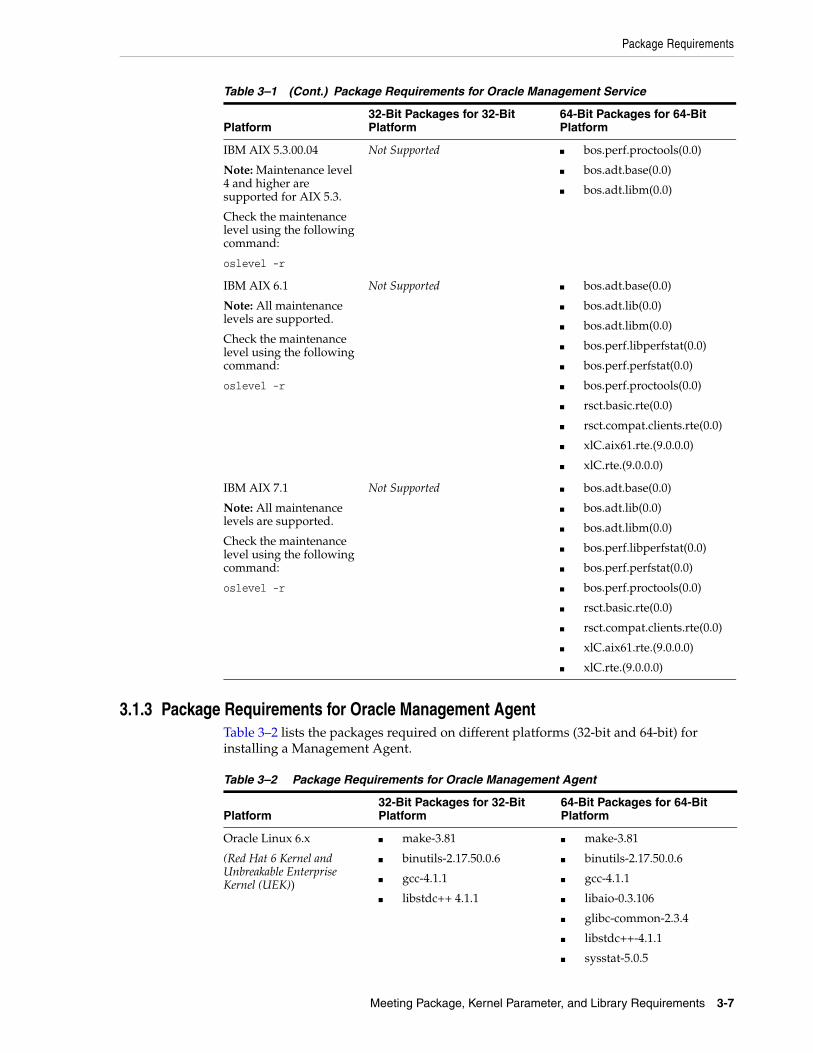
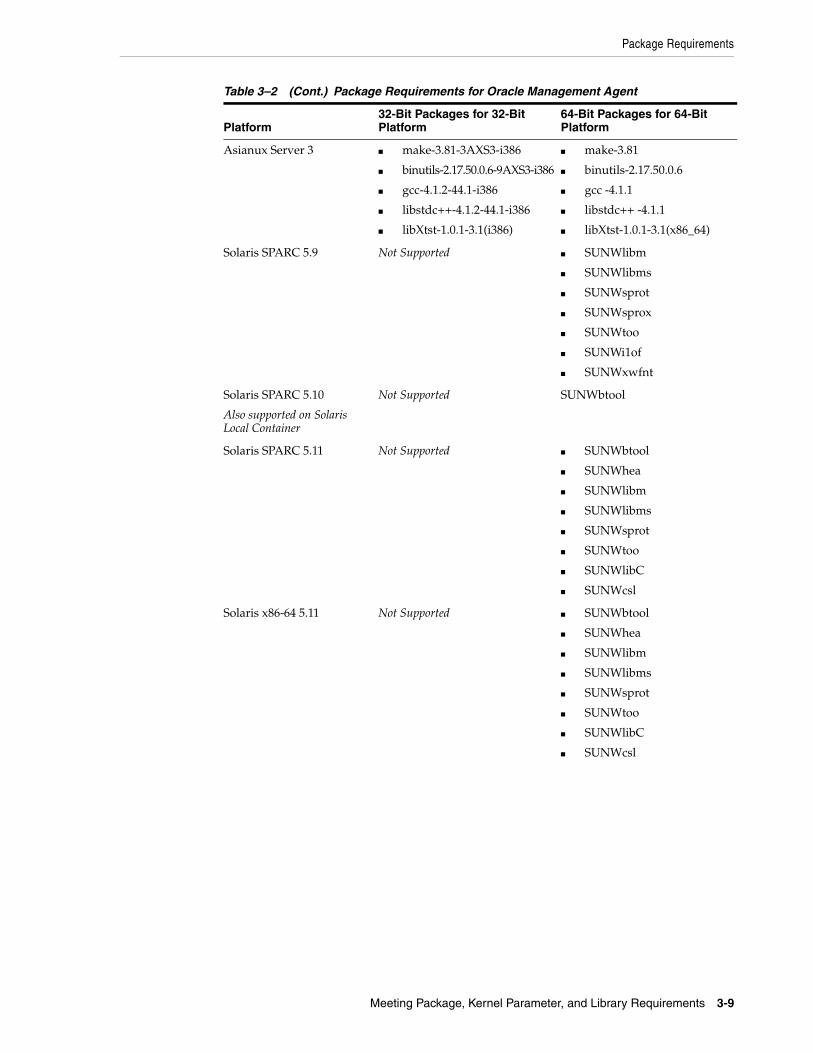
3.1.3 Package Requirements for Oracle Management AgentTable 3–2 lists the packages required on different platforms (32-bit and 64-bit) for installing a Management Agent.
IBM AIX 5.3.00.04
Note: Maintenance level 4 and higher are supported for AIX 5.3.
Check the maintenance level using the following command:
oslevel -r
Not Supported ■ bos.perf.proctools(0.0)
■ bos.adt.base(0.0)
■ bos.adt.libm(0.0)
IBM AIX 6.1
Note: All maintenance levels are supported.
Check the maintenance level using the following command:
oslevel -r
Not Supported ■ bos.adt.base(0.0)
■ bos.adt.lib(0.0)
■ bos.adt.libm(0.0)
■ bos.perf.libperfstat(0.0)
■ bos.perf.perfstat(0.0)
■ bos.perf.proctools(0.0)
■ rsct.basic.rte(0.0)
■ rsct.compat.clients.rte(0.0)
■ xlC.aix61.rte.(9.0.0.0)
■ xlC.rte.(9.0.0.0)
IBM AIX 7.1
Note: All maintenance levels are supported.
Check the maintenance level using the following command:
oslevel -r
Not Supported ■ bos.adt.base(0.0)
■ bos.adt.lib(0.0)
■ bos.adt.libm(0.0)
■ bos.perf.libperfstat(0.0)
■ bos.perf.perfstat(0.0)
■ bos.perf.proctools(0.0)
■ rsct.basic.rte(0.0)
■ rsct.compat.clients.rte(0.0)
■ xlC.aix61.rte.(9.0.0.0)
■ xlC.rte.(9.0.0.0)
Table 3–2 Package Requirements for Oracle Management Agent
Platform32-Bit Packages for 32-Bit Platform
64-Bit Packages for 64-Bit Platform
Oracle Linux 6.x
(Red Hat 6 Kernel and Unbreakable Enterprise Kernel (UEK))
■ make-3.81
■ binutils-2.17.50.0.6
■ gcc-4.1.1
■ libstdc++ 4.1.1
■ make-3.81
■ binutils-2.17.50.0.6
■ gcc-4.1.1
■ libaio-0.3.106
■ glibc-common-2.3.4
■ libstdc++-4.1.1
■ sysstat-5.0.5
Table 3–1 (Cont.) Package Requirements for Oracle Management Service
Platform32-Bit Packages for 32-Bit Platform
64-Bit Packages for 64-Bit Platform
Package Requirements
3-8 Oracle Enterprise Manager Cloud Control Basic Installation Guide
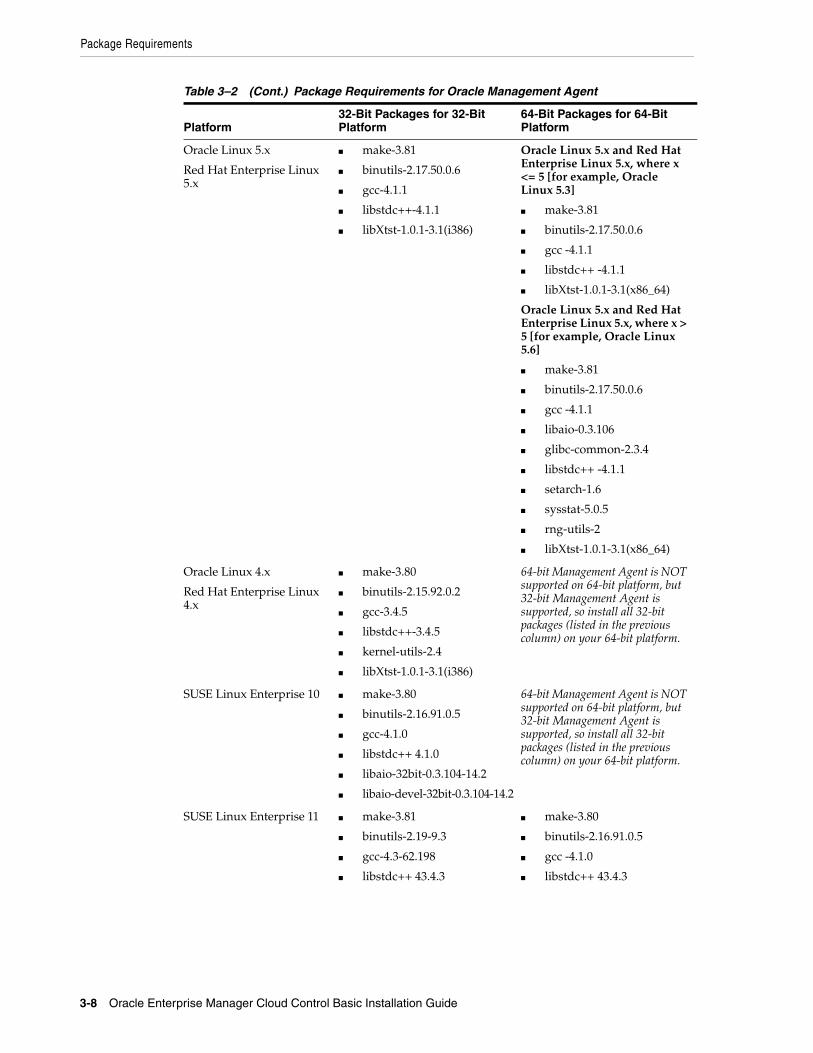
Oracle Linux 5.x
Red Hat Enterprise Linux 5.x
■ make-3.81
■ binutils-2.17.50.0.6
■ gcc-4.1.1
■ libstdc++-4.1.1
■ libXtst-1.0.1-3.1(i386)
Oracle Linux 5.x and Red Hat Enterprise Linux 5.x, where x <= 5 [for example, Oracle Linux 5.3]
■ make-3.81
■ binutils-2.17.50.0.6
■ gcc -4.1.1
■ libstdc++ -4.1.1
■ libXtst-1.0.1-3.1(x86_64)
Oracle Linux 5.x and Red Hat Enterprise Linux 5.x, where x > 5 [for example, Oracle Linux 5.6]
■ make-3.81
■ binutils-2.17.50.0.6
■ gcc -4.1.1
■ libaio-0.3.106
■ glibc-common-2.3.4
■ libstdc++ -4.1.1
■ setarch-1.6
■ sysstat-5.0.5
■ rng-utils-2
■ libXtst-1.0.1-3.1(x86_64)
Oracle Linux 4.x
Red Hat Enterprise Linux 4.x
■ make-3.80
■ binutils-2.15.92.0.2
■ gcc-3.4.5
■ libstdc++-3.4.5
■ kernel-utils-2.4
■ libXtst-1.0.1-3.1(i386)
64-bit Management Agent is NOT supported on 64-bit platform, but 32-bit Management Agent is supported, so install all 32-bit packages (listed in the previous column) on your 64-bit platform.
SUSE Linux Enterprise 10 ■ make-3.80
■ binutils-2.16.91.0.5
■ gcc-4.1.0
■ libstdc++ 4.1.0
■ libaio-32bit-0.3.104-14.2
■ libaio-devel-32bit-0.3.104-14.2
64-bit Management Agent is NOT supported on 64-bit platform, but 32-bit Management Agent is supported, so install all 32-bit packages (listed in the previous column) on your 64-bit platform.
SUSE Linux Enterprise 11 ■ make-3.81
■ binutils-2.19-9.3
■ gcc-4.3-62.198
■ libstdc++ 43.4.3
■ make-3.80
■ binutils-2.16.91.0.5
■ gcc -4.1.0
■ libstdc++ 43.4.3
Table 3–2 (Cont.) Package Requirements for Oracle Management Agent
Platform32-Bit Packages for 32-Bit Platform
64-Bit Packages for 64-Bit Platform
Package Requirements
Meeting Package, Kernel Parameter, and Library Requirements 3-9
Asianux Server 3 ■ make-3.81-3AXS3-i386
■ binutils-2.17.50.0.6-9AXS3-i386
■ gcc-4.1.2-44.1-i386
■ libstdc++-4.1.2-44.1-i386
■ libXtst-1.0.1-3.1(i386)
■ make-3.81
■ binutils-2.17.50.0.6
■ gcc -4.1.1
■ libstdc++ -4.1.1
■ libXtst-1.0.1-3.1(x86_64)
Solaris SPARC 5.9 Not Supported ■ SUNWlibm
■ SUNWlibms
■ SUNWsprot
■ SUNWsprox
■ SUNWtoo
■ SUNWi1of
■ SUNWxwfnt
Solaris SPARC 5.10
Also supported on Solaris Local Container
Not Supported SUNWbtool
Solaris SPARC 5.11 Not Supported ■ SUNWbtool
■ SUNWhea
■ SUNWlibm
■ SUNWlibms
■ SUNWsprot
■ SUNWtoo
■ SUNWlibC
■ SUNWcsl
Solaris x86-64 5.11 Not Supported ■ SUNWbtool
■ SUNWhea
■ SUNWlibm
■ SUNWlibms
■ SUNWsprot
■ SUNWtoo
■ SUNWlibC
■ SUNWcsl
Table 3–2 (Cont.) Package Requirements for Oracle Management Agent
Platform32-Bit Packages for 32-Bit Platform
64-Bit Packages for 64-Bit Platform
Package Requirements
3-10 Oracle Enterprise Manager Cloud Control Basic Installation Guide
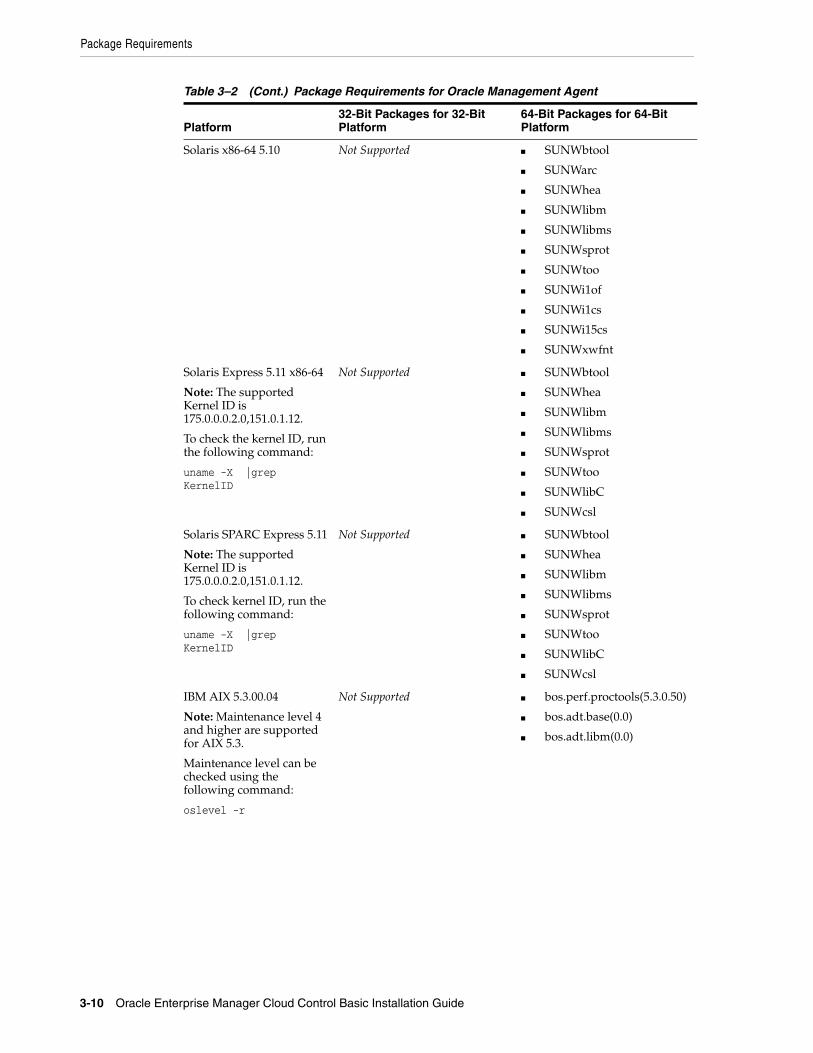
Solaris x86-64 5.10 Not Supported ■ SUNWbtool
■ SUNWarc
■ SUNWhea
■ SUNWlibm
■ SUNWlibms
■ SUNWsprot
■ SUNWtoo
■ SUNWi1of
■ SUNWi1cs
■ SUNWi15cs
■ SUNWxwfnt
Solaris Express 5.11 x86-64
Note: The supported Kernel ID is 175.0.0.0.2.0,151.0.1.12.
To check the kernel ID, run the following command:
uname -X |grep KernelID
Not Supported ■ SUNWbtool
■ SUNWhea
■ SUNWlibm
■ SUNWlibms
■ SUNWsprot
■ SUNWtoo
■ SUNWlibC
■ SUNWcsl
Solaris SPARC Express 5.11
Note: The supported Kernel ID is 175.0.0.0.2.0,151.0.1.12.
To check kernel ID, run the following command:
uname -X |grep KernelID
Not Supported ■ SUNWbtool
■ SUNWhea
■ SUNWlibm
■ SUNWlibms
■ SUNWsprot
■ SUNWtoo
■ SUNWlibC
■ SUNWcsl
IBM AIX 5.3.00.04
Note: Maintenance level 4 and higher are supported for AIX 5.3.
Maintenance level can be checked using the following command:
oslevel -r
Not Supported ■ bos.perf.proctools(5.3.0.50)
■ bos.adt.base(0.0)
■ bos.adt.libm(0.0)
Table 3–2 (Cont.) Package Requirements for Oracle Management Agent
Platform32-Bit Packages for 32-Bit Platform
64-Bit Packages for 64-Bit Platform
Kernel Parameter Requirements
Meeting Package, Kernel Parameter, and Library Requirements 3-11
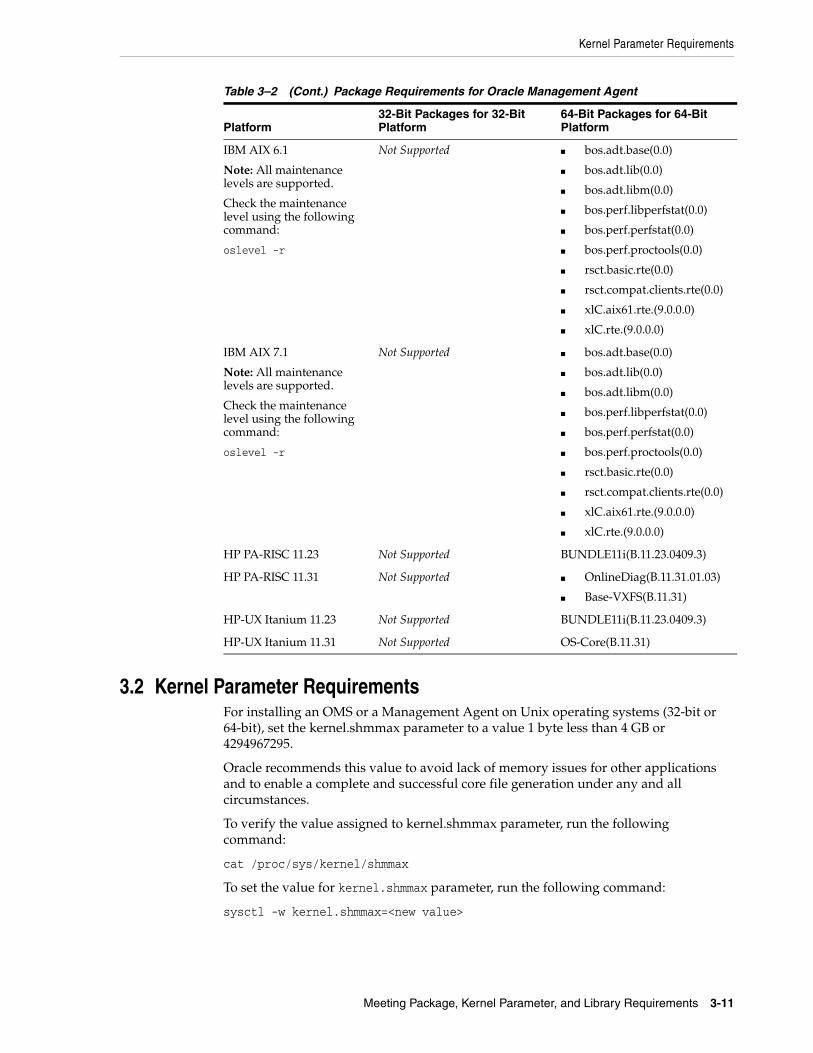
3.2 Kernel Parameter RequirementsFor installing an OMS or a Management Agent on Unix operating systems (32-bit or 64-bit), set the kernel.shmmax parameter to a value 1 byte less than 4 GB or 4294967295.
Oracle recommends this value to avoid lack of memory issues for other applications and to enable a complete and successful core file generation under any and all circumstances.
To verify the value assigned to kernel.shmmax parameter, run the following command:
cat /proc/sys/kernel/shmmax
To set the value for kernel.shmmax parameter, run the following command:
sysctl -w kernel.shmmax=<new value>
IBM AIX 6.1
Note: All maintenance levels are supported.
Check the maintenance level using the following command:
oslevel -r
Not Supported ■ bos.adt.base(0.0)
■ bos.adt.lib(0.0)
■ bos.adt.libm(0.0)
■ bos.perf.libperfstat(0.0)
■ bos.perf.perfstat(0.0)
■ bos.perf.proctools(0.0)
■ rsct.basic.rte(0.0)
■ rsct.compat.clients.rte(0.0)
■ xlC.aix61.rte.(9.0.0.0)
■ xlC.rte.(9.0.0.0)
IBM AIX 7.1
Note: All maintenance levels are supported.
Check the maintenance level using the following command:
oslevel -r
Not Supported ■ bos.adt.base(0.0)
■ bos.adt.lib(0.0)
■ bos.adt.libm(0.0)
■ bos.perf.libperfstat(0.0)
■ bos.perf.perfstat(0.0)
■ bos.perf.proctools(0.0)
■ rsct.basic.rte(0.0)
■ rsct.compat.clients.rte(0.0)
■ xlC.aix61.rte.(9.0.0.0)
■ xlC.rte.(9.0.0.0)
HP PA-RISC 11.23 Not Supported BUNDLE11i(B.11.23.0409.3)
HP PA-RISC 11.31 Not Supported ■ OnlineDiag(B.11.31.01.03)
■ Base-VXFS(B.11.31)
HP-UX Itanium 11.23 Not Supported BUNDLE11i(B.11.23.0409.3)
HP-UX Itanium 11.31 Not Supported OS-Core(B.11.31)
Table 3–2 (Cont.) Package Requirements for Oracle Management Agent
Platform32-Bit Packages for 32-Bit Platform
64-Bit Packages for 64-Bit Platform

Library Requirements
3-12 Oracle Enterprise Manager Cloud Control Basic Installation Guide
3.3 Library RequirementsThis section lists the libraries required on different platforms (32-bit and 64-bit) for installing an OMS or a Management Agent. In particular, this section covers the following:
■ Library Requirements for Oracle Management Service
■ Library Requirements for Oracle Management Agent
3.3.1 Library Requirements for Oracle Management ServiceTable 3–3 lists the libraries required on different platforms (32-bit and 64-bit) for installing a new Enterprise Manager system or an additional OMS.
3.3.2 Library Requirements for Oracle Management AgentThere are no library requirements for Management Agent.
Table 3–3 Library Requirements for Oracle Management Service
Platform32-Bit Libraries for 32-Bit Platform
64-Bit Libraries for 64-Bit Platform
Oracle Linux 6.x
Red Hat Enterprise Linux 6.x
glibc-2.5.12 glibc-2.5.12
Oracle Linux 5.x
Red Hat Enterprise Linux 5.x
glibc-2.5-12 glibc-2.5.12
Oracle Linux 4.x
Red Hat Enterprise Linux 4.x
glibc-2.3.4-2.43.i386 -
SUSE Linux Enterprise 10 glibc-2.2.4-31.7 -
SUSE Linux Enterprise 11 glibc-2.9 glibc-2.9
Asianux Server 3 glibc-2.3.4-2.9 glibc-2.3.4-2.9
4
Creating Operating System Groups and Users 4-1
4Creating Operating System Groups and Users
The chapter explains what operating system groups and users you need to create and how to create them. In particular, this chapter covers the following:
■ What Operating System Groups and Users Are Required?
■ How to Create the Operating System Groups and Users?
4.1 What Operating System Groups and Users Are Required?The following operating system group and user are required for all installation types:
■ The Oracle Inventory Group (typically, oinstall)
You must create this group the first time you install Oracle software on the system. The default name chosen for this group is oinstall. This group owns the Oracle inventory that is a catalog of all Oracle software installed on the system.
■ The Oracle Software Owner User (typically, oracle)
You must create this user the first time you install Oracle software on the system. This user owns all of the software installed during the installation. This user must have the Oracle Inventory group as its primary group.
A single Oracle Inventory group is required for all installations of Oracle software on the system. After the first installation of Oracle software, you must use the same Oracle Inventory group for all subsequent Oracle software installations on that system.
4.2 How to Create the Operating System Groups and Users?The following sections describe how to create the required operating system users and groups:
■ Creating the Oracle Inventory Group
Note: If Oracle software is already installed on the system, then the existing Oracle Inventory group must be the primary group of the operating system user that you use to install other Oracle software.
Note: In Oracle documentation, this user is referred to as the oracle user.

How to Create the Operating System Groups and Users?
4-2 Oracle Enterprise Manager Cloud Control Basic Installation Guide
■ Creating the Oracle Software Owner User
4.2.1 Creating the Oracle Inventory GroupYou must create the Oracle Inventory group if it does not already exist. The following subsections describe how to determine the Oracle Inventory group name if it exists, and how to create it if necessary.
4.2.1.1 Determining Whether the Oracle Inventory Group ExistsWhen you install Oracle software on the system for the first time, the oraInst.loc file is created. This file identifies the name of the Oracle Inventory group and the path to the Oracle Inventory directory.
To determine whether the Oracle Inventory group exists, enter the following command:
$ more /etc/oraInst.loc
If the oraInst.loc file exists, then the output from this command looks like:
inventory_loc=/u01/app/oracle/oraInventoryinst_group=oinstall
The inst_group parameter shows the name of the Oracle Inventory group, oinstall.
4.2.1.2 Creating the Oracle Inventory GroupIf the oraInst.loc file does not exist, or if the file exists but the Oracle Inventory group is different, then create the Oracle Inventory group oinstall using the following command:
# /usr/sbin/groupadd oinstall
4.2.2 Creating the Oracle Software Owner UserYou must create an Oracle software owner user in the following circumstances:
■ If an Oracle software owner user does not exist, for example, if this is the first installation of Oracle software on the system
■ If an Oracle software owner user exists, but you want to use a different operating system user, with different group membership, to give database administrative privileges to those groups in a new Oracle Database installation
Note: As an alternative to creating local users and groups, you can create the appropriate users and groups in a directory service, for example, Network Information Services (NIS). For information about using directory services, contact your system administrator or refer to your operating system documentation.
Note: the oraInst.loc file is available in the /etc directory for Linux and other platforms. On Solaris platforms, it is available at /var/opt/oracle/.
How to Create the Operating System Groups and Users?
Creating Operating System Groups and Users 4-3
4.2.2.1 Determining Whether an Oracle Software Owner User ExistsTo determine whether an Oracle software owner user named oracle exists, run the following command:
$ id oracle
If the oracle user exists, then the output from this command looks like this:
uid=440(oracle) gid=200(oinstall) groups=201(dba),202(oper)
If the user exists, then determine whether you want to use the existing user or create another oracle user.
■ To use the existing user, ensure that the user's primary group is the Oracle Inventory group.
■ To modify an existing user, refer to the Section 4.2.2.3.
■ To create a user, refer to Section 4.2.2.2.
4.2.2.2 Creating an Oracle Software Owner UserIf the Oracle software owner user does not exist or if you require a new Oracle software owner user, then follow these steps to create one. In the following procedure, use the user name oracle unless a user with that name already exists.
1. To create the oracle user, enter a command similar to the following:
# /usr/sbin/useradd -g oinstall oracle
In this command, the -g option specifies the primary group, which must be the Oracle Inventory group, for example oinstall.
2. Set the password of the oracle user:
# passwd oracle
4.2.2.3 Modifying an Oracle Software Owner User
If the oracle user exists, but its primary group is not oinstall, then enter a command similar to the following to modify it. Specify the primary group using the -g option.
# /usr/sbin/usermod -g oinstall oracle
Note: If necessary, contact your system administrator before using or modifying an existing user.
Note: Oracle recommends you to use the same UIDs across all the OMS instances, especially when you use Oracle Software Library. If the UIDs are different, then the files created by one OMS cannot be modified by another OMS.

How to Create the Operating System Groups and Users?
4-4 Oracle Enterprise Manager Cloud Control Basic Installation Guide
5
Installing Cygwin and Starting SSH Daemon 5-1
5Installing Cygwin and Starting SSH Daemon
This chapter explains how to install Cygwin and start the SSH daemon on Microsoft Windows hosts. In particular, this chapter covers the following:
■ Overview
■ Before You Begin
■ Installing Cygwin
■ Configuring SSH After Installing Cygwin
5.1 OverviewThe Add Host Targets Wizard is an application built into the Enterprise Manager Cloud Control console. It offers GUI-rich, interactive screens that enable you to install Oracle Management Agents (Management Agents) on unmanaged hosts and convert them to managed hosts, so that they can be monitored and managed in Enterprise Manager Cloud Control.
When you use the Add Host Targets Wizard to install a Management Agent on a host running on Microsoft Windows, as a prerequisite, you must install Cygwin and start the SSH Daemon on the host. To do so, follow the steps listed in Section 5.3.
Cygwin is essentially a utility that offers a Linux-like environment on a Microsoft Windows host. Technically, it is a DLL (cygwin1.dll) that acts as a Linux API layer providing substantial Linux API functionality. Once you install Cygwin, you can configure the SSH Daemon on the host.
The SSH Daemon enables the Add Host Targets Wizard to establish SSH connectivity between the OMS host and the host on which you want to install a Management Agent. Using this connectivity, the wizard transfers the Management Agent software binaries to the destination host over SSH protocol, installs the Management Agent, and configures it.
Note: This chapter is applicable only when the host on which you want to install the Management Agent runs on Microsoft Windows.
Note: The Add Host Targets Wizard is certified and supported with Cygwin 1.7.
Before You Begin
5-2 Oracle Enterprise Manager Cloud Control Basic Installation Guide
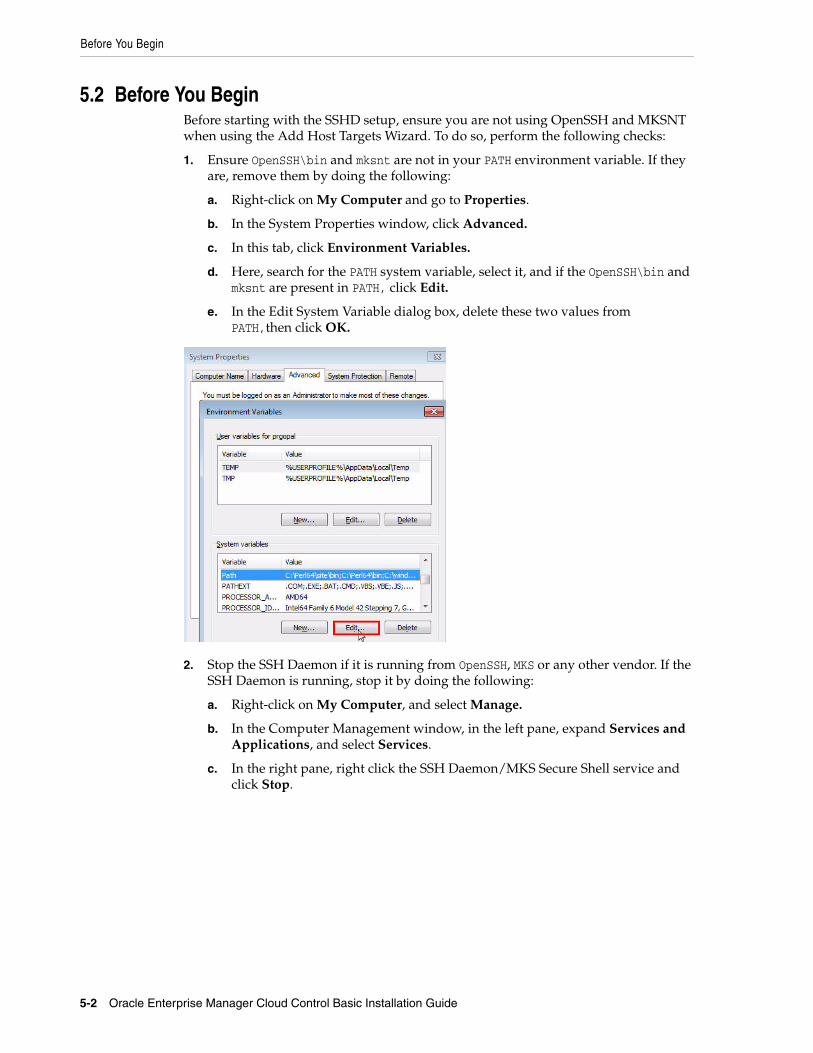
5.2 Before You BeginBefore starting with the SSHD setup, ensure you are not using OpenSSH and MKSNT when using the Add Host Targets Wizard. To do so, perform the following checks:
1. Ensure OpenSSH\bin and mksnt are not in your PATH environment variable. If they are, remove them by doing the following:
a. Right-click on My Computer and go to Properties.
b. In the System Properties window, click Advanced.
c. In this tab, click Environment Variables.
d. Here, search for the PATH system variable, select it, and if the OpenSSH\bin and mksnt are present in PATH, click Edit.
e. In the Edit System Variable dialog box, delete these two values from PATH,then click OK.
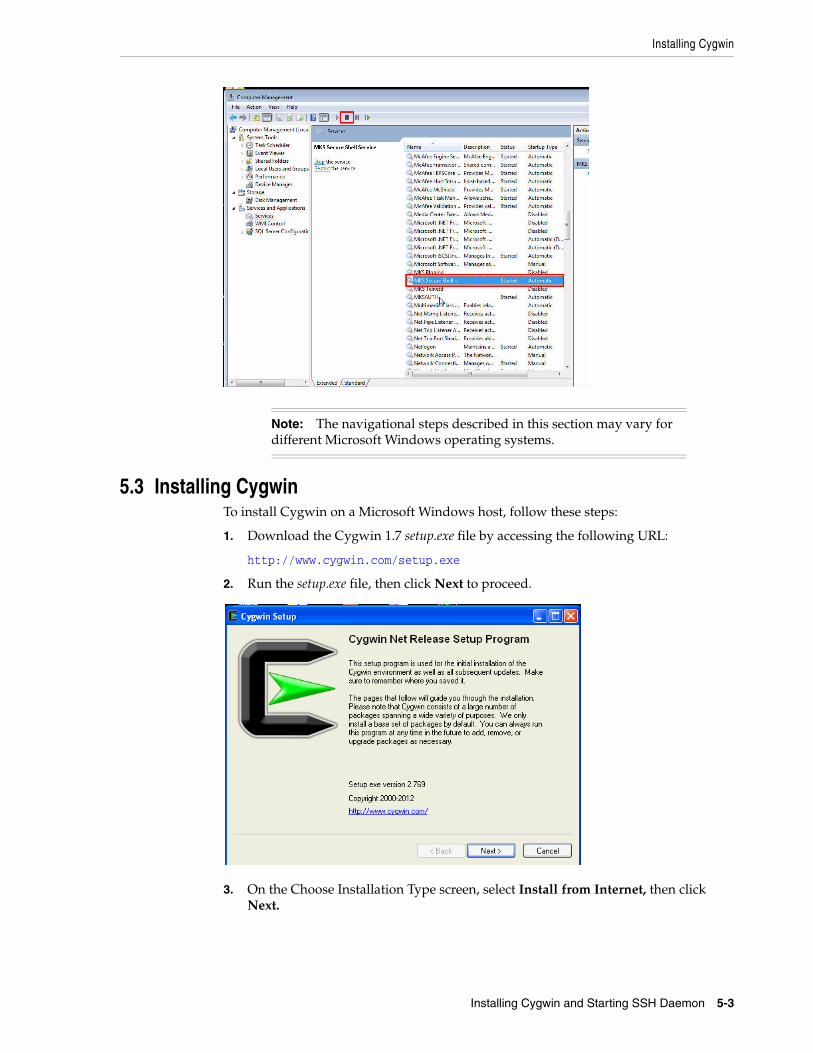
2. Stop the SSH Daemon if it is running from OpenSSH, MKS or any other vendor. If the SSH Daemon is running, stop it by doing the following:
a. Right-click on My Computer, and select Manage.
b. In the Computer Management window, in the left pane, expand Services and Applications, and select Services.
c. In the right pane, right click the SSH Daemon/MKS Secure Shell service and click Stop.
Installing Cygwin
Installing Cygwin and Starting SSH Daemon 5-3
5.3 Installing CygwinTo install Cygwin on a Microsoft Windows host, follow these steps:
1. Download the Cygwin 1.7 setup.exe file by accessing the following URL:
http://www.cygwin.com/setup.exe
2. Run the setup.exe file, then click Next to proceed.
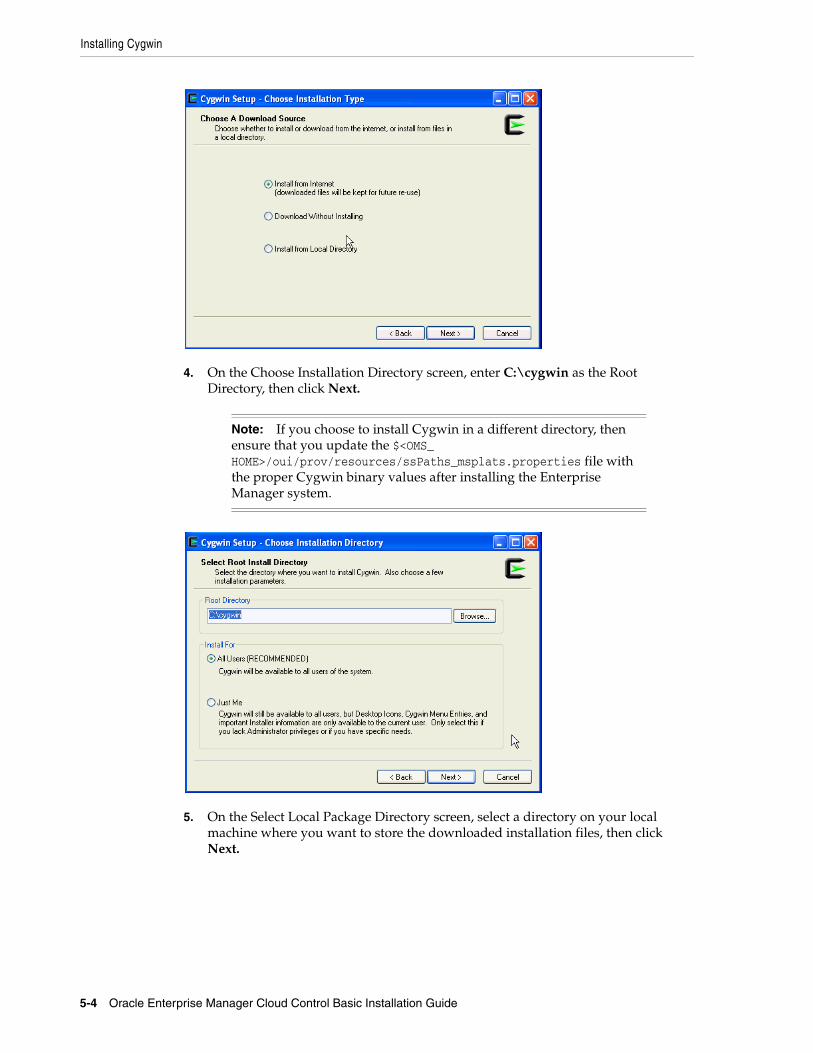
3. On the Choose Installation Type screen, select Install from Internet, then click Next.
Note: The navigational steps described in this section may vary for different Microsoft Windows operating systems.
Installing Cygwin
5-4 Oracle Enterprise Manager Cloud Control Basic Installation Guide
4. On the Choose Installation Directory screen, enter C:\cygwin as the Root Directory, then click Next.
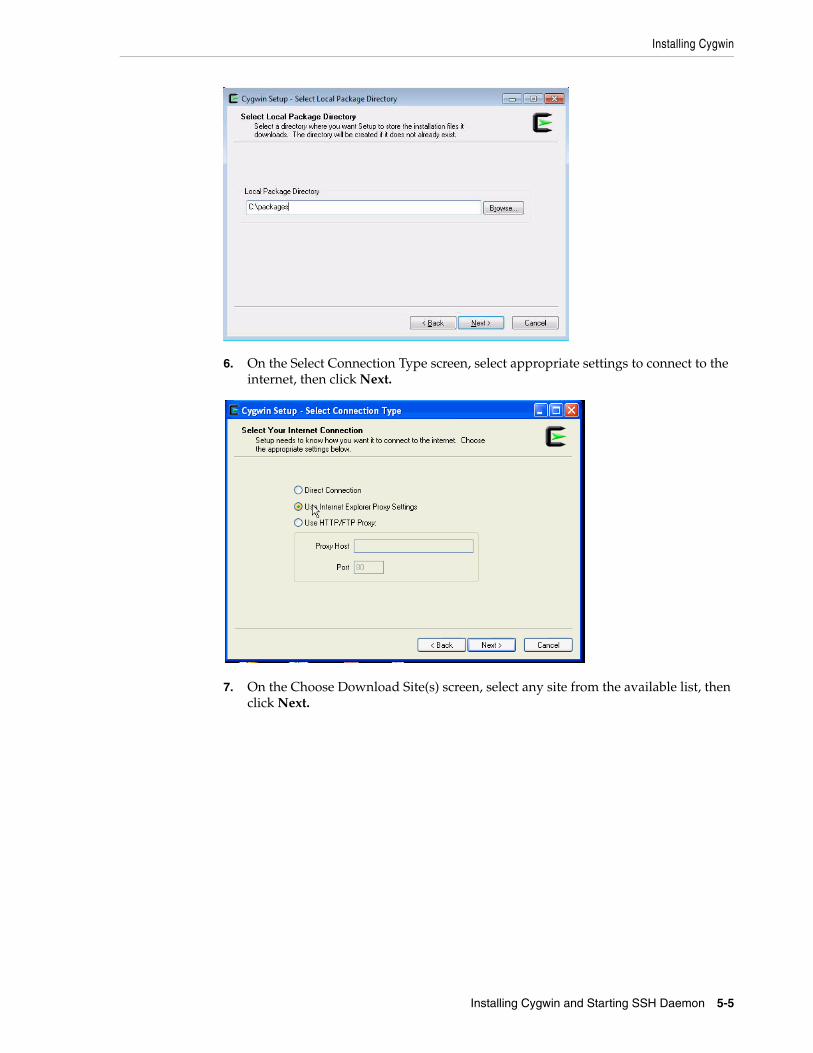
5. On the Select Local Package Directory screen, select a directory on your local machine where you want to store the downloaded installation files, then click Next.
Note: If you choose to install Cygwin in a different directory, then ensure that you update the $<OMS_HOME>/oui/prov/resources/ssPaths_msplats.properties file with the proper Cygwin binary values after installing the Enterprise Manager system.
Installing Cygwin
Installing Cygwin and Starting SSH Daemon 5-5
6. On the Select Connection Type screen, select appropriate settings to connect to the internet, then click Next.
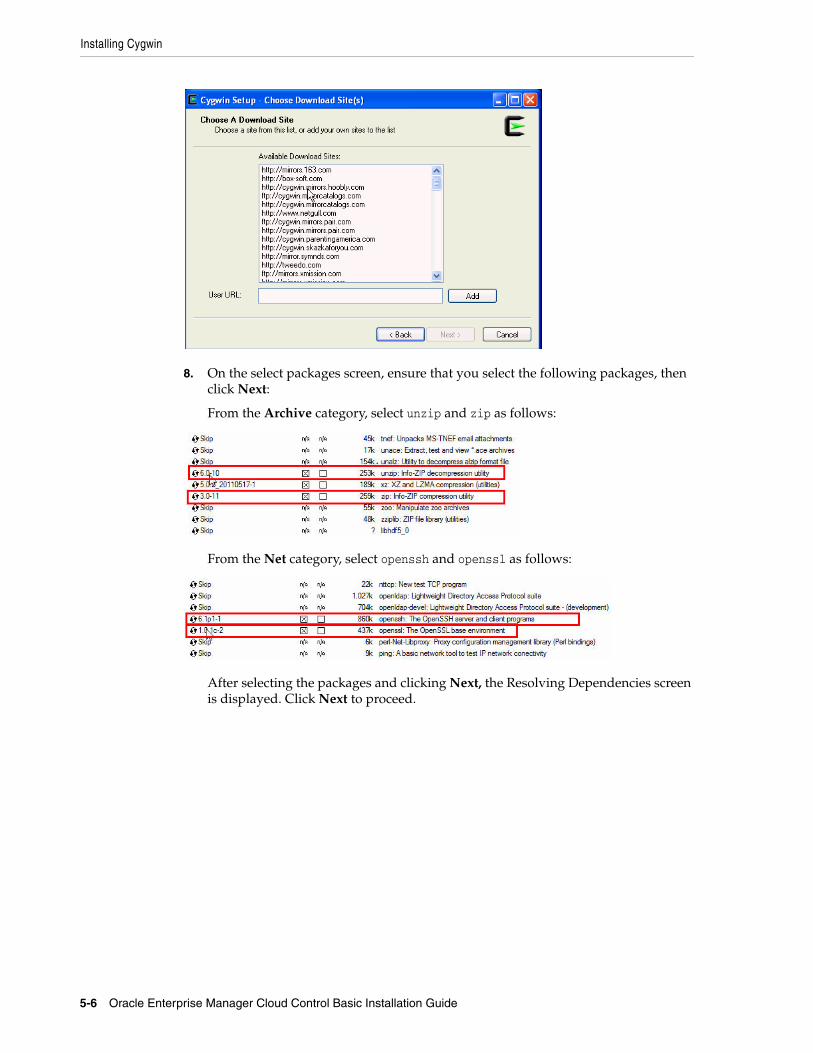
7. On the Choose Download Site(s) screen, select any site from the available list, then click Next.
Installing Cygwin
5-6 Oracle Enterprise Manager Cloud Control Basic Installation Guide
8. On the select packages screen, ensure that you select the following packages, then click Next:
From the Archive category, select unzip and zip as follows:
From the Net category, select openssh and openssl as follows:
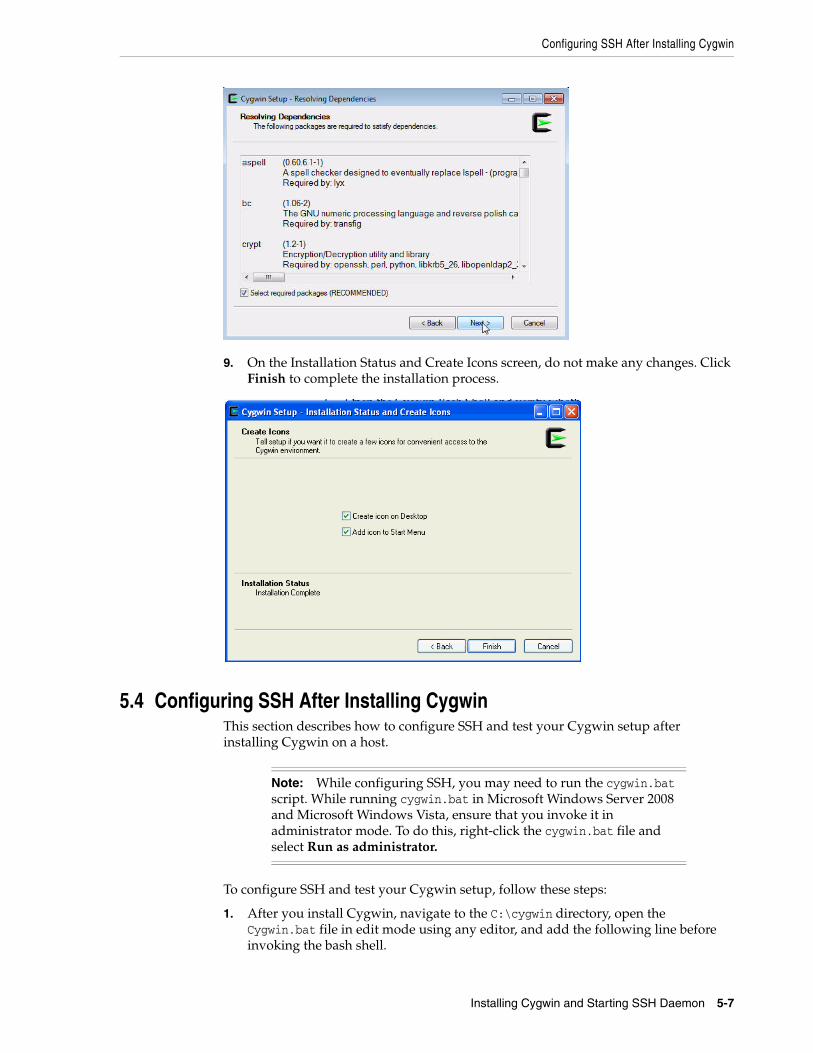
After selecting the packages and clicking Next, the Resolving Dependencies screen is displayed. Click Next to proceed.
Configuring SSH After Installing Cygwin
Installing Cygwin and Starting SSH Daemon 5-7
9. On the Installation Status and Create Icons screen, do not make any changes. Click Finish to complete the installation process.
5.4 Configuring SSH After Installing CygwinThis section describes how to configure SSH and test your Cygwin setup after installing Cygwin on a host.
To configure SSH and test your Cygwin setup, follow these steps:
1. After you install Cygwin, navigate to the C:\cygwin directory, open the Cygwin.bat file in edit mode using any editor, and add the following line before invoking the bash shell.
Note: While configuring SSH, you may need to run the cygwin.bat script. While running cygwin.bat in Microsoft Windows Server 2008 and Microsoft Windows Vista, ensure that you invoke it in administrator mode. To do this, right-click the cygwin.bat file and select Run as administrator.
Configuring SSH After Installing Cygwin
5-8 Oracle Enterprise Manager Cloud Control Basic Installation Guide
set CYGWIN=binmode ntsec
For example, here are the contents for the Cygwin.bat file after adding the above line:
@echo off
C:chdir C:\cygwin\binset CYGWIN=binmode ntsecbash --login -i
2. To verify if Cygwin (cygrunsrv) is installed properly, run C:\cygwin\Cygwin.bat, and execute the following command:
cygrunsrv -h
If Cygwin is installed properly, then all the Cygwin help options are displayed on the screen. However, if this command returns an error message, then you may have to reinstall Cygwin.
3. To install the SSHD service, run C:\cygwin\Cygwin.bat, and execute the following command:
ssh-host-config
After running the command, you are prompted the following questions:
*** Query: Should privilege separation be used? <yes/no>: yes*** Query: New local account ’sshd’? <yes/no>: yes*** Query: Do you want to install sshd as a service?*** Query: <Say "no" if it is already installed as a service> <yes/no>: yes*** Query: Enter the value of CYGWIN for the deamon: [] binmode ntsec*** Query: Do you want to use a different name? (yes/no) yes/no
At this point, if you want to use the same name, that is cyg_server, enter no. You are then prompted the following questions:
*** Query: Create new privileged user account 'cyg_server'? (yes/no) yes*** Query: Please enter the password:*** Query: Renter:
However, if you want to use a different name, enter yes. You are then prompted the following questions:
*** Query: Enter the new user name: cyg_server1*** Query: Reenter: cyg_server1*** Query: Create new privileged user account 'cyg_server1'? (yes/no) yes*** Query: Please enter the password:*** Query: Reenter:
If the configuration is successful, you will see the following message:
Host configuration finished. Have fun!
4. Backup the c:\cygwin\etc\passwd file and then use any editor to open the file in edit mode. Remove only those entries of the user that you will use to connect to the host on which you want to install a Management Agent. Ask the user to make a backup of the c:\cygwin\etc\passwd file before editing.
■ If the user that you are employing to connect to the host on which you want to install the Management Agent is a local user, run C:\cygwin\Cygwin.bat and execute the following:
Configuring SSH After Installing Cygwin
Installing Cygwin and Starting SSH Daemon 5-9
/bin/mkpasswd -l –u <USER> >> /etc/passwd
■ If the user you are employing to connect to the host on which you want to install the Management Agent running is a domain user, run C:\cygwin\Cygwin.bat and execute the following:
/bin/mkpasswd -d -u <USER> >> /etc/passwdmkdir -p /home/<USER> (for example, mkdir -p /home/pjohn)chown <USER> /home/<USER> (for example, chown pjohn /home/pjohn)
5. (domain user only) If the user you are employing to connect to the host on which you want to install the Management Agent is a domain user, do the following to start the SSH daemon:
a. Right-click on My Computer, and select Manage.
b. In the Computer Management dialog box that appears, go to Services and Applications, and select CYGWIN sshd.
c. Right-click CYGWIN sshd and select Properties.
d. In the Properties dialog box, go to the Log On tab.
e. Here, specify the domain/user name and password. Click Apply.
f. Run C:\cygwin\Cygwin.bat, and execute the following:
chown <USERNAME> /var/log/sshd.logchown -R <USERNAME> /var/emptychown <USERNAME> /etc/ssh*chmod 755 /var/emptychmod 644 /var/log/sshd.log
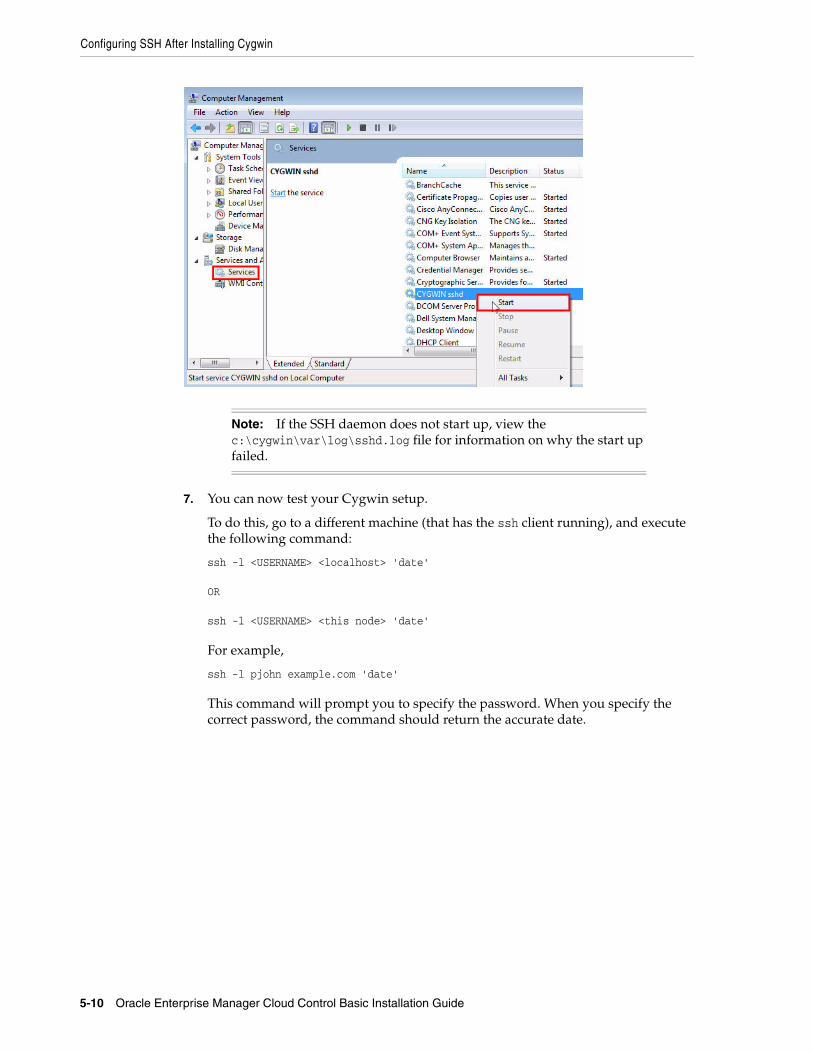
6. Perform one of the following steps to start the SSH daemon:
Run C:/cygwin/Cygwin.bat and execute the following command:
/usr/sbin/sshd
OR
Run C:/cygwin/Cygwin.bat and execute the following command:
cygrunsrv -S sshd
OR
Perform these steps:
a. Right-click on My Computer, and select Manage.
b. In the Computer Management dialog box that appears, go to Services and Applications, and select CYGWIN sshd.
c. Right-click CYGWIN sshd and select Start.
Note: If /var/log/sshd.log does not exist, you do not have to execute the following commands:
chown <USERNAME> /var/log/sshd.logchmod 644 /var/log/sshd.log
Configuring SSH After Installing Cygwin
5-10 Oracle Enterprise Manager Cloud Control Basic Installation Guide
7. You can now test your Cygwin setup.
To do this, go to a different machine (that has the ssh client running), and execute the following command:
ssh -l <USERNAME> <localhost> 'date'
OR
ssh -l <USERNAME> <this node> 'date'
For example,
ssh -l pjohn example.com 'date'
This command will prompt you to specify the password. When you specify the correct password, the command should return the accurate date.
Note: If the SSH daemon does not start up, view the c:\cygwin\var\log\sshd.log file for information on why the start up failed.
Part IIIPart III Installation
This part describes how you can install Enterprise Manager Cloud Control. In particular, this part contains the following chapters:
■ Chapter 6, "Installing Enterprise Manager System"
■ Chapter 8, "Adding Additional Oracle Management Service"
■ Chapter 7, "Installing Oracle Management Agent"
■ Chapter 9, "Installing Application Dependency and Performance"
■ Chapter 10, "Installing JVM Diagnostics"

6
Installing Enterprise Manager System 6-1
6Installing Enterprise Manager System
This chapter describes how you can install a new Enterprise Manager system while utilizing an existing, certified Oracle Database to store Oracle Management Repository (Management Repository). In particular, this chapter covers the following:
■ Introduction
■ Before You Begin
■ Prerequisites
■ Installation Procedure
■ After You Install
6.1 IntroductionThis section covers the following:
■ Overview of the Installation Types
■ Overview of What Is Installed and Configured
■ Overview of the Directory Structures
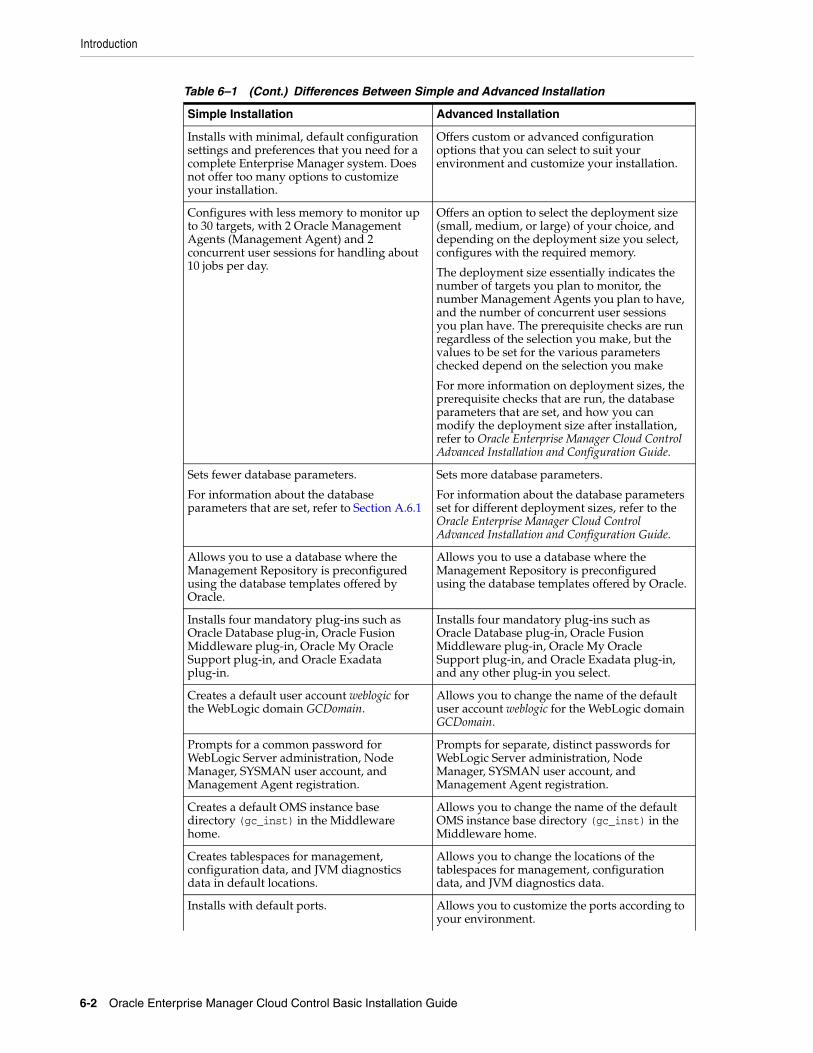
6.1.1 Overview of the Installation TypesYou can install Enterprise Manager Cloud Control with either simple or advanced configuration. Table 6–1 describes the basic differences between the two installation types.
Note: For information on the releases Enterprise Manager Cloud Control has had so far, refer to Oracle Enterprise Manager Cloud Control Advanced Installation and Configuration Guide.
Table 6–1 Differences Between Simple and Advanced Installation
Simple Installation Advanced Installation
Meant for demo or evaluation purposes, and small deployments, and when you do not want to worry about the granular control of the installer and want to install the Enterprise Manager system quickly, with less memory, and for monitoring fewer targets in their environment
Meant for small, medium, and large deployments, and when you want to customize your installation with custom locations, directory names, and passwords.
Introduction
6-2 Oracle Enterprise Manager Cloud Control Basic Installation Guide
Installs with minimal, default configuration settings and preferences that you need for a complete Enterprise Manager system. Does not offer too many options to customize your installation.
Offers custom or advanced configuration options that you can select to suit your environment and customize your installation.
Configures with less memory to monitor up to 30 targets, with 2 Oracle Management Agents (Management Agent) and 2 concurrent user sessions for handling about 10 jobs per day.
Offers an option to select the deployment size (small, medium, or large) of your choice, and depending on the deployment size you select, configures with the required memory.
The deployment size essentially indicates the number of targets you plan to monitor, the number Management Agents you plan to have, and the number of concurrent user sessions you plan have. The prerequisite checks are run regardless of the selection you make, but the values to be set for the various parameters checked depend on the selection you make
For more information on deployment sizes, the prerequisite checks that are run, the database parameters that are set, and how you can modify the deployment size after installation, refer to Oracle Enterprise Manager Cloud Control Advanced Installation and Configuration Guide.
Sets fewer database parameters.
For information about the database parameters that are set, refer to Section A.6.1
Sets more database parameters.
For information about the database parameters set for different deployment sizes, refer to the Oracle Enterprise Manager Cloud Control Advanced Installation and Configuration Guide.
Allows you to use a database where the Management Repository is preconfigured using the database templates offered by Oracle.
Allows you to use a database where the Management Repository is preconfigured using the database templates offered by Oracle.
Installs four mandatory plug-ins such as Oracle Database plug-in, Oracle Fusion Middleware plug-in, Oracle My Oracle Support plug-in, and Oracle Exadata plug-in.
Installs four mandatory plug-ins such as Oracle Database plug-in, Oracle Fusion Middleware plug-in, Oracle My Oracle Support plug-in, and Oracle Exadata plug-in, and any other plug-in you select.
Creates a default user account weblogic for the WebLogic domain GCDomain.
Allows you to change the name of the default user account weblogic for the WebLogic domain GCDomain.
Prompts for a common password for WebLogic Server administration, Node Manager, SYSMAN user account, and Management Agent registration.
Prompts for separate, distinct passwords for WebLogic Server administration, Node Manager, SYSMAN user account, and Management Agent registration.
Creates a default OMS instance base directory (gc_inst) in the Middleware home.
Allows you to change the name of the default OMS instance base directory (gc_inst) in the Middleware home.
Creates tablespaces for management, configuration data, and JVM diagnostics data in default locations.
Allows you to change the locations of the tablespaces for management, configuration data, and JVM diagnostics data.
Installs with default ports. Allows you to customize the ports according to your environment.
Table 6–1 (Cont.) Differences Between Simple and Advanced Installation
Simple Installation Advanced Installation
Introduction
Installing Enterprise Manager System 6-3
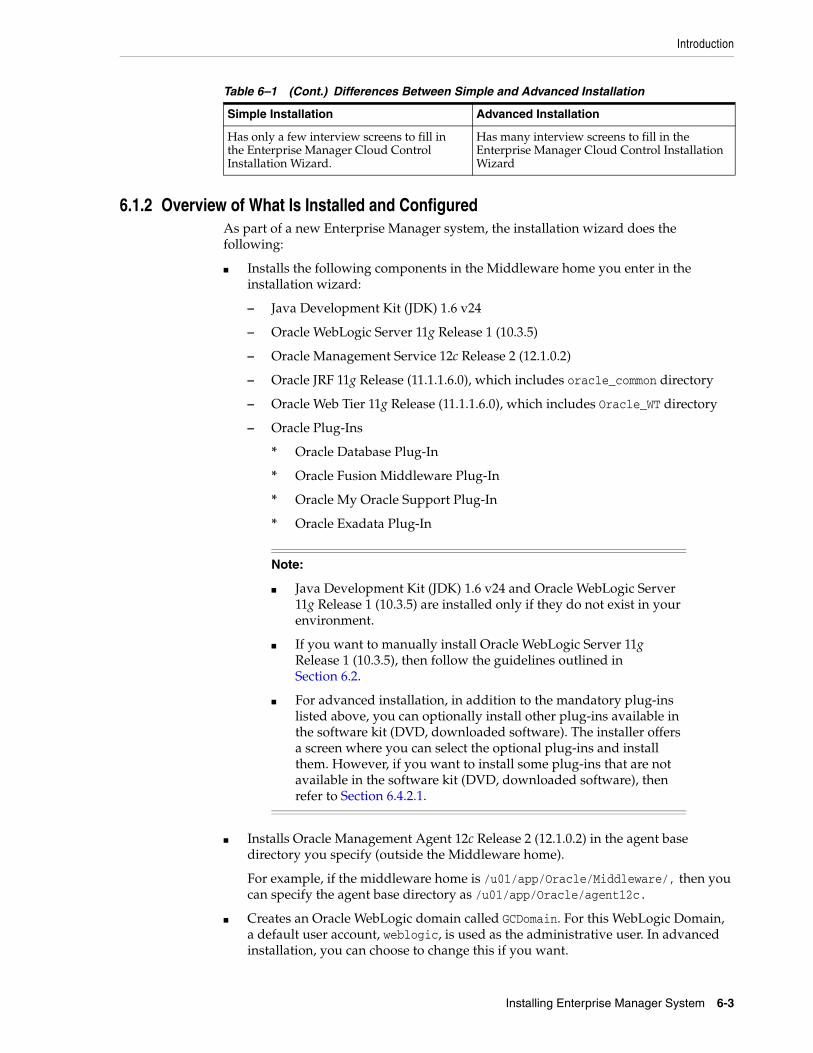
6.1.2 Overview of What Is Installed and ConfiguredAs part of a new Enterprise Manager system, the installation wizard does the following:
■ Installs the following components in the Middleware home you enter in the installation wizard:
– Java Development Kit (JDK) 1.6 v24
– Oracle WebLogic Server 11g Release 1 (10.3.5)
– Oracle Management Service 12c Release 2 (12.1.0.2)
– Oracle JRF 11g Release (11.1.1.6.0), which includes oracle_common directory
– Oracle Web Tier 11g Release (11.1.1.6.0), which includes Oracle_WT directory
– Oracle Plug-Ins
* Oracle Database Plug-In
* Oracle Fusion Middleware Plug-In
* Oracle My Oracle Support Plug-In
* Oracle Exadata Plug-In
■ Installs Oracle Management Agent 12c Release 2 (12.1.0.2) in the agent base directory you specify (outside the Middleware home).
For example, if the middleware home is /u01/app/Oracle/Middleware/, then you can specify the agent base directory as /u01/app/Oracle/agent12c.
■ Creates an Oracle WebLogic domain called GCDomain. For this WebLogic Domain, a default user account, weblogic, is used as the administrative user. In advanced installation, you can choose to change this if you want.
Has only a few interview screens to fill in the Enterprise Manager Cloud Control Installation Wizard.
Has many interview screens to fill in the Enterprise Manager Cloud Control Installation Wizard
Note:
■ Java Development Kit (JDK) 1.6 v24 and Oracle WebLogic Server 11g Release 1 (10.3.5) are installed only if they do not exist in your environment.
■ If you want to manually install Oracle WebLogic Server 11g Release 1 (10.3.5), then follow the guidelines outlined in Section 6.2.
■ For advanced installation, in addition to the mandatory plug-ins listed above, you can optionally install other plug-ins available in the software kit (DVD, downloaded software). The installer offers a screen where you can select the optional plug-ins and install them. However, if you want to install some plug-ins that are not available in the software kit (DVD, downloaded software), then refer to Section 6.4.2.1.
Table 6–1 (Cont.) Differences Between Simple and Advanced Installation
Simple Installation Advanced Installation
Introduction
6-4 Oracle Enterprise Manager Cloud Control Basic Installation Guide
■ Creates a Node Manager user account called nodemanager. A Node Manager enables you to start, shut down, or restart an Oracle WebLogic Server instance remotely, and is recommended for applications with high availability requirements.
■ Configures an Oracle Management Service Instance Base location (gc_inst) in the Oracle Middleware home (Middleware home), for storing all configuration details related to Oracle Management Service 12c. In advanced installation, you can choose to change this if you want.
For example, if the Middleware home is /u01/app/Oracle/Middleware/, then the instance base location is /u01/app/Oracle/Middleware/gc_inst. You can choose to change this, if you want, in the installer. However, you can change it for only advanced installation and not for simple installation.
■ Configures Oracle Management Repository in the existing, certified Oracle Database. If the database instance is created using the database template offered by Oracle, then this step is skipped.
■ Runs the following configuration assistants to configure the installed or upgraded components:
– Plugins Prerequisites Check Configuration Assistant
– Repository Configuration Assistant
– MDS Schema Configuration Assistant
– OMS Configuration Assistant
– Plugins Deployment and Configuration Assistant
– Start Oracle Management Service Configuration Assistant
– Oracle Configuration Manager for OMS Configuration Assistant
Note: The existing, certified Oracle Database must be one of the certified databases listed in the Enterprise Manager certification matrix available on My Oracle Support, or a database instance created with a preconfigured Oracle Management Repository (Management Repository) using the database templates offered by Oracle.
To access the Enterprise Manager certification matrix, follow the steps outlined in Appendix E.
For information about creating a database instance with a preconfigured Management Repository using the database templates offered by Oracle, refer to Appendix D.
The database can be on a local or remote host, and if it is on a remote host, it must be monitored by Oracle Management Agent. However, Oracle Real Application Clusters (Oracle RAC) databases must only be on a shared disk.
Note: If you use a database instance that was created with a preconfigured Management Repository using the database templates offered by Oracle, then Repository Out-of-Box Configuration Assistant is run instead of Repository Configuration Assistant.
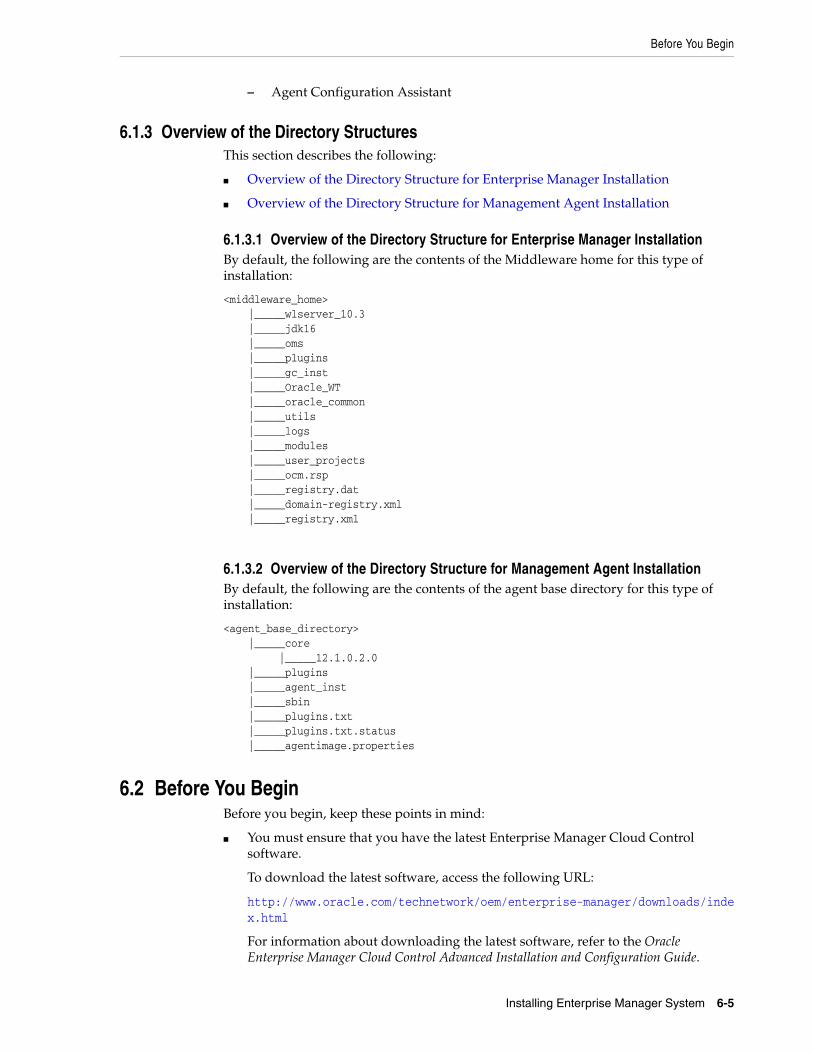
Before You Begin
Installing Enterprise Manager System 6-5
– Agent Configuration Assistant
6.1.3 Overview of the Directory StructuresThis section describes the following:
■ Overview of the Directory Structure for Enterprise Manager Installation
■ Overview of the Directory Structure for Management Agent Installation
6.1.3.1 Overview of the Directory Structure for Enterprise Manager InstallationBy default, the following are the contents of the Middleware home for this type of installation:
<middleware_home> |_____wlserver_10.3 |_____jdk16 |_____oms |_____plugins |_____gc_inst |_____Oracle_WT |_____oracle_common |_____utils |_____logs |_____modules |_____user_projects |_____ocm.rsp |_____registry.dat |_____domain-registry.xml |_____registry.xml
6.1.3.2 Overview of the Directory Structure for Management Agent InstallationBy default, the following are the contents of the agent base directory for this type of installation:
<agent_base_directory> |_____core |_____12.1.0.2.0 |_____plugins |_____agent_inst |_____sbin |_____plugins.txt |_____plugins.txt.status |_____agentimage.properties
6.2 Before You BeginBefore you begin, keep these points in mind:
■ You must ensure that you have the latest Enterprise Manager Cloud Control software.
To download the latest software, access the following URL:
http://www.oracle.com/technetwork/oem/enterprise-manager/downloads/index.html
For information about downloading the latest software, refer to the Oracle Enterprise Manager Cloud Control Advanced Installation and Configuration Guide.

Before You Begin
6-6 Oracle Enterprise Manager Cloud Control Basic Installation Guide
■ Ensure that there are no white spaces in the name of the directory where you download and run the Enterprise Manager Cloud Control software from. For example, do not download and run the software from a directory titled EM Software because there is a white space between the two words of the directory name.
■ You can install Enterprise Manager Cloud Control using the installation wizard only on a single host, that is, locally on the server where the wizard is invoked. You cannot install on multiple or remote hosts.
■ Oracle Management Service 12c Release 2 (12.1.0.2) can communicate only with Oracle Management Agent 12c Release 2 (12.1.0.2) and Oracle Management Agent 12c Release 1 (12.1.0.1), and not with any earlier release of the Management Agent.
And Oracle Management Service 12c Release 1 (12.1.0.1) can communicate only with Oracle Management Agent 12c Release 1 (12.1.0.1), and not with any earlier release or higher release of the Management Agent.
■ Do not install on a symlink. If you do, then you will not be able to clone this OMS later.
■ You must not set the ORACLE_HOME and ORACLE_SID environment variables. You must ensure that the Oracle directories do NOT appear in the PATH.
■ You must set the DISPLAY environment variable.
– In bash terminal, run the following command:
export DISPLAY=<hostname>:<vnc port>.0
For example, export DISPLAY=example.com:1.0
– In other terminals, run the following command:
setenv DISPLAY <hostname>:1.0
For example, setenv DISPLAY example.com:1.0
■ The Enterprise Manager Cloud Control Installation Wizard installs Java Development Kit (JDK) 1.6 v24 and Oracle WebLogic Server 11g Release 1 (10.3.5) only if they do not exist in your environment.
■ If Oracle WebLogic Server 11g Release 1 (10.3.5) does not exist and if you want to manually install it, then ensure that you install it using JDK 1.6 v24+ (64-bit version for 64-bit platforms and 32-bit version for 32-bit platforms).
– Download JDK 1.6 v24+ for your platform from the platform vendor’s Web site.
For example, download SUN JDK 1.6 v24+ for Linux platforms from the following Oracle Web site URL:
http://www.oracle.com/technetwork/java/javase/downloads/index.html
Similarly, download the JDK for other platforms from other vendors’ trusted Web sites.
– If you already have JDK, then verify its version by navigating to the <JDK_Location>/bin directory and running the following command:
"./java -fullversion"
To verify whether it is a 32-bit or a 64-bit JDK, run the following command:
"file *"
– JROCKIT is not supported.
Before You Begin
Installing Enterprise Manager System 6-7
– If you want to manually install Oracle WebLogic Server 11g Release 1 (10.3.5) on Linux 64-bit platforms, first install the 64-bit JDK for that platform, and then download and use the wls1035_generic.jar file to install Oracle WebLogic Server.
For example,
<JDK home>/bin/java -d64 -jar <absolute_path _to_wls1035_generic.jar>
– If you want to manually install Oracle WebLogic Server 11g Release 1 (10.3.5) on Linux 32-bit platforms, then download and use either the wls1035_linux32.bin file or the wls1035_generic.jar file.
For example,
<JDK home>/bin/java -jar <absolute_path _to_wls1035_generic.jar>
– You must procure the Oracle WebLogic Server 11g Release 1 (10.3.5) software and install it following the instructions outlined in the Oracle® Fusion Middleware Installation Guide for Oracle WebLogic Server. Ensure that it is a default installation. The guide is available in the Fusion Middleware documentation library available at:
http://www.oracle.com/technetwork/middleware/weblogic/documentation/index.html
– You must ensure that the Oracle WebLogic Server installation is a typical installation, and even if you choose to perform a custom installation, ensure that components chosen for custom installation are the same as the ones associated with a typical installation.
– You must ensure that the user installing the WebLogic Server is the same as the one installing Enterprise Manager Cloud Control.
■ You must ensure that the Oracle WebLogic Server 11g Release 1 (10.3.5) installed by the Enterprise Manager Cloud Control Installation Wizard or by you is dedicated for Enterprise Manager Cloud Control. You must not have any other Oracle Fusion Middleware product installed in that Middleware home.
Enterprise Manager Cloud Control cannot coexist with any Oracle Fusion Middleware product in the same Middleware home because the ORACLE_COMMON property is used by both the products.
■ You can optionally use the database templates offered by Oracle to create a database instance with a preconfigured Management Repository. To do so, refer to Appendix D. You can use such a database instance for simple as well as advanced installation.
However, note that the database templates are essentially designed for simple installation, although they can be used for advanced installation. Therefore, while performing an advanced installation (possibly with small, medium, or large deployment size selection), when you provide the details of such a database, you will be prompted that the database parameters need to be modified to suit the deployment size you selected. You can confirm the message to proceed further. The installation wizard will automatically set the database parameters to the required values.
■ If you want to optionally follow the configuration guidelines for deploying the Management Repository so that your management data is secure, reliable, and always available, refer to the Oracle Enterprise Manager Cloud Control Administrator’s Guide.
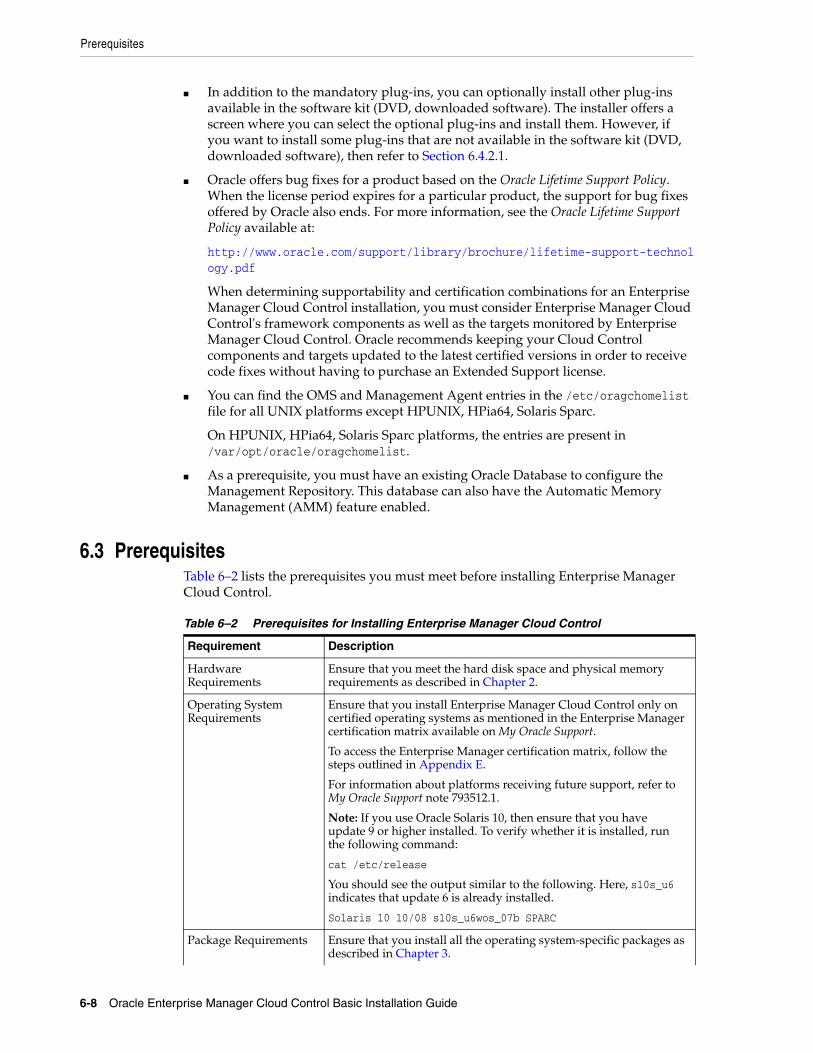
Prerequisites
6-8 Oracle Enterprise Manager Cloud Control Basic Installation Guide
■ In addition to the mandatory plug-ins, you can optionally install other plug-ins available in the software kit (DVD, downloaded software). The installer offers a screen where you can select the optional plug-ins and install them. However, if you want to install some plug-ins that are not available in the software kit (DVD, downloaded software), then refer to Section 6.4.2.1.
■ Oracle offers bug fixes for a product based on the Oracle Lifetime Support Policy. When the license period expires for a particular product, the support for bug fixes offered by Oracle also ends. For more information, see the Oracle Lifetime Support Policy available at:
http://www.oracle.com/support/library/brochure/lifetime-support-technology.pdf
When determining supportability and certification combinations for an Enterprise Manager Cloud Control installation, you must consider Enterprise Manager Cloud Control's framework components as well as the targets monitored by Enterprise Manager Cloud Control. Oracle recommends keeping your Cloud Control components and targets updated to the latest certified versions in order to receive code fixes without having to purchase an Extended Support license.
■ You can find the OMS and Management Agent entries in the /etc/oragchomelist file for all UNIX platforms except HPUNIX, HPia64, Solaris Sparc.
On HPUNIX, HPia64, Solaris Sparc platforms, the entries are present in /var/opt/oracle/oragchomelist.
■ As a prerequisite, you must have an existing Oracle Database to configure the Management Repository. This database can also have the Automatic Memory Management (AMM) feature enabled.
6.3 PrerequisitesTable 6–2 lists the prerequisites you must meet before installing Enterprise Manager Cloud Control.
Table 6–2 Prerequisites for Installing Enterprise Manager Cloud Control
Requirement Description
Hardware Requirements
Ensure that you meet the hard disk space and physical memory requirements as described in Chapter 2.
Operating System Requirements
Ensure that you install Enterprise Manager Cloud Control only on certified operating systems as mentioned in the Enterprise Manager certification matrix available on My Oracle Support.
To access the Enterprise Manager certification matrix, follow the steps outlined in Appendix E.
For information about platforms receiving future support, refer to My Oracle Support note 793512.1.
Note: If you use Oracle Solaris 10, then ensure that you have update 9 or higher installed. To verify whether it is installed, run the following command:
cat /etc/release
You should see the output similar to the following. Here, s10s_u6 indicates that update 6 is already installed.
Solaris 10 10/08 s10s_u6wos_07b SPARC
Package Requirements Ensure that you install all the operating system-specific packages as described in Chapter 3.
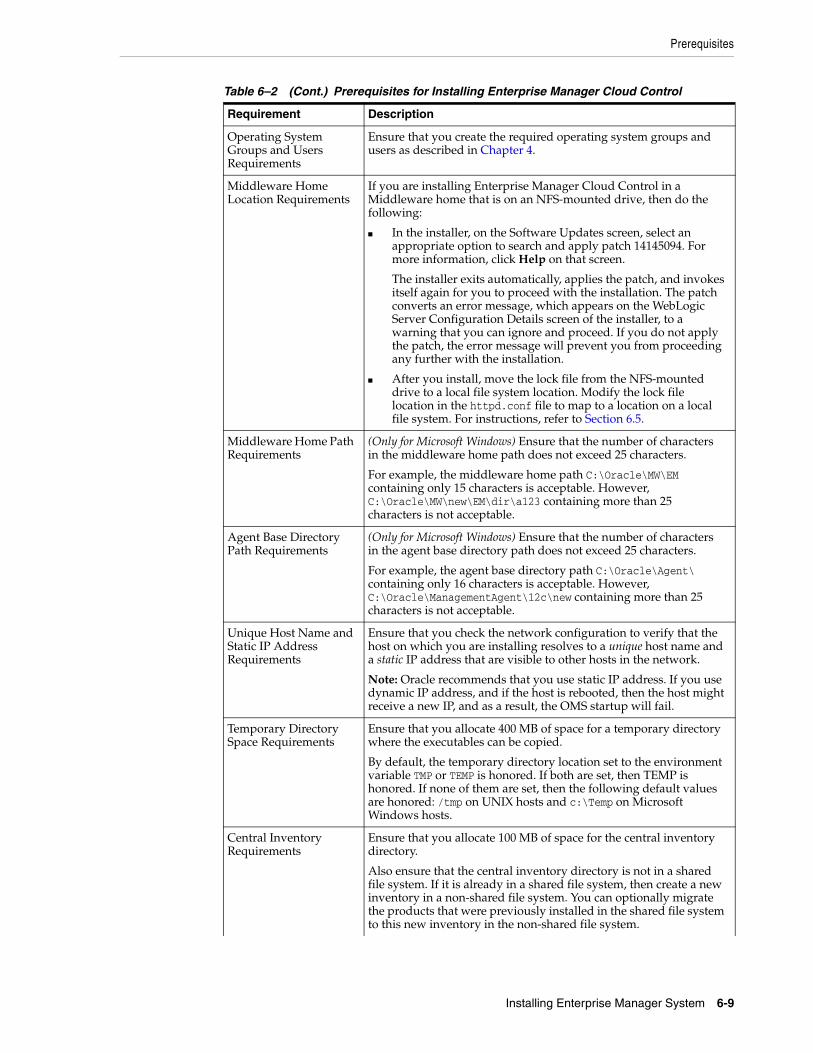
Prerequisites
Installing Enterprise Manager System 6-9
Operating System Groups and Users Requirements
Ensure that you create the required operating system groups and users as described in Chapter 4.
Middleware Home Location Requirements
If you are installing Enterprise Manager Cloud Control in a Middleware home that is on an NFS-mounted drive, then do the following:
■ In the installer, on the Software Updates screen, select an appropriate option to search and apply patch 14145094. For more information, click Help on that screen.
The installer exits automatically, applies the patch, and invokes itself again for you to proceed with the installation. The patch converts an error message, which appears on the WebLogic Server Configuration Details screen of the installer, to a warning that you can ignore and proceed. If you do not apply the patch, the error message will prevent you from proceeding any further with the installation.
■ After you install, move the lock file from the NFS-mounted drive to a local file system location. Modify the lock file location in the httpd.conf file to map to a location on a local file system. For instructions, refer to Section 6.5.
Middleware Home Path Requirements
(Only for Microsoft Windows) Ensure that the number of characters in the middleware home path does not exceed 25 characters.
For example, the middleware home path C:\Oracle\MW\EM containing only 15 characters is acceptable. However, C:\Oracle\MW\new\EM\dir\a123 containing more than 25 characters is not acceptable.
Agent Base Directory Path Requirements
(Only for Microsoft Windows) Ensure that the number of characters in the agent base directory path does not exceed 25 characters.
For example, the agent base directory path C:\Oracle\Agent\ containing only 16 characters is acceptable. However, C:\Oracle\ManagementAgent\12c\new containing more than 25 characters is not acceptable.
Unique Host Name and Static IP Address Requirements
Ensure that you check the network configuration to verify that the host on which you are installing resolves to a unique host name and a static IP address that are visible to other hosts in the network.
Note: Oracle recommends that you use static IP address. If you use dynamic IP address, and if the host is rebooted, then the host might receive a new IP, and as a result, the OMS startup will fail.
Temporary Directory Space Requirements
Ensure that you allocate 400 MB of space for a temporary directory where the executables can be copied.
By default, the temporary directory location set to the environment variable TMP or TEMP is honored. If both are set, then TEMP is honored. If none of them are set, then the following default values are honored: /tmp on UNIX hosts and c:\Temp on Microsoft Windows hosts.
Central Inventory Requirements
Ensure that you allocate 100 MB of space for the central inventory directory.
Also ensure that the central inventory directory is not in a shared file system. If it is already in a shared file system, then create a new inventory in a non-shared file system. You can optionally migrate the products that were previously installed in the shared file system to this new inventory in the non-shared file system.
Table 6–2 (Cont.) Prerequisites for Installing Enterprise Manager Cloud Control
Requirement Description
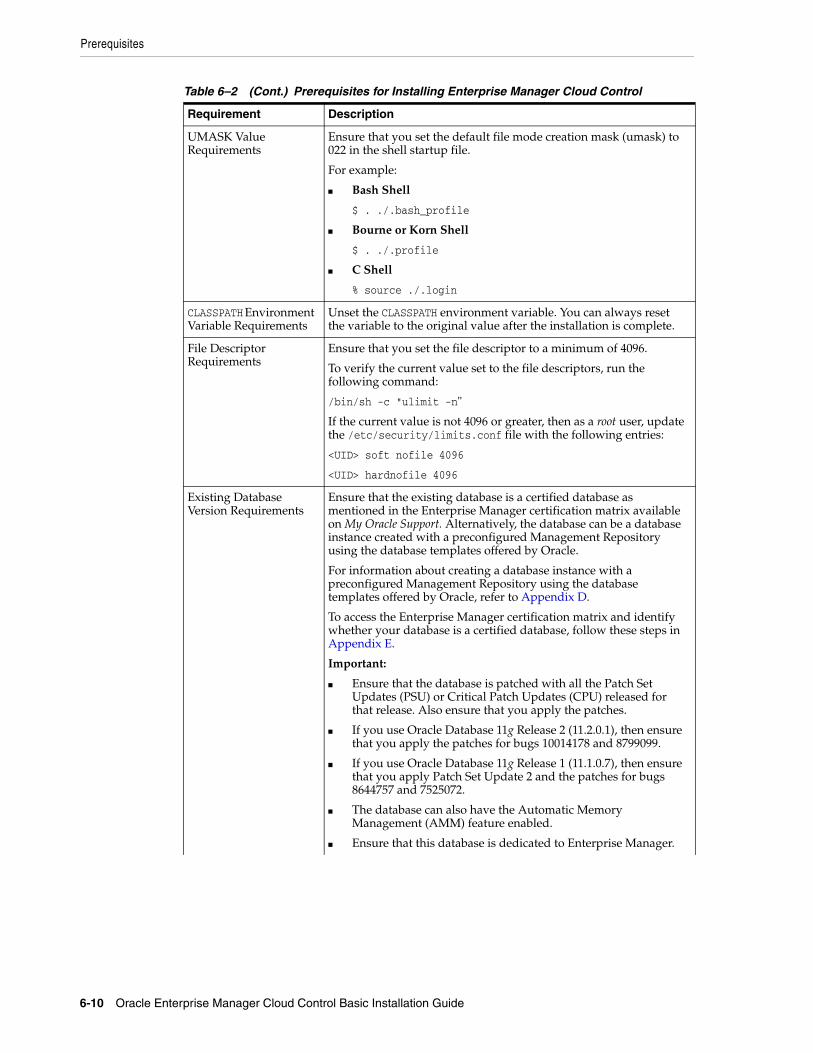
Prerequisites
6-10 Oracle Enterprise Manager Cloud Control Basic Installation Guide
UMASK Value Requirements
Ensure that you set the default file mode creation mask (umask) to 022 in the shell startup file.
For example:
■ Bash Shell
$ . ./.bash_profile
■ Bourne or Korn Shell
$ . ./.profile
■ C Shell
% source ./.login
CLASSPATH Environment Variable Requirements
Unset the CLASSPATH environment variable. You can always reset the variable to the original value after the installation is complete.
File Descriptor Requirements
Ensure that you set the file descriptor to a minimum of 4096.
To verify the current value set to the file descriptors, run the following command:
/bin/sh -c "ulimit -n"
If the current value is not 4096 or greater, then as a root user, update the /etc/security/limits.conf file with the following entries:
<UID> soft nofile 4096
<UID> hardnofile 4096
Existing Database Version Requirements
Ensure that the existing database is a certified database as mentioned in the Enterprise Manager certification matrix available on My Oracle Support. Alternatively, the database can be a database instance created with a preconfigured Management Repository using the database templates offered by Oracle.
For information about creating a database instance with a preconfigured Management Repository using the database templates offered by Oracle, refer to Appendix D.
To access the Enterprise Manager certification matrix and identify whether your database is a certified database, follow these steps in Appendix E.
Important:
■ Ensure that the database is patched with all the Patch Set Updates (PSU) or Critical Patch Updates (CPU) released for that release. Also ensure that you apply the patches.
■ If you use Oracle Database 11g Release 2 (11.2.0.1), then ensure that you apply the patches for bugs 10014178 and 8799099.
■ If you use Oracle Database 11g Release 1 (11.1.0.7), then ensure that you apply Patch Set Update 2 and the patches for bugs 8644757 and 7525072.
■ The database can also have the Automatic Memory Management (AMM) feature enabled.
■ Ensure that this database is dedicated to Enterprise Manager.
Table 6–2 (Cont.) Prerequisites for Installing Enterprise Manager Cloud Control
Requirement Description
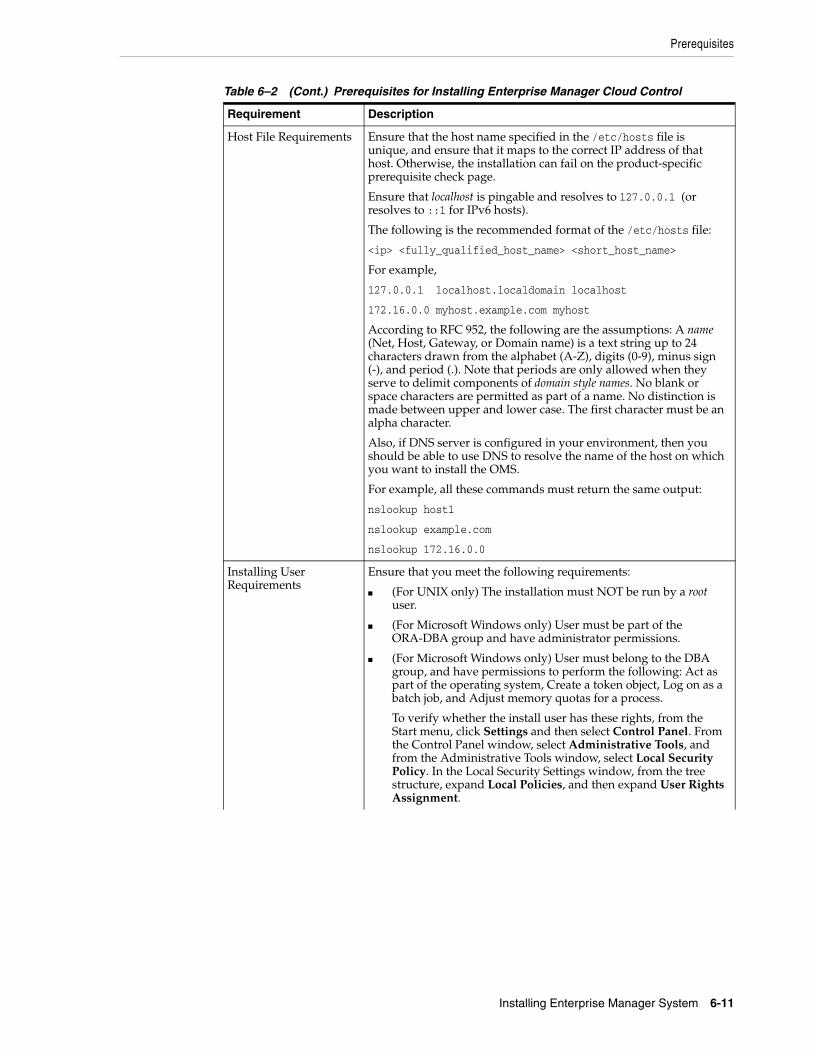
Prerequisites
Installing Enterprise Manager System 6-11
Host File Requirements Ensure that the host name specified in the /etc/hosts file is unique, and ensure that it maps to the correct IP address of that host. Otherwise, the installation can fail on the product-specific prerequisite check page.
Ensure that localhost is pingable and resolves to 127.0.0.1 (or resolves to ::1 for IPv6 hosts).
The following is the recommended format of the /etc/hosts file:
<ip> <fully_qualified_host_name> <short_host_name>
For example,
127.0.0.1 localhost.localdomain localhost
172.16.0.0 myhost.example.com myhost
According to RFC 952, the following are the assumptions: A name (Net, Host, Gateway, or Domain name) is a text string up to 24 characters drawn from the alphabet (A-Z), digits (0-9), minus sign (-), and period (.). Note that periods are only allowed when they serve to delimit components of domain style names. No blank or space characters are permitted as part of a name. No distinction is made between upper and lower case. The first character must be an alpha character.
Also, if DNS server is configured in your environment, then you should be able to use DNS to resolve the name of the host on which you want to install the OMS.
For example, all these commands must return the same output:
nslookup host1
nslookup example.com
nslookup 172.16.0.0
Installing User Requirements
Ensure that you meet the following requirements:
■ (For UNIX only) The installation must NOT be run by a root user.
■ (For Microsoft Windows only) User must be part of the ORA-DBA group and have administrator permissions.
■ (For Microsoft Windows only) User must belong to the DBA group, and have permissions to perform the following: Act as part of the operating system, Create a token object, Log on as a batch job, and Adjust memory quotas for a process.
To verify whether the install user has these rights, from the Start menu, click Settings and then select Control Panel. From the Control Panel window, select Administrative Tools, and from the Administrative Tools window, select Local Security Policy. In the Local Security Settings window, from the tree structure, expand Local Policies, and then expand User Rights Assignment.
Table 6–2 (Cont.) Prerequisites for Installing Enterprise Manager Cloud Control
Requirement Description
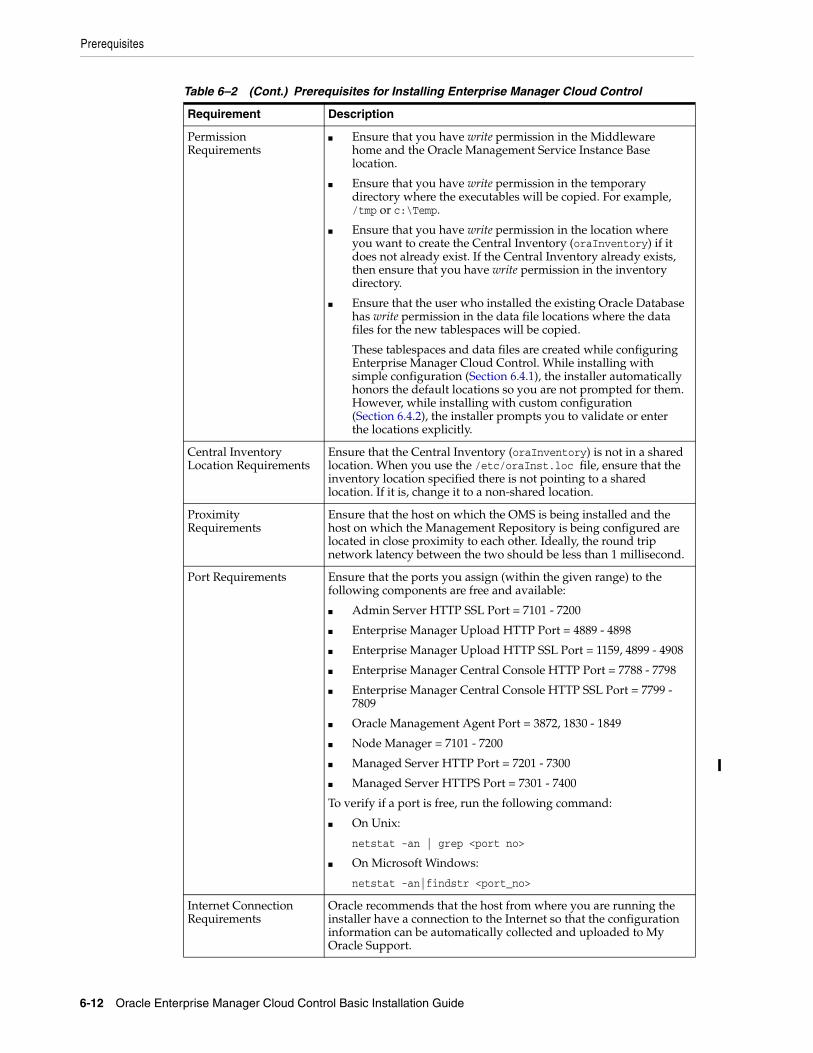
Prerequisites
6-12 Oracle Enterprise Manager Cloud Control Basic Installation Guide
Permission Requirements
■ Ensure that you have write permission in the Middleware home and the Oracle Management Service Instance Base location.
■ Ensure that you have write permission in the temporary directory where the executables will be copied. For example, /tmp or c:\Temp.
■ Ensure that you have write permission in the location where you want to create the Central Inventory (oraInventory) if it does not already exist. If the Central Inventory already exists, then ensure that you have write permission in the inventory directory.
■ Ensure that the user who installed the existing Oracle Database has write permission in the data file locations where the data files for the new tablespaces will be copied.
These tablespaces and data files are created while configuring Enterprise Manager Cloud Control. While installing with simple configuration (Section 6.4.1), the installer automatically honors the default locations so you are not prompted for them. However, while installing with custom configuration (Section 6.4.2), the installer prompts you to validate or enter the locations explicitly.
Central Inventory Location Requirements
Ensure that the Central Inventory (oraInventory) is not in a shared location. When you use the /etc/oraInst.loc file, ensure that the inventory location specified there is not pointing to a shared location. If it is, change it to a non-shared location.
Proximity Requirements
Ensure that the host on which the OMS is being installed and the host on which the Management Repository is being configured are located in close proximity to each other. Ideally, the round trip network latency between the two should be less than 1 millisecond.
Port Requirements Ensure that the ports you assign (within the given range) to the following components are free and available:
■ Admin Server HTTP SSL Port = 7101 - 7200
■ Enterprise Manager Upload HTTP Port = 4889 - 4898
■ Enterprise Manager Upload HTTP SSL Port = 1159, 4899 - 4908
■ Enterprise Manager Central Console HTTP Port = 7788 - 7798
■ Enterprise Manager Central Console HTTP SSL Port = 7799 - 7809
■ Oracle Management Agent Port = 3872, 1830 - 1849
■ Node Manager = 7101 - 7200
■ Managed Server HTTP Port = 7201 - 7300
■ Managed Server HTTPS Port = 7301 - 7400
To verify if a port is free, run the following command:
■ On Unix:
netstat -an | grep <port no>
■ On Microsoft Windows:
netstat -an|findstr <port_no>
Internet Connection Requirements
Oracle recommends that the host from where you are running the installer have a connection to the Internet so that the configuration information can be automatically collected and uploaded to My Oracle Support.
Table 6–2 (Cont.) Prerequisites for Installing Enterprise Manager Cloud Control
Requirement Description
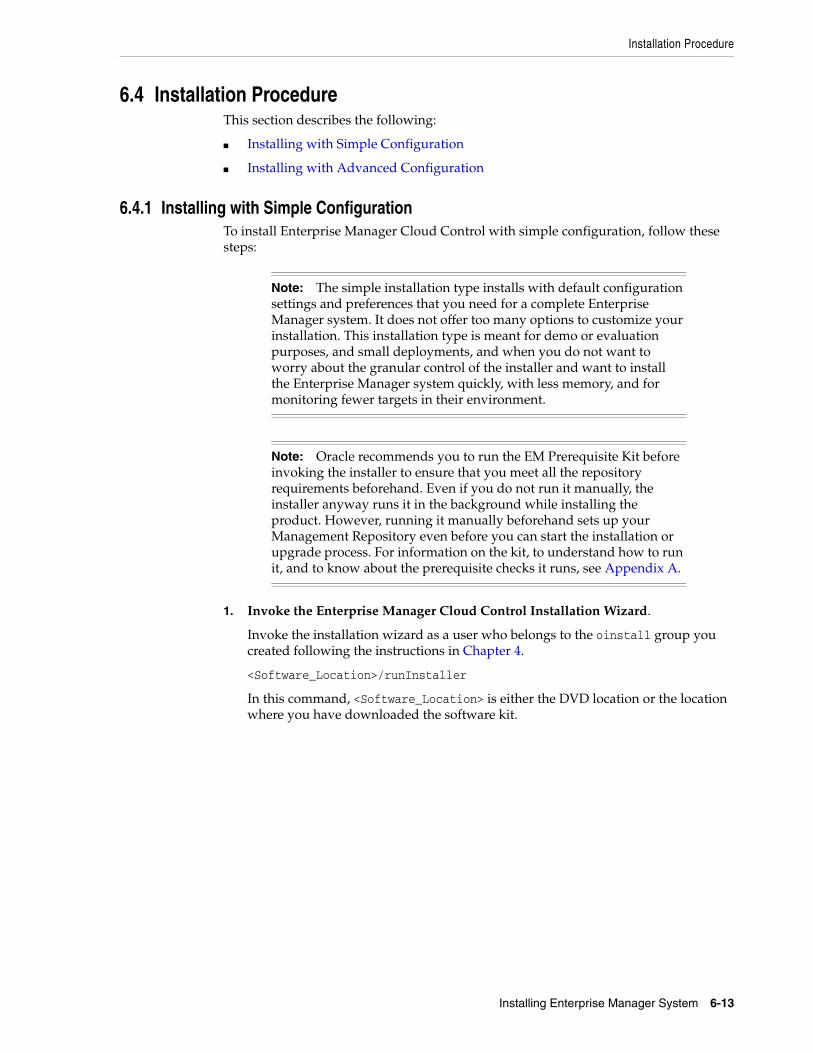
Installation Procedure
Installing Enterprise Manager System 6-13
6.4 Installation ProcedureThis section describes the following:
■ Installing with Simple Configuration
■ Installing with Advanced Configuration
6.4.1 Installing with Simple ConfigurationTo install Enterprise Manager Cloud Control with simple configuration, follow these steps:
1. Invoke the Enterprise Manager Cloud Control Installation Wizard.
Invoke the installation wizard as a user who belongs to the oinstall group you created following the instructions in Chapter 4.
<Software_Location>/runInstaller
In this command, <Software_Location> is either the DVD location or the location where you have downloaded the software kit.
Note: The simple installation type installs with default configuration settings and preferences that you need for a complete Enterprise Manager system. It does not offer too many options to customize your installation. This installation type is meant for demo or evaluation purposes, and small deployments, and when you do not want to worry about the granular control of the installer and want to install the Enterprise Manager system quickly, with less memory, and for monitoring fewer targets in their environment.
Note: Oracle recommends you to run the EM Prerequisite Kit before invoking the installer to ensure that you meet all the repository requirements beforehand. Even if you do not run it manually, the installer anyway runs it in the background while installing the product. However, running it manually beforehand sets up your Management Repository even before you can start the installation or upgrade process. For information on the kit, to understand how to run it, and to know about the prerequisite checks it runs, see Appendix A.
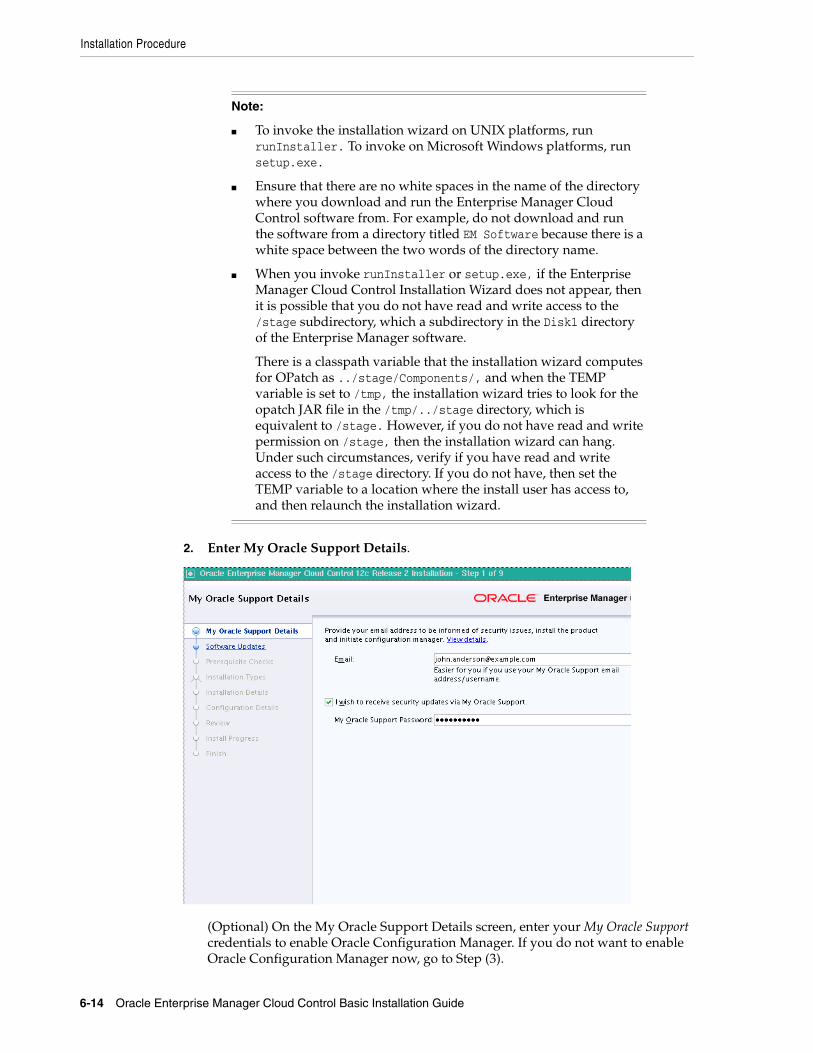
Installation Procedure
6-14 Oracle Enterprise Manager Cloud Control Basic Installation Guide
2. Enter My Oracle Support Details.
(Optional) On the My Oracle Support Details screen, enter your My Oracle Support credentials to enable Oracle Configuration Manager. If you do not want to enable Oracle Configuration Manager now, go to Step (3).
Note:
■ To invoke the installation wizard on UNIX platforms, run runInstaller. To invoke on Microsoft Windows platforms, run setup.exe.
■ Ensure that there are no white spaces in the name of the directory where you download and run the Enterprise Manager Cloud Control software from. For example, do not download and run the software from a directory titled EM Software because there is a white space between the two words of the directory name.
■ When you invoke runInstaller or setup.exe, if the Enterprise Manager Cloud Control Installation Wizard does not appear, then it is possible that you do not have read and write access to the /stage subdirectory, which a subdirectory in the Disk1 directory of the Enterprise Manager software.
There is a classpath variable that the installation wizard computes for OPatch as ../stage/Components/, and when the TEMP variable is set to /tmp, the installation wizard tries to look for the opatch JAR file in the /tmp/../stage directory, which is equivalent to /stage. However, if you do not have read and write permission on /stage, then the installation wizard can hang. Under such circumstances, verify if you have read and write access to the /stage directory. If you do not have, then set the TEMP variable to a location where the install user has access to, and then relaunch the installation wizard.

Installation Procedure
Installing Enterprise Manager System 6-15
If the host from where you are running the installation wizard does not have a connection to the Internet, then enter only the e-mail address and leave the other fields blank. After you complete the installation, manually collect the configuration information and upload it to My Oracle Support.
3. Click Next.
4. Install Software Updates.
On the Software Updates screen, select one of the following sources from where the software updates can be installed while the installation of the Enterprise Manager system is in progress. If you do not want to apply them now, then select Skip.
■ (Recommended) Select Search for Updates, then select Local Directory if you have already manually downloaded the software updates to an accessible local or remote location.
Enter the location where the updates are available, and click Search for Updates. To search the computer and select the location, click Browse. Once the search results appear with patch numbers and their details, click the patch number to view the ReadMe associated with that patch.
– If the updates have been downloaded to the default location, then select or enter the full path to the scratch path location. For example, if the scratch path location is /scratch/OracleHomes and if the software updates are available in /scratch/OracleHomes/Updates, then enter /scratch/OracleHomes/Updates.
Note: For instructions to manually download the software updates, refer to Oracle Enterprise Manager Cloud Control Advanced Installation and Configuration Guide.
Installation Procedure
6-16 Oracle Enterprise Manager Cloud Control Basic Installation Guide
– If the software updates have been downloaded to a custom location, then select or enter the full path to the custom location. For example, if the custom location is /home/john and if the software updates are available in /home/john/Updates, then enter /home/john/Updates.
■ Select Search for Updates, then select My Oracle Support if you want the installer to connect to My Oracle Support and automatically download the updates from there.
Enter the My Oracle Support account user name and password, and click Search for Updates. Once the search results appear with patch numbers and their details, click the patch number to view the ReadMe associated with that patch
5. Click Next.
If Enterprise Manager Cloud Control is the first Oracle product you are installing on the host that is running on UNIX operating system, then the Oracle Inventory screen appears. For details, see step (6). Otherwise, the Check Prerequisites screen appears. For details, see step (8).
If Enterprise Manager Cloud Control is the first Oracle product you are installing on the host that is running on Microsoft Windows operating system, then the Oracle Inventory screen does not appear. On Microsoft Windows, the following is the default inventory directory:
<system drive>\Program Files\Oracle\Inventory
6. Enter Oracle Inventory Details.
On the Oracle Inventory screen, do the following. You will see this screen only if this turns out to be your first ever installation of an Oracle product on the host.
a. Enter the full path to a directory where the inventory files and directories can be placed.
Note: Despite providing the My Oracle Support credentials, if you are unable to download the software updates, then exit the installer, and invoke the installer again passing the -showProxy parameter in the following way:
<Software_Location>/runInstaller -showProxy
Note: If you choose to skip installing the software updates during installation by not providing the My Oracle Support credentials, you can always register the credentials later using the Enterprise Manager Cloud Control console and view the recommended security patches. To do so, log in to Enterprise Manager Cloud Control, and from the Setup menu, select My Oracle Support, then click Set Credentials. On the My Oracle Support Preferred Credentials page, enter the credentials and click Apply.
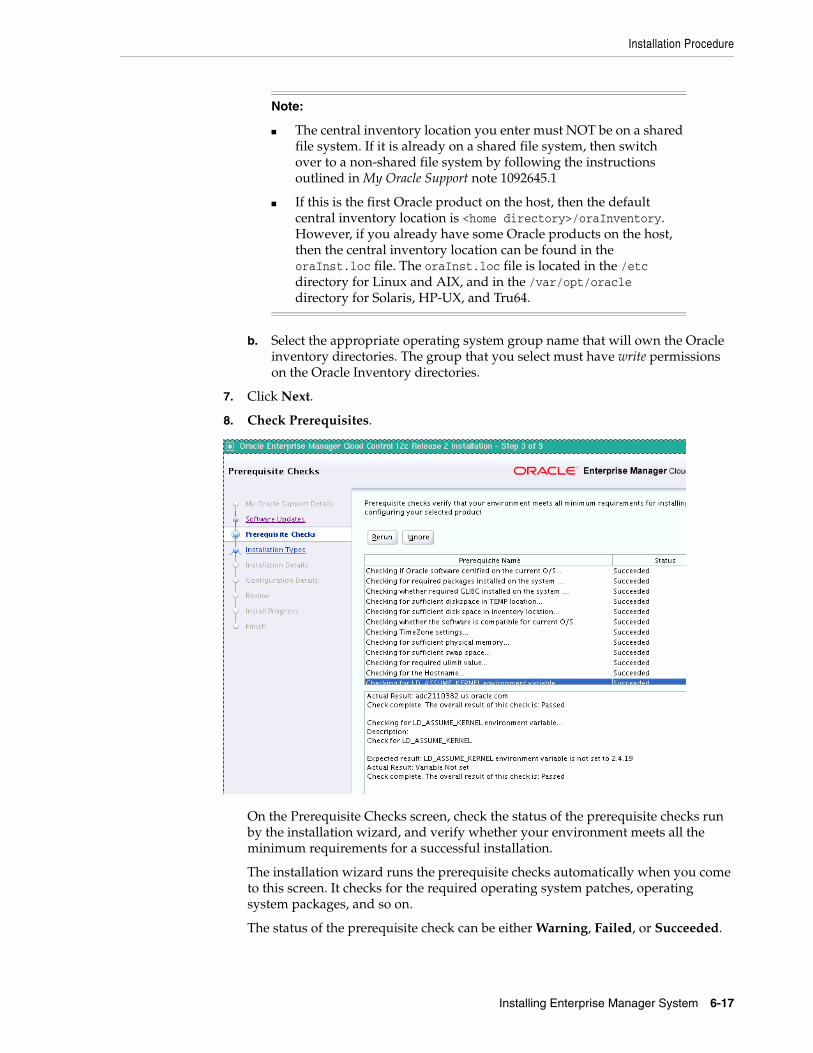
Installation Procedure
Installing Enterprise Manager System 6-17
b. Select the appropriate operating system group name that will own the Oracle inventory directories. The group that you select must have write permissions on the Oracle Inventory directories.
7. Click Next.
8. Check Prerequisites.
On the Prerequisite Checks screen, check the status of the prerequisite checks run by the installation wizard, and verify whether your environment meets all the minimum requirements for a successful installation.
The installation wizard runs the prerequisite checks automatically when you come to this screen. It checks for the required operating system patches, operating system packages, and so on.
The status of the prerequisite check can be either Warning, Failed, or Succeeded.
Note:
■ The central inventory location you enter must NOT be on a shared file system. If it is already on a shared file system, then switch over to a non-shared file system by following the instructions outlined in My Oracle Support note 1092645.1
■ If this is the first Oracle product on the host, then the default central inventory location is <home directory>/oraInventory. However, if you already have some Oracle products on the host, then the central inventory location can be found in the oraInst.loc file. The oraInst.loc file is located in the /etc directory for Linux and AIX, and in the /var/opt/oracle directory for Solaris, HP-UX, and Tru64.

Installation Procedure
6-18 Oracle Enterprise Manager Cloud Control Basic Installation Guide
■ If some checks result in Warning or Failed status, then investigate and correct the problems before you proceed with the installation. The screen provides details on why the prerequisites failed and how you can resolve them. After you correct the problems, return to this screen and click Rerun to check the prerequisites again.
■ However, all package requirements must be met or fixed before proceeding any further. Otherwise, the installation might fail.
9. Click Next.
10. Select Installation Type.
On the Installation Types screen, select Create a New Enterprise Manager System, then select Simple.
11. Click Next.
12. Enter Installation Details.
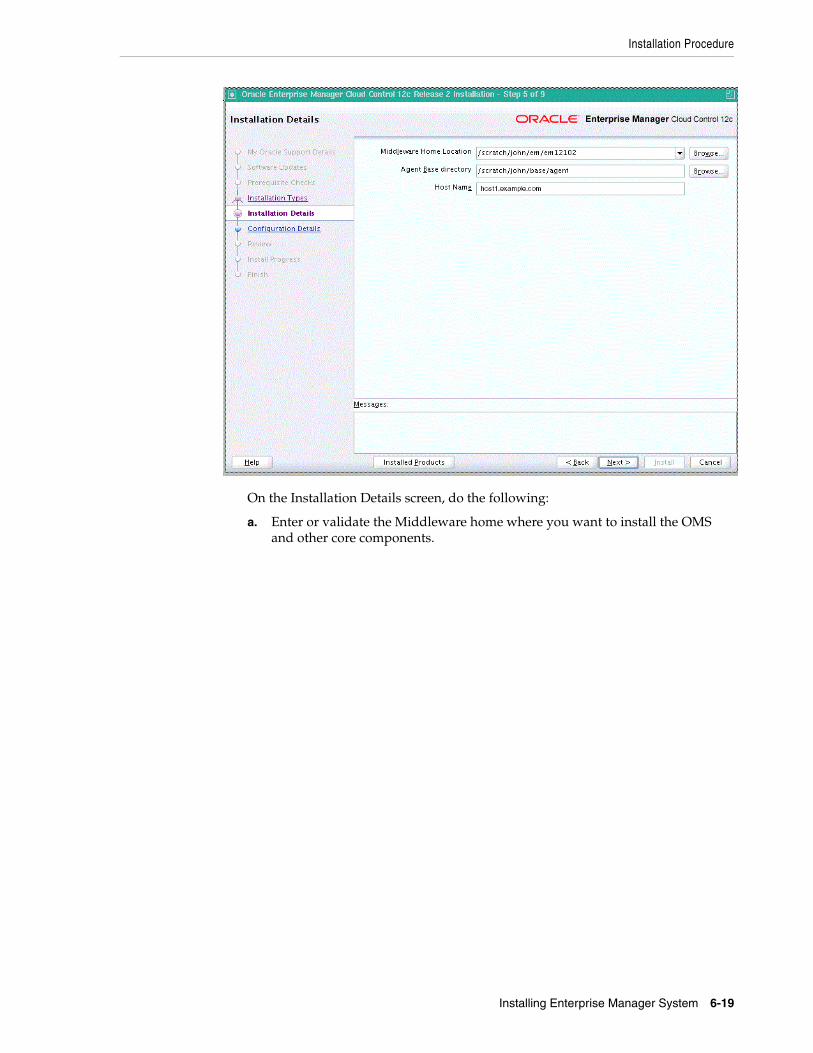
Installation Procedure
Installing Enterprise Manager System 6-19
On the Installation Details screen, do the following:
a. Enter or validate the Middleware home where you want to install the OMS and other core components.
Installation Procedure
6-20 Oracle Enterprise Manager Cloud Control Basic Installation Guide
b. Enter the absolute path to the agent base directory, a location outside the Oracle Middleware home where the Management Agent can be installed. For example, /oracle/agent. Ensure that this location is empty and has write permission. Also ensure that it is always maintained outside the Oracle Middleware home.
c. Validate the name of the host where you want to configure the OMS.
The host name appears as a fully qualified name. The host name can also appear as a virtual host name if your host is configured with virtual machine.
You can choose to accept the default host name and proceed with the installation. Alternatively, you can change the name if it is incorrect, or enter another host name for this host. Ensure that the host name you enter is
Note:
■ If you have Oracle WebLogic Server and Java Development Kit already installed, then ensure that they are of the supported releases—Oracle WebLogic Server 11g Release 1 (10.3.5) and JDK 1.6 v24+. If you have the supported releases, the installer automatically detects them and displays the absolute path to the Middleware home where they are installed. In this case, validate the Middleware home. If the location is incorrect, then enter the path to the correct location. Ensure that the Middleware home you select or enter is a Middleware home that does not have any Oracle homes for Oracle Management Service and Oracle Management Agent.
■ If you do not have Oracle WebLogic Server 11g Release 1 (10.3.5) and JDK 1.6 v24+, then the installer automatically installs them for you while installing the Enterprise Manager system. In this case, enter the absolute path to a directory where you want to have them installed. For example, /oracle/software/. Ensure that the directory you enter does not contain any files or subdirectories.
■ If you want to manually install Oracle WebLogic Server 11g Release 1 (10.3.5), then follow the guidelines outlined in Section 6.2.
■ (Only for Microsoft Windows) Ensure that the number of characters in the middleware home path does not exceed 25 characters.
For example, the middleware home path C:\Oracle\MW\EM containing only 15 characters is acceptable. However, C:\Oracle\MW\new\EM\dir\a123 containing more than 25 characters is not acceptable.
Note: (Only for Microsoft Windows) Ensure that the number of characters in the agent base directory path does not exceed 25 characters.
For example, the agent base directory path C:\Oracle\Agent\ containing only 16 characters is acceptable. However, C:\Oracle\ManagementAgent\12c\new containing more than 25 characters is not acceptable.
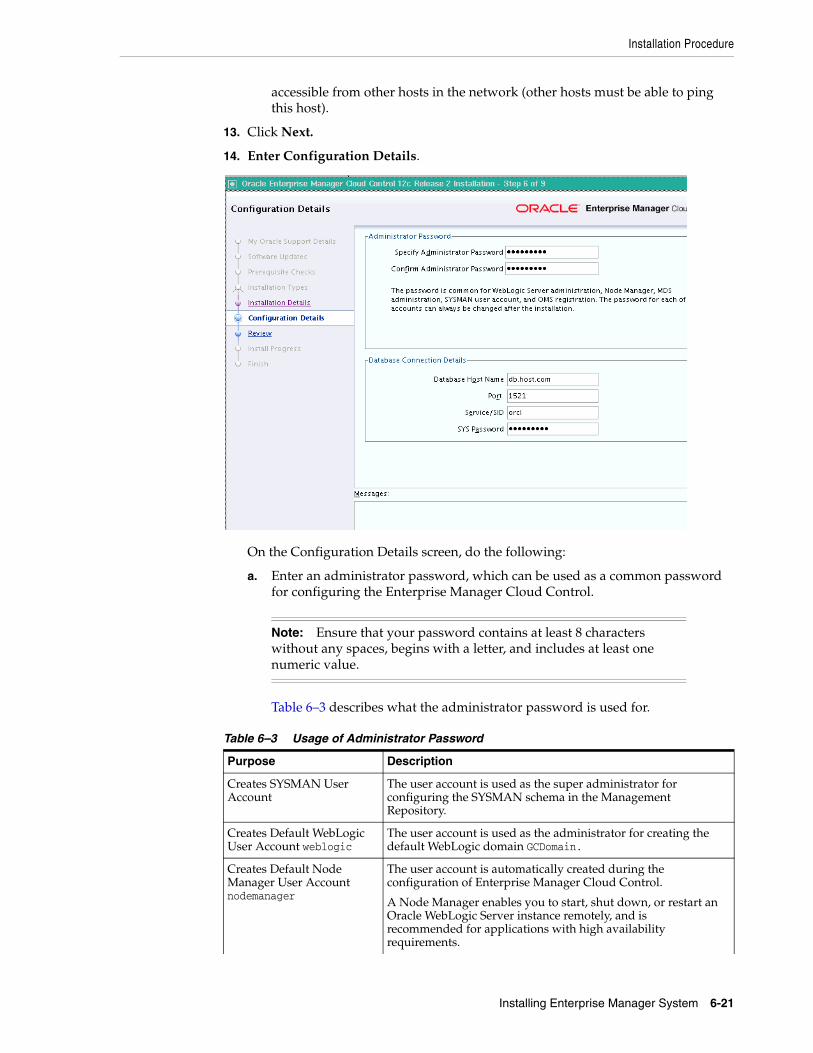
Installation Procedure
Installing Enterprise Manager System 6-21
accessible from other hosts in the network (other hosts must be able to ping this host).
13. Click Next.
14. Enter Configuration Details.
On the Configuration Details screen, do the following:
a. Enter an administrator password, which can be used as a common password for configuring the Enterprise Manager Cloud Control.
Table 6–3 describes what the administrator password is used for.
Note: Ensure that your password contains at least 8 characters without any spaces, begins with a letter, and includes at least one numeric value.
Table 6–3 Usage of Administrator Password
Purpose Description
Creates SYSMAN User Account
The user account is used as the super administrator for configuring the SYSMAN schema in the Management Repository.
Creates Default WebLogic User Account weblogic
The user account is used as the administrator for creating the default WebLogic domain GCDomain.
Creates Default Node Manager User Account nodemanager
The user account is automatically created during the configuration of Enterprise Manager Cloud Control.
A Node Manager enables you to start, shut down, or restart an Oracle WebLogic Server instance remotely, and is recommended for applications with high availability requirements.
Installation Procedure
6-22 Oracle Enterprise Manager Cloud Control Basic Installation Guide
b. Provide details of the existing, certified database where the Management Repository needs to be created. If you have already created a database instance with a preconfigured Management Repository using the database templates offered by Oracle, then provide details about that database instance.
The installer uses this information to connect to the existing database for creating the SYSMAN schema and plug-in schemas. If you provide details of a database that already has a preconfigured Management Repository, then the installer only creates plug-in schemas.
15. Click Next.
Authenticates New Management Agents
The agent registration password is used for authenticating new Management Agents that join Enterprise Manager system, where the communication between the OMS and the Management Agent is secure.
Note:
■ For information about creating a database instance with a preconfigured Management Repository using the database templates offered by Oracle, refer to Appendix D.
■ If you connect to a database instance that was created using the database template offered by Oracle, then the password assigned to user accounts SYSMAN, SYSMAN_MDS, SYSMAN_APM, and SYSMAN_OPSS, which were created while preconfiguring the Management Repository, are automatically reset with the administrator password you enter here on this screen. We also unlock all these user accounts.
■ To identify whether your database is a certified database listed in the certification matrix, follow the steps outlined in Appendix E.
■ Oracle Real Application Cluster (Oracle RAC) nodes are referred to by their virtual IP (vip) names. The service_name parameter is used instead of the system identifier (SID) in connect_data mode, and failover is turned on. For more information, refer to Oracle Database Net Services Administrator's Guide.
■ If any repository-related prerequisite check fails, see Appendix A to manually run the prerequisite check.
Table 6–3 (Cont.) Usage of Administrator Password
Purpose Description
Installation Procedure
Installing Enterprise Manager System 6-23
16. Review and Install
On the Review screen, review the details you provided for the selected installation type.
■ If you want to change the details, click Back repeatedly until you reach the screen where you want to make the changes.
■ After you verify the details, if you are satisfied, click Install to begin the installation process.
17. Track the Progress
On the Install Progress screen, view the overall progress (in percentage) of the installation and the status of each of the configuration assistants. Configuration assistants are run for configuring the installed components of Enterprise Manager Cloud Control.
Note:
■ If you are connecting to an Oracle RAC database, and if you have specified the virtual IP address of one of its nodes, then the installation wizard prompts you with a Connection String dialog and requests you to update the connection string with information about the other nodes that are part of the cluster. Update the connection string and click OK. If you want to test the connection, click Test Connection.
■ If your Oracle RAC database is configured with Single Client Access Name (SCAN) listener, then you can enter a connection string using the SCAN listener.
■ Oracle Real Application Cluster (Oracle RAC) nodes are referred to by their virtual IP (vip) names. The service_name parameter is used instead of the system identifier (SID) in connect_data mode, and failover is turned on. For more information, refer to Oracle Database Net Services Administrator's Guide.
■ If you see an error stating that the connection to the database failed with ORA-01017 invalid user name/password, then follow these steps to resolve the issue:
(1) Verify that SYS password provided is valid.
(2) Verify that the database initialization parameter REMOTE_LOGIN_PASSWORDFILE is set to Shared or Exclusive.
(3) Verify that password file with the file name orapw<SID> exists in the <ORACLE_HOME>/dbs directory of the database home. If it does not, create a password file using the ORAPWD command.
Installation Procedure
6-24 Oracle Enterprise Manager Cloud Control Basic Installation Guide
18. Run Scripts
Once the software binaries are copied and configured, you are prompted to run the allroot.sh script, and the oraInstRoot.sh script if this is the first Oracle product installation on the host. Open another window, log in as root, and manually run the scripts.
If you are installing on Microsoft Windows operating system, then you will NOT be prompted to run this script.
19. End the Installation
On the Finish screen, you should see information pertaining to the installation of Enterprise Manager. Review the information and click Close to exit the installation wizard.
For more information about this installation, refer to the following file in the OMS home:
$<OMS_HOME>/install/setupinfo.txt
Note:
■ If a configuration assistant fails, the installer stops and none of the subsequent configuration assistants are run. Resolve the issue and retry the configuration assistant.
For more information, see the appendix on troubleshooting tips in the Oracle Enterprise Manager Cloud Control Advanced Installation and Configuration Guide.
■ If you accidently exit the installer before clicking Retry, then do NOT restart the installer to reach the same screen; instead, invoke the runConfig.sh script from the OMS home to rerun the Configuration Assistant in silent mode. For Microsoft Windows platforms, invoke runConfig.bat script.
$<OMS_HOME>/oui/bin/runConfig.sh ORACLE_HOME=<absolute_path_to_OMS_home> MODE=perform ACTION=configure COMPONENT_XML={encap_oms.1_0_0_0_0.xml}
If the runConfig.sh script fails, then clean up your environment and redo the installation.
Note: If the installation fails for some reason, review the log files listed in Oracle Enterprise Manager Cloud Control Advanced Installation and Configuration Guide.
Installation Procedure
Installing Enterprise Manager System 6-25
6.4.2 Installing with Advanced ConfigurationTo install Enterprise Manager Cloud Control with advanced configuration, follow these steps:
1. Invoke the Enterprise Manager Cloud Control Installation Wizard.
Invoke the installation wizard as a user who belongs to the oinstall group you created following the instructions in Chapter 4.
<Software_Location>/runInstaller
In this command, <Software_Location> is either the DVD location or the location where you have downloaded the software kit.
Note: If you have run the installation wizard and let the installation wizard take corrective actions to correct the repository settings, and if you have exited the wizard without completing the installation process, then remember that the repository settings might not reset to their original values because you abruptly ended the installation. In this case, before invoking the installation wizard again, run the following command to manually reset the values.
<Software_Location>/install/requisites/bin/emprereqkit -executionType install -prerequisiteXMLLoc <prereq_xml_location> -connectString <connect_string> -dbUser SYS -dbPassword <db_password> -reposUser sysman -reposPassword <repo_user_password> -dbRole sysdba -runPrerequisites -runPostCorrectiveActions -useHistory
Note: Oracle recommends you to run the EM Prerequisite Kit before invoking the installer to ensure that you meet all the repository requirements beforehand. Even if you do not run it manually, the installer anyway runs it in the background while installing the product. However, running it manually beforehand sets up your Management Repository even before you can start the installation or upgrade process. For information on the kit, to understand how to run it, and to know about the prerequisite checks it runs, see Appendix A.
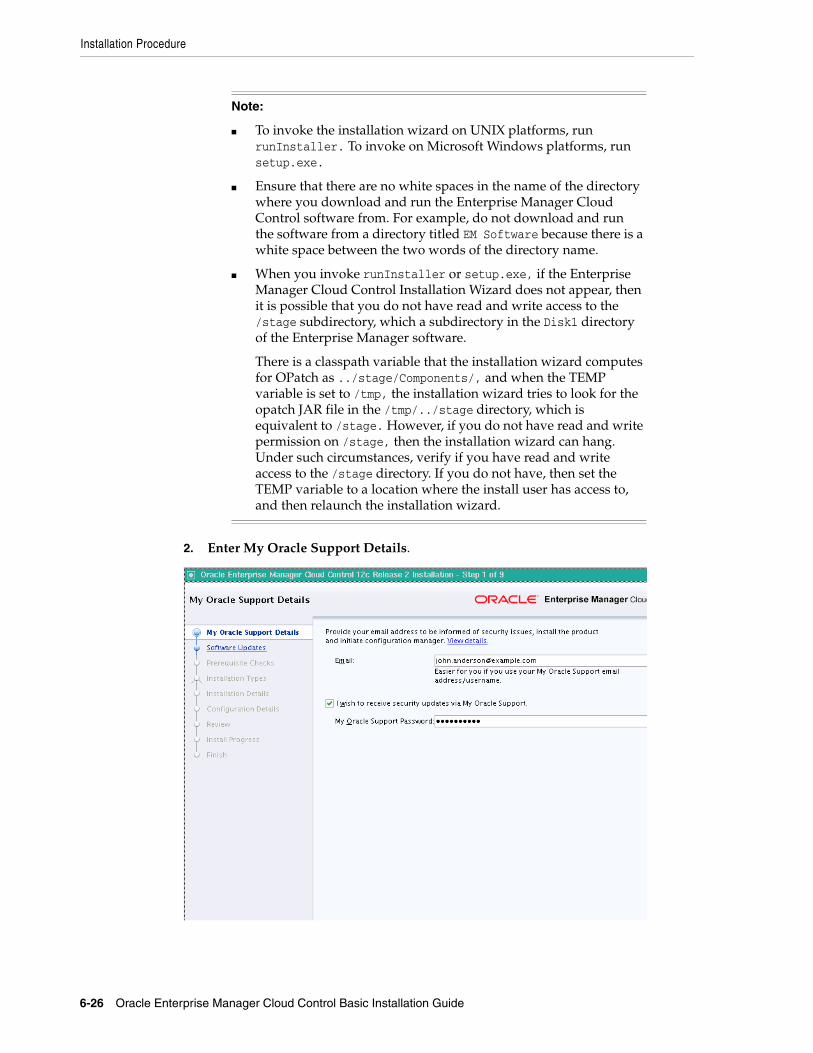
Installation Procedure
6-26 Oracle Enterprise Manager Cloud Control Basic Installation Guide
2. Enter My Oracle Support Details.
Note:
■ To invoke the installation wizard on UNIX platforms, run runInstaller. To invoke on Microsoft Windows platforms, run setup.exe.
■ Ensure that there are no white spaces in the name of the directory where you download and run the Enterprise Manager Cloud Control software from. For example, do not download and run the software from a directory titled EM Software because there is a white space between the two words of the directory name.
■ When you invoke runInstaller or setup.exe, if the Enterprise Manager Cloud Control Installation Wizard does not appear, then it is possible that you do not have read and write access to the /stage subdirectory, which a subdirectory in the Disk1 directory of the Enterprise Manager software.
There is a classpath variable that the installation wizard computes for OPatch as ../stage/Components/, and when the TEMP variable is set to /tmp, the installation wizard tries to look for the opatch JAR file in the /tmp/../stage directory, which is equivalent to /stage. However, if you do not have read and write permission on /stage, then the installation wizard can hang. Under such circumstances, verify if you have read and write access to the /stage directory. If you do not have, then set the TEMP variable to a location where the install user has access to, and then relaunch the installation wizard.
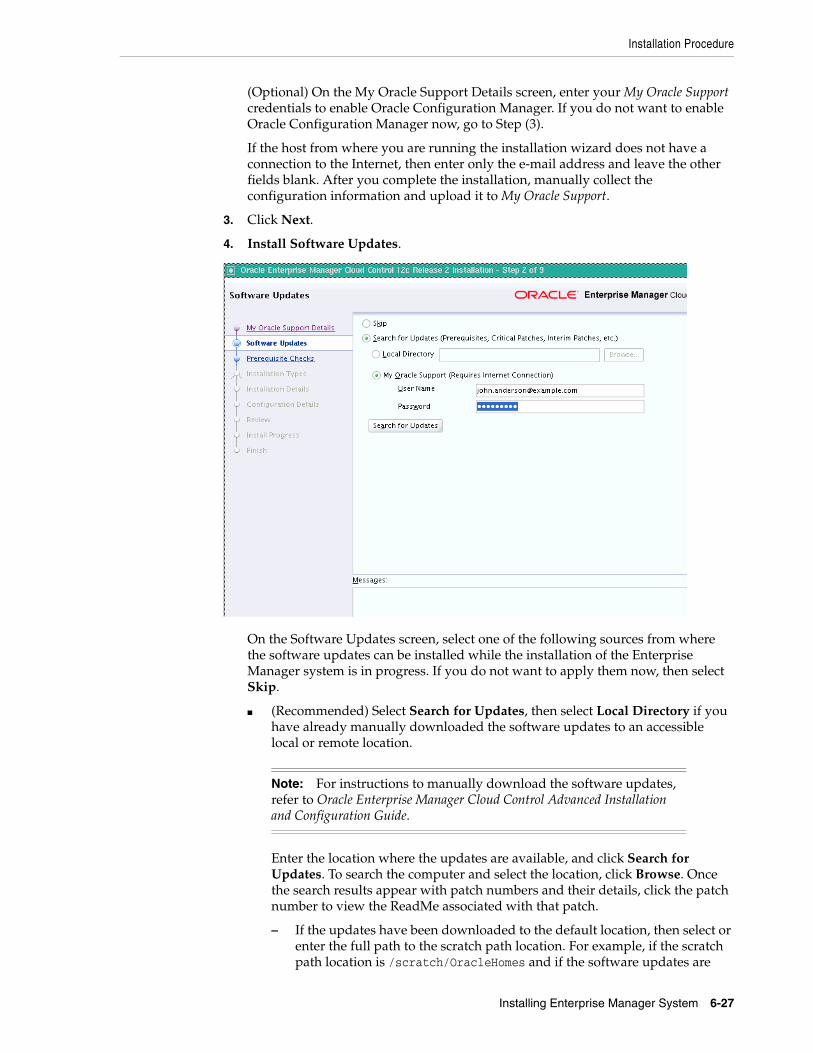
Installation Procedure
Installing Enterprise Manager System 6-27
(Optional) On the My Oracle Support Details screen, enter your My Oracle Support credentials to enable Oracle Configuration Manager. If you do not want to enable Oracle Configuration Manager now, go to Step (3).
If the host from where you are running the installation wizard does not have a connection to the Internet, then enter only the e-mail address and leave the other fields blank. After you complete the installation, manually collect the configuration information and upload it to My Oracle Support.
3. Click Next.
4. Install Software Updates.
On the Software Updates screen, select one of the following sources from where the software updates can be installed while the installation of the Enterprise Manager system is in progress. If you do not want to apply them now, then select Skip.
■ (Recommended) Select Search for Updates, then select Local Directory if you have already manually downloaded the software updates to an accessible local or remote location.
Enter the location where the updates are available, and click Search for Updates. To search the computer and select the location, click Browse. Once the search results appear with patch numbers and their details, click the patch number to view the ReadMe associated with that patch.
– If the updates have been downloaded to the default location, then select or enter the full path to the scratch path location. For example, if the scratch path location is /scratch/OracleHomes and if the software updates are
Note: For instructions to manually download the software updates, refer to Oracle Enterprise Manager Cloud Control Advanced Installation and Configuration Guide.
Installation Procedure
6-28 Oracle Enterprise Manager Cloud Control Basic Installation Guide
available in /scratch/OracleHomes/Updates, then enter /scratch/OracleHomes/Updates.
– If the software updates have been downloaded to a custom location, then select or enter the full path to the custom location. For example, if the custom location is /home/john and if the software updates are available in /home/john/Updates, then enter /home/john/Updates.
■ Select Search for Updates, then select My Oracle Support if you want the installer to connect to My Oracle Support and automatically download the updates from there.
Enter the My Oracle Support account user name and password, and click Search for Updates. Once the search results appear with patch numbers and their details, click the patch number to view the ReadMe associated with that patch
5. Click Next.
If Enterprise Manager Cloud Control is the first Oracle product you are installing on the host that is running on UNIX operating system, then the Oracle Inventory screen appears. For details, see step (6). Otherwise, the Check Prerequisites screen appears. For details, see step (8).
If Enterprise Manager Cloud Control is the first Oracle product you are installing on the host that is running on Microsoft Windows operating system, then the Oracle Inventory screen does not appear. On Microsoft Windows, the following is the default inventory directory:
<system drive>\Program Files\Oracle\Inventory
6. Enter Oracle Inventory Details.
On the Oracle Inventory screen, do the following. You will see this screen only if this turns out to be your first ever installation of an Oracle product on the host.
a. Enter the full path to a directory where the inventory files and directories can be placed.
Note: If you choose to skip installing the software updates during installation by not providing the My Oracle Support credentials, you can always register the credentials later using the Enterprise Manager Cloud Control console and view the recommended security patches. To do so, in Cloud Control, from the Setup menu, select Security, then click Preferred Credentials. On the Preferred Credentials page, click Set MOS Credentials and register the credentials.
Note: Despite providing the My Oracle Support credentials, if you are unable to download the software updates, then exit the installer, and invoke the installer again passing the -showProxy parameter in the following way:
<Software_Location>/runInstaller -showProxy
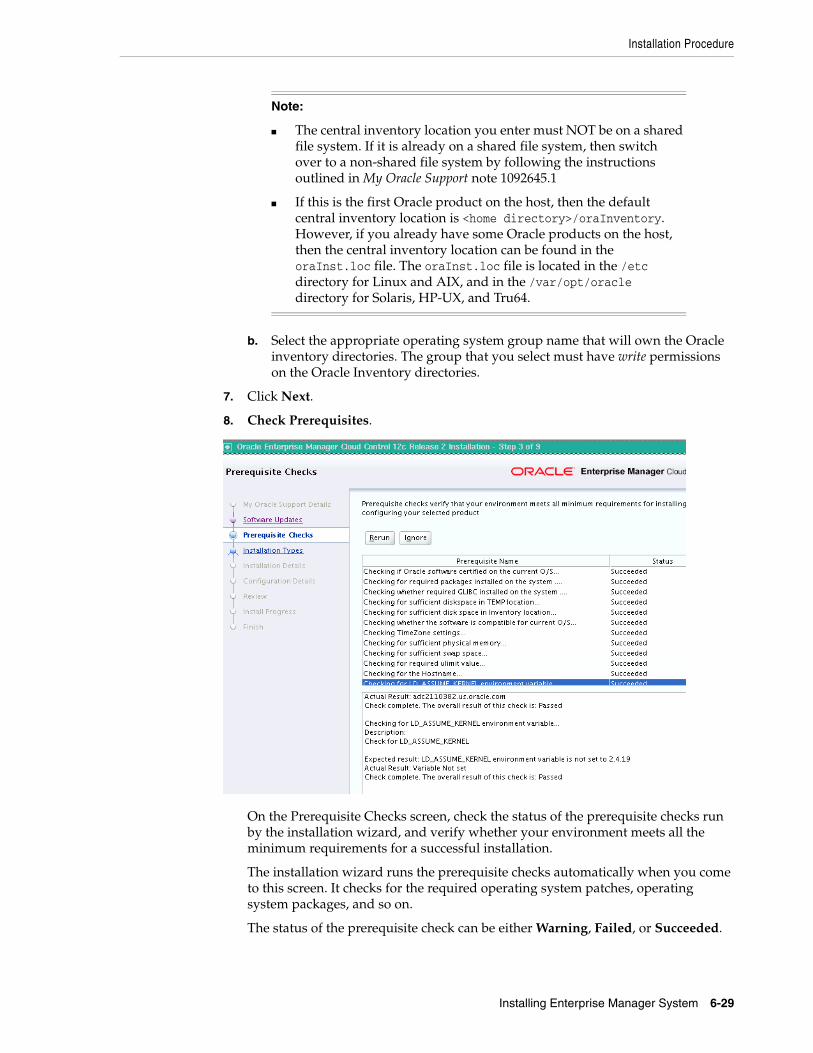
Installation Procedure
Installing Enterprise Manager System 6-29
b. Select the appropriate operating system group name that will own the Oracle inventory directories. The group that you select must have write permissions on the Oracle Inventory directories.
7. Click Next.
8. Check Prerequisites.
On the Prerequisite Checks screen, check the status of the prerequisite checks run by the installation wizard, and verify whether your environment meets all the minimum requirements for a successful installation.
The installation wizard runs the prerequisite checks automatically when you come to this screen. It checks for the required operating system patches, operating system packages, and so on.
The status of the prerequisite check can be either Warning, Failed, or Succeeded.
Note:
■ The central inventory location you enter must NOT be on a shared file system. If it is already on a shared file system, then switch over to a non-shared file system by following the instructions outlined in My Oracle Support note 1092645.1
■ If this is the first Oracle product on the host, then the default central inventory location is <home directory>/oraInventory. However, if you already have some Oracle products on the host, then the central inventory location can be found in the oraInst.loc file. The oraInst.loc file is located in the /etc directory for Linux and AIX, and in the /var/opt/oracle directory for Solaris, HP-UX, and Tru64.

Installation Procedure
6-30 Oracle Enterprise Manager Cloud Control Basic Installation Guide
If some checks result in Warning or Failed status, then investigate and correct the problems before you proceed with the installation. The screen provides details on why the prerequisites failed and how you can resolve them. After you correct the problems, return to this screen and click Rerun to check the prerequisites again.
9. Click Next.
10. Select Installation Type.
On the Installation Types screen, select Create a New Enterprise Manager System, then select Advanced.
11. Click Next.
12. Enter Installation Details.
Note: You can choose to ignore the checks with Warning status by clicking Ignore. However, all package requirements must be met or fixed before proceeding any further.

Installation Procedure
Installing Enterprise Manager System 6-31
On the Installation Details screen, do the following:
a. Enter or validate the Middleware home where you want to install the OMS and other core components.
Installation Procedure
6-32 Oracle Enterprise Manager Cloud Control Basic Installation Guide
b. Enter the absolute path to the agent base directory, a location outside the Oracle Middleware home where the Management Agent can be installed. For example, /oracle/agent. Ensure that this location is empty and has write permission. Also ensure that it is always maintained outside the Oracle Middleware home.
c. Validate the name of the host where you want to configure the OMS.
The host name appears as a fully qualified name. The host name can also appear as a virtual host name if your host is configured with virtual machine.
You can choose to accept the default host name and proceed with the installation. Alternatively, you can change the name if it is incorrect, or enter another host name for this host. Ensure that the host name you enter is
Note:
■ If you have Oracle WebLogic Server and Java Development Kit already installed, then ensure that they are of the supported releases—Oracle WebLogic Server 11g Release 1 (10.3.5) and JDK 1.6 v24+. If you have the supported releases, the installer automatically detects them and displays the absolute path to the Middleware home where they are installed. In this case, validate the Middleware home. If the location is incorrect, then enter the path to the correct location. Ensure that the Middleware home you select or enter is a Middleware home that does not have any Oracle homes for Oracle Management Service and Oracle Management Agent.
■ If you do not have Oracle WebLogic Server 11g Release 1 (10.3.5) and JDK 1.6 v24+, then the installer automatically installs them for you while installing the Enterprise Manager system. In this case, enter the absolute path to a directory where you want to have them installed. For example, /oracle/software/. Ensure that the directory you enter does not contain any files or subdirectories.
■ If you manually install Oracle WebLogic Server 11g Release 1 (10.3.5), then follow the guidelines outlined in Section 6.2.
■ (Only for Microsoft Windows) Ensure that the number of characters in the middleware home path does not exceed 25 characters.
For example, the middleware home path C:\Oracle\MW\EM containing only 15 characters is acceptable. However, C:\Oracle\MW\new\EM\dir\a123 containing more than 25 characters is not acceptable.
Note: (Only for Microsoft Windows) Ensure that the number of characters in the agent base directory path does not exceed 25 characters.
For example, the agent base directory path C:\Oracle\Agent\ containing only 16 characters is acceptable. However, C:\Oracle\ManagementAgent\12c\new containing more than 25 characters is not acceptable.
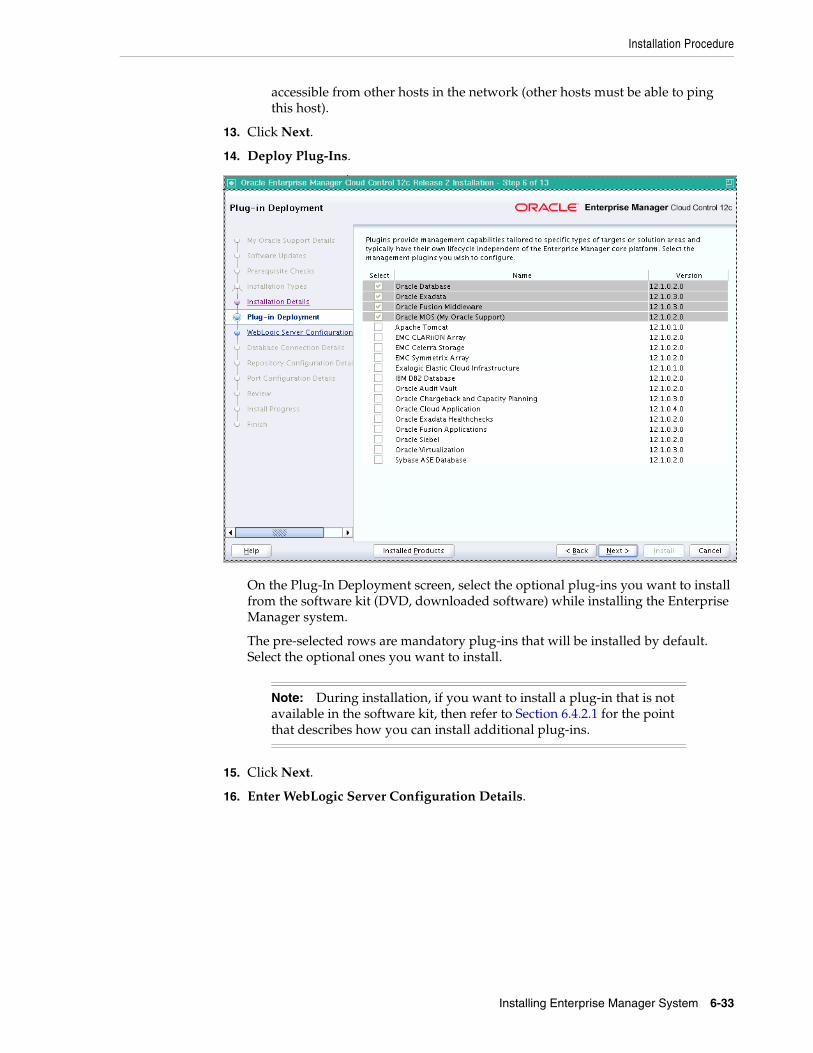
Installation Procedure
Installing Enterprise Manager System 6-33
accessible from other hosts in the network (other hosts must be able to ping this host).
13. Click Next.
14. Deploy Plug-Ins.
On the Plug-In Deployment screen, select the optional plug-ins you want to install from the software kit (DVD, downloaded software) while installing the Enterprise Manager system.
The pre-selected rows are mandatory plug-ins that will be installed by default. Select the optional ones you want to install.
15. Click Next.
16. Enter WebLogic Server Configuration Details.
Note: During installation, if you want to install a plug-in that is not available in the software kit, then refer to Section 6.4.2.1 for the point that describes how you can install additional plug-ins.
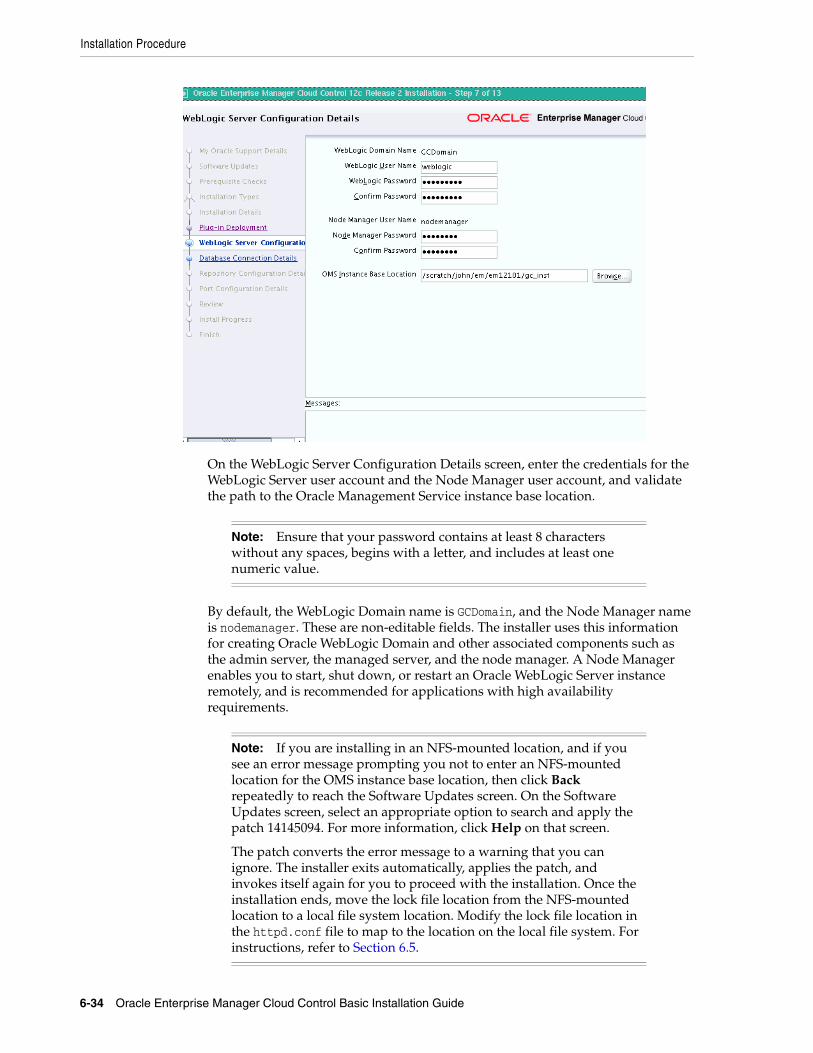
Installation Procedure
6-34 Oracle Enterprise Manager Cloud Control Basic Installation Guide
On the WebLogic Server Configuration Details screen, enter the credentials for the WebLogic Server user account and the Node Manager user account, and validate the path to the Oracle Management Service instance base location.
By default, the WebLogic Domain name is GCDomain, and the Node Manager name is nodemanager. These are non-editable fields. The installer uses this information for creating Oracle WebLogic Domain and other associated components such as the admin server, the managed server, and the node manager. A Node Manager enables you to start, shut down, or restart an Oracle WebLogic Server instance remotely, and is recommended for applications with high availability requirements.
Note: Ensure that your password contains at least 8 characters without any spaces, begins with a letter, and includes at least one numeric value.
Note: If you are installing in an NFS-mounted location, and if you see an error message prompting you not to enter an NFS-mounted location for the OMS instance base location, then click Back repeatedly to reach the Software Updates screen. On the Software Updates screen, select an appropriate option to search and apply the patch 14145094. For more information, click Help on that screen.
The patch converts the error message to a warning that you can ignore. The installer exits automatically, applies the patch, and invokes itself again for you to proceed with the installation. Once the installation ends, move the lock file location from the NFS-mounted location to a local file system location. Modify the lock file location in the httpd.conf file to map to the location on the local file system. For instructions, refer to Section 6.5.

Installation Procedure
Installing Enterprise Manager System 6-35
17. Click Next.
18. Enter Database Connection Details.
On the Database Connection Details screen, do the following:
a. Provide details of the existing, certified database where the Management Repository needs to be created. If you have already created a database instance with a preconfigured Management Repository using the database templates offered by Oracle, then provide details about that database instance.
The installer uses this information to connect to the existing database for creating the SYSMAN schema and plug-in schemas. If you provide details of a database that already has a preconfigured Management Repository, then the installer only creates plug-in schemas.
Note:
■ If you connect to a database instance that was created using the database template offered by Oracle, then note that the password assigned to the user accounts SYSMAN_MDS, SYSMAN_APM, and SYSMAN_OPSS, which were created while preconfiguring the Management Repository, are automatically reset with the SYSMAN password you enter on the Repository Configuration Details screen (as described in Step (20)).
■ Oracle Real Application Cluster (Oracle RAC) nodes are referred to by their virtual IP (vip) names. The service_name parameter is used instead of the system identifier (SID) in connect_data mode, and failover is turned on. For more information, refer to Oracle Database Net Services Administrator's Guide.

Installation Procedure
6-36 Oracle Enterprise Manager Cloud Control Basic Installation Guide
b. Select the deployment size from the Deployment Size list to indicate the number of targets you plan to monitor, the number Management Agents you plan to have, and the number of concurrent user sessions you plan have.
Table 6–4 describes each deployment size.
For more information on deployment sizes, the prerequisite checks that are run, the database parameters that are set, and how you can modify the deployment size after installation, refer to Oracle Enterprise Manager Cloud Control Advanced Installation and Configuration Guide.
19. Click Next.
Table 6–4 Deployment Size
Deployment Size Targets CountManagement Agents Count
Concurrent User Session Count
Small Up to 999 Up to 99 Up to 10
Medium Between 1000 and 9999
Between 100 and 999 Between 10 and 24
Large 10,000 or more 1000 or more Between 25 and 50
Installation Procedure
Installing Enterprise Manager System 6-37
20. Enter Repository Configuration Details
Note:
■ If you connect to a database instance that was created using the database template offered by Oracle, then you will be prompted that the database parameters need to be modified to suit the deployment size you selected. This is because the templates are essentially designed for simple installation, and the database parameters are set as required for simple installation. Since it is used for advanced installation, the parameters must be set to different values. You can confirm the message to proceed further. The installation wizard will automatically set the parameters to the required values.
■ If you are connecting to an Oracle RAC database, and if you have specified the virtual IP address of one of its nodes, then the installation wizard prompts you with a Connection String dialog and requests you to update the connection string with information about the other nodes that are part of the cluster. Update the connection string and click OK. If you want to test the connection, click Test Connection.
■ If your Oracle RAC database is configured with Single Client Access Name (SCAN) listener, then you can enter a connection string using the SCAN listener.
■ Oracle Real Application Cluster (Oracle RAC) nodes are referred to by their virtual IP (vip) names. The service_name parameter is used instead of the system identifier (SID) in connect_data mode, and failover is turned on. For more information, refer to Oracle Database Net Services Administrator's Guide
■ If you see an error stating that the connection to the database failed with ORA-01017 invalid user name/password, then follow these steps to resolve the issue:
(1) Verify that SYS password provided is valid.
(2) Verify that the database initialization parameter REMOTE_LOGIN_PASSWORDFILE is set to Shared or Exclusive.
(3) Verify that password file with the file name orapw<SID> exists in the <ORACLE_HOME>/dbs directory of the database home. If it does not, create a password file using the ORAPWD command.

Installation Procedure
6-38 Oracle Enterprise Manager Cloud Control Basic Installation Guide
On the Repository Configuration Details screen, do the following:
a. For SYSMAN Password, enter a password for creating the SYSMAN user account. The SYSMAN user account is used for creating the SYSMAN schema, which holds most of the relational data used in managing Enterprise Manager Cloud Control. SYSMAN is also the super administrator for Enterprise Manager Cloud Control.
b. For Registration Password, enter a password for registering the new Management Agents that join the Enterprise Manager system.
c. For Management Tablespace, enter the full path to the location where the data file for management tablespace (mgmt.dbf) can be stored. The installer
Note:
■ Ensure that your password contains at least 8 characters without any spaces, begins with a letter, and includes at least one numeric value.
■ If you connect to a database instance that was created using the database template offered by Oracle, then note that the password assigned to the user accounts SYSMAN_MDS, SYSMAN_APM, and SYSMAN_OPSS, which were created while preconfiguring the Management Repository, are automatically reset with the SYSMAN password you enter on this screen.
Note: Ensure that your password contains at least 8 characters without any spaces, begins with a letter, and includes at least one numeric value.
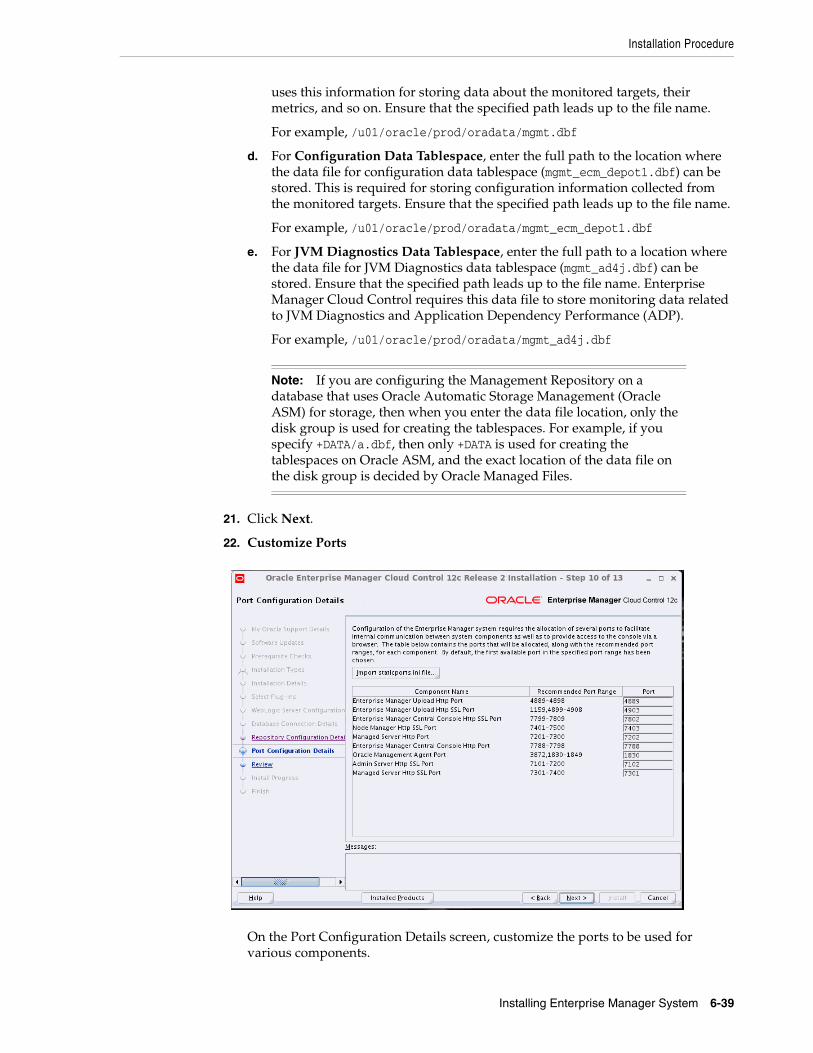
Installation Procedure
Installing Enterprise Manager System 6-39
uses this information for storing data about the monitored targets, their metrics, and so on. Ensure that the specified path leads up to the file name.
For example, /u01/oracle/prod/oradata/mgmt.dbf
d. For Configuration Data Tablespace, enter the full path to the location where the data file for configuration data tablespace (mgmt_ecm_depot1.dbf) can be stored. This is required for storing configuration information collected from the monitored targets. Ensure that the specified path leads up to the file name.
For example, /u01/oracle/prod/oradata/mgmt_ecm_depot1.dbf
e. For JVM Diagnostics Data Tablespace, enter the full path to a location where the data file for JVM Diagnostics data tablespace (mgmt_ad4j.dbf) can be stored. Ensure that the specified path leads up to the file name. Enterprise Manager Cloud Control requires this data file to store monitoring data related to JVM Diagnostics and Application Dependency Performance (ADP).
For example, /u01/oracle/prod/oradata/mgmt_ad4j.dbf
21. Click Next.
22. Customize Ports
On the Port Configuration Details screen, customize the ports to be used for various components.
Note: If you are configuring the Management Repository on a database that uses Oracle Automatic Storage Management (Oracle ASM) for storage, then when you enter the data file location, only the disk group is used for creating the tablespaces. For example, if you specify +DATA/a.dbf, then only +DATA is used for creating the tablespaces on Oracle ASM, and the exact location of the data file on the disk group is decided by Oracle Managed Files.
Installation Procedure
6-40 Oracle Enterprise Manager Cloud Control Basic Installation Guide
You can enter a free custom port that is either within or outside the port range recommended by Oracle.
To verify if a port is free, run the following command:
■ On Unix:
netstat -an | grep <port no>
■ On Microsoft Windows:
netstat -an|findstr <port_no>
However, the custom port must be greater than 1024 and lesser than 65535. Alternatively, if you already have the ports predefined in a staticports.ini file and if you want to use those ports, then click Import staticports.ini File and select the file.
23. Click Next.
24. Review and Install
On the Review screen, review the details you provided for the selected installation type.
■ If you want to change the details, click Back repeatedly until you reach the screen where you want to make the changes.
■ After you verify the details, if you are satisfied, click Install to begin the installation process.
25. Track the Progress
On the Install Progress screen, view the overall progress (in percentage) of the installation and the status of each of the Configuration Assistants. Configuration Assistants are run for configuring the installed components of Enterprise Manager Cloud Control.
Note: If all the ports on this screen appear as -1, then it indicates that the installer is unable to bind the ports on the host. To resolve this issue, exit the installer, verify the host name and the IP configuration of this host (ensure that the IP address of the host is not being used by another host), restart the installer, and try again.
Note: If the staticports.ini file is passed during installation, then by default, the ports defined in the staticports.ini file are displayed. Otherwise, the first available port from the recommended range is displayed.
The staticports.ini file is available in the following location:
<Software_Extracted_Location>/response
Installation Procedure
Installing Enterprise Manager System 6-41
26. Run Scripts
Once the software binaries are copied and configured, you are prompted to run the allroot.sh script, and the oraInstRoot.sh script if this is the first Oracle product installation on the host. Open another window, log in as root, and manually run the scripts.
If you are installing on Microsoft Windows operating system, then you will NOT be prompted to run this script. You will directly reach the Finish screen as described in Step (27).
27. End the Installation
On the Finish screen, you should see information pertaining to the installation of Enterprise Manager. Review the information and click Close to exit the installation wizard.
For more information about this installation, refer to the following file available in the OMS home:
$<OMS_HOME>/install/setupinfo.txt
Note:
■ If a configuration assistant fails, the installer stops and none of the subsequent configuration assistants are run. Resolve the issue and retry the configuration assistant.
For more information, see the appendix on troubleshooting tips in the Oracle Enterprise Manager Cloud Control Advanced Installation and Configuration Guide.
■ If you accidently exit the installer before clicking Retry, then do NOT restart the installer to reach the same screen; instead, invoke the runConfig.sh script from the OMS home to rerun the Configuration Assistant in silent mode. For Microsoft Windows platforms, invoke runConfig.bat script.
$<OMS_HOME>/oui/bin/runConfig.sh ORACLE_HOME=<absolute_path_to_OMS_home> MODE=perform ACTION=configure COMPONENT_XML={encap_oms.1_0_0_0_0.xml}
If the runConfig.sh script fails, then clean up your environment and redo the installation.
Note: If the installation fails for some reason, review the log files listed in Oracle Enterprise Manager Cloud Control Advanced Installation and Configuration Guide.
Installation Procedure
6-42 Oracle Enterprise Manager Cloud Control Basic Installation Guide
6.4.2.1 Advanced Installer OptionsThe following are some additional, advanced options you can pass while invoking the installer:
■ By default, GCDomain is the default name used for creating the WebLogic Domain. To override this and use a custom WebLogic Domain name, invoke the installer with the WLS_DOMAIN_NAME option, and enter a unique custom name.
For example, if you want to use the custom name EMDomain, then run the following command:
./runInstaller WLS_DOMAIN_NAME=EMDomain
■ By default, a Provisioning Advisor Framework (PAF) staging directory is created for copying the Software Library entities related to the deployment procedures. By default, this location is the scratch path location (/tmp). The location is used only for provisioning activities—entities are copied for a deployment procedure, and then, deleted once the deployment procedure ends.
If you want to override this location with a custom location, then invoke the installer with the EM_STAGE_DIR option, and enter a unique custom location.
For example,
./runInstaller EM_STAGE_DIR=/home/john/software/oracle/pafdir
■ During installation, if you want to install some plug-ins that are not in the software kit (DVD, downloaded software), then follow these steps:
1. Manually download the plug-ins from the Enterprise Manager download page on OTN, and store them in an accessible location:
http://www.oracle.com/technetwork/oem/grid-control/downloads/oem-upgrade-console-502238.html
2. Invoke the installer with the following option, and pass the location where the plug-ins you want to install are available:
./runInstaller -pluginLocation <absolute_path_to_plugin_software_location>
This displays a list of plug-ins available in the software kit (DVD, downloaded software) as well as the plug-ins available in this custom location. You can choose the ones you want to install.
Note: If you have run the installation wizard and let the installation wizard take corrective actions to correct the repository settings, and if you have exited the wizard without completing the installation process, then remember that the repository settings might not reset to their original values because you abruptly ended the installation. In this case, before invoking the installation wizard again, run the following command to manually reset the values.
<Software_Location>/install/requisites/bin/emprereqkit -executionType install -prerequisiteXMLLoc <prereq_xml_location> -connectString <connect_string> -dbUser SYS -dbPassword <db_password> -reposUser sysman -reposPassword <repo_user_password> -dbRole sysdba -runPrerequisites -runPostCorrectiveActions -useHistory
Installation Procedure
Installing Enterprise Manager System 6-43
■ After the installation ends successfully, the OMS and the Management Agent start automatically. If you do not want them to start automatically, then invoke the installer with START_OMS and b_startAgent options, and set them to true or false depending on what you want to control.
For example, if you do not want the Management Agent to start automatically, then run the following command:
./runInstaller START_OMS=true b_startAgent=false
To understand the limitations involved with this advanced option, see Section 6.4.2.2.
6.4.2.2 LimitationsWhen you use START_OMS and b_startAgent as advanced options to control the way the OMS and the Management Agent start up automatically, sometimes the Management Agent and the host on which it was installed do not appear as targets in the Cloud Control console.
Table 6–5 lists the different combinations of these advanced options, and describes the workaround to be followed for each combination:
Table 6–5 Advanced Options and Workarounds
Advanced Option Workaround
START_OMS=false
b_startAgent=false
1. Start the OMS:
$<OMS_HOME>/bin/emctl start oms
2. Secure the Management Agent:
$<AGENT_HOME>/bin/emctl secure agent
3. Start the Management Agent:
$<AGENT_HOME>/bin/emctl start agent
4. Add the targets:
$<AGENT_HOME>/bin/emctl config agent
addinternaltargets
5. Upload the targets:
$<AGENT_HOME>/bin/emctl upload agent
START_OMS=true
b_startAgent=false
Start the Management Agent:
$<AGENT_HOME>/bin/emctl start agent
START_OMS=false
b_startAgent=true
1. Start the OMS:
$<OMS_HOME>/bin/emctl start oms
2. Secure the Management Agent:
$<AGENT_HOME>/bin/emctl secure agent
3. Add the targets:
$<AGENT_HOME>/bin/emctl config agent
addinternaltargets
4. Upload the targets:
$<AGENT_HOME>/bin/emctl upload agent
After You Install
6-44 Oracle Enterprise Manager Cloud Control Basic Installation Guide
6.5 After You InstallAfter you install, do the following:
1. (Only for UNIX Operating Systems) If you did not run the allroot.sh script when the installer prompted you to do so, then run it manually now:
■ If this is the first Oracle product you just installed on the host, then run the oraInstroot.sh script from the inventory location specified in the oraInst.loc file that is available in the Management Agent home.
For example, if the inventory location specified in the oraInst.loc file is $HOME/oraInventory, then run the following command:
$HOME/oraInventory/oraInstRoot.sh
■ Run the allroot.sh script from the OMS home:
$<OMS_HOME>/allroot.sh
2. Verify the installation:
a. Navigate to the OMS home and run the following command to see a message that confirms that OMS is up and running.
$<OMS_HOME>/bin/emctl status oms
For example,
/u01/middleware/oms/bin/emctl status oms
b. Navigate to the Management Agent home and run the following command to see a message that confirms that the Management Agent is up and running.
$<AGENT_HOME>/bin/emctl status agent
For example,
/u01/agent/core/12.1.0.2.0/bin/emctl status agent
c. Navigate to the Management Agent home and run the following command to see a message that confirms that EMD upload completed successfully.
$<AGENT_HOME>/bin/emctl upload agent
For example,
/u01/agent/core/12.1.0.2.0/bin/emctl upload agent
Note: If you are not a root user, then use SUDO to change to a root user. For example, run the following command:
/usr/local/bin/sudo $HOME/oraInventory/oraInstRoot.sh
Note: If you are not a root user, then use SUDO to change to a root user. For example, run the following command:
/usr/local/bin/sudo $<OMS_HOME>/allroot.sh
After You Install
Installing Enterprise Manager System 6-45
3. Verify if all the plug-ins were installed successfully. To do so, access the following log file from the Management Agent home, and search for the sentence WARN:Plugin configuration has failed.
$<AGENT_HOME>/cfgtoollogs/cfgfw/CfmLogger-<timestamp>.log
For example,
$/u01/agent/core/12.1.0.2.0/cfgtoollogs/cfgfw/CfmLogger-<timestamp>.log
If you find the sentence, resolve the issue by running the AgentPluginDeploy.pl script from the Management Agent home.
$<AGENT_BASE_DIR>/agent/core/12.1.0.2.0/perl/bin/perl <AGENT_BASE_DIR>/agent/core/12.1.0.2.0/bin/AgentPluginDeploy.pl -oracleHome <AGENT_BASE_DIR>/agent/core/12.1.0.2.0 -agentDir <AGENT_BASE_DIR> -pluginIdsInfoFile <AGENT_BASE_DIR>/plugins.txt -action configure -emStateDir <AGENT_INSTANCE_HOME>
For example,
/u01/agent/core/12.1.0.2.0/perl/bin/perl /u01/agent/core/12.1.0.2.0/bin/AgentPluginDeploy.pl -oracleHome /u01/agent/core/12.1.0.2.0/ -agentDir /u01/agent -pluginIdsInfoFile /u01/agent/plugins.txt -action configure -emStateDir /u01/agent/agent_inst
4. (Optional) If the repository prerequisites had failed, and if you had manually run the EM Prerequisite Kit and taken corrective actions to meet the repository requirements, then run the utility again to reset the repository settings to what it had originally:
<Software_Location>/install/requisites/bin/emprereqkit -executionType install -prerequisiteXMLLoc <prereq_xml_location> -connectString <connect_string> -dbUser SYS -dbPassword <db_password> -reposUser sysman -reposPassword <repo_user_password> -dbRole sysdba -runPrerequisites -runPostCorrectiveActions -useHistory
5. By default, the following targets get automatically discovered and monitored in the Enterprise Manager Cloud Control console:
■ Oracle WebLogic Domain (for example, GCDomain)
Note: By default, you can access Enterprise Manager Cloud Control only using the HTTPS protocol. If you want to use the HTTP protocol, then unlock it by running the following command from the OMS home:
emctl secure unlock -console
Note: If you had run the installation wizard and let the installation wizard take corrective actions to correct the repository settings, and if you had exited the wizard without completing the installation process, then remember that the repository settings might not reset to their original values because you abruptly ended the installation. In this case, before invoking the installation wizard again, run this command to manually reset the values.
After You Install
6-46 Oracle Enterprise Manager Cloud Control Basic Installation Guide
■ Oracle WebLogic AdminServer
■ Oracle WebLogic Server
■ Oracle Web Tier
■ Application deployments, one for the Enterprise Manager Cloud Control console and one for the platform background services.
■ Oracle Management Service
■ Oracle Management Repository
■ Oracle Management Agent
■ The host on which you installed Enterprise Manager Cloud Control
However, the other targets running on that host and other hosts do not get automatically discovered and monitored. To monitor the other targets, you need to add them to Enterprise Manager Cloud Control either using the Auto Discovery Results page, the Add Targets Manually page, or the discovery wizards offered for the targets you want to monitor.
For information about discovering targets in Enterprise Manager Cloud Control, refer to the chapter on adding targets in the Oracle Enterprise Manager Cloud Control Administrator's Guide.
6. If you installed in a Middleware home that is on an NFS-mounted drive, then ensure that you maintain the lock file in a local file system and not in that NFS-mounted location. To do so, modify the lock file location in the httpd.conf file to map to a location on a local file system.
1. Stop the OMS:
<OMS_HOME>/bin/emctl stop oms -all
2. Open the following file:
<WEBTIER_INSTANCE_HOME>/config/OHS/ohs1/httpd.conf
3. Search for sections related to the modules mpm_prefork_module and mpm_worker_module. In both these sections, modify the value for the LockFile parameter so that the path leads to a location on the local file system.
<IfModule mpm_prefork_module>StartServers 5MinSpareServers 5MaxSpareServers 10MaxClients 150MaxRequestsPerChild 0AcceptMutex fcntlLockFile "${ORACLE_INSTANCE}/diagnostics/logs/${COMPONENT_TYPE}/${COMPONENT_NAME}/http_lock"</IfModule>....<IfModule mpm_worker_module>StartServers 2MaxClients 150MinSpareThreads 25MaxSpareThreads 75
Note: Oracle recommends you to take a backup of this file before editing it.
After You Install
Installing Enterprise Manager System 6-47
ThreadsPerChild 25MaxRequestsPerChild 0AcceptMutex fcntlLockFile "${ORACLE_INSTANCE}/diagnostics/logs/${COMPONENT_TYPE}/${COMPONENT_NAME}/http_lock"</IfModule>
4. Save the changes.
5. Restart the OMS:
<OMS_HOME>/bin/emctl start oms
7. Configure your proxy server as described in Appendix C.
8. (Optional) If you want to change the passwords of SYSMAN and all other internal user accounts such as SYSMAN_MDS, SYSMAN_OPSS, and SYSMAN_APM, then shut down the OMS, run the following command from the OMS home, and then restart the OMS. You will be prompted to enter the old and the new password.
<OMS_HOME>/bin/emctl config oms -change_repos_pwd
9. An encryption key is generated to encrypt sensitive data in the Management Repository. If this key is lost, all encrypted data in the Management Repository become unusable. Therefore, back up the Management Service configuration including the emkey, and maintain the backup on another host.
To back up the Management Service configuration including the emkey, run the following command:
<OMS_HOME>/bin/emctl exportconfig oms -dir <path_to_backup_location>
10. Before accessing the Enterprise Manager Cloud Control Console in a browser, install a security certificate from a trusted certification authority on the browser.
This it to ensure that the Enterprise Manager Cloud Control Console that you are accessing over HTTPS protocol is recognized as a genuine and secure Web site.
For instructions to install a security certificate on your browser and avoid security certificate alerts, refer to Oracle Enterprise Manager Cloud Control Administrator's Guide.
Note: This command concurrently changes the passwords in both the OMS configuration and the database for these affected user accounts. Therefore, it is sufficient to run this command just once.

After You Install
6-48 Oracle Enterprise Manager Cloud Control Basic Installation Guide

7
Installing Oracle Management Agent 7-1
7Installing Oracle Management Agent
This chapter describes how you can install Oracle Management Agent (Management Agent). In particular, this chapter covers the following:
■ Overview
■ Before You Begin
■ Prerequisites
■ Installation Procedure
■ After You Install
7.1 OverviewOracle Management Agent (Management Agent) is one of the core components of Enterprise Manager Cloud Control that enables you to convert an unmanaged host to a managed host in the Enterprise Manager system. The Management Agent works in conjunction with the plug-ins to monitor the targets running on that managed host.
Therefore, at any point in time, if you want to monitor a target running on a host, ensure that you first convert that unmanaged host to a managed host by installing a Management Agent, and then manually discover the targets running on it to start monitoring them.
To install a Management Agent, use the Add Host Targets Wizard that is accessible from within the Enterprise Manager Cloud Control console. Oracle recommends that you use this wizard for the mass-deployment of Management Agents.
Figure 7–1 describes a method to access the Add Host Targets Wizard.

Overview
7-2 Oracle Enterprise Manager Cloud Control Basic Installation Guide
Figure 7–1 Add Host Targets Wizard
The Add Host Targets Wizard is an application that offers GUI-rich, interactive screens. To access it, do one of the following:
■ From the Setup menu, select Add Target, then select Add Targets Manually. On the Add Targets Manually page, select Add Host Targets and click Add Host.
■ From the Setup menu, select Add Target, then select Auto Discovery Results. On the Auto Discovery Results page, select a host you want to monitor in Enterprise Manager Cloud Control, and click Promote.
The wizard enables you to do the following on multiple hosts across platforms with options to run preinstall and postinstall scripts:
■ Deploy a fresh Management Agent
■ Clone an existing well-tested and patched Management Agent
■ Install a Management Agent (called Shared Agent) using an existing, centrally shared Management Agent (called Master Agent)
To monitor a target, you need to add the target to Enterprise Manager Cloud Control either using the Auto Discovery Results page, the Add Targets Manually page, or the discovery wizards offered for the targets you want to monitor.
Note: This chapter only describes how you can deploy a fresh Management Agent using the Add Host Targets Wizard. For information on cloning an existing instance and deploying a Management Agent using a shared instance, refer to Oracle Enterprise Manager Cloud Control Advanced Installation and Configuration Guide.
Before You Begin
Installing Oracle Management Agent 7-3
For information about discovering targets in Enterprise Manager Cloud Control, refer to the chapter on adding targets in the Oracle Enterprise Manager Cloud Control Administrator's Guide.
Once the installation is complete, you will see the following default contents in the agent base directory:
<agent_base_directory> |_____core |_____12.1.0.2.0 |_____plugins |_____agent_inst |_____sbin |_____plugins.txt |_____plugins.txt.status |_____agentimage.properties
7.2 Before You BeginBefore you begin installing a Management Agent using the Add Host Targets Wizard, keep these points in mind:
■ The Add Host Targets Wizard converts an unmanaged host to a managed host in the Enterprise Manager system by installing a 12.1.0.2.0 Management Agent.
■ Oracle recommends you to use the Add Host Targets Wizard to mass-deploy Management Agents in your environment.
■ Oracle Management Agent 12c communicates only with Oracle Management Service 12c and not with any earlier release of Enterprise Manager.
A 12.1.0.1.0 Management Agent is compatible with a 12.1.0.2.0 OMS. However, using the Add Host Targets Wizard of a 12.1.0.2.0 OMS, you can install only the latest available Management Agent 12c software. For example, if the 12.1.0.2.0 Management Agent software is available in Oracle Software Library, you cannot use the Add Host Targets Wizard of a 12.1.0.2.0 OMS to install a 12.1.0.1.0 Management Agent.
For information about the compatibility between 12c releases of Management Agents and the OMS, see Table 1-1 present in the Introduction to Upgrade Approaches chapter in the Oracle Enterprise Manager Cloud Control Upgrade Guide.
■ If you have multiple hosts, sharing a common mounted drive, then install the Management Agents in two different phases:
1. In the Add Host Targets Wizard, select the deployment type Fresh Agent Install, and install a Management Agent on the host where the drive is shared.
Note: If you want to repoint your existing Management Agents to a new Oracle Management Service (OMS), then you must first deinstall those Management Agents and plug-ins, and then redeploy those Management Agents and plug-ins using the new OMS. This is typically done when you want to move from an Enterprise Manager Cloud Control system in a test environment to an Enterprise Manager Cloud Control system in a production environment.
When you repoint your existing Management Agents to a new OMS, you cannot move the targets monitored by the Management Agents, the target history, and the Management Agent history. The monitored targets and the history data is lost.

Before You Begin
7-4 Oracle Enterprise Manager Cloud Control Basic Installation Guide
Alternatively, you can select the deployment type Clone Existing Agent, and clone the Management Agent to the host where the drive is shared.
For more information, refer to the chapter on cloning a Management Agent in the Oracle Enterprise Manager Cloud Control Advanced Installation and Configuration Guide.
2. In the Add Host Targets Wizard, select the deployment type Add Host to Shared Agent, and install a Management Agent on all other hosts that access the shared, mounted drive. (Here, you will select the Management Agent you installed in the previous step as the master agent or shared agent.)
For more information, refer to the chapter on installing a Shared Agent in the Oracle Enterprise Manager Cloud Control Advanced Installation and Configuration Guide.
■ If you have an Oracle RAC Cluster with multiple nodes, then you must install a Management Agent on each of the nodes separately. In other words, in the Add Host Targets Wizard, you must add each node explicitly as a destination host.
■ The Add Host Targets Wizard uses SSH to establish connectivity between Oracle Management Service (OMS) and the remote hosts where you want to install the Management Agents.
■ Only SSH1 (SSH version 1) and SSH2 (SSH version 2) protocols offered by OpenSSH are supported for deploying a Management Agent.
■ SSH public key authentication and password based authentication are supported. So you can use an existing SSH public key authentication without exposing your passwords. You can provide a dummy password in the wizard and bypass the validation.
To set up SSH public key authentication, follow these steps:
1. Navigate to the following location in the OMS home:
$<OMS_HOME>/oui/prov/resources/scripts
For example,
/home/software/em/middleware/oms/oui/prov/resources/scripts
2. Run the following script on the OMS host as the OMS user, and pass the Management Agent install user name and the fully qualified name of the target hosts:
sshUserSetup.sh -setup -user <agent_install_1user_name> -hosts <target_hosts>
3. Access the Add Host Targets Wizard, and provide the dummy password and install the Management Agent.
The wizard ignores the dummy password, and honors the keys present in the following location on the OMS host to perform the installation. Here, $HOME refers to the home directory of the OMS install user.
– $HOME/.ssh/id_rsa
– $HOME/.ssh/id_dsa
– $HOME/.ssh/identity
If you want to provide additional keys, specify them as values for the oracle.sysman.prov.remoteinterfaces.identitylist property present in the
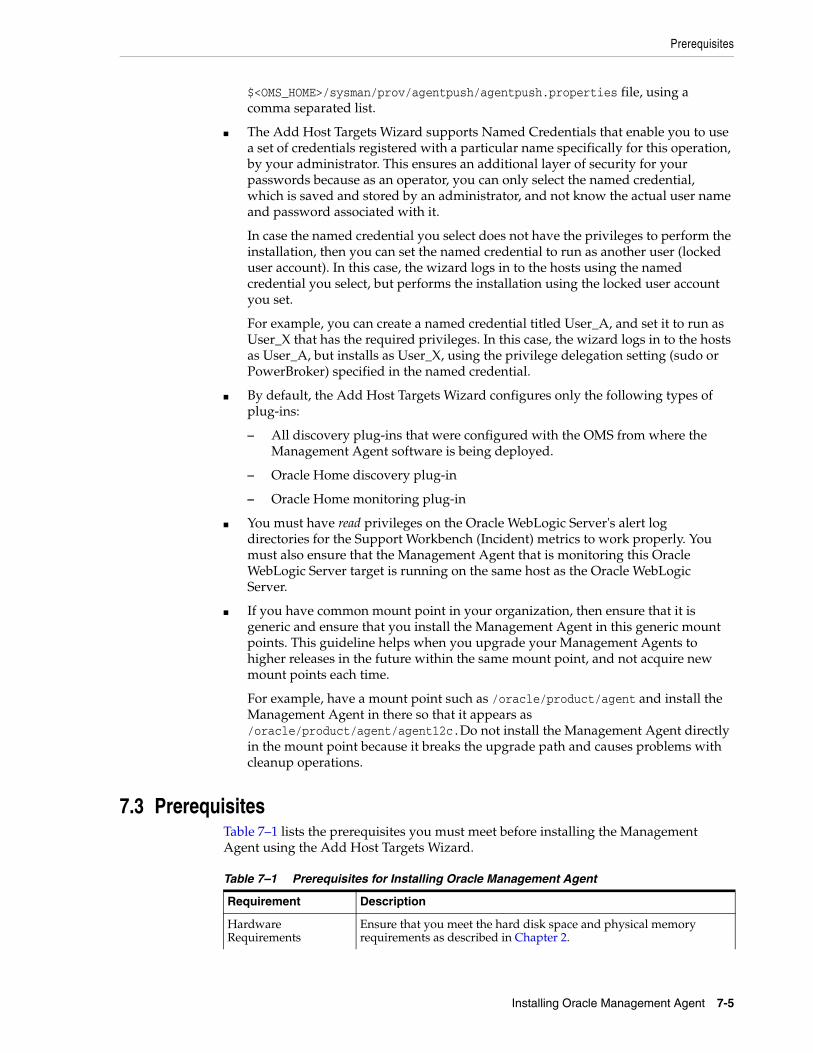
Prerequisites
Installing Oracle Management Agent 7-5
$<OMS_HOME>/sysman/prov/agentpush/agentpush.properties file, using a comma separated list.
■ The Add Host Targets Wizard supports Named Credentials that enable you to use a set of credentials registered with a particular name specifically for this operation, by your administrator. This ensures an additional layer of security for your passwords because as an operator, you can only select the named credential, which is saved and stored by an administrator, and not know the actual user name and password associated with it.
In case the named credential you select does not have the privileges to perform the installation, then you can set the named credential to run as another user (locked user account). In this case, the wizard logs in to the hosts using the named credential you select, but performs the installation using the locked user account you set.
For example, you can create a named credential titled User_A, and set it to run as User_X that has the required privileges. In this case, the wizard logs in to the hosts as User_A, but installs as User_X, using the privilege delegation setting (sudo or PowerBroker) specified in the named credential.
■ By default, the Add Host Targets Wizard configures only the following types of plug-ins:
– All discovery plug-ins that were configured with the OMS from where the Management Agent software is being deployed.
– Oracle Home discovery plug-in
– Oracle Home monitoring plug-in
■ You must have read privileges on the Oracle WebLogic Server's alert log directories for the Support Workbench (Incident) metrics to work properly. You must also ensure that the Management Agent that is monitoring this Oracle WebLogic Server target is running on the same host as the Oracle WebLogic Server.
■ If you have common mount point in your organization, then ensure that it is generic and ensure that you install the Management Agent in this generic mount points. This guideline helps when you upgrade your Management Agents to higher releases in the future within the same mount point, and not acquire new mount points each time.
For example, have a mount point such as /oracle/product/agent and install the Management Agent in there so that it appears as /oracle/product/agent/agent12c.Do not install the Management Agent directly in the mount point because it breaks the upgrade path and causes problems with cleanup operations.
7.3 PrerequisitesTable 7–1 lists the prerequisites you must meet before installing the Management Agent using the Add Host Targets Wizard.
Table 7–1 Prerequisites for Installing Oracle Management Agent
Requirement Description
Hardware Requirements
Ensure that you meet the hard disk space and physical memory requirements as described in Chapter 2.

Prerequisites
7-6 Oracle Enterprise Manager Cloud Control Basic Installation Guide
Software Requirements
(For Microsoft Windows) Ensure that you have installed Cygwin 1.7 on the destination host as described in Chapter 5.
Note: While running cygwin.bat in Microsoft Windows Server 2008 and Microsoft Windows Vista, ensure that you invoke it in administrator mode. To do this, right-click the cygwin.bat file and select Run as administrator.
Operating System Requirements
Ensure that you install the Management Agent only on certified operating systems as mentioned in the Enterprise Manager certification matrix available on My Oracle Support.
To access the Enterprise Manager certification matrix, follow the steps outlined in Appendix E.
For information about platforms receiving future support, refer to My Oracle Support note 793512.1.
Note: If you use Oracle Solaris 10, then ensure that you have update 9 or higher installed. To verify whether it is installed, run the following command:
cat /etc/release
You should see the output similar to the following. Here, s10s_u6 indicates that update 6, which is not a supported update level for installation, is installed.
Solaris 10 10/08 s10s_u6wos_07b SPARC
Package Requirements Ensure that you install all the operating system-specific packages as described in Chapter 3.
User and Operating System Group Requirement
Ensure that you create the required operating system groups and users as described in Chapter 4.
Destination Host Requirements
Ensure that the destination hosts are accessible from the host where the OMS is running.
If the destination host and the host on which OMS is running belong to different network domains, then ensure that you update the /etc/hosts file on the destination host to add a line with the IP address of that host, the fully qualified name of that host, and the short name of the host.
For example, if the fully-qualified host name is example.com and the short name is mypc, then add the following line in the /etc/hosts file:
172.16.0.0 example.com mypc
Destination Host Credential Requirements
Ensure that all the destination hosts running on the same operating system have the same set of credentials. For example, all the destination hosts running on Linux operating system must have the same set of credentials.
The wizard installs the Management Agent using the same user account. If you have hosts running on the same operating system but with different credentials, then have two different deployment sessions.
Permission Requirements
■ Ensure that the agent base directory you specify is empty and has write permission.
■ Ensure that the instance directory is empty and has write permission.
Table 7–1 (Cont.) Prerequisites for Installing Oracle Management Agent
Requirement Description
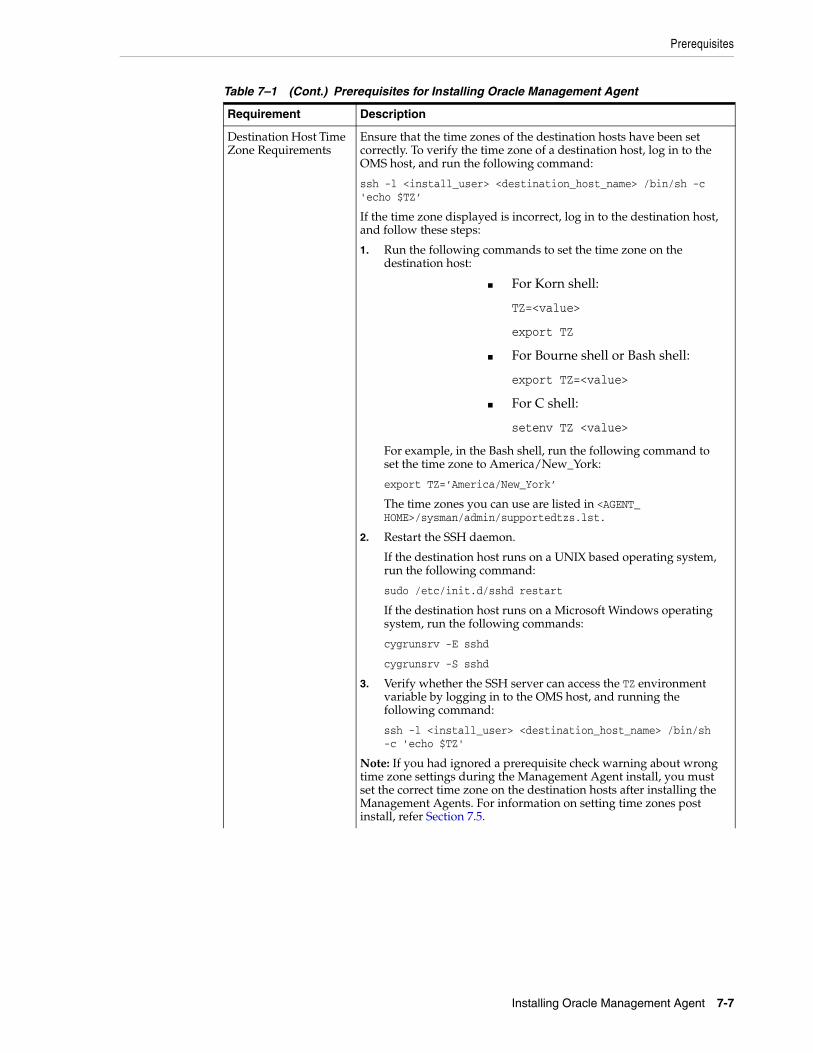
Prerequisites
Installing Oracle Management Agent 7-7
Destination Host Time Zone Requirements
Ensure that the time zones of the destination hosts have been set correctly. To verify the time zone of a destination host, log in to the OMS host, and run the following command:
ssh -l <install_user> <destination_host_name> /bin/sh -c 'echo $TZ’
If the time zone displayed is incorrect, log in to the destination host, and follow these steps:
1. Run the following commands to set the time zone on the destination host:
■ For Korn shell:
TZ=<value>
export TZ
■ For Bourne shell or Bash shell:
export TZ=<value>
■ For C shell:
setenv TZ <value>
For example, in the Bash shell, run the following command to set the time zone to America/New_York:
export TZ=’America/New_York’
The time zones you can use are listed in <AGENT_HOME>/sysman/admin/supportedtzs.lst.
2. Restart the SSH daemon.
If the destination host runs on a UNIX based operating system, run the following command:
sudo /etc/init.d/sshd restart
If the destination host runs on a Microsoft Windows operating system, run the following commands:
cygrunsrv -E sshd
cygrunsrv -S sshd
3. Verify whether the SSH server can access the TZ environment variable by logging in to the OMS host, and running the following command:
ssh -l <install_user> <destination_host_name> /bin/sh -c 'echo $TZ'
Note: If you had ignored a prerequisite check warning about wrong time zone settings during the Management Agent install, you must set the correct time zone on the destination hosts after installing the Management Agents. For information on setting time zones post install, refer Section 7.5.
Table 7–1 (Cont.) Prerequisites for Installing Oracle Management Agent
Requirement Description
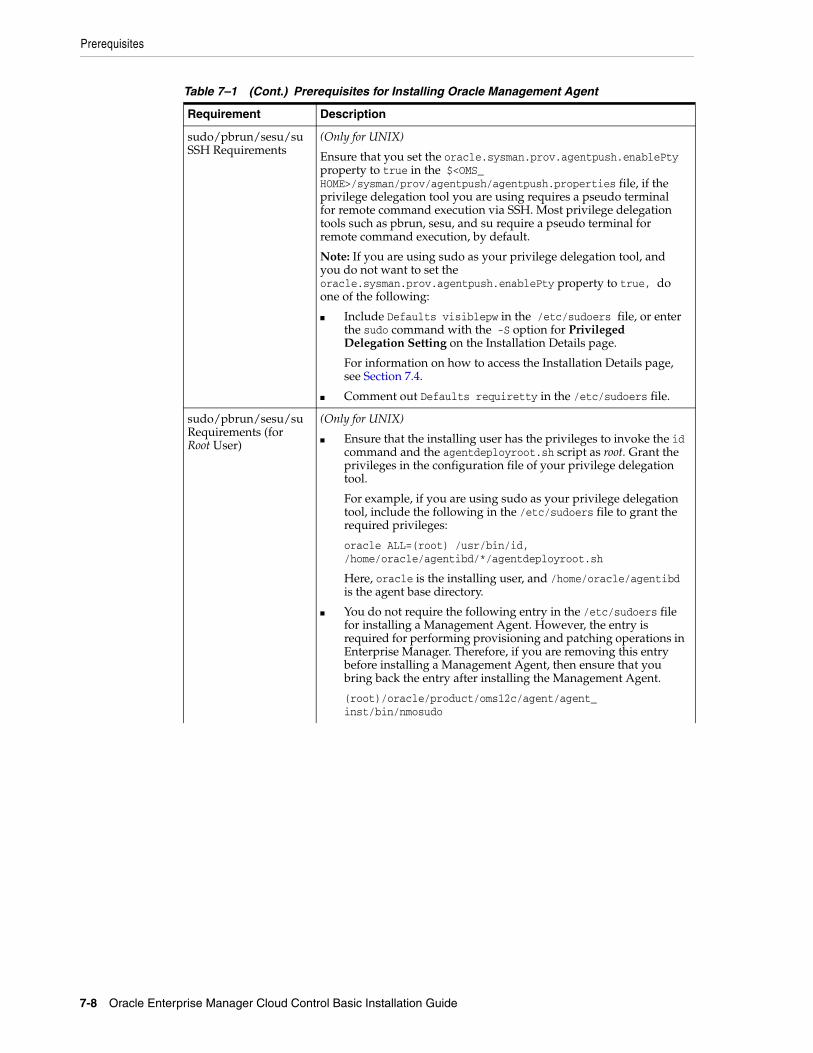
Prerequisites
7-8 Oracle Enterprise Manager Cloud Control Basic Installation Guide
sudo/pbrun/sesu/su SSH Requirements
(Only for UNIX)
Ensure that you set the oracle.sysman.prov.agentpush.enablePty property to true in the $<OMS_HOME>/sysman/prov/agentpush/agentpush.properties file, if the privilege delegation tool you are using requires a pseudo terminal for remote command execution via SSH. Most privilege delegation tools such as pbrun, sesu, and su require a pseudo terminal for remote command execution, by default.
Note: If you are using sudo as your privilege delegation tool, and you do not want to set the oracle.sysman.prov.agentpush.enablePty property to true, do one of the following:
■ Include Defaults visiblepw in the /etc/sudoers file, or enter the sudo command with the -S option for Privileged Delegation Setting on the Installation Details page.
For information on how to access the Installation Details page, see Section 7.4.
■ Comment out Defaults requiretty in the /etc/sudoers file.
sudo/pbrun/sesu/su Requirements (for Root User)
(Only for UNIX)
■ Ensure that the installing user has the privileges to invoke the id command and the agentdeployroot.sh script as root. Grant the privileges in the configuration file of your privilege delegation tool.
For example, if you are using sudo as your privilege delegation tool, include the following in the /etc/sudoers file to grant the required privileges:
oracle ALL=(root) /usr/bin/id, /home/oracle/agentibd/*/agentdeployroot.sh
Here, oracle is the installing user, and /home/oracle/agentibd is the agent base directory.
■ You do not require the following entry in the /etc/sudoers file for installing a Management Agent. However, the entry is required for performing provisioning and patching operations in Enterprise Manager. Therefore, if you are removing this entry before installing a Management Agent, then ensure that you bring back the entry after installing the Management Agent.
(root)/oracle/product/oms12c/agent/agent_inst/bin/nmosudo
Table 7–1 (Cont.) Prerequisites for Installing Oracle Management Agent
Requirement Description
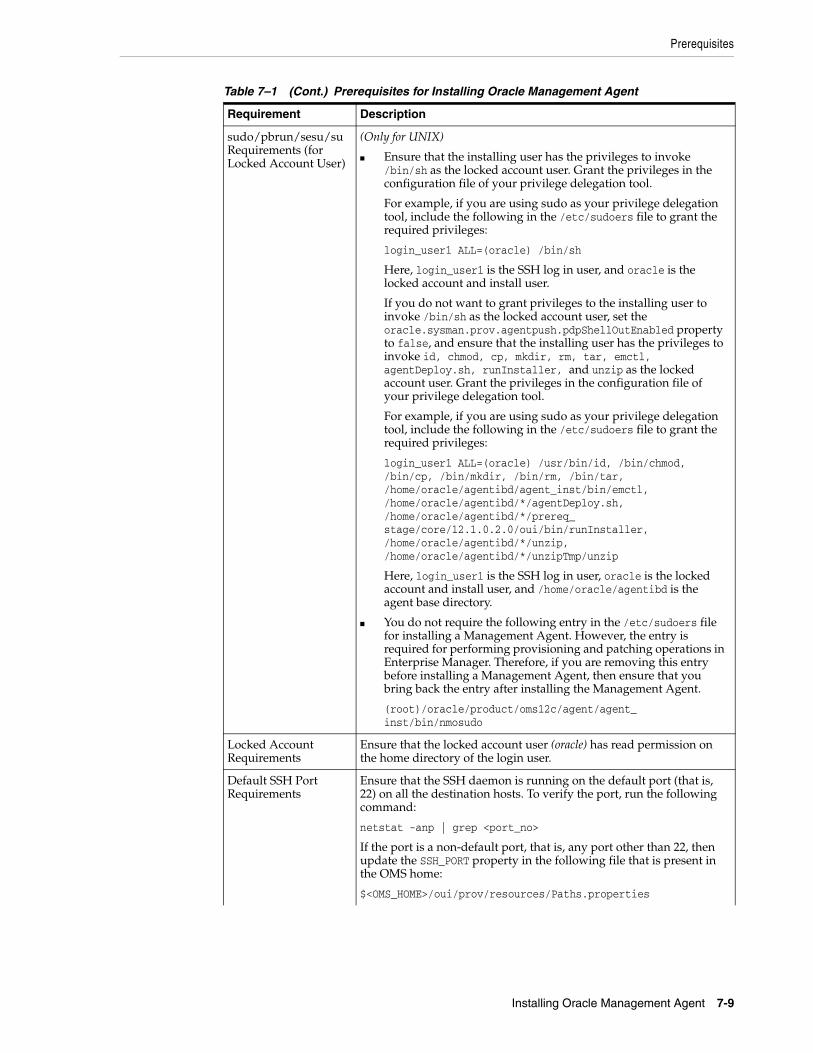
Prerequisites
Installing Oracle Management Agent 7-9
sudo/pbrun/sesu/su Requirements (for Locked Account User)
(Only for UNIX)
■ Ensure that the installing user has the privileges to invoke /bin/sh as the locked account user. Grant the privileges in the configuration file of your privilege delegation tool.
For example, if you are using sudo as your privilege delegation tool, include the following in the /etc/sudoers file to grant the required privileges:
login_user1 ALL=(oracle) /bin/sh
Here, login_user1 is the SSH log in user, and oracle is the locked account and install user.
If you do not want to grant privileges to the installing user to invoke /bin/sh as the locked account user, set the oracle.sysman.prov.agentpush.pdpShellOutEnabled property to false, and ensure that the installing user has the privileges to invoke id, chmod, cp, mkdir, rm, tar, emctl, agentDeploy.sh, runInstaller, and unzip as the locked account user. Grant the privileges in the configuration file of your privilege delegation tool.
For example, if you are using sudo as your privilege delegation tool, include the following in the /etc/sudoers file to grant the required privileges:
login_user1 ALL=(oracle) /usr/bin/id, /bin/chmod, /bin/cp, /bin/mkdir, /bin/rm, /bin/tar, /home/oracle/agentibd/agent_inst/bin/emctl, /home/oracle/agentibd/*/agentDeploy.sh, /home/oracle/agentibd/*/prereq_stage/core/12.1.0.2.0/oui/bin/runInstaller, /home/oracle/agentibd/*/unzip, /home/oracle/agentibd/*/unzipTmp/unzip
Here, login_user1 is the SSH log in user, oracle is the locked account and install user, and /home/oracle/agentibd is the agent base directory.
■ You do not require the following entry in the /etc/sudoers file for installing a Management Agent. However, the entry is required for performing provisioning and patching operations in Enterprise Manager. Therefore, if you are removing this entry before installing a Management Agent, then ensure that you bring back the entry after installing the Management Agent.
(root)/oracle/product/oms12c/agent/agent_inst/bin/nmosudo
Locked Account Requirements
Ensure that the locked account user (oracle) has read permission on the home directory of the login user.
Default SSH Port Requirements
Ensure that the SSH daemon is running on the default port (that is, 22) on all the destination hosts. To verify the port, run the following command:
netstat -anp | grep <port_no>
If the port is a non-default port, that is, any port other than 22, then update the SSH_PORT property in the following file that is present in the OMS home:
$<OMS_HOME>/oui/prov/resources/Paths.properties
Table 7–1 (Cont.) Prerequisites for Installing Oracle Management Agent
Requirement Description
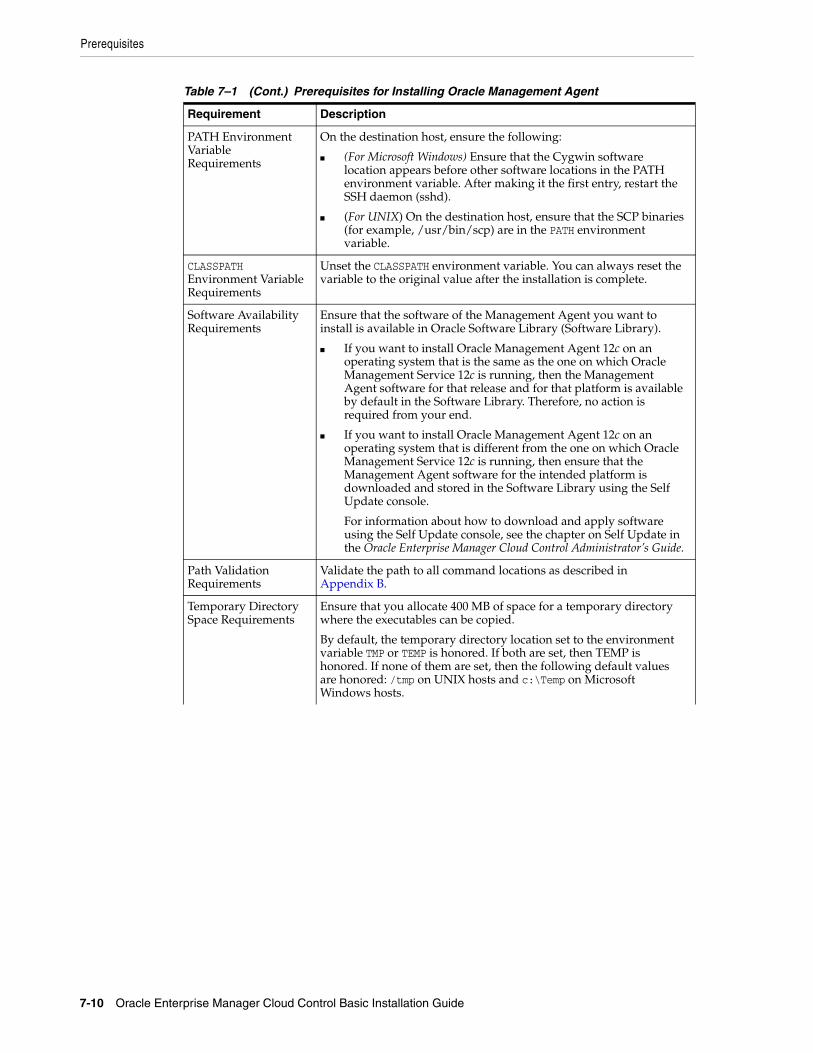
Prerequisites
7-10 Oracle Enterprise Manager Cloud Control Basic Installation Guide
PATH Environment Variable Requirements
On the destination host, ensure the following:
■ (For Microsoft Windows) Ensure that the Cygwin software location appears before other software locations in the PATH environment variable. After making it the first entry, restart the SSH daemon (sshd).
■ (For UNIX) On the destination host, ensure that the SCP binaries (for example, /usr/bin/scp) are in the PATH environment variable.
CLASSPATH Environment Variable Requirements
Unset the CLASSPATH environment variable. You can always reset the variable to the original value after the installation is complete.
Software Availability Requirements
Ensure that the software of the Management Agent you want to install is available in Oracle Software Library (Software Library).
■ If you want to install Oracle Management Agent 12c on an operating system that is the same as the one on which Oracle Management Service 12c is running, then the Management Agent software for that release and for that platform is available by default in the Software Library. Therefore, no action is required from your end.
■ If you want to install Oracle Management Agent 12c on an operating system that is different from the one on which Oracle Management Service 12c is running, then ensure that the Management Agent software for the intended platform is downloaded and stored in the Software Library using the Self Update console.
For information about how to download and apply software using the Self Update console, see the chapter on Self Update in the Oracle Enterprise Manager Cloud Control Administrator’s Guide.
Path Validation Requirements
Validate the path to all command locations as described in Appendix B.
Temporary Directory Space Requirements
Ensure that you allocate 400 MB of space for a temporary directory where the executables can be copied.
By default, the temporary directory location set to the environment variable TMP or TEMP is honored. If both are set, then TEMP is honored. If none of them are set, then the following default values are honored: /tmp on UNIX hosts and c:\Temp on Microsoft Windows hosts.
Table 7–1 (Cont.) Prerequisites for Installing Oracle Management Agent
Requirement Description
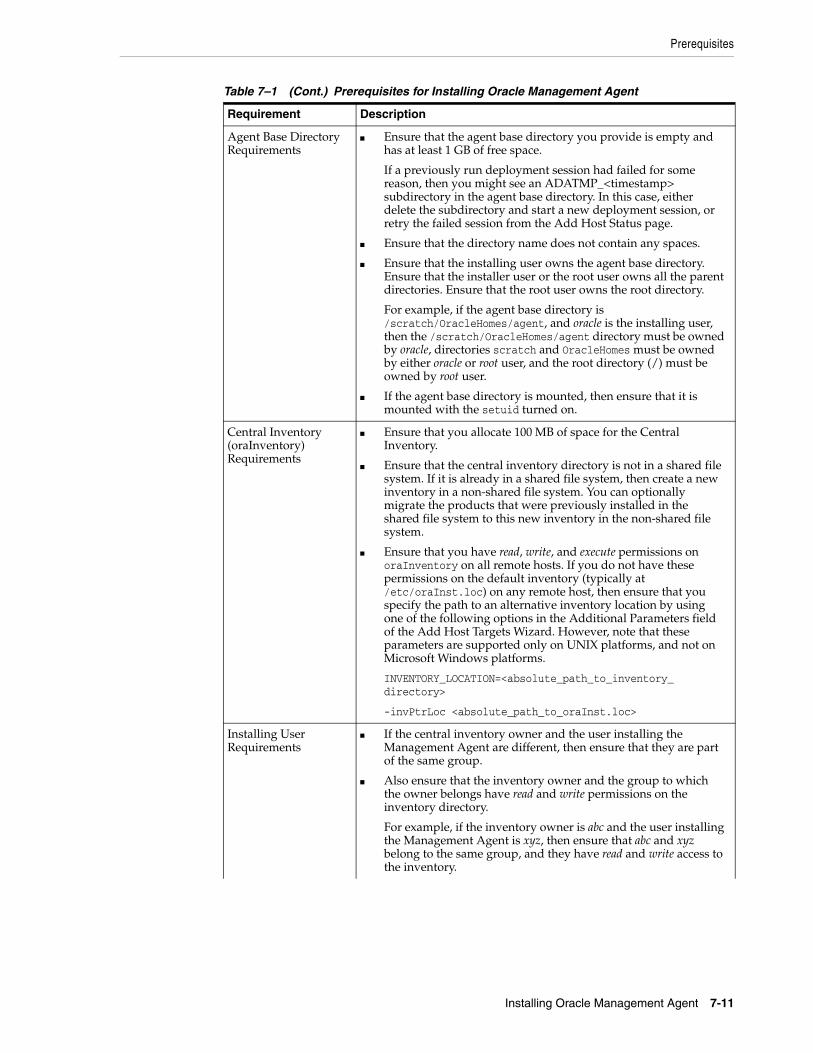
Prerequisites
Installing Oracle Management Agent 7-11
Agent Base Directory Requirements
■ Ensure that the agent base directory you provide is empty and has at least 1 GB of free space.
If a previously run deployment session had failed for some reason, then you might see an ADATMP_<timestamp> subdirectory in the agent base directory. In this case, either delete the subdirectory and start a new deployment session, or retry the failed session from the Add Host Status page.
■ Ensure that the directory name does not contain any spaces.
■ Ensure that the installing user owns the agent base directory. Ensure that the installer user or the root user owns all the parent directories. Ensure that the root user owns the root directory.
For example, if the agent base directory is /scratch/OracleHomes/agent, and oracle is the installing user, then the /scratch/OracleHomes/agent directory must be owned by oracle, directories scratch and OracleHomes must be owned by either oracle or root user, and the root directory (/) must be owned by root user.
■ If the agent base directory is mounted, then ensure that it is mounted with the setuid turned on.
Central Inventory (oraInventory) Requirements
■ Ensure that you allocate 100 MB of space for the Central Inventory.
■ Ensure that the central inventory directory is not in a shared file system. If it is already in a shared file system, then create a new inventory in a non-shared file system. You can optionally migrate the products that were previously installed in the shared file system to this new inventory in the non-shared file system.
■ Ensure that you have read, write, and execute permissions on oraInventory on all remote hosts. If you do not have these permissions on the default inventory (typically at /etc/oraInst.loc) on any remote host, then ensure that you specify the path to an alternative inventory location by using one of the following options in the Additional Parameters field of the Add Host Targets Wizard. However, note that these parameters are supported only on UNIX platforms, and not on Microsoft Windows platforms.
INVENTORY_LOCATION=<absolute_path_to_inventory_directory>
-invPtrLoc <absolute_path_to_oraInst.loc>
Installing User Requirements
■ If the central inventory owner and the user installing the Management Agent are different, then ensure that they are part of the same group.
■ Also ensure that the inventory owner and the group to which the owner belongs have read and write permissions on the inventory directory.
For example, if the inventory owner is abc and the user installing the Management Agent is xyz, then ensure that abc and xyz belong to the same group, and they have read and write access to the inventory.
Table 7–1 (Cont.) Prerequisites for Installing Oracle Management Agent
Requirement Description
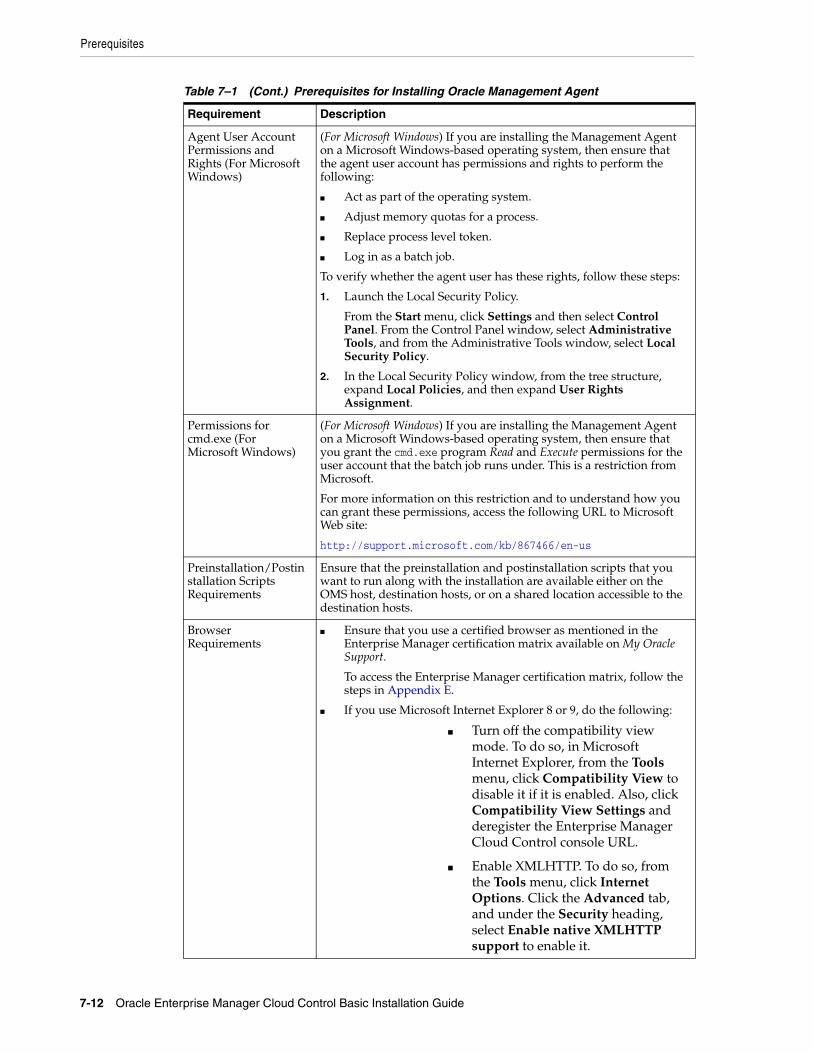
Prerequisites
7-12 Oracle Enterprise Manager Cloud Control Basic Installation Guide
Agent User Account Permissions and Rights (For Microsoft Windows)
(For Microsoft Windows) If you are installing the Management Agent on a Microsoft Windows-based operating system, then ensure that the agent user account has permissions and rights to perform the following:
■ Act as part of the operating system.
■ Adjust memory quotas for a process.
■ Replace process level token.
■ Log in as a batch job.
To verify whether the agent user has these rights, follow these steps:
1. Launch the Local Security Policy.
From the Start menu, click Settings and then select Control Panel. From the Control Panel window, select Administrative Tools, and from the Administrative Tools window, select Local Security Policy.
2. In the Local Security Policy window, from the tree structure, expand Local Policies, and then expand User Rights Assignment.
Permissions for cmd.exe (For Microsoft Windows)
(For Microsoft Windows) If you are installing the Management Agent on a Microsoft Windows-based operating system, then ensure that you grant the cmd.exe program Read and Execute permissions for the user account that the batch job runs under. This is a restriction from Microsoft.
For more information on this restriction and to understand how you can grant these permissions, access the following URL to Microsoft Web site:
http://support.microsoft.com/kb/867466/en-us
Preinstallation/Postinstallation Scripts Requirements
Ensure that the preinstallation and postinstallation scripts that you want to run along with the installation are available either on the OMS host, destination hosts, or on a shared location accessible to the destination hosts.
Browser Requirements
■ Ensure that you use a certified browser as mentioned in the Enterprise Manager certification matrix available on My Oracle Support.
To access the Enterprise Manager certification matrix, follow the steps in Appendix E.
■ If you use Microsoft Internet Explorer 8 or 9, do the following:
■ Turn off the compatibility view mode. To do so, in Microsoft Internet Explorer, from the Tools menu, click Compatibility View to disable it if it is enabled. Also, click Compatibility View Settings and deregister the Enterprise Manager Cloud Control console URL.
■ Enable XMLHTTP. To do so, from the Tools menu, click Internet Options. Click the Advanced tab, and under the Security heading, select Enable native XMLHTTP support to enable it.
Table 7–1 (Cont.) Prerequisites for Installing Oracle Management Agent
Requirement Description
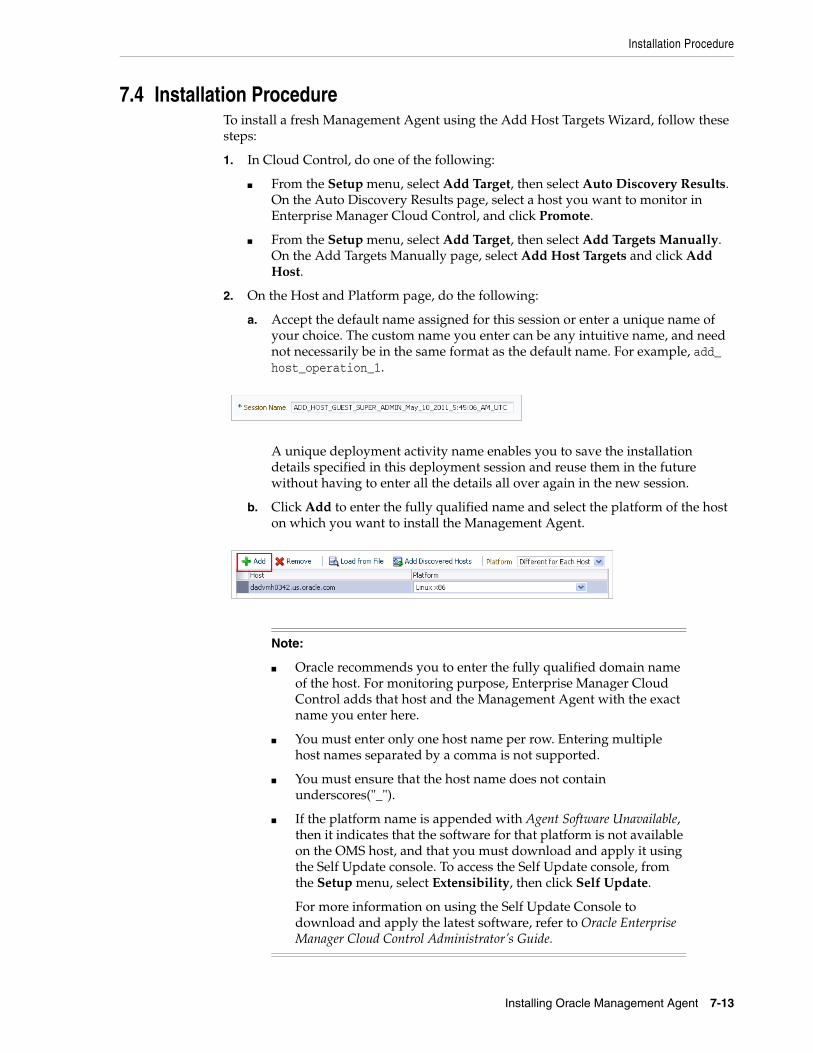
Installation Procedure
Installing Oracle Management Agent 7-13
7.4 Installation ProcedureTo install a fresh Management Agent using the Add Host Targets Wizard, follow these steps:
1. In Cloud Control, do one of the following:
■ From the Setup menu, select Add Target, then select Auto Discovery Results. On the Auto Discovery Results page, select a host you want to monitor in Enterprise Manager Cloud Control, and click Promote.
■ From the Setup menu, select Add Target, then select Add Targets Manually. On the Add Targets Manually page, select Add Host Targets and click Add Host.
2. On the Host and Platform page, do the following:
a. Accept the default name assigned for this session or enter a unique name of your choice. The custom name you enter can be any intuitive name, and need not necessarily be in the same format as the default name. For example, add_host_operation_1.
A unique deployment activity name enables you to save the installation details specified in this deployment session and reuse them in the future without having to enter all the details all over again in the new session.
b. Click Add to enter the fully qualified name and select the platform of the host on which you want to install the Management Agent.
Note:
■ Oracle recommends you to enter the fully qualified domain name of the host. For monitoring purpose, Enterprise Manager Cloud Control adds that host and the Management Agent with the exact name you enter here.
■ You must enter only one host name per row. Entering multiple host names separated by a comma is not supported.
■ You must ensure that the host name does not contain underscores("_").
■ If the platform name is appended with Agent Software Unavailable, then it indicates that the software for that platform is not available on the OMS host, and that you must download and apply it using the Self Update console. To access the Self Update console, from the Setup menu, select Extensibility, then click Self Update.
For more information on using the Self Update Console to download and apply the latest software, refer to Oracle Enterprise Manager Cloud Control Administrator’s Guide.
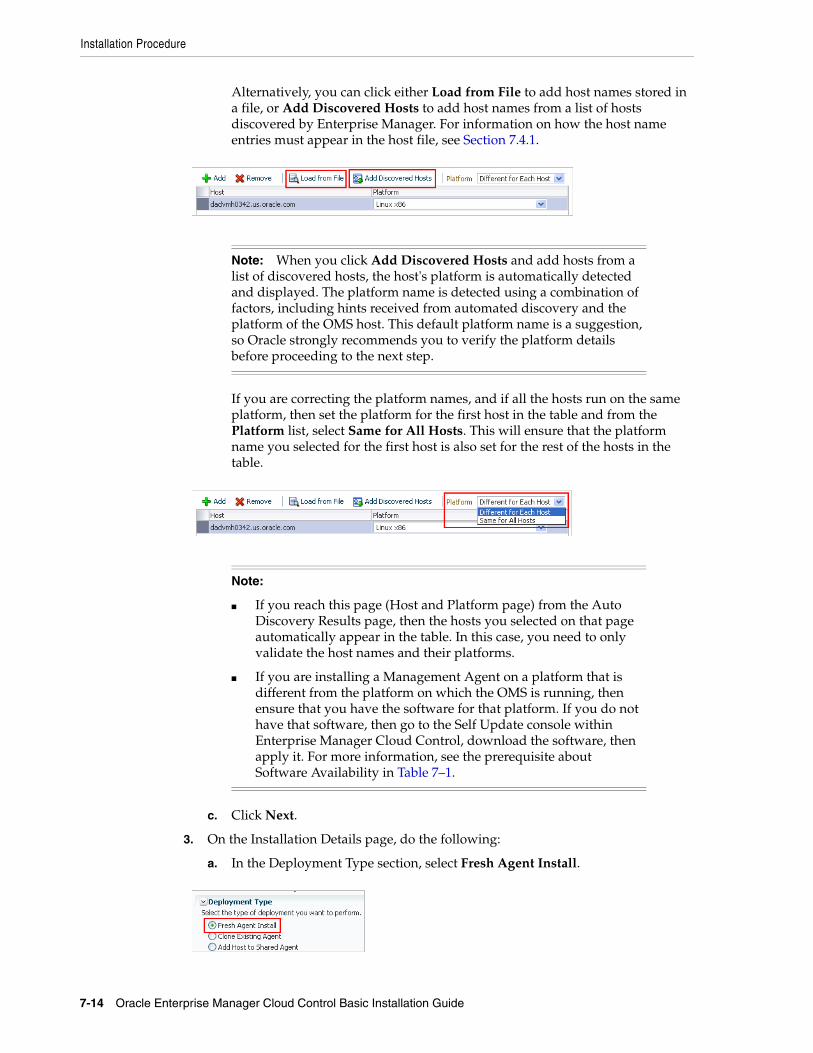
Installation Procedure
7-14 Oracle Enterprise Manager Cloud Control Basic Installation Guide
Alternatively, you can click either Load from File to add host names stored in a file, or Add Discovered Hosts to add host names from a list of hosts discovered by Enterprise Manager. For information on how the host name entries must appear in the host file, see Section 7.4.1.
If you are correcting the platform names, and if all the hosts run on the same platform, then set the platform for the first host in the table and from the Platform list, select Same for All Hosts. This will ensure that the platform name you selected for the first host is also set for the rest of the hosts in the table.
c. Click Next.
3. On the Installation Details page, do the following:
a. In the Deployment Type section, select Fresh Agent Install.
Note: When you click Add Discovered Hosts and add hosts from a list of discovered hosts, the host's platform is automatically detected and displayed. The platform name is detected using a combination of factors, including hints received from automated discovery and the platform of the OMS host. This default platform name is a suggestion, so Oracle strongly recommends you to verify the platform details before proceeding to the next step.
Note:
■ If you reach this page (Host and Platform page) from the Auto Discovery Results page, then the hosts you selected on that page automatically appear in the table. In this case, you need to only validate the host names and their platforms.
■ If you are installing a Management Agent on a platform that is different from the platform on which the OMS is running, then ensure that you have the software for that platform. If you do not have that software, then go to the Self Update console within Enterprise Manager Cloud Control, download the software, then apply it. For more information, see the prerequisite about Software Availability in Table 7–1.

Installation Procedure
Installing Oracle Management Agent 7-15
b. From the table, select the first row that indicates the hosts grouped by their common platform name.
c. In the Installation Details section, provide the installation details common to the hosts selected in Step 3 (b). For Installation Base Directory, enter the absolute path to the agent base directory where you want the software binaries, security files, and inventory files of the Management Agent to be copied.
For example, /u01/app/Oracle/
If the path you enter does not exist, the application creates a directory at the specified path, and copies the Management Agent software binaries, security files, and inventory files there.
d. For Instance Directory, accept the default instance directory location or enter the absolute path to a directory of your choice where all Management Agent-related configuration files can be stored.
For example, /u01/app/Oracle/agent_inst
If you are entering a custom location, then ensure that the directory has write permission. Oracle recommends you to maintain the instance directory inside the agent base directory.
If the path you enter does not exist, the application creates a directory at the specified path, and stores all the Management Agent-related configuration files there.
e. From Named Credential list, select an appropriate profile whose credentials can be used for setting up the SSH connectivity between the OMS and the remote hosts, and for installing a Management Agent on each of the remote hosts.
Note: If you have multiple hosts sharing a common mounted drive, then install the Management Agents in two different phases:
1. In the Add Host Targets Wizard, select the deployment type Fresh Agent Install, and install a Management Agent on the host where the drive is shared.
2. In the Add Host Targets Wizard, select the deployment type Add Host to Shared Agent, and install a Management Agent on all other hosts that access the shared, mounted drive. (Here, you will select the Management Agent you installed in the previous step as the master agent or shared agent.)
Note: The Installation Base Directory is essentially the agent base directory. Ensure that the directory you provide is empty. If a previously run deployment session had failed for some reason, then you might see an ADATMP_<timestamp> subdirectory in the agent base directory. In this case, either delete the subdirectory and start a new deployment session, or retry the failed session from the Add Host Status page.
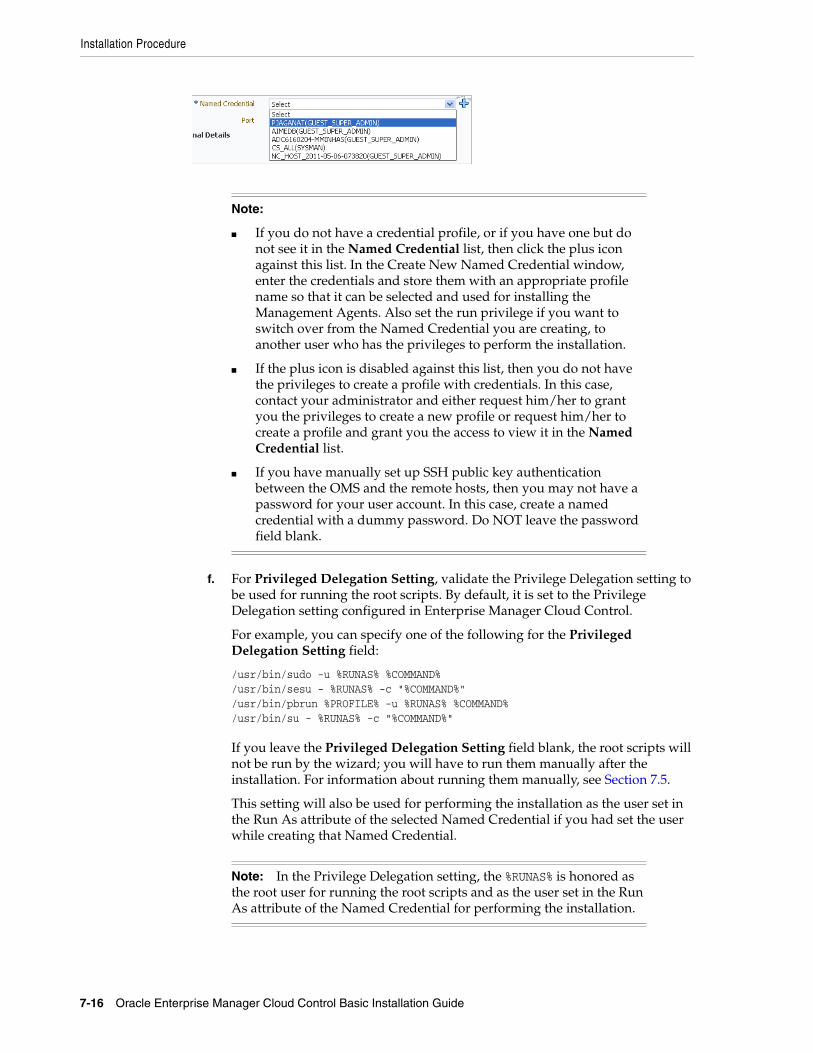
Installation Procedure
7-16 Oracle Enterprise Manager Cloud Control Basic Installation Guide
f. For Privileged Delegation Setting, validate the Privilege Delegation setting to be used for running the root scripts. By default, it is set to the Privilege Delegation setting configured in Enterprise Manager Cloud Control.
For example, you can specify one of the following for the Privileged Delegation Setting field:
/usr/bin/sudo -u %RUNAS% %COMMAND%/usr/bin/sesu - %RUNAS% -c "%COMMAND%"/usr/bin/pbrun %PROFILE% -u %RUNAS% %COMMAND%/usr/bin/su - %RUNAS% -c "%COMMAND%"
If you leave the Privileged Delegation Setting field blank, the root scripts will not be run by the wizard; you will have to run them manually after the installation. For information about running them manually, see Section 7.5.
This setting will also be used for performing the installation as the user set in the Run As attribute of the selected Named Credential if you had set the user while creating that Named Credential.
Note:
■ If you do not have a credential profile, or if you have one but do not see it in the Named Credential list, then click the plus icon against this list. In the Create New Named Credential window, enter the credentials and store them with an appropriate profile name so that it can be selected and used for installing the Management Agents. Also set the run privilege if you want to switch over from the Named Credential you are creating, to another user who has the privileges to perform the installation.
■ If the plus icon is disabled against this list, then you do not have the privileges to create a profile with credentials. In this case, contact your administrator and either request him/her to grant you the privileges to create a new profile or request him/her to create a profile and grant you the access to view it in the Named Credential list.
■ If you have manually set up SSH public key authentication between the OMS and the remote hosts, then you may not have a password for your user account. In this case, create a named credential with a dummy password. Do NOT leave the password field blank.
Note: In the Privilege Delegation setting, the %RUNAS% is honored as the root user for running the root scripts and as the user set in the Run As attribute of the Named Credential for performing the installation.
Installation Procedure
Installing Oracle Management Agent 7-17
g. For Port, accept the default port (3872) that is assigned for the Management Agent to communicate, or enter a port of your choice.
The custom port you enter must not be busy. If you are not sure, you can leave this field blank. Enterprise Manager Cloud Control automatically assigns the first available free port within the range of 1830 - 1849.
h. (Optional) In the Optional Details section, enter the absolute path to an accessible location where the preinstallation and postinstallation scripts you want to run are available. Note that only shell scripts are supported, and only one preinstallation or one postinstallation script can be specified.
If you want to run the script as root, then select Run as Root. If the script is on the host where OMS is running and is not on the host where you want to install the Management Agent, then select Script on OMS. In this case, the script will be copied from the OMS host to the destination hosts, and then run on the destination hosts.
i. (Optional) For Additional Parameters, enter a whitespace-separate list of additional parameters that you want to pass during the installation. For a complete list of supported additional parameters, see Table 7–2.
For example, if you want to provide the inventory pointer location file, then enter -invPtrLoc followed by the absolute path to the file location. However, note that this parameter is supported only on UNIX platforms, and not on Microsoft Windows platforms.
j. Repeat Step 3 (b) to Step 3 (i) for every other row you have in the table.
k. Click Next.
4. On the Review page, review the details you have provided for the installation and do one of the following:
■ If you want to modify the details, then click Back repeatedly to reach the page where you want to make the changes.
■ If you want to cancel the deployment session for some reason, click Cancel. You are automatically taken to the Add Targets Manually page.
■ If you are satisfied with the details, then click Deploy Agent to install the Management Agent. You are automatically taken to the Add Host Status page that enables you to monitor the progress of the deployment session.
If you want to cancel a running deployment session, then on the Add Host Targets page, click Cancel. Note that once you cancel the session, you cannot track or resume the session in any way. However, the currently launched commands on the remote hosts will continue to run until they are completed.
7.4.1 Format of Host List File In the Add Host Targets Wizard, you can click Load from File to add the hosts listed in a file. However, ensure that the file you select has one of the following formats:
Note: If the installation fails for any reason, review the log files. For information on how to access the log files, refer to Oracle Enterprise Manager Cloud Control Advanced Installation and Configuration Guide.
One log file is generated per host, so if you installed Management Agents on multiple hosts, then review all the log files.
Installation Procedure
7-18 Oracle Enterprise Manager Cloud Control Basic Installation Guide
■ Only the host name.
For Example,
host1.example.com
host2.example.com
■ The host name followed by the platform name.
For Example,
host1.example.com linux_x64
host2.example.com aix
The supported platform names are linux_x64, linux, solaris, hpunix, hpi, linux64_zseries, aix, linux_ppc64, windows_x64, solaris_x64, win32.
7.4.2 Supported Additional ParametersTable 7–2 lists the additional parameters supported for installing a new Management Agent using the Add Host Targets Wizard.
Table 7–2 Supported Additional Parameters
Parameter Description
INVENTORY_LOCATION
Enter the absolute path to the Central Inventory (oraInventory).
For example, INVENTORY_LOCATION=$HOME/oraInventory
Note: This parameter is supported only on UNIX platforms, and not on Microsoft Windows platforms.
This parameter will be used only when the Central Inventory pointer /etc/oraInst.loc (or /var/opt/oracle/oraInst.loc) does not exist.
-invPtrLoc Enter the absolute path to the inventory file that has the location of the Central Inventory (oraInventory).
For example, -invPtrLoc /tmp/oraInst.loc
Note: This parameter is supported only on UNIX platforms, and not on Microsoft Windows platforms.
s_agentSrvcName (Only for Microsoft Windows) Enter a custom name for the Management Agent service.
Every Management Agent appears as a service in Microsoft Windows, and every Management Agent has a default service name. If you want to assign a custom name to identify it, then use this parameter.
For example, s_agentSrvcName=agentsrvc1
Note: If you upgrade a 12c Release 1 (12.1.0.1) Management Agent installed on a Microsoft Windows host to 12c Release 2 (12.1.0.2), and you want to install another Management Agent on the same host, reporting to a different OMS, ensure that you specify the s_agentSrvcName parameter.
b_startAgent=false Specify this parameter if you do not want the Management Agent to start automatically once it is installed and configured.
If you do not specify this parameter, the Management Agent starts automatically once it is installed and configured.
After You Install
Installing Oracle Management Agent 7-19
7.5 After You InstallAfter you install a Management Agent using the Add Host Targets Wizard, follow these steps:
1. Verify the installation on the Add Host Status page. Review the progress made on each of the phases of the deployment operation — Initialization, Remote Prerequisite Check, and Agent Deployment.
If a particular phase fails or ends up with a warning, then review the details provided for each phase in the Agent Deployment Details section, and do one of the following:
■ Ignore the warning or failure, and continue with the session if you prefer.
– You can choose to proceed with the deployment of Management Agents only on those remote hosts that have successfully cleared the checks, and you can ignore the ones that have Warning or Failed status. To do so, click Continue and select Continue, Ignoring Failed Hosts.
– You can choose to proceed with the deployment of Management Agents on all the hosts, including the ones that have Warning or Failed status. To do so, click Continue and select Continue, All Hosts.
■ Fix the problem by reviewing the error description carefully, understanding its cause, and taking action as recommended by Oracle.
– You can choose to retry the deployment of Management Agents with the same installation details. To do so, click Retry and select Retry Using Same Inputs.
– You can retry the deployment of Management Agents with modified installation details. To do so, click Retry and select Update Inputs and Retry.
b_secureAgent=false Specify this parameter if you do not want the Management Agent to be secured after the install.
If you specify this parameter, ensure that you also specify the OMS HTTP port, using the EM_UPLOAD_PORT parameter.
For example, b_secureAgent=false EM_UPLOAD_PORT=4899
If you do not specify this parameter, the Management Agent is secured automatically after the install.
Note: In the Add Host Targets Wizard, after you click Deploy Agent to install one or more Management Agents, you are automatically taken to the Add Host Status page.
If you want to view the details or track the progress of all the deployment sessions, then from the Setup menu, select Add Target, and then, click Add Targets Manually. On the Add Targets Manually page, select Add Host Targets and click Add Host Results.
Table 7–2 (Cont.) Supported Additional Parameters
Parameter Description
After You Install
7-20 Oracle Enterprise Manager Cloud Control Basic Installation Guide
2. If required, manually verify the installation:
a. Navigate to the Management Agent home and run the following command to see a message that confirms that the Management Agent is up and running:
$<AGENT_INSTANCE_HOME>/bin/emctl status agent
b. Navigate to the Management Agent home and run the following command to see a message that confirms that EMD upload completed successfully:
$<AGENT_INSTANCE_HOME>/bin/emctl upload
3. Verify if all the plug-ins were installed successfully. To do so, access the following log file from the Management Agent home, and search for the sentence WARN:Plugin configuration has failed.
$<AGENT_HOME>/cfgtoollogs/cfgfw/CfmLogger-<timestamp>.log
For example,
$/u01/agent/core/12.1.0.2.0/cfgtoollogs/cfgfw/CfmLogger-<timestamp>.log
If you find the sentence, resolve the issue by running the AgentPluginDeploy.pl script from the Management Agent home.
$<AGENT_BASE_DIR>/agent/core/12.1.0.2.0/perl/bin/perl <AGENT_BASE_DIR>/agent/core/12.1.0.2.0/bin/AgentPluginDeploy.pl -oracleHome <AGENT_BASE_DIR>/agent/core/12.1.0.2.0 -agentDir <AGENT_BASE_DIR> -pluginIdsInfoFile <AGENT_BASE_DIR>/plugins.txt -action configure -emStateDir <AGENT_INSTANCE_HOME>
For example,
/u01/agent/core/12.1.0.2.0/perl/bin/perl /u01/agent/core/12.1.0.2.0/bin/AgentPluginDeploy.pl -oracleHome /u01/agent/core/12.1.0.2.0/ -agentDir /u01/agent -pluginIdsInfoFile /u01/agent/plugins.txt -action configure -emStateDir /u01/agent/agent_inst
4. If you have restrictive Privilege Delegation Provider (PDP) configuration settings, enter the location of nmosudo in your PDP configuration file.
Enterprise Manager supports PDPs such as SUDO and PowerBroker that enable administrators to restrict certain users from running certain commands.
In Enterprise Manager Cloud Control 12c Release 2 (12.1.0.2), nmosudo is located in the sbin directory, which is in the agent base directory. For example, <AGENT_BASE_DIRECTORY>/sbin/nmosudo. In Enterprise Manager Cloud Control 12c Release 1 (12.1.0.1) [with or without Bundle Patch 1], nmosudo is located in the
Note: If you want to cancel a running deployment session, then click Cancel. Note that once you cancel the session, you cannot track or resume the session in any way. However, the currently launched commands on the remote hosts will continue to run until they are completed.
Note: If the status of the Management Agent is down for some reason, then manually start the Management Agent:
$<AGENT_INSTANCE_HOME>/bin/emctl start agent
After You Install
Installing Oracle Management Agent 7-21
agent instance directory. For example, <AGENT_INSTANCE_DIRECTORY>/bin/nmosudo.
Therefore, when you install an Enterprise Manager Cloud Control 12c Release 2 (12.1.0.2) Management Agent, you must modify your PDP configuration file to update the new location of nmosudo.
For example, if you use SUDO as your PDP, the configuration file for SUDO is typically /etc/sudoers. In this file, update the following entry with the new location to nmosudo.
sudouser ALL : oracle /eminstall/basedir/sbin/nmosudo *
5. (Only for UNIX Operating Systems) If you had ignored the prerequisite check warning about not having root privileges, SUDO/PBRUN binaries, or SUDO/PBRUN privileges, then manually run the following scripts as a root user from each of the hosts where the installation was done. If you do not have SUDO/PBRUN privileges, then request your Administrator who has the privileges to run these scripts.
■ If this is the first Oracle product you just installed on the host, then run the oraInstroot.sh script from the inventory location specified in the oraInst.loc file that is available in the Management Agent home.
For example, if the inventory location specified in the oraInst.loc file is $HOME/oraInventory, then run the following command:
$HOME/oraInventory/oraInstRoot.sh
■ Run the root.sh script from the Management Agent home:
$<AGENT_HOME>/root.sh
6. If you had ignored a prerequisite check warning about wrong time zone settings, follow these steps:
1. Set the correct time zone on the destination host.
For information on how to set the time zone on a destination host, refer Destination Host Time Zone Requirements in Table 7–1.
2. Deinstall the Management Agent present on the destination host.
For information on how to deinstall a Management Agent, refer to Oracle Enterprise Manager Cloud Control Advanced Installation and Configuration Guide.
3. Install a Management Agent on the destination host.
Note: If you are not a root user, then use SUDO/PBRUN to change to a root user. For example, run the following command:
/usr/bin/sudo $HOME/oraInventory/oraInstRoot.sh
Note: If you are not a root user, then use SUDO/PBRUN to change to a root user. For example, run the following command:
/usr/bin/sudo $<AGENT_HOME>/root.sh
After You Install
7-22 Oracle Enterprise Manager Cloud Control Basic Installation Guide
7. By default, the host and the Management Agent get automatically added to the Enterprise Manager Cloud Control console for monitoring. None of the targets running on that host get automatically discovered and monitored.
To monitor the other targets, you need to add them to Enterprise Manager Cloud Control either using the Auto Discovery Results page, the Add Targets Manually page, or the discovery wizards offered for the targets you want to monitor.
For information about discovering targets in Enterprise Manager Cloud Control, refer to Oracle Enterprise Manager Cloud Control Administrator's Guide.
Note: If you want to repoint your existing Management Agents to a new Oracle Management Service (OMS), then you must first deinstall those Management Agents and plug-ins, and then redeploy those Management Agents and plug-ins using the new OMS. This is typically done when you want to move from an Enterprise Manager Cloud Control system in a test environment to an Enterprise Manager Cloud Control system in a production environment.
When you repoint your existing Management Agents to a new OMS, you cannot move the targets monitored by the Management Agents, the target history, and the Management Agent history. The monitored targets and the history data is lost.
8
Adding Additional Oracle Management Service 8-1
8Adding Additional Oracle Management Service
This chapter describes how you can install an additional Oracle Management Service (OMS) to your existing Enterprise Manager Cloud Control environment. In particular, this chapter covers the following:
■ Overview
■ Before You Begin
■ Prerequisites
■ Installation Procedure
■ After You Install
8.1 OverviewOracle Management Service (OMS) is one of the core components of Enterprise Manager Cloud Control that orchestrates with Oracle Management Agents (Management Agents) and plug-ins to discover targets, monitor and manage them, and store the collected information in a repository for future reference and analysis.
When you install Enterprise Manager for the very first time, by default, the installer installs one OMS along with one Management Agent. While this default configuration suits smaller environments, typically in larger production environments, you may have the need to install additional OMS instances to help reduce the load on a single OMS and improve the efficiency of the data flow.
Note: This chapter describes how you can install an additional OMS in interactive, graphical mode. If you want to perform the same operation in silent way, then refer to the Oracle Enterprise Manager Cloud Control Advanced Installation and Configuration Guide.
Note: On the source OMS, if you have deployed additional plug-ins that were not part of the Enterprise Manager software (DVD, or downloaded software), then follow the instructions outlined in Oracle Enterprise Manager Cloud Control Advanced Installation and Configuration Guide.
Note: You can have multiple OMS instances and still connect to just one Oracle Management Repository (Management Repository).
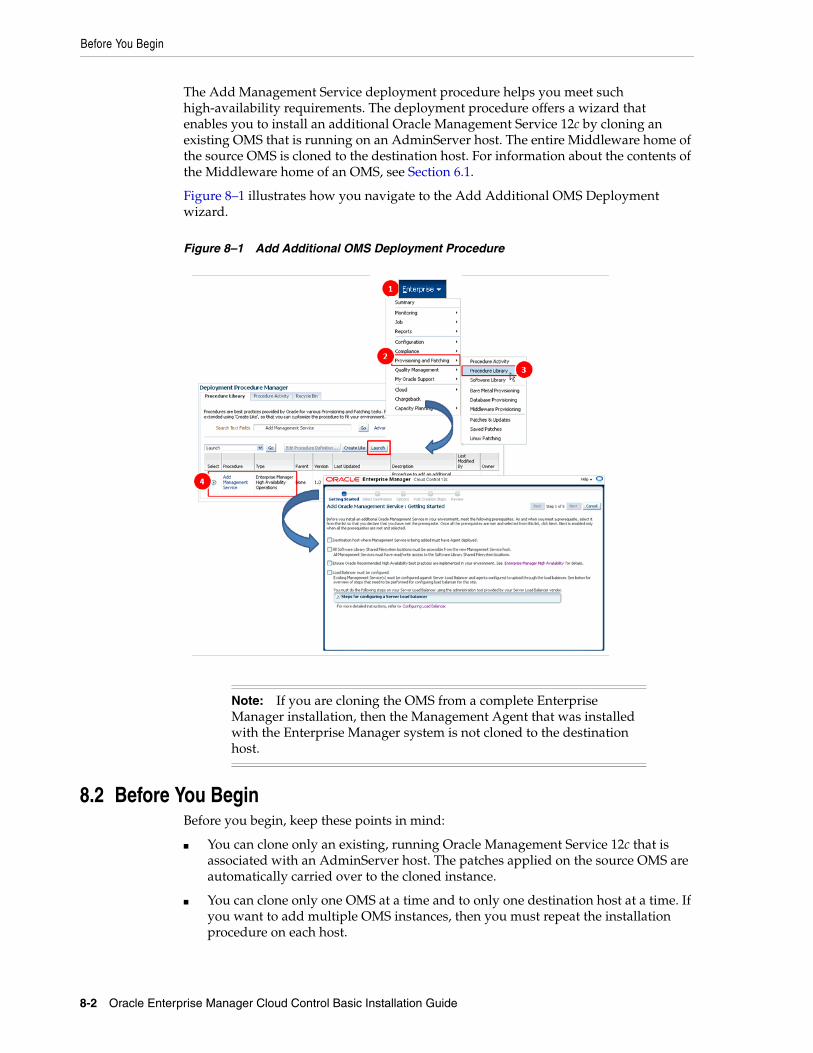
Before You Begin
8-2 Oracle Enterprise Manager Cloud Control Basic Installation Guide
The Add Management Service deployment procedure helps you meet such high-availability requirements. The deployment procedure offers a wizard that enables you to install an additional Oracle Management Service 12c by cloning an existing OMS that is running on an AdminServer host. The entire Middleware home of the source OMS is cloned to the destination host. For information about the contents of the Middleware home of an OMS, see Section 6.1.
Figure 8–1 illustrates how you navigate to the Add Additional OMS Deployment wizard.
Figure 8–1 Add Additional OMS Deployment Procedure
8.2 Before You BeginBefore you begin, keep these points in mind:
■ You can clone only an existing, running Oracle Management Service 12c that is associated with an AdminServer host. The patches applied on the source OMS are automatically carried over to the cloned instance.
■ You can clone only one OMS at a time and to only one destination host at a time. If you want to add multiple OMS instances, then you must repeat the installation procedure on each host.
Note: If you are cloning the OMS from a complete Enterprise Manager installation, then the Management Agent that was installed with the Enterprise Manager system is not cloned to the destination host.
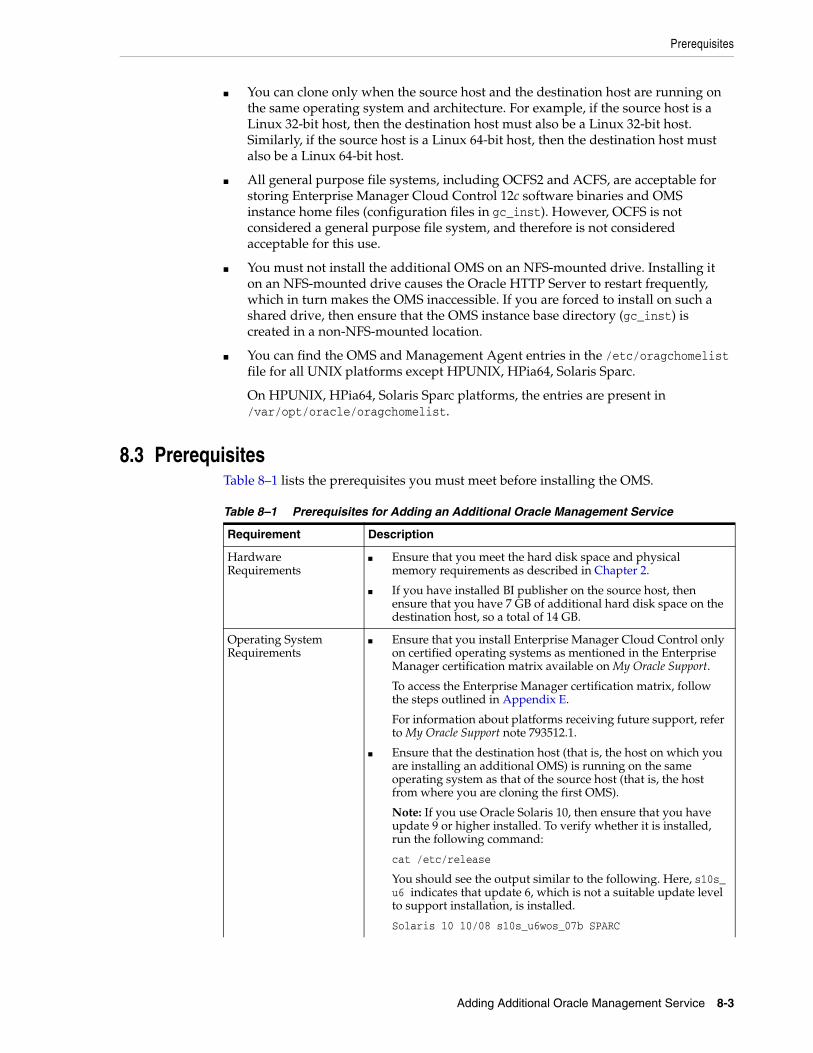
Prerequisites
Adding Additional Oracle Management Service 8-3
■ You can clone only when the source host and the destination host are running on the same operating system and architecture. For example, if the source host is a Linux 32-bit host, then the destination host must also be a Linux 32-bit host. Similarly, if the source host is a Linux 64-bit host, then the destination host must also be a Linux 64-bit host.
■ All general purpose file systems, including OCFS2 and ACFS, are acceptable for storing Enterprise Manager Cloud Control 12c software binaries and OMS instance home files (configuration files in gc_inst). However, OCFS is not considered a general purpose file system, and therefore is not considered acceptable for this use.
■ You must not install the additional OMS on an NFS-mounted drive. Installing it on an NFS-mounted drive causes the Oracle HTTP Server to restart frequently, which in turn makes the OMS inaccessible. If you are forced to install on such a shared drive, then ensure that the OMS instance base directory (gc_inst) is created in a non-NFS-mounted location.
■ You can find the OMS and Management Agent entries in the /etc/oragchomelist file for all UNIX platforms except HPUNIX, HPia64, Solaris Sparc.
On HPUNIX, HPia64, Solaris Sparc platforms, the entries are present in /var/opt/oracle/oragchomelist.
8.3 PrerequisitesTable 8–1 lists the prerequisites you must meet before installing the OMS.
Table 8–1 Prerequisites for Adding an Additional Oracle Management Service
Requirement Description
Hardware Requirements
■ Ensure that you meet the hard disk space and physical memory requirements as described in Chapter 2.
■ If you have installed BI publisher on the source host, then ensure that you have 7 GB of additional hard disk space on the destination host, so a total of 14 GB.
Operating System Requirements
■ Ensure that you install Enterprise Manager Cloud Control only on certified operating systems as mentioned in the Enterprise Manager certification matrix available on My Oracle Support.
To access the Enterprise Manager certification matrix, follow the steps outlined in Appendix E.
For information about platforms receiving future support, refer to My Oracle Support note 793512.1.
■ Ensure that the destination host (that is, the host on which you are installing an additional OMS) is running on the same operating system as that of the source host (that is, the host from where you are cloning the first OMS).
Note: If you use Oracle Solaris 10, then ensure that you have update 9 or higher installed. To verify whether it is installed, run the following command:
cat /etc/release
You should see the output similar to the following. Here, s10s_u6 indicates that update 6, which is not a suitable update level to support installation, is installed.
Solaris 10 10/08 s10s_u6wos_07b SPARC
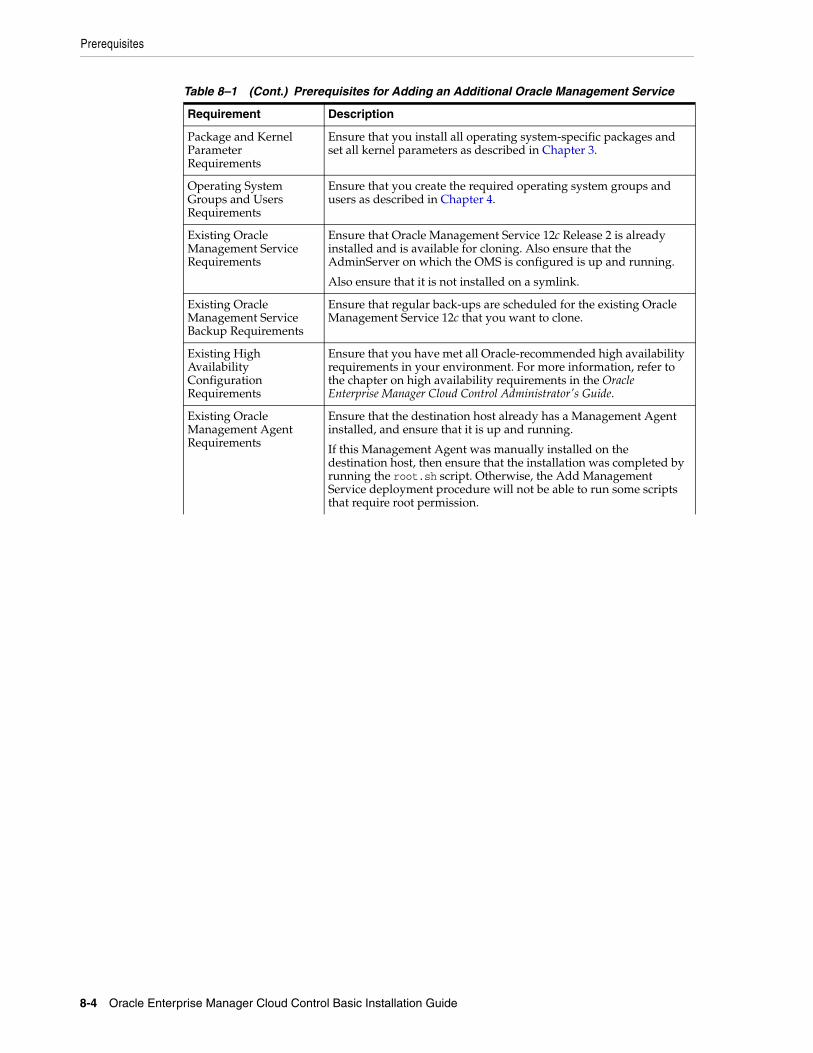
Prerequisites
8-4 Oracle Enterprise Manager Cloud Control Basic Installation Guide
Package and Kernel Parameter Requirements
Ensure that you install all operating system-specific packages and set all kernel parameters as described in Chapter 3.
Operating System Groups and Users Requirements
Ensure that you create the required operating system groups and users as described in Chapter 4.
Existing Oracle Management Service Requirements
Ensure that Oracle Management Service 12c Release 2 is already installed and is available for cloning. Also ensure that the AdminServer on which the OMS is configured is up and running.
Also ensure that it is not installed on a symlink.
Existing Oracle Management Service Backup Requirements
Ensure that regular back-ups are scheduled for the existing Oracle Management Service 12c that you want to clone.
Existing High Availability Configuration Requirements
Ensure that you have met all Oracle-recommended high availability requirements in your environment. For more information, refer to the chapter on high availability requirements in the Oracle Enterprise Manager Cloud Control Administrator's Guide.
Existing Oracle Management Agent Requirements
Ensure that the destination host already has a Management Agent installed, and ensure that it is up and running.
If this Management Agent was manually installed on the destination host, then ensure that the installation was completed by running the root.sh script. Otherwise, the Add Management Service deployment procedure will not be able to run some scripts that require root permission.
Table 8–1 (Cont.) Prerequisites for Adding an Additional Oracle Management Service
Requirement Description
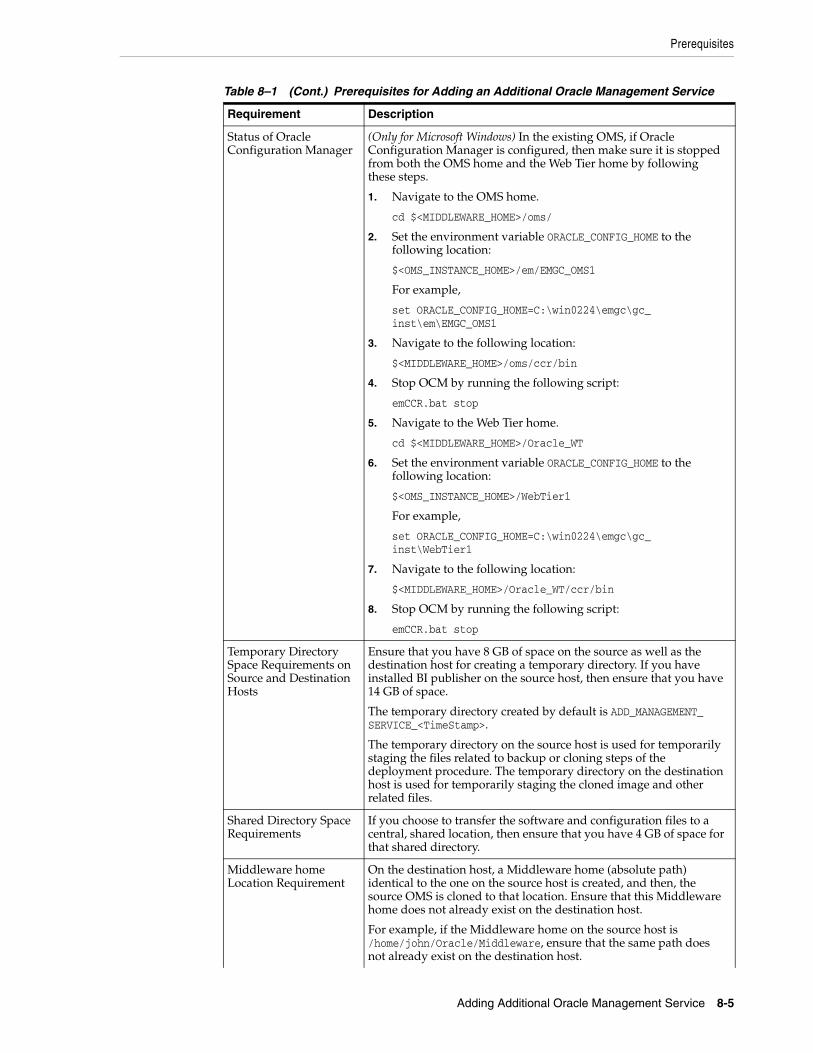
Prerequisites
Adding Additional Oracle Management Service 8-5
Status of Oracle Configuration Manager
(Only for Microsoft Windows) In the existing OMS, if Oracle Configuration Manager is configured, then make sure it is stopped from both the OMS home and the Web Tier home by following these steps.
1. Navigate to the OMS home.
cd $<MIDDLEWARE_HOME>/oms/
2. Set the environment variable ORACLE_CONFIG_HOME to the following location:
$<OMS_INSTANCE_HOME>/em/EMGC_OMS1
For example,
set ORACLE_CONFIG_HOME=C:\win0224\emgc\gc_inst\em\EMGC_OMS1
3. Navigate to the following location:
$<MIDDLEWARE_HOME>/oms/ccr/bin
4. Stop OCM by running the following script:
emCCR.bat stop
5. Navigate to the Web Tier home.
cd $<MIDDLEWARE_HOME>/Oracle_WT
6. Set the environment variable ORACLE_CONFIG_HOME to the following location:
$<OMS_INSTANCE_HOME>/WebTier1
For example,
set ORACLE_CONFIG_HOME=C:\win0224\emgc\gc_inst\WebTier1
7. Navigate to the following location:
$<MIDDLEWARE_HOME>/Oracle_WT/ccr/bin
8. Stop OCM by running the following script:
emCCR.bat stop
Temporary Directory Space Requirements on Source and Destination Hosts
Ensure that you have 8 GB of space on the source as well as the destination host for creating a temporary directory. If you have installed BI publisher on the source host, then ensure that you have 14 GB of space.
The temporary directory created by default is ADD_MANAGEMENT_SERVICE_<TimeStamp>.
The temporary directory on the source host is used for temporarily staging the files related to backup or cloning steps of the deployment procedure. The temporary directory on the destination host is used for temporarily staging the cloned image and other related files.
Shared Directory Space Requirements
If you choose to transfer the software and configuration files to a central, shared location, then ensure that you have 4 GB of space for that shared directory.
Middleware home Location Requirement
On the destination host, a Middleware home (absolute path) identical to the one on the source host is created, and then, the source OMS is cloned to that location. Ensure that this Middleware home does not already exist on the destination host.
For example, if the Middleware home on the source host is /home/john/Oracle/Middleware, ensure that the same path does not already exist on the destination host.
Table 8–1 (Cont.) Prerequisites for Adding an Additional Oracle Management Service
Requirement Description
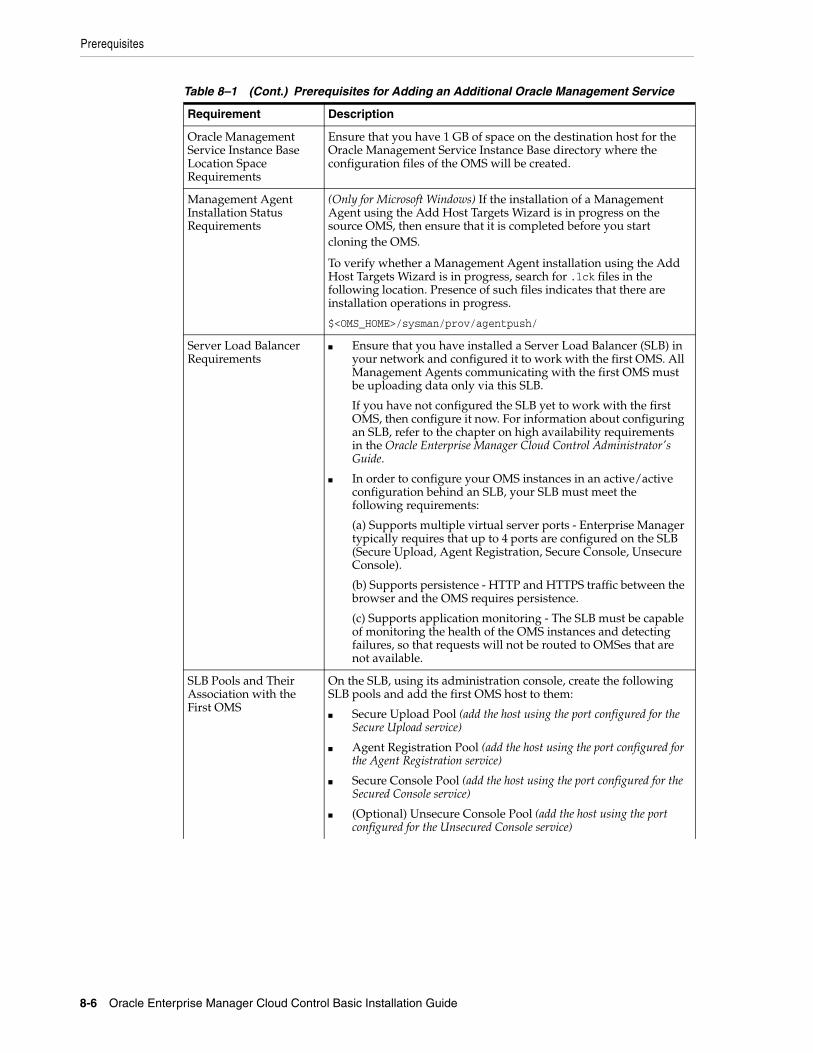
Prerequisites
8-6 Oracle Enterprise Manager Cloud Control Basic Installation Guide
Oracle Management Service Instance Base Location Space Requirements
Ensure that you have 1 GB of space on the destination host for the Oracle Management Service Instance Base directory where the configuration files of the OMS will be created.
Management Agent Installation Status Requirements
(Only for Microsoft Windows) If the installation of a Management Agent using the Add Host Targets Wizard is in progress on the source OMS, then ensure that it is completed before you start cloning the OMS.
To verify whether a Management Agent installation using the Add Host Targets Wizard is in progress, search for .lck files in the following location. Presence of such files indicates that there are installation operations in progress.
$<OMS_HOME>/sysman/prov/agentpush/
Server Load Balancer Requirements
■ Ensure that you have installed a Server Load Balancer (SLB) in your network and configured it to work with the first OMS. All Management Agents communicating with the first OMS must be uploading data only via this SLB.
If you have not configured the SLB yet to work with the first OMS, then configure it now. For information about configuring an SLB, refer to the chapter on high availability requirements in the Oracle Enterprise Manager Cloud Control Administrator's Guide.
■ In order to configure your OMS instances in an active/active configuration behind an SLB, your SLB must meet the following requirements:
(a) Supports multiple virtual server ports - Enterprise Manager typically requires that up to 4 ports are configured on the SLB (Secure Upload, Agent Registration, Secure Console, Unsecure Console).
(b) Supports persistence - HTTP and HTTPS traffic between the browser and the OMS requires persistence.
(c) Supports application monitoring - The SLB must be capable of monitoring the health of the OMS instances and detecting failures, so that requests will not be routed to OMSes that are not available.
SLB Pools and Their Association with the First OMS
On the SLB, using its administration console, create the following SLB pools and add the first OMS host to them:
■ Secure Upload Pool (add the host using the port configured for the Secure Upload service)
■ Agent Registration Pool (add the host using the port configured for the Agent Registration service)
■ Secure Console Pool (add the host using the port configured for the Secured Console service)
■ (Optional) Unsecure Console Pool (add the host using the port configured for the Unsecured Console service)
Table 8–1 (Cont.) Prerequisites for Adding an Additional Oracle Management Service
Requirement Description
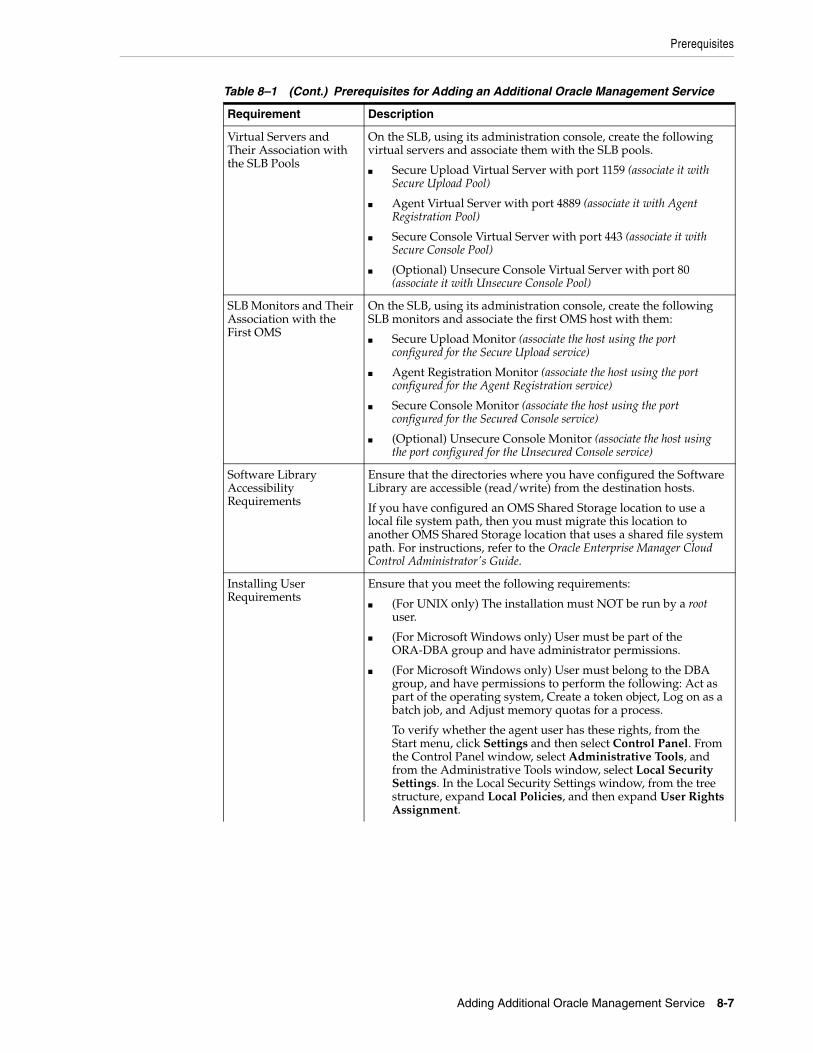
Prerequisites
Adding Additional Oracle Management Service 8-7
Virtual Servers and Their Association with the SLB Pools
On the SLB, using its administration console, create the following virtual servers and associate them with the SLB pools.
■ Secure Upload Virtual Server with port 1159 (associate it with Secure Upload Pool)
■ Agent Virtual Server with port 4889 (associate it with Agent Registration Pool)
■ Secure Console Virtual Server with port 443 (associate it with Secure Console Pool)
■ (Optional) Unsecure Console Virtual Server with port 80 (associate it with Unsecure Console Pool)
SLB Monitors and Their Association with the First OMS
On the SLB, using its administration console, create the following SLB monitors and associate the first OMS host with them:
■ Secure Upload Monitor (associate the host using the port configured for the Secure Upload service)
■ Agent Registration Monitor (associate the host using the port configured for the Agent Registration service)
■ Secure Console Monitor (associate the host using the port configured for the Secured Console service)
■ (Optional) Unsecure Console Monitor (associate the host using the port configured for the Unsecured Console service)
Software Library Accessibility Requirements
Ensure that the directories where you have configured the Software Library are accessible (read/write) from the destination hosts.
If you have configured an OMS Shared Storage location to use a local file system path, then you must migrate this location to another OMS Shared Storage location that uses a shared file system path. For instructions, refer to the Oracle Enterprise Manager Cloud Control Administrator's Guide.
Installing User Requirements
Ensure that you meet the following requirements:
■ (For UNIX only) The installation must NOT be run by a root user.
■ (For Microsoft Windows only) User must be part of the ORA-DBA group and have administrator permissions.
■ (For Microsoft Windows only) User must belong to the DBA group, and have permissions to perform the following: Act as part of the operating system, Create a token object, Log on as a batch job, and Adjust memory quotas for a process.
To verify whether the agent user has these rights, from the Start menu, click Settings and then select Control Panel. From the Control Panel window, select Administrative Tools, and from the Administrative Tools window, select Local Security Settings. In the Local Security Settings window, from the tree structure, expand Local Policies, and then expand User Rights Assignment.
Table 8–1 (Cont.) Prerequisites for Adding an Additional Oracle Management Service
Requirement Description
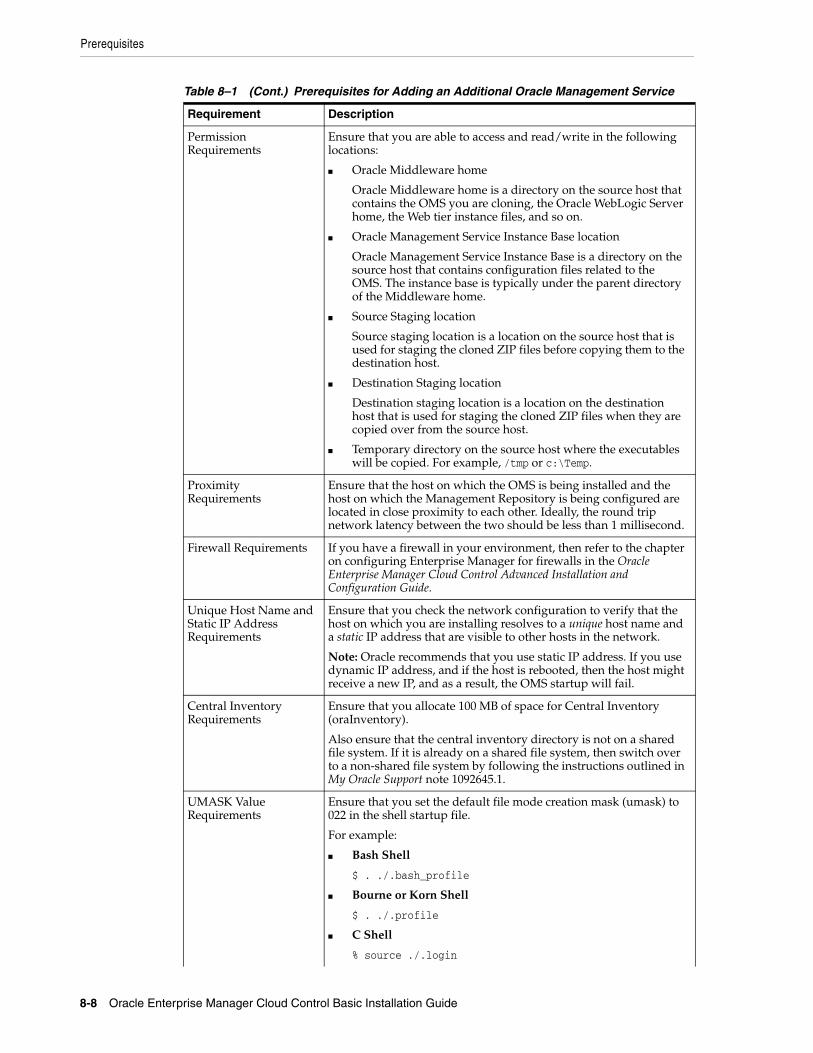
Prerequisites
8-8 Oracle Enterprise Manager Cloud Control Basic Installation Guide
Permission Requirements
Ensure that you are able to access and read/write in the following locations:
■ Oracle Middleware home
Oracle Middleware home is a directory on the source host that contains the OMS you are cloning, the Oracle WebLogic Server home, the Web tier instance files, and so on.
■ Oracle Management Service Instance Base location
Oracle Management Service Instance Base is a directory on the source host that contains configuration files related to the OMS. The instance base is typically under the parent directory of the Middleware home.
■ Source Staging location
Source staging location is a location on the source host that is used for staging the cloned ZIP files before copying them to the destination host.
■ Destination Staging location
Destination staging location is a location on the destination host that is used for staging the cloned ZIP files when they are copied over from the source host.
■ Temporary directory on the source host where the executables will be copied. For example, /tmp or c:\Temp.
Proximity Requirements
Ensure that the host on which the OMS is being installed and the host on which the Management Repository is being configured are located in close proximity to each other. Ideally, the round trip network latency between the two should be less than 1 millisecond.
Firewall Requirements If you have a firewall in your environment, then refer to the chapter on configuring Enterprise Manager for firewalls in the Oracle Enterprise Manager Cloud Control Advanced Installation and Configuration Guide.
Unique Host Name and Static IP Address Requirements
Ensure that you check the network configuration to verify that the host on which you are installing resolves to a unique host name and a static IP address that are visible to other hosts in the network.
Note: Oracle recommends that you use static IP address. If you use dynamic IP address, and if the host is rebooted, then the host might receive a new IP, and as a result, the OMS startup will fail.
Central Inventory Requirements
Ensure that you allocate 100 MB of space for Central Inventory (oraInventory).
Also ensure that the central inventory directory is not on a shared file system. If it is already on a shared file system, then switch over to a non-shared file system by following the instructions outlined in My Oracle Support note 1092645.1.
UMASK Value Requirements
Ensure that you set the default file mode creation mask (umask) to 022 in the shell startup file.
For example:
■ Bash Shell
$ . ./.bash_profile
■ Bourne or Korn Shell
$ . ./.profile
■ C Shell
% source ./.login
Table 8–1 (Cont.) Prerequisites for Adding an Additional Oracle Management Service
Requirement Description
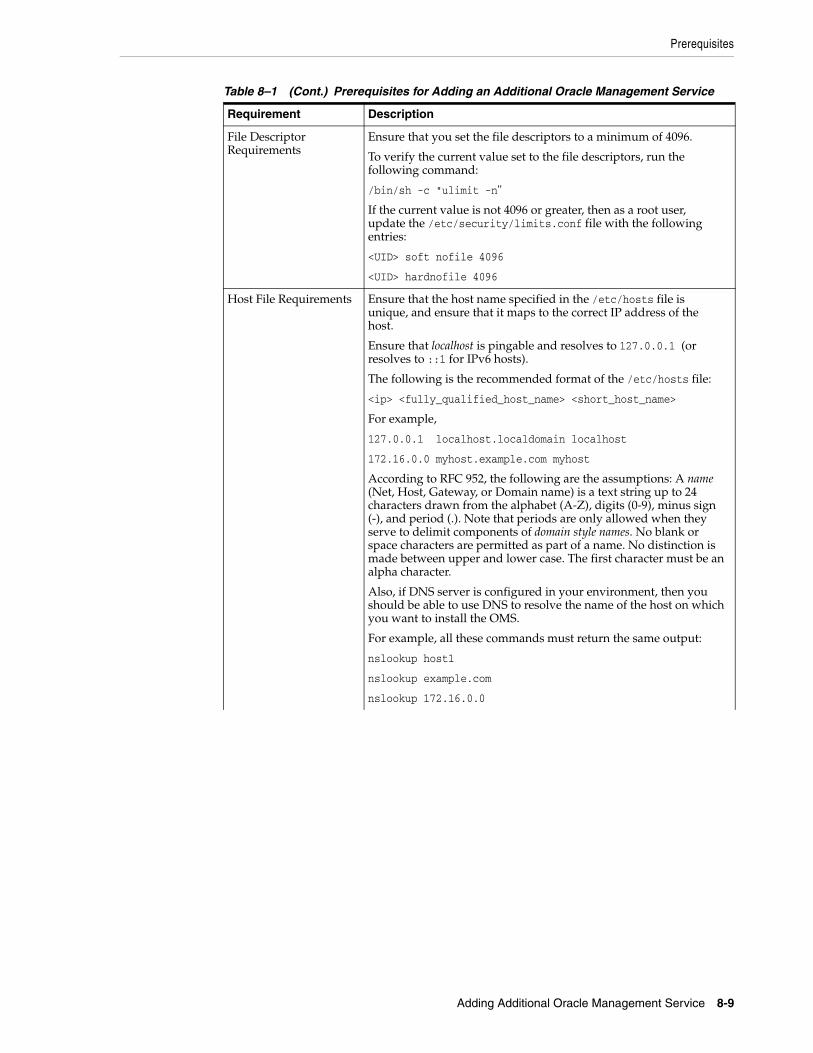
Prerequisites
Adding Additional Oracle Management Service 8-9
File Descriptor Requirements
Ensure that you set the file descriptors to a minimum of 4096.
To verify the current value set to the file descriptors, run the following command:
/bin/sh -c "ulimit -n"
If the current value is not 4096 or greater, then as a root user, update the /etc/security/limits.conf file with the following entries:
<UID> soft nofile 4096
<UID> hardnofile 4096
Host File Requirements Ensure that the host name specified in the /etc/hosts file is unique, and ensure that it maps to the correct IP address of the host.
Ensure that localhost is pingable and resolves to 127.0.0.1 (or resolves to ::1 for IPv6 hosts).
The following is the recommended format of the /etc/hosts file:
<ip> <fully_qualified_host_name> <short_host_name>
For example,
127.0.0.1 localhost.localdomain localhost
172.16.0.0 myhost.example.com myhost
According to RFC 952, the following are the assumptions: A name (Net, Host, Gateway, or Domain name) is a text string up to 24 characters drawn from the alphabet (A-Z), digits (0-9), minus sign (-), and period (.). Note that periods are only allowed when they serve to delimit components of domain style names. No blank or space characters are permitted as part of a name. No distinction is made between upper and lower case. The first character must be an alpha character.
Also, if DNS server is configured in your environment, then you should be able to use DNS to resolve the name of the host on which you want to install the OMS.
For example, all these commands must return the same output:
nslookup host1
nslookup example.com
nslookup 172.16.0.0
Table 8–1 (Cont.) Prerequisites for Adding an Additional Oracle Management Service
Requirement Description
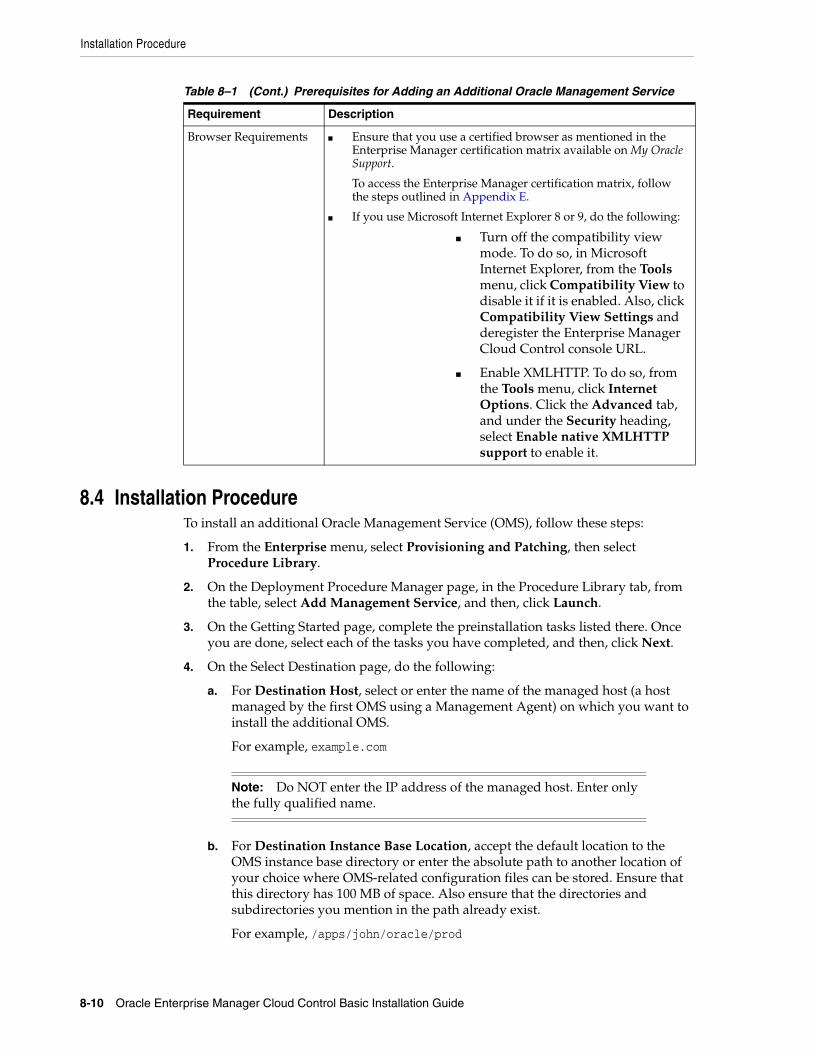
Installation Procedure
8-10 Oracle Enterprise Manager Cloud Control Basic Installation Guide
8.4 Installation ProcedureTo install an additional Oracle Management Service (OMS), follow these steps:
1. From the Enterprise menu, select Provisioning and Patching, then select Procedure Library.
2. On the Deployment Procedure Manager page, in the Procedure Library tab, from the table, select Add Management Service, and then, click Launch.
3. On the Getting Started page, complete the preinstallation tasks listed there. Once you are done, select each of the tasks you have completed, and then, click Next.
4. On the Select Destination page, do the following:
a. For Destination Host, select or enter the name of the managed host (a host managed by the first OMS using a Management Agent) on which you want to install the additional OMS.
For example, example.com
b. For Destination Instance Base Location, accept the default location to the OMS instance base directory or enter the absolute path to another location of your choice where OMS-related configuration files can be stored. Ensure that this directory has 100 MB of space. Also ensure that the directories and subdirectories you mention in the path already exist.
For example, /apps/john/oracle/prod
Browser Requirements ■ Ensure that you use a certified browser as mentioned in the Enterprise Manager certification matrix available on My Oracle Support.
To access the Enterprise Manager certification matrix, follow the steps outlined in Appendix E.
■ If you use Microsoft Internet Explorer 8 or 9, do the following:
■ Turn off the compatibility view mode. To do so, in Microsoft Internet Explorer, from the Tools menu, click Compatibility View to disable it if it is enabled. Also, click Compatibility View Settings and deregister the Enterprise Manager Cloud Control console URL.
■ Enable XMLHTTP. To do so, from the Tools menu, click Internet Options. Click the Advanced tab, and under the Security heading, select Enable native XMLHTTP support to enable it.
Note: Do NOT enter the IP address of the managed host. Enter only the fully qualified name.
Table 8–1 (Cont.) Prerequisites for Adding an Additional Oracle Management Service
Requirement Description
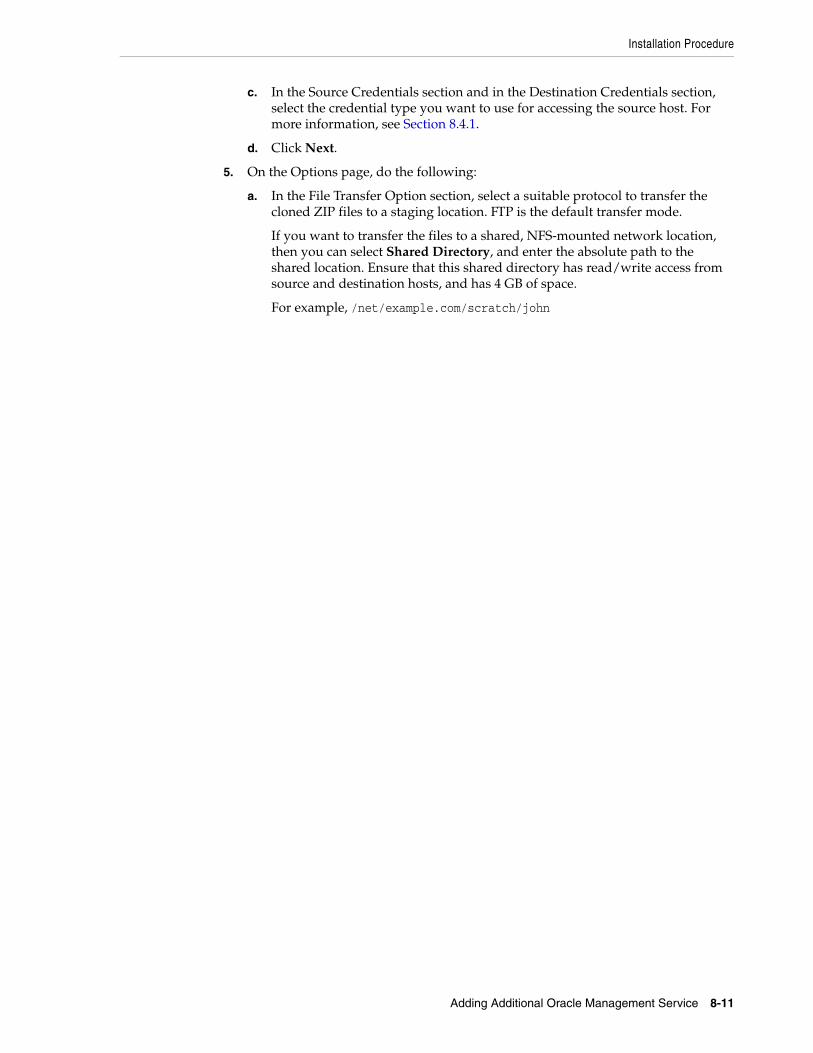
Installation Procedure
Adding Additional Oracle Management Service 8-11
c. In the Source Credentials section and in the Destination Credentials section, select the credential type you want to use for accessing the source host. For more information, see Section 8.4.1.
d. Click Next.
5. On the Options page, do the following:
a. In the File Transfer Option section, select a suitable protocol to transfer the cloned ZIP files to a staging location. FTP is the default transfer mode.
If you want to transfer the files to a shared, NFS-mounted network location, then you can select Shared Directory, and enter the absolute path to the shared location. Ensure that this shared directory has read/write access from source and destination hosts, and has 4 GB of space.
For example, /net/example.com/scratch/john
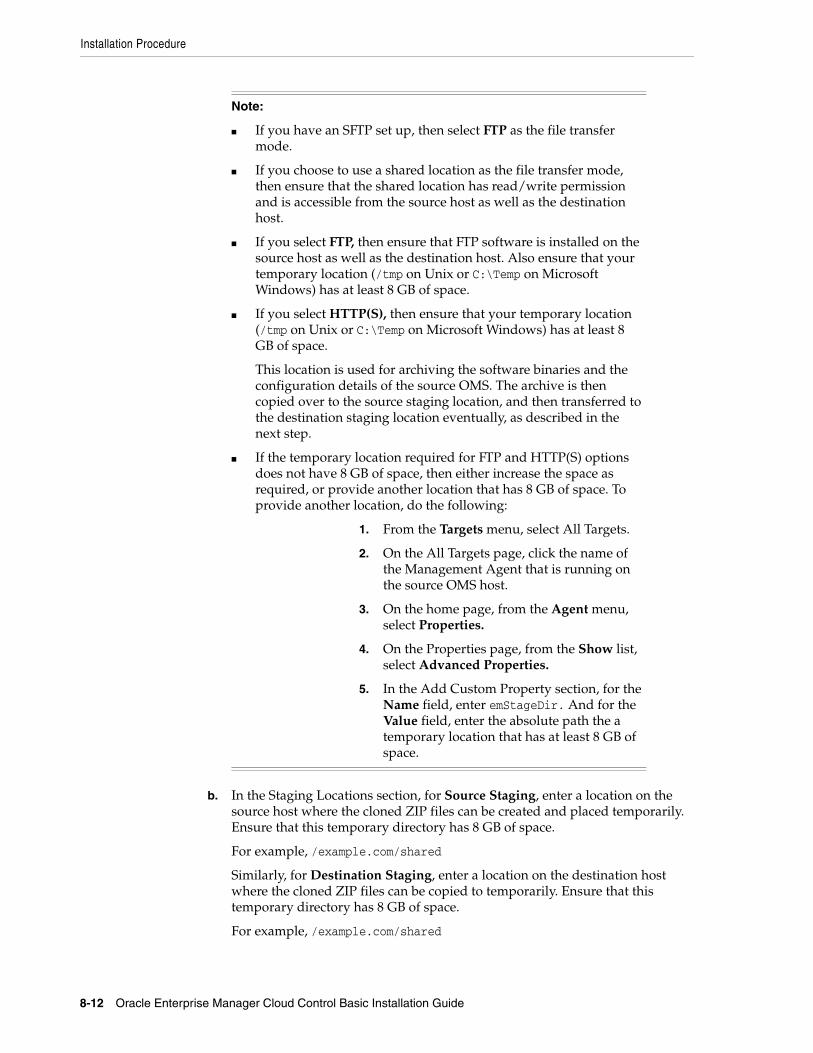
Installation Procedure
8-12 Oracle Enterprise Manager Cloud Control Basic Installation Guide
b. In the Staging Locations section, for Source Staging, enter a location on the source host where the cloned ZIP files can be created and placed temporarily. Ensure that this temporary directory has 8 GB of space.
For example, /example.com/shared
Similarly, for Destination Staging, enter a location on the destination host where the cloned ZIP files can be copied to temporarily. Ensure that this temporary directory has 8 GB of space.
For example, /example.com/shared
Note:
■ If you have an SFTP set up, then select FTP as the file transfer mode.
■ If you choose to use a shared location as the file transfer mode, then ensure that the shared location has read/write permission and is accessible from the source host as well as the destination host.
■ If you select FTP, then ensure that FTP software is installed on the source host as well as the destination host. Also ensure that your temporary location (/tmp on Unix or C:\Temp on Microsoft Windows) has at least 8 GB of space.
■ If you select HTTP(S), then ensure that your temporary location (/tmp on Unix or C:\Temp on Microsoft Windows) has at least 8 GB of space.
This location is used for archiving the software binaries and the configuration details of the source OMS. The archive is then copied over to the source staging location, and then transferred to the destination staging location eventually, as described in the next step.
■ If the temporary location required for FTP and HTTP(S) options does not have 8 GB of space, then either increase the space as required, or provide another location that has 8 GB of space. To provide another location, do the following:
1. From the Targets menu, select All Targets.
2. On the All Targets page, click the name of the Management Agent that is running on the source OMS host.
3. On the home page, from the Agent menu, select Properties.
4. On the Properties page, from the Show list, select Advanced Properties.
5. In the Add Custom Property section, for the Name field, enter emStageDir. And for the Value field, enter the absolute path the a temporary location that has at least 8 GB of space.
Installation Procedure
Adding Additional Oracle Management Service 8-13
c. In the Destination Ports section, validate the ports displayed by default.
These default ports are based on the ports already assigned and used by the OMS that you are cloning. Oracle recommends you to use the same ports as your source OMS so that you have a homogeneous environment.
You can choose to retain the ports displayed by default or enter a custom port. Ensure that the custom port you enter is within the recommended range as shown in the Recommended Port Range column. If you want to check the availability of a custom port, then click Check Ports.
d. Click Next.
6. On the Post Creation Steps page, enter one or more e-mail IDs (separate by a comma) where the details of the postinstallation tasks to be performed can be sent, and then, click Next.
For your e-mail to work, you must have already configured the mail server. For instructions, see Oracle Enterprise Manager Cloud Control Administrator Guide.
7. On the Review page, review the details and click Finish.
8.4.1 Selecting CredentialsYou can select one of the following credential types for accessing the source and the destination hosts:
Note: Once the OMS is installed on the destination host, the cloned ZIP files are automatically deleted from both the staging locations.
Note: If the installation fails, particularly in the Install Homes step, then before you retry installing the OMS, clean up the Middleware home on the destination host where the installation failed. To do so, on the destination host, do the following:
1. Invoke the installer from the following location:
<Middleware_Home>/oms/oui/bin/runInstaller
2. In the installation wizard, on the My Oracle Support Details screen, click Installed Products.
a. Select all plug-in homes and click Remove.
b. Select the JDK home and click Remove.
c. Select the Oracle WebTier home and click Remove.
d. Select the OMS home and the Oracle Common directory, and click Remove.
e. Exit the installer.
3. Delete the Middleware home directory.
4. Return to the Add Management Service deployment procedure that failed, and retry the Install Homes step.
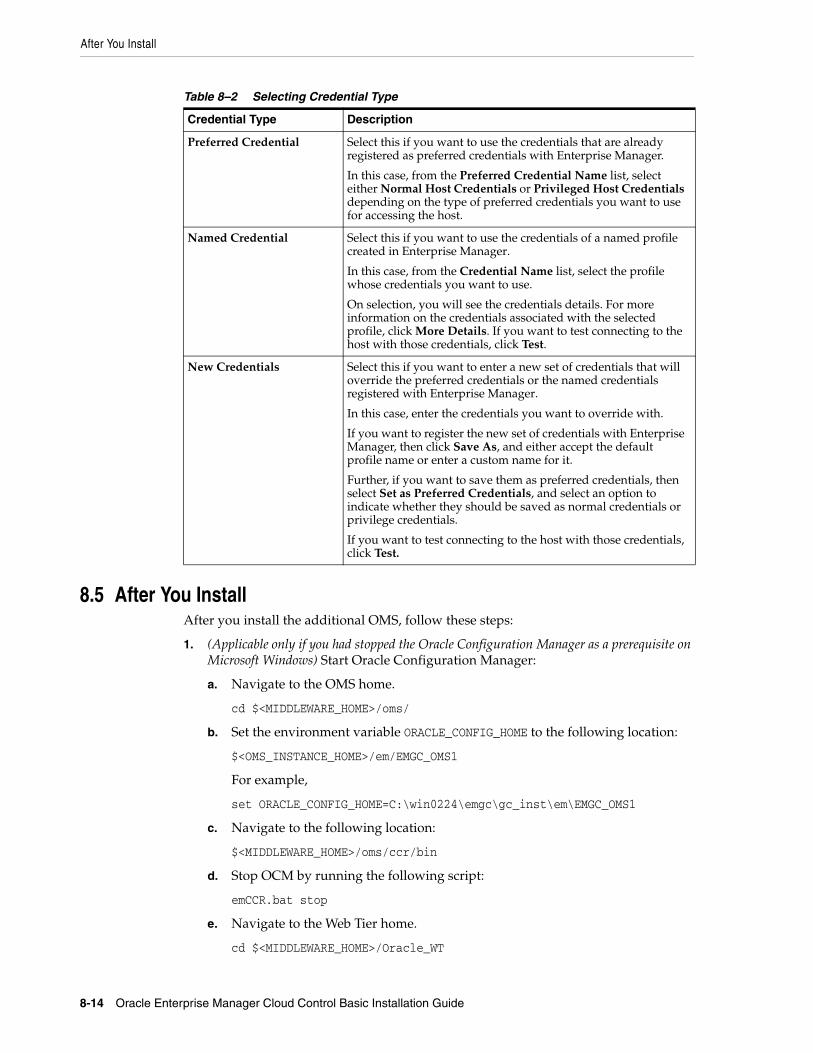
After You Install
8-14 Oracle Enterprise Manager Cloud Control Basic Installation Guide
8.5 After You InstallAfter you install the additional OMS, follow these steps:
1. (Applicable only if you had stopped the Oracle Configuration Manager as a prerequisite on Microsoft Windows) Start Oracle Configuration Manager:
a. Navigate to the OMS home.
cd $<MIDDLEWARE_HOME>/oms/
b. Set the environment variable ORACLE_CONFIG_HOME to the following location:
$<OMS_INSTANCE_HOME>/em/EMGC_OMS1
For example,
set ORACLE_CONFIG_HOME=C:\win0224\emgc\gc_inst\em\EMGC_OMS1
c. Navigate to the following location:
$<MIDDLEWARE_HOME>/oms/ccr/bin
d. Stop OCM by running the following script:
emCCR.bat stop
e. Navigate to the Web Tier home.
cd $<MIDDLEWARE_HOME>/Oracle_WT
Table 8–2 Selecting Credential Type
Credential Type Description
Preferred Credential Select this if you want to use the credentials that are already registered as preferred credentials with Enterprise Manager.
In this case, from the Preferred Credential Name list, select either Normal Host Credentials or Privileged Host Credentials depending on the type of preferred credentials you want to use for accessing the host.
Named Credential Select this if you want to use the credentials of a named profile created in Enterprise Manager.
In this case, from the Credential Name list, select the profile whose credentials you want to use.
On selection, you will see the credentials details. For more information on the credentials associated with the selected profile, click More Details. If you want to test connecting to the host with those credentials, click Test.
New Credentials Select this if you want to enter a new set of credentials that will override the preferred credentials or the named credentials registered with Enterprise Manager.
In this case, enter the credentials you want to override with.
If you want to register the new set of credentials with Enterprise Manager, then click Save As, and either accept the default profile name or enter a custom name for it.
Further, if you want to save them as preferred credentials, then select Set as Preferred Credentials, and select an option to indicate whether they should be saved as normal credentials or privilege credentials.
If you want to test connecting to the host with those credentials, click Test.
After You Install
Adding Additional Oracle Management Service 8-15
f. Set the environment variable ORACLE_CONFIG_HOME to the following location:
$$<OMS_INSTANCE_HOME>/WebTierIH1
For example,
set ORACLE_CONFIG_HOME=C:\win0224\emgc\gc_inst\WebTierIH1
g. Navigate to the following location:
$<MIDDLEWARE_HOME>/Oracle_WT/ccr/bin
h. Stop OCM by running the following script:
emCCR.bat stop
2. Perform these steps on the Server Load Balancer (SLB) using its administration console:
(a) Add the additional OMS host to the following SLB pools:
■ Secured Upload Pool (add the host using the port configured for the Secured Upload service)
■ Agent Registration Pool (add the host using the port configured for the Agent Registration service)
■ Secure Console Pool (add the host using the port configured for the Secure Console service)
■ (Optional) Unsecure Console Pool (add the host using the port configured for the Unsecure Console service)
(b) Associate the additional OMS host with the following monitors:
■ Secure Upload Monitor (associate the host using the port configured for the Secure Upload service)
■ Agent Registration Monitor (associate the host using the port configured for the Agent Registration service)
■ Secure Console Monitor (associate the host using the port configured for the Secure Console service)
■ (Optional) Unsecure Console Monitor (associate the host using the port configured for the Unsecure Console service)
3. Run root.sh as a root user on the destination host.
4. By default, the following targets get automatically discovered and monitored in the Enterprise Manager Cloud Control console:
■ Oracle WebLogic Server, where the additional OMS is deployed
■ Oracle Web Tier
■ Application deployments, one for the Enterprise Manager Cloud Control console and one for the platform background services.
■ Oracle Management Service
■ Oracle Management Agent
Note: For information about configuring SLB, refer to the Oracle Enterprise Manager Administration Guide.
After You Install
8-16 Oracle Enterprise Manager Cloud Control Basic Installation Guide
■ The host on which you installed Enterprise Manager Cloud Control
However, the other targets running on that host and other hosts do not get automatically discovered and monitored. To monitor the other targets, you need to add them to Enterprise Manager Cloud Control either using the Auto Discovery Results page, the Add Targets Manually page, or the discovery wizards offered for the targets you want to monitor.
For information about discovering targets in Enterprise Manager Cloud Control, refer to the chapter on adding targets in the Oracle Enterprise Manager Cloud Control Administrator's Guide.
5. An encryption key is generated to encrypt sensitive data in the Management Repository. If this key is lost, all encrypted data in the Management Repository becomes unusable. Therefore, back up the Management Service configuration including the emkey, and maintain the backup on another host.
To back up the Management Service configuration including the emkey, run the following command:
<OMS_HOME>/bin/emctl exportconfig oms -dir <path_to_backup_location>
6. Before accessing the Enterprise Manager Cloud Control Console in a browser, install a security certificate from a trusted certification authority on the browser.
This it to ensure that the Enterprise Manager Cloud Control Console that you are accessing over HTTPS protocol is recognized as a genuine and secure Web site.
For instructions to install a security certificate on your browser and avoid security certificate alerts, refer to Oracle Enterprise Manager Cloud Control Administrator's Guide.
9
Installing Application Dependency and Performance 9-1
9Installing Application Dependency and Performance
This chapter describes how you can install Application Dependency and Performance (ADP) in the Enterprise Manager Cloud Control environment.
In particular, this chapter covers the following:
■ Overview
■ Before you Begin
■ Prerequisites
■ Installation Procedure
■ After You Install
9.1 OverviewApplication Dependency and Performance (ADP) is one of the critical functionalities in Enterprise Manager Cloud Control that allows you to analyze Java EE, SOA, Portal, OSB, and ADF applications. It captures the complex relationships among various application building blocks in its application schema model - the core of the Oracle intelligent platform.
Therefore, to manage applications effectively, gain an understanding of the complex relationships among the business functions, associated interconnected components, and the underlying runtime environments, you must deploy Application Dependency and Performance (ADP) Manager application, and monitor them by installing the corresponding ADP agents.
To install ADP, use the Application Performance Management page that is accessible from within Enterprise Manager Cloud Control console. To access the page, from Setup menu, select Application Performance Management.
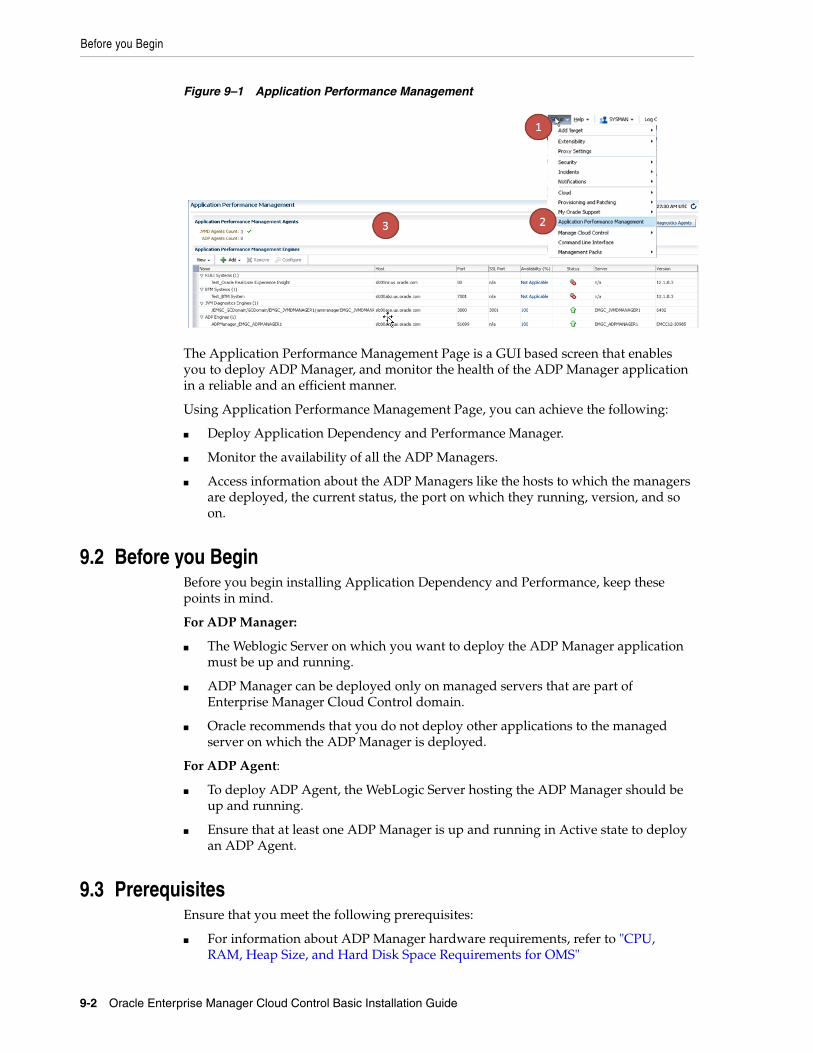
Before you Begin
9-2 Oracle Enterprise Manager Cloud Control Basic Installation Guide
Figure 9–1 Application Performance Management
The Application Performance Management Page is a GUI based screen that enables you to deploy ADP Manager, and monitor the health of the ADP Manager application in a reliable and an efficient manner.
Using Application Performance Management Page, you can achieve the following:
■ Deploy Application Dependency and Performance Manager.
■ Monitor the availability of all the ADP Managers.
■ Access information about the ADP Managers like the hosts to which the managers are deployed, the current status, the port on which they running, version, and so on.
9.2 Before you BeginBefore you begin installing Application Dependency and Performance, keep these points in mind.
For ADP Manager:
■ The Weblogic Server on which you want to deploy the ADP Manager application must be up and running.
■ ADP Manager can be deployed only on managed servers that are part of Enterprise Manager Cloud Control domain.
■ Oracle recommends that you do not deploy other applications to the managed server on which the ADP Manager is deployed.
For ADP Agent:
■ To deploy ADP Agent, the WebLogic Server hosting the ADP Manager should be up and running.
■ Ensure that at least one ADP Manager is up and running in Active state to deploy an ADP Agent.
9.3 PrerequisitesEnsure that you meet the following prerequisites:
■ For information about ADP Manager hardware requirements, refer to "CPU, RAM, Heap Size, and Hard Disk Space Requirements for OMS"
Installation Procedure
Installing Application Dependency and Performance 9-3
■ The default ADP Manager ports are: ADP Manager Port: 51099, Java Provider Port: 55003, and Remote Service Controller Port: 55000
■ Before deploying ADP Agent, ensure that you meet the following prerequisites:
9.4 Installation ProcedureThis section contains the following topics:
■ Deploying ADP Manager on the Same Host as OMS
■ Deploying ADP Agents
9.4.1 Deploying ADP Manager on the Same Host as OMSTo deploy ADP Manager on the same host as OMS, automatically creating a managed server, you must log in to Enterprise Manager Cloud Control with Super Administrator privileges (SYSMAN), and perform the following steps:
1. In Cloud Control, from Setup menu, select Application Performance Management.
Requirement Releases
Oracle WebLogic Server 9.2.x
10.0.x
10.1.x
10.2.x
10.3.x
11gR1, 11gPS1, 11gPS2, 11gPS3
Oracle WebLogic Portal 9.2.x
10.0.x
10.1.x
10.2.x
10.3.x
Oracle Application Server 10.1.3.x
Oracle SOA Suite 10.1.3.x (on OC4J, WLS 9.2.x)
Note: For SOA Suite 10g, ADP requires that at least JDK 1.5.0.6 be in use, and there be minimum values set for the following JVM arguments:
- XX:MaxPermSize=256M (or higher)
- Xms512M (or higher)
- Xmx1024M (or higher)
11gR1, 11gR1 PS1, PS2, PS3
Oracle Service Bus (OSB) 2.6
2.6.1
3
10gR3
11
Oracle Application Integration Architecture (AIA)
2.2.1
2.3
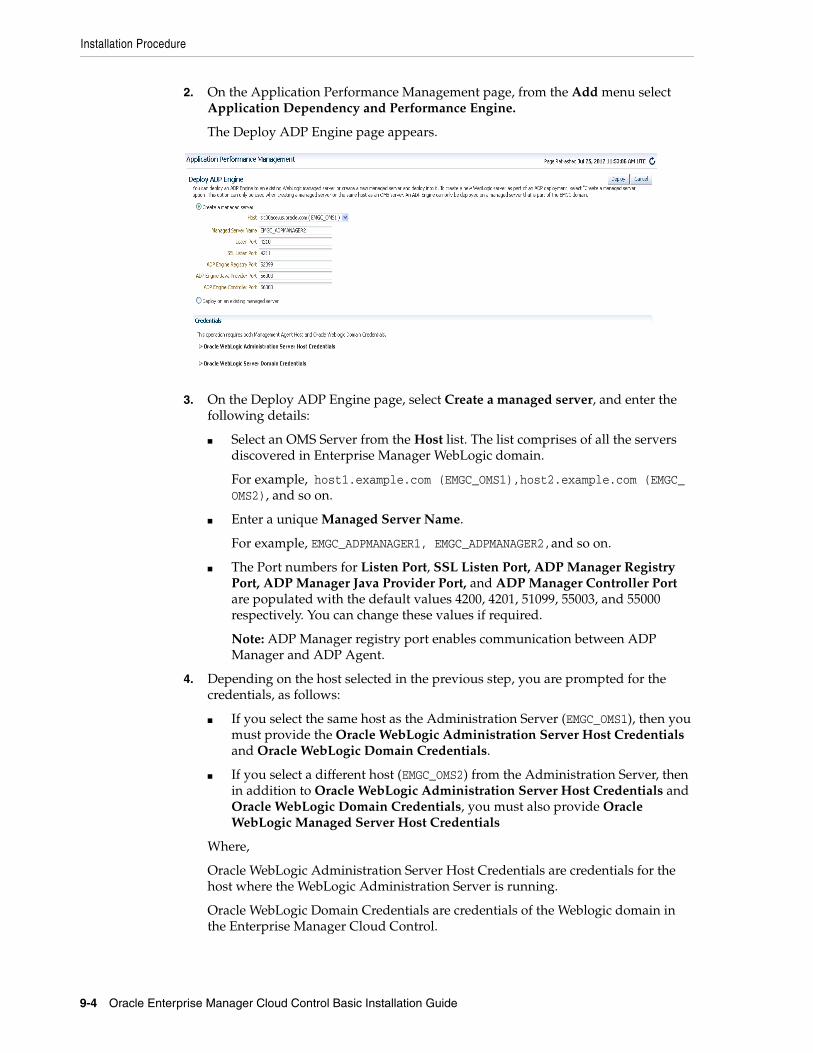
Installation Procedure
9-4 Oracle Enterprise Manager Cloud Control Basic Installation Guide
2. On the Application Performance Management page, from the Add menu select Application Dependency and Performance Engine.
The Deploy ADP Engine page appears.
3. On the Deploy ADP Engine page, select Create a managed server, and enter the following details:
■ Select an OMS Server from the Host list. The list comprises of all the servers discovered in Enterprise Manager WebLogic domain.
For example, host1.example.com (EMGC_OMS1),host2.example.com (EMGC_OMS2), and so on.
■ Enter a unique Managed Server Name.
For example, EMGC_ADPMANAGER1, EMGC_ADPMANAGER2,and so on.
■ The Port numbers for Listen Port, SSL Listen Port, ADP Manager Registry Port, ADP Manager Java Provider Port, and ADP Manager Controller Port are populated with the default values 4200, 4201, 51099, 55003, and 55000 respectively. You can change these values if required.
Note: ADP Manager registry port enables communication between ADP Manager and ADP Agent.
4. Depending on the host selected in the previous step, you are prompted for the credentials, as follows:
■ If you select the same host as the Administration Server (EMGC_OMS1), then you must provide the Oracle WebLogic Administration Server Host Credentials and Oracle WebLogic Domain Credentials.
■ If you select a different host (EMGC_OMS2) from the Administration Server, then in addition to Oracle WebLogic Administration Server Host Credentials and Oracle WebLogic Domain Credentials, you must also provide Oracle WebLogic Managed Server Host Credentials
Where,
Oracle WebLogic Administration Server Host Credentials are credentials for the host where the WebLogic Administration Server is running.
Oracle WebLogic Domain Credentials are credentials of the Weblogic domain in the Enterprise Manager Cloud Control.
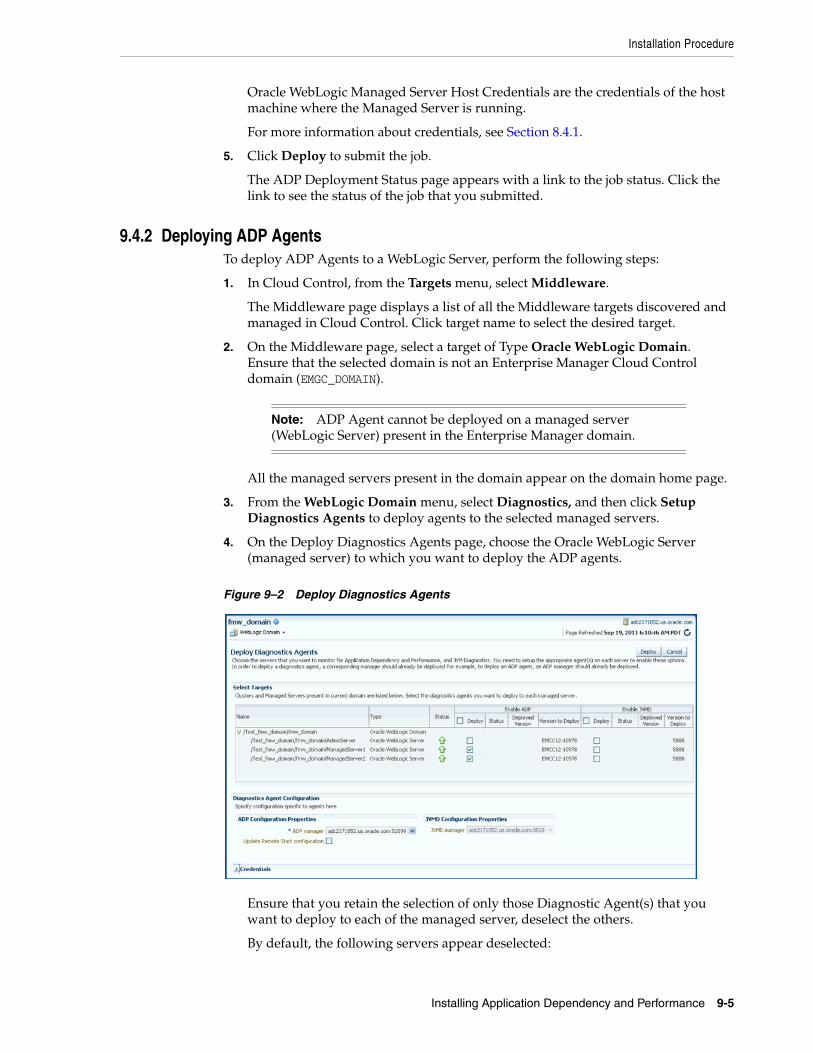
Installation Procedure
Installing Application Dependency and Performance 9-5
Oracle WebLogic Managed Server Host Credentials are the credentials of the host machine where the Managed Server is running.
For more information about credentials, see Section 8.4.1.
5. Click Deploy to submit the job.
The ADP Deployment Status page appears with a link to the job status. Click the link to see the status of the job that you submitted.
9.4.2 Deploying ADP AgentsTo deploy ADP Agents to a WebLogic Server, perform the following steps:
1. In Cloud Control, from the Targets menu, select Middleware.
The Middleware page displays a list of all the Middleware targets discovered and managed in Cloud Control. Click target name to select the desired target.
2. On the Middleware page, select a target of Type Oracle WebLogic Domain. Ensure that the selected domain is not an Enterprise Manager Cloud Control domain (EMGC_DOMAIN).
All the managed servers present in the domain appear on the domain home page.
3. From the WebLogic Domain menu, select Diagnostics, and then click Setup Diagnostics Agents to deploy agents to the selected managed servers.
4. On the Deploy Diagnostics Agents page, choose the Oracle WebLogic Server (managed server) to which you want to deploy the ADP agents.
Figure 9–2 Deploy Diagnostics Agents
Ensure that you retain the selection of only those Diagnostic Agent(s) that you want to deploy to each of the managed server, deselect the others.
By default, the following servers appear deselected:
Note: ADP Agent cannot be deployed on a managed server (WebLogic Server) present in the Enterprise Manager domain.
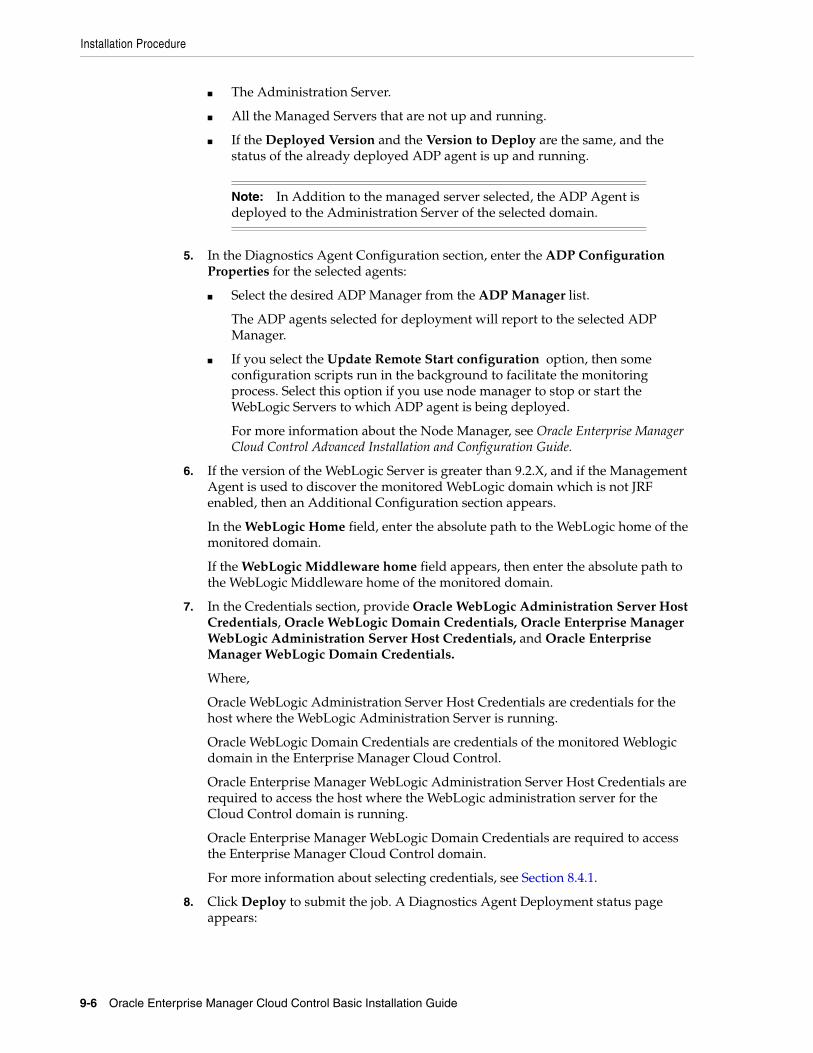
Installation Procedure
9-6 Oracle Enterprise Manager Cloud Control Basic Installation Guide
■ The Administration Server.
■ All the Managed Servers that are not up and running.
■ If the Deployed Version and the Version to Deploy are the same, and the status of the already deployed ADP agent is up and running.
5. In the Diagnostics Agent Configuration section, enter the ADP Configuration Properties for the selected agents:
■ Select the desired ADP Manager from the ADP Manager list.
The ADP agents selected for deployment will report to the selected ADP Manager.
■ If you select the Update Remote Start configuration option, then some configuration scripts run in the background to facilitate the monitoring process. Select this option if you use node manager to stop or start the WebLogic Servers to which ADP agent is being deployed.
For more information about the Node Manager, see Oracle Enterprise Manager Cloud Control Advanced Installation and Configuration Guide.
6. If the version of the WebLogic Server is greater than 9.2.X, and if the Management Agent is used to discover the monitored WebLogic domain which is not JRF enabled, then an Additional Configuration section appears.
In the WebLogic Home field, enter the absolute path to the WebLogic home of the monitored domain.
If the WebLogic Middleware home field appears, then enter the absolute path to the WebLogic Middleware home of the monitored domain.
7. In the Credentials section, provide Oracle WebLogic Administration Server Host Credentials, Oracle WebLogic Domain Credentials, Oracle Enterprise Manager WebLogic Administration Server Host Credentials, and Oracle Enterprise Manager WebLogic Domain Credentials.
Where,
Oracle WebLogic Administration Server Host Credentials are credentials for the host where the WebLogic Administration Server is running.
Oracle WebLogic Domain Credentials are credentials of the monitored Weblogic domain in the Enterprise Manager Cloud Control.
Oracle Enterprise Manager WebLogic Administration Server Host Credentials are required to access the host where the WebLogic administration server for the Cloud Control domain is running.
Oracle Enterprise Manager WebLogic Domain Credentials are required to access the Enterprise Manager Cloud Control domain.
For more information about selecting credentials, see Section 8.4.1.
8. Click Deploy to submit the job. A Diagnostics Agent Deployment status page appears:
Note: In Addition to the managed server selected, the ADP Agent is deployed to the Administration Server of the selected domain.
After You Install
Installing Application Dependency and Performance 9-7
The status page appears with a link to the job status. Click the link to see the status of the job that you submitted.
9.5 After You InstallThis section contains the following details:
■ Verifying ADP Manager Installation
■ Verifying ADP Agent Installation
9.5.1 Verifying ADP Manager InstallationOnce you have deployed ADP Manager, you can perform the following sanity checks to verify if the ADP manager has been installed accurately on the managed server:
■ In Cloud Control, from Setup menu, click Application Performance Management.
On the Application Performance Management page, the newly deployed ADP Manager must appear and its status must be up and running.
■ Follow these steps:
1. In Cloud Control, from the Targets menu, select Middleware.
2. From Middleware Features menu, click Application Dependency and Performance.
3. On the ADP home page, in the Registration tab, the managed server on which the ADP Manager is deployed must appear.
4. Select the manager name, and click Test Connect to ensure that the manger is up and running.
9.5.2 Verifying ADP Agent InstallationOnce you have deployed ADP Agent, you can perform the following steps to verify if the ADP Agent is installed on the targeted manager servers accurately:
1. In Cloud Control, from Targets menu, select Middleware.
Note: Restart the administration server and the managed servers to which the ADP Agents have been deployed. These servers should be restarted only after the deployment has completed successfully.
After You Install
9-8 Oracle Enterprise Manager Cloud Control Basic Installation Guide
2. On the Middleware page, from Middleware Features, click Application Dependency and Performance.
3. On the Monitoring tab, expand the folder corresponding to the ADP Manager associated with the deployed agents.
4. Select the Status node in the navigation tree, and click the node, do not expand it. Verify the Agent Information table for the servers that you deployed to.
Note: If you have not restarted the monitored servers, then the EJB Deployed status should be true, and the Agent Installed status should be false.
Once you restart the monitored servers, the Agent Status for those servers should be REPORTING.
10
Installing JVM Diagnostics 10-1
10Installing JVM Diagnostics
This chapter describes how you can install JVM Diagnostics (JVMD) in the Enterprise Manager Cloud Control environment.
In particular, this chapter covers the following:
■ Overview
■ Before you Begin
■ Prerequisites
■ Installation Procedure
■ After You Install
10.1 OverviewJVM Diagnostics (JVMD) is one of the critical functionalities in Enterprise Manager Cloud Control that enables administrators to diagnose performance problems in Java applications in the production environment. By eliminating the need to reproduce problems, it reduces the time required to resolve these problems thus improving application availability and performance.
Therefore, to manage applications effectively and identify the root cause of performance problems in the production environment without having to reproduce them in the test or development environment, you must deploy JVMD Manager. The JVMD Manager runs as an Enterprise JavaBeans (EJB) Technology on a WebLogic Server.
The JVMD Agent is deployed on the targeted JVM (the one running a production WebLogic Server). It collects real-time data and transmits it to the JVM Diagnostics Manager. This data is stored in the Management Repository, and the collected information is displayed on Enterprise Manager Cloud Control console for monitoring purposes. The communication between the JVMD Manager and the JVMD Agent can be a secure (SSL) or non-secure connection.
To install JVMD, use the Application Performance Management page that is accessible from within Enterprise Manager Cloud Control console. To access the portal, from Setup menu, and then select Application Performance Management.
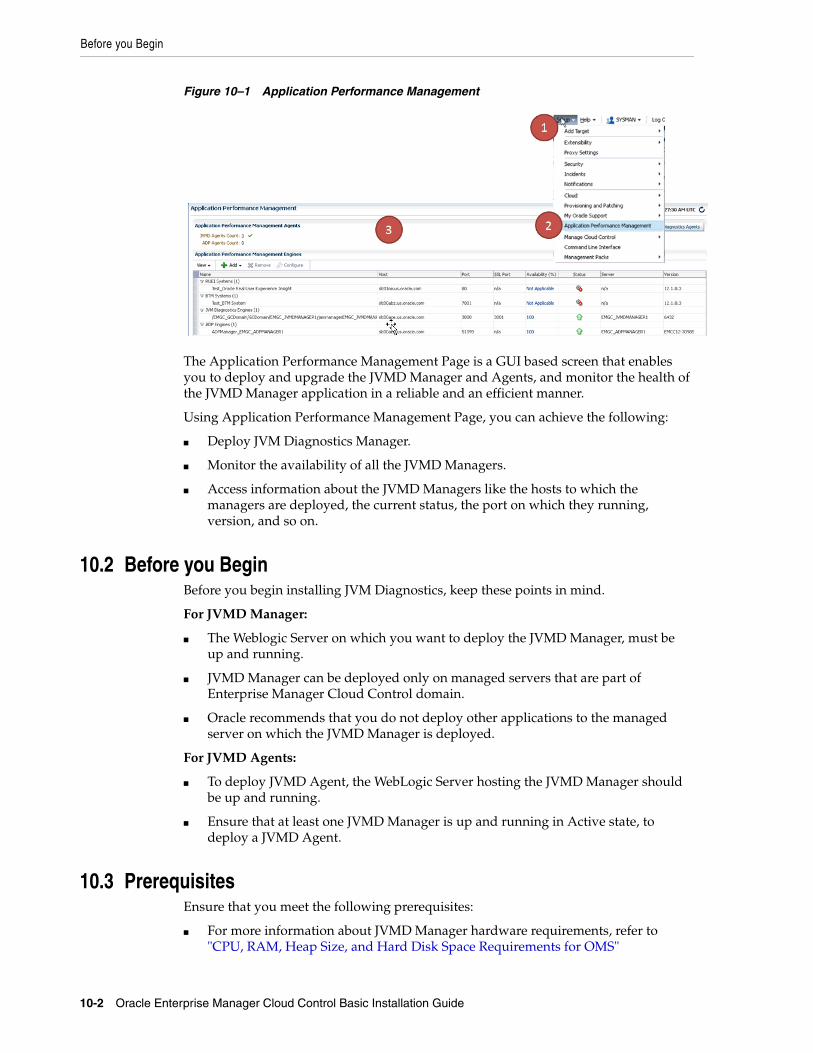
Before you Begin
10-2 Oracle Enterprise Manager Cloud Control Basic Installation Guide
Figure 10–1 Application Performance Management
The Application Performance Management Page is a GUI based screen that enables you to deploy and upgrade the JVMD Manager and Agents, and monitor the health of the JVMD Manager application in a reliable and an efficient manner.
Using Application Performance Management Page, you can achieve the following:
■ Deploy JVM Diagnostics Manager.
■ Monitor the availability of all the JVMD Managers.
■ Access information about the JVMD Managers like the hosts to which the managers are deployed, the current status, the port on which they running, version, and so on.
10.2 Before you BeginBefore you begin installing JVM Diagnostics, keep these points in mind.
For JVMD Manager:
■ The Weblogic Server on which you want to deploy the JVMD Manager, must be up and running.
■ JVMD Manager can be deployed only on managed servers that are part of Enterprise Manager Cloud Control domain.
■ Oracle recommends that you do not deploy other applications to the managed server on which the JVMD Manager is deployed.
For JVMD Agents:
■ To deploy JVMD Agent, the WebLogic Server hosting the JVMD Manager should be up and running.
■ Ensure that at least one JVMD Manager is up and running in Active state, to deploy a JVMD Agent.
10.3 PrerequisitesEnsure that you meet the following prerequisites:
■ For more information about JVMD Manager hardware requirements, refer to "CPU, RAM, Heap Size, and Hard Disk Space Requirements for OMS"
Installation Procedure
Installing JVM Diagnostics 10-3
■ The JDK version required to deploy JVMD Agent is JDK 1.5 or higher
■ Supported Operating Systems for JVMD Agents are:
– Linux x86
– Linux x86-64
– Windows x86
– Windows x86-64
– Solaris x86
– Solaris x86-64
– Solaris SPARC
– Solaris SPARC (64 bit)
– AIX PowerPC (32 bit)
– AIX PowerPC (64 bit)
– JRVE
– HP IA-64(32 bit)
– HP IA-64(64 bit)
– HP PA-RISC(32 bit)
10.4 Installation ProcedureThis section contains the following topics:
■ Deploying JVMD Manager on the Same Host as OMS
■ Deploying JVMD Agents
10.4.1 Deploying JVMD Manager on the Same Host as OMSTo deploy JVMD Manager on the same host as OMS; automatically creating a managed server, you must log in with SYSMAN account (a default Super Administrators account that is installed with Enterprise Manager), and perform the following steps:
1. In Cloud Control, from Setup menu, select Application Performance Management.
For more information about the Application Performance Management page, see Figure 10–1.
2. On the Application Performance Management page, from the Add menu, select JVM Diagnostics Engine.
The Deploy JVM Diagnostics Engine appears.
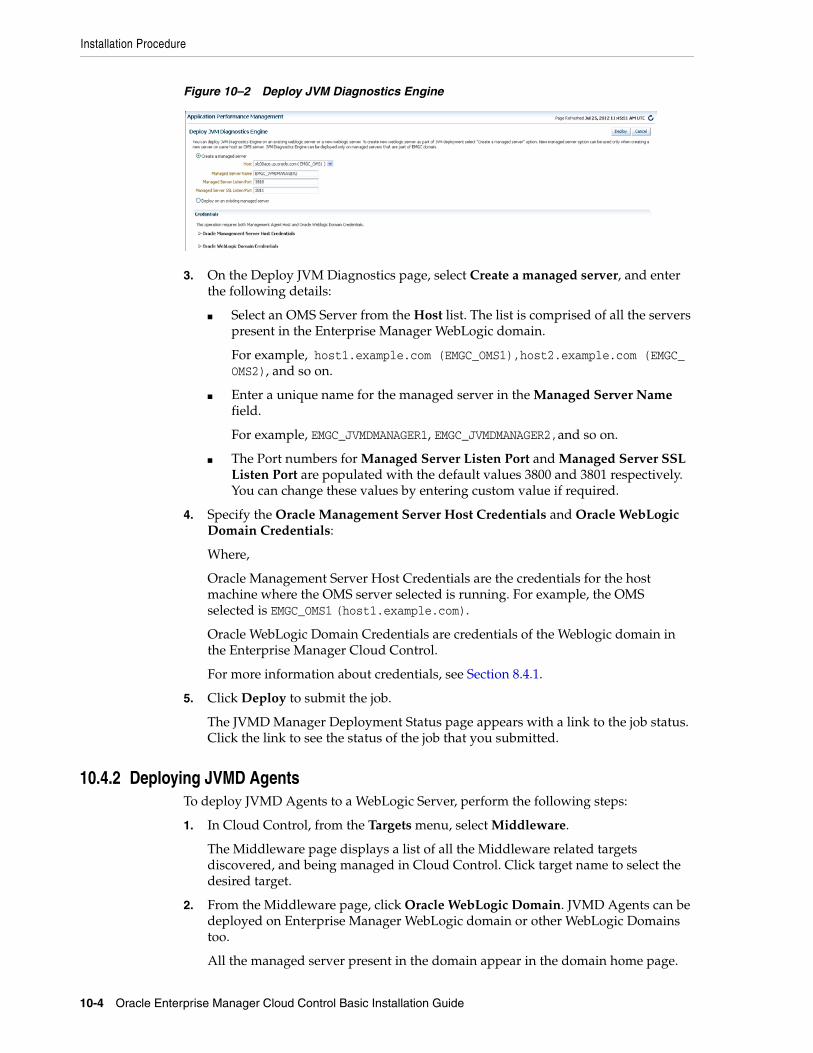
Installation Procedure
10-4 Oracle Enterprise Manager Cloud Control Basic Installation Guide
Figure 10–2 Deploy JVM Diagnostics Engine
3. On the Deploy JVM Diagnostics page, select Create a managed server, and enter the following details:
■ Select an OMS Server from the Host list. The list is comprised of all the servers present in the Enterprise Manager WebLogic domain.
For example, host1.example.com (EMGC_OMS1),host2.example.com (EMGC_OMS2), and so on.
■ Enter a unique name for the managed server in the Managed Server Name field.
For example, EMGC_JVMDMANAGER1, EMGC_JVMDMANAGER2,and so on.
■ The Port numbers for Managed Server Listen Port and Managed Server SSL Listen Port are populated with the default values 3800 and 3801 respectively. You can change these values by entering custom value if required.
4. Specify the Oracle Management Server Host Credentials and Oracle WebLogic Domain Credentials:
Where,
Oracle Management Server Host Credentials are the credentials for the host machine where the OMS server selected is running. For example, the OMS selected is EMGC_OMS1 (host1.example.com).
Oracle WebLogic Domain Credentials are credentials of the Weblogic domain in the Enterprise Manager Cloud Control.
For more information about credentials, see Section 8.4.1.
5. Click Deploy to submit the job.
The JVMD Manager Deployment Status page appears with a link to the job status. Click the link to see the status of the job that you submitted.
10.4.2 Deploying JVMD AgentsTo deploy JVMD Agents to a WebLogic Server, perform the following steps:
1. In Cloud Control, from the Targets menu, select Middleware.
The Middleware page displays a list of all the Middleware related targets discovered, and being managed in Cloud Control. Click target name to select the desired target.
2. From the Middleware page, click Oracle WebLogic Domain. JVMD Agents can be deployed on Enterprise Manager WebLogic domain or other WebLogic Domains too.
All the managed server present in the domain appear in the domain home page.
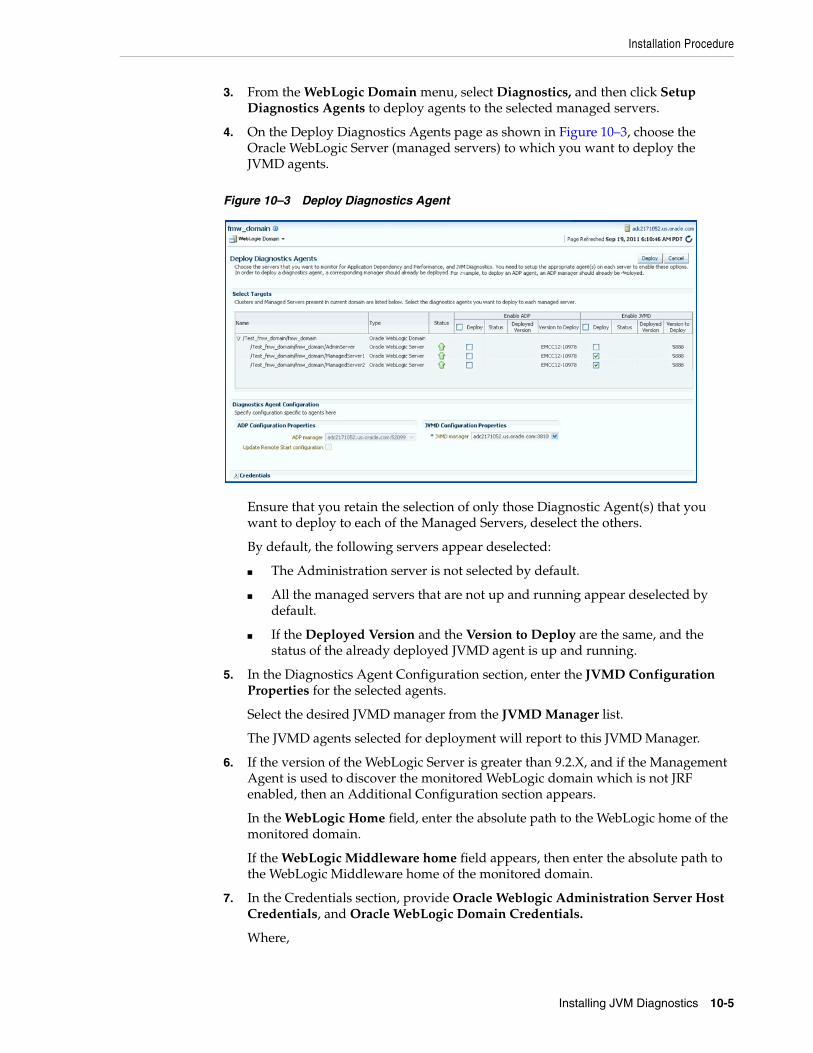
Installation Procedure
Installing JVM Diagnostics 10-5
3. From the WebLogic Domain menu, select Diagnostics, and then click Setup Diagnostics Agents to deploy agents to the selected managed servers.
4. On the Deploy Diagnostics Agents page as shown in Figure 10–3, choose the Oracle WebLogic Server (managed servers) to which you want to deploy the JVMD agents.
Figure 10–3 Deploy Diagnostics Agent
Ensure that you retain the selection of only those Diagnostic Agent(s) that you want to deploy to each of the Managed Servers, deselect the others.
By default, the following servers appear deselected:
■ The Administration server is not selected by default.
■ All the managed servers that are not up and running appear deselected by default.
■ If the Deployed Version and the Version to Deploy are the same, and the status of the already deployed JVMD agent is up and running.
5. In the Diagnostics Agent Configuration section, enter the JVMD Configuration Properties for the selected agents.
Select the desired JVMD manager from the JVMD Manager list.
The JVMD agents selected for deployment will report to this JVMD Manager.
6. If the version of the WebLogic Server is greater than 9.2.X, and if the Management Agent is used to discover the monitored WebLogic domain which is not JRF enabled, then an Additional Configuration section appears.
In the WebLogic Home field, enter the absolute path to the WebLogic home of the monitored domain.
If the WebLogic Middleware home field appears, then enter the absolute path to the WebLogic Middleware home of the monitored domain.
7. In the Credentials section, provide Oracle Weblogic Administration Server Host Credentials, and Oracle WebLogic Domain Credentials.
Where,
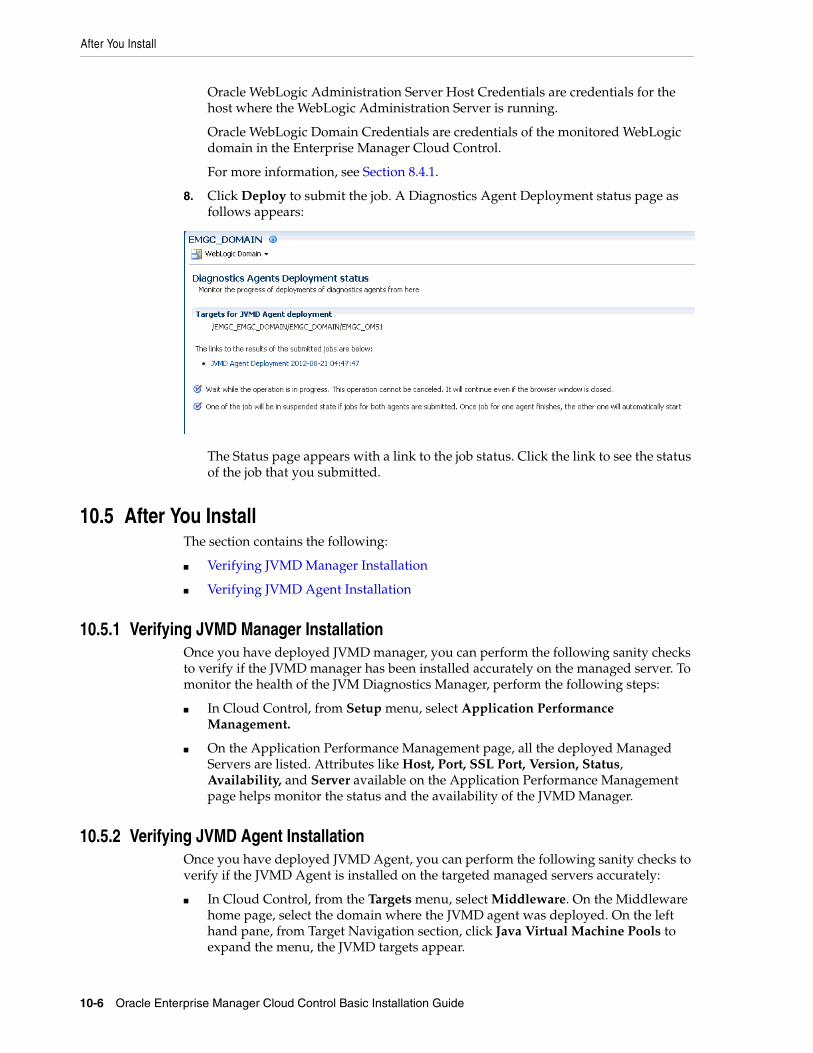
After You Install
10-6 Oracle Enterprise Manager Cloud Control Basic Installation Guide
Oracle WebLogic Administration Server Host Credentials are credentials for the host where the WebLogic Administration Server is running.
Oracle WebLogic Domain Credentials are credentials of the monitored WebLogic domain in the Enterprise Manager Cloud Control.
For more information, see Section 8.4.1.
8. Click Deploy to submit the job. A Diagnostics Agent Deployment status page as follows appears:
The Status page appears with a link to the job status. Click the link to see the status of the job that you submitted.
10.5 After You InstallThe section contains the following:
■ Verifying JVMD Manager Installation
■ Verifying JVMD Agent Installation
10.5.1 Verifying JVMD Manager InstallationOnce you have deployed JVMD manager, you can perform the following sanity checks to verify if the JVMD manager has been installed accurately on the managed server. To monitor the health of the JVM Diagnostics Manager, perform the following steps:
■ In Cloud Control, from Setup menu, select Application Performance Management.
■ On the Application Performance Management page, all the deployed Managed Servers are listed. Attributes like Host, Port, SSL Port, Version, Status, Availability, and Server available on the Application Performance Management page helps monitor the status and the availability of the JVMD Manager.
10.5.2 Verifying JVMD Agent InstallationOnce you have deployed JVMD Agent, you can perform the following sanity checks to verify if the JVMD Agent is installed on the targeted managed servers accurately:
■ In Cloud Control, from the Targets menu, select Middleware. On the Middleware home page, select the domain where the JVMD agent was deployed. On the left hand pane, from Target Navigation section, click Java Virtual Machine Pools to expand the menu, the JVMD targets appear.

After You Install
Installing JVM Diagnostics 10-7
Each of the targets corresponds to one of the managed servers chosen for JVMD agent deployment. All these mentioned targets should be up and running.
■ Log into the WebLogic Administration console of the domain where the JVMD agent was deployed. The targeted managed servers should have a new application with the name javadiagnosticagent_<managed_server_name>, and this application should up and running.

After You Install
10-8 Oracle Enterprise Manager Cloud Control Basic Installation Guide
Part IVPart IV Getting Started with Enterprise Manager
This part contains the following chapters:
■ Chapter 11, "Getting Started with Enterprise Manager"

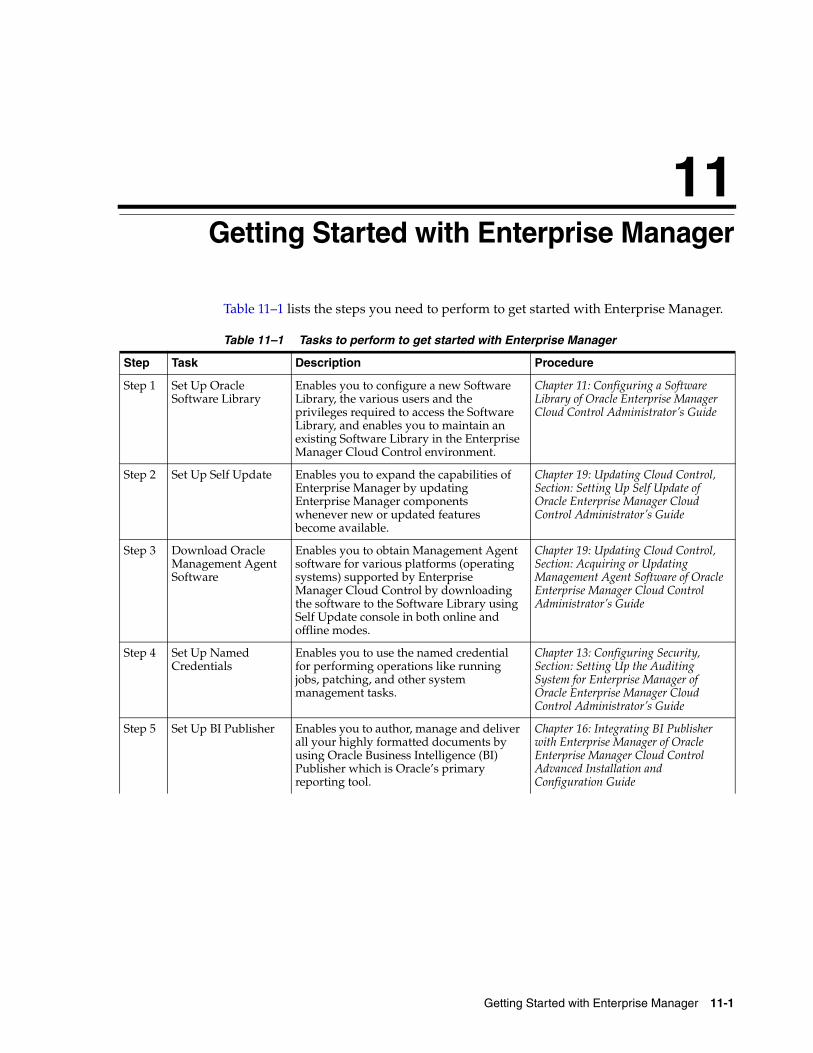
11
Getting Started with Enterprise Manager 11-1
11Getting Started with Enterprise Manager
Table 11–1 lists the steps you need to perform to get started with Enterprise Manager.
Table 11–1 Tasks to perform to get started with Enterprise Manager
Step Task Description Procedure
Step 1 Set Up Oracle Software Library
Enables you to configure a new Software Library, the various users and the privileges required to access the Software Library, and enables you to maintain an existing Software Library in the Enterprise Manager Cloud Control environment.
Chapter 11: Configuring a Software Library of Oracle Enterprise Manager Cloud Control Administrator’s Guide
Step 2 Set Up Self Update Enables you to expand the capabilities of Enterprise Manager by updating Enterprise Manager components whenever new or updated features become available.
Chapter 19: Updating Cloud Control, Section: Setting Up Self Update of Oracle Enterprise Manager Cloud Control Administrator’s Guide
Step 3 Download Oracle Management Agent Software
Enables you to obtain Management Agent software for various platforms (operating systems) supported by Enterprise Manager Cloud Control by downloading the software to the Software Library using Self Update console in both online and offline modes.
Chapter 19: Updating Cloud Control, Section: Acquiring or Updating Management Agent Software of Oracle Enterprise Manager Cloud Control Administrator’s Guide
Step 4 Set Up Named Credentials
Enables you to use the named credential for performing operations like running jobs, patching, and other system management tasks.
Chapter 13: Configuring Security, Section: Setting Up the Auditing System for Enterprise Manager of Oracle Enterprise Manager Cloud Control Administrator’s Guide
Step 5 Set Up BI Publisher Enables you to author, manage and deliver all your highly formatted documents by using Oracle Business Intelligence (BI) Publisher which is Oracle’s primary reporting tool.
Chapter 16: Integrating BI Publisher with Enterprise Manager of Oracle Enterprise Manager Cloud Control Advanced Installation and Configuration Guide
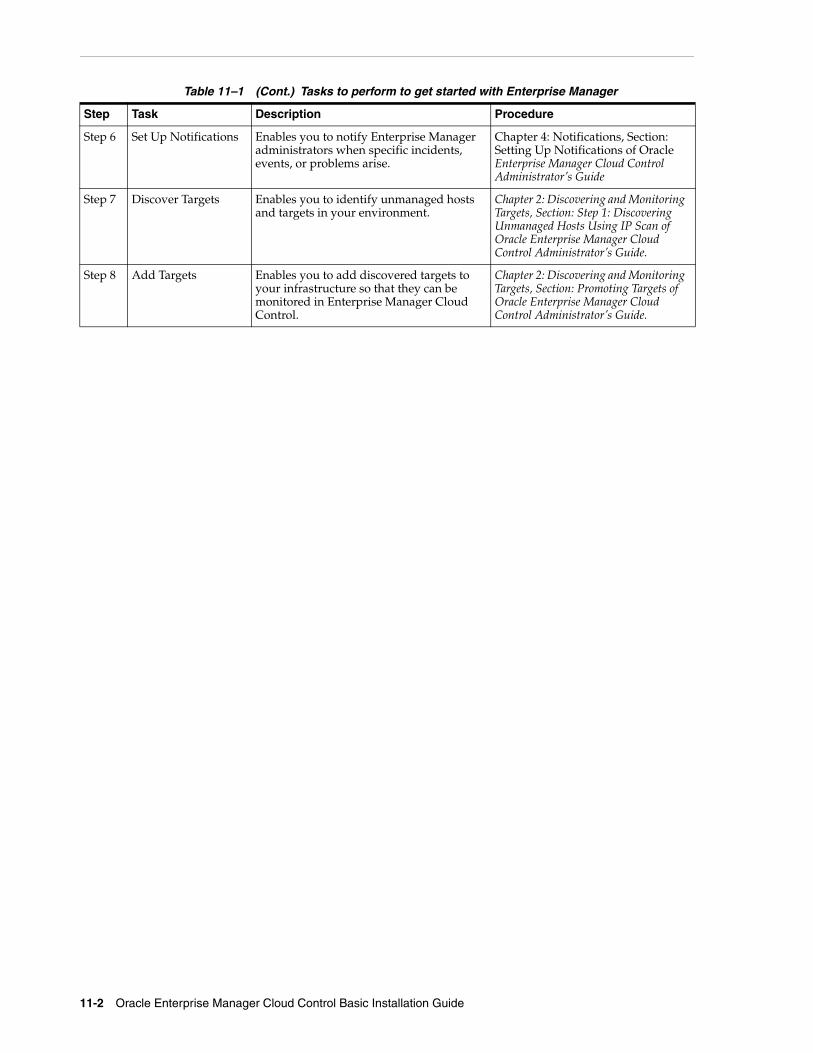
11-2 Oracle Enterprise Manager Cloud Control Basic Installation Guide
Step 6 Set Up Notifications Enables you to notify Enterprise Manager administrators when specific incidents, events, or problems arise.
Chapter 4: Notifications, Section: Setting Up Notifications of Oracle Enterprise Manager Cloud Control Administrator’s Guide
Step 7 Discover Targets Enables you to identify unmanaged hosts and targets in your environment.
Chapter 2: Discovering and Monitoring Targets, Section: Step 1: Discovering Unmanaged Hosts Using IP Scan of Oracle Enterprise Manager Cloud Control Administrator’s Guide.
Step 8 Add Targets Enables you to add discovered targets to your infrastructure so that they can be monitored in Enterprise Manager Cloud Control.
Chapter 2: Discovering and Monitoring Targets, Section: Promoting Targets of Oracle Enterprise Manager Cloud Control Administrator’s Guide.
Table 11–1 (Cont.) Tasks to perform to get started with Enterprise Manager
Step Task Description Procedure

Part VPart V Appendix
This part contains the following appendixes:
■ Appendix A, "Overview of EM Prerequisite Kit Utility"
■ Appendix B, "Validating Command Locations"
■ Appendix C, "Setting Up Proxy Configuration for Oracle Management Service"
■ Appendix D, "Creating a Database Instance with Preconfigured Repository Using Database Templates"
■ Appendix E, "Accessing the Enterprise Manager Certification Matrix"

A
Overview of EM Prerequisite Kit Utility A-1
AOverview of EM Prerequisite Kit Utility
This appendix describes the Enterprise Manager Prerequisite Kit utility (EM Prerequisite Kit) that the installation wizard runs every time it installs or upgrades your Enterprise Manager. In particular, this appendix covers the following:
■ About EM Prerequisite Kit
■ Running the EM Prerequisite Kit
■ Running the EM Prerequisite Kit with Additional Arguments
■ Viewing Prerequisite Check Results
■ Viewing Log Files
■ Repository Prerequisites
A.1 About EM Prerequisite Kit The EM Prerequisite Kit is a command line utility that runs repository-related prerequisite checks in your environment to ensure that you meet all the repository requirements for installing or upgrading an Enterprise Manager system.
The kit not only runs the prerequisite checks but also takes corrective action automatically, to the extent possible, when a prerequisite check fails. The kit also takes postrequisite steps to revert the corrective actions taken and ensure that the system is back to how it was before installing or upgrading the Enterprise Manager system.
The EM Prerequisite Kit is run internally by the Enterprise Manager Installation Wizard while installing or upgrading an Enterprise Manager system.
A.2 Running the EM Prerequisite KitThe EM Prerequisite Kit is run internally by the Enterprise Manager Installation Wizard while installing or upgrading an Enterprise Manager system. However, if any
Note: You can download the latest version of EM Prerequisite Kit from the Self Update framework as follows:
1. In Cloud Control, from the Setup menu, select Extensibility, and then select Self Update.
2. On the Self Update page, download the new version of XMLs under the entity EM Deployment Prerequisite Resources Updates, if there are any available.
Once you download and apply these updates, you cannot rollback to the previous version of XMLs.
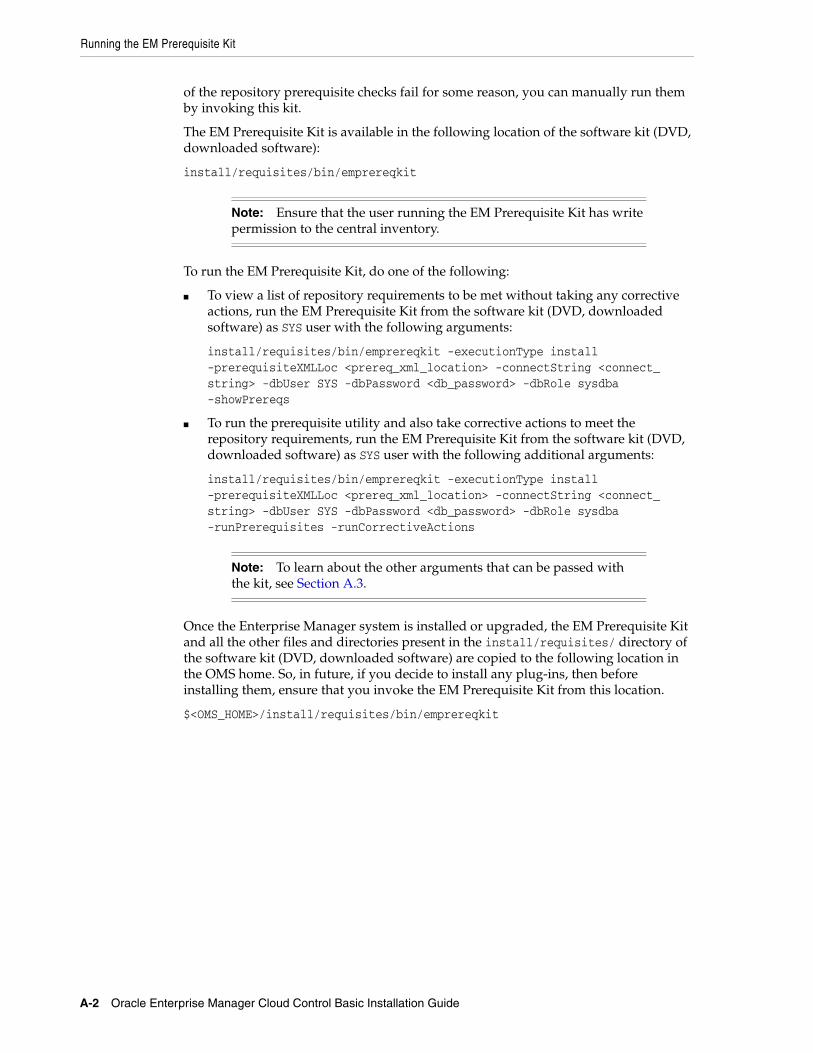
Running the EM Prerequisite Kit
A-2 Oracle Enterprise Manager Cloud Control Basic Installation Guide
of the repository prerequisite checks fail for some reason, you can manually run them by invoking this kit.
The EM Prerequisite Kit is available in the following location of the software kit (DVD, downloaded software):
install/requisites/bin/emprereqkit
To run the EM Prerequisite Kit, do one of the following:
■ To view a list of repository requirements to be met without taking any corrective actions, run the EM Prerequisite Kit from the software kit (DVD, downloaded software) as SYS user with the following arguments:
install/requisites/bin/emprereqkit -executionType install -prerequisiteXMLLoc <prereq_xml_location> -connectString <connect_string> -dbUser SYS -dbPassword <db_password> -dbRole sysdba -showPrereqs
■ To run the prerequisite utility and also take corrective actions to meet the repository requirements, run the EM Prerequisite Kit from the software kit (DVD, downloaded software) as SYS user with the following additional arguments:
install/requisites/bin/emprereqkit -executionType install -prerequisiteXMLLoc <prereq_xml_location> -connectString <connect_string> -dbUser SYS -dbPassword <db_password> -dbRole sysdba -runPrerequisites -runCorrectiveActions
Once the Enterprise Manager system is installed or upgraded, the EM Prerequisite Kit and all the other files and directories present in the install/requisites/ directory of the software kit (DVD, downloaded software) are copied to the following location in the OMS home. So, in future, if you decide to install any plug-ins, then before installing them, ensure that you invoke the EM Prerequisite Kit from this location.
$<OMS_HOME>/install/requisites/bin/emprereqkit
Note: Ensure that the user running the EM Prerequisite Kit has write permission to the central inventory.
Note: To learn about the other arguments that can be passed with the kit, see Section A.3.
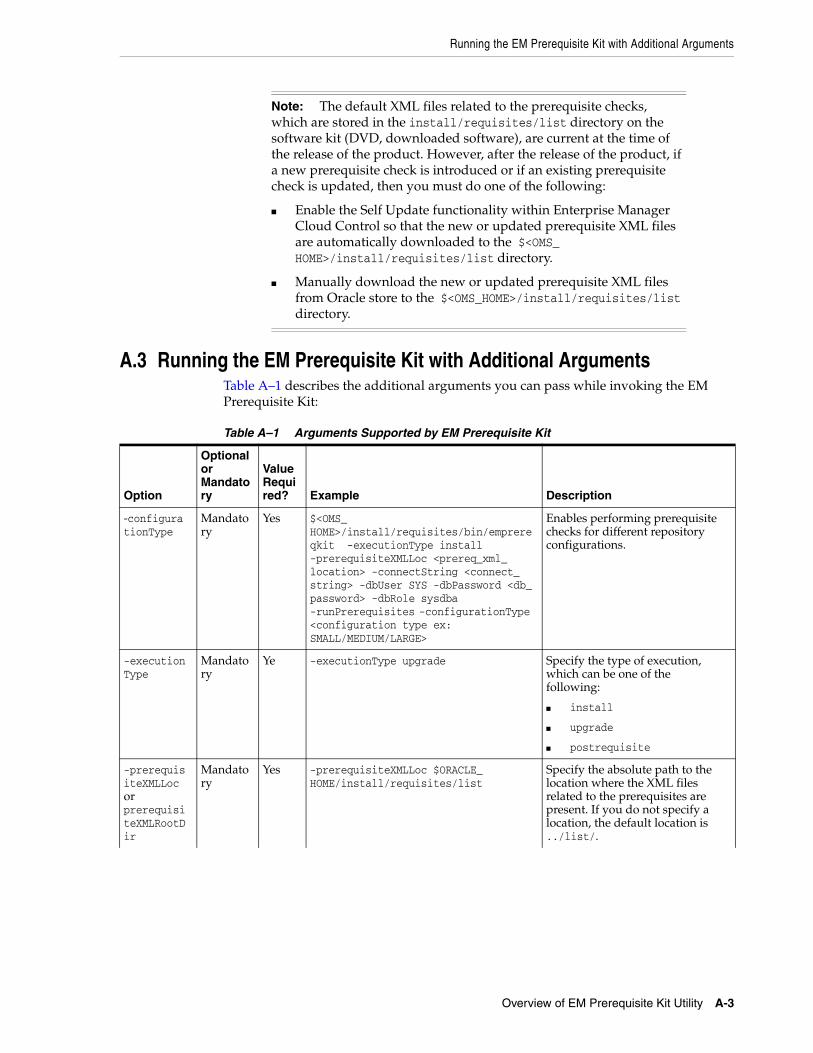
Running the EM Prerequisite Kit with Additional Arguments
Overview of EM Prerequisite Kit Utility A-3
A.3 Running the EM Prerequisite Kit with Additional ArgumentsTable A–1 describes the additional arguments you can pass while invoking the EM Prerequisite Kit:
Note: The default XML files related to the prerequisite checks, which are stored in the install/requisites/list directory on the software kit (DVD, downloaded software), are current at the time of the release of the product. However, after the release of the product, if a new prerequisite check is introduced or if an existing prerequisite check is updated, then you must do one of the following:
■ Enable the Self Update functionality within Enterprise Manager Cloud Control so that the new or updated prerequisite XML files are automatically downloaded to the $<OMS_HOME>/install/requisites/list directory.
■ Manually download the new or updated prerequisite XML files from Oracle store to the $<OMS_HOME>/install/requisites/list directory.
Table A–1 Arguments Supported by EM Prerequisite Kit
Option
Optional or Mandatory
Value Required? Example Description
-configurationType
Mandatory
Yes $<OMS_HOME>/install/requisites/bin/emprereqkit -executionType install -prerequisiteXMLLoc <prereq_xml_location> -connectString <connect_string> -dbUser SYS -dbPassword <db_password> -dbRole sysdba -runPrerequisites -configurationType <configuration type ex: SMALL/MEDIUM/LARGE>
Enables performing prerequisite checks for different repository configurations.
-executionType
Mandatory
Ye -executionType upgrade Specify the type of execution, which can be one of the following:
■ install
■ upgrade
■ postrequisite
-prerequisiteXMLLoc or prerequisiteXMLRootDir
Mandatory
Yes -prerequisiteXMLLoc $ORACLE_HOME/install/requisites/list
Specify the absolute path to the location where the XML files related to the prerequisites are present. If you do not specify a location, the default location is ../list/.
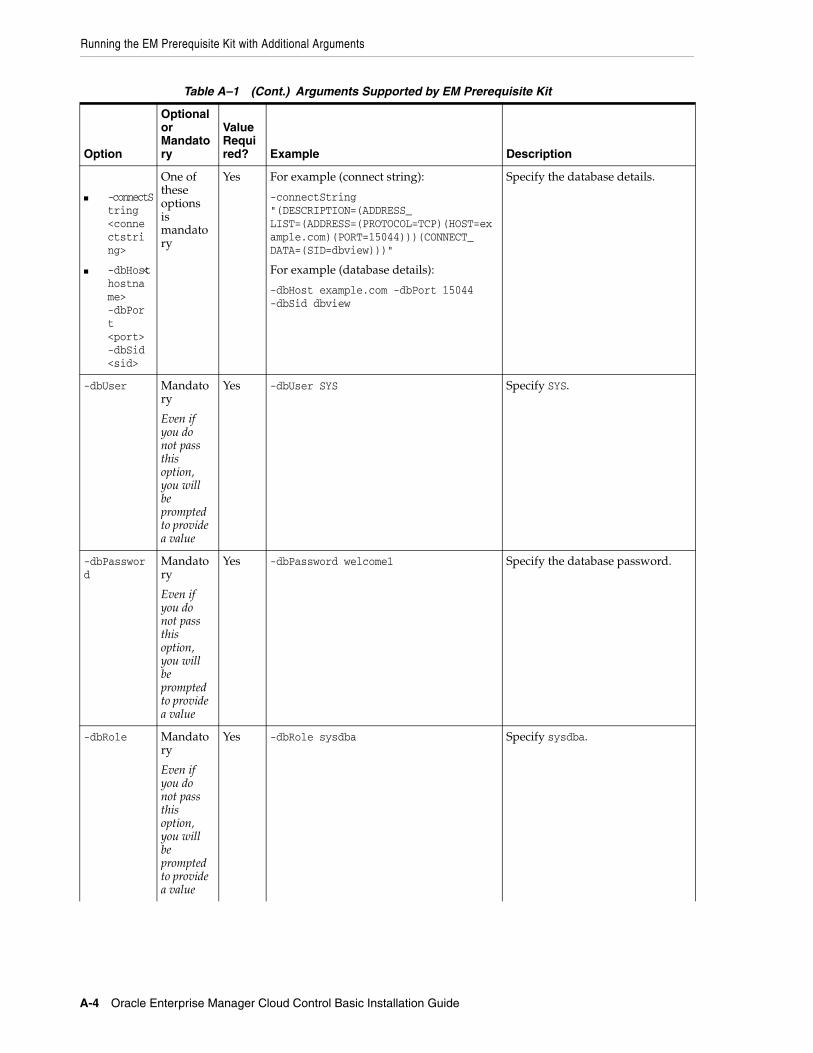
Running the EM Prerequisite Kit with Additional Arguments
A-4 Oracle Enterprise Manager Cloud Control Basic Installation Guide
■ -connectString <connectstring>
■ -dbHost <hostname> -dbPort <port> -dbSid <sid>
One of these options is mandatory
Yes For example (connect string):
-connectString "(DESCRIPTION=(ADDRESS_LIST=(ADDRESS=(PROTOCOL=TCP)(HOST=example.com)(PORT=15044)))(CONNECT_DATA=(SID=dbview)))"
For example (database details):
-dbHost example.com -dbPort 15044 -dbSid dbview
Specify the database details.
-dbUser Mandatory
Even if you do not pass this option, you will be prompted to provide a value
Yes -dbUser SYS Specify SYS.
-dbPassword
Mandatory
Even if you do not pass this option, you will be prompted to provide a value
Yes -dbPassword welcome1 Specify the database password.
-dbRole Mandatory
Even if you do not pass this option, you will be prompted to provide a value
Yes -dbRole sysdba Specify sysdba.
Table A–1 (Cont.) Arguments Supported by EM Prerequisite Kit
Option
Optional or Mandatory
Value Required? Example Description
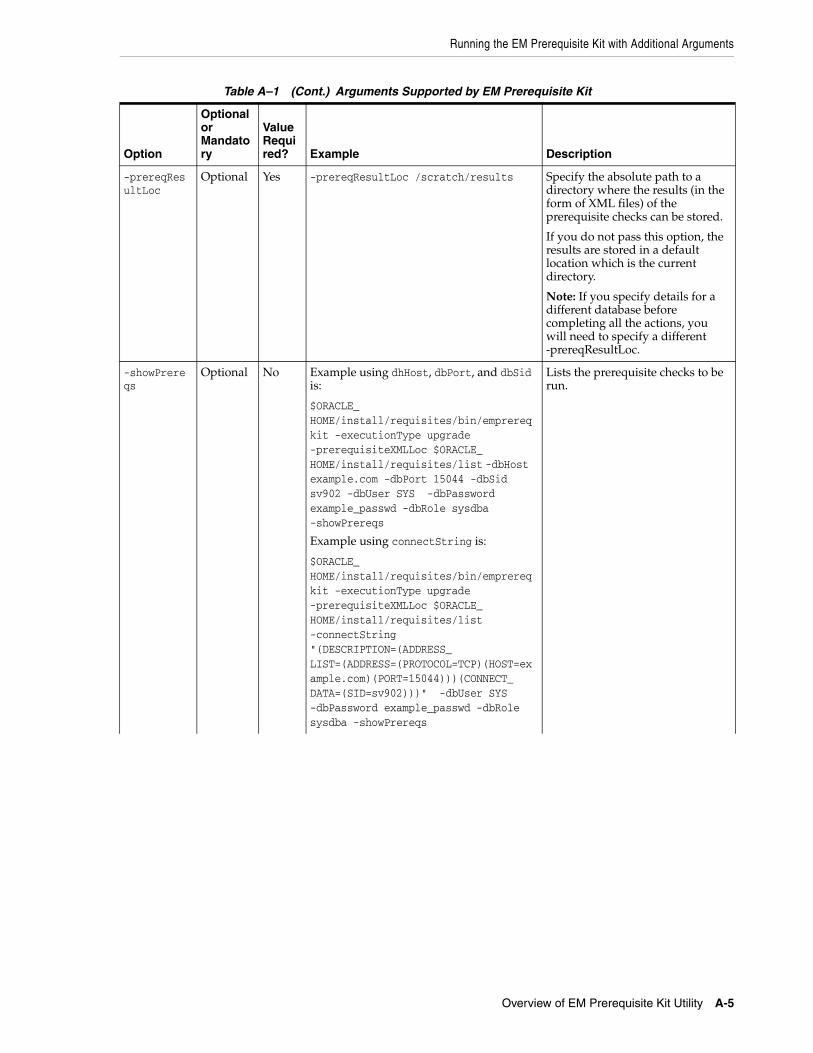
Running the EM Prerequisite Kit with Additional Arguments
Overview of EM Prerequisite Kit Utility A-5
-prereqResultLoc
Optional Yes -prereqResultLoc /scratch/results Specify the absolute path to a directory where the results (in the form of XML files) of the prerequisite checks can be stored.
If you do not pass this option, the results are stored in a default location which is the current directory.
Note: If you specify details for a different database before completing all the actions, you will need to specify a different -prereqResultLoc.
-showPrereqs
Optional No Example using dhHost, dbPort, and dbSid is:
$ORACLE_HOME/install/requisites/bin/emprereqkit -executionType upgrade -prerequisiteXMLLoc $ORACLE_HOME/install/requisites/list -dbHost example.com -dbPort 15044 -dbSid sv902 -dbUser SYS -dbPassword example_passwd -dbRole sysdba -showPrereqs
Example using connectString is:
$ORACLE_HOME/install/requisites/bin/emprereqkit -executionType upgrade -prerequisiteXMLLoc $ORACLE_HOME/install/requisites/list -connectString "(DESCRIPTION=(ADDRESS_LIST=(ADDRESS=(PROTOCOL=TCP)(HOST=example.com)(PORT=15044)))(CONNECT_DATA=(SID=sv902)))" -dbUser SYS -dbPassword example_passwd -dbRole sysdba -showPrereqs
Lists the prerequisite checks to be run.
Table A–1 (Cont.) Arguments Supported by EM Prerequisite Kit
Option
Optional or Mandatory
Value Required? Example Description
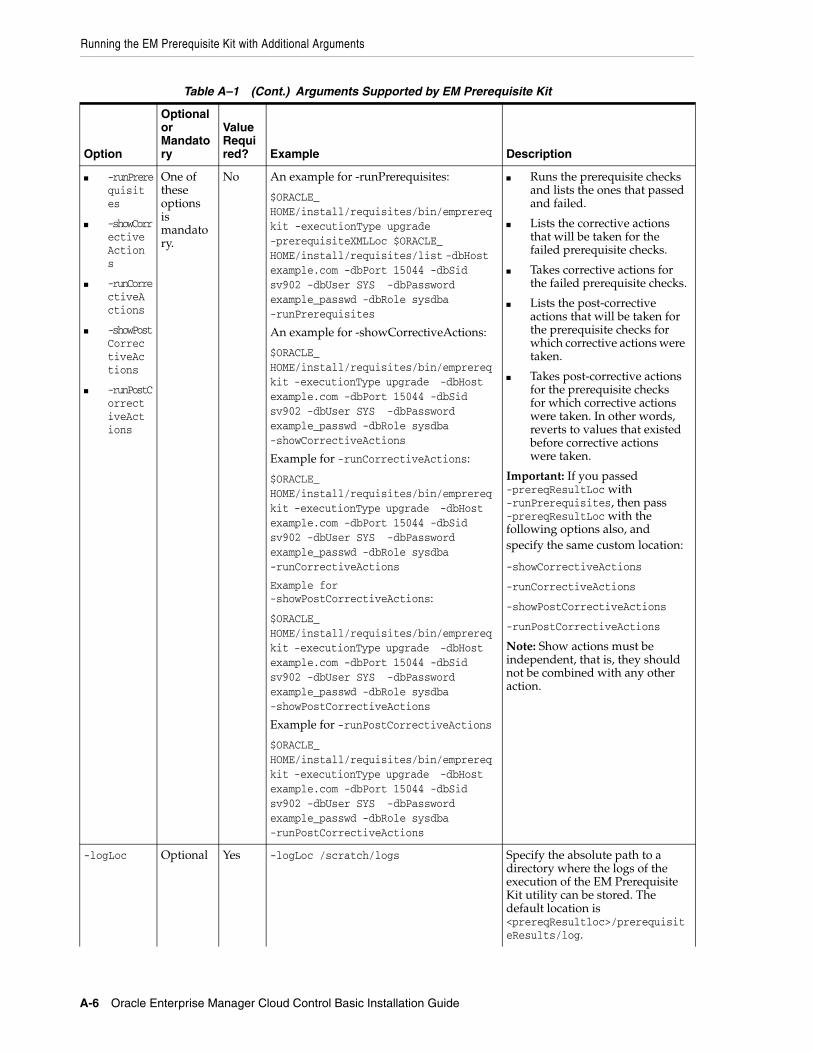
Running the EM Prerequisite Kit with Additional Arguments
A-6 Oracle Enterprise Manager Cloud Control Basic Installation Guide
■ -runPrerequisites
■ -showCorrectiveActions
■ -runCorrectiveActions
■ -showPostCorrectiveActions
■ -runPostCorrectiveActions
One of these options is mandatory.
No An example for -runPrerequisites:
$ORACLE_HOME/install/requisites/bin/emprereqkit -executionType upgrade -prerequisiteXMLLoc $ORACLE_HOME/install/requisites/list -dbHost example.com -dbPort 15044 -dbSid sv902 -dbUser SYS -dbPassword example_passwd -dbRole sysdba -runPrerequisites
An example for -showCorrectiveActions:
$ORACLE_HOME/install/requisites/bin/emprereqkit -executionType upgrade -dbHost example.com -dbPort 15044 -dbSid sv902 -dbUser SYS -dbPassword example_passwd -dbRole sysdba -showCorrectiveActions
Example for -runCorrectiveActions:
$ORACLE_HOME/install/requisites/bin/emprereqkit -executionType upgrade -dbHost example.com -dbPort 15044 -dbSid sv902 -dbUser SYS -dbPassword example_passwd -dbRole sysdba -runCorrectiveActions
Example for -showPostCorrectiveActions:
$ORACLE_HOME/install/requisites/bin/emprereqkit -executionType upgrade -dbHost example.com -dbPort 15044 -dbSid sv902 -dbUser SYS -dbPassword example_passwd -dbRole sysdba -showPostCorrectiveActions
Example for -runPostCorrectiveActions
$ORACLE_HOME/install/requisites/bin/emprereqkit -executionType upgrade -dbHost example.com -dbPort 15044 -dbSid sv902 -dbUser SYS -dbPassword example_passwd -dbRole sysdba -runPostCorrectiveActions
■ Runs the prerequisite checks and lists the ones that passed and failed.
■ Lists the corrective actions that will be taken for the failed prerequisite checks.
■ Takes corrective actions for the failed prerequisite checks.
■ Lists the post-corrective actions that will be taken for the prerequisite checks for which corrective actions were taken.
■ Takes post-corrective actions for the prerequisite checks for which corrective actions were taken. In other words, reverts to values that existed before corrective actions were taken.
Important: If you passed -prereqResultLoc with -runPrerequisites, then pass -prereqResultLoc with the following options also, and specify the same custom location:
-showCorrectiveActions
-runCorrectiveActions
-showPostCorrectiveActions
-runPostCorrectiveActions
Note: Show actions must be independent, that is, they should not be combined with any other action.
-logLoc Optional Yes -logLoc /scratch/logs Specify the absolute path to a directory where the logs of the execution of the EM Prerequisite Kit utility can be stored. The default location is <prereqResultloc>/prerequisiteResults/log.
Table A–1 (Cont.) Arguments Supported by EM Prerequisite Kit
Option
Optional or Mandatory
Value Required? Example Description
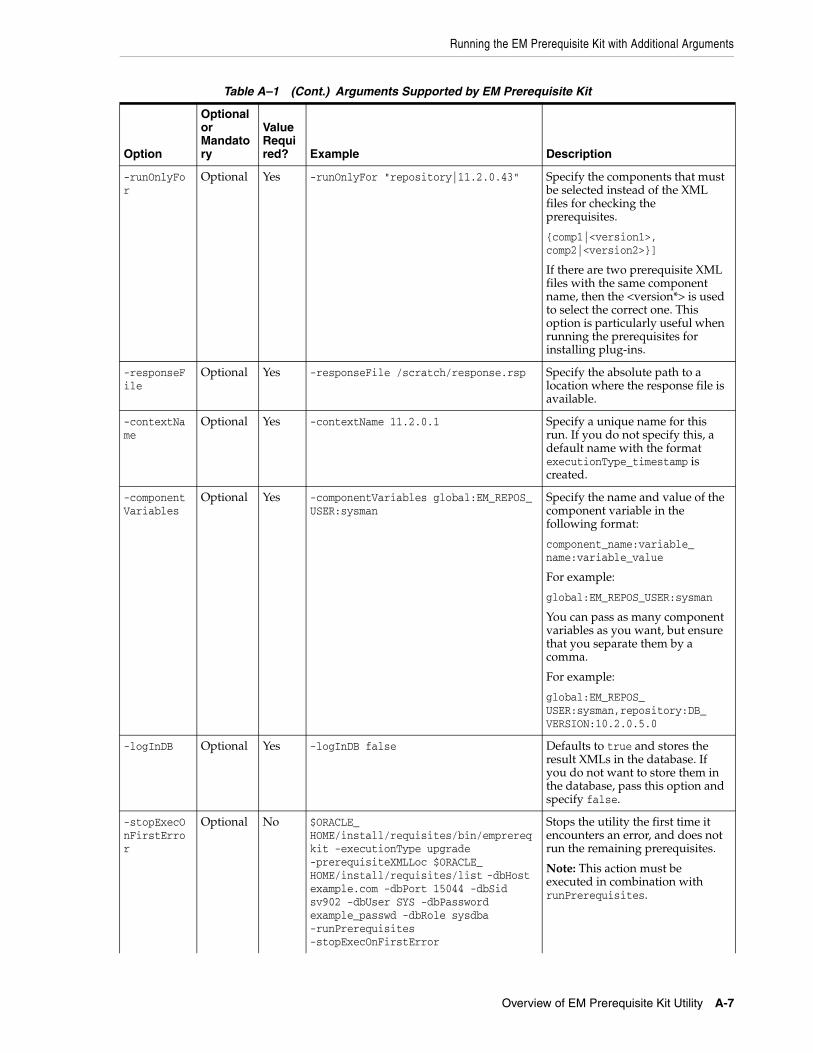
Running the EM Prerequisite Kit with Additional Arguments
Overview of EM Prerequisite Kit Utility A-7
-runOnlyFor
Optional Yes -runOnlyFor "repository|11.2.0.43" Specify the components that must be selected instead of the XML files for checking the prerequisites.
{comp1|<version1>, comp2|<version2>}]
If there are two prerequisite XML files with the same component name, then the <version*> is used to select the correct one. This option is particularly useful when running the prerequisites for installing plug-ins.
-responseFile
Optional Yes -responseFile /scratch/response.rsp Specify the absolute path to a location where the response file is available.
-contextName
Optional Yes -contextName 11.2.0.1 Specify a unique name for this run. If you do not specify this, a default name with the format executionType_timestamp is created.
-componentVariables
Optional Yes -componentVariables global:EM_REPOS_USER:sysman
Specify the name and value of the component variable in the following format:
component_name:variable_name:variable_value
For example:
global:EM_REPOS_USER:sysman
You can pass as many component variables as you want, but ensure that you separate them by a comma.
For example:
global:EM_REPOS_USER:sysman,repository:DB_VERSION:10.2.0.5.0
-logInDB Optional Yes -logInDB false Defaults to true and stores the result XMLs in the database. If you do not want to store them in the database, pass this option and specify false.
-stopExecOnFirstError
Optional No $ORACLE_HOME/install/requisites/bin/emprereqkit -executionType upgrade -prerequisiteXMLLoc $ORACLE_HOME/install/requisites/list -dbHost example.com -dbPort 15044 -dbSid sv902 -dbUser SYS -dbPassword example_passwd -dbRole sysdba -runPrerequisites -stopExecOnFirstError
Stops the utility the first time it encounters an error, and does not run the remaining prerequisites.
Note: This action must be executed in combination with runPrerequisites.
Table A–1 (Cont.) Arguments Supported by EM Prerequisite Kit
Option
Optional or Mandatory
Value Required? Example Description

Viewing Prerequisite Check Results
A-8 Oracle Enterprise Manager Cloud Control Basic Installation Guide
A.4 Viewing Prerequisite Check ResultsEvery time the EM Prerequisite Kit is run, the results of the prerequisite checks run for a particular component are stored in an instance XML file. The instance XML file has the file name <component>.xml. The results are in the same format as the information stored in the prerequisite XML files. The only difference is the new column that indicates the actual result of the prerequisite check.
Table A–2 lists the instance file locations depending on how the EM Prerequisite Kit was invoked.
-list Optional
Must be passed independently while invoking the utility
No $ORACLE_HOME/install/requisites/bin/emprereqkit -executionType upgrade -dbHost example.com -dbPort 15044 -dbSid sv902 -dbUser SYS -dbPassword example_passwd -dbRole sysdba -list
Organizes and lists the prerequisite check results (stored in the database) based on when it was run and the context.
-export Optional
Must be passed independently while invoking the utility
No $ORACLE_HOME/install/requisites/bin/emprereqkit -executionType upgrade -dbHost example.com -dbPort 15044 -dbSid sv902 -dbUser SYS -dbPassword example_passwd -dbRole sysdba -export
Copies the prerequisite check results (XML files) from the database to an external file system.
-purge Optional
Must be passed independently while invoking the utility
No $ORACLE_HOME/install/requisites/bin/emprereqkit -executionType upgrade -dbHost example.com -dbPort 15044 -dbSid sv902 -dbUser SYS -dbPassword example_passwd -dbRole sysdba -purge
Defaults to false and retains the result XMLs in the database. If you want to delete them from the database, pass this option.
-help Optional No emprereqkit -help This option gives details of various parameters which can be passed to EM Prerequisite Kit.
Table A–2 EM Prerequisite Kit Result File Location (Instance XML File)
invocation Type Instance File Location1 Latest Instance File Location2
Manually Invoked <prereqResultLoc>/resultXMLs/<time-stamp>
Note: When you provide prereqResultLoc value, the result xml location is as mentioned above. Else, the result xml location is <Current Directory>/ prerequisiteResults/resultXMLs/<time-stamp>
<prereqResultLoc>/resultXMLs/LATEST/
Note: When you provide prereqResultLoc value, the result xml location is as mentioned above. Else, the result xml location is <Current Directory>/ prerequisiteResults/resultXMLs/LATEST
Table A–1 (Cont.) Arguments Supported by EM Prerequisite Kit
Option
Optional or Mandatory
Value Required? Example Description

Viewing Log Files
Overview of EM Prerequisite Kit Utility A-9
A.5 Viewing Log FilesTable A–3 lists all the log files that are created every time the EM Prerequisite Kit is run.
Automatically Invoked by the Enterprise Manager Cloud Control Installation Wizard
<MW_HOME>/.gcinstall_temp/resultXMLs/<time-stamp>
Note: When you proceed through the installation wizard pages, EM Prerequisite Kit result XMLs are created in /tmp/OraInstall<timestamp>/emprereqkit/resultXMLs/<time-stamp>.
When install begins, the /tmp/OraInstall<timestamp>/emprereqkit/resultXMLs/<time-stamp> result xmls are copied to <MWHOME>/.gcinstall_temp/resultXMLs/<time-stamp>.
<MW_HOME>/.gcinstall_temp/resultXMLs/LATEST
Note: When you proceed through the installation wizard pages, EM Prerequisite Kit result xmls are created in /tmp/OraInstall<timestamp>/ emprereqkit/p; resultXMLs/LATEST.
When install begins, the /tmp/OraInstall<timestamp>/ emprereqkit/ resultXMLs/LATEST result xmls are copied to <MW_HOME>/.gcinstall_temp/resultXMLs/LATEST
1 Instance File Location refers to the <time-stamp> directory that is created dynamically by the utility every time the EM Prerequisite Kit is run. The instance file created here is retained until you decide to delete it.
2 Latest Instance File Location refers to a single, standard location maintained for the latest instance file created when the EM Prerequisite Kit was last run. The instance file created here is overwritten every time the utility is run.
Note: The <prereqResultLoc> location refers to the location you enter for the -prereqResultLoc option while invoking the utility. If this option is not passed, then by default, the directory from where you invoke the utility is considered as the base directory, and a directory titled prerequisiteResults is dynamically created in it, and then the instance file is stored in it.
Table A–3 EM Prerequisite Kit Log Files
Log File Name Description
emprereqkit.log Contains information about every step taken or action performed by the kit
emprereqkit.err.log Contains only the error and stacktrace of the exceptions occurred
emprereqkit.output Contains information about the status (pass or fail) of all the prerequisite checks that are run. It also contains detailed information regarding each prerequisite check.For example, prerequisite name, execution status, detailed recommendation (what queries are to be executed to correct the failed prerequisite), and so on.s
<functional_area>.log Contains information about the function area-specific prerequisite checks that are run. For example, repository.log that contains repository-specific performance-related prerequisite checks that are run.
Table A–2 (Cont.) EM Prerequisite Kit Result File Location (Instance XML File)
invocation Type Instance File Location1 Latest Instance File Location2
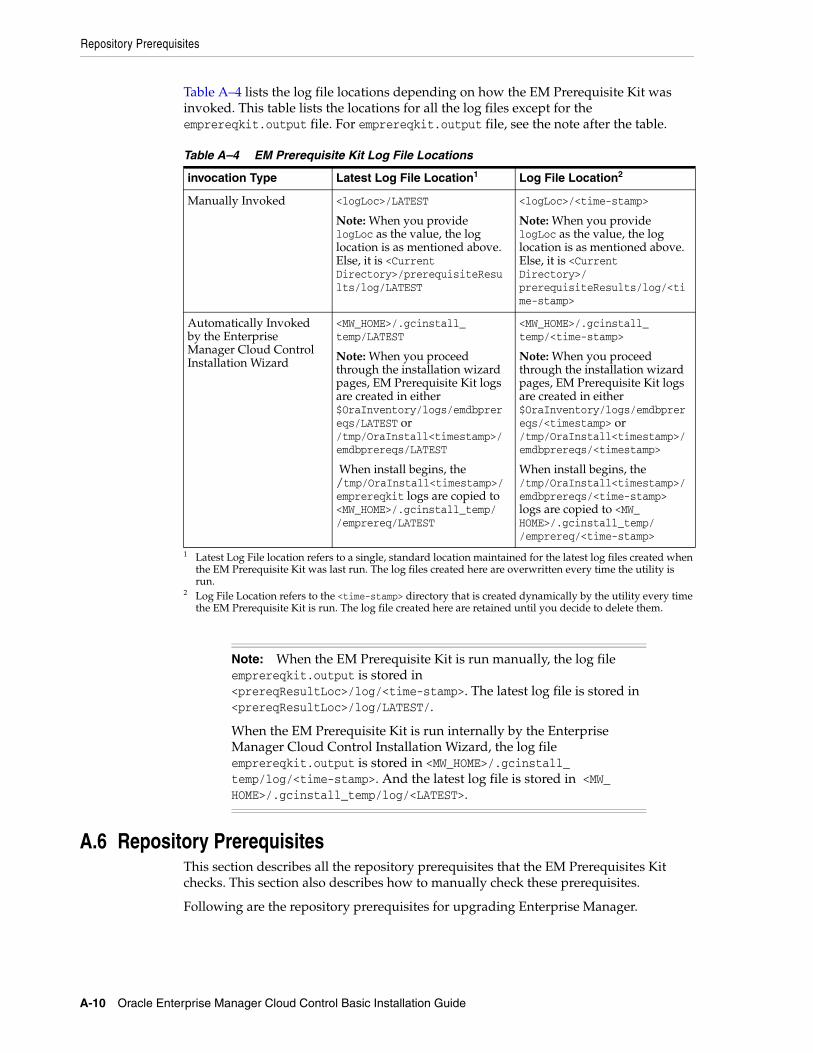
Repository Prerequisites
A-10 Oracle Enterprise Manager Cloud Control Basic Installation Guide
Table A–4 lists the log file locations depending on how the EM Prerequisite Kit was invoked. This table lists the locations for all the log files except for the emprereqkit.output file. For emprereqkit.output file, see the note after the table.
A.6 Repository PrerequisitesThis section describes all the repository prerequisites that the EM Prerequisites Kit checks. This section also describes how to manually check these prerequisites.
Following are the repository prerequisites for upgrading Enterprise Manager.
Table A–4 EM Prerequisite Kit Log File Locations
invocation Type Latest Log File Location1
1 Latest Log File location refers to a single, standard location maintained for the latest log files created when the EM Prerequisite Kit was last run. The log files created here are overwritten every time the utility is run.
Log File Location2
2 Log File Location refers to the <time-stamp> directory that is created dynamically by the utility every time the EM Prerequisite Kit is run. The log file created here are retained until you decide to delete them.
Manually Invoked <logLoc>/LATEST
Note: When you provide logLoc as the value, the log location is as mentioned above. Else, it is <Current Directory>/prerequisiteResults/log/LATEST
<logLoc>/<time-stamp>
Note: When you provide logLoc as the value, the log location is as mentioned above. Else, it is <Current Directory>/ prerequisiteResults/log/<time-stamp>
Automatically Invoked by the Enterprise Manager Cloud Control Installation Wizard
<MW_HOME>/.gcinstall_temp/LATEST
Note: When you proceed through the installation wizard pages, EM Prerequisite Kit logs are created in either $OraInventory/logs/emdbprereqs/LATEST or /tmp/OraInstall<timestamp>/ emdbprereqs/LATEST
When install begins, the /tmp/OraInstall<timestamp>/emprereqkit logs are copied to <MW_HOME>/.gcinstall_temp/ /emprereq/LATEST
<MW_HOME>/.gcinstall_temp/<time-stamp>
Note: When you proceed through the installation wizard pages, EM Prerequisite Kit logs are created in either $OraInventory/logs/emdbprereqs/<timestamp> or /tmp/OraInstall<timestamp>/ emdbprereqs/<timestamp>
When install begins, the /tmp/OraInstall<timestamp>/ emdbprereqs/<time-stamp> logs are copied to <MW_HOME>/.gcinstall_temp/ /emprereq/<time-stamp>
Note: When the EM Prerequisite Kit is run manually, the log file emprereqkit.output is stored in <prereqResultLoc>/log/<time-stamp>. The latest log file is stored in <prereqResultLoc>/log/LATEST/.
When the EM Prerequisite Kit is run internally by the Enterprise Manager Cloud Control Installation Wizard, the log file emprereqkit.output is stored in <MW_HOME>/.gcinstall_temp/log/<time-stamp>. And the latest log file is stored in <MW_HOME>/.gcinstall_temp/log/<LATEST>.

Repository Prerequisites
Overview of EM Prerequisite Kit Utility A-11
Table A–5 Repository Prerequisites for Upgrading Enterprise Manager System
Prerequisite
Applies to Install/Upgrade
Automatic Description
Basic Policy Requirements
Upgrade No Ensure that valid policy exists for MGMT_TARGETS. To verify, run the following query:
select 'EM_TARGET_POLICY' from dual where not exists (select policy_name from dba_policies where object_owner=SYSMAN' and pf_owner='SYSMAN' and object_name='MGMT_TARGETS') )
The query must not return any rows.
Active Jobs Requirements
Upgrade No Ensure that there are no background DBMS jobs currently running in the Repository Database. To verify, run the following query:
select count(*) FROM dba_jobs_running run_job,gv$session sess WHERE sess.sid=run_job.sid AND sess.schemaname='SYSMAN'
If the result of the query is 0 then there are no active DBMS jobs, if result is not 0 then wait for the active jobs to complete.
Checks if GVM Performance collection job is running
Upgrade Yes Ensure that the GVM Performance Metric Collection job is stopped and deleted. To verify if a job named GVMPERFMETRICCOLL exists, run the following query:
select count(*) from mgmt_job where job_name = 'GVMPERFMETRICCOLL' and job_type = 'UpdateGVMPerfMetric'
If it exists, then stop and delete.
Valid Reference Requirements
Upgrade No Ensure that all entries for execution_id in MGMT_JOB_EXECUTION either point to a valid entry in MGMT_JOB_EXEC_SUMMARY, or are NULL.
To verify, run the following query. The query must not return any rows.
SELECT COUNT(1) FROM MGMT_JOB_EXECUTION e WHERE NOT EXISTS (SELECT 1 FROM MGMT_JOB_EXEC_SUMMARY s WHERE s.execution_id = e.execution_id) AND execution_id IS NOT NULL
Job Type Uniqueness Requirements
Upgrade No Ensure that there are no duplicate entries in MGMT_JOB_TYPE_INFO for the following set of columns: job_type, job_type_owner, major_version, minor_version1, minor_version2.
To verify, run the following query. The query must not return any rows.
SELECT job_type FROM MGMT_JOB_TYPE_INFO GROUP BY job_type, job_type_owner, major_version, minor_version1, minor_version2 HAVING COUNT(1) > 1
SQL Plan Baseline Capture Parameter Requirements
Install, Upgrade
No Ensure that the parameter optimizer_capture_sql_plan_baselines is set to FALSE (or default).
The SQL plan baseline capture must never be turned on for the Management Repository. Enterprise Manager heavily depends on updated CBO statistics. If stale CBO statistics exist, the SQL plan baseline capture could cause bad execution plans to be used for critical functionality.
Current Availability Index Requirements
Install, Upgrade
No Ensure that the current availability index is renamed to the following:
■ If you are running the kit before upgrading to 12c release, then rename it to MGMT_CURRENT_AVAILABILITY_PK.
■ If you are running the kit after upgrading to 12c release, then rename it to EM_CURRENT_AVAILABILITY_PK.
My Oracle Support User Name Size Requirements
Upgrade No Ensure that the My Oracle Support user name is not longer than 239 characters. If it is, then you cannot upgrade.
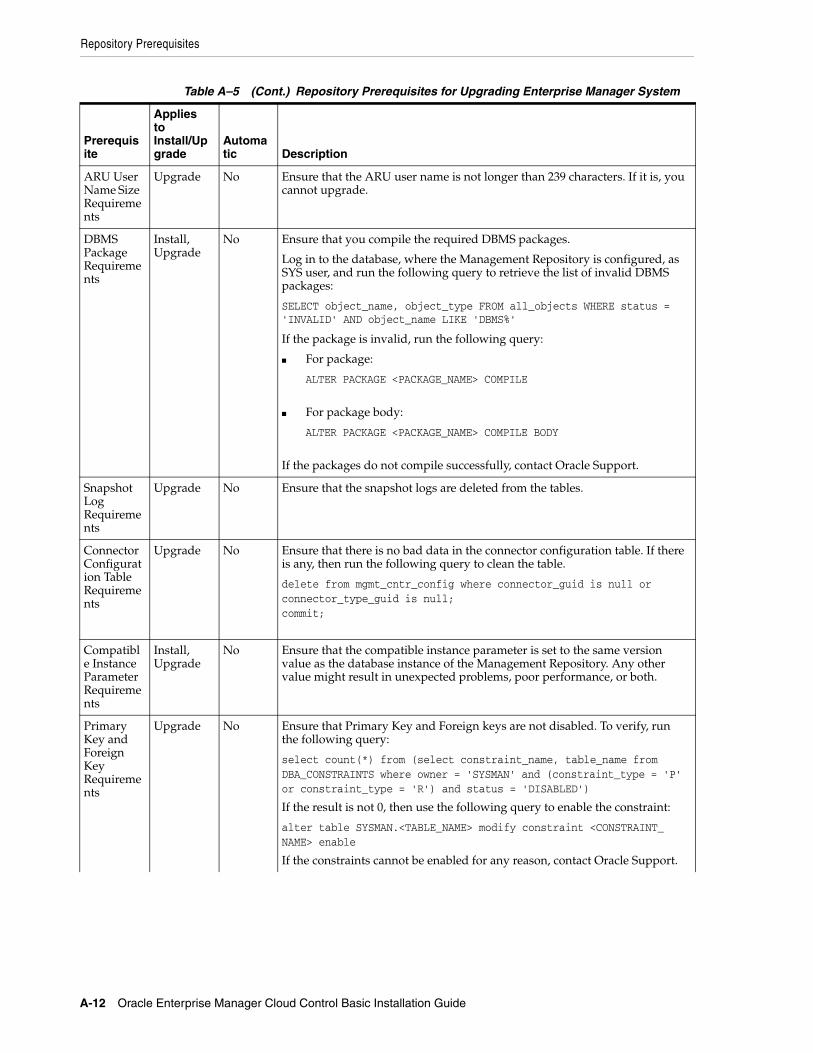
Repository Prerequisites
A-12 Oracle Enterprise Manager Cloud Control Basic Installation Guide
ARU User Name Size Requirements
Upgrade No Ensure that the ARU user name is not longer than 239 characters. If it is, you cannot upgrade.
DBMS Package Requirements
Install, Upgrade
No Ensure that you compile the required DBMS packages.
Log in to the database, where the Management Repository is configured, as SYS user, and run the following query to retrieve the list of invalid DBMS packages:
SELECT object_name, object_type FROM all_objects WHERE status = 'INVALID' AND object_name LIKE 'DBMS%'
If the package is invalid, run the following query:
■ For package:
ALTER PACKAGE <PACKAGE_NAME> COMPILE
■ For package body:
ALTER PACKAGE <PACKAGE_NAME> COMPILE BODY
If the packages do not compile successfully, contact Oracle Support.
Snapshot Log Requirements
Upgrade No Ensure that the snapshot logs are deleted from the tables.
Connector Configuration Table Requirements
Upgrade No Ensure that there is no bad data in the connector configuration table. If there is any, then run the following query to clean the table.
delete from mgmt_cntr_config where connector_guid is null or connector_type_guid is null; commit;
Compatible Instance Parameter Requirements
Install, Upgrade
No Ensure that the compatible instance parameter is set to the same version value as the database instance of the Management Repository. Any other value might result in unexpected problems, poor performance, or both.
Primary Key and Foreign Key Requirements
Upgrade No Ensure that Primary Key and Foreign keys are not disabled. To verify, run the following query:
select count(*) from (select constraint_name, table_name from DBA_CONSTRAINTS where owner = 'SYSMAN' and (constraint_type = 'P' or constraint_type = 'R') and status = 'DISABLED')
If the result is not 0, then use the following query to enable the constraint:
alter table SYSMAN.<TABLE_NAME> modify constraint <CONSTRAINT_NAME> enable
If the constraints cannot be enabled for any reason, contact Oracle Support.
Table A–5 (Cont.) Repository Prerequisites for Upgrading Enterprise Manager System
Prerequisite
Applies to Install/Upgrade
Automatic Description
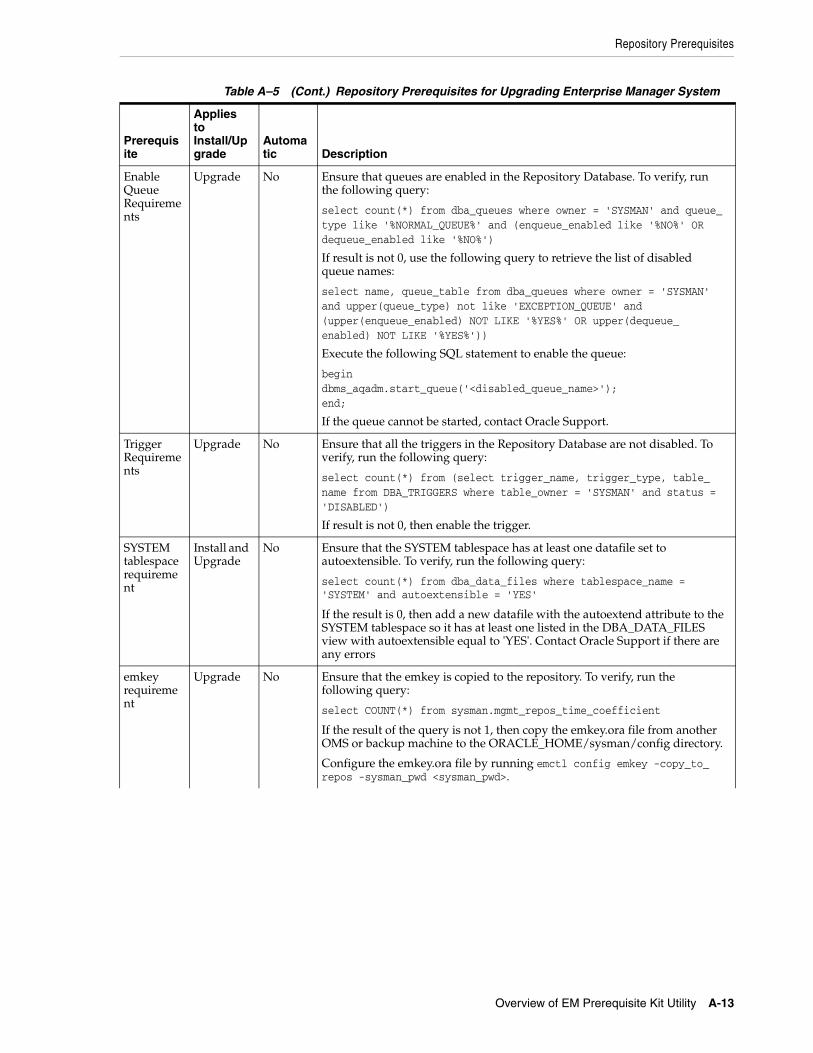
Repository Prerequisites
Overview of EM Prerequisite Kit Utility A-13
Enable Queue Requirements
Upgrade No Ensure that queues are enabled in the Repository Database. To verify, run the following query:
select count(*) from dba_queues where owner = 'SYSMAN' and queue_type like '%NORMAL_QUEUE%' and (enqueue_enabled like '%NO%' OR dequeue_enabled like '%NO%')
If result is not 0, use the following query to retrieve the list of disabled queue names:
select name, queue_table from dba_queues where owner = 'SYSMAN' and upper(queue_type) not like 'EXCEPTION_QUEUE' and (upper(enqueue_enabled) NOT LIKE '%YES%' OR upper(dequeue_enabled) NOT LIKE '%YES%'))
Execute the following SQL statement to enable the queue:
begindbms_aqadm.start_queue('<disabled_queue_name>');end;
If the queue cannot be started, contact Oracle Support.
Trigger Requirements
Upgrade No Ensure that all the triggers in the Repository Database are not disabled. To verify, run the following query:
select count(*) from (select trigger_name, trigger_type, table_name from DBA_TRIGGERS where table_owner = 'SYSMAN' and status = 'DISABLED')
If result is not 0, then enable the trigger.
SYSTEM tablespace requirement
Install and Upgrade
No Ensure that the SYSTEM tablespace has at least one datafile set to autoextensible. To verify, run the following query:
select count(*) from dba_data_files where tablespace_name = 'SYSTEM' and autoextensible = 'YES'
If the result is 0, then add a new datafile with the autoextend attribute to the SYSTEM tablespace so it has at least one listed in the DBA_DATA_FILES view with autoextensible equal to 'YES'. Contact Oracle Support if there are any errors
emkey requirement
Upgrade No Ensure that the emkey is copied to the repository. To verify, run the following query:
select COUNT(*) from sysman.mgmt_repos_time_coefficient
If the result of the query is not 1, then copy the emkey.ora file from another OMS or backup machine to the ORACLE_HOME/sysman/config directory.
Configure the emkey.ora file by running emctl config emkey -copy_to_repos -sysman_pwd <sysman_pwd>.
Table A–5 (Cont.) Repository Prerequisites for Upgrading Enterprise Manager System
Prerequisite
Applies to Install/Upgrade
Automatic Description

Repository Prerequisites
A-14 Oracle Enterprise Manager Cloud Control Basic Installation Guide
EM_USER_CONTEXT requirements
Upgrade No Ensure that EM_USER_CONTEXT is present in the repository. To verify, run the following query:
select count(*) from dba_context where schema='SYSMAN' and upper(namespace)='EM_USER_CONTEXT'
If the query result is 0, check that the procedure SETEMUSERCONTEXT is valid by executing the following query:
select status from all_objects
where object_name='SETEMUSERCONTEXT' and owner='SYSMAN'
The above query must return 'VALID'. Then run:
alter session set current_schema='SYSMAN';
Create or replace context EM_USER_CONTEXT using SETEMUSERCONTEXT;
If the context cannot be created for any reason, contact Oracle Support.
Audit Master table requirement
Upgrade No Ensure that there are no abnormal conditions stored in the Audit Master Table. To verify, run the following query:
select count(*) from sysman.mgmt_audit_master
If the query result is not 1 then, contact Oracle Support to analyze the Enterprise Manager repository before attempting to perform the patch/upgrade.
Exempt Access Policy requirement
Upgrade No Ensure that EXEMPT ACCESS POLICY is not granted directly to SYSMAN or indirectly grants to a role that is granted to SYSMAN. To verify, run the following query:
select count(*) from dba_sys_privs where upper(privilege)='EXEMPT ACCESS POLICY' and (grantee = 'sysman' or grantee in (select distinct granted_role from dba_role_privs start with grantee='SYSMAN' connect by prior granted_role=grantee) or grantee = 'sysman')
If the result of the query is not 0, then revoke EXEMPT ACCESS POLICY from SYSMAN and the roles.
For example:
revoke exempt access policy from SYSMAN
Table A–5 (Cont.) Repository Prerequisites for Upgrading Enterprise Manager System
Prerequisite
Applies to Install/Upgrade
Automatic Description
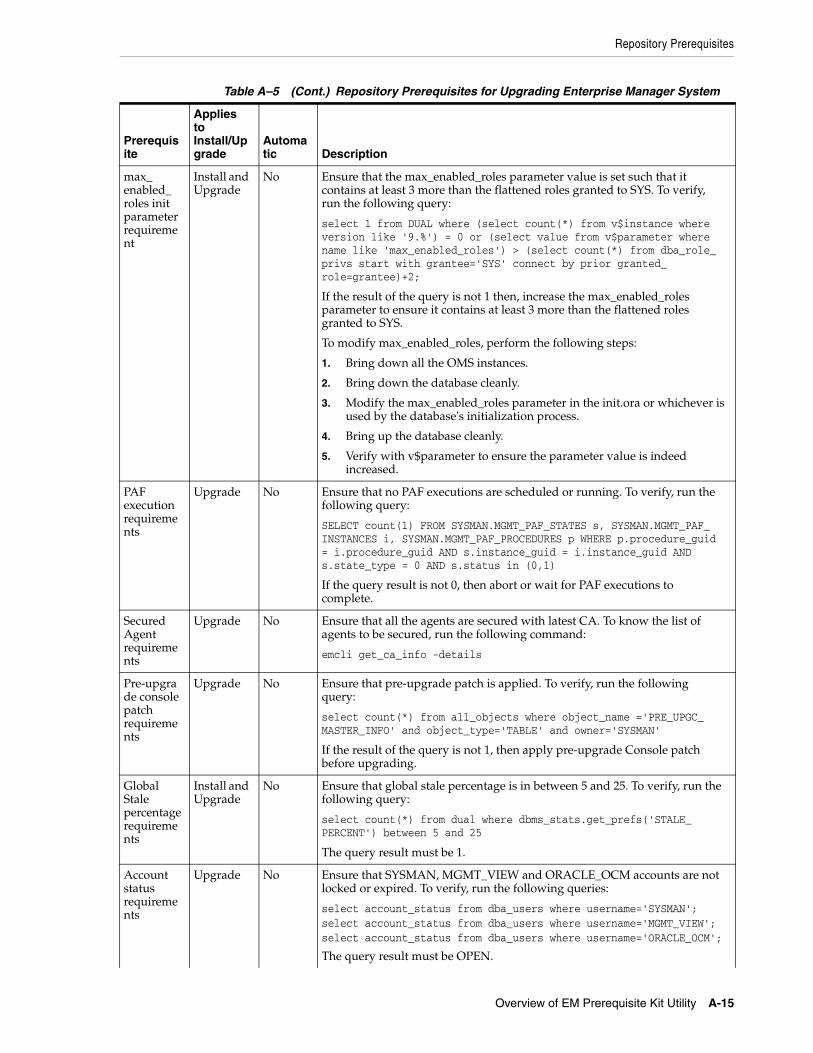
Repository Prerequisites
Overview of EM Prerequisite Kit Utility A-15
max_enabled_roles init parameter requirement
Install and Upgrade
No Ensure that the max_enabled_roles parameter value is set such that it contains at least 3 more than the flattened roles granted to SYS. To verify, run the following query:
select 1 from DUAL where (select count(*) from v$instance where version like '9.%') = 0 or (select value from v$parameter where name like 'max_enabled_roles') > (select count(*) from dba_role_privs start with grantee='SYS' connect by prior granted_role=grantee)+2;
If the result of the query is not 1 then, increase the max_enabled_roles parameter to ensure it contains at least 3 more than the flattened roles granted to SYS.
To modify max_enabled_roles, perform the following steps:
1. Bring down all the OMS instances.
2. Bring down the database cleanly.
3. Modify the max_enabled_roles parameter in the init.ora or whichever is used by the database's initialization process.
4. Bring up the database cleanly.
5. Verify with v$parameter to ensure the parameter value is indeed increased.
PAF execution requirements
Upgrade No Ensure that no PAF executions are scheduled or running. To verify, run the following query:
SELECT count(1) FROM SYSMAN.MGMT_PAF_STATES s, SYSMAN.MGMT_PAF_INSTANCES i, SYSMAN.MGMT_PAF_PROCEDURES p WHERE p.procedure_guid = i.procedure_guid AND s.instance_guid = i.instance_guid AND s.state_type = 0 AND s.status in (0,1)
If the query result is not 0, then abort or wait for PAF executions to complete.
Secured Agent requirements
Upgrade No Ensure that all the agents are secured with latest CA. To know the list of agents to be secured, run the following command:
emcli get_ca_info -details
Pre-upgrade console patch requirements
Upgrade No Ensure that pre-upgrade patch is applied. To verify, run the following query:
select count(*) from all_objects where object_name ='PRE_UPGC_MASTER_INFO' and object_type='TABLE' and owner='SYSMAN'
If the result of the query is not 1, then apply pre-upgrade Console patch before upgrading.
Global Stale percentage requirements
Install and Upgrade
No Ensure that global stale percentage is in between 5 and 25. To verify, run the following query:
select count(*) from dual where dbms_stats.get_prefs('STALE_PERCENT') between 5 and 25
The query result must be 1.
Account status requirements
Upgrade No Ensure that SYSMAN, MGMT_VIEW and ORACLE_OCM accounts are not locked or expired. To verify, run the following queries:
select account_status from dba_users where username='SYSMAN';select account_status from dba_users where username='MGMT_VIEW';select account_status from dba_users where username='ORACLE_OCM';
The query result must be OPEN.
Table A–5 (Cont.) Repository Prerequisites for Upgrading Enterprise Manager System
Prerequisite
Applies to Install/Upgrade
Automatic Description
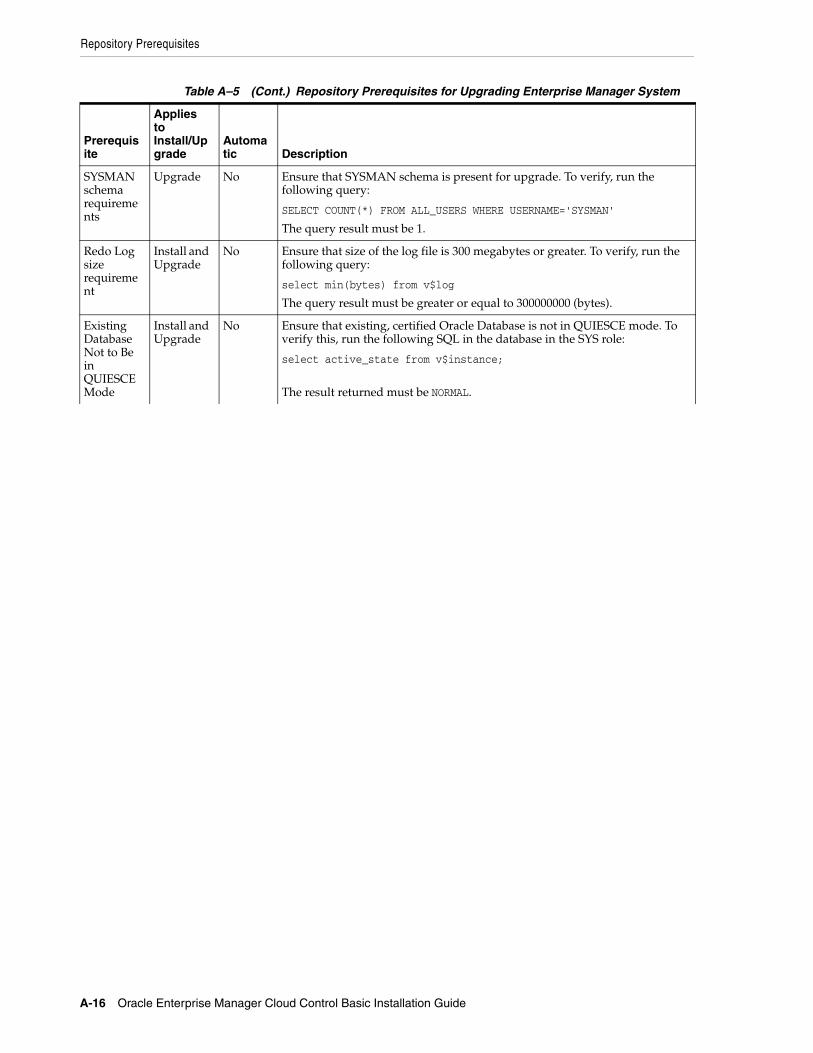
Repository Prerequisites
A-16 Oracle Enterprise Manager Cloud Control Basic Installation Guide
SYSMAN schema requirements
Upgrade No Ensure that SYSMAN schema is present for upgrade. To verify, run the following query:
SELECT COUNT(*) FROM ALL_USERS WHERE USERNAME='SYSMAN'
The query result must be 1.
Redo Log size requirement
Install and Upgrade
No Ensure that size of the log file is 300 megabytes or greater. To verify, run the following query:
select min(bytes) from v$log
The query result must be greater or equal to 300000000 (bytes).
Existing Database Not to Be in QUIESCE Mode
Install and Upgrade
No Ensure that existing, certified Oracle Database is not in QUIESCE mode. To verify this, run the following SQL in the database in the SYS role:
select active_state from v$instance;
The result returned must be NORMAL.
Table A–5 (Cont.) Repository Prerequisites for Upgrading Enterprise Manager System
Prerequisite
Applies to Install/Upgrade
Automatic Description
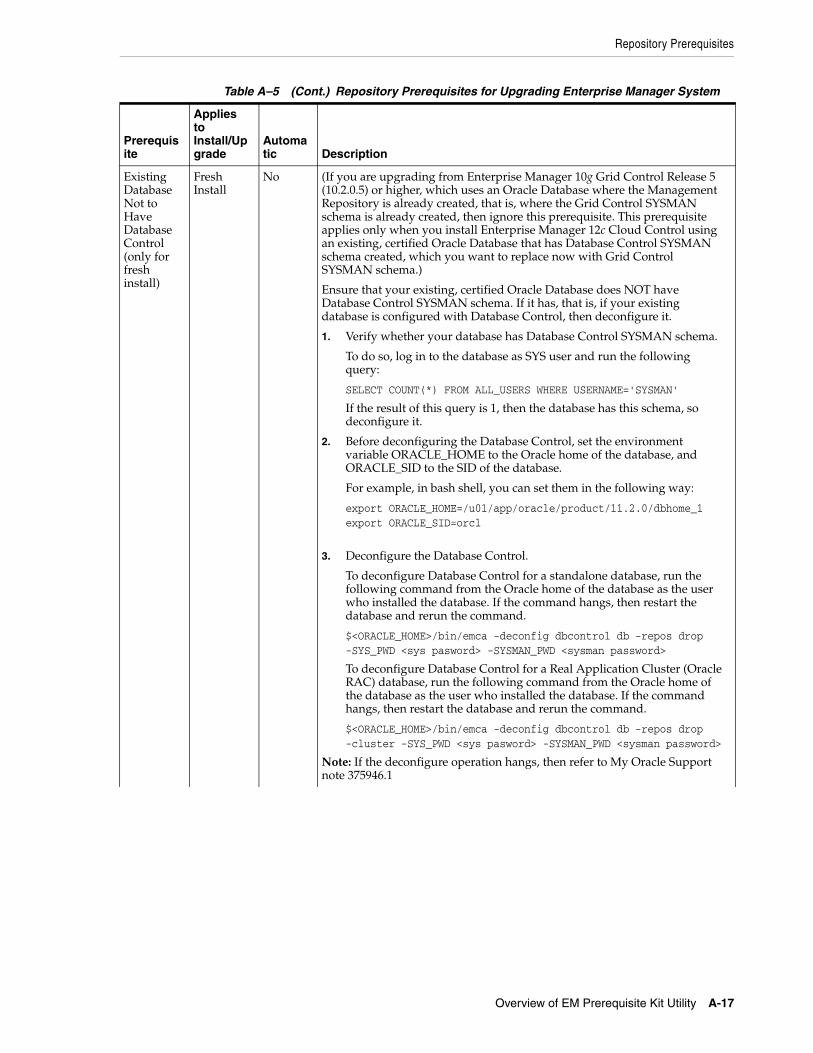
Repository Prerequisites
Overview of EM Prerequisite Kit Utility A-17
Existing Database Not to Have Database Control (only for fresh install)
Fresh Install
No (If you are upgrading from Enterprise Manager 10g Grid Control Release 5 (10.2.0.5) or higher, which uses an Oracle Database where the Management Repository is already created, that is, where the Grid Control SYSMAN schema is already created, then ignore this prerequisite. This prerequisite applies only when you install Enterprise Manager 12c Cloud Control using an existing, certified Oracle Database that has Database Control SYSMAN schema created, which you want to replace now with Grid Control SYSMAN schema.)
Ensure that your existing, certified Oracle Database does NOT have Database Control SYSMAN schema. If it has, that is, if your existing database is configured with Database Control, then deconfigure it.
1. Verify whether your database has Database Control SYSMAN schema.
To do so, log in to the database as SYS user and run the following query:
SELECT COUNT(*) FROM ALL_USERS WHERE USERNAME='SYSMAN'
If the result of this query is 1, then the database has this schema, so deconfigure it.
2. Before deconfiguring the Database Control, set the environment variable ORACLE_HOME to the Oracle home of the database, and ORACLE_SID to the SID of the database.
For example, in bash shell, you can set them in the following way:
export ORACLE_HOME=/u01/app/oracle/product/11.2.0/dbhome_1export ORACLE_SID=orcl
3. Deconfigure the Database Control.
To deconfigure Database Control for a standalone database, run the following command from the Oracle home of the database as the user who installed the database. If the command hangs, then restart the database and rerun the command.
$<ORACLE_HOME>/bin/emca -deconfig dbcontrol db -repos drop -SYS_PWD <sys pasword> -SYSMAN_PWD <sysman password>
To deconfigure Database Control for a Real Application Cluster (Oracle RAC) database, run the following command from the Oracle home of the database as the user who installed the database. If the command hangs, then restart the database and rerun the command.
$<ORACLE_HOME>/bin/emca -deconfig dbcontrol db -repos drop -cluster -SYS_PWD <sys pasword> -SYSMAN_PWD <sysman password>
Note: If the deconfigure operation hangs, then refer to My Oracle Support note 375946.1
Table A–5 (Cont.) Repository Prerequisites for Upgrading Enterprise Manager System
Prerequisite
Applies to Install/Upgrade
Automatic Description
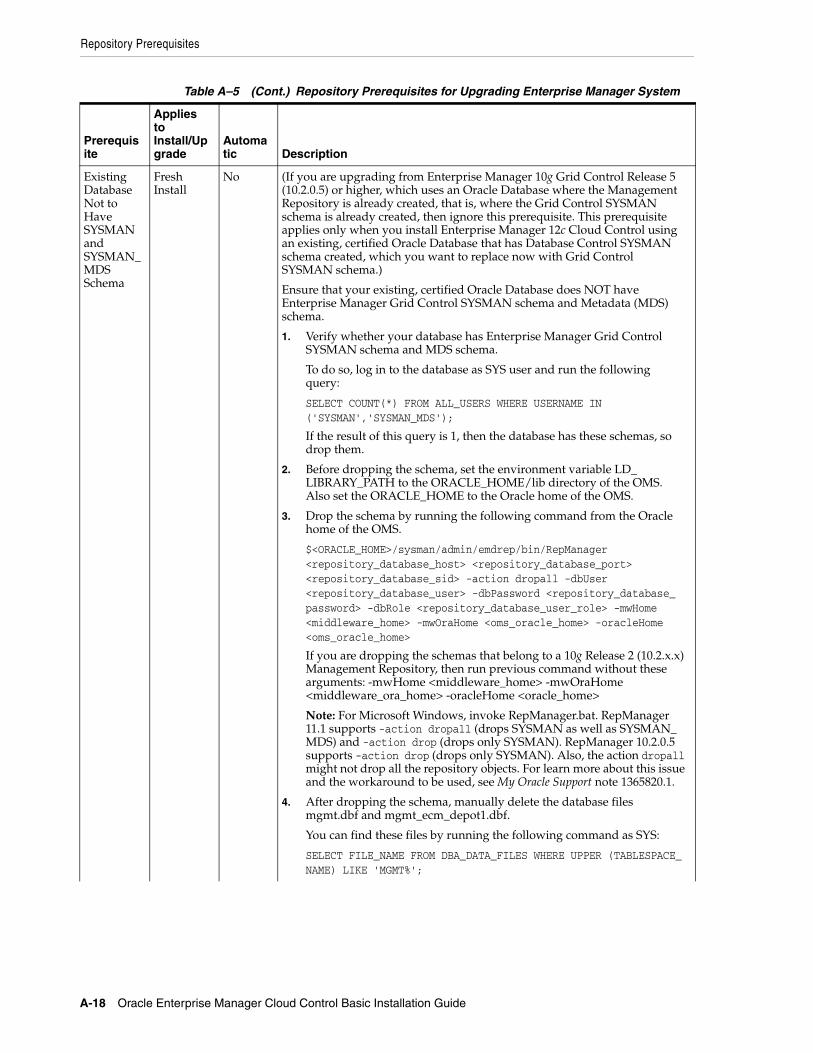
Repository Prerequisites
A-18 Oracle Enterprise Manager Cloud Control Basic Installation Guide
Existing Database Not to Have SYSMAN and SYSMAN_MDS Schema
Fresh Install
No (If you are upgrading from Enterprise Manager 10g Grid Control Release 5 (10.2.0.5) or higher, which uses an Oracle Database where the Management Repository is already created, that is, where the Grid Control SYSMAN schema is already created, then ignore this prerequisite. This prerequisite applies only when you install Enterprise Manager 12c Cloud Control using an existing, certified Oracle Database that has Database Control SYSMAN schema created, which you want to replace now with Grid Control SYSMAN schema.)
Ensure that your existing, certified Oracle Database does NOT have Enterprise Manager Grid Control SYSMAN schema and Metadata (MDS) schema.
1. Verify whether your database has Enterprise Manager Grid Control SYSMAN schema and MDS schema.
To do so, log in to the database as SYS user and run the following query:
SELECT COUNT(*) FROM ALL_USERS WHERE USERNAME IN ('SYSMAN','SYSMAN_MDS');
If the result of this query is 1, then the database has these schemas, so drop them.
2. Before dropping the schema, set the environment variable LD_LIBRARY_PATH to the ORACLE_HOME/lib directory of the OMS. Also set the ORACLE_HOME to the Oracle home of the OMS.
3. Drop the schema by running the following command from the Oracle home of the OMS.
$<ORACLE_HOME>/sysman/admin/emdrep/bin/RepManager <repository_database_host> <repository_database_port> <repository_database_sid> -action dropall -dbUser <repository_database_user> -dbPassword <repository_database_password> -dbRole <repository_database_user_role> -mwHome <middleware_home> -mwOraHome <oms_oracle_home> -oracleHome <oms_oracle_home>
If you are dropping the schemas that belong to a 10g Release 2 (10.2.x.x) Management Repository, then run previous command without these arguments: -mwHome <middleware_home> -mwOraHome <middleware_ora_home> -oracleHome <oracle_home>
Note: For Microsoft Windows, invoke RepManager.bat. RepManager 11.1 supports -action dropall (drops SYSMAN as well as SYSMAN_MDS) and -action drop (drops only SYSMAN). RepManager 10.2.0.5 supports -action drop (drops only SYSMAN). Also, the action dropall might not drop all the repository objects. For learn more about this issue and the workaround to be used, see My Oracle Support note 1365820.1.
4. After dropping the schema, manually delete the database files mgmt.dbf and mgmt_ecm_depot1.dbf.
You can find these files by running the following command as SYS:
SELECT FILE_NAME FROM DBA_DATA_FILES WHERE UPPER (TABLESPACE_NAME) LIKE 'MGMT%';
Table A–5 (Cont.) Repository Prerequisites for Upgrading Enterprise Manager System
Prerequisite
Applies to Install/Upgrade
Automatic Description
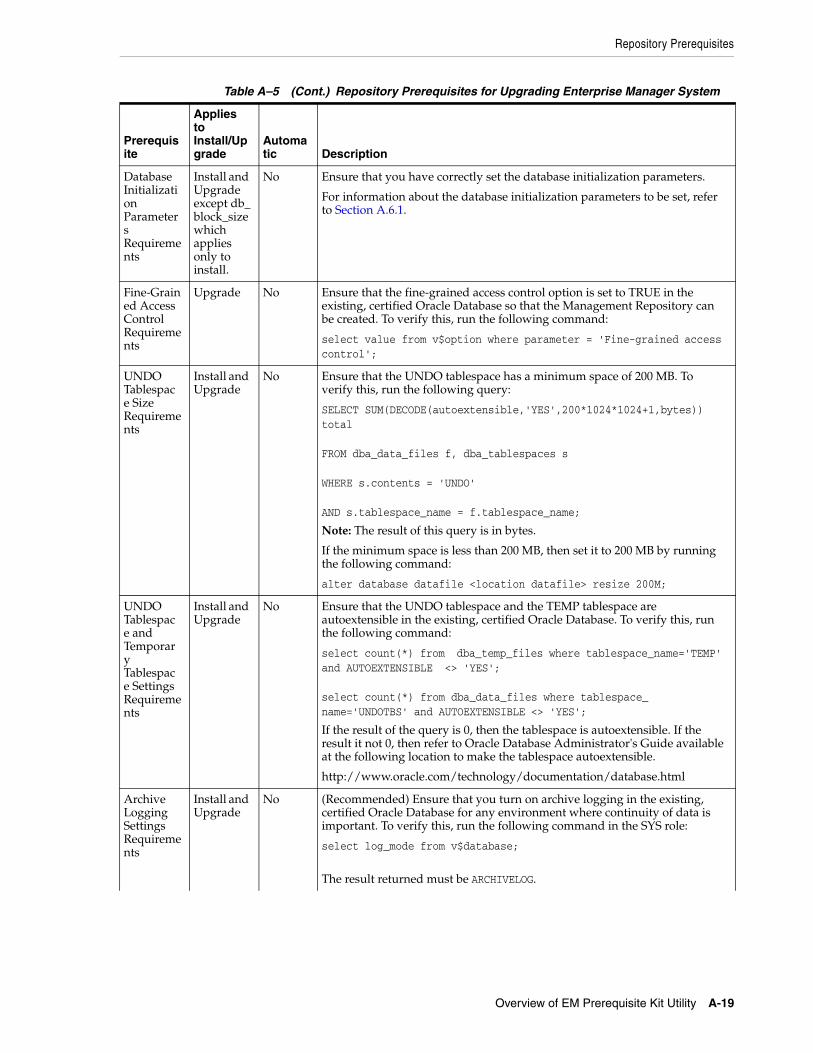
Repository Prerequisites
Overview of EM Prerequisite Kit Utility A-19
Database Initialization Parameters Requirements
Install and Upgrade except db_block_size which applies only to install.
No Ensure that you have correctly set the database initialization parameters.
For information about the database initialization parameters to be set, refer to Section A.6.1.
Fine-Grained Access Control Requirements
Upgrade No Ensure that the fine-grained access control option is set to TRUE in the existing, certified Oracle Database so that the Management Repository can be created. To verify this, run the following command:
select value from v$option where parameter = 'Fine-grained access control';
UNDO Tablespace Size Requirements
Install and Upgrade
No Ensure that the UNDO tablespace has a minimum space of 200 MB. To verify this, run the following query:
SELECT SUM(DECODE(autoextensible,'YES',200*1024*1024+1,bytes)) total FROM dba_data_files f, dba_tablespaces s WHERE s.contents = 'UNDO' AND s.tablespace_name = f.tablespace_name;
Note: The result of this query is in bytes.
If the minimum space is less than 200 MB, then set it to 200 MB by running the following command:
alter database datafile <location datafile> resize 200M;
UNDO Tablespace and Temporary Tablespace Settings Requirements
Install and Upgrade
No Ensure that the UNDO tablespace and the TEMP tablespace are autoextensible in the existing, certified Oracle Database. To verify this, run the following command:
select count(*) from dba_temp_files where tablespace_name='TEMP' and AUTOEXTENSIBLE <> 'YES'; select count(*) from dba_data_files where tablespace_name='UNDOTBS' and AUTOEXTENSIBLE <> 'YES';
If the result of the query is 0, then the tablespace is autoextensible. If the result it not 0, then refer to Oracle Database Administrator's Guide available at the following location to make the tablespace autoextensible.
http://www.oracle.com/technology/documentation/database.html
Archive Logging Settings Requirements
Install and Upgrade
No (Recommended) Ensure that you turn on archive logging in the existing, certified Oracle Database for any environment where continuity of data is important. To verify this, run the following command in the SYS role:
select log_mode from v$database;
The result returned must be ARCHIVELOG.
Table A–5 (Cont.) Repository Prerequisites for Upgrading Enterprise Manager System
Prerequisite
Applies to Install/Upgrade
Automatic Description

Repository Prerequisites
A-20 Oracle Enterprise Manager Cloud Control Basic Installation Guide
Tablespace-Related Hard Disk Space Requirements
Install No Ensure that you allocate a minimum of 200 MB hard disk space for the following tablespaces:
- Management Tablespace (mgmt.dbf)
- Configuration Data Tablespace (mgmt_ecm_depot1.dbf)
- JVM Diagnostics Data Tablespace (mgmt_ad4j.dbf)
Oracle also recommends that you keep the auto-extend feature enabled for the tablespace data files.
Note that the space requirement increases as the number of monitored targets increase, along with the input/output performance demands on the storage devices.
Existing Management Repository
Upgrade No Ensure that the existing, certified Oracle Database, which houses the Management Repository, already has a Management Repository configured, and that the Management Repository is compatible with Oracle Management Service 11g Release 1 (11.1).
Database Partitioning Requirements
Install and Upgrade
No Ensure that the existing, certified Oracle Database has the Partitioning Option enabled (therefore, ensure that you install it into Oracle Database Enterprise Edition.) Installing and using the partitioning option in the Enterprise Manager repository does not add costs to customers when used solely by Enterprise Manager.
To verify this, connect to the database as SYSDBA and run the following query:
select value from v$option where parameter = 'Partitioning';
The result of this query should be VALUE=TRUE. No additional partitioning license is required for the database that houses the Management Repository.
Database Partition Maintenance Requirements
Upgrade No If the Enterprise Manager system that you are about to upgrade was shut down for a long period of time, then you will not have partitions created in the existing, certified Oracle Database, which houses the Management Repository, to load new data. Therefore, under such circumstances, do the following:
1. Log in to the database as SYSMAN and run the following command:
execute emd_maintenance.analyze_emd_schema('SYSMAN');commit;
2. Restart the OMS from its Oracle home:
$<ORACLE_HOME>/bin/emctl start oms
Database and Listener Status Requirements
Install No Ensure that the existing, certified Oracle Database and its listener are running.
Table A–5 (Cont.) Repository Prerequisites for Upgrading Enterprise Manager System
Prerequisite
Applies to Install/Upgrade
Automatic Description
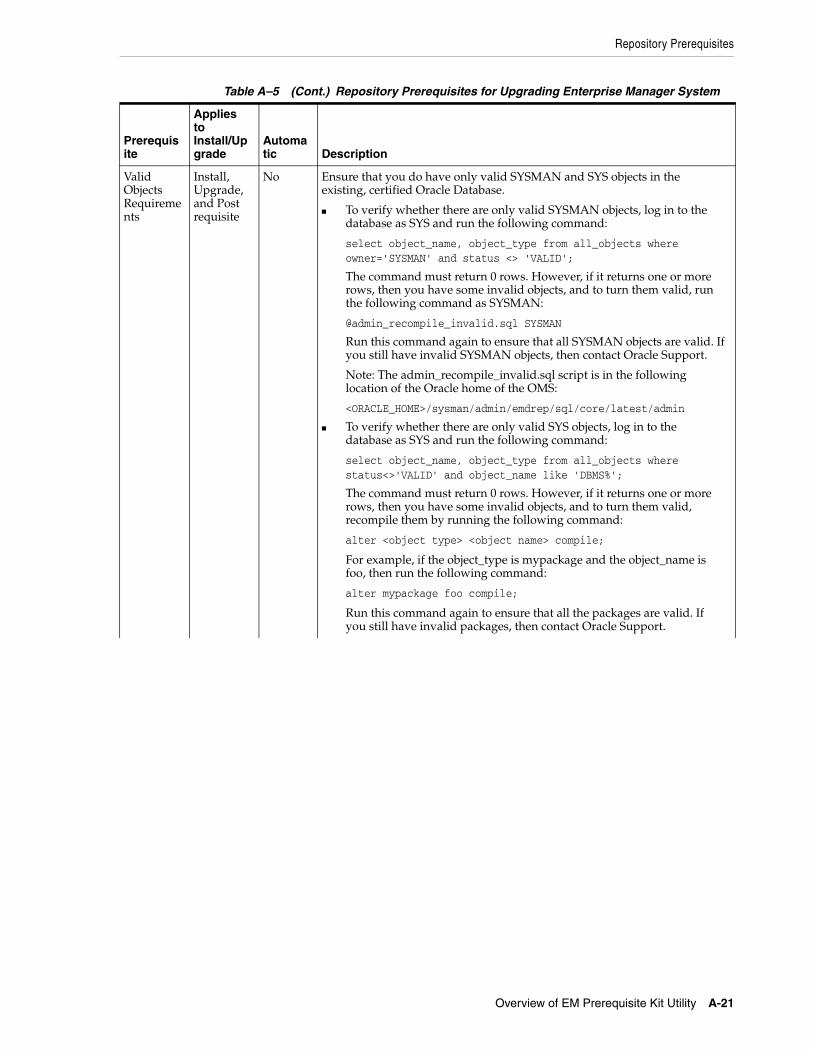
Repository Prerequisites
Overview of EM Prerequisite Kit Utility A-21
Valid Objects Requirements
Install, Upgrade, and Post requisite
No Ensure that you do have only valid SYSMAN and SYS objects in the existing, certified Oracle Database.
■ To verify whether there are only valid SYSMAN objects, log in to the database as SYS and run the following command:
select object_name, object_type from all_objects where owner='SYSMAN' and status <> 'VALID';
The command must return 0 rows. However, if it returns one or more rows, then you have some invalid objects, and to turn them valid, run the following command as SYSMAN:
@admin_recompile_invalid.sql SYSMAN
Run this command again to ensure that all SYSMAN objects are valid. If you still have invalid SYSMAN objects, then contact Oracle Support.
Note: The admin_recompile_invalid.sql script is in the following location of the Oracle home of the OMS:
<ORACLE_HOME>/sysman/admin/emdrep/sql/core/latest/admin
■ To verify whether there are only valid SYS objects, log in to the database as SYS and run the following command:
select object_name, object_type from all_objects where status<>'VALID' and object_name like 'DBMS%';
The command must return 0 rows. However, if it returns one or more rows, then you have some invalid objects, and to turn them valid, recompile them by running the following command:
alter <object type> <object name> compile;
For example, if the object_type is mypackage and the object_name is foo, then run the following command:
alter mypackage foo compile;
Run this command again to ensure that all the packages are valid. If you still have invalid packages, then contact Oracle Support.
Table A–5 (Cont.) Repository Prerequisites for Upgrading Enterprise Manager System
Prerequisite
Applies to Install/Upgrade
Automatic Description

Repository Prerequisites
A-22 Oracle Enterprise Manager Cloud Control Basic Installation Guide
DBMS Jobs and DBMS Scheduler Status Requirements
Install and Upgrade
Yes Ensure that you stop the DBMS Jobs and the DBMS Scheduler in the existing, certified Oracle Database. To do so, log in to the database as SYS:
1. Write down the value of job_queue_processes by running the following command:
select a.instance_name as sid, b.value as jobqueue from gv$instance a, gv$parameter b where a.inst_id = b.inst_id and b.name='job_queue_processes';
2. Stop the DBMS JOBS and DBMS scheduler by running the following command:
execute emd_maintenance.remove_em_dbms_jobs;alter system set job_queue_processes=0 SID='*';commit;
Note: This will allow the currently running jobs to finish, but will not allow any new jobs to be started.
3. Ensure that there are no active jobs by running the following:
select l.id2 job, l.sid, to_char(last_date, 'DD-MON-YYYY:HH24.MI.SS') last_date, to_char(this_date, 'DD-MON-YYYY:HH24.MI.SS') this_date, l.inst_id instance from sys.job$ j, gv$lock l where l.type = 'JQ' and j.job (+) = l.id2 order by 5, 4;
Gather Statistics Job Status Requirements
Install and Upgrade
Yes Ensure that you stop the Gather Statistics job that is running in the existing, certified Oracle Database. To do so, log in to the database as SYS and run the following commands:
For Oracle Database 10g (10.2.0.4) or higher:
execute dbms_scheduler.disable('GATHER_STATS_JOB',TRUE);
execute dbms_scheduler.stop_job('GATHER_STATS_JOB',TRUE);
For Oracle Database 11g (11.1.0.7) or higher:
execute dbms_auto_task_admin.disable('auto optimizer stats collection',null,null);
Table A–5 (Cont.) Repository Prerequisites for Upgrading Enterprise Manager System
Prerequisite
Applies to Install/Upgrade
Automatic Description

Repository Prerequisites
Overview of EM Prerequisite Kit Utility A-23
User Privilege Requirements
Upgrade No Ensure that SYSMAN and DBSNMP users have EXECUTE privileges to access the DBMS_RANDOM package in the existing, certified Oracle Database. To verify whether the users have EXECUTE privileges, run the following query. When you run this query for the SYSMAN user, the <user_account_name> must be SYSMAN, and when you run it for the DBSNMP user, the <user_account_name> must be DBSNMP.
SQL> CONNECT AS SYS;SQL> SELECT grantee, grantor, owner, table_nameFROM DBA_TAB_PRIVSWHERE table_name = 'DBMS_RANDOM'AND privilege = 'EXECUTE'AND grantee IN(SELECT DISTINCT granted_roleFROM DBA_ROLE_PRIVSSTART WITH grantee = '<user_account_name>'CONNECT BY PRIOR granted_role=granteeUNION ALLSELECT '<user_account_name>'FROM dualWHERE ROWNUM = 1UNION ALLSELECT 'PUBLIC'FROM dualWHERE ROWNUM = 1)
If these users do not have EXECUTE privileges, then grant them the privileges by running the following command. When you run this command for granting the privileges for the SYSMAN user, the <user_account_name> must be SYSMAN, and when you run it for the DBSNMP user, the <user_account_name> must be DBSNMP.
SQL> GRANT EXECUTE ON DBMS_RANDOM TO <user_account_name>;
Environment Variable Setting Requirements
Install No Ensure that the environment variable ORACLE_HOME is set to the Oracle home of the OMS.
For example, in Cshell, set it in the following way:
setenv ORACLE_HOME /home/OraHomes/oms10g
For example, in bash shell, set it in the following way:
export ORACLE_HOME= /home/OraHomes/oms10g
SUDO Configuration Requirements
Install No Ensure that you configure SUDO in your environment. If you are unable to do so or if you have already upgraded any of the core components (OMS or Management Agent) without configuring SUDO, then follow the workaround described in My Oracle Support note 789363.1.
Table A–5 (Cont.) Repository Prerequisites for Upgrading Enterprise Manager System
Prerequisite
Applies to Install/Upgrade
Automatic Description
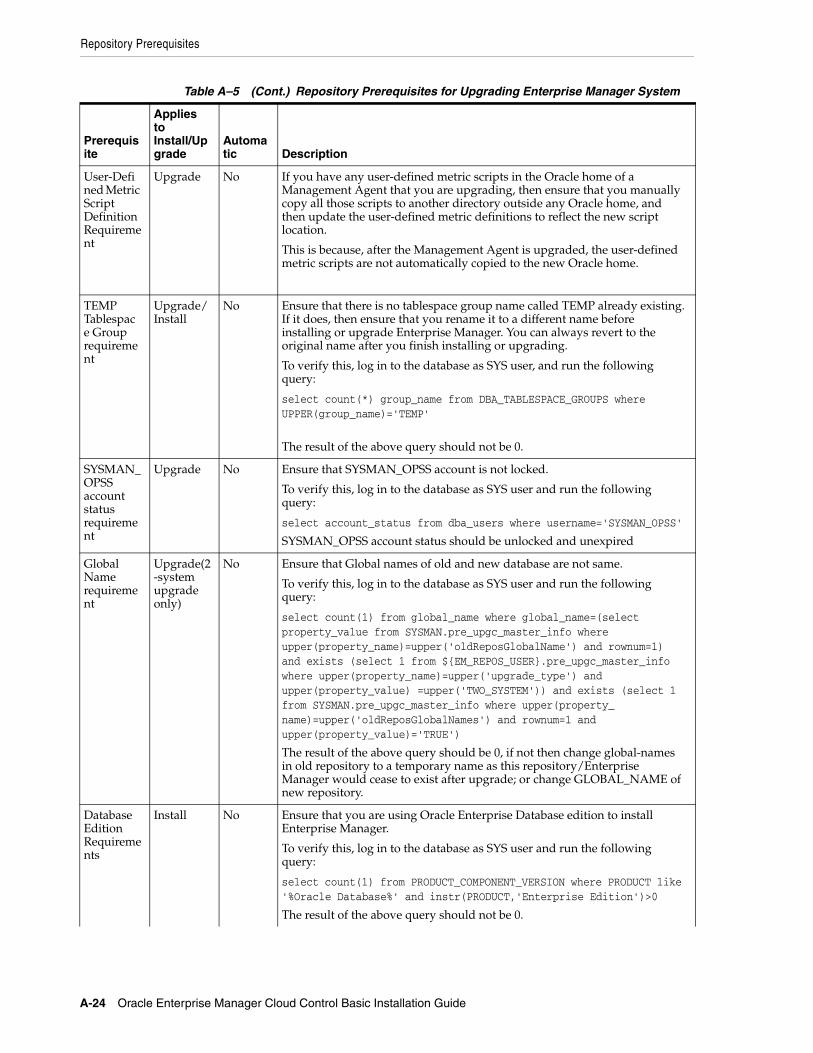
Repository Prerequisites
A-24 Oracle Enterprise Manager Cloud Control Basic Installation Guide
User-Defined Metric Script Definition Requirement
Upgrade No If you have any user-defined metric scripts in the Oracle home of a Management Agent that you are upgrading, then ensure that you manually copy all those scripts to another directory outside any Oracle home, and then update the user-defined metric definitions to reflect the new script location.
This is because, after the Management Agent is upgraded, the user-defined metric scripts are not automatically copied to the new Oracle home.
TEMP Tablespace Group requirement
Upgrade/Install
No Ensure that there is no tablespace group name called TEMP already existing. If it does, then ensure that you rename it to a different name before installing or upgrade Enterprise Manager. You can always revert to the original name after you finish installing or upgrading.
To verify this, log in to the database as SYS user, and run the following query:
select count(*) group_name from DBA_TABLESPACE_GROUPS where UPPER(group_name)='TEMP'
The result of the above query should not be 0.
SYSMAN_OPSS account status requirement
Upgrade No Ensure that SYSMAN_OPSS account is not locked.
To verify this, log in to the database as SYS user and run the following query:
select account_status from dba_users where username='SYSMAN_OPSS'
SYSMAN_OPSS account status should be unlocked and unexpired
Global Name requirement
Upgrade(2-system upgrade only)
No Ensure that Global names of old and new database are not same.
To verify this, log in to the database as SYS user and run the following query:
select count(1) from global_name where global_name=(select property_value from SYSMAN.pre_upgc_master_info where upper(property_name)=upper('oldReposGlobalName') and rownum=1) and exists (select 1 from ${EM_REPOS_USER}.pre_upgc_master_info where upper(property_name)=upper('upgrade_type') and upper(property_value) =upper('TWO_SYSTEM')) and exists (select 1 from SYSMAN.pre_upgc_master_info where upper(property_name)=upper('oldReposGlobalNames') and rownum=1 and upper(property_value)='TRUE')
The result of the above query should be 0, if not then change global-names in old repository to a temporary name as this repository/Enterprise Manager would cease to exist after upgrade; or change GLOBAL_NAME of new repository.
Database Edition Requirements
Install No Ensure that you are using Oracle Enterprise Database edition to install Enterprise Manager.
To verify this, log in to the database as SYS user and run the following query:
select count(1) from PRODUCT_COMPONENT_VERSION where PRODUCT like '%Oracle Database%' and instr(PRODUCT,'Enterprise Edition')>0
The result of the above query should not be 0.
Table A–5 (Cont.) Repository Prerequisites for Upgrading Enterprise Manager System
Prerequisite
Applies to Install/Upgrade
Automatic Description
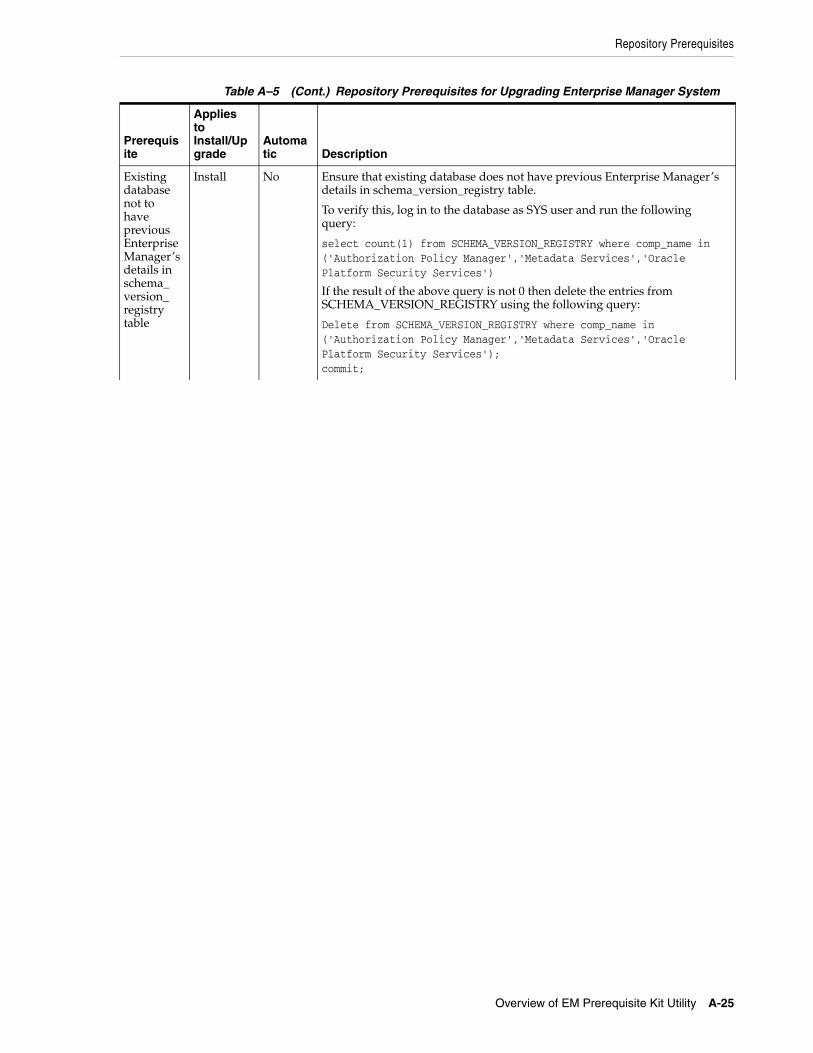
Repository Prerequisites
Overview of EM Prerequisite Kit Utility A-25
Existing database not to have previous Enterprise Manager’s details in schema_version_registry table
Install No Ensure that existing database does not have previous Enterprise Manager’s details in schema_version_registry table.
To verify this, log in to the database as SYS user and run the following query:
select count(1) from SCHEMA_VERSION_REGISTRY where comp_name in ('Authorization Policy Manager','Metadata Services','Oracle Platform Security Services')
If the result of the above query is not 0 then delete the entries from SCHEMA_VERSION_REGISTRY using the following query:
Delete from SCHEMA_VERSION_REGISTRY where comp_name in ('Authorization Policy Manager','Metadata Services','Oracle Platform Security Services');commit;
Table A–5 (Cont.) Repository Prerequisites for Upgrading Enterprise Manager System
Prerequisite
Applies to Install/Upgrade
Automatic Description
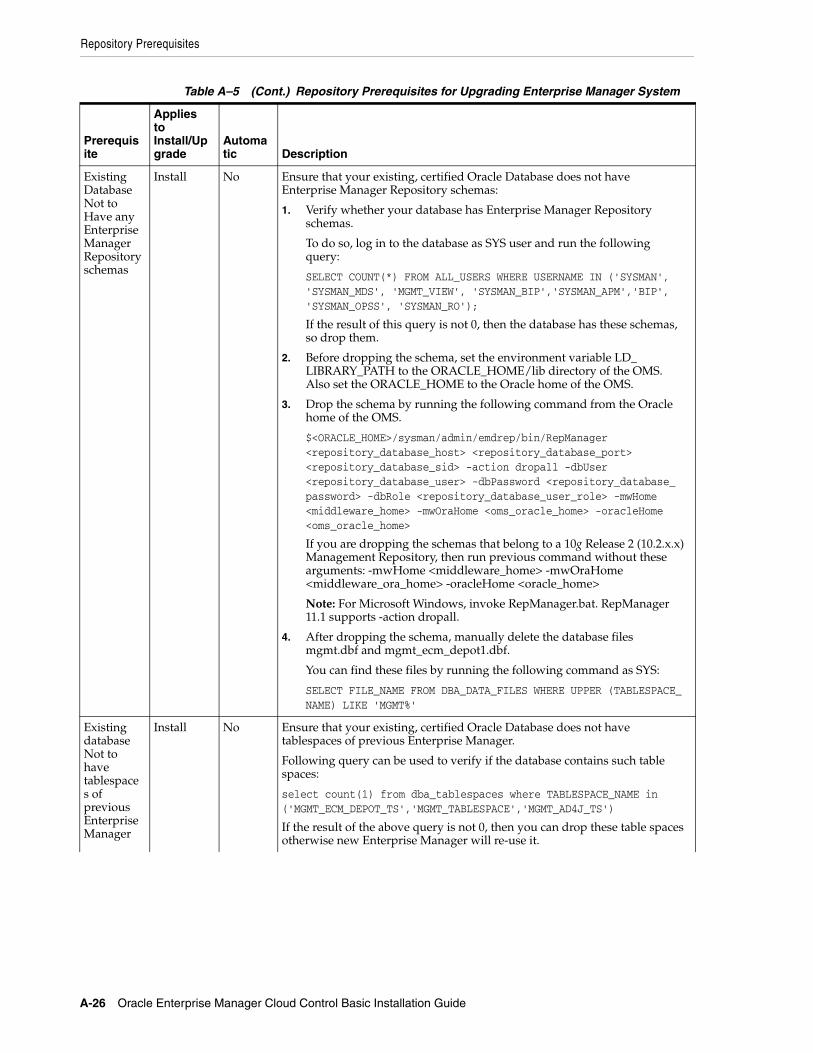
Repository Prerequisites
A-26 Oracle Enterprise Manager Cloud Control Basic Installation Guide
Existing Database Not to Have any Enterprise Manager Repository schemas
Install No Ensure that your existing, certified Oracle Database does not have Enterprise Manager Repository schemas:
1. Verify whether your database has Enterprise Manager Repository schemas.
To do so, log in to the database as SYS user and run the following query:
SELECT COUNT(*) FROM ALL_USERS WHERE USERNAME IN ('SYSMAN', 'SYSMAN_MDS', 'MGMT_VIEW', 'SYSMAN_BIP','SYSMAN_APM','BIP', 'SYSMAN_OPSS', 'SYSMAN_RO');
If the result of this query is not 0, then the database has these schemas, so drop them.
2. Before dropping the schema, set the environment variable LD_LIBRARY_PATH to the ORACLE_HOME/lib directory of the OMS. Also set the ORACLE_HOME to the Oracle home of the OMS.
3. Drop the schema by running the following command from the Oracle home of the OMS.
$<ORACLE_HOME>/sysman/admin/emdrep/bin/RepManager <repository_database_host> <repository_database_port> <repository_database_sid> -action dropall -dbUser <repository_database_user> -dbPassword <repository_database_password> -dbRole <repository_database_user_role> -mwHome <middleware_home> -mwOraHome <oms_oracle_home> -oracleHome <oms_oracle_home>
If you are dropping the schemas that belong to a 10g Release 2 (10.2.x.x) Management Repository, then run previous command without these arguments: -mwHome <middleware_home> -mwOraHome <middleware_ora_home> -oracleHome <oracle_home>
Note: For Microsoft Windows, invoke RepManager.bat. RepManager 11.1 supports -action dropall.
4. After dropping the schema, manually delete the database files mgmt.dbf and mgmt_ecm_depot1.dbf.
You can find these files by running the following command as SYS:
SELECT FILE_NAME FROM DBA_DATA_FILES WHERE UPPER (TABLESPACE_NAME) LIKE 'MGMT%'
Existing database Not to have tablespaces of previous Enterprise Manager
Install No Ensure that your existing, certified Oracle Database does not have tablespaces of previous Enterprise Manager.
Following query can be used to verify if the database contains such table spaces:
select count(1) from dba_tablespaces where TABLESPACE_NAME in ('MGMT_ECM_DEPOT_TS','MGMT_TABLESPACE','MGMT_AD4J_TS')
If the result of the above query is not 0, then you can drop these table spaces otherwise new Enterprise Manager will re-use it.
Table A–5 (Cont.) Repository Prerequisites for Upgrading Enterprise Manager System
Prerequisite
Applies to Install/Upgrade
Automatic Description
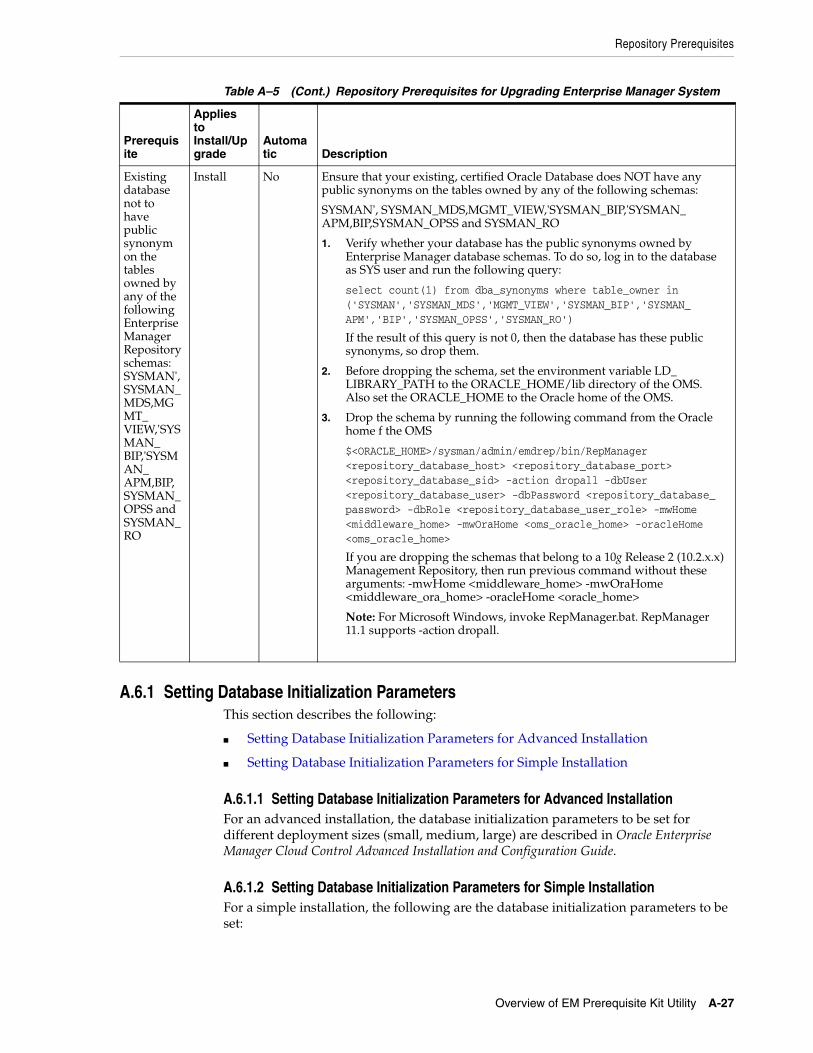
Repository Prerequisites
Overview of EM Prerequisite Kit Utility A-27
A.6.1 Setting Database Initialization ParametersThis section describes the following:
■ Setting Database Initialization Parameters for Advanced Installation
■ Setting Database Initialization Parameters for Simple Installation
A.6.1.1 Setting Database Initialization Parameters for Advanced InstallationFor an advanced installation, the database initialization parameters to be set for different deployment sizes (small, medium, large) are described in Oracle Enterprise Manager Cloud Control Advanced Installation and Configuration Guide.
A.6.1.2 Setting Database Initialization Parameters for Simple InstallationFor a simple installation, the following are the database initialization parameters to be set:
Existing database not to have public synonym on the tables owned by any of the following Enterprise Manager Repository schemas: SYSMAN', SYSMAN_MDS,MGMT_VIEW,'SYSMAN_BIP,'SYSMAN_APM,BIP,SYSMAN_OPSS and SYSMAN_RO
Install No Ensure that your existing, certified Oracle Database does NOT have any public synonyms on the tables owned by any of the following schemas:
SYSMAN', SYSMAN_MDS,MGMT_VIEW,'SYSMAN_BIP,'SYSMAN_APM,BIP,SYSMAN_OPSS and SYSMAN_RO
1. Verify whether your database has the public synonyms owned by Enterprise Manager database schemas. To do so, log in to the database as SYS user and run the following query:
select count(1) from dba_synonyms where table_owner in ('SYSMAN','SYSMAN_MDS','MGMT_VIEW','SYSMAN_BIP','SYSMAN_APM','BIP','SYSMAN_OPSS','SYSMAN_RO')
If the result of this query is not 0, then the database has these public synonyms, so drop them.
2. Before dropping the schema, set the environment variable LD_LIBRARY_PATH to the ORACLE_HOME/lib directory of the OMS. Also set the ORACLE_HOME to the Oracle home of the OMS.
3. Drop the schema by running the following command from the Oracle home f the OMS
$<ORACLE_HOME>/sysman/admin/emdrep/bin/RepManager <repository_database_host> <repository_database_port> <repository_database_sid> -action dropall -dbUser <repository_database_user> -dbPassword <repository_database_password> -dbRole <repository_database_user_role> -mwHome <middleware_home> -mwOraHome <oms_oracle_home> -oracleHome <oms_oracle_home>
If you are dropping the schemas that belong to a 10g Release 2 (10.2.x.x) Management Repository, then run previous command without these arguments: -mwHome <middleware_home> -mwOraHome <middleware_ora_home> -oracleHome <oracle_home>
Note: For Microsoft Windows, invoke RepManager.bat. RepManager 11.1 supports -action dropall.
Table A–5 (Cont.) Repository Prerequisites for Upgrading Enterprise Manager System
Prerequisite
Applies to Install/Upgrade
Automatic Description
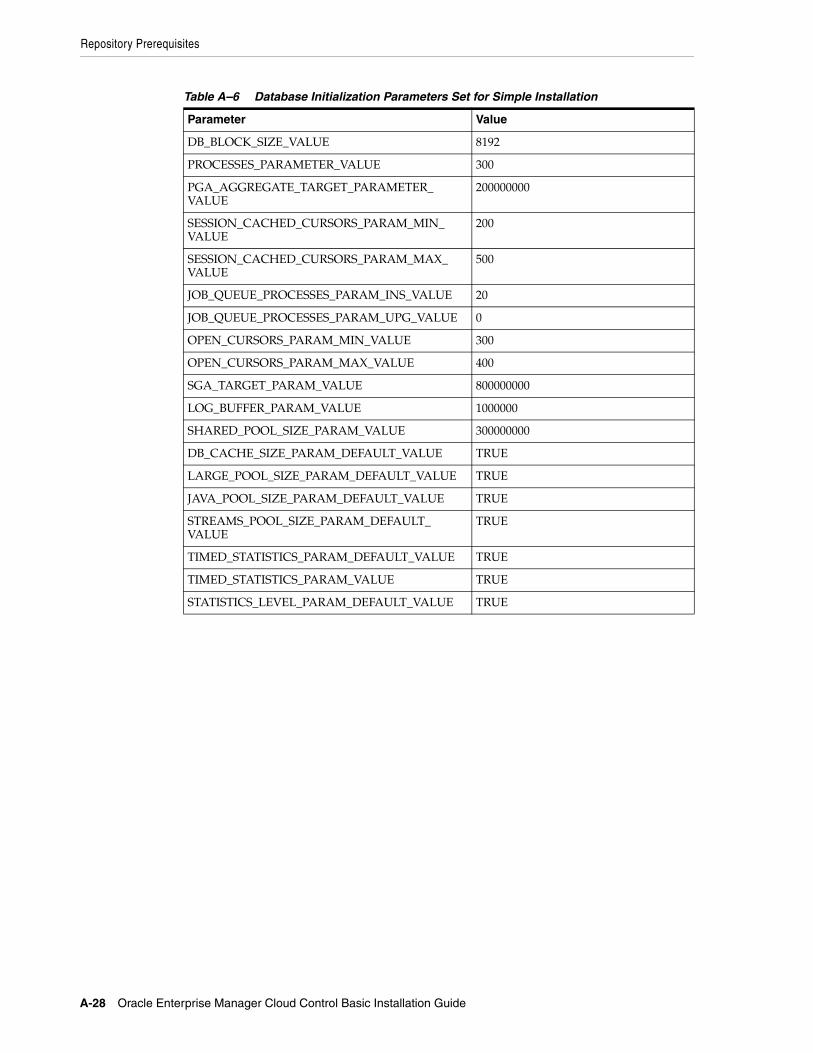
Repository Prerequisites
A-28 Oracle Enterprise Manager Cloud Control Basic Installation Guide
Table A–6 Database Initialization Parameters Set for Simple Installation
Parameter Value
DB_BLOCK_SIZE_VALUE 8192
PROCESSES_PARAMETER_VALUE 300
PGA_AGGREGATE_TARGET_PARAMETER_VALUE
200000000
SESSION_CACHED_CURSORS_PARAM_MIN_VALUE
200
SESSION_CACHED_CURSORS_PARAM_MAX_VALUE
500
JOB_QUEUE_PROCESSES_PARAM_INS_VALUE 20
JOB_QUEUE_PROCESSES_PARAM_UPG_VALUE 0
OPEN_CURSORS_PARAM_MIN_VALUE 300
OPEN_CURSORS_PARAM_MAX_VALUE 400
SGA_TARGET_PARAM_VALUE 800000000
LOG_BUFFER_PARAM_VALUE 1000000
SHARED_POOL_SIZE_PARAM_VALUE 300000000
DB_CACHE_SIZE_PARAM_DEFAULT_VALUE TRUE
LARGE_POOL_SIZE_PARAM_DEFAULT_VALUE TRUE
JAVA_POOL_SIZE_PARAM_DEFAULT_VALUE TRUE
STREAMS_POOL_SIZE_PARAM_DEFAULT_VALUE
TRUE
TIMED_STATISTICS_PARAM_DEFAULT_VALUE TRUE
TIMED_STATISTICS_PARAM_VALUE TRUE
STATISTICS_LEVEL_PARAM_DEFAULT_VALUE TRUE
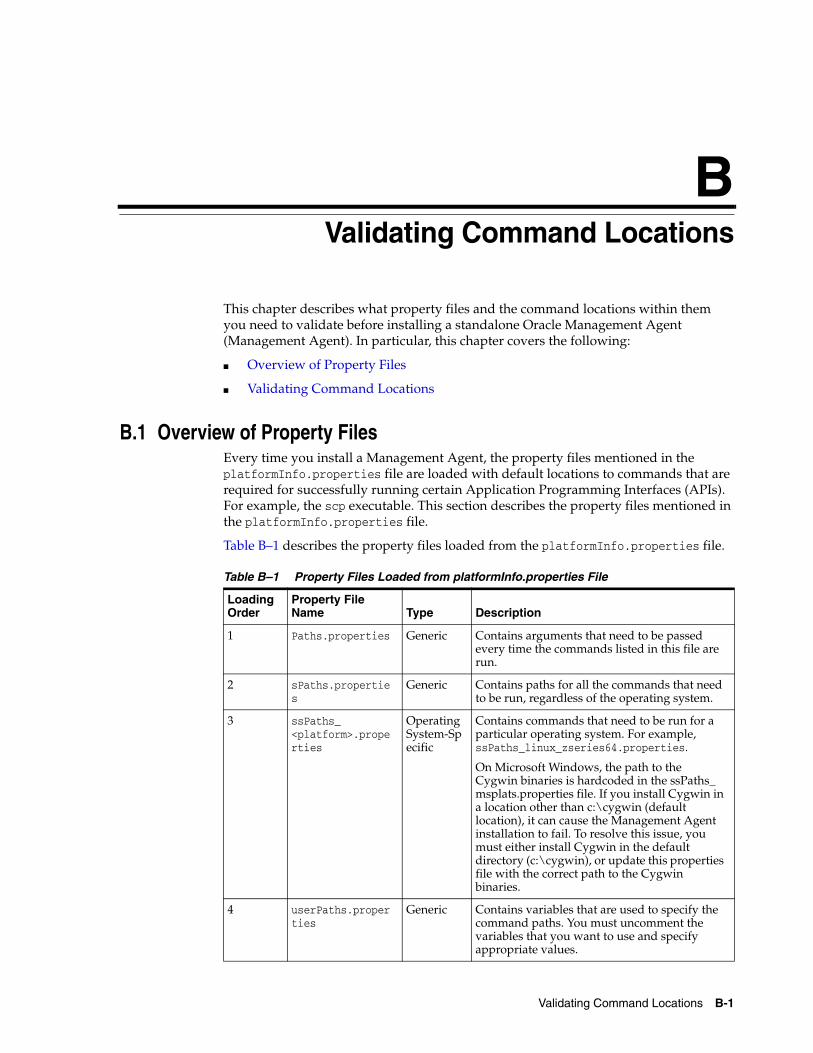
B
Validating Command Locations B-1
BValidating Command Locations
This chapter describes what property files and the command locations within them you need to validate before installing a standalone Oracle Management Agent (Management Agent). In particular, this chapter covers the following:
■ Overview of Property Files
■ Validating Command Locations
B.1 Overview of Property FilesEvery time you install a Management Agent, the property files mentioned in the platformInfo.properties file are loaded with default locations to commands that are required for successfully running certain Application Programming Interfaces (APIs). For example, the scp executable. This section describes the property files mentioned in the platformInfo.properties file.
Table B–1 describes the property files loaded from the platformInfo.properties file.
Table B–1 Property Files Loaded from platformInfo.properties File
Loading Order
Property File Name Type Description
1 Paths.properties Generic Contains arguments that need to be passed every time the commands listed in this file are run.
2 sPaths.properties
Generic Contains paths for all the commands that need to be run, regardless of the operating system.
3 ssPaths_<platform>.properties
Operating System-Specific
Contains commands that need to be run for a particular operating system. For example, ssPaths_linux_zseries64.properties.
On Microsoft Windows, the path to the Cygwin binaries is hardcoded in the ssPaths_msplats.properties file. If you install Cygwin in a location other than c:\cygwin (default location), it can cause the Management Agent installation to fail. To resolve this issue, you must either install Cygwin in the default directory (c:\cygwin), or update this properties file with the correct path to the Cygwin binaries.
4 userPaths.properties
Generic Contains variables that are used to specify the command paths. You must uncomment the variables that you want to use and specify appropriate values.
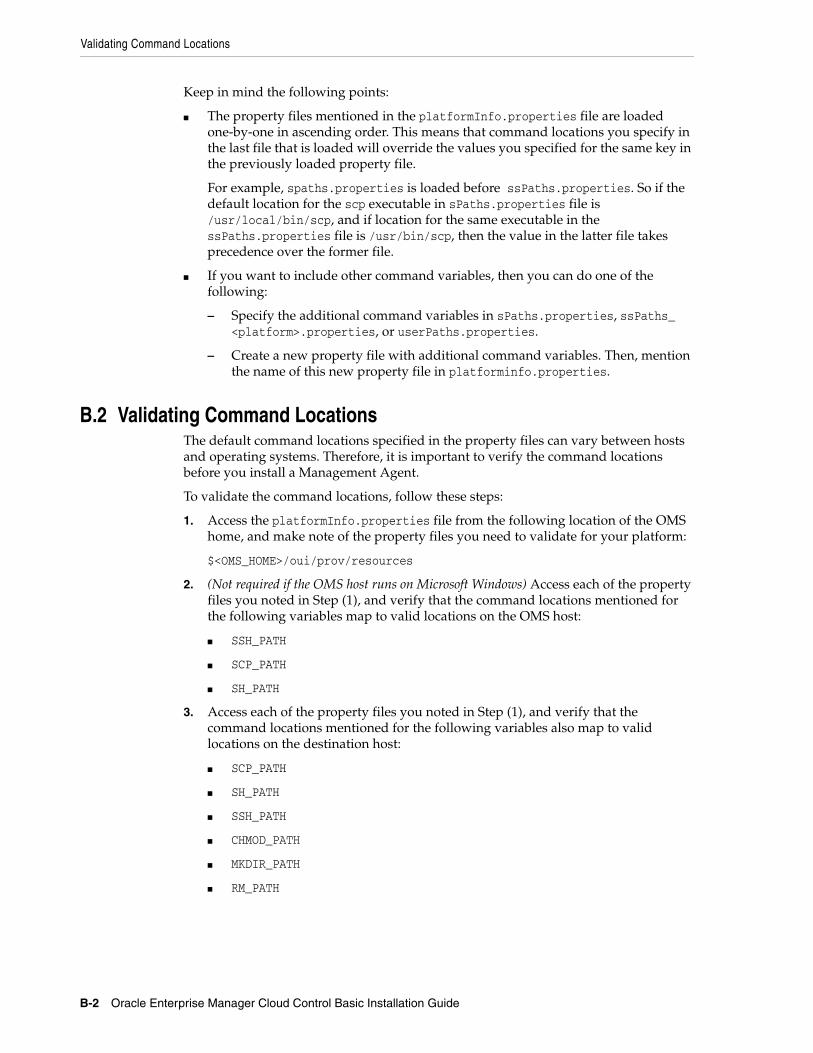
Validating Command Locations
B-2 Oracle Enterprise Manager Cloud Control Basic Installation Guide
Keep in mind the following points:
■ The property files mentioned in the platformInfo.properties file are loaded one-by-one in ascending order. This means that command locations you specify in the last file that is loaded will override the values you specified for the same key in the previously loaded property file.
For example, spaths.properties is loaded before ssPaths.properties. So if the default location for the scp executable in sPaths.properties file is /usr/local/bin/scp, and if location for the same executable in the ssPaths.properties file is /usr/bin/scp, then the value in the latter file takes precedence over the former file.
■ If you want to include other command variables, then you can do one of the following:
– Specify the additional command variables in sPaths.properties, ssPaths_<platform>.properties, or userPaths.properties.
– Create a new property file with additional command variables. Then, mention the name of this new property file in platforminfo.properties.
B.2 Validating Command LocationsThe default command locations specified in the property files can vary between hosts and operating systems. Therefore, it is important to verify the command locations before you install a Management Agent.
To validate the command locations, follow these steps:
1. Access the platformInfo.properties file from the following location of the OMS home, and make note of the property files you need to validate for your platform:
$<OMS_HOME>/oui/prov/resources
2. (Not required if the OMS host runs on Microsoft Windows) Access each of the property files you noted in Step (1), and verify that the command locations mentioned for the following variables map to valid locations on the OMS host:
■ SSH_PATH
■ SCP_PATH
■ SH_PATH
3. Access each of the property files you noted in Step (1), and verify that the command locations mentioned for the following variables also map to valid locations on the destination host:
■ SCP_PATH
■ SH_PATH
■ SSH_PATH
■ CHMOD_PATH
■ MKDIR_PATH
■ RM_PATH
C
Setting Up Proxy Configuration for Oracle Management Service C-1
CSetting Up Proxy Configuration for Oracle Management Service
For the following reasons, set up the proxy server settings in Enterprise Manager Cloud Control so that it can use those details to access My Oracle Support:
■ If you have a proxy server running on the host where Oracle Management Service (OMS) is installed.
■ If you want to use the same proxy server settings or have different settings for the OMS to communicate with its Oracle Management Agents (Management Agents).
To set up the proxy server settings, do the following:
1. In Cloud Control, from the Setup menu, click Proxy Settings.
2. On the Setup page, in the My Oracle Support and Proxy Connection tab, in the My Oracle Support Connection Setting section, select Manual proxy configuration and specify the proxy server host, port, realm, user name, and password.
Note: Only HTTP and HTTPS protocols are supported. Also note that NTLM proxy is not currently supported.
3. If you want to use the same proxy settings for communicating with the Management Agents, then go to Step (5). Otherwise, go to Step (4).
4. In the Agent Connection Setting section, do one of the following:
a. If you want to use the proxy settings given in My Oracle Support Connection Setting section, then retain the default section, that is, Use My Oracle Support connection settings.
b. If you want to use proxy settings different from the ones specified in My Oracle Support Connection Setting section, then select Manual proxy configuration and specify the proxy server details.
Note: Only HTTP and HTTPS protocols are supported. NTLM proxy is not currently supported.
5. Click Apply.
The proxy server settings you specify are registered in the Management Repository. However, in case of multiple OMS environment, after you set up the proxy server settings for one OMS, restart other OMS instances to ensure that the proxy server settings registered for communicating with the Management Agents are propogated across all OMS instances.

C-2 Oracle Enterprise Manager Cloud Control Basic Installation Guide
D
Creating a Database Instance with Preconfigured Repository Using Database Templates D-1
DCreating a Database Instance with Preconfigured Repository Using Database
Templates
While installing Enterprise Manager Cloud Control, you must provide the details of a database where Oracle Management Repository (Management Repository) can be configured to store all Enterprise Manager-related data. Although the Enterprise Manager Cloud Control Installation Wizard is capable of configuring the Management Repository in the specified database, you can optionally choose to preconfigure the Management Repository in your database beforehand. This saves installation time.
To preconfigure the Management Repository in your database, use the database templates offered by Oracle. These database templates first create a database instance, and then preconfigure the Management Repository in it.
To create a database instance with a preconfigured Oracle Management Repository using the database templates offered by Oracle, follow these steps:
1. Install Oracle Database 11g Release 2 (11.2.0.3) software on the host where you want to create the database.
Ensure that this is a software-only installation. That is, while using the Oracle Database Installation Wizard to install the database, on the Select Installation Option screen, select Install database software only.
For instructions, refer to the Oracle Database Installation Guide available at:
http://www.oracle.com/technetwork/database/enterprise-edition/documentation/index.html
Caution: You can use such a database instance for simple as well as advanced installation. However, note that the database templates are essentially designed for simple installation, although they can be used for advanced installation. The templates preconfigure the Management Repository with database parameters that are primarily required for simple installation.
Therefore, while performing an advanced installation (possibly with small, medium, or large deployment size selection), when you provide the details of such a database, you will be prompted that the database parameters need to be modified to suit the deployment size you selected for advanced installation. You can confirm the message to proceed further. The installation wizard will automatically modify the database parameters to the required values.
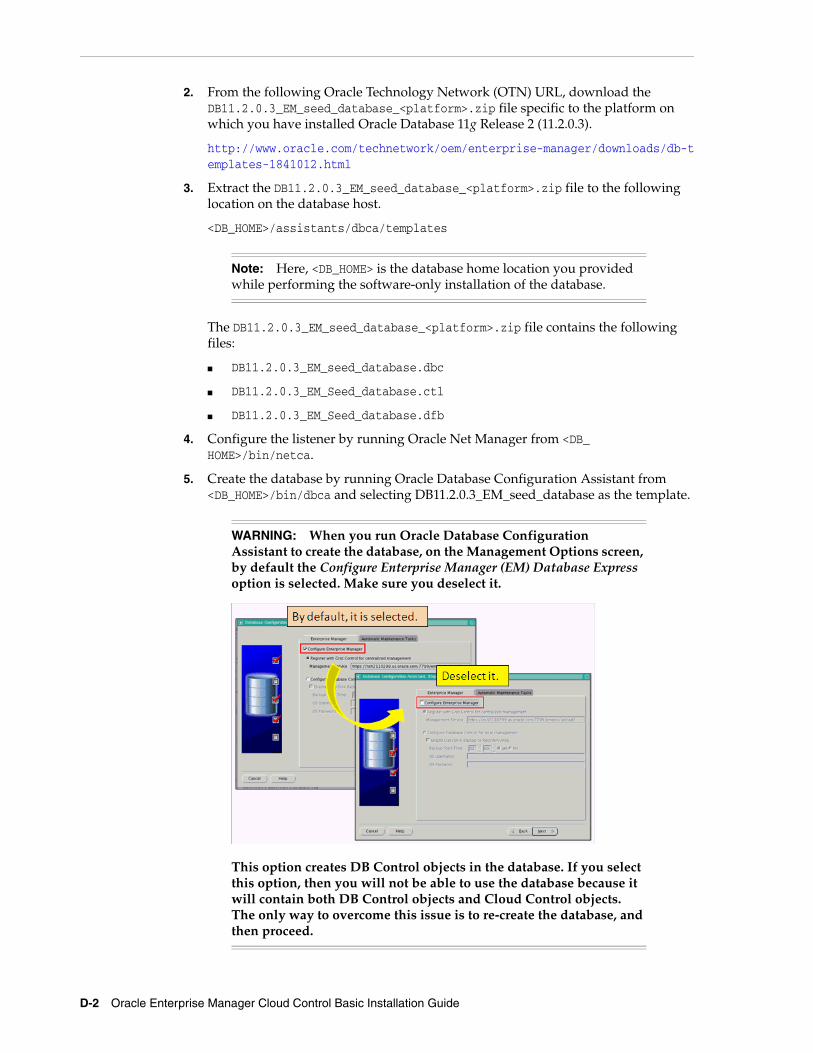
D-2 Oracle Enterprise Manager Cloud Control Basic Installation Guide
2. From the following Oracle Technology Network (OTN) URL, download the DB11.2.0.3_EM_seed_database_<platform>.zip file specific to the platform on which you have installed Oracle Database 11g Release 2 (11.2.0.3).
http://www.oracle.com/technetwork/oem/enterprise-manager/downloads/db-templates-1841012.html
3. Extract the DB11.2.0.3_EM_seed_database_<platform>.zip file to the following location on the database host.
<DB_HOME>/assistants/dbca/templates
The DB11.2.0.3_EM_seed_database_<platform>.zip file contains the following files:
■ DB11.2.0.3_EM_seed_database.dbc
■ DB11.2.0.3_EM_Seed_database.ctl
■ DB11.2.0.3_EM_Seed_database.dfb
4. Configure the listener by running Oracle Net Manager from <DB_HOME>/bin/netca.
5. Create the database by running Oracle Database Configuration Assistant from <DB_HOME>/bin/dbca and selecting DB11.2.0.3_EM_seed_database as the template.
Note: Here, <DB_HOME> is the database home location you provided while performing the software-only installation of the database.
WARNING: When you run Oracle Database Configuration Assistant to create the database, on the Management Options screen, by default the Configure Enterprise Manager (EM) Database Express option is selected. Make sure you deselect it.
This option creates DB Control objects in the database. If you select this option, then you will not be able to use the database because it will contain both DB Control objects and Cloud Control objects. The only way to overcome this issue is to re-create the database, and then proceed.
E
Accessing the Enterprise Manager Certification Matrix E-1
EAccessing the Enterprise Manager Certification Matrix
To access the Enterprise Manager certification matrix, follow these steps:
1. Log in to My Oracle Support at:
2. Click the Certifications tab.
3. On the Certifications page, in the Certification Search region, from the Product list, select one of the following:
■ Enterprise Manager Base Platform - OMS, to view the certification for OMS.
■ Enterprise Manager Base Platform - Agent, to view the certification for Management Agent.
4. From the Release list, select 12.1.0.2.0, and click Search.

E-2 Oracle Enterprise Manager Cloud Control Basic Installation Guide

Index-1
Index
AAdd Host Targets Wizard, 7-1, 7-2
Cygwin, 5-1adding targetsadditional parameters
entering parameters, 7-17supportedaddtional parameters, 7-18
ADP, 9-1agent base directory, 7-11allroot.sh script, 6-44Application Dependency and Performance
credentialsOracle Enterprise Manager WebLogic
Administration Server Host Credentials, 9-6
Oracle Enterprise Manager WebLogic Domain Credentials, 9-6
Oracle WebLogic Administration Server Host Credentials, 9-6
Oracle WebLogic Domain Credentials, 9-6installation, 9-1
facts, 9-2overview, 9-1postinstall steps, 9-7prerequisites, 9-2procedure, 9-3
portsADP Manager Controller Port, 9-4ADP Manager Java Provider Port, 9-4ADP Manager Registry Port, 9-4Listen Port, 9-4SSL Listen Port, 9-4
architecture, 1-1, 1-2
BBI Publisher, 11-1browser, 7-12browser requirements, 8-10
Ccentral inventory, 7-11, 8-8
permission, 6-12space, 6-9
command locations, B-2validating, B-1, B-2
configuration assistantsrunning
for new Enterprise Manager install, 6-4console, 1-5core components, 1-1, 1-2, 1-3CPUs
for Oracle Management Service, 2-1Cygwin, 5-1, 5-3
certified and supported version, 5-1installing, 5-3overview, 5-1SSH daemon, 5-1
Ddatabase
supported version, 6-10database templates
overview, 6-7providing details, 6-22, 6-35resetting user account passwords, 6-22, 6-35
database version, 6-10Deploy Diagnostics Agents, 9-5deploying ADP manager, 9-4deploying JVMD Manager, 10-3deployment procedure, 8-2deployment size, 6-2
handling errors, 6-7, 6-37overview, 6-2running prerequisite checks, 6-2selecting, 6-36selecting in advanced installation, 6-2setting database parameters, 6-2small, medium, large, 6-36target count, agent count, session count, 6-36
Diagnostics Agent Deployment status, 9-6, 10-6
EEM prerequisite kit
manually running, 6-45Enterprise Manager Cloud Control, 1-1
architecture, 1-1, 1-2console, 1-5

Index-2
core components, 1-1, 1-2, 1-3diagnostics, 1-2hardware requirements, 2-1installation
advanced configuration, 6-25advanced installer options, 6-42auto-discovery of targets, 6-45components configured, 6-3components installed, 6-3default, mandatory plug-ins, 6-3environment variable, 6-6facts, 6-5limitations, 6-43middleware home contents, 6-5OMS instance base location, 6-4Oracle JRF, 6-3Oracle Web Tier, 6-3Oracle WebLogic Server, 6-3overview, 6-1ports, 6-12postinstall steps, 6-44prerequisite checks, 6-17, 6-29prerequisites, 6-8simple configuration, 6-13
kernel parameters, 3-1, 3-11libraries, 3-1, 3-12load balancer, 1-3overview, 1-1packages, 3-1performance monitoring, 1-2service levels, 1-2
Enterprise Manager Prerequisite Kit, A-1arguments
-componentVariables, A-7-contextName, A-7-dbPassword, A-4-dbRole, A-4-dbUser, A-4-executionType, A-3-help, A-8-list, A-8-logInDB, A-7-logLoc, A-6-prereqResultLoc, A-5-prerequisiteXMLLoc or
prerequisiteXMLRootDir, A-3-purge, A-8-responseFile, A-7-runOnlyFor, A-7-showPrereqs, A-5-stopExecOnFirstError, A-7
invocation typeautomatic, A-9, A-10manual, A-8, A-10
log files, A-9emprereqkit.err.log, A-9emprereqkit.log, A-9emprereqkit.output, A-9performance.log, A-9
repository prerequisites, A-10
running the tool, A-1, A-3viewing results, A-8
Ffiles
oraInst.loc, 4-2firewalls, 8-8FTP, 8-11
Ggroups
creating the oinstall group, 4-2
Hhard disk space
for Oracle Management Agent, 2-2for Oracle Management Repository, 2-2for Oracle Management Service, 2-1
hardware requirements, 2-1heap size
for Oracle Management Service, 2-1high availability configuration, 8-4host file, 6-11
Iinstallation base directory
entering location, 7-15permission, 7-6requirements, 7-11
installing user, 6-11instance directory, 7-6
entering location, 7-15
JJava Development Kit
default version installed, 6-3manual installation, 6-6verifying version, 6-6
Java Virtual Machine Pools, 10-6JROCKIT, 6-6JVM Diagnostics
credentialsOracle Management Server Host
Credentials, 10-4Oracle WebLogic Administration Server Host
Credentials, 10-6Oracle WebLogic Domain Credentials, 10-4,
10-6installation
facts, 10-2overview, 10-1postinstallation steps, 10-6prerequisites, 10-2procedure, 10-3
supported JDK version, 10-3JVMD Agents, 10-1

Index-3
JVMD Manager, 10-1JVMD targets, 10-6
Kkernel parameters, 3-1, 3-11
Llibraries, 3-1, 3-12
for Oracle Management Agent, 3-12for Oracle Management Service, 3-12
load balancer, 1-3locked user account, 7-5
Mmanaged host, 1-3Management Agent, 1-3management agent
installationverifying, 7-20
property files, B-1Management Agents, 1-4Management Repository, 1-4management service
changing password, 6-47Middleware Diagnostics, 9-1, 9-2, 10-1, 10-2middleware home
location requirements, 8-5new Enterprise Manager installation
directory structure, 6-5NFS-mounted drive, 6-9, 6-46permission, 8-8
Nnamed credentials, 7-5, 7-15, 11-1node manager, 6-4notifications, 11-2
Ooinstall group
creating, 4-2description, 4-1
OMS, 1-4verifying status, 6-44
OMS instance base location, 6-4permission, 6-12, 8-8space, 8-6
OpenSSH, 7-4operating system groups
creating, 4-1Oracle Inventory group, 4-2
creating the oinstall group, 4-2oinstall, 4-1Oracle Inventory group, 4-1overview, 4-1requirements, 4-1
operating system users
creating, 4-1, 4-2creating the oracle user, 4-2modifying, 4-3oracle, 4-1Oracle software owner user, 4-1overview, 4-1requirements, 4-1
Oracle Inventorypointer file, 4-2
Oracle inventorylocation requirements, 6-12
Oracle Inventory groupcreating, 4-2description, 4-1
Oracle JRF, 6-3Oracle Management Agent, 1-3
hard disk space, 2-2installation
additional parameters, 7-17cloning, 7-2facts, 7-3fresh installation, 7-2installation base directory requirements, 7-11installing on Oracle RAC cluster, 7-4instance directory, 7-6NFS installation, 7-2overview, 7-1path validation, 7-10permission, 7-6plug-ins configured, 7-5ports, 7-17postinstall steps, 7-19postinstallation scripts, 7-17preinstallation scripts, 7-17prerequisites, 7-5procedure, 7-13software availability, 7-10supported additional parameters, 7-18verifying the installation, 7-19, 7-20
RAM size, 2-2verifying status, 6-44
Oracle Management Plug-Ins, 1-4Oracle Management Repository, 1-4
connecting from multiple OMS instances, 8-1hard disk space, 2-2RAM size, 2-2
Oracle Management Service, 1-4, A-2cloning, 8-2, 8-3CPU, 2-1hard disk space, 2-1heap size, 2-1installation
auto-discovery of targets, 8-15facts, 8-2file transfer options, 8-11NFS-mounted drive, 8-3ports, 8-13postinstall steps, 8-14prerequisites, 8-3
installing

Index-4
Add Management Service deployment procedure, 8-2
installing additional OMS, 8-1RAM size, 2-1
Oracle Software Library, 11-1Oracle Software Owner user
creating, 4-3Oracle software owner user
creating, 4-2description, 4-1
oracle usercreating, 4-2, 4-3description, 4-1
Oracle Web Tier, 6-3Oracle WebLogic Server, 9-3
default version installed, 6-3downloading software, 6-7manual installation, 6-6, 6-7manually installing, 6-3Oracle WebLogic domain, 6-3
oraInst.loc file, 6-44, 7-21location, 4-2location of, 4-2
oraInstroot.sh script, 6-44, 7-21Oralce Management Service
installationprocedure, 8-10
overview ofEnterprise Manager Cloud Control, 1-1
Ppackages, 3-1
for Oracle Management Agent, 3-7for Oracle Management Service, 3-2identifying installed packages, 3-1
passwd command, 4-3PATH environment variable, 7-10Paths.properties file, B-1permissions, 6-12platformInfo.properties file, B-2plug-ins
deployment, 1-4mandatory plug-ins, 1-4monitoring, 1-4optional plug-ins, 1-4pluggable entities, 1-4release cycles, 1-4selecting plug-ins, 6-33verifying installation, 6-45, 7-20
portscustomizing, 6-39new Enterprise Manager installation, 6-12
postinstallation scripts, 7-12, 7-17preconfigured repository
overview, 6-7, 6-22, 6-35providing details, 6-22, 6-35
preinstallation scripts, 7-12, 7-17privileged delegation setting, 7-8, 7-16property files, B-1
overview, B-1platformInfo.properties file, B-1
proxy configurationsetting up proxy for OMS, C-1
proxy server settings, C-1
RRAM size
for Oracle Management Agent, 2-2for Oracle Management Repository, 2-2for Oracle Management Service, 2-1
repository prerequisites, 6-45root.sh script, 7-21, 8-15
Sself update, 11-1, A-3server load balancers
requirements, 8-6SLB monitors, 8-7SLB pools, 8-6virtual servers, 8-7
session nameformat, 7-13overview, 7-13
shared directoryspace, 8-5
software library accessibility, 8-7software updates, 6-15, 6-27sPaths.properties file, B-1, B-2spaths.properties file, B-2SSH, 7-4, 7-9SSH daemon, 5-1, 5-3SSH public key Authentication, 7-4SSH1, 7-4SSH2, 7-4ssPaths.properties file, B-2staging location
destination, 8-8, 8-12source, 8-8, 8-12
storage location, 1-4SUDO, 7-8, 7-9Super Administrator Privileges, 9-3support workbench metrics, 7-5SYSMAN account, 10-3SYSMAN password, 6-47
Ttargets, 1-1
adding targetsdiscovering targetsmanaging, 1-1monitoring, 1-1
temporary directorypermission, 6-12, 8-8space, 6-9, 7-10, 8-5

Index-5
UUMASK, 8-8UMASK value, 6-10UNIX commands
passwd, 4-3useradd, 4-3
UNIX userscreating the oracle user, 4-3
unmanaged host, 1-3useradd command, 4-3userPaths.properties file, B-1users
creating the oracle user, 4-2, 4-3Oracle software owner user, 4-1
VVerifying
ADP Agent installation, 9-7ADP Manager installation, 9-7
verifyingJVMD Agent installation, 10-6JVMD Manager installation, 10-6
WwebLogic domain, 6-3WebLogic Server versions, 9-6

Index-6