clinical skills mastery programme - med.scot.nhs.uk · nhs lothian clinical skills mastery...
TRANSCRIPT

1
Clinical Skills Mastery Programme
Knee Joint Aspiration Educational Reading Pack
Authors: Dr Andrew Carachi Clinical Development Fellow Dr James Jefferies Clinical Development Fellow Dr Christianne Ong Clinical Development Fellow Mr Sam Mackenzie Orthopaedic Registrar Dr Elly Hampton Clinical Teaching Fellow Dr Matt Reed Emergency Medicine Consultant Mr Iain Brown Orthopaedic Consultant Dr Simon Edgar Director of Medical Education
Updated June 2015

2
NHS Lothian Clinical Skills Mastery Programme Knee Joint Aspiration Reading Pack
Contents
1. Mastery Programme Overview and Procedural Phases
2. Introduction and Intended Learning Outcomes
3. Indications
4. Patient Safety Considerations
a. Risk Factor Considerations
b. Patient Education
5. Risk Assessment
6. Anatomy relating to knee joint aspiration
7. Knee joint aspiration techniques
8. Equipment and Resources
9. Knee Joint Aspiration Procedure
10. Appendices
a. Trouble-shooting Guide
b. Knee Fluid Parameters and Patterns
c. Request C&S on TRAK
d. Equipment Checklist
e. Procedural Checklist
f. Skills Assessment Checklist
g. References
3
NHS Lothian Clinical Skills Mastery Programme
Welcome to the NHSL Mastery Programme Knee Joint Aspiration Reading Pack.
We hope you find this pack a valuable learning resource to compliment your simulated
practice sessions.
In order to optimise your learning, you must read this pack and watch the associated
video before your first simulation session.
The NHSL Mastery Programme has been developed to enhance the technical and non-
technical skills of clinicians undertaking complex clinical procedures.
Each procedural skill will be approached via a combination of written and video educational
resources with subsequent simulated practice, facilitated by appropriately skilled trainers.
Acknowledgements
The authors would like to thank the following people for their generous contributions to this
pack and many other aspects of this programme:
Dr Elzbieta Czarniak, Consultant Microbiology
Luke Tysall, Clinical Scientist Infection Control
Stephen Punton, Medical Photography Department
Nathan Oliver, Simulation Manager
Sam Wyllie, MED Administrator

4
Intended Learning Outcomes
After participation in the NHSL Clinical Skills Mastery Programme:
• Trainee clinicians will have the skills required to achieve competency in mandatory
and desired procedural skills to the level of safe clinical performance under
supervision.
• Faculty clinicians will be able to teach clinical procedural skills to doctors in training
in an effective and structured fashion, receiving appropriate recognition for their
contributions.

5
Methods
The flow diagram (below) describes the envisaged path to procedural competency for
clinicians in NHS Lothian. This involves a sequence of:
• Knowledge Packs - combination of written and video educational resources for each
procedural skill, with a consistent emphasis on patient safety.
• A 2-phase supervised simulated procedural training programme, including checklist-
based formative assessment throughout.
- Task trainer in skills lab (non-clinical)
- Task trainer in-situ (clinical environment)
• Co-ordination via online booking site TUBS (www.tutorialbooking.com)
• Training of faculty with accreditation through the regional Clinical Educator
Programme

6
NHS Lothian Clinical Skills Mastery Programme
We recognise that the traditional model of “see one, do one, teach one” is no longer pertinent.
Our new approach allows development of fundamental skills in a manner that minimises risk
to patients.
In addition, this novel approach allows refreshment of old skills, minimising the effects of
potentially harmful skill decay.
Knowledge
Skills
Drills
Performance
Safety

7
NHS Lothian Clinical Skills Mastery Programme
General Principles
Complex procedural skills can be daunting prospects initially. It is not uncommon for
novices to become overwhelmed when performing such procedures, resulting in avoidable
error or harm.
It can be helpful to fragment the task into discrete, manageable parts, ensuring one is
complete before moving onto the next.
Our Mastery Procedural Phases (shown below) is one method of approaching any complex
skill. This will be discussed more in the videos and simulation skills sessions.
Procedural Phases1. Preparation, Assistance and Positioning
Non technical skills + clinical decision making
2. Asepsis + Anaesthetic
3. Procedural Pause3 Point Check
4. Insertion
5. Dressing
6. CompletionDocumentation / Communication / Trouble shooting
8
Introduction
A hot swollen knee, without precipitating trauma, is a common presentation that provides an
interesting diagnostic challenge. A variety of infective and rheumatological conditions can
cause a swollen knee. Sampling of knee joint fluid provides immediate and essential
information. A thorough understanding of the indications, local anatomy and technique are
essential in order to ensure a safe and successful procedure. The technique must be performed
by competent practitioners, who have had relevant training and supervision.
Intended Learning Outcomes
After reading this educational pack and watching the associated video resource, the clinician
in training will have an understanding of:
• the indications for performing a knee joint aspiration
• the contraindications and safety concerns of the procedure.
• the potential complications of the procedure and the basic principles of their
management.
• the method of knee joint aspiration
• their own personal limitations and when to obtain help from a senior clinician.

9
Indications
Knee joint aspiration should be considered in patients presenting with a non-traumatic knee
effusion of unknown aetiology. The primary role of knee aspiration is to confirm or refute a
diagnosis of septic arthritis.
Clinical Assessment
There are a number of significant clinical findings that raise the suspicion of a septic joint and
necessitate a joint aspiration in order to reach a diagnosis.
These include an acute (1-7 days) presentation of:
• Increasing knee pain
• Swelling/effusion
• Overlying erythema
• Increased temperature
• Restricted joint movement
• Systemic features including pyrexia, feeling systemically unwell, lethargy, and loss of
appetite.
Some presentations can be ambiguous, i.e. a low suspicion for septic arthritis due to
unremarkable inflammatory markers, a reassuring clinical examination may enable a patient
to be discharged without a joint aspiration but with a warning statement. Conversely, if a
patient does not have a convincing story of septic arthritis but has raised inflammatory
markers, it may be worth aspirating the knee, as the risk of missing a septic arthritis can lead
to significant comorbidity. If in doubt always seek senior advice.
Blood tests
All patients who have a non-traumatic hot swollen joint should have FBC, CRP, ESR and
urate level checked. These bloods are essential in the assessment of a non traumatic hot
swollen joint. Note that the CRP is the most sensitive and reliable marker of inflammation in
this context.

10
Radiographs
AP and lateral radiographs of the affected knee should be performed to rule out any fracture
and to look for signs of osteomyelitis which may take up to six weeks to become apparent on
a radiograph and that a radiograph should not be relied upon if normal.
Differential Diagnosis
The aim of assessment is to first rule out a septic arthritis; however, acute monoarthritis of
the knee can be due to a number of other conditions:
• Gout
• Reactive arthritis
• Autoimmune
• Pseudo gout
• Cellulitis
• Bursitis
The following page displays an algorithm for assessing non-traumatic swollen joints

11
12
Patient Safety Considerations
A knee joint aspiration should be performed in a safe environment, having removed or
minimised any potential risk factors. If there is any risk of harm to the patient or clinician the
procedure should be delayed and senior advice sought.
Questions to consider before performing a knee joint aspiration
1. Is the aspiration indicated?
2. Are there any absolute or relative contraindications to aspiration? (see Risk
assessment below)
3. Is supervision required?
4. Is the necessary equipment available?
5. What is my ‘Plan B?’
Patient Education
• Explain current findings and the indication for joint aspiration
• Explain the steps of the procedure
• Explore the patient’s concerns and ask if they have any questions
Complications
When performed by a competent practitioner in an appropriate environment and under strict
asepsis, knee joint aspiration is a safe procedure. Complications are considered infrequent or
rare but the patient should be warned of their potential:
- the introduction of infection into the knee joint by the needle
- haemoarthrosis
- localised cellulitis
- pain
Patient consent
Having ensured the patient understands the procedure, its indications, risks and
complications, gain verbal consent and document this in the patient notes.
13
Risk Assessment
Contraindications
• Knee joint replacement in situ
• Severe overlying dermatitis or cellulitis
• Bacteraemia in an agitated or confused patient
• Severe coagulopathy
Knee joint replacement
There is an increased risk of introducing infection to the prosthetic implant. In NHS Lothian
this is performed by, or under the instruction of, a senior orthopaedic surgeon (often in an
operating theatre).
Cellulitis
Cellulitis or dermatitis at needle entry points can potentially seed infection into a joint. In the
rare event of a cellulitis enveloping a knee seek senior help to clarify the need to aspirate and
to identify less commonly used needle entry points to the knee.
Agitated or confused patient
There is an increased risk of failure and infection if the patient is unable to remain still due to
confusion or agitation. All measures should be taken to remove these sources. Where this is
not possible, a senior and experienced clinician should attempt an insertion. Additional
assistants may be required.
Uncontrolled coagulopathy
Potential bleeding risks include patients on anticoagulation treatments (eg. warfarin,
rivoroxiban, dalteparin) and those with hereditary bleeding disorders. This must be
investigated and optimized before aspiration occurs. This may involve taking coagulation
screens, optimizing the INR, liaising with medical and haematological specialties, and must
be corrected to prevent uncontrolled bleeding into the joint following aspiration.

14
Anatomy for knee joint aspiration
The knee joint is a complex hinge joint and the site of attachment of many muscles and
ligaments. A detailed knowledge of knee anatomy is not required for joint aspiration, but
rather an appreciation of the important structures, their position, and how to avoid them. In
order to conduct a safe knee aspiration, we will consider a few vital learning points.
Bones
• The 3 Bones that make up the knee joint include the femur, the patella, and the tibia.

15
• An articulation is a term used to describe the contact point between two (or more)
bones. The knee joint has 2 articulations:
- The tibiofemoral: between the tibia and femur
- The patellofemoral: between the femur and the patella
• The patella: This bone lies between the quadriceps and patellar tendons.
Ligaments & Tendons
4 ligaments lie between the tibia and femur to stabilise the knee. Although important, these
ligaments are not encountered during knee aspiration.
• The cruciate ligaments (anterior and posterior): these lie within the tibiofemoral
articulation and are major knee stabilisers.
• The collateral ligaments (medial and lateral): they lie either side of the knee to provide
further stability.
Neurovascular structures
The blood vessels and nerves that supply the knee joint itself are relatively small and do not
require special consideration during aspiration. More important is the presence of the major
blood vessels and nerves that traverse the knee joint to supply the leg and foot. These are:
• Popliteal artery
• Popliteal vein
• Common peroneal nerve
• Tibial nerve
Fortunately, these structures cross the knee posteriorly which is far removed from the site of
knee aspiration.
Suprapatella bursa
The key anatomical concept in knee aspiration is the presence and position of the
‘suprapatellar bursa’
A bursa is a sac that contains a small amount of synovial (joint) fluid and helps to provide a
cushion between bones and tendons, allowing for easy movement with reduced friction.
Several bursae surround the knee but the suprapatella bursa (often called the suprapatella

16
pouch) is the only one relevant to knee apsiration.
• This bursa lies behind the patella and the quadriceps
tendon, resting on the anterior femur.
• Crucially, this large pouch is a continuation of the
knee joint cavity, so fluid in the knee cavity is also in
the suprapatellar bursa.
• Knee aspiration techniques take advantage of this
pouch to allow the withdrawal of fluid at a site away
from the tibiofemoral articulation and therefore the
important ligaments and neurovascular structures.
Surface Anatomy
Having gained an appreciation of the underlying anatomy, aspiration is performed using
superficial landmarks. Although swelling will distort the normal appearance of the knee, the
areas relevant to aspiration are almost always palpable. The patella is the main anatomical
landmark and guides the needle insertion point.
Patella
Aspiration is performed proximal to or at the level of the patella. This structure is clearly
palpated on the anterior aspect of the knee. Begin by palpating anteriorly before moving
laterally to define the patella’s lateral edge, before finding the inferior and superior aspects.
Often, marking this border with a pen will aid the aspiration.
Distal femur
Palpate the lateral condyle (outside aspect) of the femur to aid orientation. There is no
specific area to mark.
Only once you are confident of the surface anatomy and landmarks, an aspiration can
be performed.

17
Techniques
When performing a joint aspiration there are 4 points to consider relating to technique:
1. Hand position
2. Needle insertion point
3. Needle direction
4. Depth of needle insertion
1. Hand position
Hand position is very important as it allows you to steady the needle, control the direction and
aspirate. One hand is used to hold the needle and syringe and direct it, the other hand is used
to aspirate by drawing on the syringe plunger. For right-handed people, the left hand should
hold the tip of the syringe close to the base of the needle in between the thumb and index
finger (as shown in diagram 1 below). Use the little and ring finger to stabilise against the
patient’s knee. With the right hand hold the end of the syringe, enabling you to direct the
needle, control the speed and aspirate simultaneously. This technique allows the needle to be
held stationary while aspirating.
Diagram 1
18
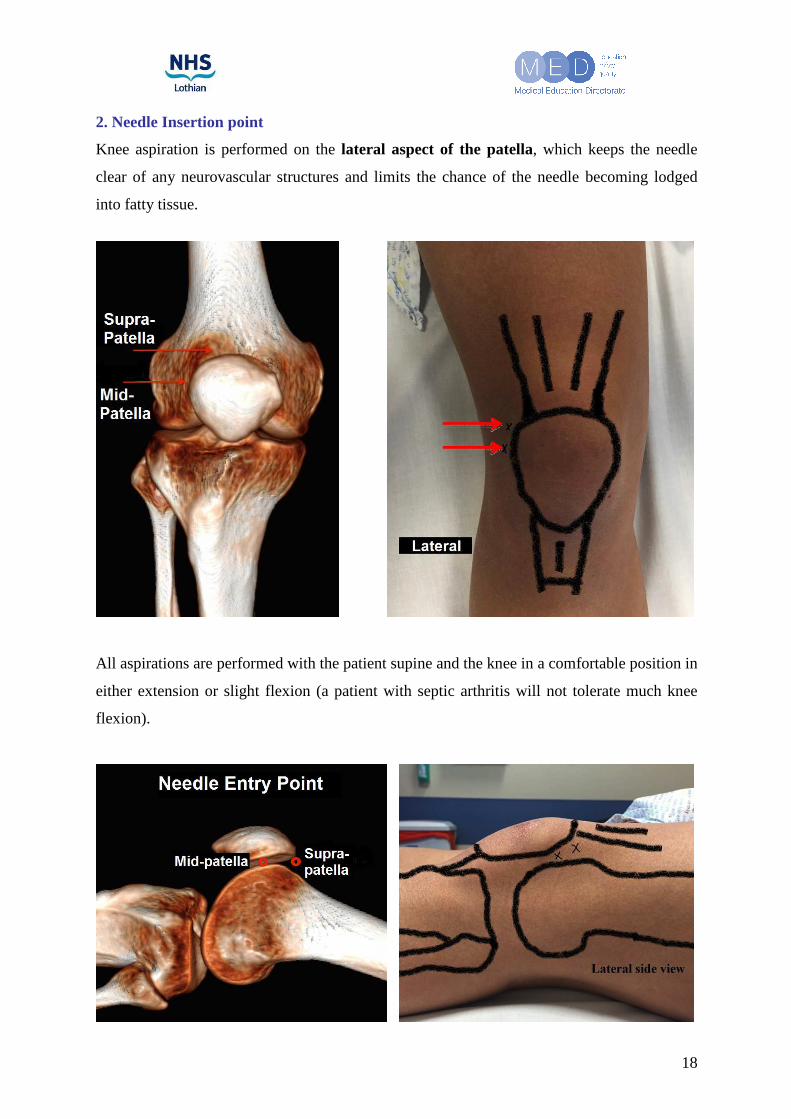
2. Needle Insertion point
Knee aspiration is performed on the lateral aspect of the patella, which keeps the needle
clear of any neurovascular structures and limits the chance of the needle becoming lodged
into fatty tissue.
All aspirations are performed with the patient supine and the knee in a comfortable position in
either extension or slight flexion (a patient with septic arthritis will not tolerate much knee
flexion).

19
3. Needle direction
The needle must invade the suprapatellar pouch as it lies between the superior patella and
trochlea of the femur. The figure below shows the relationship of these bones and
demonstrates that the needle must travel parallel to these joint surfaces. To that end needle
direction is passed medially and slightly posteriorly.
4. Needle depth
The clinician should have confidence that the described needle trajectory will mean avoidance
of significant structures. The bevel will penetrate skin, fat and enter the bursa. If it is inserted
further, the next tissue is bone, which is painful to strike but not dangerous. If the needle
strikes bone it is simply regressed slightly.

20
Equipment
Essential equipment
• Sharps bin
• Procedural trolley
• Apron, sterile gloves
• Sterile pack including:
- Sterile cotton swabs
- Drape
- Small galley pot for cleansing fluid
• Antiseptic solution:
- Chlorhexidine solution
- Iodine based solution (if no allergy)
• 2x 20ml syringe for aspirate collection
• 1 green (21G) needle for insertion into joint and aspiration
- Large needle for aspiration of thick pus
• Adhesive dressings e.g. “Mepore”
• At least 2 universal containers for joint aspirate

21
Optional Equipment
Certain patients may be anxious or in pain and may benefit from skin infiltration of a local
anaesthetic. If required:
• Lidocaine 1% 5mls
• 5ml syringe
• 1 red needle for drawing up lidocaine 1%
• 1 blue (23G) needle for injection of lidocaine 1% subcutaneously
• Sterile scissors

22
Knee Joint Aspiration Procedure
Phase 1 – Preparation, Assistance + Positioning
1. Obtain informed consent
• Explain the procedure to patient
• Potential Complications and their management
2 Assess for contraindications
• Check for anticoagulant or antiplatelet medications
• Check for allergies
• Ensure competent practitioners and adequate supervision available
3. Patient and clinician preparation
• Ensure seating / standing and bed height appropriate
• Remove pager + mobile phone
• Adjust lighting
• Reassure patient

23
4. Patient position
• Knee flexion up to10-20 degrees.
• Place a towel or pillow beneath the knee for comfort
• Palpate the bony landmarks; identify the superolateral border of the patella
• Mark your entry point
5. Arrange equipment
• Arrange equipment (Non-touch technique to ensure sterile field)
• Open your sterile pack and place your equipment onto the trolley
• Draw up 1% lidocaine (if needed)

24
Phase 2 – Asepsis
1. Establish aseptic conditions for clinician and patient
• Put on apron and wash hands with surgical scrub
• Put on sterile gloves
• Apply antiseptic skin wash to area and allow it to dry
- Use circular motions starting centrally at the point intended for aspiration
before moving outwards. Include a large area.

25
2. Drape the patient
• Take care to not touch patient
• The sterile drape does not have an aperture. Before placing it upon a patient’s
knee, pick up the drape and fold it in half. Ensure it does not become contaminated
whilst doing this.
• Tear a 3 cm semicircular hole in the middle of the dressing
• Unfold the drape and you will see a hole has now been created in the centre of the
drape
• Place the drape on the patient’s knee with the aperture over marked aspiration site
• Restart this procedure if the drape becomes contaminated
Phase 3 – Procedural Pause (Crucial for Patient Safety)
• Visualise procedure in correct order
• Perform 3 point check
o Patient
o Assistant
o Clinician
• Provide everyone with an opportunity to speak up
• Repalpate the landmarks and recheck your aspiration point through the drape
• Final equipment check

26
Phase 4 – Anaesthesia & Insertion
1. Insertion
• Introduce a green needle with a 20 ml syringe into your chosen point:
perpendicular to the long axis of the femur and aimed towards the centre of the
knee
• Insert the needle confidently into the joint space while gently aspirating until
synovial fluid enters the syringe
• Aspirate as much fluid as possible. Replace your 20 ml syringe with another if
necessary; secure the needle in place while the 20 ml syringe is replaced with a
new one.
• Withdraw the needle and syringe simultaneously from the knee.

27
Phase 5 – Anchoring + Dressing
• Apply an adhesive dressing (e.g. Mepore)
Phase 6 – Completion
1. Dispose of waste and sharps appropriately 2. Ensure patient comfortable and safe 3. Documentation
• Document procedure in the notes and note the following:
- Date and time of the procedure
- Aspiration performed using an aseptic technique with patient’s consent
- Amount of fluid aspirated
- Macroscopic appearance of the aspirate (see Appendix B)
- Document the neurovascular status of the leg post procedure and document
any complications
4. Other Tasks
• Put the aspirate into a sample tube
• Order labels on TRAK (see Appendix C)

28
• Send the sample to the lab for urgent an gram stain, microscopy, crystals and
culture:
- Call the lab and inform them about the incoming sample
- Micro reception RIE and WGH: 26021 9am-5pm
- Micro reception SJH: 53075 9am-5pm
- For urgent Gram stain, microscopy and crystal assessment Micro is contactable
on bleep 2900 Out of Hours (5pm- 9am) for the RIE, WGH and SJH
• Check the neurovascular status of the leg post procedure
29
Appendices
Appendix A: Trouble-shooting: FAQ’s
1. My insertion spot is correct and the needle is in but I am hitting bone. What do I do?
• If a bone is encountered during needle insertion, partially withdraw the needle a few
millimetres, verify the anatomic landmarks, and advance the needle slowly whilst
aspirating in a corrected direction towards the intercondylar notch.
2. I can’t seem to aspirate any more fluid out of the knee. Am I still in the right place?
• If fluid stops flowing into the syringe, attempt to “milk” the suprapatellar region by
applying gentle pressure to the region.
3. There seems to be a lot of bleeding from the site after aspiration. What should I do?
• The larger blood vessels to the knee are located on the posterior aspect of the knee/
cubital fossa. An anterior approach therefore minimizes the risk of hitting any major
vessels and nerves. Nevertheless, small vessels may be damaged leading to bleeding.
• If this happens, use a sterile dressing and apply firm pressure over the site until
satisfied the bleeding has stopped. If bleeding continues, get senior help.
• This is why history (in particular coagulation status) should always be explored
thoroughly before attempting a knee aspiration.
• Finally, always document the neurovascular status of the leg after aspirating a knee
joint- distal pulses & sensation.
4. Failed Aspiration: *How many attempts are acceptable?
• Even the presence of a grossly swollen knee joint does not guarantee a successful
attempt first time.
• Do not make repeated attempts to withdraw & advance a needle in the knee. This
increases the risk of structural damage, intra-articular bleeding, introducing infection,
and discomfort for the patient.
• If this is the case, reassure the patient and re-gather the necessary equipment.

30
• Palpate the knee joint again and identify the bony landmarks of the knee. Never be
afraid to ask your assistant for their opinion. Take your time.
• Identify a safe zone of aspiration on the contra-lateral side.
• Run through the protocol again from the start.
• If this is still proving difficult reassess.
• Get experienced help.
31
Appendix B: Knee parameters & patterns
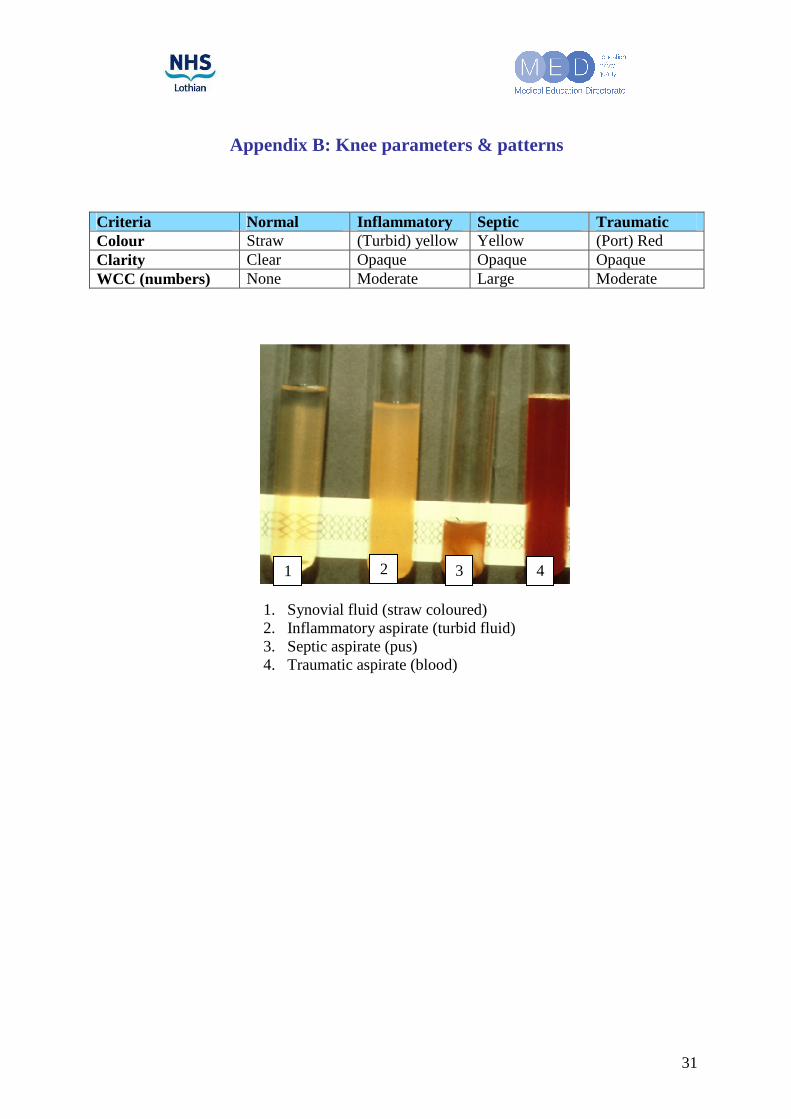
Criteria Normal Inflammatory Septic Traumatic Colour Straw (Turbid) yellow Yellow (Port) Red Clarity Clear Opaque Opaque Opaque WCC (numbers) None Moderate Large Moderate
1. Synovial fluid (straw coloured) 2. Inflammatory aspirate (turbid fluid) 3. Septic aspirate (pus) 4. Traumatic aspirate (blood)
1 2 3 4

32
Appendix C: Request C&S on TRAK
Step 1: Select your patient and click on Order in the Clinical Menu on the top-left of your screen.

33
Step 2: Type in “C&S” in the Order Item bar and select C&S Fluids
34
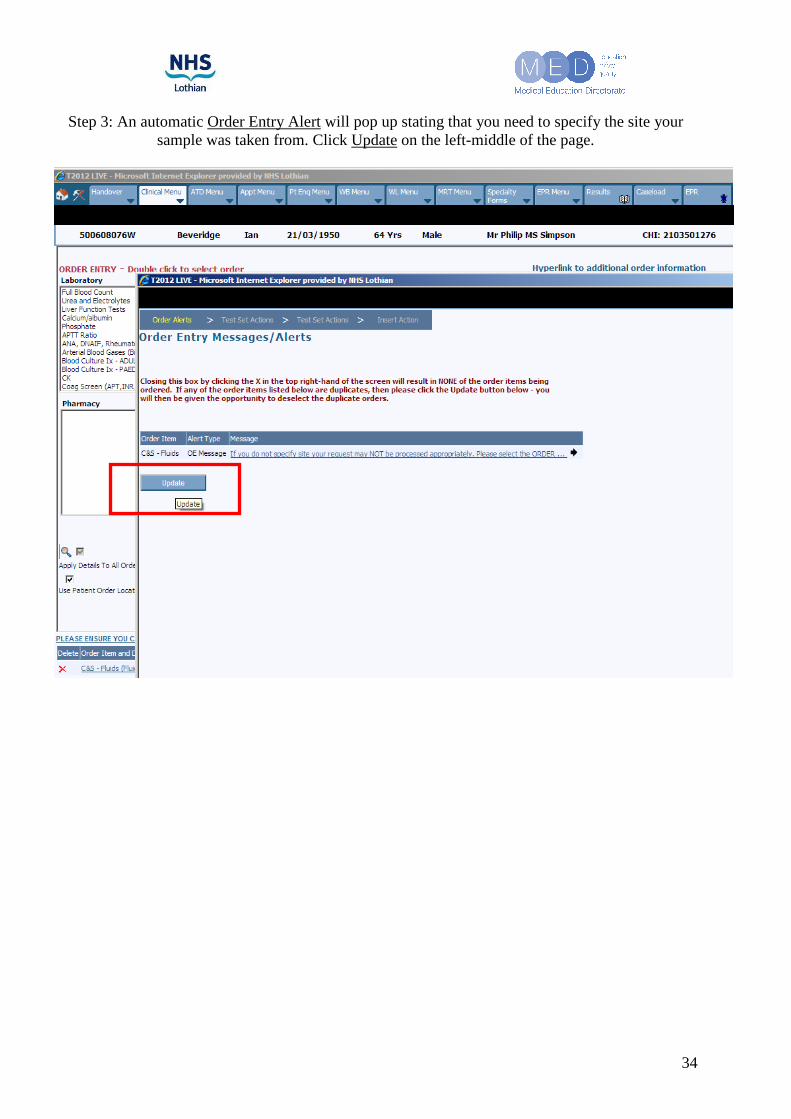
Step 3: An automatic Order Entry Alert will pop up stating that you need to specify the site your sample was taken from. Click Update on the left-middle of the page.

35
Step 4: A second screen will pop up concerning Laboratory Order Details. Select in the Specimen type box Fluid, synovial and in the Body/Sample Site the specific site the aspirate was taken from
(in this reading pack the Knee, Lt or Knee, Rt. Press the Update button again to return to your order entry menu.

36
Step 5: In the main menu, make sure that you have ticked the box next to Specimen Collected now. This will automatically insert the current date and time the box was ticked. This is also the time that will appear in the results menu on TRAK, so don’t print labels long in advance, or else the ordered
date in the results section will be incorrect. Not ticking this box will produce no labels upon completion of your request.
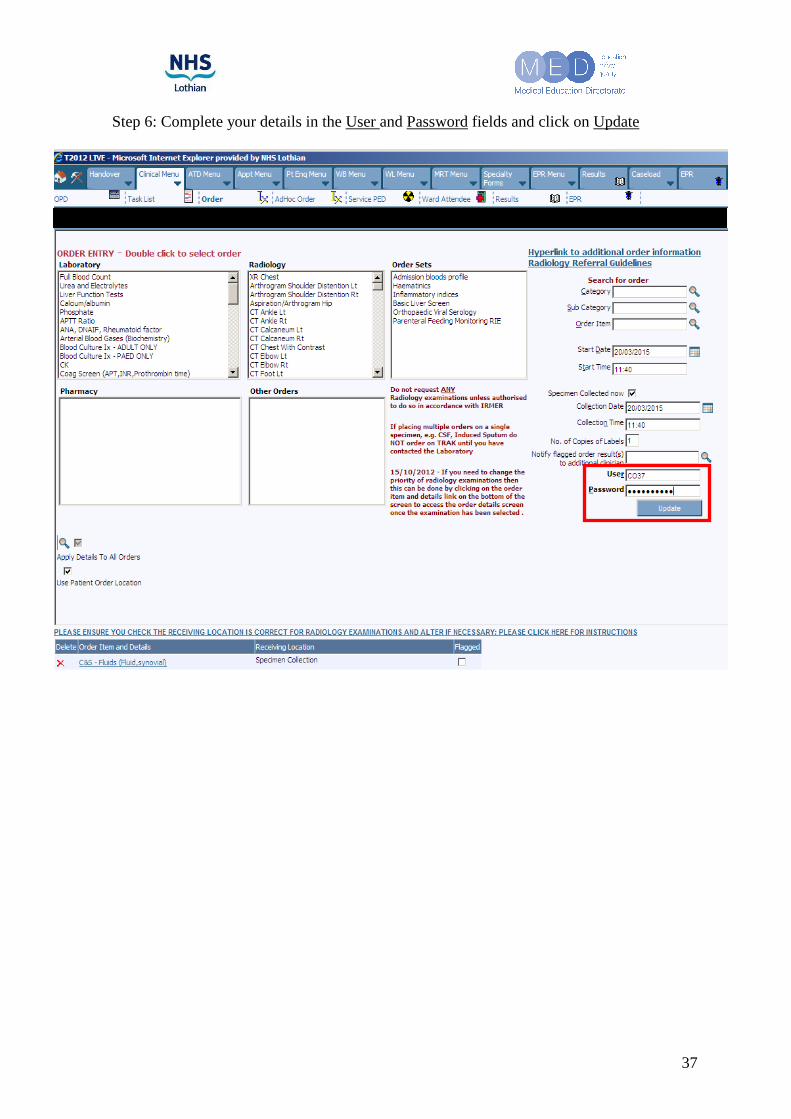
37
Step 6: Complete your details in the User and Password fields and click on Update

38
Step 7: Fill in the details in the boxes behind the bold requests and click on Update to complete your request.

39
Appendix D: Knee Joint Aspiration Equipment Checklist
Item
Obtained
• Sharps Bin
• Apron and sterile gloves.
• Procedural trolley
• Sterile dressing pack
• Antiseptic solution
o iodine based solution (if no allergy)
• 2x 20ml syringe for aspirate collection
• 1 green needle for insertion into joint and aspiration
• Adhesive dressings e.g. “mepore”
• At least 2 universal containers for joint aspirate
Optional Items
Obtained
• Lignocaine 1% 5mls
• Sterile scissors
• 5ml syringe
• 1 red needle for drawing up lidocaine 1%
• 1 blue (23G) needle for injection of lidocaine 1% subcutaneously

40
Appendix E: Knee Joint Aspiration Procedural Checklist
Skill Phase + Component Completed
Phase 1 – Preparation, Assistance + Positioning Explain procedure & obtain informed consent Exclude contraindications, checks allergies Optimise clinician comfort + minimise distraction Position patient Identify bony landmarks & knee aspiration point Mark the site (e.g. pen) Arrange equipment (non-touch technique to ensure sterile field)
Phase 2 – Asepsis + Anaesthesia Put on apron, wash hands & sterile gloves Apply antiseptic skin wash to area appropriately. Allow to dry (non touch) Correct draping of the patient Infiltrate local anaesthetic
Phase 3 – Procedural Pause Perform 3 point check Perform final equipment check
Phase 4 – Aspiration Correct entry point and insertion technique Draw back on syringe as needle advanced Aspirate fluid. Replace 20ml syringe with another if necessary
Phase 5 – Anchoring + Dressing Withdraw needle and syringe from knee Apply adhesive dressing
Phase 6 – Completion Dispose of waste and sharps appropriately Provide instructions to patient Label and send aspirate samples (micro/ culture/ sensitivities) Prescribe analgesia Documentation (fluid appearance, neurovascular status, brief procedural description, include lab results when available)

41
Appendix F: Knee Joint Aspiration Skills Assessment Checklist
(Formative skills assessment)
Date: Session: Tutor:
Candidate Name: Speciality/Grade:
Email address:
Skill Phase + Component Start Yes
Start No
End Yes
End No
Phase 1 – Preparation + Positioning
Optimises clinician comfort & minimises distraction (seat/light/pager)
Patient position (discussion)
Identifies & marks knee aspirate injection site
Opens sterile pack / asks assistant to do so (non-touch)
Ensures correct equipment on trolley (discussion - see checklist)
Phase 2 – Asepsis + Anaesthesia
Washes hands, uses apron & sterile gloves
Applies antiseptic skin wash & allows to dry (non-touch)
Drapes the patient (non-touch)
Phase 3 – Procedural Pause
Performs 3 point check: patient, assistant and clinician
Performs final equipment check
Phase 4 – Aspiration
Safe & correct insertion green needle with attached syringe
Draws back on syringe as advancing
Phase 5 –Dressing
Safely withdraws needle & syringe
Applies dressing
Phase 6 – Completion
Disposes of waste and sharps appropriately
Maintains asepsis throughout
Transfers aspirate into universal containers using non sterile technique
Documents procedure, NV status, anaesthetic used, any complications
Score (out of …)
Score (%)
Baseline Score : Pass / Fail (circle)
End Score: Pass / Fail (circle)
Additional comments? ......................................................................................................................................................
......................................................................................................................................................

42
References
1. Schumacher HR Jr. Aspiration and injection therapies for joints. Arthritis Rheum. Jun 15 2003;49(3):413-20.
2. Rifat SF, Moeller JL. Site-specific techniques of joint injection. Useful additions to your treatment repertoire. Postgrad Med. Mar 2001;109(3):123-6, 129-30, 135-6.
3. Rifat SF, Moeller JL. Basics of joint injection. General techniques and tips for safe, effective use. Postgrad Med. Jan 2001;109(1):157-60, 165-6.
4. Jackson DW, Evans NA, Thomas BM. Accuracy of needle placement into the intra-articular space of the knee. J Bone Joint Surg Am. Sep 2002;84-A(9):1522-7
5. http://www.reumacr.com/FOTOS/acido_hialu.gif (cover picture)