cleaning nebulizer and airway clearance equipment at home
TRANSCRIPT
Physiotherapy Advisory Group
Cleaning Nebulizer and Airway Clearance Equipment at Home
To prevent infections caused by contaminated equipment used in the home, it should be cleaned and disinfected regularly. Equipment must be cleaned thoroughly to remove all debris before disinfecting. After cleaning with mild soap and water, disinfect either by immersion in cold disinfectants or by heat, if permissible by the manufacturer. Proper hand hygiene is required prior to all equipment handling. Please follow your CF team recommendations for proper hand washing technique.
Review Infection Control plan with your Physiotherapist. _________________________________________________________________________________
“Clean Nebulizer & Airway Clearance Equipment After Each Use”Take the device apart. Wash the pieces in mild dish soap and water. Rinse all the pieces in sterile water* Place the pieces on a clean dry towel and air dry. Store the device in a sealed plastic bag. _________________________________________________________________________________
“Sterilize Nebulizer & Airway Clearance Equipment As Soon As Possible After Each Use”Take the device apart. Wash all the pieces in mild soap and water. Choose heat or cold sterilizing by one of the following methods:
Heat sterilizing (if allowed by equipment manufacturer) • Boil for at least 10 minutes OR• Microwave (2.45GHz) for 5 minutes OR• Dishwasher, if temperature is >70°C > 158F, for 30 minutes OR• Electric steam sterilizer
OR Cold sterilizing
• Soak in 70% isopropyl alcohol for 5 minutes ORSoak in 3% Hydrogen peroxide for 30 minutes OR
• Then rinse all the pieces in sterile water*
After sterilizing equipment, place the pieces on a clean dry towel to air-dry, then store the device in a sealed plastic bag.
CF Canada does not support the use of vinegar or bleach as an effective disinfecting agent for patients with Cystic Fibrosis. _________________________________________________________________________________
*Sterile water can be bought or made by boiling tap water for 15 minutes then cooling. Discard after use.

Astra Tech - PEP/RMTTM TheraPEP® PariPEPTM/
PariPEPTM S Flutter Valve
acapella® choice
LC Plus®/ LC® Star/
LC® Sprint
eFlow® rapid/ eFlow® Altera
3% Hydrogen peroxide*
Ok Ok Ok
70% Alcohol* Ok Ok Ok
Bleach (50:1)* Ok NO NO NO
Boiling (10mins) Ok NO Ok Ok Ok Ok Ok
Electric steam
sterilizer NO Ok Ok Ok Ok
Microwave steam
sterilizer NO NO NO Ok NO
Dishwasher Ok NO Ok Ok
* Rinse all the pieces in sterile water after sterilizing o Empty boxes indicate information could not be confirmed
Follow all instructions provided by the manufacturer to maintain respiratory equipment used for airway clearance: AstraTech PEP: TheraPEP: PariPEP/PariPEP-S: Flutter: Acapella: Pari LC nebulisers: E-flow: Prepared by the CFCPAG May 2015. For review May 2017. Prepared based on the review of Canadian Consensus Statement on Aerosolized Antibiotic Use in Cystic Fibrosis Canadian Cystic Fibrosis Foundation (January 2006) and Infection Prevention and Control Guidelines for Cystic Fibrosis: 2013 Update, Cystic Fibrosis Foundation Guideline (August 2014)
Conseil consultatif sur la physiothérapie Nettoyage du nébuliseur et des appareils de dégagement des voies respiratoires à la maison Afin de prévenir les infections causées par des appareils contaminés utilisés à la maison, il importe de nettoyer et de désinfecter régulièrement ces appareils. L'appareil doit être nettoyé à fond pour éliminer tous les corps étrangers avant la désinfection. Après un nettoyage à l'eau et au savon doux, la désinfection se fait soit par une immersion dans un désinfectant à froid ou par la chaleur, si cette méthode est autorisée par le fabricant de l'appareil. Le lavage approprié des mains est requis avant la manipulation de tout appareil. Veuillez suivre attentivement la technique de lavage des mains recommandée par votre équipe de FK. Revoyez votre plan de prévention des infections avec votre physiothérapeute. _________________________________________________________________________________
« Nettoyez votre nébuliseur et vos appareils de dégagement des voies respiratoires après chaque usage »
Démontez l'appareil. Lavez les composantes avec de l'eau et un savon doux. Rincez les composantes dans de l'eau stérile*. Déposez les composantes sur une serviette sèche et propre et laissez sécher à l'air libre. Rangez l'appareil dans un sac de plastique scellé. _________________________________________________________________________________
« Stérilisez votre nébuliseur et vos appareils de dégagement des voies respiratoires dès que possible après chaque usage »
Démontez l'appareil. Lavez toutes les composantes avec de l'eau et un savon doux. Choisissez la thermostérilisation ou la stérilisation froide selon l'une des méthodes suivantes : Thermostérilisation (si le fabricant de l'appareil l'autorise)
Faire bouillir au moins 10 minutes OU
Mettre au micro-ondes (2,45 GHz) pendant 5 minutes OU
Mettre au lave-vaisselle, si la température est > 70 C (≥ 158 F), pendant 30 minutes OU
Utiliser un stérilisateur électrique à vapeur OU Stérilisation froide
Tremper dans de l'alcool isopropyl à 70 % pendant 5 minutes OU
Tremper dans du peroxyde d'hydrogène à 3 % pendant 30 minutes
Puis rincer toutes les composantes dans de l'eau stérile* Après la stérilisation de l'appareil, mettre les composantes sur une serviette sèche et propre pour laisser sécher à l'air libre, puis ranger l'appareil dans un sac de plastique scellé.
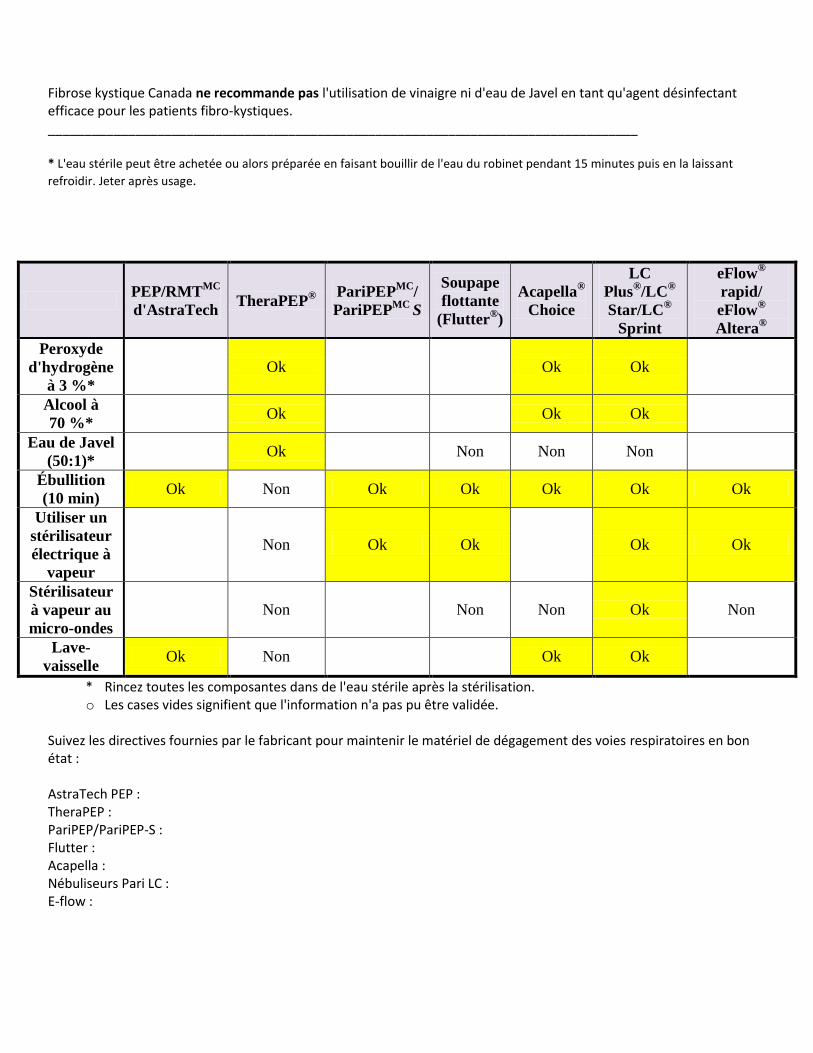
Fibrose kystique Canada ne recommande pas l'utilisation de vinaigre ni d'eau de Javel en tant qu'agent désinfectant efficace pour les patients fibro-kystiques. _________________________________________________________________________________ * L'eau stérile peut être achetée ou alors préparée en faisant bouillir de l'eau du robinet pendant 15 minutes puis en la laissant
refroidir. Jeter après usage.
PEP/RMT
MC
d'AstraTech TheraPEP
®
PariPEPMC
/
PariPEPMC
S
Soupape
flottante
(Flutter®)
Acapella®
Choice
LC
Plus®/LC
®
Star/LC®
Sprint
eFlow®
rapid/
eFlow®
Altera®
Peroxyde
d'hydrogène
à 3 %*
Ok Ok Ok
Alcool à
70 %* Ok Ok Ok
Eau de Javel
(50:1)* Ok Non Non Non
Ébullition
(10 min) Ok Non Ok Ok Ok Ok Ok
Utiliser un
stérilisateur
électrique à
vapeur
Non Ok Ok Ok Ok
Stérilisateur
à vapeur au
micro-ondes
Non Non Non Ok Non
Lave-
vaisselle Ok Non Ok Ok
* Rincez toutes les composantes dans de l'eau stérile après la stérilisation. o Les cases vides signifient que l'information n'a pas pu être validée.
Suivez les directives fournies par le fabricant pour maintenir le matériel de dégagement des voies respiratoires en bon état : AstraTech PEP : TheraPEP : PariPEP/PariPEP-S : Flutter : Acapella : Nébuliseurs Pari LC : E-flow :

Rédigé par le Conseil consultatif sur la physiothérapie de Fibrose kystique Canada en mai 2015. Révision prévue pour mai 2017. Ce document a été rédigé en accord avec le Protocole d’accord canadien sur l’utilisation des antibiotiques en aérosol dans la fibrose kystique de la Fondation de la
fibrose kystique (janvier 2006) et les Lignes directrices de la CF Foundation en matière de prévention et de contrôle des infections : Mise à jour 2013, Lignes
directrices de Fibrose kystique Canada (août 2014).

3551-1205
GB Including recommendations for cleaning of Pep/Rmt system accessories
DE Inklusive Reinigungsempfehlung für Pep/Rmt Zubehör
FR Ci joints les recommandations pour le nettoyage du masque Pep/Rmt et ses accessoires
IT Sono incluse le istruzioni per la pulizia degli accessori del sistema Pep/Rmt
NL Inclusief aanbevelingen voor het reinigen van onderdelen van het Pep/Rmt-systeem
SE Inkluderar rekommendationer för rengöring av tillbehör till Pep/Rmt-systemet
DK Indeholder vejledning til rengøring af tilbehøret til Pep/Rmt systemet
NO Inklusiv veiledning for rengjøring av Pep/Rmt-systemet med tilbehør
FI Suositukset Pep/Rmt-järjestelmän lisävarusteiden puhdistamisesta
(Ref No 71130, 71131)

2
1
3
5
4
2

3
4
IndicationsThe Pep/Rmt™ set is used to increase reduced lung volumes, decrease high lung volumes, to evacu-ate sputum and to increase strength and endurance in the inspiratory muscles.
CautionSince the tidal volume of certain patients (e.g. infants or severe obstructive lung disease) can be in parity with the dead space volume of the mask, there is a risk for raised CO2 levels in the re-inspired air. PEP treatment for such patients should therefore only be initiated by specialists and with caution.
If the treatment makes you feel dizzy or sick, or if it is unpleasantly strenuous, consult your physio-therapist.
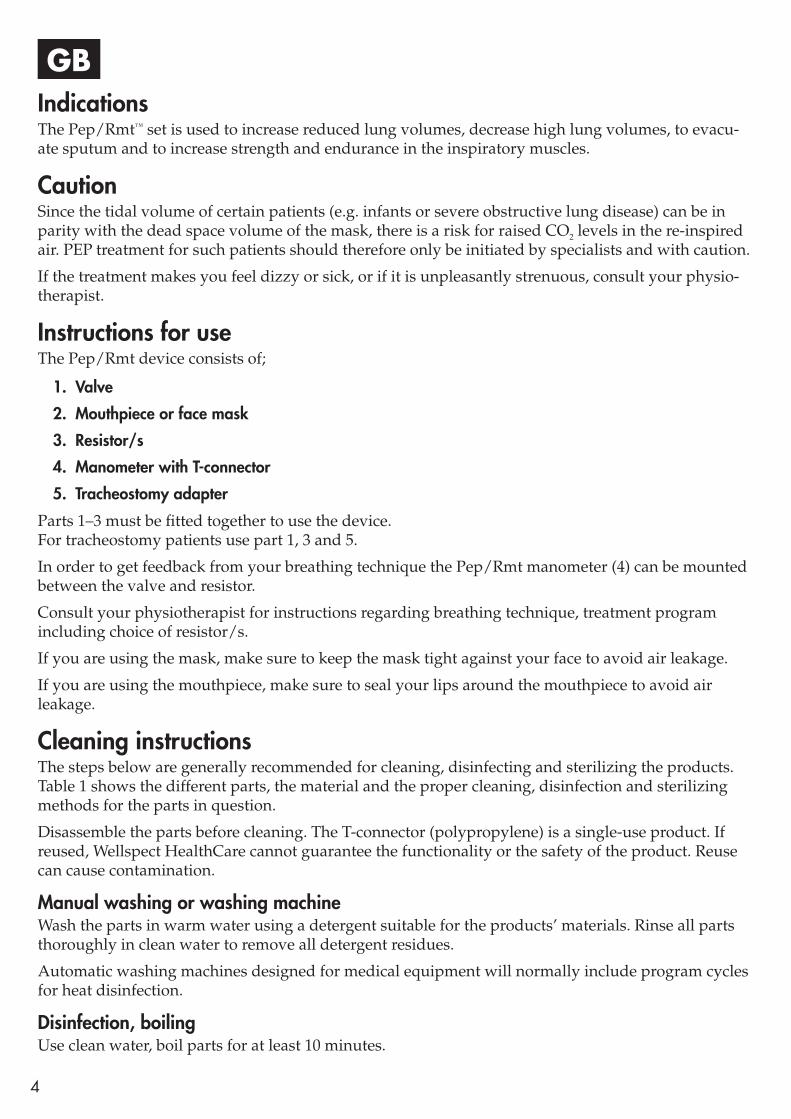
Instructions for useThe Pep/Rmt device consists of;
1. Valve
2. Mouthpiece or face mask
3. Resistor/s
4. Manometer with T-connector
5. Tracheostomy adapter
Parts 1–3 must be fi tted together to use the device. For tracheostomy patients use part 1, 3 and 5.
In order to get feedback from your breathing technique the Pep/Rmt manometer (4) can be mounted between the valve and resistor.
Consult your physiotherapist for instructions regarding breathing technique, treatment program including choice of resistor/s.
If you are using the mask, make sure to keep the mask tight against your face to avoid air leakage.
If you are using the mouthpiece, make sure to seal your lips around the mouthpiece to avoid air leakage.
Cleaning instructionsThe steps below are generally recommended for cleaning, disinfecting and sterilizing the products. Table 1 shows the different parts, the material and the proper cleaning, disinfection and sterilizing methods for the parts in question.
Disassemble the parts before cleaning. The T-connector (polypropylene) is a single-use product. If reused, Wellspect HealthCare cannot guarantee the functionality or the safety of the product. Reuse can cause contamination.
Manual washing or washing machineWash the parts in warm water using a detergent suitable for the products’ materials. Rinse all parts thoroughly in clean water to remove all detergent residues.
Automatic washing machines designed for medical equipment will normally include program cycles for heat disinfection.
Disinfection, boilingUse clean water, boil parts for at least 10 minutes.
GB

5
Disinfection, chemicalsNumerous brands of detergents and chemical disinfections are available. To avoid premature mate-rial deterioration only use compatible detergent and chemical disinfectant brands. See list of materi-als in table 1. Follow the manufacturer’s instructions for the detergent or chemical disinfectant as to dilution and exposure time. Substances containing phenol should be avoided. After exposing the parts to the chemical disinfectant, rinse thoroughly in clean water to remove all residues.
Autoclaving, 121°C / 134°CUse standard autoclaving equipment adjusted for max 121°C, or 134°C, whichever is applicable for the product.
Drying and coolingLeave parts to dry and/or cool completely before reassembling the part.
Inspection of partsAfter cleaning, disinfecting and/or sterilizing carefully inspect all parts for damage or excessive wear and replace if necessary. In case of material deterioration, e.g. cracking, the parts should be replaced.
Note: Some methods may cause discolouration of silicone parts without having an impact on their function.
The face masks have an expected lifetime of 1–3 years, depending on usage.
Applicable Methods Not applicable Cleaning Disinfection /sterilising
Washing Disinfection Autoclaving
Part Material Man
ual w
ashi
ng
Was
hing
mac
hine
Boili
ng
Che
mic
als
121°
C
134°
C
Valve if needed Polycarbonate / silicone
Resistors if needed Polyamid 66
Manometer if needed*
Mask after each use Silicone
Tracheostomy adapter if needed
Polycarbonate
Mouthpiece after each use Polypropylene
Table 1
* Wipe carefully with a paper towel and disinfectant.

8
IndicationsLe set Pep/Rmt™ sert à augmenter un volume pulmonaire diminué, à réduire un volume pulmonaire élevé, à évacuer les expectorations et à augmenter la force et l’endurance des muscles inspiratoires.
AttentionLe volume courant de certains patients (par ex. de nourrissons ou de patients souffrant de broncho-pneumopathie obstructive sévère) pouvant être égal au volume de l’espace mort du masque, il existe un risque de taux de CO2 augmentés dans l’air ré-inspiré. Pour de tels patients, un traitement par PEP ne devrait donc être initié que par des spécialistes et avec prudence.
Si le traitement vous donne des vertiges ou des nausées, ou s’il est très pénible, consultez votre kinésithérapeute.
Mode d’emploiLe système Pep/Rmt est constitué de :
1. Une valve
2. Une pièce buccale ou un masque facial
3. Un ou plusieurs résistors
4. Un manomètre avec un raccord en T
5. Adaptateur de trachéotomie
Les éléments 1 à 3 doivent être assemblés ensemble afi n de pouvoir utiliser l’appareil. Pour les patients ayant subi une trachéotomie, utiliser les éléments 1, 3 et 5.
Afi n d’obtenir des informations sur votre technique de respiration, le manomètre pour Pep/Rmt (4) peut être monté entre la valve et le résistor.
Consultez votre kinésithérapeute pour des instructions concernant la technique de respiration, le programme thérapeutique, y compris le choix du ou des résistors.
Si vous utilisez le masque, gardez le masque serré contre votre visage pour éviter toute fuite d’air.
Si vous utilisez la pièce buccale, gardez vos lèvres scellées autour de la pièce buccale pour éviter toute fuite d’air.
Instructions de nettoyageLes étapes ci-dessous sont généralement recommandées pour le nettoyage, la désinfection et la stérilisation des éléments. Le tableau 1 représente les différents éléments, le matériel et les méthodes appropriées pour nettoyer, désinfecter et stériliser les éléments en question. Démonter les éléments avant nettoyage.
Le connecteur en T (polypropylène) est à usage unique. S’il est réutilisé, Wellspect HealthCare ne peut garantir le fonctionnement et la sécurité du produit. La réutilisation peut entrainer une contamination.
Lavage manuel ou en machine à laverLaver les éléments à l’eau chaude avec un détergent compatible avec les matériaux des produits. Rincer soigneusement toutes les éléments à l’eau claire pour éliminer toute trace de détergent.
Les machines à laver automatiques conçues pour les équipements médicaux incluent normalement des cycles de programme de désinfection à la chaleur.
Désinfection, ébullitionUtiliser de l’eau propre, faire bouillir les éléments au minimum pendant 10 minutes.
FR

9
Désinfection par produits chimiquesDe nombreuses marques de détergents et de désinfectants chimiques sont disponibles. Pour éviter la détérioration prématurée du matériel, n’utiliser que des marques de détergents et de désinfectants chimiques compatibles. Voir la liste des matériels sur le tableau 1. Suivre les instructions du fabricant de détergent ou de désinfectant chimique au sujet de la dilution et le temps d’exposition. Les substances contenant du phénol doivent être évitées. Après avoir exposé les éléments au désinfectant chimique, rincer minutieusement à l’eau claire pour éliminer toute trace de résidu.
Autoclavage, 121°C / 134°CUtiliser un équipement d’autoclave standard réglé à 121°C ou 134°C maximum, en fonction de ce qui est applicable pour le produit.
Séchage et refroidissementLaisser les éléments sécher et/ou refroidir complètement avant de les rassembler.
Vérifi cation des élémentsAprès le nettoyage, la désinfection et/ou la stérilisation, vérifi er soigneusement tous les éléments à la recherche de signes d’usure ou de détérioration et les remplacer si nécessaire. En cas de détériora-tion, par ex. fi ssuration, des matériaux, les éléments doivent être remplacés.
Remarque : Certaines méthodes peuvent entraîner une décoloration des éléments en silicone sans avoir d’impact sur leur fonctionnement.
Les masques faciaux ont une durée de vie attendue de 1 à 3 ans, en fonction de leur utilisation.
Possible Méthodes Non possible Nettoyage Désinfection / stérilisation
Lavage Désinfection Autoclavage
Éléments Matière première Lava
ge m
anue
l
Lava
ge e
n m
achi
ne
Ebul
litio
n
Prod
uits
chim
ique
s
121°
C
134°
C
Valve si nécessaire Polycarbonate / silicone
Résistors si nécessaire Polyamide 66
Manomètre si nécessaire*
Masque après chaque utilisation Silicone
Adaptateur de trachéotomie si nécessaire Polycarbonate
Pièce buccale après chaque utilisation Polypropylène
Tableau 1
*Bien essuyer avec un essuie-main et du désinfectant.


CAUTION: U.S. Federal Law restricts this device to sale by or on the order of a physician. Read all warnings and instructions before use. Improper use can result in serious or fatal illness or injury. PEP™ device not sterile.
PRECUACIÓN: La Ley Federal de los Estados Unidos de Norteamérica (USA) permite la venta de este producto solo bajo prescripción médica. Lea todas las advertencias e instrucciones antes de usarse. El manejo inapropiado podría resultar en perjuicio del paciente o su enfermedad o hasta llegar a ser fatal. Dispositivo de PEP™ no estéril.
ATTENTION: La loi fédérale américaine exige que ce dispositif soit vendu sur recommandation ou pre scription médicale. Lire tous les avertissements et toutes les instructions avant l’emploi. L’usage inapproprié de ce dispositif peut transmettre une maladie ou entraîner une blessure grave ou même mortelle. L’appareil PEP™ pas stérile.
WARNING / ADVERTENCIA / AVERTISSEMENT:
FOR SINGLE PATIENT USE (ONE PERSON) ONLY
FOR USE WITH PARI LC®, PARI LC® PLUS, AND PARI LC® STARREUSABLE NEBULIZERS
INSTRUCTIONS FOR USE
PART #18F61PEP™ SYSTEM
PARI PEP™ SYSTEM THE EFFECTIVE COMBINATION OF PEP™ AND INHALATIONTHERAPY FOR SECRETION MOBILIZATION IN ACUTE AND CHRONIC DISEASES OF THE LOWER AIRWAYS.
NOSE CLIP
MANOMETER PORT CAP
MANOMETER PORT
UPPER PEP™ COMPONENT
LOWER PEP™ COMPONENT
PEP™ MOUTHPIECE
Before reading these Instructions For Use, open this page to expose the illus trations. When reading Section III on Set-Up, the illustrations on the left inside flap will match the illustrations in the text. These illus trations will be helpful to you as they are ref er enced through out these In structions For Use.
ENGLISH 5
ILLUSTRATIONS
WARNING!
Use only when prescribed by a physician and with the prescribed medication. Use only with compressors and tubing authorized by PARI. Other com pressors and tubing may produce incorrect air flow, resulting in improper treatment.
Antes de leer estas “Instrucciones Para El Uso” del equipo, abra la página con el doblez. De esa manera cuando lea la sección III de montaje, los dibujos de la izquierda del doblez de la página coincidirán con el texto. Estas ilustraciones serán de ayuda para usted, como referencia, a través de estas Instrucciones Para El Uso.
ESPAÑOL 9
ILUSTRACIONES
ADVERTENCIA:Utilícese solamente cuando lo pre scribe un médico y con el medicamento prescrito. Utilícese únicamente con el compresor y la manguera autorizada por PARI para este equipo. El uso de otros compresores y/o mangueras podrían resultar en un tratamiento inapropiado.
Avant de lire ce guide d’utilisation, ouvrir cette page pour exposer les illus trations. Les illustrations figurant sur le rabat intérieur gauche corre spon dent au texte de la Section III. Étant donné qu’on s’y reporte dans tout le guide d’utilisation, ces illustrations seront utiles à l’utilisateur.
ILLUSTRATIONS
FRANÇAIS 13
AVERTISSEMENT L’utiliser uniquement comme prescrit par le médecin et seulement pour le médicament prescrit. N’utiliser cet appareil qu’avec les compresseurs et les tubulures approuvés par PARI. L’emploi d’autres compresseurs et tubulures non approuvés peut nuire à l’efficacité du traitement.
DS-18-600 REV.Q 5/06
!
!
!
43 17
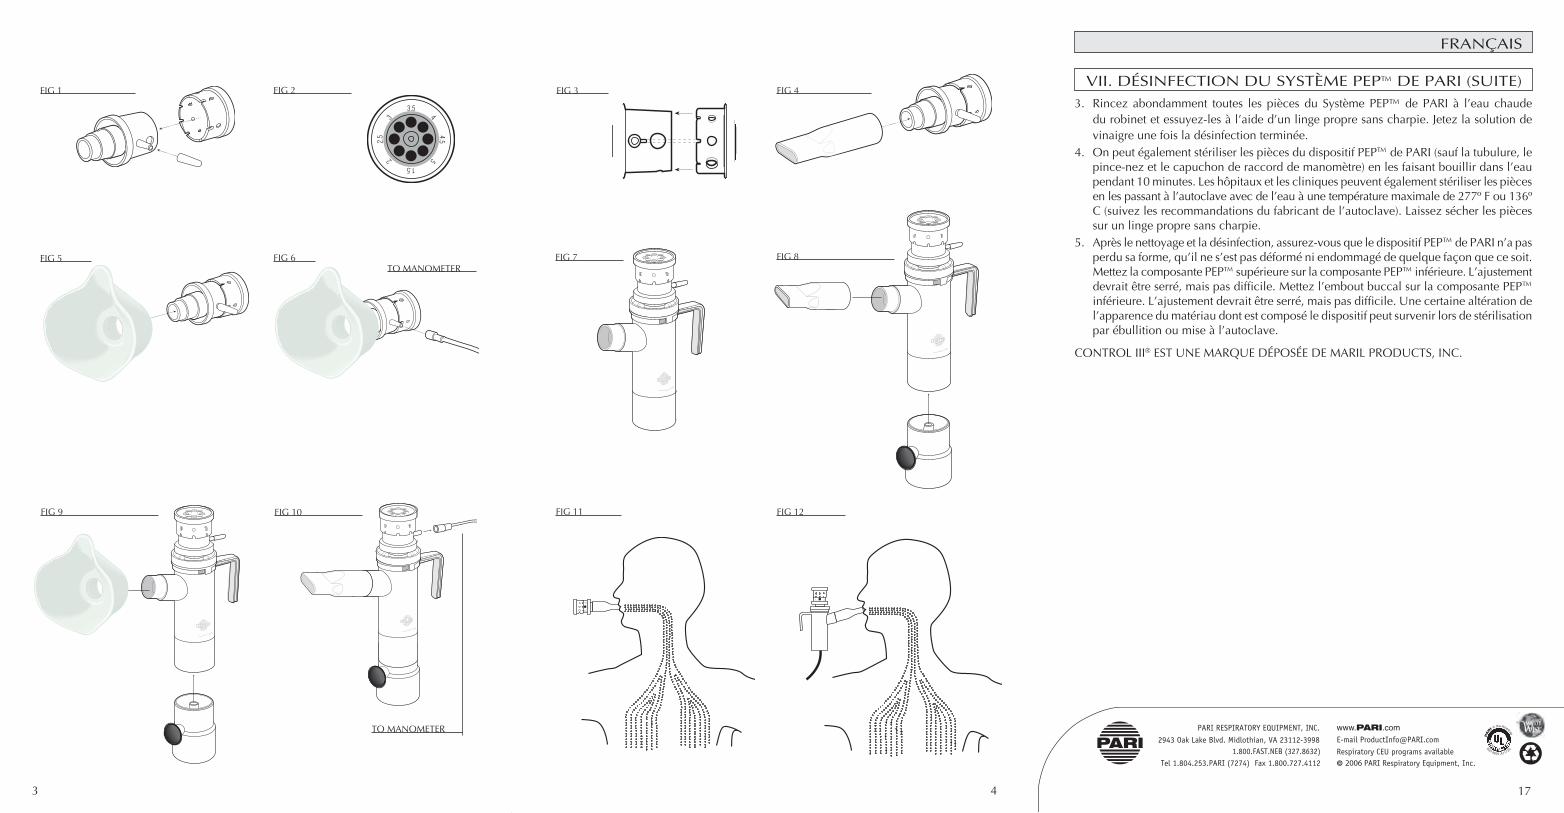
3. Rincez abondamment toutes les pièces du Système PEP™ de PARI à l’eau chaude du robinet et essuyez-les à l’aide d’un linge propre sans charpie. Jetez la solution de vinaigre une fois la désinfection terminée.
4. On peut également stériliser les pièces du dispositif PEP™ de PARI (sauf la tubulure, le pince-nez et le capuchon de raccord de manomètre) en les faisant bouillir dans l’eau pendant 10 minutes. Les hôpitaux et les cliniques peuvent également stériliser les pièces en les passant à l’autoclave avec de l’eau à une température maximale de 277º F ou 136º C (suivez les recommandations du fabricant de l’autoclave). Laissez sécher les pièces sur un linge propre sans charpie.
5. Après le nettoyage et la désinfection, assurez-vous que le dispositif PEP™ de PARI n’a pas perdu sa forme, qu’il ne s’est pas déformé ni endommagé de quelque façon que ce soit. Mettez la composante PEP™ supérieure sur la composante PEP™ inférieure. L’ajustement devrait être serré, mais pas difficile. Mettez l’embout buccal sur la composante PEP™ inférieure. L’ajustement devrait être serré, mais pas difficile. Une certaine altération de l’apparence du matériau dont est composé le dispositif peut survenir lors de stérilisation par ébullition ou mise à l’autoclave.
CONTROL III® EST UNE MARQUE DÉPOSÉE DE MARIL PRODUCTS, INC.
FRANÇAIS
VII. DÉSINFECTION DU SYSTÈME PEP™ DE PARI (SUITE)FIG 1
FIG 5 FIG 6 FIG 7
FIG 2
TO MANOMETERFIG 8
FIG 3 FIG 4
FIG 11 FIG 12FIG 9 FIG 10
TO MANOMETER

™
516
WARNINGCAUTION: U.S. Federal Law restricts this device to sale by or on the order of a physician. Use only when prescribed by a physician. Read all warnings and instructions before use. Improper use can result in serious or fatal illness or injury.
Indications for UseThe PARI PEP™ Device is an expiratory resistance exerciser designed to help pa tients exercise their lungs properly and improve secretion (mucus) clearance. This expiratory resistance exerciser is for use with pa tients for whom a physician has prescribed lung exercise therapy at home, physician’s office, hospitals and clinics. The PARI PEP™ was designed to work both as conventional PEP™ therapy and to gether with PARI Nebulizers.Use only with nebulizers and tubing authorized by PARI for this device. Other nebu lizers and tubing may result in improper treatment.
Contraindications:The following should be carefully evaluated before a decision is made to initiate Positive Ex pi ratory Pressure (PEP™) therapy: Inability to tolerate increased work of breathing; presence of an intracranial aneurysm or elevated intracranial pressure (ICP) >20 mm Hg; hemodynamic in sta bility; recent facial, oral or skull surgery or trauma; acute si nusi tis; epistaxis; esophageal surgery; active hemoptysis; nausea; known or suspected tympanic membrane rup ture or other middle ear pa thology; and un treated pneu motho rax; acute ab-domi nal pa thology, abdominal aortic an eu rysm, hiatal hernia, or preg nancy and presence of reduced coronary artery per fusion, such as in acute myocardial infarction.
!buccal. Si vous utilisez un nébuliseur conjointement à l’inhalothérapie PEP™, arrêtez le compresseur ou déclenchez le bouton interrupteur pour conserver le médicament.
4. En inspirant profondément, effectuez 2 ou 3 expirations prolongées, puis toussez et crachez toutes les mucosités ainsi délogées.
5. Respirez normalement pendant une minute puis répétez les étapes 1 à 4.
UTILISEZ CE DISPOSITIF EN SUIVANT À LA LETTRE LES INSTRUCTIONS DE VOTRE MÉDECIN!6. Deux fois par jour ou selon les instructions de votre médecin ou thérapeute, vous devriez
effectuer 5 à 6 cycles d’inhalothérapie PEP™ combinés à des expirations prolongées et des toussotements.
REMARQUE: Si vous sentez le besoin de tousser durant une séance de traitement, retirez le masque ou l’embout buccal pour éviter de le faire dans le dispositif.
S’il reste une quantité de médicament dans le nébuliseur une fois que vous avez effectué une séance de thérapie PEP™/nébulisation combinée, poursuivez la thérapie de nébulisation seule dans le PEP™ jusqu’à ce que tout le médicament soit utilisé.
FRANÇAIS
IV. MODE D’UTILISATION (SUITE)
VI. NETTOYAGE DU SYSTÈME PEP™ DE PARI1. Retirez le Système PEP™ de PARI du nébuliseur (consultez les in structions de nettoyage
et de désinfection fournies avec le nébuliseur PARI) et démontez-en les pièces.2. Lavez toutes les pièces (sauf le manomètre et la tubulure) à l’eau chaude additionnée de
savon liquide à vaisselle. Rincez-les abondamment à l’eau chaude et secouez-les pour en éliminer l’excès d’eau.
3. Laissez sécher à l’air les pièces du dispositif PEP™ de PARI ou essuyez-les à l’aide d’un linge propre sans charpie. Une fois les pièces sèches, assemblez le Système PEP™ de PARI et rangez-le.
VII. DÉSINFECTION DU SYSTÈME PEP™ DE PARI
AVERTISSEMENT — POUR RÉDUIRE LE RISQUE D’INFECTION:
!
1. Le Système PEP™ de PARI ne doit servir qu’à un seul patient (une personne). Ne partagez pas votre Système PEP™ avec d’autres patients.
2. Vous devez nettoyer et stériliser le Système PEP™ de PARI entre chaque traitement, sinon vous vous exposez à des maladies graves, même mortelles.
1. Nettoyez le Système PEP™ de PARI comme indiqué à la Section VI.2. À tous les deux jours de traitement, faites tremper pendant une (1) heure toutes les pièces
du Système PEP™ de PARI (sauf le manomètre et la tubulure) dans une solution composée d’une (1) partie de vinaigre blanc distillé et trois (3) parties d’eau très chaude du robinet. Vous pouvez aussi remplacer le vinaigre distillé par un désinfectant pour équipement respiratoire (tel Control III® et, le cas échéant, suivez les recommandations de mélange du fabricant).
ENGLISH
Pour les malades de mucoviscidose, la Fondation CF recommande de bouillir pendant10 minutes entières pour dèsinfecter.
1. To reduce the risk of increased bacterial growth, infection, illness, or injury from contamination, thoroughly clean and dry all parts of the PARI PEP™ at the end of every treatment following the instructions below.
2. Cleaning the PARI PEP™ after each treatment is not enough —you must regularly disinfect or sterilize the PARI PEP™ between treatments to prevent serious or fatal illness caused by contamination of the PARI PEP™.
3. Close supervision is necessary when this product is used by or near children and physically or mentally impaired. Never use when sleeping or drowsy.
4. This product contains small parts that may present a choking hazard to small children. ALWAYS USE CLOSE ADULT SUPERVISION WHEN ADMINISTERING A TREATMENT TO A CHILD. DO NOT LEAVE CHILD UNATTENDED DURING TREATMENT.
5. Before use, check the PARI PEP™ for proper assembly. All parts should be seated firmly in place. Use of an improperly assembled PARI PEP™ could diminish or prevent adequate delivery of medication and the effectiveness of the treatment.
WARNING!
6 7
ENGLISH
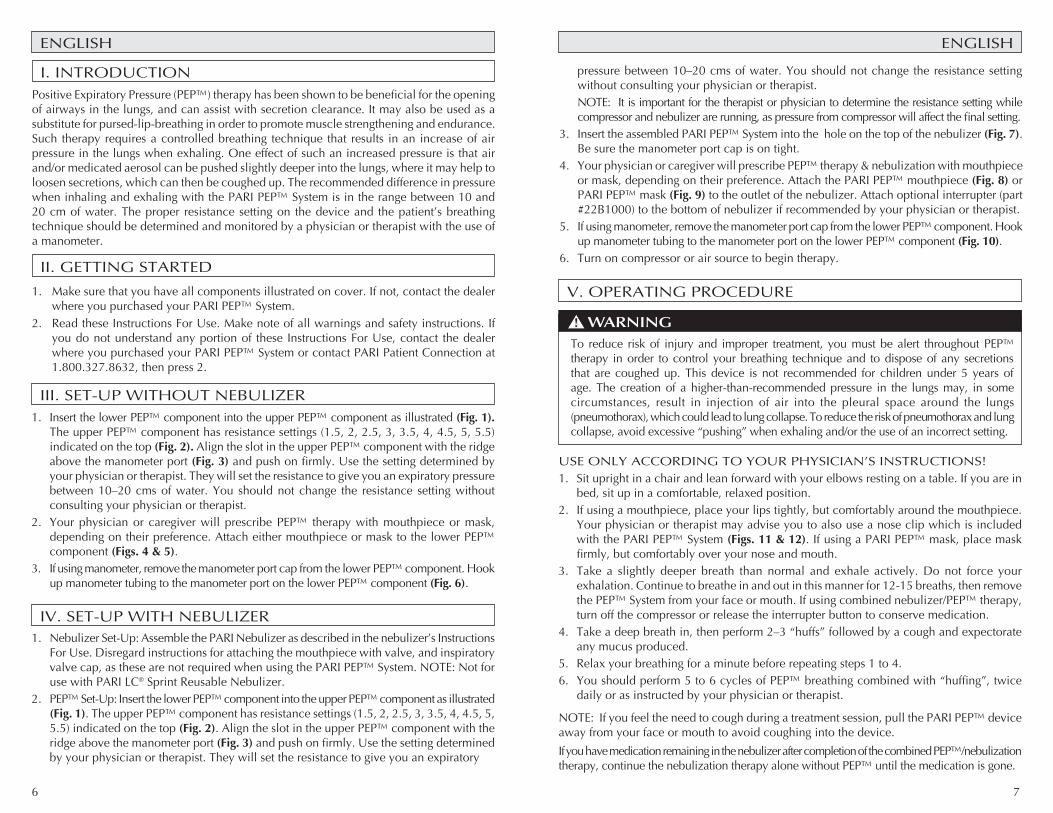
III. SET-UP WITHOUT NEBULIZER1. Insert the lower PEP™ component into the upper PEP™ component as illustrated (Fig. 1).
The upper PEP™ component has resistance settings (1.5, 2, 2.5, 3, 3.5, 4, 4.5, 5, 5.5) indicated on the top (Fig. 2). Align the slot in the upper PEP™ component with the ridge above the manometer port (Fig. 3) and push on firmly. Use the setting determined by your physician or therapist. They will set the resistance to give you an expiratory pressure between 10–20 cms of water. You should not change the resistance setting without consulting your physician or therapist.
2. Your physician or caregiver will prescribe PEP™ therapy with mouthpiece or mask, depending on their preference. Attach either mouthpiece or mask to the lower PEP™ component (Figs. 4 & 5).
3. If using manometer, remove the manometer port cap from the lower PEP™ component. Hook up manometer tubing to the manometer port on the lower PEP™ component (Fig. 6).
IV. SET-UP WITH NEBULIZER1. Nebulizer Set-Up: Assemble the PARI Nebulizer as described in the nebulizer’s In structions
For Use. Disregard instructions for attaching the mouthpiece with valve, and inspiratory valve cap, as these are not required when using the PARI PEP™ System. NOTE: Not for use with PARI LC® Sprint Reusable Nebulizer.
2. PEP™ Set-Up: Insert the lower PEP™ component into the upper PEP™ component as illus trated (Fig. 1). The upper PEP™ component has resistance settings (1.5, 2, 2.5, 3, 3.5, 4, 4.5, 5, 5.5) indicated on the top (Fig. 2). Align the slot in the upper PEP™ component with the ridge above the manometer port (Fig. 3) and push on firmly. Use the setting determined by your physician or therapist. They will set the resistance to give you an expiratory
ENGLISH
V. OPERATING PROCEDURE
USE ONLY ACCORDING TO YOUR PHYSICIAN’S INSTRUCTIONS!1. Sit upright in a chair and lean forward with your elbows resting on a table. If you are in
bed, sit up in a comfortable, relaxed position. 2. If using a mouthpiece, place your lips tightly, but comfortably around the mouthpiece.
Your physician or therapist may advise you to also use a nose clip which is included with the PARI PEP™ System (Figs. 11 & 12). If using a PARI PEP™ mask, place mask firmly, but comfortably over your nose and mouth.
3. Take a slightly deeper breath than normal and exhale actively. Do not force your exhalation. Continue to breathe in and out in this manner for 12-15 breaths, then remove the PEP™ System from your face or mouth. If using combined nebulizer/PEP™ therapy, turn off the compressor or release the interrupter button to conserve medication.
4. Take a deep breath in, then perform 2–3 “huffs” followed by a cough and expectorate any mucus produced.
5. Relax your breathing for a minute before repeating steps 1 to 4.6. You should perform 5 to 6 cycles of PEP™ breathing combined with “huffing”, twice
daily or as instructed by your physician or therapist.
NOTE: If you feel the need to cough during a treatment session, pull the PARI PEP™ device away from your face or mouth to avoid coughing into the device.
If you have medication remaining in the nebulizer after completion of the combined PEP™/nebulization therapy, continue the nebulization therapy alone without PEP™ until the medication is gone.
WARNING!
To reduce risk of injury and improper treatment, you must be alert throughout PEP™ therapy in order to control your breathing technique and to dispose of any se cretions that are coughed up. This device is not rec ommended for children under 5 years of age. The creation of a higher-than-recommended pressure in the lungs may, in some circumstances, result in injection of air into the pleural space around the lungs (pneumothorax), which could lead to lung collapse. To reduce the risk of pneu motho rax and lung collapse, avoid excessive “pushing” when exhaling and/or the use of an incorrect setting.
I. INTRODUCTIONPositive Expiratory Pressure (PEP™) therapy has been shown to be beneficial for the opening of airways in the lungs, and can assist with secretion clearance. It may also be used as a substitute for pursed-lip-breathing in order to promote muscle strength ening and en durance. Such therapy requires a con trolled breathing technique that results in an increase of air pressure in the lungs when exhaling. One effect of such an increased pressure is that air and/or medicated aerosol can be pushed slightly deeper into the lungs, where it may help to loosen se cretions, which can then be coughed up. The recommended difference in pressure when in haling and exhaling with the PARI PEP™ System is in the range between 10 and 20 cm of water. The proper resistance setting on the device and the patient’s breathing technique should be determined and monitored by a physician or thera pist with the use of a manometer.
II. GETTING STARTED
1. Make sure that you have all components illustrated on cover. If not, contact the dealer where you purchased your PARI PEP™ System.
2. Read these Instructions For Use. Make note of all warnings and safety instructions. If you do not understand any portion of these Instructions For Use, contact the dealer where you purchased your PARI PEP™ System or con tact PARI Patient Connection at 1.800.327.8632, then press 2.
pressure between 10–20 cms of water. You should not change the re sis tance setting without consulting your physician or therapist.
NOTE: It is important for the therapist or physician to determine the resistance setting while compressor and nebulizer are running, as pressure from compressor will affect the final setting.
3. Insert the assembled PARI PEP™ System into the hole on the top of the nebulizer (Fig. 7). Be sure the manometer port cap is on tight.
4. Your physician or caregiver will prescribe PEP™ therapy & nebulization with mouth piece or mask, depending on their preference. Attach the PARI PEP™ mouthpiece (Fig. 8) or PARI PEP™ mask (Fig. 9) to the outlet of the nebulizer. Attach optional interrupter (part #22B1000) to the bottom of nebulizer if recommended by your physician or thera pist.
5. If using manometer, remove the manometer port cap from the lower PEP™ component. Hook up manometer tubing to the manometer port on the lower PEP™ component (Fig. 10).
6. Turn on compressor or air source to begin therapy.

8 9
1. Clean the PARI PEP™ System as described in Section VI. 2. Every other treatment day, soak all parts (except manometer and tubing) of the PARI
PEP™ System in a solution of 1 part distilled white vinegar and 3 parts hot tap water for 1 hour. You can substitute respiratory equipment disinfectants (like Control III®) for distilled white vinegar (follow manufacturer’s instructions for mixing).
3. Rinse all parts of the PARI PEP™ System thoroughly with warm tap water and dry with a clean, lint-free cloth. Discard the vinegar solution when disinfection is complete.
4. The PARI PEP™ parts (except tubing, nose clip and manometer cap) may also be ster ilized by boiling them in water for a full 10 minutes. Hospitals and clinics can sterilize the PARI PEP™ parts by autoclaving with water at a maximum of 277˚F or 136˚C (follow autoclave manufacturer’s instructions). Dry parts on a clean, lint-free cloth.
5. After cleaning and disinfecting, make sure the PARI PEP™ has not lost its shape, been deformed or broken in any way. Place the upper PEP™ component on the lower PEP™ component. The fit should be snug but not difficult. Place the mouth piece on the lower PEP™ component. The fit should be snug but not difficult. You may see some cloudiness of the material after boiling or autoclaving.
CONTROL III® IS A REGISTERED TRADEMARK OF MARIL PRODUCTS, INC.
ESPAÑOLENGLISH
VII. DISINFECTING THE PARI PEP™ SYSTEM
WARNING, TO REDUCE RISK OF INFECTION:!
1. PARI PEP™ System is for single patient use (one person) only. Do not share your PARI PEP™ System with other patients.
2. You must regularly disinfect the PARI PEP™ System be tween treatments. Failure to do so could lead to serious or fatal illness.
!
PRECAUCIÓN: La Ley Federal de los Estados Unidos de Norteamérica (USA) permite la venta de este producto solo bajo prescripción médica. Utilícese solamente cuando lo prescribe un médico. Lea todas las advertencias e instrucciones antes de usarse. El manejo inapropiado podría resultar en perjuicio del paciente o su enfermedad o hasta llegar a ser fatal.
Indicaciones Para El UsoEl PARI PEP™ es un aparato ejercitador de resistencia espiratoria diseñado para ayudarle a pacientes a ejercitar los pulmones en forma adecuada y mejorar la eliminación de secreciones (mucosidad). Este aparato para ejercitar la resistencia espiratoria es para pacientes, a los cuales su médico les ha prescrito terapia de ejercitación pulmonar en casa, el consultorio del médico, hospitales y/o clínicas.El PARI PEP™ fue diseñado para trabajar ya sea como terapia convencional de PEP™ o en conjunto con los nebulizadores PARI. Utilícese únicamente con el nebulizador y la manguera autorizada por PARI para este equipo. Usar otros nebulizadores y/o mangueras podrían resultar en un tratamiento inapropiado.
Contraindicación:Lo siguiente debe ser cuidadosamente evaluado antes de que se tome la decisión de iniciar la terapia de Presión Positiva Espiratoria (PEP™): Si el paciente no tolera un aumento de trabajo para respirar; si se sospecha de la presencia de aneurisma intracraneal o presión intracraneal elevada (ICP) >20 mmHg; inestabilidad hemodinámica; operación o trauma reciente oral, del cráneo o de la cara; si nusi tis aguda; epistaxis; cirugía esofágica; hemoptisis activa; nausea; también si se sospecha de ruptura de la membrana timpánica u otra patología del oído medio; o de un neumotórax que no ha sido tratado; patología abdominal aguda, aneurisma aórtico abdominal, abertura de hernia, o embarazo y presencia de perfusión arterial coronaria, como en un infarto de miocardio agudo.
ADVERTENCIA
For patients with Cystic Fibrosis, the CF Foundation recommends boiling for a full 10 minutes to disinfect.
VI. CLEANING THE PARI PEP™ SYSTEM1. Remove the PARI PEP™ System from nebulizer (see PARI Nebulizer In structions For Use
to clean and disinfect the nebulizer) and disassemble.2. Wash all parts (except manometer and tubing) with warm water and liq uid dish soap.
Rinse thoroughly with warm water and shake out water.3. Air dry or hand dry PARI PEP™ components on a clean, lint-free cloth. Re assemble PARI
PEP™ System when dry and store.
™
1. Para reducir el riesgo del crecimiento, de la infección, de la enfermedad, o de la herida bacteriano aumentado de la contaminación, limpia completamente y seca todas partes de la PARI PEP™ a finales de cada tratamiento que sigue las instrucciones abajo.
2. Limpiar la PARI PEP™ después que cada tratamiento no es suficiente —usted debe desinfectar regularmente o debe esterilizar la PARI PEP™ entre tratamientos para prevenir la enfermedad grave o fatal causada por la contaminación de la PARI PEP™.
3. Es indispensable supervisar de cerca este producto cuando niños o personas con deficiencias físicas o mentales lo están utilizando o se encuentran cerca de él. Nunca lo utilice cuando está durmiendo o soñoliento.
4. Este producto contiene piezas pequeñas que podrían representar un riesgo de asfixia para los niños pequeños. UN ADULTO SIMPRE DEBERÁ SUPERVISAR A UN NIÑO BAJO TRATAMIENTO. JAMÁS DEJE DESATENDIDO A UN NIÑO DURANTE SU TRATAMIENTO.
5. Antes de usarlo, verifique se PARI PEP™ ha sido correctamente ensamblado. Todas las piezas deben encajar firmemente en el lugar correspondiente. La eficacia de un PARI PEP™ mal ensamblado podría disminuir e incluso interrumpir el flujo aceptable del medicamento y la eficacia del mismo.
ADVERTENCIA !

14 15
FRANÇAIS
II. COMMENT DÉMARRER1. Assurez-vous d’avoir en main toutes les composantes illustrées sur la page couverture
avant. Si vous ne les avez pas toutes, communiquez avec le distributeur où vous avez acheté votre Système PEP™ de PARI.
2. Lisez attentivement ce guide d’utilisation. Prenez note de tous les avertissements et des mesures de sécurité à re specter. Si vous ne comprenez pas quelque partie que ce soit de ce guide d’utilisation, communiquez avec le distributeur où vous avez acheté votre Système PEP™ de PARI ou appelez le Service aux patients de PARI au 1.800.327.8632, appuyez sur le 2.
2. Préparation du dispositif PEP™: Raccordez la composante PEP™ inférieure à la composante PEP™ supérieure, tel qu’illustré (Fig. 1). La composante PEP™ supérieure comporte les réglages de la résistance expiratoire (1,5; 2; 2,5; 3; 3,5; 4; 4,5; 5; 5,5) qui figurent sur le dessus (Fig. 2). Alignez la fente de la composante PEP™ supérieure avec la crête (bosse) située au-dessus du point de raccord de manomètre (Fig. 3) et enclenchez-les bien ensemble. Utilisez le réglage de la résistance expiratoire que votre médecin ou thérapeute a établi entre 10 et 20 cm d’eau. Vous ne devriez pas modifier ce réglage sans consulter au préalable votre médecin ou thérapeute.
REMARQUE: Il est important que le thérapeute ou le médecin détermine le réglage de la résistance lorsque le compresseur et le nébuliseur sont en marche, étant donné que la pression du compresseur influera sur le réglage final.
3. Insérez le Système PARI PEP™ assemblé dans l’orifice situé sur le dessus du nébuliseur (Fig. 7). Assurez-vous que le capuchon du raccord de manomètre est fermement en place.
4. Votre médecin ou un membre du personnel soignant vous recommandera l’utilisation d’un embout buccal ou d’un masque, selon leur préférence, pour effectuer la nébulisation/ inhalothérapie PEP™. Fixez soit l’embout buccal PEP™ de PARI (Fig. 8) ou le masque PEP™ de PARI (Fig. 9) sur l’orifice de sortie du nébuliseur. Raccordez l’interrupteur facultatif (pièce no 22B1000) au bas du nébuliseur si votre médecin ou le thérapeute vous l’a recommandé.
5. Si vous utilisez un manomètre, enlevez le capuchon du raccord de manomètre de la composante PEP™ inférieure. Branchez la tubulure du manomètre au raccord de manomètre de la composante PEP™ inférieure (Fig. 10).
6. Mettez en fonction le compresseur ou la source d’alimentation en air.
FRANÇAIS
V. MODE D’UTILISATION
AVERTISSEMENT!
Pour réduire le risque de blessure et de traitement inadéquat, vous devez faire preuve de vigilance durant l’inhalothérapie PEP™ afin de maîtriser la technique respiratoire et d’éliminer toutes les sécrétions délogées. Ce dispositif n’est pas recommandé chez les enfants de moins de 5 ans. L’obtention d’une pression plus élevée dans les poumons que celle recommandée peut donner lieu à une injection d’air dans la cavité pleurale autour des poumons (pneu motho rax), ce qui peut aboutir au collapsus pulmonaire. Pour réduire le risque de pneu motho rax et de collapsus pulmonaire, évitez tout effort d’expiration excessif et(ou) l’utilisation du dispositif à un réglage incorrect.
UTILISEZ CE DISPOSITIF EN SUIVANT À LA LETTRE LES INSTRUCTIONS DE VOTRE MÉDECIN !1. En position assise sur une chaise de table, inclinez-vous légèrement vers l’avant de sorte
que vos coudes reposent sur la table ou, si vous êtes au lit, adoptez une position assise, confortable et détendue.
2. Si vous utilisez un embout buccal, refermez les lèvres fermement mais confortablement autour de l’embout. Votre médecin ou thérapeute peut vous recommander d’utiliser le pince-nez compris avec le Système PEP™ de PARI (Fig. 11A et 11B). Si vous utilisez un masque PEP™ de PARI, placez le masque fermement mais confortablement sur votre visage pour recouvrir votre nez et votre bouche.
3. Inspirez plus profondément que normalement et expirez de façon active, mais sans vous efforcer à expirer. Continuez à inspirer et à expirer de cette manière pendant 12 à 15 respirations, puis, selon le Système PEP™ utilisé, ôtez le masque ou retirez l’embout
1 Raccordez la composante PEP™ inférieure à la composante PEP™ supérieure, tel qu’illustré (Fig. 1). La composante PEP™ supérieure comporte les réglages de la résistance expiratoire (1.5; 2; 2.5; 3; 3.5; 4; 4.5; 5; 5.5) qui figurent sur le dessus (Fig. 2). Alignez la fente de la composante PEP™ supérieure avec la crête (bosse) située au-dessus du point de raccord de manomètre (Fig. 3) et enclenchez-les bien en semble. Utilisez le réglage de la résistance expiratoire que votre médecin ou thérapeute a établi entre 10 et 20 cm d’eau. Vous ne devriez pas modifier ce réglage sans consulter au préalable votre médecin ou thérapeute.
2. Votre médecin ou un membre du personnel soignant vous recommandera l’utilisation d’un embout buccal ou d’un masque, selon leur préférence, pour effectuer l’inhalothérapie PEP™. Fixez soit l’embout buccal ou le masque à la composante PEP™ inférieure (Fig. 4 et 5).
3. Si vous utilisez un manomètre, enlevez le capuchon du raccord de manomètre de la composante PEP™ inférieure. Reliez la tubulure du manomètre au raccord de manomètre de la composante PEP™ inférieure (Fig. 6).
III. PRÉPARATION SANS LE NÉBULISEUR
IV. PRÉPARATION AVEC LE NÉBULISEUR1. Préparation du nébuliseur: Assemblez le nébuliseur PARI selon les instructions données
dans le guide d'utilisation du nébuliseur. Ignorez les in structions relatives à l’embout buccal avec soupape et au capuchon de la soupape inspiratoire, puisque ces derniers ne sont pas requis avec le Système PEP™ de PARI. NOTE : Ne pas être utiliser avec le Sprint de LC® DE PARI Nebulizers Réutilisable.
I. INTRODUCTIONL’inhalothérapie par Pression Expiratoire Positive (PEP™) peut s’avérer très utile pour ouvrir les voies aériennes pulmonaires et en éliminer les sécrétions. Elle peut aussi remplacer la tech nique de respiration, lèvres pincées ou lèvres en fermeture de bourse, méthode respiratoire favorisant le renforcement musculaire et l’endurance. Une telle thérapie requiert une tech nique de respiration contrôlée qui a pour effet, d’une part, d’augmenter la pression d’air dans les poumons à l’expiration et, d’autre part, de favoriser à l’inspiration la pénétration plus profonde dans les poumons de l’air et(ou) du médicament en aérosol inhalé, ce qui contribue à détacher les sécrétions que le phénomène de la toux expulse hors des poumons. La différence recommandée de pression lors de l’inhalation-inspiration avec le Système PEP™ de PARI se situe entre 10 et 20 cm d’eau. Un médecin ou un inhalothérapeute devrait déterminer le réglage approprié de la résistance du dispositif à l’aide d’un manomètre et surveiller la technique d’inspiration-expiration du patient.

FLUTTER® Mucus Clearance Device Instructions for Use
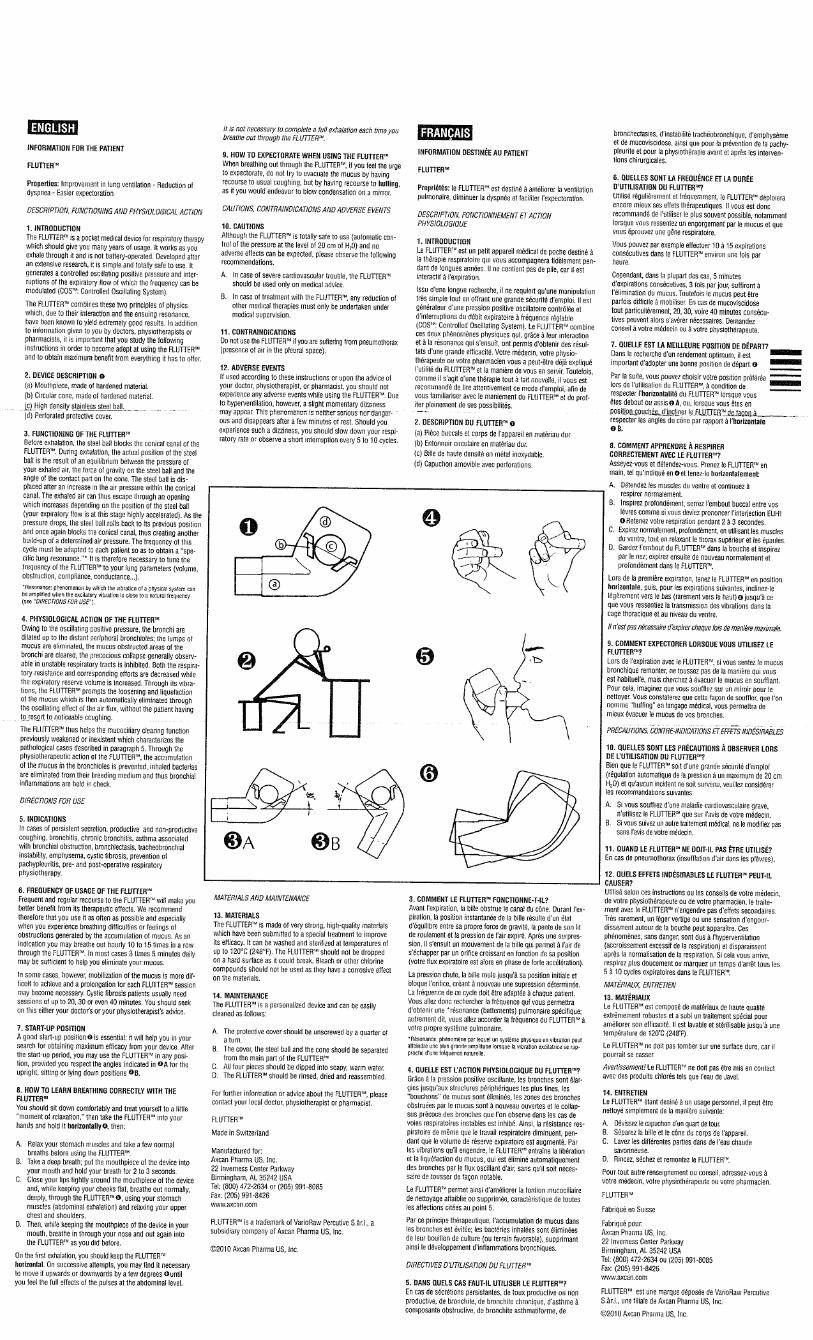
PRODUCT DESCRIPTIONThe FLUTTER® mucus clearance device is shaped like a pipe with a hardened plastic mouthpiece at one end, a plastic protective, perforated cover at the other end, and a high-density stainless steel ball resting in a plastic circular cone on the inside (Figures 1 and 2). INDICATIONS The FLUTTER® provides positive expiratory pressure (PEP) therapy for patients with mucus-producing respiratory conditions, including: Atelectasis, Bronchitis, Bronchiectasis, Cystic Fibrosis, Chronic Obstructive Pulmonary Disease (COPD), Asthma or other conditions producing retained secretions. CONTRAINDICATIONS The FLUTTER® is contraindicated for patients known to have pneumothorax or overt right-sided heart failure. PRINCIPLES OF OPERATION The principle of the FLUTTER® as a mucus clearance device is based on its ability to: (1) vibrate the airways (which loosens mucus from the airway walls); (2) intermittently increase endobronchial pressure (which helps maintain the patency of the airways during exhalation so that mucus does not become trapped as it moves up the airways); and (3) accelerate expiratory airflow (which facilitates the upward movement of mucus through the airways so that it can be more easily cleared). The FLUTTER® effect occurs during the expiratory phase of respiration. Before exhalation, the steel ball blocks the conical canal of the FLUTTER®. During exhalation, the actual position of the steel ball is the result of an equilibrium between the pressure of the exhaled air, the force of gravity on the ball, and the angle of the cone where the contact with the ball occurs. As the steel ball rolls and bounces up and down, it creates an opening and closing cycle which repeats itself many times throughout each exhalation (Figure 3). The net result is that oscillations in expiratory pressure and airflow are produced. When the oscillation frequency approximates the resonance frequency of the pulmonary system, endobronchial pressure oscillations are amplified and result in vibrations of the airways. The vibrations produced by these oscillations cause the "fluttering" sensation from which the FLUTTER® derived its name. These vibrations loosen mucus from the airway walls. The intermittent increases in endobronchial pressure decrease the collapsibility of the airways during exhalation, increasing the likelihood of clearing mucus from the tracheobronchial tract. The airflow accelerations increase the velocity of the air being exhaled, facilitating the movement of mucus up the airways (Figure 4). The FLUTTER® produces a range of oscillation frequencies between 6 and 20 Hz, which corresponds to the range of the pulmonary resonance frequencies in humans. Attaining oscillation frequencies in this range is fundamental to the efficacy of the FLUTTER®. The individual pulmonary resonance frequency of each patient is dependent on many factors, including lung volume, lung elasticity, and degree of airway obstruction. The frequency of oscillation that produces the best transmission of vibrations in a given patient corresponds to the pulmonary resonance frequency for that patient. When the resonance frequency of the pulmonary system is achieved, the pressure variations are amplified, maximizing the vibrations of the airway wall. These vibrations, coupled with increases in expiratory pressure and airflow, facilitate the clearance of mucus. The oscillation frequency produced by the FLUTTER® when its stem is in the horizontal position is approximately 15 Hz. This frequency can be modulated by changing the inclination of the FLUTTER® slightly up (higher frequency) or down (lower frequency) from its original horizontal position. Adjusting the FLUTTER® to the resonance frequency is easily accomplished by the patient who selects the angle tilt that results in the best transmission of vibrations to his/her airways.

CLINICAL STUDY RESULTSCystic Fibrosis, Bronchitis and Bronchiectasis are characterized by abnormally thick mucus. Inhaled bacteria can become imbedded in these secretions, resulting in inflammation which leads to destructive disease of the lungs. The efficacy of the FLUTTER® in facilitating mucus clearance in Cystic Fibrosis has been reported. The average amount of sputum expectorated with the FLUTTER® was over four times the amount expectorated after conventional postural drainage with percussion and vibration. Every patient expectorated more mucus with the FLUTTER® than with conventional postural drainage.1
DIRECTIONS FOR USE The patient should be seated with back straight and head slightly tilted upward so the upper airway is wide open (Figure 5). This will allow exhaled air to flow smoothly from the lungs and out through the FLUTTER®. As an alternative, the patient may be seated with elbows resting on a table at a comfortable level and head position as described above. The angle at which the patient holds the FLUTTER® is critical (Figure 6). Initially, the FLUTTER® should be held so that the stem is horizontal to the floor, which places the cone at a slight tilt. The tilt insures that the ball not only bounces but also rolls during exhalation. This combined rolling and bouncing of the steel ball produces the vibrations that dislodge mucus from the airways. The FLUTTER® then needs to be adjusted to the patient's pulmonary resonance frequency, which is done by moving the FLUTTER® slightly up or down to achieve the maximum "fluttering" effect (Figure 7). This resonance is evidenced by the vibrations within the chest that can be felt by the patients. The healthcare professional can help determine if the patient has achieved the "fluttering" effect by placing one hand on the patient's back and the other hand on the patient's chest. The vibrations in the lungs can be felt as the patient exhales. After the patient has established a comfortable position and selected the proper tilt to maximize "fluttering," therapy may begin. Beginning with Stage 1 - Mucus Loosening and Mucus Mobilization. Instruct the patient to slowly inhale to approximately 3/4 of a full breath. Place the FLUTTER® in the mouth with lips closed firmly around the stem. Position the FLUTTER® at the proper angle and perform a 2 to 3 second breath-hold. This allows the inhaled air to be evenly distributed throughout the lungs. Now the patient should exhale through the FLUTTER® at a reasonably fast but not too forceful speed. During the exhalation, keep the cheeks stiff, so the vibrations produced by the FLUTTER® are not wasted in the cheeks. Have the patient concentrate on feeling the airways vibrate and continue to exhale through the FLUTTER® to a level slightly further than one would exhale during normal breathing without the FLUTTER®. At this point the urge to cough should be suppressed. Have the patient repeat this breathing technique for another 5 to 10 breaths to loosen and mobilize as much mucus as possible. The mucus moves farther up the airways with each FLUTTER® exhalation. Emphasize to the patient the importance of inhaling slowly, holding the breath 2 to 3 seconds, and suppressing the urge to cough. Now the patient is ready to begin Stage 2 - Mucus Elimination. Have the patient perform 1 or 2 additional breaths through the FLUTTER®. This time, breathe in slowly and as fully as comfortably possible. Really fill the lungs with air. Again perform a 2 to 3 second breath-hold. Now, have the patient exhale forcefully through the FLUTTER® as completely and as comfortably as possible. This forceful exhalation moves mucus up to a level in the lungs that triggers a cough. However, if the mucus is not easily coughed out following 1 or 2 elimination breaths, the patient should attempt a "huff" maneuver (like trying to "huff" a bread crumb out of the throat). The standard series of 5 to 10 mucus-loosening breaths with cough suppression followed by 1 or 2 mucus elimination breaths with cough should result in successful airway clearance. If your patient is new to FLUTTER® therapy or has particularly thick mucus, it may take multiple repetitions of Stage 1, Mucus Loosening and Mucus Mobilization, before performing Stage 2, Mucus Elimination. Several trials may be necessary to determine the appropriate number of breaths needed in each stage for individual patients.

FREQUENCY AND DURATION OF USEFLUTTER® therapy is complete when no further mucus can be expectorated following several diligent sequences. Frequency of use and duration of each session should be determined by the healthcare professional. FLUTTER® therapy is a more "goal-based" than "time-based" therapy, and experience has shown that successful clearing of the airways for most patients will occur in approximately 5 to 15 minutes. Generally, morning and late afternoon or evening sessions are recommended. Patients can avoid becoming overly tired by adding a session instead of extending any one session to a point of discomfort. Remember, the goal of airway clearance therapy is to comfortably and efficiently remove as much mucus as possible. The FLUTTER® will assist your patients in achieving this goal. CLEANING THE FLUTTER®
The FLUTTER® is recommended for single patient use only. Instruct patients to clean the FLUTTER® after each session to remove moisture and/or mucus (Figure 8). Disassemble and rinse all components with tap water; wipe with a clean towel, reassemble, and store in a clean, dry location. Every two days, patients should disassemble and clean their FLUTTER® in a solution of mild soap or detergent. Chlorine bleach or other chlorine-containing products (e.g., dishwashing detergent) should not be used. Rinse, dry, reassemble, and store. NOTE TO PHYSICIANS AND HEALTHCARE PROFESSIONALS The FLUTTER® provides positive expiratory pressure (PEP) therapy for patients who have Chronic Obstructive Pulmonary Disease (COPD) such as Asthma, Bronchitis, Cystic Fibrosis, Atelectasis, or other conditions producing retained secretions. PEP therapy, combined with forced expiratory technique (FET), or "huff" coughing, may be used for airway clearance, bronchial hygiene, or as an alternative to conventional chest physiotherapy (CPT) and pursed lip breathing. PEP therapy will help prevent accumulation of secretions; improve mobilization of secretions; promote effective breathing patterns and improve gas exchange and distribution of ventilation; improve central and peripheral airway function; prevent or reverse Atelectasis; and improve bronchodilation when used in combination with respiratory drug delivery via nebulizer or MDI spacer devices. PRECAUTIONS Federal law restricts this device to sale by or on the order of a physician. The patient should be instructed in FLUTTER® use by a licensed practitioner. The steel ball within the FLUTTER®, if separated from the FLUTTER®, could pose a choking hazard. The FLUTTER® must be handled carefully; it may break if dropped on a hard surface.
Reference: 1. Konstan MW, Stern RC, Doershuk CF. Efficacy of the FLUTTER device for airway mucus clearance in patients with cystic fibrosis. ®
J Pediatrics May 1994; 124:689-693. Manufactured for: AXCAN SCANDIPHARM INC. 22 Inverness Center Parkway Birmingham, AL 35242 USA www.axcan.com
FLUTTER® a registered trademark of VarioRaw Percutive S.à.r.l., an Axcan Scandipharm Inc. company. Axcan Pharma™ and the Axcan Pharma™ logo are trademarks of Axcan Pharma Inc., the parent corporation of Axcan Scandipharm Inc. ©2003 Axcan Scandipharm Inc. Printed in USA U.S. Patent No. 5'018'517 FL004-0802
One Madison St., Wampsville, NY 13163 315-363-2330/315-363-5694 Fax www.dhd.com
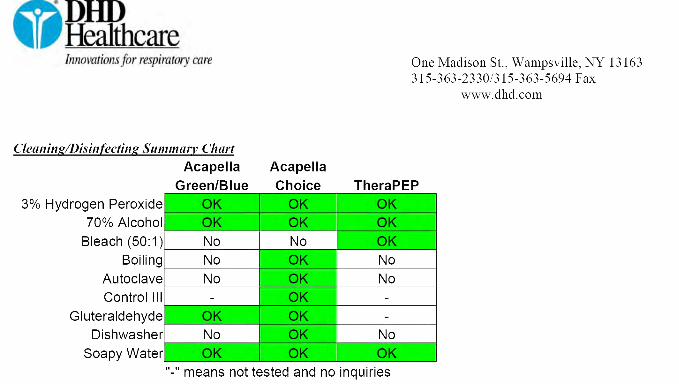
acapella® choice Cleaning/Disinfecting* Instructions
As per the Cystic Fibrosis Foundation’s cleaning and disinfecting guidelines entitled, “Respiratory, Stopping the Spread of Germs” 2003, below are the guidelines for acapella choice. Note: acapella choice is for single-patient use
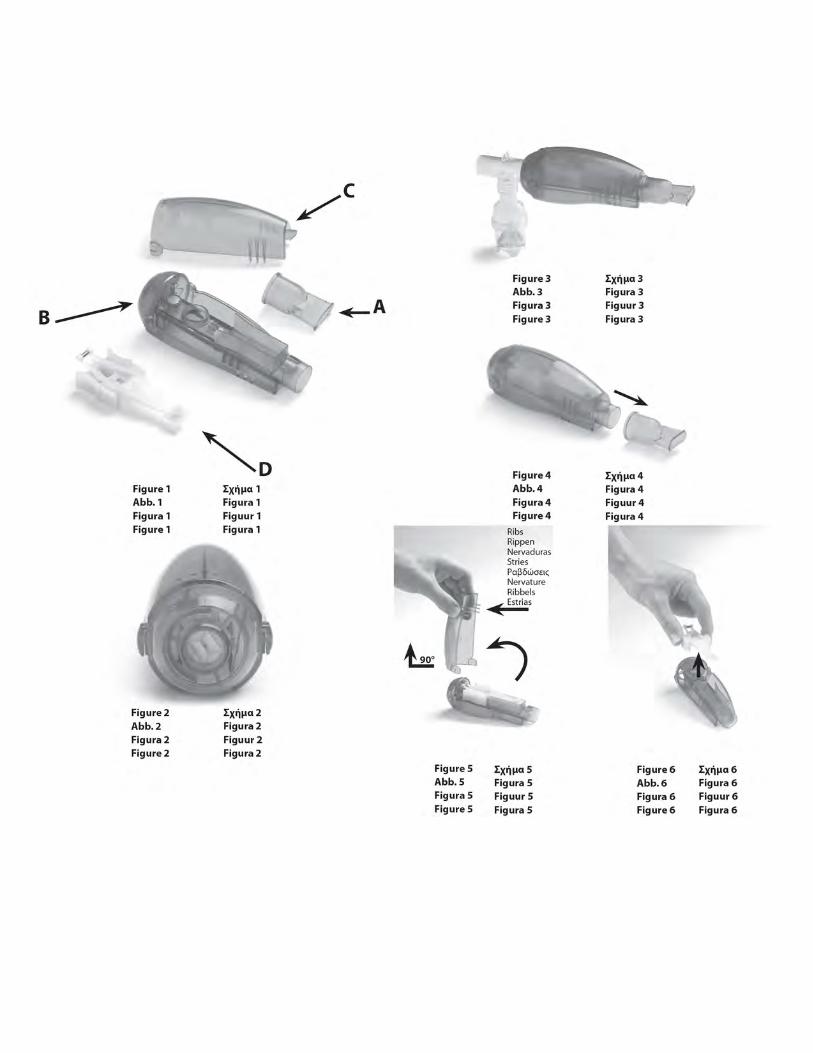
*It is the responsibility of the user to ensure all sterility verification(s) There are four (4) parts to clean: 1. The mouthpiece 2. The cover 3. The rocker assembly/platform base 4. The base unit Disassembly: Acapella choice should be disassembled into its four (4) parts (see product insert illustration): • Detach mouthpiece or mask. If you are using a mask, follow its cleaning instructions. • Detach the cover by placing your forefinger and thumb on the three (3) ribs located on the
unit toward the mouthpiece and gently pressing and lifting up. Lift only to a 90° angle. Pull cover up to detach.
• Detach the rocker assembly/platform base by placing your forefinger and thumb on either side of the grooved surface of the platform’s base, and gently lift the rocker up (rocker assembly/platform should stay in tact). DO NOT SEPARATE THE ROCKER ARM FROM ITS PLATFORM BASE.
CLEANING DHD recommends cleaning on a regular basis, or right after each use, especially if used in conjunction with a nebulizer. Always clean your hands first. Cleaning with Liquid Dish Detergent - Soak the four parts in warm, soapy water. Use a liquid dish detergent (Dawn or equivalent), mixing two (2) tablespoons of detergent per one (1) gallon water. Rinse thoroughly, preferably with sterile water, and allow parts to air dry. DISINFECTING Boiling –Boil device in water (100°C/212°F) up to twice daily for five (5) minutes. In addition, DHD suggests the use of distilled or sterile water to lessen the potential of local community, mineral-rich tap waters from calcifying acapella choice’s metallic components. Autoclaving – acapella choice will functionally withstand autoclaving at temperatures not to exceed 136°C/277°F.

One Madison St., Wampsville, NY 13163 315-363-2330/315-363-5694 Fax www.dhd.com Automatic Dishwasher – acapella choice is dishwasher safe. It is recommended to place the parts on the top shelf. Alcohol –Soak five (5) minutes, twice daily. Acapella choice is compatible with 70% isopropyl alcohol. Rinse with sterile water. You can make water sterile by boiling for five (5) minutes. Hydrogen Peroxide – Soak in 3% hydrogen peroxide for 30 minutes. Rinse with sterile water. You can make water sterile by boiling for five (5) minutes. Control III Disinfectant Germicide – Follow the manufacturer’s suggested dilution and soak time duration criteria Glutaraldehydes (Cidex® or equivalent) – acapella choice will maintain its integrity using cold sterilizing solutions such as glutaraldehydes. NOTE: It is the responsibility of the user to ensure all sterility verification(s). NOTE: DO NOT MICROWAVE. NOTE: Bleach is not recommended for use on acapella choice. It may corrode or
deteriorate the nickel-plated mechanism located on the interior of the device. Reassembly: • Put rocker assembly/platform base back into the base unit. Make sure it is firmly seated by
gently pressing rocker assembly down (fingers gripping the sides of rocker assembly). • Attach the cover by placing it back into hinges of base unit. Make sure you hear a click to
ensure it is in securely. • Place cover into original position. • Attach mouthpiece by slightly pressing the top and bottom of unit together while you slip on
mouthpiece.

One Madison St., Wampsville, NY 13163 315-363-2330/315-363-5694 Fax www.dhd.com
acapella®
Cleaning/Disinfecting* Instructions
As per the Cystic Fibrosis Foundation’s cleaning and disinfecting guidelines entitled, “Respiratory, Stopping the Spread of Germs” 2003, below are the guidelines for acapella (green and blue). Note: acapella is for single-patient use *It is the responsibility of the user to ensure all sterility verification(s) DHD recommends cleaning on a regular basis, or right after each use, especially if used in conjunction with a nebulizer. Always clean your hands first. Cleaning with Liquid Dish Detergent - Soak the device and mouthpiece (or mask) in warm, soapy water. Use a liquid dish detergent (Dawn or equivalent), mixing two (2) tablespoons of detergent per one (1) gallon water. Rinse thoroughly, preferably with sterile water, and allow parts to air dry. Alcohol –Soak five (5) minutes, twice daily. acapella (green/blue) is compatible with 70% isopropyl alcohol. Rinse with sterile water. You can make water sterile by boiling for five (5) minutes. Hydrogen Peroxide – Soak in 3% hydrogen peroxide for 30 minutes. Rinse with sterile water. You can make water sterile by boiling for five (5) minutes. Glutaraldehydes (Cidex® or equivalent) – acapella (green/blue) will maintain its integrity using cold sterilizing solutions such as glutaraldehydes. NOTE: acapella (green/blue) should not be bleached, boiled, autoclaved, microwaved or placed in an automatic dishwasher. These methods may deteriorate the nickel-plated mechanism located on the interior of the device. In addition, acapella is not made of high temperature plastics. Please ask your clinician for acapella choice if you need to use these high temperature methods. NOTE: It is the responsibility of the user to ensure all sterility verification(s).


REMEMBERReplace YouR Reusable NebulizeR cup eveRY siX MoNths
InstructIons For useFor single patient use (one person) only
Important: read InstructIons and saFety precautIons beFore use.

1 Questions? 1.800.Fast.neb (327.8632) | parI.com
your physician has prescribed a parI reusable nebulizer to treat your
respiratory symptoms because of parI’s reputation for consistent
particle size and fast treatments resulting in targeted delivery to
the lungs. parI nebulizers are the most widely used nebulizer by
pharmaceutical companies in clinical trials for new medications
compared to any other brand. designed with the patient in mind,
these instructions will help you achieve the best aerosol therapy
experience.
It Is Important to have a second parI reusable nebulIzer & extra fIlters on hand at all tImes.

Questions? 1.800.Fast.neb (327.8632) | parI.com 2
a. saFety precautIons
CAUTION
the lc® plus and lc® star are handheld nebulizers, designed to aerosolize medication approved for nebulization and prescribed by a physician. the lc® plus and lc® star are intended for adult and pediatric patients consistent with the indications for the aerosol medication. improper use can result in serious or fatal illness or injury. Nebulizer is not sterile.
WARNING
use only when prescribed by a physician and with the prescribed medication. in order to achieve the specified droplet characteristics the compressor or central air supply must provide 3.5 - 8 lpm at a minimum of 20psi.
WARNING
1. to reduce the risk of increased bacterial growth, infection, illness, or injury from contamination: thoroughly clean and dry all parts of the nebulizer and thoroughly dry any moisture or condensation in the tubing at the end of every treatment following the instructions below.
2. cleaning the nebulizer after each treatment is not enough---you must regularly disinfect or sterilize the nebulizer between treatments to prevent serious or fatal illness caused by contamination of the nebulizer.
3. Never use a nebulizer with a clogged nozzle. if the nozzle is clogged, the aerosol mist will be reduced, altered or stopped, which will diminish or eliminate the effectiveness of the treatment. if clogging occurs, replace with the same model paRi Reusable Nebulizer.
4. close supervision is necessary when this product is used by or near children and physically or mentally impaired. Never use when sleeping or drowsy.
5. this product contains small parts that may present a choking hazard to small children. the tubing also presents a strangulation hazard. alWaYs use close aDult supeRvisioN WheN aDMiNisteRiNG a tReatMeNt to a chilD. Do Not leave chilD uNatteNDeD DuRiNG tReatMeNt.
6. patients under the age of 4 or any patients who have special needs should use a facemask instead of the valved mouthpiece.
7. before use, check paRi Reusable Nebulizer for proper assembly. all parts should be seated firmly in place. use of an improperly assembled nebulizer could diminish or prevent adequate delivery of medication and the effectiveness of the treatment.
IndIcatIons For usethe paRi lc® plus and lc® star reusable nebulizers are used to deliver aerosolized medication to the lungs. these nebulizers are used with patients for whom a physician has prescribed medication for aerosol treatments in the home, doctor’s office, hospital, or clinic.

Wing tip™ tubing
paRi Reusable Nebulizer
inspiratory valve cap
Nebulizer insert
Nebulizer semi-circle
alignment Rings
Nebulizer cup
air intake
b. GettInG startedcheck your paRi reusable nebulizer package to ensure items are included.
timestrip®
3 Questions? 1.800.Fast.neb (327.8632) | parI.com
Mouthpiece with expiratory valve
Nebulizer outlet
Questions? 1.800.Fast.neb (327.8632) | parI.com 4
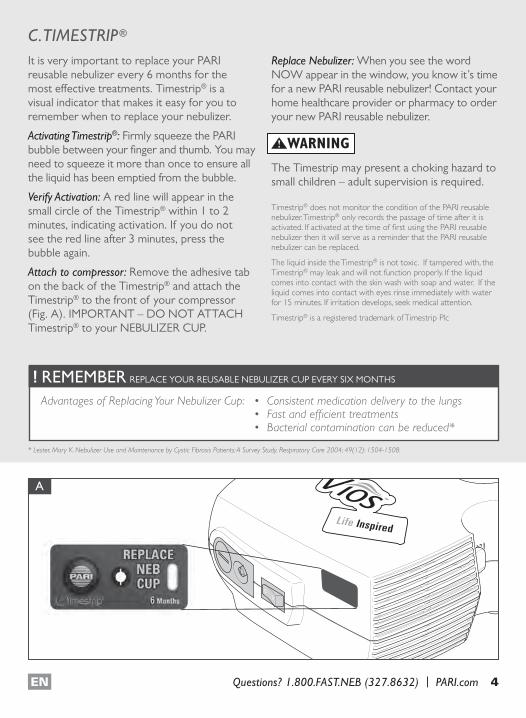
A
c. tImestrIp®
it is very important to replace your paRi reusable nebulizer every 6 months for the most effective treatments. timestrip® is a visual indicator that makes it easy for you to remember when to replace your nebulizer.
activating timestrip®: Firmly squeeze the paRi bubble between your finger and thumb. You may need to squeeze it more than once to ensure all the liquid has been emptied from the bubble.
Verify activation: a red line will appear in the small circle of the timestrip® within 1 to 2 minutes, indicating activation. if you do not see the red line after 3 minutes, press the bubble again.
attach to compressor: Remove the adhesive tab on the back of the timestrip® and attach the timestrip® to the front of your compressor (Fig. a). iMpoRtaNt – Do Not attach timestrip® to your NebulizeR cup.
replace nebulizer: When you see the word NoW appear in the window, you know it’s time for a new paRi reusable nebulizer! contact your home healthcare provider or pharmacy to order your new paRi reusable nebulizer.
WARNING
the timestrip may present a choking hazard to small children – adult supervision is required.
Timestrip® does not monitor the condition of the PARI reusable nebulizer. Timestrip® only records the passage of time after it is activated. If activated at the time of first using the PARI reusable nebulizer then it will serve as a reminder that the PARI reusable nebulizer can be replaced.
The liquid inside the Timestrip® is not toxic. If tampered with, the Timestrip® may leak and will not function properly. If the liquid comes into contact with the skin wash with soap and water. If the liquid comes into contact with eyes rinse immediately with water for 15 minutes. If irritation develops, seek medical attention.
Timestrip® is a registered trademark of Timestrip Plc
REMEMBER Replace YouR Reusable NebulizeR cup eveRY siX MoNths
* lester, mary K. nebulizer use and maintenance by cystic fibrosis patients: a survey study. respiratory care 2004; 49(12): 1504-1508.
Advantages of Replacing Your Nebulizer Cup: • Consistent medication delivery to the lungs • Fast and efficient treatments • Bacterial contamination can be reduced*

5 Questions? 1.800.Fast.neb (327.8632) | parI.com
d. nebulIzer set-up1. clean/disinfect nebulizer cup: Refer to section
e-F to clean and/or disinfect your nebulizer prior to first use. Re-assemble nebulizer.
2. connect tubing to compressor: insert one end of Wing-tip™ tubing to the air outlet on the compressor. it should fit snugly (Fig. b).
3. load medication: Remove the nebulizer insert by twisting counter-clockwise until it stops and lift up (Fig.c). pour medication into the nebulizer cup (Fig.D). Never fill past the max. fill line of 8ml for the lc® plus and 6ml for lc® staR. Replace the nebulizer insert making sure the two alignment rings are lined up with each other.
4. attach mouthpiece or mask: if using the mouthpiece, attach the mouthpiece to the nebulizer outlet with the expiratory valve facing up. then attach the inspiratory valve cap by pressing it firmly into the top of the nebulizer. if using a mask, refer to the mask instructions.
5. attach tubing to nebulizer cup: Firmly press other end of the Wing-tip™ tubing to bottom of paRi reusable nebulizer (Fig. e).
6. starting treatment: sit in a relaxed, upright position and turn the compressor “oN”.
7. nebulizer position: place the mouthpiece on top of tongue and close lips around it. take slow, deep breaths. as you inhale, the inhalation valve opens.
8. breathing: For mouthpiece, inhale and exhale slowly through your mouth. as you exhale, the valve on the mouthpiece opens to allow the exhaled mist to escape. For mask, place mask over nose and mouth and inhale and exhale slowly.
9. complete treatment: continue until the medication is gone or you hear a slight “sputtering” sound. turn compressor off.
WInG-tIp™ tubInGit is normal if moisture or condensation appears in your tubing during a treatment. this can be a natural effect of your environment’s temperature. if this happens, finish your treatment and then disconnect the tubing from the nebulizer. leave the other end attached to the compressor air outlet and let run for a few minutes. the warm air from the compressor will dry the inside of the tubing. use a damp cloth to wipe the exterior of the tubing.
B C

Questions? 1.800.Fast.neb (327.8632) | parI.com 6
D E
1. Disconnect the tubing from the air intake on the bottom of the nebulizer cup.
2. if there is any moisture (condensation) in the tubing, let the compressor run with only the tubing attached for 2-3 minutes. the warm air from the compressor will dry out the tubing. alternatively, you can dry the tubing by removing it from the compressor and hanging it up with the “ends down” to allow any moisture (condensation) to drain out and evaporate. use a clean damp cloth to wipe the exterior of the tubing.
3. Disassemble reusable nebulizer parts as illustrated on page 3.
4. Wash all parts with warm water and liquid dish soap. Do Not Wash the tubiNG.
5. Rinse the reusable nebulizer parts thoroughly with warm water and shake out water.
6. air dry or hand dry nebulizer parts on a clean, lint-free cloth. Reassemble nebulizer when parts are dry and store.
7. You can also wash all parts of the reusable nebulizer on the top shelf of a dishwasher. Do Not Wash tubiNG. place the reusable nebulizer parts in a dishwasher basket, then place the basket on the top rack of the dishwasher. Remove and dry the parts when the dishwasher cycle is complete.
WARNING
to ReDuce RisK oF iNFectioN:1. Nebulizer for single patient use (one person)
only. Do not share your nebulizer with other patients.
2. You must regularly disinfect or sterilize the nebulizer between treatments. Failure to do so could lead to serious or fatal illness.
e. cleanInG your parI reusable nebulIzer

F. dIsInFectInG your parI reusable nebulIzer
1. clean the nebulizer as described in section e. For low-level disinfection every other treatment day, soak all parts of the paRi Reusable Nebulizer (except tubing and mask) in a solution of 1 part distilled white vinegar and 3 parts hot tap water for 1 hour. You can substitute respiratory equipment disinfectant (like control iii®) for distilled white vinegar (follow manufacturer’s instructions for mixing).
2. Rinse all parts of the paRi Reusable Nebulizer thoroughly with warm tap water and dry with a clean, lint-free cloth. Discard the vinegar solution when disinfection is complete.
3. the paRi Reusable Nebulizer parts (except tubing and mask) may also be disinfected by boiling them in clean pot of water for a full 10 minutes.
4. hospitals and clinics can sterilize the paRi Reusable Nebulizer parts (except mask and tubing) by autoclaving (a maximum of 277° F or 136° c), follow autoclave manufacturer’s instructions.
5. Dry parts on a clean, lint-free cloth.
CONTROL III® IS A REGISTERED TRADEMARK OF MARIL PRODUCTS, INC.
NOTE: FOR PATIENTS wITh CySTIC FIbROSIS, ThE CF FOUNDATION RECOMMENDS bOILING FOR A FULL 10 MINUTES TO DISINFECT.
G. Warranty and return InFormatIon
paRi reusable nebulizers include a 6 month limited warranty for home care use.
if you have any problems and need to return your paRi reusable nebulizer, contact paRi patient connection at 1.800.Fast.Neb (327.8632)
please be sure to clean and disinfect your paRi reusable nebulizer and place it in a plastic bag before returning.
7 Questions? 1.800.Fast.neb (327.8632) | parI.com
© 2009 PARI Respiratory Equipment, Inc. 022D0121 Rev B 07/10
Manufactured for:
PARI Respiratory Equipment, Inc.2943 Oak Lake Blvd., Midlothian, VA 23112 USATel: 800.FAST.NEB (327.8632) and 804.253.7274Fax: 800.727.4112 | [email protected] Online at: www.PARI.com


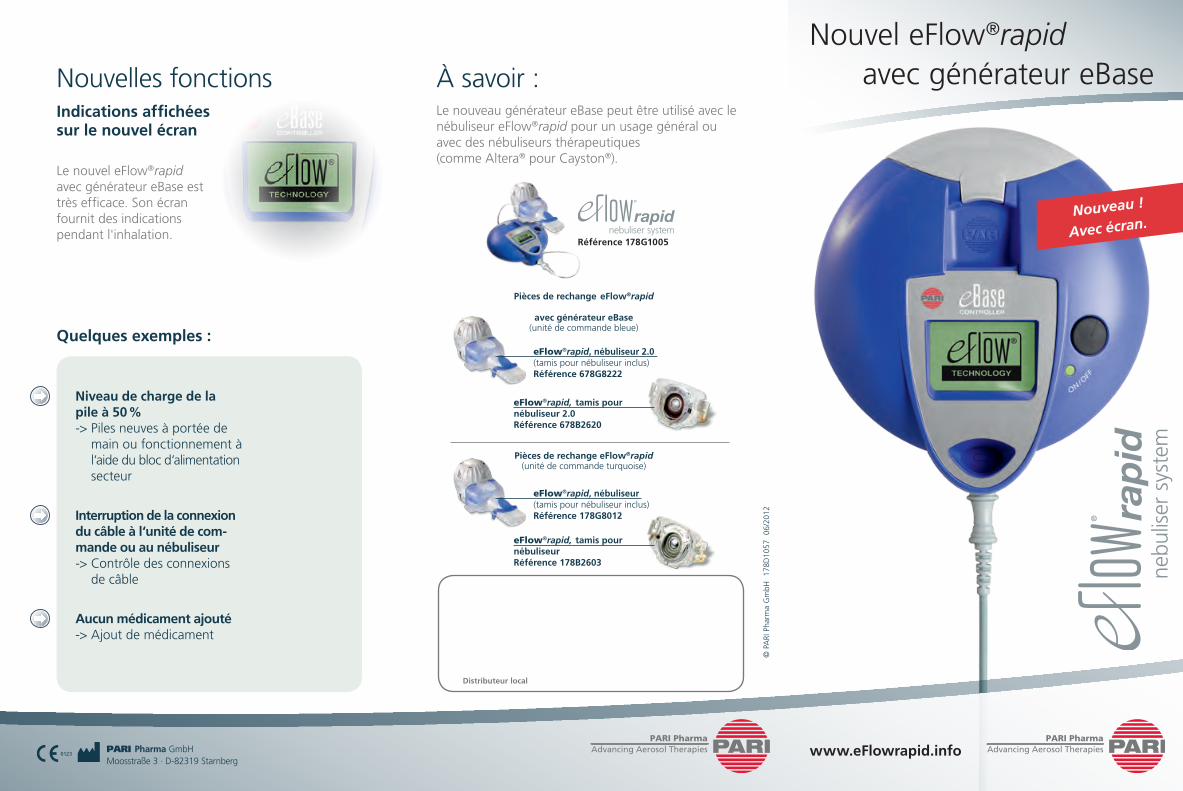
www.eFlowrapid.info
Nouvel eFlow®rapid avec générateur eBase
© P
ARI
Pha
rma
Gm
bH
178D
1057
06
/201
2
Nouveau !
Avec écran.
À savoir :Le nouveau générateur eBase peut être utilisé avec le nébuliseur eFlow®rapid pour un usage général ou avec des nébuliseurs thérapeutiques (comme Altera® pour Cayston®).
Distributeur local
Indications affichées sur le nouvel écran
Nouvelles fonctions
Le nouvel eFlow®rapid avec générateur eBase est très efficace. Son écran fournit des indications pendant l'inhalation.
Quelques exemples :
PARI Pharma GmbHMoosstraße 3 · D-82319 Starnberg
0123
nebuliser system Référence 178G1005
Pièces de rechange eFlow®rapid
avec générateur eBase (unité de commande bleue)
eFlow®rapid, tamis pour nébuliseur 2.0Référence 678B2620
eFlow®rapid, nébuliseur 2.0 (tamis pour nébuliseur inclus)Référence 678G8222
eFlow®rapid, nébuliseur (tamis pour nébuliseur inclus)Référence 178G8012
Pièces de rechange eFlow®rapid (unité de commande turquoise)
eFlow®rapid, tamis pour nébuliseurRéférence 178B2603
nebu
liser
sys
tem
Niveau de charge de la pile à 50 % -> Piles neuves à portée de
main ou fonctionnement à l‘aide du bloc d‘alimentation secteur
Interruption de la connexion du câble à l‘unité de com-mande ou au nébuliseur -> Contrôle des connexions
de câble
Aucun médicament ajouté -> Ajout de médicament

Aérosolthérapie moderne : deux fois plus rapide !
des tamis pour nébuliseur
Test de fonctionnement
Petit guide pour une hygiène optimale à la maison
Conseils d'hygiène
eFlow®rapid permet une inhalation rapide et efficace, qui réduit significativement la contrainte de la thérapie1.
Pour plus de détails, reportez-vous aux instructions d'utilisation.
Mesurez le temps nécessaire pour procéder à la nébulisation de 2,5 ml de solution sérum physiologique (NaCl 0,9 %).
4 minutes
5 minutes
Composants
Couvercle du réservoir à médicaments
Joint du couvercle
Générateur eBase
Interrupteur marche/arrêt
Câble du nébuliseur
Réservoir à médicaments*
Tamis pour nébuliseur 2.0
Chambre du nébuliseur*
Valve inspiratoire
Embout buccal avec valve expiratoire
Pièces pré-montéesdu nébuliseur*
www.eFlowrapid.info
* La chambre du nébuliseur et le réservoir à médicaments sont pré-montés et ne peuvent pas être dissociés.
Résumé des principaux avantages :
1) Fischer R, Nährig S, Kerscher M, Huber RM: Inhalation with PARI eFlow®rapid reduces treatment burden significantly in adult CF patients without altering lung function, 2007.
nebuliser system
1. Si la nébulisation dure entre 4 et 5 minutes, le tamis pour nébuliseur doit être nettoyé à l’aide de l’outil easycare.
2. Si la nébulisation dure plus de 5 minutes après le net-toyage à l‘aide d‘easycare, le tamis pour nébuliseur doit être remplacé.
Nettoyage Démontez les différents composants du nébuliseur. Rincez soigneusement à l’eau chaude avec un peu de détergent après chaque inhalation.
Désinfection Désinfectez le nébuliseur démonté et le tamis pour nébuliseur au moins une fois par jour en les plaçant dans un stérilisateur à biberons disponible dans le commerce pendant 15 minutes ou en les mettant dans de l’eau distillée bouillante pendant au moins 5 minutes.
Stockage Stockez le nébuliseur dans un endroit propre, sec et hygiénique.
Séchage Séchez les différentes parties intégralement.
Une thérapie courte est synonyme de meilleure qualité de vie
Fonctionnement silencieux pour une utilisation discrète
Légèreté, faible encombrement et maniabilité. Fonctionnement possible sur piles ou secteur pour une plus grande mobilité
Simplicité de nettoyage. Le nébuliseur peut être désinfecté et traité à l‘autoclave pour des normes d’hygiène optimale
Nouvel écran. Il fournit des indications lors de l’inhalation