cisco unified communications system end-user guide · the east orange school district utilizes a...
TRANSCRIPT

Cisco
Unified Communications System End-User Guide
Version 1.0
Revised 11/19/2012
Customized for
East Orange School District
Note: Information in this document is drawn from Cisco documentation. These guides have been condensed and simplified in this document. For the full version of these guides, please see the links within the additional resources section.

© 2009 Promedia Technology Services, Inc. Unified Communication User Guide page 1
Table of Contents
Introduction ....................................................................................................................................... 3
Desktop and Wall-‐Mounted Phones ................................................................................................... 4 Phone Overview ......................................................................................................................................................................................... 4 Understanding Lines vs. Calls ............................................................................................................................................................... 8 Understanding Call and Line Icons ..................................................................................................................................................... 8 Answering Calls .......................................................................................................................................................................................... 9 Using Do Not Disturb ................................................................................................................................................................................ 9 Diverting a Call You Are Not Able to Answer ................................................................................................................................. 9 Placing a Call ............................................................................................................................................................................................. 10 Ending a Call .............................................................................................................................................................................................. 11 Transferring a Call .................................................................................................................................................................................. 11 Placing a Call on Hold to be Retrieved at your own Extension ........................................................................................... 11 Parking a Call (placing a call on hold to be picked up at another extension) ............................................................... 12 Conference Calls ...................................................................................................................................................................................... 12 Telephone Meetings (Meet Me conferencing) ............................................................................................................................ 12 Forwarding your calls ........................................................................................................................................................................... 12 Shared lines ............................................................................................................................................................................................... 13 Voice Mail ........................................................................................................................................ 14 Accessing voicemail from your primary phone ......................................................................................................................... 14 Accessing Voicemail from another Phone. ................................................................................................................................... 14 Accessing Voicemail from an outside phone. .............................................................................................................................. 14 Accessing Voicemail from your email box. .................................................................................................................................. 15 Additional Resources ............................................................................................................................................................................ 17


© 2009 Promedia Technology Services, Inc. Unified Communication User Guide page 3
Introduction The East Orange School District utilizes a Cisco Unified Communications Manager cluster for handling all incoming and outbound telephone calls throughout the organization. This Communications Manager system, together with Cisco IP Phones, Speaker Phones, and Soft Phones (PC-based phones) makes up this phone system. The district uses 5-digit extensions for placing internal calls and for accessing an extension from the auto attendant. In addition to the main phone number, some extensions have Direct Inbound Dialing which is an outside number which will ring directly to an inside extension. Access to the voice mail system from outside of Carver School can be obtained by dialing 973-266-5860 and pressing “*”.
© 2009 Promedia Technology Services, Inc. Unified Communication User Guide page 4
Desktop and Wall-Mounted Phones
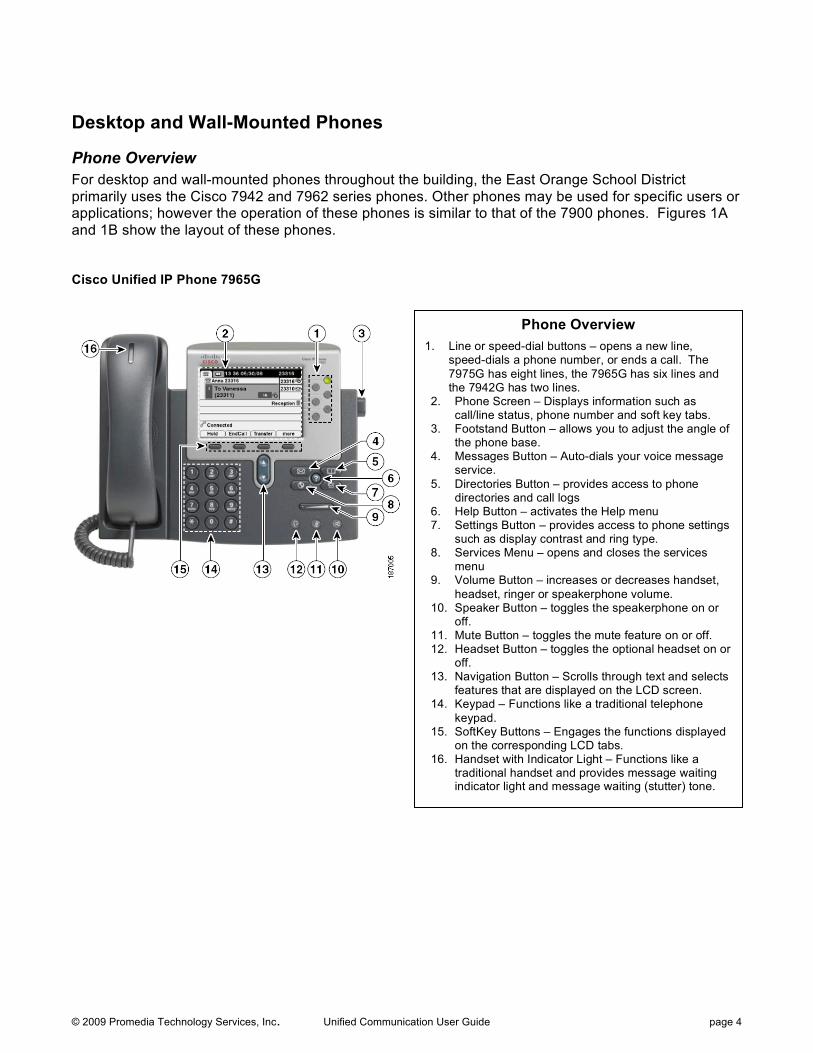
Phone Overview For desktop and wall-mounted phones throughout the building, the East Orange School District primarily uses the Cisco 7942 and 7962 series phones. Other phones may be used for specific users or applications; however the operation of these phones is similar to that of the 7900 phones. Figures 1A and 1B show the layout of these phones. Cisco Unified IP Phone 7965G
Phone Overview
1. Line or speed-dial buttons – opens a new line, speed-dials a phone number, or ends a call. The 7975G has eight lines, the 7965G has six lines and the 7942G has two lines.
2. Phone Screen – Displays information such as call/line status, phone number and soft key tabs.
3. Footstand Button – allows you to adjust the angle of the phone base.
4. Messages Button – Auto-dials your voice message service.
5. Directories Button – provides access to phone directories and call logs
6. Help Button – activates the Help menu 7. Settings Button – provides access to phone settings
such as display contrast and ring type. 8. Services Menu – opens and closes the services
menu 9. Volume Button – increases or decreases handset,
headset, ringer or speakerphone volume. 10. Speaker Button – toggles the speakerphone on or
off. 11. Mute Button – toggles the mute feature on or off. 12. Headset Button – toggles the optional headset on or
off. 13. Navigation Button – Scrolls through text and selects
features that are displayed on the LCD screen. 14. Keypad – Functions like a traditional telephone
keypad. 15. SoftKey Buttons – Engages the functions displayed
on the corresponding LCD tabs. 16. Handset with Indicator Light – Functions like a
traditional handset and provides message waiting indicator light and message waiting (stutter) tone.

© 2009 Promedia Technology Services, Inc. Unified Communication User Guide page 5
The phone screen delivers important information about the status of the phone and the call you are on, as well as the options that are available to you for handling the call. Figure 2 indicates a common screen and explains the sections of the display. Phone Screen Features - 7962
Phone Screen Features
1. Primary Phone line – Displays the extension number for your primary phone line. If several feature tabs are open the phone number and the time and date alternate display in this area.
2. Icons for programmable buttons -- the icon in this area will indicate a phone line (a phone), speed dial (a keypad), Phone services option (a globe) and a phone feature (a bullet)
3. Softkey label – Displays the function of the softkey directly below the label.
4. Status line – displays the audio mode icons, status information and prompts.
5. Call activity area – Displays the current calls per line, including caller ID, call duration, and call state.
6. Phone tab – indicates call activity 7. Feature tabs – each feature menu has a
corresponding tab which is visible when the feature is open.

© 2009 Promedia Technology Services, Inc. Unified Communication User Guide page 6
The operation and features of your phone may vary depending on how your phone is configured by the administrator. For a more detailed phone user guide, please refer to the website referenced below and select your phone model. Note: Use only a soft, dry cloth to wipe the phone screen. Do not use any liquids or powders on the phone, as they can contaminate phone components and cause failures. 7900 series phones: http://www.cisco.com/en/US/products/hw/phones/ps379/products_user_guide_list.html

© 2009 Promedia Technology Services, Inc. Unified Communication User Guide page 7
Cisco Unified IP Phone 6921 – Please refer to the Phone Features found at http://www.cisco.com/en/US/prod/voicesw/ps6788/phones/ps10326/ps10343/ip6921_prod_tour/index.html
The operation and features of your phone may vary depending on how your phone is configured by the administrator. For a more detailed phone user guide, please refer to the website referenced below and select your phone model. Note: Use only a soft, dry cloth to wipe the phone screen. Do not use any liquids or powders on the phone, as they can contaminate phone components and cause failures. 6900 series phones: http://www.cisco.com/en/US/docs/voice_ip_comm/cuipph/6921_6941_6961/8_6/english/user_guide/6921_6941_6945_6961_enu86.html
© 2009 Promedia Technology Services, Inc. Unified Communication User Guide page 8
Understanding Lines vs. Calls It is sometimes easy to confuse lines and calls on your phone. Use these tips to avoid confusion.
Lines Your phone supports multiple lines. Each line corresponds to an extension that others can use to call you. The number of lines assigned to your phone depends on how your programmable buttons have been configured by the administrator. To see how many lines you have look at that area of your phone screen. You have as many lines as you have phone numbers and phone line icons. The first line is generally your main extension. Subsequent lines are generally shared lines. Refer to a later section in this guide for shared lines. Calls Each line can support multiple calls. Therefore, you might find yourself handling several calls on one phone line. Most lines are configured for 4 calls per line with a busy trigger of 2 calls. When a line already has 2 calls, a third call will receive a busy flag and will be forwarded to number designated in the call forward busy field configured by your administrator. A line with 2 calls however can still make a third and fourth call.
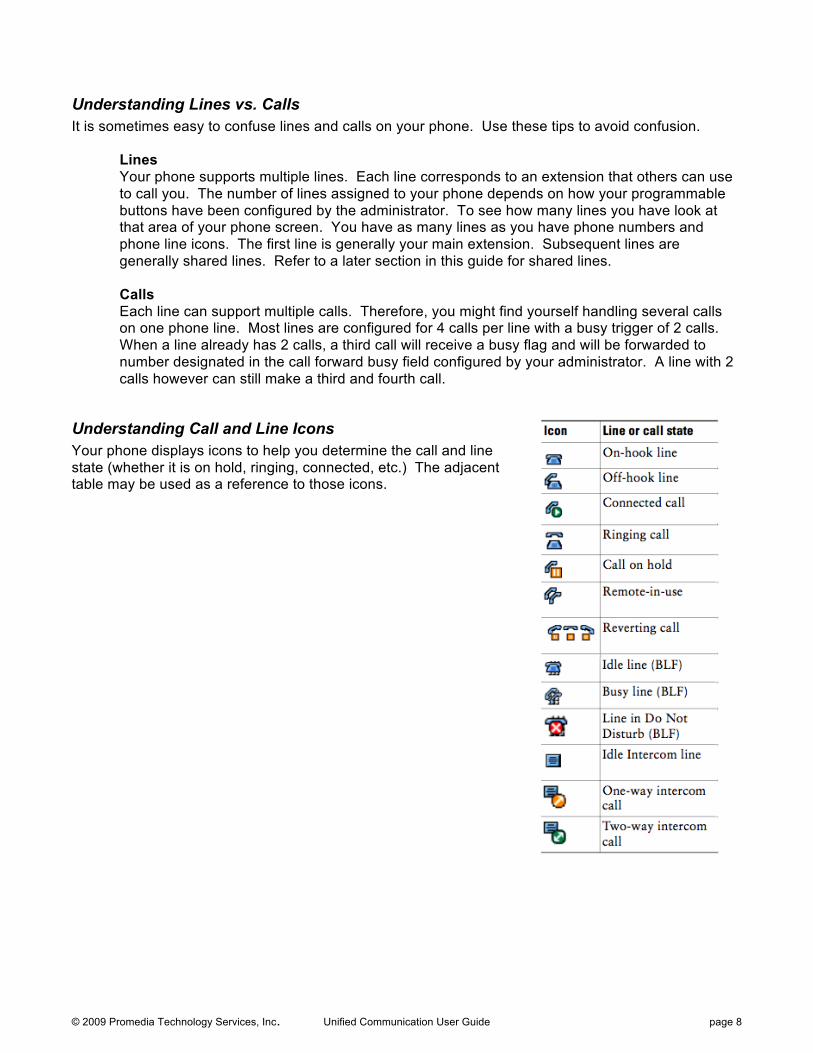
Understanding Call and Line Icons Your phone displays icons to help you determine the call and line state (whether it is on hold, ringing, connected, etc.) The adjacent table may be used as a reference to those icons.
© 2009 Promedia Technology Services, Inc. Unified Communication User Guide page 9
Answering Calls When your phone rings the display will indicate the line that is ringing and the source of the call.
If the phone is on-hook and you are not on a call You may lift the receiver to answer the call on the handset. If you wish to you answer the call on speaker, either press the Answer softkey or press the speaker button. If the phone is on-hook and you are already on a call Press the Answer soft key. This will place your current call on hold and connect you to the new incoming call. If the phone is off-hook and you are not on a call Press the Answer softkey to accept the call on the handset. If you wish to answer the call on speaker, press the speaker key. If the phone is off-hook and you are already on a call Press the Answer softkey, this will place your current call on hold and connect you to the new incoming call.
Using Do Not Disturb You can use the Do Not Disturb (DND) feature to block incoming calls from ringing on your phone. DND and Call Forward are both enabled on your phone, calls are forwarded and the caller does not hear a busy tone. Your intercom lines still ring when DND is active. To turn on DND Press the DND softkey. “Do Not Disturb” displays on the phone and the ring tone is turned off. To turn off DND
Press the DND softkey. “Do Not Disturb” will disappear from the phone display. You can use the Do Not Disturb (DND) feature to block incoming calls from ringing on your phone. The caller still has to wait for the no answer ring duration to expire before call forward no answer setting is triggered. DND and Call Forward are both enabled on your phone, calls are forwarded and the caller does not hear a busy tone.
Diverting a Call You Are Not Able to Answer If you receive a call when you are not able to answer it, you may press the iDivert or Divert softkey to stop the phone from ringing and send the caller directly to voice mail. iDivert can only be used for calls that have not been answered.
© 2009 Promedia Technology Services, Inc. Unified Communication User Guide page 10
Placing a Call When dialing inside calls you will dial the 4-digit extension. When dialing outside calls you will dial 9 plus 1 plus the area code plus the number.
To place a new call using the handset when you are not currently on the phone Lift the handset and dial the number. To place a new call when you are on another call Press the New Call softkey and dial the number. This will place your current call on hold. To place a new call using the speaker phone While the phone is on-hook, press either the New Call softkey or the speaker button and dial the number. To place a new call using a directory 1. Press the directories key on the 7900 & 6900 phones. 2. Use the navigation pad to select the directory you wish to use or use the keypad to indicate
the number of your choice. 3. Use the keypad to enter a portion of the first and/or last name and press the Search softkey. 4. Use the navigation pad, or the keypad to select the entry you wish to call. To stop the call,
press the Exit softkey. 5. Press the Dial softkey to dial the number as it is displayed or press the EditDial softkey to
edit the number before dialing. 6. While the call is connecting lift the handset.
To return a missed call 1. Press the directories key. 2. Select “Missed Calls.” 3. Use the navigation pad to highlight the missed call you want to return. 4. Press EditDial softkey. 5. Dial 9. 6. Press speaker button or pick-up the handset to place the call.
To redial the last number called Lift the handset or leave it on hook for a speaker phone call. Press the Redial softkey. To receive notification when a busy ringing extension is available 1. Press the CallBack softkey while listening to the busy tone or ring sound. 2. Hang up. Your phone will alert you when the line is free. 3. Place the call again.
Switching Between Calls To switch between calls on your phone, use the navigation pad to highlight the call you want to switch to. Press the Resume softkey. The current call will be placed on hold and you will be connected to the highlighted call.

© 2009 Promedia Technology Services, Inc. Unified Communication User Guide page 11
Ending a Call To end a call, hang-up the handset or press the EndCall softkey.
Transferring a Call To transfer a call to an inside extension and announce the call 1. Inform the caller that you will be transferring them. 2. Press the Transfer softkey (7900 & 6900 phones), the caller is now on hold. 3. Dial the extension to which you are transferring the call. 4. When the receiving party answers announce the call. 5. Press the Transfer softkey or Transfer button again to complete the call. Note: If the receiving party is not available, press the End Call softkey, use the navigation pad to select the original call, and press the Resume softkey.
To transfer a call to an inside extension without announcing the call (blind transfer) 1. Inform the caller that you will be transferring them. 2. Press the Transfer softkey (7900 & 6900 phones); the caller is now on hold, 3. Dial the extension to which you are transferring the call. 4. Press the Transfer softkey
To transfer a call to an external phone number or cell phone number 1. Inform the caller that you will be transferring them. 2. Press the Transfer softkey (7900 & 6900 phones), the caller is now on hold. 3. Dial the number of the phone line to which you are transferring, including 88 plus 1 plus area
code plus number. For local calls, dial 88 plus the 7 digit number. 4. When the receiving party answers announce the call. 5. Press the Transfer softkey
Note: If the receiving party is not available, press the End Call softkey, use the navigation pad to select the original call, and press the Resume softkey.
To transfer a call to directly to a user’s voicemail 1. Press the Transfer softkey (7900 & 6900 phones), the caller is now on hold. 2. Dial * and the 4 digit extension. 3. Press the Transfer softkey Note: The Transfer softkey must be pressed immediately after dialing * and the extension to avoid cutting too much of the voicemail opening greeting
Placing a Call on Hold to be Retrieved at your own Extension Press the Hold softkey or button (7900 & 6900 phones) To resume the call, use the up down rocker to highlight the holding call, and press the Resume softkey.
© 2009 Promedia Technology Services, Inc. Unified Communication User Guide page 12
Parking a Call (placing a call on hold to be picked up at another extension) Press the Park softkey; the system will display the call parked number, a 4-digit number between 73000 thru 73099 To retrieve the call, dial the park number from any extension. Note: The call park number is displayed on the phone for 20 seconds. If the parked call is not picked up after 360 seconds, it will automatically ring the line or phone that originally parked the call.
Conference Calls To establish a conference call 1. Place or receive the initial conference member call. 2. Press the Conf softkey or the Conference button and dial the next call. Announce the
conference and press the Conf softkey or Conference button again. 3. Repeat step 2 for each additional caller. You may have up to 40 callers conferenced. To establish a conference call by joining calls already on your phone 1. Make sure one call is active and the other is on hold. 2. Press the Conf softkey or Conference button. 3. Press the Line button of the call you want to add to the conference. Managing a Conference Call Pressing the ConfList or Details softkey will display a list of all of the members of a conference call. To get an updated list of participants while viewing the conference list, press Update. The user who established the call may remove a caller by displaying the list using the ConfList or Details softkey, using the navigation pad to select the member to be removed, and pressing the Remove softkey.
Telephone Meetings (Meet Me conferencing) To establish a MeetMe conference meeting 1. Press the MeetMe softkey and enter a number between 74000 thru 74099 2. People joining the meeting will dial the 74000 thru 74099 number you used to establish the
meeting and will be joined to the meeting..
Forwarding your calls You can forward your calls to another extension or to an outside cell phone or phone line.
1. Press the CFwdAll or FwdAll softkey. 2. Dial the extension to forward the calls to or dial 8 plus 1, plus the area code plus the outside
number. Press the End Call softkey. 3. You may also press the voicemail button or softkey to forward to voicemail. 4. To cancel the forward, press the CFwdAll softkey (7900 & 6900 phones)
Note: Avoid using Call Forward All for phones with shared lines (extensions that appear on other phones). Calls to the shared line (extensions) will also be forwarded. CFwdAll softkey only forwards the calls to the primary line/button.
© 2009 Promedia Technology Services, Inc. Unified Communication User Guide page 13
Shared lines Shared lines are extensions or lines that appear on more than one phone.
Tips • The remote line button of a shared line will turn red when the line is in use. • You may continue to use the shared line by pressing the red line button to use the line. • To see if the shared line is in use, look for the remote-in-use icon next to a red line button. • To view details about current calls on the shared line, press the red line button for the
remote-in-use line. All non-private calls appear in the call activity area of the phone screen.
© 2009 Promedia Technology Services, Inc. Unified Communication User Guide page 14
Voice Mail Unity is the voice messaging system for the East Orange School District. Each non-classroom extension or line has an associated voicemail box and user account. The Message Waiting Indicator (MWI) light on the phone works only for the primary line. All lines, including the primary line, will switch the line button icon from a telephone to an envelope if there is a message on the line.
Accessing voicemail from your primary phone 1. Press the Messages button or softkey. 2. When prompted, enter your PIN. The default PIN is 1234. If this is the first time logging on to
your mailbox, you will be asked to set up a password and record your name. 3. You will also have an opportunity record a greeting which callers will hear when they reach your
voicemail box. Sample Opening Greeting
You have reached the voicemail box for {YOUR NAME} at {School Name}. Please leave a message after the tone or press 0 for the operator.
4. Refer to figure 4 for the Unity Menu. If a phone has multiple lines (shared lines), the line from which you want to retrieve the voicemail must be pressed before pressing the messages button or softkey.
Accessing Voicemail from another Phone. 1. Press the Messages button or softkey. 2. Press *. When prompted enter your 5-digit extension (your User ID) followed by # to logon to
your own mailbox. When prompted, enter your PIN. The default PIN is 1234. 3. If this is the first time logging on to your mailbox, you will be asked to set up a password and
record your name. 4. You will also have an opportunity record a greeting which callers will hear when they reach your
voicemail box. Sample Opening Greeting
You have reached the voicemail box for {YOUR NAME} at {School Name}. Please leave a message after the tone or press 0 for the operator.
5. Refer to figure 4 for the Unity Menu.
Accessing Voicemail from an outside phone. 1. Dial 973-266-5860 2. Press *. When prompted enter your 5-digit extension (your User ID) followed by # to logon
to your own mailbox. When prompted, enter your PIN. The default PIN is 1234. 3. If this is the first time logging on to your mailbox, you will be asked to set up a password and
record your name. 4. You will also have an opportunity record a greeting which callers will hear when they reach your
voicemail box. Sample Opening Greeting
You have reached the voicemail box for {YOUR NAME} at {School Name}. Please leave a message after the tone or press 0 for the operator.
5. Refer to figure 4 for the Unity Menu.
© 2009 Promedia Technology Services, Inc. Unified Communication User Guide page 15
Accessing Voicemail from your email box. 1. Voicemail messages for your extension will appear in your Exchange inbox. 2. Open them as you would any incoming message. 3. Click the message to play it. 4. Once you have listened to a message, the MWI on your phone will turn off. 5. You may forward, delete or save voice messages just as you would any other message. If you
forward the message via email, the recipient will only be able to play the message using an email client. Forwarded messages cannot be played on the phone. See note below.
6. Voicemail deleted through Exchange is also deleted from your Unity inbox. Note: Moving the email messages in Outlook, manually or using Rules, marks the message as read. Note: You may use any email client, Outlook 2000/2003/2007/2010 or Outlook Web Access, that you normally use to open your district emails. Voice messages will be played by your default media player. Note: if ViewMail for Outlook is installed on your PC, you will have additional options for handling the message, including forwarding the message to another Unity subscriber as a voicemail message.
Cisco Unity Personal Communications Assistant
You may use Cisco Personal Communications Assistant to manage your Unity user settings and passwords. To access Cisco Personal Communications Assistant from the internal network go to http://10.53.252.12/ciscopca. Use the same user name and password you use for the computer network.