chord electronics ltd. · chord electronics ltd. ... it should be serviced only by chord...
TRANSCRIPT
DAVE Digital to Analogue Veritas in Extremis
Digital/Analogue Converter, Digital Preamp, Headphone Amplifier
OPERATING INSTRUCTION
- ! -1
Chord Electronics Ltd.

Chord Dave connection diagram
- ! -2
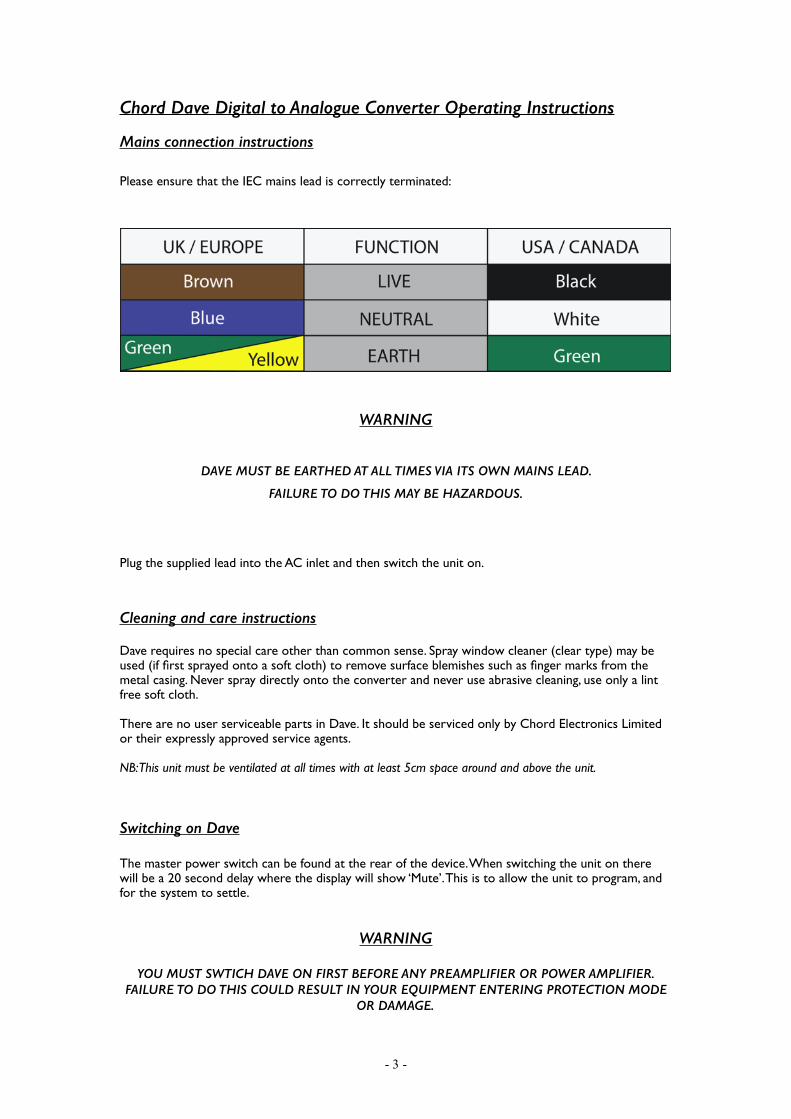
Chord Dave Digital to Analogue Converter Operating Instructions
Mains connection instructions
Please ensure that the IEC mains lead is correctly terminated:
WARNING
DAVE MUST BE EARTHED AT ALL TIMES VIA ITS OWN MAINS LEAD.
FAILURE TO DO THIS MAY BE HAZARDOUS.
Plug the supplied lead into the AC inlet and then switch the unit on.
Cleaning and care instructions
Dave requires no special care other than common sense. Spray window cleaner (clear type) may be used (if first sprayed onto a soft cloth) to remove surface blemishes such as finger marks from the metal casing. Never spray directly onto the converter and never use abrasive cleaning, use only a lint free soft cloth.
There are no user serviceable parts in Dave. It should be serviced only by Chord Electronics Limited or their expressly approved service agents.
NB: This unit must be ventilated at all times with at least 5cm space around and above the unit.
Switching on Dave
The master power switch can be found at the rear of the device. When switching the unit on there will be a 20 second delay where the display will show ‘Mute’. This is to allow the unit to program, and for the system to settle.
WARNING
YOU MUST SWTICH DAVE ON FIRST BEFORE ANY PREAMPLIFIER OR POWER AMPLIFIER. FAILURE TO DO THIS COULD RESULT IN YOUR EQUIPMENT ENTERING PROTECTION MODE
OR DAMAGE.
- ! -3

Audio Outputs
There is a pair of stereo balanced outputs via Neutrik XLR style connectors and one pair of stereo unbalanced outputs via gold plated RCA phono style connectors. Each of these will drive down to a 50ohm load. This means that Dave will work with all known pre-amplifiers and is able to drive very long audio cables without difficulty. Both audio outputs work at the same time so this allows Dave to be connected to two pre-amplifiers if needed.
As Dave features a digital volume control it can also be connected directly to a power amplifier without the need for a preamplifier.
Digital Inputs
Dave features eight digital input formats. They can all be used at the same time and are individually selectable using the left/right selector buttons on the top panel or via remote control.
These consist of four separate 75ohm-SP/DIF2 BNC (BNC1,2,3,4) inputs, one AES balanced XLR input (AES), two Plastic Fibre Optic (Opt1,2) inputs, and a single USB B type connector (USB).
Display
The display is split into 4 zones. The top half of the screen shows the selected input, sample frequency and volume level.
Depending on the display mode the background colour will change to clearly indicate the sample frequency and volume level. In the example below the USB input is shown running at 44.1KHz indicated by the red background.
The sample rate colours are as follows:
- ! -4
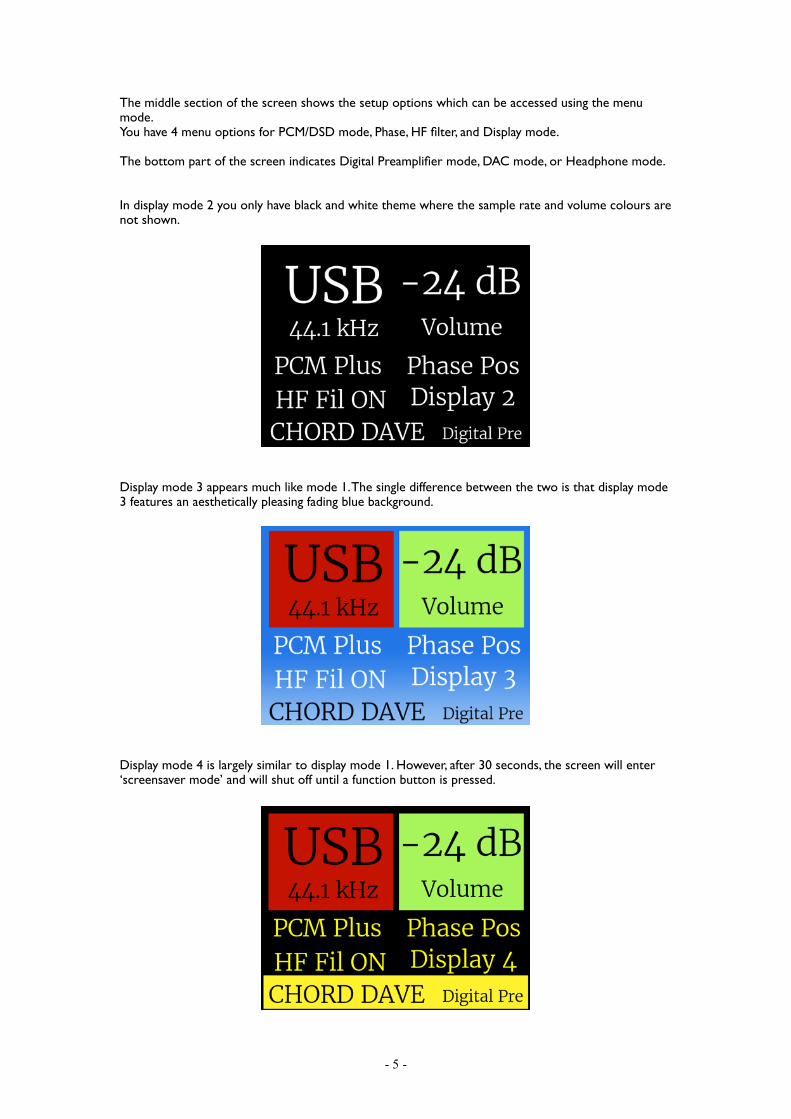
The middle section of the screen shows the setup options which can be accessed using the menu mode. You have 4 menu options for PCM/DSD mode, Phase, HF filter, and Display mode.
The bottom part of the screen indicates Digital Preamplifier mode, DAC mode, or Headphone mode.
In display mode 2 you only have black and white theme where the sample rate and volume colours are not shown.
Display mode 3 appears much like mode 1. The single difference between the two is that display mode 3 features an aesthetically pleasing fading blue background.
Display mode 4 is largely similar to display mode 1. However, after 30 seconds, the screen will enter ‘screensaver mode’ and will shut off until a function button is pressed.
- ! -5

Manual Controls
Dave can be operated manually by the controls on the top of the unit, or it can be operated using the supplied remote control. Using these controls you can select the digital input, adjust the volume level, and make changes to the setup options.
The top control panel features 4 push buttons and a rotary volume control.
The volume control rotates left or right to decrease or increase the volume level. Pushing it down will mute or unmute the output.
The left/right buttons select the digital input and this is displayed on the top right of the screen.
The up/down buttons select the setup options at the bottom of the screen. Once an option is highlighted the left/right buttons will change the setting.
- ! -6
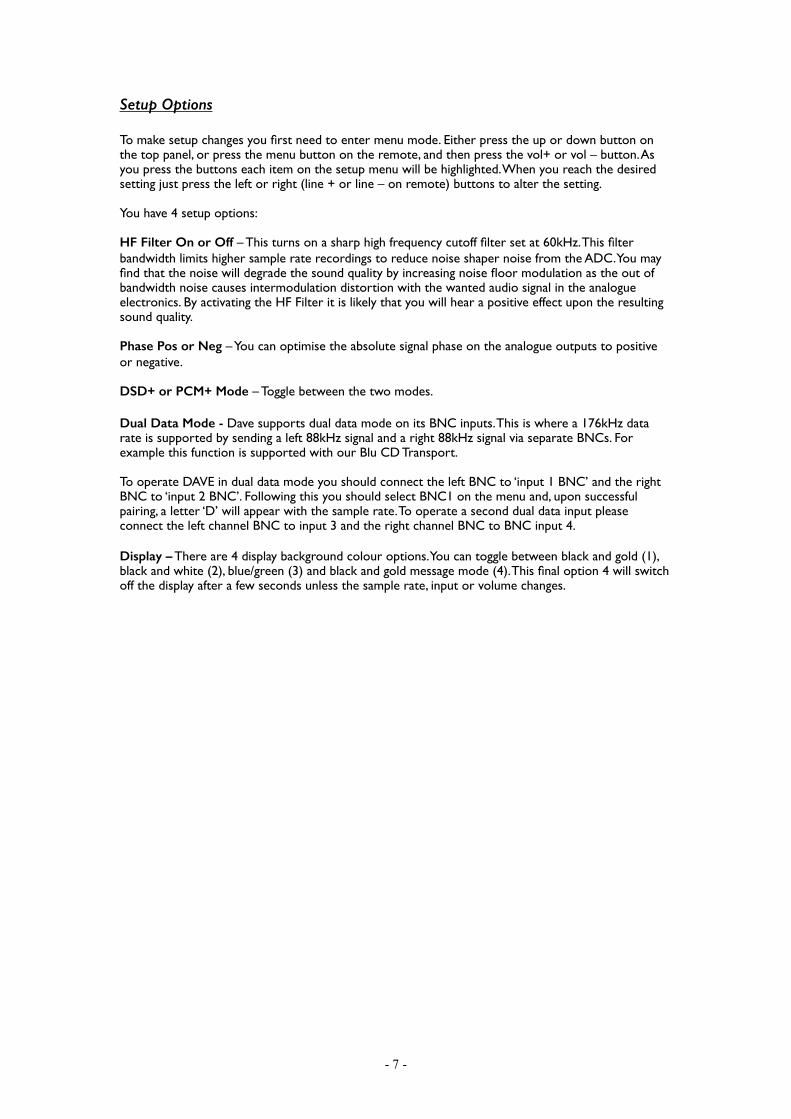
Setup Options
To make setup changes you first need to enter menu mode. Either press the up or down button on the top panel, or press the menu button on the remote, and then press the vol+ or vol – button. As you press the buttons each item on the setup menu will be highlighted. When you reach the desired setting just press the left or right (line + or line – on remote) buttons to alter the setting.
You have 4 setup options:
HF Filter On or Off – This turns on a sharp high frequency cutoff filter set at 60kHz. This filter bandwidth limits higher sample rate recordings to reduce noise shaper noise from the ADC. You may find that the noise will degrade the sound quality by increasing noise floor modulation as the out of bandwidth noise causes intermodulation distortion with the wanted audio signal in the analogue electronics. By activating the HF Filter it is likely that you will hear a positive effect upon the resulting sound quality.
Phase Pos or Neg – You can optimise the absolute signal phase on the analogue outputs to positive or negative.
DSD+ or PCM+ Mode – Toggle between the two modes.
Dual Data Mode - Dave supports dual data mode on its BNC inputs. This is where a 176kHz data rate is supported by sending a left 88kHz signal and a right 88kHz signal via separate BNCs. For example this function is supported with our Blu CD Transport.
To operate DAVE in dual data mode you should connect the left BNC to ‘input 1 BNC’ and the right BNC to ‘input 2 BNC’. Following this you should select BNC1 on the menu and, upon successful pairing, a letter ‘D’ will appear with the sample rate. To operate a second dual data input please connect the left channel BNC to input 3 and the right channel BNC to BNC input 4.
Display – There are 4 display background colour options. You can toggle between black and gold (1), black and white (2), blue/green (3) and black and gold message mode (4). This final option 4 will switch off the display after a few seconds unless the sample rate, input or volume changes.
- ! -7

DAC Mode
Dave can be used with the inbuilt volume control to drive an amplifier directly but should you wish to use it with a preamplifier or AV amplifier it can be switched to DAC Mode.
Simultaneously pressing both left and right buttons on the top panel will activate DAC mode and this will be indicated on the bottom right of the display. DAC mode fixes the output level to 3dB (3V unbalanced, 6V balanced line level output) and deactivates the volume control along with some remote control functions. This mode is remembered even when the power is turned off.
To turn off DAC mode simply press both left and right buttons at the same time until you see ‘Digital Pre’ on the bottom right of the display.
Please note that inserting headphones into the front jack socket will automatically deactivate DAC mode. This is so that you can adjust the volume level for safe headphone listening.
Please note: Never use DAC mode when connected directly to a power amplifier as you could risk permanent damage to your loudspeakers due to the high volume level.
DSD+ or PCM+ Mode
Dave has two menu options specifically tailored for PCM or DSD playback. You can play both PCM and DSD music using either mode, but each one is specifically optimised for a particular format. In order to cycle between each mode please highlight the segment, typically by pressing the down button, and then either press the left or right button for two seconds.
PCM+ - Use this for PCM playback up to 768KHz. DSD playback up to DSD256 is also supported but it is decimated and not optimised in this mode.
DSD+ - Use this for DSD64, 128, and 256 (single, dual and quad speed) playback. There is no decimation. PCM can still be played and this mode is ideal for streaming video with audio as it has a lower delay.
Before changing modes please stop music playback and mute your amplifier to allow the clocks to resynchronise and avoid incorrect playback. Please note that when switching between PCM+ or DSD+ modes there will be a 20 second delay where the display will show ‘Mute’. This is to
allow the unit to program, and for the system to settle.
- ! -8

Headphone Mode
Dave features a very high quality headphone output which is able to drive both in ear monitors and also on ear headphones from 8 to 800 ohms. Simply plug in to the front socket using a ¼” (6.35mm) jack plug. Dave will automatically switch to headphone mode and mute the main outputs. Headphone mode stores a separate volume level for your headphones and does not effect the main volume on the analogue outputs.
In headphone mode you can select from 4 crossfeed settings to suit your listening experience and headphones. Use the up/down buttons or remote control to select the crossfeed option then use the left/right button to change the setting from crossfeed 1 to 4.
- ! -9
Using the USB Digital Input
Driver installation
It is only necessary to install drivers for Windows based computers. Only Windows Vista, 7, 8 and 10 are supported. Dave will not work with Windows XP.
Please download the Windows driver at www.chordelectronics.co.uk on the Dave product page.Once downloaded you will need to extract the file from the downloaded zip file and then run the driver installation program.
Once installation is complete then plug Dave into the Windows computer using either the supplied USB cable or any other USB 2.0 compatible cable.
Installing the driver on a Mac, Android or Linux device
Dave uses a class compliant USB interface so it does not require any driver software on Mac, Android or Linux devices. Simply plug a USB2.0 USB cable between Dave and the computer, tablet or phone and it will be automatically detected and play.
Please note you may need to setup your playback software to use Dave as the audio output device.
Setting Dave as the default audio device in Windows
Once the driver software has been installed and Dave is connected to a Windows based computer then you can set Windows to send all audio through Dave as follows:-
Stage 1:- Configuring audio devices
Connect Dave to the computer with the supplied USB cable.
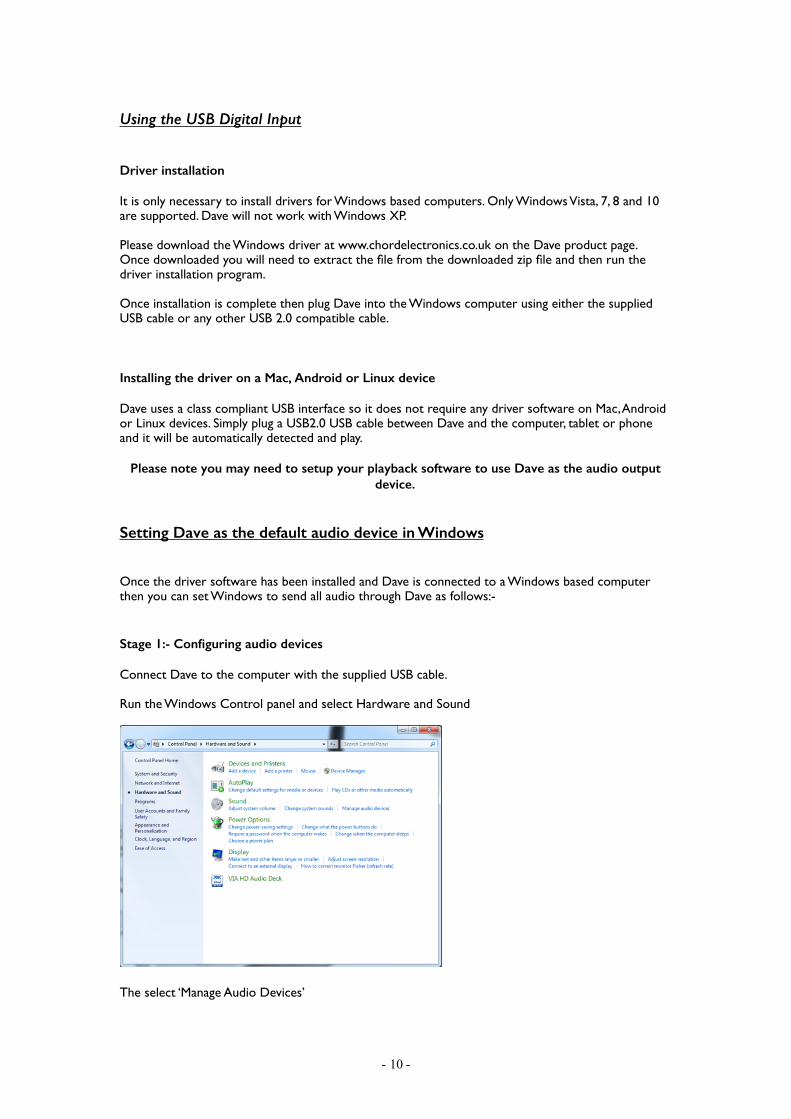
Run the Windows Control panel and select Hardware and Sound
The select ‘Manage Audio Devices’
- ! -10
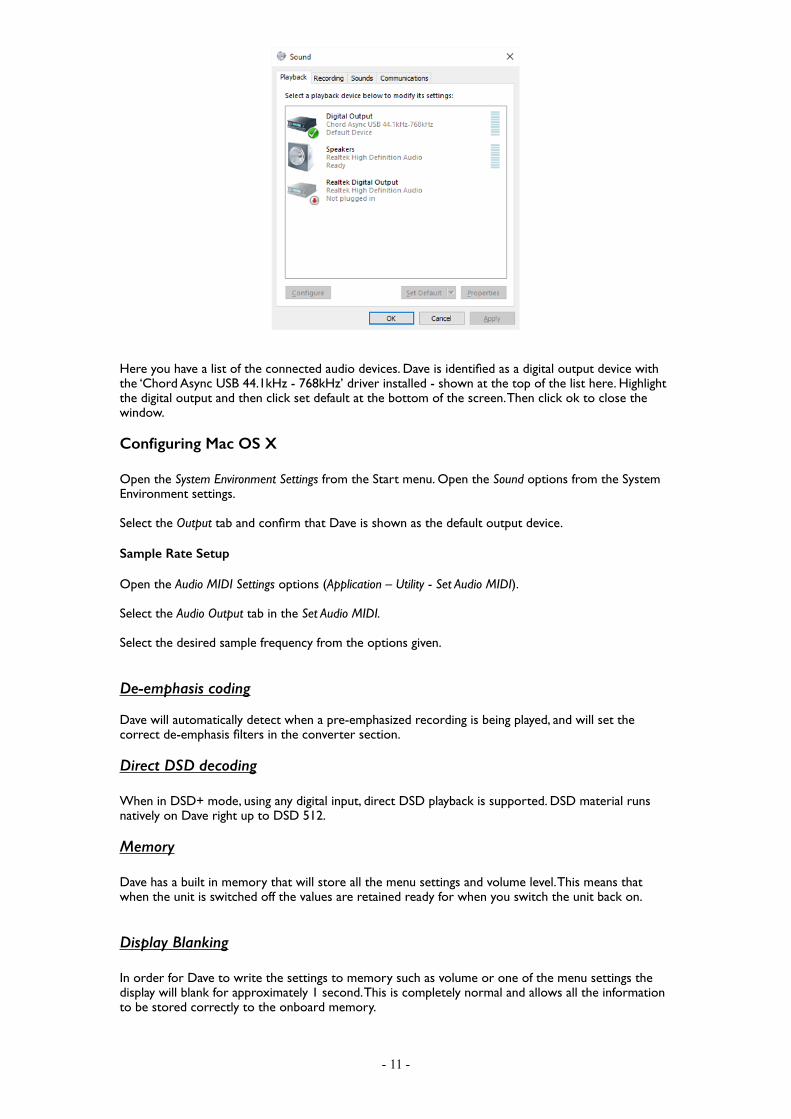
Here you have a list of the connected audio devices. Dave is identified as a digital output device with the ‘Chord Async USB 44.1kHz - 768kHz’ driver installed - shown at the top of the list here. Highlight the digital output and then click set default at the bottom of the screen. Then click ok to close the window.
Configuring Mac OS X
Open the System Environment Settings from the Start menu. Open the Sound options from the System Environment settings.
Select the Output tab and confirm that Dave is shown as the default output device.
Sample Rate Setup
Open the Audio MIDI Settings options (Application – Utility - Set Audio MIDI).
Select the Audio Output tab in the Set Audio MIDI.
Select the desired sample frequency from the options given.
De-emphasis coding
Dave will automatically detect when a pre-emphasized recording is being played, and will set the correct de-emphasis filters in the converter section.
Direct DSD decoding
When in DSD+ mode, using any digital input, direct DSD playback is supported. DSD material runs natively on Dave right up to DSD 512.
Memory
Dave has a built in memory that will store all the menu settings and volume level. This means that when the unit is switched off the values are retained ready for when you switch the unit back on.
Display Blanking
In order for Dave to write the settings to memory such as volume or one of the menu settings the display will blank for approximately 1 second. This is completely normal and allows all the information to be stored correctly to the onboard memory.
- ! -11
Product Specification
FREQUENCY RESPONSE: 20Hz to 20kHz flat within +/-0.1dB (HF filter off)
THD + N: 127.5dB (AWT)
CHANNEL SEPARATION: >125dB @ 1KHz
DYNAMIC RANGE: 127.5dB (AWT)
DIGITAL INPUTS: 4 x 75Ω SP/DIF BNC Coax 44.1KHz - 384KHz
1 x AES Balanced XLR 44.1KHz - 96KHz
2 x Plastic fibre optic ( TOSlink ) 44KHz - 192KHz
1 x USB ( B type ) 44KHz - 768KHz PCM + DSD
ANALOGUE OUTPUTS: 2 x RCA Phono
2 x Balanced XLR
HEADPHONE OUTPUT: 1% THD 6.8v RMS with 300 ohm (154 mW)
1% THD 6.8v RMS with 33 ohm (1.4W)
PHASE SWITCH: 2 Settings Positive or Negative output phase
SAMPLE FREQUENCIES: 44.1Khz - 768Khz DSD64,128,256,512 native DSD + DoP (input dependant)
OUTPUT IMPEDANCE: 0.0055ohm (short circuit protected) damping factor 145
POWER SUPPLY: 90V AC - 250V AC auto switching 50 - 60HZ
DIMENSIONS IN MM: 338 x 60 x 145mm (Width x Height x Depth)
WEIGHT: 7Kg
- ! -12