chemistry analyzer - idexx · pdf fileproprietary rights notice information in this document...
TRANSCRIPT

Operator’s Manual
IDEXX VetTest* Chemistry Analyzer


Proprietary Rights Notice
Information in this document is subject to change without notice. Companies, names, and data used in examples are fictitious unless otherwise noted. No part of this document may be reproduced or transmitted in any form or by any means, electronic, mechanical, or otherwise, for any purpose, without the express written permission of IDEXX Laboratories. IDEXX Laboratories may have patents or pending patent applications, trademarks, copyrights, or other intellectual or industrial property rights covering this document or subject matter in this document. The furnishing of this document does not give a license to these property rights except as expressly provided in any written license agreement from IDEXX Laboratories.
© 2010 IDEXX Laboratories, Inc. All rights reserved. • 06-02247-05
*VetTest, VetTrol, Cornerstone, and SNAP are trademarks or registered trademarks of IDEXX Laboratories, Inc. or its affiliates in the United States and other countries. All other product and company names and logos are trademarks of their respective holders.
One IDEXX DriveWestbrook, Maine 04092 USAidexx.com


v
Contents
Preface ........................................................................................................................... ixAbout this Guide ............................................................................................................................... ixIDEXX Technical Support Contact Information ................................................................................. xiInternational Symbol Descriptions ................................................................................................... xiiGeneral Safety Summary ................................................................................................................ xiv
Safety Symbols on the Product............................................................................................... xivConnection to a Power Source ............................................................................................... xivPersonal Safety ....................................................................................................................... xiv
A Important Things to Know About the VetTest* Analyzer ....................................A–1Overview ....................................................................................................................................... A–1Slide Packaging and Storage ....................................................................................................... A–1Profile Interpretation (Canine and Feline only) ............................................................................. A–1Star Reference System ................................................................................................................ A–2Your Participation in Reference-Range Data Collection ............................................................... A–2Software Updates ......................................................................................................................... A–2VetTest Chemistries ...................................................................................................................... A–3VetTest Species ............................................................................................................................. A–4
B System Overview and Installation .......................................................................B–1Choosing the Analyzer Location ................................................................................................... B–1Handling ....................................................................................................................................... B–1Precautions ................................................................................................................................... B–2Important Electrical Safety Precautions ........................................................................................ B–2Unpacking the Analyzer ................................................................................................................ B–2VetTest Analyzer Components (Front and Back Views) ............................................................... B–3Accessing Components Inside the Right-side Cover .................................................................. B–4Connecting the VetTest Pipettor ................................................................................................... B–5Inserting the Paper Roll ................................................................................................................ B–6Inserting the VetTest Software Disk .............................................................................................. B–6Connecting the Power Cord and Turning On the Analyzer ........................................................... B–7Adjusting Initial Settings .............................................................................................................. B–7Connecting Your Printer ................................................................................................................ B–8Connecting an External Keyboard ............................................................................................... B–8Connecting an IDEXX SNAP* Reader Analyzer ........................................................................... B–9
C Sample Collection and Preparation ....................................................................C–1Plasma and Serum Collection and Preparation ........................................................................... C–1
Plasma and Serum Sample Volumes ................................................................................... C–1General Blood Sample Collection Precautions..................................................................... C–1Serum Sample Preparation ...................................................................................................C–2Plasma Sample Preparation .................................................................................................C–2Centrifuged Sample Inspection ............................................................................................C–3
Urine Sample Collection and Preparation .................................................................................... C–3Urine Sample Volumes .......................................................................................................... C–4Urine Sample Preparation .....................................................................................................C–4

vi
Sample Storage ............................................................................................................................C–4Storing Serum or Plasma Samples .......................................................................................C–4Storing Urine Samples ..........................................................................................................C–5Analysis of Stored Samples ..................................................................................................C–5
Combined Chemistry and Hematology Sample Preparation ....................................................... C–5
D Basic System Operation ......................................................................................D–1Prepare Your Materials and Information .......................................................................................D–1Specify a Sample from the Main Menu ........................................................................................D–1
Enter Patient Species ............................................................................................................D–1Enter Patient Identification (ID) ..............................................................................................D–2
Insert slides ...................................................................................................................................D–2Reading the Bar Codes ................................................................................................................D–2Preparing the Pipettor for a Sample .............................................................................................D–3Sample Analysis Display ..............................................................................................................D–3Postanalysis Steps........................................................................................................................D–4Results ..........................................................................................................................................D–4
E Advanced Operations ..........................................................................................E–1Out-of-Linearity Range Samples ................................................................................................. E–1Analyzer Linearity Range ............................................................................................................. E–1Dilution Protocols .......................................................................................................................... E–2
Plasma and Serum Dilutions ................................................................................................. E–2Urine Dilutions ....................................................................................................................... E–3Running a Dilution on the VetTest Analyzer .......................................................................... E–4
Patient Monitoring ......................................................................................................................... E–5Combining Results on the Same Sample .................................................................................... E–5
F Quality Control ..................................................................................................... F–1Quality Control Materials ..............................................................................................................F–1
IDEXX VetTrol* Control ..........................................................................................................F–1VetTest Quality Control Panel .................................................................................................F–2
IDEXX UPRO Control .....................................................................................................................F–3Preparing the VetTrol Quality Control Fluid ....................................................................................F–3Preparing the UPRO Control .........................................................................................................F–3Performing the Quality Control Procedure on the VetTest Analyzer .............................................F–4Documenting Quality Control Results ...........................................................................................F–5Performing the Ca Offset Procedure .............................................................................................F–5
G Other Maintenance ............................................................................................. G–1General Upkeep and Cleaning .....................................................................................................G–1
Case Cleaning .......................................................................................................................G–1Screen Cleaning ....................................................................................................................G–1Dust and Animal Hair ............................................................................................................G–1Disk Drive Protection .............................................................................................................G–1Right Side Cover and Rotor Cleaning ...................................................................................G–1Pipettor Cleaning ...................................................................................................................G–2Pipettor Collar Cleaning ........................................................................................................G–2Used Slide Drawer ................................................................................................................G–2Temperature Control ..............................................................................................................G–2

vii
UV Lamp Replacement ................................................................................................................G–2Autocalibration ..............................................................................................................................G–2
Autocalibration Kit .................................................................................................................G–2
H Chemistry Description and Guide .......................................................................H–1Introduction to Biochemical Profiling ............................................................................................H–1Enzymes .......................................................................................................................................H–1
Enzymes as Indicators of Organ Damage ............................................................................H–1Enzyme Half-lives ..................................................................................................................H–2
Albumin/ALB .................................................................................................................................H–3Alkaline phosphatase/ALKP .........................................................................................................H–4Alanine aminotransferase/ALT (SGPT) .........................................................................................H–5Amylase/AMYL ..............................................................................................................................H–6Aspartate aminotransferase/AST (SGOT) ....................................................................................H–7Calcium/Ca2+ ...............................................................................................................................H–8Cholesterol/CHOL ........................................................................................................................H–9Creatine kinase/CK .....................................................................................................................H–10Creatinine/CREA .........................................................................................................................H–11Gamma-glutamyltransferase/GGT .............................................................................................H–12Glucose/GLU ..............................................................................................................................H–13Lactic Acid (LAC) ........................................................................................................................H–14Lactate dehydrogenase/LDH .....................................................................................................H–15Lipase/LIPA .................................................................................................................................H–16Magnesium/Mg2+ .......................................................................................................................H–17Ammonia/NH3 ............................................................................................................................H–18Inorganic phosphate/PHOS .......................................................................................................H–19Total bilirubin/TBIL .......................................................................................................................H–20Total protein/TP ...........................................................................................................................H–21Triglycerides/TRIG .......................................................................................................................H–22Urea/UREA/BUN .........................................................................................................................H–23Uric acid/URIC ............................................................................................................................H–24Urine Creatinine ..........................................................................................................................H–25Urine Protein/UPRO ....................................................................................................................H–26UPC Protocol ..............................................................................................................................H–27
I Self-Help Guide ..................................................................................................... I–1Analyzer Power and Function .........................................................................................................I–1Screen “Failure” Messages ............................................................................................................I–4Temperature Warnings ....................................................................................................................I–9Miscellaneous ...............................................................................................................................I–10
J Specifications and Warnings ............................................................................... J–1Power Input ....................................................................................................................................J–1Warnings ........................................................................................................................................J–1Interference with Radio Communications .....................................................................................J–1
K Appendix: Differences in Results ........................................................................K–1With a Commercial Laboratory or Other Instrument .................................................................... K–1With Your Own Expectations......................................................................................................... K–1

viii
L Appendix: Reference Ranges .............................................................................. L–1Canine—Puppies .........................................................................................................................L–1Canine—Adults .............................................................................................................................L–2Canine—Geriatric .........................................................................................................................L–3Feline—Kittens ..............................................................................................................................L–4Feline—Adults ..............................................................................................................................L–5Feline—Geriatric ............................................................................................................................L–6Equine—Yearlings .........................................................................................................................L–7Equine—Foals ...............................................................................................................................L–8Equine—Adults ..............................................................................................................................L–9Equine—Mares at Stud ...............................................................................................................L–10Dairy Cows ...................................................................................................................................L–11Beef Cattle ...................................................................................................................................L–12Llama ...........................................................................................................................................L–13Sea Turtles ...................................................................................................................................L–14Provisional Reference Ranges ....................................................................................................L–15
Avian—Parrots .....................................................................................................................L–15Avian—Cockatoos ...............................................................................................................L–16Avian—Budgerigar ...............................................................................................................L–17Avian—Cockatiel, Canary, Conure .......................................................................................L–18Avian—Macaws ...................................................................................................................L–19Ferret ....................................................................................................................................L–20Goat ......................................................................................................................................L–21Monkey .................................................................................................................................L–22Mouse ..................................................................................................................................L–23Pig ......................................................................................................................................L–24Rabbit ...................................................................................................................................L–25Rat ......................................................................................................................................L–26Sheep ...................................................................................................................................L–27Snake ...................................................................................................................................L–28Tortoise .................................................................................................................................L–29Lizard ....................................................................................................................................L–30
M Appendix: Unit Conversion ................................................................................ M–1Conversion Factors.......................................................................................................................M–1

ix
Preface
About this Guide
Use This Section... To Learn About...
A Important Things to Know About the VetTest* Analyzer
How the analyzer works• Slide packaging and storage• Profile interpretation• Star reference system• Software updates• Available chemistries•
B System Overview and Installation Choosing a location• Handling and safety precautions• Installation and setup procedures•
C Sample Collection and Preparation Plasma and serum collection and preparation• Urine collection and preparation•
D Basic System Operations Specifying samples• Inserting slides• Reading bar codes• Preparing the pipettor• Postanalysis steps• Reviewing results•
E Advanced Operations Linearity ranges• Dilution protocols• Patient monitoring processes• Combining patient results•
F Monthly QC Procedure Quality control materials• Preparing the QC materials• Performing QC procedures•
G Other Maintenance General upkeep and cleaning• UV lamp replacement• Autocalibration•
H Chemistry Description and Guide Biochemistry profiling• Enzymes• Specific chemistries•
I Self-Help Guide How to troubleshoot problems•
J Specifications and Warnings Power specifications• Instrument warnings• Interference with radio communications•

Use This Section... To Learn About...
K Appendix: Differences in Results Differences in results from the VetTest analyzer as • compared to other analyzers or your expectations
L Appendix: Reference Ranges Reference ranges for a variety of species•
M Unit Conversions Conversion factors (U.S. to S.I.)•
x
IDEXX VetTest* Chemistry Analyzer Operator’s Manual

IDEXX Technical Support Contact Information
United States/Canada/Latin America
Toll-free Technical Support ........................................................... 1-800-248-2483
Toll-free Fax................................................................................... 1-800-248-3010
www.idexx.com
Europe
Toll-free Technical Support .........................................................00800 1234 3399
Toll-free Fax.................................................................................00800 1234 3333
Australia
Toll-free Technical Support ...............................................................1800 655 978
Toll-free Fax.......................................................................................1800 634 409
www.idexx.com.au
Japan
Toll-free Technical Support .............................................................. 0120-71-4921
Toll-free Fax...................................................................................... 0422-71-4922
www.idexx.co.jp
New Zealand
Toll-free Technical Support .............................................................. 0800-102-084
Asia
Toll-free Technical Support ................................................... 886-2-28883336,230
xi
Preface

xii
International Symbol DescriptionsInternational symbols are often used on packaging to provide a pictorial representation of particular information related to the product (such as use by, temperature limitations, batch code, etc.). IDEXX Laboratories has adopted the use of international symbols on our analyzers, product boxes, labels, inserts, and guides in an effort to provide our users with easy-to-read information.
If you are unsure of the meaning for a particular symbol, see the table below for a description of each symbol that can be found on IDEXX Laboratories packaging.
Symbol Description Symbol Description
Use byA utiliser avant
Verwendbar bis
Usare entro
Usar antes de
使用期限
Temperature limitationTempérature limite
Zulässiger Temperaturbereich
Temperatura limite
Limitación de temperatura
保存温度(下限)
Batch Code (Lot)Code de lot (Lot)
Chargenbezeichnung (Partie)
Codice del lotto (partita)
Código de lote (Lote)
ロット番号
Upper limit of temperatureLimite supérieure de température
Temperaturobergrenze
Limite superiore di temperatura
Limite superior de temperatura
保存温度(上限)
Serial NumberNuméro de série
Seriennummer
Numero di serie
Número de serie
シリアル番号
Consult instructions for useConsulter la notice d’utilisation
Gebrauchsanweisung beachten
Consultare le istruzioni per l’uso
Consultar las instrucciones de uso
取扱説明書をご参照ください。
Catalog NumberNuméro catalogue
Bestellnummer
Numero di catalogo
Número de catálogo
製品番号
Keep away from sunlightConserver à l’abri de la lumière
Vor direkter Sonneneinstrahlung schützen
Mantener alejado de la luz solar
Tenere lontano dalla luce diretta del sole
遮光してください。
IDEXX VetTest* Chemistry Analyzer Operator’s Manual

xiii
Symbol Description Symbol Description
Authorized Representative in the European CommunityReprésentant agréé pour la C.E.E.
Autorisierte EG-Vertretung
Rappresentante autorizzato nella Comunitá Europea
Representante autorizado en la Comunidad Europea
EC内の正規販売代理店
WEEE Directive 2002/96/ECDirective 2002/96/CE (DEEE)
WEEE-Richtlinie 2002/96/EG
Directiva 2002/96/CE RAEE
Direttiva RAEE 2002/96/CE
廃電気電子機器指令(WEEE Directive 2002/96/EC)
ManufacturerFabricant
Hersteller
Ditta produttrice
Fabricante
製造元
Biological RisksRisques biologiques
Biogefährlich
Rischi biologici
Riesgos biológicos
生物学的リスク
Caution, consult accompanying documentsAttention, consulter les documents joints
Achtung, Begleitdokumente beachten
Attenzione, consultare la documentazione allegata
Precaución, consultar la documentación adjunta
注意、添付文書をご参照ください。
2Do Not ReuseUsage unique
Nicht wiederverwenden
No reutilizarw
Non riutilizzare
再利用しないでください。
Preface

xiv
IDEXX VetTest* Chemistry Analyzer Operator’s Manual
General Safety SummaryPlease review the precautions on this page and on the analyzer to avoid personal injury, fire hazard, or damage to the product. Use of the equipment in a manner not specified by the manufacturer may impair the equipment’s safety features.
Safety Symbols on the Product
Caution Protective Ground Earth Terminal
Connection to a Power SourceUse the correct power cord. Use only the power cord specified for this product and certified for the country of use. Use only a grounded cord, and be sure that the grounding conductor is connected to the earth ground.
Position the equipment so the power cord is easily accessible.
Use only 2A 250V 5 x 20 slow blow fuse for replacement.
Personal SafetyA pinch point exists between the sample rotor and bridge. Keep your fingers and any loose clothing away from the rotor if you are running the analyzer with the rotor cover removed.

A Important Things to Know About the VetTest* Analyzer
OverviewThe VetTest* Chemistry Analyzer is a blood and urine testing instrument that analyzes up to 12 biochemical tests simultaneously, using a single sample of either serum, plasma, or urine, in about six minutes.
The VetTest analyzer prompts you through a series of steps—offering short “beeps” at each prompt—that help you prepare the pipettor, introduce the sample and initiate analysis. After drawing enough total sample, the pipettor dispenses 10 microliters onto each slide in succession. The sample spreads over the top layer of the slide and is absorbed. As the sample filters through the layers, biochemical reactions take place that produce progressive color changes. The VetTest analyzer’s optical system measures the colors and their intensity.
The analyzer uses three reflectometers operating at six wavelengths to perform both end-point and rate measurements. The analyzer converts these measurements into values that are displayed on the analyzer screen and the paper printout.
The analyzer’s software disk contains the calibration data for the various lots of slides. IDEXX provides free software updates that contain new calibration data for new slide lots so that you do not have to worry about calibrating them.
Slide Packaging and StorageChemistry slides are supplied in cartons and are packaged individually in sealed foil.
Important: Store green boxes in the refrigerator and purple boxes in the freezer. For convenience, you can store all the boxes in the freezer.
Slides can be used directly from the freezer or refrigerator. You do not need to bring them to room temperature before using them on the VetTest analyzer.
You can cycle the slides you use most often from cold storage to room temperature and back on a daily basis up to five times (or one week) without hindering slide performance. For slides used less often, do not cycle the entire box; just remove several slides from the box, or remove the slides from storage as needed.
Important: Open the foil package only when you’re ready to run a test. Slides removed from the foil must be used within 15 minutes or be discarded.
Profile Interpretation (Canine and Feline only)The VetTest analyzer has been set to automatically provide an interpretation of results. If you do not want the diagnostic interpretation to print automatically, disable it by choosing Settings at the Main Menu. Press Printer Settings, then press Print Interpretations, and then 0 to disable (see Adjusting Initial Settings, page B-7, for more information.)
Important: The VetTest Profile Interpretation is a software algorithm that is based solely on results of the specific chemistries run. The more chemistries run, the more specific the interpretation. The VetTest analyzer cannot make clinical judgments or diagnoses.
A–1

A–2
IDEXX VetTest* Chemistry Analyzer Operator’s Manual
Star Reference System Note: For adult and geriatric canine and adult and geriatric feline patient samples only.
In addition to providing Profile Interpretation, the VetTest analyzer provides users with information on the degree of an abnormal result for certain chemistries. The display and printout includes one (*), two (**), or three (***) stars, along with the “Hi” or “Lo” indicators, when a test result falls out of the reference range. The stars serve to identify unusual results which may require special attention or further study. For example, a one-star display indicates a slight to moderate increase or decrease in analyte concentration. A two- or three-star display highlights a more significant deviation from the reference range. The particular ranges for the star rating were developed by G. Daniel Boon, DVM, MS, Dipl. ACVP and A.H. Rebar, DVM, PhD, Dipl. ACVP. Both are experienced veterinary clinical pathologists who based their findings on the VetTest analyzer’s database and their professional judgement.
Stars should be treated as a tool, not to be used alone, but in conjunction with other interpretive information such as physical examination and additional test results. The star system is translated to indicator bars on a full-page printout from an external printer.
Your Participation in Reference-Range Data CollectionReference ranges for clinical chemistry analyses are important guidelines used by veterinarians to determine an animal's health. Reference ranges are typically established by testing samples from a large group of healthy animals and creating a statistical distribution of results. In establishing the initial reference ranges for the VetTest analyzer, IDEXX relied on historical, established normal ranges. An important priority for IDEXX is to continuously improve the accuracy of these ranges, and we have that unique ability with each new set of returned software diskettes we receive from our worldwide user base.
You can contribute to this important work each time you run a test by first enabling your VetTest analyzer, then indicating if this animal is sick or questionable, or healthy on the appropriate VetTest analyzer screen display. To do so, first enable the patient “Health Screen” after installing a new software disk:
From the Main Menu, press 1. Settings.
Press 2. Health Screen.
Press 3. 1 to enable Health Screen. (Press 0 to disable Health Screen.)
During analysis, a screen will be displayed after the patient identification is entered. This screen prompts you to indicate if the patient is healthy.
Software UpdatesIDEXX will mail you, at no charge, your new software disk containing updated calibration data for newly produced slides. You should install the new disk promptly in order to run new slide lots. The new disk also will contain additional enhancements to the analyzer, such as new menu features and updated reference or quality control ranges. You will also receive a return mailer for your old software. The returned disk provides IDEXX with important information concerning reference ranges.
Note: You do not need to perform a quality control procedure after inserting new software. Keep to your regularly scheduled quality control.
Example of “Hi” result with 3 stars
S/N 06824 Ver. X.X16-Oct-1007 02:14PMAdult CanineBoots
TBIL = 1.64 mg/dl HI*** (0.00-0.70)

A–3
Important Things to Know About Your Analyzer
VetTest ChemistriesIndividual chemistries in 12-test and 25-test packages are available for the VetTest analyzer. These include:
Individual Chemistry Individual Chemistry
ALB Albumin LAC Lactate
ALKP Alkaline phosphatase LDH Lactate dehydrogenase
ALT (SGPT) Alanine aminotransferase LIPA Lipase
AMYL Amylase Mg2+ Magnesium
AST (SGOT) Aspartate aminotransferase NH3 Ammonia
Ca2+ Calcium PHOS Inorganic phosphate
CHOL Cholesterol TBIL Total bilirubin
CK Creatine kinase TP Total protein
CREA Creatinine TRIG Triglycerides
GGT Gamma-glutamyltransferase UREA/BUN Urea
GLU Glucose URIC Uric Acid
Note: Globulin is calculated by subtracting albumin from total protein.
Several prepackaged panels and profiles are also available for the VetTest analyzer. These include:
Profile/Panel Name Included Chemistries
General Health Profile ALB, ALKP, ALT, AMYL, Ca2+, CHOL, CREA, GLU, PHOS, TBIL, TP, UREA/BUN, GLOB
Preanesthetic Panel ALKP, ALT, CREA, GLU, TP, UREA/BUN
Diagnostic Health Profile ALB, ALKP, ALT, AMYL, BUN, Ca2+, CREA, GGT, GLU, LIPA, TBIL, TP, GLOB
NSAID Monitoring Panel ALKP, ALT, AST, BUN, CREA
Urine P:C Ratio UPRO (urine protein) and UCRE (urine creatinine); to be used with a sample preparation kit
Equine Health Panel ALB, ALKP, AST, Ca2+, CK, CREA, GGT, GLOB, GLU, LDH, TBIL, TP UREA/BUN
Avian Health Profile ALB, AST, Ca2+, GLU, TP, URIC, GLOB
Quality Control Panel ALB, ALKP, ALT, Ca2+, GLU, NH3

A–4
IDEXX VetTest* Chemistry Analyzer Operator’s Manual
VetTest SpeciesCanine Puppy (< 6 months) Adult Geriatric (> 8 years)
Feline Kitten (< 6 months) Adult Geriatric (> 8 years)
Equine Yearling Foal Adult Mare at Stud
Bovine Beef Cattle Dairy Cow
Avian Budgerigar Cockatoos (Grey Cheek, Moluccan, Umbrella) Cockatiel Canary Conure Macaw (Blue and Gold, Hyacinth, Scarlet) Parrots (Amazon Blue, Amazon Yellow, Eclectus, African Grey)
Ferret
Goat
Lizard
Llama
Monkey
Mouse
Pig
Rabbit
Rat
Sea Turtles
Sheep
Snake
Tortoise

B System Overview and Installation
Choosing the Analyzer LocationBefore you set up, choose a work area that is efficient for you and that meets the physical requirements of the analyzer:
Dimensions:
Width ............................................................................ 46.5 cm (18.4 inches)
Depth ........................................................................... 36.0 cm (14.3 inches)
Height .......................................................................... 20.0 cm (7.9 inches)
Height including pipettor ............................................. 24.5 cm (9.7 inches)
Choose a well-ventilated area away from obvious sources of heat, cold, humidity, or vibrations.
For optimum results, room temperature should be between 19° and 27°C (66° to 81°F) and relative humidity between 30% and 85%. Room temperatures below 15°C (60°F) and above 30°C (86°F) may give inconsistent results. The analyzer will operate outside this range but the screen may display a “temperature warning” message and results may show some drift.
Make sure the VetTest* Chemistry Analyzer is not in direct sunlight. The analyzer is a light-sensitive instrument and stray light entering the outside case will affect results.
Choose a flat, stable surface for the analyzer. Do not move it frequently. Be sure to leave adequate room for the pipettor and paper roll, and to load slides.
Important: Ensure proper ventilation (Figure B-1). The analyzer’s cooling vents are in the base. Leave at least 10 to 15 cm (4 to 6 inches) clearance around the machine so that air can circulate on all sides.
Do not use the VetTest dust cover when analyzer is on.
Warning: Very low temperatures can cause considerable damage to the analyzer. Permanent damage may be caused if the analyzer is switched on at temperatures below freezing. The VetTest analyzer should be unpacked and allowed to come to room temperature (19°–27°C/66°–81°F) for a minimum of one hour after it has been in a cold environment.
HandlingUse extreme care when handling the VetTest analyzer. The internal rotor, computer circuitry, and optical sensors can be damaged if the analyzer is dropped or bumped, particularly when the machine is turned on. If you must move the analyzer any distance, use the original packaging materials and re-install the transit clamps (see Accessing Components Inside the Right-Side Cover, page B-4, for a description and use of the transit clamps).
Clearance
Airflow
Figure B-1: VetTest analyzer ventilation
B–1

B–2
IDEXX VetTest* Chemistry Analyzer Operator’s Manual
PrecautionsNever• use the VetTest analyzer with the transit clamps in position.
Do not• stack other equipment or containers on top of the VetTest analyzer.
Keep the VetTest analyzer away from sources of heat or flames (e.g., Bunsen • burners).
Do not• place or operate the VetTest analyzer near X-ray equipment, photocopiers or other devices that generate static or magnetic fields (e.g., transformers).
Protect• the analyzer from damp conditions or wet weather.
Take care not to spill water or other fluids on the analyzer.•
Do not• use any of the following liquids, abrasives, or aerosol sprays on or near the VetTest analyzer, as they may damage the outer case and may influence the analysis results:
– Organic solvents – Insecticides
– Ammonia-based cleaners – Disinfectant
– Ink markers – Polish
– Sprays containing volatile liquids – Room freshener
Important Electrical Safety PrecautionsAlways use the correct AC electrical source.•
Use only the power cable supplied.•
Disconnect the power plug:•
If the power cord or plug becomes frayed or otherwise damaged –
If anything is spilled onto the equipment –
If your equipment is exposed to rain or any excessive moisture –
If your equipment is dropped or the case has been damaged –
If you suspect that your analyzer needs service or repair –
Whenever you clean the case –
Unpacking the AnalyzerThe VetTest analyzer is a highly sophisticated piece of equipment and care should be taken not to damage any of the sensitive components when unpacking and handling it.
The shipping carton should contain the VetTest analyzer, paper roll cover, and paper roll. You’ll find the pipettor and the paper roll holder inside the used-slide drawer (see Figure B-2: VetTest analyzer front view on page B-3). The carton also contains the following:
Dust cover•
Power cord•
Operator's Manual•
Warranty and return envelope•
Installation certificate and return envelope•
Software disk•

B–3
System Overview and Installation
In a separate package you will receive the Install Kit that includes:
One set of VetTrol* Quality Control (2 bottles)•
Two slides each of TP, Mg, ALT, ALKP, Ca• 2+
Ten sample cups•
Ten metering tips•
Note: Keep VetTrol Control and all slides frozen until needed.
The VetTest analyzer weighs about 14 kg (31 pounds). To prevent back injury, bend your knees when lifting, and get help if you need it.
Remove the VetTest analyzer from the shipping carton by firmly gripping the base of the machine and lifting it; place it on the work surface with the front facing forward. Keep the shipping carton in case you need it for future transportation.
The VetTest analyzer runs on ordinary household current. If you haven’t experienced electrical problems such as lights flickering when you use a photocopier or turn on an electric stove or sterilizer, your electrical service is probably adequate. The VetTest analyzer has been set to the correct voltage for the electricity supply in your territory and an appropriate power cable and plug is provided.
VetTest Analyzer Components (Front and Back Views)
printer
screen display
keyboard
air vents (in base)
used slide drawer
slide insertion tray
pipettor connection socket
pipettor holder
right side coverpaper roll cover
Figure B-2: Front view of VetTest analyzer
right side cover
right side cover
handle
power connection
ON/OFF switch
disk drive cover
paper roll cover
Figure B-3: Back view of the VetTest analyzer
communication port cover

B–4
IDEXX VetTest* Chemistry Analyzer Operator’s Manual
Accessing Components Inside the Right-side CoverYou will need to open the right-side cover on the analyzer to clean the rotor area, remove slide jams/foreign objects, and to remove and install the transit clamps that hold the rotor in position during transportation.
To clean the rotor area:Routinely remove and dust off the right-side cover with canned air spray. Use a damp cloth to wipe off any dried residue from the rotor surfaces.
To clear a slide jam:Slides or foreign objects may become jammed inside of the rotor.
Make sure the used slide drawer is pushed all of the way in so that no opening is 1. seen in front.
Turn off the VetTest analyzer.2.
Remove the right-side cover on your analyzer by lifting the lip on the back.3.
Release and remove the trapped slide or foreign object. You can gently turn the 4. rotor in either direction to facilitate slide removal.
Replace the analyzer’s right-side cover.5.
Turn on the analyzer to reset the rotor to its proper position. 6.
To remove transit clamps:
Important:
Never• connect the power or turn on the VetTest analyzer until the transit clamps are removed.
Never• transport the VetTest analyzer without re-installing the transit clamps.
Before the machine is plugged in for the first time, it is essential to remove the two transit clamps from the inside of the casing.
Remove the pipettor from its holder.1.
Remove the analyzer’s right-side cover 2. by lifting the lip on the back.
Locate the two transit clamps (Figure 3. B-4). Then, using a Phillip’s screwdriver, remove the two screws in each transit clamp.
Note: Save the transit clamps and screws for the analyzer being returned. (See the “To install the transit clamps” section that follows.)
If you are using a SNAP* Reader with 4. the VetTest analyzer, position it in place of the cover (removed in step 1). If you are not using a SNAP Reader, replace the cover.
Install the power cord and turn on the analyzer.5.
Figure B-4: Top views of the VetTest analyzer with transit clamps in place and the transit clamps removed
B–5
System Overview and Installation
To install the transit clamps:
Important: Prior to installing the transit clamps, ensure the power is off and that the power cord has been unplugged from the VetTest analyzer.
Remove the analyzer’s right-side cover by lifting the lip on the back.1.
Install the two transit clamps. Slide them onto the rotor and then, using a Phillip’s 2. screwdriver, screw in and tighten both screws.
Replace the analyzer’s right-side cover.3.
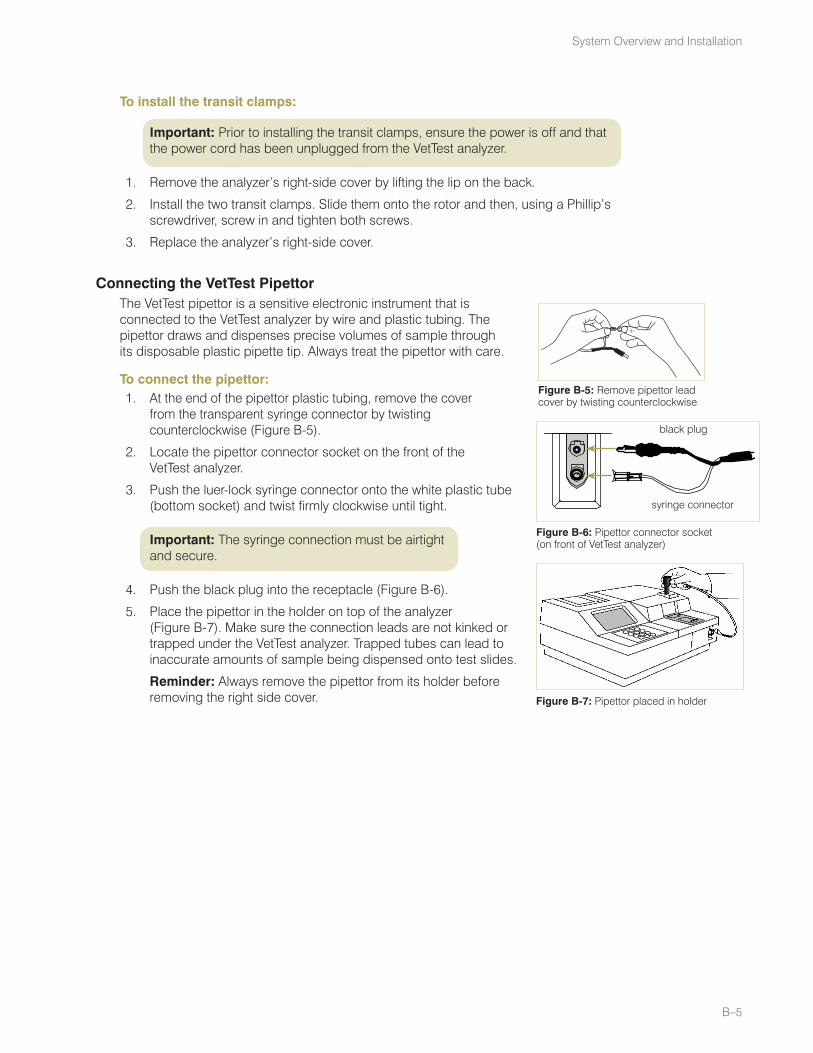
Connecting the VetTest PipettorThe VetTest pipettor is a sensitive electronic instrument that is connected to the VetTest analyzer by wire and plastic tubing. The pipettor draws and dispenses precise volumes of sample through its disposable plastic pipette tip. Always treat the pipettor with care.
To connect the pipettor:1. At the end of the pipettor plastic tubing, remove the cover
from the transparent syringe connector by twisting counterclockwise (Figure B-5).
Locate the pipettor connector socket on the front of the 2. VetTest analyzer.
Push the luer-lock syringe connector onto the white plastic tube 3. (bottom socket) and twist firmly clockwise until tight.
Important: The syringe connection must be airtight and secure.
Push the black plug into the receptacle4. (Figure B-6).
5. Place the pipettor in the holder on top of the analyzer (Figure B-7). Make sure the connection leads are not kinked or trapped under the VetTest analyzer. Trapped tubes can lead to inaccurate amounts of sample being dispensed onto test slides.
Reminder: Always remove the pipettor from its holder before removing the right side cover.
Figure B-5: Remove pipettor lead cover by twisting counterclockwise
black plug
Figure B-6: Pipettor connector socket (on front of VetTest analyzer)
syringe connector
Figure B-7: Pipettor placed in holder

B–6
IDEXX VetTest* Chemistry Analyzer Operator’s Manual
Inserting the Paper RollIDEXX recommends using only VetTest brand thermal paper for best results. The thermal paper is coated on one side; the print only shows on the coated side. The paper must be inserted correctly for print to appear.
To insert the paper roll: Turn off the VetTest analyzer.1.
Remove the printer cover (Figure B-8). If necessary, remove the old 2. paper roll and its holder.
Cut the end of the paper to a point, about 5 cm (2 inches) long.3.
Do not tear off the paper and do not use the Paper Advance button until the full width of the paper is pulled through the exit slot. (The Paper Advance button cannot be used if the analyzer is OFF). Failure to follow these instructions may cause a paper jam.
Feed the paper from the bottom of the roll (Figure B-9).4.
Gently curl the tip of the paper and then insert the paper into the 5. gap just below the case (Figure B-9).
Feed the paper until the tip appears at the paper exit (Figure B-10). 6. Grip the paper tip and pull gently until the full width of the paper is through the exit slot.
Insert a roll holder in the paper roll. Then, drop the roll holder into 7. the slot (Figure B-10).
Replace the cover.8.
Important: Always make sure that the full width of the paper is protruding through the exit slot before:
Switching the analyzer on•
Pressing the Paper Advance button•
Printing results•
Inserting the VetTest Software Disk
To insert a new software disk:Make sure the VetTest analyzer is OFF.1.
Remove the metal cover over the software disk at the back of 2. the analyzer by undoing the two screws holding it in place (Figure B-11).
Push in the black button to release any disk that may be currently 3. in the disk drive.
Note: When replacing old software, put the old software disk in the pre-addressed envelope supplied with the new software release and return it to IDEXX.
Insert the new software disk and replace the disk cover to prevent 4. the inadvertent ejection of the disk.
printer cover
Figure B-8: Remove printer cover
paper entrancepaper exit
Paper Advance button
Figure B-9: Paper position and printer parts
Figure B-10: Feed paper through and insert roll holder
disk drive cover
Figure B-11: Remove the screws to release the disk drive cover
screws
B–7
System Overview and Installation
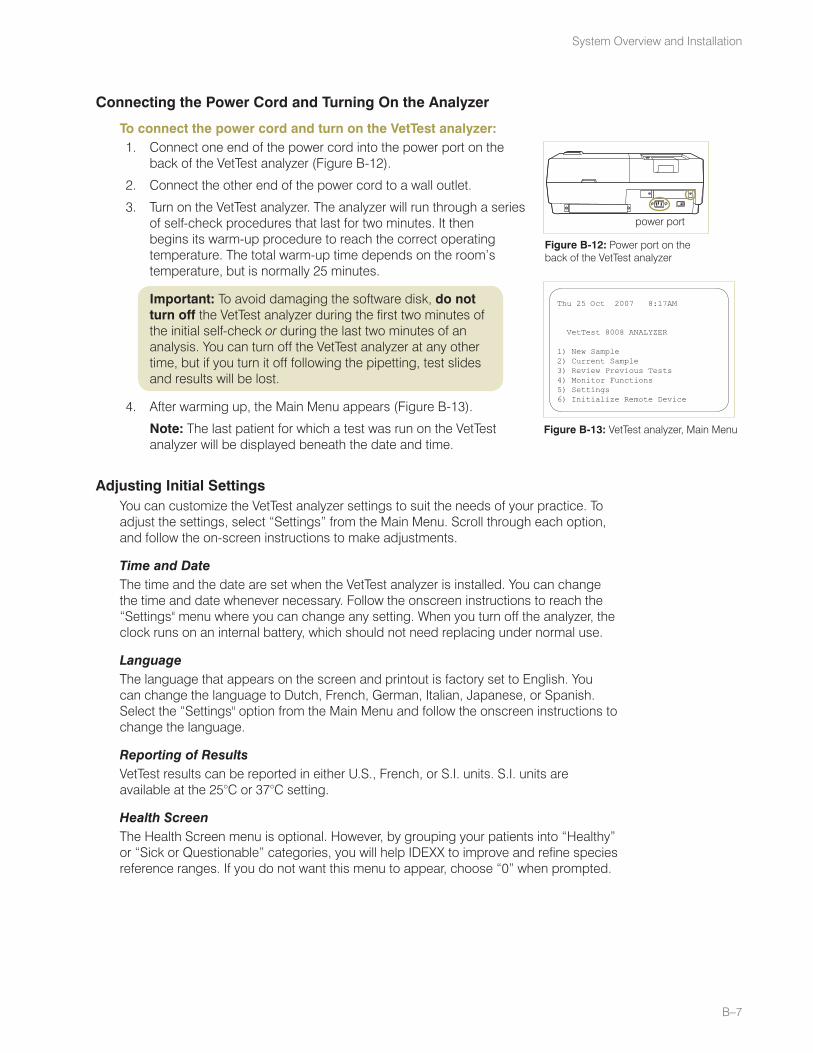
Connecting the Power Cord and Turning On the Analyzer
To connect the power cord and turn on the VetTest analyzer:Connect one end of the power cord into the power port on the 1. back of the VetTest analyzer (Figure B-12).
Connect the other end of the power cord to a wall outlet. 2.
Turn on the VetTest analyzer. The analyzer will run through a series 3. of self-check procedures that last for two minutes. It then begins its warm-up procedure to reach the correct operating temperature. The total warm-up time depends on the room’s temperature, but is normally 25 minutes.
Important: To avoid damaging the software disk, do not turn off the VetTest analyzer during the first two minutes of the initial self-check or during the last two minutes of an analysis. You can turn off the VetTest analyzer at any other time, but if you turn it off following the pipetting, test slides and results will be lost.
After warming up, the Main Menu appears (Figure B-13). 4.
Note: The last patient for which a test was run on the VetTest analyzer will be displayed beneath the date and time.
Adjusting Initial Settings You can customize the VetTest analyzer settings to suit the needs of your practice. To adjust the settings, select “Settings” from the Main Menu. Scroll through each option, and follow the on-screen instructions to make adjustments.
Time and DateThe time and the date are set when the VetTest analyzer is installed. You can change the time and date whenever necessary. Follow the onscreen instructions to reach the “Settings" menu where you can change any setting. When you turn off the analyzer, the clock runs on an internal battery, which should not need replacing under normal use.
LanguageThe language that appears on the screen and printout is factory set to English. You can change the language to Dutch, French, German, Italian, Japanese, or Spanish. Select the “Settings" option from the Main Menu and follow the onscreen instructions to change the language.
Reporting of ResultsVetTest results can be reported in either U.S., French, or S.I. units. S.I. units are available at the 25°C or 37°C setting.
Health Screen The Health Screen menu is optional. However, by grouping your patients into “Healthy” or “Sick or Questionable” categories, you will help IDEXX to improve and refine species reference ranges. If you do not want this menu to appear, choose “0” when prompted.
power port
Figure B-12: Power port on the back of the VetTest analyzer
Thu 25 Oct 2007 8:17AM
VetTest 8008 ANALYZER
1) New Sample2) Current Sample3) Review Previous Tests4) Monitor Functions5) Settings6) Initialize Remote Device
Figure B-13: VetTest analyzer, Main Menu

B–8
IDEXX VetTest* Chemistry Analyzer Operator’s Manual
Printout SettingsThe VetTest analyzer has its own internal printer. You can also connect to an external printer (see Connecting Your Printer, page B-8). Follow the onscreen instructions for each printing option to adjust the printer, depending on your configuration.
Paper Cutting• —For use with the internal VetTest printer only. This option sets the number of blank lines that appear after the results print.
Clinic Name/Address (full-page printout only)• —This option lets you enter your clinic's name and address so each full-page report on the external printer is personalized. (For information on entering alphanumeric text on the VetTest analyzer screen, see Connecting an External Keyboard, page B-8.)
Print Interpretation• —This option lets you turn on or off the automatic printing of the Profile Interpretation, a list of suggested conditions that may be consistent with the results reported (available for dogs and cats only). When set to off, you can choose to print the Profile Interpretation following a sample analysis by choosing the “Print Interpretation” option.
Letterhead Lines (full-page printout only)• —This option sets the number of blank lines at the top of each printout so you can use your own letterhead.
Connecting Your PrinterNote: Not all printers are compatible with the VetTest analyzer. To ensure compatibility with future software updates, contact IDEXX Technical Support for a list of compatible printers.
If you are connecting a printer to your VetTest analyzer, you must set the communication switches on the printer to allow communication with the VetTest analyzer. Refer to directions supplied with the printer for initial setup. Contact IDEXX Technical Support for additional assistance.
To attach a printer to the VetTest analyzer:Remove the metal cover over the communications panel on the back of the 1. VetTest analyzer. (Figure B-3)
Plug the printer cable into the port labeled “Printer.” Make sure to use a parallel 2. printer cable.
Connecting an External Keyboard The VetTest analyzer allows you to input the name and address of your clinic in a one-time operation so you can customize the printouts on the external printer. In addition, patient identification can accommodate letters, numbers, or a combination of both (e.g., “Snappy101”). Contact IDEXX Technical Support for a list of compatible keyboards.
To connect an external keyboard:Turn off the VetTest analyzer.1.
If you have not already done so, remove the metal cover over the communications 2. panel on the back of the VetTest analyzer. (Figure B-3)
Refer to the instructions inside the keyboard container for proper switch setting.3.
Plug the external keyboard into the “KBD” on the back of the VetTest analyzer.4.
Turn on the VetTest analyzer.5.
When a keyboard is attached to the VetTest analyzer, you can use either this external keyboard or the VetTest keypad to operate the analyzer.

B–9
System Overview and Installation
Note: The relationship of the keys on the external keyboard with the VetTest keypad are as follows:
Keypad External Keyboard
E = ENTER
C = BACKSPACE
Restrictions: All 10 digits and 26 letters can be used on the external keyboard. Do not use spaces or the following symbols when entering a patient identification:
. Period : Colon
, Comma ; Semicolon
? Question mark * Asterisk
+ Plus sign > Greater than
= Equals sign < Less than
\ Back slash / Forward slash
Connecting an IDEXX SNAP* Reader AnalyzerSee the IDEXX SNAP* Reader Analyzer’s Operator’s Manual for installation instructions.

B–10
IDEXX VetTest* Chemistry Analyzer Operator’s Manual

C Sample Collection and Preparation
The VetTest* Chemistry Analyzer is validated for animal plasma, serum or urine analysis only, and should not be used for the analysis of other body fluids. The VetTest analyzer is for veterinary use only.
Plasma and Serum Collection and PreparationMinimize Stress—Make sure the pet is calm when taking the blood sample. Use a needle of appropriate size and gauge, and draw the blood smoothly to avoid inducing unnecessary clotting or hemolysis. Tests most likely to show increases due to stress include: aspartate aminotransferase (AST), creatine kinase (CK), glucose (GLU), lactate dehydrogenase (LDH), inorganic phosphate (PHOS) and magnesium (Mg2+).
Fasting—For best results, pets should fast for at least five hours before taking the blood sample. It is often difficult, especially with cats, to be sure of when the animal last ingested food. The effect of feeding on most test results is small compared with changes seen in disease, unless a large meal has been consumed within five hours of testing. The tests most likely to show important increases after ingestion of food are: cholesterol (CHOL), glucose (GLU), inorganic phosphate (PHOS), triglycerides (TRIG) and urea (UREA/BUN).
Plasma and Serum Sample VolumesThe VetTest analyzer requires a minimum of 40 µL of sample to run one test. The tables below show sample requirements for 1–12 tests:
# Slides Minimum Sample Volume # Slides Minimum Sample Volume
1 40 µL 7 100 µL
2 50 µL 8 110 µL
3 60 µL 9 120 µL
4 70 µL 10 130 µL
5 80 µL 11 140 µL
6 90 µL 12 150 µL
Generally, 500 µL of whole blood yields enough serum or plasma to run 12 slides.
Note: You should always consider the possibility that a dilution may be required to follow up certain tests whose results fall out of range. See Dilution Protocols on page E-2 for details.
General Blood Sample Collection PrecautionsUse good technique to minimize stress to the animal and to avoid hemolysis.•
Use the lowest gauge (largest) needle appropriate for the species.•
Select the largest peripheral vein possible.•
Always use new needles and syringes. •
Use only the recommended collection devices. •
Use an adequate volume of blood. Fill the collection devices to the manufacturer’s • recommended volumes.
Label the collection tube with the patient’s ID.•
C–1

C–2
IDEXX VetTest* Chemistry Analyzer Operator’s Manual
Serum Sample Preparation
To prepare a serum sample:Use the appropriate tube.1.
Use the appropriate sample collection device. 2.
Gently draw the patient’s blood and transfer it, if necessary, to a serum tube.3.
Notes:
If using a syringe and needle draw, be sure to remove the needle before • transferring the blood into the tube to avoid hemolysis.
When using an evacuated tube, such as a Vacutainer* tube, allow the sample • to draw naturally into the tube by vacuum.
Let the sample sit for a minimum of 20 to 30 minutes to ensure it is fully clotted. 4. (Clotting time may vary by sample.)
Centrifuge the sample for 10 minutes in a standard centrifuge (8,000 rpm) or for 5. 120 seconds in a high-speed (>12,000 rpm) centrifuge.
Using a transfer pipette, transfer the serum sample to a sample cup.6.
Process the sample immediately, or see the 7. Sample Storage section on page C-4 for storage guidelines.
Plasma Sample Preparation
To prepare a plasma sample:Use the appropriate tube. 1.
Note: Do not use EDTA. EDTA can cause interference with many analytes.
Use the appropriate sample collection device.2.
Gently draw the patient’s blood and transfer it, if necessary, to an appropriate 3. plasma tube.
Notes:
If using a syringe and needle draw, be sure to remove the needle before • transferring the blood into the tube to avoid hemolysis.
When using an evacuated tube, such as a Vacutainer* tube, allow the sample • to draw naturally into the tube by vacuum.
Gently invert the sample for 30 seconds to mix it. Thoroughly mix the blood. 4.
Note: Never shake the tube. This will cause hemolysis, which may interfere with analysis.
Centrifuge the sample for 10 minutes in a standard centrifuge (8,000 rpm) or for 5. 120 seconds in a high-speed (>12,000 rpm) centrifuge.
Using a transfer pipette, transfer the plasma sample to a sample cup.6.
Process the sample immediately, or see the 7. Sample Storage section on page C-4 for storage guidelines.

C–3
Sample Collection and Preparation
Centrifuged Sample InspectionIt is good practice to examine the blood sample carefully following centrifugation. If fibrin strands can be seen in the sample, these may interfere with sample pipetting. It may be necessary to rim the serum/plasma with a wooden stick. Then respin the sample and proceed.
Various conditions, such as hemolysis, may affect results. You also want to modify your test panel based on the following visual observations. Refer to the Chemistries Description and Guide section for information about how each condition may affect specific chemistries.
HemolysisVisual: Sample has a transparent, reddish hue ranging from pink to deep red.
Indications: Damage to red cells during sample preparation or intravascular hemolysis.
IcterusVisual: Plasma has a transparent yellow to opaque brown color.
Indications: Obstructive or toxic liver disease, intravascular hemolysis.
LipemiaVisual: Sample has a pale, milky appearance, possibly with floating fat globules.
Indications: Recent ingestion of a fatty meal or dysfunction in lipid metabolism.
Urine Sample Collection and PreparationA urine analysis on the VetTest analyzer can only be run with urine protein slides or urine creatinine slides. The IDEXX Urine P:C Ratio (urine protein:creatinine [UPC] ratio) is the first test to run urine on the VetTest analyzer. It consists of two slides specifically validated and calibrated for urine samples:
The urine protein (UPRO) slide •
The urine creatinine (UCRE) slide•
The Urine P:C Ratio is currently validated for use on canine and feline samples only.
The best urine sample to use is one obtained through cystocentesis because it is the most sterile sample. Small traces of blood in the sample, as a result of this collection method, will not affect sample test results.
Microhematuria, or the presence of <100 RBC/hpf, which is often noted in samples obtained by cystocentesis, will not significantly alter the UPC result.
Note: A catheter or free-catch method for urine collection is also acceptable for this test.
After the sample has been collected, it needs to be centrifuged, which causes the urine to separate into two portions:
Supernatant• —This liquid portion is always present after centrifugation and is used for the Urine P:C Ratio sample.
Sediment• —This portion is only visible when bacteria, cells, crystals, and/or casts are present in the sample. It appears as a grainy or sandy material at the bottom of the sample tube.

C–4
IDEXX VetTest* Chemistry Analyzer Operator’s Manual
Urine Sample VolumesTo run a Urine P:C Ratio, you need a minimum of 50 µL of the supernatant.
30 µL is used to prime the VetTest pipettor. •
10 µL is dispensed onto the UPRO slide. •
10 µL is needed to prepare the UCRE sample using the sample preparation kit.•
Note: The IDEXX Urine Protein:Creatinine Sample Preparation Kit prepares the sample for the urine creatinine test so the VetTest analyzer can calculate the most accurate and quantitative UPC ratio result.
Urine Sample Preparation
To prepare a urine sample:Obtain a urine sample through cystocentesis.1.
Centrifuge the sample on a “urine” setting for a spin time of 45 seconds. 2.
Transfer the supernatant to an untreated collection tube or a sample cup using a 3. VetTest transfer pipette (or any other pipette). During this process, it is important that you do not aspirate any of the sediment, if present.
Run the UPRO slide on the VetTest analyzer.4.
While the UPRO test is running, use the sample preparation kit to properly 5. prepare the sample for the UCRE slide analysis. See the kit’s package insert for instructions.
Run the UCRE slide using the prepared sample.6.
Note: See the Sample Storage section on page C-4 for storage guidelines.
Sample StorageIDEXX recommends that you process and analyze samples immediately after collection for best results. However, if storage is necessary, follow these sample storage and testing guidelines.
Storing Serum or Plasma SamplesFor storage, the serum or plasma must be separated and removed immediately from the blood cells. Do not attempt to pour off the sample.
• Using a transfer pipette, carefully transfer the serum or plasma to an untreated collection tube, taking care not to draw up any white or red blood cells.
• Cap the tube tightly to avoid contamination and evaporation. Avoid frothing at any stage as this damages the serum proteins.
If you cannot perform analysis within four hours of drawing and processing the sample, refrigerate it at 2°–8°C (36°–46°F). If you cannot perform analysis for more than 48 hours, you should freeze the serum/plasma at -18°C (0°F).
Note: For additional information on the effects of delays in removing serum or plasma from the cells, see section H: Chemistry Description and Guide.
Note: See the calcium (Ca2+), total bilirubin (TBIL), lactate (LAC), lactate dehydrogenase (LDH), ammonia (NH3), and glucose (GLU) chemistry descriptions for additional special handling and storage requirements.

C–5
Sample Collection and Preparation
Storing Urine SamplesFor a Urine P:C Ratio, the urine sample should be analyzed within four hours of collection. If this is not possible, you can refrigerate the sample at 2°–8°C (36°–46°F) for up to three days.
Analysis of Stored Samples
Serum or Plasma SamplesFor serum or plasma samples stored at 2°–8°C (36°–46°F) and at -18°C (0°F):
Allow the samples to come to room temperature, (19°–27°C/66°–81°F).•
Mix the samples gently, but thoroughly, by inversion. • Do not shake.
Centrifuge the samples to remove any fibrin particles that may have formed • during storage.
Analyze the samples immediately after centrifugation. •
Urine SamplesFor refrigerated urine samples, be sure the samples have come to room temperature before analysis.
Combined Chemistry and Hematology Sample PreparationWhen performing an analysis using both the chemistry and the hematology analyzers, it is necessary to collect two tubes of blood because the sample requirements for clinical chemistry and hematology testing are different. Chemistry testing on the VetTest requires serum or plasma.
Note: A urine analysis on the VetTest analyzer can only be run with urine protein slides or urine creatinine slides and when performing UPC ratios.
Hematology requires whole blood mixed with EDTA anticoagulant. We recommend liquid tri-potassium (K3) EDTA. Make sure the blood-to-EDTA ratio is appropriate (follow the manufacturer’s specifications).
To prepare blood for both chemistry and hematology testing:Draw a sample into a new syringe. Do not heparinize. 1.
Without delay, gently transfer the sample into two separate tubes:2.
Red- or green-topped tube for chemistry testing•
EDTA tube for hematology testing•
Important: You must immediately transfer the sample to keep it from clotting.
Follow the instructions for serum or plasma sample preparation as described 3. earlier in this section. Follow the sample preparation instructions in the hematology analyzer’s manual for hematology sample preparation.
Important: Do not use EDTA for chemistry testing. EDTA can cause interference with many analytes.

C–6
IDEXX VetTest* Chemistry Analyzer Operator’s Manual

Prepare Your Materials and InformationHave the following items ready before beginning an analysis:
Species information•
Patient number•
Prepared sample, at the minimum sample volume required•
Important: Make sure the sample is at room temperature (19°–27°C/ 66°–81°F). Do not analyze a stored sample straight from the refrigerator. Careful sample collection, preparation, and storage is vital to obtaining accurate results.
Refer to section C: Sample Preparation and Collection of this manual before beginning analysis.
Selected VetTest* chemistry slides. • Slides can be used directly from the freezer or refrigerator. You do not need to bring them to room temperature before using them on the VetTest analyzer. Keep individual slides in their foil packs until just before inserting them into the analyzer.
A new disposable pipette tip. •
Note: Use only VetTest disposable pipette tips. A new tip must be used for each test.
Disposable, lint-free laboratory wipes.•
The VetTest analyzer provides step-by-step onscreen instructions, complete with “beeps,” to indicate when to enter patient information, pipette the sample, and insert the slides. Do not rush these steps. When you are ready to begin an analysis, follow the onscreen instructions. Do not insert slides until instructed to do so.
Note: If you attempt to insert a slide before being instructed to do so, a continuous warning noise will sound. Pulling back on the slide insertion tray will silence the warning.If you persist and insert a slide, the analyzer will eject the slide into the used-slide drawer and reset itself.
Specify a Sample from the Main Menu
Enter Patient SpeciesThe VetTest analyzer first prompts you to select from the following species options:
• Canine • Bovine
• Feline • Avian
• Equine • More Species
The VetTest analyzer has chemistry test reference ranges for a variety of species. After analysis, your results are compared to the applicable reference range. The VetTest analyzer then prints your results alongside its reference range. Serum or plasma from other species can be tested (select “More Species,” then “0–Other”). All listed species have reference ranges.
Note: The “More Species> Other” option does not have reference ranges.
D Basic System Operation
D–1

D–2
IDEXX VetTest* Chemistry Analyzer Operator’s Manual
Enter Patient Identification (ID)The VetTest analyzer requires a patient identification (ID) to be entered. Choose from 1 to 10 digits using the internal keypad. With an external keyboard, you can choose a combination of 10 alphanumeric characters, excluding spaces. The VetTest analyzer will not allow you to proceed until an ID has been entered. After the patient identification is entered, you can enter the first and last name of the client. These two lines help to identify the client; you can choose any combination of alphanumeric characters, as well as spaces, up to 30 characters. If you do not want to include a client first and last name, press E on the VetTest keypad or the Enter key on the external keyboard.
Note: Including a client first and last name enables practice information management systems to better determine with which patient and client a set of results should be associated.
If the VetTest analyzer is connected to IDEXX Cornerstone* practice management software, then you can enter the 7-digit requisition ID obtained from the practice management computer. When you are ready to continue, follow the onscreen instructions.
Insert slidesWhen the VetTest analyzer prompts you to insert the chemistry slides, remove individual slides from their foil packaging and insert each slide. Slides can be used directly from the freezer or refrigerator. You do not need to bring them to room temperature before using them on the VetTest analyzer.
Important: Open the foil packages only when you’re ready to insert slides. Slides removed from the foil packaging must be used within 15 minutes or be discarded.
Note: Do not let your fingers come in contact with the slide membrane. Always handle the slide by grasping it by its outer plastic edges.
• Insert the slides, one at a time, into the slide loading tray with the bar code facing up and the notch on the left (Figure D-1). After each slide is in place, gently push the loading tray forward as far as it will go, and then pull it back. The VetTest analyzer screen displays the number of slides inserted.
• When you’ve inserted the desired slides, press E and follow the onscreen instructions. If 12 slides (the maximum) are inserted, the VetTest analyzer automatically begins analysis.
Note: To remove a slide from the slot in the loading tray, press the right side of the slide with a pointed tool such as a pen (Figure D-2). The left side will rise and the slide can be removed.
Reading the Bar CodesThe VetTest analyzer reads each slide’s bar code, and the name of the applicable chemistry appears onscreen. The optical sensors take background readings. Bar-code reading failures may be caused by:
• A defaced bar code
• An upside-down slide
• An incorrectly inserted slide
If one of these situations occurs, the VetTest analyzer ejects the slide into the used-slide drawer. Incorrectly inserted slides can be re-inserted. Follow the onscreen instructions to proceed.
Note: If the bar code problem persists, see section I: Self-Help Guide for additional information.
Figure D-1: Insert VetTest slide
Figure D-2: Remove VetTest slide

D–3
Basic System Operation
Preparing the Pipettor for a SampleWhen the VetTest analyzer is ready, it will prompt you to prepare the pipettor.
To prepare the pipettor for a sample:Remove the pipettor from its holder on the 1. VetTest analyzer.
Fit a new, disposable plastic pipette tip over the 2. metal end of the pipettor (Figure D-3). Be sure to push it on firmly.
Replace the pipettor in its holder and watch screen 3. for prompts. The VetTest analyzer will initialize the internal pipette syringe and inform you not to place the tip in the sample until prompted to do so. The screen display will indicate when the analyzer is ready.
Keep the pipettor vertical (upright) during pipetting to ensure that fluid is not drawn into the pipettor’s plastic tubing (Figure D-4).
Place the pipette tip into a freshly centrifuged sample. 4. With plasma samples, take care not to dip into the buffy coat or packed red cells.
Single Beep5. —Press and release the button on top of the pipettor (Figure D-4). A single beep will signal the start of aspiration. The pipettor will automatically draw up the correct amount of sample for the tests. Keep the tip in the sample while waiting for the next beep signal.
Double Beep6. —When the VetTest analyzer beeps twice, lift the tip out of the sample (Figure D-5). Wait for the next signal.
Triple Beep7. —After the VetTest analyzer beeps three times, a small quantity of air will be drawn into the very end of the pipette tip. Carefully wipe the pipette tip (especially the end of the tip) with a twisting motion using a clean, disposable lint-free tissue (Figure D-6).
Immediately insert the pipettor back in its holder in the 8. analyzer. A final, single beep signals the start of the analysis process.
Important: You must replace the pipettor in its holder within 20 seconds (Figure D-7). If a warning sounds, follow the screen instructions. (If the problem persists, see section I: Self-Help Guide for more information.)
Sample Analysis DisplayAnalysis progresses automatically and takes about 5 to 6 minutes, depending on the chemistries. The screen will display the selected chemistries and the time remaining. The reflective density of each slide, which is a function of the concentration of the analyte, is measured up to 18 times during the analytical process. These measurements are shown for each chemistry as a time curve that develops on the screen during analysis. Three beeps signal the completion of analysis.
Figure D-6: Triple beep—carefully wipe the pipette tip
Figure D-7: After wiping the tip, promptly place the pipettor back in its holder
Figure D-3: Firmly press new pipette tip onto pipettor
Figure D-4: Single beep—press and release pipettor button
Keep pipettor vertical
Figure D-5: Double beep—lift tip out of sample

D–4
IDEXX VetTest* Chemistry Analyzer Operator’s Manual
Postanalysis StepsThe VetTest analyzer automatically ejects used slides into the used-slide drawer.
When sample analysis is complete:Empty the used-slide drawer.1.
Remove the pipettor. Then pull off and discard the pipette tip.2.
Replace the pipettor in its holder.3.
Check the paper supply.4.
When you are ready to continue, follow the onscreen instructions.5.
Important: IDEXX recommends that you empty the used-slide drawer after every analysis. A full slide drawer can jam the rotor. Also, if the drawer is empty at the start of slide insertion, any ejected unused slides will be easily identified and can be reloaded.
Results
Internal VetTest printer resultsResults from the internal VetTest printer are shown here:
Software version
Analyzer serial number
Date/Time
Species
Required ID
S/N 06824 Ver X.X
16-Aug-2007 02:14PM
Adult Canine
Mitzy
Bob
Jones
1
ALB = 3.19 g/dl (2.70-3.80)
ALKP = 159 U/L (23-212)
ALT = 58 U/L (10-100)
AMYL = 159 U/L LO (500-1500)
Ca = 8.29 mg/dl LO* (7.90-12.00)
CHOL = 159.7 mg/dl (110.0-320.0)
CREA = 1.41 mg/dl (0.50-1.80)
GLU = 86.8 mg/dl (77.0-125.0)
PHOS = 3.35 mg/dl (2.50-6.80)
TBIL = 1.64 mg/dl HI*** (0.00-0.90)
TP = 4.99 g/dl LO* (5.20-8.20)
BUN = 22.2 mg/dl (7.0-27.0)
GLOB = 1.80 g/dl LO (2.50-4.50)
Patient ID
Client first name
Client last name
Selected test chemistry
Result from this sample
Reference range
Relationship between results from this sample and the reference range
Star system indicator
Above reference range: HI
Below reference range: LO
Calculated by subtracting ALB from TP
Note: The reference ranges displayed in the report are for the named species (i.e., Canine, Feline).
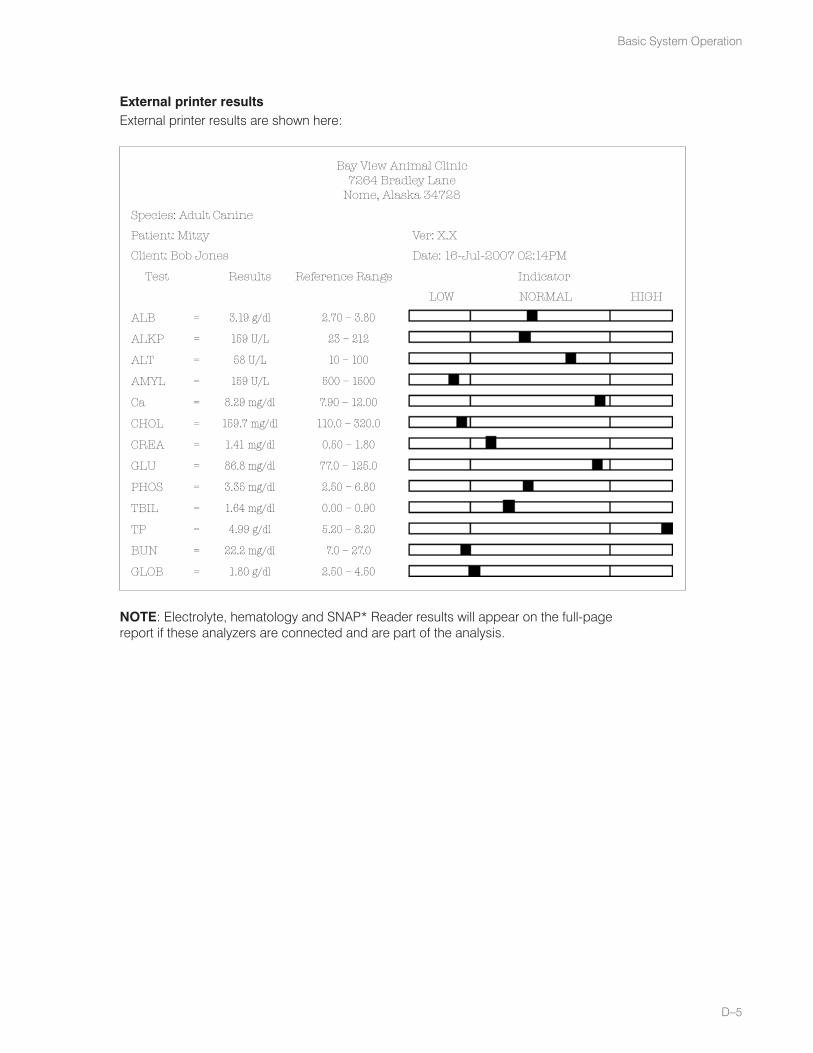
D–5
Basic System Operation
External printer resultsExternal printer results are shown here:
Bay View Animal Clinic7264 Bradley Lane
Nome, Alaska 34728
Species: Adult Canine
Patient: Mitzy Ver: X.X
Client: Bob Jones Date: 16-Jul-2007 02:14PM
Test Results Reference Range Indicator
LOW NORMAL HIGH
ALB = 3.19 g/dl 2.70 – 3.80
ALKP = 159 U/L 23 – 212
ALT = 58 U/L 10 – 100
AMYL = 159 U/L 500 – 1500
Ca = 8.29 mg/dl 7.90 – 12.00
CHOL = 159.7 mg/dl 110.0 – 320.0
CREA = 1.41 mg/dl 0.50 – 1.80
GLU = 86.8 mg/dl 77.0 – 125.0
PHOS = 3.35 mg/dl 2.50 – 6.80
TBIL = 1.64 mg/dl 0.00 – 0.90
TP = 4.99 g/dl 5.20 – 8.20
BUN = 22.2 mg/dl 7.0 – 27.0
GLOB = 1.80 g/dl 2.50 – 4.50
NOTE: Electrolyte, hematology and SNAP* Reader results will appear on the full-page report if these analyzers are connected and are part of the analysis.

D–6
IDEXX VetTest* Chemistry Analyzer Operator’s Manual
Profile Interpretation printoutAn example of the Profile Interpretation option results are shown here:
Bay View Animal Clinic7264 Bradley Lane
Nome, Alaska 34728
Species: Adult Patient: Mitzy Ver: X.XClient: Bob Jones Date: 16-Jul-2007 02:14PM
Results of this profile may be consistent with the following conditions Hypoparathyroidism Indicators : Ca Additional tests : Mg
Pancreatitis Indicators : Ca TBIL Additional tests : LIPA AST TRIG Cl WBC GRAN
Pregnancy Indicators : TBIL Additional tests : AST
Intra-vascular hemolysis Indicators : TBIL Additional tests : AST CK LDH Mg HCT
Pancreatic neoplasia Indicators : TBIL Additional tests : AST GGT LIPA
Portosystemic shunt(s) Indicators : TP Additional tests : LDH NH3
Lactation Indicators : Ca
Congestive heart failure Indicators : TP Additional tests : AST LDH Na Cl
Malabsorption Indicators : Ca

E Advanced Operations
Out-of-Linearity Range Samples Occasionally a test value may be outside the analyzer’s range capability. The test value may be greater than (>) the linearity range, or interfering substances in the sample may be causing a nonlinear or invalid result. See the following chart for linearity ranges on individual chemistries. If a value is required, it will be necessary to dilute the sample and repeat the test.
Note: On an external printer, an out-of-linearity result is displayed as dashes (- - - - ). A dilution message is printed on the internal VetTest* printer results.
Analyzer Linearity Range
Test U.S. Units S.I. Units
ALB 0–6.0 g/dL 0–60 g/L
ALKP 10–2000 U/L 10–2000 U/L
ALT 10–1000 U/L 10–1000 U/L
AMYL 0–2500 U/L 0–2500 U/L
AST 0–1083 U/L 0–1083 U/L
CA 0–16.0 mg/dL 0–4.00 mmol/L
CHOL 0–520 mg/dL 0–13.4 mmol/L
CK 0–2036 U/L 0–2036 U/L
CREA 0–13.6 mg/dL 0–1202 µmol/L
GGT 0–952 U/L 0–952 U/L
GLU 0–686 mg/dL 0–38.1 mmol/L
LAC 0.5–12 mmol/L 0.5–12 mmol/L
LDH 50–2800 U/L 50–2800 U/L
LIPA 0–6000 U/L 0–6000 U/L
MG 0–5.2 mg/dL 0–2.17 mmol/L
NH3 0–950 µmol/L 0–950 µmol/L
PHOS 0–16.1 mg/dL 0–5.19 mmol/L
TBIL 0.1–27.9 mg/dL 2–477 µmol/L
TP 0–12.0 g/dL 0–120 g/L
TRIG 0–375 mg/dL 0–4.23 mmol/L
UREA 0–130 mg/dL 0–45.9 mmol/L
URIC 0.1–20 mg/dL 6–1190 µmol/L
UCRE 5–350 mg/dL 0.05–3.5 g/L
UPRO 5–400 mg/dL 0.05–4.0 g/L
E–1
E–2
IDEXX VetTest* Chemistry Analyzer Operator’s Manual
Dilution ProtocolsThe ability to perform dilutions on the VetTest analyzer allows you to qualify extremely elevated results.
Plasma and Serum DilutionsThe VetTest analyzer supports plasma and serum dilutions in two circumstances:
When a test value is outside the linearity range of the VetTest analyzer •
When the sample contains interfering substances (e.g., medications) that cause a • nonlinear or invalid result
Plasma and Serum Dilution TipsPerform a dilution only when a test value is accompanied by a greater than symbol • (>) or dashes (---) on the patient report.
Use normal saline (0.9%) as the diluent.•
For best results, start with a 1:1 dilution (1 part sample to 1 part saline).•
Do not exceed 10 parts saline.•
Use an accurate measuring device, such as a calibrated pipette or syringe.•
Plasma and Serum Dilution ChartVolumes are for example only. Parts Sample + Parts Saline = Total Parts
Parts Sample Parts Saline Total Parts (Dilution Factor)
1 (10 µL) 0 1 (undiluted sample)
1 (10 µL) 1 (10 µL) 2
1 (10 µL) 2 (20 µL) 3
1 (10 µL) 3 (30 µL) 4
1 (10 µL) 4 (40 µL) 5
1 (10 µL) 5 (50 µL) 6
1 (10 µL) 6 (60 µL) 7
1 (10 µL) 7 (70 µL) 8
1 (10 µL) 8 (80 µL) 9
1 (10 µL) 9 (90 µL) 10
1 (10 µL) 10 (100 µL) 11
Parts Saline: the number entered into the VetTest when running the diluted sampleDilution Factor: the total number of parts in the diluted sample; the VetTest automatically multiplies the result by this number to correct for the dilution
Preparing Plasma and Serum Dilutions
To prepare a 1:1 dilution:Accurately measure the desired amount of plasma or serum to be diluted and 1. gently transfer it to a sample cup.
Accurately measure an equal amount of saline and transfer it to the sample 2. collected in step 1.
Thoroughly mix the sample and saline.3.
Proceed to the analysis (see 4. Running a Dilution on the VetTest Analyzer, page E-4).

E–3
Advanced Operations
To prepare dilutions greater than 1:1:If additional dilutions beyond 1:1 are necessary, always begin with the original, undiluted sample. Then, incrementally increase the parts saline as indicated in the dilution chart.
Urine DilutionsThe VetTest analyzer supports urine dilutions when either the UPRO or UCRE test value is outside the linearity range of the VetTest analyzer.
Note: Only the test value that is outside linearity needs to be diluted, not the entire ratio.
Urine Dilution TipsPerform a dilution only when a test value is accompanied by a greater than symbol • (>) or dashes (---) on the patient report.
Use the deionized (DI) water supplied with the Urine P:C Sample Preparation Kit • as the diluent.
For best results, start with a 1:1 dilution (1 part sample to 1 part DI water).•
Do not exceed 10 parts DI water.•
Use an accurate measuring device, such as a calibrated pipette or syringe.•
Urine Dilution ChartVolumes are for example only. Parts Sample + Parts DI Water = Total Parts
Parts Sample Parts DI Water Total Parts (Dilution Factor)
1 (10 µL) 0 1
1 (10 µL) 1 (10 µL) 2
1 (10 µL) 2 (20 µL) 3
1 (10 µL) 3 (30 µL) 4
1 (10 µL) 4 (40 µL) 5
1 (10 µL) 5 (50 µL) 6
1 (10 µL) 6 (60 µL) 7
1 (10 µL) 7 (70 µL) 8
1 (10 µL) 8 (80 µL) 9
1 (10 µL) 9 (90 µL) 10
1 (10 µL) 10 (100 µL) 11
Parts DI Water: the number entered into the VetTest when running the diluted sampleDilution Factor: the total number of parts in the diluted sample; the VetTest automatically multiplies the result by this number to correct for the dilution

E–4
IDEXX VetTest* Chemistry Analyzer Operator’s Manual
Preparing Urine Dilutions
To prepare a 1:1 dilution:
For UPRO:Accurately measure the desired amount of urine to be diluted and gently transfer it 1. to a sample cup.
Accurately measure an equal amount of DI water and transfer it to the sample 2. collected in step 1.
Thoroughly mix the sample and DI water.3.
Proceed to the analysis (see 4. Running a Dilution on the VetTest Analyzer, page E-4).
For UCRE:Accurately measure the desired amount of the sample prepared with the Urine P:C 1. Sample Preparation Kit.
Accurately measure an equal amount of DI water and transfer it to the sample 2. collected in step 1.
Thoroughly mix the sample and DI water.3.
Proceed to the analysis (see 4. Running a Dilution on the VetTest Analyzer, page E-4).
To prepare dilutions greater than 1:1:
For UPRO:If additional dilutions beyond 1:1 are necessary, always begin with the original urine sample. Then, incrementally increase the parts DI water as indicated in the dilution chart.
For UCRE:If additional dilutions beyond 1:1 are necessary, always begin with the sample prepared with the Urine P:C Sample Preparation Kit. Then, incrementally increase the parts DI water as indicated in the dilution chart.
Running a Dilution on the VetTest Analyzer
To run a dilution after preparing the diluted sample (plasma, serum, or urine):From the VetTest main menu, select 1. 1 – New Sample.
Select 2. 7 – Dilutions, enter the number of diluent parts (parts saline or parts DI water) and press E. The species menu appears.
Note: If you are running the most recent patient entered into the VetTest analyzer, select 2 – Current Sample. Then select 1 – Dilution, enter the number of diluent parts and press E.
Continue the normal testing sequence. Results printed out will automatically be 3. multiplied by the appropriate dilution factor (see the dilution charts on pages E-2 and E-3).

E–5
Advanced Operations
Patient MonitoringThe patient monitoring feature offers the capability to save onto the software disk multiple results from the same patient sequenced by date and time. During a glucose tolerance test, for example, multiple samples are drawn and tested. All the results can be saved in association with a unique patient ID and then printed on one page when desired.
To activate the patient monitoring feature:After a sample has been tested, select 1. Monitor Patient. The message “Patient Number to Monitor is _ _ _ _. Is this Correct?” appears.
Select 2. YES to automatically save the results to a new record. If a patient record already exists, the new results are added to it.
To print the results of patient monitoring:From the Main Menu, select 1. Monitor Functions.
Enter the patient ID.2.
Select the print option.3.
Note: Results will print to the internal VetTest printer only.
Important: When monitoring one patient (multiple samples) it is important to select “Monitor Patient” after each sample has been run. When patient monitoring is complete, you should print and file the results in the patient's permanent folder because test data does not transfer between software versions.
Combining Results on the Same SampleThe VetTest analyzer automatically saves the last seven (7) patients onto its disk. The combining results feature is useful if you want to perform additional tests on the same sample. For example, if you want to run a lipase in addition to the 12-chemistry General Health Profile, use the combine results feature to obtain all 13 tests on one printout. Or, if you run a short panel, then decide to run additional tests from that same sample for more information, again, use the combine results feature to place all results on one printout.
To combine results for a patient:After a sample has been tested and the current analysis is complete, this 1. message will appear on the VetTest screen:
Recent information present for this patient.
Do you wish to keep results from earlier analysis for a combined analysis interpretation?
E = Yes, combine
C = No, delete earlier analysis

E–6
IDEXX VetTest* Chemistry Analyzer Operator’s Manual
Press 2. E to combine the current results with the previously stored results. Or, press C to delete the previous results and store only the current results.
Note: Rerunning the same chemistry with the same patient ID will cause the old result to be overwritten by the new result. Previous results cannot be retrieved.
Important! COMBINE RESULTS FROM A SINGLE SAMPLE ONLY.
IDEXX does not recommend combining results from samples collected at different times, even from the same patient. Patient conditions can change even over short time periods, and combining such results would be highly misleading.

F Quality Control
The purpose of Quality Control (QC) is to verify that your VetTest* Chemistry Analyzer is functioning properly. The following QC procedure verifies both the VetTest optics groups and the integrity of your slides. If a QC test fails (i.e., test results fall outside of the reference range on the VetTest printout), follow the procedure chart on page F-5 to determine the source of failure. If the problem persists, contact IDEXX Technical Support.
You should run a QC test:
When the analyzer is first installed.•
Once every four (4) weeks for a routine check.•
If the analyzer has been moved or bumped severely.•
If fluid has been spilled on the analyzer.•
If you think your results are incorrect.•
IDEXX recommends that you run a quality control analysis once a month. Your VetTest analyzer contains a monthly quality-control reminder. When the reminder appears, run your monthly quality control as you normally would on the day it is due. You do not need to run quality control when the reminder appears; you can do it at a time that is convenient for you.
Each time you run the monthly quality control, the VetTest analyzer automatically stores the date in its memory and displays the QC reminder 30 days later.
Quality Control Materials To run quality control on the VetTest analyzer, you need the following materials:
A lint-free wipe•
IDEXX VetTest Quality Control Panel; each panel contains one chemistry slide for • each of the six optic lamps inside the analyzer
IDEXX VetTrol* Control material•
IDEXX UPRO Control material•
The control panel and materials are described in the following sections.
IDEXX VetTrol* Control IDEXX VetTrol Control material is a lyophilized, bovine-based control fluid that is specially formulated for use on the VetTest analyzer to monitor its precision and accuracy. It consists of one diluent vial and one control vial per set with each box of VetTrol Control containing four sets of vials for a four-month supply of quality control material. After reconstitution, the control fluid should be tested in the same manner as a patient sample, and the reported values compared to those on the VetTest printout. The VetTrol Control material works on all blood chemistry slides and the UCRE slide. (For information on testing the UPRO slide, see IDEXX UPRO Control on page F-3).
Storage: The VetTrol Control material must be stored in the freezer at or below -18°C (0°F). Discard vials at their expiration dates. Expired or unwanted material should be disposed of with other clinical waste.
Stability and Handling: For most constituents, VetTrol Control can be used up to 24 hours after reconstitution when it is stored between 2°–8°C (36°–46°F). For creatine kinase and ammonia values, VetTrol should be used within two hours after reconstitution. Exposure to light will affect bilirubin and creatine kinase results. Ammonia concentration will increase with time.
F–1

F–2
IDEXX VetTest* Chemistry Analyzer Operator’s Manual
VetTest Quality Control PanelThe VetTest Quality Control Panel includes all the chemistries needed to ensure a comprehensive quality control procedure on the VetTest analyzer. The Quality Control Panel consists of six slides per panel, with four panels per box for a four-month supply of quality control material. The six chemistries included are: calcium (Ca2+), alanine aminotransferase (ALT), ammonia (NH3), albumin (ALB), alkaline phosphatase (ALKP), and glucose (GLU).
Storage: The Quality Control Panel slides must be stored in the freezer at -18°C (0°F) until ready for use. You can use the slides directly from the freezer.
Each Quality Control Panel slide tests an optic lamp:
Quality Control Panel
Chemistry Slide Optic Lamp
NH3 Yellow 592 nm
GLU Green 562 nm
ALB Red 640 nm
Ca2+ Deep Red 680 nm
ALT (SGPT) UV 350 nm
ALKP UV 400 nm
Note: Additional Chemistry Slides for Optic Lamp TestsIn addition to the Quality Control Panel slides, you can use the following chemistry slides to perform quality control on the optic lamps:
Chemistry Slide Optic Lamp
NH3 Yellow 592 nm
GLUTPTRIGCHOLTBILAMYLLIPALAC
Green 562 nm
BUNURICALBPHOSCREAMg2+
UCRE
Red 640 nm
CACKUPRO
Deep Red 680 nm
AST (SGOT)ALT (SGPT)LDH
UV 350 nm
ALKPGGT
UV 400 nm
F–3
Quality Control
IDEXX UPRO ControlThe UPRO Control material is an assayed control used to monitor the performance of the urine protein slide (UPRO) on the VetTest analyzer. Because of the uniqueness in the composition of the UPRO slide, you must use the IDEXX UPRO Control material to test the performance of this slide. Each box of UPRO Control contains six 2-mL bottles.
Notes:
The UCRE slide performance can be analyzed using the VetTrol Control material.•
The UPRO Control is an optional control fluid that is available if you want to test • the performance of your UPRO slide. By running your monthly QC analysis with the VetTrol Control material, you are testing the performance of the optic lamp that analyzes the UPRO slide.
Storage: The UPRO Control material must be stored in the refrigerator at 8°C (46°F). Do not freeze. Be sure to bring a vial to room temperature before use. Immediately return the vial to the refrigerator. Opened vials can be stored in the refrigerator for up to 7 days.
Preparing the VetTrol Quality Control FluidUse the VetTrol Quality Control fluid to test the VetTest analyzer’s optic lamps, the blood chemistry slides, and the UCRE slide.
To prepare the VetTrol Control for QC testing:Remove one VetTrol Control vial and one diluent vial from the freezer. Allow 60–90 1. minutes for the vials to equilibrate to room temperature before proceeding.
Slowly invert the diluent vial several times to thoroughly mix the contents. 2. Do not shake.
Gently tap the control vial on the counter several times to dislodge any material 3. adhering to the stopper.
Remove the seal and stopper from each control vial 4. just before adding the diluent. Do not leave the control vials open.
Transfer EXACTLY 3.0 mL of diluent to the control vial. (Refer to the VetTrol 5. package insert for supported transfer devices.) Discard the remaining diluent.
Tightly replace the original stopper on the control vial and gently invert the vial 6. several times. DO NOT SHAKE. Allow 45–60 minutes for reconstitution, inverting occasionally during this time. Visually verify that all freeze-dried material is dissolved before continuing to step 7.
Note: If analysis is delayed, keep the control vial tightly stoppered and refrigerated. Before proceeding, allow the contents to come to room temperature and gently invert the vial several times. Discard the control vial after one day.
Proceed immediately to running the quality control procedure on the VetTest 7. analyzer.
Preparing the UPRO ControlUse the UPRO Control fluid to perform quality control on the UPRO slide only.
To prepare the UPRO Control fluid for QC testing of the UPRO slide:Remove one vial of UPRO Control from the refrigerator and let it reach room 1. temperature (approximately 30 minutes) before proceeding.
Thoroughly mix the contents of the UPRO Control vial by gently inverting it several 2. times. DO NOT SHAKE.

F–4
IDEXX VetTest* Chemistry Analyzer Operator’s Manual
Remove the seal and stopper from the vial. Proceed immediately to running the 3. quality control procedure on the VetTest analyzer.Note: Any remaining fluid in the UPRO Control vial is valid for up to seven days as long as it is kept refrigerated and tightly stoppered. It is important to restopper the vial and return it to the refrigerator immediately after aspirating the initial contents if you plan to reuse the control within seven days.
Performing the Quality Control Procedure on the VetTest Analyzer From the VetTest main menu select 1. 1 for New Sample.
Select 2. 6 for Controls.
The current quality control lot numbers will be displayed. Select the number that 3. corresponds with the number on your control vial (either VetTrol or UPRO Control).
Proceed as if running a patient sample, following the prompts on the VetTest screen.4.
Compare your results with the corresponding ranges on the printout.5.
If one chemistry is out of range, follow this chart to complete the QC procedure:
Check expiration date of slide/control. Discard expired material.
Repeat same test (x) using same control and, if possible, another test
in the same optics group.
Proceed with patient analysis
Run original test (x) with new box of slides
Proceed with patient analysis
Reconstitute a new control and repeat tests (x) and (y)
Call IDEXX Technical Support for assistance
Random Test (x) Out of Range
First test (x) still out of range, second test type (y)
within range
Both tests (x) and (y) repeat out of range
Rerun (x) and/or (y) out of range
Rerun (x) is still out of range test
Rerun (x) results within range
Both tests (x) and (y) repeat within range

F–5
Quality Control
If several chemistries are out of range, follow this chart to complete the QC procedure:
Several tests out of range (high or low)
Reconstitute new control material.
Carefully measure 3 mL (cc) in order to avoid an overly diluted or concentrated mixture.
Repeat the QC protocol using the new control.
If QC is within range, proceed with analysis.
If QC fails, call IDEXX Technical Support.
Documenting Quality Control ResultsIDEXX provides you with preprinted pages to document your QC results. You should take time to record all QC results in these “QC Logs.”
Note: At the top of each QC log page is a control lot number that must match the lot number on the VetTrol Control vial or UPRO Control vial that you use for a QC procedure. Should you encounter any problems during a QC procedure, these records will help you and IDEXX Technical Support identify trends and troubleshoot problems.
Performing the Ca Offset ProcedureThe Ca Offset Procedure should be performed only when recommended by IDEXX Technical Support.
Important: This procedure must be performed using slides from an unexpired VetTest Calcium 25-slide box only and VetTrol Control material.
To perform a Ca Offset procedure:Reconstitute a fresh sample of VetTrol Control fluid and perform a QC procedure • using four (4) calcium slides in a row. All slides must be from the same lot number. The VetTest will automatically recalculate the new offset and store the information in its memory.
The four calcium values will be printed at the end of the analysis on the internal • printer. The values should all be in range for that QC lot.
If one or all values are out of range, contact IDEXX Technical Support to determine • if further steps need to be taken.
Note: If you perform this procedure and the VetTest analyzer displays the results but does not display the new calcium offset value, call IDEXX Technical Support (not all combinations of unexpired slides and control fluids are supported).

F–6
IDEXX VetTest* Chemistry Analyzer Operator’s Manual

G Other Maintenance
General Upkeep and Cleaning
Case CleaningAlways disconnect the power before cleaning the VetTest* Chemistry Analyzer. Clean the analyzer with a damp (not wet) lint-free cloth. A mild liquid soap will remove grease.
Do not use any of the following near the analyzer:
organic solvents• ammonia-based cleaners•
ink markers• sprays containing volatile liquids•
insecticides• disinfectant•
polish• room freshener•
Care should be taken not to spill any samples, chemicals, cleaning agents, water, urine or other fluids on the analyzer.
Never wipe the VetTest analyzer or its surroundings with ammonia-based cleaning products. Avoid urine odors around the analyzer. Ammonia in the atmosphere will falsely increase ammonia (NH3), quality control, and patient test results.
Screen CleaningIf the screen gets dirty, apply an antistatic screen cleaning agent (not ammonia-based) to a clean cloth or paper towel and wipe the screen. Do not spray the cleaner directly onto the screen. Liquid can run down inside the case and damage the electrical circuits. Take care not to scratch the screen.
Dust and Animal HairDust and animal hair can lead to analyzer failures. Routinely dust off the VetTest analyzer with a damp cloth and dust around the location. Do not block the cooling vents under the analyzer by allowing paper, loose materials, or dust to accumulate. A VetTest dust cover should be used when the analyzer is turned off. Do not use the cover when the analyzer is turned on. The cover may cause the VetTest analyzer to overheat or cause the printer paper to jam.
Disk Drive ProtectionKeep the disk drive cover on to help prevent dust from entering the disk drive. Cleaning the disk drive as a preventative measure is not recommended unless the analyzer is in a high-dust area. For high-dust areas, using a double-sided 87.5 mm (3.5") commercial disk drive cleaner four times a year will help prevent damage. Follow the disk drive cleaner directions for use.
Right Side Cover and Rotor CleaningRoutinely remove and dust off the right side cover with canned air spray. Use a damp cloth to wipe any dried residue off the rotor surfaces.
G–1

G–2
IDEXX VetTest* Chemistry Analyzer Operator’s Manual
Pipettor CleaningThe pipettor may get clogged due to residual sample. Always keep the pipettor vertical when sample is in the tip. Moisture or liquid may accumulate in the clear plastic line if a tip is left on after a sample run, so make sure to discard the tip when prompted to do so by the VetTest analyzer.
To clean the pipettor, carefully wipe the pipette tip (especially the end of the tip) with a twisting motion using a clean, disposable lint-free tissue (as shown, right).
Note: Any moisture or liquid in the plastic line can lead to inaccurate results or spotting failures. A clogged pipettor may result in a slide spotting failure or prevent the analyzer from properly aspirating and dispensing the sample. Please be aware that the pipettor is not covered under the analyzer warranty.
Pipettor Collar CleaningThe pipettor collar may become dirty with accumulations of dried plasma or serum, which can result in improper pipette operation and possible spotting failures. To clean, remove the pipettor from the holder and clean the inside of the pipettor collar with a cotton swab wetted with alcohol (as shown, right).
Used Slide DrawerAlways empty the used-slide drawer after every run. Accumulation of slides can jam the slide ejector, causing analyzer failure.
Temperature ControlVery low temperatures can cause considerable damage to the VetTest analyzer. Permanent damage may be caused if the VetTest analyzer is switched on at temperatures below freezing. Allow the analyzer to fully reach room temperature (19°–27°C/66°–81°F) after it has been in a cold environment.
UV Lamp ReplacementThe UV 350 and UV 400 lamps, two of the analyzer’s six light sources, are user changeable. Typical lamp life is 8 to 16 months. A screen message will alert you that a lamp has failed and that chemistries in that optics group should not be run until the lamp is replaced. Contact IDEXX Technical Support to order lamp kits and instructions.
AutocalibrationThe autocalibration procedure allows the VetTest analyzer to compensate for lamp intensity variation. The procedure is performed after the installation of a 350 or 400 UV lamp, or, when instructed by IDEXX Technical Support during the life of the lamp to correct for minor changes.
Autocalibration kits are provided by IDEXX free of charge. The materials provided in the kit are intended to be used together. Do not use other Autocalibration slides or other versions of software in this procedure.
Keep all autocalibration materials (slides, diskette, and instructions) in a clean, dry, room-temperature location for future use.
Autocalibration KitNote: After changing the 350 or 400 UV lamps, leave the VetTest analyzer turned on for 1–2 hours before running the autocalibration procedure. This will ensure proper performance of the VetTest analyzer.

G–3
Other Maintenance
Materials Provided• Software diskette labeled “AUTOCAL 3SL Ver X.X.”
• Three autocalibration slides
To autocalibrate the VetTest analyzer:Turn off the VetTest analyzer and remove the current software diskette from the 1. disk drive. Save the software diskette so you can reinsert it after completing the autocalibration procedure (see Inserting the VetTest Software Disk, page B-6, for more information).
Make sure that the used-slide drawer is empty.2.
Insert the AUTOCAL 3SL Ver X.X diskette into the disk drive on your VetTest 3. analyzer and turn on the power.
Load the three slides as instructed on the VetTest analyzer screen. Use the chart 4. below to guide in the proper identification of each slide to assure that the slides are inserted in the correct order.
Autocalibration Slides—Order and Identification
Insertion Order
Physical Description of Slide Last Four Numbers Printed on Envelope LabelTop Bottom
First Flat White Shiny White XXXX
Second Flat White Flat White XXXX
Third Flat White Shiny Black XXXX
Do not touch the central surface of the slides. Dust or fingerprints will interfere with the reading of the slides and may result in inaccurate results or error messages. Handle each slide by the plastic frame only. Gently wipe the slides with a lint-free cloth to clean, if necessary.
Upon completion of the autocalibration process, the screen will display either:5.
“Pass Done, press any key to continue”a.
Follow the screen prompts and continue with step #6.
or
“Fail Done, press any key to continue"b.
Follow the screen prompts and try the procedure again. If the analyzer fails the autocalibration process again, contact IDEXX Technical Support.
Carefully remove the slides from the used-slide drawer and reseal them in their 6. respective envelopes.
Turn off the VetTest analyzer and remove the autocalibration diskette from the 7. disk drive.
Insert the original software diskette that was removed in step 1.8.
Turn on the VetTest analyzer. Following the warm-up cycle, the analyzer will be 9. ready to use as usual.

G–4
IDEXX VetTest* Chemistry Analyzer Operator’s Manual
H Chemistry Description and Guide
Introduction to Biochemical ProfilingBy performing appropriate biochemical tests on good quality samples, you can obtain information that, when used with clinical findings, should assist you to make a more accurate diagnosis and prognosis. Selecting the appropriate tests is crucial.
Single tests are helpful in a particular circumstance, such as following the course of an identified disease or monitoring the effect of therapy. However, many individual chemistry tests do not give information specific to any particular organ or system. A test result may be indicative of change to a number of organs, or in one or more metabolic systems. Chemistry results, therefore, must be considered in conjunction with other test results and clinical findings. The use of multiple tests—or a profile—covering several organ systems can be very helpful when it is difficult to reach a diagnosis from the clinical signs alone. The following sections discuss enzymes, and each of the chemistries offered on the IDEXX VetTest* Chemistry Analyzer.
EnzymesEight tests for enzymes are available for use on the VetTest analyzer. Please read the following information as well as the section on the individual chemistry tests.
The eight enzymes fall into one of two categories: those found in the cellular cytoplasm (or mitochondria) and those bound to cell membranes.
Enzymes in cellular cytoplasmEnzymes found in the cellular cytoplasm or mitochondria are: ALT (SGPT), AMYL, AST (SGOT), CK, LDH, LIPA. Cells release these enzymes when there is a change in the membrane permeability or when frank necrosis occurs. The amount of these enzymes in the blood stream is therefore a function of the rate at which the enzyme is being released from the cells, and the rate at which it is being cleared from circulation.
When only minor, transient changes occur in the morphology and function of cells, these enzymes may be released quite easily. Therefore, they are often early indicators of cellular damage.
Enzymes bound to cell membranesEnzymes bound to cell membranes (not present in cellular fluid) are: ALKP, GGT.
These enzymes are commonly used to detect diseases of the hepatic or biliary system. However, neither ALKP nor GGT are present in large amounts in any of the liver tissues and they are not released when hepatic necrosis occurs. Their activity increases in the blood during obstructive or proliferative changes in the hepato-biliary system. How they are released is not completely understood, but may be caused by de novo synthesis, solubilization or a mechanism not yet identified. Increases in the serum activity of these enzymes are associated with potentially serious lesions.
Enzymes as Indicators of Organ DamageWhen the liver is damaged, liver enzymes are released into the circulation. In acute damage through, for example, exposure to a toxicant such as carbon tetrachloride, the lesion is transient and enzymes leak from the tissues during the period of active cell damage. Afterward, repair processes begin and enzyme release declines and eventually ceases. In this case there is a fairly narrow window of time, which is dependent on the enzyme half-life, during which increased enzyme activity may be detected.
H–1

H–2
IDEXX VetTest* Chemistry Analyzer Operator’s Manual
In diseases such as viral hepatitis where the damage may be prolonged and progressive, the enzyme release will also be prolonged. Here, removal of enzyme from the circulation may not keep pace with enzyme release and the serum activity will remain high for as long as damage continues. Monitoring enzyme activity can be useful in determining whether or not a lesion is resolving. If blood samples are taken sequentially and the enzyme activity is falling, the implication is that active cell damage has ceased. If the activity remains elevated or increases, the implication is that damage is continuing.
Enzyme Half-livesThe enzyme half-life is the time taken for 50% of the sample enzyme activity to be removed from the circulation. This is often expressed as “t½”. The half-life is difficult to determine and may vary markedly with the enzyme and animal species. The following table gives an approximation of the half-lives of some of the diagnostic enzymes.
Enzyme Dog Cat
t½ t½
ALKP 120 h 6 h
ALT (SGPT) 48 h 48 h
AMYL 12 h 12 h
AST (SGOT) 12 h 40 h
CK 14 h 15 h
GGT 100 h *
LDH 18 h 30 h
LIPA 18 h 18 h
* no data available

H–3
Chemistry Description and Guide
Albumin/ALBAlbumin forms the largest fraction of the total serum protein in the healthy animal. It is synthesized solely in the liver, has a low molecular weight, and plays an important role in the transport of endogenous and exogenous compounds in bound form. Albumin also makes a major contribution to osmoregulation.
Principal reasons for performing the test:To investigate hepatic and renal function, the degree of hydration, or protein losing enteropathies. The test should not generally be performed in isolation because of its lack of specificity.
Most common abnormalities indicated by the test:Impaired renal and hepatic function.
Special precautions in sample collection:Remove plasma or serum promptly from the clot or cells. Hemolysis may cause an increased albumin value.
Complementary tests:Albumin concentration is usually determined in conjunction with the measurement of total protein and other tests of renal and hepatic function. When albumin is measured with total protein, the total globulins will be calculated automatically and given with the results.

H–4
IDEXX VetTest* Chemistry Analyzer Operator’s Manual
Alkaline phosphatase/ALKPThe enzyme alkaline phosphatase is found in many body tissues. Highest levels are found in the kidney cortex, small intestinal mucosa, and osteoblasts. In many instances the enzyme is present in the epithelial cells lining excretory ducts.
In the cat, the half-life of alkaline phosphatase is very short due to rapid renal excretion. Sensitivity of the test in the cat may be low. Therefore, a modest increase in this species can be an indicator of disease.
Principal reason for performing the test:As an indicator of hepatic disease involving the biliary system.
Most common abnormalities indicated by the test:Obstructive or proliferative changes in the hepato-biliary system.
Special precautions in sample collection:EDTA and fluoride/oxalate should not be used as anticoagulants. Remove plasma or serum promptly from the clot or cells. Hemolyzed specimens should not be used because ALKP contamination from red cells will occur.
Complementary tests:Alkaline phosphatase activity is usually determined in conjunction with other tests of hepatic function and damage.
H–5
Chemistry Description and Guide
Alanine aminotransferase/ALT (SGPT)For practical purposes the enzyme alanine aminotransferase is specific to the liver in dogs and cats. It is found in the cellular cytoplasm and may be released into the blood during changes in cell membrane permeability or necrosis.
Principal reason for performing the test:To investigate hepatic damage in dogs and cats.
Note: Do not use this test for the detection of liver disease in ruminants, horses, and pigs as the enzyme activity in the liver is very low. Even in severe liver disease in these species the increase in activity is minimal.
Most common abnormality indicated by the test:Hepatic parenchymal lesions.
Special precautions in sample collection:EDTA and fluoride/oxalate should not be used as anticoagulants. Remove plasma or serum promptly from the clot or cells. Hemolyzed specimens should not be used because ALT contamination from red cells will occur.
Limitations of procedure:High total protein samples that are predominantly gamma globulin can increase ALT results. Samples should be diluted 1:1 with saline and reanalyzed (see Dilution Protocols, page E-2).
Complementary tests:Alanine aminotransferase activity is usually determined in conjunction with other tests of hepatic damage or function.

H–6
IDEXX VetTest* Chemistry Analyzer Operator’s Manual
Amylase/AMYL
Important: Read this page in conjunction with the details on Lipase (LIPA).
The enzymes amylase and lipase are found at high activity in the pancreas and to a lesser extent in the salivary glands, small intestinal mucosa, and liver. They have a short half-life and are removed rapidly from the circulation. There are some reports which suggest that lipase may have a slightly longer half-life. Measurements of both enzymes may be used in the confirmation of acute pancreatitis, but because of the slightly longer half-life lipase may be more suitable. (See Enzymes, page H-1.)
Principal reason for performing the test:As an indicator of acute pancreatitis.
Most common abnormality indicted by the test:Acute necrotic pancreatitis and renal failure.
Special precautions in sample collection:Blood samples should be taken within one day of the onset of symptoms suggesting acute pancreatitis. Do not use oxalate, citrate or EDTA anticoagulants. Remove plasma or serum promptly from the clot or cells. Hemolyzed specimens should not be used.
Complementary tests:Amylase and lipase are usually determined in conjunction with tests of hepatic and pancreatic damage and function.

H–7
Chemistry Description and Guide
Aspartate aminotransferase/AST (SGOT)The enzyme aspartate aminotransferase is present in large amounts in the organs and tissues of dogs and cats. It is found in the cytoplasm and mitochondria of the cells and is released into the blood during changes in cell membrane permeability or necrosis. (See Enzymes, page H-1.)
The test is not a specific or sensitive indicator of damage to any organ or tissue.
Principal reasons for performing the test:To investigate damage to liver, cardiac, or skeletal muscle.
Most common abnormality indicated by the test:Hepatic parenchymal lesions.
Special precautions in sample collection:Blood samples must be processed and centrifuged immediately after collection. Even slight hemolysis can cause marked increases in activity. EDTA and fluoride/oxalate should not be used as anticoagulants. Remove plasma or serum promptly from the clot or cells. Hemolyzed specimens should not be used because AST contamination from red cells will occur.
Complementary tests:Aspartate aminotransferase activity is usually determined in conjunction with other tests of liver, cardiac, or skeletal muscle damage or function.

H–8
IDEXX VetTest* Chemistry Analyzer Operator’s Manual
Calcium/Ca2+ Calcium is an essential element which is involved in many body systems. These include the skeleton, enzyme activation, muscle metabolism, blood coagulation, and osmoregulation. In the blood, calcium exists in ionized and protein-bound forms. Factors governing the total plasma or serum concentration are complex and include interaction with other chemical moieties, proteins, and hormones.
Calcium, phosphorus, and albumin metabolism are interdependent.
Principal reasons for performing the test:As an indicator of certain neoplasias, bone disease, parathyroid disease, and eclampsia.
Most common abnormality indicated by the test:Neoplasia
Special precautions in sample collection:Centrifugation should take place quickly after the sample has been drawn. The sample should not be exposed to the air for long periods. Glassware must be scrupulously clean to avoid contamination by sources of calcium (e.g., detergents). Prolonged contact with the clot may lead to lowered calcium values due to dilution by red cell water.
Do not use tubes containing fluoride, oxalate, citrate, or EDTA as these agents will cause significant negative interference. Total calcium results in patients receiving these substances therapeutically may be falsely low.
If analysis cannot be performed within 4 hours, the sample should be removed from the red cells and refrigerated in a tightly stoppered container at 2°–8°C (36°–46°F) for short-term storage (up to 24 hours). Sample should not be frozen. Sample must be allowed to reach room temperature before analysis.
Limitations of procedure: Keeping the sample in an open container at room temperature may elevate the reported test result. This effect is caused by the loss of carbon dioxide and change in pH of the specimen. These changes are minimized by anaerobic handling procedures and prompt analysis.
Complementary tests:Calcium should be determined in conjunction with measurements of inorganic phosphate, albumin, total protein, and glucose.

H–9
Chemistry Description and Guide
Cholesterol/CHOLSerum cholesterol occurs at high concentration in the esterified form and at much lower concentration in the free form. Cholesterol is synthesized in the liver and other tissues and is also absorbed in the free form from the small intestine. It is esterified in the liver and is the precursor of steroid hormones.
Cholesterol is broken down in the liver to bile acids and eliminated via the bile duct.
Principal reason for performing the test:As an indicator of hypothyroidism.
Most common abnormality indicated by the test:Hypothyroidism
Special precautions in sample collection:Blood should not be drawn within 12 hours of a meal. Remove plasma or serum promptly from the clot or cells. Heparin and EDTA may be used as anticoagulants for plasma specimens.
Complementary tests:Cholesterol measurements should not be performed in isolation but as part of a profile of tests to investigate endocrine, hepatic, and renal disease. If high cholesterol is found in the absence of diabetes, hepatic, or renal disease, hypothyroidism may be present. This can be confirmed by measuring thyroid function.

H–10
IDEXX VetTest* Chemistry Analyzer Operator’s Manual
Creatine kinase/CKCreatine kinase is found at high activity only in the cytoplasm of cardiac and skeletal muscle. This enzyme catalyzes the reversible phosphorylation of creatine by ATP to creatine phosphate and ADP. Creatine phosphate is the major source of high energy phosphate used in muscle contraction. (See Enzymes page H-1).
Principal reason for performing the test:To identify lesions in skeletal or cardiac muscle.
Most common abnormality indicated by the test:Skeletal muscle lesions attributable to trauma or vigorous exercise.
Special precautions in sample collection:Samples must be processed and centrifuged immediately after drawing blood. Grossly hemolyzed samples should not be used. Even slight hemolysis can cause marked increases in enzyme activity. Blood samples should be taken within 6 hours of suspect lesion. It is important to determine that the patient has not been exercised vigorously during the 12 hours prior to sampling. This may cause marked increases in creatine kinase activity. EDTA and fluoride/oxalate will cause lowered CK results.
Limitations of procedure:Elevated carbon dioxide levels may cause a significantly lowered result.
Complementary tests:Creatine kinase determination provides a specific, sensitive indication of muscle cell damage. Aspartate aminotransferase and lactate dehydrogenase activities may also be measured but are less specific and show smaller corresponding increases when muscle damage is present.

H–11
Chemistry Description and Guide
Creatinine/CREACreatinine is a degradation product of creatine in muscle metabolism. The daily production of creatinine is fairly constant and not influenced markedly by age, diet, exercise, or catabolism. Creatinine is eliminated from the body by glomerular filtration and tubular secretion in the kidneys.
Principal reason for performing the test:As an indicator of renal disease and/or an index of glomerular filtration rate.
Most common abnormality indicated by the test:Renal disease
Special precautions in sample collection:Blood should not be drawn for creatinine determination within 6 hours of a meal. Oxalate/fluoride, citrate, or EDTA should not be used as anticoagulants. Remove plasma or serum promptly from the clot or cells.
Complementary tests:Creatinine determinations should usually be performed in conjunction with measurements of urea, inorganic phosphate, total protein, and albumin. PCV can be helpful as an indicator of reduced erythropoietin production. Appropriate urine tests should also be performed (e.g., specific gravity and protein concentration).
An increase in both urea and creatinine provides a more reliable index of renal disease than an increase in only one of the parameters, especially if changes are small. It is generally accepted that serum urea concentration increases before creatinine in renal disease in humans. However, the precise relationship between these tests in different animal species remains to be determined. Until this is resolved it may be prudent to perform both urea and creatinine determinations where early renal disease is suspected.
H–12
IDEXX VetTest* Chemistry Analyzer Operator’s Manual
Gamma-glutamyltransferase/GGTThe enzyme gamma-glutamyltransferase is membrane-bound. It is present in large quantities in the kidney medulla and cortex and to a lesser extent in the small intestinal mucosa and bile canaliculi. (See Enzymes, page H-1.)
Despite the high activity of gamma-glutamyltransferase in the kidney, renal disease does not result in high enzyme activity in the serum sample.
Principal reason for performing the test:As an indicator of hepatic cholestasis or neoplasia.
Most common abnormality indicated by the test:Hepatic neoplasia
Special precautions in sample collection:Do not use fluoride/oxalate as an anticoagulant. Remove plasma or serum promptly from the clot or cells. Hemolyzed specimens should not be used.
Complementary tests:Serum gamma-glutamyltransferase activity is usually determined in conjunction with other tests of hepatic function and damage.
H–13
Chemistry Description and Guide
Glucose/GLUGlucose is the principal source of energy in monogastric mammals. The circulating concentration in the healthy animal is maintained within narrow limits.
Principal reason for performing the test:To investigate carbohydrate metabolism.
Most common abnormality indicated by the test:Diabetes mellitus
Special precautions in sample collection:For glucose determinations the animal should have been fasted for 5–8 hours before sampling. Hemolysis may cause a decrease in glucose results.
For plasma samples: When blood is collected in lithium heparin it is important that the sample be centrifuged immediately after collection. In this anticoagulant glycolysis occurs quite rapidly in the presence of red cells and the glucose concentration in the sample can diminish at up to 10% an hour at room temperature. Remove plasma promptly from the red cells.
For serum samples: Do not centrifuge serum samples until clotting is complete. Samples must be centrifuged completely. Remove serum promptly from the clot to avoid metabolism of glucose by the cells. A maximum of 30 minutes between drawing and separation from the clot is recommended.
Limitations of procedure:Particulate matter in the sample (e.g., fibrin clots, cells, and other debris) may cause low results, especially at elevated glucose concentrations. Be sure that the sample is adequately centrifuged.
Complementary tests:When the patient is a diagnosed diabetic, glucose tests may be performed in isolation. It is however, useful to perform other tests for renal and hepatic function and lipid metabolism to monitor secondary effects of poorly controlled diabetes.
If a slight/moderate increase in glucose is found in a previously undiagnosed patient, a urinary glucose and glucose tolerance test may be indicated. Under no circumstances should a glucose tolerance test be performed on a frankly diabetic animal.

H–14
IDEXX VetTest* Chemistry Analyzer Operator’s Manual
Lactic Acid (LAC)Lactate is produced by anaerobic metabolism of glucose and its concentration depends on relative rates of production in muscle cells and erythrocytes and metabolism in the liver.
Principal reason for performing the test:Elevated lactate levels usually are caused by overproduction or undermetabolism. They result from tissue hypoxia, diabetes mellitus, malignancies, ethanol or methanol ingestion, and metabolic acidosis.
Most common abnormality indicated by the testWhile the presence of lactate does not indicate any particular disease, elevated amounts of lactate are an indicator of significant metabolic derangement.
Sample type and precautions:Use samples collected in a fluoride oxalate tube. (Can also use lithium heparin tube if separated from cells within 5 minutes.)
Complementary tests:Electrolytes and blood gases, CBC, clinical chemistry profile and urinalysis

H–15
Chemistry Description and Guide
Lactate dehydrogenase/LDHThe enzyme lactate dehydrogenase is present in large amounts in all organs and tissues (including red blood cells) of dogs and cats. It is found in the cell cytoplasm and is released into the blood during changes in cell membrane permeability or necrosis. The test is not a specific or sensitive indicator of damage to any organ or tissue. (See Enzymes, page H-1.)
Note: The normal range of lactate dehydrogenase in the dog and cat is wide, as can be the intra-animal variation from day to day. Consequently, small increases in activity due to minimal organ damage are difficult to identify. The measurement of lactate dehydrogenase is a somewhat traditional test whose diagnostic value is limited in practice.
Principal reason for performing the test:To investigate damage to liver, cardiac, or skeletal muscle.
Most common abnormality indicated by the test:Increased activity is usually associated with hepatic parenchymal lesions.
Special precautions in sample collection:Fluoride/oxalate and EDTA should not be used as anticoagulants. Remove plasma or serum promptly from the clot or cells and analyze as soon as possible.
Hemolyzed specimens should not be used because LDH contamination from red blood cells will occur.
Complementary tests:Lactate dehydrogenase activity is usually determined in conjunction with other tests of liver, cardiac, or skeletal muscle damage or function.

H–16
IDEXX VetTest* Chemistry Analyzer Operator’s Manual
Lipase/LIPA
Important: Read this page in conjunction with the details on Amylase (AMYL).
The enzymes lipase and amylase are found at high activity in the pancreas and to a lesser extent in the salivary glands, small intestinal mucosa, and liver. They have a short half-life and are removed rapidly from the circulation. There are some reports which suggest that lipase may have a slightly longer half-life. Measurements of both enzymes may be used in the confirmation of acute pancreatitis, but because of the slightly longer half-life lipase may be more suitable. (See Enzymes, page H-1.)
Principal reason for performing the test:As an indicator of acute pancreatitis.
Most common abnormality indicated by the test:Acute necrotic pancreatitis
Special precautions in sample collection:Blood samples should be taken within one day of the onset of symptoms suggesting acute pancreatitis. Do not use oxalate/fluoride, citrate, or EDTA anticoagulants. Promptly remove plasma or serum from the clot or cells.
Complementary tests:Lipase and amylase are usually determined in conjunction with tests of hepatic and pancreatic damage and function.

H–17
Chemistry Description and Guide
Magnesium/Mg2+ Magnesium plays an important intracellular role in the activation of enzymes, including those responsible for many anabolic and catabolic processes. It is also involved in the formation and destruction acetylcholine, which governs the transmission of electrical impulses at the neuromuscular junction. The adrenal, thyroid, and parathyroid glands appear to regulate serum magnesium concentration.
Principal reason for performing the test:The importance of measuring serum magnesium concentration in dogs and cats has not been fully investigated. However, there have been reports of hypomagnesemia in dogs following the removal of the parathyroid gland.
Most common abnormality indicated by the test:Hypomagnesemia following parathyroid gland removal.
Special precautions in sample collection:Blood samples should be centrifuged immediately after collection as magnesium is released from hemolyzed erythrocytes and can give erroneously high magnesium concentrations. Do not use oxalate/citrate or EDTA as anticoagulants. Blood collection tubes preserved with sodium fluoride cause lower results. Remove plasma or serum promptly from the clot or cells.
Limitations of procedure:Very high calcium levels can slightly elevate normal magnesium results. Abnormally high phosphorus levels can cause slightly lower magnesium results.

H–18
IDEXX VetTest* Chemistry Analyzer Operator’s Manual
Ammonia/NH3 Ammonia is the catabolic product of protein digestion and is extremely toxic. It is converted rapidly in the liver to urea which is eliminated from the body by the kidneys.
Principal reason for performing the test:To detect a portosystemic shunt.
Most common abnormality indicated by the test:Portosystemic shunt
Special precautions in sample collection:Blood should be processed and centrifuged immediately following collection. For this reason, plasma is recommended as the sample of choice.
Ammonia measurements in either plasma or serum are significantly affected by environmental factors and/or the passage of time. Minimal exposure of the sample to the air is essential. All sample containers should be capped unless sample is being introduced or withdrawn. Do not attempt to measure ammonia in hemolyzed samples. Contamination from the red cells will invalidate the test.
Limitations of procedure:The following preparation and environmental factors can result in elevated ammonia values:
Allowing red blood cells and plasma/serum to remain in contact even for a brief • period
Use of serum•
Cigarette smoke•
Ammonia-based cleaners•
Ammonia- or latex-based paints•
Non-VetTest analyzer covers•
Magic markers/pens•
Hand creams•
Decomposing urine•
Urine•
Important: For optimum performance, ammonia testing should NOT be done when UREA/BUN slides are in the same run. Do not use cleaning solutions or hand creams that contain ammonia in the area of the analyzer.
Complementary tests:Ammonia may be determined in isolation but more usually in conjunction with other tests of hepatic damage or dysfunction.

H–19
Chemistry Description and Guide
Inorganic phosphate/PHOSPhosphorus is an element which plays a major role as a metabolic intermediate and is a constituent of nucleic acids, phospholipids, and nucleotides. Phosphates are also important components of buffering systems within the body fluids. Phosphate and calcium are absorbed in the small intestine. Absorption is influenced by the presence of other minerals, nutrients, vitamins, and intestinal pH. Calcium and phosphorous metabolism are interdependent.
Principal reason for performing the test:As an indicator of the severity of renal disease.
Most common abnormality indicated by the test:Renal failure and gastroenteritis.
Special precautions in sample collection:Do not use oxalate, fluoride, citrate, or EDTA as anticoagulants. Blood samples must be processed and centrifuged immediately after collection as phosphates are released quickly from the red cells. Slight hemolysis can result in marked increases in phosphate concentration.
Complementary tests:Inorganic phosphate determination should be performed in conjunction with measurements of calcium, albumin, total protein, and glucose. If renal disease is suspected, urea, creatinine, albumin, and total protein should also be determined. PCV may also be helpful to detect reduced erythropoietin production.
H–20
IDEXX VetTest* Chemistry Analyzer Operator’s Manual
Total bilirubin/TBILHemoglobin from degenerate erythrocytes is converted to bilirubin in the reticuloendothelial system. Free unconjugated bilirubin is transported to the liver bound to albumin where it is conjugated with glucuronic acid and eliminated in the bile. In obstructive liver disease, the concentration of conjugated bilirubin in the blood increases.
During intravascular hemolysis, very large numbers of erythrocytes are destroyed quickly and the conjugation mechanism in the liver becomes overloaded so that high concentrations of free bilirubin are found in the blood. If the loss of hemoglobin and erythrocytes is very large, anoxia may occur. Hepatocyte dysfunction follows leading to cellular swelling which occludes the bile canaliculi so preventing the elimination of conjugated bilirubin. A concomitant rise in conjugated bilirubin then occurs.
Principal reason for performing the test:To detect obstructive liver disease.
Note: In the healthy dog and cat the concentration of total bilirubin in the serum is very low. Visual inspection of the sample will frequently indicate whether bilirubin determination is necessary.
Most common abnormality indicated by the test:Intrahepatic obstruction
Special precautions in sample collection:Blood samples taken for bilirubin determination should be processed, centrifuged, and analyzed immediately as bilirubin degrades rapidly in light. If immediate analysis is impossible, the sample must be kept in the dark and preferably at 4°–8°C (36°–40°F) in a refrigerator. Sample must be allowed to come to room temperature before analysis.
It is critical that samples be properly centrifuged. Otherwise, leukocytes and platelets may remain in suspension, even when red cells have been separated. Cellular material on the slide may cause significant positive error.
Limitations of procedure:Samples that come in contact with alcohol from sterile wipes may become hemolyzed, which will increase the results.
Complementary tests:Total bilirubin should be determined with other tests of hepatic function and damage. Hematocrit should also be performed to eliminate or confirm the presence of hemolytic disease. Determination of urinary urobilinogen and bilirubin may also be useful.

H–21
Chemistry Description and Guide
Total protein/TPThe serum total protein concentration comprises all the proteins found in the aqueous phase of the blood. In the healthy animal, albumin constitutes the major single component. The remaining proteins are the alpha, beta, and gamma globulins. The globulin concentration is determined by subtracting the albumin from the total protein.
Principal reason for performing the test:Total protein measurement may provide useful information when used in combination with tests to investigate hepatic and renal function, the degree of hydration, protein losing enteropathies, or gammopathies. The test is nonspecific and if performed in isolation will be unlikely to provide diagnostic information.
Most common abnormality indicated by the test:Impaired renal and hepatic function, dehydration, gastrointestinal lesions.
Special precautions in sample collection:Remove plasma or serum promptly from the clot or cells. Hemolysis can result in raised total protein concentrations.
Results obtained from the analysis of plasma may be slightly higher than serum due to the fibrinogen that remains in the plasma.
Complementary tests:Total protein concentration is usually determined in conjunction with the measurement of albumin and other tests of renal and hepatic function.

H–22
IDEXX VetTest* Chemistry Analyzer Operator’s Manual
Triglycerides/TRIGTriglycerides are usually present in the diet of dogs and cats, especially when the animals are fed table scraps. They are also synthesized in the liver, mainly from carbohydrates providing a secondary energy source, and are stored in fatty tissue. Their hydrolysis to mono and diglyceride glycerol and free fatty acids is catalyzed by pancreatic lipase.
Principal reason for performing the test:To detect abnormalities in lipid metabolism.
Most common abnormality indicated by the test:High fat diet or abnormalities in fat metabolism.
Special precautions in sample collection:Blood should not be drawn within 12 hours of a meal.
Heparin and EDTA may be used as anticoagulants for plasma specimens. Remove plasma or serum promptly from the clot or cells. Grossly lipemic specimens may give inaccurate results, and should be diluted before analysis (see Dilution Protocols, page E-2).
Limitations of procedure:Glycerol: This triglycerides method is similar to most other triglycerides methods because it is not blanked for glycerol. Glycerol can, therefore, cause higher triglycerides results. Sources of glycerol are:
In vivo:• Patients may show an increase in triglyceride concentration due to endogenous glycerol.
In vitro contamination:• Possible sources are collection tubes with glycerol-lubricated stoppers, hand lotions that can contaminate disposable tips, and total parenteral nutrition fluids that contain glycerol.
Complementary tests:Triglycerides should not be measured in isolation. If the sample is turbid or milky the test should be determined in conjunction with measurements of cholesterol and glucose, and hepatic and renal function tests.

H–23
Chemistry Description and Guide
Urea/UREA/BUNThe catabolism of proteins results in the production of ammonia which is extremely toxic. This is converted to urea in the liver and eliminated from the body by glomerular filtration in the kidneys.
Principal reason for performing the test:As an indicator of renal disease.
Most common abnormality indicated by the test:Renal disease
Special precautions in sample collection:Blood should not be drawn for urea determination within 6 hours of a meal. Do not use sodium fluoride or EDTA as anticoagulants. Samples that contain hemoglobin increase urea nitrogen.
Important: For optimum performance, NH3 testing should not be performed when any UREA/BUN slides are in the same run.
Complementary tests:Urea concentration should usually be determined in conjunction with measurements of creatinine, inorganic phosphate, total protein, and albumin. Urea concentration is considered to be more influenced by high protein diet than creatinine. A PCV can be helpful as an indicator of reduced erythropoietin production. Appropriate urine tests should also be performed (e.g., specific gravity and protein concentration).
An increase in both serum urea and creatinine provides a more reliable index of renal disease than an increase in only one of the parameters, especially if changes are small. It is generally accepted that urea concentration increases before creatinine in renal disease in humans. However the precise relationship between these tests in different animal species remains to be determined. Until this is resolved it may be prudent to perform both urea and creatinine determinations where early renal disease is suspected.

H–24
IDEXX VetTest* Chemistry Analyzer Operator’s Manual
Uric acid/URICUric acid determinations are useful in avian patients and Dalmation dogs in place of urea determinations. In all dogs (except Dalmations) with diffuse hepatic disease, there is marked elevation of blood uric acid above the normal levels of <1 mg/dL.
Principal reason for performing the test:As an indicator of the severity of renal disease in avian populations (and Dalmations).
Most common abnormality indicated by the test:Renal disease
Special precautions in sample collection:Plasma collected from sodium fluoride, citrate, or EDTA preservative should not be used. Remove plasma or serum promptly from the clot or cells.
Complementary tests:Creatinine

H–25
Chemistry Description and Guide
Urine CreatinineUrine creatinine is determined so the concentration of electrolytes filtered or lost through the glomeruli or renal tubules such as urinary protein or cortisol can be quantitated, compared, and expressed as ratios with diagnostic significance.
Principal reason for performing the test:To be performed with urine protein in order to determine the urine protein to creatinine ratio (UPC).
Most common abnormality indicated by the test:Proteinuria indicating early renal failure, protein losing nephropathy.
Sample type and precautions:Urine, preferably a mid-stream sample, collected in a clean container. An inactive urinary sediment should be demonstrated and urinary tract infection (UTI) via culture and sensitivity should be ruled out before performing as UTI may mildly to moderately raise the UPC.
Complementary tests:Complete urinalysis with culture and sensitivity. Serum chemistries such as creatinine, BUN, albumin, and globulin.
CBC
SNAP* 4Dx* Test
Storage information:Handle and store urine samples in closed containers to avoid evaporation and contamination. Samples may be stored at room temperature for up to three days (refrigeration preferred). Frozen samples can be stored indefinitely.

H–26
IDEXX VetTest* Chemistry Analyzer Operator’s Manual
Urine Protein/UPROUrinary protein is determined and compared to the concentration of creatinine in order to assess the level of renal protein (glomeruli and tubular) loss to determine the urine protein/creatinine ratio (UPC).
Principal Reason for Performing the TestTo be performed with urine creatinine in order to determine the urine protein to creatinine ratio (UPC).
Most common abnormality indicated by the test:Proteinuria indicating early renal failure, protein losing nephropathy.
Sample type and precautions:Urine, preferably a mid-stream sample, collected in a clean container. An inactive urinary sediment should be demonstrated and urinary tract infection (UTI) via culture and sensitivity should be ruled out before performing as UTI may mildly to moderately raise the UPC.
Complementary tests:Complete urinalysis with culture and sensitivity. Serum chemistries such as creatinine, BUN, albumin, and globulin.
CBC
SNAP* 4Dx* Test
Storage Information:Handle and store urine samples in closed containers to avoid evaporation and contamination. Samples may be stored at room temperature for up to four hours. Refrigerated samples may be stored up to three days. Do not freeze samples.
Do not use hemolyzed specimens as hemoglobin increases results significantly. Intact red blood cells can be removed via centrifugation.

H–27
Chemistry Description and Guide
UPC Protocol
Principle reason for performing test:To aid in the diagnosis of protein-losing nephropathies such as glomerulonephritis and amyloidosis and as an early marker of chronic renal failure.
Includes:Urine protein, urine creatinine, protein:creatinine ratio
Submission Requirements:2 mL urine in a sterile container
Storage/Stability:48 hours at 2°–8°C
Interferences:Gross hematuria, pyuria. Complementary tests include complete urinalysis with culture and sensitivity. Serum chemistries such as creatinine, BUN, albumin, globulin, CBC, SNAP* 4Dx*, and imaging studies.
Interpretation:Proteinuria requires proof of persistence and localization to prerenal, renal or postrenal origins. Prove persistence of proteinuria by repeating the UPC (urine protein:creatinine) ratio at least three times, a minimum of two weeks apart.
Prerenal proteinuria is possible when a CBC and a biochemical profile detect • hemolysis, hyperglobulinemia or evidence of muscle damage. Recommend investigation and management for the underlying cause.
Postrenal proteinuria is caused by urogenital tract diseases, hematuria or pyuria. • Repeat the test with a cystocentesis sample or evaluate urine sediment for hemorrhage or inflammation. Consider a urine culture. Recommend investigation and management for the underlying cause.
Renal proteinuria: evaluate in the face of azotemia•
Nonazotemic, persistent, renal proteinuria (dogs and cats):UPC <0.5=within reference interval
UPC 0.5–1.0=questionable, repeat at appropriate interval
UPC 1.0–2.0=excessive proteinuria; recommend investigation for underlying systemic diseases
UPC ≥2.0=excessive proteinuria; recommend investigation for underlying systemic diseases and medical management
Azotemic, persistent, renal proteinuria (dogs):UPC <0.5=warrant monitoring and investigation
UPC ≥0.5=excessive proteinuria; recommend investigation for underlying systemic diseases and medical management
Azotemic, persistent, renal proteinuria (cats):UPC <0.4=warrant monitoring and investigation
UPC ≥0.4=excessive proteinuria; recommend investigation for underlying systemic diseases and medical management

H–28
IDEXX VetTest* Chemistry Analyzer Operator’s Manual
His
tory
an
d p
hys
ical
exa
m
CB
C, b
ioch
emic
al p
rofi
le,
uri
nal
ysis
(ex
amin
e u
rin
e se
dim
ent
and
sp
ecif
ic g
ravi
ty)
Ren
alP
ost
ren
alP
rere
nal
-A
ctiv
e se
dim
ent
-P
olla
kiu
ria
-A
zote
mia
±A
ctiv
e se
dim
ent
±P
olla
kiu
ria
±A
zote
mia
+ A
ctiv
e se
dim
ent
+ P
olla
kiu
ria
-A
zote
mia
+He
mog
lobi
nuria
+M
yogl
obin
iuria
+Be
nce
Jone
s pr
otei
nuria
(mye
lom
a)ID
EX
X U
rin
e P
rote
in:C
reat
inin
e R
atio
+Ur
inar
y tra
ct in
fect
ion
+St
ones
+Tu
mor
s
If p
ost
ren
al r
ule
d o
ut
If p
rere
nal
ru
led
ou
t
<0.5
can
ine
<0.4
fel
ine
With
in re
fere
nce
rang
e
≥0.5
can
ine
≥0.4
fel
ine
Mon
itor,
inve
stig
ate,
trea
t
<0.5
ca
nin
e an
d f
elin
eW
ithin
re
fere
nce
rang
e
≥0.5
<1.0
ca
nin
e an
d f
elin
eM
onito
r
≥1.0
<2.0
ca
nin
e an
d f
elin
eM
onito
r,in
vest
igat
e
≥2.0
can
ine
and
fel
ine
Mon
itor,
inve
stig
ate,
trea
t
aimet
ozA
-ai
metoz
A +
Inve
stig
ate
azo
tem
iaK
idn
ey d
isea
se
wit
h p
rote
inu
ria
Rep
eat
uri
ne
P:C
rat
io in
tw
o w
eeks
Inve
stig
ate
po
ten
tial
ca
use
s o
f im
mu
ne-
med
iate
d
glo
mer
ulo
nep
hri
tis
or
inte
rwst
itia
l nep
hri
tis
Wo
rk u
p f
or
pro
tein
uri
a

I Self-Help Guide
Analyzer Power and Function
Screen is blue or black; green power light OFF.
Cause: The power cable is not connected to the analyzer or to an electrical outlet.Solution: Turn the VetTest* analyzer off. Check the power cable connections.
Disconnect then reconnect on both ends; then turn the analyzer on (reboot).
Cause: The VetTest analyzer’s power switch is in the off position.Solution: Check analyzer switch and power switch are on.
Cause: Faulty power outlet.Solution: Check the socket.
Analyzer screen is blank, green power light is ON.
Cause: Disk not seated correctly in the disk drive.Solution: Remove and reinsert the disk; then reboot the VetTest analyzer (see Inserting
the VetTest Software Disk, page B-6).
Cause: The software disk is damaged.Solution: Reboot the VetTest analyzer using another disk.
Cause: The disk drive is damaged or dirty.Solution: Turn off the VetTest analyzer. On the back of the VetTest analyzer, remove
the metal cover over the software disk (see Connecting the Power Cord and Turning On the Analyzer, page B-7).
Turn on the VetTest analyzer and observe the light above the electrical connection. The light should come on in a few seconds and remain on while the disk is being read. If the light comes on, clean the disk drive (see General Upkeep and Cleaning, page G-1). If the light does not come on, call IDEXX Technical Support for assistance.
Cause: Damaged liquid crystal display (LCD).Solution: Call IDEXX Technical Support for assistance.
I–1
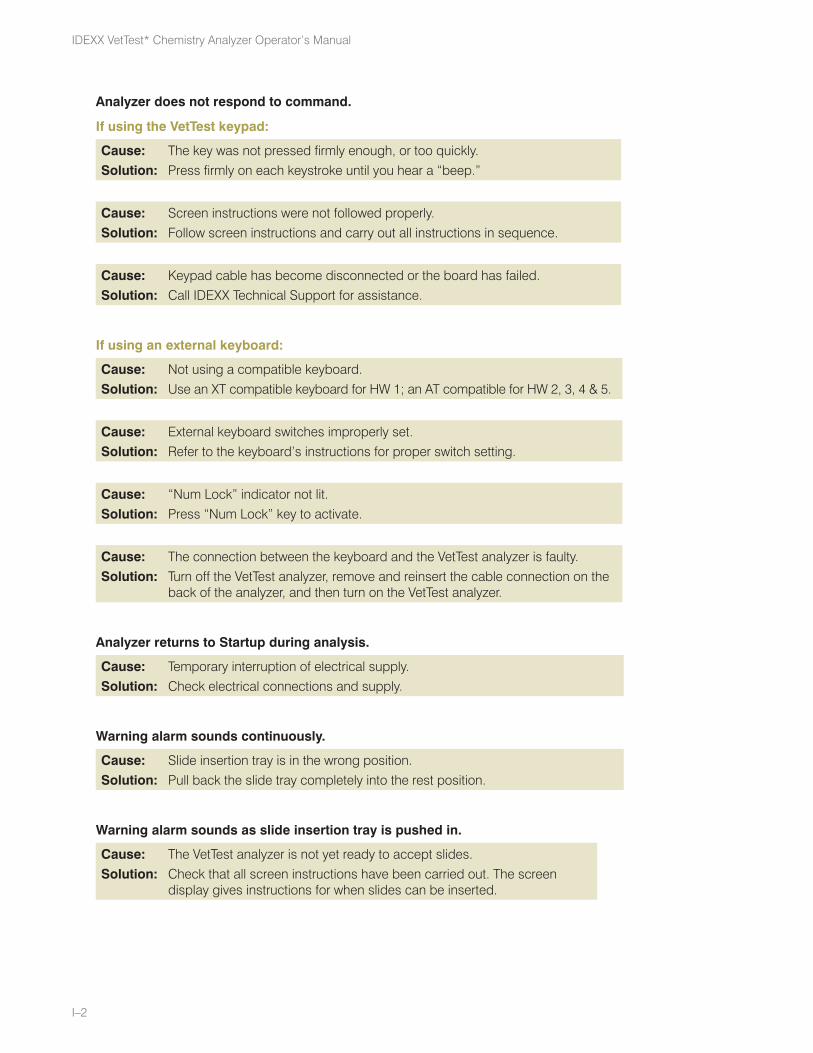
I–2
IDEXX VetTest* Chemistry Analyzer Operator’s Manual
Analyzer does not respond to command.
If using the VetTest keypad:
Cause: The key was not pressed firmly enough, or too quickly.Solution: Press firmly on each keystroke until you hear a “beep.”
Cause: Screen instructions were not followed properly. Solution: Follow screen instructions and carry out all instructions in sequence.
Cause: Keypad cable has become disconnected or the board has failed.Solution: Call IDEXX Technical Support for assistance.
If using an external keyboard:
Cause: Not using a compatible keyboard.Solution: Use an XT compatible keyboard for HW 1; an AT compatible for HW 2, 3, 4 & 5.
Cause: External keyboard switches improperly set.Solution: Refer to the keyboard’s instructions for proper switch setting.
Cause: “Num Lock” indicator not lit.Solution: Press “Num Lock” key to activate.
Cause: The connection between the keyboard and the VetTest analyzer is faulty.Solution: Turn off the VetTest analyzer, remove and reinsert the cable connection on the
back of the analyzer, and then turn on the VetTest analyzer.
Analyzer returns to Startup during analysis.
Cause: Temporary interruption of electrical supply.Solution: Check electrical connections and supply.
Warning alarm sounds continuously.
Cause: Slide insertion tray is in the wrong position.Solution: Pull back the slide tray completely into the rest position.
Warning alarm sounds as slide insertion tray is pushed in.
Cause: The VetTest analyzer is not yet ready to accept slides.Solution: Check that all screen instructions have been carried out. The screen
display gives instructions for when slides can be inserted.

I–3
Self-Help Guide
Results did not print, or “Printer Fail” message.
If using the VetTest thermal printer:
Cause: Out of paper. Solution: Insert a new paper roll (see instructions page B-6).
Cause: The paper roll was inserted upside down.Solution: Remove and reinsert the paper roll correctly. The paper should feed towards
the VetTest analyzer from the bottom of the roll.
Cause: The paper is jammed in printer.Solution: Turn off the VetTest analyzer and remove the paper roll. Carefully remove any
pieces of paper visible in the slot.
Reinsert the paper roll (see instructions page B-6). Turn on the VetTest analyzer.
Note: You can still use the VetTest analyzer when the printer is not working. Be sure to copy the results from the screen.
Do not insert sharp objects into the printer. This can irreversibly damage the internal printer mechanism.
If using an external printer:
Cause: The printer is not “On Line.”Solution: Ensure the printer is on line.
Cause: No paper in the printer.Solution: Insert paper—no more than 25 sheets. Fan the stack of paper before
loading it.
Cause: Printer cable is not connected properly.Solution: Turn off the printer, remove, and reinsert the printer cable on the VetTest
analyzer’s printer port and on the printer’s port. Then turn on the printer.
Cause: The printer is jammed.Solution: Turn off the printer and remove all paper. Reinsert no more than 25 sheets
of paper. Fan the stack of paper before loading. Turn on the printer. Make sure the printer is “On Line.”
Cause: The paper is too lightweight. Solution: Remove the paper and insert a heavier weight stock, such as copier
paper.

I–4
IDEXX VetTest* Chemistry Analyzer Operator’s Manual
Screen “Failure” Messages
Screen display reads: “Analysis aborted. Press any key to continue.” No results given.
Cause: The slide insertor tray was pushed in accidentally during analysis. Solution: Repeat the analysis. Do not push the slide insertor tray in during analysis. Note: Shut down and restart the VetTest analyzer if the abort was caused by
the slide insertor tray hitting the rotor.
Screen display reads: “Slide bar code failure” (single slide).
Cause: The VetTest analyzer did not properly read the slide bar code. Solution: Retrieve the slide from the used-slide drawer and reinsert it. Follow the VetTest
screen instructions. The analyzer will prompt you to select the number on the screen corresponding with the chemistry. After entering the correct number, the analyzer will prompt you to enter the calibration information (two- or three-digit number on the slide box in the area marked “calibration inf.”).
Screen display reads: “Slide bar code failure” (multiple slides).
Cause: The VetTest analyzer did not properly read the bar code on multiple slides.Solution: Clean the bar code reader:
1. Turn off the VetTest analyzer.2. Remove the rotor cover.3. Remove the two white “thumb” screws on the bridge (see illustration
page B-4).4. Lift the bridge up from the bottom right; it will stand on end on the upper
left. The bar code reader is located on the bottom left of the bridge. Look for a silver cylinder projecting outward with a red filter inside.
Note: If the cylinder appears bent, or if the problem continues, contact IDEXX Technical Support.
5. Clean the filter with a damp, lint-free cloth to remove any dust.6. Replace the bridge and then replace and tighten the thumb screws.7. Replace the rotor cover. Important: Ensure the rotor cover is refitted correctly. Light entering the
analyzer could interfere with the result readings.8. Turn on the VetTest analyzer.
Do not unscrew any parts other than indicated. Do not press keypad when fingers (or tools) are close to the rotor. Do not attempt to look at light sources. UV light can damage eyes. Do not apply any force to the rotor.
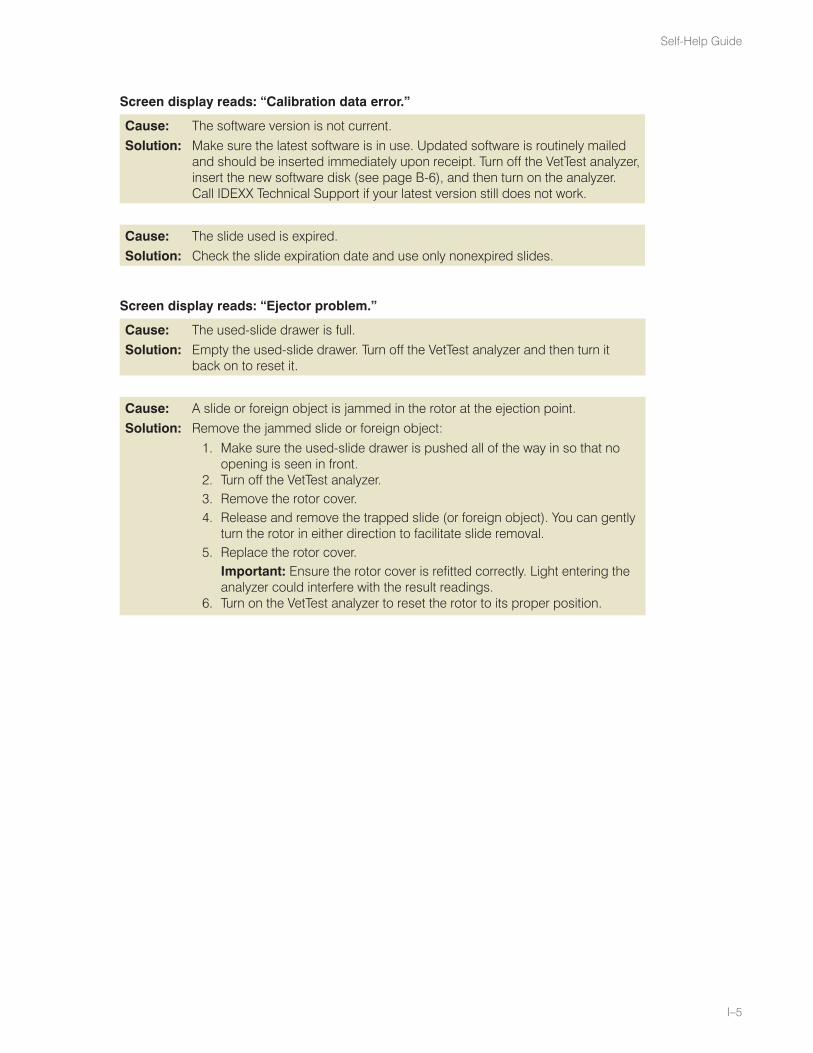
I–5
Self-Help Guide
Screen display reads: “Calibration data error.”
Cause: The software version is not current. Solution: Make sure the latest software is in use. Updated software is routinely mailed
and should be inserted immediately upon receipt. Turn off the VetTest analyzer, insert the new software disk (see page B-6), and then turn on the analyzer. Call IDEXX Technical Support if your latest version still does not work.
Cause: The slide used is expired.Solution: Check the slide expiration date and use only nonexpired slides.
Screen display reads: “Ejector problem.”
Cause: The used-slide drawer is full.Solution: Empty the used-slide drawer. Turn off the VetTest analyzer and then turn it
back on to reset it.
Cause: A slide or foreign object is jammed in the rotor at the ejection point.Solution: Remove the jammed slide or foreign object:
1. Make sure the used-slide drawer is pushed all of the way in so that no opening is seen in front.
2. Turn off the VetTest analyzer. 3. Remove the rotor cover.4. Release and remove the trapped slide (or foreign object). You can gently
turn the rotor in either direction to facilitate slide removal.5. Replace the rotor cover. Important: Ensure the rotor cover is refitted correctly. Light entering the
analyzer could interfere with the result readings.6. Turn on the VetTest analyzer to reset the rotor to its proper position.

I–6
IDEXX VetTest* Chemistry Analyzer Operator’s Manual
Screen display reads: “Calibration data error.” continued
Cause: The knob in the center of rotor is loose.Solution: Remove the rotor and tighten the white thumb screws:
1. Turn off the VetTest analyzer.2. Remove the rotor cover.3. Remove the two white “thumb” screws on the bridge (see illustration
page B-4).4. Lift the bridge up from the bottom right; it will stand on end on the upper
left.5. Hold the rotor with one hand to prevent movement and tighten the knob
in the center of the rotor by turning it clockwise.6. Replace the bridge and then replace and tighten the thumb screws.7. Replace the rotor cover. Important: Ensure the rotor cover is refitted correctly. Light entering the
analyzer could interfere with the result readings.8. Turn on the VetTest analyzer to reset the rotor to its proper position. Note: If no physical obstruction is noted and rotor knob is tight, slide
chute may need adjustment or ejector arm may be stuck. Call IDEXX Technical Support for assistance.
Do not unscrew any parts other than indicated. Do not press keypad when fingers (or tools) are close to the rotor. Do not attempt to look at light sources. UV light can damage eyes. Do not apply any force to the rotor.
Screen display reads: “Possible sensor problem. Insert pipette and press E.”
Cause: The pipettor was not reinserted within 20 seconds.Solution: At the 3-beep signal, wipe the pipettor with a disposable laboratory wipe
and immediately replace the pipettor in its holder. Note: If “Possible sensor problem” message occurs frequently, the
pipette sensor may need adjusting. Call IDEXX Technical Support.
Cause: Highly viscous sample.Solution: Simply press E to bypass the sensor. This will not affect your results.

I–7
Self-Help Guide
Screen display reads: “Results invalidated. Slide spotting failure.”
Cause: Sample wicking up the outside of the pipettor tip during slide spotting.Solution: Rerun the sample with new slides and thoroughly wipe the pipettor tip
with a twisting motion all the way down to the end (see Preparing the Pipettor for a Sample, page D-3).
Note: Ensure the disposable pipette tip is IDEXX P/N 98-12047-00 and not a generic version.
Cause: Fibrin clot blocked pipettor tip.Solution: Review the Plasma and Serum Collection and Preparation section on
page C-1.
Cause: Inadequate sample volume for the number of requested tests.Solution: Make sure the minimum volume requirements of 10 µL per slide plus a
pipettor priming volume of 30 µL have been met (see section C: Sample Preparation and Collection).
Cause: A previously used slide was inserted.Solution: Use only new slides. To avoid confusion, empty the used-slide drawer
after every analysis.
Cause: The pipette tip was not kept in the sample until the pipetting was completed.
Solution: Follow screen directions and do not rush prompts (review section D: Basic System Operation).
Cause: Pipettor connection tubes caught beneath analyzer.Solution: Pipettor tubing should hang freely on right side of analyzer.
Cause: The pipettor collar in the pipettor holder is sticking due to the accumulation of dried plasma or serum.
Solution: Remove the pipettor from its holder and clean the inside of the pipettor collar with a cotton swab wetted with alcohol.

I–8
IDEXX VetTest* Chemistry Analyzer Operator’s Manual
Screen display reads: “Results invalidated. Slide spotting failure.” continued
Cause: The pipettor is clogged by sample, or there is moisture in pipettor tubing.The pipettor should always be kept fully upright during the pipetting sequence. Used tips must be discarded immediately after analysis is completed.
Solution: Check the pipettor and the tubing:1. Remove the pipettor from its holder. Disconnect it from the front
of the VetTest analyzer by pulling the black plug and twisting the luer–lock syringe connector counterclockwise.
2. Fill a 12-cc syringe with alcohol.3. Take the pipettor to a sink area.4. Connect the hub of the syringe to the pipettor syringe connector and
flush alcohol through the tubing and out of the pipettor’s metal tip. Important: Use enough force to create a steady stream of alcohol.
If the metal tip feels blocked, do not force flush. Submerge only the metal tip in alcohol and try to repeat the flush later.
5. Flush 20 separate syringefuls of air through the pipettor syringe connector using a clean, dry 30-cc syringe. Be sure to disconnect the Luer lock before refilling the syringe with air.
Important: Inspect the clear length of plastic tubing to ensure no moisture is left in the tubing. If necessary, continue flushing with air until the tubing appears completely dry.
6. Re–attach the pipettor, ensuring the syringe connector is airtight and secure.
Cause: Air leak in the pipettor line.Solution: Ensure there is a tight connection for the luer–lock syringe connector.
Inspect the tubing for holes and replace the tube if necessary (see VetTest Pipettor, page B-5).
Note: Even though the VetTest analyzer may show only one result as invalid, the other results are suspect. A blocked pipettor or perfusion may only deposit part of the sample on a given slide, then deposit too much on the next slide as it clears the blockage or the perfused drop becomes large enough to fall off the tip. If a slide-spotting failure occurs, the whole analysis must be repeated.
Screen display reads: “Analyzer failure (number).”
Cause: The probable cause will be displayed on screen.Solution: Follow the onscreen instructions. If the issue is not resolved, note the
failure number and call IDEXX Technical Support for assistance.
Screen display reads: “Quality Control Reminder. Have you run your regular control check? We strongly recommend performing a Ca offset procedure.”
Solution: See the Performing the Ca Offset Procedure, page F-5.
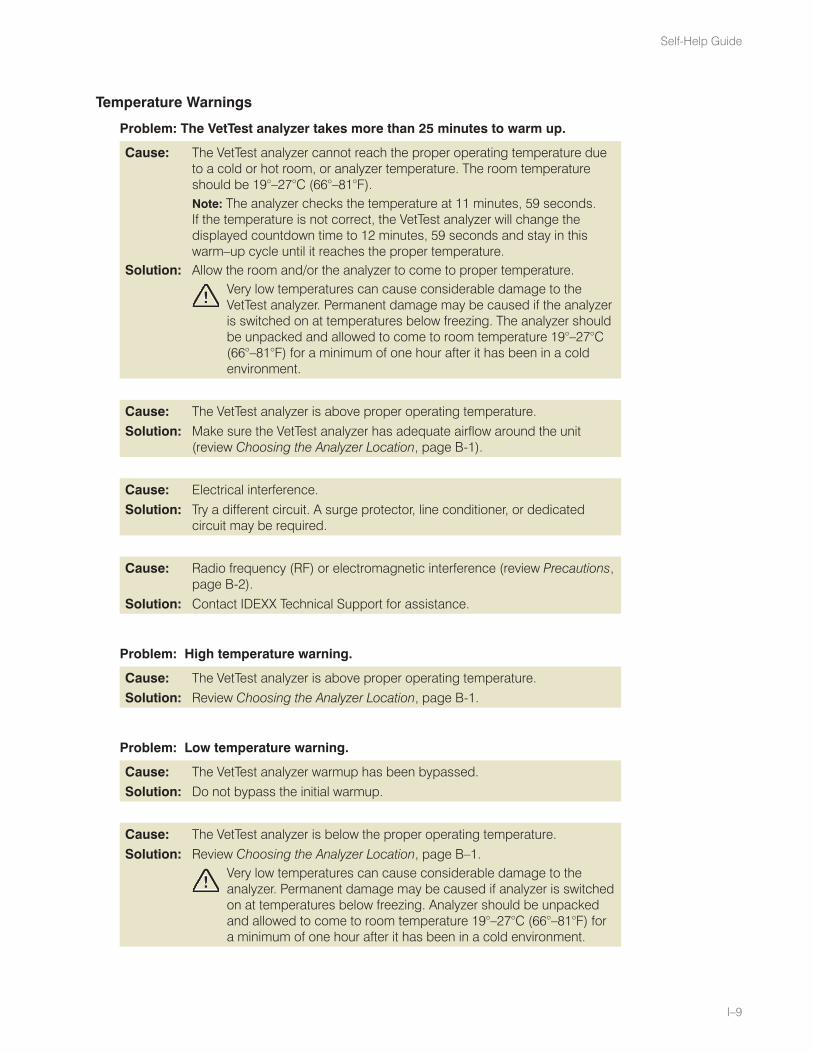
I–9
Self-Help Guide
Temperature Warnings
Problem: The VetTest analyzer takes more than 25 minutes to warm up.
Cause: The VetTest analyzer cannot reach the proper operating temperature due to a cold or hot room, or analyzer temperature. The room temperature should be 19°–27°C (66°–81°F).
Note: The analyzer checks the temperature at 11 minutes, 59 seconds. If the temperature is not correct, the VetTest analyzer will change the displayed countdown time to 12 minutes, 59 seconds and stay in this warm–up cycle until it reaches the proper temperature.
Solution: Allow the room and/or the analyzer to come to proper temperature. Very low temperatures can cause considerable damage to the
VetTest analyzer. Permanent damage may be caused if the analyzer is switched on at temperatures below freezing. The analyzer should be unpacked and allowed to come to room temperature 19°–27°C (66°–81°F) for a minimum of one hour after it has been in a cold environment.
Cause: The VetTest analyzer is above proper operating temperature.Solution: Make sure the VetTest analyzer has adequate airflow around the unit
(review Choosing the Analyzer Location, page B-1).
Cause: Electrical interference.Solution: Try a different circuit. A surge protector, line conditioner, or dedicated
circuit may be required.
Cause: Radio frequency (RF) or electromagnetic interference (review Precautions, page B-2).
Solution: Contact IDEXX Technical Support for assistance.
Problem: High temperature warning.
Cause: The VetTest analyzer is above proper operating temperature.Solution: Review Choosing the Analyzer Location, page B-1.
Problem: Low temperature warning.
Cause: The VetTest analyzer warmup has been bypassed.Solution: Do not bypass the initial warmup.
Cause: The VetTest analyzer is below the proper operating temperature.Solution: Review Choosing the Analyzer Location, page B–1.
Very low temperatures can cause considerable damage to the analyzer. Permanent damage may be caused if analyzer is switched on at temperatures below freezing. Analyzer should be unpacked and allowed to come to room temperature 19°–27°C (66°–81°F) for a minimum of one hour after it has been in a cold environment.

I–10
IDEXX VetTest* Chemistry Analyzer Operator’s Manual
Miscellaneous
Lamp fail message.
Cause: Internal lamp is not functioning properly. Solution: Call IDEXX Technical Support for assistance.
Differences in results.
Cause: Result differs with commercial laboratory or other instrument result.Solution: Comparing results using different equipment or methods is imprecise at
best. (Review Appendix: Differences in Results, page K-1.) Perform the QC procedure for that particular chemistry to rule out a VetTest analyzer or slide issue.
Cause: Result differs with your expectations.Solution: Many factors may be involved to cause unexpected results. (Review
Appendix: Differences in Results, page K-1.) Perform the QC procedure for that particular chemistry to rule out a VetTest analyzer or slide issue.

J Specifications and Warnings
Power Input100–240 volts AC, 50–60 Hertz, 1 Ampere
WarningsThe VetTest* Chemistry Analyzer contains no user-serviceable components. Do not attempt to disassemble the analyzer. Call IDEXX Technical Support for any service issues.
To avoid electric shock hazard, the protective grounding conductor to the power cable must be connected to ground. Use only the power cable that is supplied with the unit.
The VetTest analyzer contains moving parts that are accessible to the user during cleaning. Disconnect the power before cleaning. Refer to the cleaning instructions in this manual for the correct procedure.
Ultraviolet lamps are visible when servicing the rotor/disc assembly. Use care when the cover is removed. Always replace the cover before operating the analyzer.
IEC protection Class B.
INPUT: Alternating current only.
Interference with Radio CommunicationsThis equipment generates, uses, and can radiate radio frequency energy. If not installed and used in accordance with this manual, the analyzer may cause interference to radio communications. It has been tested and found to comply with the limits for a Class A computing device pursuant to subpart J or Part 15 of the FCC rules, which are designed to provide reasonable protection against such interference when operated in a commercial environment. Operation of this equipment in a residential area may cause interference in which case the user, at his own expense, will be required to take whatever measures may be required to correct the interference.
J–1

J–2
IDEXX VetTest* Chemistry Analyzer Operator’s Manual

K Appendix: Differences in Results
With a Commercial Laboratory or Other InstrumentReference ranges must be created for each analyte and each new instrument or method of analysis. Every commercial laboratory must establish its own species reference ranges for the equipment and methodology used. IDEXX is continually doing this work for you with every software release (see Your Participation in Reference Range Data Collection, page A-2). Comparing results from different laboratories that may be using different equipment or methods is imprecise at best. Any comparisons should be performed on the same sample that has been split, stored under like conditions, and tested at approximately the same time. Comparisons of values must take into account differences in the corresponding reference ranges.
With Your Own ExpectationsIf you receive results that are not what you expected for a particular patient, consider the following:
• Were there any abnormalities noted in the sample taken (i.e., hemolysis, lipemia, stress, etc.) that could cause the changes seen?
• How far outside the range is the result? The more narrow the range, the more important minor changes become. For example, a significant result for ALKP would be 3 times the upper end of the reference range.
• Would any treatments or drugs the patient may be taking alter the results?
• Do clinical findings support the results? Surprising abnormal results are usually accompanied by other evidence.
• Is the result biologically significant or possibly so? Don't be reluctant to get a retest on the sample to confirm results.
• What other tests or procedures might be used to confirm or reject this result?
All laboratory results should be interpreted in light of the case history, the clinical signs, and the results of ancillary tests.
K–1

K–2
IDEXX VetTest* Chemistry Analyzer Operator’s Manual

L Appendix: Reference Ranges
Canine—Puppies
Test U.S. Units S.I. Units
*ALB 2.1–3.6 g/dL 21–36 g/L
ALKP 46–337 U/L 46–337 U/L
ALT 8–75 U/L 8–75 U/L
AMYL 300–1300 U/L 300–1300 U/L
AST 0–50 U/L 0–50 U/L
BUN 7–29 mg/dL 2.5–10.4 mmol/L
Ca2+ 7.8–12.6 mg/dL 1.95–3.15 mmol/L
CHOL 100–400 mg/dL 2.6–10.3 mmol/L
CK 99–436 U/L 99–436 U/L
CREA 0.3–1.2 mg/dL 27–106 µmol/L
GGT 0–2 U/L 0–2 U/L
GLU 77–150 mg/dL 4.28–8.33 mmol/L
LAC 0.5–2.5 mmol/L 0.5–2.5 mmol/L
LDH 0–273 U/L 0–273 U/L
LIPA 100–1500 U/L 100–1500 U/L
Mg2+ 1.2–2.04 mg/dL 0.50–0.85 mmol/L
NH3 0–99 µmol/L 0–99 µmol/L
PHOS 5.1–10.4 mg/dL 1.65–3.35 mmol/L
TBIL 0–0.8 mg/dL 0–14 µmol/L
TP 4.8–7.2 g/dL 48–72 g/L
TRIG 0.2–32.8 mg/dL 0.00–0.37 mmol/L
URIC 0–1 mg/dL 0–60 µmol/L
GLOB 2.3–3.8 g/dL 23–38 g/L
Na+ 145–157 mmol/L 145–157 mmol/L
K+ 3.5–5.5 mmol/L 3.5–5.5 mmol/L
Cl– 105–119 mmol/L 105–119 mmol/L
* Interference from other proteins may produce slight elevations in albumin concentrations.
L–1

L–2
IDEXX VetTest* Chemistry Analyzer Operator’s Manual
Canine—Adults
Test U.S. Units S.I. Units
*ALB 2.3–4.0 g/dL 23–40 g/L
ALKP 23–212 U/L 23–212 U/L
ALT 10–100 U/L 10–100 U/L
AMYL 500–1500 U/L 500–1500 U/L
AST 0–50 U/L 0–50 U/L
BUN 7–27 mg/dL 2.5–9.6 mmol/L
Ca2+ 7.9–12.0 mg/dL 1.98–3.00 mmol/L
CHOL 110–320 mg/dL 2.84–8.27 mmol/L
CK 10–200 U/L 10–200 U/L
CREA 0.5–1.8 mg/dL 44–159 µmol/L
GGT 0–7 U/L 0–7 U/L
GLU 74–143 mg/dL 4.11–7.95 mmol/L
LAC 0.5–2.5 mmol/L 0.5–2.5 mmol/L
LDH 40–400 U/L 40–400 U/L
LIPA 200–1800 U/L 200–1800 U/L
Mg2+ 1.40–2.38 mg/dL 0.58–0.99 mmol/L
NH3 0–98 µmol/L 0–98 µmol/L
PHOS 2.5–6.8 mg/dL 0.81–2.19 mmol/L
TBIL 0–0.9 mg/dL 0–15 µmol/L
TP 5.2–8.2 g/dL 52–82 g/L
TRIG 10–100 mg/dL 0.11–1.13 mmol/L
URIC 0–1 mg/dL 0–60 µmol/L
GLOB 2.5–4.5 g/dL 25–45 g/L
Na+ 144–160 mmol/L 144–160 mmol/L
K+ 3.5–5.8 mmol/L 3.5–5.8 mmol/L
Cl– 109–122 mmol/L 109–122 mmol/L
* Interference from other proteins may produce slight elevations in albumin concentrations.
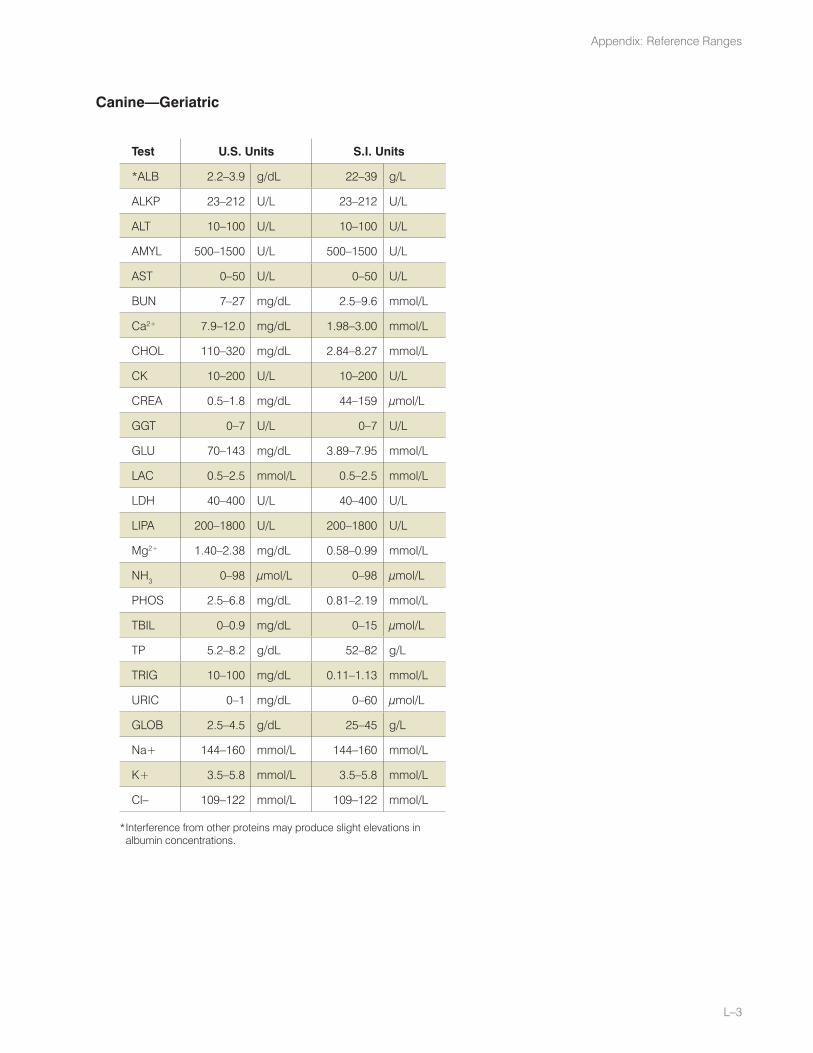
L–3
Appendix: Reference Ranges
Canine—Geriatric
Test U.S. Units S.I. Units
*ALB 2.2–3.9 g/dL 22–39 g/L
ALKP 23–212 U/L 23–212 U/L
ALT 10–100 U/L 10–100 U/L
AMYL 500–1500 U/L 500–1500 U/L
AST 0–50 U/L 0–50 U/L
BUN 7–27 mg/dL 2.5–9.6 mmol/L
Ca2+ 7.9–12.0 mg/dL 1.98–3.00 mmol/L
CHOL 110–320 mg/dL 2.84–8.27 mmol/L
CK 10–200 U/L 10–200 U/L
CREA 0.5–1.8 mg/dL 44–159 µmol/L
GGT 0–7 U/L 0–7 U/L
GLU 70–143 mg/dL 3.89–7.95 mmol/L
LAC 0.5–2.5 mmol/L 0.5–2.5 mmol/L
LDH 40–400 U/L 40–400 U/L
LIPA 200–1800 U/L 200–1800 U/L
Mg2+ 1.40–2.38 mg/dL 0.58–0.99 mmol/L
NH3 0–98 µmol/L 0–98 µmol/L
PHOS 2.5–6.8 mg/dL 0.81–2.19 mmol/L
TBIL 0–0.9 mg/dL 0–15 µmol/L
TP 5.2–8.2 g/dL 52–82 g/L
TRIG 10–100 mg/dL 0.11–1.13 mmol/L
URIC 0–1 mg/dL 0–60 µmol/L
GLOB 2.5–4.5 g/dL 25–45 g/L
Na+ 144–160 mmol/L 144–160 mmol/L
K+ 3.5–5.8 mmol/L 3.5–5.8 mmol/L
Cl– 109–122 mmol/L 109–122 mmol/L
* Interference from other proteins may produce slight elevations in albumin concentrations.
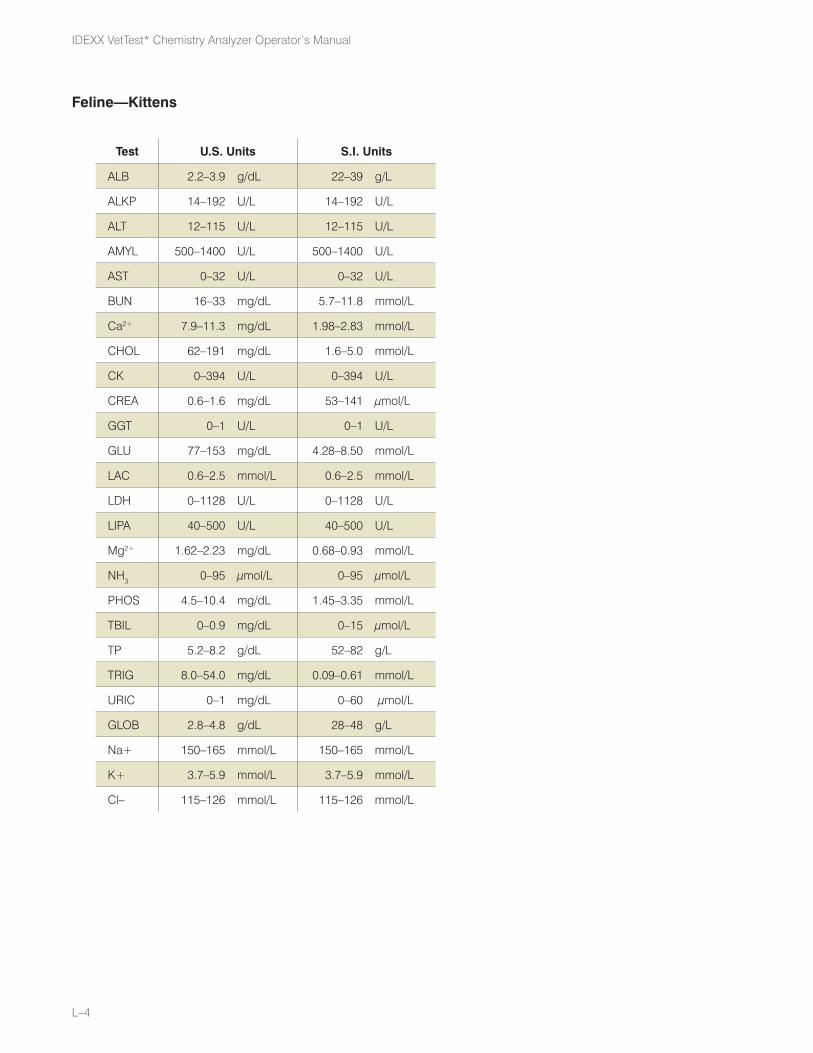
L–4
IDEXX VetTest* Chemistry Analyzer Operator’s Manual
Feline—Kittens
Test U.S. Units S.I. Units
ALB 2.2–3.9 g/dL 22–39 g/L
ALKP 14–192 U/L 14–192 U/L
ALT 12–115 U/L 12–115 U/L
AMYL 500–1400 U/L 500–1400 U/L
AST 0–32 U/L 0–32 U/L
BUN 16–33 mg/dL 5.7–11.8 mmol/L
Ca2+ 7.9–11.3 mg/dL 1.98–2.83 mmol/L
CHOL 62–191 mg/dL 1.6–5.0 mmol/L
CK 0–394 U/L 0–394 U/L
CREA 0.6–1.6 mg/dL 53–141 µmol/L
GGT 0–1 U/L 0–1 U/L
GLU 77–153 mg/dL 4.28–8.50 mmol/L
LAC 0.6–2.5 mmol/L 0.6–2.5 mmol/L
LDH 0–1128 U/L 0–1128 U/L
LIPA 40–500 U/L 40–500 U/L
Mg2+ 1.62–2.23 mg/dL 0.68–0.93 mmol/L
NH3 0–95 µmol/L 0–95 µmol/L
PHOS 4.5–10.4 mg/dL 1.45–3.35 mmol/L
TBIL 0–0.9 mg/dL 0–15 µmol/L
TP 5.2–8.2 g/dL 52–82 g/L
TRIG 8.0–54.0 mg/dL 0.09–0.61 mmol/L
URIC 0–1 mg/dL 0–60 µmol/L
GLOB 2.8–4.8 g/dL 28–48 g/L
Na+ 150–165 mmol/L 150–165 mmol/L
K+ 3.7–5.9 mmol/L 3.7–5.9 mmol/L
Cl– 115–126 mmol/L 115–126 mmol/L

L–5
Appendix: Reference Ranges
Feline—Adults
Test U.S. Units S.I. Units
ALB 2.2–4.0 g/dL 22–40 g/L
ALKP 14–111 U/L 14–111 U/L
ALT 12–130 U/L 12–130 U/L
AMYL 500–1500 U/L 500–1500 U/L
AST 0–48 U/L 0–48 U/L
BUN 16–36 mg/dL 5.7–12.9 mmol/L
Ca2+ 7.8–11.3 mg/dL 1.95–2.83 mmol/L
CHOL 65–225 mg/dL 1.7–5.8 mmol/L
CK 0–314 U/L 0–314 U/L
CREA 0.8–2.4 mg/dL 71–212 µmol/L
GGT 0–1 U/L 0–1 U/L
GLU 74–159 mg/dL 4.11–8.83 mmol/L
LAC 0.6–2.5 mmol/L 0.6–2.5 mmol/L
LDH 0–798 U/L 0–798 U/L
LIPA 100–1400 U/L 100–1400 U/L
Mg2+ 1.5–3.0 mg/dL 0.63–1.25 mmol/L
NH3 0–95 µmol/L 0–95 µmol/L
PHOS 3.1–7.5 mg/dL 1.00–2.42 mmol/L
TBIL 0–0.9 mg/dL 0–15.4 µmol/L
TP 5.7–8.9 g/dL 57–89 g/L
TRIG 10–100 mg/dL 0.11–1.13 mmol/L
URIC 0–1 mg/dL 0–60 µmol/L
GLOB 2.8–5.1 g/dL 28–51 g/L
Na+ 150–165 mmol/L 150–165 mmol/L
K+ 3.5–5.8 mmol/L 3.5–5.8 mmol/L
Cl– 112–129 mmol/L 112–129 mmol/L

L–6
IDEXX VetTest* Chemistry Analyzer Operator’s Manual
Feline—Geriatric
Test U.S. Units S.I. Units
ALB 2.3–3.9 g/dL 23–39 g/L
ALKP 14–111 U/L 14–111 U/L
ALT 12–130 U/L 12–130 U/L
AMYL 500–1500 U/L 500–1500 U/L
AST 0–48 U/L 0–48 U/L
BUN 16–36 mg/dL 5.7–12.9 mmol/L
Ca2+ 7.8–11.3 mg/dL 1.95–2.83 mmol/L
CHOL 65–225 mg/dL 1.7–5.8 mmol/L
CK 0–314 U/L 0–314 U/L
CREA 0.8–2.4 mg/dL 71–212 µmol/L
GGT 0–1 U/L 0–1 U/L
GLU 71–159 mg/dL 3.95–8.83 mmol/L
LAC 0.6–2.5 mmol/L 0.6–2.5 mmol/L
LDH 0–798 U/L 0–798 U/L
LIPA 100–1400 U/L 100–1400 U/L
Mg2+ 1.5–3.0 mg/dL 0.63–1.25 mmol/L
NH3 0–95 µmol/L 0–95 µmol/L
PHOS 3.1–7.5 mg/dL 1.00–2.42 mmol/L
TBIL 0–0.9 mg/dL 0–15.4 µmol/L
TP 5.7–8.9 g/dL 57–89 g/L
TRIG 10–100 mg/dL 0.11–1.13 mmol/L
URIC 0–1 mg/dL 0–60 µmol/L
GLOB 2.8–5.1 g/dL 28–51 g/L
Na+ 150–165 mmol/L 150–165 mmol/L
K+ 3.5–5.8 mmol/L 3.5–5.8 mmol/L
Cl– 112–129 mmol/L 112–129 mmol/L

L–7
Appendix: Reference Ranges
Equine—Yearlings
Test U.S. Units S.I. Units
ALB 3.80–4.70 g/dL 38–47 g/L
ALKP 10–469 U/L 10–469 U/L
ALT 5–30 U/L 5–30 U/L
AMYL 0–9 U/L 0–9 U/L
AST 0–317 U/L 0–317 U/L
BUN 11.4–22.3 mg/dL 4.07–7.96 mmol/L
Ca2+ 9.90–12.44 mg/dL 2.47–3.11 mmol/L
CHOL 53.0–113.0 mg/dL 1.37–2.92 mmol/L
CK 0–354 U/L 0–354 U/L
CREA 0.40–1.78 mg/dL 35–157 µmol/L
GGT 0–50 U/L 0–50 U/L
GLU 57.8–167.2 mg/dL 3.21–9.29 mmol/L
LAC 0.5–1.78 mmol/L 0.5–1.78 mmol/L
LDH 0–1337 U/L 0–1337 U/L
LIPA 400–1000 U/L 400–1000 U/L
Mg2+ 1.55–2.09 mg/dL 0.65–0.87 mmol/L
NH3 0–90 µmol/L 0–90 µmol/L
PHOS 4.37–6.29 mg/dL 1.41–2.03 mmol/L
TBIL 0.00–2.47 mg/dL 0–42 µmol/L
TP 5.20–8.50 g/dL 52–85 g/L
TRIG 18.5–52.3 mg/dL 0.21–0.59 mmol/L
GLOB 2.40–4.00 g/dL 24–40 g/L
Na+ 132–146 mmol/L 132–146 mmol/L
K+ 2.4–4.7 mmol/L 2.4–4.7 mmol/L
Cl– 97–108 mmol/L 97–108 mmol/L

L–8
IDEXX VetTest* Chemistry Analyzer Operator’s Manual
Equine—Foals
Test U.S. Units S.I. Units
ALB 3.00–4.00 g/dL 30–40 g/L
ALKP 505–4667 U/L 505–4667 U/L
ALT 0–14 U/L 0–14 U/L
AMYL 0–10 U/L 0–10 U/L
AST 0–228 U/L 0–228 U/L
BUN 5.7–26.9 mg/dL 2.03–9.60 mmol/L
Ca2+ 9.36–11.84 mg/dL 2.34–2.96 mmol/L
CHOL 78.0–458.0 mg/dL 2.02–11.83 mmol/L
CK 21–473 U/L 21–473 U/L
CREA 0.85–1.70 mg/dL 75–150 µmol/L
GGT 0–71 U/L 0–71 U/L
GLU 108.9–267.8 mg/dL 6.05–14.88 mmol/L
LAC 0.5–1.78 mmol/L 0.5–1.78 mmol/L
LDH 0–1830 U/L 0–1830 U/L
LIPA 200–1300 U/L 200–1300 U/L
Mg2+ 1.39–2.88 mg/dL 0.58–1.20 mmol/L
NH3 0–90 µmol/L 0–90 µmol/L
PHOS 4.00–7.10 mg/dL 1.29–3.09 mmol/L
TBIL 0.00–4.06 mg/dL 0–69 µmol/L
TP 4.70–7.20 g/dL 47–72 g/L
TRIG 4.4–165.7 mg/dL 0.05–1.87 mmol/L
GLOB 1.80–3.60 g/dL 18–36 g/L
Na+ 132–146 mmol/L 132–146 mmol/L
K+ 2.4–4.7 mmol/L 2.4–4.7 mmol/L
Cl– 97–108 mmol/L 97–108 mmol/L

L–9
Appendix: Reference Ranges
Equine—Adults
Test U.S. Units S.I. Units
ALB 1.9–3.2 g/dL 19–32 g/L
ALKP 10–326 U/L 10–326 U/L
ALT 5–50 U/L 5–50 U/L
AMYL 0–35 U/L 0–35 U/L
AST 100–600 U/L 100–600 U/L
BUN 10–25 mg/dL 3.6–8.9 mmol/L
Ca2+ 10.4–12.9 mg/dL 2.60–3.23 mmol/L
CHOL 50–110 mg/dL 1.3–2.9 mmol/L
CK 10–350 U/L 10–350 U/L
CREA 0.8–2.2 mg/dL 71–187 µmol/L
GGT 0–87 U/L 0–87 U/L
GLU 64–150 mg/dL 3.56–8.33 mmol/L
LAC 0.5–1.78 mmol/L 0.5–1.78 mmol/L
LDH 250–2070 U/L 250–2070 U/L
LIPA 400–1000 U/L 400–1000 U/L
Mg2+ 1.70–2.43 mg/dL 0.71–1.01 mmol/L
NH3 0–90 µmol/L 0–90 µmol/L
PHOS 1.8–5.6 mg/dL 0.58–1.81 mmol/L
TBIL 0–3.5 mg/dL 0–60 µmol/L
TP 5.6–7.9 g/dL 56–79 g/L
TRIG 11.1–67.7 mg/dL 0.13–0.76 mmol/L
GLOB 2.40–4.7 g/dL 24–47 g/L
Na+ 133–150 mmol/L 133–150 mmol/L
K+ 3.0–5.3 mmol/L 3.0–5.3 mmol/L
Cl- 97–109 mmol/L 97–109 mmol/L
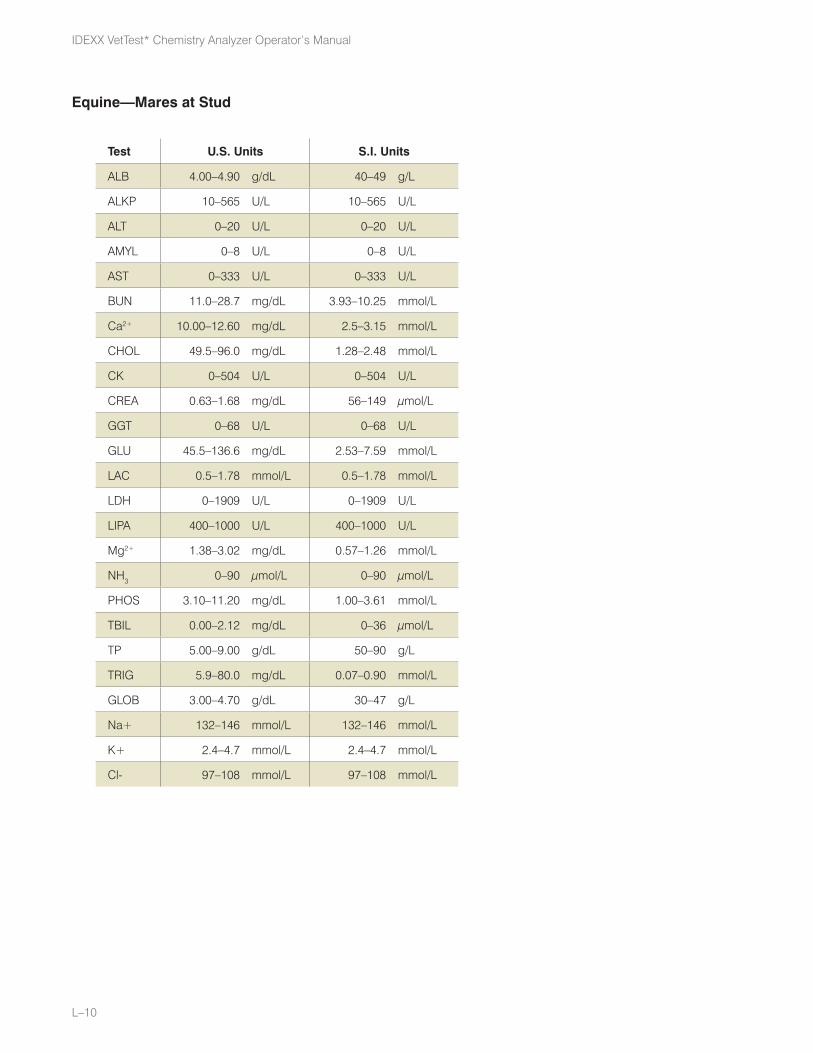
L–10
IDEXX VetTest* Chemistry Analyzer Operator’s Manual
Equine—Mares at Stud
Test U.S. Units S.I. Units
ALB 4.00–4.90 g/dL 40–49 g/L
ALKP 10–565 U/L 10–565 U/L
ALT 0–20 U/L 0–20 U/L
AMYL 0–8 U/L 0–8 U/L
AST 0–333 U/L 0–333 U/L
BUN 11.0–28.7 mg/dL 3.93–10.25 mmol/L
Ca2+ 10.00–12.60 mg/dL 2.5–3.15 mmol/L
CHOL 49.5–96.0 mg/dL 1.28–2.48 mmol/L
CK 0–504 U/L 0–504 U/L
CREA 0.63–1.68 mg/dL 56–149 µmol/L
GGT 0–68 U/L 0–68 U/L
GLU 45.5–136.6 mg/dL 2.53–7.59 mmol/L
LAC 0.5–1.78 mmol/L 0.5–1.78 mmol/L
LDH 0–1909 U/L 0–1909 U/L
LIPA 400–1000 U/L 400–1000 U/L
Mg2+ 1.38–3.02 mg/dL 0.57–1.26 mmol/L
NH3 0–90 µmol/L 0–90 µmol/L
PHOS 3.10–11.20 mg/dL 1.00–3.61 mmol/L
TBIL 0.00–2.12 mg/dL 0–36 µmol/L
TP 5.00–9.00 g/dL 50–90 g/L
TRIG 5.9–80.0 mg/dL 0.07–0.90 mmol/L
GLOB 3.00–4.70 g/dL 30–47 g/L
Na+ 132–146 mmol/L 132–146 mmol/L
K+ 2.4–4.7 mmol/L 2.4–4.7 mmol/L
Cl- 97–108 mmol/L 97–108 mmol/L

L–11
Appendix: Reference Ranges
Dairy Cows
Test U.S. Units S.I. Units
ALB 2.5–3.5 g/dL 25–35 g/L
ALKP 28–233 U/L 28–233 U/L
AMYL 0–34 U/L 0–34 U/L
AST 50–150 U/L 50–150 U/L
BUN 10–25.3 mg/dL 3.6–9.3 mmol/L
Ca2+ 8–12 mg/dL 2–3 mmol/L
CHOL 45–200 mg/dL 1.2–5.2 mmol/L
CK 50–350 U/L 50–350 U/L
CREA 0.5–1.6 mg/dL 44–141 µmol/L
GGT 0–87 U/L 0–87 U/L
GLU 56–88 mg/dL 3.11–4.89 mmol/L
LIPA 30–200 U/L 30–200 U/L
Mg2+ 1.8–3.0 mg/dL 0.8–1.3 mmol/L
NH3 0–90 µmol/L 0–90 µmol/L
PHOS 4.0–8.6 mg/dL 1.3–2.8 mmol/L
TBIL 0–0.73 mg/dL 0–12 µmol/L
TP 6.2–8.0 g/dL 62–80 g/L
TRIG 0–8.42 mg/dL 0–0.10 mmol/L
GLOB 3.0–4.9 g/dL 30–49 g/L
Na+ 138–155 mmol/L 138–155 mmol/L
K+ 3.9–6.4 mmol/L 3.9–6.4 mmol/L
Cl- 96–116 mmol/L 96–116 mmol/L

L–12
IDEXX VetTest* Chemistry Analyzer Operator’s Manual
Beef Cattle
Test U.S. Units S.I. Units
ALB 2.50–3.60 g/dL 25–36 g/L
ALKP 10–149 U/L 10–149 U/L
AMYL 0–28 U/L 0–28 U/L
AST 0–91 U/L 0–91 U/L
BUN 7.0–17.2 mg/dL 2.50–6.14 mmol/L
Ca2+ 7.80–10.46 mg/dL 1.95–2.62 mmol/L
CHOL 76.0–226.8 mg/dL 1.96–5.86 mmol/L
CK 0–110 U/L 0–110 U/L
CREA 0.00–1.95 mg/dL 0–172 µmol/L
GGT 0–80 U/L 0–80 U/L
GLU 46.0–93.2 mg/dL 2.56–5.18 mmol/L
LIPA 30–400 U/L 30–400 U/L
Mg2+ 1.26–2.40 mg/dL 0.52–1.00 mmol/L
NH3 0–90 µmol/L 0–90 µmol/L
PHOS 4.29–7.89 mg/dL 1.38–2.55 mmol/L
TBIL 0.00–0.73 mg/dL 0–12 µmol/L
TP 5.80–8.00 g/dL 58–80 g/L
TRIG 0.0–8.24 mg/dL 0.00–0.09 mmol/L
GLOB 2.70–3.80 g/dL 27–38 g/L
Na+ 132–152 mmol/L 132–152 mmol/L
K+ 3.9–5.8 mmol/L 3.9–5.8 mmol/L
Cl- 97–111 mmol/L 97–111 mmol/L

L–13
Appendix: Reference Ranges
Llama
Test U.S. Units S.I. Units
ALB 1.7–3.7 g/dL 17–37 g/L
ALKP 30–95 U/L 30–95 U/L
ALT 10–29 U/L 10–29 U/L
AMYL 175–1242 U/L 175–1242 U/L
AST 81–559 U/L 81–559 U/L
BUN 3–36 mg/dL 1.0–12.7 mmol/L
Ca2+ 7.0–11.0 mg/dL 1.75–2.75 mmol/L
CHOL 7–88 mg/dL 0.18–2.27 mmol/L
CK 11–153 U/L 11–153 U/L
CREA 0.8–1.9 mg/dL 71–168 µmol/L
GGT 9–70 U/L 9–70 U/L
GLU 85–236 mg/dL 4.72–13.11 mmol/L
LDH 343–1348 U/L 343–1348 U/L
Mg2+ 1.4–2.9 mg/dL 0.58–1.21 mmol/L
PHOS 1.0–11.0 mg/dL 0.32–3.55 mmol/L
TBIL 0.1–0.2 mg/dL 2–3 µmol/L
TP 3.9–7.5 g/dL 39–75 g/L
GLOB 2.2–4.5 g/dL 22–45 g/L
Na+ 147–159 mmol/L 147–159 mmol/L
K+ 4.3–5.3 mmol/L 4.3–5.3 mmol/L
Cl– 112–119 mmol/L 112–119 mmol/L

L–14
IDEXX VetTest* Chemistry Analyzer Operator’s Manual
Sea Turtles
Test U.S. Units S.I. Units
ALB 1.0–2.5 g/dL 10–25 g/L
ALKP 24–48 U/L 24–48 U/L
AST 66–315 U/L 66–315 U/L
BUN/UREA 35–110 mg/dL 12.5–39.3 mmol/L
Ca2+ 5.0–14.0 mg/dL 1.25–3.50 mmol/L
CHOL 150–445 mg/dL 3.88–11.50 mmol/L
CREA 0.1–0.3 mg/dL 9–25 µmol/L
GLOB 2.6–4.5 g/dL 26–45 g/L
GLU 72–125 mg/dL 4.00–6.95 mmol/L
LDH 100–800 U/L 100–800 U/L
Mg2+ 6.70–9.40 mg/dL 2.79–3.92 mmol/L
PHOS 5.5–9.5 mg/dL 1.77–3.06 mmol/L
TP 3.6–6.8 g/dL 36–68 g/L
TRIG 15–260 mg/dL 0.17–2.94 mmol/L
URIC 0.3–1.8 mg/dL 15–107 µmol/L

L–15
Appendix: Reference Ranges
Provisional Reference Ranges
Avian—Parrots
Test Amazon BlueAmazon Yellow Eclectus African Grey
U.S. Units
ALB 0.74–1.70 0.66–1.27 0.60–1.27 0.75–4.90 g/dL
ALKP 15–109 31–198 97–668 24–94 IU
ALT 0–19 0–7 0–17 2–21 IU
AMYL 402–882 264–798 425–981 211–519 IU
AST 73–160 67–151 19–159 28–200 IU
BUN 0.7–3.2 0.6–2.7 0.6–2.5 0.6–124.0 mg/dL
Ca2+ 8.13–11.31 7.74–10.52 7.99–11.89 7.00–9.50 mg/dL
CHOL 210.0–471.1 140–316.7 183.2–339.0 217.0–330.0 mg/dL
CK 97–450 98–646 144–418 71–408 IU
CREA 0.00–0.10 0.00–0.11 0.10–016 0.10–0.40 mg/dL
GGT 1–12 2–19 0–1 0–900 IU
GLU 231.6–296.3 219.9–295.2 233.0–392.0 224.0–308.0 mg/dL
LDH 178–395 160–427 277–957 105–420 IU
LIPA 85–204 75–276 28–52 0–1250 IU
Mg2+ 3.19–3.84 2.26–3.74 1.81–3.08 0.0–3.84 mg/dL
NH3 166–585 138–444 89–262 0–809 µmol/L
PHOS 2.03–4.02 1.06–3.30 2.31–5.23 1.00–5.20 mg/dL
TBIL 0.00–0.01 0.00–0.13 0.00–0.10 0.00–26.80 mg/dL
TP 3.65–4.98 3.42–4.63 3.46–4.99 2.60–4.90 g/dL
TRIG 102.1–264.1 91.0–215.0 69.5–303.8 51.0–140.0 mg/dL
URIC 1.3–5.7 0.6–6.1 2.4–8.8 3.1–7.0 mg/dL

L–16
IDEXX VetTest* Chemistry Analyzer Operator’s Manual
Avian—Cockatoos
Test Grey Cheek Moluccan Umbrella U.S. Units
ALB 0.75–4.90 0.99–2.87 0.89–2.74 g/dL
ALKP 0–3000 40–160 30–204 IU
ALT 0–668 0–8 2–14 IU
AMYL 0–2500 414–972 424–759 IU
AST 150–400 53–140 84–143 IU
BUN 0.6–124.0 0.7–4.0 0.6–4.0 mg/dL
Ca2+ 2.90–15.10 7.46–12.15 8.33–11.10 mg/dL
CHOL 5.0–485 131.0–337.8 112.4–370.4 mg/dL
CK 100–300 60–606 112–559 IU
CREA 0.10–0.40 0.10–0.56 0.10–0.24 mg/dL
GGT 0–900 0–1 0–3 IU
GLU 200.0–350.0 188.7–261.4 192.5–277.0 mg/dL
LDH 150–450 518–1785 445–1143 IU
LIPA 0–1250 60–147 75–192 IU
Mg2+ 0.00–3.84 1.70–3.46 1.77–3.10 mg/dL
NH3 0–809 69–271 103–318 µmol/L
PHOS 0.40–13.80 1.70–4.97 2.57–5.28 mg/dL
TBIL 0.00–26.80 0.00–0.24 0.00–0.30 mg/dL
TP 2.50–4.50 3.64–5.53 3.82–5.51 g/dL
TRIG 0.0–375.0 105.4–294.0 191.0–375.0 mg/dL
URIC 4.0–12.0 2.6–12.8 3.4–11.7 mg/dL

L–17
Appendix: Reference Ranges
Avian—Budgerigar
Test Budgerigar U.S. Units
ALB 0.75–4.90 g/dL
ALKP 54–326 IU
ALT 5–20 IU
AMYL 187–582 IU
AST 55–154 IU
BUN 0.6–124.0 mg/dL
Ca2+ 6.40–11.20 mg/dL
CHOL 172.0–286.0 mg/dL
CK 54–252 IU
CREA 0.10–0.40 mg/dL
GGT 0–900 IU
GLU 254.0–399.0 mg/dL
LDH 154–271 IU
LIPA 0–1250 IU
Mg2+ 0.00–3.84 mg/dL
NH3 0–809 µmol/L
PHOS 0.90–1.90 mg/dL
TBIL 0.00–26.80 mg/dL
TP 2.00–3.00 g/dL
TRIG 109.0–271.0 mg/dL
URIC 3.0–8.6 mg/dL
GLOB 2.10–3.20 g/dL

L–18
IDEXX VetTest* Chemistry Analyzer Operator’s Manual
Avian—Cockatiel, Canary, Conure
Test Cockatiel Canary Conure U.S. Units
ALB 0.75–4.90 0.75–4.90 0.75–4.90 g/dL
ALKP 0–3000 0–3000 0–3000 IU
ALT 0–668 0–668 0–668 IU
AMYL 0–2500 0–2500 0–2500 IU
AST 100–350 150–350 125–350 IU
BUN 0.6–124.0 0.6–124.0 0.6–124.0 mg/dL
Ca2+ 8.50–13.00 2.90–15.10 8.00–15.00 mg/dL
CHOL 5.0–485.0 5.0–485.0 5.0–485.0 mg/dL
CK 100–300 0–2015 100–300 IU
CREA 0.10–0.40 0.10–0.40 0.10–0.50 mg/dL
GGT 0–900 0–900 0–900 IU
GLU 200.0–450.0 200.0–450.0 200.0–350.0 mg/dL
LDH 125–450 0–686 125–420 IU
LIPA 0–1250 0–1250 0–1250 IU
Mg2+ 0.00–3.84 0.00–3.84 0.00–3.84 mg/dL
NH3 0–809 0–809 0–809 µmol/L
PHOS 0.40–13.80 0.40–13.80 0.40–13.80 mg/dL
TBIL 0.00–26.80 0.00–26.80 0.00–26.80 mg/dL
TP 3.00–5.00 3.00–5.00 2.50–4.50 g/dL
TRIG 0.0–375.0 0.0–375.0 0.0–375.0 mg/dL
URIC 3.5–11.0 4.0–12.0 2.10–3.20 mg/dL
GLOB 2.10–3.20 2.10–3.20 2.10–3.20 g/dL

L–19
Appendix: Reference Ranges
Avian—Macaws
Test Blue and Gold Blue Hyacinth Scarlet U.S. Units
ALB 0.42–1.89 1.40–2.03 0.58–2.09 g/dL
ALKP 27–205 3–84 9–74 IU
ALT 0–11 3–8 0–7 IU
AMYL 295–506 283–595 217–710 IU
AST 17–126 68–122 32–95 IU
BUN 0.7–6.2 2.2–7.3 1.6–9.5 mg/dL
Ca2+ 7.22–12.62 7.51–10.14 8.05–10.73 mg/dL
CHOL 82.5–193.0 69.7–158.3 107.7–319.2 mg/dL
CK 62–393 284–871 76–406 IU
CREA 0.10–0.17 0.10–0.29 0.10–0.13 mg/dL
GGT 0–1 0–1 0–1 IU
GLU 227.3–309.9 215.3–275–0 205.5–292.4 mg/dL
LDH 174–649 221–626 157–684 IU
LIPA 142–657 272–833 176–483 IU
Mg2+ 2.04–3.84 1.33–2.80 1.48–3.22 mg/dL
NH3 93–452 82–234 66–349 µmol/L
PHOS 1.56–6.83 1.57–4.88 1.52–5.22 mg/dL
TBIL 0.00–1.02 0.00–0.24 0.00–0.27 mg/dL
TP 3.67–5.23 3.91–4.59 3.75–5.08 g/dL
TRIG 85.5–288.0 84.1–201.0 83.0–266.2 mg/dL
URIC 0.7–13.8 3.5–19.9 1.7–8.0 mg/dL
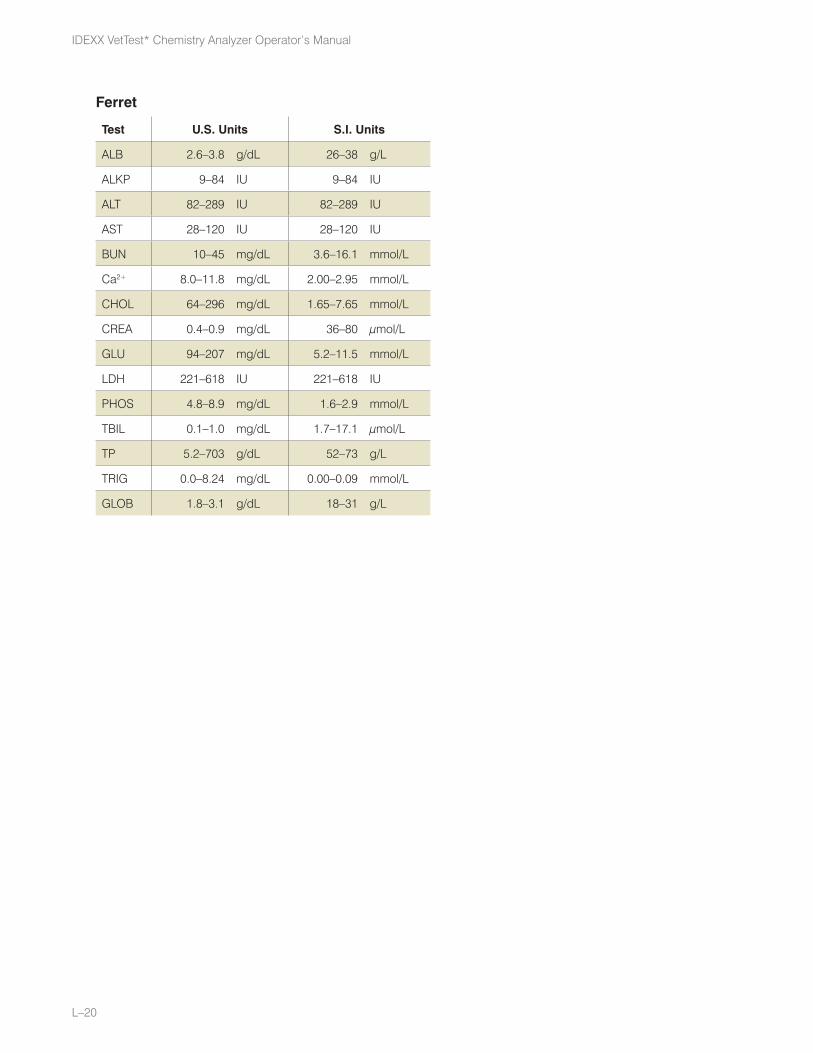
L–20
IDEXX VetTest* Chemistry Analyzer Operator’s Manual
Ferret
Test U.S. Units S.I. Units
ALB 2.6–3.8 g/dL 26–38 g/L
ALKP 9–84 IU 9–84 IU
ALT 82–289 IU 82–289 IU
AST 28–120 IU 28–120 IU
BUN 10–45 mg/dL 3.6–16.1 mmol/L
Ca2+ 8.0–11.8 mg/dL 2.00–2.95 mmol/L
CHOL 64–296 mg/dL 1.65–7.65 mmol/L
CREA 0.4–0.9 mg/dL 36–80 µmol/L
GLU 94–207 mg/dL 5.2–11.5 mmol/L
LDH 221–618 IU 221–618 IU
PHOS 4.8–8.9 mg/dL 1.6–2.9 mmol/L
TBIL 0.1–1.0 mg/dL 1.7–17.1 µmol/L
TP 5.2–703 g/dL 52–73 g/L
TRIG 0.0–8.24 mg/dL 0.00–0.09 mmol/L
GLOB 1.8–3.1 g/dL 18–31 g/L

L–21
Appendix: Reference Ranges
Goat
Test U.S. Units S.I. Units
ALB 2.8–3.8 g/dL 28–38 g/L
ALKP 75–228 IU 75–228 IU
AMYL 1–30 IU 1–30 IU
ALT 23–44 IU 23–44 IU
AST 122–321 IU 122–321 IU
BUN 10–21 mg/dL 3.6–7.5 mmol/L
Ca2+ 8.2–9.8 mg/dL 2.05–2.45 mmol/L
CHOL 63–108 mg/dL 1.63–2.79 mmol/L
CK 28–130 IU 28–130 IU
CREA 0.6–1.4 mg/dL 53–124 µmol/L
GGT 60–101 IU 60–101 IU
GLU 54–93 mg/dL 3.0–5.2 mmol/L
LDH 811–1250 IU 811–1250 IU
PHOS 4.2–7.6 mg/dL 1.35–2.45 mmol/L
TBIL 0.05–0.35 mg/dL 0.9–6.0 µmol/L
TP 6.4–7.8 g/dL 64–78 g/L
TRIG 10–29 mg/dL 0.11–0.33 mmol/L

L–22
IDEXX VetTest* Chemistry Analyzer Operator’s Manual
Monkey
Test U.S. Units S.I. Units
ALB 2.8–4.4 g/dL 28–44 g/L
ALKP 73–210 IU 73–210 IU
ALT 20–120 IU 20–120 IU
AMYL 149–500 IU 149–500 IU
AST 23–94 IU 23–94 IU
BUN 7–25 mg/dL 2.5–8.9 mmol/L
Ca2+ 8.3–10.1 mg/dL 2.08–2.53 mmol/L
CHOL 73–179 mg/dL 1.88–4.62 mmol/L
CK 63–460 IU 63–460 IU
CREA 0.4–1.2 mg/dL 35–106 µmol/L
GGT 40–78 IU 40–78 IU
GLU 50–100 mg/dL 2.8–5.6 mmol/L
LDH 578–1800 IU 578–1800 IU
PHOS 2.4–6.5 mg/dL 0.8–2.1 mmol/L
TBIL 0.1–0.6 mg/dL 1.7–10 µmol/L
TP 5.9–7.6 g/dL 59–76 g/L
TRIG 31–153 mg/dL 0.35–1.73 mmol/L

L–23
Appendix: Reference Ranges
Mouse
Test U.S. Units S.I. Units
ALB 2.5–4.8 g/dL 25–48 g/L
ALKP 62–209 IU 62–209 IU
ALT 28–132 IU 28–132 IU
AMYL 1691–3615 IU 1691–3615 IU
AST 59–247 IU 59–247 IU
BUN 18–29 mg/dL 6.4–10 mmol/L
Ca2+ 5.9–9.4 mg/dL 1.48–2.35 mmol/L
CHOL 36–96 mg/dL 0.93–2.48 mmol/L
CK 68–1070 IU 68–1070 IU
CREA 0.2–0.8 mg/dL 18–71 µmol/L
GLU 90–192 mg/dL 5.0–10.7 mmol/L
LDH 1105–3993 IU 1105–3993 IU
PHOS 6.1–10.1 mg/dL 2.0–3.3 mmol/L
TBIL 0.1–0.9 mg/dL 1.7–1.5 µmol/L
TP 3.6–6.6 g/dL 36–66 g/L
TRIG 55–144 mg/dL 0.62–1.63 mmol/L
URIC 1.7–5.4 mg/dL 101–321 µmol/L

L–24
IDEXX VetTest* Chemistry Analyzer Operator’s Manual
Pig
Test U.S. Units S.I. Units
ALB 1.8–33.0 g/dL 18–330 g/L
ALKP 92–294 IU 92–294 IU
ALT 9–43 IU 9–43 IU
AMYL 271–1198 IU 271–1198 IU
AST 16–65 IU 16–64 IU
BUN 6–30 mg/dL 2.1–10.7 mmol/L
Ca2+ 6.5–11.4 mg/dL 1.63–2.85 mmol/L
CHOL 18–79 mg/dL 0.46–2.04 mmol/L
CK 50–3531 IU 50–3531 IU
CREA 0.5–2.1 mg/dL 44–186 µmol/L
GGT 16–30 IU 16–30 IU
GLU 85–160 mg/dL 4.7–8.9 mmol/L
LDH 575–3294 IU 575–3294 IU
LIPA 10–44 IU 10–44 IU
PHOS 3.6–9.2 mg/dL 1.2–3.0 mmol/L
TBIL 0.1–0.3 mg/dL 1.7–5.1 µmol/L
TP 6.0–8.0 g/dL 60–80 g/L
TRIG 41–83 mg/dL 0.46–0.94 mmol/L
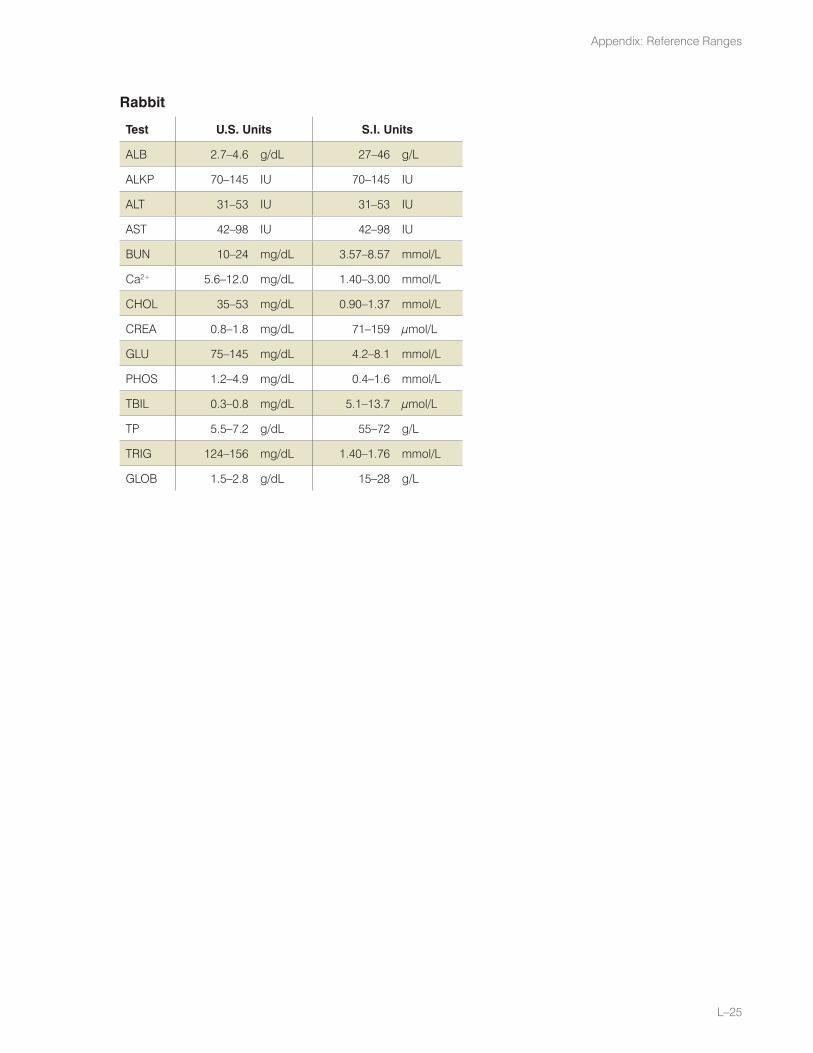
L–25
Appendix: Reference Ranges
Rabbit
Test U.S. Units S.I. Units
ALB 2.7–4.6 g/dL 27–46 g/L
ALKP 70–145 IU 70–145 IU
ALT 31–53 IU 31–53 IU
AST 42–98 IU 42–98 IU
BUN 10–24 mg/dL 3.57–8.57 mmol/L
Ca2+ 5.6–12.0 mg/dL 1.40–3.00 mmol/L
CHOL 35–53 mg/dL 0.90–1.37 mmol/L
CREA 0.8–1.8 mg/dL 71–159 µmol/L
GLU 75–145 mg/dL 4.2–8.1 mmol/L
PHOS 1.2–4.9 mg/dL 0.4–1.6 mmol/L
TBIL 0.3–0.8 mg/dL 5.1–13.7 µmol/L
TP 5.5–7.2 g/dL 55–72 g/L
TRIG 124–156 mg/dL 1.40–1.76 mmol/L
GLOB 1.5–2.8 g/dL 15–28 g/L

L–26
IDEXX VetTest* Chemistry Analyzer Operator’s Manual
Rat
Test U.S. Units S.I. Units
ALB 3.8–4.8 g/dL 38–48 g/L
ALKP 16–302 IU 16–302 IU
ALT 20–61 IU 20–61 IU
AMYL 326–2246 IU 326–2246 IU
AST 39–111 IU 39–111 IU
BUN 9–21 mg/dL 3.2–7.5 mmol/L
Ca2+ 5.3–11.6 mg/dL 1.33–2.90 mmol/L
CHOL 20–92 mg/dL 0.52–2.37 mmol/L
CK 48–340 IU 48–340 IU
CREA 0.05–0.65 mg/dL 4.4–57 µmol/L
GGT 1–6 IU 1–6 IU
GLU 50–135 mg/dL 2.8–7.5 mmol/L
LDH 167–1428 IU 167–1428 IU
LIPA 10–150 IU 10–150 IU
PHOS 5.8–11.2 mg/dL 1.9–3.6 mmol/L
TBIL 0.1–0.7 mg/dL 1.7–12 µmol/L
TP 5.3–6.9 g/dL 53–69 g/L
TRIG 26–108 mg/dL 0.29–1.22 mmol/L
GLOB 1.5–2.8 g/dL 15–28 g/L
URIC 0.8–4.4 mg/dL 48––262 µmol/L
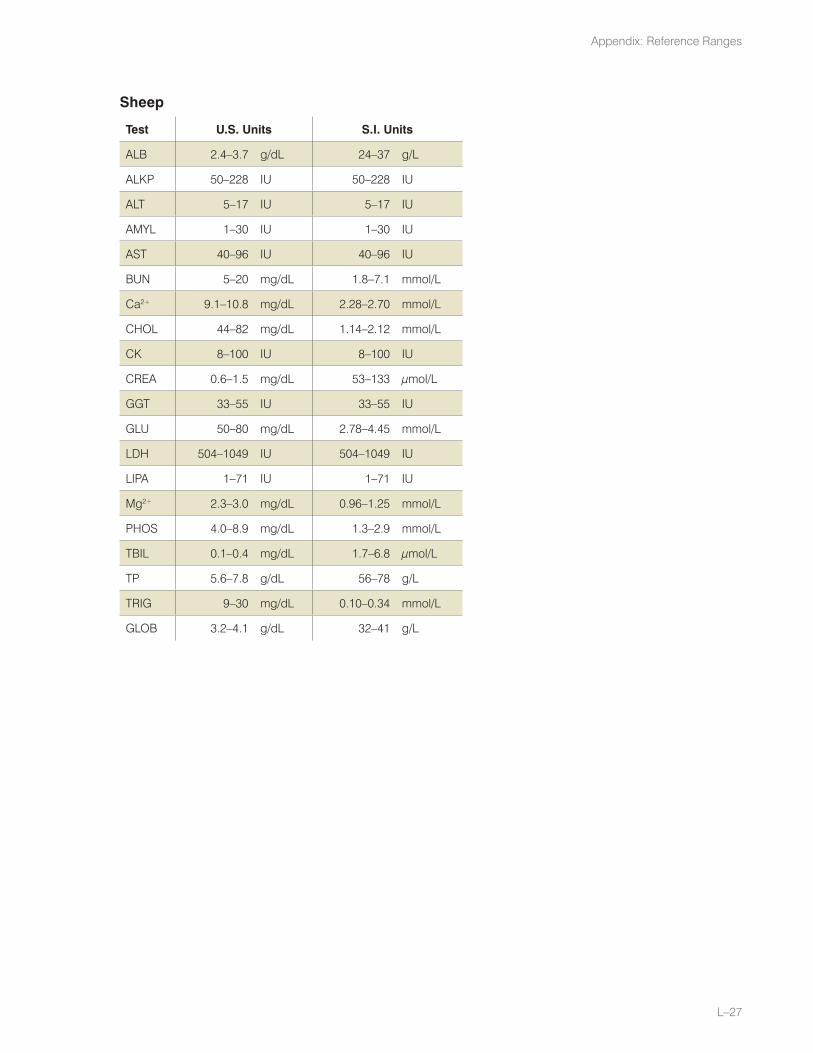
L–27
Appendix: Reference Ranges
Sheep
Test U.S. Units S.I. Units
ALB 2.4–3.7 g/dL 24–37 g/L
ALKP 50–228 IU 50–228 IU
ALT 5–17 IU 5–17 IU
AMYL 1–30 IU 1–30 IU
AST 40–96 IU 40–96 IU
BUN 5–20 mg/dL 1.8–7.1 mmol/L
Ca2+ 9.1–10.8 mg/dL 2.28–2.70 mmol/L
CHOL 44–82 mg/dL 1.14–2.12 mmol/L
CK 8–100 IU 8–100 IU
CREA 0.6–1.5 mg/dL 53–133 µmol/L
GGT 33–55 IU 33–55 IU
GLU 50–80 mg/dL 2.78–4.45 mmol/L
LDH 504–1049 IU 504–1049 IU
LIPA 1–71 IU 1–71 IU
Mg2+ 2.3–3.0 mg/dL 0.96–1.25 mmol/L
PHOS 4.0–8.9 mg/dL 1.3–2.9 mmol/L
TBIL 0.1–0.4 mg/dL 1.7–6.8 µmol/L
TP 5.6–7.8 g/dL 56–78 g/L
TRIG 9–30 mg/dL 0.10–0.34 mmol/L
GLOB 3.2–4.1 g/dL 32–41 g/L

L–28
IDEXX VetTest* Chemistry Analyzer Operator’s Manual
Snake
Test U.S. Units S.I. Units
ALKP 80–145 IU 80–145 IU
ALT 10–260 IU 10–260 IU
AST 5–35 IU 5–35 IU
BUN 1–11 mg/dL 0.4–3.9 mmol/L
Ca2+ 10–22 mg/dL 2.5–5.5 mmol/L
CHOL 50–139 mg/dL 1.3–3.6 mmol/L
CREA 0.1–0.5 mg/dL 8.8–44 µmol/L
GGT 1–15 IU 1–15 IU
GLU 10–108 mg/dL 0.6–6.0 mmol/L
LDH 30–600 IU 30–600 IU
PHOS 2.8–5.7 mg/dL 0.9–1.8 mmol/L
TP 2.9–8.0 g/dL 29–80 g/L
TRIG 53–177 mg/dL 0.6–2.0 mmol/L
URIC 1–10 mg/dL 60–595 µmol/L

L–29
Appendix: Reference Ranges
Tortoise
Test U.S. Units S.I. Units
ALB 1.3–3.0 g/dL 13–30 g/L
ALKP 36–156 IU 36–156 IU
AST 14–18 IU 14–18 IU
BUN 19–33 mg/dL 6.8–11.8 mmol/L
Ca2+ 10.0–14.5 mg/dL 2.50–3.63 mmol/L
CREA 0.1–0.4 mg/dL 8.8–35 µmol/L
PHOS 2.3–11.5 mg/dL 0.7–3.7 mmol/L
TBIL 0.1–0.6 mg/dL 1.7–10.2 µmol/L
TP 3.0–7.0 g/dL 30–70 g/L
GLOB 1.6–4.0 g/dL 16–40 g/L
URIC 1.2–2.8 mg/dL 71–167 µmol/L

L–30
IDEXX VetTest* Chemistry Analyzer Operator’s Manual
Lizard
Test U.S. Units S.I. Units
ALKP 60-99 IU 60-99 IU
AST 5-103 IU 5-103 IU
BUN 1-12 mg/dL 3.2-7.5 mmol/L
Ca2+ 7.6-10 mg/dL 1.33-2.90 mmol/L
CHOL 46-140 mg/dL 0.52-2.37 mmol/L
CREA 0.06-0.15 mg/dL 4.4-57 µmol/L
GGT 1-10 IU 1-10 IU
GLU 54-198 mg/dL 2.8-7.5 mmol/L
LDH 250-1000 IU 250-1000 IU
PHOS 1.9-5.1 mg/dL 1.9-3.6 mmol/L
TP 3.0-8.1 g/dL 53-69 g/L
TRIG 53-106 mg/dL 0.29-1.22 mmol/L
URIC 2.7-8.0 mg/dL 48-262 µmol/L

M Appendix: Unit Conversion
Conversion Factors
Chemistry
Conversion Factors Units
U.S. Conc. Unit U.S. to S.I. U.S. to French S.I. Conc. Unit French Conc. Unit
GLU mg/dL 0.05556 0.01 mmol/L g/l
BUN mg/dl 0.35702 0.021 mmol/L g/L
Ca2+ mg/dL 0.25 10 mmol/L mg/L
URIC mg/dL 59.5 10 µmol/L mg/L
TP g/dL 10 10 g/L g/L
TRIG mg/dL 0.01129 0.01 nmol/L g/L
CHOL mg/dL 0.02584 0.01 mmol/L g/L
ALB g/dL 10 10 g/L g/L
NH3 µmol/L 1 1 µmol/L µmol/L
PHOS mg/dL 0.32258 10 mmol/L mg/L
TBIL mg/dL 17.1 10 µmol/L mg/L
CREA mg/dL 88.4 10 µmol/L mg/L
Mg2+ mg/dL 0.41667 10 mmol/L mg/L
AMYL U/L 1 1 U/L U/L
AST U/L 1 1 U/L U/L
LIPA U/L 1 1 U/L U/L
ALT U/L 1 1 U/L U/L
LDH U/L 1 1 U/L U/L
CK U/L 1 1 U/L U/L
ALKP U/L 1 1 U/L U/L
GGT U/L 1 1 U/L U/L
NA+ mmol/L 1 1 mmol/L mmol/L
K+ mmol/L 1 1 mmol/L mmol/L
CL- mmol/L 1 1 mmol/L mmol/L
GLOB g/dL 10 10 g/L g/L
LAC mmol/L 1 1 mmol/L mmol/L
UCRE mg/dL 0.01 0.01 g/L g/L
UPRO mg/dL 0.01 0.01 g/L g/L
M–1

M–2
IDEXX VetTest* Chemistry Analyzer Operator’s Manual


One IDEXX DriveWestbrook, Maine 04092 USA
idexx.com06-02247-05