chapter 7 - map and compass - house of clan stewarts main ...pgsar/training/gsar manual/7 map and...
TRANSCRIPT
Chapter 7 - Map and Compass
Upon completion of this chapter, you will be able to: • Orient a map to terrain using a compass. • Use a compass to determine the bearing to be followed between
two points on a map. • Given the bearing, use a compass to plot the direction on a
map. • Use triangulation to fix one’s position on a map. • Use a single bearing and another reference to fix one’s position
on a map. • Use a map to select a suitable route for travelling between two
points. • Follow a simple course of less than 2 km in the field that has
been plotted on a map. • Use an altimeter in conjunction with map and compass for fixing
position. • Review GPS navigation systems. • Identify the benefits and drawbacks in using GPS for navigation. • Demonstrate travelling skills used for his/her environment such as:
- Trails - Bush - Talus/scree - Snow
• Define technical versus non-technical terrain and identify the limitations of Ground Search Team members.

MAP AND COMPASS
Orienting a Map with a Compass
While navigating on a search it is recommended that the map be oriented to the terrain so you can identify visible landmarks, find your position and plan your route. Orienting a map is turning the map so that the north on the map is located north in the landscape. There is two ways to do this:
1. One way is look at your surroundings and identify known features such as mountains, roads, rivers and valleys. Then turn the map until the known feature on the map is lined up with actual surroundings. You have now oriented the map by inspection.
2. A simpler way is to orient the map with a compass. First make
sure that your compass is adjusted for magnetic declination then set the compass at 360°. Place it on the map with the meridian lines on the compass lined up with the North-South grid lines on the map. Now turn the map and compass together until the red end of magnetic needle is in the red end of the orienting arrow. The map is now oriented with the terrain by using a compass.
Finding a Bearing
on a Map
In the next procedure – finding a bearing on a map – the magnetic needle will not be used. If the searcher wishes to know what bearing he must follow on the ground to get from point A to point B on a map, the following procedure is followed: The long edge of the compass (either one) is placed along the line joining A and B with the sighting line (mirror end) towards B. Exactly where on this line the compass is placed does not matter.
Holding the compass in this position the compass housing is turned until the meridian lines on the base of the inside of the housing are aligned with the North-South grid lines on the map with the orienting arrow towards the North.
The position of the magnetic needle does not matter – it has nothing to do with this procedure. The reading on the compass housing at the index pointer will be the bearing to follow in going from A to B. Figure 7.1 illustrates the arrangement of the compass when set to read a bearing from a map. In this case, to go from A to B would require following a bearing of 135°.
One edge of the compass base has a centimetre scale impressed on it and provided that the points are not too far apart, this scale can be used to determine distance from A to B using the procedures discussed in the chapter on maps.
EMD – 1999
GROUND SEARCH AND RESCUE 7-3

MAP AND COMPASS
Figure 7.1: Arrangement of a compass to determine the bearing required for travelling from Point A to Point B
The things you must remember are:
• The sight line (mirror end) must be towards the destination.
• The meridian lines must be aligned with the grid lines.
• North on the compass housing must be oriented to Grid North on the map. If it is pointing to the bottom of the map your bearing will be off by 180°.
• The position of the magnetic needle does not matter.
• Before going to use this bearing in the field the declination has to be set for the map being used.
Plotting a Bearing
on a Map
If the position of a point on the map is known and the bearing from that point to an unplotted point is also known, the searcher may mark this direction on the map using a procedure similar to the one just described.
7-4 EMD 1999
GROUND SEARCH AND RESCUE
MAP AND COMPASS
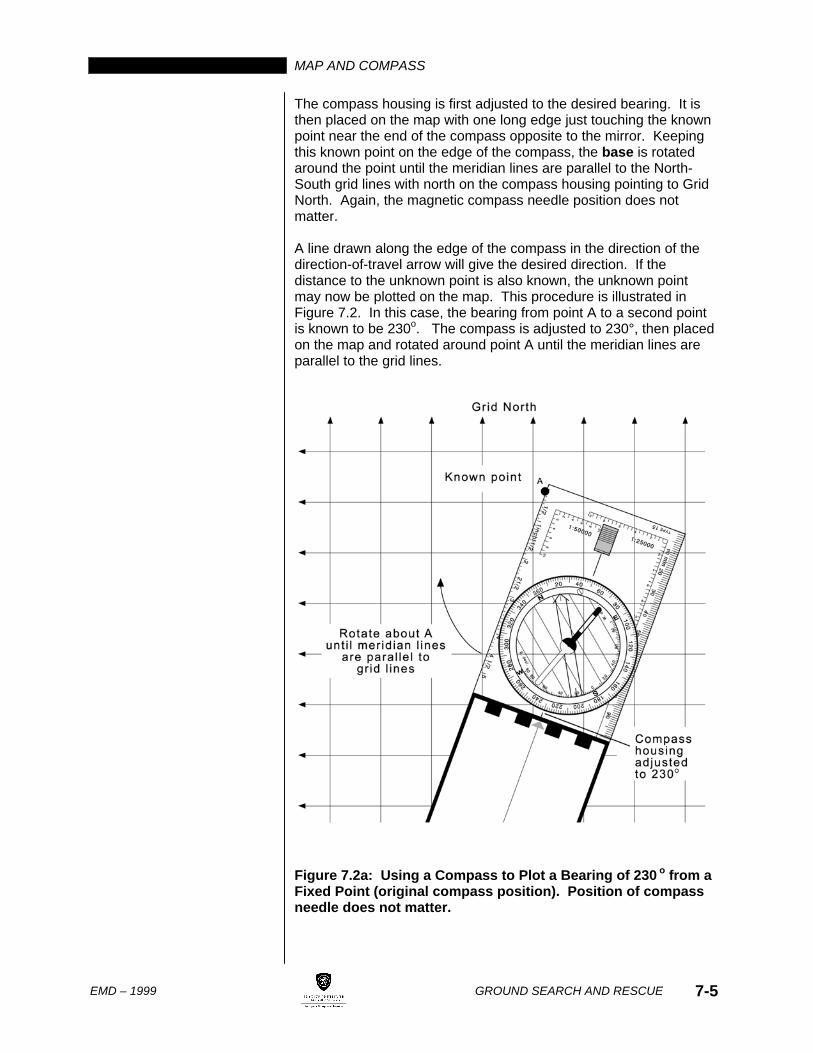
The compass housing is first adjusted to the desired bearing. It is then placed on the map with one long edge just touching the known point near the end of the compass opposite to the mirror. Keeping this known point on the edge of the compass, the base is rotated around the point until the meridian lines are parallel to the North-South grid lines with north on the compass housing pointing to Grid North. Again, the magnetic compass needle position does not matter.
A line drawn along the edge of the compass in the direction of the direction-of-travel arrow will give the desired direction. If the distance to the unknown point is also known, the unknown point may now be plotted on the map. This procedure is illustrated in Figure 7.2. In this case, the bearing from point A to a second point is known to be 230o. The compass is adjusted to 230°, then placed on the map and rotated around point A until the meridian lines are parallel to the grid lines.
Figure 7.2a: Using a Compass to Plot a Bearing of 230 o from a Fixed Point (original compass position). Position of compass needle does not matter.
EMD – 1999
GROUND SEARCH AND RESCUE 7-5
MAP AND COMPASS
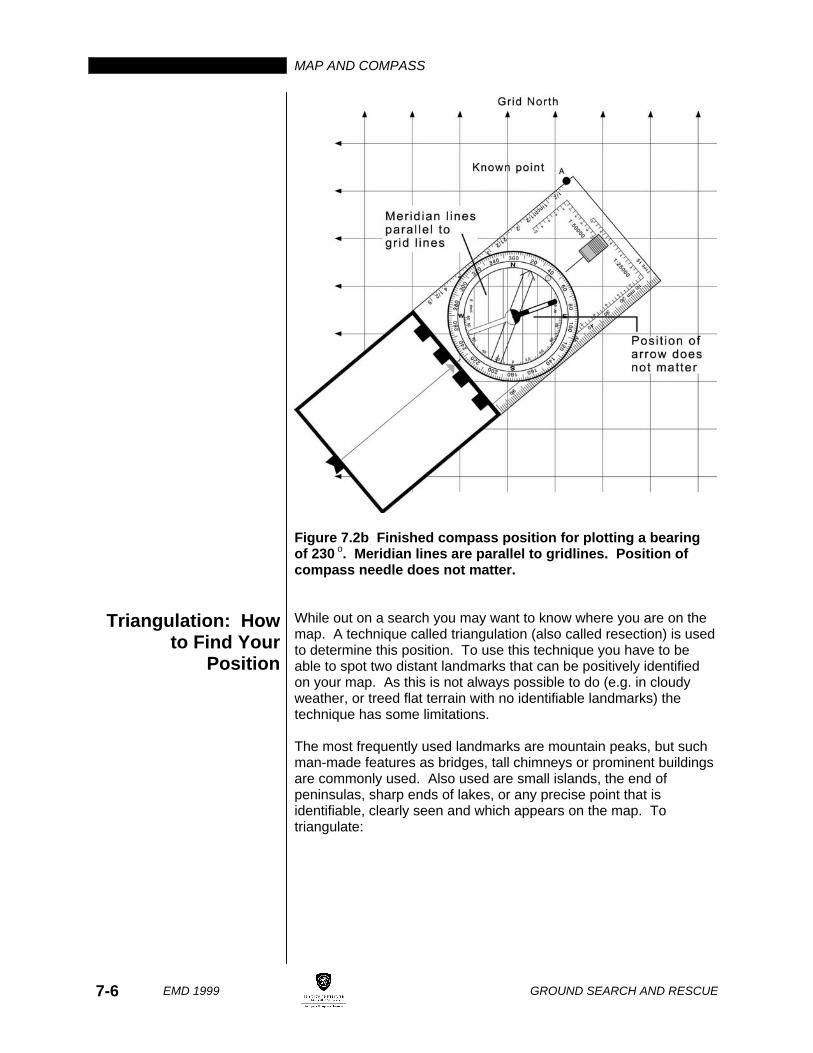
Figure 7.2b Finished compass position for plotting a bearing of 230 o. Meridian lines are parallel to gridlines. Position of compass needle does not matter.
Triangulation: How to Find Your
Position
While out on a search you may want to know where you are on the map. A technique called triangulation (also called resection) is used to determine this position. To use this technique you have to be able to spot two distant landmarks that can be positively identified on your map. As this is not always possible to do (e.g. in cloudy weather, or treed flat terrain with no identifiable landmarks) the technique has some limitations.
The most frequently used landmarks are mountain peaks, but such man-made features as bridges, tall chimneys or prominent buildings are commonly used. Also used are small islands, the end of peninsulas, sharp ends of lakes, or any precise point that is identifiable, clearly seen and which appears on the map. To triangulate:
7-6 EMD 1999
GROUND SEARCH AND RESCUE
MAP AND COMPASS
Triangulation • Sight on the landmark and determine its back bearing by aligning the white end of the compass needle over the orienting arrow instead of the normal red end. This will be the bearing from the landmark to your position as if you were standing on the landmark.
• Plot (draw) the bearing from the sighted landmark onto the map, just as if you were standing on the landmark and plotting a line of travel on that bearing.
• Do the same for the second landmark, plotting this line also.
Since you must be located on both lines, the point where they cross will be your location. For maximum accuracy, the two known points should be well separated, and preferably at something like right angles to each other. The closer they are, the less accurate the technique will be. Conversely, if they are at almost 180 degrees, they will be less accurate.
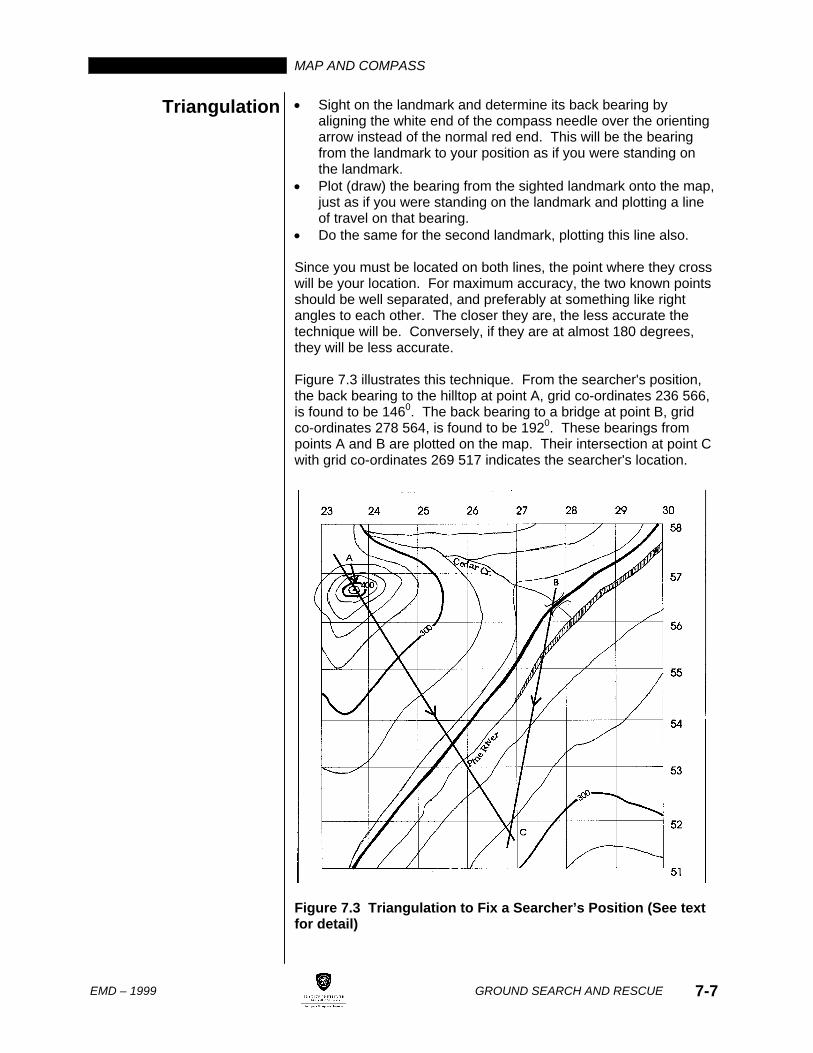
Figure 7.3 illustrates this technique. From the searcher's position, the back bearing to the hilltop at point A, grid co-ordinates 236 566, is found to be 1460. The back bearing to a bridge at point B, grid co-ordinates 278 564, is found to be 1920. These bearings from points A and B are plotted on the map. Their intersection at point C with grid co-ordinates 269 517 indicates the searcher's location.
Figure 7.3 Triangulation to Fix a Searcher’s Position (See text for detail)
EMD – 1999
GROUND SEARCH AND RESCUE 7-7

MAP AND COMPASS
Line of Position Only one back bearing needs to be taken if an additional fact is
known. If, for example, the searcher is walking along a road, the intersection of the back bearing with the road will define the searcher's position. This is called a line of position since you must be somewhere on the back bearing from the landmark and you are defining your position using the additional fact (e.g. on the road). This technique would apply equally to any other linear feature marked on the map such as a stream, power line, railway line, or lake shore along which the searcher is known to be located.
A special case of this situation arises when the searcher knows his or her elevation as a result of using an altimeter. Altimeter use will be discussed at the end of this chapter. As long as the searcher's approximate location is known, his or her position can then be established along a particular contour line. Figures 7.4 and 7.5 illustrate these forms of position fixing.
In Figure 7.4, the searcher is somewhere along the creek marked on the map. The back bearing to the mountaintop is found to be 1230. By plotting this bearing from the mountaintop on the map, the searcher's location is fixed at S.
Figure 7.4 Fixing Location using a Known Travel Aid (Creek) and Back Bearing to a Known Point (Mountaintop)
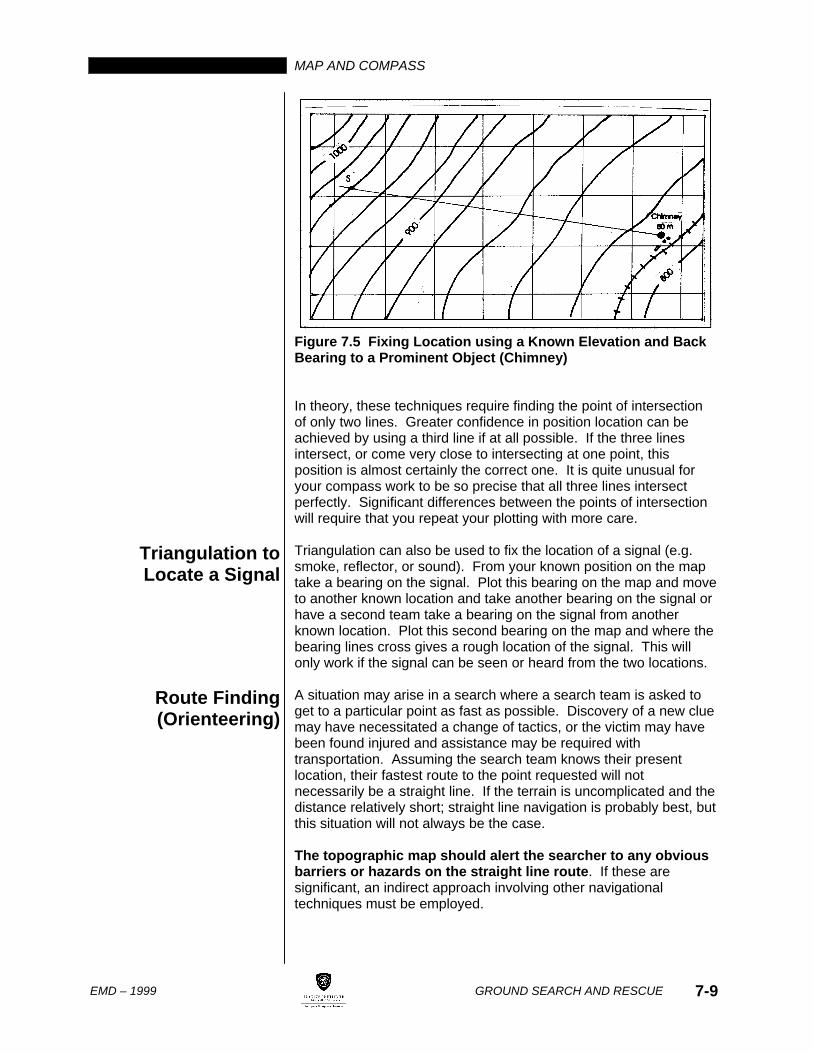
In Figure 7.5, the searcher's altimeter indicates an altitude of 960 m. The back bearing to the tall chimney near the railway line is found to be 2780. By plotting this bearing from the chimney on the map and finding its intersection with the 960 m contour, the searcher's location is fixed at S.
7-8 EMD 1999
GROUND SEARCH AND RESCUE
MAP AND COMPASS
Figure 7.5 Fixing Location using a Known Elevation and Back Bearing to a Prominent Object (Chimney)
In theory, these techniques require finding the point of intersection of only two lines. Greater confidence in position location can be achieved by using a third line if at all possible. If the three lines intersect, or come very close to intersecting at one point, this position is almost certainly the correct one. It is quite unusual for your compass work to be so precise that all three lines intersect perfectly. Significant differences between the points of intersection will require that you repeat your plotting with more care.
Triangulation to Locate a Signal
Triangulation can also be used to fix the location of a signal (e.g. smoke, reflector, or sound). From your known position on the map take a bearing on the signal. Plot this bearing on the map and move to another known location and take another bearing on the signal or have a second team take a bearing on the signal from another known location. Plot this second bearing on the map and where the bearing lines cross gives a rough location of the signal. This will only work if the signal can be seen or heard from the two locations.
Route Finding (Orienteering)
A situation may arise in a search where a search team is asked to get to a particular point as fast as possible. Discovery of a new clue may have necessitated a change of tactics, or the victim may have been found injured and assistance may be required with transportation. Assuming the search team knows their present location, their fastest route to the point requested will not necessarily be a straight line. If the terrain is uncomplicated and the distance relatively short; straight line navigation is probably best, but this situation will not always be the case.
The topographic map should alert the searcher to any obvious barriers or hazards on the straight line route. If these are significant, an indirect approach involving other navigational techniques must be employed.
EMD – 1999
GROUND SEARCH AND RESCUE 7-9
MAP AND COMPASS
Certainly, choosing a route on which the slope is acceptable, and on
which excessive alternating descending and ascending does not occur, is a very important consideration. As such a route may be quite circuitous, distance measurement is likely to be quite difficult. As a result, the searcher should first aim to get to a point that is fairly close to the required point and which can be reached and identified relatively easily. Once at this intermediate point, straight line navigation may be used to get to the desired destination. The more changes of direction, the greater the chance of error.
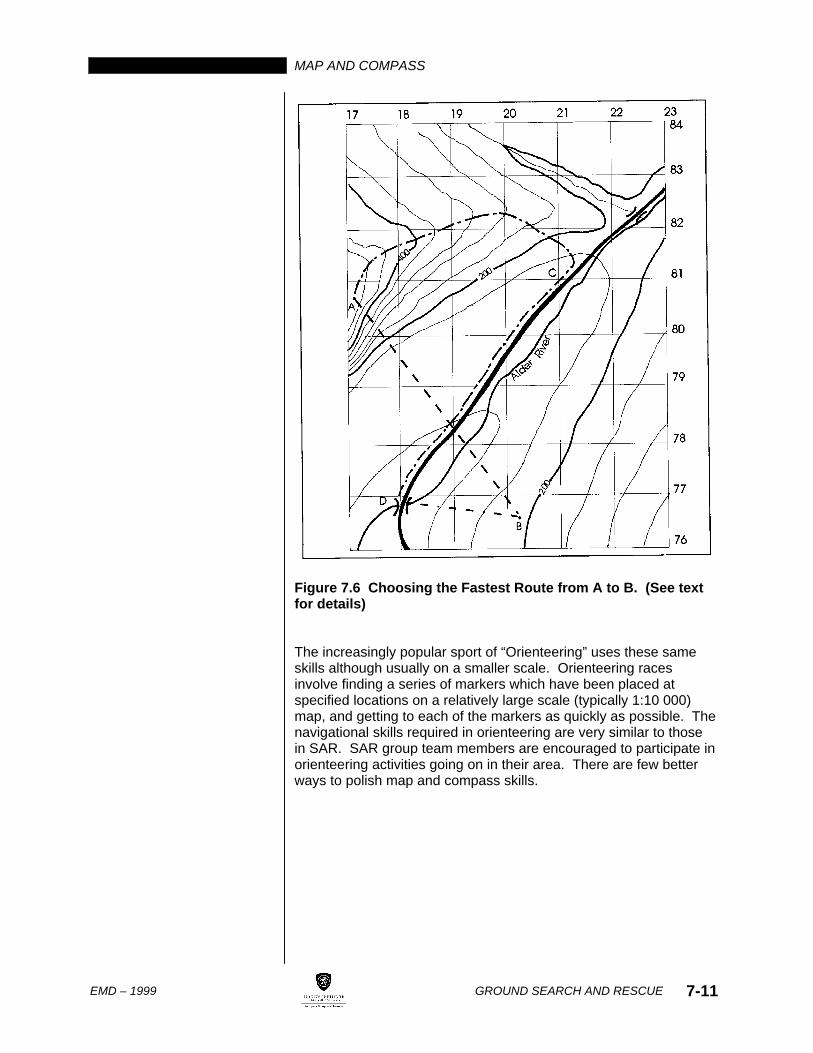
Figure 7.6 illustrates such a procedure. A search team at point A, grid co-ordinates 171 808, receives word that an aircraft has spotted what could be the wreckage of a missing plane in fairly dense forest at point B, grid co-ordinates 202 766. The SAR Manager wishes them to get to point B as quickly as possible. The straight line path, marked -----, is impractical for two reasons. A very steep hill immediately in front of the search team could prove quite dangerous, and the river running down the middle of the map is impossible to cross without a bridge. A good route might be the line marked ACDB. The team would descend from the hill to the road somewhere near C, using the gradually sloping spur on the hill's eastern flank. It would then follow the road to where it crosses the river on a bridge at D. At this point, it could be established that the desired point would be found on a bearing of 0960 at a distance to be determined from the map scale. Straight line navigation could then be used.
7-10 EMD 1999
GROUND SEARCH AND RESCUE
MAP AND COMPASS
Figure 7.6 Choosing the Fastest Route from A to B. (See text for details)
The increasingly popular sport of “Orienteering” uses these same skills although usually on a smaller scale. Orienteering races involve finding a series of markers which have been placed at specified locations on a relatively large scale (typically 1:10 000) map, and getting to each of the markers as quickly as possible. The navigational skills required in orienteering are very similar to those in SAR. SAR group team members are encouraged to participate in orienteering activities going on in their area. There are few better ways to polish map and compass skills.
EMD – 1999
GROUND SEARCH AND RESCUE 7-11
MAP AND COMPASS
Altimeters As mentioned earlier in this chapter, the effective use of map and
compass in some areas can be enhanced through the use of an altimeter. An altimeter is a modified barometer that measures altitude. Atmospheric pressure decreases with higher altitude and an altimeter measures the atmospheric pressure but displays the reading in units of altitude. By using an altimeter to determine your altitude and thus which map contour you are on, you may take a bearing on a known point and plot a single line of position on your map. Your position is where the line crosses the contour.
In times of poor visibility, an altimeter can be used to determine when a searcher has reached a particular point on a road, trail, or other travel aid. The position will be found where the contour line for that elevation crosses the trail on the map.
As atmospheric pressure varies with weather conditions as well as altitude, an altimeter must be set frequently for it to operate properly. It should be set at a known elevation before beginning a search, and then be checked and reset if necessary at any known elevations along the search route. If the altimeter reading increases significantly when the searcher knows no significant increase in elevation has occurred, falling atmospheric pressure is indicated which is usually a sign of deteriorating weather conditions.
Altimeters are available from most suppliers of outdoor recreational equipment. The cost can vary from $50 or less for the least expensive models to several hundred dollars for the most reliable ones. Moderately priced wristwatches are now available with built-in altimeter/barometer modes, which will read in either feet or meters. It is a great help for mountain search teams to have several altimeters in the party.
Global Positioning System (GPS)
GPS receivers allow for quick and accurate identification of one’s position based on information the unit receives from GPS satellites. These satellites transmit their position and timing information to the receivers. The receivers use this information to triangulate the receiver’s location in latitude and longitude. Some GPS receivers can readily toggle between lat/long and UTM grid co-ordinates. The receiver needs to obtain a signal from three satellites to pinpoint a position. Obtaining a signal from a fourth satellite provides more accuracy as well as the elevation of the position. The GPS receivers have a potential accuracy of locating a position within 15 meters however the U.S. Department of Defence introduce selective availability which lowers the accuracy to within 100 m. This is often accurate enough for most SAR requirements.
7-12 EMD 1999
GROUND SEARCH AND RESCUE
MAP AND COMPASS
One of the benefits of using GPS receivers in SAR tasks is to pinpoint positions when traditional navigational techniques (such as triangulation with a magnetic compass) cannot be performed. Examples of situations in which this would be useful are: finding a injured subject at night and transmitting the location to base, describing the position of a potential clue in a whiteout and noting its position for future reference, or informing the SAR Manager exactly where the search teams are located in terrain in which traditional triangulation will not work (eg. pine forest with no identifiable landmarks).
In addition to pinpointing your position, GPS receivers can also be used to guide you to your destination. An example of how this could be of benefit to a SAR Group would be in guiding evacuation teams to the location of a found subject. Once the subjects’ position is known the co-ordinates could be given to the evacuation team and entered into the GPS receiver. The receiver can then tell you the compass bearing, distance and once you start moving the speed at which you are travelling. A topographic map is still necessary to indicate hazards along the route.
There are some disadvantages in depending solely on the use of GPS receivers for navigation. The receivers do not work well under heavy forest cover especially if it is wet or covered in snow, or if used in deep valleys or gullies. In these conditions, the receivers have difficulty picking up satellite signals and without the data from three satellites, a location cannot be given. In addition, GPS receivers can be damaged if dropped, do not work well at low temperatures and the batteries can go dead. The elevation information from a GPS is so inaccurate as to make the readings useless. An altimeter has to be used if accurate elevation readings are required. Also, unlike altimeters, GPS receivers cannot give the barometric pressure which can be used to determine weather change.
GPS receivers definitely have some advantages that can be of benefit to SAR teams but in no way should they replace traditional map and compass work for wilderness navigation.
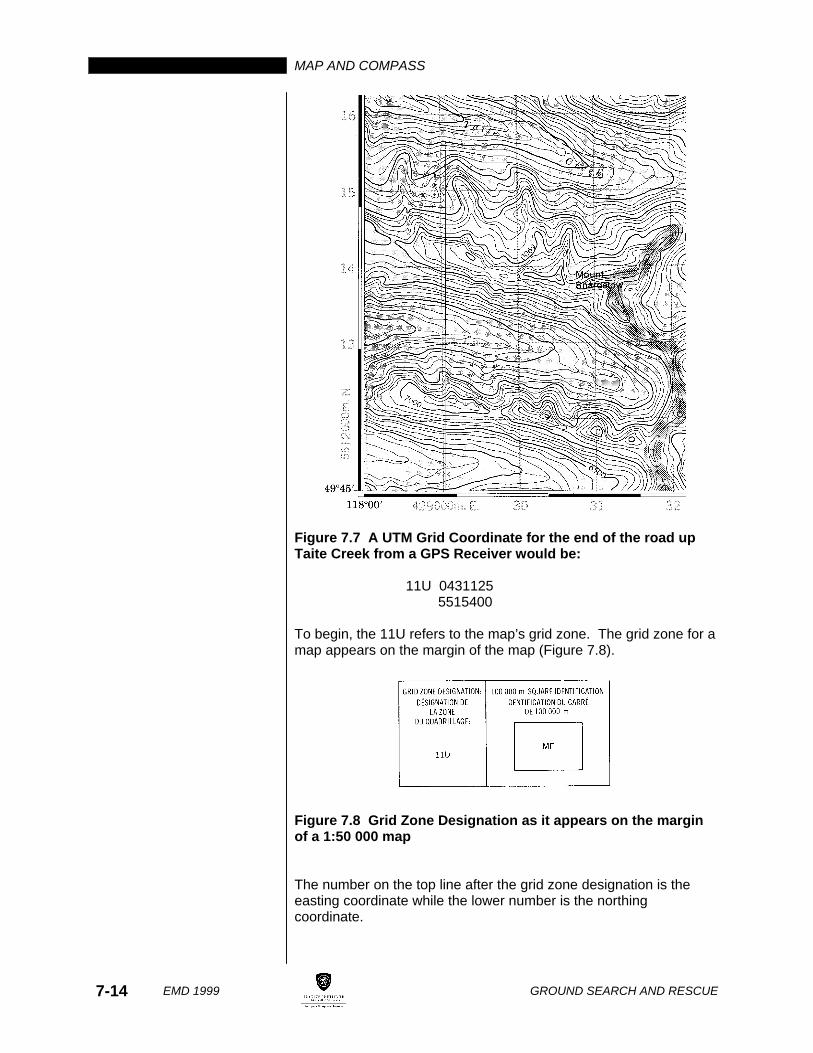
GPS and UTM Grid GPS receivers can display your location as UTM Grid Coordinates. However, the number they display will not be the 6 figure grid coordinate that are commonly used by SAR Groups. For example, the grid coordinates from a GPS receiver for the end of the logging road on Taite Creek (Figure 7.7) would be:
11U 0431125
5515400 The key is to know which figures to use to make the 6 digit grid reference.
EMD – 1999
GROUND SEARCH AND RESCUE 7-13
MAP AND COMPASS
Figure 7.7 A UTM Grid Coordinate for the end of the road up Taite Creek from a GPS Receiver would be:
11U 0431125
5515400
To begin, the 11U refers to the map’s grid zone. The grid zone for a map appears on the margin of the map (Figure 7.8).
Figure 7.8 Grid Zone Designation as it appears on the margin of a 1:50 000 map
The number on the top line after the grid zone designation is the easting coordinate while the lower number is the northing coordinate.
7-14 EMD 1999
GROUND SEARCH AND RESCUE

MAP AND COMPASS
The easting coordinate (0431125) gives the east position down to the meter (remember GPS receivers are only accurate to within 100m due to selective availability). If you look in the corner of the map the full starting easting coordinate is given. In our example it is 429000 (Figure 7.6). Note that the 0 at the beginning of the easting coordinate is not put on the map. The larger 29 numbers indicate the grid line number for the grid line situated directly above the full number (429000). Therefore, as the end of the road is over from the 31 grid line, the 3 digit easting coordinate for the end of the road is 311.
The northing coordinate (5515400) is figured out in the same manner as for the easting coordinate. In this case the starting grid number for the map is 5512000 with the larger 12 indicating the grid line next to this number. As the end of the road is above the 15 line the 3 digit northing coordinate is 154.
To summarize, a reading from the GPS receiver of: 11U 0431125 5515400
becomes 311 154 in a six digit grid coordinate. The conversion to a 6 digit coordinate can be easily done in the field by dropping the first two and the last two numbers off both the easting and the northing numbers.
Travel Skills While conducting a search you may experience terrain that normally you would not think of travelling through. Terrain such as heavy brush, steep gullies, and swamps pose challenges to the searcher. Even on a relatively flat trail there are things that should be considered while travelling.
One thing to think about is your pace. On a SAR task with the adrenaline flowing through your body you tend to walk faster than you should. Remember, you may be walking for hours and you don’t want to burn yourself out too soon. A moderate pace (not too slow) with short rest stops is the most efficient way to travel. Adjust your pace for the terrain. When travelling as a group, the pace should be adjusted for the slowest person, making sure no one falls behind. Putting the slowest person at the front of the group can set the pace and encourage the slow person to hike at a slightly faster pace. Ten minutes into the hike is a good time for an initial rest to adjust equipment and clothing. After that, a 5 minute rest every 1 hour to 1.5 hours should be sufficient.
EMD – 1999
GROUND SEARCH AND RESCUE 7-15
MAP AND COMPASS
Trails Often a hasty search of trails is one of the first things to be done on
a search. The search teams are sent along the trails to look for clues. Knowledge of the trails to be followed is a definite asset as more time can be spent looking for clues and less time spent looking for the trail. This trail knowledge is even more helpful at night when the trails are harder to follow. Time spent hiking and learning the local trails is an invaluable exercise.
If you are sent to search an unfamiliar trail and the objective is to follow the trail for a specific distance, make sure that you do not lose the trail. If you happen to find that you have lost the trail, stop, keep one person at the last position and have another person walk back and look for where the trail turned off. Keep within voice contact and if you have to work your way back to where the trail turned off, work as a group. Do not become separated.
Brush
Brush can be encountered in two different circumstances in SAR tasks. One is that searchers have to travel through the brush to the search area and the other is that a brushy area has to be searched.
If you are just travelling through the brush it is best to try and avoid it. Here are some ideas to keep in mind when avoiding brush. Travel on trails or roads even if the distance is longer. Travel in tall timber as there is less brush under the trees. Travel on ridges, straight up creekbeds, travel on snow, scree or talus or travel on game trails.
If you are required to search brush then you will have to go straight through it. Often by the time the dense bush is being searched all other high probability areas have been searched. Searching through dense bush is a slow difficult process. When searching through dense brush these suggestions might be helpful.
• Wear gloves especially for searching in areas of brambles or Devil’s Club.
• Wear clear goggles to protect your eyes from being whipped by branches (this is especially important if searching brush at night when the branches cannot be seen).
• Make sure you see where you are placing your feet as there can be holes, water or even cliffs under the brush which cannot be seen.
• Make sure any loose equipment is securely attached to your body. There have been instances of pagers, radios and other types of equipment being knocked off in the bush that then required finding.
• Follow a compass bearing as it is very easy to lose your direction in the bush.
7-16 EMD 1999
GROUND SEARCH AND RESCUE
MAP AND COMPASS
Talus and Scree Often when searching in mountainous areas the searchers will come across talus or scree slopes. As mentioned earlier these slopes can provide brush free paths up mountains but they can also be quite dangerous if not stable. Talus or scree slopes often are in gullies or are at the bottom of cliffs. Talus is composed of rocks that are large enough to step on individually. While travelling up a talus slope it is important not to dislodge large rocks or rock avalanches onto yourself or onto other members of your search team. Keep close together when travelling as a group so no rocks gain momentum if they become dislodged.
Scree slopes are made up of small pebbles and rocks and are a couple centimetres in width. The size of rocks is usually quite uniform in scree with the rocks moving around your feet if stepped on. Movement of the rocks can make uphill progress on scree slopes very tiresome. Avoid hiking up scree slopes if at all possible. During downward descent use the movement of the rocks to help you descend. Again, if travelling as a group stay close together and try to avoid damaging vegetation on the slope, slope sides or bottom.
When crossing scree or talus slopes on trails it is important to locate where the trail leaves the slope and heads back into the woods. This is especially important at night. Many hours have been spent looking for trails on the edges of talus and scree slopes.
Snow and Glaciers
Snow is often encountered on searches in BC. Snow can make travel easier or it can make it difficult and dangerous. In soft snow other equipment such as skis or snowshoes are required to travel effectively. Their use will not be covered in this manual. Some of the hazards include cold, winds, avalanches, breaking through snow bridges across creeks, tree wells and crevasses on glaciers. Glacier travel requires special techniques which are beyond the scope of this manual.
Technical versus Non-technical
Terrain
You are on technical terrain when special equipment or special techniques are required to move across an area. Examples of technical terrain include glaciers; mountains that require lead climbing; class 4 scrambling or repelling; swiftwater; caving; diving; and flat ice crossings.
It is important for SAR volunteers to know their limitations and that going into technical terrain requires more instruction and practice than is provided in the GSAR course.
EMD – 1999
GROUND SEARCH AND RESCUE 7-17
MAP AND COMPASS
Additional Resources
Graydon, Don, and Hanson, Kurt. 6th Edition, Mountaineering, The Freedom of the Hills. Seattle, WA: The Mountaineers, 1997. Kjellstrom, Bjorn. Be Expert with Map & Compass. New York, NY: MacMillan General Reference, 1994. Seidman, David. The Essential Wilderness Navigator. Camden, MD: International Marine/Ragged Mountain Press, 1995. Further references listed in the Bibliography.
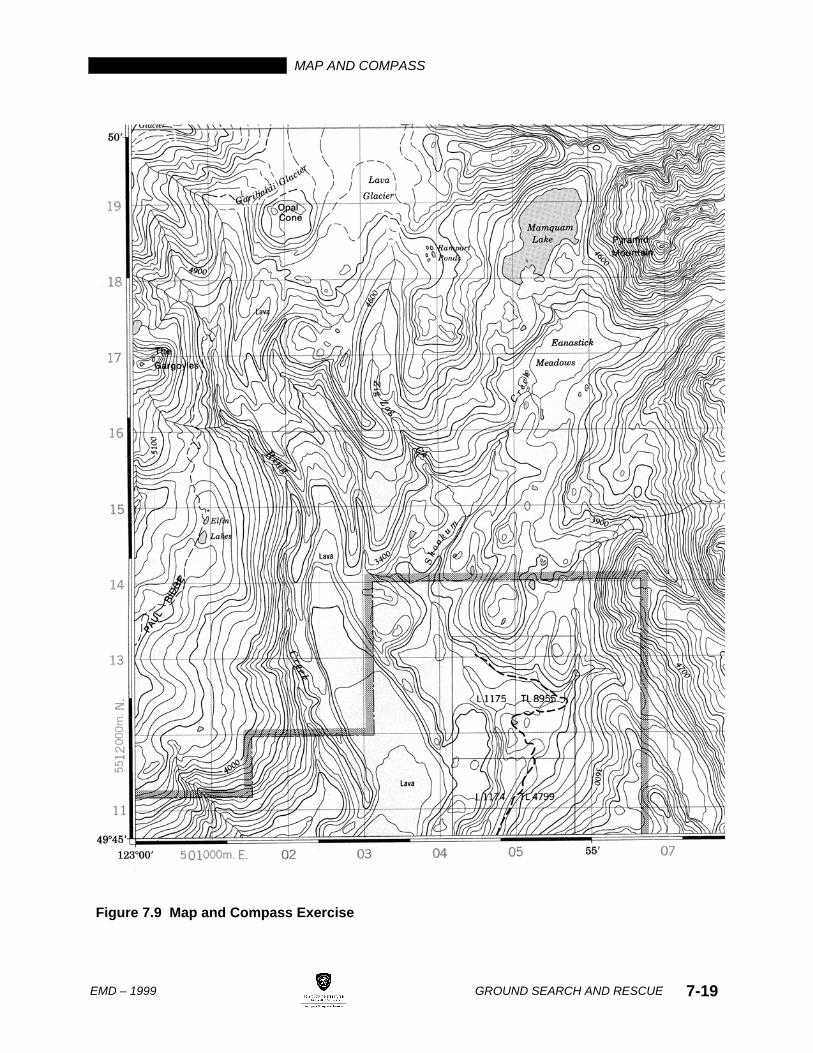
Chapter Review Please answer the following questions on a separate sheet of paper so that another student can use this manual. Use Figure 7.7 to answer the questions. The answers to these questions are located at the end of the manual.
1. What is the bearing looking from Pyramid Mountain to the Opal Cone? What is the back bearing?
2. You are in the Valley of Skookum Creek. Base wants to know
what your location is. You take two bearings. The bearing on the east Gargoyle is 291° and the bearing on Pyramid Mountain is 32°. What is the UTM grid reference of your location?
3. You are on the trail by Elfin Lakes. You take a bearing on
Pyramid Mountain and find that it is 67°. What is the latitude and longitude and the grid reference of your position?
4. What is one area of technical terrain on the map provided.
7-18 EMD 1999
GROUND SEARCH AND RESCUE
MAP AND COMPASS
Figure 7.9 Map and Compass Exercise
EMD – 1999
GROUND SEARCH AND RESCUE 7-19