chapter 15 „grade rule grading” - grafisdownload.grafis.de/pdf/lbv9e15.pdf · ©friedrich:...
TRANSCRIPT
Chapter 15 „Grade Rule Grading” _________________________________________________________________________________________________________________
©Friedrich: Grafis - Textbook Part 2, Edition 10/2003
Contents
15.1 Digitizing the pattern perimeter ................... 2 15.2 Overview on assigning grade rules................ 7 15.3 Edit grade rules ............................................. 8 15.4 Save grade rule pattern ............................... 11 15.5 Edit grade rule pattern, drag and transfer
grade rules .................................................. 12 15.6 Digitize grade rules ..................................... 15 15.7 Transfer grade rules from a template
pattern ........................................................ 19 15.8 Convert record into grade rule pattern...... 21 15.9 Create, use and edit grade rule library ....... 22 15.10 Group grade points ..................................... 24
______________________
From Version 7 grade rule grading is integrated in Grafis. Construction patterns as well as grade rule patterns (Rule Patterns) can be used for pattern development. Construction patterns are generated on the basis of body measurements. Grade rules are not required for grading, see Chapter 12. A grade rule pattern consists of a pattern perimeter with grade points. Each grade point is linked to a grade rule table with size-related point movement in x and y direction. Grade rule patterns can be accepted into the record to form the basis of style development just like construction patterns (Chapters 1 to 14). As
opposed to construction patterns, grade rule patterns cannot be graded made-to-measure. This chapter deals with the following topics: • digitizing a pattern (section 15.1) and • overview of options for assigning grade rules
(section 15.2), • edit grade rules in three different ways (section
15.3), • saving a grade rule pattern (section 15.4) with
the options: accept into the construction record for style
development, deposit as template and deposit as construction into the call list.
• edit grade rule patterns, transfer and drag grade rules (section 15.5)
• digitizing grade rules from a nest plot (section 15.6)
• transfer grade rules from a template (section 15.7)
• „extract” grade rule pattern (section 15.8) for separation of parts from a complex style
to develop pattern components and transfer of grade rules from „tested” patterns
onto digitized contours. • apply and use grade rule library (section 15.9) • create grading groups (section 15.10).

2 Chapter 15 “Grade Rule Grading“ _________________________________________________________________________________________________________________ ©Friedrich: Grafis - Textbook Part 2, Edition 10/2003
15.1 Digitizing the pattern perimeter
Prerequisites
Prerequisite for digitizing is a digitizer with a 16-button mouse, connected and switched on. The respective Windows95/98 or WindowsNT driver must be installed. If these conditions are fulfilled, the test programme \Grafis\HILFEN\TABTEST.EXE displays the current pixel position of the digitizer cursor in x and y direction when moving the digitizer mouse across the active area.
Have the overview of the digitizer key assignment and the menu pad for the digitizer ready. Both can be found in the Documentation. They are different from the ones in Grafis Version 6 and earlier.
Position the menu pad anywhere within the active area of the digitizer. At the beginning and after each change of position, only the position is to be defined as follows: <TAB> (Tab key) starts setup. Then, points P1 and P2 of the menu pad are to be digitized.
Step-by-step guide
⇒ Prepare digitizer ⇒ Prepare the pattern to be digitized, mark missing
notches etc., decide whether to digitize with or without seam allowance
⇒ Activate and annotate an empty part in the part list (possibly prepare the part list with annotations for all parts to be digitized)
⇒ Enter the base size of the pattern to be digitized into the first position in the size table
⇒ Grade Rules | Digitize Grade Rule Pattern ⇒ Click GRP: Digitize ⇒ Set up menu pad (at the beginning, only) ⇒ Determine entry transformation and define scale
Fa=... (e.g. 2 for patterns in half scale) ⇒ Digitize lines and points ⇒ possibly: Save digitized patterns and digitize
another pattern ⇒ Terminate with [Quit Digitizing] on the menu pad
or ⇒ Edit (digitize / replace) and save the grade rule
pattern (see sections 15.4 and 15.5) ⇒ Quit with
Preparation
Digitizing is easier if the required grade points are marked on the pattern. This could be done by hand, also. With Grade Rule Pattern | Digitize Grade Rule Pattern digitizing ensues into an empty part. Therefore, activate a part with „0” record steps. The digitized pattern can be inserted into the record or the call list or can be saved as a template, later.
With Grade Rule | Edit Grade Rule Pattern subsequent digitizing of points, lines or grade rules into non-edited or edited grade rule patterns or even into constructed patterns is possible. This option is not explained in detail.
Before digitizing, Grafis is to be told the size of the pattern to be digitized. The base size is to be entered into the first position of the size table. In the example blazer side panel (Picture 15-5) this is size 38. Subsequently, a new base size can be entered by calling Edit | New Base Size for All from a grade rule table.
After these preparations, continue with Grade Rule | Digitize Grade Rule Pattern. The menu for editing grade rule patterns shown on page 12 is opened. First, open the digitize menu shown on the right via the digitize function in the menu.
Entry transformation
For the data transfer digitizer =>Grafis five entry transformations are available p+px =>0,0 p+py =>0,0 p+px =>p p+py =>p p+p =>p+p
The entry transformation determines the data transfer digitizer => Grafis. It is to be updated after repositioning the pattern on the digitizer. The entry transformations are called via the menu template. They have the following significance.
template
transform.: p+px=>p00 p+py=>p00 p+px=>p p+py=>p p+p=>p+p
Fa=1.0000
points (1) lin/cur (1)
Grade rules
digitize

Chapter 15 “Grade Rule Grading“ 3 _________________________________________________________________________________________________________________
©Friedrich: Grafis - Textbook Part 2, Edition 10/2003
Transformations p+px => 0,0 and p+px =>p
These transformations align the pattern horizontally. With p+px => 0,0 the first digitizer point Pa is set onto the zero point in Grafis. The second digitizer point Pb defines the x axis of the digitizer template (Picture 15-1). As opposed to p+px => 0,0 the first digitizer point Pa is positioned on a point to be constructed in Grafis with p+px =>p.
Transformations p+py => 0,0 and p+py =>p
These transformations align the pattern vertically. They differ from p+px => 0,0 and p+px =>p only in the second digitizer point Pb defining the y axis of the digitizer template (Picture 15-2).
Transformation p+p => p+p
The first digitizer point Pa is set on position Pc in Grafis; the second point Pb is set on Pd in Grafis. The scale and co-ordinate rotation is calculated according to these settings (Picture 15-3). Use this
transformation for inserting/replacing curves for example.
Scale factor
For all transformations other than p+p=> p+p the scale factor Fa=... is to be set. The digitized point co-ordinates are multiplied with this factor. A pattern with scale 1:2, digitized with scale factor Fa=2.00 appears full size in Grafis.
The digitizer mouse key functions
For digitizing, a 16-button mouse is required; the keys are assigned the following functions (Picture 15-4): 1: <digitize> Set digi point. 2: <deposit+continue> The active line/curve (red) or active points
(white, round) are deposited. The next line/curve is linked, directly. Starting point of the next line/curve is identical to the final point of the last line/curve. It is not digitized again.
3: <deposit+start> The active line/curve or active points are
deposited. A new object with a new starting point is digitized.
4: <delete nearest digi point> The point closest to the cursor and active (digi
point or grade point) is deleted. 5: <digitize with grade point> A digi point is digitized as a grade point. 6: <click p> Set digi point onto a point. 7: <click l> Set digi point onto a line/curve.
digitizer
X
YGRAFIS
X
Y
0,0 or Pc
Pb
Pa
Picture 15-1
digitizer
X
YGRAFIS
X
Y
0,0 or Pc
Pb
Pa
Picture 15-2
digitizer
GRAFISPa
PbPc
Pd
Picture 15-3
Picture 15-4

4 Chapter 15 “Grade Rule Grading“ _________________________________________________________________________________________________________________ ©Friedrich: Grafis - Textbook Part 2, Edition 10/2003
Picture 15-5

Chapter 15 “Grade Rule Grading“ 5 _________________________________________________________________________________________________________________
©Friedrich: Grafis - Textbook Part 2, Edition 10/2003
8: <click pl> Set digi point onto the fulcrum of a line/curve. 9: <zoom digi area> The screen display is zoomed so that it contains
all active digi objects not yet deposited. 10: <zoom all> The screen display is zoomed so that it contains
all screen objects; as the function „centre picture„ with <F6>.
11: <zoom +> Increase screen display. 12: <zoom -> Reduce screen display. 15: <move points> Move grade points. 16: <re-digitize lines/curves> Replace lines/curves. The starting and final point
of the line/curve cannot be changed. The functions <move points> and <re-digitize lines/curves> are particularly useful for editing grade rule patterns which are already incorporated in style developments.
The functions of the menu pad are explained after the exercise on page 7.
Digitizing points and lines/curves
In the digitizing mode all deposited lines appear yellow and all active lines red. Active points are round and filled in white, deposited points are white crosses. Switching between [points] and [line/curve] (on the menu template) effects all active objects. Each digitized line or point sequence must be deposited with <deposit+continue> or <deposit+start>. Starting and final point of a line/curve are automatically converted into grade points. It is resumed with a new object. Check before each deposit that the digitized contour equals the template with <zoom digi area>.
Step-by-step guide
⇒ Select object type [points] or [line/curve] ⇒ if [line/curve]; at the beginning and after
<deposit+start>: • digitize starting point of the line, option 1 „form with intermediate points”: • digitize final point of the line, • <zoom digi area>, • digitize intermediate points option 2 „digitize in sequence”: • digitize line in sequence, • <zoom digi area>,
⇒ if <points>: • digitize all points
⇒ Correction with <delete nearest digi point> ⇒ Deposit the digitized line or points with
• <deposit+continue>, if the final point of the digitized object is to be the starting point of the next object or
• <deposit+start>, if the next object starts at a new position.
⇒ Correction with <move points> and <re-digitize line/curve>
Digitize the objects of the template. The perimeter should have no gaps. It can be closed by binding the final point of the last line onto the existing objects with <click p>, <click l> or <click pl>. Points on lines (e.g. notch positions) should be bound onto previously digitized lines with <click l>.
Exercise
Digitizing is explained with the blazer side panel depicted in scale 1:2 on page 4 as an example (Picture 15-5). Note that the smaller the scale of the template, the less accurate the digitized pattern. Fix a copy of the blazer side panel to the digitizer. Activate an empty part in the part list, annotate the part and set the base size (here: ____38_0) onto position 01 in the size table. The following steps relate to Picture 15-6.
Grade Rule | Digitize Grade Rule Pattern digitize <TAB> digitize points P1 and P2 of the
menu template p+py=>0,0 click point 11 and then point 10 Fa=2 for templates in scale 1:2 [line/curve] P1 with <digitize> P2 with <digitize w. grade point> P3 with <digitize w. grade point> P4 with <digitize> <zoom digi area> This curve was digitized „in sequence“. The other option follows when digitizing the armhole curve. Before deposit, shape the curve with points P14, P15, P16. P14 with <digitize> Should P14 not be at the required position delete P14 with <delete nearest digi point> P14 with <digitize> P15 with <digitize> P16 with <digitize> <deposit +continue> P5 with <digitize> <zoom all> <deposit +continue>

6 Chapter 15 “Grade Rule Grading“ _________________________________________________________________________________________________________________ ©Friedrich: Grafis - Textbook Part 2, Edition 10/2003
Now, the second option follows. First, the final point is digitized and then, the intermediate points. We recommend this option as the rule „the less points the smoother the curve“ applies to digitizing, also.
P7 with <digitize> <zoom digi area> P6 with <digitize w. grade point> P17 with <digitize> possibly additional intermediate points <deposit +continue> P9 with <digitize> <zoom digi area> P8 with <digitize>
The function <digitize w. grade point> is not used, here as digitizing points is to be covered.
P18 with <digitize> P19 with <digitize> possibly additional intermediate points <deposit +continue> Digitize the notch P8 as a grade point. [points] click P8 with <click l> <deposit + start>
[line/curve] <zoom all> click P9 with <click pl> click P1 with <click pl> <deposit + start> The contour is closed. All notch positions are marked with grade points. Digitize the grain line, also. P10 with <digitize> <deposit+continue> P11 with <digitize> <deposit+continue> P12 with <digitize> <deposit+continue> P13 with <digitize> <deposit+start> The pattern is digitized in base size 38. Carry out a final check. The function keys <F2> (zoom with digitizer mouse) and <F6> work in digitizer mode, also.
Deleting objects is possible in the Grade Rule | Digitize Grade Rule Pattern mode, only, not in the Grade Rule | Edit Grade Rule Pattern mode. To delete points select [delete objects p] from the menu template; to delete lines/curves select [delete objects l] (echo → right menu strip). Delete all respective objects with the digitizer mouse. Deleting is terminated with [delete objects OFF].
Replacing objects is possible in the Grade Rule | Edit Grade Rule Pattern mode, also. Thus, grade rule patterns which are the basis for style developments can be altered, subsequently. To move a point click on it with the digitizer mouse key <move points> and digitize it again. With <re-digitize line/curve> you can replace a line/curve. Starting and final point of the line/curve remain unchanged. <deposit+start> deposits the new line/curve.
Should grade rules be digitized from a graded nest continue according to section 15.6. Otherwise, you can choose between • digitizing all patterns and apply grade rules, later
or • entering the grade rules for the pattern, directly
and then, digitizing the pattern.
1
11
10
5
6
4
3 7
8
9
2
17
16
14
15
12
13
19
18
Picture 15-6

Chapter 15 “Grade Rule Grading“ 7 _________________________________________________________________________________________________________________
©Friedrich: Grafis - Textbook Part 2, Edition 10/2003
The function [save to part] of the menu pad allows for saving the digitized pattern in the record. Grafis opens a window for display of part numbers and names. Select an empty part with the template functions [↑] and [↓] and save with [YES]. This saving from the digitizing mode allows for digitizing of a number of patterns without having to change between digitizer mouse and keyboard. The names for the parts to be digitized can be entered into the part list prior to digitizing.
Terminate digitizing with [quit digitizing] from the menu template. If you do not wish to continue to proceed with the next section of this chapter, immediately deposit the digitized pattern into the active part with save => record. It can be processed further via Grade Rule | Edit Grade Rule Pattern.
The functions of the menu pad
The menu pad is to be positioned on the active area of the digitizer. The position of the menu pad is defined with <Tab> and digitizing points P1 and P2. The fields of the menu pad can, then, be activated by clicking. They have the following significance: [ p+px => 0,0 ] [ p+px => p ] [ p+py => 0,0 ] [ p+py =>p ] [ p+p => p+p ]
Activate one of the five described entry transformations.
[ Fa= ... ] Enter the scale factor (except for „p+p => p+p„).
[ points ] Digitize single points (applies to all active digi points).
[ line/curve ] Digitize line/curve (applies to all active digi points). For a line select [ line/curve ], digitize the starting and final point and deposit the object.
[ grade rules ON/OFF ] Start/end digitizing grade rules from a graded nest, see section 15.6.
[ set attributes ] Set attributes for the active type of object [points] or [line/curve]. Click the required attribute number 1, 2 or 3. As an echo, the new attribute number appears in brackets in the menu strip on the right behind the object type, e.g. lin/cur (3) means the digitized line/curve is given line attribute no. 3.
[ delete objects ] Delete points with [ delete objects p ] or lines with [ delete objects l ]. Quit deleting with [ delete objects OFF ].
[ save to part ] Save the digitized patterns to an empty part to be selected from the part list. With [ ↑ ] or [ ↓ ] you can scroll in the part list. The selection is to be confirmed with [ YES ].
[ ↑ ] or [ ↓ ] Scroll in the part list.
[ save ] or [ abort ] Confirm selection in the part list or abort saving.
[ quit digitizing ] Quit digitize mode. The dialogue resumes at the computer.
The following functions were not used in the Exercise: • delete objects • set attributes and • saving from the digitizing mode.
15.2 Overview of assigning grade rules
Grade rules should be assigned to break sizes, only. All other sizes are calculated by Grafis by interpolation or extrapolation analogous to calculation of x values.
Assigning grade rules to grade points can be done in 9 different ways of which the operator usually uses only a few. Overview of the individual options:
The option enter absolute grade rules (section 15.3) is the most common way of assignment. Grade rules can be entered in mm or 1/10mm.
The option enter grade rule differences (section 15.3) is also used.
The option enter grade rule proportions (section 15.3) will be welcomed by experienced users. The grade rule difference is calculated on the basis of a factor multiplied with the previous grade rule difference.
The option digitize grade rules (section 15.6) is required if grade rules are not available as numeric values but indirect as graded nest or sets of sizes.
The option transfer grade rules with copy or proportional (section 15.5) is used for additional grade points for example.
With the option drag grade rules (section 15.5) grade rules can be altered „by eye“.

8 Chapter 15 “Grade Rule Grading“ _________________________________________________________________________________________________________________ ©Friedrich: Grafis - Textbook Part 2, Edition 10/2003
The option apply grade rule library (section 15.9) is interesting for companies who have many years of experience of grading and work with their own libraries. It is to be investigated whether existing grade rule libraries from other CAD systems can be converted for Grafis.
For the option transfer grade rules from a template pattern (section 15.7) proven gradeable templates have to be saved for the respective style types. Digitized first patterns without grading information can transfer grade rules from these templates.
The option import grade rule patterns from other CAD systems is possible via standard interfaces. This option is to be adjusted in each case for the specific company and is not part of this Textbook.
15.3 Edit grade rules Grade points are marked with a red or green circle. A red circle indicates that the grade point has not been assigned a grade rule. The different options for assigning grade rules were mentioned briefly in section 15.2. Topic of this section is editing grade rules in the options normal, difference and proportional display. In Grafis, grade rules are saved in grade rule tables. The window for editing grade rule tables (Picture 15-7) opens after having clicked on a grade point. A red arrow indicates the grade point for which the grade rule table is displayed. The elements of the window are explained in Picture 15-7.
Display options
Grade rules for grade point no.: Base size
Toggle between display in mm and 1/10 mm
Label for break size
Delete grade rule asbreak size
Accept grade rule asbreak size
Enter grade rulefor x or y
Difference to base size in x directionin mm or 1/10 mm
Difference to base size in y directionSize column
Dialogue field forcomments;
Open with double-click.
Label for base size
Picture 15-7
Chapter 15 “Grade Rule Grading“ 9 _________________________________________________________________________________________________________________
©Friedrich: Grafis - Textbook Part 2, Edition 10/2003
The functions of the pull-down menu of this window have the following significance: File |Save in Library...
saves the grade rule table in a library, provided a library is available (section 15.9).
File |Delete from Library... deletes the grade rule table from the library (section 15.9).
File |Print prints the single grade rule table in the active display option. An overview of all grade rule tables can be output via the print menu function.
File |Close or closes the window.
Edit | New Base Size for All defines a new base size. The contour of the base size remains unchanged. The grade rule table is re-calculated for the new base size. Is the current base size 38 replaced by size 40 the pattern is reduced in all sizes. The break sizes and the grade rule differences remain existent.
Edit | Grade Point becomes new Stack Point changes the marked grade point into the new stack point of the grade rule pattern.
Edit | Reduce Break Sizes (all Grade Points) automatically removes the mark for break sizes from all sizes which can be calculated by interpolation from adjacent sizes without alteration. Grading remains unchanged after calling this function.
Edit | Reduce Break Sizes (this Grade Point) as before but for the marked grade point, only.
Edit | Nil X and Y deletes all grade rule settings. After calling this function the grade point is not graded, it remains unchanged during grading.
Edit | Nil X or Y deletes the x or y component of the grade rule. After calling this function the grade point is graded with one component, only.
Edit | Allow Rotate/Mirror Grade Rules If this option is ticked grade rules of the marked grade point can be mirrored and rotated. A crosshair appears with the functions analogous <F3>. Rotate and mirror grade rules should be used by experienced users, only. The rotation angle and mirror are indicated in the grade rule table.
Display displays the grade rules in millimetres or 1/10 millimetre. The active option is indicated with a tick. In the industry, the display option 1/10 mm is common.
Enter values in the line highlighted with a bar. The interpretation of the values in x and y direction depends on the display option selected
under Display. The values are accepted with or <ENTER>.
accepts values in fields „x” and „y”. The marked size becomes break size.
deletes marked size as break size. The values for this size are interpolated.
The cards „norm”, „diff” and „fact” contain different view options for the current grade rule table (Pictures 15-9 to 15-11). Changes to the view alter the contents of the other displays, also.
grey edit window at the lower window edge In this edit field you can enter your own comments on the grade rule. It is opened with a double-click, clicking another function closes the field. Grafis automatically enters information on source of the rule and dragging the grade point into this field.
Topic of the following exercise is entry of grade rules in the normal view. Then, explanations on the three display options follow.
Exercise: Enter grade rules for blazer side panel
For the blazer side panel digitized in section 15.1 grade rules are to be entered for grading in a size range from 34 to 46. The following grade rules belong to the grade points numbered according to Picture 15-6 (values in mm). They may not correspond with common grade rules. Practise entry of grade rules. Later, you can determine your own values.
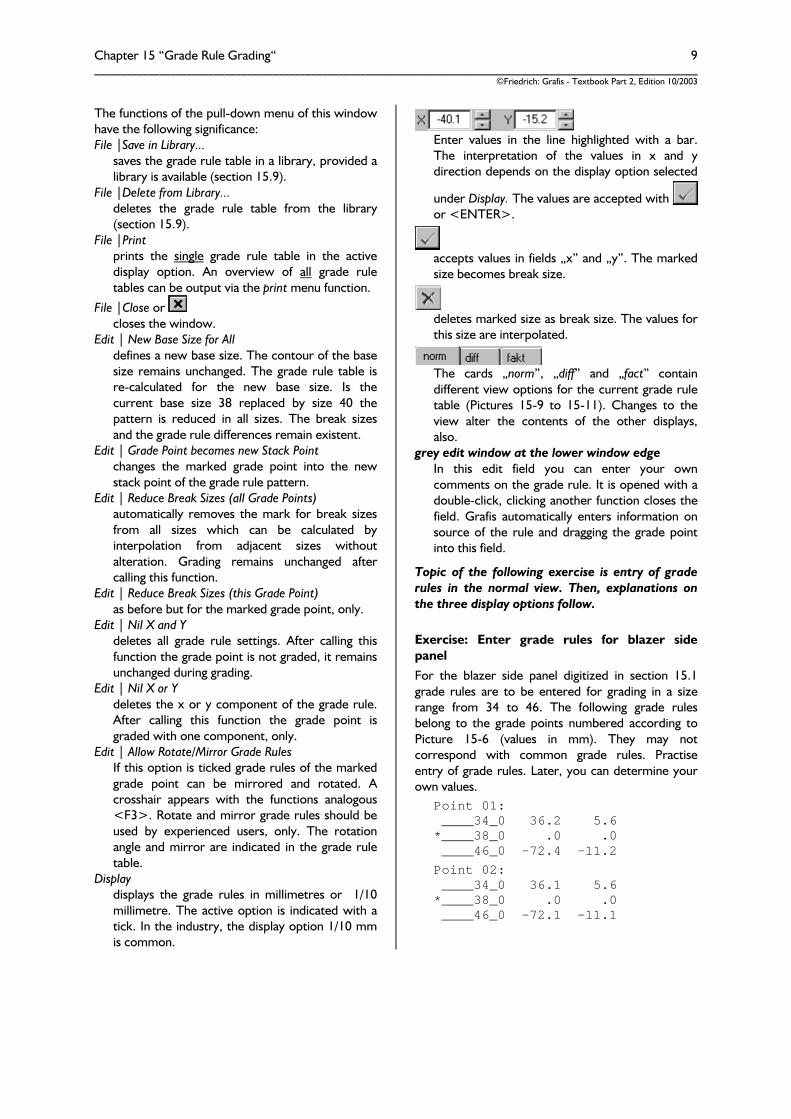
Point 01: ____34_0 36.2 5.6 *____38_0 .0 .0 ____46_0 -72.4 -11.2 Point 02: ____34_0 36.1 5.6 *____38_0 .0 .0 ____46_0 -72.1 -11.1
10 Chapter 15 “Grade Rule Grading“ _________________________________________________________________________________________________________________ ©Friedrich: Grafis - Textbook Part 2, Edition 10/2003
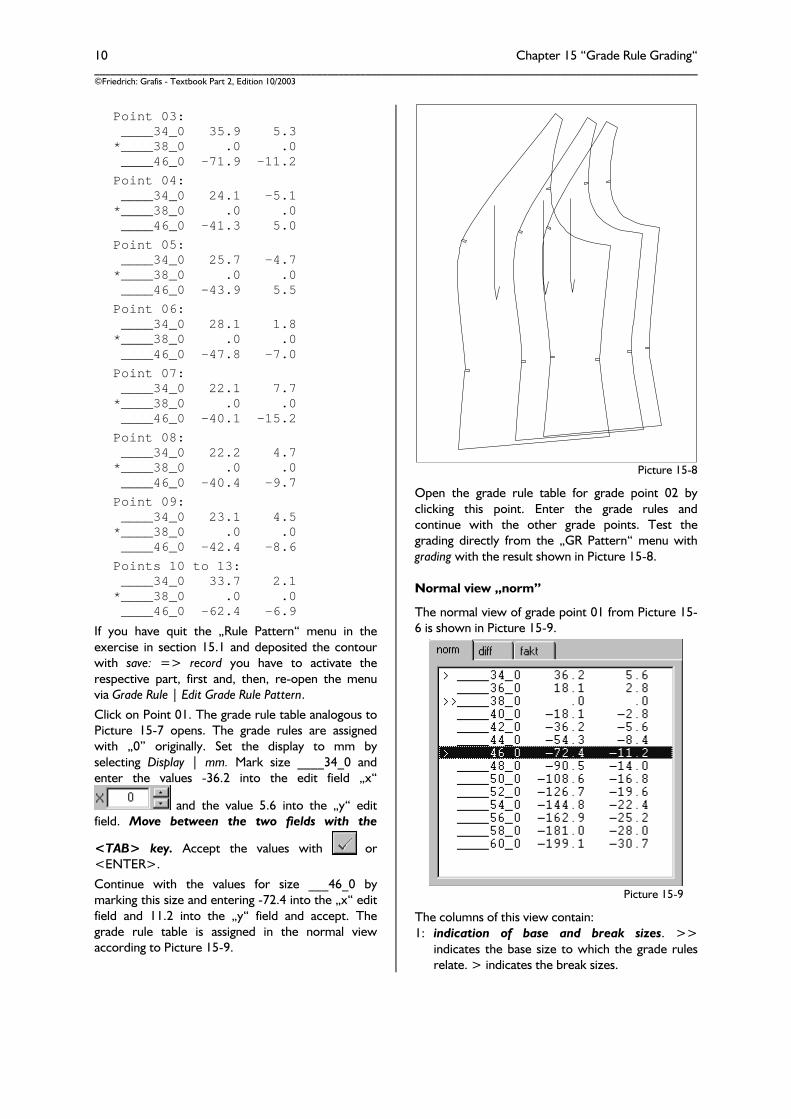
Point 03: ____34_0 35.9 5.3 *____38_0 .0 .0 ____46_0 -71.9 -11.2 Point 04: ____34_0 24.1 -5.1 *____38_0 .0 .0 ____46_0 -41.3 5.0
Point 05: ____34_0 25.7 -4.7 *____38_0 .0 .0 ____46_0 -43.9 5.5 Point 06: ____34_0 28.1 1.8 *____38_0 .0 .0 ____46_0 -47.8 -7.0 Point 07: ____34_0 22.1 7.7 *____38_0 .0 .0 ____46_0 -40.1 -15.2
Point 08: ____34_0 22.2 4.7 *____38_0 .0 .0 ____46_0 -40.4 -9.7 Point 09: ____34_0 23.1 4.5 *____38_0 .0 .0 ____46_0 -42.4 -8.6
Points 10 to 13: ____34_0 33.7 2.1 *____38_0 .0 .0 ____46_0 -62.4 -6.9
If you have quit the „Rule Pattern“ menu in the exercise in section 15.1 and deposited the contour with save: => record you have to activate the respective part, first and, then, re-open the menu via Grade Rule | Edit Grade Rule Pattern.
Click on Point 01. The grade rule table analogous to Picture 15-7 opens. The grade rules are assigned with „0” originally. Set the display to mm by selecting Display | mm. Mark size ____34_0 and enter the values -36.2 into the edit field „x“
and the value 5.6 into the „y“ edit field. Move between the two fields with the
<TAB> key. Accept the values with or <ENTER>.
Continue with the values for size ___46_0 by marking this size and entering -72.4 into the „x“ edit field and 11.2 into the „y“ field and accept. The grade rule table is assigned in the normal view according to Picture 15-9.
Open the grade rule table for grade point 02 by clicking this point. Enter the grade rules and continue with the other grade points. Test the grading directly from the „GR Pattern“ menu with grading with the result shown in Picture 15-8.
Normal view „norm”
The normal view of grade point 01 from Picture 15-6 is shown in Picture 15-9.
The columns of this view contain: 1: indication of base and break sizes. >>
indicates the base size to which the grade rules relate. > indicates the break sizes.
Picture 15-8
Picture 15-9

Chapter 15 “Grade Rule Grading“ 11 _________________________________________________________________________________________________________________
©Friedrich: Grafis - Textbook Part 2, Edition 10/2003
2: the size name, 3: the grade rule of the size in x direction, as
difference to the base size. Display is in mm or 1/10 mm depending on the setting in Display.
4: the grade rule of the size in y direction.
For all non-break sizes the grade rules are interpolated or extrapolated from adjacent break sizes.
A size becomes a break size by marking the size, editing the setting if required and accepting with
.
Difference view „diff”
Regard the grade rule for point 01 in the difference view (Picture 15-10).
In this view the values for the break sizes and the difference per increments, only are displayed. In Picture 15-10 these are sizes 34, 38 and 46. The base size 38 is marked with >. The line with the size name in the second column contains the grade rule for this size as difference to the base size. The respectively following line with the mark - (for difference) indicates the difference value per size. In the difference view difference values should be edited.
If you have the difference values per size proceed as follows with entry of grade rules:
⇒ Mark all break sizes in the normal view by marking the respective size and accepting the
value with .
⇒ Then, change to difference view and enter the grade rule differences in x and y.
Note: If the increments are identical for all sizes accept one size larger than the base size as a break
size. If 38 is the base size accept size 40 with and enter the grade rule for size 40 in the difference or normal view.
Proportional view „fact”
Regard the grade rule for point 01 in the proportional view (Picture 15-11).
This view is similar to the difference view. As opposed to the difference view, however, the grade rule is shown for the first size area, only (base size to nearest larger break size). All other grade rules are calculated by multiplication of this grade rule with a factor which can be edited.
The line with the grade rule difference in the size column is marked with „-”. The line with factors shows a „*” in this column.
If you know a difference value and the change or difference as a factor proceed as follows with entry of grade rules:
⇒ Mark all break sizes in the normal view by marking the respective size and accepting the
value with .
⇒ Change to the factor view, enter the difference value for the first size range and then, enter the factor for the other size ranges.
15.4 Save Grade Rule Pattern
Before quitting the Rule Pattern menu the grade rule pattern is to be saved. The following three options are available:
Save with => record or => x.GRP
The grade rule pattern is accepted into the active part. Thus, depositing this pattern is a construction step in the part and corresponds to call grade rule construction. Select this option if you digitize a number of new patterns. In this case, open a new style in Grafis, prepare the part list with the names of the pattern pieces to be digitized at the beginning and then, digitize the patterns. This way all pattern pieces are saved in one Grafis style. After testing
Picture 15-10
Picture 15-11

12 Chapter 15 “Grade Rule Grading“ _________________________________________________________________________________________________________________ ©Friedrich: Grafis - Textbook Part 2, Edition 10/2003
each part can be saved as a template or in the call list via Grade Rule | Edit Grade Rule Pattern. Instead of „=> record” the menu strip shows „=> x.GRP”, if a grade rule pattern of the active part is edited with Grade Rule | Edit Grade Rule Pattern. With „=> x.GRP” the alterations to the grade rule pattern are accepted. The number indicates which grade rule pattern of the active part is being processed.
Save with => template
The grade rule pattern is saved in the directory for template patterns \Grafis\[current construction system]\SWERT or in another directory. Grade rule pattern files have the extension *.SWS. The grade rules of these template patterns can be transferred to other grade rule patterns (see section 15.7). Save the blazer side panel from section 15.3 as a template under \Grafis\[current construction system]\SWERT\BLAZERST.SWS.
Save with => call
The grade rule pattern is saved as a grade rule construction in the call list.
Save a pattern in the call list, only after is has been tested and released.
Step-by-step guide
⇒ Open the Rule Pattern menu for the grade rule pattern to be saved via Grade Rule | Edit Grade Rule Pattern for example
⇒ save: => call
⇒ Click on or and enter a suitable name
⇒ later: edit the call list, design a graphic for the construction and store text information about the construction (see section 21.3)
Save the blazer side panel from section 15.3 in the call list. After having clicked =>call the dialogue ‚Insert module' opens (Picture 15-12).
For entry of a name for the grade rule pattern file
click on and you can enter the file name in the ‚Store as' field. Alternatively, a prepared mask can
be called by clicking . This interface is explained in more detail in section 18.2.
After ‚OK' the file is created in the directory \Grafis\[directory of construction system]\Prog. In the call list you can find a ‚New entry' in the area of constructions of the construction system. The entry can be renamed and designed, see section 21.3.
15.5 Edit grade rule patterns, drag and transfer grade rules
The menus for Grade Rule | Edit Grade Rule Pattern Change Record to Grade Rule Pattern Import Grade Rule Pattern Digitize Grade Rule Pattern
are identical. Depending on the selection certain functions are greyed out. The individual menu functions have the following significance:
digitize/extract/import
Depending on the selection one or more of these functions are available. digitize starts digitizing of contours or grade rules, see sections 15.1 or 15.6.
extract starts extracting a grade rule pattern from the active part. The active part can be • a constructed pattern based on body
measurements or • a grade rule pattern with or without
modifications. The possibilities of this function are topic of section 15.8. import starts data import. Currently, import of the following data formats is possible: • Grafis own data transfer format, • AAMA/DXF format and • HPGL data. For adjustment of the import function for industrial application additional services from the Grafis-team are required.
Picture 15-12
digitize extract import grad.point:
placedraggroup
-indicate grade rule:
edittransfer
delete print test run grading stack save:
=> call=> templat=> record
g rule patt

Chapter 15 “Grade Rule Grading“ 13 _________________________________________________________________________________________________________________
©Friedrich: Grafis - Textbook Part 2, Edition 10/2003
Grade points
Under grad.point: all functions for editing grade points can be found.
set open the menu depicted on the right for setting additional grade points.
With automat. grade points are set automatically. Existing grade points are not overwritten or deleted. With digi and the click options individual grade points can be set with the known point construction functions. All other options of point construction (e.g. intersectn) can be found via construct.
The new grade points are marked in red as their grade rule tables are still empty. With the functions of the Grade Rule menu grade rules can be assigned to grade points. Set additional grade points onto curves, especially if the curve shape has not been graded as required.
With drag the contour of the base size can be altered. Activate drag and drag one of the grade points with left mouse button pressed. You are altering the shape „by eye”. Grafis indicates the movement of the grade point in x and y direction in a dialogue window. Terminate dragging with . Only after having confirmed the security question are the alterations accepted. For your information, Grafis registers the move values in the dialogue window of the grade rule table of the grade rule table with code % and the alteration date (e.g.: %31-07-98 = -10.0 5.0).
With group grade associations can be formed. This special grading option is topic of section 15.10.
Switch to +indicate to show the grade point number. The screen image can be output via Edit | Copy (Clipboard) or with the functions of the print menu.
Grade rules
edit opens the menu for editing grade rule tables with the following options:
With edit and clicking a grade point its grade rule table opens, see section 15.3.
copy allows for transfer of grade rules from one/two grade point/s to another grade point with the options:
• 1=>1 , • [special] and • 2=>1 .
The options „1=>1„ differ as follows: 1=>1(XY) the complete grade rule table is
copied 1=>1(X) only the x component value is
copied 1=>1(Y) only the y component value is
copied
For „1=>1„-copying activate one of the three copy options and click the grade point from which grade rules are to be copied. Move the cursor. An arrow appears with which you define onto which grade point the grade rules are to be copied. Quit copying with .
With the options „[special]„ grade rules are copied from one grade point to another. When copying, the x component can be mirrored for example ([Xspg Y ]). In the other case the grade rules are not overwritten but added. Double-click on the two lines marked with square brackets allows for selection of other special options which should be used by experienced operators, only.
The options „2=>1„ transfer the grade rules of two points onto a third. They differ as follows: 2=>1(lin) the new grade rules are
calculated linear in relation to the direct connection between the two points. Use this option when the points lie on a long (imaginary) connecting line.
2=>1(cur) the new grade rules are calculated as components. Use this option when the points lie on a shaped (imaginary) line.
GP place: automat.
digi
pick P pick L pick PL
construct.
edit drag
copy:1=>1 (XY)1=>1 (X)1=>1 (Y)
[Xspg Y ] [X Yspg]
2=>1 (lin)2=>1 (cur)

14 Chapter 15 “Grade Rule Grading“ _________________________________________________________________________________________________________________ ©Friedrich: Grafis - Textbook Part 2, Edition 10/2003
For „2=>1”-copying activate one of the two copy options and click the grade points from which the grade rules are to be copied. Define the grade points to obtain new grade rules with the arrow (Picture 15-13). Quit with . Note the exercise in this section.
transfer opens the menu for transfering grade rules from template patterns, see section 15.7.
Delete
delete opens a sub-menu. It allows for deletion of points or lines of the contour (single or all with all P+L). Grade points are deleted individually with single: GPoints or all GP. Deleting points and lines of the contour during alteration of a grade rule is not permitted as subsequent construction steps could relate to these objects.
print opens the sub-menu with the following functions:
g rule tabl: => print starts output of the grade rule table for all grade points. The table contains the grade point numbers and their absolute grade rules in the break sizes.
g rule tabl: => Clipboard copies the table to the clipboard. For a formatted view select a proportion typeface, e.g. CourierNew.
g rule patt: => plot starts output of the grade rule pattern with marked grade points. Should the grade point numbers be visible (Rule Pattern: menu +indicate) these are plotted, also.
test run / grading / stack / save:
These functions are already known. grading in this menu starts grading with grade rules. Saving was topic in section 15.4.
Exercise
Activate the gradeable blazer side panel from section 15.3. Set an additional grade point onto the armhole curve. Copy the grade rules of the adjacent grade points with „2=>1”-copy onto the new grade point (Picture 15-13). part organis Grade Rule | Edit Grade Rule Pattern grad.point: set click l set grade point onto the
armhole curve Grade Rule: edit copy 2=>1(lin) assign grade rule according to
Picture 15-13. First, click on the sleeve notch then, the point on the side seam and then, the new grade point.
terminates copying grading The grade is shown in the right
nest in Picture 15-14. The curve shape is slightly flatter.
Grade Rule: edit copy 2=>1(cur) steps as above grading The grade is shown in the left
nest in Picture 15-14. The curve shape is slightly rounder
terminates copying
..... are transferredto this point.
The grade rules ofthese points .....
Picture 15-13
single:pointslines
gr.points all P+L all GP
g rule tabl:=>print=>clipbd
g rule patt plot
46
38 34
left: 2=>1(prop) copied Centre: grading before inserting the grade point right: 2=>1(lin) copied
Picture 15-14

Chapter 15 “Grade Rule Grading“ 15 _________________________________________________________________________________________________________________
©Friedrich: Grafis - Textbook Part 2, Edition 10/2003
Drag the grade point in the base size 38 by approx. 2mm „to the left”, i.e. 2mm in negative x direction (Picture 15-15). grad.point: drag drag the grade point with
pressed left mouse button. The move amount is shown in the dialogue window.
By dragging the grade point you have altered the contour of the pattern in the base size. Grafis registered the move values of the grade point in the dialogue window of the grade rule table with code % and date of alteration (e.g. %31-07-98 = -2.0 0.0).
Drag the grade rules of this grade point. Note! These alterations are accepted without confirmation. Grade Rule: drag Click on the grade point of
which you want to drag the grade rule. Drag the pointer according to Picture 15-16 with pressed left mouse button. The move value is indicated in the dialogue window.
15.6 Digitize grade rules
If the pattern is available as a graded nest, i.e. all required sizes stacked, the grade rules can be digitized.
The nest has to contain the base size and the break sizes, only. Further sizes do not have to be digitized, they are interpolated by Grafis, automatically. Why work harder than necessary!
Step-by-step guide ⇒ Digitize the pattern perimeter of
the base size (see section 15.1) ⇒ Open the size table via Extras |
Size table and enter and activate the sizes of the nest in systematically order. The size in position 01 is the size of the digitized contour. The grade rules of all further activated sizes are digitized in this order.
⇒ if the Rule Pattern menu had been quit: • Grade Rule | Edit Grade Rule
Pattern • Digitize • Determine entry transformation and scale
factor ⇒ Click [Grade Rules ON/OFF] on the menu
template ⇒ Digitize the grade rules of all grade points,
respectively with: • Click grade point, possibly adjust on screen;
it is sufficient to click near the point • Digitize position of the point in other sizes;
the size to be digitized is displayed on the menu strip. The displayed order is to be followed, exactly.
Drag grade point by2mm in negative xdirection:
beforeafter
46
3834
Picture 15-15
3438
46
With this pointerthe grade rulesfor sizes 34 or
46 can bedragged.
Picture 15-16
template
transform.: p+px=>p00 p+py=>p00 p+px=>p p+py=>p p+p=>p+p
Fa=1.0000
points (1) lin/cur (1)
Sprungwerte
____40_0____34_0____46_0
digitize
grade rules
____38_0

16 Chapter 15 “Grade Rule Grading“ _________________________________________________________________________________________________________________ ©Friedrich: Grafis - Textbook Part 2, Edition 10/2003
• After having digitized the last size the computer gives an acoustic signal.
⇒ Quit with [Grade Rules ON/OFF] on the menu template.
⇒ possibly: re-digitize lines, points or grade rules ⇒ Quit with [Quit digitizing] on the template or ⇒ Edit the grade rule pattern ⇒ Save the grade rule pattern in the record, as a
template or in the call list.
After having quit the digitize mode test the state or work with test run and grading from the Rule Pattern menu. Should errors occur lines, points and grade rules can be re-digitized.
Exercise
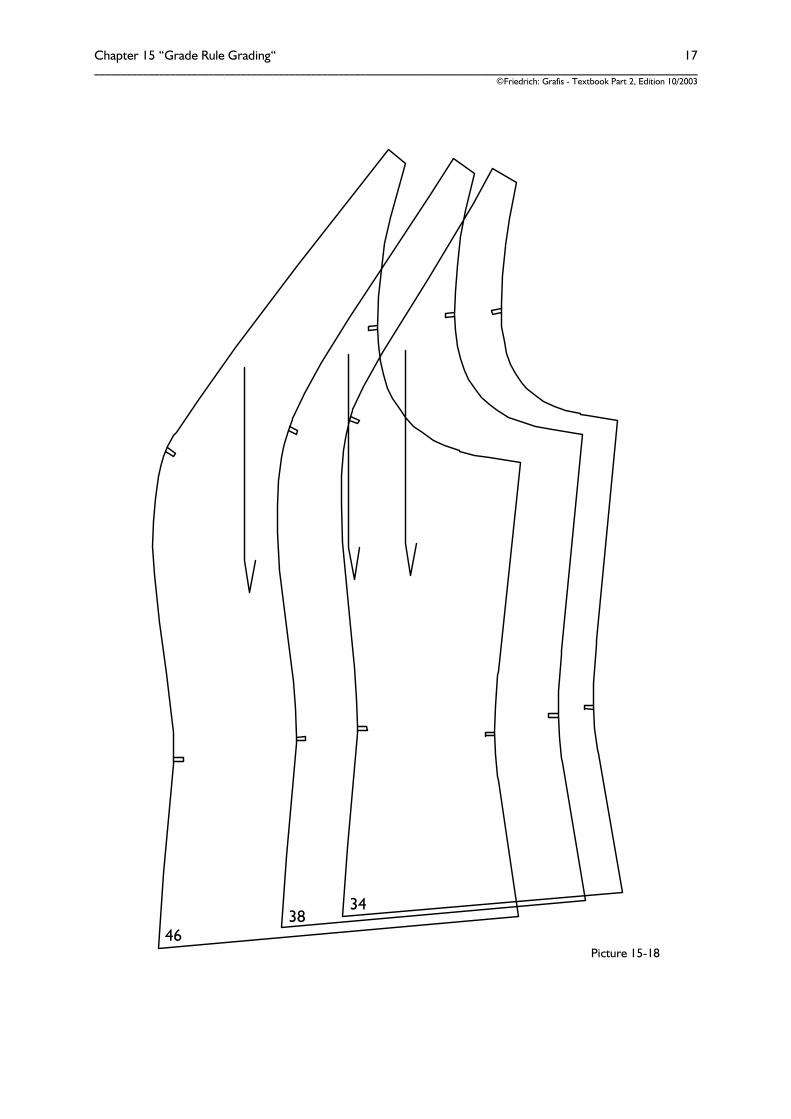
Picture 15-18 shows a graded nest of the blazer side panel (Exercise in section 15.1) in sizes 34, 38 and 46. For more clarity the sizes are not stacked as usual but displayed shifted. The grade rules of the blazer side panel are to be digitized. Fix a copy of the nest to the digitizer table. First, digitize the contour in size 38, see section 15.1. After having digitized the contour the grade rules are to be digitized. The following steps relate to Picture 15-17. <zoom all> [Grade Rules ON/OFF] Sizes 38, 34 and 46 appear below Grade Rules in the menu. If other sizes or another order appear the entries in the size table have to be altered. In this case, quit the digitizing mode but not Rule Pattern and edit the size table via Extras | Size Table. After digitize you are back in the digitize mode. If the pattern on the digitizer table was not changed resume digitizing the grade rules, immediately.
Point P1 in size 38 corresponds with point P2 in size 34 and P3 in size 46. The grade rules for this point are digitized as follows: P1 with <digitize> digitize close to the point P2 with <digitize> digitize exact P3 with <digitize> digitize exact After P3 the computer gived an acoustic signal. It means: grade rule digitizing for this point is completed. The grade point is now marked in green and assigned with a grade rule. You can resume with another grade point. Continue with grade point P4, still marked in red. P4 with <digitize> digitize approximately
P5 with <digitize> digitize exact P6 with <digitize> digitize exact
If an error occurs during those steps continue digitizing to the signal (or press digitizer mouse button no. 4) and digitize the grade rule again.
Digitize the grade rules for the grade points until all points are marked in green. Quit the digitizing mode with [Quit Digitizing] on the menu template and test the grade with test run grading If grade rules were digitized incorrectly the graded nest can look bad. First, analyse which points were not graded correctly. If necessary deactivate size 46 in the size table so that sizes 34 and 38 are displayed, only. Re-digitize the grade rules. During digitizing grade rules, sizes 38, 34 and 46 must be active, again.
34 38 46
5 4 6
2 1 3
Picture 15-17
Chapter 15 “Grade Rule Grading“ 17 _________________________________________________________________________________________________________________
©Friedrich: Grafis - Textbook Part 2, Edition 10/2003
Picture 15-18
3438
46

18 Chapter 15 “Grade Rule Grading“ _________________________________________________________________________________________________________________ ©Friedrich: Grafis - Textbook Part 2, Edition 10/2003
In the next step the curve shape in the graded sizes is to be checked. The shape of the panel seam in size 46 is not yet identical with the template. To correct curve shapes set one or more additional grade points and digitize the relevant grade rules. grad.point: set click l first, set the additional grade
points P1 and P4 (Picture 15-19)
Mark the additional grade points on the template in the sizes of the nest, also.
Digitize the grade rules of the new grade points. P1 with <digitize> digitize approximately P2 with <digitize> digitize exact P3 with <digitize> digitize exact After P3 the computer gives an acoustic signal. Continue with P4, then, quit the digitizing mode with [ Quit Digitizing ] on the menu template and test again. Set additional grade points until you agree with the grade result and then, deposit the grade rule pattern (see section 15.4).
Digitize grade rules for the seam line from the pattern contour Before digitizing you have to decide whether to digitize with or without seam allowance. If you want to digitize without seam allowance, but the seam line is shown in the base size, only (Picture 15-20) you can digitize the grade rules for the seam line from the graded nest of the pattern contour.
Step-by-step guide ⇒ Digitize the seam line in the base size ⇒ Open the size table via Extras | Size Table, enter
the base size in position 01 and the sizes of the nest with the base size again in systematic order and activate.
⇒ Click digitize and [ Grade Rules ON/OFF ] on the menu template
⇒ Digitize the grade rules for the grade points respectively with: • Click grade point, possibly position on
screen; it is sufficient to click near the point. • Digitize the points corresponding to the
grade point on the pattern perimeter, also in the base size.
• After having digitized the last size the computer gives an acoustic signal.
⇒ Further analogous to the known steps ⇒ In the end: open a grade rule table and select
Edit | New Base Size for All. Here, enter ____38_0.
343846
546
213
Picture 15-19
123
4
Picture 15-20

Chapter 15 “Grade Rule Grading“ 19 _________________________________________________________________________________________________________________
©Friedrich: Grafis - Textbook Part 2, Edition 10/2003
Exercise
For the example in Picture 15-20 with base size 38 and pattern contours for 34, 38 and 46 the seam contour (dashed) in size 38 is to be digitized, first. Then, edit the size table as follows
> 01 ____38_0 > 02 ____34_0 > 03 ____38_0 > 04 ____46_0
With [ Grade Rules ON/OFF ] on the menu template grade rule digitizing begins. The menu shown on the right must appear. Digitize the grade rule for P1: P1 with <digitize> digitize
approximately; adjust to the screen
P2 with <digitize> digitize exact (size 34)
P3 with <digitize> digitize exact (size 38)
P4 with <digitize> digitize exact (size 46)
Digitize the grade rules for all grade points. In the end, open the grade rule table of one of the grade points, select ____38_0 and define ___38_0 as the new base size with Edit | New Base Size for All.
15.7 Transfer grade rules from a template pattern
With the function Grade Rule: transfer in the Rule Pattern menu grade rules can be transfered from a template pattern. Use this option when a pattern is available in the base size, only. Digitize the pattern in the base size and then, transfer the grade rules from an available tested grade rule pattern. After Installation of Grafis no template patterns are available. Template patterns are generated via save: => template from the Rule Pattern menu. Saving a grade rule pattern as a template is possible via Grade Rule | Edit Grade Rule Pattern or Grade Rule | Change Record to Grade Rule Pattern (see section 15.8).
Clicking on transfer in the Rule Pattern menu opens the sub-menu shown on the right with the following functions:
edit opens the grade rule table of a grade point to be clicked, see section 15.3.
Function group template
The functions below template: help with preparation of the template for transfering grade rules.
First, call the template. Select a tested grade rule pattern saved as a template (*.SWS). The template appears with dashed lines. At the same time, Grafis asks you to co-ordinate both patterns to one another. co-ordinate (further down in the menu) is already active.
To call another template you have to hide the active template, first. Then, a new template can be called. It is possible to transfer grade rules from more than one template.
With co-ordinate you define which grade points have identical grade rules. First, the point of the template is to be defined then, the point in the active grade rule pattern.
move allows for the template to the moved, rotated or mirrored. Functionality corresponds to the <F3> function. During rotation or mirror of the template the grade rules are updated, also. Therefore, rotate and mirror before copying the grade rules. The rotation angle is displayed in the line Dw=.... For very small rotation drag further away from the centre of the circle. Moving the template does not affect the grade rules.
After having adjusted and positioned the template, effectively copying grade rules begins with the functions below copy.
Function group copy
With the functions below copy transfering grade rules from the template and copying onto the active grade rule pattern begins.
template
transform.: p+px=>p00 p+py=>p00 p+px=>p p+py=>p p+p=>p+p
Fa=1.0000
points (1) lin/cur (1)
Sprungwerte
____40_0____34_0
____38_0____46_0
digitize
Grade rules
____38_0
edit template:
call hide
coordin. move
Dw= .0 copy
1=>1 (XY) 1=>1 (X) 1=>1 (Y)
* single guided
-identical +X-incrmts +Y- incrmts

20 Chapter 15 “Grade Rule Grading“ _________________________________________________________________________________________________________________ ©Friedrich: Grafis - Textbook Part 2, Edition 10/2003
The copy options were explained in section 15.5, already. For the copy option „1=>1„ copying can ensue either single (with * single) or guided (with * guided). With * guided the grade points of the active grade rule pattern one after the other are the beginning of a thread which is to be connected with the corresponding grade point of the template. The grade points are processed in order of their numbers. Assigning can be skipped with . Activating * single terminates guided transfering.
Display options
In the option +identical grade points with identical grade rules are connected with dashed lines. The following are connected:
+X incrmts and +Y incrmts: identical grade rule tables
+X incrmts and -Y incrmts: grade rule tables with identical x components
-X incrmts and +Y incrmts: grade rule tables with identical y components
Exercise
Generate a blazer side panel similar to Picture 15-21, for example by drawing and digitizing the contour. Transfer the grade rules from the template saved in section 15.4 as BLAZERST.SWS.
Edit the digitized pattern with the Rule Pattern menu as follows: Grade Rule: transfer call open BLAZERST.SWS The prepared blazer side panel appears dashed. co-ordinate click in both patterns the
corner points armhole / side seam
move move and rotate the template; reset rotation to 0
*guided copy 1=>1 (XY) transfer all grade points guided;
if necessary skip a point with and re-process with *single
grading the grade corresponds with the nest in Picture 15-22 (sizes 34, 38 and 46).
If a grade point is graded incorrectly select Grade Rule: transfer again. The settings for transfer remain existent when quitting the Rule Pattern menu. If necessary the pattern can be edited further with the functions explained in section 15.5.
template
active graderule pattern
Picture 15-21
Picture 15-22

Chapter 15 “Grade Rule Grading“ 21 _________________________________________________________________________________________________________________
©Friedrich: Grafis - Textbook Part 2, Edition 10/2003
15.8 Change record to grade rule pattern
Each Grafis part can be changed to a grade rule pattern. This applies to pure construction patterns as well as grade rule patterns which were edited with the Grafis construction functions.
Changing a part into a grade rule pattern or extracting a grade rule pattern is interesting for example for: • releasing one or more parts form a hereditary
line for use in a different style or • transferring a tested, constructed grade onto a
pattern available in the base size, only.
Step-by-step guide ⇒ Activate the part to be changed into a grade rule
pattern; ⇒ Enter the base size into position 01 in the size
table; in the following positions of the size table enter and activate all sizes from which you want to extract the grade rules;
⇒ Grade Rule | Change Record to Grade Rule Pattern
⇒ extract, First, set the grade points automatically. Grafis takes off the grade rules for these grade points for all sizes active in the size table.
⇒ grading, the pattern is now graded as a grade rule pattern. The pattern must be identical with the original construction pattern. Especially on curves differences occur which can be rectified by setting additional grade points with grad.point: set and repeated extract. The grade points do not have to be set again. Click alternately on grade rule: extract and grading. When no differences are visible the grade rule pattern can be saved.
⇒ possibly: edit the grade rule pattern according to section 15.5
⇒ Save the pattern according to section 15.4 ⇒ Quit with .
Test extracting by saving production patterns or certain development stages of a style as grade rule patterns. From the constructed blazer side panel in Picture 15-24 the grade rules for the break sizes 34, 38 and 46 were extracted with automatically set grade points. In Picture 15-23 the nest of the constructed pattern and the extracted pattern are displayed on top of one another. On the marked lines differences can be found.
These differences between construction pattern andgrade rule pattern are corrected with additional gradepoints.
Picture 15-23
additionalgrade points
Picture 15-24

22 Chapter 15 “Grade Rule Grading“ _________________________________________________________________________________________________________________ ©Friedrich: Grafis - Textbook Part 2, Edition 10/2003
After having set additional grade points with grad.point: set and click l or click pl according to Picture 15-24 and repeated extract the nests of the constructed pattern and the grade rule pattern are identical (Picture 15-25).
Prior to extracting, check if notches or other symbols should be replaced by points. A notch for example consists of two grade points. The base size and all break sizes must be entered in the size table and must be active. Proceed according to the step-by-step guide and save the patterns in the call list and as template grade rule patterns.
15.9 Create, use and edit a grade rule library
A grade rule library is a collection of grade rule tables. Use of a number of libraries is possible. The individual grade rule tables can obtain their own designation. A library is saved in the grade rule pattern data format (*.SWS). This section is divided in the topics: • create a grade rule library • assign grade rules from the library and • edit a grade rule library.
Create a grade rule library
A grade rule library can be extracted from existing patterns or created by entering the values. The former option is explained, first.
Step-by-step guide ⇒ Prepare a pattern with all gradeable pattern
pieces, ⇒ Enter and activate the break sizes in the size
table, ⇒ Grade Rule | Change Record to Grade Rule Pattern ⇒ Set grade points from which grade rule tables
are to be inserted into the library, manually ⇒ extract ⇒ possibly: set further grade points and extract ⇒ with return to the Rule Pattern menu ⇒ Name grade rule table with „#: ...„; the first 11
characters appear in the library. ⇒ Save grade rule pattern with save: => template
under \Grafis\[construction system]\SWERT\ LIBRARY\[library name].SWS
Generate a Grafis pattern with all corresponding pattern pieces (see Picture 15-26). Activate the break sizes in the size table (here: 38, 34, 46) and start Grading | Grade All Parts. Then, open the Rule Pattern menu via Grade Rule | Change Record to Grade Rule Pattern and set the grade points from which grade rules are to be inserted into the library with grad.point: set. Not all grade points have to be set! Then, click on extract. The grade rule tables for the grade points were calculated.
Construction pattern and grade rule pattern aftercorrection:
Picture 15-25
Picture 15-26

Chapter 15 “Grade Rule Grading“ 23 _________________________________________________________________________________________________________________
©Friedrich: Grafis - Textbook Part 2, Edition 10/2003
Click on a grade point; the grade rule table window opens (Picture 15-27). Double-click on the dialogue window at the lower edge of the table. Enter into the dialogue window: #: [name for grade rule] (here: ft_rev/olap for front corner revers/overlap). The first eleven characters of the name appear later in the grade rule library. Introduce your own system when naming the grade rules. Note that the grade rules are listed in alphabetical order. Enter a name for each grade point. Then, save the grade rule pattern with save: => template under \Grafis\[construction system]\SWERT\LIBRARY\BLAZER.SWS. The grade rule library is created.
If you require an empty grade rule library in which grade rules are to be saved, later the following step-by-step guide applies:
Step-by-step guide for an empty library ⇒ Activate empty part, ⇒ Enter base size into the size table, ⇒ Grade Rule | Digitize Grade Rule Pattern ⇒ grad.point: set ⇒ construct ⇒ p on x&y with x=y=0 ⇒ with return to Rule Pattern menu ⇒ Save grade rule pattern with save: => template
under \Grafis\[construction system]\SWERT\ LIBRARY\[library name].SWS
Use grade rule library Grade rule libraries are opened from the Rule Pattern menu via Grade Rule: edit and used as follows:
Step-by-step guide ⇒ Click Grade Rule: edit in the Rule Pattern menu ⇒ Select required grade rule library (Picture 15-
28), ⇒ click required grade rule once and then, click the
grade point to which the grade rule is to be assigned;
Entry
Picture 15-27
Selected grade rule libraryClick here to select a different library.
Selection listHere, select the required
library or grade rule.
Scroll the list
Scroll the list
Picture 15-28

24 Chapter 15 “Grade Rule Grading“ _________________________________________________________________________________________________________________ ©Friedrich: Grafis - Textbook Part 2, Edition 10/2003
Digitize a pattern without grade rules. Edit the pattern in the Rule Pattern menu (possibly: Grade Rule | Edit Grade Rule Pattern). Open the Grade Rule: edit menu (Picture 15-28). All functions introduced in section 15.5 are available. Select the required grade rule library under drag by clicking this field and selecting one of the available libraries from the list below. The selected library is entered into the field below drag. The list below the field with the name of the library now contains the grade rules. Scroll in this list by clicking on the separating line above and below the list. Click on the first grade rule and move the cursor to the pattern without pressed mouse button. For your support an arrow to the respective nearest grade point appears. Click on the grade point to which you want to assign this grade rule.
Assigning can ensue with the three copy options 1=>1; 1=>1 (XY) is the default.
Edit grade rule library
Grade rules can be added to an open grade rule library as follows:
Step-by-step guide ⇒ Click Grade Rule: edit in the Rule Pattern menu ⇒ Select the required grade rule library ⇒ Edit a grade rule: double-click on the grade rule
in the right menu strip, edit the grade rule and quit with
⇒ Add a grade rule: activate edit and open the grade rule table to be added to the library. Edit the grade rule table and enter a name with #:.... Save the grade rule table with File | Save in Library in the library. Close the grade rule table with .
⇒ Delete a grade rule: double-click on the grade rule in the right menu strip and File | Delete from Library.
Edit the library according to the step-by-step guide. The alterations are saved in the library, immediately.
15.10 Group grade points Grouping grade points is a powerful and sophisticated function. It is explained briefly in this section using a simple example. It can be used far more extensively than described, here. With the function group a grade point can be graded in relation to another grade point. The grade rule tables discussed so far relate to the pattern contour in the base size. With group and assign this relation is released and grading can be related to a grade point. A grade point can be assigned with a number of grade points. The grade point associated with other grade points is marked with a dashed circle. A grade point which already has grade points assigned to it can be associated with another grade point (chain of grade associations).
The option with or without correction Grade points can be grouped with or without correction: with correction the rules of a grade point are calculated so that it will continue to be graded without alteration. without correction the grade rule table remains unchanged. The only change is to what it relates. with corr: allocate and then with corr: remove returns to the original state. The same applies to the option w.out corr.
edit grad.point w.out corr:
allocate remove
grad.point with corr.:
allocate remove
drillhole
P1
P2
Picture 15-29

Chapter 15 “Grade Rule Grading“ 25 _________________________________________________________________________________________________________________
©Friedrich: Grafis - Textbook Part 2, Edition 10/2003
With correction should be used when a grade point has been graded correctly but its grade is to be changed / checked in relation to another point. See also the following example (Pictures 15-29 and 15-34). Without correction should be used when the grade rules for a new point are to be adjusted in relation to an existing point.
Example
Picture 15-29 shows a front with drillholes for a welt pocket. The welt has the same dimensions for all sizes. The nest in Picture 15-29 is stacked at P1. The grade rule table for P2 is shown in Picture 15-30. The grade point P2 is associated with grade point P1 with the following steps and graded in relation to P1.
Grade Rule | Edit Grade Rule Pattern grad.point: group gradpoint with corr: allocate P2 is to be allocated to P1 according
to Picture 15-31.
edit The grade rule table for P2 after allocation is shown in Picture 15-32. The position of P2 does not change in relation to P1 in all sizes. All grade rules are zero.
Now, the grade rules for drillhole P2 are to be changed so that the pocket is 5 mm narrower in both sizes 34 and 36 and 10 mm wider from size 44. In sizes 38 to 42 the grade for the pocket is to remain unchanged. The grade rule table for P2 is to be altered according to Picture 15-33.
The result after grading and stacking of the pattern at P1 is shown in Picture 15-34.
Now, remove the grade association with Grade Rule | Edit Grade Rule gradpoint: group gradpoint with corr: remove
Picture 15-30
P1
P2
Picture 15-31
Picture 15-32
Picture 15-33
P1P2
Picture 15-34

26 Chapter 15 “Grade Rule Grading“ _________________________________________________________________________________________________________________ ©Friedrich: Grafis - Textbook Part 2, Edition 10/2003
To remove click the point to which another point was assigned; in this case click P2.
edit The grade rule table was calculated for the relation to the pattern contour (Picture 15-35). The grade of the pattern corresponds with Picture 15-34.
Use w.out corr: if you have set a new grade point and want to grade it in relation to an existing grade point. If no grade point has been set at drillhole P2 you can obtain the result in Picture 15-34 with the following steps.
Grade Rule | Edit Grade Rule gradpoint: set click pl the centre of the drillhole gradpoint: group gradpoint w.out corr: allocate P2 is to be associated wit P1
according to Picture 15-31. edit
The grade rules for P2 remain zero after allocation (Picture 15-32). Alter the grade rules according to Picture 15-33.
grading For result see Picture 15-34
Picture 15-35