chapter 1 ladies and gentlemen: start your point-and-shoots! · chapter 1 ladies and gentlemen:...
TRANSCRIPT

Chapter 1
Ladies and Gentlemen: Start YourPoint-and-Shoots!
In This Chapter� Installing batteries
� Batteries and digital point-and-shoot cameras
� Loading film
� Turning on the camera
� How to hold your camera
� How to press the shutter button
� What to do if you accidentally open the camera back
� Rewinding do’s and don’ts
� Getting the most from a one-time-use camera
Your point-and-shoot camera is practically an invitation to just starttaking pictures. A wonder of automation, it uses advanced electronics
and tiny motors to quickly execute the many separate steps that photogra-phers used to have to do manually each time they wanted to take a picture.Point-and-shoots automatically advance the film from shot to shot, or, ifthey’re digital, automatically store your pictures in their onboard “memory.”And film or digital, they automatically compute the correct exposure — theexact amount of light that your film or digital camera needs to properlyrecord the subject — and adjust their settings accordingly. They automati-cally turn on the flash in dim light. And they automatically focus the lens.Digital cameras take things a step further, using a built-in computer to con-vert each scene you shoot into a “file” of tiny dots of varying color and tone.
Actually, your particular point-and-shoot may not perform every one ofthese functions. And which ones it does perform depends partly (though notentirely) on what type of point-and-shoot you have. So I begin this chapter —a chapter otherwise devoted to getting you started taking pictures as quicklyas possible — by describing the four different types of point-and-shoot cam-eras. The good news: You really don’t need to know what kind of point-and-shoot camera you have to make it point and shoot. But knowing what kind of
541161 Ch01.qxd 9/13/03 12:20 AM Page 9

point-and-shoot you have can actually help you make better pictures. That is,after all, why you’re reading this book — right?
The Four Types of Point-and-Shoot CamerasLike people, point-and-shoots have more in common than they do differences.This is especially true of the way you operate the cameras — what you push,slide, or twist to make them do specific things. But while they’re operated inpretty much the same way, point-and-shoots differ both in the way the image iscaptured and in the mechanical and electronic complexity they bring to the job.Those differences make it possible to divide these cameras into four main types.
The 35mm point-and-shootGranddaddy of the point-and-shoot movement, the 35mm point-and-shootuses 35mm film — the film that comes in the funny-looking little cassette withthe perforated tongue sticking out at you. You grab that tongue of film tostart the roll through the camera, as this chapter explains in detail. 35mmpoint-and-shoots come in every form from cheapo, check-out counter spe-cials to expensive, full-featured models that rival 35mm single-lens reflexes(those professional-style system cameras) in their sophistication.
The Advanced Photo System point-and-shootA younger generation of point-and-shoot cameras, Advanced Photo System(APS) models look pretty much like their 35mm counterparts. But they take adifferent, smaller-than-35mm film cassette that has allowed manufacturers tocreate smaller cameras. The system also simplifies film loading, makes stor-age and reprinting easier, and gives you a shot-by-shot choice of three differ-ent print sizes, which you pick with a switch on the camera. See Chapter 8 fordetails on the Advanced Photo System.
The one-time-use point-and-shootThey’re everywhere. From drugstore counters to Disney World, one-time-usecameras are by far the most popular type of point-and-shoot, outselling reload-able models many times over. These inexpensive (usually $5 to $15, depend-ing on the type) models are in some respects the ultimate point-and-shoot.You don’t have to figure out how to insert film, for example, because they comepreloaded with a roll. (In fact, you can get them in both 35mm and AdvancedPhoto System versions.) The same goes for batteries, also preinstalled. Youneedn’t master any pushbuttons except for the shutter button and the flash
10 Part I: What You Need to Take Pictures
541161 Ch01.qxd 9/13/03 12:20 AM Page 10

button, if your model has a flash at all. You don’t even have to remember tobring your camera along, because you can buy a one-time-use camera on theway or on the spot. After you finish shooting a roll, you just give the camerato the photofinisher — no rewinding necessary. And last, but not least, one-time-use cameras are the only cameras with complete instructions printed onthem! (See the sidebar “When to use a one-time-use camera” in this chapterfor details.)
Don’t buy and shoot with a one-time-use camera simply because you’re intim-idated by your regular, reloadable point-and-shoot. Read this chapter, andyour regular point-and-shoot won’t scare you anymore!
The digital point-and-shootUnlike the other types of point-and-shoot cameras, a digital point-and-shootneither contains nor accepts film. How can it make photographs without film?The same way video camcorders do: With a permanently installed electroniclight sensor, sometimes called a “chip.” For clarity’s sake, I refer to it as animage sensor in this book.
Unlike many camcorders, a digital camera stores photographs as digital filesthat can be downloaded directly and immediately to a computer for variouspurposes, including retouching, e-mailing, and printing. And most digital point-and-shoots store these files on memory cards, small plastic-and-silicon wafersthat are (in some respects) the digital equivalent of film. Yet in terms of oper-ation, digital point-and-shoots are essentially like film-using cameras — andagain, most of the shooting advice in this and other chapters applies to themas well. Perhaps the main difference is that some camera settings (mostlyless important ones) are adjusted on the same tiny, computer-like screen withwhich you view your subjects and review your pictures. These days, manypeople have both film and digital point-and-shoots in their homes. Forspecifics on working with digital models, see Chapter 15.
The Parts of Your CameraHere are a couple of things to remember whenever you feel you’re not quitegetting the hang of operating your camera. First, for all its pushbuttons, dials,windows, and flashing lights, your camera is basically a lightproof box. It’slightproof to protect the film or image sensor inside it from any light otherthan what the lens gathers from the subject and uses to form a picture on thesurface of the film or sensor. And second, the camera is basically an exten-sion of your eye — a window on your subject. In fact, to view your subjectyou look through a little window on the camera back called the viewfinder.Most digital cameras have viewfinders, but also let you see the subject you’rephotographing on what I prefer to call a viewing screen — essentially, a little
11Chapter 1: Ladies and Gentlemen: Start Your Point-and-Shoots!
541161 Ch01.qxd 9/13/03 12:20 AM Page 11

computer monitor that’s connected to the camera’s image sensor. (There areother terms in circulation for this screen, but I think they’re confusing.) Formore about what you see when you look through the camera’s viewfinder,read Chapter 5. And for specifics about a digital point-and-shoot’s viewingscreen, see Chapters 4 and 15.
Now for those pushbuttons. When it comes to the design and location of yourpoint-and-shoot’s controls, little standardization exists. In pictorial terms,two very different-looking controls in two very different places may do prettymuch the same thing. But whatever the control configuration, most 35mmand APS models, and many though not all digital models, have an LCD panel.The LCD panel is a digital display on the top or side of the camera that indi-cates what settings you’re making. Figures 1-1 and 1-2 show the location ofcamera controls and other basic camera features for a typical 35mm point-and-shoot. Figures 1-3 and 1-4 show the same for a typical digital point-and-shoot. The purposes of these controls and features are spelled out in Part II,and you can refer back to these figures for help in locating specific parts andbuttons. But your camera may be different from the models shown — and theonly way to know is to check your camera manual.
On/off buttonShutter button
Zoom toggle control
LCD panel
Self-timerbutton
Flash mode/backlightcompensation button
Mode/date setting buttonHand grip
Built-in flashZoom lensBatterycompartment
Tripod socket (not visible)
Midroll rewind button (not visible)
Figure 1-1:These
controls andfeatures are
typical of a well-
appointed35mm point-
and-shoot.
12 Part I: What You Need to Take Pictures
541161 Ch01.qxd 9/13/03 12:20 AM Page 12

Your camera manual shows you which controls do what, and where they are.Sometimes it loses a little in translation, but your manual is an importantphotographic tool. It doesn’t tell you how to take better point-and-shoot pic-tures; that’s the job of this book. What it does tell you is where to find andhow to operate the camera controls that can help you take better pictures.
Getting a Charge: The Pluses andMinuses of Batteries
Point-and-shoot cameras are chock full of little motors that do everythingfrom advancing and rewinding your film to zooming your lens. These motors,along with other electrical demands — with digital point-and-shoots, theviewing screen is the biggest hog — consume quite a bit of electricity. Makersof kids’ toys have a simple solution: Use more batteries. But because a point-and-shoot camera must remain compact, manufacturers have devised a dif-ferent strategy: Use smaller, more powerful, longer-life batteries.
Lithium batteriesMost film-using point-and-shoots are powered by special lithium batteries.Made specifically for cameras, these cells are shorter than the familiar AAbattery, but a lot more expensive.
There are two common types of lithium batteries. One is a three-volt cell thatgoes by proprietary designations such as KL123A, CR123A, or DL123A (a 123A is always in there) and costs as much as $7, sometimes more. The other is theshorter, thinner three-volt CR2 lithium battery, which costs about the same.Some cameras need two three-volt lithium batteries. And some take double-barreled six-volt batteries, either the 223A or, infrequently, the bigger 2CR5.These batteries can cost up to $13. And their prices may go even higher, depend-ing on what the market will bear — and in tony or touristy areas, it will bear a lot.
More and more digital cameras use proprietary rechargeable batteries, but anumber of these models take the CRV3 lithium battery. It looks like two famil-iar AA cells just stuck together, but don’t be fooled: It costs up to $25, thoughyou can sometimes find it for less than $20. See the sidebar, “Batteries anddigital point-and-shoots.”
Fortunately, you get what you pay for: Lithium batteries last much longerthan alkaline AA cells. But the number of pictures you actually get from alithium battery depends on the power needs of your camera; the more motor-ized it is, the fewer the rolls. Most 35mm and APS models give you within therange of 10 to 25 24-exposure rolls per battery, assuming that you use flashabout half the time. (Lithiums also don’t conk out in freezing weather as fastas AA cells, a good thing if you like taking pictures in the snow.)
DIGITAL
13Chapter 1: Ladies and Gentlemen: Start Your Point-and-Shoots!
541161 Ch01.qxd 9/13/03 12:20 AM Page 13

When you need to buy a new battery, always bring the old one — or betteryet, your camera — to the store. Given all the different types of batteries, notknowing which type you need can drive clerks crazy. And by bringing yourcamera to the store and putting in the new battery there, you’re immediatelyreassured that the new battery brings your camera up to snuff.
Lithium batteries are sometimes hard to find in out-of-the-way places.Suburban camera shops are a dependable source, but if your camera losespower in Timbuktu, you’re in trouble. Even if you can find the right lithiumbattery, you may have to pay a black-market price for it.
Autofocus mode button
Flash mode button
Shutter button
Zoom toggle control
Date-setting button
Diopter adjustment
Viewfinder eyepiece
Flash ready lamp (red or orange)
Focus OK lamp (green)
Film check window
Battery compartment
Film compartment
Camera back
Camera back latch
Tripod socket (not visible)
Panorama switch(not visible)
Midroll rewind button (not visible)
Figure 1-2:The
photogra-pher’s
view of thecontrols and
parts on atypical, full-
featured35mm point-
and-shoot.
14 Part I: What You Need to Take Pictures
541161 Ch01.qxd 9/13/03 12:20 AM Page 14

Shooting insurance: Pack an extra batteryIf your point-and-shoot takes lithium batteries, you should always keep anextra one (or two, if that’s what the model requires) on hand. To prolong thebattery’s shelf life, keep it in the refrigerator, in its original packaging inside abaggie. (Never freeze it.) Just avoid putting the battery straight into yourcamera from the refrigerator; give it a half hour to warm up.
Take an extra battery with you to weddings, graduations, bar mitzvahs, orany other occasions that you want to photograph. These events are flash-intensive, and using flash a lot reduces the number of pictures you get from abattery. If you take an extra battery along, you don’t have to stop shooting ifthe one in your camera peters out. Just be sure to refresh your memory about
Speaker
Shutterbutton
Still/Video/Self-timer switch Self-timer lamp
Zoom toggle buttons (not visible)
Viewfinder windowOn/off button
Built-in flash
USB/TV connections(not visible)
AC power adapter connector(not visible)
Memory card slot(not visible)
3X Zoom lensMicrophoneBatterycompartment
Figure 1-3:From the
front, adigital point-
and-shootdoesn’t look
muchdifferent
than a35mm or
APS point-and-shoot.
15Chapter 1: Ladies and Gentlemen: Start Your Point-and-Shoots!
541161 Ch01.qxd 9/13/03 12:20 AM Page 15

how to install it, in case you need to do it fast. (See “Loading batteries — theright way,” later in this chapter, for the details.)
A different kind of recycling As a battery weakens, your camera’s flash takes longer to recycle — torecharge itself for the next flash picture. (See Chapter 7 for more on flashrecycling.) This sluggishness becomes a practical problem if, as with mostpoint-and-shoots, your camera won’t let you shoot until the flash has mostlyrecycled. Have you ever tried to take a picture right after turning on thecamera or to take flash pictures in quick succession, only to find that whenyou press the shutter button it just doesn’t respond — and you have to keeppressing and pressing to get it to fire the camera? Sometimes the problem isdue to the camera’s inability to focus, but more often than not, it’s caused byan overly long recycling time — the direct result of a low battery.
You can turn off the flash (which otherwise powers up automatically everytime you turn on the camera) to sidestep this problem. But I think flash is oneof the most valuable photographic tools on your point-and-shoot, and I encour-age you to use it generously — even outdoors! So please read Chapter 7 forways to deal with flash recycling woes and to find out about the flash-readylamp, which alerts you when the flash is ready to fire again.
If your camera’s shutter button won’t let you take a picture, don’t keep bear-ing down on it. The camera may still be recycling the flash, preventing youfrom shooting to reduce the chance of a bad picture. Release the pressure,wait a few seconds, and then press again.
The good old AAsSome point-and-shoots get their power from AA (or AAA) batteries, the samesize that goes into most battery-powered gizmos. With 35mm and APS cam-eras, it is often the less expensive models that use AA and AAA cells. If youhave such a camera, be sure to use alkaline AA (or AAA) batteries rather thanthe standard cheapo AA (or AAA) batteries. Alkalines last way longer thanregular batteries, and most battery makers offer alkalines that are speciallyformulated for use in digital cameras and other power-hungry electronicdevices. Some cameras actually accept both AA batteries or the smallerthree-volt lithiums. Now there’s a great idea, especially if you’re going toTimbuktu. (Pack extra AAs anyway.)
And if you really are going to Timbuktu, or even somewhere less exotic, con-sider buying lithium AA batteries, not to be confused with the small lithiumcells made specifically for cameras. Lithium AAs look the same as regular AAbatteries but last up to three times as long as alkaline AAs. They’re also threetimes as expensive as alkaline AAs. But you don’t have to change them half as
16 Part I: What You Need to Take Pictures
541161 Ch01.qxd 9/13/03 12:20 AM Page 16
often, which means you’re less likely to see a great photo opportunity disap-pear before your eyes as you struggle with batteries.
Lithium AAs are especially valuable with digital cameras because of theirenergy-sapping viewing screens. But you certainly can use them in your regu-lar film point-and-shoot if it accepts AAs. Another option is to use dual-celledCR3V batteries, which fit in cameras that take AA cells. (You’ll need one formodels that take two AAs, and two for models that take four AAs.) An expen-sive solution, but you won’t be changing batteries for a long time.
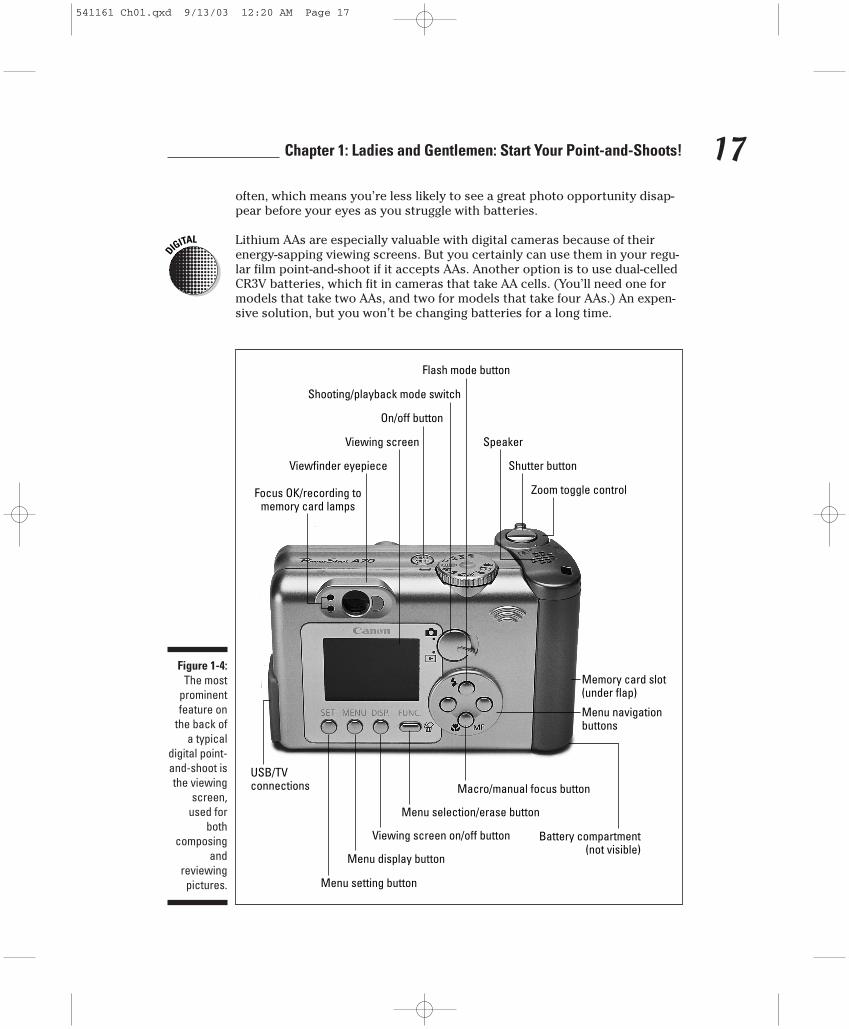
On/off button
Flash mode button
Shooting/playback mode switch
Shutter button
Zoom toggle control
Speaker
Focus OK/recording tomemory card lamps
Viewfinder eyepiece
Viewing screen
Battery compartment(not visible)
Menu setting button
Menu display button
Viewing screen on/off button
Menu selection/erase button
Macro/manual focus buttonUSB/TVconnections
Menu navigation buttons
Memory card slot(under flap)
Figure 1-4:The most
prominentfeature on
the back ofa typical
digital point-and-shoot isthe viewing
screen,used for
bothcomposing
andreviewingpictures.
DIGITAL
17Chapter 1: Ladies and Gentlemen: Start Your Point-and-Shoots!
541161 Ch01.qxd 9/13/03 12:20 AM Page 17

If your camera takes AA batteries and you feel guilty about throwing themaway, you can get rechargeable AA cells. Some digital point-and-shoots — theones that don’t use specially-shaped, proprietary rechargeables — actuallycome with AA rechargeables and a charger. Or purchase an inexpensive plug-in AA recharger and at least two sets of cells — four cells if your cameratakes two batteries, eight cells if it takes four. That way, you can alternatecharging them and always have a freshly charged set.
Loading batteries — the right wayIf you’ve ever had to figure out where to stick batteries in your child’slatest electronic acquisition, then loading batteries in your point-and-shootshouldn’t be a challenge. Turn off your camera when you install the batteries;otherwise, it may go crazy opening and closing its lens. (Some cameras turnthemselves off after you install new batteries, so you have to turn them backon to shoot.)
18 Part I: What You Need to Take Pictures
Batteries and digital point-and-shootsDigital point-and-shoots don’t accept thescaled-down lithium batteries used by betterfilm models. The reason for this, as far as I cantell, is that these newfangled cameras haveenormous power needs — so special lithiumbatteries would make them prohibitively expen-sive to operate. Most early digital point-and-shoots used four AA batteries, and some still do,eating them like they’re going out of style. Manymodels use just two AAs to stay small, if theydon’t come with a proprietary rechargeable cell.
The big power drain in these cameras is theirlittle viewing screens. These mini-monitors areintended not just for playback of pictures thatyou’ve already shot, but also for viewing andcomposing your subject while you’re shooting.Though many models have a window-typeviewfinder in addition to the viewing screen,others have no such viewfinder and force youto use the viewing screen for shooting. Everyminute the screen is on, even if you’re not takingpictures, it’s sucking your batteries dry.
If your digital point-and-shoot makes you shootwith the viewing screen, turn the camera ononly when you’re ready to take pictures. Turn itoff as soon as you’re done shooting. This habitextends the life of the batteries.
If your camera has both a window-typeviewfinder and a viewing screen, you can getmuch more life out of your batteries by shootingwith the regular viewfinder and saving the viewing screen for playback only. Oh, and ifyou’re taking your digital point-and-shoot to an occasion — or on a trip — pack at least twochanges of batteries.
When you use flash and a digital point-and-shoot’s viewing screen for your pictures, youconsume batteries even more quickly. But theseveral seconds digital point-and-shoots oftenmake you wait before taking the next shot aren’talways battery-related: During this interval, thecamera is processing the information from theimage sensor.
DIGITAL
541161 Ch01.qxd 9/13/03 12:20 AM Page 18

With big point-and-shoot models, you typically have to open a latched coveron the camera bottom to install batteries. On more compact models, the bat-tery compartment is often under a door or flap incorporated into the side orgrip of the camera (see Figure 1-5). Sometimes you have to pry open suchdoors with a coin or key. This design is annoying when you don’t have anychange and break a fingernail trying to do it.
More annoying are camera-bottom battery covers that you open by looseninga screw. (You need a coin for this type, too.) And most annoying are batterycovers that aren’t hinged. They come off completely when you unscrew them.If you have one of these covers, don’t change batteries when you’re standingover a sewer grate, in a field of tall grass, or on a pier!
With digital point-and-shoots having proprietary rechargeable batteries, thebattery slot and the memory card slot are often under the same door on theside of the camera. This is especially true of compact models.
Whether you’re loading four AA cells or just a single lithium, make sure thatthe batteries are correctly oriented as you insert them. You’ll find a diagramand/or plus and minus markings, usually within the compartment or on theinside of the door. The bump end of the battery is its positive (+) terminal;the flat end is its negative (–) terminal. The batteries also have plus and minussymbols on their sides. AA (and AAA cells) usually don’t go in all facing thesame way; you may have to reverse every other cell. Always follow yourcamera’s diagram.
If you don’t install batteries in their correct orientation, your camera won’tstart up when you try to turn it on. If this happens, remove the batteries,reinsert them correctly, and then try to turn the camera on again.
If your camera doesn’t turn on and you’re sure the batteries are correctlyinstalled, then the problem may be that the batteries have lost their punchfrom sitting on a shelf too long. Which brings me to the battery icon. If yourcamera has an LCD panel or viewing screen, the icon tells you when batterypower is low.
Figure 1-5:This point-
and-shoot’sbattery
compart-ment is on
the side;others are in
the bottom.
19Chapter 1: Ladies and Gentlemen: Start Your Point-and-Shoots!
541161 Ch01.qxd 9/13/03 12:20 AM Page 19

After you turn on your camera or load film, your camera may display a battery-shaped icon, usually in a corner of the LCD panel or viewing screen. (SeeChapter 4 for more on the LCD panel and viewing screen.) If the icon’s shapeis fully darkened, the battery has sufficient power. If it’s half darkened, you’vealready used a good portion of its juice — and may have noticed already thatthe flash recycling time is increasing. If the icon is barely filled in and/orblinking, you need a new battery. (See Figure 1-6.) Many models won’tdisplay the icon at all until the battery is on its way out.
Some models may display battery status all the time. And other models mayhave a pushbutton battery check. Pushing the button makes a light glow. Buthowever your camera displays battery status, if it does, check the status reg-ularly. If you’re planning to shoot a special event or going on a trip, check itbefore you go. If the battery needs replacing, do it now.
By the way, changing batteries when film is in the camera is perfectly okay.The LCD panel goes blank during the change. Even though the LCD is battery-dependent, the camera “remembers” how many pictures you’ve taken — orhow many are left, depending on your model — and restores the display afteryou power up again. Models with mechanical counters remain unaffected. Thecamera ordinarily doesn’t remember specific settings that you previouslymade, however. (See Chapter 4 for more on setting camera modes.)
If you have a roll of film in the camera, be sure to leave the old battery in ituntil you’re ready to put in a new one. Left too long without a battery, thecamera may forget how many pictures have been taken.
Models with quartz date capability, which allows them to imprint the timeand/or date on your prints, generally do not use the camera’s main battery tokeep time. They use a tiny button cell — a watch battery — that either comeswith the camera or is factory-installed. This battery usually lasts many years.You can replace it after it dies, though some models may need to be returnedto the manufacturer for this service. Check your manual! (And see Chapter 3for the pros and cons of putting the time or date on the front of your pictures.)
Powersufficient
Powerlow Change
battery
Figure 1-6:Typicalbatterypowericons.
20 Part I: What You Need to Take Pictures
541161 Ch01.qxd 9/13/03 12:20 AM Page 20

If you don’t use your camera for long periods of time — a couple of monthsor more — remove the batteries to prevent the possibility that they will startto leak corrosive fluids. (Just remember that you lose the frame count — butthen you shouldn’t be leaving film that long in the camera anyway!) Leakage,most likely with AA batteries, can seriously damage your camera’s innards.The solution: Take pictures more often!
Loading Film — the Painless Way!Probably the single greatest source of photographic anxiety, loading film ismuch easier than it used to be — and, thanks to point-and-shoot innovation,easier than most people think. Nearly all reloadable point-and-shoots (one-time-use cameras not included) have automatic film loading, and the AdvancedPhoto System’s film cassette and drop-in loading makes something easy eveneasier. (See Chapter 8 for details.)
But first, here’s all that you ever need to know about loading film into a 35mmpoint-and-shoot. Nothing gives away an amateur like tentative or prolongedfilm loading. Master this stuff, and you’ll look like a pro.
After you close the back of a 35mm point-and-shoot, the camera automati-cally advances the film to the first frame. (With some low-budget models youmay have to advance the film manually with a little fold-out crank; see“Counting up — and down,” later in this chapter, for details.) But what cowspeople is the film leader — the little strip of film that protrudes from the cas-sette’s lightproof lip (see Figure 1-7). The leader starts out perforated on bothsides (as is the film inside the cassette), but tapers to a short half-width stripwith perforations only on one side. After the cassette is in position inside thecamera, you pull the leader across to the film take-up spool, which automati-cally engages it after you close the camera back.
Figure 1-7:An
AdvancedPhoto
System filmcassette
(left) and a35mm film
cassette(right).
21Chapter 1: Ladies and Gentlemen: Start Your Point-and-Shoots!
541161 Ch01.qxd 9/13/03 12:20 AM Page 21
Here’s how 35mm loading works:
1. Open the camera back.
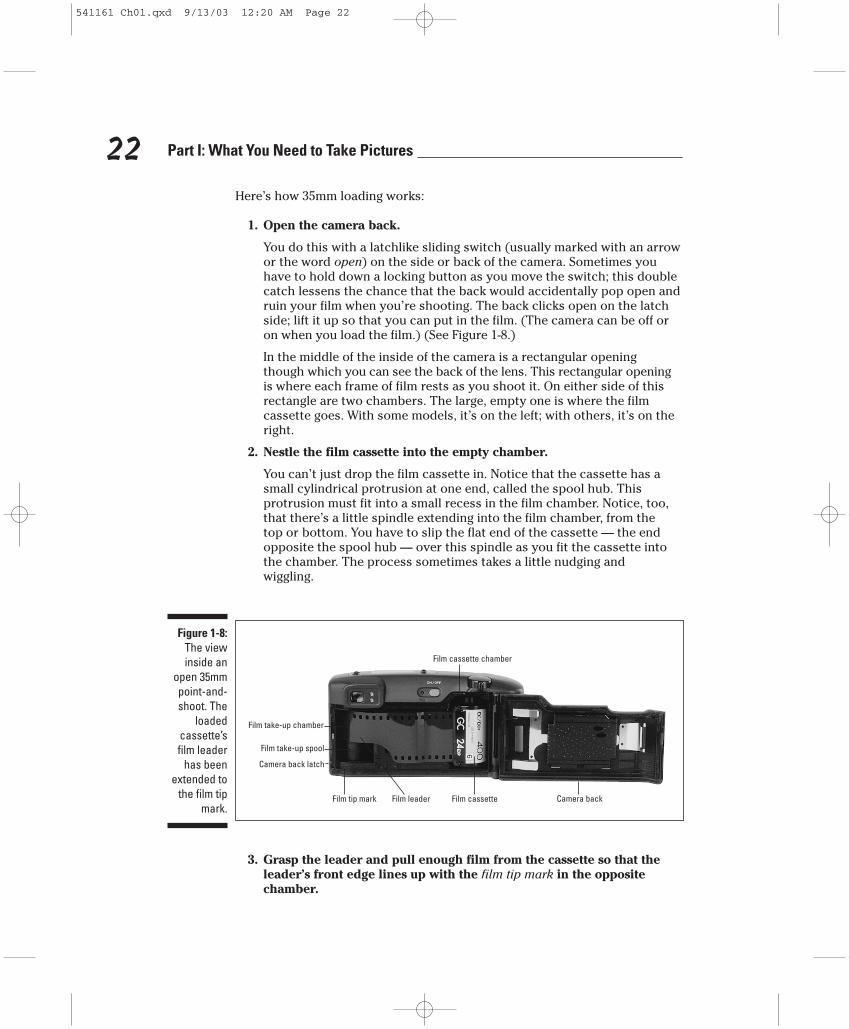
You do this with a latchlike sliding switch (usually marked with an arrowor the word open) on the side or back of the camera. Sometimes youhave to hold down a locking button as you move the switch; this doublecatch lessens the chance that the back would accidentally pop open andruin your film when you’re shooting. The back clicks open on the latchside; lift it up so that you can put in the film. (The camera can be off oron when you load the film.) (See Figure 1-8.)
In the middle of the inside of the camera is a rectangular opening though which you can see the back of the lens. This rectangular openingis where each frame of film rests as you shoot it. On either side of thisrectangle are two chambers. The large, empty one is where the film cassette goes. With some models, it’s on the left; with others, it’s on theright.
2. Nestle the film cassette into the empty chamber.
You can’t just drop the film cassette in. Notice that the cassette has asmall cylindrical protrusion at one end, called the spool hub. This protrusion must fit into a small recess in the film chamber. Notice, too,that there’s a little spindle extending into the film chamber, from the top or bottom. You have to slip the flat end of the cassette — the endopposite the spool hub — over this spindle as you fit the cassette intothe chamber. The process sometimes takes a little nudging and wiggling.
3. Grasp the leader and pull enough film from the cassette so that theleader’s front edge lines up with the film tip mark in the oppositechamber.
Film cassette chamber
Camera backFilm cassetteFilm leaderFilm tip mark
Film take-up spool
Film take-up chamber
Camera back latch
Figure 1-8:The viewinside an
open 35mmpoint-and-shoot. The
loadedcassette’sfilm leader
has beenextended to
the film tipmark.
22 Part I: What You Need to Take Pictures
541161 Ch01.qxd 9/13/03 12:20 AM Page 22
The film tip mark is often, though not always, colored orange or red. Pullgently on the leader, keeping a finger on the cassette itself so that itdoesn’t lift out of the chamber. Lie the film flat across the rectangularopening to see if it reaches the mark. If it doesn’t, pull it out a little more.
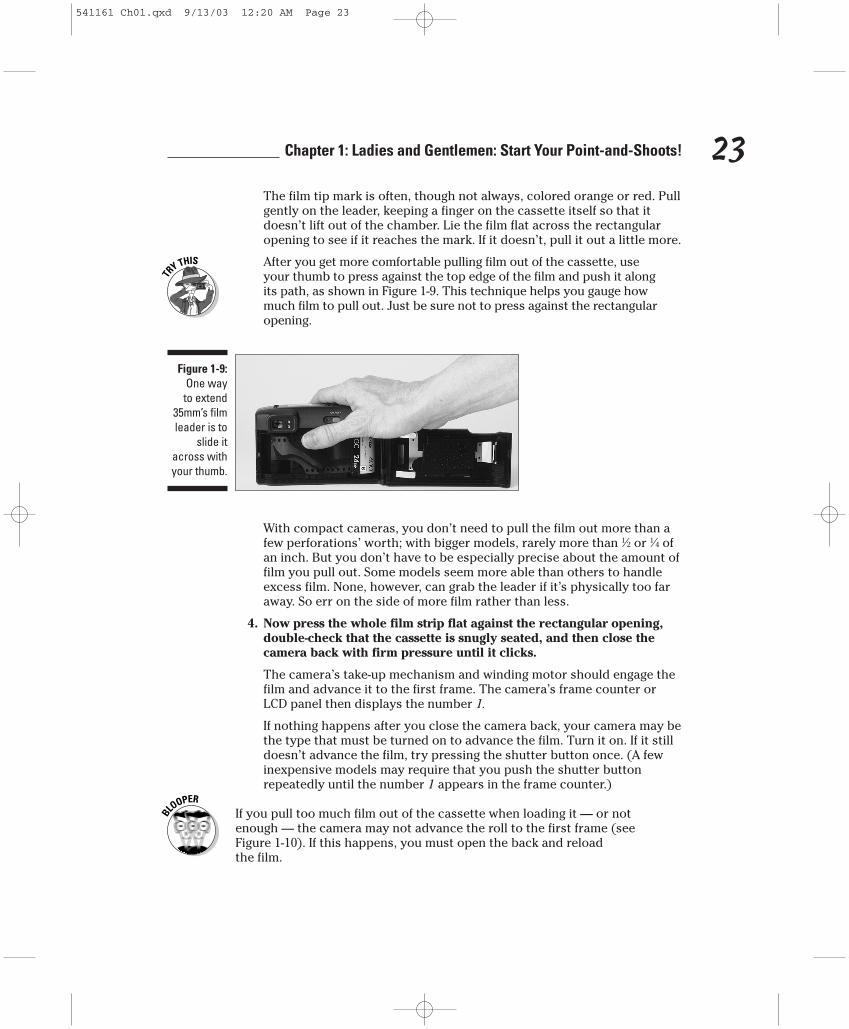
After you get more comfortable pulling film out of the cassette, useyour thumb to press against the top edge of the film and push it alongits path, as shown in Figure 1-9. This technique helps you gauge howmuch film to pull out. Just be sure not to press against the rectangularopening.
With compact cameras, you don’t need to pull the film out more than afew perforations’ worth; with bigger models, rarely more than 1⁄2 or 1⁄4 ofan inch. But you don’t have to be especially precise about the amount offilm you pull out. Some models seem more able than others to handleexcess film. None, however, can grab the leader if it’s physically too faraway. So err on the side of more film rather than less.
4. Now press the whole film strip flat against the rectangular opening,double-check that the cassette is snugly seated, and then close thecamera back with firm pressure until it clicks.
The camera’s take-up mechanism and winding motor should engage thefilm and advance it to the first frame. The camera’s frame counter orLCD panel then displays the number 1.
If nothing happens after you close the camera back, your camera may bethe type that must be turned on to advance the film. Turn it on. If it stilldoesn’t advance the film, try pressing the shutter button once. (A fewinexpensive models may require that you push the shutter buttonrepeatedly until the number 1 appears in the frame counter.)
If you pull too much film out of the cassette when loading it — or notenough — the camera may not advance the roll to the first frame (seeFigure 1-10). If this happens, you must open the back and reload the film.
Figure 1-9:One way to extend
35mm’s filmleader is to
slide itacross withyour thumb.
23Chapter 1: Ladies and Gentlemen: Start Your Point-and-Shoots!
541161 Ch01.qxd 9/13/03 12:20 AM Page 23

Fortunately, most 35mm point-and-shoots tell you (after you close the backand they attempt to engage the leader) if you pulled out too much film — or ifyou didn’t pull out enough. They give you this warning, if they have an LCDpanel, by blinking an icon of the film cartridge and/or the number 1 or an E(for empty). Models without LCD panels simply fail to move their mechanicalframe counters to 1.
To fix the problem, open the camera back. Pressing the film flat against thecamera, check again to see whether the leader lines up with the film tip mark.If it’s short, just pull out a little more film and close the camera back again.
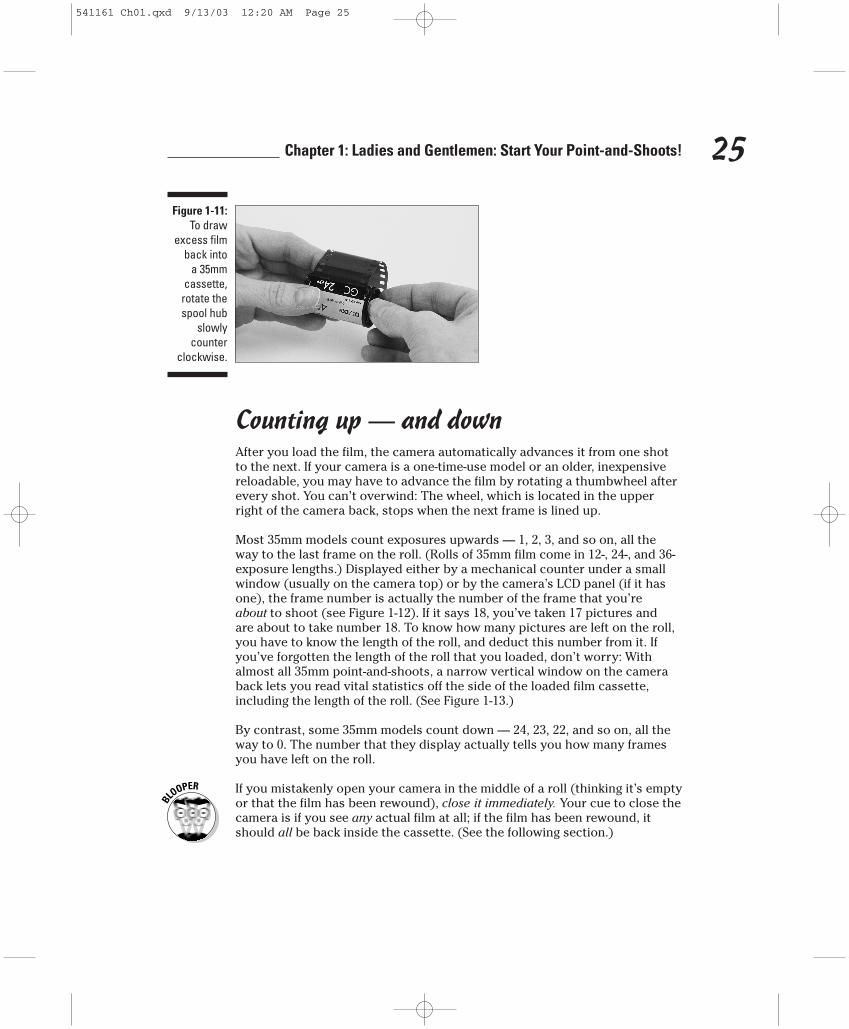
If you pulled out too much film, take out the cassette. Hold the cassettebetween the thumb and fingers of one hand and point the spool hub towardyou. Grasp the spool hub with the thumb and forefinger of your other handand rotate it counterclockwise to draw the leader back into the cassette (seeFigure 1-11). This rotation may not appear to have an effect until the coil offilm inside the cassette begins to tighten up. Continue to turn the spool hubuntil the half-width portion of the film is a few perforations away from thecassette’s lip. Rotate it slowly, so that you don’t accidentally pull the wholeleader back into the cassette.
Now load the film as I describe earlier in this section. If you pull out too muchfilm again, just repeat the process.
Do not rotate the film cassette’s spool hub in a clockwise direction. It puts upa lot of resistance if you try, and doing so may cause damage to the film.
Some 35mm point-and-shoot brands use a drop-in loading system that isfairly foolproof, as such things go. The cassette slips into a shaped compart-ment on the bottom of the camera. You do have to pull out the film leader abit so that the camera can engage it after you close the door, but the com-partment is shaped so that you can clearly see how to insert the cassette.
Right Wrong
Figure 1-10:Don’t pulltoo much
film out of a 35mm
cassettewhen you’reloading it —or too little.
24 Part I: What You Need to Take Pictures
541161 Ch01.qxd 9/13/03 12:20 AM Page 24
Counting up — and downAfter you load the film, the camera automatically advances it from one shotto the next. If your camera is a one-time-use model or an older, inexpensivereloadable, you may have to advance the film by rotating a thumbwheel afterevery shot. You can’t overwind: The wheel, which is located in the upperright of the camera back, stops when the next frame is lined up.
Most 35mm models count exposures upwards — 1, 2, 3, and so on, all theway to the last frame on the roll. (Rolls of 35mm film come in 12-, 24-, and 36-exposure lengths.) Displayed either by a mechanical counter under a smallwindow (usually on the camera top) or by the camera’s LCD panel (if it hasone), the frame number is actually the number of the frame that you’reabout to shoot (see Figure 1-12). If it says 18, you’ve taken 17 pictures andare about to take number 18. To know how many pictures are left on the roll,you have to know the length of the roll, and deduct this number from it. Ifyou’ve forgotten the length of the roll that you loaded, don’t worry: Withalmost all 35mm point-and-shoots, a narrow vertical window on the cameraback lets you read vital statistics off the side of the loaded film cassette,including the length of the roll. (See Figure 1-13.)
By contrast, some 35mm models count down — 24, 23, 22, and so on, all theway to 0. The number that they display actually tells you how many framesyou have left on the roll.
If you mistakenly open your camera in the middle of a roll (thinking it’s emptyor that the film has been rewound), close it immediately. Your cue to close thecamera is if you see any actual film at all; if the film has been rewound, itshould all be back inside the cassette. (See the following section.)
Figure 1-11:To draw
excess filmback into
a 35mmcassette,rotate thespool hub
slowlycounter
clockwise.
25Chapter 1: Ladies and Gentlemen: Start Your Point-and-Shoots!
541161 Ch01.qxd 9/13/03 12:20 AM Page 25

Fogging film (say it ain’t so!)When you open the camera back before the film has been fully rewound, theresulting exposure to incoming stray light is said to fog the film. Fogging basi-cally clouds up, discolors, mars with streaks, or completely obliterates thepictures that you’ve shot — assuming that you go on to get them developed.
Fogging almost certainly ruins your most recent shots. But if you close thecamera back quickly, some of the earlier pictures on the roll may be salvage-able. They may be okay because the film is opaque before development andforms a tight coil on the take-up spool as you shoot — the top loop or loopsprotecting the film beneath. But the longer you leave the back open, the moredamage is done. And the brighter the surrounding light, the more immediatethe damage. You don’t know how bad the damage is until you have the filmprocessed, which is worth doing. The photofinisher does not print badlyfogged frames, so you don’t have to pay for them.
Figure 1-13:You can tell
whether35mm film is
loaded bylooking at awindow onthe camera
back.
Figure 1-12:To displaythe frame
count, yourpoint-and-shoot uses
either itsLCD panel
(left) or aseparatewindow
(right).
26 Part I: What You Need to Take Pictures
541161 Ch01.qxd 9/13/03 12:20 AM Page 26

If you open the camera in the middle of the roll, the film you haven’t used yetis still safe in the cassette and, with the exception of a frame or two, shouldbe unfogged. In fact, after you reclose the back, the camera might behave asif you’ve loaded a new roll and advance the film to what it thinks is the firstframe — in the process pulling out enough film to reach the unfogged por-tion. But just to be safe, fire off a few blank frames (shots of nothing in partic-ular) to advance the roll farther, and you’re ready to continue shooting. (Thatis, if you’re not so anxious to assess the damage that you choose to rewindthe film and have it processed immediately!) Keep in mind that because theframe counter is reset to 0 after you open and close the back, unless you canremember how many frames were left on the roll, you don’t know exactlywhen it will end.
35mm models that count frames down rather than up may actually prewindthe film. Prewinding means that right after you load the cassette and close thecamera back, these models advance the film all the way to the last frame. Youhear their motors whirring for quite some time, and you may see their coun-ters counting up along the way. Then, as you take each picture, they draw thefilm, a frame at a time, back into the cassette. (Rewinding is short, because atthe end of the roll only a few inches of film are left!)
The thought behind prewinding is sensible: Should you open the cameraback accidentally in the middle of the roll or should you drop the camera andthe back pops open, the frames that you’ve already shot are safe inside thecassette. With a prewinding camera, the only film that would be fogged bythe light you let in is the film that’s still outside the cassette — which has nopictures on it.
So if you have a prewinding camera and accidentally open the back in themiddle of a roll, close it and rewind the film. (Check out “Rewinding Film(Congratulations!)”, later in this chapter, for instructions on midroll rewind-ing.) Do not shoot any more pictures; you’d be taking them with fogged film,and they probably wouldn’t come out. If you shut your camera really fast,you may have a few good frames toward the end of the roll, but why take thechance? The photofinisher doesn’t print what you don’t shoot and certainlydoesn’t print fogged negatives. Film is cheap.
Loading film into an Advanced Photo System cameraBeing well thought-out machines, APS cameras make loading film effortless.Photographers who’ve moved from a 35mm point-and-shoot to an APS modelhave probably noticed that the APS model doesn’t have a camera back to
27Chapter 1: Ladies and Gentlemen: Start Your Point-and-Shoots!
541161 Ch01.qxd 9/13/03 12:20 AM Page 27
open up for film insertion, only a small door. This door — call it the film-compartment door — is usually on the bottom of the camera. On a fewmodels you may find it finagled into the side or even the top. You usuallyopen it with a latchlike sliding switch or a flat lever.
With some models, you have to press a button to unlock the switch; withothers, you must push the switch up or sideways before it fully slides to openthe film-compartment door. Such designs are meant to protect against acci-dental opening of the door, which would fog your film. In fact, if you open andclose the door without rewinding the film (or with some models, even if youmove the switch), the camera may go ahead and rewind the film for you asinsurance against any possibility of shooting on fogged film. (See “Foggingfilm (say it ain’t so!)” for more details.)
By the way, I’ve found that the film-compartment switch or lever on APS cam-eras often takes more pressure to move than the camera-back switch on35mm models.
As for the APS cassette, you’ll notice not only that it’s smaller and differentlyshaped than a 35mm cassette, but that it lacks 35mm’s leader — the annoyinglittle strip of protruding film. (Are you happy?) The film is entirely within thecassette and is actually pushed out of the cassette to the take-up spool(which you can’t even see) after you close the film-compartment door.Loading an APS cassette is about as simple as sliding a VHS cassette intoyour TV’s VCR.
As you throw the switch, the door pops open. Lift the door up if it doesn’topen all the way on its own. Then just push the film cassette into the camera,end first. If one end doesn’t fit, put in the other end first.
You can’t accidentally load an Advanced Photo System film cassette back-wards. The cassette is specially shaped so it fits only one way.
With some APS models, you may encounter a slight, springy resistance asyou slide in the cassette. If you do, push the cassette all the way down; it mayclick into position. But if the cassette rides up a little in the compartment,just push it down with the film-compartment door when you close it.
After you close the film-compartment door, which takes firm pressure, thecamera automatically advances the film to the first frame. Most APS modelsautomatically advance the film whether they’re on or off. They take more timethan 35mm cameras to accomplish this task — quite a long time, which can befrustrating if you’re in a hurry to get more pictures. But don’t let all this motor-ized whirring and whining lead you to think that the film is being prewound.You may get that idea because most APS cameras (though not all) countframes down, starting at 15, 25, or 40 frames — the standard APS roll lengths.
28 Part I: What You Need to Take Pictures
541161 Ch01.qxd 9/13/03 12:20 AM Page 28

Loading digital camerasDigital cameras don’t need film, silly. That’s why you can’t hear the familiarwhir of the film-winding motor after you take a picture. The silence of digitalpoint-and-shoots is disquieting to some film-oriented photographers. When dig-ital cameras first came out I facetiously suggested to manufacturers that theyput a little computer chip into them to fake this noise, just to make it seem as ifsomething is really happening. Something is happening, of course — quietlyand electronically. And now most models provide such sound effects.
Actually, you do “load” digital cameras in one sense: With most models, to getphotographs you have to place a memory card into a slot on the camera body.The memory card is where your pictures reside until you put them somewhereelse, and depending on its storage capacity, you may need more than one.When a card fills up with pictures, you either have to remove it and replace itwith another or transfer its pictures to your computer and erase it so you canstart putting new pictures on it. (For more about this, see Chapter 15.)
DIGITAL
29Chapter 1: Ladies and Gentlemen: Start Your Point-and-Shoots!
The Advanced Photo System cassettePart of the Advanced Photo System’s appeal isthat its film cassette has no visible leader — soyou don’t have to worry, as you do with 35mm,about engaging a leader to load the film. But thislack of a visible leader also means that you can’ttell with a quick look whether you’ve shot a rollof film. Instead, you have to look at icons on theend of the cassette. These icons are especiallyuseful because with the Advanced PhotoSystem, your processed film is returned in theoriginal cassette, where it remains for long-termstorage and future reprinting.
The icons — a circle, a half circle, an X, and arectangle — surround the opening in the middleof one end of the cassette (see figure). To keeptheir proper sequence perfectly clear, they arenumbered 1, 2, 3, and 4 (respectively), andarrows point from one icon to the next. Theicons are actually small, shaped cutouts in thecassette surface, and a white indicator appearsbeneath the appropriate cutout to tell you theroll’s status. With a new, unexposed cassette,the circle appears white (left cassette in figure).With a cassette in which only a portion of the
roll has been shot, the half circle appears white.(This status is only possible with the few APSmodels having mid-roll film change capability,which I explain in the section “Rewinding Film(Congratulations!).”) With a cassette that is fullyexposed (that is, all the frames have been shot)but unprocessed, the X appears white (centercassette). And with a processed cassette, therectangle appears white (right cassette).
If you inadvertently load either an exposed but unprocessed APS cassette or a processedAPS cassette, your APS camera does notadvance the film. This protection preventsdouble-exposure and shooting pictures thatwould not come out.
541161 Ch01.qxd 9/13/03 12:20 AM Page 29

Turning the Camera On — and Off AgainMost point-and-shoots, whether 35mm, Advanced Photo System, or digitalmodels, are turned on with a single pushbutton on the top or back of thecamera, marked on/off. You push it once to turn the camera on and again toturn the camera off. Other models may turn on and off with sliding switches,also placed on the top or back. Some switches have two positions; othershave a spring mechanism that returns them to a single position. (You slidethem once to turn the camera on and again to turn the camera off.) Somecameras have sliding on/off switches on the front, usually below the lens.These switches also open the camera’s built-in protective lens cover, so youmust slide them back to close the cover and turn off the camera.
Still other models, both digital and film-using, are turned on and off with alarge, sliding front panel that doubles as a lens protector. It’s sometimescalled a clamshell cover, a term inherited from older cameras that actuallyhad swing-out front covers. This design is very sensible. To open up and turnon the camera, you simply use the flats of your fingers to slide the cover tothe side. (The cover usually has a ridge to help you grasp it.) To turn off thecamera, you slide the cover back over the lens. With some designs, you haveto wait a moment for the lens to retract into the camera before you can slidethe cover all the way over.
One other style of on/off switch is fairly common. It is built into a thumb-controlled dial on the back or top of the camera. The dial has various settingson it, but rotating it one click away from its off position, to a setting marked Aor Auto, or sometimes just plain On, turns on the camera. (This setting may becolor-coded green, for go.) Rotating the dial back to Off turns the camera off.
30 Part I: What You Need to Take Pictures
How to press the shutter buttonDon’t treat your shutter button like a hot potato!Many point-and-shooters wait for pictures withtheir finger hovering above the shutter button,“stabbing” it to take the shot. This bad habitcauses you to jerk the camera — and that unin-tended movement is one of the main causes ofunsharp pictures.
Instead, keep your finger resting lightly on theshutter button. When you want to take a picture,slowly, smoothly bear down on the button untilyou hear the shutter click. Then release thebutton without completely removing your finger
from it. Get yourself to do this by pretending thatyour shutter-button finger is glued on: Keep itthere before, during, and after snapping a pic-ture. Practice with an unloaded camera to get afeel for it. Watch yourself in a mirror: You shouldsee no movement of the camera at all.
This technique is also crucial to mastering theshutter button’s two-step operation — pressingit halfway to lock the autofocus and then all theway down to take the picture. See Chapter 6 formore on the shutter button two-step.
541161 Ch01.qxd 9/13/03 12:20 AM Page 30

As you turn the camera on, the first thing that happens is that the lens isuncovered. This function may be strictly mechanical, as it is with sliding frontpanels or below-the-lens sliding switches. In other cases, it’s accomplishedwith motor-driven spring action.
Some lens covers are just large, flat doors that are flush with the front of thecamera; after you turn off the camera, they hide the entire lens, cylindricalbarrel and all, within the camera body. (You find them mainly on nonzoomingmodels.) Other lens covers are made of delicate blades that are built into thelens barrel and spring open to uncover just the glass portion of the lens.Whatever the design, the lens cover protects the front glass surface of thelens from smudges or scratches. But if your camera has a bladed cover, beadvised that if you leave it in a purse or carryall, the cover blades can catchon something and be pulled open, subjecting the lens to scratching from keysand so on. If you stash your camera in a bag, keep it in a fitted pouch.
Point-and-shoot cameras with sliding front covers are a smart idea. The lensis more protected than with other designs, making the camera ideal for slip-ping into a pocket or purse.
After you turn your camera on, it may extend the lens, especially if it’s an autofocus model. (Many cameras extend the lens as the cover is opening.)The lens is extended with a small motor. Extending the lens readies thecamera for shooting, and with 35mm zoom models, sets the lens to its shortest (most wide-angle) focal length — which is generally 35mm or 38mm, though sometimes 28mm. (Note that these settings are different forAPS cameras; for more on focal lengths, check out Chapter 5.) You can thenzoom to the setting of your choice. If your camera does not have autofocuscapability, the lens may not need to move at all.
Get a Grip: Holding Your CameraPoint-and-shoot cameras are often so small — and therefore so crowded withbuttons, dials, windows, and other doodads — that you usually don’t havemuch leeway in terms of how to hold them when you’re taking pictures. Youbasically have to pinch each end of the camera between your thumb and fin-gers, except that with the right hand, your index finger must rest on the shut-ter button, on top of the camera. Your remaining three right-hand fingersform a sort of wedge against the front of the camera. Many models incorpo-rate a curved or ridged grip on the right side, which makes for a more securegrasp and, coincidentally, a nice little space for the battery compartment.
Your right thumb should rest vertically against the back of your camera. Withmost zooming models, you find the zoom control at the tip of your thumb, inthe upper right of the camera back. But some models have their zoom controlson the top of the camera, where they must be operated by the right index
31Chapter 1: Ladies and Gentlemen: Start Your Point-and-Shoots!
541161 Ch01.qxd 9/13/03 12:20 AM Page 31

finger. You have to get used to moving your finger back and forth betweenthese zoom controls and the shutter button. You will.
You have a little more flexibility in how you use your left hand, though thebest way depends partly on the specific design of your camera. The worstthing that you can do is to stick a finger over the flash, which definitely ruinsindoor pictures (see Figure 1-14, top left). Find a comfortable way of graspingthe camera that avoids this problem and use it consistently.
An easy way to determine whether you’re covering the flash when you holdthe camera — a real no-no — is simply to look at yourself in a mirror whilesighting through the camera’s viewfinder.
As far as your left thumb goes, one thing that you can do with it is prettymuch to match the position of your right thumb: point it up and slightlyinwards. The front of the camera then rests against the side of your indexfinger (see Figure 1-14, top right). But my preferred left-hand grip places thethumb against the bottom of the camera, and, preferably, the index fingeracross the top (see Figure 1-14, bottom left). You just have to hold your otherfingers away from the camera (again, to avoid blocking the flash) either byfolding them in tightly or splaying them out, which looks a little ornate.
Wrong Right
Right Right
Figure 1-14:The
steadiestgrip on the
camera is often
the mostcomfortable
one, butthere are
right waysand wrong
ways —and you
shouldnever cover
the flash(top left).
See text fordetails.
32 Part I: What You Need to Take Pictures
541161 Ch01.qxd 9/13/03 12:20 AM Page 32

I think this technique is more secure, lessening the chance that hand tremorswill make your pictures unsharp. However, if your camera has a flash thatpops up from the top of the camera or it has pushbuttons there that you mayaccidentally press, you can’t use this technique, so go back to Plan A. For ver-tical shots with flash, try to place the camera’s built-in flash at the top ratherthan the bottom; this creates a more flattering effect with people pictures(see Figure 1-14, bottom right).
Rewinding Film (Congratulations!)When a 35mm or APS point-and-shoot camera reaches the end of a roll offilm, it automatically rewinds it — that is, the camera draws the entire roll ofexposed but undeveloped pictures back into the cassette. (Less expensivemodels may require manual rewinding with a crank; read on.) Sometimes thecamera squeezes in an extra shot or two at the end of a roll, depending onthe brand of film and the winding system; you may get 37 exposures insteadof 36. The standard roll lengths in 35mm are 12, 24, and 36 exposures; in theAdvanced Photo System, 15, 25, and 40.
If you have a 35mm camera, it has a little window on the back through whichyou can see a small portion of the outside of the loaded film cassette. Thiswindow allows you to read the number of frames off the cassette, should youforget the length of the roll that you loaded. If the camera counts exposuresupwards (1, 2, 3, and so on), as most do, this information lets you determinewhen you’re nearing the end of the roll. If you have an Advanced Photo Systemcamera, you probably don’t have to figure out how many frames you haveleft, because most APS models count frames down — in other words, they tellyou how many exposures are left on the roll. (Digital point-and-shoots countdown too, and you can go straight to Chapter 15 for more on that.)
Knowing how many frames are left on a roll is useful, not because of anythingto do with rewinding — the camera rewinds the film only after it senses the tugat roll’s end — but because it lets you plan your shooting. If you’re about toleave for a wedding with a 24-exposure roll in your 35mm point-and-shoot andthe frame counter says 23, you know you’re not going to have enough film toget the pictures you want. At the very least, you should bring an extra roll.
I say at the very least because I have a better idea: Put a new roll of film in yourcamera before you go. That way, you won’t have to stop and reload after shoot-ing two frames — possibly just when you have a perfect picture in sight. It’s notworth losing a great picture to save a frame or two of film. Film is the cheapestpart of photography, and photofinishers don’t print frames that you don’tshoot — nor can they charge you for prints that they don’t make.
33Chapter 1: Ladies and Gentlemen: Start Your Point-and-Shoots!
541161 Ch01.qxd 9/13/03 12:20 AM Page 33

To put in a new roll of film before the last one is finished, you have to pushthe rewind button. With most point-and-shoot cameras, it is a tiny pushbut-ton (usually the smallest of any button on the camera) that is recessed toprevent accidental rewinding. Its location varies totally from camera model tocamera model; yours may be on the bottom, sides, back, or top. (The onlyplace that you won’t ordinarily find it is the front.) The button is almostalways marked with a symbol that combines double arrows and a stylizedfilm cassette (see Figure 1-15). The capability is often called midroll rewind.
There are other reasons to rewind film before roll’s end. For one, you can getpictures back sooner — for example, to be able to send out promised printsof a special event. Even if you waste five or ten frames (a buck or two’s worthof film), it’s worth the satisfaction of sharing those important images whenthe event is still fresh in peoples’ minds.
Another good reason to rewind film before the end of a roll is to switch to adifferent type of film for a different purpose, occasion, or lighting condition.The switch can be aesthetically motivated — a change from color to blackand white, for example. Or it can be practical — switching to a faster film(one with a higher ISO number) when you want to take pictures by low exist-ing light. (Read Chapter 2 for more on different types of film.)
To rewind your film:
1. Turn the camera on, if it’s not on already.
Some models may be able to rewind when they’re off, but turn them onanyway.
2. Push the rewind button.
To push the rewind button, you probably need a pencil or pen or bobbypin — a straightened paper clip also does the job — though some cam-eras may incorporate a little groove that allows you to use your finger-nail. After you push the button, the camera starts rewinding the film withits motor, just as if it had reached the end of the film on its own. Most butnot all models count down the exposures. If you have a mechanical framecounter, you see it slowly move backwards from the last exposure (say,24) to 0; if your camera displays frame numbers on its LCD panel, itcounts backwards frame by frame.
Figure 1-15:The film
rewind icon.
34 Part I: What You Need to Take Pictures
541161 Ch01.qxd 9/13/03 12:20 AM Page 34

After the camera rewinds the film all the way back into the cassette —and with some models, this process can take as long as 45 seconds witha 36-exposure roll — the motor stops. (Cameras with an LCD panel usu-ally blink the icon of the cassette with the number 0 or the letter E — forempty, not error.)
If pressing the rewind button doesn’t start the rewind motor or if thewinding stops in the middle, do not open the camera. First, if the camerais off, turn it on and push the button again. If that procedure doesn’twork, replace the battery. You don’t have to hurry to replace it; the filmis safe. If replacing the battery doesn’t get the rewind going (push thebutton again, if need be, after it’s installed), bring the camera to yourlocal photo dealer or photofinisher to have the film rewound. (SeeChapter 3 for more on choosing a photofinisher.)
3. After the motor stops, open the camera back or film compartment andtake out the film.
With 35mm, rewinding draws the film entirely inside the cassette, leav-ing no film leader outside. In fact, that’s how you can tell if a 35mm rollhas been shot: If the perforated film leader is visible, the roll is ready toshoot; if the film leader is not visible, the roll is exposed and ready forprocessing. (See Figure 1-16.)
35Chapter 1: Ladies and Gentlemen: Start Your Point-and-Shoots!
Some rewind variations (What else is new?)A few point-and-shoots replace the singlerewind button with a sliding switch that clicksback into position when you open the cameraback to remove the rewound film. And a few usea two-button combination for rewinding. Withone of my favorite models, actually, you have tohold down what is normally the self-timer buttonfor a couple of seconds to make the LCD panel’srewind symbol flash, and then you push theshutter button to start the rewind. I definitelyneeded my manual to figure this one out. So ifyou can’t find a rewind button anywhere on yourcamera, check your manual!
If you have a bare-bones 35mm point-and-shoot, it may not have a rewind motor at all —just a manual crank on the camera. You flip outthe crank and rotate it to rewind the film into the
cassette. In order to start rewinding, you usu-ally first have to push a small (and sometimesrecessed) button, normally on the camerabottom. Pushing this button unlocks the film-advance mechanism. Be sure to turn the crankin the direction of its indicating arrows (usually,but not always, counterclockwise). Hold thecamera body firmly (keep those fingers off thelens!) and rewind smoothly and slowly until youfeel a little tug or click, which is the film leaderdisengaging from the take-up spool. Then youfeel a reduction in the pressure needed to turnthe crank. Turn the crank a few more times todraw the film completely into the cassette.(Don’t worry — you can’t overdo it.) Finally,open the camera back to remove the film.
541161 Ch01.qxd 9/13/03 12:20 AM Page 35

36 Part I: What You Need to Take Pictures
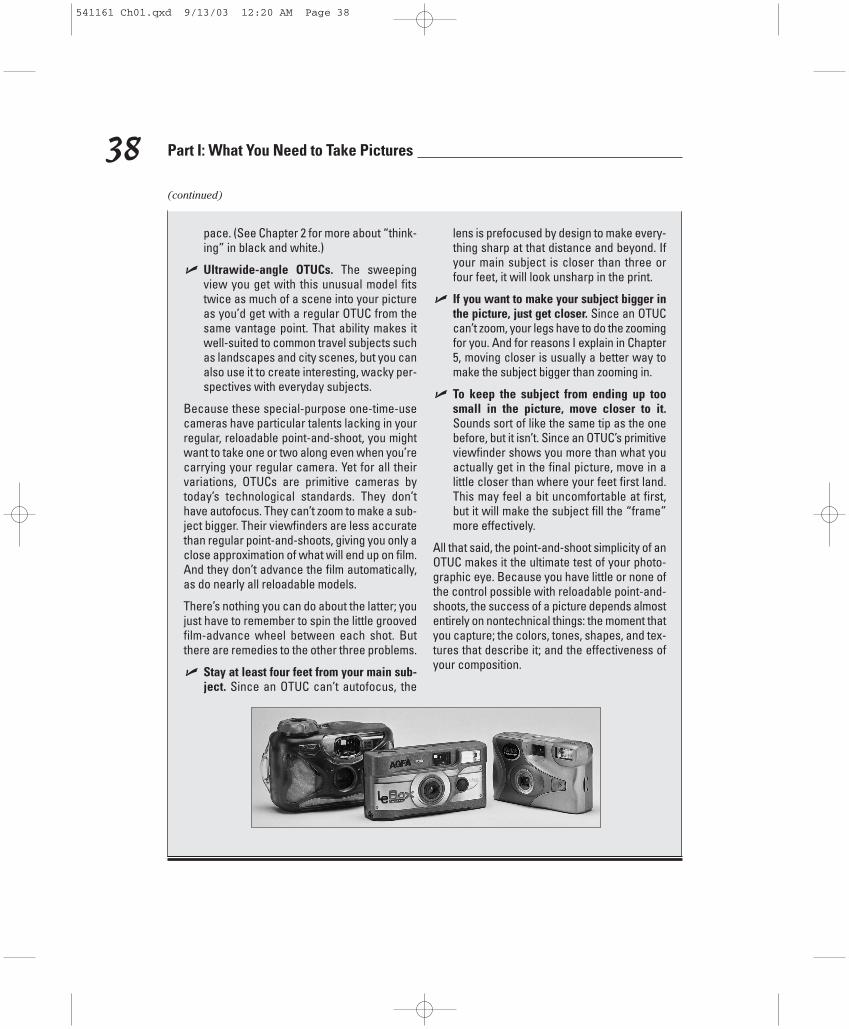
When to use a one-time-use cameraSome people call them disposable cameras.That isn’t entirely fair, because about 85 percentof their content (by weight) is reused or recy-cled by manufacturers, including the battery,flash, and lens. Some people call them single-use cameras, but the companies that makethem don’t like that term either because itsacronym is SUC. (They don’t think these cam-eras suck, and neither do I.) So as the popular-ity of these one-roll wonders has burgeoned,the photo industry has settled for OTUC — anacronym for one-time-use camera.
OTUCs are bare-bones cameras that comealready loaded with a roll of film. You don’t evenhave to unload them, because when you’ve fin-ished the roll you just turn in the camera to aphotofinisher. It’s ironic that the world’s best-selling camera uses the same consumer para-digm as the original 1887 Kodak — the camerainvented and introduced by company founderGeorge Eastman, AKA the Great Yellow Father.
Purchased with a roll of black-and-white filmpreloaded, the Kodak was advertised with theslogan “You Press the Button, We Do the Rest.”Sounds like an OTUC, the difference being thatyou had to send the Kodak camera itself back tothe factory for processing, and it was mailedback to you with the prints — reloaded with afresh roll of film.
Unlike the Kodak, you can buy a one-time-usecamera nearly anywhere, so it’s a fallback ifyou’ve left your reloadable point-and-shoot athome. In my book there’s little excuse for that.(See Chapter 10 for a list of ten really lame rea-sons for not taking your camera with you.) If, onthe other hand, you’re going to the beach anddon’t want to expose your good camera to sandand salt spray, an OTUC is just the ticket. Or ifyou’re worried that flashing your good camera ina questionable neighborhood might invite theft,an OTUC can allay your fears. (Why are youtaking pictures in a questionable neighborhood?)
If you’ve read this chapter and still face the ultimate frustration — yourcamera just won’t shoot — go directly to Chapter 20. There you find ten succinct suggestions for getting your point-and-shoot shooting again.
Figure 1-16:If a 35mmcassette’sfilm leader
is visible(left), the roll
is ready toshoot; if the
leader’sinside thecassette
(right), theroll has
been shot.
541161 Ch01.qxd 9/13/03 12:20 AM Page 36

37Chapter 1: Ladies and Gentlemen: Start Your Point-and-Shoots!
Sometimes an OTUC can mean the differencebetween getting and not getting photographs.Lose or damage your reloadable camera on atrip? Buy an OTUC and you can still bring pic-tures home. Spouse or kid run off with thereloadable camera when kitty is doing some-thing adorable? Keep an OTUC in the house andyou can grab it.
When you buy an OTUC, you have to choosebetween a model with a built-in flash and onewithout. Flashless OTUCs are a bit cheaper,ostensibly designed for outdoor photographyonly.
Even if you’re planning to shoot outdoors withan OTUC, I suggest getting a model with a built-in flash. Firing the flash when you’re shooting inbright light helps lighten dark shadows, for moreflattering pictures of people. And having flashavailable lets you keep shooting when outdoorlight gets low or you move into deep shade.Besides, you never know when you’ll be head-ing indoors, and that way you won’t have to stopshooting.
Don’t take indoor pictures with an OTUC thathas no flash! If they come out at all, the qualityis usually terrible.
For more about OTUCs and flash, plus how (andwhy) to make the flash fire even when you’re inbright light, see Chapter 7. And keep in mind thatunlike other types of point-and-shoots, an OTUCcan’t figure out when flash is called for. Youhave to decide if flash is needed or useful, andif it is, push a flash-activation button that is usu-ally located on the front of the camera.
Even if there’s a regular point-and-shoot in yourpocket, an OTUC can be valuable. That’sbecause one-time-use cameras now come inmany varieties for specific purposes. Theseinclude:
� Sports OTUCs. Chunky, “ruggedized”models with extra weatherproofing, theseoften have rubbery body panels that make
them easier to grip in wet conditions. Theyaren’t, however, waterproof!
� Underwater OTUCs. A thick, sealed plastichousing lets you take these models todepths of 10 or 15 feet, sometimes evendeeper. But because they lack a flash, I rec-ommend staying close to the water’s sur-face, where the light is stronger. (The loweryou go, the bluer your pictures will usuallybe.) Great for snorkeling. Also fun at thepool!
� Panoramic OTUCs. Shoot with one, andyou’ll get back wide-screen prints measur-ing the usual four inches high but 10 or 11 1⁄2inches wide, depending on the processing.They’re terrific for shots of scenery andlandscapes, and it’s fun to use them verti-cally for pictures of trees, big-city buildings,and other tall subjects (your ganglyteenager?). Just keep in mind that eventhough the camera itself doesn’t cost more,panoramic-format prints will add consider-ably to your photofinishing bill. A panoramicprint often costs two or three times as muchas a standard 4 x 6.
� Advanced Photo System OTUCs. A mouth-ful of an acronym, the APS OTUC benefitsfrom the system’s smaller-than-35mm filmsize, which allows the camera to be morecompact than its 35mm cousins. Somemodels even give you a choice betweentwo of the three different print formats thatAPS provides, selected with a switch on thecamera. In either case, your film comesback respooled in the APS cassette ratherthan in loose strips like 35mm. (See Chapter8 for details.)
� Black-and-white OTUCs. These modelscome loaded with a special film that pro-duces black-and-white images yet can beprocessed in the same chemicals as yourusual color film. Drop it off at your usualphotofinisher and you’ll get back black-and-white prints, a nice photographic change of
(continued)
541161 Ch01.qxd 9/13/03 12:20 AM Page 37
38 Part I: What You Need to Take Pictures
pace. (See Chapter 2 for more about “think-ing” in black and white.)
� Ultrawide-angle OTUCs. The sweepingview you get with this unusual model fitstwice as much of a scene into your pictureas you’d get with a regular OTUC from thesame vantage point. That ability makes itwell-suited to common travel subjects suchas landscapes and city scenes, but you canalso use it to create interesting, wacky per-spectives with everyday subjects.
Because these special-purpose one-time-usecameras have particular talents lacking in yourregular, reloadable point-and-shoot, you mightwant to take one or two along even when you’recarrying your regular camera. Yet for all theirvariations, OTUCs are primitive cameras bytoday’s technological standards. They don’thave autofocus. They can’t zoom to make a sub-ject bigger. Their viewfinders are less accuratethan regular point-and-shoots, giving you only aclose approximation of what will end up on film.And they don’t advance the film automatically,as do nearly all reloadable models.
There’s nothing you can do about the latter; youjust have to remember to spin the little groovedfilm-advance wheel between each shot. Butthere are remedies to the other three problems.
� Stay at least four feet from your main sub-ject. Since an OTUC can’t autofocus, the
lens is prefocused by design to make every-thing sharp at that distance and beyond. Ifyour main subject is closer than three orfour feet, it will look unsharp in the print.
� If you want to make your subject bigger inthe picture, just get closer. Since an OTUCcan’t zoom, your legs have to do the zoomingfor you. And for reasons I explain in Chapter5, moving closer is usually a better way tomake the subject bigger than zooming in.
� To keep the subject from ending up toosmall in the picture, move closer to it.Sounds sort of like the same tip as the onebefore, but it isn’t. Since an OTUC’s primitiveviewfinder shows you more than what youactually get in the final picture, move in alittle closer than where your feet first land.This may feel a bit uncomfortable at first,but it will make the subject fill the “frame”more effectively.
All that said, the point-and-shoot simplicity of anOTUC makes it the ultimate test of your photo-graphic eye. Because you have little or none ofthe control possible with reloadable point-and-shoots, the success of a picture depends almostentirely on nontechnical things: the moment thatyou capture; the colors, tones, shapes, and tex-tures that describe it; and the effectiveness ofyour composition.
(continued)
541161 Ch01.qxd 9/13/03 12:20 AM Page 38