chamelion - part 1
TRANSCRIPT

Chamelion - Part 1 Learning Outcomes
• Understand that sounds are made up of sine waves, and what you can see in a spectrum analyzer • Become more experience with tone controls
o Learn how to adjust bass and treble tone controls o Learn how to adjust ADSR parameters on filter cutoff to control subtractive synthesis on bass
line • Learn how to double tracks and spread them over stereo field
Spectrum Analyzer – Hammond Organ Create a new session in Logic.
What is the shortcut for opening the Mixer window in Logic? __________

Create a software instrument with a virtual B3 Hammond Organ
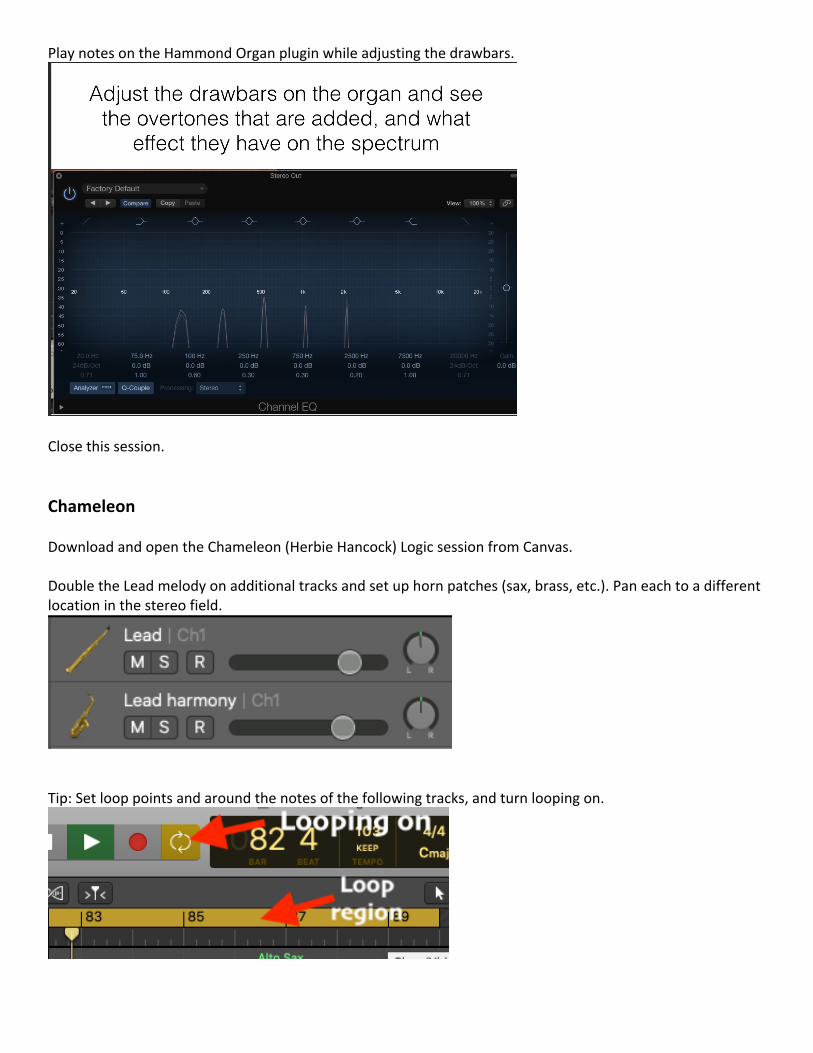
Play notes on the Hammond Organ plugin while adjusting the drawbars.
Close this session. Chameleon Download and open the Chameleon (Herbie Hancock) Logic session from Canvas. Double the Lead melody on additional tracks and set up horn patches (sax, brass, etc.). Pan each to a different location in the stereo field.
Tip: Set loop points and around the notes of the following tracks, and turn looping on.

Adjust bass and treble controls of electric piano to taste. Try the controls with the solo button on. There are two electric piano instruments, one for “comping” the chords, and the other for the solo.
See what increasing the intensity of the chorus on the electric piano does.
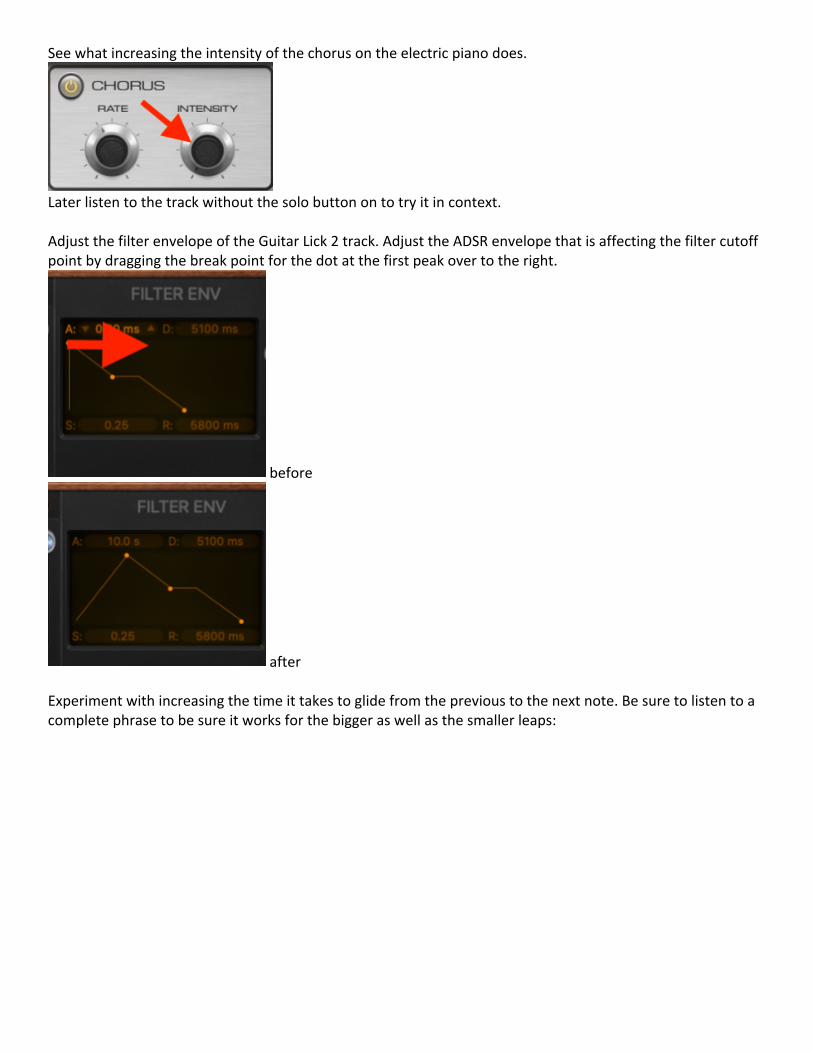
Later listen to the track without the solo button on to try it in context. Adjust the filter envelope of the Guitar Lick 2 track. Adjust the ADSR envelope that is affecting the filter cutoff point by dragging the break point for the dot at the first peak over to the right.
before
after Experiment with increasing the time it takes to glide from the previous to the next note. Be sure to listen to a complete phrase to be sure it works for the bigger as well as the smaller leaps:


Add some reverb to the drums:

Chamelion – Part 2 Learning Outcomes
• Learn how to insert plugins on individual tracks • Learn how to insert plugins on the stereo mix • Learn what a compressor does
Insert a compressor on the Subtractive synth bass. Set an overall balance for all the tracks. Add some automation on the two solos on the electric piano and guitar tracks if you want. Do you want to automate the drums?

Reverb on a single channel Last time you adjusted the reverb of the Drumset right inside the plugin:
Open up the Drumset and turn the reverb off:
Instead of using the plugin’s reverb insert a Chromaverb plugin on its channel. Experiment with the presets and find a pleasing wet/dry balance. Click on the empty Audio FX slot for the Drumset:
Plugin a stereo Chromaverb plugin:

Try out some of the presets:
Experiment with the Chromaverb’s Wet/Dry balance. “Dry” is the signal going straight through without reverb, “Wet” is how much of the signal is coming from the reverb. Usually you don’t add a lot of reverb on the stereo mix since instruments like bass don’t need it as much, so experiment with keeping the “Wet” level down.
Reverb on group of channels Reverb can create an ambience and make electronic sounds seems to exist in a room. In nature instruments are located in the same room, so you may find yourself wanting to have a group of instruments have the same reverb settings. It would be inefficient in this case to insert a reverb on every channel, both because of the computational load you are putting on the computer’s CPU, and the work involved in duplicating the same settings on each reverb. Instead, you can create a single reverb instrument on an Auxiliary track, and send it the signals from each instrument through a Bus. Open the Mixer window. Click on the Send spot for the Melody 1 instrument:

Select Bus 1.
You now have the option to send a copy of the Melody 1 instrument’s signal out through Bus 1. Notice that you now have a new Aux channel to the left of the Stereo Out fader of the mixer:
Confirm that its input is set to Bus 1:
Now whatever you send out through Bus 1 from the Melody 1 track will come into the input of Aux 1. Click on the knob and drag up to turn up the amount of Melody 1 that you’re sending out Bus 1:

When you turn up the level of the Bus 1 send you are sending that much of the Melody 1 signal to the input of that Auxiliary track. Solo the Melody 1 and the Aux 1 channels. Insert a Chromaverb stereo plugin into the Aux 1 channel. You should now see it underneath “Bus 1”:
Turn up the volume of the Aux 1 fader to bring in the reverb. When you’re plug a reverb into an aux channel you might as well turn up the “wet” volume to 100% and then control how much reverb you are hearing in the mix by adjusting the level of the aux’s fader in the mixer. Logic has taken care of this for you by setting the “wet” level to 100%
Now hook the other three melody and harmony instruments up to send a copy of their signals out through Bus 1 as well. Now that you have Bus 1 going to Aux 1 you’ll the see the option named for you:
Solo those other three channels and turn up their Bus 1 sends. If you’re looping a section of the song where all four instruments are playing you should hear them all playing through the Aux 1 reverb.

Un-solo the four melody channels and the Aux 1 reverb, and see how they sound in the context of the other tracks. Adjust the level of the Aux 1 reverb to taste. Reverb on the Master mix (everything)

Try out some different presets:
Adjust the Chromaverb’s Wet/Dry balance.
If you want a lot of reverb on one particular instrument, insert a reverb on just its channel, or open the instruments control panel and add reverb directly there, like you did with the Drumset. Compression A compressor is an automatic volume control that turns a level down when it goes over a threshold. Imagine gramma or grandpa sitting at the mixer and turning down a channel whenever it gets too loud. The threshold defines what “too loud” is. The “attack time” sets how quickly they respond—how fast they turn it down once it gets too loud. The “release time” sets how quickly they turn it back up once its not too loud anymore.

Compression on a single channel Plug in a compressor on the bass. Solo that channel and experiment with the threshold and compression ratio. The higher the ratio, the louder the input will have to get before the output gets louder, in other words, the more compression there is. For this track, set the ratio to 8. Turn the threshold to -20dB. Now anytime the signal gets louder than -20dB the compressor will turn it down. Click on “graph” so you can see how compression is being applied:
When you’re done, un-solo the track and see how it sits in the mix. Compression on the whole mix Plug in a stereo multiband compressor below the reverb on the master channels:
Now you should see:

Open it up and see how it is independently compressing the four different frequency bands starting around bar 130 during the louder solo section. See how much each of the 4 bands is being compressed. At this moment the low and mid bass regions are being turned down. This is reducing how much any one of the particular regions is being heard to smooth out the sound:
You may want to insert a compressor on the “Busy Bass” in this section. If you slow down the attack time it will let more of the start of the bass notes come through before they are turned down by the compressor. Adjust the levels of the epiano and guitar solos so they don’t stick out quite so much.
Copyright 2020 Robert Willey