chalkable classroom basic – overview - sti …support.sti-k12.com/documentation/quickref/chalkable...
TRANSCRIPT

Chalkable_0724151115 Chalkable Classroom – Basic Overview • 1
Chalkable Classroom – Basic Overview
About This Document This document provides an overview of the navigation and primary features of Chalkable Classroom.
Chalkable Classroom – Basic Overview 1 About This Document ................................................................................................................ 1 Initial Setup ................................................................................................................................ 3
Security ........................................................................................................................ 3 InformationNOW Setup .............................................................................................. 3 Chalkable Setup ........................................................................................................... 4
Basic Navigation ........................................................................................................................ 7 Initial Login ................................................................................................................. 7 Home Page .................................................................................................................. 8 Header ......................................................................................................................... 8 Menu Tabs ................................................................................................................. 10
Feed ......................................................................................................................................... 11 Items ........................................................................................................................................ 12
Adding Items ............................................................................................................. 12 Editing Items ............................................................................................................. 14
Lesson Plan .............................................................................................................................. 16 Creating Lesson Plans ............................................................................................... 16 Lesson Plans In The Feed .......................................................................................... 20
Attendance ............................................................................................................................... 21 Attendance Analytics................................................................................................. 22 Entering Attendance .................................................................................................. 23
Attendance Reports .................................................................................................................. 28 Attendance Profile ..................................................................................................... 29 Attendance Register................................................................................................... 30 Seating Chart Report ................................................................................................. 31
Grades ...................................................................................................................................... 31 Student Analytics ...................................................................................................... 32 Score Entry ................................................................................................................ 32 Entering Item Scores From Score Entry Screen ........................................................ 36 Entering Item Scores From Grid View ...................................................................... 37 Entering Report Card Comments, Direct Average From Grid View ......................... 40 Marking Up (Annotating) Attachments ..................................................................... 41 Standards ................................................................................................................... 45

Chalkable_0724151115 Chalkable Classroom – Basic Overview • 2
Entering & Posting Final Report Card Grades .......................................................... 47 Grade Book Reports ................................................................................................................ 49
Grade Book Report .................................................................................................... 50 Worksheet Report ...................................................................................................... 51 Progress Report ......................................................................................................... 52 Comprehensive Progress ........................................................................................... 53 Missing Assignments................................................................................................. 55 Birthday Listing ......................................................................................................... 56 Grade Verification ..................................................................................................... 57 Seating Chart ............................................................................................................. 58
Discipline ................................................................................................................................. 58 Add Discipline ........................................................................................................... 59 View Discipline ......................................................................................................... 60 Edit Discipline ........................................................................................................... 61 Delete Discipline ....................................................................................................... 61
Apps ......................................................................................................................................... 62 Learning Earnings .................................................................................................................... 62 Messages .................................................................................................................................. 62
Create New Message ................................................................................................. 63 People ...................................................................................................................................... 65 Student Profile ......................................................................................................................... 66
Now ........................................................................................................................... 66 Info ............................................................................................................................ 67 Schedule .................................................................................................................... 68 Attendance ................................................................................................................. 68 Discipline .................................................................................................................. 69 Explorer ..................................................................................................................... 69 Apps .......................................................................................................................... 69
Calendar ................................................................................................................................... 69 Day View ................................................................................................................... 70 Week View ................................................................................................................ 71 Month View ............................................................................................................... 71
Settings .................................................................................................................................... 73 Password .................................................................................................................... 73 Setup .......................................................................................................................... 73 Profile ........................................................................................................................ 74

Chalkable_0724151115 Chalkable Classroom – Basic Overview • 3
Initial Setup
Security To access Chalkable, users must be granted permission. All users must also be assigned one or more sections in the Master Schedule.
Grant Permission To grant permission to Chalkable, perform the following steps:
1. Go to System Preferences | Permission Maintenance.
2. Add a new group or select the group of users who are to be granted permission to Chalkable (ex. Teacher).
3. Under the Classroom section check Maintain Classroom.
4. Click Apply to save the changes.
5. Go to Staff | Staff Maintenance. Search for and select to View a staff member who should have access to Chalkable. Click the Access tab. Verify that the user is a member of a group that has been granted access to Chalkable (i.e. Teacher or Chalkable Access) that was specified in step #2 above.
Note: Permissions in Chalkable Classroom work the same in the InformationNOW interface. For example, if teachers are not granted the Classroom | Maintain Classroom Attendance option under System Preferences | Permission Maintenance, they will not be able to access the Attendance function in Chalkable Classroom. Also, a Maintain Classroom Discipline permission is available which allows teachers to enter discipline records via Chalkable Classroom – a feature that is not available under the InformationNOW Classroom menu.
Other Permissions • Maintain Classroom Discipline: Users with permission to Maintain Classroom Discipline will be able to
enter student discipline records consisting of just an infraction and a note at this time. Users will only be able to assign infractions that have been set as Show In Classroom under System Preferences | Setup | Infractions. Discipline is not available through the InformationNOW Classroom menu. It is only available in Chalkable Classroom.
• Maintain Classroom Absence Reasons: Users with permission to Maintain Classroom Absence Reasons will be able to select a reason code when marking a student either tardy or absent. Users without this permission will only be able to select the Skip Reason that is set up under Attendance | Setup | Settings tab | Skip Reason.
• Administer Chalkable: users with this permission can access the Chalkable Classroom ADMIN functions.
InformationNOW Setup For a teacher to access Chalkable Classroom they must be assigned to at least one section in the master schedule in InformationNOW. To assign users to a section in the master schedule, perform the following steps:
1. Go to Scheduling | Master Schedule.
2. Search for and select to View a section.
3. Click the Teacher link to assign the user to the section. This user will then be able to access this class section in Chalkable Classroom.

Chalkable_0724151115 Chalkable Classroom – Basic Overview • 4
Chalkable Setup
Categories Go to Settings | Setup. Select the Class and the Categories tab will display. Categories are section/class specific. Examples of Categories are Test, Homework, Project, Quizzes, etc.
Also, the school has an option to create categories for all users. Categories created by the school will display with a lock icon and may not be edited.
To add a category, click Add.
• Name: Name the type of category for activities to be graded.
• Description: Enter a more detailed description of this category, if desired.
• High Score to Drop: Enter the number of highest scores that should be dropped from the overall running average for this category. For example, if creating a category of homework and the two highest scores that the student received for homework assignments are to be dropped from their overall running average, enter a 2 here. When a 2 is entered, the two highest scores that a student received for homework assignments will be dropped from their overall running average. Leave the value at 0 (zero) if no highest scores are to be dropped for this category.
• Low Score to Drop: Enter the number of lowest scores that should be dropped from the overall running average for this category. For example, if creating a category of homework and the two lowest scores that the student received for homework assignments are to be dropped from their overall running average, enter a 2 here. When a 2 is entered, the two lowest scores that a student received for homework assignments will be

Chalkable_0724151115 Chalkable Classroom – Basic Overview • 5
dropped from their overall running average. Leave the value at 0 (zero) if no lowest scores are to be dropped for this category.
• Percentage: A percentage must be entered if using the Category Points or the Category Average method of averaging grades. Using a Percentage is the same as weighting a category.
Example A: A teacher might want her Test category to be 60% (enter 60 for the Percentage value) and the Homework category to be 40% (enter 40 for the Percentage value) of the grading period average. To compute the average, all the test activities are averaged together and all the homework activities are averaged together. The percentages would then be applied for each category, with the grading period average being the sum of these products.
Example B: A student has a 90 average on all his tests and a 95 average on all his homework. Apply the percentages (90 times 60% = 54 and 95 times 40% = 38) and add the products (54+38); the grading period average is 92.
Options Go to Settings | Setup. Click the Options tab and then select a Class. Options are section/class specific. The grade book options listed below are provided to allow teachers to customize features available in Chalkable.
Available options are:
• Round Displayed Averages: When selected, the average will be displayed in whole numbers.
• Include Withdrawn Students: Check this box to show students who were in class for only part of the time frame but are currently withdrawn from the section/class.
• Display Student Averages: This option will allow a numerical average to display on the Scores tab of the Grade Book. The average that is displayed is controlled by the graded item that is marked with Display as avg in Grade Book.
• Display Letter Grades: Check this box to display in the average column the current Letter Grade for the numerical average.
Chalkable_0724151115 Chalkable Classroom – Basic Overview • 6
Note: This may differ from what is actually posted to a student’s grade file due to rounding. The grade posted may or may not be rounded, whereas the average in Chalkable Classroom can also be rounded or not rounded. Also, if no letter grade is displayed, confirm that the numeric value is defined within a valid alpha grade on the scale.
• Averaging Method: Choices include:
Note: The school has the option to set the averaging method for all classes. If the user is unable to select an averaging method, check with the program administrator at your school to see if this option has been locked by the school.
o Points: When averaging by the Points method, the average is calculated by dividing the total amount of points the student has earned by the total points possible. Example: 932/1000 = 93.2.
o Average: When averaging by the Average method, each individual activity is averaged, and then all the activities are averaged together to obtain a single value. Example: 91/100=91.0, 48/50=96.0, and 23/25=92.0. The Average is then calculated by averaging all activities; 91.0, 96.0, and 92.0 = 93.0.
o Category Points: When averaging by the Category Points method, the average for each category is calculated as with the Points method, and then a percentage is applied to the categories to determine the average. Example: A category named Test will represent 60% of the students’ grades and a category named Homework will represent 40% of the students’ grades. Determine the Test average via the Points method from above, using ONLY the Test category for the total points earned and possible (All Tests = 273/300 = 91.0). Determine the Homework average by the same method (All Homework = 659/700 = 94.1). To apply the percentage, multiply 60% times 91.0 = 54.6, and 40% times 94.1 = 37.64; then add the products together (54.6 + 37.64 = 92.24). 92.24 is the average for this example.
o Category Average: This average method is calculated the same as the Category Point method. Example: Average the Test category (91.0 + 96.0 = 93.5) and average the Homework category (92.0 + 93.0 = 92.5). Apply the percentage 60% times 93.5 (56.1) and 40% times 92.5 (37.0). The average would be the sum (56.1 + 37.0) = 93.1.
• Standards: This section is used to determine how averages are given to standards that are attached to the selected course.
o Standard Calculate Weight Maximum Value: Check this box if the maximum weight will be calculated for the standard’s grade.
o Standards Calculate Rule options include the following:
Current Grading Period: Select this rule if the student’s grade for a standard will only include the current grading period activities.
Running Section: Select this rule if the student’s grade for a standard will include the activities for the section of the current course in which the student is enrolled. A section may last all year.
Running Term: Select this rule if the student’s grade for a standard will include all activities for the term. A term may have more than one grading period but may not last all year.
o Standards Scale: Select the grading scale used to determine the standard’s grade.
o Standards Calculate Method:
Averaging: Select this method if each individual activity is an average. The standard’s grade is calculated by averaging all the activities.
Points: Select this method if each individual activity is based on points (example: 90/100). The standard’s grade is calculated by dividing the total points earned by the total points possible.
• Click OK when all selections are complete.

Chalkable_0724151115 Chalkable Classroom – Basic Overview • 7
Comments A comment bank can be created for use with report card comments and general student comments. Comments are specific to the teacher and show in all classes/sections for that teacher. Go to Settings | Setup. Select the Comments option. Existing comments will display.
• Click Add.
• Enter the Comment.
• Click OK.
Basic Navigation
Initial Login To access Chalkable Classroom, log in to InformationNOW. Click Chalkable in the upper right hand corner.

Chalkable_0724151115 Chalkable Classroom – Basic Overview • 8
Note: If the Chalkable link does not display in the upper right corner, contact the school/district office or InformationNOW program administrator.
The first time a user logs in to Chalkable Classroom they are required to confirm their email address and name. It is not necessary to enter this information. Just confirm the email address and name and click Confirm.
Home Page There are three sections of the Chalkable home page: Header (Class List), Menu Tabs (left), and Feed (center).
Header • Search: Search for items (activities), apps (study center users only) or people. Enter search
criteria and hit the enter key on the keyboard or click the magnifying glass.
Click the Person to view their basic profile page.
Chalkable_0724151115 Chalkable Classroom – Basic Overview • 9
Click the Name of the item to access the score entry screen for the selected item.
Click the App icon to access the app store screen for that app.
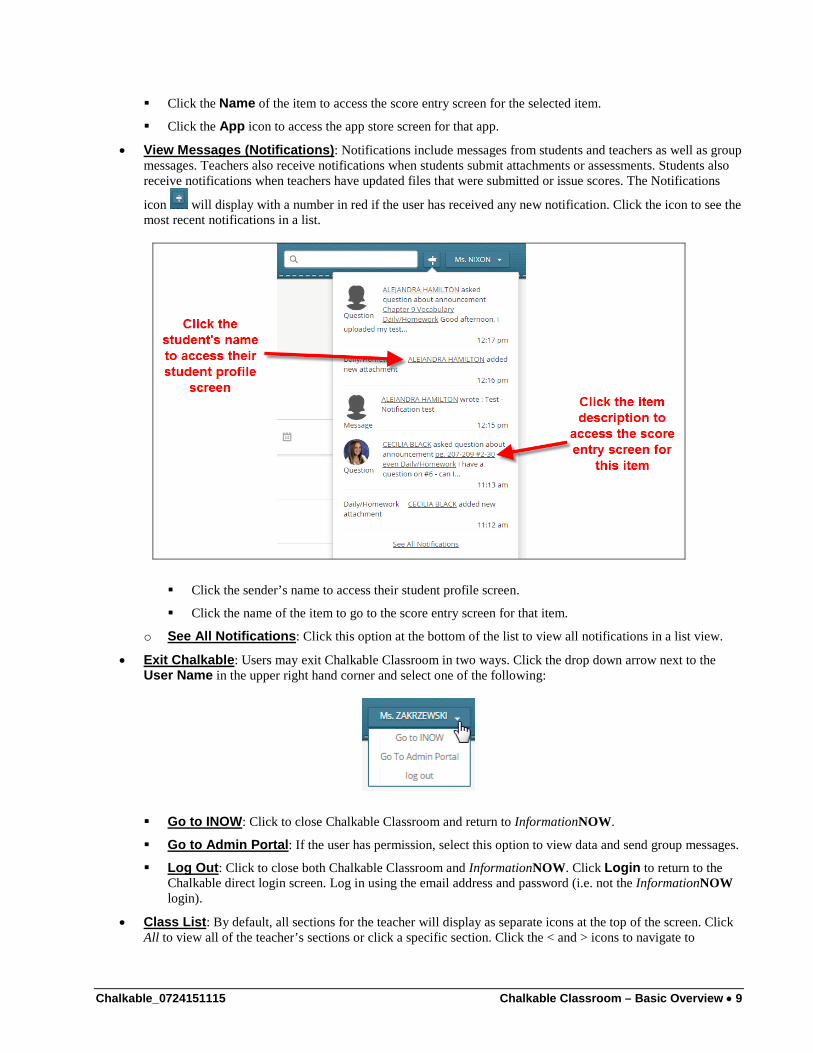
• View Messages (Notifications): Notifications include messages from students and teachers as well as group messages. Teachers also receive notifications when students submit attachments or assessments. Students also receive notifications when teachers have updated files that were submitted or issue scores. The Notifications
icon will display with a number in red if the user has received any new notification. Click the icon to see the most recent notifications in a list.
Click the sender’s name to access their student profile screen.
Click the name of the item to go to the score entry screen for that item.
o See All Notifications: Click this option at the bottom of the list to view all notifications in a list view.
• Exit Chalkable: Users may exit Chalkable Classroom in two ways. Click the drop down arrow next to the User Name in the upper right hand corner and select one of the following:
Go to INOW: Click to close Chalkable Classroom and return to InformationNOW.
Go to Admin Portal: If the user has permission, select this option to view data and send group messages.
Log Out: Click to close both Chalkable Classroom and InformationNOW. Click Login to return to the Chalkable direct login screen. Log in using the email address and password (i.e. not the InformationNOW login).
• Class List: By default, all sections for the teacher will display as separate icons at the top of the screen. Click All to view all of the teacher’s sections or click a specific section. Click the < and > icons to navigate to

Chalkable_0724151115 Chalkable Classroom – Basic Overview • 10
additional classes and terms. Click a specific section to view the details for that class. Icons are based on key words from the section name:
Keywords Icon Science: Biology, Chemistry, Physics, Earth science, Space science, Lab, Environmental, Anatomy, Physical, Botany, Plant, Soil, Astronomy, Oceanography, Psychology
Math: Algebra, Algebra I, Algebra II, Geometry, Pre-calculus, Statistics, Trigonometry, Calculus, Algebraic, Mathematics, Equation, English: Literature, Humanities, Composition, Oral languages, Grammar, Language arts, Writing, Reading, Reading comprehension, Vocabulary, Literary, Journalism, Theology
Social Studies: History, Government, Economics, Social sciences, Geography, Psychology Current events, Local, Foreign, Global, U.S., World, Civics, Sociology, Biblical, Bible, Worldview, Ethics
Phys Ed: Gym, Athletics, Teams, Track, Sports, Health Safety, Physical Education, P.E.,
Language: Arabic, French, German, Greek, Hebrew, Italian, Japanese, Korean, Latin, Mandarin, Russian, Spanish, Chinese, ESL, Foreign Language Art: Dance, Drama, Music, Studio art, Performance
Comp Sci: Computers, Computer, Digital, Web
Other: Electives, Home Etc., all other class names
Menu Tabs Access various options including:
• Feed: Click to view a list of items.
o ToDo: Click to filter the list to only items that have not been marked as Done.
o All: Click to view all items including those that are still marked as ToDo and those that are marked as Done.
• New Item: Add a new item (activity) to a class.
• Attendance: Take attendance for classes.

Chalkable_0724151115 Chalkable Classroom – Basic Overview • 11
• Grades: Add scores to items. Enter grading period comments, final grades for printing on report cards, etc.
• Discipline: Add, modify and delete discipline for students.
• Apps: Manage, add and purchase applications that can be attached to items. Only available for use with Chalkable Study Center.
• Learning Earnings: Click to access the Learning Earnings website.
• Messages: Create, read and delete messages.
• People: View all people in classes, send messages, etc.
• Calendar: View activities/items, calendar events, etc. in a calendar grid view for one or all classes.
• Settings: Change password, update the user profile and set up categories, comments and options.
Feed Click to view items (activities) for a selected class or for all classes. Items will display in date ascending order.

Chalkable_0724151115 Chalkable Classroom – Basic Overview • 12
• All Vs. Individual Class: The list will default to all items for all classes. Click a class at the top of the screen to filter the list below to just items for the selected class.
• > To More Classes: Depending on the display settings and number of classes taught an arrow > icon will display to the right of the list of classes that allows users to view additional classes.
• ToDo vs. All: Click to filter the list to only items (activities) that have not yet been marked as Done (ToDo) or All items:
• Item (Activity): Items are listed in date order from oldest to newest.
o Ribbon Icon: Gray if the item has not yet been marked as Done. Gold if marked as Done. Click the ribbon icon to toggle between Done and ToDo.
Note: Items that have been marked as Done will not display if the list is filtered to ToDo only.
o Category: Displays the category selected for this item (Ex. Lesson Plan, Homework, Test).
o Class Name/Number: The name of the class along with the course and section number (Ex. Math 7 210001.002).
o Item Name: The name of the item (Ex. Convert Fractions, Decimals, %).
o Item Date: The date the item is due (Ex. 1/7/15).
o Icon:
Indicates there is an attachment assigned to this item.
Indicates this item is currently hidden from student view.
• Scroll: The screen initially displays 20-25 items. Scroll down to view more items.
Items Activities in InformationNOW are referred to as Items in Chalkable Classroom.
Adding Items • To insert a new item (graded activity or lesson plan) to a grade book click New Item from the Menu on the left.
• Select the Class section to which the item is to be added.

Chalkable_0724151115 Chalkable Classroom – Basic Overview • 13
Note: Any Item previously added that was not saved or discarded is stored as a draft and will display.
• The Add Item screen will display. Enter the following:
o Class: Select a different class section if desired.
o Term: Displays the current term based on today’s date (ex. Semester 2).
o Class/Section: Displays the name and course/section number for the currently selected class. Ex.
o Category: Displays categories that are created under Settings | Setup | Select Class | Categories. Defaults to the first category alphabetically. To change, select the category for this item.
o Name: Defaults to the next numbered item of the category. For example, if this is the 14th item added in the Homework category, the name would display as Homework14. Click in the field to enter a new name for the item. Ex.
o Brief Description: Enter a brief description of the item. Defaults to the last description added but can be modified. The brief description will display in the home portal for students.
o Inbox: Click the inbox icon to see the last items that were added for this class. Select one to copy the description to this new item.
o Attach: Click to add standards, files and more..
o Date: Defaults to today’s date. Select the due date of the item. Chalkable Classroom automatically determines the grading period for the item based on the date selected.
o Max Score: Enter the total points possible for the item.
o Advanced Options: To use advanced items, click Show Advanced Options.

Chalkable_0724151115 Chalkable Classroom – Basic Overview • 14
Weight Multiplier: Enter the number of times the score that the student receives for this item is to count in their overall grade book average. For example, if the score for this item should not count in the overall average, enter a 0. If the score should count once in the overall average, enter a 1. If the score should count twice in the student’s overall average enter a 2.
Weight Addition: Enter the number of points that are to be added to each student’s score for this item. For example, if each student is to receive an extra 5 points added to their score for this item, enter a 5.
Hide From Students: Defaults to No. Click the circle to change to Yes if this item is to be hidden from student view.
Can drop student score: Defaults to No. Click the circle to change to Yes if the score for this item can be dropped from the student’s overall average.
Add To Lesson Plan Gallery: Available only for study center users when creating a lesson plan. Allows the user to save the lesson plan to a gallery that is accessible to other teachers in the district.
• Click Submit to save the item or Discard to close the screen without saving.
Editing Items There are three ways to access an existing item for editing.
• Select the item from the Feed list. Click Feed from the menu tabs on the left. Click the Name of the item. Click Edit.
• Select the item from the Calendar View. Click Calendar from the menu tabs on the left. Click the day to see the items for the day. Click the Name of the item. Click Edit.
• Select the item from the Grade View. Click Grades from the menu tabs on the left. Select the class from the list at the top.
o From the Box view click the name of the item.
o From the Grid view, click the column heading of the item.
• Click Edit.

Chalkable_0724151115 Chalkable Classroom – Basic Overview • 15
Editing Item Once the details of the item are displayed using one of the three options mentioned above the user may edit any of the item details including description, max score, etc.
Note: When editing a date, users are allowed to select a date that is in a different grading period. When the date is changed, the scores move with the item. It is important to keep in mind that, for example, if scores were entered for an item that was in grading period 2 and then report card grades were posted and then the date of the activity is changed to a date in grading period 3, the students posted grade for grading period 2 may need to be reposted as their overall average has changed since the item was moved. Users should take care when changing dates for activities that move the item from one grading period to another.
• Save: Click to Save the record with the changes made.
• Delete: Click to Delete this item. Warning! Scores must be removed for all students for the item before it can be deleted.
• Duplicate: Click to create a duplicate of this item. Select the class(es) to which the item is to be copied. Multiple classes may be selected using Ctrl+click. Click Submit.
Chalkable_0724151115 Chalkable Classroom – Basic Overview • 16
Lesson Plan Lesson Plans are created as items in Chalkable Classroom.
Note: In previous releases, Lesson plans were created as ‘non-graded’ activities in InformationNOW Grade Book and Chalkable Classroom. Now, Lesson plans in Chalkable Classroom are a special ‘system’ category of items and are stored only in Chalkable Classroom. Refer to the Chalkable Classroom - Teachers Helper Quick Reference Guide for tasks that can be completed in InformationNOW and/or Chalkable.
Creating Lesson Plans
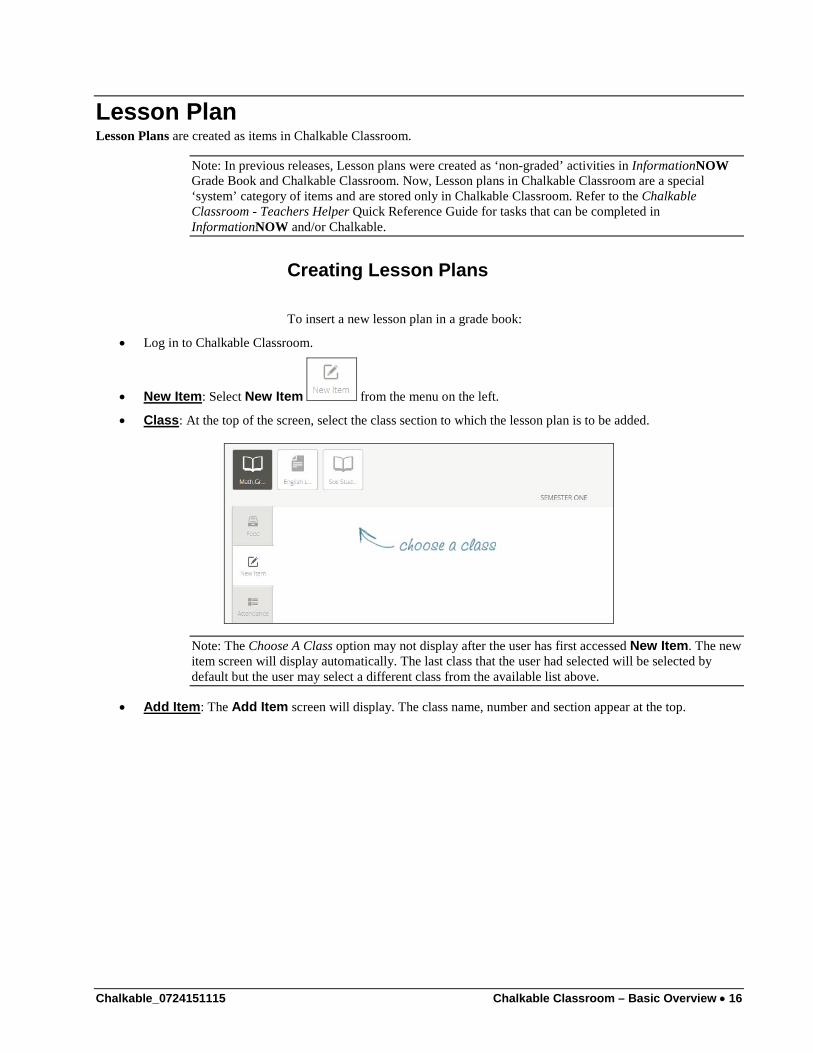
To insert a new lesson plan in a grade book:
• Log in to Chalkable Classroom.
• New Item: Select New Item from the menu on the left.
• Class: At the top of the screen, select the class section to which the lesson plan is to be added.
Note: The Choose A Class option may not display after the user has first accessed New Item. The new item screen will display automatically. The last class that the user had selected will be selected by default but the user may select a different class from the available list above.
• Add Item: The Add Item screen will display. The class name, number and section appear at the top.

Chalkable_0724151115 Chalkable Classroom – Basic Overview • 17
• Category: Tabs will display across the top for the various item categories (ex. Lesson Plan, Homework, Tests).
Select the Lesson Plan tab.
• Name: Enter the Lesson Plan name according to the conventions established by the district. A suggested convention for lesson plan titles is the grade level, subject area and topic.
For example, a 4th grade math lesson on improper fractions would be titled 04 Math Improper Fractions.
• Search Gallery: For Chalkable Study Center users, a gallery is available which allows users to create a district-wide collection of lesson plans, resources, modules, and templates. Lesson plans saved to the gallery are available to all other teachers in the district.
To import an existing lesson plan from the gallery, select the desired category from the available list. In the field to the right, enter part of the name of the lesson plan.

Chalkable_0724151115 Chalkable Classroom – Basic Overview • 18
Note: To create a new category, click +Add Category. Categories are not teacher specific. They should be district-defined (ex. Lesson Plan, Resources, Modules, Templates).
• Brief Description: Enter a brief description of the lesson plan in the text box. This field defaults to the last description added but can be modified. The brief description will display in the home portal for students.
• Due Min/Max Date: Defaults to today’s date. Select the date range over which the instruction described in the lesson plan will occur. Chalkable automatically determines the grading period for the lesson plan based on the date selected.
• Show Advanced Options:
o Hide From Students: Defaults to No. Click the circle to change to Yes if this item is to be hidden from student view.
o Add to Lesson Plan Gallery: Defaults to No. Click the circle to change to Yes to make this lesson plan available in the gallery for the district. Available to Study Center users only.
• Attach: Click Attach to add components to the lessons plan.
Chalkable_0724151115 Chalkable Classroom – Basic Overview • 19
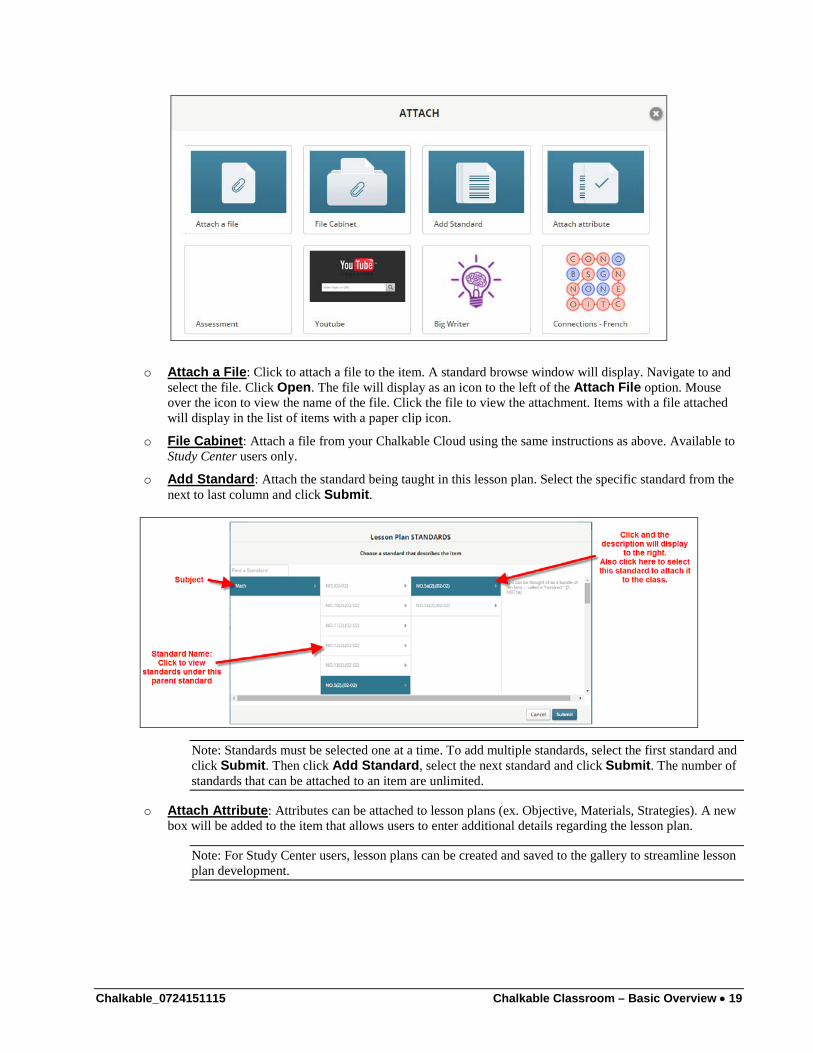
o Attach a File: Click to attach a file to the item. A standard browse window will display. Navigate to and select the file. Click Open. The file will display as an icon to the left of the Attach File option. Mouse over the icon to view the name of the file. Click the file to view the attachment. Items with a file attached will display in the list of items with a paper clip icon.
o File Cabinet: Attach a file from your Chalkable Cloud using the same instructions as above. Available to Study Center users only.
o Add Standard: Attach the standard being taught in this lesson plan. Select the specific standard from the next to last column and click Submit.
Note: Standards must be selected one at a time. To add multiple standards, select the first standard and click Submit. Then click Add Standard, select the next standard and click Submit. The number of standards that can be attached to an item are unlimited.
o Attach Attribute: Attributes can be attached to lesson plans (ex. Objective, Materials, Strategies). A new box will be added to the item that allows users to enter additional details regarding the lesson plan.
Note: For Study Center users, lesson plans can be created and saved to the gallery to streamline lesson plan development.
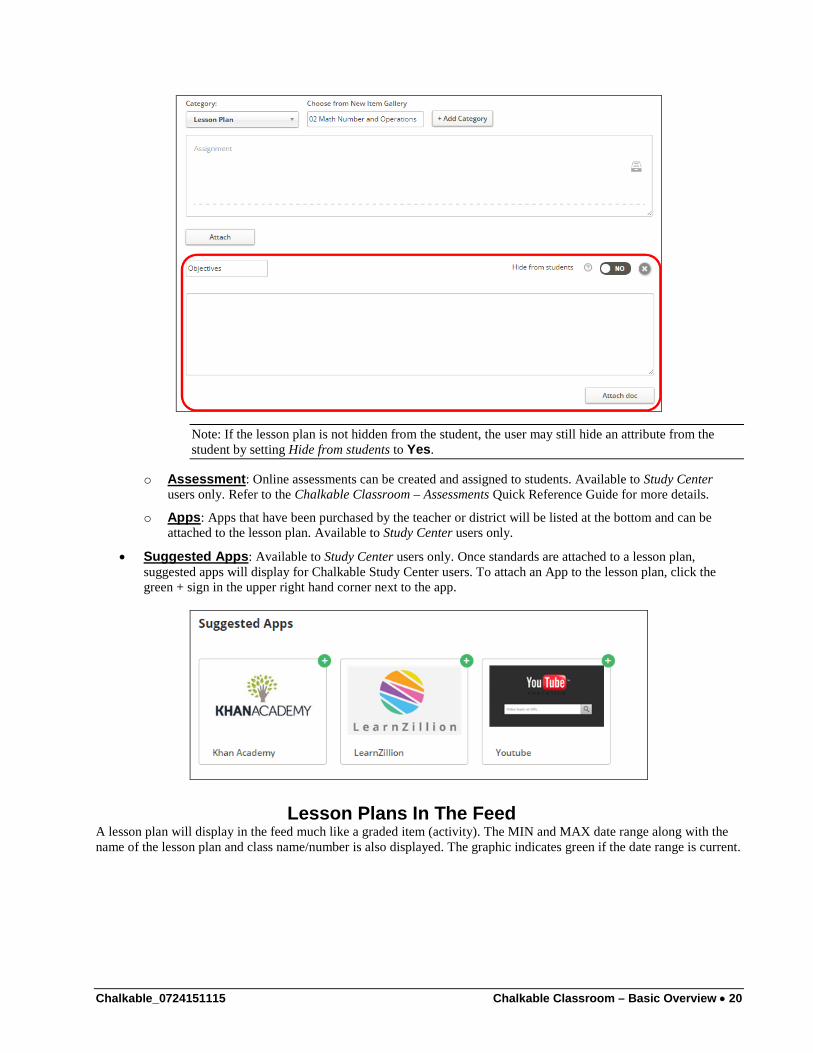
Chalkable_0724151115 Chalkable Classroom – Basic Overview • 20
Note: If the lesson plan is not hidden from the student, the user may still hide an attribute from the student by setting Hide from students to Yes.
o Assessment: Online assessments can be created and assigned to students. Available to Study Center users only. Refer to the Chalkable Classroom – Assessments Quick Reference Guide for more details.
o Apps: Apps that have been purchased by the teacher or district will be listed at the bottom and can be attached to the lesson plan. Available to Study Center users only.
• Suggested Apps: Available to Study Center users only. Once standards are attached to a lesson plan, suggested apps will display for Chalkable Study Center users. To attach an App to the lesson plan, click the green + sign in the upper right hand corner next to the app.
Lesson Plans In The Feed A lesson plan will display in the feed much like a graded item (activity). The MIN and MAX date range along with the name of the lesson plan and class name/number is also displayed. The graphic indicates green if the date range is current.

Chalkable_0724151115 Chalkable Classroom – Basic Overview • 21
• If any of the date range is not current (in the past), the bar will show red for the day(s) that is past. For example, if the lesson plan covers 5 days, and 2 days are past, the bar will be partially red (2/5 red) and the percentage will be 60% (60% of the allocated time is remaining).
• If the date range is future, the entire bar is red until the minimum date of the range is reached. At least one date within the date range must be current for the bar to show green.
Attendance To post attendance or view existing records select Attendance under the Menu on the left.
The list of classes will display at the top. Classes for which attendance has not yet been posted will display with a red exclamation point icon . In order for a class to show with the exclamation point icon the class must have taken place today and the first three minutes of the class period must have passed. Once three minutes of the class period has passed the class will display with an exclamation point icon if attendance has not yet been posted for the day.

Chalkable_0724151115 Chalkable Classroom – Basic Overview • 22
Attendance Analytics When the user selects the Attendance tab, an analytics screen will display.
• Sections: Click a class to enter attendance for that class.
• Absent/Late: Click to filter graph below to display only Absent or only Late records.
• Graph: Each section’s attendance displays in a different color in the graph. Hover over the section number/name to highlight the attendance for the selected section. Hover over a line in the graph and the related class will display as highlighted in the list above.
• Students: Student pictures display at the bottom of the screen. If no picture is on file for the student, a male
or female icon will display based on the gender designated in InformationNOW.
o A student must have at least three absences to appear on the list below the graph.
o Students display in the order of absences with the most absent student displaying first in the list.
o Hover over a picture to view the student’s name and the class in which they are scheduled. The number of times the student has missed the class will display after the colon (:).
Chalkable_0724151115 Chalkable Classroom – Basic Overview • 23
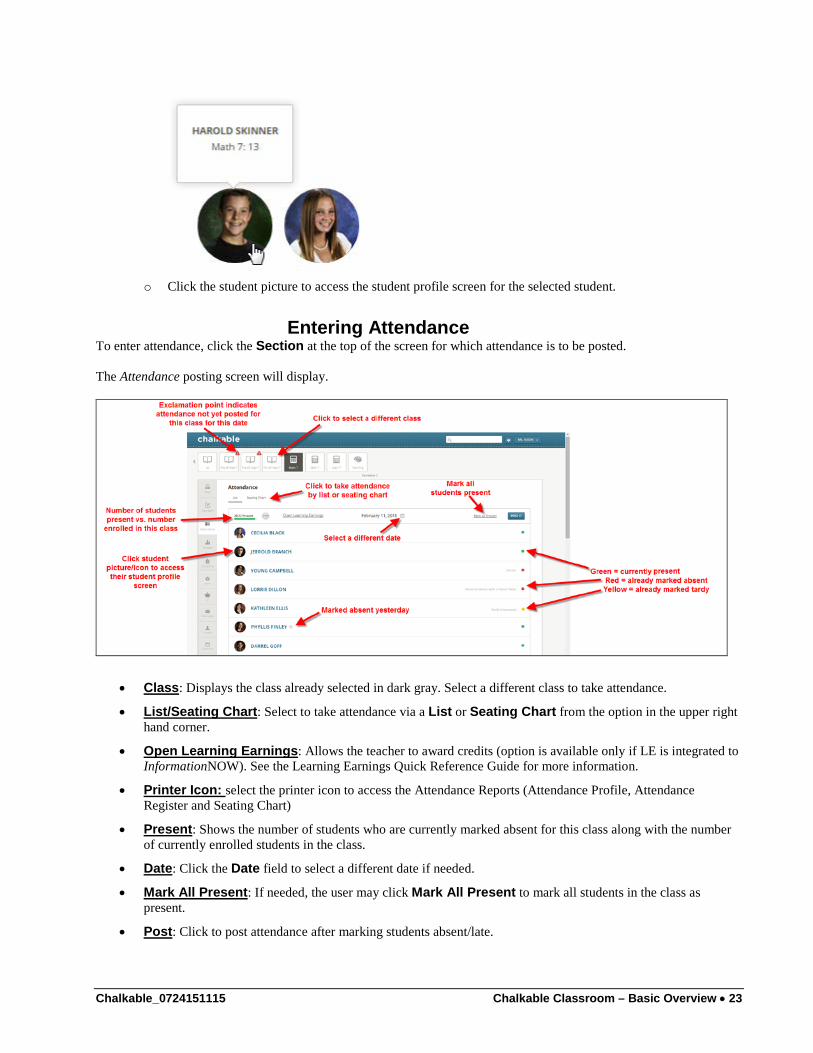
o Click the student picture to access the student profile screen for the selected student.
Entering Attendance To enter attendance, click the Section at the top of the screen for which attendance is to be posted. The Attendance posting screen will display.
• Class: Displays the class already selected in dark gray. Select a different class to take attendance.
• List/Seating Chart: Select to take attendance via a List or Seating Chart from the option in the upper right hand corner.
• Open Learning Earnings: Allows the teacher to award credits (option is available only if LE is integrated to InformationNOW). See the Learning Earnings Quick Reference Guide for more information.
• Printer Icon: select the printer icon to access the Attendance Reports (Attendance Profile, Attendance Register and Seating Chart)
• Present: Shows the number of students who are currently marked absent for this class along with the number of currently enrolled students in the class.
• Date: Click the Date field to select a different date if needed.
• Mark All Present: If needed, the user may click Mark All Present to mark all students in the class as present.
• Post: Click to post attendance after marking students absent/late.

Chalkable_0724151115 Chalkable Classroom – Basic Overview • 24
• Student: Students currently enrolled in the class will display in the list.
o Click the student picture/icon to access the student profile screen for the selected student.
o An indicator will display next to the student name if the student was marked absent on the previous day.
Take Attendance By List • To mark a student absent or late, click the green Present button to the right of the student’s name.
• Click the < left or > right arrow to select Absent or Late.
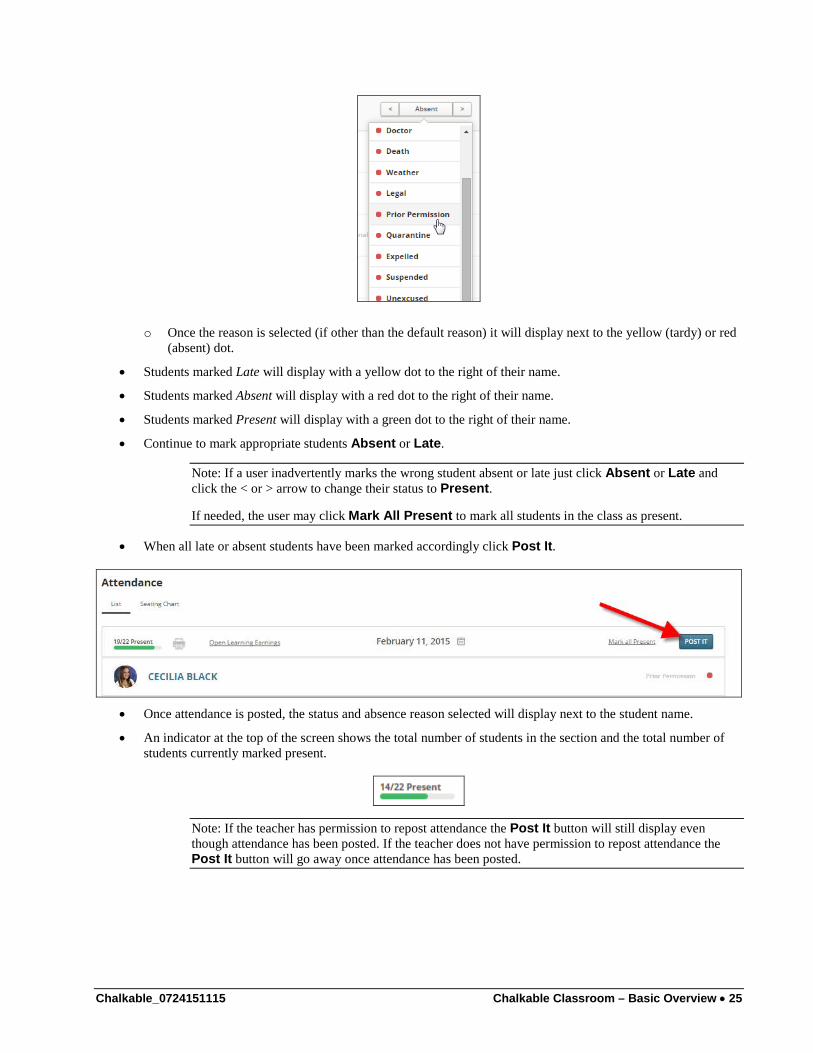
• When Absent or Late is selected:
o If the teacher does not have rights to change absence reasons only the default reason will display. The user will click the reason and the student will be marked Absent or Late with the selected reason. The student will display with a yellow (tardy) or red (absent) dot next to their name. Once the attendance has been posted the absence reason will display.
o If the teacher has permission to assign absence reason codes, when the user selects Absent or Late a list of absence reasons will display. The user may select the appropriate Reason from the list.
Chalkable_0724151115 Chalkable Classroom – Basic Overview • 25
o Once the reason is selected (if other than the default reason) it will display next to the yellow (tardy) or red (absent) dot.
• Students marked Late will display with a yellow dot to the right of their name.
• Students marked Absent will display with a red dot to the right of their name.
• Students marked Present will display with a green dot to the right of their name.
• Continue to mark appropriate students Absent or Late.
Note: If a user inadvertently marks the wrong student absent or late just click Absent or Late and click the < or > arrow to change their status to Present.
If needed, the user may click Mark All Present to mark all students in the class as present.
• When all late or absent students have been marked accordingly click Post It.
• Once attendance is posted, the status and absence reason selected will display next to the student name.
• An indicator at the top of the screen shows the total number of students in the section and the total number of students currently marked present.
Note: If the teacher has permission to repost attendance the Post It button will still display even though attendance has been posted. If the teacher does not have permission to repost attendance the Post It button will go away once attendance has been posted.

Chalkable_0724151115 Chalkable Classroom – Basic Overview • 26
Taking Attendance By Seating Chart Click the Seating Chart option in the upper left corner of the Attendance screen.
Note: If a seating chart has not been created the user is first prompted to create the grid. Click Create Grid. Set the number of rows and columns for the grid and click Save. Click Add Students. Use drag/drop to place students in the grid. If a student has already been marked absent, the absence level (absent/late) will display along with the reason over the student picture/icon.
• Date: Click to select the date if needed.
• Edit Grid: To edit the size of the seating chart (rows/columns), click Edit Grid. Enter the number of rows and columns.
• Edit Students: To modify the seating chart, click Edit Students. Click and drag students to their appropriate location.
• Mark Student Absent/Late/Present: To mark a student absent or late, click their icon/picture.
o Late/Absent: Select Late or Absent.

Chalkable_0724151115 Chalkable Classroom – Basic Overview • 27
o Reason: If the user has rights to assign absence reasons they may elect the reason from the available list.
o Once the reason is selected the reason will display when the user clicks that student icon/picture.
Students marked as present will display with a green dot.
Students marked as late will display with a yellow dot.
Students marked as absent will display with a red dot.
• Repeat the steps for each absent or late student.
Note: To mark a student as Present, select Present from the list.
• When all students have been marked accordingly click Post It.

Chalkable_0724151115 Chalkable Classroom – Basic Overview • 28
Note: The user may also click Mark All Present to set all students to present before posting.
Attendance Reports To access attendance reports, click the Printer icon to the right of the XX/YY Present graphic (on the list view for a specific class/section in Attendance.
• Select the desired report by clicking on the tab.

Chalkable_0724151115 Chalkable Classroom – Basic Overview • 29
Attendance Profile The Attendance Profile report shows the attendance history for the selected students.
The Attendance Profile report shows the attendance history for the selected students.
• Grouping: Select the desired grouping (no grouping = student order, grade level, homeroom)
• ID to Print: Select the ID to include on the report including Student Number, State ID, Alt Student Number, SSNumber or None.
• Start Date: Enter the starting date of activities to include in the report. Defaults to first day of academic session.
• End Date: Enter the last date of activities to include in the report. Defaults to the last day of the academic session.
• Include:
o Period absences: Check to include the periods that the student was absent.
o Reason totals: Check to include a summary count by absence reasons.
o Check in/out: Check to include check in check out information.
o Unlisted information: check to include the unlisted demographic information for the student.
o Notes: check to include the notes on the attendance transaction
o Withdrawn students: check to include students that have been withdrawn from school.
• Absence Reasons: check the absent reasons you want to include on the report (default = all reasons selected).
• Terms: check the terms to include transactions for (default = all defined terms)
Chalkable_0724151115 Chalkable Classroom – Basic Overview • 30
• Select: Place a check next to the student(s) to include on the report or click Select all. • Format: Select PDF.
• Click to Download the report.
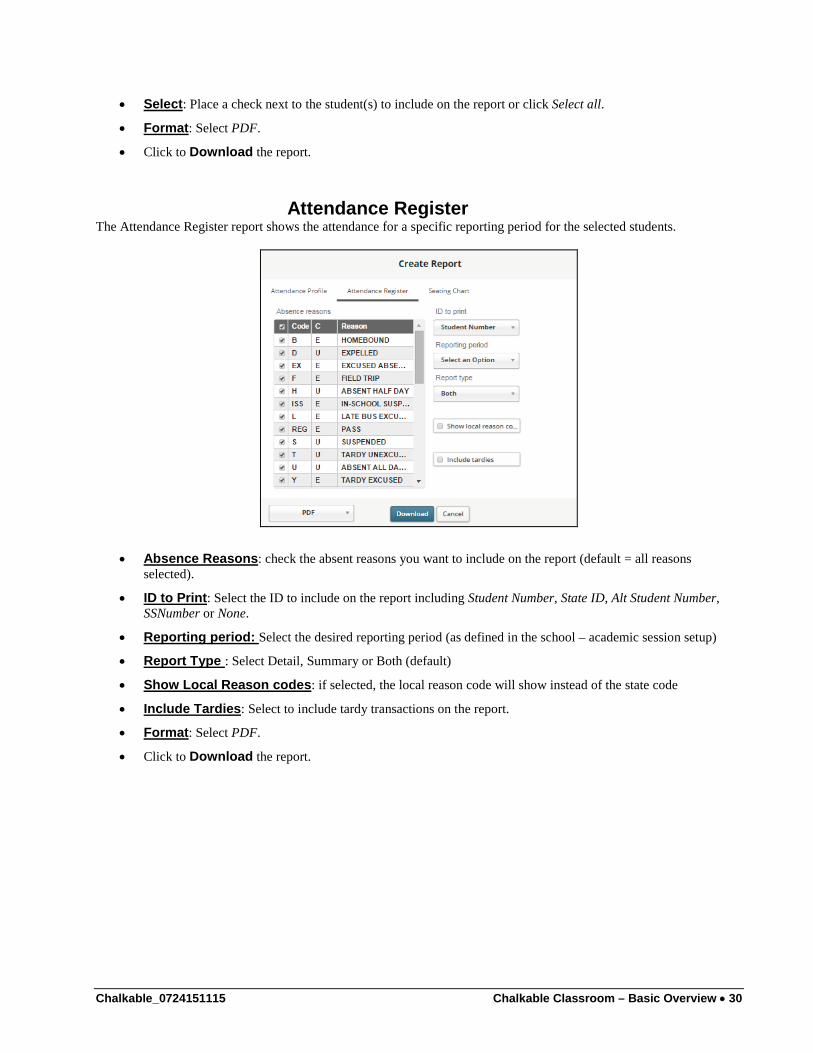
Attendance Register The Attendance Register report shows the attendance for a specific reporting period for the selected students.
• Absence Reasons: check the absent reasons you want to include on the report (default = all reasons selected).
• ID to Print: Select the ID to include on the report including Student Number, State ID, Alt Student Number, SSNumber or None.
• Reporting period: Select the desired reporting period (as defined in the school – academic session setup)
• Report Type : Select Detail, Summary or Both (default)
• Show Local Reason codes: if selected, the local reason code will show instead of the state code
• Include Tardies: Select to include tardy transactions on the report. • Format: Select PDF.
• Click to Download the report.

Chalkable_0724151115 Chalkable Classroom – Basic Overview • 31
Seating Chart Report The Seating Chart reports will print the seating chart as defined in the attendance screen.
• Photograph: Select to include student’s photograph in addition to the student name. • Format: Select PDF.
• Click to Download the report.
Grades To access grades, select Grades under the Menu on the left.
• Sections: At the top of the screen there is an option to view All sections. Click a single section to access the score entry grid for that class.
• Class/Section/Name: The class and section number will display along with the class name. Click the name to access the score entry grid for the class.

Chalkable_0724151115 Chalkable Classroom – Basic Overview • 32
Student Analytics The student grade analytics screen displays data based on the students’ overall running grade book averages. The analytics are automatically updated as item (activity) scores are entered in the grade book under the box or grid view.
• Students: Students are grouped by class. If student pictures are installed they will display. Male students without a picture display with the icon. Female students without a picture display with the icon.
The lowest five (5) performing students display to the left of the All button. Students must have an overall average of below 65 to display to the left.
The top five performing students in the class will display to the right of the All button.
Click All to display all students in the class with a graphic representation of the current overall running grade book averages. Hover over a student on the graph line to view their name and overall average on the list above. Hover over a student in the list to view their location in the graph line below. Hover over a student Picture/Icon to view their name and overall average for the section.
Click the student Picture/Icon to access that student’s information page.
Score Entry To access the Item view, either click the class name at the top of the Grades screen or click the class/section/name in the list of classes.
The current grading period is selected by default. The user may view the grade information in a Box or a Grid view.
Box View The following is an example of the Box view where items display in a list under the selected grading period. In Box view all items for the grading period will display broken down by category.

Chalkable_0724151115 Chalkable Classroom – Basic Overview • 33
• Items/Standards/Final Grades/Learning Earnings:
Items: Defaults to Item view. Click to view the items for the selected grading period.
Standards: Click to view standards for the selected grading period and enter standard marks
Final Grades: Click to view/edit the student’s overall running grade book average for the grading period and edit/enter grading period grades to print on report cards.
Open Learning Earnings: Allow the teacher to award learning Earning credits to student via the Grade Book. This option will only appear if Learning Earnings is integrated to InformationNOW. See the Learning Earnings Quick Reference Guide for additional information.
• Box/Grid View: Select Box or Grid view.
• Grading Period: The current grading period will be selected by default. Click the name of the grading period to switch to that grading period.
• Category: All items display in columns for each category. Hover over the category to view:
o Avg: The overall running average for all students in the class for this category.
o Worth: The percentage value of all items in this category for the students’ overall average. For example, if the category Homework was created as 20% of the student’s overall average, a 20% would display here.

Chalkable_0724151115 Chalkable Classroom – Basic Overview • 34
• Item View: Hover over an item to view the full name, date and class average for the item in a graph view.
Users may also click to drop all scores for the selected item from the student’s overall running grade book average.
• Click an item to access the score entry screen for that item. See “Entering Item Scores From Score Entry” on page 36 for more details
Grid View The following is an example of a Grid view where the students who are enrolled in the class and each item for the selected class and grading period display as a separate column at the bottom of the screen.

Chalkable_0724151115 Chalkable Classroom – Basic Overview • 35
• Items/Standards/Final Grades/Learning Earnings:
Items: Defaults to Item view. Click to view the items for the selected grading period.
Standards: Click to view standards for the selected grading period and enter standard marks
Final Grades: Click to view/edit the student’s overall running grade book average for the grading period and edit/enter grading period grades to print on report cards.
Open Learning Earnings: Click to access the Learning Earnings site. This will only appear if Learning Earnings is integrated with InformationNOW. See the Learning Earnings Quick Reference Guide for additional information.
• Box/Grid View: Select Box or Grid view.
• Grading Period: The current grading period will be expanded by default. Click the icon next to any grading period or the grading period name to view the items for that grading period.
• All standards: Select to view All Standards or click the drop arrow and select a standard from the list. When a standard is selected only items attached to that standard will display.
• All categories: Select to view All Categories or click the drop arrow and select a category from the list. When a category is selectedd only Items of the selected category will display.
• Next/Prev: Click to access additional columns for more items (activities). The number of columns displayed will be determined by the screen resolution and any additional columns that are selected (ex. Points Earned/Points Possible).
• Printer: Select the printer icon to print various reports.

Chalkable_0724151115 Chalkable Classroom – Basic Overview • 36
• Students: In Grid view, each student in the class will display in a row.
• Columns: The columns to the right of the student name will vary depending on the options selected under Settings | Setup | Options | Select Class.
o Avg: The average column will always display showing the student’s current overall running average for the class and grading period.
Override Student Overall Running Average: Click in the column across from a student name to override the student’s overall running average. If an overall average is changed, the word Edited will display below the average. Hover over the field to view what Chalkable Classroom computed as the student’s overall average. Click in the field and remove the changed average to restore the student’s overall average to the average that was calculated by Chalkable Classroom.
Enter/Select A Comment: Click Comment to enter a free form comment for the average or select a comment from the available list.
• Items: Each item (activity) for the selected class and grading period displays in a separate column. The column heading contains the partial name of the item along with the date due and points possible. Hover over the short name to view the entire name.
o Click within the column across from a student name to enter a score.
o Click the column heading to access the score entry screen for the selected item. From the score entry screen users may enter student scores and can also click Edit to edit the item/activity and change description, points possible, whether or not it is visible to students, etc.
Entering Item Scores From Score Entry Screen Users may access the score entry screen for an item from several locations. Choose one of the following three:
• From the Feed tab, click the name of an item.
• From the Calendar tab, click the name of an item.
• From the Grades tab, select a Class. From either Box or Grid view click the name of the item. Using one of the above methods the score entry screen will display.
• To enter a score for a student click in the area to the right of their name and enter the student’s score. Press the enter key on the keyboard to save the score and move to the next student on the list. Alternately, users may enter the score and then click next to a different student on the list to enter the score for that student.
Chalkable_0724151115 Chalkable Classroom – Basic Overview • 37
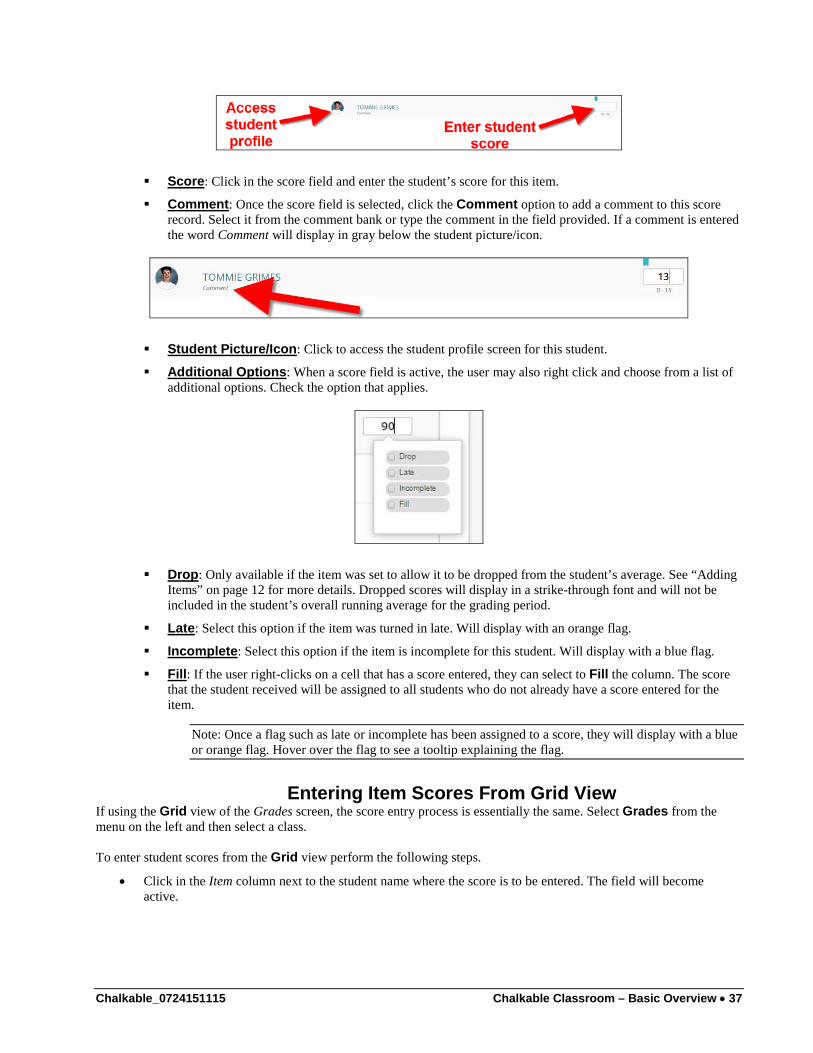
Score: Click in the score field and enter the student’s score for this item.
Comment: Once the score field is selected, click the Comment option to add a comment to this score record. Select it from the comment bank or type the comment in the field provided. If a comment is entered the word Comment will display in gray below the student picture/icon.
Student Picture/Icon: Click to access the student profile screen for this student.
Additional Options: When a score field is active, the user may also right click and choose from a list of additional options. Check the option that applies.
Drop: Only available if the item was set to allow it to be dropped from the student’s average. See “Adding Items” on page 12 for more details. Dropped scores will display in a strike-through font and will not be included in the student’s overall running average for the grading period.
Late: Select this option if the item was turned in late. Will display with an orange flag.
Incomplete: Select this option if the item is incomplete for this student. Will display with a blue flag.
Fill: If the user right-clicks on a cell that has a score entered, they can select to Fill the column. The score that the student received will be assigned to all students who do not already have a score entered for the item.
Note: Once a flag such as late or incomplete has been assigned to a score, they will display with a blue or orange flag. Hover over the flag to see a tooltip explaining the flag.
Entering Item Scores From Grid View If using the Grid view of the Grades screen, the score entry process is essentially the same. Select Grades from the menu on the left and then select a class. To enter student scores from the Grid view perform the following steps.
• Click in the Item column next to the student name where the score is to be entered. The field will become active.

Chalkable_0724151115 Chalkable Classroom – Basic Overview • 38
• Enter the score for the selected item and student. Press the enter key or down arrow on the keyboard to save the score and move down to the next student.
o Comment: When a cell is selected the Comment button becomes active.
o When selected, the comment box will display allowing the user to enter a comment for this student’s score record. If a comment list has been entered, the list will display and the user may select the comment.
The user may then edit the comment field as desired and click to Add the comment to the score record.
Once entered and saved, a comment icon will display.

Chalkable_0724151115 Chalkable Classroom – Basic Overview • 39
• Additional Options: Click inside a score field and then right click in the score field to access additional
options. Place a check next to the item that applies to this score for this student.
o Drop: Only available if the item was set to allow it to be dropped from the student’s average. See “Adding Items” on page 12 for more details. Dropped scores will display in a strike-through font and will not be included in the student’s overall running average for the grading period.
o Late: Select this option if the item was turned in late. Displays with an orange flag.
Incomplete: Select this option if the item is incomplete for this student. Displays with a blue flag.
Fill: If the user right-clicks on a cell that has a score entered, they can select to Fill the column. The score that the student received will be assigned to all students who do not already have a score entered for the item.
Absence: If the student is absent on the date of the item a teal flag will display.
Note: Once a flag such as late or incomplete has been assigned to a score, they will display with a blue or orange flag. Hover over the flag to see a tooltip explaining the flag.

Chalkable_0724151115 Chalkable Classroom – Basic Overview • 40
• Average: At the bottom of the columns for the grading period an average will display. The row contains the overall average for all students within the grading period. Each item column contains an average of all students for the selected item.
Entering Report Card Comments, Direct Average From Grid View
If using the Grid view of the Grades screen, the teacher can access the report card comments (bank) and update the calculated average with a direct entry (of permission allows) by selecting the cell for the average for the student.
Once the cell is selected, the Codes button is active and the report card comments from the bank can be selected (free form comments cannot be access from this ‘quick link’).
If permission is granted to the user, the user can override the calculated average by typing a new average into the cell.
Chalkable_0724151115 Chalkable Classroom – Basic Overview • 41
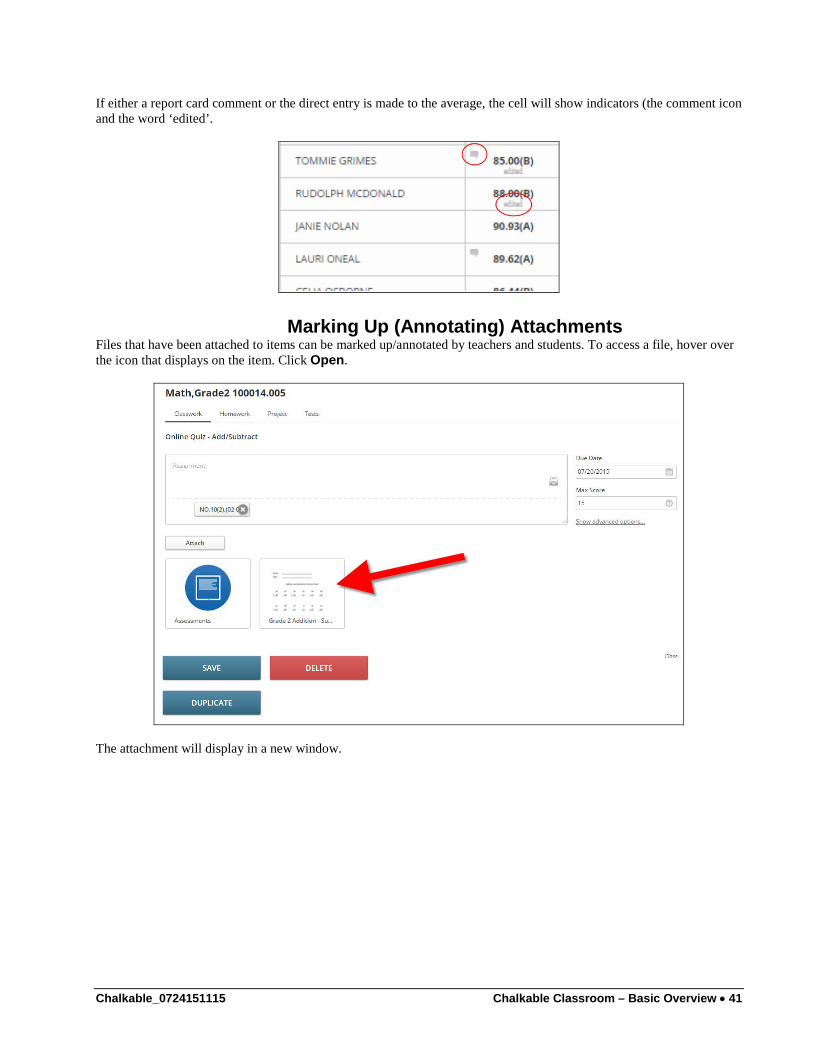
If either a report card comment or the direct entry is made to the average, the cell will show indicators (the comment icon and the word ‘edited’.
Marking Up (Annotating) Attachments Files that have been attached to items can be marked up/annotated by teachers and students. To access a file, hover over the icon that displays on the item. Click Open.
The attachment will display in a new window.

Chalkable_0724151115 Chalkable Classroom – Basic Overview • 42
• Download Attachment: Click to download the attached file to the local computer. Depending on the browser used select to save the file to the desired location. The user may then review the file and follow instructions per the teacher.
• Zoom: Click to zoom in or out.
• Page Forward/Back: Click the arrows to view additional pages.
• Comment: Click to add a comment. The comment toolbar will display.
o Point Comment: Inserts a line to the text with a comment box off to the right.
o Area Comment: Draw a text box around a section of the file with a comment off to the right.
o Text Comment: Highlight a line of text with a comment off to the right. With a text comment the user has an option to delete the comment or reply to a a comment from a previous user.

Chalkable_0724151115 Chalkable Classroom – Basic Overview • 43
Note: If using Text Comment, the user also has the option to select the color of highlighting to use.
o Draw: Allows the user to draw a circle, square, etc. around any section of the attachment. Select the
desired color from the Draw tool menu . Once an item is drawn the user may indicate it as complete or delete the drawn item.
o Highlight: When selected a highlight tool will display. Select the preferred color of highlighting from the
available list and use the tool to highlight a section of the file.
o Text: Select to insert text into a document. When selected a Text Tool menu will display allowing the user
to select the color of the text and font size .
o Strikeout: Allows the user to strike out text within the file and insert a comment. When selected a Text Tool menu will display allowing the user to select the color of the text and font size.
.

Chalkable_0724151115 Chalkable Classroom – Basic Overview • 44
o Delete: To remove a comment or highlighting the user may right click on the item and select to delete/remove it from the file.
Each time the user clicks Comment and edits the file a copy will be saved as an attachment on the item. To remove a marked up file from the item click the red X above the file picture.
Student/Teacher Annotations & Notifications When a student marks up/annotates a file attachment on an item the teacher will receive a notification. Click the Notification icon in the upper right hand corner to access notifications.
Users may also click the Messages option on the Menu tab on the left to access notifications.
• From the notification the teacher can click anywhere to access the score entry screen for the item (activity).
• Click the arrow next to the student name to access their attachment.
• Click the Attachment to view/annotate.
• Mark up/annotate the file as desired.
Note: Certain graphic files such as .JPG or .BMP cannot be annotated.
• Click the X in the upper right hand corner when finished.
• When the user clicks the X in the upper right hand corner a notification is generated to the student letting them know the file was graded or a comment was added.
Chalkable_0724151115 Chalkable Classroom – Basic Overview • 45
• The student can click the notification to view the changes.
Note: The process can be repeated as desired. Each time an attached file is modified a notification is generated to the user.
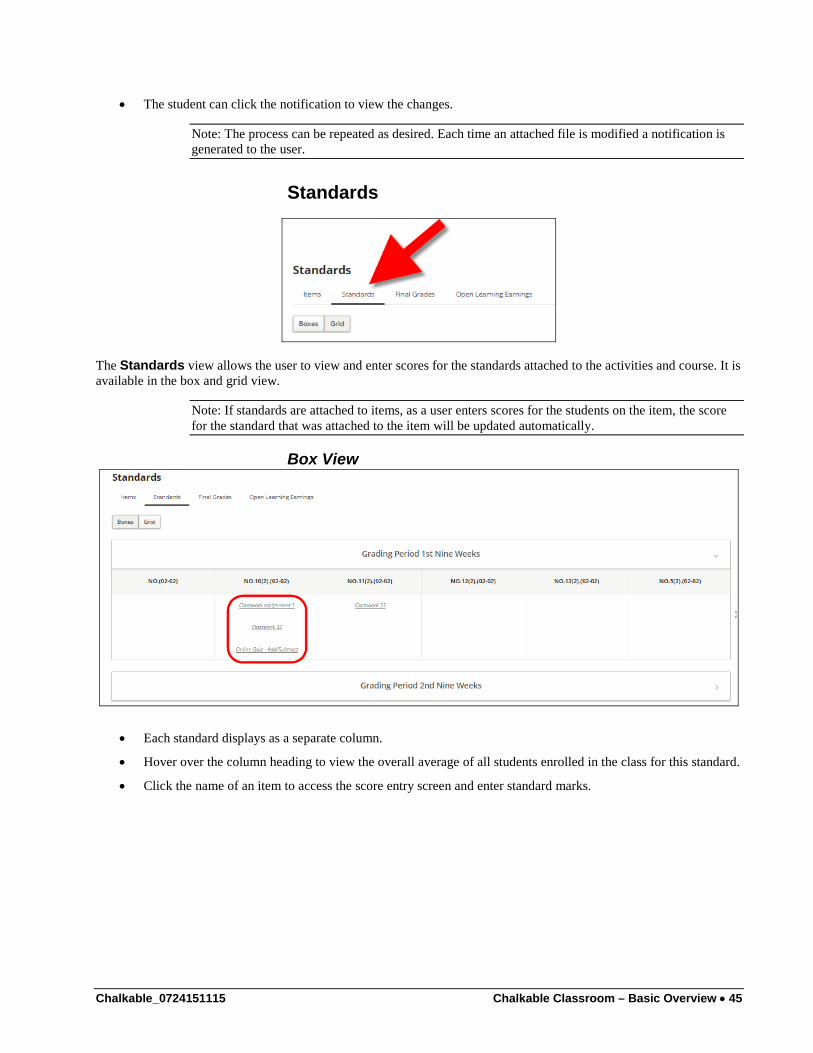
Standards
The Standards view allows the user to view and enter scores for the standards attached to the activities and course. It is available in the box and grid view.
Note: If standards are attached to items, as a user enters scores for the students on the item, the score for the standard that was attached to the item will be updated automatically.
Box View
• Each standard displays as a separate column.
• Hover over the column heading to view the overall average of all students enrolled in the class for this standard.
• Click the name of an item to access the score entry screen and enter standard marks.

Chalkable_0724151115 Chalkable Classroom – Basic Overview • 46
Grid View
• Standard: Each standard displays as a separate column. Hover over the column heading to view the entire standard description.
• Standard Mark: To enter a standard mark, click in the standard column across from the student name. Enter the desired mark and hit the enter key on the keyboard or select the alpha score from the available drop list.
o In the above example, S was the mark the user assigned to the student for this standard. Once the S was selected the user has additional options to:
S (Fill All): which will assign the S to all students in the list where the score cell is blank; or,
See All >: See all available standard marks in a drop list.

Chalkable_0724151115 Chalkable Classroom – Basic Overview • 47
• Fill: Once a mark is entered for a student, users may right click on their score and select Fill. This will assign the score that this student received to the rest of the students on the list with blank score cells saving data entry time.
• Comment: When a cell is selected the Comment button becomes active. When the comment is entered and the user clicks Add an icon will appear in the field indicating a comment has been added.
Entering & Posting Final Report Card Grades Users will go to the Final Grades screen to post grades to be printed on report cards.
• Select Final Grades to view/edit the final average for the section.
• Post: Click to post student scores to be printed on report cards.
Note: If posting is not turned on, the button will not display. Contact the school office if the teacher needs to post grades and the Post button is not visible.
• Grading Period: Click > to expand the view for that grading period.
• Graded Item: Click the drop down arrow to select a different graded item (ie. grading period grade, semester exam, semester final).

Chalkable_0724151115 Chalkable Classroom – Basic Overview • 48
• Student Grading Profile: Click the arrow > next to the student name or click in the score field next to the student to view the student’s grading profile along with attendance information, discipline information and the ability to add comments.
• AVG: The student’s calculated average based on scores from the items will display in gray. To change the student’s calculated average, enter it in the field to the right.
• Graded Item: Select the graded item drop list at the top of the screen to select a different graded item for this student or click a different tab below the student’s name.
• Grades: A graph of the student’s grades will display. Hover over the item category (ex. Homework/Classwork) to view a graph of items from the selected category.
• Attendance: The attendance section shows the student’s attendance versus the overall class attendance. Hover over a color in the graph for details regarding days present, late or absent.

Chalkable_0724151115 Chalkable Classroom – Basic Overview • 49
• Suggested Avg: The calculated average is displayed. The suggested grade is the system calculated average; however, the user may override the calculated average for the student using the score entry AVG field in the upper right hand corner.
• Discipline: Displays information regarding student’s discipline history. Includes only discipline records entered by the teacher. Hover over to view the full name of the infraction.
• Comments: To add comments from the comment bank select it from the drop list. Free form report card
comments may also be entered in the text box.
Grade Book Reports The grade book reports described below are available within Chalkable Classroom. To access these reports, go to Grades under the Menu on the left. Click a class section. If necessary, select the grading period. Click the printer icon from the Grid view.

Chalkable_0724151115 Chalkable Classroom – Basic Overview • 50
• Click the tab for the desired report.
Grade Book Report
• Start Date: Enter the starting date of activities to include in the report. Defaults to first day of grading period.
• End Date: Enter the last date of activities to include in the report. Defaults to the last day of the grading period.
• Report Type: Select Summary or Detail.
• Order By: Select to order the report by Student ID, Section Average or Student Display Name.
• ID to Print: Select the ID to include on the report including Student Number, State ID, Alt Student Number, SSNumber or None.
• Options:
o Display letter grade: Check to include the letter grade equivalent of the score.
o Suppress student name: Check to hide student names on the report.
o Display total points: Check to include student’s total points on the report.
o Display student average: Check to include the overall student average on the report.
• Include:

Chalkable_0724151115 Chalkable Classroom – Basic Overview • 51
o Withdrawn students: Check to include currently withdrawn students on the report.
o Non-graded activities: Check to include items on the report that have not been checked as graded.
• Select: Place a check next to the student(s) to include on the report or click Select all. • Format: Select PDF.
• Click to Download the report.
Worksheet Report
• Start Date: Enter the starting date of activities to include in the report. Defaults to first day of grading period.
• End Date: Enter the last date of activities to include in the report. Defaults to the last day of the grading period.
• ID to Print: Select the ID to include on the report including Student Number, State ID, Alt Student Number, SSNumber or None.
• Items to select: Check each item to be included on the report.
• Blank Columns: Enter up to 5 blank columns to be printed on the report. Check the box next to the field and enter the heading in the field provided.
• Include:
o Scores
o Letter Grade
o Average
o Student Name
• Working Filter: A working filter is a user-specific tool which allows students or staff from a report to be saved for use in additional functions. For example, when generating the Worksheet report, users may select to save the students from the report to the working filter. This working filter may then be used to generate other reports.
Chalkable_0724151115 Chalkable Classroom – Basic Overview • 52
• Select: Place a check next to the student(s) to include on the report or click Select all. • Format: Select PDF.
• Click to Download the report.
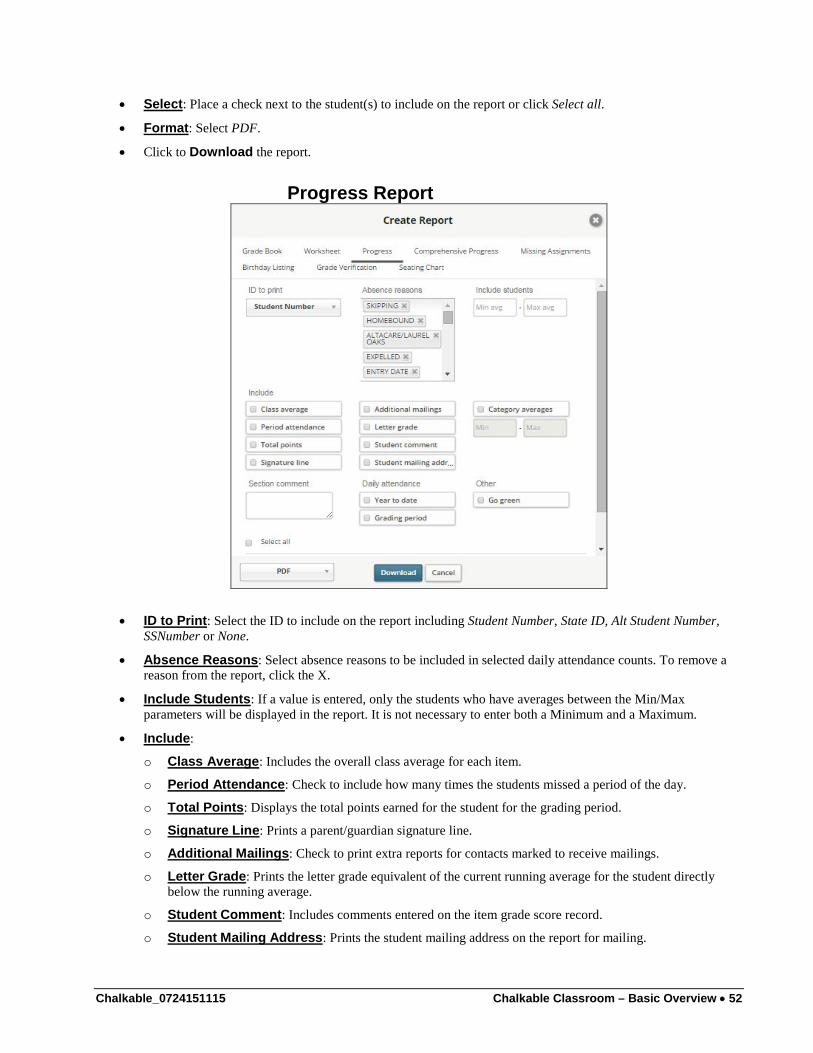
Progress Report
• ID to Print: Select the ID to include on the report including Student Number, State ID, Alt Student Number, SSNumber or None.
• Absence Reasons: Select absence reasons to be included in selected daily attendance counts. To remove a reason from the report, click the X.
• Include Students: If a value is entered, only the students who have averages between the Min/Max parameters will be displayed in the report. It is not necessary to enter both a Minimum and a Maximum.
• Include:
o Class Average: Includes the overall class average for each item.
o Period Attendance: Check to include how many times the students missed a period of the day.
o Total Points: Displays the total points earned for the student for the grading period.
o Signature Line: Prints a parent/guardian signature line.
o Additional Mailings: Check to print extra reports for contacts marked to receive mailings.
o Letter Grade: Prints the letter grade equivalent of the current running average for the student directly below the running average.
o Student Comment: Includes comments entered on the item grade score record.
o Student Mailing Address: Prints the student mailing address on the report for mailing.

Chalkable_0724151115 Chalkable Classroom – Basic Overview • 53
o Category Averages: To include only students with an overall category average in a given range, check the Category Averages box and enter the numeric range in the fields provided.
• Section Comment: Enter a comment to be printed for each section.
• Daily Attendance: Prints Year-To-Date and/or Grading Period daily attendance. Period Attendance may be included as well.
• Go Green: Select this option to not print a hard copy of the report for any student/guardian (contact) who has elected to Go Green. An alert will be created instead which can be used to generate an email to the student/contact to let them know the report is available for viewing via the Home Portal.
• Select: Place a check next to the student(s) to include on the report or click Select all. Once a student is selected the user may enter a free form comment that will print for the selected student.
• Format: Select PDF.
• Click to Download the report.
Comprehensive Progress
• Grading Period: Select the grading period for the report.
• Start Date: Enter the starting date of activities to include in the report. Defaults to first day of grading period.
• End Date: Enter the last date of activities to include in the report. Defaults to the last day of the grading period.
• Order By: Select to order the report by Student Display Name, Student ID, Grade Level, Homeroom or Postal Code.
• ID to Print: Select the ID to include on the report including Student Number, State ID, Alt Student Number, SSNumber or None.

Chalkable_0724151115 Chalkable Classroom – Basic Overview • 54
• Absence Reasons: Select absence reasons to be included in selected daily attendance counts. To remove a reason from the report, click the X.
• Include:
o Class Average: Includes the overall class average for each item.
o Class Average Only: Check to include only the overall average for the entire class on the report.
o Category Averages: Check to include a breakdown of student averages by category.
o Period Attendance: Check to include how many times the students missed a period of the day.
o Total Points: Displays the total points earned for the student for the grading period.
o Signature Line: Prints a parent/guardian signature line.
o Additional Mailings: Check to print extra reports for contacts marked to receive mailings.
o Student Comment: Includes comments entered on the item grade score record.
o Student Mailing Address: Prints the student mailing address on the report for mailing.
o Student Photo: Check to include the student photo on the report.
o Withdrawn Students: Check to include students who are currently withdrawn on the report.
• Include Students: If a value is entered, only the students who have averages between the Min/Max parameters will be displayed in the report. It is not necessary to enter both a Minimum and a Maximum.
• Daily Attendance: Check to include student daily attendance records on the report. Check to include either Year to date and/or Grading period absences.
• Other:
o Go Green: Select this option to not print a hard copy of the report for any student/guardian (contact) who has elected to Go Green. An alert will be created instead which can be used to generate an email to the student/contact to let them know the report is available for viewing via the Home Portal.
o Window Envelope: Check to print the report with the appropriate margins so the mailing address will display in a window envelope.
• Select: Place a check next to the student(s) to include on the report or click Select all. • Format: Select PDF.
• Click to Download the report.

Chalkable_0724151115 Chalkable Classroom – Basic Overview • 55
Missing Assignments
• Start Date: Enter the starting date of activities to include in the report. Defaults to first day of grading period.
• End Date: Enter the last date of activities to include in the report. Defaults to the last day of the grading period.
• Order By: Select to order the report by Student Display Name, Student ID, Grade Level, Homeroom or Postal Code.
• ID to Print: Select the ID to include on the report including Student Number, State ID, Alt Student Number, SSNumber or None.
• Alternate Scores: Select the alternate scores that are to be included when considering if a score is missing.
• Include:
o Alternate Scores Only: Check to include only alternate scores on the report.
o Withdrawn Students: Check to include currently withdrawn students on the report.
• Options:
o Count Zeros As Missing: Check this box to consider a 0 (zero) as a missing grade and include any 0’s in the report.
o One Per Page: Check to print one student per page.
o Suppress Student Name: Check to hide the student name on the report. The selected Student ID to print will display.
• Select: Place a check next to the student(s) to include on the report or click Select all. • Format: Select PDF.
• Click to Download the report.

Chalkable_0724151115 Chalkable Classroom – Basic Overview • 56
Birthday Listing
• Date or Range Of Dates: Enter the range of dates of birthdays to include. For example, to print all birthdays for the year 1999, enter 1/1/1999 to 12/31/1999.
• Month or Range of Months: Select the start and end month. For example, to print tall February birthdays regardless of the year the student was born, select February for both the start and end months.
• *Group By: Select to group the report by No Grouping (Alphabetic), Date of Birth, Grade Level or Homeroom.
• Include Withdrawn Students: Select to include currently withdrawn students on the report.
• Include Student Photo: Check to include the student’s photo if on file.
• Format: Select PDF.
• Click to Download the report.

Chalkable_0724151115 Chalkable Classroom – Basic Overview • 57
Grade Verification
• Grading Period: Select the grading period for the report.
• Graded Items: Select the graded items to be included in the report. To exclude a graded item, click the X to the right.
• Grade Type: Select to include Alpha, Numeric or Both.
• Include:
o Comment: Check to include the student comment.
o Signature: Check to include a signature line.
o Withdrawn: Check to include currently withdrawn students on the report.
• Student Order: Select Display Name, Grade Level or ID to print.
• ID To Print: Select Alt Student Number, SSN, State ID Number or Student Number.
• Select: Place a check next to the student(s) to include on the report or click Select all. • Format: Select PDF.
• Click to Download the report.

Chalkable_0724151115 Chalkable Classroom – Basic Overview • 58
Seating Chart
• Photograph: Check to include the student photo on the report where photos exist.
• Format: Select PDF.
• Click to Download the report.
Discipline Click to add, modify or delete discipline records for students. Select Discipline under the Menu on the left.
Note: Discipline records entered by teachers may be viewed by anyone who has access to discipline in InformationNOW. However, the ability to enter discipline by teachers is not a permission that is granted by default. Permission must be granted. Also, only Infractions that have been set to Show in Classroom will be available for the teacher to select from Chalkable Classroom.
• Choose a Class. A list of student enrolled in the class will display.

Chalkable_0724151115 Chalkable Classroom – Basic Overview • 59
• Last/First Name: Click to sort the list below by last or first name.
• Date: Click the date to select a new date from the calendar if necessary.
• Count: A count of students currently enrolled in the class.
• Student Picture/Icon: Click a student icon/pic to view their student profile screen.
Add Discipline • Student Name: To give a student a new discipline record click their name.
• The screen will expand to display available infractions. Hover over the infraction to view the entire description.
• Infraction: Check the applicable Infraction.
• Occurrence Note: Enter an occurrence note if applicable.

Chalkable_0724151115 Chalkable Classroom – Basic Overview • 60
Note: Users may not enter a double quote (“) in the notes field. It is recommended to use single quotes (‘) in the notes field.
• The record is saved automatically. A Saving message will display next to the student name. When the record is finished saving the message will change to Saved.
• To view the record, click the student bar.
View Discipline There are several ways to view existing discipline records. Users may access the student profile screen from several methods including the following:
• In the Search section at the top of the screen. Type part of the student’s first or last name. Select them from the search result list to view their student profile screen.
• Select Grades from the Menu on the left. Click the Class and click the student picture/icon from a class roster to access the student profile.
• Select Attendance from the Menu on the left. Click the student picture/icon to view their student profile.
• Select Discipline from the Menu on the left. Select a class in which the student is enrolled. Click the student picture/icon to access their student profile screen.
• Once the student is selected the student profile screen will display.
• Scroll over the Discipline section to view a list of the student’s discipline infractions.

Chalkable_0724151115 Chalkable Classroom – Basic Overview • 61
Edit Discipline • Click Discipline under the Menu on the left.
• Select the class in which the student is enrolled.
• Select the Date of the occurrence.
• The student name will display with an exclamation point icon next to their name indicating they have a discipline record entered for the selected date. Hover over the exclamation point to view the infraction. Click the icon to view the discipline record. Make necessary changes to the infraction and/or notes.
Note: Once a user accesses the discipline record from the student’s discipline tab in InformationNOW and edits the record to add a disposition, etc., the Chalkable Classroom user will not be able to edit the discipline record from Chalkable Classroom.
Delete Discipline • Click Discipline under the Menu on the left.
• Select the class in which the student is enrolled.
• Select the Date of the occurrence.
• The student name will display with an exclamation point icon next to their name indicating they have a discipline record entered for the selected date. Hover over the exclamation point to view the infraction. Click the icon to view the discipline record.
• Uncheck the discipline infraction. The Saving message will display. Refresh the screen and the exclamation point will no longer display next to the student name and the record has been deleted.
Note: Once a user accesses the discipline record from the student’s discipline tab in InformationNOW and edits the record to add a disposition, etc., the Chalkable Classroom user will not be able to edit the discipline record from Chalkable Classroom.

Chalkable_0724151115 Chalkable Classroom – Basic Overview • 62
Apps Apps are available only to Chalkable Classroom Study Center users. For more details, refer to the Chalkable Classroom - Apps Quick Reference Guide.
Learning Earnings Users may access Learning Earnings from within Chalkable Classroom. For more details, refer to the Learning Earnings - Getting Started guide which is available from the Chalkable support website at http://support.sti-k12.com.
Messages Users may create, read and delete messages. Click Messages in the Menu on the left or click the message icon in the upper right hand corner.
Note: This is not an email system but a message within Chalkable Classroom. The recipient must be a Chalkable Classroom user and must log into Chalkable Classroom in order to see the message. Currently anyone may message any other Chalkable Classroom in the district including students and teachers.
• Inbox: Click to filter the list below to the inbox.
• Sent: Click to filter the list below to only sent items.
• New Message: Click to create a new message.
• Filter: Enter search criteria and click the magnifying glass to search the current view.
• Delete: To delete a message, place a check next to the item and click Delete.
• Mark Read/Unread: Place a check next to one or more messages and select to mark them as Read or Unread.
• Filter: Click to filter the list to All messages, messages from Parents, Student, Teacher or Admin users.
• Scroll: Click |< to go to first page of messages on the list. Click < to go to the previous page. Click > to go to the next page. Click >| to go to the last page.
• View: Click the message to view the details.

Chalkable_0724151115 Chalkable Classroom – Basic Overview • 63
Create New Message To create a new message click New Message.
• To: Type a few letters of the persons first or last name. Recipients must be selected from the list. Select the recipient from the available list.
Note: Multiple recipients are not allowed.

Chalkable_0724151115 Chalkable Classroom – Basic Overview • 64
• Subject/Body: Enter the desired subject and body of the message.
• Send Message: Click to Send Message to the recipient or click to Cancel.
• When the user has a new message a number will display in the upper right hand corner next to the Messages icon.
• The message will display when the user clicks the message icon in the upper right hand corner.
• The message will also display if the user selects the Messages icon from the Menu tabs on the left.

Chalkable_0724151115 Chalkable Classroom – Basic Overview • 65
People Allows the user to see information regarding all people in their assigned sections. Alternately, users may select Whole School to view a list of all students in the school.
• Sections: All sections will display by default. Click a class section at the top of the screen to filter the list of students below to one section.
• My Students/Whole School: Filter the list below to only students enrolled in the teacher’s classes or to the whole school.
• First Name/Last Name: Sort the list by First name or Last name.
• Filter List: Click in the Filter List box to enter filter criteria for the list below. For example, to filter the list to students with a last name of Anderson, enter Anderson in the Filter List field. Click X to remove the filter criteria and press the enter key on the keyboard to return to the full list.
• Count: Displays the count of people in the list below.
• Student:
Message: Click to send a message to the student.
Student Picture/Icon: Click to access the student profile screen for the selected student.

Chalkable_0724151115 Chalkable Classroom – Basic Overview • 66
Student Profile The student profile is available from numerous locations in Chalkable Classroom. Generally, wherever the student picture or icon is displayed the user may click to access the student profile.
• Now: shows the student profile with quick links to alerts, ranks, grades, discipline, and classes
• Info: shows the student demographic information along with contacts
• Grading: Not currently available.
• Schedule: Click to view the student’s current schedule in a day, week or month calendar.
o Day View: Click a class on the schedule to view the name of the class, teacher, room and the start/end time of day they are in that class. A dot will display indicating the class where the student should be based on the current date and time.
o Week View: Displays the activities for each of the classes in their schedule.
o Month View: A dot indicates there is an assignment for that day. Click the dot to view details or click to add a New Item for that class if you are teacher.
• Attendance: Not currently available.
• Discipline: Not currently available.
• Explorer: Click to view the student’s classes along with their average for each class ranked from lowest (weakest) average to highest. (only available with Chalkable Study Center)
• Apps: Only available with Chalkable Study Center.
Now A view showing the student profile with quick links to alerts, ranks, grades, discipline, and classes.
• Alert: Hover over the exclamation point icon to view alerts that have been entered for the student.
• Class: Displays the class that the student should be in now directly below the student name based on the time and date. Green dot next to the class indicates the student is currently considered present. Red dot indicates they are absent. Yellow dot indicates tardy. White dot indicates attendance has not yet been posted for this student for today for this class.
• Rank: The current rank of the student based on the last time ranks were posted to transcripts.
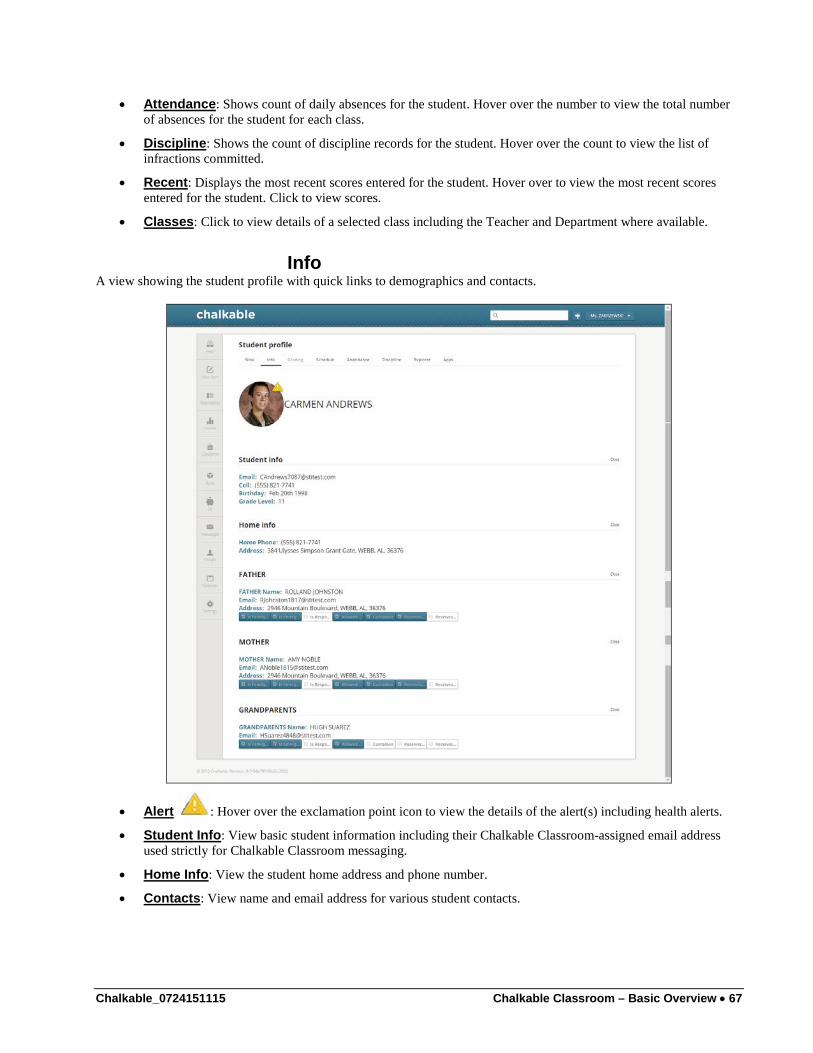
Chalkable_0724151115 Chalkable Classroom – Basic Overview • 67
• Attendance: Shows count of daily absences for the student. Hover over the number to view the total number of absences for the student for each class.
• Discipline: Shows the count of discipline records for the student. Hover over the count to view the list of infractions committed.
• Recent: Displays the most recent scores entered for the student. Hover over to view the most recent scores entered for the student. Click to view scores.
• Classes: Click to view details of a selected class including the Teacher and Department where available.
Info A view showing the student profile with quick links to demographics and contacts.
• Alert : Hover over the exclamation point icon to view the details of the alert(s) including health alerts.
• Student Info: View basic student information including their Chalkable Classroom-assigned email address used strictly for Chalkable Classroom messaging.
• Home Info: View the student home address and phone number.
• Contacts: View name and email address for various student contacts.
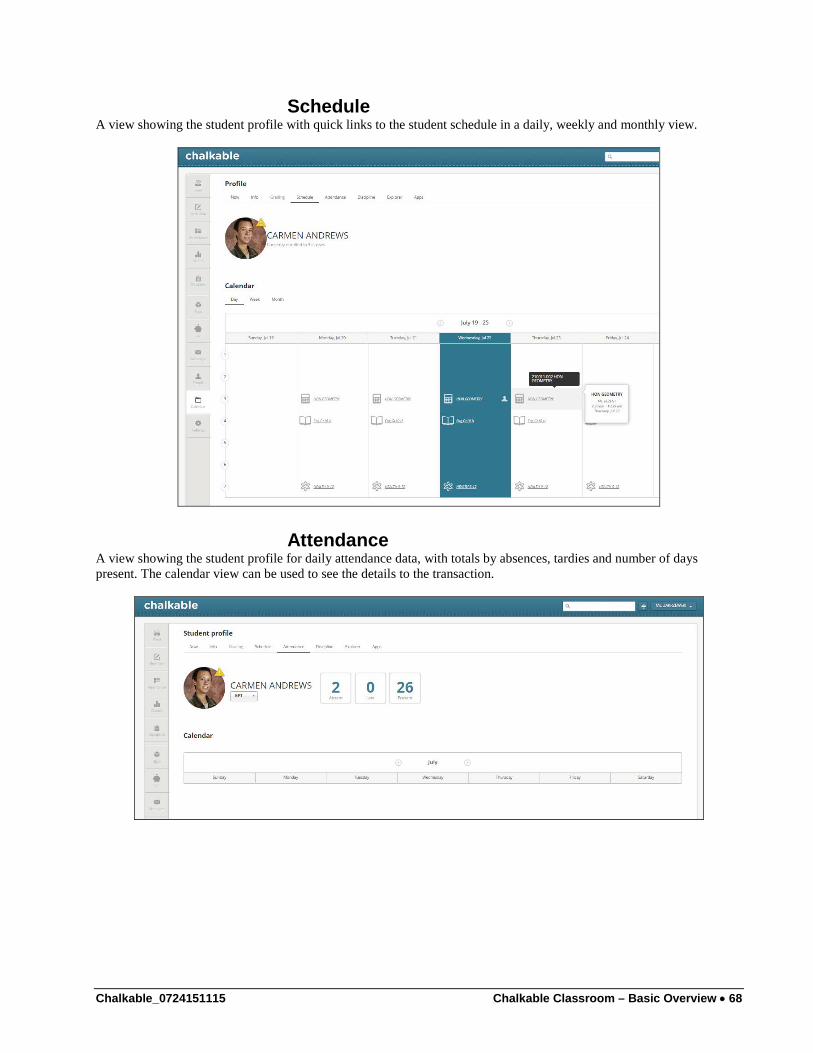
Chalkable_0724151115 Chalkable Classroom – Basic Overview • 68
Schedule A view showing the student profile with quick links to the student schedule in a daily, weekly and monthly view.
Attendance A view showing the student profile for daily attendance data, with totals by absences, tardies and number of days present. The calendar view can be used to see the details to the transaction.
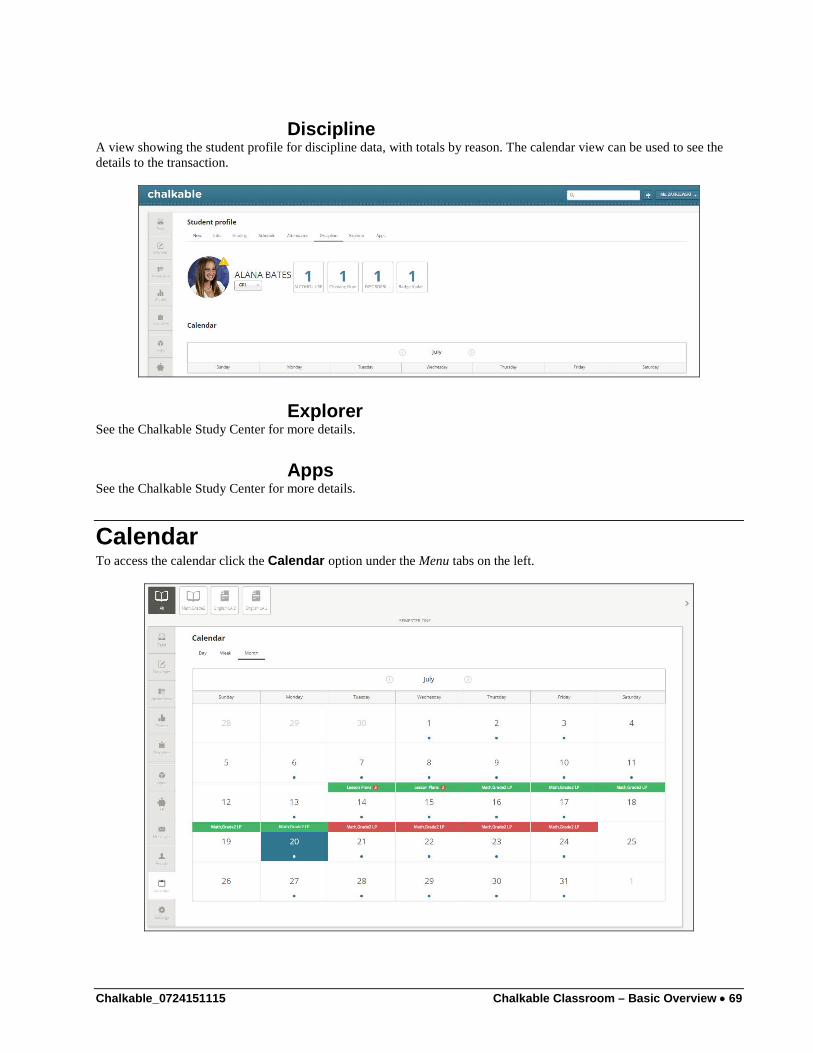
Chalkable_0724151115 Chalkable Classroom – Basic Overview • 69
Discipline A view showing the student profile for discipline data, with totals by reason. The calendar view can be used to see the details to the transaction.
Explorer See the Chalkable Study Center for more details.
Apps See the Chalkable Study Center for more details.
Calendar To access the calendar click the Calendar option under the Menu tabs on the left.

Chalkable_0724151115 Chalkable Classroom – Basic Overview • 70
Users may toggle between a Day, Week or Month view. A list of items will display.
• Day/Week/Month View: Click to select a Day, Week or Month view. Defaults to Month view.
• Previous/Next: Click or to navigate to the previous or next day, week or month depending on view selected.
• Class List: Available only on Week or Month view. All class items will display by default. Click to view All classes or click the class icon to filter the calendar below to just the selected class.
Day View A view showing the logged-in staff person where that person is scheduled to be at each timeslot in the day for the current week. If selecting Day view, the items will display as follows with periods of the day down the left hand side of the screen and days of the week across the top. The class number displays across from the period and in the day column.
• Click a Class number to see the activities for the selected day and period.
• Class Name will display along with start/end time and date and all items entered for the selected class and date.
• Click the Description of the item to access the score entry screen for the selected item.
• Click New Item to add a new item for this class and date.
• A dot will display next to a class indicating where the teacher should be in based on the current date and time.
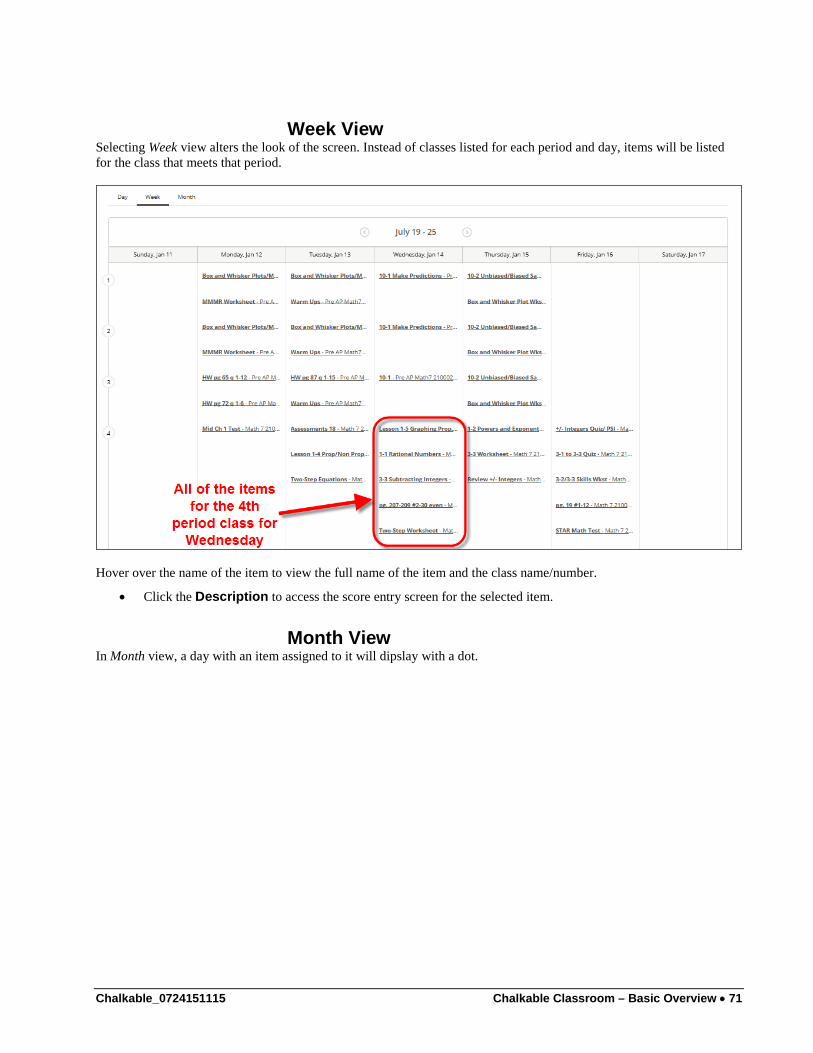
Chalkable_0724151115 Chalkable Classroom – Basic Overview • 71
Week View Selecting Week view alters the look of the screen. Instead of classes listed for each period and day, items will be listed for the class that meets that period.
Hover over the name of the item to view the full name of the item and the class name/number.
• Click the Description to access the score entry screen for the selected item.
Month View In Month view, a day with an item assigned to it will dipslay with a dot.
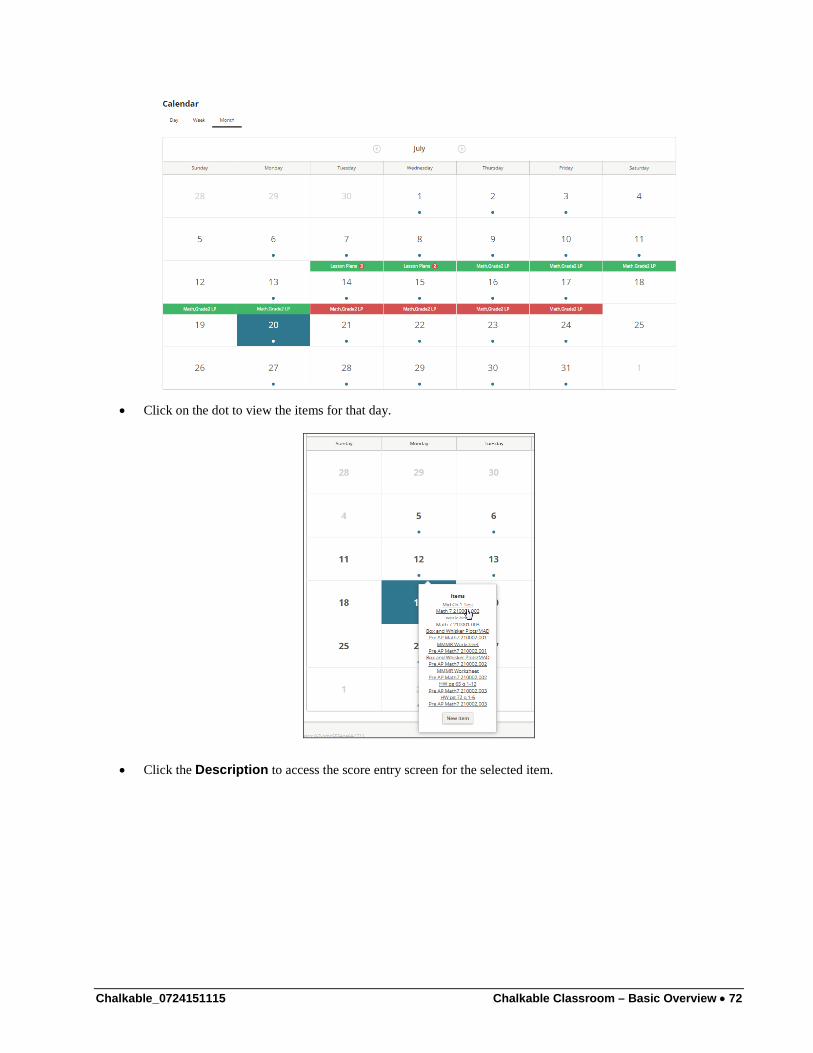
Chalkable_0724151115 Chalkable Classroom – Basic Overview • 72
• Click on the dot to view the items for that day.
• Click the Description to access the score entry screen for the selected item.
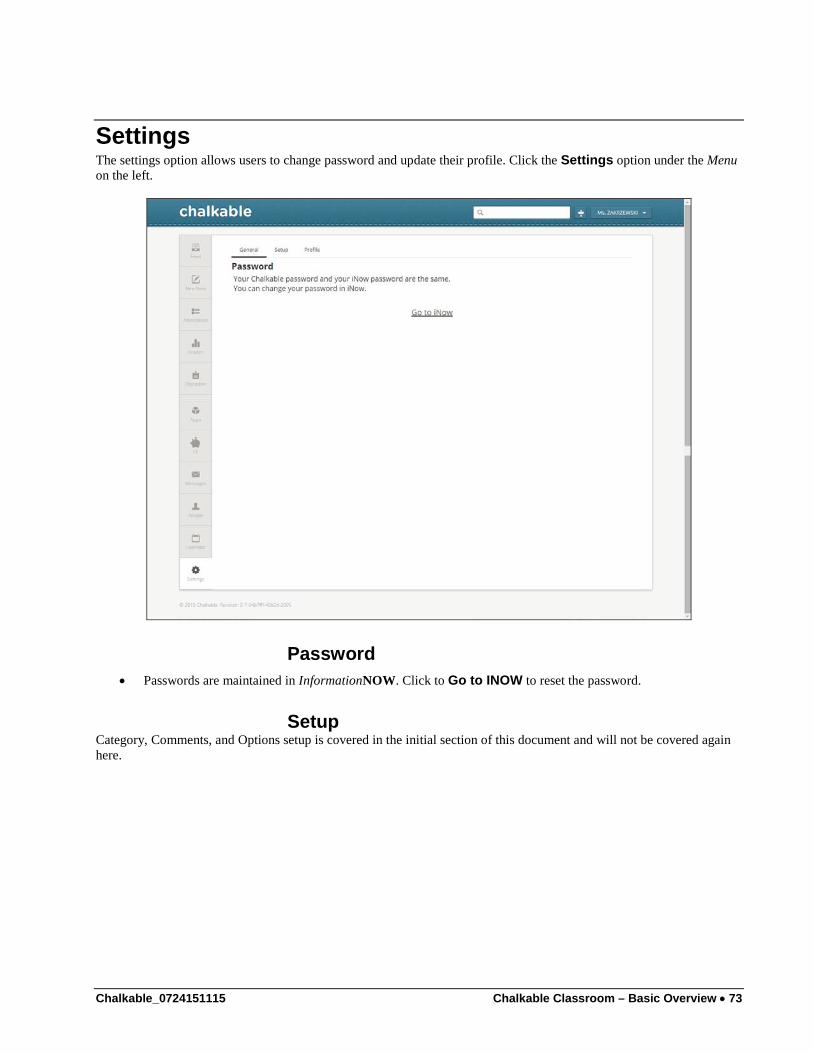
Chalkable_0724151115 Chalkable Classroom – Basic Overview • 73
Settings The settings option allows users to change password and update their profile. Click the Settings option under the Menu on the left.
Password • Passwords are maintained in InformationNOW. Click to Go to INOW to reset the password.
Setup Category, Comments, and Options setup is covered in the initial section of this document and will not be covered again here.

Chalkable_0724151115 Chalkable Classroom – Basic Overview • 74
Profile Click to display the user profile.
Now: Displays the current teacher location based on day and time along with staff picture.
Note: The teacher’s title (Ms. or Mr.) is determined by the gender assigned to the teacher.
Info: Displays teacher personal data including their Chalkable Classroom email address and other personal data where available.
Schedule: Includes a day, week or month view of the teacher’s calendar including access to items (activities).
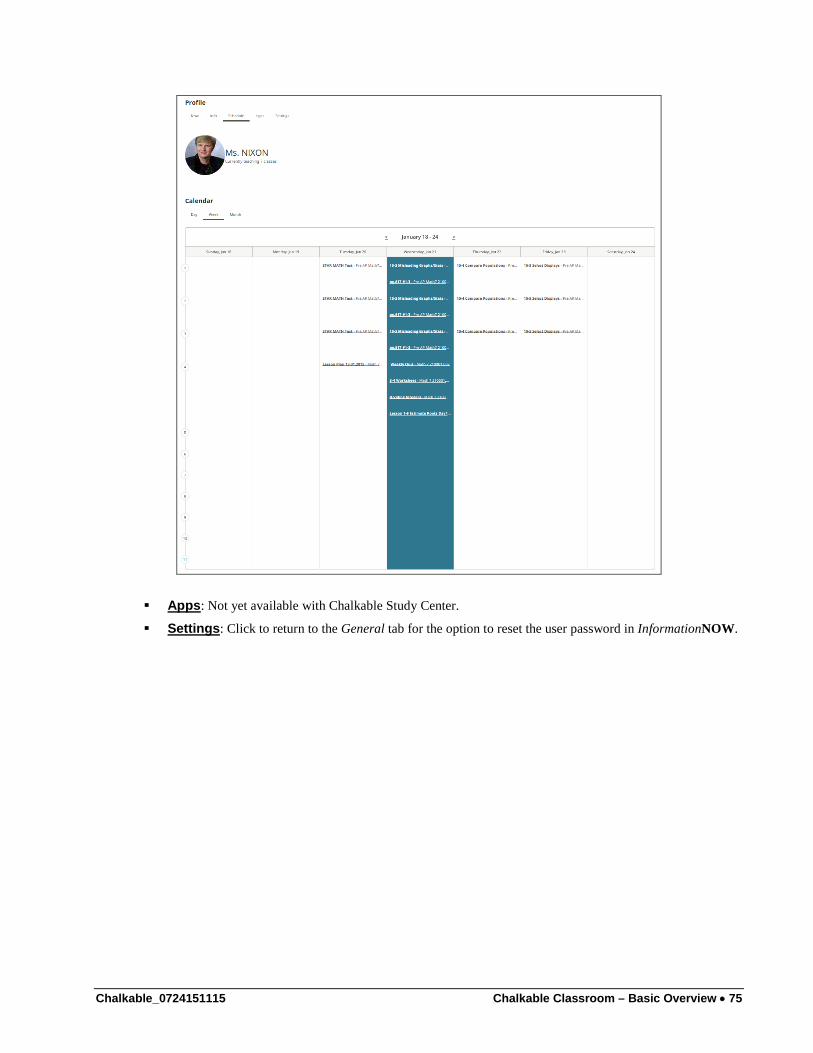
Chalkable_0724151115 Chalkable Classroom – Basic Overview • 75
Apps: Not yet available with Chalkable Study Center.
Settings: Click to return to the General tab for the option to reset the user password in InformationNOW.