第一节课 -...
TRANSCRIPT
第一节课
开 始
第 1 章 像素
第 2 章 Processing第 3 章 交互
Learning Processing:A Beginner’s Guide to Programming Images, Animation, and Interaction, Second Edition

第 1 章
像 素
千里之行,始于足下。
—老子
本章主要内容: ● 明确像素和坐标的概念 ● 绘制基本图形:点、线、矩形、椭圆 ● 颜色:灰度、RGB ● 颜色:alpha 透明度
请注意,你在本章并不会真正开始编程!你只是使用基于文本的指令在屏幕上创造图
形,请尽情享受这个过程带给你的愉悦。事实上,这些文本指令就是“代码”!
1.1 坐标纸
本书会教授你如何通过计算媒介进行编程,我们以 Processing 开发环境(http://www. processing.org)为基础进行讨论和举例。在一切开始之前,你要像八年级的学生一样,拿出
坐标纸,在上面画一条线。两点之间距离最短的是经典的直线,我们的学习就从这两点一线
开始。
图 1-1 展示了点 A(1,0)和点 B(4,5)之间的一
条线段。如果你想指导一个朋友绘制同样的线段,你会跟
他说:“请绘制一条始于点(1,0),止于点(4,5)的线
段。”此刻,想象你的朋友是一台计算机,你想指导这个
数码家伙在它的屏幕上绘制出同样的线。其实上述指令同
样适用于计算机(只是此时你可以忽略掉朋友之间的客套
寒暄,而需要留意的是精确的指令格式)。这条指令如下
所示:
1 PixelsA journey of a thousand miles begins with a single step.—Lao-tzu
In this chapter:– Specifying pixel coordinates– Basic shapes: point, line, rectangle, ellipse– Color: grayscale, RGB– Color: alpha transparency
Note that you are not doing any programming yet in this chapter! You are just dipping your feet in the water andgetting comfortable with the idea of creating onscreen graphics with text-based commands, that is, “code”!
1-1 Graph paperThis book will teach you how to program in the context of computational media, and it will use thedevelopment environment Processing (http://www.processing.org) as the basis for all discussion andexamples. But before any of this becomes relevant or interesting, you must first channel your eighth-gradeself, pull out a piece of graph paper, and draw a line. The shortest distance between two points is a goodold fashioned line, and this is where you will begin, with two points on that graph paper.
Figure 1-1
Figure 1-1 shows a line between point A (1,0) and point B (4,5). If you wanted to direct a friend of yoursto draw that same line, you would say “draw a line from the point one-zero to the point four-five, please.”Well, for the moment, imagine your friend was a computer and you wanted to instruct this digital pal todisplay that same line on its screen. The same command applies (only this time you can skip thepleasantries and you will be required to employ a precise formatting). Here, the instruction will look likethis:
line(1, 0, 4, 5);
祝贺你,你已经写完了第一行计算机代码!稍后,我会告诉你关于这行代码的具体格
式要求。现在,我们为电脑提供了一条指令(我称之为函数(function)),并且命名为直线
(line)让它来执行。此外,我们还声明了绘制从点 A(1,0)到点 B(4,5)直线的实参
(argument)。如果把这条线的代码比作句子,那么函
数就是谓语动词,实参则是句子的宾语。只是代码
以分号而不是句号结尾,如图 1-2 所示。
这里,关键是要注意计算机屏幕不过是一张精
致的坐标纸。屏幕中的每个像素都具有一个坐标,
即两个数值:x 坐标(横坐标)和 y 坐标(纵坐标)。
Learning Processing:A Beginner’s Guide to Programming Images, Animation, and Interaction, Second Edition
图 1-1
图 1-2
第 1 章 像 素 3
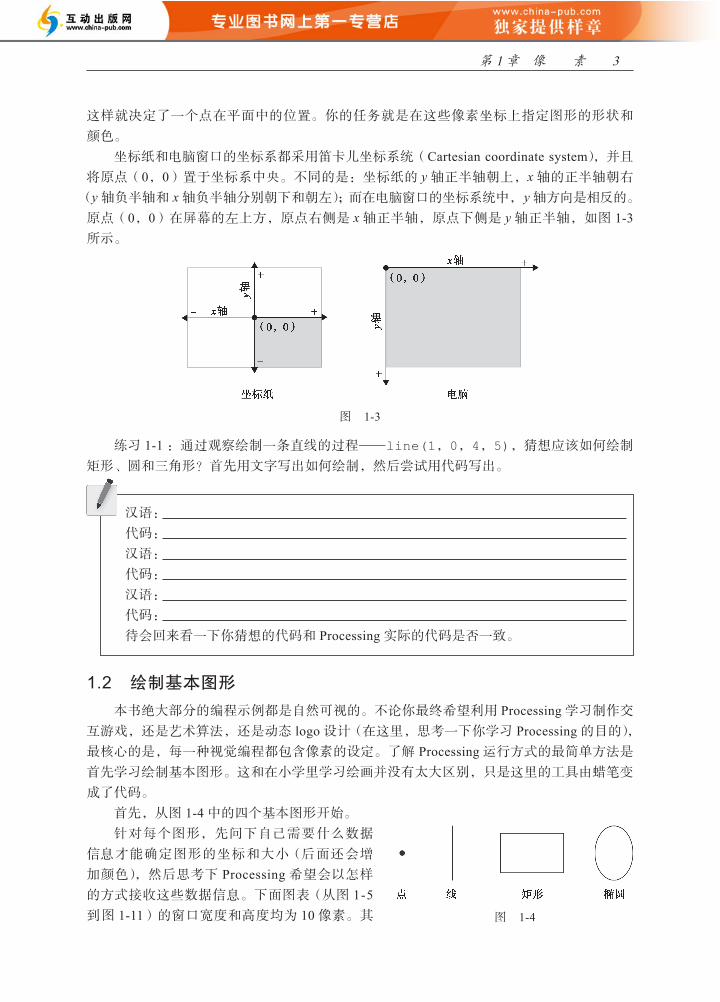
这样就决定了一个点在平面中的位置。你的任务就是在这些像素坐标上指定图形的形状和
颜色。
坐标纸和电脑窗口的坐标系都采用笛卡儿坐标系统(Cartesian coordinate system),并且
将原点(0,0)置于坐标系中央。不同的是:坐标纸的 y 轴正半轴朝上,x 轴的正半轴朝右
(y 轴负半轴和 x 轴负半轴分别朝下和朝左);而在电脑窗口的坐标系统中,y 轴方向是相反的。
原点(0,0)在屏幕的左上方,原点右侧是 x 轴正半轴,原点下侧是 y 轴正半轴,如图 1-3所示。
图 1-3
练习 1-1 :通过观察绘制一条直线的过程—line(1,0,4,5),猜想应该如何绘制
矩形、圆和三角形?首先用文字写出如何绘制,然后尝试用代码写出。
汉语:
代码:
汉语:
代码:
汉语:
代码:
待会回来看一下你猜想的代码和 Processing 实际的代码是否一致。
1.2 绘制基本图形
本书绝大部分的编程示例都是自然可视的。不论你最终希望利用 Processing 学习制作交
互游戏,还是艺术算法,还是动态 logo 设计(在这里,思考一下你学习 Processing 的目的),
最核心的是,每一种视觉编程都包含像素的设定。了解 Processing 运行方式的最简单方法是
首先学习绘制基本图形。这和在小学里学习绘画并没有太大区别,只是这里的工具由蜡笔变
成了代码。
首先,从图 1-4 中的四个基本图形开始。
针对每个图形,先问下自己需要什么数据
信息才能确定图形的坐标和大小(后面还会增
加颜色),然后思考下 Processing 希望会以怎样
的方式接收这些数据信息。下面图表(从图 1-5到图 1-11)的窗口宽度和高度均为 10 像素。其 图 1-4
4 第一节课 开 始
实真正开始编程之后,你通常会使用更大的窗口(因为 10×10 像素只占据屏幕几毫米的空
间)。但是,出于示范的目的,小尺寸的窗口更容易呈现出图像在坐标纸上的效果,从而帮
助我们理解每一行代码。
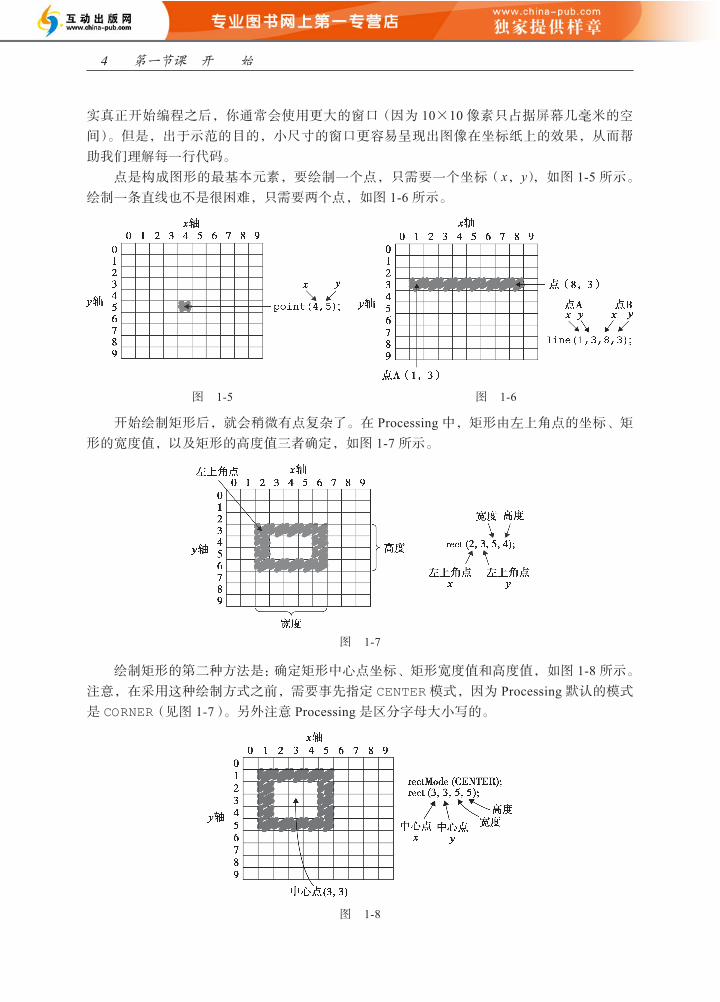
点是构成图形的最基本元素,要绘制一个点,只需要一个坐标(x,y),如图 1-5 所示。
绘制一条直线也不是很困难,只需要两个点,如图 1-6 所示。
图 1-5 图 1-6
开始绘制矩形后,就会稍微有点复杂了。在 Processing 中,矩形由左上角点的坐标、矩
形的宽度值,以及矩形的高度值三者确定,如图 1-7 所示。
图 1-7
绘制矩形的第二种方法是:确定矩形中心点坐标、矩形宽度值和高度值,如图 1-8 所示。
注意,在采用这种绘制方式之前,需要事先指定 CENTER 模式,因为 Processing 默认的模式
是 CORNER(见图 1-7)。另外注意 Processing 是区分字母大小写的。
图 1-8

第 1 章 像 素 5
绘制矩形的第三种方法是确定矩形的两个点坐标:矩形左上角点和右下角点。这种绘制
模式是 CORNERS(见图 1-9)。
了解了矩形的绘制方法之后,椭圆的绘制也就很好理解了。实际上,椭圆绘制和矩形绘
制 rect() 大同小异,绘制椭圆时,可以想象有一个矩形的边界框 (见图 1-10)。与矩形
rect() 的 CORNER 模式不同,椭圆 ellipse() 的默认绘制模式是 CENTER,如图 1-11所示。1
必须承认,图 1-11 中的椭圆看上去并不是特别圆滑。Processing 有一个选择使用哪些像
图 1-10图 1-9
图 1-11
计算机图形学中,一个图形的边界框是指能够涵盖该图形的最小的矩形。例如,一个圆的边界框如
图 1-10 所示。

6 第一节课 开 始
素创建圆的内置方法。放大后,你会发现有很多小方块以近似圆的方式进行排列,但是缩小
到一定程度后,你就会看到一个完美的圆。在后续章节,你会发现使用 Processing 可以创建
自己的算法,能让你单独对图形的每个像素点进行着色(当然,有可能你已经想到可以使用
point()命令逐点进行绘制),但是目前,最好使用 ellipse()命令执行这个工作。
当然,Processing 函数库中不仅仅只有点、直线、椭圆和矩形的图形绘制命令。在第 2章,你会看到 Processing 语言参考文档提供
了绘制函数的完整列表,以及对应的实参要
求、句法示例和相应的图形输出。当前,作
为练习,你可以尝试想象一下其他的图形应该
需要什么样的实参,如图 1-12 所示,依次为:
triangle()、arc()、quad()和 curve()。
练习 1-2:使用下面的空白图表,根据代码粗略绘制出图形。Exercise 1-2: Using the blank graph below, draw the primitive shapes specified by the code.
line(0, 0, 9, 6);point(0, 2);point(0, 4);rectMode(CORNER);rect(5, 0, 4, 3);ellipseMode(CENTER);ellipse(3, 7, 4, 4);
Exercise 1-3: Reverse engineer a list of primitive shape drawing instructions for the diagram below.
_______________________________________________________________________
_______________________________________________________________________
_______________________________________________________________________
_______________________________________________________________________
_______________________________________________________________________
9Pixels
练习 1-3:根据下面的图形,反向推导出初始的图形绘制指令。
图 1-12
第 1 章 像 素 7
1.3 灰度模式
正如 1.2 节所讨论的,在屏幕上构建图形至少要知道像素坐标。你已经非常礼貌地指导
计算机在某个特定的位置绘制了特定大小的图形。但是,还有一个非常关键的内容没有介
绍—颜色。
在数字化的世界里,精确性是非常重要的。比如,“嗨,你能将那个圆设定为蓝绿色
吗?”之类的话是没有意义的。因为,颜色是通过一系列具体的数值来定义的。下面举一个
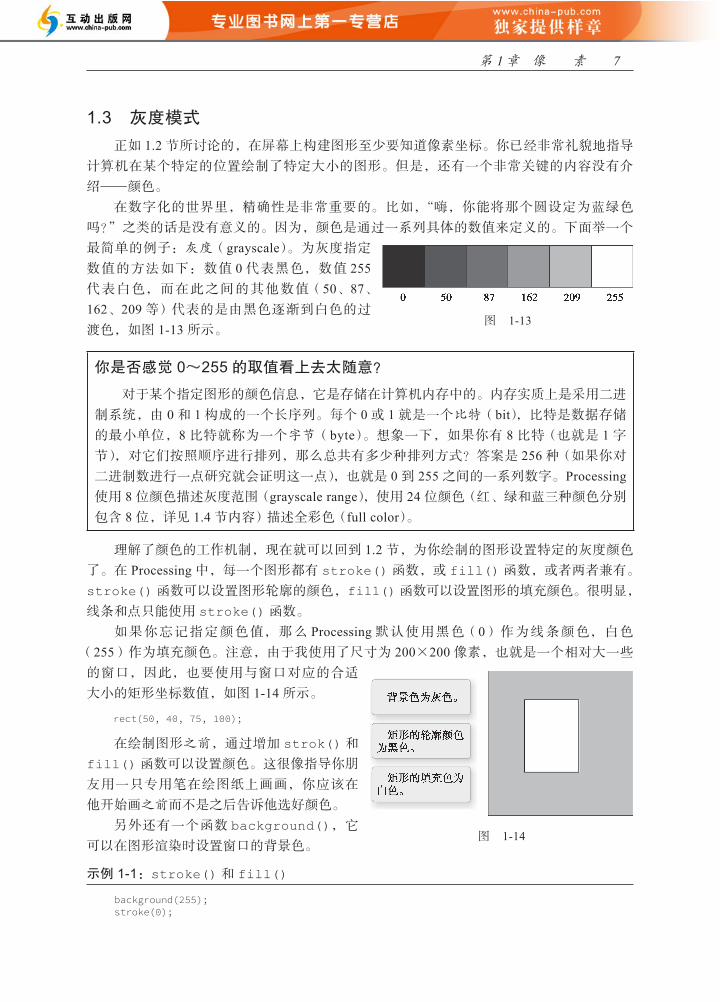
最简单的例子:灰度(grayscale)。为灰度指定
数值的方法如下:数值 0 代表黑色,数值 255代表白色,而在此之间的其他数值(50、87、162、209 等)代表的是由黑色逐渐到白色的过
渡色,如图 1-13 所示。
你是否感觉 0~255 的取值看上去太随意?
对于某个指定图形的颜色信息,它是存储在计算机内存中的。内存实质上是采用二进
制系统,由 0 和 1 构成的一个长序列。每个 0 或 1 就是一个比特(bit),比特是数据存储
的最小单位,8 比特就称为一个字节(byte)。想象一下,如果你有 8 比特(也就是 1 字
节),对它们按照顺序进行排列,那么总共有多少种排列方式?答案是 256 种(如果你对
二进制数进行一点研究就会证明这一点),也就是 0 到 255 之间的一系列数字。Processing使用 8 位颜色描述灰度范围(grayscale range),使用 24 位颜色(红、绿和蓝三种颜色分别
包含 8 位,详见 1.4 节内容)描述全彩色(full color)。
理解了颜色的工作机制,现在就可以回到 1.2 节,为你绘制的图形设置特定的灰度颜色
了。在 Processing 中,每一个图形都有 stroke() 函数,或 fill() 函数,或者两者兼有。
stroke() 函数可以设置图形轮廓的颜色,fill()函数可以设置图形的填充颜色。很明显,
线条和点只能使用 stroke() 函数。
如果你忘记指定颜色值,那么 Processing 默认使用黑色(0)作为线条颜色,白色
(255)作为填充颜色。注意,由于我使用了尺寸为 200×200 像素,也就是一个相对大一些
的窗口,因此,也要使用与窗口对应的合适
大小的矩形坐标数值,如图 1-14 所示。
1-3 Grayscale colorAs you learned in Section 1-2 on page 5, the primary building block for placing shapes onscreen is a pixelcoordinate. You politely instructed the computer to draw a shape at a specific location with a specific size.Nevertheless, a fundamental element was missing — color.
In the digital world, precision is required. Saying “Hey, can you make that circle bluish-green?” will notdo. Therefore, color is defined with a range of numbers. I’ll start with the simplest case: black and white orgrayscale. To specify a value for grayscale, use the following: 0 means black, 255 means white. In between,every other number — 50, 87, 162, 209, and so on — is a shade of gray ranging from black to white. SeeFigure 1-13.
Figure 1-13
Does 0–255 seem arbitrary to you?
Color for a given shape needs to be stored in the computer’s memory. This memory is just a longsequence of 0’s and 1’s (a whole bunch of on or off switches.) Each one of these switches is a bit,eight of them together is a byte. Imagine if you had eight bits (one byte) in sequence — how manyways can you configure these switches? The answer is (and doing a little research into binarynumbers will prove this point) 256 possibilities, or a range of numbers between 0 and 255.Processing will use eight bit color for the grayscale range and 24 bit for full color (eight bits foreach of the red, green, and blue color components; see Section 1-4 on page 12).
Understanding how this range works, you can now move to setting specific grayscale colors for the shapesyou drew in Section 1-2 on page 5. In Processing, every shape has a stroke() or a fill() or both. Thestroke() specifies the color for the outline of the shape, and the fill() specifies the color for theinterior of that shape. Lines and points can only have stroke(), for obvious reasons.
If you forget to specify a color, Processing will use black (0) for the stroke() and white (255) for thefill() by default. Note that I’m now using more realistic numbers for the pixel locations, assuming alarger window of size 200 × 200 pixels. See Figure 1-14.
rect(50, 40, 75, 100);
Lesson 1: The Beginning10
在绘制图形之前,通过增加 strok() 和
fill() 函数可以设置颜色。这很像指导你朋
友用一只专用笔在绘图纸上画画,你应该在
他开始画之前而不是之后告诉他选好颜色。
另外还有一个函数 background(),它
可以在图形渲染时设置窗口的背景色。
示例 1-1:stroke() 和 fill()
Figure 1-14
Figure 1-15
Figure 1-16
By adding the stroke() and fill() functionsbefore the shape is drawn, you can set the color.It’s much like instructing your friend to use aspecific pen to draw on the graph paper. Youwould have to tell your friend before he or shestarting drawing, not after.
There is also the function background(),which sets a background color for the windowwhere shapes will be rendered.
Example 1-1. Stroke and fill
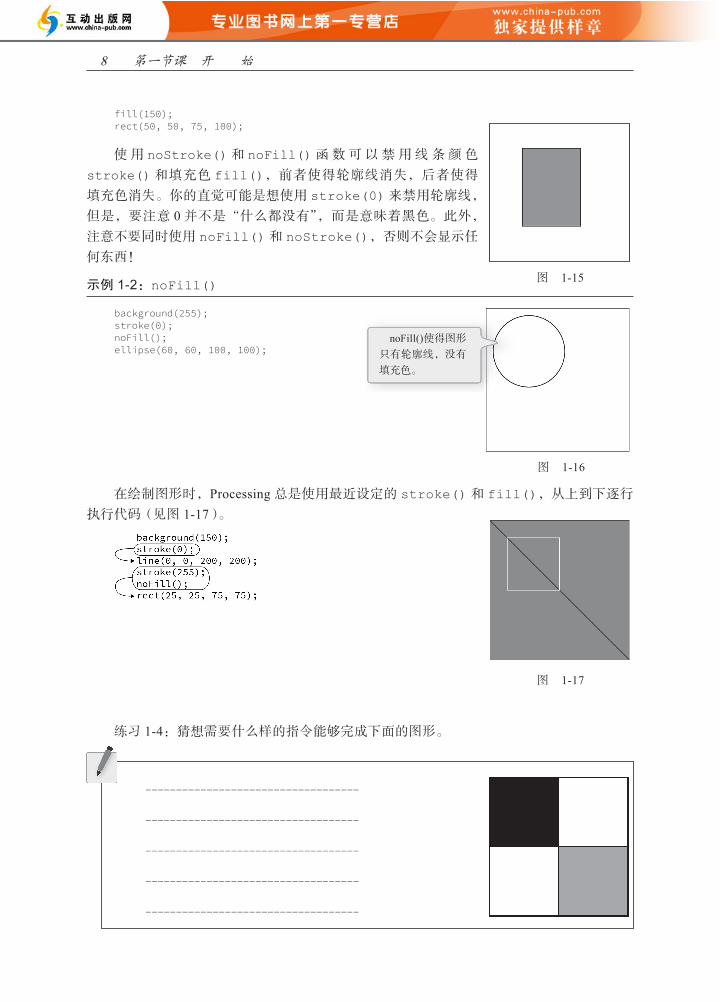
background(255);stroke(0);fill(150);rect(50, 50, 75, 100);
stroke() or fill() can be eliminated with the noStroke() ornoFill() functions. Your instinct might be to say stroke(0) for nooutline, however, it’s important to remember that 0 is not “nothing,” butrather denotes the color black. Also, remember not to eliminate both —with noStroke() and noFill(), nothing will appear!
Example 1-2. noFill()
background(255);stroke(0);noFill();ellipse(60, 60, 100, 100);
When you draw a shape, Processing willalways use the most recently specifiedstroke() and fill(), reading the codefrom top to bottom. See Figure 1-17.
11Pixels
图 1-13
图 1-14
8 第一节课 开 始
Figure 1-14
Figure 1-15
Figure 1-16
By adding the stroke() and fill() functionsbefore the shape is drawn, you can set the color.It’s much like instructing your friend to use aspecific pen to draw on the graph paper. Youwould have to tell your friend before he or shestarting drawing, not after.
There is also the function background(),which sets a background color for the windowwhere shapes will be rendered.
Example 1-1. Stroke and fill
background(255);stroke(0);fill(150);rect(50, 50, 75, 100);
stroke() or fill() can be eliminated with the noStroke() ornoFill() functions. Your instinct might be to say stroke(0) for nooutline, however, it’s important to remember that 0 is not “nothing,” butrather denotes the color black. Also, remember not to eliminate both —with noStroke() and noFill(), nothing will appear!
Example 1-2. noFill()
background(255);stroke(0);noFill();ellipse(60, 60, 100, 100);
When you draw a shape, Processing willalways use the most recently specifiedstroke() and fill(), reading the codefrom top to bottom. See Figure 1-17.
11Pixels
使 用 noStroke()和 noFill()函 数 可 以 禁 用 线 条 颜 色
stroke()和填充色 fill(),前者使得轮廓线消失,后者使得
填充色消失。你的直觉可能是想使用 stroke(0) 来禁用轮廓线,
但是,要注意 0 并不是“什么都没有”,而是意味着黑色。此外,
注意不要同时使用 noFill() 和 noStroke(),否则不会显示任
何东西!
示例 1-2:noFill()
Figure 1-14
Figure 1-15
Figure 1-16
By adding the stroke() and fill() functionsbefore the shape is drawn, you can set the color.It’s much like instructing your friend to use aspecific pen to draw on the graph paper. Youwould have to tell your friend before he or shestarting drawing, not after.
There is also the function background(),which sets a background color for the windowwhere shapes will be rendered.
Example 1-1. Stroke and fill
background(255);stroke(0);fill(150);rect(50, 50, 75, 100);
stroke() or fill() can be eliminated with the noStroke() ornoFill() functions. Your instinct might be to say stroke(0) for nooutline, however, it’s important to remember that 0 is not “nothing,” butrather denotes the color black. Also, remember not to eliminate both —with noStroke() and noFill(), nothing will appear!
Example 1-2. noFill()
background(255);stroke(0);noFill();ellipse(60, 60, 100, 100);
When you draw a shape, Processing willalways use the most recently specifiedstroke() and fill(), reading the codefrom top to bottom. See Figure 1-17.
11Pixels
在绘制图形时,Processing 总是使用最近设定的 stroke() 和 fill(),从上到下逐行
执行代码(见图 1-17)。
Figure 1-17
Exercise 1-4: Try to guess what the instructions would be for the following screenshot.
___________________________________
___________________________________
___________________________________
___________________________________
___________________________________
___________________________________
1-4 RGB colorA nostalgic look back at graph paper helped you to learn the fundamentals for pixel locations and size.Now that it’s time to study the basics of digital color, here’s another childhood memory to get you started.Remember finger painting? By mixing three “primary” colors, any color could be generated. Swirling allcolors together resulted in a muddy brown. The more paint you added, the darker it got.
Digital colors are also constructed by mixing three primary colors, but it works differently from paint.First, the primaries are different: red, green, and blue (i.e., “RGB” color). And with color on the screen,you’re mixing light, not paint, so the mixing rules are different as well.• Red + green = yellow• Red + blue = purple• Green + blue = cyan (blue-green)• Red + green + blue = white• No colors = black
Lesson 1: The Beginning12
练习 1-4:猜想需要什么样的指令能够完成下面的图形。
Figure 1-17
Exercise 1-4: Try to guess what the instructions would be for the following screenshot.
___________________________________
___________________________________
___________________________________
___________________________________
___________________________________
___________________________________
1-4 RGB colorA nostalgic look back at graph paper helped you to learn the fundamentals for pixel locations and size.Now that it’s time to study the basics of digital color, here’s another childhood memory to get you started.Remember finger painting? By mixing three “primary” colors, any color could be generated. Swirling allcolors together resulted in a muddy brown. The more paint you added, the darker it got.
Digital colors are also constructed by mixing three primary colors, but it works differently from paint.First, the primaries are different: red, green, and blue (i.e., “RGB” color). And with color on the screen,you’re mixing light, not paint, so the mixing rules are different as well.• Red + green = yellow• Red + blue = purple• Green + blue = cyan (blue-green)• Red + green + blue = white• No colors = black
Lesson 1: The Beginning12
图 1-15
图 1-17
图 1-16
noFill()使得图形
只有轮廓线,没有
填充色。
第 1 章 像 素 9
1.4 RGB 颜色
前面几节的内容帮助你学习了像素坐标、图形尺寸等基础知识。现在是时候学习数位色
彩的基础知识了。回想一下童年,还记得手指画吗?通过混合最基础的三种原色,我们可以
得到任何颜色。如果将所有颜色混合在一起,会导致浑浊的棕色。而且你混合的颜料越多,
就变得越暗。
数位色彩(digital color)同样是混合三种基础颜色来实现的,但其运行机制和绘画颜料
有所不同。首先,数位色彩的色光三原色是不同的:红、绿和蓝(RGB 三个字母所对应的
red、green 和 blue)。其次,数位色彩以光来合成颜色,而不是用颜料来合成,因此其颜色
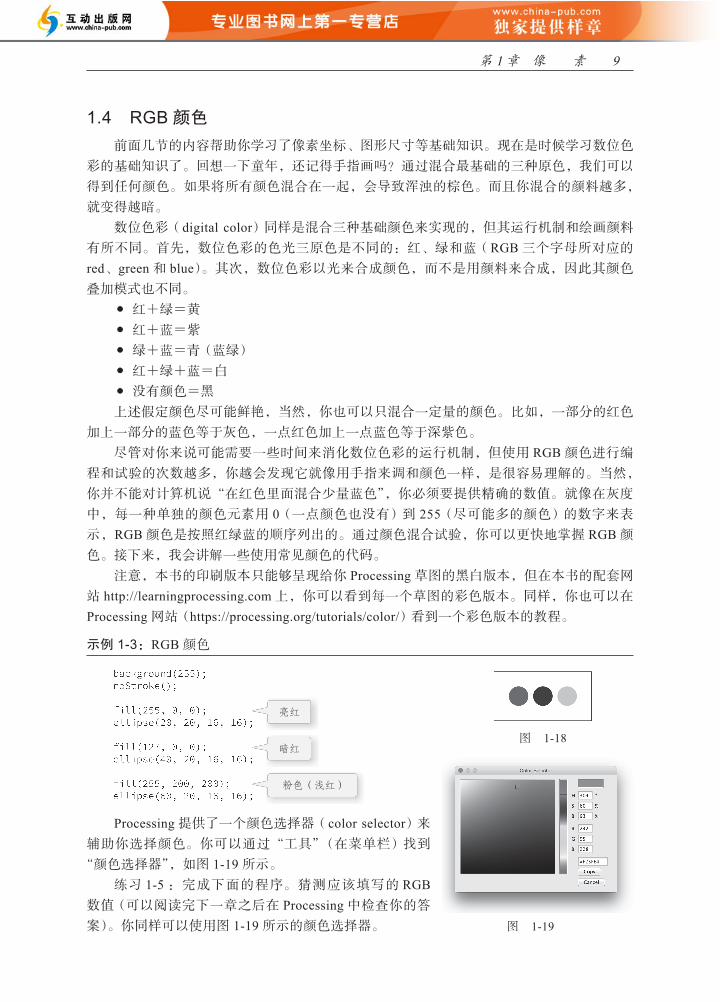
叠加模式也不同。 ● 红+绿=黄 ● 红+蓝=紫 ● 绿+蓝=青(蓝绿) ● 红+绿+蓝=白 ● 没有颜色=黑
上述假定颜色尽可能鲜艳,当然,你也可以只混合一定量的颜色。比如,一部分的红色
加上一部分的蓝色等于灰色,一点红色加上一点蓝色等于深紫色。
尽管对你来说可能需要一些时间来消化数位色彩的运行机制,但使用 RGB 颜色进行编
程和试验的次数越多,你越会发现它就像用手指来调和颜色一样,是很容易理解的。当然,
你并不能对计算机说“在红色里面混合少量蓝色”,你必须要提供精确的数值。就像在灰度
中,每一种单独的颜色元素用 0(一点颜色也没有)到 255(尽可能多的颜色)的数字来表
示,RGB 颜色是按照红绿蓝的顺序列出的。通过颜色混合试验,你可以更快地掌握 RGB 颜
色。接下来,我会讲解一些使用常见颜色的代码。
注意,本书的印刷版本只能够呈现给你 Processing 草图的黑白版本,但在本书的配套网
站 http://learningprocessing.com 上,你可以看到每一个草图的彩色版本。同样,你也可以在
Processing 网站(https://processing.org/tutorials/color/)看到一个彩色版本的教程。
示例 1-3:RGB 颜色
亮红
暗红
粉色(浅红)
Processing 提供了一个颜色选择器(color selector)来
辅助你选择颜色。你可以通过“工具”(在菜单栏)找到
“颜色选择器”,如图 1-19 所示。
练习 1-5 :完成下面的程序。猜测应该填写的 RGB数值(可以阅读完下一章之后在 Processing 中检查你的答
案)。你同样可以使用图 1-19 所示的颜色选择器。
图 1-18
图 1-19
10 第一节课 开 始
亮蓝
深紫
黄色
练习 1-6:下面每一行代码会生成什么颜色?将答案填写在空白处。
1.5 颜色透明度
除了红、绿和蓝这三种构成颜色的最基础元素之外,还有一个可选的第四种元素,就是
颜色的 alpha 值。alpha 值指的是不透明度,当需要实现一个图形在另外一个图形之上半透
明的叠加效果时,alpha 非常有用。一张图像的 alpha 值在很多时候被统称为“alpha 通道”。
你要知道,屏幕显示的像素并没有真正变透明,这只是一个颜色混合的错觉。实际上,
Processing 通过一个颜色百分比与另外一个颜色的百分比的混合叠加计算,创造出视觉上混
合的效果。(如果你对编写“玫瑰色”眼镜感兴趣,你可以从这开始。)
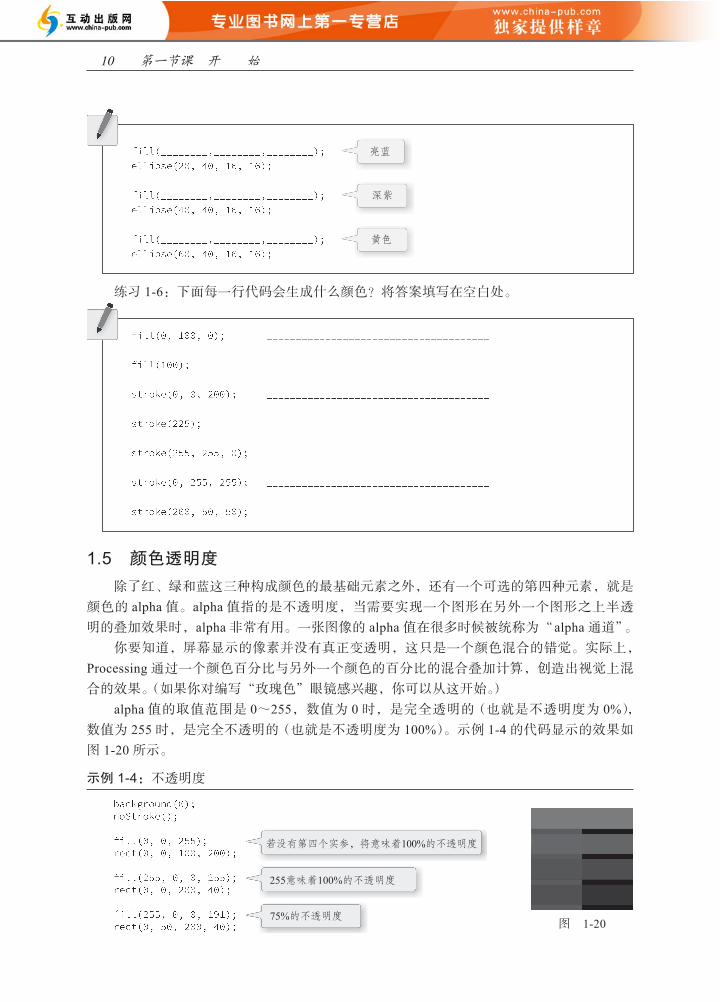
alpha 值的取值范围是 0~255,数值为 0 时,是完全透明的(也就是不透明度为 0%),
数值为 255 时,是完全不透明的(也就是不透明度为 100%)。示例 1-4 的代码显示的效果如
图 1-20 所示。
示例 1-4:不透明度
若没有第四个实参,将意味着100%的不透明度
255意味着100%的不透明度
75%的不透明度图 1-20


12 第一节课 开 始
示例 1-5:展示了我设计的 Zoog 代码,对应的输出结果如图 1-21 所示。
图 1-21
这个示例向你展示了通过 Processing 制作出来的一个生物形象,名为 Zoog。在本书的
前 9 章课程内容中,我将会为你讲解 Zoog 的整个童年。通过展示 Zoog 逐渐长大的过程讲
述 Processing 编程的基础知识。你首先会看到 Zoog 最初的模样,接下来会学习制作具有互
动性的以及动态的 Zoog,最后,还会学习复制 Zoog 从而创造出许多的 Zoog。这里,我建议你设计属于自己的一个“宠物”形象(注意没有必要必须设计一个人形
的或者类似生物的形态,任何编程得到的图形都可以),然后通过前 9 章的课程,不断让你
的宠物不断进化成长。在大多数情况下,每个示例(在前面几章)只需要你改变宠物的一小
部分。这个过程有助于你巩固对于计算机编程基本要素的知识(变量、条件语句、循环、函
数、对象和数组)的理解,这样让你为后面的学习做好准备:Zoog 逐渐长大,离开家,到
更加高级的编程当中去冒险,也就是本书第 10 章以后的内容。