cd400 ka175 ka180 ka185 ka186 ka273 374455 - black &...
TRANSCRIPT
����@@@@����ÀÀÀÀ����@@@@����ÀÀÀÀ����@@@@����ÀÀÀÀ����@@@@����ÀÀÀÀ����@@@@����ÀÀÀÀ����@@@@����ÀÀÀÀ����@@@@����ÀÀÀÀ����@@@@����ÀÀÀÀ����@@@@����ÀÀÀÀ����@@@@����ÀÀÀÀ����@@@@����ÀÀÀÀ����@@@@����ÀÀÀÀ����@@@@����ÀÀÀÀ����@@@@����ÀÀÀÀ����@@@@����ÀÀÀÀ����@@@@����ÀÀÀÀ����@@@@����ÀÀÀÀ����@@@@����ÀÀÀÀ����@@@@����ÀÀÀÀ����@@@@����ÀÀÀÀ����@@@@����ÀÀÀÀ����@@@@����ÀÀÀÀ����@@@@����ÀÀÀÀ����@@@@����ÀÀÀÀ����@@@@����ÀÀÀÀ����@@@@����ÀÀÀÀ����@@@@����ÀÀÀÀ����@@@@����ÀÀÀÀ����@@@@����ÀÀÀÀ����@@@@����ÀÀÀÀ����@@@@����ÀÀÀÀ����@@@@����ÀÀÀÀ����@@@@����ÀÀÀÀ����@@@@����ÀÀÀÀ����@@@@����ÀÀÀÀ����@@@@����ÀÀÀÀ����yyyy
CD400KA175KA180KA185KA186KA273374455
CD400 KA175-374455 UK p01-12 16/3/00, 1:33 pm1

2
Congratulations!On the purchase of yourBlack & Decker sander.To ensure the best results from your sanderplease read these safety and usageinstructions carefully.
If you have any questions or queries afterreading this user manual please do nothesitate to call our Service and InformationCentre, whose number you will find towardsthe back of this user manual, or one of ourAuthorised Repair Agents. A list of theseAgents and further information is available onthe Internet at www.2helpU.com.
CD400 KA175-374455 UK p01-12 16/3/00, 1:33 pm2
3
ContentsPage 4 Safety instructions
Additional precautions to take when sanding paint and MDF
Page 5 Personal safety
Environmental safety
Cleaning and disposal
Double insulation
Electrical safety
Mains plug replacement
Page 6 Extension cables
Unwanted tools and the environment
The Black & Decker guarantee
After sales service for your Black & Decker product
Our after sales service policy
Accessories
Technical data
Features
Page 7 Preparing your sander
Fitting the sandpaper
Dust extraction
Page 8 Variable speed
Operating your sander
Handy hints
Tool care
EC declaration of conformity
Black & Decker phone numbers and addresses
Guarantee card for Australia and New Zealand
CD400 KA175-374455 UK p01-12 16/3/00, 1:33 pm3
4
SAFETY INSTRUCTIONSWarning! When using electric tools, the followingbasic safety precautions should always be taken toreduce the risk of fire, electric shock and personalinjury. Read all these instructions before attempting tooperate the product and save this booklet.
For safe operation:• Keep the work area clean. Cluttered areas and
benches invite injuries.• Consider the work area environment. Do not expose
the power tool to rain and do not use in damp or wetlocations. Keep the work area well lit. Do not usethe power tool where there is a risk to cause fireor explosion.
• Guard against electric shock. Avoid body contact,where possible, with earthed or grounded surfaces(e.g. pipes, radiators, ranges and refrigerators).
• Keep children away. Do not let visitors touch thetool or extension cord. All visitors should be keptaway from the work area.
• Store idle tools. When not in use, tools should bestored in a dry, high or locked place, out of reachof children.
• Do not force the tool. It will do the job better andmore safely at the rate for which it was intended.
• Use the right tool. Do not force small tools orattachments to do the job of a heavy duty tool.Do not use the tool for purposes not intended; forexample, do not use a circular saw to cut treelimbs or logs.
• Dress properly. Do not wear loose clothing orjewellery as they can be caught in moving parts.Rubber gloves and non-skid footwear arerecommended when working outdoors. Wearprotective hair covering to contain long hair.
• Use safety glasses. Use a face or dust mask as well,if the operation is dusty or if the tool is being used inenclosed spaces.
• Connecting dust extraction equipment. If devicesare provided for the connection of dust extractionand collection ensure these are connected andproperly used, especially in confined areas.
• Do not abuse the cord. Never carry the tool by itscord or yank it to disconnect it from the socket. Keepthe cord away from heat, oil and sharp edges.
• Secure the work. Use clamps or a vice to hold thework. It is safer than using a hand and it frees bothhands to operate the tool.
• Do not overreach. Keep proper footing and balanceat all times.
• Maintain the tool with care. Keep a cutting toolsharp and clean for better and safer performance.Follow the instructions for lubricating and changingaccessories. Inspect the tools cord periodically and,if damaged, have repaired by an authorised serviceagent. Inspect the extension cord periodically andreplace if damaged. Keep the handles dry, clean andfree from oil and grease.
• Disconnect the tool when not in use, beforeservicing and when changing accessories such asblades, bits and cutters.
• Remove adjusting keys and wrenches. Form thehabit of checking to see that keys and adjustingwrenches are removed from the tool and replaced inthe storage area before switching on.
• Avoid unintentional starting. Do not carry aplugged-in tool with a finger on the switch.Ensure the switch is off when plugging in.
• Use an outdoor extension cord. When a tool is usedoutdoors, only use an extension cord intended foroutdoor use and so marked.
• Stay alert. Watch what you are doing, use commonsense and do not operate the tool when tired.
• Check damaged parts. Before further use of the tool,a guard or other part that is damaged should becarefully checked to determine whether it willoperate properly and perform its intended function.Check for alignment of moving parts, free running ofmoving parts, breakage of parts, mounting and anyother conditions that may affect its operation.A guard or other part that is damaged should beproperly repaired or replaced by an authorisedservice centre unless otherwise indicated in theproduct booklet. Have defective switches replacedby an authorised service agent. Do not use the tool ifthe switch does not turn it on and off.
• Warning! The use of any accessory or attachment,other than recommended in the product booklet,may present a risk of personal injury.
• Have the tool repaired by a qualified person. Theelectrical tool is in accordance with the relevant safetyrequirements. Repairs should only be carried out byqualified persons using original spare parts, otherwise,this may result in considerable danger to the user.
ADDITIONAL PRECAUTIONS TO TAKE WHEN SANDINGPAINT AND MEDIUM DENSITY FIBREBOARD (MDF)Sanding of lead based paint is not recommended dueto the difficulty of controlling the contaminated dust.The greatest danger of lead poisoning is to childrenand pregnant women.
Sanders user manual
CD400 KA175-374455 UK p01-12 16/3/00, 1:33 pm4
5
ENGLISHAny pre-1960 building may have been painted in thepast with paint containing lead, and covered byadditional layers of paint. It is important to determinewhether the paint that is being sanded contains leadbefore beginning work. This can be done with lead testkits or by a professional decorator.If in doubt, we recommend the following precautionswhen sanding any paint or MDF.
PERSONAL SAFETYNo children or pregnant women should enter the workarea where the paint sanding is being done until allcleaning up has been completed.A dust mask or respirator should be worn by all personsentering the work area. The filter should be replaceddaily or whenever the wearer has difficulty breathing.Note: Only those dust masks suitable for working withlead paint dust and fumes should be used. Ordinarypaint masks do not offer this protection.No eating, drinking or smoking should be done in thework area to prevent ingesting paint particles. Workersshould wash and clean up before eating, drinking orsmoking. Articles of food ,drink etc., should not be leftin the work area where dust could settle on them.
ENVIRONMENTAL SAFETYPaint should be removed in such a manner as tominimise the amount of dust generatedAreas where paint removal is occurring should besealed with plastic sheeting.Sanding should be done in a manner to reduce trackingof paint dust outside the work area.
CLEANING AND DISPOSALAll surfaces in the work area should be vacuumed andthoroughly cleaned daily for the duration of the sandingproject. Vacuum filter bags should be changedfrequently. Items of clothing, dust sheets, toys,washable furniture and utensils should be washedthoroughly before being used again.
Save these instructions!
DOUBLE INSULATIONThe tool is double insulated. This means that allthe external metal parts are electrically insulatedfrom the mains power supply. This is done byplacing insulation barriers between theelectrical and mechanical components makingit unnecessary for the tool to be earthed.Note: Double insulation does not take the placeof normal safety precautions when operating thetool. The insulation system is for added protection
against injury resulting from a possible electricalinsulation failure within the tool.
ELECTRICAL SAFETYBe sure the supply is the same as the voltage given onthe rating plate. The tool is fitted with a two-core cableand plug.
MAINS PLUG REPLACEMENT (UK ONLY)Should the mains plug need replacing and you arecompetent to do this, proceed as instructed below.If you are in doubt, contact a Black & Decker serviceagent or a qualified electrician.• Disconnect the plug from the power supply.• Cut off the plug and dispose of safely. A plug with
bared copper conductors is very dangerous ifengaged in a live socket outlet.
• Only fit BS1363A approved plugs fitted with thecorrectly rated fuse. Note: Fuses do not givepersonal protection against electric shock.
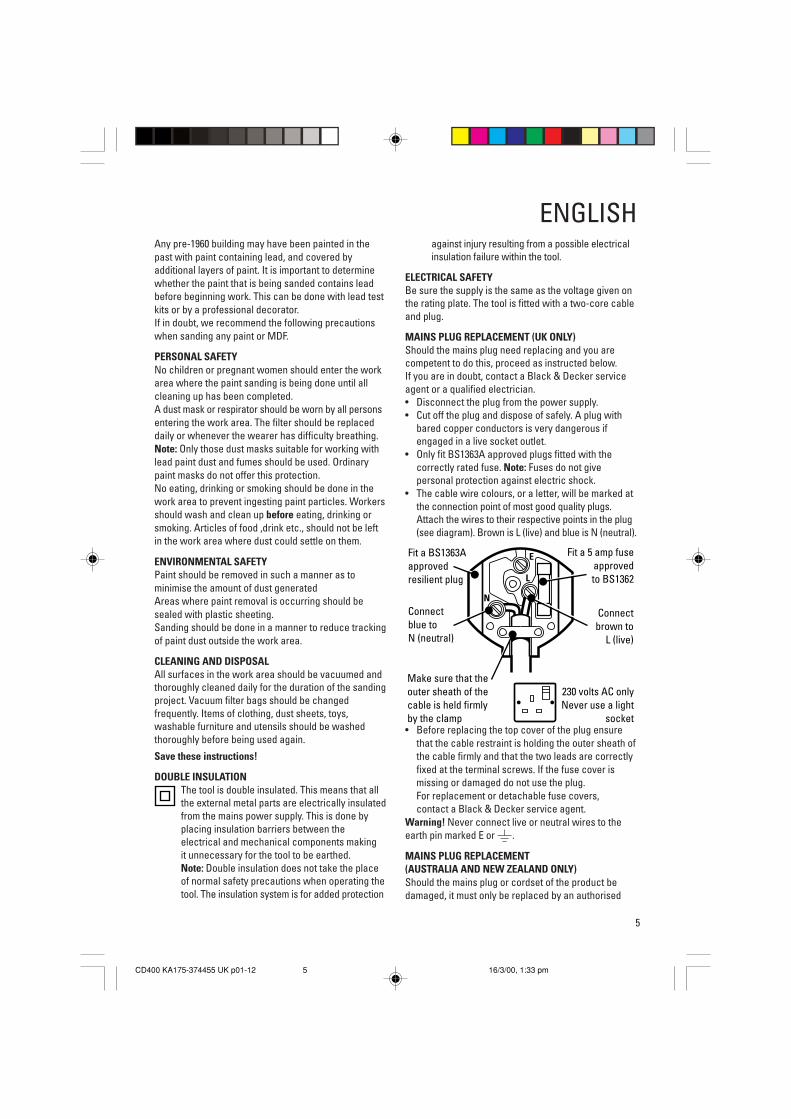
• The cable wire colours, or a letter, will be marked atthe connection point of most good quality plugs.Attach the wires to their respective points in the plug(see diagram). Brown is L (live) and blue is N (neutral).
Fit a 5 amp fuseapprovedto BS1362
N
L
E
230 volts AC only Never use a light
socket
Make sure that the outer sheath of the cable is held firmly by the clamp
Fit a BS1363A approved resilient plug
Connect blue to N (neutral)
Connect brown to
L (live)
• Before replacing the top cover of the plug ensurethat the cable restraint is holding the outer sheath ofthe cable firmly and that the two leads are correctlyfixed at the terminal screws. If the fuse cover ismissing or damaged do not use the plug.For replacement or detachable fuse covers,contact a Black & Decker service agent.
Warning! Never connect live or neutral wires to theearth pin marked E or .
MAINS PLUG REPLACEMENT(AUSTRALIA AND NEW ZEALAND ONLY)Should the mains plug or cordset of the product bedamaged, it must only be replaced by an authorised
CD400 KA175-374455 UK p01-12 16/3/00, 1:33 pm5

6
ENGLISHBlack & Decker service agent because specialpurpose tools are required.
EXTENSION CABLESUp to 30m (100ft) of 3-core extension cable can be usedwithout undue loss of power. Note: An extension cableshould not be used unless absolutely necessary. Use ofan improper extension cable could result in a risk offire and electric shock. If an extension cable must beused, make sure it is properly wired, contains the correctrated fuse as recommended in its literature and is ingood electrical condition.
UNWANTED TOOLS AND THE ENVIRONMENTShould you find one day that the tool needsreplacement or is of no further use, think of theprotection of the environment. Black & Deckerservice agents will accept old tools and willdispose of them in an environmentally safe way.
THE BLACK & DECKER GUARANTEE(UK, AUSTRALIA AND NEW ZEALAND ONLY)If the Black & Decker product becomes defective dueto faulty materials and workmanship, within 24 monthsfrom the date of purchase, we guarantee to eitherreplace all defective parts or at our discretion, replacethe unit free of charge provided that:• The product is returned to us or our authorised
repairers with evidence of date of purchase.• The product has not been used for trade,
professional or hire purposes.• The product has not been subjected to misuse
or neglect.• The product has not sustained any damage through
foreign objects, substances or accidents.• Repairs have not been attempted by anyone other
than our authorised repair agents.This guarantee is offered as an extra benefit and isadditional to the customers statutory rights.
AFTER SALES SERVICE FOR YOUR BLACK & DECKERPRODUCT (UK, AUSTRALIA AND NEW ZEALAND ONLY)Black & Decker offers a nationwide network ofauthorised service agents. The use of other than genuineBlack & Decker accessories and parts may damage orreduce the performance of your Black & Deckerproduct and may also endanger the user. The termsand conditions of the warranty may also be effected.
OUR AFTER SALES SERVICE POLICY(UK, AUSTRALIA AND NEW ZEALAND ONLY)It is our aim that all Black & Decker customers shouldbe totally satisfied with their Black & Decker product
and after sales service, but if help or advice is neededplease contact your local Black & Decker authorisedrepair agent who will be happy to help. Full details ofour after sales service and a list of these agents can befound on the Internet at www.2helpU.com. Alternatively,call our Service and Information Centre whose numberyou will find towards the back of this manual.
ACCESSORIESThe performance of any power tool is dependant uponthe accessory used. Black & Decker accessories areengineered to high quality standards and are designedto enhance the performance of your tool. Buying aBlack & Decker accessory will ensure that you get thevery best from your Black & Decker tool.
TECHNICAL DATAThe level of sound pressure of the tool is in accordancewith EEC legislation. It is recommended that you takeappropriate measures for the protection of your hearingif the sound level seems uncomfortable. This normallyequates to a sound pressure in excess of 85dB (A).
FEATURES
4 •
1 •
3•
5•
2 •
1•5•
3••4
2•
4 •
1 •5 •
3•
•6
CD400 KA175-374455 UK p01-12 16/3/00, 1:33 pm6

7
ENGLISH1. On/off switch2. Paper clamp3. Dust extraction4. Sander base5. Handle6. Variable speed control
Your product includes some or all of these features.
Note: This user manual also covers more than onecatalogue number within this product group. Refer toyour carton for details of your product.
PREPARING YOUR SANDERTo prepare your sander, proceed as follows:Disconnect the plug from the electricity supply.Fit the correct grade of sandpaper to the base of yoursander. Connect the dust extraction outlet to a vacuumcleaner or fit the dust extraction bag (KA273).Set the variable speed control to the desired setting(KA185E/KA186E).
FITTING THE SANDPAPERYour sander uses one third sheet (CD400/KA175/KA180/KA185/KA185E), or pre-cut punched nylon backedsheets (KA186/KA186E/374455), or half sheet (KA273) ofsandpaper. To fit the sandpaper, proceed as follows:Disconnect the plug from the electricity supply.
KA186/KA186E/374455Press the nylon loop sideof the abrasive sheetagainst the hooks on thebase, making sure theholes of the paper and thebase are aligned.
CD400/KA175/KA180/KA185/KA185EPress the handles of thefront and rear paperclamps upwards, torelease them from theirretaining grooves.
Operate the paper clamplevers to open the paperclamps (KA273).
Align the holes in thesandpaper with the dustextraction holes in thebase of your sander.
Hold the sandpaper inposition and insert theedge of the sandpaperunder the front paperclamp. Press the handleof the paper clampdownwards and locate itin the retaining groove(CD400/KA175/KA180/KA185/KA185E). Operatethe front paper clamplever to close the paperclamp (KA273). Keeping a
slight tension on the sandpaper, to adhere it to thebase, insert the rear edge in the rear paper clamp.Press the handle of the paper clamp downwards andlocate it in the retaining groove (CD400/KA175/KA180/KA185/KA185E). Operate the rear paper clamp lever toclose the paper clamp (KA273).
DUST EXTRACTION (CD400/KA175/KA180/KA185/KA185E/KA186/KA186E/374455)Your sander has an adaptor to connect it to avacuum cleaner. To connect the vacuum cleaner,
proceed as follows:Insert the adaptor in therear outlet of your sanderand connect the hose ofthe vacuum cleaner.
DUST EXTRACTION (KA273)Your sander has an external bag for the collection ofdust. To fit the dust extraction bag, proceed as follows:
��������������������������������
yyyyyyyyyyyyyyyyyyyyyyyyyyyyyyyy
CD400 KA175-374455 UK p01-12 16/3/00, 1:33 pm7
8
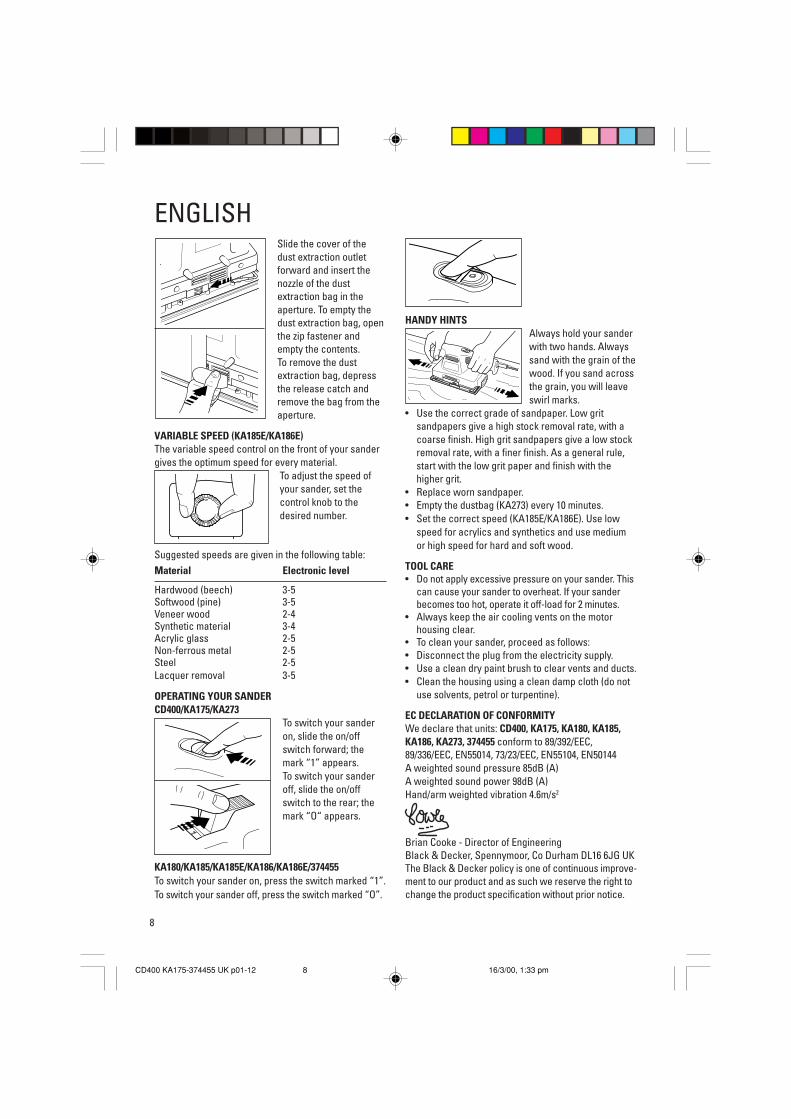
ENGLISHSlide the cover of thedust extraction outletforward and insert thenozzle of the dustextraction bag in theaperture. To empty thedust extraction bag, openthe zip fastener andempty the contents.To remove the dustextraction bag, depressthe release catch andremove the bag from theaperture.
VARIABLE SPEED (KA185E/KA186E)The variable speed control on the front of your sandergives the optimum speed for every material.
To adjust the speed ofyour sander, set thecontrol knob to thedesired number.
Suggested speeds are given in the following table:Material Electronic level
Hardwood (beech) 3-5Softwood (pine) 3-5Veneer wood 2-4Synthetic material 3-4Acrylic glass 2-5Non-ferrous metal 2-5Steel 2-5Lacquer removal 3-5
OPERATING YOUR SANDERCD400/KA175/KA273
To switch your sanderon, slide the on/offswitch forward; themark “1” appears.To switch your sanderoff, slide the on/offswitch to the rear; themark “O“ appears.
KA180/KA185/KA185E/KA186/KA186E/374455To switch your sander on, press the switch marked “1”.To switch your sander off, press the switch marked “O”.
HANDY HINTSAlways hold your sanderwith two hands. Alwayssand with the grain of thewood. If you sand acrossthe grain, you will leaveswirl marks.
• Use the correct grade of sandpaper. Low gritsandpapers give a high stock removal rate, with acoarse finish. High grit sandpapers give a low stockremoval rate, with a finer finish. As a general rule,start with the low grit paper and finish with thehigher grit.
• Replace worn sandpaper.• Empty the dustbag (KA273) every 10 minutes.• Set the correct speed (KA185E/KA186E). Use low
speed for acrylics and synthetics and use mediumor high speed for hard and soft wood.
TOOL CARE• Do not apply excessive pressure on your sander. This
can cause your sander to overheat. If your sanderbecomes too hot, operate it off-load for 2 minutes.
• Always keep the air cooling vents on the motorhousing clear.
• To clean your sander, proceed as follows:• Disconnect the plug from the electricity supply.• Use a clean dry paint brush to clear vents and ducts.• Clean the housing using a clean damp cloth (do not
use solvents, petrol or turpentine).
EC DECLARATION OF CONFORMITYWe declare that units: CD400, KA175, KA180, KA185,KA186, KA273, 374455 conform to 89/392/EEC,89/336/EEC, EN55014, 73/23/EEC, EN55104, EN50144A weighted sound pressure 85dB (A)A weighted sound power 98dB (A)Hand/arm weighted vibration 4.6m/s2
Brian Cooke - Director of EngineeringBlack & Decker, Spennymoor, Co Durham DL16 6JG UKThe Black & Decker policy is one of continuous improve-ment to our product and as such we reserve the right tochange the product specification without prior notice.
CD400 KA175-374455 UK p01-12 16/3/00, 1:33 pm8

9
CD400 KA175-374455 UK p01-12 16/3/00, 1:33 pm9

Australia DeWalt Industrial Power Tool Company Tel: 03 9895 9200(Distributors of Black & Decker products) Fax: 03 9899 74657 Clarice Road, Box Hill, Victoria 3128
New Zealand Black & Decker Tel: 09 579 7600483 Great South Road Fax: 09 579 8200Penrose, Auckland
South Africa Black & Decker South Africa (Pty) Ltd Tel: 011 314 4431Suite no 107, PostNet X65 Fax: 011 314 4435Halfway House 1685
United Kingdom Black & Decker Tel: 01753 574277210 Bath Road, Slough Tlx: 848317 BAND MHBerkshire SL1 3YD Fax: 01753 551155
Part no: 373340-40 10/99
CD400 KA175-374455 UK p01-12 16/3/00, 1:33 pm10
GUAR
ANTE
E CA
RDRETAIN THIS CARD
Blac
k &
Dec
ker w
elco
mes
you
as
a pu
rcha
ser o
f thi
s pr
oduc
t fro
mou
r ran
ge o
f Hom
e W
orks
hop
and
Gard
en To
ols
and
Acce
ssor
ies.
All o
ur p
rodu
cts
are
engi
neer
ed a
nd m
anuf
actu
red
to e
nsur
e th
ehi
ghes
t sta
ndar
ds o
f rel
iabi
lity
and
perfo
rman
ce d
urin
g us
e,an
d ar
e su
ppor
ted
in A
fter S
ales
Ser
vice
by
a w
ide
netw
ork
ofBl
ack
& D
ecke
r Aut
horis
ed S
ervi
ce C
entre
s.
BLAC
K &
DEC
KER
SUPP
LEM
ENTA
RY G
UARA
NTE
ESu
bjec
t to
the
cond
ition
s st
ated
bel
ow, B
lack
& D
ecke
r gua
rant
ees
that
it w
ill c
orre
ct b
y re
pair
or p
arts
repl
acem
ent,
with
out c
harg
e,an
y de
fect
in th
e pr
oduc
t whi
ch th
is G
uara
ntee
Car
d ac
com
pani
es(“
Prod
uct”
) aris
ing
from
faul
ty w
orkm
ansh
ip o
r mat
eria
ls w
here
suc
hde
fect
aris
es w
ithin
two
year
s fro
m th
e da
te o
f pur
chas
e of
the
prod
uct.
A pr
oduc
t sub
ject
to c
laim
und
er th
is g
uara
tee
shou
ld b
ere
turn
ed a
s a
com
plet
e un
it to
the
mos
t con
veni
ent B
lack
& D
ecke
rAu
thor
ised
Ser
vice
Cen
tre o
r Age
nt.
CON
DITI
ONS
The
Blac
k &
Dec
ker S
uppl
emen
tary
Gua
rant
ee d
oes
not a
pply
in th
efo
llow
ing
case
s:•
whe
re th
e pr
oduc
t has
bee
n us
ed fo
r tra
de o
r ind
ustri
al p
urpo
ses;
•w
here
any
def
ect o
r fai
lure
is a
ttrib
uted
to a
ccid
ent,
mis
use,
abu
se,
negl
igen
ce o
r non
-obs
erva
nce
of lo
cal r
egul
atio
ns o
n th
e pa
rt of
the
owne
r or u
ser;
or•
whe
re th
e pr
oduc
t has
bee
n se
rvic
ed b
y a
pers
on n
ot a
utho
rised
by
Blac
k &
Dec
ker t
o do
so,
or w
ith n
on-a
ppro
ved
parts
; or
•to
loos
e ac
cess
orie
s.In
ord
er to
enf
orce
the
Blac
k &
Dec
ker S
uppl
emen
tary
Gua
rant
ee,
proo
f of p
urch
ase
is re
quire
d (G
uara
ntee
Car
d an
d or
sto
re re
ceip
t).Th
e pe
riod
of th
e Bl
ack
& D
ecke
r Sup
plem
enta
ry G
uara
ntee
beg
ins
AUST
RALI
A/N
EW Z
EALA
ND
2 YEA
R RE
PAIR
GUA
RAN
TEE
from
the
orig
inal
dat
e of
pur
chas
e no
twith
stan
ding
any
sub
sequ
ent
repa
ir or
par
ts re
plac
emen
t. N
o Gu
aran
tees
oth
er th
an c
onta
ined
inth
is d
ocum
ent,
whe
ther
writ
ten
or v
erba
l, are
aut
horis
ed to
be
mad
eon
beh
alf o
f Bla
ck &
Dec
ker .
All o
ther
con
ditio
ns a
nd g
uara
ntee
sw
heth
er e
xpre
ssed
or i
mpl
ied
by la
w, a
re, t
o th
e ex
tent
per
mitt
ed b
yla
w, h
ereb
y ex
clud
ed. T
he B
lack
& D
ecke
r Sup
plem
enta
r y G
uara
ntee
does
not
app
ly o
utsi
de A
ustra
lia a
nd N
ew Z
eala
nd.
PURC
HASE
RS’ S
TATU
TORY
RIG
HTS
The
Blac
k &
Dec
ker S
uppl
emen
tary
Gua
rant
ee s
et o
ut a
bove
doe
s no
tex
clud
e an
y co
nditi
ons
or g
uara
ntee
s th
at m
ay b
e m
anda
toril
y im
plie
dby
law
, and
you
r atte
ntio
n is
dra
wn
to th
e pr
ovis
ions
of t
he C
onsu
mer
Guar
ante
e Ac
t 199
3 (N
ew Z
eala
nd o
nly)
, Tra
de P
ract
ices
Act
197
4 an
dSt
ate
legi
slat
ion
(Aus
tralia
onl
y), w
hich
con
fers
righ
ts u
pon
cons
umer
s. T
he B
lack
& D
ecke
r Sup
plem
enta
ry G
uara
ntee
is in
addi
tion
to a
ny ri
ghts
con
ferr
ed o
n a
cons
umer
und
er th
e Ac
t, w
here
appl
icab
le, a
nd a
ny o
ther
righ
ts p
rovi
ded
unde
r app
licab
le le
gisl
atio
n.
WAR
RAN
TY R
EGIS
TRAT
ION
NAM
E:
ADDR
ESS:
POST
COD
E:
PHON
E:
Cata
logu
e nu
mbe
r:De
scrip
tion:
Date
of p
urch
ase:
Reta
iler’s
nam
e:
CD400 KA175-374455 UK p01-12 16/3/00, 1:33 pm11
Part no: 373340-40 10/99
AUSTRALIA/NEW ZEALAND Part No: 763838
AUSTRALIA / NEW
ZEALAND
R
DO NOT M
AIL THIS CARD TO BLACK & DECKER. RETAIN
THIS CARD IN CASE OF A CLAIM
.
UPON PURCHASE
Fill in the Warranty Registration Section of the card and attach your
purchase receipt to the top corner of the card. Retain in case ofclaim
s in the future.
MAKIN
G A CLAIMTake your defective product together w
ith the Warranty Registration
Card and purchase receipt to your local Service Centre. You caneither do this in person or send freight prepaid. If m
ailing or shippingyour appliance, ensure to rem
ove any liquids from the product
(if applicable) and pack it carefully in a sturdy carton with enough
packing material to prevent dam
age. Include a note describing theproblem
to the Service Centre and be sure to give your telephonenum
ber and return address.
AUSTRALIADeW
alt Power Tool Com
pany(Distributors of Black &
Deckerproducts)7 Clarice Road, Box HillVictoria, 3128
For ServiceSee “Electric Tools-Retail and/orRepairs” section of Yellow
Pagesfor Service &
Sales, otherwise
Head Office (03) 9213 8200
NEW
ZEALAND
Black & Decker (N
ew Zealand)
Limited
Consumer Hom
e Workshop &
Garden Tools
Product Service Division,PO Box 12-135Penrose, Auckland
For your local AuthorisedService Centre
Please contact your retailer or
Black & Decker (N
Z) Limited
483 Great South RoadPenrose, Auckland
Ph:(09) 579 7600Fax:(09) 525 1975
ATTACH
RECEIPT HERE
CD400 KA175-374455 UK p01-12 16/3/00, 1:33 pm12