business voice cloud - logix
TRANSCRIPT

Contents Introduction ....................................................................................................................................................... 6
Portal Access ................................................................................................................................................ 7 Direct Online Access ........................................................................................................................................... 7 Access Via RPX ................................................................................................................................................... 7
Admin Tools ...................................................................................................................................................... 8 Dashboard ..................................................................................................................................................... 9
Admin Dashboard Sections ................................................................................................................................. 9 Profile ....................................................................................................................................................................... 9 Favorite Services ..................................................................................................................................................... 9 Quick View ............................................................................................................................................................. 10 Call Activity ............................................................................................................................................................ 10 Devices .................................................................................................................................................................. 10 Activity History ....................................................................................................................................................... 10
Locations ..................................................................................................................................................... 11 Access Group Settings by Location ................................................................................................................... 11 Account / Authorization Codes .......................................................................................................................... 12
Add an Account or Authorization Code .................................................................................................................. 12 Account / Authorization Code Administration ......................................................................................................... 12 Edit an Account / Authorization Code ..................................................................................................................... 12 View Account / Authorization Code Reports........................................................................................................... 13
Announcement Repository ................................................................................................................................ 13 Add an Announcement File .................................................................................................................................... 13 Download an Announcement File .......................................................................................................................... 13 Edit an Announcement File .................................................................................................................................... 13 Delete an Announcement File ................................................................................................................................ 13
Auto Attendant ................................................................................................................................................... 14 Edit Auto Attendant Basic Settings ......................................................................................................................... 14 Edit Auto Attendant Business Hours Prompts ........................................................................................................ 14 Edit Auto Attendant After Hours Prompts ............................................................................................................... 15
Auto Attendant – Tree ........................................................................................................................................ 15 Edit Auto Attendant Tree Advanced Settings ......................................................................................................... 15 Set Auto Attendant Tree Business Hours Prompts ................................................................................................ 16 Set Auto Attendant Tree After Hours Prompts ....................................................................................................... 16 Set Auto Attendant Tree Holiday Prompts ............................................................................................................. 16 Add Auto Attendant Tree Submenus ...................................................................................................................... 17 Edit Auto Attendant Tree Submenus ...................................................................................................................... 17 Delete Auto Attendant Tree Submenus .................................................................................................................. 17
Outbound Caller ID ............................................................................................................................................ 18 Manage Outbound Caller ID .................................................................................................................................. 18
Series Completion ............................................................................................................................................. 18 Add Series Completion .......................................................................................................................................... 18 Edit Series Completion ........................................................................................................................................... 18 Delete Series Completion ...................................................................................................................................... 19
Conference Bridge List ...................................................................................................................................... 19 Manage Conference Bridge List ............................................................................................................................. 19
Instant Conference ............................................................................................................................................ 19 Manage Instant Conference ................................................................................................................................... 19
Call Park (Groups) ............................................................................................................................................. 20 Manage Call Park Group Default Settings ............................................................................................................. 20 Add a Call Park Group ........................................................................................................................................... 20 Edit a Call Park Group ........................................................................................................................................... 20 Delete a Call Park Group ....................................................................................................................................... 21
Call Pickup (Groups) .......................................................................................................................................... 21 Add a Call Pickup Group ........................................................................................................................................ 21 Manage Call Pickup Groups .................................................................................................................................. 21
Advanced Hunting ............................................................................................................................................. 22 Manage Advanced Hunting Settings ...................................................................................................................... 22
Music On Hold ................................................................................................................................................... 23 Manage Music On Hold .......................................................................................................................................... 23
Custom Contact Directory .................................................................................................................................. 23 Add a Custom Contact Directory List ..................................................................................................................... 23 Edit a Custom Contact Directory List ..................................................................................................................... 23 Delete a Custom Contact Directory List ................................................................................................................. 23
Departments ...................................................................................................................................................... 24 Add a Department .................................................................................................................................................. 24 Edit a Department .................................................................................................................................................. 24 Delete a Department .............................................................................................................................................. 24
Enterprise Directory ........................................................................................................................................... 25 Print Enterprise Directory Summary ....................................................................................................................... 25 Print Enterprise Directory Details ........................................................................................................................... 25
Time Schedule ................................................................................................................................................... 25 Add a Schedule ...................................................................................................................................................... 25 Delete a Schedule .................................................................................................................................................. 25 Add an Event ......................................................................................................................................................... 25 Edit an Event .......................................................................................................................................................... 26 Delete an Event ..................................................................................................................................................... 26
Manage Lines .................................................................................................................................................... 26 Manage Users ................................................................................................................................................... 27
Manage User Password and Recovery Email ........................................................................................................ 27 Add Users to Groups ............................................................................................................................................. 27 Edit User Access and Extension ............................................................................................................................ 27 Set MACD and Device Provisioning Permissions .................................................................................................. 28 Delete Users .......................................................................................................................................................... 28
Manage Group Calling Line ID .......................................................................................................................... 29 Services & Users ......................................................................................................................................... 30
Manage Services & Users ................................................................................................................................. 30 User Profile ............................................................................................................................................................ 31 Voicemail ............................................................................................................................................................... 31 Call Logs ................................................................................................................................................................ 31 Applications ........................................................................................................................................................... 31 Basic Features ....................................................................................................................................................... 31
Working with User Settings ................................................................................................................................ 31 Access the Settings Page ...................................................................................................................................... 32 View / Edit User Feature Settings .......................................................................................................................... 32
Trunking ....................................................................................................................................................... 33 Manage Trunking Settings ................................................................................................................................. 33
Call Forward Always .............................................................................................................................................. 33 Unreachable Destination ........................................................................................................................................ 34
Enterprise Settings ..................................................................................................................................... 35 Enterprise FQDN Setup ..................................................................................................................................... 35
Add a Fully Qualified Domain Name (FQDN) ......................................................................................................... 35 Delete a Fully Qualified Domain Name (FQDN) ..................................................................................................... 35
Enterprise Departments ..................................................................................................................................... 36 Add a Department .................................................................................................................................................. 36 Edit a Department .................................................................................................................................................. 36 Delete a Department .............................................................................................................................................. 36
Enterprise Directory ........................................................................................................................................... 36 Print Enterprise Directory Summary ....................................................................................................................... 36 Print Enterprise Directory Details ........................................................................................................................... 36
Enterprise Time Schedules ................................................................................................................................ 37 Add a Schedule ...................................................................................................................................................... 37 Delete a Schedule .................................................................................................................................................. 37 Add an Event ......................................................................................................................................................... 37 Edit an Event .......................................................................................................................................................... 37 Delete an Event ..................................................................................................................................................... 37
Enterprise Agent Default Settings ...................................................................................................................... 38 Manage Enterprise Agent Default Settings ............................................................................................................ 38
Enterprise Agent Unavailable Codes ................................................................................................................. 38
Enable Agent Unavailable Codes........................................................................................................................... 38 Add Agent Unavailable Codes ............................................................................................................................... 39 Edit Agent Unavailable Codes ............................................................................................................................... 39
Enterprise Call Disposition Codes ..................................................................................................................... 39 Add Call Disposition Codes .................................................................................................................................... 39 Edit Call Disposition Codes .................................................................................................................................... 40 Delete Call Disposition Codes ................................................................................................................................ 40
Enterprise Contact Center Routing Policies ...................................................................................................... 40 Manage Enterprise Contact Center Routing Policies ............................................................................................. 40
Devices ......................................................................................................................................................... 41 View Device Lists ............................................................................................................................................... 42 Group VLAN Settings ........................................................................................................................................ 42 Group FQDN Settings ........................................................................................................................................ 43 Add a Device ..................................................................................................................................................... 43 Export Device Setting/Configuration Information ............................................................................................... 43 View Device Activity History .............................................................................................................................. 44 Check Registration Status ................................................................................................................................. 44 Configure a Device ............................................................................................................................................ 44
Swap Device .......................................................................................................................................................... 45 Modify Current Device VLAN Set to TCP ............................................................................................................... 45 Set Device FQDN Assignment ............................................................................................................................... 45 Set Device Line Assignments ................................................................................................................................ 45 Modify Device Configuration .................................................................................................................................. 46
Unassign a Device ............................................................................................................................................. 46 Device - Unassign Only .......................................................................................................................................... 46 Device - Unassign and Remove from Inventory ..................................................................................................... 46
Manage Unassigned Devices ............................................................................................................................ 47 Edit Unassigned Device Inventory Data ................................................................................................................. 47 Remove an Unassigned Device from Inventory ..................................................................................................... 47 Add a Fully Qualified Domain Name (FQDN) ......................................................................................................... 48 Delete a Fully Qualified Domain Name (FQDN) ..................................................................................................... 48
Contact Center ............................................................................................................................................ 49 Edit Contact Center Queues .............................................................................................................................. 49
Edit Contact Center Basics .................................................................................................................................... 50 Edit Contact Center Group Policy Settings ............................................................................................................ 50 Edit Contact Center Bandwidth and QoS Settings ................................................................................................. 50 Edit Contact Center Settings .................................................................................................................................. 50 Edit Contact Center Reporting ............................................................................................................................... 50 Edit Contact Center Agent Settings........................................................................................................................ 51 Reset Contact Center Queue Password ................................................................................................................ 51
Configure Contact Center Features ................................................................................................................... 51 Contact Center Agents ........................................................................................................................................... 52 Contact Center Status & Statistics ......................................................................................................................... 52 Contact Center Supervisors ................................................................................................................................... 52 Contact Center Announcements ............................................................................................................................ 53
Manage Contact Center Announcement Repository ......................................................................................... 53 Contact Center Distinctive Ring ............................................................................................................................. 53 Contact Center Bounced Calls – Queue ................................................................................................................ 53 Contact Center Overflow – Queue ......................................................................................................................... 54 Contact Center Stranded Calls – Queue ................................................................................................................ 54
Service Changes ......................................................................................................................................... 55 Open Requests .................................................................................................................................................. 56
View Open Requests by Location .......................................................................................................................... 56 Sort Open Requests .............................................................................................................................................. 56 View Open Requests by Location .......................................................................................................................... 56 Clear Filters ............................................................................................................................................................ 56 View a Service Change Order ................................................................................................................................ 57 Edit a Service Change Order ................................................................................................................................. 57 Delete a Service Change Order ............................................................................................................................. 57 Terminate a Service Change Order ....................................................................................................................... 57
Add Services ...................................................................................................................................................... 58

Add a Service Change Order ................................................................................................................................. 58 Print Service Change Confirmation ........................................................................................................................ 59
Manage User Add-Ons ...................................................................................................................................... 60 Assign a User Level Add-On .................................................................................................................................. 61 Un-Assign a User Level Add-On ............................................................................................................................ 61
View All Service Changes .................................................................................................................................. 62 View Service Change Details ................................................................................................................................. 63 Edit an Active Service Change ............................................................................................................................... 63 Delete a Service Change ....................................................................................................................................... 63
Caller ID (CNAM) ............................................................................................................................................... 63 Block .................................................................................................................................................................. 64 Extension ........................................................................................................................................................... 64 Listing ................................................................................................................................................................ 65 Virtual Terminating Number ............................................................................................................................... 66

Introduction This guide is a convenient, go-to resource for Administrators getting started with the Logix Cloud Services Portal to manage communications accounts and services online. It provides an overview of the application website sections that may be available to various users who access the Portal, and offers instructions and tips for setup and maintenance of the communication features and services offered by your telecommunications provider.
We encourage you to take some time to review this document and keep it handy for future reference. Should you need further assistance, please reach out to us. We are always here to help you with fast, courteous, and professional support, and we offer free additional training upon request.
It is important to note that this document describes all features that can be enabled and made available by the provider or the organization. Some features described here may not be included in your subscription or offered to all users by your organization. Please contact your organization’s Communications Administrator to determine the features and services you will have access to review and manage within the Logix Cloud Services Portal.
IMPORTANT!
The Cloud Services Portal is a permission-based application. The application provider defines the initial activation and service level of the portal for all end users. This includes the sections that will be made available to users working within it, and any customizations to the style or branding. Super Administrator access to work in the Realtime Provisioning Explorer (RPX) application is required to complete these activation and customization tasks.
Contact this application's provider for assistance or more information.
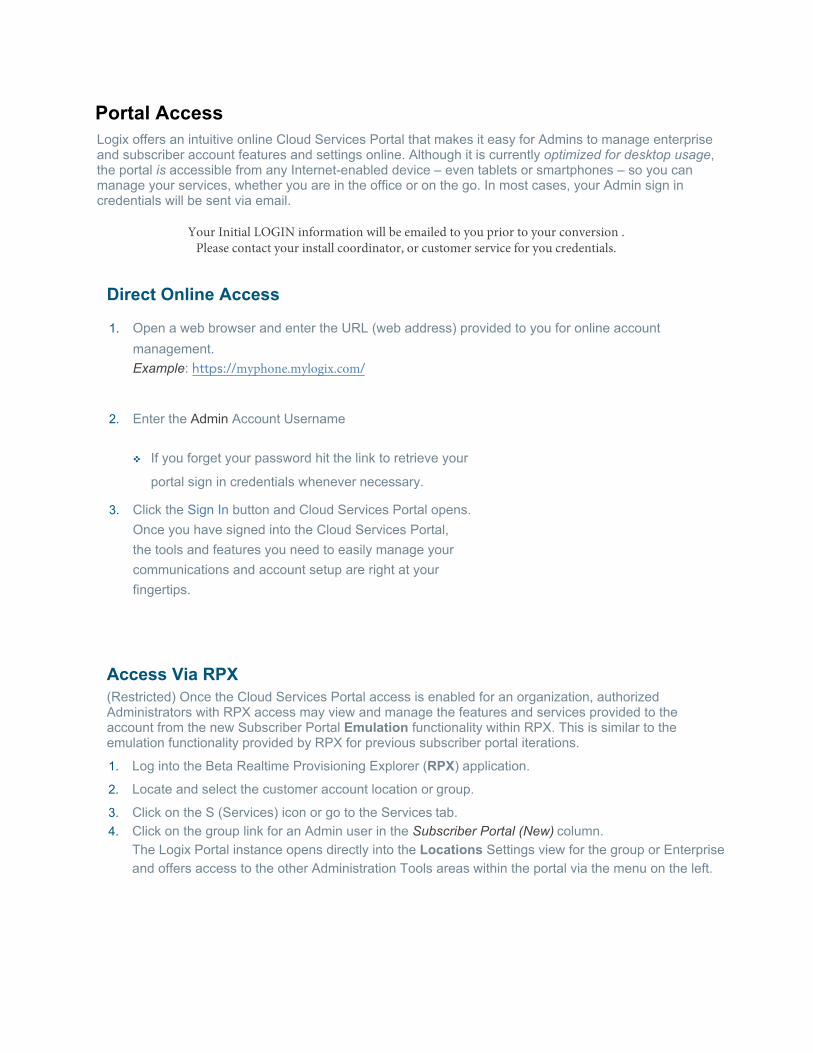
Portal Access Logix offers an intuitive online Cloud Services Portal that makes it easy for Admins to manage enterprise and subscriber account features and settings online. Although it is currently optimized for desktop usage, the portal is accessible from any Internet-enabled device – even tablets or smartphones – so you can manage your services, whether you are in the office or on the go. In most cases, your Admin sign in credentials will be sent via email.
Your Initial LOGIN information will be emailed to you prior to your conversion .Please contact your install coordinator, or customer service for you credentials.
Direct Online Access
1. Open a web browser and enter the URL (web address) provided to you for online account management.Example: https://myphone.mylogix.com/
2. Enter the Admin Account Username
If you forget your password hit the link to retrieve your
portal sign in credentials whenever necessary.
3. Click the Sign In button and Cloud Services Portal opens.Once you have signed into the Cloud Services Portal,the tools and features you need to easily manage yourcommunications and account setup are right at yourfingertips.
Access Via RPX (Restricted) Once the Cloud Services Portal access is enabled for an organization, authorized Administrators with RPX access may view and manage the features and services provided to the account from the new Subscriber Portal Emulation functionality within RPX. This is similar to the emulation functionality provided by RPX for previous subscriber portal iterations.
1. Log into the Beta Realtime Provisioning Explorer (RPX) application.
2. Locate and select the customer account location or group.
3. Click on the S (Services) icon or go to the Services tab.4. Click on the group link for an Admin user in the Subscriber Portal (New) column.
The Logix Portal instance opens directly into the Locations Settings view for the group or Enterpriseand offers access to the other Administration Tools areas within the portal via the menu on the left.

Admin Tools The Cloud Services Portal provides useful resources for routine Administrator-level tasks. Administrators can sign in and instantly locate account information, setup and manage individual user accounts, define universal settings for Groups or Locations, create and update Auto-Attendants, Hunt Groups, Enterprise Time Schedules, and much more – quickly and easily online.
When Administrators log into the portal, they see the Admin Tools section of the Menu Panel which provides authorized users with access to manage the organizational settings and services, as well as locate and manage individual accounts within the organization.
Security Note: Once logged in, the connection will automatically close if left idle for an extended period. The system first prompts the user to continue working or log out, and then offers a countdown period prior to automatically closing and returning to the Sign In page.
The Admin Tools navigation menu is permission-based, and can provide access to any or all of the following sections, if they are in use for the organization or enabled for the Admin:
Dashboard – The home page for Administrators that provides accessto key information, features, and the areas each Admin is authorizedto manage within the portal
Locations – Location and Group level setting management Services & Users – User Account list and access to manage individual
user service settings Devices – Review and manage device inventory on the account Trunking – Review and manage SIP Trunk settings Enterprise Settings – Manager enterprise-level services and settings Contact Center – Administer contact center settings and configurations Service Changes – Advanced service change and order management
tools only displayed to specially trained Administrators
Your role and authorization level determine the sections and features you may view and manage.
Each menu option opens the main page to begin working with the related settings or services, when those are included on the account. Only the options and services the Admin is authorized to view by the organization or provider will be available for review within the portal.
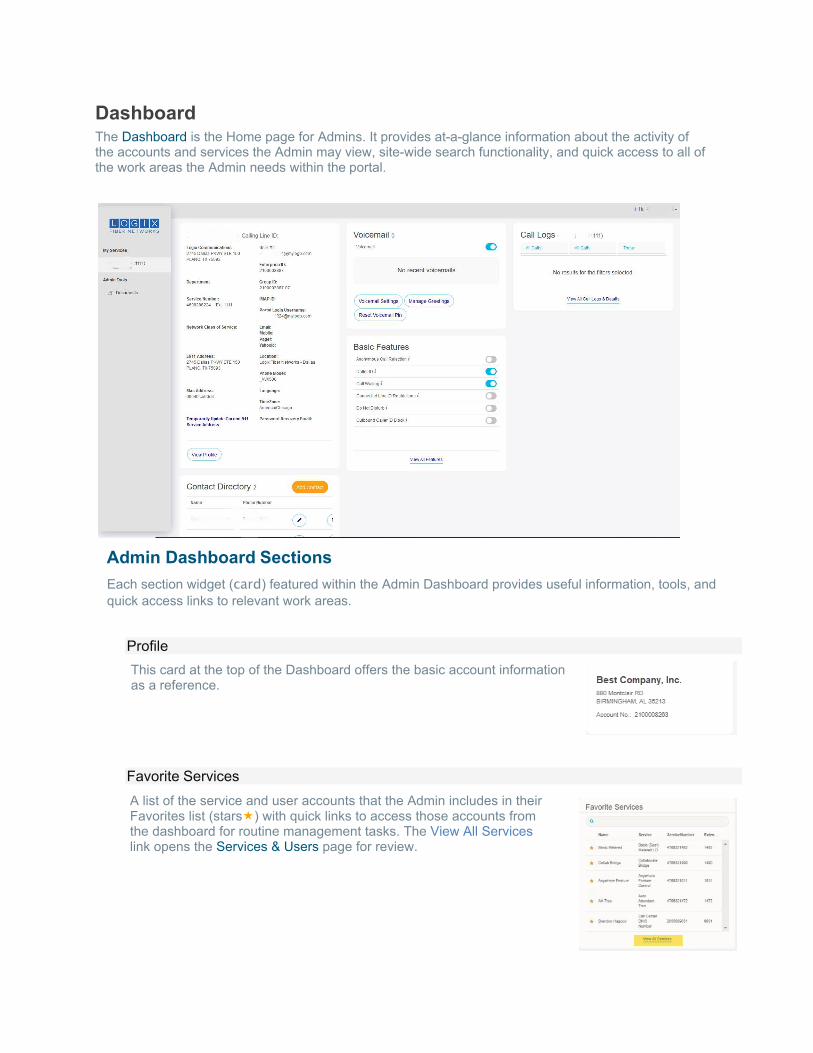
Dashboard The Dashboard is the Home page for Admins. It provides at-a-glance information about the activity of the accounts and services the Admin may view, site-wide search functionality, and quick access to all of the work areas the Admin needs within the portal.
Admin Dashboard Sections Each section widget (card) featured within the Admin Dashboard provides useful information, tools, and quick access links to relevant work areas.
Profile This card at the top of the Dashboard offers the basic account information as a reference.
Favorite Services A list of the service and user accounts that the Admin includes in their Favorites list (stars) with quick links to access those accounts from the dashboard for routine management tasks. The View All Services link opens the Services & Users page for review.
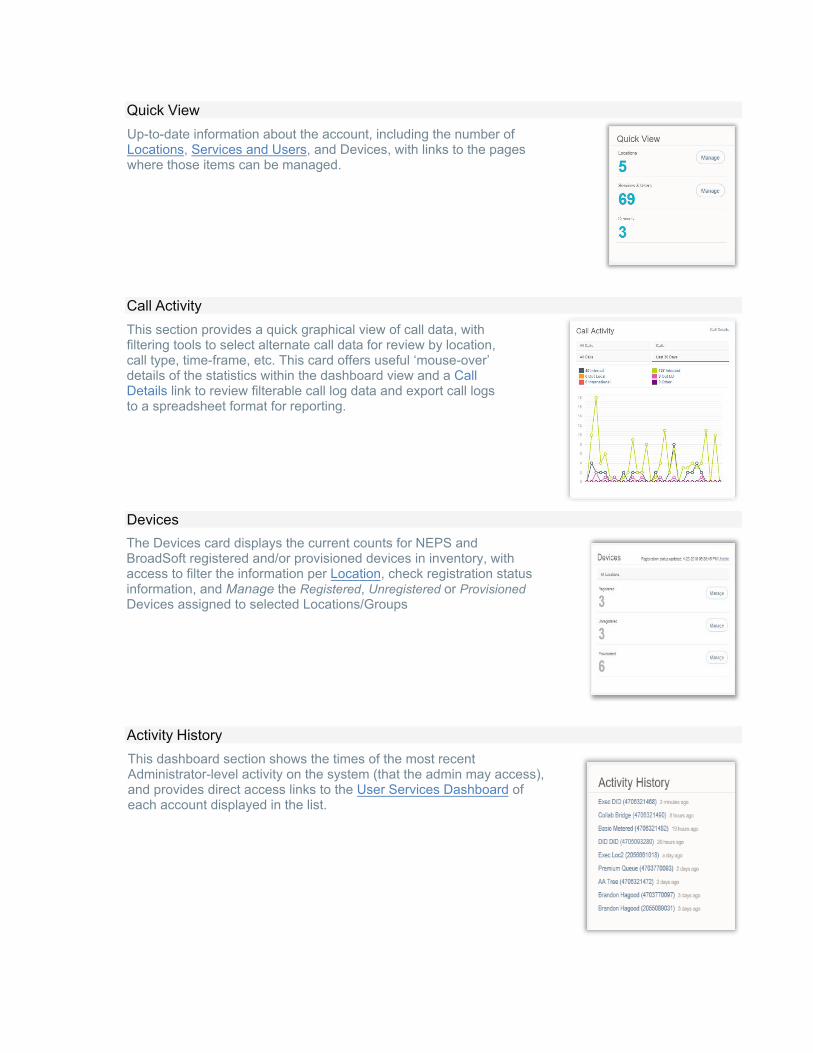
Quick View Up-to-date information about the account, including the number of Locations, Services and Users, and Devices, with links to the pages where those items can be managed.
Call Activity This section provides a quick graphical view of call data, with filtering tools to select alternate call data for review by location, call type, time-frame, etc. This card offers useful ‘mouse-over’ details of the statistics within the dashboard view and a Call Details link to review filterable call log data and export call logs to a spreadsheet format for reporting.
Devices The Devices card displays the current counts for NEPS and BroadSoft registered and/or provisioned devices in inventory, with access to filter the information per Location, check registration status information, and Manage the Registered, Unregistered or Provisioned Devices assigned to selected Locations/Groups
Activity History This dashboard section shows the times of the most recent Administrator-level activity on the system (that the admin may access), and provides direct access links to the User Services Dashboard of each account displayed in the list.

Locations The Locations page provides a searchable list of the Locations (Groups) currently configured on the account. Authorized Admins may search for terms within the list, use the column headers to sort the data alphanumerically, edit features the Group uses, and export a detailed location list to a .csv format report.
Section Search
Enter terms to locate data specific to the Locations section.
Column Links The links in the Location ID, Services, and Users columns open filtered lists within the Services & Users page for review and maintenance of related assignments.
The Edit icon for each Location opens the Group Settings page for Feature maintenance and administration tasks.
Access Group Settings by Location The Locations page provides easy access to manage the group settings by Location. If there are multiple locations or groups, this page provides the primary information for each within a searchable and filterable list and the ability to manage individual group/location settings and services via the adjacent Edit icon.
1. Click on the Edit icon adjacent to a Location (far right column) to open the Location’s GroupSettings dialog. Any features or services the Group uses are displayed for management in thispage.
2. Click on the ► arrow under the View/Edit column adjacent to a setting in the list to open its Edit view.
Location/Group features often include at least some of the following setting options:
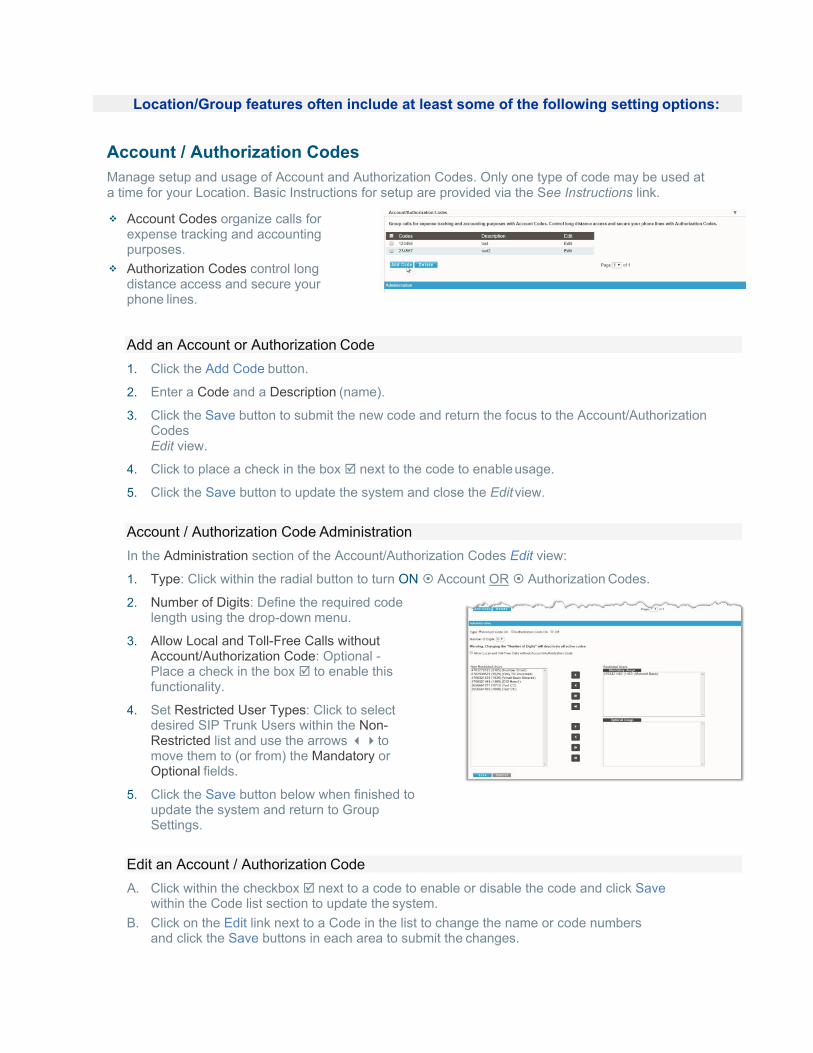
Account / Authorization Codes Manage setup and usage of Account and Authorization Codes. Only one type of code may be used at a time for your Location. Basic Instructions for setup are provided via the See Instructions link.
Account Codes organize calls forexpense tracking and accountingpurposes.
Authorization Codes control longdistance access and secure yourphone lines.
Add an Account or Authorization Code 1. Click the Add Code button.
2. Enter a Code and a Description (name).
3. Click the Save button to submit the new code and return the focus to the Account/AuthorizationCodesEdit view.
4. Click to place a check in the box next to the code to enable usage.
5. Click the Save button to update the system and close the Edit view.
Account / Authorization Code Administration In the Administration section of the Account/Authorization Codes Edit view:
1. Type: Click within the radial button to turn ON Account OR Authorization Codes.
2. Number of Digits: Define the required codelength using the drop-down menu.
3. Allow Local and Toll-Free Calls withoutAccount/Authorization Code: Optional -Place a check in the box to enable thisfunctionality.
4. Set Restricted User Types: Click to selectdesired SIP Trunk Users within the Non-Restricted list and use the arrows tomove them to (or from) the Mandatory orOptional fields.
5. Click the Save button below when finished toupdate the system and return to GroupSettings.
Edit an Account / Authorization Code A. Click within the checkbox next to a code to enable or disable the code and click Save
within the Code list section to update the system.B. Click on the Edit link next to a Code in the list to change the name or code numbers
and click the Save buttons in each area to submit the changes.
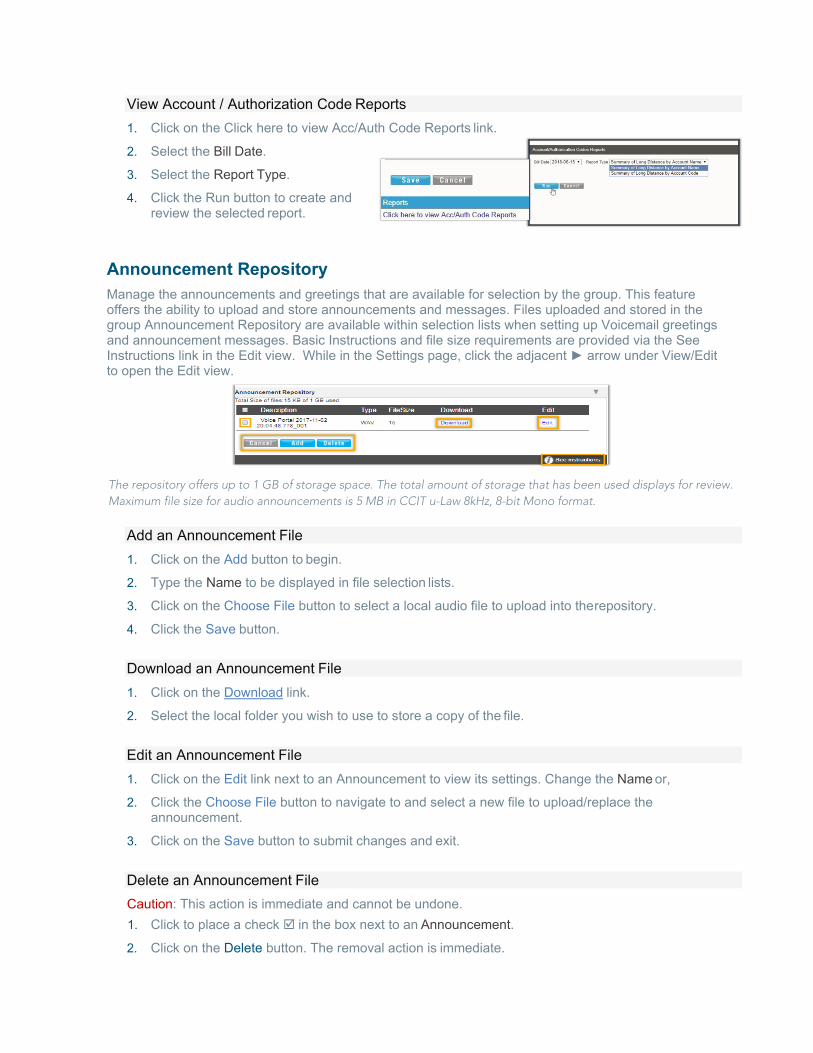
View Account / Authorization Code Reports 1. Click on the Click here to view Acc/Auth Code Reports link.
2. Select the Bill Date.
3. Select the Report Type.
4. Click the Run button to create andreview the selected report.
Announcement Repository Manage the announcements and greetings that are available for selection by the group. This feature offers the ability to upload and store announcements and messages. Files uploaded and stored in the group Announcement Repository are available within selection lists when setting up Voicemail greetings and announcement messages. Basic Instructions and file size requirements are provided via the See Instructions link in the Edit view. While in the Settings page, click the adjacent ► arrow under View/Edit to open the Edit view.
The repository offers up to 1 GB of storage space. The total amount of storage that has been used displays for review. Maximum file size for audio announcements is 5 MB in CCIT u-Law 8kHz, 8-bit Mono format.
Add an Announcement File 1. Click on the Add button to begin.
2. Type the Name to be displayed in file selection lists.
3. Click on the Choose File button to select a local audio file to upload into the repository.
4. Click the Save button.
Download an Announcement File 1. Click on the Download link.
2. Select the local folder you wish to use to store a copy of the file.
Edit an Announcement File 1. Click on the Edit link next to an Announcement to view its settings. Change the Name or,
2. Click the Choose File button to navigate to and select a new file to upload/replace theannouncement.
3. Click on the Save button to submit changes and exit.
Delete an Announcement File Caution: This action is immediate and cannot be undone. 1. Click to place a check in the box next to an Announcement.
2. Click on the Delete button. The removal action is immediate.
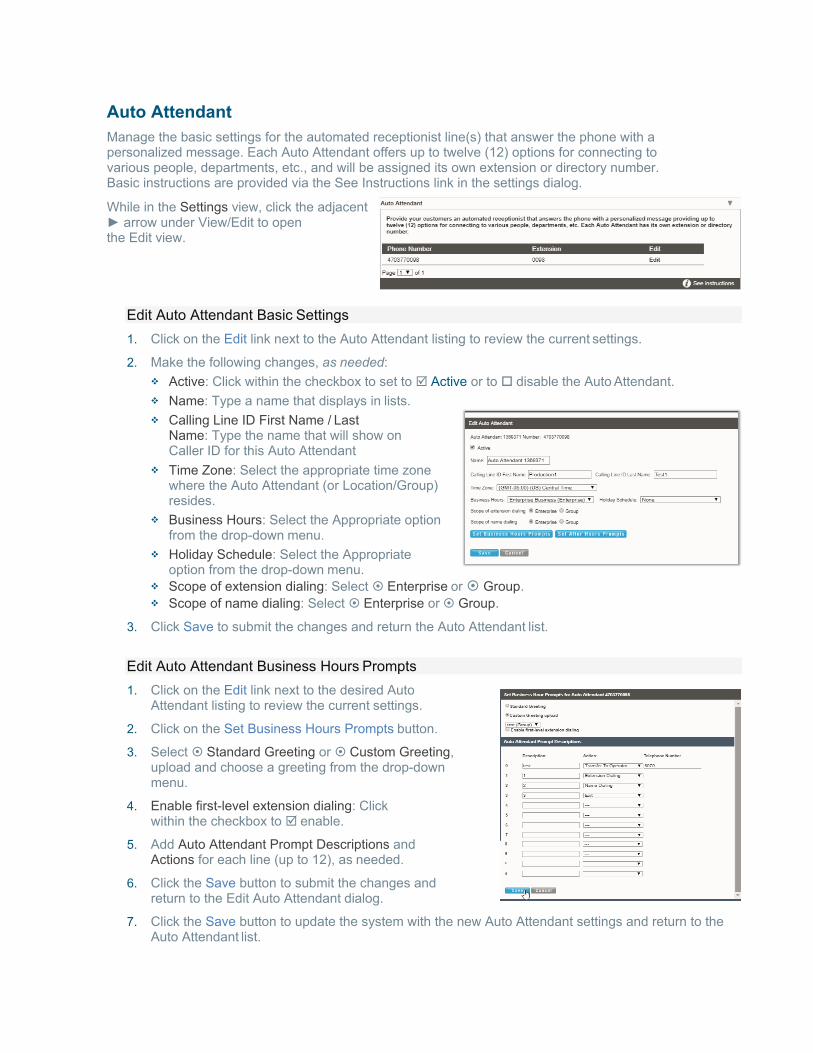
Auto Attendant Manage the basic settings for the automated receptionist line(s) that answer the phone with a personalized message. Each Auto Attendant offers up to twelve (12) options for connecting to various people, departments, etc., and will be assigned its own extension or directory number. Basic instructions are provided via the See Instructions link in the settings dialog.
While in the Settings view, click the adjacent ► arrow under View/Edit to openthe Edit view.
Edit Auto Attendant Basic Settings 1. Click on the Edit link next to the Auto Attendant listing to review the current settings.
2. Make the following changes, as needed: Active: Click within the checkbox to set to Active or to disable the Auto Attendant. Name: Type a name that displays in lists. Calling Line ID First Name / Last
Name: Type the name that will show onCaller ID for this Auto Attendant
Time Zone: Select the appropriate time zonewhere the Auto Attendant (or Location/Group)resides.
Business Hours: Select the Appropriate optionfrom the drop-down menu.
Holiday Schedule: Select the Appropriateoption from the drop-down menu.
Scope of extension dialing: Select Enterprise or Group. Scope of name dialing: Select Enterprise or Group.
3. Click Save to submit the changes and return the Auto Attendant list.
Edit Auto Attendant Business Hours Prompts 1. Click on the Edit link next to the desired Auto
Attendant listing to review the current settings.
2. Click on the Set Business Hours Prompts button.
3. Select Standard Greeting or Custom Greeting,upload and choose a greeting from the drop-downmenu.
4. Enable first-level extension dialing: Clickwithin the checkbox to enable.
5. Add Auto Attendant Prompt Descriptions andActions for each line (up to 12), as needed.
6. Click the Save button to submit the changes andreturn to the Edit Auto Attendant dialog.
7. Click the Save button to update the system with the new Auto Attendant settings and return to theAuto Attendant list.
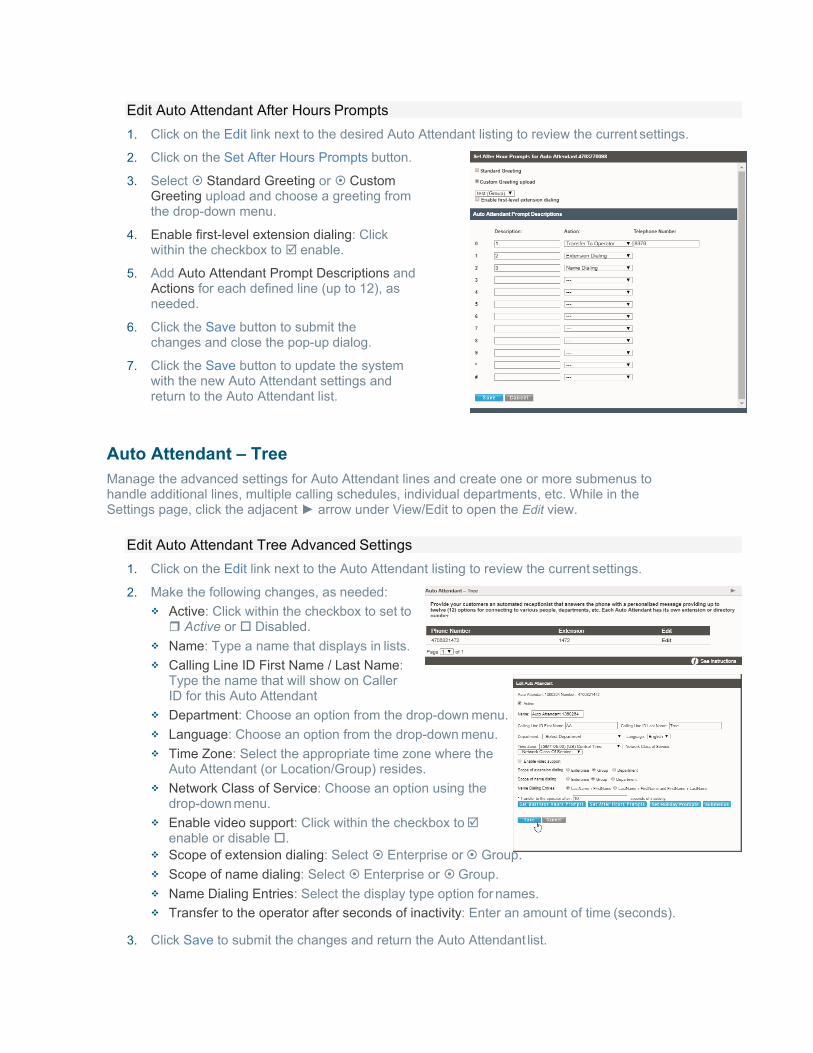
Edit Auto Attendant After Hours Prompts 1. Click on the Edit link next to the desired Auto Attendant listing to review the current settings.
2. Click on the Set After Hours Prompts button.
3. Select Standard Greeting or CustomGreeting upload and choose a greeting fromthe drop-down menu.
4. Enable first-level extension dialing: Clickwithin the checkbox to enable.
5. Add Auto Attendant Prompt Descriptions andActions for each defined line (up to 12), asneeded.
6. Click the Save button to submit thechanges and close the pop-up dialog.
7. Click the Save button to update the systemwith the new Auto Attendant settings andreturn to the Auto Attendant list.
Auto Attendant – Tree Manage the advanced settings for Auto Attendant lines and create one or more submenus to handle additional lines, multiple calling schedules, individual departments, etc. While in the Settings page, click the adjacent ► arrow under View/Edit to open the Edit view.
Edit Auto Attendant Tree Advanced Settings 1. Click on the Edit link next to the Auto Attendant listing to review the current settings.
2. Make the following changes, as needed: Active: Click within the checkbox to set to Active or Disabled.
Name: Type a name that displays in lists. Calling Line ID First Name / Last Name:
Type the name that will show on CallerID for this Auto Attendant
Department: Choose an option from the drop-down menu. Language: Choose an option from the drop-down menu. Time Zone: Select the appropriate time zone where the
Auto Attendant (or Location/Group) resides. Network Class of Service: Choose an option using the
drop-down menu. Enable video support: Click within the checkbox to
enable or disable . Scope of extension dialing: Select Enterprise or Group. Scope of name dialing: Select Enterprise or Group. Name Dialing Entries: Select the display type option for names. Transfer to the operator after seconds of inactivity: Enter an amount of time (seconds).
3. Click Save to submit the changes and return the Auto Attendant list.
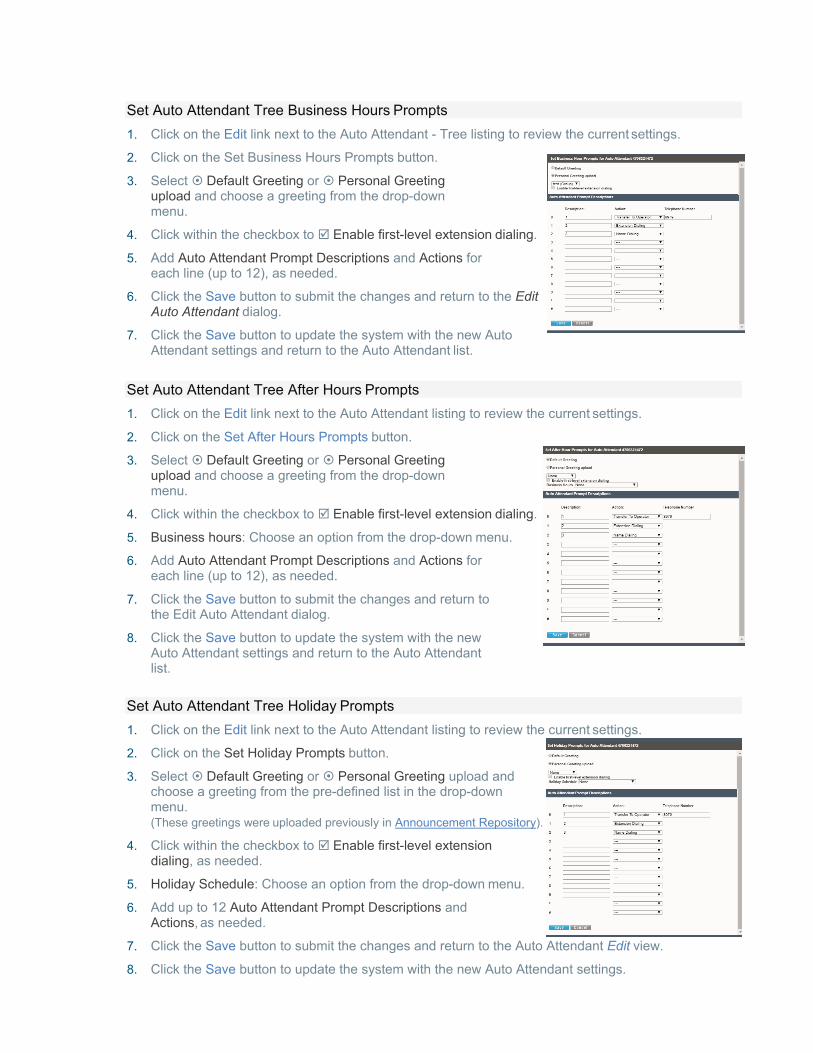
Set Auto Attendant Tree Business Hours Prompts 1. Click on the Edit link next to the Auto Attendant - Tree listing to review the current settings.
2. Click on the Set Business Hours Prompts button.
3. Select Default Greeting or Personal Greetingupload and choose a greeting from the drop-downmenu.
4. Click within the checkbox to Enable first-level extension dialing.
5. Add Auto Attendant Prompt Descriptions and Actions foreach line (up to 12), as needed.
6. Click the Save button to submit the changes and return to the EditAuto Attendant dialog.
7. Click the Save button to update the system with the new AutoAttendant settings and return to the Auto Attendant list.
Set Auto Attendant Tree After Hours Prompts 1. Click on the Edit link next to the Auto Attendant listing to review the current settings.
2. Click on the Set After Hours Prompts button.
3. Select Default Greeting or Personal Greetingupload and choose a greeting from the drop-downmenu.
4. Click within the checkbox to Enable first-level extension dialing.
5. Business hours: Choose an option from the drop-down menu.
6. Add Auto Attendant Prompt Descriptions and Actions foreach line (up to 12), as needed.
7. Click the Save button to submit the changes and return tothe Edit Auto Attendant dialog.
8. Click the Save button to update the system with the newAuto Attendant settings and return to the Auto Attendantlist.
Set Auto Attendant Tree Holiday Prompts 1. Click on the Edit link next to the Auto Attendant listing to review the current settings.
2. Click on the Set Holiday Prompts button.
3. Select Default Greeting or Personal Greeting upload andchoose a greeting from the pre-defined list in the drop-downmenu.(These greetings were uploaded previously in Announcement Repository).
4. Click within the checkbox to Enable first-level extensiondialing, as needed.
5. Holiday Schedule: Choose an option from the drop-down menu.
6. Add up to 12 Auto Attendant Prompt Descriptions andActions, as needed.
7. Click the Save button to submit the changes and return to the Auto Attendant Edit view.
8. Click the Save button to update the system with the new Auto Attendant settings.
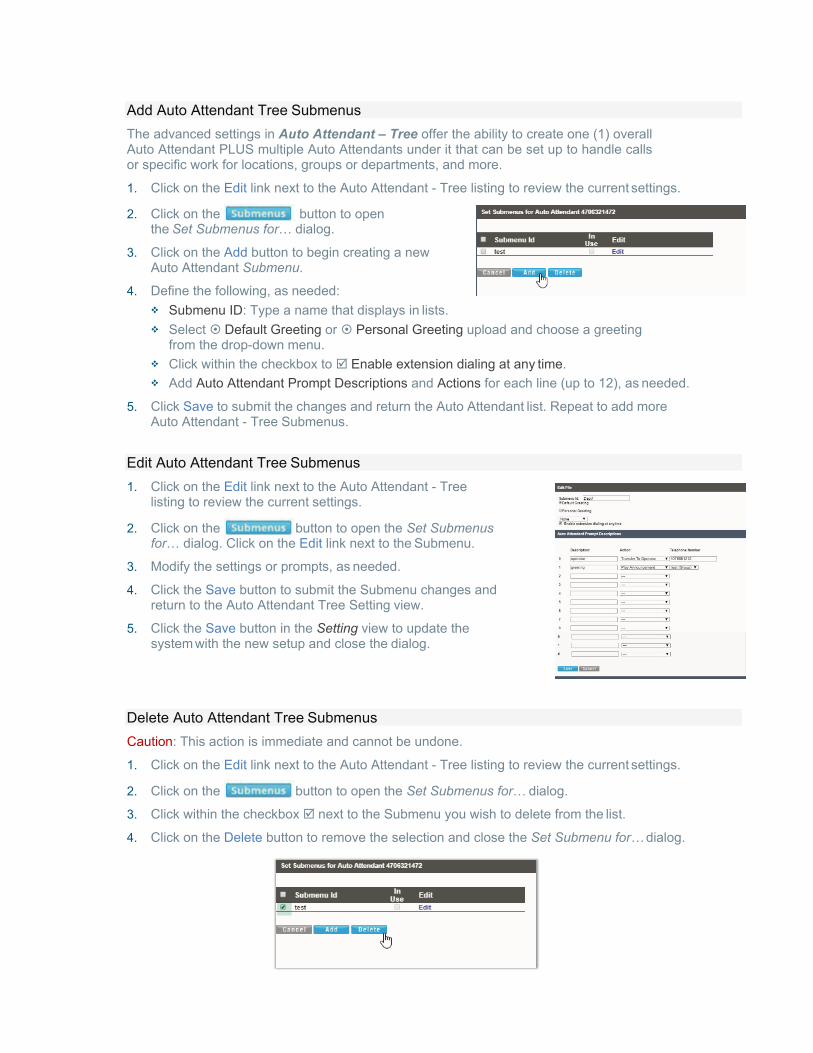
Add Auto Attendant Tree Submenus The advanced settings in Auto Attendant – Tree offer the ability to create one (1) overall Auto Attendant PLUS multiple Auto Attendants under it that can be set up to handle calls or specific work for locations, groups or departments, and more.
1. Click on the Edit link next to the Auto Attendant - Tree listing to review the current settings.
2. Click on the button to open the Set Submenus for… dialog.
3. Click on the Add button to begin creating a newAuto Attendant Submenu.
4. Define the following, as needed: Submenu ID: Type a name that displays in lists. Select Default Greeting or Personal Greeting upload and choose a greeting
from the drop-down menu. Click within the checkbox to Enable extension dialing at any time. Add Auto Attendant Prompt Descriptions and Actions for each line (up to 12), as needed.
5. Click Save to submit the changes and return the Auto Attendant list. Repeat to add moreAuto Attendant - Tree Submenus.
Edit Auto Attendant Tree Submenus 1. Click on the Edit link next to the Auto Attendant - Tree
listing to review the current settings.
2. Click on the button to open the Set Submenus for… dialog. Click on the Edit link next to the Submenu.
3. Modify the settings or prompts, as needed.
4. Click the Save button to submit the Submenu changes andreturn to the Auto Attendant Tree Setting view.
5. Click the Save button in the Setting view to update thesystem with the new setup and close the dialog.
Delete Auto Attendant Tree Submenus Caution: This action is immediate and cannot be undone.
1. Click on the Edit link next to the Auto Attendant - Tree listing to review the current settings.
2. Click on the button to open the Set Submenus for… dialog.
3. Click within the checkbox next to the Submenu you wish to delete from the list.
4. Click on the Delete button to remove the selection and close the Set Submenu for… dialog.
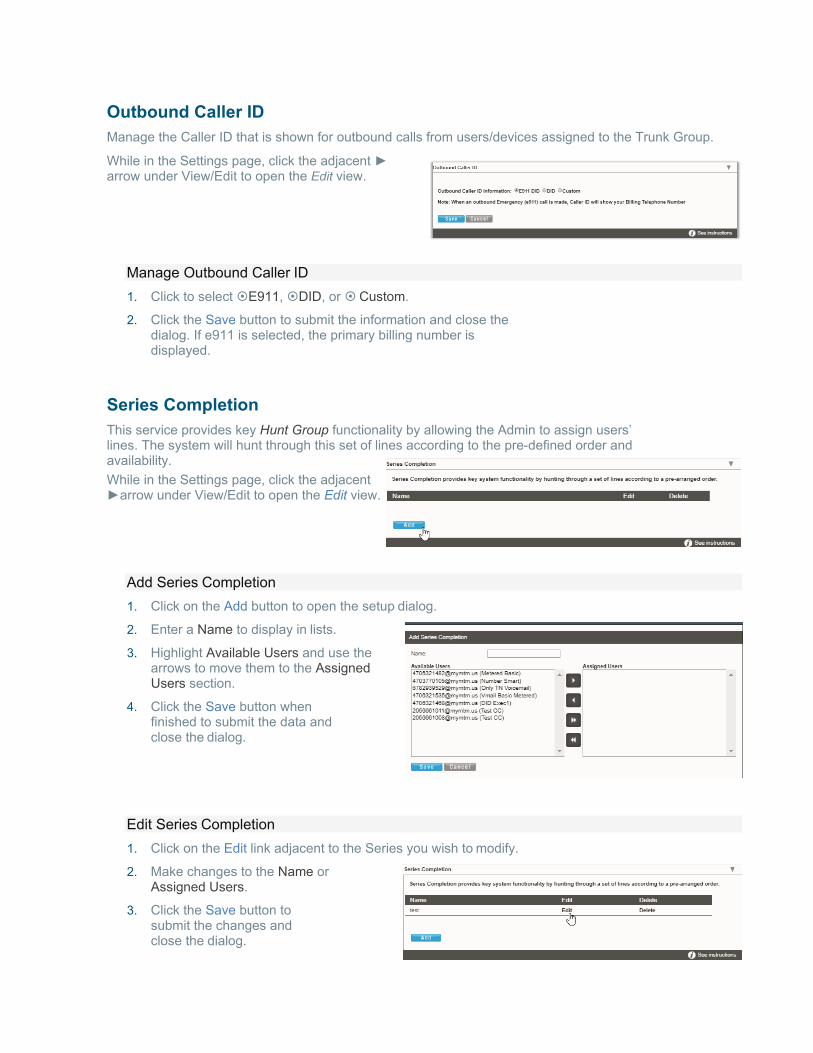
Outbound Caller ID Manage the Caller ID that is shown for outbound calls from users/devices assigned to the Trunk Group.
While in the Settings page, click the adjacent ► arrow under View/Edit to open the Edit view.
Manage Outbound Caller ID 1. Click to select E911, DID, or Custom.
2. Click the Save button to submit the information and close thedialog. If e911 is selected, the primary billing number isdisplayed.
Series Completion This service provides key Hunt Group functionality by allowing the Admin to assign users’ lines. The system will hunt through this set of lines according to the pre-defined order and availability. While in the Settings page, click the adjacent ►arrow under View/Edit to open the Edit view.
Add Series Completion 1. Click on the Add button to open the setup dialog.
2. Enter a Name to display in lists.
3. Highlight Available Users and use thearrows to move them to the AssignedUsers section.
4. Click the Save button whenfinished to submit the data andclose the dialog.
Edit Series Completion 1. Click on the Edit link adjacent to the Series you wish to modify.
2. Make changes to the Name orAssigned Users.
3. Click the Save button tosubmit the changes andclose the dialog.
Delete Series Completion Caution: This action is immediate and cannot be undone.
1. Click on the Delete option adjacentto the item you wish to remove fromthe system.The selected item is immediatelyremoved from the list and from thesystem.
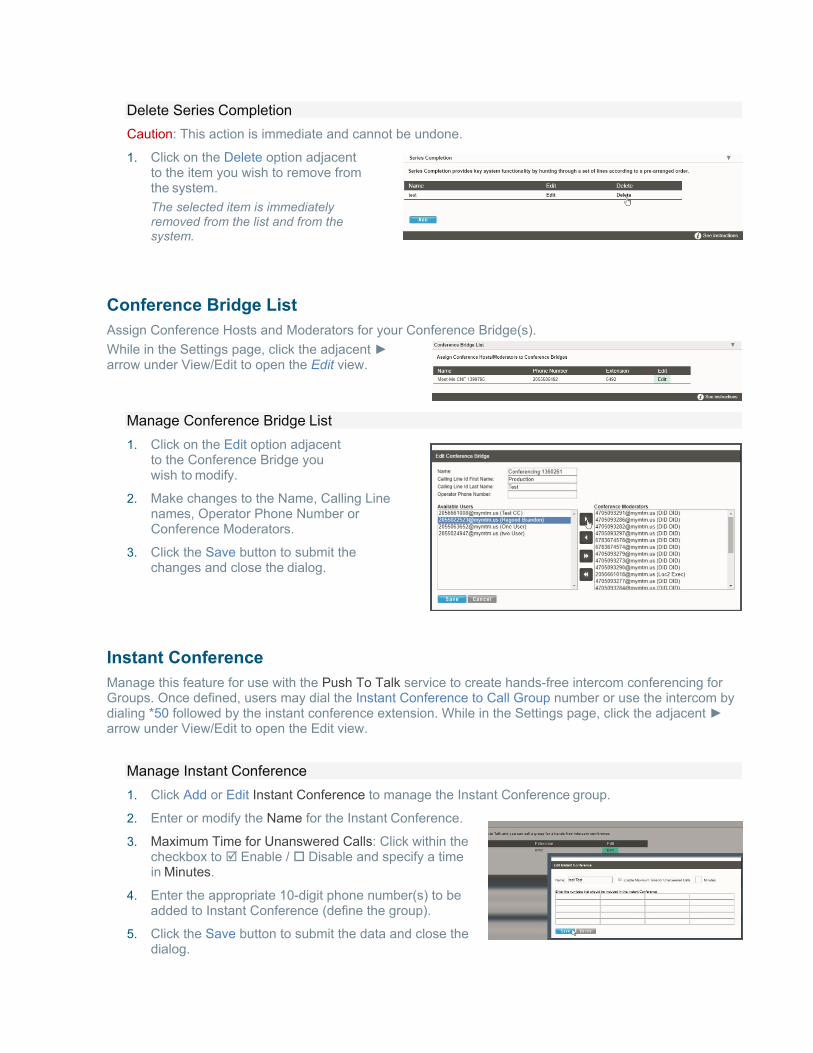
Conference Bridge List Assign Conference Hosts and Moderators for your Conference Bridge(s). While in the Settings page, click the adjacent ► arrow under View/Edit to open the Edit view.
Manage Conference Bridge List 1. Click on the Edit option adjacent
to the Conference Bridge youwish to modify.
2. Make changes to the Name, Calling Linenames, Operator Phone Number orConference Moderators.
3. Click the Save button to submit thechanges and close the dialog.
Instant Conference Manage this feature for use with the Push To Talk service to create hands-free intercom conferencing for Groups. Once defined, users may dial the Instant Conference to Call Group number or use the intercom by dialing *50 followed by the instant conference extension. While in the Settings page, click the adjacent ► arrow under View/Edit to open the Edit view.
Manage Instant Conference 1. Click Add or Edit Instant Conference to manage the Instant Conference group.
2. Enter or modify the Name for the Instant Conference.
3. Maximum Time for Unanswered Calls: Click within thecheckbox to Enable / Disable and specify a timein Minutes.
4. Enter the appropriate 10-digit phone number(s) to beadded to Instant Conference (define the group).
5. Click the Save button to submit the data and close thedialog.

Call Park (Groups) Manage the Location/Group settings for Call Park Groups, and enable people within your organization to park and retrieve 1 call at a time. While in the Settings page, click the adjacent ► arrow under View/Edit to open the Edit view.
Manage Call Park Group Default Settings 1. Select or Enter the
following: Settings forCall Park: Alternate User Recall To: Choose a user type.
Set Display Timer (in seconds). Click to Disable/ Enable Parked Destination Announcement. Ring Pattern for Recalled Calls: Select an option from the drop-down menu. Recall Timer: Set an amount of time (from 30-600 seconds). Alert Alternate Recall User Wait Time: Set an amount of time (from 30-600 seconds).
2. Click the Save button to submit the default settings and close the dialog.
Add a Call Park Group 1. Click the Add button.
2. Accept the default or enter a Group Name.3. Choose the group’s Recall To: user type.
4. Use the arrows to move highlighted AssignedUsers to/from Selected Users.
5. Click the Save button to submit the information andclose the dialog.
Edit a Call Park Group 1. Modify the Call Park (Group) Default Settings.
2. Click the Save button to update the call park group default settings.
3. Optional: Click the Edit option next to a Group in the list.
4. Modify the Group Name, Recall To, or User assignments.
5. Click the Save button to submit the changes and close the dialog.
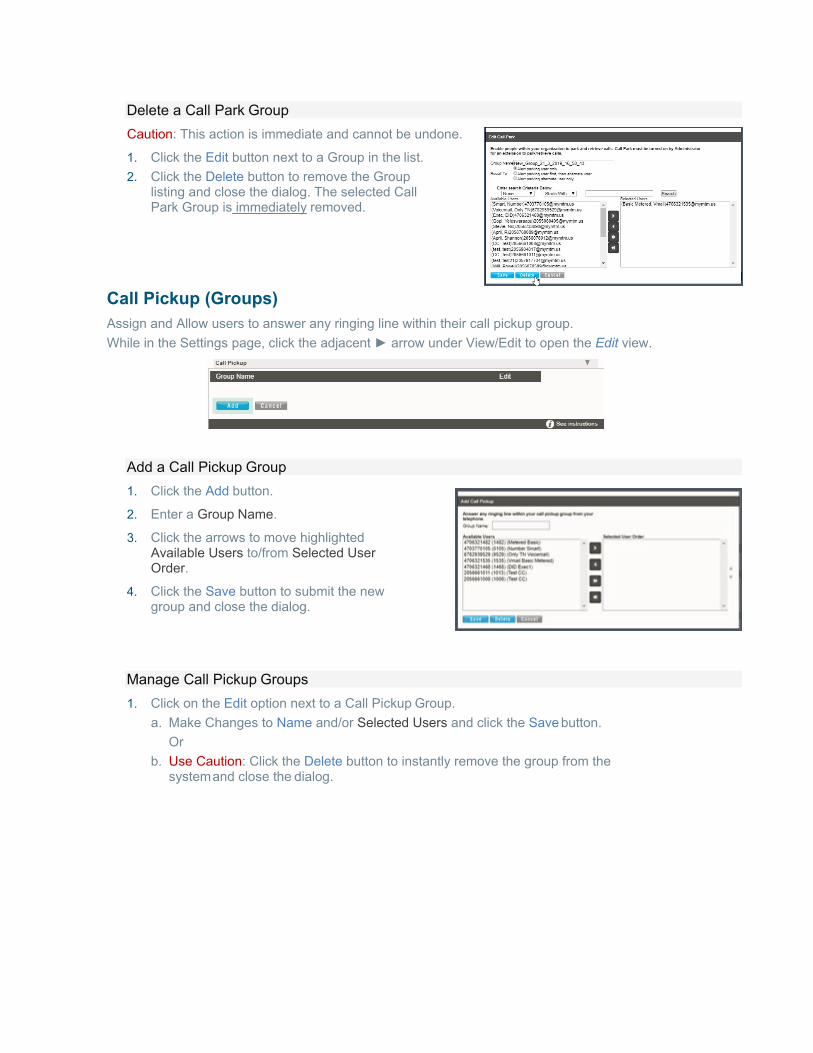
Delete a Call Park Group Caution: This action is immediate and cannot be undone.
1. Click the Edit button next to a Group in the list.2. Click the Delete button to remove the Group
listing and close the dialog. The selected CallPark Group is immediately removed.
Call Pickup (Groups) Assign and Allow users to answer any ringing line within their call pickup group. While in the Settings page, click the adjacent ► arrow under View/Edit to open the Edit view.
Add a Call Pickup Group 1. Click the Add button.
2. Enter a Group Name.
3. Click the arrows to move highlightedAvailable Users to/from Selected UserOrder.
4. Click the Save button to submit the newgroup and close the dialog.
Manage Call Pickup Groups 1. Click on the Edit option next to a Call Pickup Group.
a. Make Changes to Name and/or Selected Users and click the Save button.Or
b. Use Caution: Click the Delete button to instantly remove the group from thesystem and close the dialog.
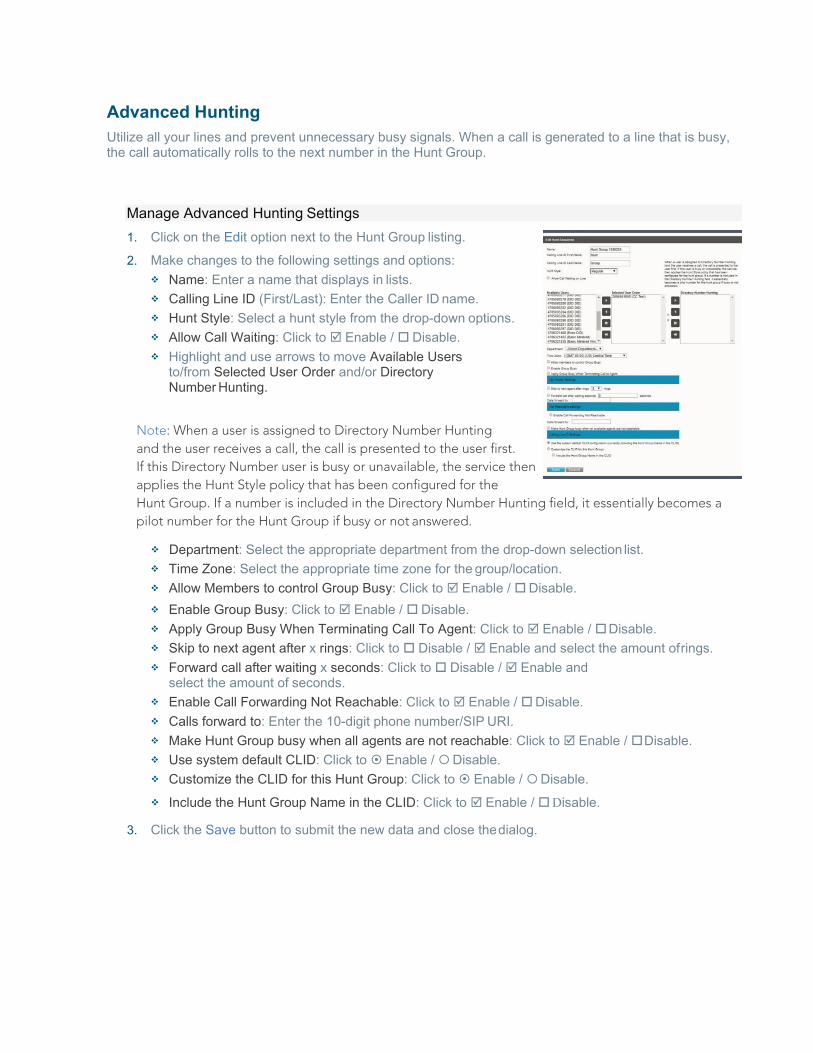
Advanced Hunting Utilize all your lines and prevent unnecessary busy signals. When a call is generated to a line that is busy, the call automatically rolls to the next number in the Hunt Group.
Manage Advanced Hunting Settings 1. Click on the Edit option next to the Hunt Group listing.
2. Make changes to the following settings and options: Name: Enter a name that displays in lists. Calling Line ID (First/Last): Enter the Caller ID name. Hunt Style: Select a hunt style from the drop-down options. Allow Call Waiting: Click to Enable / Disable. Highlight and use arrows to move Available Users
to/from Selected User Order and/or DirectoryNumber Hunting.
Note: When a user is assigned to Directory Number Hunting and the user receives a call, the call is presented to the user first. If this Directory Number user is busy or unavailable, the service then applies the Hunt Style policy that has been configured for the Hunt Group. If a number is included in the Directory Number Hunting field, it essentially becomes a pilot number for the Hunt Group if busy or not answered.
Department: Select the appropriate department from the drop-down selection list. Time Zone: Select the appropriate time zone for the group/location. Allow Members to control Group Busy: Click to Enable / Disable. Enable Group Busy: Click to Enable / Disable. Apply Group Busy When Terminating Call To Agent: Click to Enable / Disable. Skip to next agent after x rings: Click to Disable / Enable and select the amount of rings. Forward call after waiting x seconds: Click to Disable / Enable and
select the amount of seconds. Enable Call Forwarding Not Reachable: Click to Enable / Disable. Calls forward to: Enter the 10-digit phone number/SIP URI. Make Hunt Group busy when all agents are not reachable: Click to Enable / Disable. Use system default CLID: Click to Enable / Disable. Customize the CLID for this Hunt Group: Click to Enable / Disable. Include the Hunt Group Name in the CLID: Click to Enable / Disable.
3. Click the Save button to submit the new data and close the dialog.
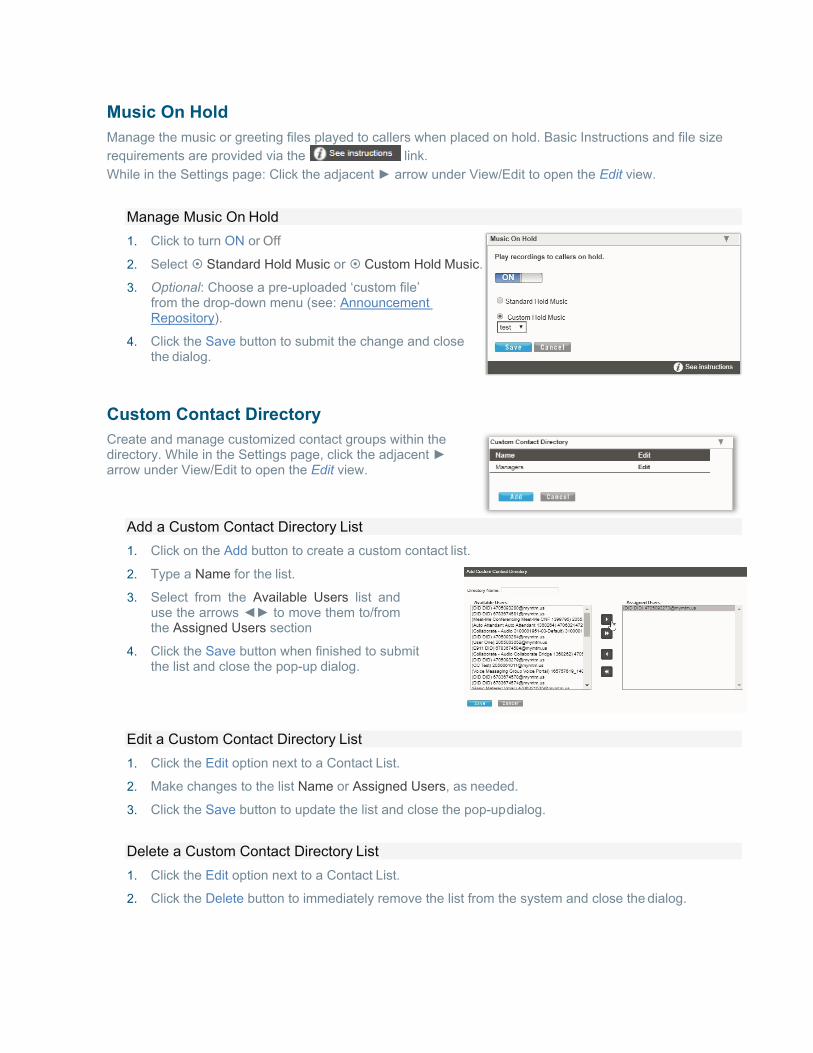
Music On Hold Manage the music or greeting files played to callers when placed on hold. Basic Instructions and file size requirements are provided via the link. While in the Settings page: Click the adjacent ► arrow under View/Edit to open the Edit view.
Manage Music On Hold 1. Click to turn ON or Off
2. Select Standard Hold Music or Custom Hold Music.
3. Optional: Choose a pre-uploaded ‘custom file’from the drop-down menu (see: AnnouncementRepository).
4. Click the Save button to submit the change and closethe dialog.
Custom Contact Directory Create and manage customized contact groups within the directory. While in the Settings page, click the adjacent ► arrow under View/Edit to open the Edit view.
Add a Custom Contact Directory List 1. Click on the Add button to create a custom contact list.
2. Type a Name for the list.
3. Select from the Available Users list anduse the arrows ◄► to move them to/fromthe Assigned Users section
4. Click the Save button when finished to submitthe list and close the pop-up dialog.
Edit a Custom Contact Directory List 1. Click the Edit option next to a Contact List.
2. Make changes to the list Name or Assigned Users, as needed.
3. Click the Save button to update the list and close the pop-up dialog.
Delete a Custom Contact Directory List 1. Click the Edit option next to a Contact List.
2. Click the Delete button to immediately remove the list from the system and close the dialog.
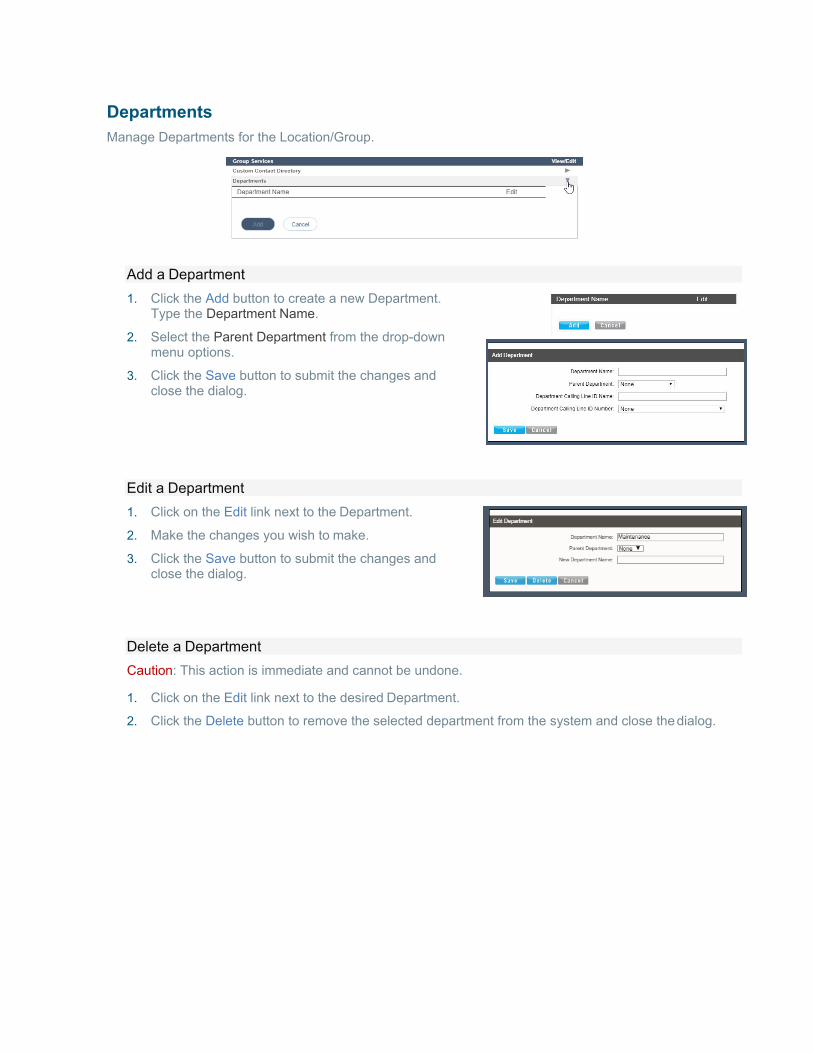
Departments Manage Departments for the Location/Group.
Add a Department 1. Click the Add button to create a new Department.
Type the Department Name.
2. Select the Parent Department from the drop-downmenu options.
3. Click the Save button to submit the changes andclose the dialog.
Edit a Department 1. Click on the Edit link next to the Department.
2. Make the changes you wish to make.
3. Click the Save button to submit the changes andclose the dialog.
Delete a Department Caution: This action is immediate and cannot be undone.
1. Click on the Edit link next to the desired Department.
2. Click the Delete button to remove the selected department from the system and close the dialog.
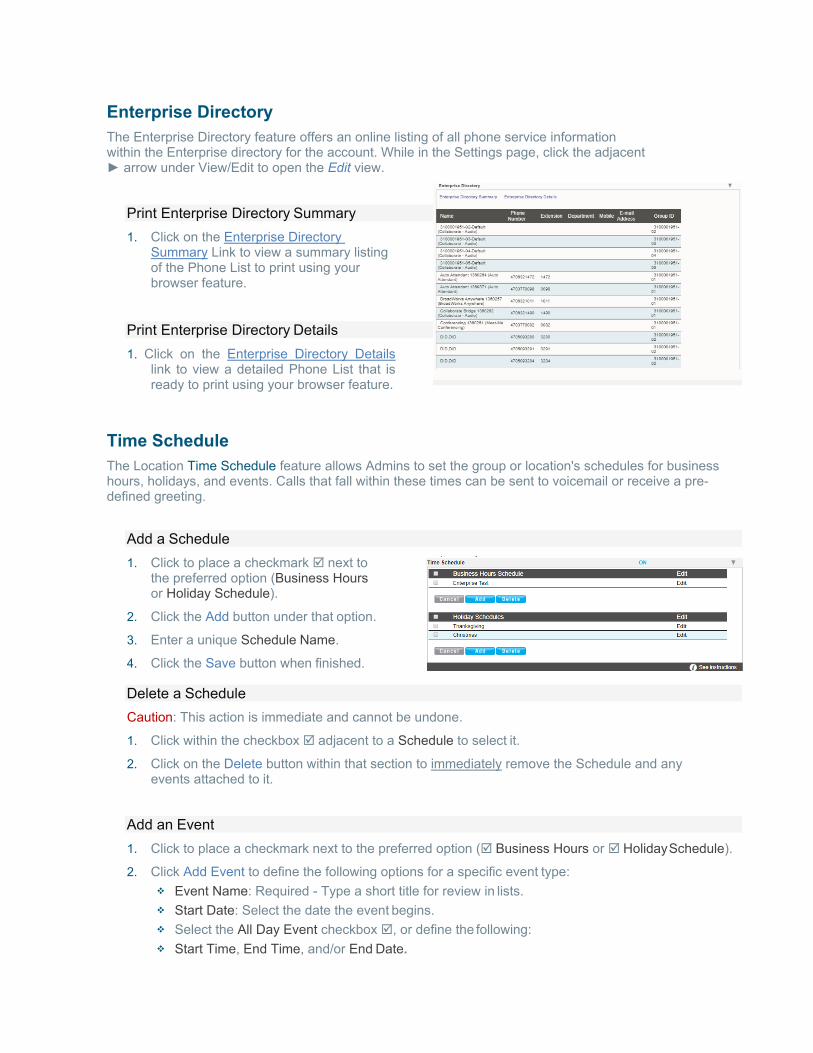
Enterprise Directory The Enterprise Directory feature offers an online listing of all phone service information within the Enterprise directory for the account. While in the Settings page, click the adjacent ► arrow under View/Edit to open the Edit view.
Print Enterprise Directory Summary 1. Click on the Enterprise Directory
Summary Link to view a summary listingof the Phone List to print using yourbrowser feature.
Print Enterprise Directory Details 1. Click on the Enterprise Directory Details
link to view a detailed Phone List that isready to print using your browser feature.
Time Schedule The Location Time Schedule feature allows Admins to set the group or location's schedules for business hours, holidays, and events. Calls that fall within these times can be sent to voicemail or receive a pre- defined greeting.
Add a Schedule 1. Click to place a checkmark next to
the preferred option (Business Hoursor Holiday Schedule).
2. Click the Add button under that option.
3. Enter a unique Schedule Name.
4. Click the Save button when finished.
Delete a Schedule Caution: This action is immediate and cannot be undone.
1. Click within the checkbox adjacent to a Schedule to select it.
2. Click on the Delete button within that section to immediately remove the Schedule and anyevents attached to it.
Add an Event 1. Click to place a checkmark next to the preferred option ( Business Hours or Holiday Schedule).
2. Click Add Event to define the following options for a specific event type: Event Name: Required - Type a short title for review in lists. Start Date: Select the date the event begins. Select the All Day Event checkbox , or define the following: Start Time, End Time, and/or End Date.
Optional: Recurs – (Never, Daily, Weekly, Monthly by Day, Monthly by Week,Yearly by Day, Yearly by Week)
Optional: Recur every x (Months or Year and/or the Numerical day of the month).
Optional: End – Never, After (x # of occurrences), or Date (set the end date).
3. Click Save when finished to submit the data and close the dialog.
Edit an Event 1. Click on the Edit option next to the desired Time Schedule option.
2. Make changes to the event name, date, times, or recurrences.
3. Click Save when finished to submit the changes and close the dialog.
Delete an Event Caution: This action is immediate and cannot be undone.
1. Click within the checkbox adjacent to a Schedule to select it.
2. Click the Edit option next to the selected item to review the schedule’s list of Events.
3. Click within the checkbox adjacent to an Event listed within the dialog to select it.
4. Click on the Delete Event button.
5. Click on the Save button to update the data for the Schedule and close the dialog.
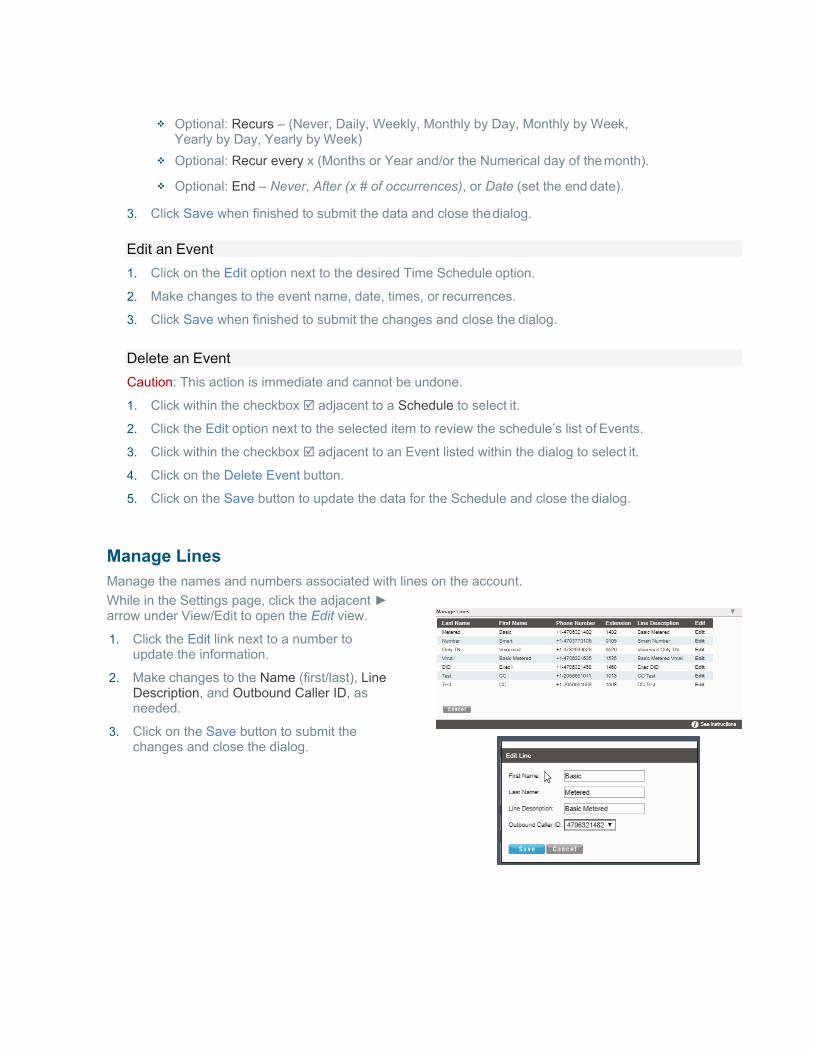
Manage Lines Manage the names and numbers associated with lines on the account. While in the Settings page, click the adjacent ► arrow under View/Edit to open the Edit view.
1. Click the Edit link next to a number toupdate the information.
2. Make changes to the Name (first/last), LineDescription, and Outbound Caller ID, asneeded.
3. Click on the Save button to submit thechanges and close the dialog.

Manage Users Manage users, their access rights and extension assignments.
While in the Settings page, click the adjacent ► arrow under View/Edit to open the Edit view.
Manage User Password and Recovery Email 1. Locate the user you wish to modify within the list. Click the Edit option next to the selected user.
2. Enter the following, as needed: Password: Type the new Password and again in Re-
enter Password to confirm. Password Recovery Email: Type the full email in
[email protected] format. This is where the system will send the recovery information.
3. Click the Save button to submit the change and close the dialog.
Add Users to Groups 1. Click the Add User button. Enter or define the following:
User Name: Type the name or designation (phone number, device type, etc.) youwish to display in lists.
Password: Enter and reenter thepassword assignment for the user.
Password Recovery Email: Enter an email addressfor password recovery notifications.
Group Admin: Click to enable/disable this as theinitial assignment.
Contact Center Manager: Click to enable/disable thisas the initial assignment.
Highlight item(s) in the Available Groups section anduse the arrows to add to the Assigned Groups.
2. Click the Save button to submit the change andclose the dialog.
Edit User Access and Extension 1. Locate the user you wish to modify within the list.
2. Click the Edit option next to the selected user.
3. Make changes to the following, as needed: Password (and repeat) Password Recovery Email: Enter a new email address. Assign Administrative Rights to Enable, as needed. Assign Contact Center Manager
Rights to Enable as needed. Extension Assignments: Select from the
Available Numbers and use the arrows ◄►to move to or from the User Extensions.
4. Click the Save button to submit and close the dialog.
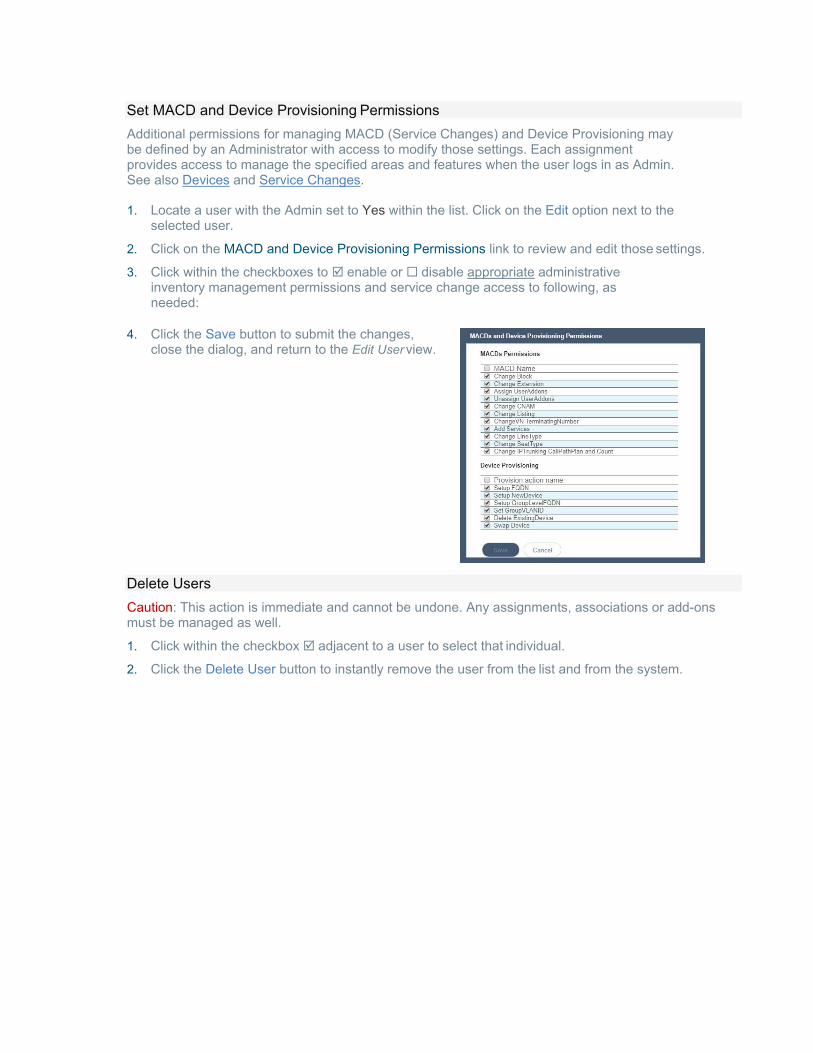
Set MACD and Device Provisioning Permissions Additional permissions for managing MACD (Service Changes) and Device Provisioning may be defined by an Administrator with access to modify those settings. Each assignment provides access to manage the specified areas and features when the user logs in as Admin. See also Devices and Service Changes.
1. Locate a user with the Admin set to Yes within the list. Click on the Edit option next to theselected user.
2. Click on the MACD and Device Provisioning Permissions link to review and edit those settings.
3. Click within the checkboxes to enable or disable appropriate administrativeinventory management permissions and service change access to following, asneeded:
4. Click the Save button to submit the changes,close the dialog, and return to the Edit User view.
Delete Users Caution: This action is immediate and cannot be undone. Any assignments, associations or add-ons must be managed as well.
1. Click within the checkbox adjacent to a user to select that individual.
2. Click the Delete User button to instantly remove the user from the list and from the system.
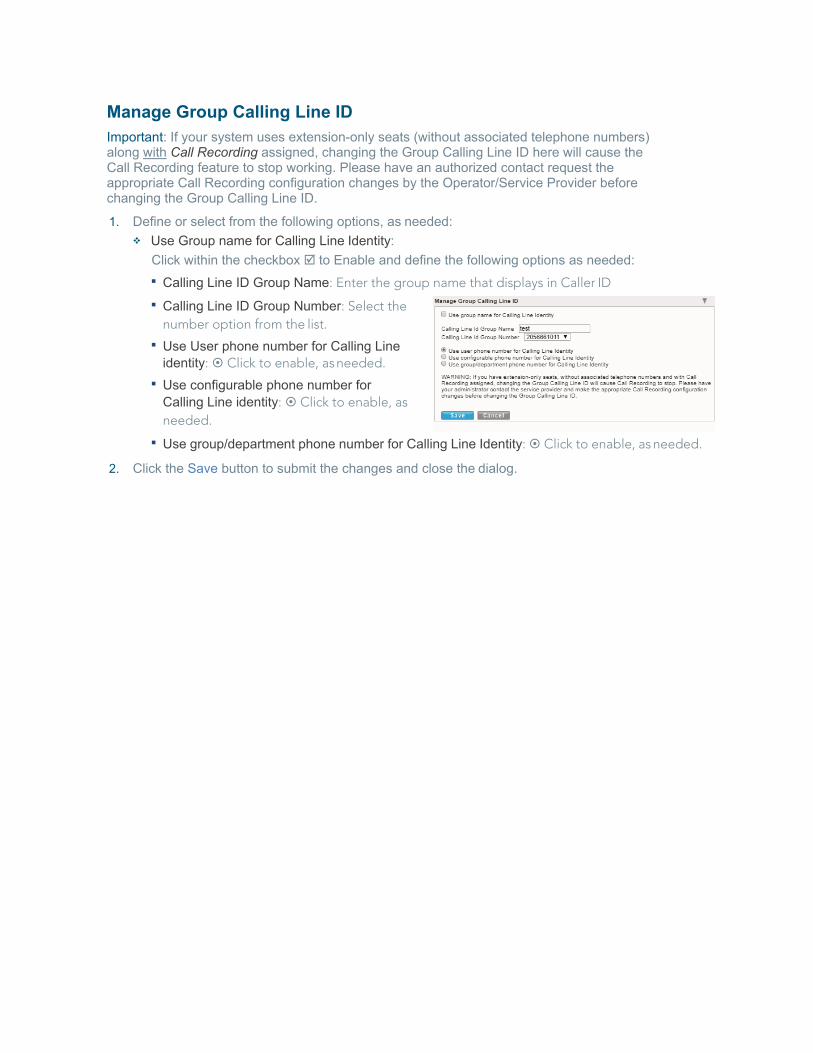
Manage Group Calling Line ID Important: If your system uses extension-only seats (without associated telephone numbers) along with Call Recording assigned, changing the Group Calling Line ID here will cause the Call Recording feature to stop working. Please have an authorized contact request the appropriate Call Recording configuration changes by the Operator/Service Provider before changing the Group Calling Line ID.
1. Define or select from the following options, as needed: Use Group name for Calling Line Identity:
Click within the checkbox to Enable and define the following options as needed: Calling Line ID Group Name: Enter the group name that displays in Caller ID
Calling Line ID Group Number: Select thenumber option from the list.
Use User phone number for Calling Lineidentity: Click to enable, as needed.
Use configurable phone number forCalling Line identity: Click to enable, asneeded.
Use group/department phone number for Calling Line Identity: Click to enable, as needed.
2. Click the Save button to submit the changes and close the dialog.
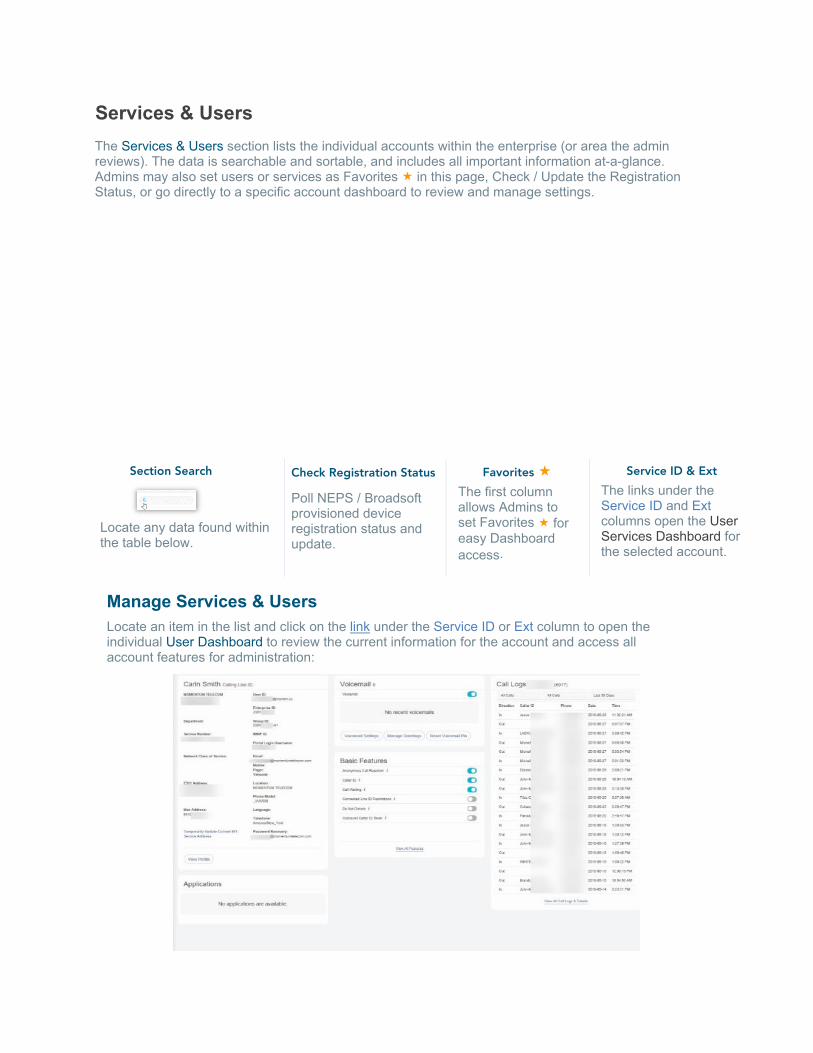
Services & Users The Services & Users section lists the individual accounts within the enterprise (or area the admin reviews). The data is searchable and sortable, and includes all important information at-a-glance. Admins may also set users or services as Favorites in this page, Check / Update the Registration Status, or go directly to a specific account dashboard to review and manage settings.
Section Search
Locate any data found within the table below.
Check Registration Status
Poll NEPS / Broadsoft provisioned device registration status and update.
Favorites The first column allows Admins to set Favorites for easy Dashboard access.
Service ID & Ext The links under the Service ID and Ext columns open the User Services Dashboard for the selected account.
Manage Services & Users Locate an item in the list and click on the link under the Service ID or Ext column to open the individual User Dashboard to review the current information for the account and access all account features for administration:

User Profile This dashboard card displays the current profile information and the View Profile button provides access to manage temporary e911 locations, Change the Password, Manage notification emails and update directory information.
Voicemail This card displays recent un-deleted voicemails to play, delete, forward, or block callers. A red dot indicates un-played messages. A View All Voicemails & Details link provides access to review and manage all undeleted voicemails if there are more undeleted messages available than can be displayed within the dashboard.
Call Logs This dashboard card displays the latest calls to/from the user’s device and View All Call Logs button opens a new page to display up to 1000 calls within the past 90 days, with filtering tools and a link to Export Call Logs to a spreadsheet report format.
Applications This card provides direct links to the landing or Sign In page for add-on applications assigned to the user, if applicable.
Basic Features This card displays the On/Off feature settings for easy access and the View All Features & Services link offers direct access to the user’s Settings page to manage all services and features provided for the account.
Working with User Settings Clicking on the View All Features link at the bottom of the Basic Features card opens the Settings page, which lists the features and services that are available to the user in an easy to read table format, and provides access to View and to Edit the settings for each feature.
Features are generally grouped by type to make similar features easy to locate. On/Off features show their current status within the table. The arrow ► under the View/Edit column (far right) for a feature opens the Edit view. Many of the On/Off features shown in this list and the individually enabled settings shown here may
also be managed through the user’s device using phone codes, AKA: Star Codes. (ex: *77).
Your account type and/or role defines the users, features and services you may access.
Some features shown in this document may not be available to all organizations, Admins or users.
Access the Settings Page 1. In the Dashboard: Click on the View All Features link in the Basic Features card to open the
Settings page.
View / Edit User Feature Settings 1. In the Settings page: Click on the arrow ► under the View/Edit column next to a feature to open itsEdit view and modify the feature setup.
Instructions for managing individual user level features and services are provided in the User Guide.

Trunking The Trunking page offers a searchable view of the current SIP Trunk Group(s) on the account, and offers access to review and manage individual services or users assigned to a SIP Trunk Group. The data displayed here includes Location ID, Trunk Group ID, Pilot DID, Call Paths, and the trunk group Service Number count.
Section Search
Locate data found within the table below.
Column Links The link in the Location ID column provides access to review the list of Services & Users assigned to the Trunk group. The Pilot DID link opens the User Services Dashboard and Profile for the account.
The Edit button opens the SIP Trunk Group settings for review and maintenance.
Click on the Edit icon adjacent to the Trunk Group listing (far right column) to open the Trunk Group Features page and manage the call forwarding settings and usage.
Manage Trunking Settings General Settings for SIP Trunking might include any features defined for organization-wide use.
For Example:
Call Forward Always This feature defines the overall behavior of Forwarding and Routing for the SIP Trunk. Click on the arrow ► under the View/Edit column to open the Edit view for this service. The default action for Call Forwarding Always is None. 1. Click to enable one of the following alternate
options, as needed: Forward to Phone Number/SIP-URI: and enter the
10- digit number (no spaces or special characters). Reroute to Trunk Group and select the group using the drop-down menu.
2. Click the Save button when finished to submit the data and close the settings dialog.
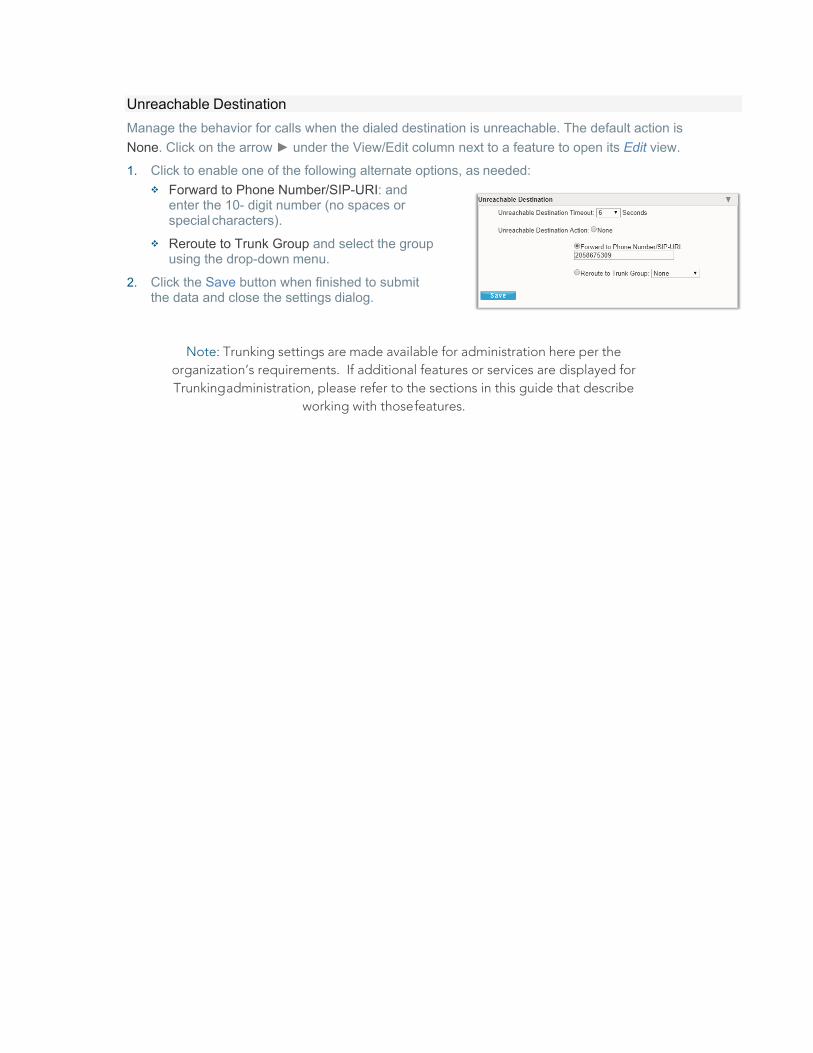
Unreachable Destination Manage the behavior for calls when the dialed destination is unreachable. The default action is None. Click on the arrow ► under the View/Edit column next to a feature to open its Edit view.
1. Click to enable one of the following alternate options, as needed: Forward to Phone Number/SIP-URI: and
enter the 10- digit number (no spaces orspecial characters).
Reroute to Trunk Group and select the groupusing the drop-down menu.
2. Click the Save button when finished to submitthe data and close the settings dialog.
Note: Trunking settings are made available for administration here per the organization’s requirements. If additional features or services are displayed for Trunking administration, please refer to the sections in this guide that describe
working with those features.
Enterprise Settings The Enterprise Settings menu option opens that section for review and administration of the global feature settings. In this section simply click on an ►arrow under the View/Edit column adjacent to the desired Enterprise Service or the Contact Center feature to view the item’s Edit dialog and manage the settings.
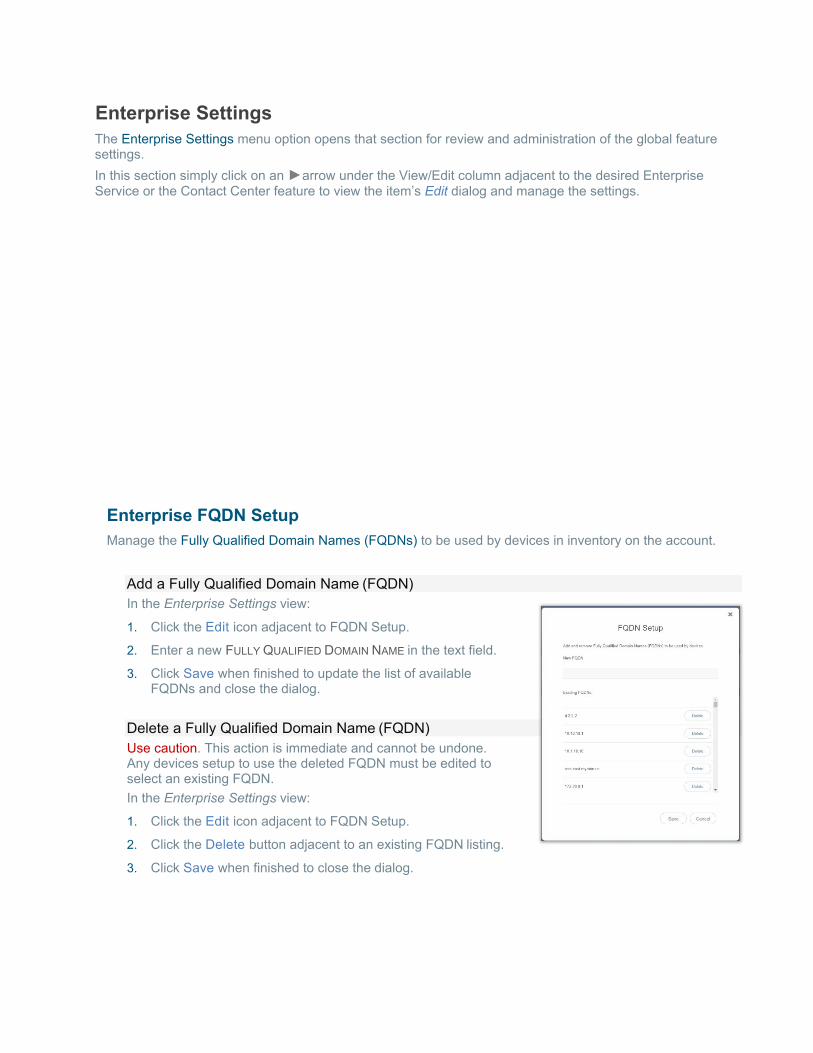
Enterprise FQDN Setup Manage the Fully Qualified Domain Names (FQDNs) to be used by devices in inventory on the account.
Add a Fully Qualified Domain Name (FQDN) In the Enterprise Settings view:
1. Click the Edit icon adjacent to FQDN Setup.
2. Enter a new FULLY QUALIFIED DOMAIN NAME in the text field.
3. Click Save when finished to update the list of availableFQDNs and close the dialog.
Delete a Fully Qualified Domain Name (FQDN) Use caution. This action is immediate and cannot be undone. Any devices setup to use the deleted FQDN must be edited to select an existing FQDN. In the Enterprise Settings view:
1. Click the Edit icon adjacent to FQDN Setup.
2. Click the Delete button adjacent to an existing FQDN listing.
3. Click Save when finished to close the dialog.
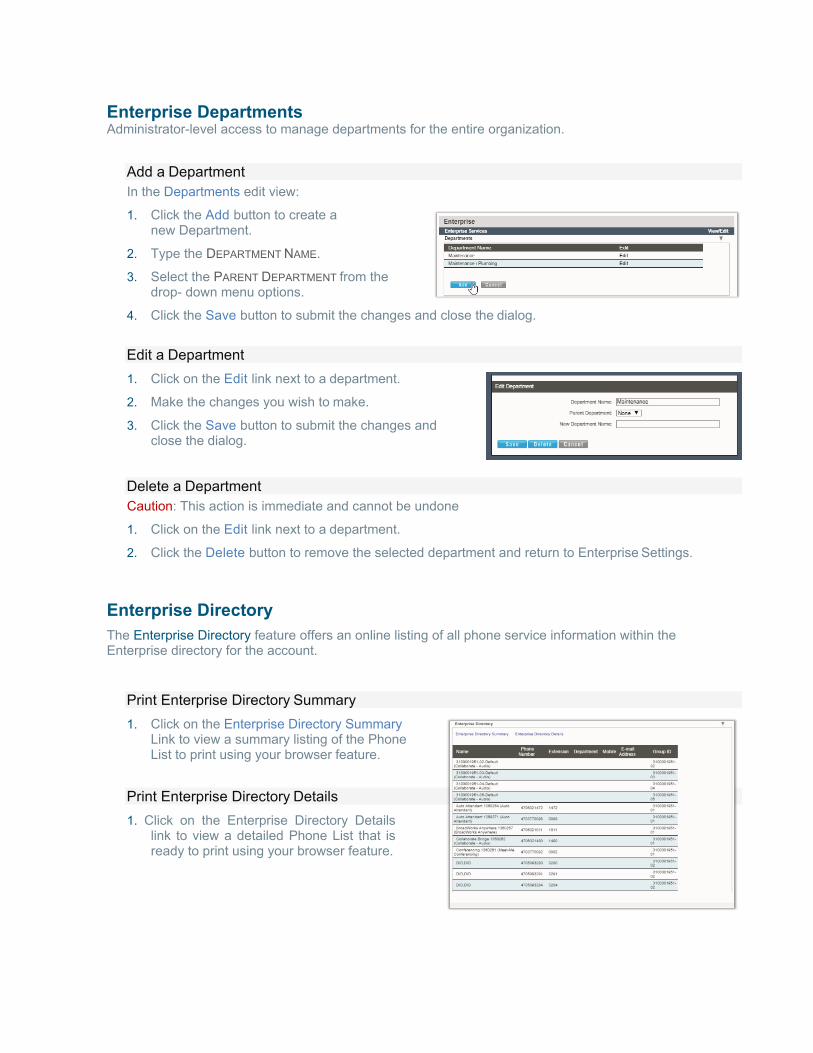
Enterprise Departments Administrator-level access to manage departments for the entire organization.
Add a Department In the Departments edit view:
1. Click the Add button to create anew Department.
2. Type the DEPARTMENT NAME.
3. Select the PARENT DEPARTMENT from thedrop- down menu options.
4. Click the Save button to submit the changes and close the dialog.
Edit a Department 1. Click on the Edit link next to a department.
2. Make the changes you wish to make.
3. Click the Save button to submit the changes andclose the dialog.
Delete a Department Caution: This action is immediate and cannot be undone
1. Click on the Edit link next to a department.
2. Click the Delete button to remove the selected department and return to Enterprise Settings.
Enterprise Directory The Enterprise Directory feature offers an online listing of all phone service information within the Enterprise directory for the account.
Print Enterprise Directory Summary 1. Click on the Enterprise Directory Summary
Link to view a summary listing of the PhoneList to print using your browser feature.
Print Enterprise Directory Details 1. Click on the Enterprise Directory Details
link to view a detailed Phone List that isready to print using your browser feature.
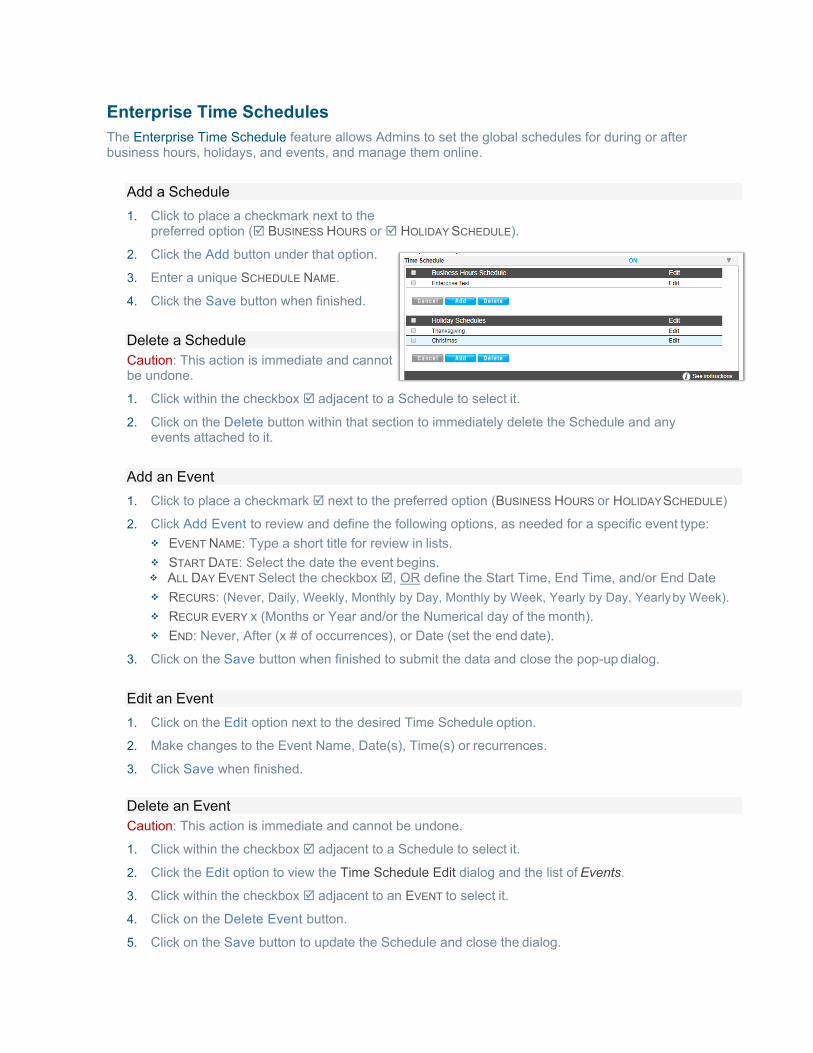
Enterprise Time Schedules The Enterprise Time Schedule feature allows Admins to set the global schedules for during or after business hours, holidays, and events, and manage them online.
Add a Schedule 1. Click to place a checkmark next to the
preferred option ( BUSINESS HOURS or HOLIDAY SCHEDULE).
2. Click the Add button under that option.
3. Enter a unique SCHEDULE NAME.
4. Click the Save button when finished.
Delete a Schedule Caution: This action is immediate and cannot be undone.
1. Click within the checkbox adjacent to a Schedule to select it.
2. Click on the Delete button within that section to immediately delete the Schedule and anyevents attached to it.
Add an Event 1. Click to place a checkmark next to the preferred option (BUSINESS HOURS or HOLIDAY SCHEDULE)
2. Click Add Event to review and define the following options, as needed for a specific event type: EVENT NAME: Type a short title for review in lists. START DATE: Select the date the event begins. ALL DAY EVENT Select the checkbox , OR define the Start Time, End Time, and/or End Date RECURS: (Never, Daily, Weekly, Monthly by Day, Monthly by Week, Yearly by Day, Yearly by Week). RECUR EVERY x (Months or Year and/or the Numerical day of the month). END: Never, After (x # of occurrences), or Date (set the end date).
3. Click on the Save button when finished to submit the data and close the pop-up dialog.
Edit an Event 1. Click on the Edit option next to the desired Time Schedule option.
2. Make changes to the Event Name, Date(s), Time(s) or recurrences.
3. Click Save when finished.
Delete an Event Caution: This action is immediate and cannot be undone.
1. Click within the checkbox adjacent to a Schedule to select it.
2. Click the Edit option to view the Time Schedule Edit dialog and the list of Events.
3. Click within the checkbox adjacent to an EVENT to select it.
4. Click on the Delete Event button.
5. Click on the Save button to update the Schedule and close the dialog.
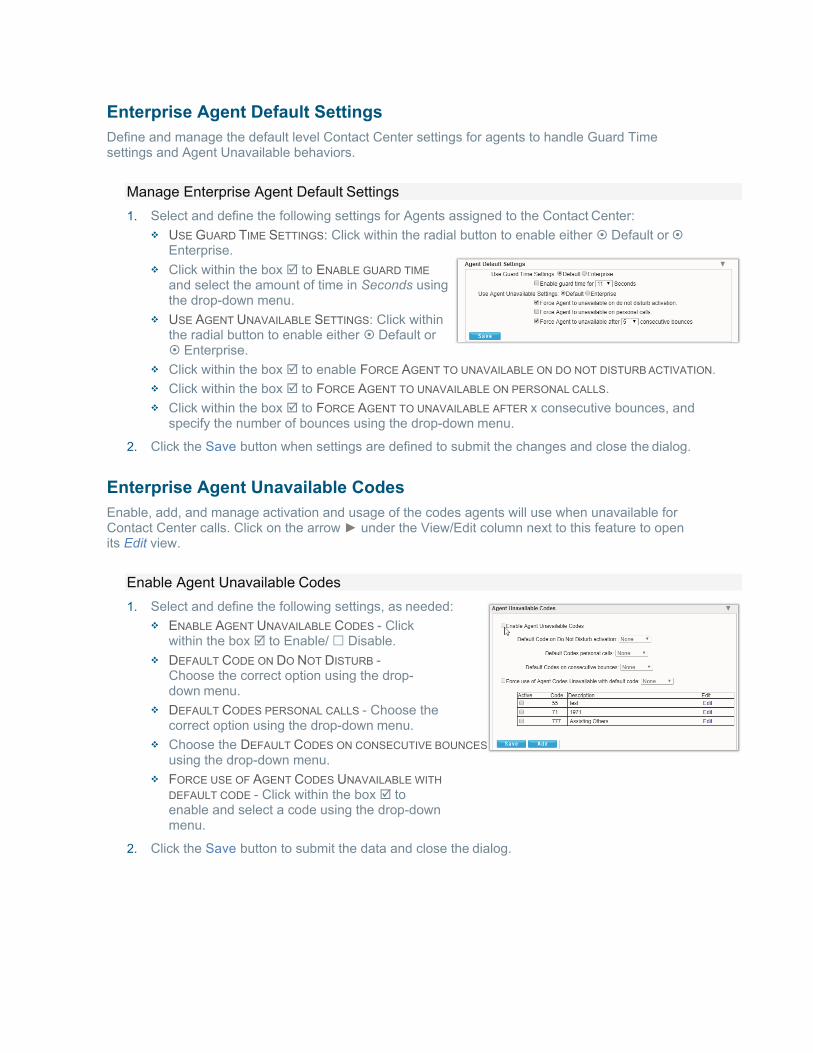
Enterprise Agent Default Settings Define and manage the default level Contact Center settings for agents to handle Guard Time settings and Agent Unavailable behaviors.
Manage Enterprise Agent Default Settings 1. Select and define the following settings for Agents assigned to the Contact Center:
USE GUARD TIME SETTINGS: Click within the radial button to enable either Default or Enterprise.
Click within the box to ENABLE GUARD TIMEand select the amount of time in Seconds usingthe drop-down menu.
USE AGENT UNAVAILABLE SETTINGS: Click withinthe radial button to enable either Default or Enterprise.
Click within the box to enable FORCE AGENT TO UNAVAILABLE ON DO NOT DISTURB ACTIVATION. Click within the box to FORCE AGENT TO UNAVAILABLE ON PERSONAL CALLS. Click within the box to FORCE AGENT TO UNAVAILABLE AFTER x consecutive bounces, and
specify the number of bounces using the drop-down menu.
2. Click the Save button when settings are defined to submit the changes and close the dialog.
Enterprise Agent Unavailable Codes Enable, add, and manage activation and usage of the codes agents will use when unavailable for Contact Center calls. Click on the arrow ► under the View/Edit column next to this feature to open its Edit view.
Enable Agent Unavailable Codes 1. Select and define the following settings, as needed:
ENABLE AGENT UNAVAILABLE CODES - Clickwithin the box to Enable/ Disable.
DEFAULT CODE ON DO NOT DISTURB -Choose the correct option using the drop-down menu.
DEFAULT CODES PERSONAL CALLS - Choose thecorrect option using the drop-down menu.
Choose the DEFAULT CODES ON CONSECUTIVE BOUNCESusing the drop-down menu.
FORCE USE OF AGENT CODES UNAVAILABLE WITHDEFAULT CODE - Click within the box toenable and select a code using the drop-downmenu.
2. Click the Save button to submit the data and close the dialog.
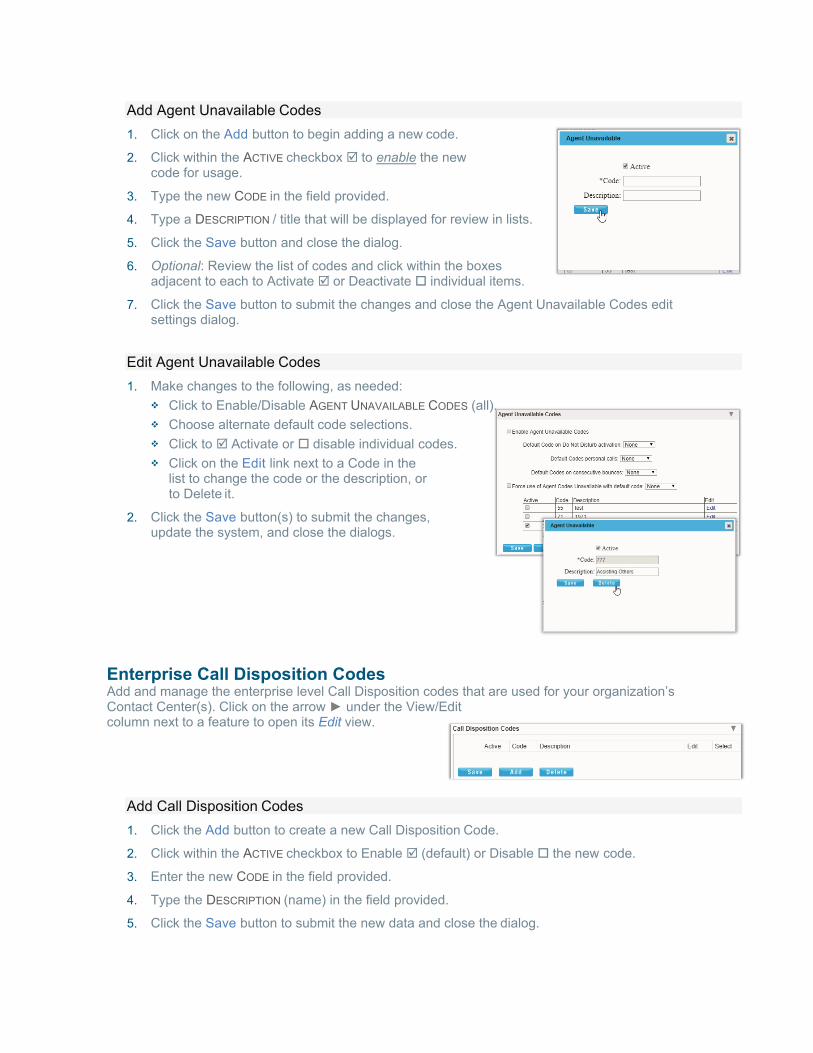
Add Agent Unavailable Codes 1. Click on the Add button to begin adding a new code.
2. Click within the ACTIVE checkbox to enable the newcode for usage.
3. Type the new CODE in the field provided.
4. Type a DESCRIPTION / title that will be displayed for review in lists.
5. Click the Save button and close the dialog.
6. Optional: Review the list of codes and click within the boxesadjacent to each to Activate or Deactivate individual items.
7. Click the Save button to submit the changes and close the Agent Unavailable Codes editsettings dialog.
Edit Agent Unavailable Codes 1. Make changes to the following, as needed:
Click to Enable/Disable AGENT UNAVAILABLE CODES (all). Choose alternate default code selections. Click to Activate or disable individual codes. Click on the Edit link next to a Code in the
list to change the code or the description, orto Delete it.
2. Click the Save button(s) to submit the changes,update the system, and close the dialogs.
Enterprise Call Disposition Codes Add and manage the enterprise level Call Disposition codes that are used for your organization’s Contact Center(s). Click on the arrow ► under the View/Edit column next to a feature to open its Edit view.
Add Call Disposition Codes 1. Click the Add button to create a new Call Disposition Code.
2. Click within the ACTIVE checkbox to Enable (default) or Disable the new code.
3. Enter the new CODE in the field provided.
4. Type the DESCRIPTION (name) in the field provided.
5. Click the Save button to submit the new data and close the dialog.
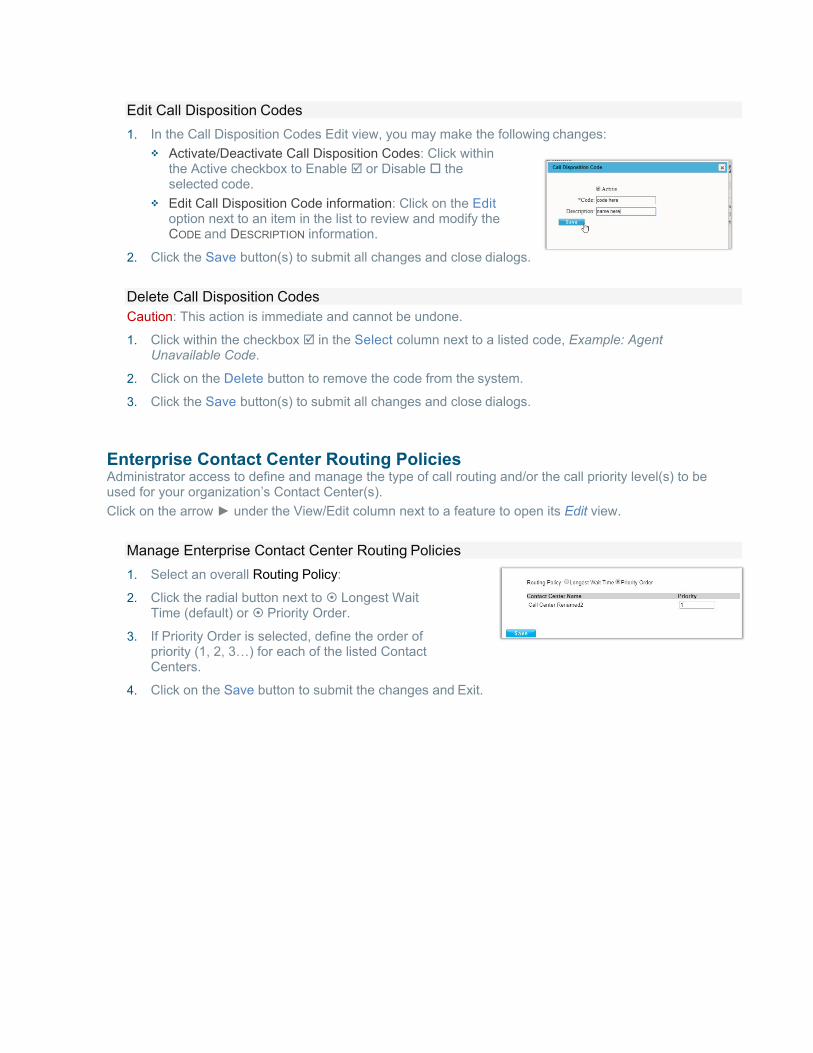
Edit Call Disposition Codes 1. In the Call Disposition Codes Edit view, you may make the following changes:
Activate/Deactivate Call Disposition Codes: Click withinthe Active checkbox to Enable or Disable theselected code.
Edit Call Disposition Code information: Click on the Editoption next to an item in the list to review and modify theCODE and DESCRIPTION information.
2. Click the Save button(s) to submit all changes and close dialogs.
Delete Call Disposition Codes Caution: This action is immediate and cannot be undone.
1. Click within the checkbox in the Select column next to a listed code, Example: AgentUnavailable Code.
2. Click on the Delete button to remove the code from the system.
3. Click the Save button(s) to submit all changes and close dialogs.
Enterprise Contact Center Routing Policies Administrator access to define and manage the type of call routing and/or the call priority level(s) to be used for your organization’s Contact Center(s). Click on the arrow ► under the View/Edit column next to a feature to open its Edit view.
Manage Enterprise Contact Center Routing Policies 1. Select an overall Routing Policy:
2. Click the radial button next to Longest WaitTime (default) or Priority Order.
3. If Priority Order is selected, define the order ofpriority (1, 2, 3…) for each of the listed ContactCenters.
4. Click on the Save button to submit the changes and Exit.
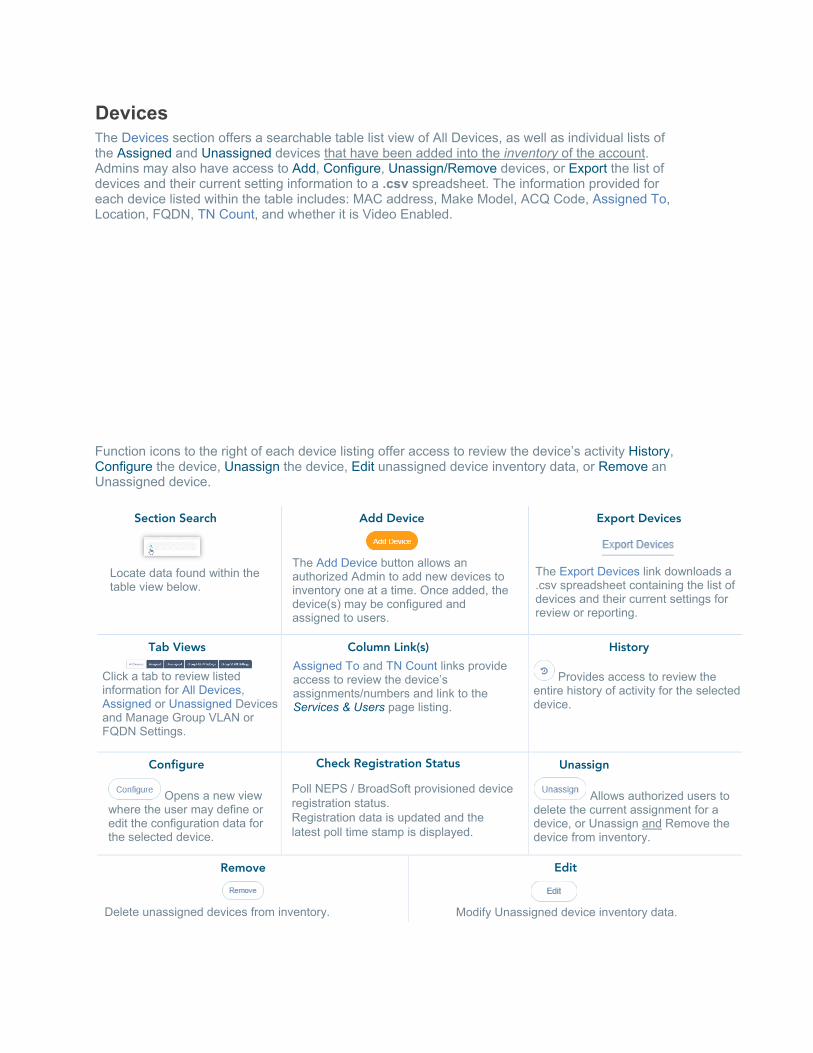
Devices The Devices section offers a searchable table list view of All Devices, as well as individual lists of the Assigned and Unassigned devices that have been added into the inventory of the account. Admins may also have access to Add, Configure, Unassign/Remove devices, or Export the list of devices and their current setting information to a .csv spreadsheet. The information provided for each device listed within the table includes: MAC address, Make Model, ACQ Code, Assigned To, Location, FQDN, TN Count, and whether it is Video Enabled.
Function icons to the right of each device listing offer access to review the device’s activity History, Configure the device, Unassign the device, Edit unassigned device inventory data, or Remove an Unassigned device.
Section Search
Locate data found within the table view below.
Add Device
The Add Device button allows an authorized Admin to add new devices to inventory one at a time. Once added, the device(s) may be configured and assigned to users.
Export Devices
The Export Devices link downloads a .csv spreadsheet containing the list of devices and their current settings for review or reporting.
Tab Views
Click a tab to review listed information for All Devices, Assigned or Unassigned Devices and Manage Group VLAN or FQDN Settings.
Column Link(s) Assigned To and TN Count links provide access to review the device’s assignments/numbers and link to the Services & Users page listing.
History
Provides access to review the entire history of activity for the selected device.
Configure
Opens a new view where the user may define or edit the configuration data for the selected device.
Check Registration Status
Poll NEPS / BroadSoft provisioned device registration status. Registration data is updated and the latest poll time stamp is displayed.
Unassign
Allows authorized users to delete the current assignment for a device, or Unassign and Remove the device from inventory.
Remove
Delete unassigned devices from inventory.
Edit
Modify Unassigned device inventory data.
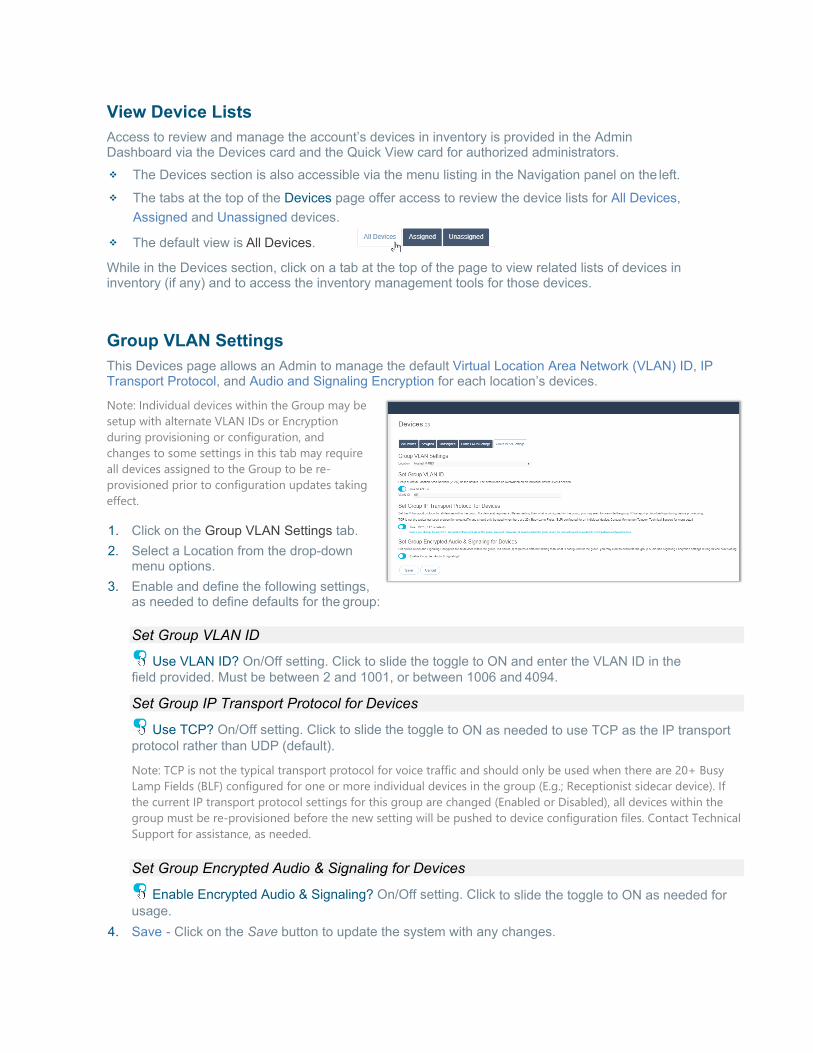
View Device Lists Access to review and manage the account’s devices in inventory is provided in the Admin Dashboard via the Devices card and the Quick View card for authorized administrators. The Devices section is also accessible via the menu listing in the Navigation panel on the left. The tabs at the top of the Devices page offer access to review the device lists for All Devices,
Assigned and Unassigned devices.
The default view is All Devices.
While in the Devices section, click on a tab at the top of the page to view related lists of devices in inventory (if any) and to access the inventory management tools for those devices.
Group VLAN Settings This Devices page allows an Admin to manage the default Virtual Location Area Network (VLAN) ID, IP Transport Protocol, and Audio and Signaling Encryption for each location’s devices.
Note: Individual devices within the Group may be setup with alternate VLAN IDs or Encryption during provisioning or configuration, and changes to some settings in this tab may require all devices assigned to the Group to be re-provisioned prior to configuration updates taking effect.
1. Click on the Group VLAN Settings tab.2. Select a Location from the drop-down
menu options.3. Enable and define the following settings,
as needed to define defaults for the group:
Set Group VLAN ID
Use VLAN ID? On/Off setting. Click to slide the toggle to ON and enter the VLAN ID in the field provided. Must be between 2 and 1001, or between 1006 and 4094.
Set Group IP Transport Protocol for Devices
Use TCP? On/Off setting. Click to slide the toggle to ON as needed to use TCP as the IP transport protocol rather than UDP (default).
Note: TCP is not the typical transport protocol for voice traffic and should only be used when there are 20+ Busy Lamp Fields (BLF) configured for one or more individual devices in the group (E.g.; Receptionist sidecar device). If the current IP transport protocol settings for this group are changed (Enabled or Disabled), all devices within the group must be re-provisioned before the new setting will be pushed to device configuration files. Contact Technical Support for assistance, as needed.
Set Group Encrypted Audio & Signaling for Devices
Enable Encrypted Audio & Signaling? On/Off setting. Click to slide the toggle to ON as needed for usage.
4. Save - Click on the Save button to update the system with any changes.
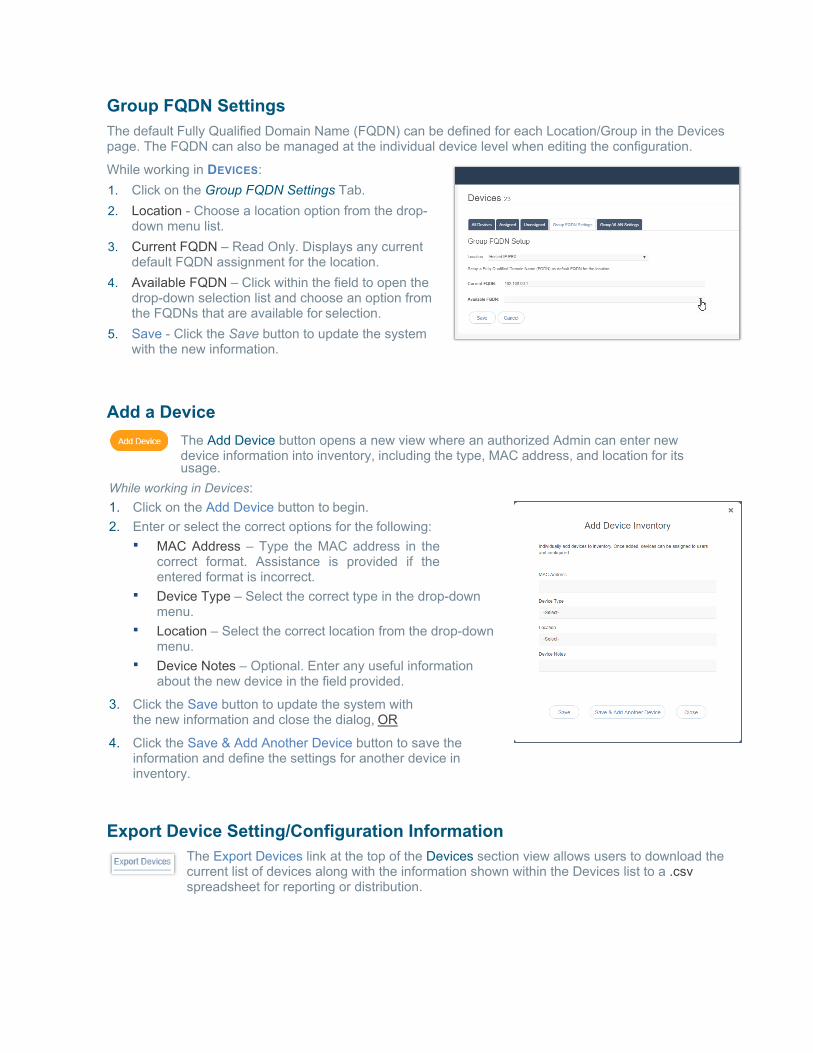
Group FQDN Settings The default Fully Qualified Domain Name (FQDN) can be defined for each Location/Group in the Devices page. The FQDN can also be managed at the individual device level when editing the configuration.
While working in DEVICES: 1. Click on the Group FQDN Settings Tab.2. Location - Choose a location option from the drop-
down menu list.3. Current FQDN – Read Only. Displays any current
default FQDN assignment for the location.4. Available FQDN – Click within the field to open the
drop-down selection list and choose an option fromthe FQDNs that are available for selection.
5. Save - Click the Save button to update the systemwith the new information.
Add a Device The Add Device button opens a new view where an authorized Admin can enter new device information into inventory, including the type, MAC address, and location for its usage.
While working in Devices: 1. Click on the Add Device button to begin.2. Enter or select the correct options for the following: MAC Address – Type the MAC address in the
correct format. Assistance is provided if theentered format is incorrect.
Device Type – Select the correct type in the drop-downmenu.
Location – Select the correct location from the drop-downmenu.
Device Notes – Optional. Enter any useful informationabout the new device in the field provided.
3. Click the Save button to update the system withthe new information and close the dialog, OR
4. Click the Save & Add Another Device button to save theinformation and define the settings for another device ininventory.
Export Device Setting/Configuration Information The Export Devices link at the top of the Devices section view allows users to download the current list of devices along with the information shown within the Devices list to a .csv spreadsheet for reporting or distribution.

View Device Activity History The History column of the Devices page offers quick button access to review the activity (provision, configuration, and assignment) history of each device. While working in Devices:
1. Click on the History button adjacent to a device to instruct the system to open a new dialog, and load the device’s activity history for review.
2. Click the Close button to exit the dialog and return to the Devices list view.
Check Registration Status The Check Registration Status link (top right of the main Devices page) polls NEPS and BroadSoft for the latest registration information, and updates the devices in the list with that new data, as needed. The date and time of the latest check is displayed to Admins as a reference. Note: The review and update process may take a few moments to complete.
Configure a Device The Configure button next to a device in the list opens a dialog that allows an authorized Admin to define the configuration or make modifications to the current configuration settings for a selected device. The information icons in the dialog offer helpful setting information.
Note: Device configuration options are dependent on the BroadWorks features and services that are enabled for use by the organization. While working in Devices:
1. Click on the Configure button adjacent to a Device in the list to open the Configure Device dialog.
2. Select or specify the device configuration options, as needed or required.(Note: The information displayed in darker gray fields is read-only.)
3. Define the Telephone Number, Label (extension), and service/feature behavior options for each Line.
4. Information about each service setting is provided by clicking on the adjacent icon.
5. Click Save when all necessary configuration information for the device has been defined.The system updates and the dialog closes.
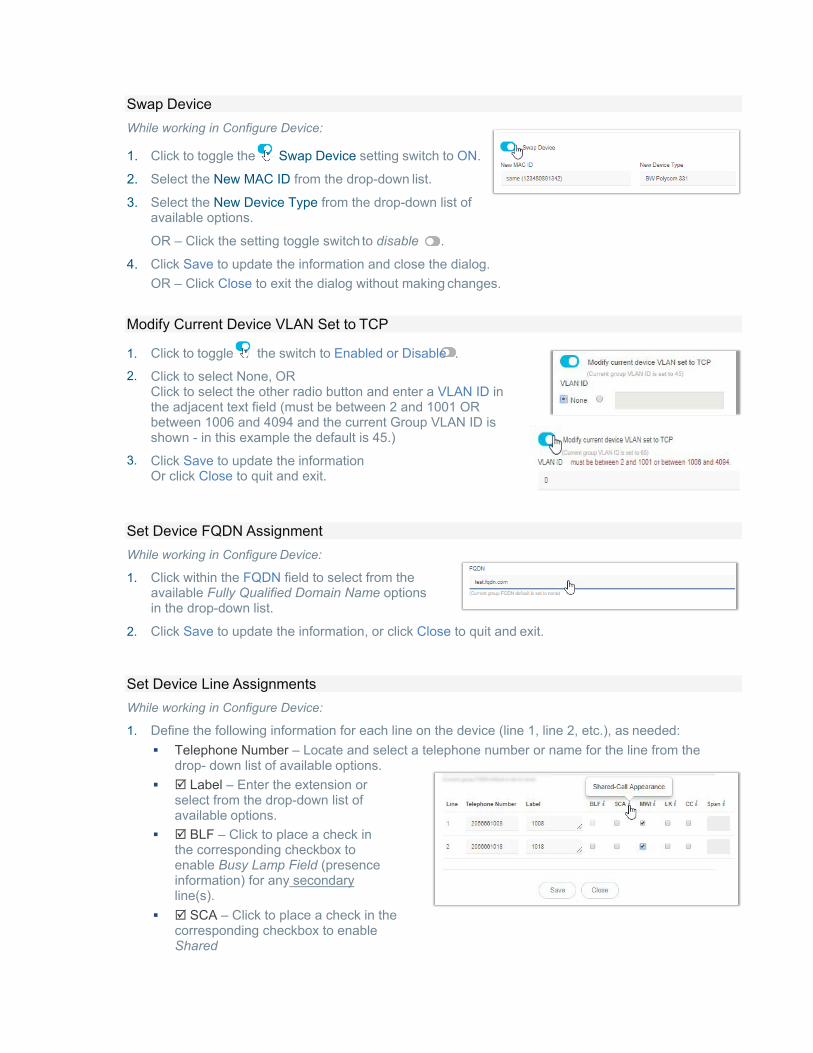
Swap Device While working in Configure Device:
1. Click to toggle the Swap Device setting switch to ON.
2. Select the New MAC ID from the drop-down list.
3. Select the New Device Type from the drop-down list ofavailable options.
OR – Click the setting toggle switch to disable .
4. Click Save to update the information and close the dialog.OR – Click Close to exit the dialog without making changes.
Modify Current Device VLAN Set to TCP
1. Click to toggle the switch to Enabled or Disable .2. Click to select None, OR
Click to select the other radio button and enter a VLAN ID inthe adjacent text field (must be between 2 and 1001 ORbetween 1006 and 4094 and the current Group VLAN ID isshown - in this example the default is 45.)
3. Click Save to update the informationOr click Close to quit and exit.
Set Device FQDN Assignment While working in Configure Device:
1. Click within the FQDN field to select from theavailable Fully Qualified Domain Name optionsin the drop-down list.
2. Click Save to update the information, or click Close to quit and exit.
Set Device Line Assignments While working in Configure Device:
1. Define the following information for each line on the device (line 1, line 2, etc.), as needed: Telephone Number – Locate and select a telephone number or name for the line from the
drop- down list of available options. Label – Enter the extension or
select from the drop-down list ofavailable options.
BLF – Click to place a check inthe corresponding checkbox toenable Busy Lamp Field (presenceinformation) for any secondaryline(s).
SCA – Click to place a check in thecorresponding checkbox to enableShared
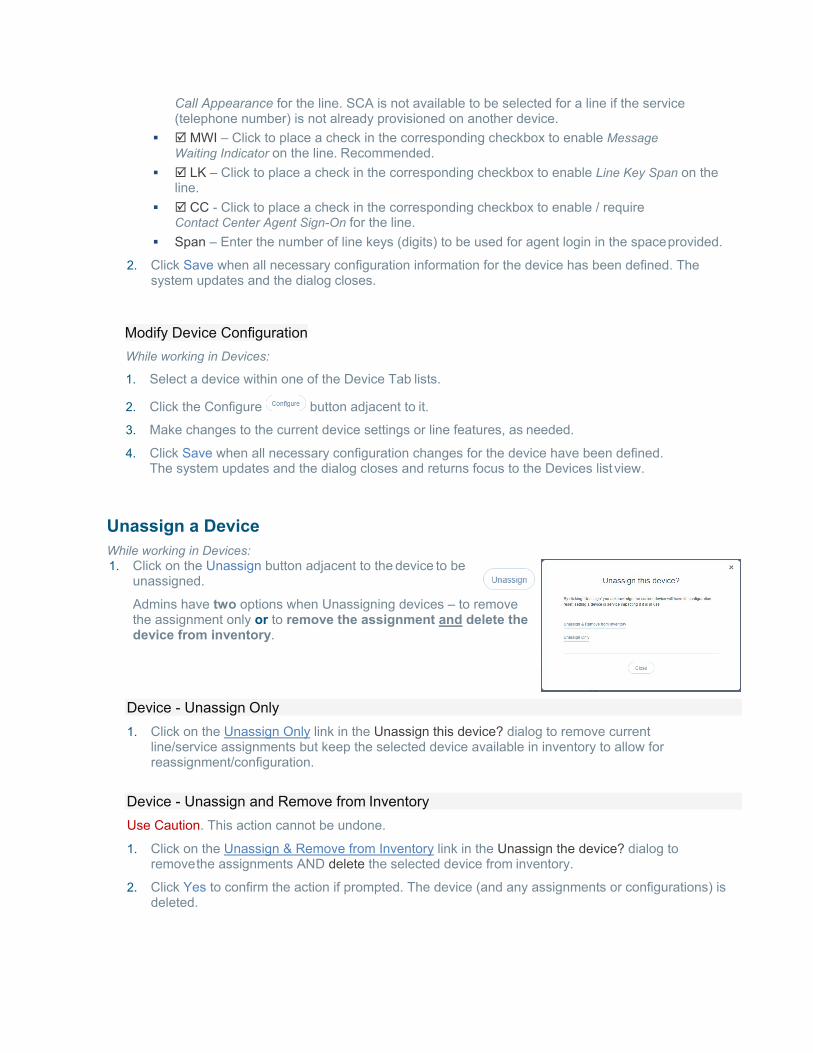
Call Appearance for the line. SCA is not available to be selected for a line if the service (telephone number) is not already provisioned on another device.
MWI – Click to place a check in the corresponding checkbox to enable MessageWaiting Indicator on the line. Recommended.
LK – Click to place a check in the corresponding checkbox to enable Line Key Span on theline.
CC - Click to place a check in the corresponding checkbox to enable / requireContact Center Agent Sign-On for the line.
Span – Enter the number of line keys (digits) to be used for agent login in the space provided.
2. Click Save when all necessary configuration information for the device has been defined. Thesystem updates and the dialog closes.
Modify Device Configuration While working in Devices:
1. Select a device within one of the Device Tab lists.
2. Click the Configure button adjacent to it.
3. Make changes to the current device settings or line features, as needed.
4. Click Save when all necessary configuration changes for the device have been defined.The system updates and the dialog closes and returns focus to the Devices list view.
Unassign a Device While working in Devices: 1. Click on the Unassign button adjacent to the device to be
unassigned.
Admins have two options when Unassigning devices – to removethe assignment only or to remove the assignment and delete thedevice from inventory.
Device - Unassign Only 1. Click on the Unassign Only link in the Unassign this device? dialog to remove current
line/service assignments but keep the selected device available in inventory to allow forreassignment/configuration.
Device - Unassign and Remove from Inventory Use Caution. This action cannot be undone.
1. Click on the Unassign & Remove from Inventory link in the Unassign the device? dialog toremove the assignments AND delete the selected device from inventory.
2. Click Yes to confirm the action if prompted. The device (and any assignments or configurations) isdeleted.
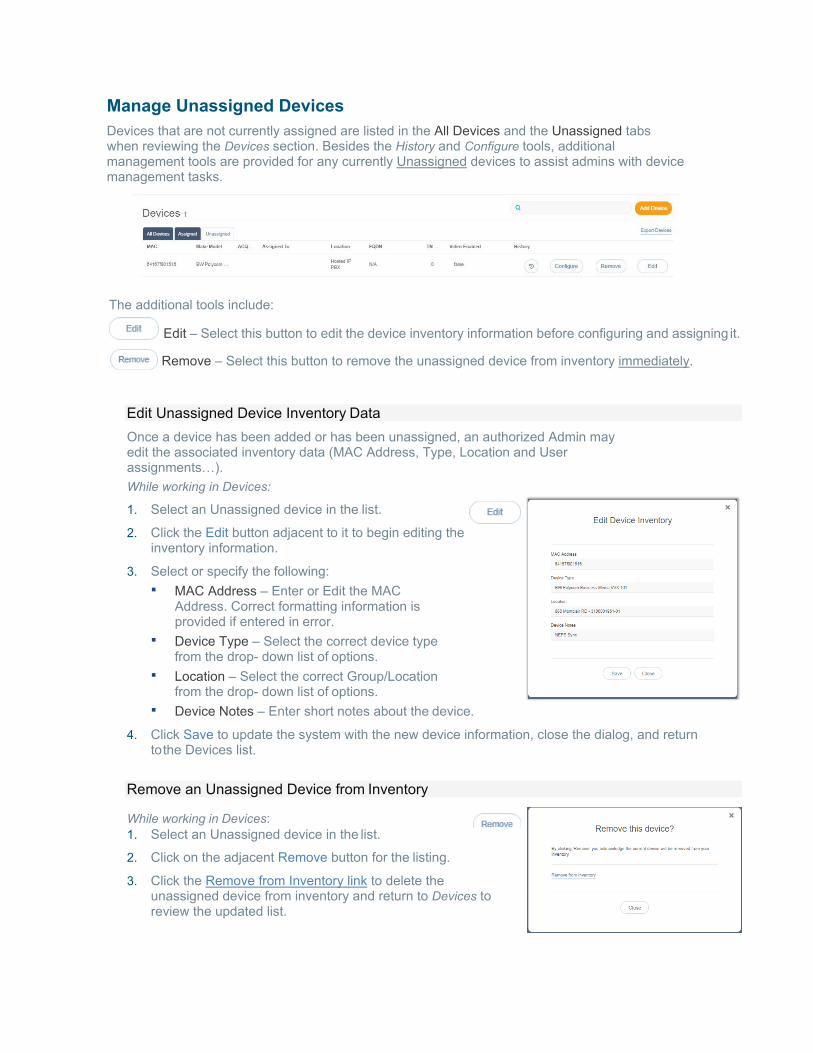
Manage Unassigned Devices Devices that are not currently assigned are listed in the All Devices and the Unassigned tabs when reviewing the Devices section. Besides the History and Configure tools, additional management tools are provided for any currently Unassigned devices to assist admins with device management tasks.
The additional tools include:
Edit – Select this button to edit the device inventory information before configuring and assigning it.
Remove – Select this button to remove the unassigned device from inventory immediately.
Edit Unassigned Device Inventory Data Once a device has been added or has been unassigned, an authorized Admin may edit the associated inventory data (MAC Address, Type, Location and User assignments…). While working in Devices:
1. Select an Unassigned device in the list.
2. Click the Edit button adjacent to it to begin editing theinventory information.
3. Select or specify the following: MAC Address – Enter or Edit the MAC
Address. Correct formatting information isprovided if entered in error.
Device Type – Select the correct device typefrom the drop- down list of options.
Location – Select the correct Group/Locationfrom the drop- down list of options.
Device Notes – Enter short notes about the device.
4. Click Save to update the system with the new device information, close the dialog, and returnto the Devices list.
Remove an Unassigned Device from Inventory
While working in Devices: 1. Select an Unassigned device in the list.
2. Click on the adjacent Remove button for the listing.
3. Click the Remove from Inventory link to delete theunassigned device from inventory and return to Devices toreview the updated list.
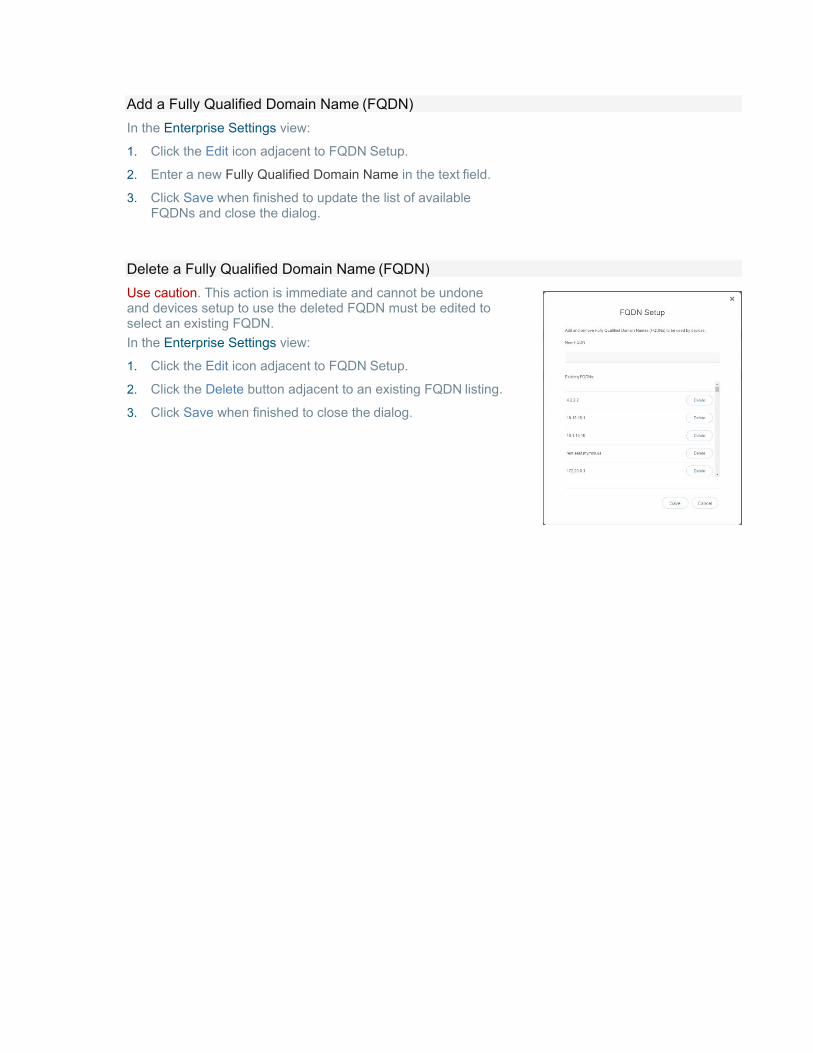
Add a Fully Qualified Domain Name (FQDN) In the Enterprise Settings view:
1. Click the Edit icon adjacent to FQDN Setup.
2. Enter a new Fully Qualified Domain Name in the text field.
3. Click Save when finished to update the list of availableFQDNs and close the dialog.
Delete a Fully Qualified Domain Name (FQDN) Use caution. This action is immediate and cannot be undone and devices setup to use the deleted FQDN must be edited to select an existing FQDN. In the Enterprise Settings view:
1. Click the Edit icon adjacent to FQDN Setup.
2. Click the Delete button adjacent to an existing FQDN listing.
3. Click Save when finished to close the dialog.
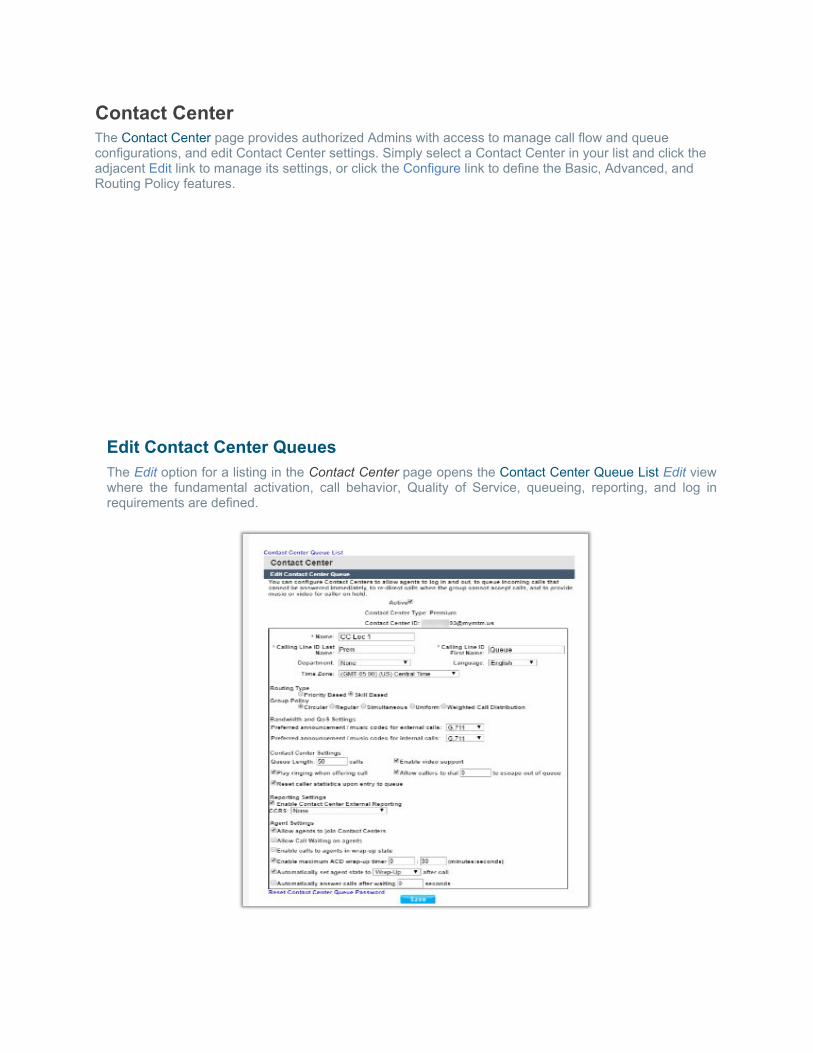
Contact Center The Contact Center page provides authorized Admins with access to manage call flow and queue configurations, and edit Contact Center settings. Simply select a Contact Center in your list and click the adjacent Edit link to manage its settings, or click the Configure link to define the Basic, Advanced, and Routing Policy features.
Edit Contact Center Queues The Edit option for a listing in the Contact Center page opens the Contact Center Queue List Edit view where the fundamental activation, call behavior, Quality of Service, queueing, reporting, and log in requirements are defined.
Edit Contact Center Basics 1. Make changes to the following, as needed.
Name: Type the name of the Contact Centerthat will display in lists and reports.
Calling Line ID: Type the Last Name and the First Name Department: Choose the appropriate
department from the drop-down menu. Language: Select a language from the drop-down menu. Time Zone: Choose the appropriate option
for the location of the contact center.
2. Click the Save button or continue to the next section.
Edit Contact Center Group Policy Settings 1. Group Policy Section: Define the following, as needed:
Circular: hunt agents in order listed on queueprofile, starting where the last call left off
Regular: Send calls to first available agent on list, always beginning at the top of the list. Simultaneous: Ring all agents at the same time; first user to answer handles the call. Uniform: Send calls to the agent that has been idle the longest. Weighted Call Distribution: (enables Skills-based routing) Distribute calls to idle agents
per their Contact Center profile skill percentage assignments.
2. Click the Save button, or continue to the next section…
Edit Contact Center Bandwidth and QoS Settings 1. Select from the following setting options, as needed:
Preferred announcement / music codec for external calls: Use the drop-downmenu to select from None, G.711, G.726, G.729 or AMR
Preferred announcement / music codec for internal calls: Use the drop-downmenu to select from None, G.711, G.726, G.729 or AMR
2. Click the Save button to submit all changes and close the dialog - or continue to the next section.
Edit Contact Center Settings 1. Select and/or define the following Setting options, as needed:
Queue Length calls: Enter the minimum number of calls for the queue to trigger. Enable video support: Click within the checkbox to enable/ disable Play Ringing when offering call: Click within the checkbox to enable/ disable. Allow callers to dial to escape out of queue: Enter the digit(s) a caller may dial to exit the queue. Reset caller statistics upon entry to queue: Click within the checkbox to enable/ disable.
2. Click the Save button to submit all changes and close the dialog - or continue to the next section.
Edit Contact Center Reporting 1. Select or define the following Reporting options, as needed:
Enable Contact Center External Reporting: Click within the checkbox to enable/ disable.
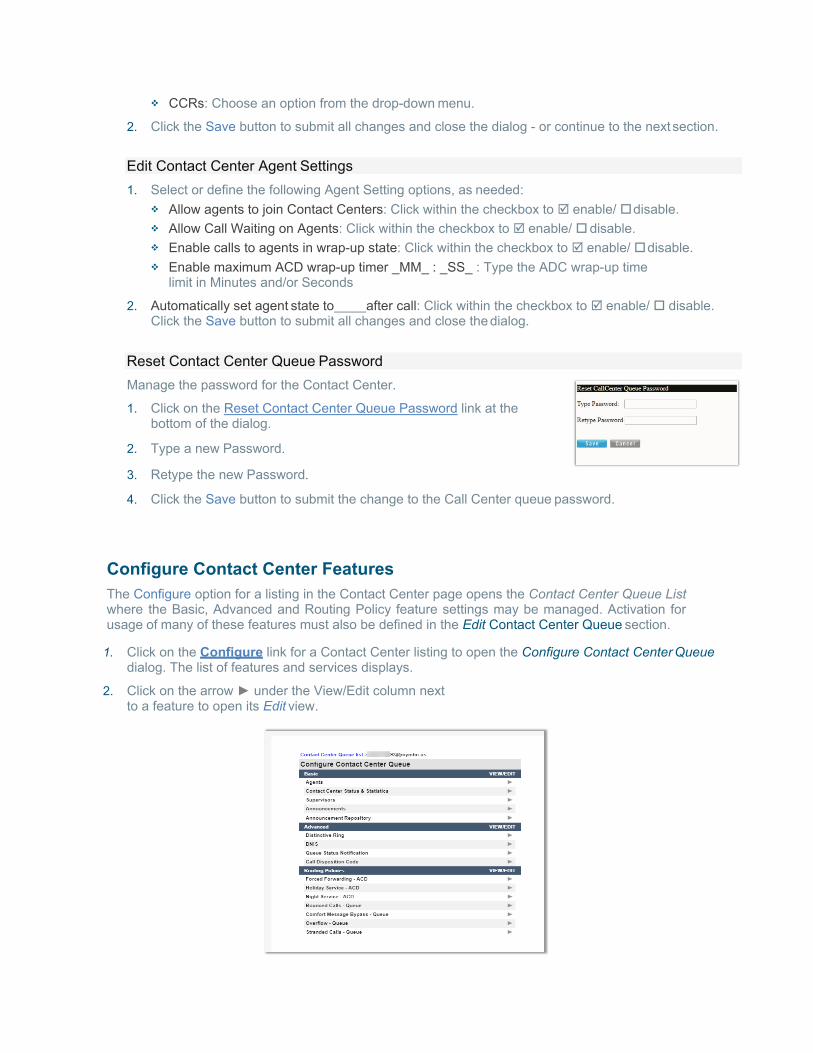
CCRs: Choose an option from the drop-down menu.
2. Click the Save button to submit all changes and close the dialog - or continue to the next section.
Edit Contact Center Agent Settings 1. Select or define the following Agent Setting options, as needed:
Allow agents to join Contact Centers: Click within the checkbox to enable/ disable. Allow Call Waiting on Agents: Click within the checkbox to enable/ disable. Enable calls to agents in wrap-up state: Click within the checkbox to enable/ disable. Enable maximum ACD wrap-up timer _MM_ : _SS_ : Type the ADC wrap-up time
limit in Minutes and/or Seconds
2. Automatically set agent state to after call: Click within the checkbox to enable/ disable. Click the Save button to submit all changes and close the dialog.
Reset Contact Center Queue Password Manage the password for the Contact Center.
1. Click on the Reset Contact Center Queue Password link at thebottom of the dialog.
2. Type a new Password.
3. Retype the new Password.
4. Click the Save button to submit the change to the Call Center queue password.
Configure Contact Center Features The Configure option for a listing in the Contact Center page opens the Contact Center Queue List where the Basic, Advanced and Routing Policy feature settings may be managed. Activation for usage of many of these features must also be defined in the Edit Contact Center Queue section.
1. Click on the Configure link for a Contact Center listing to open the Configure Contact Center Queuedialog. The list of features and services displays.
2. Click on the arrow ► under the View/Edit column nextto a feature to open its Edit view.
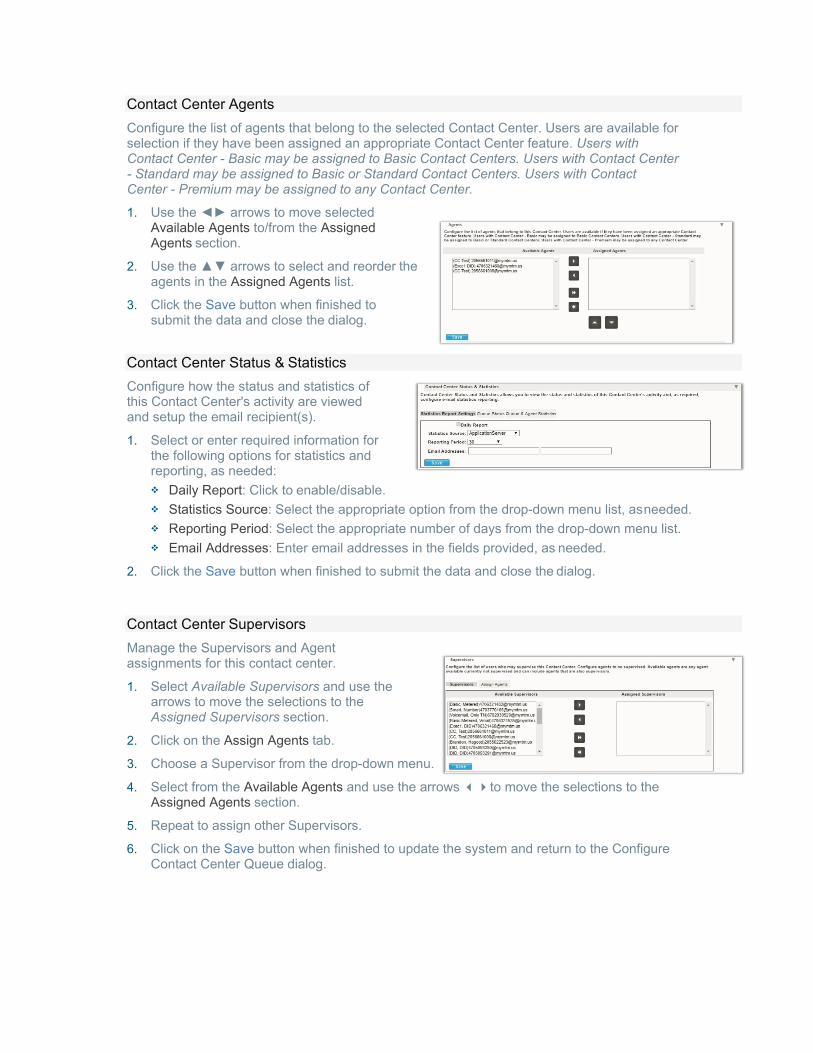
Contact Center Agents Configure the list of agents that belong to the selected Contact Center. Users are available for selection if they have been assigned an appropriate Contact Center feature. Users with Contact Center - Basic may be assigned to Basic Contact Centers. Users with Contact Center - Standard may be assigned to Basic or Standard Contact Centers. Users with ContactCenter - Premium may be assigned to any Contact Center.
1. Use the ◄► arrows to move selectedAvailable Agents to/from the AssignedAgents section.
2. Use the ▲▼ arrows to select and reorder theagents in the Assigned Agents list.
3. Click the Save button when finished tosubmit the data and close the dialog.
Contact Center Status & Statistics Configure how the status and statistics of this Contact Center's activity are viewed and setup the email recipient(s).
1. Select or enter required information forthe following options for statistics andreporting, as needed: Daily Report: Click to enable/disable. Statistics Source: Select the appropriate option from the drop-down menu list, as needed. Reporting Period: Select the appropriate number of days from the drop-down menu list. Email Addresses: Enter email addresses in the fields provided, as needed.
2. Click the Save button when finished to submit the data and close the dialog.
Contact Center Supervisors Manage the Supervisors and Agent assignments for this contact center.
1. Select Available Supervisors and use thearrows to move the selections to theAssigned Supervisors section.
2. Click on the Assign Agents tab.
3. Choose a Supervisor from the drop-down menu.
4. Select from the Available Agents and use the arrows to move the selections to theAssigned Agents section.
5. Repeat to assign other Supervisors.
6. Click on the Save button when finished to update the system and return to the ConfigureContact Center Queue dialog.
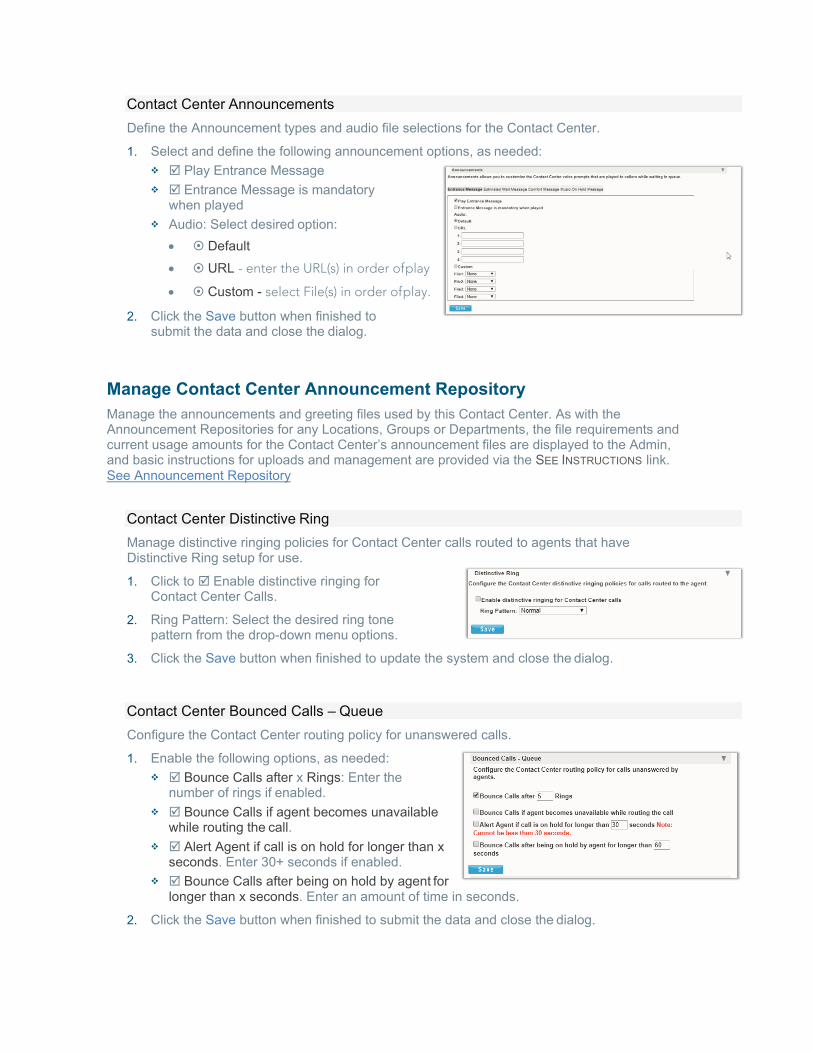
Contact Center Announcements Define the Announcement types and audio file selections for the Contact Center.
1. Select and define the following announcement options, as needed: Play Entrance Message Entrance Message is mandatory
when played Audio: Select desired option:
• Default• URL - enter the URL(s) in order of play
• Custom - select File(s) in order of play.
2. Click the Save button when finished tosubmit the data and close the dialog.
Manage Contact Center Announcement Repository Manage the announcements and greeting files used by this Contact Center. As with the Announcement Repositories for any Locations, Groups or Departments, the file requirements and current usage amounts for the Contact Center’s announcement files are displayed to the Admin, and basic instructions for uploads and management are provided via the SEE INSTRUCTIONS link. See Announcement Repository
Contact Center Distinctive Ring Manage distinctive ringing policies for Contact Center calls routed to agents that have Distinctive Ring setup for use.
1. Click to Enable distinctive ringing forContact Center Calls.
2. Ring Pattern: Select the desired ring tonepattern from the drop-down menu options.
3. Click the Save button when finished to update the system and close the dialog.
Contact Center Bounced Calls – Queue Configure the Contact Center routing policy for unanswered calls.
1. Enable the following options, as needed: Bounce Calls after x Rings: Enter the
number of rings if enabled. Bounce Calls if agent becomes unavailable
while routing the call. Alert Agent if call is on hold for longer than x
seconds. Enter 30+ seconds if enabled. Bounce Calls after being on hold by agent for
longer than x seconds. Enter an amount of time in seconds.
2. Click the Save button when finished to submit the data and close the dialog.
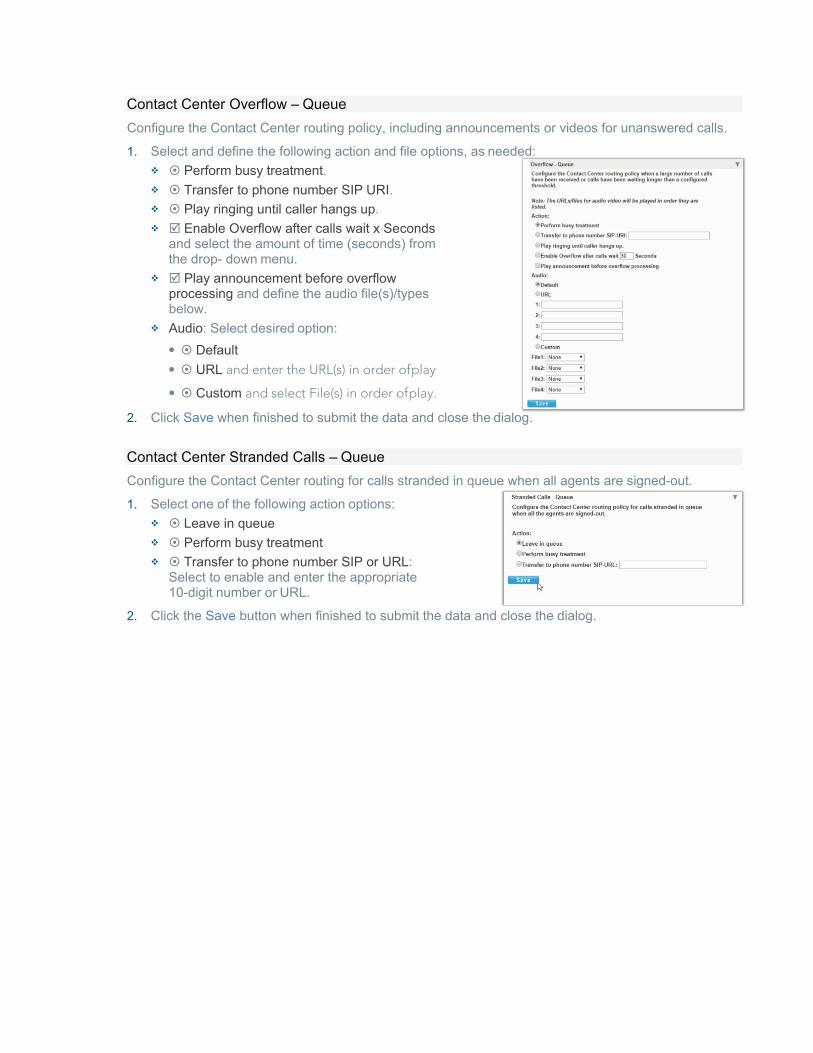
Contact Center Overflow – Queue Configure the Contact Center routing policy, including announcements or videos for unanswered calls.
1. Select and define the following action and file options, as needed: Perform busy treatment. Transfer to phone number SIP URI. Play ringing until caller hangs up. Enable Overflow after calls wait x Seconds
and select the amount of time (seconds) fromthe drop- down menu.
Play announcement before overflowprocessing and define the audio file(s)/typesbelow.
Audio: Select desired option:• Default• URL and enter the URL(s) in order of play
• Custom and select File(s) in order of play.
2. Click Save when finished to submit the data and close the dialog.
Contact Center Stranded Calls – Queue Configure the Contact Center routing for calls stranded in queue when all agents are signed-out.
1. Select one of the following action options: Leave in queue Perform busy treatment Transfer to phone number SIP or URL:
Select to enable and enter the appropriate10-digit number or URL.
2. Click the Save button when finished to submit the data and close the dialog.

Service Changes The Service Changes section of the Logix Cloud Services Portal is an advanced
Administration tool which requires additional access permissions to be in place in order for the user to see and work with the tools it provides.
The Service Changes page provides a searchable list of the current service orders for the account and the current status of each. Tools are provided to view services by Location, Add Services, Manage User Add-Ons, View All Service Changes (historical activity), Edit and Terminate incomplete orders, or Delete open service change orders. Information and useful system notifications are provided throughout this area to assist Super Admins with Service Change tasks.
The primary Service Change tools listed at the top of the page include:
Select the Location to be managed/reviewed from the drop-down selection tool above the tabs and then choose a tab or action button to begin performing tasks.
Opens the Add Service view to allow selection and configuration of new service requests/orders.
Opens the Manage User Add-ons view of the current Add-on assignments, sortable by location and Un-Assign Add-ons to allow reassignment/Change.
Opens the All Service Changes view to display a sortable list of all service change requests that have been entered and their status (Open, Submitted, Discarded, Processing). Context sensitive tools are provided to View, Edit, Delete and/or Terminate, based on the current status of the order.
The default view when the Service Changes page displays is Open Requests for All Locations. Information is provided in a sortable table view. Tabs above the table offer access to all of the service change areas and the tools to perform related actions and tasks.
The Change management areas are only non-billable and may include sections like:
Open Requests, Caller ID [CNAM], Block, Extension, and Virtual Terminating Number.
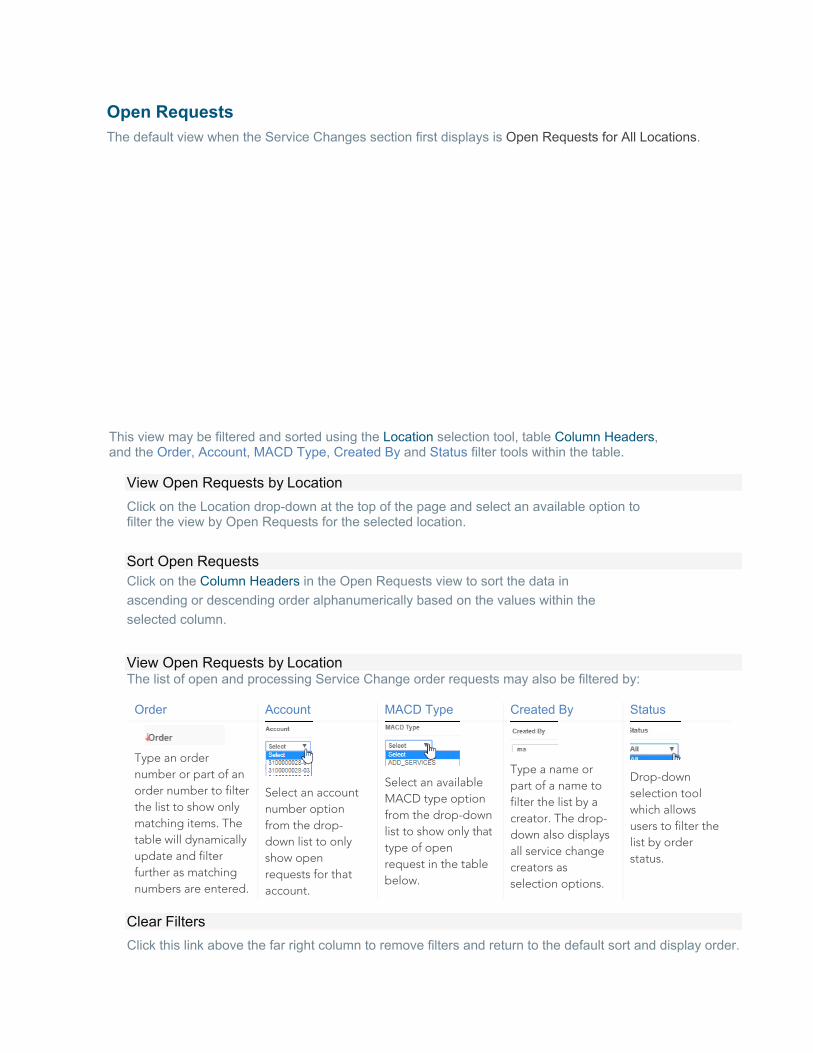
Open Requests The default view when the Service Changes section first displays is Open Requests for All Locations.
This view may be filtered and sorted using the Location selection tool, table Column Headers, and the Order, Account, MACD Type, Created By and Status filter tools within the table.
View Open Requests by Location Click on the Location drop-down at the top of the page and select an available option to filter the view by Open Requests for the selected location.
Sort Open Requests Click on the Column Headers in the Open Requests view to sort the data in ascending or descending order alphanumerically based on the values within the selected column.
View Open Requests by Location The list of open and processing Service Change order requests may also be filtered by:
Order Account MACD Type Created By Status
Type an order number or part of an order number to filter the list to show only matching items. The table will dynamically update and filter further as matching numbers are entered.
Select an account number option from the drop- down list to only show open requests for that account.
Select an available MACD type option from the drop-down list to show only that type of open request in the table below.
Type a name or part of a name to filter the list by a creator. The drop- down also displays all service change creators as selection options.
Drop-down selection tool which allows users to filter the list by order status.
Clear Filters Click this link above the far right column to remove filters and return to the default sort and display order.
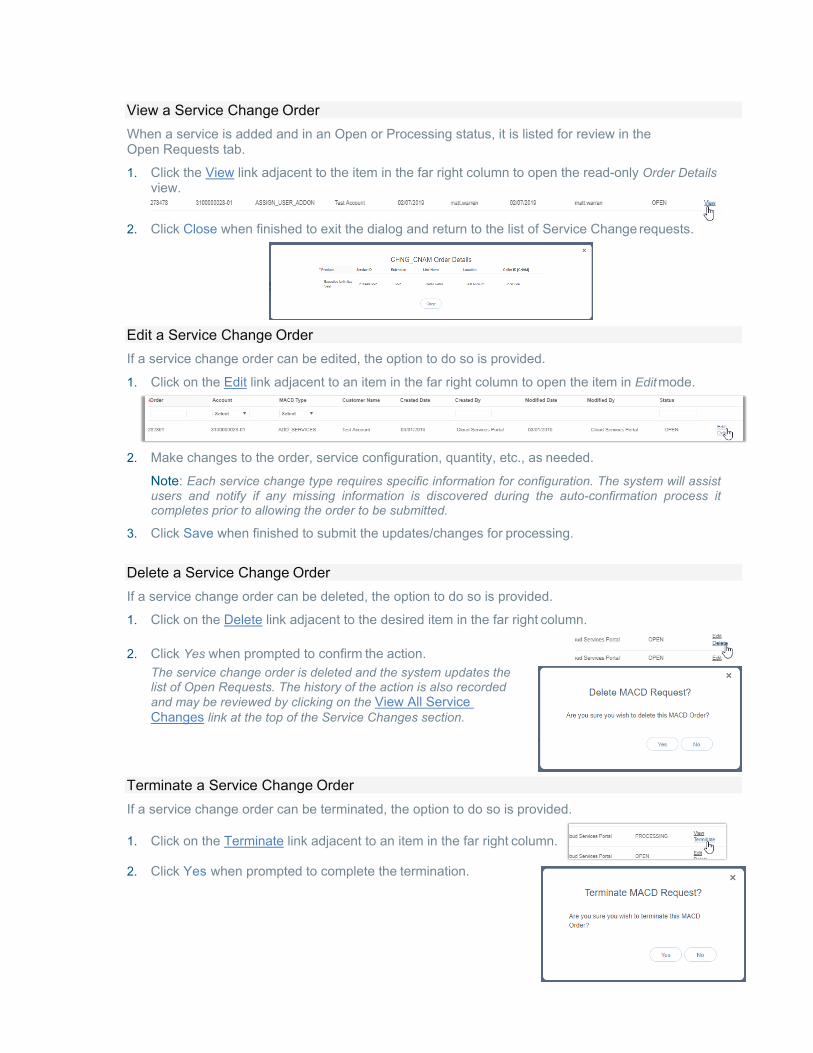
View a Service Change Order When a service is added and in an Open or Processing status, it is listed for review in the Open Requests tab.
1. Click the View link adjacent to the item in the far right column to open the read-only Order Detailsview.
2. Click Close when finished to exit the dialog and return to the list of Service Change requests.
Edit a Service Change Order If a service change order can be edited, the option to do so is provided.
1. Click on the Edit link adjacent to an item in the far right column to open the item in Edit mode.
2. Make changes to the order, service configuration, quantity, etc., as needed.
Note: Each service change type requires specific information for configuration. The system will assistusers and notify if any missing information is discovered during the auto-confirmation process itcompletes prior to allowing the order to be submitted.
3. Click Save when finished to submit the updates/changes for processing.
Delete a Service Change Order If a service change order can be deleted, the option to do so is provided.
1. Click on the Delete link adjacent to the desired item in the far right column.
2. Click Yes when prompted to confirm the action.The service change order is deleted and the system updates thelist of Open Requests. The history of the action is also recordedand may be reviewed by clicking on the View All ServiceChanges link at the top of the Service Changes section.
Terminate a Service Change Order If a service change order can be terminated, the option to do so is provided.
1. Click on the Terminate link adjacent to an item in the far right column.
2. Click Yes when prompted to complete the termination.

Add Services Where enabled, this button offers Advanced access to create and submit a new service order for a location on the account.
Add a Service Change Order 1. Click the Add Services button to
open the Add Services view.
2. Choose a Location from thedrop- down selection tool.
3. Choose the desired service by:a. Enter a term in the
Search tool above thelist.
b. Scroll through thelist of availableitems.
4. Click the Add button adjacent to adesired item to select it.The selected item is displayed at thetop of the page to allow forconfiguration.Most service change types requirespecific configuration information inorder to submit for processing.Note: At any time, users may stop theadd process.Click Remove to delete the item from the order and click Yes to confirm and re-select something else; or clickCancel to discard the order and click Yes to confirm.
5. Click Configure to view configuration details.
6. Enter all required and any useful information for configuration of the selected item.
7. Click Save. The system will review and then either provide a Success! message, or indicate thatthere is missing/required configuration information, and will provide an opportunity to revise andSave again.
8. Repeat steps 3 – 7 for any other services to be added to this location in this order.
9. Click Continue to proceed to order submission.
10. Enter or select an appropriatebegin Service Date (today ishighlighted).
11. Click Submit Order whenfinished to send the newservice order and view theOrder Confirmation page.
During validation, the system will note any current services or products that are inconsistent or incompatible with a new order selection, as well as those that already exist and do not need to be re-ordered, and then inform the user.
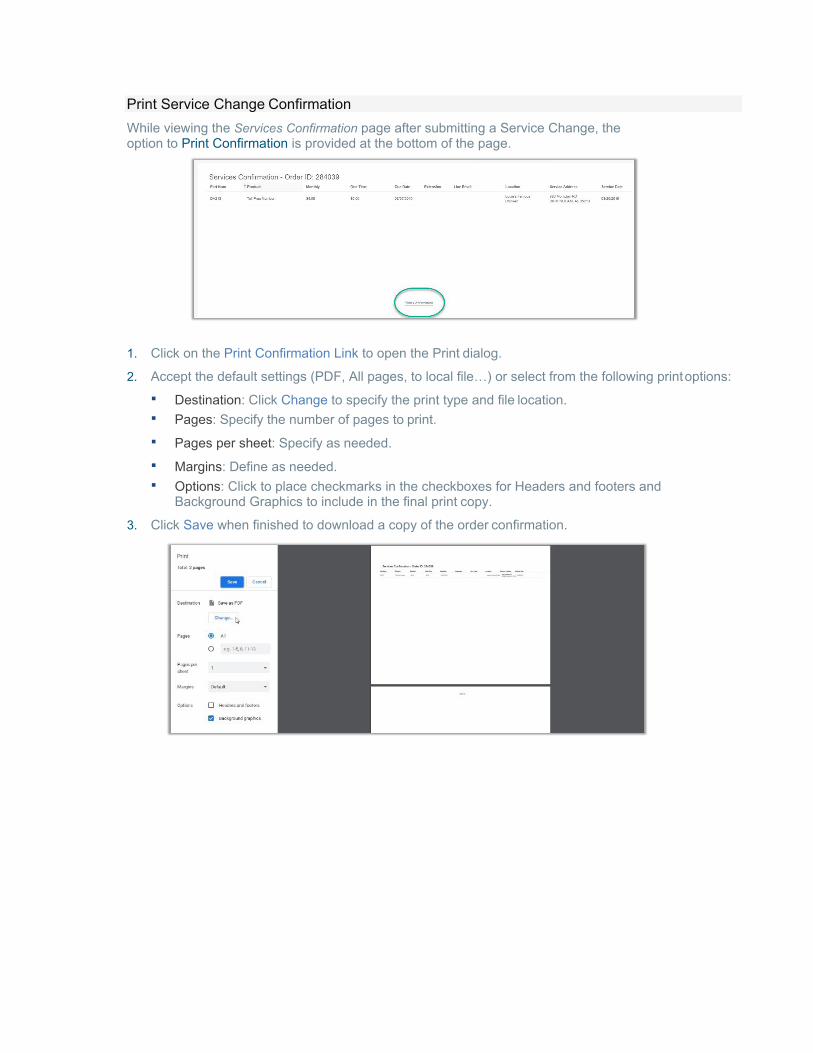
Print Service Change Confirmation While viewing the Services Confirmation page after submitting a Service Change, the option to Print Confirmation is provided at the bottom of the page.
1. Click on the Print Confirmation Link to open the Print dialog.
2. Accept the default settings (PDF, All pages, to local file…) or select from the following print options: Destination: Click Change to specify the print type and file location. Pages: Specify the number of pages to print. Pages per sheet: Specify as needed. Margins: Define as needed. Options: Click to place checkmarks in the checkboxes for Headers and footers and
Background Graphics to include in the final print copy.
3. Click Save when finished to download a copy of the order confirmation.
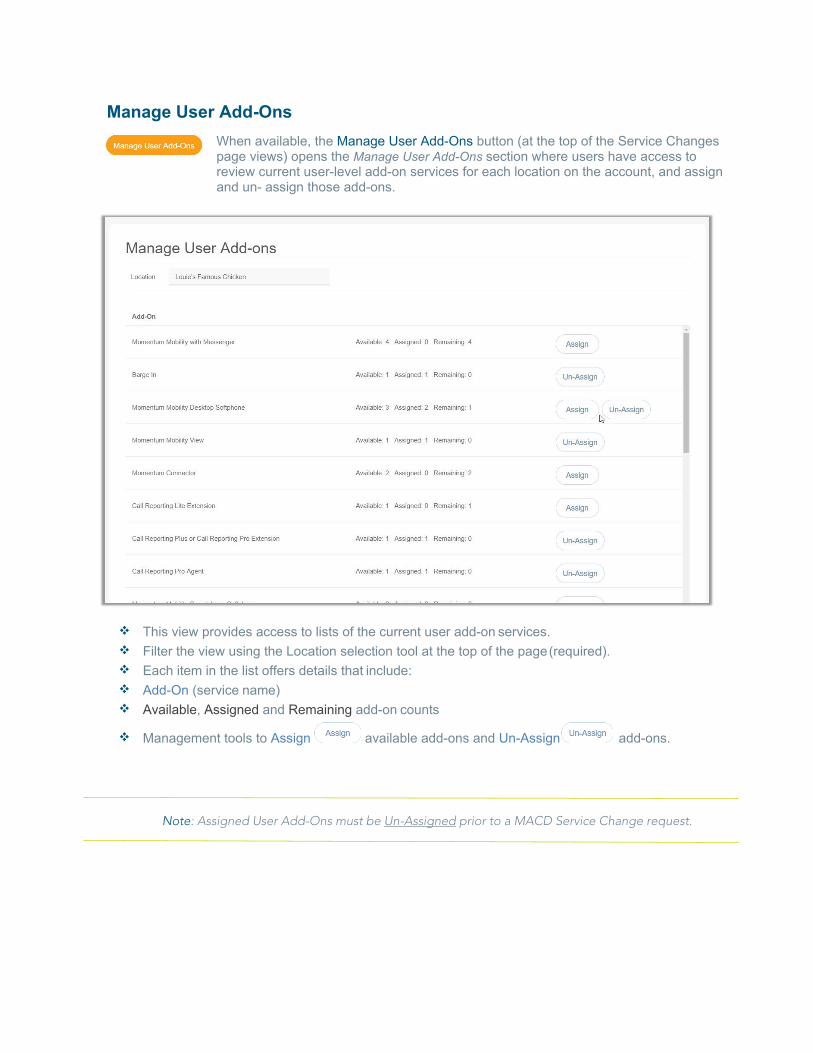
Manage User Add-Ons When available, the Manage User Add-Ons button (at the top of the Service Changes page views) opens the Manage User Add-Ons section where users have access to review current user-level add-on services for each location on the account, and assign and un- assign those add-ons.
This view provides access to lists of the current user add-on services. Filter the view using the Location selection tool at the top of the page (required). Each item in the list offers details that include: Add-On (service name) Available, Assigned and Remaining add-on counts
Management tools to Assign available add-ons and Un-Assign add-ons.
Note: Assigned User Add-Ons must be Un-Assigned prior to a MACD Service Change request.
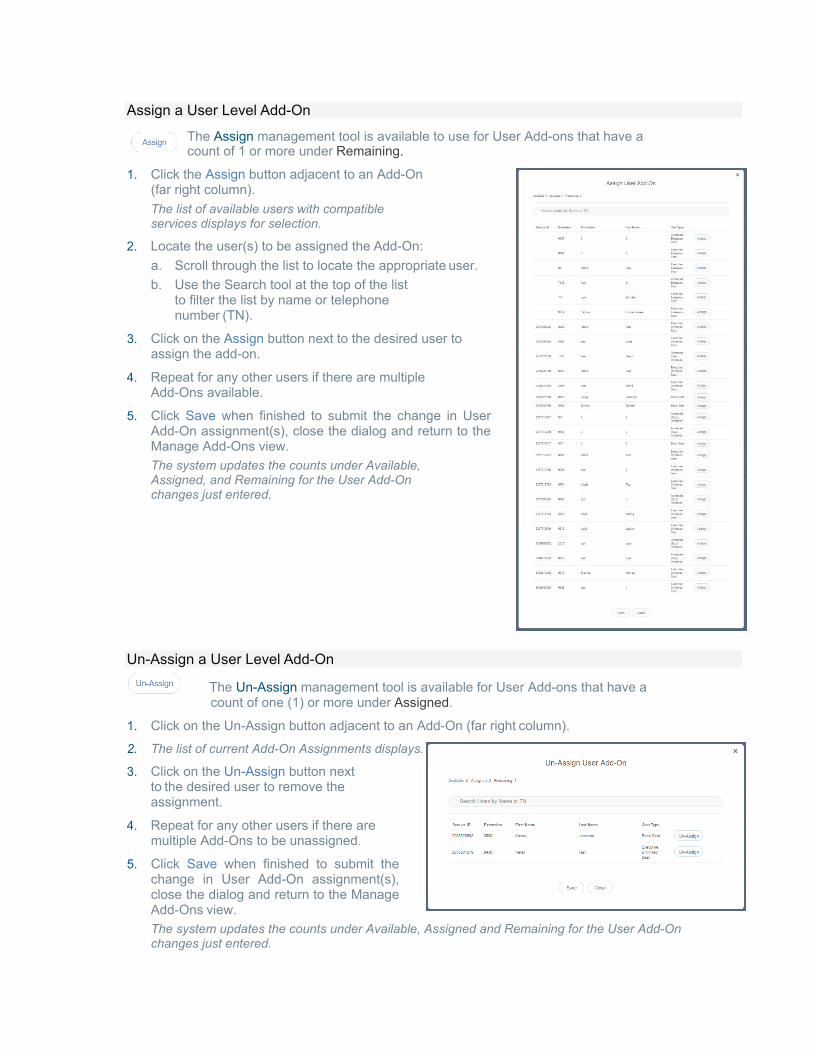
Assign a User Level Add-On
The Assign management tool is available to use for User Add-ons that have a count of 1 or more under Remaining.
1. Click the Assign button adjacent to an Add-On(far right column).The list of available users with compatibleservices displays for selection.
2. Locate the user(s) to be assigned the Add-On:a. Scroll through the list to locate the appropriate user.b. Use the Search tool at the top of the list
to filter the list by name or telephonenumber (TN).
3. Click on the Assign button next to the desired user toassign the add-on.
4. Repeat for any other users if there are multipleAdd-Ons available.
5. Click Save when finished to submit the change in UserAdd-On assignment(s), close the dialog and return to theManage Add-Ons view.The system updates the counts under Available,Assigned, and Remaining for the User Add-Onchanges just entered.
Un-Assign a User Level Add-On
The Un-Assign management tool is available for User Add-ons that have a count of one (1) or more under Assigned.
1. Click on the Un-Assign button adjacent to an Add-On (far right column).
2. The list of current Add-On Assignments displays.
3. Click on the Un-Assign button nextto the desired user to remove theassignment.
4. Repeat for any other users if there aremultiple Add-Ons to be unassigned.
5. Click Save when finished to submit thechange in User Add-On assignment(s),close the dialog and return to the ManageAdd-Ons view.The system updates the counts under Available, Assigned and Remaining for the User Add-Onchanges just entered.
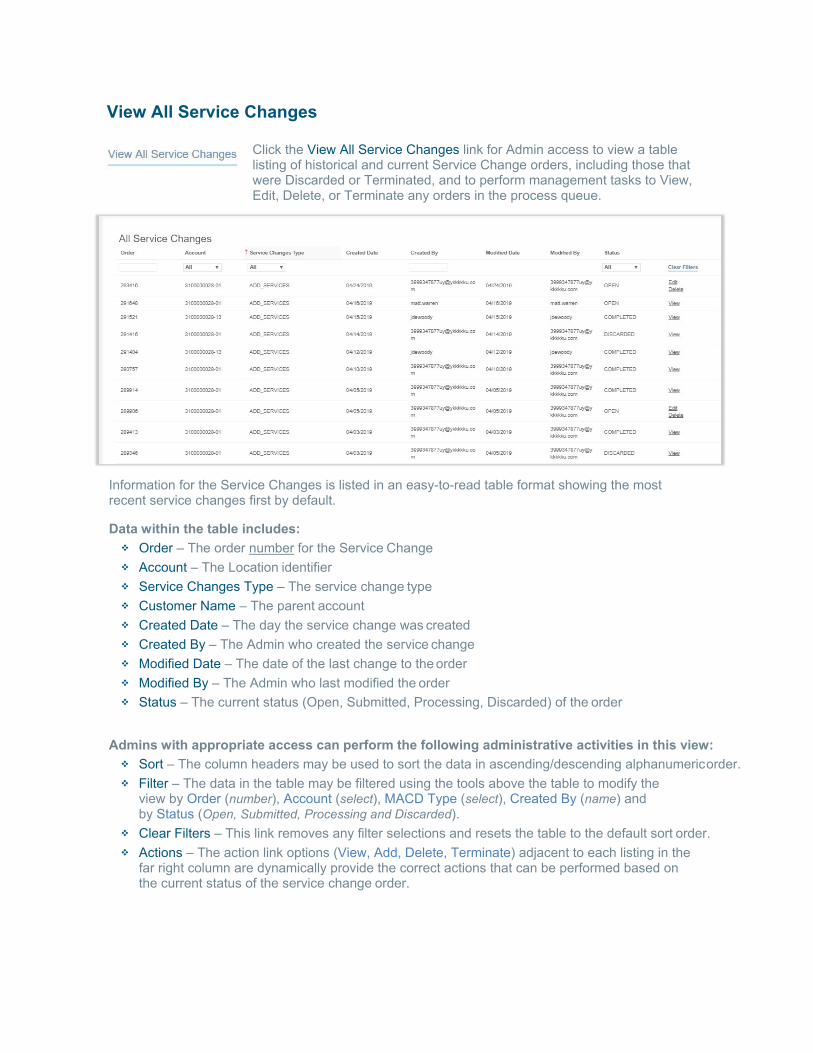
View All Service Changes
Click the View All Service Changes link for Admin access to view a table listing of historical and current Service Change orders, including those that were Discarded or Terminated, and to perform management tasks to View, Edit, Delete, or Terminate any orders in the process queue.
Information for the Service Changes is listed in an easy-to-read table format showing the most recent service changes first by default.
Data within the table includes: Order – The order number for the Service Change Account – The Location identifier Service Changes Type – The service change type Customer Name – The parent account Created Date – The day the service change was created Created By – The Admin who created the service change Modified Date – The date of the last change to the order Modified By – The Admin who last modified the order Status – The current status (Open, Submitted, Processing, Discarded) of the order
Admins with appropriate access can perform the following administrative activities in this view: Sort – The column headers may be used to sort the data in ascending/descending alphanumeric order. Filter – The data in the table may be filtered using the tools above the table to modify the
view by Order (number), Account (select), MACD Type (select), Created By (name) andby Status (Open, Submitted, Processing and Discarded).
Clear Filters – This link removes any filter selections and resets the table to the default sort order. Actions – The action link options (View, Add, Delete, Terminate) adjacent to each listing in the
far right column are dynamically provide the correct actions that can be performed based onthe current status of the service change order.

View Service Change Details 1. Click View next to an item to review the read-only information about the service change order.
2. Click Cancel when finished.
Edit an Active Service Change This action is available when editing is permissible.
1. Click on the Edit link next to the desired item to open the Add Services view where editing ispermitted.
2. Click the Configure button to update or modify quantity, name, numbers etc.
Note: Each service change type requires specific information for configuration. The system will assistusers and notify if any missing information is discovered during the auto-confirmation process itcompletes prior to allowing the order to be submitted.
3. Locate, select and configure additional services (as needed).
Delete a Service Change This action is available to select when permissible within the process. Completed orders cannot be deleted. Use Caution: This action cannot be undone.
1. Click the Delete link option adjacent to a Service Change order listing.
2. Click Yes to confirm the action when prompted.
Caller ID (CNAM) If enabled, allows Admins to manage/change the Caller ID to be displayed for lines in each location on the account. In this tab, Column headers may be used to sort the list alphanumerically. A section search tool is provided to allow users to filter the list by entered terms. The details provided for each of the items in the list include the Product (name), Service ID, Extension (current), Line Name, and Location.
1. Click on the Caller ID [CNAM] tab.
2. Select the appropriate Location at the top of the page to display the assigned lines. Locate theservice to be receive a CNAM change within the list
3. Caller ID [CNAM]: Type thename to be displayed toreceivers when Caller ID is inuse.
4. Repeat for any additionalCaller ID [CNAM] changes toother listings.
5. Click Save to submit the changes for processing,Or click Cancel and confirm when prompted to discard changes.
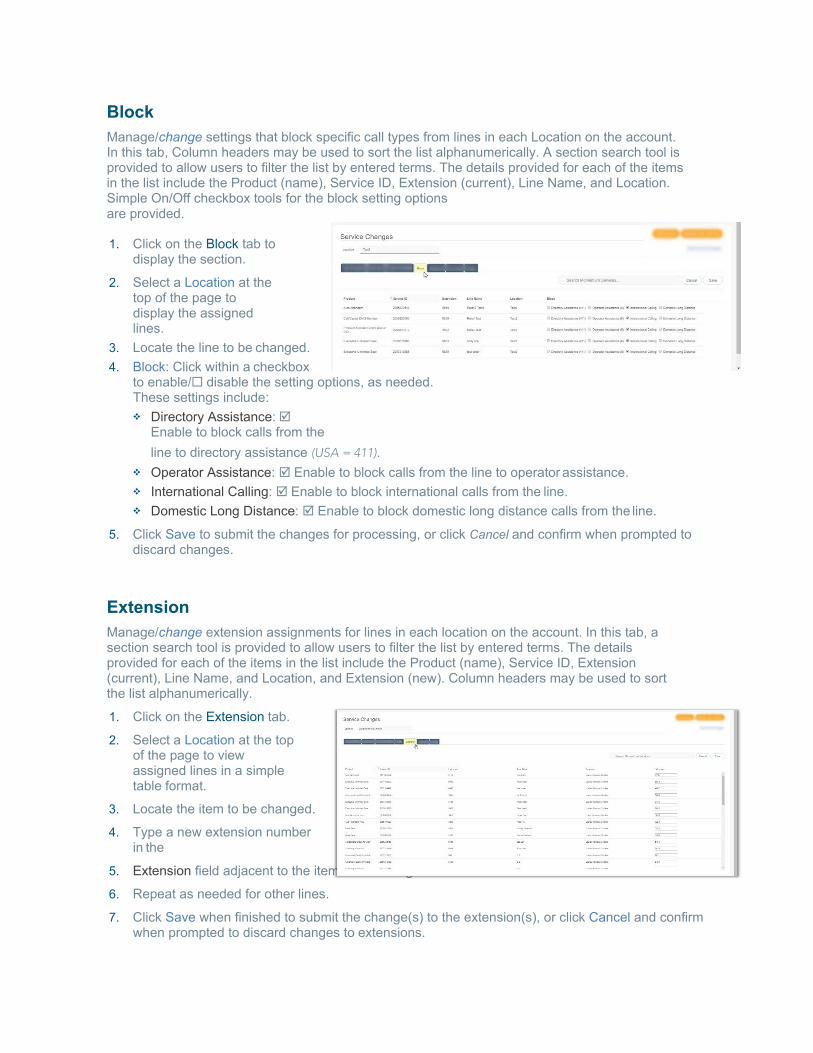
Block Manage/change settings that block specific call types from lines in each Location on the account. In this tab, Column headers may be used to sort the list alphanumerically. A section search tool is provided to allow users to filter the list by entered terms. The details provided for each of the items in the list include the Product (name), Service ID, Extension (current), Line Name, and Location. Simple On/Off checkbox tools for the block setting options are provided.
1. Click on the Block tab todisplay the section.
2. Select a Location at thetop of the page todisplay the assignedlines.
3. Locate the line to be changed.4. Block: Click within a checkbox
to enable/ disable the setting options, as needed.These settings include: Directory Assistance:
Enable to block calls from theline to directory assistance (USA = 411).
Operator Assistance: Enable to block calls from the line to operator assistance. International Calling: Enable to block international calls from the line. Domestic Long Distance: Enable to block domestic long distance calls from the line.
5. Click Save to submit the changes for processing, or click Cancel and confirm when prompted todiscard changes.
Extension Manage/change extension assignments for lines in each location on the account. In this tab, a section search tool is provided to allow users to filter the list by entered terms. The details provided for each of the items in the list include the Product (name), Service ID, Extension (current), Line Name, and Location, and Extension (new). Column headers may be used to sort the list alphanumerically.
1. Click on the Extension tab.
2. Select a Location at the topof the page to viewassigned lines in a simpletable format.
3. Locate the item to be changed.
4. Type a new extension numberin the
5. Extension field adjacent to the item in the far right column.
6. Repeat as needed for other lines.
7. Click Save when finished to submit the change(s) to the extension(s), or click Cancel and confirmwhen prompted to discard changes to extensions.
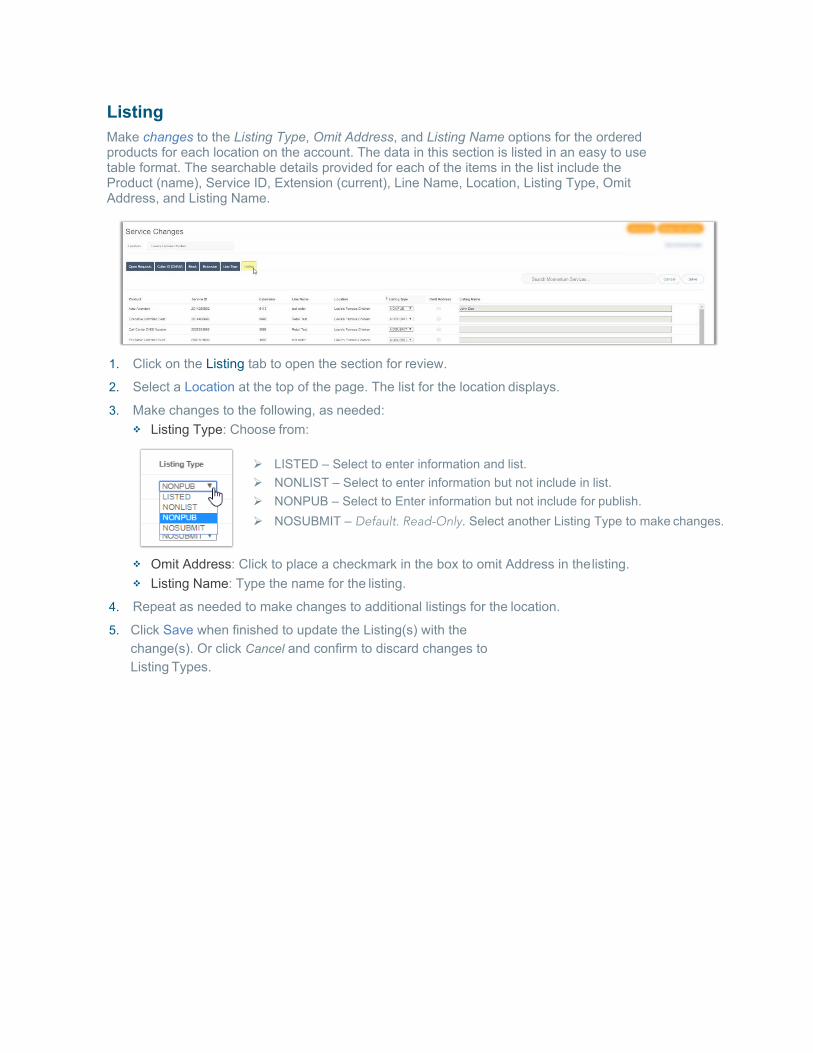
Listing Make changes to the Listing Type, Omit Address, and Listing Name options for the ordered products for each location on the account. The data in this section is listed in an easy to use table format. The searchable details provided for each of the items in the list include the Product (name), Service ID, Extension (current), Line Name, Location, Listing Type, Omit Address, and Listing Name.
1. Click on the Listing tab to open the section for review.
2. Select a Location at the top of the page. The list for the location displays.
3. Make changes to the following, as needed: Listing Type: Choose from:
LISTED – Select to enter information and list. NONLIST – Select to enter information but not include in list. NONPUB – Select to Enter information but not include for publish. NOSUBMIT – Default. Read-Only. Select another Listing Type to make changes.
Omit Address: Click to place a checkmark in the box to omit Address in the listing. Listing Name: Type the name for the listing.
4. Repeat as needed to make changes to additional listings for the location.
5. Click Save when finished to update the Listing(s) with thechange(s). Or click Cancel and confirm to discard changes toListing Types.
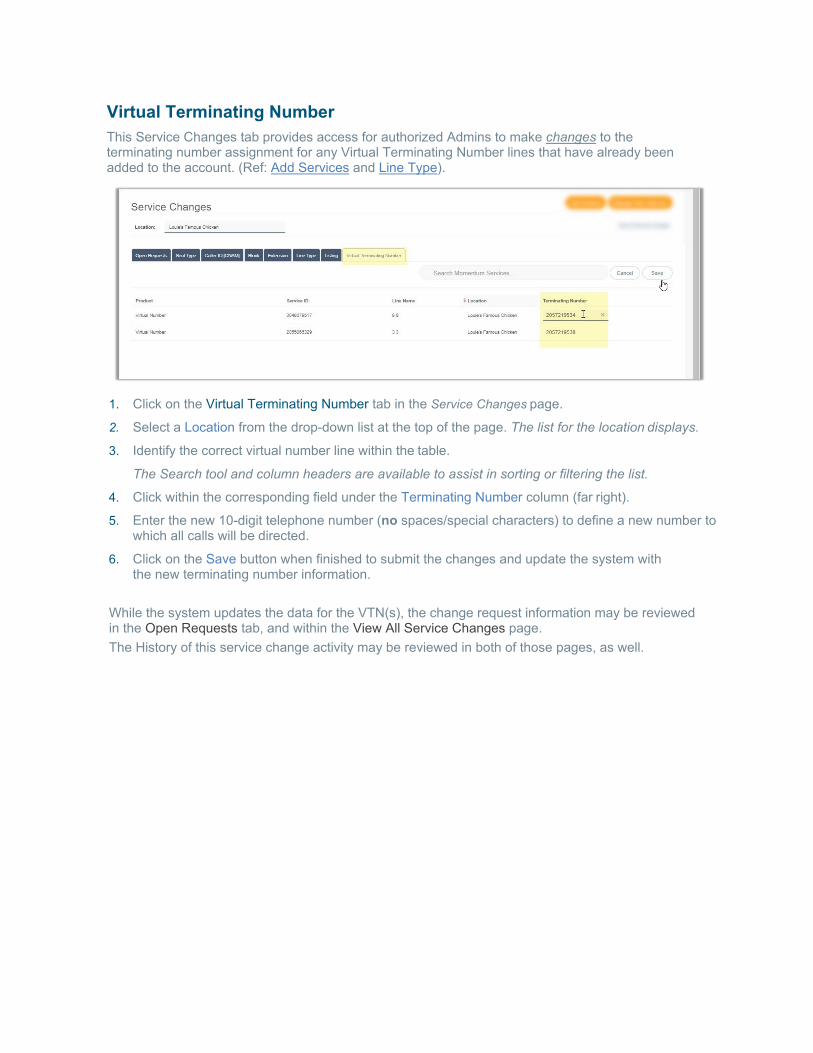
Virtual Terminating Number This Service Changes tab provides access for authorized Admins to make changes to the terminating number assignment for any Virtual Terminating Number lines that have already been added to the account. (Ref: Add Services and Line Type).
1. Click on the Virtual Terminating Number tab in the Service Changes page.
2. Select a Location from the drop-down list at the top of the page. The list for the location displays.
3. Identify the correct virtual number line within the table.
The Search tool and column headers are available to assist in sorting or filtering the list.
4. Click within the corresponding field under the Terminating Number column (far right).
5. Enter the new 10-digit telephone number (no spaces/special characters) to define a new number towhich all calls will be directed.
6. Click on the Save button when finished to submit the changes and update the system withthe new terminating number information.
While the system updates the data for the VTN(s), the change request information may be reviewed in the Open Requests tab, and within the View All Service Changes page. The History of this service change activity may be reviewed in both of those pages, as well.