book of chess strategy
DESCRIPTION
Chess Strategy, Intermediate and Advanced Players, Playing chessTRANSCRIPT

FIRST BOOK OF CHESS STRATEGY
G. M. LISITSYN B.CAFFERTY
The Chess Player Nottingham

First Published 1976 Copyright The Chess Player 1976
Printed in Eqland by The Chess Player Ltd., 12 Burton Avenue, Carlton,
Nottingham NG4 lPI', England

CONTENTS
Introduction
The Ele!'lents of Chess Strategy
The Placing of the King
The Placing of the Queen
The Placing o f the Rook
The Placing of the Bishop
The Placing of the Knight
The Placing of the Pawns
The Overall Placing of Pieces and Pawns The Absolute and Relative Strength of the Pieces
The Mobilisation of the Pieces and Centre Pawns
bnproving the Position of the Pieces Driving Back the Enemy Pieces
Exchanges
Strengthening the Position Weakening the Opponent's Position
Limiting the Opponent's Counterplay
Assessing the Position
Chess Theory is not Dogma
5
8
9
24
31
36
43
49
58
65
70
76
80
84
88
92

INTRODUCTION
Chess is a game which takes the form of a contest or struggle in which each side uses material (the sixteen men) to move about in space (the 64 squares) creating different positirns. However the contest is rather unusual or contradictory since material advantage or positional advantage does not always decide . Sometimes a win is achieved with a smaller amount of material than the opponent enjoys, or with an inferior (or apparently inferior) position for the pieces and pawns.
How can this be explained? The special nature of chess lies principally in the role played by the king. If check is given it has to be met, disregarding all other considerations. If the king cannot be saved then the contest is over irrespective of the current state of material or position. This special role of the king is also seen in stalemate and perpetual check.
Consider some examples .
1 : Black has great material advantage , but White wins in view of the very bad position of the enemy king - 1 B-N5 R-KB2 2 B
B4 N-B3 3 B-Q2 and 4 B-B3 mate .

6
2
2: Black seems to have the better of it in view of his unblocked passed
pawns, but White gets in first by 1 QxP+ K-N 1 (l.. .KxQ 2 R-KR3 mate) 2 P-B7 mate . A sacrifice of material!
3
3: Black is three pawns up, but he cannot force a win e.g. l . . .R-N7 2 R-R1 + R-R7 3 R-R1 repetition, or 1 . . . P-N7 2 KxP K-NS 3 R-R4+ K-N4 4 K-N1 , or 1 . . . P-B8=Q+ 2 Rx.Q P-N7 3 R-KN 1 R-R8 4 K-B2. Black's rook is too badly placed.
A second complicating factor is the role of a pawn when it reaches
the far end of the board , and is then promoted to any piece other than the king. If, as is normal, it is queened then a unit conventionally considered as worth one becomes ten times as valuable!
See diagram ni!Xt page
4: 1 Q-N7 RxQ 2 Px.Rand queens, or 1 ... R-B1 2 N-B6+. 5: A sacrificial breakthrough 1 P-N6 PxP 2P-R6! B-N 1 3 P-R7.
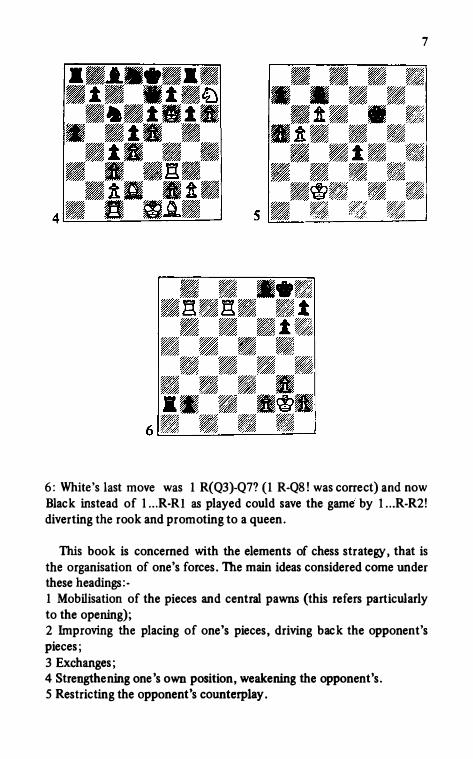
7
6: White's last move was 1 R{Q3)-Q7? {1 R-Q8! was correct) and now Black instead of l ...R-R l as played could save the game by l...R-R2! diverting the rook and promoting to a queen.
This book is concerned with the elements of chess strategy, that i s the organisation of one's forces. The main ideas considered come under these headings:-1 Mobilisation of the pieces and central pawns (this refers particularly to the opening); 2 Improving the placing of one's pieces, driving back the opponent's pieces; 3 Exchanges; 4 Strengthening one's own position, weakening the opponent's. 5 Restricting the opponent 's counterplay.

THE ELEMENTS OF CHESS STRATEGY
In the course of play the pieces and pawns take up various positions. Depending upon their placing the men can be described as good or bad. A good placement for one's men is very significant, and is generally a guarantee that one can successfully carry out various plans or tactical operations while hindering the action of the opponent.
The correct organisation of one's forces is intimately linked with the theory about the 'relative strength' of pieces and pawns. We all know that counting the pawn as one unit, a minor piece is worth about three, a rook five , a queen ten. This is the 'absolute' strength of the various men, but in the eyes of strategy the relative strength at any given time is even more important.
The factors which affect the relative strength of the pieces are : -
1 Their scope, the number of squares which they control. 2 Their mobility, which depends on the extent to which squares are blocked. Mobility is less than scope . Only in exceptional cases are they equal. 3 Their invulnerability, the extent to which they are liable to attack if they are not actually en prise. 4 The extent to which they are in contact with the rest of their forces. 5 Their proximity to the enemy camp, since it is this that creates pressure on the position of the other side.
We shall now consider each piece in turn from this point of view.

THE PLACING OF THE KING
One o f our tasks in the opemng ts to castle at the right time, so that the king is moved away to the flank where it is under the protection of a pawn wall, while at the same time a rook is mobilised by being brought closer to the centre. For the king to remain on a centre f1le is dangerous, especially if lines are being opened at that part of the board.
However in some opening systems, normally of a closed nature, castling is deferred in order to leave options open. If one side has a
marked initiative, sees no danger to the king, and cannot afford to lose any time then castling may be deferred. Finally castling may not be necessary if widespread exchanges have led to an early ending in which neither side has enough material left to threaten the king.
7 : In answer to l ... N(N6)-K5+ White has gone wrong by 2 K-K3? (2 KBl !) and Black announced mate in five by 2 ... P-B5+ 3 NxP Q-B7+ 4 K-Q3 QxB+! 5 Kx.Q B-B4+ 6 K-Q3 NxN mate. Very pretty! 8: With the king uncastled the rooks are normally out of play. 1 RxP!
Q-Q4 {l...Kx.R 2 Qx.P+ K-Bl 3 R-KBI + K-Kl 4 N-Q6+) 2 RxB+ Kx.R 3

10
Q-R4+ K-B2. Now there are several ways to win. The simplest is 4 R-KB I + K-Nl 5 Q-K7 R-KBl 6 RxR+ NxR 7 N-86 mate.
8
9: A famous loss by Capablanca. The K-nle is opened at great cost. 1
PxN! QxQ 2 PxP R-KNl 3 N-Q4. Now Black has to give back the queen since if 3 ... QxBP 4 QR-Kl+ N-K4 5 RxN+ K-Q2 6 R-Q5+ K-Kl 7
R-Kl +. Black chose 3 .. . Q-K5 4 QR-Kl N-84 5 RxQ+ NxR 6 R-Kl RxP 7 RxN+ Resigns.
10: Black has just played P-83 to drive the knight away, but White does not retreat since he has a plan based on the uncastled king and the inactive rook. I Q-KN3 PxN 2 Q-N7 R-Bl 3 R-B7 QxR 4 QxQ B-Q4 5 QxP P-Q6 6 Q-K3 B-B5 7 P-QN3! R-B2 8 P-83! and White won since Black does not have enough compensation for his deficit in material. See diagram next page 11 : Sometimes the right plan is to exchange pawns to bare the enemy king position. 1 P-Q5 BPxQP 2 BPxP B-84 3 PxP+ KxP 4 Q-Q5+ K-84 5 B-K4+ K-NS 6 Q-K6+ Resigns (6 .. . K-R4 7 Q-R3+).

11
J I
The best defence for a king on the flank consists of pawns and minor pieces. In diagram 12 White's king is well placed, safely guarded by three unmoved pawns and a knight. For the time being only the knight at K5 exerts any pressure on the K-side. Compare with diagram 1 3 where the king position is just slightly worse due to the move P-KR3, since the square KN3 has one defender instead of two, and in time KR3 may become an object of attack, perhaps by the pawn breakthrough P-KN4-N5 by Black.
14: Another sound defensive formation is a triangle of pawns accompanied by a fianchettoed bishop, as in diagram 1 4. Here Black also has a good king position. 1 5 : Castling on the Q-side is seen less often, and is generally not so safe. In diagram 15 there is an exception since few of Black's forces are active or look towards the king (from a Steinitz Defence to the Ruy Lopez).

12
...... . •• • t • - •t � - -
•*•*• • • •*•*•
.ft. • • . " -�-- })t.J �"t.JU .ftBAB N��-,R�
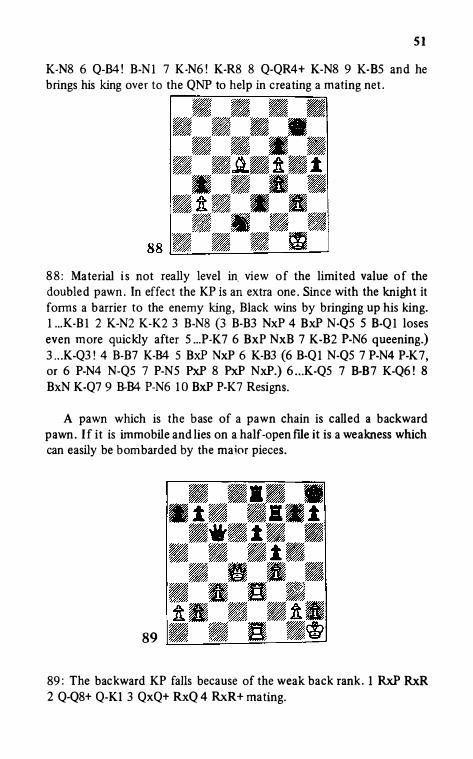
14 UtY � � � IS =:....__===----=:."""-----'
16: If the pawn cover is weakened or stripped away it is a different story.
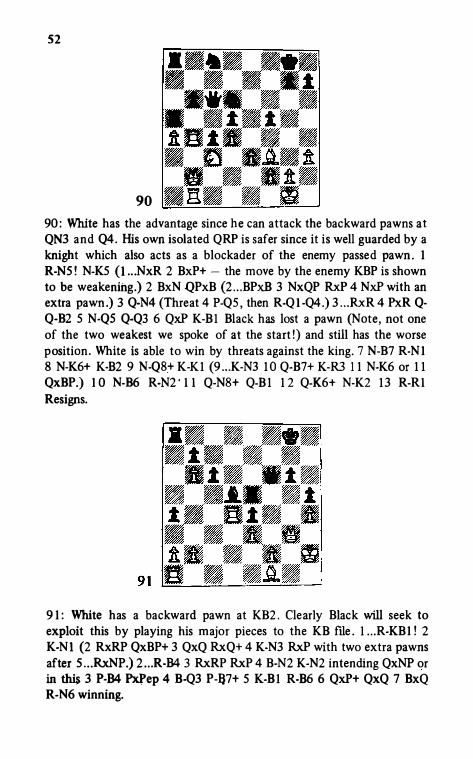
Here in diagram 16 there are just two isolated pawns trying to shelter the king. I RxN (White has to get in P-KS to divert the defending queen.) l .. . PxR 2 P-KS QxN 3 Qx.RP KR-Kl 4 B-R7+ K-Rl 5 8:xP+! K-Nl· 6 8-R7+ K-Rl 7 8-K4+ K-N1 8 Q-R7+ K-81 9 Q-R8+ K·K2 10 Q-86+ K-81 11 8xQ Rx8 1 2 P-84 B·N2 13 R-Kl Resigns.

13
17: Black has pennitted BxKN breaking up his K-side. White exploits energetically the fact that since he has not castled he can use the
KN-flle for his rook. 1 P-KN4! PxN 2 BPxP B-K2 3 0-0-0! B-N4 (3 ...
BxP 4 QR-Nl, or 3 ... B-N3 4 BxB PxB S QxP+ K-Rl 6 QxP+ K-Nl 7 KR-Bl N-R3 8 R-BS! RxR 9 PxR are no better) 4 PxB K-Rl S Q-82 P-KB4 6 P-KR4 B-K2 7 Q-84 Resigns.
1 8: If the fianchettoed bishop has been exchanged then the triangle of pawns that is left is a weak structure . The enemy pieces can easily occupy the resulting weak spots. Thus in 18 Black could even afford to give up a rook to exploit this. l . .. RxP 2 PxR NxP 3 Q-Bl (3 Q-R4 is better, but even then Black stands better after 3 ... N-B6+ 4 K-Rl P-K4 S B-K3 P-QR3 followed by ·P-KR4-RS with excellent attacking prospects.) 3 ... N-86+ 4 K-Rl P-K4 S B-K3. Now according to Botvinnik the strongest moves are S ... P-KR4 or S ... R-Ql with a general
strengthening of Black's position, since White has no counterplay. Unfortunately mack hurried to win the knight by S ... N-Q7+ 6 P-B3 NxN and the game ended in a draw.
19

14
19: The open diagonafQN3/KN8 produced by the wea ken ing P-KB3 is exploited by 1 QxP+ (I R-R3 N-B l 2 Q-B7 KN-K3 lets Black fight on.) l . . . KxQ 2 R-R3+ N-R5 3 RxN+ K-N3 4 N-K7+ K-N4 5 P-84+ KxR 6 B
QJ! Cuts off the king. 6 . .. P-84 7 N-N6 mate .
If a king has lost the right to castle in the opening it can be put into comparative safety by so called artificial castling. In the Old Indian Defence after 1 P-Q4 N-KB3 2 P-QB4 P-Q3 3 N-QB3 P-K4 4 PxP PxP 5 QxQ+ KxQ 6 B-N5 Black should play P-83 7 0-0-0+ K·B2 when the king is quite safe e.g. 8 N-83 QN-Q2 9 P-K4 8-84 1 0 B-R4 N-N5 1 1 R-Q2 P-B3. If White goes 6 N-B3 instead of 6 B-N5 then 6 ... KN-Q2 7 N-KNS K-Kl 8 N-N5 N-R3 and then the white knights can be driven back.
If the position has been simplified by a number o f e xchanges then the king may be left in the centre in view of the forthcoming ending. Thus, afte r l P-Q4 P-Q4 2 P-Q84 P-K3 3 N-QB3 N-KB3 4 N-83 P-84 5 BPxP NxP 6 P-K4 NxN 7 PxN PxP 8 PxP B-N5+ 9 B-Q2 Q-R4 1 0 R-QNI BxB+ 11 QxB QxQ+ 12 KxQ N-B3 13 8-QJ White has no reaso n to move his king away to KNI in an ar tificial castling operation. He can put it on K2, or even better on K3 guarding his QP. For the same reasons Black has no need to castle . K2 is a perfectly safe square in this case.
20: Both kings are badly defended, Black's lacking pawn cover, White's susceptible to a back row mate .
In such cases who is to move is iniportant. White played 1 R-N7+ and duly won in time, but there was a quicker win by 1 B-R5+ K-B3 2
Q·Q6+ R-K3 3 Q-B8+ N-82 4 QxN mate, or l, .. N-N3 2 BxN+ PxB 3 Q·
N7+ K-K3 4 RxKNP+ K-Q4 5 Q-Q4 mate.
IS
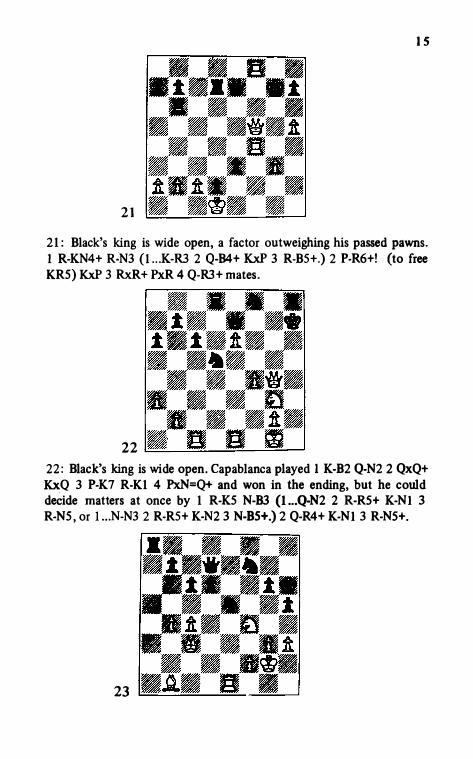
21
21: Black's king is wide open, a factor outweighing his passed pawns. 1 R-KN4+ R�N3 (l...K-R3 2 Q-B4+ KxP 3 R-BS+.) 2 P-R6+! (to free KRS) KxP 3 RxR+ Px.R 4 Q-R3+ mates.
22 ��.:=:!!!�=:...,_=�
22: Black's king is wide open. Capablanca played 1 K-B2 Q-N2 2 QxQ+ Kx.Q 3 P-K7 R-K1 4 Px.N=Q+ and won in the ending, but he could deeide matters at once by 1 R-KS N-B3 (l •.• Q-N2 2 R-RS+ K-Nl 3 R-NS, or 1 ... N-N3 2 R-RS+ K-N2 3 N-BS+.) 2 Q-R4+ K-Nl 3 R-NS+.
23
16
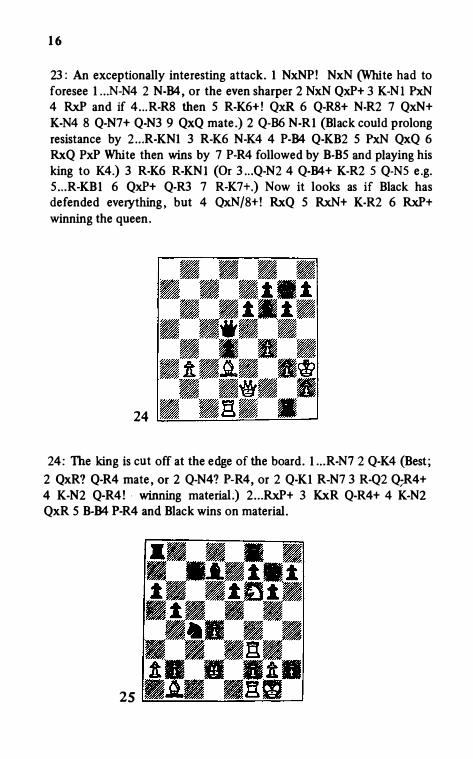
23: An exceptionally interesting attack. 1 NxNP! NxN (White had to foresee l ... N-N4 2 N-84, or the even sharper 2 NxN QxP+ 3 K-Nl PxN 4 RxP and if 4 ... R-R8 then 5 R-K6+! QxR 6 Q-R8+ N-R2 7 QxN+ K-N4 8 Q-N7+ Q-N3 9 QxQ mate.) 2 Q-B6 N-Rl (Black could prolong resistance by 2 ... R-KN1 3 R-K6 N-K4 4 P-84 Q-KB2 5 PxN QxQ 6 RxQ PxP White then wins by 7 P-R4 followed by B-B5 and playing his king to K4.) 3 R-K6 R-KNI (Or 3 ... Q-N2 4 Q-84+ K-R2 5 Q-N5 e.g. S ... R-KBl 6 QxP+ Q-R3 7 R-K7+.) Now it looks as if Black has defended everything, but 4 QxN/8+! RxQ 5 RxN+ K-R2 6 RxP+ winning the queen .
24
24: The king is cut off at the edge of the board. l ... R-N7 2 Q-K4 (Best;
2 QxR? Q·R4 mate, or 2 Q-N4? P-R4, or 2 Q-Kl R-N7 3 R-Q2 Q;R4+ 4 K-N2 Q-R4! · winning material;) 2 .. . RxP+ 3 KxR Q-R4+ 4 K-N2 QxR 5 B-B4 P-R4 and Black wins on material.
25

17
25: KB3 and KR3 are the weak spots. 1 N-R5+ PxN (1 .. . K-R1 2 Q-R6 R-KN1 3 RxP.) 2 Q-N5+ K-R1 3 Q-B6+ K-N1 4 BxP+ ! KxB 5 R-KR3.
26: A harder example. l . ..R-R5 2 PxR Q-N5+ 3 K-Rl Q-B6+ 4 K -N 1 N-N3 ! 5 KR-K1 NxP 6 K-B1 R-K5! 7 P-KR3 (not noticing the opponent 's intentions otherwise he would have gone 7 QxR.) . 7 ... Qx RP+ 8 K-K2 Q-B6+ 9 K-Q3 (9 K-Bl R-KNS and mates) 9 ... R-Q5+! White resigned in view of 10 K-B3 RxN+ 11 K-Q3 R-Q5+ 12 K-B3 RQB5+ 1 3 K-Q3 Q-K5+ 14 K-K2 RxQ.
27: 1 NxP BxR 2 R-R8+ KxR 3 QxB+ R-R2 (3 ... K-Nl 4 R-N8+ K-B2 5 Q-R7+) 4 QxBP+ R-N2 5 R-N7 wins.

18
28
28: Weak squares combined with a self-block. 1 NxP BxN 2 QxRP+ KxQ 3 R-RS mate.
29
29: A win by Morphy based on a bad king defended by just one pawn. l ... RxP+ 2 KxR Q-R6+ (2 ... R-KN1 + is also good.) 3 K-B2 Q-R7+ 4 K-B3 R-KBl+ 5 Q-KB7 RxQ mate.
30
19
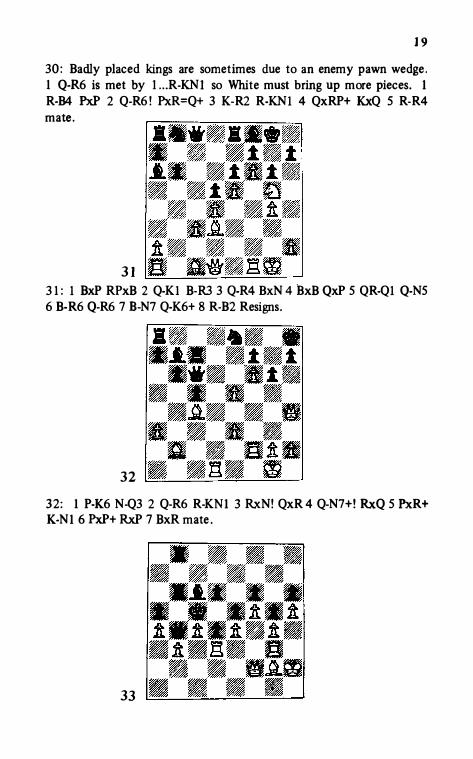
30: Badly placed kings are sometimes due to an enemy pawn wedge. 1 Q-R6 is met by 1 ... R-KN1 so White must bring up more pieces. 1 R-B4 PxP 2 Q-R6 ! PxR=Q+ 3 K-R2 R-KN1 4 QxRP+ KxQ 5 R-R4 mate .
31 31 : 1 BxP RPxB 2 Q-K1 B-R3 3 Q-R4 BxN 4 BxB QxP 5 QR-Q1 Q-N5 6 B-R6 Q-R6 7 B-N7 Q-K6+ 8 R-B2 Resigns.
32 32: 1 P-K6 N-Q3 2 Q-R6 R-KN1 3 RxN! QxR 4 Q-N7+! RxQ 5 PxR+ K-N1 6 PxP+ RxP 7 BxR mate.
33

20
33 : In blocked positions a king seemingly safely placed can be smoked out by line - opening sacrifices. 1 RxP PxR 2 R-Q3 B-Q2 3 RxP! QxNP (3 ... K-B3 4 P-BS! QxBP 5 R-B4) 4 R-Q3+ K-NS 5 RxQ+ KxR 6 Q-Q4 K-R7 7 P-BS and White soon won.
Summing up we may say that the signs of a badly placed king are: the absence of pawn cover or adequate piece protection, weakened pawn cover, superior enemy forces in his vicinity, lack of mobility due to self-blocking pieces.
In the endgame the king should normally be played towards the centre. However tactical factors and king safety should always be borne in mind.
34
34: 1 R-Q4+ K-B4?? 2 P-QR4! and the king is in a mating net.
35
35: King superiority comes into its own. Black resigned here in view of l ... K-Q2 2 P-N4 K-B2 (2 ... K-K2 3 P-B6 penetrating on the Q side.) 3

21 K-K.6 K-83 4 K-87 KxP 5 KxP P-N4 6 PxP e.g. KxP 7 P-N5 ! queening long before the QRP.
36
36: The king at Q4 is almost an extra piece, but the win is not so simple. I P-N6 N-N5 2 P-N7 8xP+ 3 K-85 BxP. The opponent's counterplay must be cut down. 1 P-KR3! P-83 (l .. .NxP 2 P-N6.) 2 BxP+ K-N2 3 PxP+ KxP 4 N-85 K-K2 5 K-QS! P-N4 6 P-R4 N-Q8 7 P·RS N-B6+ 8 K-86 NxP 9 KxN wins.
Decentralised kings in the endgame are not well placed, especially in the corner or at the edge of the board.
37: J...P-NS 2 Q-K7+ Q-N4 3 P-N3 mate, or l. . . Q-85+ 2 P-N3+!
22
38 =:...,__
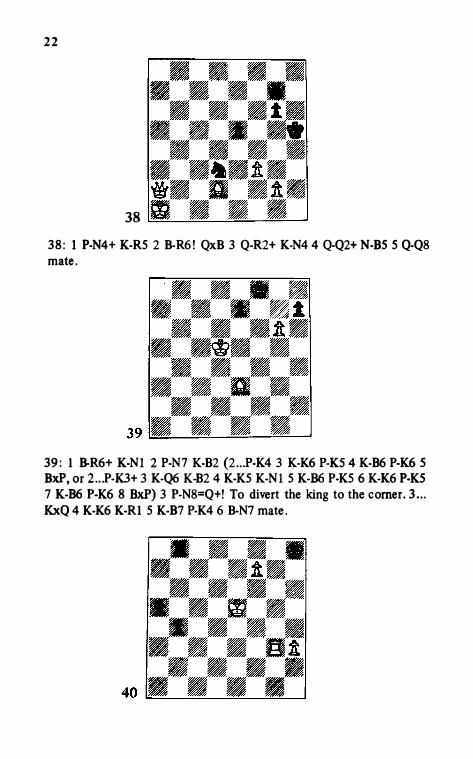
38: 1 P-N4+ K-R5 2 B-R6 ! QxB 3 Q-R2+ K-N4 4 Q-Q2+ N-B5 5 Q-Q8 mate.
39: 1 B-R6+ K-Nl 2 P-N7 K-B2 (2 ... P-K4 3 K-K6 P-K5 4 K-B6 P-K6 5 BxP, or 2 ... P-K3+ 3 K-Q6 K-B2 4 K-K5 K-Nl 5 K-B6 P-K5 6 K-K6 P-K5
7 K-B6 P-K6 8 BxP) 3 P-N8=Q+! To divert the king to the corner. 3 ... KxQ 4 K-K6 K-Rl 5 K-B7 P-K4 6 B-N7 mate.

23 40: Level material, but the contrast between the kings is dedlive. 1 K·B6 R·N3+ (Trying for perpetual check. l •. .K•R2 2 R-IO and R-K8 or l •• .P-N6 2 RxP .) 2 K-BS R-N4+ (2 •.. R-Nl 3 K·N6 u in the pme.) 3 K-N6 R-N3+ 4 K-RS R-Nl (4-.R-N4+ S K·R6 R-N3+ 6 R-N6.) S K-R6 P-RS (5 ; . .P-N6 6 RxP .) 6 R-N61 P-N6 7 R·K6 R-KBl 8 R·KB.

THE PLACING OF THE QUEEN
It is not so easy to indicate the best place to put the queen. The reason is that this major piece often becomes an object of attack by
lesser men. In the opening the best squares for her are normally QB2, Q2, K2 and sometimes KB2.
41: This is a position from the Queen's Indian Defence in which both queens are well placed from the point of view of safety since neither pawns nor minor pieces can trouble either queen at the moment. Generally speaking the best place depends very much on the given circumstances. In some openings such as the Dutch Defence, the Sicilian, the Queen's Gambit and the Nimzoindian Defence the queen may well be mobilised further forward on the third or fourth rank, even though this may mean greater vulnerability to sudden threats. In the Reti Opening QRl is often a good square, as seen in diagram 42.
The queen presses on the long black diagonal backing up the bishop, and may later penetrate along the QR-ftle.
25
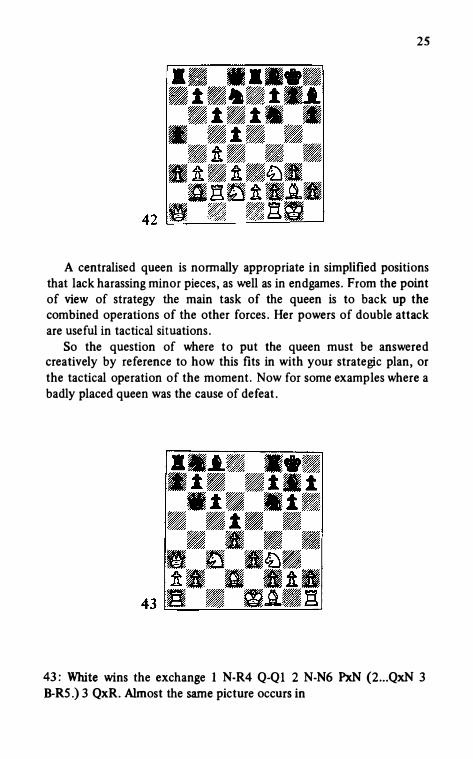
A centralised queen is normally appropriate in simplified positions that lack harassing minor pieces, as well as in endgames. From the point of view of strategy the main task of the queen is to back up the combined operations of the other forces. Her powers of double attack are useful in tactical situations.
So the question of where to put the queen must be answered creatively by reference to how this fits in with your strategic plan, or the tactical operation of the moment. Now for some examples where a badly placed queen was the cause of defeat.
43: White wins the exchange 1 N-R4 Q-Ql 2 N-N6 PxN (2 ... QxN 3 8-RS.) 3 QxR. Almost the same picture occurs in
26
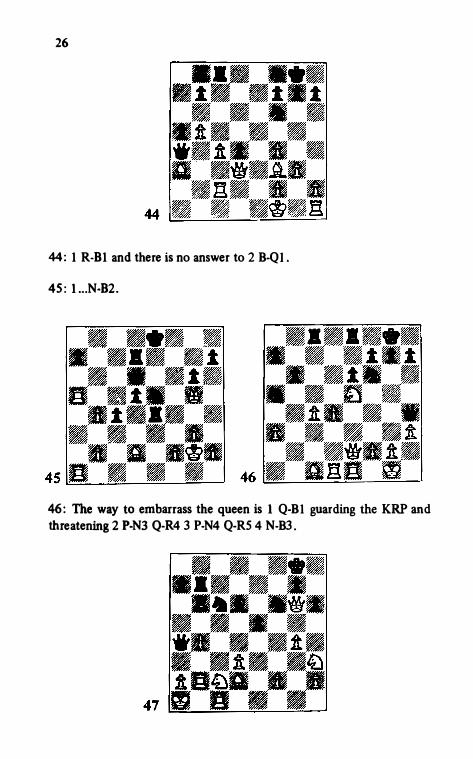
44: 1 R-81 and there is no answer to 2 8-QI.
45: I...N-82.
46: The way to embarrass the queen is 1 Q-81 guarding the KRP and threatening 2 P-N3 Q-R4 3 P-N4 Q-RS 4 N-83.
27
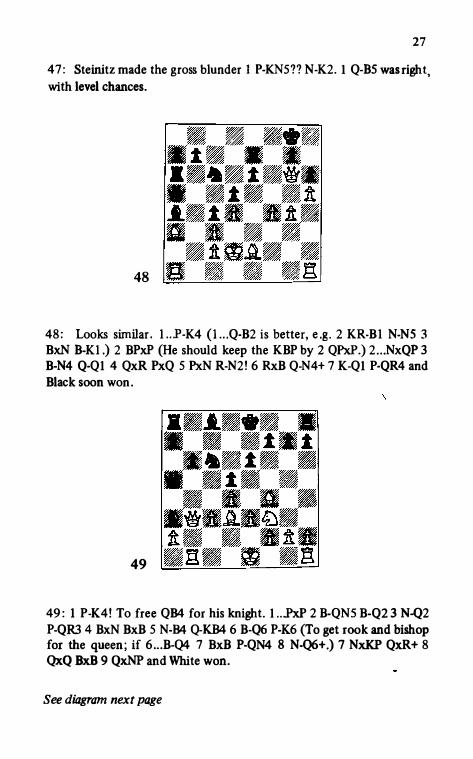
47: Steinitz made the gross blunder 1 P-KN5?? N-K2. 1 Q-BS was right,
with level chances.
48
48: Looks similar. l . .. P-K4 {l...Q-B2 is better, e.g. 2 KR-B l N-NS 3 BxN B-K l .) 2 BPxP {He should keep the KBP by 2 QPxP.) 2 ... NxQP 3 B-N4 Q-Ql 4 QxR PxQ 5 PxN R-N2! 6 RxB Q-N4+ 7 K-Ql P-QR4 and
Black soon won.
49
49: 1 P-K4! To free QB4 for his knight. 1 .. .PxP 2 B-QN5 B-Q2 3 N-Q2
P-QR3 4 BxN BxB 5 N-B4 Q-KB4 6 B-Q6 P-K6 {To get rook and bishop for the queen; if 6 ... B-Q4 7 BxB P-QN4 8 N-Q6+.) 7 NxKP QxR+ 8 QxQ BxB 9 QxNP and White won.
See diagram next page
28
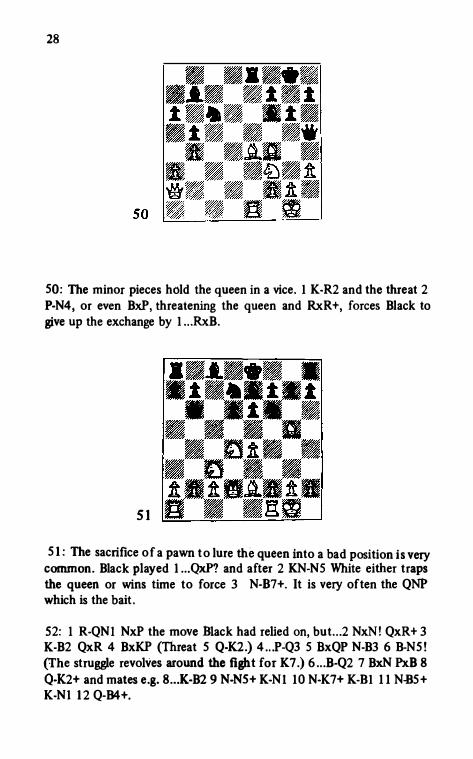
50: The minor pieces hold the queen in a vice. 1 K-R2 and the threat 2
P-N4, or even BxP, threatening the queen and RxR+, forces Black to give up the exchange by l .. . RxB.
51
51: The sacrifice of a pawn to lure the queen into a bad position is very common. Black played l ... QxP? and after 2 KN-N5 White either traps the queen or wins time to force 3 N-B7+. It is very often the QNP which is the bait.
52: I R-QN1 NxP the move Inack had relied on, but...2 NxN! QxR+ 3 K-B2 QxR 4 BxKP (Threat 5 Q-K2.) 4 .. . P�Q3 5 BxQP N-83 6 B-N5! (The struggle revolves around the fight for K7.) 6 . .. B-Q2 7 BxN PxB 8 Q-K2+ and mates e.g. 8 ... K-B2 9 N-N5+ K-Nl 1 0 N-K7+ K-Bl 1 1 N-B5+ K-Nl 12 Q-B4+.

29
53: Black sacrifices a pawn to draw the queen into a bad position. 1 ... B-Q2 2 QxNP (2 Q-K2 is better .) 2 ... B-B3 3 Q-R6 P-Q6! 4 R-B5 (The threat was 4 ... R-Rl .) 4 ... Q-Q2 ! 5 RxN Q-QS+ 6 K-B1 (Or 6 K-R1 QxR 7 QxB Q-N4 8 Q-K6+ K-R1 9 Q-R2 R-KB 1 10 B-B3 Q-K6 1 1 K-N2 P-N4 12 P-R3 P-R4 13 P-N4 P-R5 followed by Q-K8-N6+.) 6 ... QxR 7 QxB Q-R8+ 8 K-B2 Q-Q5+ 9 K-B 1 R-KBl + 10 B-B3 Q-K6 11 Q-QS+ K-R1 1 2 P-K5 QxN 13 P-K6 Q-K7+ Resigns.
54: As the board becomes more open with the disappearence of material through exchanges, the queens should strive for a centralised position. White wins this ending with level material thanks to his better placed queen. 1 : .. Q�N7+ (Passive play is no better e.g. l . .. Q-B2 2 K-K3

30
K-K2 3 K-K4 K-B3 4 P-RS placing Black in Zugzwang.) 2 K-K3 Q-B8+ 3 K-K4 Q-K8+ 4 K-BS QxP 5 QxP+ K-Nl 6 Q-B4+ K-Rl (6 ... K-R2 is rather better, but after 7 Q-K4! Black cannot save the game because of the inevitable loss of the KP.) 7 Q-KN4 Q-K8 8 K-N6! (This shows up the badly placed black pieces.) 8 ... Q-QB8 9 Q-Q7! Q-KN8+ 10 K-B7 K-R2 11 Q-BS+ P-N3 12 Q-Q7 Resigns .
A queen at the edge of the board is normally badly placed in an ending.
ss
SS: White wins by 1 K-R4 (or 1 K-N4.) l...P-RS=Q+ 2 K-N3.
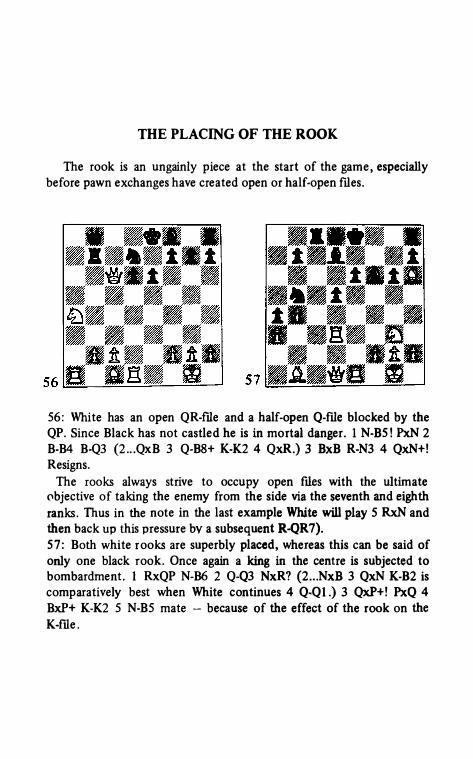
THE PLACING OF THE ROOK
The rook is an ungainly piece at the start of the game, especially before pawn exchanges have created open or half-open fl.les.
56: White has an open QR-fl.le and a half-open Q-fl.le blocked by the QP. Since Black has not castled he is in mortal danger . 1 N-B5! PxN 2 B·B4 B-Q3 (2 ... QxB 3 Q-BS+ K-K2 4 QxR.) 3 BxB R-N3 4 QxN+! Resigns.
The rooks always strive to occupy open flles with the ultimate Clbjective of taking the enemy from the side via the seventh and eighth
ranks. Thus in the note in the last example White will play 5 RxN and then back up this pressure bv a subsequent R-QR7). 57: Both white rooks are superbly placed, whereas this can be said of only one black rook. Once again a king in the centre is subjected to bombardment. 1 RxQP N-B6 2 Q-Q3 NxR? (2 ... NxB 3 QxN K-82 is comparatively best when White continues 4 Q.Q1.) 3 QxP+! PxQ 4 BxP+ K-K2 5 N-85 mate - because of the effect of the rook on the K-fl.le.
32
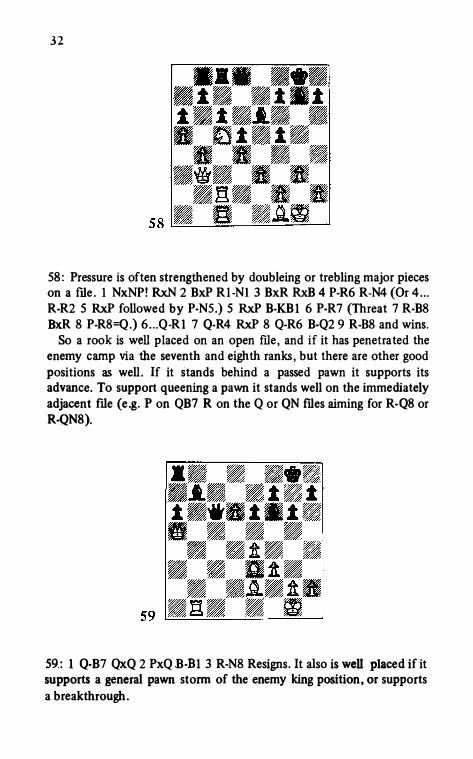
58: Pressure is often strengthened by doubleing or trebling major pieces on a flle. 1 NxNP! RxN 2 BxP Rl-Nl 3 BxR RxB 4 P-R6 R-N4 (Or 4 . . . R-R2 5 RxP followed by P-NS.) 5 RxP B-KBl 6 P-R7 (Threat 7 R-B8 BxR 8 P-R8=Q.) 6 . . . Q�Rl 7 Q-R4 RxP 8 Q-R6 B-Q2 9 R-B8 and wins.
So a rook is well placed on an open me, and if it has penetrated the enemy camp via the seventh and eighth ranks, but there are other good positions as well. If it stands behind a passed pawn it supports its advance. To support queening a pawn it stands well on the immediately adjacent me (e.g. P on QB7 R on the Q or QN files aiming for R-Q8 or R..QN8).
59: 1 Q-B7 QxQ 2 PxQ .B-Bl 3 R-N8 Resigns. It also is well placed if it supports a general pawn storm of the enemy king position, or supports a breakthrough.

33
60: The rook is well placed at KB1 defending the wedge pawn against 1 ... Q-N3+. White won by 1 Q-R6 Q-B4+ 2 R-Q4 ! Q-Bl3 QxQ+ and 4 RxN.
Other positions for the rook are generally bad or unsatisfactory. A rook placed in front of its own pawns with minor pieces on the board is hardly ever a good piece.
61: The rook at KN3 is misplaced. 1 P-KN3 (To win the exchange,by 2 K-Rl and 3 N-R4) l...P-K4 (Rather better i.'. l ...Q-K2 preparing PK4, but then 2 B-B4 BxB 3 NxB R-B3 4 QR-K! maintaining positional advantage With pressure against the backward KP.) 2 PxP! (In the game White played the weaker 2 NxKP.) 2 ... R-K3 (Or 2 ... Q-K2 3 N-B4.) 2 N-B4 R-K1 4 NxP ! NxN 5 Q-B4 and White should win.
A rook immediately behind its own pawn may not be well placed since its forward mobility is limited. The position can be improved by advancing the pawn. Another bad rook position occurs when the piece is fixed in the middle of pawn masses.

34
62
62: If knights were off the board Black would have some play by P-KS or P-KR4, and hls rook would have retreat squares at KB3, KB2 or KBl. As it is White wins material by 1 N-K4 Q-N4 (The threat was 2 P-N3, while if l...N-Q3 2 N-N3 N-B2 - guarding the KP - 3 N-RS.) 2 P-N3 RxN 3 PxR Q-Q2 4 Q-KBI QxNP 5 Q-B6 K-Bl 6 R-KB2 and Black can resign.
63: White has a bad rook, blocked by its own pawns from taking part in the fight. l. . . K�N2 (To prevent 2 PxP+, while if 2 KxR P-R6 queening.) 2 P-RS P-R6 (As Flohr pointed out 2 ... R�N5 is even stronger.) 3 KxR P-R7 4 RPxP RPxP 5 R-NS P-RS=Q 6 RxKP Q-B6! apd Bl,ack wins the ending after a long !ight. See diagraf_!l next page
64: The black rook is stranded amongst the pawns. The threat is K-Q3, then N-R6 forcing R-BS, then P-QN3. Black gets the rook out only at

3S
the price of a lost ending l ... R-BS 2 K-Q3 B·K2 3 N�R6! R-RS 4 RxR PxR 5 N-N8 P-R6 6 PxP BxP 7 NxP B-B4 8 K-B4 B-N8 9 K-NS K-B2 10 K-R6 etc.

THE PLACING OF THE BISHOP
The real danger to a bishop normally comes from pawns. Thus according to circumstances the bishop takes up a position on the flank or in the centre. hi principle the latter is preferable , since there the bishop's scope and mobility is greater. However if the centre is occupied by pawns a flank position is preferable until exchanges have cleared the centre.
Just like the rook the bishop is at its best when occupying open lines, in this case diagonals, which are free of its own pawns, or even better, unobstructed by enemy pawns as well.
65: White is two pawns down, but all his pieces are well placed. Both bishops have open diagonals. The black position suffers from an
uncastled king and a poorly placed KR. White makes use of his advantage by I B-NS ! P-R3 (missing the
threat. I.. .B-N2 would let Black escape after 2 N-B6+ or 2 Q-Q6.) 2 QxN!! BxQ (2 ... PxB 3 N-B6+ K-K2 4 NxR+, or 2 ... PxQ 3 N-B6+ mating .) 3 N-B6+ K-Ql 4 NxB+ p,c,B 5 NxQ R-N I 6 R-B6 B-NS 7 R-K4 B-R4 8 RxQP+ K-K2 9 N-Q7 Resigns.

37
66: White's bishop is very well placed occupying two open diagonals. The same cannot be said of his opposite number, since its second diagonal is closed by its own KP. Black would stand much better if he could exchange bishops. As it is he loses in a few moves due to poor placing of his KN. 1 B-R7+ K-Rl 2 B-N6! N-83 3 BxP! Q-Q3 4 N-N6+ K-�2 5 NxR+ K-RI 6 Q-R7+! NxQ 7 N-N6 mate.
67: A modem tendency is to develop the bishop on the longest diagonals. Thus in 67 White's KB dominates along the line KR1/QR8. White can put his other bishop on just as promising a diagonal by 1 B-N2 but by concrete analysis found a stronger line. 1 N-Q5! (Not 1 NxN BxN 2 �xP? N-N5 3 P-KR4 BxP!) l ... N/K3xN (Black loses a pawn after 1...8-QI 2 N4xN BxN 3 N-84 Q-B2 4 NxB QxN 5 BxP.) 2 NxB+ K-82 3 QxN KXN. Black has maintained material equality but his king is exposed to a withering attack. 4 P-B5 QxKP (speeding up the inevitable.) 5 PxP+ PxP 6 B-N5 K-B2 7 BxN PxB 8 KR-K1 Q-N5 9 QxQP R-Rl 10 QR-81 P-B5 11 P-KR3 Q-N4 12 R-K7+ K-N3 13 R-B5 8-84 14 RxB Resigns. The bishop has the last word. After 14 ... KxR or 14 ... QxR comes 15 B-K4 mating or winning the queen.

38
68: The centralisation of a bishop often gives e,..cellent results . Here the pressure on KB7 is decisive . A subsidiary factor is that the bishop prevents the advance of the passed QBP while supporting the advance of its own pawn majority . Black starts by trying to free his rook. 1 ... N-QS 2 K-B2 P-N4 3 P-N3 PxP 4 PxP N-K3 5 K-K3 P-BS (5 . .. R-B1 6 P-B5 N-Q1 7 P-K6 PxP 8 PxP winning.) 6 P-B5! N-B4 7 R-B7 N-Q6 8 P-K6 ! PxP PxP Resigns (9 .. . R-K1 1 0 P-K7+ K-N2 1 1 B-B6 .
69: Well placed pieces help in playing tactical operations. Black loses to a blow from the bishop due to the weakness at critical points at QR3,
KBJ, and KN3. I B-B7! KxB (l ... QxB 2 RxR or l . .. RxR 2 QxP+ K-Bl 3 Q-NS+ K-K2 4 Q-KS+ K-Q3 5 Q-K6 mate.) 2 RxR QxR 3 Q-N7+
K-Nl 4 QxR P-K5 5 R-K3 B-Q5 6 RxP Resigns.
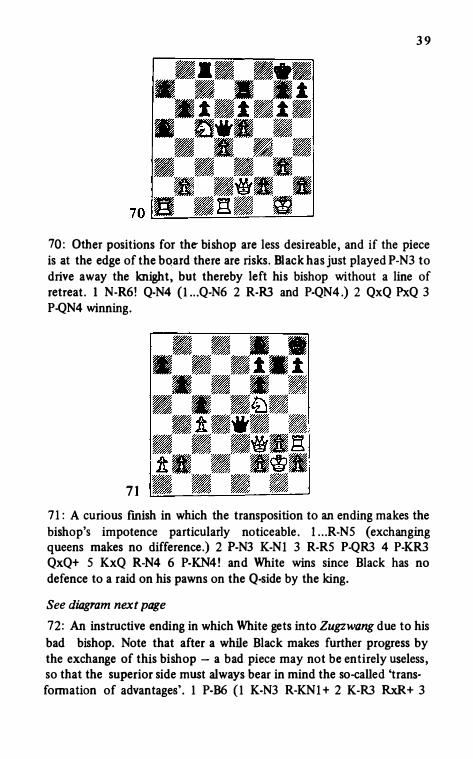
39
70: Other positions for the- bishop are less desireable, and if the piece is at the edge of the bqard there are risks. Black has just played P-N3 to drive away the knight, but thereby left his bishop without a line of retreat. I N-R6! Q-N4 (I .. . Q-N6 2 R-R3 and P-QN4 .) 2 QxQ PxQ 3 P-QN4 winning.
71 71: A curious fmish in which the transposition to an ending makes the bishop's impotence particularly no ticeable . l .. . R-NS (exchanging queens makes no difference.) 2 P-N3 K-Nl 3 R-RS P-QR3 4 P-KR3 QxQ+ 5 KxQ R-N4 6 P-KN4! an d White wins since Black has no defence to a raid on his pawns on the Q-side by the king.
See diagram next page 72: An instructive ending in which White gets into Zugzwang due to his bad bishop. Note that after a while Black makes further progress by the exchange of this bishop - a bad piece may not be entirely useless, so that the superior side must always bear in mind the so-called 'transformation of advantages'. 1 P-B6 (1 K-N3 R-KNl + 2 K-R3 RxR+ 3

40
RxR R-N8 leads to the same thing.) 1 ... K-R3 2 K-N4 R-KN1 + 3 K-R3 (3 K-B5 R-N6 !) 3 .. . RxR+ 4 RxR R-N8 5 B-Q3 R-K8 (Threatening to win the bishop.) 6 B-N1 J(-R4 7 K-N3 R-KB8! 8 B-Q3 NxB! 9 RxN R-B5 1 0 R-R3 (10 R-K3 loses the KRP and KBP.) 1 0 ... Rx.KP 11 R-R6 R-N5+ 1 2 K-R3 (12 K-B3 R-B5+ and Rx.KBP.) 1 2 ... Rx.P+ 1 3 K-N3 R-N5+ 1 4 K-R3 RxP 1 5 RxP R-Q5 16 K-N3 K-N4 17 K-B3 K-B4 1 8 K-K3 P-B5 Resigns. One must bear in mind that a bishop can often change quickly from an attacking piece into an object of attack. This is often the case when it is played to N5 and is then advantageously driven away for example in the Ruy Lopez, Black may gain a number of tempi for advancing his Q-side pawns by P-QR3, P-QN4 and after B-QN3 then N-QR4.
•• ••• • ..... �·�· .
. ·�· . • • • • a.e.• • �. •.au • a - - &/!"\. •• U U U"Z..l � •*• ill n a � �R 73 � � G .c=,.
73: Black takes the initiative on the K-side using the position of the bishop at KR4 . l ...P-KN4 1 B-N3 P-KR4 3 P-R3 (3 NxP? P-R5 4 B-B4
P -K4 trapping the bishop.) 3 ... N-K5 4 B-Q3 P-KB4 5 B-R2 0-0-0 6 RKN1 (KN2 needs guarding.) 6 ... QR-Nl 7 N-Q2 (Necessary to avoid P-N5 followed by P-R5.) 7 ... NxN 8 QxN P-N5 9 0-0-0 P-R5 1 0 B-B4 R-N2! (Not 1 0 . . .P-K4 1 1 PxP PxP 12 BxBP attacking the knight three

41
times with an excellent game.) 11 QR-K1 {White is prepared to give up the bishop for three pawns rather than see it immured by B-R2 P-N6.) 1 1 ...P-K4 12 BxBP PxB 13 K.PxP Q-B1 1 4 PxP P-Q4 1 5 K-N2 K-N 1 and B1ackgradually forced the win by the manoeuvre N-B3 -K1-Q3 .
74
74: Finally, proof that a bishop can be bad even when much material has been removed. As long as a pawn or two are on the colour of the bishop there are difficulties to be encountered. 1 K-R6 K-R1 2 N-R4 (Preventing B-N1 with some freedom.) 2 ... K-N1 3 N-B3 K-R1 4 N-KS K-N1 5 N-B6 K-Rl 6 N-K7 Zugzwang, 6 ... B-N1 7 N-N6 mate. Without the pawn at KB4 Black would have drawn by giving his bishop up for the enemy pawn at the right stage.
75: White wins the enemy QNP after 1 K-B3 B-Q2 2 B-B1 K-K2 {2 ... B-B3 3 NxP.) 3 NxB and 4 BxP+. If this pawn win were not on (say with Black's bishop at QB3 and king at K2) the win would not be clear, but White still has much the better of it. He can try for the king entry K-K2-B3-B4-NS etc., or tie Black to the defence of the QNP by
42
N-N3-Q2-Nl-B3 and B·Bl .
The factor of co-operation is normally very marked with two bishops as opposed to one.· As we have already seen a biShop may be bad �ause all the action is on sq�es of the opposite colour. Two bishops in an open position are therefore more than twice as strong as one I

THE PLACING OF THE KNIGHT
The best posts for knights in the opening and middle game are the central squares QBS, QS, KS and KBS. The knights hope to get there after the mobilisation of the pieces and central pawns, or along with this p·rocess, which is why many chess teachers advocate N-KB3 and NQB3 rather than any other initial knight move. Once well established there, backed up perhaps by a pawn guard, creating the so-<:alled 'outpost', the jumping piece exerts pressure on the enemy and can play a big part in supporting an attack or combination.
76 : The knight at KBS was unpleasant for Black preventing him from developing his KB. So his last move was P-KN3, which appears to drive the knight away. In fact it gives fresh scope to the other knight due to the formation of a hole at Black's KB3. 1 Q-NS+! N-Q2 2 KR-Kl B-NS 3 N-B6+ K-Bl 4 NxN+ RxN 5 Q-KS Resigns.

44
77: Black's knight supports the attack so well that there is no need to
pause to take back. the bishop. 1 ... R-R1 + 2 B-R3 (2 K-N1 Q-R5 .) RxB+ 3 K-Nl (3 RxR Q-N7 mate.) 3 ... QR-Rl ! 4 Q-B3 Q-R3 5 K-B1 RR8+ 6 R-N1 RxR+ 7 KxR Q-R7+ 8 K-Bl Q-R8+ Resigns.
78: The knight played a big part once Black has brought the QB into play. l .. . P-Q5 2 PxP PxP 3 BxP BxB 4 RxB RxR 5 NxR QxN! 6 PxQ N-B7+ 7 K-Nl NxP mate.
Another good post for a knight is in front of an isolated centre pawn from where it cannot be driven off by a pawn. Thus in the French Defence if Black gets an isolated QP (after, say, 1 P-K4 P-K3 2 P-Q4 P-Q4 3 N-Q2 P-QB4 4 KPxP KPxP 5 KN-B3 N-QB3 6 B-N5 B-Q3 7 PxP BxBP) White will do well to establlsh his knight on Q4. Or in the Carokann after 1 P-K4 P-QB3 2 P-Q4 P-Q4 3 PxP PxP 4 P-QB4 N-KB3 5 N-QB3 P-K3 6 B-N5 B-K2 Black's best defensive formation is PxP

45
followed by N-Q4.
A knight stuck in the opponent's vitals at, say , Q6 or K6, can cause a great deal of trouble. Since it is far advanced into the enemy camp such a piece would normally need to be guarded by a pawn so that if the knight is exchanged a nasty passed or advanced pawn takes its place .
79: Grandmaster Levenfish castled here, obviously satisfied by his fine position, and breakthrough chances based on P-KN4 opening lines, but he missed the immediate win 1 NxNP diverting the r,uard of the KP.
•• • ••• .... l'Ji . .. ..... � .... ' . .& ' , •• .& • ·{)·!· • .ft. • BftB B B
•••• ft • �-��- ft a u �tg'd u so B®B�D •
80: 1 Q-83 R-N3 (To meet the threatened 2 Q-B6 by 2 . . . RxP+ with perpetual check or win of the Q8P and QP with check.} 2 P-QN3 Q-R6 3 R-Q3 (Once again cutting out the counterplay from a rook sacrifice.) 3 ... Q-N5 4 R-Q81 P-KS 5 Q-86! R2xN 6 PxR PxR 6 R-81 Resigns.
A knight in the corner or at the edge of the board is nearly always a bad piece . Not only is its mobility limited from an aggressive point of view, but there are also risks of it being lost , so that in the games of masters one finds that knights reach such edge positions only for a
46
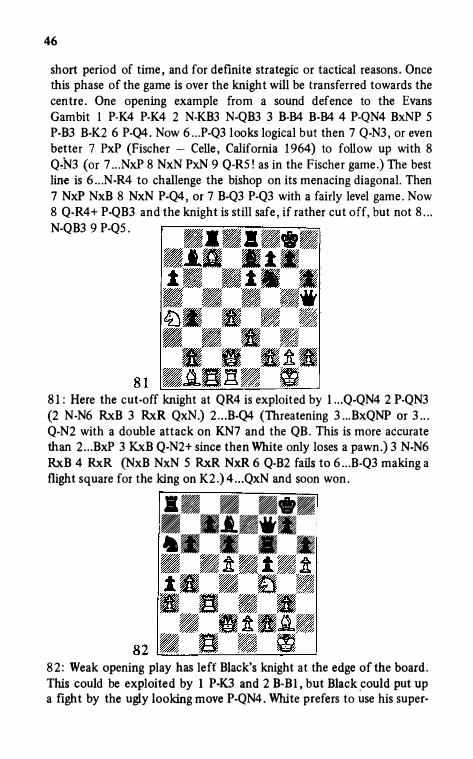
short period of time, and for definite strategic or tactical reasons. Once this phase of the game is over the knight will be transferred towards the centre . One opening example from a sound defence to the Evans Gambit 1 P-K4 P-K4 2 N-KB3 N-QB3 3 B-B4 B-B4 4 P-QN4 BxNP 5 P-B3 B-K2 6 P-Q4. Now 6 ... P-Q3 looks logical but then 7 Q-N3, or even better 7 PxP (Fischer - Celle, California 1964) to follow up with 8 Q"N3 (or 7 .. . NxP 8 NxN PxN 9 Q-RS! as in the Fischer game.) The best line is 6 ... N-R4 to challenge the bishop on its menacing diagonal. Then 7 NxP NxB 8 NxN P-Q4, or 7 B-Q3 P-Q3 with a fairly level game . Now 8 Q-R4+ P-QB3 and the knight is still safe , if rather cut off, but not 8 . . . N-QB3 9 P-QS.
81: Here the cut-off knight at QR4 is exploited by l . .. Q-QN4 2 P-QN3 (2 N-N6 RxB 3 RxR QxN.) 2 ... B-Q4 (Threatening 3 ... BxQNP or 3 ... Q-N2 with a double attack on KN7 and the QB. This is more accurate than 2 ... BxP 3 KxB Q-N2+ since then White only loses a pawn.) 3 N-N6 RxB 4 RxR (NxB NxN 5 RxR NxR 6 Q-B2 fails to 6 ... B-Q3 making a flight square for the king on K2.)4 ... QxN and soon won .
•• • ••• • • .... it. ,.. . . . • ·ft·:t·ft ;t& • " • u . � B n . B u ft;Sj • u
• �4-1\. • S.U.U.ll.b � 8 n 8 � 82 • ft;Sj • Q
8 2 : Weak opening play has leff Black's knight at the edge of the board. This could be exploited by 1 P-K3 and 2 B·Bl, but Black ,could put up a fight by the ugly looking move P-QN4. White prefers to use his super·
47
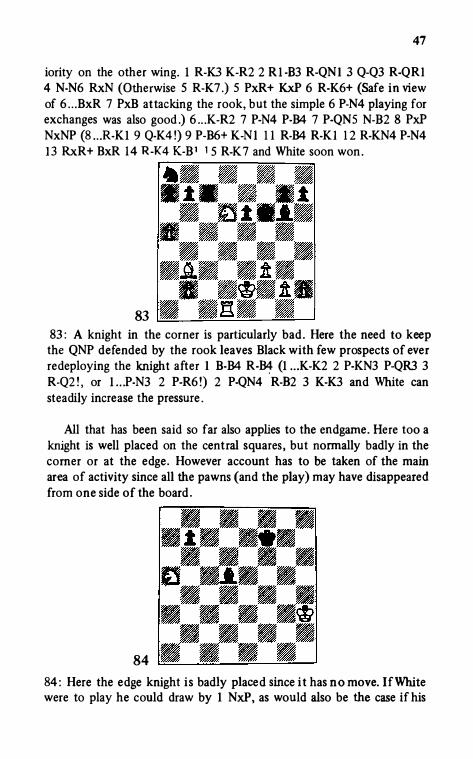
iority on the other wing. I R-K3 K-R2 2 R I -83 R-QNI 3 Q-Q3 R-QRI 4 N-N6 RxN (Otherwise 5 R-K7 .) 5 PxR+ KxP 6 R-K6+ (Safe in view of 6 . . . BxR 7 PxB attacking the rook, but the simple 6 P-N4 playing for exchanges was also good .) 6 . . . K-R2 7 P-N4 P-84 7 P-QN5 N-82 8 PxP NxNP (8 . . . R-Kl 9 Q-K4 !) 9 P-86+ K-Nl 1 1 R-84 R-Kl 1 2 R-KN4 P-N4 1 3 Rx.R+ BxR 14 R -K4 K-8 1 1 5 R-K7 and White soon won .
83 ='--===---'=---' 83 : A knight in the corner is particularly bad . Here the need to keep the QNP defended by the rook leaves Black with few prospects of ever redeploying the knight after 1 B-84 R-� (l . . . K-K2 2 P-KN3 P-QR3 3 R-Q2 ! , or l . . .P-N3 2 P-R6 !) 2 P-QN4 R-82 3 K-K3 and White can steadily increase the pressure .
All that has been said so far also applies to the endgame . Here too a knight is well placed on the central squares , but normally badly in the corner or at the edge . However account has to be taken of the main area of activity since all the pawns (and the play) may have disappeared from one side of the board .
84 84 : Here the edge knight i s badly placed since i t has n o move. If White were to play he could draw by 1 NxP, as would also be the case if his

48
king were on the Q-side . The actual play was l . . .P-N3 2 K-N3 PxN Resigns. Black has the 'unqueenable' RP, but the white king is '>Utside the square .

THE PLACING OF THE PAWNS
As the greatest numerical force on the board the pawns, despite their low value taken singly , are constantly in the strong player's mind . When looking at a position a player tends to assume that the pieces are level (otherwise why are both sides playing on?) and quickly surveys the pawns to see if either side is a pawn up , and to establish the skeleton or outline o f the position .
Generally speaking linked pawns (having a neighbour on the next ftle right or left) are preferable to isolated ones, since in the former case if one is attacked it can normally be guarded more easily , especiaily by its neighbour.
The doubled pawn generally has its element of weakness out
weighing its wlwment of strength but this depends on dynamic factors .
Thus after the opening moves I P-K4 P-K4 2 N-KB3 N-QB3 3 B-84 B-84 4 P-Q3 P-03 5 B-K3 Steinitz recommended 5 . . . BxB to saddle White with a doubled pawn whereas Tarrasch preferred to avoid giving the opponent an open KB-file and played 5 . . . B-N3 . Then if 6 BxB RPxB and Black has his QR partially mobilised to compensate for the doubled QNP.
In m odern opening theory the position after 1 P-04 N-KB3 2 P-084 P-K3 3 N-QB3 B-N5 4 P-QR3 BxN+ 5 PxB P-84 has supporters both of White and Black. The former speak of White 's powerful pawn centre and two bishops, the latter of Black's long terin winning chances based upon attacking the QBP by P-QN3 , B-R3 and N-QB3 -QR4 or Q-R4 .
The significance of the pawn is also an all-pervading factor because
of the well-known formula 'Other things being equal a pawn up is
sufficient to win the game ' . This means that both players must
constantly bear in mind the possibility that multiple exchanges will sirnplefy the position to an ending where a pawn up will prove a decisive advantage (especially in pure pawn endings).
What this means, looked at another way, is that a pawn sacrifice

so
may be more lightly undertaken in the opening (the well-known gambits etc.) and in the early middle game when the pieces have much potential scope than at a later stage , where the compensation for a lost pawn must be more definite .
After 1 P-K4 P-K4 no modem authority would claim that 2 P-KB4 is a losing move , as White gains some central preponderance after 2 . . . PxP 3 N-K83 or 3 8-84 . In the next diagram (85) P-KB4? is just a bad move giving away a pawn for nothing.
••• • • • i . B i B - �. & . � . . ..... .
• • • • • • .a. • -. �. A • •
��=--=��==�
R R i ll R ft R ft R B • 85 -�· • • 86 .::;::=_�=--
The dynarntc and contradictory nature of chess is well seen in pawn play .
86 : In the struggle against a rook two passed pawns on the rank generally win , even if not supported by the king. l ...R-N3 2 P-Q7 R-N 1 3 P-87 or 1 . . . R-QB8 2 P-Q7 R-Q8 3 P-87 or l . . . R-Q8 2 P-87 etc .
However against a minor piece with more limited scope than a rook far distant pawns are preferable .
8 7 ="'--"="----"
8 7 : 1 P-R7 8xP 2 P-N7 P-N6 3 P-N8=Q P-N1 4 Q-QN3 K-88 (Or 4 . . . 8-Q5 5 Q-R2 ! K-87 6 Q-R4+ K-81 7 Q-84+ K-N8 8 Qx8 .) 5 Q-Q83+
S I
K-N8 6 Q-B4 ! B-N 1 7 K-N6 ! K-R8 8 Q-QR4+ K-N8 9 K-85 and he brings his king over to the QNP to help in creating a mating net .
8 8 : Material i s not really level in. view o f the limited value o f the doubled pawn . In effect the KP is an extra one . Since with the knight it fonns a barrier to the enemy king, Black wins by bringing up his king. 1 . . . K-8 1 2 K-N2 K-K2 3 B-N8 (3 8-83 NxP 4 BxP N-QS 5 8-Q l loses even more quic kly after S .. . P-K7 6 BxP NxB 7 K-82 P-N6 queening.)
3 . . . K-Q3 ! 4 B-B7 K-B4 5 BxP NxP 6 K-83 (6 8-Q l N-QS 7 P-N4 P-K7, or 6 P-N4 N-QS 7 P-NS PxP 8 PxP NxP.) 6 . . . K-QS 7 B-87 K-Q6 ! 8 BxN K-Q7 9 B-B4 P-N6 1 0 BxP P-K7 Resigns.
A pawn which is the base of a pawn chain is called a backward pawn . If it is immobile and lies on a half-open ftle it is a weakness which can easily be bombarded by the maior pieces .
89
89 : The backward KP falls because of the weak back rank . 1 RxP RxR 2 Q-Q8+ Q-K1 3 QxQ+ RxQ 4 RxR+ mating.
52
90 90 : White has the advantage since he can attack the backward pawns at QN3 and Q4. His own isolated QRP is safer since it is well guarded by a
knight which also acts as a blockader of the enemy passed pawn . 1 R-NS ! N-KS (l . . . NxR 2 BxP+ - the move by the enemy KBP is shown to be weakening .) 2 BxN QPxB (2 . . . BPxB 3 NxQP RxP 4 NxP with an extra pawn .) 3 Q-N4 (Threat 4 P-QS , then R-Q 1 -Q4 .) 3 . . . RxR 4 PxR Q
Q-B2 5 N-QS Q-Q3 6 QxP K-Bl Black has lost a pawn (Note, not one of the two weakest we spoke of at the start ! ) and still has the worse position . White is able to win by threats against the king. 7 N-B7 R-N 1 8 N-K6+ K-B2 9 N-Q8+ K-K1 (9 . . . K-N3 1 0 Q-B7+ K-R3 1 1 N-K6 or 1 1 QxBP.) 1 0 N-B6 R-N2 · 1 1 Q-N8+ Q-B 1 1 2 Q-K6+ N-K2 1 3 R-R1
Resigns.
9 1 : White has a backward pawn at KB2 . Clearly Black will seek to exploit this by playing his major pieces to the KB ftle . l . . . R-KB1 ! 2 K-Nl (2 RxRP QxBP+ 3 QxQ RxQ+ 4 K-N3 RxP with two extra pawns
after S . . . RxNP.) 2 . . . R-B4 3 RxRP RxP 4 B-N2 K-N2 intending QxNP or in � 3 P-B4 PxPep 4 B-Q3 P-IP+ 5 K-B l R-B6 6 QxP+ QxQ 7 BxQ R-N6 winning.

53
92 : White is already ready to attack the backward QBP having trebled the major pieces on the QB ftle . The time has come for a decisive stroke I P-NS R2-B2 ( l . . . P-QB4 fails to the pretty variation 2 PxP QxN 3 PxP RxR 4 PxR RxQ 5 RxR and queens.) 2 PxP K-N2 (2 . . . NxP 3 B-NS .) 3 Q-Nl ! NxP 4 QxP (All Black's pieces are pinned. Black tries to break the pin but this only speeds up his inevitable defeat .) 4 . . . R-Nl 5
QxR/8 ! NxQ 6 RxR QxP 7 BxP N-B3 8 RlxN BxR 9 RxP+ K-R3 (9 . . . K-Rl 10 B-R 7 and 1 1 N-N6 mate .) I 0 P-84 ! (Threatening R-KR7 mate .) QxP+ 1 1 K-R2 QxN 1 2 BPxQ Resigns.
Positions often arise with two linked pawns standing abreast on halfopen ftles. These so-<:alled hanging pawns tend to be strong rather than weak, especially when they are safely guarded by mino r pieces. Their advance after suitable preparation can offer increased scope to the pieces as well as lead to the creation of a passed pawn . If just major pieces are left the hanging pawns tend not to be so strong.

54
93 : White's minor pieces are passive , and he exerts little pressure on the
hanging pawns . Botvinnik as Black won by 1 . . . B-R3 (The start of an attack against K6 and KB7 . The threat is P-Q S .) 2 B-R3 N-NS ! (2 . . . P
QS ? 3 NxP .) 3 Q-Q3 (There was a threat of 3 . . . BxP and sm othe red mate if 4 PxB .) 3 . . . QN-K4 4 NxN QxN S N-N3 Q-B3 (Threat 6 . . . Q·RS 7 PKR3 NxKP.) 6 N-R 1 P·QS ! 7 Q-K2 N-K4 8 PxP (Other lines are no better .) 8 . . . PxP ! (Not 8 . . . BxR 9 PxN .) 9 RxR BxR ! 1 0 R-K 1 (Or 1 0
P-KR3 P-Q6 1 1 Q-K4 with rathe r longe r resistance . ) 1 0 . . . P-Q6 1 1 Q-Q 1 B-NS 1 2 Q-R1 ( 1 2 P·B3 NxP+ 1 3 PxN BxP 14 Q-N 1 P-Q7 winning .) 1 2 . . . P-Q7 and Black soon force d resignation .
If the hanging pawns can be broken up , or are poorly defende d by the minor pieces the opponent has prospects of getting the better of it . In such cases the advance of the pawns merely leads them into a blockaded state i .e . they are turne d into a weakness .
94 94 : l . . .P-QN4 ! 2 P-BS (2 PxP PxP 3 NxNP? Q-Q4 .) 2 . . . Q-Q 1 3 R-R 1
P-NS ! (The pawns have been weakene d as has White's QS square which Black now controls . The passed QNP is also strong.) 4 N-K2 B-K
·s 5 Q
R3 B-B7 6 R-KB l P-N6 7 Q-QB3 N-Q4 8 Q-N2 N-K6 9 KR-Kl Q-Q4 10 N-KB3 KR-K 1 1 1 QR-B l R-B3 ? This move relaxes the pres
sure and Black only . won after further mistake s by his opponent. The right way to play was l l . . . R-N l strengthening the passe d pawn , especially as there was nothing for White to undertake .
When there are many pieces on the b oard it is not always easy to exploit the weakness of a passed pawn - there is probably too much going on with the aid of these pieces to re duce the whole theme of the game to simple positional pressure . However when there is little material left the attac k on an isolated pawn nearly always bears fruit .

ss
95: 1 R-Q4 (To render the object of attack immobile . If 1 P-K4 P-QS , though even then 2 K-K2 leaves White with winning prospects.) l.. .K-N l 2 P-K4 K-B l 3 RxP and White will win the K +P ending easily and there are not much better chances for Black in the rook ending after 3 . . . R-Nl 4 R-Q6 since the QNP is easily attacked by White by R
QB6 (on an impregnable square) or K-K3 -Q4 etc . So it is not possible for Black to activate his rook.
96
96 : White wins the isolated pawn by I N-K3 P-QS 2 N-B2 P-Q6 3 N-Q4 ! BxN 4 RxP taking the bishop next move .
The plan for attacking isolated pawns generally is the same as that for backward pawns, namely a concentration of forces on open lines. The defending pieces are driven back, or lose some mobility because of their defensive role.
See diagram next page 97 : Black has fiXed his attention on the QRP and now it is time to drive

56
away the defending knight . I . . :P-QN4 2 Q-K2 Q-K3 3 B-B l P-N5 ! 4
N-K4 RxP 5 RxR (5 NxB? QxQ .) 5 . . . RxR 6 Q-B3 B-B l Black has won the pawn and so carried out his current strategical task.
It must be borne in mind that an isolated pawn in the centre can have a positive side to it , since it provides an out-post for minor pieces, and there is often pressure along adjacent ftles and diagonals . Hence the isolated pawn that frequently arises in the Queen 's Gambit or French Defence can certainly not be described as weak if there have not been many pieces exchanged . The risk is that when the position becomes simplified the weakness of the pawn will become more real than potential .
98 : White has a potential outpost at K5 and great pressure in the centre and on the K-side because of his well-placed pieces. 1 Q-Q3 R-Kl 2 P-QS ! PxP 3 B-N5 N-KS (3 . . . P-N3 4 RxB QxR 5 NxP.) 4 NxN PxN 5 QxP P-N3 6 Q-KR4 and White has a powerful attack e .g . 6 . . . P-KR4 7 BN3 with grave threats against KB7 . Generally _speaking the advance P-Q5 is in favour of the possessor of the isolated pawn since it gives his

57
pieces dynamic chances, and is a sign that his opponent hu not achieved an adequate blockade of the pawn. Such a biockade is the first step towards achieving favourable piece exchanges.

THE OVERALL PLACING OF PIECES AND PAWNS
THE ABSOLUTE AND RELATIVE STRENGTH OF THE PIECES
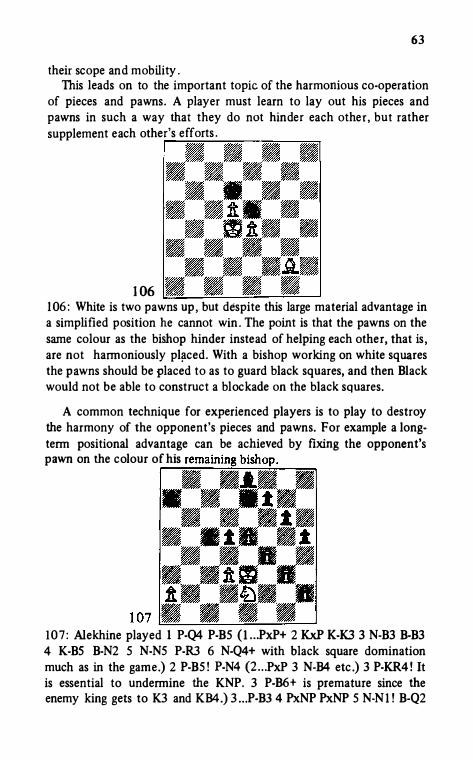
We already know that a single piece can be good or bad depending upon where it is posted . Hence the sum total of our forces can also be considered to be good or bad . This brings in the extra consideration of co-operation . Our forces are well placed overall when they are harmoniously placed, not hindering each other. An excellent example of such overall 'goodness' is seen in the next diagram .
99 =-==
The king is excellently guarded, the queen is safe from harm from the enemy minor pieces, but also has an active position . The rooks stand on open files , the knight on a supported central square the bishop on an open diagonal . By comparison Black has a much less good position , with his king under pressure from bishop , knight and queen (thus he cannot play for exchanges by N-Q2 because of QxBP+). There is a weakening of the K-side produced by P-KR3 , the QR and QB are not mobilised and the KR is blocked by its KP. Finally there is the tactical weakness of two unguarded pieces . In view of this disparity it is not surprising that White quickly exploited his advantage . 1 . . . R-Nl (To get the QB developed. If l ... B-Q2 2 RxB NxR 3 QxBP+ K-Rl 4 NxN QR-Ql 5 Q-N6 .) 2 R-Q4 P-QN3 3 Q-B4 R-Bl (3 .. . B-N2 4 R-Q7

59
NxR 5 QxBP+ etc .) 4 R-K3 (Continuing to concentrate his forces on the K-side .) 4 . . . R-N2 5 QxN ! PxQ 6 R-N4+ K-R 1 7 R-R3 forcing mate .
l OO 1 00 : White has a thoroughly satisfactory position . True the pawn cover round his king is not ideal , but Black is in no position to exploit this due to his passive st ate . Meanwhile White's pieces are ideally placed, whereas the black knight at QR1 is a very bad piece . If it were in play at, say , Q3 , KB3 or QN4 Black would stand no worse . As it is White has a fine combination based on this bad piece . 1 NxNP RxN 2 QxR QxQ 3 RxR K-B1 4 R-N8 (The key move driving the queen away - 4 . . . QxR 5 N-Q7+, or 4 . . . Q-R2 5 R1 -B8 N-B2 6 N-B6 .) 4 . . . Q-K2 5 RxQN P-N3 6 R l -B8 K-N2 7 RxN Q-QB2 8 R/K8-QB8 and Black soon resigned.
Yet to be successful at chess a player must not just examine the significance of each piece from the point of view of strategy i .e . its position on the board . A strategically well placed piece may turn out to be a tactical weakness, and vice versa . This may prove to be an exception , or rare occurrence , but the master does not lose sight of the possibility for all that . One must also examine the overall picture, the 'factor of linkage between the different pieces .

60 1 0 1 : As an example we may quote a few moves from a famous game Kotov � Keres, Budapest, 1 9 50 which went I N-84 PxB 2 NxN R-Kl and now the paradoxical 3 N-R8 ! is the winning follow-up adding weight to the threat of Q-R7+ by pressing on the KBP. The game continued 3 . . . R-K2 4 Q-R7+ K-B l 5 P-84 NxP 6 P-BS PxP 7 0-0 and White's attack soon broke through. We deal more thoroughly with this consideration in the section 'Chess Theory is not Dogma' .
Finally. a player has t o cultivate a sense o f proportion. The advantages we have spoken of such as pressure on a backward pawn have been illustra ted ·by cle.arcut examples for purposes of exposition. In practical play such advantages may be insignificant for a long time. Tarrasch held that three won tempi in the opening were worth a pawn. Using this scale of values it may well be that the disadvantage to the opponent of a pawn weakness may only be worth a fraction of a pawn , and a number o f such advantages have to be accumulated by superior play before a plus can be transfonned into a win .
Once again we take the opportunity to stress that as a first or rough guide to a position material should be counted up on the conventional absolute scale of values that reckons a minor piece worth just over three pawns, a rook five pawns and so on . When it comes to a deeper study of the position from the point of view of deciding upon the next move or drawing up a whole plan of campaign it is better to think in tenns of the relative rather than the absolute value of each unit .
What are the reasons for the change in value of a piece? What factors affect its strength?
Principally it is the scope of a piece that matters, how many squares it controls and how important those squares are in the given position . From this point of view a centralised position is superior as we have already stated .
See diagram next page
1 02 : White wins due to the decentralised nature of the enemy forces I B-83+ K-R3 2 P-N4 K-R2 3 P-N5 K-Rl 4 B-K4 B-R2 (Having no choice of move is , of course , one sign of a bad position.) 5 BxB KxB 6 KxP.
Then there is the factor of security, the extent to which the piece is safe on the square which it occupies . For example a central position for the king is not go,od in the opening or middle game , premature central-

6 1
isation o f the queen o r rook leads to the piece being exposed to attack. Generally speaking any unguarded unit is a potential weakness, the cause of tension on the board .
1 03_; The black bishop occ�pies a central position, but is poorly guarded, and the king is badly placed . White wins the bishop or mates by 1 .P-KN3 PxP 2 PxP Q-R3+ 3 K-N2 P-84 4 Q-85 mate, or 2 . . . K-R4 3 Q-R7+ K-N5 (3 . . . Q-R3 4 Q-85+ Q-N4 5 Q-R3 + mates .) 4 B-K2+ KxP 5 Q-R2 mate . If the black bishop had been guarded by the QBP its mobility would have been less (but not in a vital direction) but its safety would have been greater so that Black could keep it level by 2 ... Q-R3 + 3 K-N2 K-83 .
The third factor to be constantly borne in mind is the activity of a piece, its proximity to the opponent 's position . Uninterrupted contact. with one's own forces is also important. If one unit is far from base it may lose in strength ('One man in a field is not an army' as the Russian proverb puts it), and might run the risk of being lost .

62
1 04
1 04 : Black's forward knight and KNP are cut off from the main army and form a weak link in . Black's position . Alekhine won by 1 BxN+! RxB 2 N-N6 8-Ql 3 K-N3 and KxP.
The fifth and final factor affecting a piece's strength is its mobility, the opportunities it has to be transferred quickly from one part of the board to another. This is affected by the blocking of lines on parts of the board .
1 05 105 : White wins due to the great mobility of his N at KB3 . Note that if the Q4 square was not available to White his knight would have less mobility and he would not be able to win as in the game . 1 NxNP ! KxN 2 N-Q4 Q-Bl 3 N-B5+ K-Nl 4 Q-N3+ N-N5 5 QxN+ Resigns .
These five factors or considerations provide the 'correction factor' to the absolute strength of a piece . By now it should be clear why a bishop both of whose diagonals are blocked by its own pawns is a bad piece . These pawns reduce the scope and mobility of the piece, so affecting its absolute strength . Generally speaking the relative strength of the line-moving pieces {i .e . not the knight) depends a great deal on
63
their scope and mobility . This leads on to the important topic of the harmonious co-operation
of pieces and pawns. A player must learn to lay out his pieces and pawns in such a way that they do not hinder each other , but rather supplement each other's efforts .
1 06 1 06 : White is two pawns up , but despite this large material advantage in a simplified position he cannot win . The point is that the pawns on the same colour as the bishop hinder instead of helping each other, that is , are not harmoniously pl11ced. With a bishop working on white squares the pawns should be placed to as to guard black squares, and then Black would not be able to construct a blockade on the black squares.
A common technique for experienced players is to play to destroy the harmony of the opponent's pieces and pawns. For example a longterm positional advantage can be achieved by fixing the opponent's pawn on the colour of his n:nl<unlmg ,...,....,;,.,..........,=
1 07 =-107 : Alekhine played 1 P-Q4 P-BS (l . . .PxP+ 2 KxP K-K3 3 N-B3 B-B3 4 K-BS B-N2 5 N-N5 P-R3 6 N-Q4+ with black square domination much as in the game.) 2 P-B5 ! P-N4 (2 . . . PxP 3 N-B4 etc .) 3 P-KR4 ! It is essential to undermine the KNP. 3 P-B6+ is premature since the enemy king gets to K3 and KB4.) 3 . . . P-B3 4 PxNP PxNP 5 N-N 1 ! B-Q2

64
{S ... P-NS 6 N-K2 B-Q2 7 K-84 , or S . . .P-RS 6 P-N4 B-RS 7 K-K2 ! and 8 N-RJ .) 6 P-86+ K-K l (6 .. .K-B2 7 N-83 K-N3 8 NxP!) 7 N-83 P-NS 8 N-R4 B-K3 9 N-N6 B-82 10 N-84 K-Q2 1 1 K-K2 ! P-QR4 1 2 K-lO B-Nl {1 2 . . .P-RS 1 3 P-RJ and White is making use of the Zugzwtmg weapon.) 13 NxP and White went on to win.

THE MOBILISATION OF THE PIECES AND
CENTRE PAWNS
At the start of the game both sides try to put their pieces and
pawns on the most advantageous squares. One of the main strategic means of achieving this aim is the development or mobilisation of the pieces and centre pawns. In the simpler openings this mobilisation needs 1 0- 1 1 moves ; in complex openings the process takes several m oves longer .
A player has to create during this time a safe pawn base in the centre, often by such a formation as pawns on QB4 and Q4 , or Q3 and K4 , or then again QB4 and K4 . This applies more to White than to Black who by reason of moving second has to take more account of his opponent 's actions and therefore may well adopt a more defensive formation with a single pawn stationed in the centre at K3 , Q3 or QB3 .
If there is no such firm base there is the risk of having developed units driven back by the enemy pawns .
The king should normally be moved to the wing where he is more easily defended , and by castling a rook is b rought towards the centre .
The rooks will normally strive to get to Kl and 'Q l , or to an open file . The queen is best placed on a centre square on the second rank. The major pieces, rooks and queen, are most safely located behind the minor pieces and pawns.
The minor pieces are normally best placed thus : - knights at QB3 and KB3 , the bishops at KN2, QN2, QB4 Q3 (after the QP has moved forward) or K2 , at KNS , KB4, K3 or possibly Q2 .
Other useful pieces of advice : - don't waste time on prophylactic moves by wing pawns as the opponent may use the time when he thereby is free from threats to outstrip you in development and then
use his better mobilised army to harry you. This means that moves like P-KR3 and P-QR3 to prevent a bishop coming to KNS or QNS are normally unnecessary - it is a different story if you challenge a bishop

66
that is already there , since then time is not lost . Don't put your knights at the edge of the board without very good
reason . In more complicated opening systems there may be refinements
such as deferred castling so as to save time, or to mask one's plan, or because the board has already become much clearer of material . Or we may have the development of the pieces without much of a firm pawn base in the centre (e .g . the Grunfeld Defence 1 P-Q4 N-KB3 2 P-QB4 PKN3 3 N-QB3 P-Q4 4 PxP NxP 5 P-K4 NxN 6 PxN B-N2 7 B-QB4 0-0 and only later P-QB4, or the Alekhine Defence 1 P-K4 N-KB3 2 P-K5 N-Q4 3 P-Q4 P-Q3 . Note that in these cases it is more a question of undermining the enemy centre rather than building one of one's own). Or again the development of the queen to the fourth rank (as in the Sicilian or Dutch Defences). Or long knight marches such as QN-Q2-KB1 - K3/KN3 (as in the Ruy Lopez), or the early advance of the KBP, sometimes to open a flle , sometimes to support an outpost on K5 (such as in the King's Gambit , the Vienna, Bird 's Opening or the Dutch Defence).
If the pieces and centre pawns are not utilised in the ways indicate there is the risk of an early rout .
1 08
1 08 : White has moved his queen around to the detriment of getting out his QN and QB. mack has a quick win by 1 . . . Q-R5 2 R-N2 QxRP+ 3 RxQ R-N8 mate .
1 09 : Steinitz had allowed his king to be driven round to QBl and has had his KRP doubled, just to win a pawn . Chigorin exploited this by l . . . RXP! 2 B-N2 (2 QxR Q-K8+, or 2 P-R3 KR-Ql ! 3 K-N 1 R-Q7 !) 2 . . .
KR-Q1 3 P-R4 R-Q8+ 4 RxR RxR+ S QxR NxQ Resigns.

67
1 1 0 : Note the marke d comparison between the QR and Q8 or each side here . 1 . . . 8xP 2 Px8 (2 Q-K6+ QxQ 3 NxQ 8-K6+ 4 K-Rl R-88+ ! 5
K-N2 R-87+ winning.) 2 . . . NxP 3 QN-83 (3 KN-83 is even worse because of 3 . . . Q-N3+ 4 Q-N3 N-K7+.) 3 . . . N-K7+ 4 K-N2 P-R3 ! S Q-Q2 Q-84 6 Q-K3 PxN 7 B-Q2 B-KS Resigns.
1 1 1 I l l : I N-KS N-Q7 2 R-Ql P-87 3 R-Q8 1 N-N6 4 RxP NxP 5 R-Q2 N-N6 6 BxN NxR 7 8-N7 Resigns because of 7 . . . R-QNl 8 B-86+ K-K2 9 R-R7+ with great material advantage.

68
1 1 2 : 1 NxRP+ Px.N 2 Q-N6+ K-Rl 3 QxRP+ K-Nl 4 RxN N-N5 5 BxP+ ! RxB 6 RxQ+ and it is all over .
Finally some opening catastrophes due to weak play, contrary to the sound methods we have indicated earlier in this chapter.
Badly Developed Pieces
1 P-K4 P-K4 2 Q-R5? N-QB3 3 B-B4 P-KN3 4 Q-N4? P-Q4 5 Q moves PxB
1 P-K4 P-K4 2 N-KB3 Q-B3 ? 3 B-B4 Q-KN3? 4 N-B3 QxNP? 5 RKNl Q-R6 6 BxP+! and Black must move his king because of 6 . . . KxB? 7 N-KN5+.
I P-K4 P-K4 2 N-KB3 N-QB3 3 N-B3 B-B4? ! 4 NxP NxN 5 P-Q4 Q-K2? (5 . . . B-Q3 ! ) 6 N-Q5 Q-Q3 7 PxB QxP 8 B-KB4 P-Q3 ? (8 .. .P-B3 was necessary to leave the queen some freedom .) 9 P-QN4 Q-B3 1 0 BQN5 ! The queen is lost.
Lack of a Pawn Base
1 P-K4 P-K4 2 N-KB3 N-QB3 3 B-B4 B-B4 4 P-B3 N-B3 5 P-Q4 PxP 6 PxP B-N3? (6 . . . B-N5+!) 7 P-Q5 N-K2 8 P-KS N-K5 9 P-Q6 PxP 10 PxP NxBP 1 1 Q-N3 NxR 12 BxP+ K-Bl 1 3 B-NS Resigns .
1 P-K4 P-QB4 2 N-KB3 N-KB3 3 P-KS N-Q4 4 N-B3 NxN 5 QPxN P-QN3 ? (5 . . . P-Q4 !) 6 P-K6 ! QPxP (6 . . . BPxP 7 N-KS P-N3 8 Q-B3 , or 6 . . . . P-B3 7 N-K5 PxN 8 Q-B3 Q-B2 9 QxR N-B3 1 0 B-QNS and Black cannot trap the queen .) 7 QxQ+ KxQ 8 N-KS K-Kl 9 B-QN5+ B-02 (9 . . . N-Q2 1 0 B-B6 R-QN1 1 1 B-B4 .) 1 0 NxB NxN 1 1 B-KB4 P-QR3 1 2 B-B6 R-B l 1 3 B-N7 R-Q 1 14 B-B7 winning the exchange .
Creating Holes in the Position
1 P-K4 N-KB3 2 N-QB3 P-Q4 3 P-K5 N-KS 4 QN-K2 N-B4 5 P-QB3? (5 P-Q4 !) 5 . . . N-Q6 mate .
1 P-K4 N-KB3 2 N-QB3 P-Q4 3 PxP NxP 4 KN-K2 N-QB3 5 P-KN3 ? (5 P-Q4 .) 5 . . . B-NS 6 B-N2 N-Q5 ! 7 BxN QxB! 8 P-B3 (8 NxQ N-B6+ 9 K-B 1 B-R6 mate .) 8 . . . QxBP 9 R-B1 Q-N7 Resigns .
69 A Piece Trapped by Enemy Pawns
1 P-K4 P-K4 2 N-KB3 N-QB3 3 8-NS P-QR3 4 B-R4 P-Q3 5 P-Q4 PQN4 6 B-N3 NxP 7 NxN PxN 8 QxP? (8 B-Q5 or 8 P-QB3 .) 8 . . . P-QB4 9 Q-Q5 B-K3 10 Q-86+ B-Q2 1 1 Q-Q5 P-85 etc.
1 P-K4 P-QB4 2 P-QN4 PxP 3 P-QR3 N-QB3 4 PxP N-.83 ? 5 P-N5 N-QN 1 6 P-K5 Q-B2 7 P-Q4 (7 PxN? Q-K4+.) 7 . . . N-Q4 8 P-QB4 N -N3 9 P-85 N-Q4 1 0 P-N6 Resigns ! An example of unorthodox but effective play by White . If l O . . . Q-QI 1 1 RxP ! RxR 1 2 PxR Q-R4+ 1 3 N-83 ! NxN (1 3 . . . QxN+ 14 B-Q2 .) 14 PxN-Q NxQ+ 1 5 B-Q2 Q-Q I 1 6 KxN with decisive material advantage .
Unguarded Pieces - Knight at the Board 's Edge
I P-Q4 P-Q4 2 B-KN5 N-KB3 3 N-Q2 B-B4 4 P-QB4 P-K3 5 KN-83 QN-Q2 6 N-R4? (6 P-K3 !) 6 . . . B-K5 7 PxP PxP 8 NxB? (8 P-K3 .) 8 . . . NxN ! 9 BxQ B-N5+ 1 0 Q-Q2 BxQ+. l l K-Q I RxB 12 P-83 B-N4 ! remaining a piece up.
Material Win at the Cost of Position
1 P-K4 P-K4 2 N-QB3 N-KB3 3 P-84 P-Q4 4 BPxP NxP 5 N-83 BKN5 6 Q-K2 N-84 ? (6 . . . NxN 7 NPxN P-Q84 .) 7 P-Q4 BxN? 8 QxB Q-R5+ 9 P-KN3 QxQP 1 0 B-K3 ! QxP 1 1 0-0-0 P-QB3 1 2 NxP ! PxN 1 3 RxP Q-K3 ( I 3 . . . Q-K5 1 4 B-N5+ N-QB3 1 5 QBxN! QxQ 1 6 R-KI + B-K2 1 7 RxB+ K-8 1 1 8 R-K3+ .) 14 B-Q84 Q-K5 1 5 BxN ! QxQ 1 6 R-K l + Resigns.
1 P-Q84 N-KB3 2 N-QB3 P-K3 3 N-83 P-QN3 4 P-K4 B-N2 5. P-K5 N-K5 6 B-Q3 NxN 7 QPxN P-Q3 ? (7 . . . B-K2) 8 N-N5 ! PxP? (8 . . . P-N3 .) 9 NxBP Q-83 (9 . . . KxN 1 0 B-N6+ wins the queen or mates.) 1 0 NxR P-N3 1 1 Q-N4 QxN 1 2 QxKP+ B-K2 1 3 B-N5 Resigns .

IM PROVING THE POSITION OF THE PIECES
DRIVING BACK THE ENEMY PIECES
After the pieces have been developed (and sometimes simultaneously with this process) we aim to improve the position of our pieces. Thus if circumstances allow the knights go from B3 to K5 or Q5 . The frequent alternative is N-R4-B5. An alternative route to the centre is N-Q2-KB1 -K3 -Q5 , or N-Q2-B4-K3 -Q5 . If possible the knight is played even further into the enemy camp by being put on the sixth rank, say , by N-KN5-K6 or N-QN5-Q6 .
1 1 3 1 1 3 : Black sees a strong outpost for his knight at Q6, so starts by 1 . . . B-Q5 . (The rest of the play revolves around this plan and White's attempts to prevent it.) 2 QR-Q 1 N-B4 3 BxB+ QxB 4 RxB (His best chance in the given situation .) 4 . . . RxR 5 Q-K5? (5 B-K3 was much stronger, 5 . . . R-K5 6 NxR QxN 7 Q-Q2 N-Q6 8 P-B3 Q-B3 9 P-N3 and though Black has achieved his object White has chances too .) 5 ... R-Q4
6 NxR QxN 7 R-K1 Q-B3 8 Q-K3 N-Q6 9 R-N l R-Ql . An advanced and protected knight such as the one at Q6 is nearly always superbly placed, working in various directions and hindering the action of the enemy pieces. That is the case here. White failed to fmd his best chance 1 0 P-B3 K-N2 1 1 Q-K4 R-Q4 with some advantage to Black.) 1 0 PKR4 NxNP ! 1 1 QxRP N-Q6 1 2 R-Q l ? R-Q2 and White resigned since he has no defence to 1 3 . . . N-B5 .
7 1
1 14 : White achieves a'
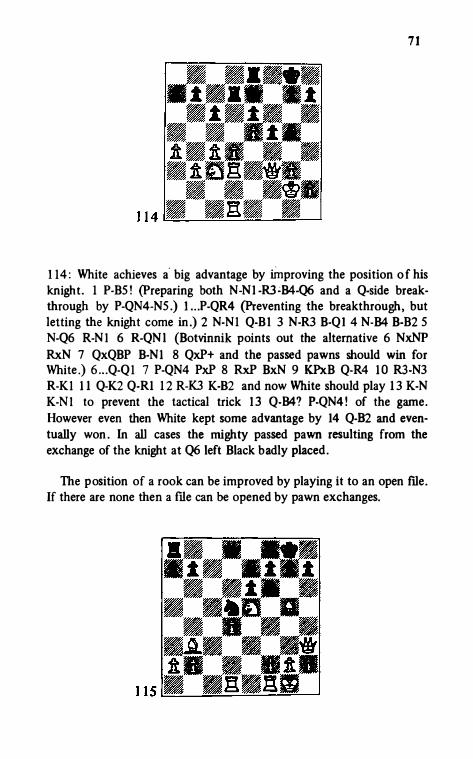
big advantage by ilnproving the position o f his knight. 1 P-85 ! (Preparing both N-N1 -RJ ;B4-Q6 and a Q-side breakthrough by P-QN4-N5 .) l . . .P-QR4 (Preventing the breakthrough, but letting the knight come in.) 2 N-N 1 Q-8 1 3 N-R3 B-Q1 4 N-84 B-82 5 N-Q6 R-N 1 6 R-QN l (Botvinnik points out the alternative 6 NxNP
RxN 7 QxQBP B-N1 8 QxP+ and the passed pawns should win for White .) 6 . . . Q-Ql 7 P-QN4 PxP 8 RxP BxN 9 K.Px.B Q-R4 1 0 R3-N3 R-K1 1 1 Q-K2 Q-R1 1 2 R-K3 K-82 and now White should play 1 3 K-N K-Nl to prevent the tactical trick 1 3 Q-84? P-QN4 ! of the game. However even then White kept some advantage by 14 Q-82 and eventually won . In all cases the mighty passed pawn resulting from the exchange of the knight at Q6 left Black badly placed .
The position of a rook can be improved by playing it to an open ftle. If there are none then a ftle can be opened by pawn exchanges.

72
1 1 5 : White could improve his KR by KR-K1 , but even stronger here is 1 P-84 since after 2 P-B5 White both opens the KB file and undermines the enemy knight at Q5 0 1 o o oR-B l (The pawn advance cannot be prevente d - 1 o o oP-N3 2 B-R6 R-Kl 3 B-R4 winning the exchange , or 1 0 0 0 N-K5 2 NxP ! RxN 3 QxKPo) 2 P-B5 PxP (Or 2 0 0 0Q -Q3 3 PxP PxP 4 KR-Kl , or in this 3 o o .QxP 4 Q-KB3 o) 3 RxP Q-Q3 (As a result of the strengthening of the rook's position and the weakening of support for the knight in front of the isolated pawn White has an overwhelming positional advantage . Black's last m ove is a decisive mistake , but even after the superior 3 o o .R-B2 Black would not be able to hold out for long, e .g. 4 QR-KB1 P-QR3 5 NxP ! RxN 6 KBxN NxB 7 RxR BxB 8 Q-K6 ! or 4 . . . N-N3 5 Q-R4 - to sacrifice both rooks on KB6 - 5 o · · QN-Q4 6 NxP RxN 7 KBxN NxB 8 RxR BxB 9 QxB ! ! ) 4 NxP RxN (4 . . . KxN 5 BxN+.) 5 QBxN BxB (5 . . . NxB 6 RxN and 7 QxR+ .) 6 RxN Q-B3 7 R-Q6 (Not 7 R-QB5?
0BxP+.) 7 . . . Q-K 1 8 R-Q7 .
Strengthening a bishop's position is achieved either by transferring it to an open diagonal , or by some form of line opening or square clearance .
1 1 6 : The bishop occupies a purely defensive post, so 1 B-84 KR-K 1 ( I . . . QxQP 2 QxQ NxQ 3 QR-Bl + N-B3 4 P-QN4 ! and 1 . . . P-KN4 2 B-K5 NxB 3 PxN both favour White .) 2 QR-B 1 RxR 3 QxR K-Q2 4 Q-K3 R-K1 5 Q-QN3 . (As a result of the bishop transfer White has much the better of it . He wins the QP and quite soon the game.) 5 . . . R-K3 6 QxQP+ K-K2 7 B-K5 P-KN3 8 P-QN4 K-B2 9 R-K1 N-K2 1 0 QxR+ Resigns.
See diagram next page 1 1 7 : 1 P-Q5 ! B-Q2 ( 1 0 0 oPxP is bad, since after 2 PxP BxP 3 BxN PxB 4 RxP both bishops will have been brought to life .) 2 B-R2 ! PxP (The threat was 3 RxN PxR 4 P-Q6+o) 3 PxP N-K4 4 R-K3 Q-B3 . 5 RxN RxR

73
6 BxR QxB 7 QxP+ K-Rl 8 QxB Resigns .
As the position becomes more simplified the queen can be played to a centralised position , and with the onset of the ending this applies to the king as well .
Generally speaking the strengthening of the position of the pieces is a very important strategical idea that applies at all stages . After all the process of development in the opening is · nothing more than the preliminary strengthening of poorly placed pieces - in . the initial position only the knights have any scope at all . Bear_ing all this in mind one must not forget about the reverse side of the coin which is the attempt to drive the enemy's forces from good positions.
What are the means adopted to drive back enemy units? First and foremost direct attack. If a lesser UQit , especially a · pawn, attacks a stronger unit then the stronger must normally retreat upon pain of loss of material . Retreat may also be forced by tactical threats as we have already seen in diagram 93 where White's pieces were induced to take up inferior posts - B at QR3 , N at KRl . In diagram 94 Black not only improved his own position but forced a retreat on his opponent by 3 . . . P-NS etc .
In the struggle for an open me we often see the driving off of pieces that prevent a, successful incursion to the back rank or the seventh rank. The same driving-off process also occurs frequently whe
-n exploiting an
advantage that has already been achieved .
See diagram n ex t page 1 1 8 : White has pressure on the KB me and pawns on th� centre files which rob enemy pieces of useful squares. However in order to take this further he has tb drive back the enemy knight at KN3 . 1 P-KR4

74
1 1 8 (Threat : 2 Q-N3 as well as 2 P-R5 N-R1 3 Q-N3 P-N3 4 N-R6+.) 1 .. .
P-83 2 Q-N3 ! PxP 3 PxP N4-K2 (3 . . . R-86 falls to 4 Q-N4 e .g. 4 .. .
NxKP? 5 RxN .RxR 6 N-R6+.) 4 N-Q6 RxB 5 RxR NxKP 6 Q-82 ! PKR3 7 Q-88+ K-R2 8 N-85 NxN 9 QxN+ P-N3 1 0 Q-88 R-K1 1 1 Q-84 P-KR4 1 2 R-QB3 R-K2 1 3 R-K3 Resigns .
1 1 9 1 20
1 19 : The same story here where White does not worry about losing material if only he can drive the knight away . 1 P-85 BxR 2 QxB N-R1 3 Q-N4 KR-K 1 (3 . . .P-Q4 falls to 4 BxP PxB 5 NxP Q-Q 1 6 B-87!) 4 P-K5 K-81 5 N-K4 (There was another winning line in 5 QxB+ and. 6 P-86+.) 5 . . . PxP 6 P-86 ! BxP 7 R-KB1 B-N2 8 N-N5 ! Q-N5 9 NxP QxP+ 10 QxQ PxQ 1 1 NxN+ and Black soon resigned.
1 20 : White has the better pawn formation . How can he exploit this? 1 P-QN3 ! (To drive the knight back.) I ... R-83 (l . . . RxP RxN.) 2 P-QB4 N-N5? (2 . . . N-83 is right.) 3 Q-83 ! K-82 (3 .. .P-R4 4 R-Q5.) 4 R-Kl (Stronger than 4 QxN Q-QS+ S R-K3 Q-RS .) 4 . . . Q-Q3 S Q-R8 P-K4 6 QxRP+ K-K l 7 Q-R8+ K-Q2 8 QxP and White won.

75
1 2 1 1 2 1 : A good example of corn bining the two themes o f this section. 1 . . . P-K4! 2 PxP PxP 3 B-N1 KR..Q l 4 Q-B l B-K3 5 R-B2 (5 R·Ql playing for exchanges was the best chance .) 5 . . . }>-R4 (Preparing to improve the position of his KB.) 6 R-R1 K-R2. 7 N-N4 B-R3 8 Q-N1 (Now Black has gained a clear advantage by improving his pieces and driving off the opponent's. As a result he wins a pawn.) 8 . . . B-K6 9 R-K2 BxB 1 0 KxB NxNP!
Summing up we may sa, that this section is clearly based on the concept of the relative strength of pieces.
EXCHANGES
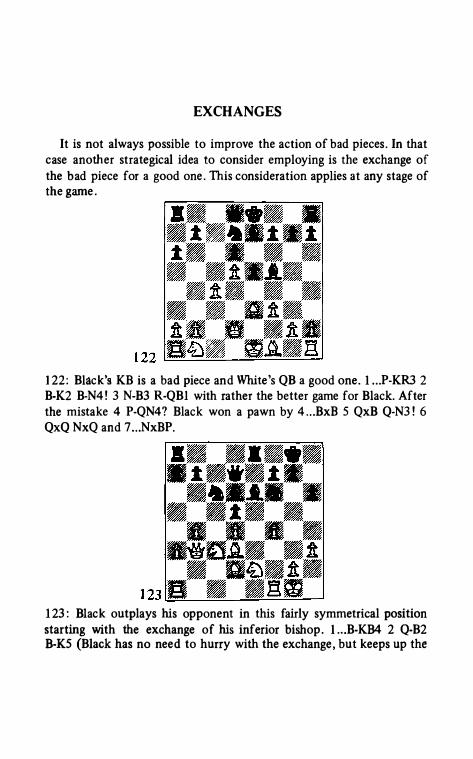
It is not always possible to improve the action of bad pieces . In that case another strategical idea to consider employing is the exchange of the bad piece for a good one . This consideration applies at any stage of the game .
1 22 : Black's KB is a bad piece and White 's QB a good one . l . . . P-KR3 2 B-K2 B-N4 ! 3 N-B3 R-QBl with rather the better game for Black. After the mistake 4 P-QN4? Black won a pawn by 4 . . . BxB 5 QxB Q-N3 ! 6 QxQ NxQ and 7 . . . NxBP.
1 23 : Black outplays his opponent in this fairly symmetrical position starting with the exchange of his inferior bishop . l . . . B-KB4 2 Q-B2 B-KS (Black has no need to hurry with the exchange , but keeps up the

77
tension while occupying a powerful outpost .) 3 P-N5 (This 'aggressive ' move only weakens White 's QB4 square further . 3 QR-B l was better.) 3 . . . BxB ! 4 QxB N-QR4 5 N-N3 (Not 5 NxP NxN 6 BxN because of 6 . . . R-K6 7 Q-Q2 QxNP, or 7 Q-B4 Q-K3 8 P-B5 Q-K5 . Black can always get the pawn back, and has great central pressure .) 5 . . . N-B5 6 B-Bl QR-B l 7 R-R2 B-Bl 8 P-QR4 B-N5 9 N-Q l N-K5 (According to Botvinnik it was more exact to play first 9 . . . N-Q3 and only then N/B3 -N/B3-K5 thus preventing P-B5 .) 1 0 P-B5 NxN 1 1 QxN B-Q3 (Black has great central pressure , especially on the white square whose defender was exchanged earlier . Black now improves the position of his bishop.) 12 Q-KB3 B-K2 13 Q-KN3 B-B3 ! 14 BxP BxP+ 1 5 K-Rl P-B3 ! 1 6 B-Bl R-K5 (Black gradually centralises all his pieces.) 1 7 Q-Q3 N-K4 1 8 Q-N l R-QB5 1 9 P-R5 B-B4 20 P-N6 P-R3 2 1 N-N2 R-B6 2 2 B-Q2 R-QN6 23 Q-B2 Q-N4 24 R-BI B-B I 25 R-Q I R-K7 26 Q-B I RxRP+! 27 PxR P-Q5 Resigns .
We know that a knight on the fifth rank in the centre is well posted. Strategic considerations often dictate that such a piece should be exchanged . Thus in a well-known game of Botvinnik after the book moves I P-K4 P-K4 2 P-KB4 P-Q4 3 N-KB3 QPxP 4 NxP Black played 4 .. . N-Q2 . Now if 5 NxN BxN and White is left with weaknesses caused by the advance of the KBP. So White tried to support the knight , 5 P-Q4 PxPep 6 BxP (6 NxQP N-KB3 and Black stands rather better.) 6 . . . NxN ! 7 PxN. Now the knight has been exchanged and replaced by an isolated pawn, 7 . . . Q-R5+ 8 P-KN3 Q-KN5 9 QxQ BxQ 1 0 B-K3 N-K2 I I N-B3 N-B3 1 2 B-QN5 B-Q2 ! As a result of his accurate defence Black has equality .
1 24 1 24 : Black has a strong knight so White challenges with his yet undeveloped piece . I N-Q2 N-N4 (After l ... NxN 2 BxN White would have the advantage in view of Black's pawn weaknesses .) 2 R-B2 ! (To

78
improve his knight 's position by N-B 1 -N3 -B5 .) 2 . . . R-B3 3 N-B 1 B-R4? (According to Keres this is a decisive mistake ; Black had better practical chapces by 3 . . . B-K3 guarding the weak QP .) 4 N-N3 B-N3 5 N-B5 with great positional advantage to White .
. } 25 =:...._===-=___J
1 25 : An illustration of the exchange of queens for strategic aims. 1 Q-K3 ! (Black cannot avoid the exchange since if 1 . . . Q-B2 then 2 R-Q6 or 2 NxP.) 1-.. .QxQ 2 PxQ B-N5 3 P-R5 N-B 1 4 R-QB1 BxN 5 PxB N-K2 6 N-QS ! (Yet another exchange to help the rooks penetrate the enemy position. If now 6 . . . KNxN then the simplest reply is 7 BxN NxB 8 RxN etc .) 6 . . . N-B3 (Avoiding the exchange involves Black in the loss of the KBP.) 7 NxN+ PxN 8 R-Q7 QR-N 1 9 K-B2 (Threat - 1 0
R-KN1 + and 1 1 BxP.) 9 . . . NxP 10 R1 -B7 QR-B1 1 1 RxBP QRxR 1 2 RxR+ K-Rl 1 3 B-QS ! P-N4 (Or 1 3 . . . N-B3 1 4 RxP.) 1 4 P-N3 ! White has stalemated the knight which avoided the exchange some moves ago . White went on to force a wih .
Sometimes the exchange of pawns is seen in this connection.
1 26 : 1 P-BS (To improve the position of the QB and to bring the other bishop more into the game.) l . . . QxBP 2 BxP (2 B-B7 is premature in

79
view of 2 ... Q-NS+.) 2 . • .N-BJ 3 Q-B4! (Yet another e:xhange which enables White to force a winning endgame.) 3 . . • QxQ 4 BxQ RxP S RxR NxR 6 BxQRP and White won easily by using his QRP.
STRENGTHENING THE POSITION WEAKENING mE OPPONENT'S POSITION
Strengthening one's own position is certainly not a strategy of waiting, but a useful and sometimes essential preparation for the success of future operations. Basically such strengthening consists of safeguarding critical and weak points, and such strategic weaknesses as, for example , isolated and doubled pawns and a broken king position .
Many opening variations lead to the creation of isolated pawns in the centre which are both a weakness (since they have to be guarded by
the pieces) and a strength since they provide outposts for knights and adjacent open files for rooks . However because of the element of
weakness the isolated pawn has to be defended.
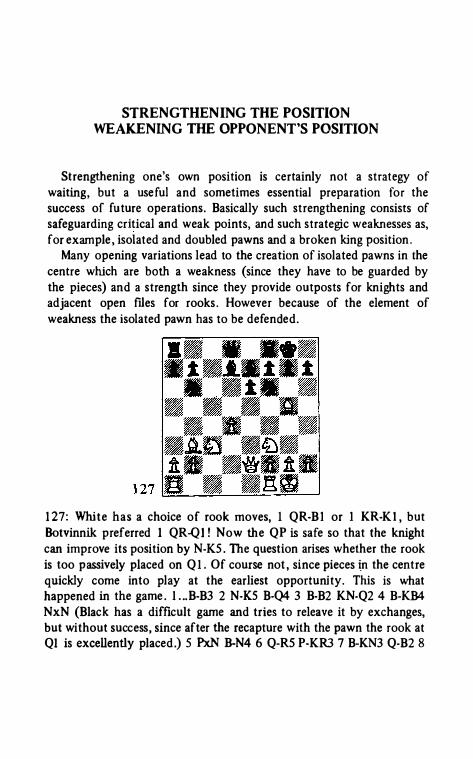
1 27: White has a choice of rook moves, 1 QR-B l or 1 KR-K l , but
Botvinnik preferred 1 QR-Q l ! Now the QP is safe so that the knight can improve its position by N-KS . The question arises whether the rook
is too passively placed on Q 1 . Of course not , since pieces �n the centre quickly come into play at the earliest opportunity. This is what happened in the game . l . .. B-B3 2 N-KS B-Q4 3 B-B2 KN-Q2 4 B-KB4 NxN (Black has a difficult game and tries to releave it by exchanges, but without success, since after the recapture with the pawn the rook at Ql is excellently placed .) 5 PxN B-N4 6 Q-RS P-KR3 7 B-KN3 Q-B2 8

8 1
P-KR4 8-Q1 (Now watch that rook a t work ! ) 9 R-Q4 Q-84 1 0 R-KN4 P-84 1 1 PxPep RxP 1 2 8-K5 8-83 1 3 RxP+ Resigns.
1 28 : Safeguarding the position occurs \n many sorts of situation . In this position from the Giuoco Piano White's centre pawns occupy the centre, but are under fire . 1 Q-Q3 ! R-Kl (1 . . . 8xN 2 Px8 only strengthens White's K4 , and White can still safely go 0-0, since no danger threatens the king there, and there is the active follow-up K-Rl and R-KNI .) 2 N-Q2 , or 2 0-0 B-R4 3 N-Q2 and White has solved his strategic problem.
1 29 1 29 : White threatens to control K5 by P-N5 driving away the 1rnight . Black must safeguard this point by 1 . . . P-QR3 , followed by doubling rooks on one of the open flies. Instead he played, 1 . . . R-B2? at once . There came 2 B-Q3 N-83 3 P-N5 ! B-R4+ 4 K-K2 N-K2 5 RxR+ NxR 6 Q-R4 when Black's pieces were disorganised and White has gained a big positional advantage .
Weakening the opponent 's position is of great significance , and examples have already been seen of the benefits this brings - especially creating holes for our pieces to occupy, and breaking up the pawn cover of the king. Thus in number 1 1 5 1 P-84 was better than the natural
82
l KR-Kl because by the subsequent P-B5 White could reckon on weakening the enemy position .
When it comes to weakening the king position the commonest method is exchanging a minor piece in the king's vicinity , because in that way the number of defenders is reduced, and often the recapture involves a pawn weakness (e .g. B-KN5 and BxN/KB6 when the reply PxB follows) . In other cases 'a b reakthrough or undermining move is part o f the attacker's scheme .
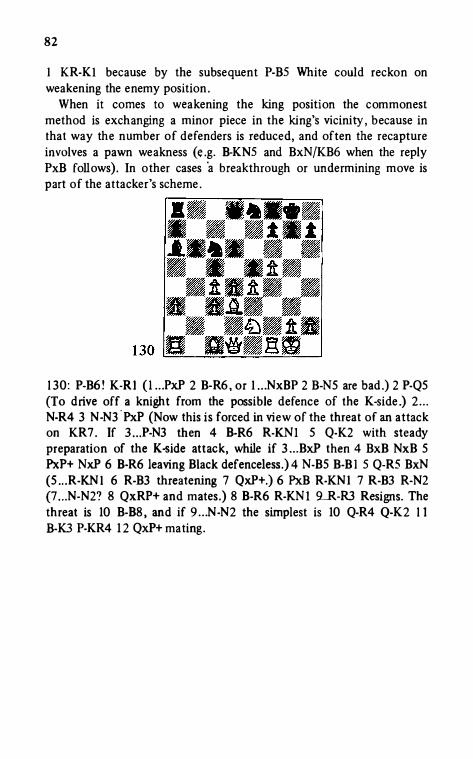
1 30 : P-B6 ! K-R l ( l . . . PxP 2 B-R6 , or l . . . NxBP 2 B-N5 are bad .) 2 P-Q5 (To drive off a knight from the possible defence of the K-side.) 2 . . . N-R4 3 N-N3
·PxP (Now this i s forced in view of the threat of an attack
on KR7. If 3 . . . P-N3 then 4 B-R6 R-KN I 5 Q-K2 with steady preparation of the K-side attack, while if 3 . . . BxP then 4 BxB NxB 5 PxP+ NxP 6 B-R6 leaving Black defenceless.) 4 N-B5 B-B I 5 Q-RS BxN (5 . . . R-KN I 6 R-B3 threatening 7 QxP+.) 6 PxB R-KN I 7 R-B3 R-N2 {7 . . . N-N2? 8 QxRP+ and mates .) 8 B-R6 R-KN l 9_R-R3 Resigns. The threat is 10 B-B8 , and if 9 . . . N-N2 the simplest is 10 Q-R4 Q-K2 1 1 B-K3 P-KR4 1 2 QxP+ mating .

LIMITING THE OPPONENT'S COUNTERPLA Y
An immense part of good chess play is anticipating the threats and plans of the opponent . You must watch out for every move by him and after each move made on the board work out what he is trying to achieve . I t is the greatest possible mistake to think only about your own schemes . It needs considerable self-discipline and practice not to answer straight away if your move seems obvious. Learn to ask yourself after every move by your opponent the two questions 'What is he threatening?' so as to check for his short-term tactical threats and combinations, and 'What is he up to? ' to discern longer term ideas and schemes .
Once his ideas have been discovered they must be weighed for their soundness and feasibility .
1 3 1 : White has been attacking, and has allowed himself to be carried away by his own po'ssibilities only . He has just taken the KRP. There now came l . . .N-K4 ! 2 PxN (Otherwise the queen is lost .) 2 . . . QxP+ 3 K-B1 QxN 4 B-B3 Q-B3 ! Black who has material advantage forces the queens off and wins.
Once the opponent 's intentions have been fathomed the task is to find a move which will fit into your own plans but will also put obstacles in the path of the opponent .

84
1 32 1 3 2 : White has sacrificed a pawn in the opening, and has considerable positional advantage . White has play on the Q-side , but at the moment is playing to exploit a slight weakness on the K-side where the enemy pawns are not well guarded . On the other hand Black has to try and improve the position of his pieces , particularly his knights . White's first move c om bines the aim of attacking the KBP with preventing N-Q4 . 1 Q-B3 NI -Q2 (Giving up the exchange . l . . .R-Q2 with passive defence looks better e.g . 2 N-Q3 B-R6 3 R-B2 N-Q4 4 B-Q2 Q-Q l .) 2 N-K2 KR-B l 3 B-R6 N-Q4 4 BxR RxB 5 BxN QxB 6 QxQ KPxQ As a result White has an endgame with material advantage . There followed 7 PxP BPxP 8 R-N3 N-N3 9 R-KR3 R-82 1 0 P-84 N-B5 1 1 R-Q 1 (Watching out for Black's intentions. This stops N-Q7-K5 .) 1 1 . . . B-Q1 1 2 P-N4 B-N3 1 3 K-N2 (Preparing 1 4 R-KB3 and the pawns advance on the K-side . 1 3 R-KB3 at once is bad - 1 3 . . . NxP.) 1 3 . . . K-Q2 1 4 R-KB3 K-K3 1 5 K-N3 P-84 (This lets White advance the pawn without a preparatory QR-KB 1 , but Black stood to lose anyway .) 1 6 P-B5+! NPx.P 1 7 N-84+ K-K2 1 8 NxP+ K-B 1 1 9 P-K6 R-N2 20 RxP+ Resigns .
1 33 1 33 : A sharp position in Which Black would like to transfer his QR to the K-side . . If White can stop this he Will get the better of it in view of
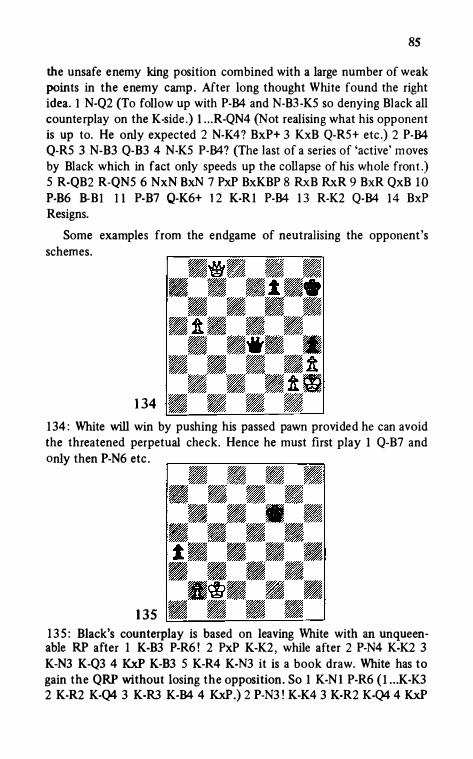
85
the unsafe enemy king position combined with a large number of weak points in the enemy camp . After long thought White found the right idea . I N-Q2 (To follow up with P-B4 and N-B3 -K5 so denying Black all counterplay on the K-side .) I . . . R-QN4 (Not realising what his opponent is up to. He only expected 2 N-K4? BxP+ 3 KxB Q-R5+ etc .) 2 P-B4 Q-RS 3 N-B3 Q-B3 4 N-K5 P-B4? (The last of a series of 'active' moves by Black which in fact only speeds up the collapse of his whole front .) 5 R-QB2 R-QNS 6 NxN BxN 7 PxP BxKBP 8 RxB RxR 9 BxR QxB 1 0 P-86 B-BI I I P-B7 Q-K6+ 1 2 K-R 1 P-B4 1 3 R-K2 Q-B4 14 BxP Resigns.
Some examples from the endgame of neutralising the opponent's schemes.
1 34 1 34 : White will win by pushing his passed pawn provided he can avoid the threatened perpetual check. Hence he must first play 1 Q-87 and only then P-N6 etc .
1 35 1 3 5 : Black's counterplay is based on leaving White with an unqueenable RP after 1 K-83 P-R6 ! 2 PxP K-K2 , while after 2 P-N4 K-K2 3 K-N3 K-Q3 4 KxP K-B3 5 K-R4 K-N3 it is a book draw. White has to gain the QRP without losing the opposition. So 1 K-N l P-R6 ( l . . .K-K3 2 K-R2 K-Q4 3 K-R3 K-B4 4 KxP .) 2 P-N3 ! K-K4 3 K-R2 K-Q4 4 KxP

86
K-B4 5 K-R4 .
1 36 : White plays to queen his pawn by robbing the rook of squares . 1 P-N4 R-K5 2 P-R5 ·RxNP 3 P-R6 R-N8 (Or 3 . . . R-R5 4 R-Q8 and queens.) 4 P-R7 R-QR8 5 R-QR3 ! (Again closing a vital line.) 5 .. .PxR 6 P-R8=Q.

ASSESSING THE POSITION
Assessing a position is based upon comparing the forces of each side and their respective potential . In order to do this properly the judgement has to be made both from the point of view of quantity and quality , which brings us back again to the question of the absolute and relative strength of the pieces. The check of the material balance is normally pretty easy . Potential is much harder to sum up�
13 7 : Here material is level , but from the point of view1 of quality Black has greater potential since his king is safe whereas three of his pieces, knight, queen and QB menace the opposing king . Moreover Black has two rooks in play compared to White's one. The position of the remaining pieces and pawns is fairly level . In fact Black has a tactical possibility open to him which confirms the first assessment as bein� in his favour . l . . .PxP ! (A remarkable sacrifice to attack the king. White replies with an intermediate move since if 2 PxP N-K7+ and 3 . . . BxB.) 2 NxB+ Rx.N 3 B-QS+ (3 BxN PxP 4 QxP R-KN3 ! 5 QxP Rx.B+ 6 K-Rl R-Rl 7 QxP RxP+ 8 KxR B-Bl + winning the queen.) 3 ... Rx.B ! (Not 3 . . . K-Rl 4 BxN PxP 5 QxR ! which is what White was hoping for.) 4 PxR PxP 5 QxN Q-K7 ! and forces mate .

88
1 38 : Let us try and exercise our 'p ositional judgement' as it is often calle d on this position . Equal in material , but favourable to Black, since the white king is by far the more expose d an d the KN is not yet out . How is Blac k , to m ove to exploit this? Clearly by attacking on the QB ftle . He c annot disc over check yet since his QN is pinned, and he has no time to castle since a piece is en prise . So l . . . Q-Q2 ! Now the vis-a-vis of q�eens is seen t o be in Black's favour, since the white queen is unguarded, and would be lost after 2 K-Q2 BxB 3 KxB N-K4+. So 2 K-N l BxB+ 3 RxB Q-84 ! 4 P-K4 (4 Q-B2 N-QNS .) 4 . . . NxP 5 K-R l 0-0 ! 6 R-Q l P-N4 ! 7 QxNP N-QS 8 Q-Q3 N-87 + 9 K-Nl N-NS Resigns.
These two examples show the role of tactics in positions whe re the positional advantage is great , an d the tenseness in the position demands sharp measures . Later we shall see examples where the advantage may not be so great and the means of exploiting it slower .
It is norm ally much harder to assess positions where material is unequal but the weaker side has c ompensation in the form of better placed forces .
1 39

89
1 39 : White is the exchange down for a pawn, but for the moment he has an extra piece in play in view of the passive rook at QR8 . White is able to win by exploiting his pressure on the KN file and various tactical factors such as knight fork and unguarded enemy piece as seen in the first note . 1 P-R6 P-N3 (l . . . K-B2? 2 N-Q6+; l . . . K-R2 2 PxP R-B4 3 B-Q4 threatening 4 N-B6+.) 2 RxP+ K-R2 3 R-Q6 ! (Threatened the combined attack 4 N-N5+ K-N 1 5 P-R7+ and 6 B-Q4+.) 3 . . . R-B4 4 PKR4 R-KN l 5 B-K3 R-N3 6 R-Q7+ ! R-B2 7 R-Q8 RxRP 8 BxR KxB 9 N-Q6 R-BS 1 0 K-N3 ! Resigns .
Hence positional assessment i s carried out in two stages : 1 A static assessment ; 2 A dynamic assessment (weighing up the stregical and tactical chances of each side) .
We shall not deal any further with the first stage , but will dwell a little on the second .
In order to •see the dynamic possibilities for each side i t i s necessary to immerse oneself in the analysis of variations. In this work it is a great help to know the elements of tactics and strategy and to have a wide knowle dge of typical and theoretical positions in all three stages of the game , opening , middle game and endgame . Such knowledge guides thought into the right- patterns and helps to save time .
1 40 140 : A straightforward static assessment without troubling to go too deep into dynamic possibilities can have tragic results . Thus here , Black is two pawns up and failed to bother analysing seriously . He went 1 . . . B-N7? which allowed 2 R-R8+ K-B2 3 B-K8+! (To divert the knight.) 3 ... NxB 4 K-N5 forcing mate . Had he realised this hidden possibility Black would have examined better moves such as l . . . B-Q2 not blocking the rook from his KN7 square, or . . . l R-B6 or 1 . . . R-KN7.
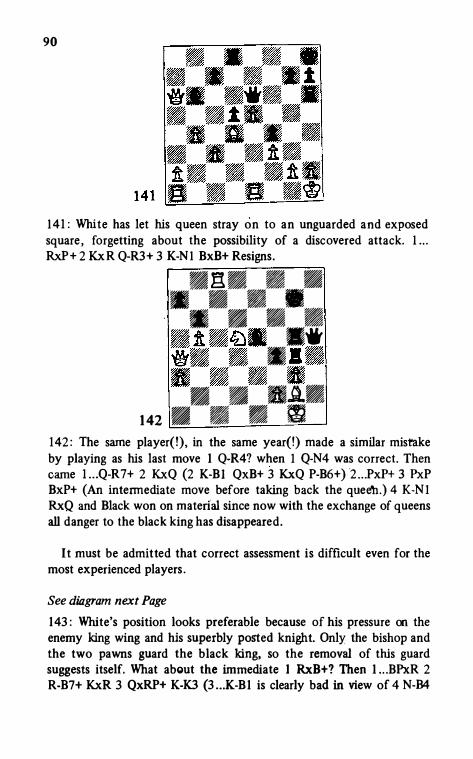
90
14 1 : White has let his queen stray on to an unguarded and exposed square , forgetting about the possibility of a discovered attack. 1 . . . RxP+ 2 KxR Q-R3+ 3 K-N1 BxB+ Resigns .
• E! . • • • • • • • • • • • D i U�· Bit mil!ij ·� �. ,• -«r& • , •• • B . • u - d u
B B BA& 1 42 • • • �
142 : The same player( !), in the same year(!) made a similar mist'ake by playing as his last move 1 Q-R4? when 1 Q-N4 was correct. Then came l . . .Q-R7+ 2 KxQ (2 K-B1 QxB+ 3 KxQ P-B6+)2 . . . Px.P+ 3 PxP Bx.P+ (An intermediate move before taking back the que�.) 4 K-N 1
RxQ and Black won on material since now with the exchange of queens all danger to the black king has disappeared.
It must be admitted that correct assessment is difficult even for the most experienced players .
See diagram next Page 143 : White's position looks preferable because of his pressure on the enemy king wing and his superbly posted knight. Only the bishop and the two pawns guard the black king, so the removal of this guard suggests itself. What about the immediate 1 RxB+? Then 1 . . . BPxR 2 R-B7+ KxR 3 QxRP+ K-K3 {3 . . . K-B1 is clearly bad in view of 4 N-B4
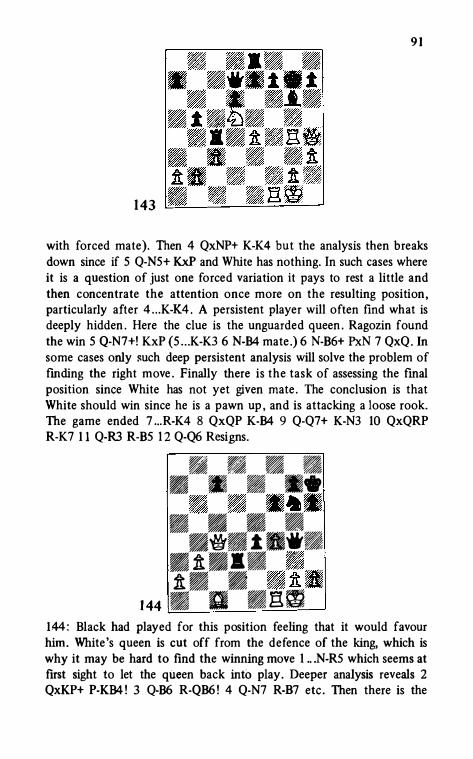
9 1
1 43
with forced mate). Then 4 QxNP+ K-K4 but the analysis then breaks down since if 5 Q-N5+ KxP and White has nothing. In such cases where it is a question of just one forced variation it pays to rest a little and then concentrate the attention once more on the resulting position , particularly after 4 . . . K-K4 . A persistent player will often find what is deeply hidden . Here the clue is the unguarded queen . Ragozin found the win 5 Q-N7+! KxP (5 . . . K-K3 6 N-B4 mate .) 6 N-86+ PxN 7 QxQ. In some cases only !luch deep persistent analysis will solve the problem of fmding the right move . Finally there is the task of assessing the fmal position since White has not yet given mate . The conclusion is that White should win since he is a pawn up , and is attacking a loose rook. The game ended 7 . . . R-K4 8 QxQP K-B4 9 Q-Q7+ K-N3 10 QxQRP R-K7 1 1 Q-R3 R-85 1 2 Q-Q6 Resigns .
1 44
• • • • • • • • • . �-- -�- � - -• • • • ·�· i ·�· · ft ··· ·ft B B B ft L • a • ��
144: Black had played for this position feeling that it would favour him. White 's queen is cut off from the defence of the king, which is why it may be hard to find the winning move I .. .N-RS which seems at first sight to let the queen back into play . Deeper analysis reveals 2 QxKP+ P-KB4 ! 3 Q-86 R-QB6 ! 4 Q-N7 R-87 etc . Then there is the

92
extension of this idea 3 Q-N7 or R8 P-B3 ! 4 QxP R-QB6 . This is what actually happened in the game with the continuation 5 O-Q5 R-B4 ! 6 Q-Q2 RxB! etc. Remember that analysis has to have breadth as well as depth. Are there other ways of guarding KN2 after l . . . N-R5? Consider 2 R-B2 R-Q8+, or 2 P-N3 RxP+, or 2 Q-B2 P-KB4 when 3 . . . P-K6 and 4 ... R-Q7 will be threatened.
145 : White has concentrated his forces well. They give an aggressive impression overall as compared to the passive set-up of Black's position. Clearly the threats are basically against KB6 and along the KR file . If l . . . QxP 2 NPxP B-R l 3 P-RS ! RxP 4 QxR QxB S BPxP etc, or (as in the game) l . . . NPxP 2 NPxP BxP 3 KR-N l + K-Rl and now a search should come up with 4 Q-NS P-Q4 S Q-N7+! mating . We leave it to the reader to establish that other first moves would not save Black.
One of the criteria in assessing a position dynamically is what chances there are for transposing to a favourable endgame , or to a drawable ending if under pressure .
1 46
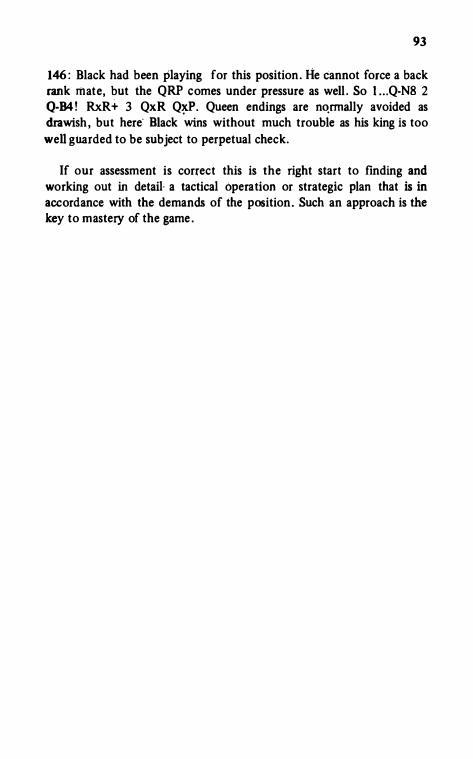
93
146 : Black had been playing for this position . He cannot force a back rank m ate, but the QRP comes under pressure as well . So l . . . Q-N8 2 Q-84! RxR+ 3 QxR Q�P. Queen endings are nq_rmally avoided as drawish, but here· Black wins without much trouble as his king is too
well guarded to be subject to perpetual check.
If our assessment is correct this is the right start to finding and working out in detail· a tactical operation or strategic plan that is in accordance with the demands of the position . Such an approach is the key to mastery of the game .
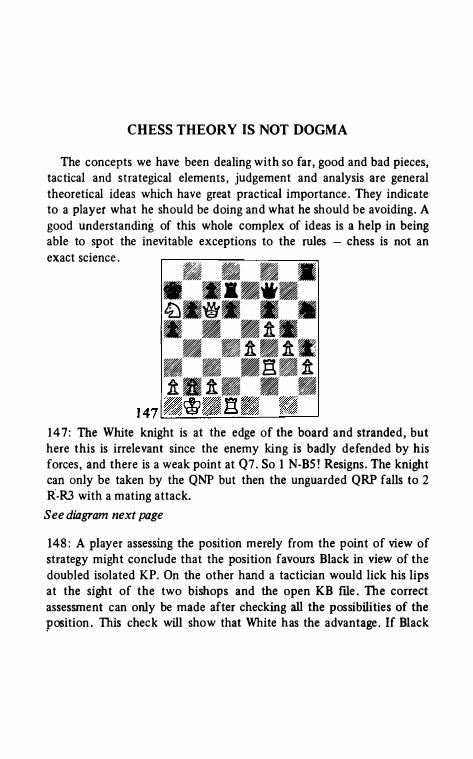
CHESS THEORY IS NOT DOGMA
The concepts we have been dealing with so far , good and bad pieces, tactical and strategical elements , judgement and analysis are general theoretical ideas which have great practical importance . They indicate to a player what he should be doing and what he should be avoiding . A good understanding of this whole complex of ideas is a help in being able to spot the inevitable exceptions to the rules - chess is not an exact science .
• • • • • • . • it. �·*· • • • 8 R ft • 8 R ft 8 ft . • • - � · ft .ft & ft • • • ·rtih· � - • 1 47 ·'Q'· t=a · •
1 4 7 : The White knight is at the edge of the board and stranded, but here this is irrelevant since the enemy king is badly defended by his forces , and there is a weak point at Q7. So 1 N-BS ! Resigns . The knight can only be taken by the QNP but then the unguarded QRP falls to 2 R-R3 with a mating attack.
See diagram next page
148 : A player assessing the position merely from the point of view of strategy might conclude that the position favours Black in view of the doubled isolated KP. On the other hand a tactician would lick his lips at the sight of the two bishops and the open KB flle . The correct assessment can only be made after checking all the possibilities of the
position . This check will show that White has the advantage . If Black
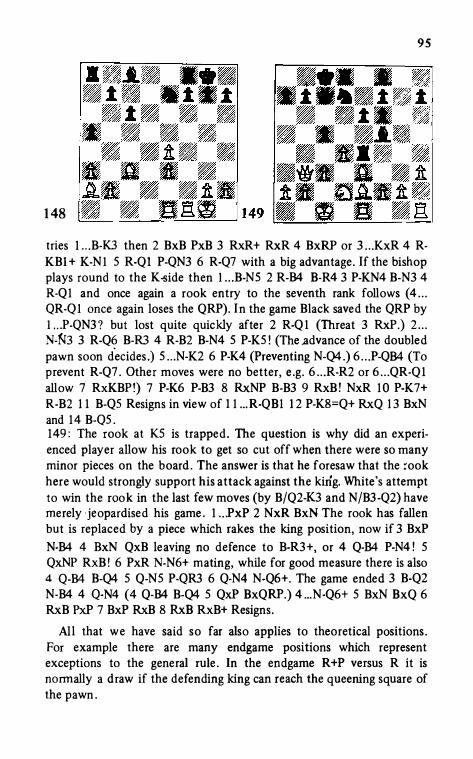
95
1 48
tries 1 . . .8-KJ then 2 BxB PxB 3 RxR+ RxR 4 BxRP or 3 . . . KxR 4 RKBI + K-N l 5 R-Ql P-QN3 6 R-Q7 with a big advantage . If the bishop plays round to the K�ide then l . . . B-N5 2 R-84 B-R4 3 P-KN4 B-N3 4 R-Ql and once again a rook entry to the seventh rank follows (4 . . . QR-Q l once again loses the QRP). In the game Black saved the QRP by l . . . P-QN3 ? but lost quite quickly after 2 R-Q I (Threat 3 RxP.) 2 . . . N-�B 3 R-Q6 B-R3 4 R-82 B-N4 5 P-K5 ! (The .advance of the doubled pawn soon d
.ecides .) 5 . . . N-K2 6 P-K4 (Preventing N-Q4 .) 6 . . . P-Q84 (To
prevent R-Q7 . Other moves were no better, e .g . 6 . . . R-R2 or 6 . . . QR-Q 1 allow 7 RxKBP !) 7 P-K6 P-83 8 RxNP B-83 9 RxB ! NxR 1 0 P-K7+ R-82 1 1 B-Q5 Resigns in view of l l .. . R-QBI 1 2 P-K8=Q+ RxQ 1 3 BxN and 14 B-Q5 . 149 : The rook at K5 is trapped. The question is why did an experienced player allow his rook to get so cut off when there were so many minor pieces on the board . The answer is that he foresaw that the :ook here would strongly support his attack against the king. White's attempt to win the rook in the last few moves (by B/Q2-K3 and N/B3 -Q2) have merely · jeopardised his game . 1 . . . PxP 2 NxR BxN The rook has fallen but is replaced by a piece which rakes the king position, now if 3 BxP
N-84 4 BxN QxB leaving no defence to B-R3+, or 4 Q-84 P-N4 ! 5 QxNP RxB ! 6 PxR N-N6+ mating, while for good measure there is also 4 Q-84 B-Q4 5 Q-N5 P-QR3 6 Q-N4 N-Q6+. The game ended 3 B-Q2 N-84 4 Q-N4 (4 Q-84 B-Q4 5 QxP BxQRP.) 4 .. . N-Q6+ 5 BxN BxQ 6 RxB PxP 7 BxP RxB 8 RxB RxB+ Resigns .
All that we have said so far also applies to theoretical positions . For example there are many endgame positions which represent exceptions to the general rule . In the endgame R+P versus R it is normally a draw if the defending king can reach the queening square of the pawn .

96
1 SO : Here however the possession of the seventh rank and the bad black rook position makes a difference (the rook should be at the other end of the board checking the enemy king from the rear) . 1 R-B7 R-N I 2 R-N7+ K-B1 (2 . . . K-R1 3 R-R7+ and 4 P-B7+.) 3 R-KR7 K-N l 4 P-B7+ etc . Moved to the right so that White has a KNP with all the pieces similarly placed it is only a draw since White lacks the vital rook check to drive the enemy king into a check from the pawn .
There are also the varying attitudes to opening lines over the years . Up to about 1940 a backward QP on an open file in the Sicilian Defence would have been condemned by theorists as a weakness with pretty well no compensating features. Since that time the opening sequences I P-K4 P-QB4 2 N-KB3 P-Q3 3 P-Q4 Px.P 4 NxP N-KB3 S N-QB3 P-QR3 6 B-K2 P-K4 and 1 P-K4 P-QB4 2 N-KB3 N-QB3 3 P-Q4 PxP 4 NxP N-KB3 S N-QB3 P-Q3 6 B-K2 P-K4 have become recognised as perfectly sound for Black. Similarly it was once held that the only good opening moves for White were 1 P-K4 , 1 P-Q4 , 1 N-KB3 and 1 P-QB4 (since many theorists distrust Bird's Opening, I P-KB4). In recent years following the example of such players as Reti, Simagin, l.arsen and Korchnoy the moves 1 P-KN3 and P-QN3 have been widely adopted.
The student can hope to keep track of such re-assessments if he follows current praxis through magazines and modern games collections. Chess has lasted many centuries, but never stands still - that , after all , is one of its great attractions !

Some knowledge of chess strategy is essential
to all players. This book deals with the
subject from the very beginning as the authors
give very practical advice on such basic topics
as where to place your pieces, when to
exchange, strengthening your position and
weakening that of your opponent and
improving the position of your pieces.
All the points discussed are fully illustrated
by the many positions given and the positions
themselves are an excellent refresher course
in chess tactics.
l
l