bom to excel revit plugin help & faq
TRANSCRIPT

BOM to Excel Revit Plugin
Help and FAQHingePoint.com | 214-301-0000
2300 McDermott Road STE 200-235 Plano, TX 75025

This guide is helpful for those learning the power of the new BOM to Excel Revit Plugin- (Reports, Tables & Quantities)
The Plugin performance & results are guaranteed, Literally Guaranteed. ® To get a brief introduction to the app, see our original video below!
11

STEP #1 This example is based off the Revit Advanced sample file. It
shows how you can create a Furniture BOM with professional output, and quantity take offs for estimating cost. Select your
schedule in upper left, the default parameters in lower left preview on the right side panels. 2
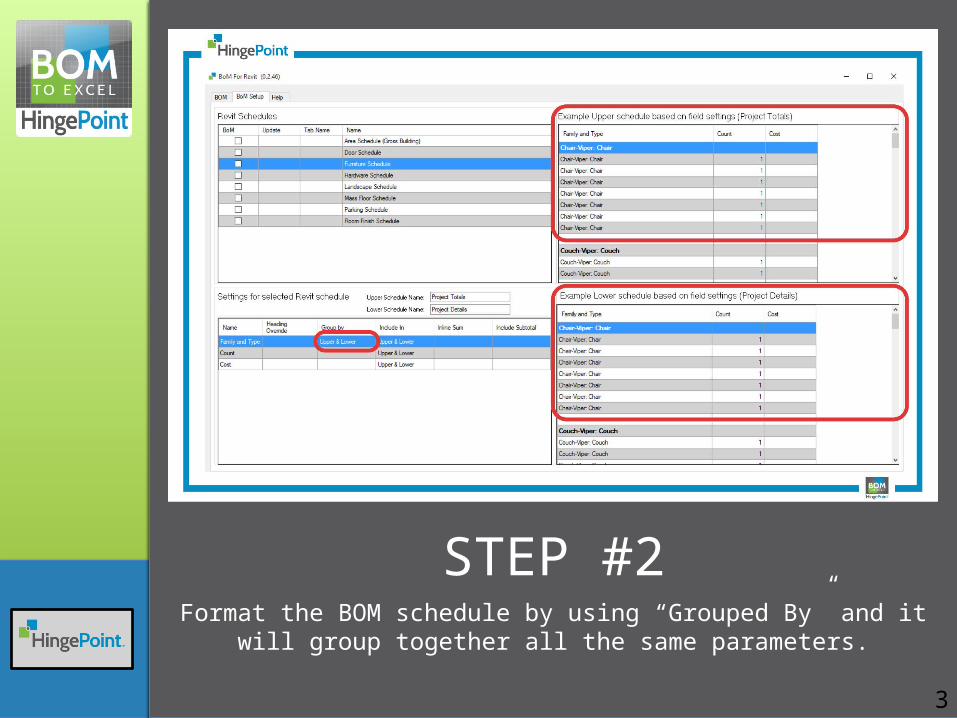
STEP #2 Format the BOM schedule by using “Grouped By” and it will
group together all the same parameters.
3

STEP #3 Inline Sum rolls up a group into 1 line and sums up the quantities
for that group. Subtotal adds up the total of the group at the bottom of the group.
4

STEP #4 Click the Checkbox when you get the BOM settings complete.
Click Save will create a Tab in the BOM Plugin. Unchecking the box and clicking save removes the Tab in Revit and in Excel
output.5

STEP #5 Click on the Tab for the BOM schedule you just created and
preview the BOM within Revit and it will look the same as a Tab in the Excel output file.
6

STEP #6 BOM Tab allows for exported to Excel. See the Report Date of
your last export. Refresh button ensure the last saved settings are exported to Excel. Click the Open BOM File link to open the
Excel file.
7

STEP #7 BOM Excel file has a Tab
for each BOM Schedule, with Summary Table,
Detailed Tables, quantity subtotals and inline sums,
exactly as you set up in the
BOM for Revit plugin.
8

GENERAL USAGE INSTRUCTIONS The BOM for Revit plugin fits into your design and modeling
workflow from the very beginning. As soon as you start creating Revit content, you can place it into a schedule, and
the BOM plugin will work. Here are the steps:Start Revit and open a new or existing project.
Create a Schedule or multiple schedules.
Click BOM Plugin from the Plugin Ribbon and Menu.
The Revit schedules will automatically populate in the upper left pane.
9

As you make configuration changes, you can preview them instantly in the upper and lower right panes.
Each BOM schedule you save, will become a new tab in the BOM for Revit plugin.
Select a new Revit schedule in the upper left, and then repeat the steps to configure a new BOM schedule and Save.
Configure the BOM format you desire using the lower left pane WYSIWYG tools.
Click the Revit schedule you want to include in the BOM (upper left pane) highlighted in blue.
10

Close and Restart – If you close Revit after having saved changes, then when you open Revit again (and you own the Plugin), your previous settings will be retained. No need to reconfigure the BOM schedule again.
As the Revit model is updated, the BOM for Revit data is updated automatically. Export the Excel file again for each new version of the Excel BOM output. The Excel file will not be updated until you click the Export link.
Once all BOM schedules are complete, you can export to Excel using the BOM tab by clicking the Export to Excel link.
11

Author/Company InformationHingePoint is an authorized Autodesk Development Network partner and specializes in automating workflow for the AEC industry.
We have developed multiple custom Revit and AutoCAD plugins for clients.
We also offer BIM services, Revit modeling services, Revit family development, and BIM systems design.
As a systems integrator, we can integrate data and workflow from Revit and CAD into SalesForce, BlueBeam, SolidWorks, SAP, TRIRIGA and many other systems.
12

Need to Report a Problem?
Thanks for letting us know. It will make our software better.
Email us with:
1. A description of the expected behavior.
2. A description of the defective result.
3. Attach the Revit File you were using at the time.
4. What version of Revit are you using?
5. Screen capture of the error.
6. On the help screen, tell us if you are using the Paid or Trial version and what your license number is.
Email the above information to: [email protected]
13

Hingepoint.com | 214-301-00002300 McDermott Road STE 200-235 Plano, TX
75025
THANK YOU!14