betriebsanleitung / operating manual mode d emploi...
TRANSCRIPT

Teile Nr./Part No. 987356 ProMinent Dosiertechnik GmbH · 69123 Heidelberg · Germany BA DTZ 019 03/10 DE/EN/FR/ES
ProM
inen
t®
Durchlaufgeber DGMaDGMa In-Line Probe HousingChambre d’analyse DGMaDetector de paso DGMa
Betriebsanleitung / Operating ManualMode d’emploi / Instrucciones de servicio
BA_DTZ_019_03_10_4spr.p65 30.03.2010, 14:01 Uhr1

ProMinent®Seite 2
Betriebsanleitung in Deutschvon Seite 3 bis 18
DE
Operating Instructions in Englishfrom page 19 to page 34
Mode d’emploi en françaisde la page 35 à la page 50
Instrucciones de servicio en españolde página 51 hasta página 66
EN
FR
ES
Technische Änderungen vorbehalten.Subject to technical modifications.Sous réserve de modifications techniques.Reservadas modificaciones técnicas.
BA_DTZ_019_03_10_4spr.p65 30.03.2010, 14:01 Uhr2

ProMinent® Page 19
Table of Contents
Please read the operating instructions through completelybefore commissioning this in-line probe housing!Do not discard!The operator shall be liable for any damages caused byinstallation or operating errors!
Identity Code Ordering System For In-Line ProbeHousing Modules 20General Notes for the User 21
1 About the In-Line Probe Housing 21
2 Safety 21
3 Description of Component Function 22
4 Storage and Transport 23
5 Assembly and Installation 23
5.1 Assembly 23
5.2 Hydraulic Installation 25
5.3 Electrical Installation 26
6 Commissioning the DGMa 26
6.1 Setting the Flow 26
6.2 Setting the Switch Point of the Flow Sensor 26
6.3 Calibrating the Sensors 27
6.4 Replacing/Adding Modules 27
7 Troubleshooting 29
8 Disposal 30
9 Technical Data 30
9.1 Flow Modules 30
9.2 Flow Sensor 31
10 Replacement Parts and Accessories 31
11 Scale Drawing 32
12 List of Replacement Parts 33
BA_DTZ_019_03_10_4spr.p65 30.03.2010, 14:01 Uhr19
ProMinent®Page 20
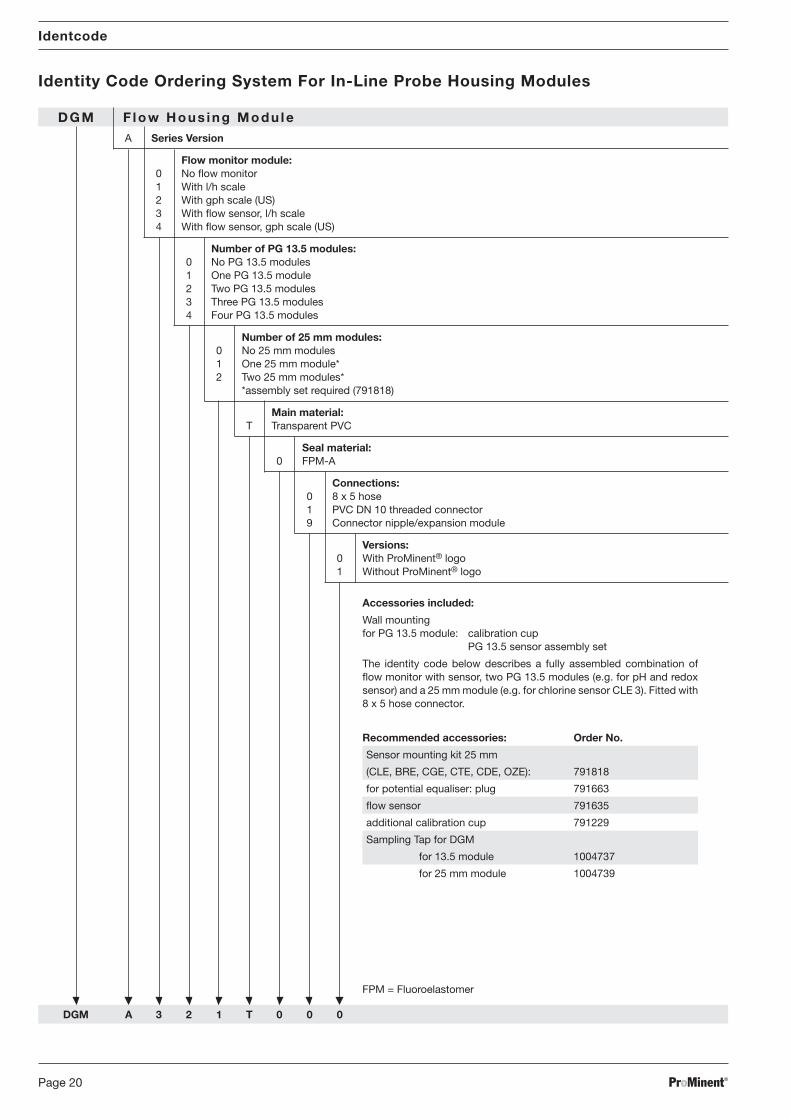
Identcode
Identity Code Ordering System For In-Line Probe Housing Modules
DGM Flow Hous ing Modu leA Series Version
Flow monitor module:0 No flow monitor1 With l/h scale2 With gph scale (US)3 With flow sensor, l/h scale4 With flow sensor, gph scale (US)
Number of PG 13.5 modules:0 No PG 13.5 modules1 One PG 13.5 module2 Two PG 13.5 modules3 Three PG 13.5 modules4 Four PG 13.5 modules
Number of 25 mm modules:0 No 25 mm modules1 One 25 mm module*2 Two 25 mm modules*
*assembly set required (791818)
Main material:T Transparent PVC
Seal material:0 FPM-A
Connections:0 8 x 5 hose1 PVC DN 10 threaded connector9 Connector nipple/expansion module
Versions:0 With ProMinent® logo1 Without ProMinent® logo
DGM A 3 2 1 T 0 0 0
Accessories included:
Wall mountingfor PG 13.5 module: calibration cup
PG 13.5 sensor assembly set
The identity code below describes a fully assembled combination offlow monitor with sensor, two PG 13.5 modules (e.g. for pH and redoxsensor) and a 25 mm module (e.g. for chlorine sensor CLE 3). Fitted with8 x 5 hose connector.
Recommended accessories: Order No.
Sensor mounting kit 25 mm
(CLE, BRE, CGE, CTE, CDE, OZE): 791818
for potential equaliser: plug 791663
flow sensor 791635
additional calibration cup 791229
Sampling Tap for DGM
for 13.5 module 1004737
for 25 mm module 1004739
FPM = Fluoroelastomer
BA_DTZ_019_03_10_4spr.p65 30.03.2010, 14:01 Uhr20

ProMinent® Page 21
General Notes for the User
Please read through the following notes. This information will help you use the operating manualmore effectively.
Points are highlighted as follows:
• lists
instructions
Operating advice:
NOTES
Notes are intended to make your job easier.
and safety advice:
WARNING
Describes a potentially dangerous situation. Non-observance can lead to seriouspersonal injury!
IMPORTANT
Describes a potentially dangerous situation. Non-observance can lead to damageto property!
1 About the In-Line Probe Housing
The in-line probe housing has a modular structure. To maximise volume, it is designed so thatone sensor can be installed in every module. The ideal flow around the sensors keeps responsetimes low. The flow is guided towards the sensors from below.
The in-line probe housing modules are supplied pre-assembled on a mounting panel.
2 Safety
For use as specified below:
• The DGMa must be used exclusively for drinking water, swimming pool water or water of asimilar quality that does not contain solid matter.
• Operate the in-line probe housing only within the conditions described in the technical data!
• All other applications and modifications are prohibited.
• The DGMa must not be used for gaseous or solid media.
• The DGMa must be assembled and installed by trained, authorized staff only.
• You shall be responsible for observing the information provided in the operating instructions atthe various phases in the service life of the device!
Safety advice
IMPORTANT
• Before using the DGMa in corrosive media, check the resistance of the housingmaterial (please refer to the chemical resistance list in ProMinent's productcatalogue or www.prominent.com).
• Observe the maximum operating parameters for the whole in-line probehousing (e.g. pressure, temperature). Take into account the lowest maximumoperating parameters of the in-line probe housing components and sensors(please refer to the individual operating manuals). Please also note anytemperature dependences.
General Notes for the User/About the In-Line Probe Housing/Safety
BA_DTZ_019_03_10_4spr.p65 30.03.2010, 14:01 Uhr21

ProMinent®Page 22
6 7 8
3
2
10
1
9
4
11
5
3 Description of Component Function
The ball valve (1) regulates and stops the flow. The flow module (2) has a float (4), which indicatesthe flow.
A flow sensor (3) monitors the flow. There is a reed contact (changeover) in the tip of the flowsensor, which opens if the float moves more than 2 mm away from the sensor or closer towardsit.
The flow plug ensures optimal flow to the membrane capped DULCOTEST® sensors (“25 mm”,pos. 10). It prevents air bubbles from forming on the membrane of the DULCOTEST® Peroxsensor (PG 13.5, pos. 5).
The equipotential plug (8) contains a potential equaliser pin.
The outlet nozzle (6 or 10 for 25 mm or PG 13.5 version) (standard) and the sampling tap(11, 25 mm or PG 13.5 version) (optional) allow you to take water samples and empty a module.
The calibration cup (8) can be used to calibrate the pH or redox sensors without dismantlingthem. It also has a potential equaliser pin.
Figure 1Design
Description of Component Function
pH sensorPT 100 Redoxsensor
Chlorinesensor
BA_DTZ_019_03_10_4spr.p65 30.03.2010, 14:01 Uhr22

ProMinent® Page 23
4 Storage and Transport
IMPORTANT
• Store and transport the DGMa in its original packaging.
• Protect the DGMa from the effects of chemicals, even when packed.
Environmental conditions Storage and transport temperature: -10 °C ... + 60 °CHumidity: with flow sensor: max. 90 % relative humidity,
non-condensing
5 Assembly and Installation
5.1 Assembly
IMPORTANT
• Observe the flow direction (there are arrows on the modules).
• Install the in-line probe housing horizontally in an upright position.
• If it contains a flow module, install the in-line probe housing vertically. Failureto do so may lead to problems with flow measurement.
• Leave a space of approx. 300 mm above and 100 mm below the modules for:
- Installing the sensors
- Setting the flow monitor
- Screwing in the calibration cup
- Taking samples
NOTE
Moistening the seals slightly first will make it easier to assemble the componentsof the in-line probe housing.
Securing the mounting panel (Please observe dimensioned drawing! See figure 5):
Drill 2 mounting holes in a smooth wallSecure the mounting panel to the wall.
Installing the connections Screw the ball valve onto the in-flow side
Screw a connector set onto the ball valve
Screw a connector set onto the out-flow side
Installing the sensors andflow sensor IMPORTANT
The first module must be the in-line probe housing module.
Sensor with PG 13.5 threaded connector (please refer to the sensor operating manual):
Remove the upper blanking plug of a module
With pH and redox sensors, remove the transparent protective cap if there is one (do notdiscard the protective caps)
Screw the reducing pipe nipple into the module
Screw in the sensor
With DULCOTEST® Perox sensors, screw the flow plug of an in-line probe housing moduleinto the module from below
Storage and Transport/Assembly and Installation
BA_DTZ_019_03_10_4spr.p65 30.03.2010, 14:01 Uhr23

ProMinent®Page 24
Sensor with a diameter of 25 mm (please refer to the sensor operating manual and figure 2):
IMPORTANT
Lower the sensor into the in-line probe housing slowly to avoid stretching themembrane.
Remove the upper blanking plug of a 25 mm module
First push the O-ring (4) and then the mounting plate (5) onto the sensor (3) from below
Then push the retaining screw (1) onto the sensor (3) from above
Insert the sensor (3) carefully into the modul
Tighten the retaining screw (1)
Screw a flow plug (6) into the bottom of the module
Figure 2Installing the sensors
Assembly and Installation
4
2
1
3
5
6
BA_DTZ_019_03_10_4spr.p65 30.03.2010, 14:01 Uhr24

ProMinent® Page 25
Flow sensor (see figure 3)
Remove the upper blanking plug of the flow module
Push the flow sensor (1) into the flow module
Tighten the reducing pipe nipple (3)
Tighten the clamping nipple (2)
Figure 3Installing the flow sensors
Assembly and Installation
Installing additional accessories:
Screw in the equipotential plug underneath the appropriate sensor
Instead of a lower blanking plug, screw in the sampling tap (two sizes: PG 13.5 or d = 25 mm).
5.2 Hydraulic Installation
IMPORTANT
• Observe the maximum operating parameters for the whole in-line probehousing (e.g. pressure, temperature, flow)! Take into account the lowestmaximum operating parameters of the in-line probe housing components andsensors (please refer to the individual operating manuals)! Please also note thetemperature dependence of the maximum pressure!
• Assemble the in-line probe housing in such a way that the modules cannotdrain off and fill with air, even when the water is stationary!
• There must be stop valves in the in-flow and out-flow of the module block!
• When assembling the in-line probe housing, take steps to prevent positivesuction pressure from building up inside it!
• When installing the in-line probe housing in a free flow system, lay the out-flowcable in an ascending S-shape.
• Install a filter in the supply cable of the in-line probe housing if the water iscontaminated (take into account any depletion caused by the filter).
• If the in-line probe housing is installed in a fixed pipe, the power supply mustbe switched off before the module block is fitted.
Connect the in-flow cable to the ball valve connector set
Connect the out-flow cable to the connector set on the out-flow side.
3
2
1
DU
LCO
TE
ST
R 80
60
40
25
l/h
BA_DTZ_019_03_10_4spr.p65 30.03.2010, 14:01 Uhr25

ProMinent®Page 26
5.3 Electrical Installation
WARNING
• Connect the flow sensor to extra-low voltage circuits only ((SELV) inaccordance with EN 60335-1)!
• The cable must have a diameter of 4 mm for the screwed cable gland topossess the type of protection IP 65.
Take hold of the upper part of the flow sensor, turn it a quarter of a turn anticlockwise andremove it (bayonet fitting).
Loosen the locking screw of the M12 connection and insert the cable from the alarm device.
Strip 2 cm off the cable.
Strip the ends of the wires and fit connector sleeves.
Connect the flow sensor to the alarm unit in accordance with the following table:
Terminal Contact
1 N/C
2 Source (C)
3 N/O
Technical data (voltage-free reed contact):
Switch power max. 3 W
Switch voltage max. 42 V (protective extra-low voltage (SELV))
Switch current max. 0.25 A
Provide approx. 5 cm of spare cable inside the flow sensor and tighten the attachment screwof the M12 connection.
Push the upper part of the sensor right into the housing and carefully turn it clockwise until itlocks into place, taking care that the notches on the bayonet fitting do not break off.
6 Commissioning the DGMa
6.1 Setting the Flow
Use the ball valve to change the flow. Read the flow off the flow module (upper edge of the float).
6.2 Setting the Switch Point of the Flow Sensor
IMPORTANT
• It is possible for water to escape and spray arround.
• Take appropriate measures, if necessary.
A drop in the flow should cause the contact to open (the flow sensor is connected via anN/C contact (T1 – T2; (NC – C)):
Use the ball valve to set the flow at 50 l/h
Hold the flow sensor tightly and loosen the clamping nipple slightly
Use the flow sensor to push the float down to 40 l/h – the connected alarm should bedeactivated automatically
Hold the flow sensor tightly and tighten the clamping nipple
To test it, decrease the flow – this should activate the alarm
Check that the threaded connector is sealed properly.
Assembly and Installation / Commissioning the DGMa
BA_DTZ_019_03_10_4spr.p65 30.03.2010, 14:01 Uhr26
ProMinent® Page 27
6.3 Calibrating the Sensors
IMPORTANT
• It is possible for water to escape and spray arround. Take appropriatemeasures, if necessary.
• If a potential equaliser pin is used during measurement, a potential equaliserpin must also be connected during calibration and immersed in the samemedium as the sensor (please refer to the operating manual of themeasurement and control system).
pH and redox sensors:
pH and redox sensors can also be calibrated/checked after installation. Use the calibration cupsupplied for this purpose.
Close the ball valve in the in-flow of the in-line probe housing
Close the stop valve in the out-flow of the in-line probe housing
Unscrew the blanking plug of the appropriate module
Fill the calibration cup with buffer solution up to the mark
Screw the calibration cup carefully into the module from below
If a potential equaliser pin is used during measurement, connect the potential equaliser pin tothe calibration cup.
Calibrate/check the sensor (please refer to the operating manual of the control system).
Unscrew the calibration cup and screw in the blanking plug
Connect the potential equaliser pin of the blanking plug
Open the ball valve slightly and check that the module is sealed properly before opening thesystem fully
Set the flow as required (see section 6.1).
Membrane capped sensors:
Please refer to the operating manual for the sensor.
6.4 Replacing/Adding Modules
IMPORTANT
• It is possible for water to escape and spray arround. Take appropriatemeasures, if necessary.
• All module connections are fragile. Tighten them gently by hand.
NOTE
• If you would like 4 or 5 modules instead of just 2 or 3, a mounting panel for 4 to5 modules is required.
• Moistening the seals slightly first will make it easier to assemble the modules.
To replace a module, proceed as follows:
Close the ball valve and, if there is one, the stop valve on the out-flow side
Unscrew and store the sensors (please refer to the sensor operating manuals)
Remove all hoses from the in-line probe housing
Unscrew all modules and release them from the clamps
Empty the modules
If a larger mounting panel is required, remove the existing mounting panel from the wall
Release the module that is to be replaced from the module block (figure 4 in reverse)
Check that all O-rings are inserted on the connection nipples of the new module
Moisten the connection nipple of the new module with water
Place the new module on the module block as shown in figure 4.
Commissioning the DGMa
BA_DTZ_019_03_10_4spr.p65 30.03.2010, 14:01 Uhr27

ProMinent®Page 28
IMPORTANT
• All of the arrows on the modules must point in the same direction.
• If the modules cannot be screwed in easily, start again.
If you do not, the connection will not be sealed properly and you will not beable to separate the modules again without damaging them.
Turn the module clockwise until it is straight upside down
If a larger mounting panel is required, move the clamps
Press the new module block into the mounting panel clamps
Close the outlet nozzle or the sampling tap
If it has been removed, screw the mounting panel back onto the wall
Screw in the sensors and, if necessary, calibrate them (please refer to the sensor operatingmanuals)
Connect the hoses of the in-line probe housing
Open the ball valve and, if there is one, the stop valve on the out-flow side slightly
Check that the modules are sealed properly
Set the flow
Figure 4Replacing/adding modules
Commissioning the DGMa
270°
3075-3
1. Attach the module (front view) 3. Ready (front view)2. Turn it clockwise (side view)
BA_DTZ_019_03_10_4spr.p65 30.03.2010, 14:01 Uhr28

ProMinent® Page 29
7 Troubleshooting
IMPORTANT
It is possible for water to escape and spray arround. Take appropriate measures,if necessary.
Failure: the float does not show the correct flow rate or has become stuck
Reason: dirt in the water in the in-line probe housing module
Remedy: clean the module and the float using a cloth and test tube brush, or other similaritem, and, if necessary, insert a filter
IMPORTANT
Do not use chemical cleaning agents! They may attack the DGMa!
Reason: the in-line probe housing module is not completely straightRemedy: install the in-line probe housing module so that it is vertical
Failure: the flow sensor contact does not openReason: the reed contact has jammed because the electrical voltage was too high
(even if only for a short period)Remedy: reduce the voltage using a protective resistor and replace the flow sensor
Failure: the reading produced by a pH or redox sensor is unstable. It cannot be calibrated.Reason: a potential equaliser pin has not been connected although the measurement and
control system has been prepared for it.Remedy: connect a potential equaliser pin (use an equipotential plug)
Reason: the measurement and control system has not been prepared for measurement witha potential equaliser pin (e.g. there is no jumper in the system)
Remedy: prepare the measurement and control system for this type of measurement(e.g. jumper two terminals in the system)
Reason: the measurement and control system has not been prepared for measurementwithout a potential equaliser pin (e.g. terminals 9 and 10 in the DULCOMETER® D1Chave not been jumpered)
Remedy: prepare the measurement and control system for this type of measurement(e.g. connect a jumper in the system)
Reason: the sensor is dirty, defective or requires regenerationRemedy: clean, replace or regenerate the sensor (please refer to the sensor operating manual)
Failure: there is air in the in-line probe housingReason: the in-line probe housing has been installed incorrectlyRemedy: install the in-line probe housing correctly (please refer to the “Installation” section)
Open the stop valves fully and increase the flow rate to a maximum of 100 l/h untilthe air is forced out of the in-line probe housing
Failure: the sampling tap does not release any waterReason: positive suction pressure in the in-line probe housingRemedy: install the in-line probe housing correctly (please refer to the “Installation” section)
Failure: the flow changes over a few hoursReason: the module admission pressure is not constantRemedy: check the function of the pump in front of the in-line probe housing.
Check that the pump has been installed correctly.
Troubleshooting
BA_DTZ_019_03_10_4spr.p65 30.03.2010, 14:01 Uhr29

ProMinent®Page 30
8 Disposal
IMPORTANT
Please observe the applicable national regulations.
You may return the decontaminated used equipment to ProMinent DosiertechnikGmbH, Heidelberg, against prepaid postage.
9 Technical Data
IMPORTANT
• The maximum operating parameters for the whole in-line probe housing(e.g. pressure, temperature, flow) are the lowest maximum operatingparameters of the in-line probe housing components and sensors(please refer to the individual operating manuals)!
• Please also take the technical data of all other parts used, e.g. sensors, andtheir operating manuals into account!
Storage and transport temperature -10 °C ... + 60 °C
Humidity with flow sensor: max. 90 % relative humidity,non-condensing
9.1 Flow Modules
Weight approx. 245 g (PG 13.5 module)approx. 475 g (25 mm module)
Material all modules transparent PVCall fittings grey PVCseals FPMcalibration cup PPmounting panel white PVC
Temperature max. 50 °C
Max. pressure without flow sensor, 30 °C: 6 barwithout flow sensor, 50 °C: 1 barwith flow sensor, 30 °C: 2 bar
Flow rate max. 80 l/h (40 l/h recommended)
Measuring accuracy ±5 lof the flow module
Pressure loss in flow module: 12 mbar (12 cm WS)fitted modules PG 13.5 module: 2 mbar (2 cm WS)
25 mm module: 20 mbar (20 cm WS)
Disposal/Technical Data
BA_DTZ_019_03_10_4spr.p65 30.03.2010, 14:01 Uhr30

ProMinent® Page 31
9.2 Flow Sensor
Protection system IP 65
Terminal connector cross section 0.1 mm2 …1.0 mm2
Connecting cable cross section 4 mm
Data for the voltage-free reed contact in the flow sensor:
Switch power max. 3 W
Switch voltage max. 42 V (protective extra-low voltage (SELV))
Switch current max. 0.25 A
Operating current max. 1.2 A
Contact resistance max. 150 mW
Switch hysteresis of the flow sensor approx. 15 %
Terminal Contact
1 N/C
2 Source (C)
3 N/O
10 Replacement Parts and Accessories
Order No.
Assembly set for 25 mm sensor 791818(CLE, BRE, CGE, CTE, CDE, OZE)
for potential equaliser: plug 791663
Flow sensor, complete 791635
Calibration cup 791229
Sampling tapfor 25 mm module 1004739
for PG 13.5 module 1004737
Flow plug for PG 13.5 module 791703
Extension module flow with scale l/h 1023923
Extension module flow with scale gph 1023973
Flow sensor for extension module flow (optional) 791635
Extension module PG 13.5 sensors 1023975
Extension module for 25 mm sensors 1023976
Technical Data/Replacement Parts and Accessories
BA_DTZ_019_03_10_4spr.p65 30.03.2010, 14:01 Uhr31
ProMinent®Page 32
Scale Drawing
11 Scale Drawing(all dimensions in mm)
Figure 5Scale drawing,
exemplary version
Q
156max.175
24
64
M13
.5M
13.5
M13
.5/M
25M
13.5
/M25
412
6
37
37
50
60
Wal
l bra
cket
1 m
odul
e P
G 1
3,5
= 7
7
Wal
lb
rack
et2
mod
ules
PG
13,
5=
154
Wal
lb
rack
et3
mod
ules
PG
13,
5=
231
Wal
l bra
cket
3 m
odul
es P
G 1
3,5
+1
mod
ule
Ø 2
5 m
m=
314
Wal
l bra
cket
3 m
odul
es P
G 1
3,5
+2
mod
ules
Ø 2
5 m
m=
397
Flow
mod
ule
PG
13,
5
64
Mod
ule
PG
13,
5(p
H, R
edox
-LF(
T)se
nsor
s)
64
Mod
ule
PG
13,
5(p
H, R
edox
-LF(
T)se
nsor
s)
69
Mod
ule
Ø 2
5 m
m(a
mp
erom
etric
sens
ors)
69
Mod
ule
Ø 2
5 m
m(a
mp
erom
etric
sens
ors)
556
Dim
ensi
ons
in [m
m]
76_01-301_00_10-73
BA_DTZ_019_03_10_4spr.p65 30.03.2010, 14:01 Uhr32

ProMinent® Page 33
12 List of Replacement Parts
Figure 6Spare Parts
List of Replacement Parts
76_01-304_00_01-02
BA_DTZ_019_03_10_4spr.p65 30.03.2010, 14:01 Uhr33

ProMinent®Page 34
Pos. Type No. of Description Order No.
DGMa in-line probe housing
1 1 Flow sensor cpl. PC 7916352 1 Floating cpl. PC 7916343 1 Mounting plate 258x10x135 (2/3 mod.) 10018533 1 Mounting plate 412x10x135 (4/5 mod.) 10018554 1 Labor ball valve PVC 10103805 1 Calibration cup PP 7912296 1 Wall fastening 7912287 1 Connection set 8x5-1 PC3 7908868 2 Screwing set cpl. DN10 PC1 7916659 1 DGM module without logo PVC-transparent 7916679 1 DGM module with logo PVC-transparent 79121710 1 Flow meter module gph without logo PVC-transparent 79167210 1 Flow meter module gph with logo PVC-transparent 79167110 1 Flow meter module l/h without logo PVC-transparent 79167010 1 Flow meter module l/h with logo PVC-transparent 79163711 1 DGM mod. 25 mm without logo PVC-transparent 79167411 1 DGM module 25 mm with logo PVC-transparent 79167312 1 Red.nipple M30/PG13.5-d14.8 PVDF 79121913 2 Blanking plug M30x4 P2 PVDF 79122014 1 Connection nipple M20x6 P2 P 79122615 1 Connection nipple M20x6P2-M20x1.5 P 79122716 1 Blanking plug M20x1.5 P 79123517 1 Flow plug M30x4 P2 P 79170318 1 Blanking plug M34x1.5 PVDF 79173419 1 Clamped disk d31.3/25.5x1.5 P 79173320 1 Connection nipple G1/4xM20x1.5 P 100623621 1 Red.nipple M30/PG13.5-d16 79168822 1 Attachment screw M34x1.5-d25.5 PVDF 79173223 1 Equipotential plug w. rod PC1 79166324 1 Clamped nipple PG 13.5-d15.5 P 79122325 1 Flow plug M34x1.5 P 74020726 1 Clamped disk d18.5/d15.5x2 P 79122527 1 Holding nut for mounting plate PP 100185628 1 PT-screw KB 50x20 galvanized 46844529 1 Sampling tap for 25 mm module 100473930 1 Sampling tap for PG 13,5 module 100473731 1 Outlet nozzle DGMa cpl. M13.5 100877032 1 Outlet nozzle DGMa cpl. M25 100877133 1 Connection nipple M20x6 P2xG1/4 P 100623534 1 O-ring/m 9.00 - 2.50 83FPM-A 79149635 1 O-ring/m 10.00 - 2.00 83FPM-A 48102736 1 O-ring/K 13.00 - 2.50 67FPM-A 48101337 2 O-ring/m 14.00 - 2.00 83FPM-A 79163938 1 O-ring/m 15.00 - 2.00 83FPM-A 48101739 1 O-ring/m 17.17 - 1.78 83FPM-A 79198940 1 O-ring/m 20.00 - 2.50 83FPM-A 48102041 1 O-ring/m 24.00 - 2.00 83FPM-A 48103442 1 O-ring/m 25.00 – 3.50 83FPM-A 1002722
List of Replacement Parts
Subject to technical alterations.
BA_DTZ_019_03_10_4spr.p65 30.03.2010, 14:01 Uhr34