bea weblogic adapter for hl7 installation and configuration · bea weblogic adapter for hl7...
TRANSCRIPT

BEA
WebLogicAdapter for HL7Installation andConfiguration Guide forWebLogic Integration 7.0
Release 7.0Document Date: November 2002

Copyright
Copyright © 2002 BEA Systems, Inc. All Rights Reserved.
Copyright © 2002 iWay Software. All Rights Reserved.
Restricted Rights Legend
This software and documentation is subject to and made available only pursuant to the terms of the BEA SystemsLicense Agreement and may be used or copied only in accordance with the terms of that agreement. It is against thelaw to copy the software except as specifically allowed in the agreement. This document may not, in whole or in part,be copied photocopied, reproduced, translated, or reduced to any electronic medium or machine readable formwithout prior consent, in writing, from BEA Systems, Inc.
Use, duplication or disclosure by the U.S. Government is subject to restrictions set forth in the BEA Systems LicenseAgreement and in subparagraph (c)(1) of the Commercial Computer Software-Restricted Rights Clause at FAR52.227-19; subparagraph (c)(1)(ii) of the Rights in Technical Data and Computer Software clause at DFARS252.227-7013, subparagraph (d) of the Commercial Computer Software--Licensing clause at NASA FARsupplement 16-52.227-86; or their equivalent.
Information in this document is subject to change without notice and does not represent a commitment on the partof BEA Systems. THE SOFTWARE AND DOCUMENTATION ARE PROVIDED “AS IS” WITHOUTWARRANTY OF ANY KIND INCLUDING WITHOUT LIMITATION, ANY WARRANTY OFMERCHANTABILITY OR FITNESS FOR A PARTICULAR PURPOSE. FURTHER, BEA Systems DOES NOTWARRANT, GUARANTEE, OR MAKE ANY REPRESENTATIONS REGARDING THE USE, OR THERESULTS OF THE USE, OF THE SOFTWARE OR WRITTEN MATERIAL IN TERMS OF CORRECTNESS,ACCURACY, RELIABILITY, OR OTHERWISE.
Trademarks or Service Marks
BEA, Jolt, Tuxedo, and WebLogic are registered trademarks of BEA Systems, Inc. BEA Builder, BEA CampaignManager for WebLogic, BEA eLink, BEA Manager, BEA WebLogic Commerce Server, BEA WebLogicEnterprise, BEA WebLogic Enterprise Platform, BEA WebLogic Express, BEA WebLogic Integration, BEAWebLogic Personalization Server, BEA WebLogic Platform, BEA WebLogic Portal, BEA WebLogic Server, BEAWebLogic Workshop and How Business Becomes E-Business are trademarks of BEA Systems, Inc.
All other trademarks are the property of their respective companies.
BEA WebLogic Adapter for HL7 Installation and Configuration Guide for WebLogic Integration 7.0
Part Number Date
N/A November 2002
Table of Contents
About This DocumentAudience................................................................................................................v
Related Information............................................................................................. vi
Contact Us! .......................................................................................................... vi
Documentation Conventions .............................................................................. vii
1. Installing the BEA WebLogic Adapter for HL7Before Installing the Adapter ............................................................................ 1-2
Before Using the Adapter to Interact with MQSeries ................................ 1-2
Understanding the Representation of Paths....................................................... 1-3
Step 1. Obtaining the BEA WebLogic Adapter for HL7 .................................. 1-4
Step 2. Configuring the Domain........................................................................ 1-5
Step 3. Adjusting the Classpath......................................................................... 1-6
Adjusting the Classpath for Windows........................................................ 1-6
Adjusting the Classpath for UNIX ............................................................. 1-7
Step 4. Updating the BEA License.................................................................... 1-8
Step 5. Deploying the Adapter Using the WebLogic Server Console ............ 1-10
Step 6. Creating or Updating the Adapter Group ............................................ 1-18
Creating the Adapter Group ..................................................................... 1-19
Adding the User Name to the Adapter Group.......................................... 1-20
Next Steps........................................................................................................ 1-21
BEA WebLogic Adapter for HL7 Installation and Configuration Guide iii

iv BEA WebLogic Adapter for HL7 Installation and Configuration Guide

About This Document
This document explains how to install, configure, and deploy the BEA WebLogicAdapter for HL7 for WebLogic Integration 7.0 to develop online connections to HL7applications.
This document is organized as follows:
Chapter 1, “Installing the BEA WebLogic Adapter for HL7” describes how toinstall the BEA WebLogic Adapter for HL7.
Audience
This document is written for system integrators who develop client interfaces betweenHL7 and other applications. It describes how to install the BEA WebLogic Adapter forHL7 and how to develop application environments with specific focus on messageintegration. It is assumed that readers know Web technologies and have a generalunderstanding of Microsoft Windows and UNIX systems.
BEA WebLogic Adapter for HL7 Installation and Configuration Guide v

About This Document
Related Information
The following documents provide additional information for the associated softwarecomponents:
BEA WebLogic Adapter for HL7 User Guide
BEA WebLogic Adapter for HL7 Release Notes
BEA Application Explorer Installation Guide
BEA WebLogic Platform installation and user documentation, which is availableat the following URL:
http://edocs.bea.com/platform/docs70/index.html
Contact Us!
Your feedback on the BEA WebLogic Adapter for HL7 documentation is important tous. Send us e-mail at [email protected] if you have questions or comments. Yourcomments will be reviewed directly by the BEA professionals who create and updatethe BEA WebLogic Adapter for HL7 documentation.
In your e-mail message, please indicate which version of the BEA WebLogic Adapterfor HL7 documentation you are using.
If you have any questions about this version of the BEA WebLogic Adapter for HL7,or if you have problems installing and running the BEA WebLogic Adapter for HL7,contact BEA Customer Support through BEA WebSupport at www.bea.com. You canalso contact Customer Support by using the contact information provided on theCustomer Support Card, which is included in the product package.
vi BEA WebLogic Adapter for HL7 Installation and Configuration Guide

Documentation Conventions
When contacting Customer Support, be prepared to provide the following information:
Your name, e-mail address, phone number, and fax number
Your company name and company address
Your machine type and authorization codes
The name and version of the product you are using
A description of the problem and the content of pertinent error messages
Documentation Conventions
The following documentation conventions are used throughout this document.
Convention Item
boldface text Indicates terms defined in the glossary.
Ctrl+Tab Indicates that you must press two or more keys simultaneously.
italics Indicates emphasis or book titles.
monospacetext
Indicates code samples, commands and their options, data structures andtheir members, data types, directories, and file names and their extensions.Monospace text also indicates text that you must enter from the keyboard.
Examples:
#include <iostream.h> void main ( ) the pointer psz
chmod u+w *
\tux\data\ap
.doc
tux.doc
BITMAP
float
BEA WebLogic Adapter for HL7 Installation and Configuration Guide vii

About This Document
monospaceboldfacetext
Identifies significant words in code.
Example:
void commit ( )
monospaceitalictext
Identifies variables in code.
Example:
String expr
UPPERCASETEXT
Indicates device names, environment variables, and logical operators.
Examples:
LPT1
SIGNON
OR
{ } Indicates a set of choices in a syntax line. The braces themselves shouldnever be typed.
[ ] Indicates optional items in a syntax line. The brackets themselves shouldnever be typed.
Example:
buildobjclient [-v] [-o name ] [-f file-list]...[-l file-list]...
| Separates mutually exclusive choices in a syntax line. The symbol itselfshould never be typed.
... Indicates one of the following in a command line:
That an argument can be repeated several times in a command line
That the statement omits additional optional arguments
That you can enter additional parameters, values, or other information
The ellipsis itself should never be typed.
Example:
buildobjclient [-v] [-o name ] [-f file-list]...[-l file-list]...
.
.
.
Indicates the omission of items from a code example or from a syntax line.The vertical ellipsis itself should never be typed.
Convention Item
viii BEA WebLogic Adapter for HL7 Installation and Configuration Guide

CHAPTER
1 Installing the BEA WebLogic Adapter for HL7
This section provides instructions for installing the BEA WebLogic Adapter for HL7.It includes the following topics:
Before Installing the Adapter
Understanding the Representation of Paths
Step 1. Obtaining the BEA WebLogic Adapter for HL7
Step 2. Configuring the Domain
Step 3. Adjusting the Classpath
Step 4. Updating the BEA License
Step 5. Deploying the Adapter Using the WebLogic Server Console
Step 6. Creating or Updating the Adapter Group
Next Steps
BEA WebLogic Adapter for HL7 Installation and Configuration Guide 1-1

1 Installing the BEA WebLogic Adapter for HL7
Before Installing the Adapter
Before you install the BEA WebLogic Adapter for HL7, you must review the BEAWebLogic Adapter for HL7 Release Notes to ensure that you have the requiredprerequisite software installed. The BEA WebLogic Adapter for HL7 Release Notes isavailable at the following URL:
http://edocs.bea.com/wladapters/doc70/index.html
Before Using the Adapter to Interact with MQSeries
To interact with IBM MQSeries (now known as WebSphere MQ) you must first installMQSeries or MQSeries Client on the machine where the BEA WebLogic Adapter forHIPAA will be installed. Additionally, you must install the classes required to developMQSeries applications in Java through the following Java-based APIs:
MQSeries classes for Java
MQSeries classes for Java Message Service (JMS)
If you are using MQSeries 5.1 or 5.2, the required classes are provided in the MA88SupportPac, which is available at the following URL:
http://www-3.ibm.com/software/ts/mqseries/txppacs/ma88.html
If you are using WebSphere MQ 5.3, the MQSeries classes for Java and JMS areincluded in the java/lib directory of the distribution.
1-2 BEA WebLogic Adapter for HL7 Installation and Configuration Guide

Understanding the Representation of Paths
Understanding the Representation of Paths
Because the location of files in the WebLogic Integration environment depends onoptions selected during installation and configuration, the conventions that follow areused throughout to represent paths.
BEA_HOME represents the BEA Home directory specified for your WebLogicinstallation.
For example, if you install the product in the default location on a Windowssystem, BEA_HOME represents c:\bea.
WLI_HOME represents the root of your WebLogic Integration installation.
For example:
If you install WebLogic Integration 7.0 in the default location on a Windowssystem, WLI_HOME represents c:\bea\weblogic700\integration.
domain is used to indicate the name of a domain.
In WebLogic Integration 7.0, a new tool, the Configuration Wizard, is usedto create custom user domains. When you use the Configuration Wizard toset up the domain configuration stored on the administration server, you areprompted to assign a domain name, domain, and to specify the location towhich the domain directory will be installed. The files required by theadministration server are installed in the domain directory under thespecified location.
For additional information, see Using the Configuration Wizard which isavailable at the following URL:
http://edocs.bea.com/platform/docs70/confgwiz/index.html
For example, if you accept the Configuration Wizard default location,BEA_HOME\user_projects, the files required by the administration serverare installed in the following directory:
BEA_HOME\user_projects\domain
BEA WebLogic Adapter for HL7 Installation and Configuration Guide 1-3

1 Installing the BEA WebLogic Adapter for HL7
DOMAIN_HOME represents the complete path to the root of a domain.
For example:
If you use the WebLogic Integration 7.0 Configuration Wizard to create adomain in the default location on a Windows system, DOMAIN_HOMErepresents c:\bea\weblogic700\user_projects\domain.
Note: WLI_HOME and BEA_HOME (italicized) also represent the correspondingWindows and UNIX environment variables. For example, the literalinterpretation of WLI_HOME is%WLI_HOME% for Windows and $WLI_HOME forUNIX.
Unlike WLI_HOME and BEA_HOME, DOMAIN_HOME is not an environmentvariable that is set by default in the WebLogic Integration environment.
Step 1. Obtaining the BEA WebLogic Adapter for HL7
The BEA WebLogic Adapter for HL7 is packaged as an EAR file(BEA_HL7_1_0_70.ear). You can obtain the software on CD or download it fromwww.bea.com.
1-4 BEA WebLogic Adapter for HL7 Installation and Configuration Guide

Step 2. Configuring the Domain
Step 2. Configuring the Domain
The adapter can only be deployed in a domain that includes support for applicationintegration functionality. If you have not already done so, use the ConfigurationWizard to create the domain and select one of the following domain templates:
Enterprise application integration (EAI) domain template
WebLogic Integration (WLI) domain template
Platform domain template
For the information you need to configure a fully functional domain based on thetemplate, see the appropriate section of the Configuration Wizard Template Reference:
For the EAI domain template, see the following URL:
http://edocs.bea.com/platform/docs70/template/eaidomain.html
For the WLI domain template, see the following URL:
http://edocs.bea.com/platform/docs70/template/wlidomain.html
For the platform domain template, see the following URL:
http://edocs.bea.com/platform/docs70/template/platjar.html
For general information about using the Configuration Wizard, see Using theConfiguration Wizard at the following URL:
http://edocs.bea.com/platform/docs70/confgwiz/index.html
When you use the Configuration Wizard to create a domain that includes support forapplication integration, a domain-specific version of the Database Wizard is installedin the DOMAIN_HOME directory. You must run the Database Wizard for the domain toinitialize the database repository with the required tables and system data. Foradditional information, see “Configuring the Database for a Domain” in Starting,Stopping and Customizing BEA WebLogic Integration, at the following URL:
http://edocs.bea.com/wli/docs70/config/index.htm
BEA WebLogic Adapter for HL7 Installation and Configuration Guide 1-5

1 Installing the BEA WebLogic Adapter for HL7
Step 3. Adjusting the Classpath
Set the classpath using the procedure appropriate for your system:
Adjusting the Classpath for Windows
Adjusting the Classpath for UNIX
Note: The following procedures reference files that must be obtained from the MA88SupportPac (if you are using MQSeries 5.1 or 5.2) or from your WebSphereMQ 5.3 distribution. For additional information, see “Before Using theAdapter to Interact with MQSeries” on page 1-2. Be sure you know thelocation of the required files.
Adjusting the Classpath for Windows
To adjust the classpath on Windows, complete the following steps:
1. Go to the root directory for your domain:
cd DOMAIN_HOME
Note: You must choose a domain that supports application integrationfunctionality.
2. Find the SetDomainTypeData.cmd file.
Here, DomainType is the type of the domain. For example, if your domain isconfigured to support the development of solutions that employ the full range ofWebLogic Integration functionality, it contains the SetwliDomainData.cmdfile.
3. Update the SVRCP environment variable settings in theSetDomainTypeData.cmd file.
Note: The SVRCP environment variable is used in the SetDomainTypeDatascript to set the classpath for the java executable.
After the following line:
set SVRCP=%SVRCP%;%PBCOMMONCP%
1-6 BEA WebLogic Adapter for HL7 Installation and Configuration Guide

Step 3. Adjusting the Classpath
add the following JAR files:
REM ===== Libraries for MQSeries =====set SVRCP=%SVRCP%;"D:\Program Files\MQSeries\Java\lib\com.ibm.mq.iiop.jar"set SVRCP=%SVRCP%;"D:\Program Files\MQSeries\Java\lib\com.ibm.mq.jar"set SVRCP=%SVRCP%;"D:\Program Files\MQSeries\Java\lib\com.ibm.mqbind.jar"
REM ===== Native Libraries and Localized Properties =====set SVRCP=%SVRCP%;"D:\Program Files\MQSeries\Java\lib"
Here, D:\Program Files\MQSeries\Java\lib is a sample directory in which therequired MQSeries classes for Java and JMS are located. For additional information,see “Before Using the Adapter to Interact with MQSeries” on page 1-2.
Adjusting the Classpath for UNIX
To adjust the classpath on UNIX, complete the following steps:
1. Go to the root directory for your domain:
cd DOMAIN_HOME
Note: You must choose a WebLogic Integration domain that supports applicationintegration functionality.
2. Find the SetDomainTypeData.cmd file.
Here, DomainType is the type of the domain. For example, if your domain isconfigured to support the development of solutions that employ the full range ofWebLogic Integration functionality, it contains the SetwliDomainData.cmdfile.
3. Update the SVRCP environment variable settings in theSetDomainTypeData.cmd file.
Note: The SVRCP environment variable is used in the SetDomainTypeDatascript to set the classpath for the java executable.
BEA WebLogic Adapter for HL7 Installation and Configuration Guide 1-7

1 Installing the BEA WebLogic Adapter for HL7
After the following line:
SVRCP=%SVRCP%;%PBCOMMONCP%
add the following JAR files:
# ===== Libraries for MQSeries =====SVRCP=$SVRCP:/usr/MQSeries/Java/lib/com.ibm.mq.iiop.jarSVRCP=$SVRCP:/usr/MQSeries/Java/lib/com.ibm.mq.jarSVRCP=$SVRCP:/usr/MQSeries/Java/lib/com.ibm.mqbind.jar
# ===== Native Libraries and Localized Properties =====SVRCP=$SVRCP:/usr/MQSeries/Java/lib
Here, /usr/MQSeries/Java/lib is a sample directory in which the requiredMQSeries classes for Java and JMS are located. For additional information, see“Before Using the Adapter to Interact with MQSeries” on page 1-2.
Step 4. Updating the BEA License
The BEA WebLogic Adapter for HL7 cannot be used without a valid software license.If you have downloaded the adapter for evaluation, you must obtain an evaluationlicense as described on the adapter download page. If you have purchased a license forthe adapter, the license file is typically sent to you as an e-mail attachment.
When you have obtained a valid license for the adapter, update your license.bea fileby completing the following steps:
1. Save the license file that you obtained with a name other than license.bea, in theBEA_HOME directory. For example, save the file as HL7_adapter_license.bea.Use this file as the license_update_file in step 4 of this procedure.
Warning: Do not overwrite or change the name of the existing license.bea file.
2. Perform the step appropriate for your platform:
On a Windows system, open an MS-DOS session and go to the BEA_HOMEdirectory.
On a UNIX system, go to the BEA_HOME directory.
1-8 BEA WebLogic Adapter for HL7 Installation and Configuration Guide

Step 4. Updating the BEA License
3. If it is not already included, add the JDK to your PATH variable by executing thecommand appropriate to your system:
On a Windows system:
set PATH=BEA_HOME\jdk131_03\bin;%PATH%
On a UNIX system:
PATH=BEA_HOME/jdk131_03/bin:$PATHexport PATH
4. Merge the license update file into your existing license by executing thecommand appropriate to your system:
On a Windows system:
UpdateLicense license_update_file
On a UNIX system:
sh UpdateLicense.sh license_update_file
Here, license_update_file is the name to which you saved the licenseupdate file in step 1.
5. Save a copy of your updated license.bea file in a safe place outside theWebLogic Integration and application installation directories.
BEA WebLogic Adapter for HL7 Installation and Configuration Guide 1-9

1 Installing the BEA WebLogic Adapter for HL7
Step 5. Deploying the Adapter Using the WebLogic Server Console
After the BEA WebLogic Adapter for HL7 is installed, it must be deployed to yourdomain. To configure and deploy an adapter using the WebLogic ServerAdministration Console, complete the following steps:
1. Start WebLogic Server.
2. Start the WebLogic Server Administration Console in a browser using thefollowing URL:
http://host:port/console/
Here, host represents the machine on which WebLogic Server is running andport represents the listening port.
For example, http://localhost:7001/console/
3. When prompted, enter the user name and password for the server.
The WebLogic Server Administration Console opens.
1-10 BEA WebLogic Adapter for HL7 Installation and Configuration Guide

Step 5. Deploying the Adapter Using the WebLogic Server Console
Figure 1-1 WebLogic Server Console
4. In the left pane, choose Deployments and then Applications from the navigationtree.
The console displays the Applications window.
BEA WebLogic Adapter for HL7 Installation and Configuration Guide 1-11

1 Installing the BEA WebLogic Adapter for HL7
Figure 1-2 Applications Window
5. Click the Configure a new Application link.
The console displays the Locate Application or Component to configurewindow.
1-12 BEA WebLogic Adapter for HL7 Installation and Configuration Guide

Step 5. Deploying the Adapter Using the WebLogic Server Console
Figure 1-3 Locate Application or Component to Configure Window
BEA WebLogic Adapter for HL7 Installation and Configuration Guide 1-13

1 Installing the BEA WebLogic Adapter for HL7
6. Do one of the following:
If you copied the BEA_HL7_1_0_70.ear file to a directory on the administrativeserver, navigate to that directory. For example, if you copied the file to theD:\bea\AdapterEars directory, select the directory as shown in the followingfigure.
Figure 1-4 Locating the Adapter EAR File
If you have not copied the BEA_HL7_1_0_70.ear file to a directory on theadministrative server, do the following:
a. Navigate to the directory to which the file will be uploaded.
For example, to upload the adapter from your local machine to theD:\bea\AdapterEars directory on the administrative server, select thedirectory as shown in the following figure.
Figure 1-5 Selecting the Target Directory
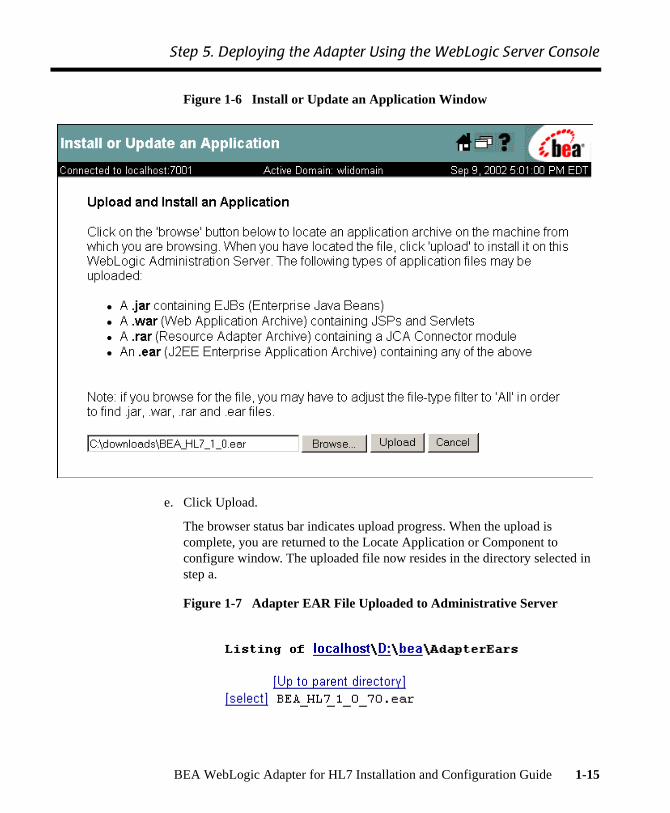
b. Click the upload it through your browser link to display the Install or Updatean Application window.
c. Click Browse to display the Choose File dialog box.
d. In the Choose File dialog box, locate the file, and then click Open.
The console displays the selected location.
1-14 BEA WebLogic Adapter for HL7 Installation and Configuration Guide
Step 5. Deploying the Adapter Using the WebLogic Server Console
Figure 1-6 Install or Update an Application Window
e. Click Upload.
The browser status bar indicates upload progress. When the upload iscomplete, you are returned to the Locate Application or Component toconfigure window. The uploaded file now resides in the directory selected instep a.
Figure 1-7 Adapter EAR File Uploaded to Administrative Server
BEA WebLogic Adapter for HL7 Installation and Configuration Guide 1-15

1 Installing the BEA WebLogic Adapter for HL7
7. Click the [select] link to the left of the adapter EAR file.
The console displays the Configure Application or Component window.
Figure 1-8 Configure Application or Component Window
8. Select the servers or clusters on which to deploy the adapter by using the arrowbuttons to move entries from the available list to the target list.
9. You must change the application name from BEA_HL7_1_0_70 to BEA_HL7_1_0.
Note: If you do not change the application name, the adapter will not be availableto application views.
1-16 BEA WebLogic Adapter for HL7 Installation and Configuration Guide

Step 5. Deploying the Adapter Using the WebLogic Server Console
The following figure shows a configured application.
Figure 1-9 Configured Application
10. Click Configure and Deploy.
The console displays the deployment status, which includes a description, status,begin time, and end time for the deployed adapter.
BEA WebLogic Adapter for HL7 Installation and Configuration Guide 1-17

1 Installing the BEA WebLogic Adapter for HL7
Step 6. Creating or Updating the Adapter Group
Before you create an application view that uses the events or services supported by anadapter, the following requirements must be met:
The user group, adapter, must be defined.
The administrative server user name must be a member of the adapter group.
The action required to complete the configuration depends on which domain templateyou selected when you created the domain. See the following table for guidelines.
Table 1-1 Configuration Requirements
If you created adomain based onthe . . .
Andthe administrativeserver user name is . . .
Then . . .
Platform domaintemplate
Any value Create the adapter group and add theadministrative user name to it asdescribed in “Creating the AdapterGroup” on page 1-19.
WLI or EAI domaintemplate
system The adapter group is alreadydefined. This group includes thesystem user name by default.
No further configuration is required.
WLI or EAI domaintemplate
A value other than system The adapter group is alreadydefined. Add the user name to thegroup as described in “Adding theUser Name to the Adapter Group” onpage 1-20.
1-18 BEA WebLogic Adapter for HL7 Installation and Configuration Guide

Step 6. Creating or Updating the Adapter Group
Creating the Adapter Group
To create the adapter group and add the administrative server user name to it,complete the following steps:
1. In the left pane of the WebLogic Server Administration Console, chooseCompatibility Security and then Groups from the navigation tree.
2. Click the Create a New Group link to display the Group window.
Figure 1-10 Group Window
3. Enter adapter in the Name field.
4. Enter the administrative server user name in the Add Users field.
5. Click Apply.
The Group window is updated as shown in the following figure.
BEA WebLogic Adapter for HL7 Installation and Configuration Guide 1-19

1 Installing the BEA WebLogic Adapter for HL7
Figure 1-11 Group Window
Adding the User Name to the Adapter Group
To add the administrative server user name to the adapter group, complete thefollowing steps:
1. In the left pane of the WebLogic Server Administration Console, chooseCompatibility Security and then Groups from the navigation tree.
The console displays the groups currently defined for the domain.
2. Locate and click the link for the adapter group to display the group definition.
1-20 BEA WebLogic Adapter for HL7 Installation and Configuration Guide

Next Steps
Figure 1-12 Group Definition
3. If the administrative server user name is not included in the Members list, enterthe user name in the Add Users field.
4. Click Apply to add the user name to the group.
The name is added to the Members list.
Next Steps
When you have successfully installed and deployed the adapter, you can log on to theWebLogic Integration Application View Console to create application views thatemploy events and services supported by the BEA WebLogic Adapter for HL7. Formore information, see the BEA WebLogic Adapter for HL7 User Guide.
BEA WebLogic Adapter for HL7 Installation and Configuration Guide 1-21

1 Installing the BEA WebLogic Adapter for HL7
1-22 BEA WebLogic Adapter for HL7 Installation and Configuration Guide